Leaderboard


Popular Content
Showing content with the highest reputation since 02/13/26 in all areas
-
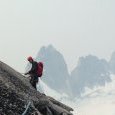
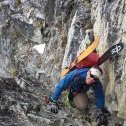
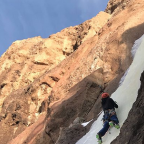
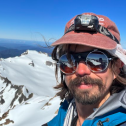
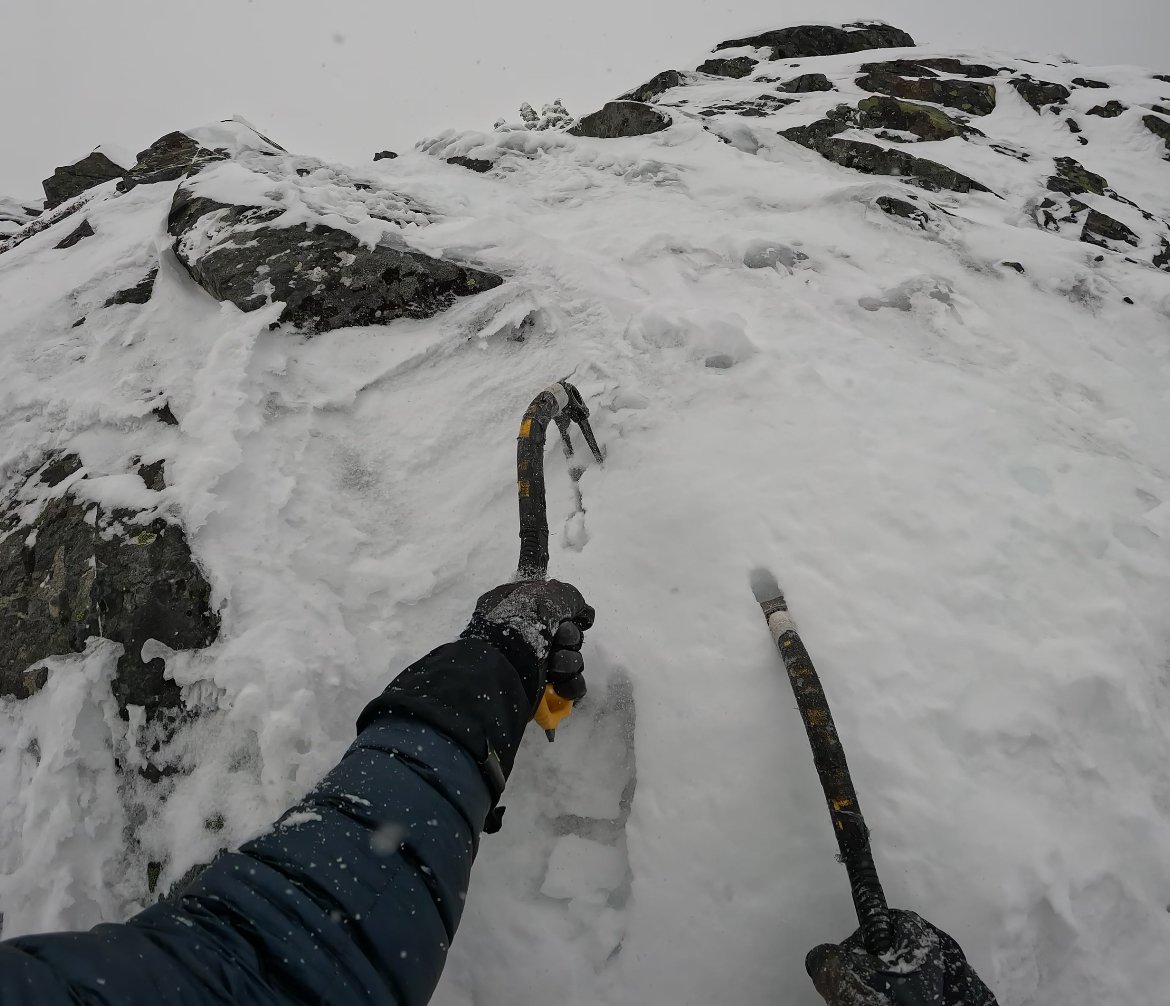
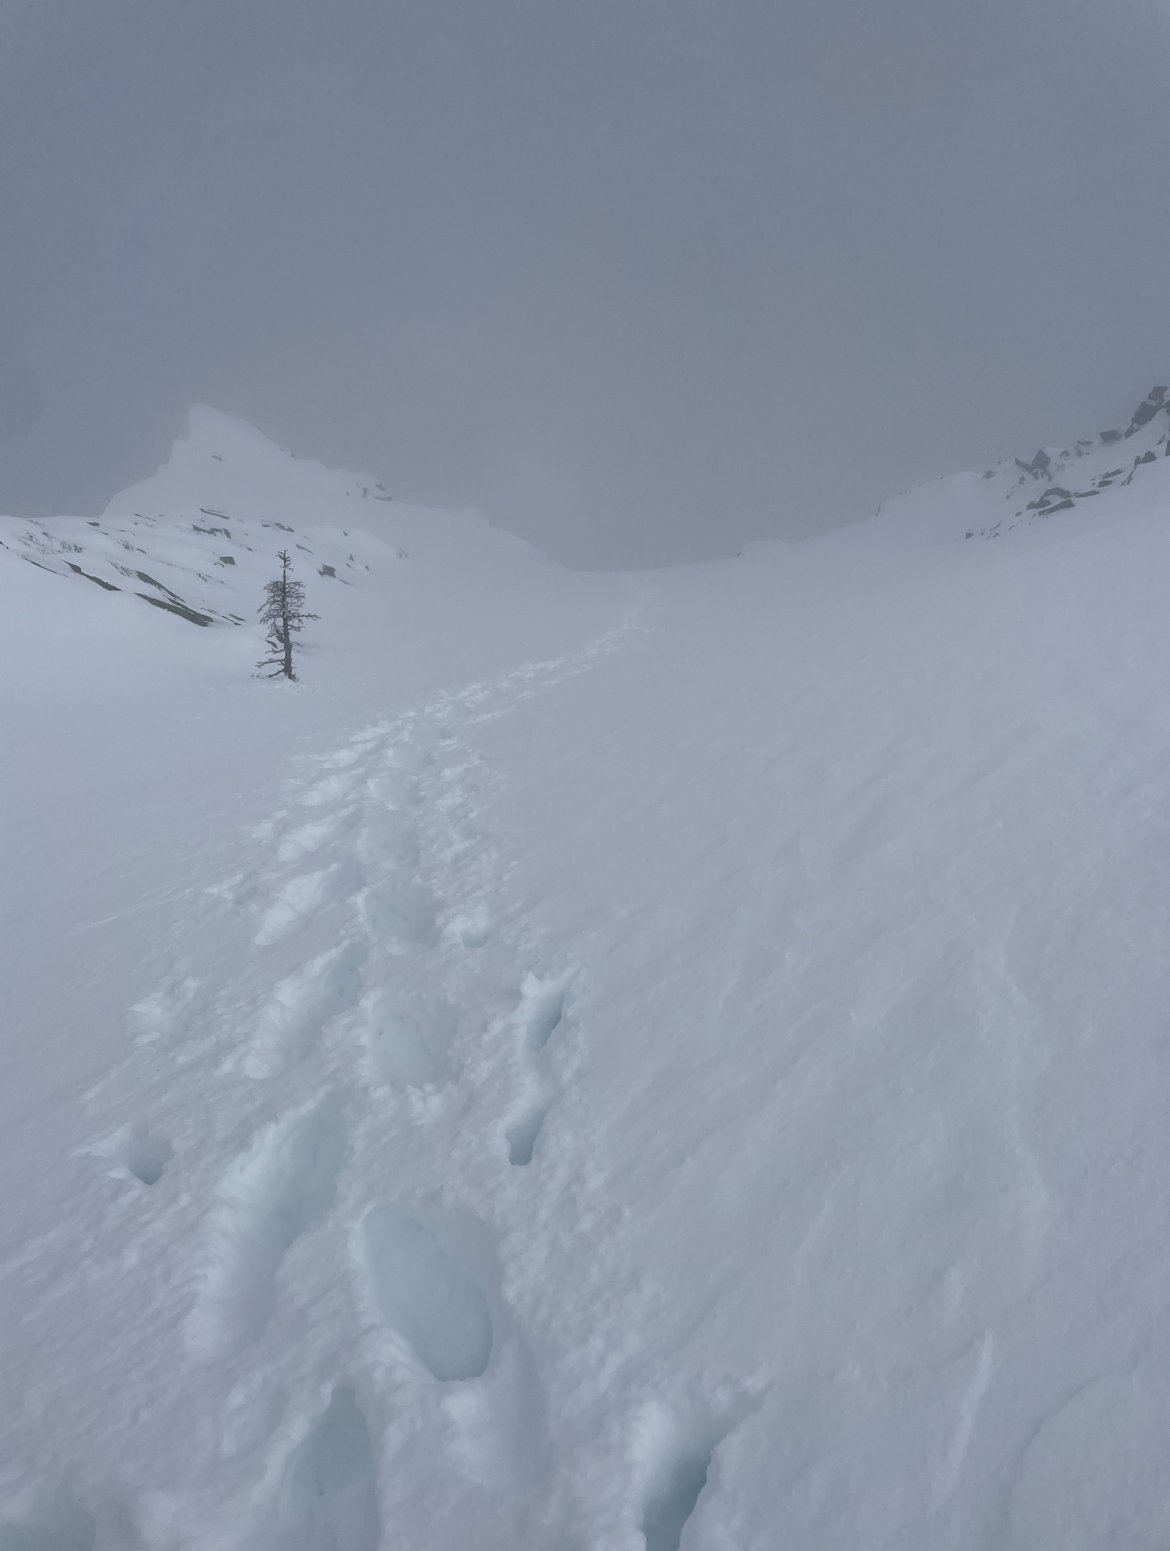
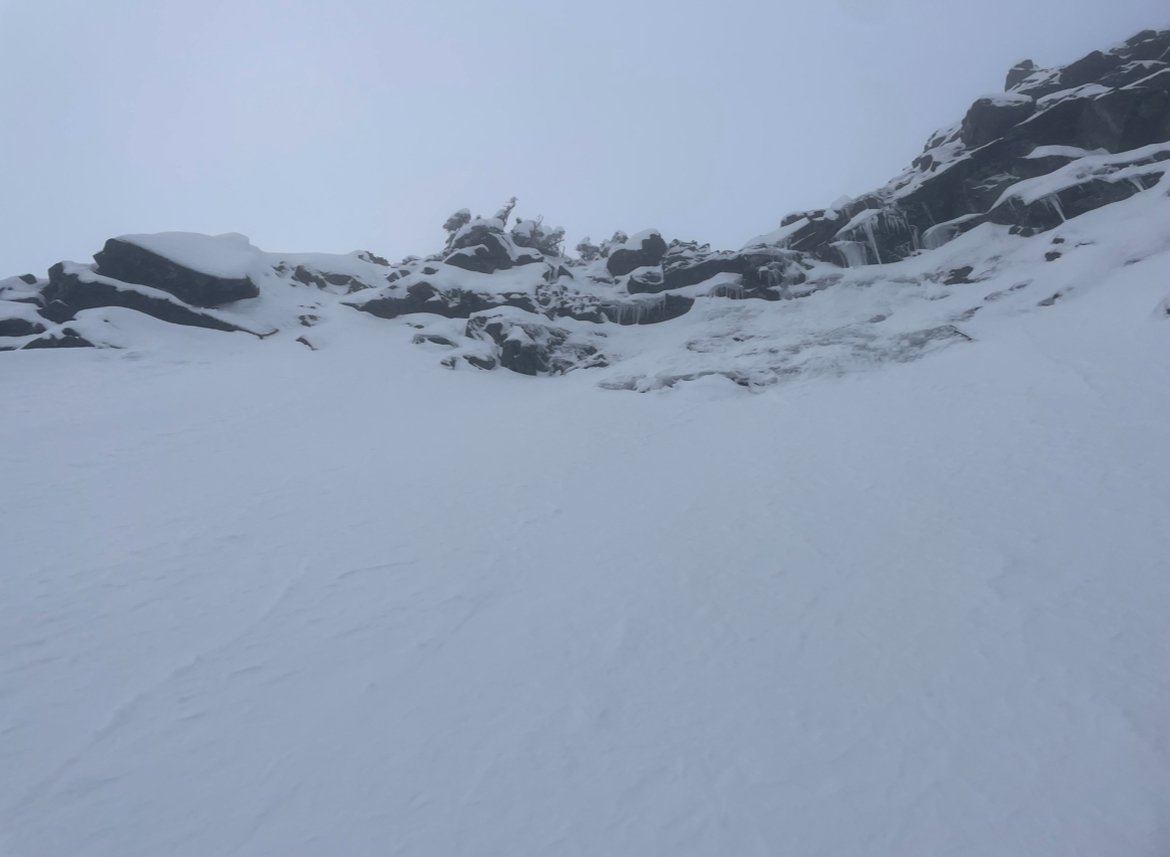
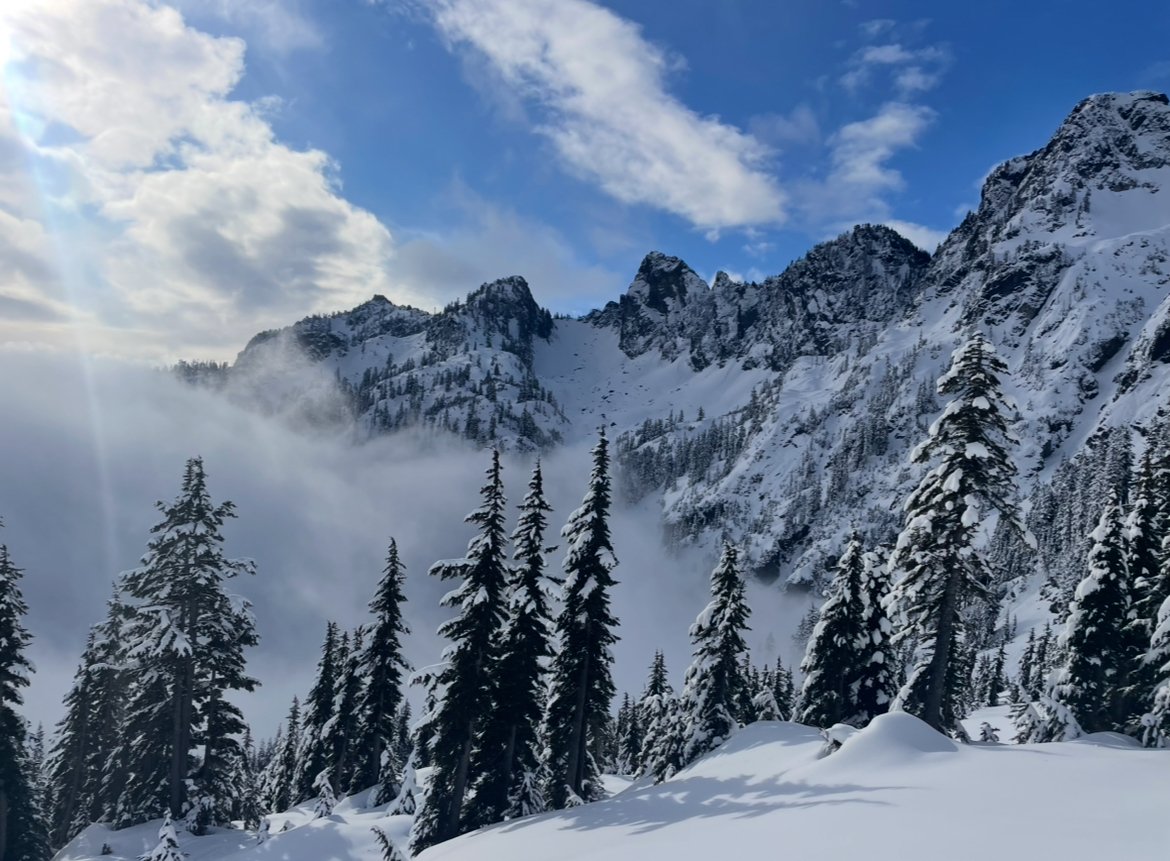
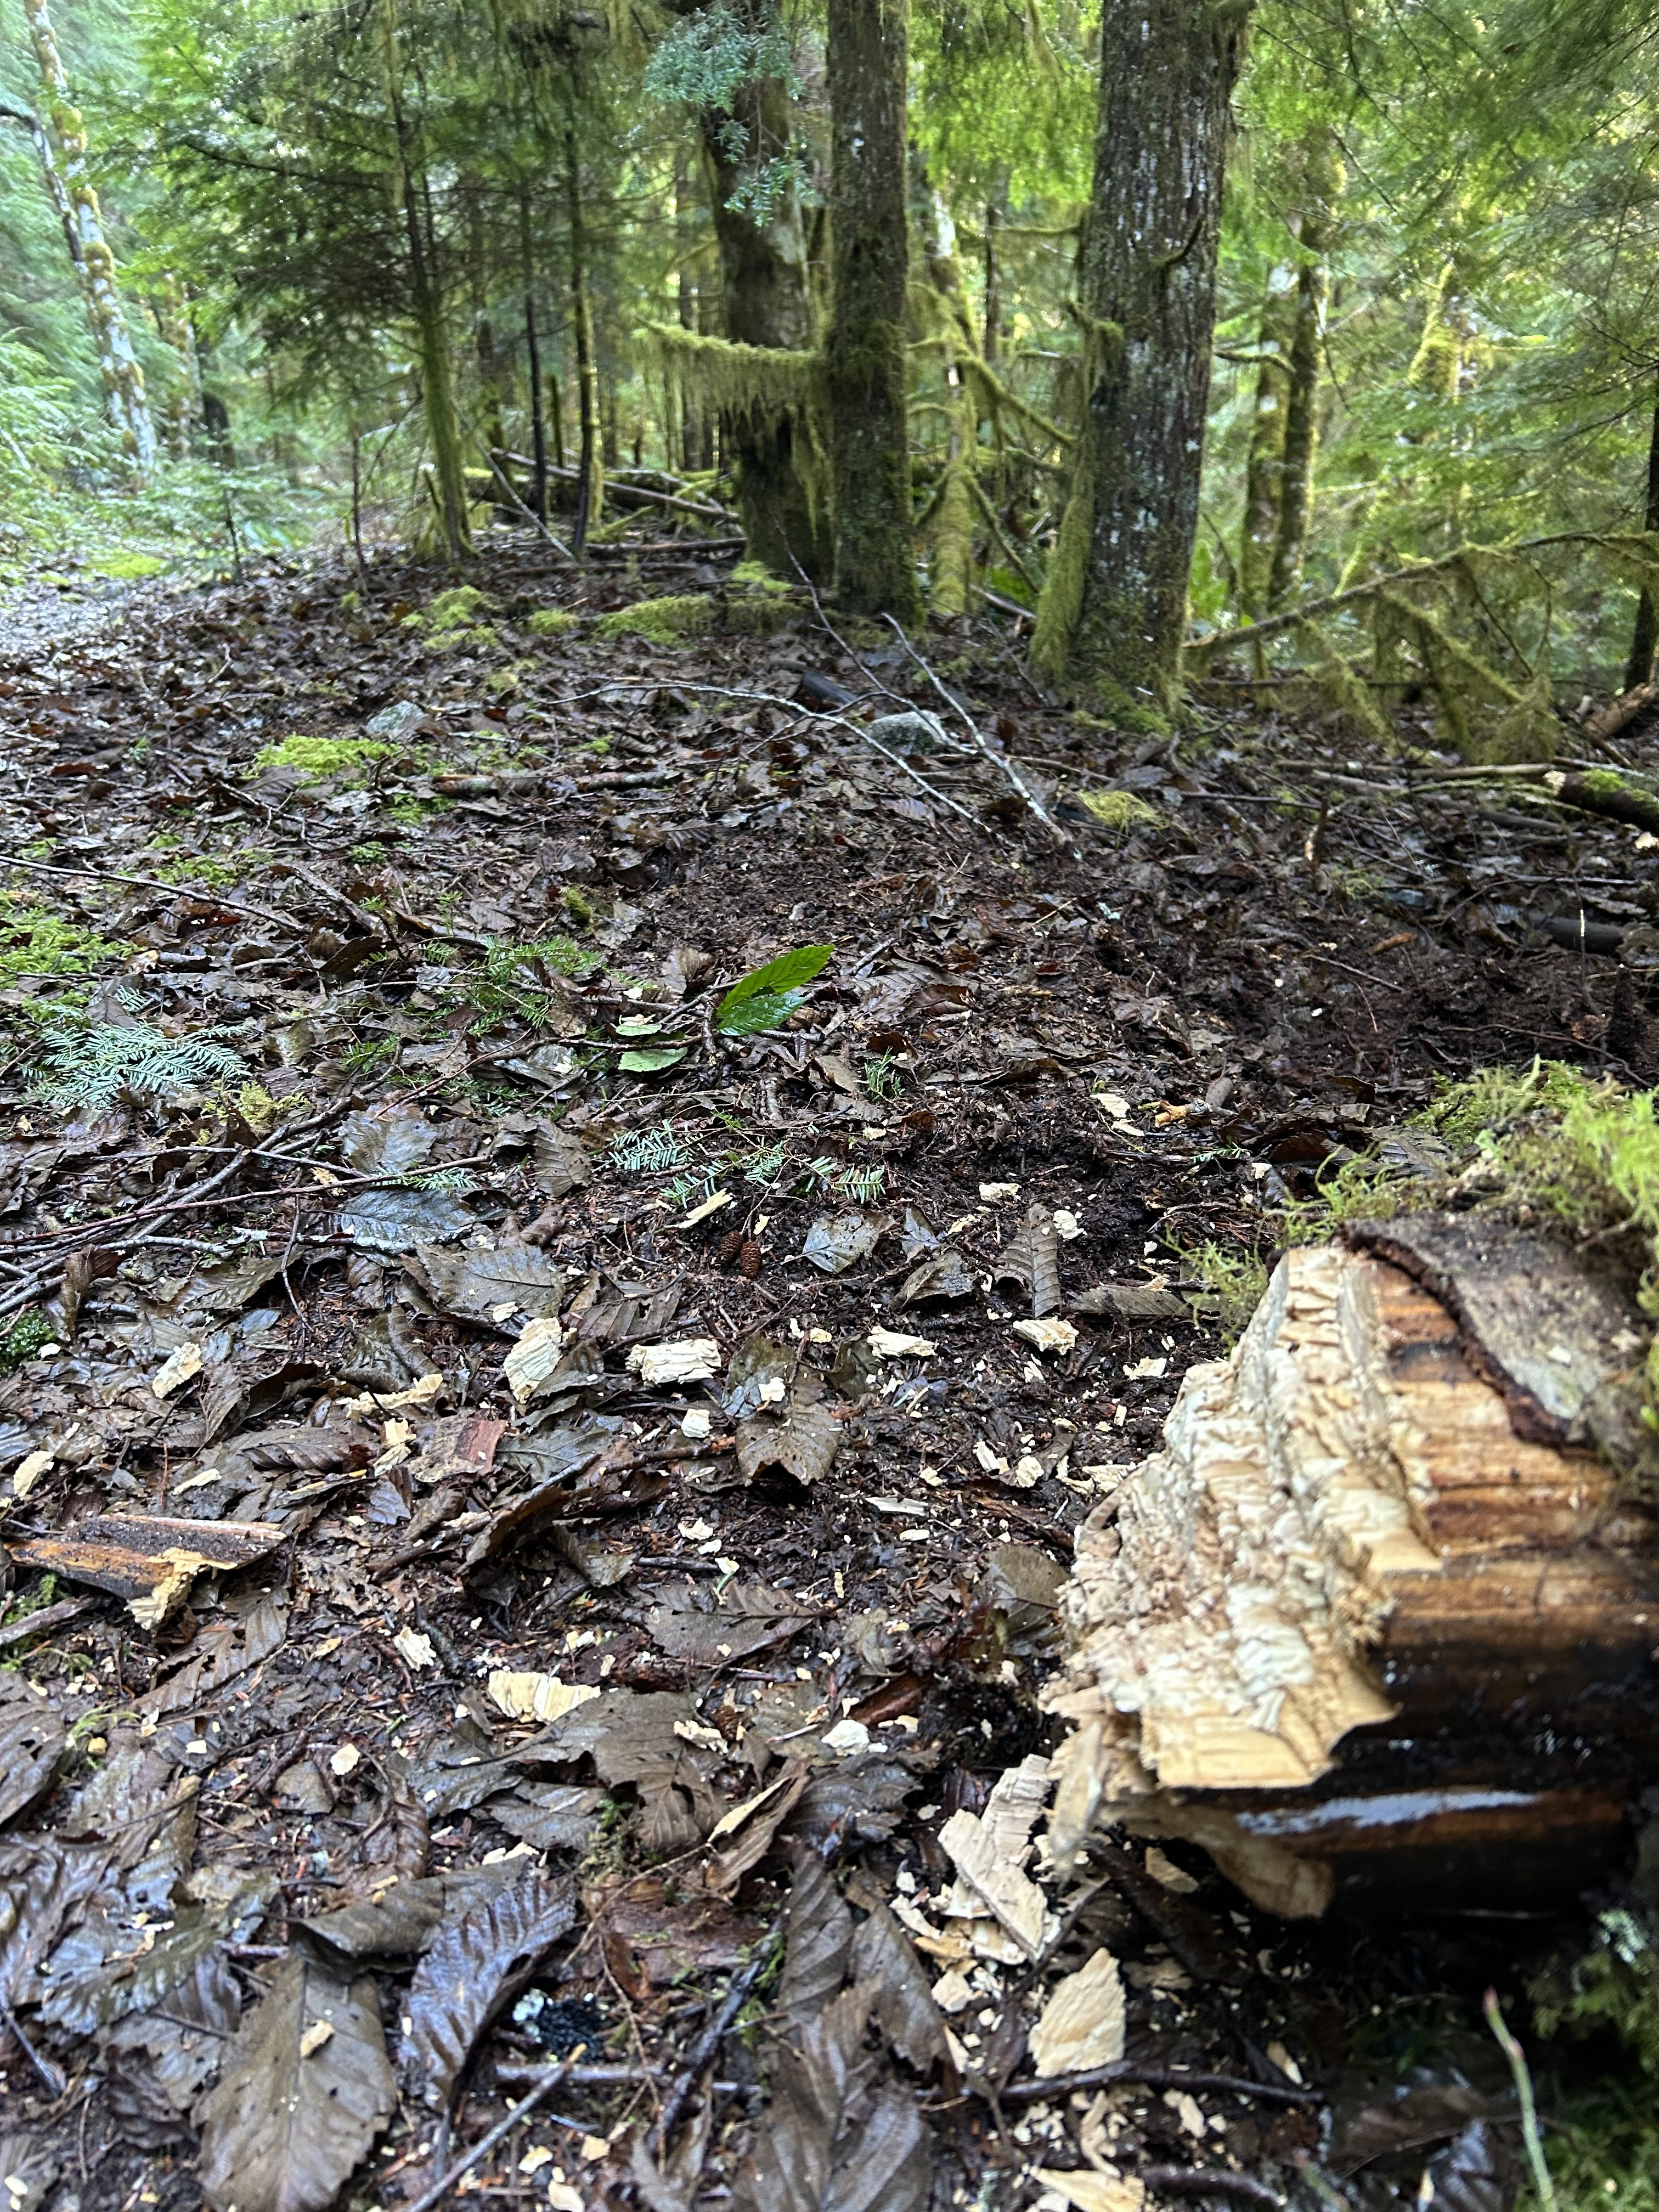
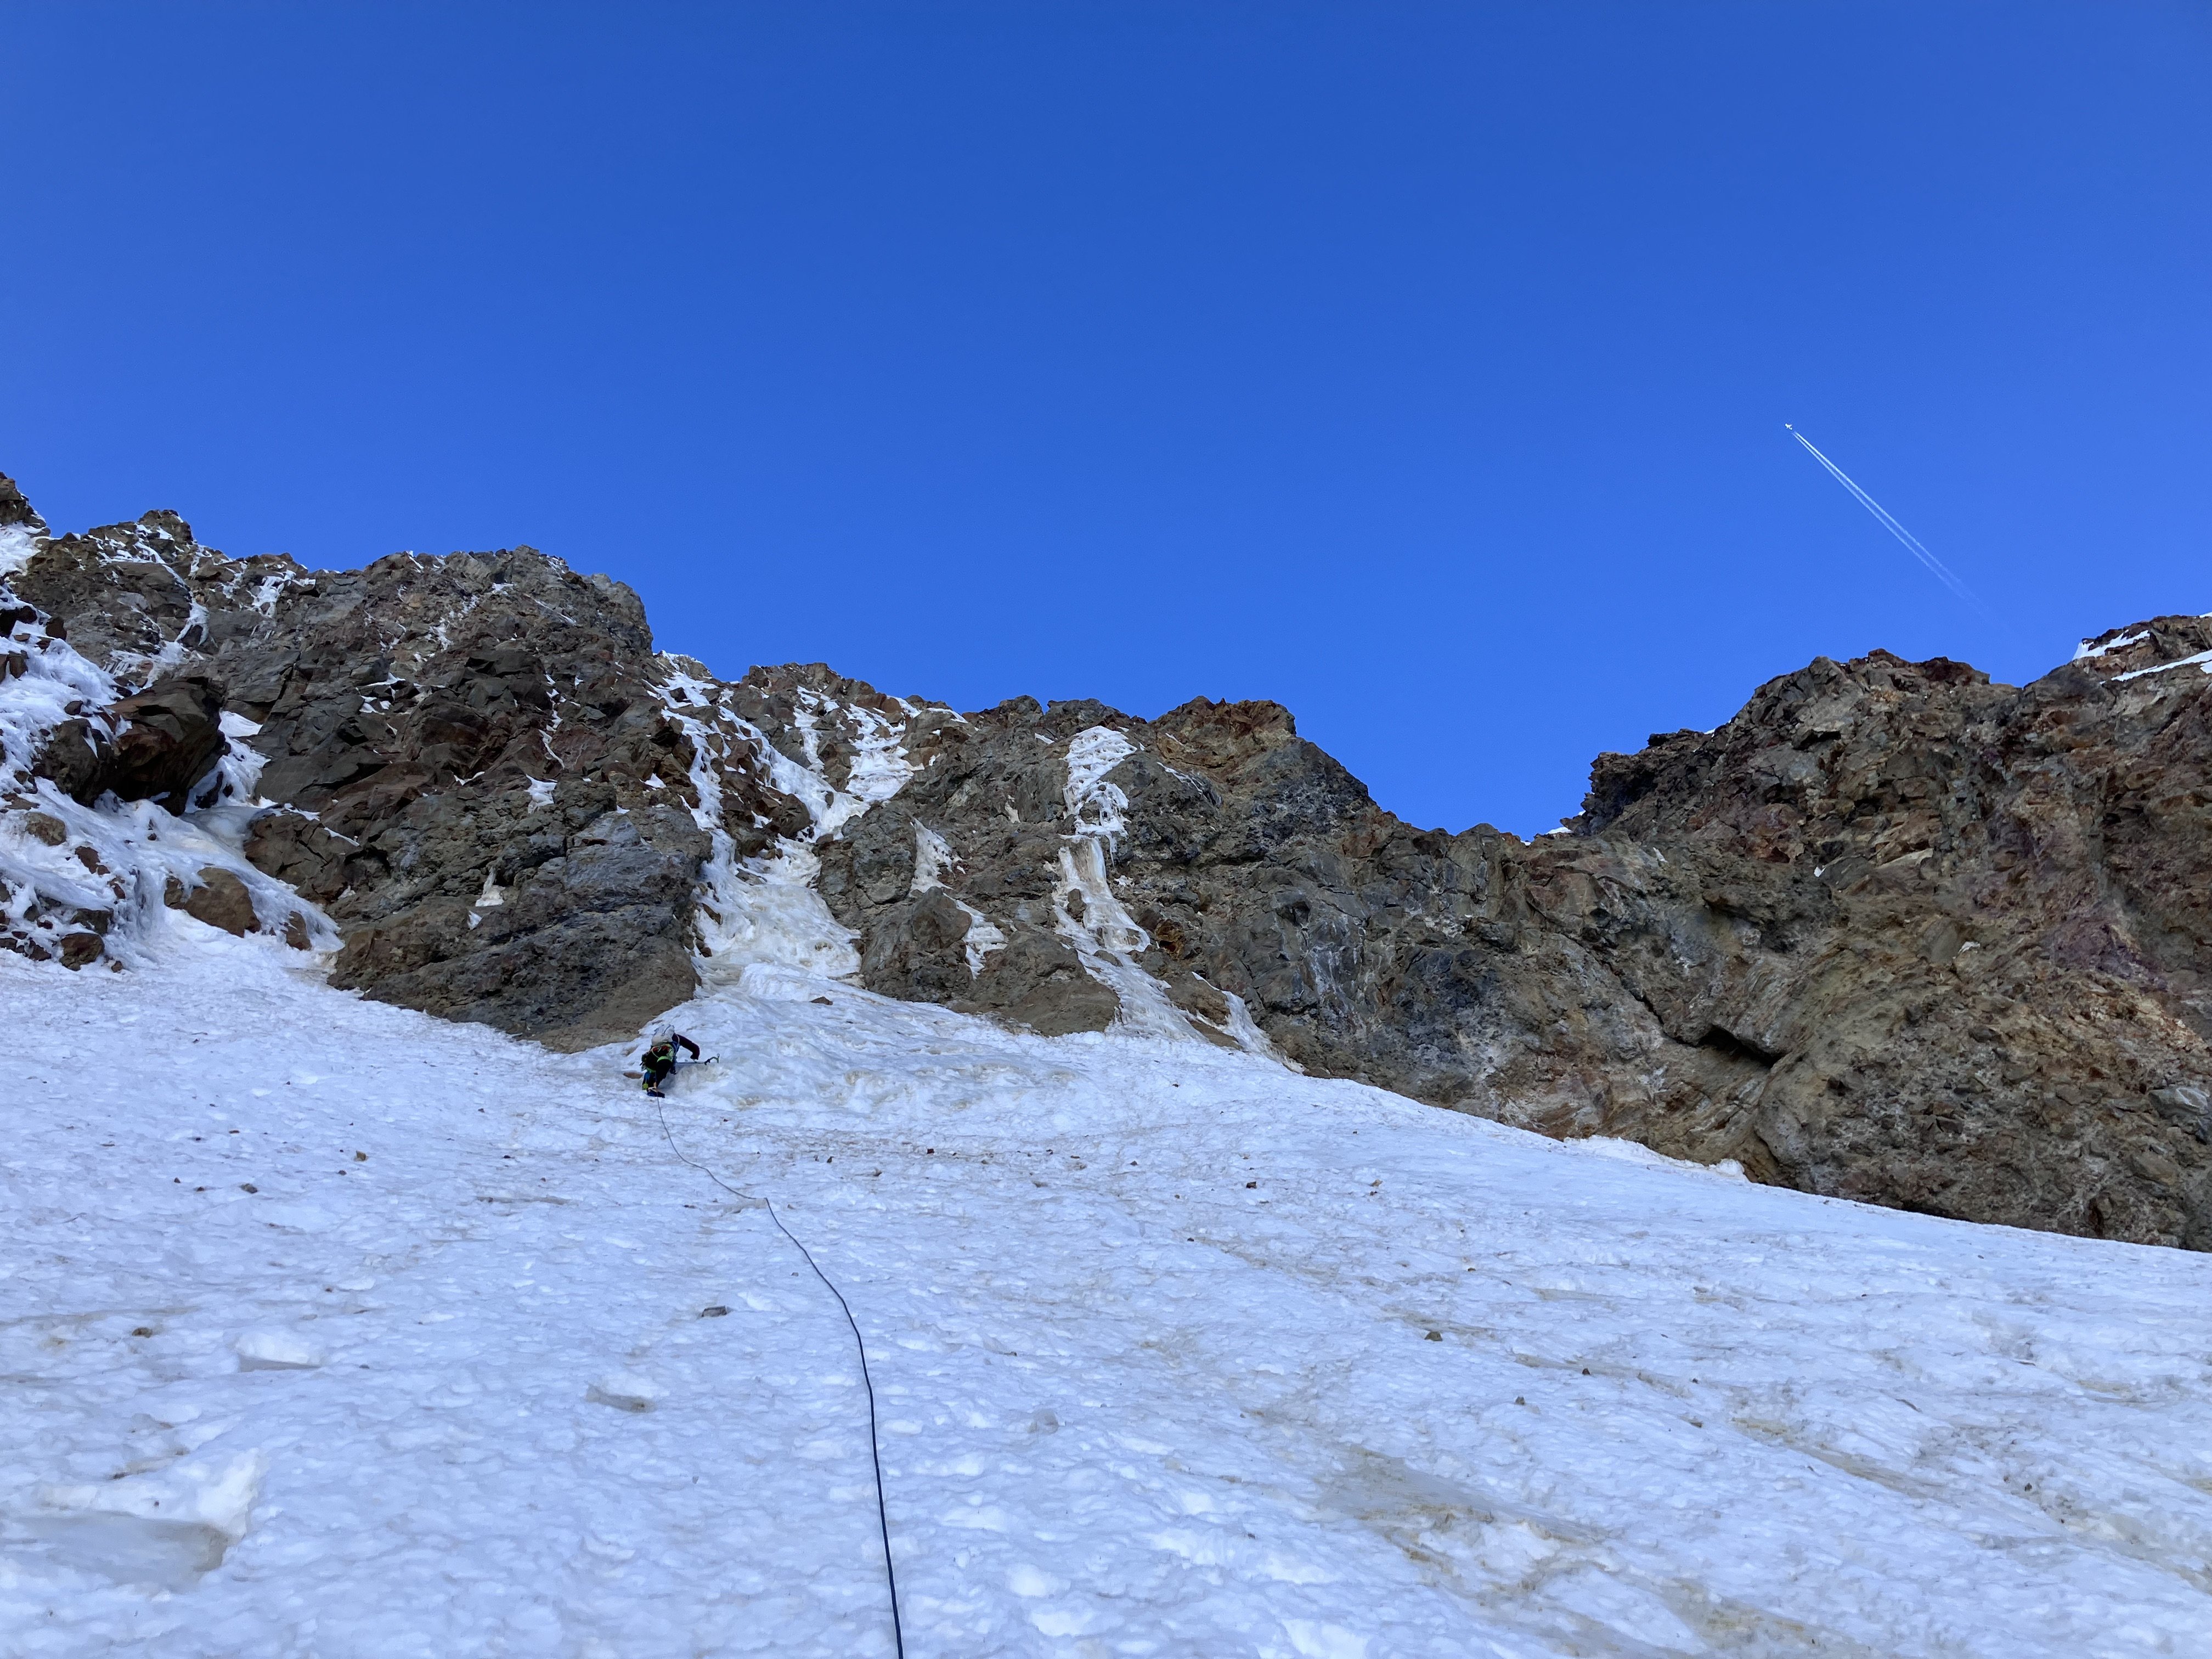
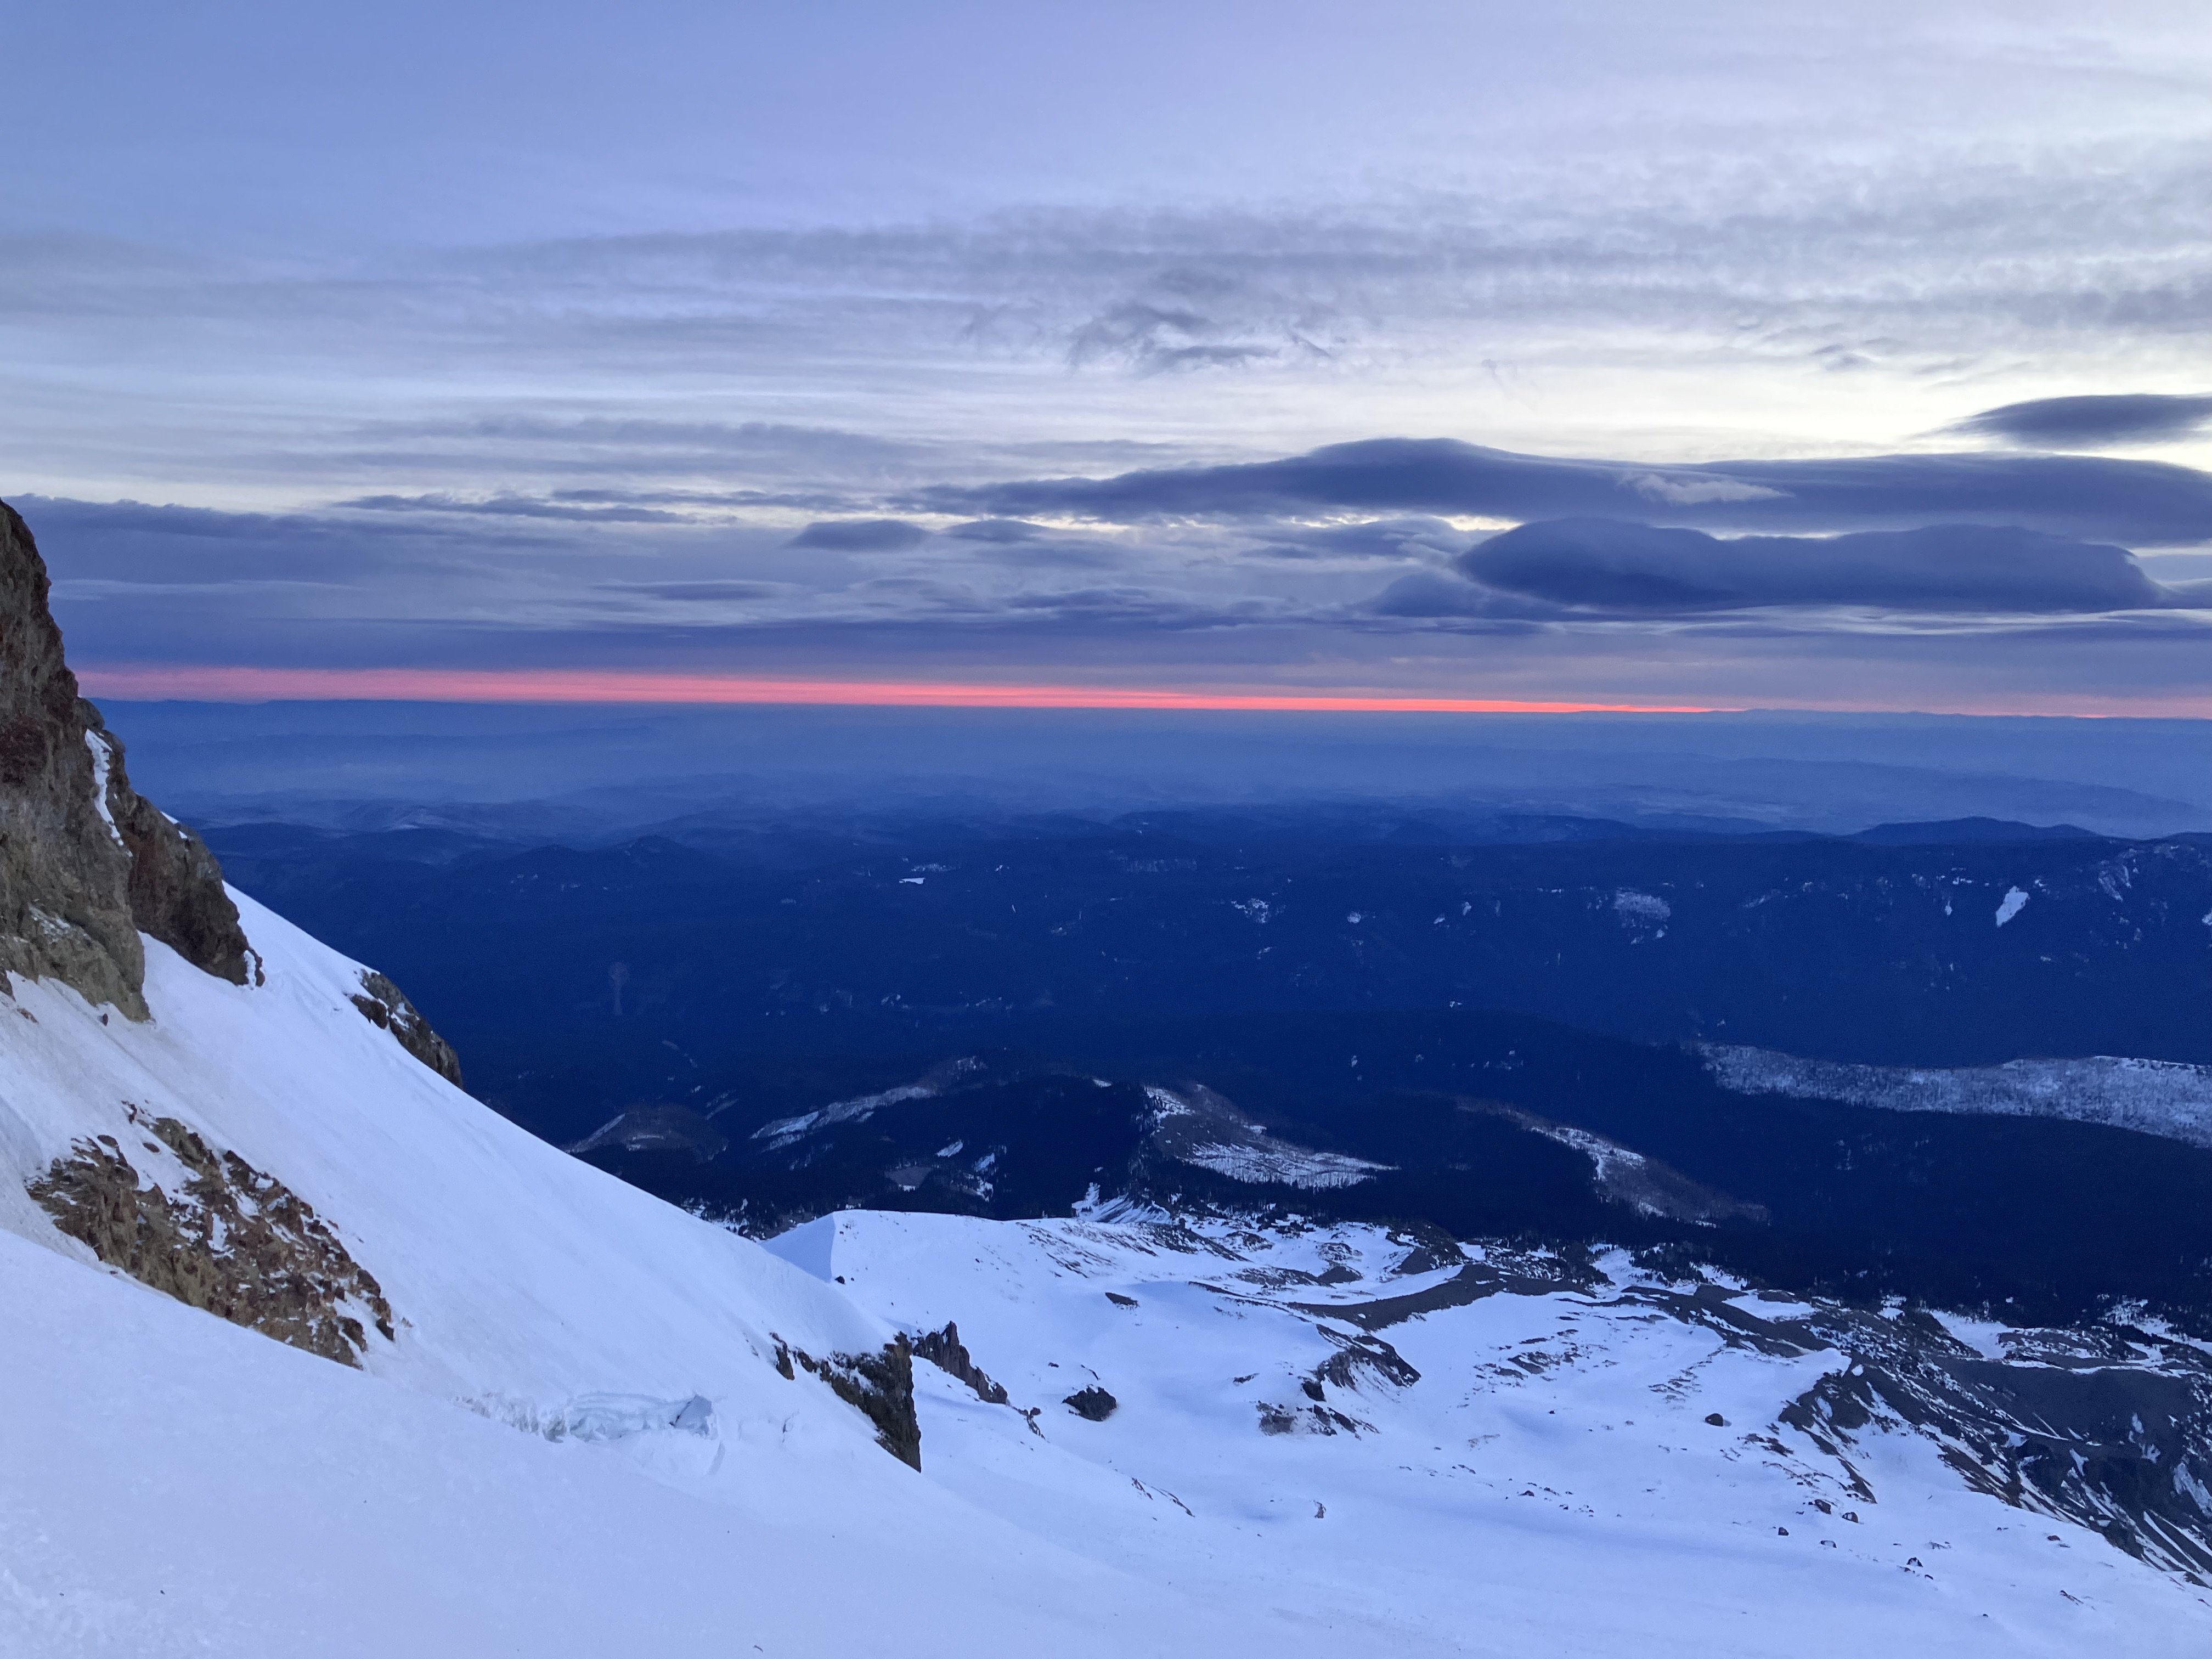
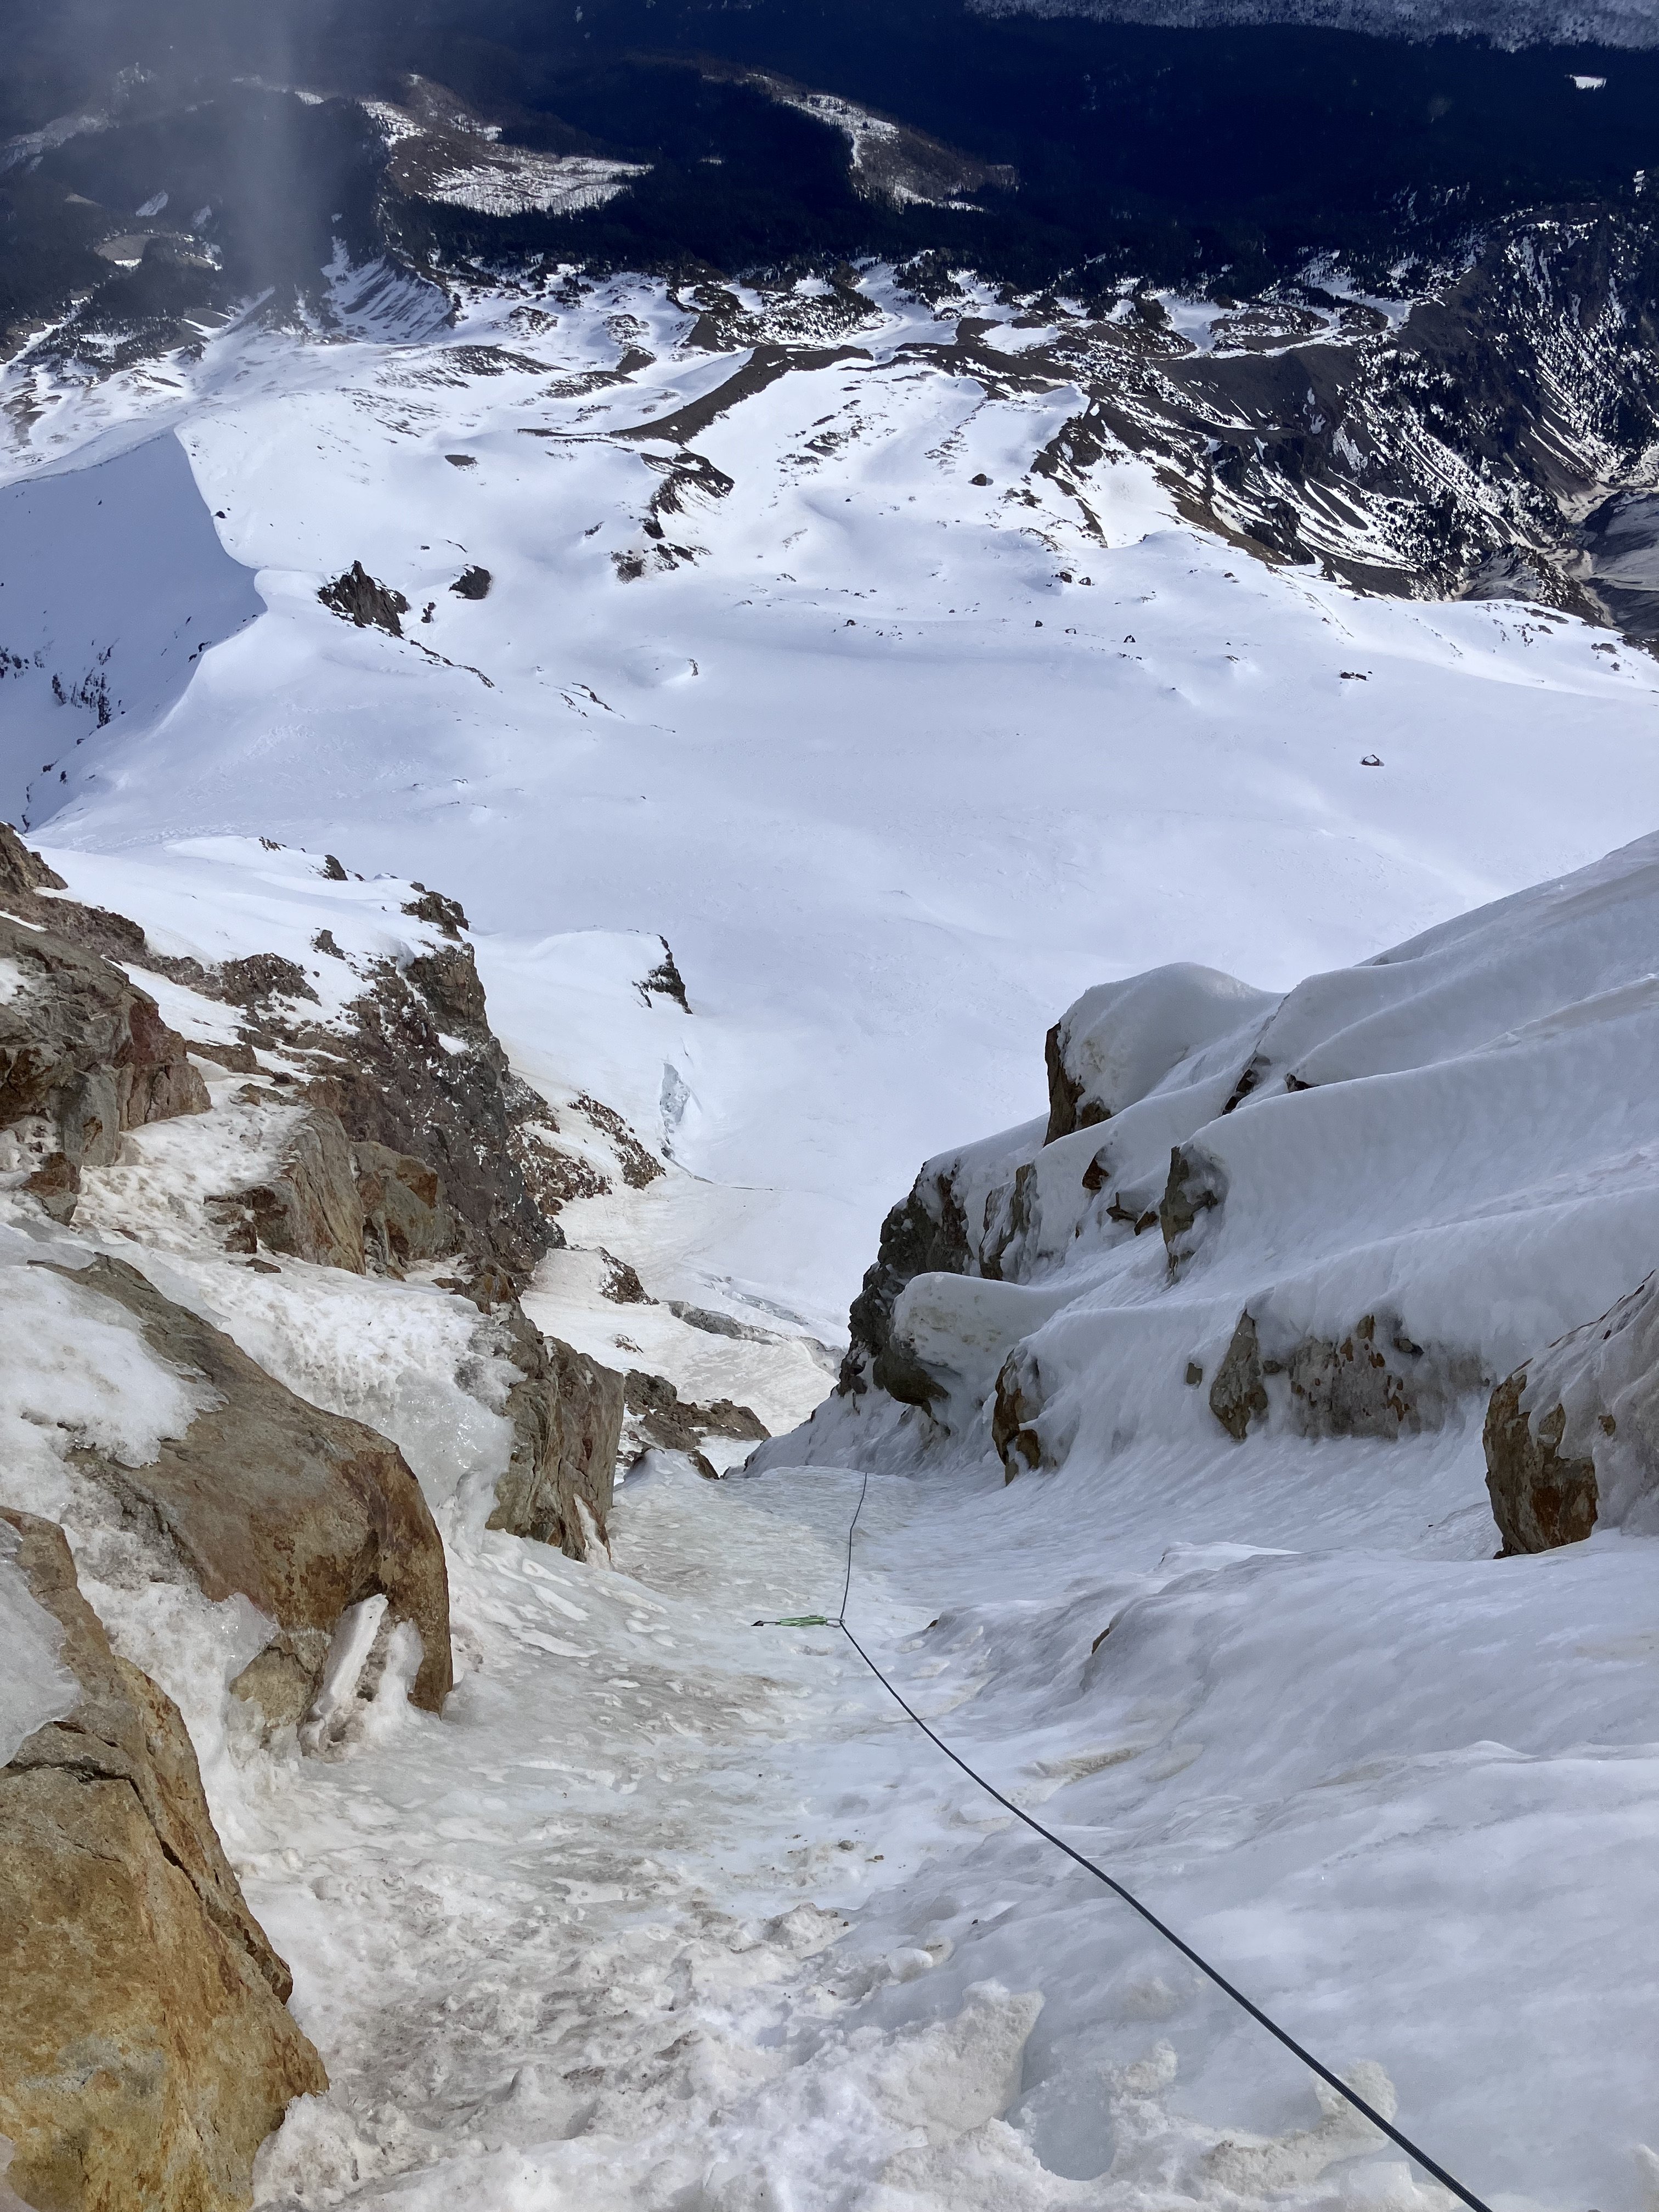
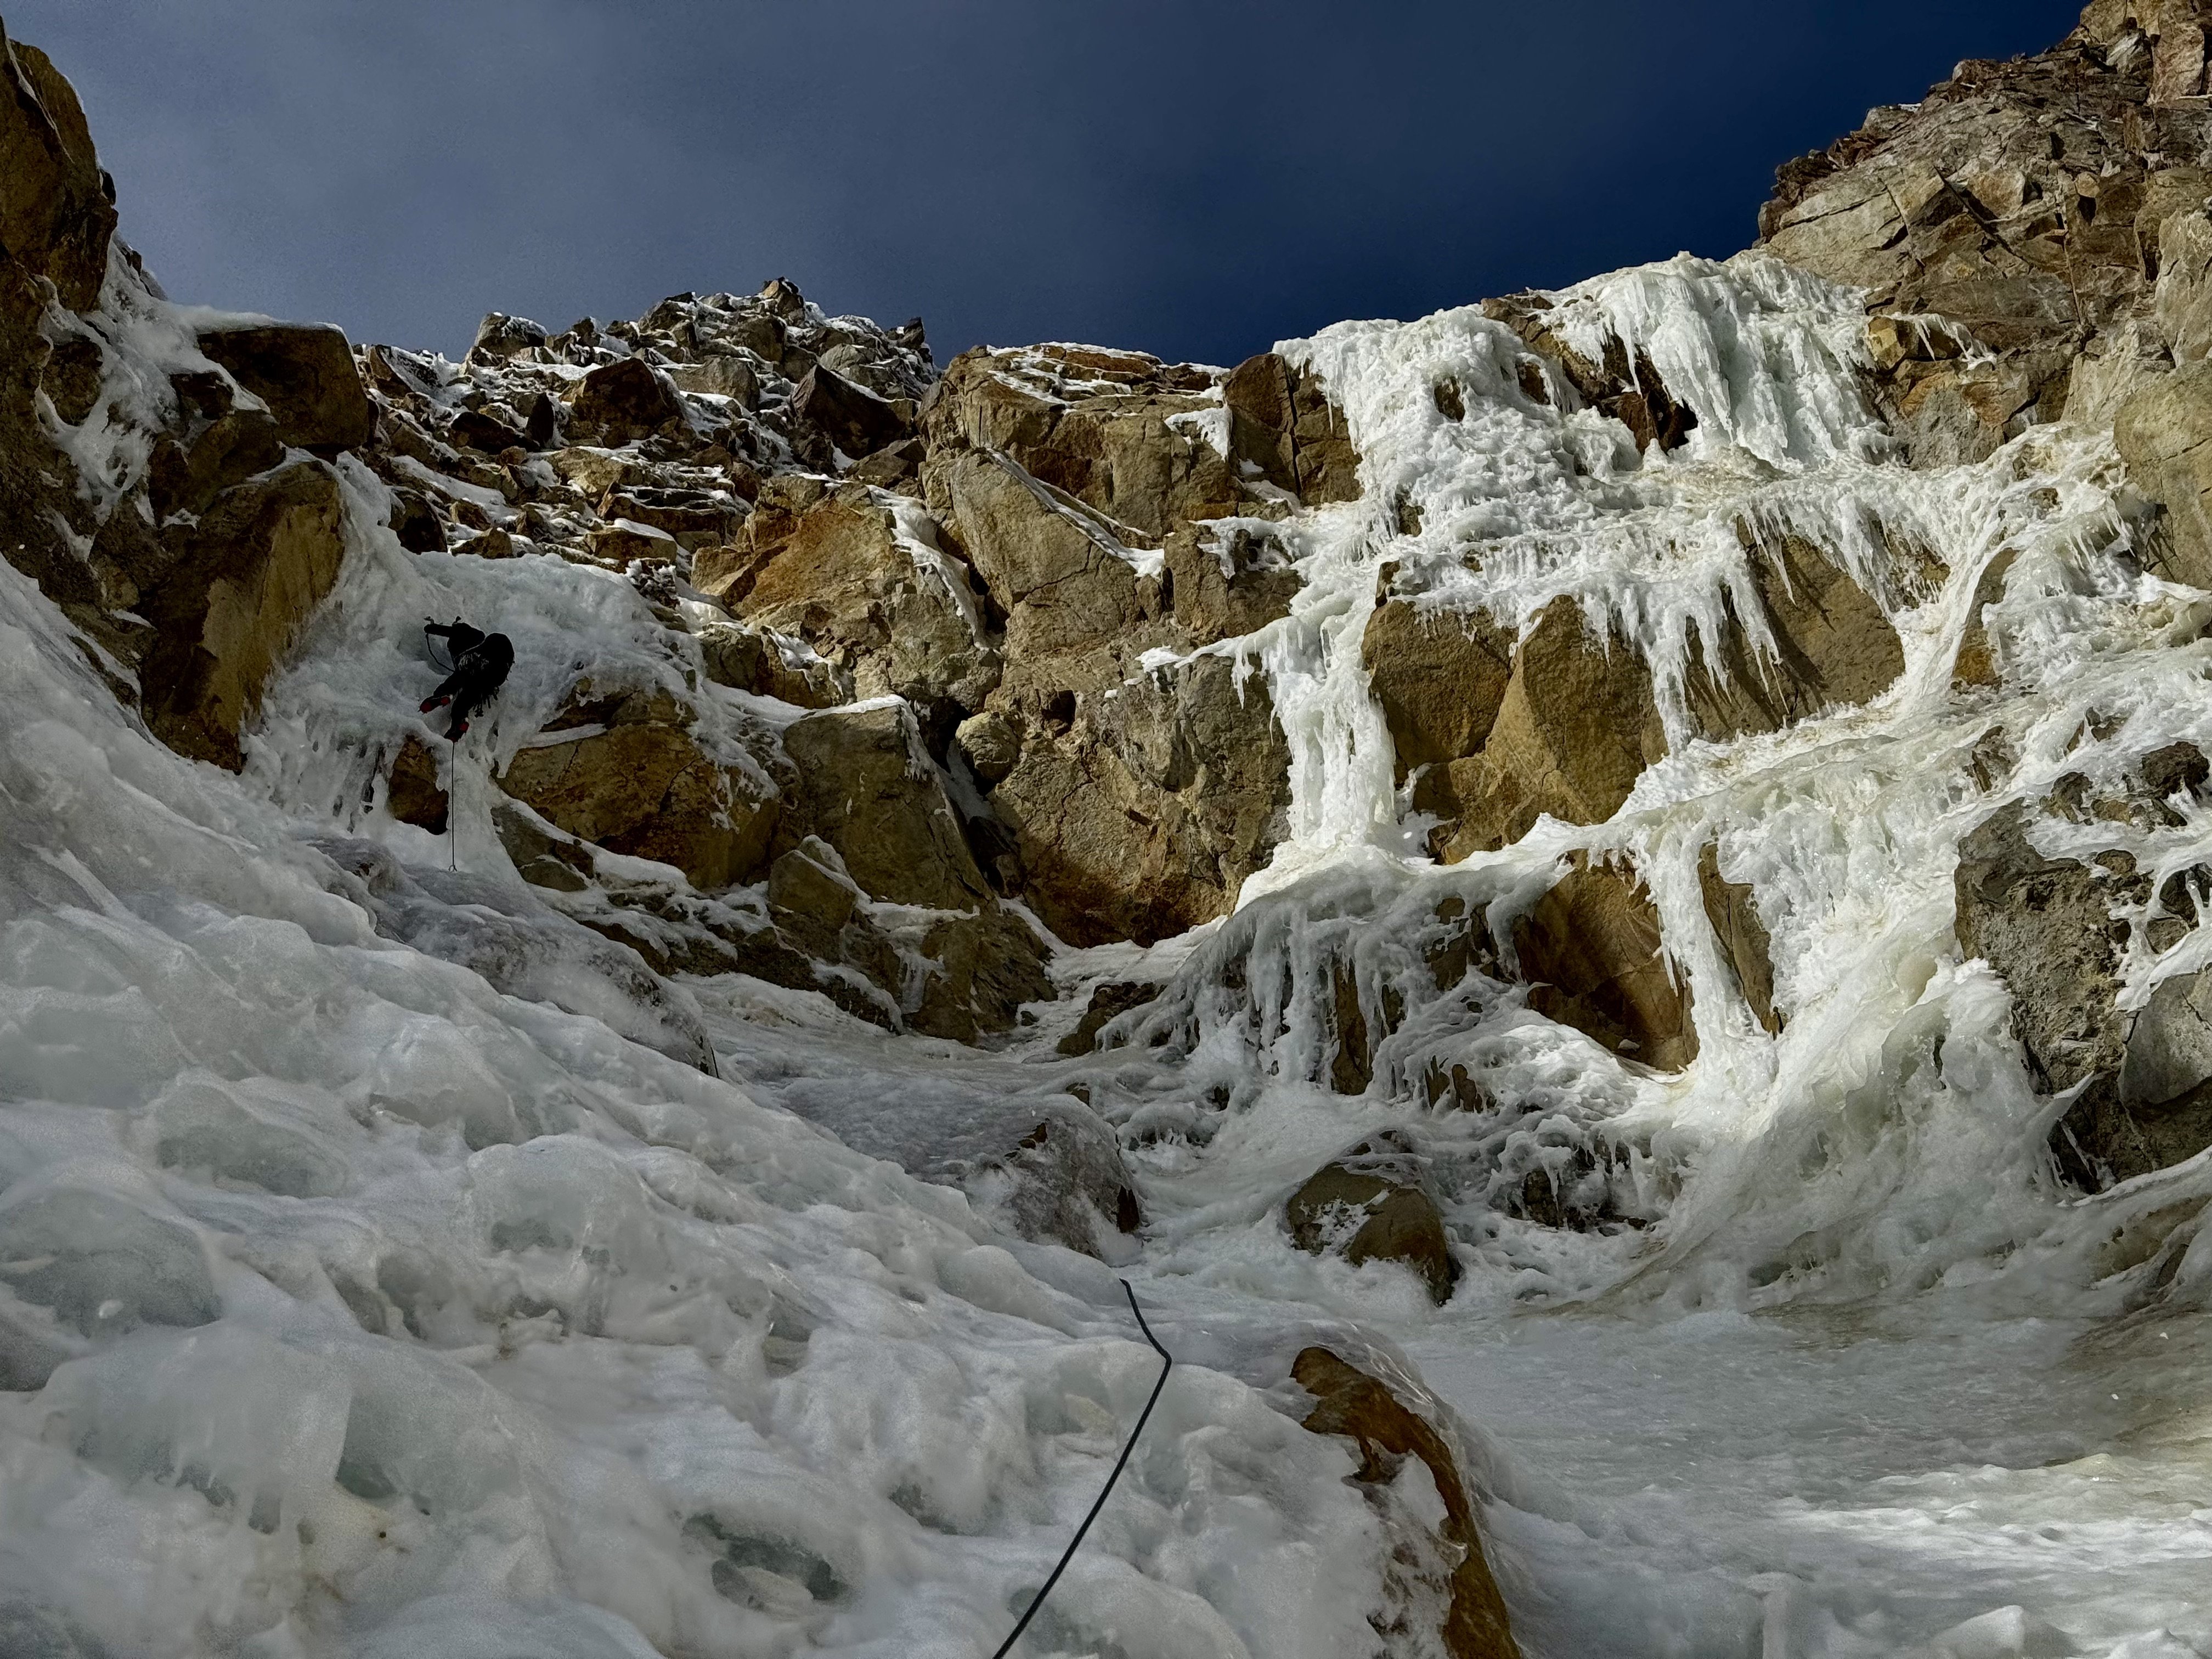
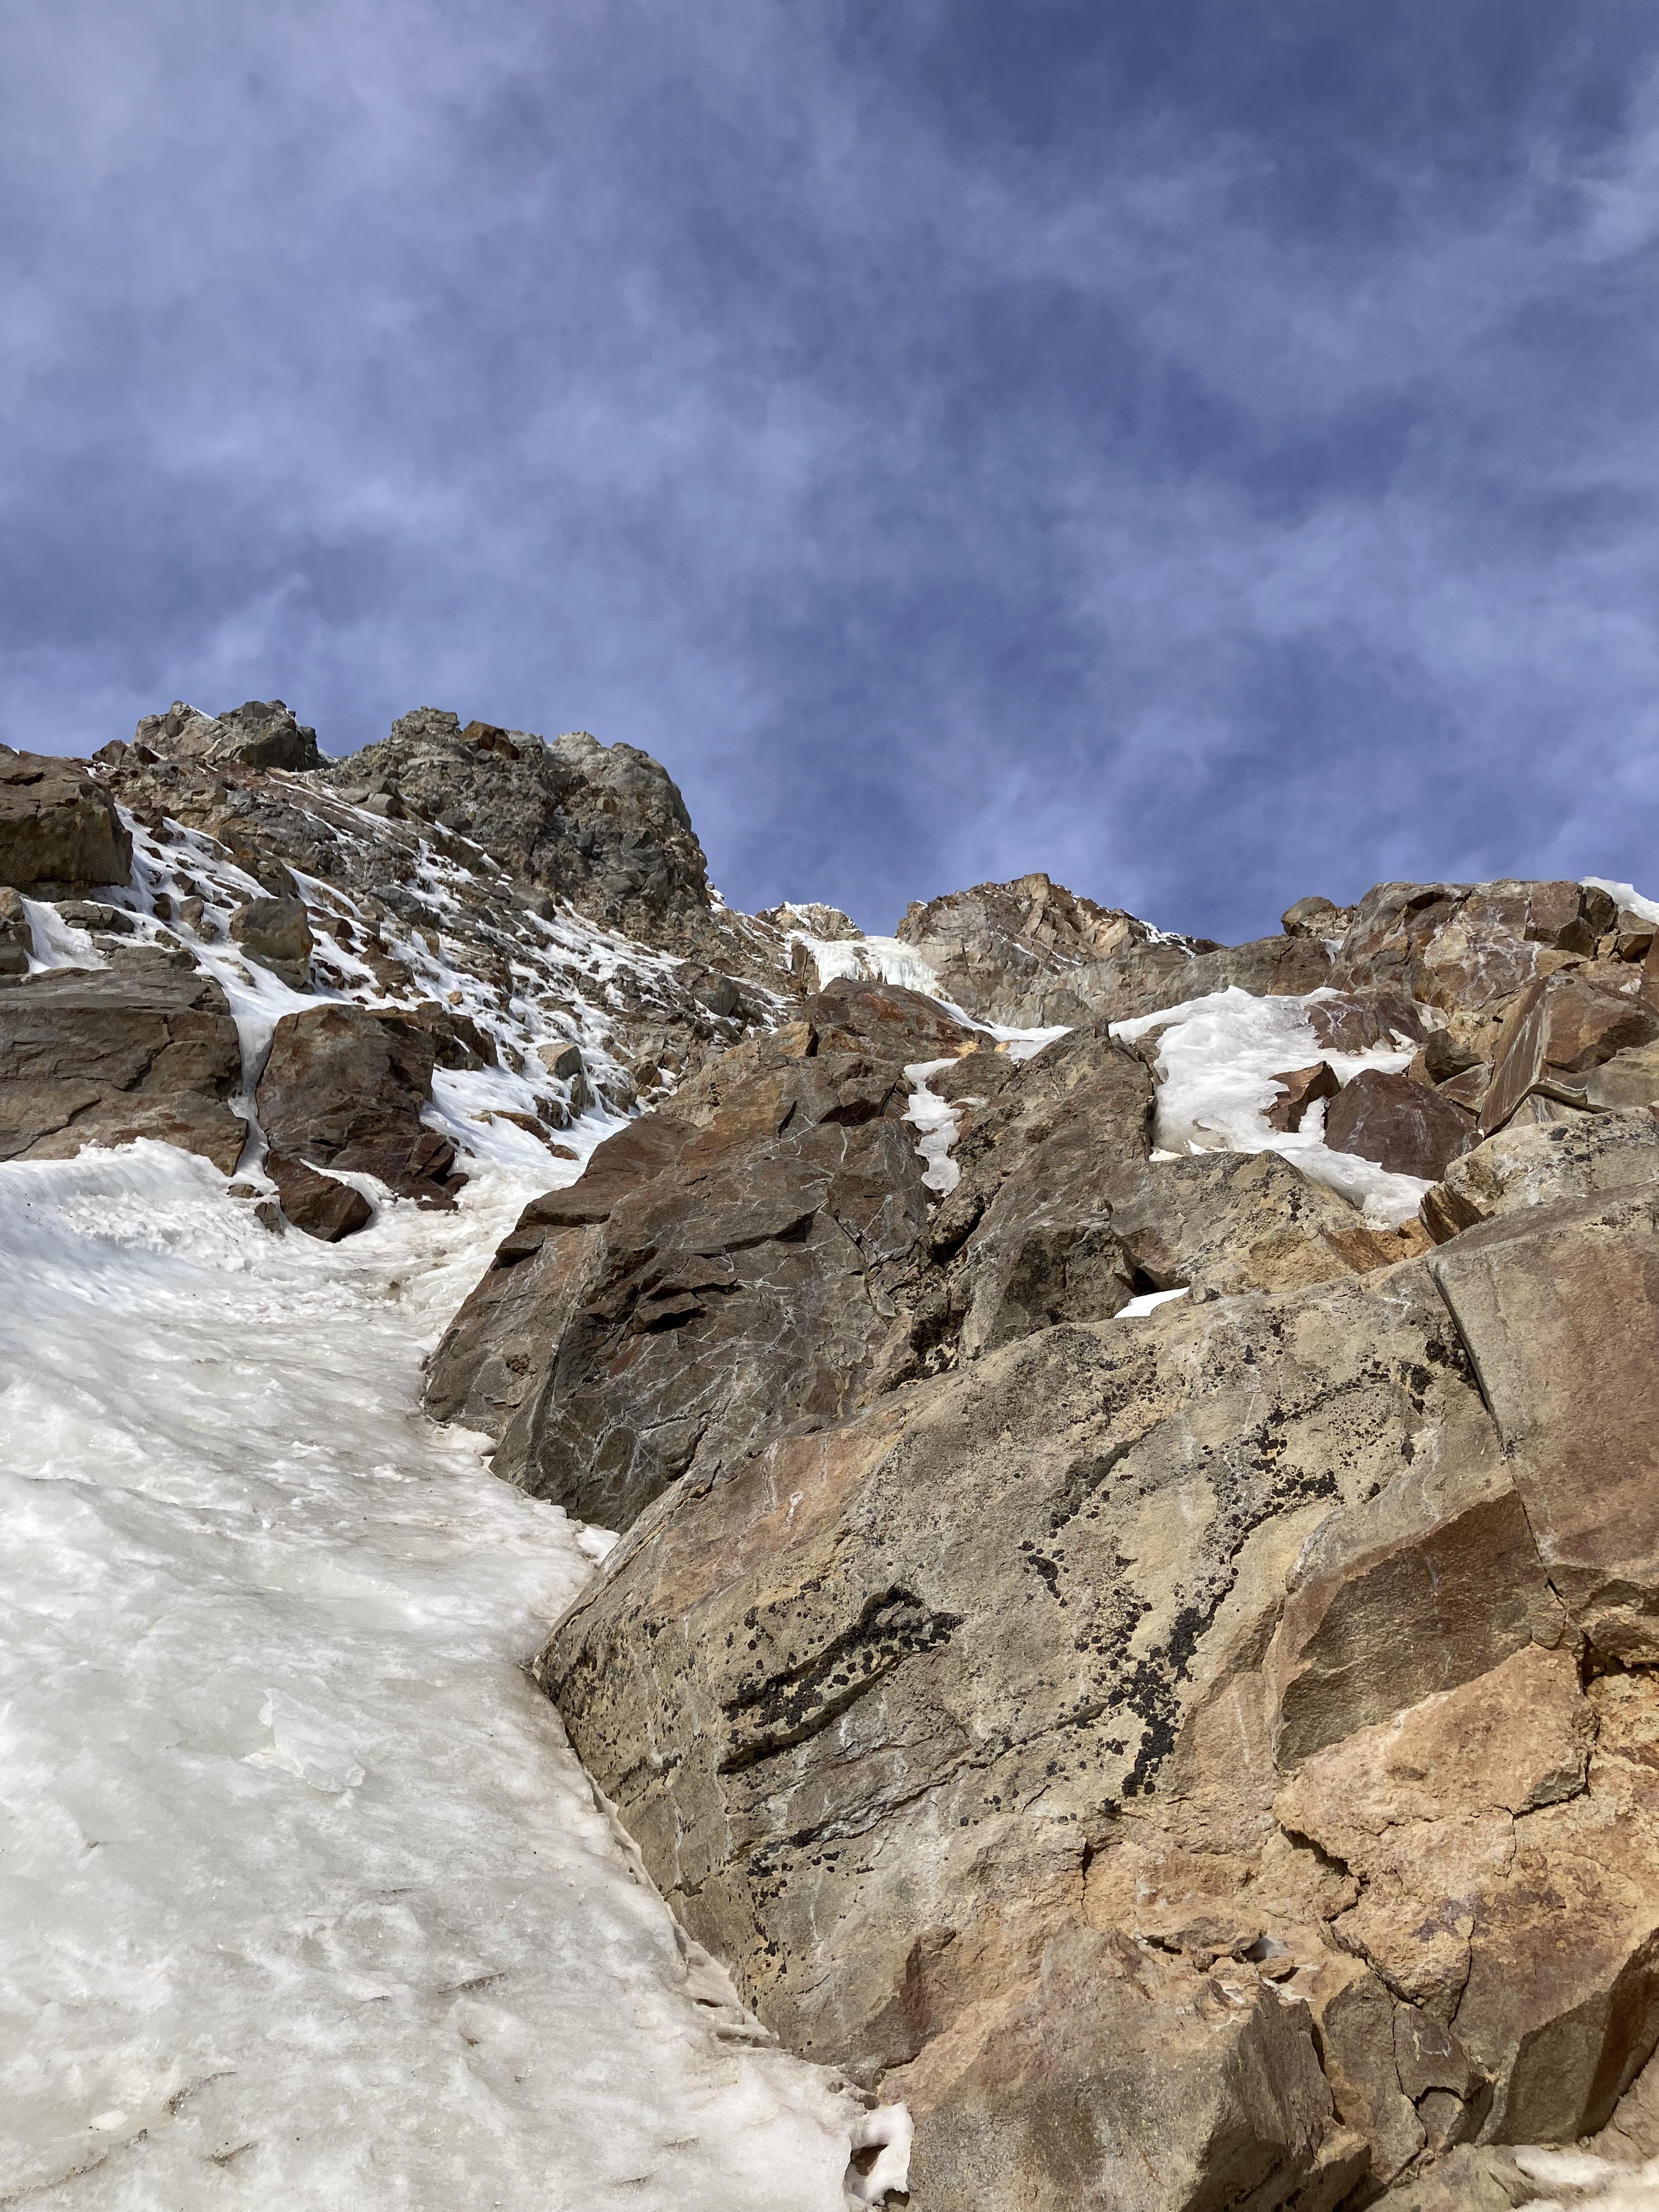
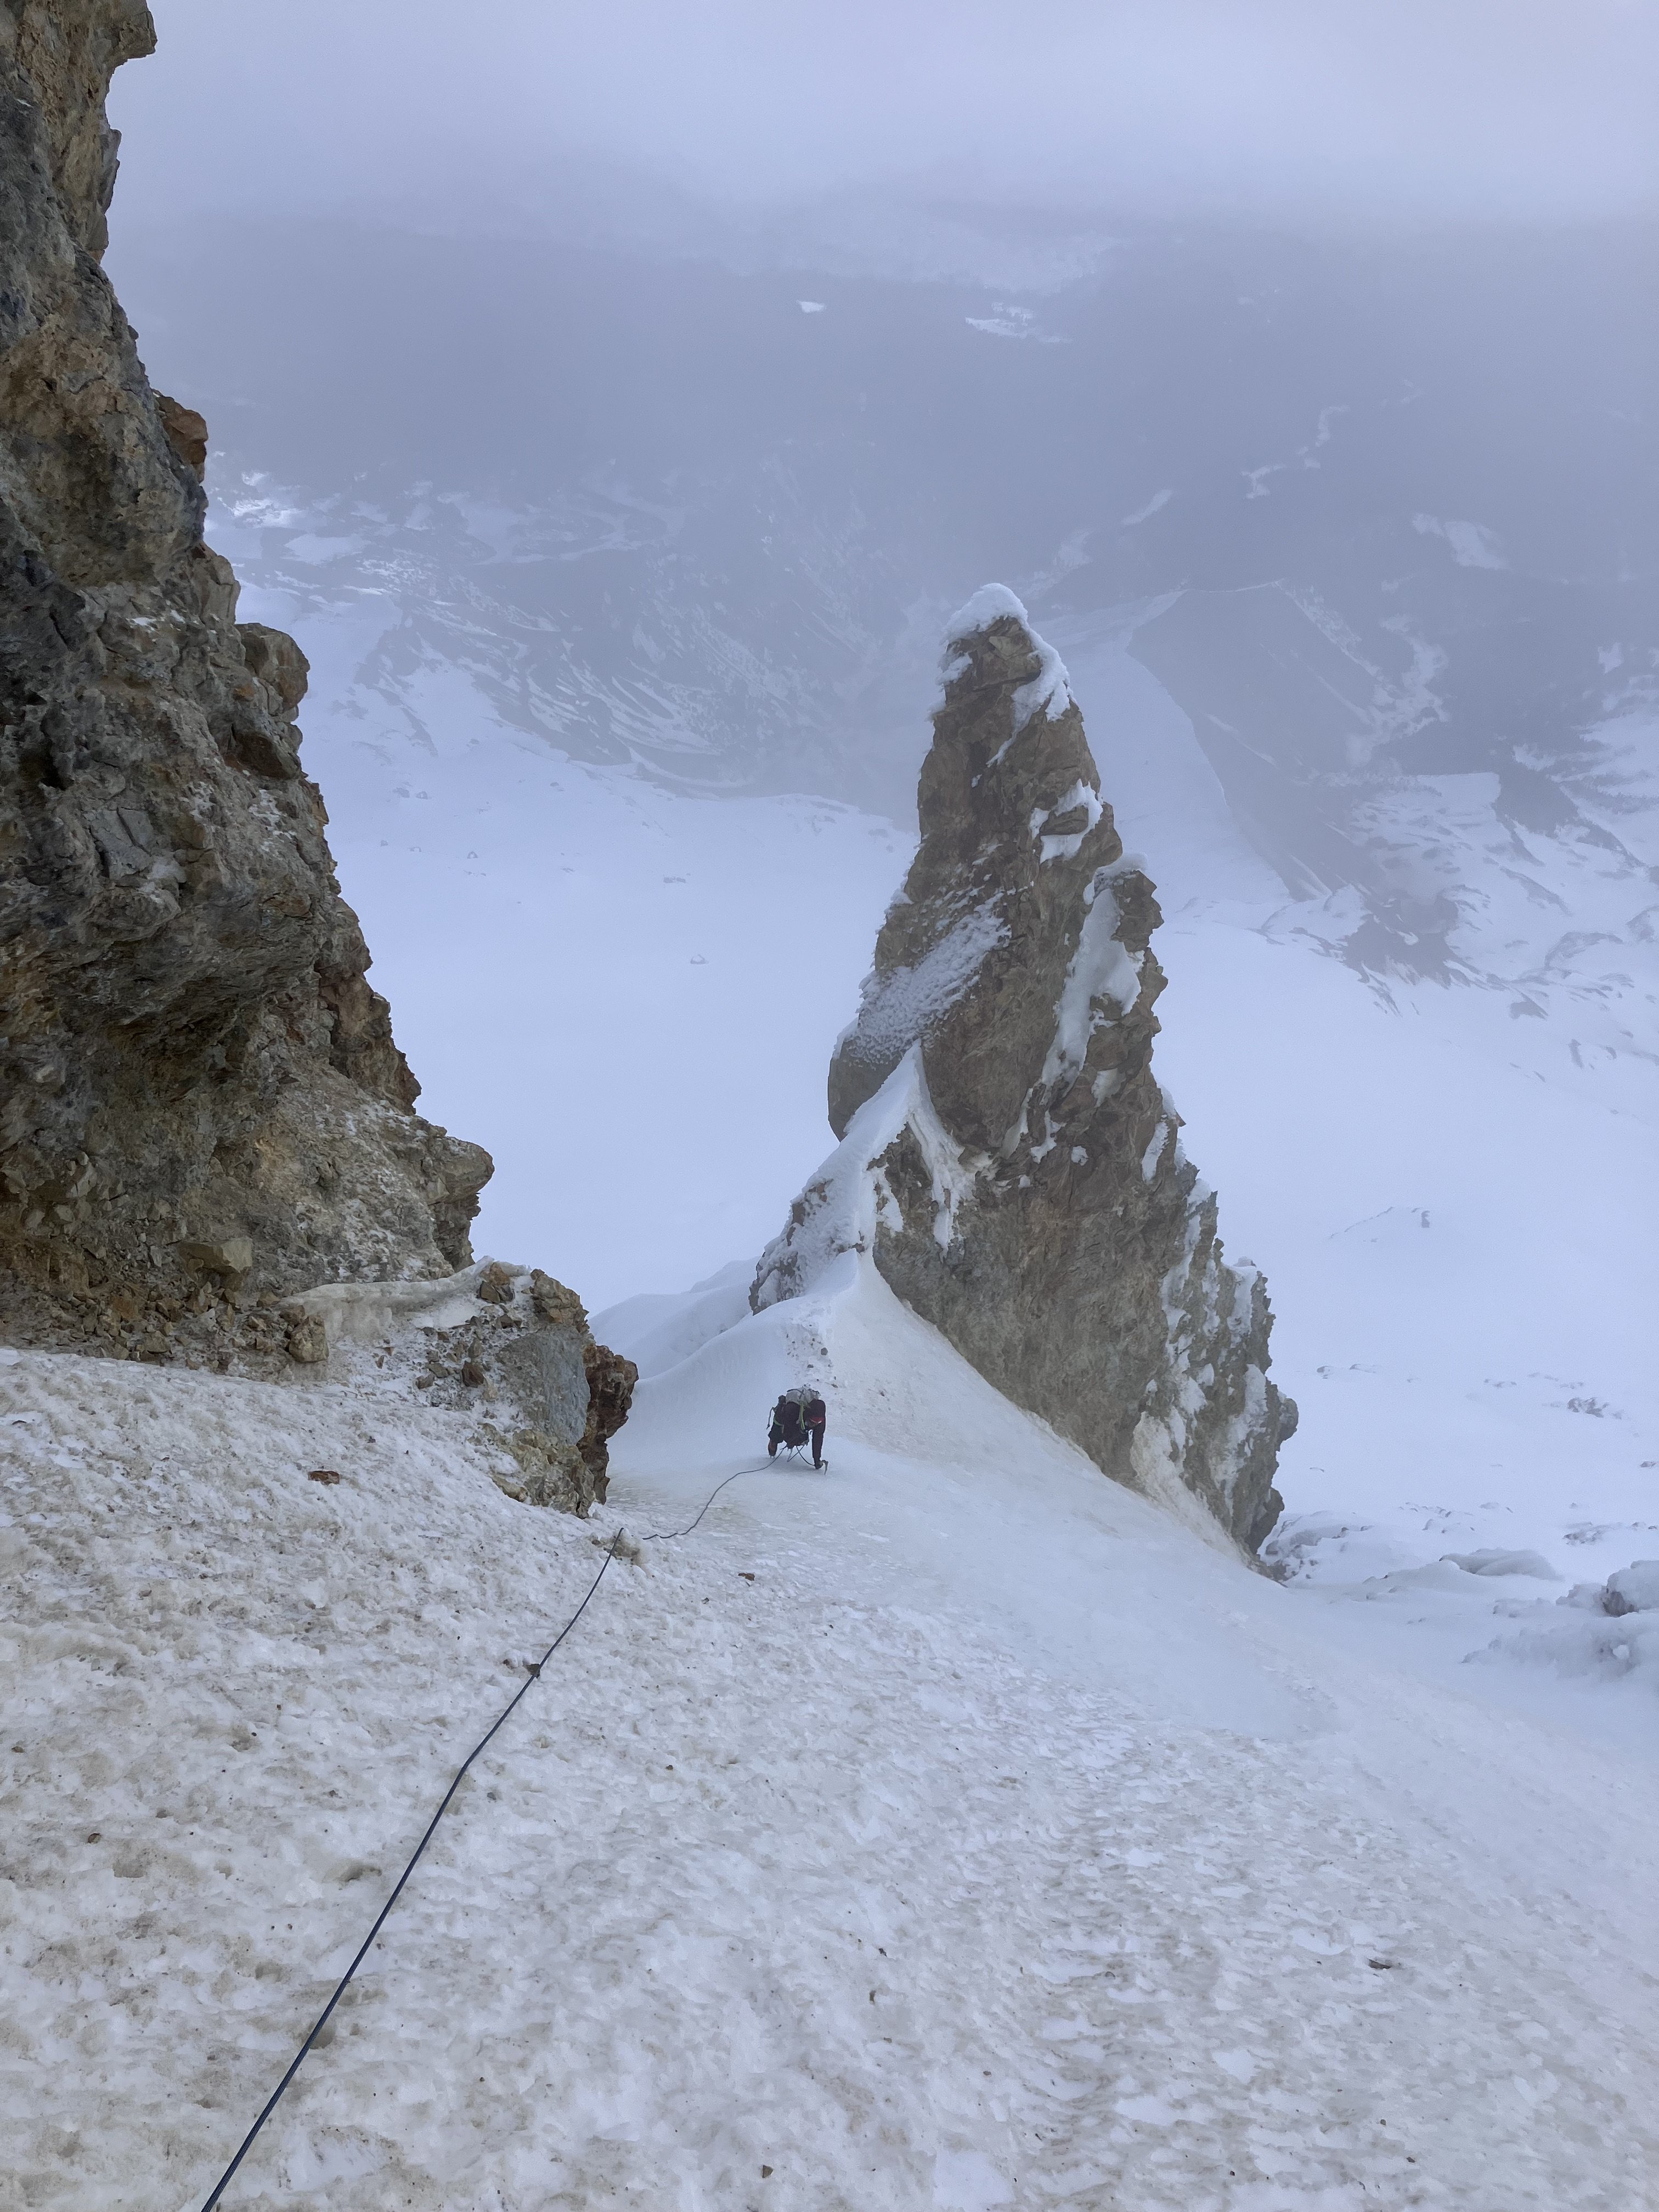
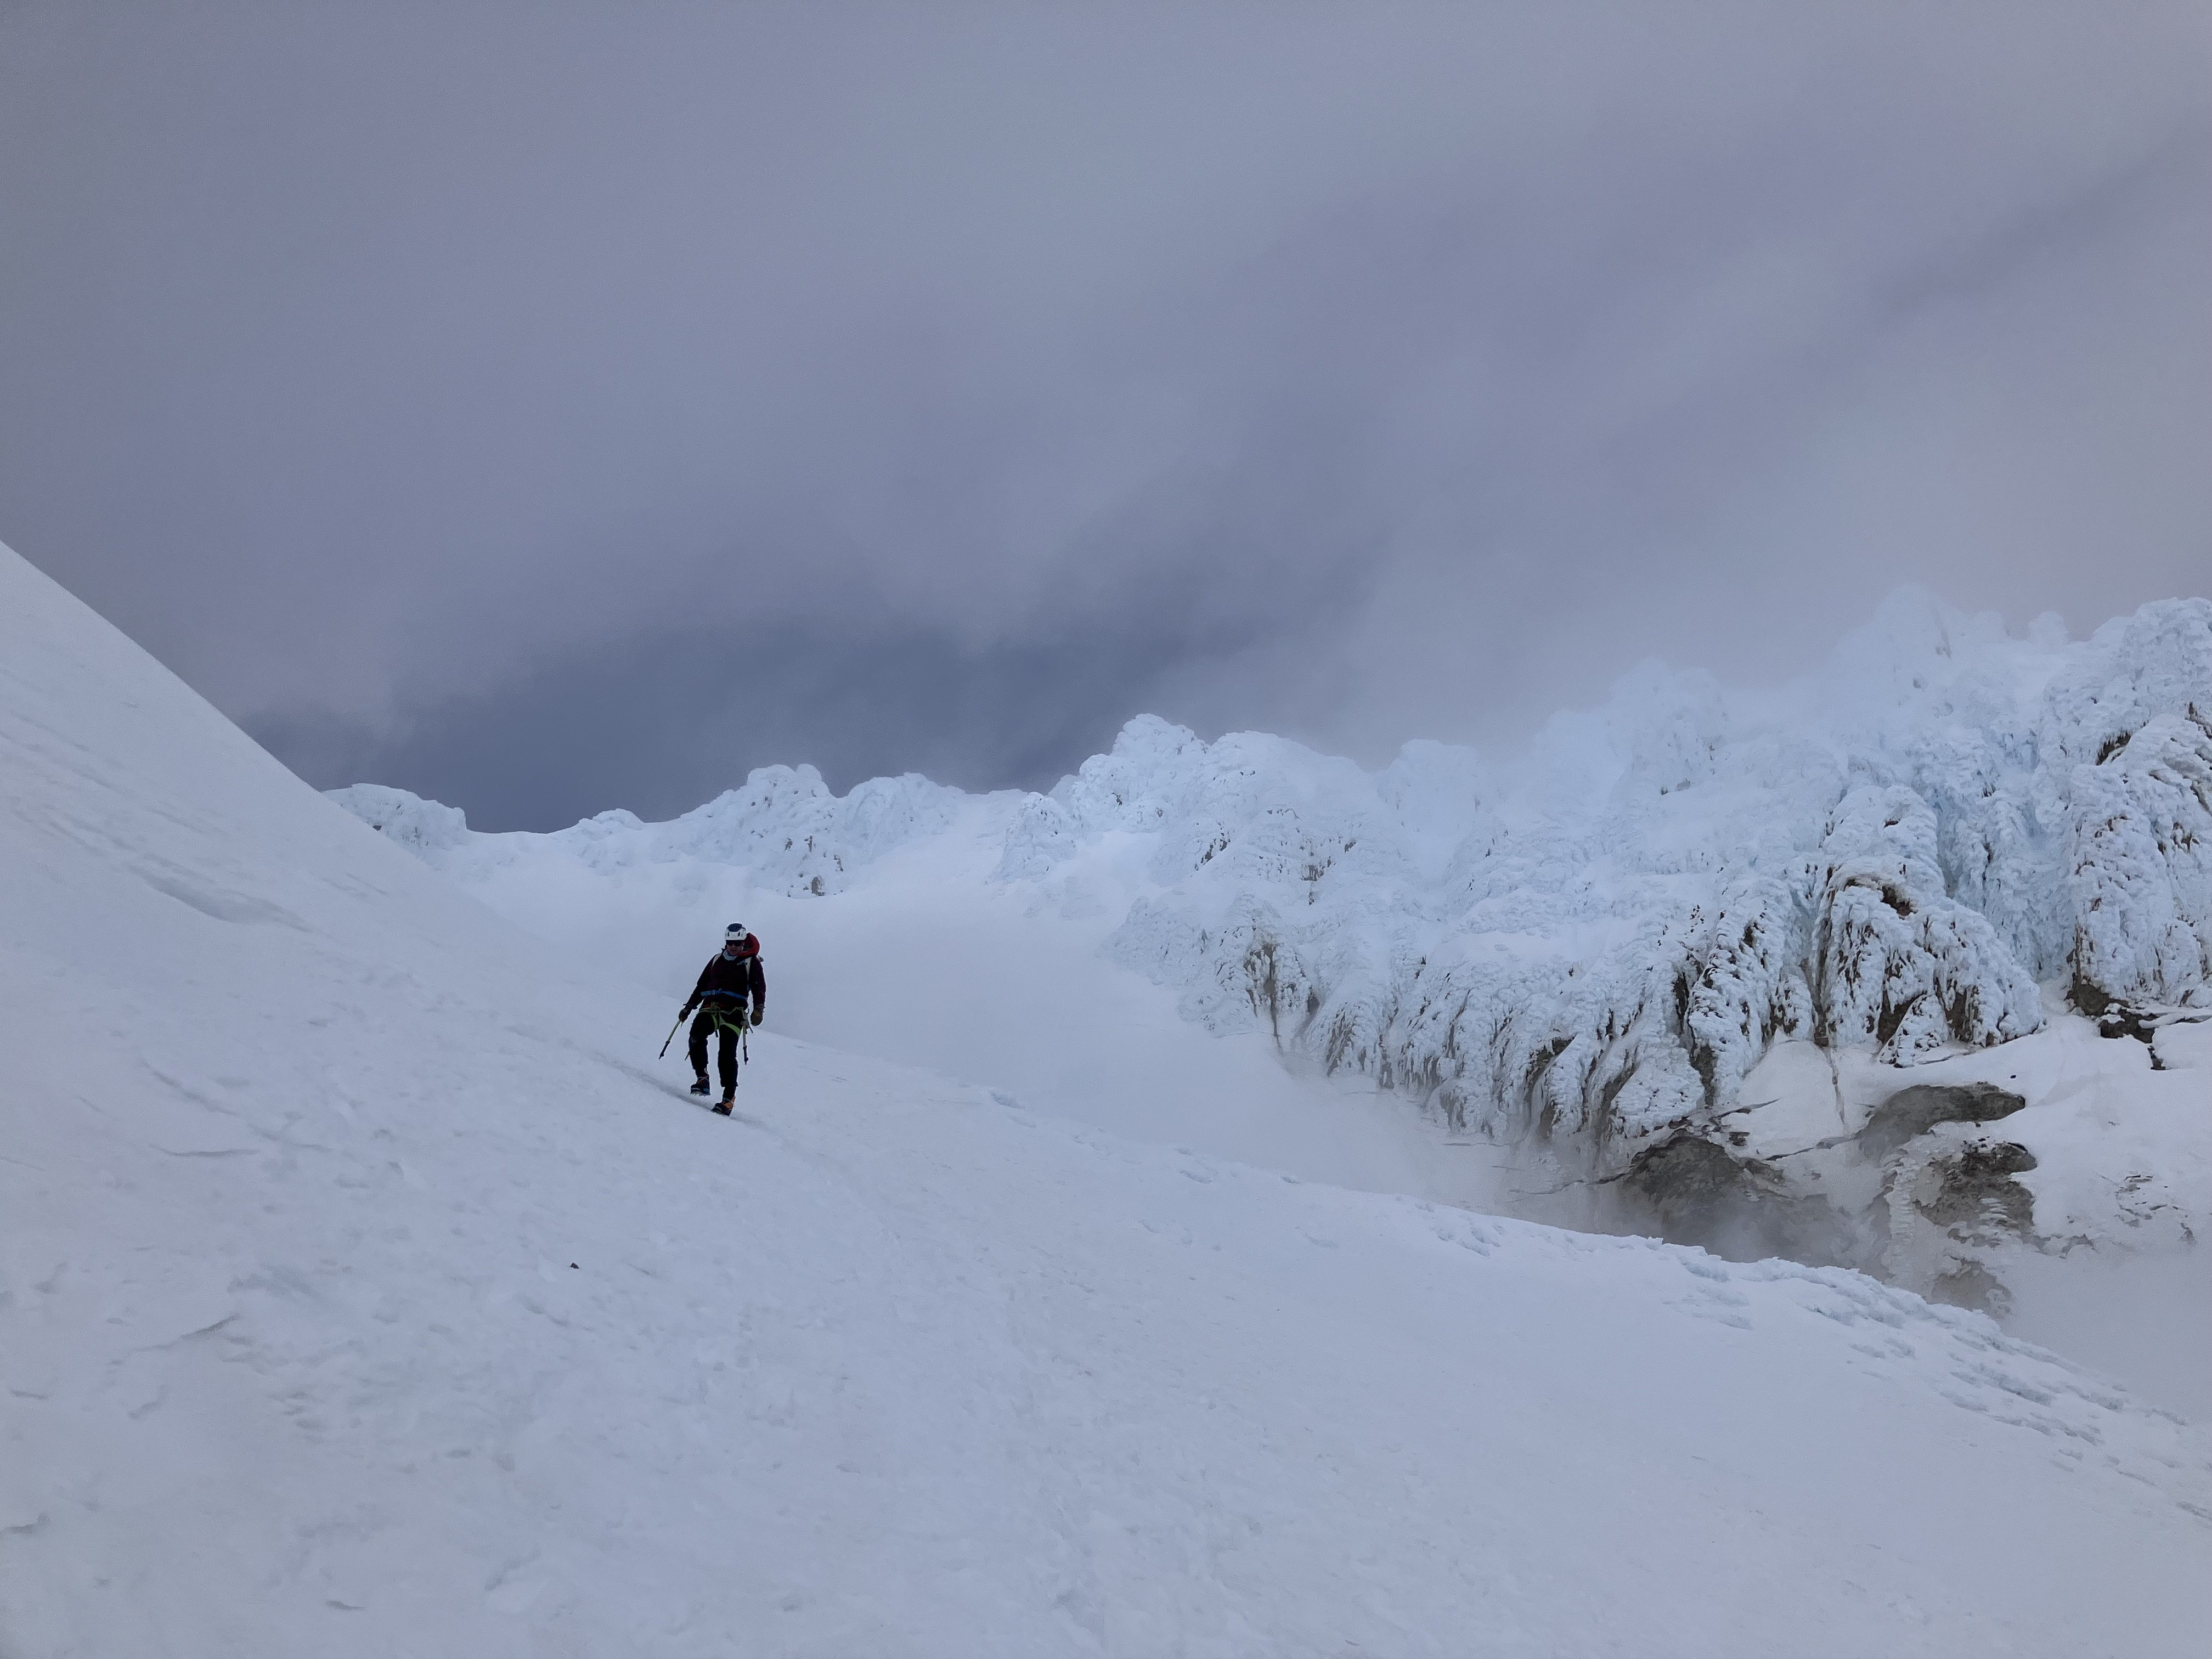
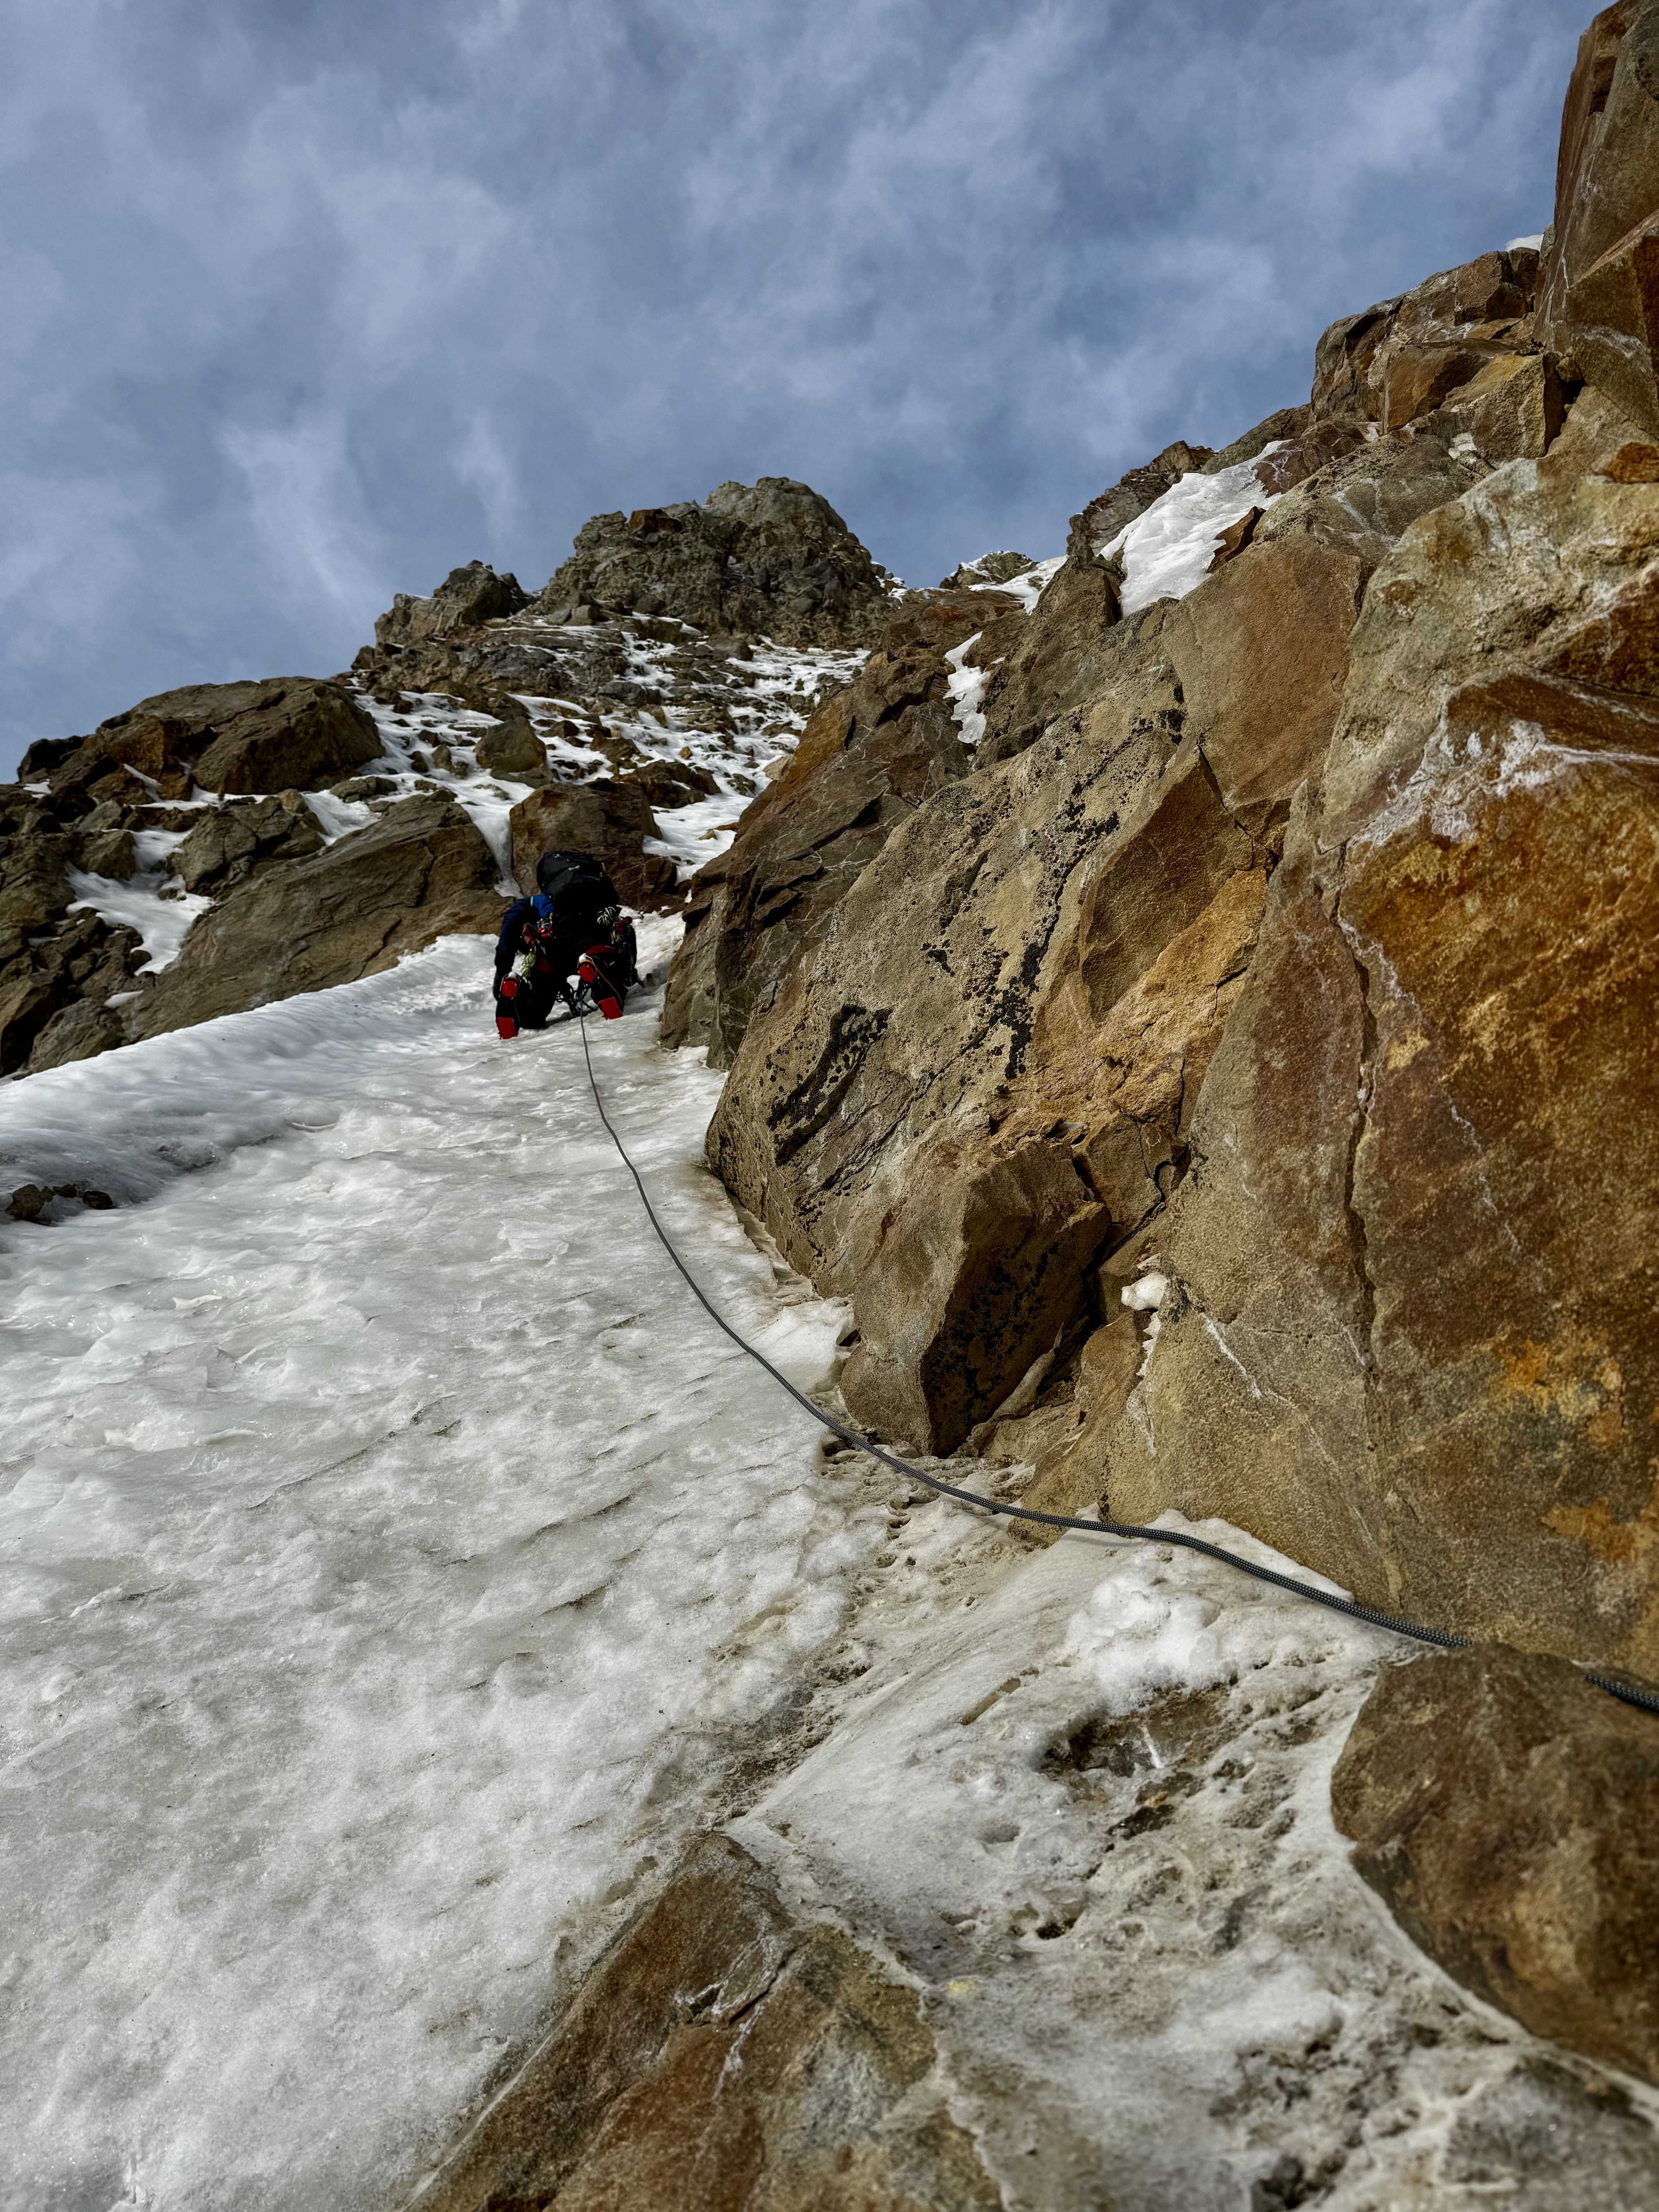
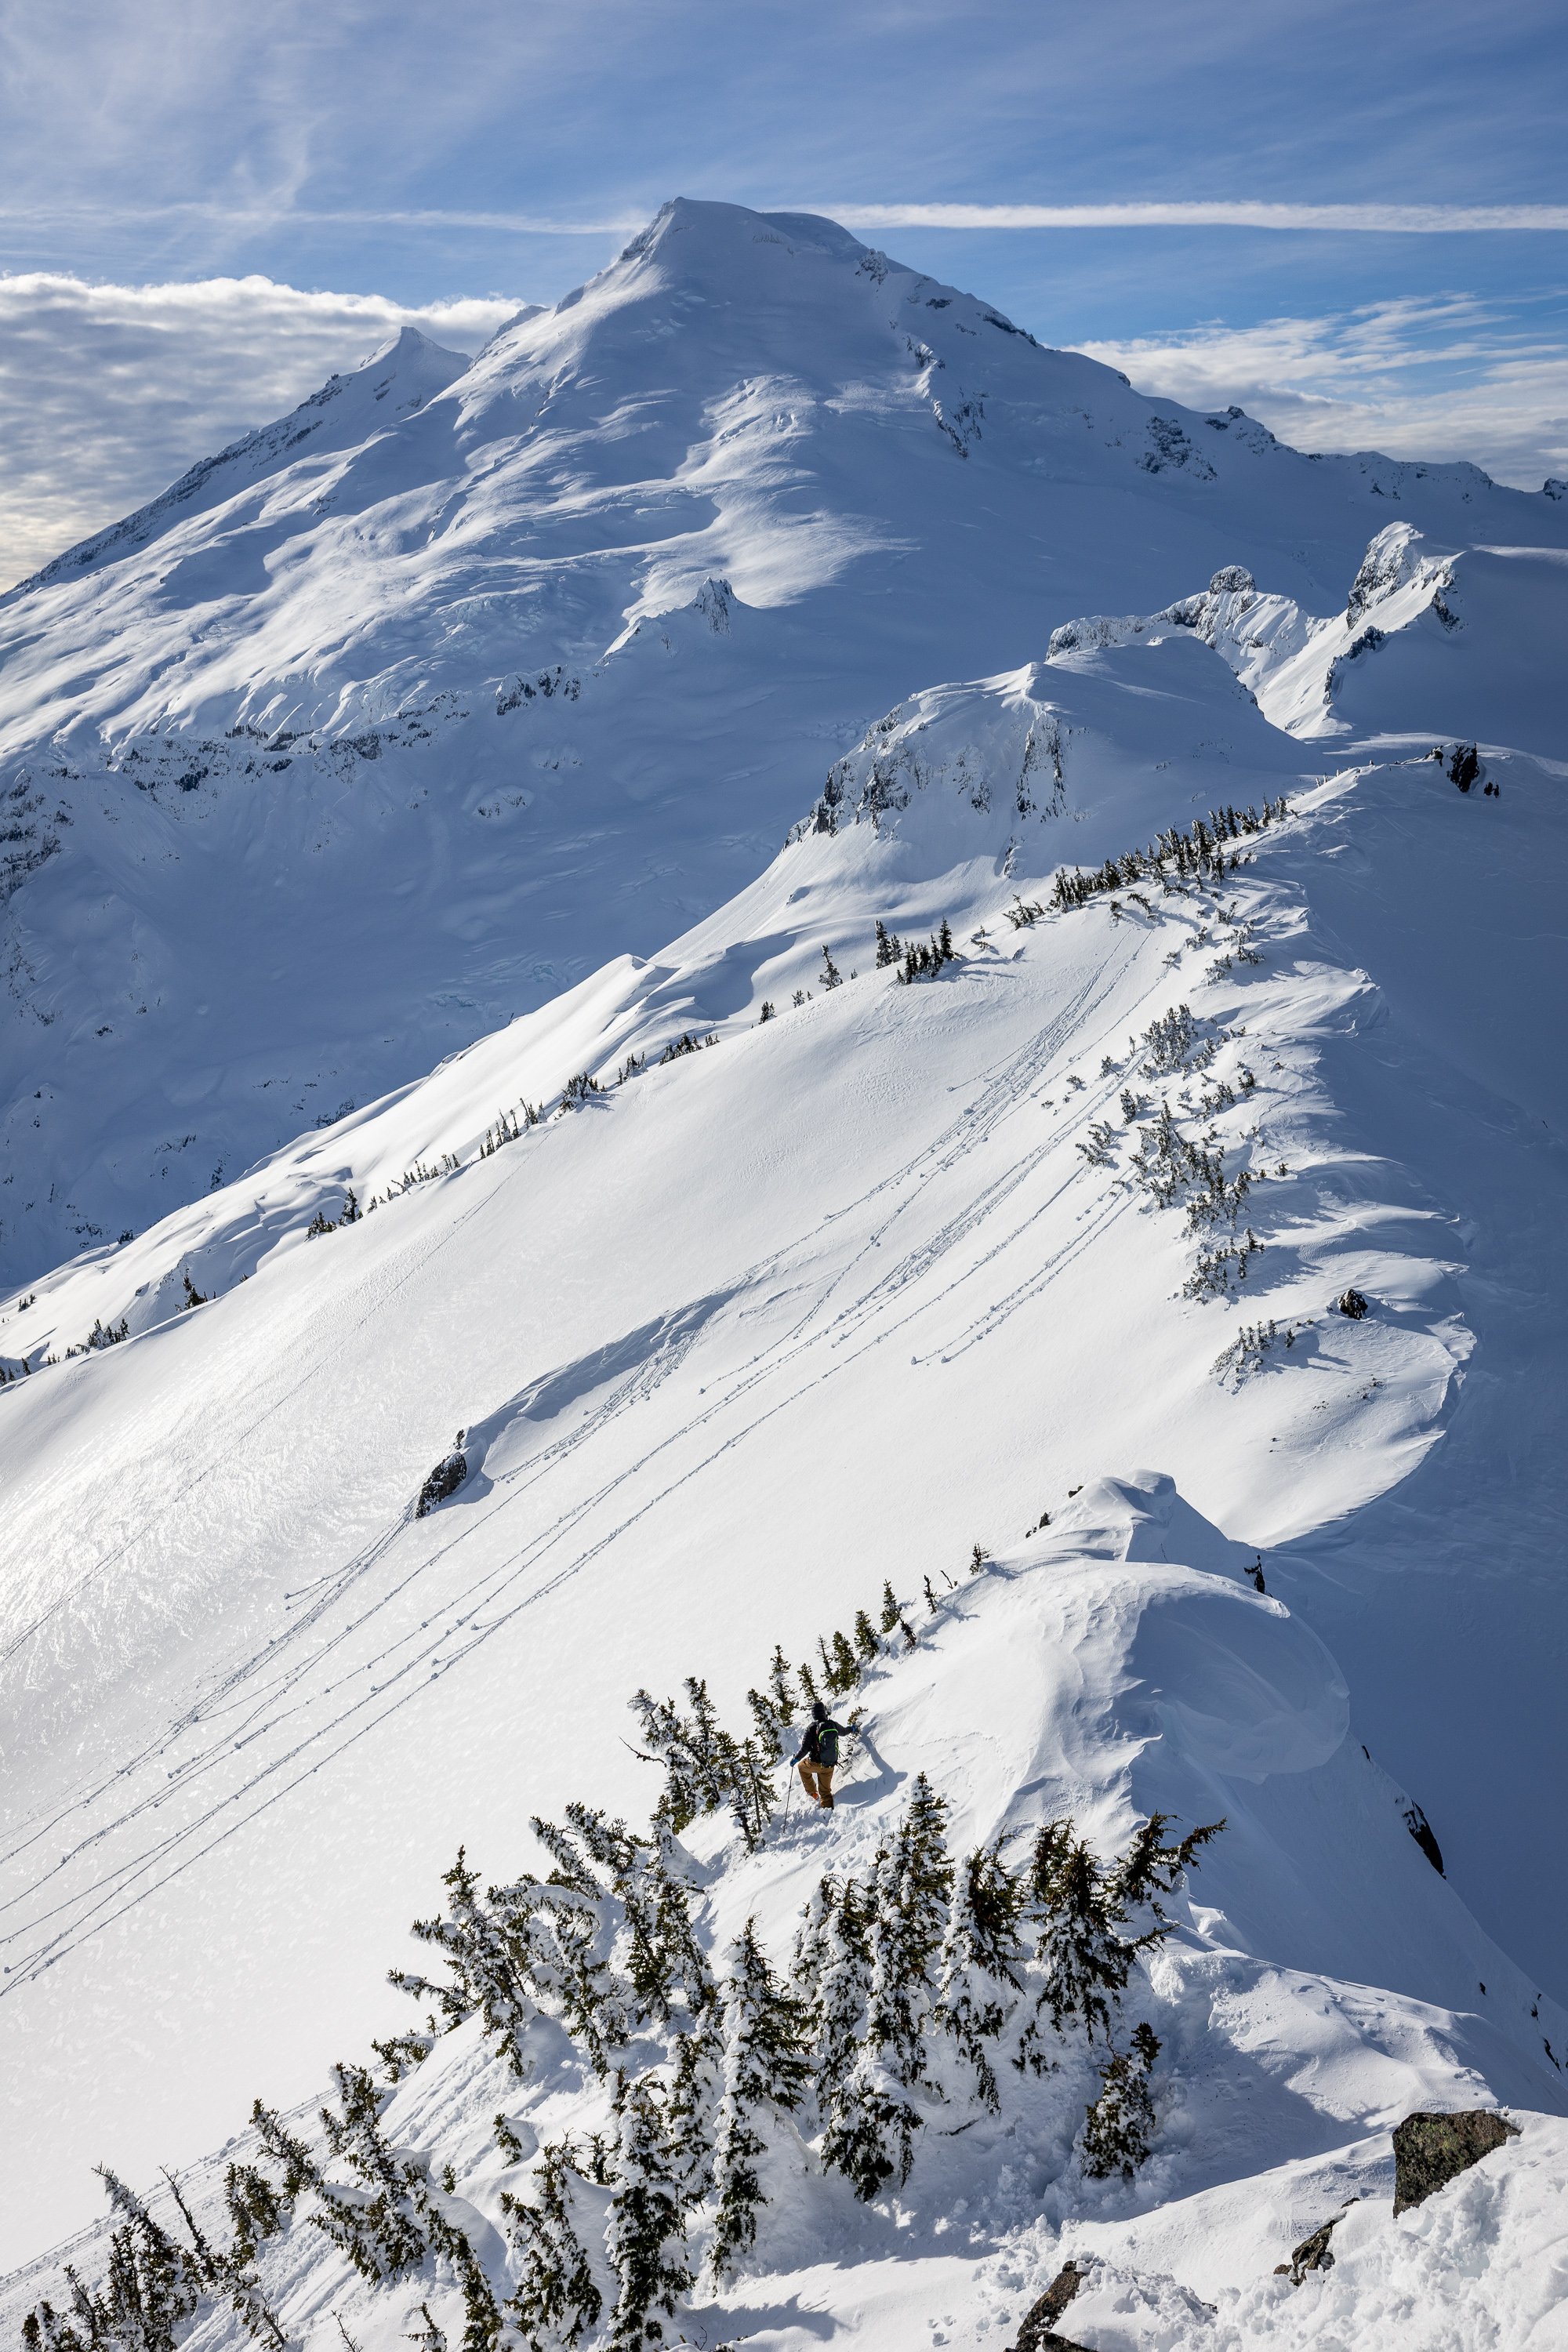
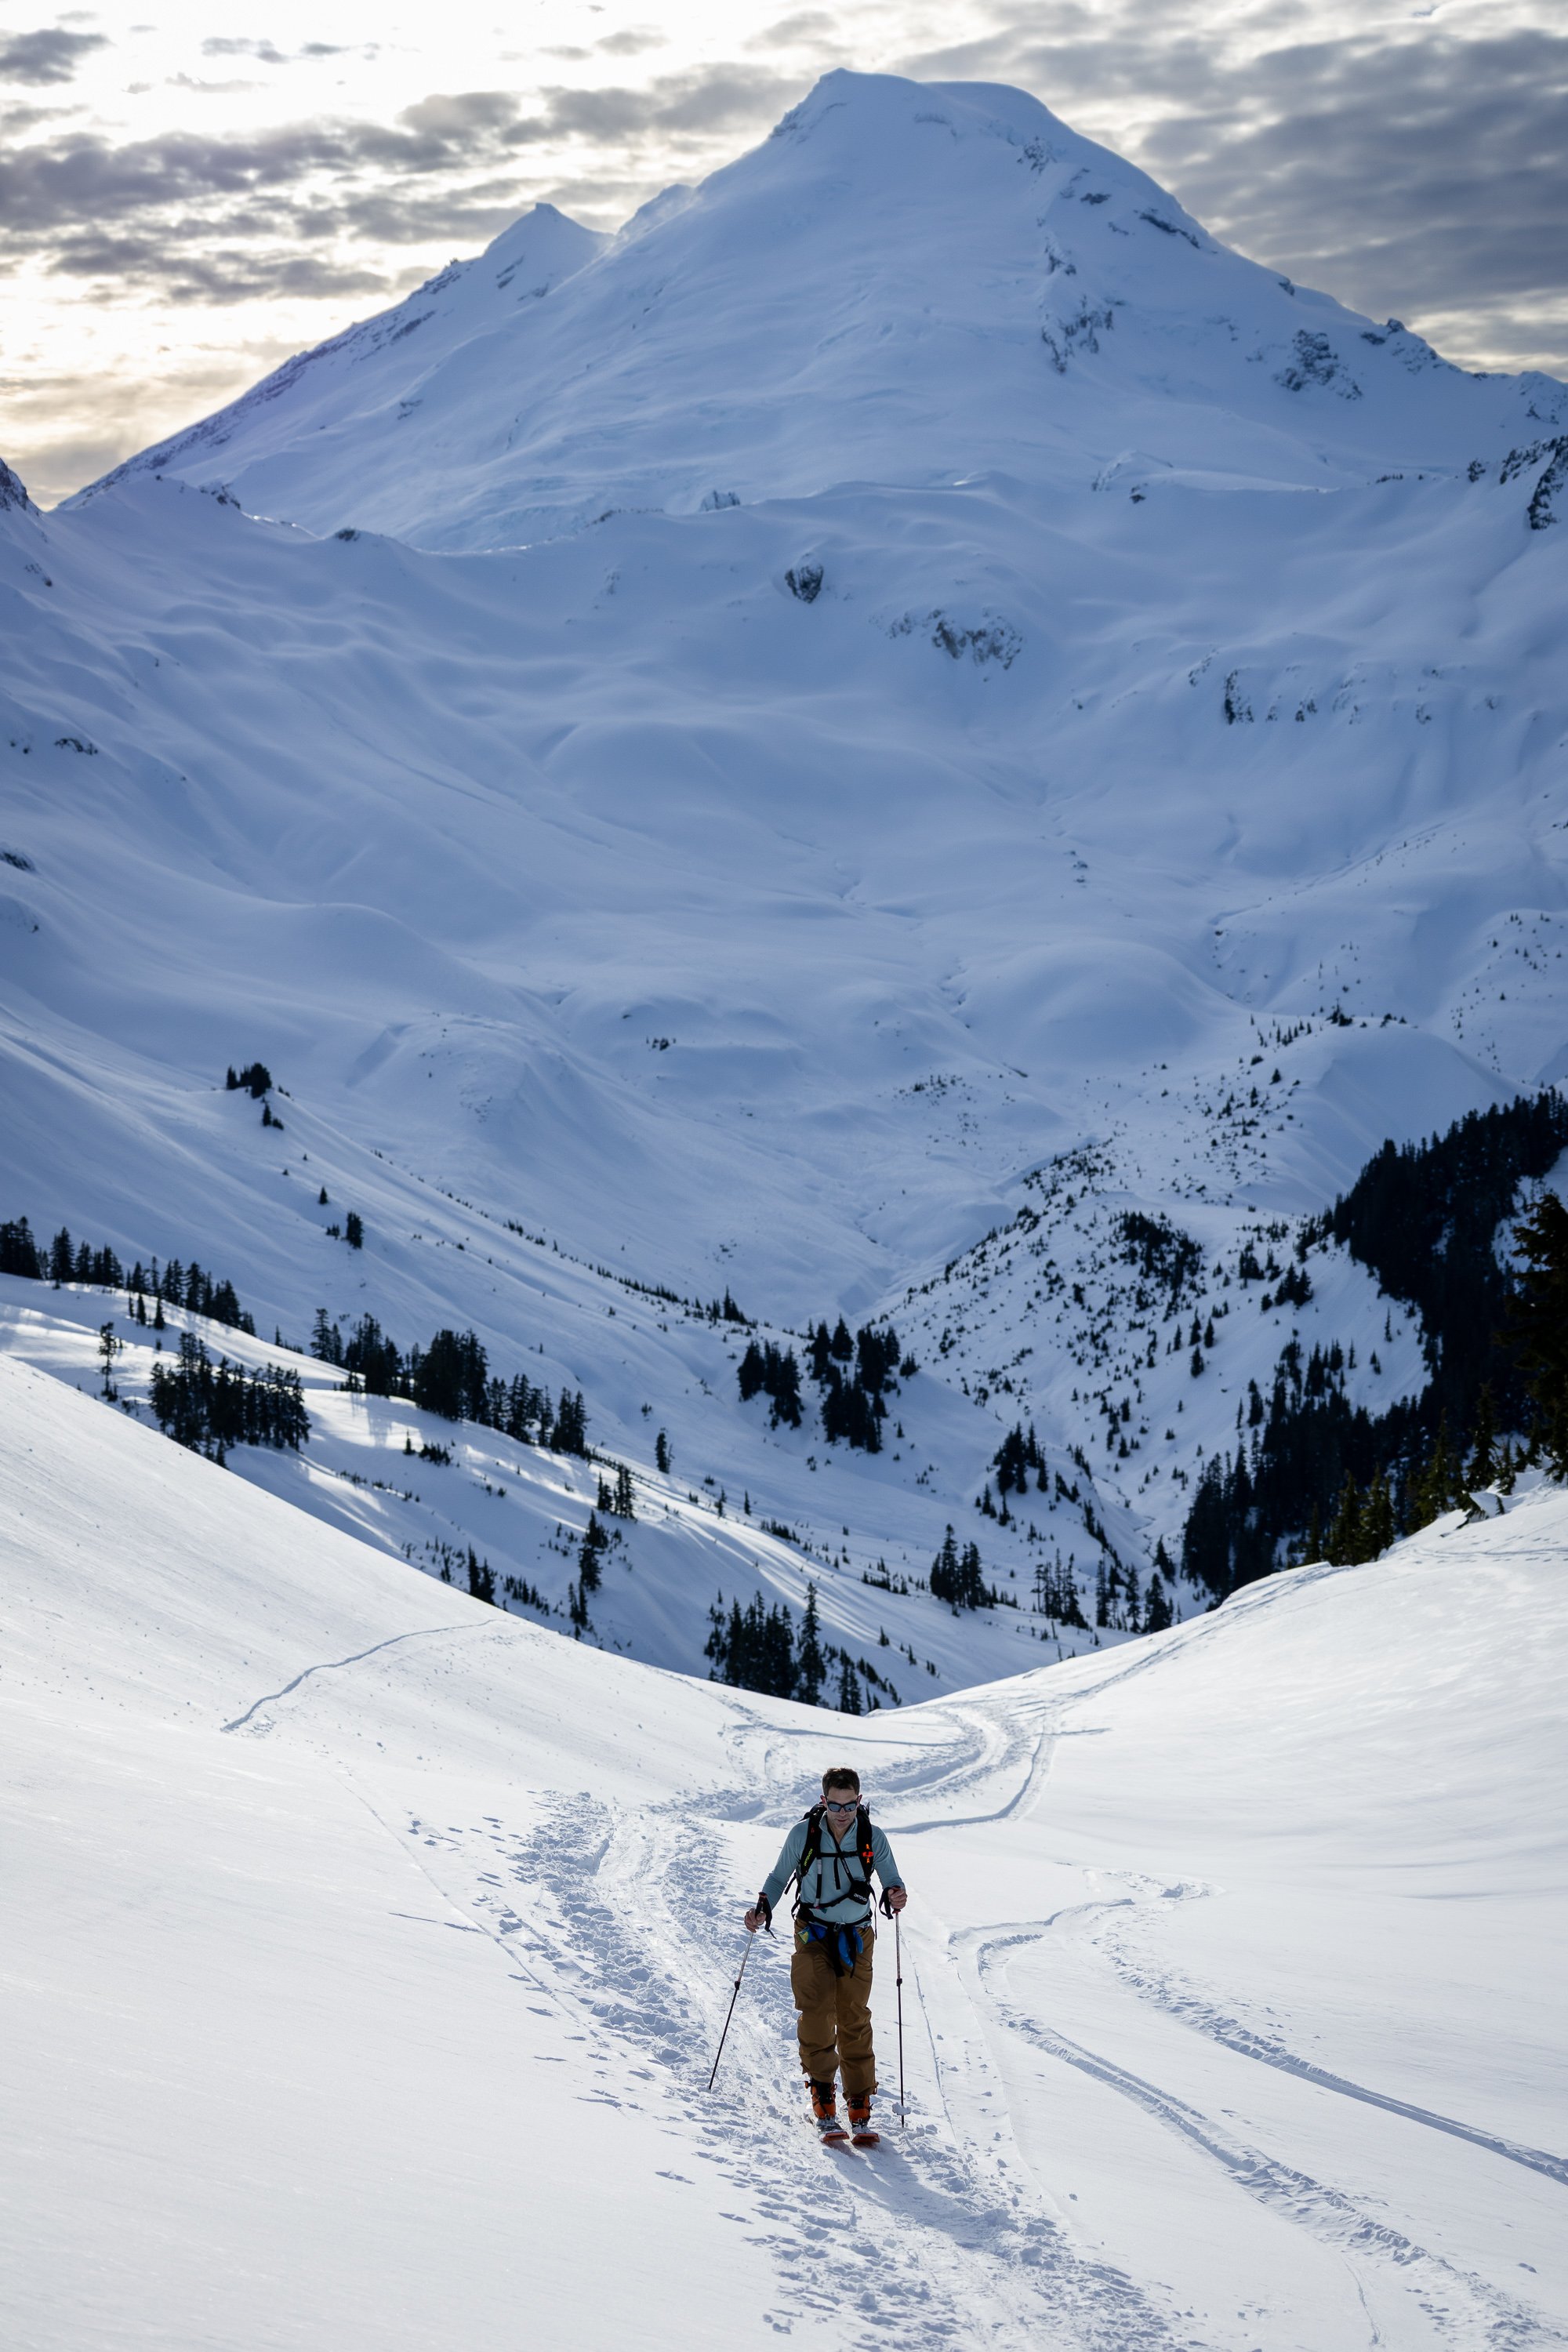
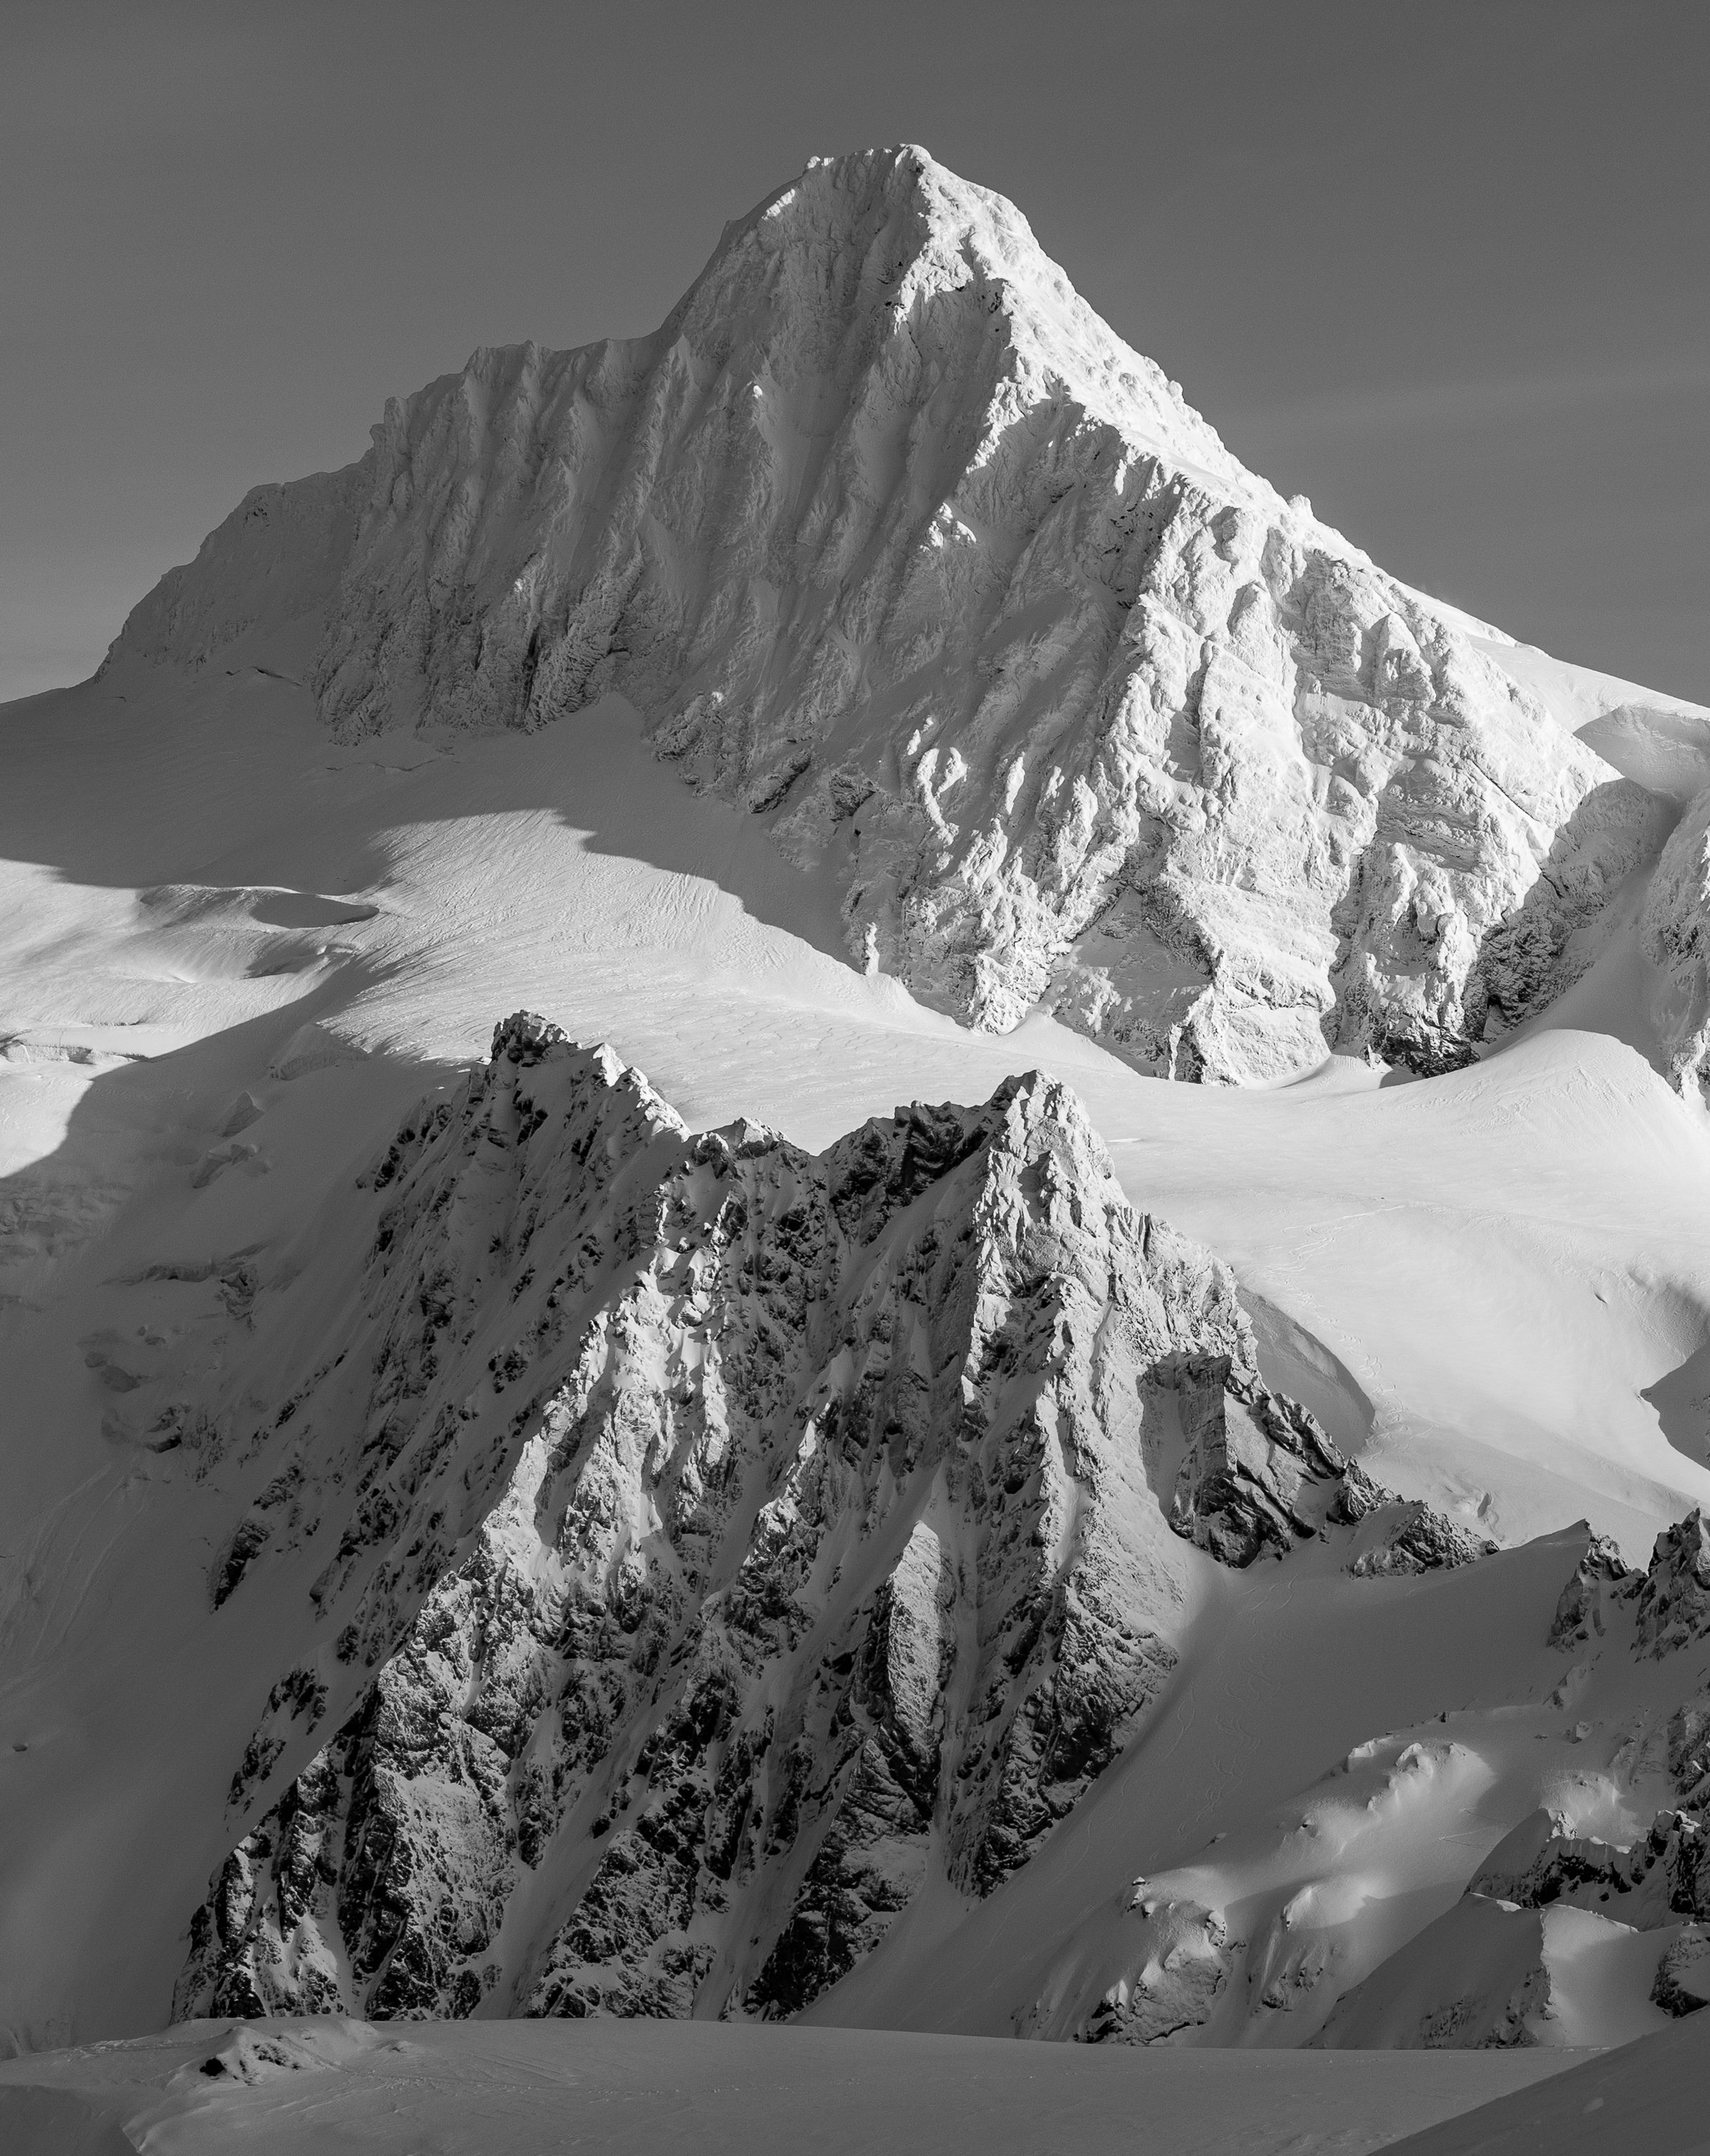
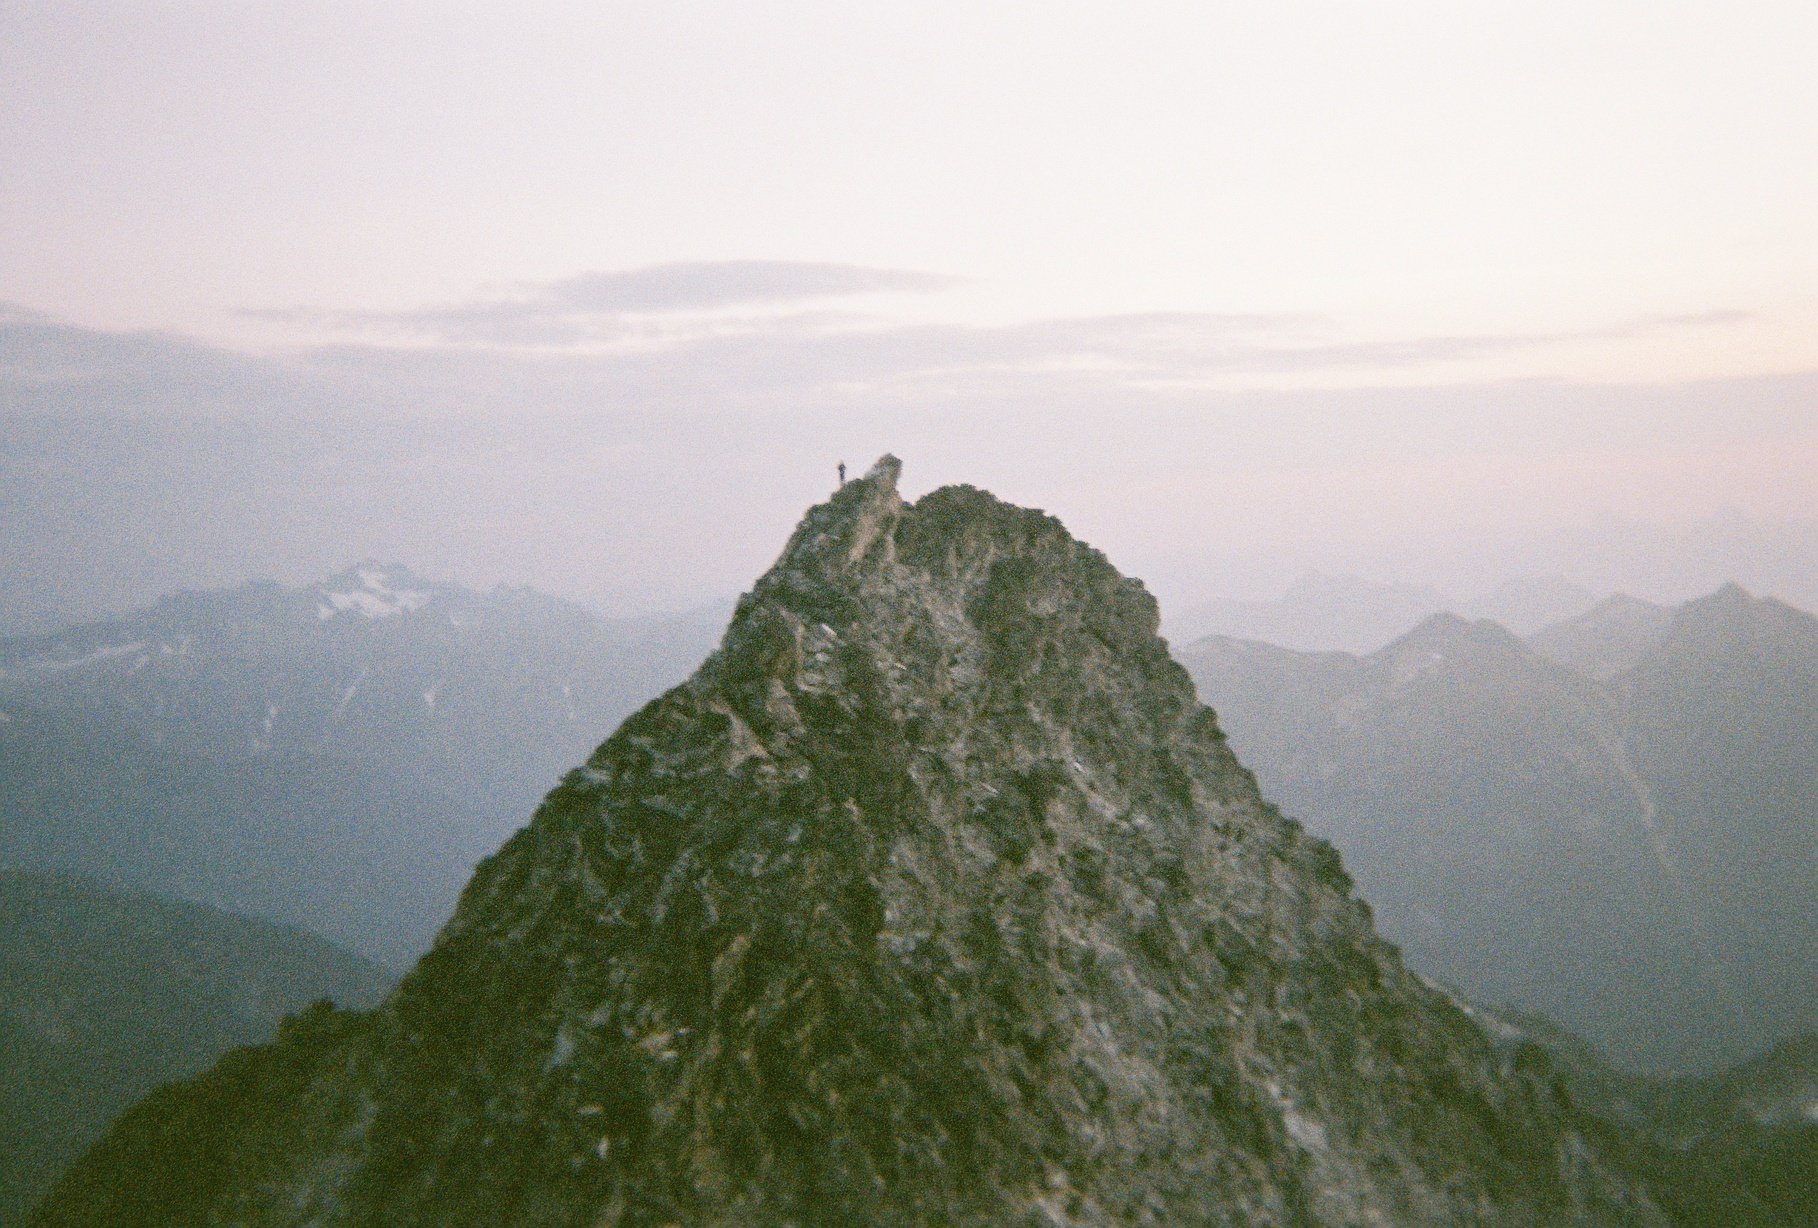
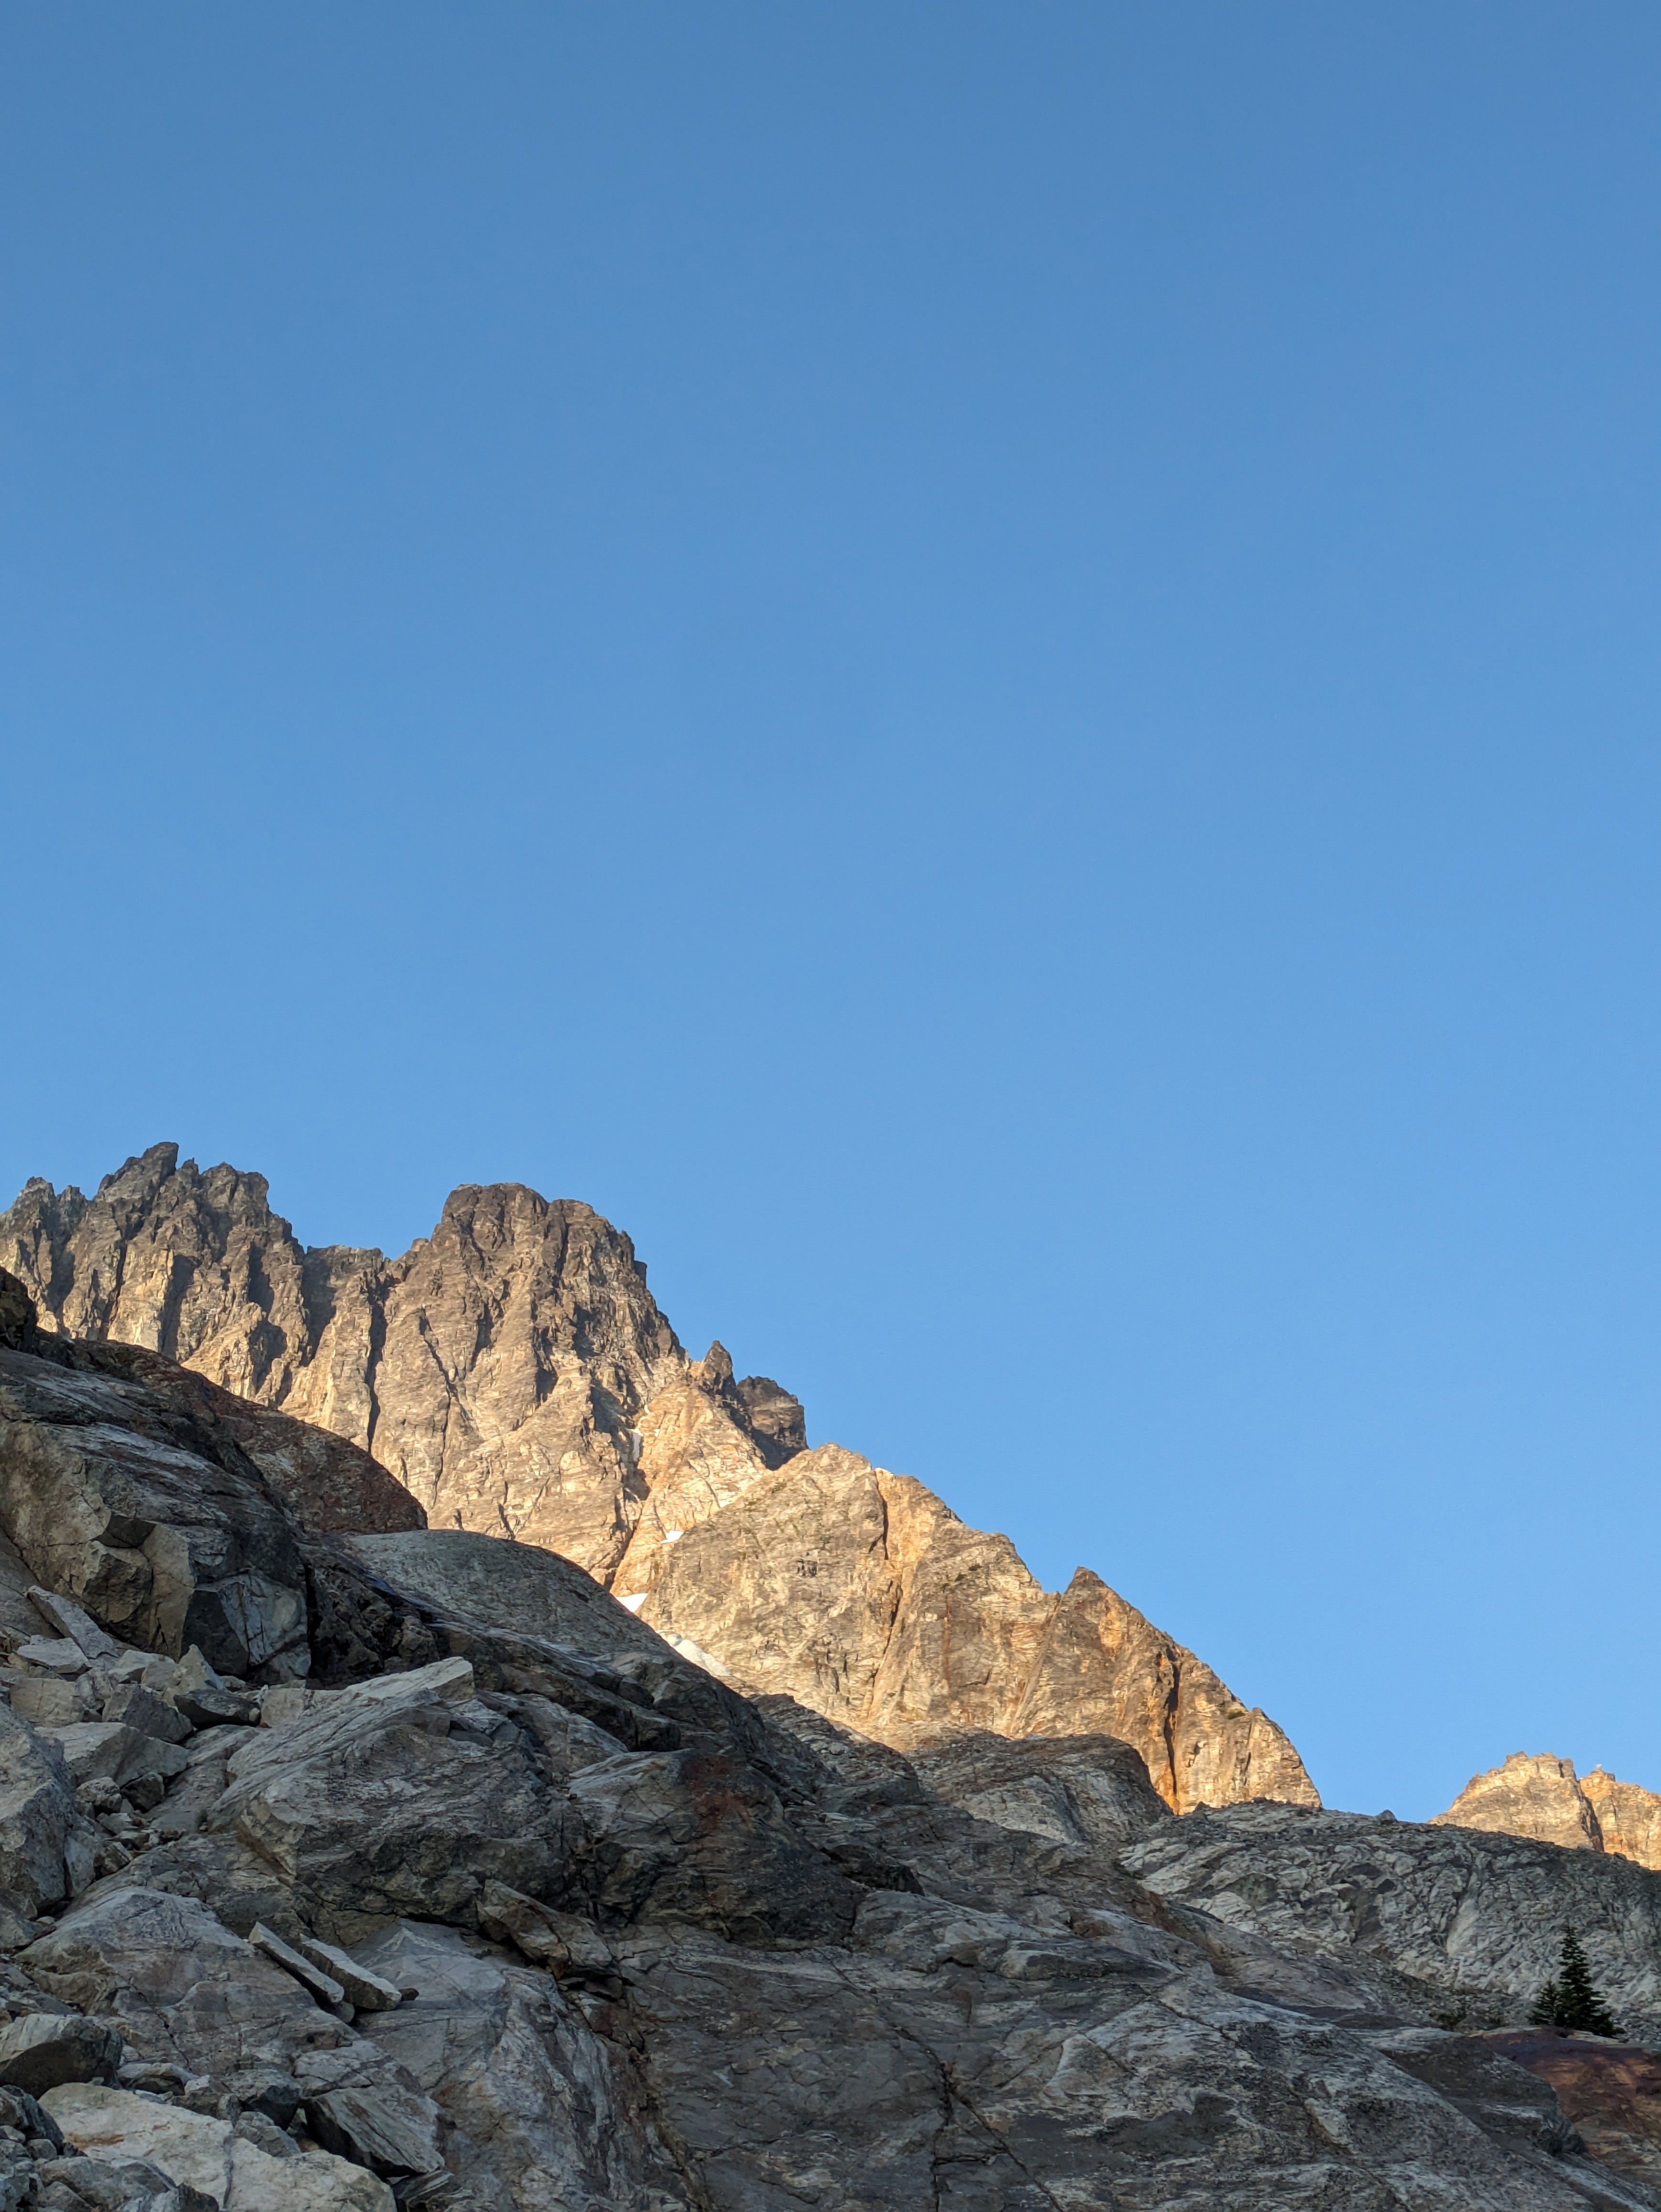
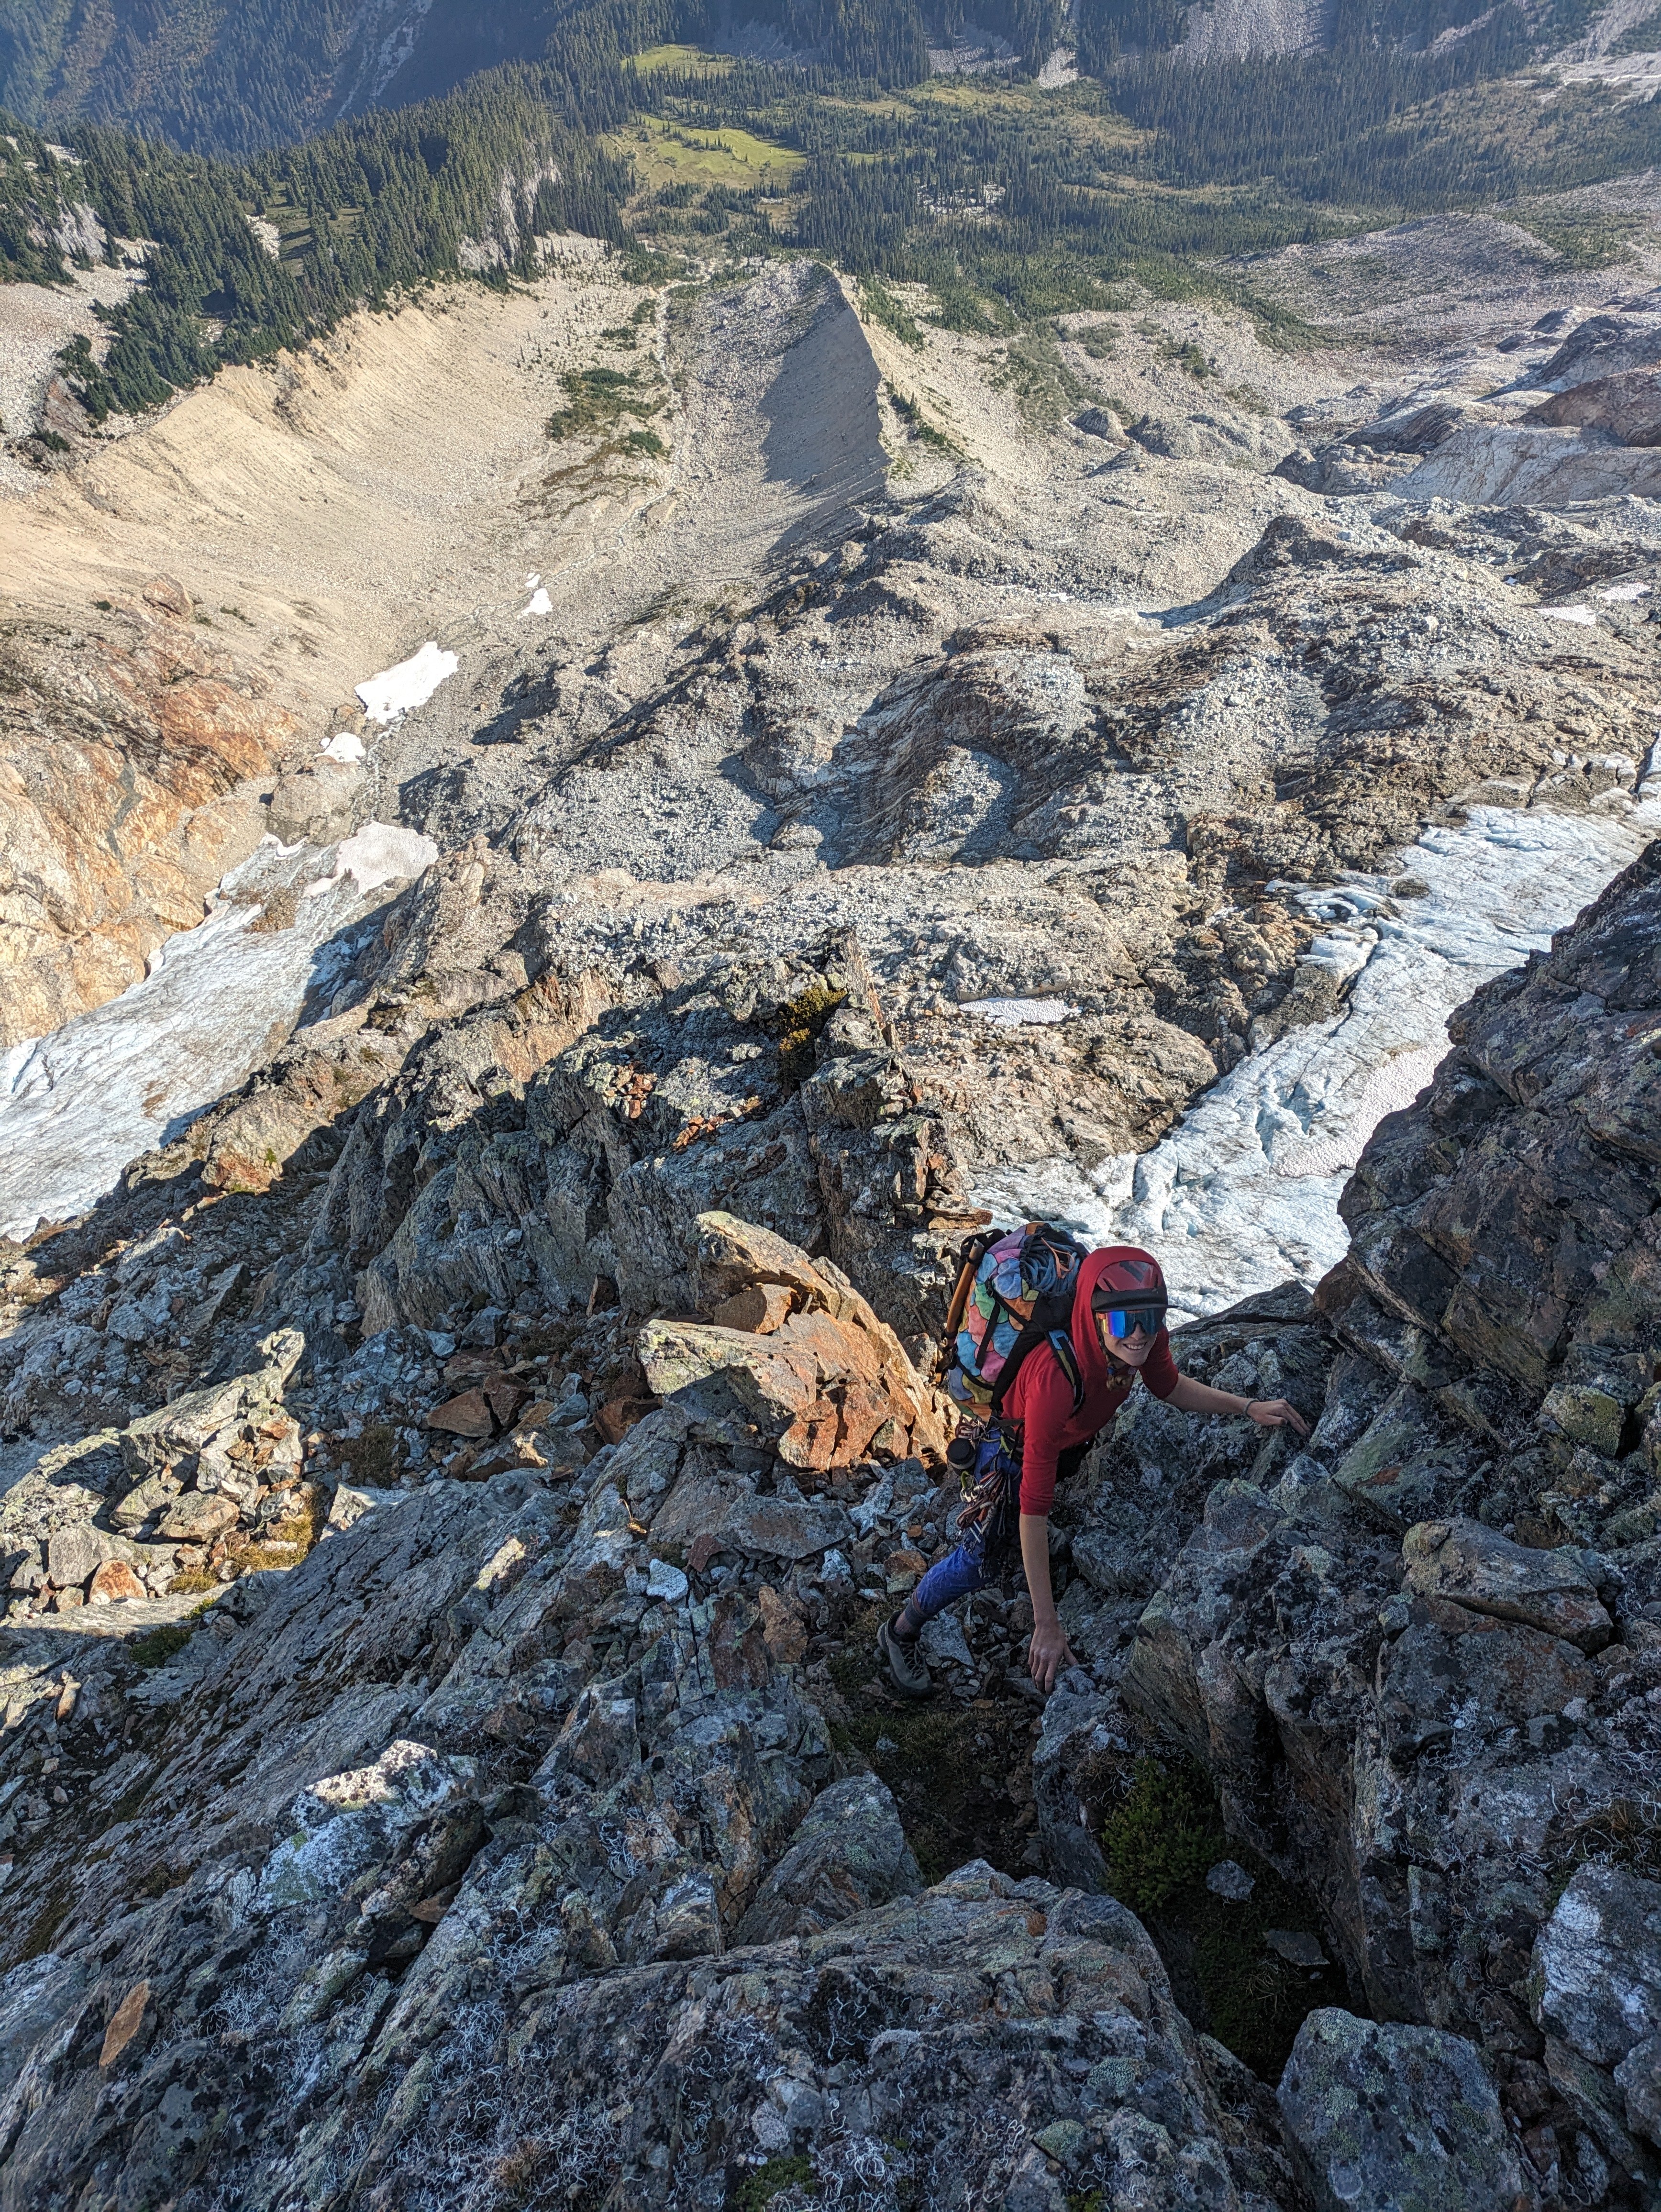
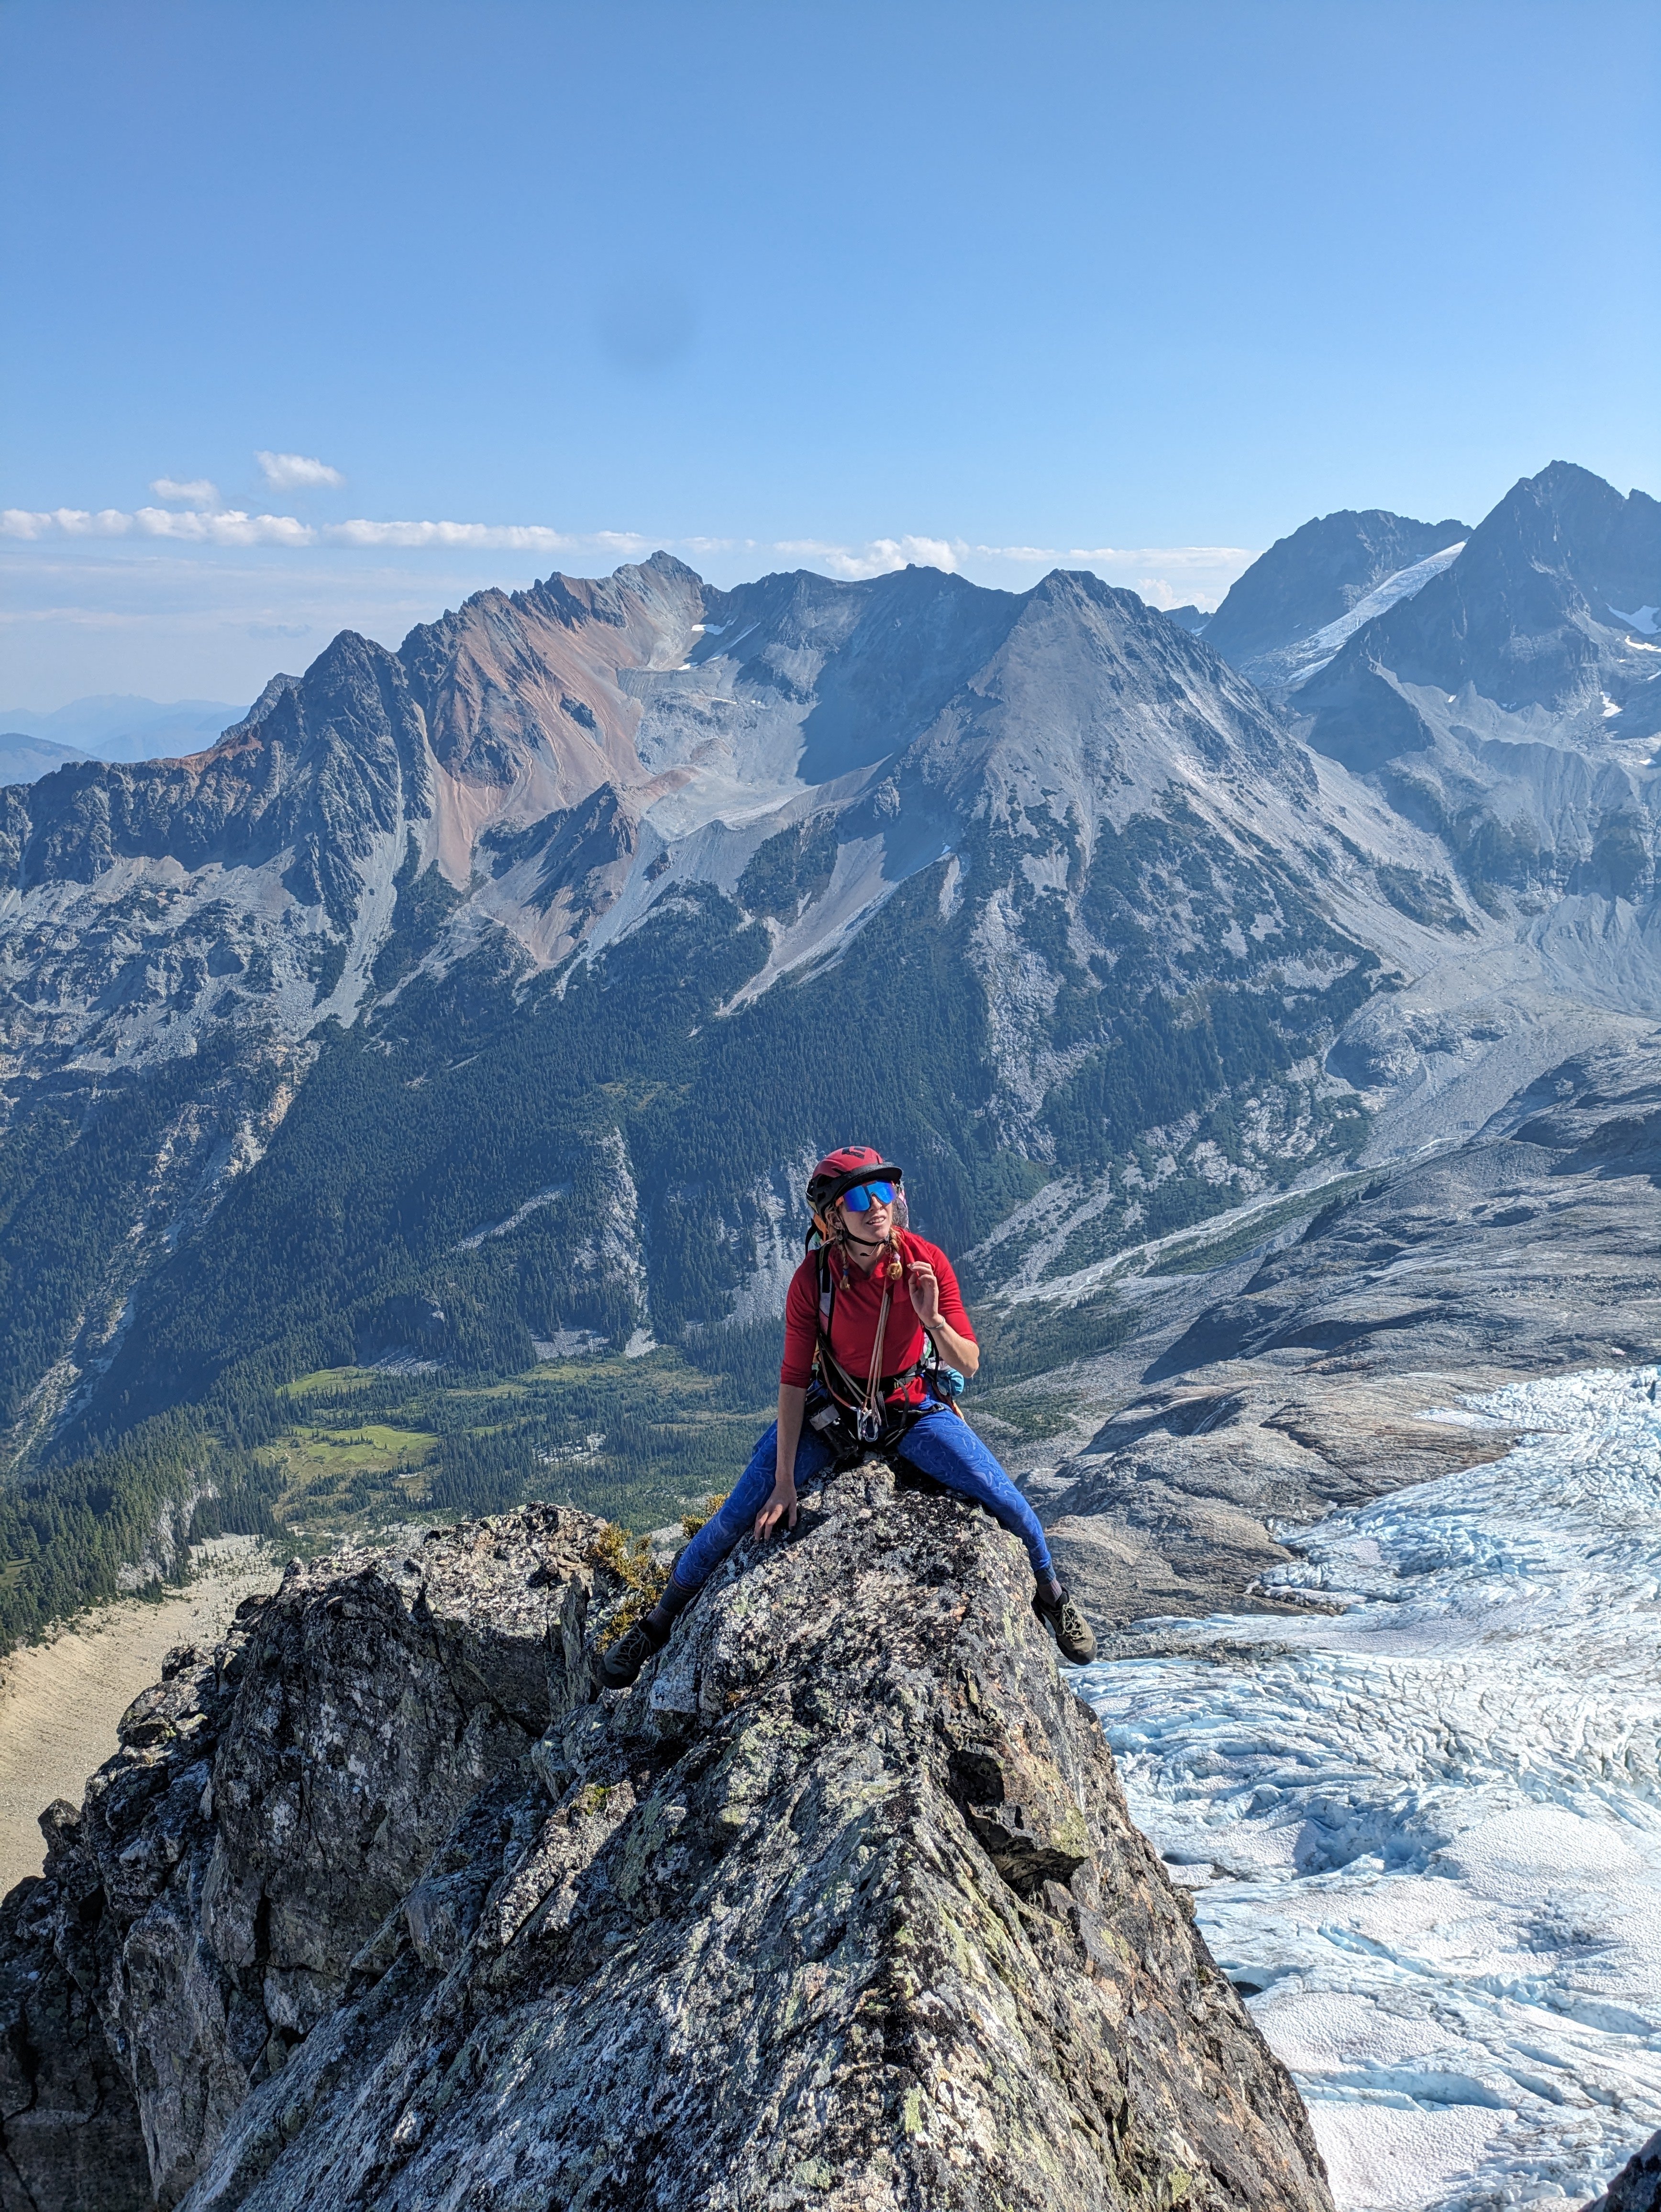
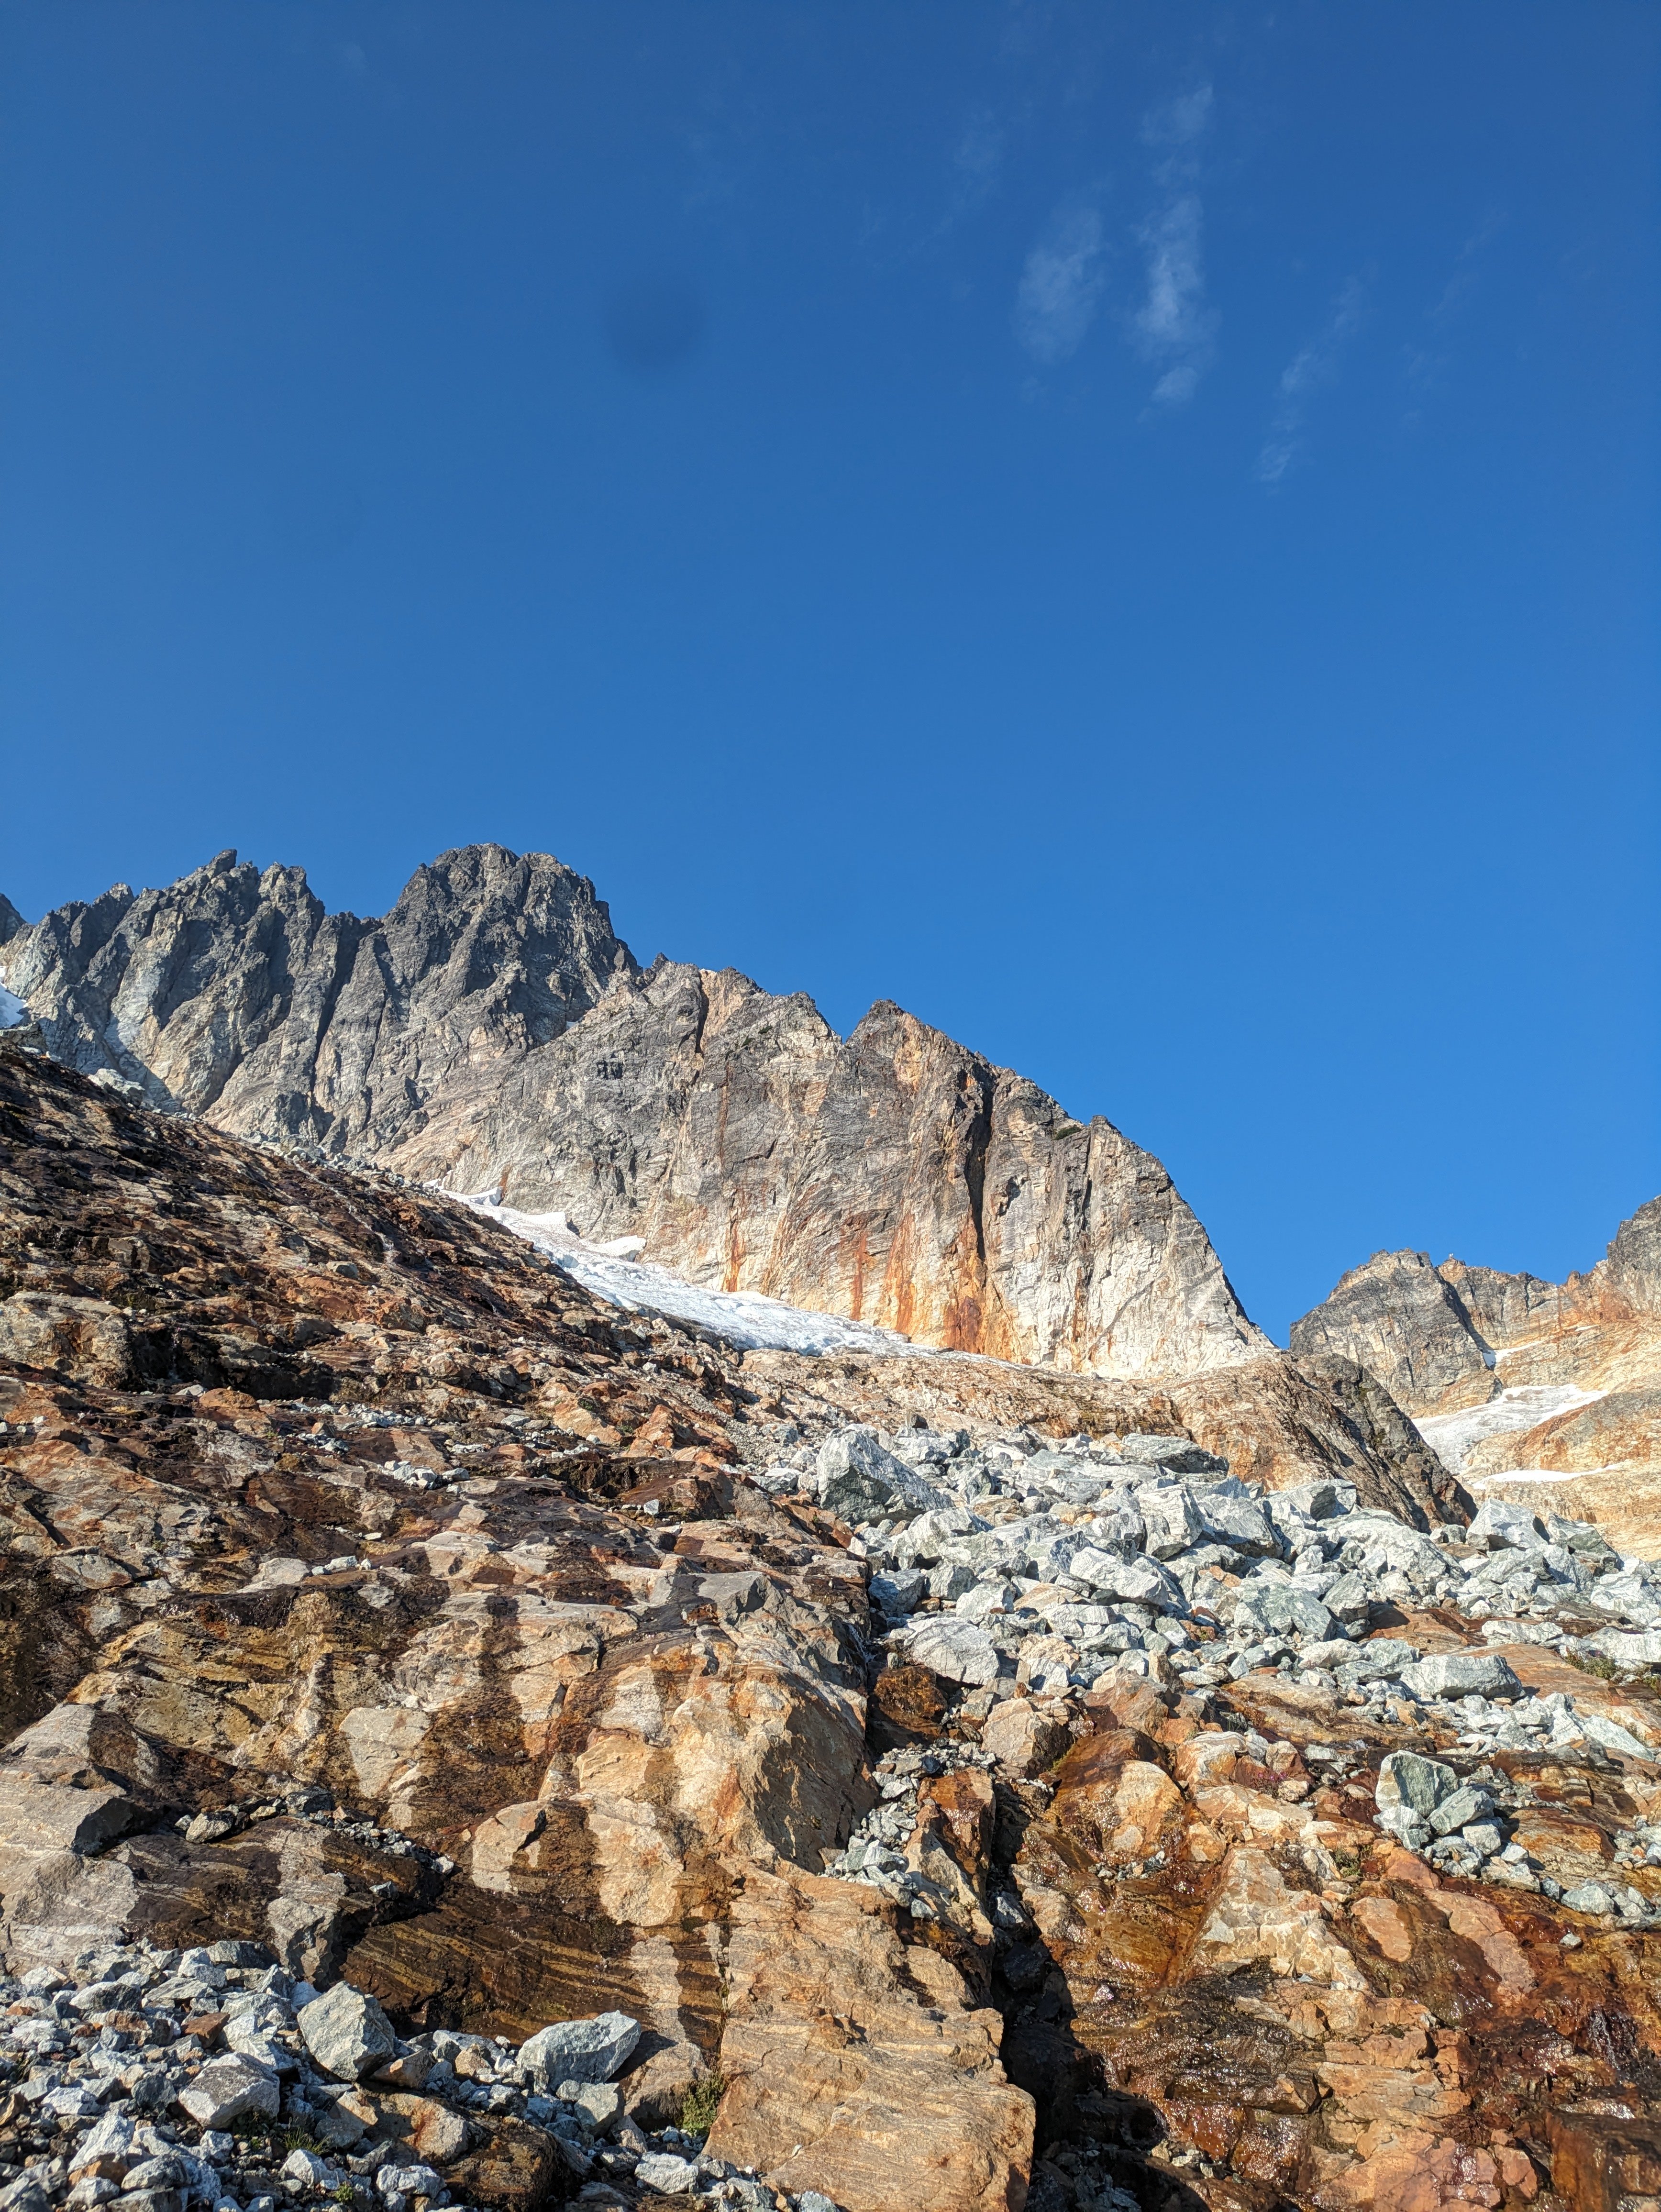
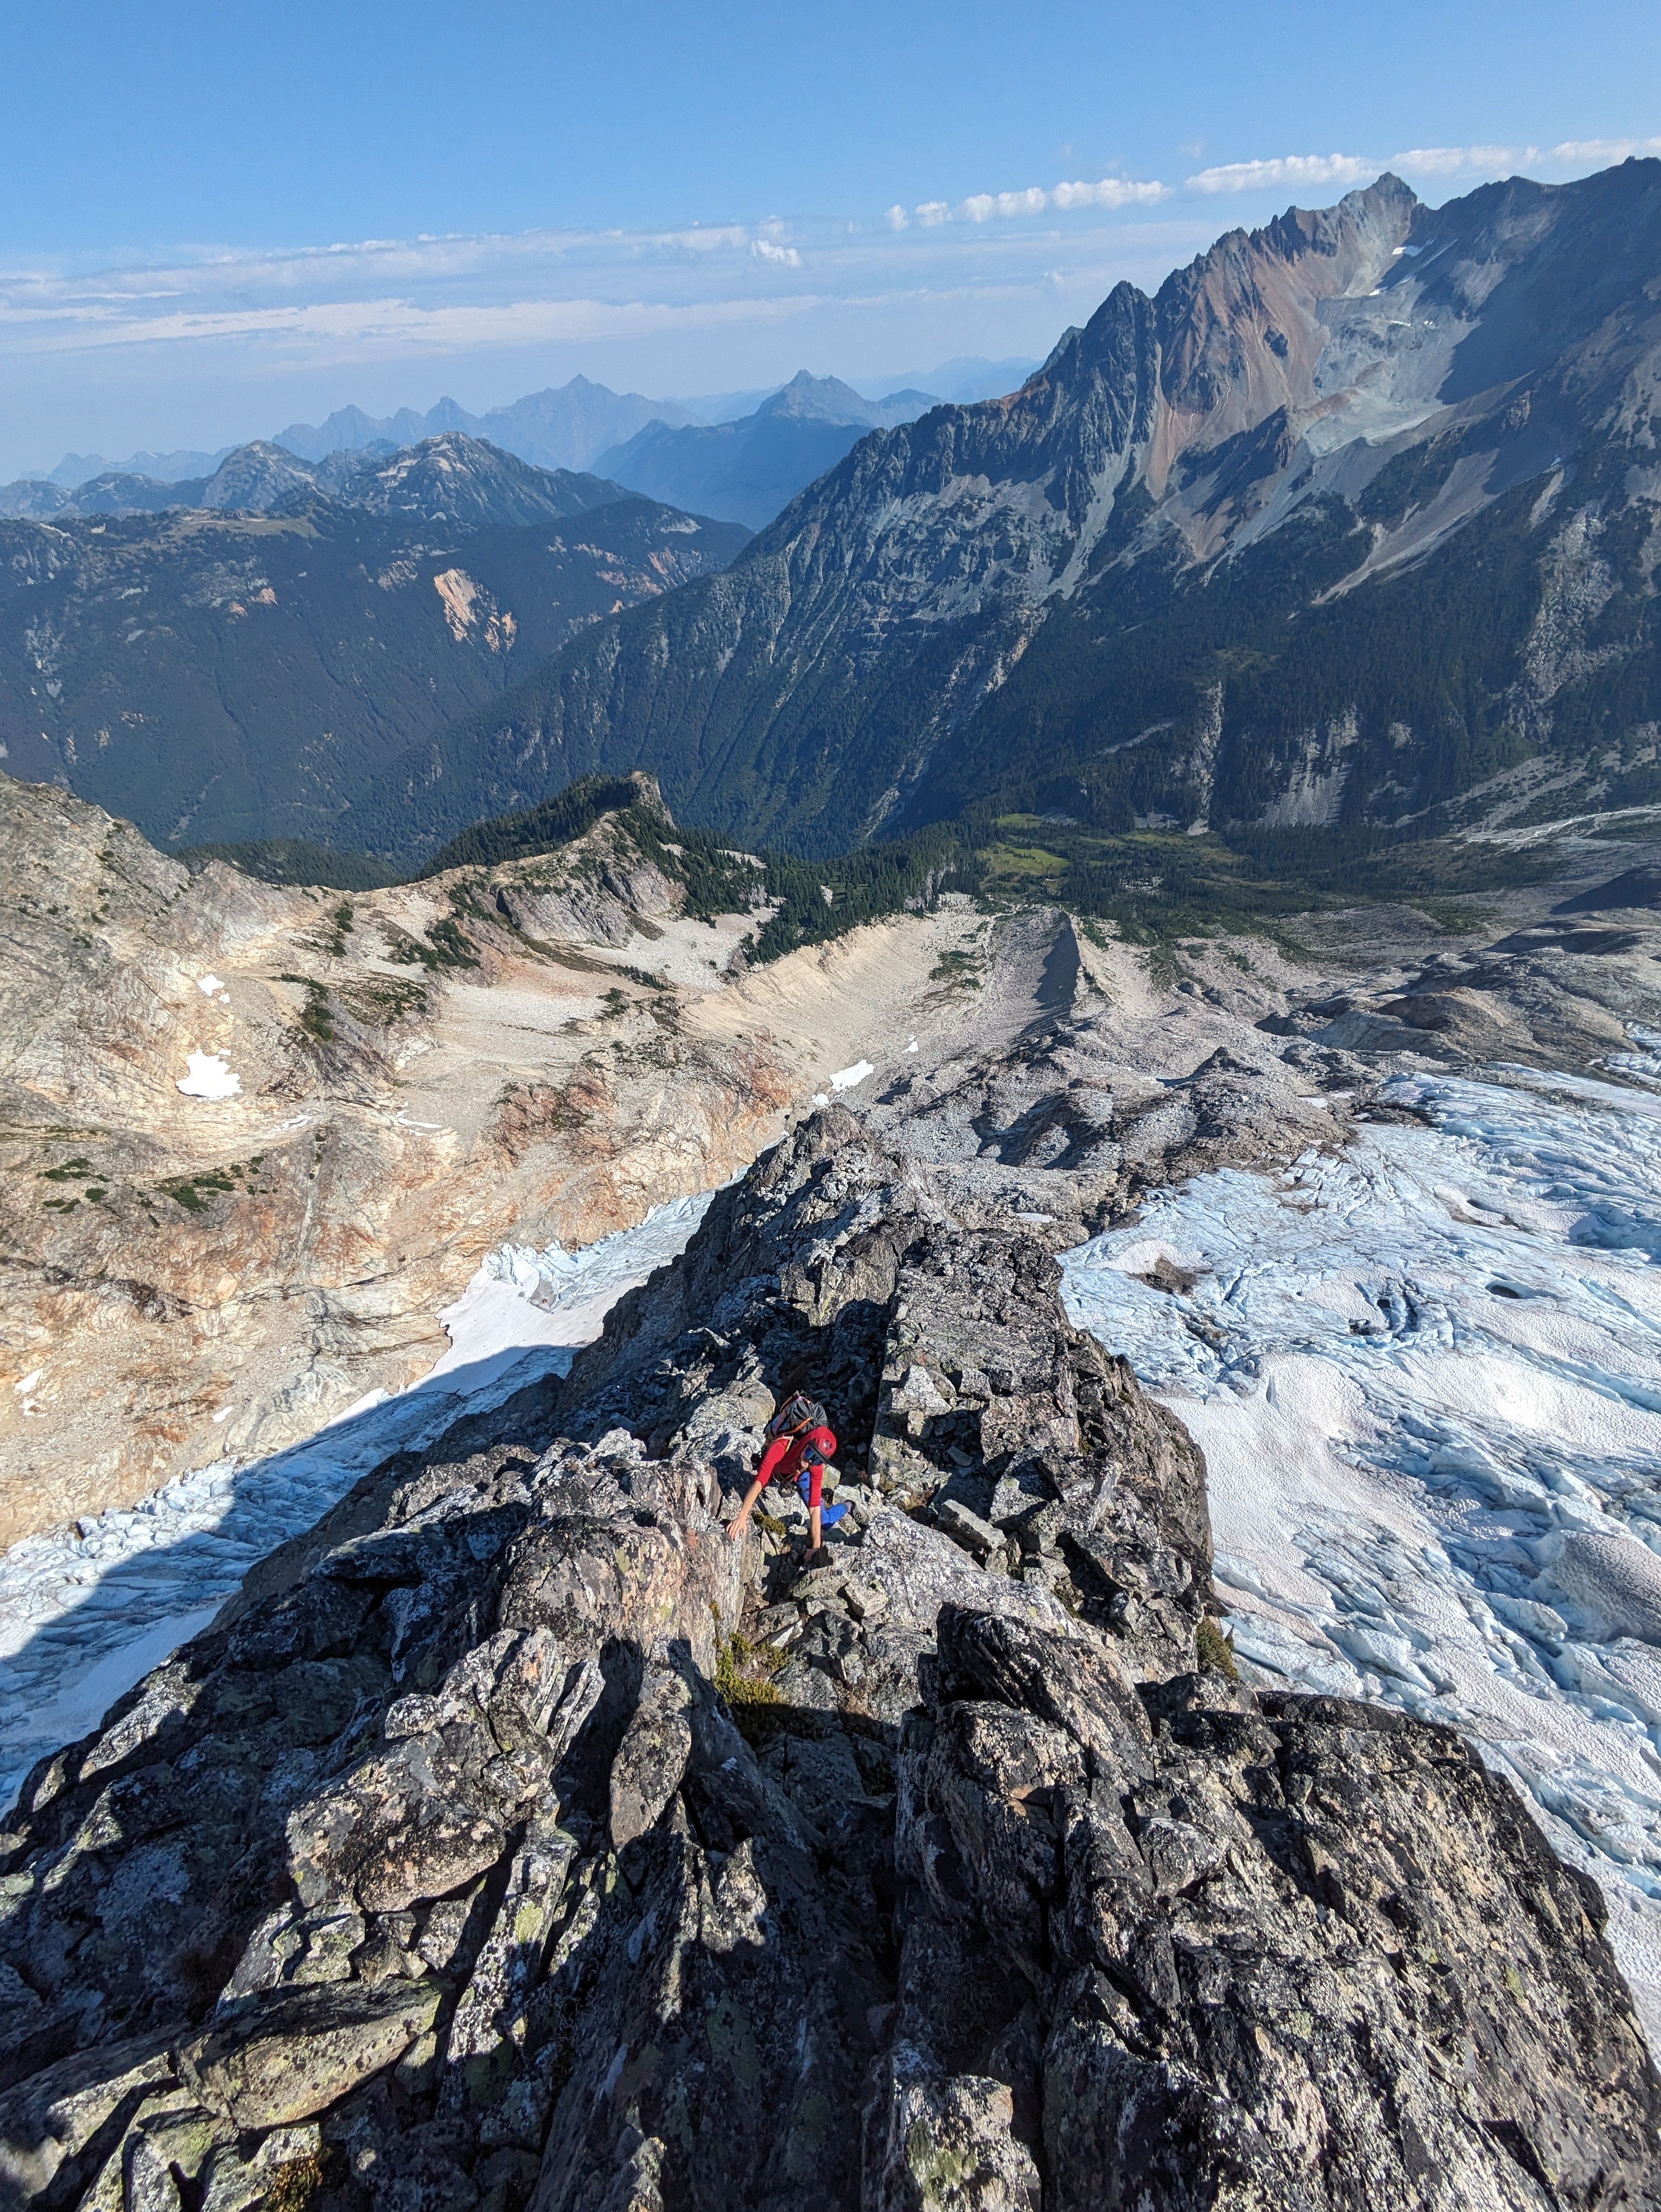
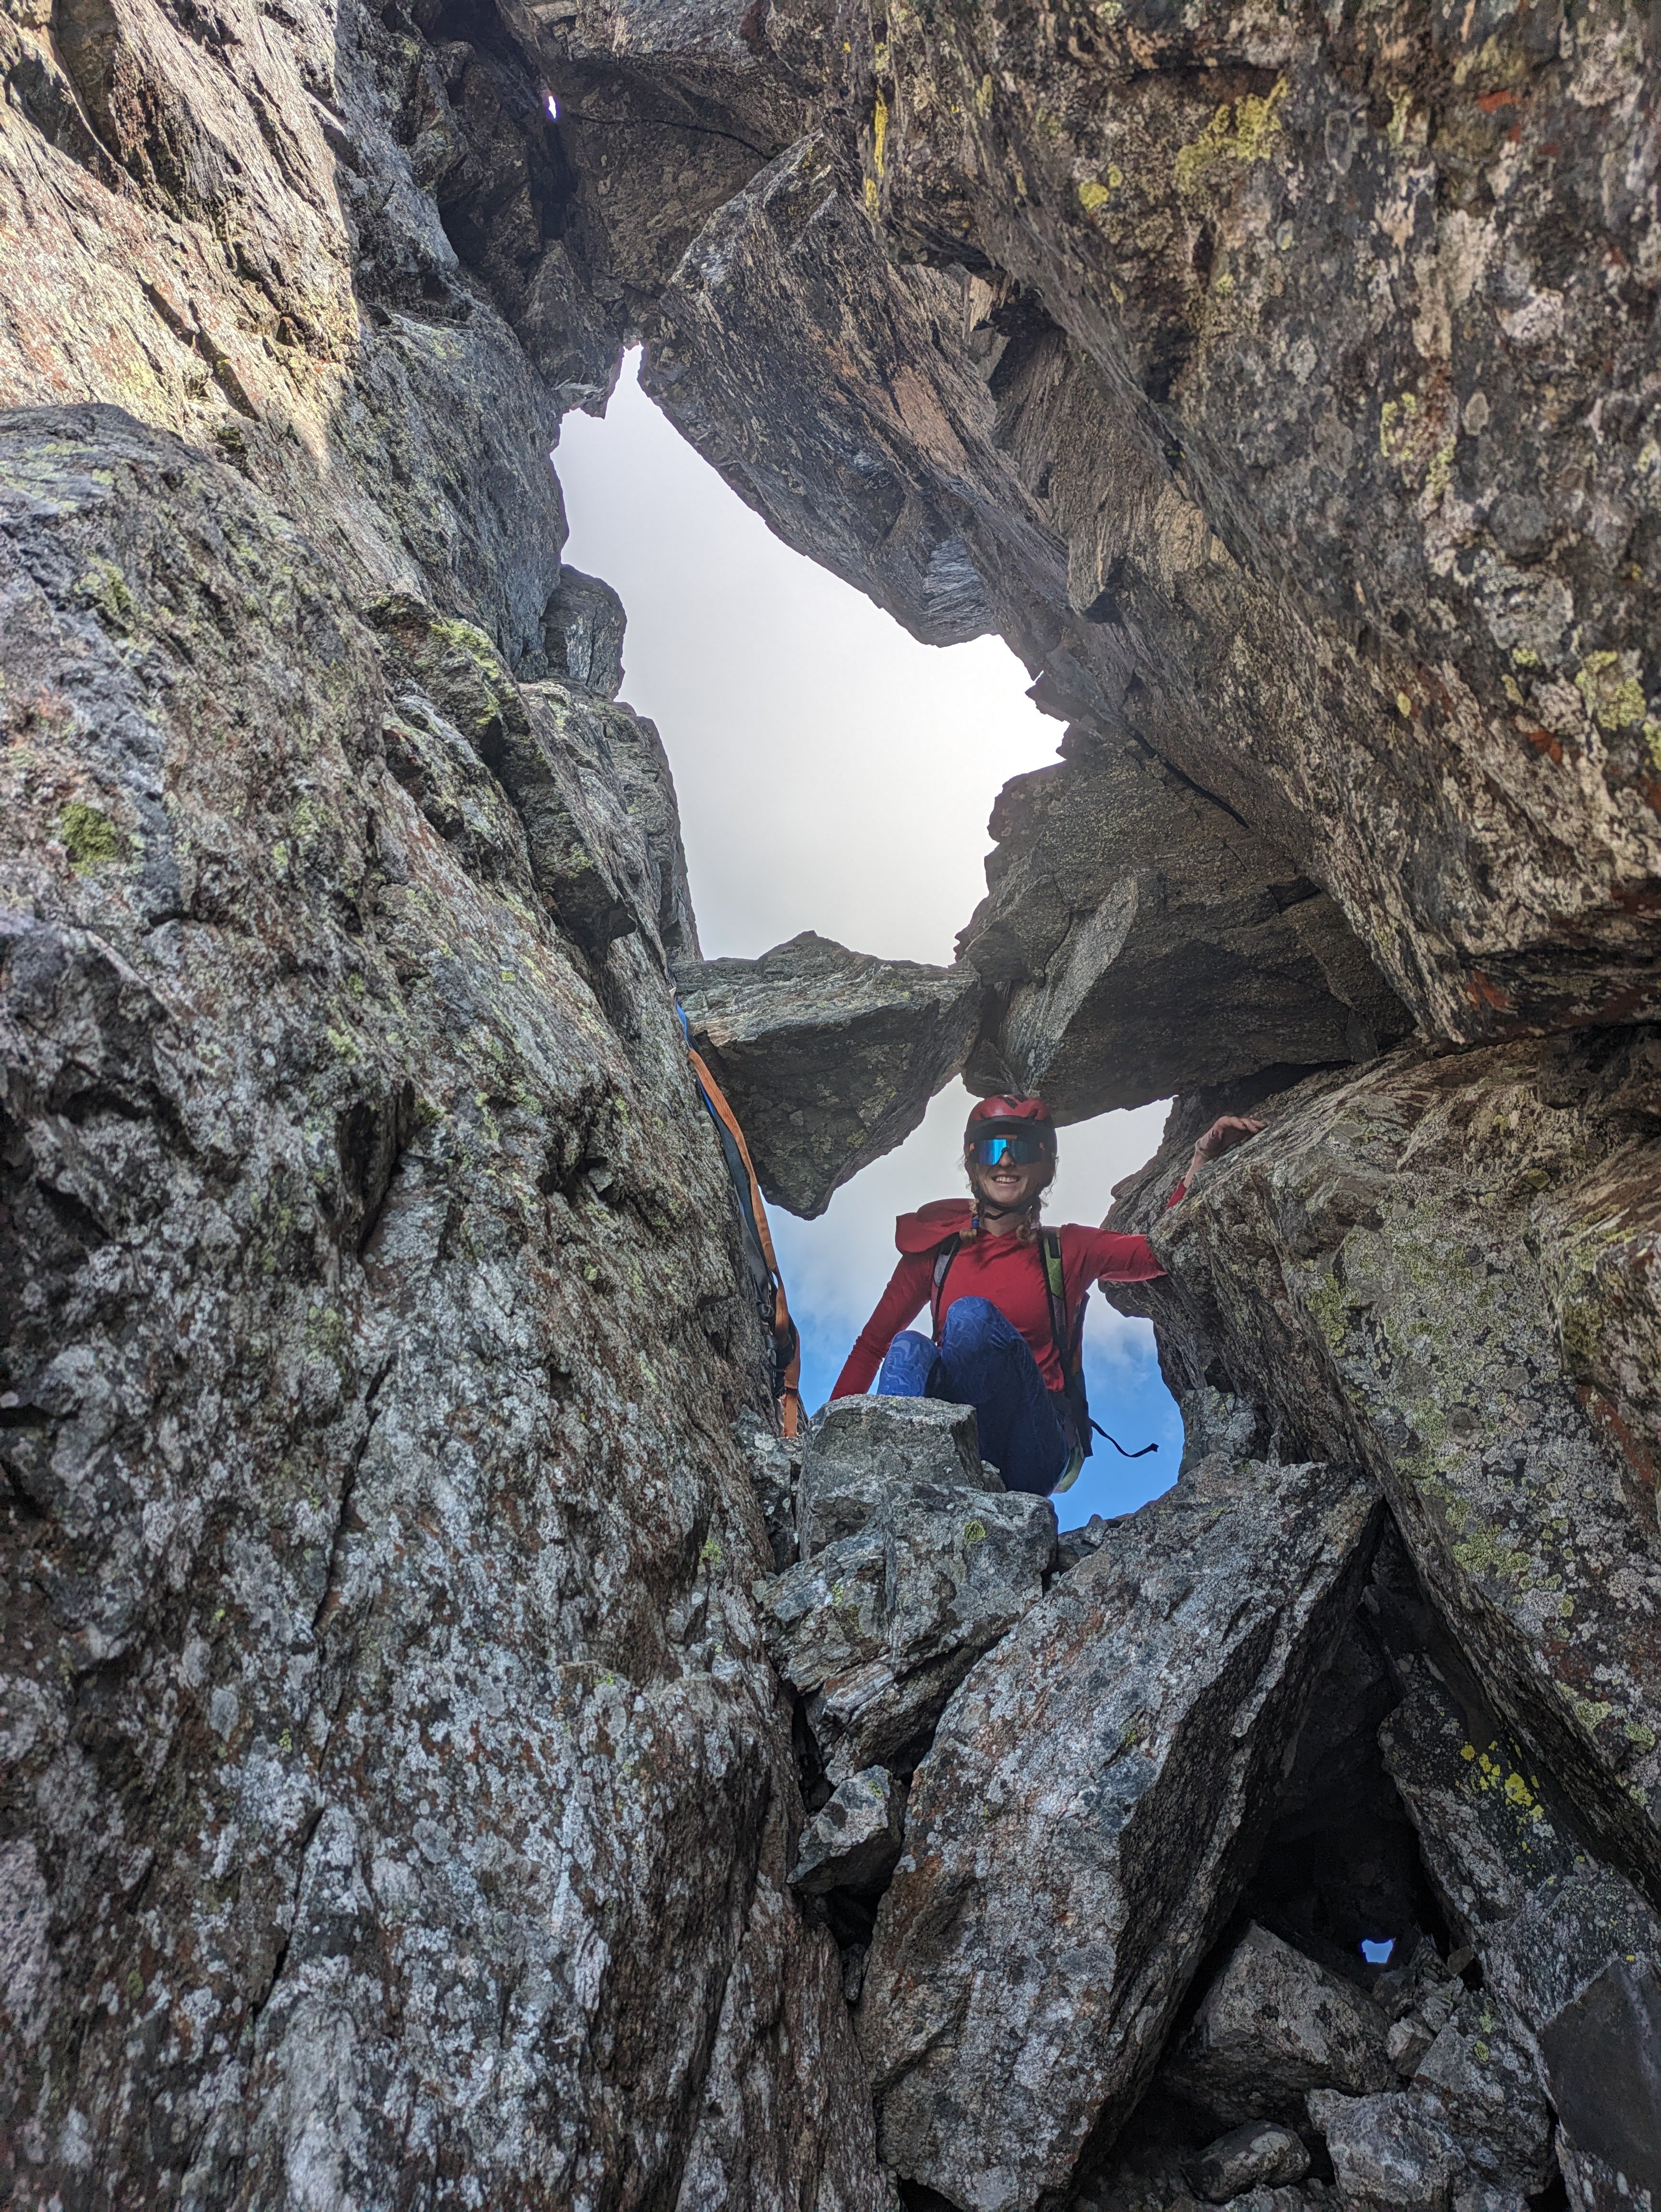
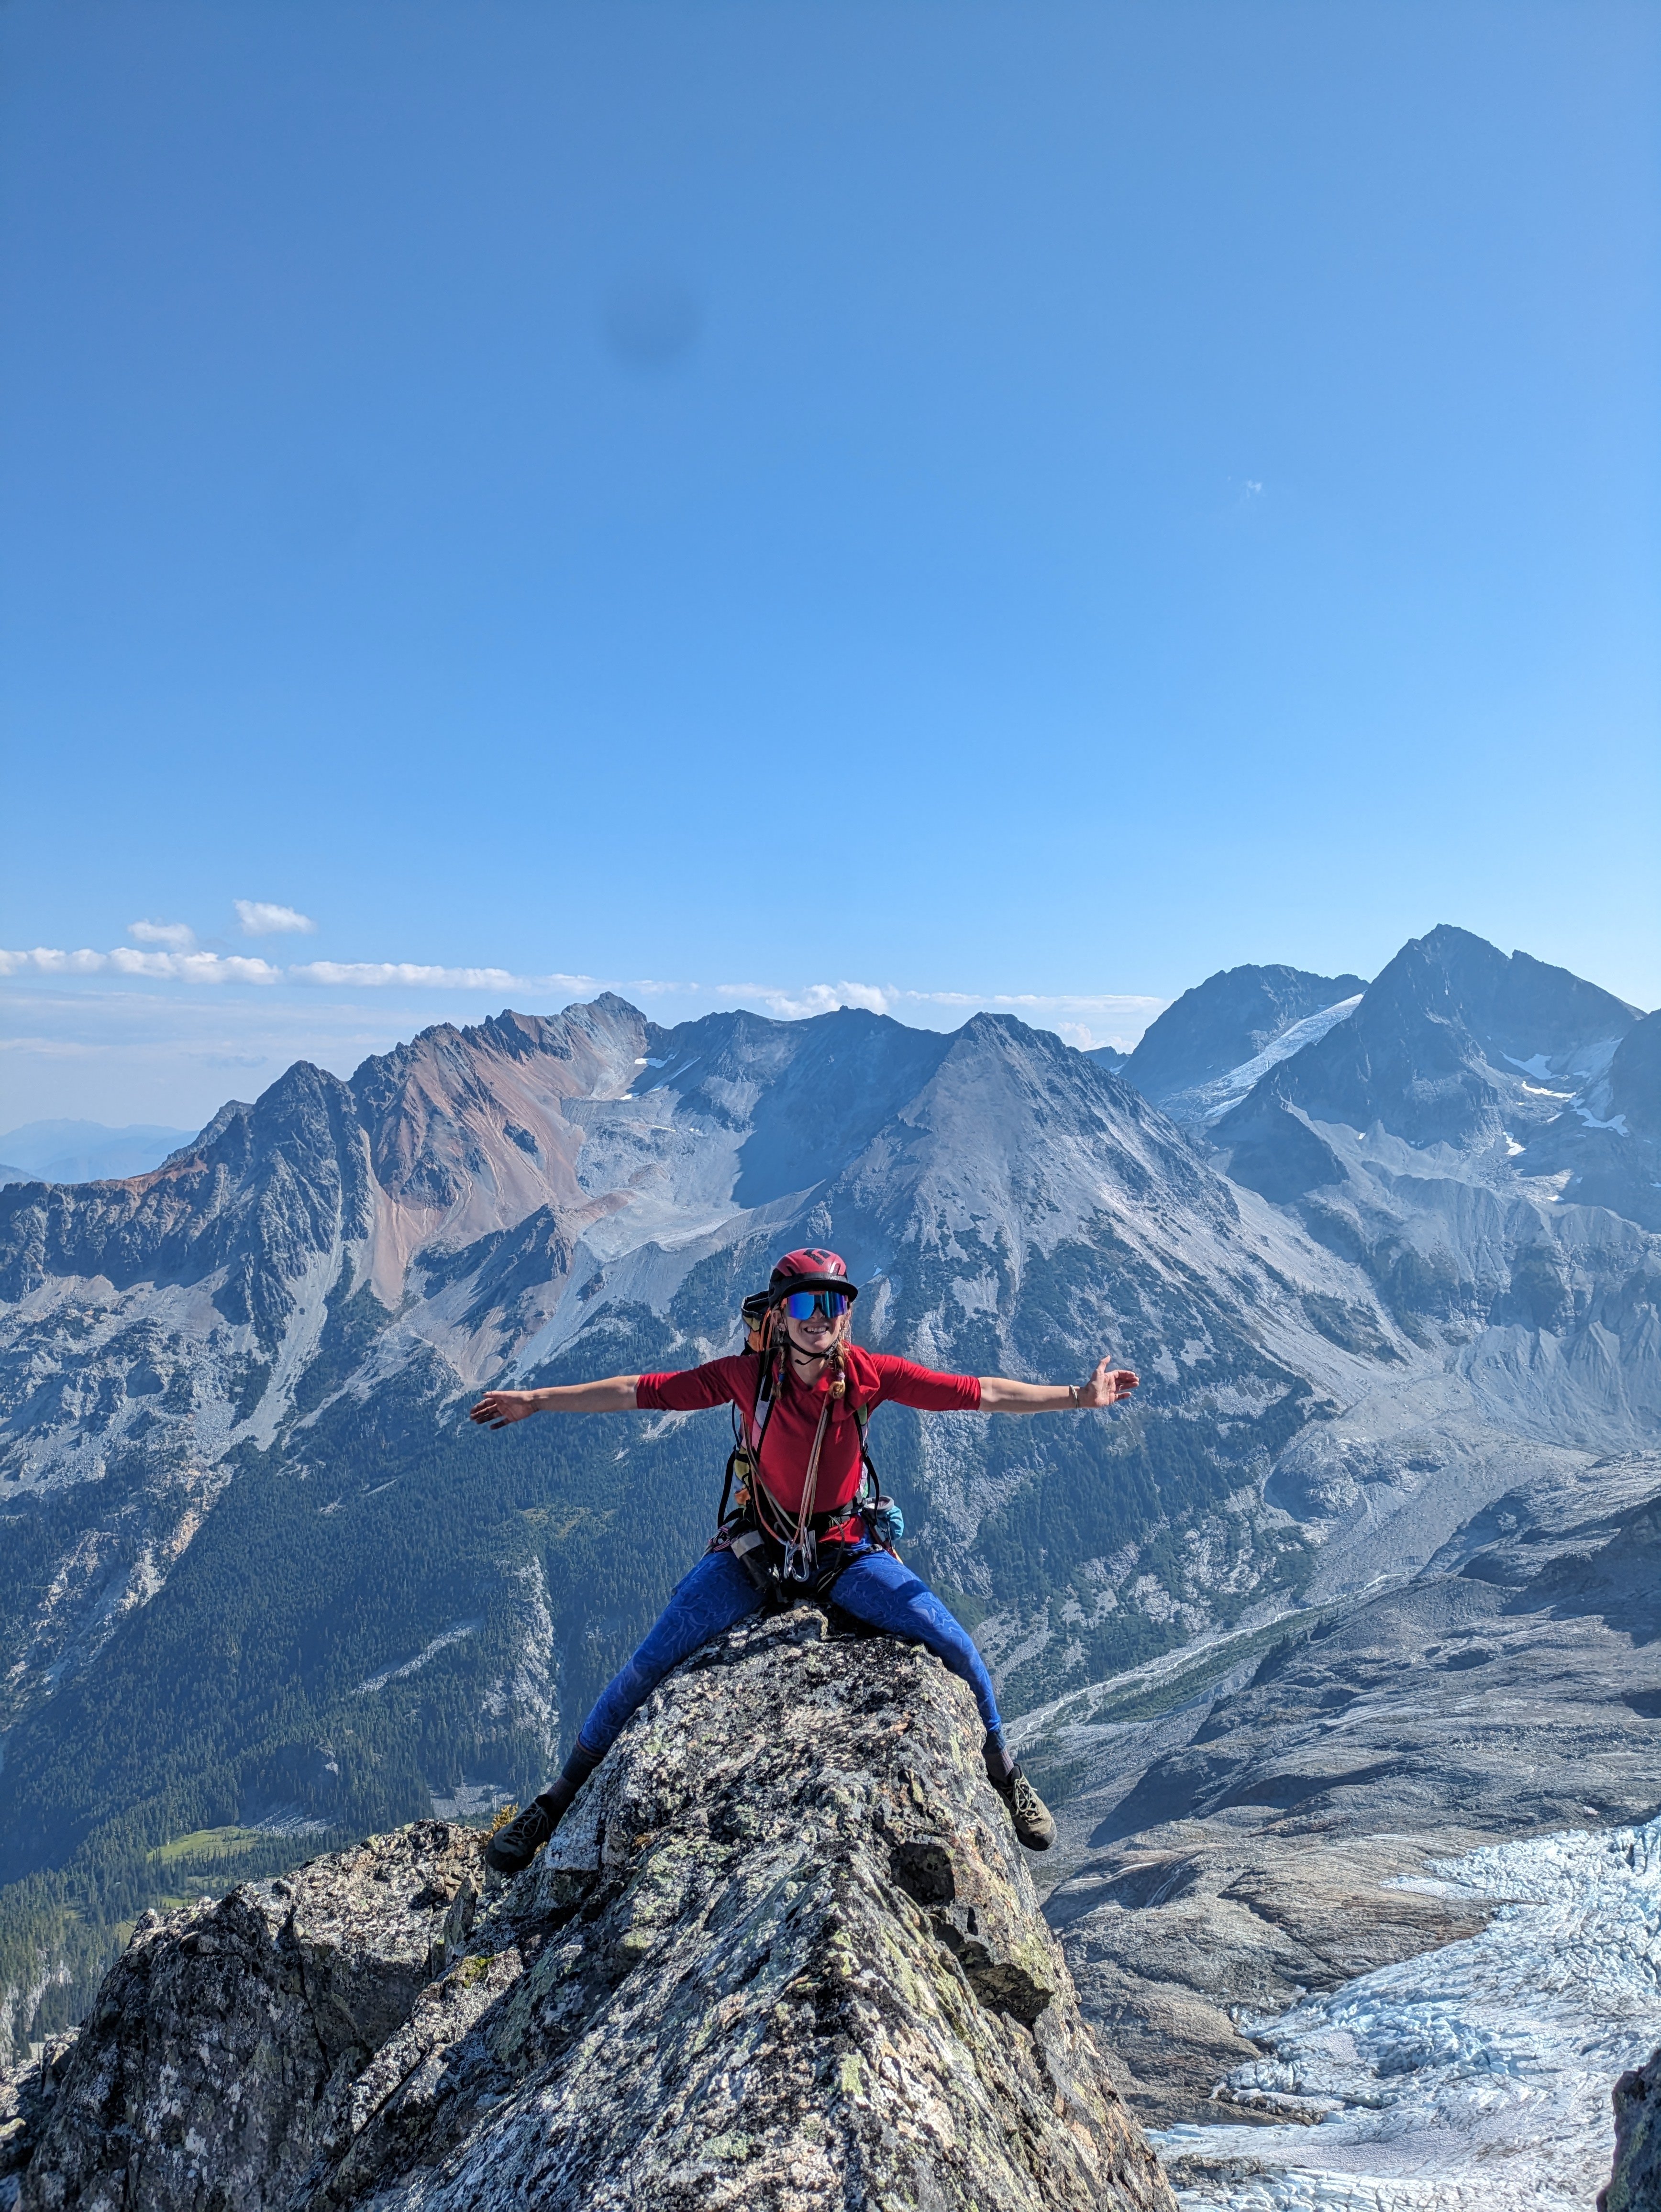
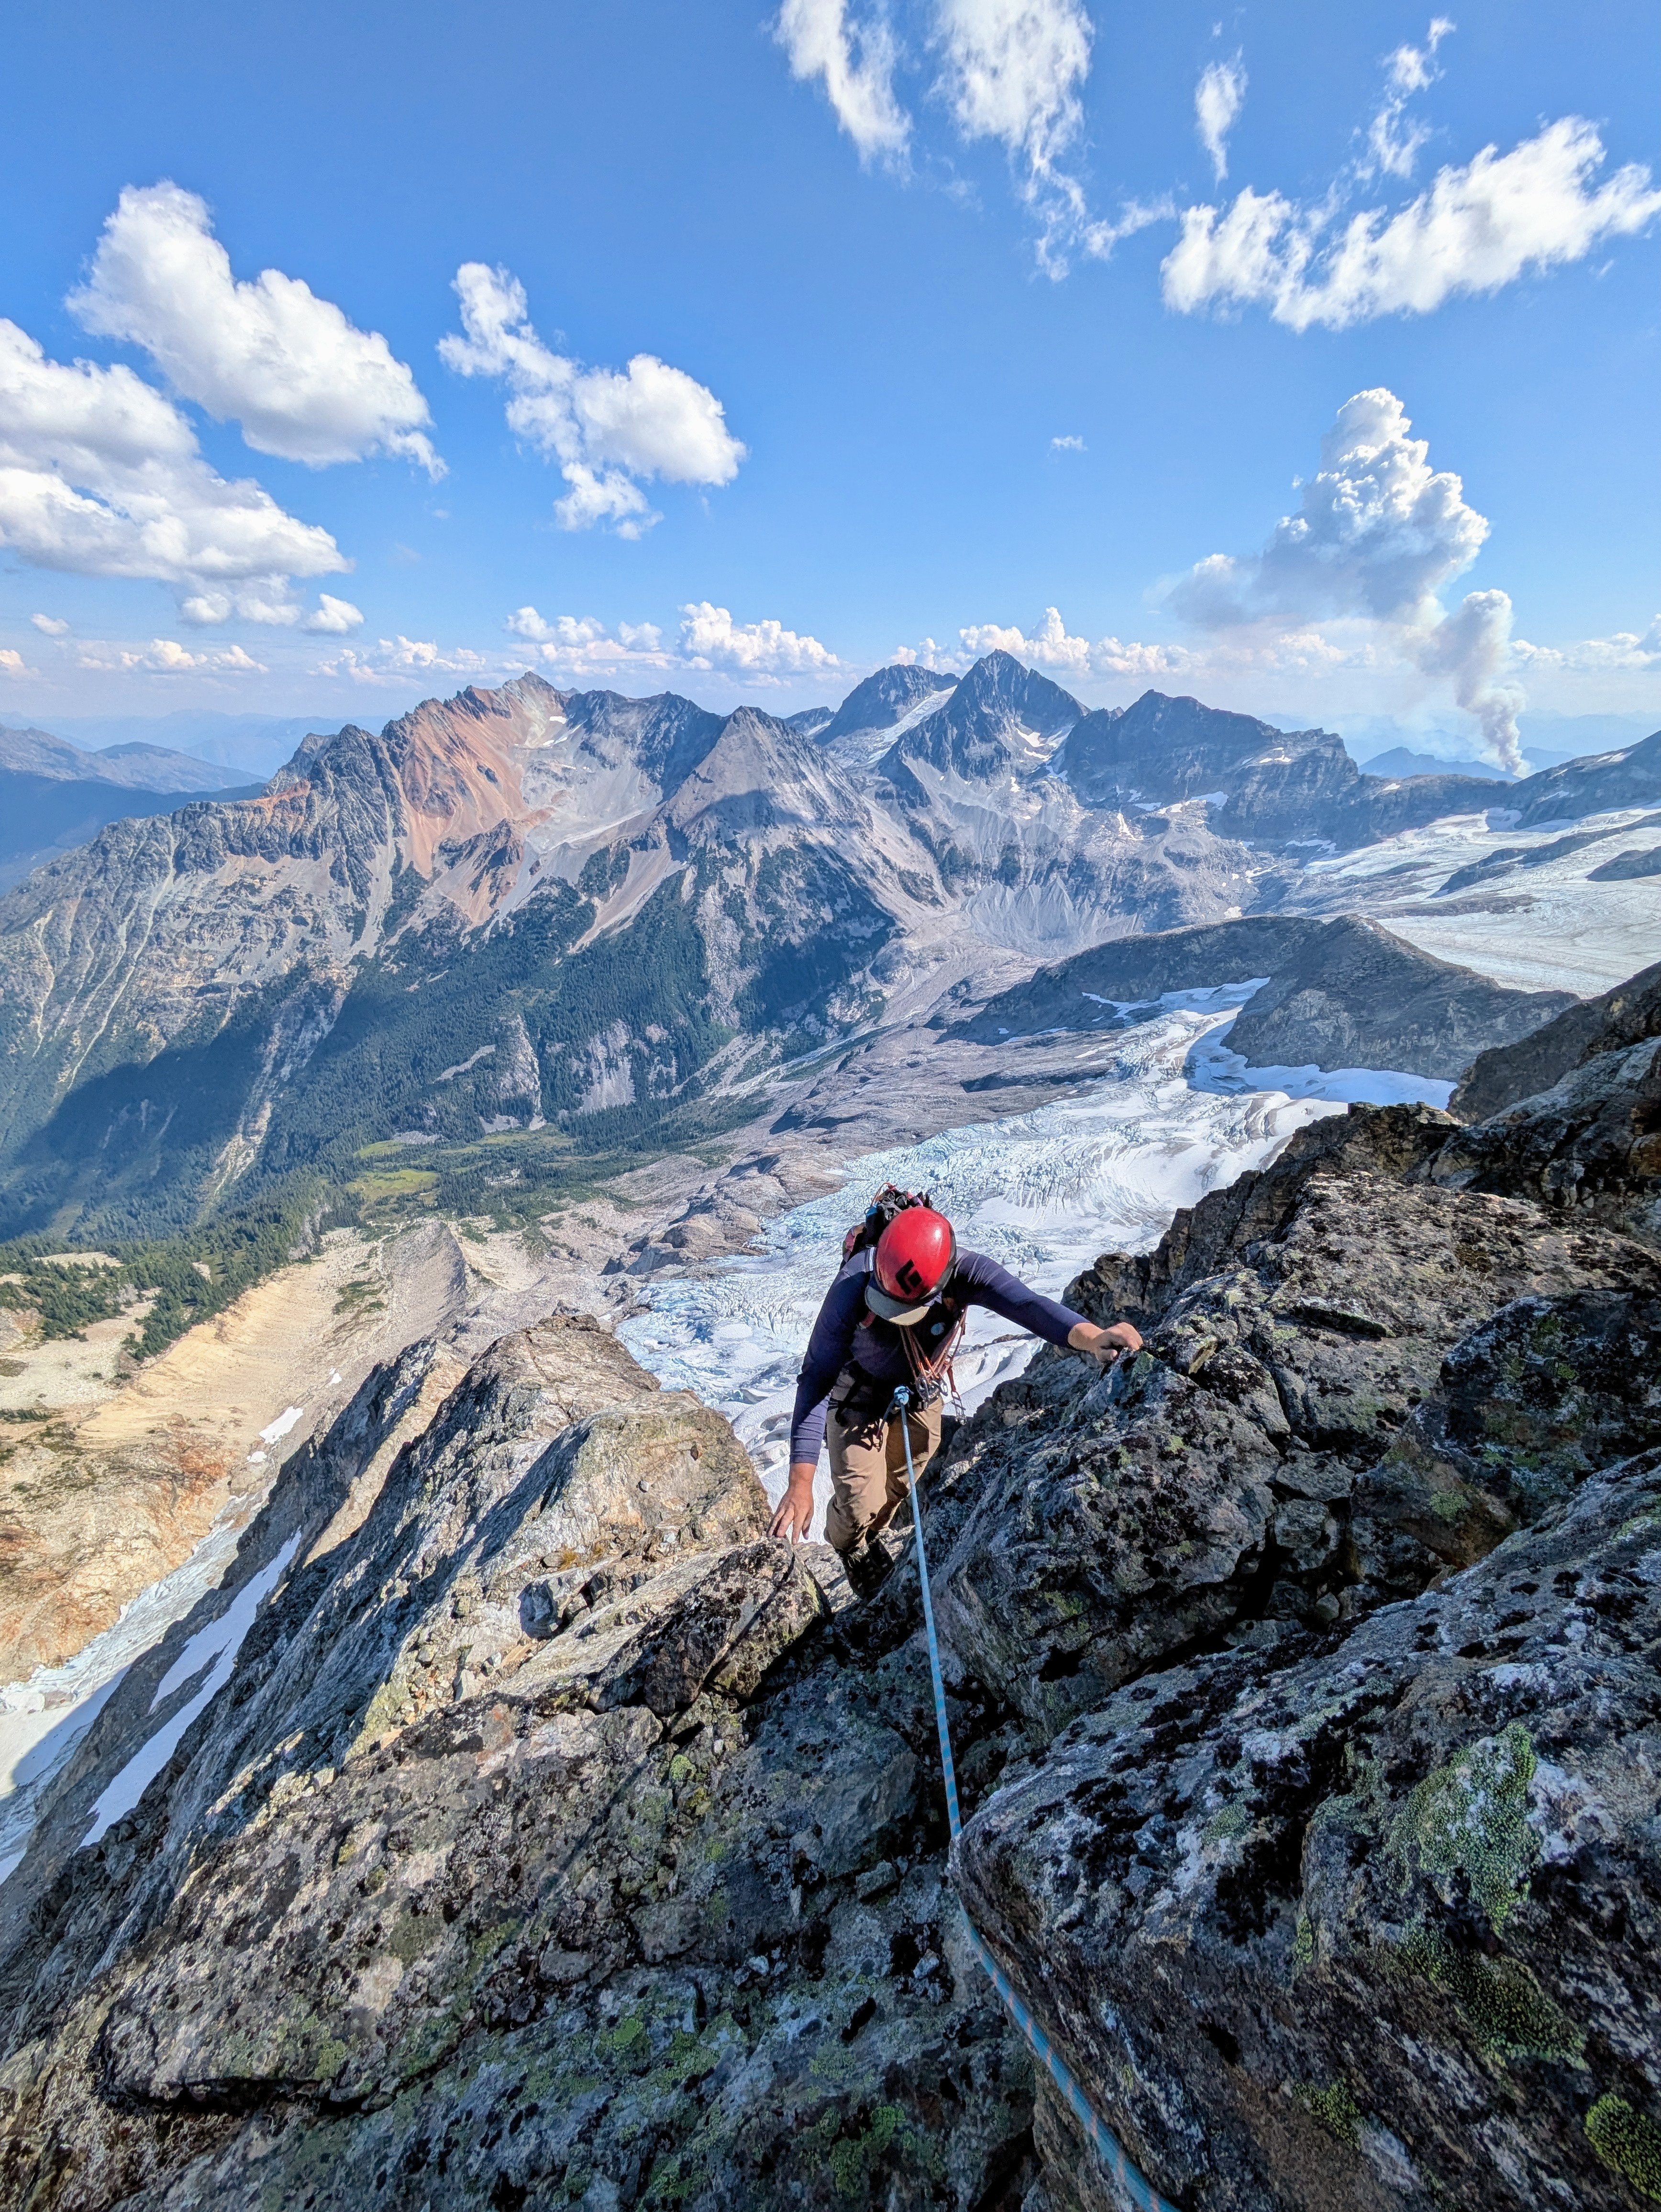
Trip: Mt. Stuart NE Face - "Always the Cowboy, Never the Cow" Trip Date: 01/24/2026 Trip Report: Mt. Stuart “Always the Cowboy, Never the Cow” January high pressure is almost always a given. Whether its three days or a week one can usually count on a high pressure system showing up sometime in January. This year it decided to consume a large portion of the month. Great for climbers! With freezing levels reaching well above 10,000ft for multiple days. Washington winter was looking canceled. After a week of warm weather, the cold finally returned. With clear skies and cold temperatures in the forecast climbing conditions were lining up. On Tuesday I got a text from Michael asking if I was free last weekend to go check out Mt. Stuart. He pitched a winter ascent of the DNR which I quickly counter offered with the idea of a line to the left of Girth Pillar we both had looked at before. Steph Abegg had posted a summit photo from Colchuck on Instagram and way in the back it showed the NE face of Stuart. One could see the face was covered in ice and that there was a sliver of white just to the left of the Girth Pillar. Not certain of conditions but excited for the potential we decided to go take a look. After a spree of texts we came up with a plan and started reaching out to friends for beta and gear. Michael was able to acquire a sled from Sam Duke (shout out Sam!) so we could zip our way up the closed forrest service road to the trailhead. The stars were aligning for a rare Washington winter climbing window. We met in Leavenworth Friday morning caffeinated and hungry. We quickly sorted gear and headed to the trailhead. Michael powered up the sled which gave a loud burp and rumbled to life. We gingerly made our way up to the trailhead as neither of us had ridden on a snowmachine, eek! But we kept it on the road. We left the Stuart Lake trailhead around 10am and were happy to find a nicely packed trail all the way to the mountaineer’s creek turn off. The warm weather had consolidated much of the snow making for mellow boot travel once we stepped off the main trail. It took us about four hours to make our way to a bivy spot near the end of the sherpa glacier drainage. We set up camp underneath a boulder settling in making jokes and discussing a wide range of subjects to occupy our time before tucking into the tent. Oh he's a wanderer! Just a wanderer! NE face looking fat! At 4am our alarm clock rang and we slowly rolled out of bed. After a slow start of brewing up and eating breakfast we packed our bags leaving camp around 5:30. We made our way up to the ice cliff glacier finding passage along the right side of the ice cliff via ice and snow covered slabs. After getting onto the glacier we could see how much ice was covering the NE face… it was historic conditions! After roping up to cross the glacier we navigated our way underneath the face. At this point the wind had woken up and began biting at any part of skin we had exposed. This would make for a chilly morning. Big Mike getting ready to get Shrundy! Sunrise on the NE face! The bergshrund crossing was looking questionable. It appeared that crossing this shrund may provide a serious challenge in the future as the options were slim. Michael made his way over a narrow snow bridge finding Neve and ice on the other side. Once across we simuled our way up a few runnels of ice eventually making our first belay below a rock step. After reaching the belay I took the rack and set off on my first lead. I made my way up this rock step placing the #4 in a very nice crack working my way into some delicate feet with good tool sticks. Once I mantled this problem I moved my way into another 20m ice runnel. Topping out I came into a snow slope that lead to the streak of ice we had been ogling ever since we saw the face. I belayed up Michael and at this point the wind had made its presence well known. It made for parka and puffy pant belays necessary. Photo: Michael Telstad First Rock Step After a hasty transition Michael took off into what appeared to be the steepest section of the route which we broke up into two pitches. Michael led a really fun ice flow with stemming and good sticks into a shallow snow slope and put me on belay. As he brought me up we were chatting how much type one fun this would be if the wind would just die down. Looking up I was excited that this was my lead. It looked like the most exciting pitch of the route. It was a left facing dihedral with a smear of ice running down the left side. I started up aiming for the corner to our left. The trickiest part was getting through a thinnest part of the smear using small rock edges and delicate front points on the thin ice. This lead into the steepest ice on the route which was challenging to navigate due to the verticality and irregular ice flow. After topping out the smear I found a rock outcropping and belayed Michael up. When he reached the belay I could see in his eyes he had been blessed by the screaming barfie fairy. After a minute of arm swings and groans he took the rack starting up the next section of ice and snow runnels. Photo: Michael Telstad The flow that started it all Photo: Michael Telstad Getting the goods! Michael led us up another rope length with some simul climbing taking us to the upper snow slopes. From here we chose the path of least resistance taking a right leaning snow ramp that we saw would take us to the sub summit. From the photo it looked straight forward. Funny enough it ended up being some of the slowest climbing on the whole route. The snow ramp we saw was actually a very narrow band of snow that was a strange consolidation requiring multiple kicks to make a secure step. This ended up being some blue collar toe bashing over the next hour or so. Bashing my way across this ledge in one long simul-block we eventually made it to an anchor where the ramp turned into a snow field leading us to the sub summit. Michael later told me he was annoyed with how long I was taking until he came around the corner and then realized the reason for my slow lead. He proceeded to thank me for the steps I had painstakingly made. Almost There! Topping out the sub summit we popped onto the sunny south side and took a snack break. We ditched packs and ran up to the summit snapped a few photos and headed down. We walked and down climbed our way to the sherpa glacier descent exit. Front pointing our way down the sherpa glacier we eventually made our way back to camp sometime around 6pm. I don’t quite remember what time. Obligatory Summit Selfie Sunset Selfie. Back at camp we ate our de-hys, listened to music and hopped into our tent. The next morning we walked out following our tracks through the mountaineer’s creek drainage. We were psyched on what we had climbed but our excitement also laid in what might come next for the NE face of Stuart. Our Camp We believe our route climbs a direct start to the ’86 Girth Pillar Left completed by Mark Beibe and Charlie Hampson which was done as an aid climb in Octobe. We climbed this completely free following ice, snow and neve with a few mixed sections. Thus it was not quite a new route but definitely a first ascent in this style. We chose the name “Always the Cowboy, Never the Cow” after a CMAT lyric from the song “I Wanna Be a Cowboy, Baby!”. This was due to the blue collar climbing and the feeling of being cowboys out in the wild wrangling ice. Photo: John Scurlock “Always the Cowboy, Never the Cow” AI5 M5 FA: Michael Telstad and Tucker Merrill Gear Notes: Alpine rack to #4, nuts, screws. Approach Notes: Mountaineers creek to Ice cliff glacier18 points
-
Wendy Thompson Hut a few nights ago....3 points
-
Disclaimer: if you're looking for beta, you'll probably be disappointed by this TR. If youre looking for an emo introspection on soloing, then perhaps you’ll be amused… I awoke without an alarm on Tuesday morning. I stumbled around and gathered my things. Two skinny 30m cords, ice tools, crampons, one ice screw, 2 carabiners, some snacks.. I loaded my pack and headed up to the pass around 8am. I left from a nearly vacant lot at 8:40; not exactly an alpine start. But with freezing levels down to 500ft and clouds in the forecast, I wasn’t too worried about timing. I skinned up the thinnest approach to Source Lake I have ever seen in February, my skis sliding out from under more than I would’ve liked. My normal skins for these skis are having glue issues, so I used 77mm skins on my 95mm skis, not ideal.. As I skinned, I thought back to the last time I attempted this route, which was 9 years prior with my college girlfriend. We drove down from Bellingham and accidentally climbed a full pitch up Bryant Peak before realizing that we were climbing the wrong mountain. Hopefully today will go a bit better, I thought to myself. As I skinned through the valley, the morning fog lay like a wet blanket. Cold, wet, quiet. I skinned up from Source Lake; there was about an inch of snow in the skinner, which made the skinning a bit nicer than the ice down low. I caught a glimpse of Chair through the trees as I crested above the fog. Dang it. Looks like no ice on the upper pitch. Oh well, maybe it wasnt meant to be. I can still take a look at the North Face, or maybe climb the lower pitches of the NE Butt, then bail. I passed a few other skiers. I was actually enjoying being alone with my thoughts, so I moved quickly, eager to get back to some silence. I finally got up into the sun and was fully free of the fog. I felt the humidity drop and my sweat start to dry, one of the best feelings. The feeling was short-lived. I booted up the thumb tack to the ridge where clouds had again blown in and brought light snow. Above the fog... View of the route. I meandered along the ridge and finally got a view of the North Face, no good, no ice, just snow on rock. Not today. I ended up at the base of the NE Buttress of Chair without even really stopping to consider if and why. I looked up, and the rocks above had a smear of ice that looked fun to climb. As I transitioned from skinning to climbing, I briefly pondered my options and how I was feeling. Soloing requires confidence. But too much confidence will get anyone into trouble. It's a delicate balancing act. Today, I had the confidence. I started up. The ice was thin. Ranging from a quarter inch to 2 inches in “fat” spots. The movement of climbing sub-vertical ice and rock is addictive. Delicate taps with the tools, finding edges for the crampon mono points, ice and rock, perfectly mixed. Nothing feels better than flowing through that terrain. Soon enough, I had “flowed” my way into a pickle. I looked up and realized I had blown past a ramp to the left I should have taken. Above was vertical rock that I had no business touching, so I awkwardly scraped my way down a bit and transitioned left over the ridge. I was not psyched about this little blunder. The downclimb had some scary moves that I did not enjoy. I contemplated bailing. Confidence gone. I knew the upper pitch wasn't in any way, what's the point? This is all so contrived… The thin climbing right off the bat, not much ice but it was good. I continued moving upward through ice and rock and got back into the flow on this slightly easier terrain. The ice was mostly an eggshell over powder on rock. The movement was a 50/50 split between scraping tools or ‘pons looking for a positive edge out of sight beneath the snow, or gentle sticks in snice. I topped out the lower pitch feeling good. I looked up at the upper “ice” pitch with no ice, and I looked at the trees to my right that I could rap down and be done. Oh well, I’ll just keep going up. I’m curious if this middle snow slope is skiable anyway. Eggshell ice over rock. Looking up at the "ice" pitch on the right and the ramp I took (but would not recommend) on the left. I booted up the snow slope, moving quickly. Only a few inches of boot pen made for efficient movement. As I approached the upper step, I considered taking the plum line that had a few ice smears, or traversing out left to what appeared to be lower-angle snow and rock. At this point, I felt like I was way off the deck and had already made one mistake, so I took what I perceived to be the easy option to the left. I climbed out of the steep snow into the steeper rock and quickly regretted my decision. No ice, very few positive edges, not ideal. I scraped my way up it, crampons skittering on smooth rock; it felt a bit harrowing. There was one lone tree at the top of these rocks, and when I finally grabbed a branch, I breathed a sigh of relief. I pulled myself up over the tree and booted to the top, relieved to be done with the climb. I wandered around the top, went to the true summit, and looked for my descent. Nothing looked like the photos I had looked at. Eventually, I found the correct gully based on a dead tree at the top, which I recognized from a photo. The correct gully was a little bit back down the climbing route from the summit(s). The descent gully was nearly dry, and I face-in down-climbed down nearly the whole thing. It was slow and tedious, and a few spots felt about as thoughtful as the route up, except there were a few smears of solid ice yielding good sticks in this gully, unlike most of the route up. I got down to the rap station and joined my 2 30m cords for a 30m rap. I finished the rap and thought that what I had just rapped seemed a lot easier to down climb than what I had down climbed to get to the rap anchor… Up the final slope. Looking down the descent gully. A slow transition at the bottom of the descent gully ensued. Coil ropes, harness off, crampons off, skins off, skis on, boots locked, finally ready to ski. The ski down yielded a few good turns. Hop turns up high with dust on crust and rather flat light. Down lower, the snow got softer and deeper, and the light improved. A few good turns later, I was into the skied-out refrozen debris over Source Lake. I boogied down that and enjoyed the icy luge back to the car. C2C was 4:20. Would be fun to try to go fast in better conditions! A few nice turns on the exit. A few parting thoughts. I really wanted to do some technical climbing and forced it a bit. The solo headspace pendulum of caution vs confidence was a bit tilted toward confidence today. We shall recalibrate a bit moving forward and try to find the elusive balance. This route probably needs more freeze-thaw after getting baked in the hot sun for weeks. It sure does have a lot of south for being the supposed “NE” Butt.

 3 points
 -
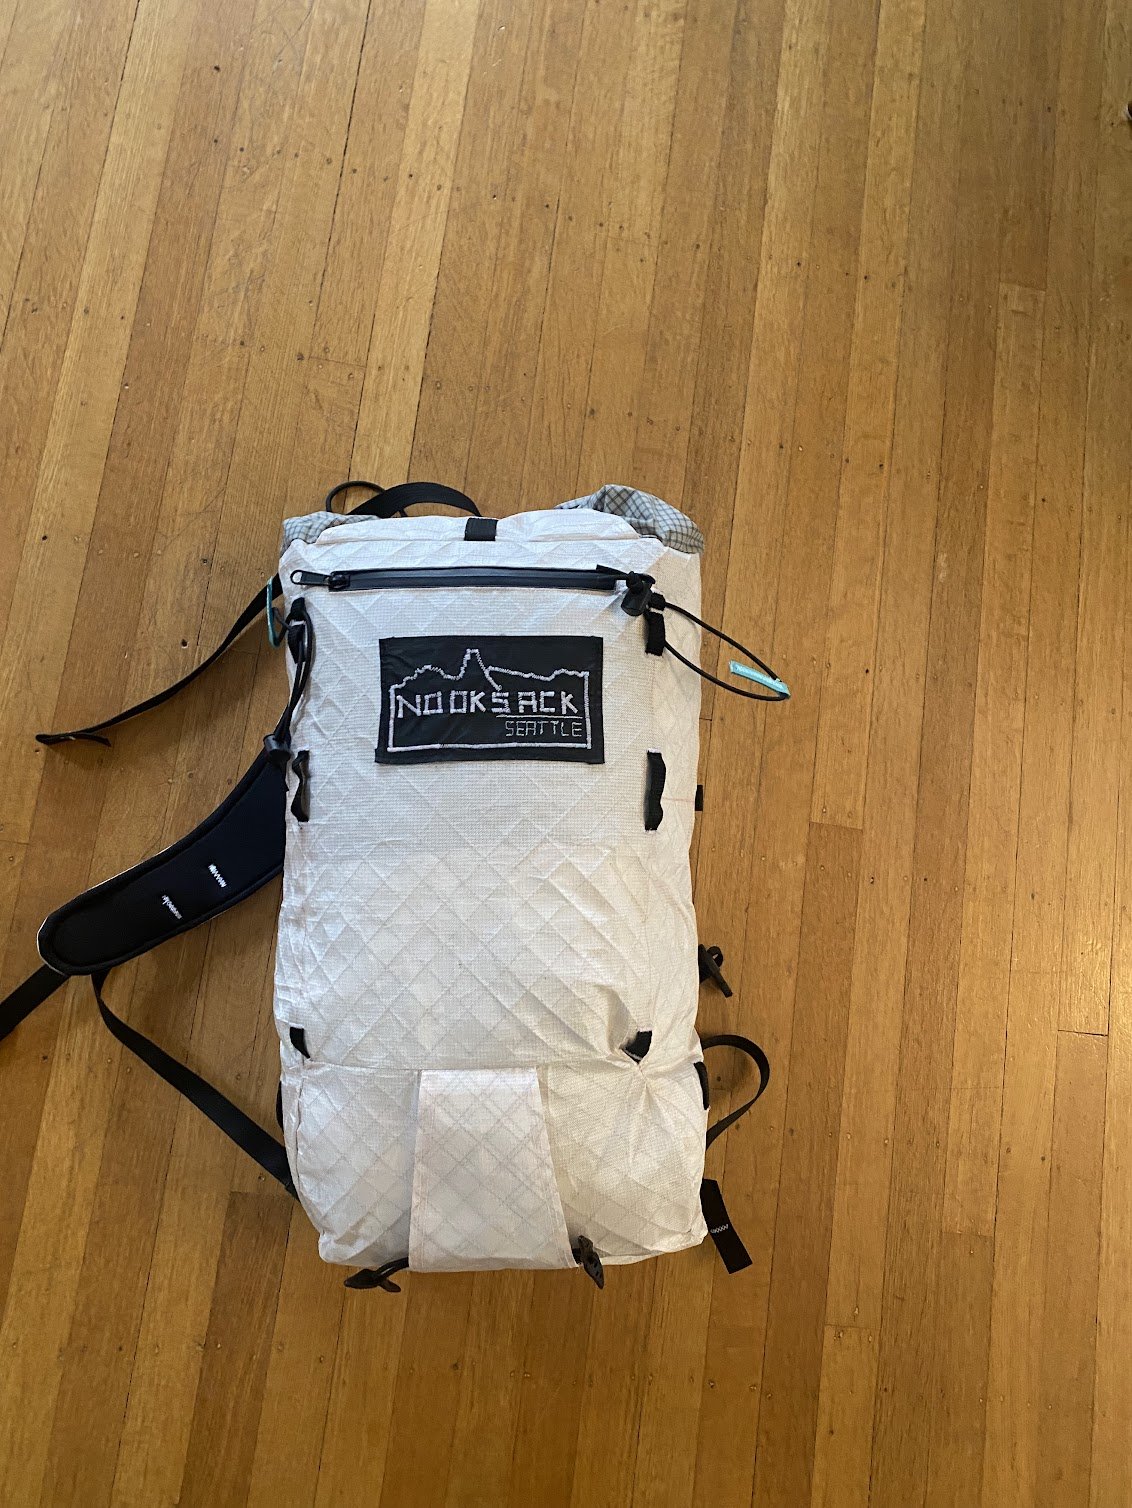
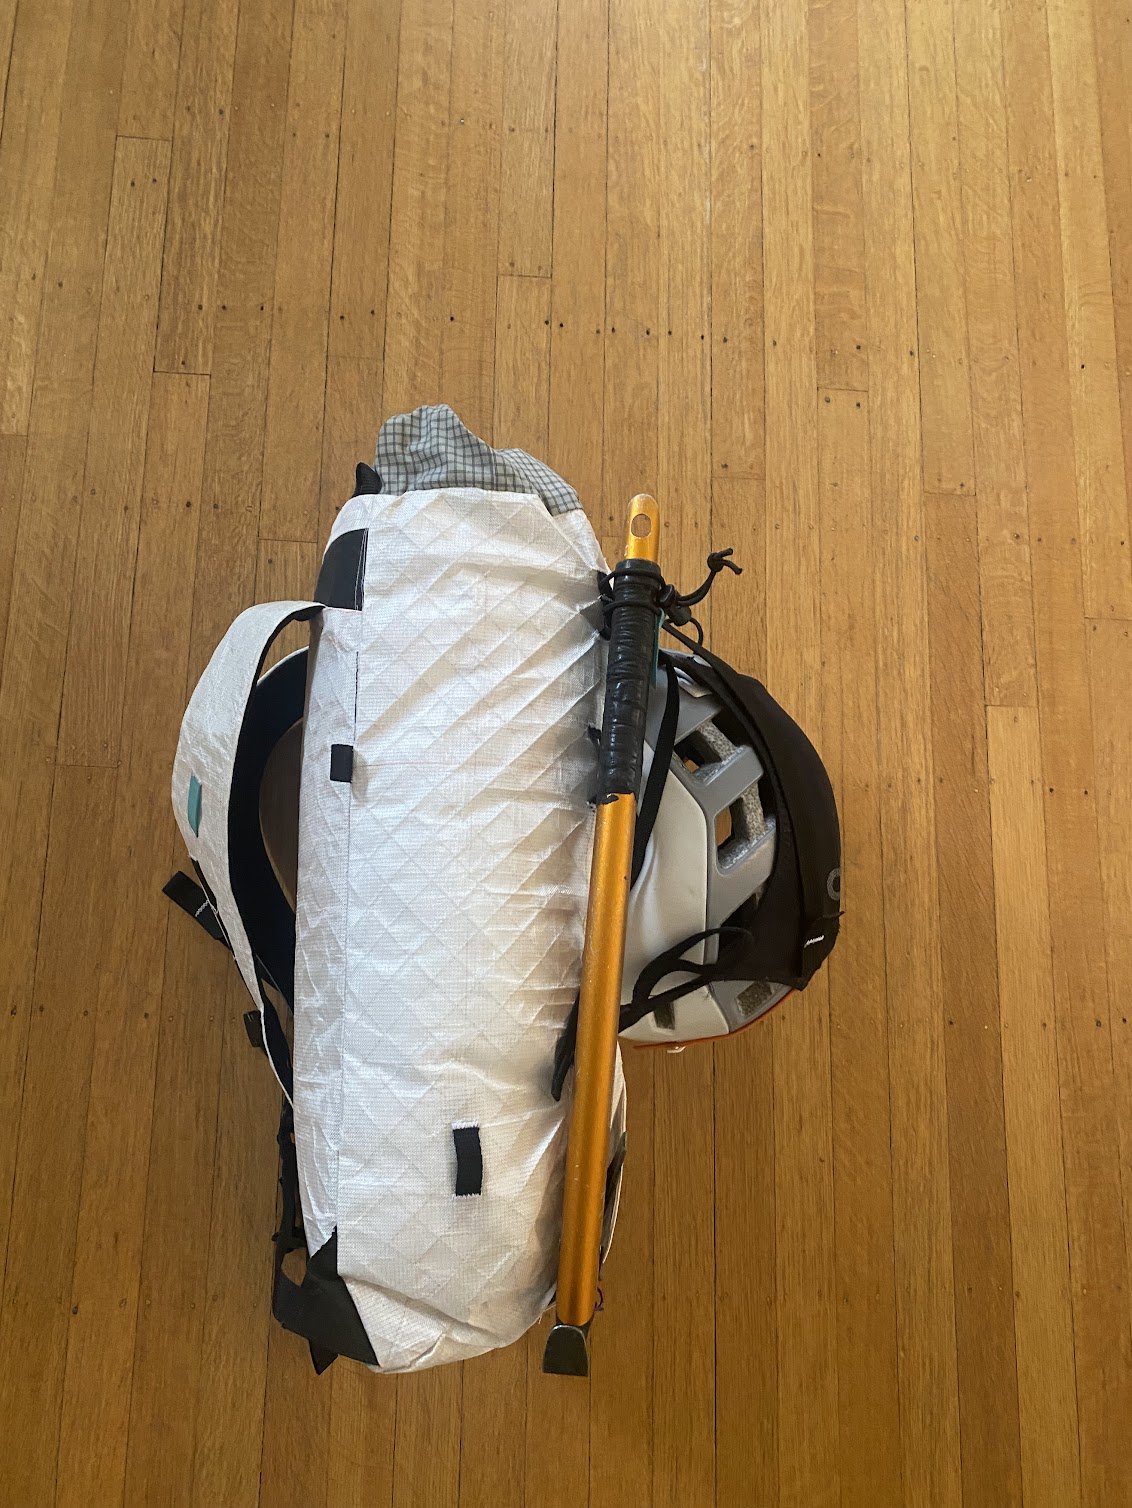
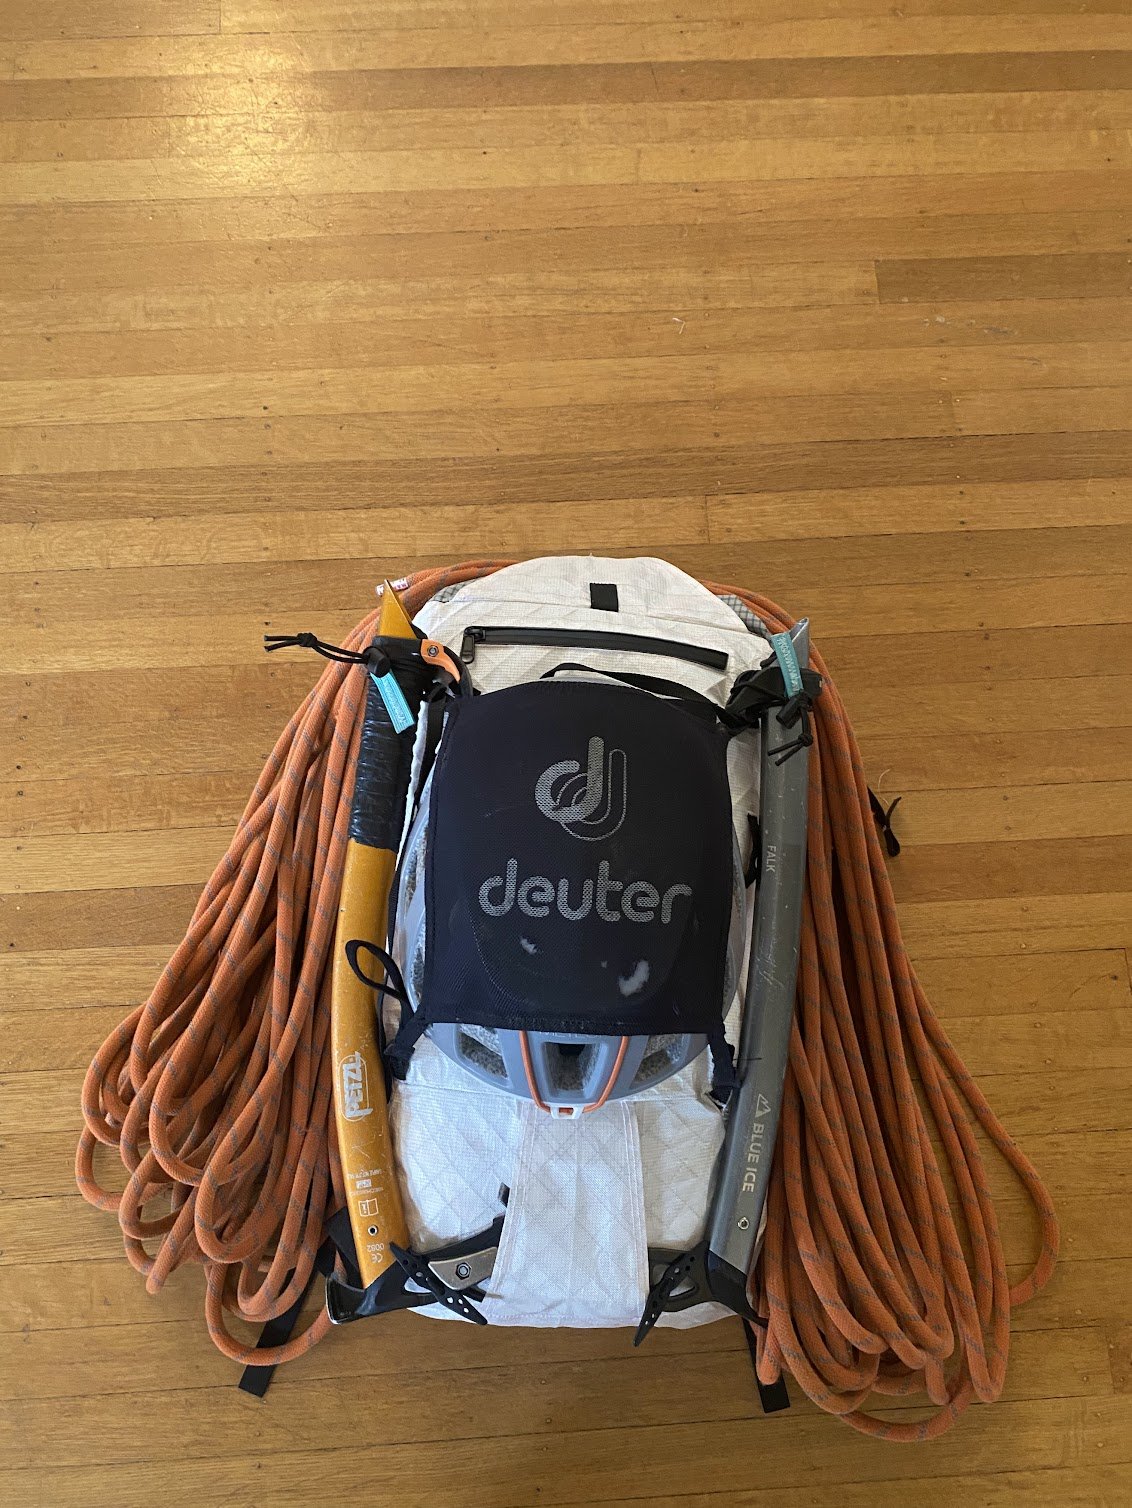
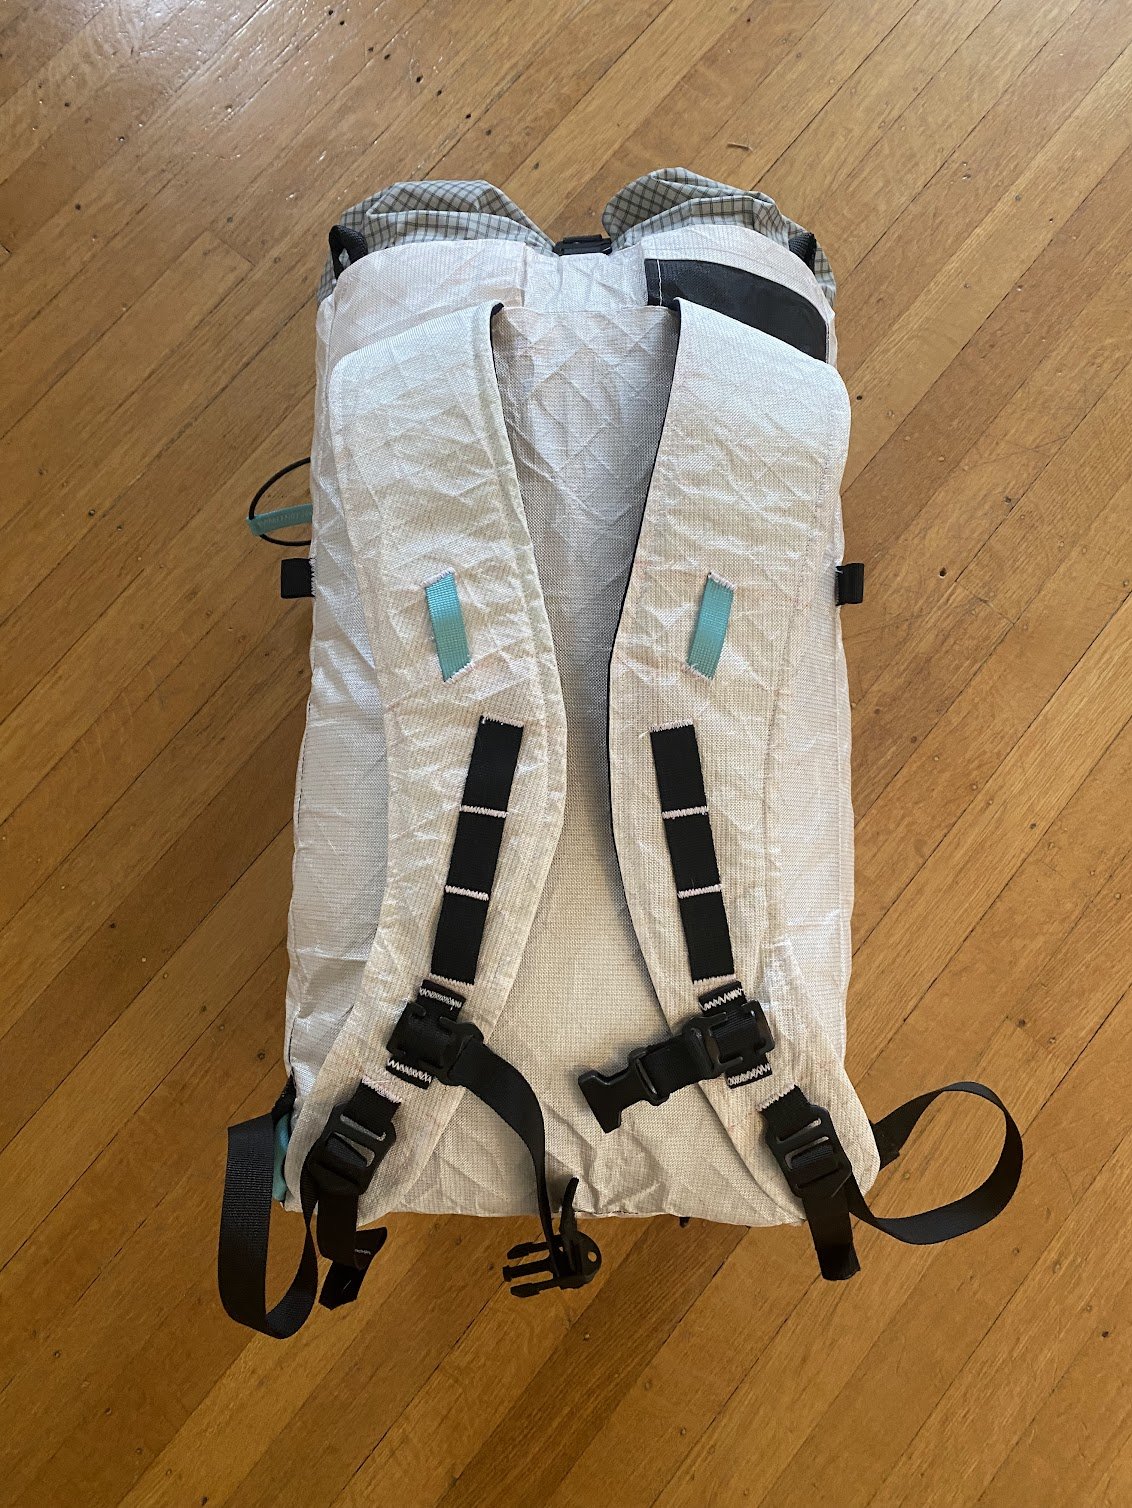
30L challenge ultra 400 500g daypack just finished. Metal G-hooks, sternum adjusters, and shoulder adjusters. super bomber and super stoked
 3 points
 -
https://www.king5.com/article/news/local/find-my-saved-skier-trapped-4-hours-avalanche/281-31496e1a-69b9-415b-b4e5-395236bb152d Took a brief break to browse for some good news. Check this out- guy survived an Avalanche FOUR HOURS buried. I've never heard of anyone lasting this long. Long enough for his wife to drive up to Stevens pass and tell the ski patrol where he was. I'm 100% sure they KNEW, not thought, but KNEW it was a body recovery situation. But there he was, still alive. It's perhaps a miracle, but more likely he was buried near the surface and there was enough air transport through the frozen snow that he didn't die of C02 poisoning. He reported creating an air pocket around his face, and his body temp dropped to 70, so he basically went in to hibernation. Still. ya gotta breathe occasionally, right? I think the key was he never gave up, wanted to survive, prayed, and his mind and body went into a "I will survive by hibernating" state. Fantastic. Or, it's a miracle. Good for him and his wife, anyway. Does anyone know, is this a record? 4 hours is INSANE -Friedrich3 points
-
Now that I'm standing on the stilts of AI, I'm making quick progress in remediating some very complex issues that have plagued the site. One has been a problem with new registrations not recieving their registration email so they could sign in. I believe I have it fixed. Try it if you've been frustrated before. The amount of things I fixed just today on this site is amazing. I can't actually believe it myself, but this is where we are at. And its going to get even better. I have plans. I'm looking for accomplices.2 points
-
I just used the search feature to find a JasonG TR I'd never seen for the Little Yoho Valley. It gets me excited for my trip next week!2 points
-
Oh I quickly realized that buying the Pro version was the thing to do. im using Claude code, which is suited to my level…not an IDE. ive worked with some really smart people and the process it uses is uncannily similar. The actual coding part is more black box but when it troubleshoots it tells you what it’s checking and why. It took it like 8 iterations to get it right but it did. I thinks the one part I’m wondering about it how good can it get at actually enabling my vision of what I want. It may just come down to my ability to write prompt rather than Claude not being able to execute.2 points
-
Board doesn’t yet support heics. Can convert them to jpg. Note to self: check on status of this. edit: no plans for support. Only Safari renders them. Other browsers do not. So it’s not a forum thing, it’s Apple doing their thing. best I could do is have the board auto convert them to jpg on upload or something, but that isn’t happening anytime soon.2 points
-
TL;DR - It's forecasted to snow continuously for the foreseeable future, so unless you're coming here to ski, I recommend staying home or going elsewhere. The gist of the season so far is that north faces above 6,500ft are in great shape. Everything below that is out or unreliable. Access is hard because so many roads washed out in the storm, Cascade River Road somehow being the exception. Dragontail and most other routes in the Enchantments are notably NOT in this season. The north side of Stuart is however in great shape. Before it started snowing again, The NE ice couloir on Eldorado was reportedly in phenomenal condition. All of this is dependent on a warm dry spell leading into a cold high pressure system allowing for the snowpack to solidify. If you don't see this, it's not worth it.2 points
-
Just imagine if you could zoom into the full res originals on a good monitor! The new camera and glass that I splurged on this winter has been a bit of a revelation. I should have done this glass upgrade 20 years ago but it took that long to wear down the Finance Minister!2 points
-
No, but (and maybe you’ve seen it) this recent TR is in the vicinity so might be interesting to look at:1 point
-
Thanks those of you throwing down $. It really is a morale boost for me, to know that I'm not alone here in keeping this good ship Cascadeclimbers.com. I want to build this so it will last. The challenges for this project are unique, but I've already faced so many keeping this site going that I'm feeling confident we can do this. This is just another bridge to cross, there will be more. We will cross them.1 point
-
Sounds like we need to do a photo auction! But in the meantime, I'll add in some $$1 point
-
thanks for the update and keeping the infrastructure here going!1 point
-
I created a new application that lets you sign up to get a email with a clickable links to all the new TRs for the month. So if you forget we exist you'll be reminded and you'll see all the new TRs. I tested it and it looks good so far. You can opt out and I've tested that. It will also include whatever I have in the "Annoucements" tab. I may put an add in there for AAI occasionally....maybe not...but it could happen so don't be mad it it does. Its cool feature! Let me know if you see anything weird with it. Its on the right sidebar. It disappears after you sign up. I put other logic into it too. When you sign up you won't immediately get an email, but I'll add something right now to let you know you're signed up. The actual email only goes out at the end of the month. But that will be it! No other BS, I promise. I don't want BS either. This is so cool, i'm having fun with this crap!
 1 point
 -
ooooh....would be cool to be able to sort search results by date. Right now if I do a user search, seems like it doesn't organize perfectly by date. Also was able to do a workaround for the TR only returns by author by searching for a username and then putting "TR" in the keyword box. Have I really put in 195 TRs over the years?!1 point
-
I just need us to crowd source ideas for making this site better code wise or any way. Lets hear your ideas. A LOT more just became possible.1 point
-
This is so great!!! Thanks @olyclimber for never giving up on the site. This should really revive our ability to mine the past for future inspiration....much appreciated!1 point
-
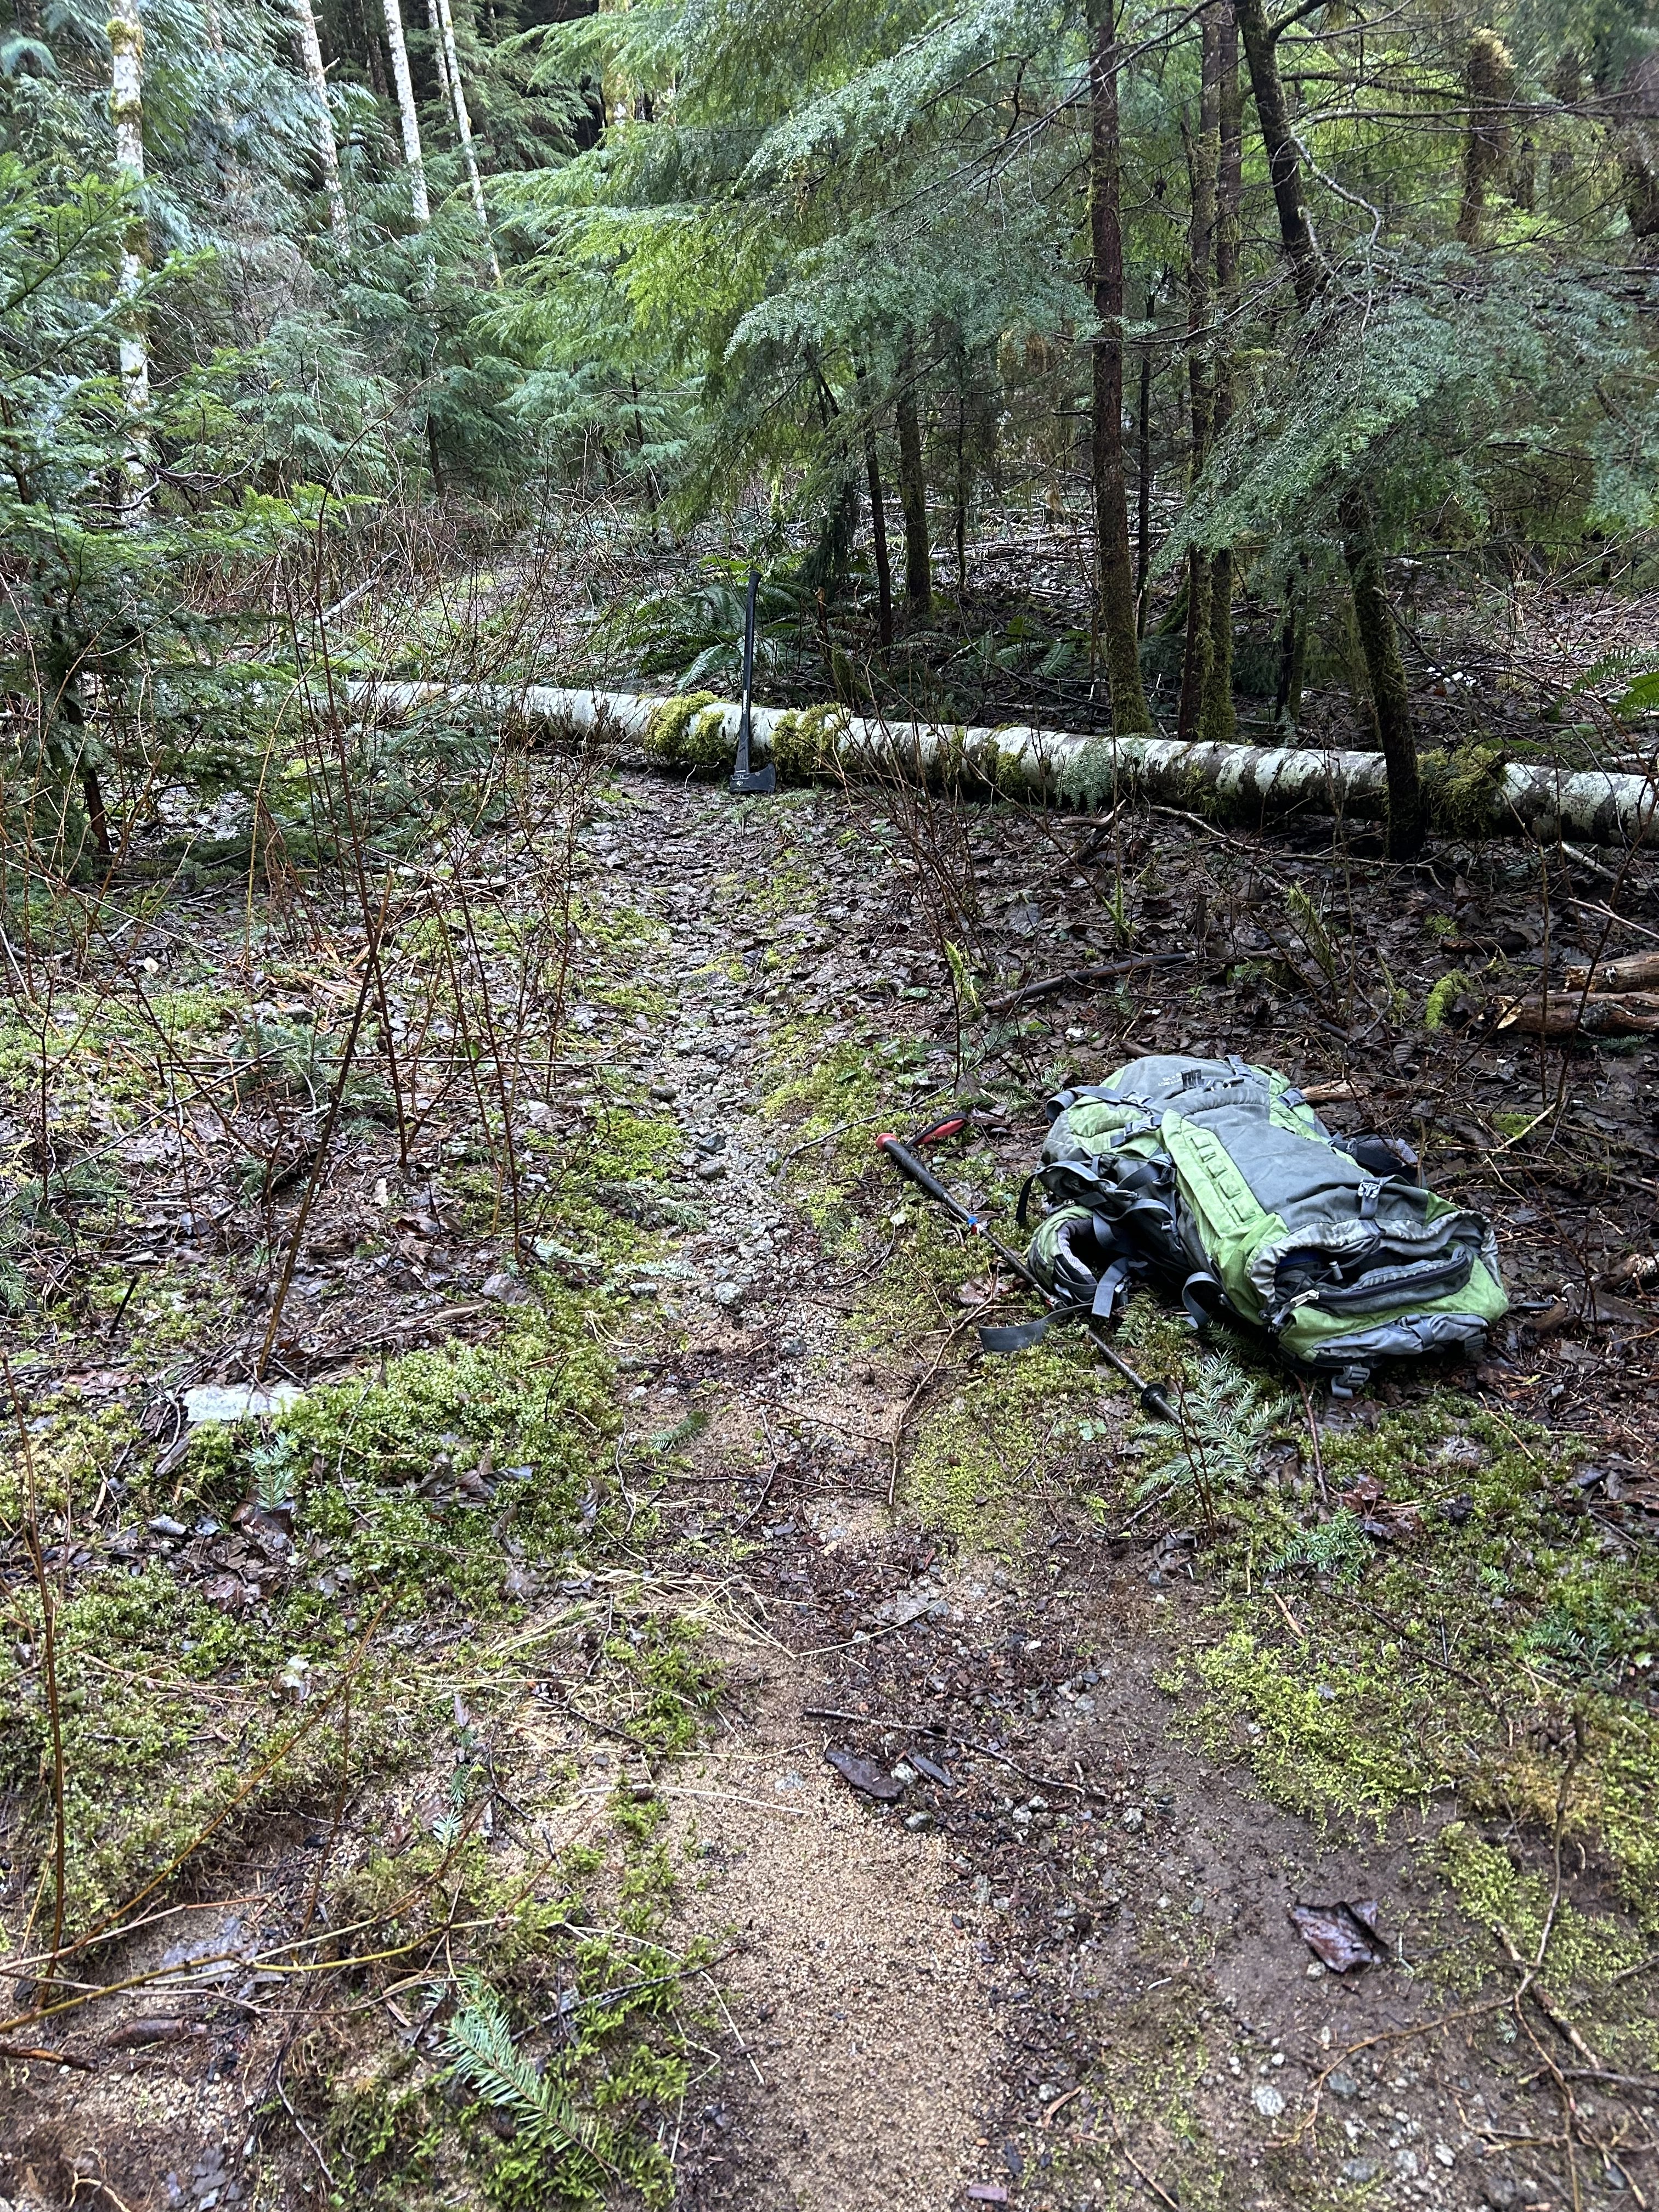
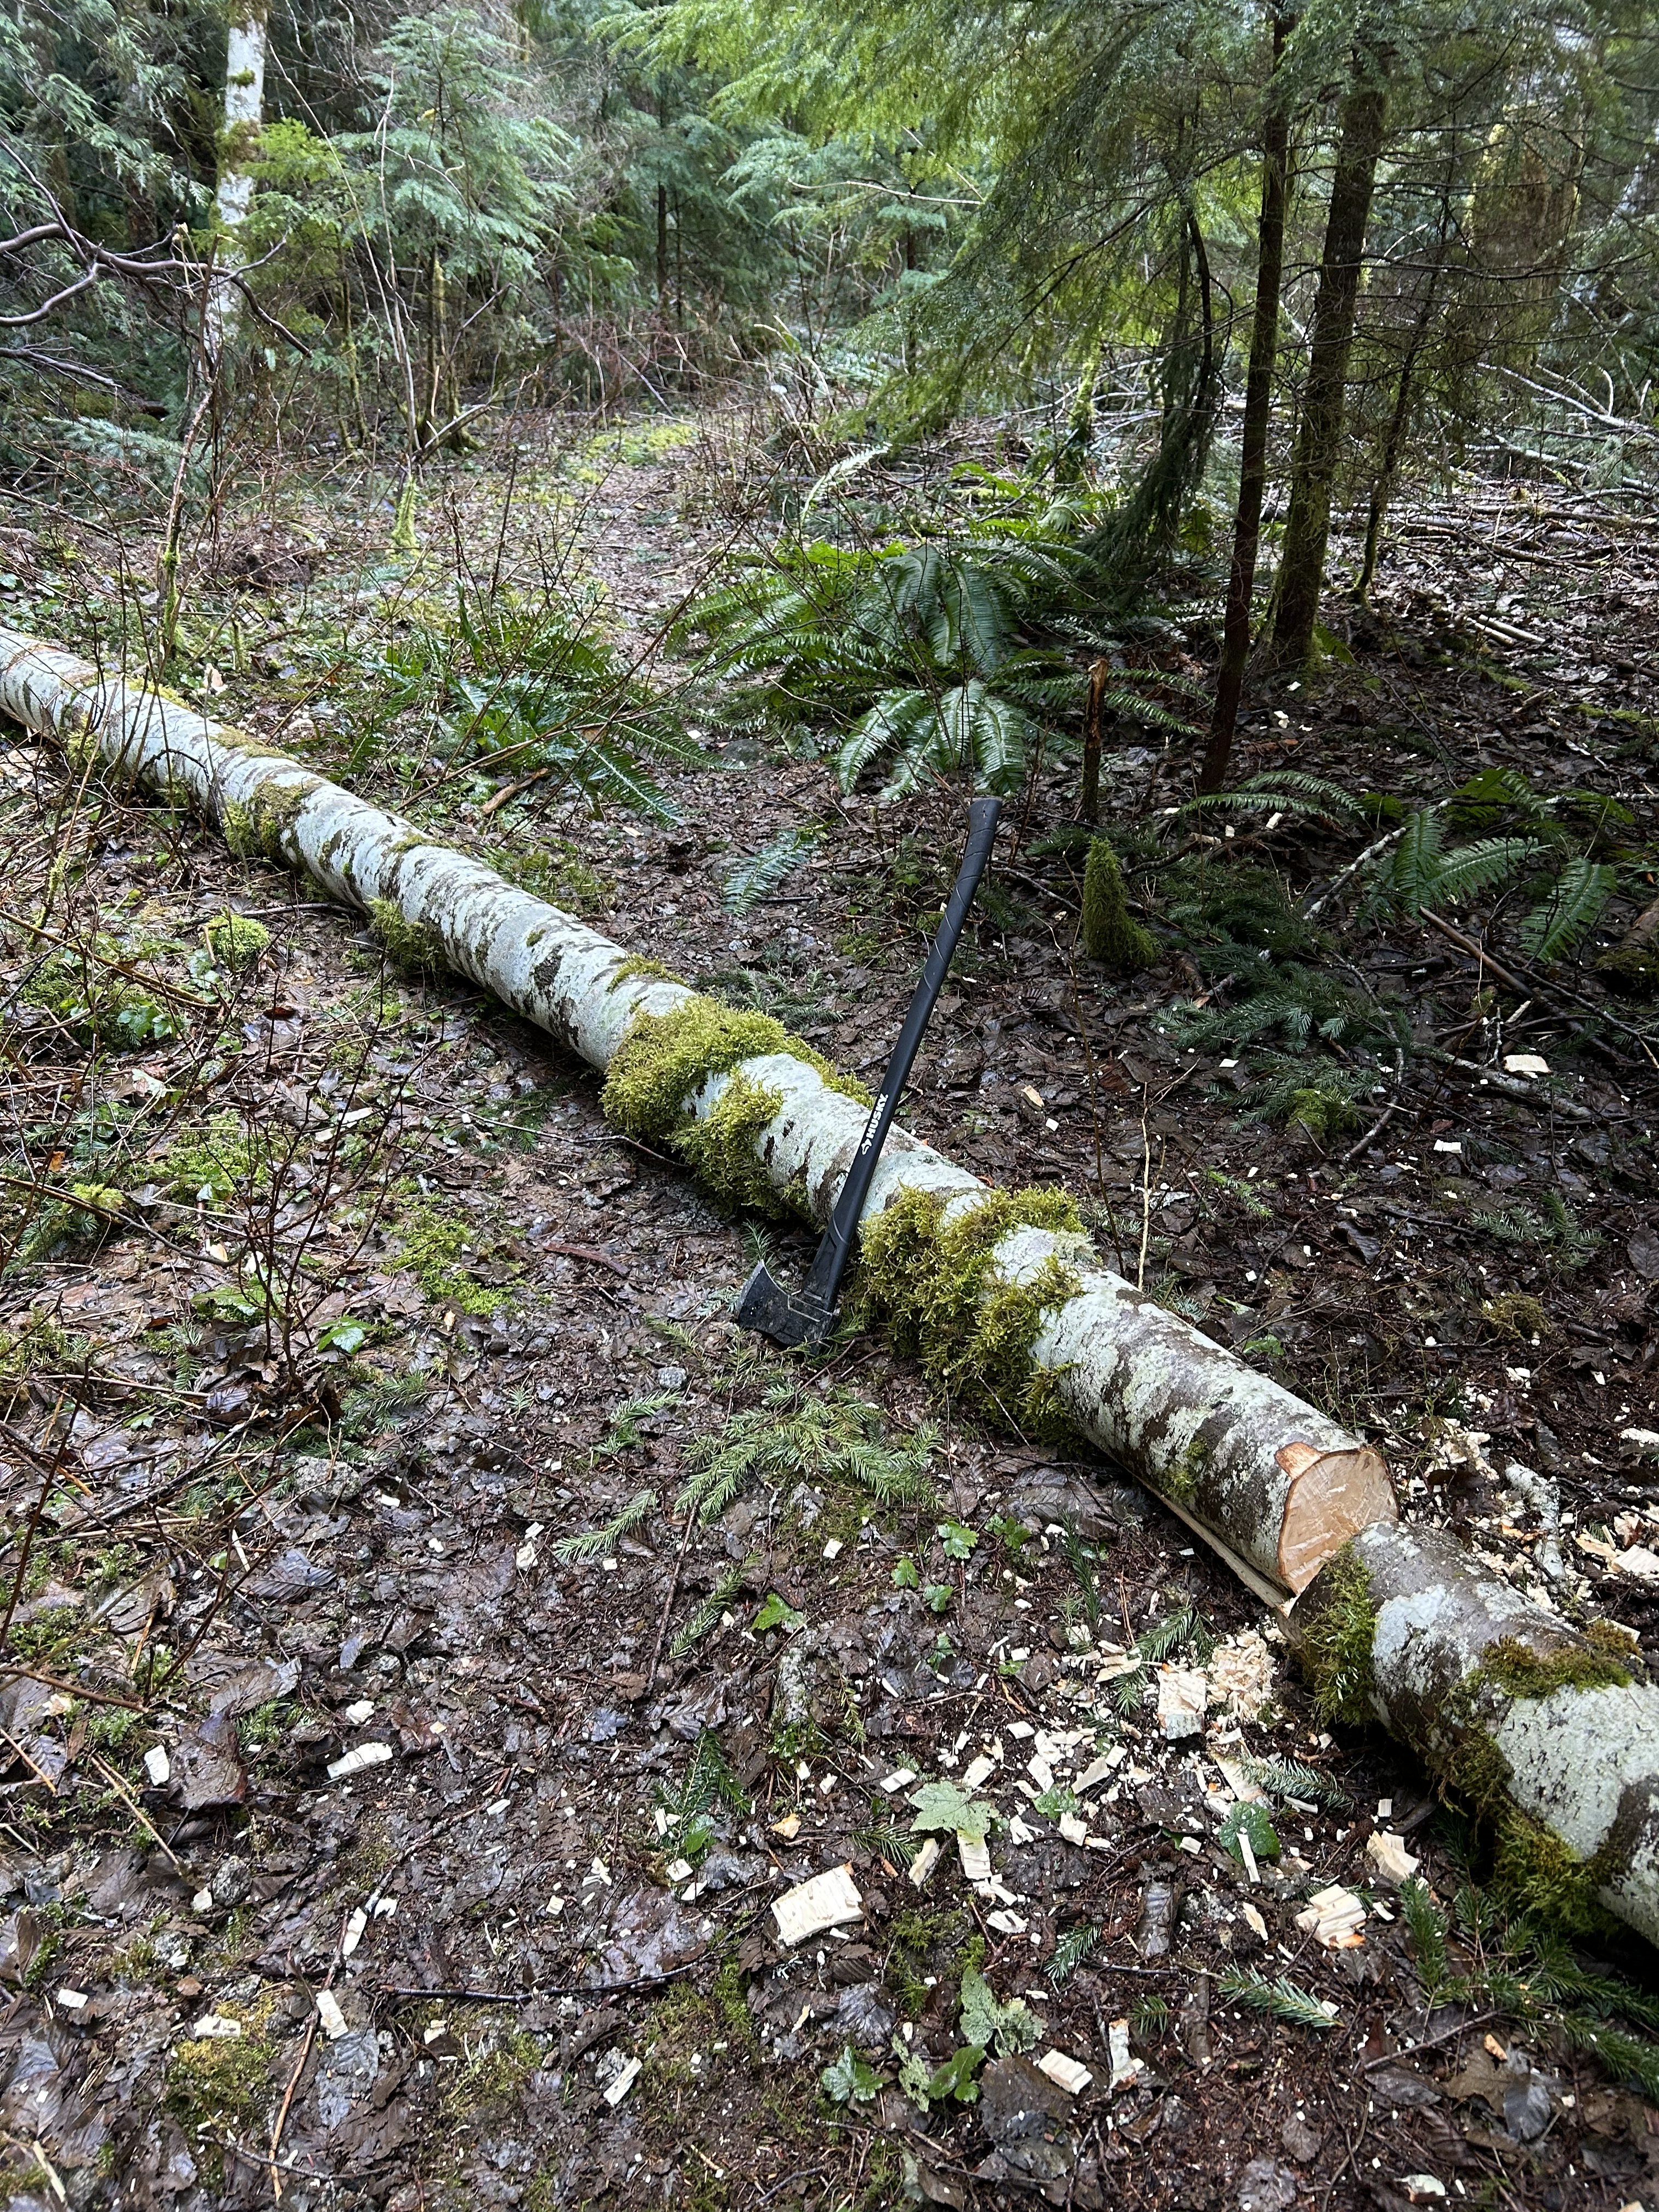
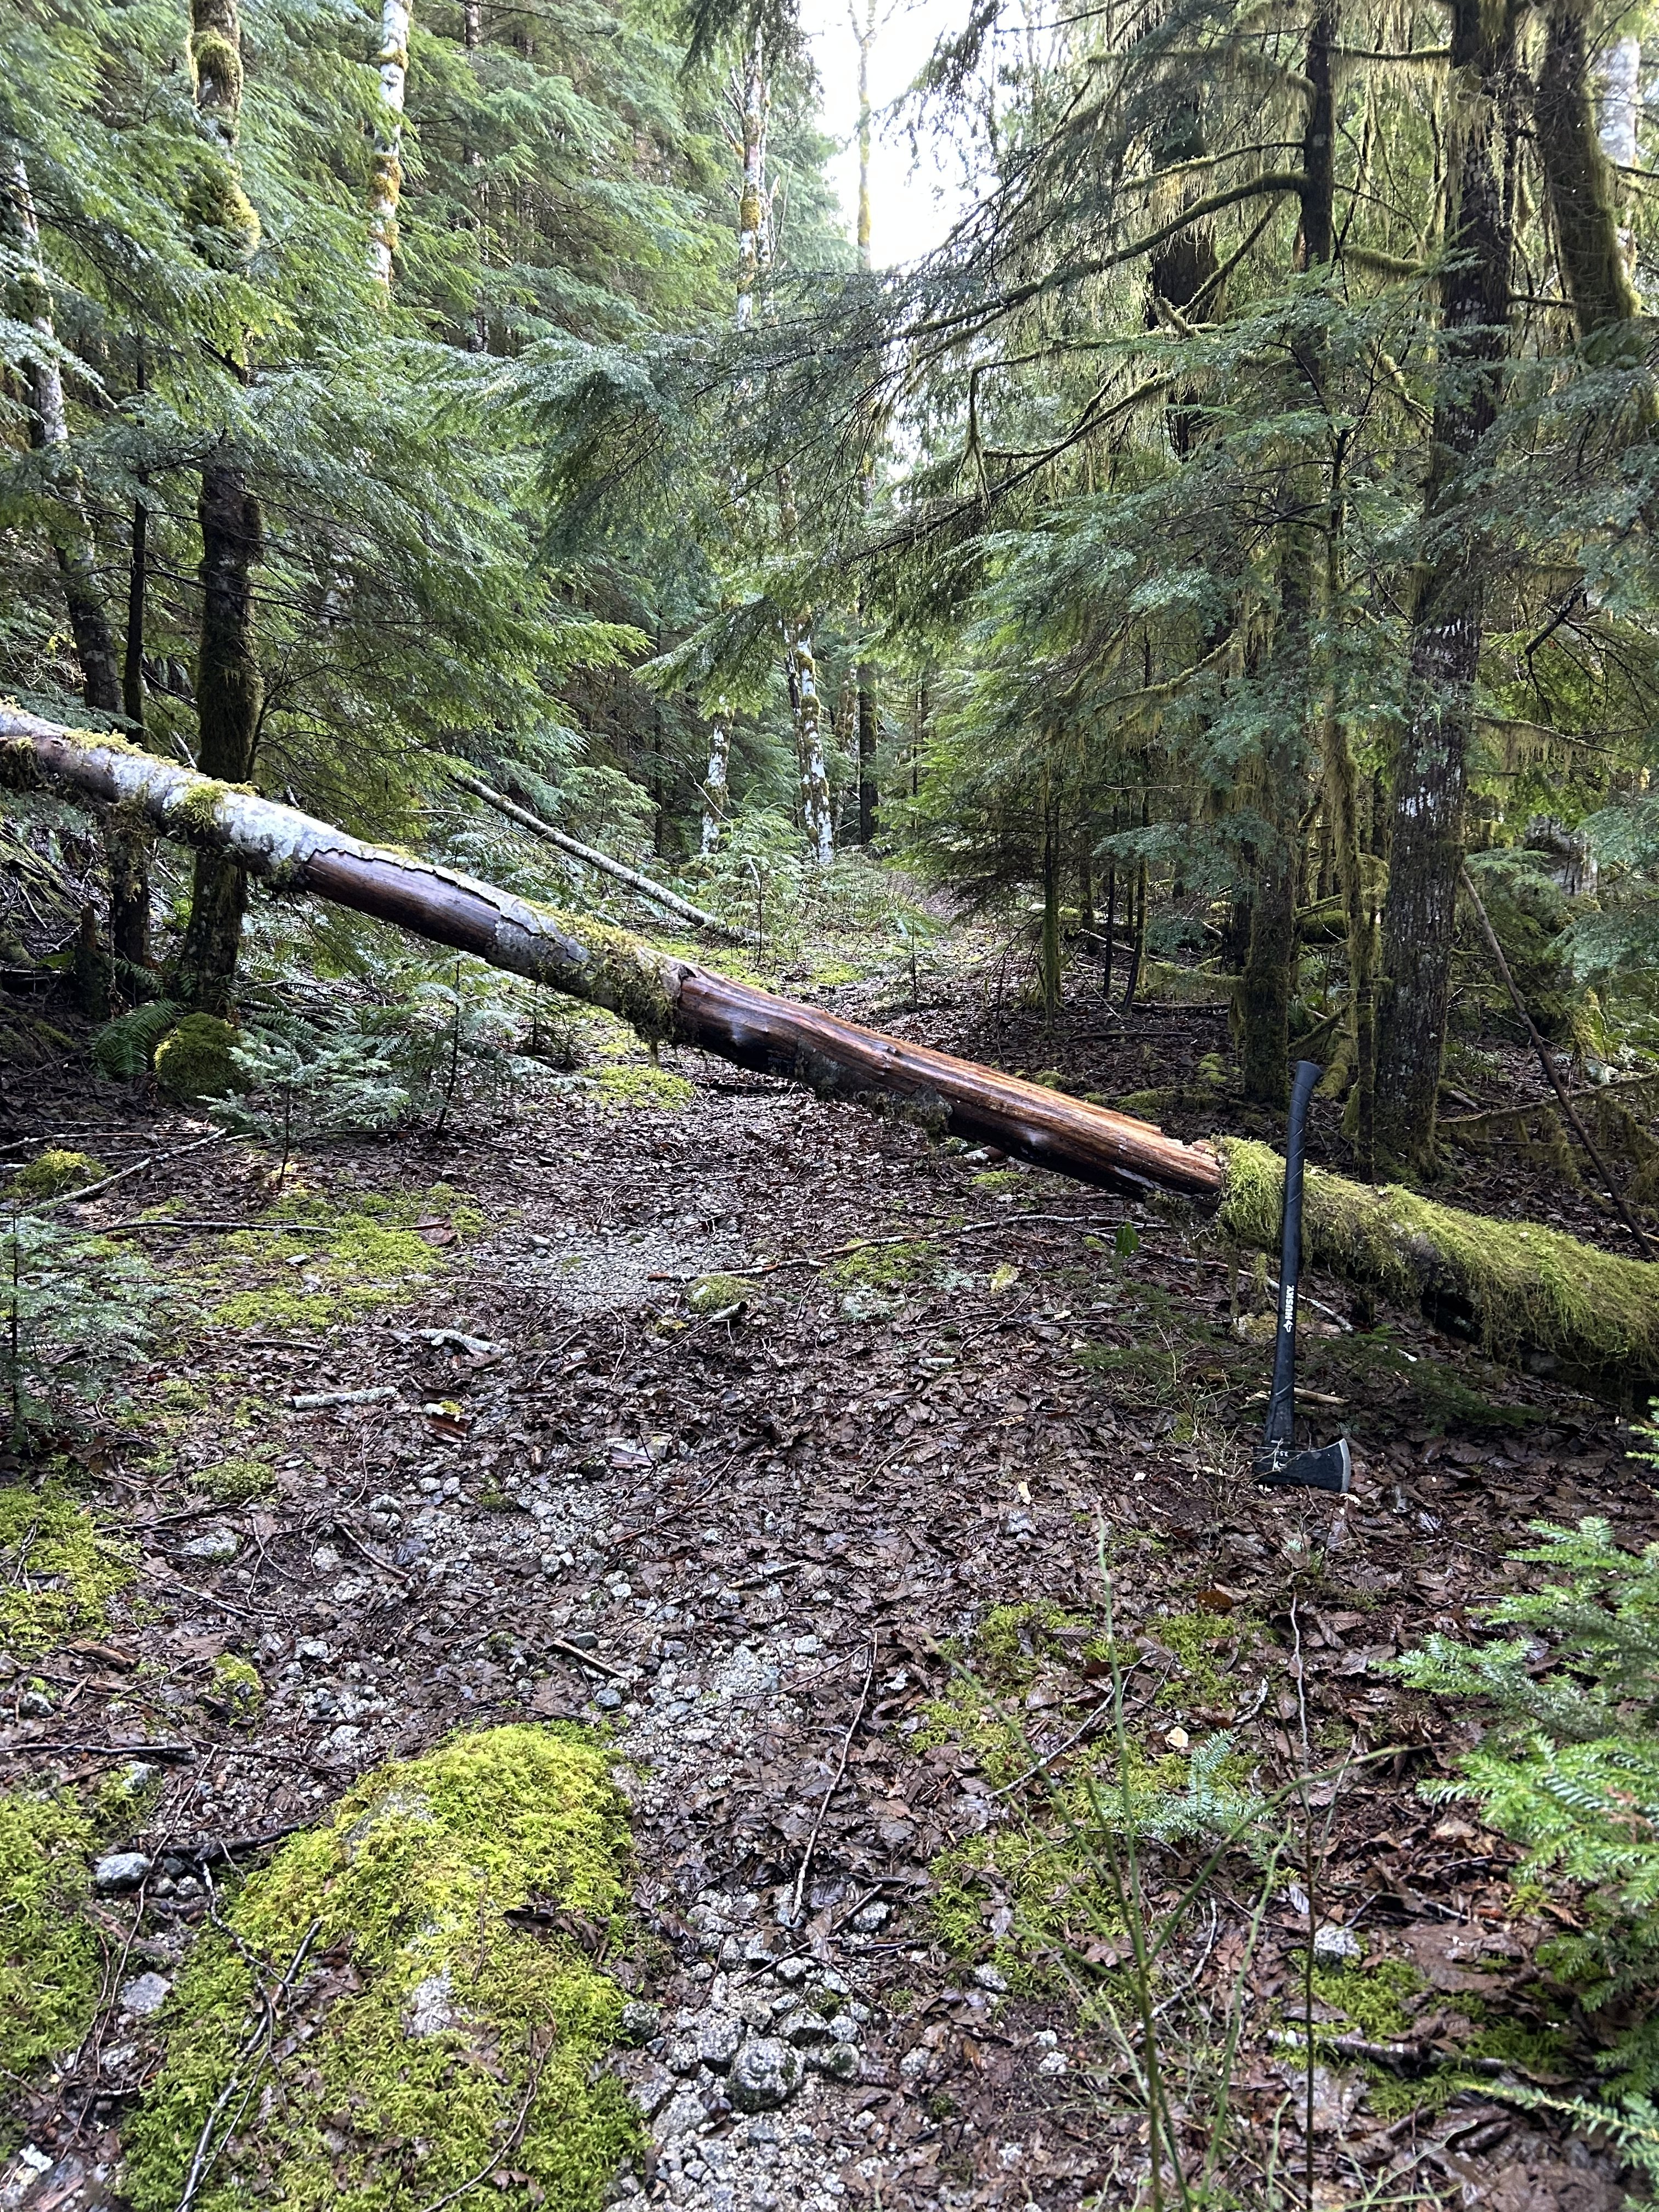
I went up on Saturday, 2/28, and chopped away the last two logs across the road. Wonderful to get out on a sunny winter day! These logas are around 3 miles up from the parking lot. Before and after Last one, before and after: And the main part of the Squire Creek Wall with recent dusting:
 1 point
 -
THANK YOU for keeping this site going. It represents the work - outdoors and online - of thousands of people over 25ish years. There are some real historical gems here. I have noticed that things are greatly improved from where they were a few years ago. Again, THANK YOU!1 point
-
I recently learned to play toxicity on my new Schecter (it lives in drop C atm). Gonna perform it soon for a charity event1 point
-
Rainier’s season has been getting shorter due to glacial wasting and recession. I personally would not attempt the standard routes on Rainier past June; even earlier for many other routes. This season is likely to be particularly short due to the snow drought in the western U.S. Also, I would skip St Helens.1 point
-
1 point
-
@JasonG I just wrote up an account of the first ascent: https://jimwalseth.substack.com/p/blind-date-in-the-bugaboos I used a photo or two from this post, thanks again for that @JeffreyW1 point
-
Retail price for a similar FF bag is $1,200 and FF bags hold their value. People are gearing up for Denali now, that would be your target market. The right person would be happy to pay $600 for this bag.1 point
-
That's kick ass. Well done and congrats, gents!1 point
-
I was very cold and my calves were getting tired. I also probably needed a snack. Thanks for the write up Tucker!1 point
-
Trip: Black Spider on Wy'east - Arachnophobia Trip Date: 01/31/2026 Trip Report: Climbed Arachnophobia the other day. Good ice, a little brittle first thing. Snow is very icy which makes for some tiring front pointing. Not as sun baked as it might appear. Five long pitches does it. L side of schrund went easily. Thanks to G for being a great partner, and Kyle and Matt for going up the route first so I didn't need to leave the family just to have a look-see. Pictures... Luckily sunrise had some cloud cover. Starting up the ice-looking bits, after some snow-looking bits that were still icy Snow-looking icy bits on P2 Starting up P2 Leading P3 Looking down P3 Coming up to the final belay at a rock anchor Descending S Side Hoping we get some snow this winter. But while we wait the sticks are quite good. If you need more beta, please feel free to DM me. -Sam Gear Notes: Single rock rack (small cams and nuts useful, nothing bigger than 0.5), pins, 10 screws Approach Notes: S Side and traverse over White River and around.
 1 point
 -
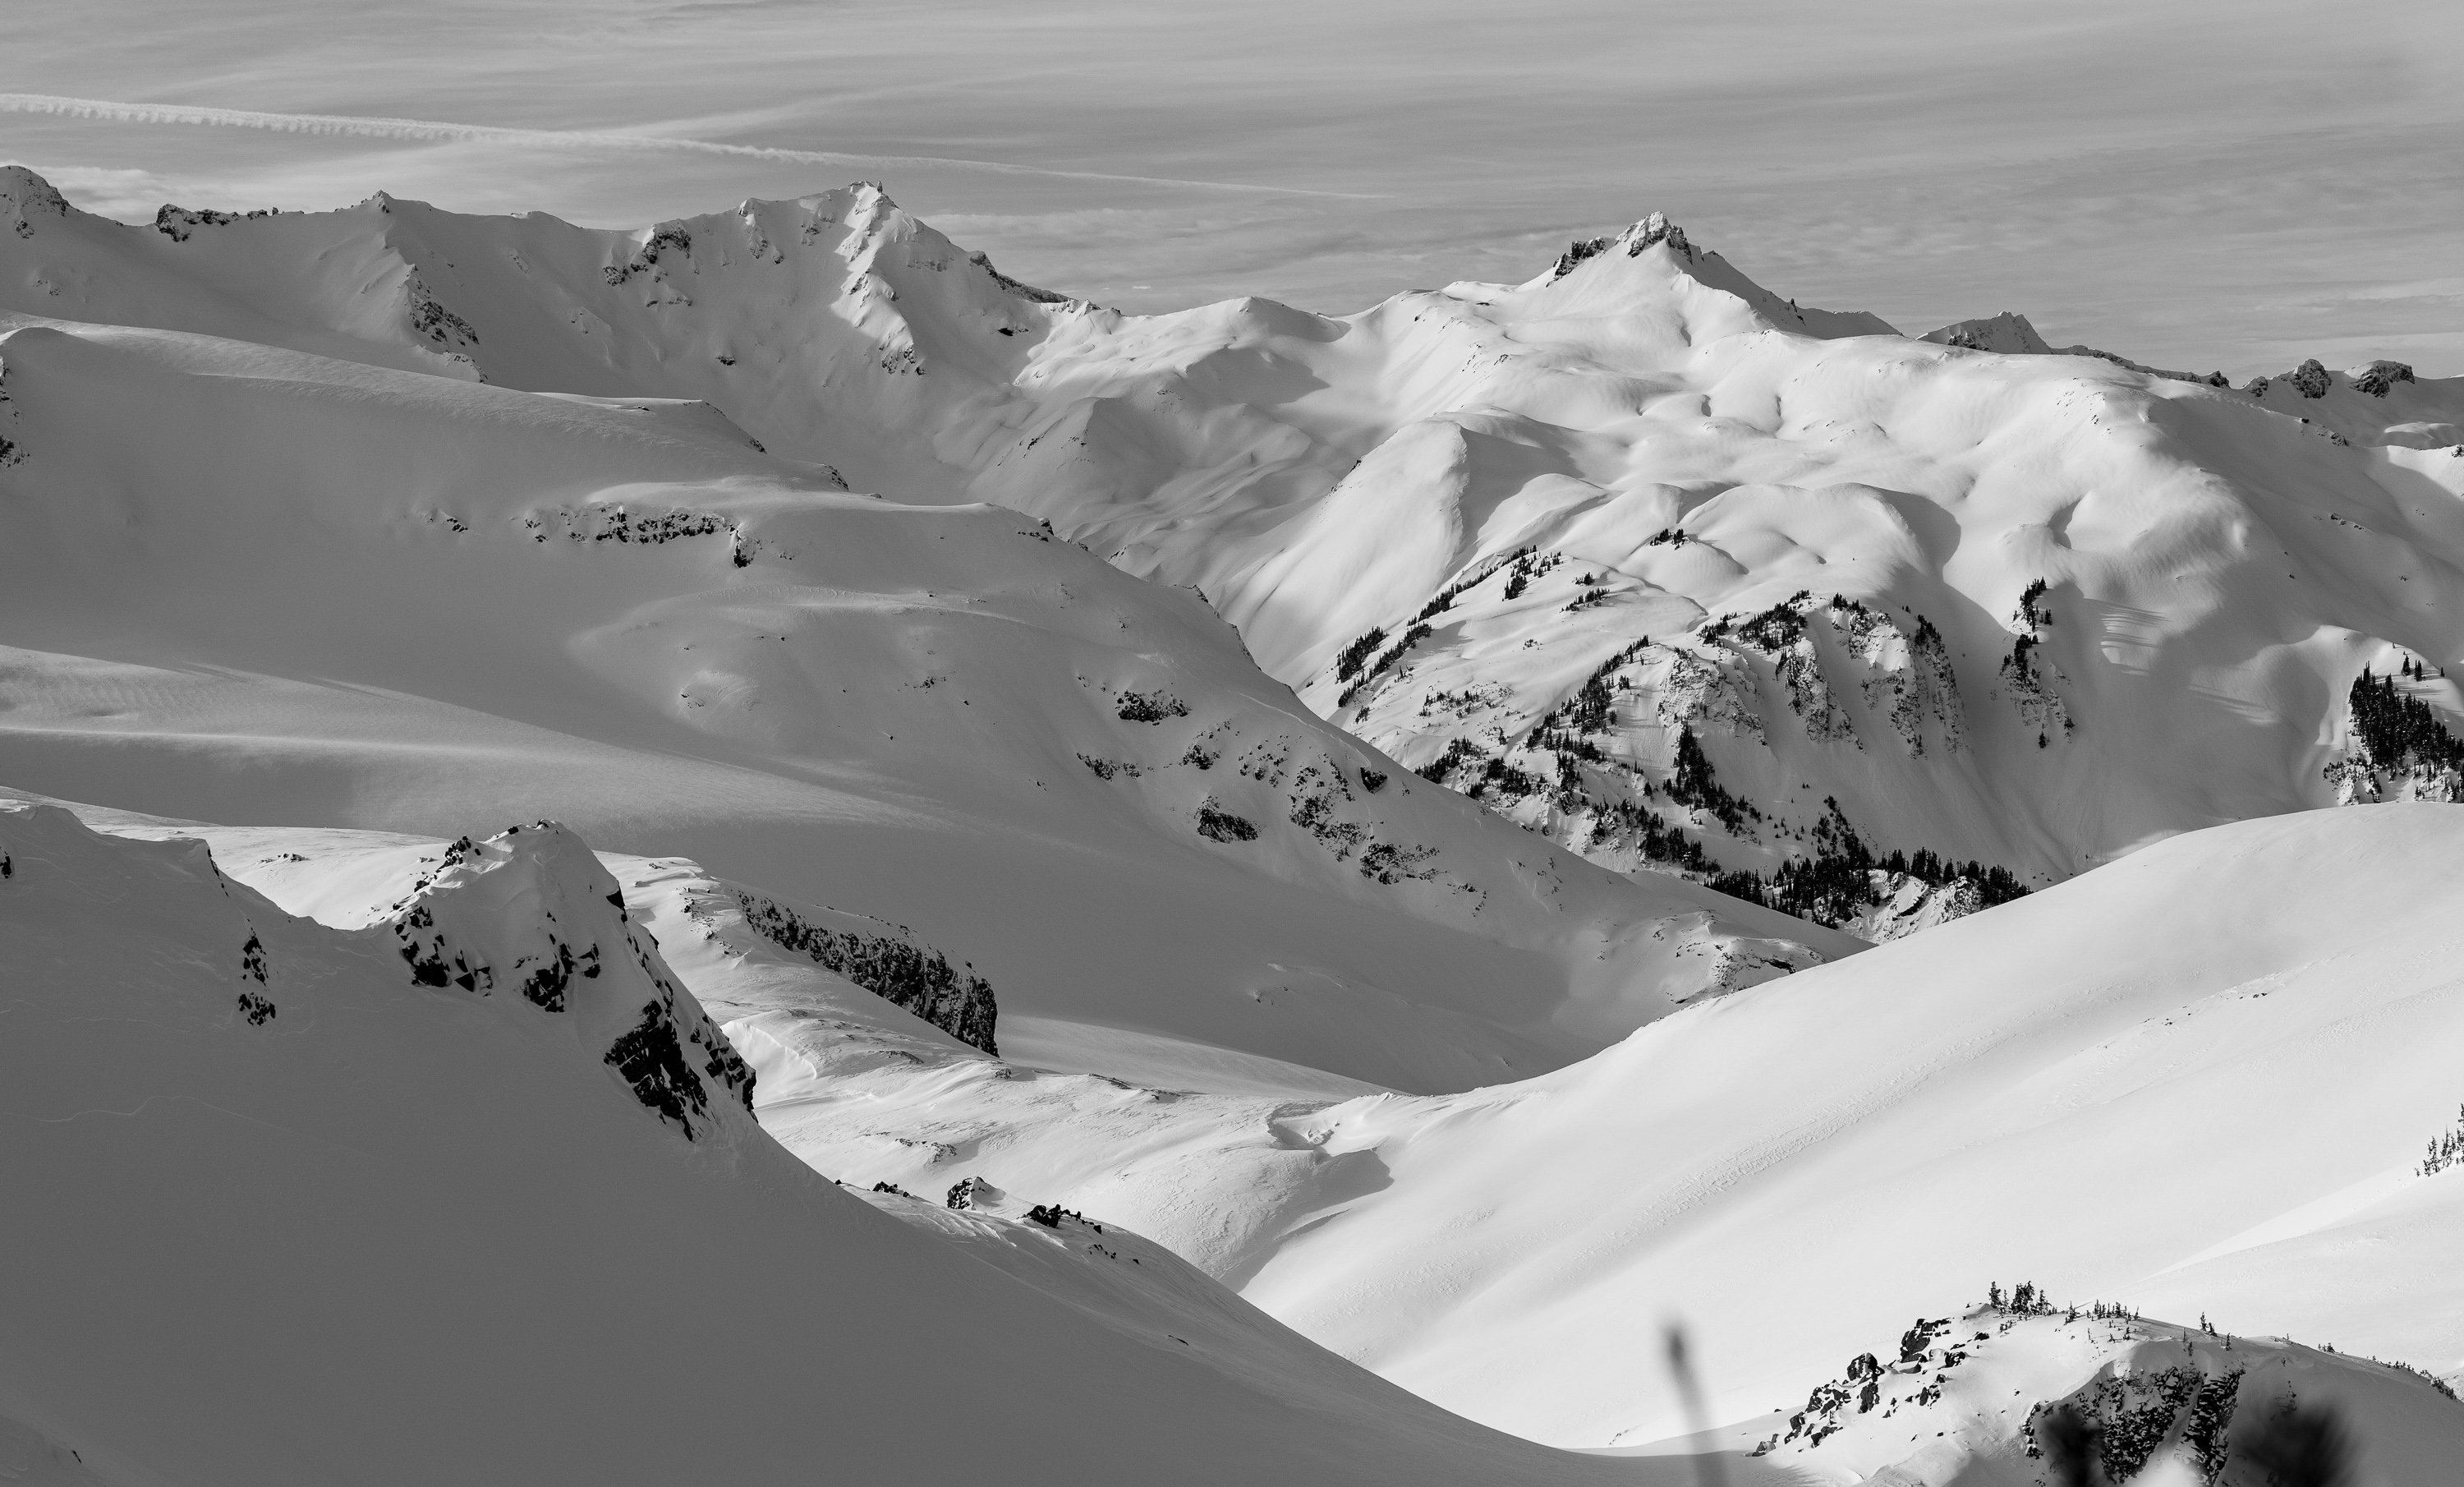
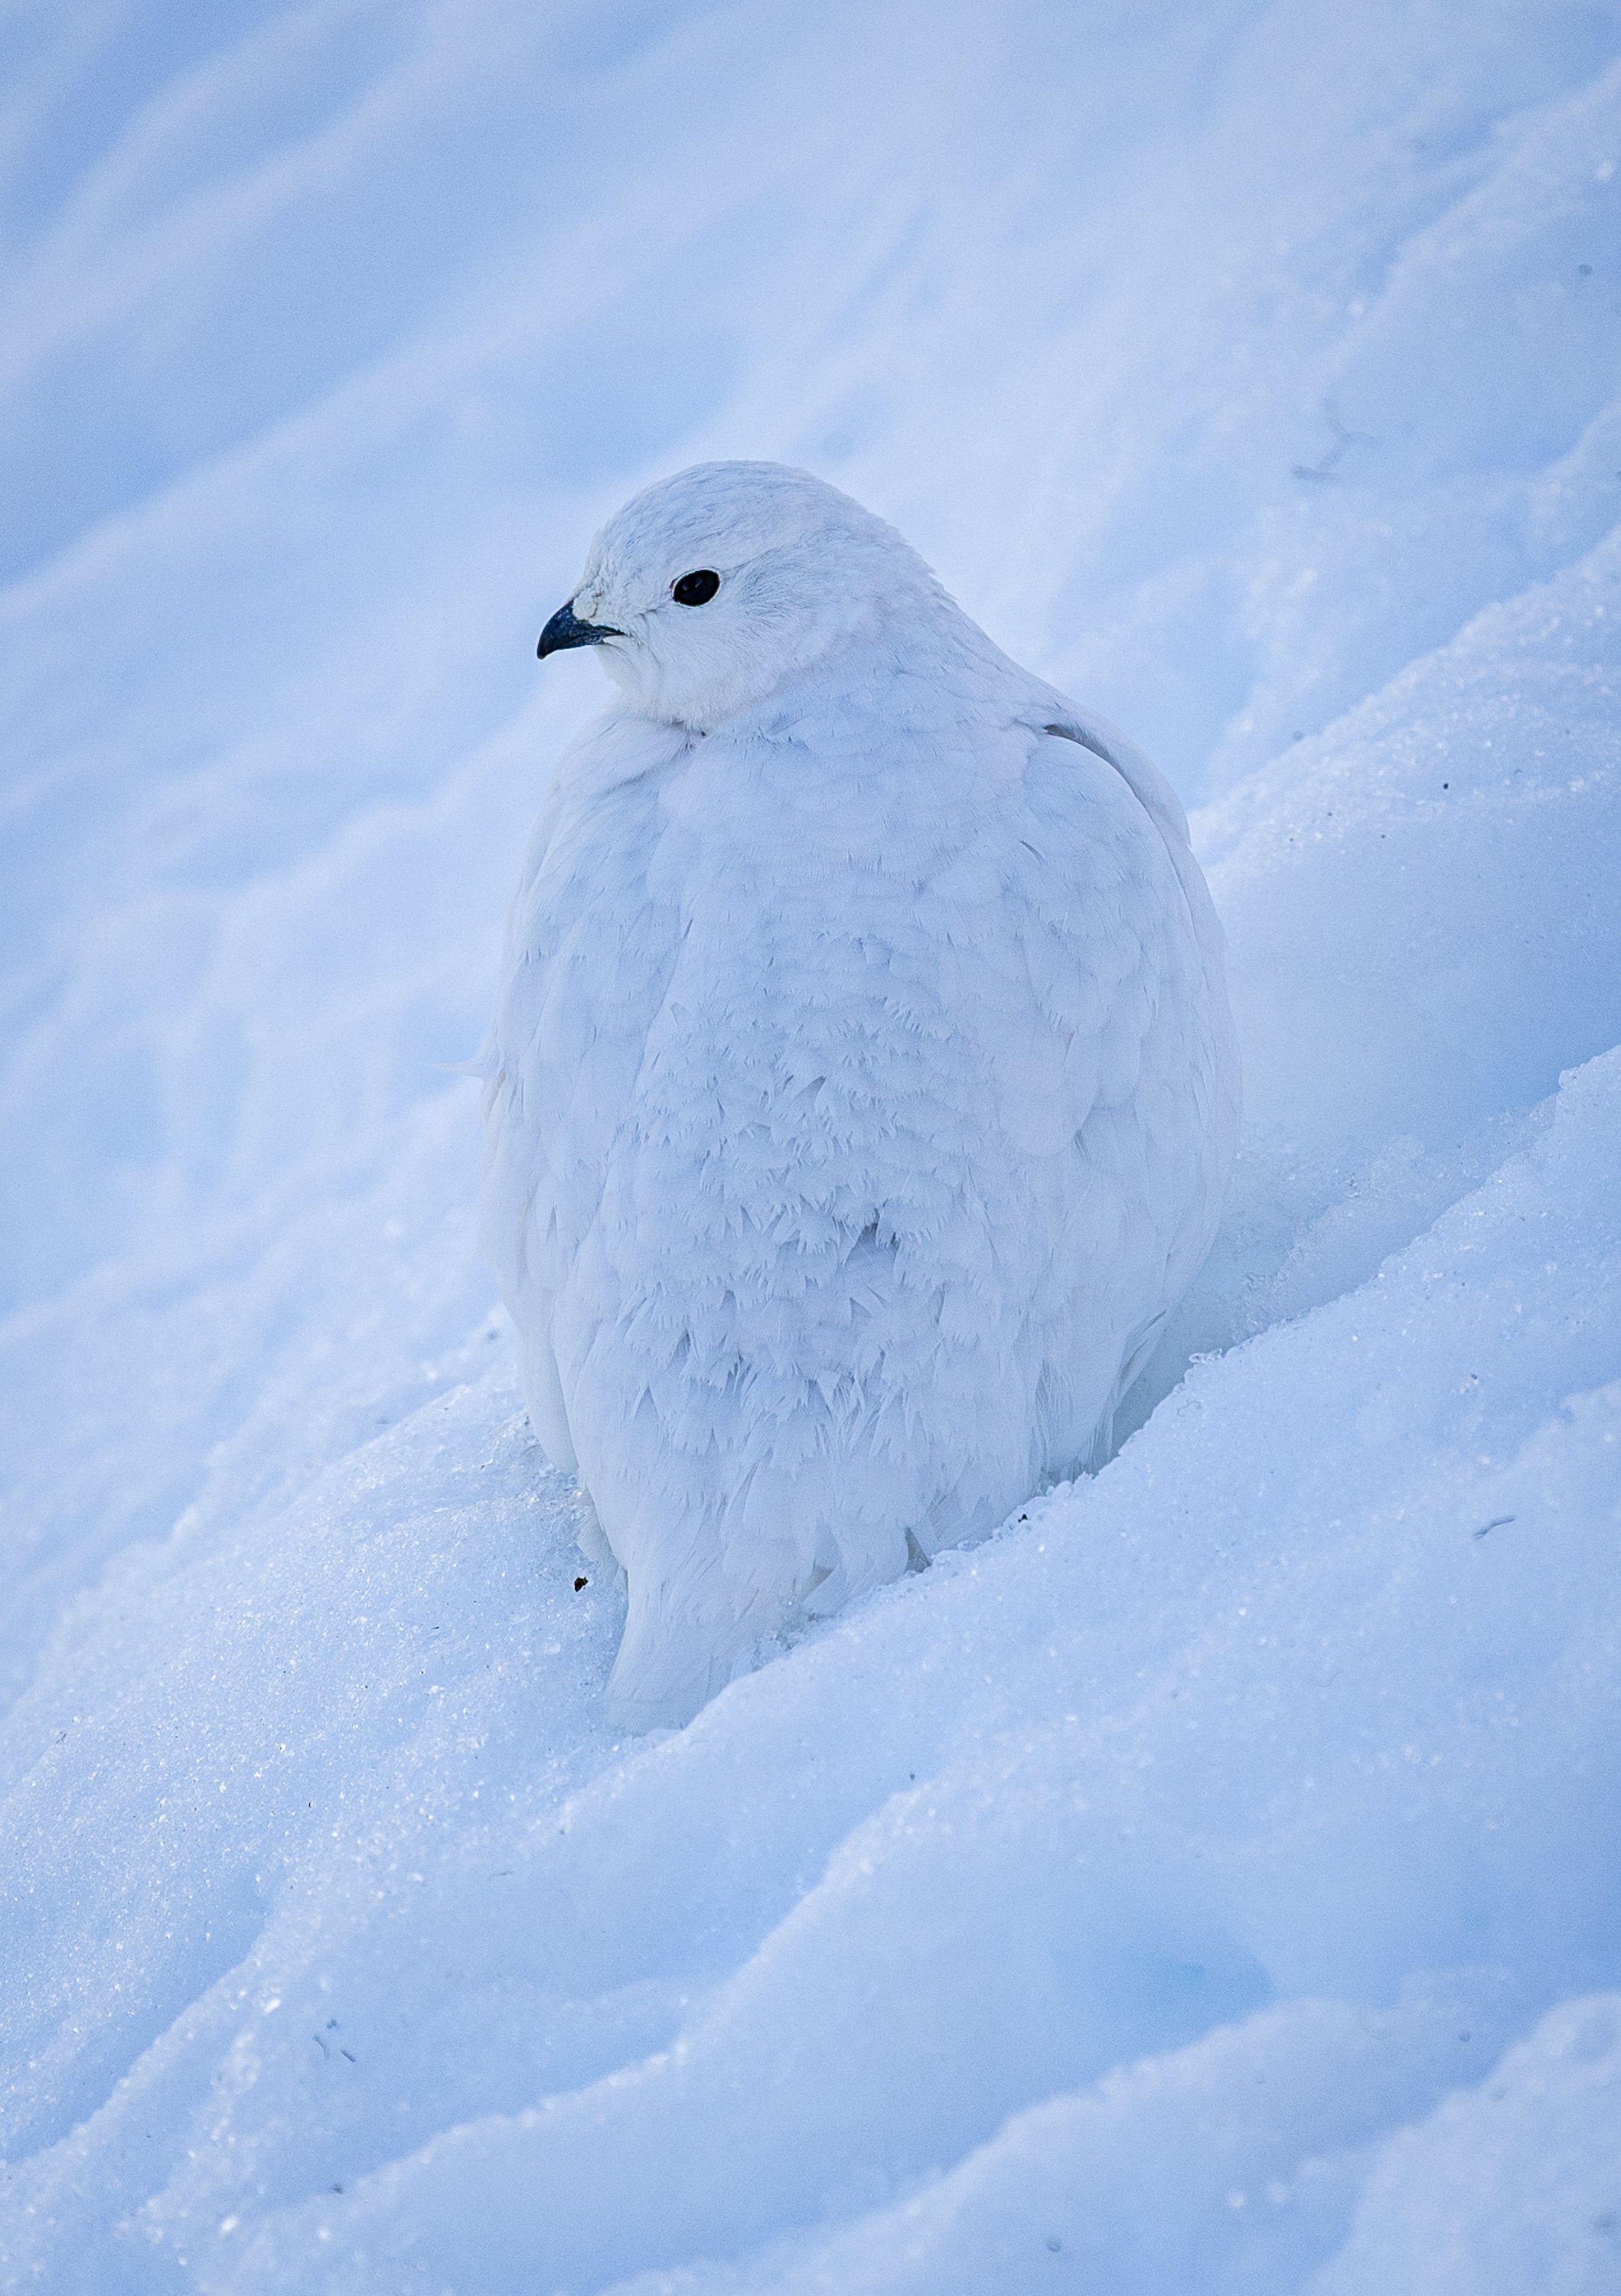
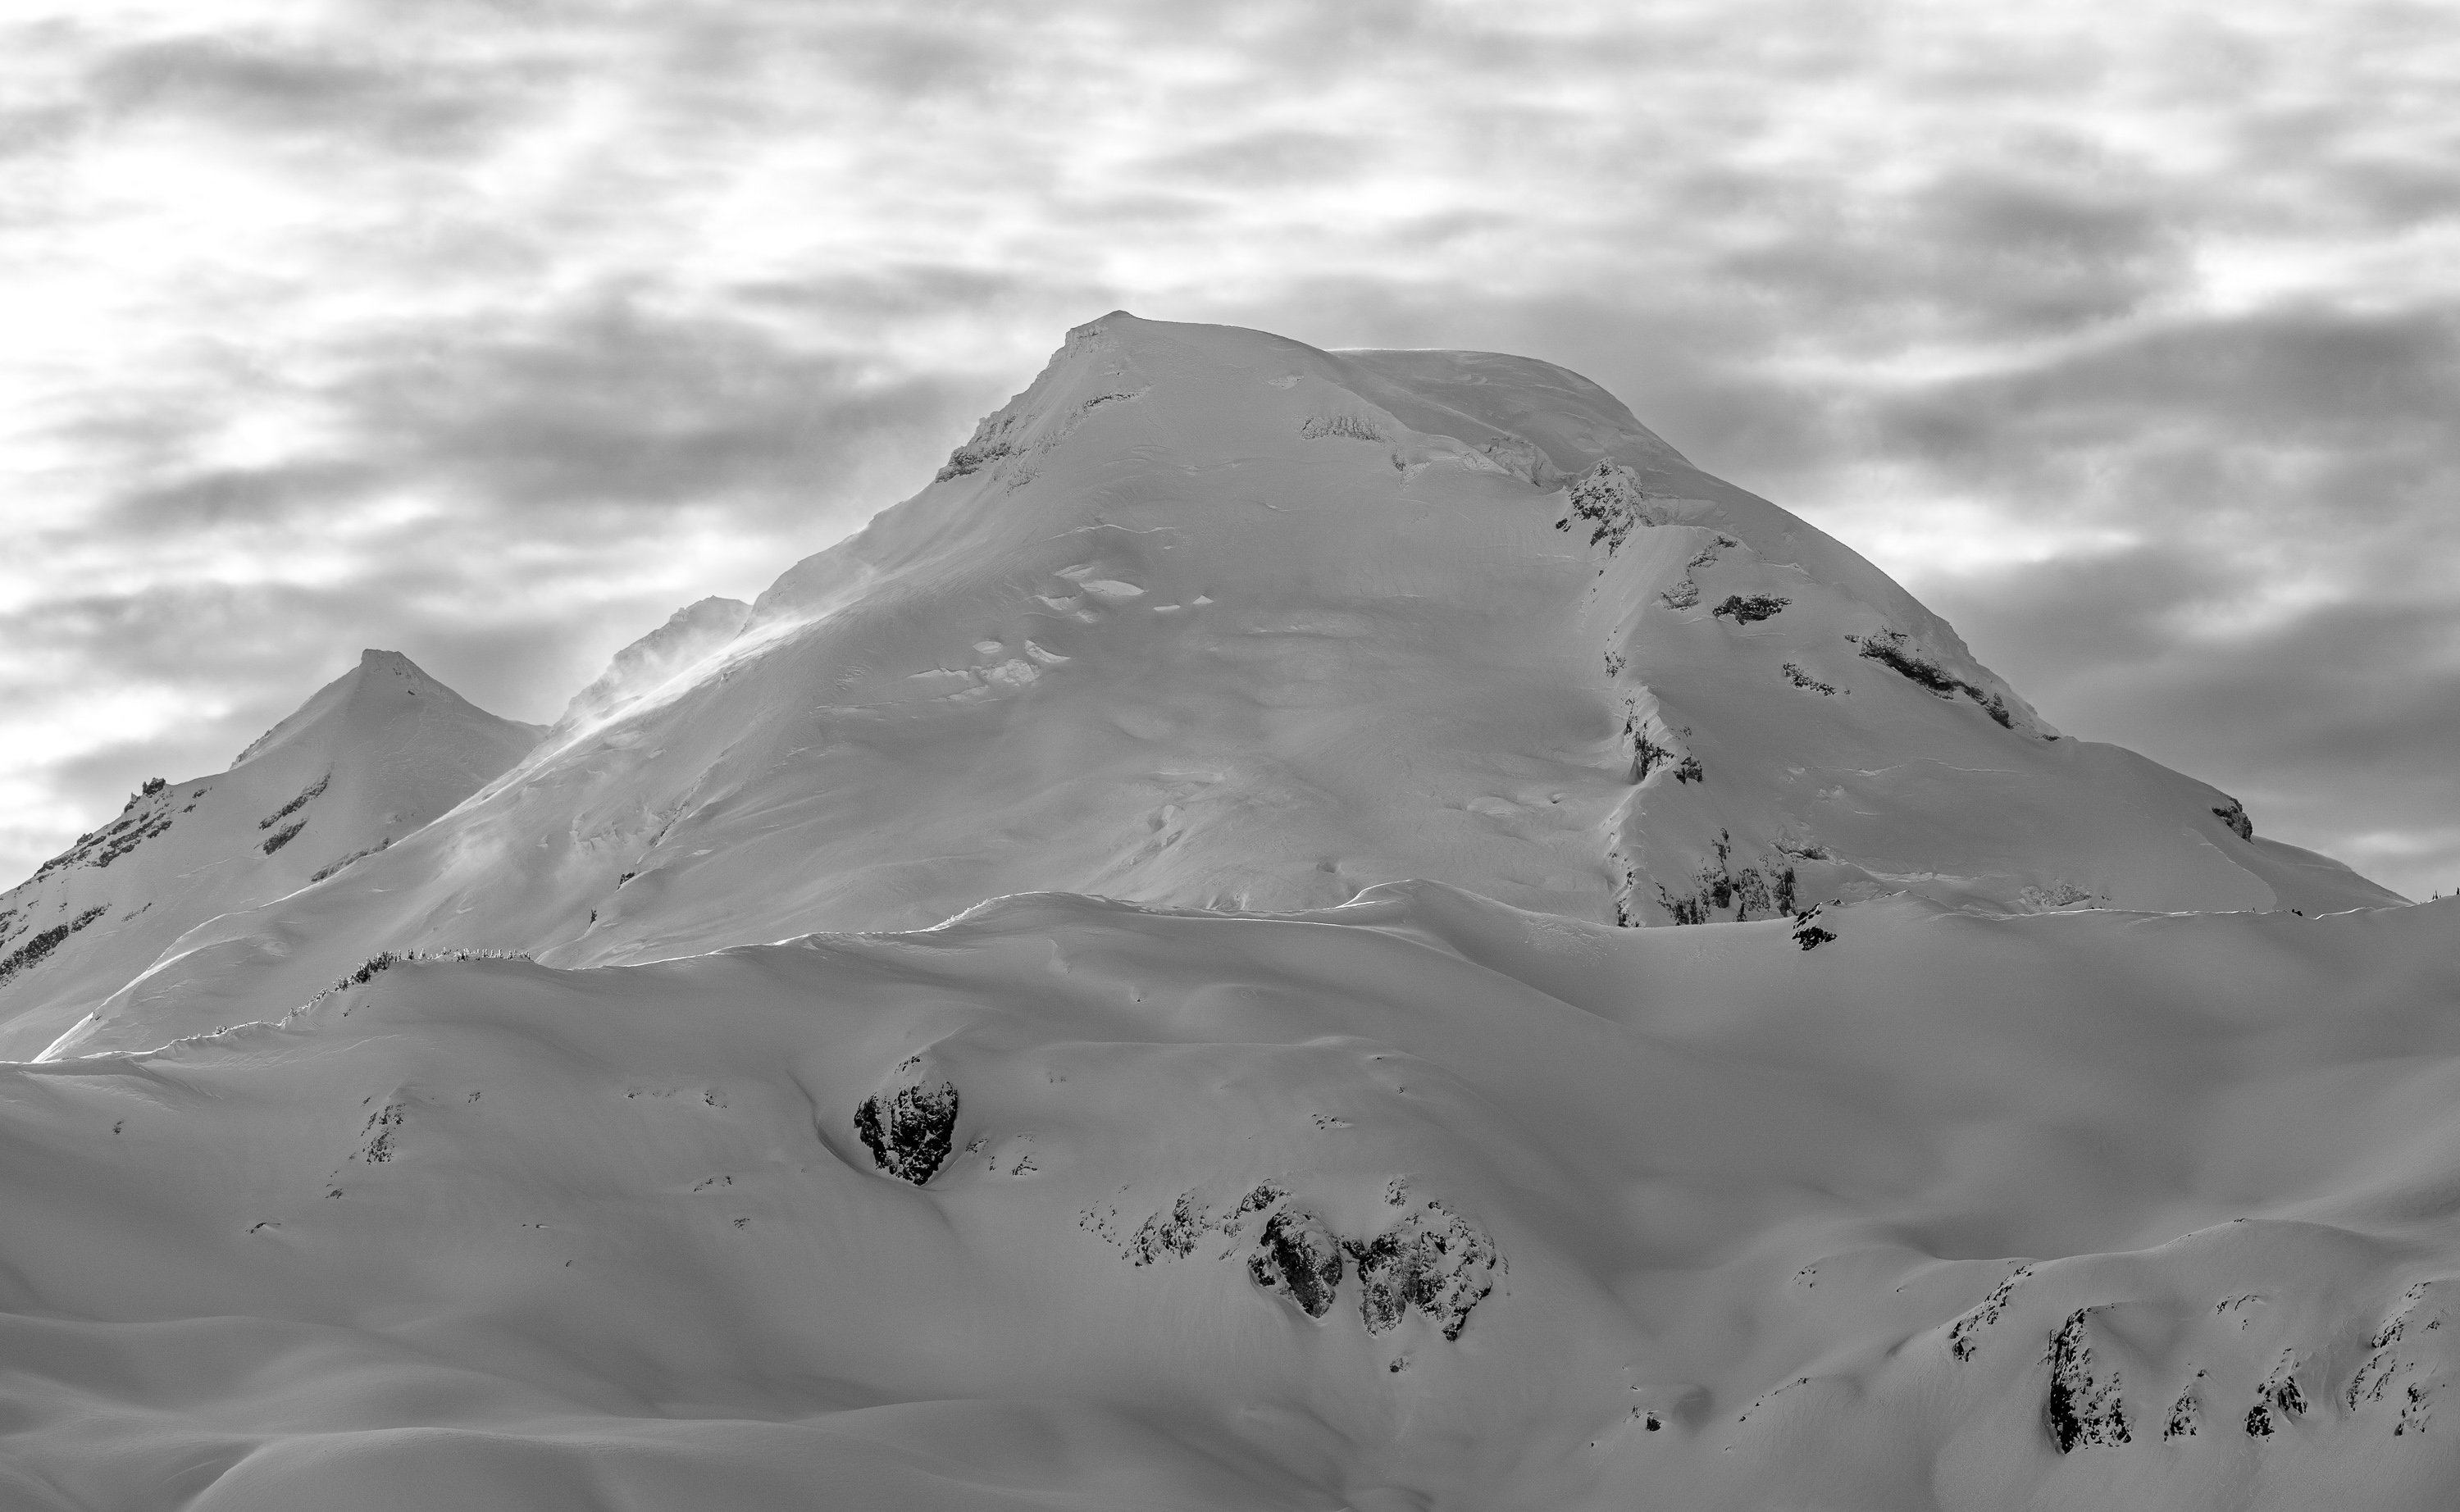
Trip: Coleman Pinnacle - Standard Trip Date: 12/30/2025 Trip Report: It has been a slow start to the ski season. A very slow start. But despite the setbacks, I've managed to have a few good days the past several weeks up in the Baker backcountry. We're fortunate up this way in that our usual backcountry backyard emerged relatively accessible from the December Floods. US2 and 410 aren't quite so lucky. I've not been doing anything remarkable the past few weeks in the Baker backcountry, but I do have a new camera that I have been having fun getting to know and so why not post a few photos from the classic Coleman Pinnacle tour? This is an outing that I tend to come back to over the past 20, climbing it every 5 years or so, if only for the views and the fun run down into Wells Creek. If you haven't been out that way.....you probably won't like it. Best to stay near town and reduce your carbon footprint. Sunrise from the parking lot: The classic view of Baker from Artist Point never gets old (to me): @Trent approaching the heli line: @Trent and Coleman Pinnacle: Der Shukshan: @Trent skinning up under Coleman Pinnacle: Summit of Coleman Pinnacle: Out to Chowder Ridge: Descending from the summit with Baker looming ahead: Ptarmigan in winter plumage down in Wells Creek: Windy on der Kulhsan: coming back up over Table on the way home: Shuksan is one of my favorites in the North Cascades: Sunset from the parking lot. As Ice Cube would say, "Today was a good day". Gear Notes: flotation, but please, leave the snowshoes at home. Approach Notes: Heather Meadows to Artist Point to alpine glory


 1 point
 -
Sloan and Bedal this past Sunday:1 point
-
East side of Mt. Pugh two days ago.
 1 point
 -
SJake on the summit of Luna, taken from the false summit with a disposable camera in 2018. One of those perfect mornings in the alpine.
 1 point
 -
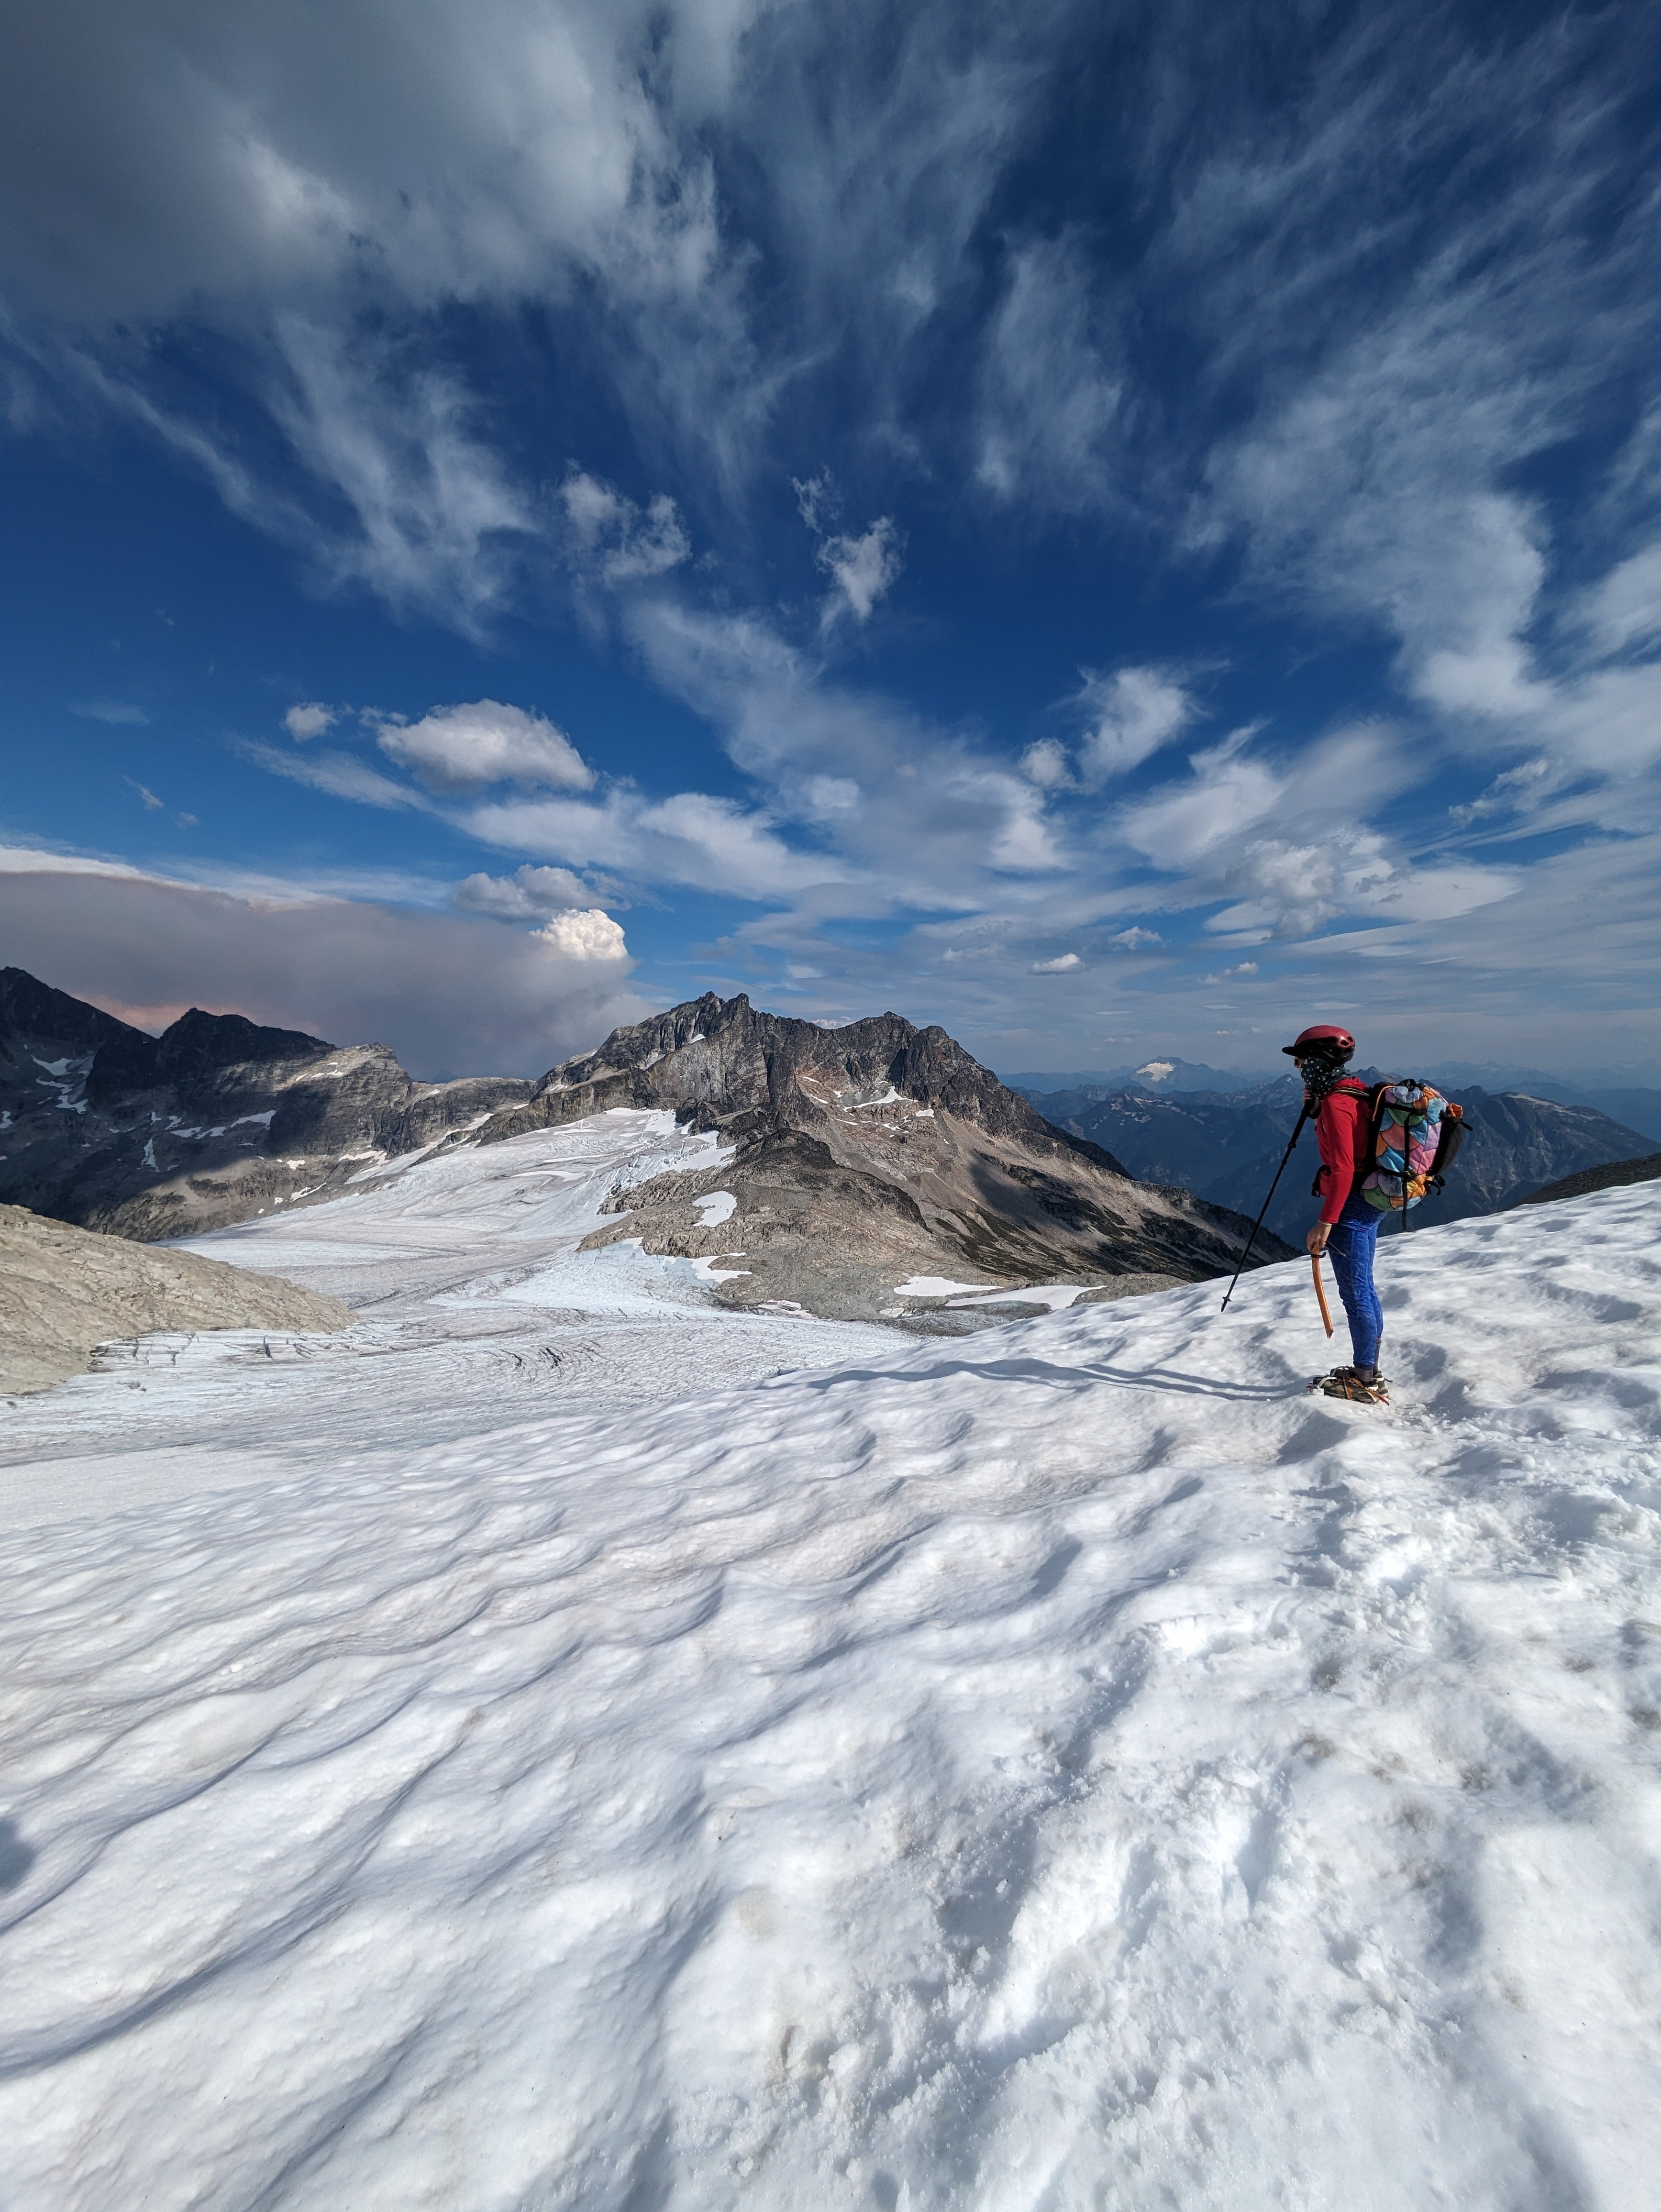
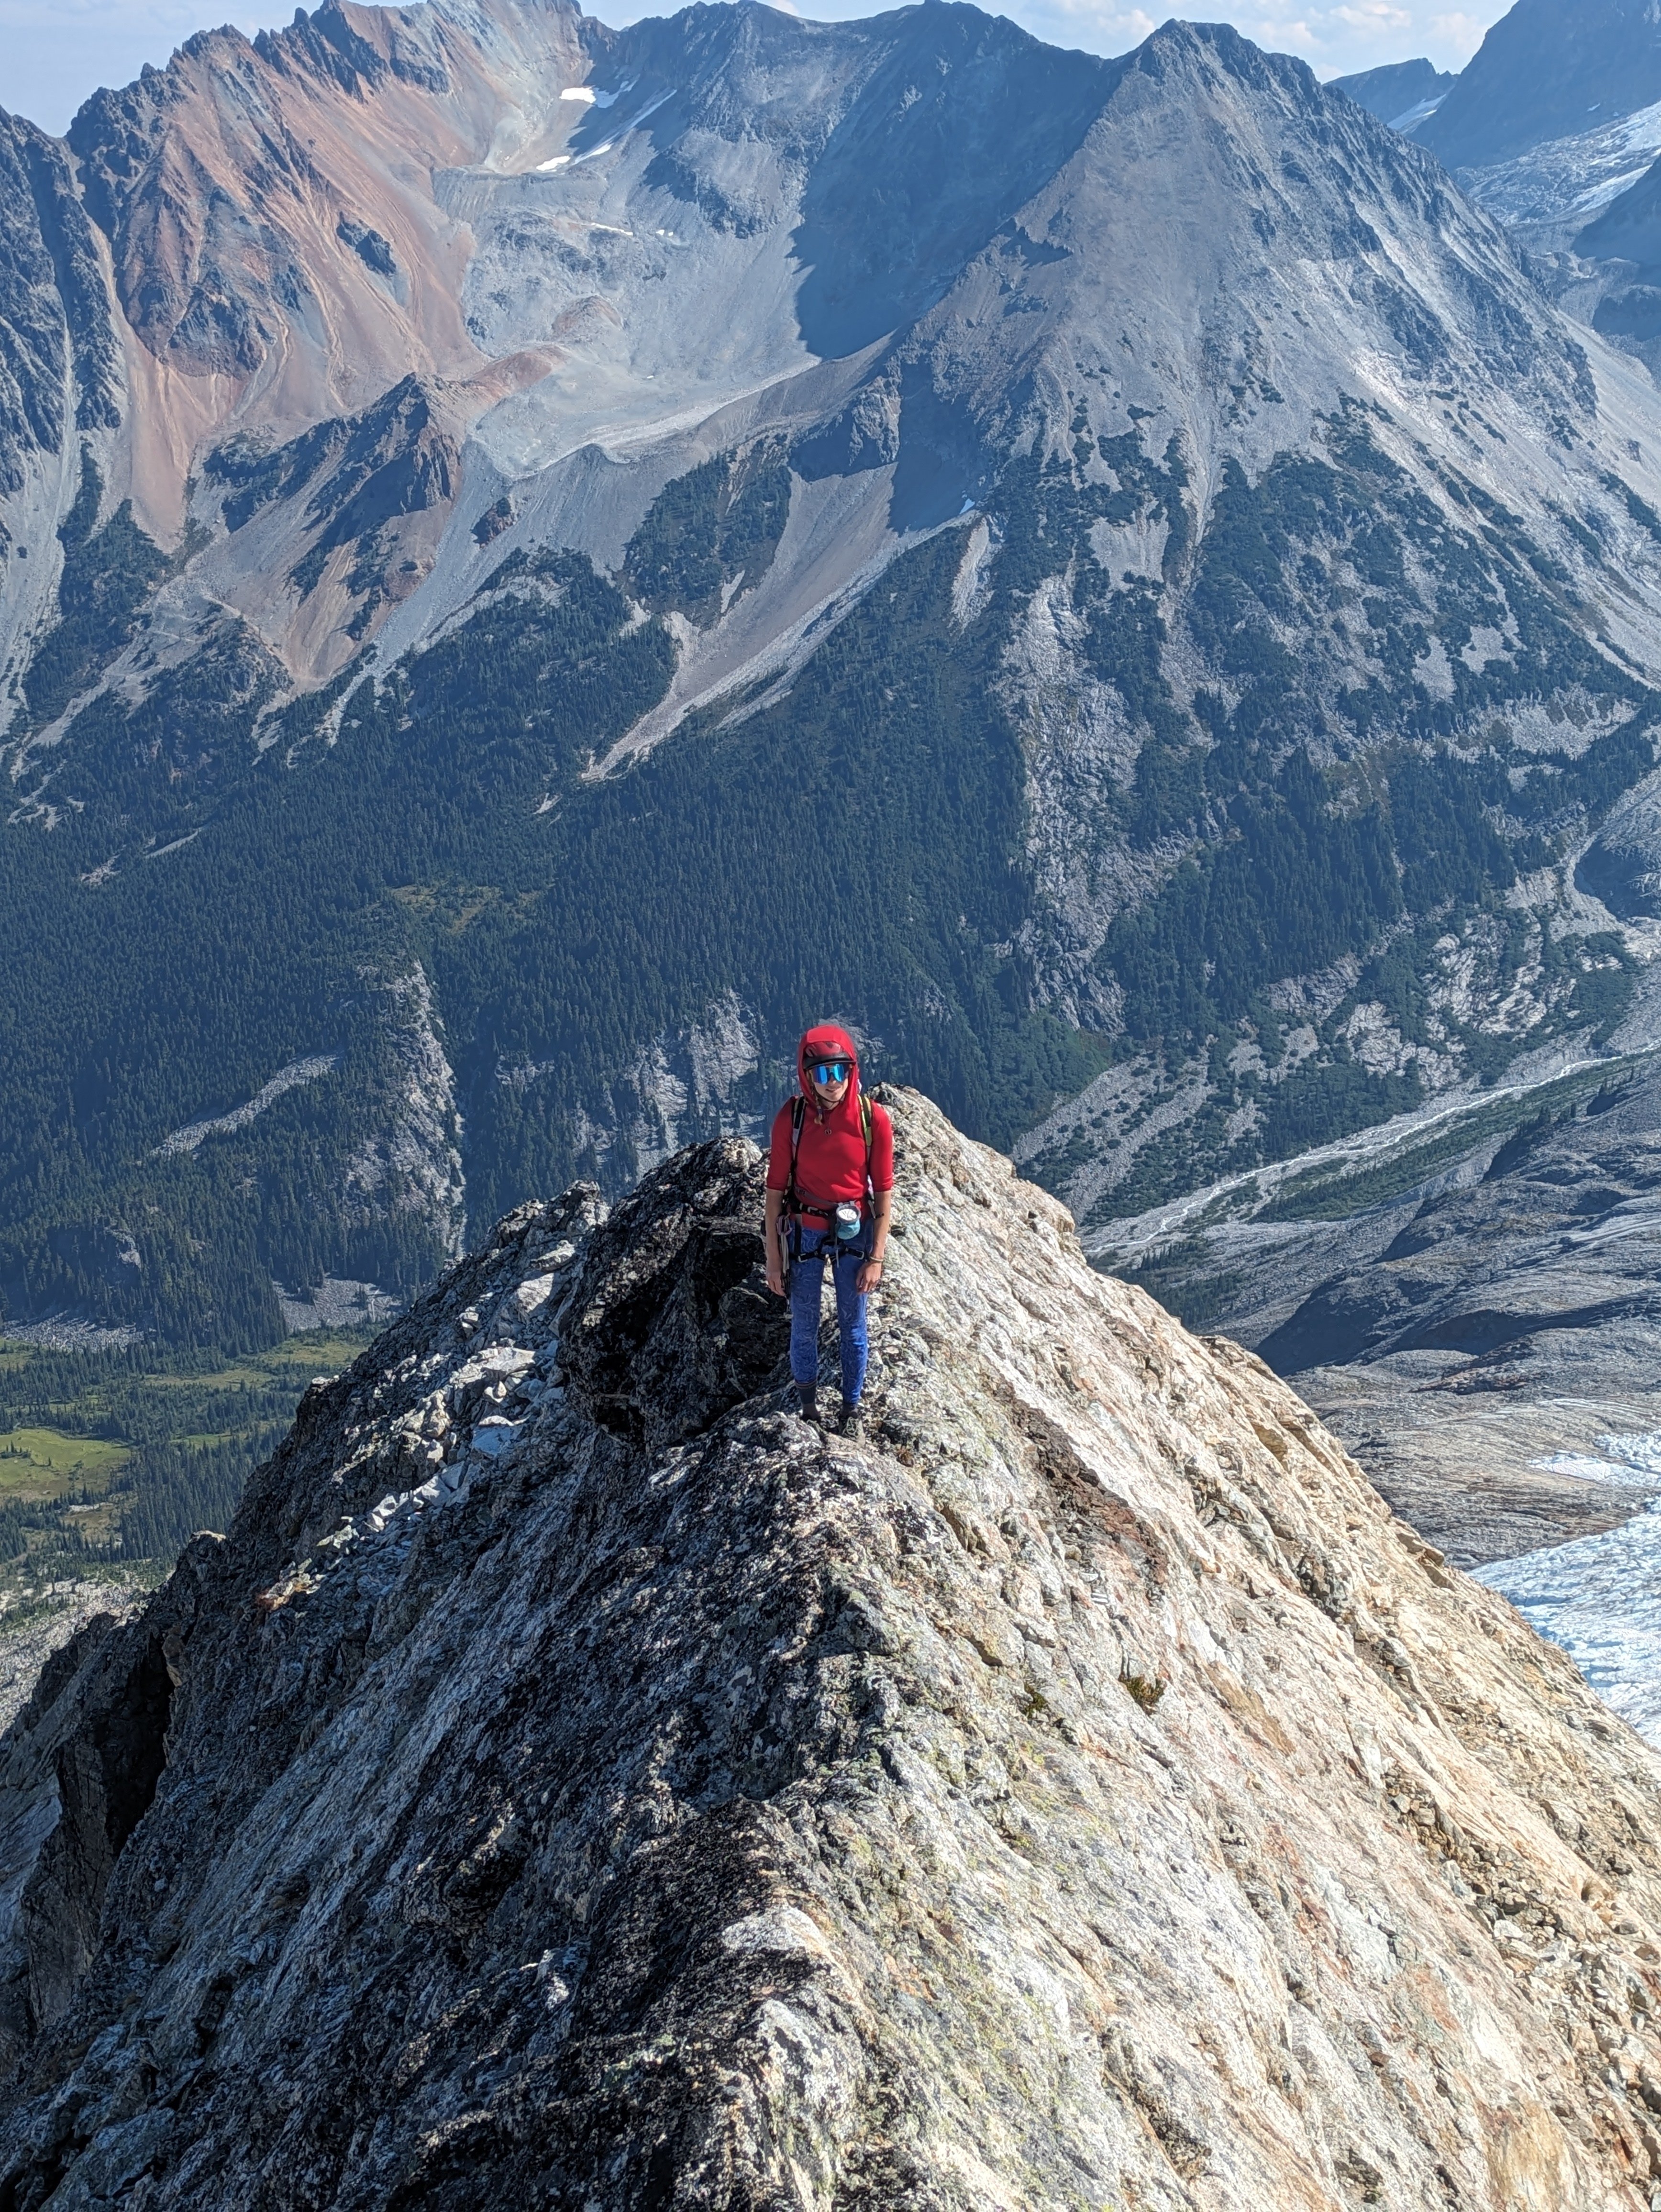
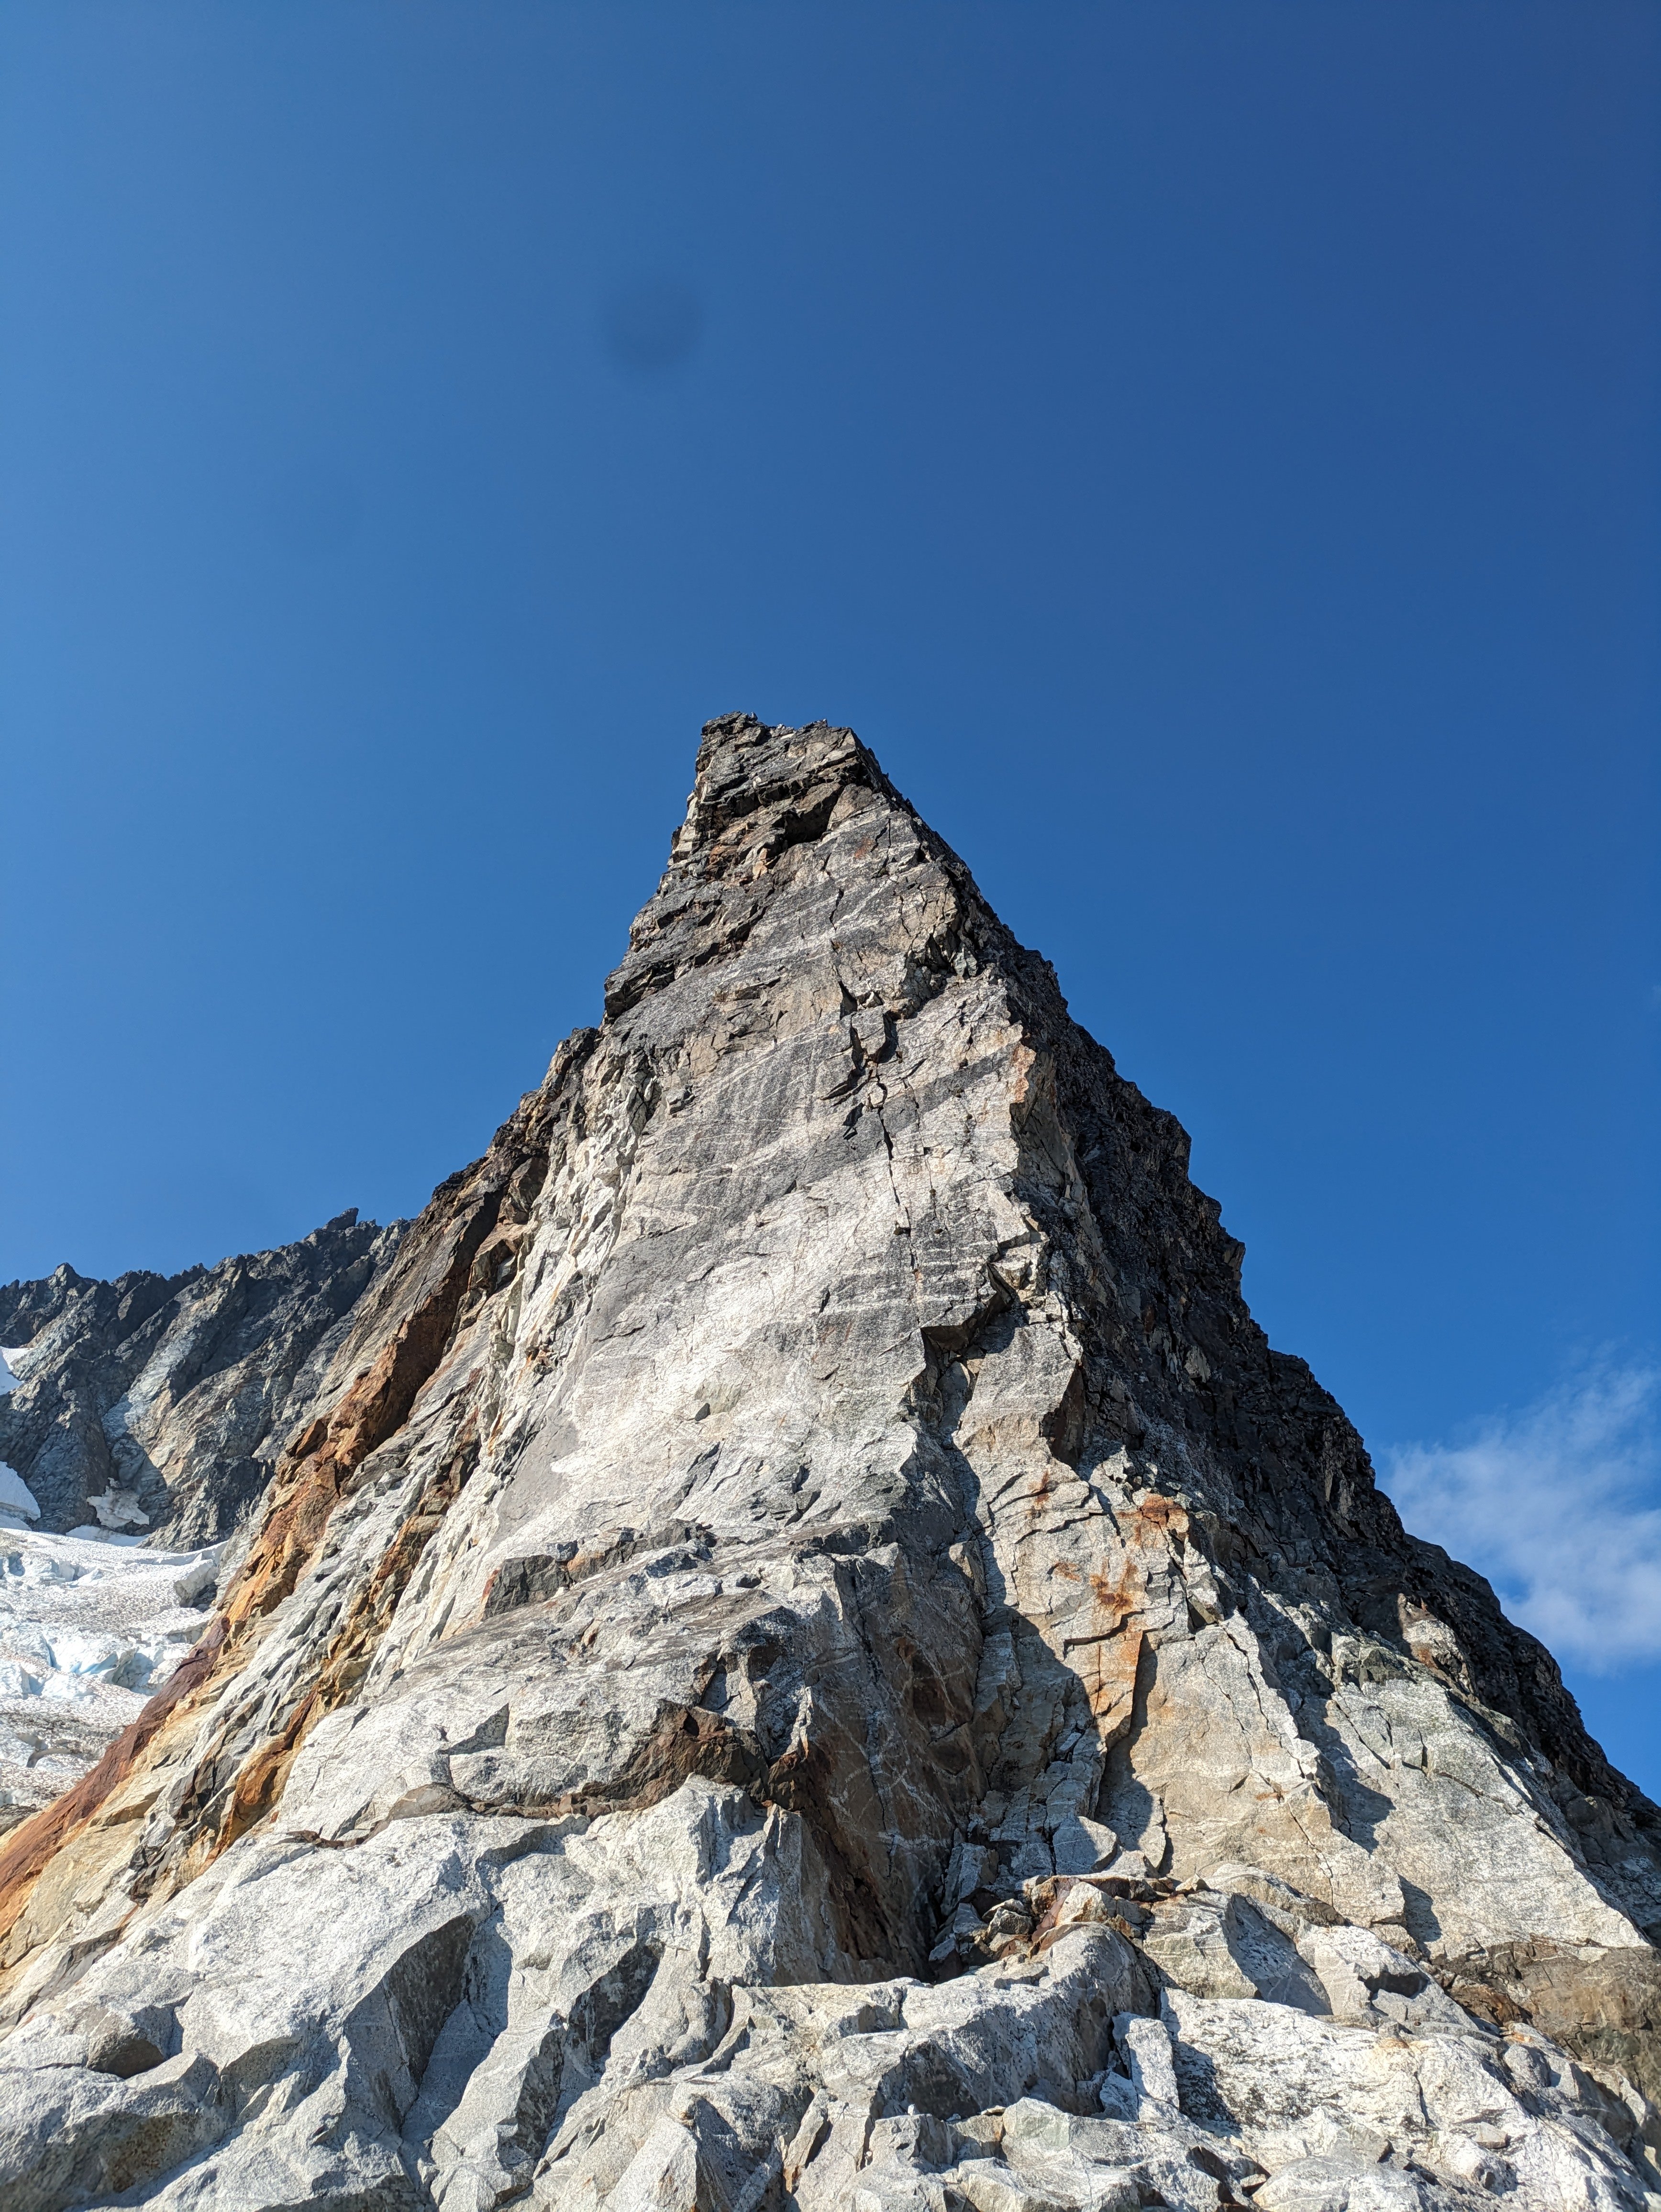
Over the last 3 days, Lani and I climbed what we believe to be the FA of the North Ridge of Redoubt. This is the long, NW trending ridge that looms over the North Face glacier route. The route was actually quite classic and comes with a high recommendation. It is by far more enjoyable than the standard route scree encountered on the descent. The route was primarily low fifth class and fourth class scrambling and we roped up for roughly 1100', though snow coverage and comfort sloping may drastically impact this number. The ridge gains a bit over 2000' over around .5 miles of horizontal. The name is inspired by the little ball of fire, Calcifer, from howls moving castle, as we watched the Perry Creek fire grow in the distance. Day 1 We approached and bivied at Ouzel lake. A bird tells me the Depot Creek "trail" is in particularly excellent condition, requiring NO bushwhacking, and they said handlines are even avoidable. The same bird mentioned that current logging roads take you all the way to the border, making the approach to Ouzel Lake 4.5 miles. We bivied all the way up at Ouzel lake as we were initially planning on climbing Spickard the next day, but growing smoke from the Perry Creek fire changed our minds on that plan. There is also an excellent potential camp at the top of Depot Creek falls, potentially allowing for a direct approach, though this would require bushwhacking of unknown taste... There are also potential bivy options on route to help facilitate a 2 day itinerary. Day 2 From the lake, we made a long contour on talus, loosing only around 400', once near and below the objective, we made our way up talus and slabs to the toe of the ridge. Excellent running water out of the toe of the glacier. We initially attempted the cracks smack on the toe of the ridge, I bailed around halfway up after encountering some 5.11 tips and entering unpleasant looseness. There is an obvious corner left of the toe that potentially holds a very classic potentially moderate direct start. The unsent directismo After bailing off the toe, we looked to the right and zig-zagged up ramps to gain the buttress crest. Snow coverage will drastically impact your experience here. Once on the ridge crest we found thousands of feet of enjoyable scrambling on mostly sound rock. Lani compared it to the NE buttress of triumph but with mostly better rock. We roped up for the occasional pitch, but mostly soloed. There is a broad saddle at 7600' where things begin to steepen subtly. This would also make an excellent bivy with a permanent snowfield for water access. Above the notch, the climbing steepened and we climbed a few back to back pitches until we were below a prominent gendarme. Unsure what the top of the gendarme would be like we traversed into the chossy gully to climbers left and climbed a short, overhanging pitch of surprisingly solid shist. After topping out the gully, we found the descent off the gendarme would have been chill, so Future parties should consider a direct line up the cracks on the gendarme for a more classic finish. Once at the notch in the ridge we met up with the large talus fields that define the slopes on the south summit. The traverse over the sub summits to the true summit was generally easy but involved a few sections of fifth class. Once on the summit, we began the "joys" of doing the standard route late season. Lani in the canonball hole Once at the base of the gullies we encountered awful scree, one could only imagine how much more awful it would be to go up, so there is that... The entire day we had been watching a fire grow in the East. Seeing it expand so quickly and already beginning to envelope spickard in smoke we decided early on our descent to forgo spickard and plan on hiking out the next day. Mordor to the East Day 3 Hike out, blueberries... Suggested Rack Single Rack .3-1, optional 2; full set of nuts; we had a single 60M rope, but it could be done with a 30M line to save weight.

 1 point
 -
Different people! Not to say anything of Mr Ng’s ability or potential. Maybe we all want to spot the next jeans wearing Cheamclimber, but I think it best just to encourage and help out the youth who clamor for the hills in our little community here. No sense in saddling expectations or projecting where someone is going. He will find his own way, and I hope his motivations are always his own. I do enjoy the TRs! Thanks Lucas!1 point
-
That was me. Cascade Climbers is a great regional resource while MP has a national or even a global reach. Just trying to be helpful.0 points