
Leaderboard


Popular Content
Showing content with the highest reputation since 02/24/26 in all areas
-
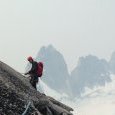
Trip: Mt. Stuart NE Face - "Always the Cowboy, Never the Cow" Trip Date: 01/24/2026 Trip Report: Mt. Stuart “Always the Cowboy, Never the Cow” January high pressure is almost always a given. Whether its three days or a week one can usually count on a high pressure system showing up sometime in January. This year it decided to consume a large portion of the month. Great for climbers! With freezing levels reaching well above 10,000ft for multiple days. Washington winter was looking canceled. After a week of warm weather, the cold finally returned. With clear skies and cold temperatures in the forecast climbing conditions were lining up. On Tuesday I got a text from Michael asking if I was free last weekend to go check out Mt. Stuart. He pitched a winter ascent of the DNR which I quickly counter offered with the idea of a line to the left of Girth Pillar we both had looked at before. Steph Abegg had posted a summit photo from Colchuck on Instagram and way in the back it showed the NE face of Stuart. One could see the face was covered in ice and that there was a sliver of white just to the left of the Girth Pillar. Not certain of conditions but excited for the potential we decided to go take a look. After a spree of texts we came up with a plan and started reaching out to friends for beta and gear. Michael was able to acquire a sled from Sam Duke (shout out Sam!) so we could zip our way up the closed forrest service road to the trailhead. The stars were aligning for a rare Washington winter climbing window. We met in Leavenworth Friday morning caffeinated and hungry. We quickly sorted gear and headed to the trailhead. Michael powered up the sled which gave a loud burp and rumbled to life. We gingerly made our way up to the trailhead as neither of us had ridden on a snowmachine, eek! But we kept it on the road. We left the Stuart Lake trailhead around 10am and were happy to find a nicely packed trail all the way to the mountaineer’s creek turn off. The warm weather had consolidated much of the snow making for mellow boot travel once we stepped off the main trail. It took us about four hours to make our way to a bivy spot near the end of the sherpa glacier drainage. We set up camp underneath a boulder settling in making jokes and discussing a wide range of subjects to occupy our time before tucking into the tent. Oh he's a wanderer! Just a wanderer! NE face looking fat! At 4am our alarm clock rang and we slowly rolled out of bed. After a slow start of brewing up and eating breakfast we packed our bags leaving camp around 5:30. We made our way up to the ice cliff glacier finding passage along the right side of the ice cliff via ice and snow covered slabs. After getting onto the glacier we could see how much ice was covering the NE face… it was historic conditions! After roping up to cross the glacier we navigated our way underneath the face. At this point the wind had woken up and began biting at any part of skin we had exposed. This would make for a chilly morning. Big Mike getting ready to get Shrundy! Sunrise on the NE face! The bergshrund crossing was looking questionable. It appeared that crossing this shrund may provide a serious challenge in the future as the options were slim. Michael made his way over a narrow snow bridge finding Neve and ice on the other side. Once across we simuled our way up a few runnels of ice eventually making our first belay below a rock step. After reaching the belay I took the rack and set off on my first lead. I made my way up this rock step placing the #4 in a very nice crack working my way into some delicate feet with good tool sticks. Once I mantled this problem I moved my way into another 20m ice runnel. Topping out I came into a snow slope that lead to the streak of ice we had been ogling ever since we saw the face. I belayed up Michael and at this point the wind had made its presence well known. It made for parka and puffy pant belays necessary. Photo: Michael Telstad First Rock Step After a hasty transition Michael took off into what appeared to be the steepest section of the route which we broke up into two pitches. Michael led a really fun ice flow with stemming and good sticks into a shallow snow slope and put me on belay. As he brought me up we were chatting how much type one fun this would be if the wind would just die down. Looking up I was excited that this was my lead. It looked like the most exciting pitch of the route. It was a left facing dihedral with a smear of ice running down the left side. I started up aiming for the corner to our left. The trickiest part was getting through a thinnest part of the smear using small rock edges and delicate front points on the thin ice. This lead into the steepest ice on the route which was challenging to navigate due to the verticality and irregular ice flow. After topping out the smear I found a rock outcropping and belayed Michael up. When he reached the belay I could see in his eyes he had been blessed by the screaming barfie fairy. After a minute of arm swings and groans he took the rack starting up the next section of ice and snow runnels. Photo: Michael Telstad The flow that started it all Photo: Michael Telstad Getting the goods! Michael led us up another rope length with some simul climbing taking us to the upper snow slopes. From here we chose the path of least resistance taking a right leaning snow ramp that we saw would take us to the sub summit. From the photo it looked straight forward. Funny enough it ended up being some of the slowest climbing on the whole route. The snow ramp we saw was actually a very narrow band of snow that was a strange consolidation requiring multiple kicks to make a secure step. This ended up being some blue collar toe bashing over the next hour or so. Bashing my way across this ledge in one long simul-block we eventually made it to an anchor where the ramp turned into a snow field leading us to the sub summit. Michael later told me he was annoyed with how long I was taking until he came around the corner and then realized the reason for my slow lead. He proceeded to thank me for the steps I had painstakingly made. Almost There! Topping out the sub summit we popped onto the sunny south side and took a snack break. We ditched packs and ran up to the summit snapped a few photos and headed down. We walked and down climbed our way to the sherpa glacier descent exit. Front pointing our way down the sherpa glacier we eventually made our way back to camp sometime around 6pm. I don’t quite remember what time. Obligatory Summit Selfie Sunset Selfie. Back at camp we ate our de-hys, listened to music and hopped into our tent. The next morning we walked out following our tracks through the mountaineer’s creek drainage. We were psyched on what we had climbed but our excitement also laid in what might come next for the NE face of Stuart. Our Camp We believe our route climbs a direct start to the ’86 Girth Pillar Left completed by Mark Beibe and Charlie Hampson which was done as an aid climb in Octobe. We climbed this completely free following ice, snow and neve with a few mixed sections. Thus it was not quite a new route but definitely a first ascent in this style. We chose the name “Always the Cowboy, Never the Cow” after a CMAT lyric from the song “I Wanna Be a Cowboy, Baby!”. This was due to the blue collar climbing and the feeling of being cowboys out in the wild wrangling ice. Photo: John Scurlock “Always the Cowboy, Never the Cow” AI5 M5 FA: Michael Telstad and Tucker Merrill Gear Notes: Alpine rack to #4, nuts, screws. Approach Notes: Mountaineers creek to Ice cliff glacier3 points
-
I recently learned to play toxicity on my new Schecter (it lives in drop C atm). Gonna perform it soon for a charity event1 point
-
Rainier’s season has been getting shorter due to glacial wasting and recession. I personally would not attempt the standard routes on Rainier past June; even earlier for many other routes. This season is likely to be particularly short due to the snow drought in the western U.S. Also, I would skip St Helens.1 point
-
1 point
-
Retail price for a similar FF bag is $1,200 and FF bags hold their value. People are gearing up for Denali now, that would be your target market. The right person would be happy to pay $600 for this bag.1 point
-
I was very cold and my calves were getting tired. I also probably needed a snack. Thanks for the write up Tucker!1 point
-
Board doesn’t yet support heics. Can convert them to jpg. Note to self: check on status of this. edit: no plans for support. Only Safari renders them. Other browsers do not. So it’s not a forum thing, it’s Apple doing their thing. best I could do is have the board auto convert them to jpg on upload or something, but that isn’t happening anytime soon.1 point
