All Activity
- Past hour
-
 What a sweet adventure! Nice job on the line. Bout time someone found another way to get into the pickets! 😆
 - Today
-

first ascent "Imperfect Bypass" IV 5.10+R FA of the SW ridge of Whatcom Peak
wayne replied to Sam Boyce's topic in North Cascades
Well done!! That’s a huge line for sure ! -
 pdxscotty joined the community
 -
Which side are you approaching from? Could probably get eyes on it before you leave the TH if you're smart about it. I was up by the Prouty Glacier on South Sister today and was surprised at the amount of snow. The summits were socked in so I couldn't see the upper mountains. I would guess there will be some snow and some choss based on what I saw and my experience up on North.
-

first ascent "Imperfect Bypass" IV 5.10+R FA of the SW ridge of Whatcom Peak
JasonG replied to Sam Boyce's topic in North Cascades
Yikes! Well done keeping things from going bad, and thanks for the honesty. Beautiful country to be in, if nothing else. -
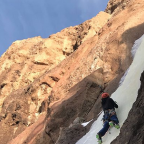
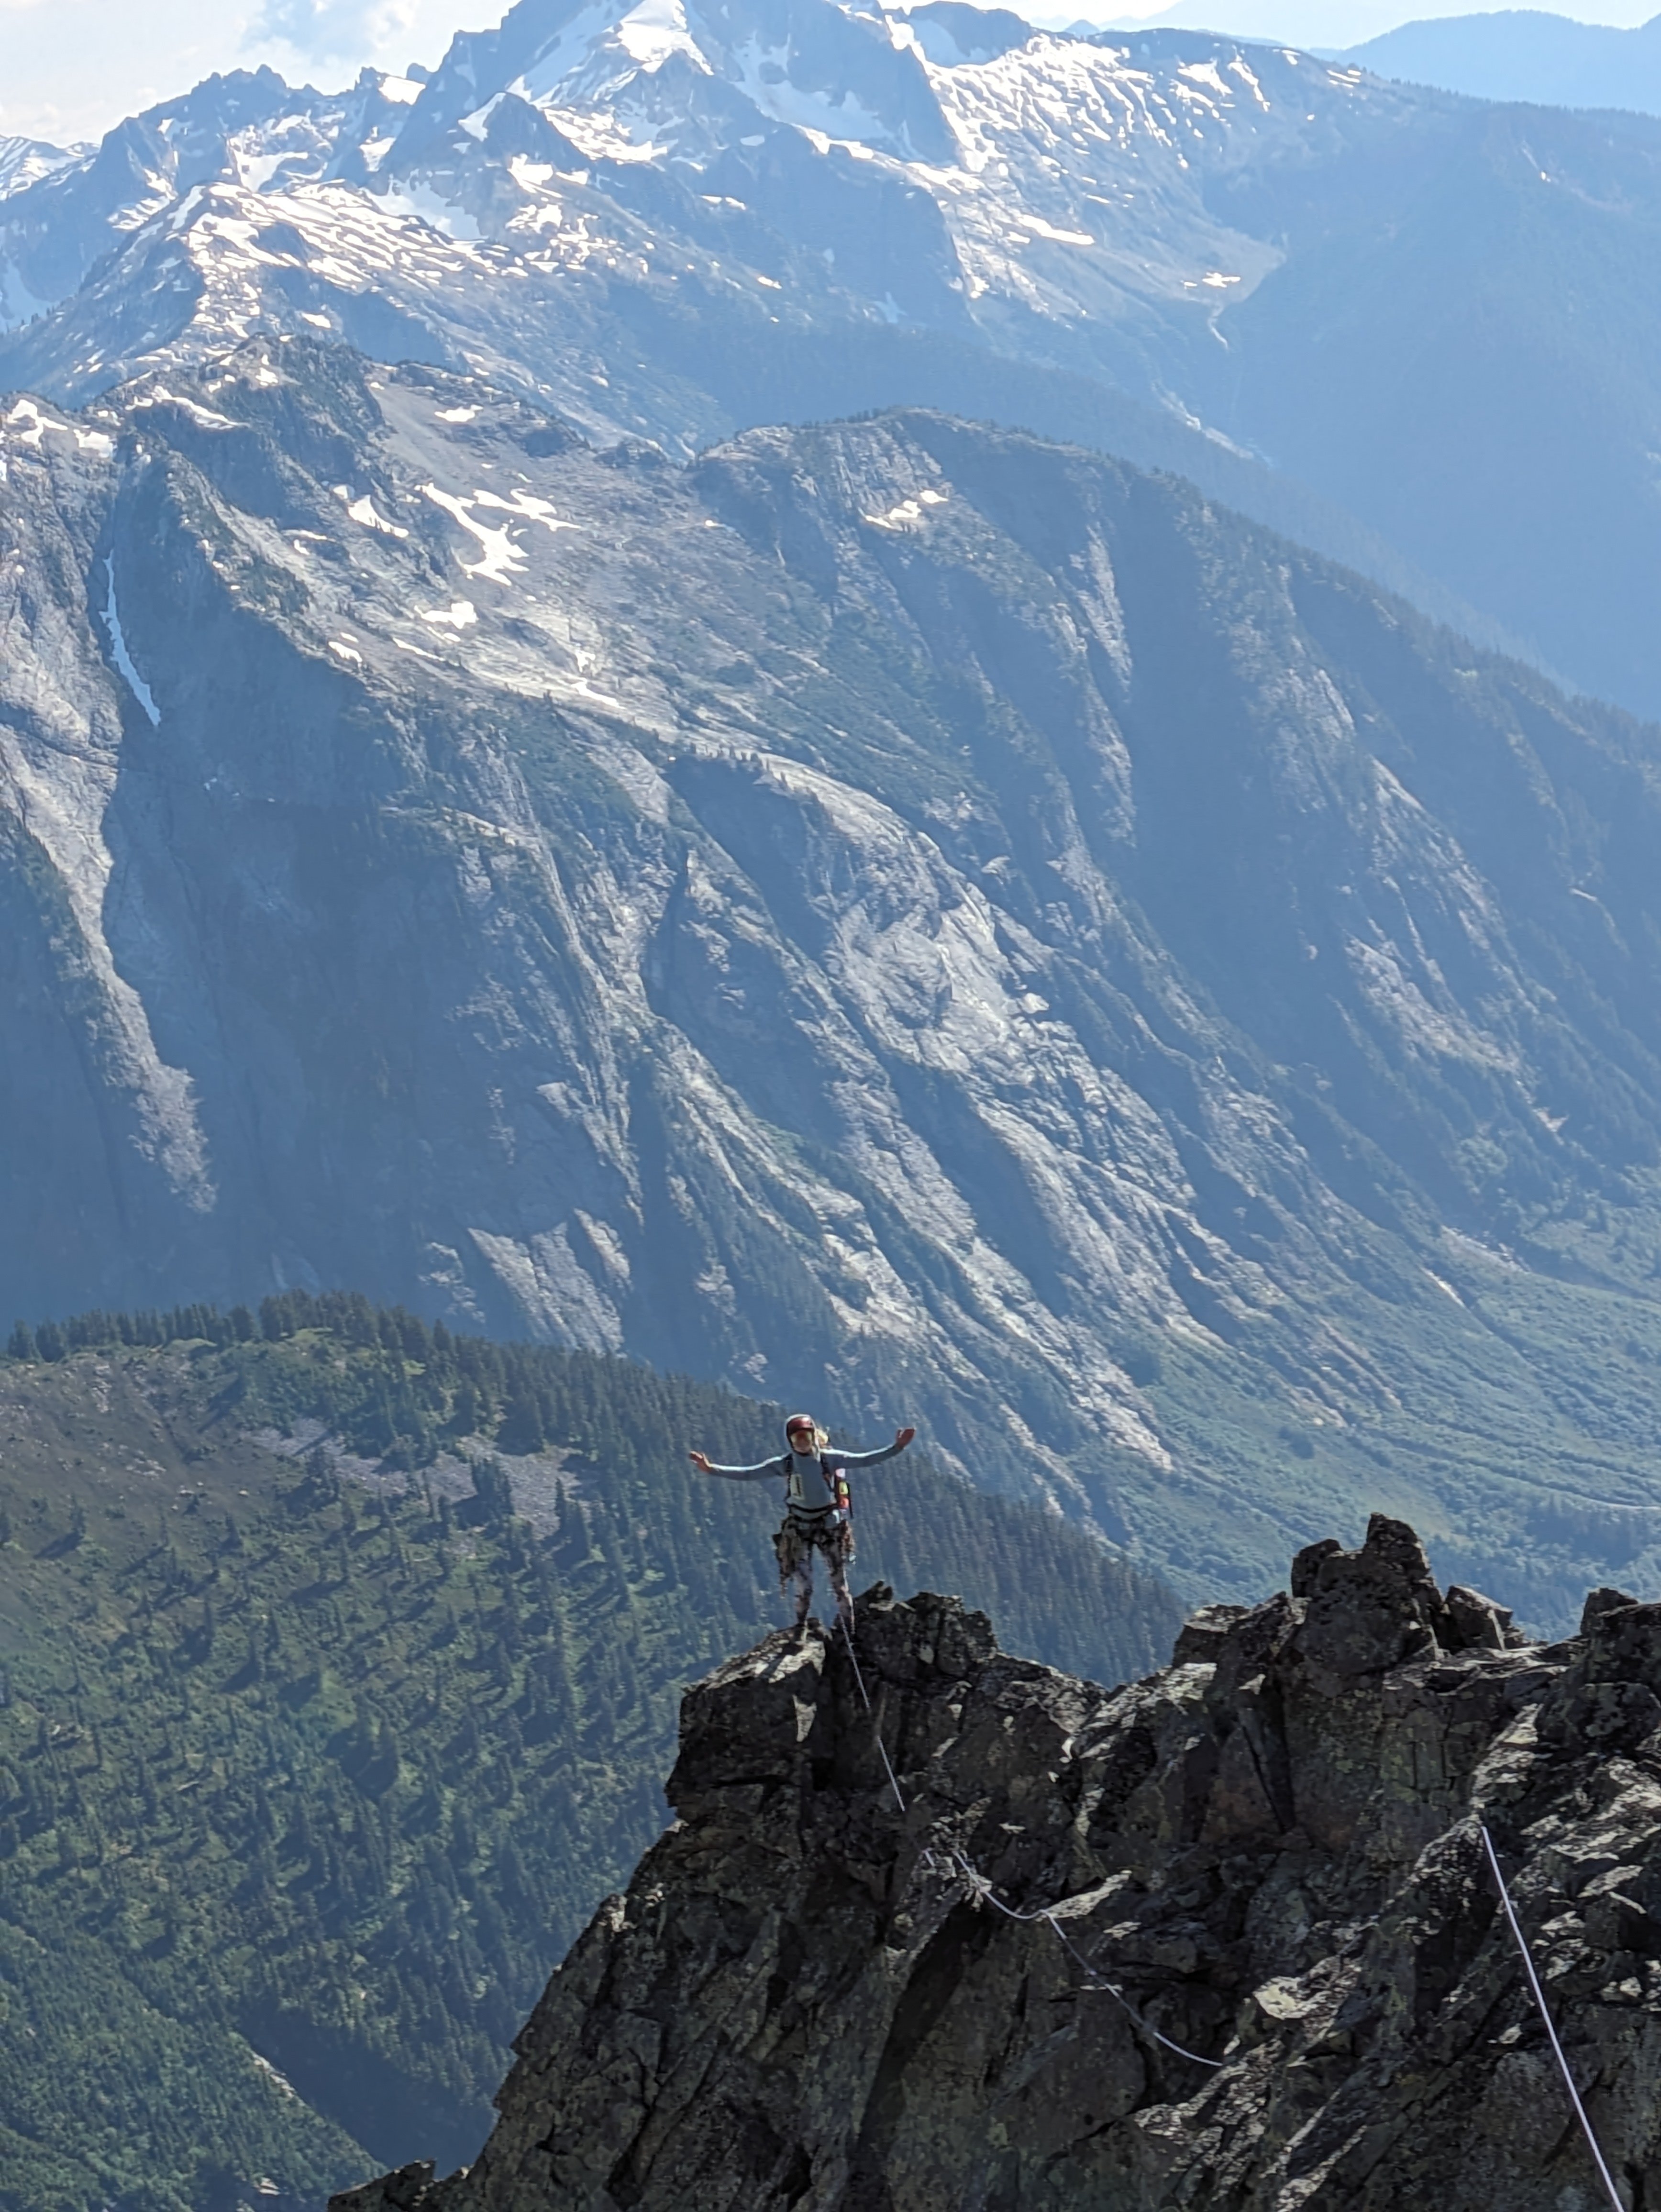
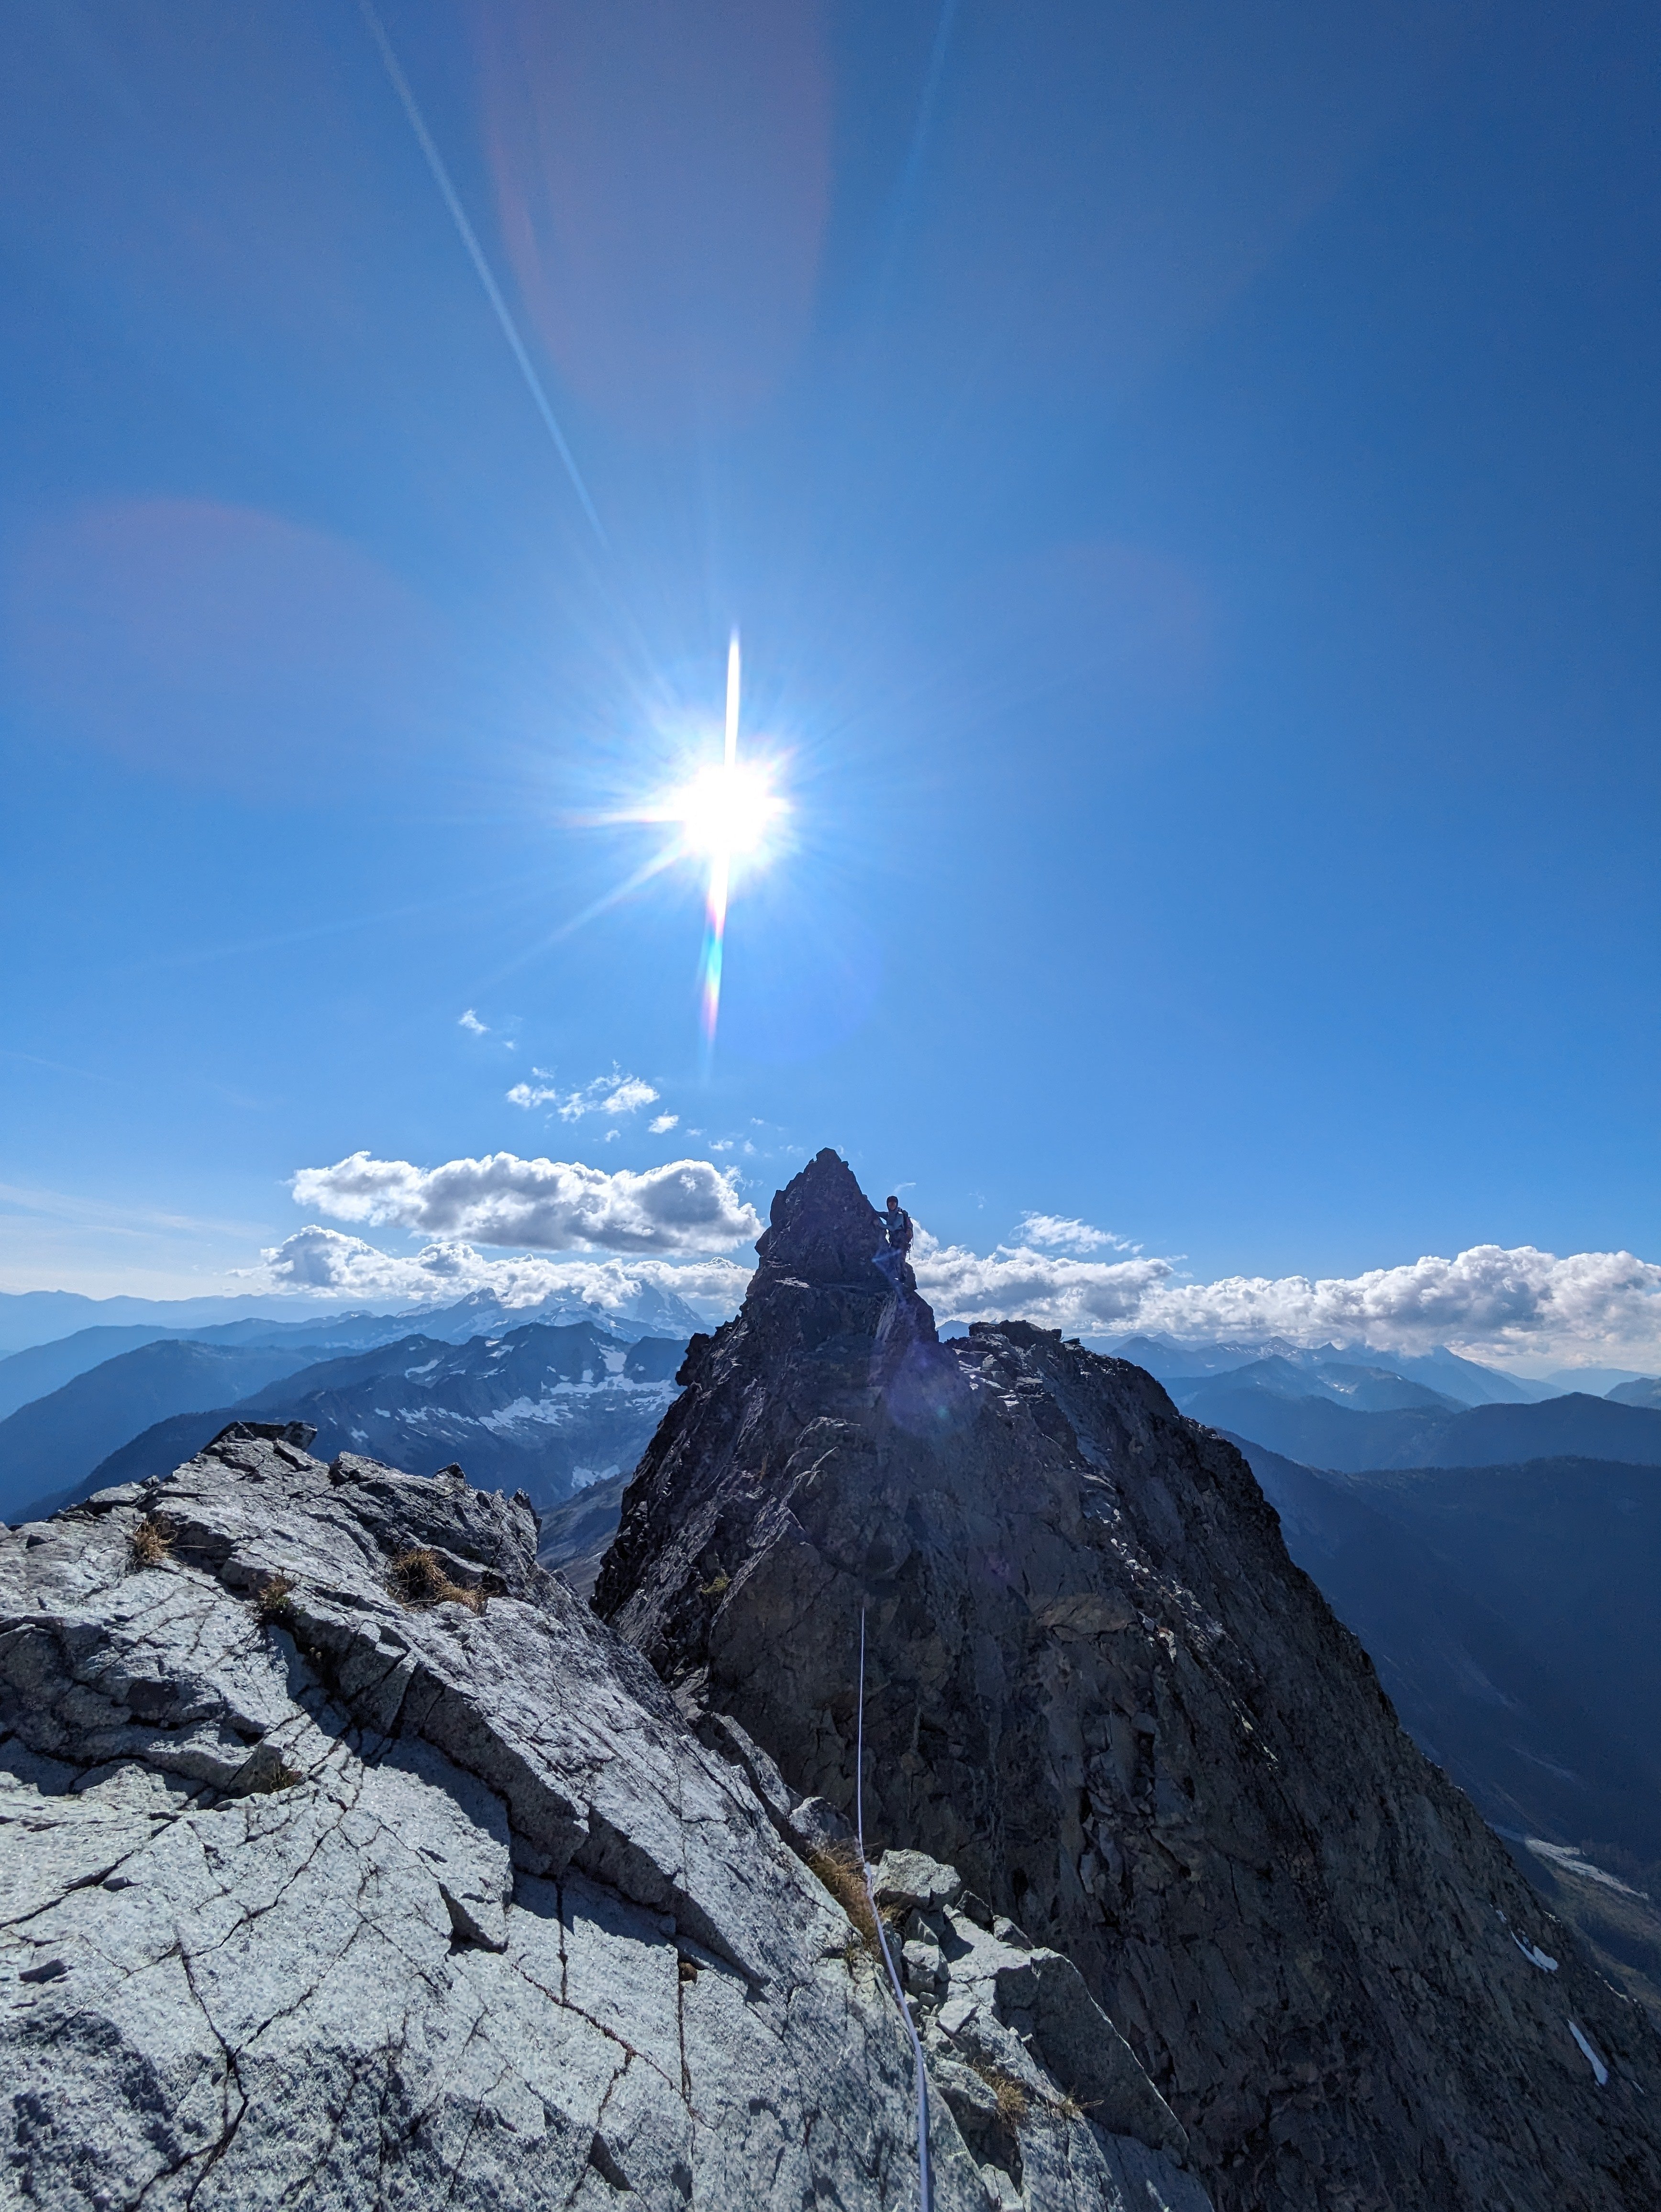
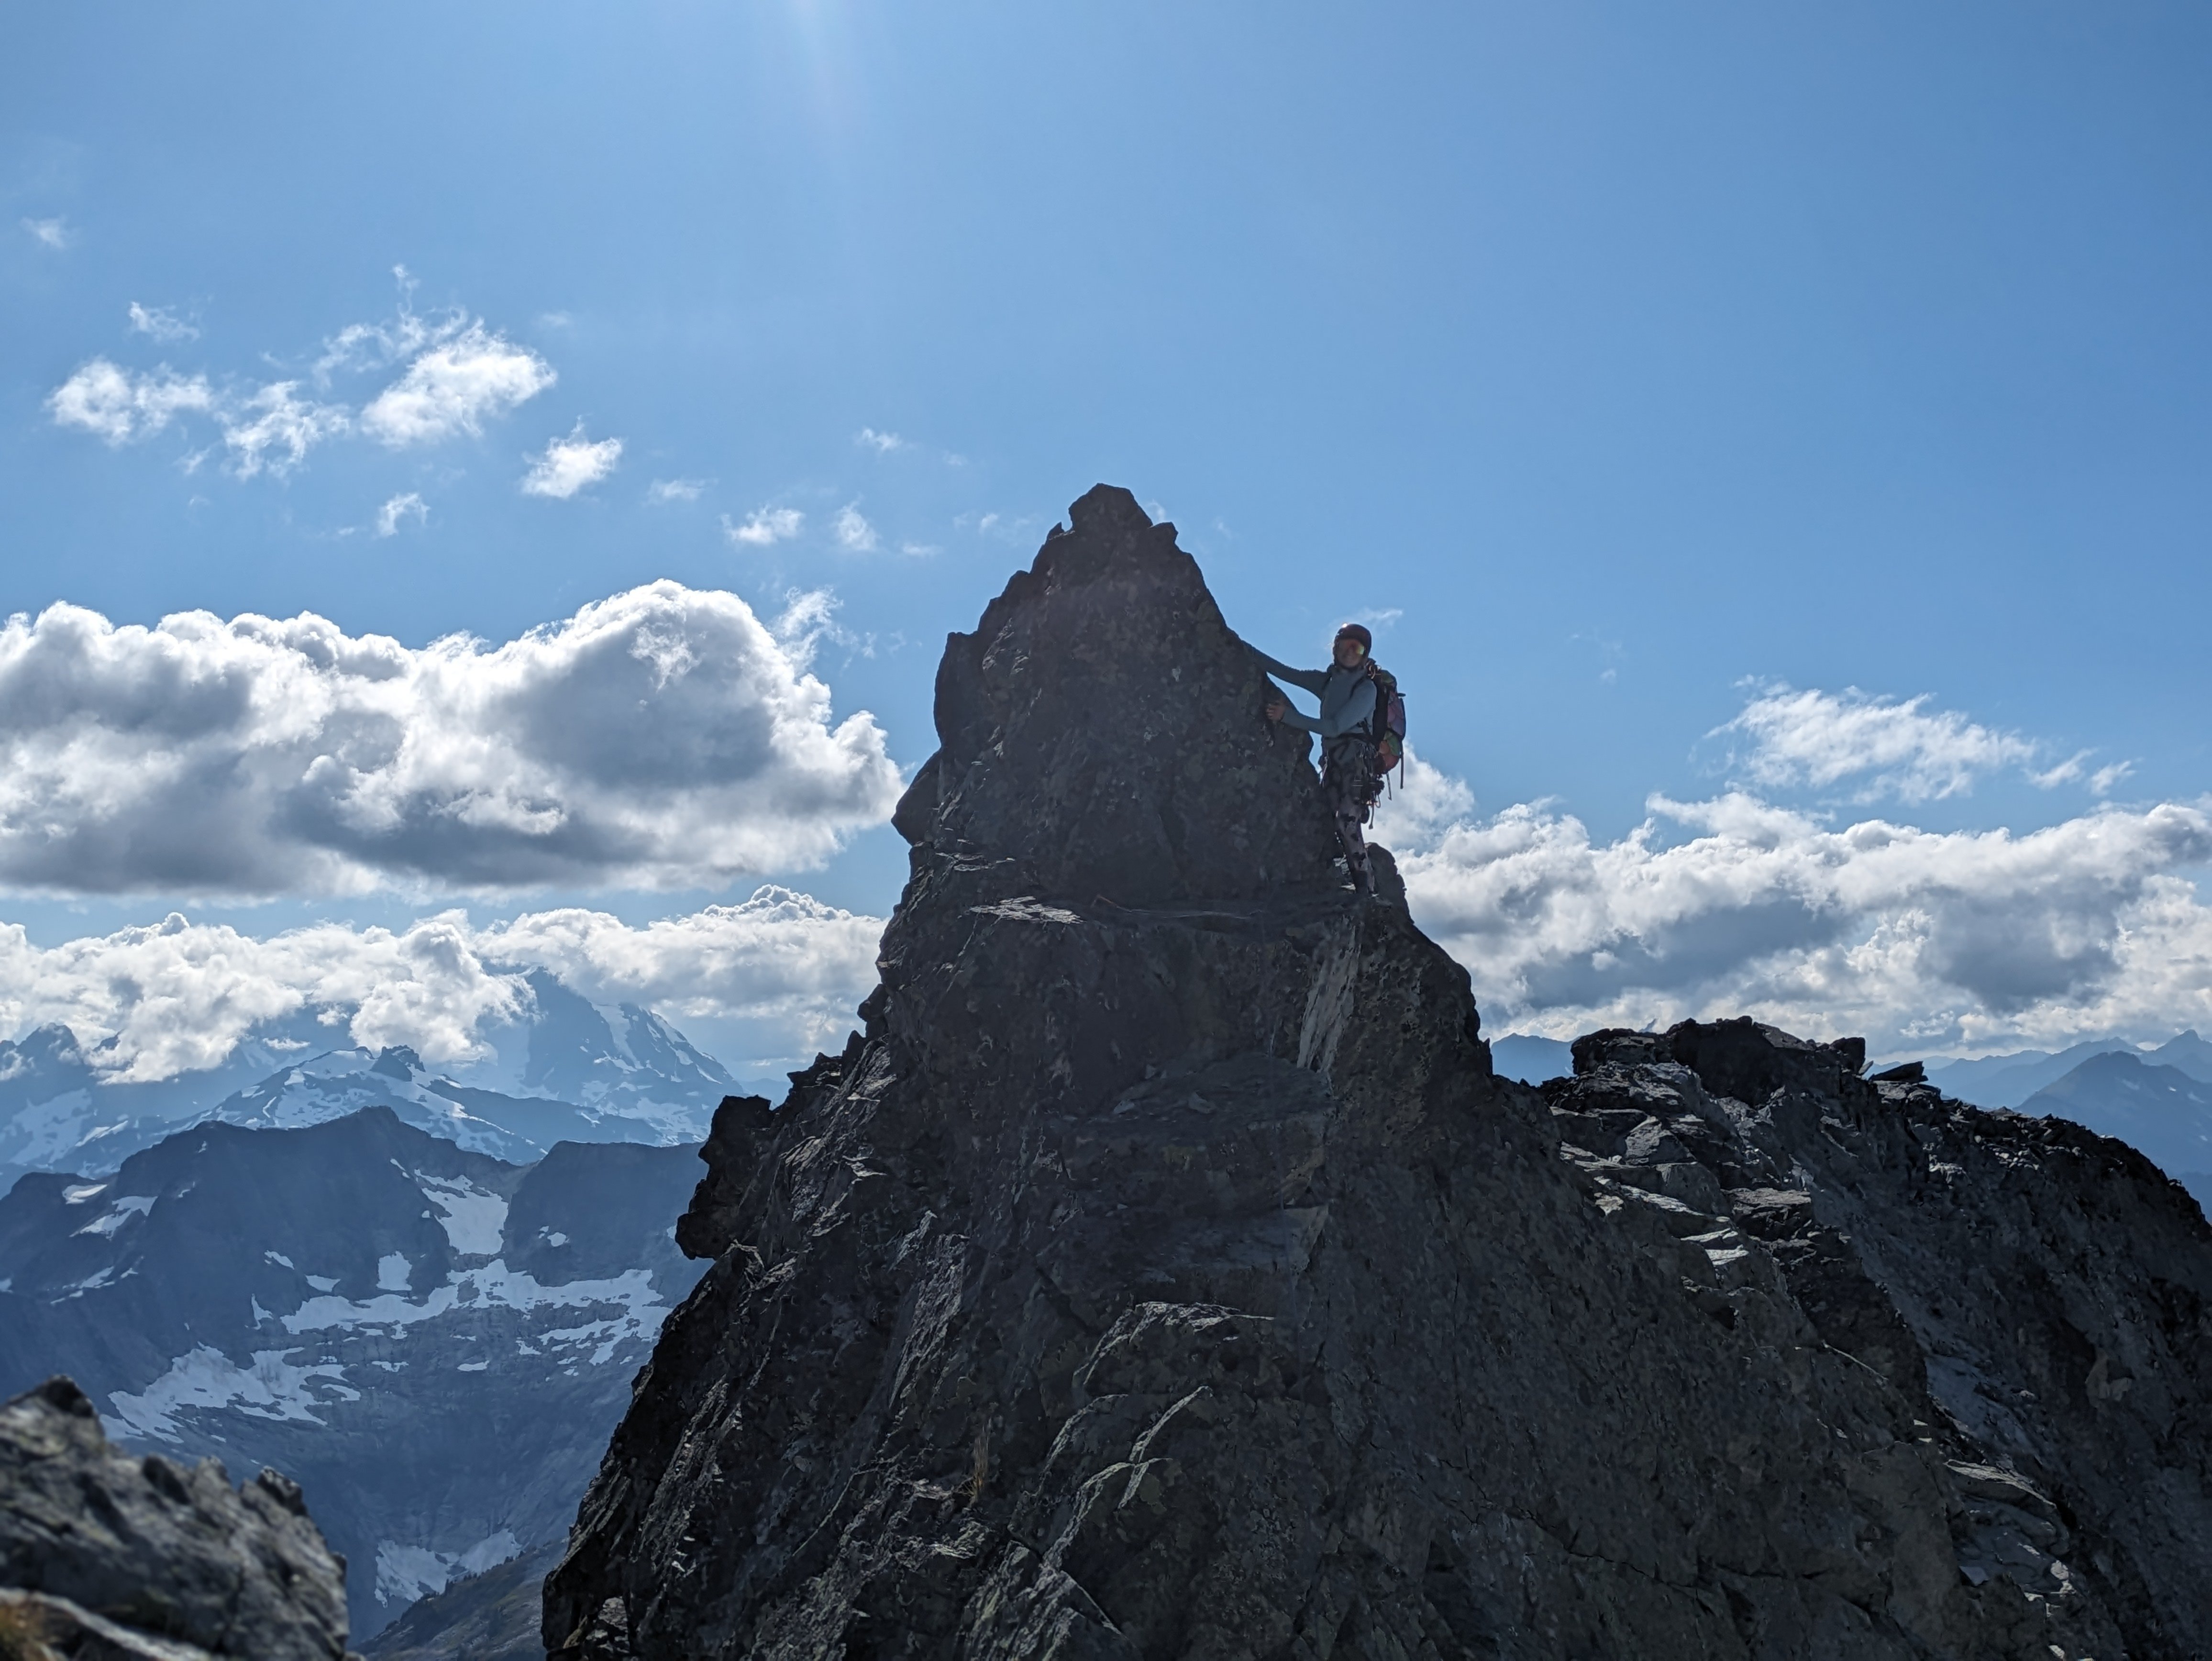
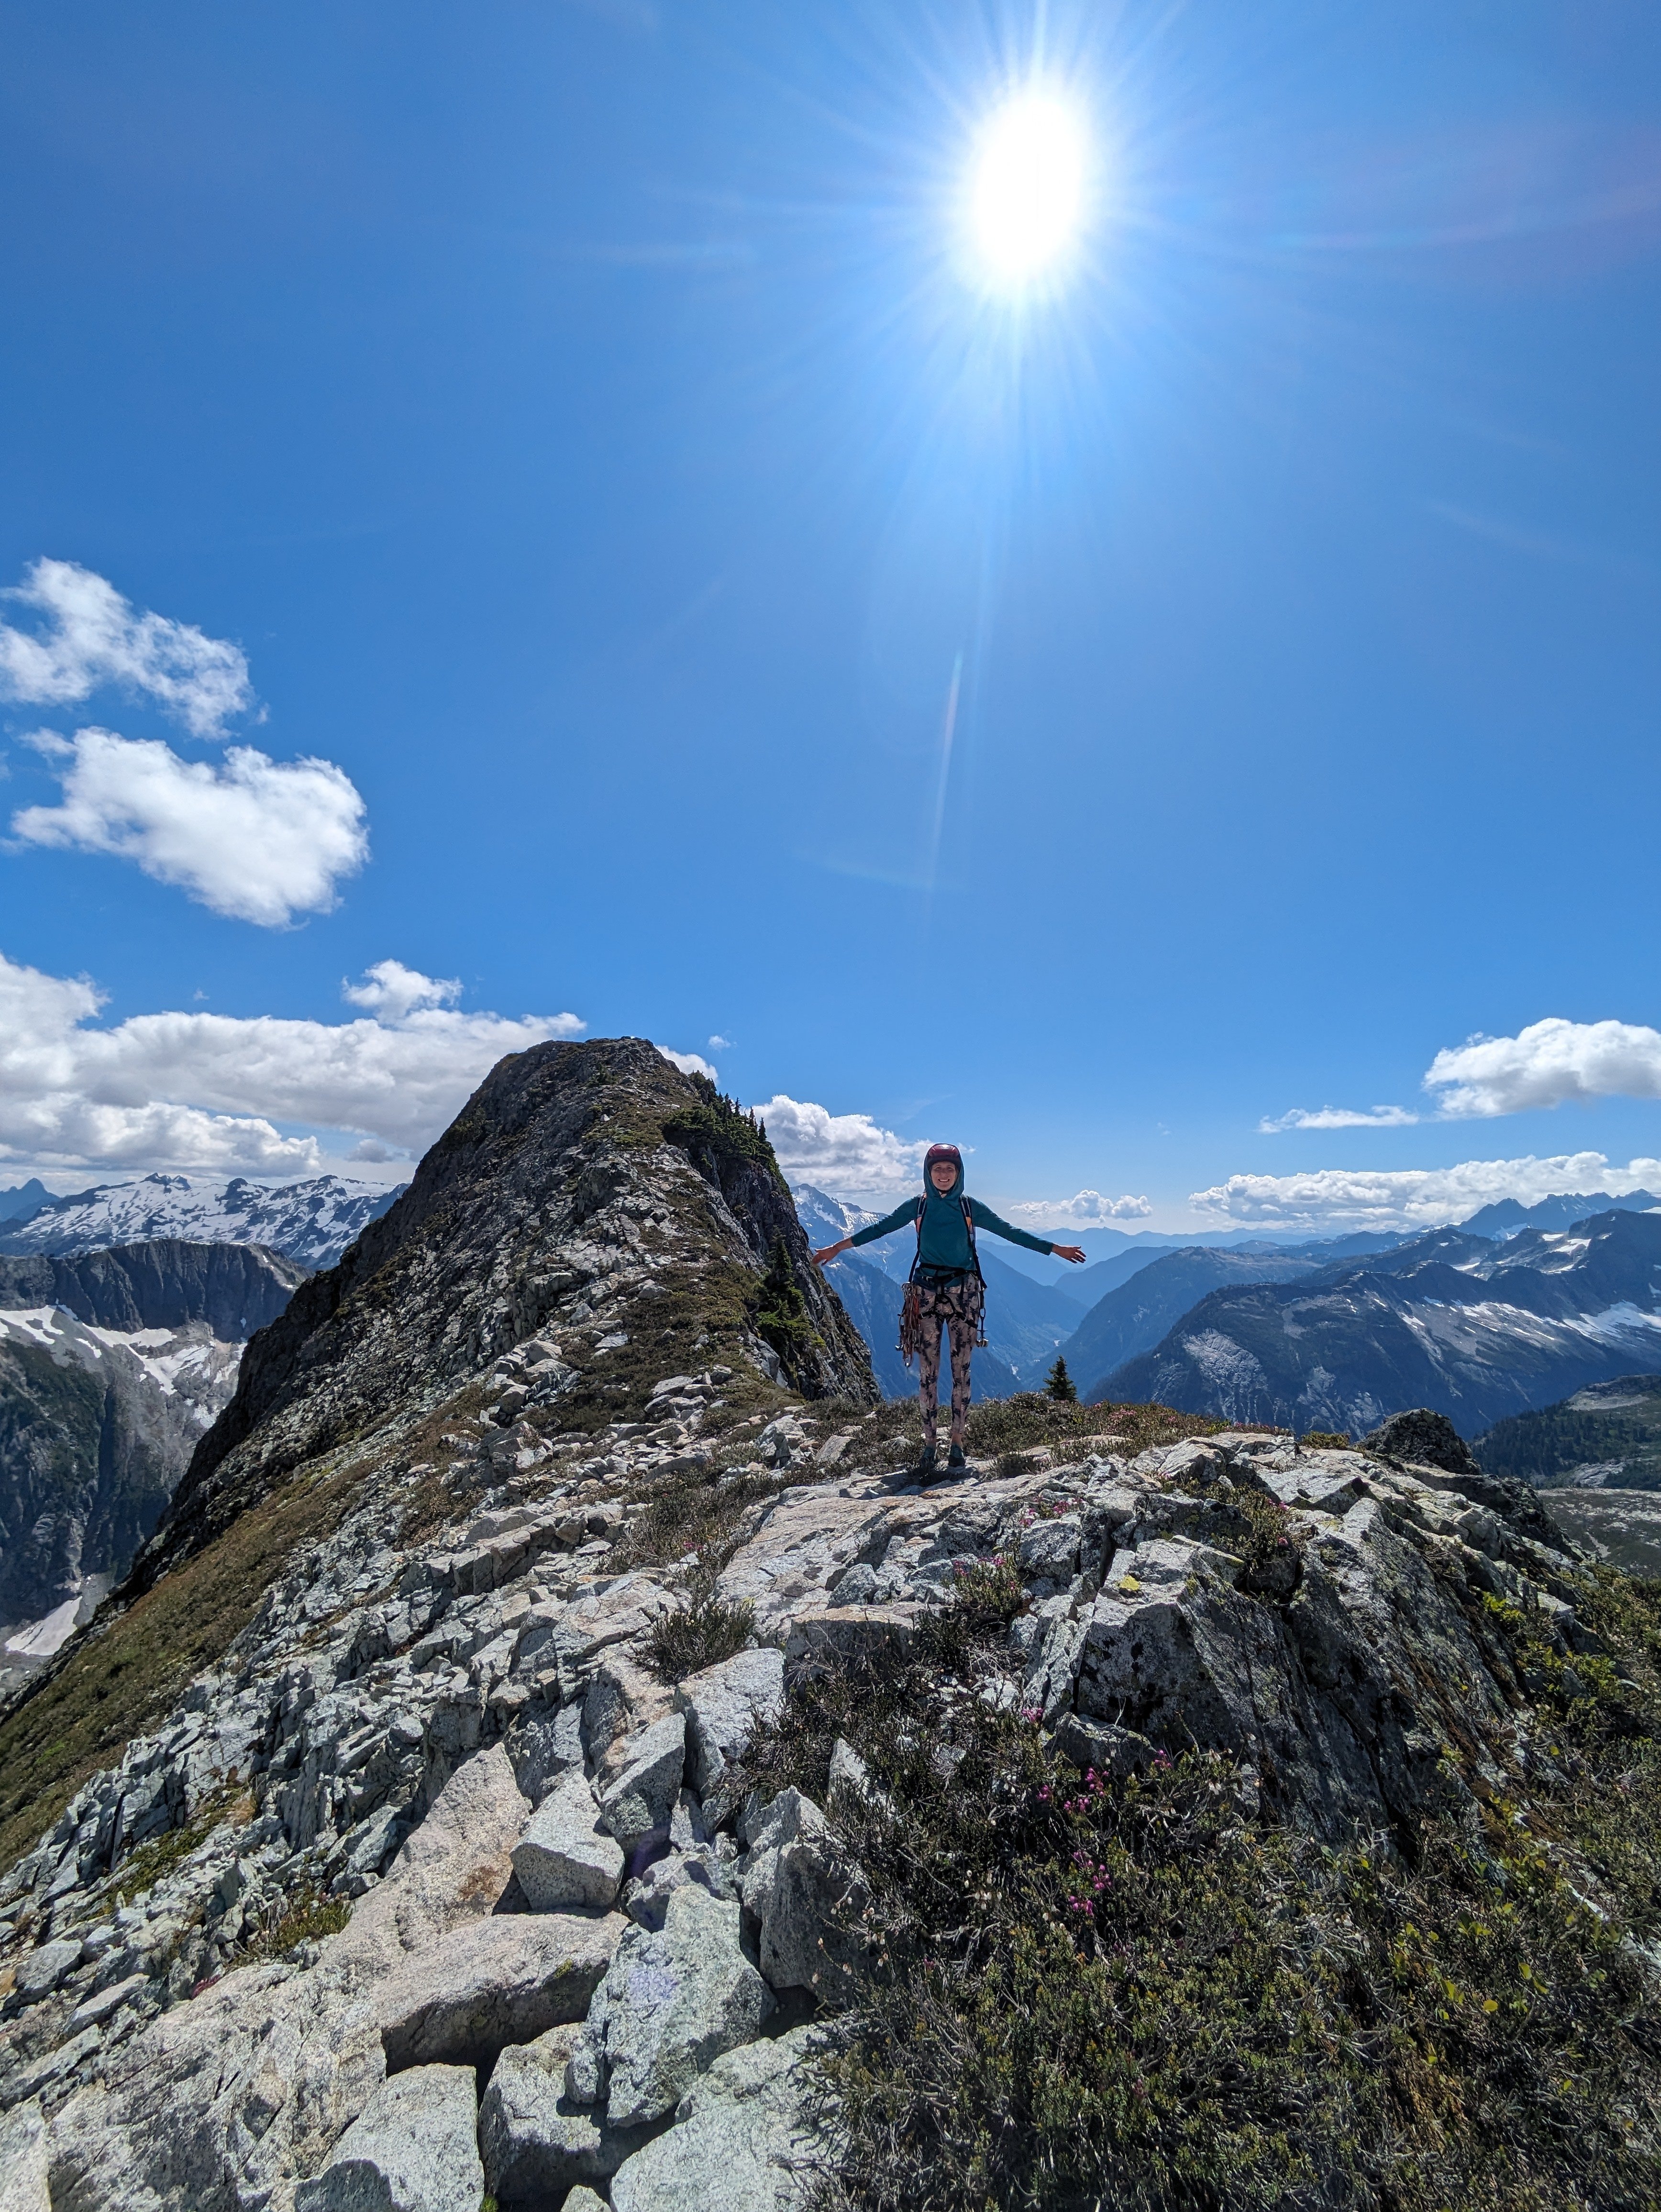
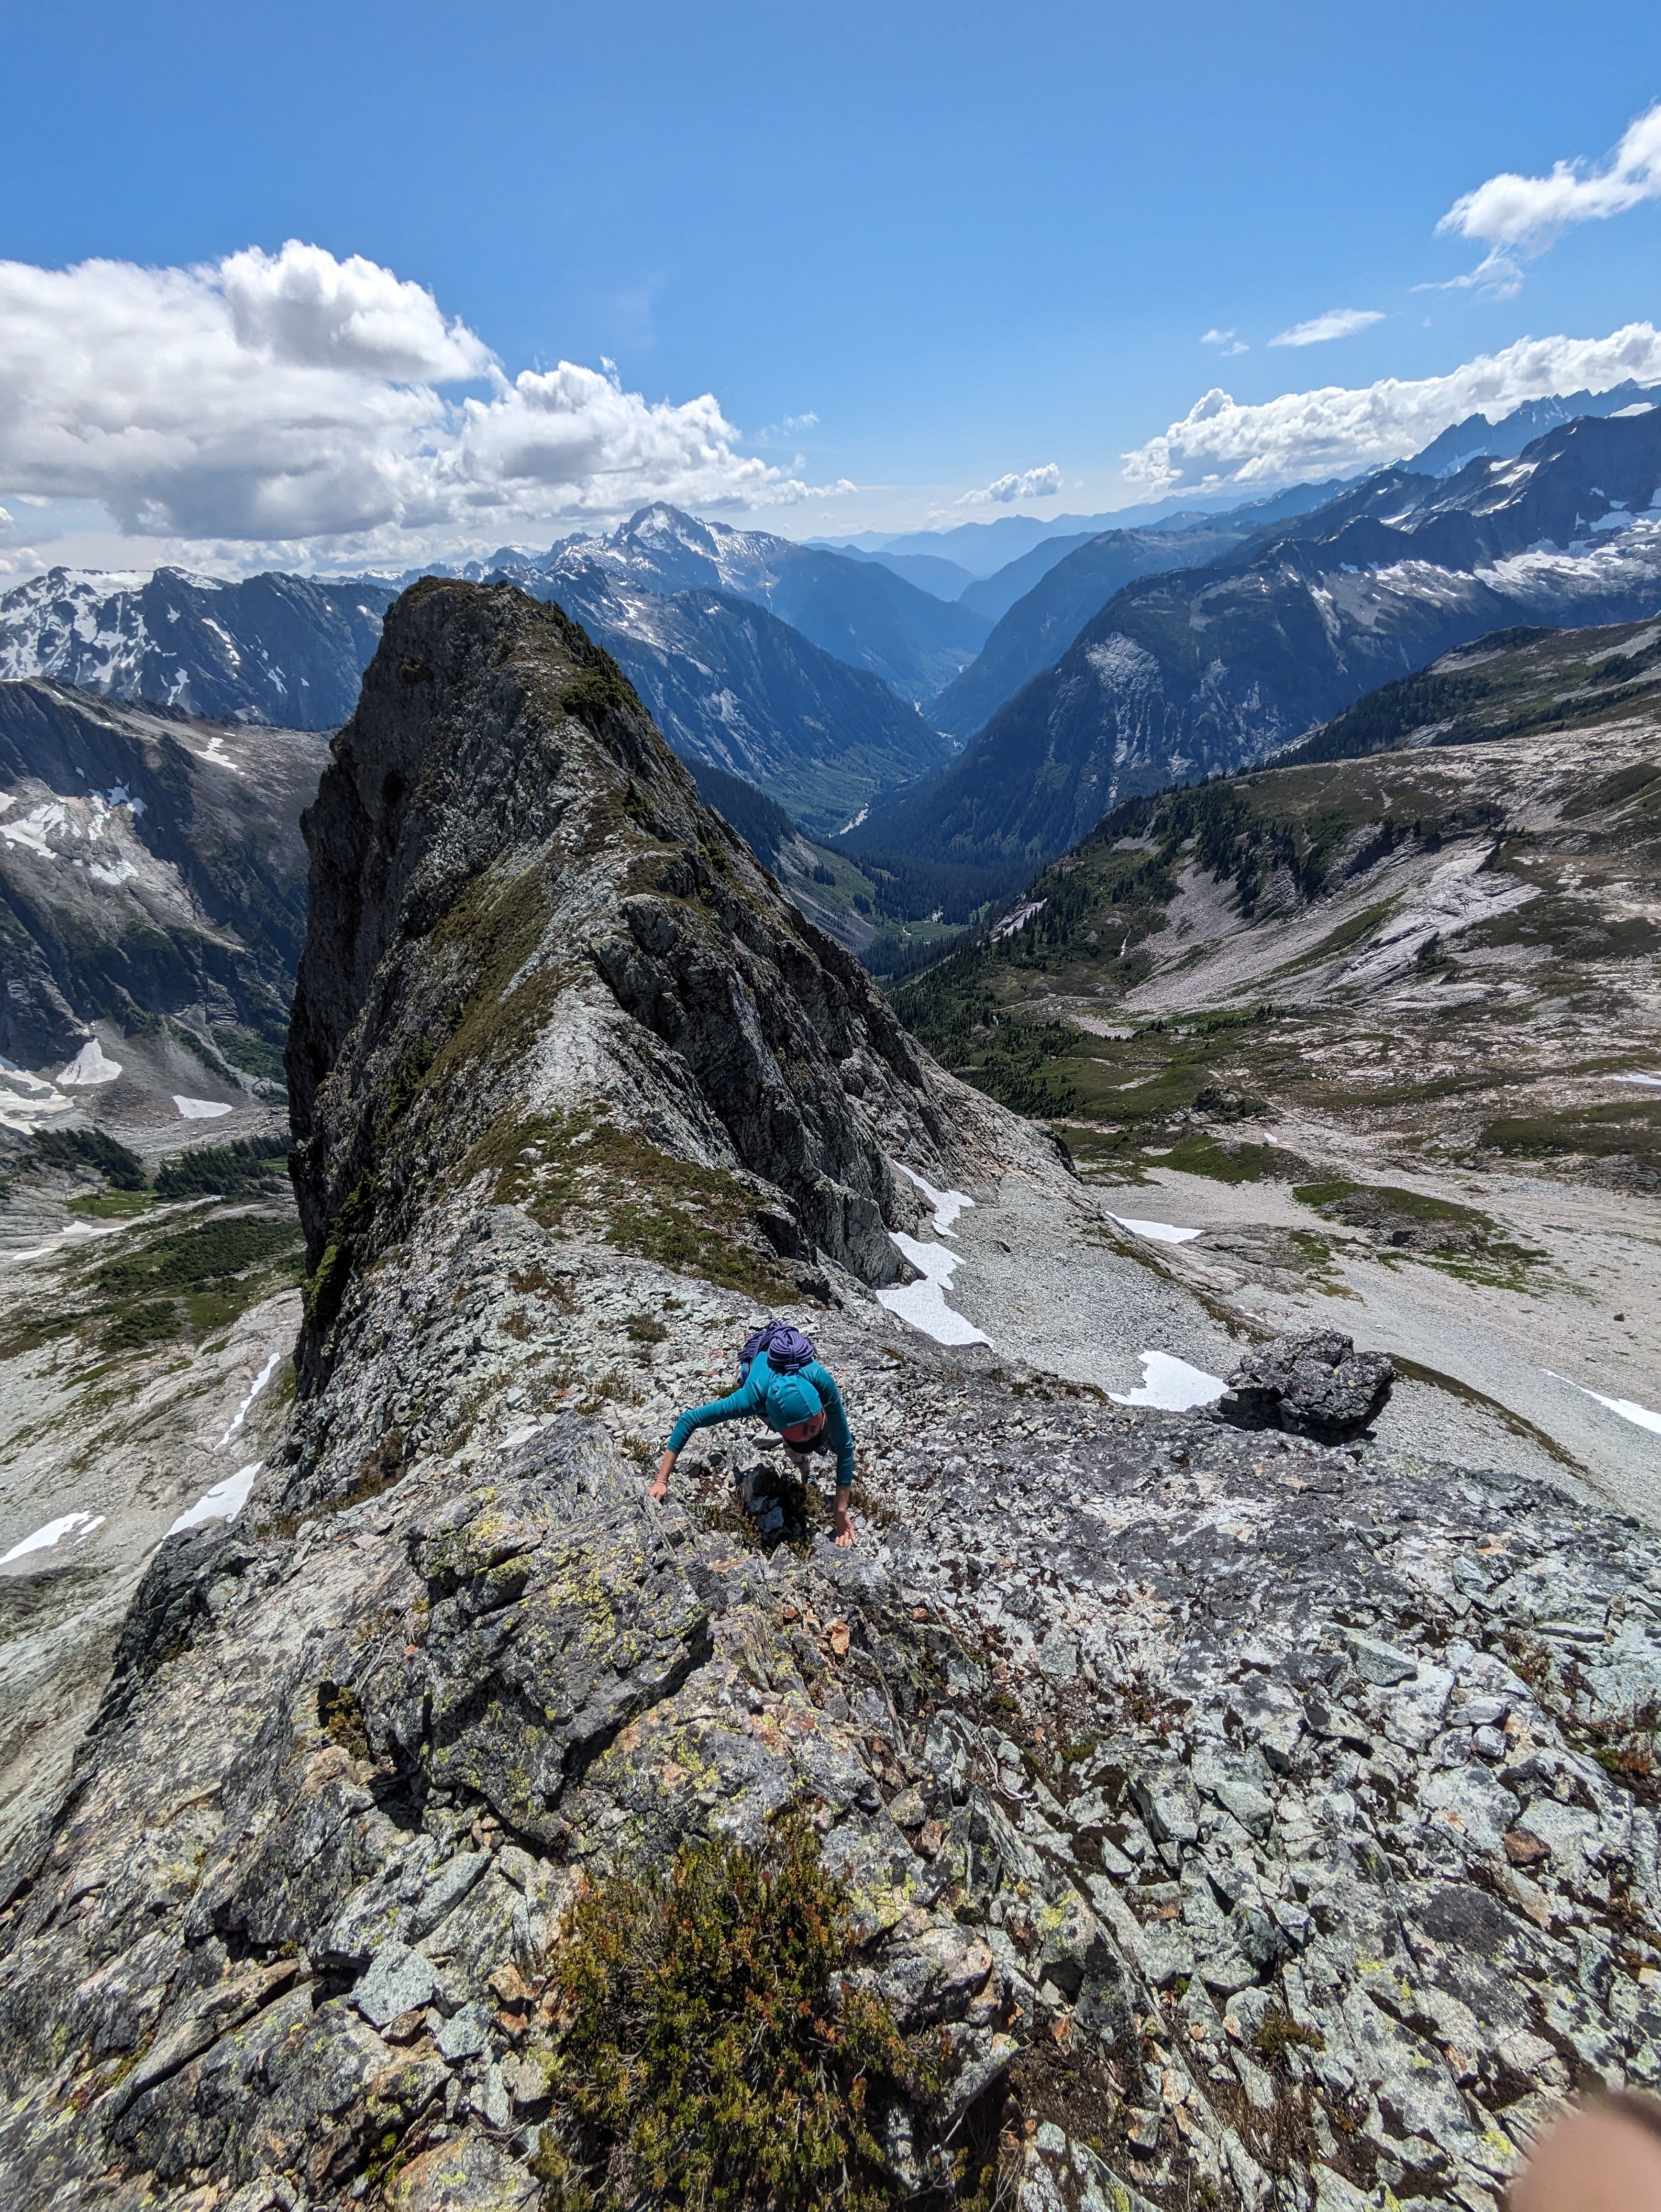
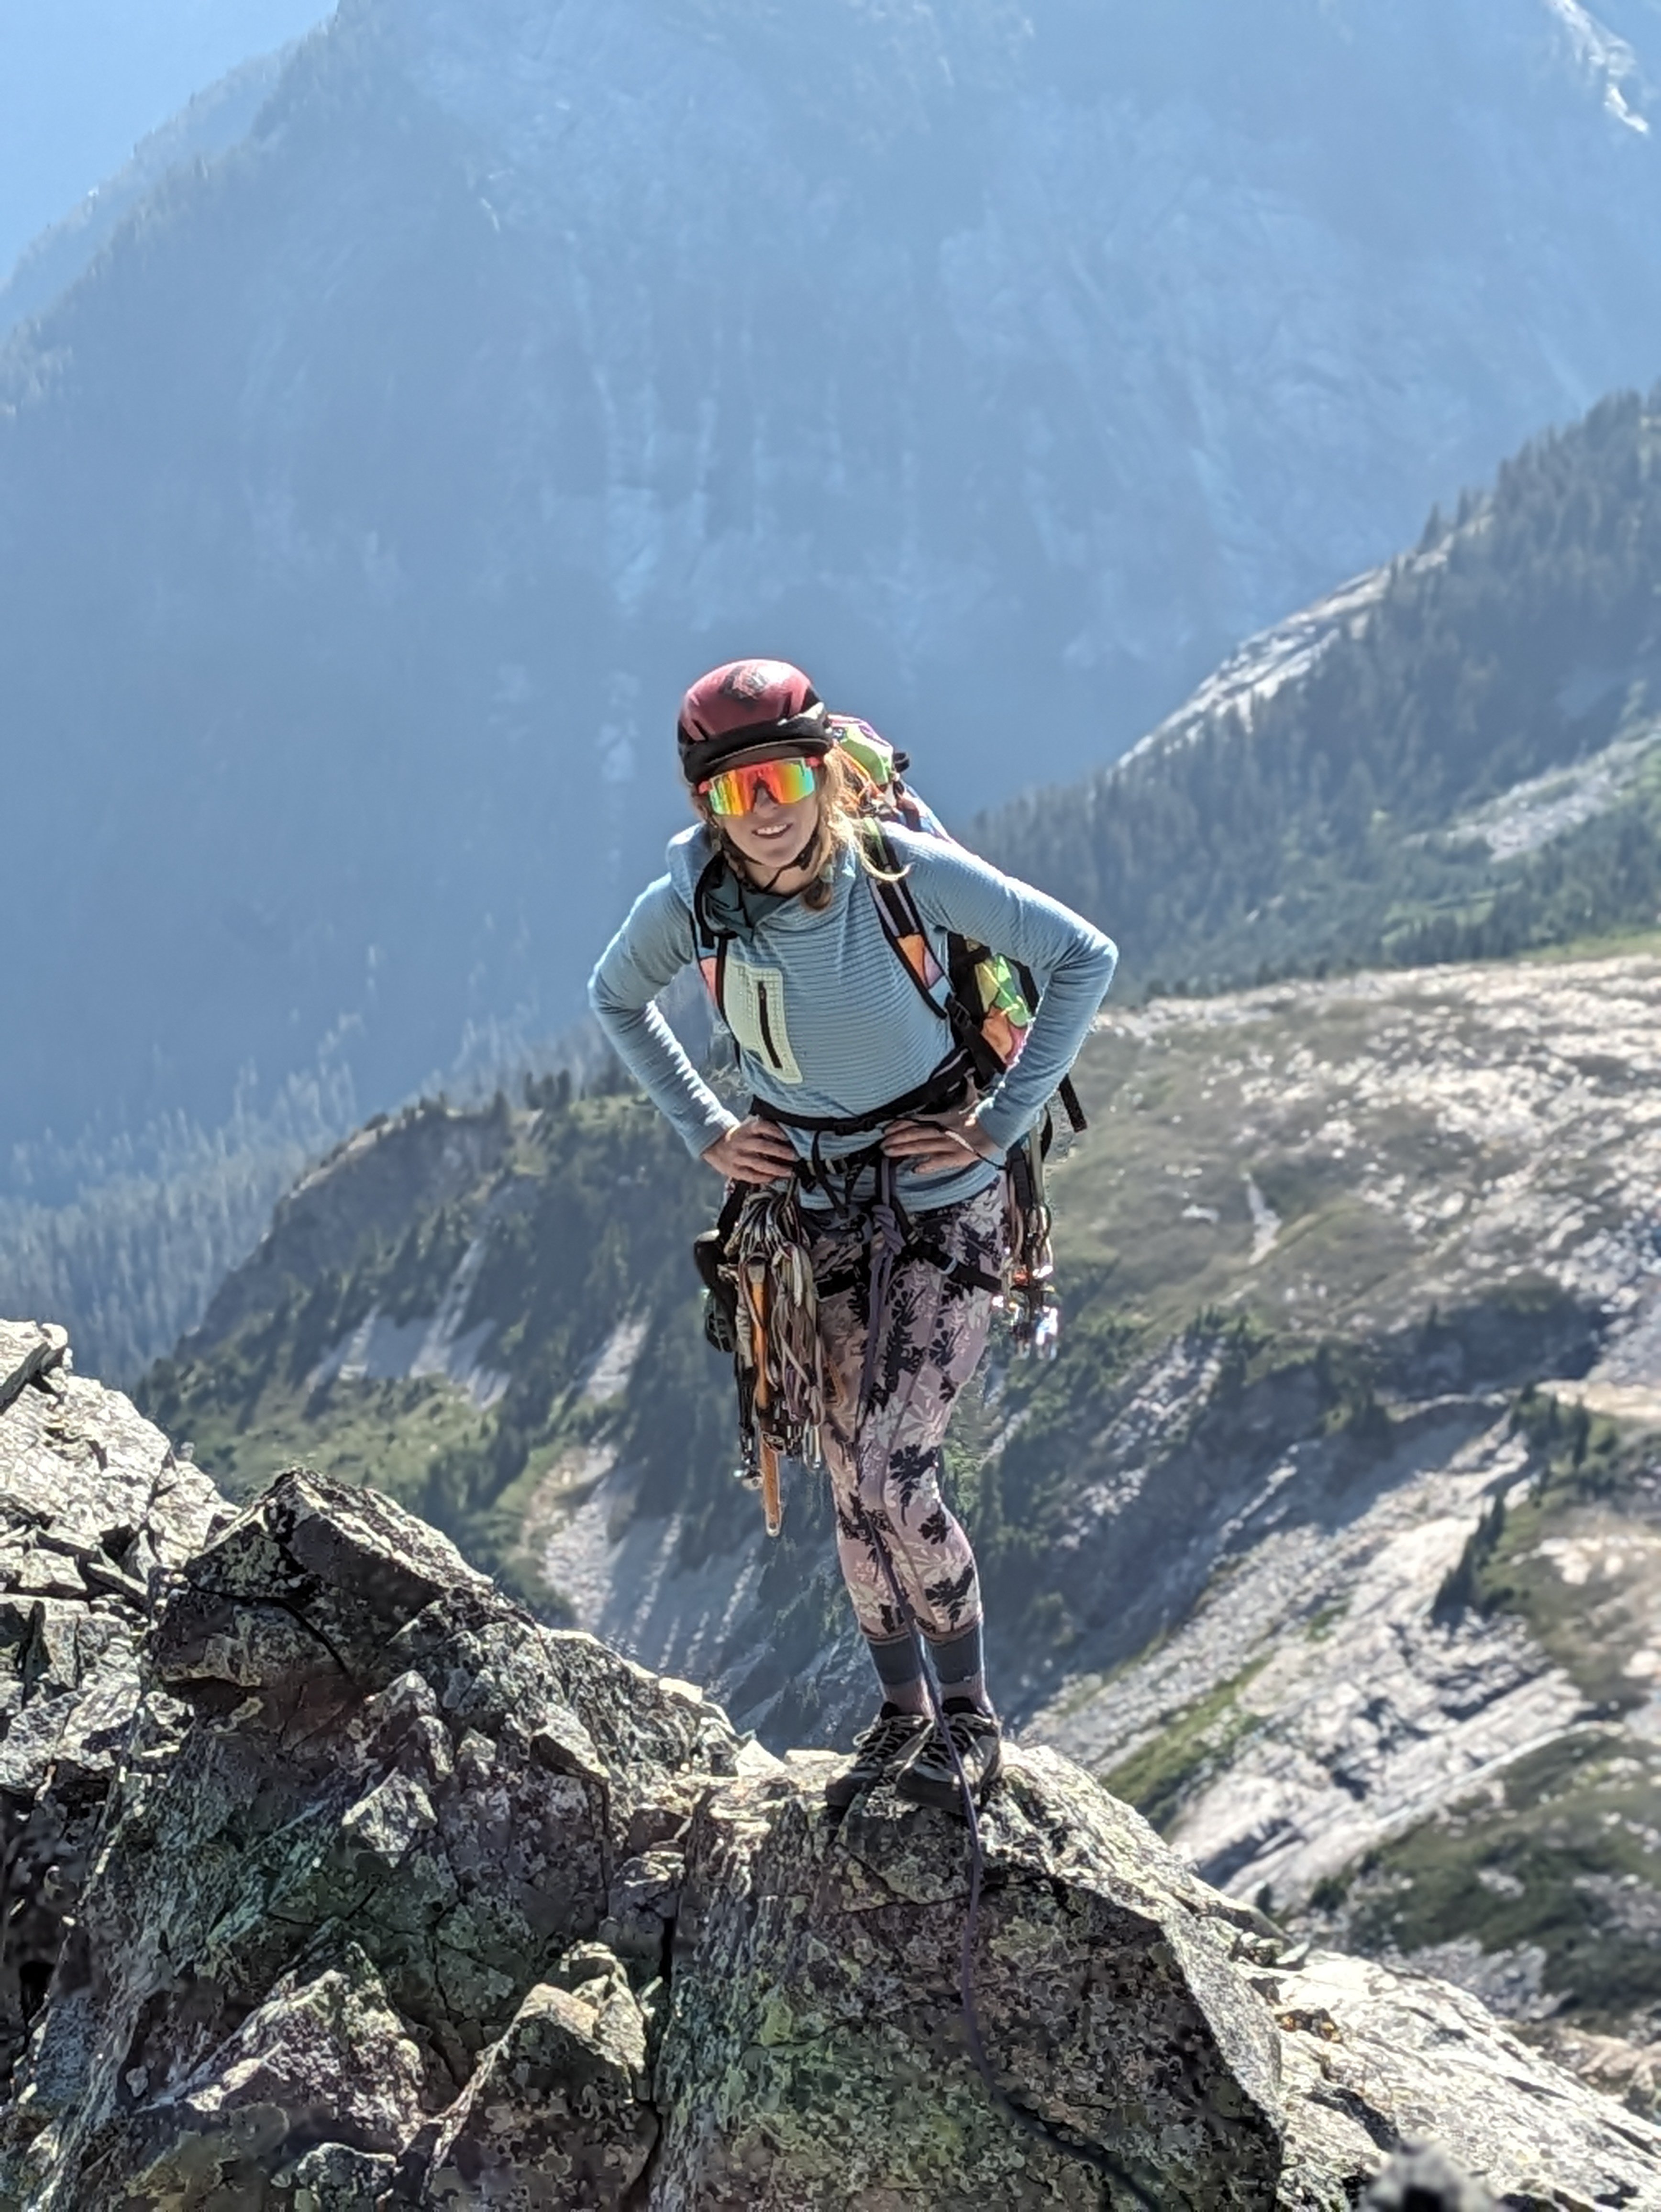
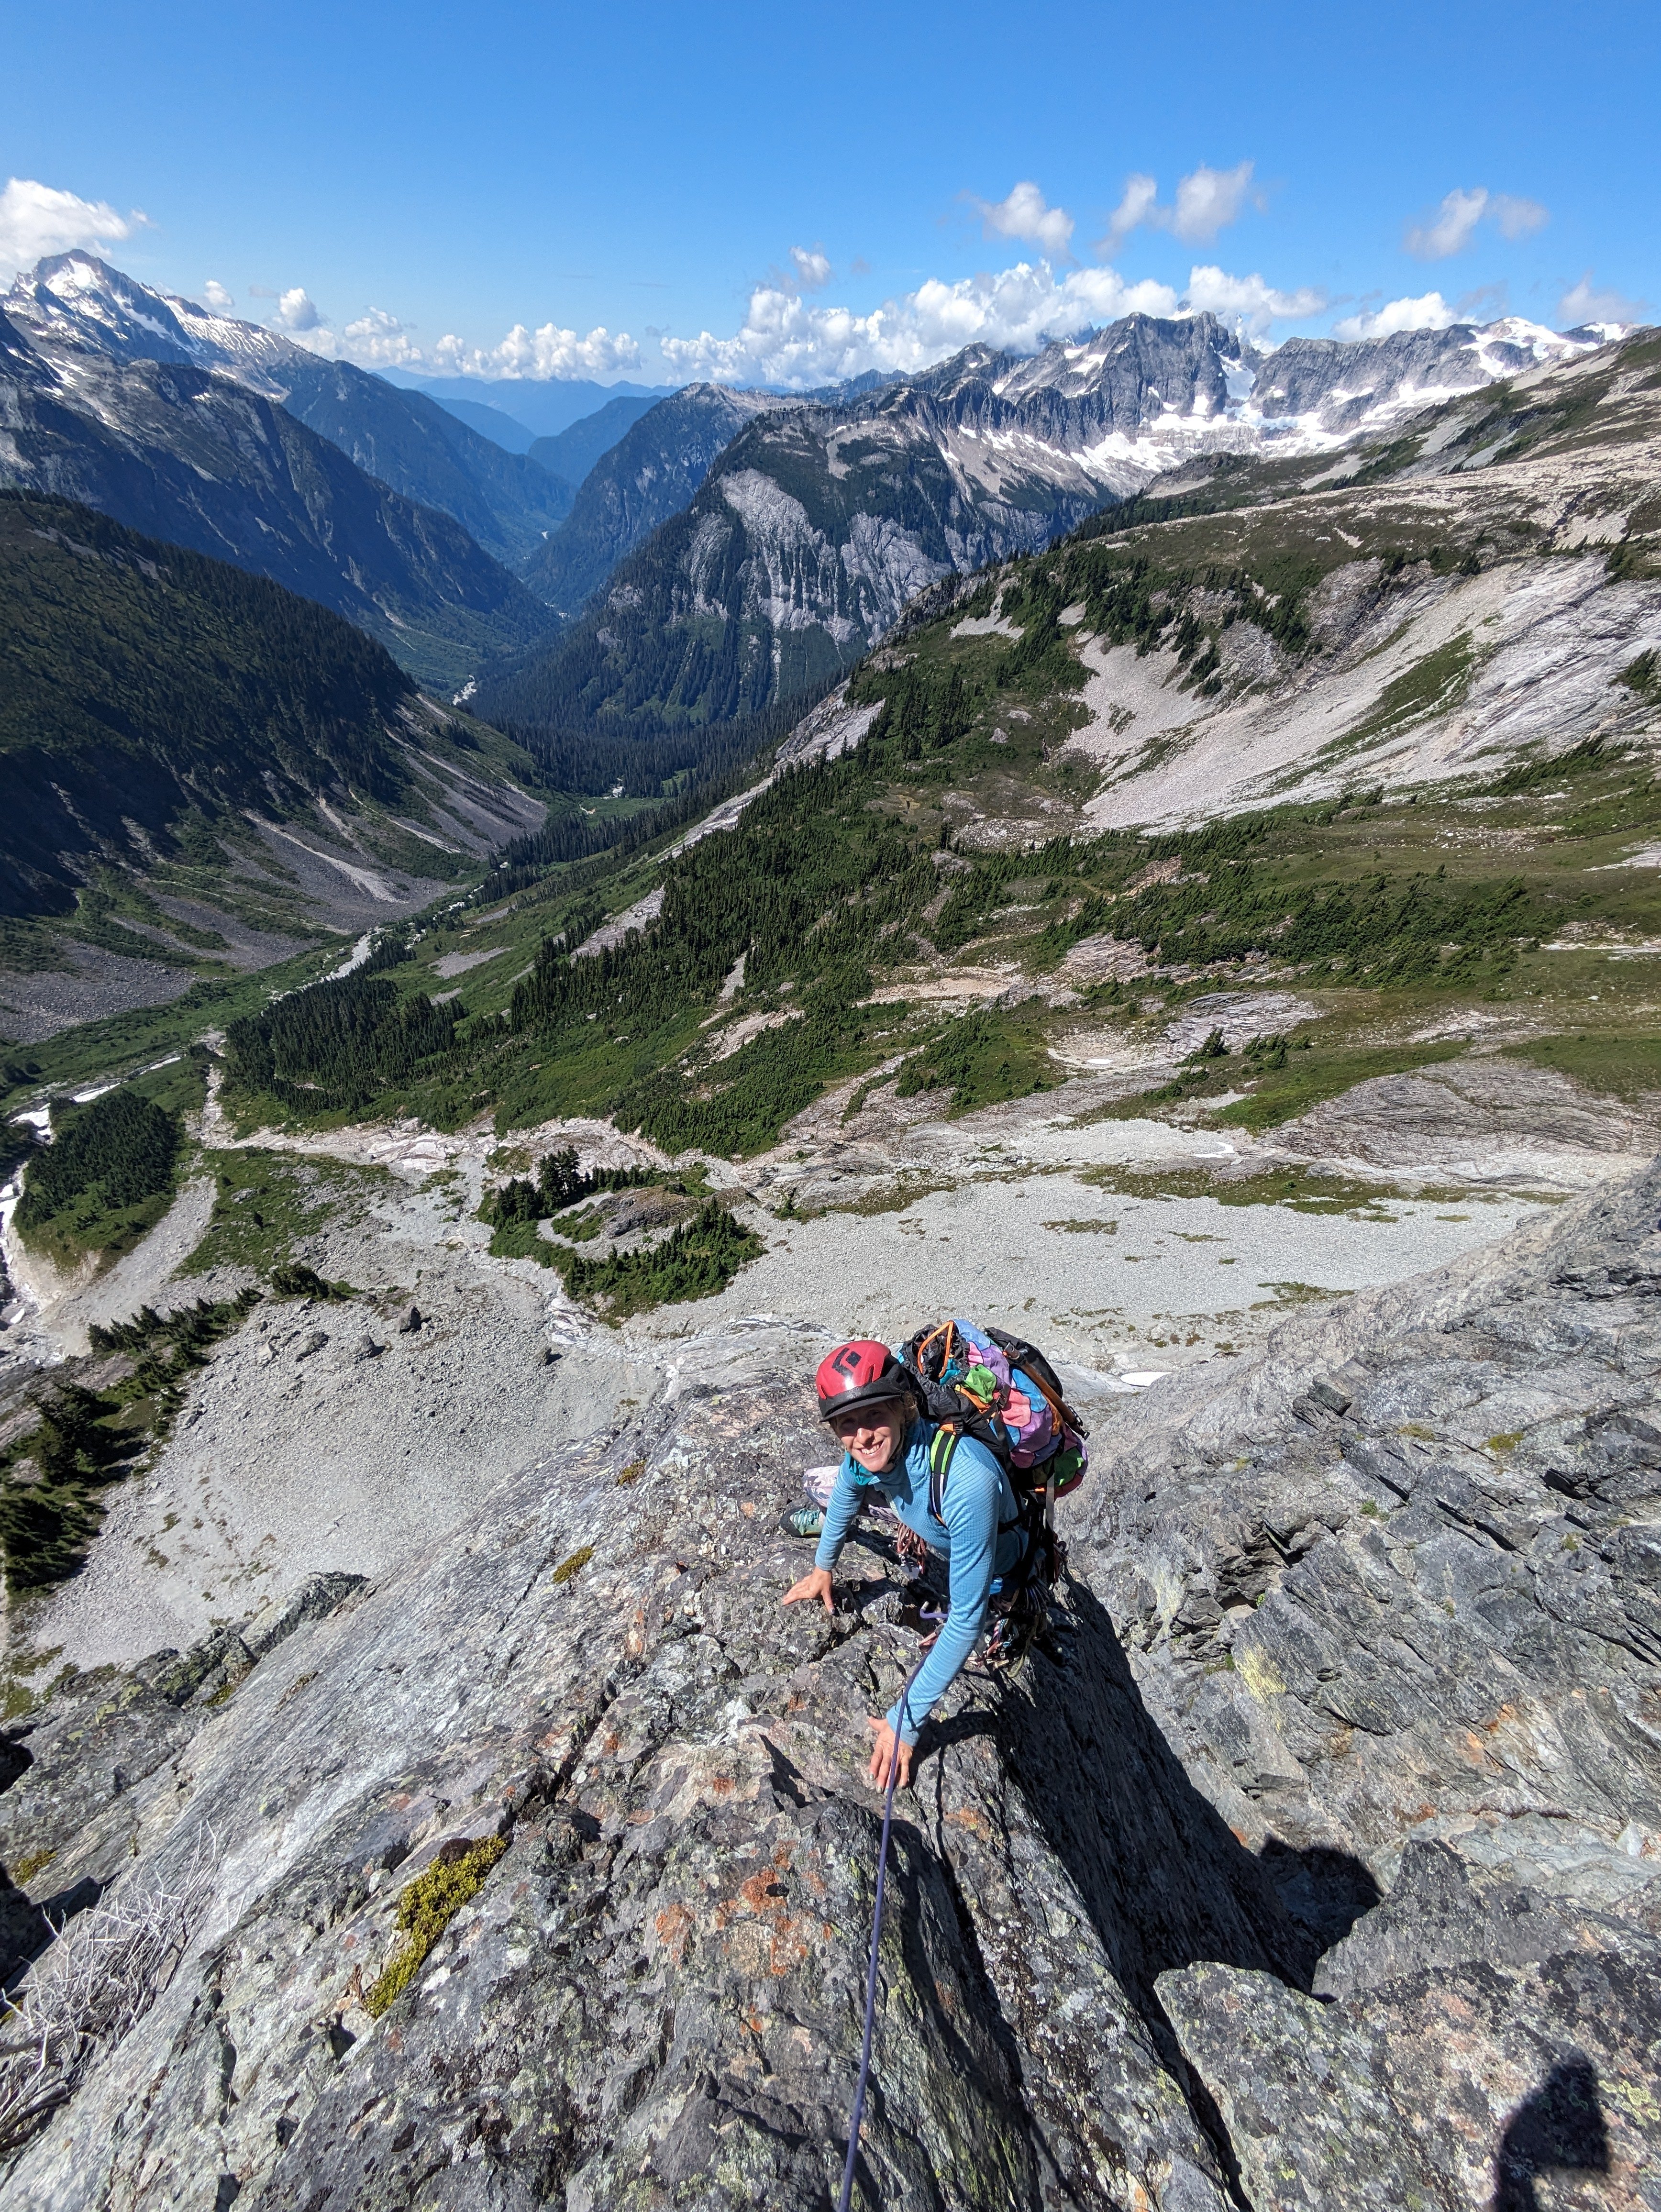
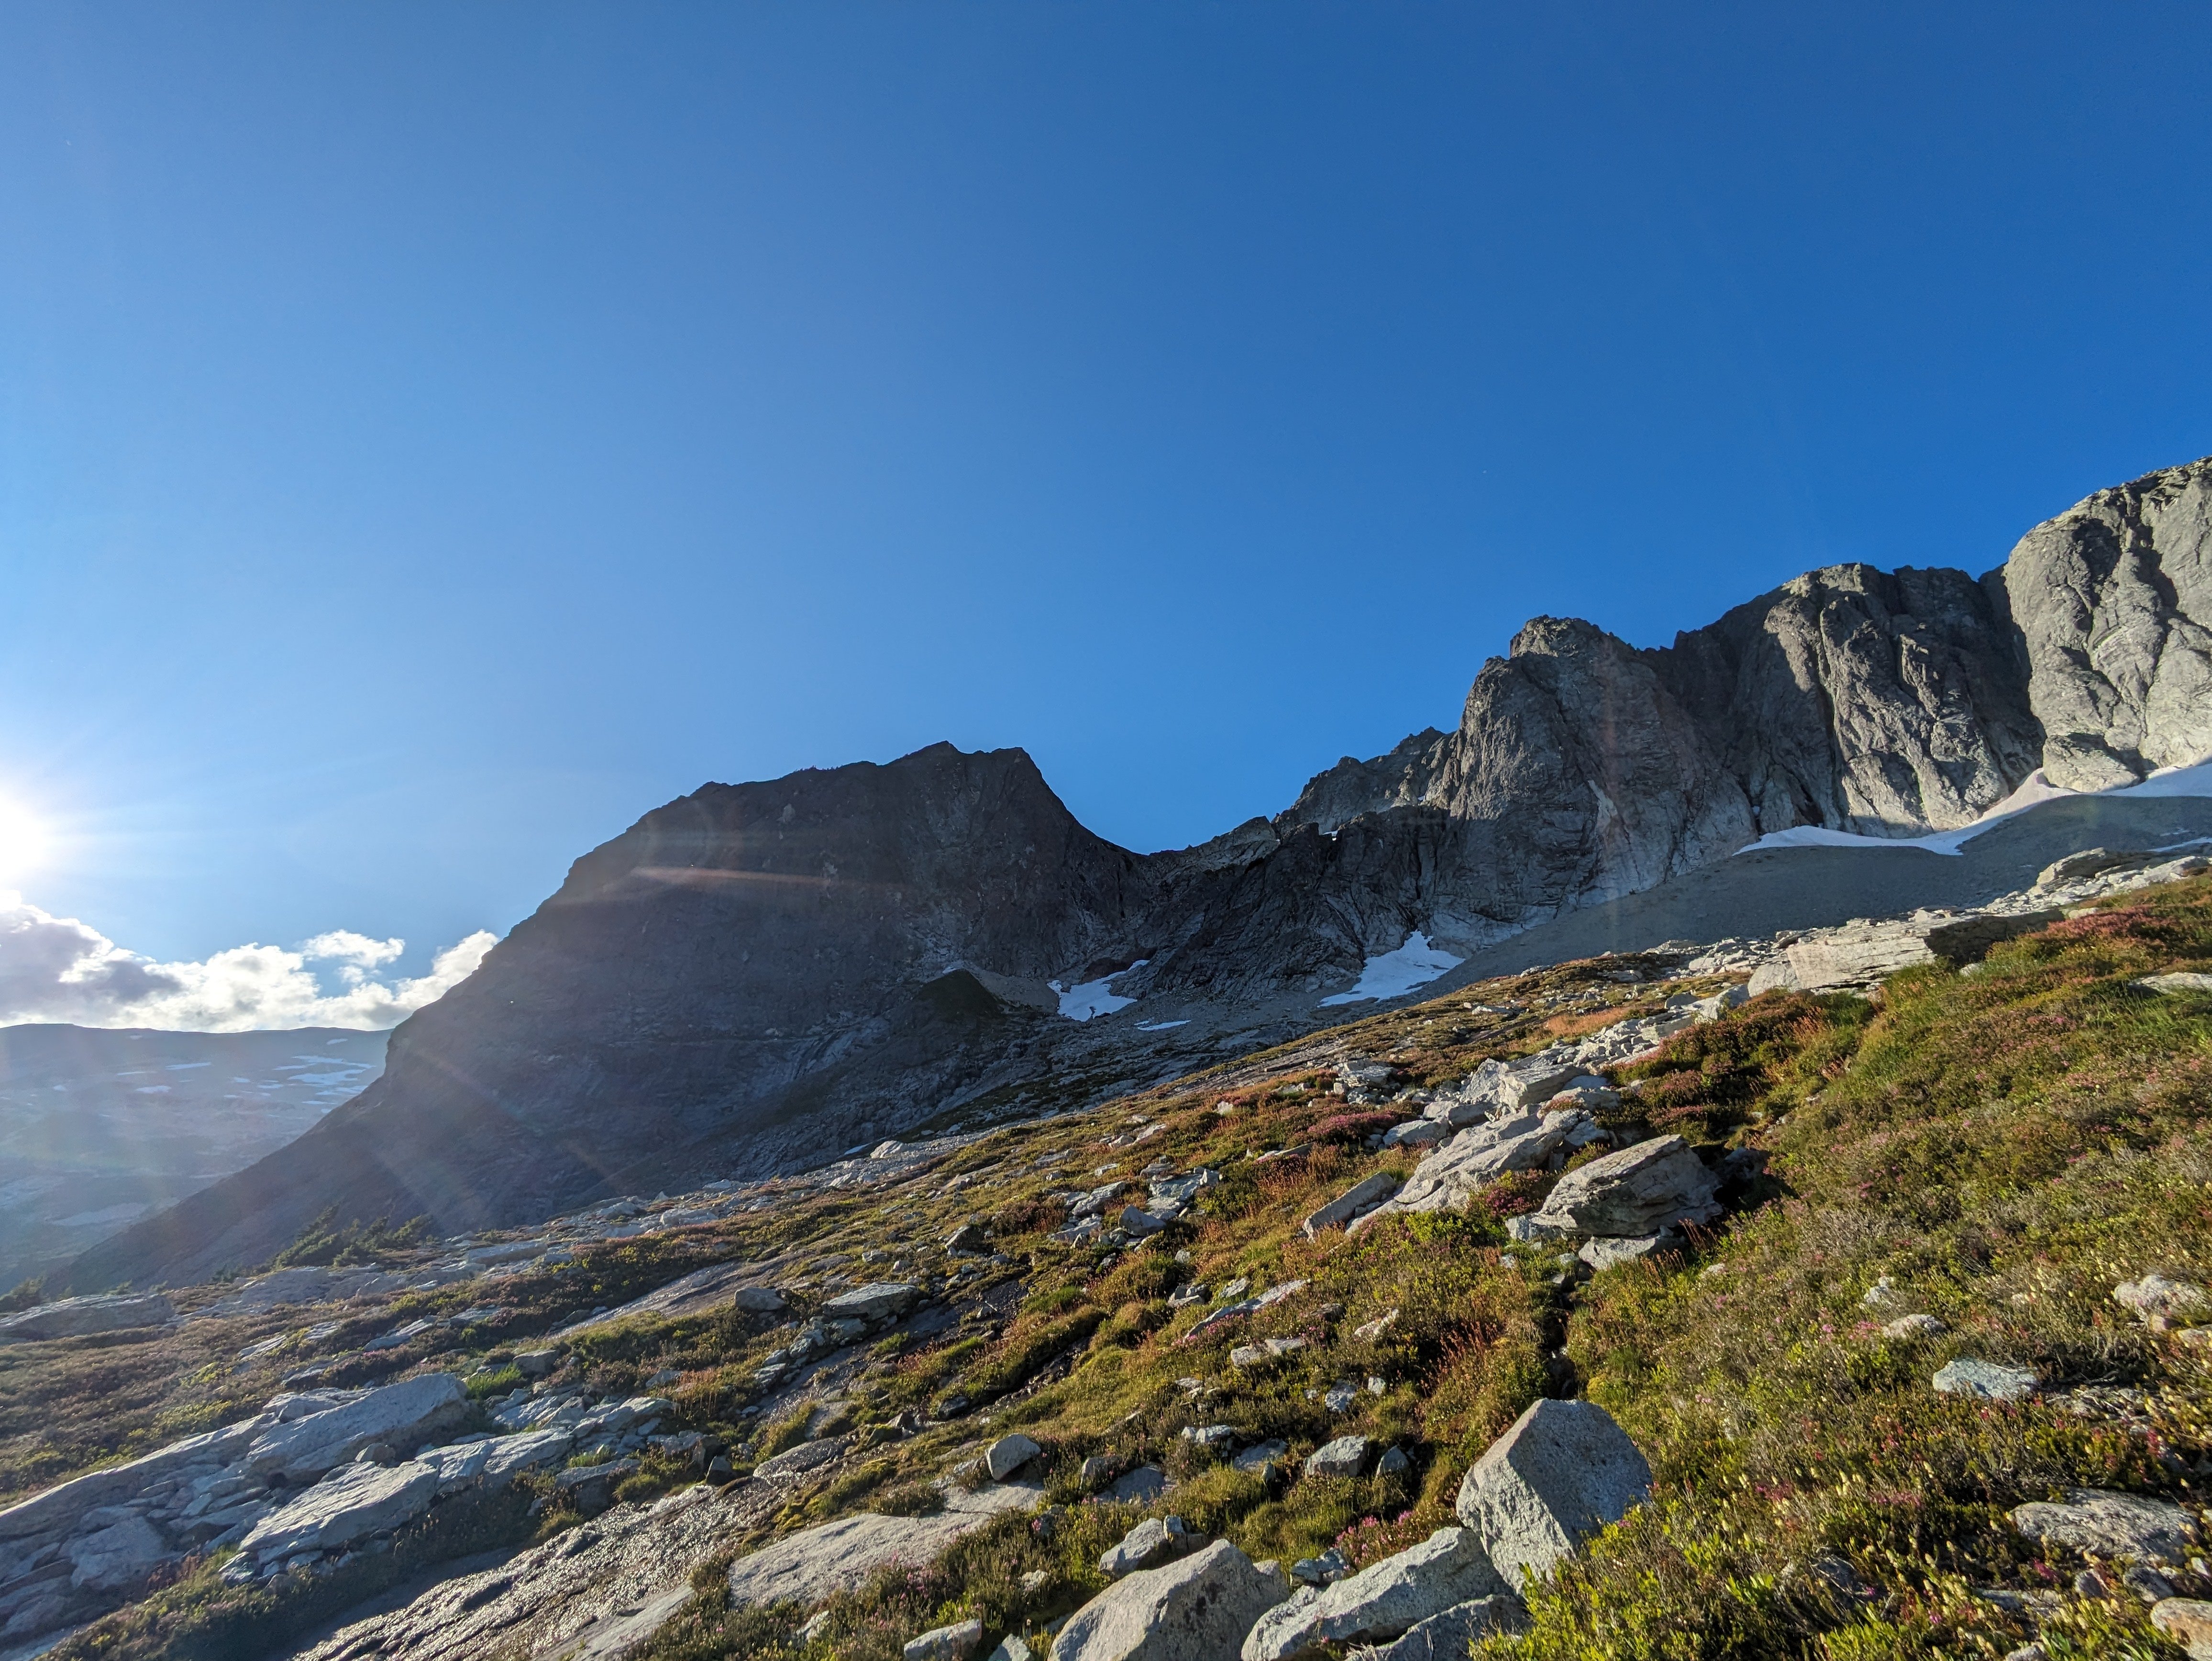
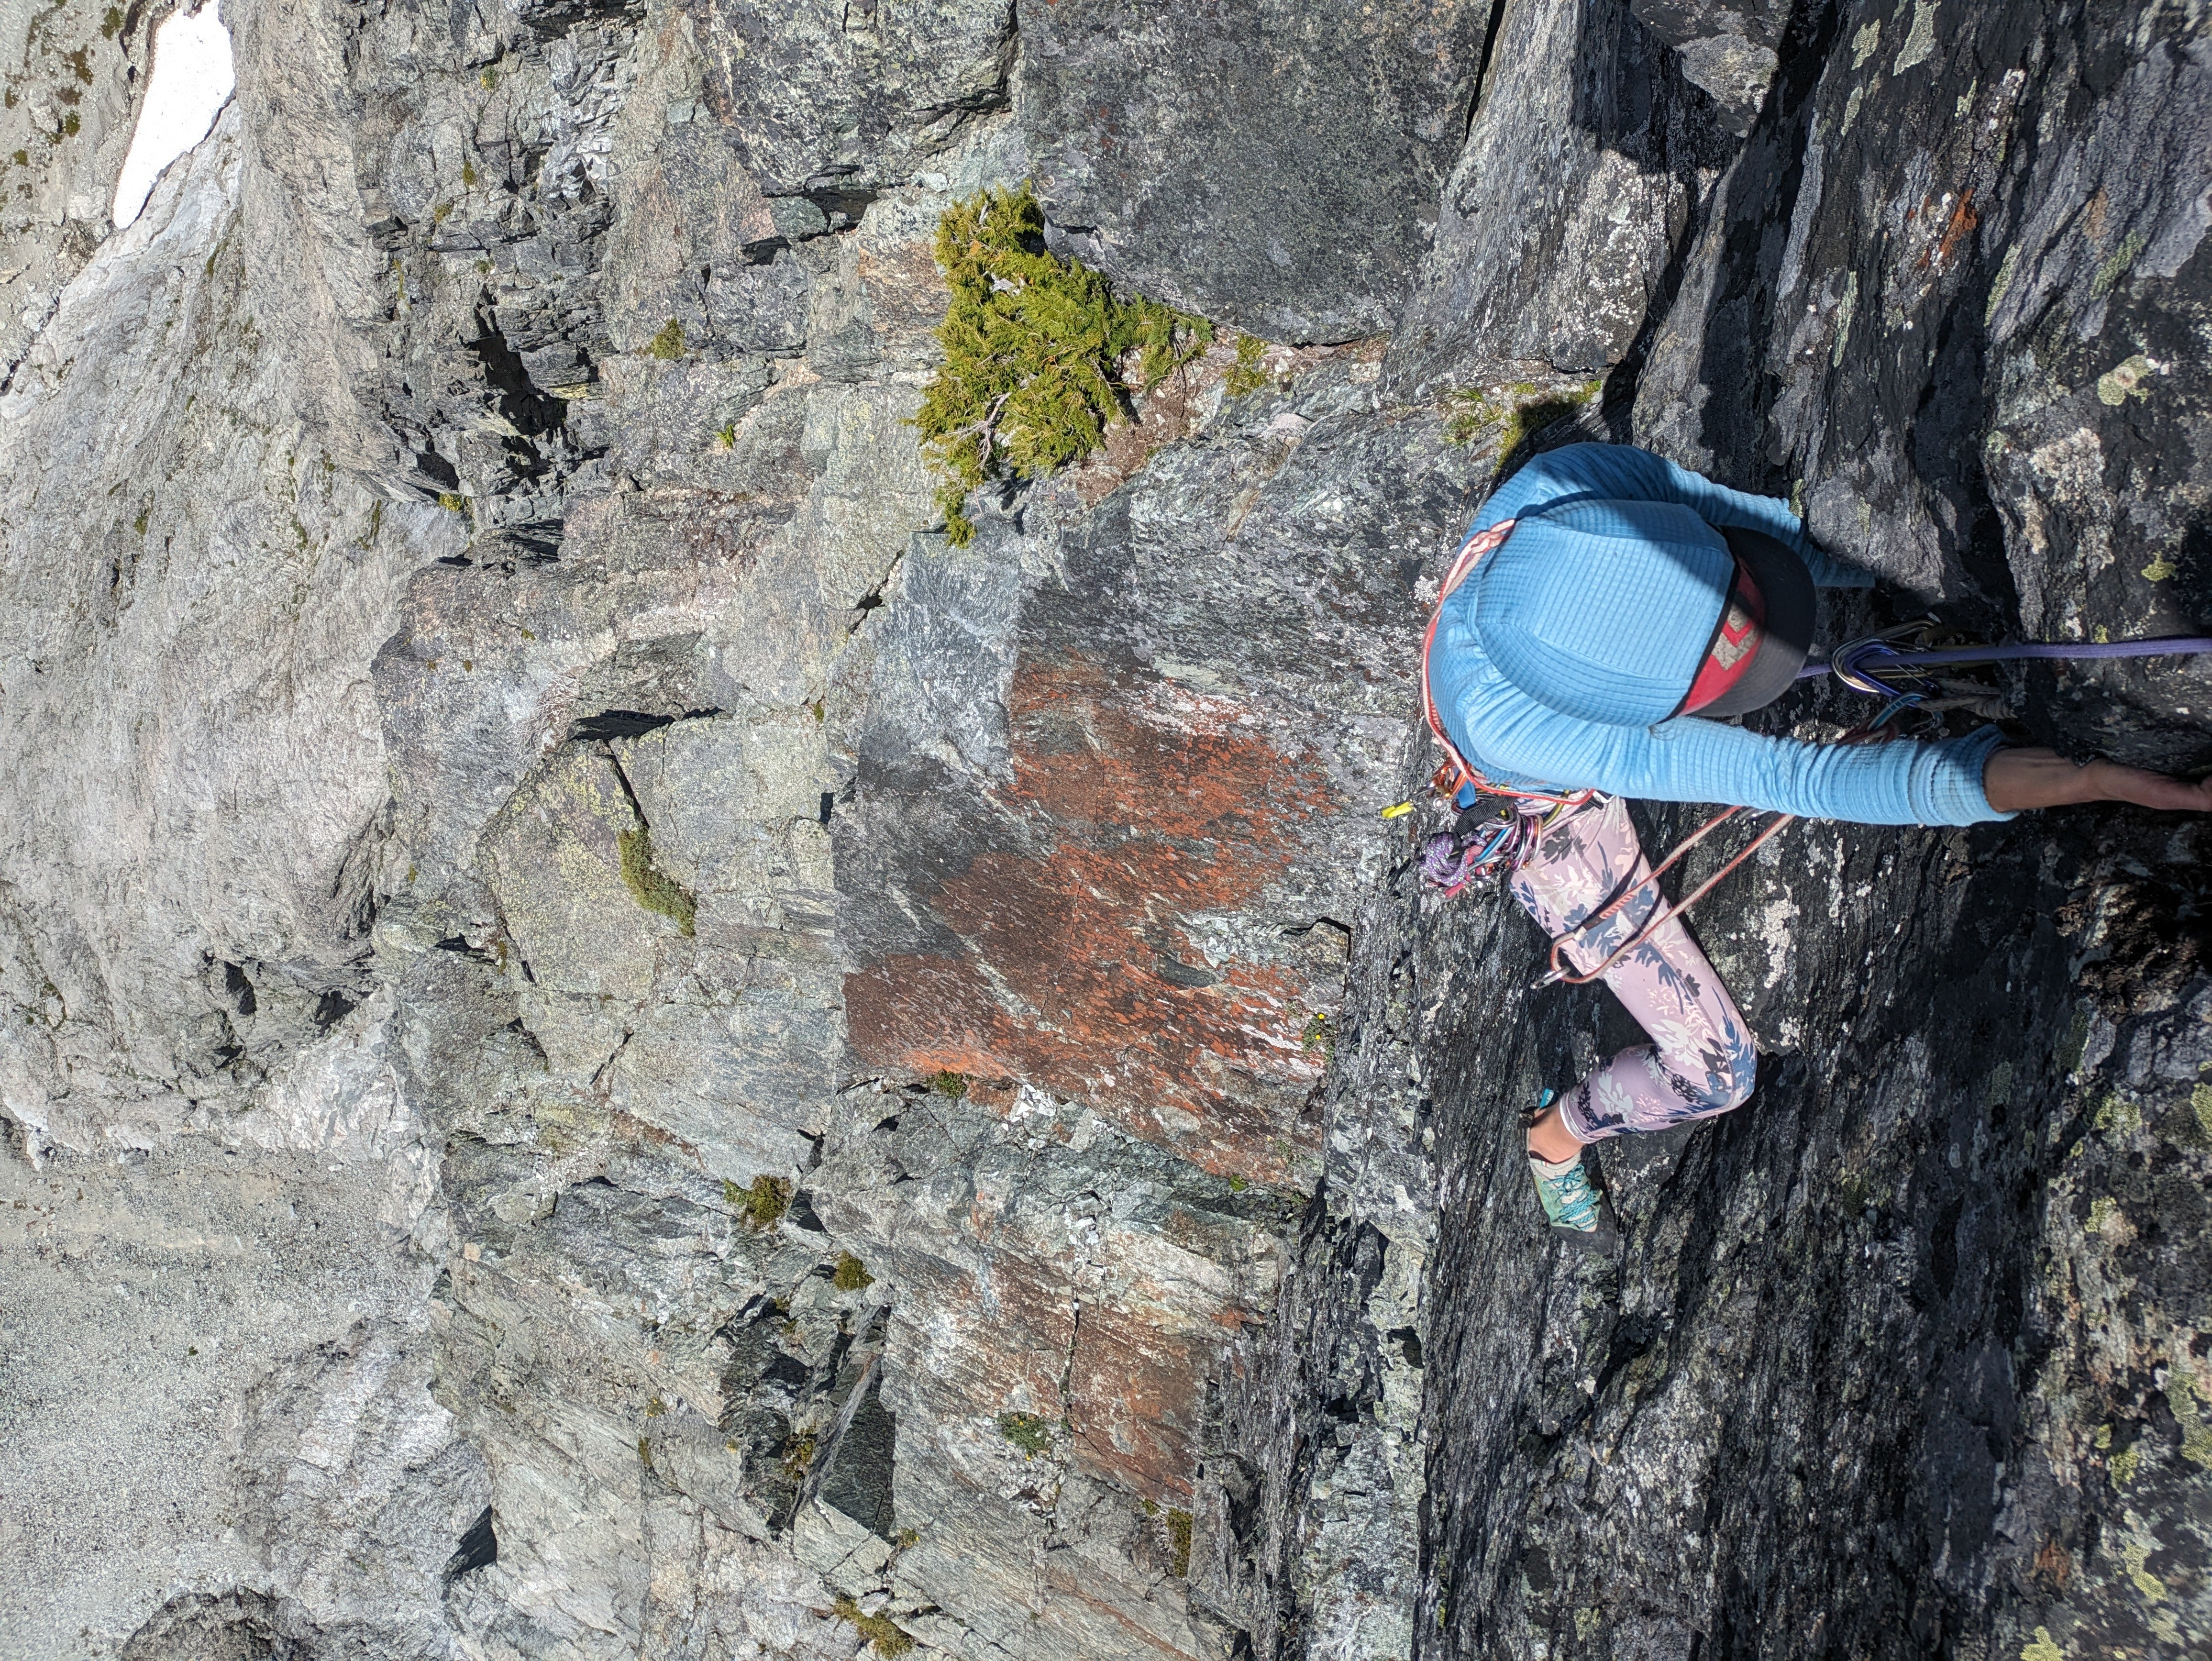
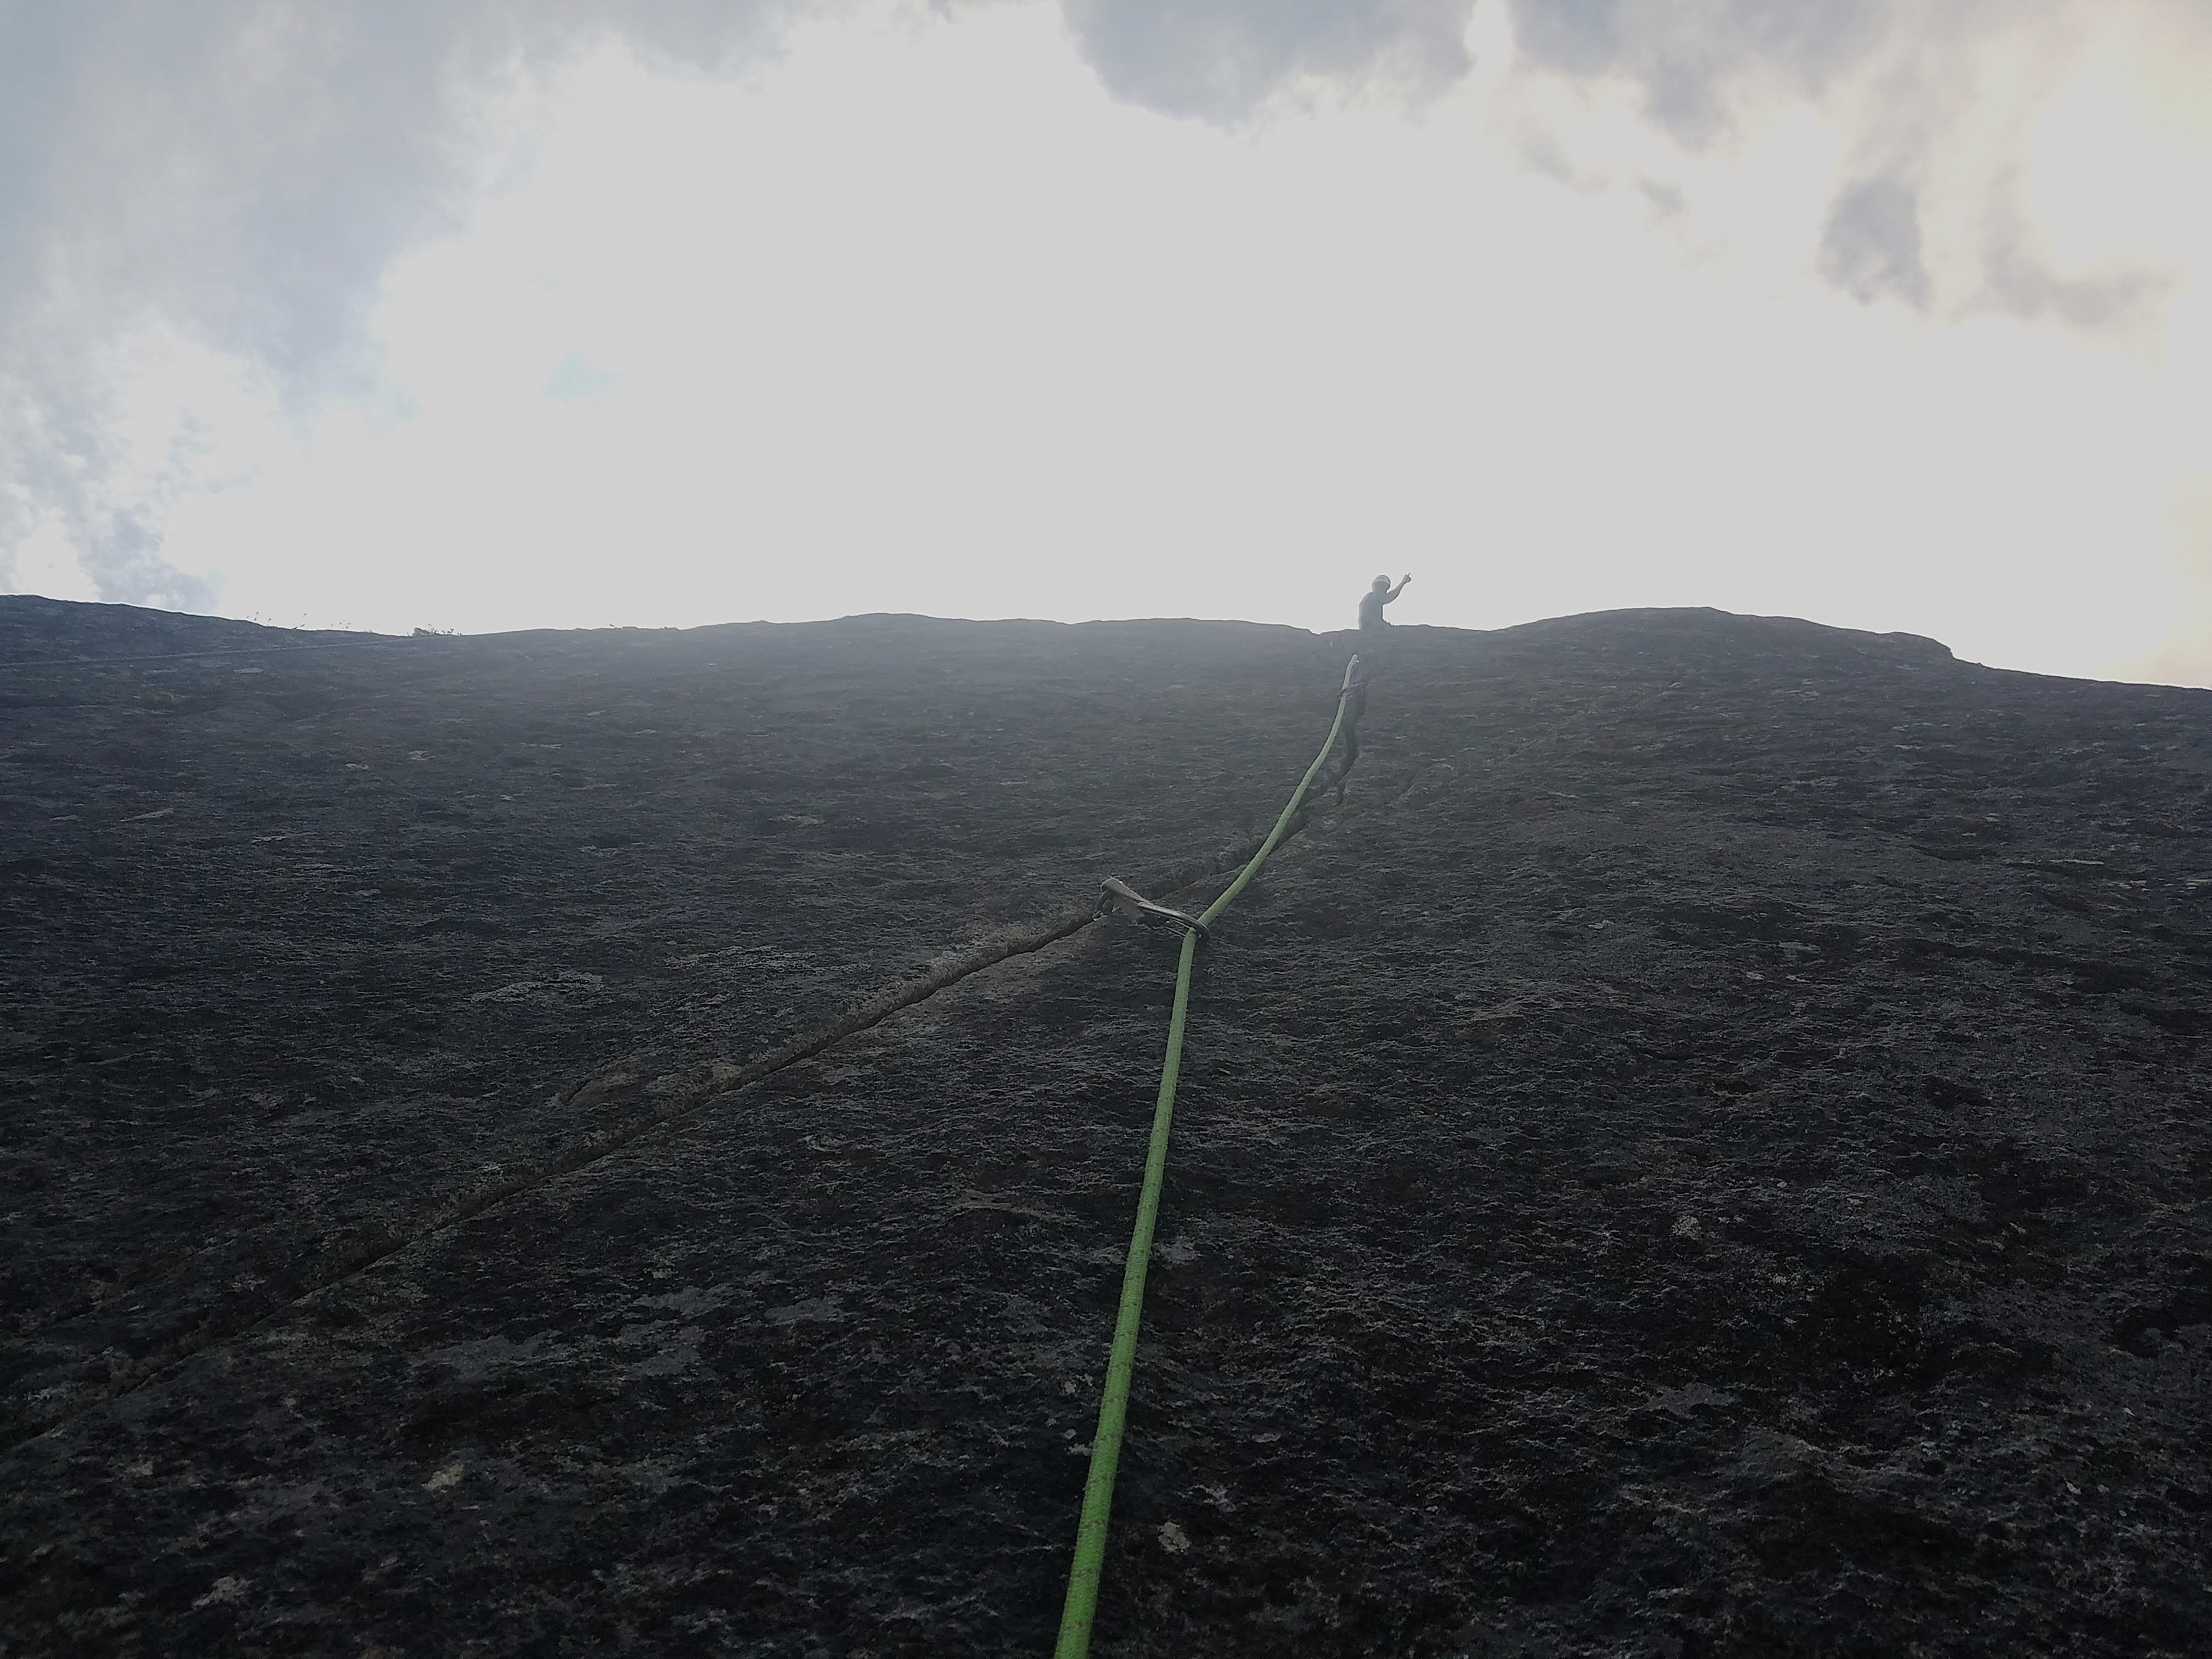
 From July 25-27, Lani Chapko and I climbed the SW ridge of Whatcom peak. This is the large, two-tiered ridge that, at its toe forms the imperfect impass. The ridge gains 2400' with 3000' of roped travel. The ridge is generally not very sustained with the upper half being mostly low fifth class. We did it in 14 pitches or simul blocks. The route climbed on generally very low quality shist and required care and deliberate, slow movement the whole time. Protection was surprisingly good through the lower, challenging climbing, but non-existent at times higher up, forcing very long simul blocks to locate anchors. The route follows the skyline Day 1 We left the Hannegan Pass TH around 2pm and hiked to a camp on the summit of easy peak. Day 2 Finish the easy ridge traverse and drop down to the toe of the ridge. We started just left and uphill of the toe on an obvious ledge. Climb then return via easy pass/imperfect impass back to a camp on the summit of easy peak. NOTE: I bolstered the rap anchor above the second pitch of the impasse and added new tat. There is now a small nut and good KB in addition to the sketchy horn that people had been using. Please do not clean this anchor, this section is about 5.5 and often seeps for long after rains. So it can be nice to have the option to rap. Day 3 Wake up late, and hike out, eating copious berries and taking longer than the approach 😅. Here's some photos of the climb Climbing on one of the lower 5.9 pitches Short overhanging crack crux The broad notch halfway up Easy scrambling above the notch Some cool ridge climbing up high A near gendarme towards the top Another view One more view of the ridge, following the skyline. Gear; Single Rack .1 to 3, doubles .3 to .5; small set of nuts and 3 KB's (used extensively). As always, here are my pitch notes, though id hardly recommend this route. In all seriousness, Castle in the Sky is a bonefide modern classic Cascades alpine route, so if you want to do something technical on Whatcom, you should really just do that! P1 100' 5.3 Climb water polished slabs and grooves to a massive ledge (easy solo). Move (or establish) belay to far right end of the ledge P2 200' 5.8 climb a runout mossy dike to a poor belay stance. P3 200' 5.6 Continue up the moss dike to a big ledge system. Traverse the ledge to the right anc belay just before the massive cleft. P4 100' 5.9 Traverse into the gully, climb the sometimes chossy gully and belay below an overhanging OW in a forming cave. P5 100' 5.10a Steep moves to the right exit the gully. Then steep chossy, but well protected climbing gains a ramp then a ledge to belay. P6 100' 5.10+ Trend up cracks to a tree. Awk moves through the tree gain a small ledge. The crux crack lies above. Steep pumpy climbing with barely ok gear leads to a sloping ledge to belay. P7 200' 5.9 Surprisingly techy climbing above the belay relents to chossy low fifth class on the ridge. Stretch your rope and find a belay. P8 200' low fifth Scramble the ridge to some trees. Scramble a few hundred feet to the base of a gendarme P9 250' 5.5 Scramble up a grassy ramp on the right of the gendarme. Belay at a small saddle. A few hundred feet of 4th class through a massive notch in the ridge. This is a possible bivy site or bail point. Several hundred more feet of scrambling up to low fifth leads to a small notch. P10 300' low fifth Scramble a loose gully to where you can find gear to belay. P11 200' 5.5 Continue up the gully to where the ridge knife edges out. P12 200' 5.4 Climb the knife edge ridge to the next notch. P13 600' 5.5 Continue along the ridge to the base of the summit headwall. P14 200' 5.7 Climb the left side of the headwall to a spot just below the summit, then scramble to the summit.
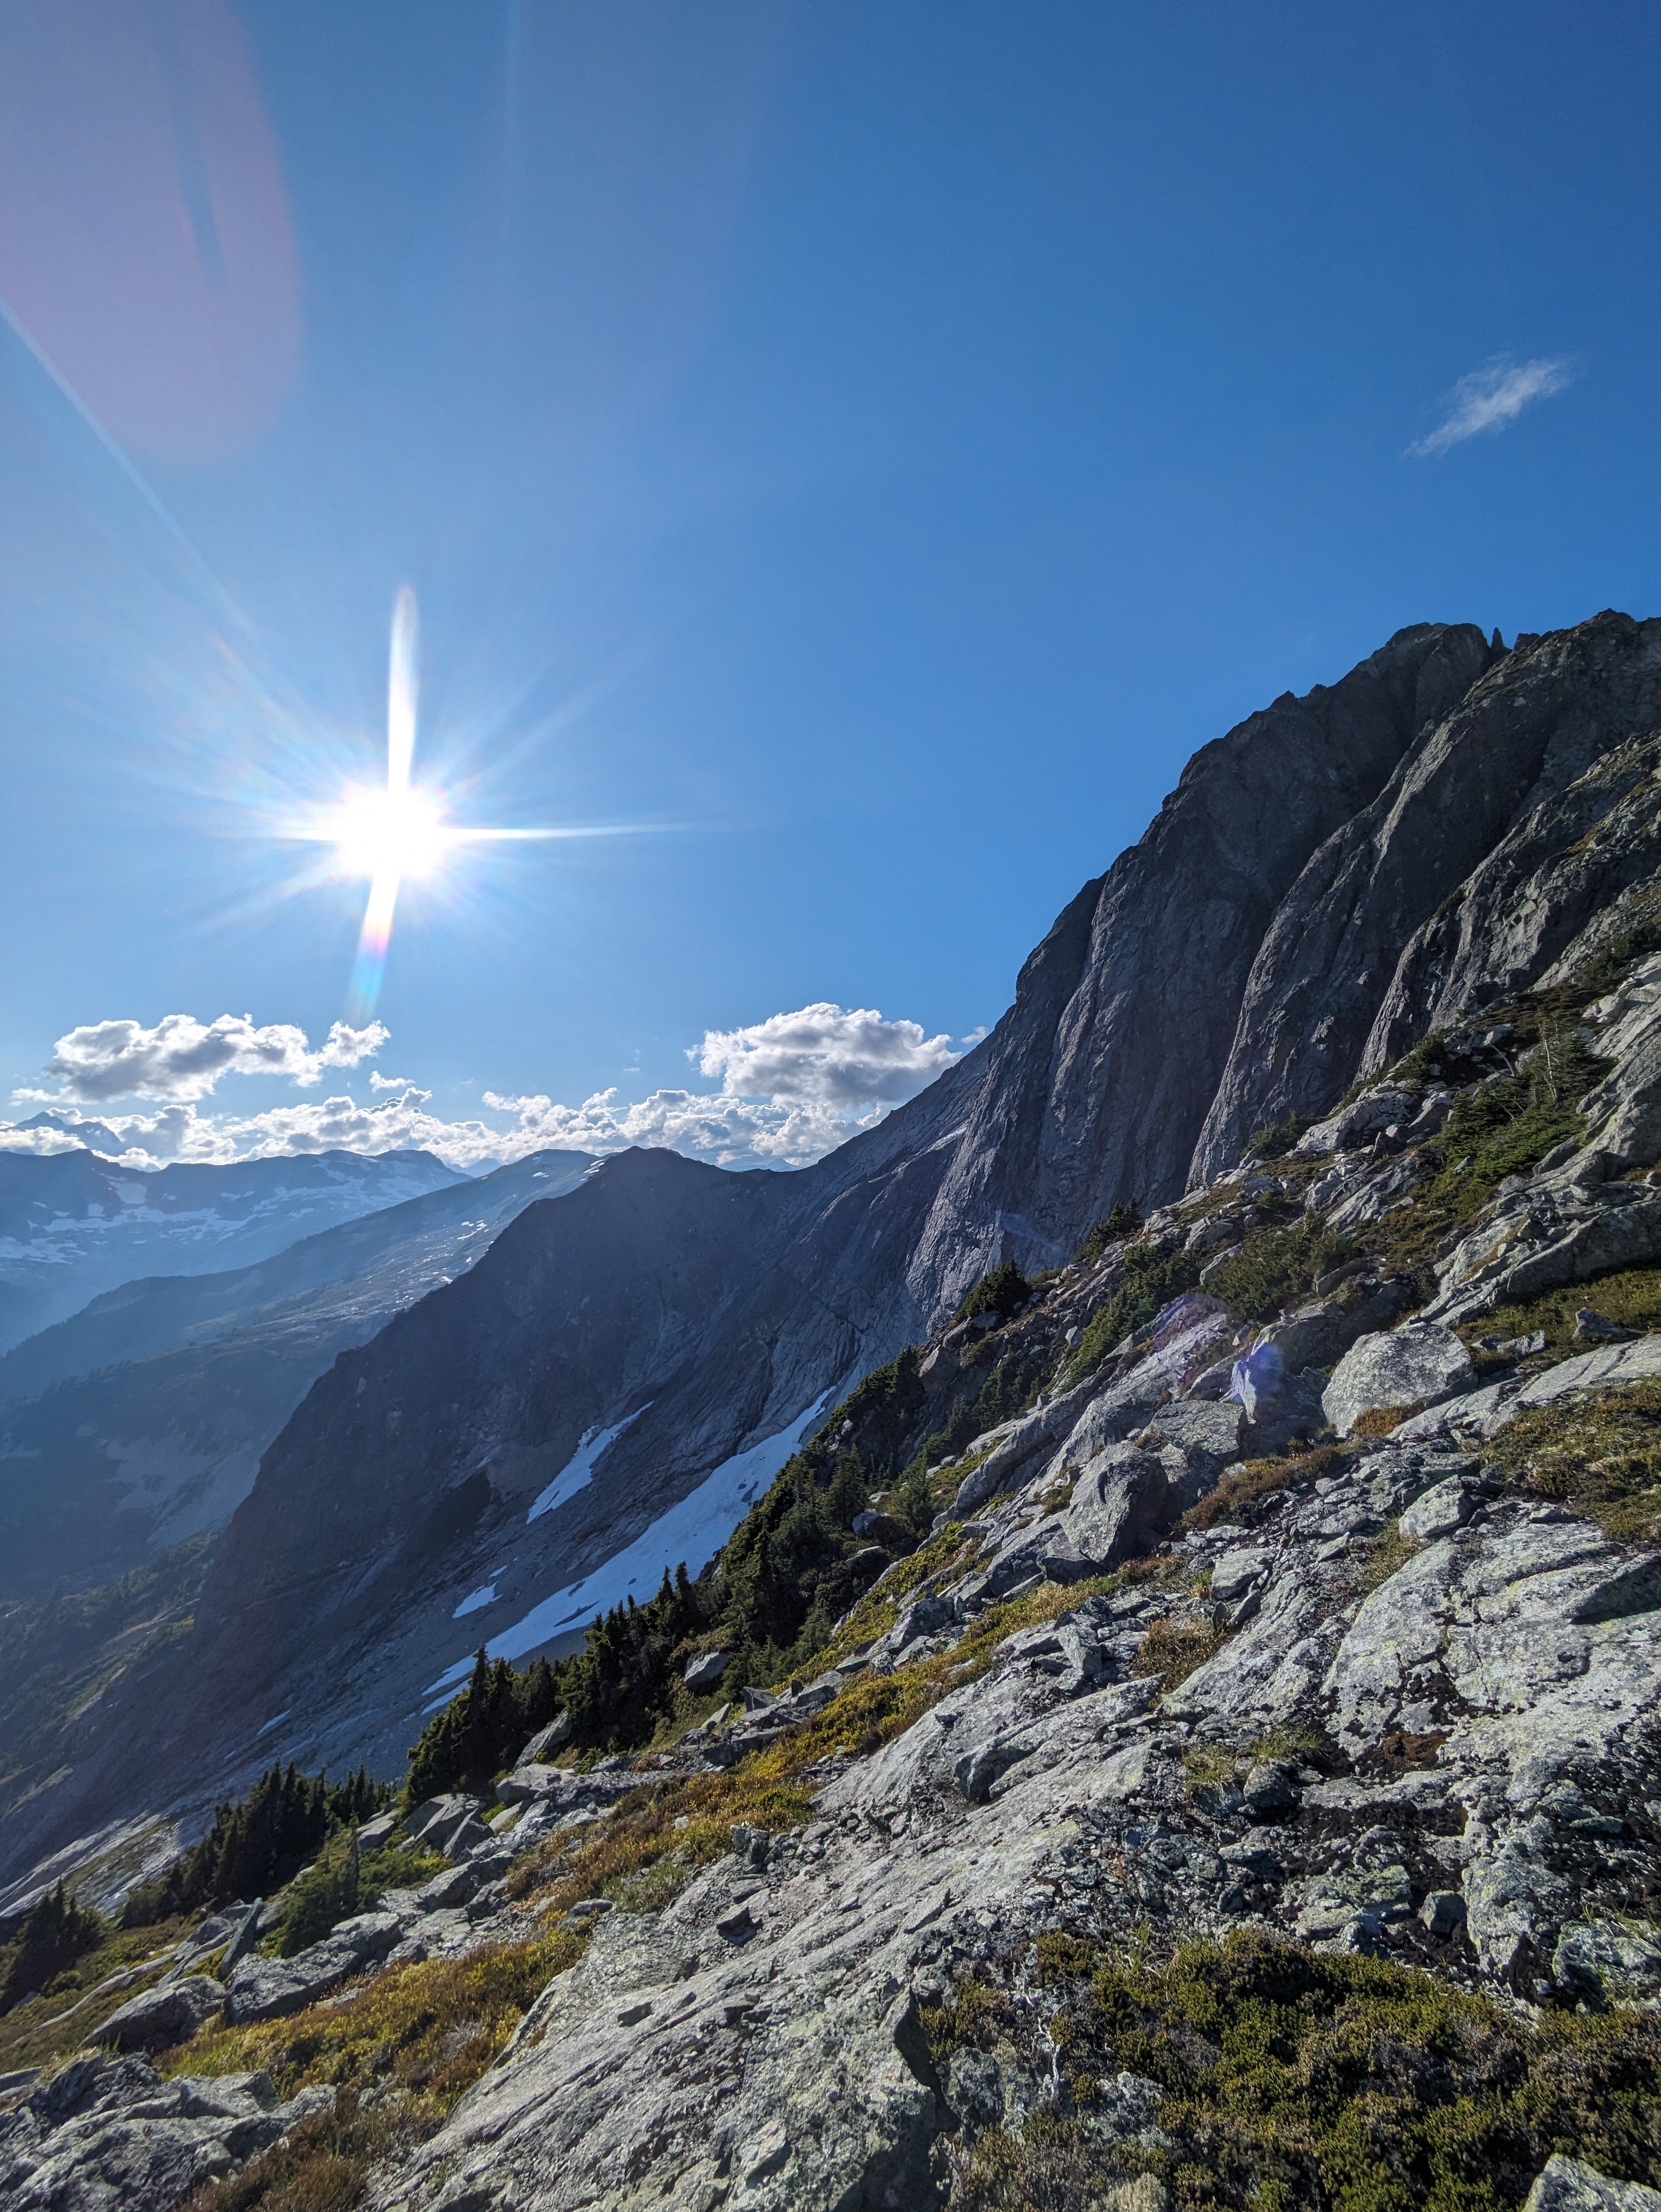
-
 Sure. Mostly I’ll focus on the gear we took from artist point to GP. The gear up Baker was different…sort of standard summer volcano kit… After Baker we treated it more like backpacking. Going as light as we could wherever ~reasonable We used 55L Hyperlite packs. Big enough for all the gear and weeks worth of food. But light enough to accomplish the goal of being under 40lbs fully loaded. tents - we used a big Agnes UL freestanding and a Hyperlite 1p non freestanding. sleeping gear varied by person but for the most part we were using ~20 degree UL quilts and the lightest air pads we could tolerate. I had an old school 3/4 foam pad to supplement footwear was a big topic of discussion in the months (years, really) leading up to the trip. I can’t say enough good things about the scarpa ribelle run xt for the wide variety of terrain out there. They take a crampon really well for being essentially a trail runner. I wish they dried quicker but they definitely met the need without having to wear boots for the endless regular hiking hours various UL ice axes, standard strap on crampons, trekking poles regarding technical gear (which may be more what you actually want to know here)…this too was an endless back and forth leading up to the trip. It would be easy to go way too heavy. But you can’t really head out in this terrain with just hiking kit. Ultimately we ended up with a 30m rad line, a couple small cams and nuts, a picket, couple ice screws. We used everything except the screws, although there was a moment where we considered some funkery that would have employed them. We had some other basic glacier pieces. Grivel screams for rapping the rad line…our harnesses were all super minimal (there’s a few out there that weigh like 2-3oz) food: yes, a ton of freeze drieds. Various other calorie dense snacks. Cashews, MMs. We packed a ton of pizza out with us from the resupply. The calorie deficit was probably the hardest part of the trip. It really wears on your mind when it goes on for that long. Honestly I’m not sure I’d bring that much more food though. Keeping the pack light was pretty important. Perhaps we could have added a resupply at cascade pass and then been able to go with more food/day through the southern portions feels like I’m missing something but I think that’s it other than some other unremarkable items like chargers, cookset etc
 -
Looks like a great route! https://www.mountainproject.com/route/201457237/negligence
- Yesterday
-

new route Hannegan Buttress - Negligence (5.10d)
manninjo replied to Zackw7's topic in North Cascades
Looks like a stellar crack climb, nice work! -
What if they were having the most fun? I say if you can’t make it to a main named summit it’s time to submit it to Geographic Names and get your summit named. This will please the sponsors.
- 1 reply
-
- 1
-

-
Super discounted from $180 to $27 USD. Willing to work with the fixed leg loops. https://outlet.arcteryx.com/ca/en/shop/mens/skaha-harness
-
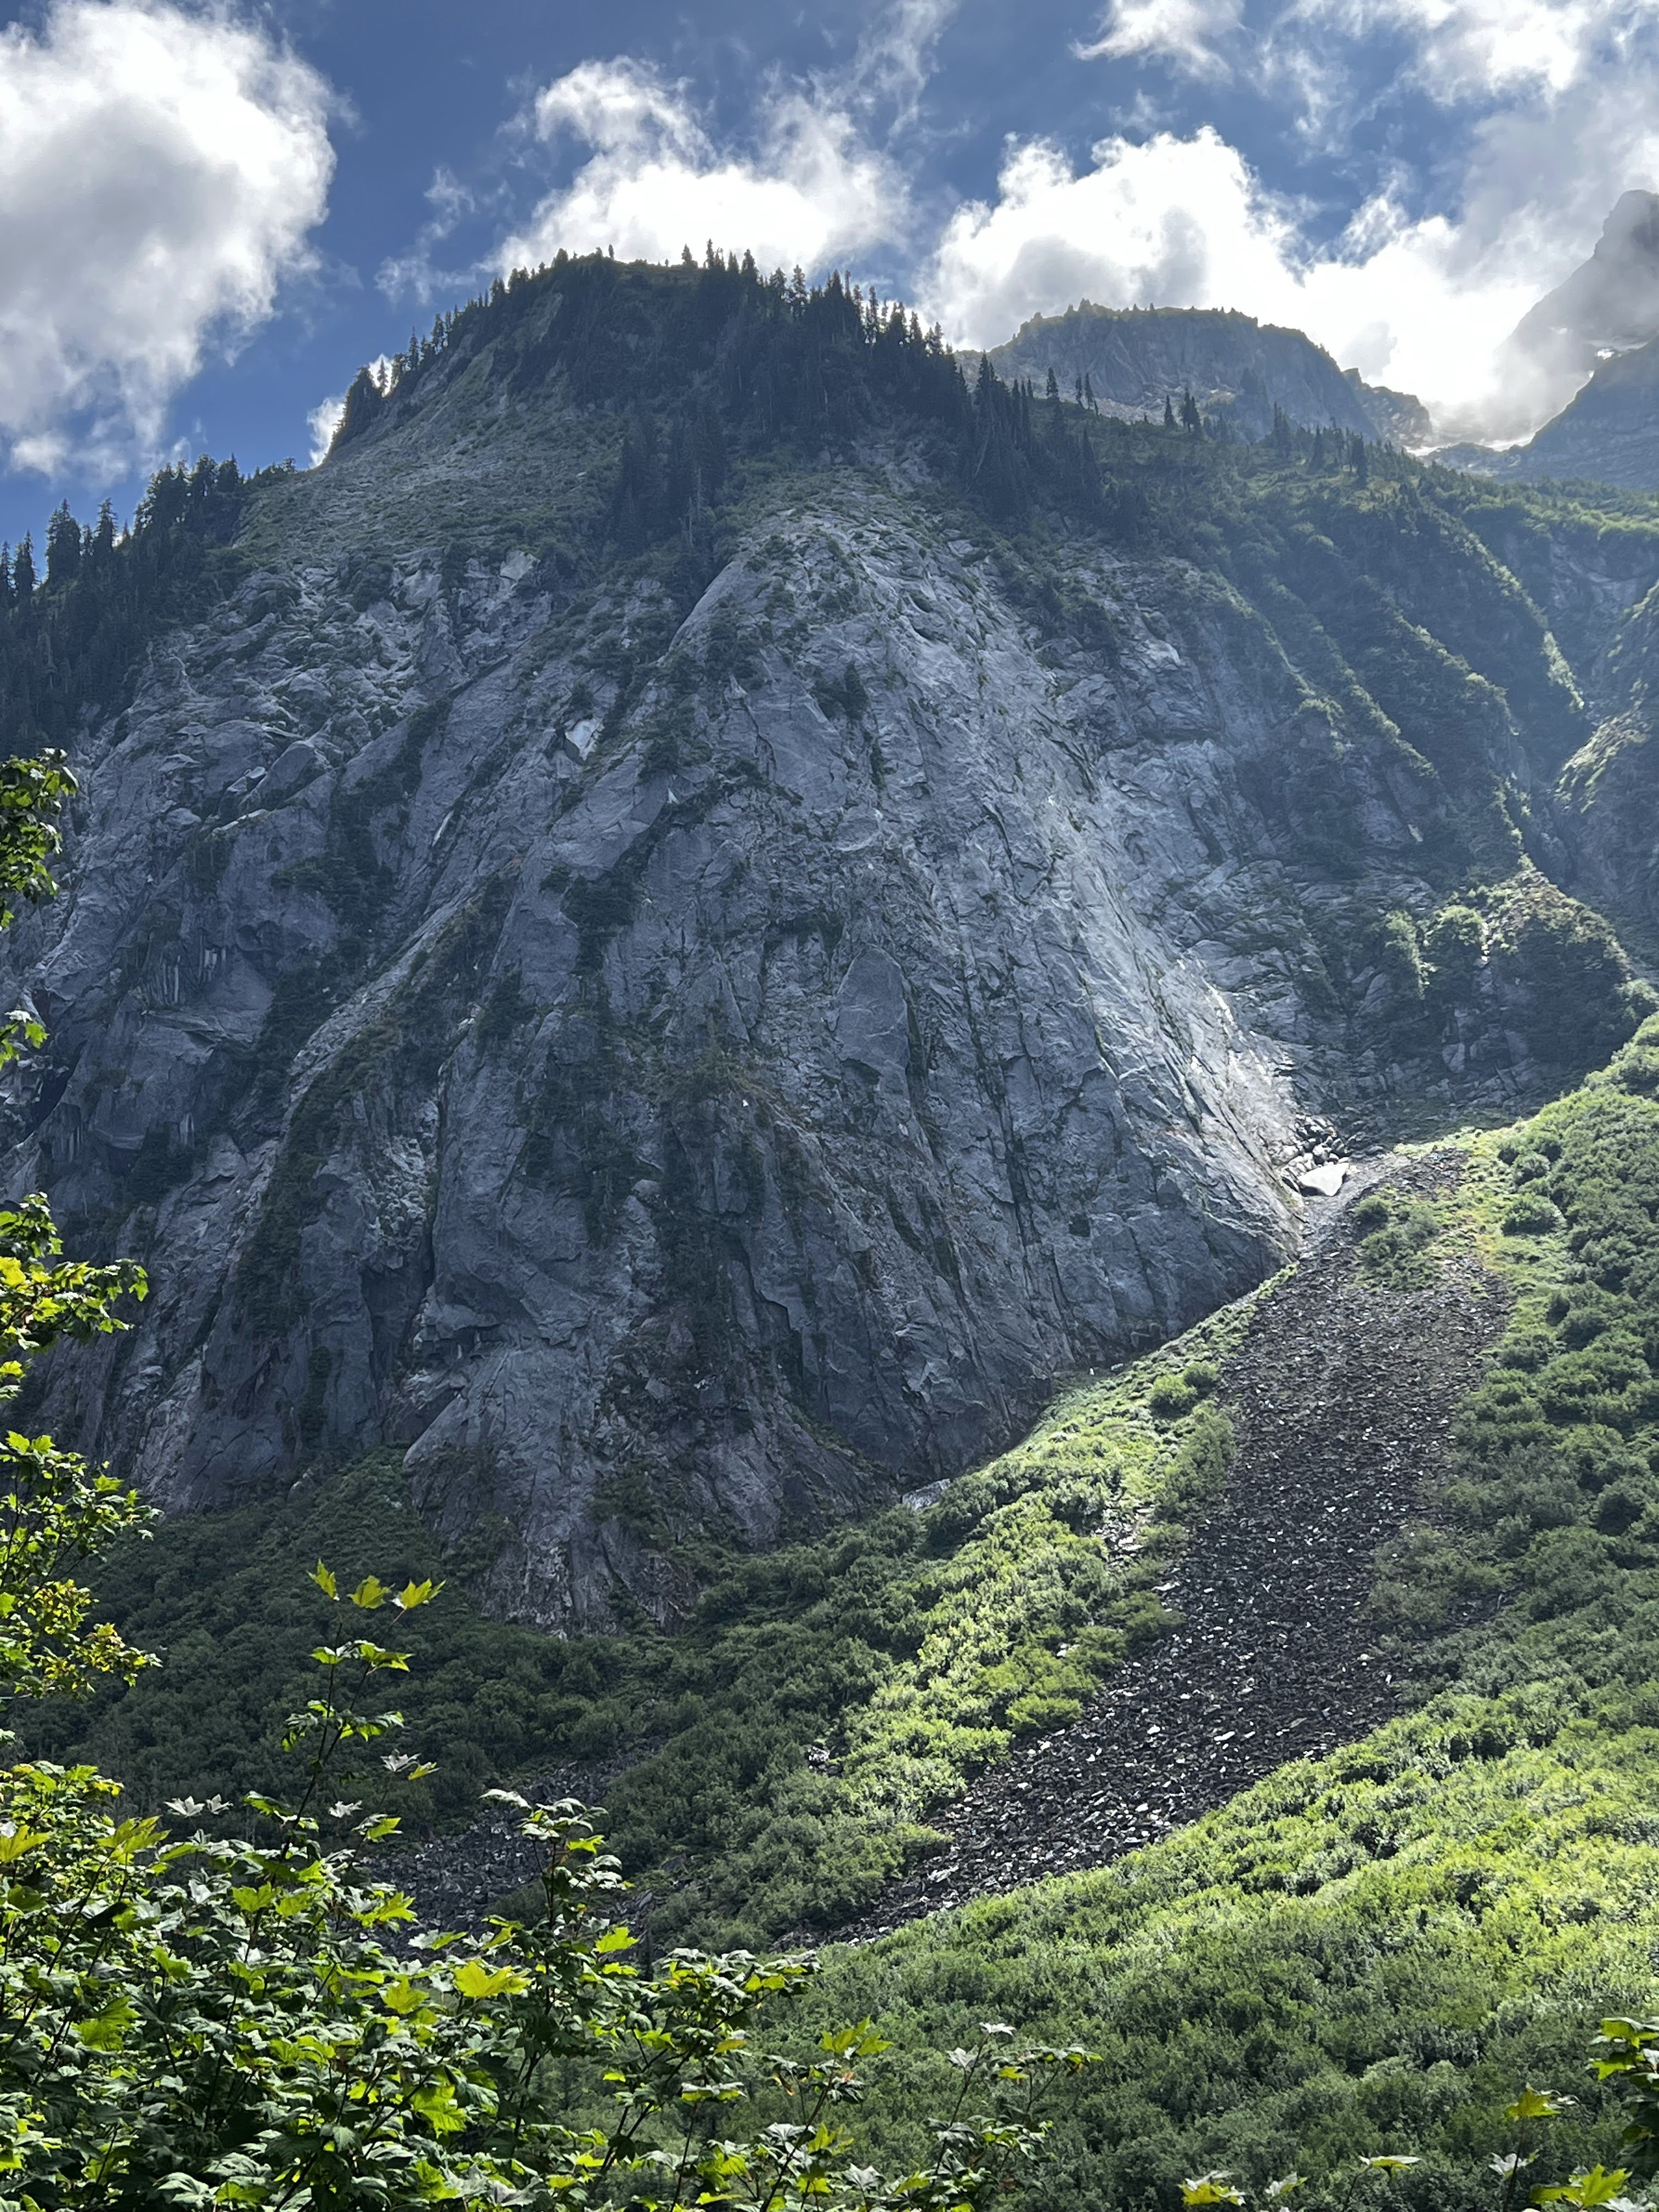
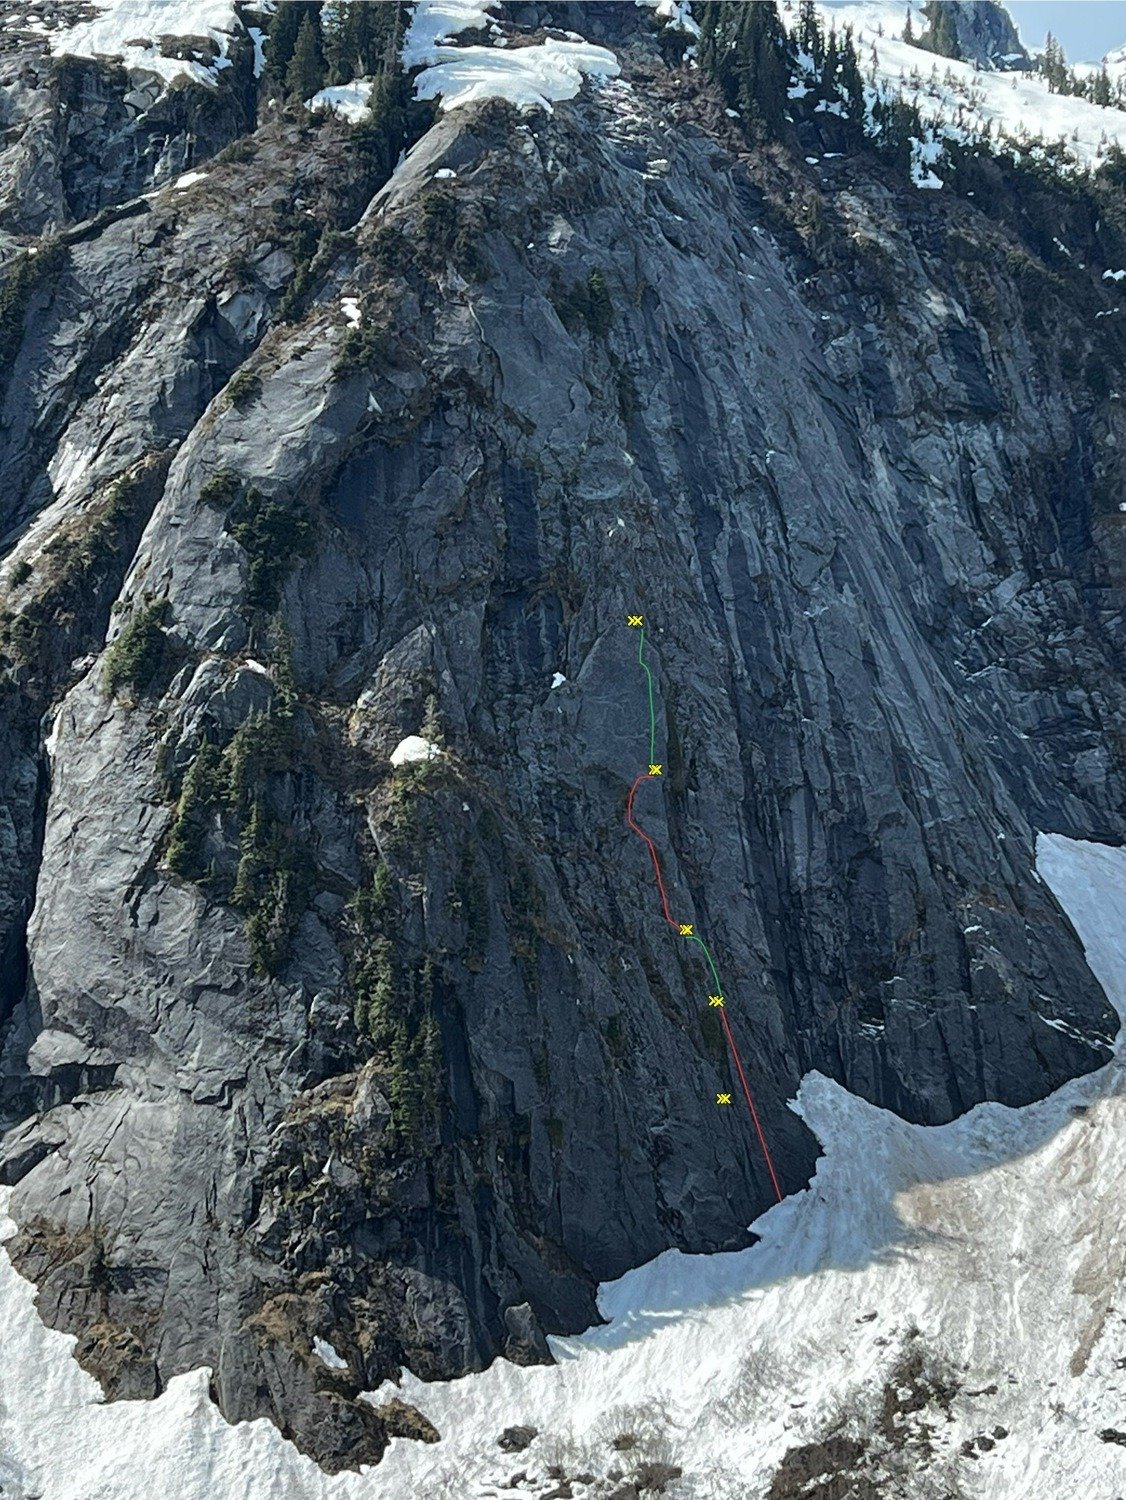
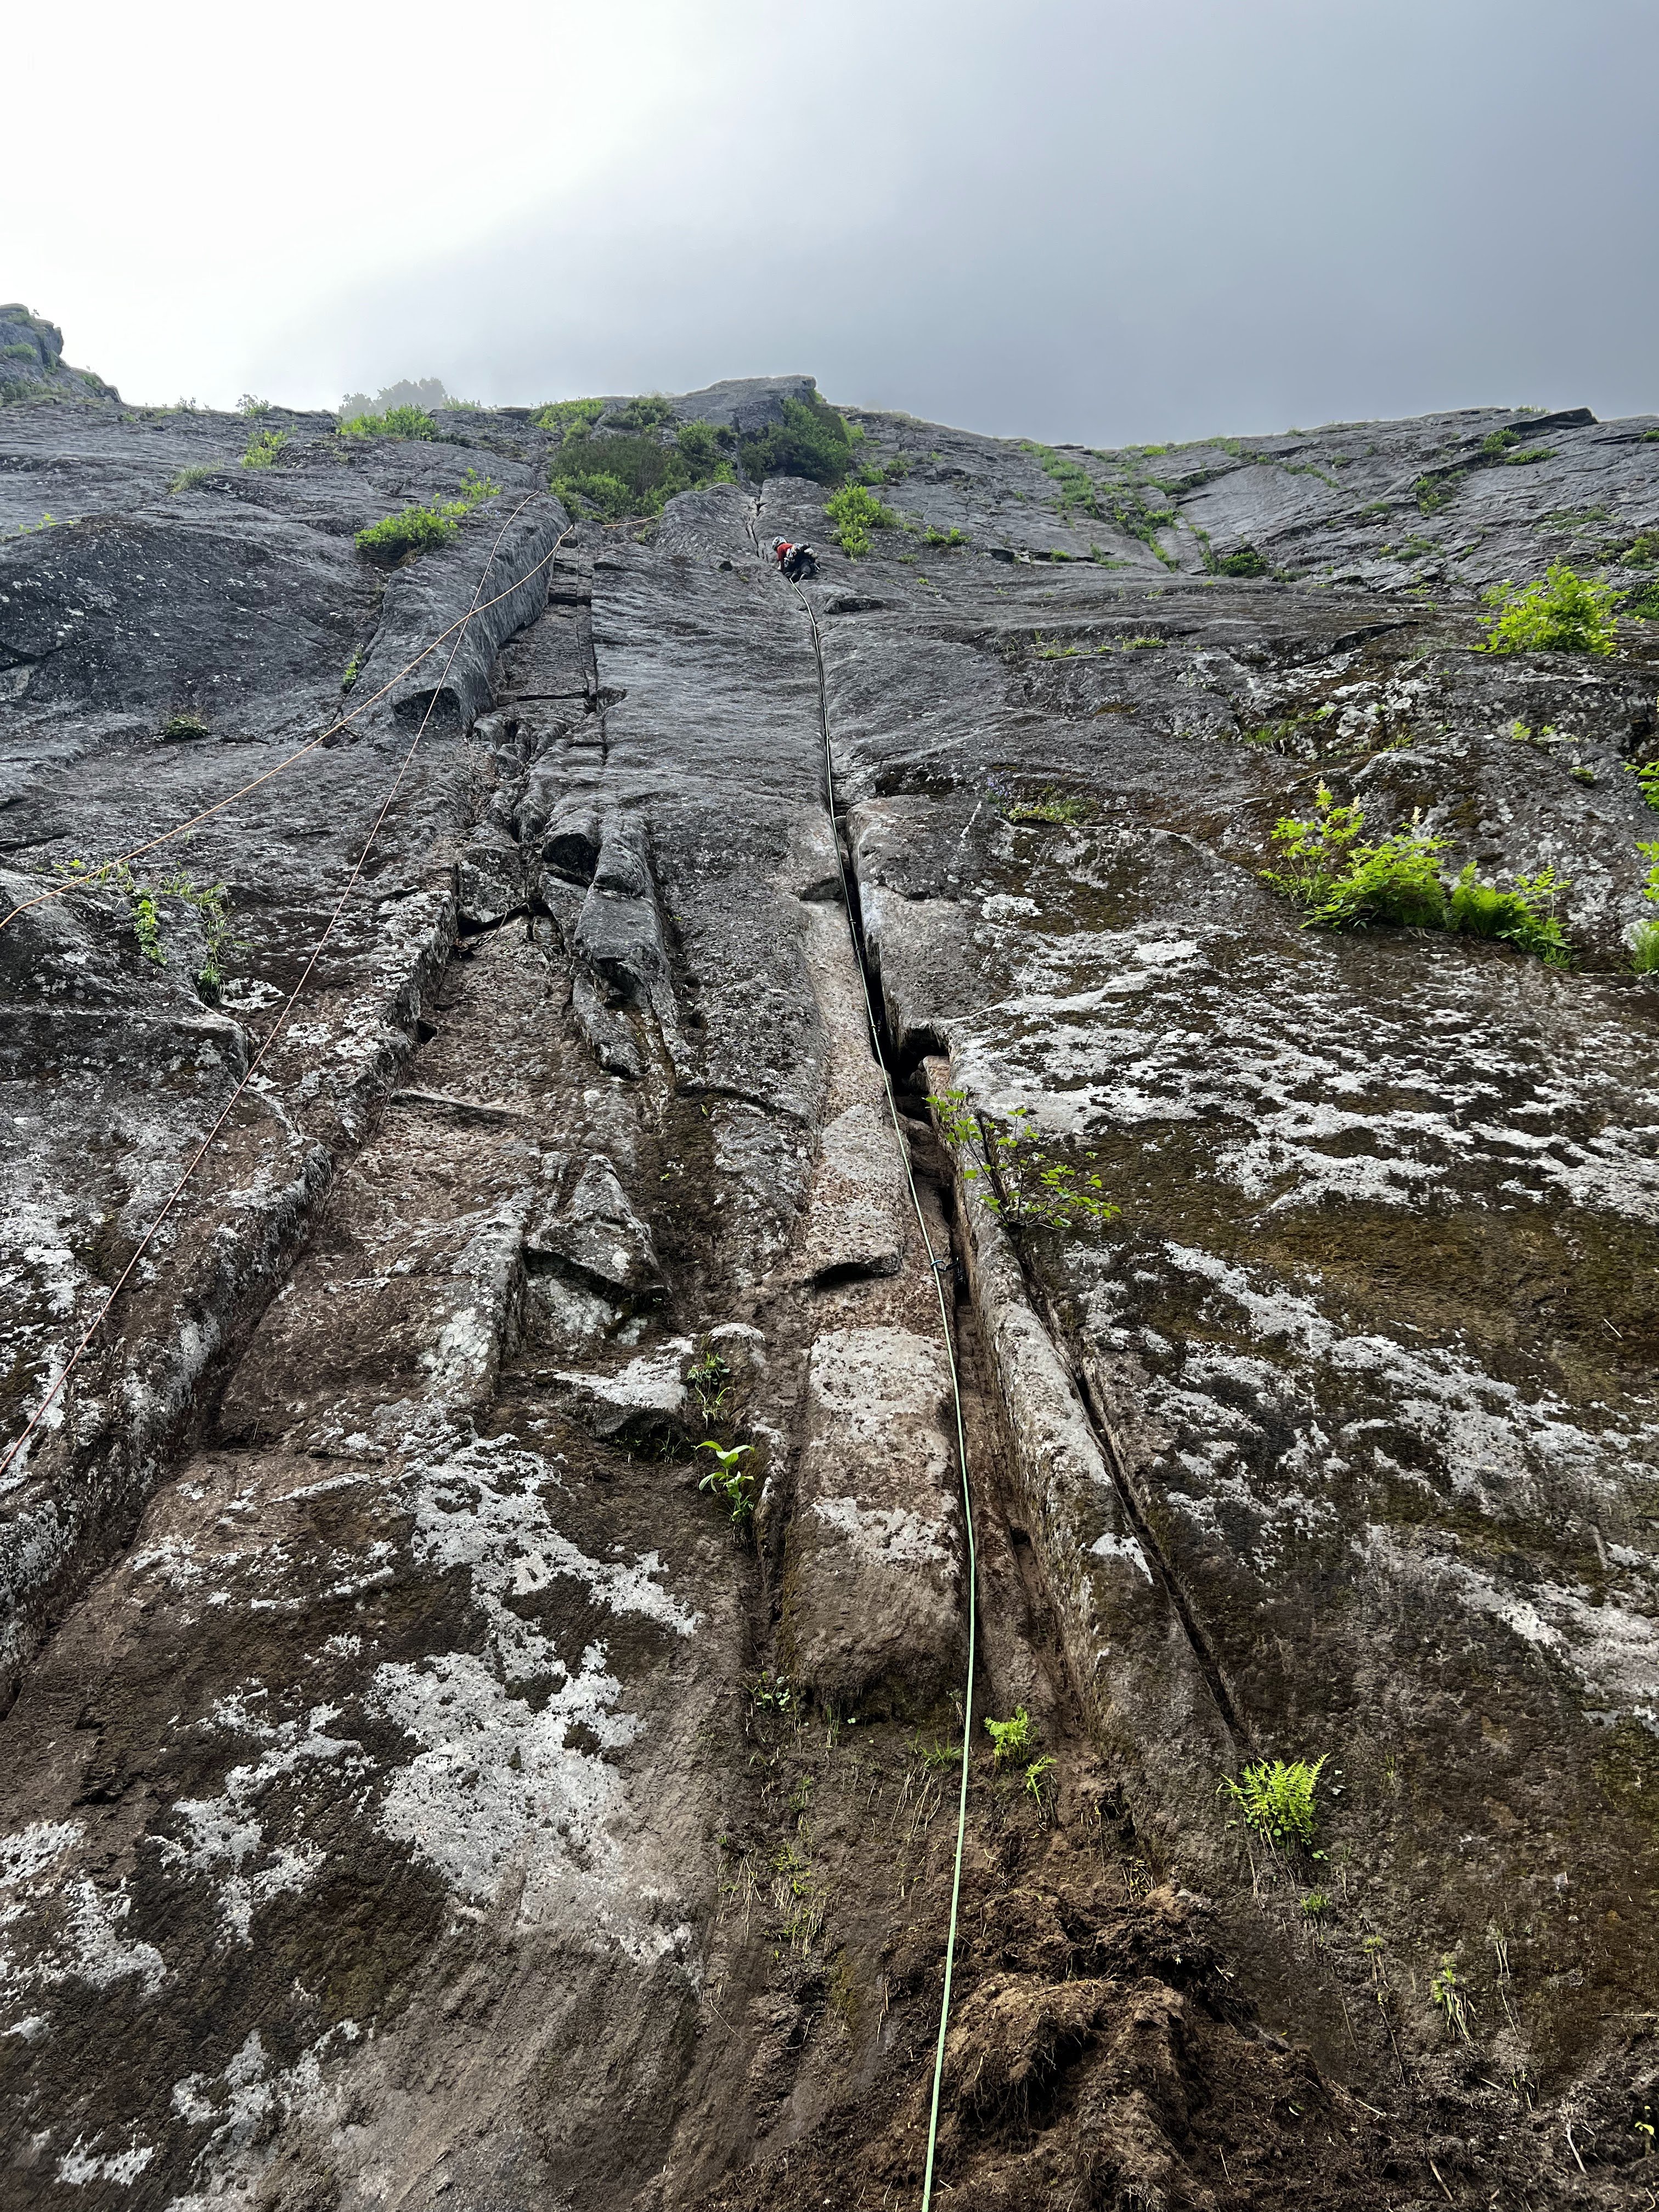
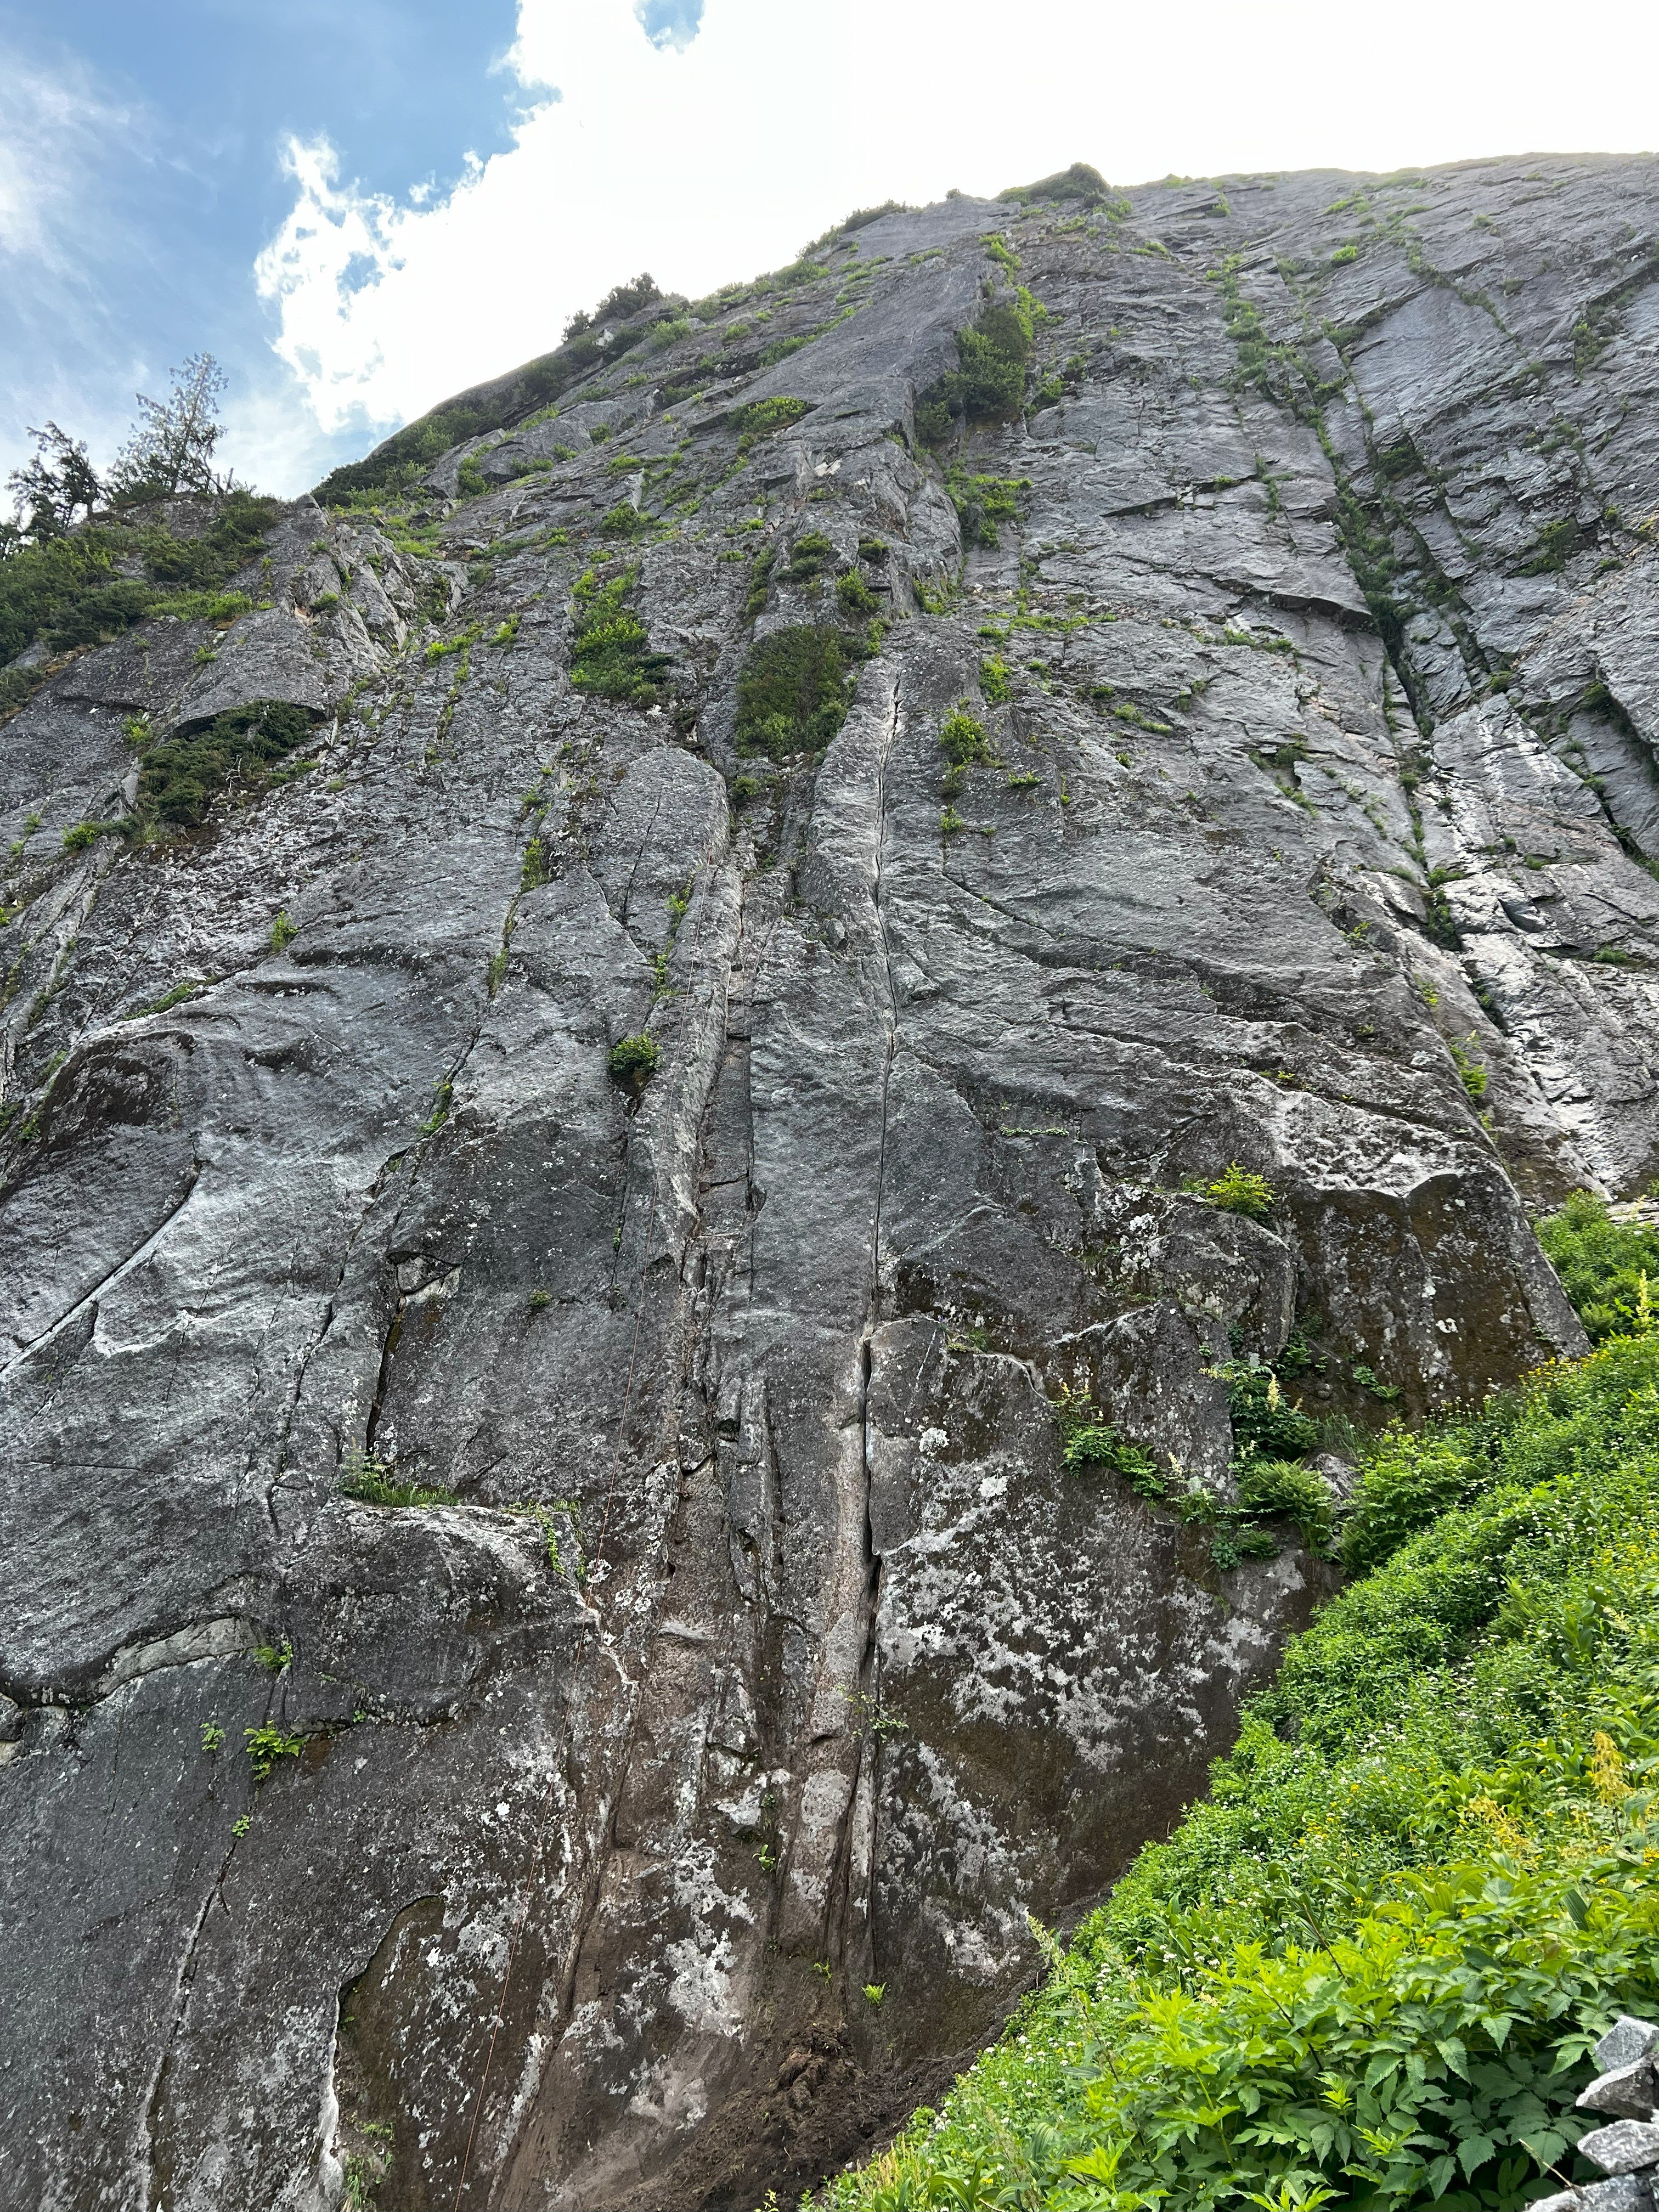
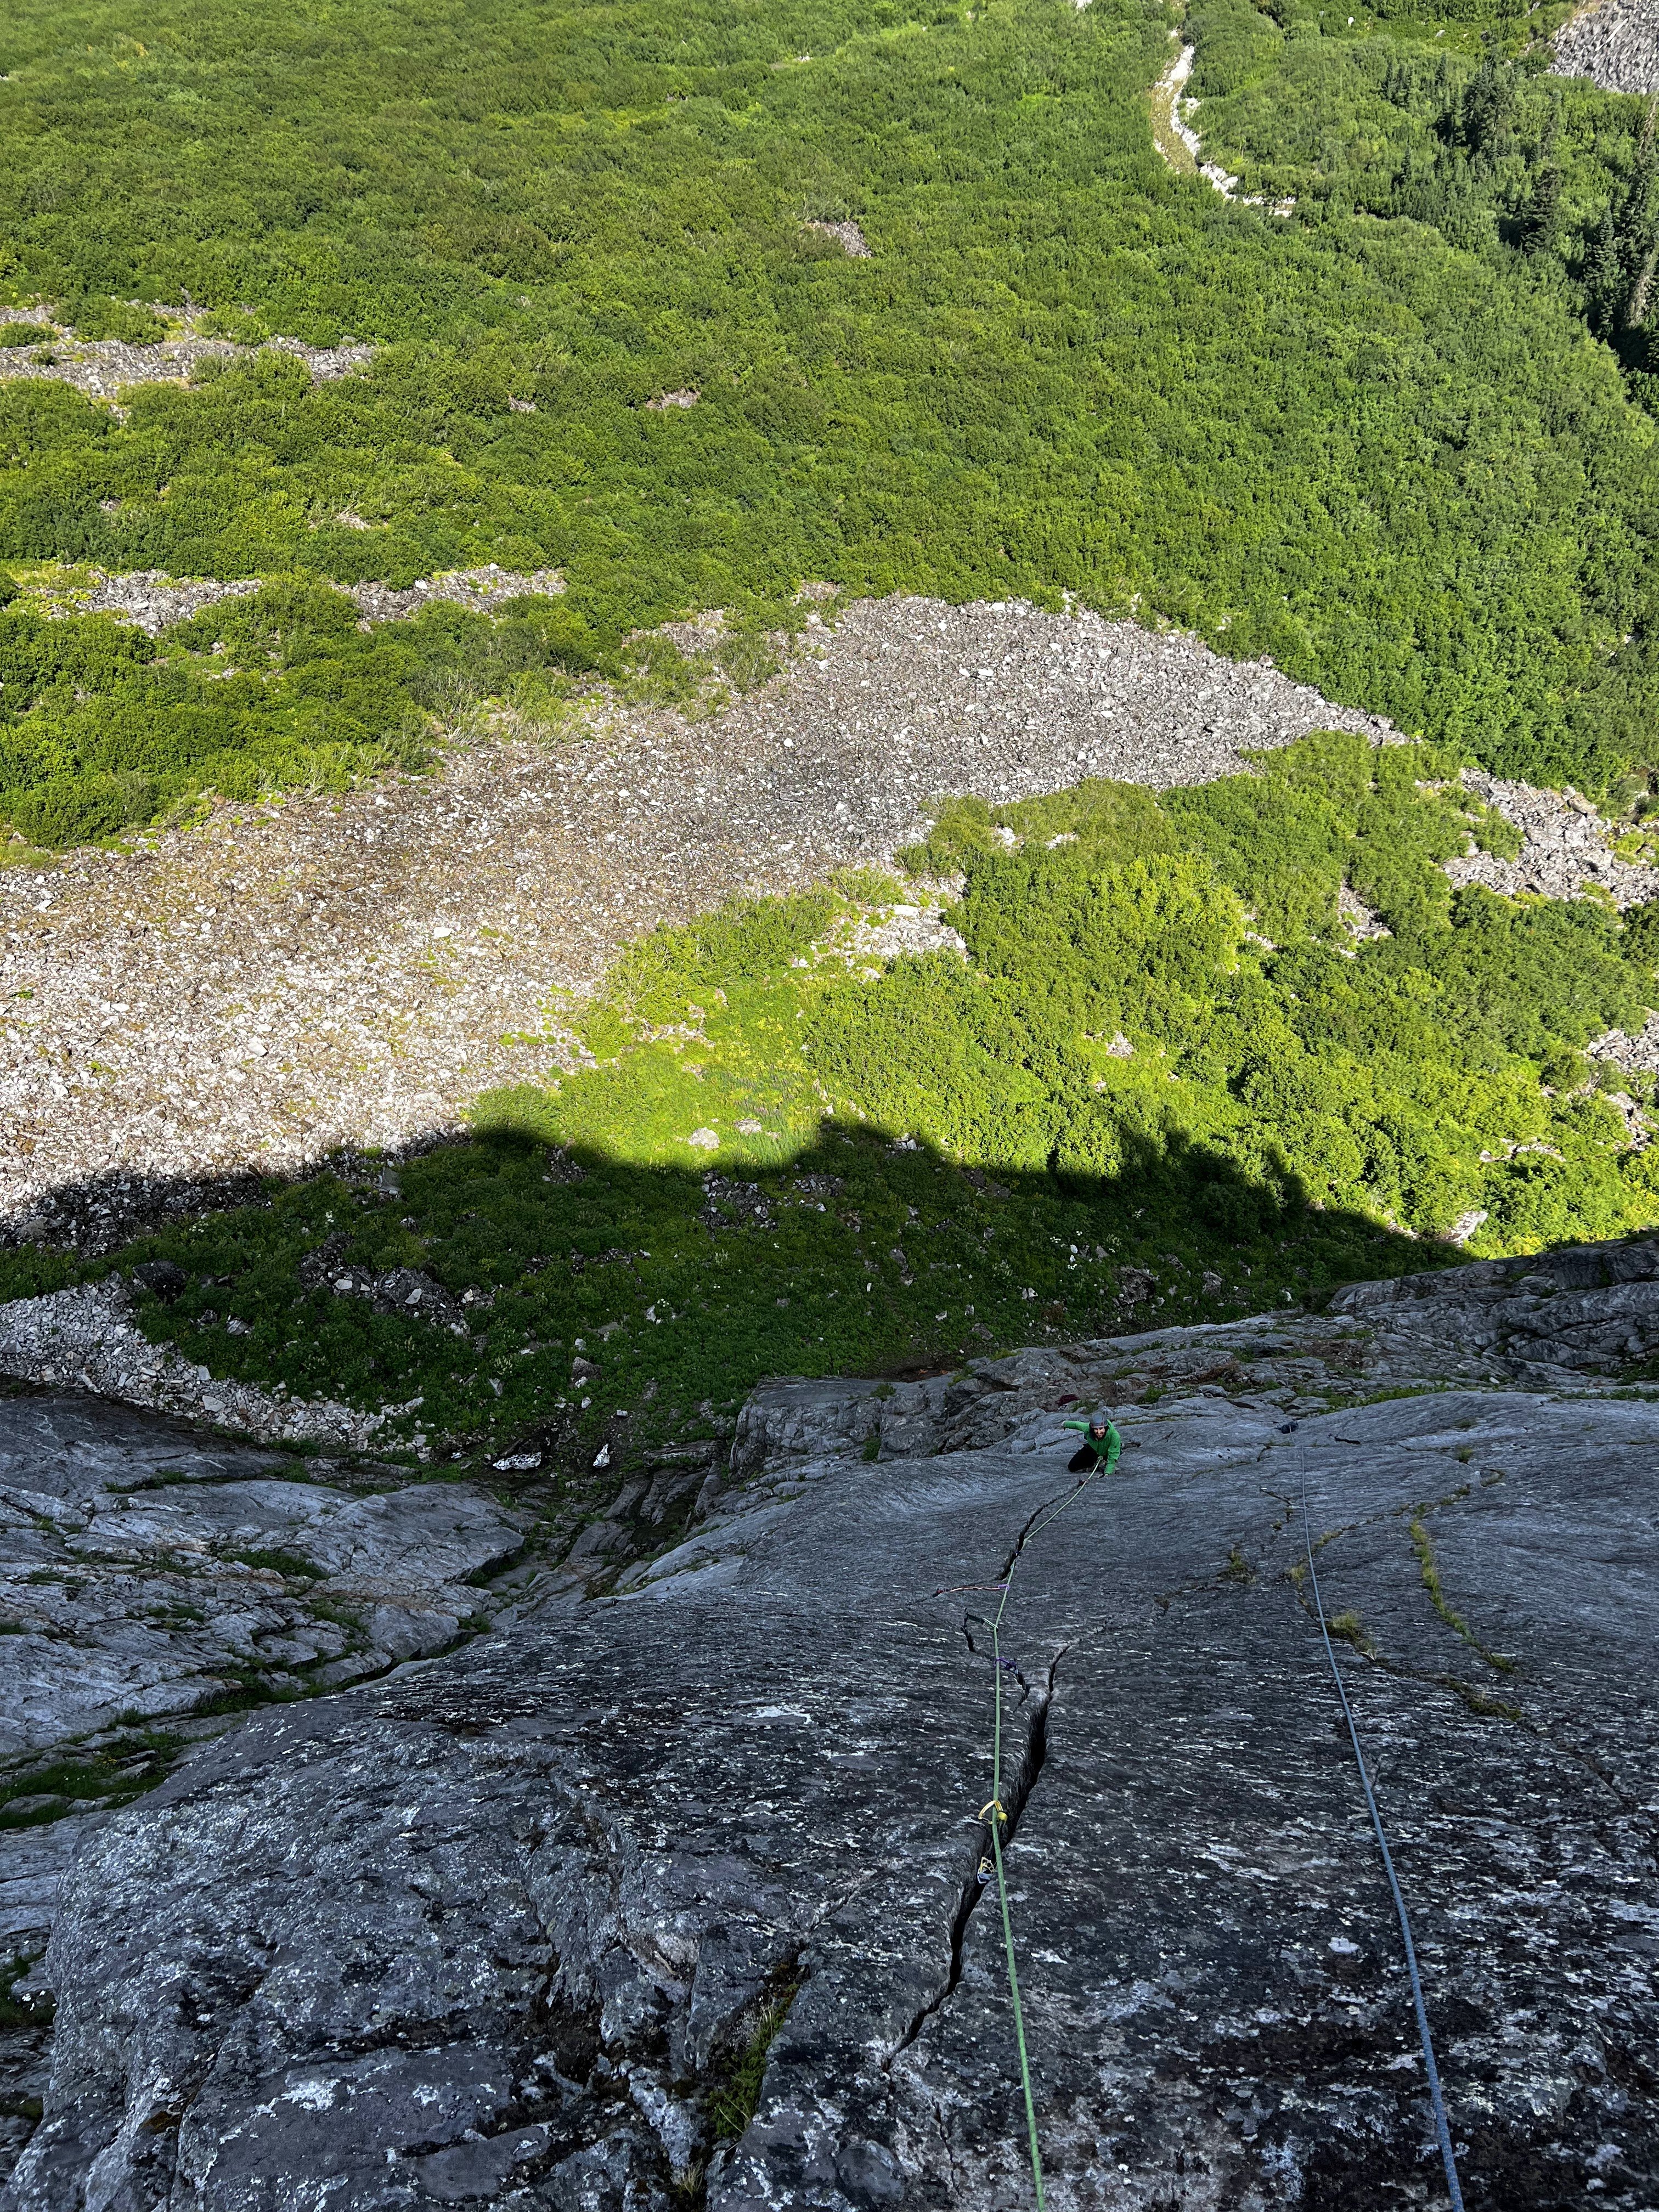
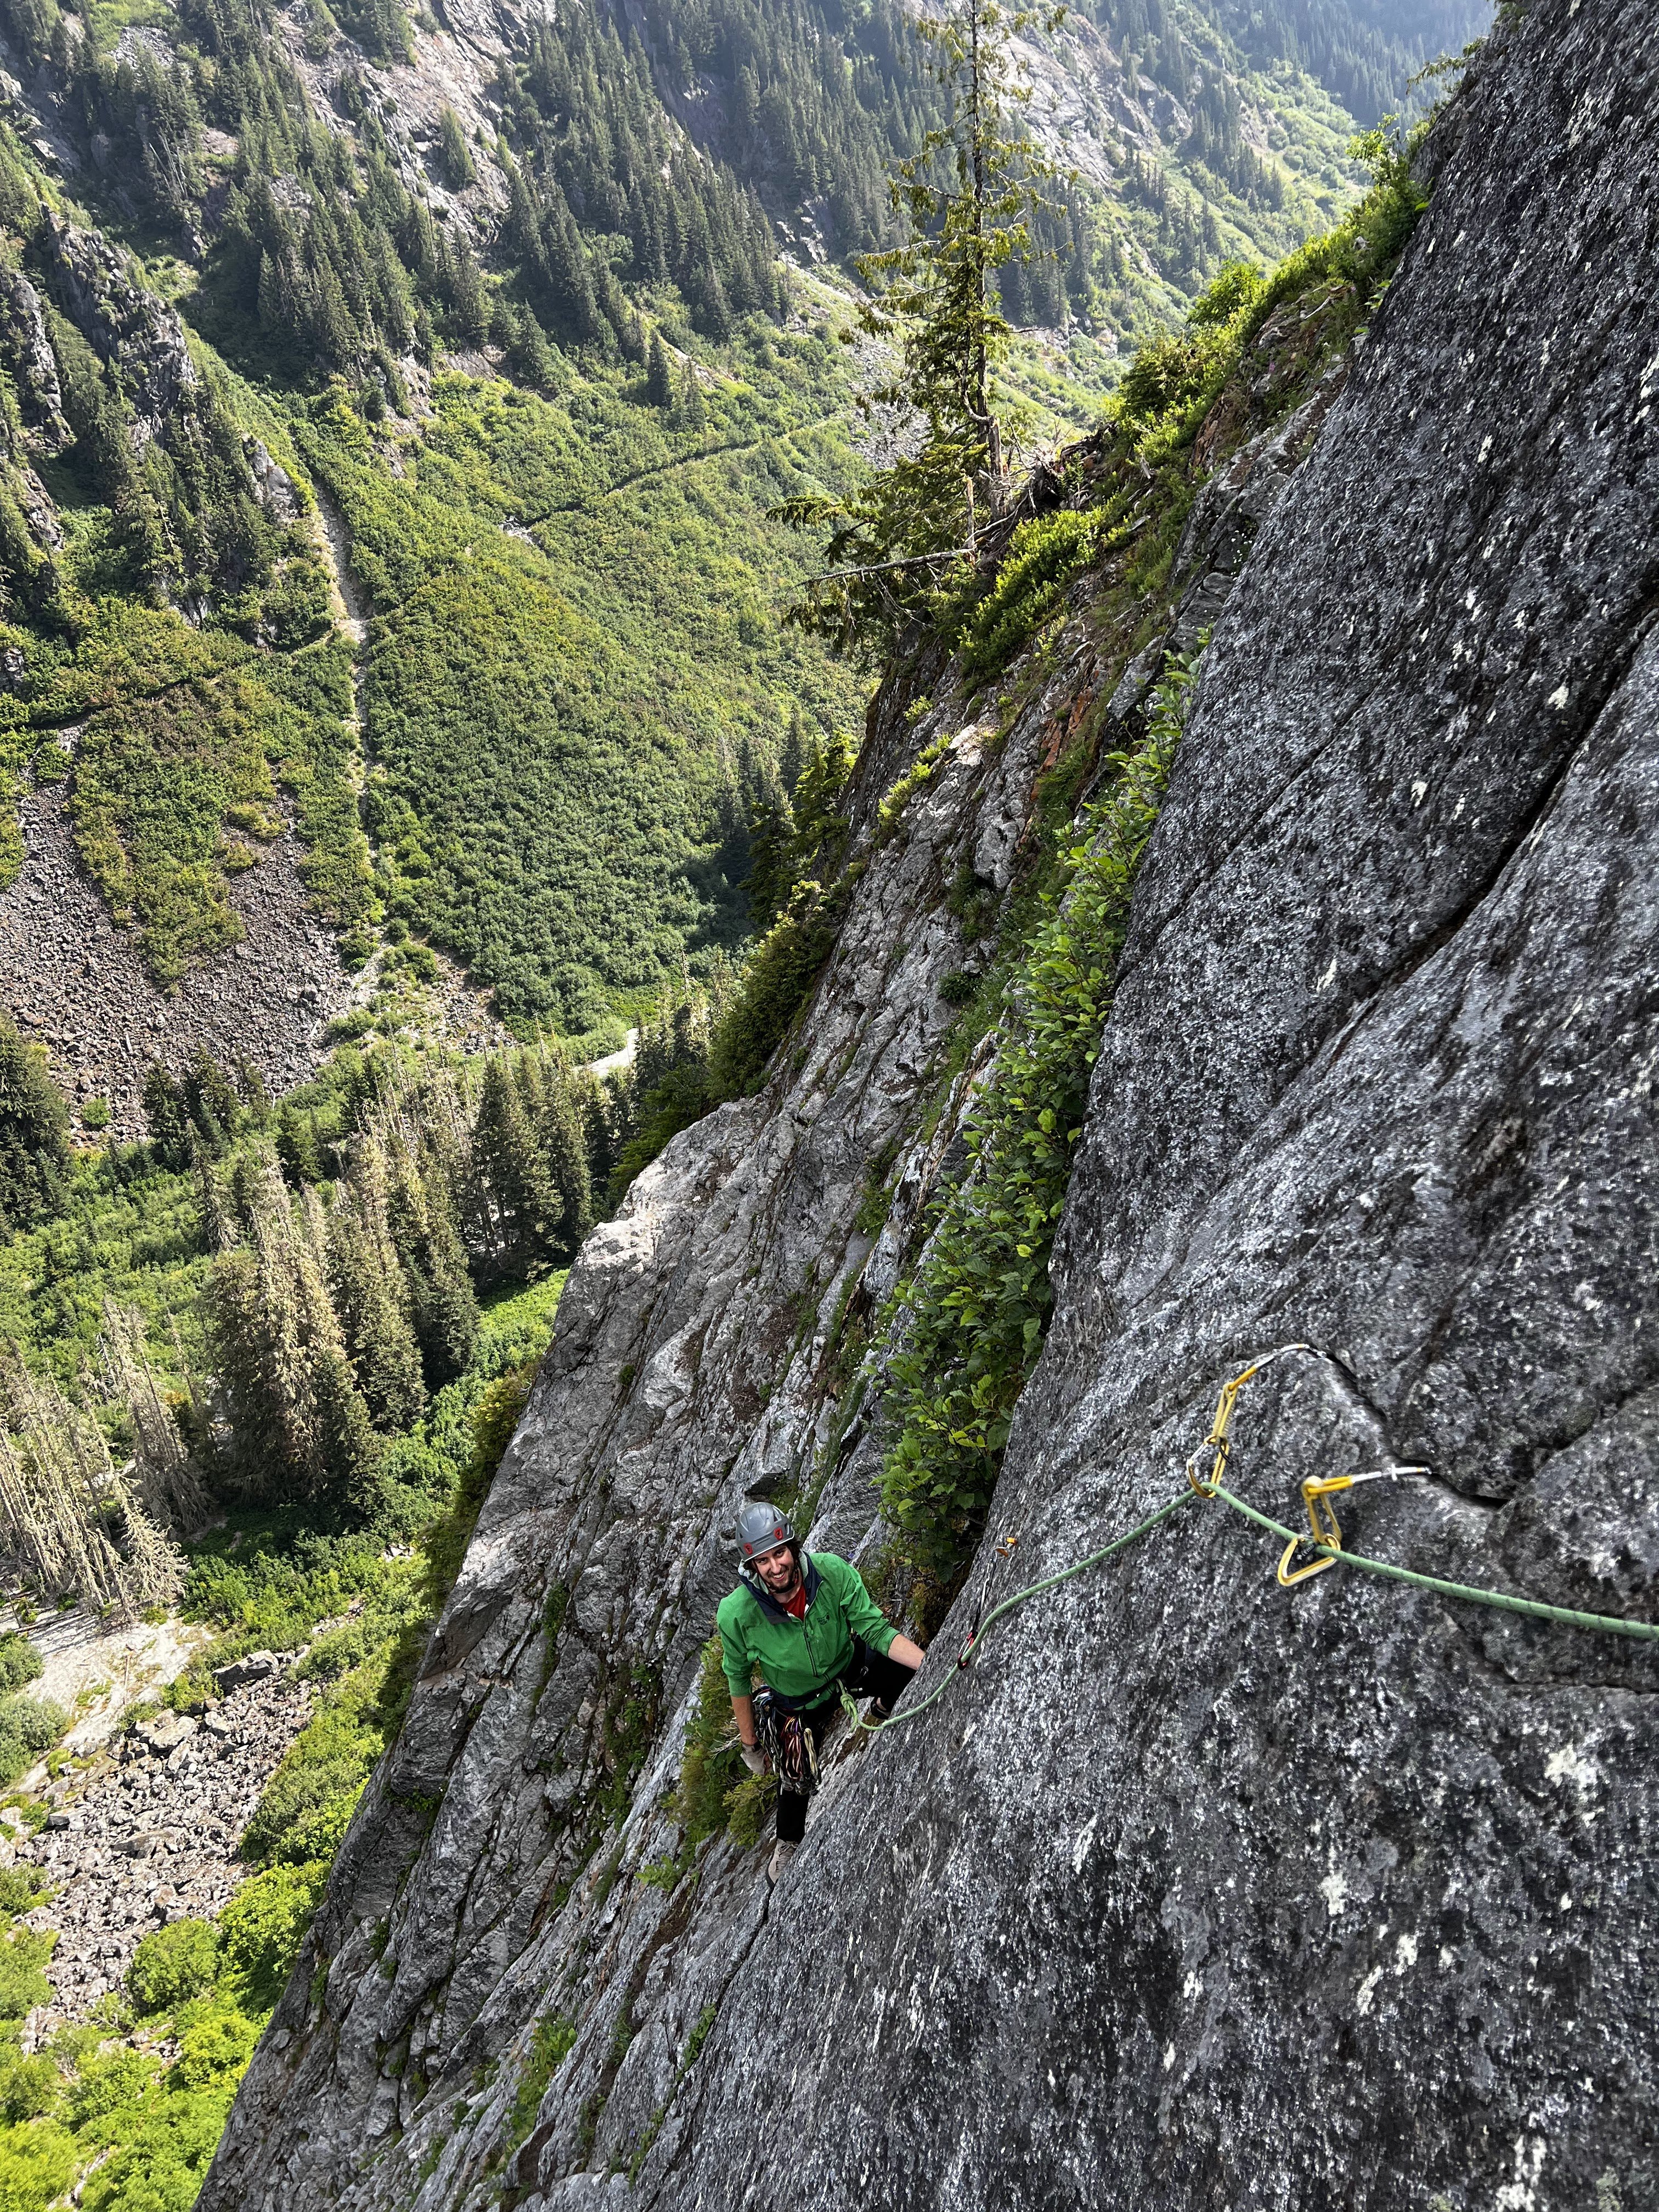
Howdy friends, it's my pleasure to present you all with the newest Washington classic - Negligence located off the Hannegan pass trail. This is a stellar line that links up several crack systems to access a shield about halfway up the large buttress seen across the valley. We spent most of the spring/summer of 2025 developing and cleaning this line and would like nothing more than people to get out there and climb the thing. Approach - From the Hannegan Pass Trailhead, hike Hannegan Pass Trail past the first two switchbacks about halfway to the campsites. Shortly after the second switchback, drop down the open talus field on your right. Continue down the talus almost to the creek, cut right into the woods, then make your way down to the creek from there. Jump from a large log across the first narrow creek band and you’ve found the tunnel through the slide alder. Be bear aware here, we found multiple fresh signs of them (probably due to the golfball sized salmon berries). Follow this until the major creek crossing, then cross the creek. After crossing, head through the trees directly towards the nose of the buttress, hopping another small creek braid before entering into the talus for the final approach. Follow cairns up the talus, then follow the path (likely overgrown) through the underbrush to the base of the wall. The route is located a couple hundred feet to the right of the nose. In total, the approach is around 2 miles, but tends to take around 45 minutes, give or take. Climb - This route takes a series of remarkable crack systems 400 feet up the Hannegan Buttress over four pitches. Protection is traditional, styles vary from off-width to tips, and all anchors are bolted for ease of descent (316SS all around). Each pitch ends at a conferable belay ledge. Pitch 1 - Depending on snowpack, either hop right into the offwidth start, or cross a deep snowfield to dig right into the rest of the pitch. A long continuous crack system varies from tight fingers to the wide stuff, favoring tight hands and good feet. This pitch reminds me of a steeper version of the Apron with lots of flared hands, sustained 5.9 climbing with several good rests. The bottom wide bit is a little dirty and will probably remain so since it gets buried under the snow pack, but it quickly cleans up. This pitch would be a classic all on its own. (5.9+) Pitch 2 - Amble up from the belay towards a notch gully in the leftward wall, clipping in a pin down low, then placing a bit of gear before firing a few fun moves to gain the gully. Make your way up the 4th class to a great ledge to top out this short pitch. (5.8) Pitch 3 - Step left from the belay and begin climbing up a wide box. Tread lightly on the red stone before pulling into the right-facing dihedral towards the alcove. Exit the alcove on thin tips, and continue upwards until bomber hands placements allow you the confidence to trend left in the flake system. Follow the flakes until the roof, then brace yourself for a thin, thoughtful, arching crux protected by small gear as you pull out onto the Shield. Save a .2 and your smallest cam for the business. The crux of this pitch is short and sweet. Its probably easier for folks with thin fingers or long arms and can easily be pulled through on gear. (5.10d) Pitch 4 - This one's in the money for best pitch in all of Washington! Climb the stupendous splitter to the top of the Shield. It is as good as it looks. Some finger crack moves will take you past a loose book size rock (never fear, that thing isn't coming out) to glorious hand jams. It gets a little steeper at the top so be sure to take in the scenery and catch your breath a bit. Top out on a large ledge. (5.10b) Descent: Rap with a single 70m rope. Use the intermediate anchor on the ledge climbers left between the P1 anchor and the ground. Otherwise, just rap the route. Gear - 70m rope Double rack .2 - 3. Singles of 4, .1, and a purple c3 (or equivalent tiny cam, or trango gold ballnut… the best option) to protect the crux. Wires, all sizes. Consider triples in .4 and .5 for the long first pitch and a 5 if offwidths make you shake. Background - The vision and much of the labor for this route came from Nate Fearer with additional help from myself, Neil Miller, Spencer Moore and Alex Pederson. The route name comes from the fact that Nate started this project while on paternity leave and completed it within the first four months of his son's life (he really is a good father and loving husband). The route was established ground up as an aid line, then dug, cleaned, and scrubbed. Then scrubbed, then scrubbed, then scrubbed. Further ascents will clean it even more. Also, we found some evidence of prior development out there including a bolted (2 pitch?) line left of the nose. If anyone has information on this route please let me know.
.jpg.2b582877bdbee4a7e892f3bb36fd185c.jpg)
.jpg.bdabd6c4d8ebc9668d06dd06dc2df6a7.jpg)
-
from here: https://www.climbing.com/culture-climbing/climbers-new-summit-peru/?utm_source=Mountain+Tactical+Institute&utm_campaign=fa2d4fb6fe-EMAIL_CAMPAIGN_2025_05_14_04_59_COPY_01&utm_medium=email&utm_term=0_-108b308039-274756150&mc_cid=fa2d4fb6fe&mc_eid=83876508f4 Last month, professional European alpinists Dani Arnold, Alexander Huber, and Simon Geitl climbed some outrageously beautiful new terrain on Jirishanca (6,125m), in Peru’s Cordillera Huayhuash range. Photos circulated soon after, showing the men jamming steep grey limestone, perched on exposed bivy ledges, and smiling on what looked to be a summit. But the most widely shared image was one taken directly below the mountain’s southeast aspect. In the photo, a bright red line traces a weakness in the steep rockwall before branching onto the East Ridge. The climbers proudly touted their effort as a new route: Kolibri (5.11d A2), which ended on the mountain’s “east summit.” The only problem? The east summit doesn’t exist. The stunning southeast side of Jirishanca with the line of Kolibri marked. Kolibri climbs sections of the route Suerte(also known as the Italian Route) and finishes on the East Ridge, which was first climbed in 1957. From this foreshortened angle, the “east summit” does indeed look prominent. But another, more honest angle (shared below) depicts this feature as merely a brief bump in an otherwise steep landscape. (Photo: Dani Arnold) Where is Jirishanca’s “east summit”? Climbing has, for better and worse, written extensively about Jirishanca over the last three years. In 2022, Americans Josh Wharton and Vince Anderson freed Suerte (5.13a WI 6 M7; 1,060m) during the same period that Canadians Quentin Roberts and Alik Berg established Reino Hongo (M7 AI 5+ 90° snow). Afterward, the Canadians accepted alpinism’s greatest formal honor: the Piolet d’Or. Two years later, Jirishanca became the backdrop of a great debate when Reel Rock made a film about Suerte—but photoshopped key moments out. So when I—who’d edited or written no fewer than four in-depth articles about the mountain—first saw the image of Jirishanca marked up with the supposed line of Kolibri, I was surprised I hadn’t heard of an “east summit” before. Wharton had climbed high on the same ridge in 2015 and 2019 before reaching the main summit. Had he ever considered stopping on this so-called sub-peak? When I connected with Wharton over email, he told me he was unaware of any “east summit.” “I actually reached [the Kolibri team’s] high point on my very first trip to Jirishanca in 2015, climbed well beyond it in 2019, and ultimately made the actual summit in 2022,” he told me. “What they are describing as a ‘summit’ is really just a flat spot in the ridge about six to eight pitches of non-trivial climbing from the actual summit.” Wharton explained that, compared to the relatively straightforward rock climbing that comprises the lower section of the mountain, Jirishanca’s steep, snow-choked summit ridge is actually the mountain’s crux “in terms of logistics, conditions, and tactics.” The summit ridge may not have a flashy mixed or rock grade, but it includes real, consequential fifth-class snow climbing. Dani Arnold stands in slings during a steep mixed pitch on Kolibri. (Photo: Dani Arnold) Wharton also said that, generally, he was not hyper-critical of those who end alpine routes below the summit. “I’m not a ‘summit guy’ when it comes to trivial snow fields, a five-foot summit boulder problem, or even three pitches of 5.8 atop a 15-pitch 5.13, for instance,” he said. However, for big, technical mountains like Jirishanca, he admits that, for him, “the true summit does count for something.” I then reached out to Quentin Roberts to ask if he’d heard of an “east summit.” He said no, and sent me a photo of Jirishanca from a more sobering perspective, circling the flat bump which constituted the Europeans’ “summit.” Jirishanca from the southwest. The red circle marks roughly where the Kolibri team labels the “east summit.” (Photo: Quentin Roberts) What were Arnold, Geitl, and Huber thinking? Thoroughly confused, slightly annoyed, but still hopeful some logical answer existed, I decided to ask Arnold to explain himself. Was he aware of other climbers who recognized the east summit? Was he at all interested in reaching the main summit? Over email, he said he was “not sure” about other parties ending their routes where he ended his, and acknowledged that the team’s ultimate goal was, indeed, to gain the main summit. When Arnold and his team breached the steep rock crux low on the mountain, they felt certain they would stand on top. But conditions would have it otherwise. “It turned out that the most challenging part was not where we thought it would be,” he explained, describing the upper slopes as having “extremely dangerous” snow conditions. “You can dig down a meter and still won’t find any holds.” During this email exchange with Arnold, any remaining benefit of the doubt I had dissipated. Arnold, Huber, and Geitl had retroactively lowered their definition of success midway through their climb. They wanted the main summit. They realized the main summit was too dangerous/difficult to attain. They looked around, noticed they were on a relatively flat piece of terrain, and decided their “route” ended on that “summit.” That doesn’t seem very sporting to me, and it sets a poor example to any aspiring alpinist who looks up to these professionals. The team poses on their summit, with the top of the mountain conveniently out of view. (Photo: Dani Arnold) What they should have been celebrating I was truly disappointed to realize these climbers had probably invented a new summit merely for the purposes of sharing an archetypal climbing success story. I’m not sure whether their decision was the result of inflated egos or the sponsor-induced pressures of being a modern-day professional alpinist. Regardless, it felt like there was an underlying sense of inadequacy at play. I thought back to something the American alpinist Colin Haley had written for Alpinist in 2016. He titled the Facebook series “No shame in failure.” “[…] Climbing to the very top of a mountain is always more difficult than climbing only partway to the top of a mountain. … More painful are the times that we badly want to reach the top of the mountain, but the various forces that make alpinism difficult turn us down below. However, just because we’ve failed does not mean we can’t be proud of our effort. … When I see climbers claiming success without reaching the top of the mountain, it makes me believe that there must be some sort of misplaced shame in an attempt. …” Haley went on to share anecdotes about the numerous near-miss successes of his career, including, most notably, Patagonia’s Torre Traverse (5.11 A1; 2,220m) in a single day with Alex Honnold—save for two straightforward pitches of rime-ice climbing. Haley didn’t pretend there was some new, previously unknown sub-summit two pitches below Cerro Torre’s real summit. He chalked the experience up to an attempt—itself among his best climbing accomplishments—and returned the next year to finish it up. In the high-stakes game of alpinism, the Jirishanca team’s approach feels like a fundamentally dangerous idea to promote: that “success” only happens if you reach a summit. Instead, I wish they were emphasizing their decision to prioritize safe, secure climbing over achieving their goal. After all, the summit wasn’t impossible, it was unexpectedly difficult. I want to celebrate this team for ending their attempt when the terrain exceeded their risk tolerance. I do not want to celebrate them for inventing a new summit because they felt obligated to share a textbook definition of success. That is not the spirit of alpinism.
-

first ascent [TR] Tower Rock - FA - Rapunzel's Back in Rehab - C1 7/15/2015
Rad replied to ivan's topic in Southern WA Cascades
Wonderful tale. Thanks for sharing. Super cool you found a life partner who is also your partner partner. That's rare. -
 Alex Liu joined the community
 -
Hey! Looking for an experienced climber to join me for a 3-person rope team on a Rainier summit attempt via Camp Muir and the Disappointment Cleaver route. Itinerary: Aug 9 (Saturday ~8am) – Morning start hike to Camp Muir Aug 10 (Sunday early AM/midnight) – Summit push Who I’m Looking For: Glacier travel + crampon/ice axe experience Know how to rope up, travel in rope team, self-arrest and crevasse rescue Solid fitness — let me know what other climbs you've done and or other conditioning stats. Speed is safety for all of us Good attitude, okay with turning around if conditions demand it Gear: We have most group gear needed already so Glacier rope travel kit (harness, axe, helmet, headlamp, crampons, carabiners, slings, prusiks) Mountaineering boots (compatible with crampons) Snow overnight (tent, sleeping pad, sleeping bag, snow stakes) Forecast looks decent so far. Ranger blogs says it's been pretty good condition so far for how late it is in the season: https://mountrainierclimbing.blogspot.com/ If you're interested, email me with your: Mountaineering experience Fitness level Weight Gear list Any questions
- Last week
-
 cacreature joined the community
 -
Thanks, Gene.
- 1 reply
-
- 1
-

-
I have a permit for climbing Mount Rainier from August 15-16th. Let me know if you want to join, looking to get a couple people to form a rope team. I have summited Rainier three times previously. Feel free to contact me here or at my email elithompson90909@gmail.com.
-
 ethompson joined the community
 -
 Xuan Huang joined the community
 -
Have you done mt adam in July? If not , I can join.
-
 Nice! Link to my report below - cool to see the conditions change throughout the season. https://spokalpine.com/2025/07/21/dakobed-glacier-peak-frostbite-ridge-ii-ai2/
 -
Want to hit shucksan this weekend?
-
Hello! First time posting here! My name is Hayden Lohr and I would say I’m an intermediate mountaineer, I’ve hit eldorado, mt Anderson, mt hood and the likes. Me and my buddy who is more a beginner (he has done hood and a few other climbs, trained crevasse rescue a few times but has yet to be on a glacier) are aiming to do mt shucksan this weekend via sulfide glacier. It is his first glacier but I figure based on his expertise and the boot pack with a third party member it is a fine start, looking for anyone free august 9-10?
-
 Hayden Lohr joined the community
 -
Sorry wrong board pls ignore I’ll put where it needs to be! Hello! First time posting here! My name is Hayden Lohr and I would say I’m an intermediate mountaineer, I’ve hit eldorado, mt Anderson, mt hood and the likes. Me and my buddy who is more a beginner (he has done hood and a few other climbs, trained crevasse rescue a few times but has yet to be on a glacier) are aiming to do mt shucksan this weekend via sulfide glacier. It is his first glacier but I figure based on his expertise and the boot pack with a third party member it is a fine start, looking for anyone free august 9-10?
-
 Bent joined the community
 -
Does anyone know the current conditions of the traverse on north? Looking to climb it this week and not sure whether to expect snow or rock.
-
 CramponAxe joined the community
 -
[TR] Little Big Chief - Northwest Face / Falcon Route
JasonG replied to ilias's topic in Alpine Lakes
So great that you could check in @Martin Volken, this is the kind of first hand info and history that makes keeping the lights on around here worth it! Please dig around the site and add some more history and beta! -

[TR] Little Big Chief - Northwest Face / Falcon Route
Martin Volken replied to ilias's topic in Alpine Lakes
Hi all; Just came across this and joining the conversation 24 years later, lol. The name came from the fact that a Falcon swooped us on the exposed summit ridge. Essentially the last pitch. I am a bit surprised to hear about the less than stellar rock report. I found the rock to be pretty good, but then again, I had a great capacity of kidding myself regarding rock quality at the time. But seriously... What I do remember for sure is that the line was a nice plum line to the top and that the camping the Summit Chief Valley was really amazing. Below is a link to the few photos I was able to find. Jeff Hansel might have some more. https://drive.google.com/drive/u/0/folders/1cec_PLE8JFHNmJdzzIyb3to_9tNYGgdA -
🤣 Great TR. Cool seeing the north side of the mountain get more visitors lately