Leaderboard

Popular Content
Showing content with the highest reputation on 09/24/20 in all areas
-
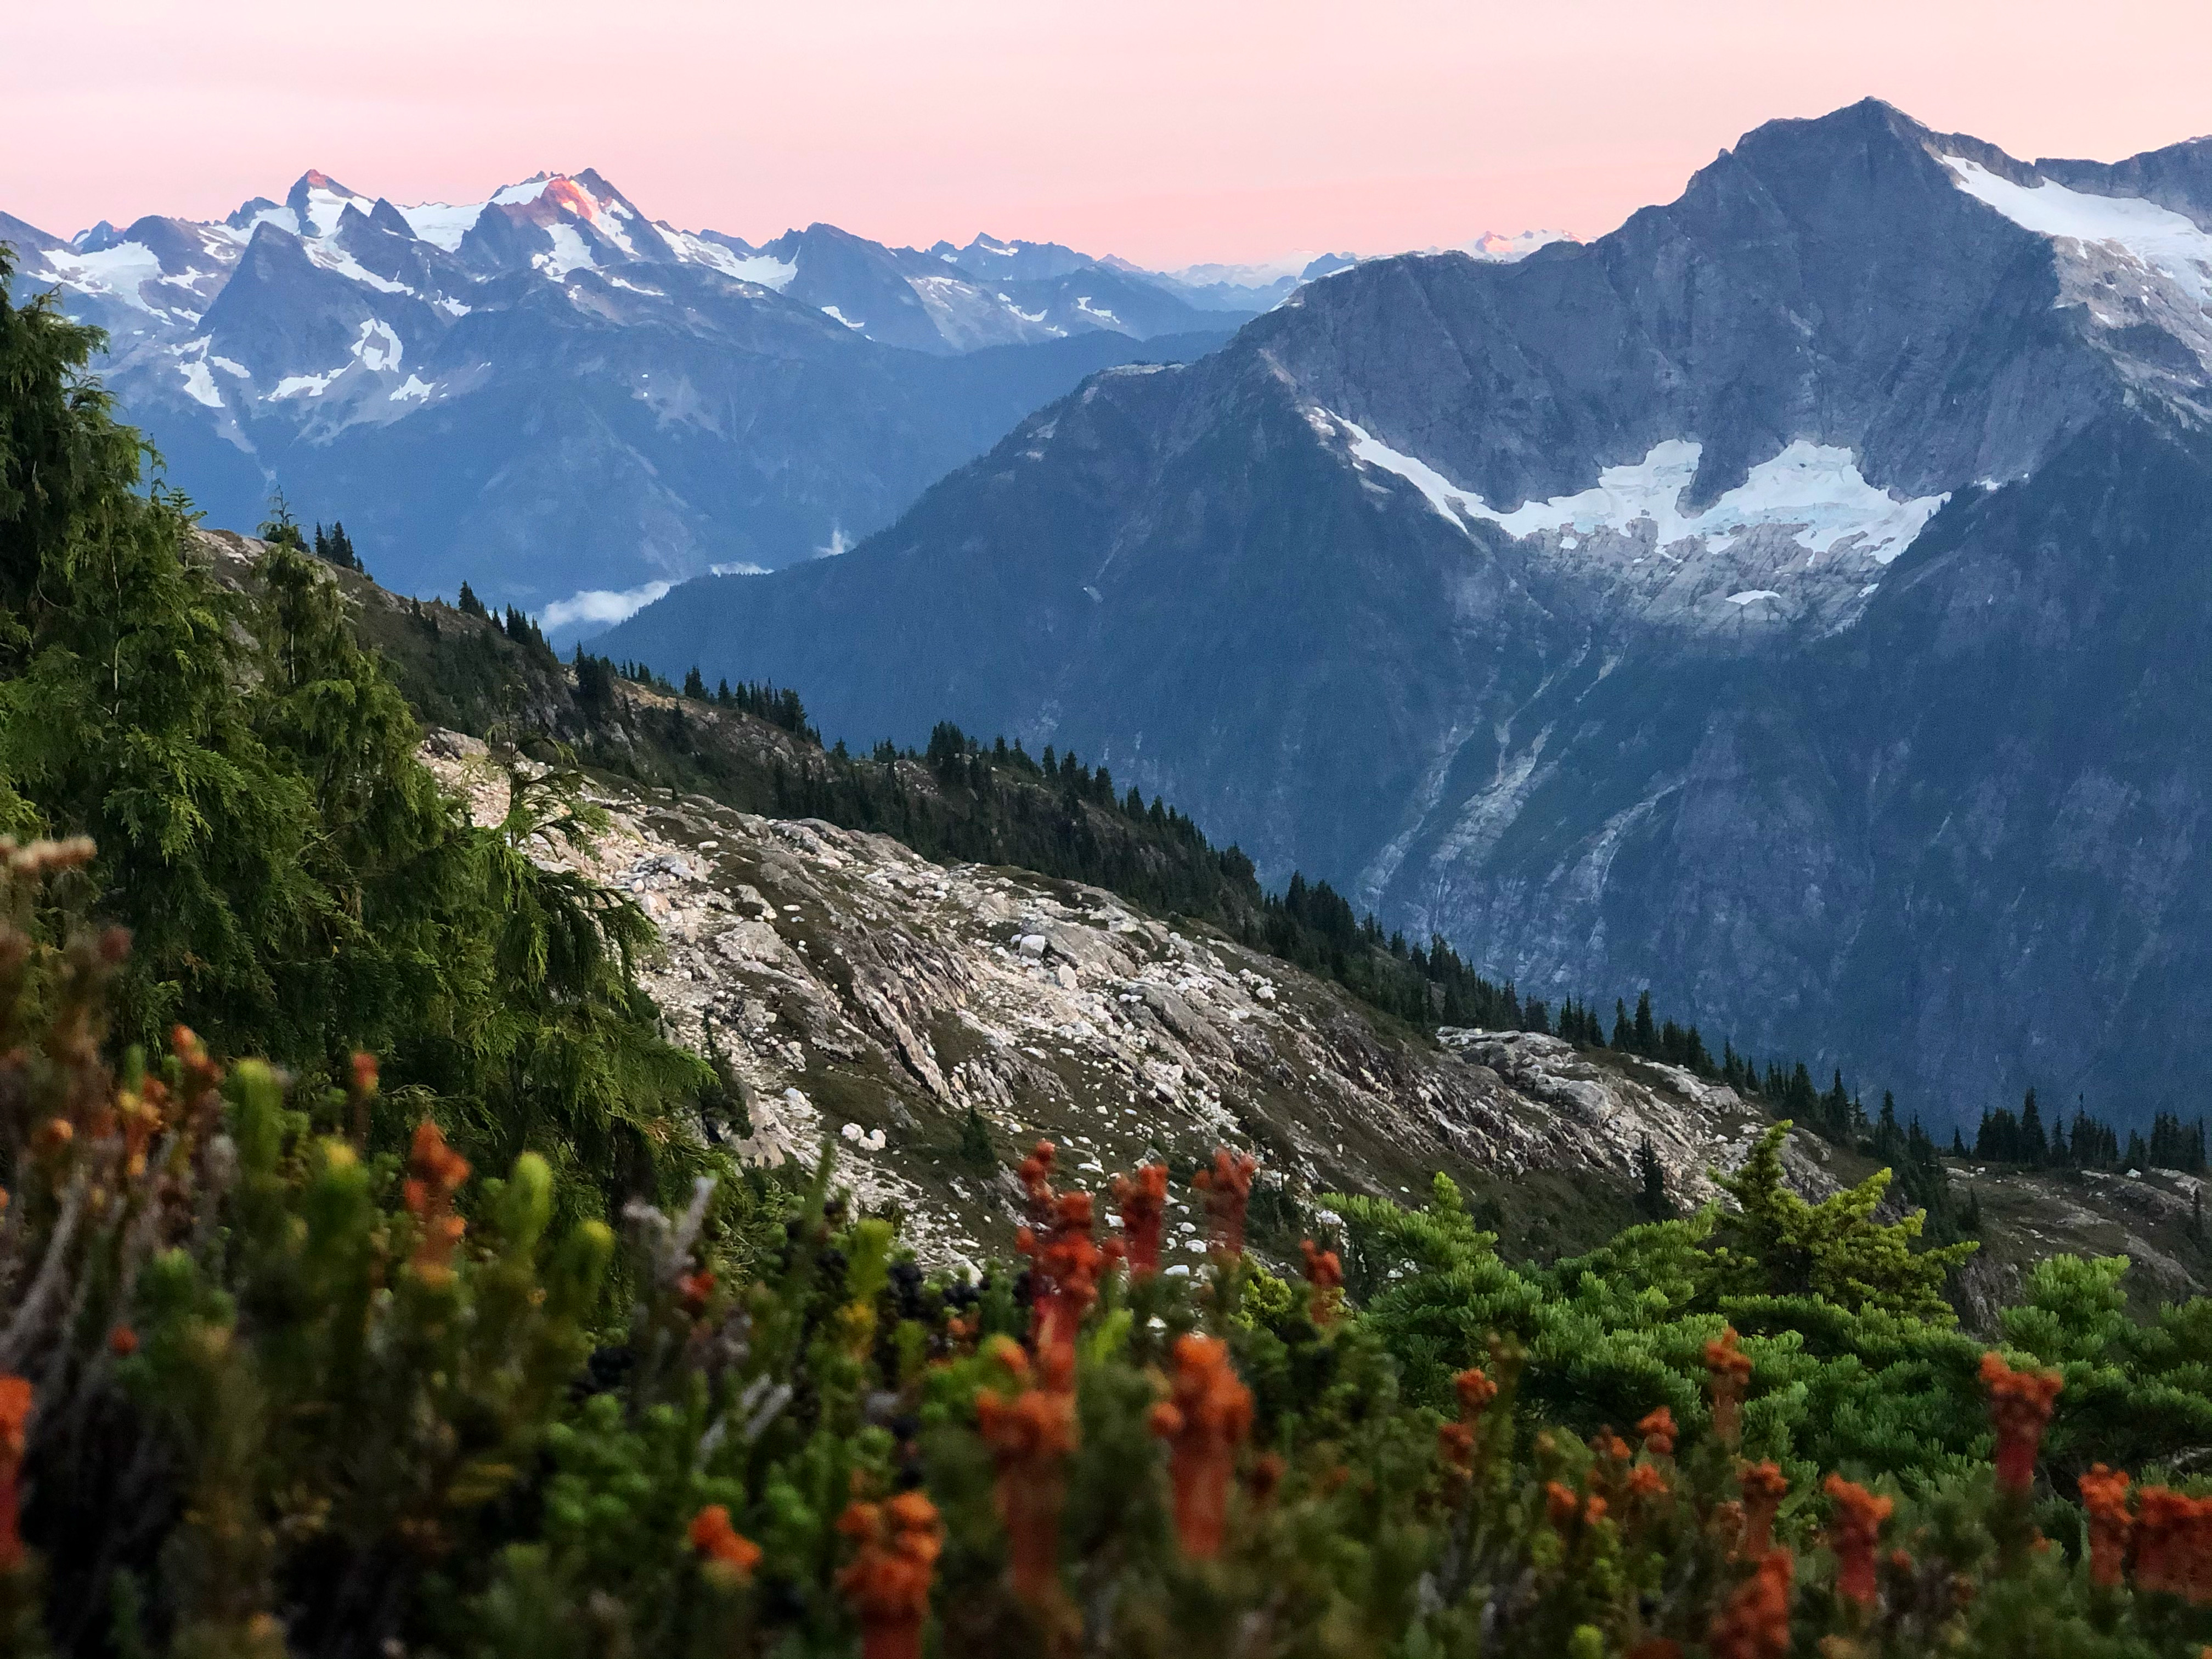
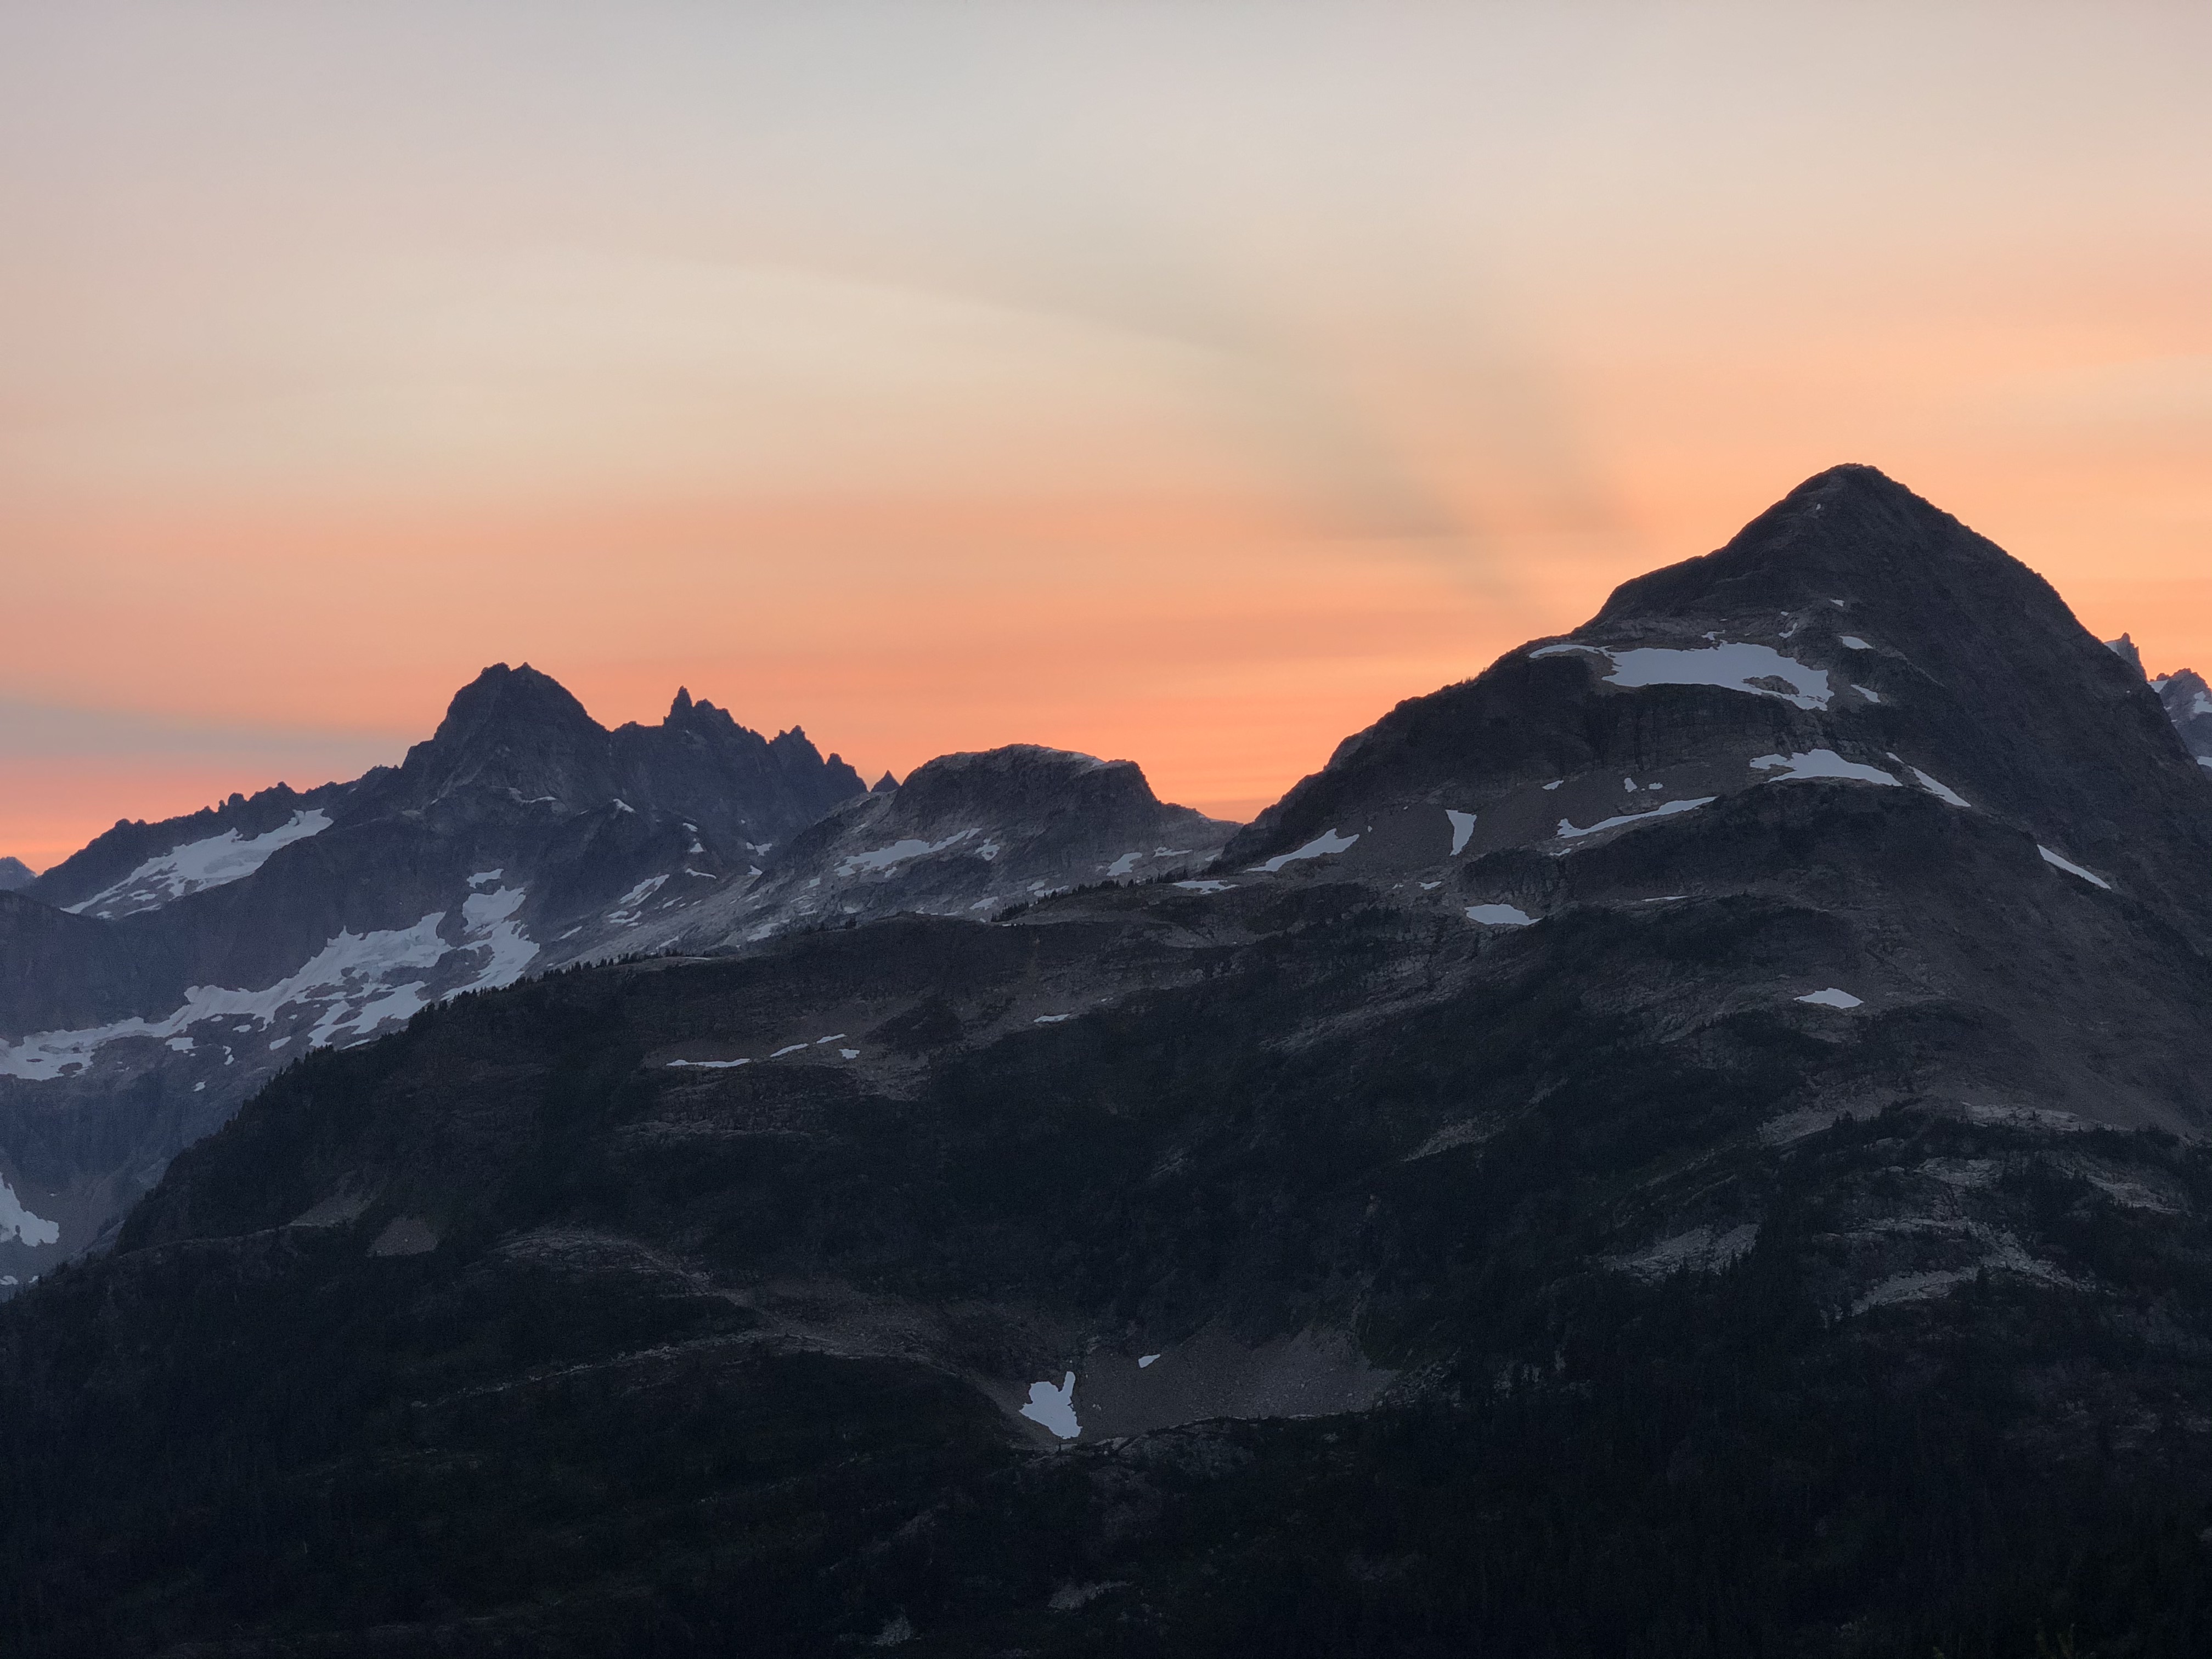
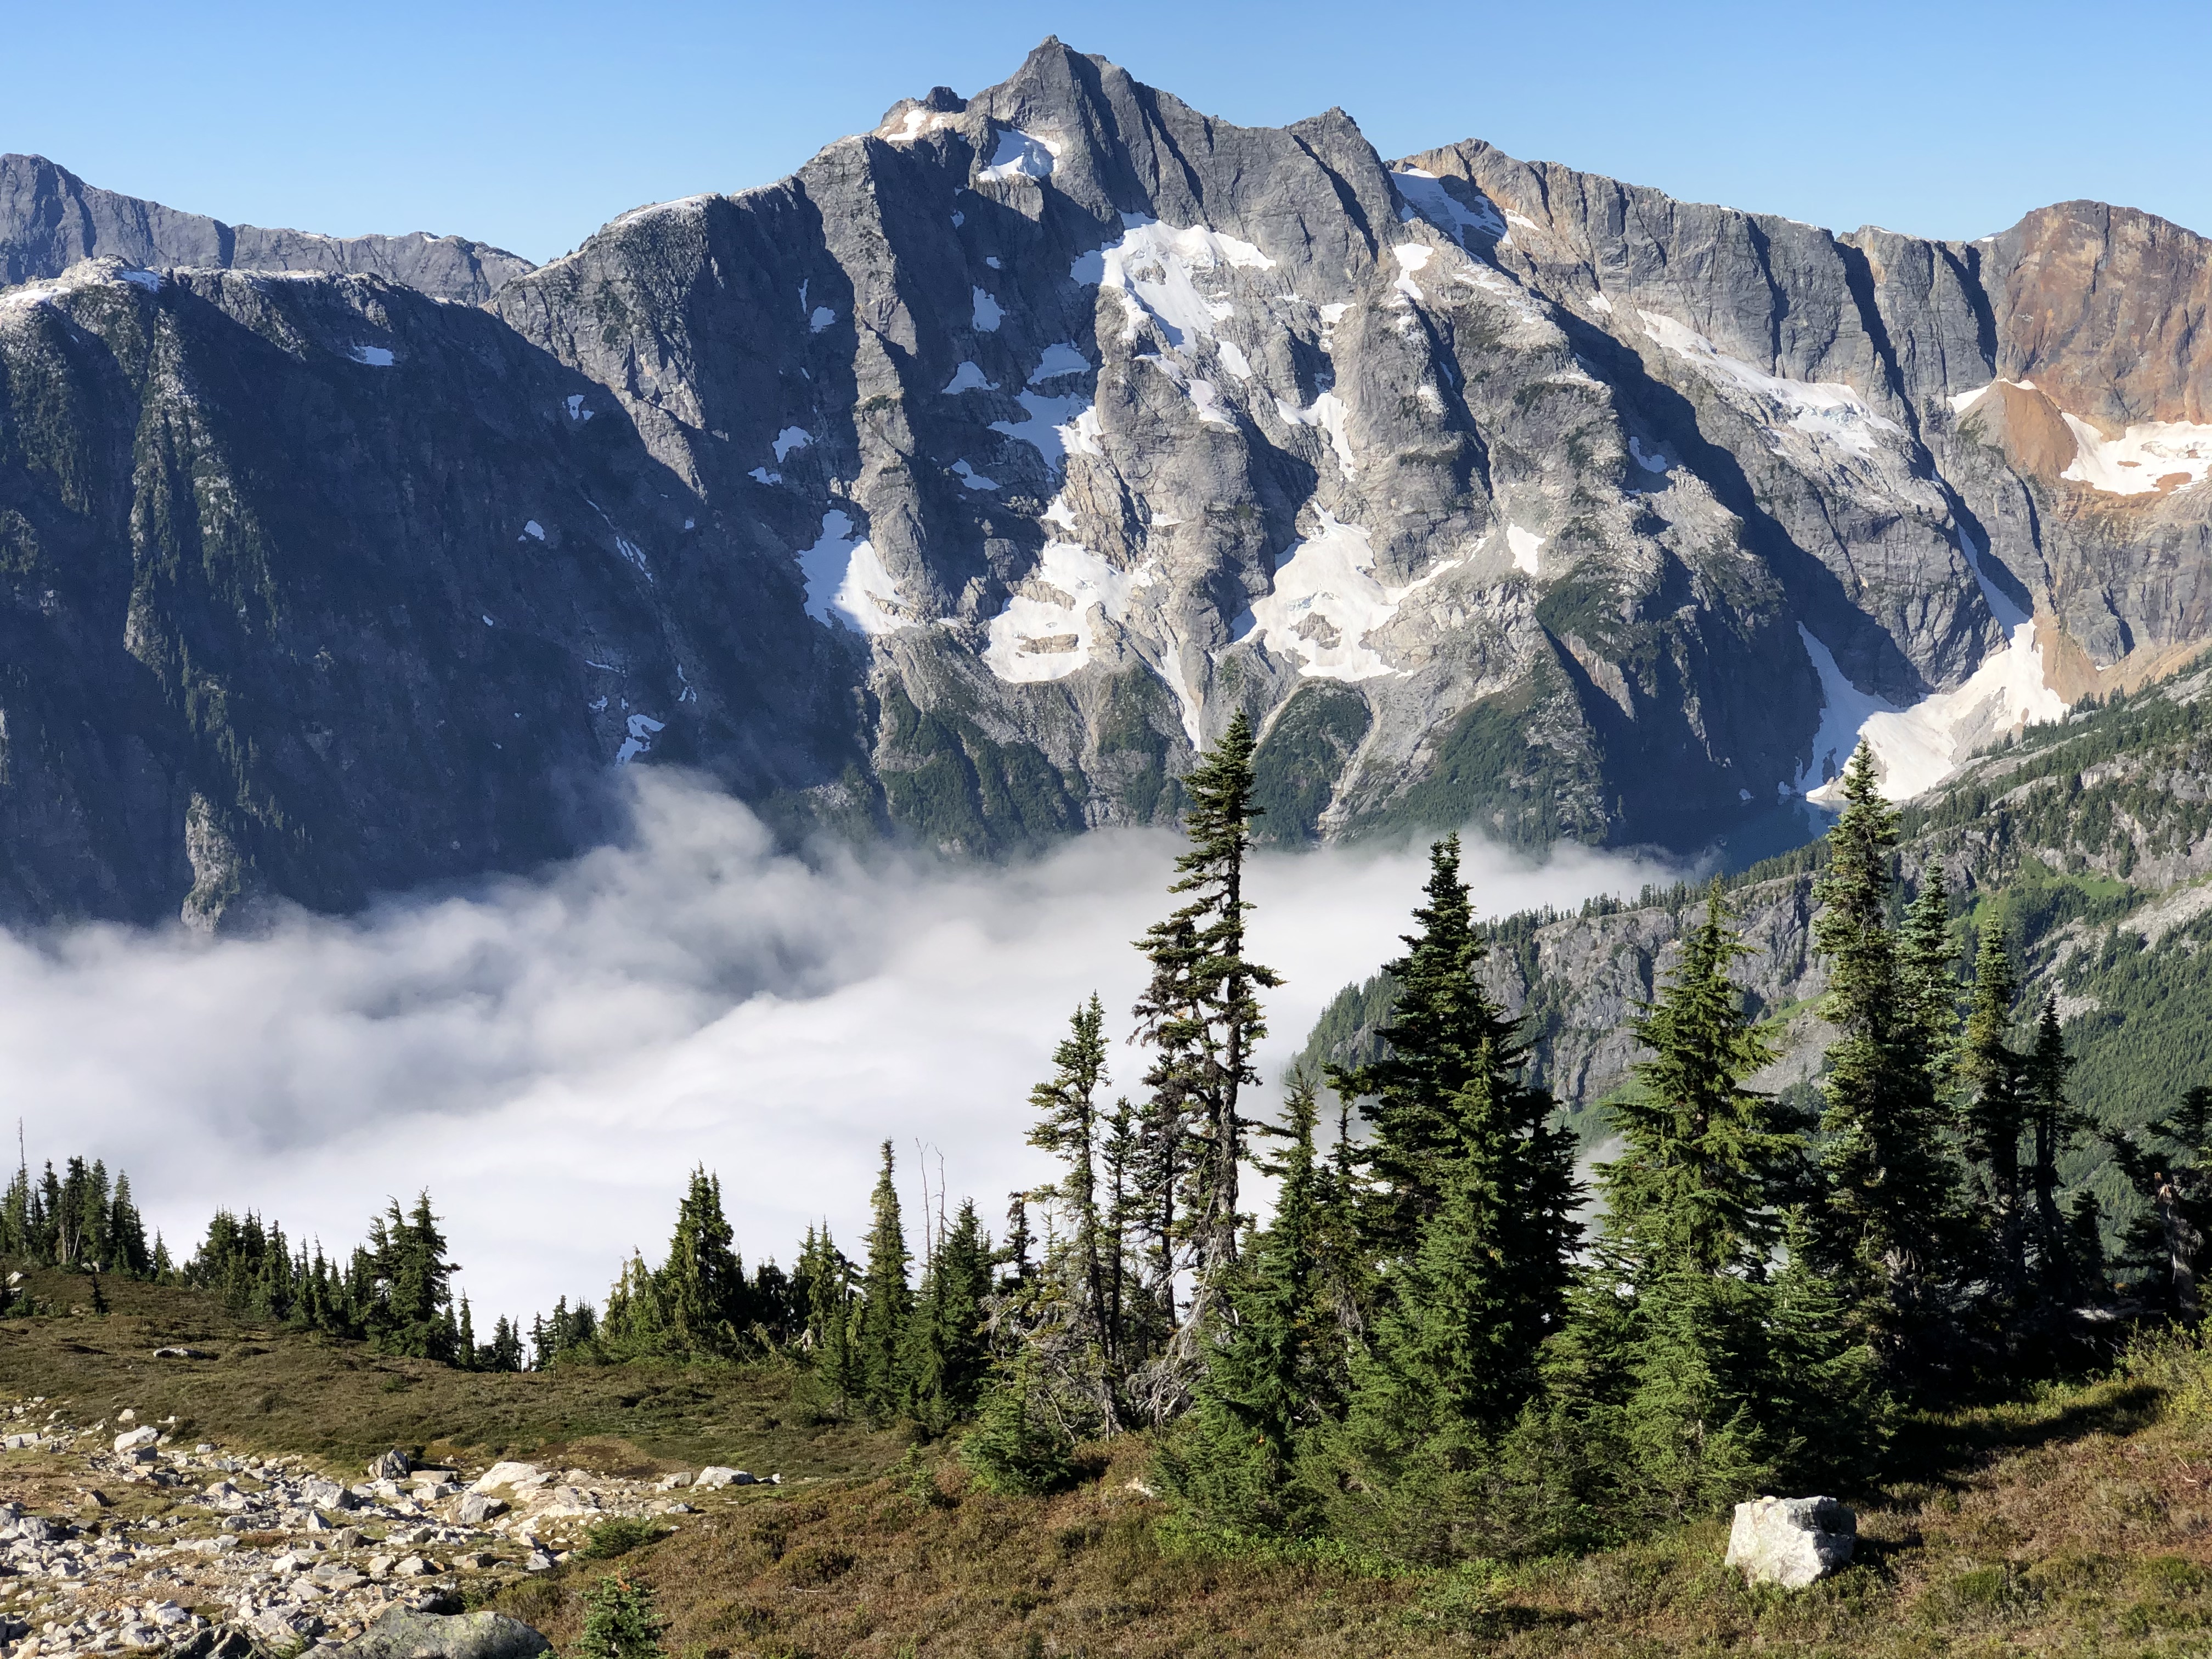
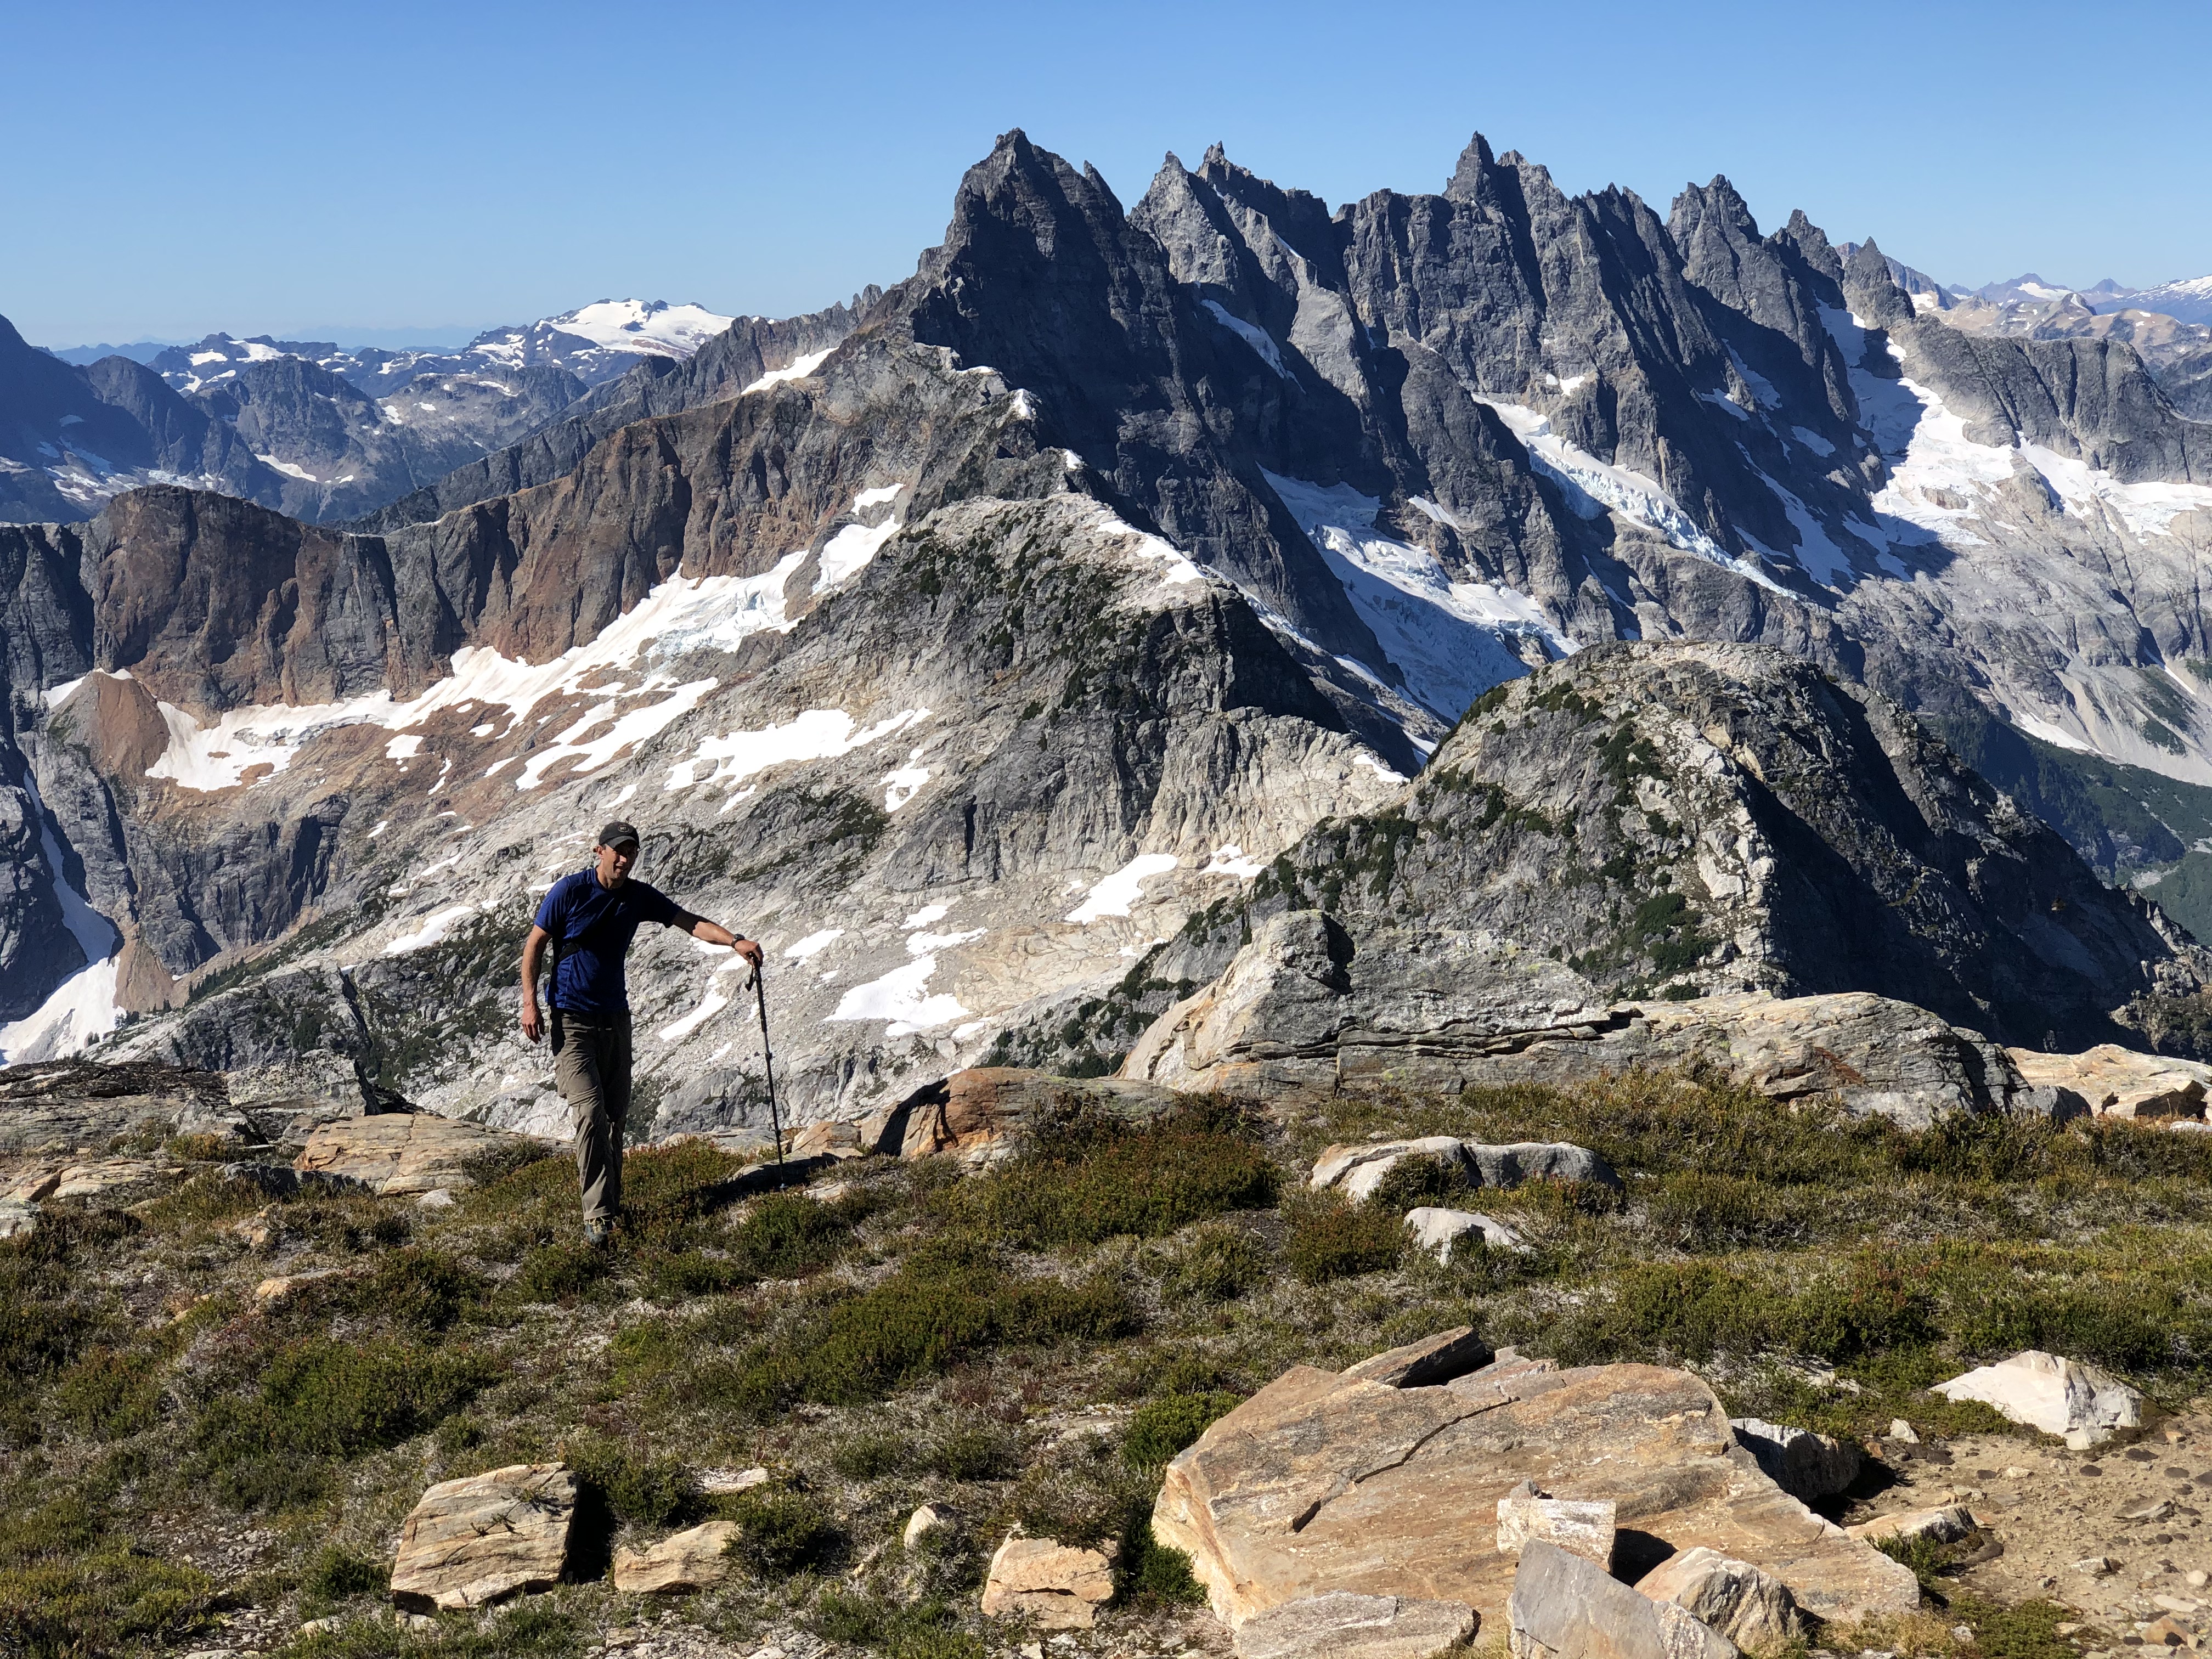
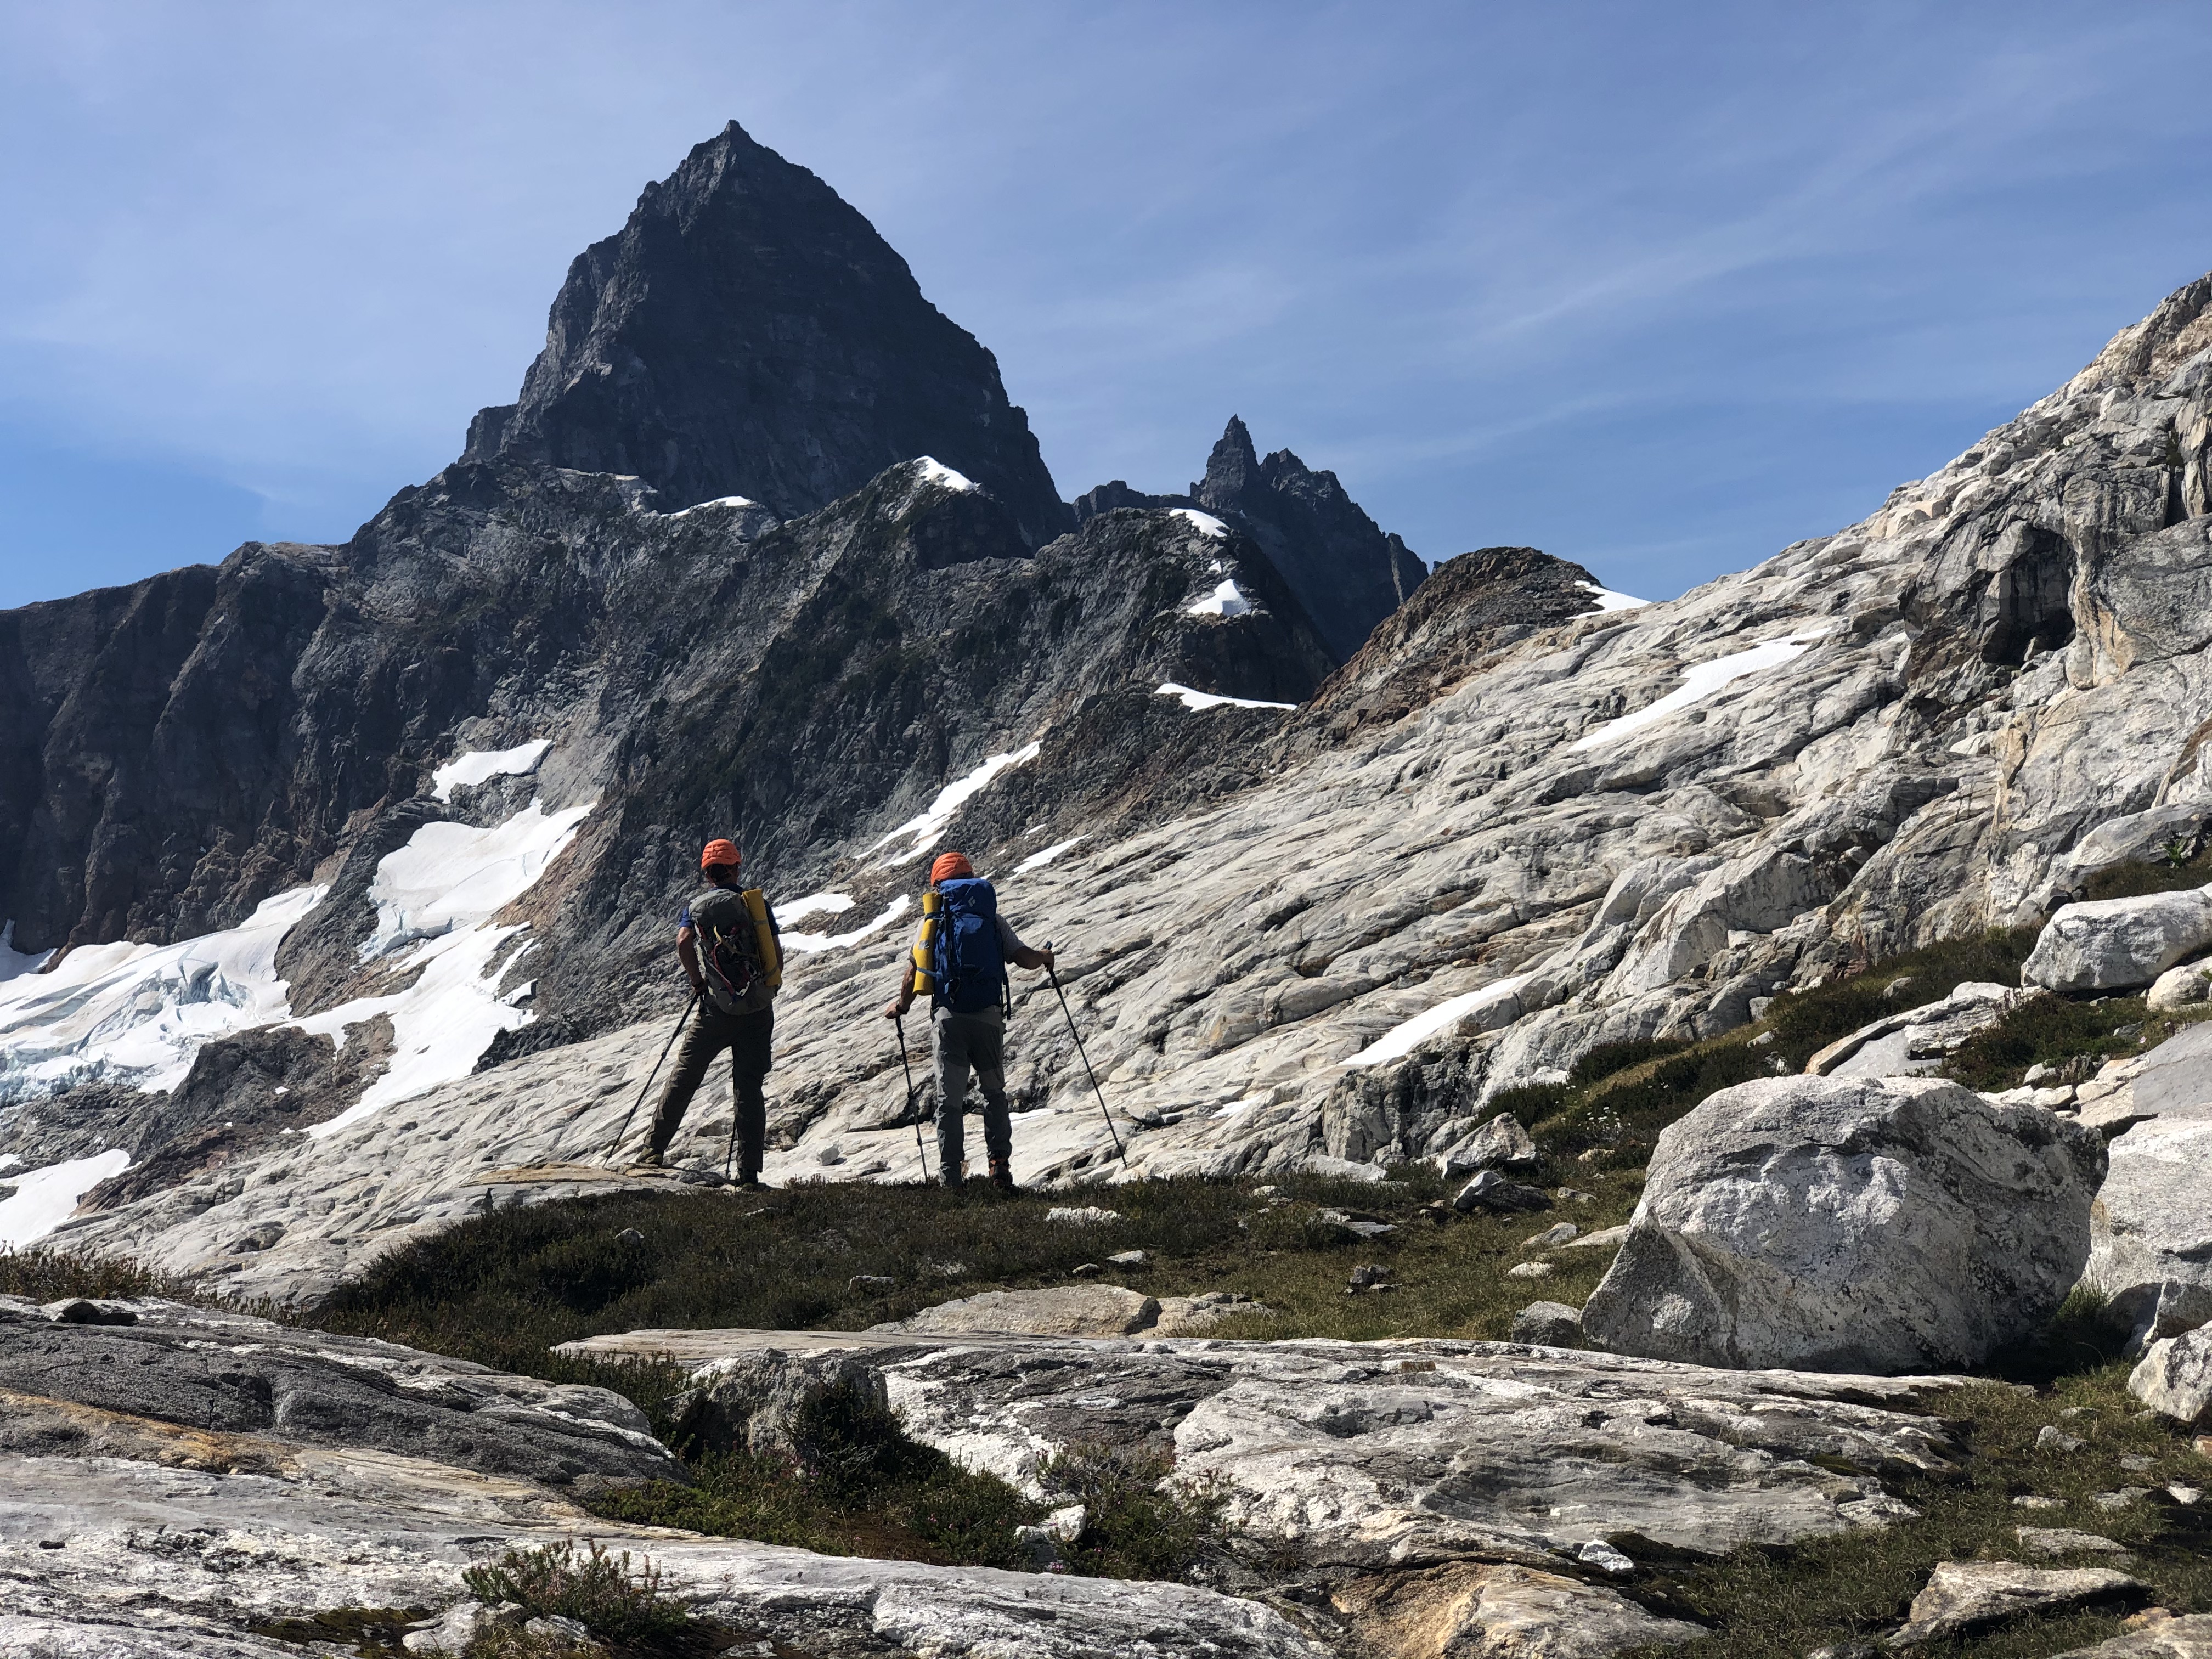
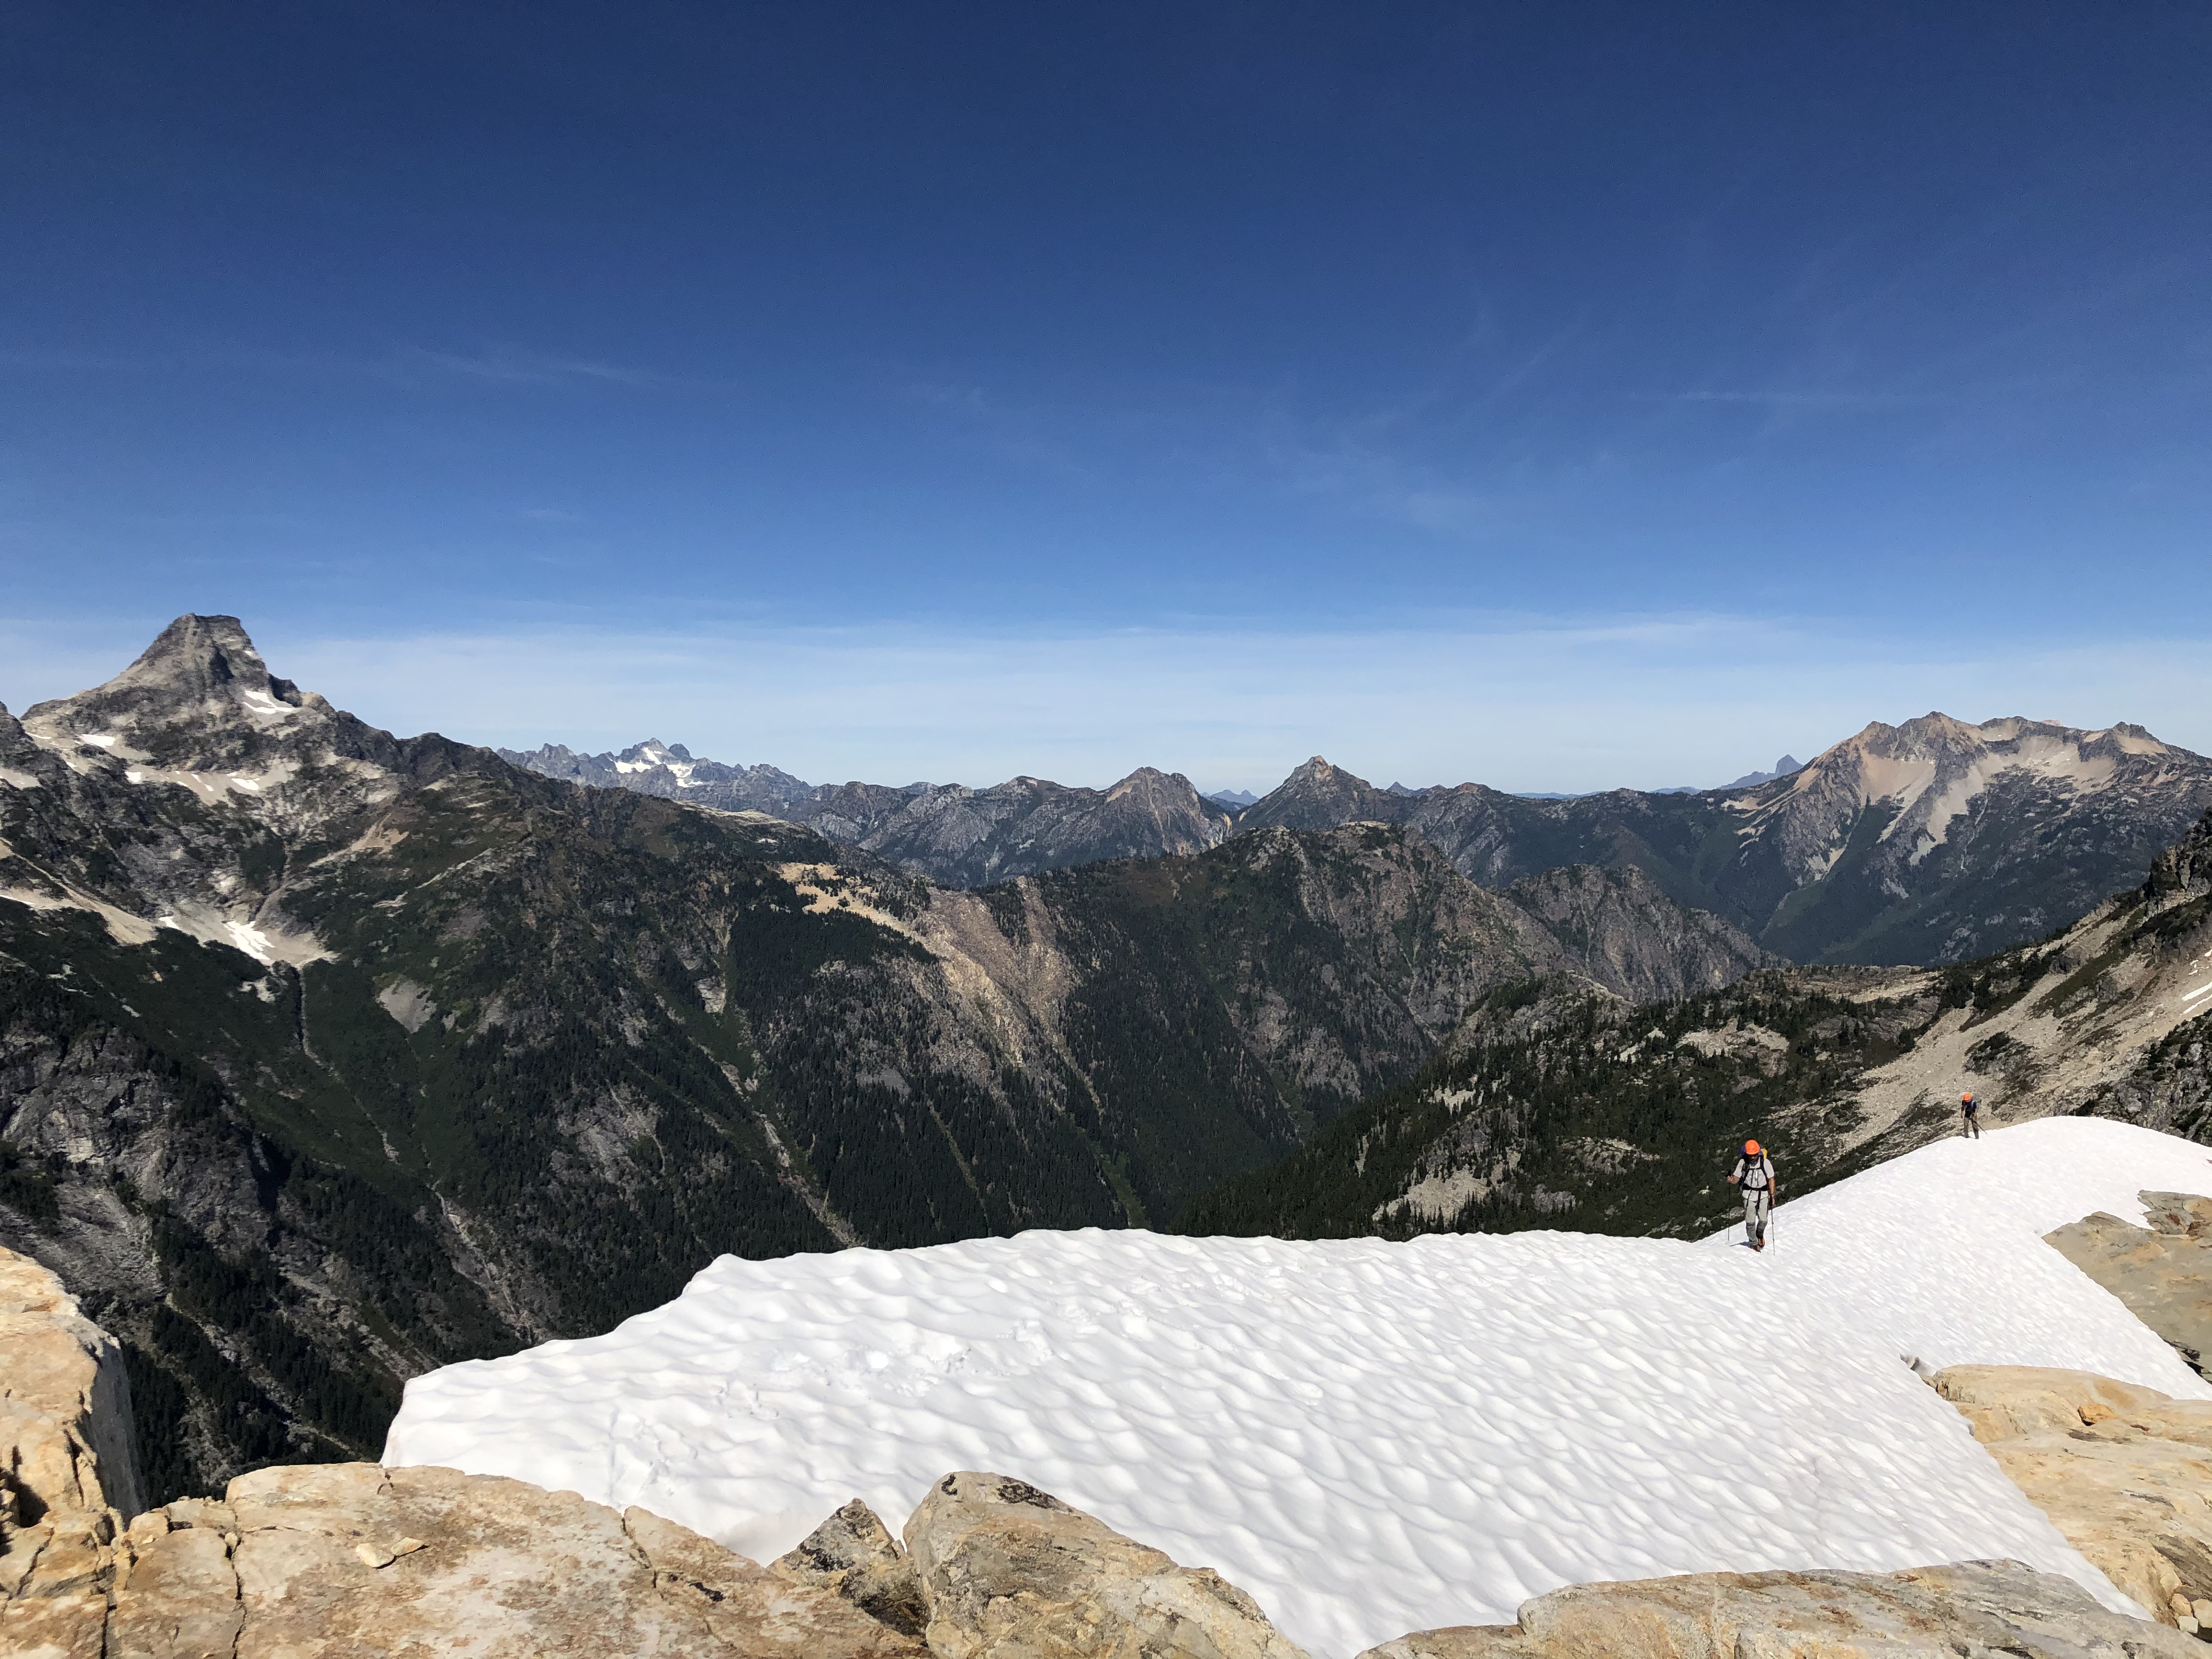
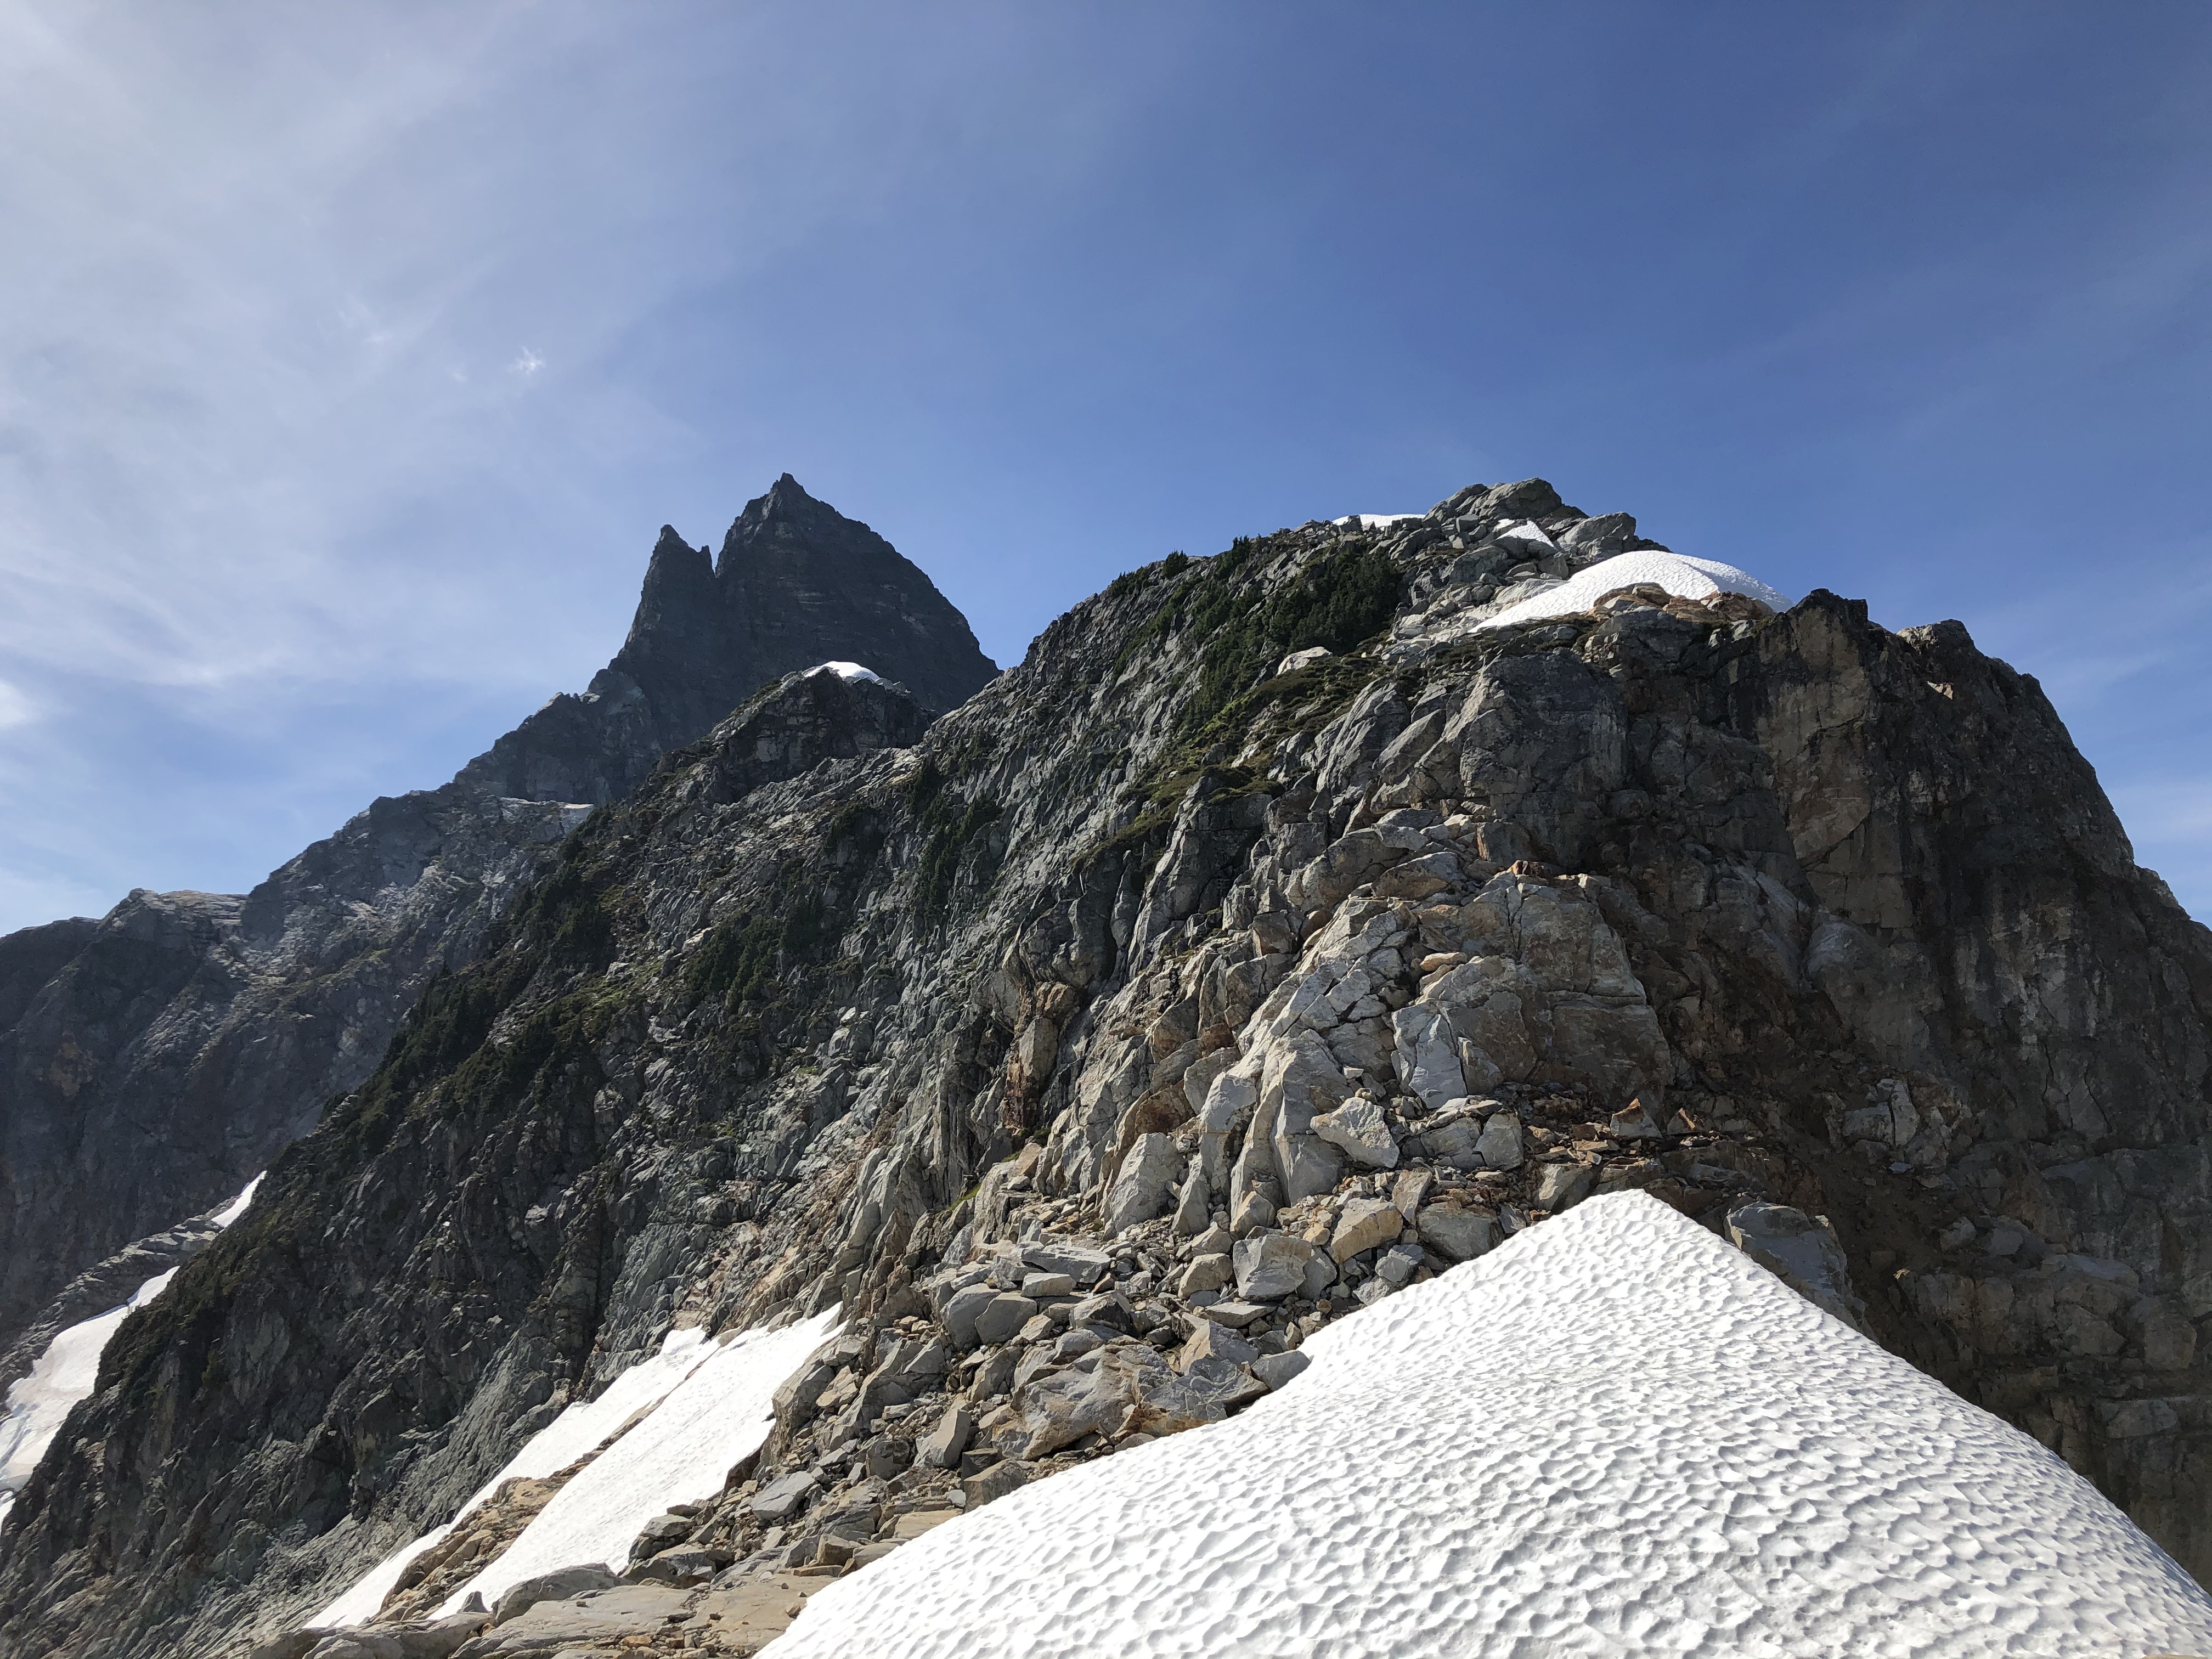
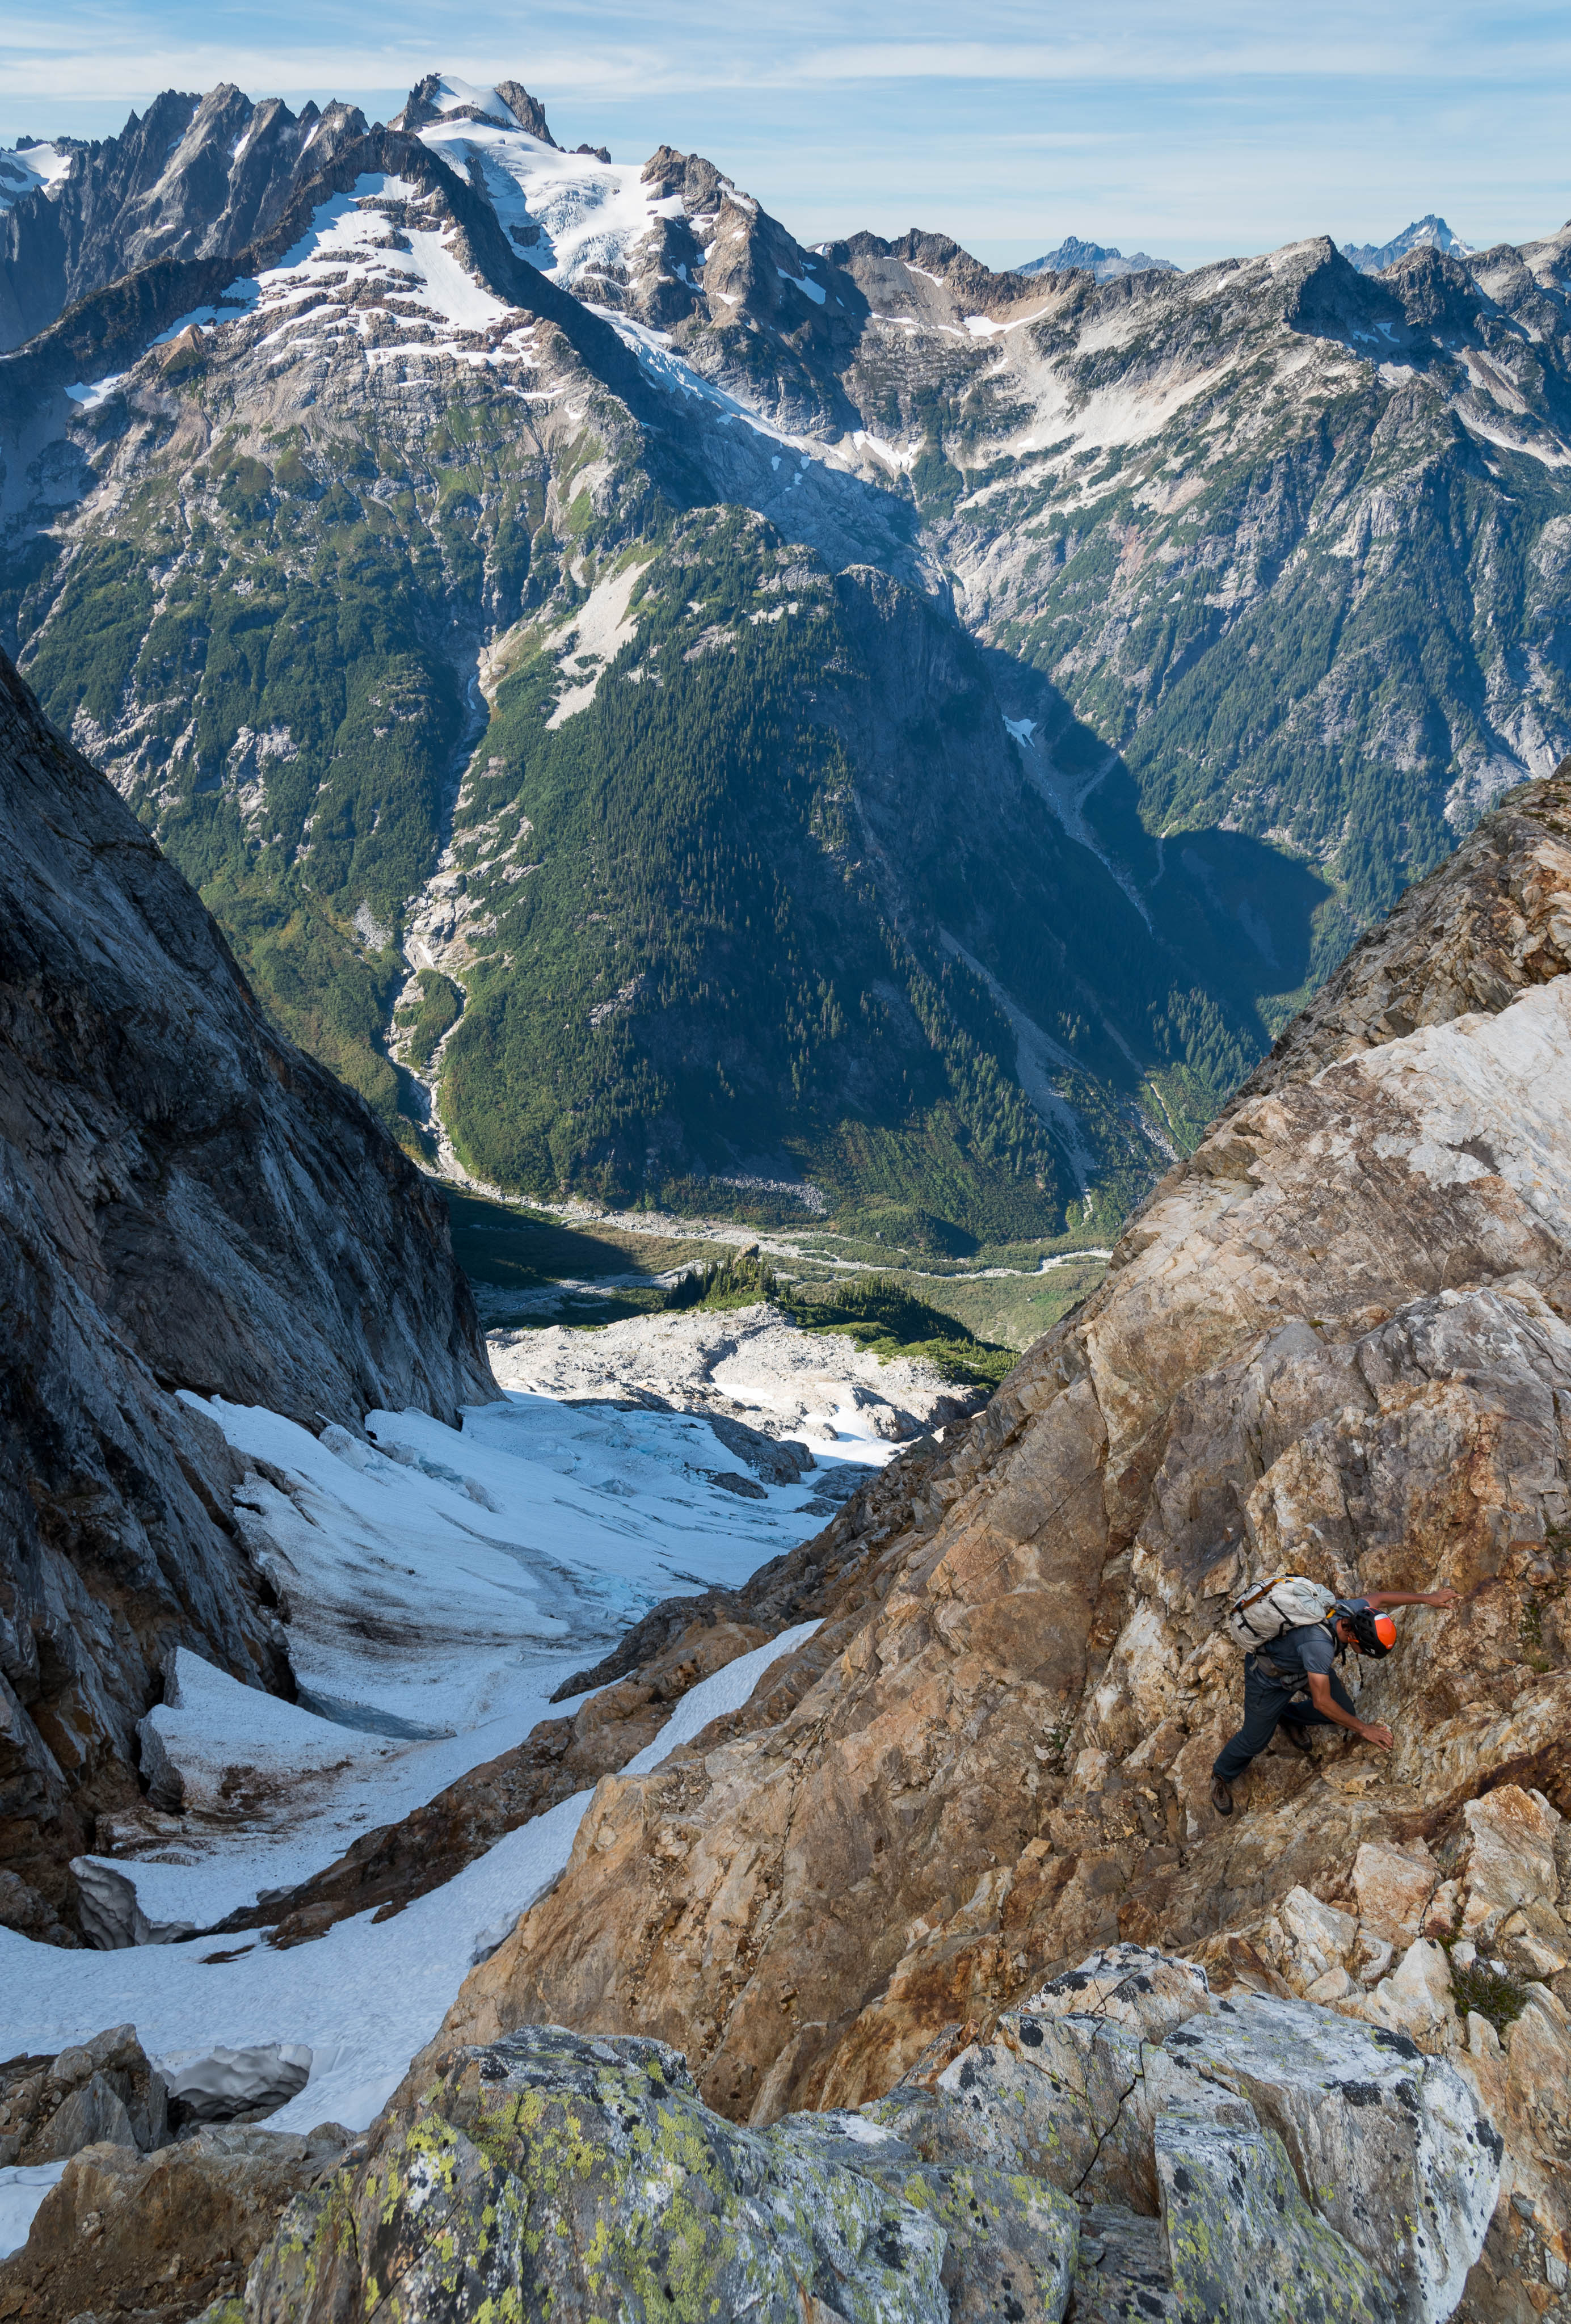
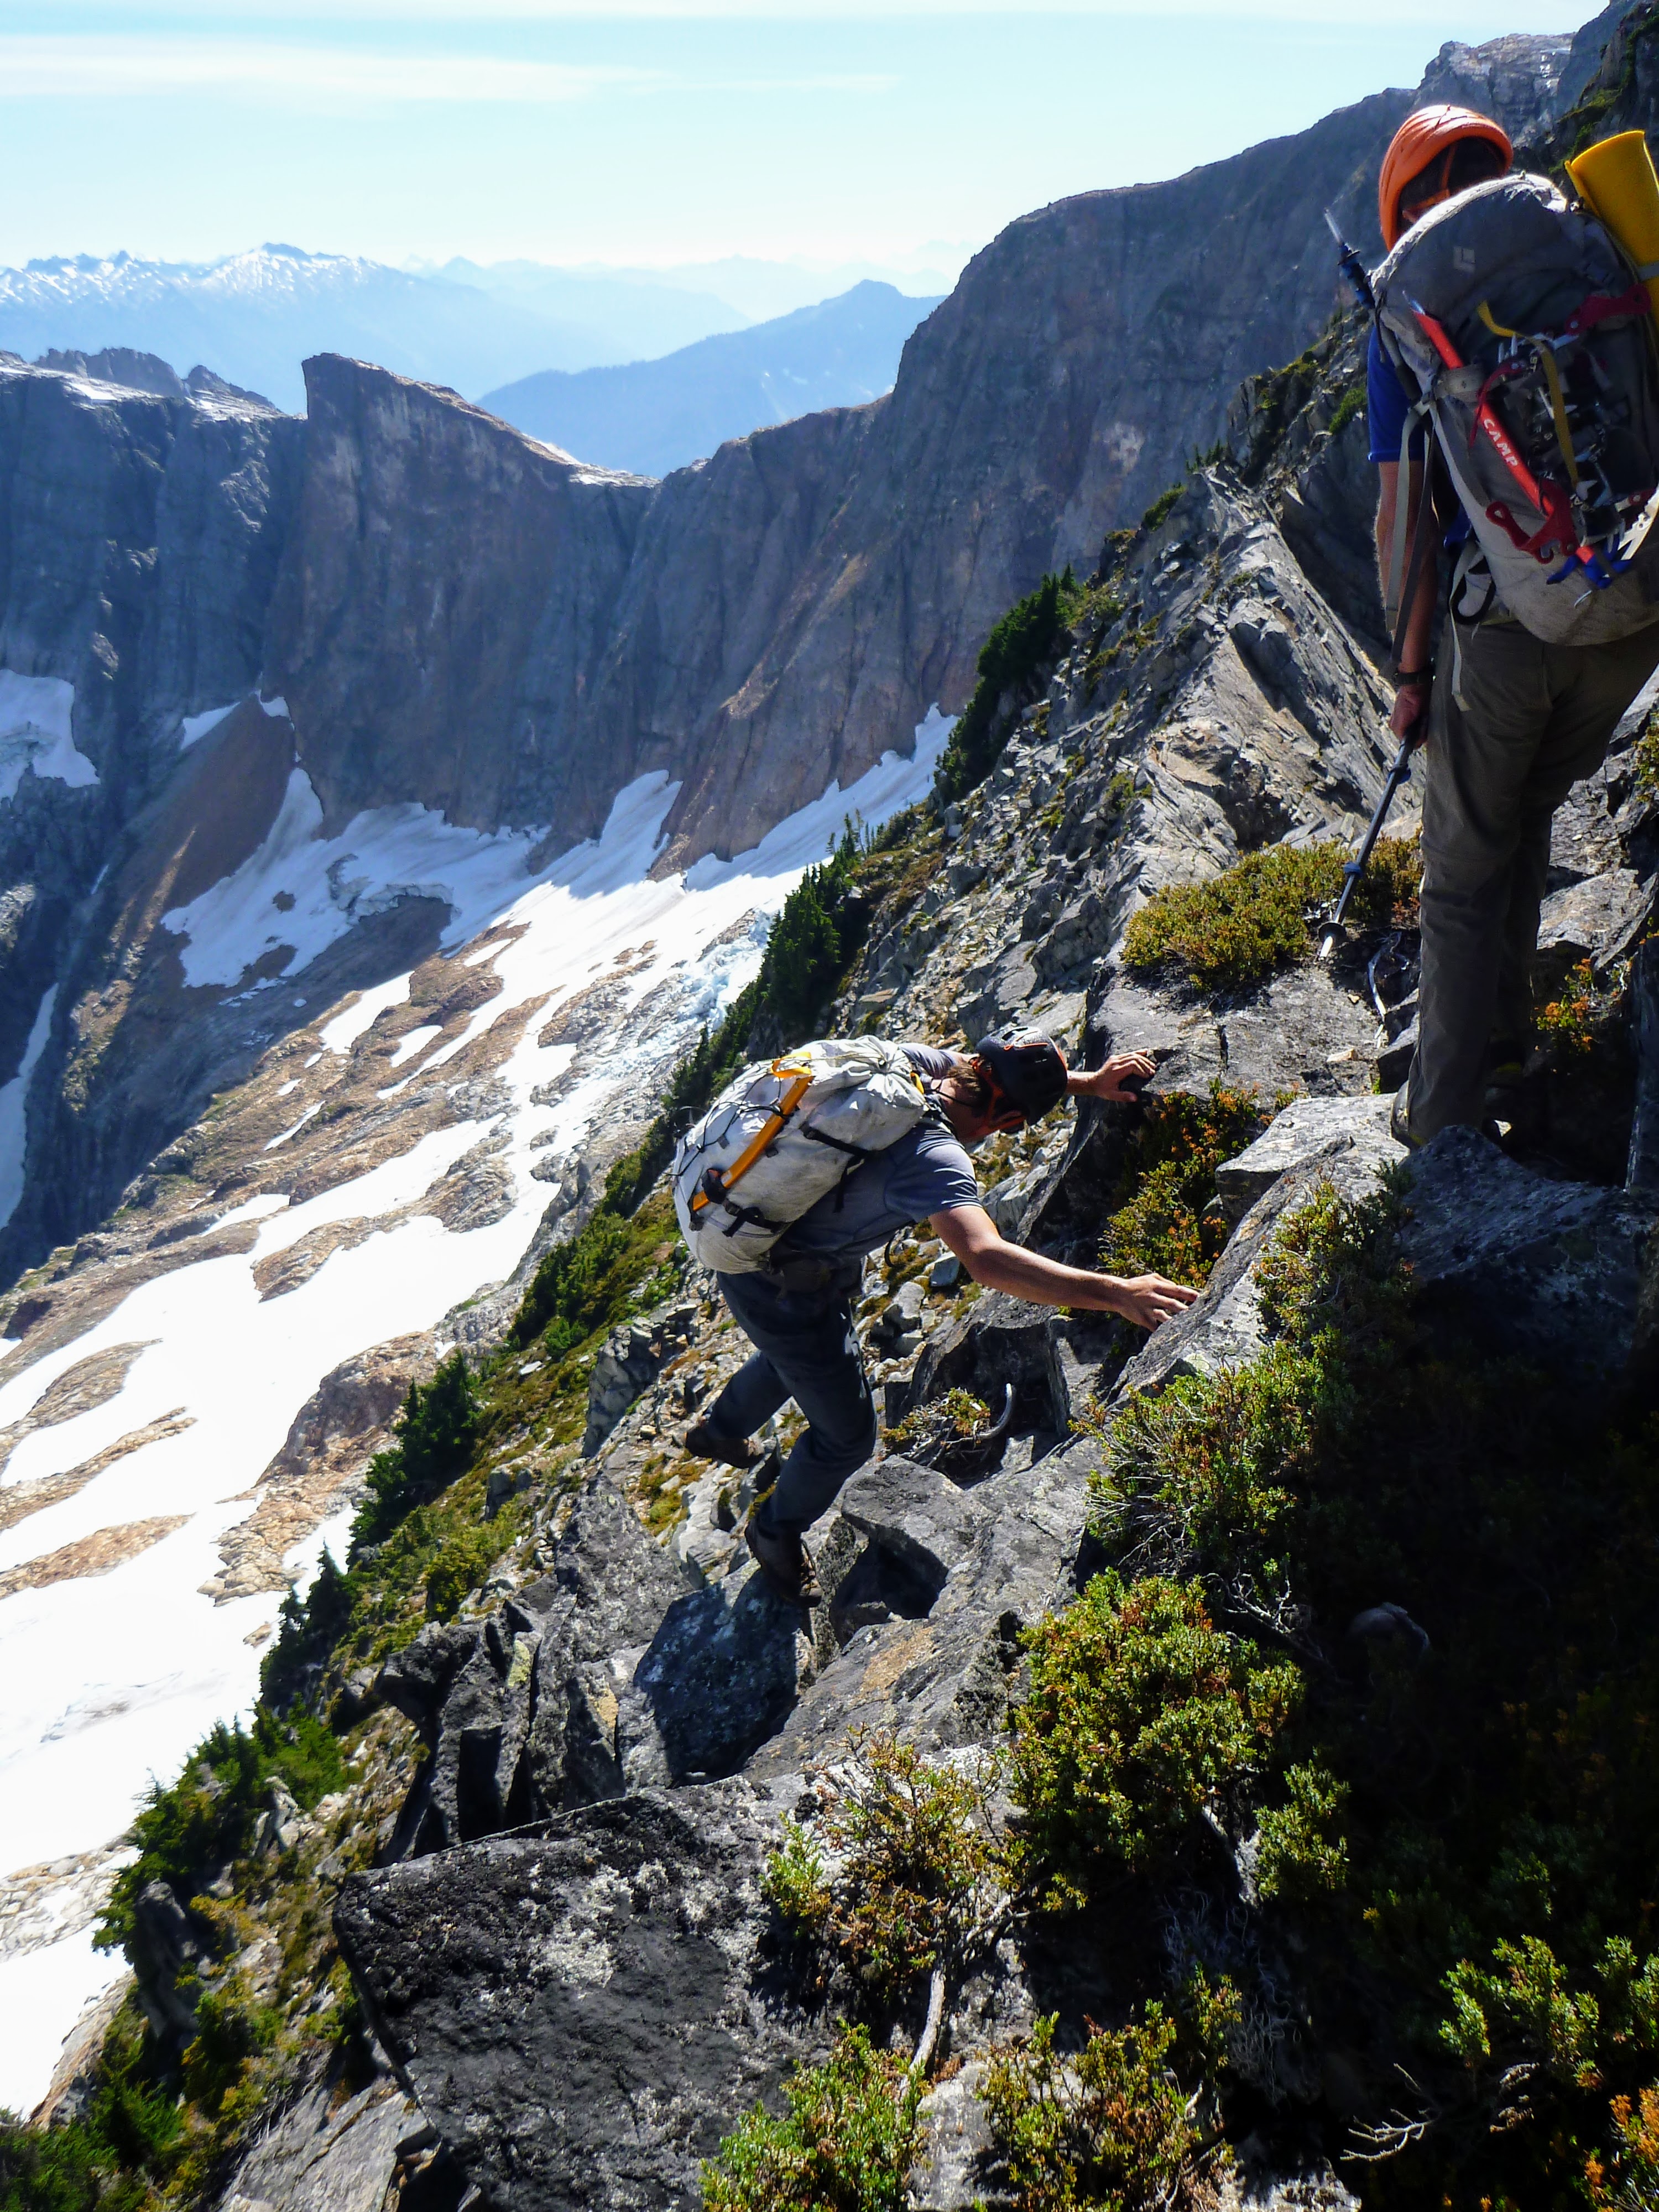
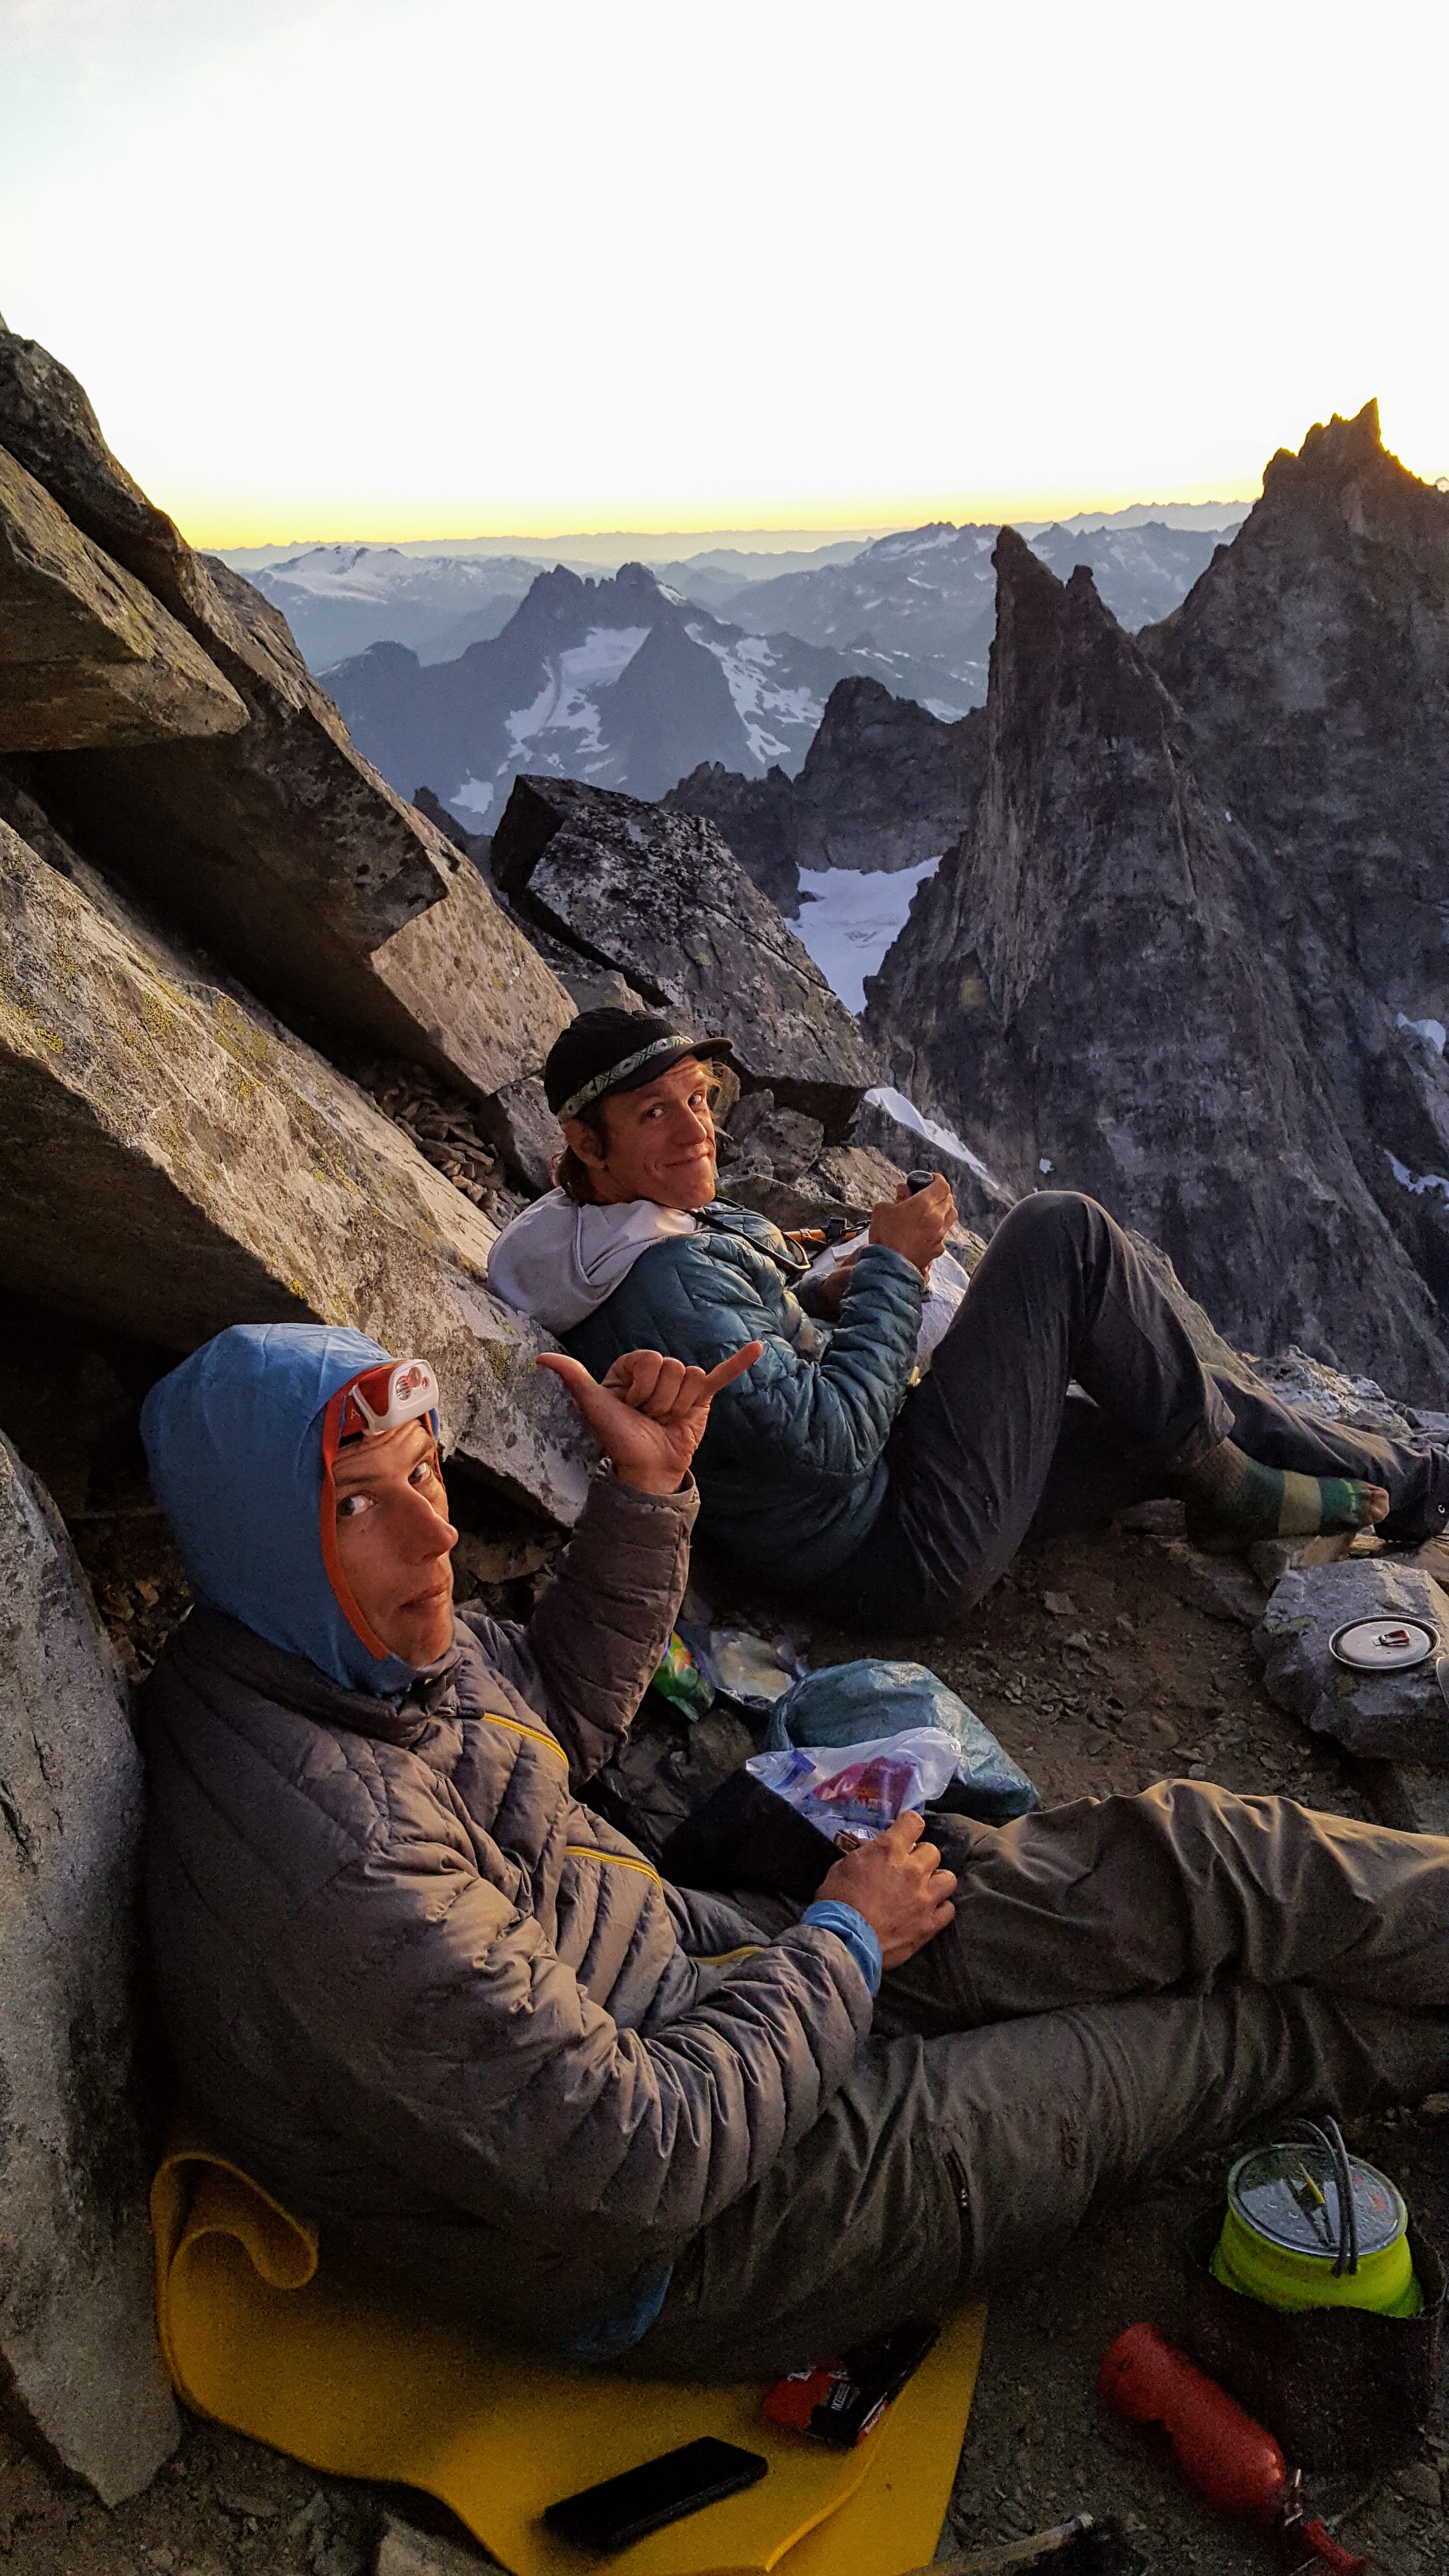
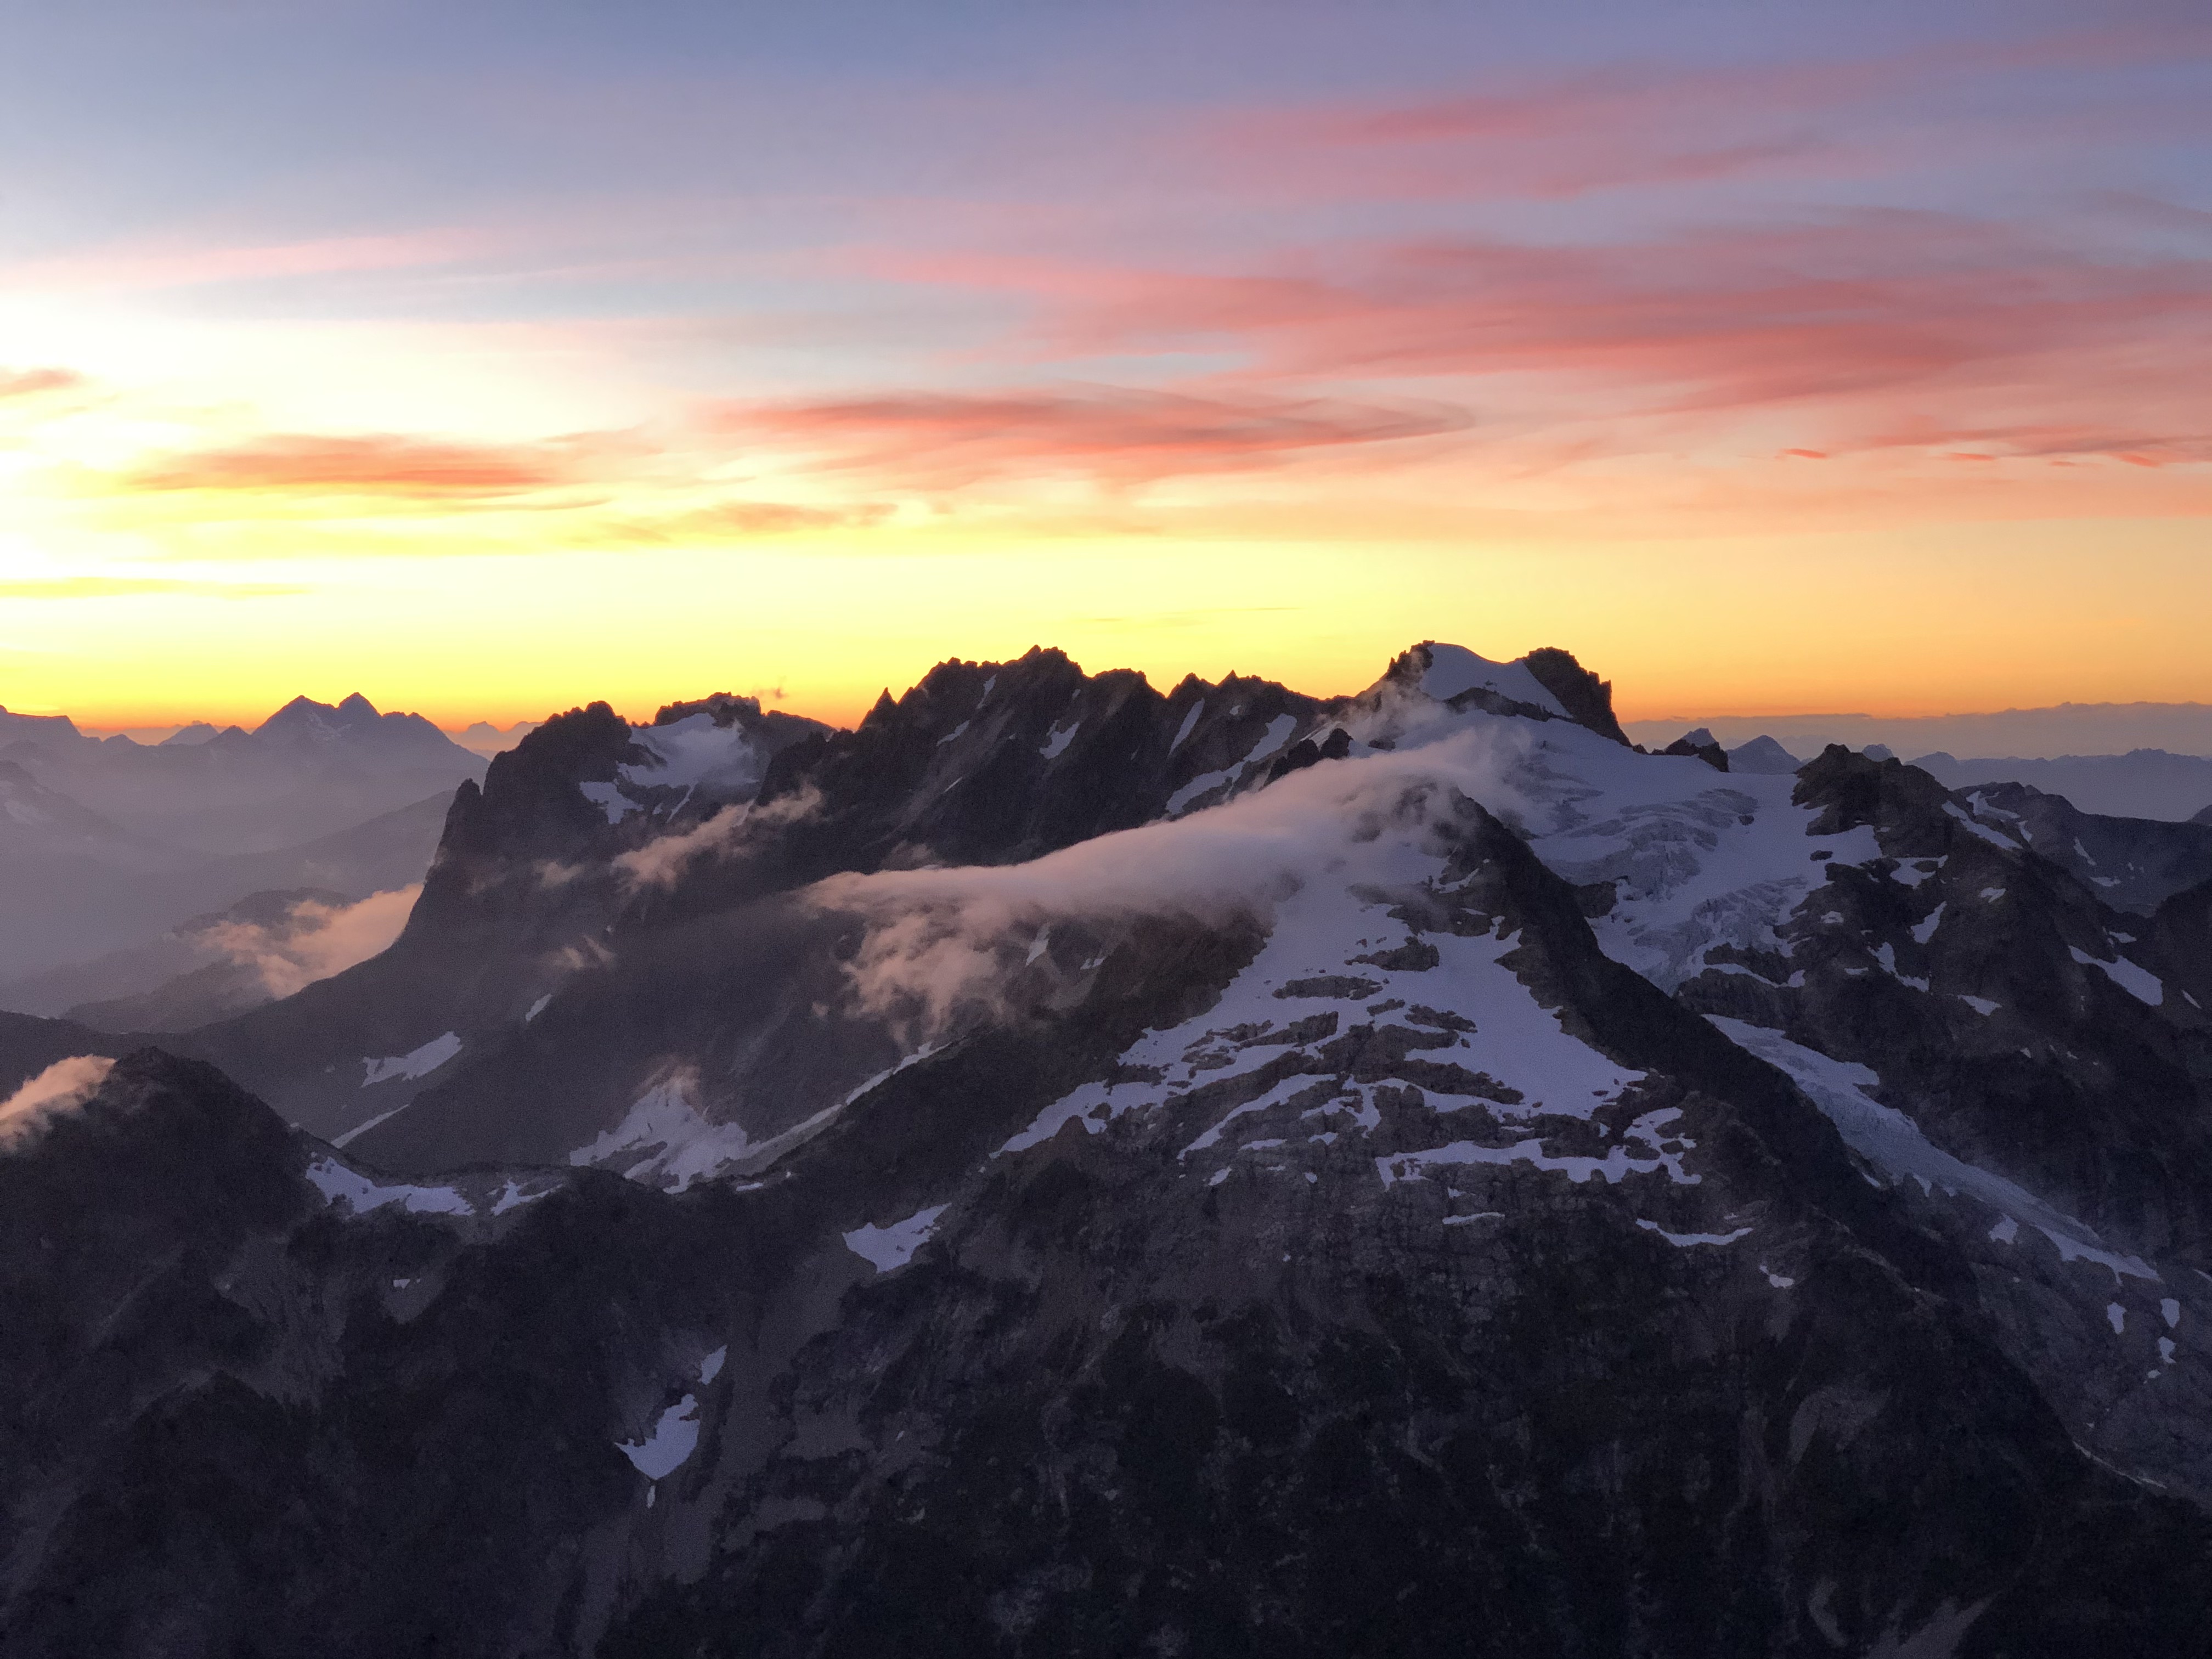
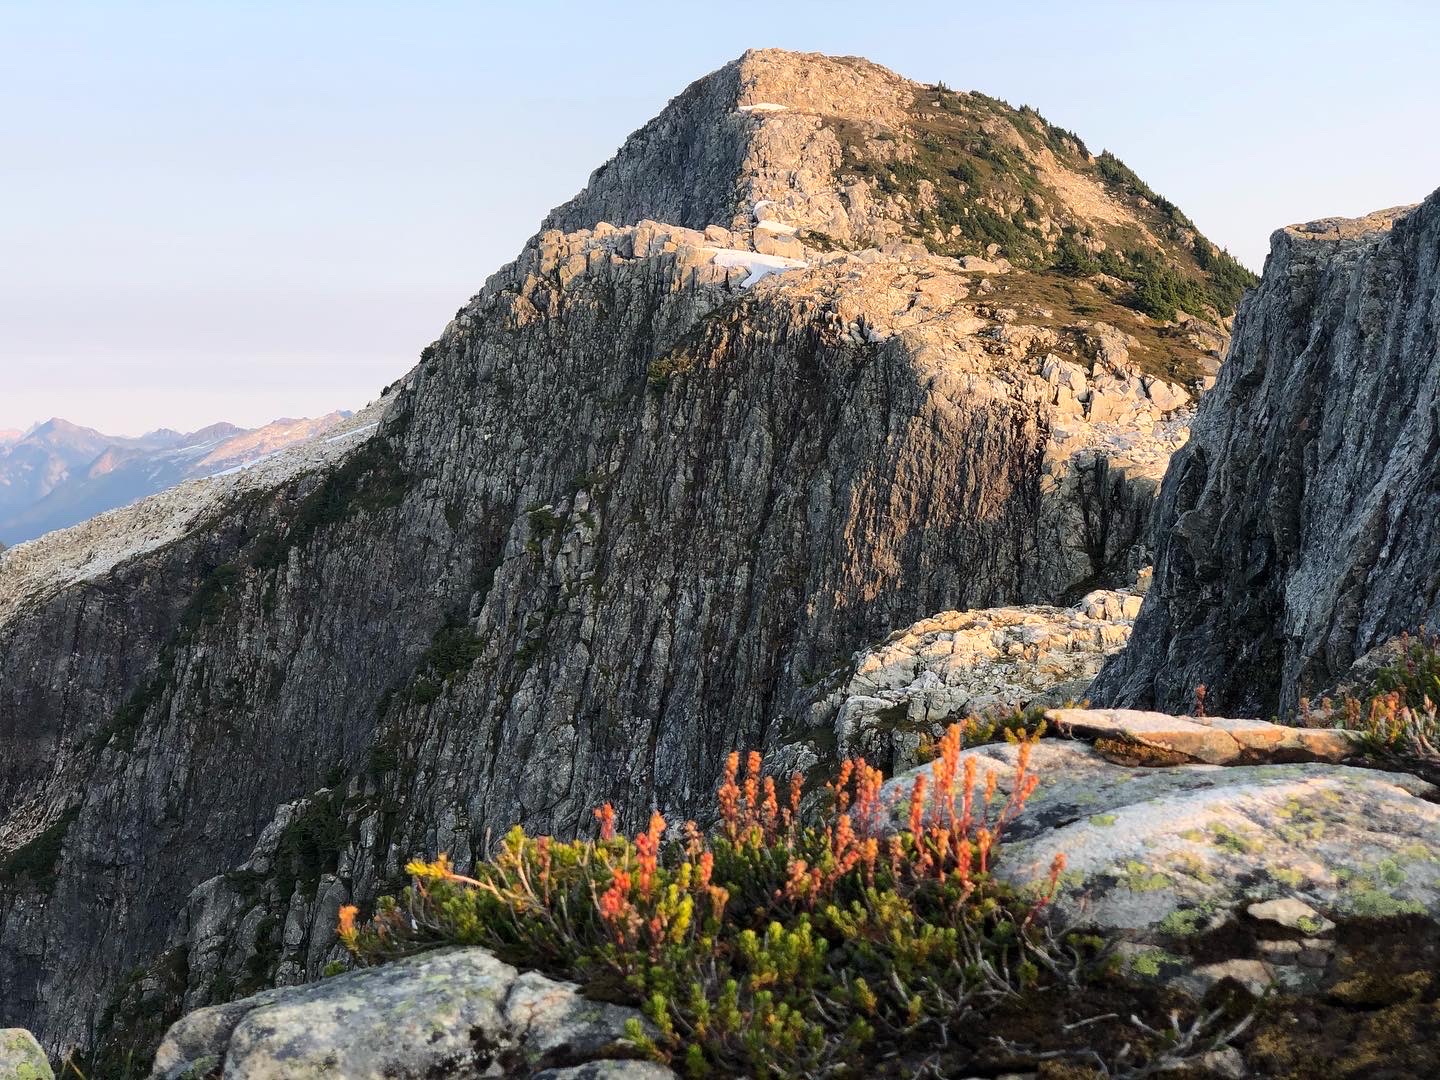
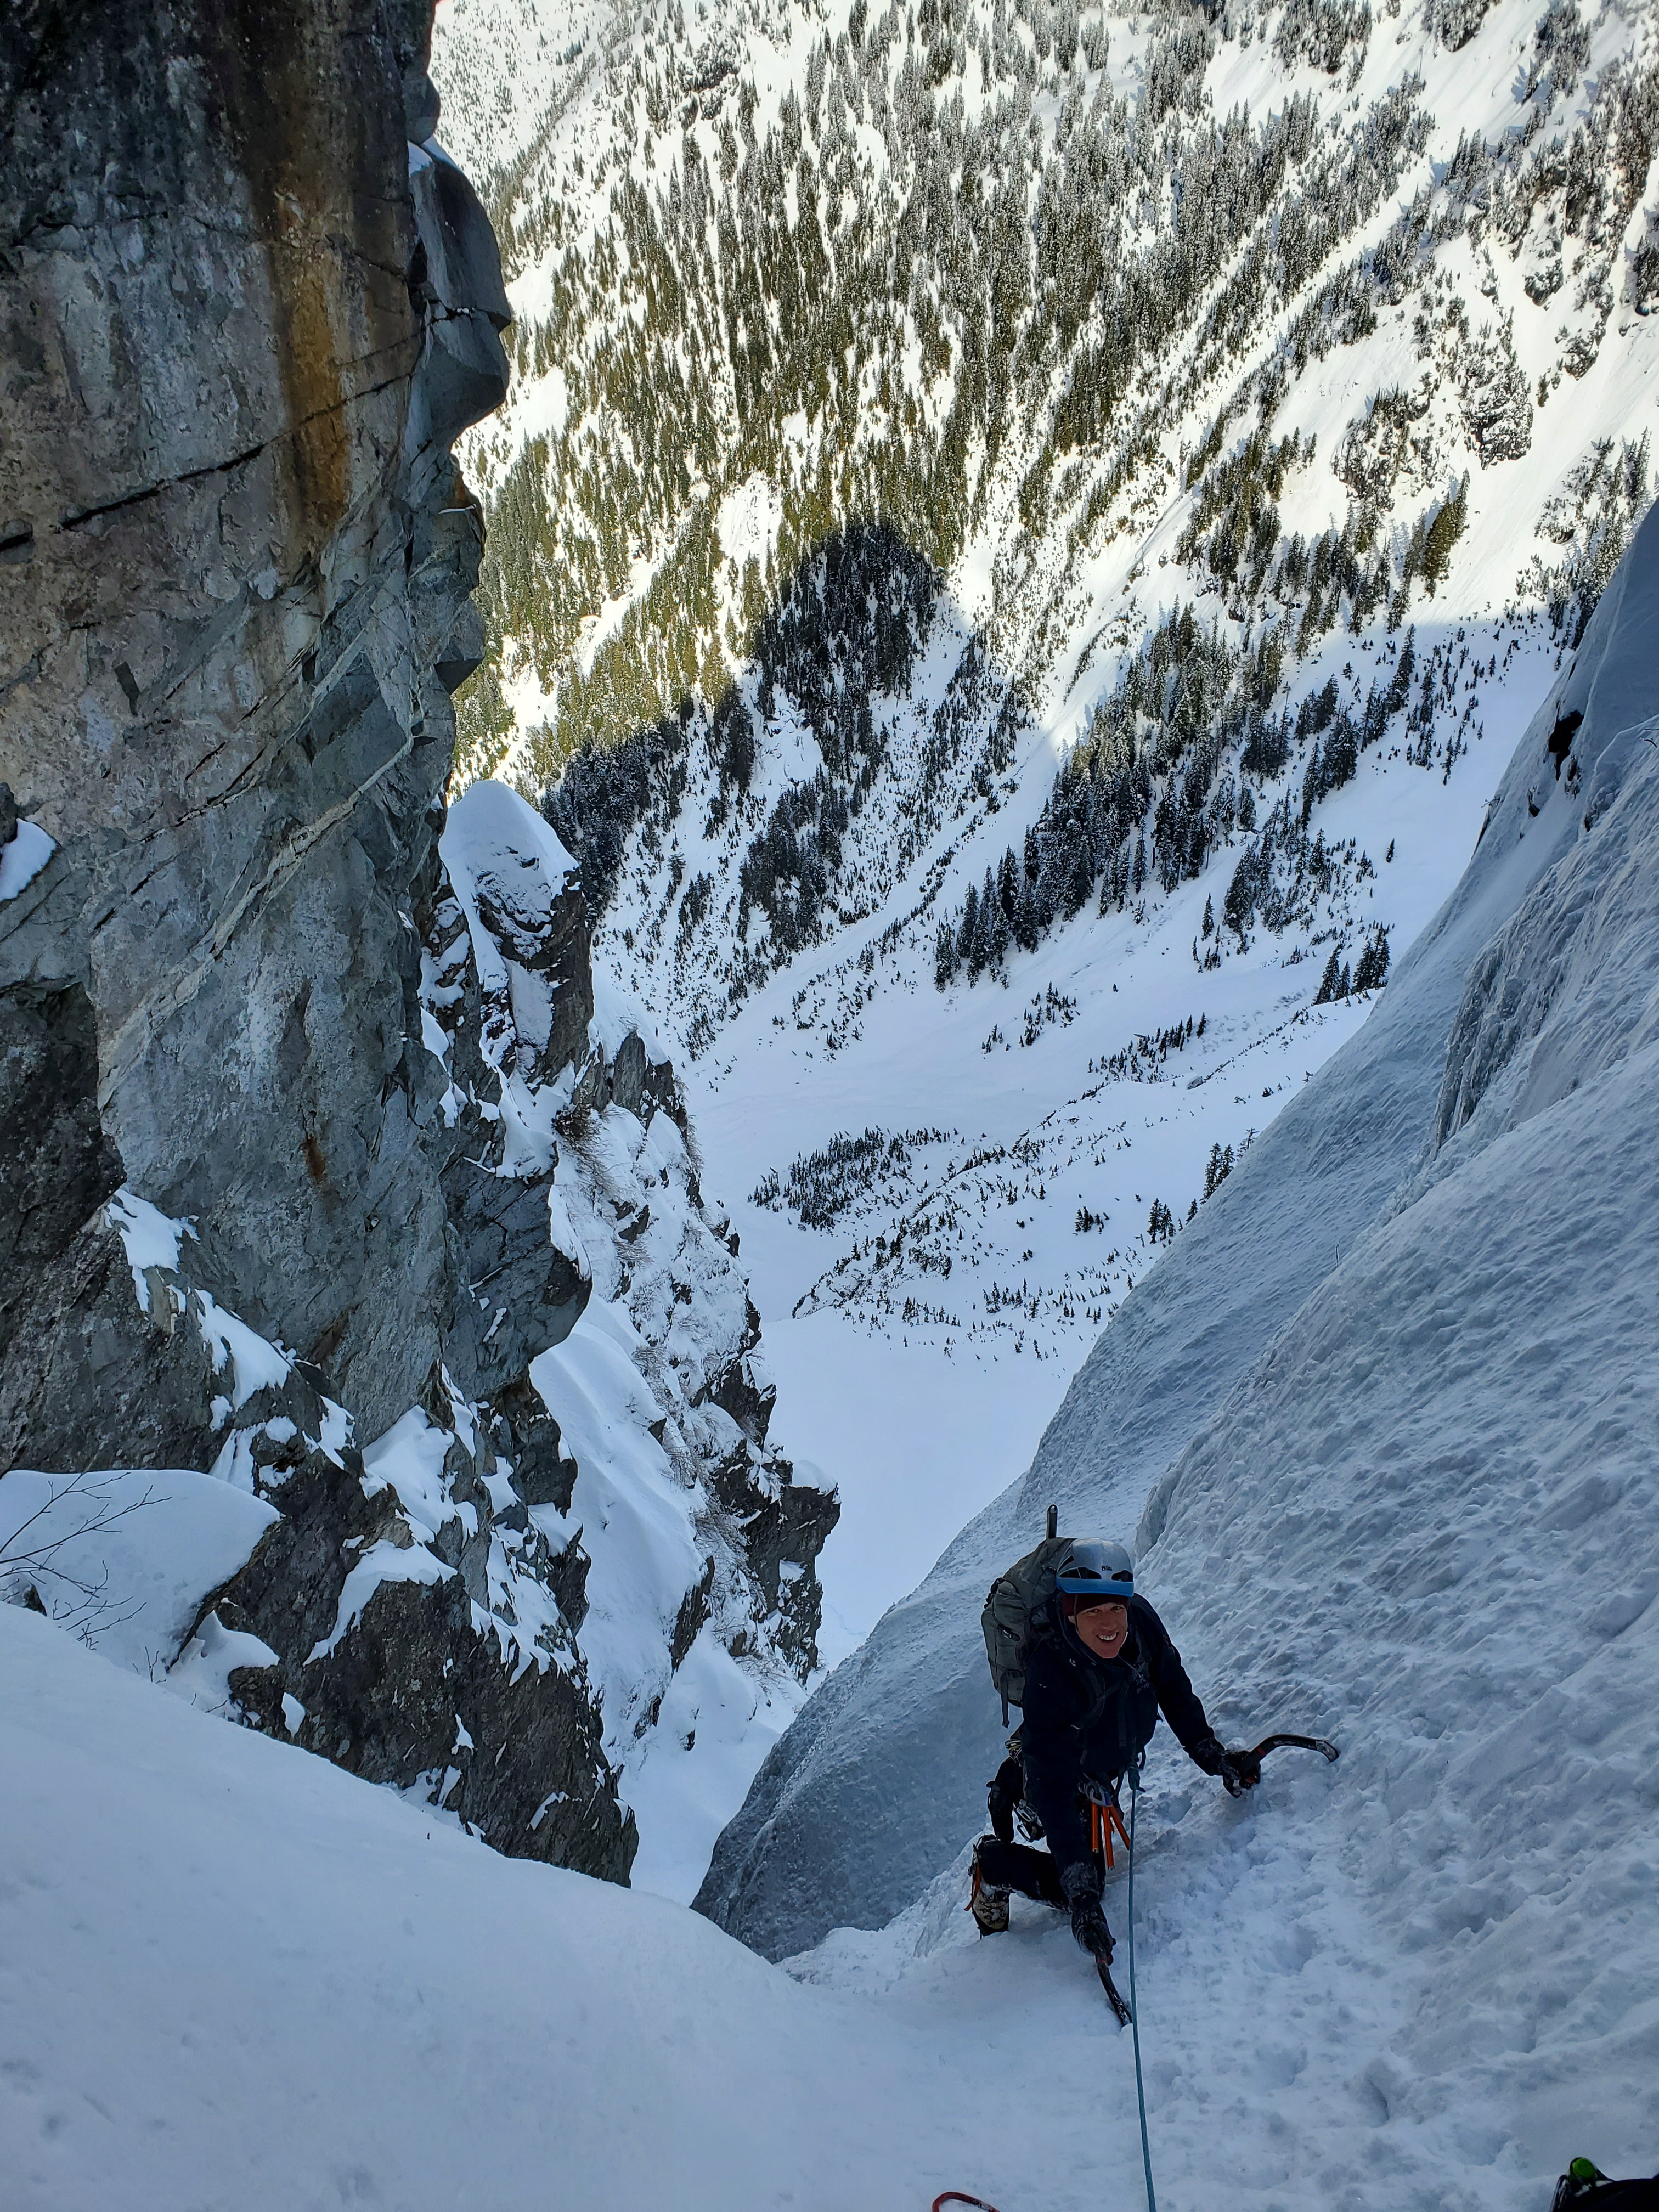
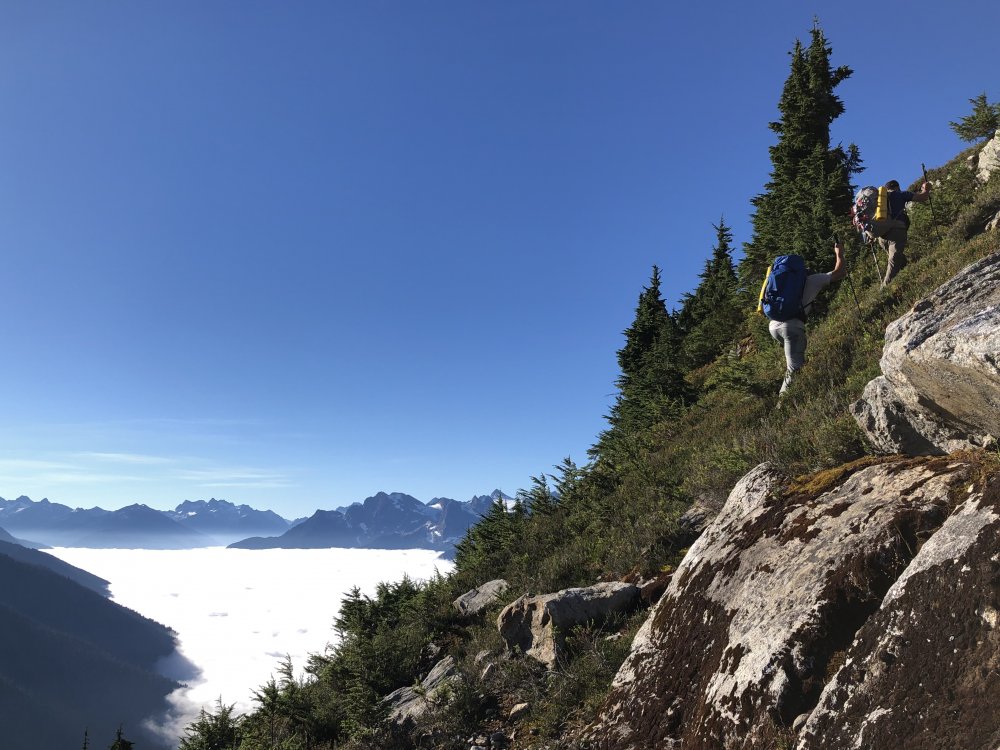
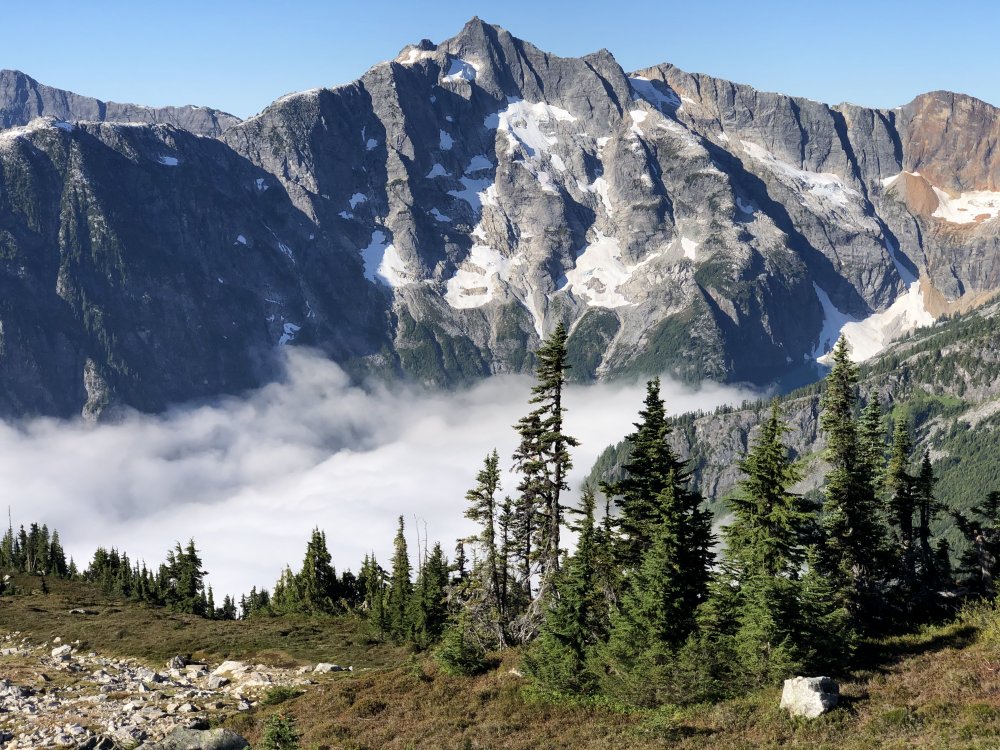
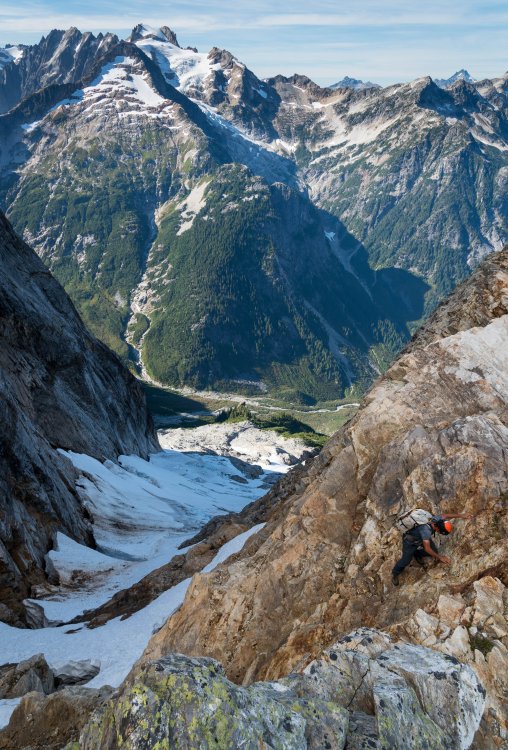
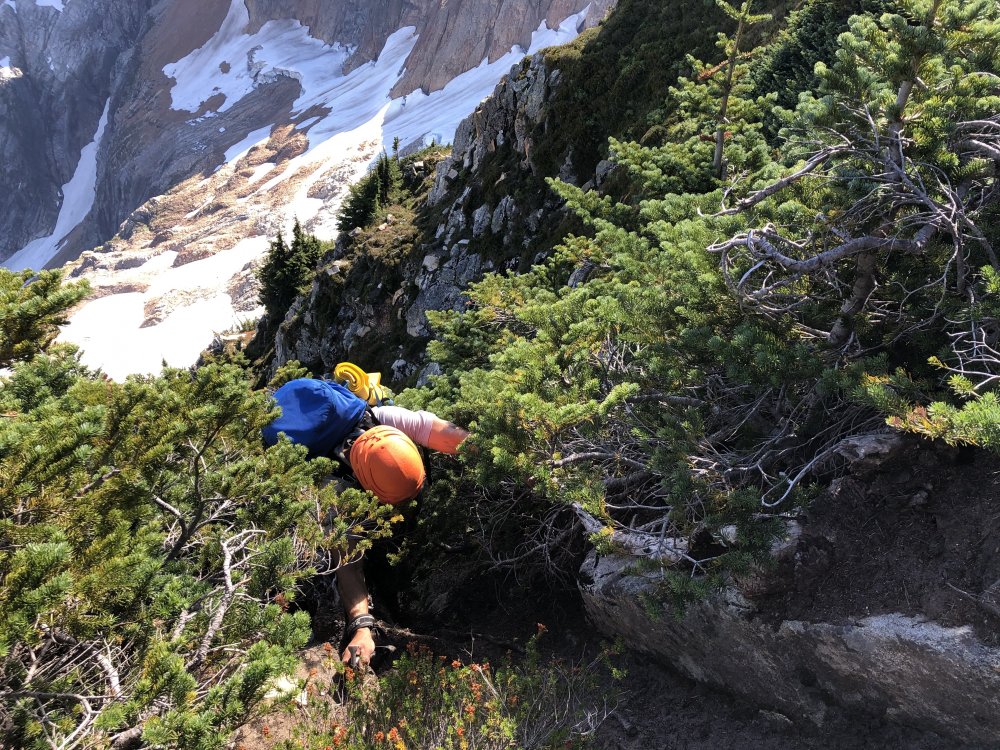
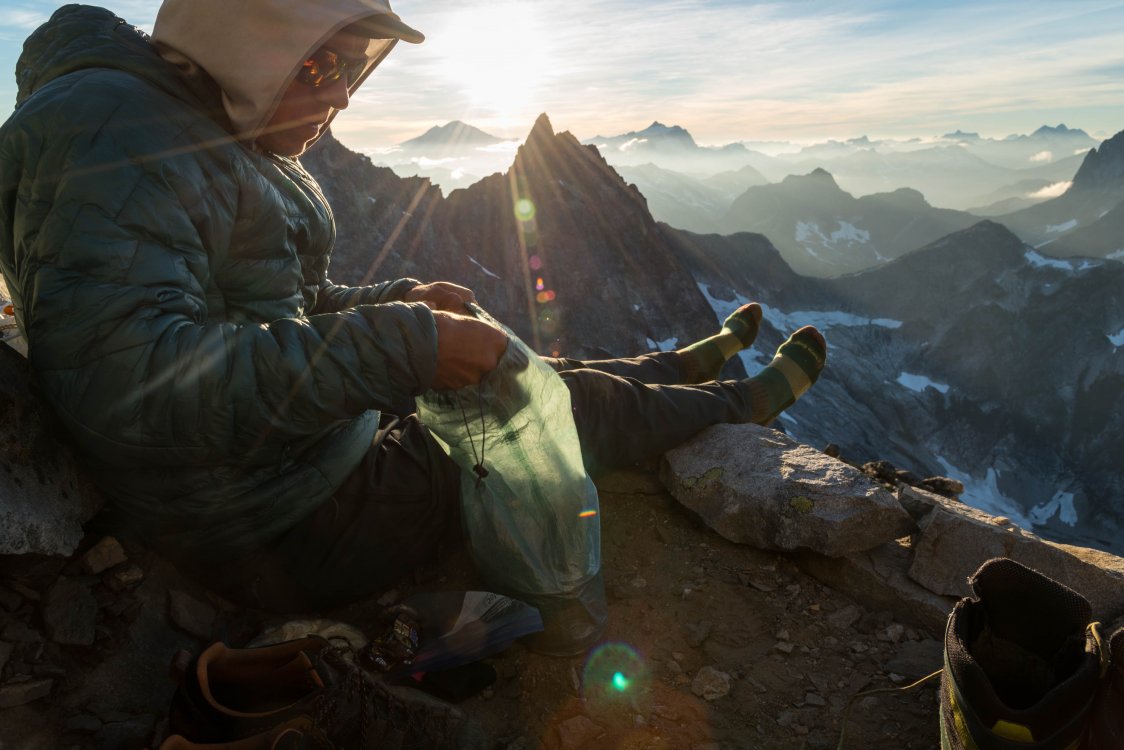
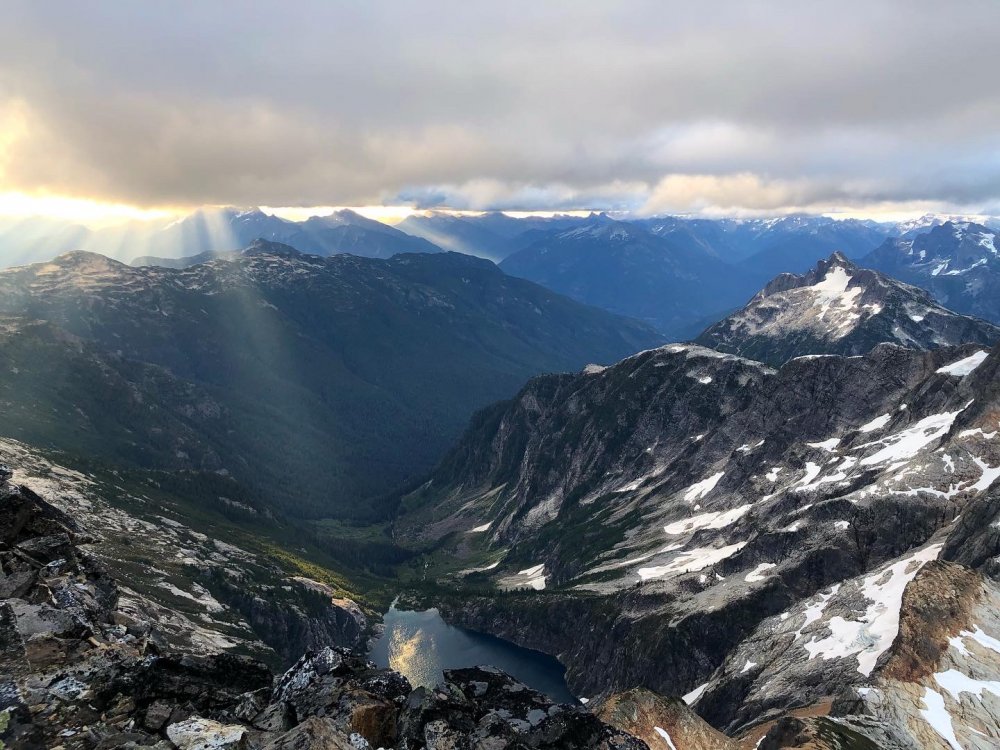
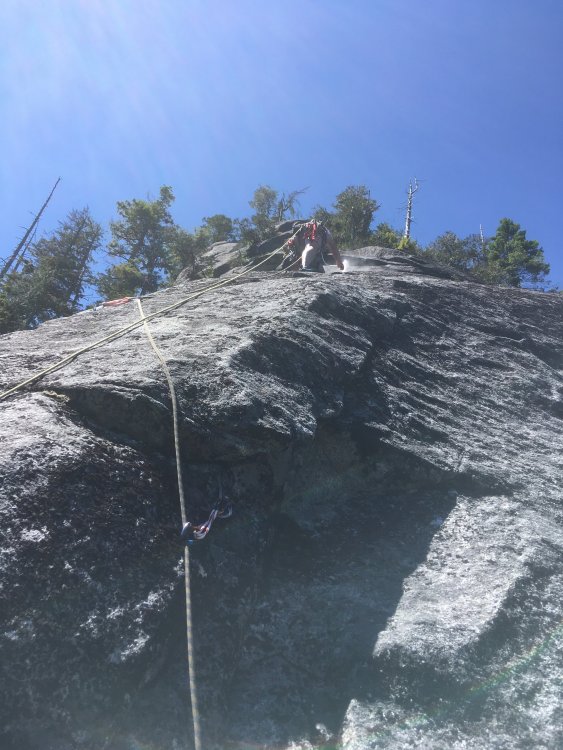
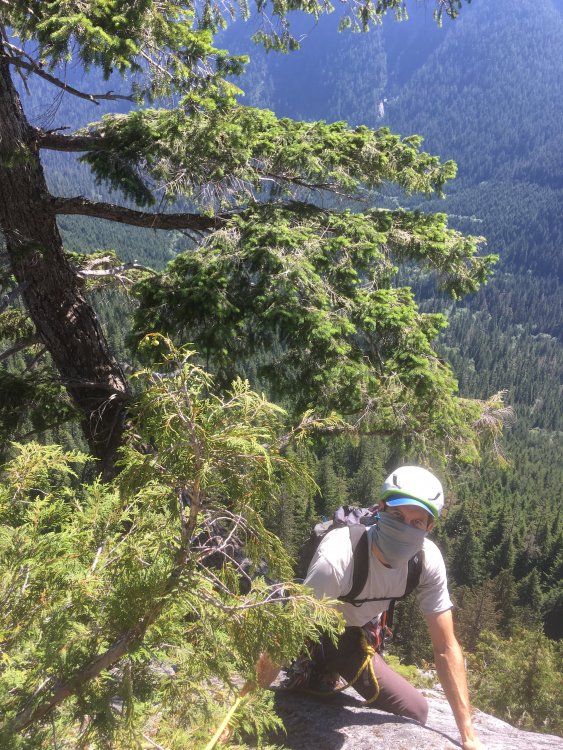
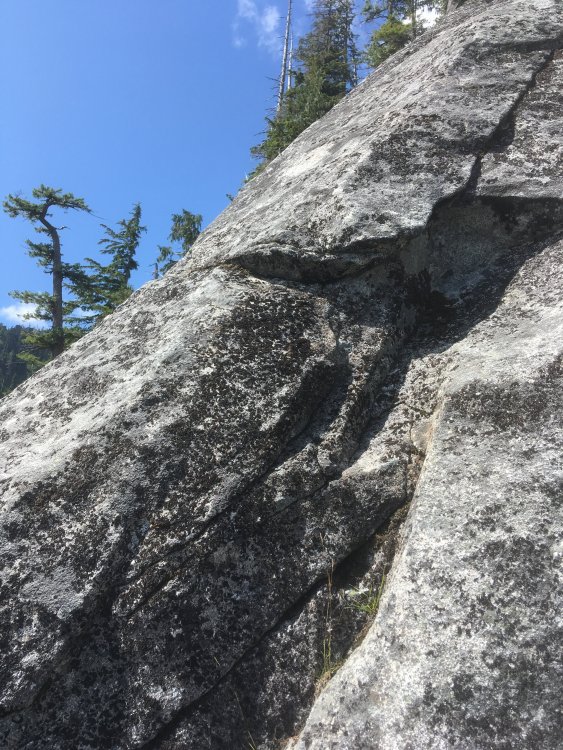
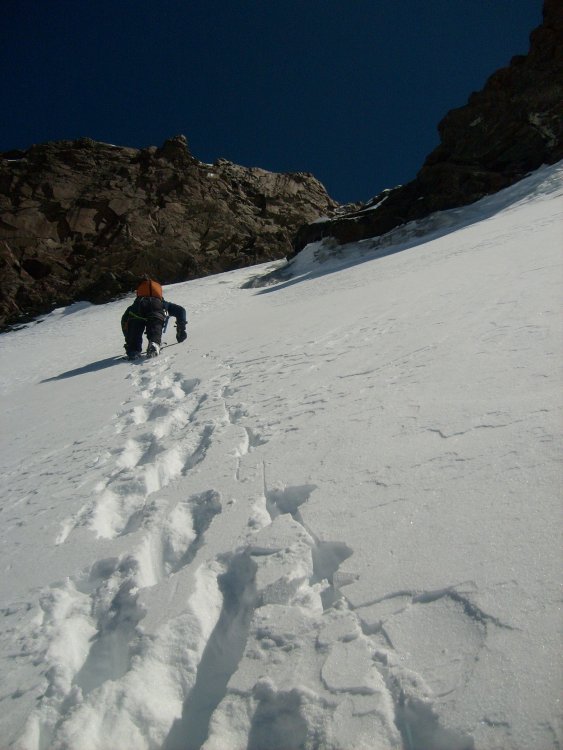
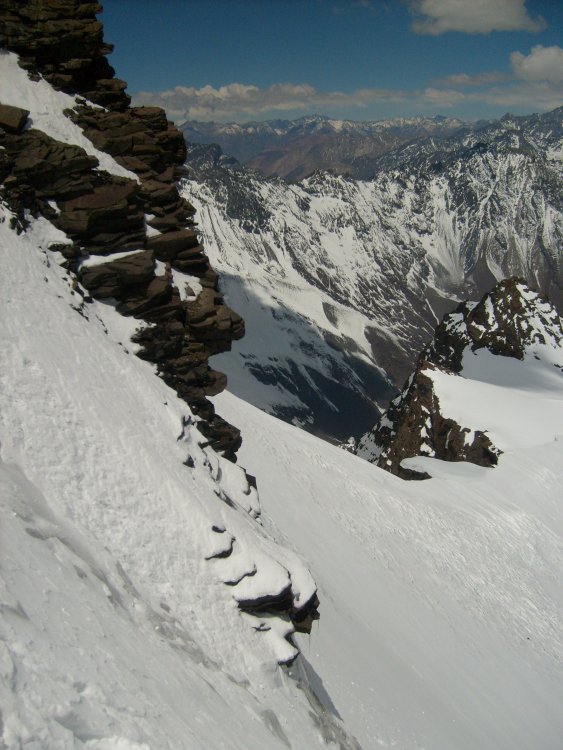
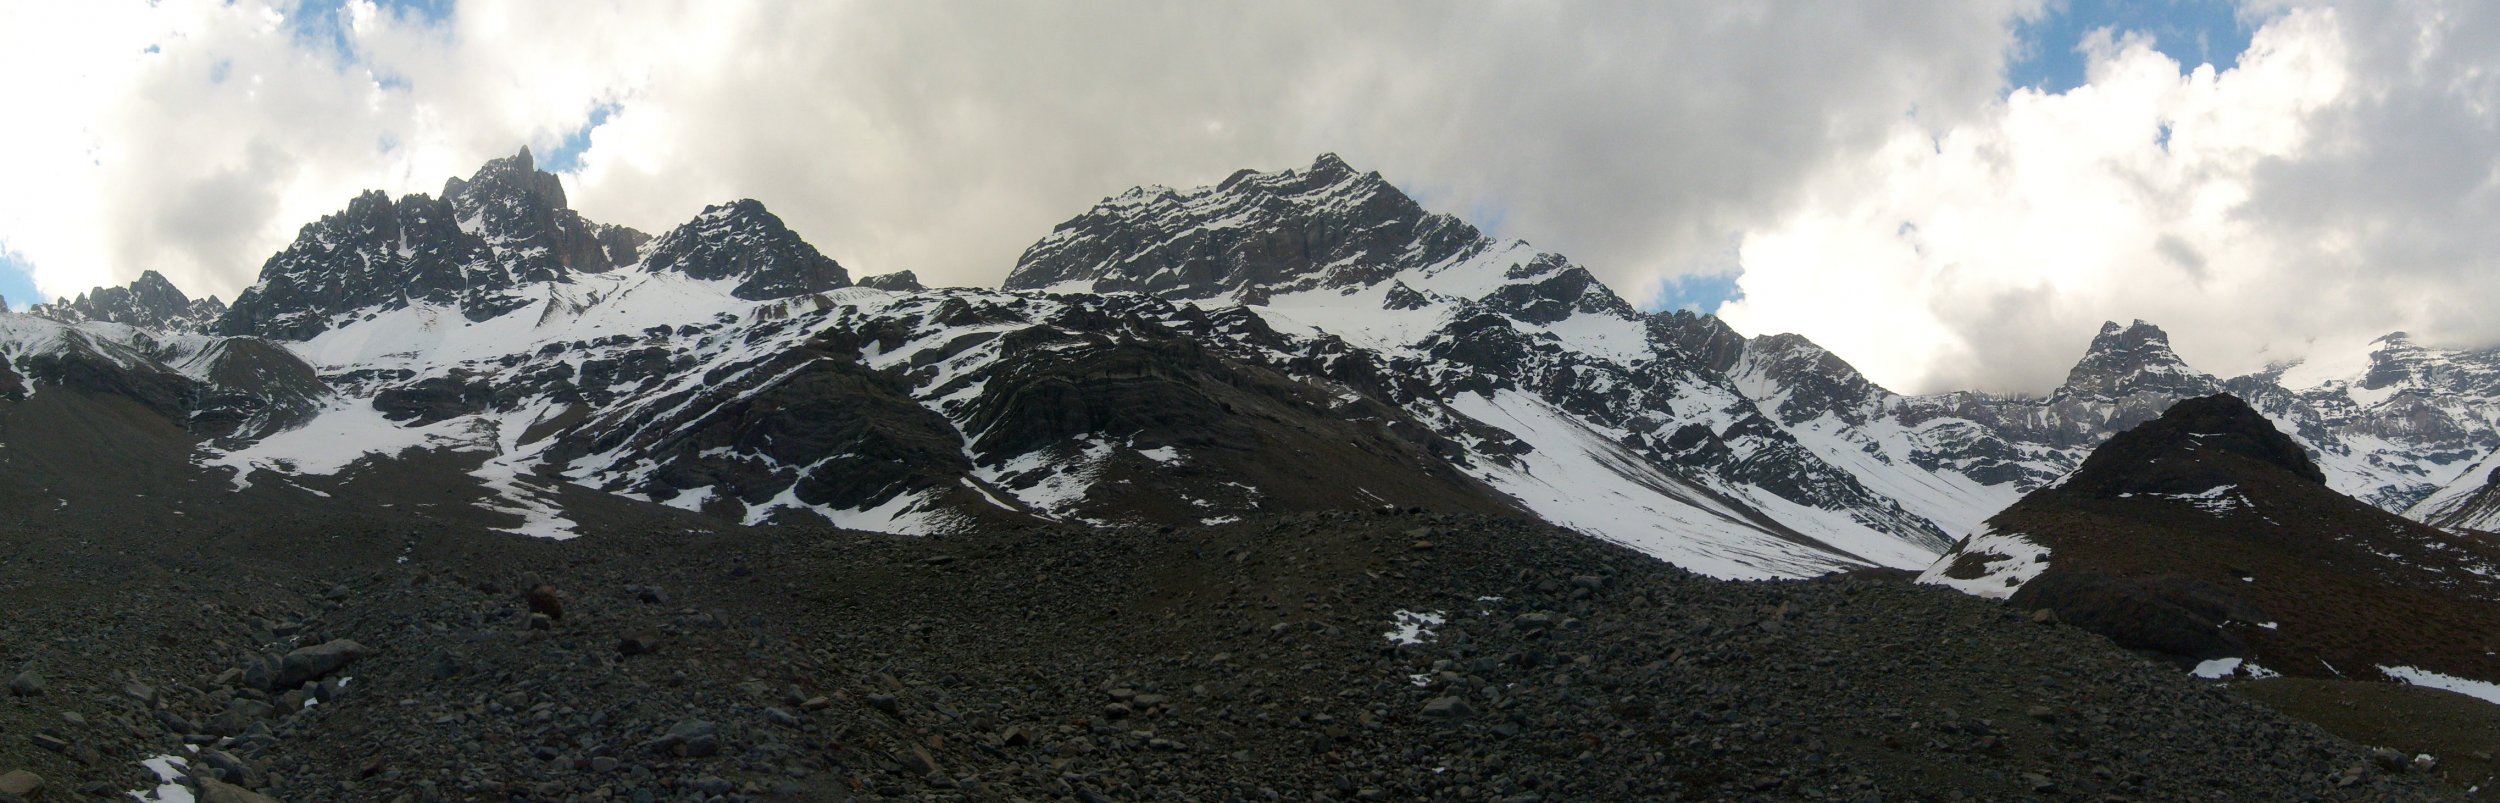
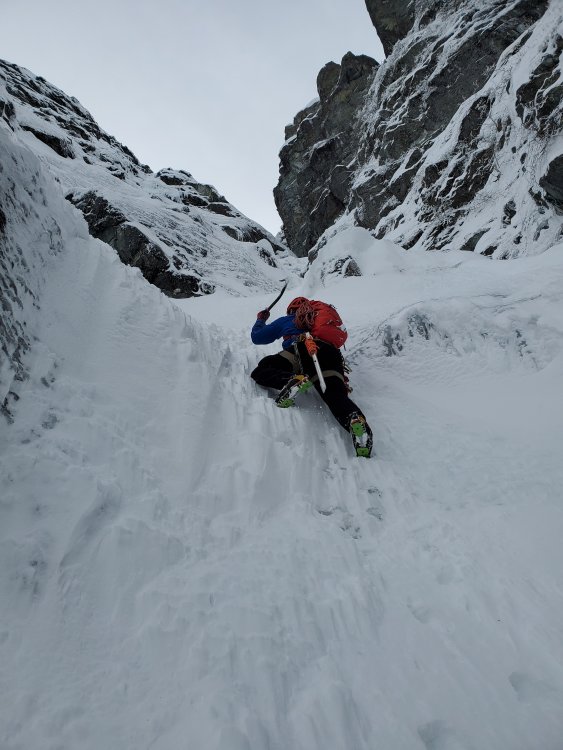
Trip: Storm King Mountain (8515’) - North Ridge Route Trip Date: 09/05/2020 Trip Report: Storm King Mountain (8515’), North Ridge Route Trip Report – September 5-7, 2020 I climbed Storm King Mountain (8515’), North Ridge Route. I tried this route last year at the end of July but under estimated the amount of time, effort and amount of route finding required to do the route and had to turn around before making the summit. This year I still under estimated the time and effort required but was able to make the summit due to better beta from my previous attempt last year. It took me 3 days. I started at the Bridge Creek Trailhead off Hwy 20 just east of Rainy Pass. It was an out and back trip using Bridge Creek Trail to North Fork Trail into the North side of Goode and Storm King. The trail is in excellent shape all the way to Grizzly Creek Camp. After Grizzly Creek Camp the trail gets overgrown but is not hard to follow. The adventure starts when you cross the North Fork of Bridge Creek. Down low, after crossing the creek (3100’-3200’elevation), heading up the rocky brushy slope I almost walked into a large Wasp nest in the middle of the faint climbers trail. I got lucky and made a detour around the nest without incident. I followed a faint trail up the tree lined ridge between Goode and Storm King. The ridge tops out at 4700’ on a nice wide fairly flat plateau that would make a great camp, no water though. I continued up the ridge to about 5100’ and started my traverse over to the bottom of the North Ridge of Storm King (5000’). This is the easiest spot to gain the North Ridge of Storm King, right at the base of the glacier. The rock is a mix of Class 3, 4 and low 5th in spots heading up. On either side of the ridge it is steep, sheer rock so you will know if you are off route. It took me 5 hours to go from the base of the North Ridge to the Summit. I summited late at 6:00pm so I headed down to find a place to bivy at about 7200’ next to the snow field separating the upper and lower mountain. I got up early the next morning and started down at 6:30am. Once back at the bottom of the North Ridge I headed straight down and diagonal toward the creek valley below. On the map it looked like the easiest way down (contour line wise). Even though it was the easiest way down to the main creek, it still involved coming down several 10’ vertical drops that required careful Vege-Belaying technique. I usually hate Slide Alder, but in this case, I was very happy it was on the down route as it was very useful. Overall the North Ridge of Storm King is a tough climb. The approach is difficult, the exit is difficult, and the ridge requires your full attention. The trail into the area is long and you will need comfortable shoes to save your feet. There was a search and rescue helicopter flying all over the creek valley and up to the base of Goode on Sunday the 6th. Looks like they were doing a rescue. They spent some time parked on an island in the middle of the creek below. It was a good reminder to keep my shit wired tight doing this route. Hopefully all went well for the rescue operation. Some Tips and Notes: 1. This is a long trip. I should have spread the pain more evenly over the three days. Day 1 go as far up as you can to camp. I thought Grizzly Camp was far enough on Day 1, it wasn’t. 2. The climbers trail up the tree cover ridge between Goode and Storm King is steep and hard to follow. Mostly just look for skid marks from animals and humans to stay on route. 3. There are good camping options at 4700’ on the tree covered ridge and above. The 7200’ bivy spot on the side of Storm King is pretty good, If I had more of my gear with me it would have been very pleasant. There was water all along the route where there was melting snow/glacier. 4. A rope would probably be a good idea to bring along. Rappelling would have been nice in several spots but you would definitely have to watch for loose rock coming down on you as you rappel. A didn’t bring a rope to save weight and it worked out fine for me. 5. I brought an Ice Axe & Crampons and didn’t use them. Maybe early in the season they would have been needed. Travel Time for reference: Day 1 (TH to Grizzly Camp), 4.5 hours – Day 2 (Grizzly Camp to Summit to 7200’ bivy), 12.5 hours – Day 3 (7200’ bivy to TH), 14 hours. Gear used: Trekking Pole, Helmet, Ice Axe, Crampons, Full Gaiters, Work Gloves Wasp nest down low after crossing North Fork Bridge Creek around 3100-3200' Climbers Trail up tree cover ridge between Goode and Storm King View from 4700' ridge plateau Potential camp at 4700' ridge plateau Full view of North Ridge of Storm King. Start of ridge is the at the bottom right where the heavy shadow is (5000'). North Ridge start location (5000'). Get used to this view for the next several hours. View off to the side of the North Ridge. Storm King - "Where Echoes Go To Die" - I believe it, must have been climbing the North Ridge. Goode looking sexy like usual. Wish I had more time on the summit to enjoy the view, it was stunning. End of the Exit route. Farewell Storm King - North Ridge. Until we meet again, may God hold you in the palm of his hands. Gear Notes: Trekking Pole, Helmet, Ice Axe, Crampons, Full Gaiters, Work Gloves - Didn't need the Ice Axe or Crampons Approach Notes: Bridge Creek Trailhead - Bridge Creek Trail to North Fork Trail & back2 points
-
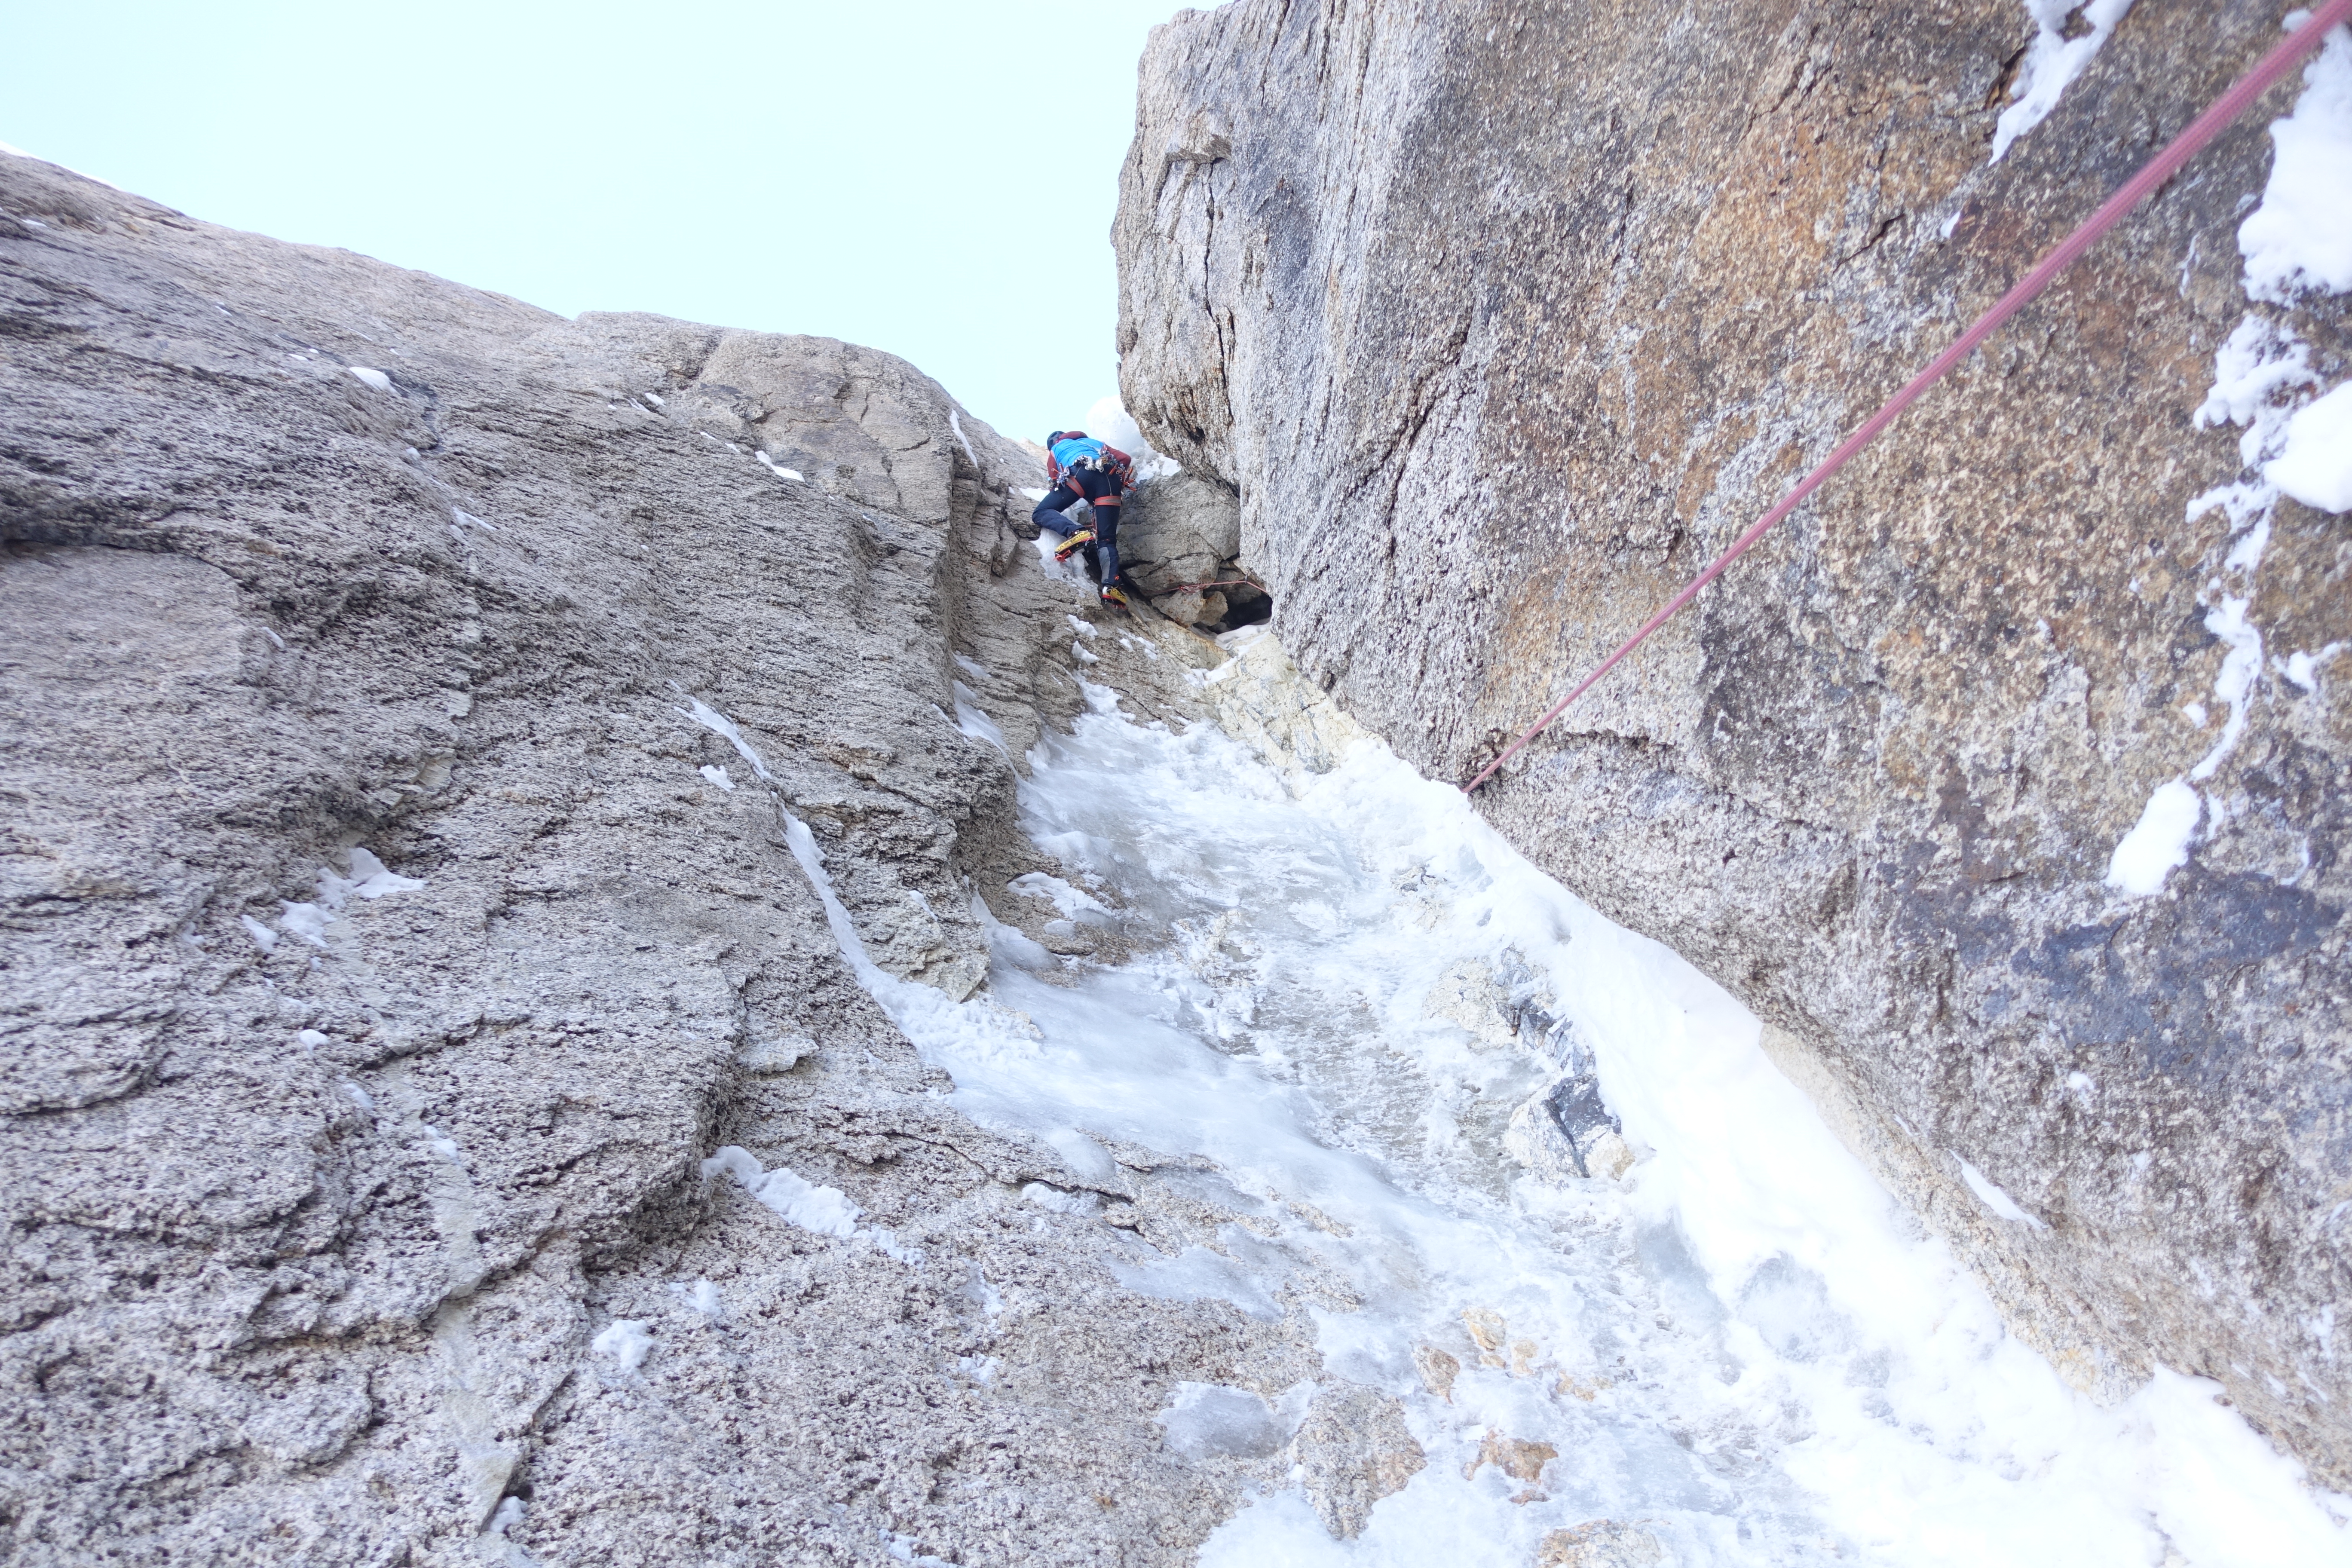
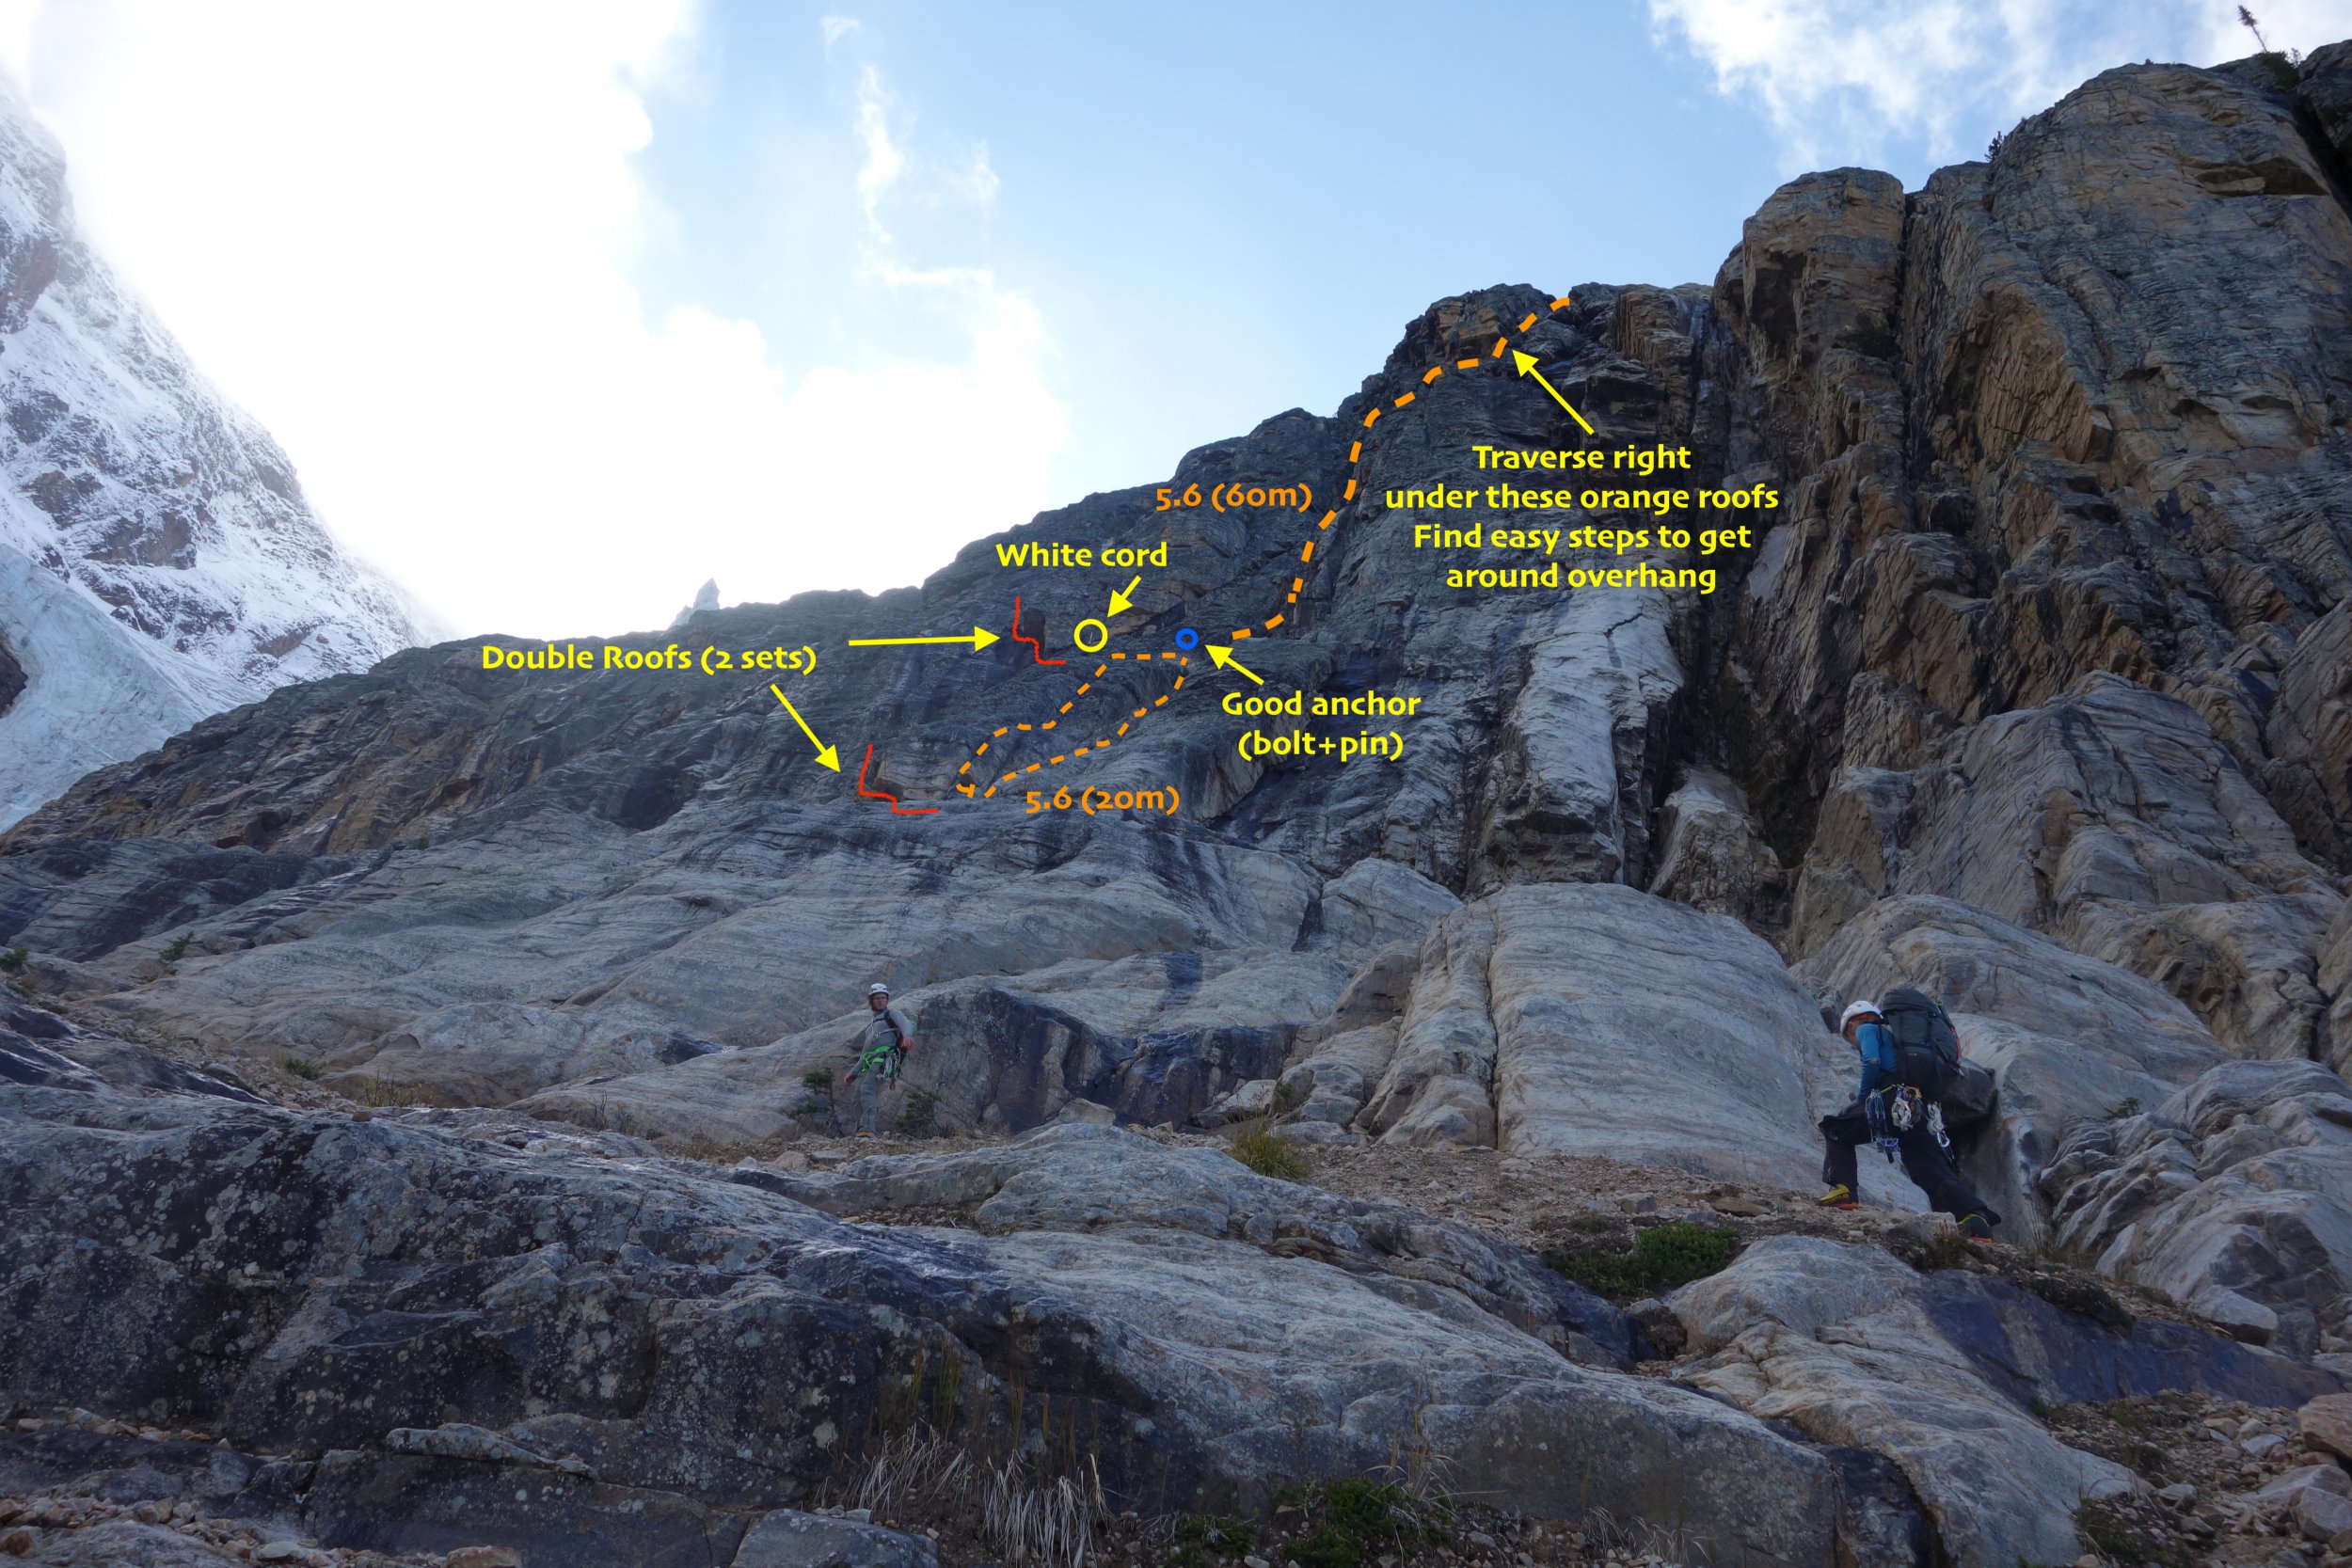
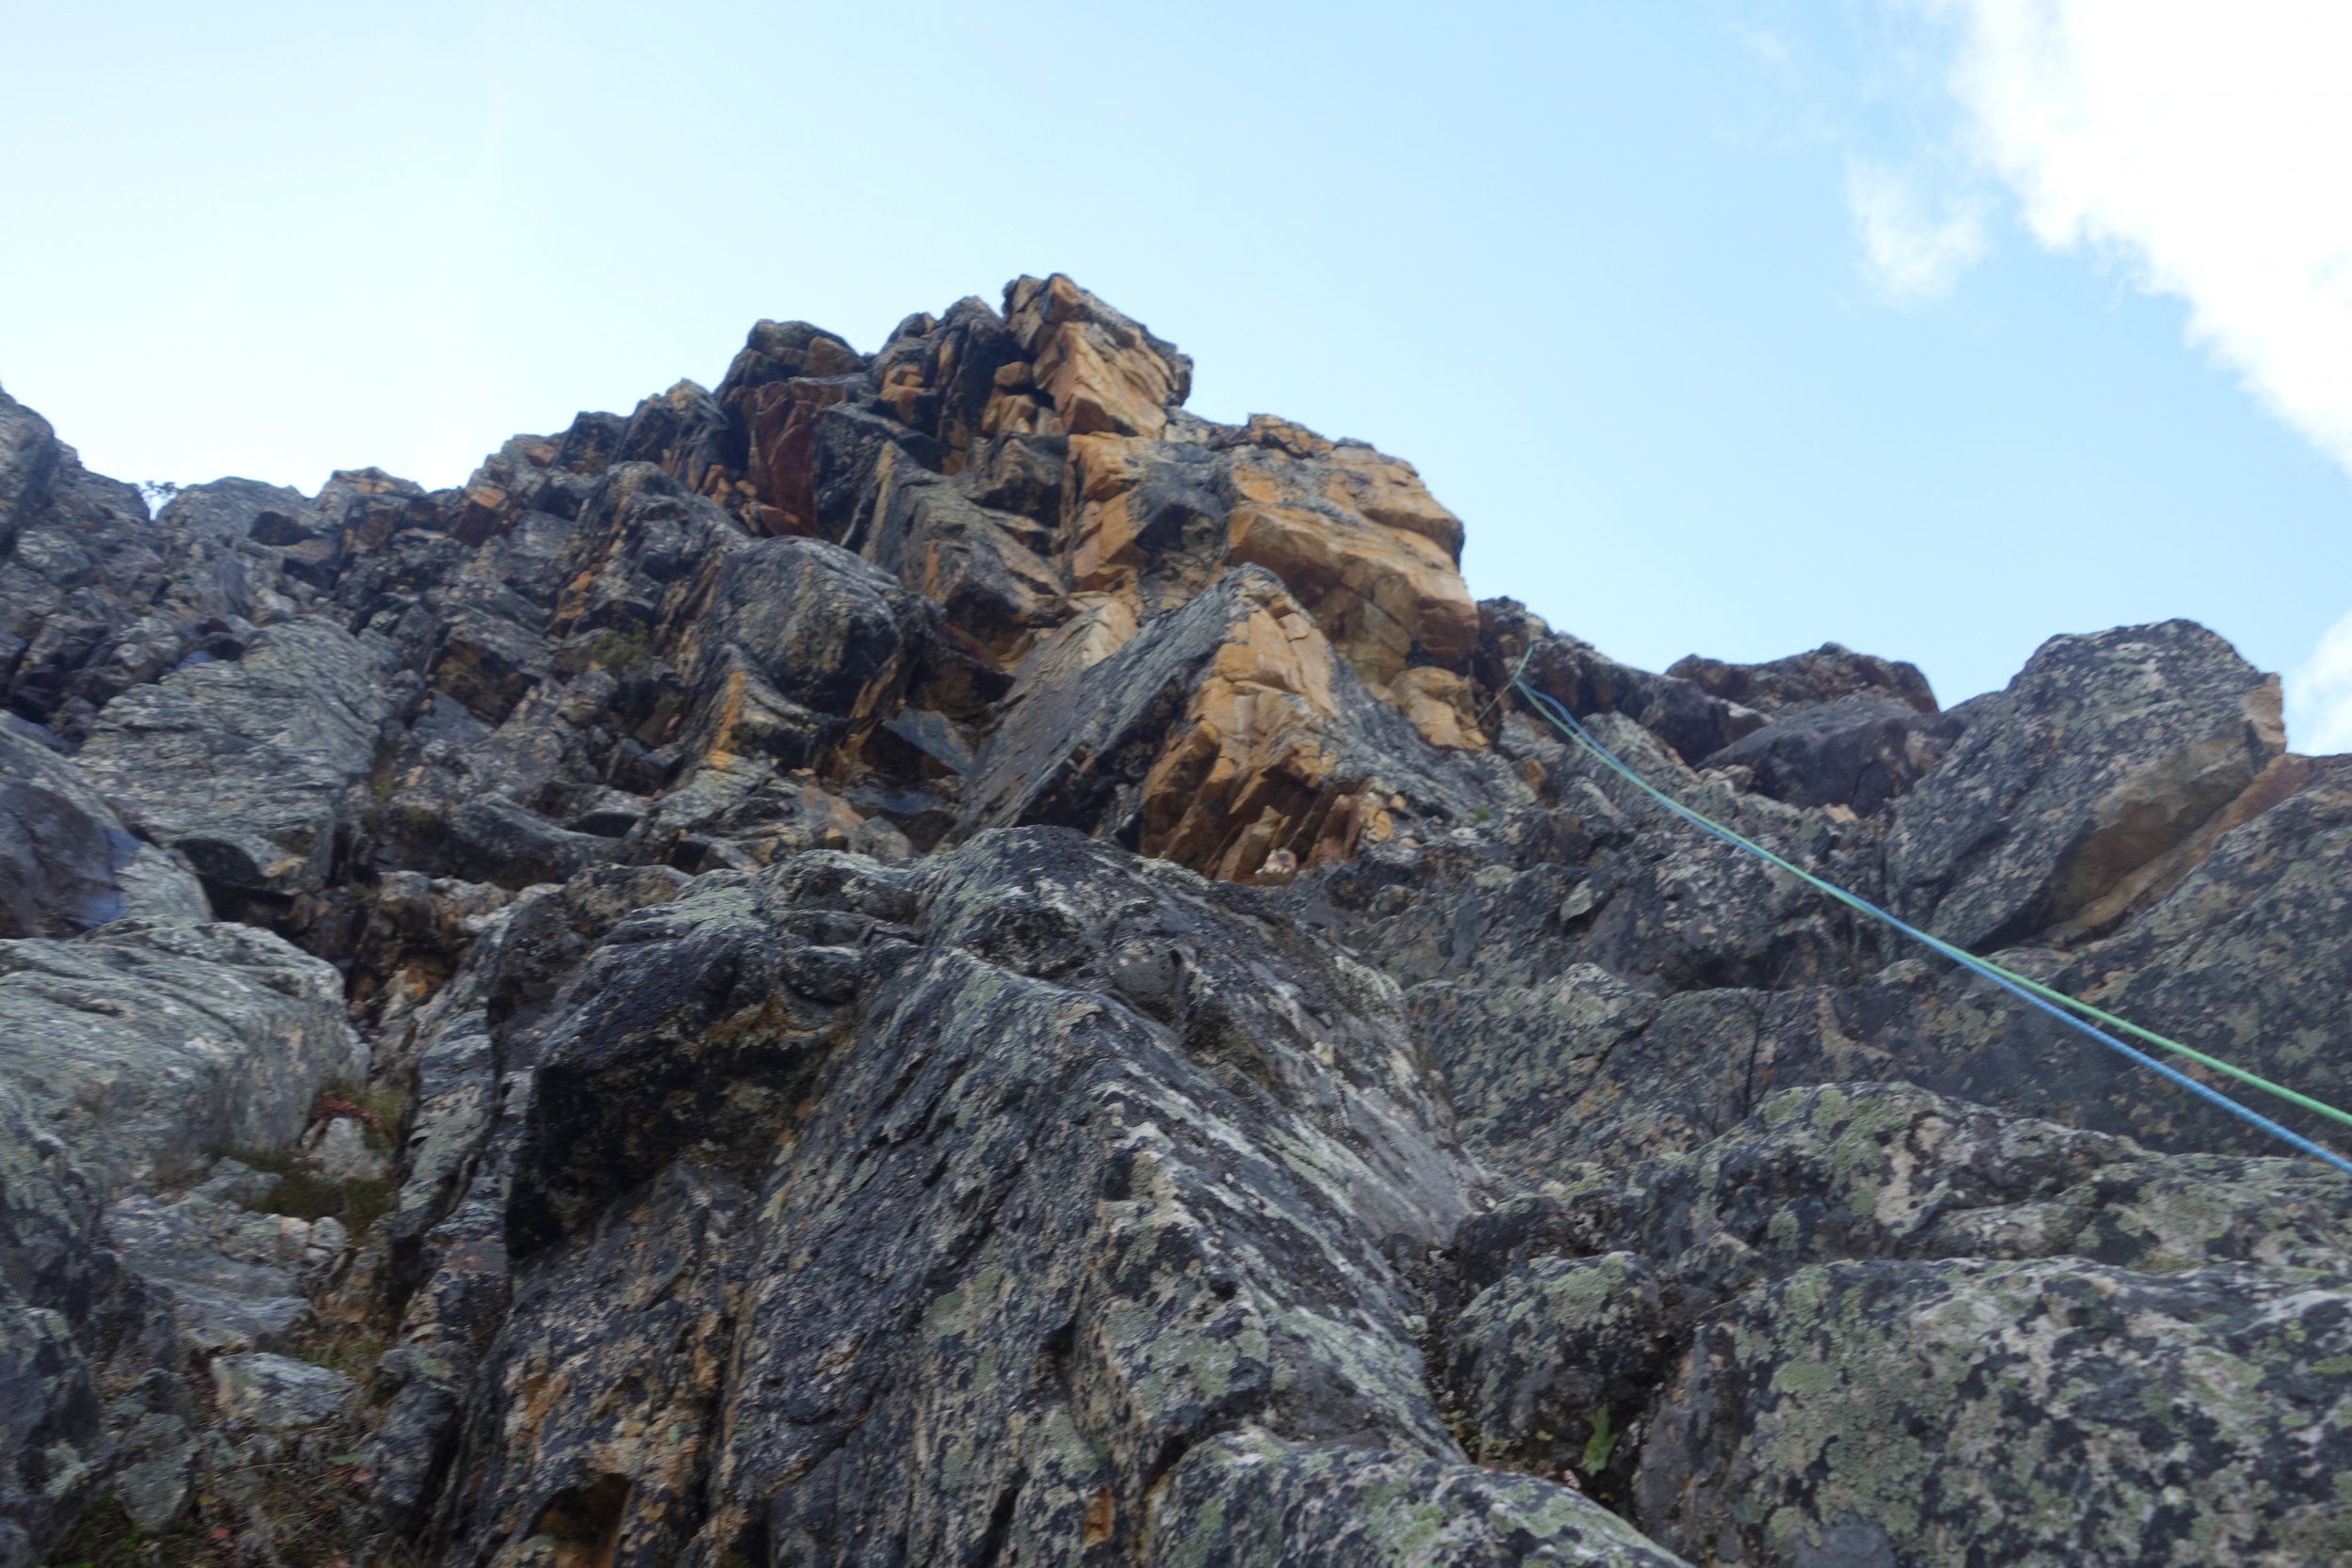
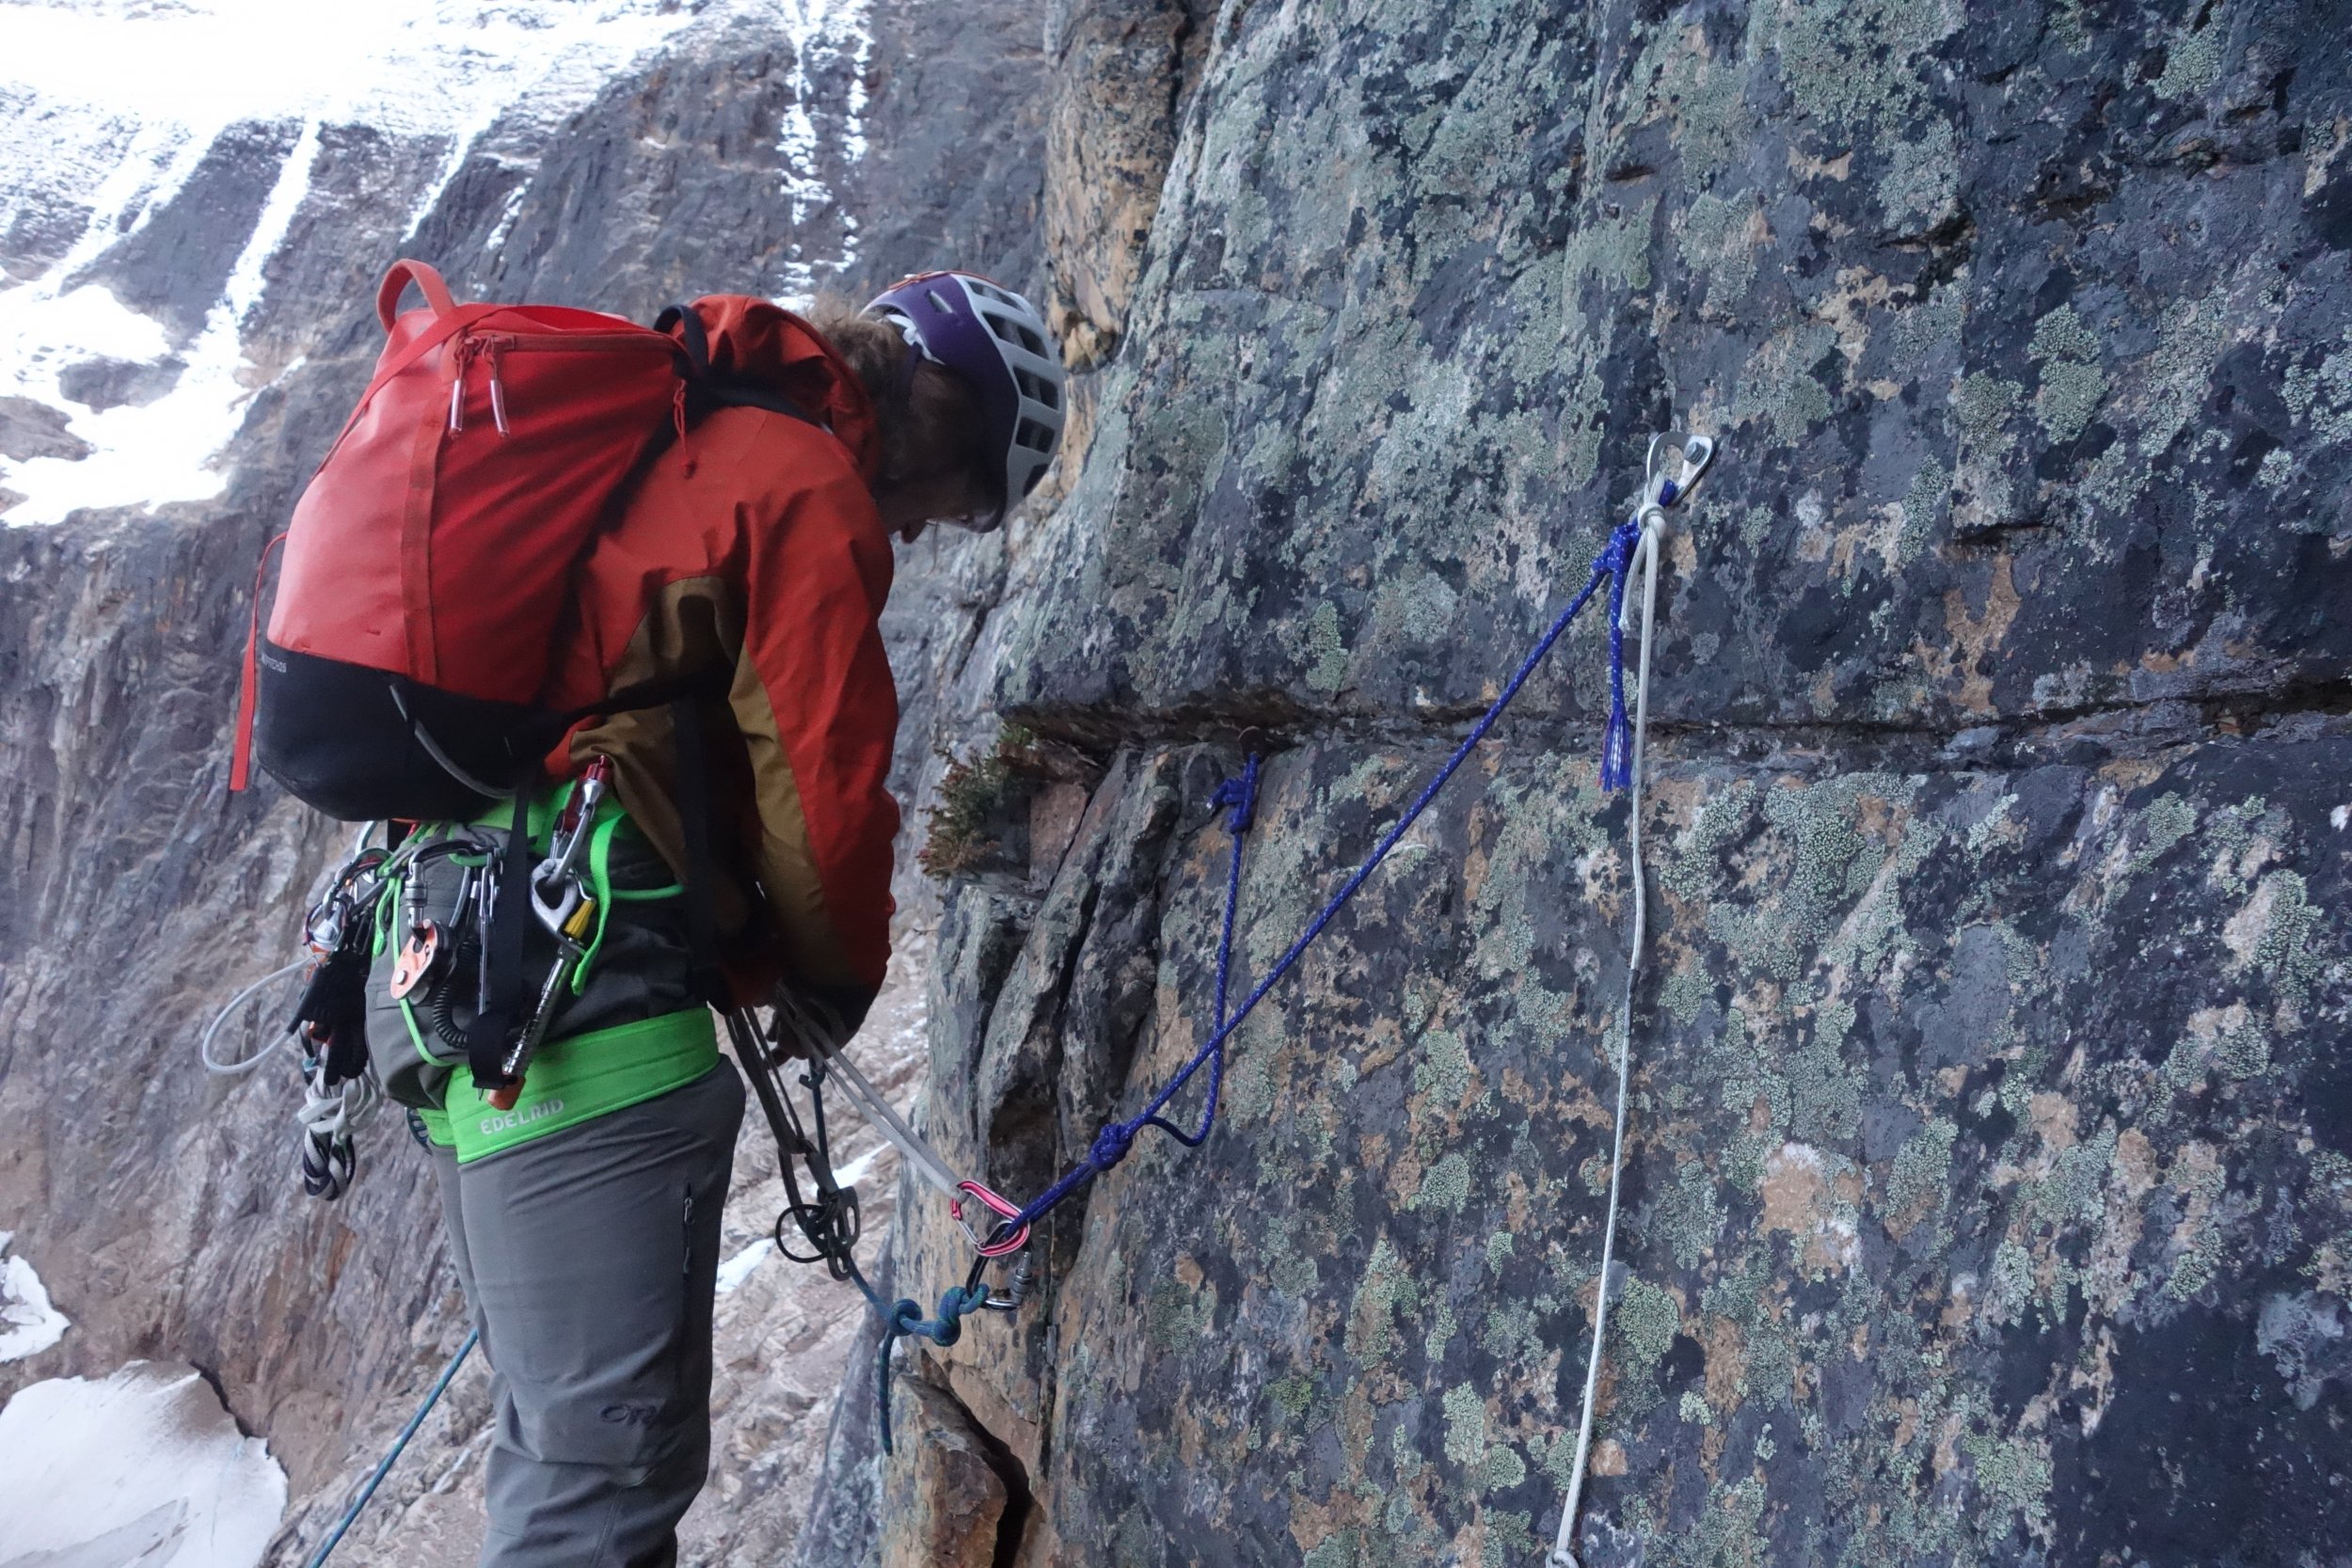
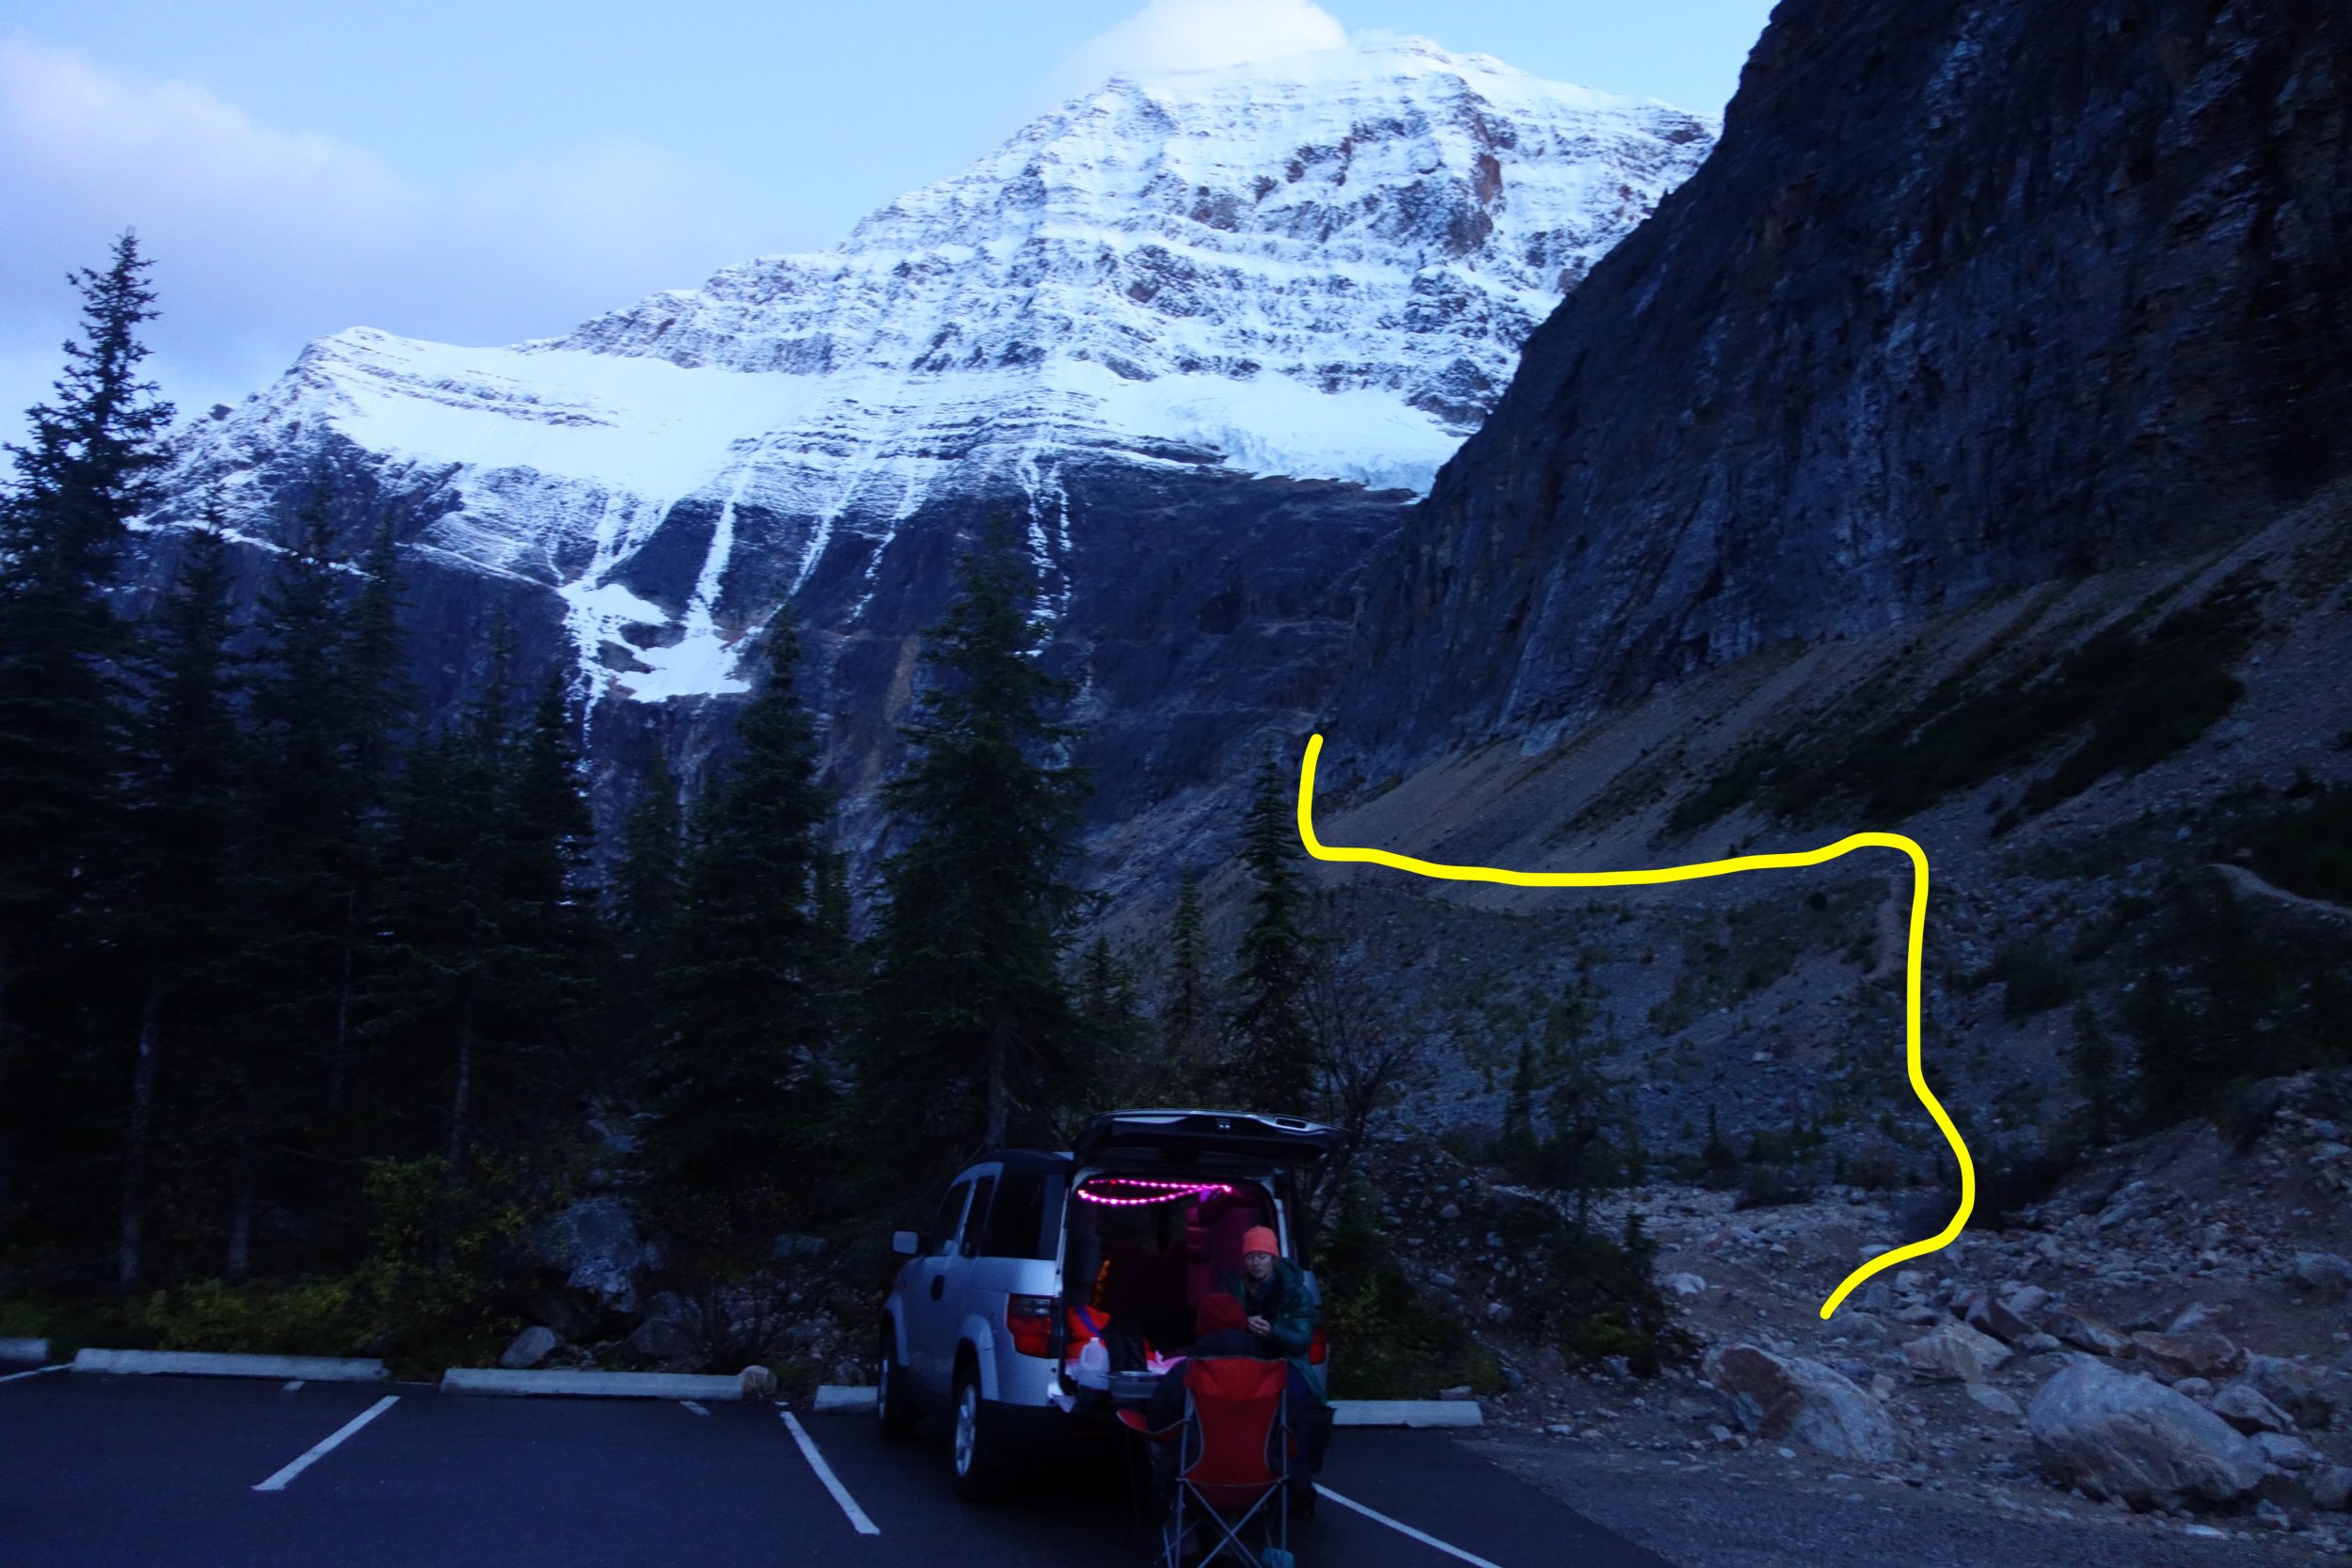
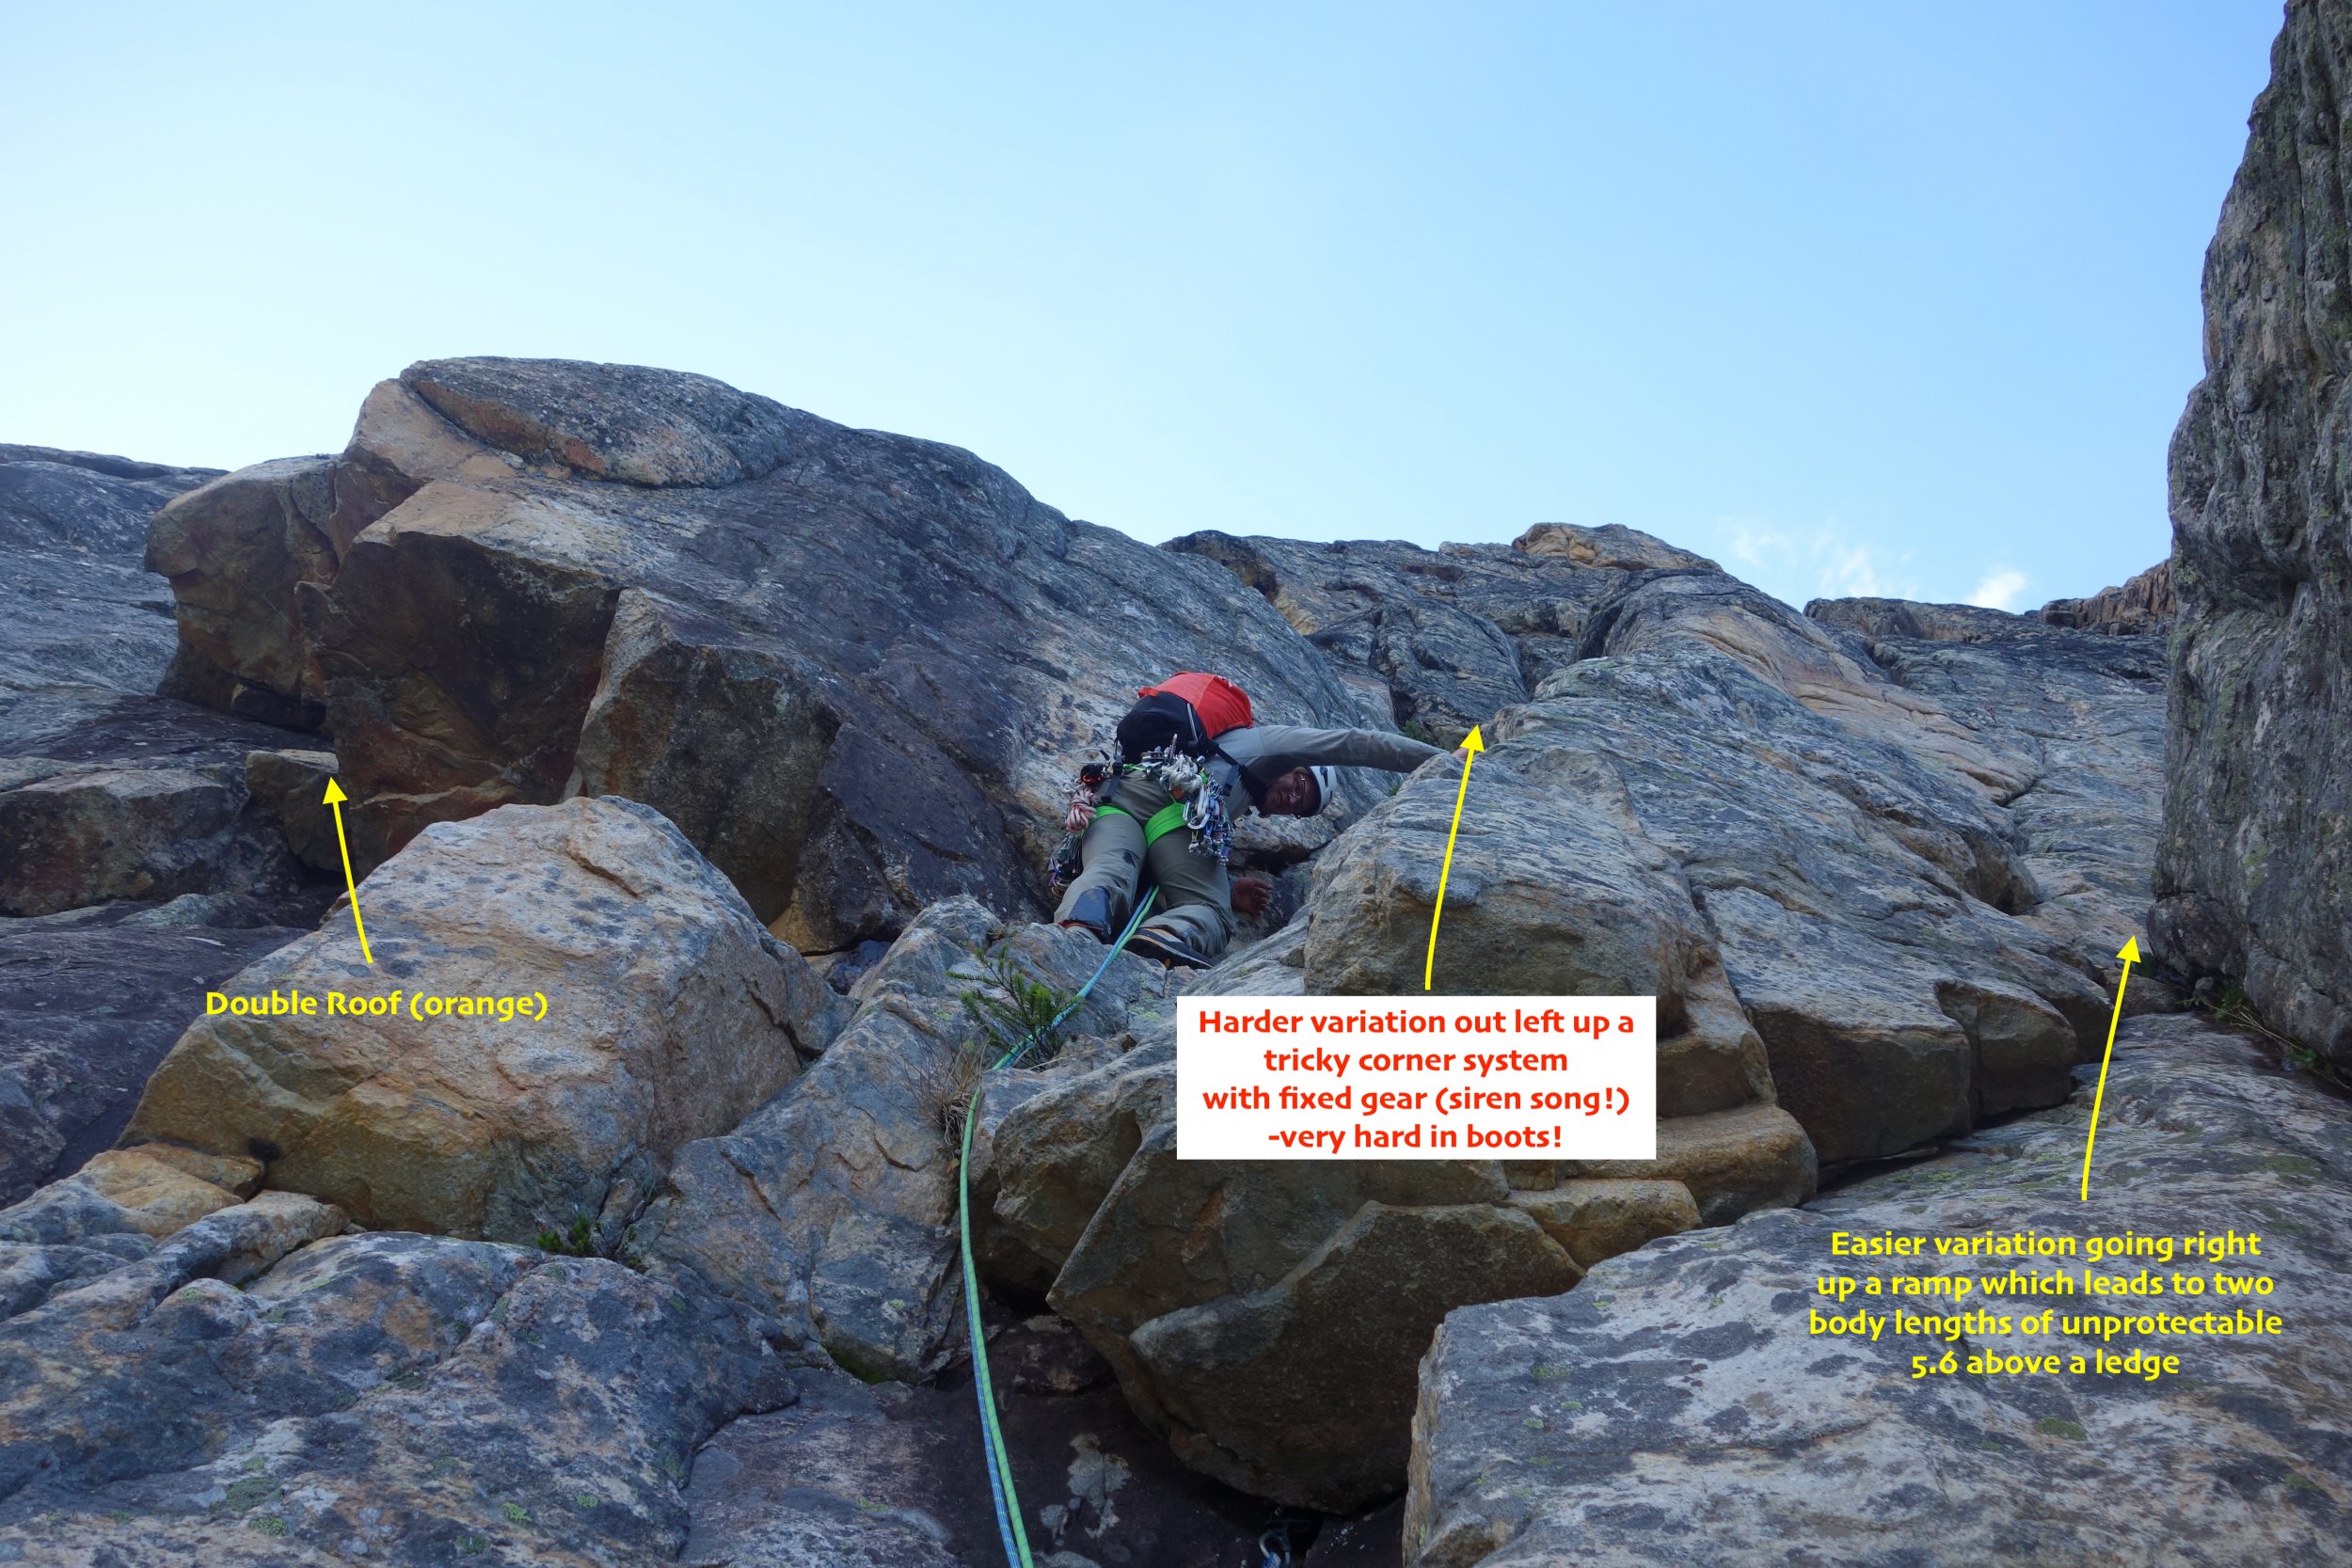
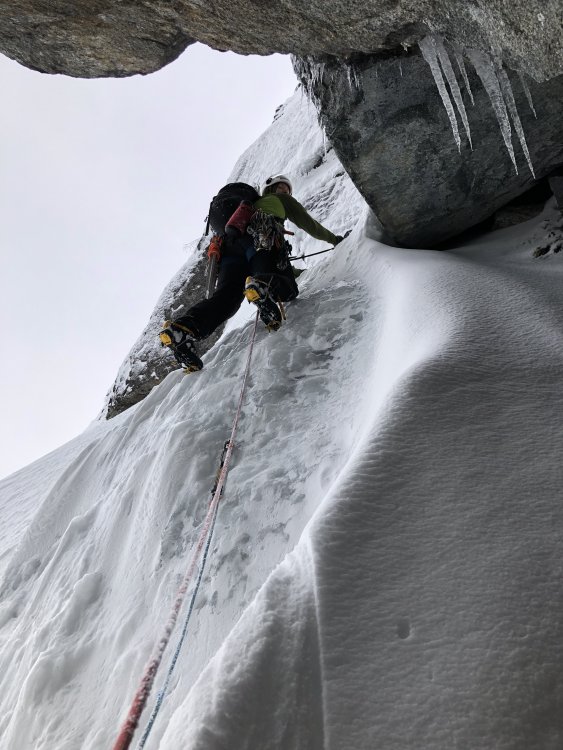
Trip: Mount Edith Cavell - North Face (Chouinard/Beckey/Doody) - Attempt Trip Date: 09/22/2019 Trip Report: Climbers: Jeff and Priti Wright, and Dane! High Point: Bergshrund at the base of the wall, above the Angel Glacier One of North America’s great mountain faces. The original North Face route on Mount Edith Cavell (near Jasper, Canada) takes the central line up the face to the summit. This was a Smash n Grab attempt from Seattle after watching weather and conditions for a month. I think we nailed it on both counts, which alone was a good lesson. We were joined by our friend Dane who has been climbing in the area for a month long trip and whom we met while climbing All Along the Watchtower this August. We got up to the base of the wall above the Angel Glacier bergshrund and were forced to turn around due to a crampon toe bail failure. None of us had brought spare crampon toe bails (lesson!). We're stoked to come back and try it again, now that we have the approach beta dialed. It was still a grand adventure! The typical style (which we followed) is to do the approach in a few hours by daylight to practice the routefinding on the complex 5.6 rock route up to the Angel Glacier to get around the hanging seracs. Then, come back to the car, sleep, and start over again at O-dark thirty to go for a car-to-car push in a day. This avoids bringing bivy gear up the wall. It was humbling and awesome just to get up to the base of the wall, stand on its bergshrund, and look up into the dimly moonlit vertical darkness with packs full of metal and desire. On the attempt in the dark, it took 4.5hrs to get from the car to the bergshrund. We had left two fixed ropes and top rope solo'd to avoid re-leading it. If I came back with a single rope, I would fix the 60m single rope from above the chimney (leave an anchor) to get all the way to the bottom of the 5th class start, then re-lead the final 25m again in the dark. The route is commonly climbed in July and August, which brings two hazards: 1) rock fall, and 2) a band of exposed, loose, unprotectable shale near the summit ridge. By waiting until late August-October, the rock is more stable, and the band of shale is covered in snow and/or ice. The downside is that snow on route makes the climbing mixed, and icy cracks can make it difficult to find protection. By late September, the approach is still dry, 5.6 rock climbing (which we did in boots). The wall, however, was all snow-over-rock, which makes the 5.7 rock on the wall a mixed experience in crampons and ice tools (instead of rock climbing with rock shoes in the summertime) . This TR only describes the approach. The original route took 3rd class terrain to the left of the Angel Glacier ice flow. But hanging seracs now threaten much of the wall, and a new 5.6 approach route goes way right of the ice flow to gain the Angel Glacier. This route is totally safe and stays well away from the hanging seracs. The picture above is our high point along the Angel Glacier to the bergshrund, and the approximate North Face route is a dashed line (which we didn't get to do). We followed the hand-drawn topo on Mountain Project, and it was REALLY useful! https://www.mountainproject.com/photo/107268014 From the parking lot, cross the small stream and immediately gain the lateral moraine (shown above) which eventually leads up to the wall. As you approach, take note of 25m tree rappel (above your head) shown in the topo which is an alternate descent to down climbing the 3rd/4th class approach. Continue traversing on a 3rd class path for quite a ways, step across one stream from a waterfall, and continue until it forces you to start ascending up and right to a large ledge (shown in the topo). This is the same ledge which leads to the optional tree rappel descent (this tree is easy to find and is all the way climber's right along this ledge). The approach is left of a small waterfall and right of the larger waterfall (as shown in topo). Below is a picture of the tree from which you can make a 25m rappel, if descending. From the large ledge, continue up 3rd/4th class terrain (unroped) and look up for two sets of double roofs. The lower set is orange and you belay just below this. The upper is black, and has and a white cord hanging from a pin just to the right of it. This white cord is a crummy anchor, or (more likely) a redirect to the better anchor further right (one pin, one bolt). There are two options for the start, if you take the easier option (right), you won't pass by this white cord at all. Two pitches gain the upper 3rd/4th scramble. Recommend making the 1st pitch a short, 20m pitch and stopping at the bolt anchor to avoid an awkward belay further up in the chimney. The second pitch goes up a chimney (no actual chimney moves, nice feet and hands abound), and is a 60m rope stretcher with a short overhang section. Both pitches are just left of the corner waterfall shown in the picture below. The picture below also shows Priti and Dane on the big ledge (the same ledge where the tree rappel is). We had twin ropes and fixed one long 60m rope from the top of pitch 2, then fixed a short 20m rappel from the bolt anchor. This allowed us to top rope solo the route in the dark the next day with a micro traxion and skip having to re-lead it in the dark. Watch out for snafflehounds in the summer! The picture above is looking up from where you first rope up. Above is the bolt/piton anchor above the first pitch on a good ledge. If you take the right variation on the first pitch, it leads directly (and obviously) to this anchor. The second pitch looks a little different than what the topo describes (beware). Start up a chimney (shown above) for 20m to a scrambling section. Then cross right on easy terrain under large orange roofs (don't keep going up a ramp straight up, shown above). Then a short overhanging move with good feet and hands (5.6) to a large ledge with a 2-pin anchor (may require a few meters of simul-climbing to reach this anchor). You can add in a good black Totem to this anchor to back it up. From this ledge, you can unrope. You are not yet on the large ledge shown in the topo which crosses the waterfall; this is still above you. Continue straight up from the anchor on easy 4th/low-5th until you find the large ledge. Cross back right across the waterfall and continue to a large left-facing corner. Easy ledges take you well up the corner system until you can exit right on easy 3rd class steps. Don't leave the corner too early! Pass through a patch of small trees, then across a grassy patch to look up and see a large, obvious notch (easy to pick out in moonlight). Continue up scree slopes to this notch. Once at the notch, the topo recommends descending 15m, then ascending a gully. We did this, and we do not recommend!!! Loose, hard, and scary. Instead continue up a right-facing corner straight up from the notch; this looks difficult, but there are good feet to stem. Once above the corner, traverse way left to get onto the Angel Glacier. Whew! Water plan: Here you will find an optional bivy site and running water. Allegedly there is also running water at the East Ridge col. You can start from the car with just half a liter of water, fill up a couple liters at the bivy site, then fill again at the East Ridge notch (maybe). The Angel Glacier is heavily crevassed near the seracs (obviously) so you can make a wide sweep to get away from the edge. It gets a little steep when you approach the wall, but not too bad. Some reports mention that it gets tricky to cross the bergshrund in summertime. The East Ridge (recommended) is way shorter and takes you straight back to your car. This is the descent recommended to us by the Smileys. The West Ridge is much longer, with complex routefinding on easy 3rd class terrain, and forces you to walk back up the road to get back to your car. The East Ridge is mostly 3rd/4th but stays mainly on the ridgeline (shouldn't be too hard to find your way in the dark) and has a crux 5.2/5.3 section that some parties rappel. This 5.2/5.3 section is located just above the shoulder, halfway up the ridge. Below is the easy descent from the East Ridge col which takes you along the lateral moraine to a trail and back to the trailhead. Gear Notes: Pickets for the summit snow field, 4 screws (various sizes), rack to #3, nuts, 2 KB's, 2 ice tools each Approach Notes: Read above


 1 point
 -
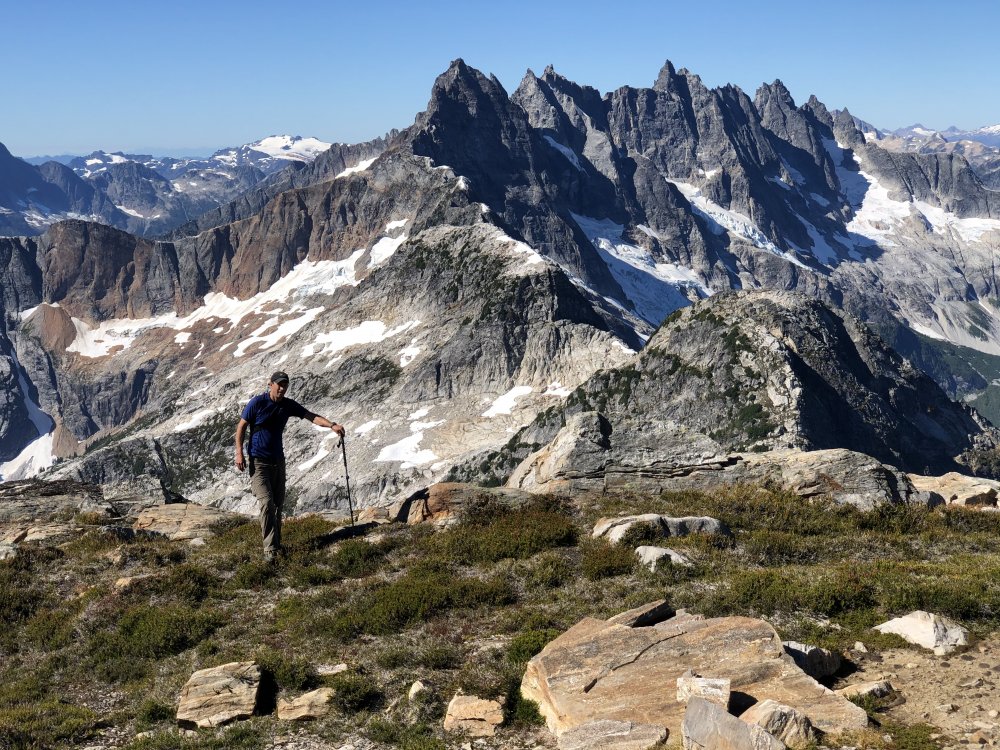
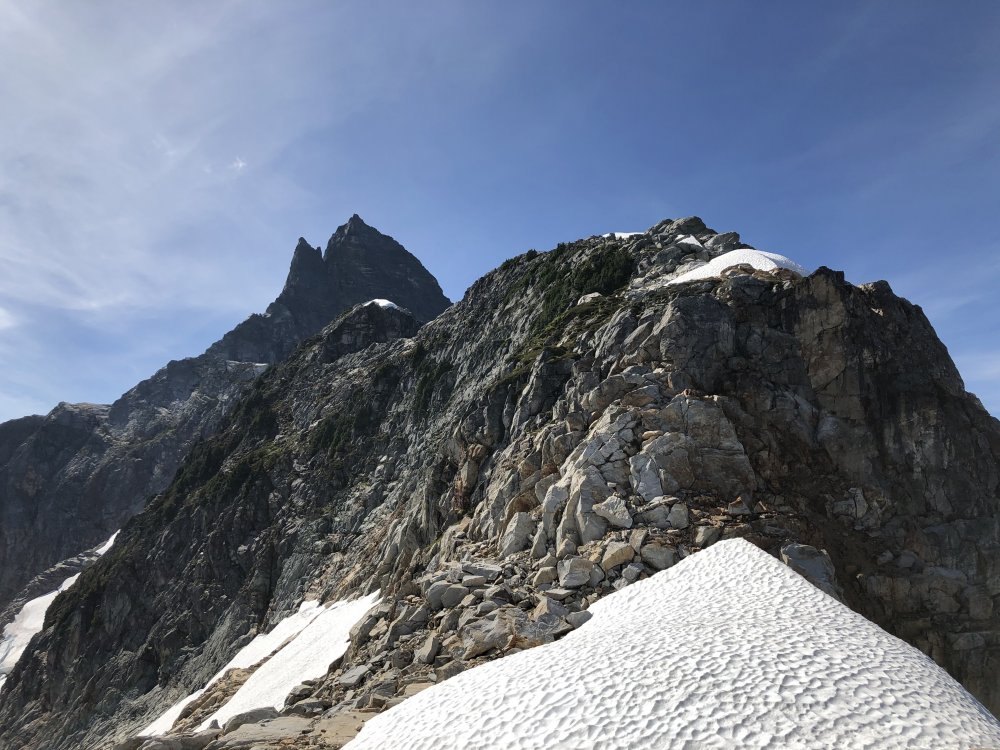
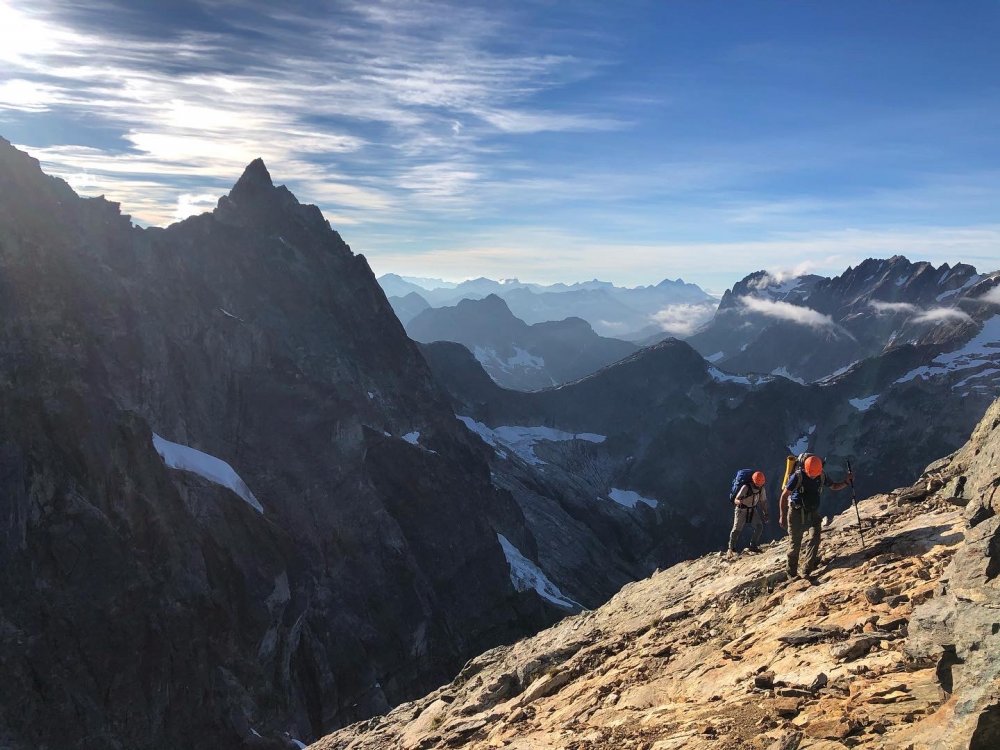
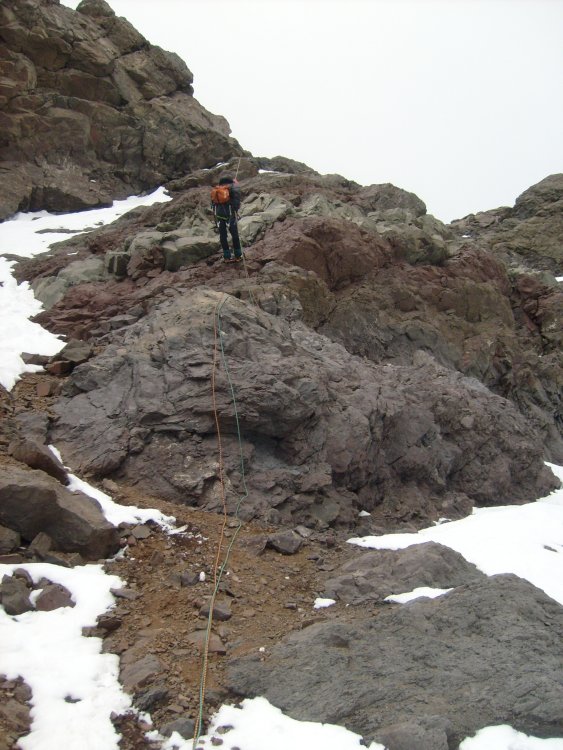
Trip: The Bugaboos - Pigeon Spire - W Ridge / South Howser Tower - Beckey-Chouinard / Bugaboo Spire - NE Ridge Trip Date: 08/02/2019 Trip Report: Aug 2-8, 2019 Our initial plan was to head down to The Bugaboos a week earlier, but according to a weather forecast, a storm was coming, so we decided to wait it out. Luckily, several days later we saw another window of good weather. I’ve heard some people plan a trip months ahead only to sit in a wet tent with snow all around . We used https://www.meteoblue.com/ for the weather forecast. Itinerary: Aug 2: Meet after work. Drive as far as we could. Spend a night at a campground along the way. Aug 3: Drive the rest of the way. Hike to the Applebee campground and setup tents. Aug 4: Leisure morning. Climb Pigeon Spire W ridge. Aug 5: Alpine start. Climb South Howser Tower. Aug 6: Rest day. Aug 7: Alpine start. Climb NE ridge of Bugaboo Spire. Aug 8: Hike down and drive home. We did not bring chicken wire. There will be plenty. I’m not sure if it helps – I saw porcupines walking behind it, or make sure it's solid and there are no holes between the wire and ground. TH to the Applebee campground – 2.5h. The campground has tap water and plenty of toilet paper. The place is swarming with rodents. Don’t leave any food in a tent or a backpack – there are metal boxes and hangers for it. Pigeon Spire - W Ridge The route is longer than I anticipated. I’d call it three-summit traverse (the last is the true). We simul-climbed on the way up. On the way down, we did two rappels from the summit and down-climbed the rest unroped. I was wearing mountaineering boots. Timeline: 9:25 – Start 10:25 – Top of Snowpatch col 11:20 – Base of the climb About 13:15 - Summit 14:30 – Back to the base Pigeon Spire on the right as seen from the summit of South Howser Tower: South Howser Tower – Beck-Chouinard route I did wear boots until Pigeon col, then switched to approach shoes. For the rest of the approach we had one pair of crampons and an ice axe for both of us. There was stream water after descending the col. We were lucky to have only three parties total on the mountain and we left the first at the base. We simul-climbed until the forth (5.10-) pitch. First few pitches after the bivy site seemed shorter, and watch for loose rock. For rappels, we used 60m and followed instructions from Steph Abegg supplemented by @JeffreyW’s comments. Here are my additional comments: #3 - stay on the ridge, at the end where will be a step down with a small ledge. When standing on the ledge bolt anchor is about climbers 1pm o’clock. Silly I were standing on the ledge, did not see bolts, swung left, and had to ascent a rope after. #6 – after finishing #5 use nearby bolts. Rappel (walk) left (climbers) along the ledge, i.e. what Jeff describes as “rappel parallel to the handline down the scrambley ledge”, until find next bolts: #last – the first person got lowered and extended rappel with a cordelette just in case. Timeline: 3:40? – Start 7:10 – Base of the climb 11:15 – Big ledge 18:10 – Short rappel 19:40 – Summit Shortly after pitch-dark – Finished rappels 1:20 – Back to the campground Not as big, huh: Standing on the summit: North and South Hoswer towers: Bugaboo Spire – NE Ridge Scrambling up Bugaboo-Crescent col was fine, but there was one insecure move, that made my back chill. I tried to link first two pitches with 60m, but end up short 3-5m. Make sure to well extend the third pitch, because of its nature. Left variations and 5.10 to gain South summit were great. Scrambling down Kain route was endless. There are multiple paths, generally marked with cairns, do not drop down too fast and keep traversing skiers right. I can see why parties descending in the dark often get in trouble on this route. Timeline: 5:00? – Start 5:50 – Base of Bugaboo-Crescent col 6:20 – Top of Bugaboo-Crescent col 7:00 – Base of the climb 11:00 – North summit 12:30 – South summit 15:40 – Top of Snowpatch col 17:00 – Back to the campground Traverse from N to S summit (looking forward): Traverse from N to S summit (looking backwards): Bonus 1. On the way home, we stopped by Kinsmen Beach at Windermere Lake to wash off all sweat and dust. It was delightful. 2. Below is my food plan. All food was portioned into zip-lock bags. What worked well: none left with no starving. Instant potatoes with tuna was the best meal. Egg noodles and cheese was the worst. Fri Dinner Grocery/Restaurant take out Sat Breakfast Buy a sandwich Lunch Buy a sandwich/etc Dinner Couscous 363 cal Turkey Jerky 105 cal Pita bread 140 cal Chocolate 150 cal Sun Breakfast Instant oat + powdered milk 300 cal + dried blueberries (oatmeal) Granola bar 130 cal Lunch Gummy bears 180 cal Pita bread 140 cal Trail mix 250 cal Snickers 250 cal Tailwind 400 cal Dinner Instant potatoes 392 cal Tuna 160 cal Pita bread 140 cal Garlic oil Mon Breakfast Oatmeal 300 cal Granola bar 130 cal Lunch Couscous 320 cal Salami 200 cal Pita bread 140 cal Trail mix 250 cal Dinner Egg Noodles 381 cal Cheese 170 cal Chocolate 150 cal Tue Breakfast Oatmeal 130 cal Granola bar 300 cal Lunch Gummy bears 180 cal Pita bread 140 cal Trail mix 250 cal Snickers 250 cal Dinner Mountain house? Wed Breakfast Oatmeal/Bars/leftovers 300 cal Granola bar 130 cal Lunch Stash some food at the car Gear Notes: A tent, two 8 oz fuels (we ended up using only one), jetboil, water filter. 8 singles, 6 doubles, 2x cordelette, BD cams .1-.3, doubles in .4-4”, 60m rope, grigri, set of BD nuts. Approach Notes: Some comments in TR1 point
-
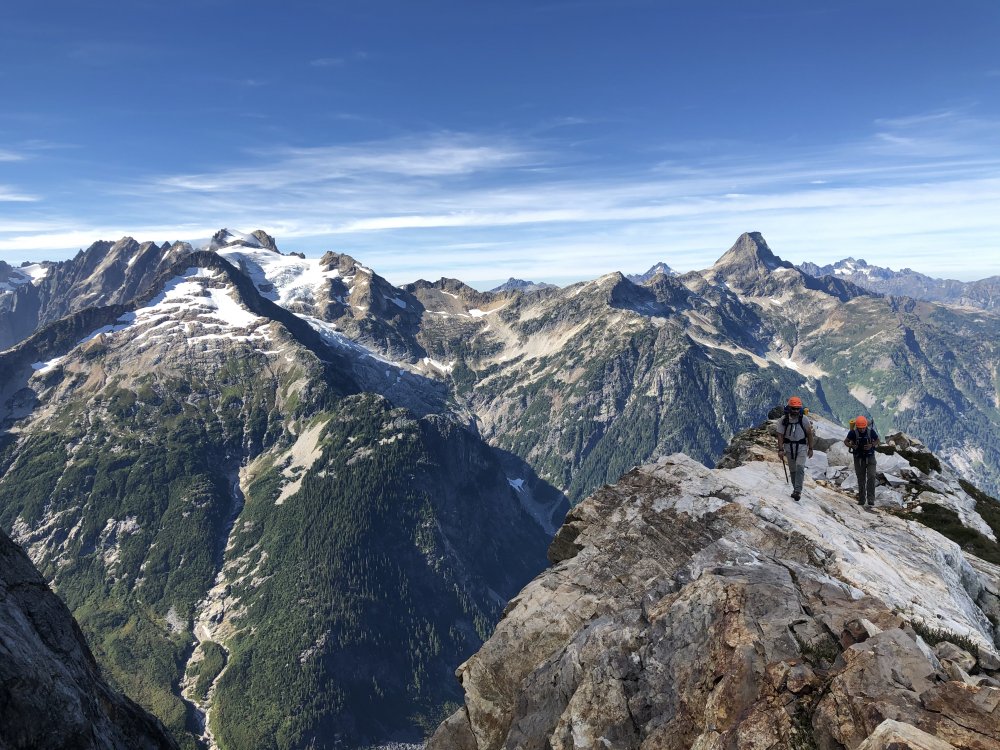
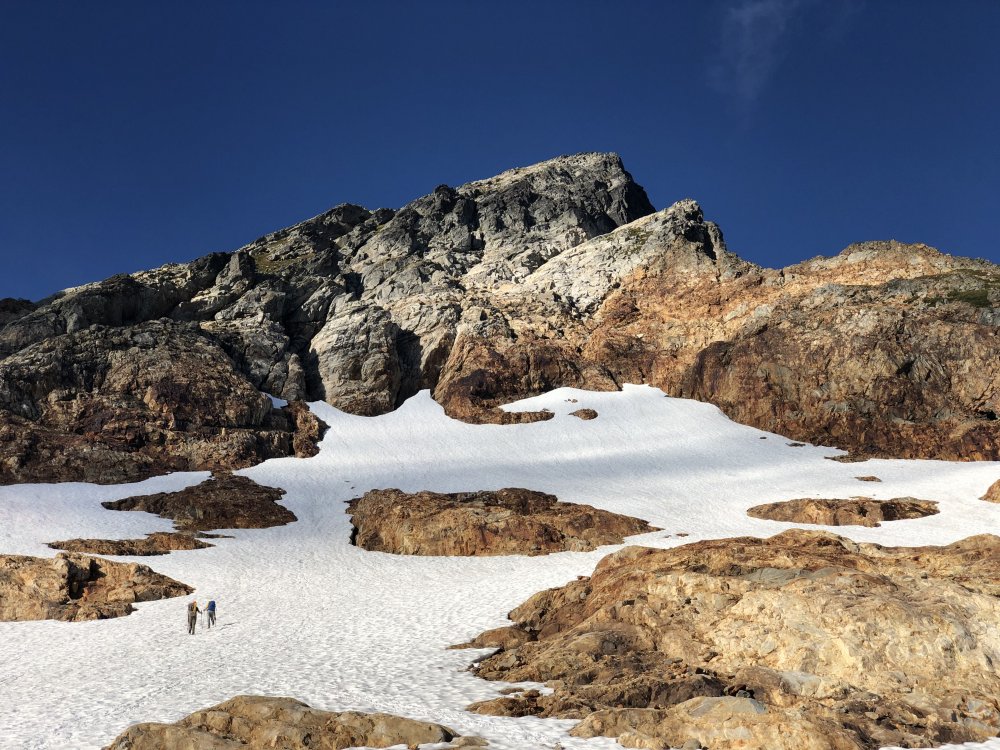
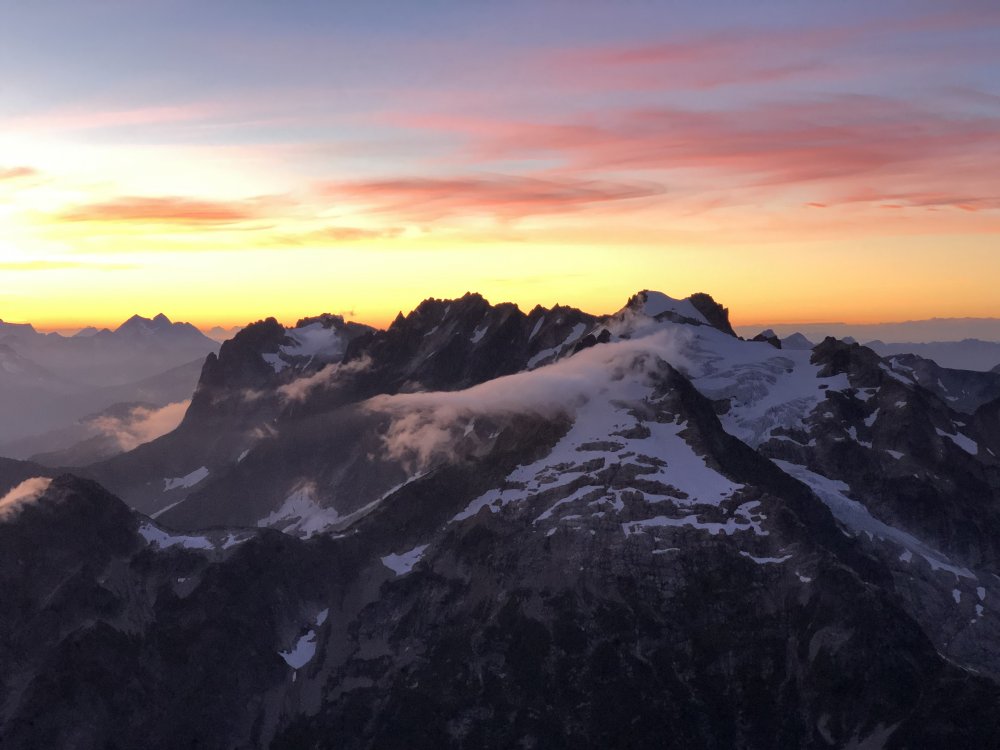
Trip: West Mcmillan Spire/Elephant Butte - West ridges via Stetattle Ridge Trip Date: 09/06/2020 Trip Report: Two weeks ago I had the pleasure of getting back into the Southern Pickets with @JasonG and @Trent. We took the eastern high route/approach via Stetattle Ridge. I outlined the route in the approach notes, this will be more for a general itinerary/thoughts/photo dump. Hiking along Stetattle was extremely panoramic and quite pleasant. We setup camp the first night just north of North Stetattle (pt. 6728). There were abundant tarns for water and flat spots to setup at. Not long after unpacking the guys pulled out the whisky and chocolate, a ritual I'm not familiar with having spent most of my time trying to be as ultralight as possible. We shot the shit for hours and listened to tunes on Steve's little speakers. I'm sure now that theres a little room in my pack for some whiskey. I slept really well until the (full?) moon was dead center over the sky and woke me up with its brightness. We got up decently early for the big day of tagging Elephant Butte and and a plan of making it to the summit of West Mac for the nights bivy. We were a bit above an awesome sea of clouds down in the valley. The drop down to the notch above Torrent creek is fairly straight forward and to get up out of it toward the benches at 6200' above the small lake east of Elephant Butte is just a bit more involved, but not too bad. We dropped packs at the notch at the base of the west ridge of Elephant Butte. Was a quick romp to the summit and we were surprised how many entries in the register there were as of late. We toyed with the idea of staying on the ridge crest and tagging the next two high points west of the Butte (Hippo, Rhino). But some hairy climbing/scrambling, lack of inspiration to tag them, and a concern for having enough time to deal with the ridge to get into Terror basin pushed that idea to the side. I'm glad we spent the effort on the more important task of getting into Terror Basin safely and efficiently. We stayed more or less at 6200' from Elephant Butte until we got to the notch just west of pt 6455. From there it was staying very close to the ridge crest. At this point, the route gets very exposed, serious and committing. Scrambling on 4th class rock, heather benches, veggie pulling. It was not too far removed from what you'd experience on the NEB of Jburg. It finally eases off just before Little Mac. A small sandy notch allows entry into Terror Basin. From there we traversed down across snow to get to the base of West Mac, we were able to go up a dry mossy waterfall on the rib extending down from West Mac which cut out quite a bit of travel. We scrambled up the west ridge and made our way up to the summit. Theres now currently three one-person bivy spots up there now. We made dinner, drank whiskey and waited for the sunset. It was an awesome sunset, highlight of the trip for sure. But after every calm, comes a storm. We settled in for the night in really pleasant weather. At some point the winds picked up dramatically and Steve and I got sand blasted all night. Meanwhile Jason was locked in mortal combat with the snaffles. He said they were trying to take his headlamp off his head. They had told me the night prior that the snaffles really like him. I think the wind that Steve and I were experiencing were keeping the snaffles at bay, leaving Jason as easy prey. Didn't sleep a much that night as you'd guess. Got up and made breakfast and a big pot of coffee in a spot on the summit mostly out of the wind. The sunrise was fantastic and made up for the night we had. Packed up and made out way down West Mac and out Terror basin without issue. This was an incredible trip and thanks to Jason for inviting me on this, I cant say I would've thought to do this kind of trip myself. It was the kind of trip I have been meaning to have for some time now though. And big thanks to Jason and Steve for being SOLID partners. It was really cool being around two guys that have been climbing with each other for as long as you both have. I won't be caught without whiskey on the next Choss Dawgs trip. Myself as we make our way up Sourdough Creek. Jason Photo. Jason and Steve looking at the next two days. North Stetattle. Sunset, Elephant Butte and The Southern Pickets Sunrise, Snowfield group and Davis Peak Sea of Fog. Jason up on Elephant Butte About to make our way into the business end of the traverse. Steve Photo. Steve with the veggie belays. End of the hairy stuff. Jason photo. Into Terror Basin. Headed up West Mac. Up on West Mac preparing for battle with snaffles and wind. Steve photo. Dinner time. Jason photo. Sunset on Mt. Fury Morning light on Inspiration, The Pyramid, Degenhardt and Terror. Kulshan in the distance. Ray of light on Azure Lake. Hopefully Jason and Steve will drop off more of their photos! Gear Notes: Ice Axe, Crampons, Whiskey, Chocolate, Van Halen Approach Notes: Start at Sourdough Lookout Trail, go up along Sourdough creek, Stay on the crest of Stetattle Ridge. From pt. 6154 follow game trails down ramps and ledges to the notch above Torrent Creek. Ascend more ramps and ledges with a bit of steep schwacking up to ~6200'. Traverse westward around that elevation, Elephant Butte is a quick jaunt from the notch west of it. Gain the ridge proper from a notch just west of pt. 6455 (just east of the Mcmillan Spires). This is where the scrambling gets extremely exposed. Traverse mostly solid rock and heather benches toward East Mcmillan, occasional goat trails and veggie belays. Aim for a small notch to the left of where the ridge meets Little Mac.


 1 point
 -
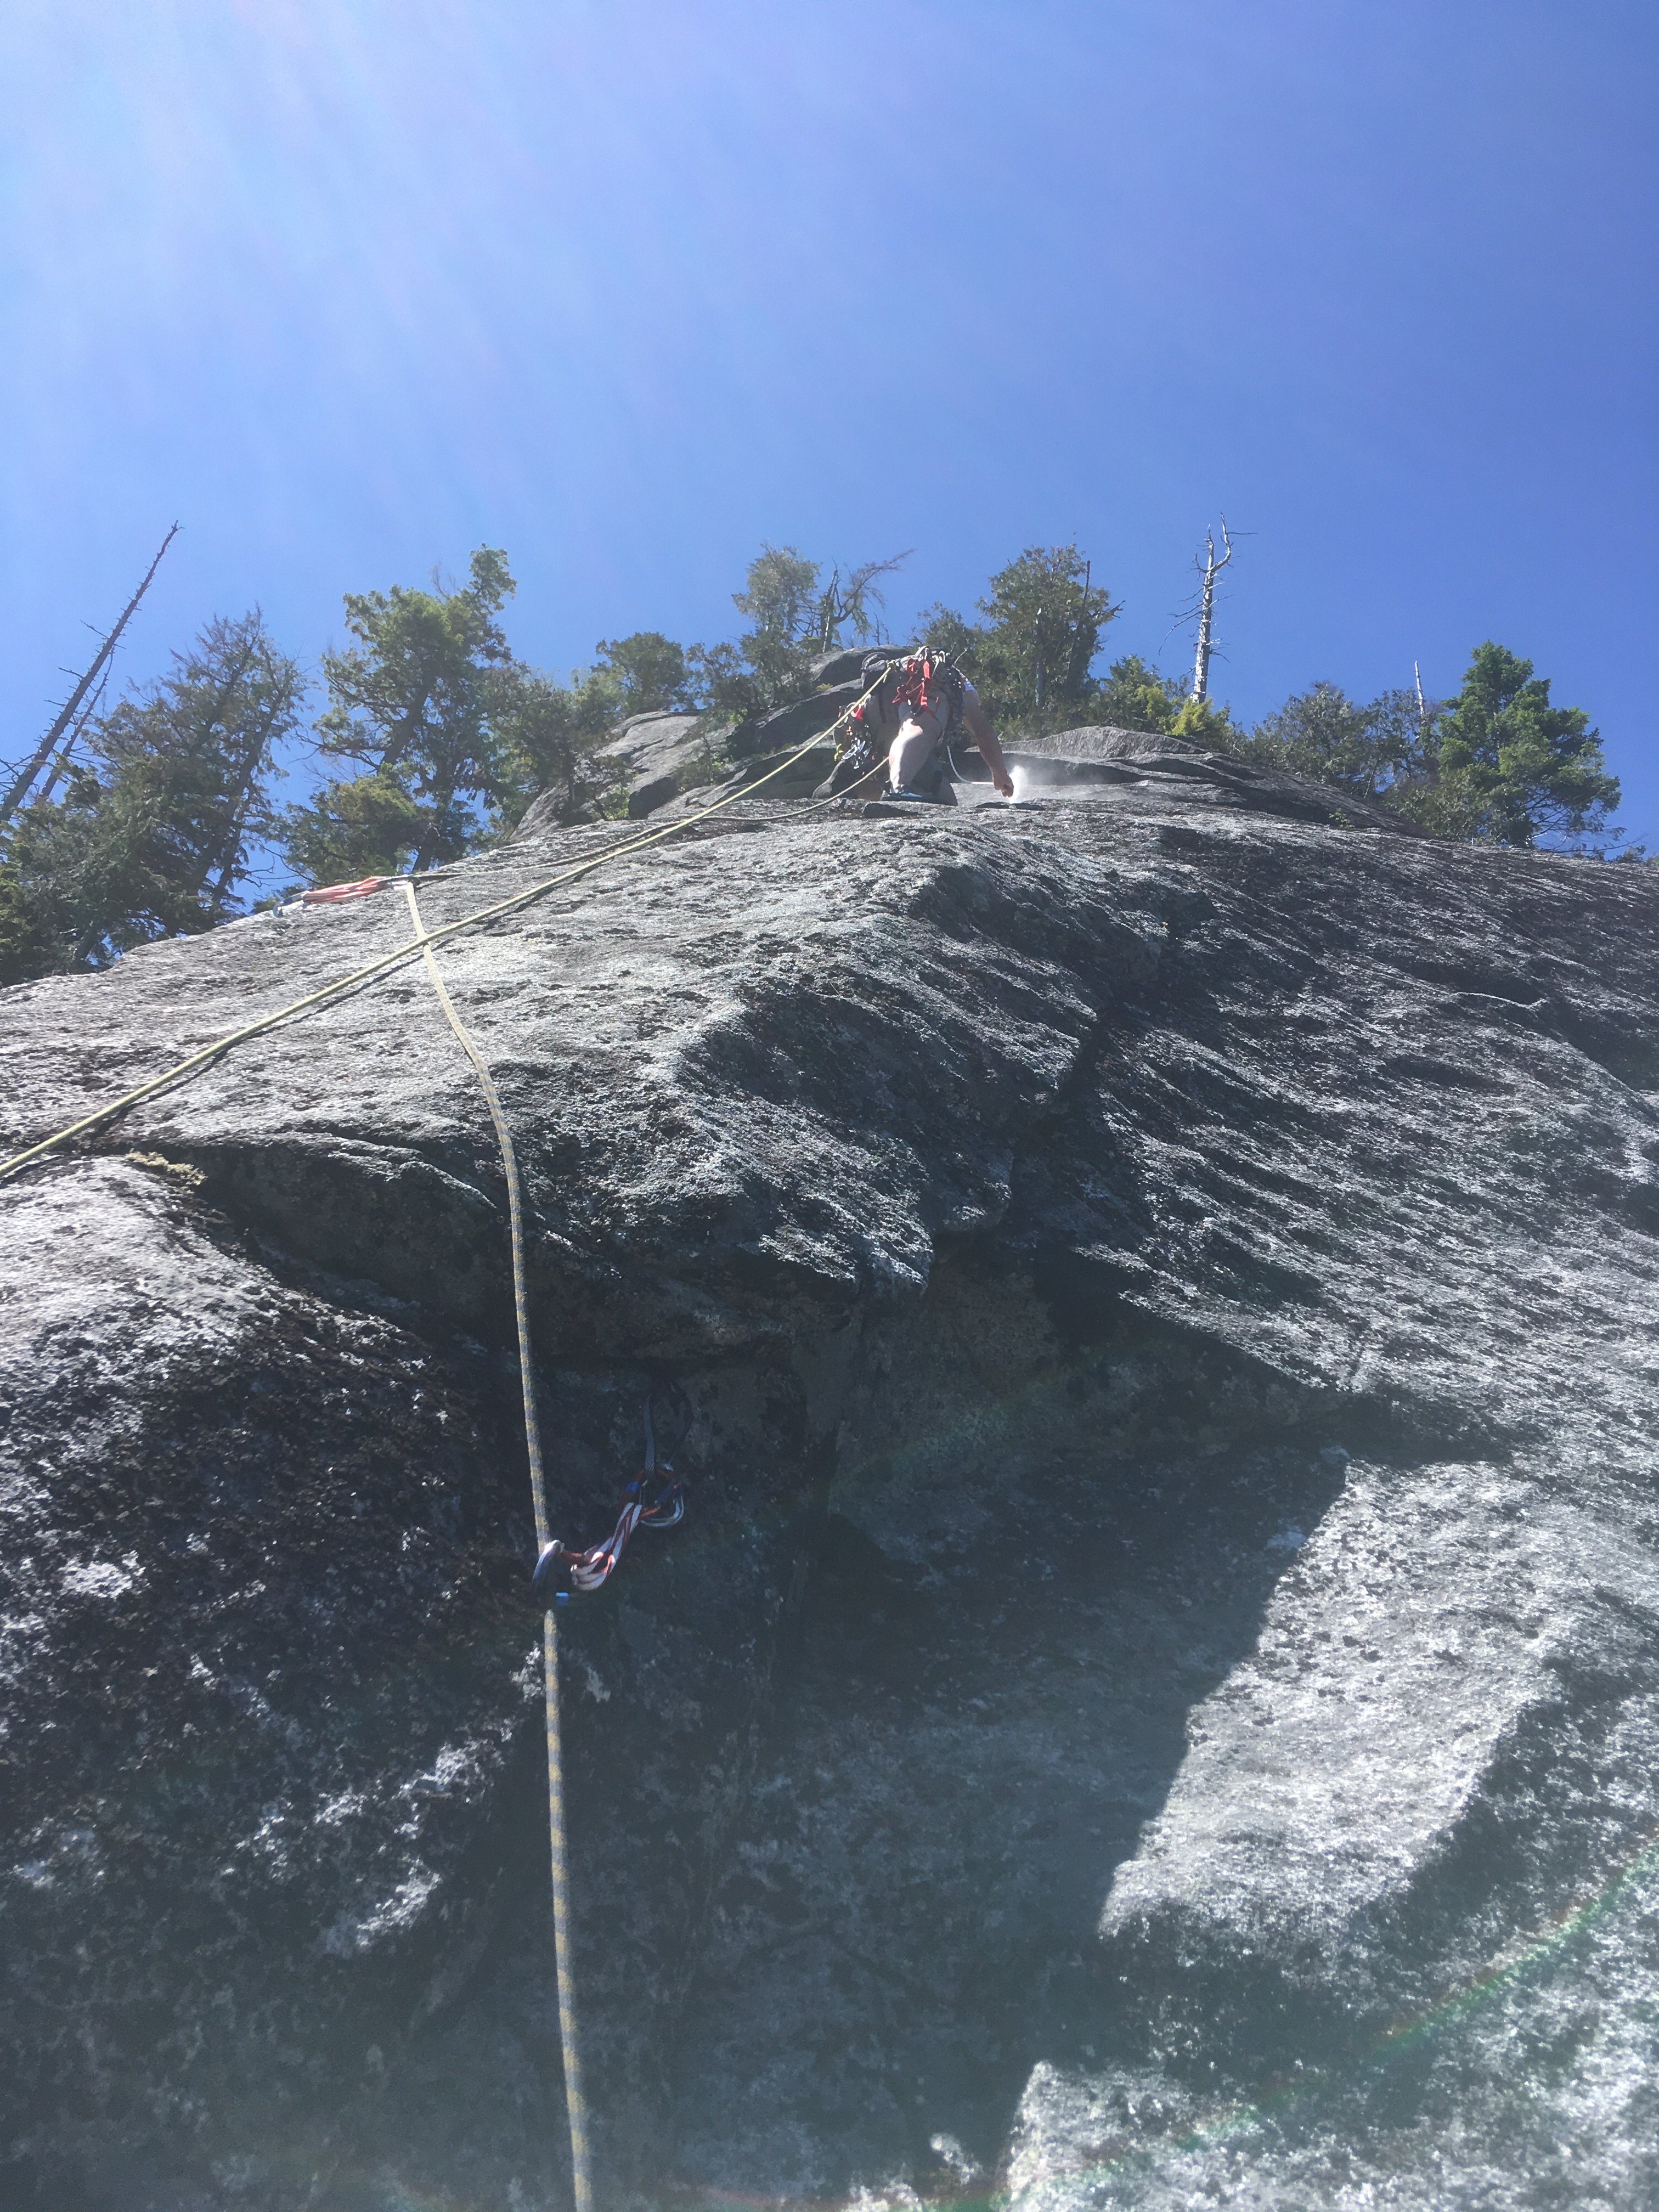
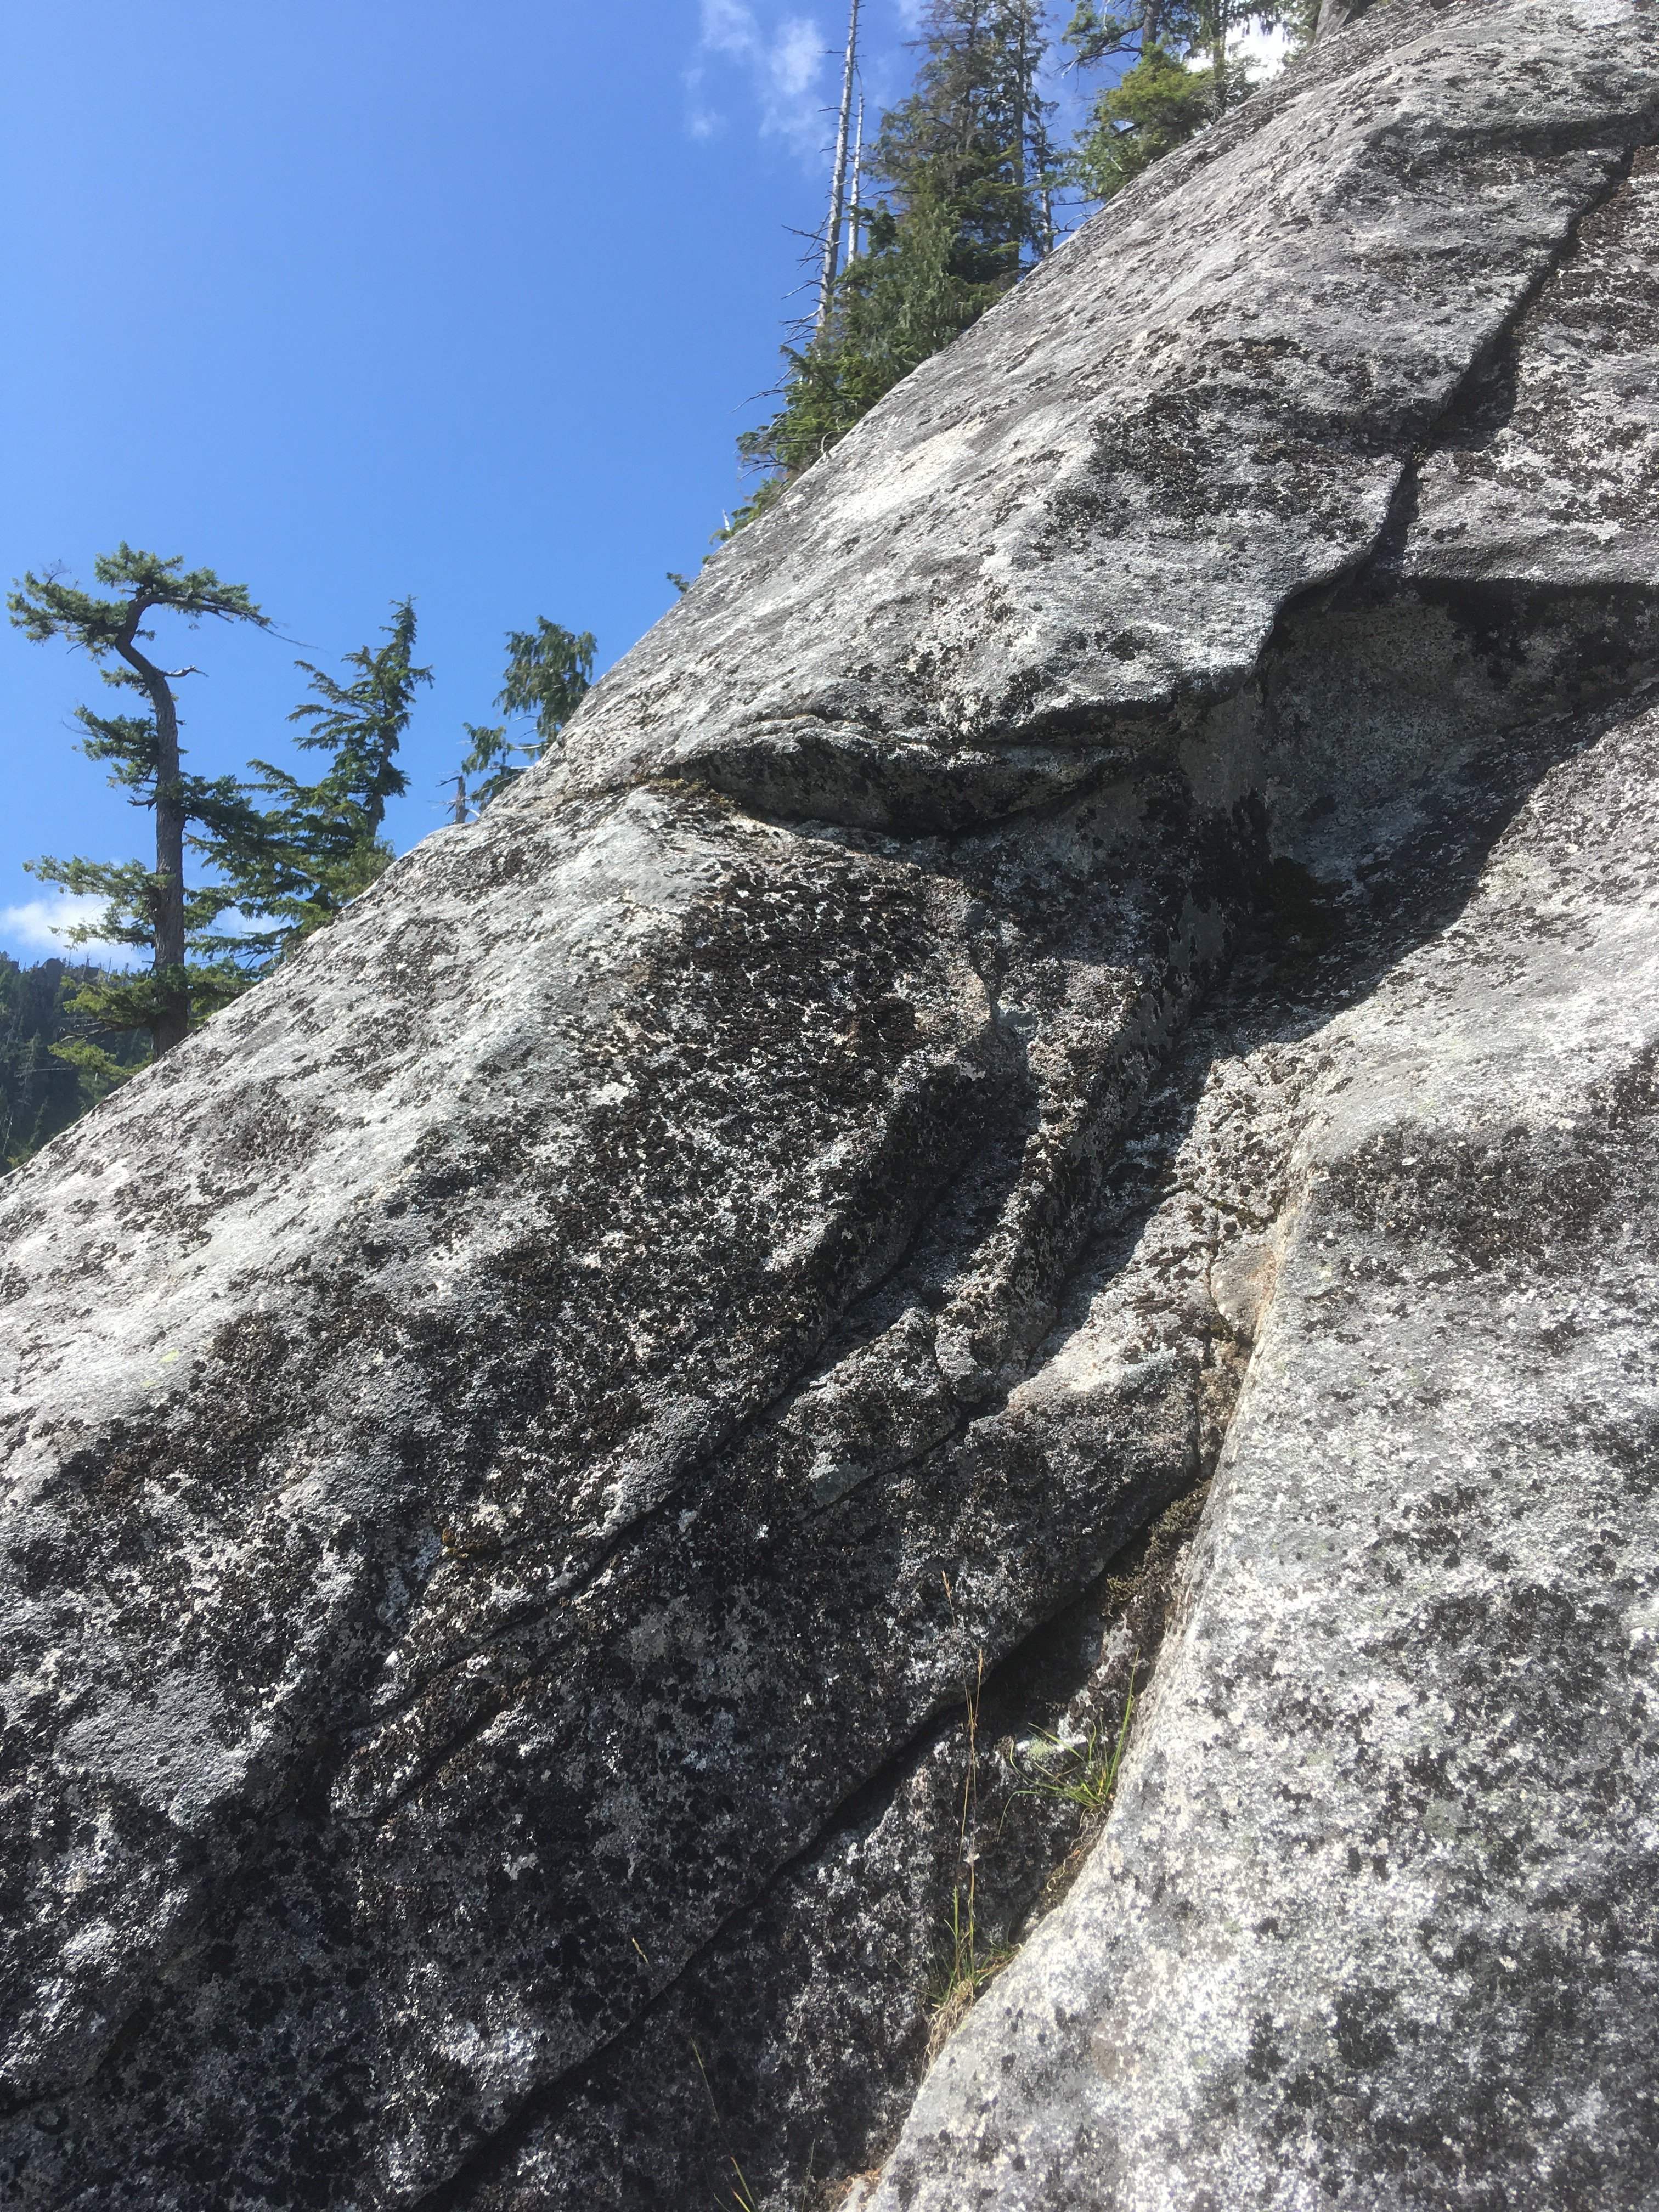
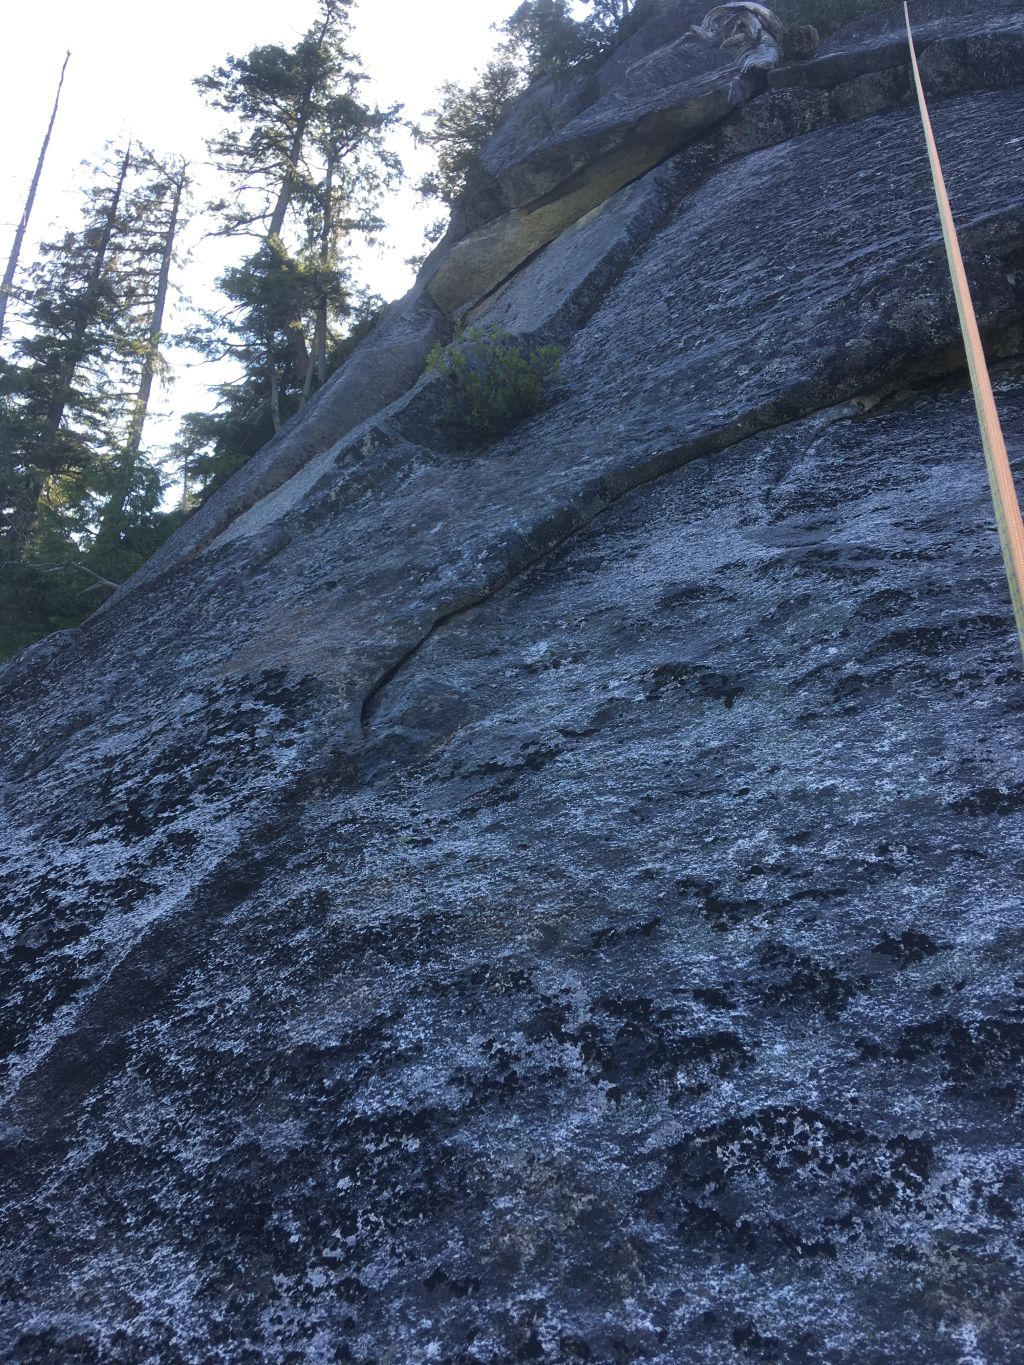
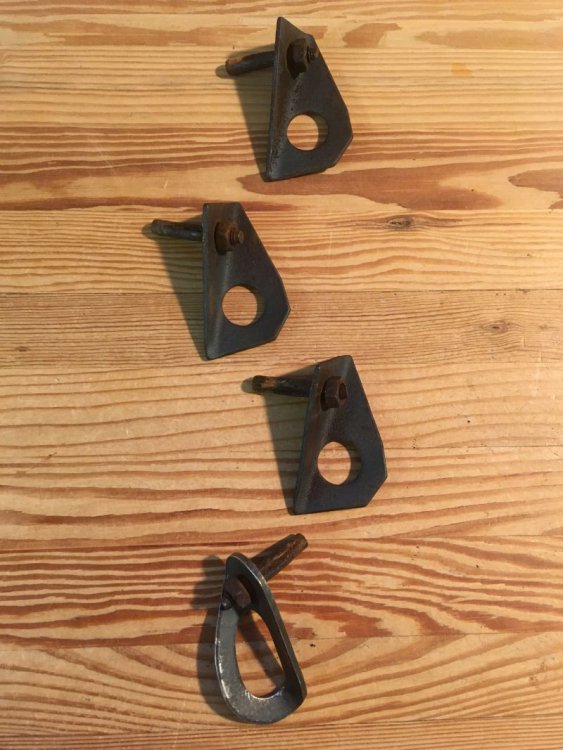
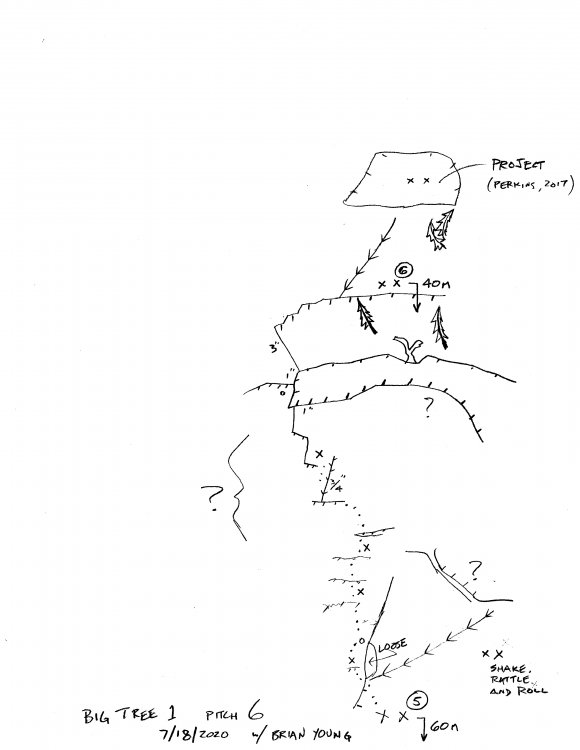
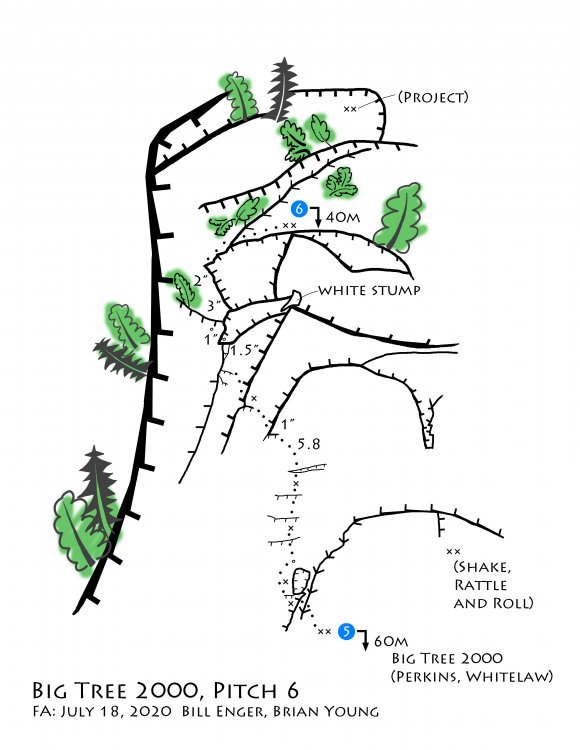
Trip: Three O'Clock Rock - Big Tree 2000, pitch 6, 5.8 Trip Date: 07/18/2020 Trip Report: A New Pitch on an Old Favorite Crag The decision to explore the area above the Big Tree was rooted in my desire to finish my Magic Bus Variation route. Yale Lewis and I are in the middle of its final pitch, with two bolts in, bolted on lead, and a long, cool ramp ahead. I wanted to find out if there is a good way to get on top of it to discover the perfect place for the anchor. As this will help to get the pro bolts just right, I'm settling for bolting the rest on top-rope. Since Robin Taft was a willing and dedicated partner for some new adventure, I teamed up with her to do the initial investigation. She leads sport, bolts only, so I had to find ways to keep her interested in the climbing approach. We got there in June to do Shake, Rattle and Roll which ends at an anchor one pitch above the Big Tree. It is a fine slab route, one pitch of which has 12 bolts and no gear placements—perfect for Robin! On the descent, I looked around and noted I have to go one pitch higher to get atop Magic Bus. Also, there is an old pitch up there, ending at roughly the same place, which has rusty quarter inchers and Leeper hangers! So, next time up I came loaded for bear and bolt replacement. Later in June, I chose an unusual method to get back up to the same spot: two pitches of Cornucopia, step right for two pitches of Big Tree 1, then the new connector pitch to Shake, Rattle and Roll, and then the last pitch of that climb. We did all that, and I got out the drill and hammer. Robin was patiently enjoying the sunny day while I rapped and removed four split-shank inch long goobers and hand-drilled them out for modern stainless steel. That is pitch 5 of Big Tree 2000, as described in David Whitelaw's book, Weekend Rock. It looked very cool, but I hadn't led it yet. In early July I returned with my rope solo gear to replace the last two old bolts on P5. To continue, the steeper hump on the left from the belay looked not bad, and the slab above it looked like a continuation of the great slab below. I replaced the last old bolt and top-roped the pitch. Having secured the permission of one of the FA party, David Whitelaw, I added three bolts to the pitch to make sense of it. Two at the bottom to connect to the first bolt, and one before the final bolt. Finally, the stage was set for another pitch. On July 18, Brian Young and I climbed Big Tree 1 to get up there, and the exciting work began. From my journal: "Goal focus is narrow. Launch upward from the Big Tree 2000 top anchor with full drilling gear. Try to get above the Magic Bus line. Brian took the odd pitches, but then declined the 5.9 P5. I led that, the new bolts are good. The pitch bolting seems perfect to me. Brian could not believe that the third bolt was the original first." Brian and I set up at the P5 top anchor. Hammer, drill, six bolts, a single rack and the blow tube. I left the anchor and bolted left around a large loose plate, eight feet in diameter. Trying not to touch it, once on top of the new level I found perfect waves of clean slab just as on Pitch 5. I put in three bolts in a row using the transverse ripples, connected with easy friction moves. Then I had to reach left to a thin ledge with no pro, so I put in the fifth bolt. Cracks led up and left, keeping on the verge of the drop to the Tidbits side of the buttress. I dug out a perfect fingerlock hold in a vertical 1" crack, to a ledge. The final 3" crack is clean and secure to a mossy ledge above a tree. I drilled a two-bolt chain anchor for a restful belay stance. From this new anchor, one can look above and see the bolts called out on Matt Perkins' topo labeled, "Project". As it stands, this 40 meter pitch ends at just the right level for a Magic Bus exploration rappel. My field notes for Pitch 5. For the original topo, see "Weekend Rock", by David Whitelaw Four of the five bolts replaced on Big Tree 2000, pitch 5 My first topo, before I realized this was Big Tree 2000, not Big Tree 1 A later version of the topo In the process of bringing the lines into Photoshop, the feature lines were traced in ink on mylar The final topo Cruising the slab on the FA Brian Richter coming up past the Big Tree to help The start of the new pitch. There is now a bolt to help avoid the hollow-sounding plate above the little overlap One of the 5.8 crux moves is to step left and get pro in the pocket shown Robin at the new anchor Thanks to Brian Young for the long belay session while I worked out the pitch. And to Robin Taft for multiple trips to rebolt and clean it. And also to Brian Richter for belaying another trip up the new pitch to clean and refine it. And special thanks to the slab masters who went first, Matt Perkins and David Whitelaw, whose vision found it and got them a long way up there. Gear Notes: Light single standard rack to 3". Approach Notes: Eight Mile Trail to the South Buttress of Three O'Clock Rock. Climb any route to the Big Tree. Climb Big Tree 2000, pitch 5, 5.9. For a way that is only 5.8, climb Shake, Rattle and Roll and then take a very short rappel to the Big Tree 2000 pitch 5 top anchor. See Matt Perkins' overall topo for the Big Tree Area.


 1 point
 -
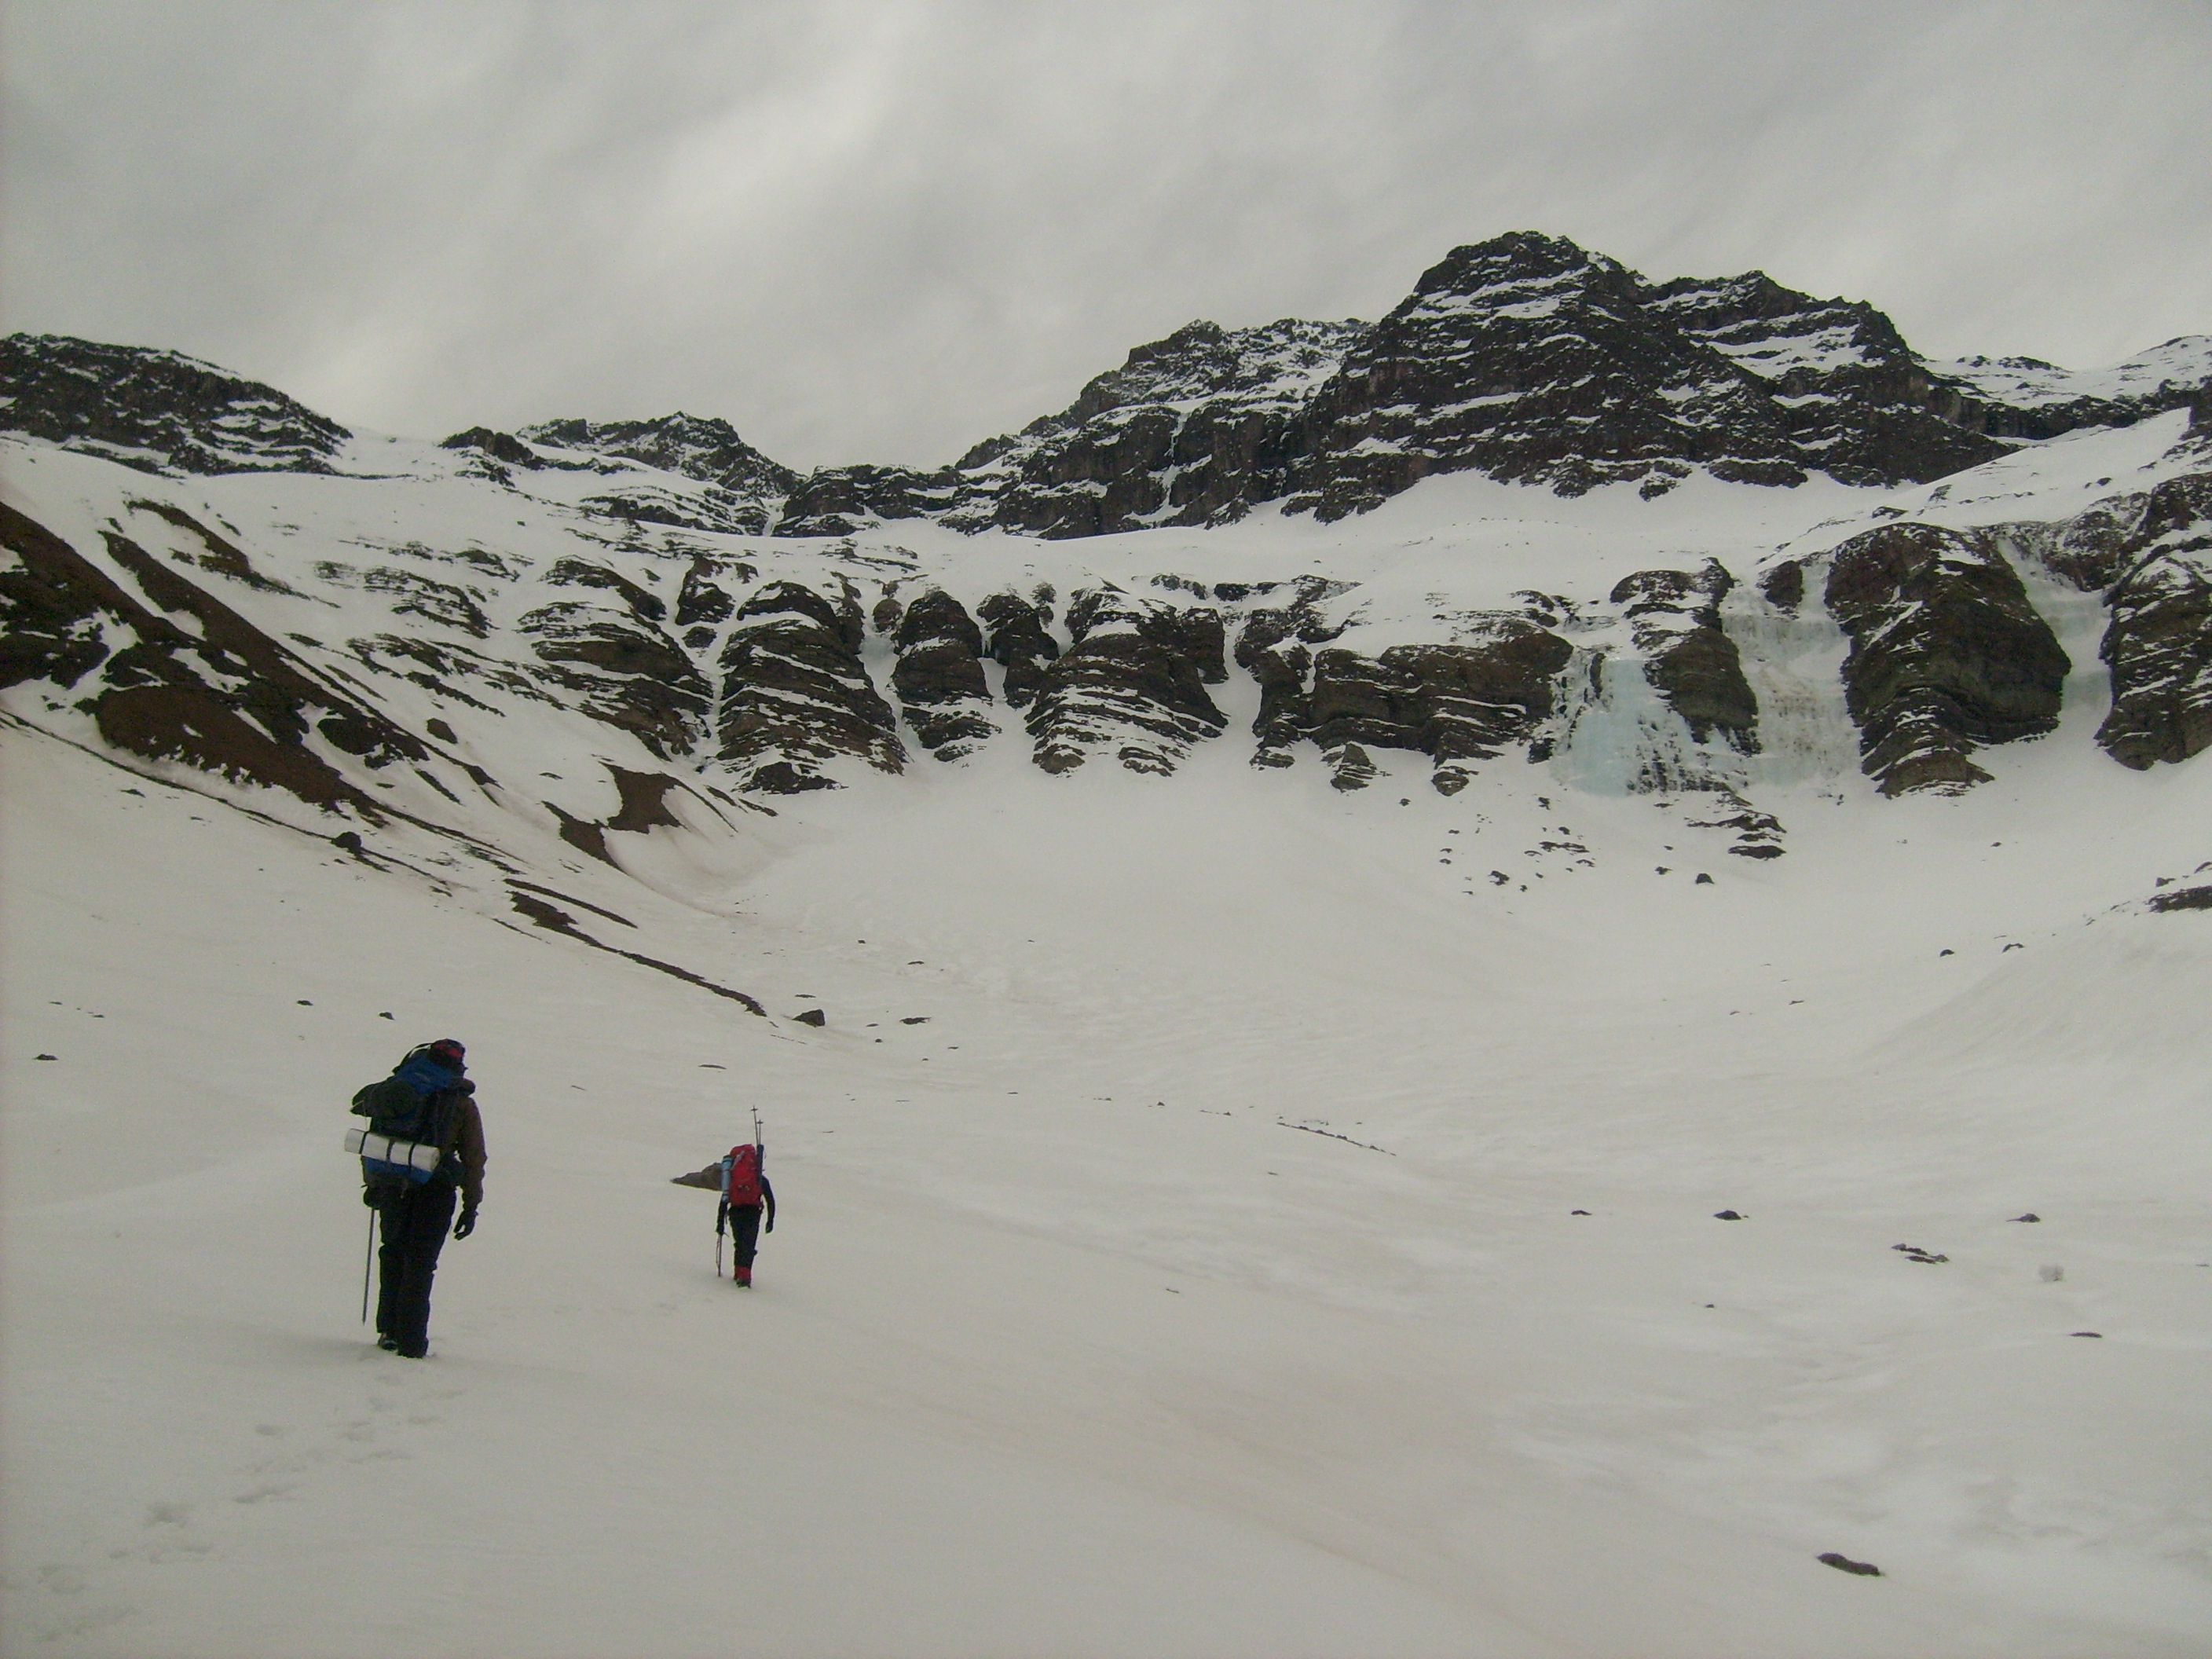
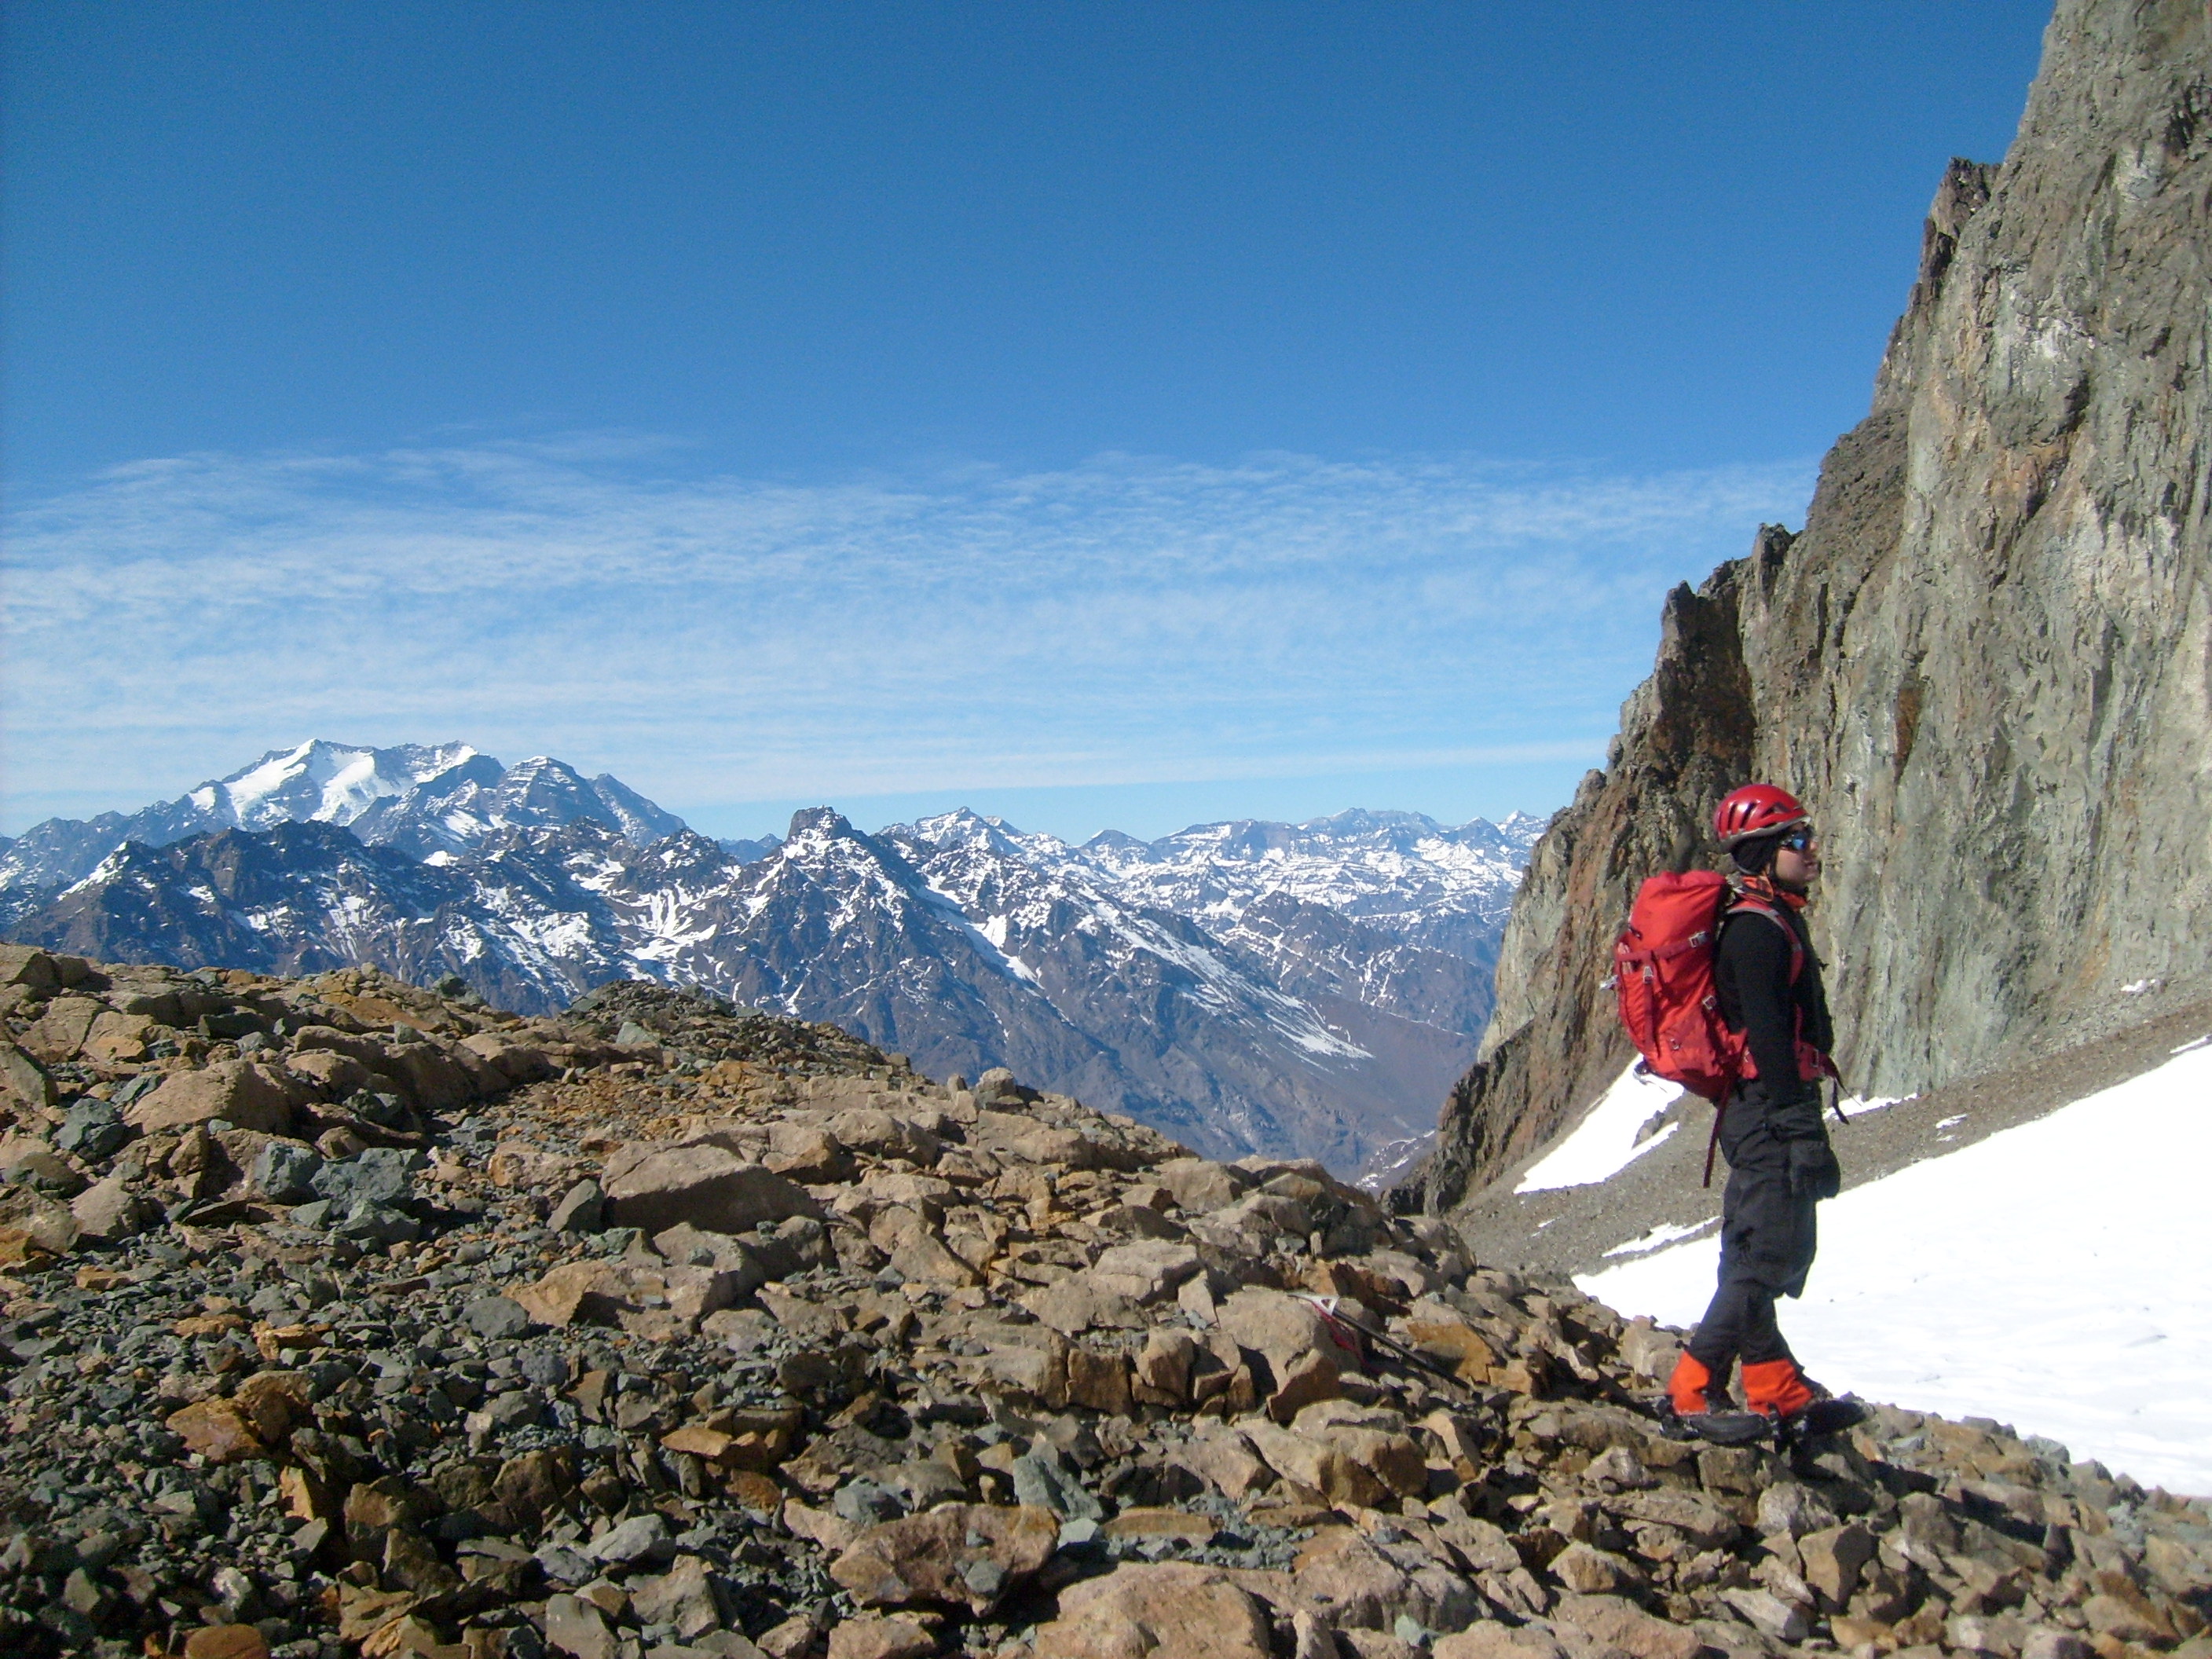
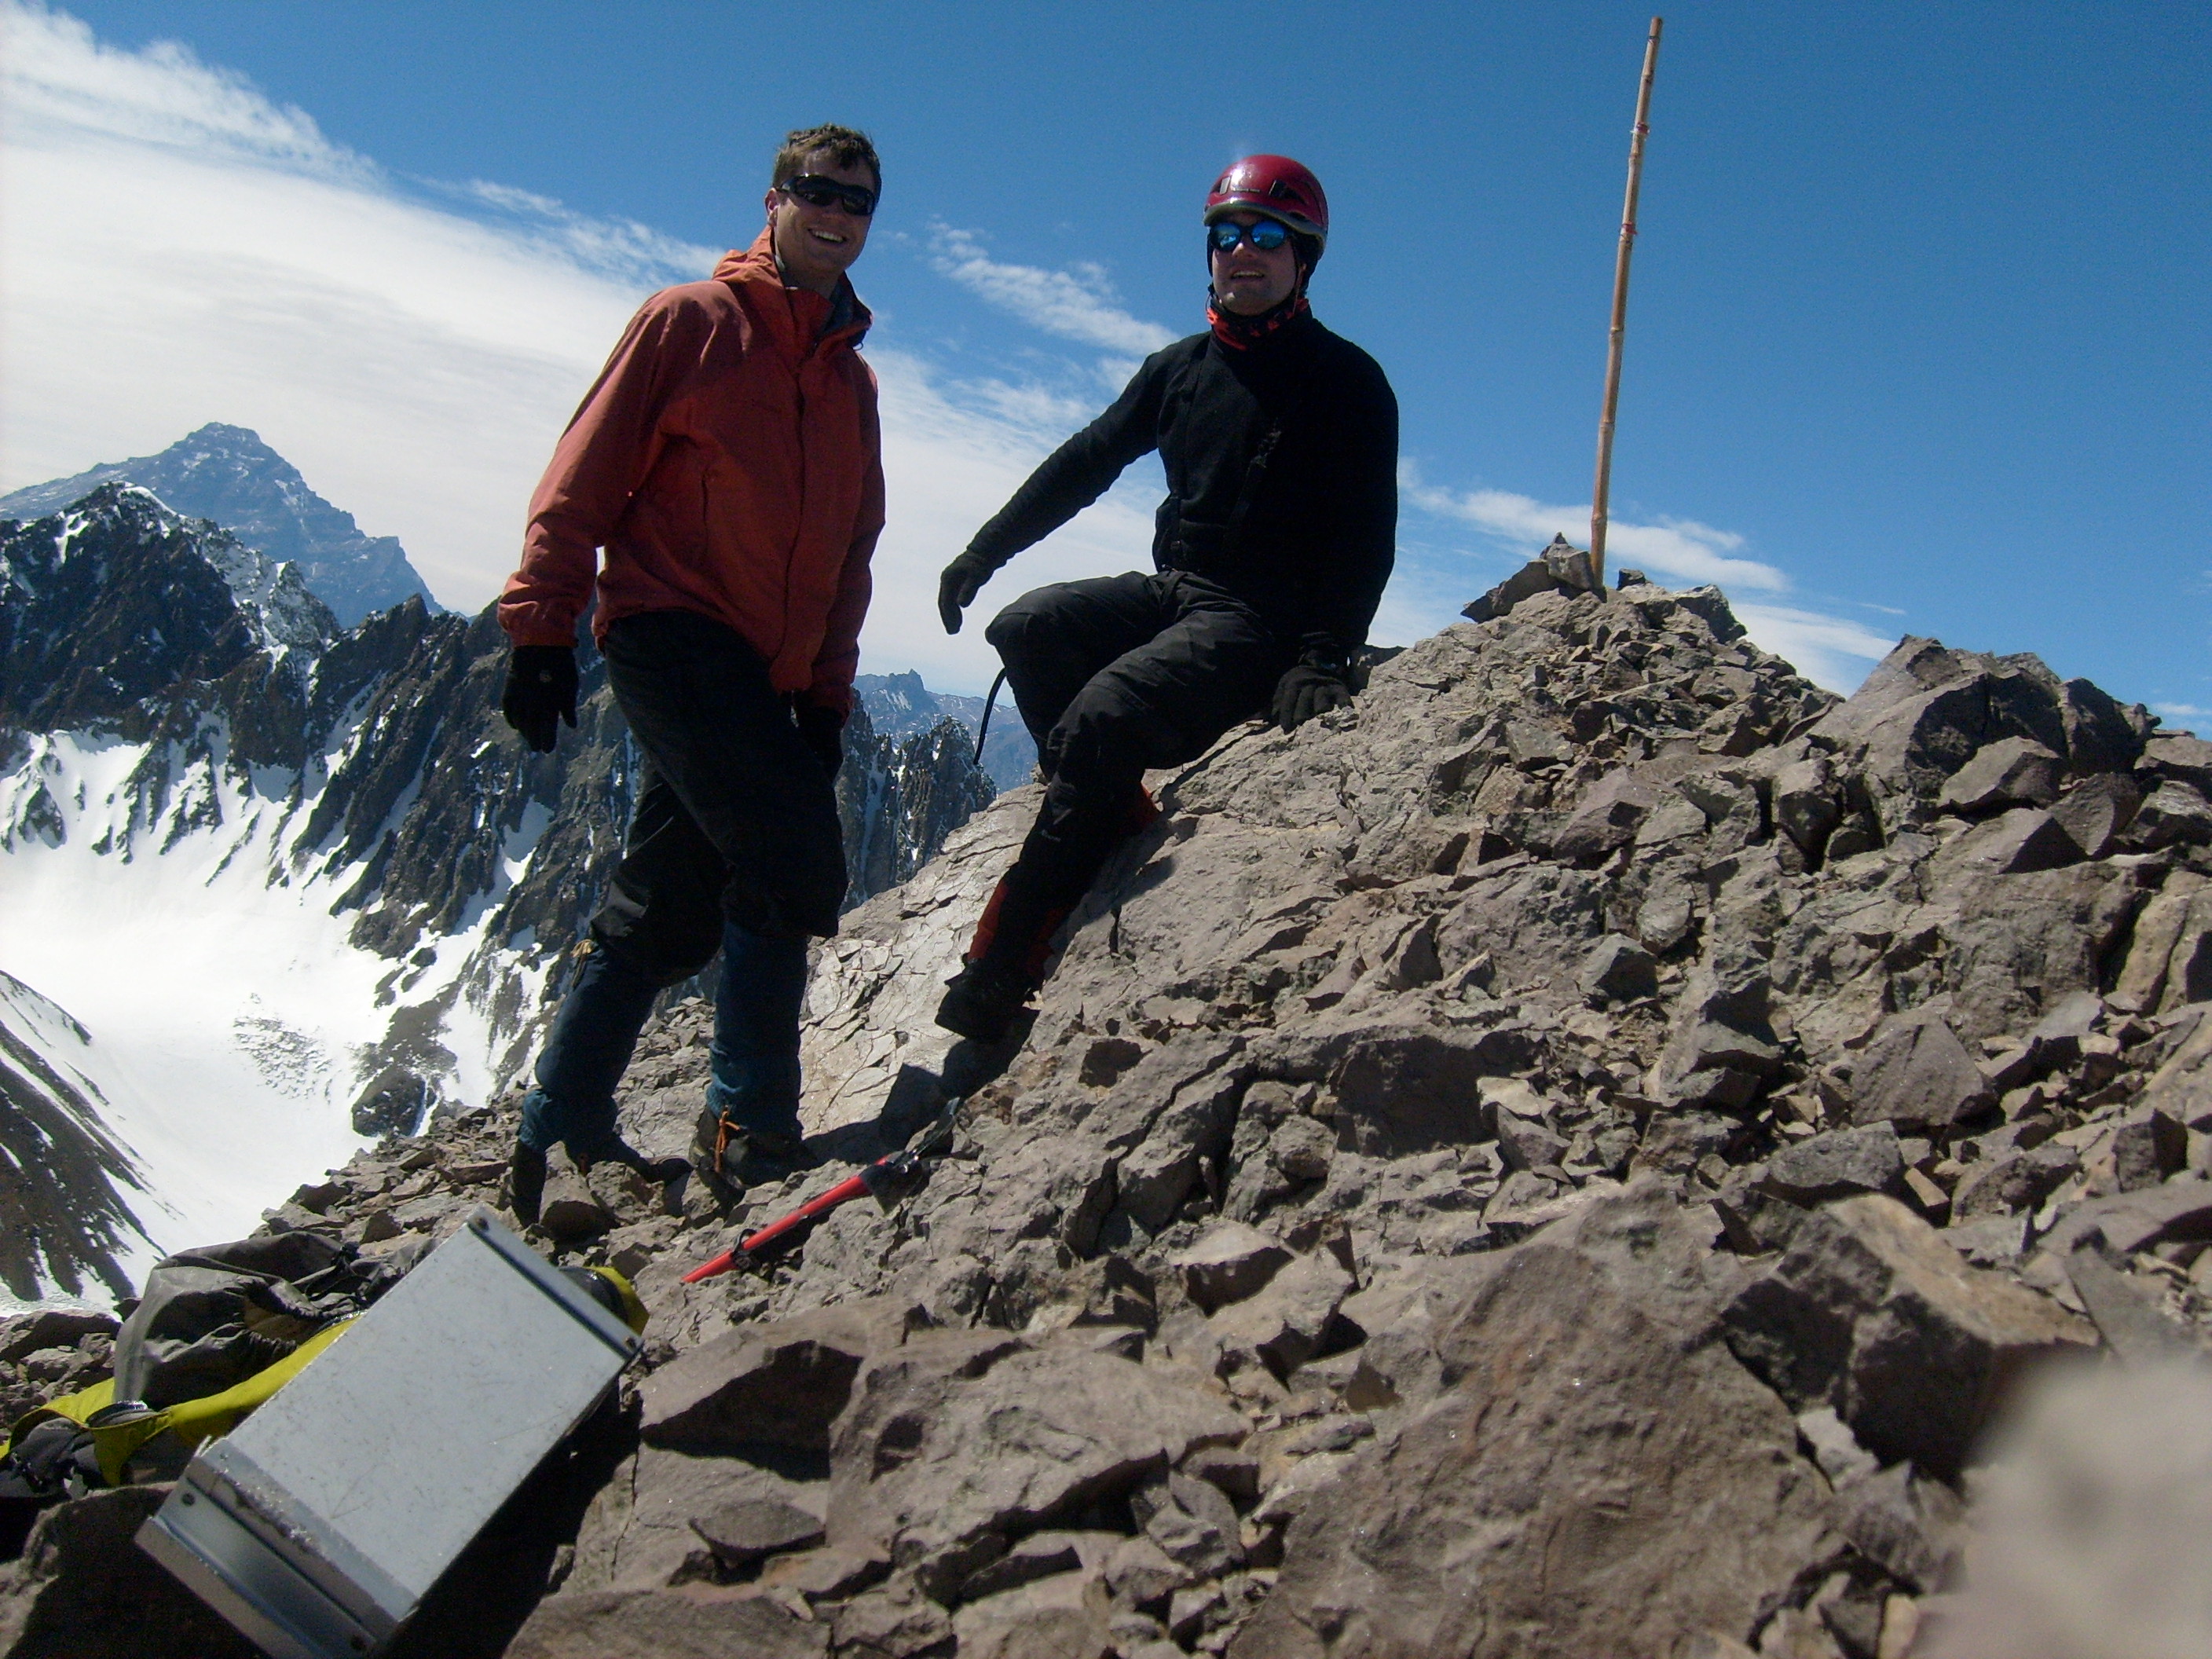
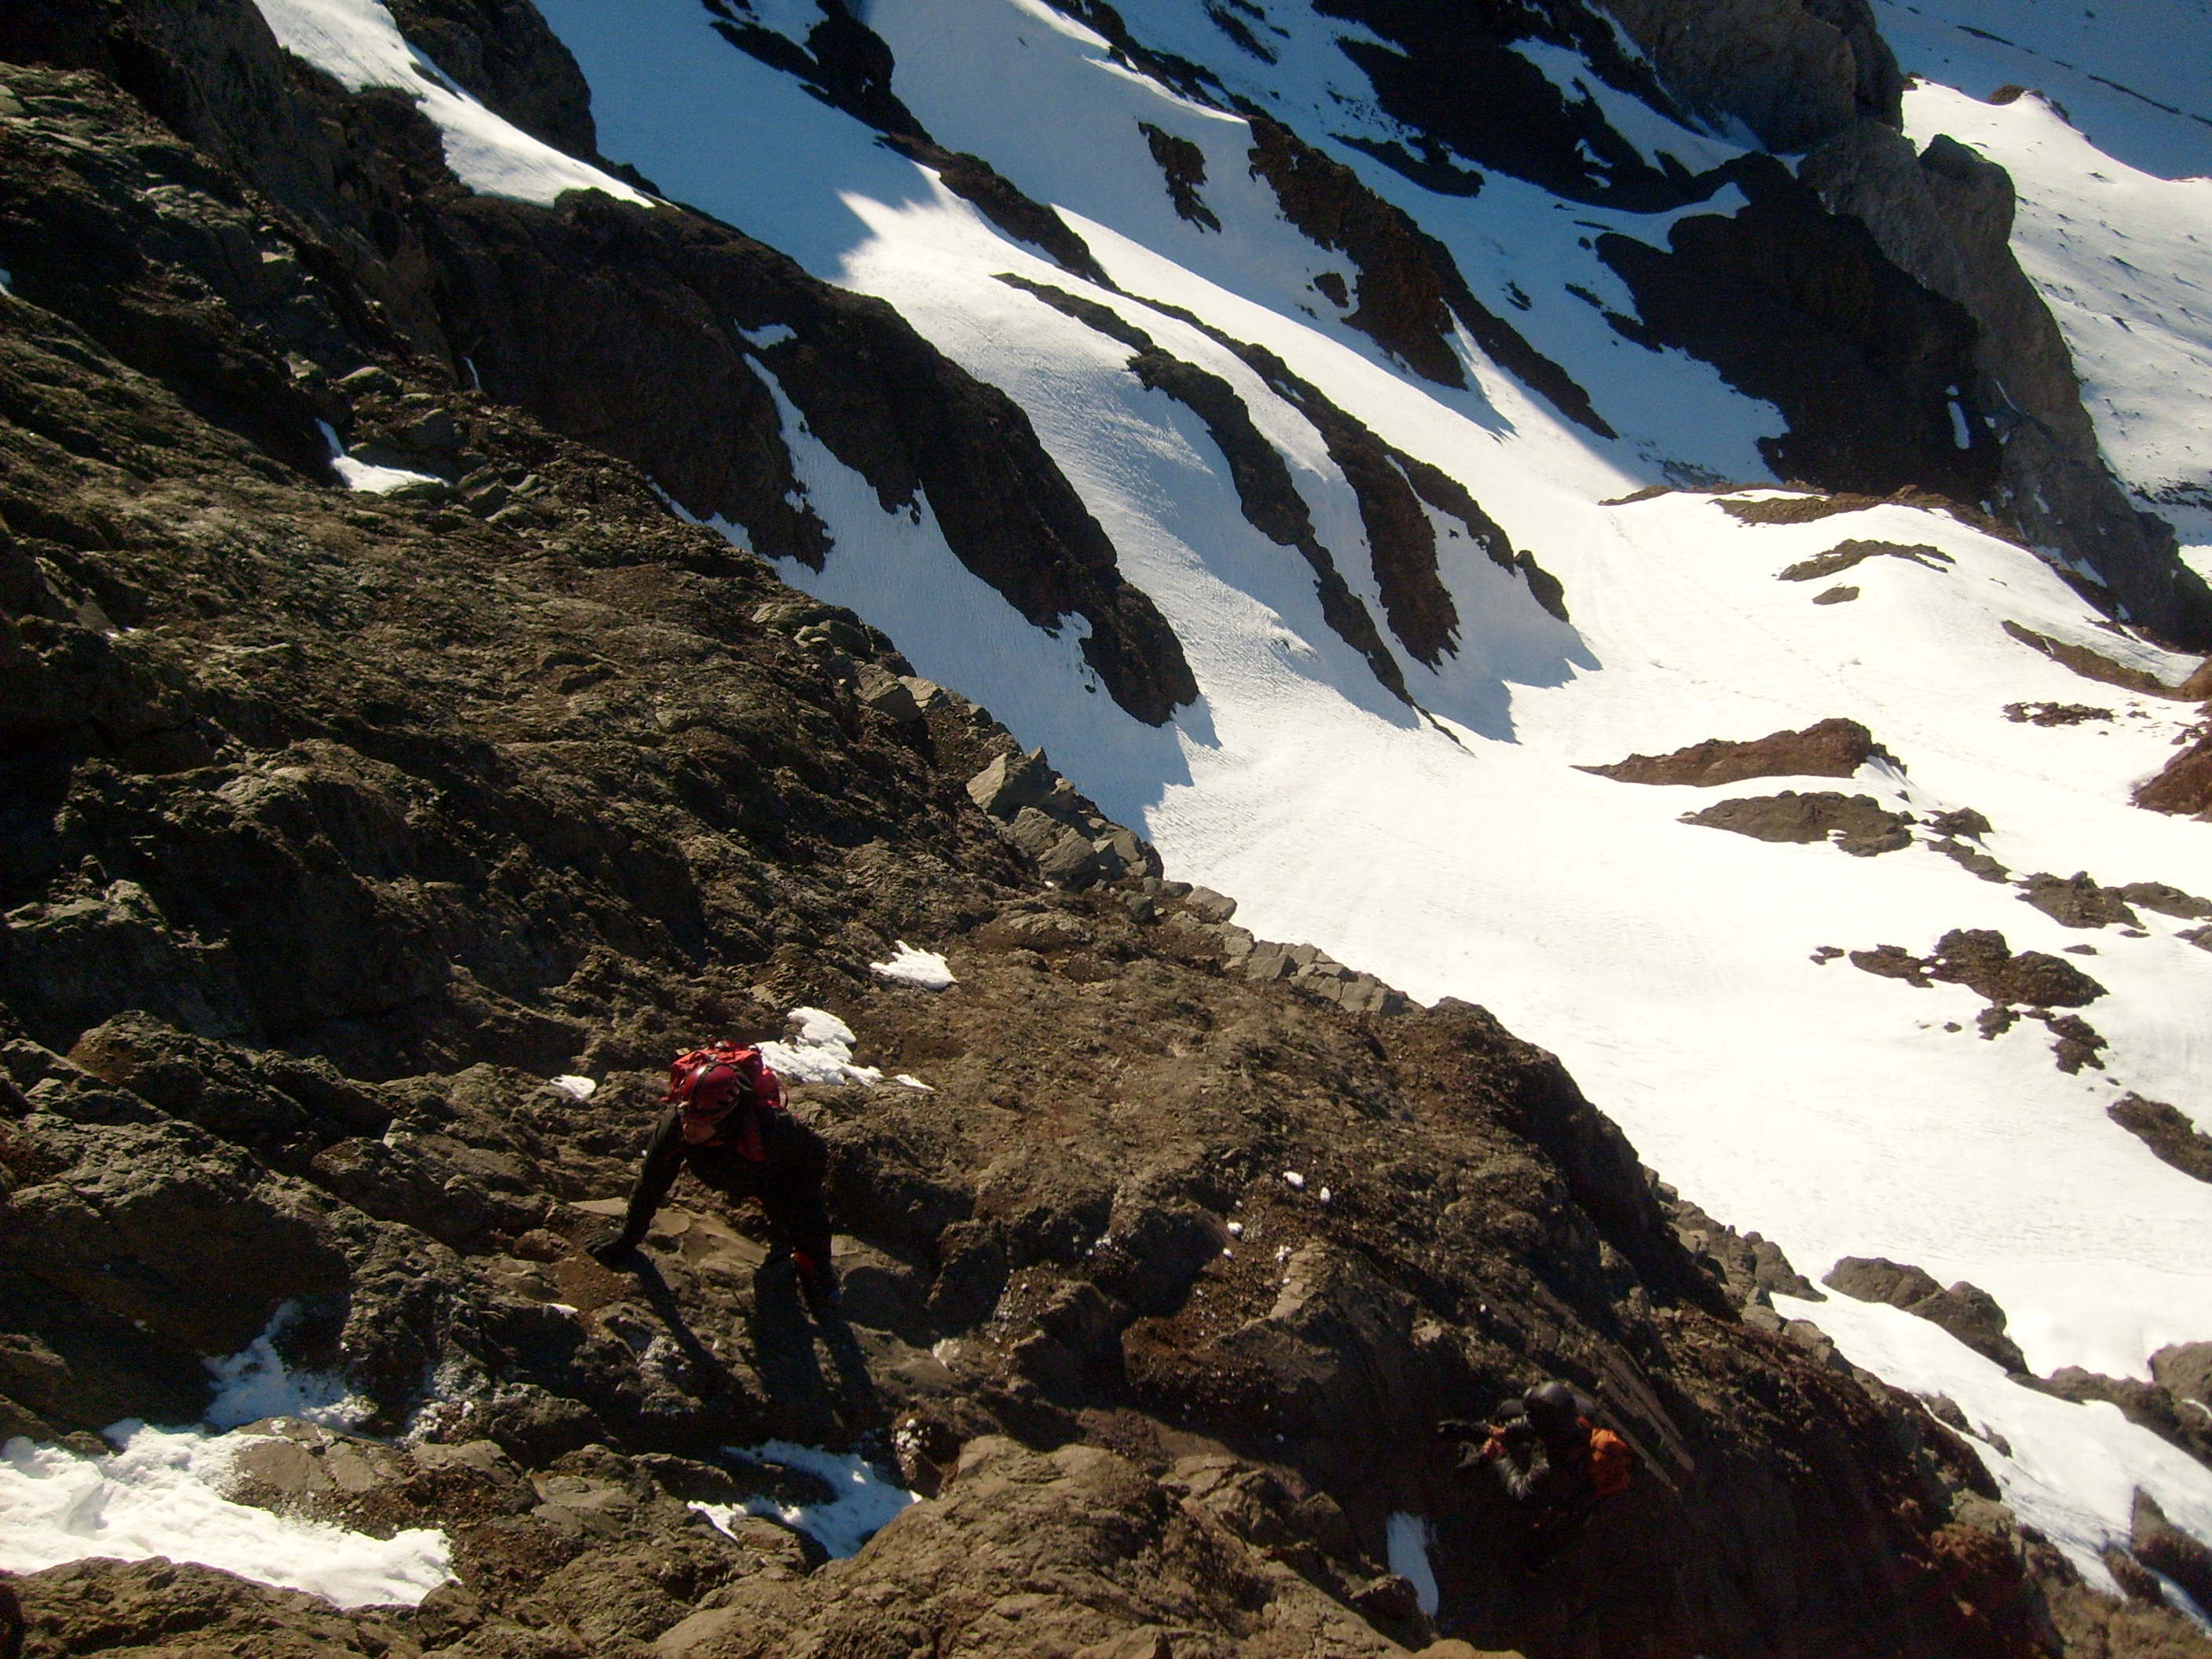
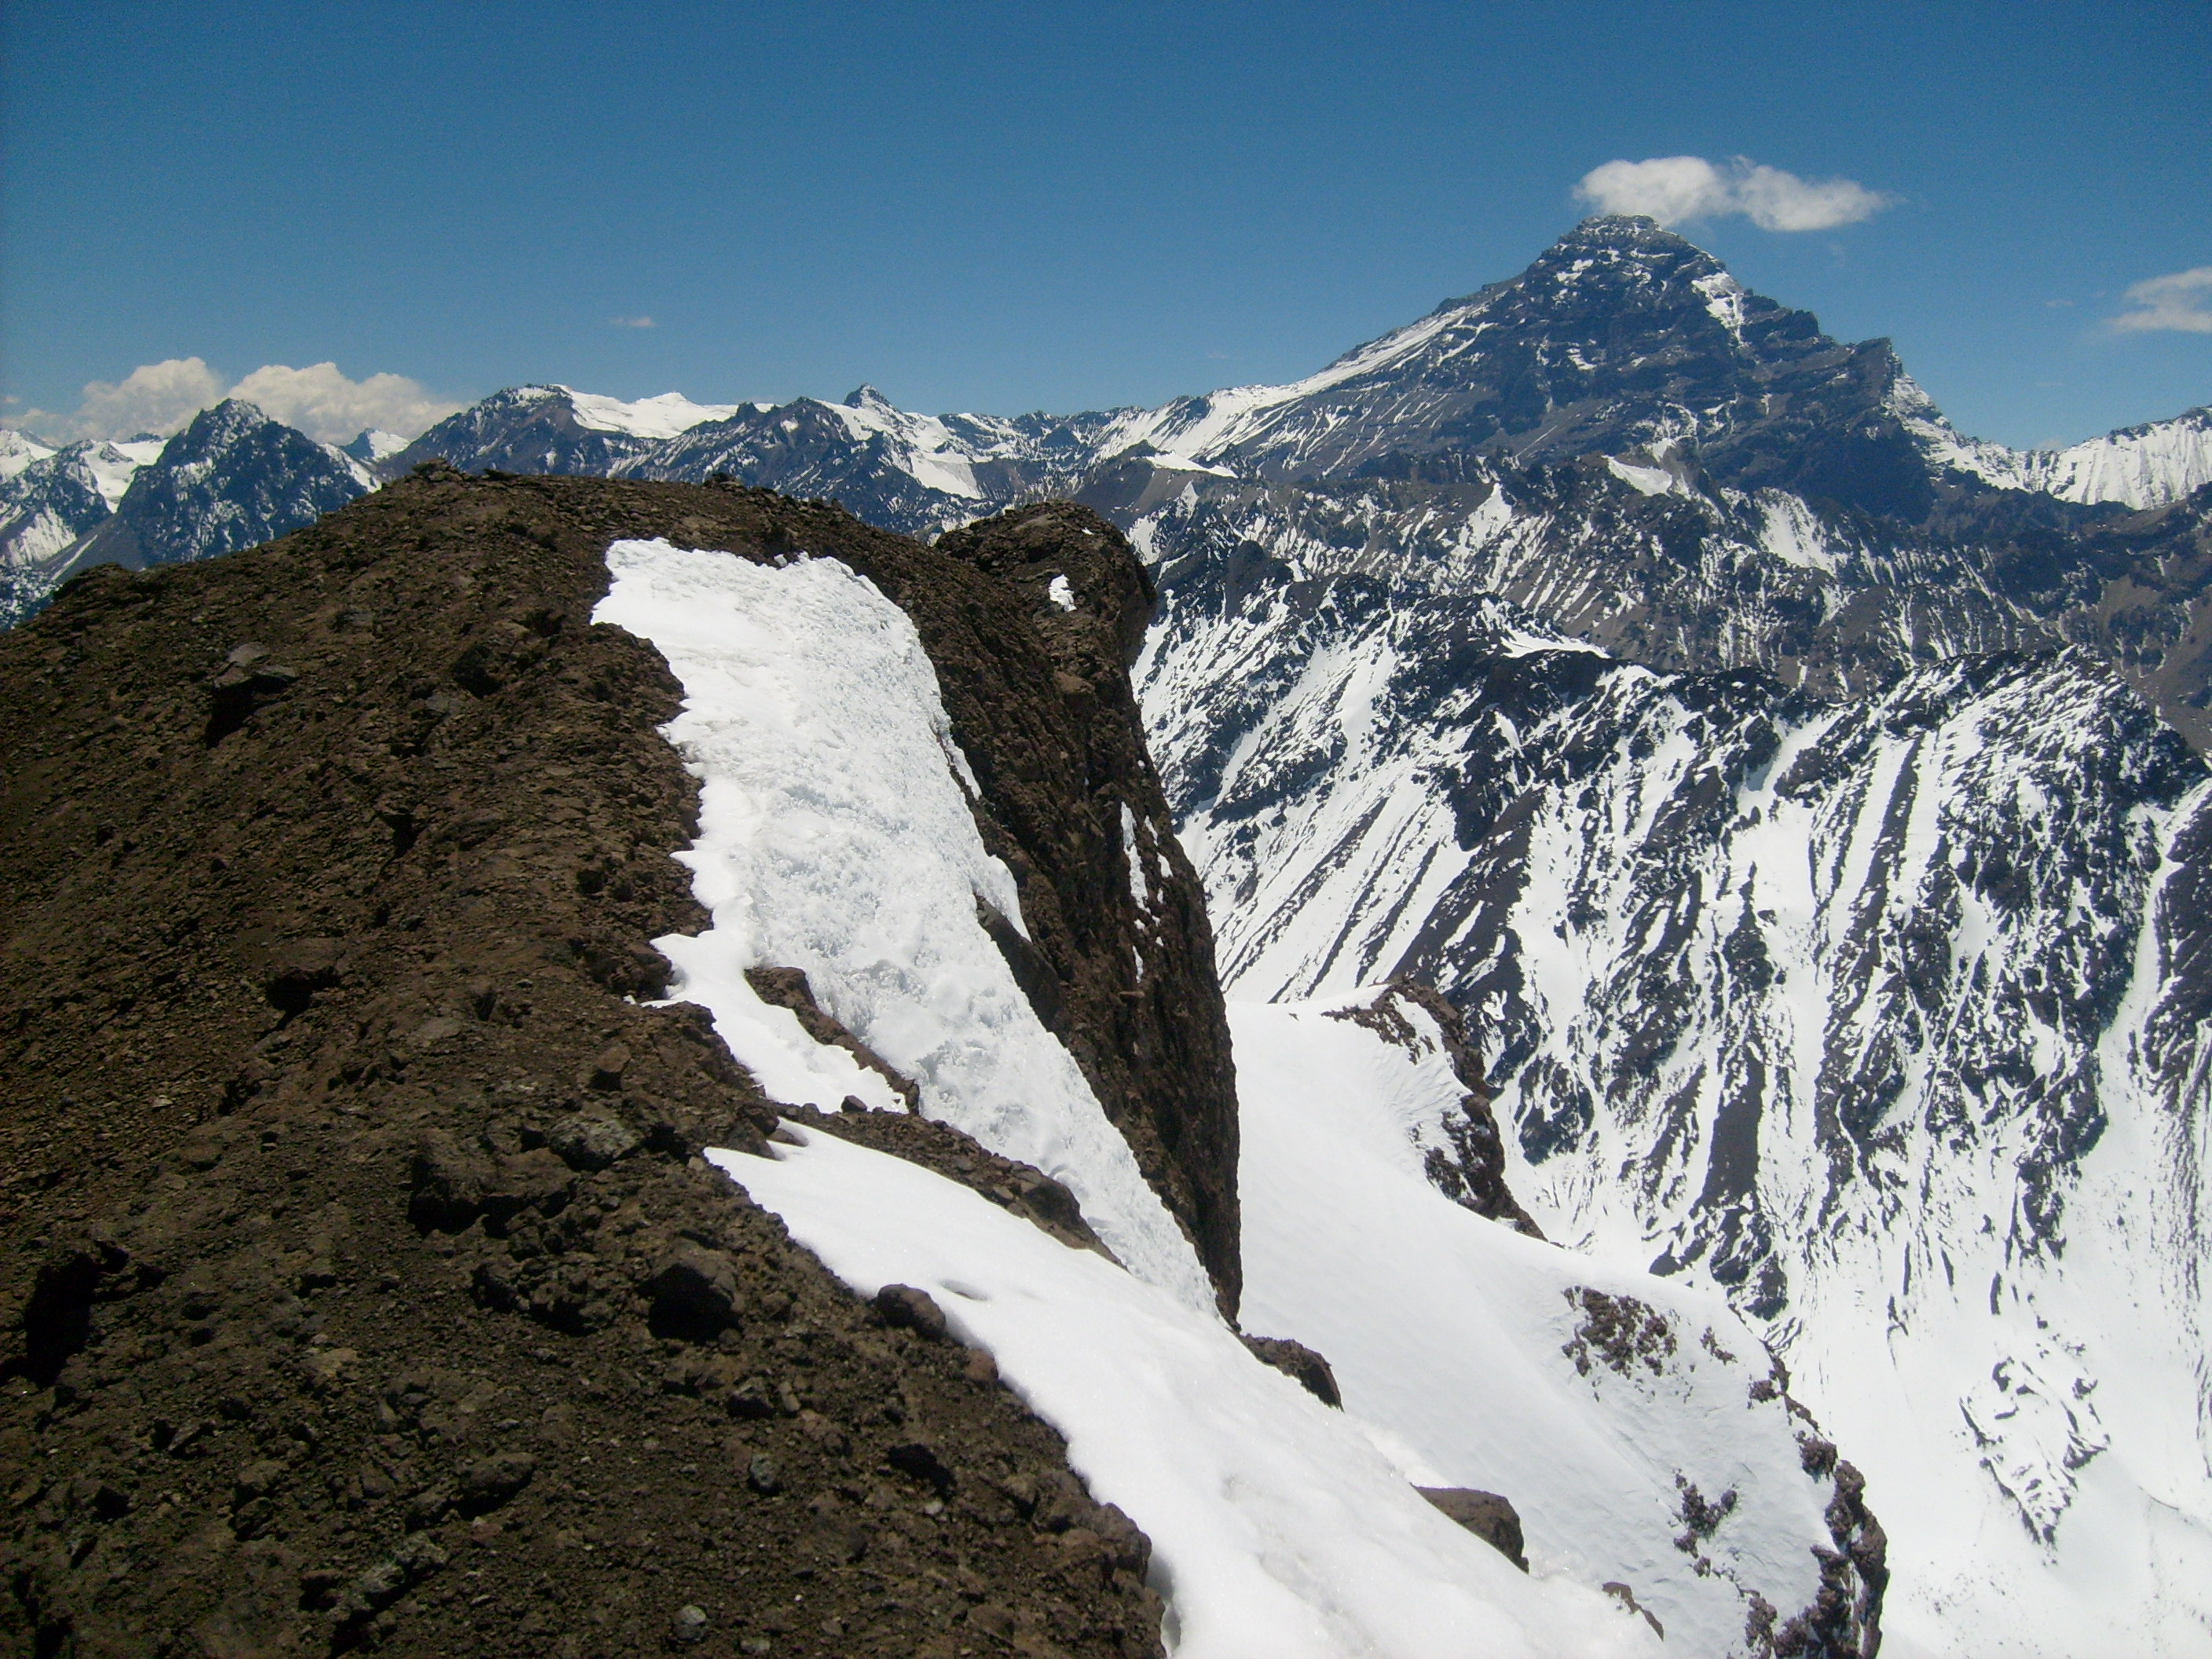
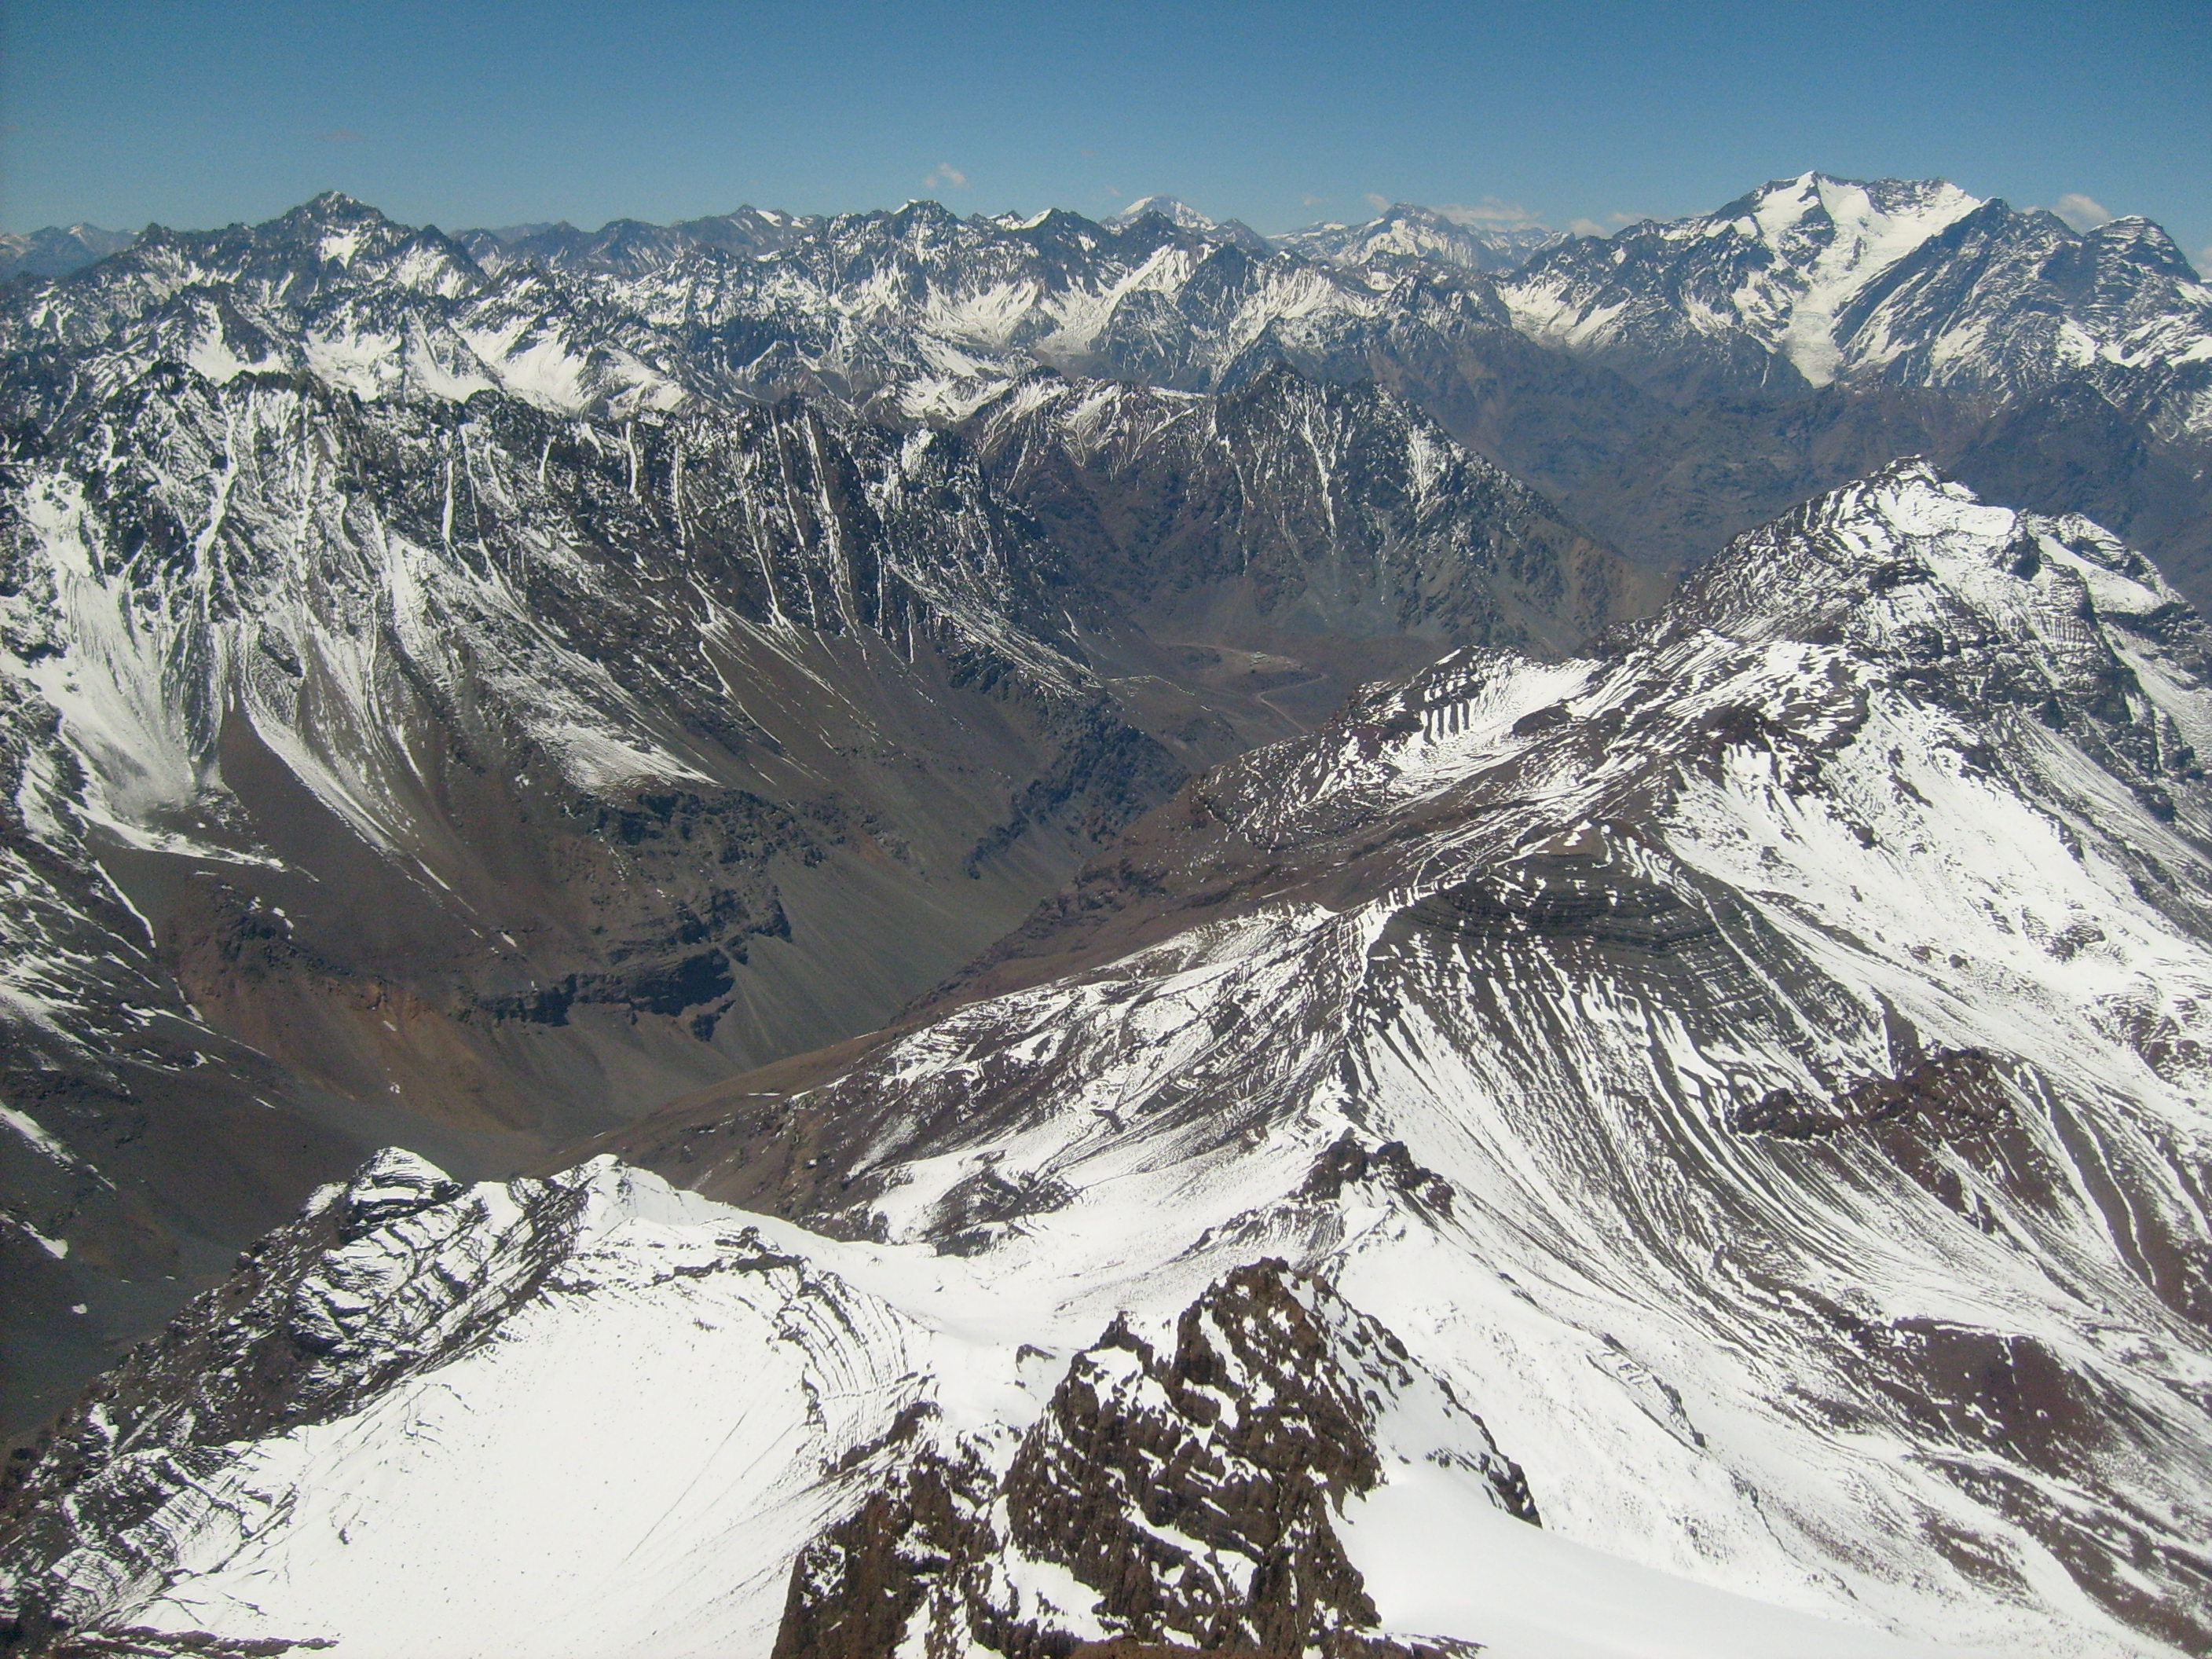
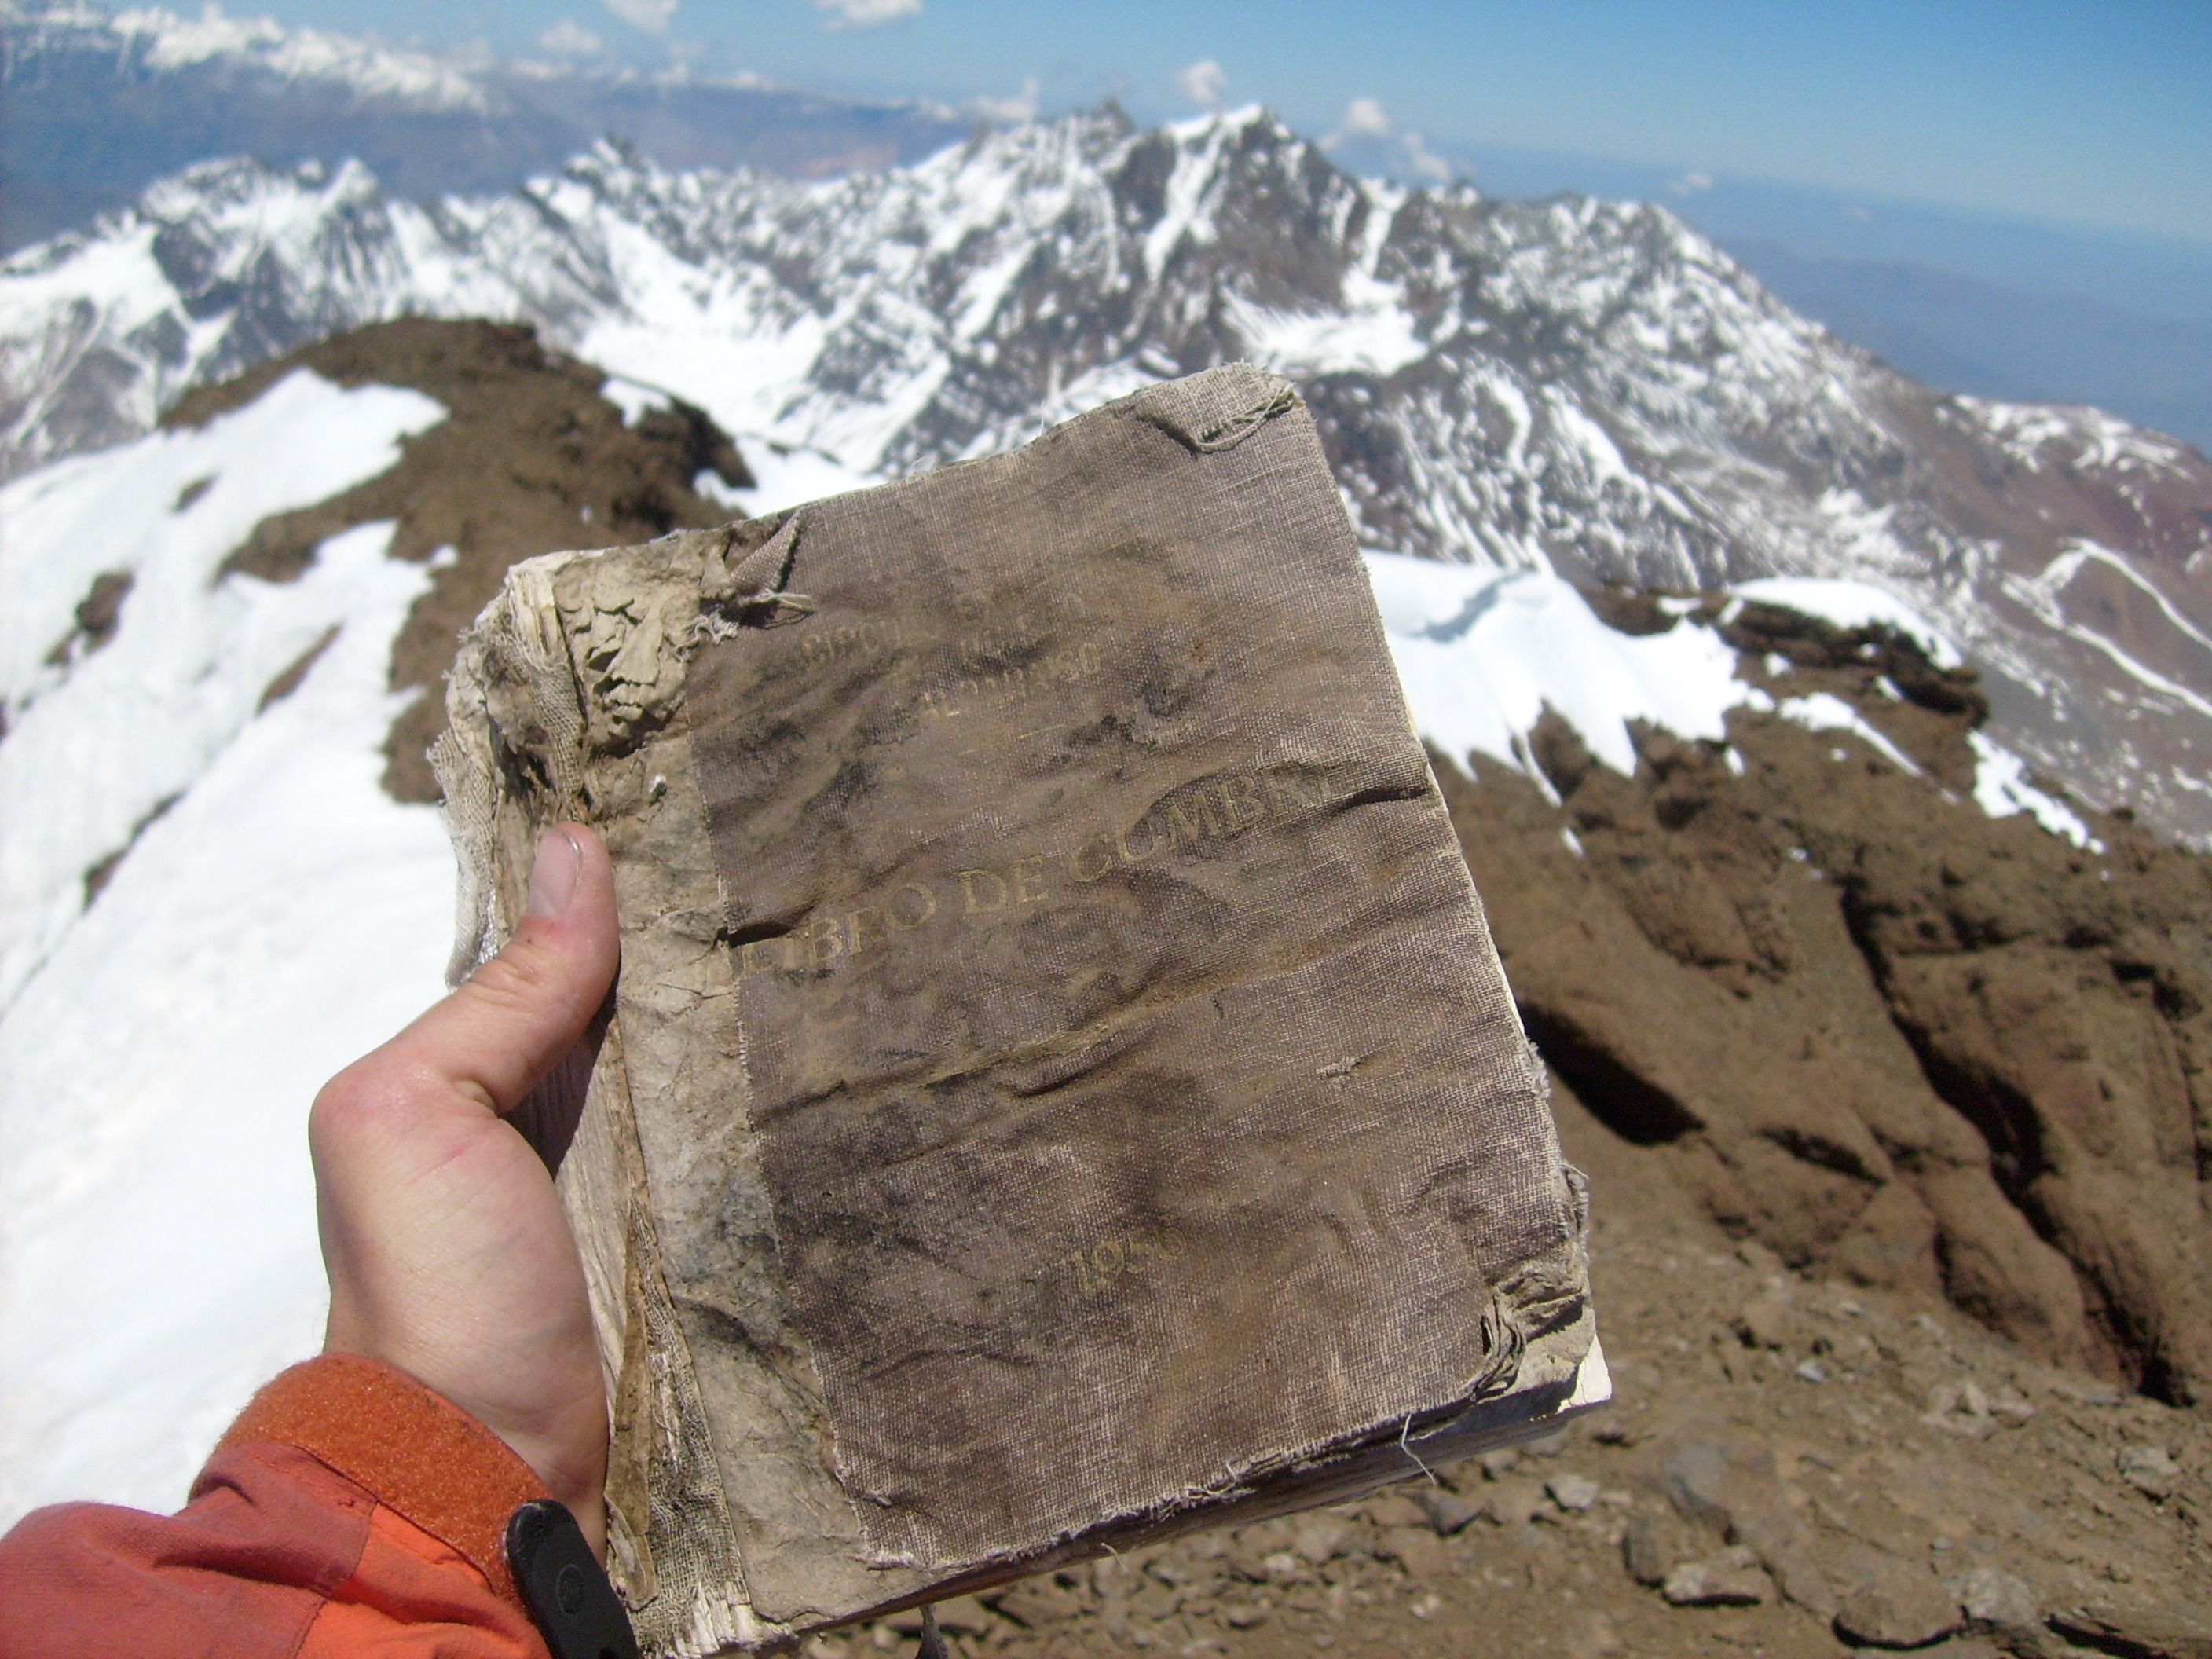
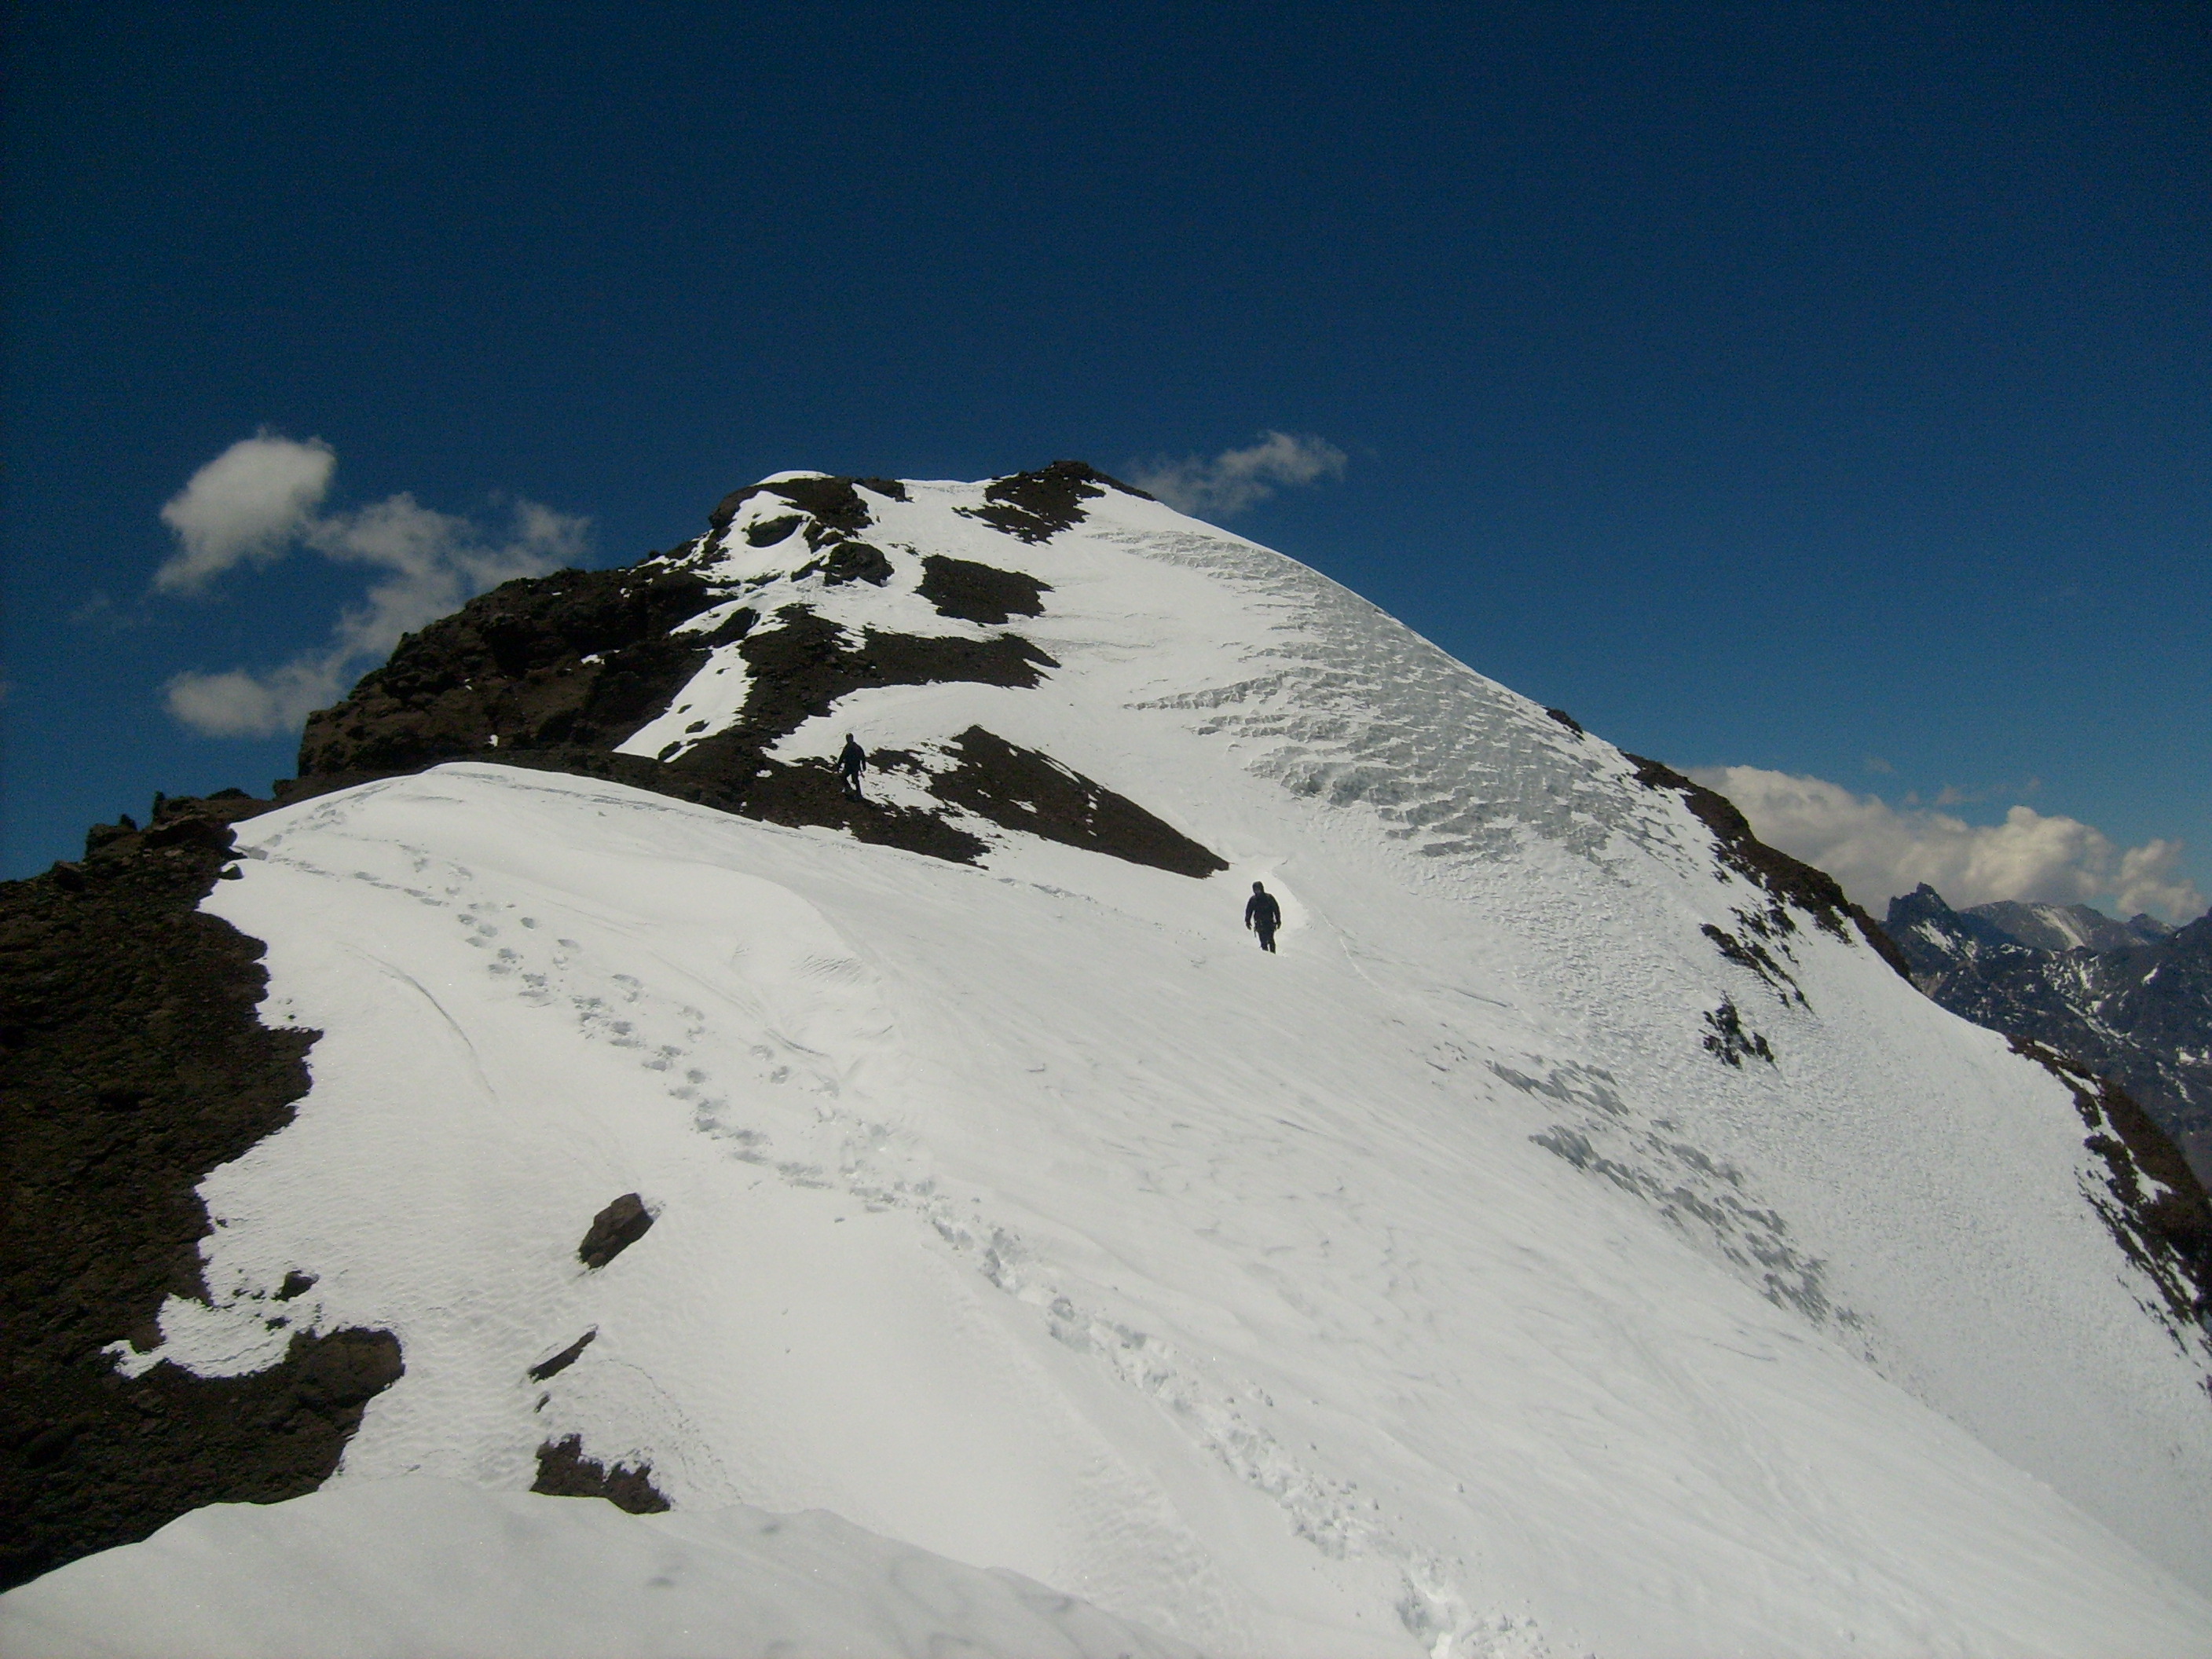
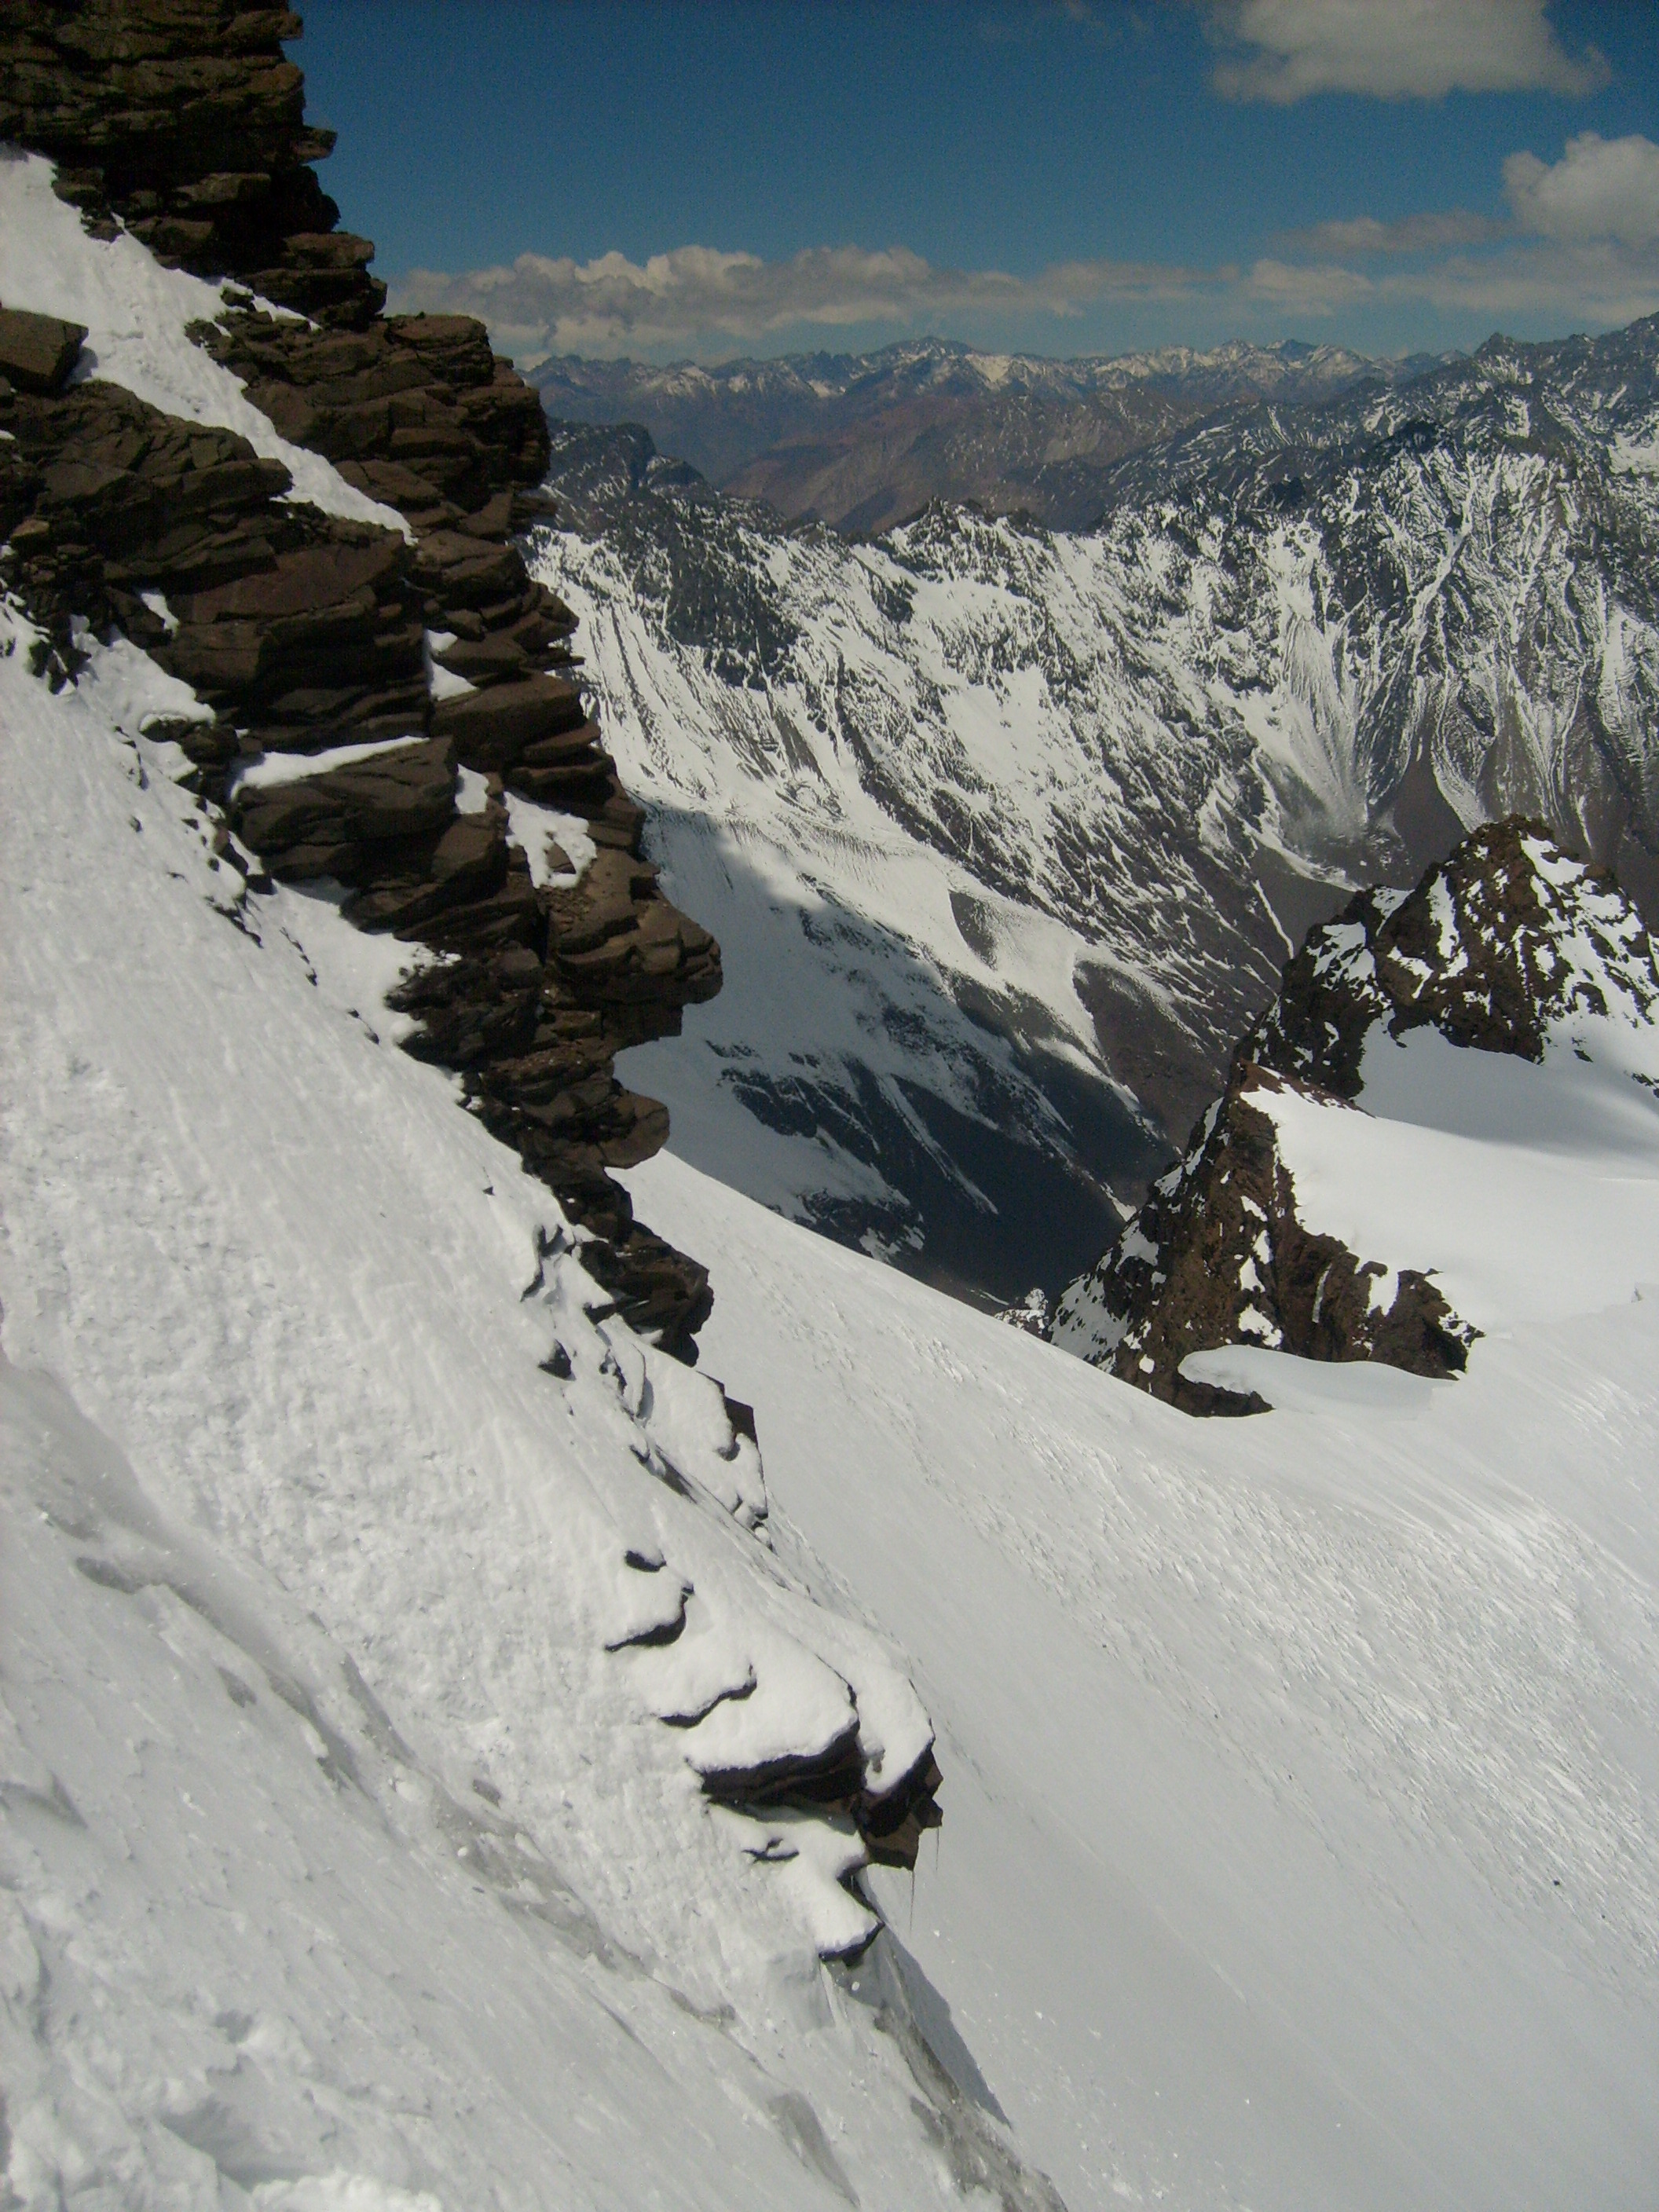
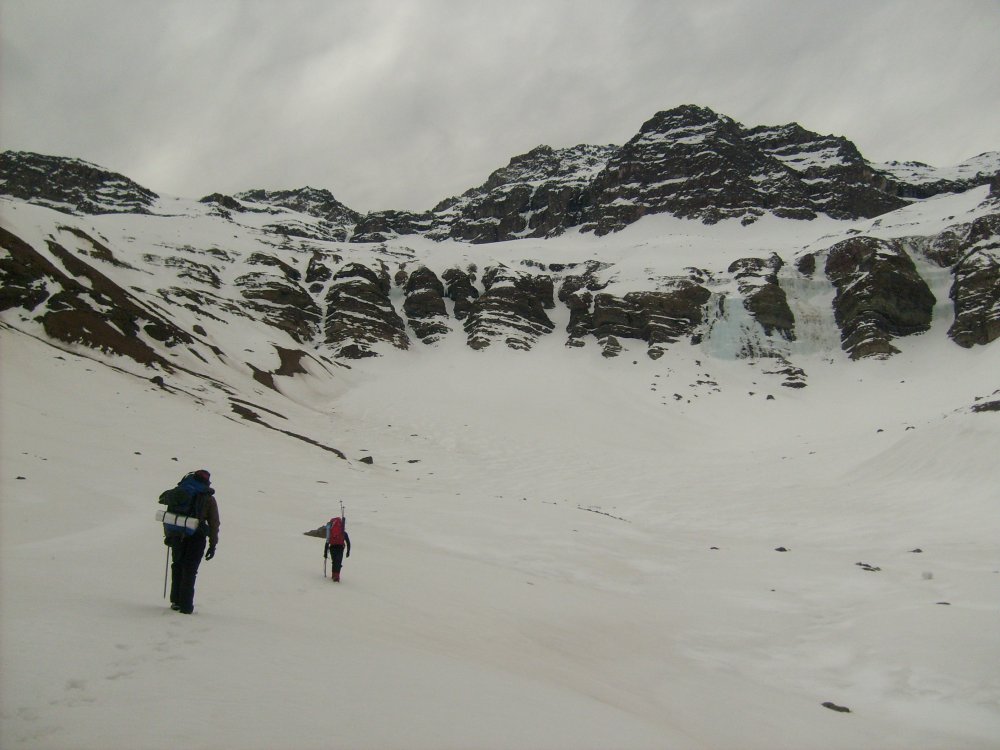
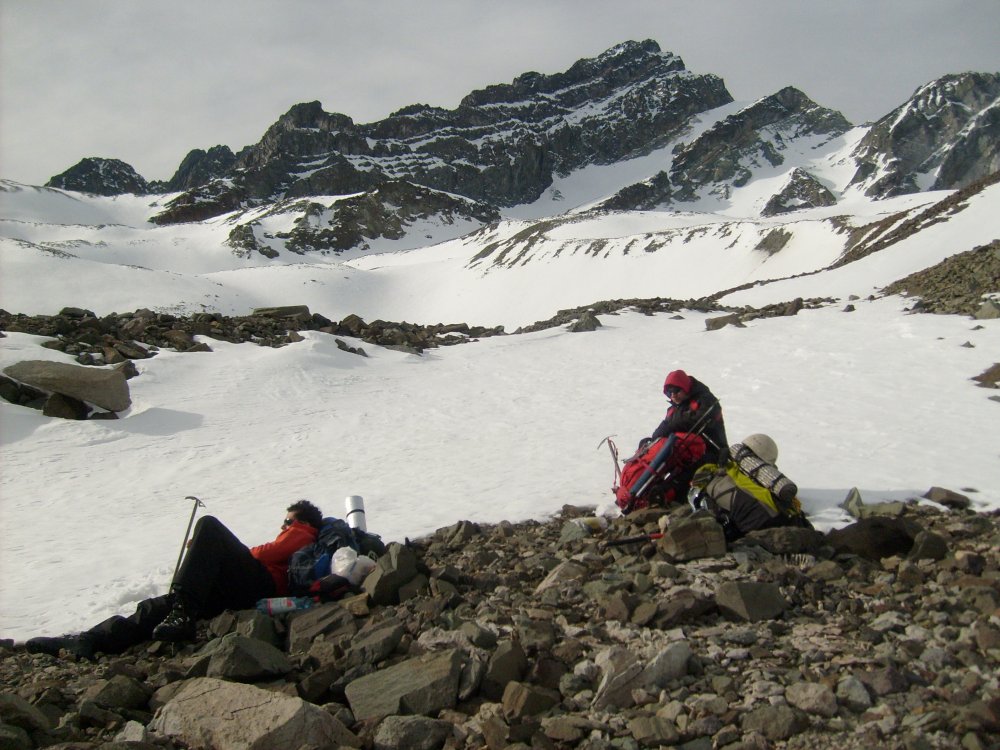
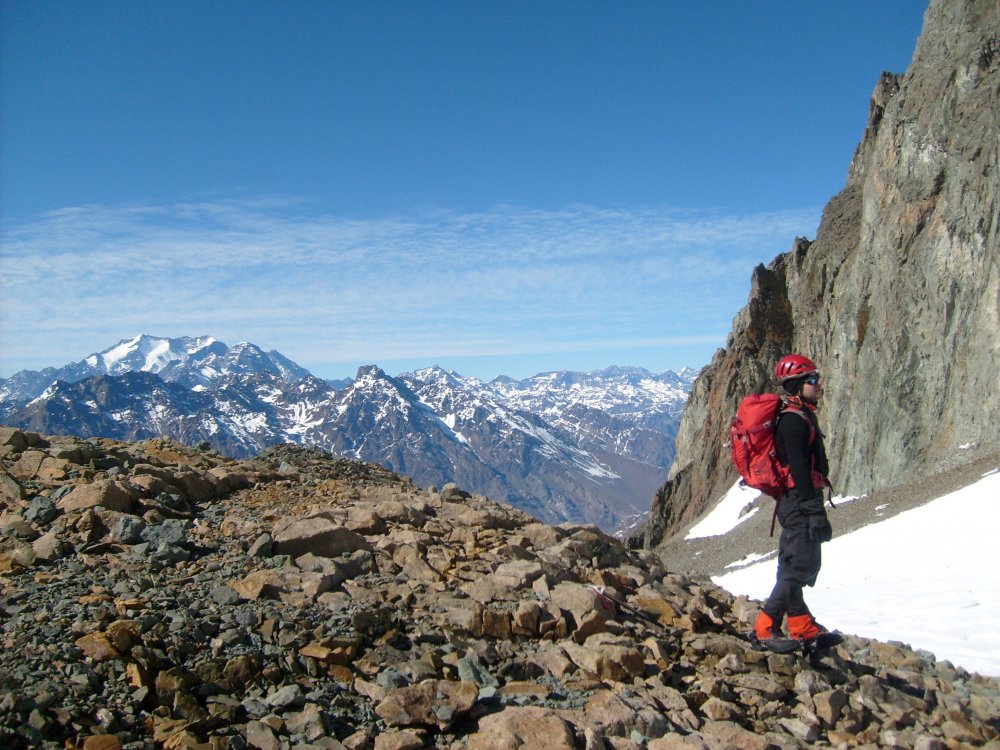
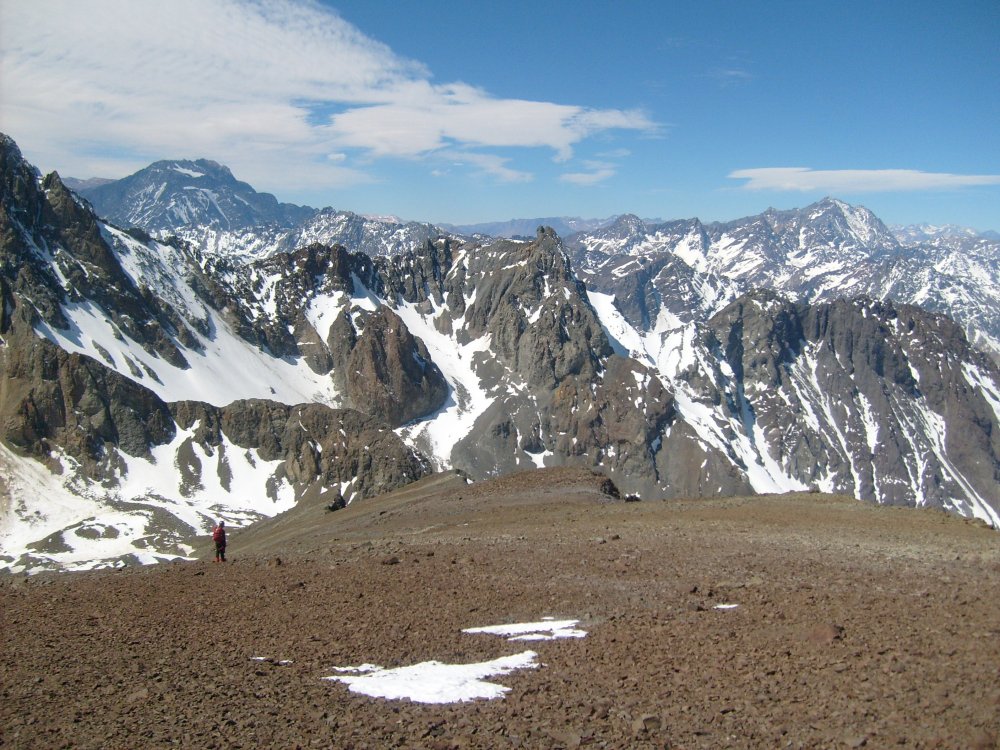
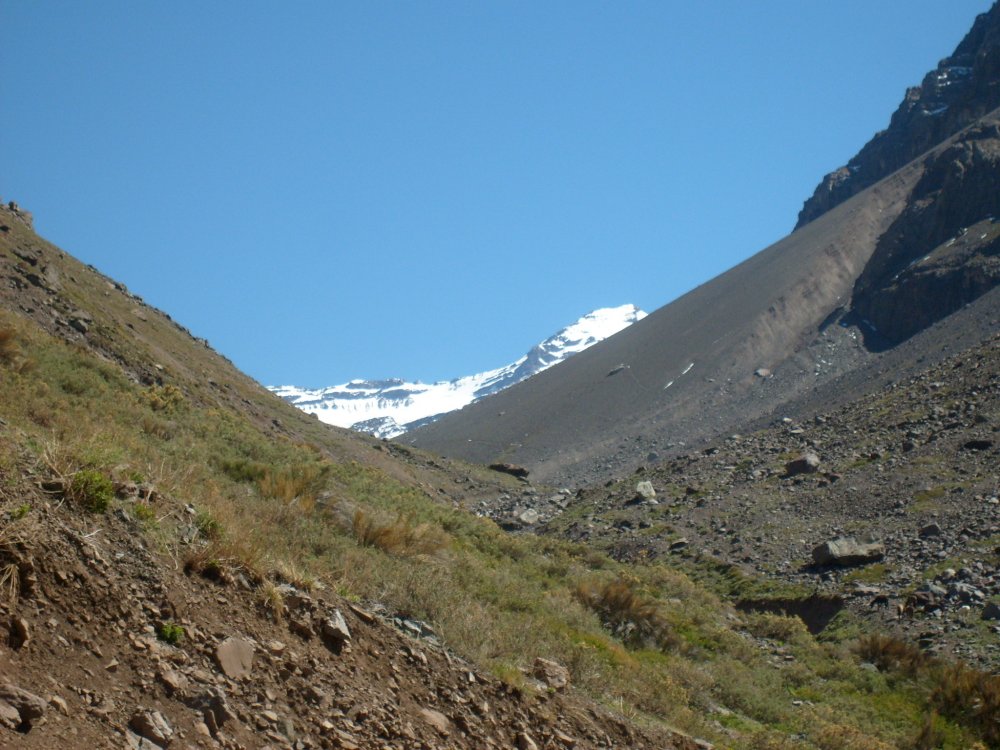
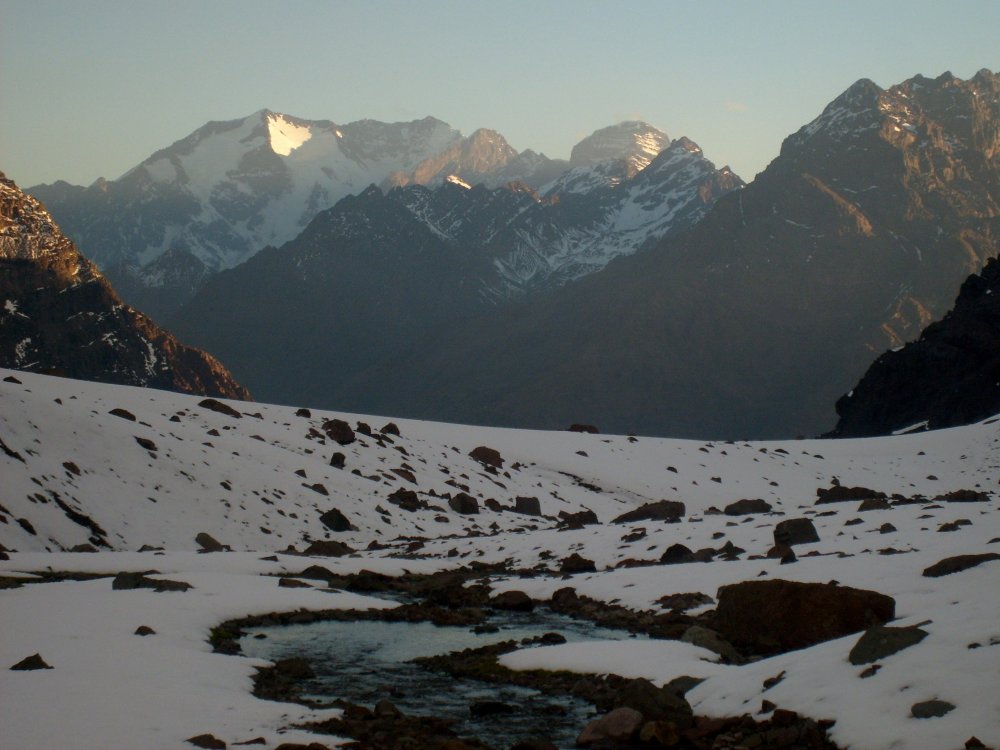
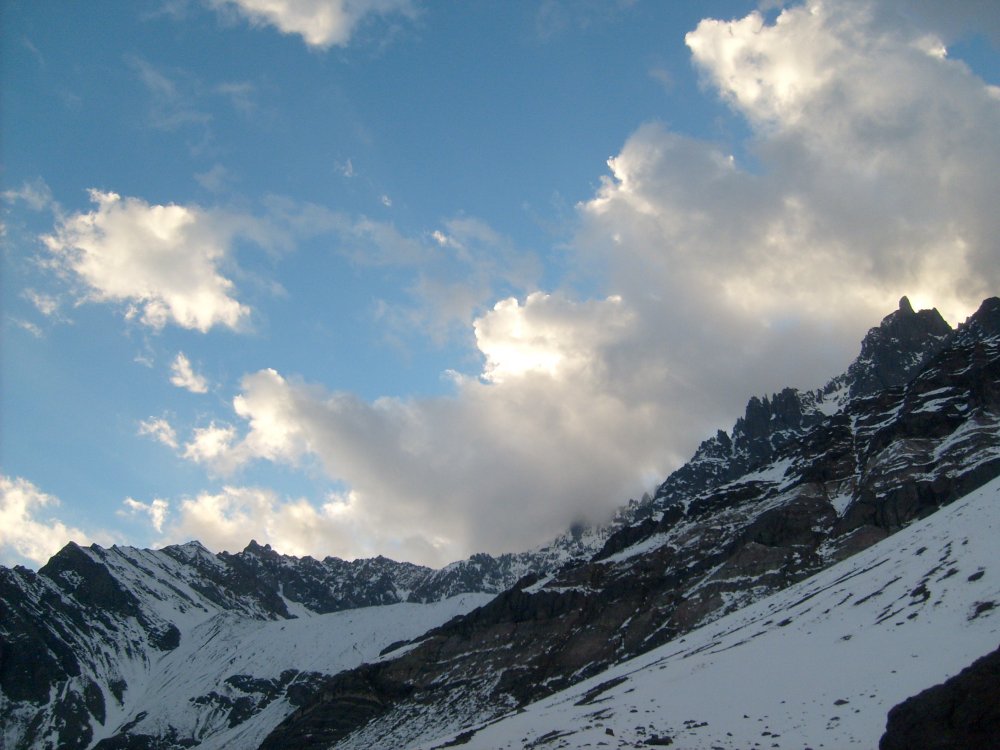
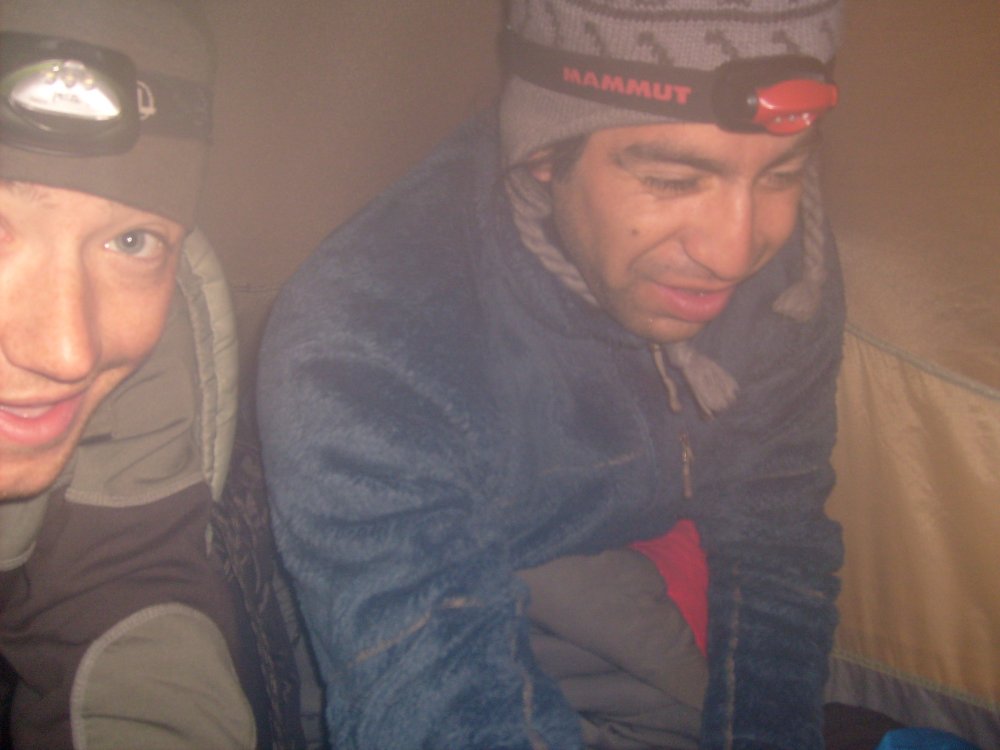
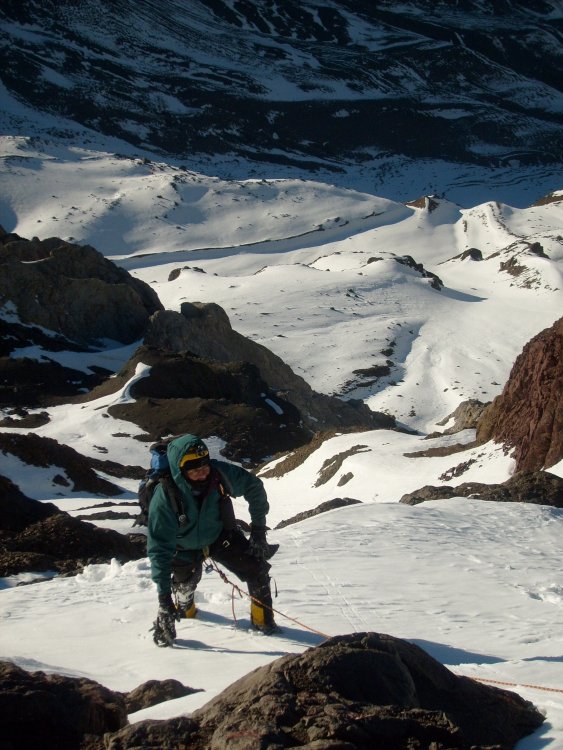
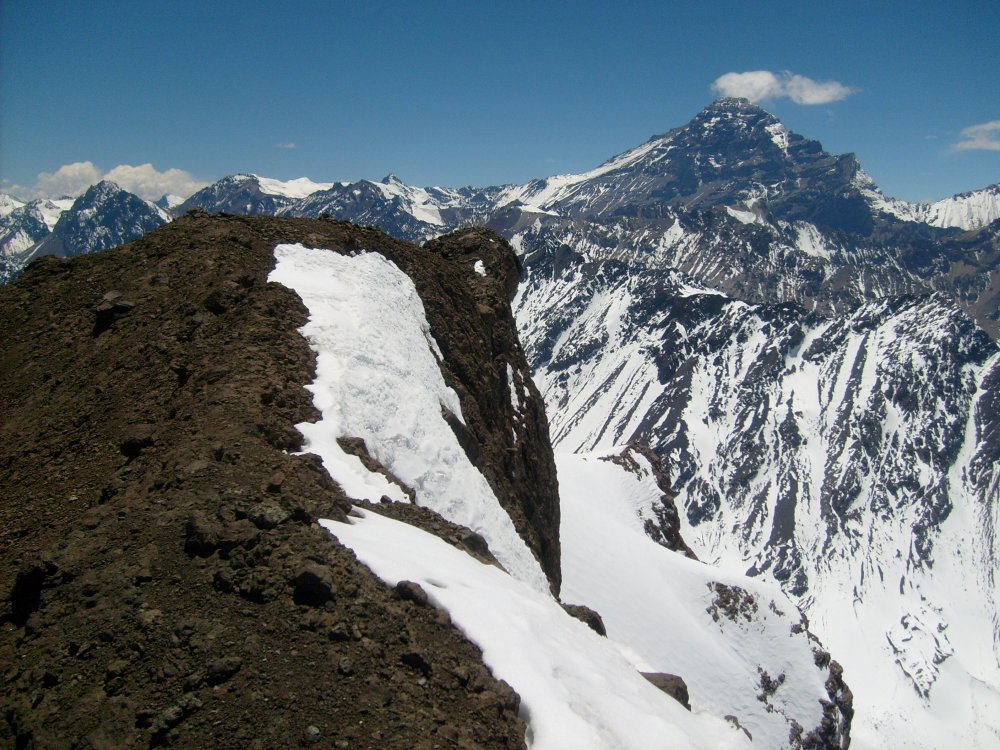
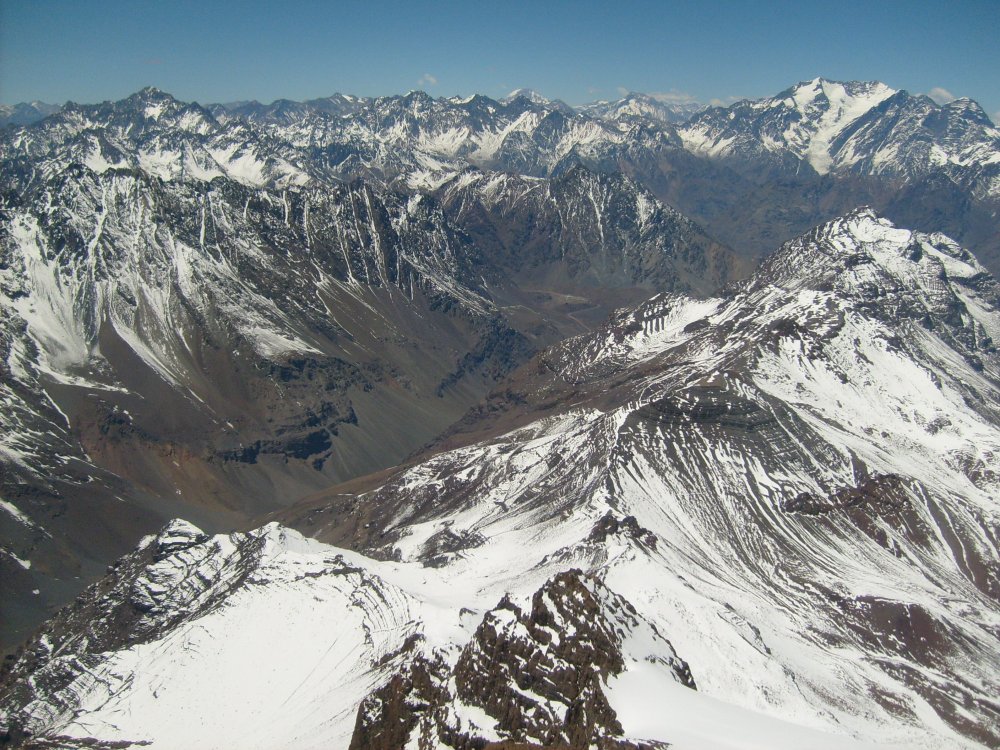
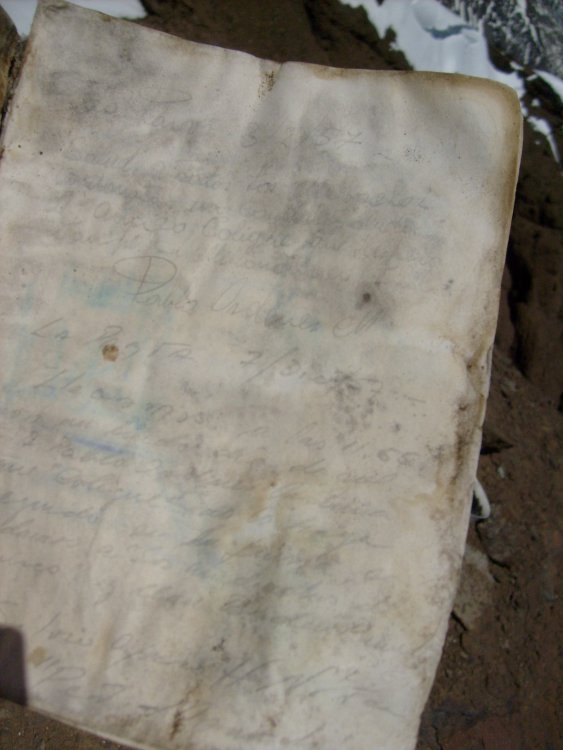
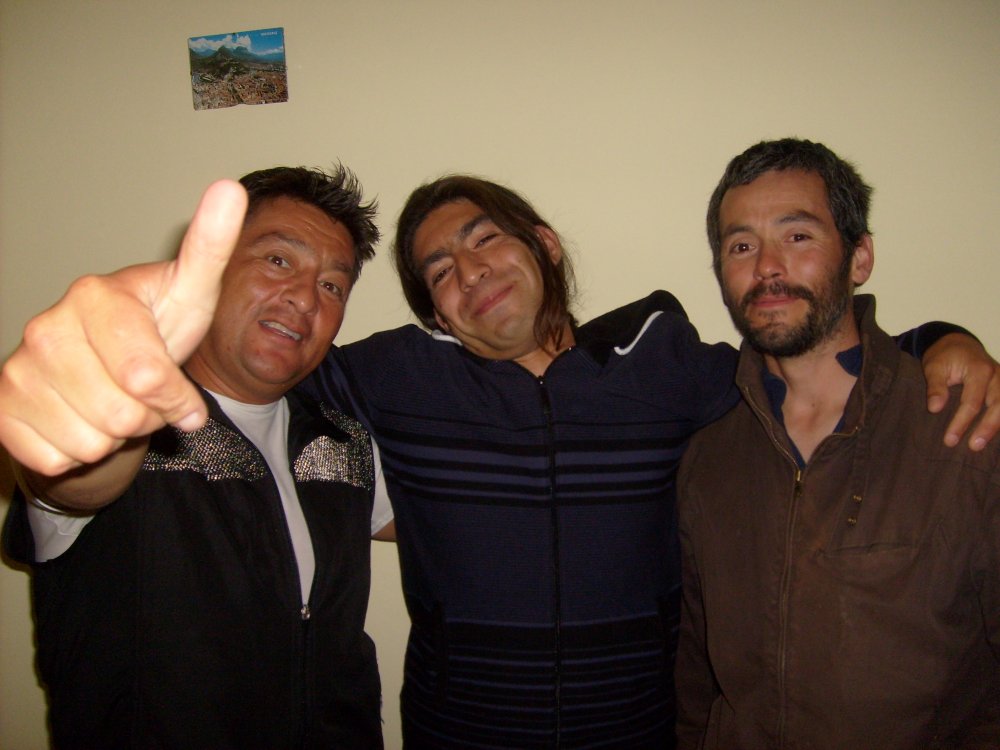
Trip: Valle Aconcagua 2010: Gloria & Parva del Inca - normales Trip Date: 09/01/2010 Trip Report: Figured I'd share some other climbs I did when I lived in Chile. These were less exciting/dangerous than Licancabur, but that's probably a good thing! Valle Aconcagua is the canyon leading into the mountains from the town of Los Andes, the same valley that takes you to Portillo and Mendoza, Argentina. Both of these peaks are north of the highway and a valley apart. Cerro Gloria (Sept 2010) The best reference for Chilean climbs is the online guidebook Andeshandbook. Here's their description of the ruta normal: https://www.andeshandbook.org/montanismo/ruta/140/Normal It's a chill walk-up. We approached in 1 day and climbed and retreated the next. Good ice climbing possibilities down low. The route heads right and around the back of the peak. Felipe and Ramiro taking a break Ramiro higher up. The big, glaciated peak on the left is Nevado Juncal, and the fortress-like peak just right of it in the foreground is Alto Los Leones. Tilted summit shot with Aconcagua on the left Walking down the choss. To the right is the big cliff on the S face of Gloria Parva del Inca (November 2010) This was the most technical mountain climb I did that year. There's a scramble section that we rappelled, and we had to climb some thinly covered low-angle ice past a hidden bergschrund. It's a fucking rad peak. The summit is perched above a monstrous cliff. According to Drew Tabke it's maybe been skied by someone? To get to this one you go one valley deeper towards Mendoza and head north up Estero Ojos de Agua. We did this over 3 or 4 days, with 2 to approach high camp. https://www.andeshandbook.org/montanismo/ruta/253/Ruta_de_Hielo The tip of the peak visible from the parking lot Better views higher. Like everything in the Andes, the scale is hard to comprehend. Sick views of Juncal and los Leones, camp 1! Jagged ridgeline above camp My best shot of the route, next morning. We would gain the glacier plateau on the shadowy left side, then pass through the rock choke and gain the left of the summit ridge, which we'd take to the summit. We moved camp close to the base of the peak and started on the morning of the 3rd day. Brewing up in the tent with Victor. I only this year got rid of this sweet BD Mirage tent. Good tent but too cold for the Andes. Looking down on Ramiro and Victor after the scramble We threw a rope down for Daniel, who wasn't psyched on the scramble as much. The crux bergshcrund crossing, pretty hard ice underneath the powdery snow. We didn't rope up mostly from ignorance about the proper techniques. I remember being pretty comfortable on the ice, probably from having hiked around in snow and in ski boots for a long time. Above the choke we climbed straight up until we encountered more ice, then backtracked and traversed off climber's left to the rocky ridge. Summit! Aconcagua dominating behind. The valley with Portillo is the next over, but Laguna del Inca is out of sight. Big cliff right underneath the summit. You can see the highway and border facility in the distance, and of course Juncal and a bunch of other big peaks. My guess is the big one in the middle is Marmolejo, the furthest S 6000m+ peak, but I'm not sure about that. It doesn't come out in my photos, but we could barely make out the sea to the W. Summit register was a big book with entries going back to the 50's Heading back down with the homies. It was fairly steep cramponing in the choke I stepped into a crevasse and my leg went in up to my waist! Luckily it was only 6" wide or so. I was so clueless! Not roped up of course. After this find, I headed back to our uptrack. Now, I recognize it was pretty damn dangerous conditions to travel unroped... powdery 6-12" on top of some old snow just perfect for hiding the crevasses. It might have had some avy danger, too, although it hadn't snowed in a while and the powdery snow up top I think was just weak, faceted old snow. Wish I had a picture of another axe I borrowed. It was hand-welded out of steel, with a square shaft! I think I left that at home and just brought my massive 80 cm traditional CAMP axe. Rappelling the rock step Not much I remember about the trip except that we were so late getting back to the truck that Daniel was pissed! He had a wife and kids to get to and a real job to work the next day. Here's Daniel, Victor, and Carlos at my going-away party a month later Gear Notes: axe, crampons, friends Approach Notes: use Andeshandbook


 1 point
 -
What a great way to turn up the adventure for West Mac! Glad you got this TR up, and I especially love the photo that is right after "Steve with the veggie belays"!1 point
-
S6302701.AVI video from the summit Ojos de Agua panorama
 1 point
 -
awesome pics...you hard dudes with the out of print yellow pads! thank you!1 point
-
Thanks for the write-up and fine photos! Looks like you had a grand time.1 point
-
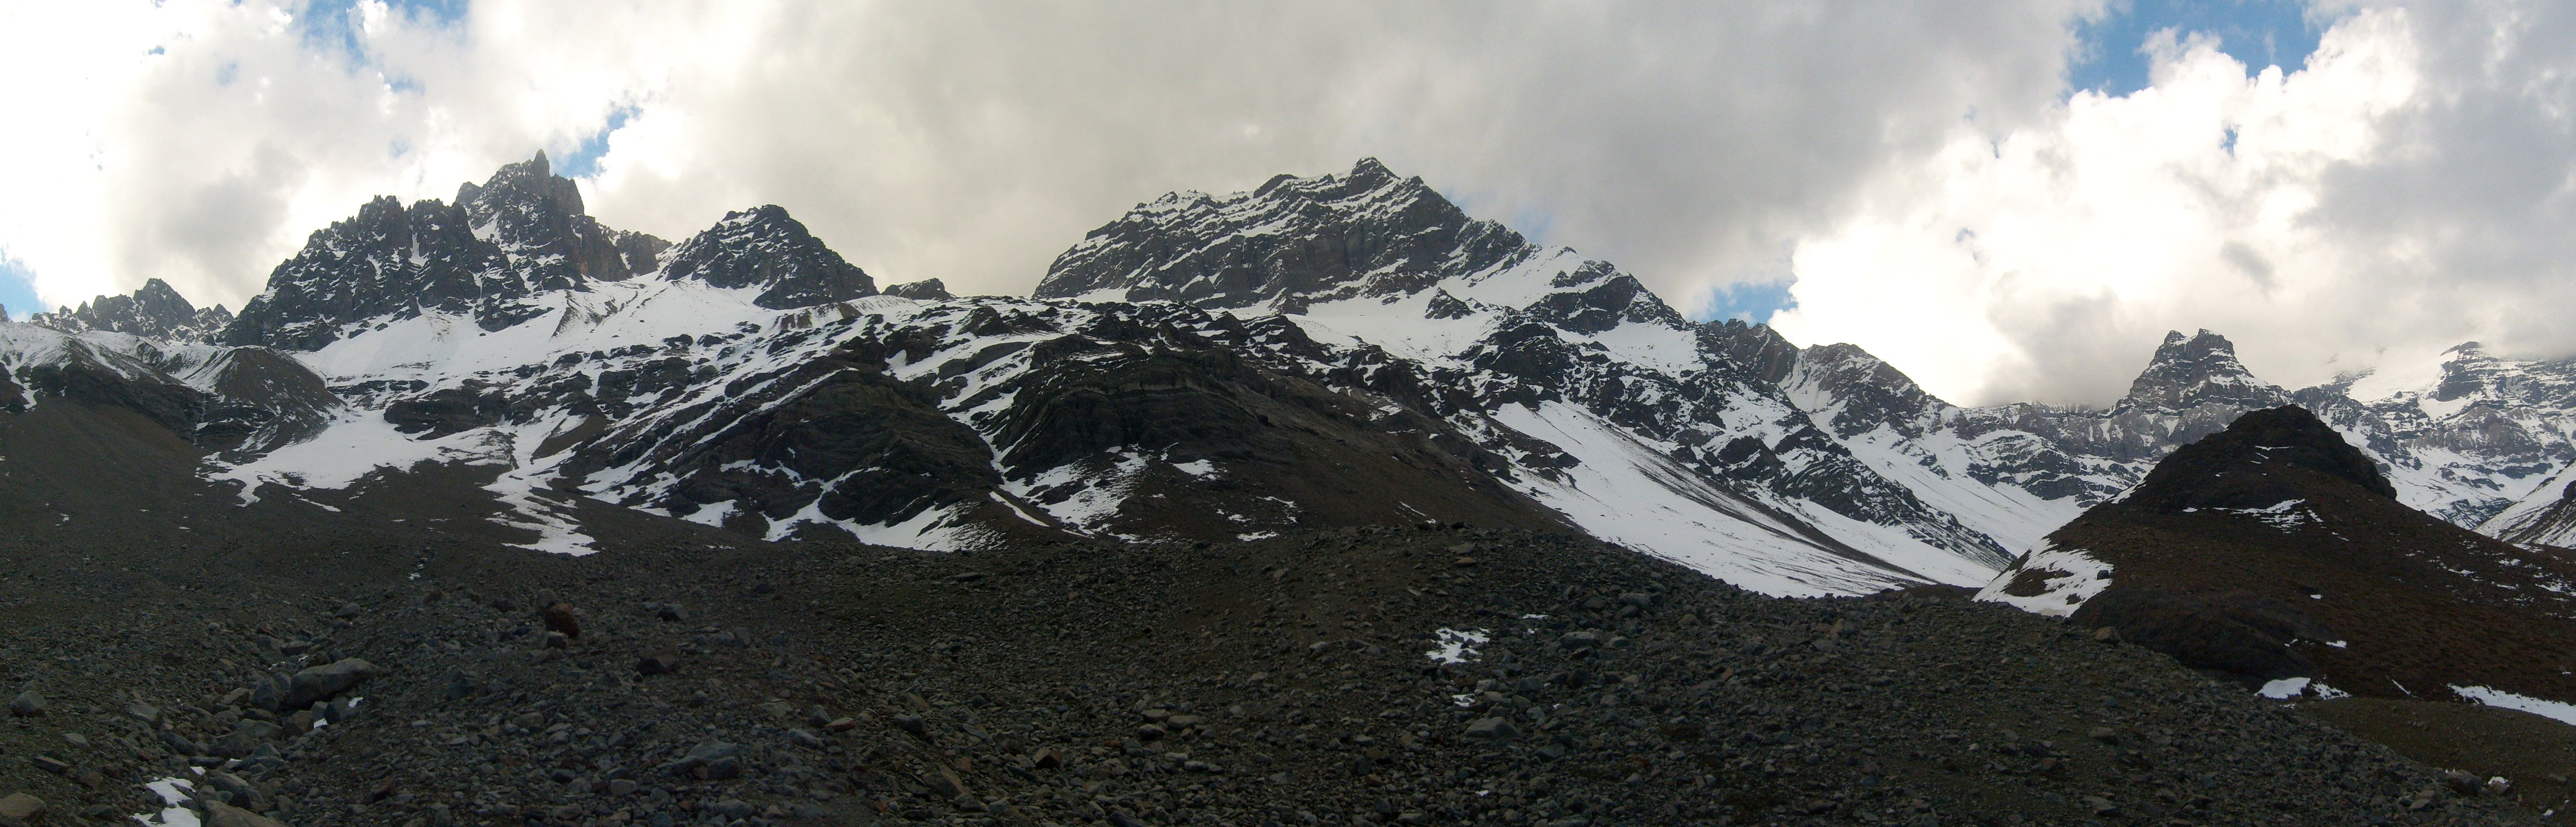
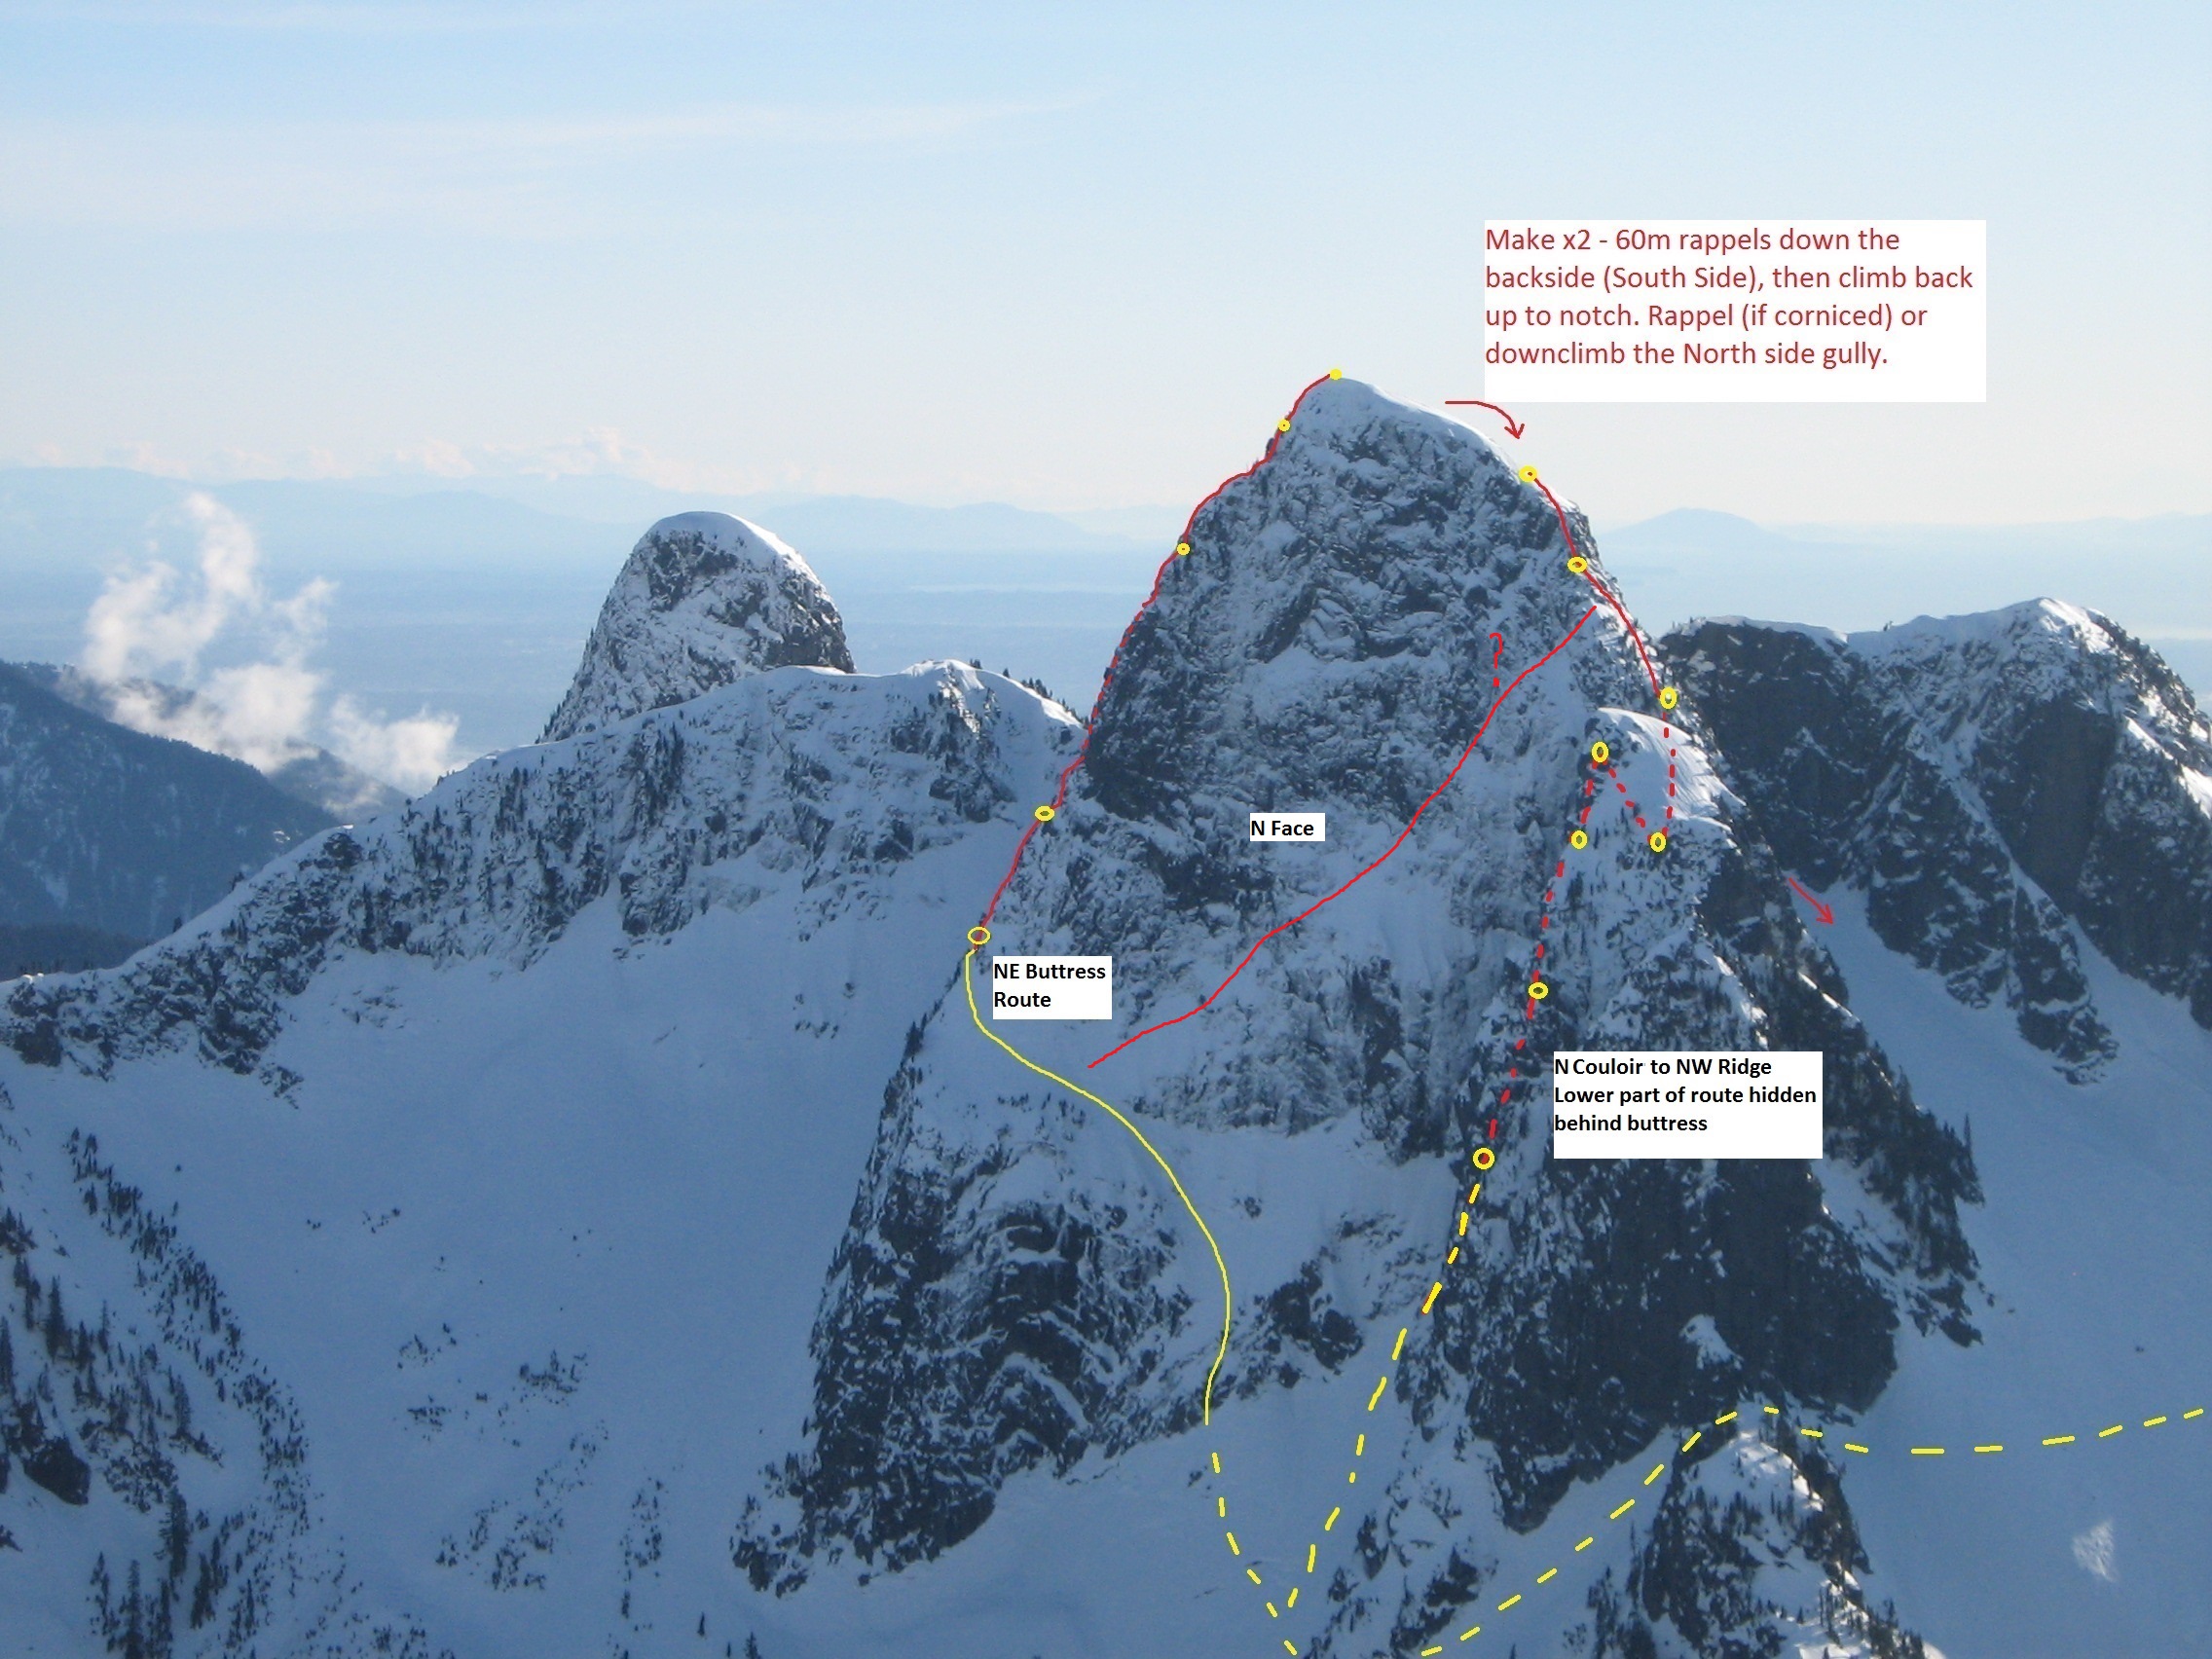
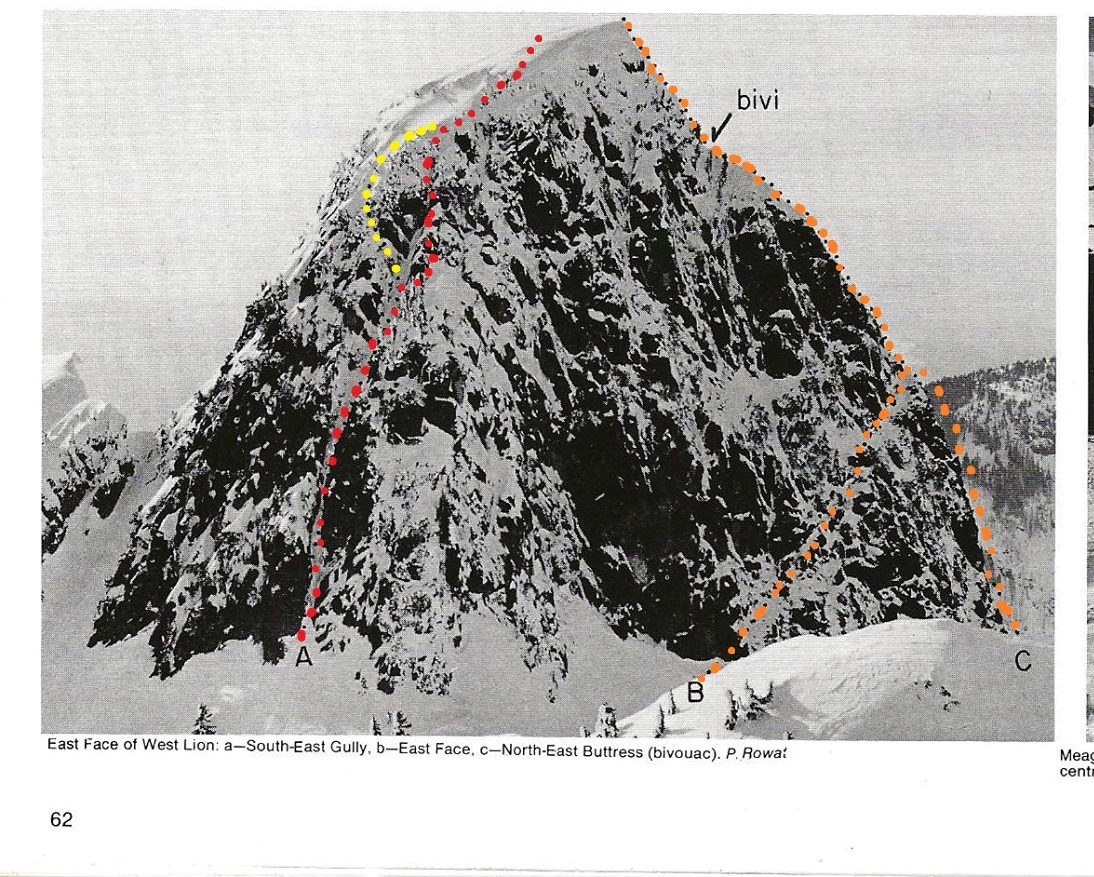
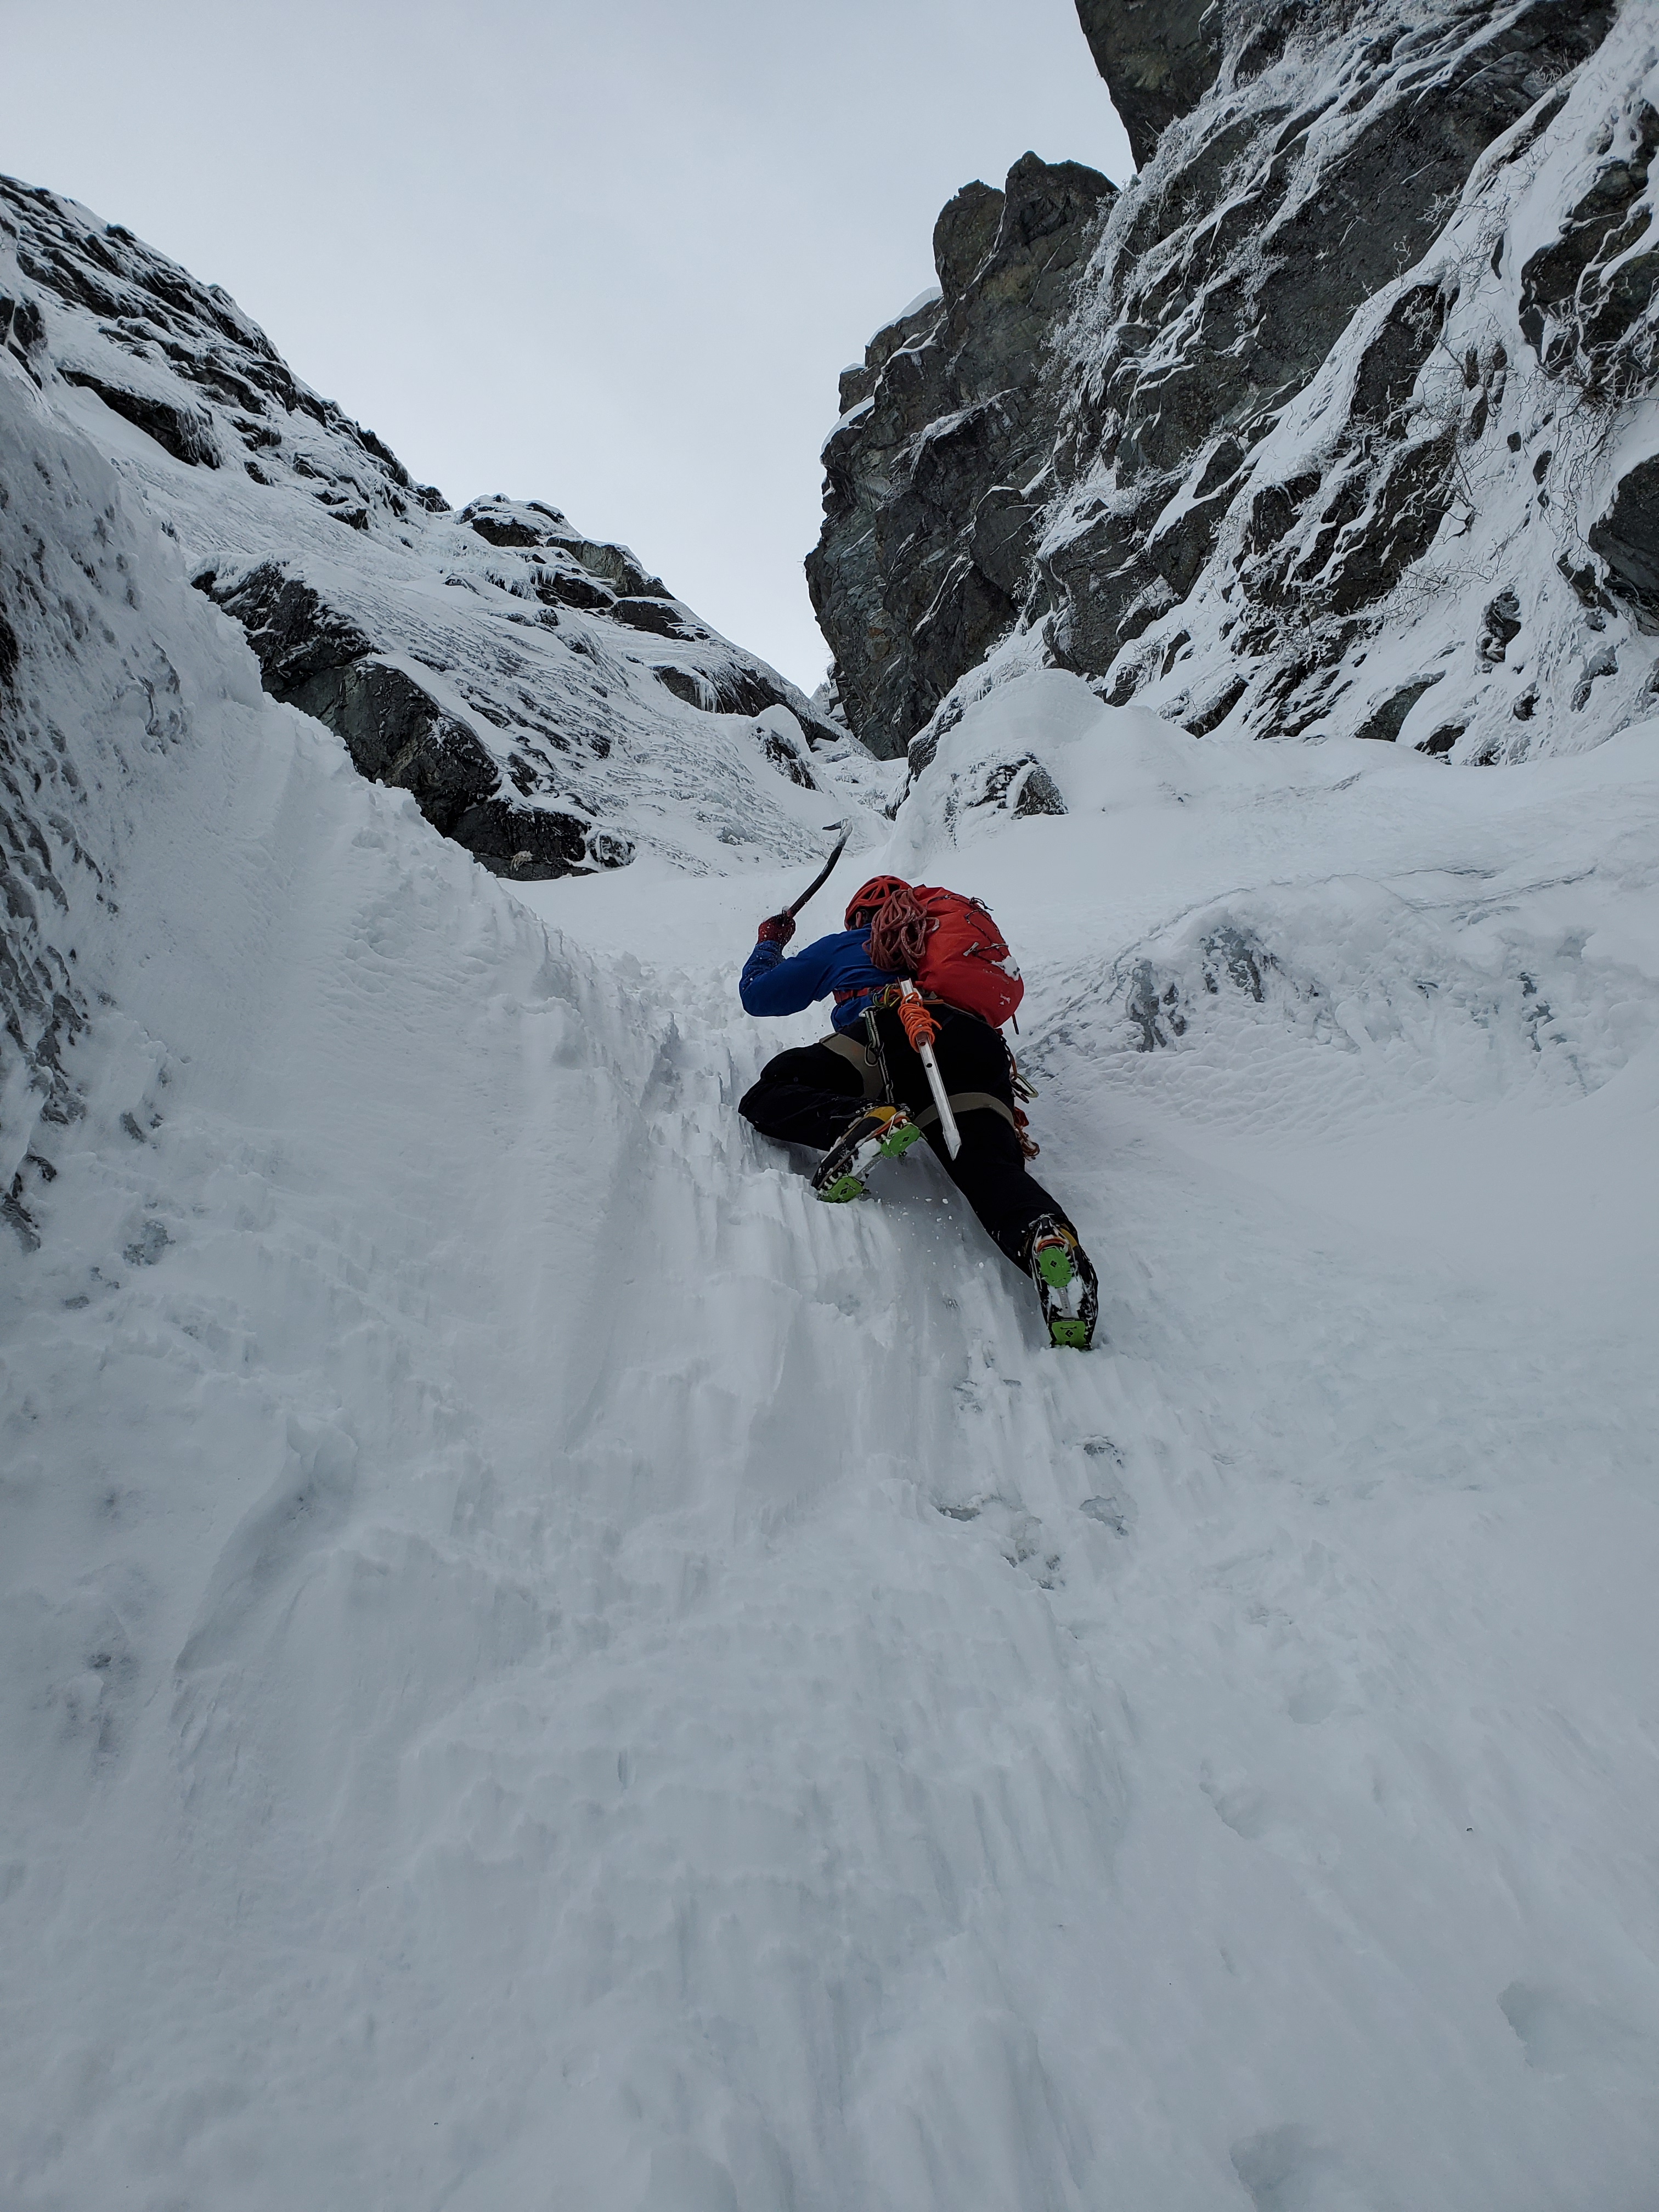
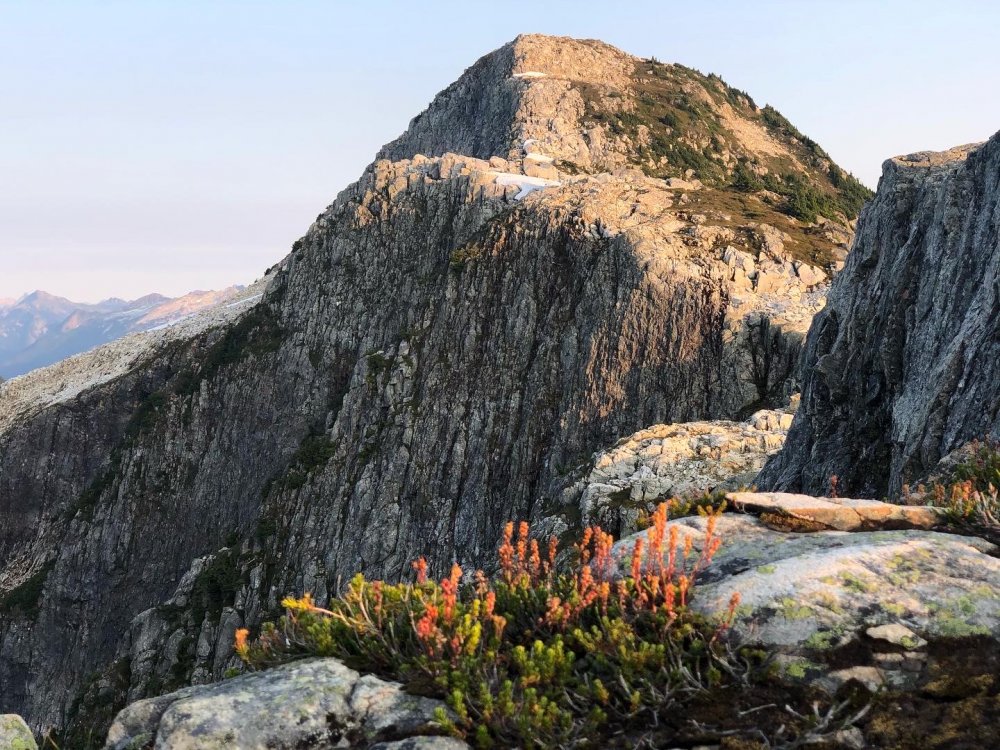
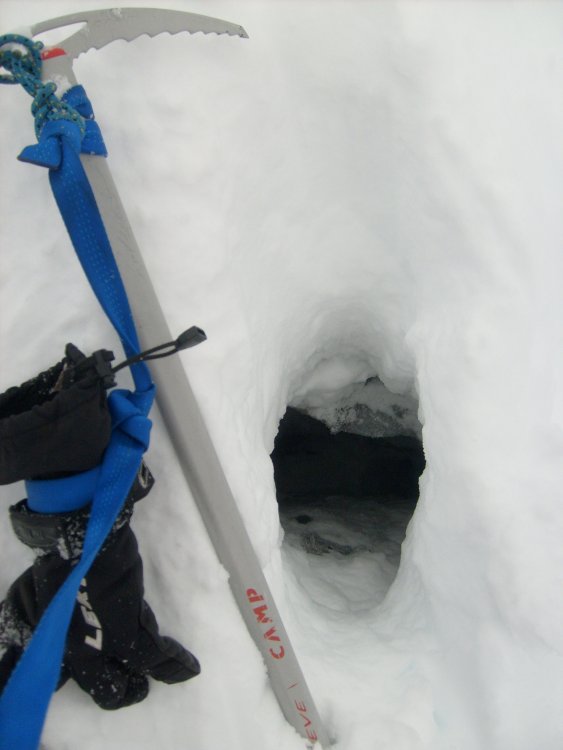
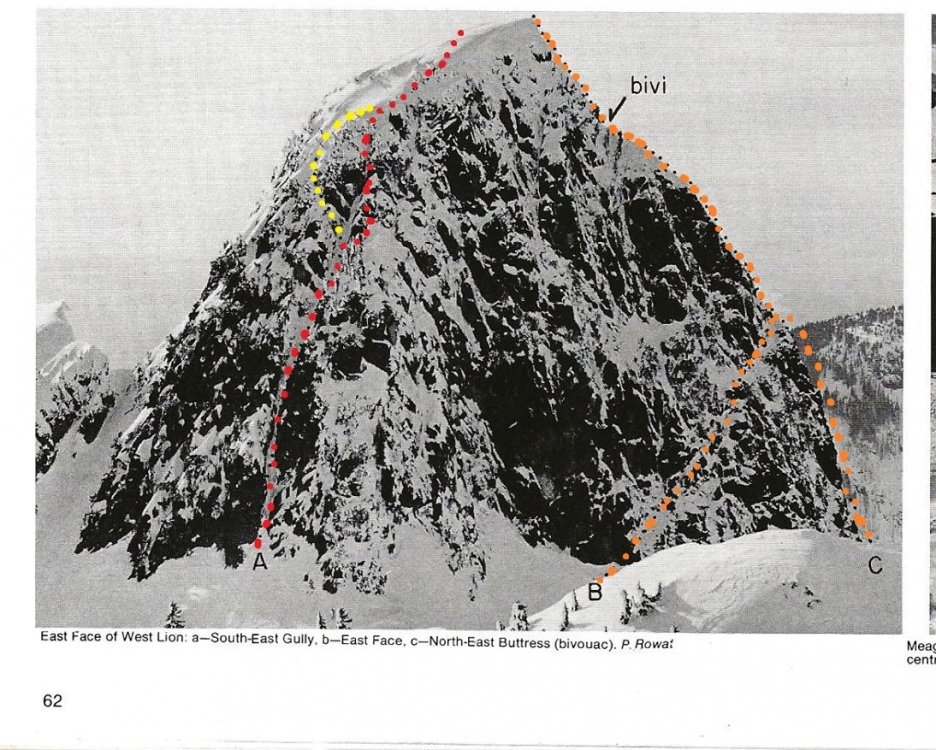
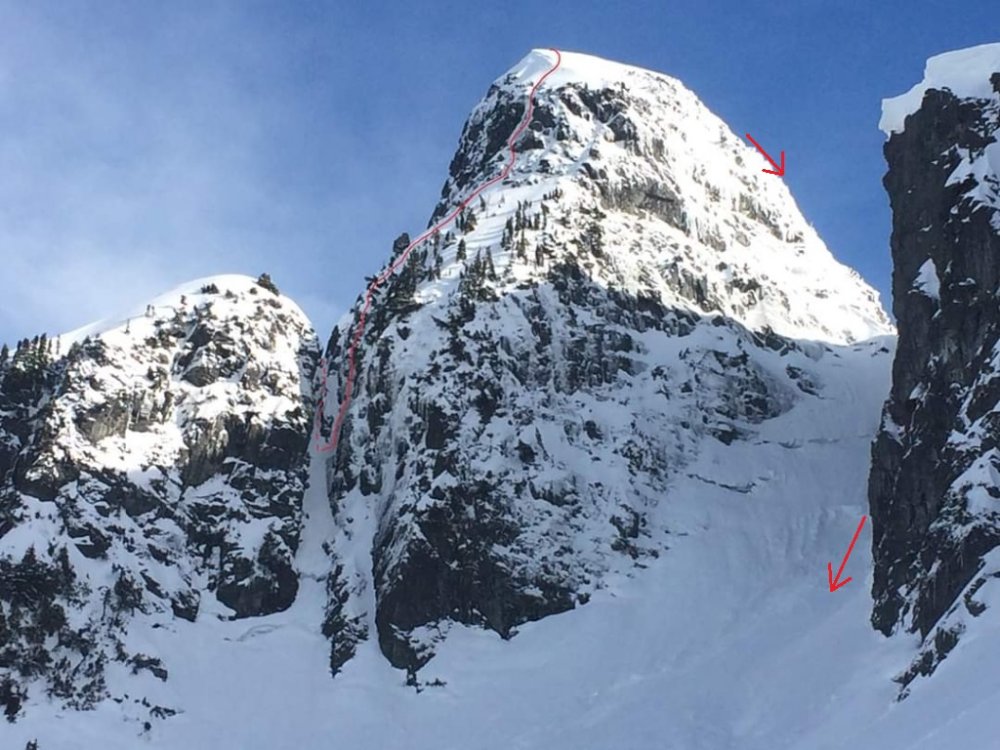
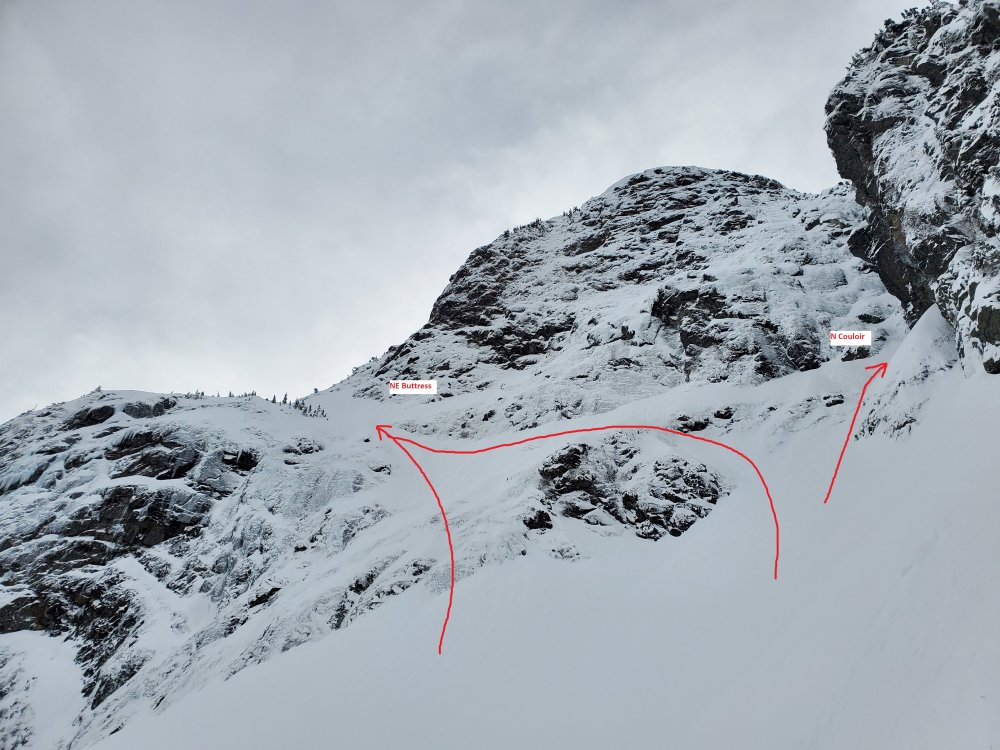
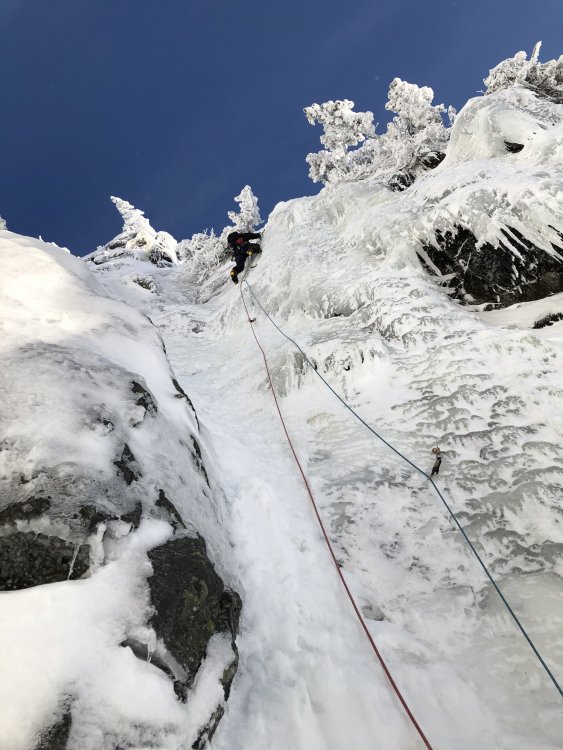
Trip: West Lion - Winter - North Couloir to NW Ridge Trip Date: 02/09/2020 Trip Report: This trip report is 2 months late but wanted to post this for folks in the future looking for info on this route/or the West Lion in general. On Feb 9 Richard, David and I Climbed the the West Lion via the N couloir and then the NW ridge. We were around 14hrs car to car which seems pretty average for winter routes up on the lions. Some faster groups do achieve 8-12hr range c to c. Nevertheless winter routes up here are always a longer day. For general info I'm aware of the following winter routes on the West Lion, there could be more... SE Gully - WI4- - 140m NE Buttress - AI3/M4 - 400m NE Buttress with East Face Approach - Difficulty Unknown North Face - Hard (Line below is approx) North Couloir to West Ridge - AI4- - 400m North Couloir to West Ridge Direct (no rappel) - M4/M5 addition? Photo topo of the North side routes and approach on West Lion Photo posted by Don Serl on Westcoastice Facebook group, outlining the East side routes on the West lion including a variation entrance onto the NE buttress in orange. I climbed the SE gully via the Red line, although I notice the original line in yellow goes out left. North Couloir to NW Ridge. Upper part of the route as viewed from the approach basin. Descent gully noted on the right. Looking up the North side of the West Lion while approach the North Couloir. Richard soloing up the lower portion of the North Couloir. Photo of me leaving the comfortable cave on Pitch 2 in the Couloir Dave coming up pitch 2 in the Couloir. Richard on pitch 3 in the Couloir. Photo of me on the 4rth pitch just after rapping from the notch Richard leading the last section of ice on pitch 6. Dave and Richard walking up the last portion to the summit with epic views that evening toward Howe sound/Strait of Georgia. Descending the gully back to the approach basin in fading light. On Feb 9 no flotation was needed on the approach, although the north side had much deeper penetration (crotch deep coming into gully). After being up to the lions area well over a dozen times in the winter I have concluded it is more likely then not, that flotation will be needed/helpful on the approach to the basin. FYI I have found that the approach trail up is too steep to skin up efficiently, and offers a very short (not worthwhile) ski descent. Conditions are very fickle for north shore alpine ice. When routes come in shape they seem to last only a couple weeks per season. I feel this line is similar in overall difficulty/ exertion as the winter NW buttress but this has more full length ice pitches then the NW buttress. I don't recall reading the route grade for the N Coulior/West Ridge but these are my thoughts on the difficulty (certainly conditions dependent): Pitch 1 - AI2+ - 70m P2 - AI3 out of cave - 60m P3 - AI3 step with vertical snow just below the notch - 30m (40m Rappel from notch on shrub to next continuous ice flow) P4 - AI4-/3+ - 50m P5 - Steep snow to base of last ice pitch - 70m P6 - AI3 - 60m Walk to summit 14hr car to car Cheers, Henrik Hinkkala Gear Notes: x2-60m half ropes, 10 extendable slings/runners (used all), 4 nuts (didn't use), 9 screws most 13-17cm (Used 7, many got rocked), 3 pitons + spectre (used all), 5 cams (blue/ yellow/ orange metolious, red ultralight, red link cam- used all but blue/ yellow), 1 picket (used twice) Approach Notes: Follow Lions Trail up to Lions Basin


 1 point
 -
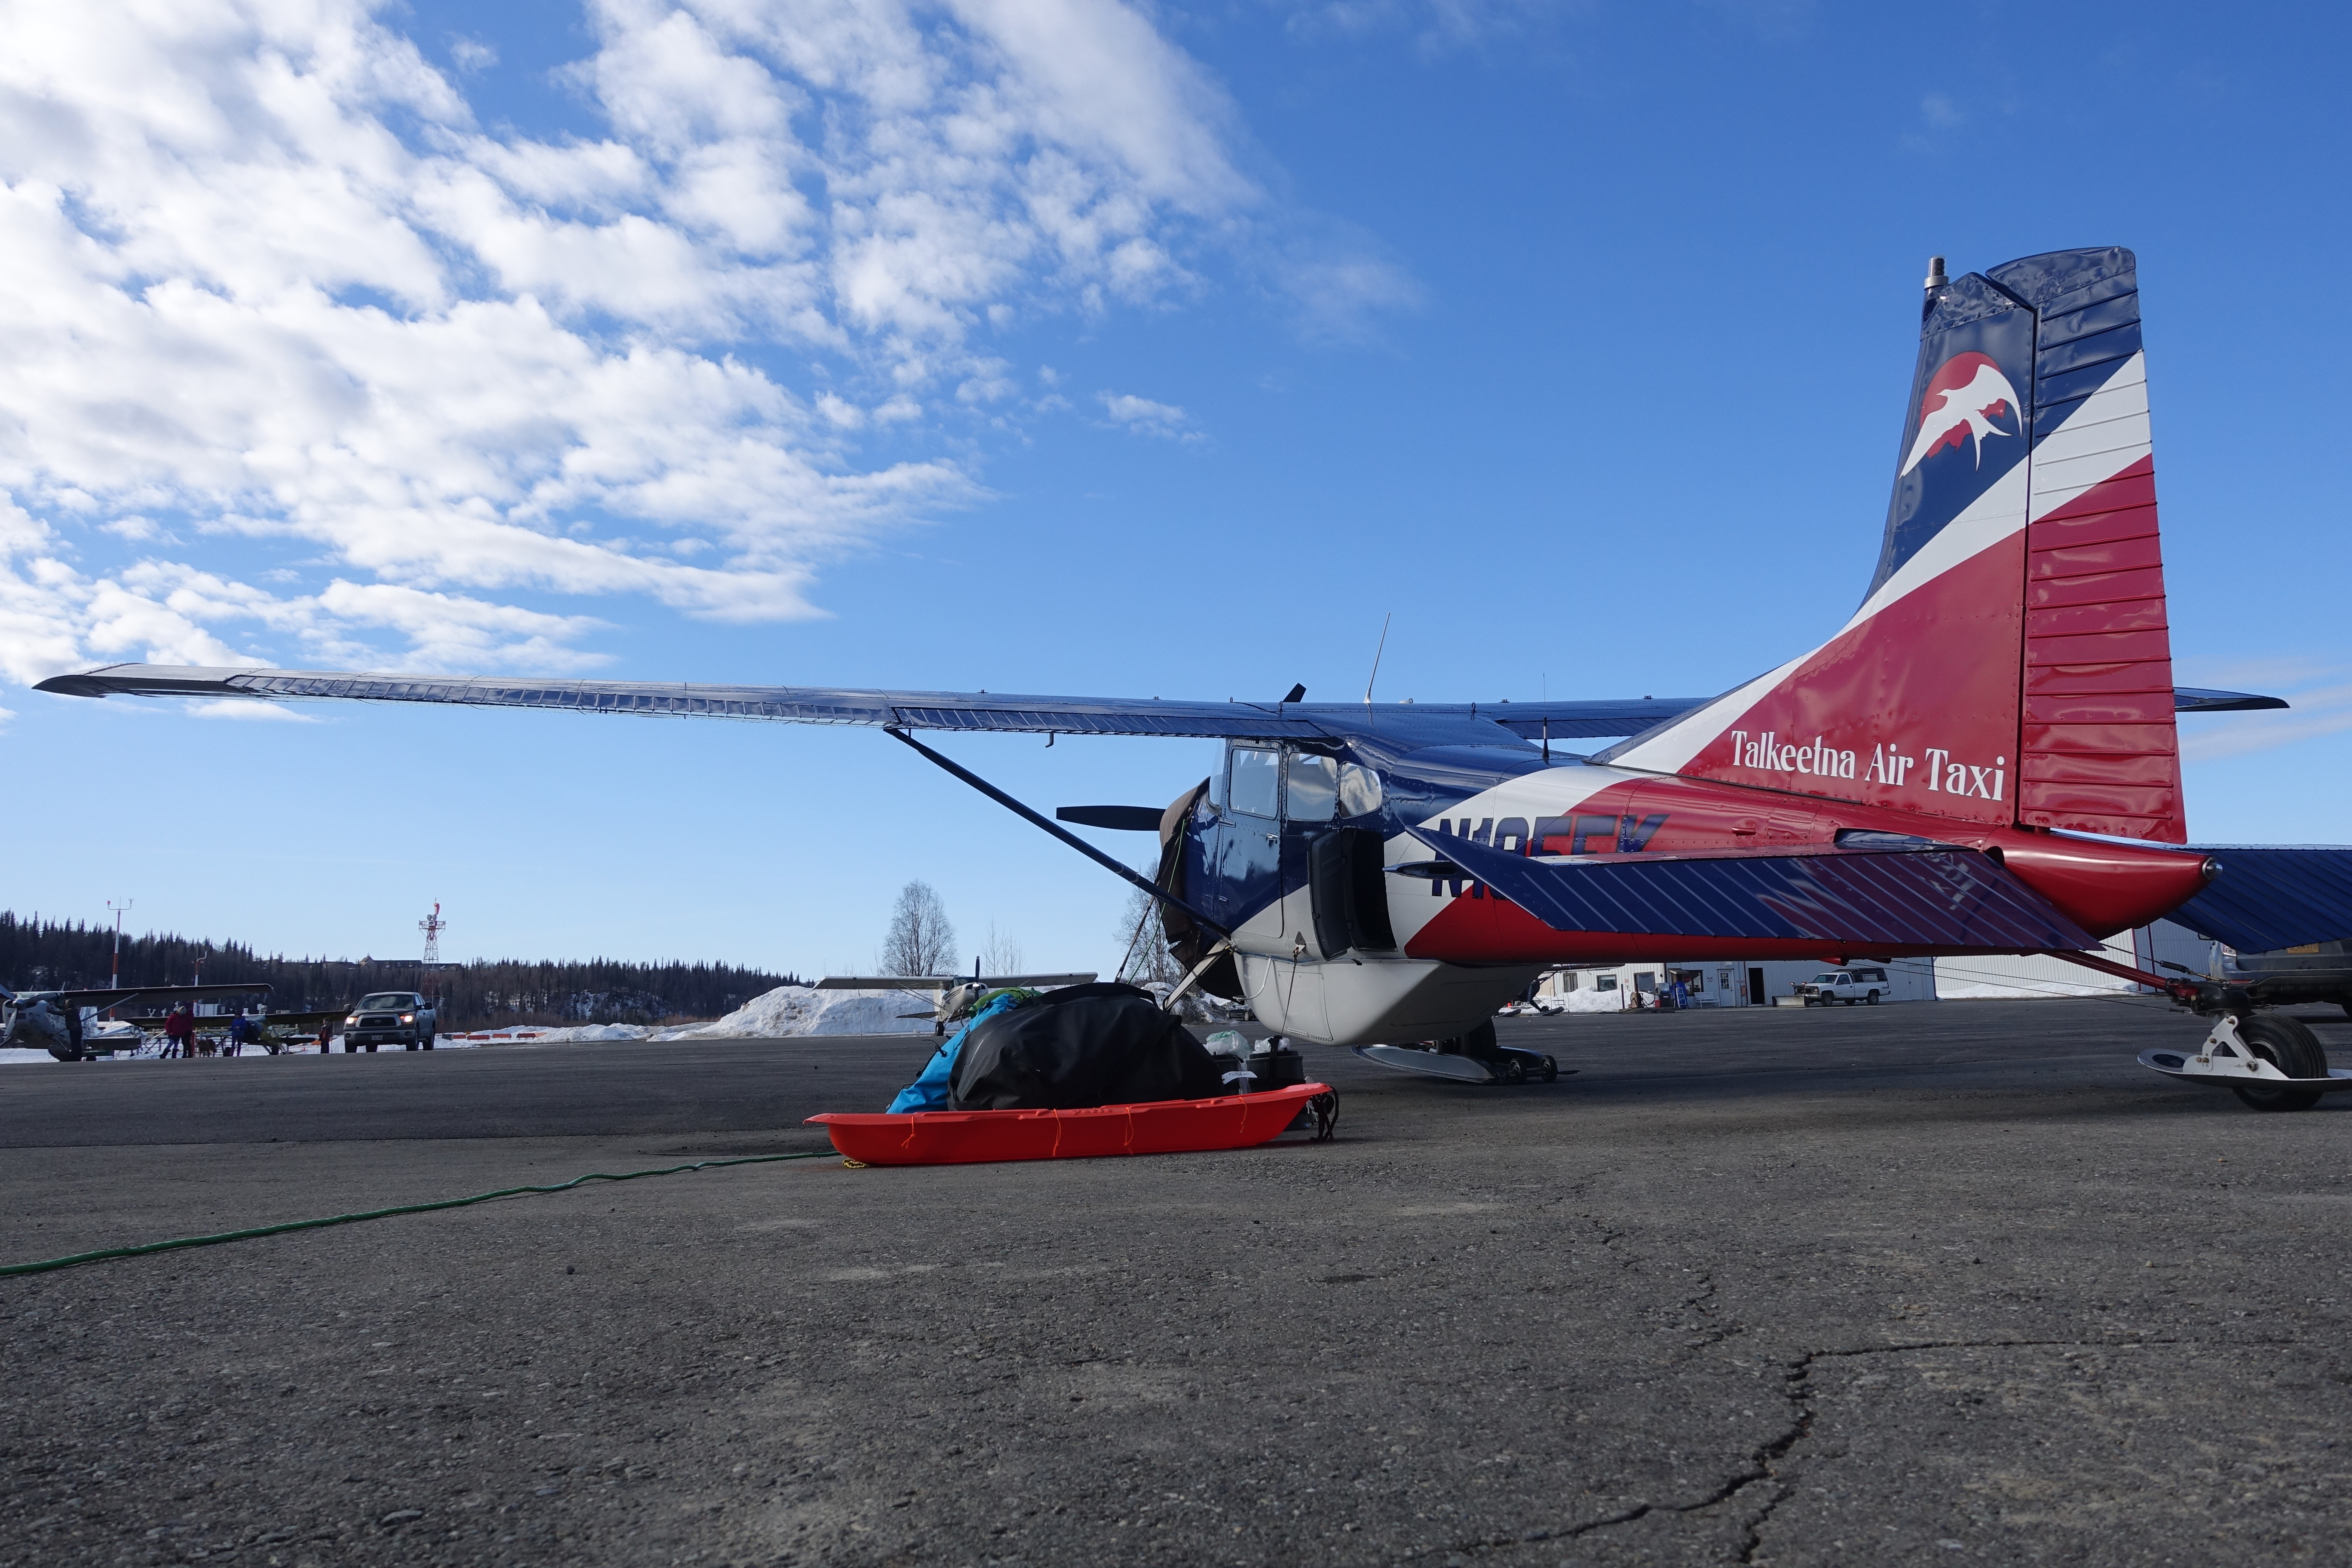
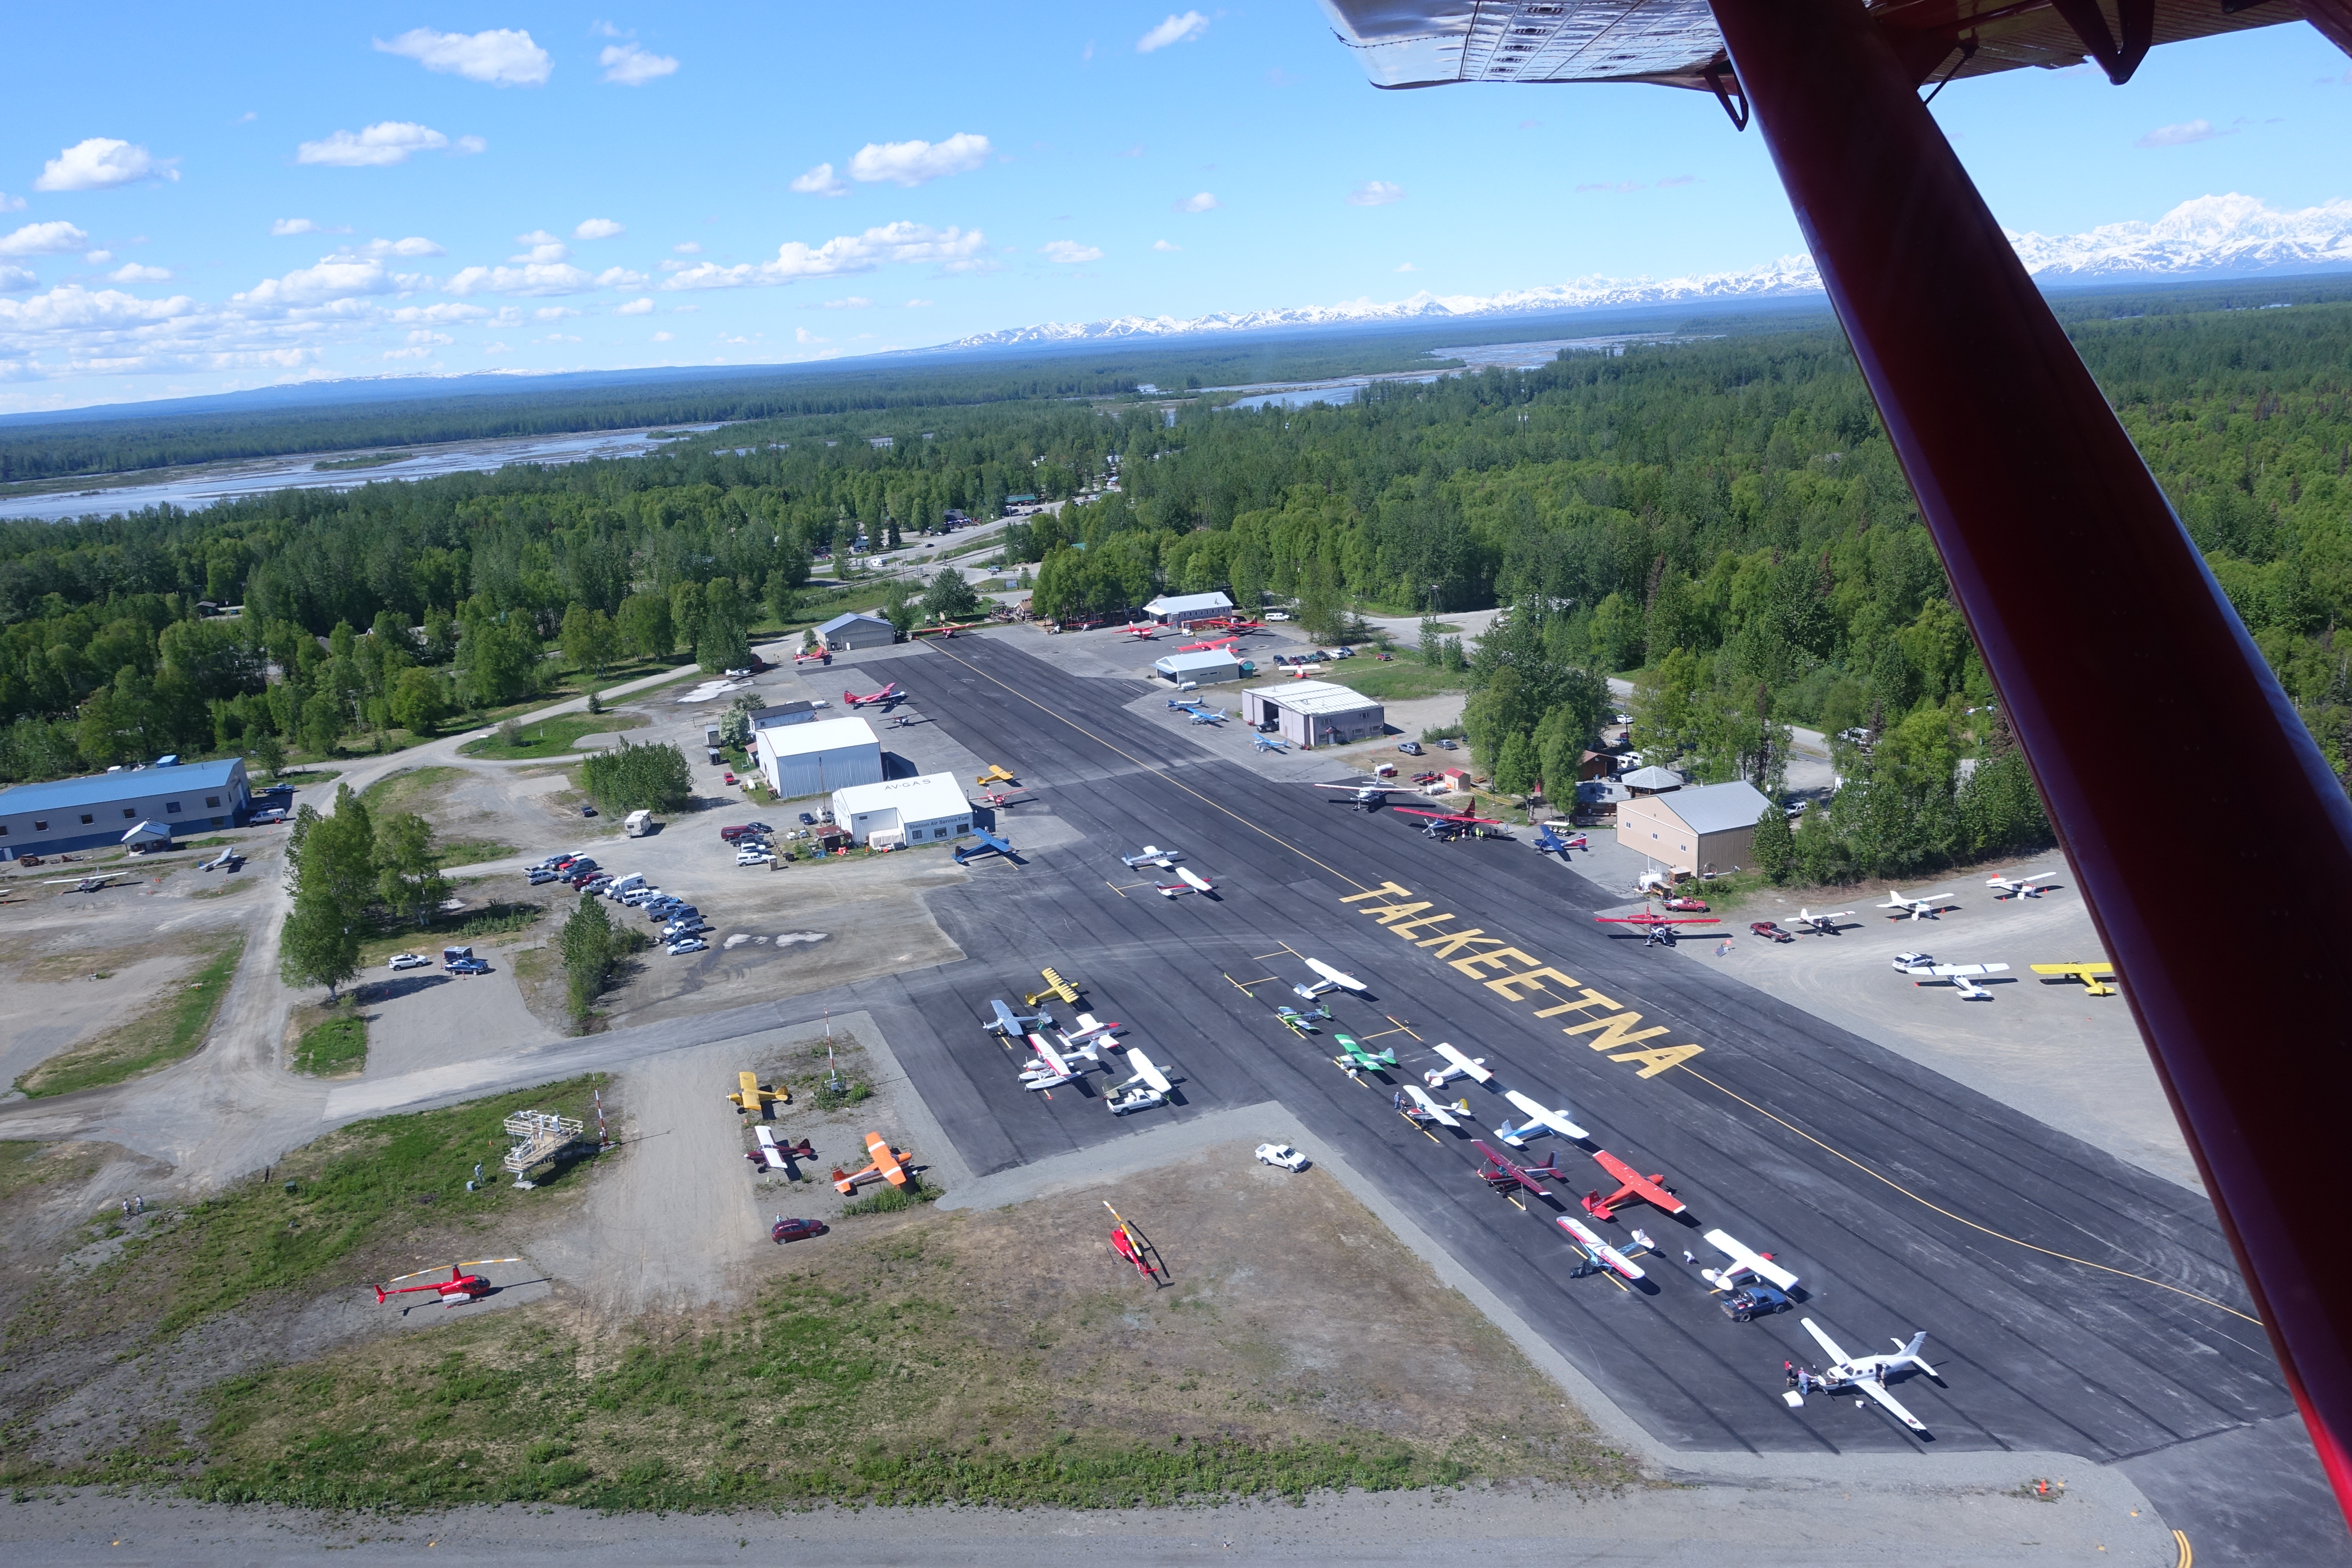
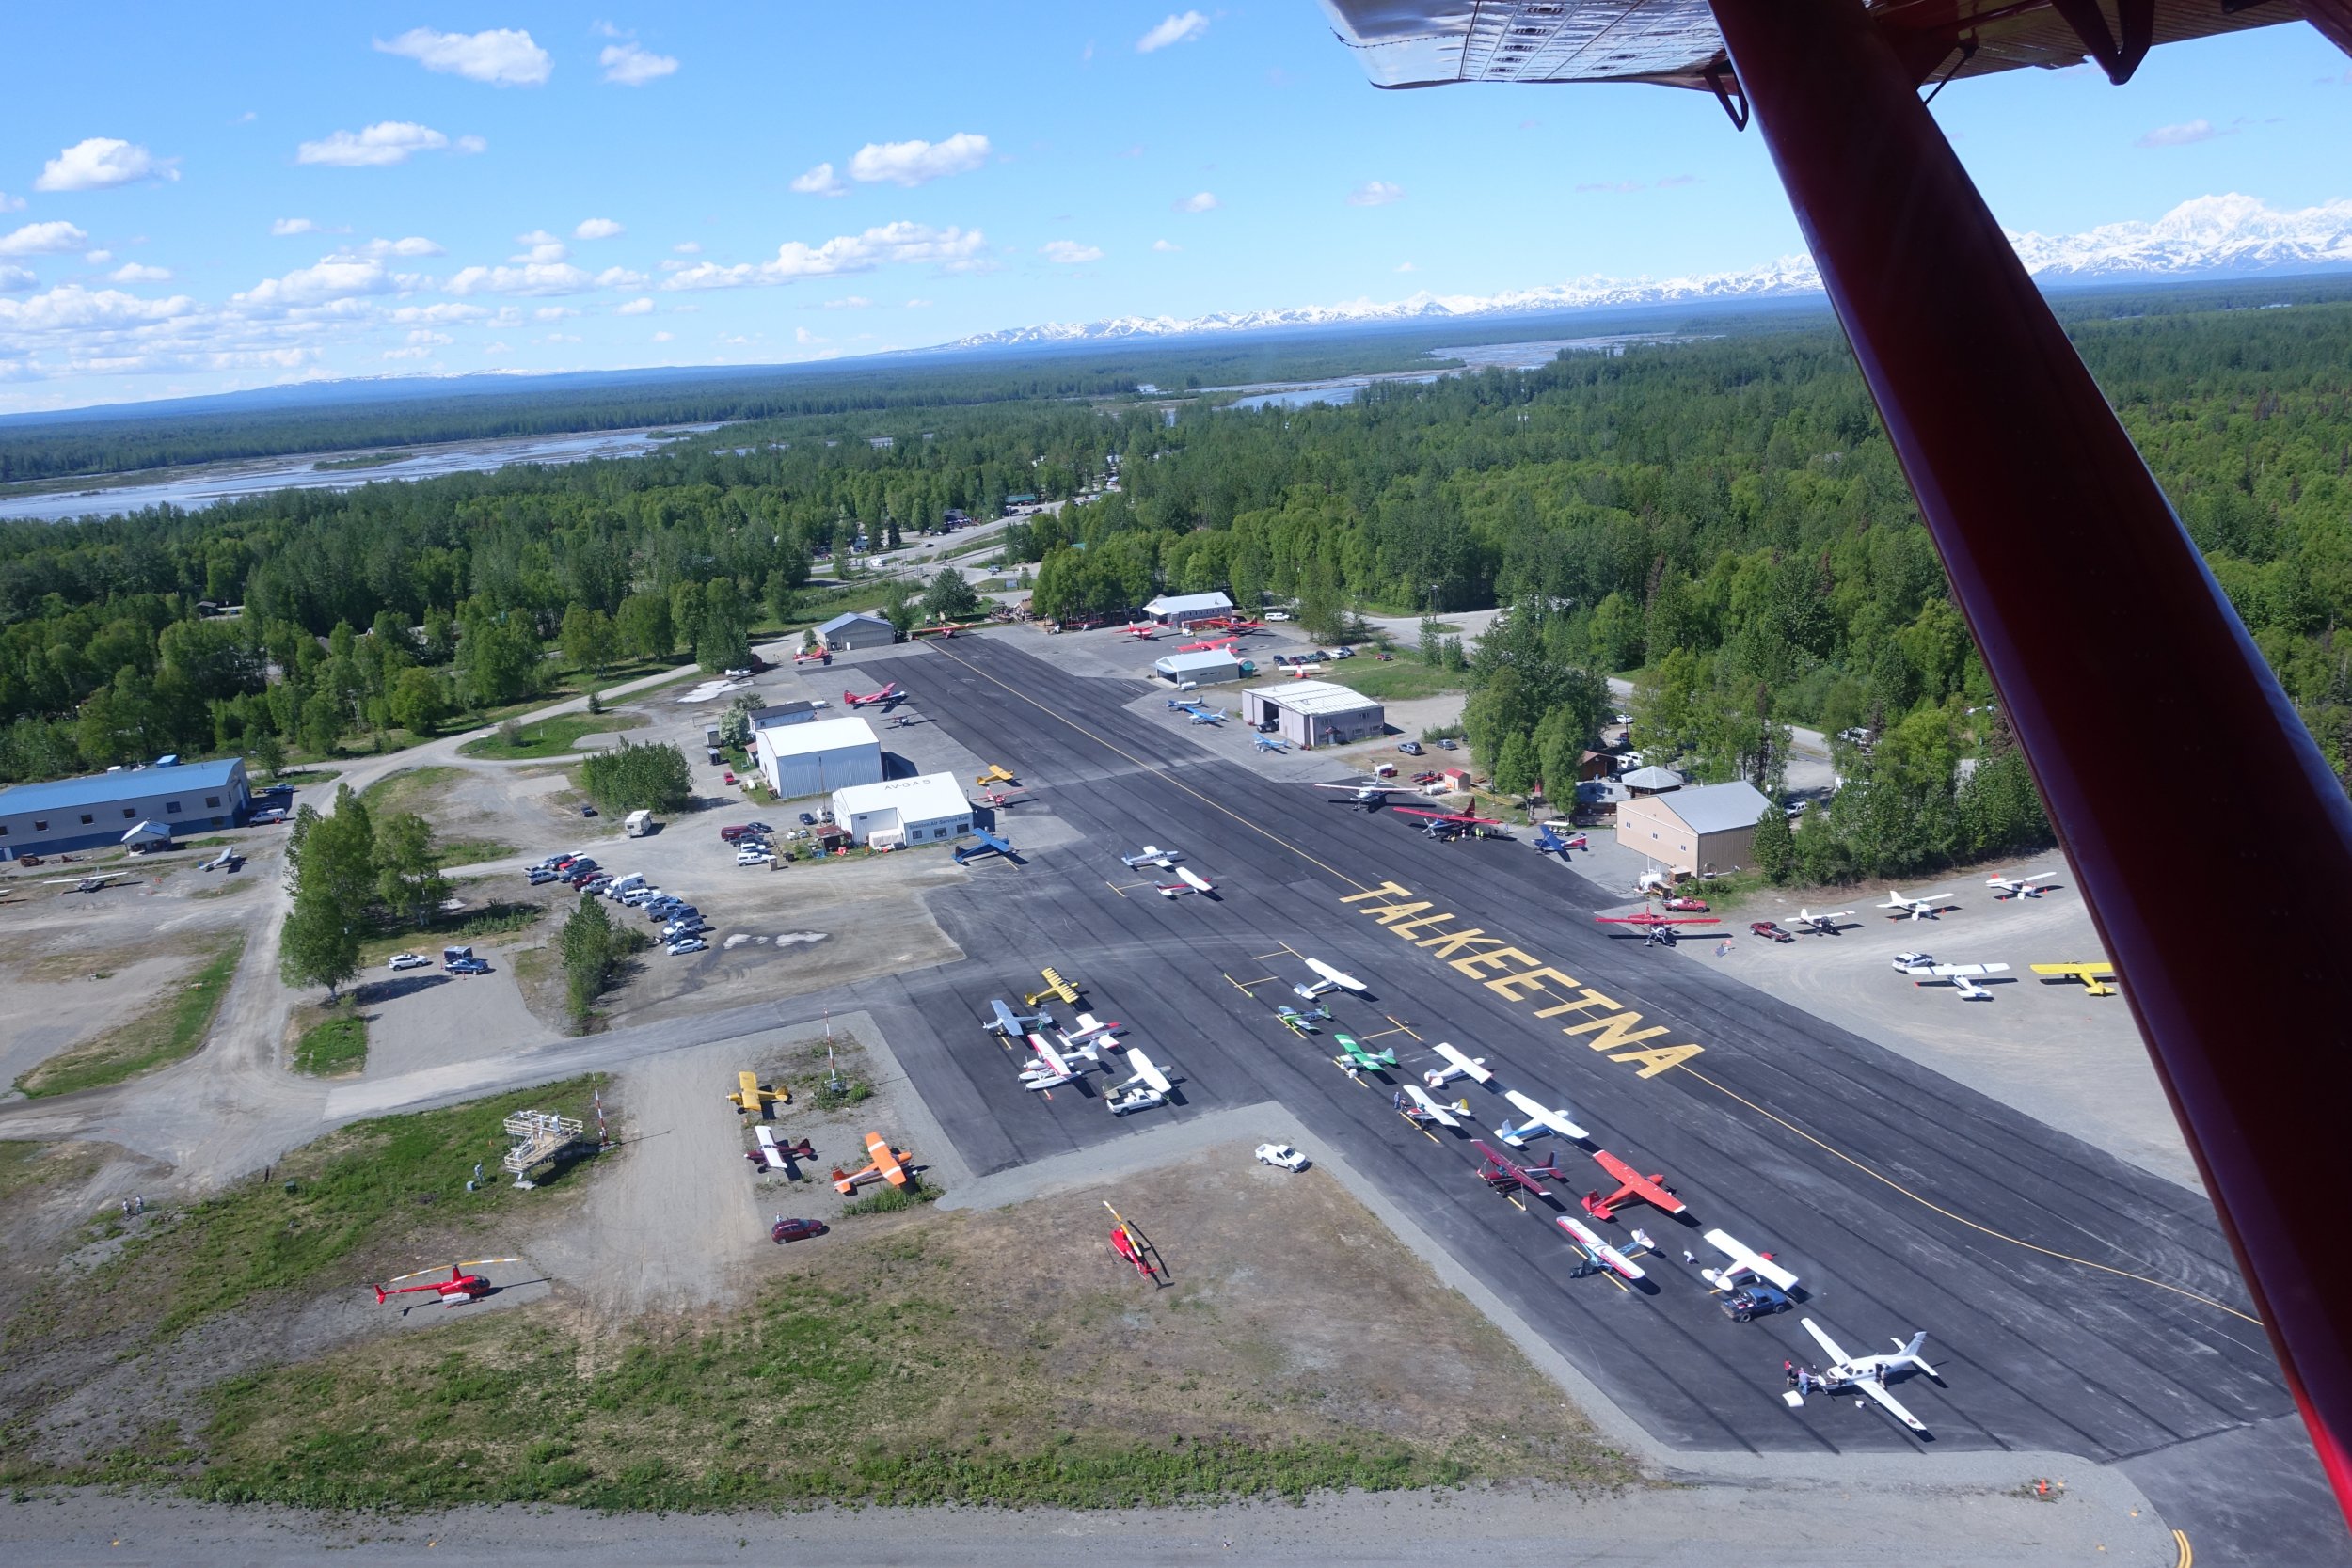
Trip: Moose's Tooth - Shaken, Not Stirred Trip Date: 04/15/2018 Summary: Ascent of Moose's Tooth to the summit via the route "Shaken, Not Stirred" 19 hours camp to camp with Doug Shepherd April 15th 2018. Details: Alaska. Finally. After multiple trips to Alaska every year since 2009 life priorities had forced me to take a "leave of absence" since my last trip in March of 2016. It was nice to finally return and with Doug Shepherd, someone who I've done numerous trips with including my very first trip to AK in 2009. Various existing commitments limited us to a 3 day trip but weather and temps the week leading up suggested we would likely find something we could climb during the short window. I grabbed Doug at ANC early Saturday morning and we blasted for Talkeetna. After the usual shenanigans (weight in, repack) Paul zipped us in. After looking at possible objectives on the flight in we settled on Shaken, Not Stirred on the Moose's Tooth. Though I had climbed the Moose's Tooth in 2010 it was via Ham and Eggs. I'd always wanted to climb Shaken but had never seen it in. A SLC team was coming out at the same time we were getting dropped off and had attempted it the day prior. They had bailed at the crux due to lack of ice but after quickly looking at their pictures we thought we should at least give it a try as it appeared like it would go with some mixed climbing. We departed camp later than normal on Sunday (~6 am) to allow temps to warm slightly; this allowed us to wear single boots. I took the first simul block to just below the narrows where Doug took over. Doug fired a few amazing pitches that took us to the crux which was ice free but Doug was able to safely protect and find a mixed way through the crux. Following the pitch I have to say it was a very impressive lead. Some more climbing took us to the Englishman’s Col where we enjoyed an extended hydrate + coffee break before heading to the true summit. I will say the terrain between the Englishman’s Col and the true summit is a lot of up and down with at least two rappels and nearly constant crevasse and cornice danger. "Enjoy" We tagged the summit sometime after sunset but before dark; Doug's first time and my second. We managed to start the rappels down Ham and Eggs before it got truly dark so at that point it was just hitting rap anchors and/or making naked threads as needed. We arrived back at camp ~19 hours later and flew out the following day, Monday, before heading back to the lower 48. Good times. Gear Notes: partial set of nuts, single set 00-2 c3, double set 0.4 -> 4 ultralights, 10 laser speed light ice screws, 3 micro trax, single + tag line Approach Notes: Talkeetna Air Taxi is the best


 1 point
 -
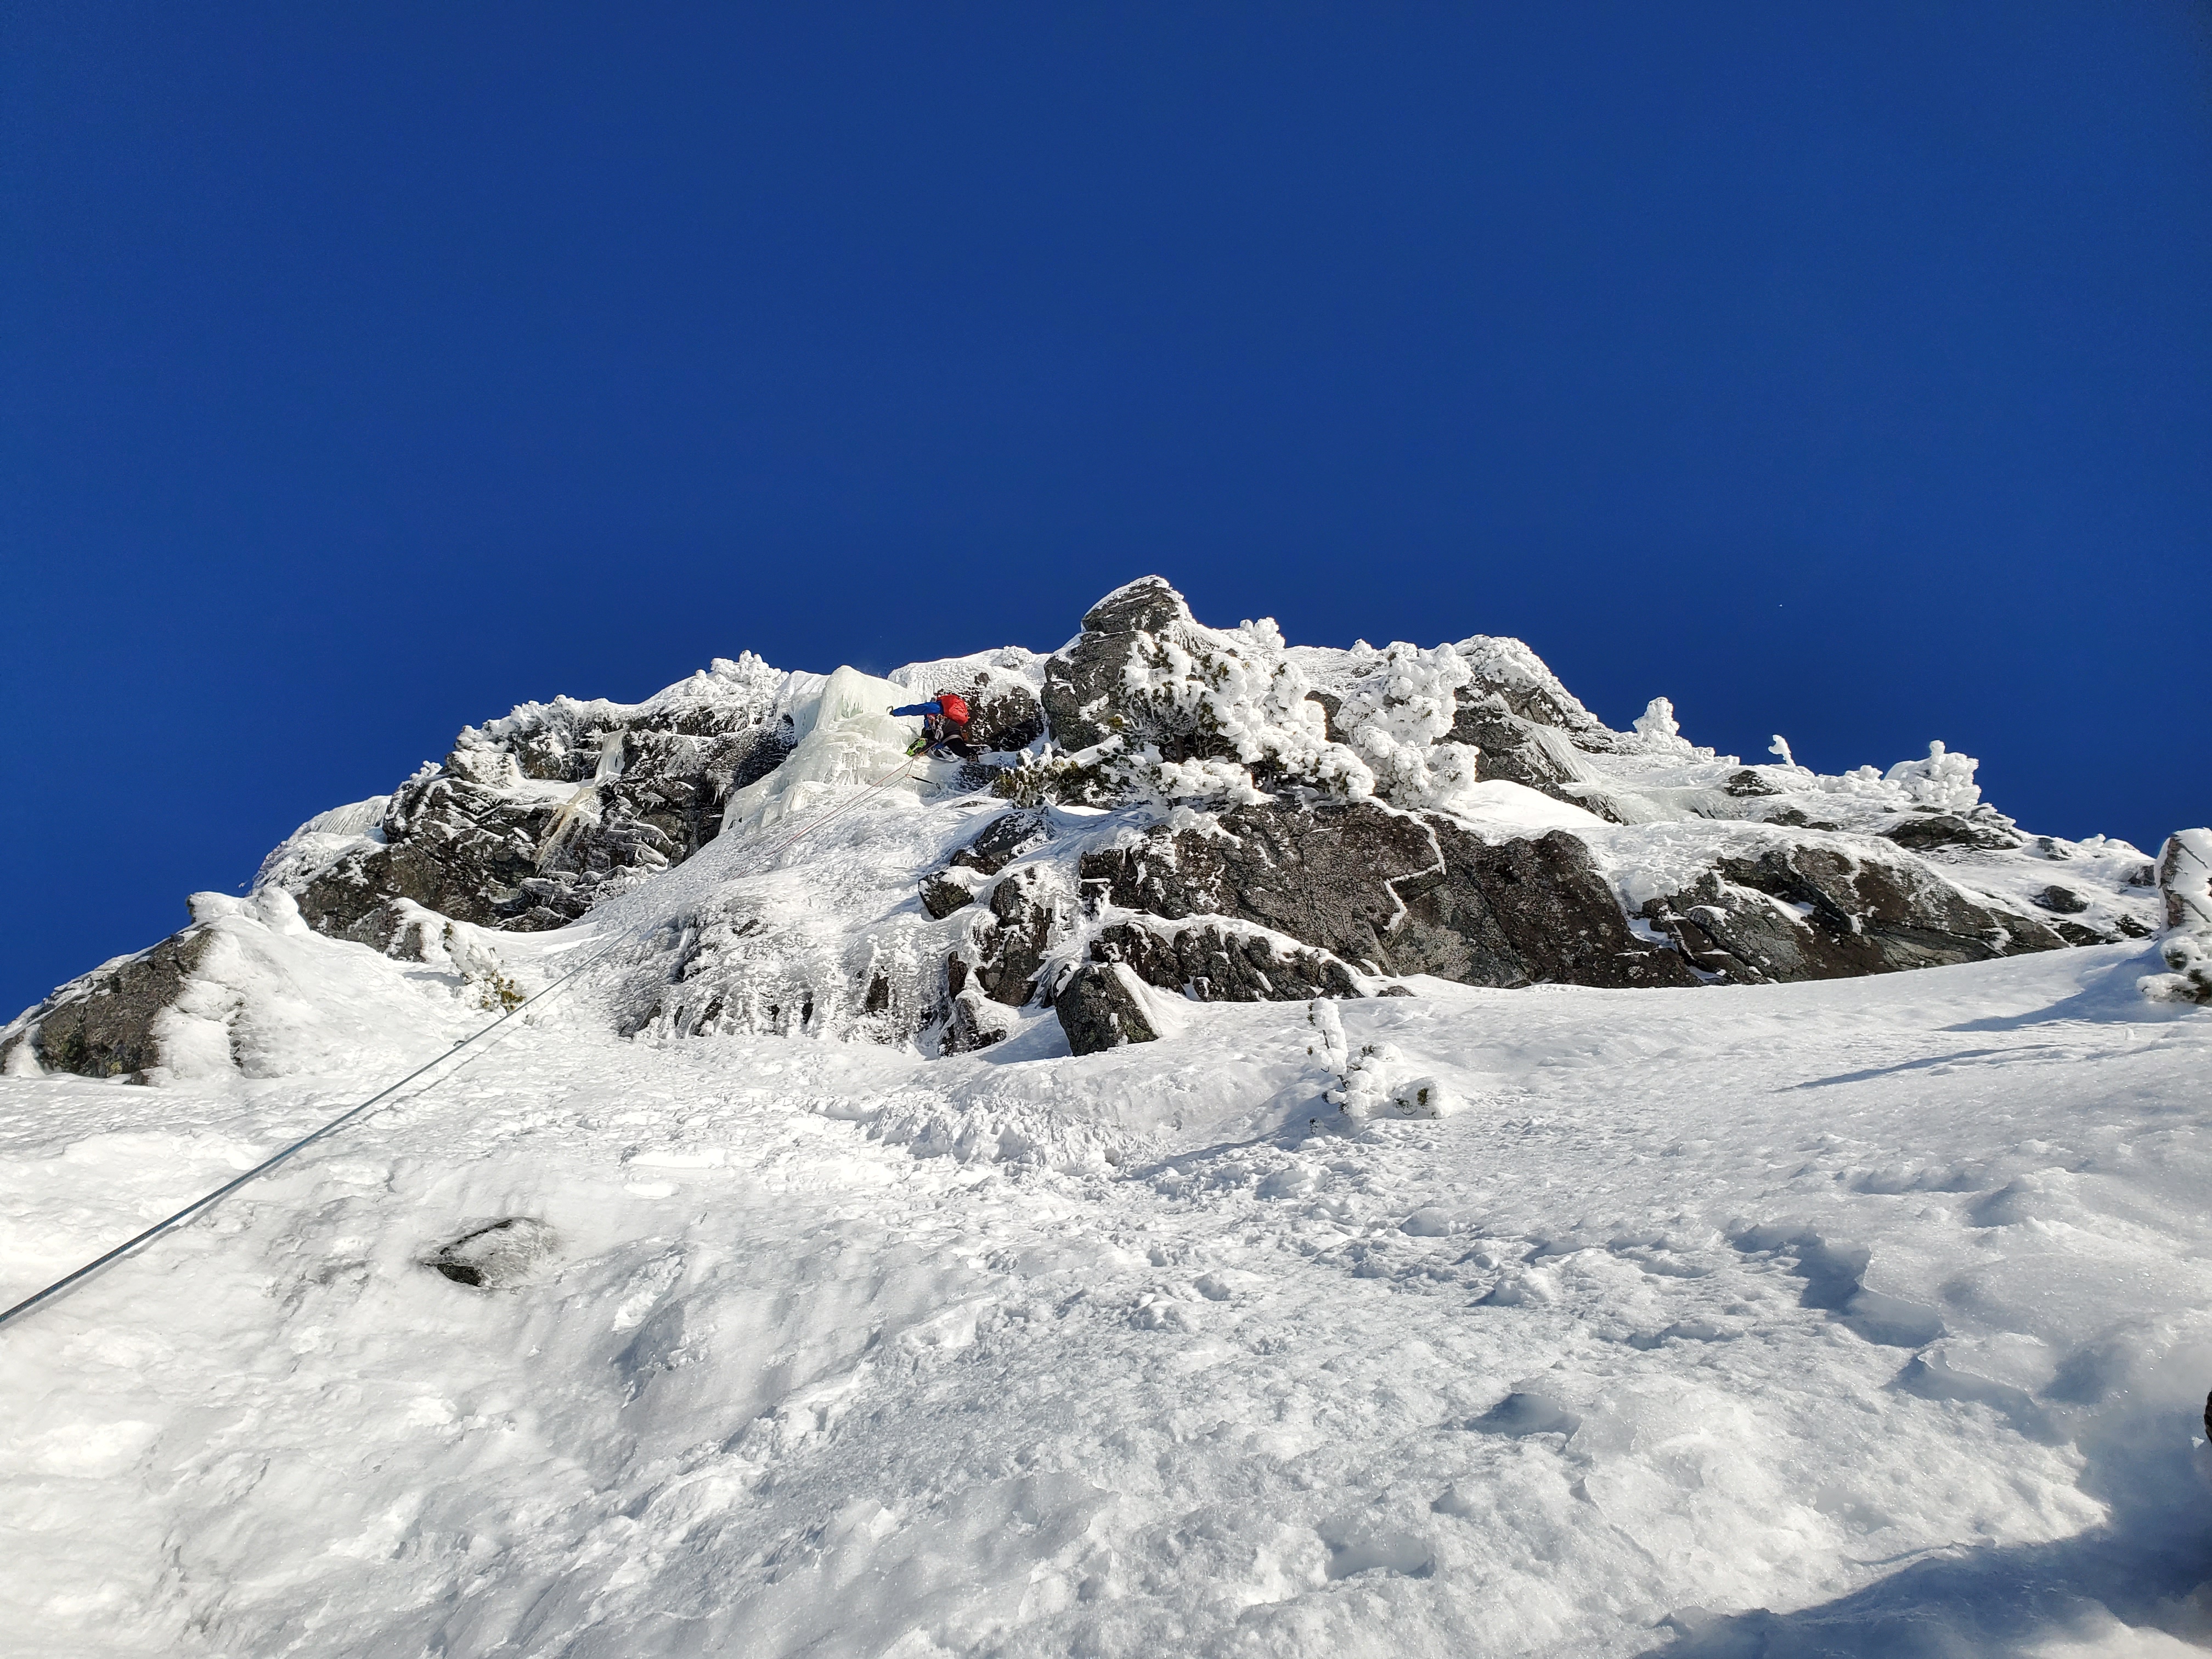
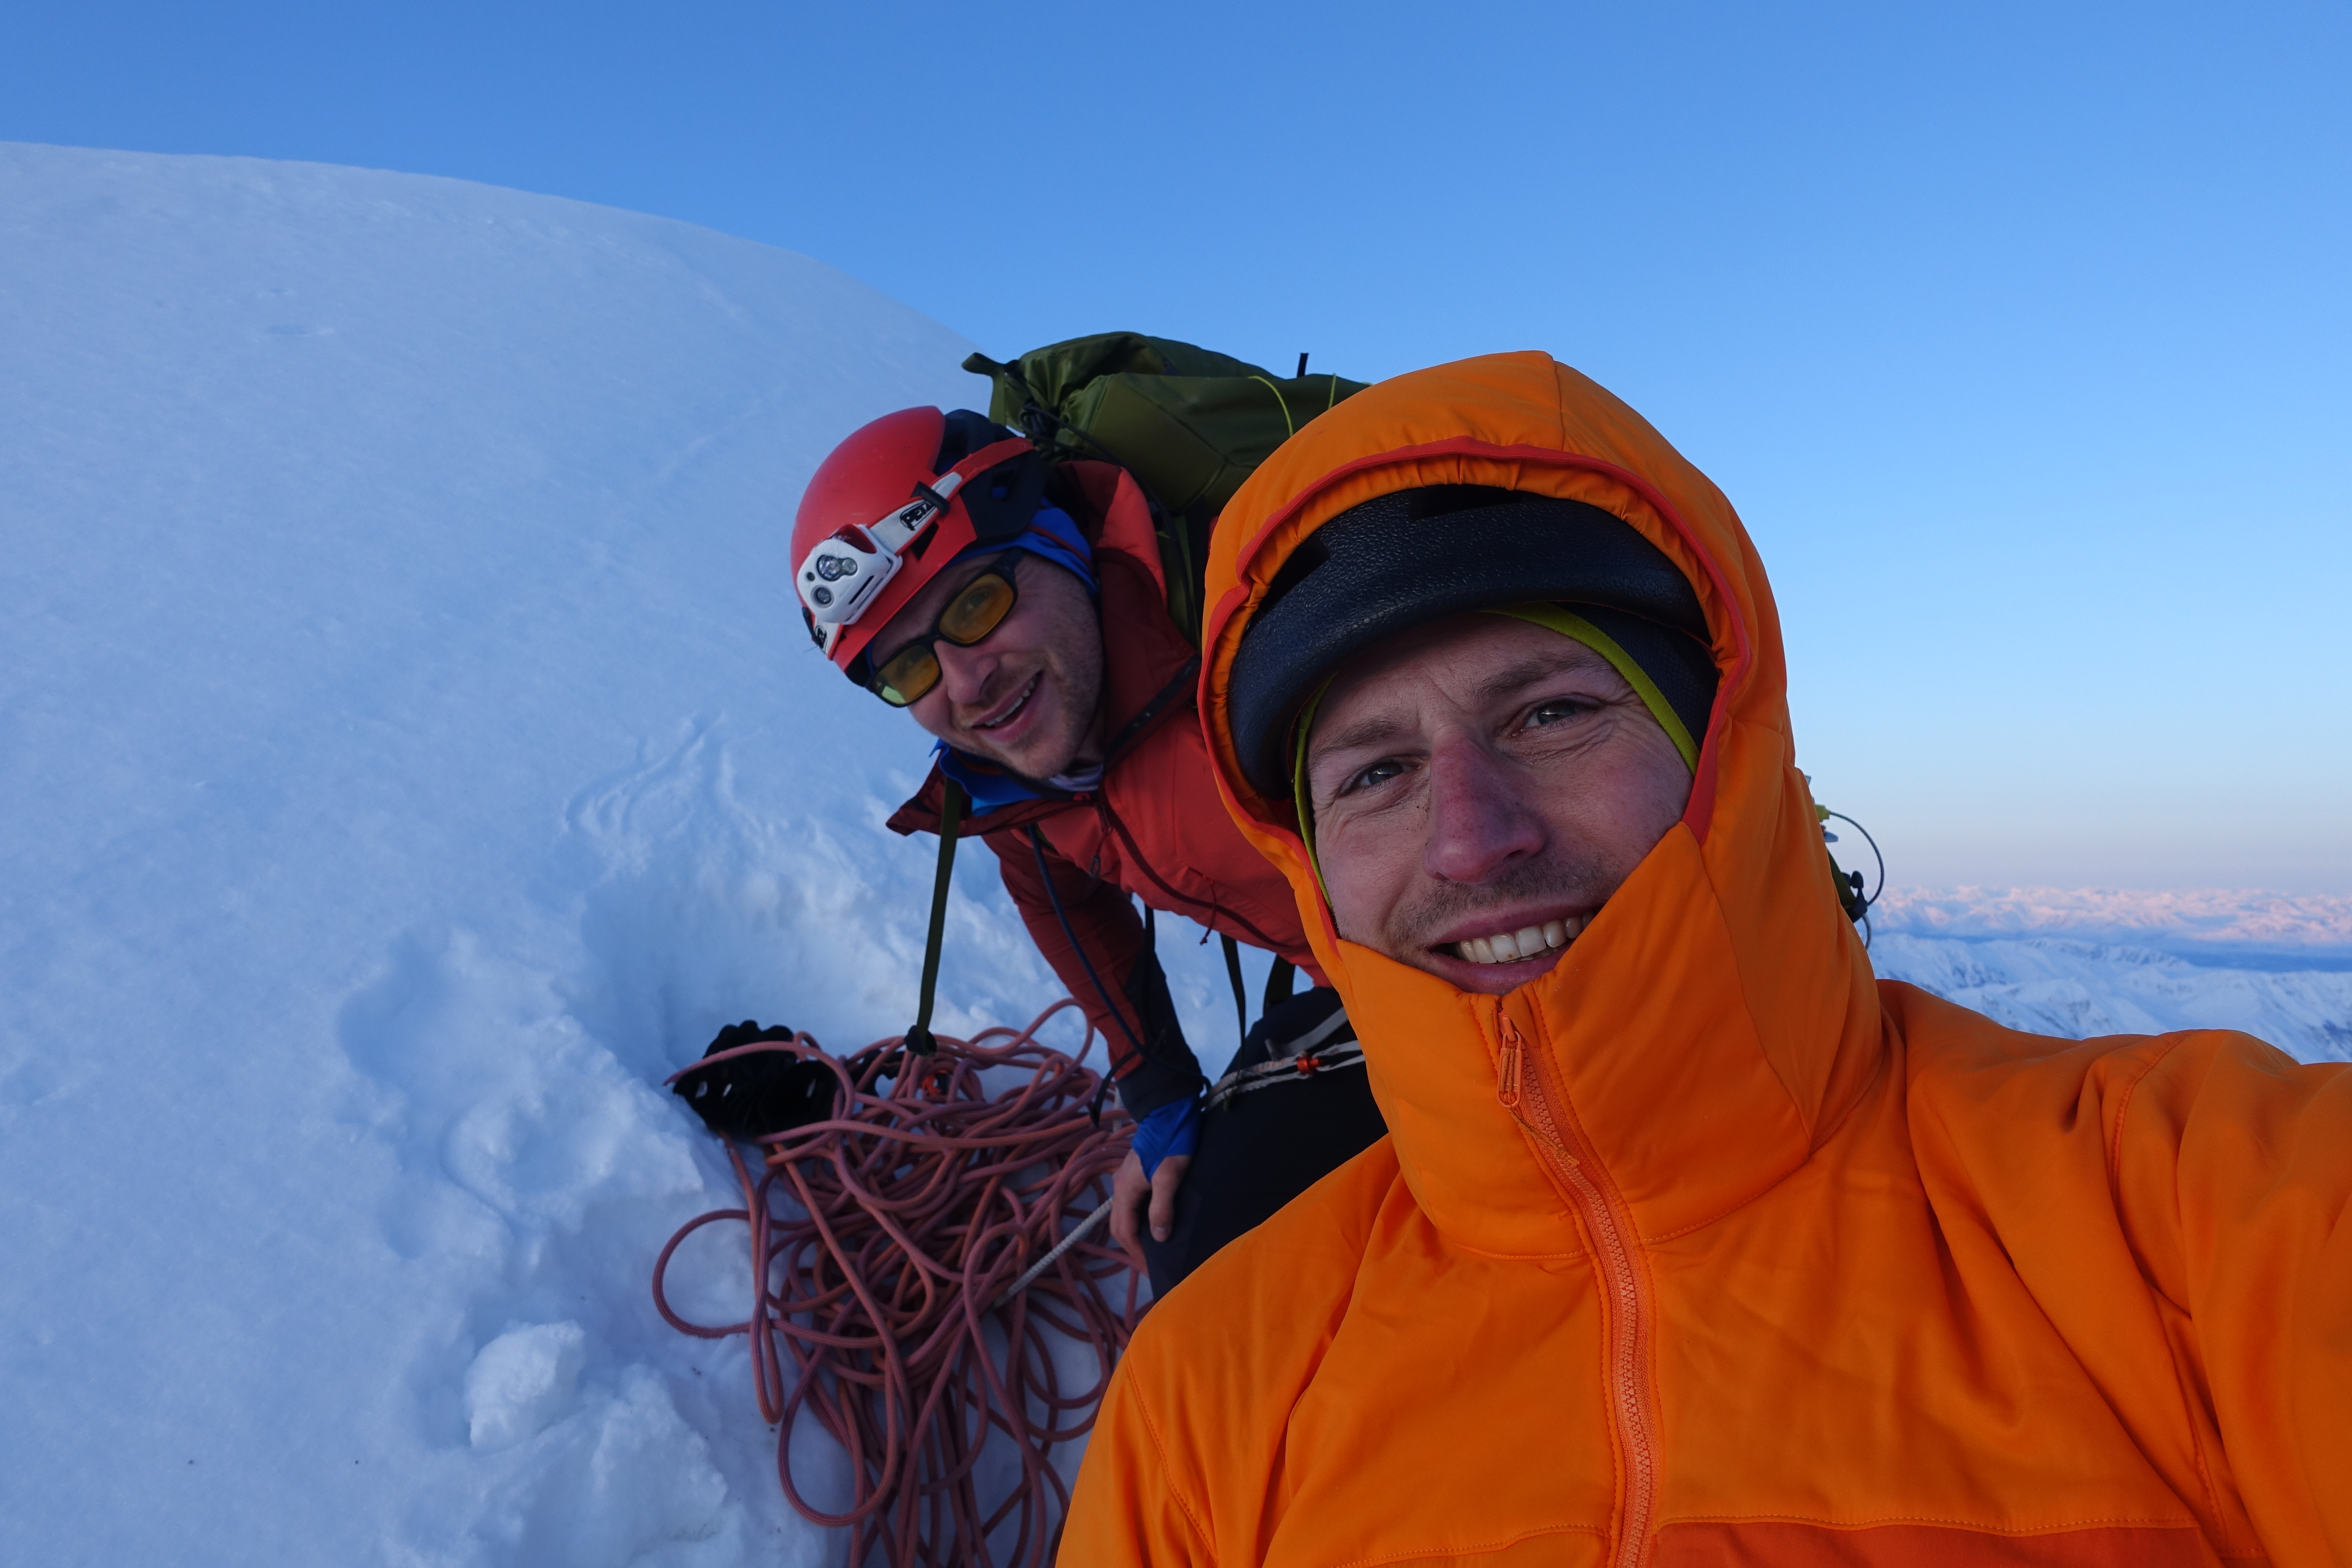
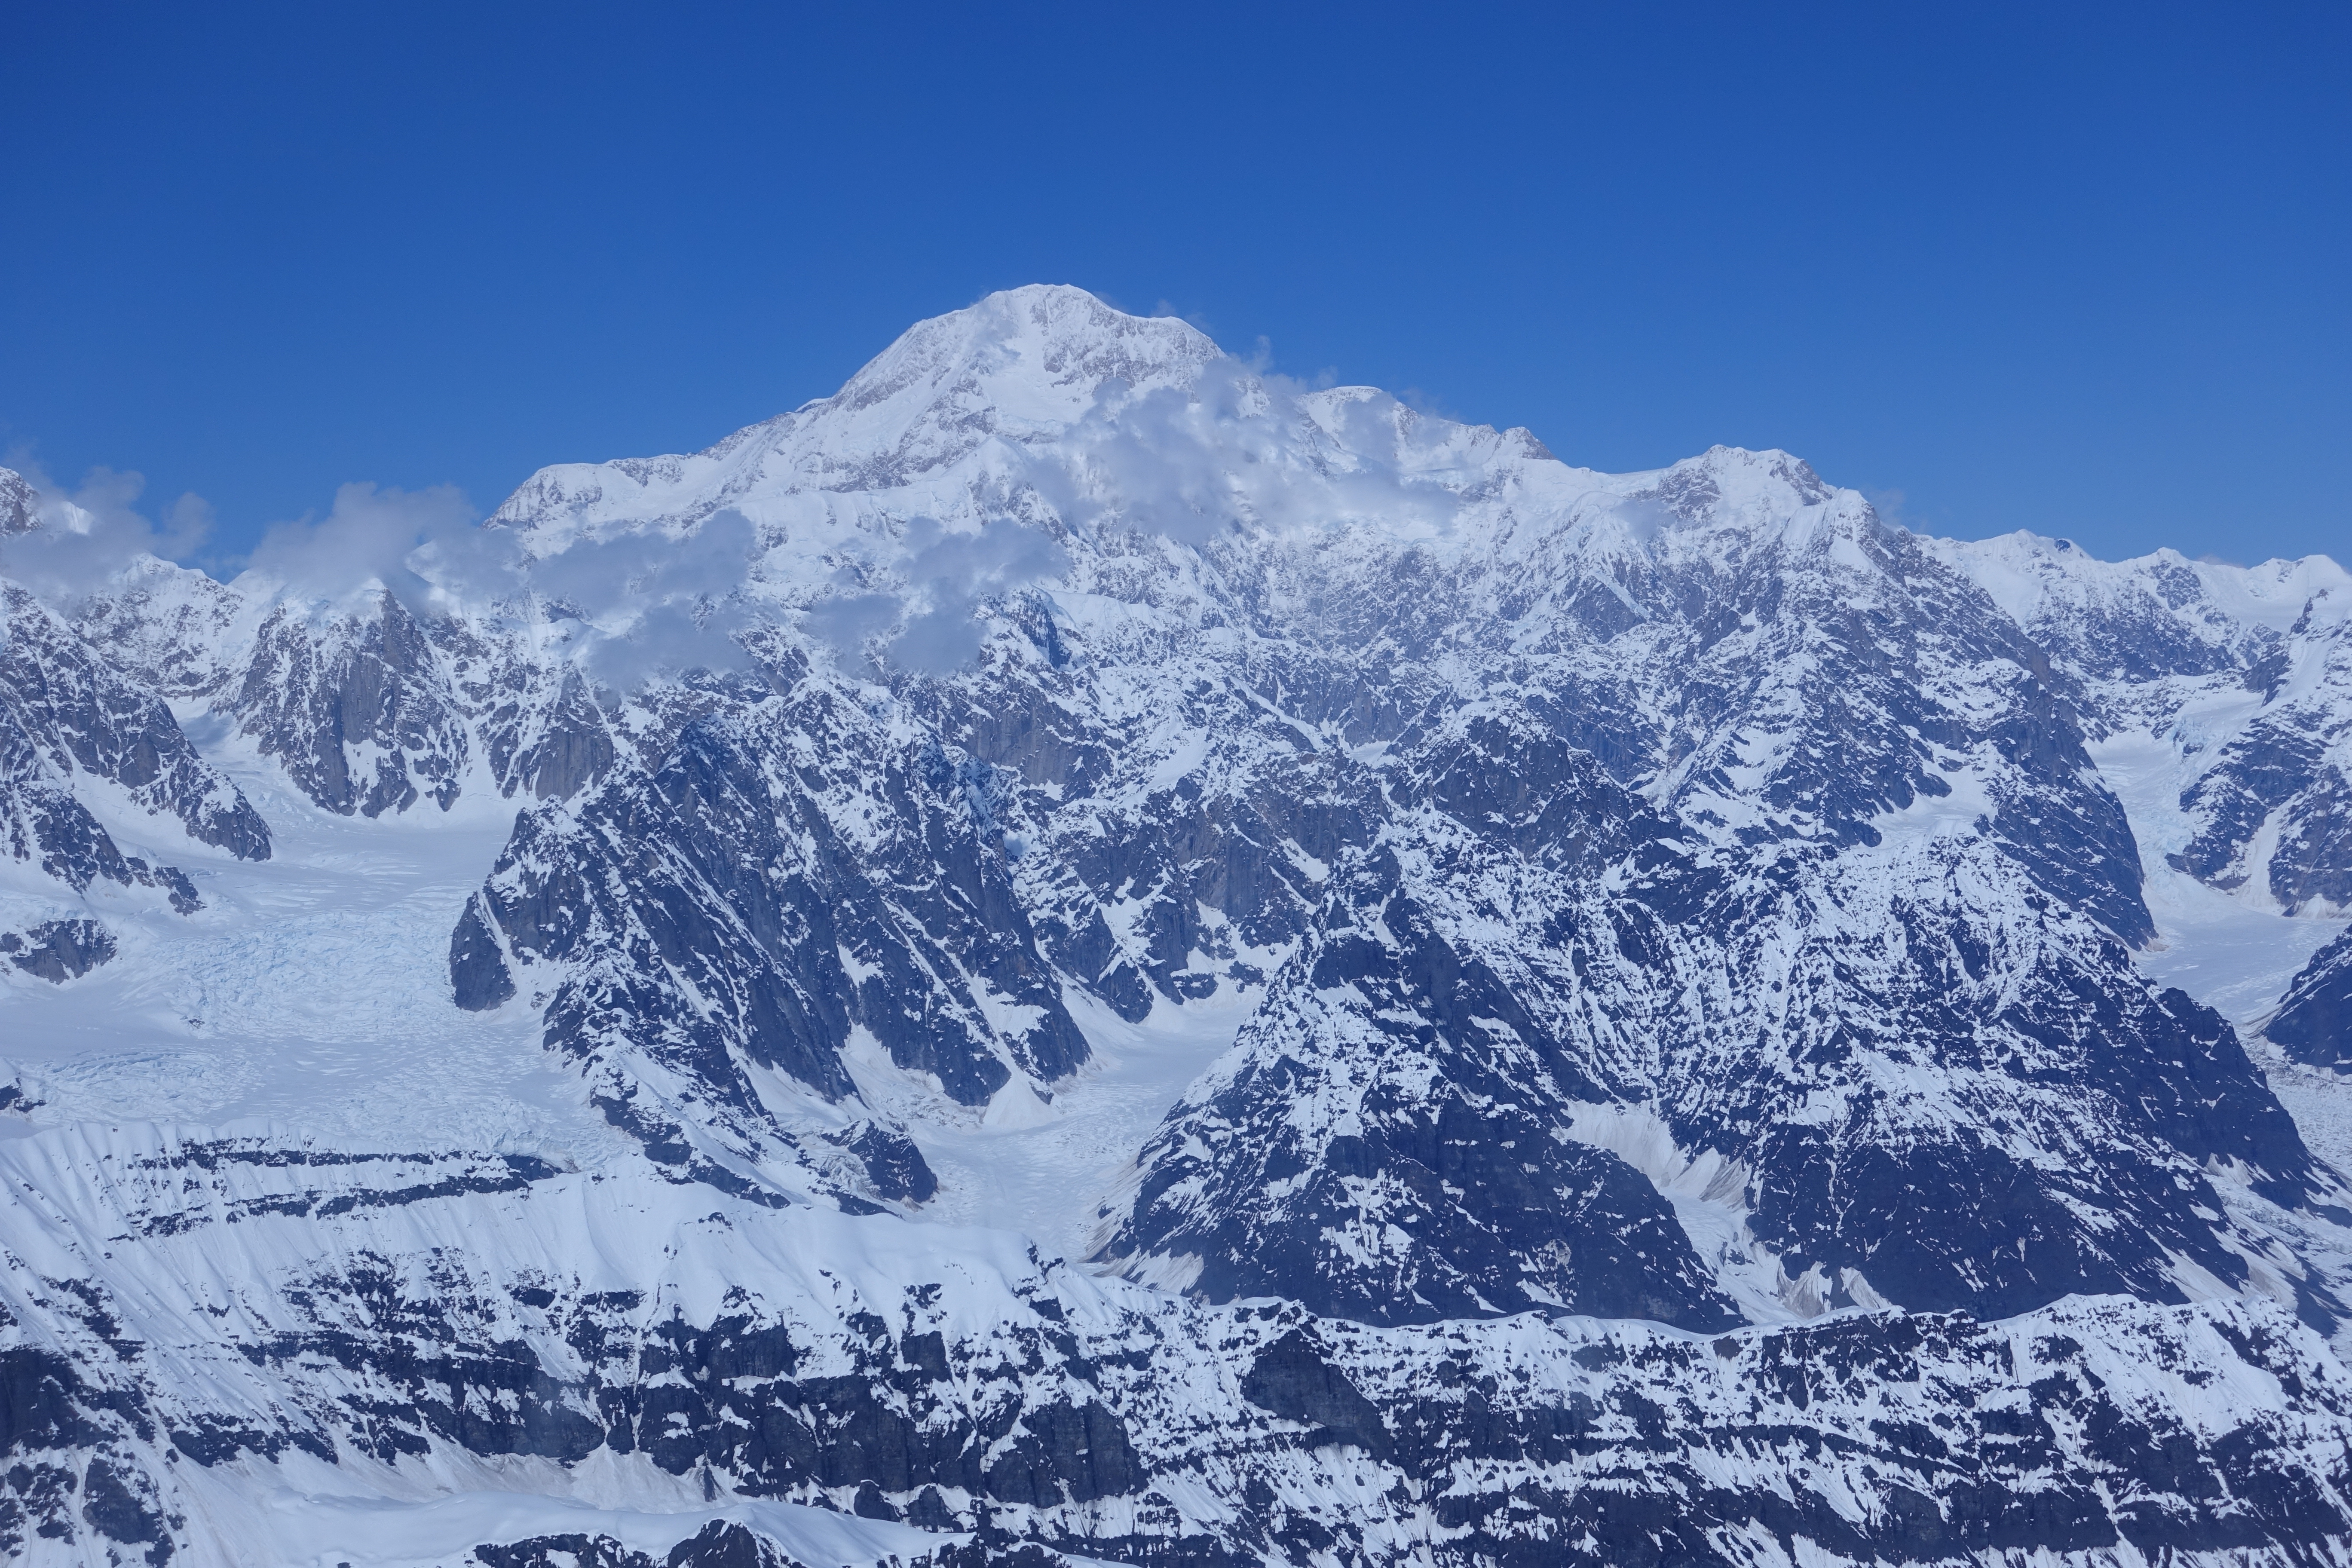
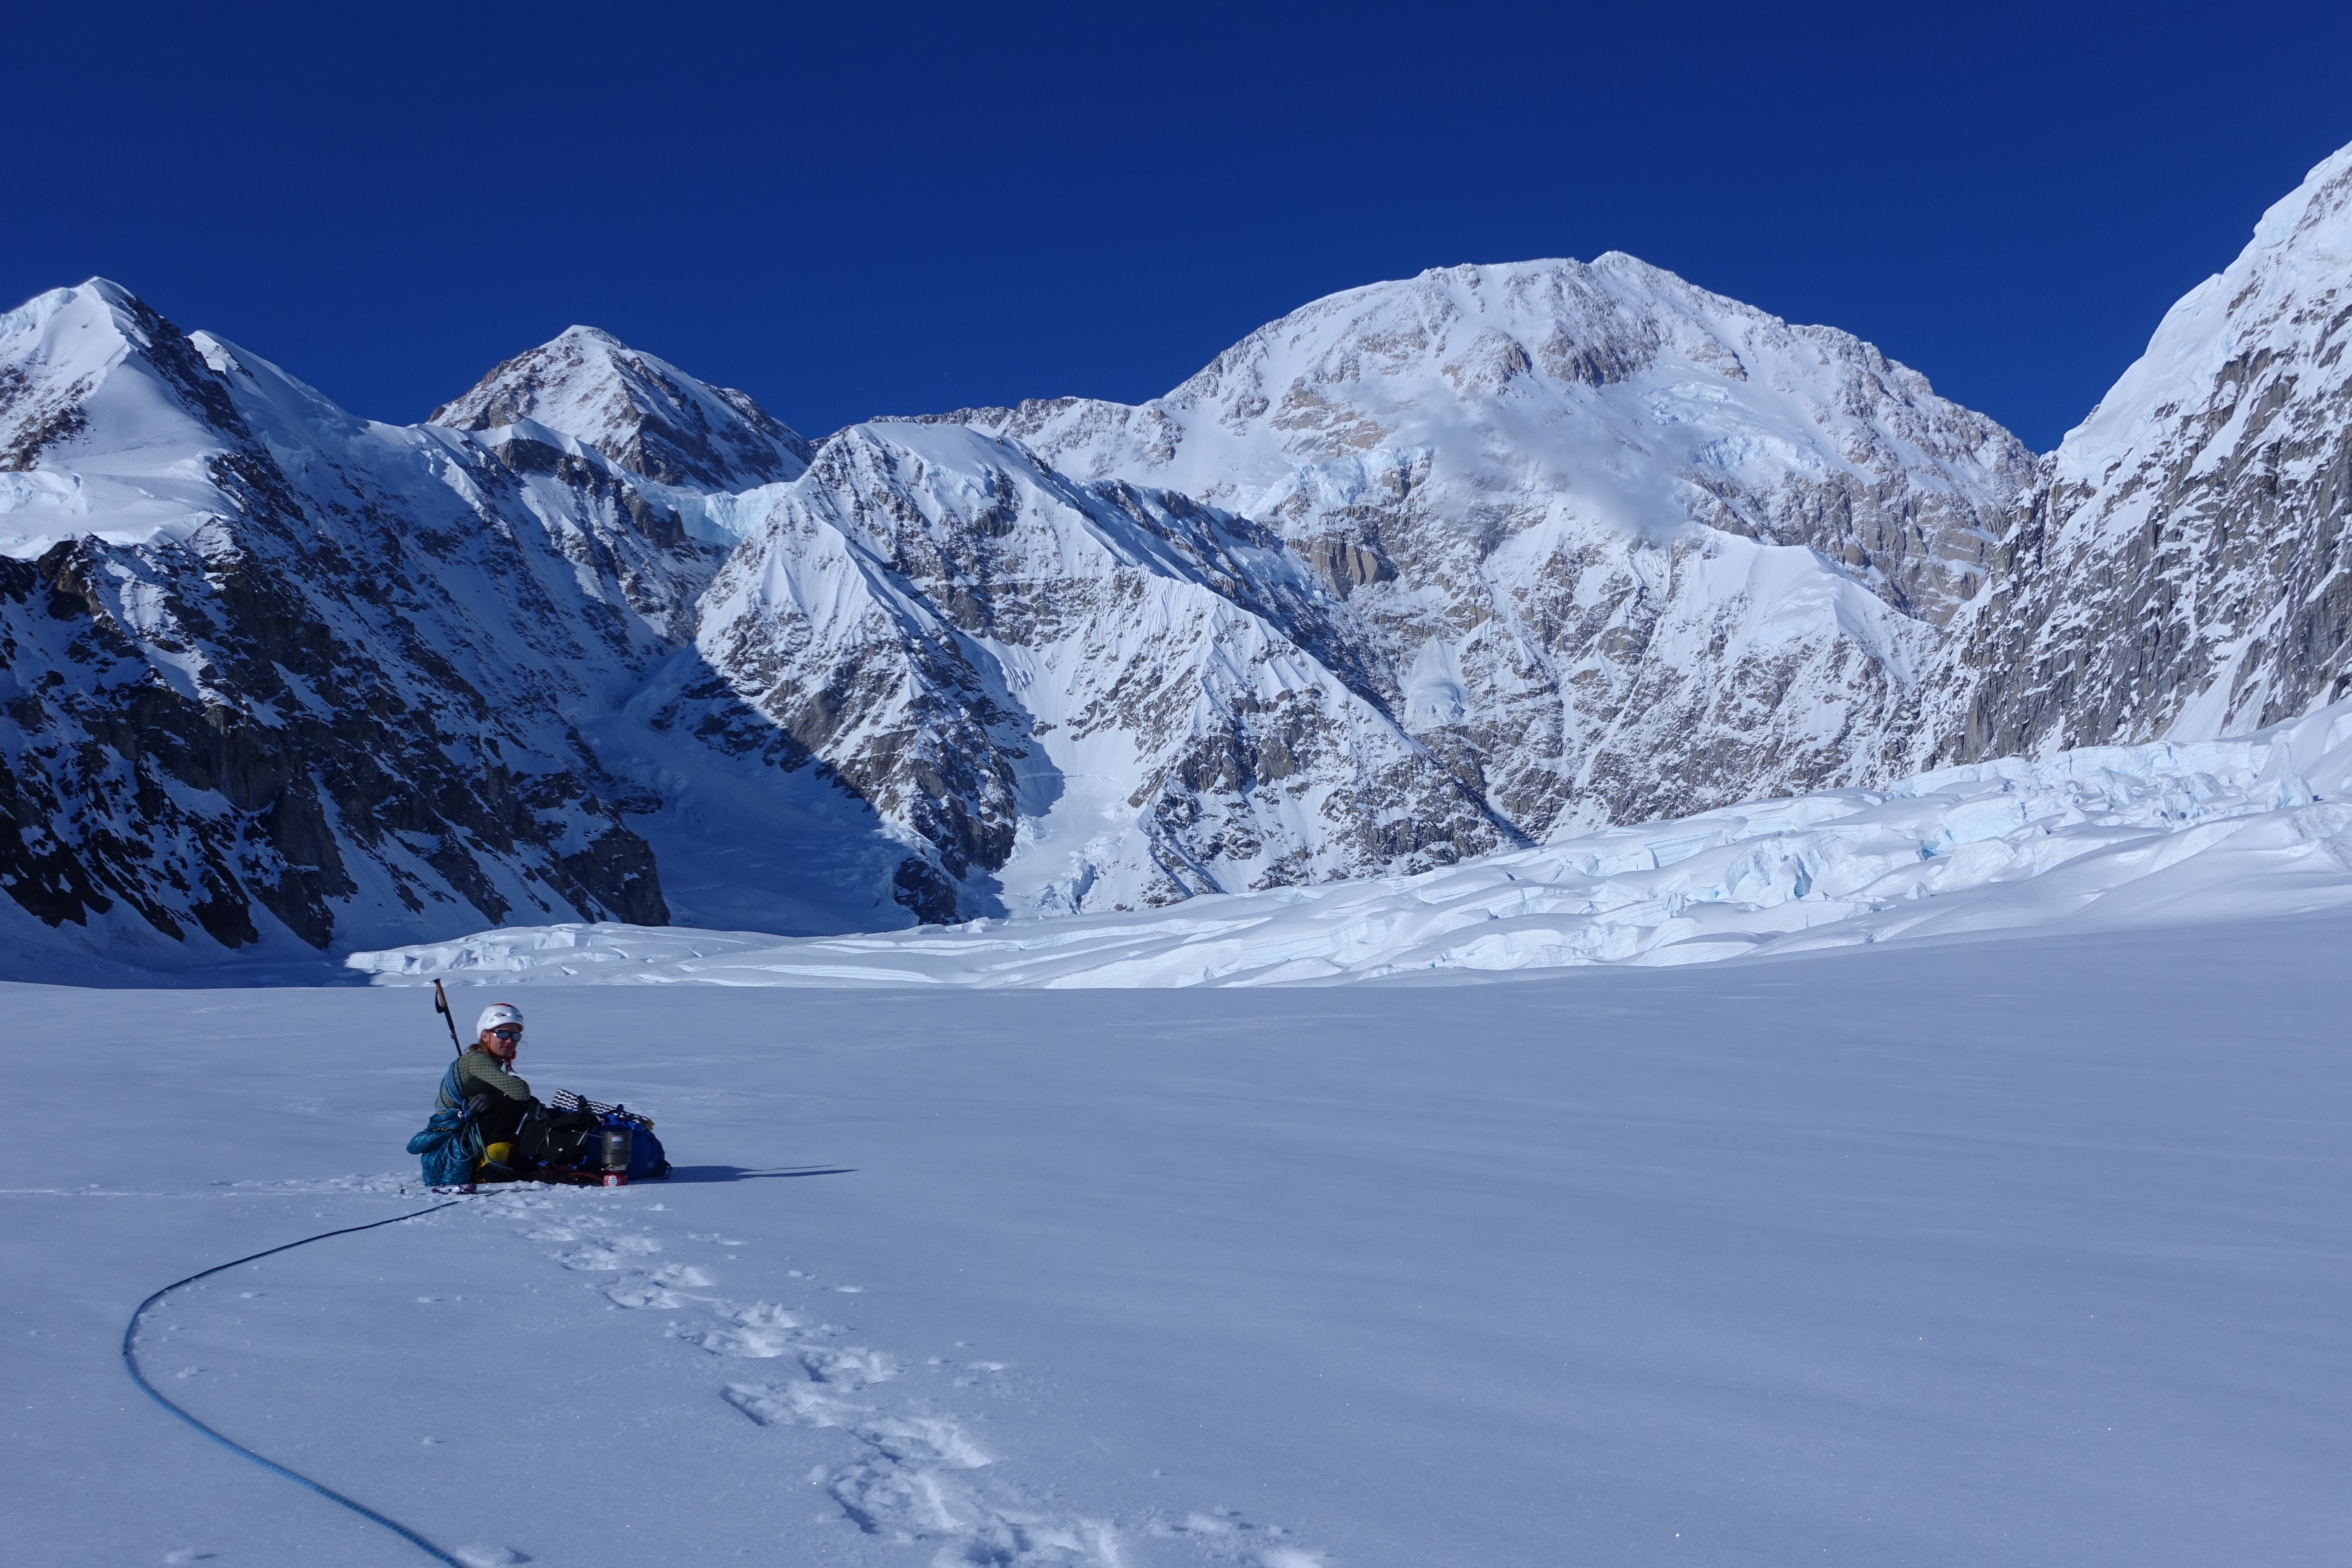
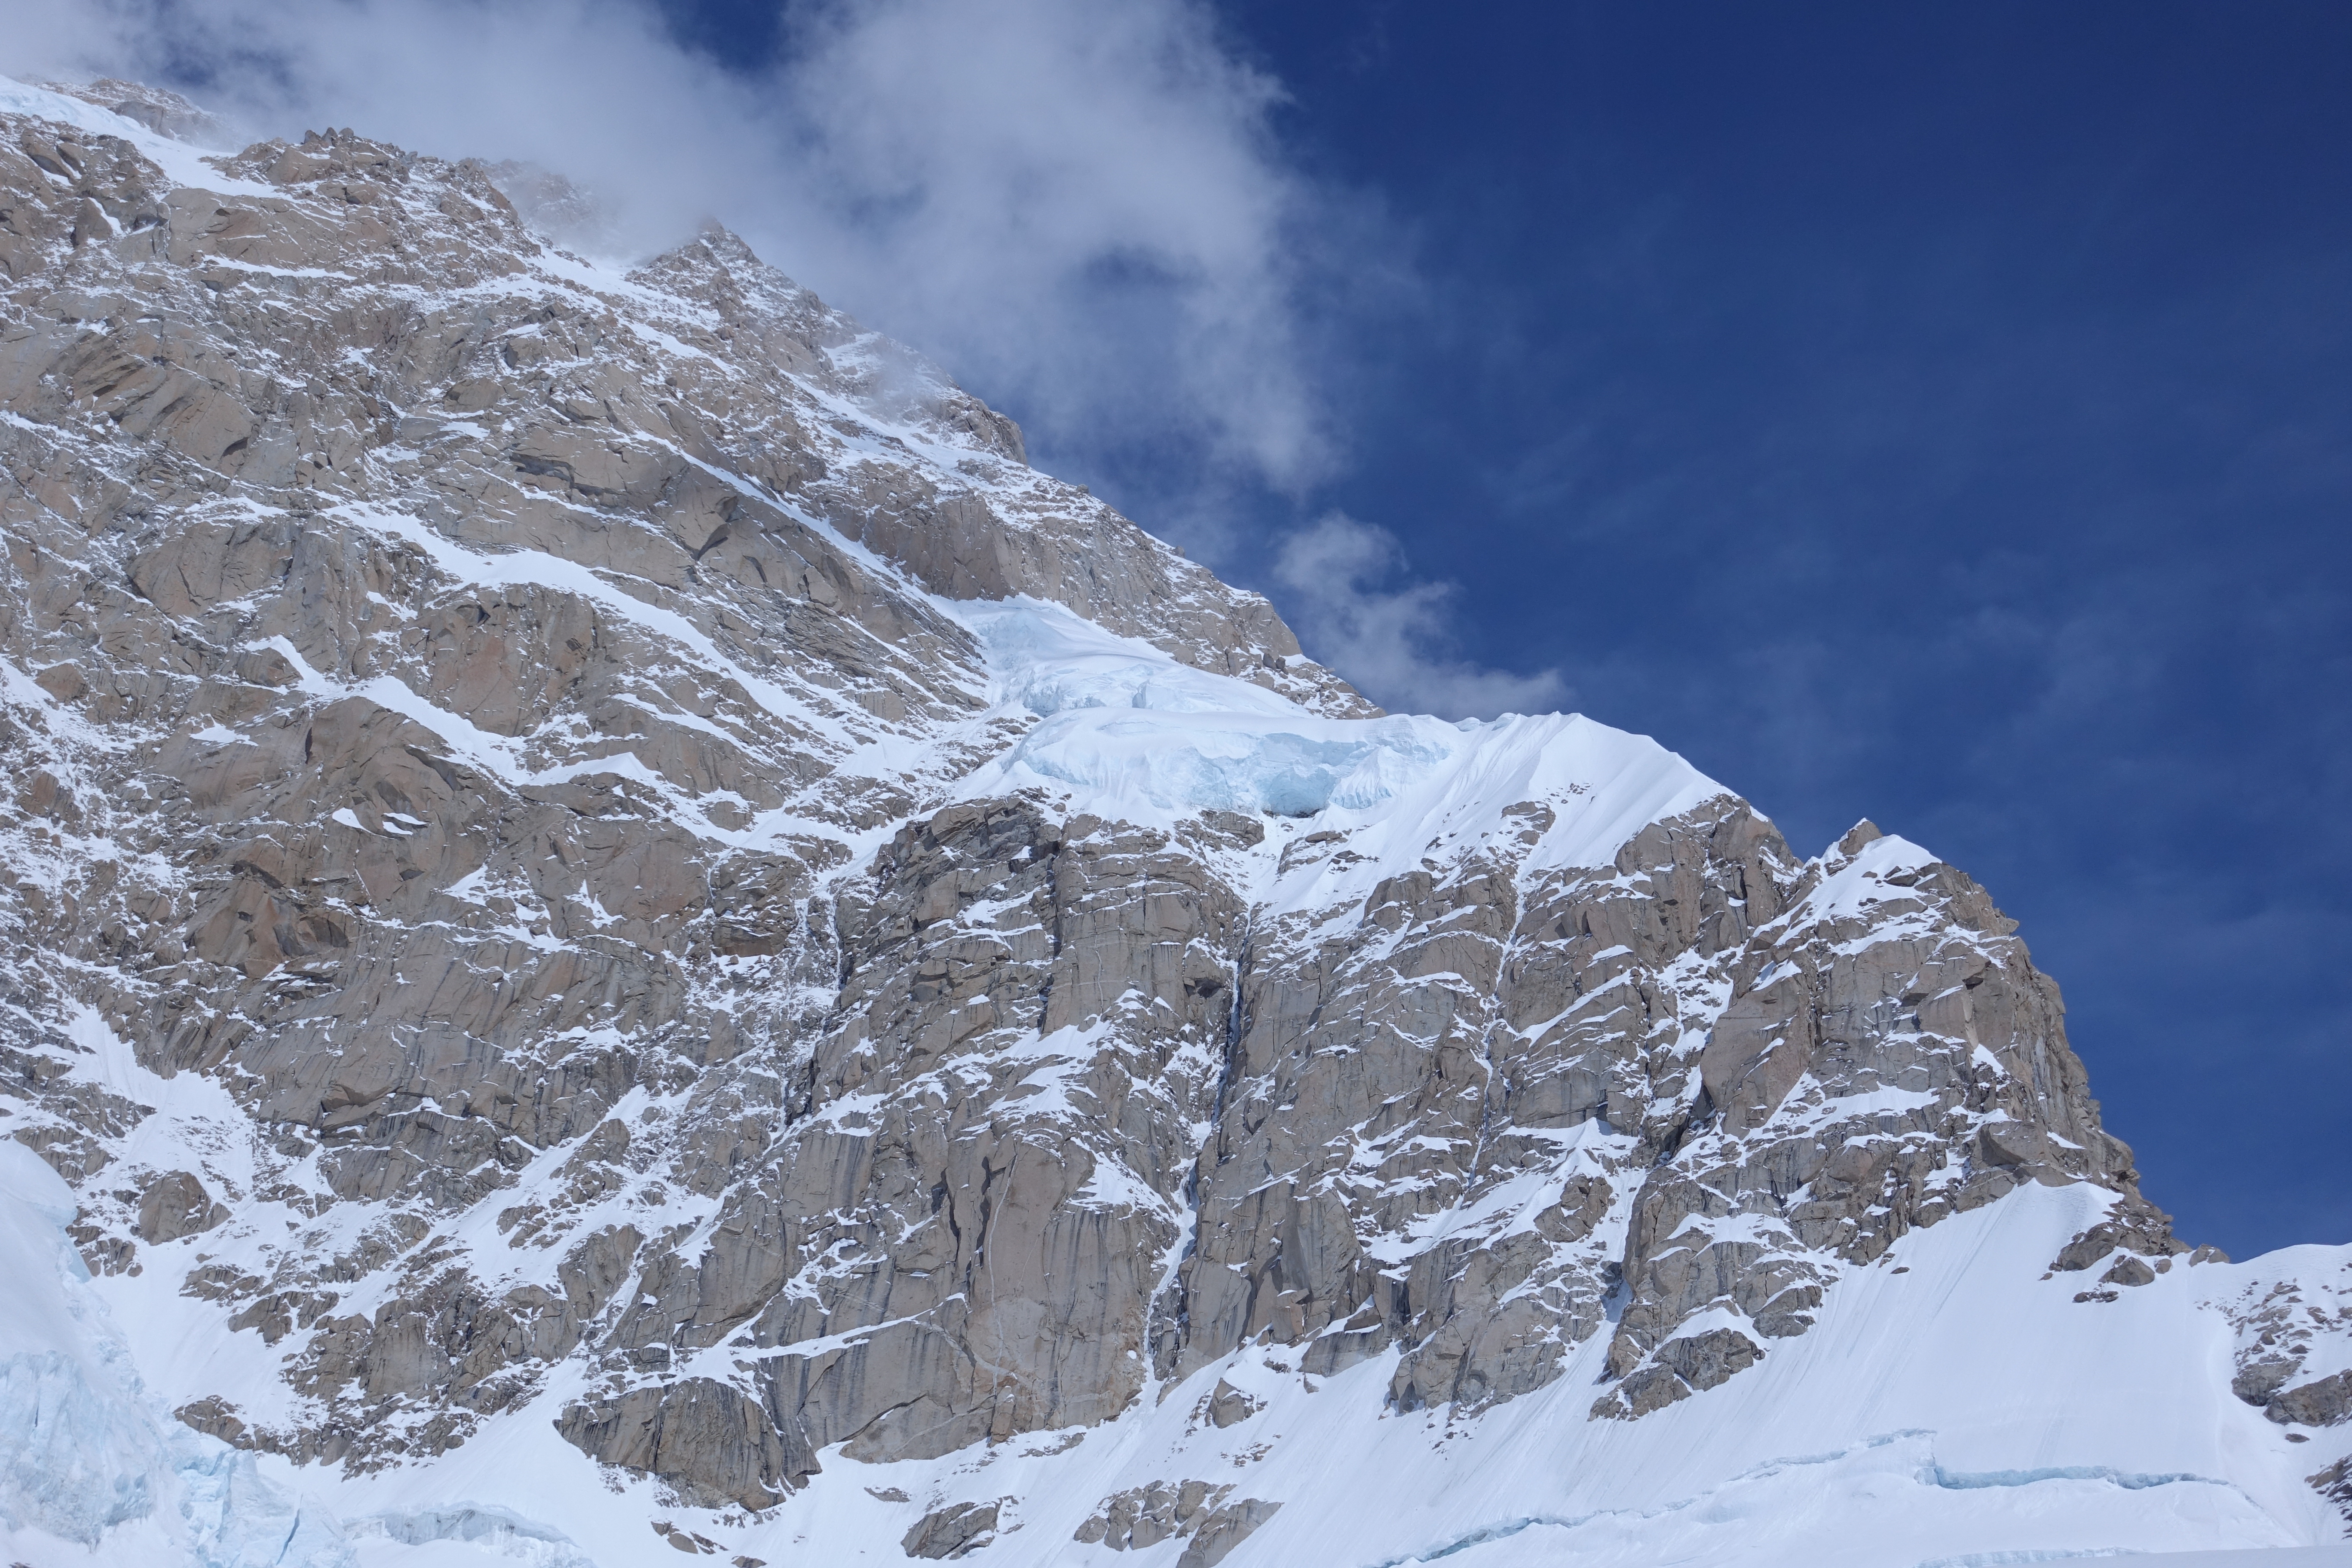
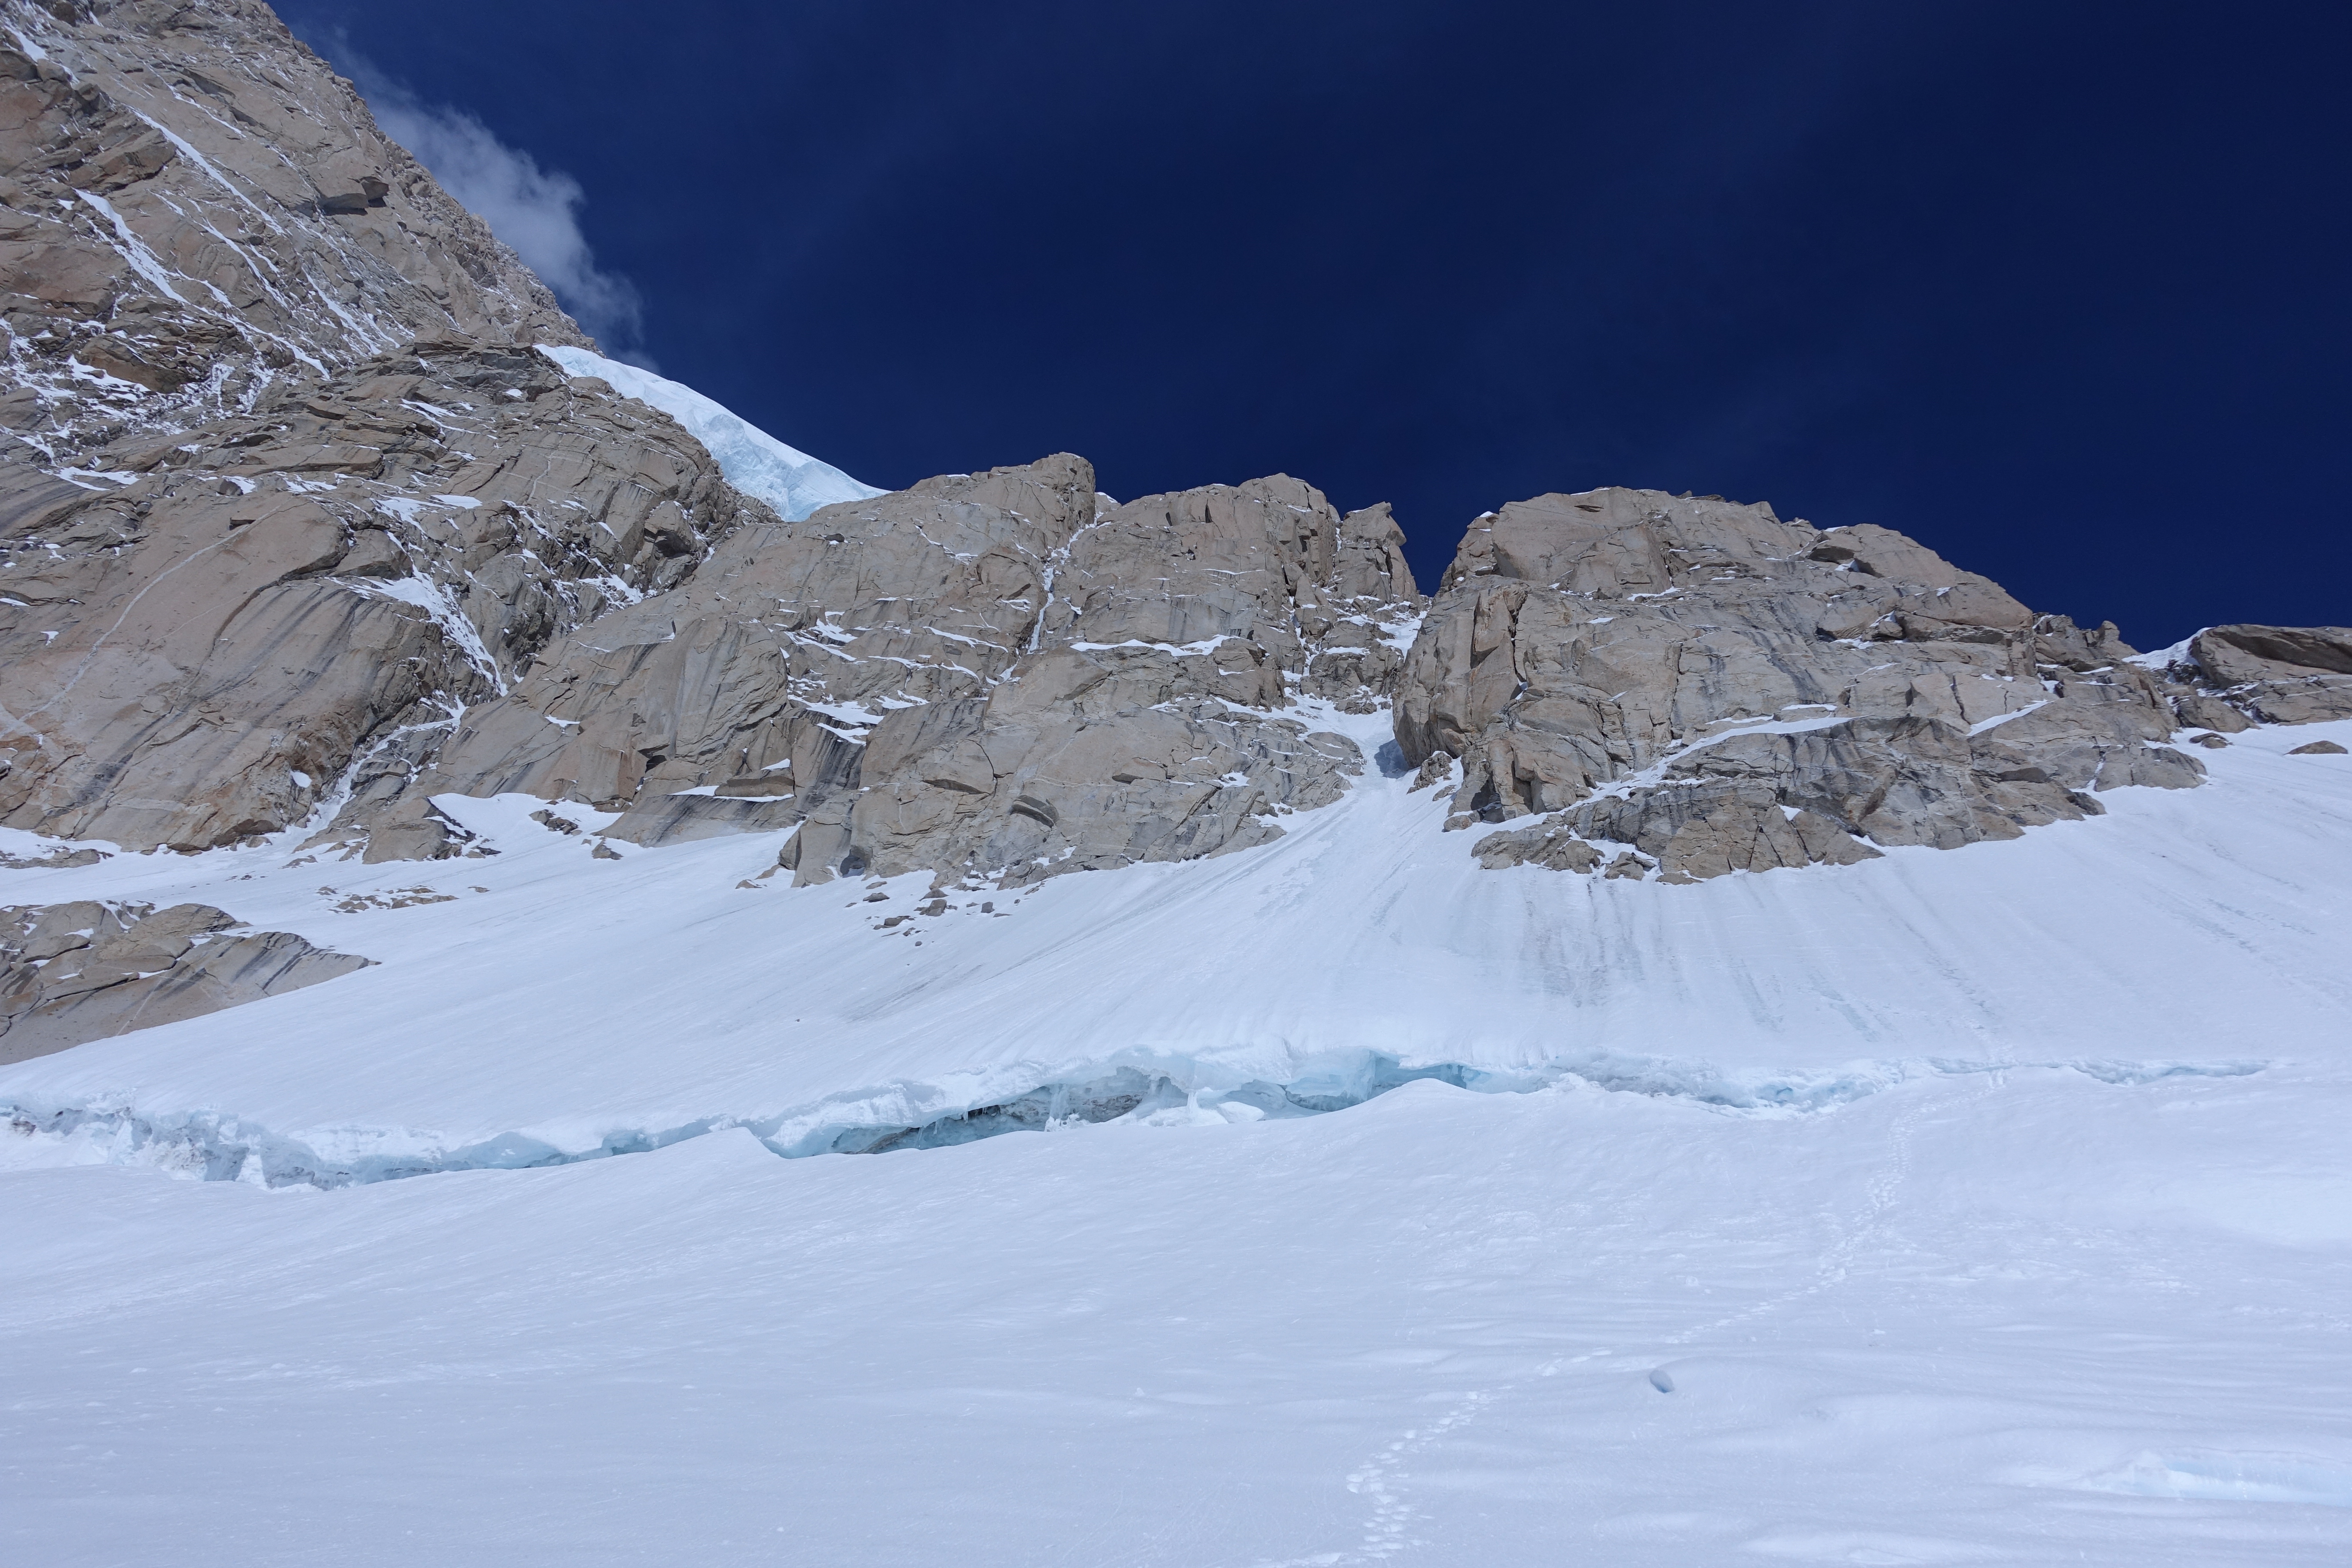
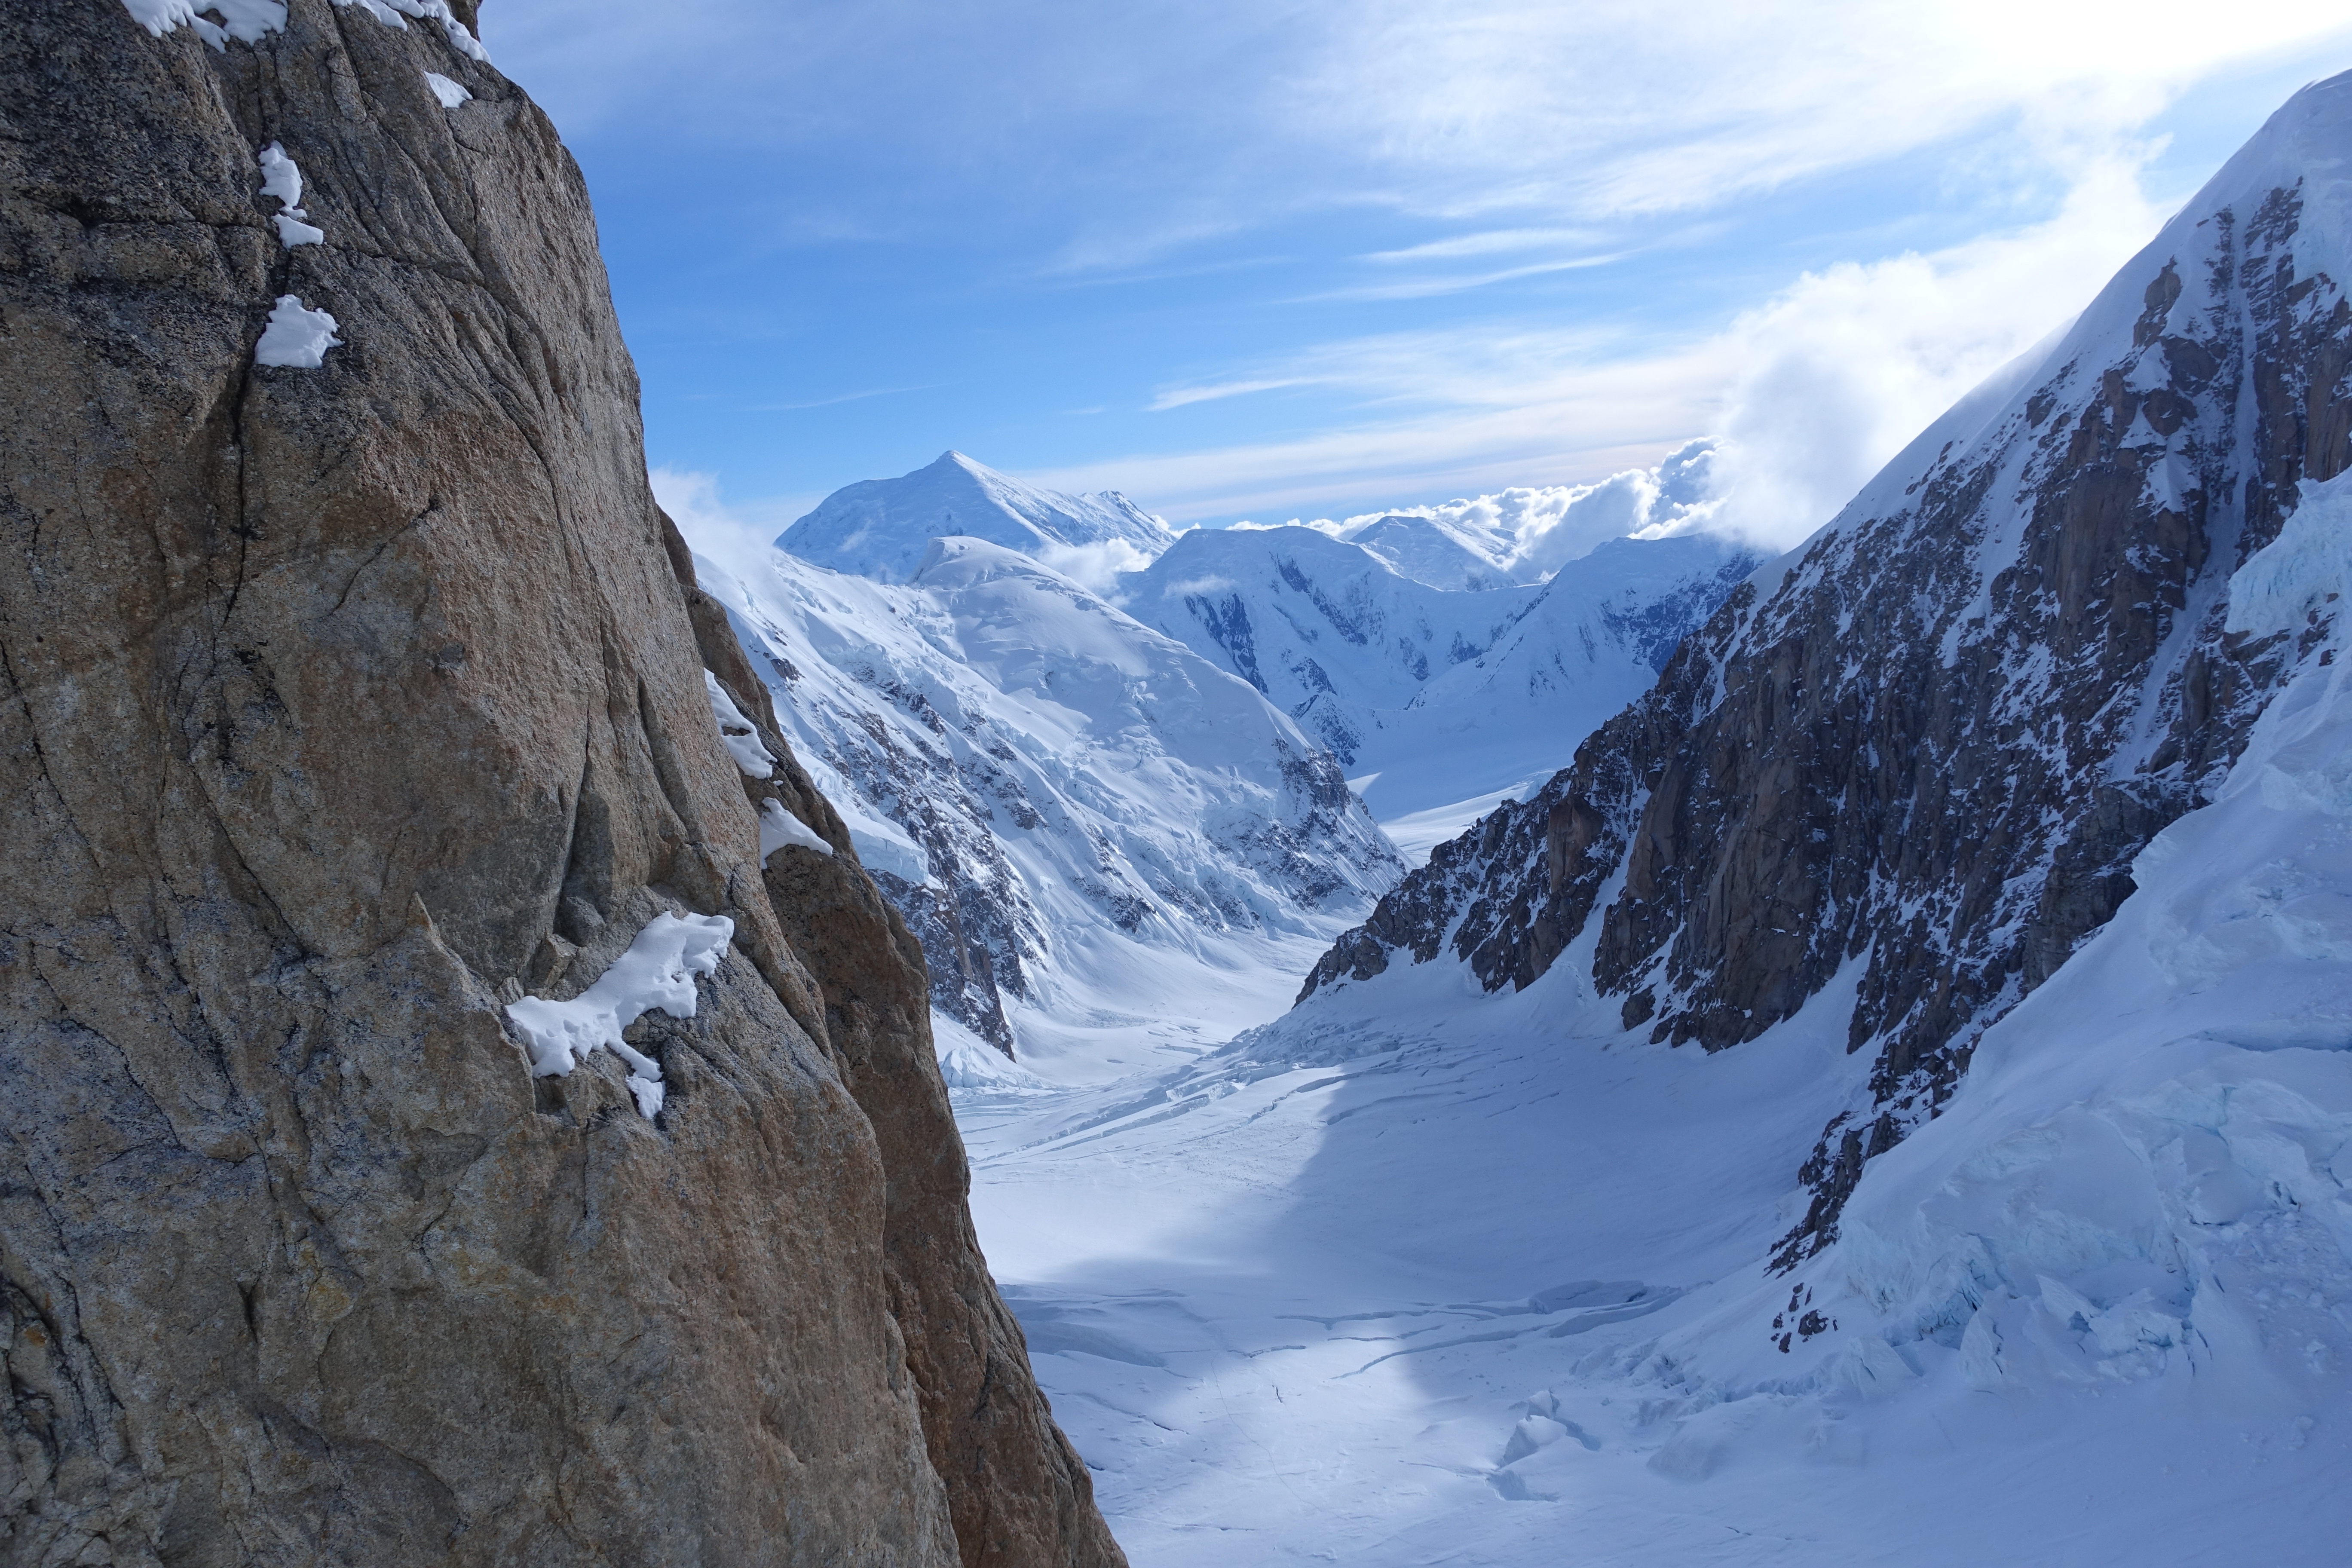
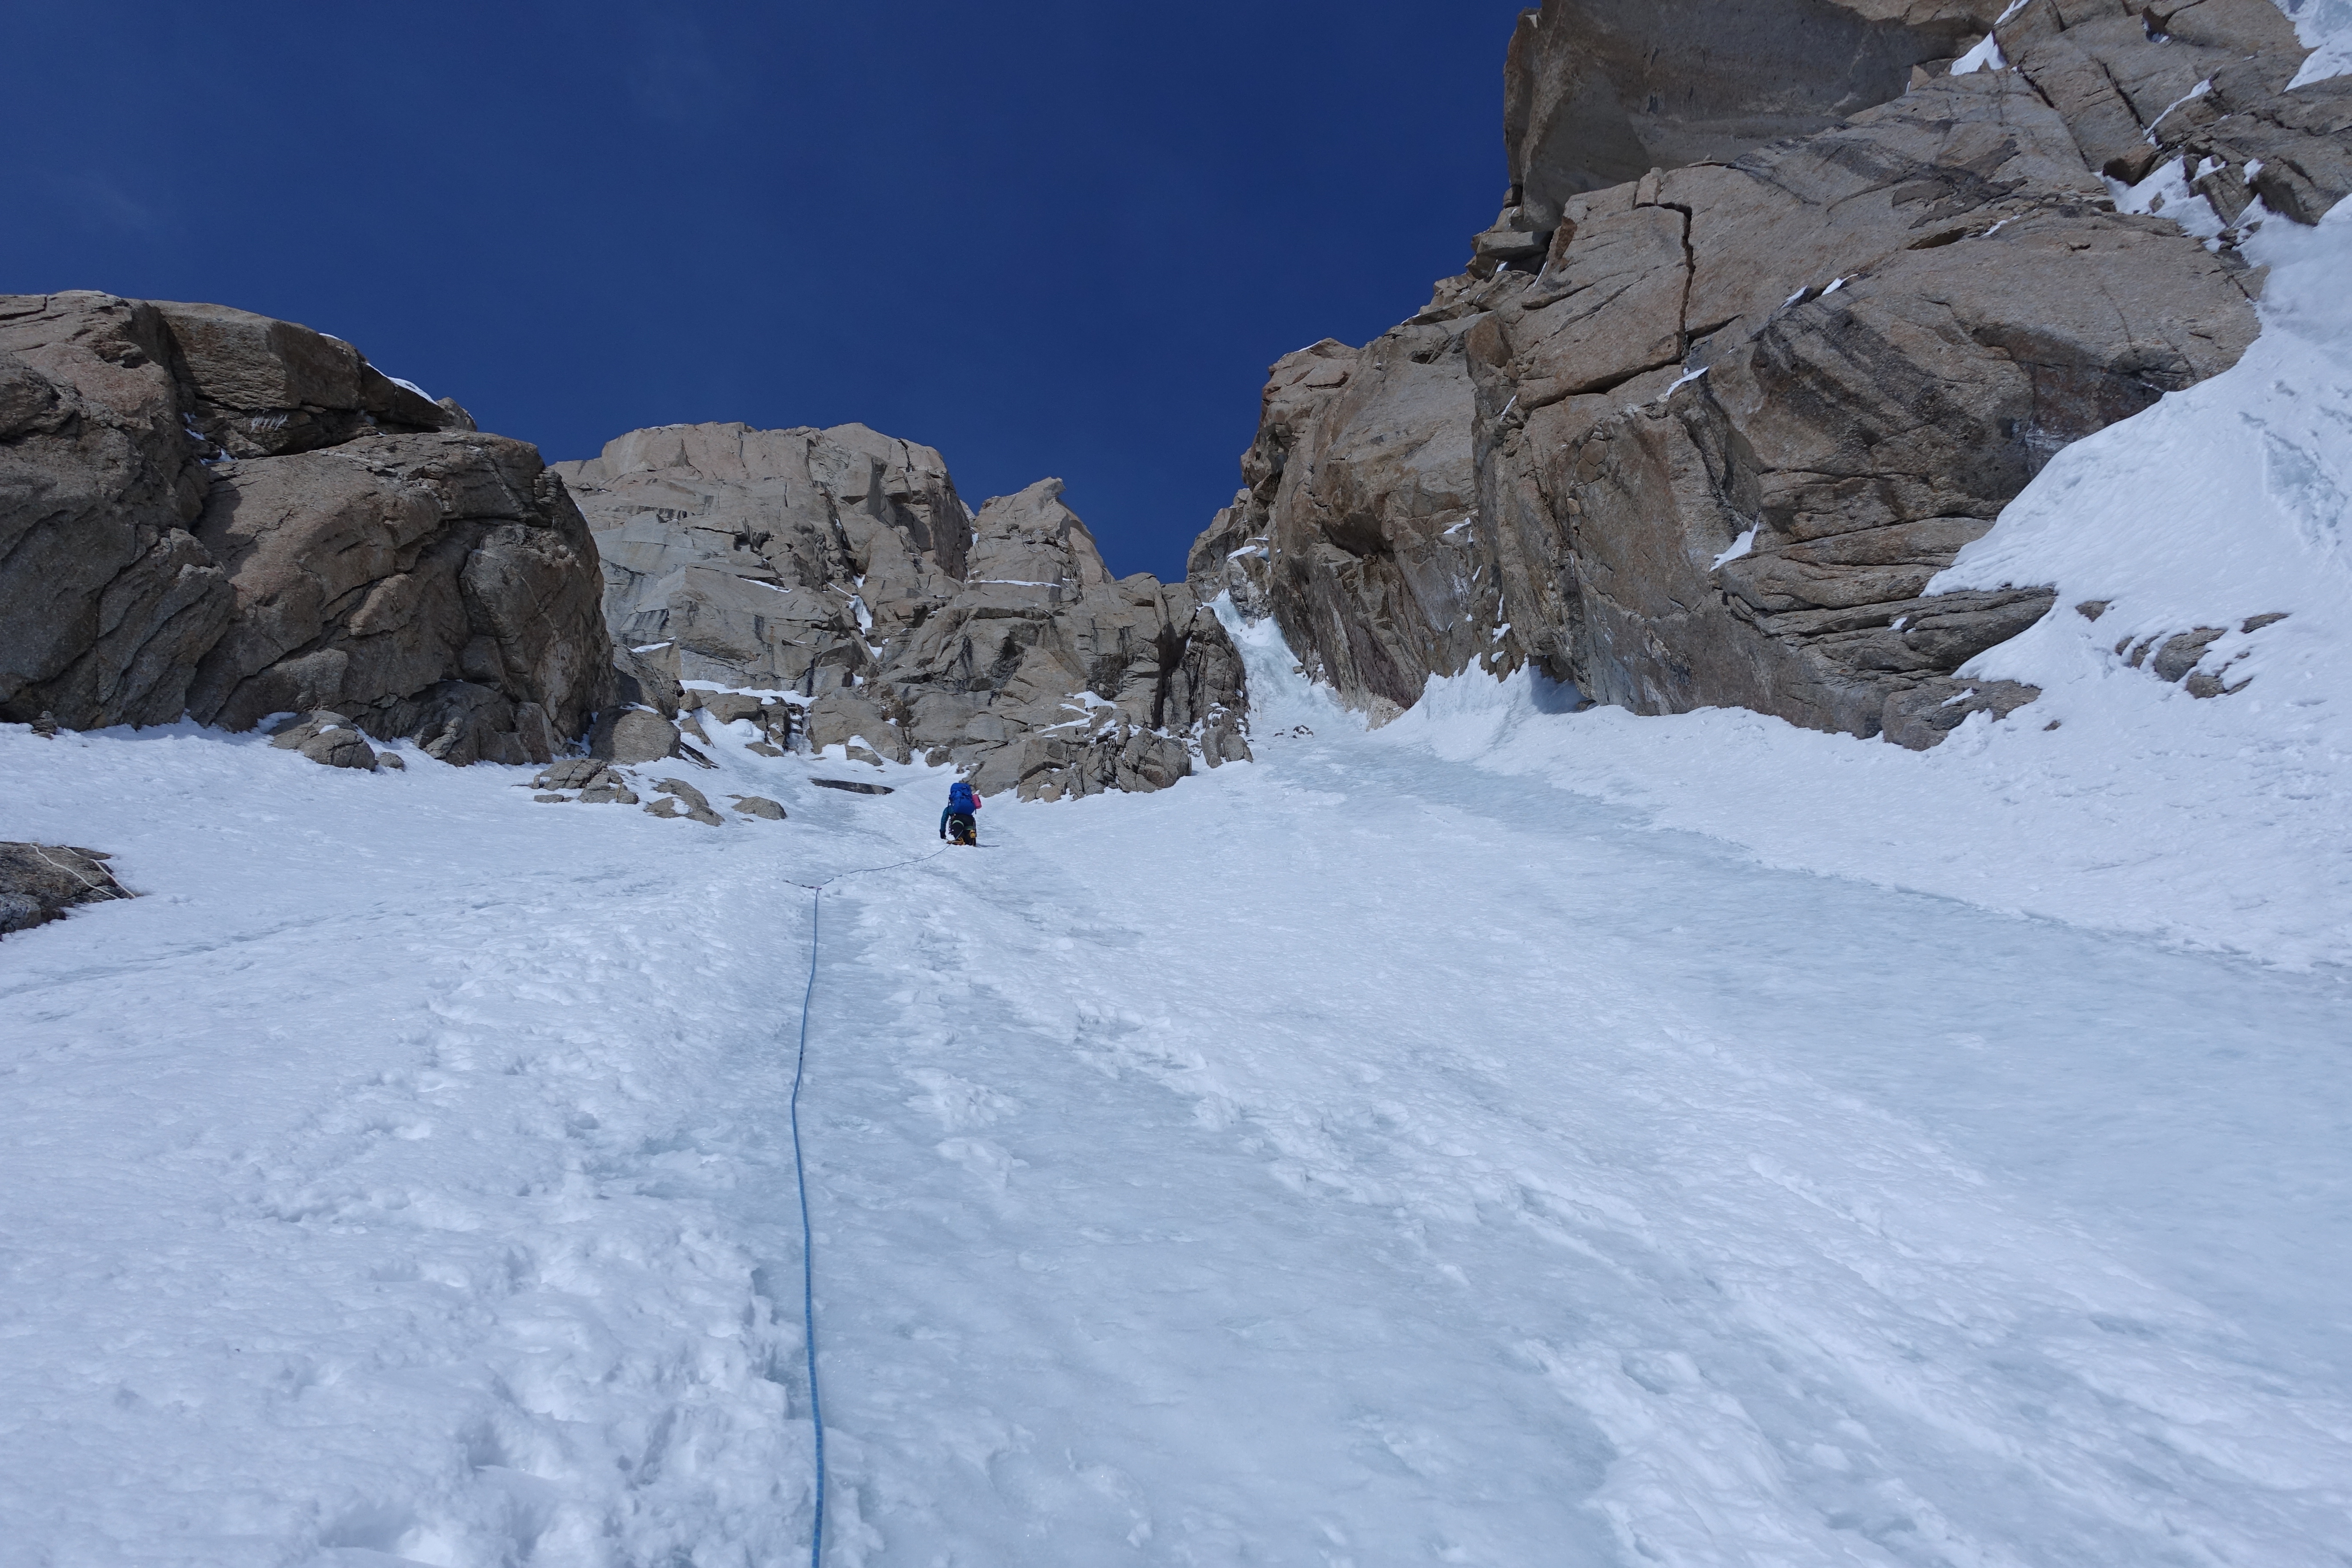
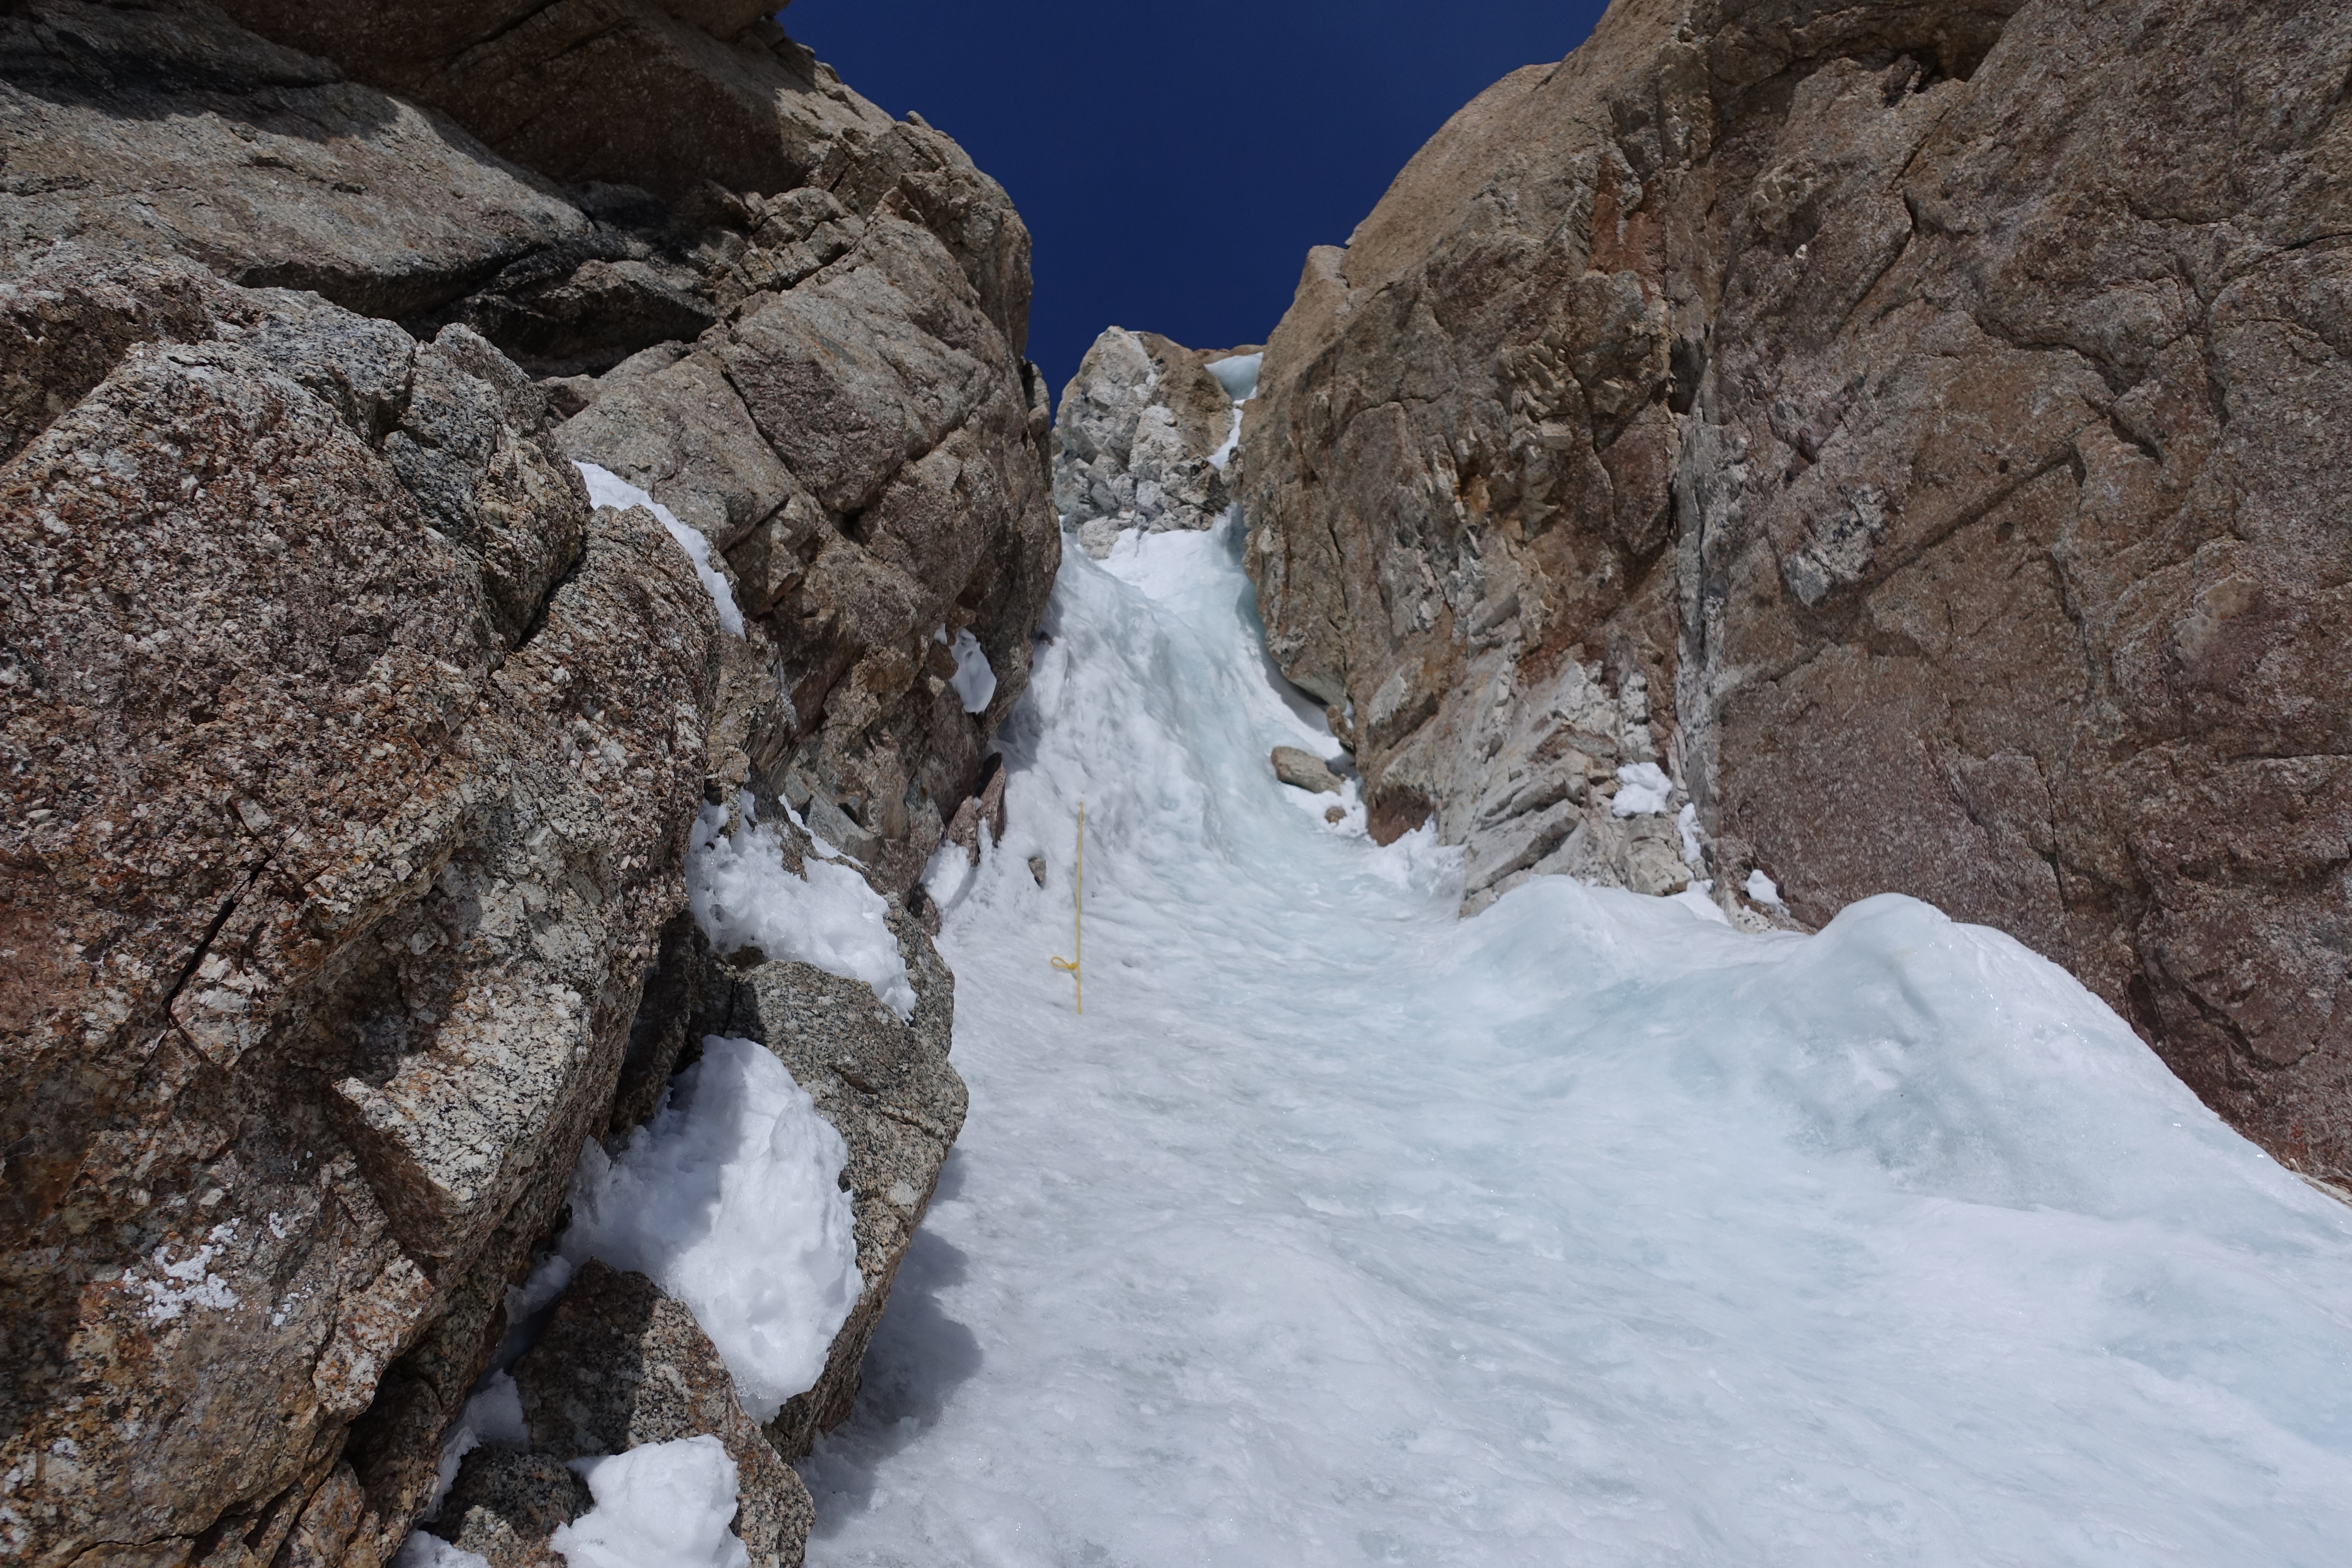
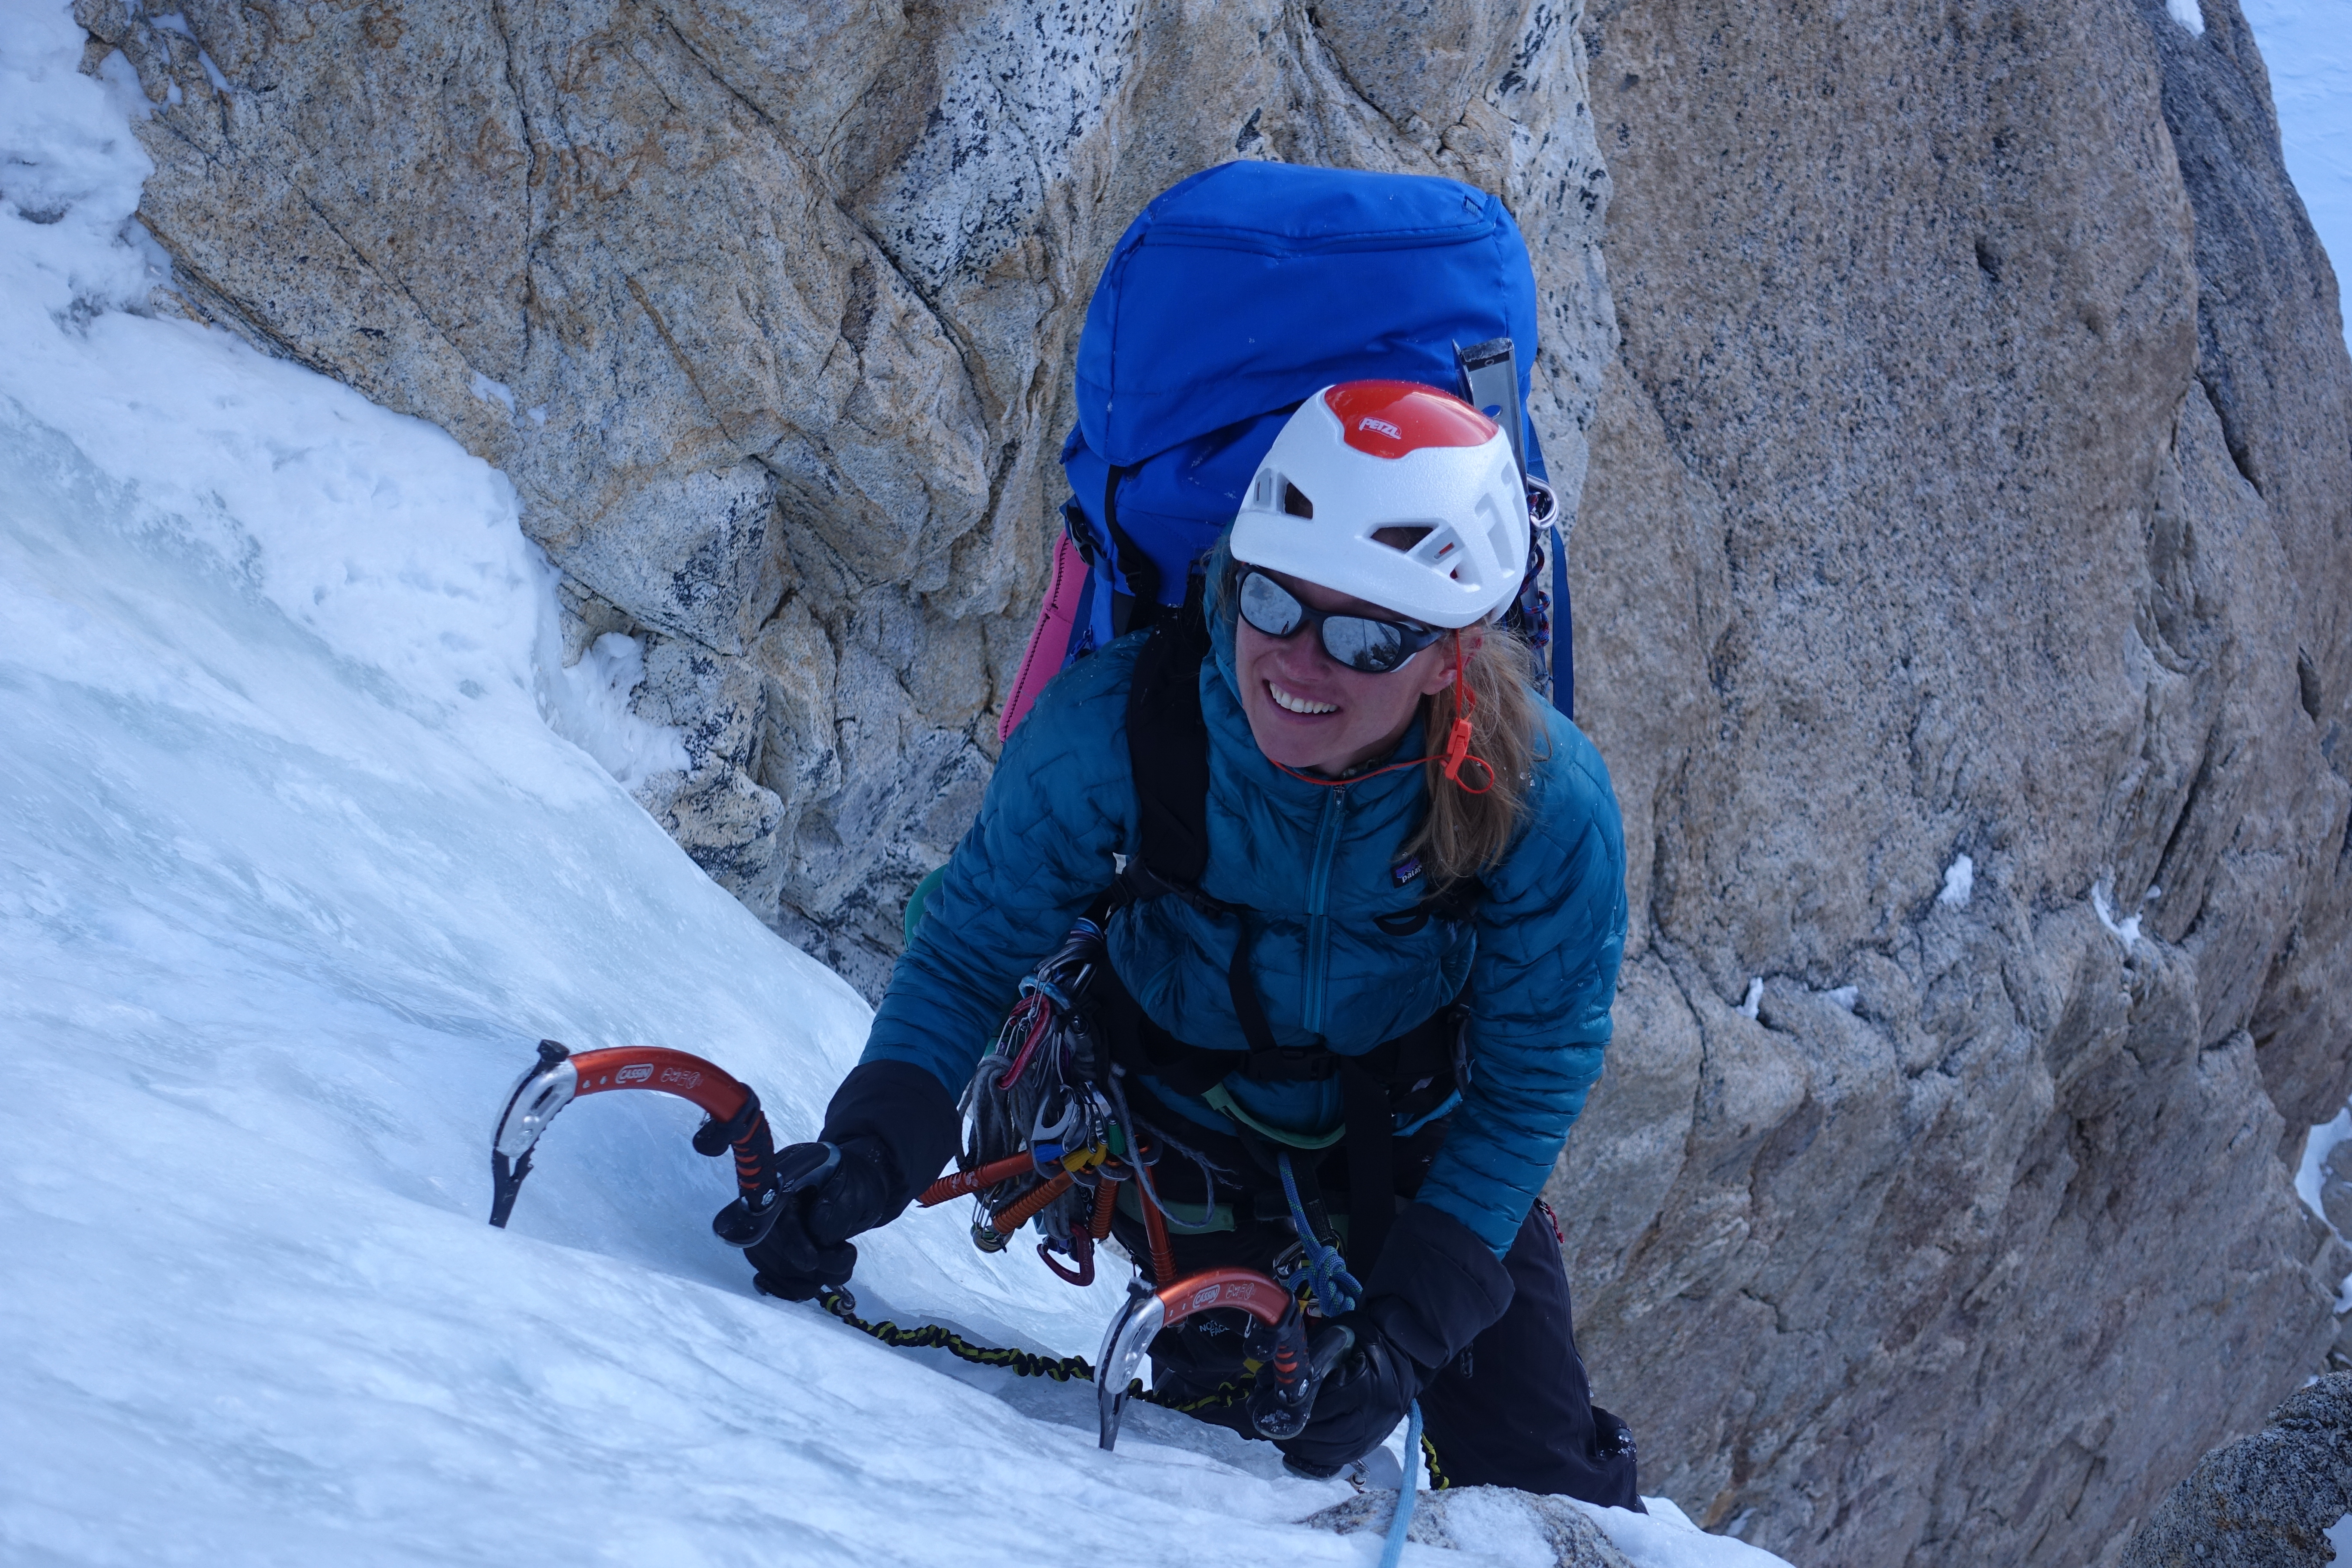
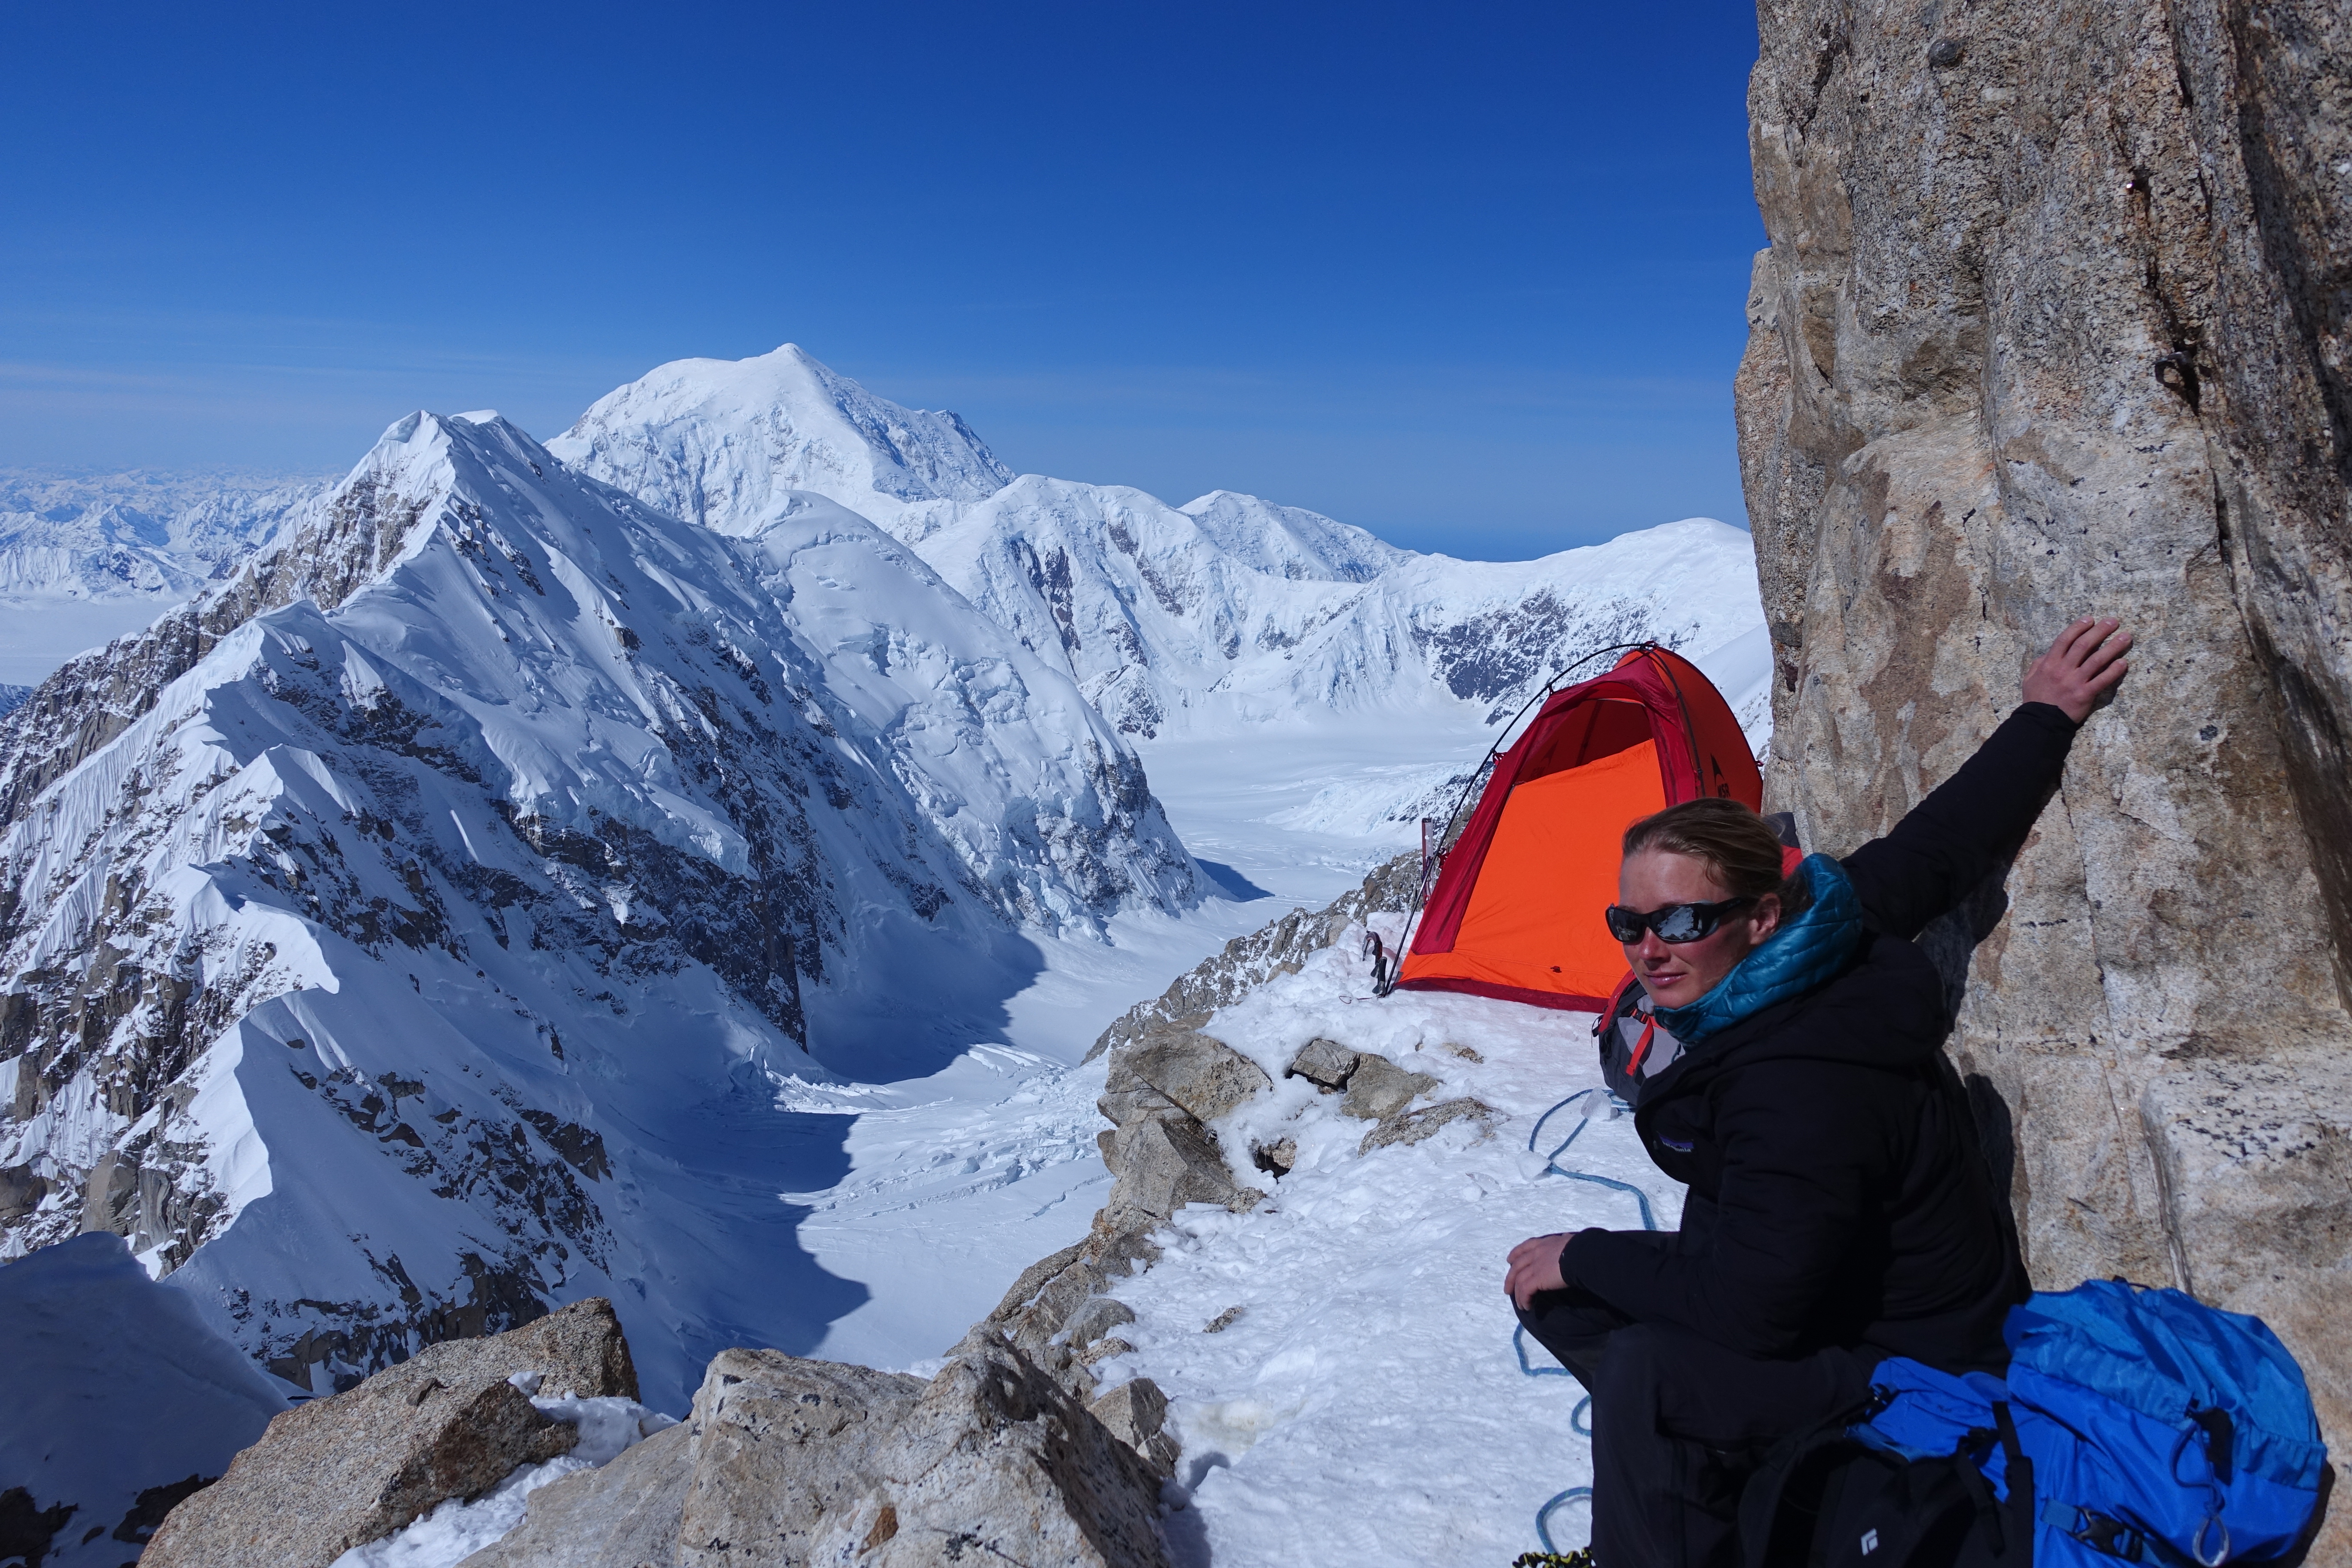
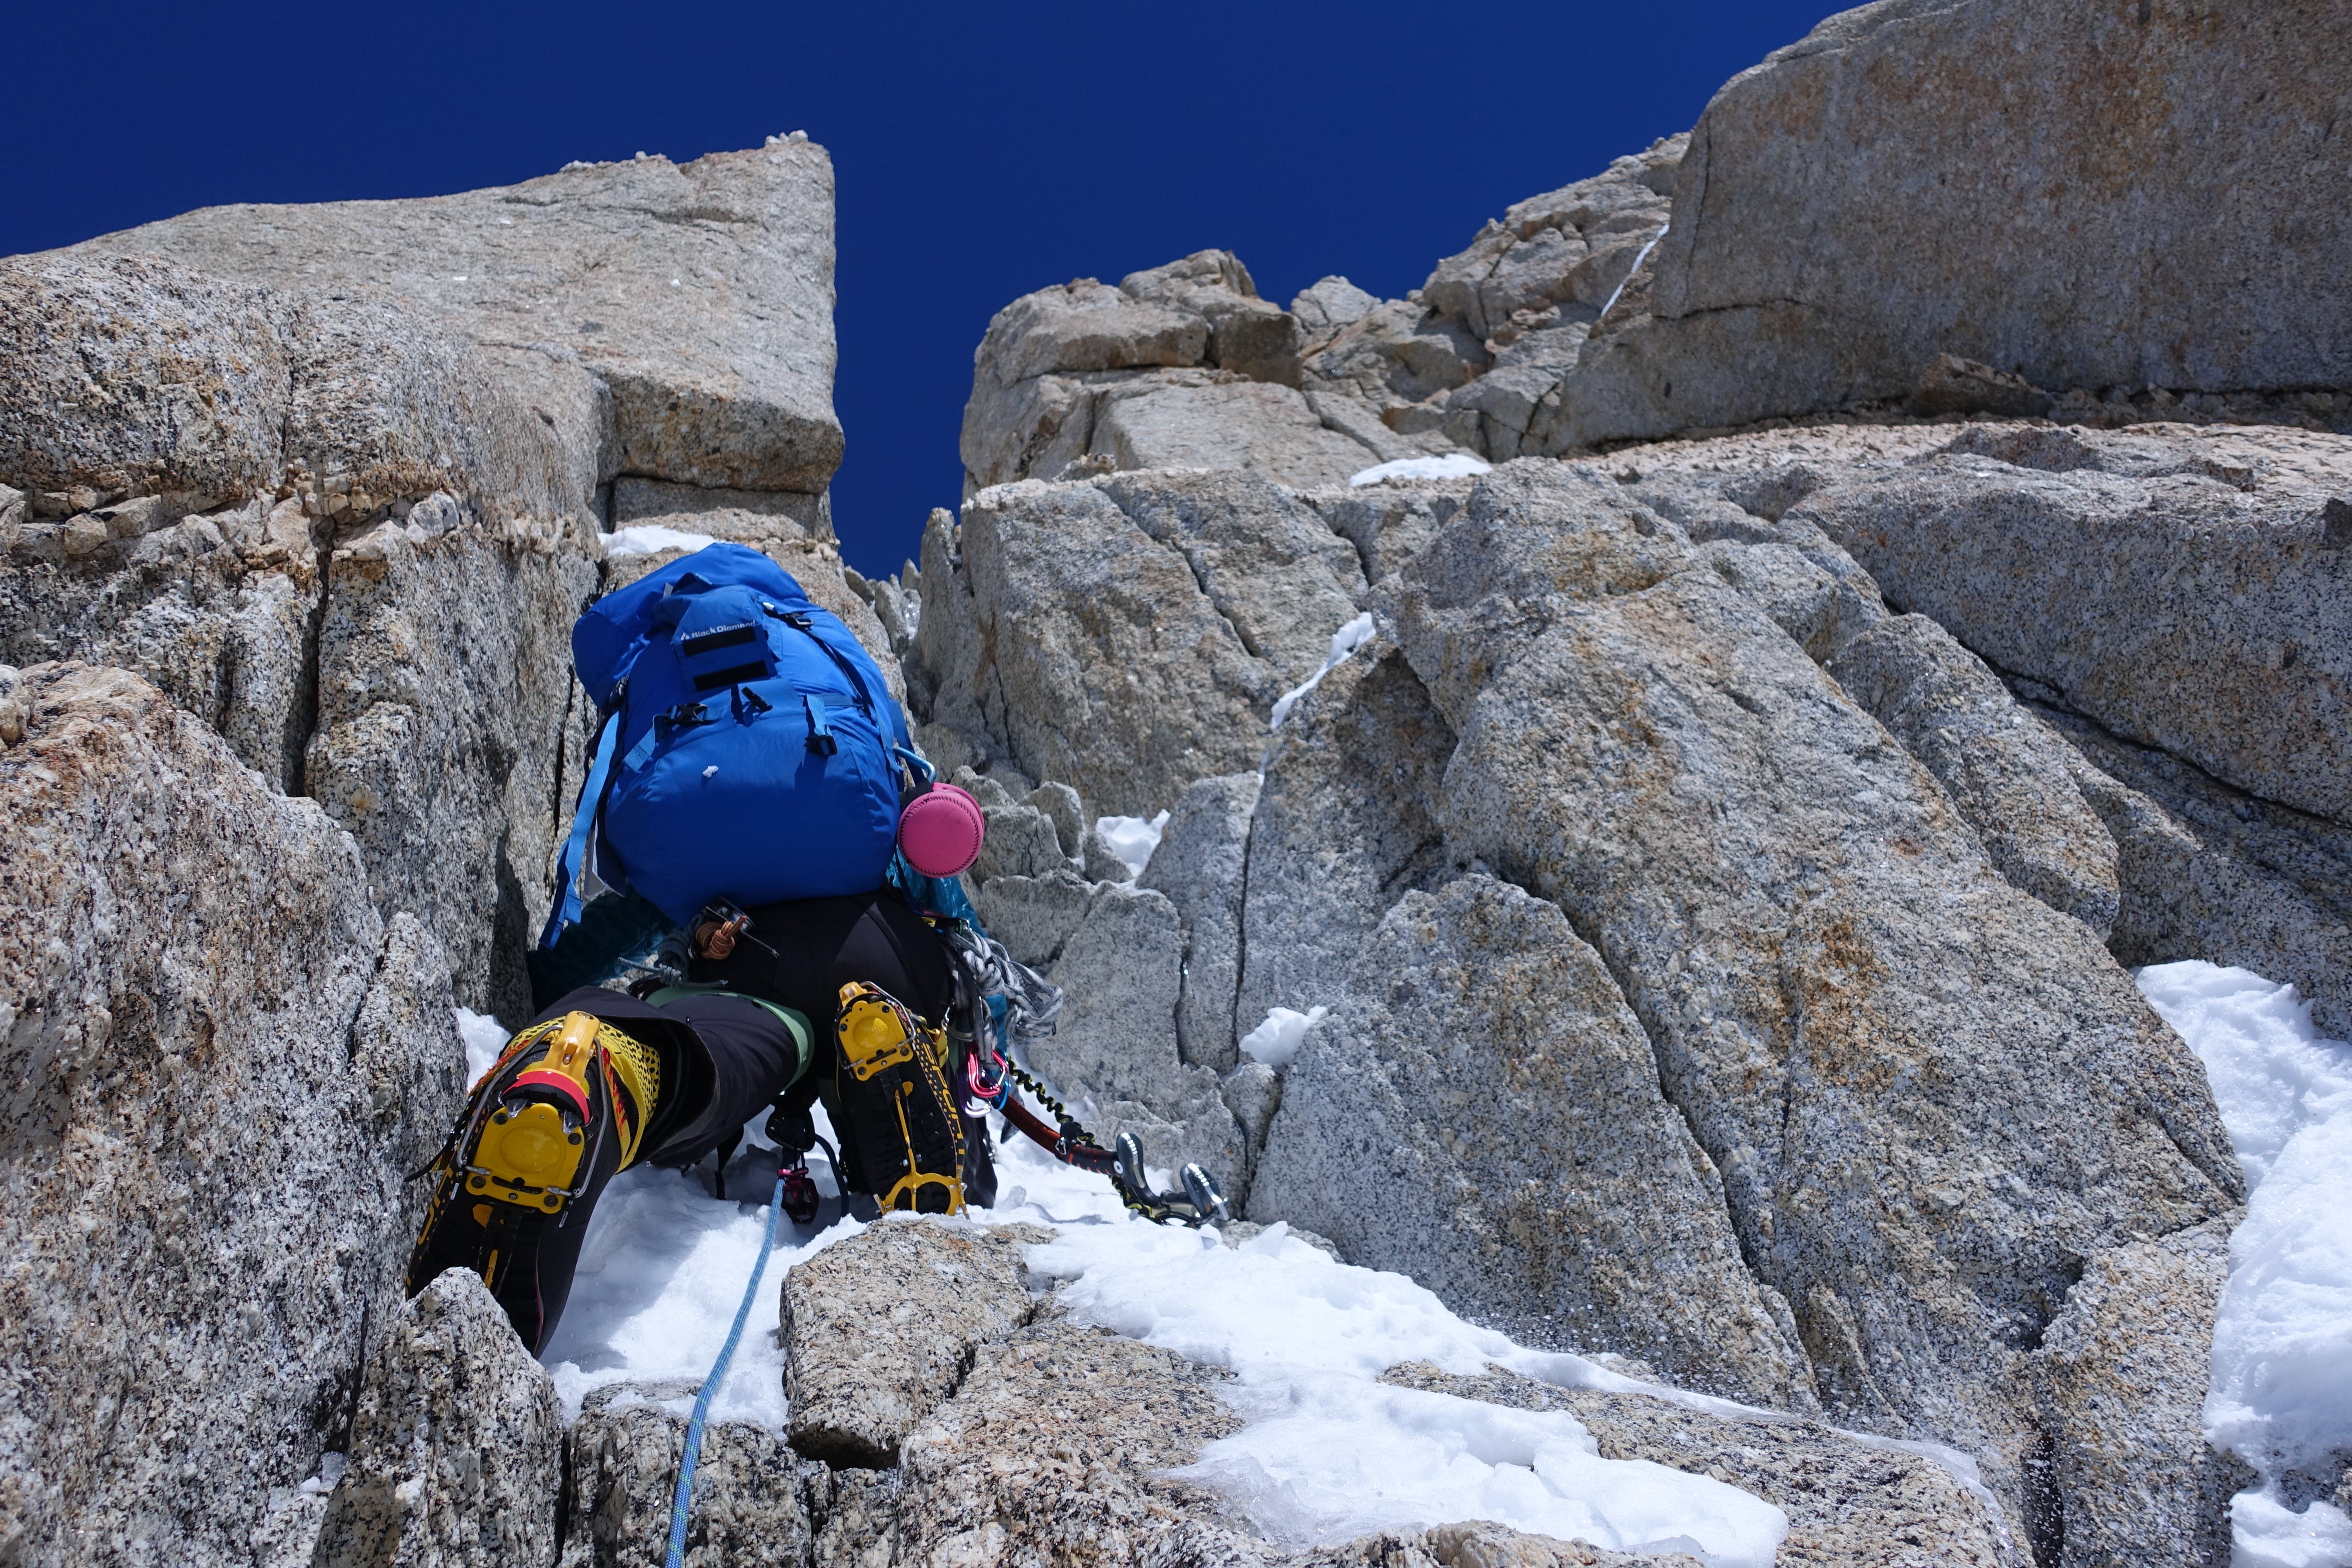
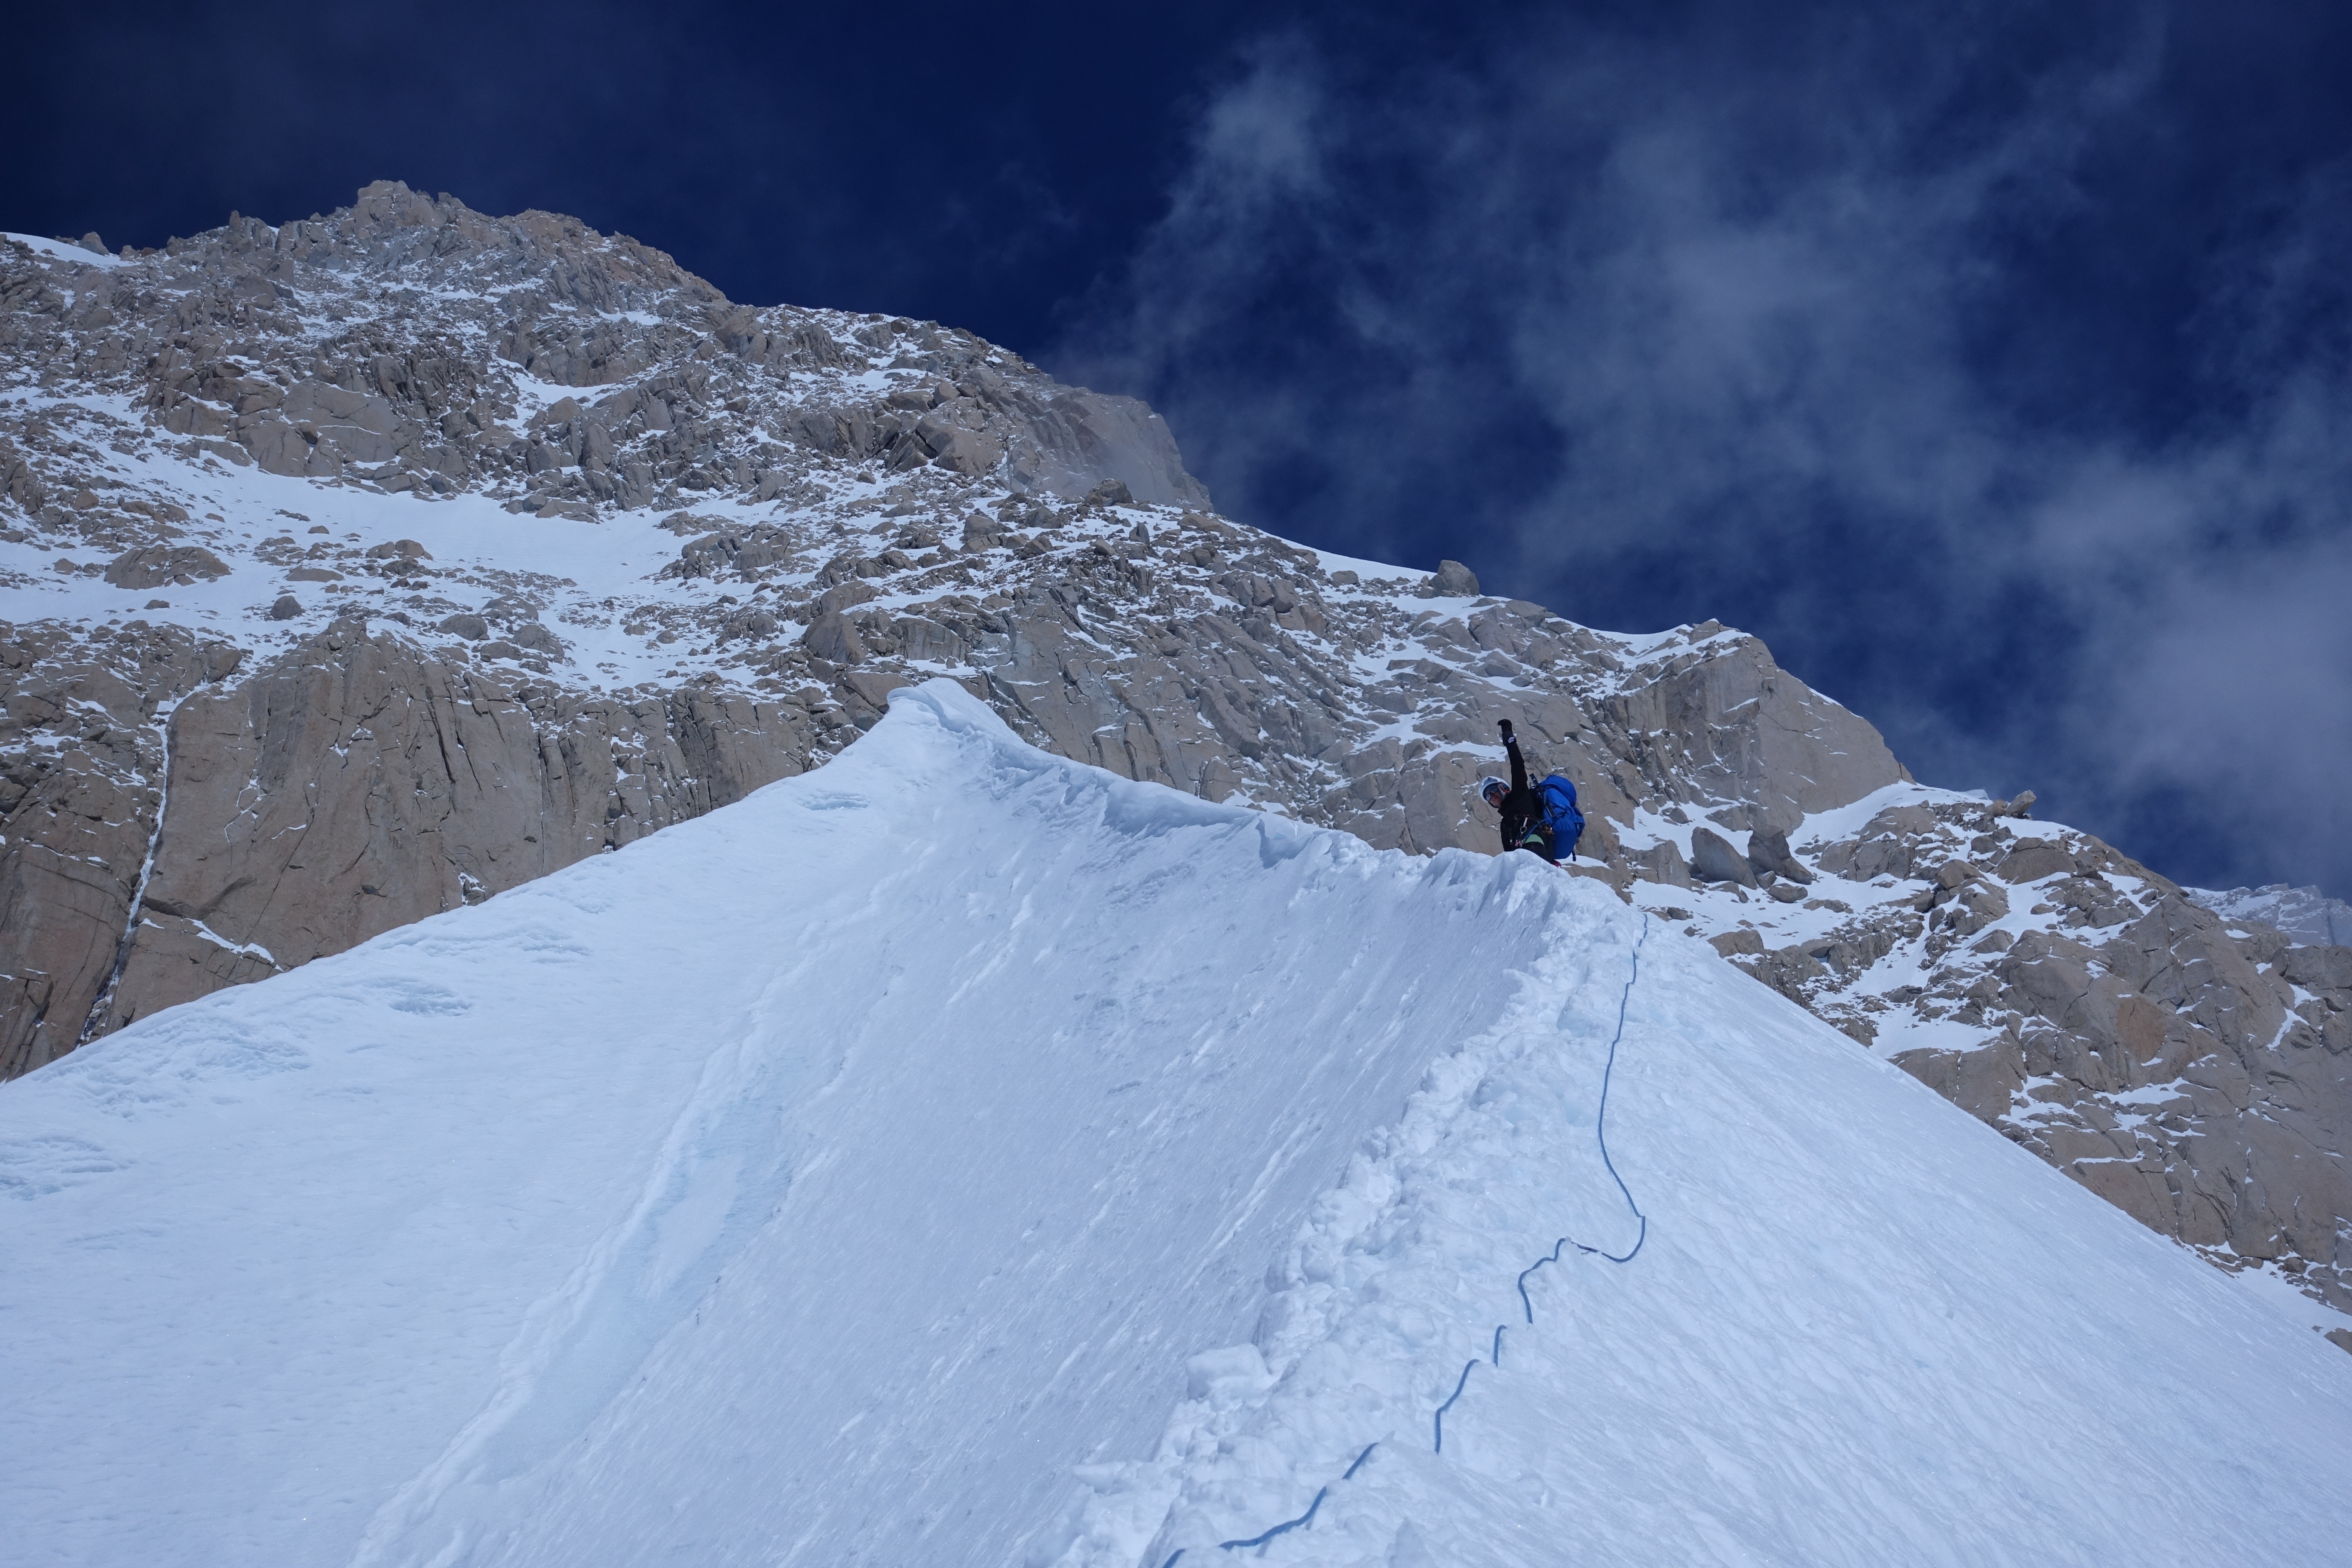
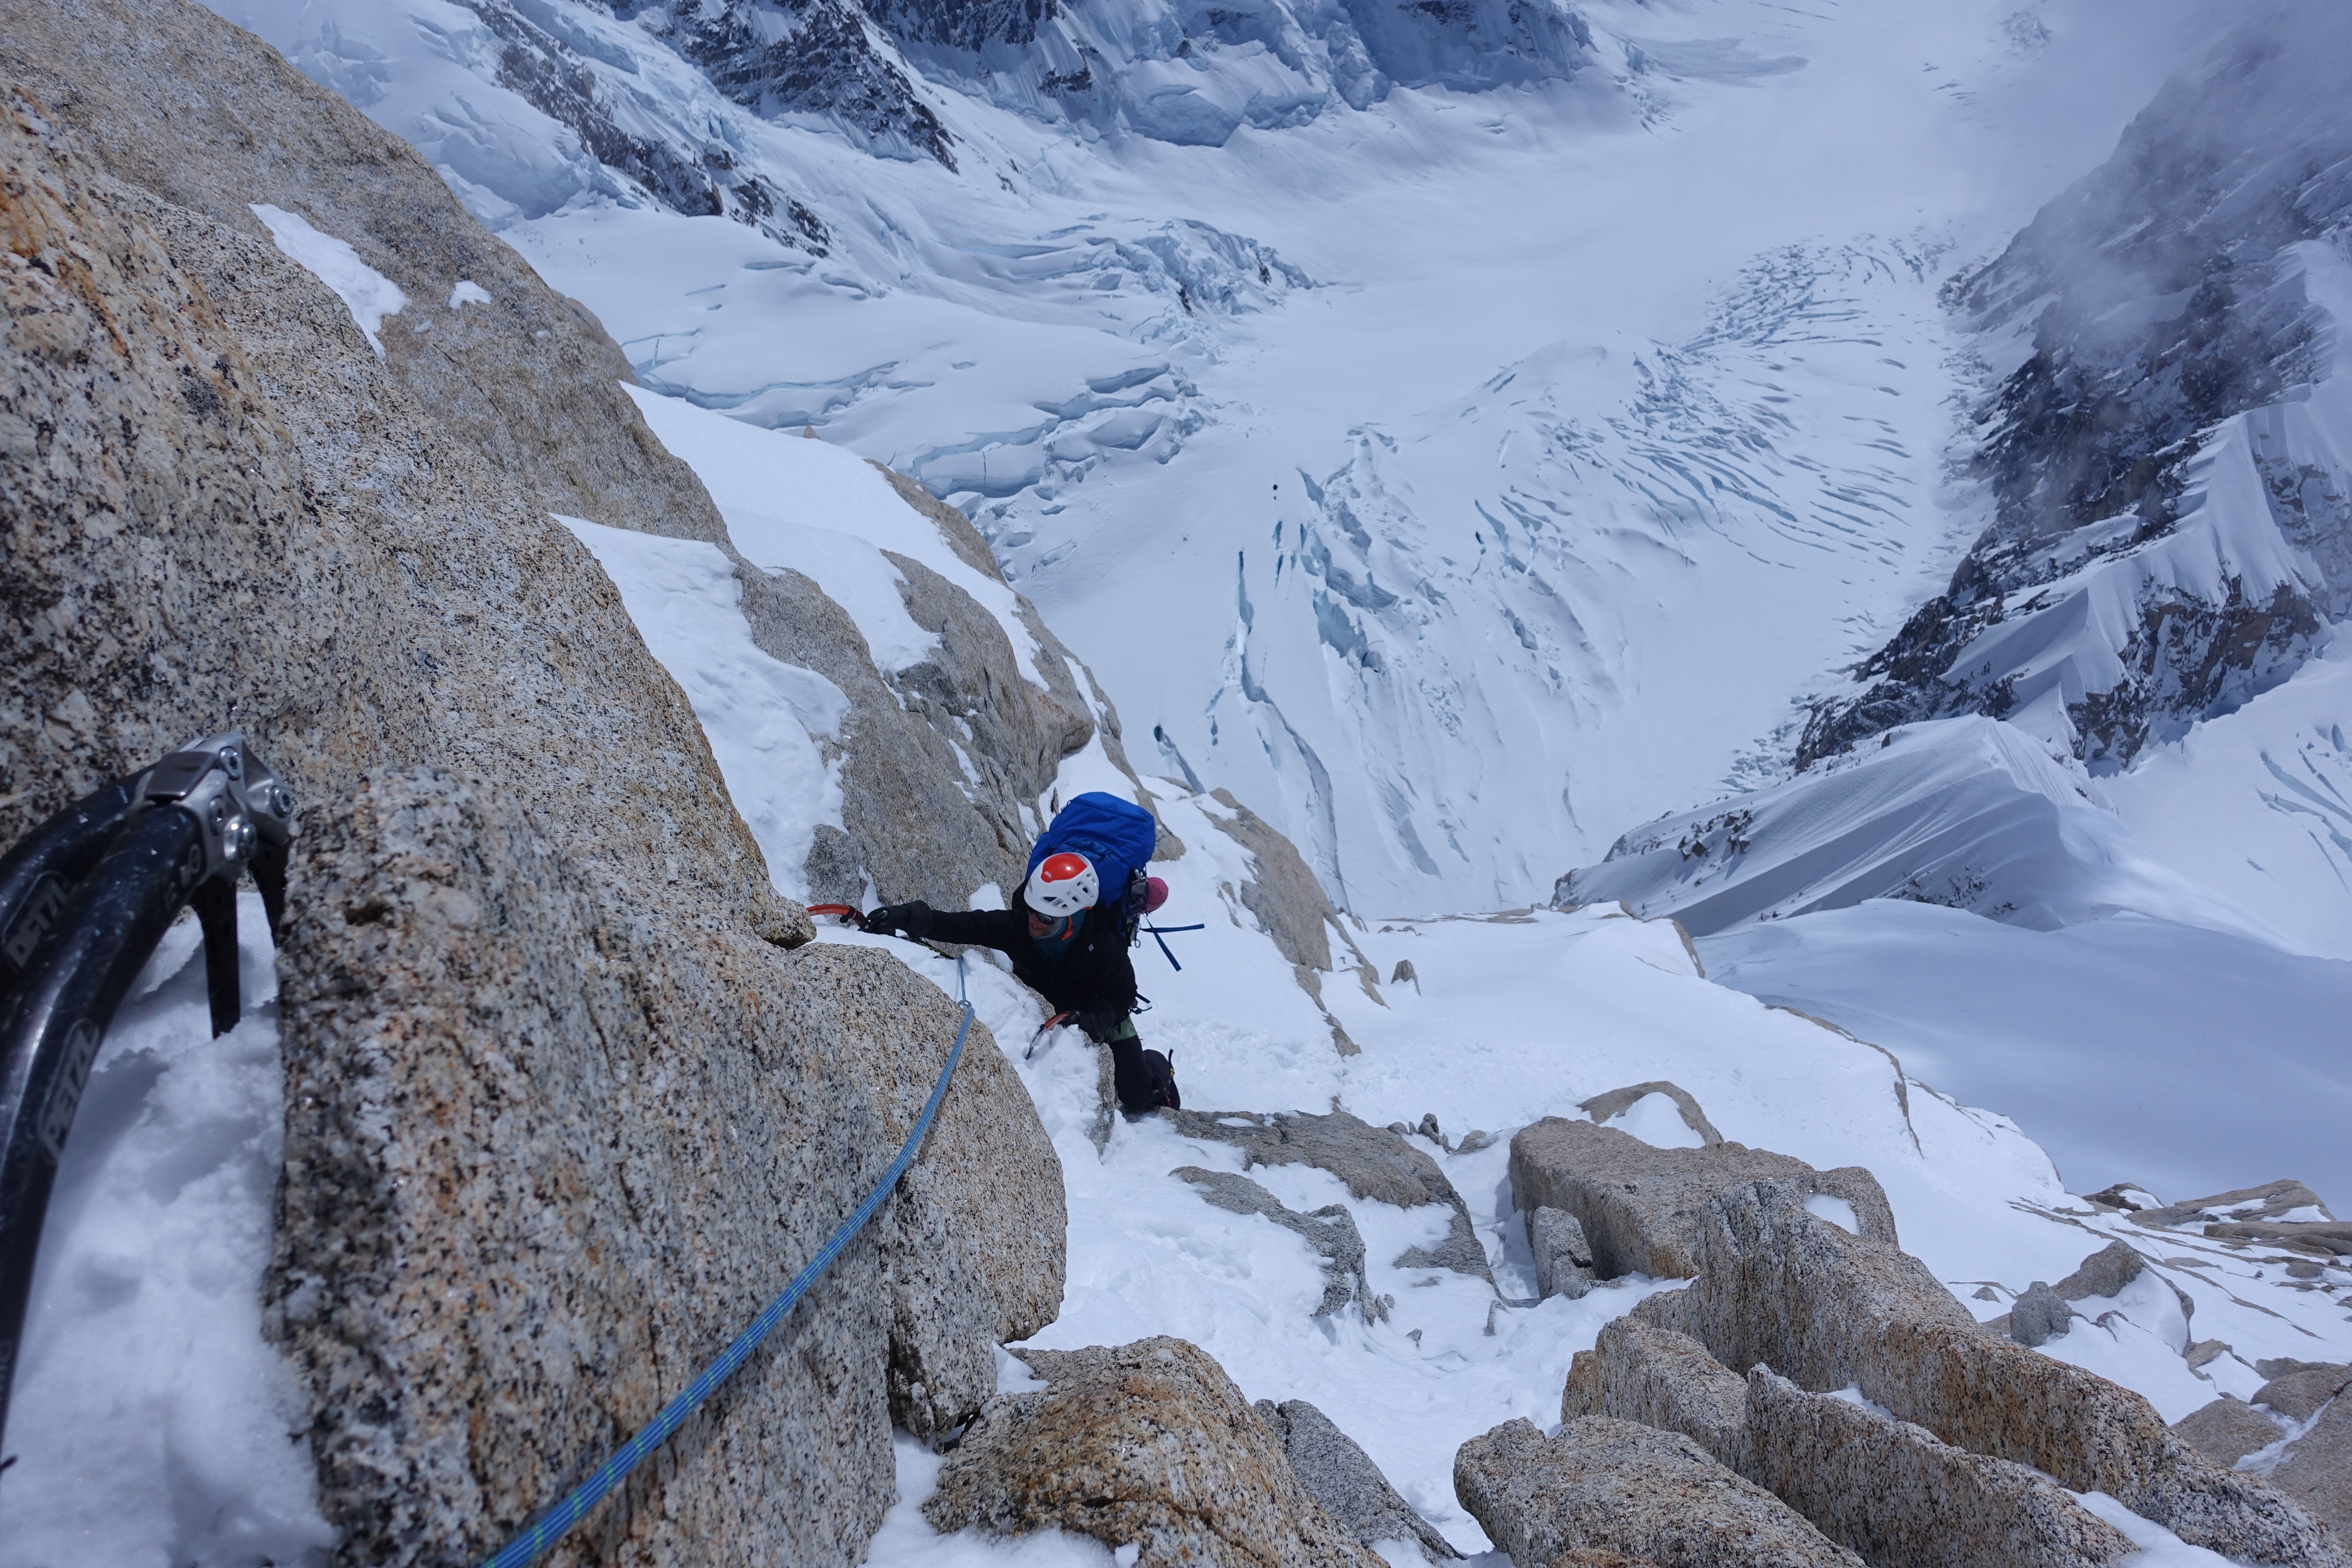
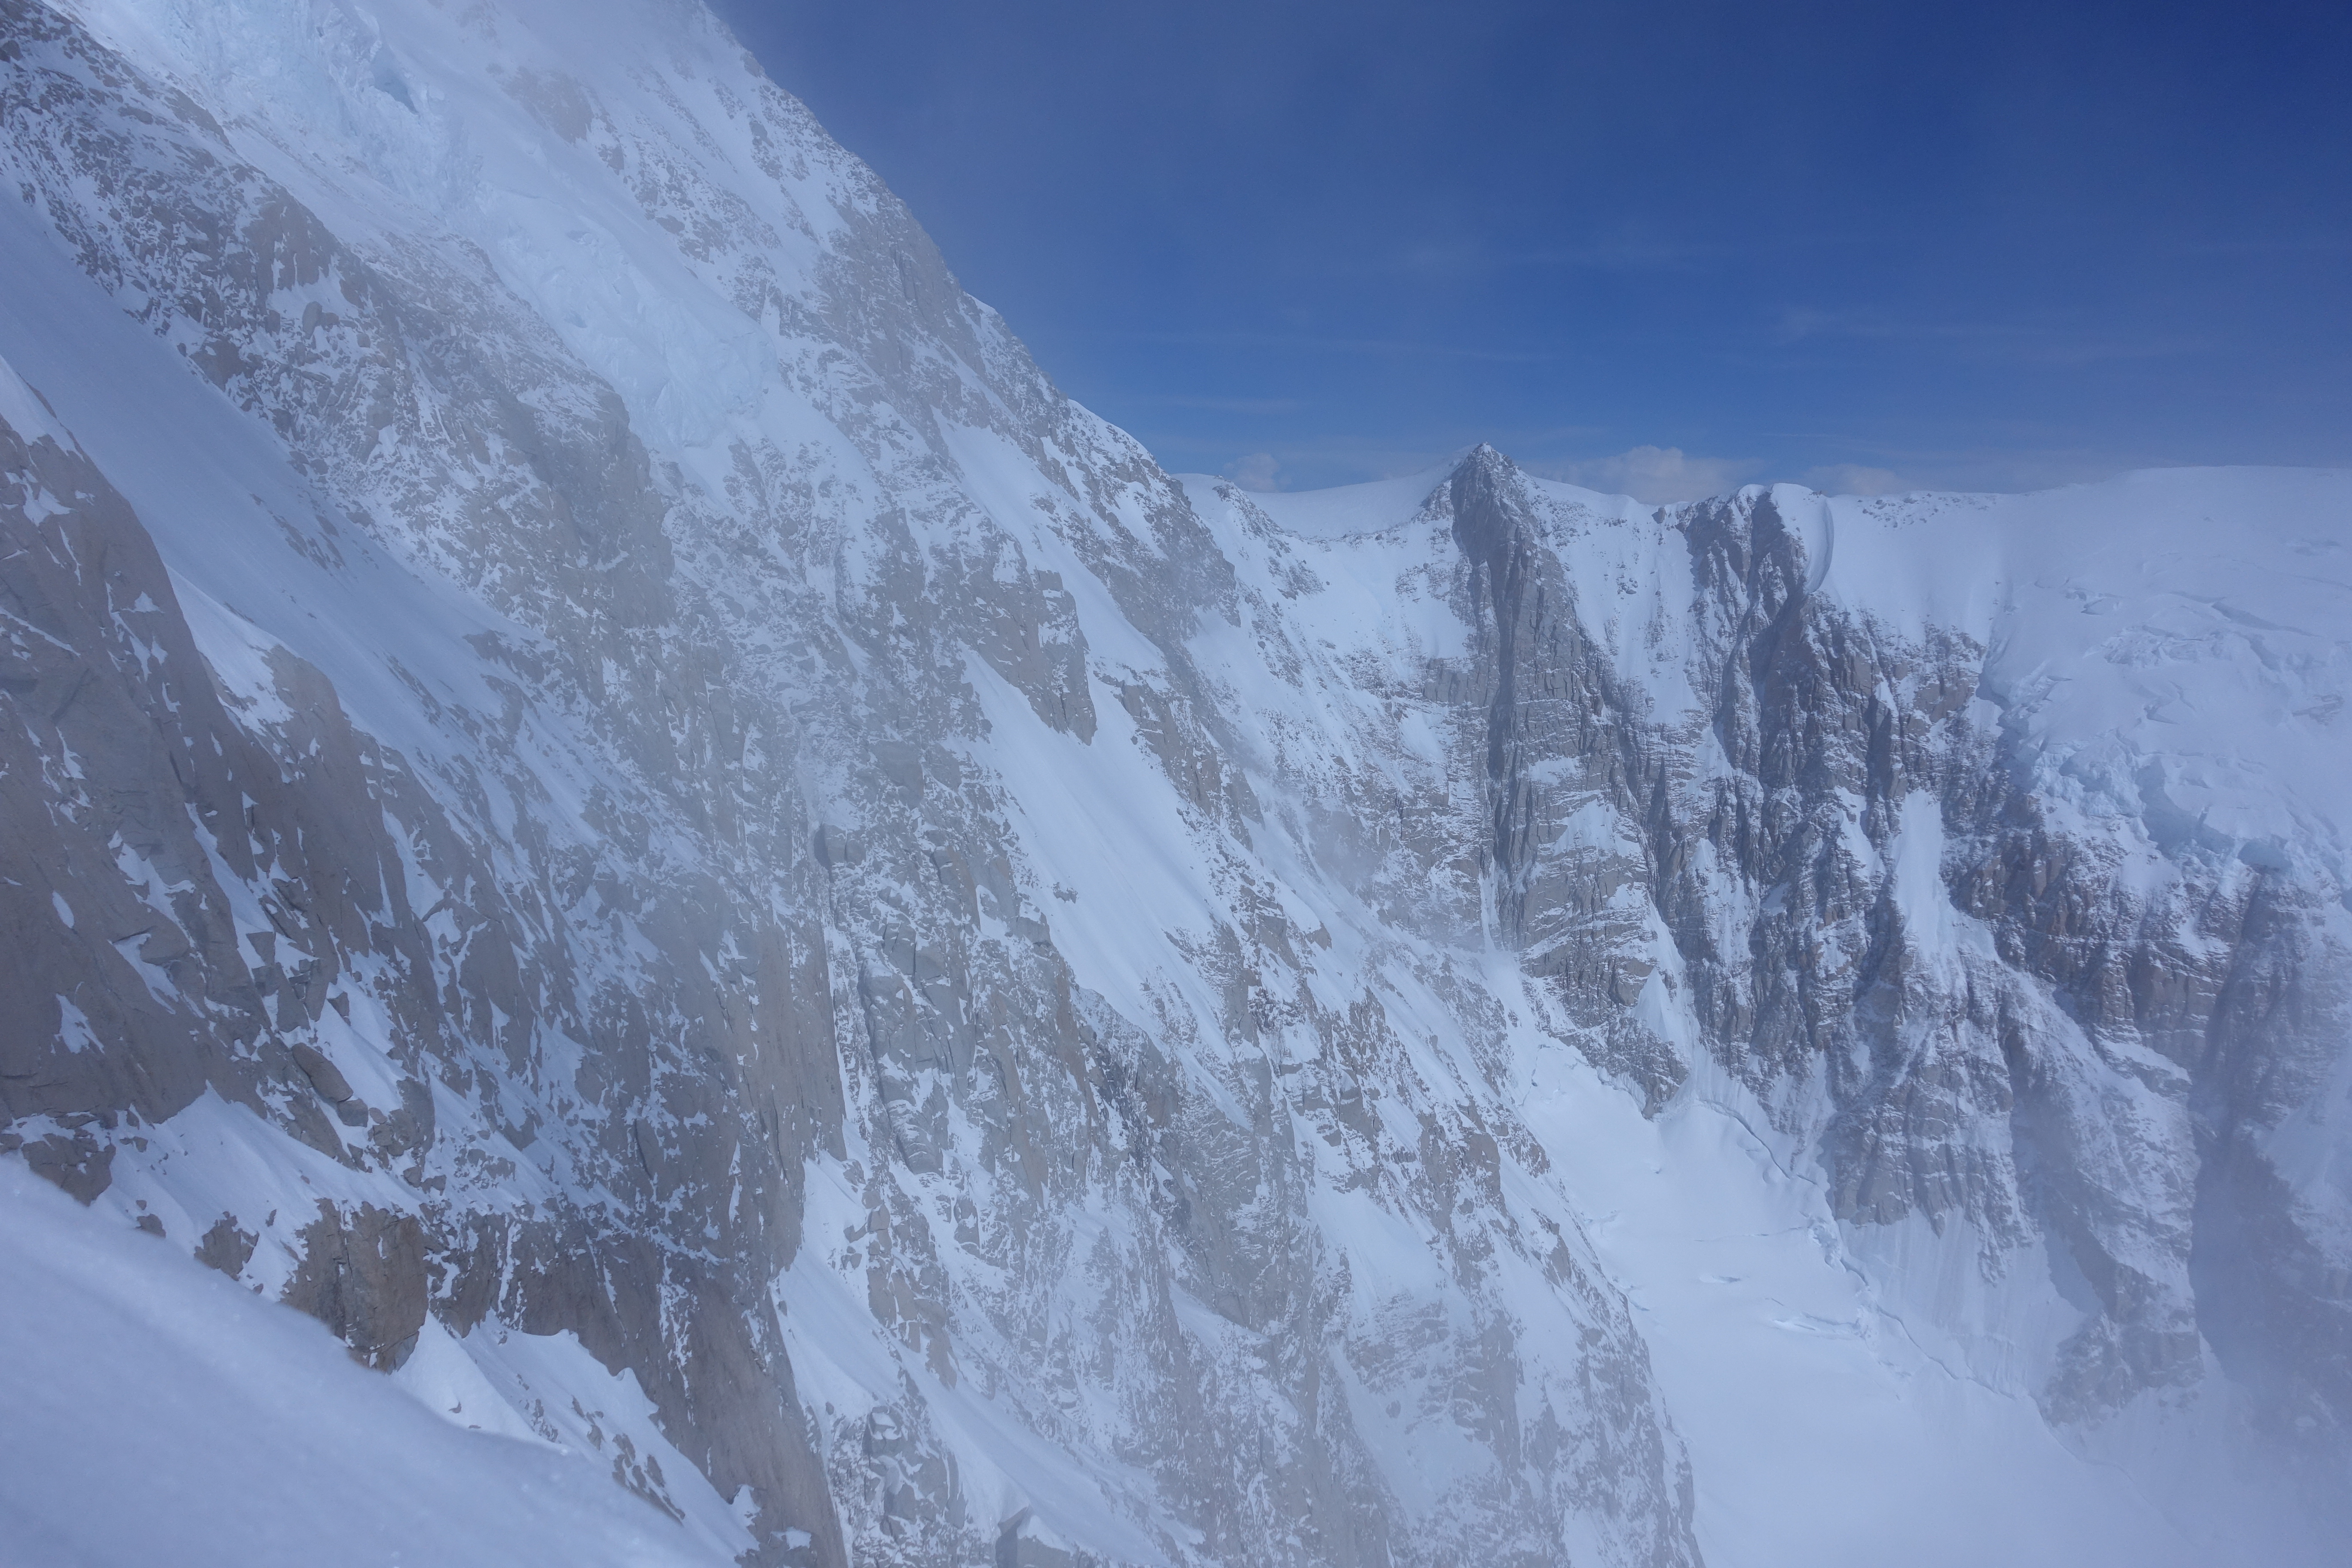
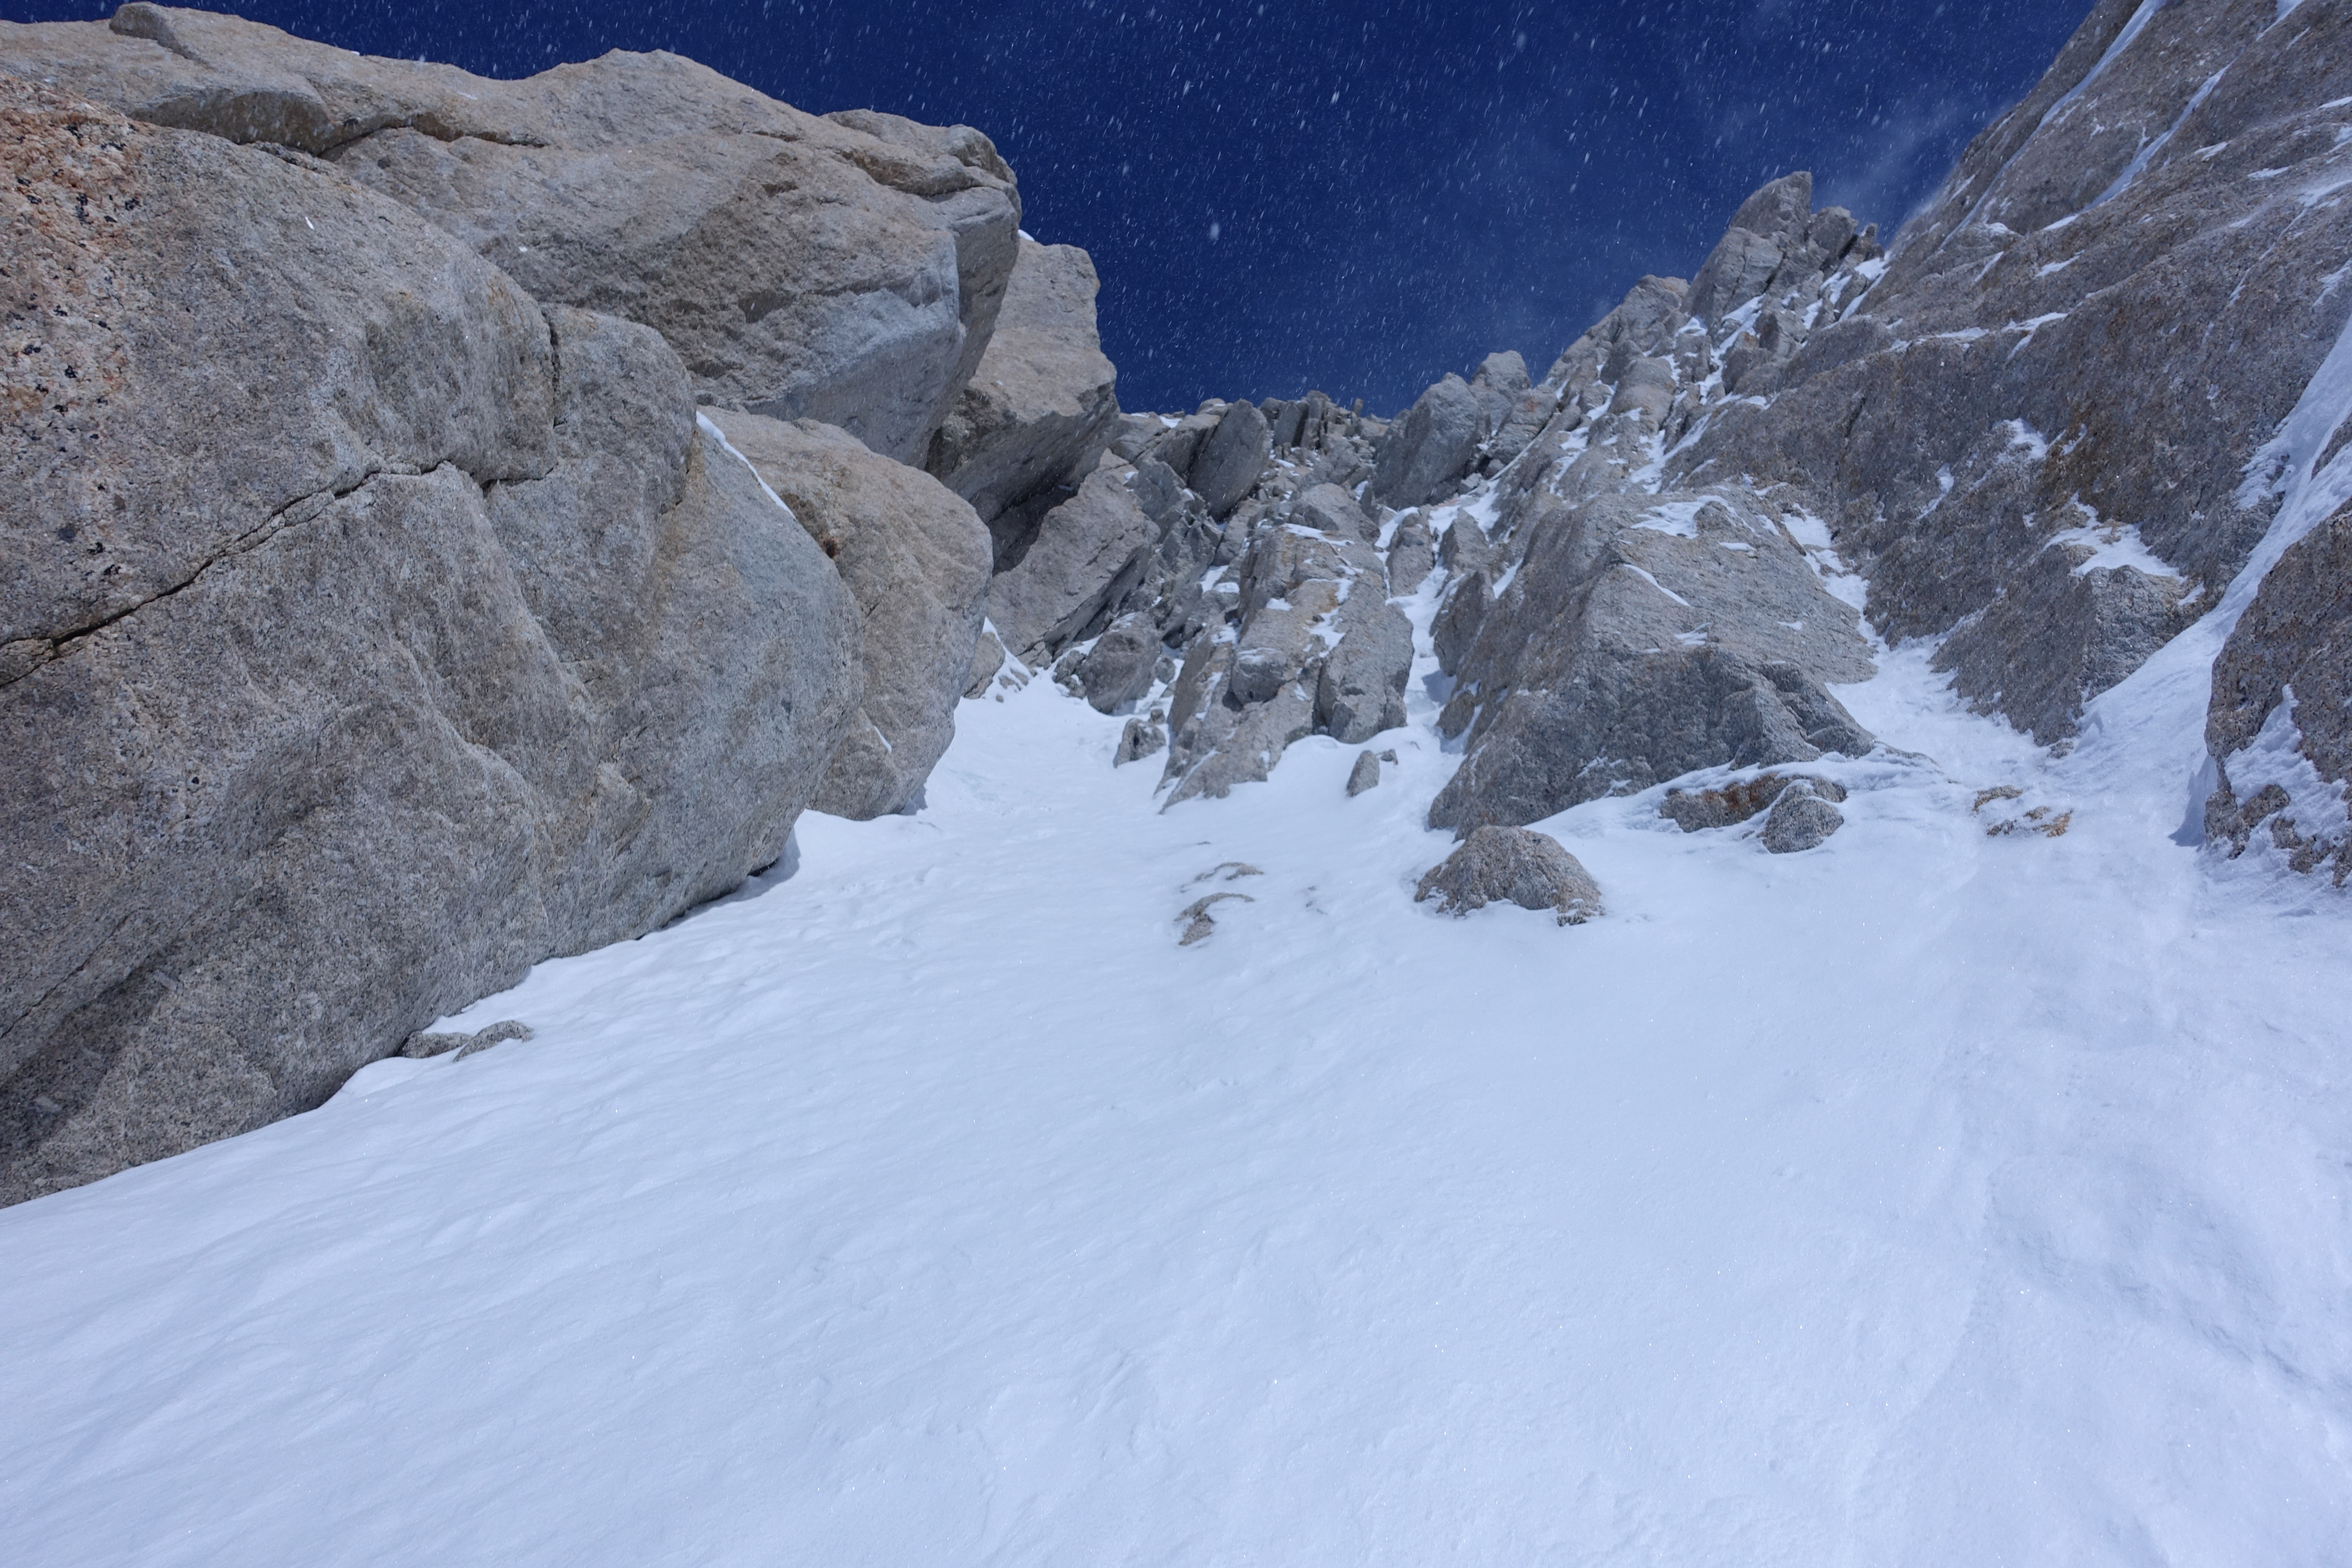
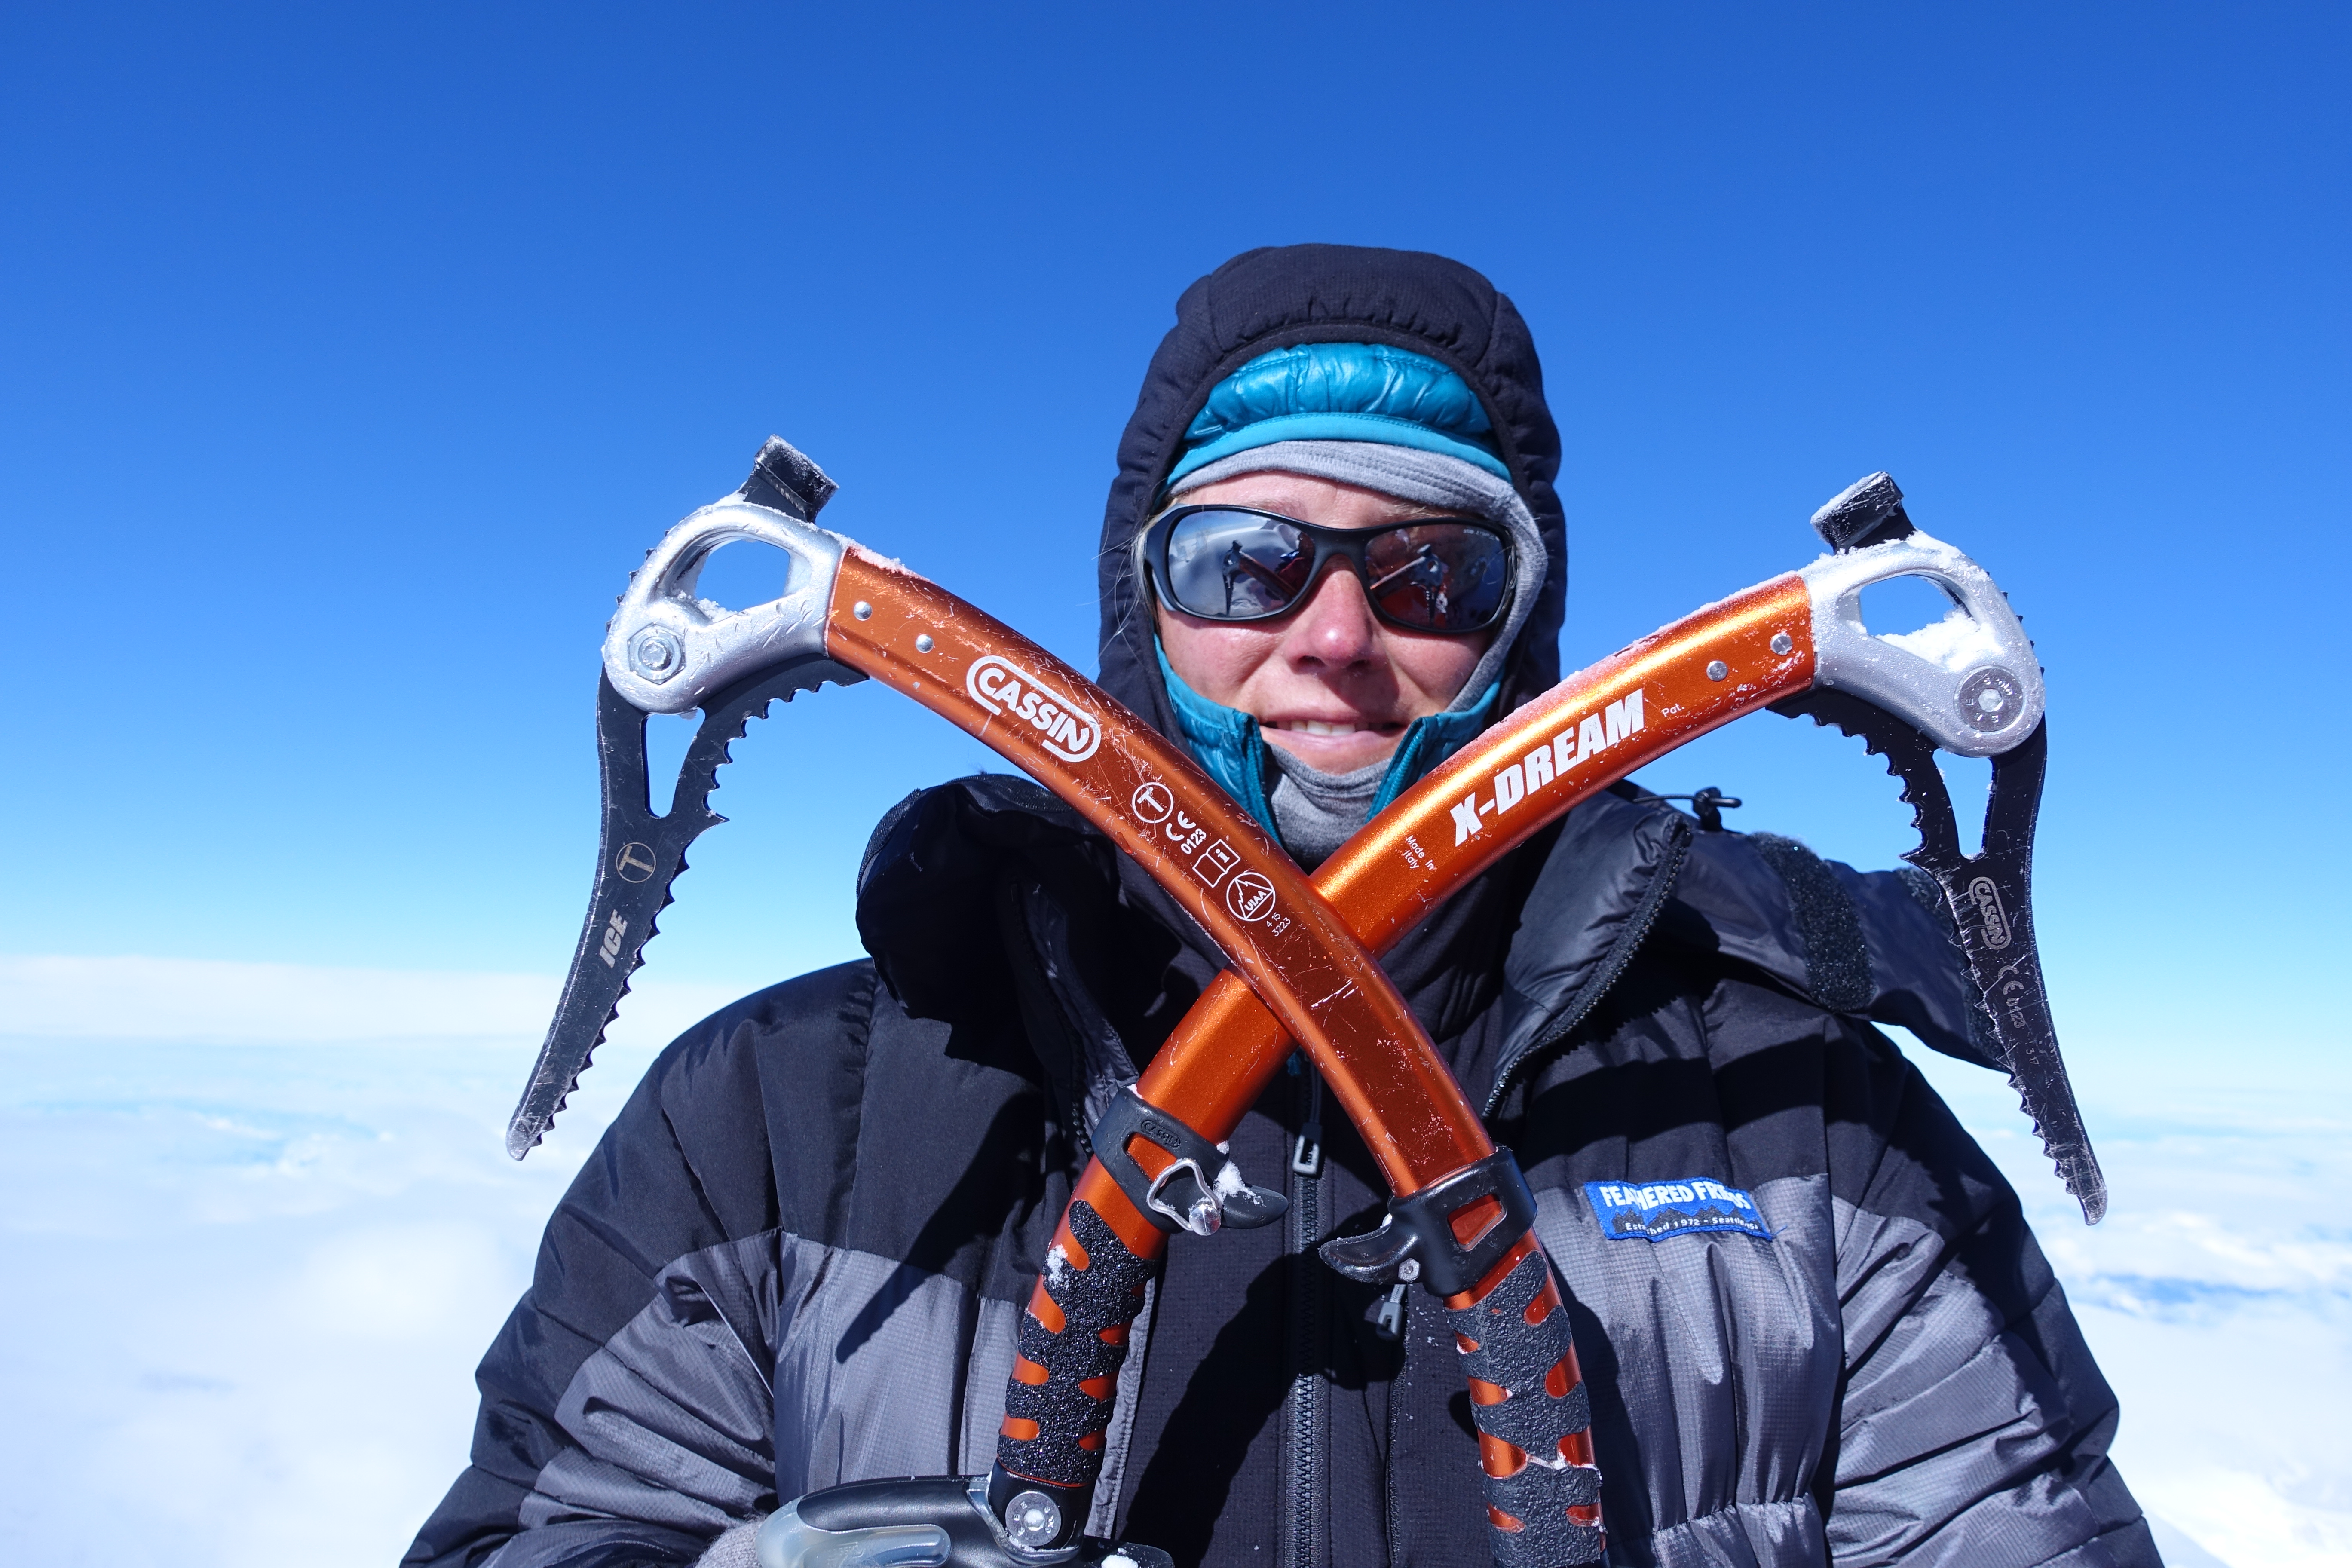
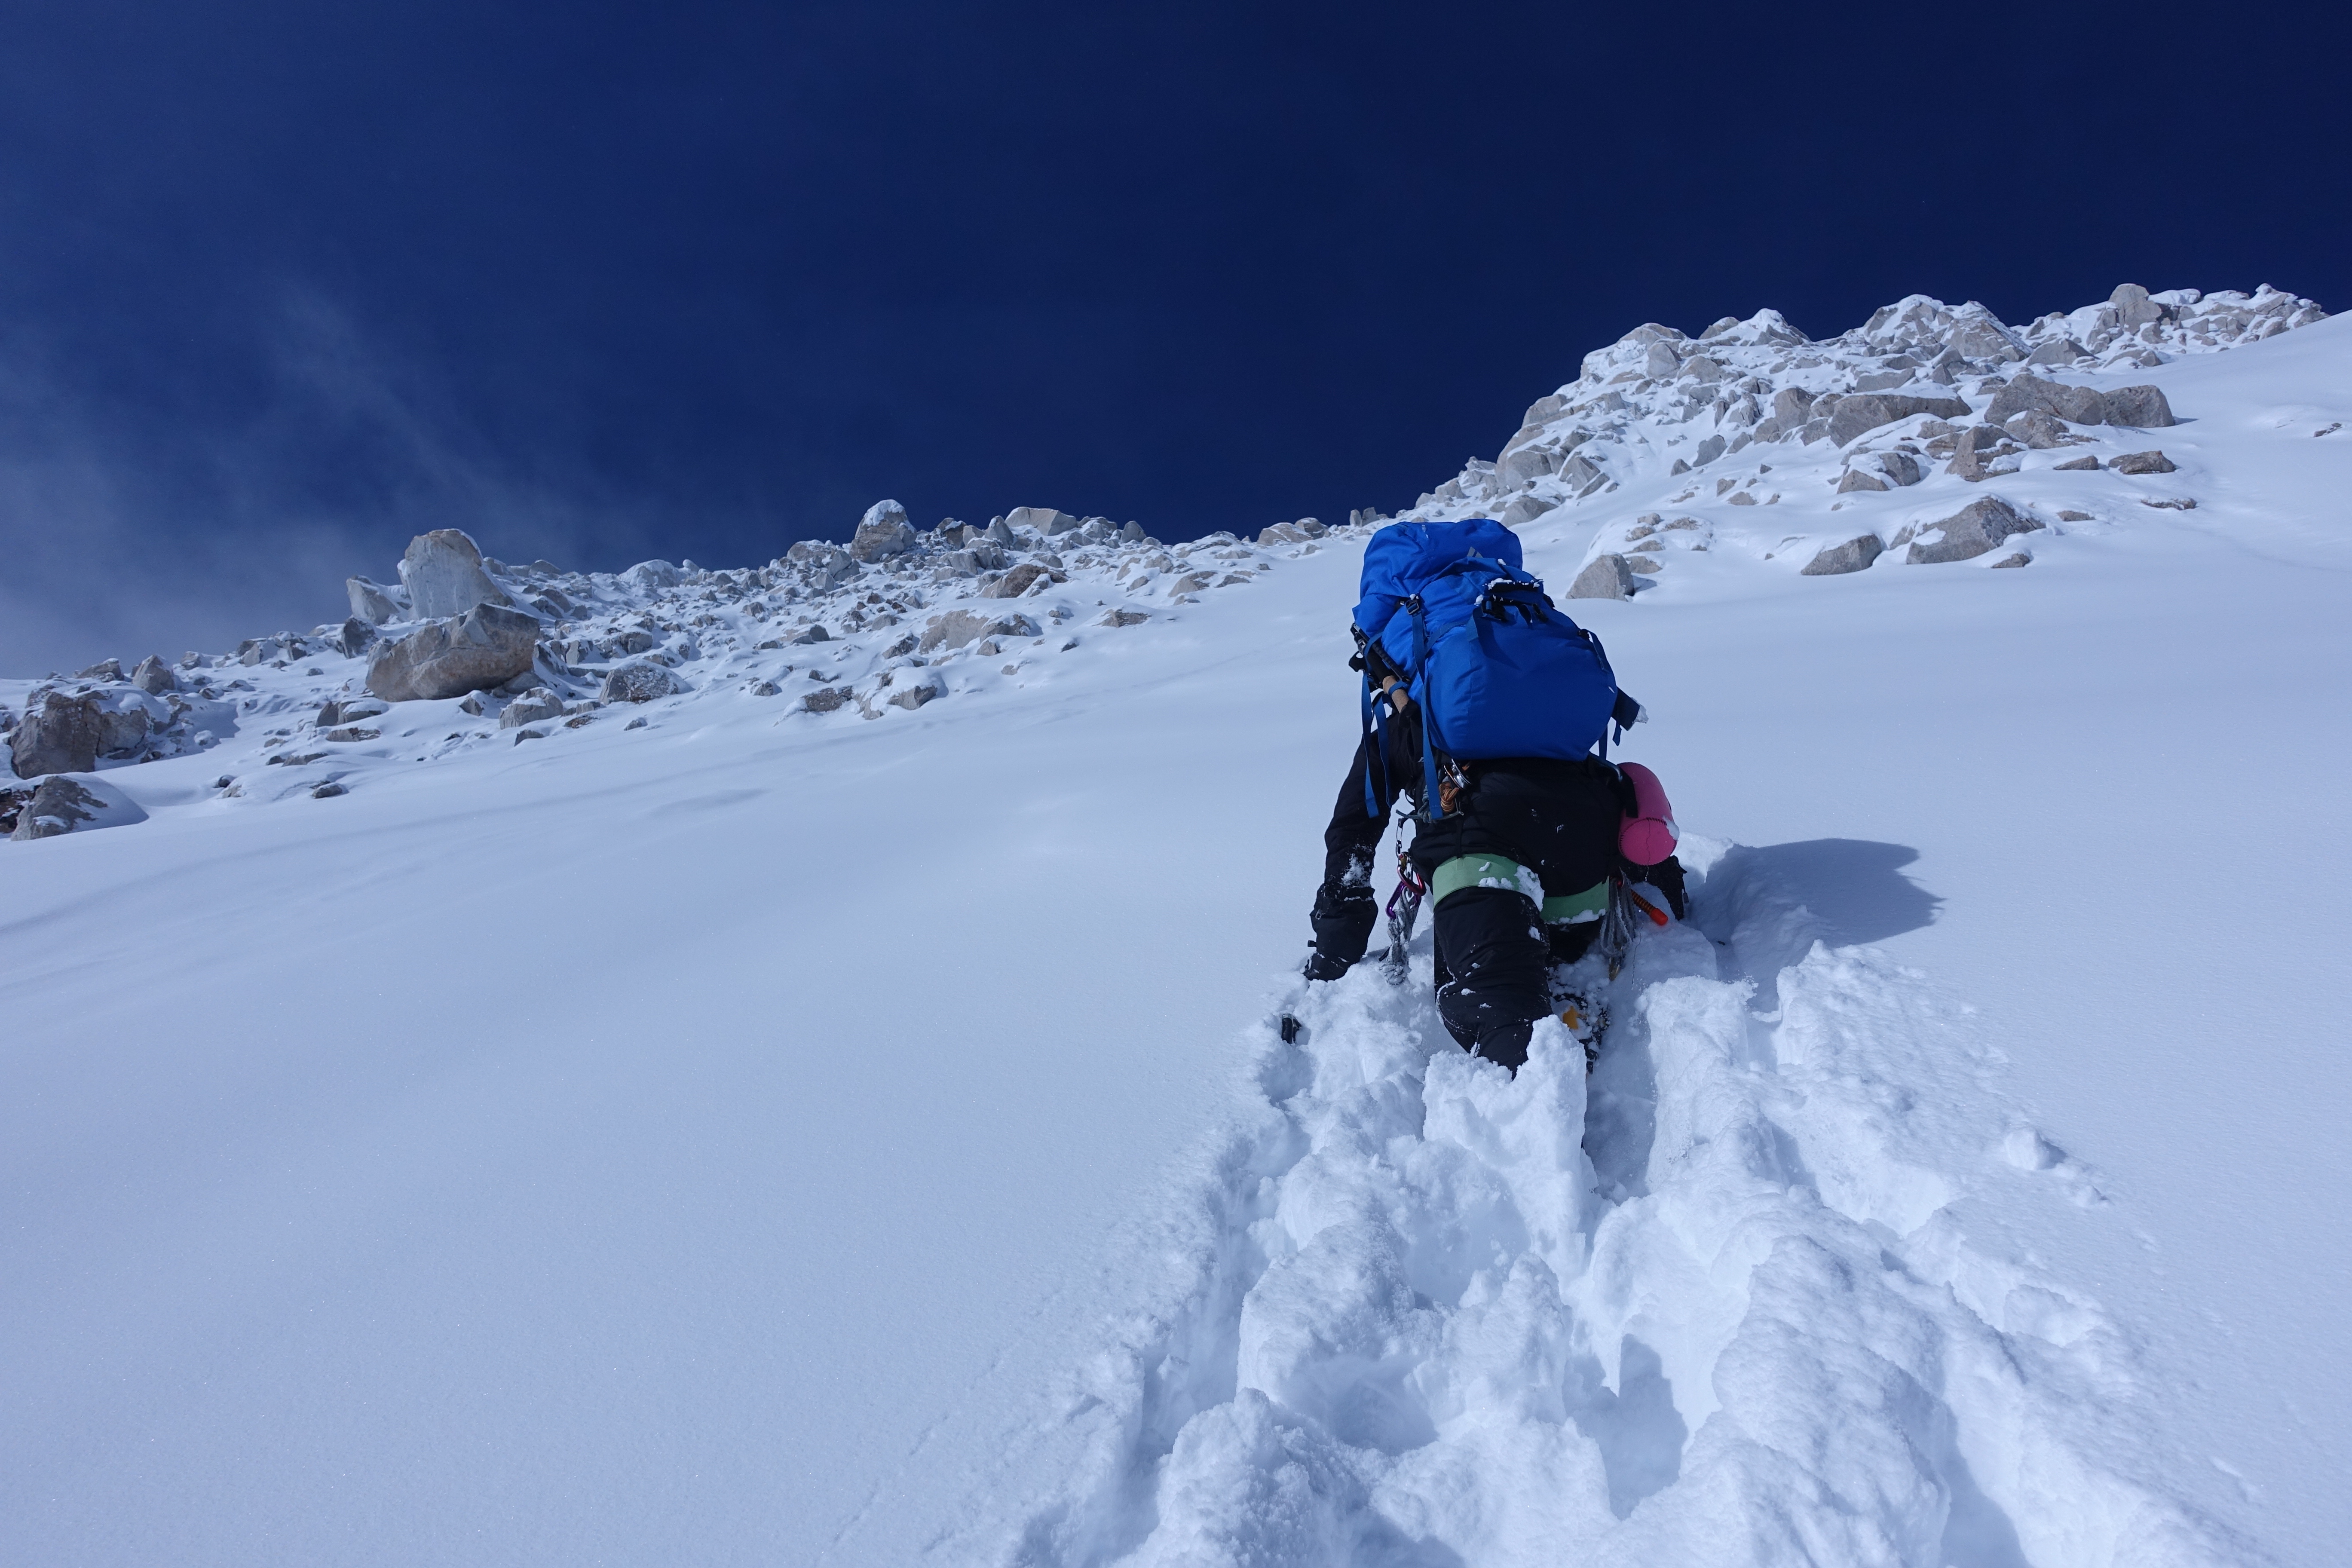
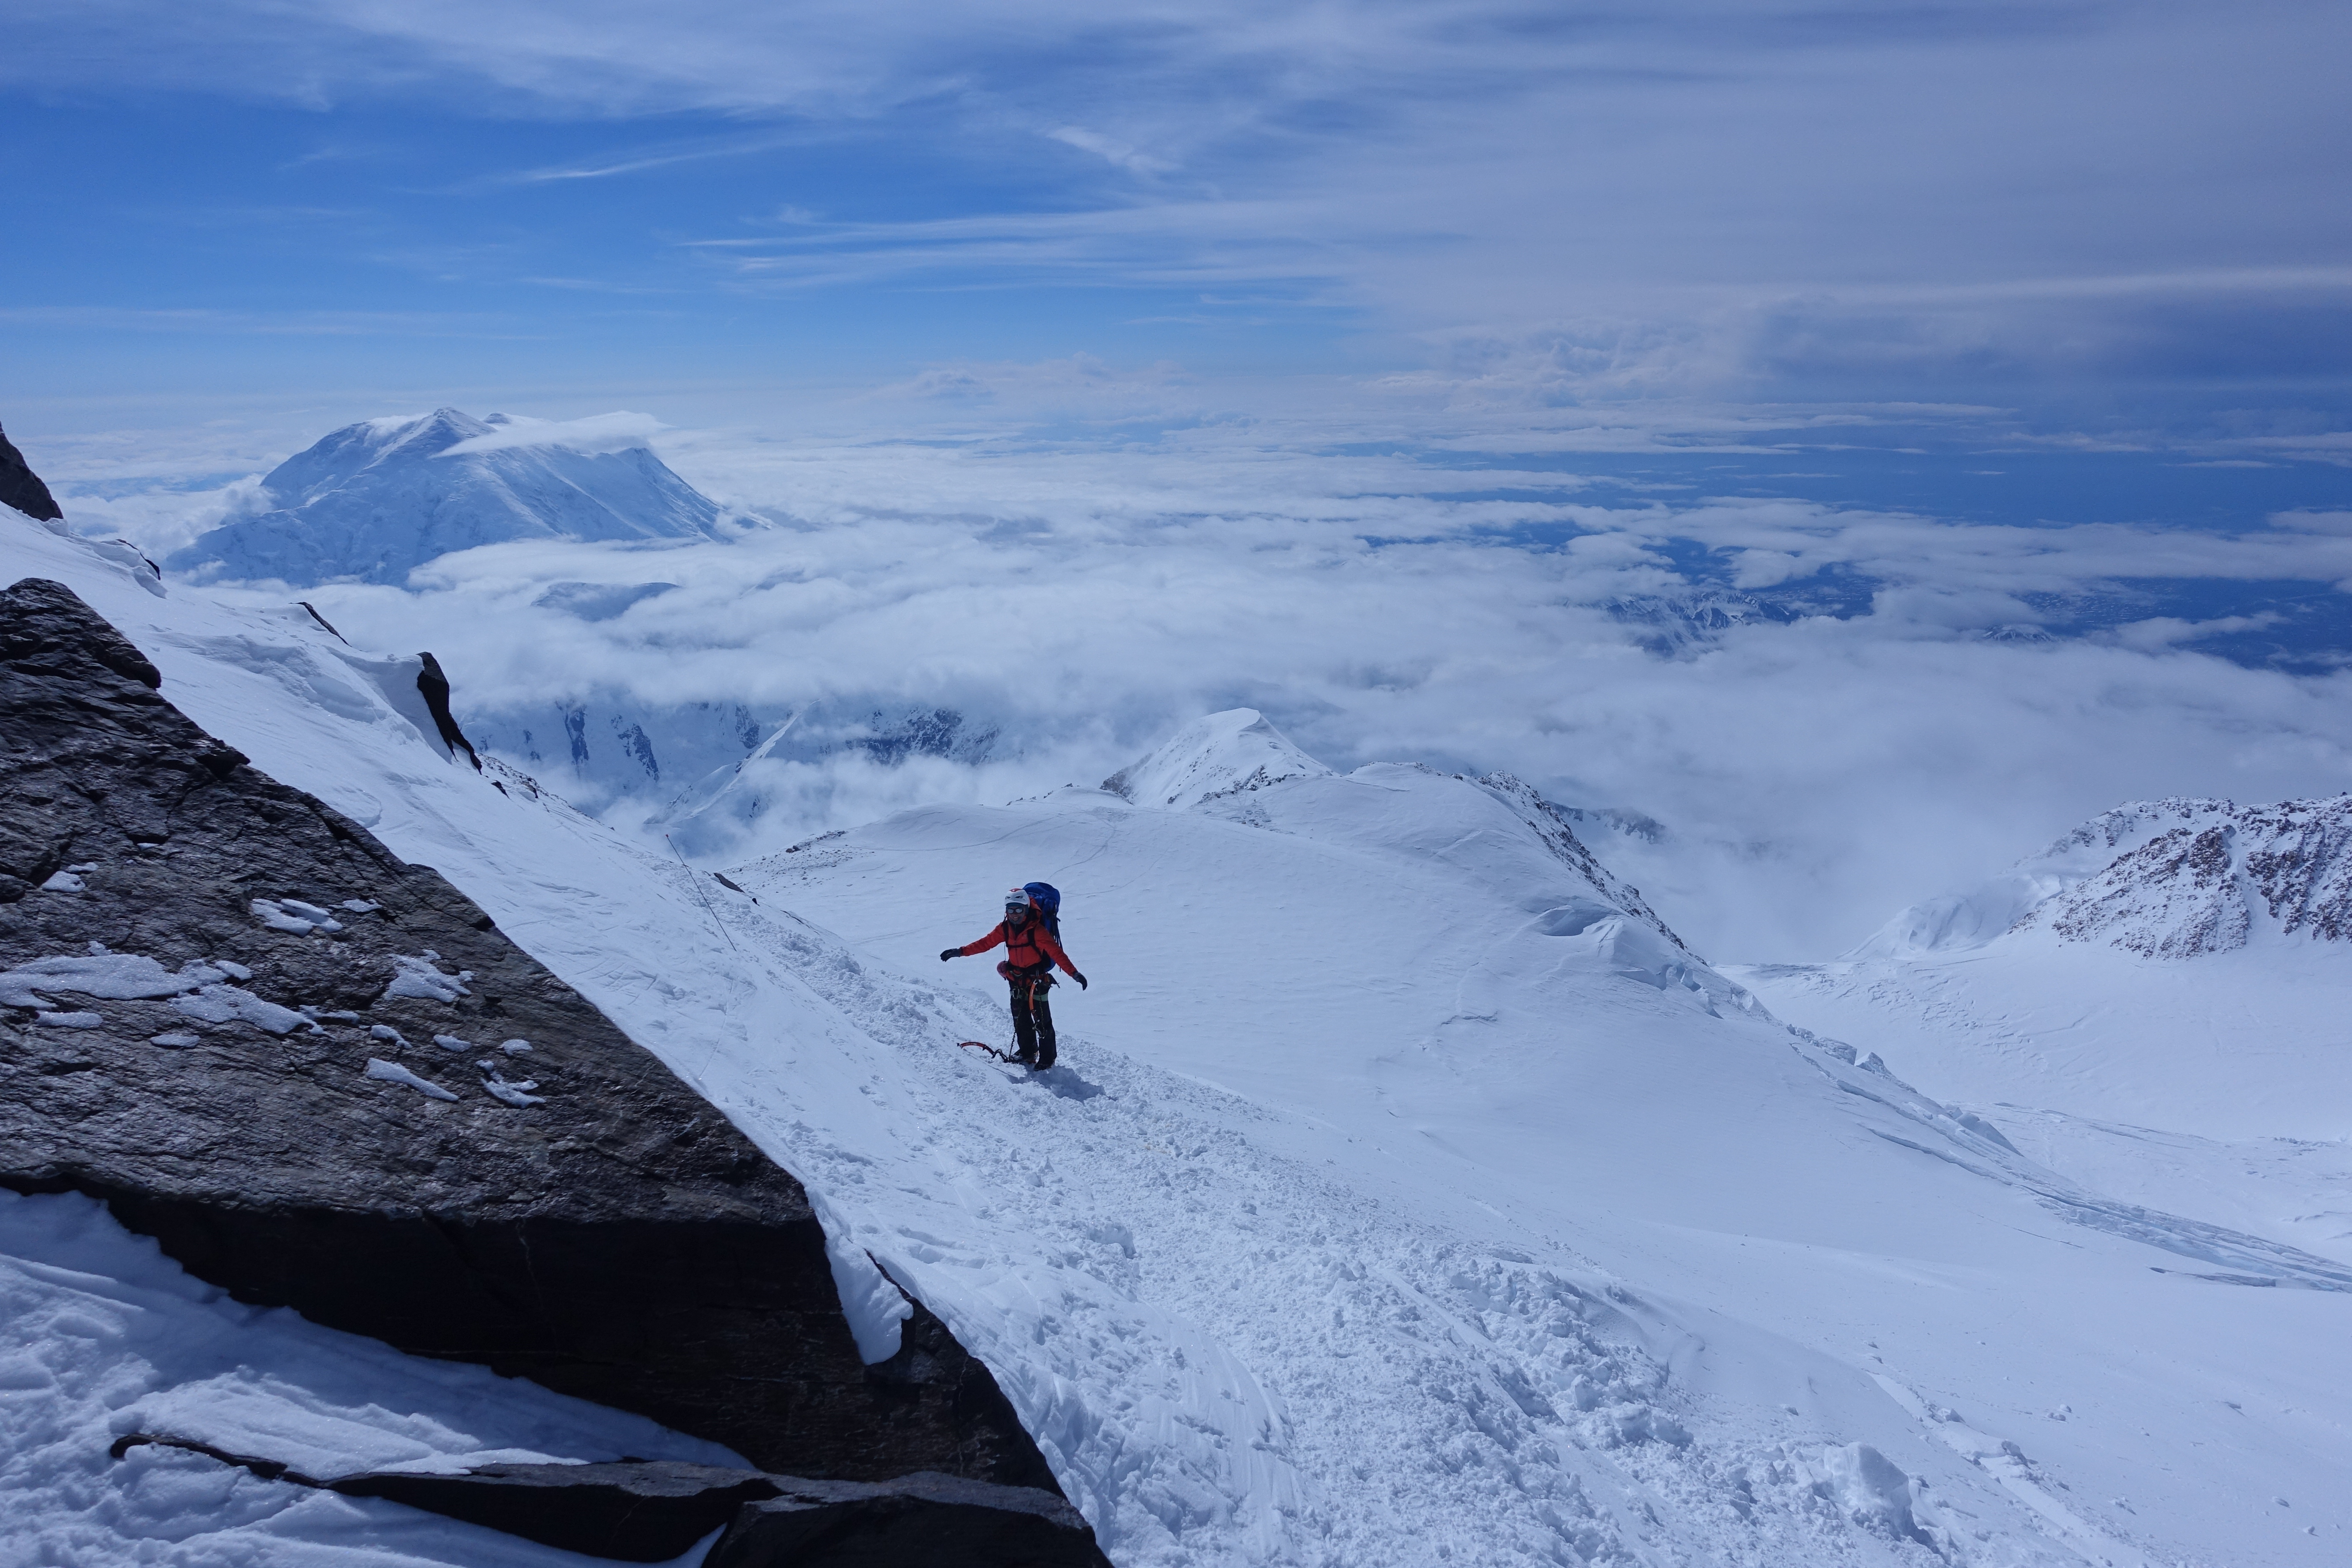
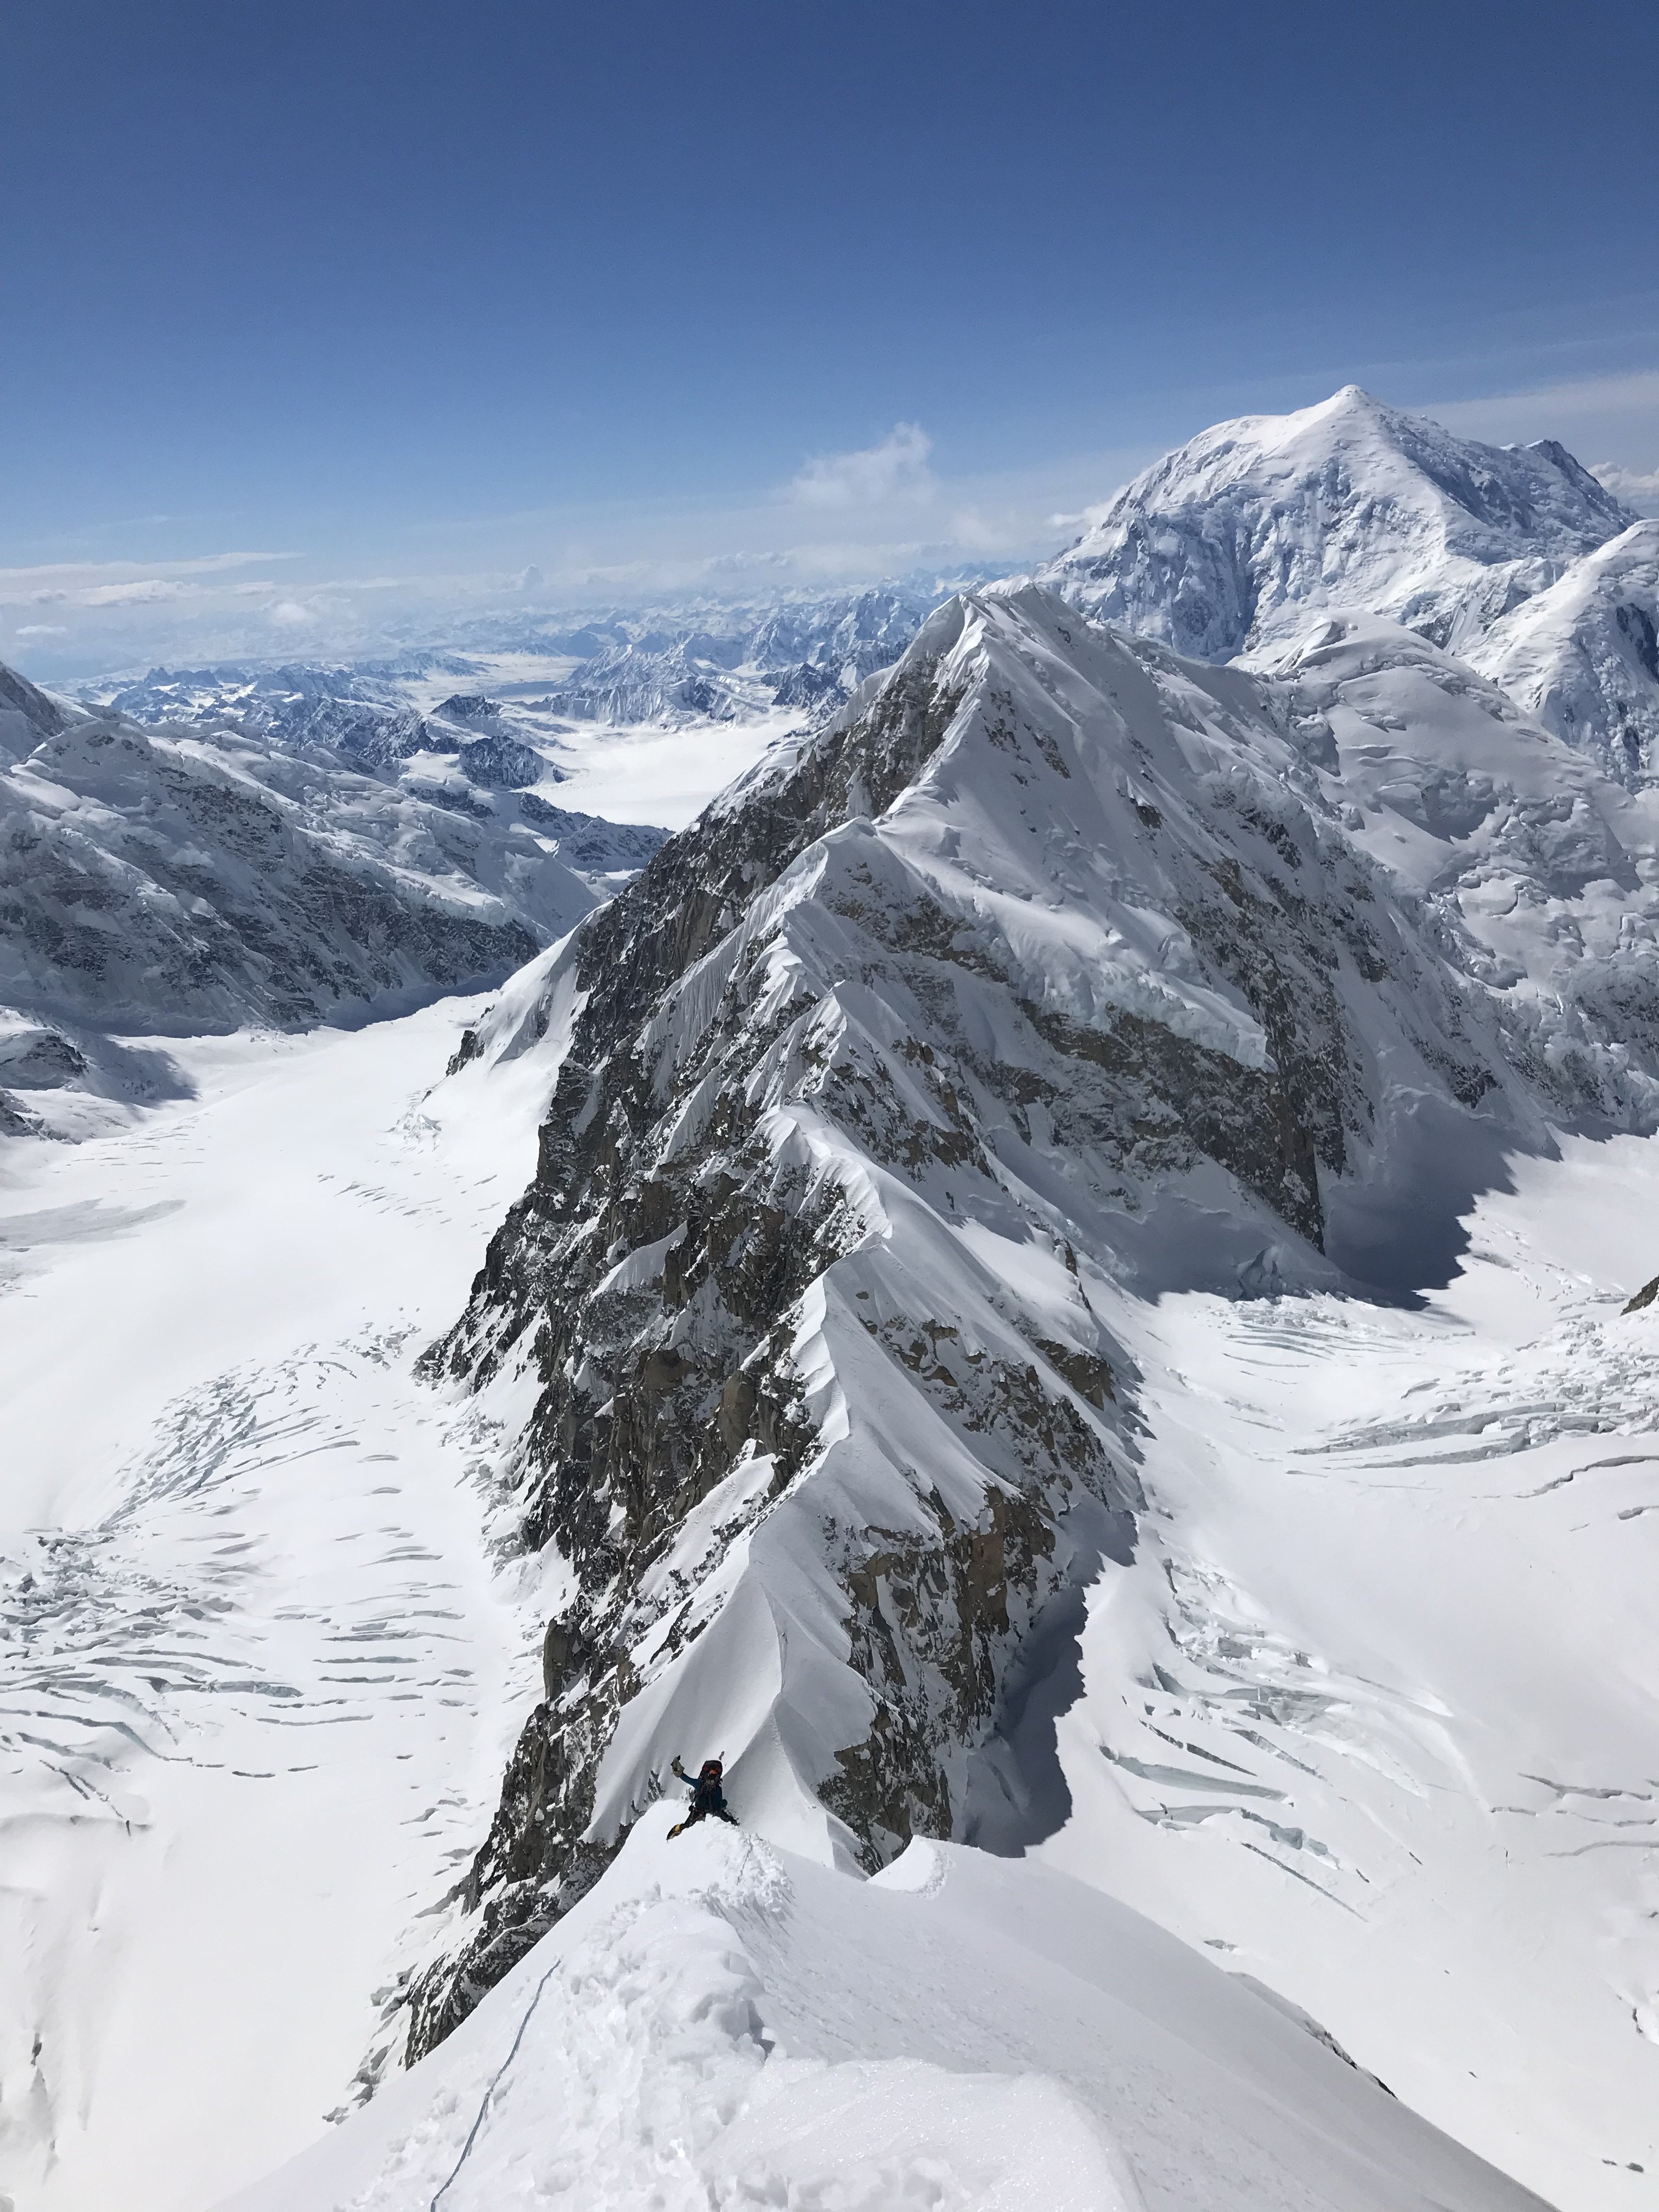
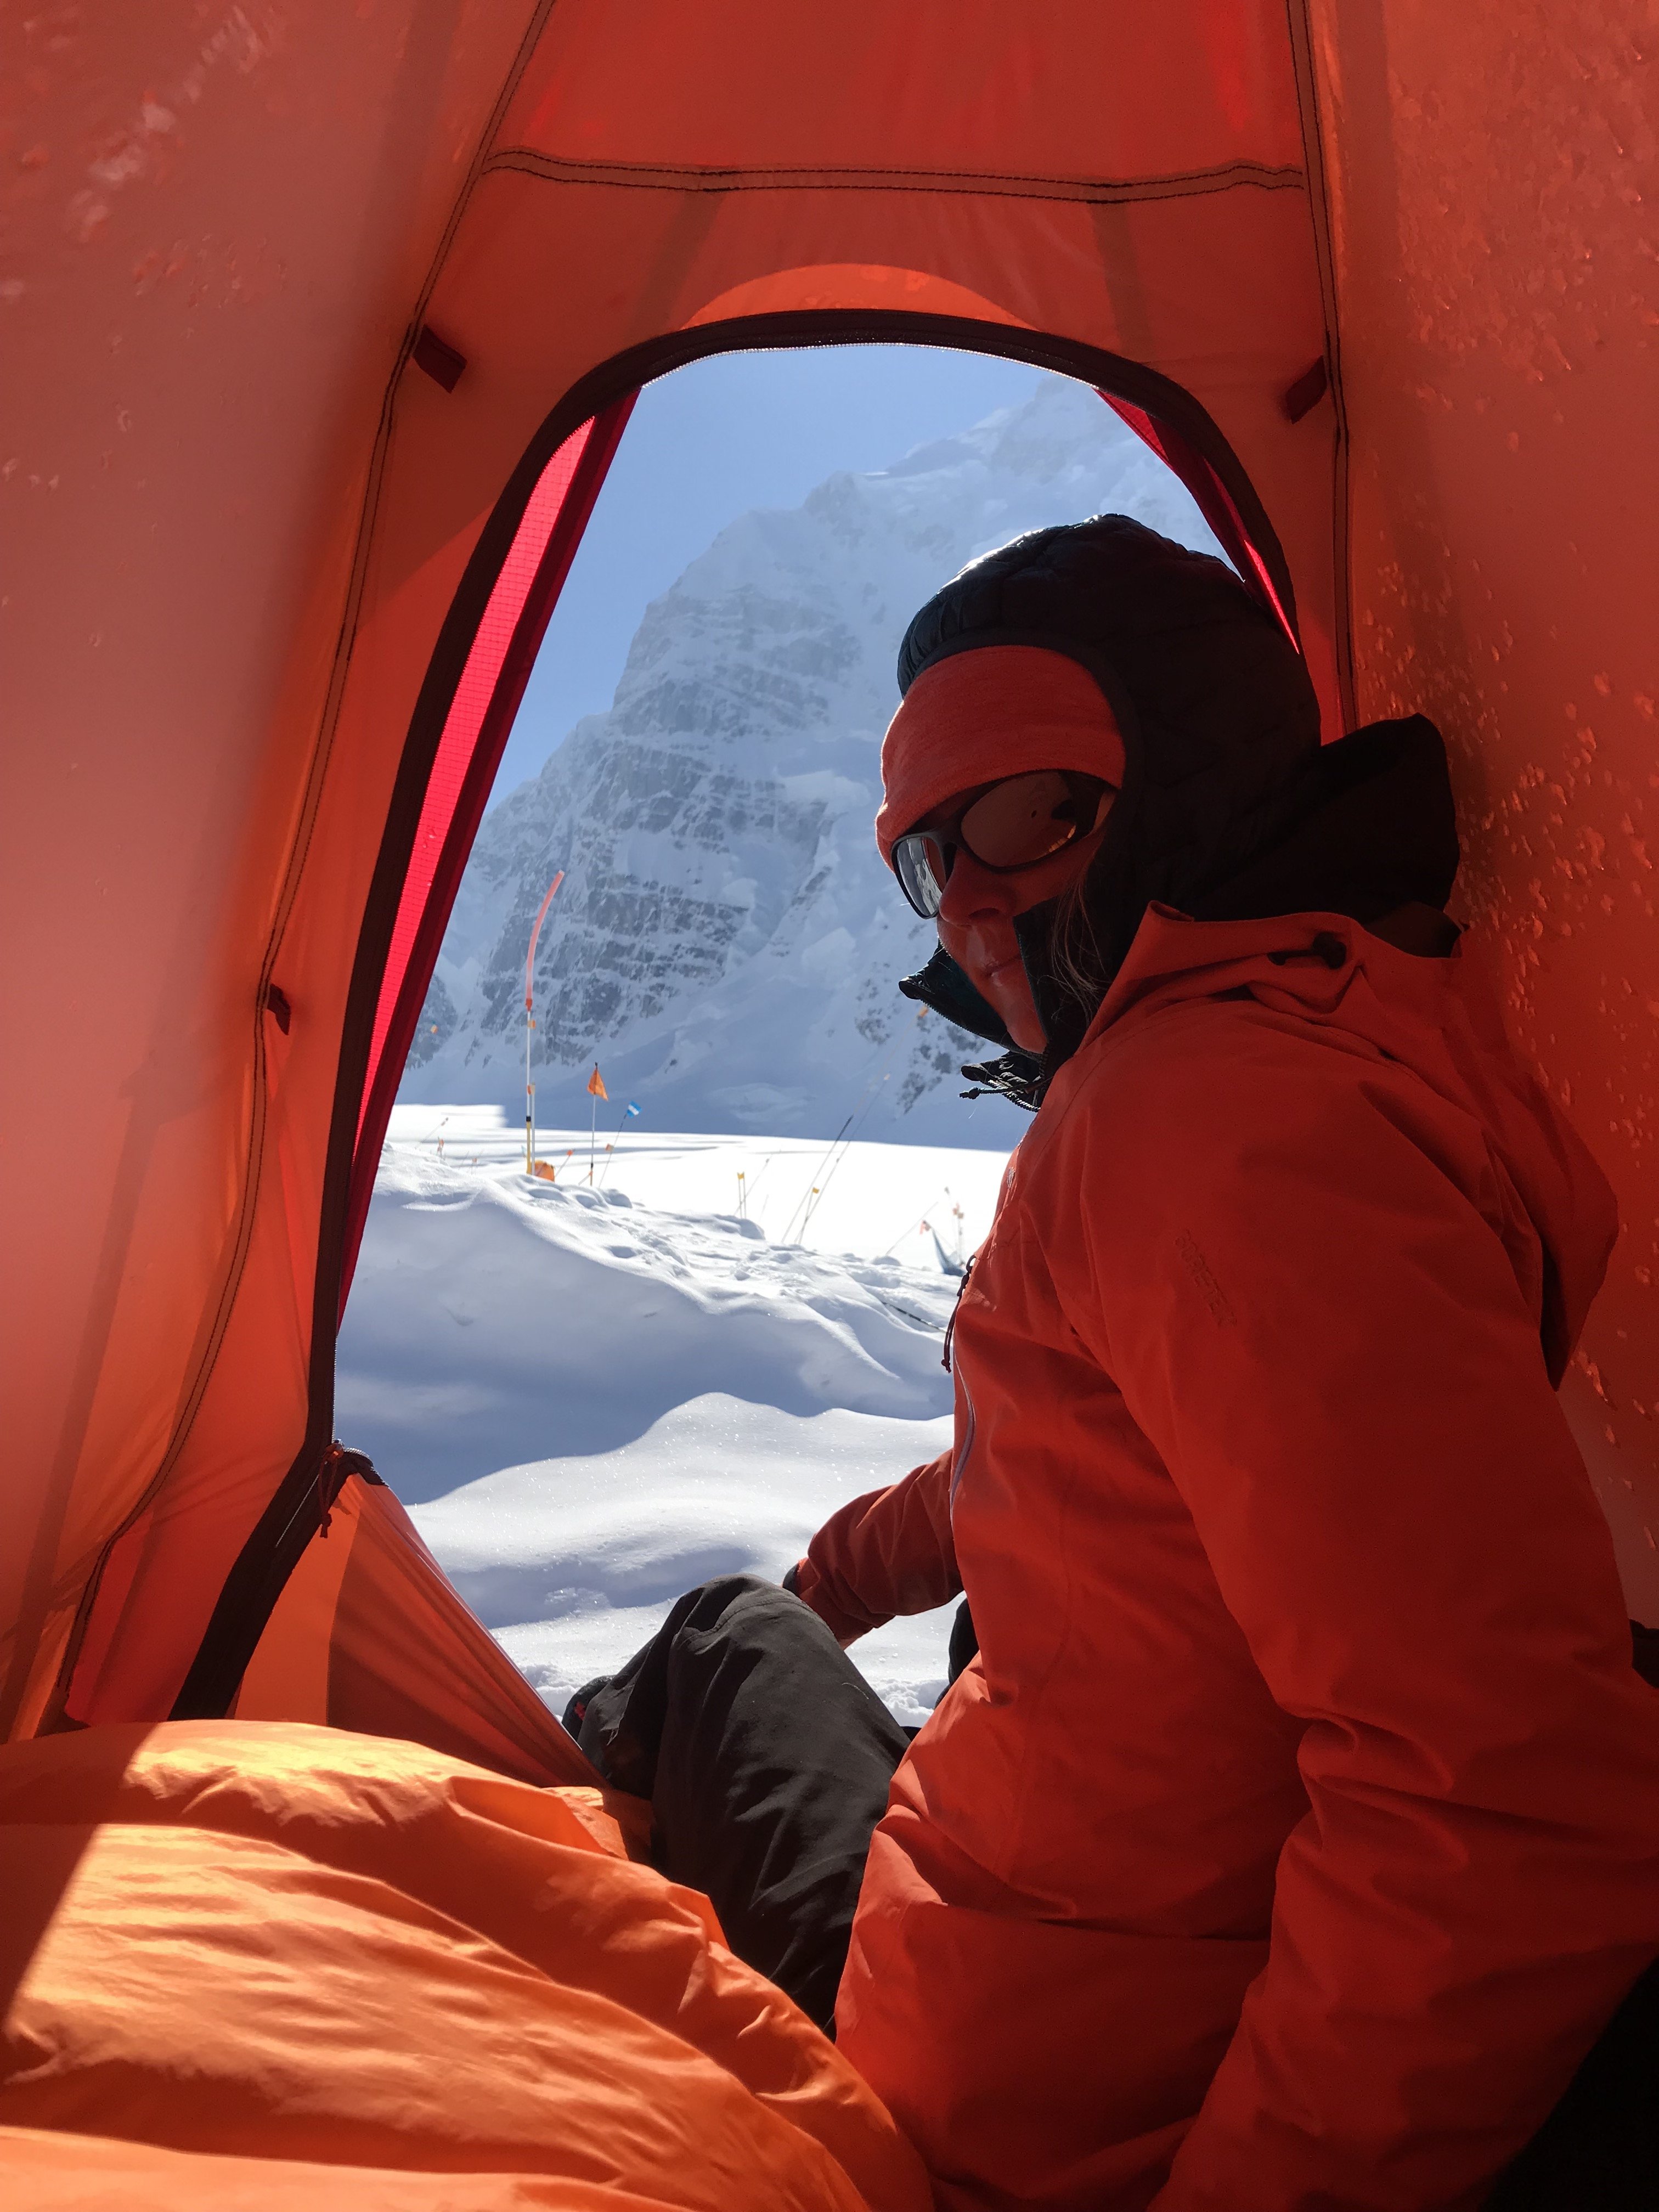
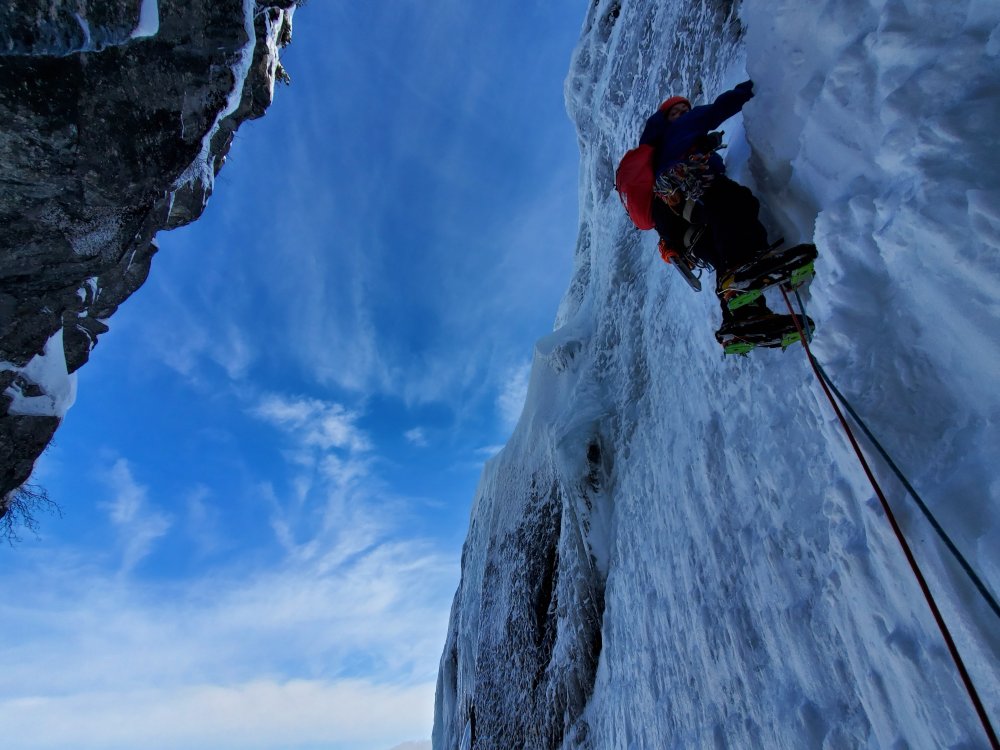
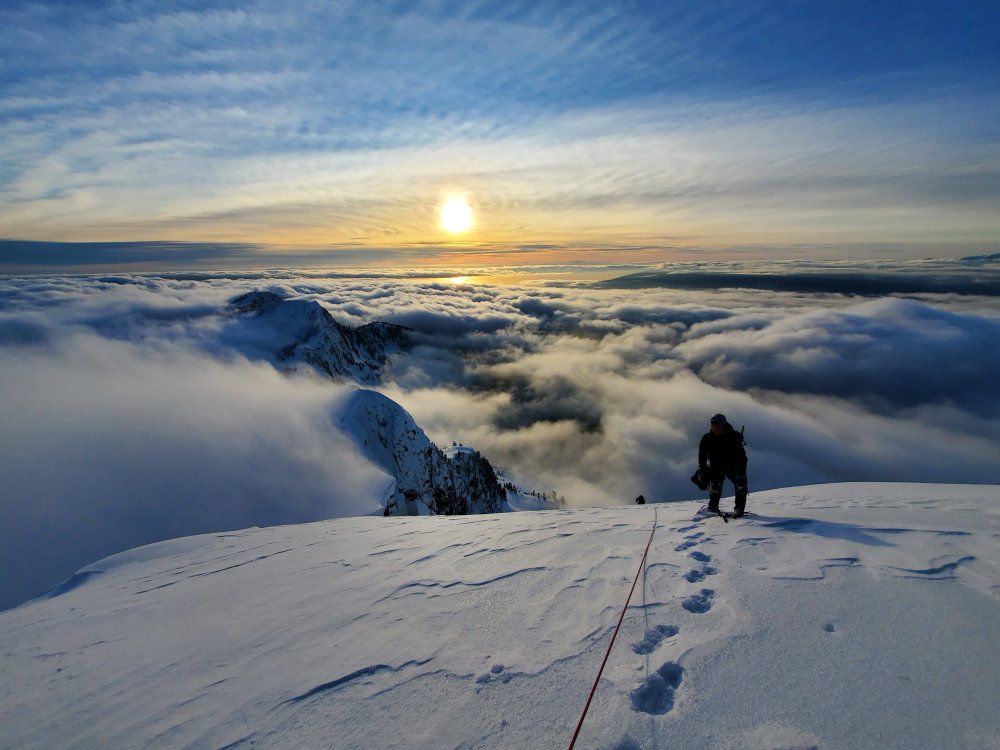
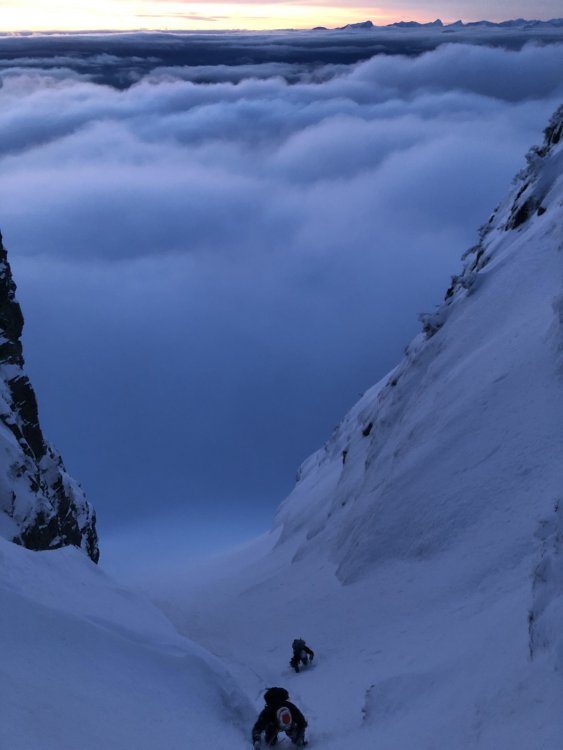
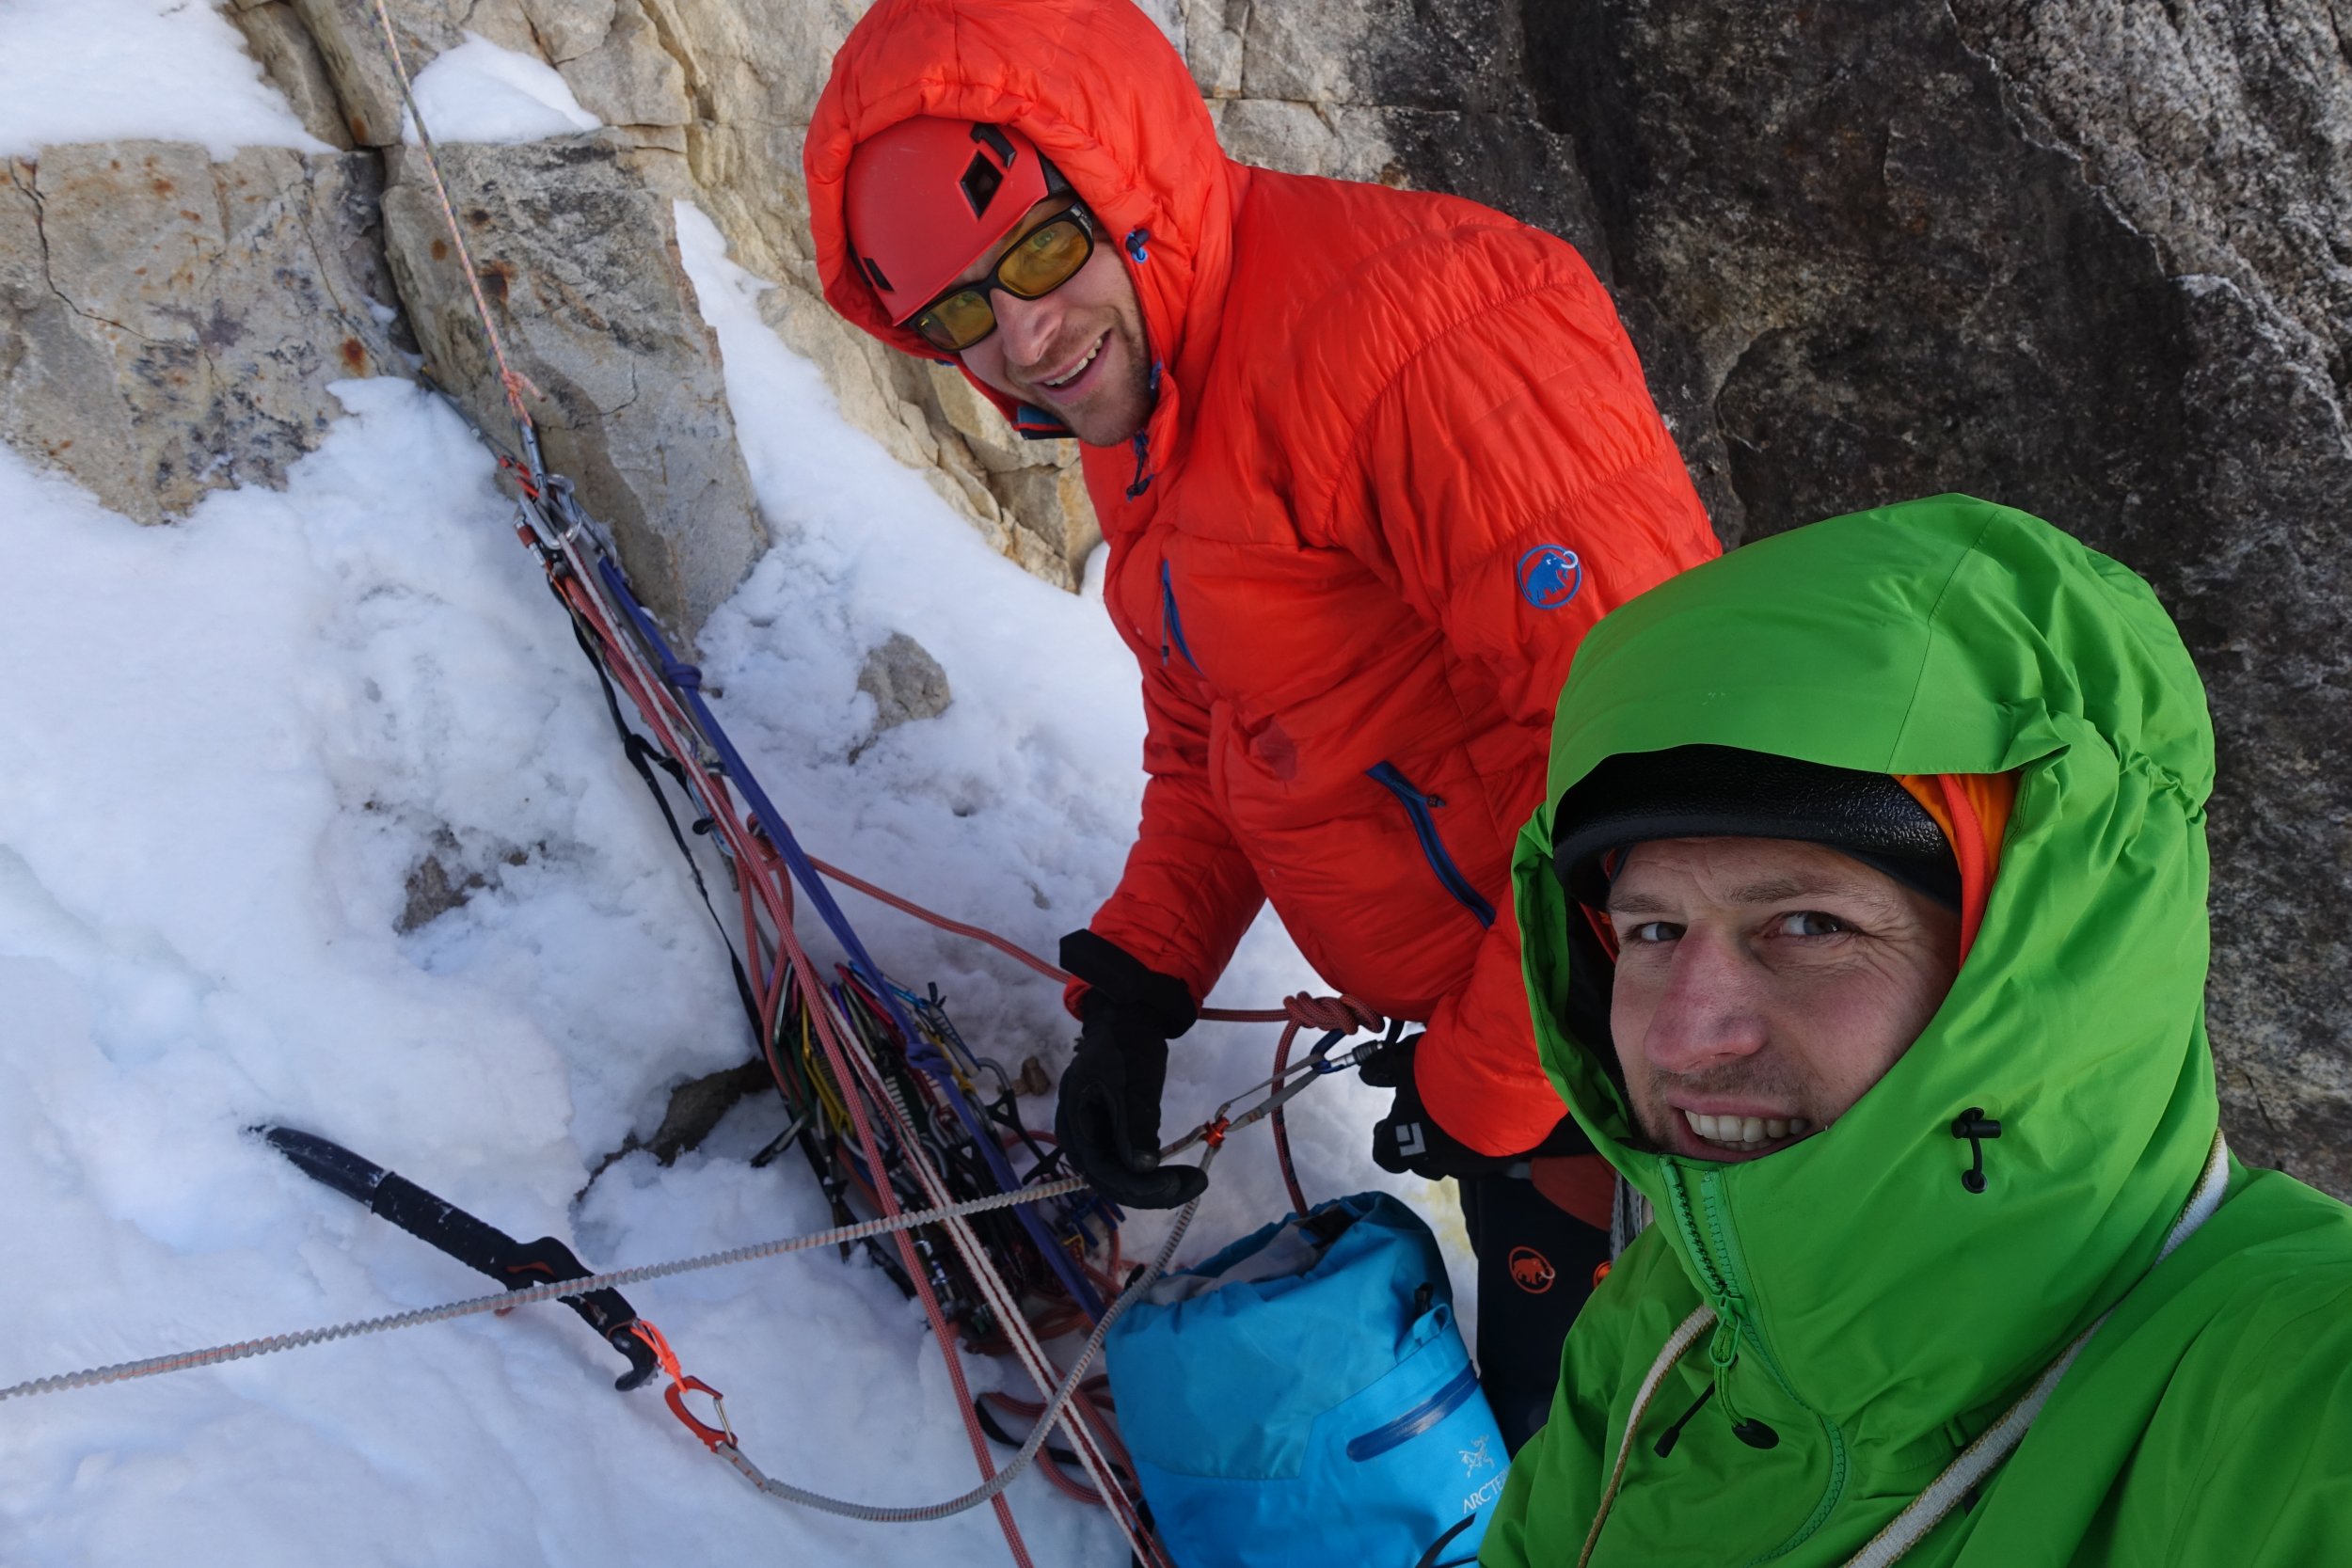
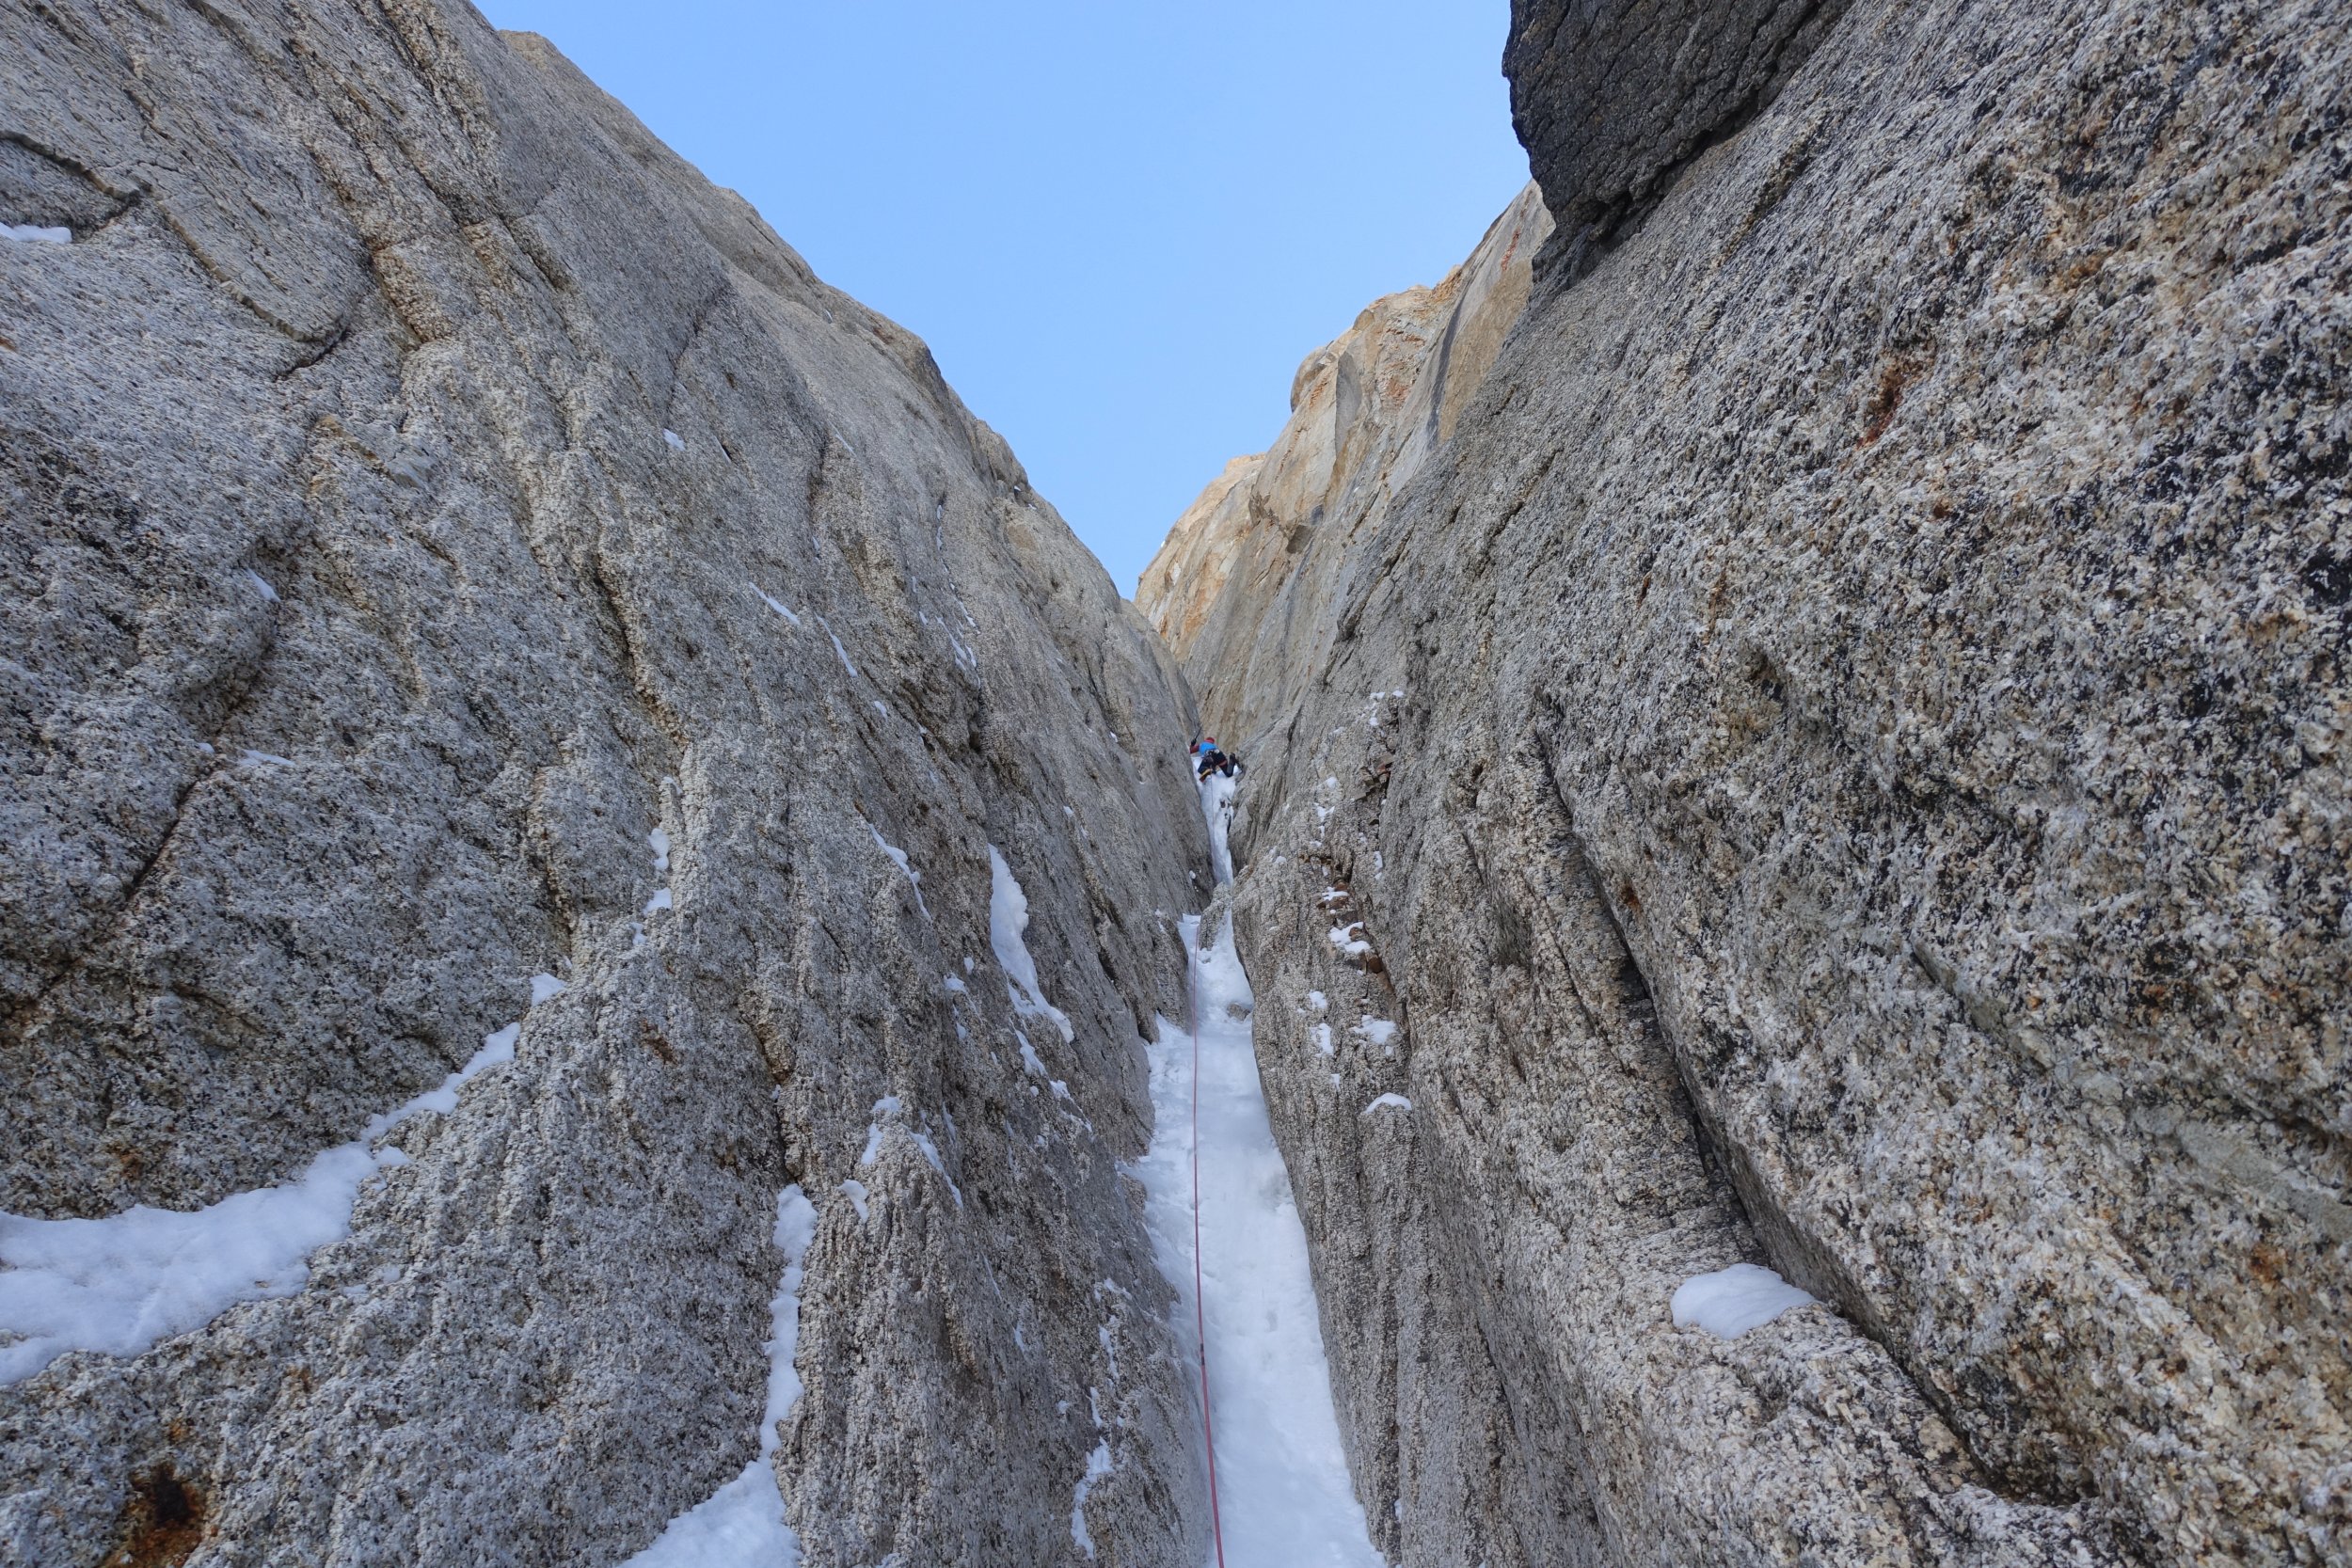
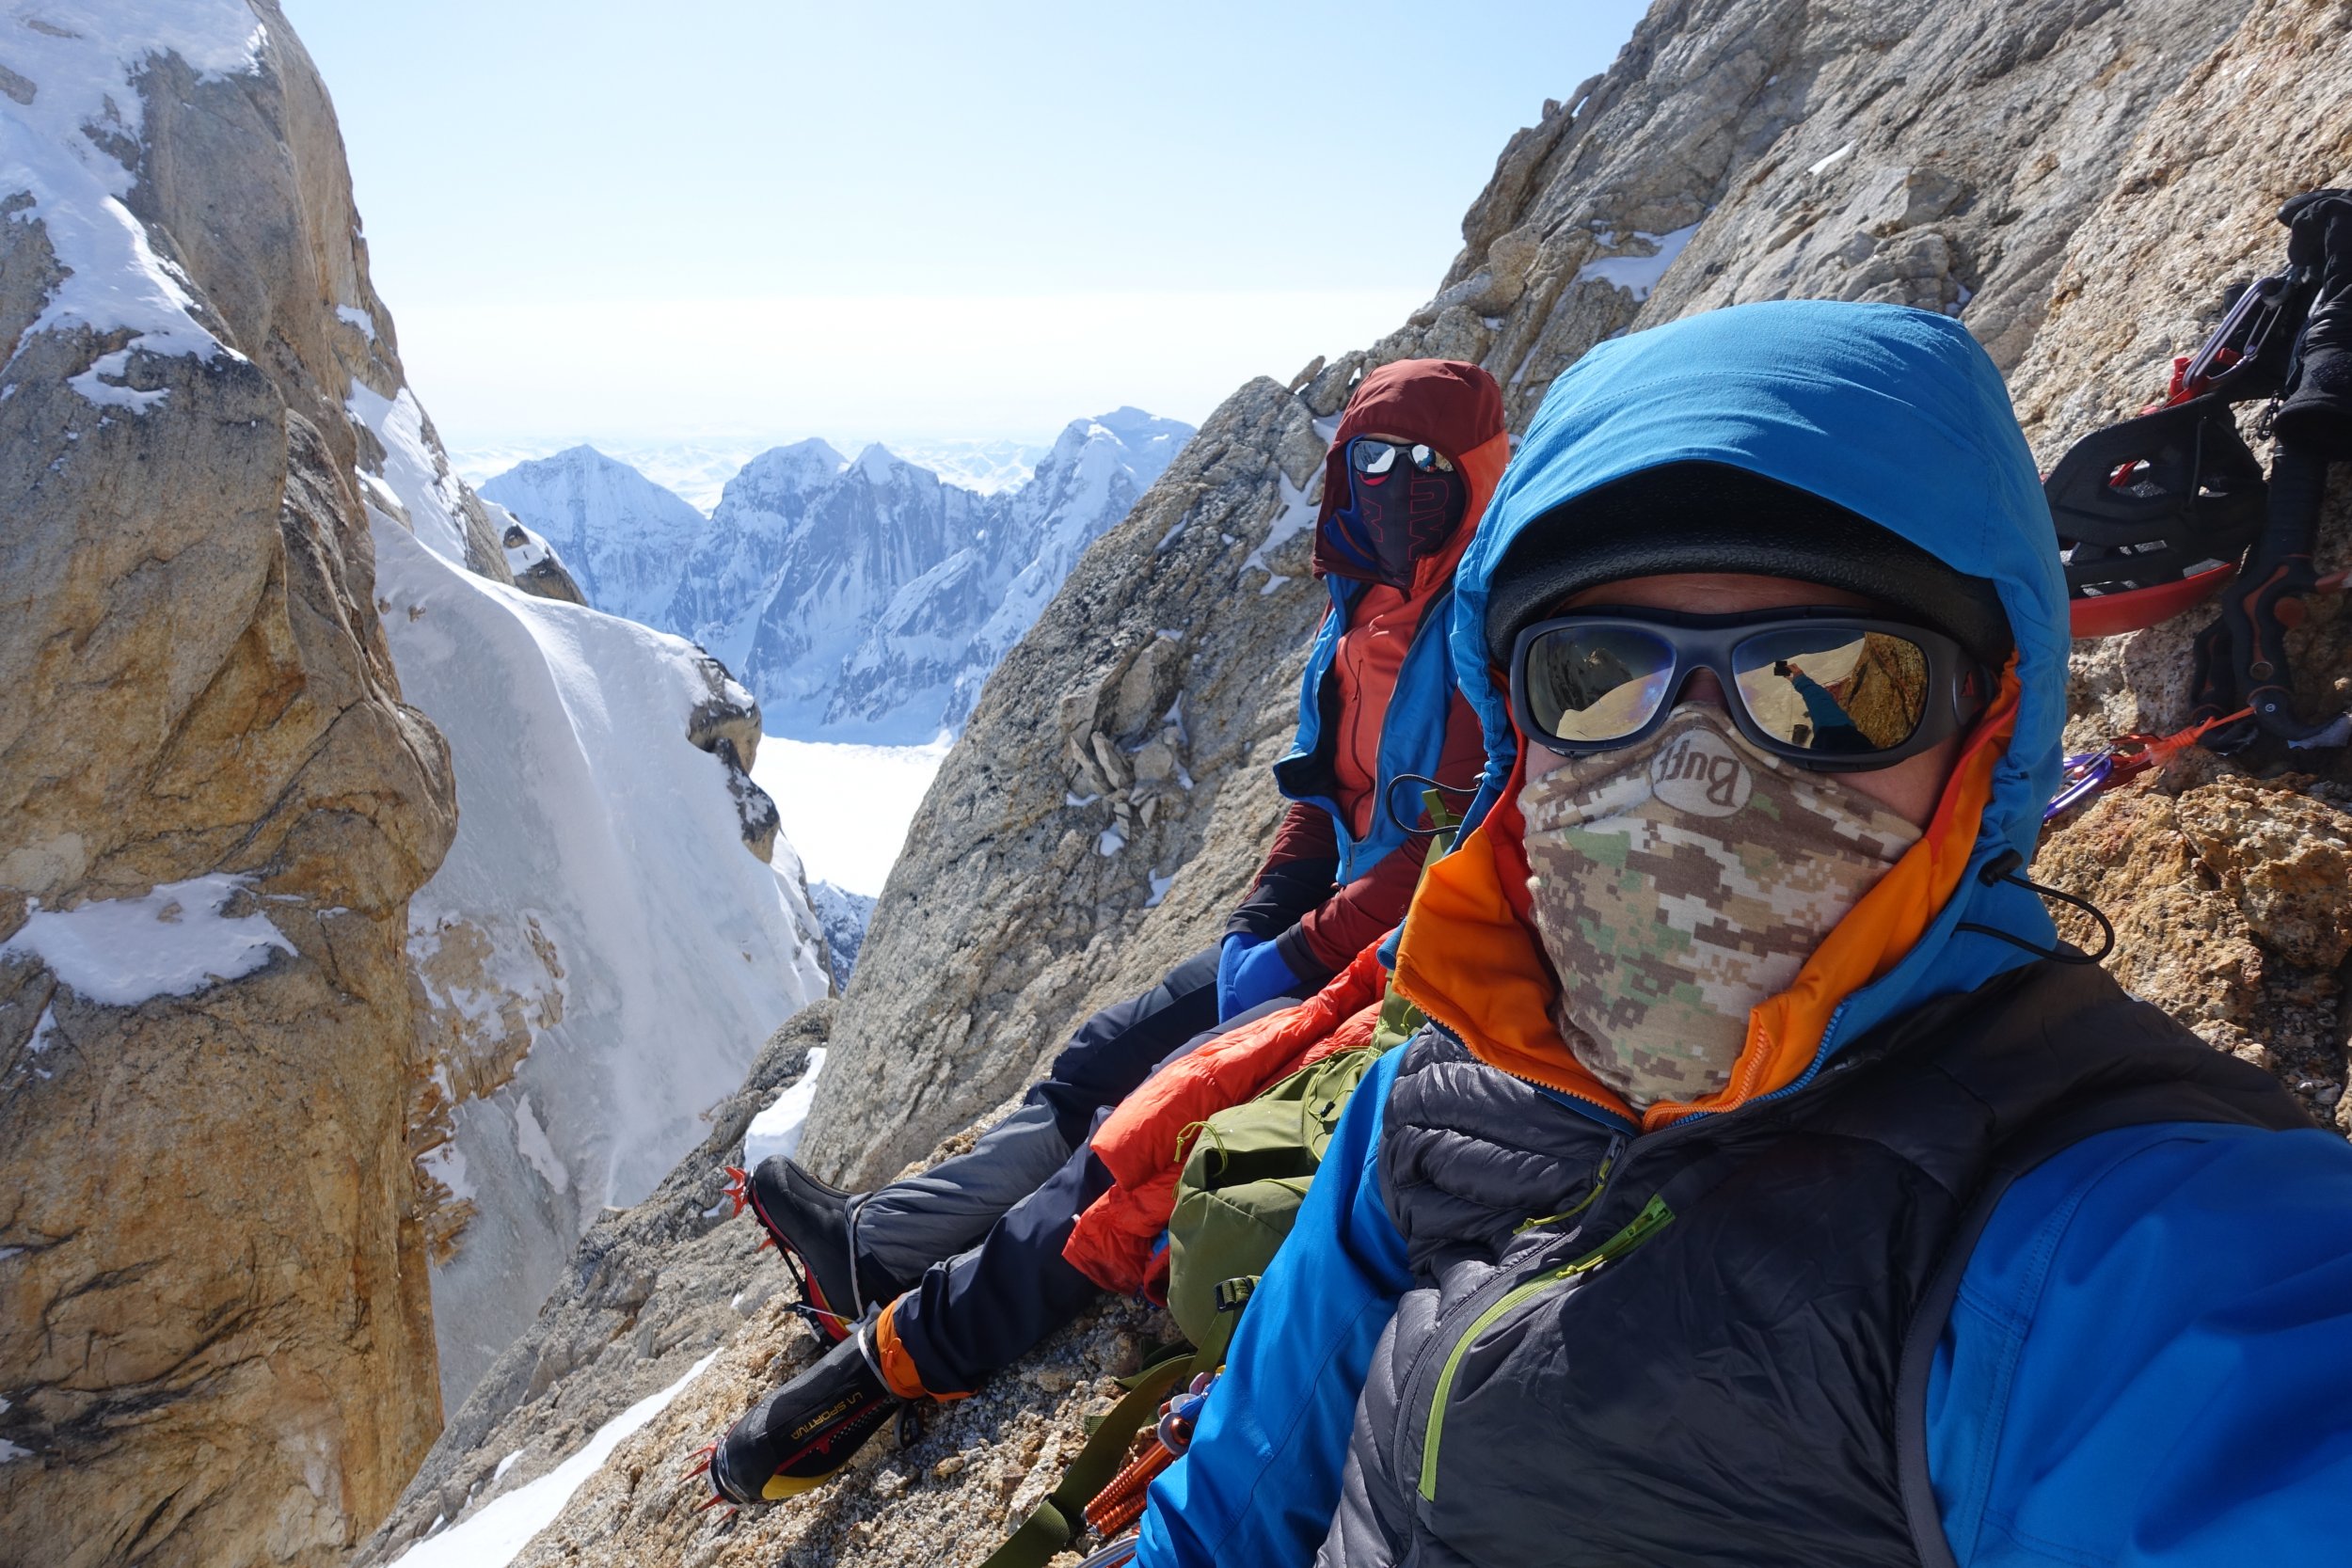
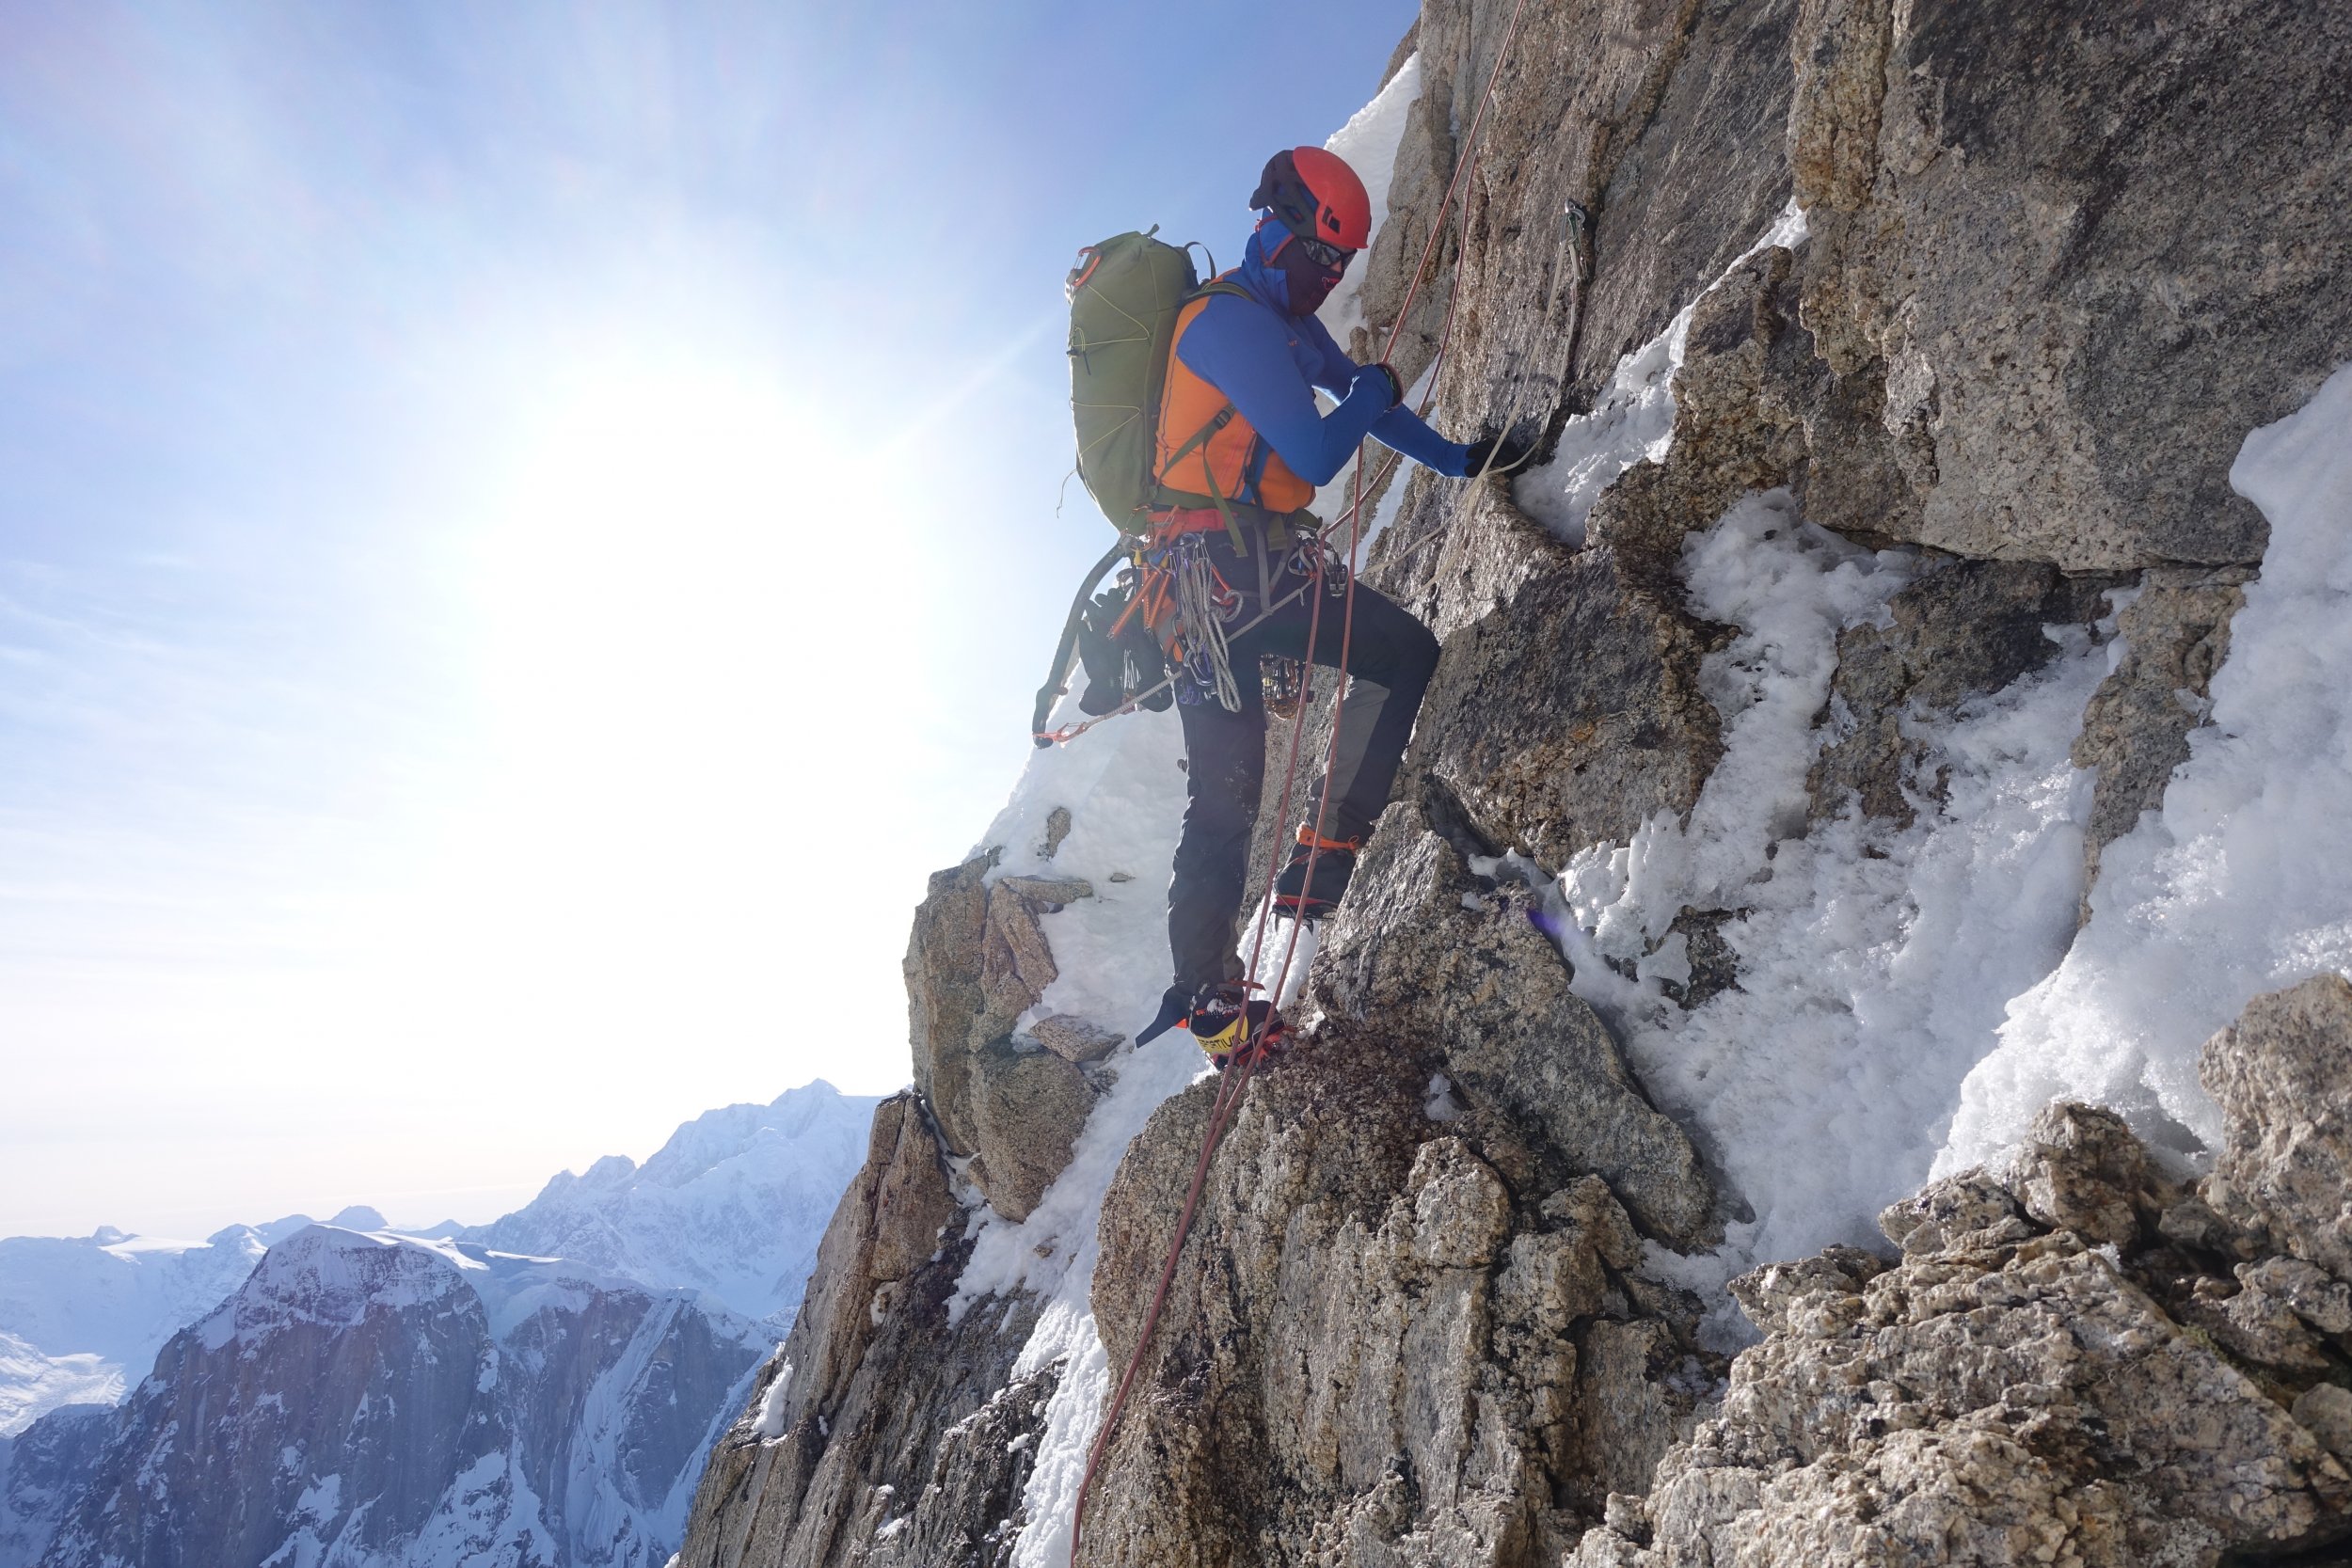
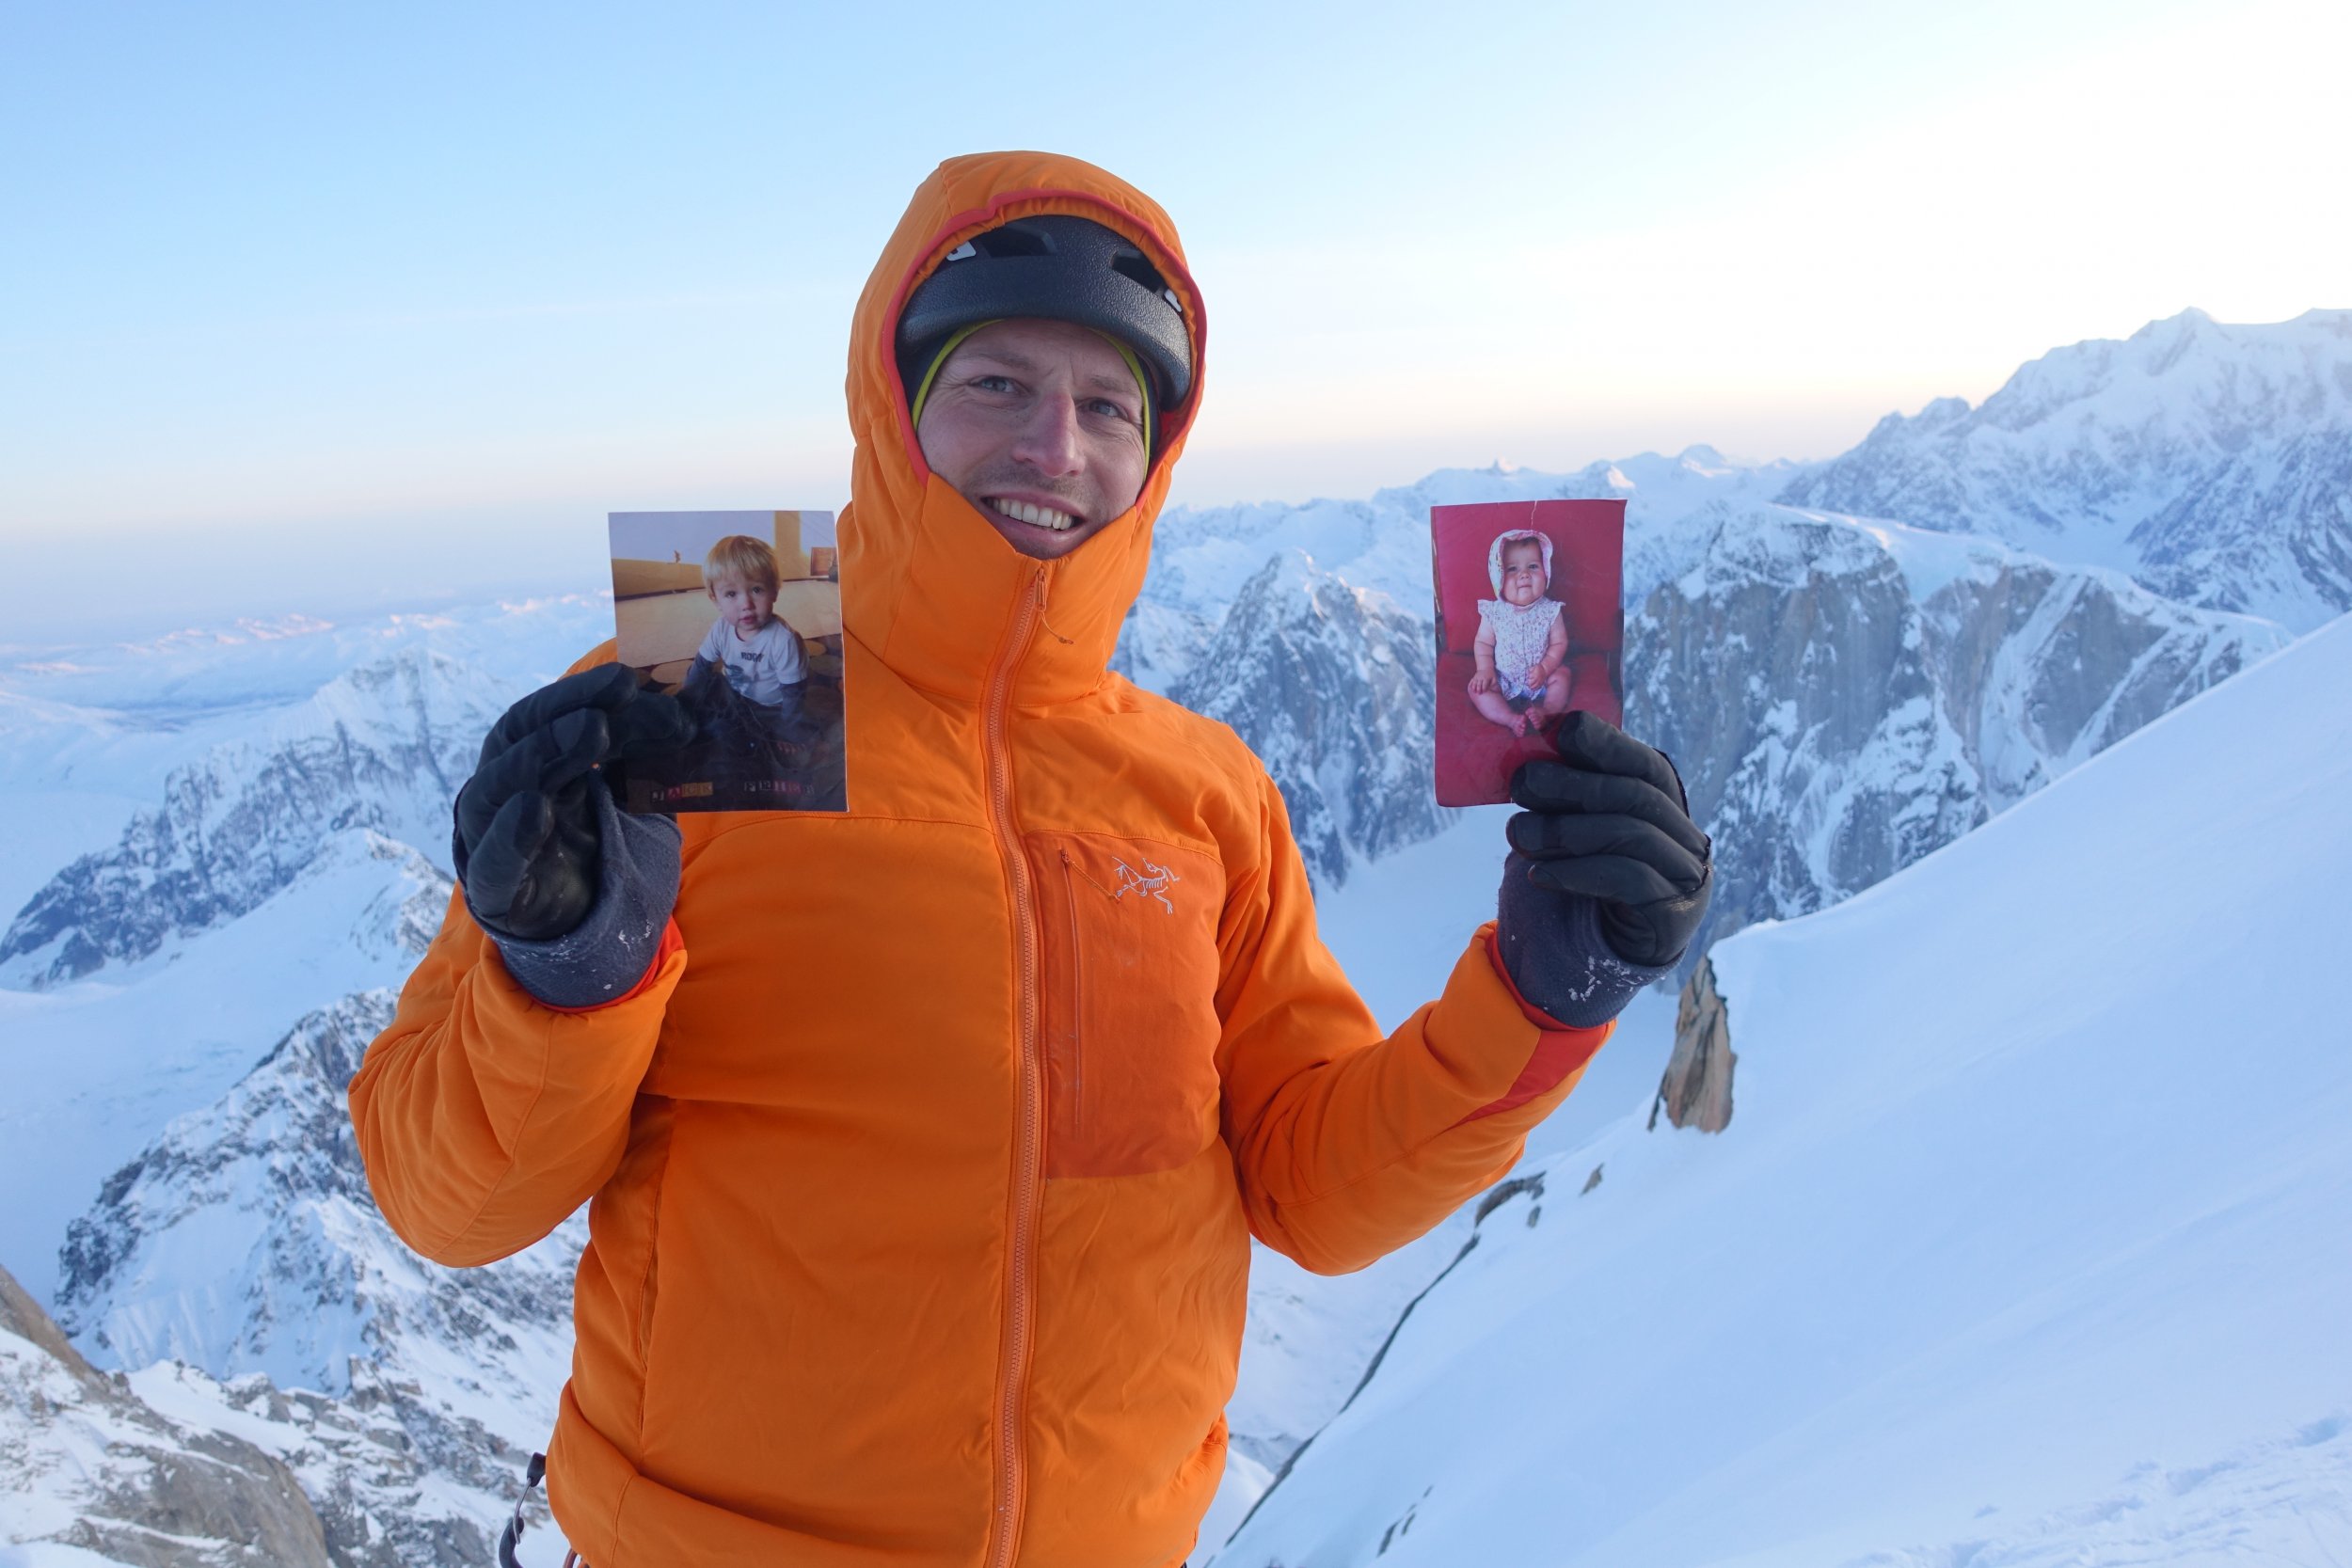
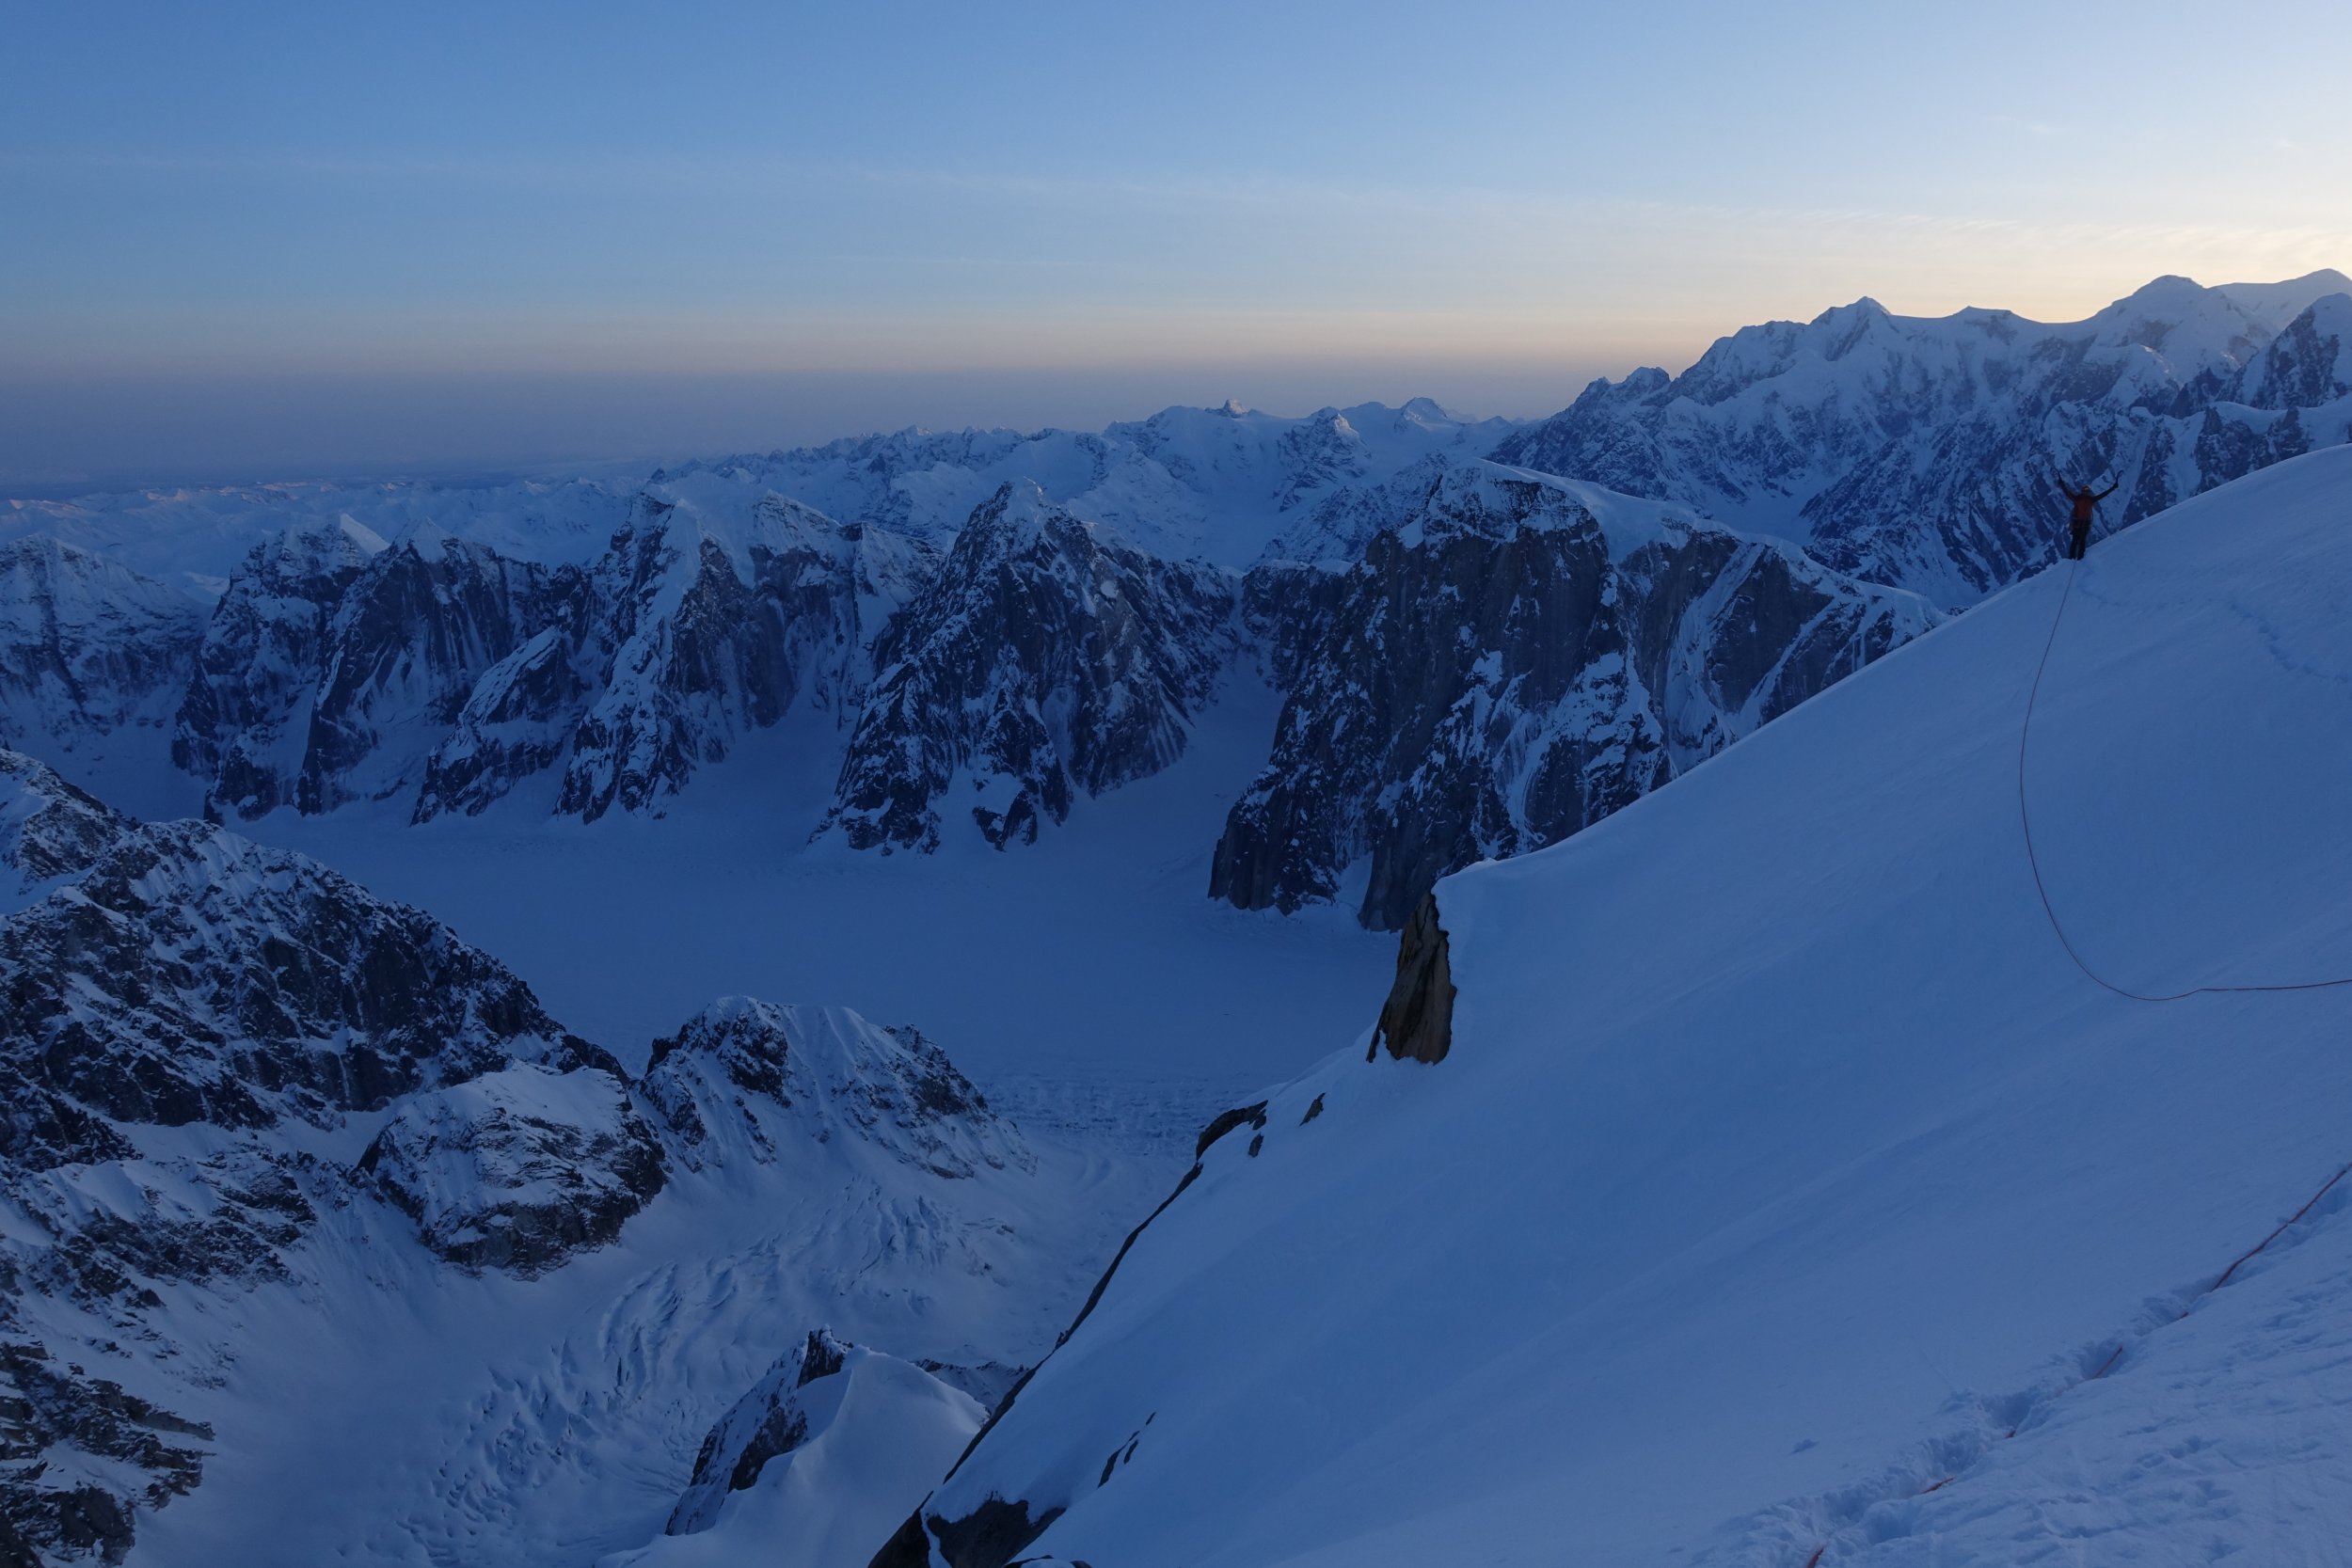
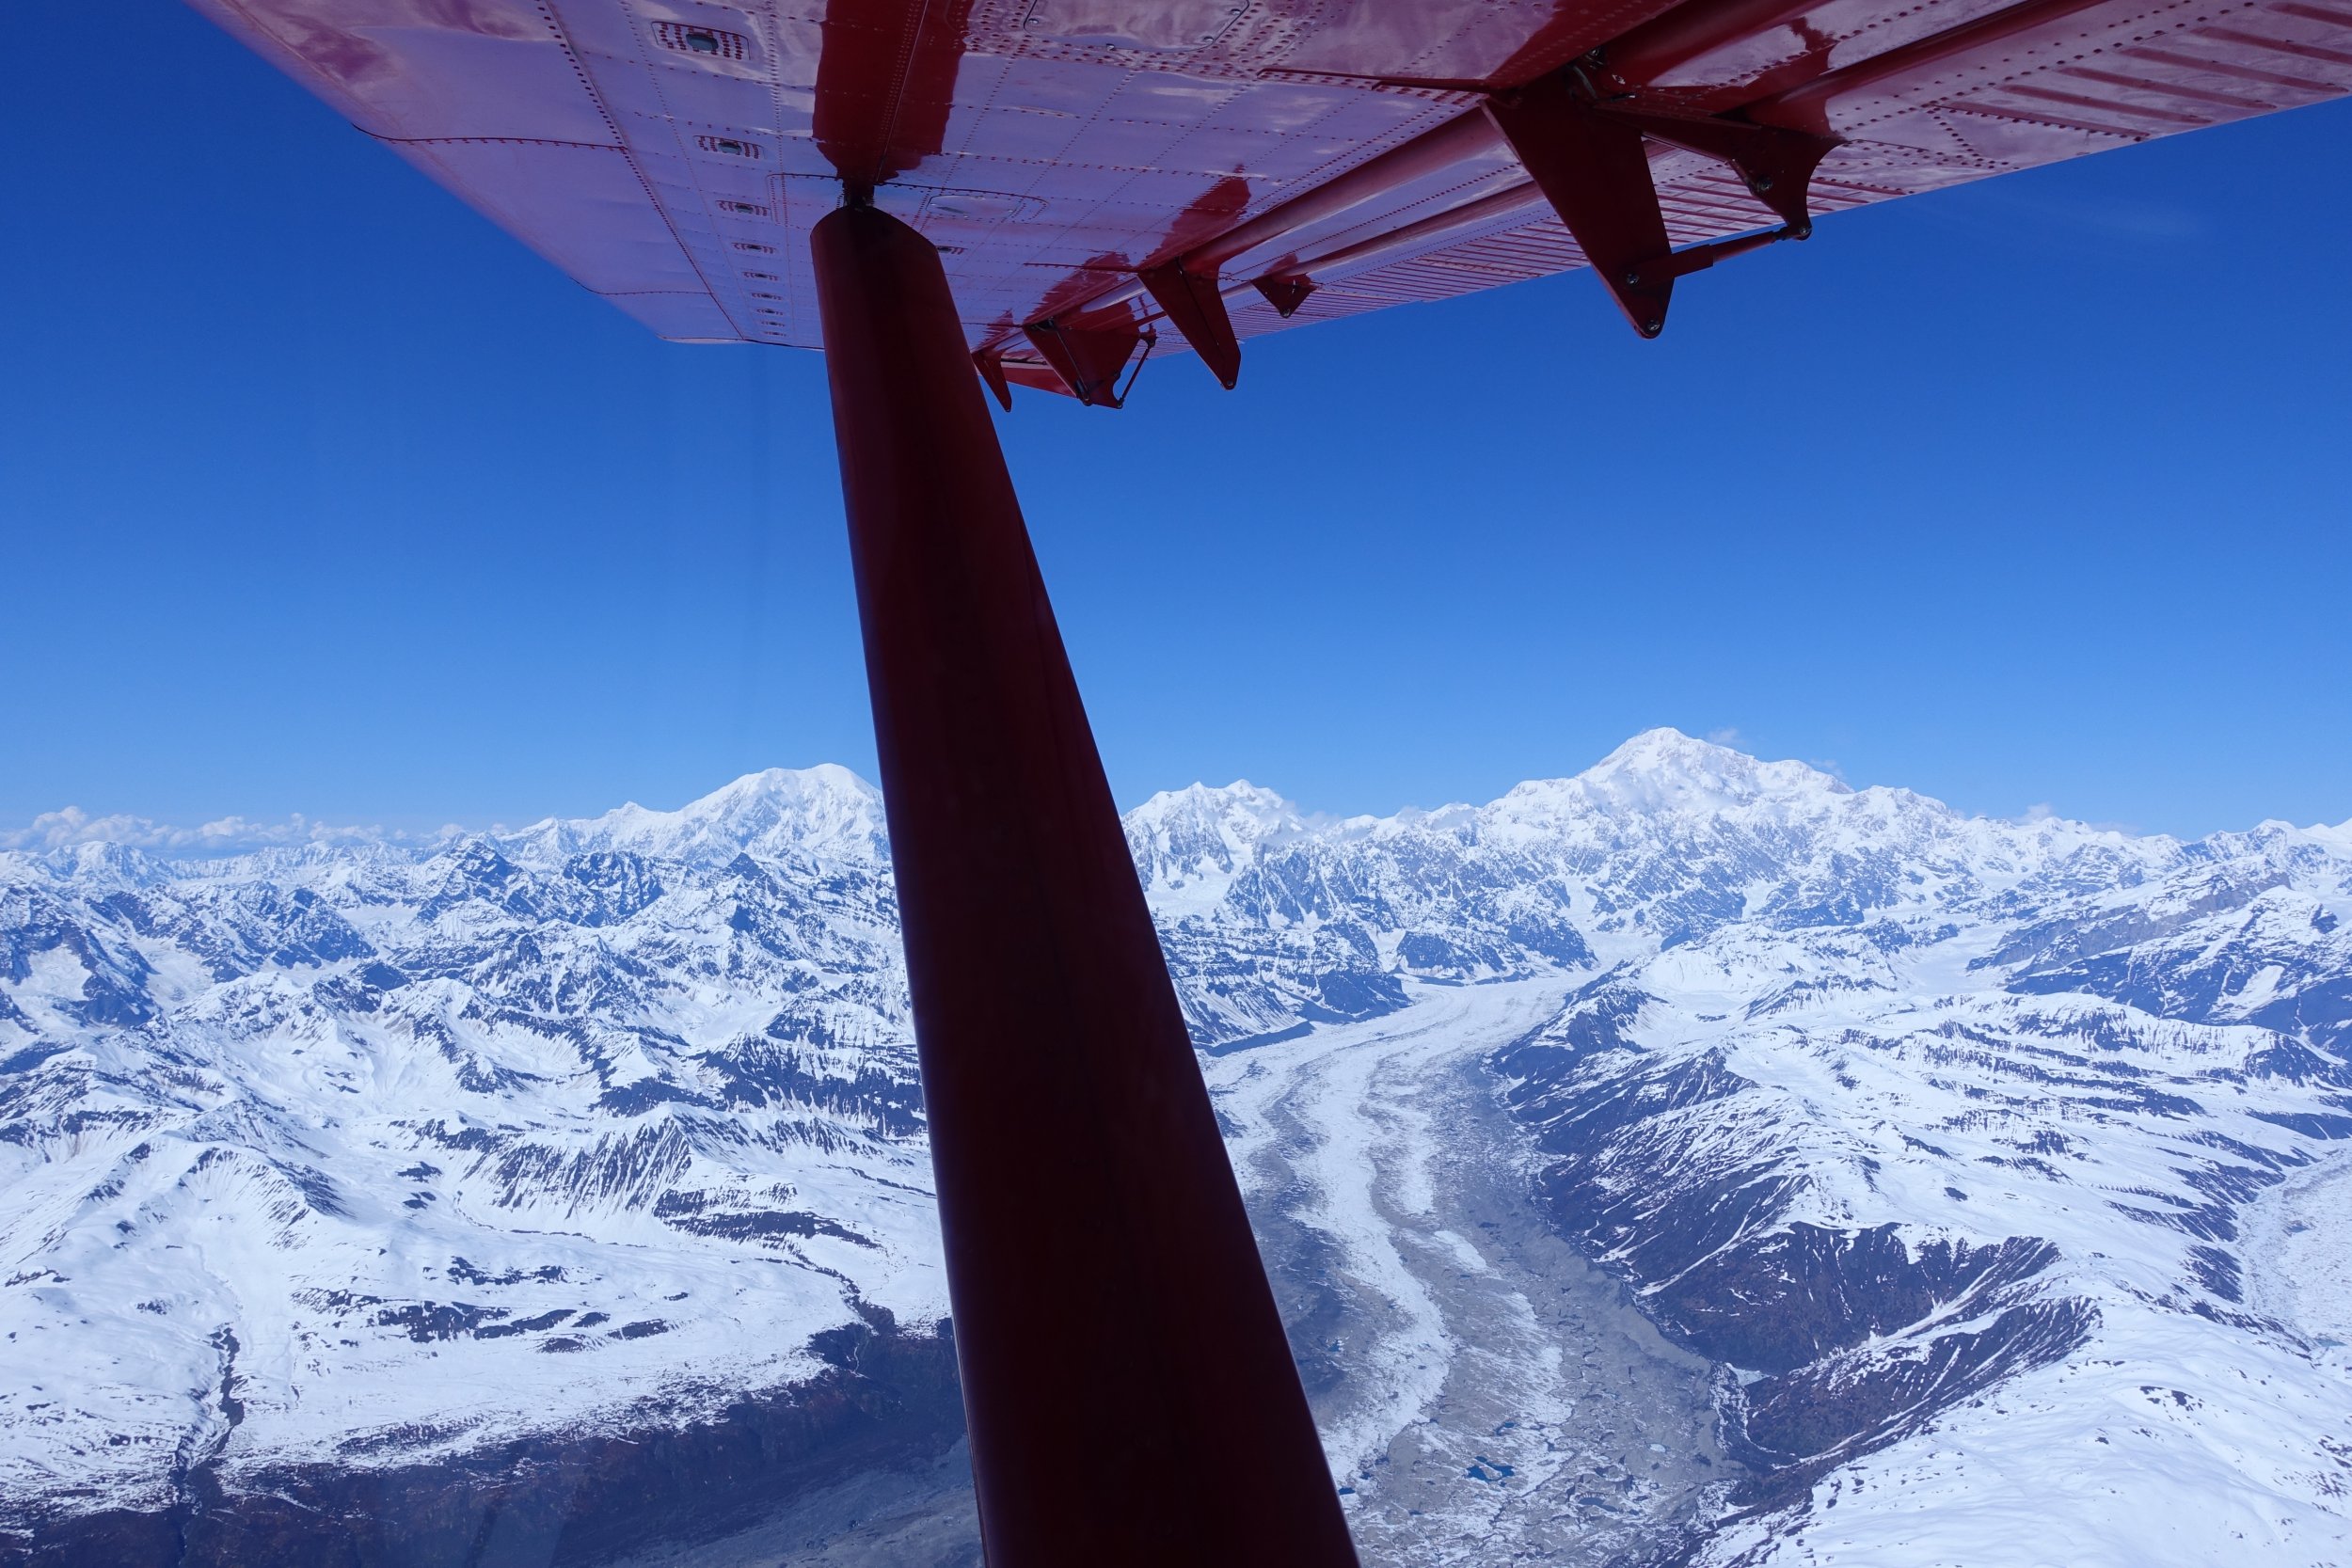
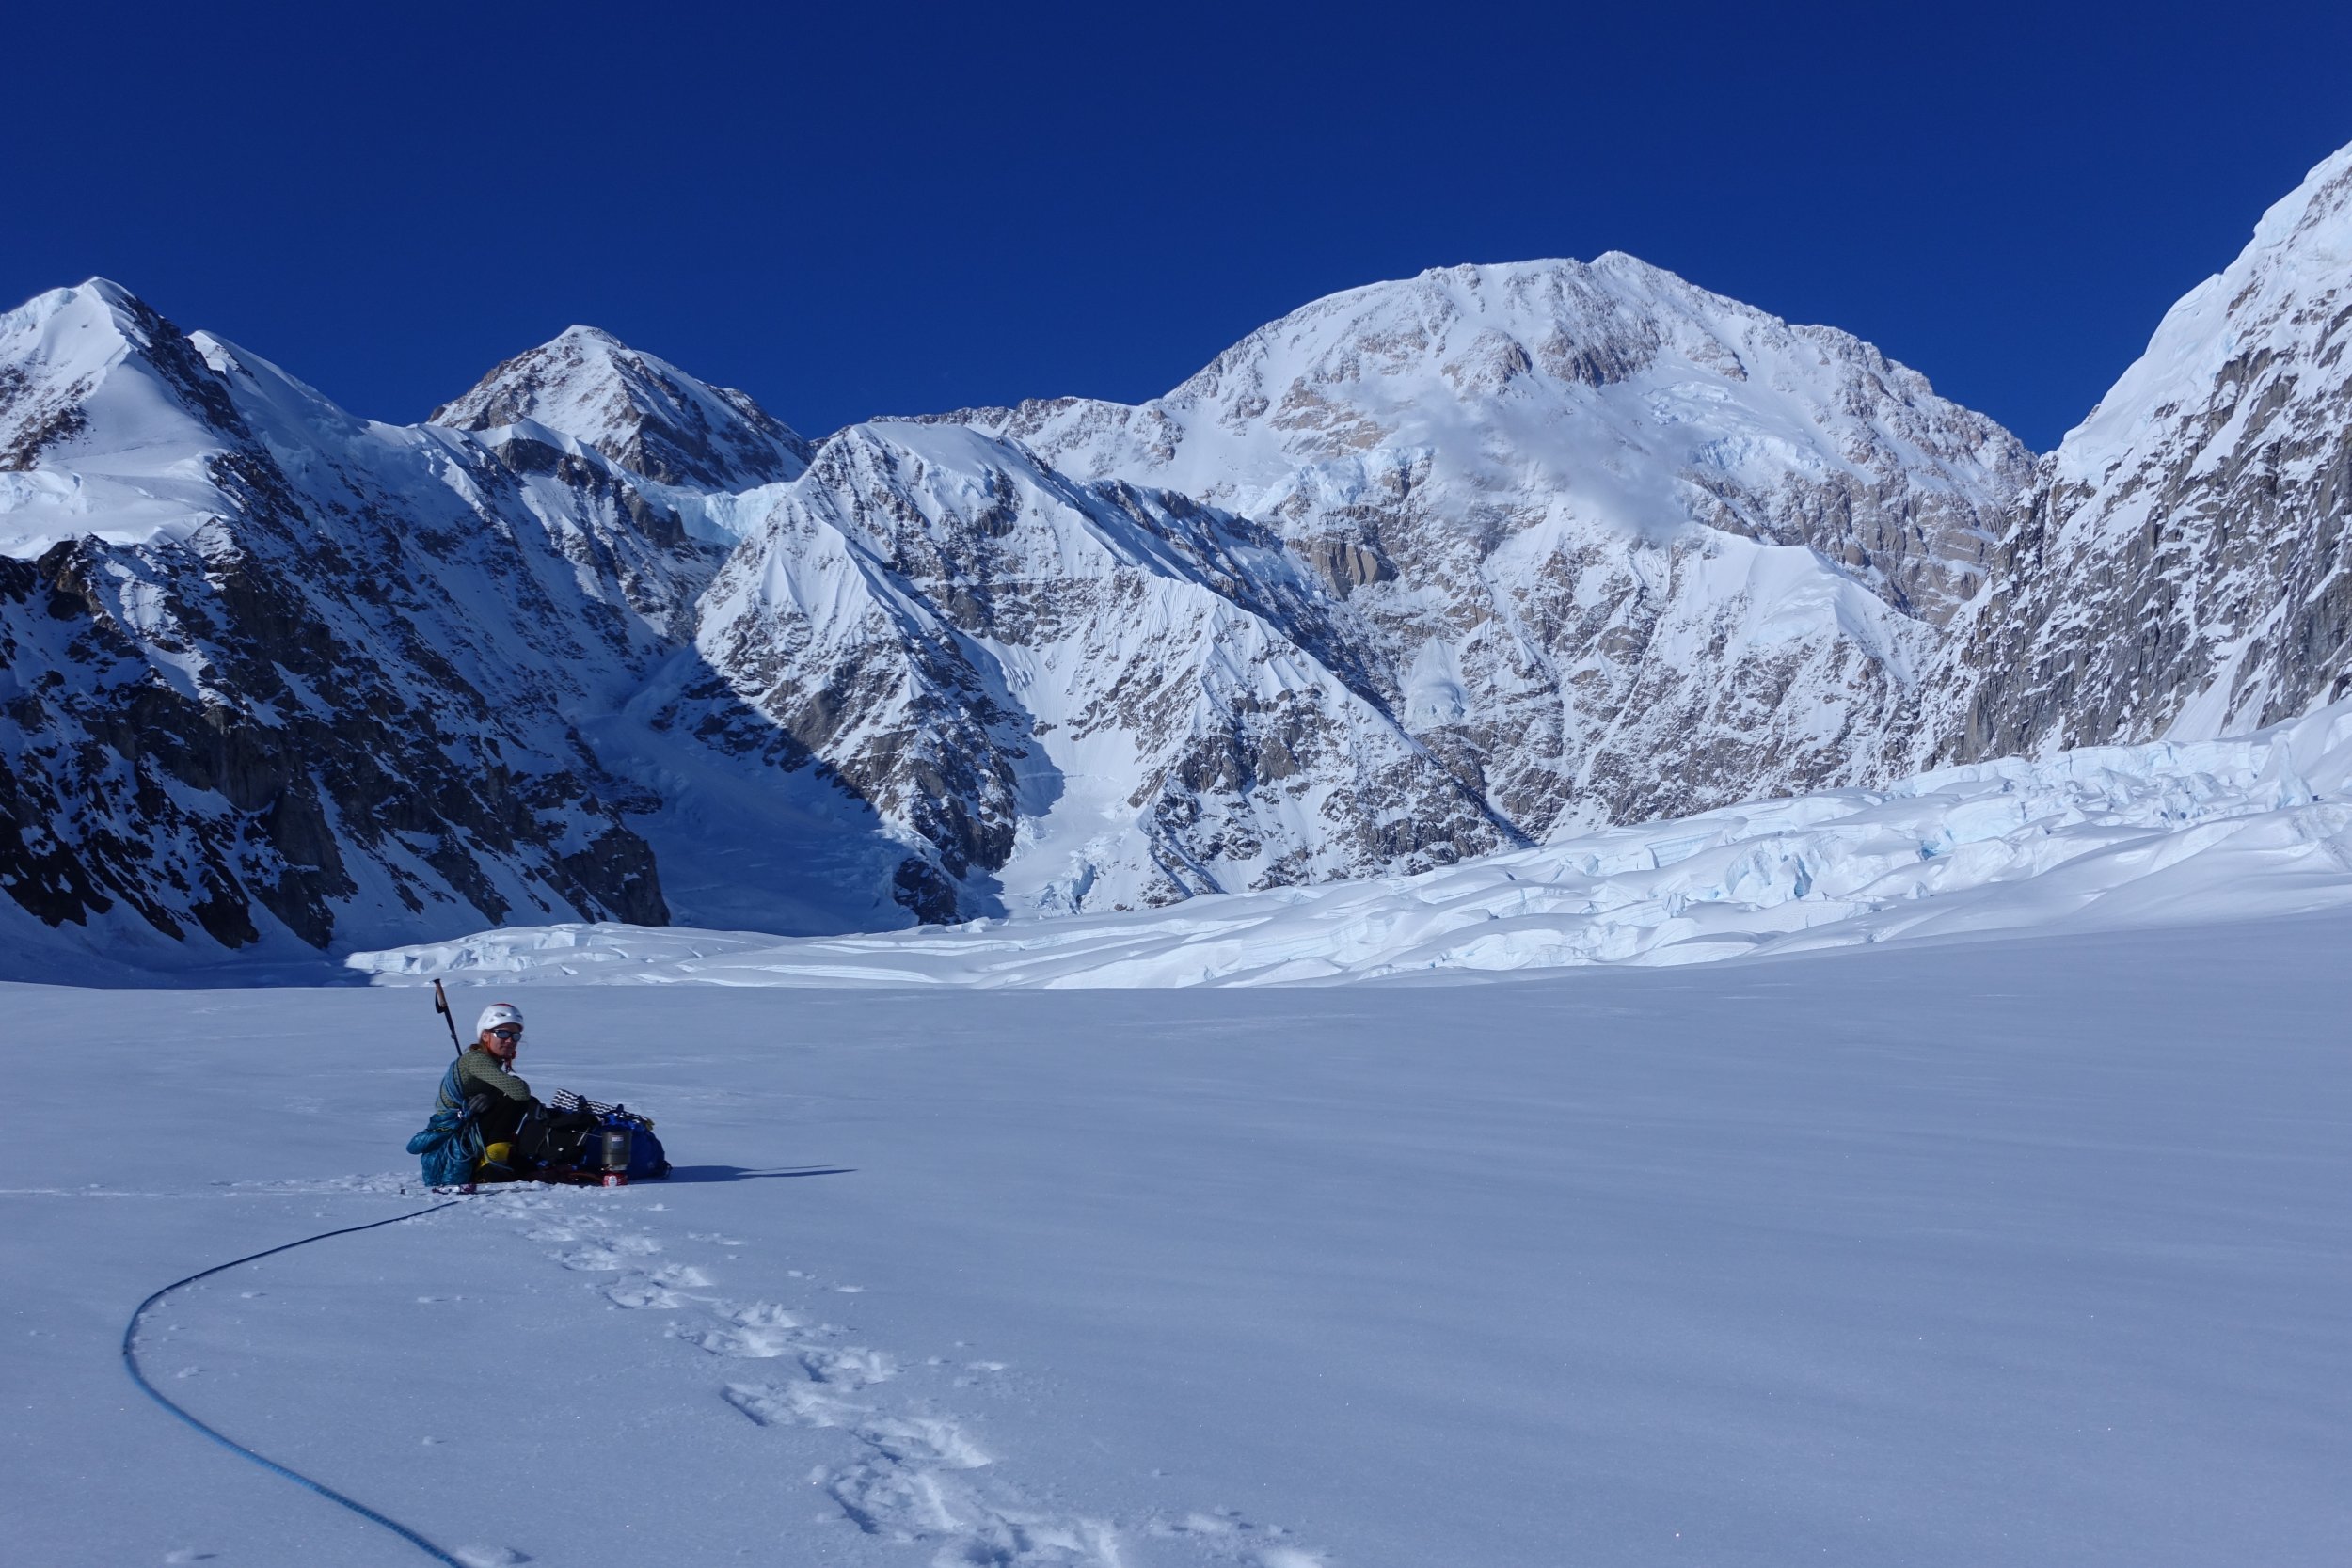
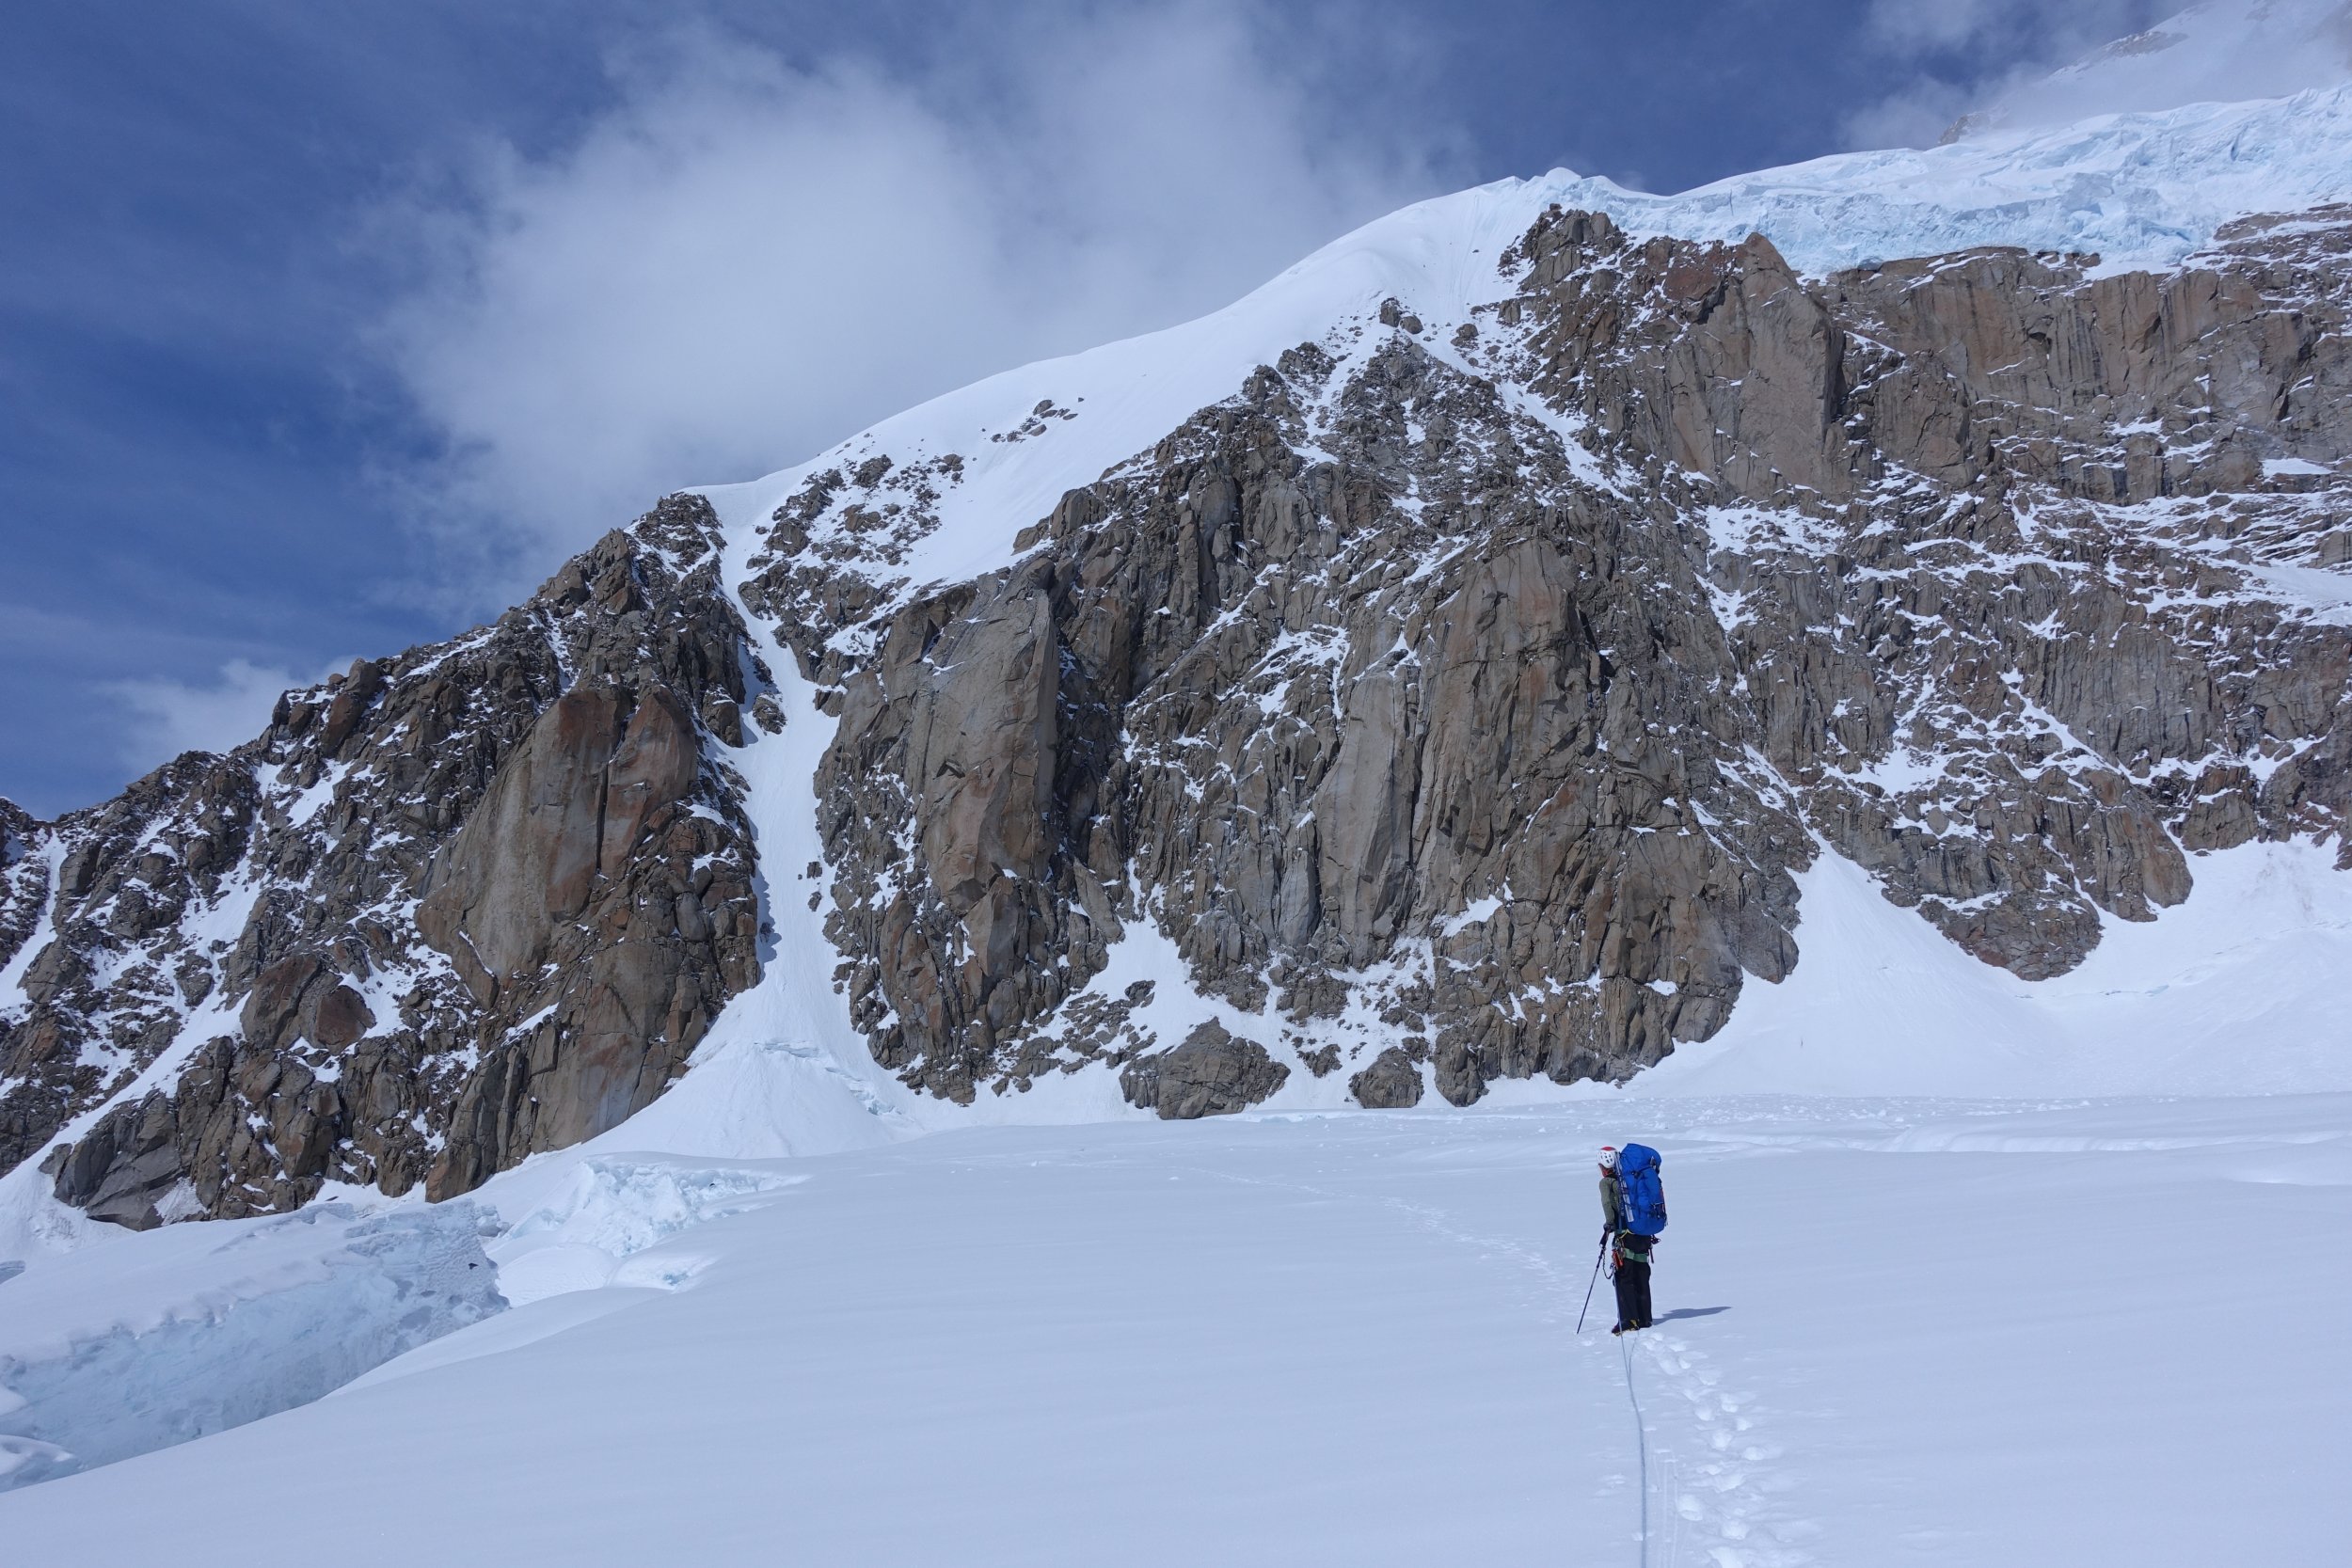
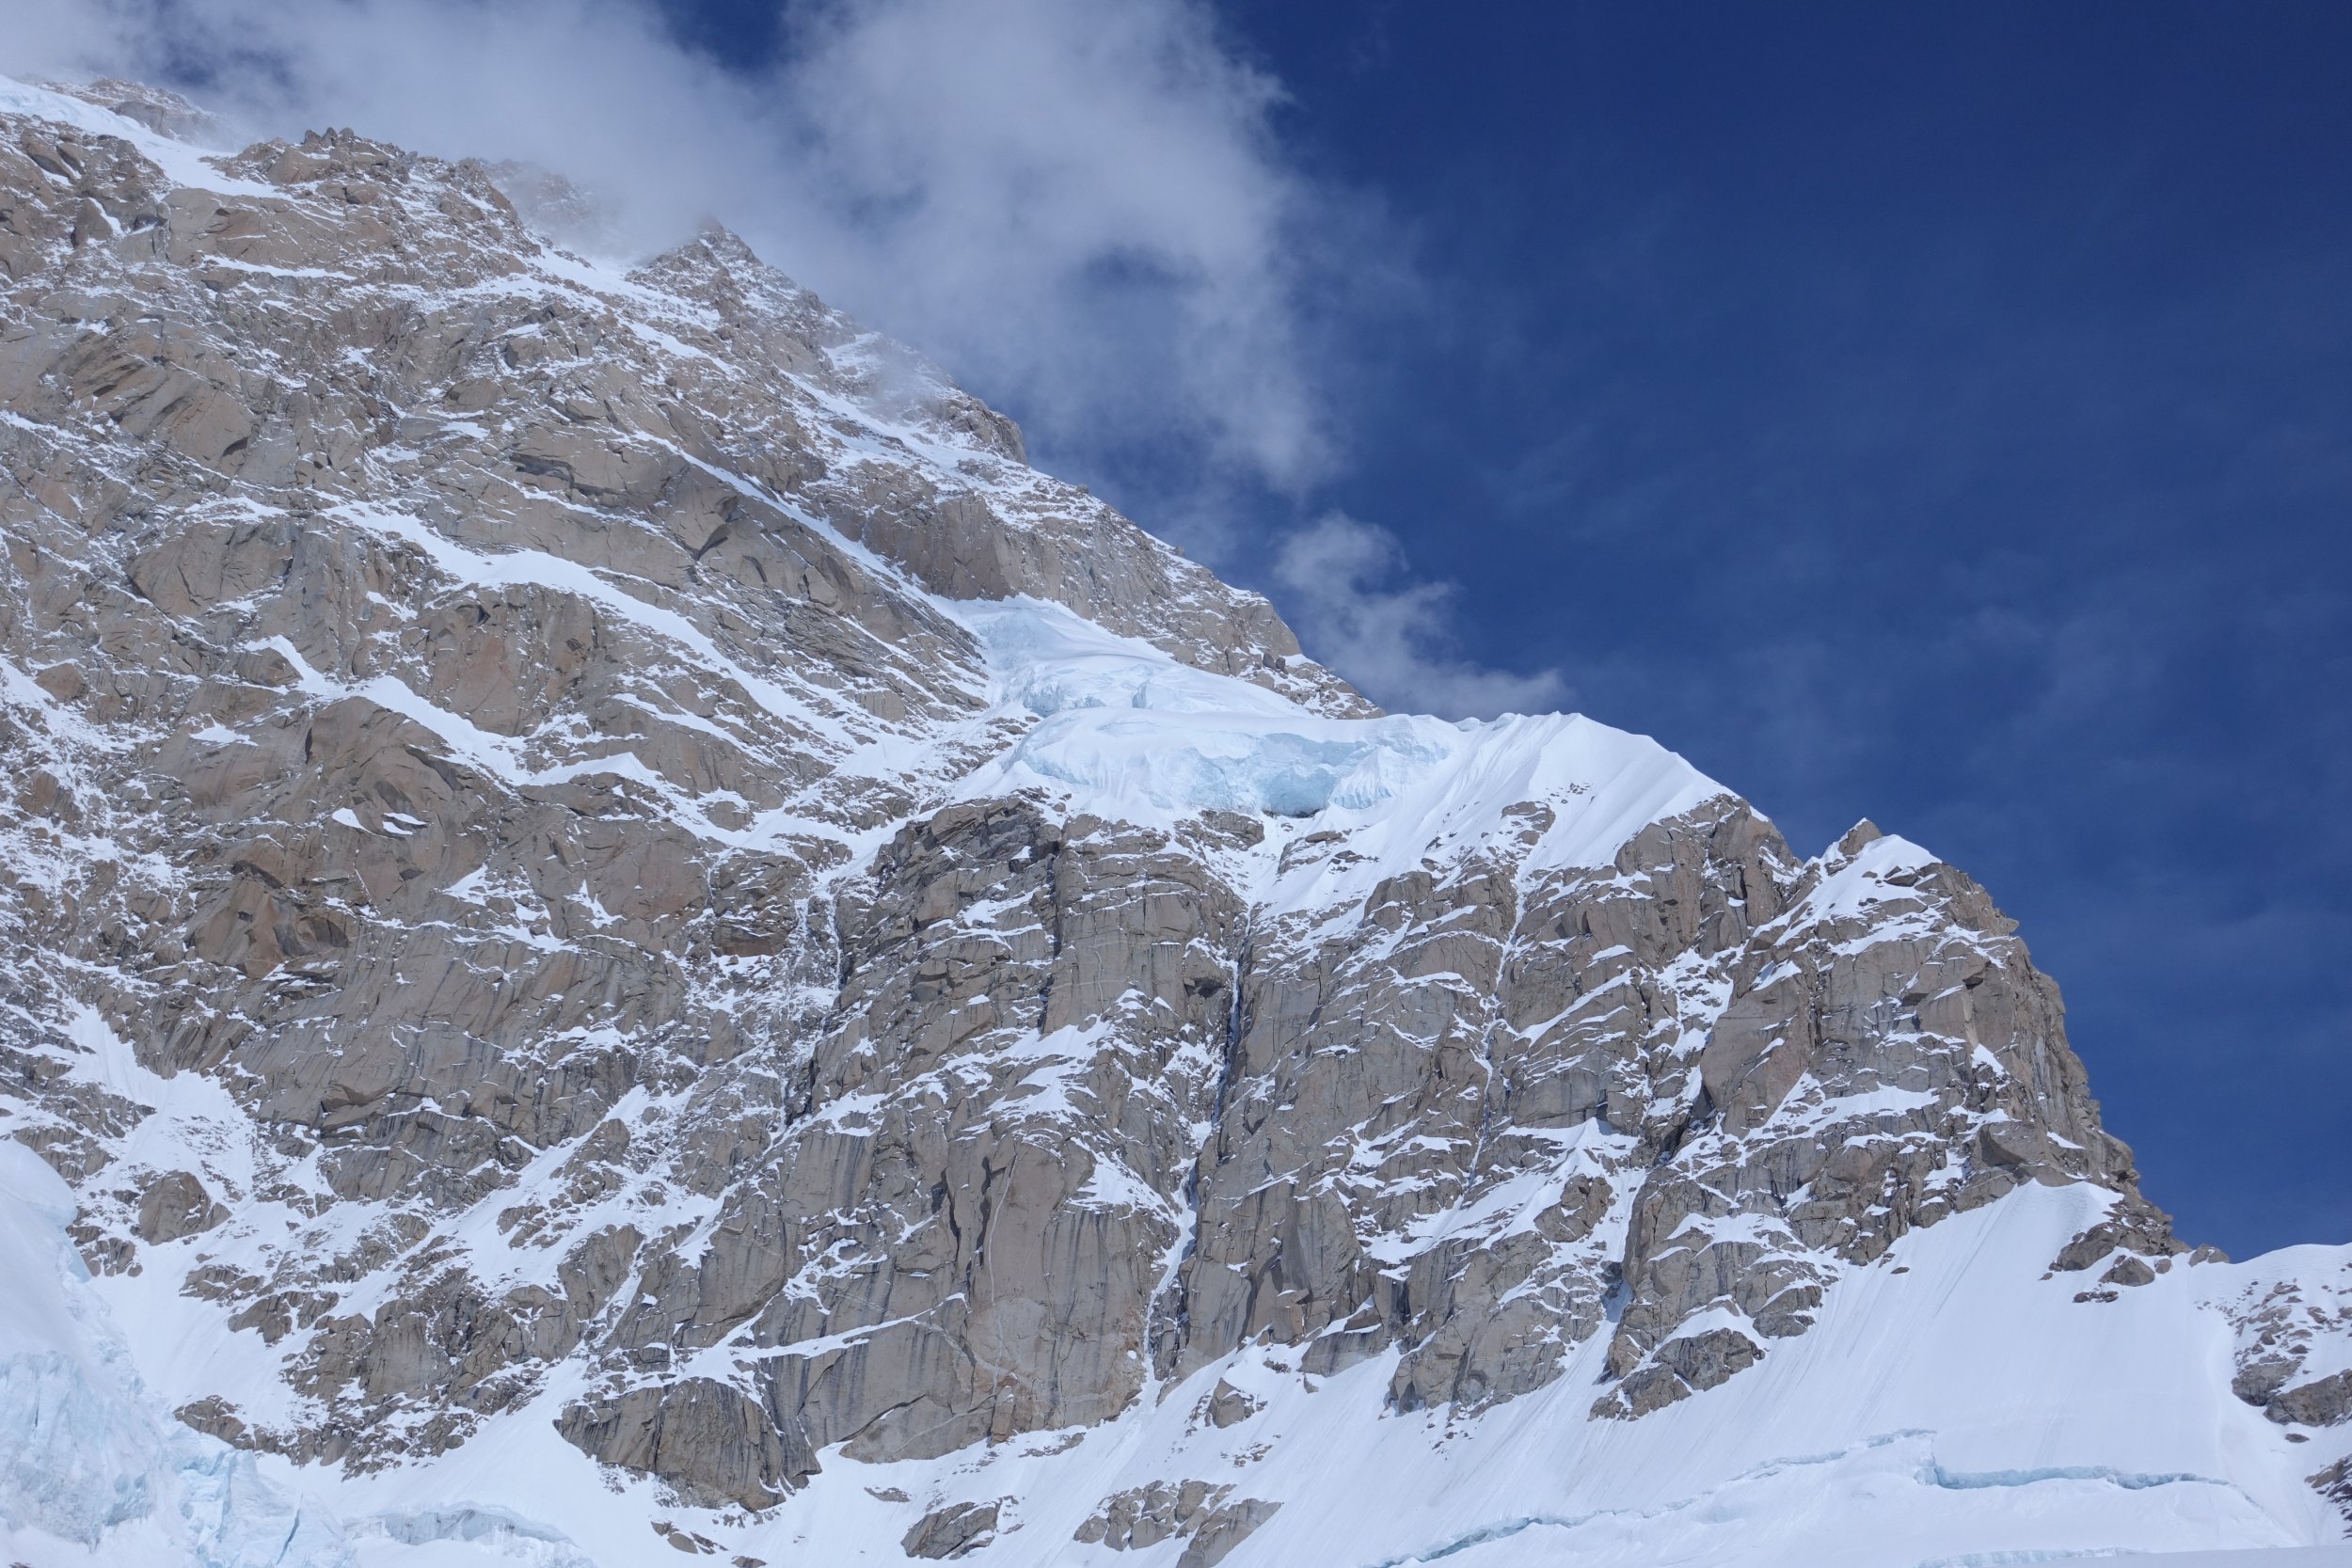
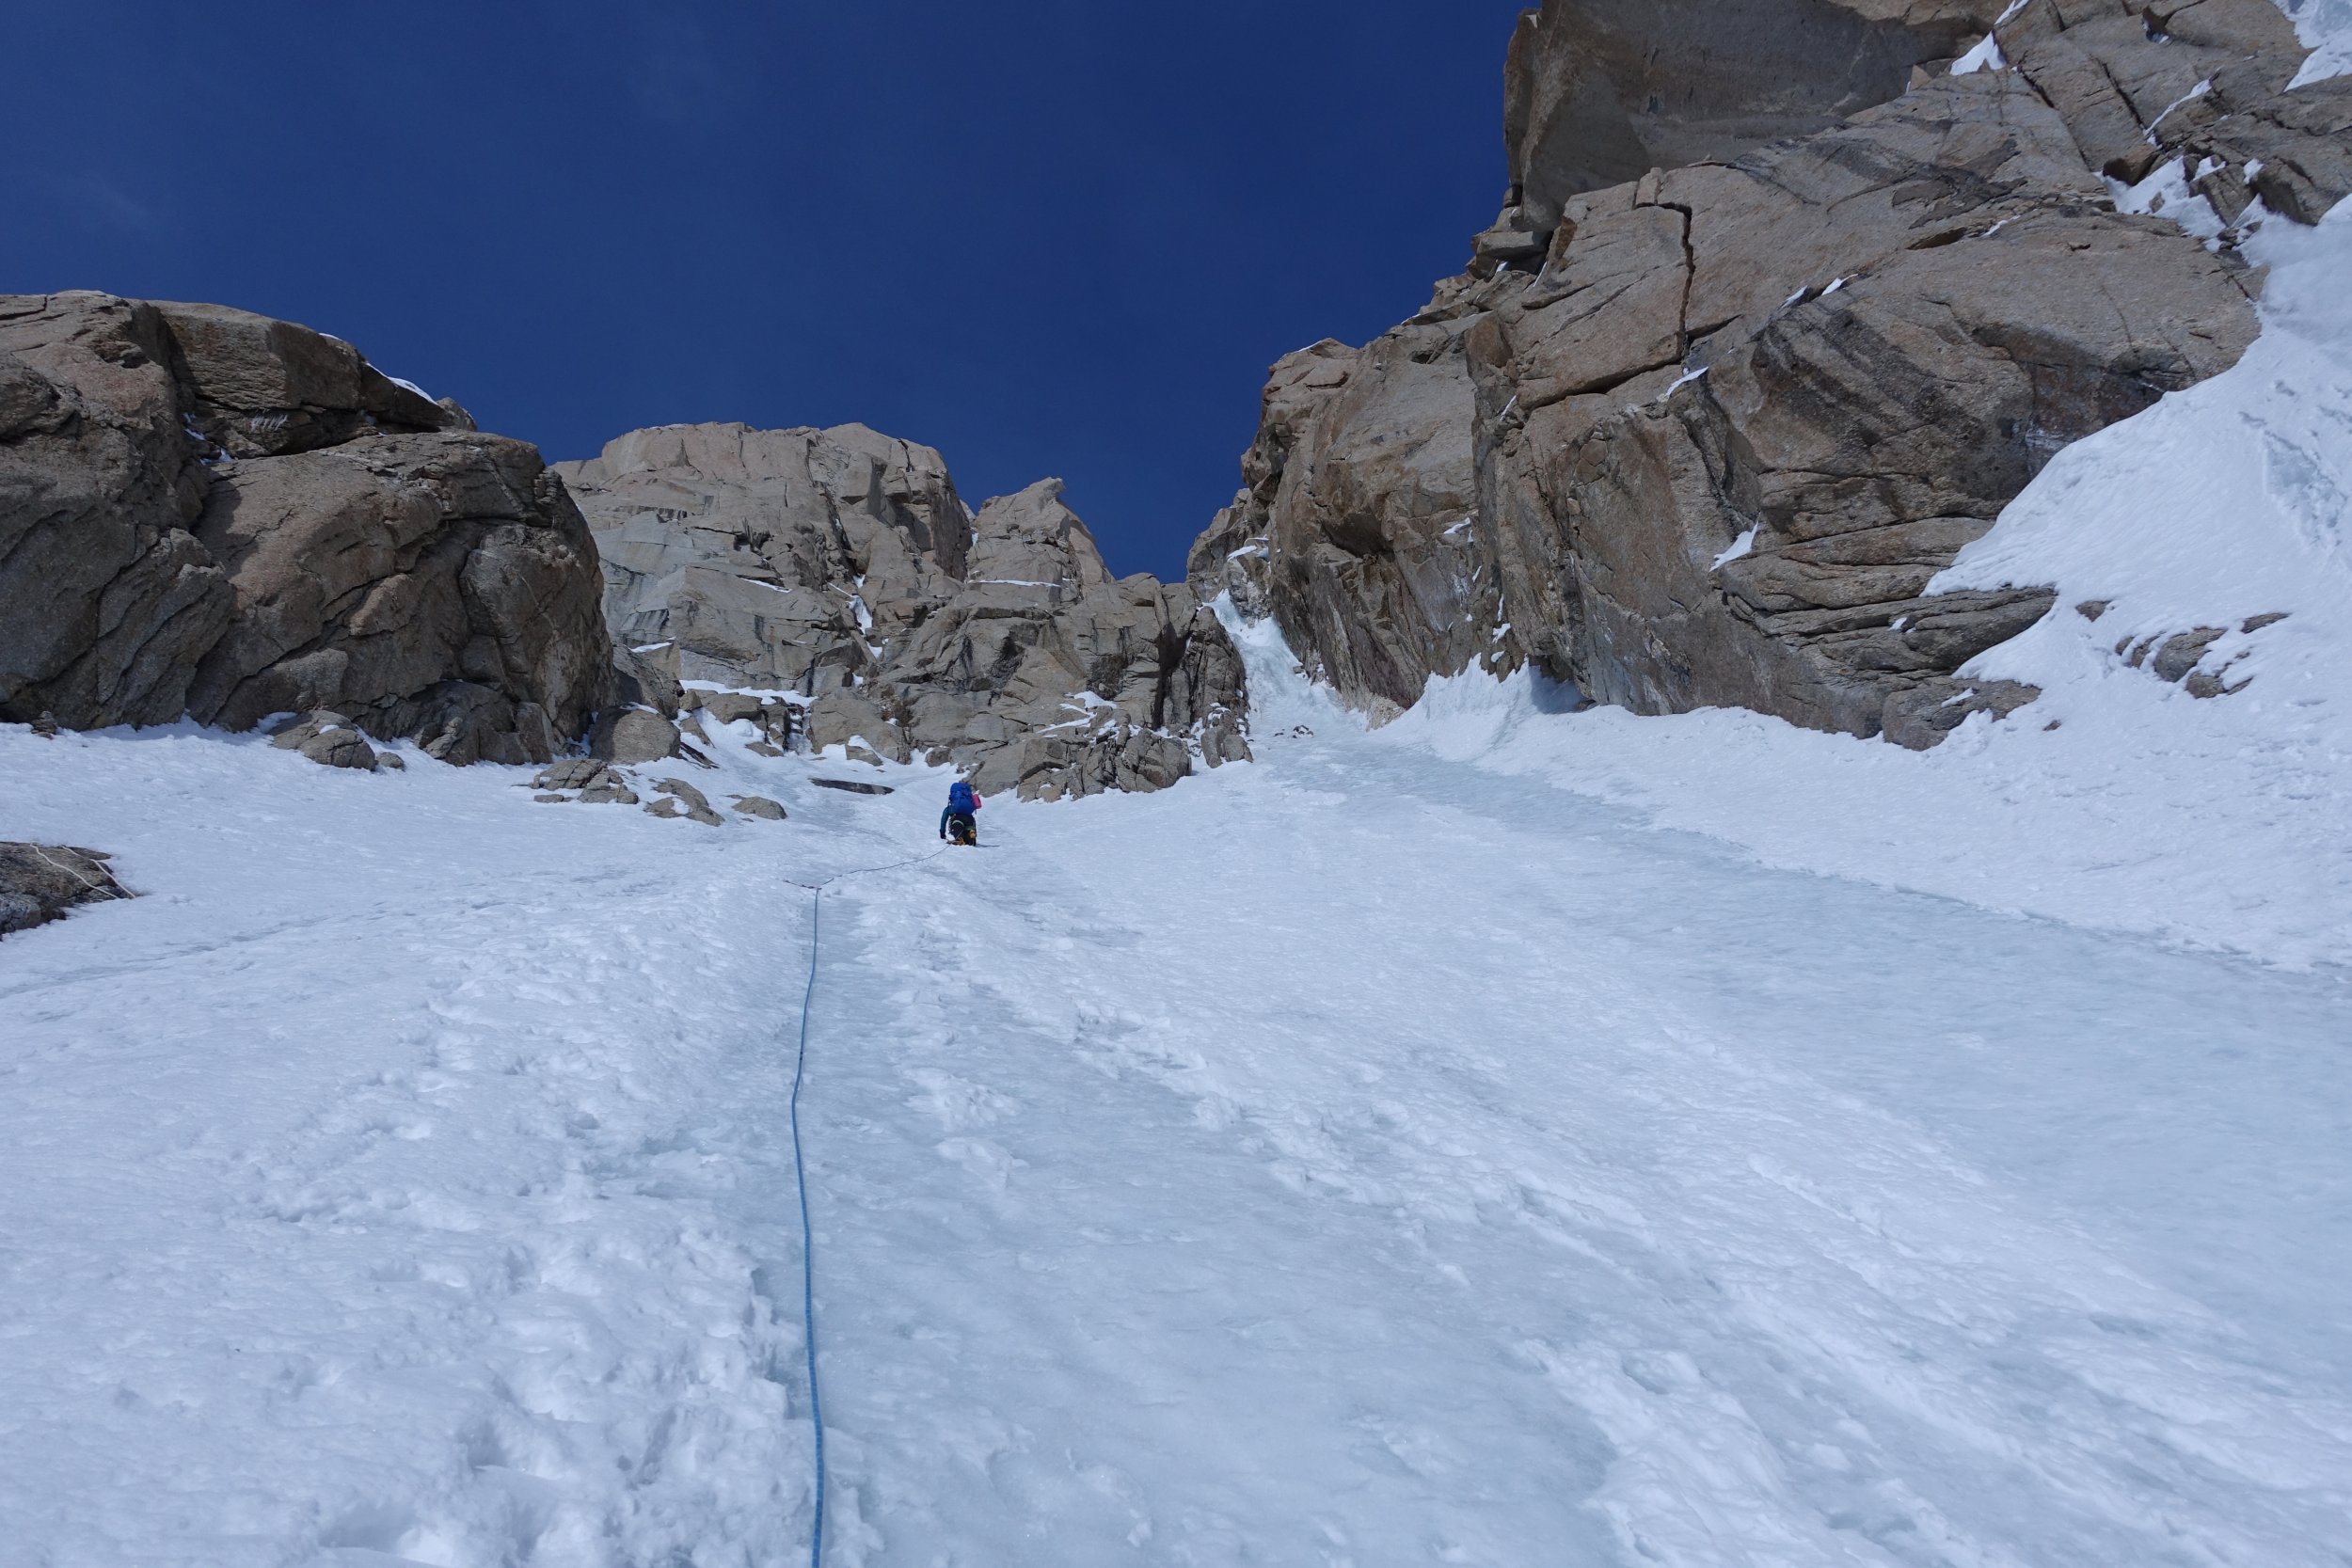
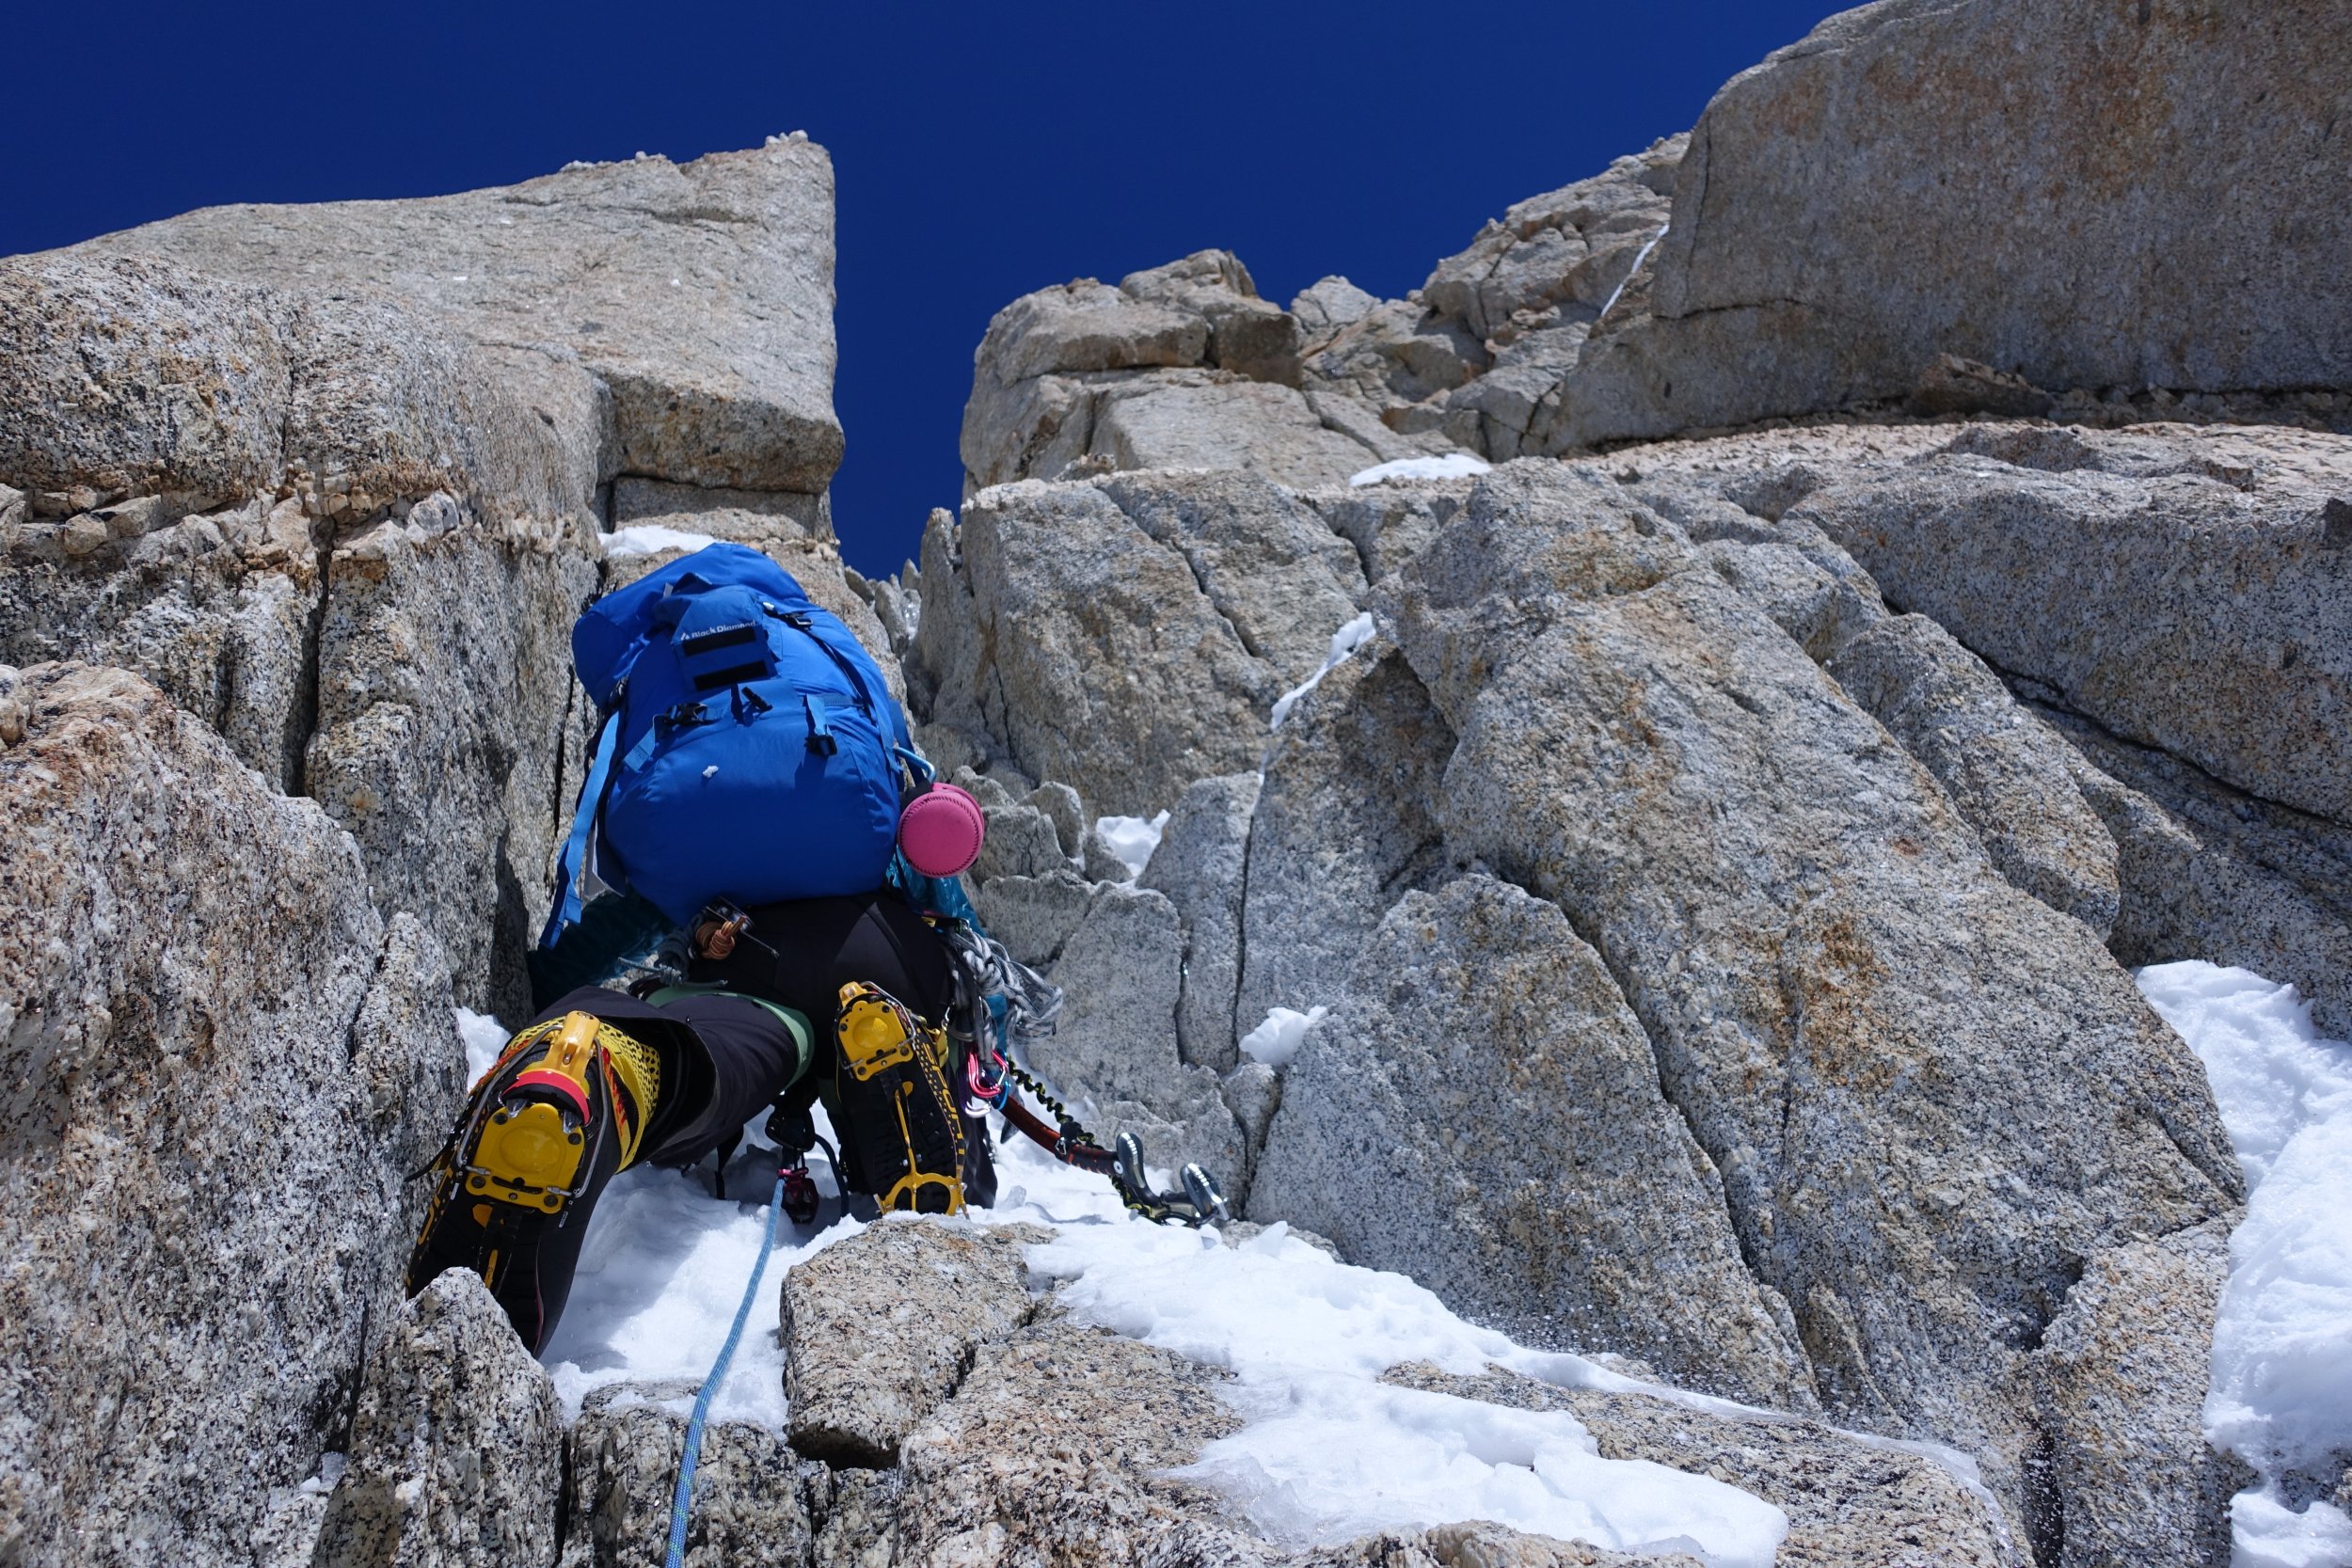
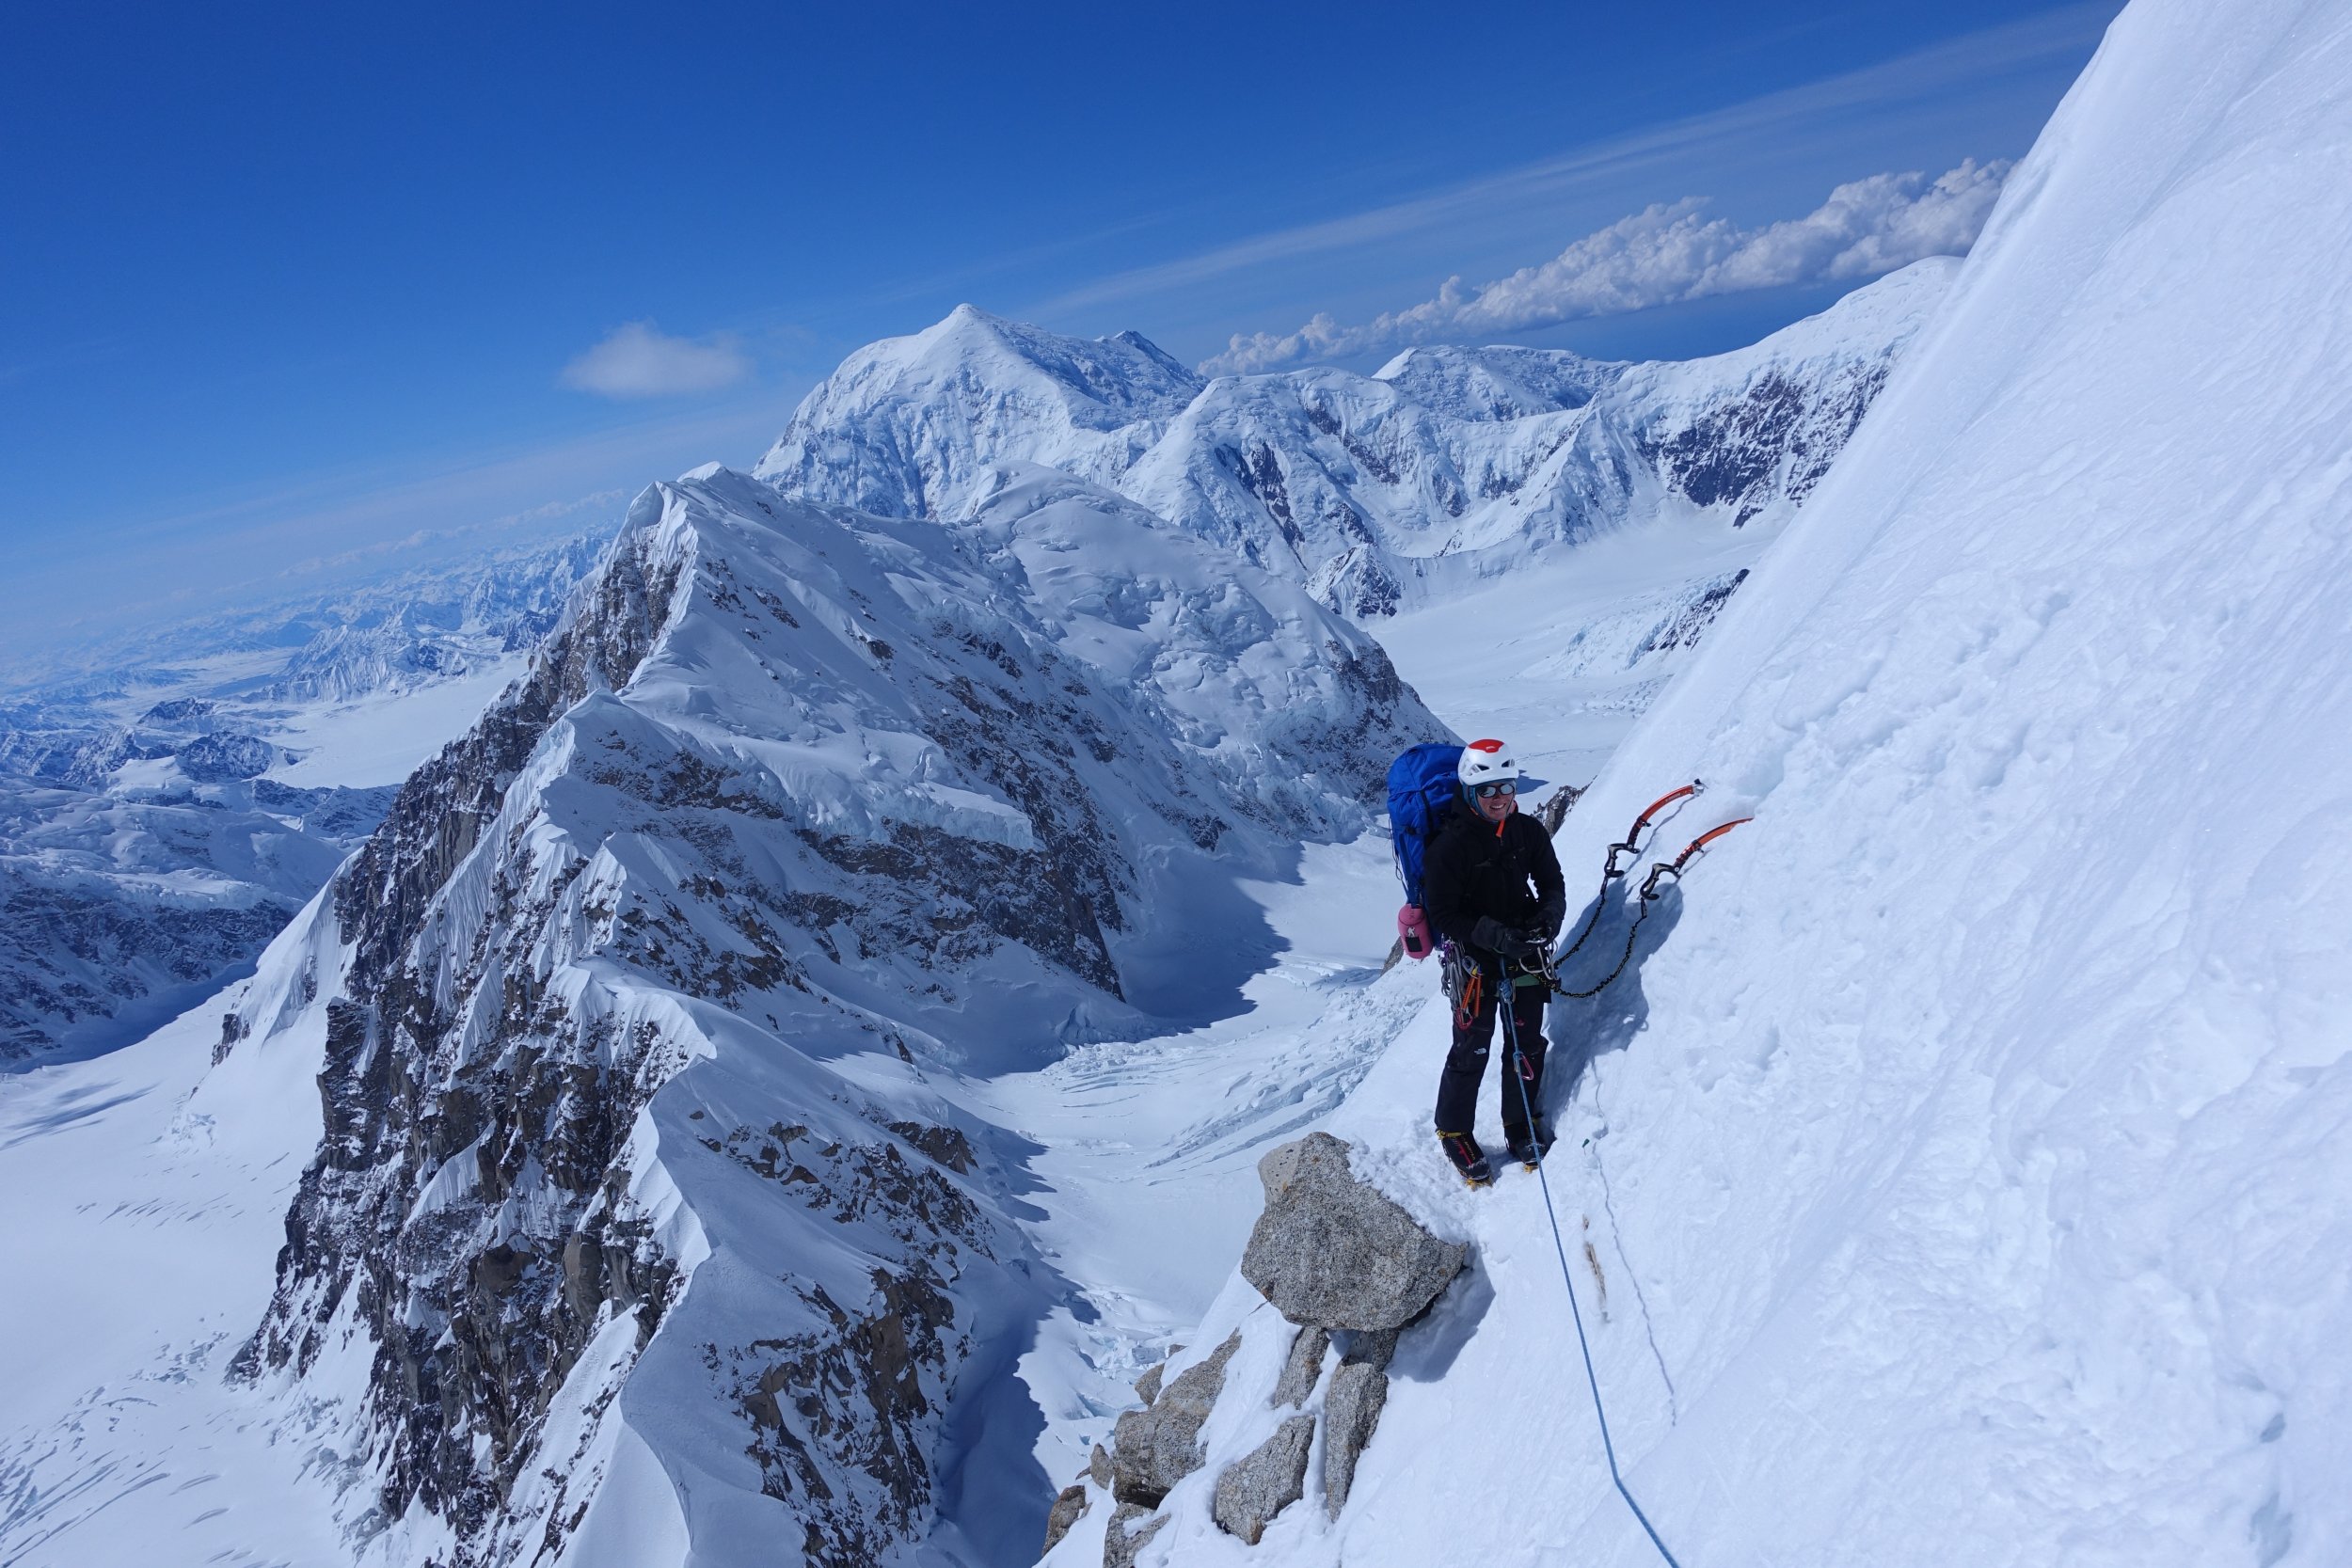
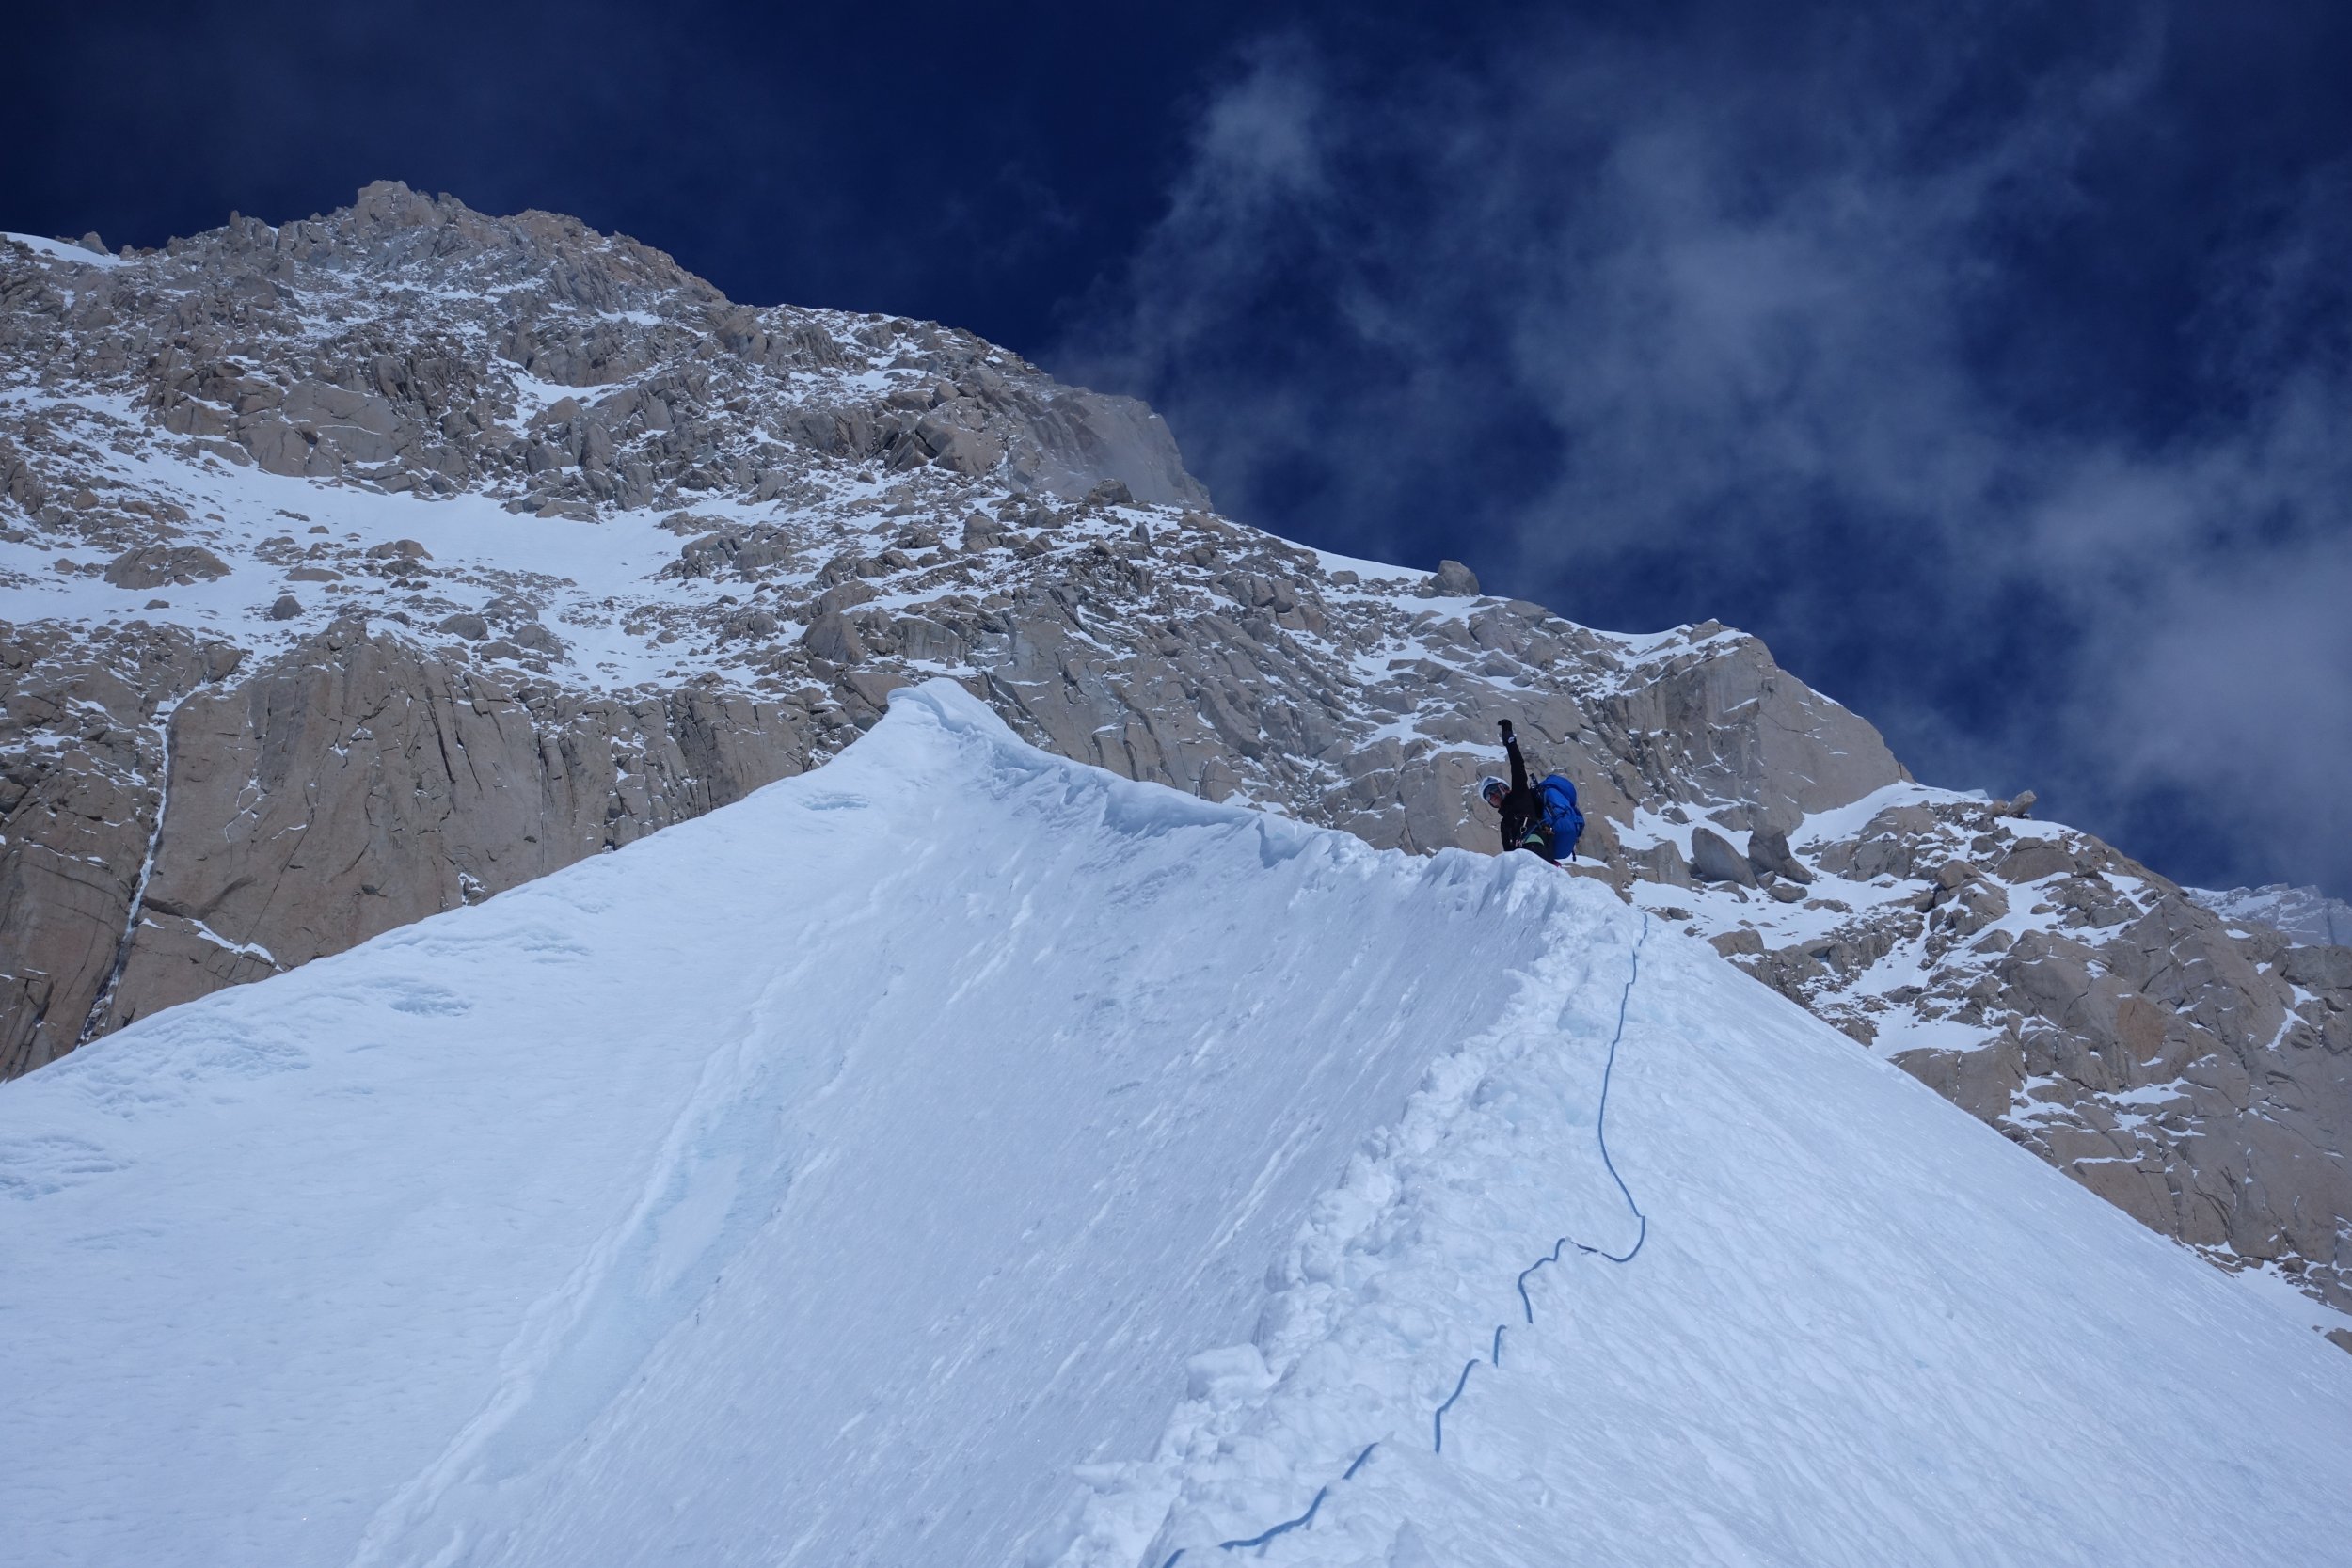
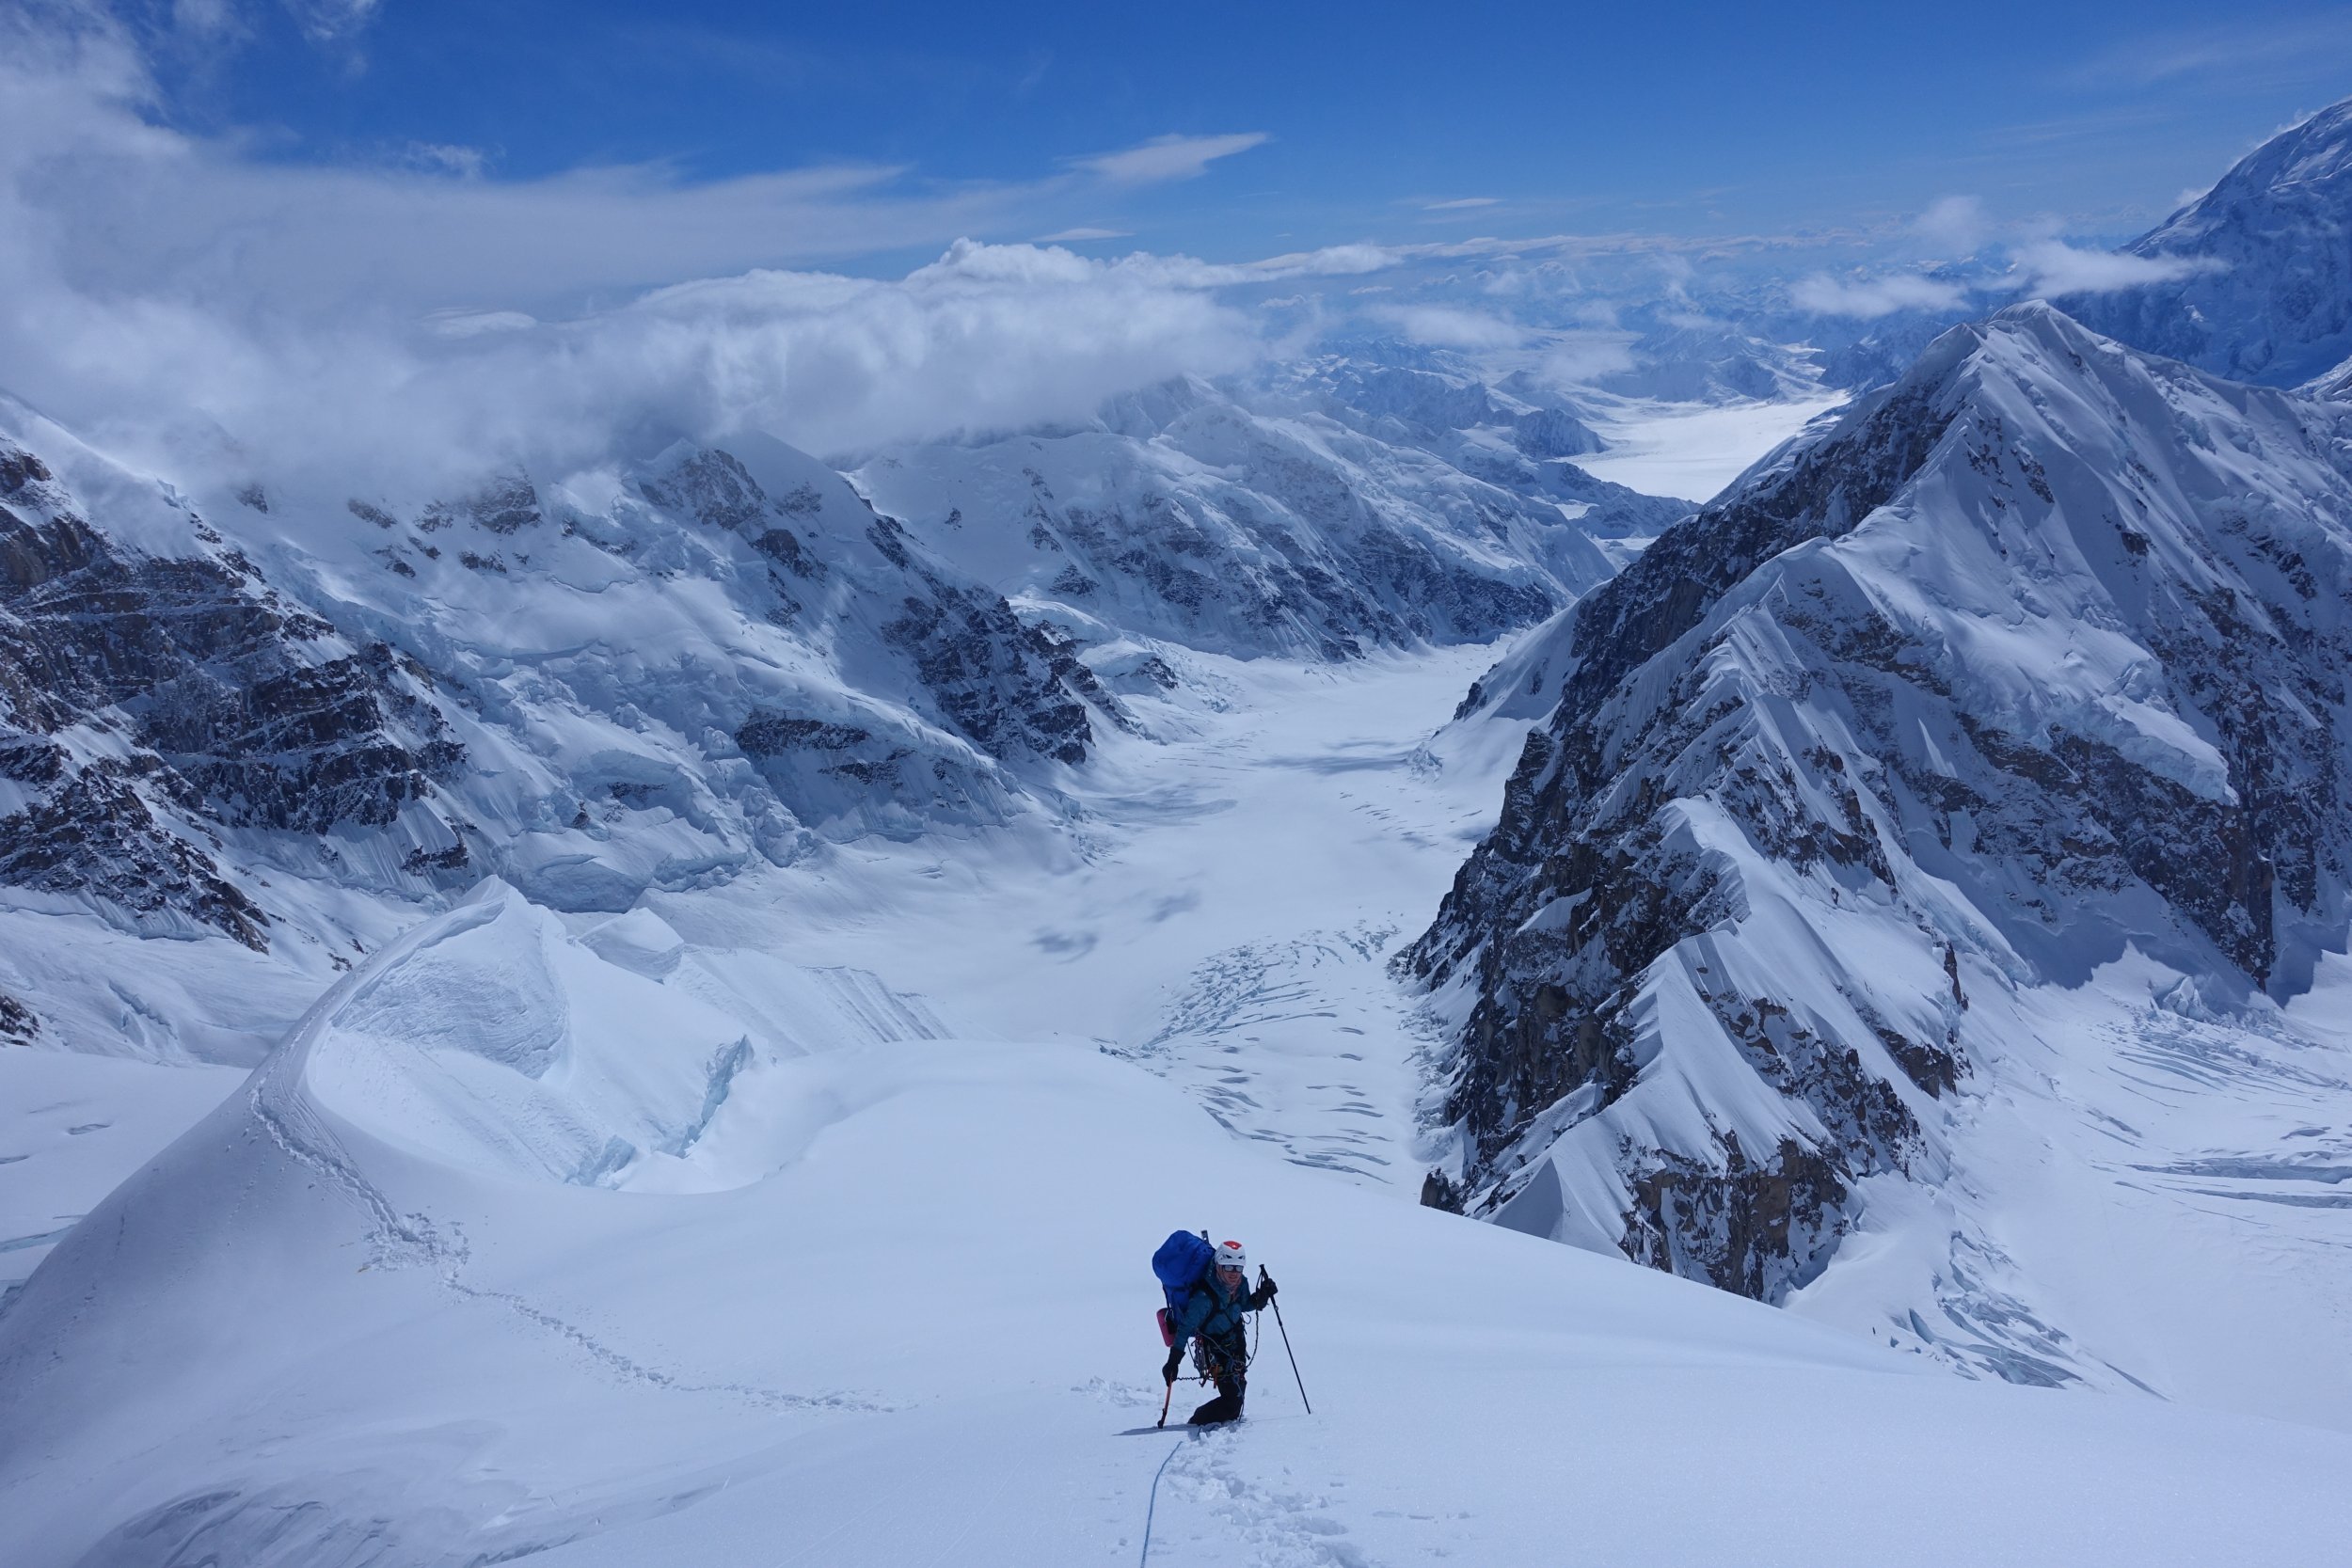
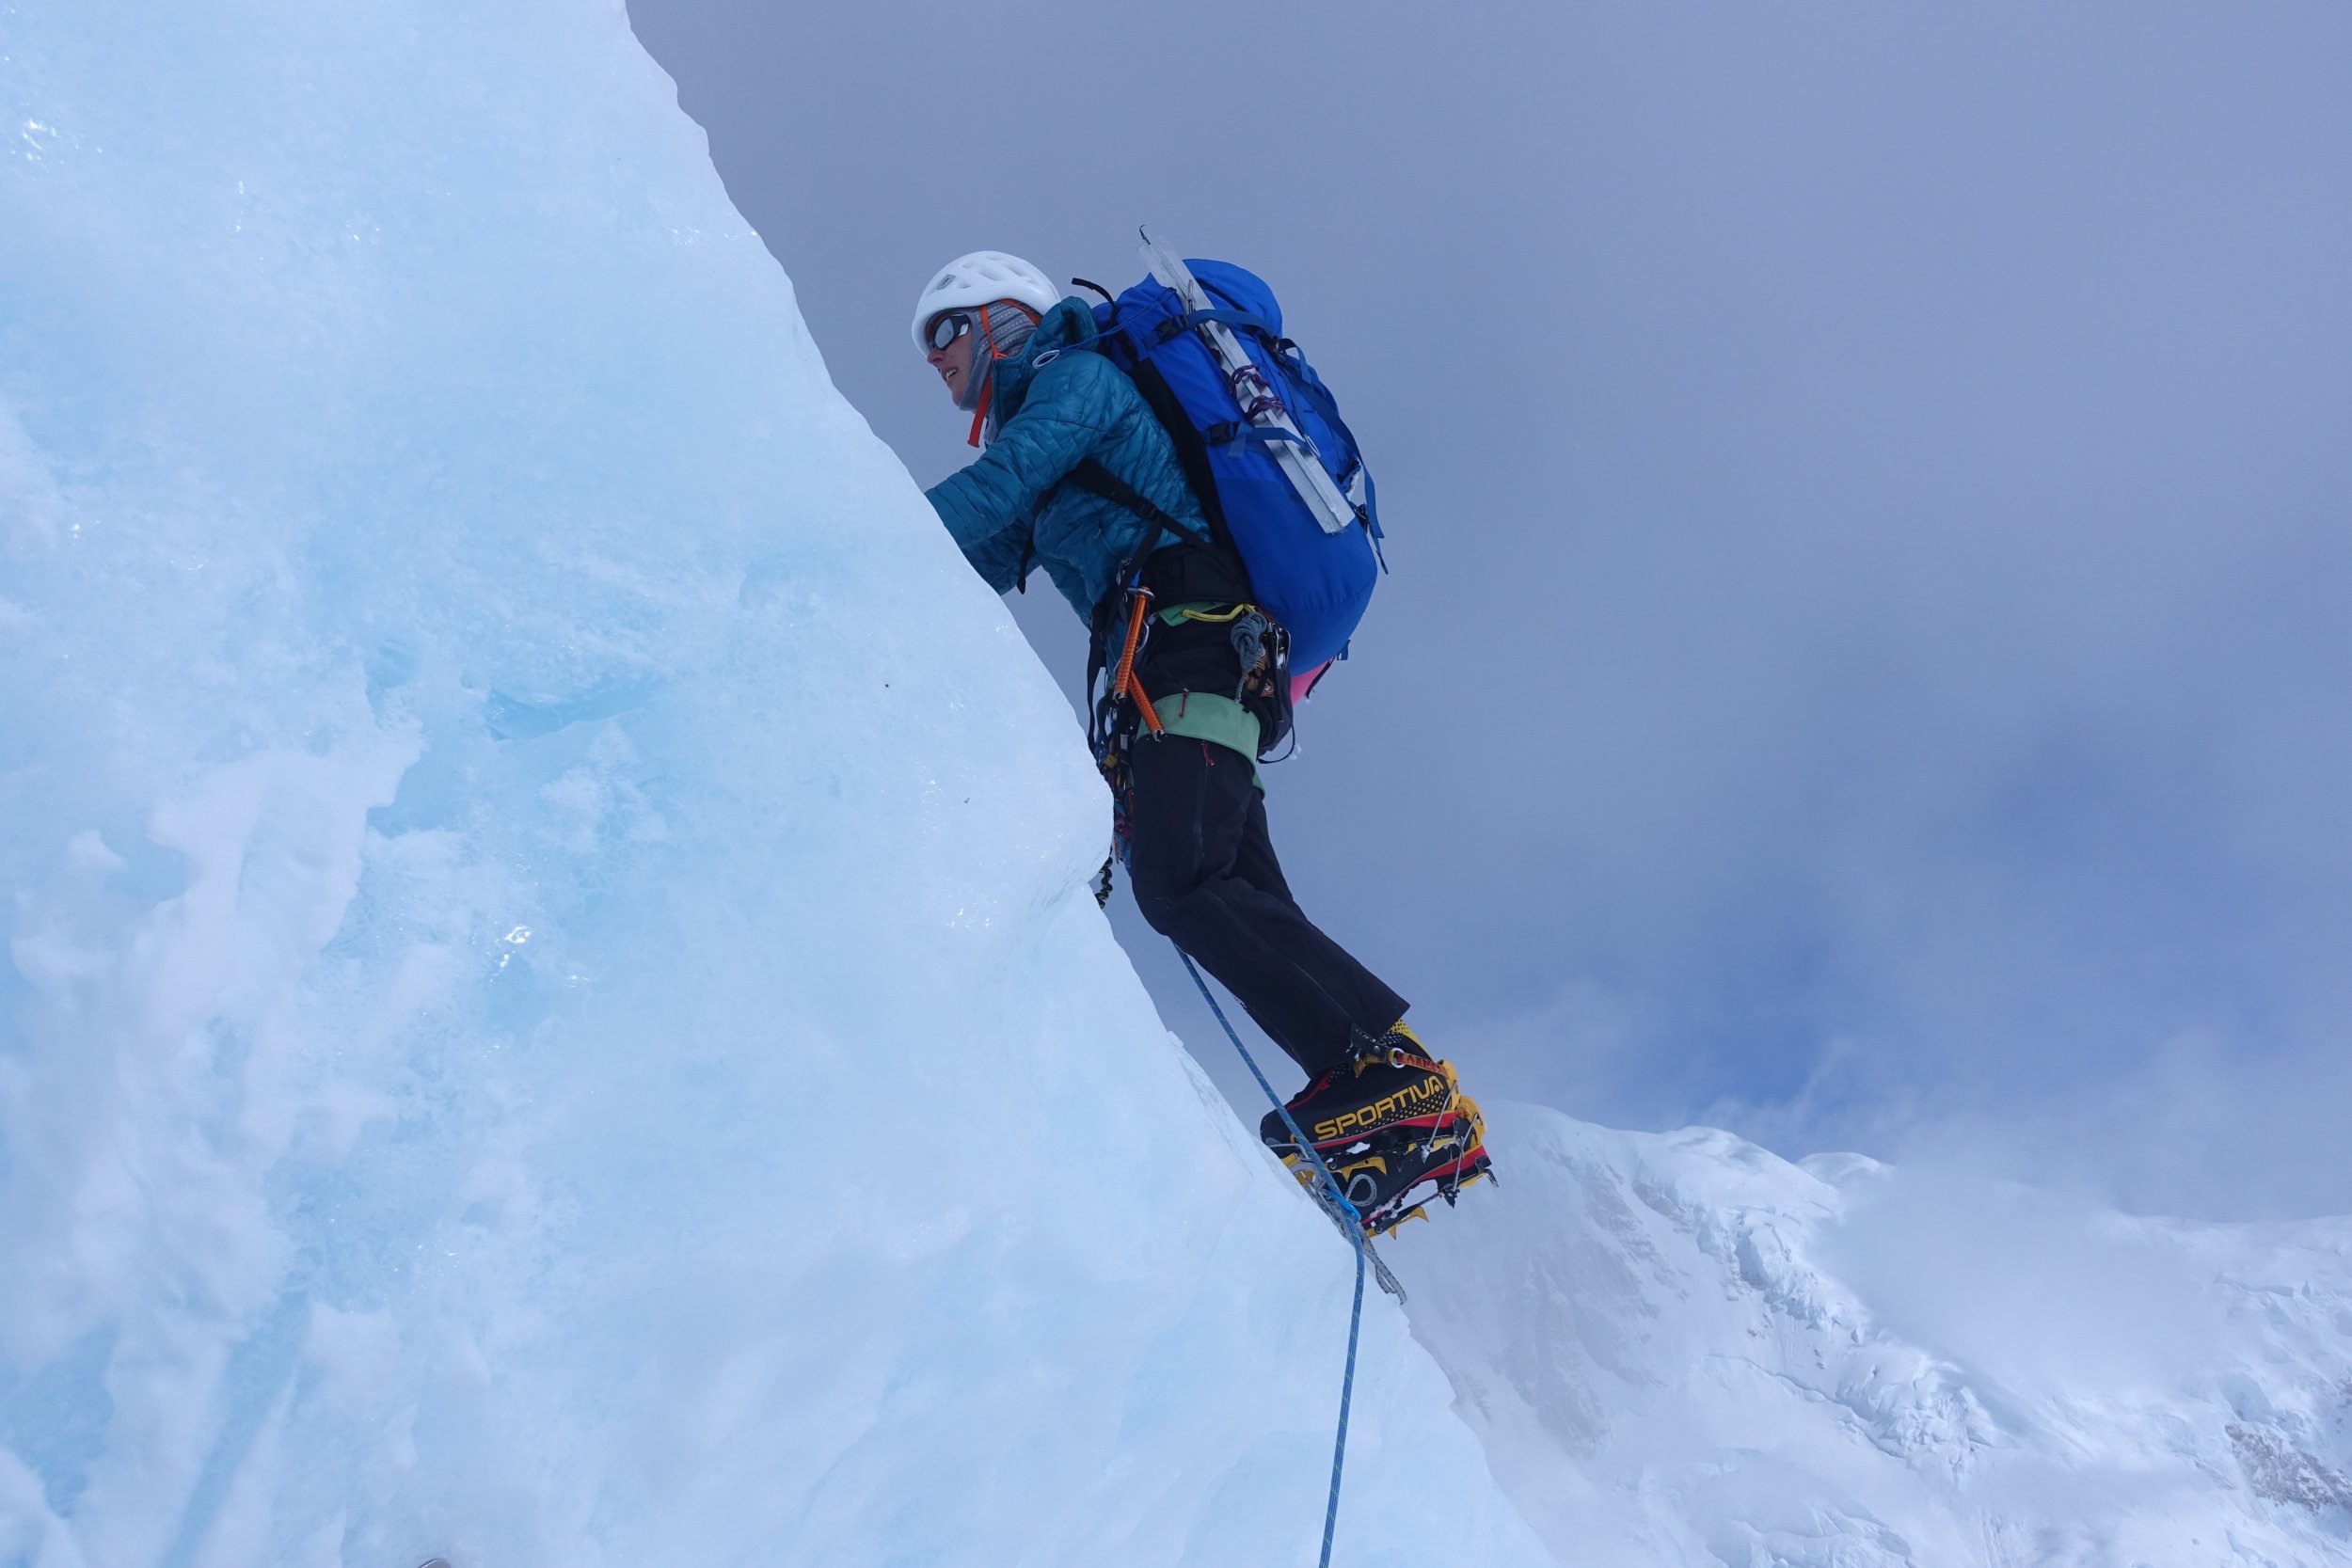
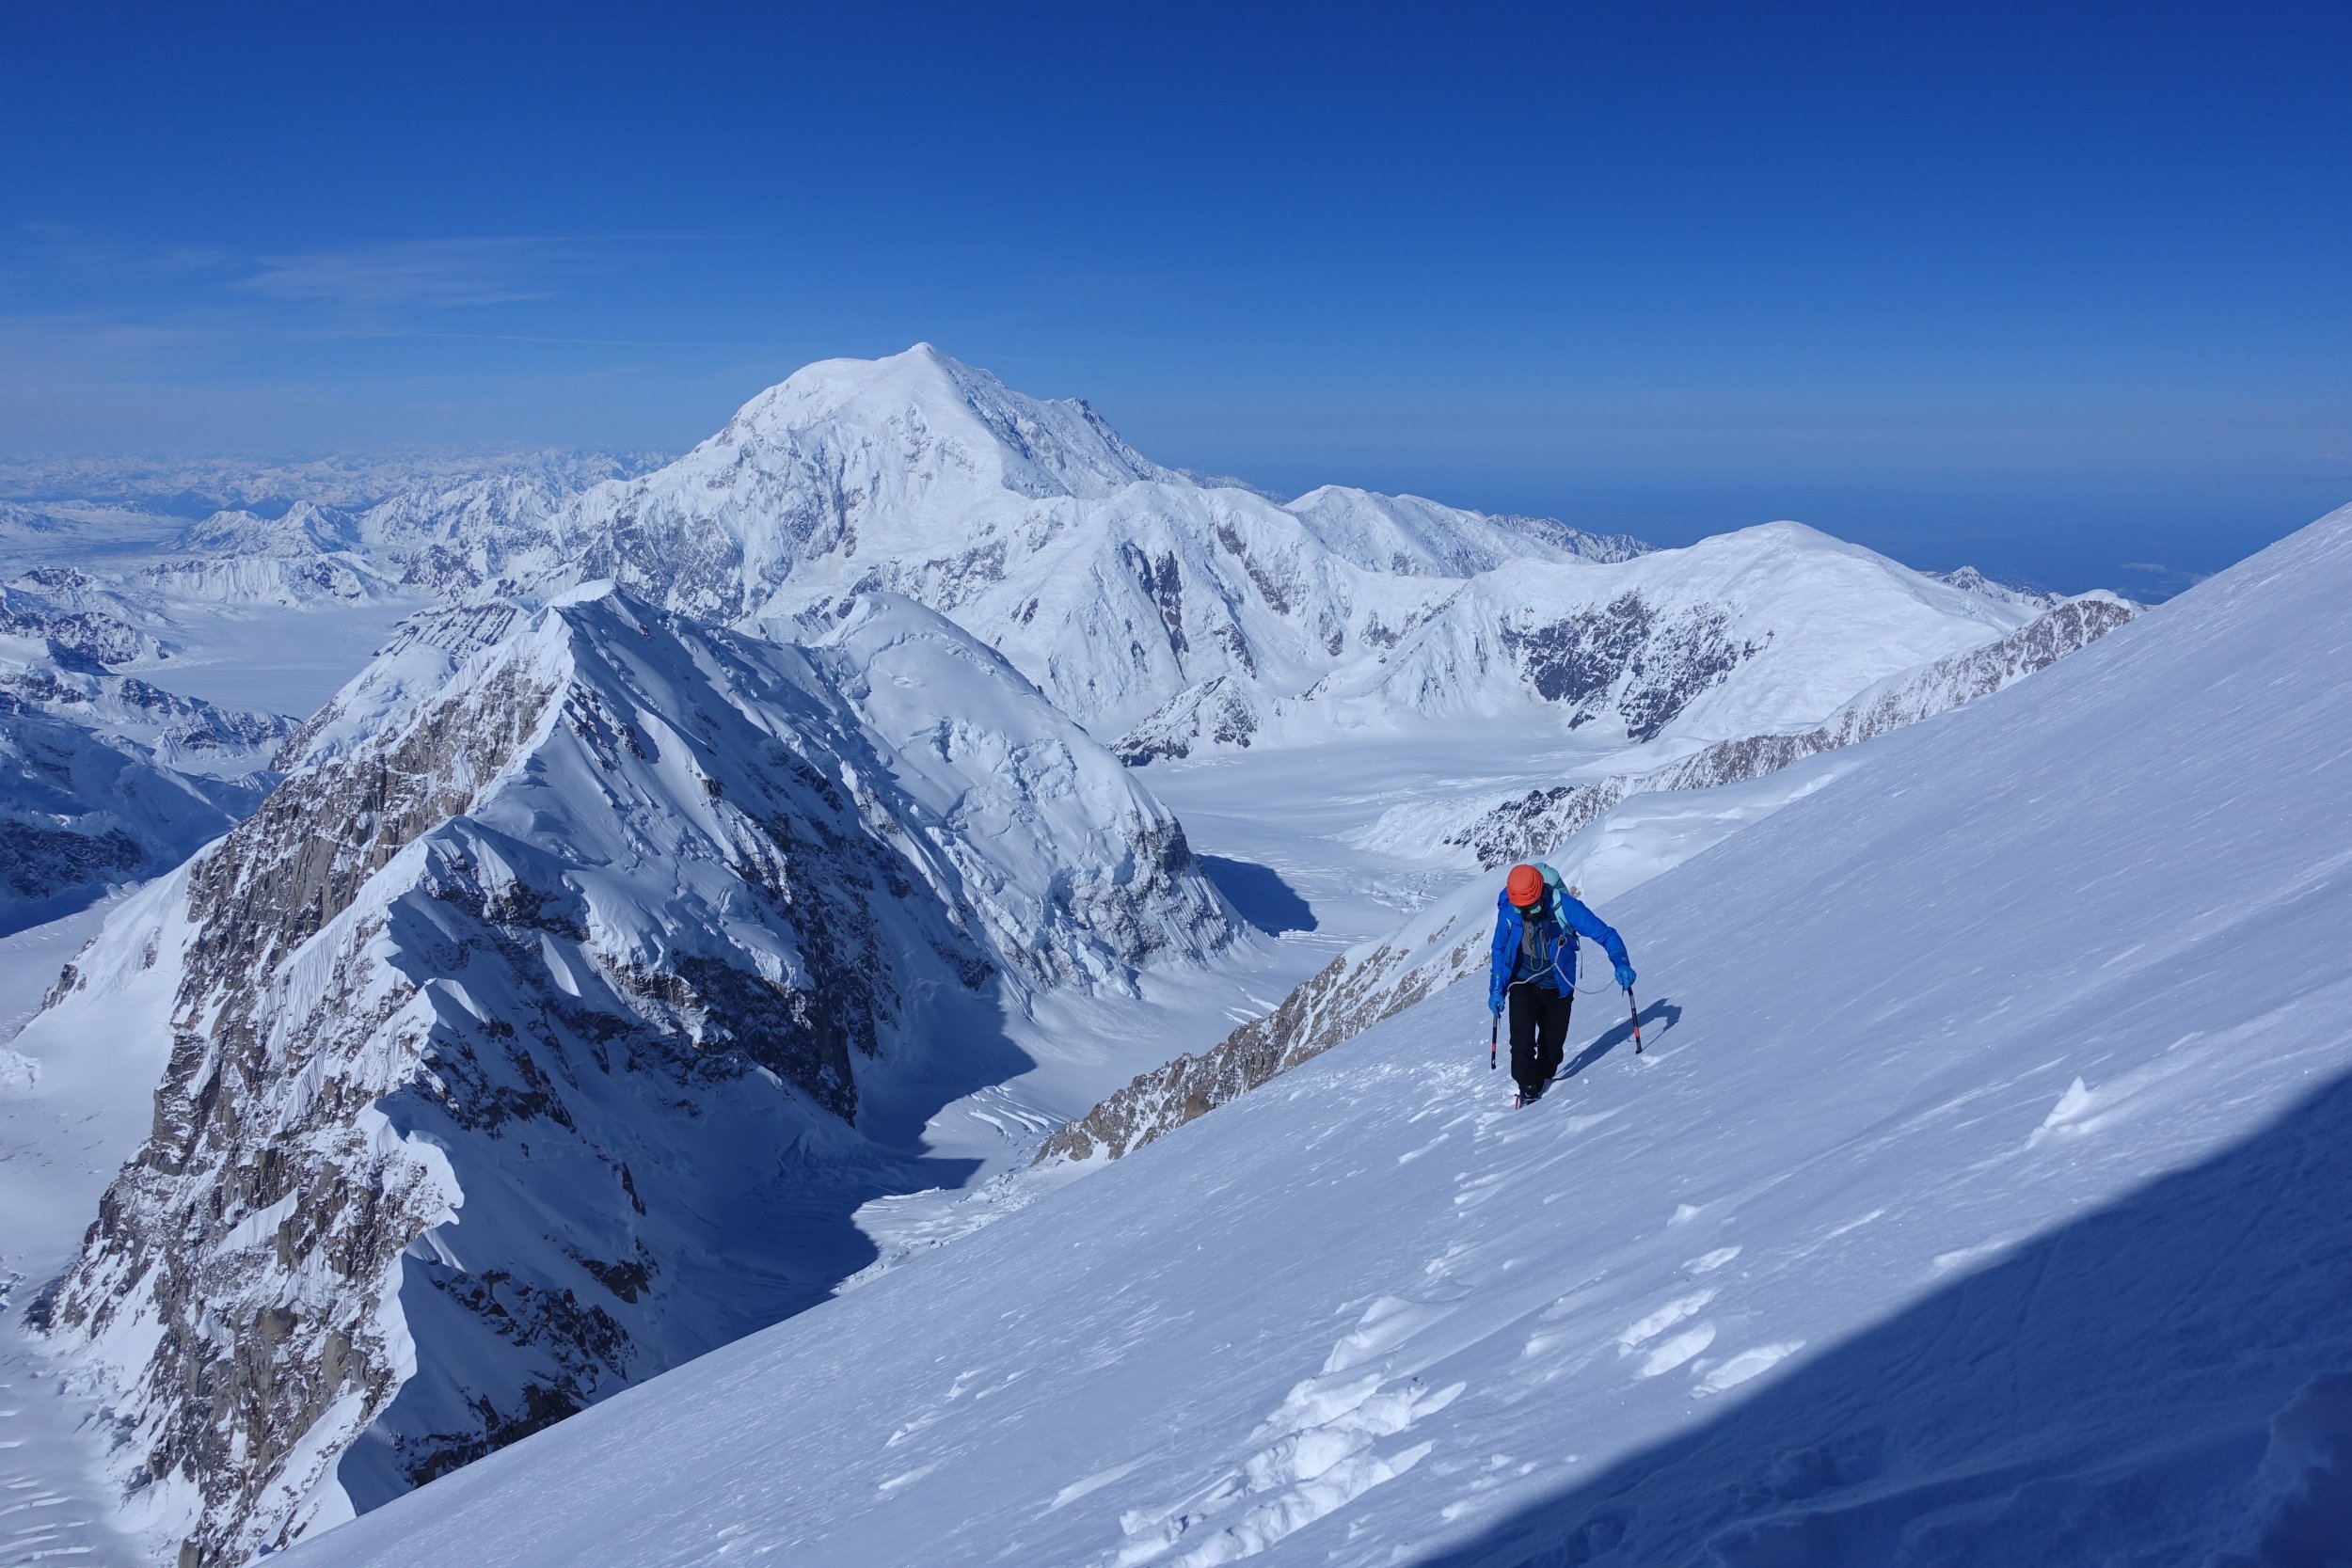
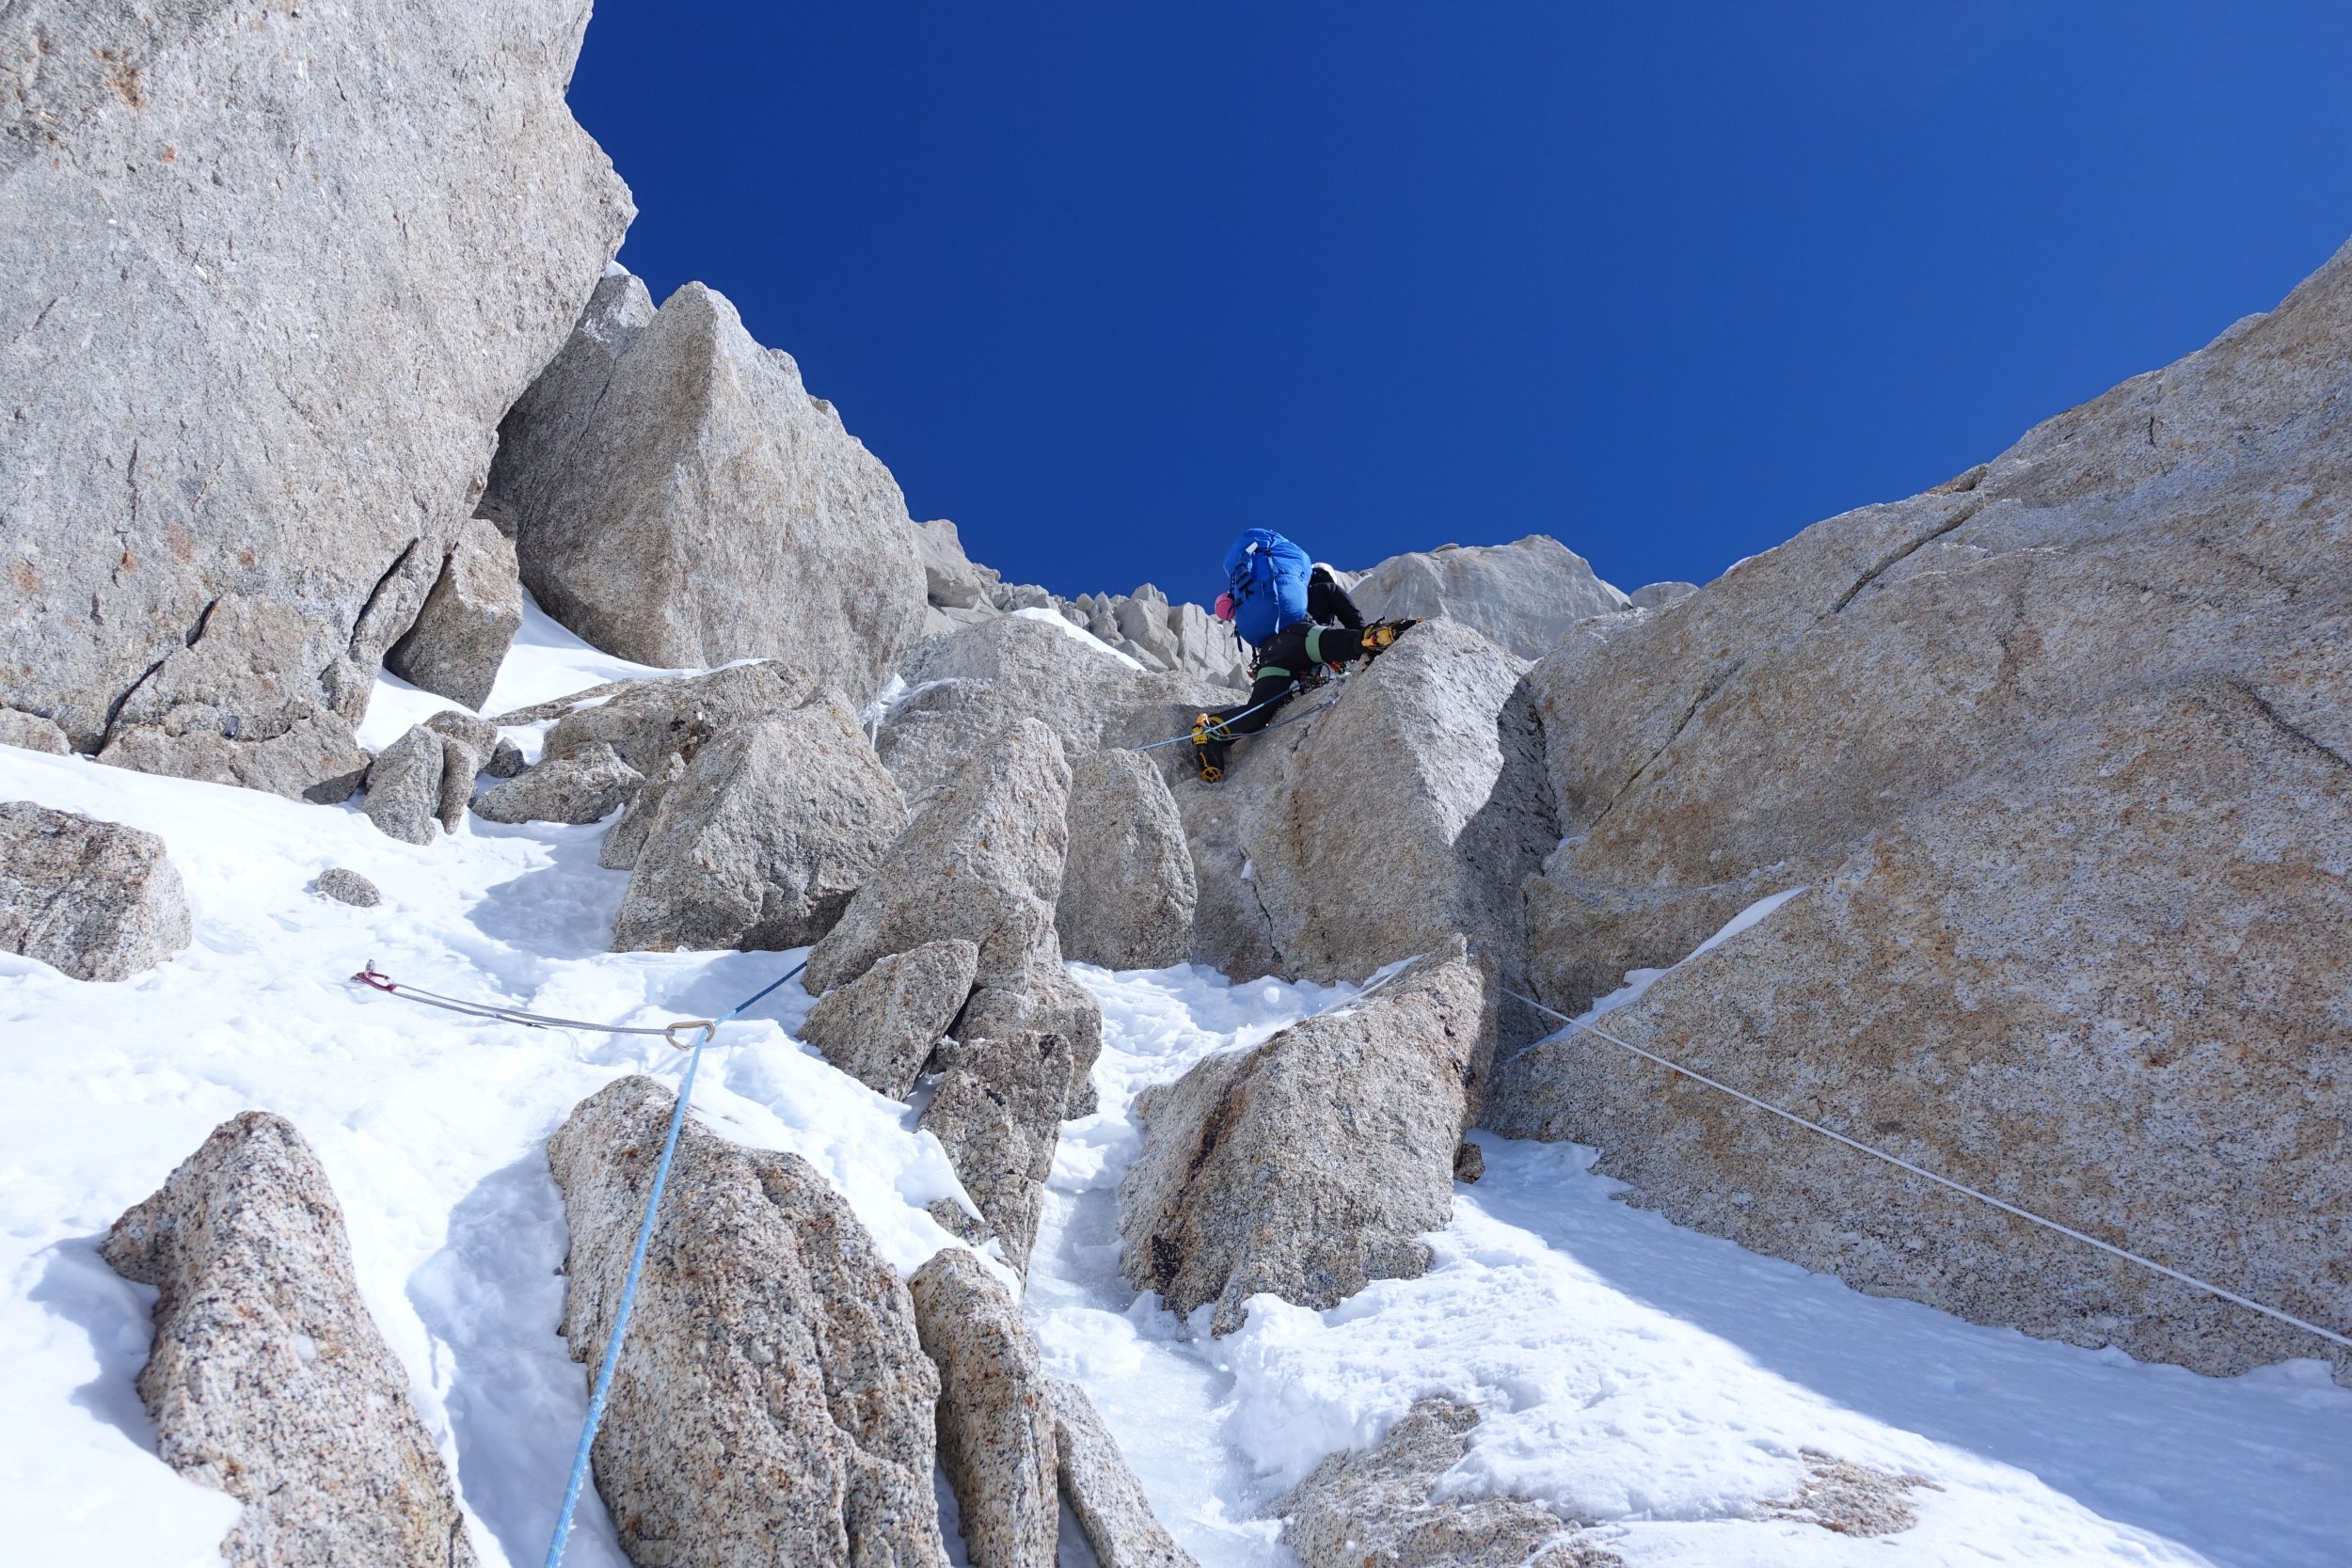
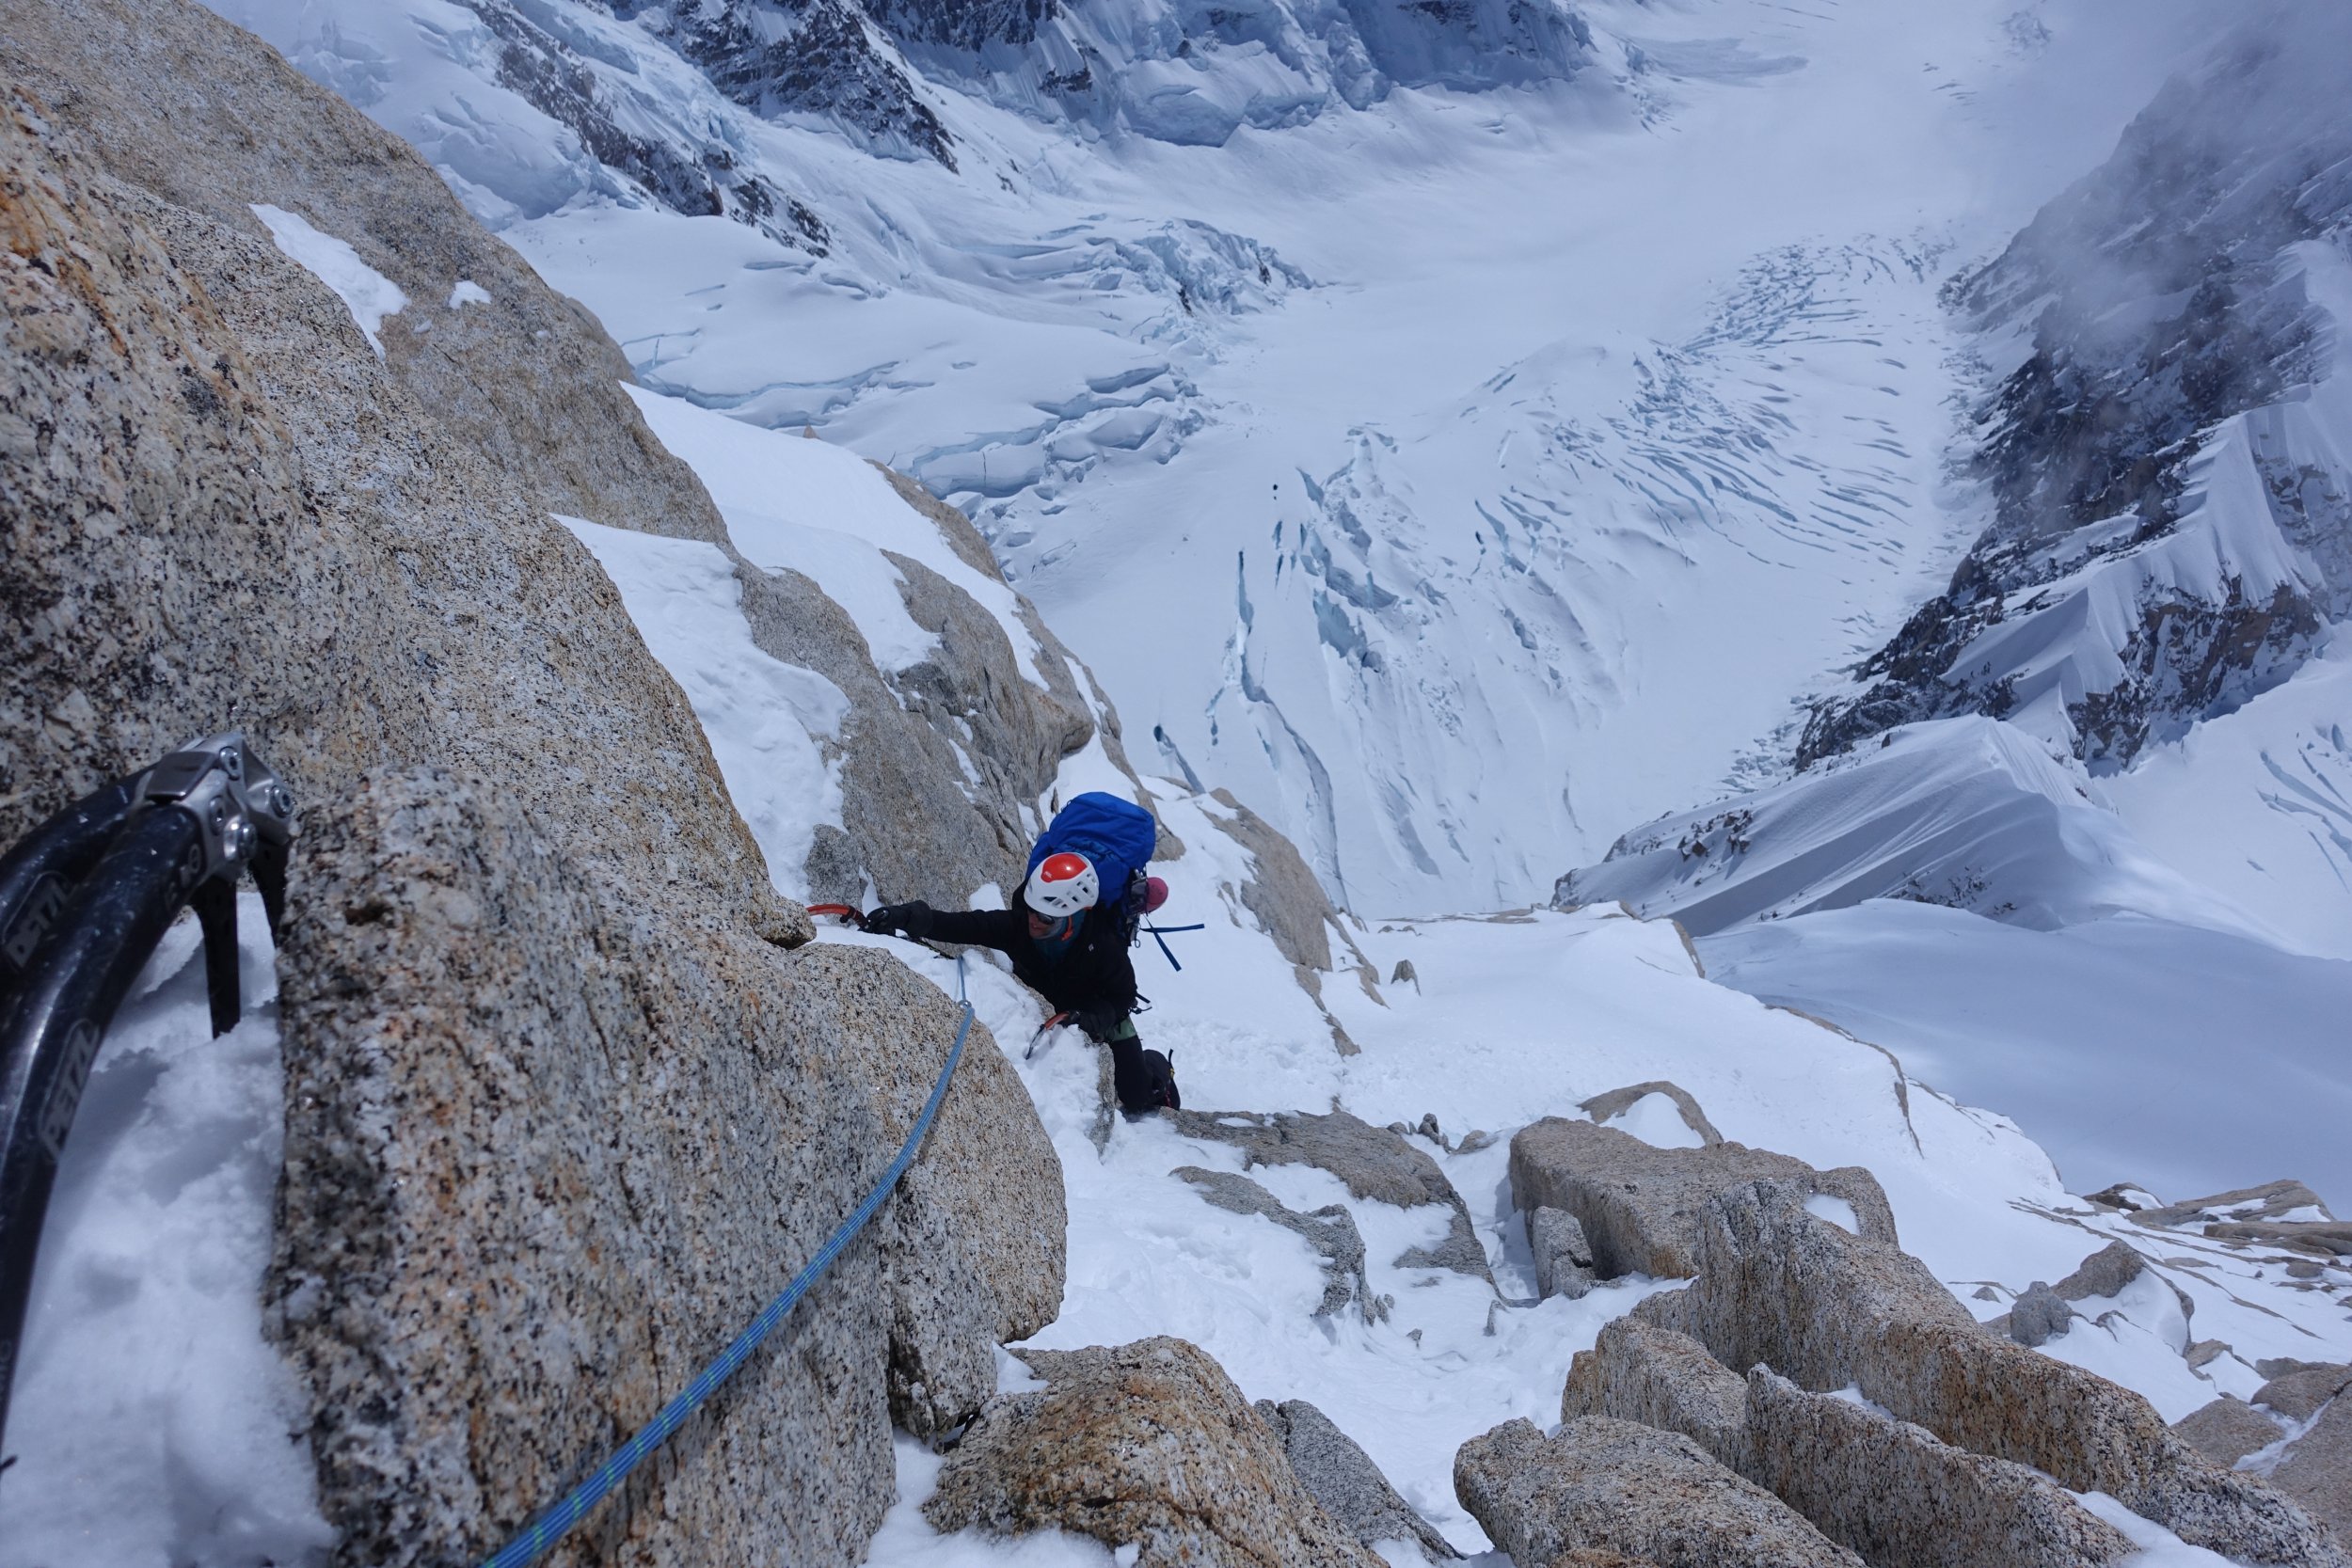
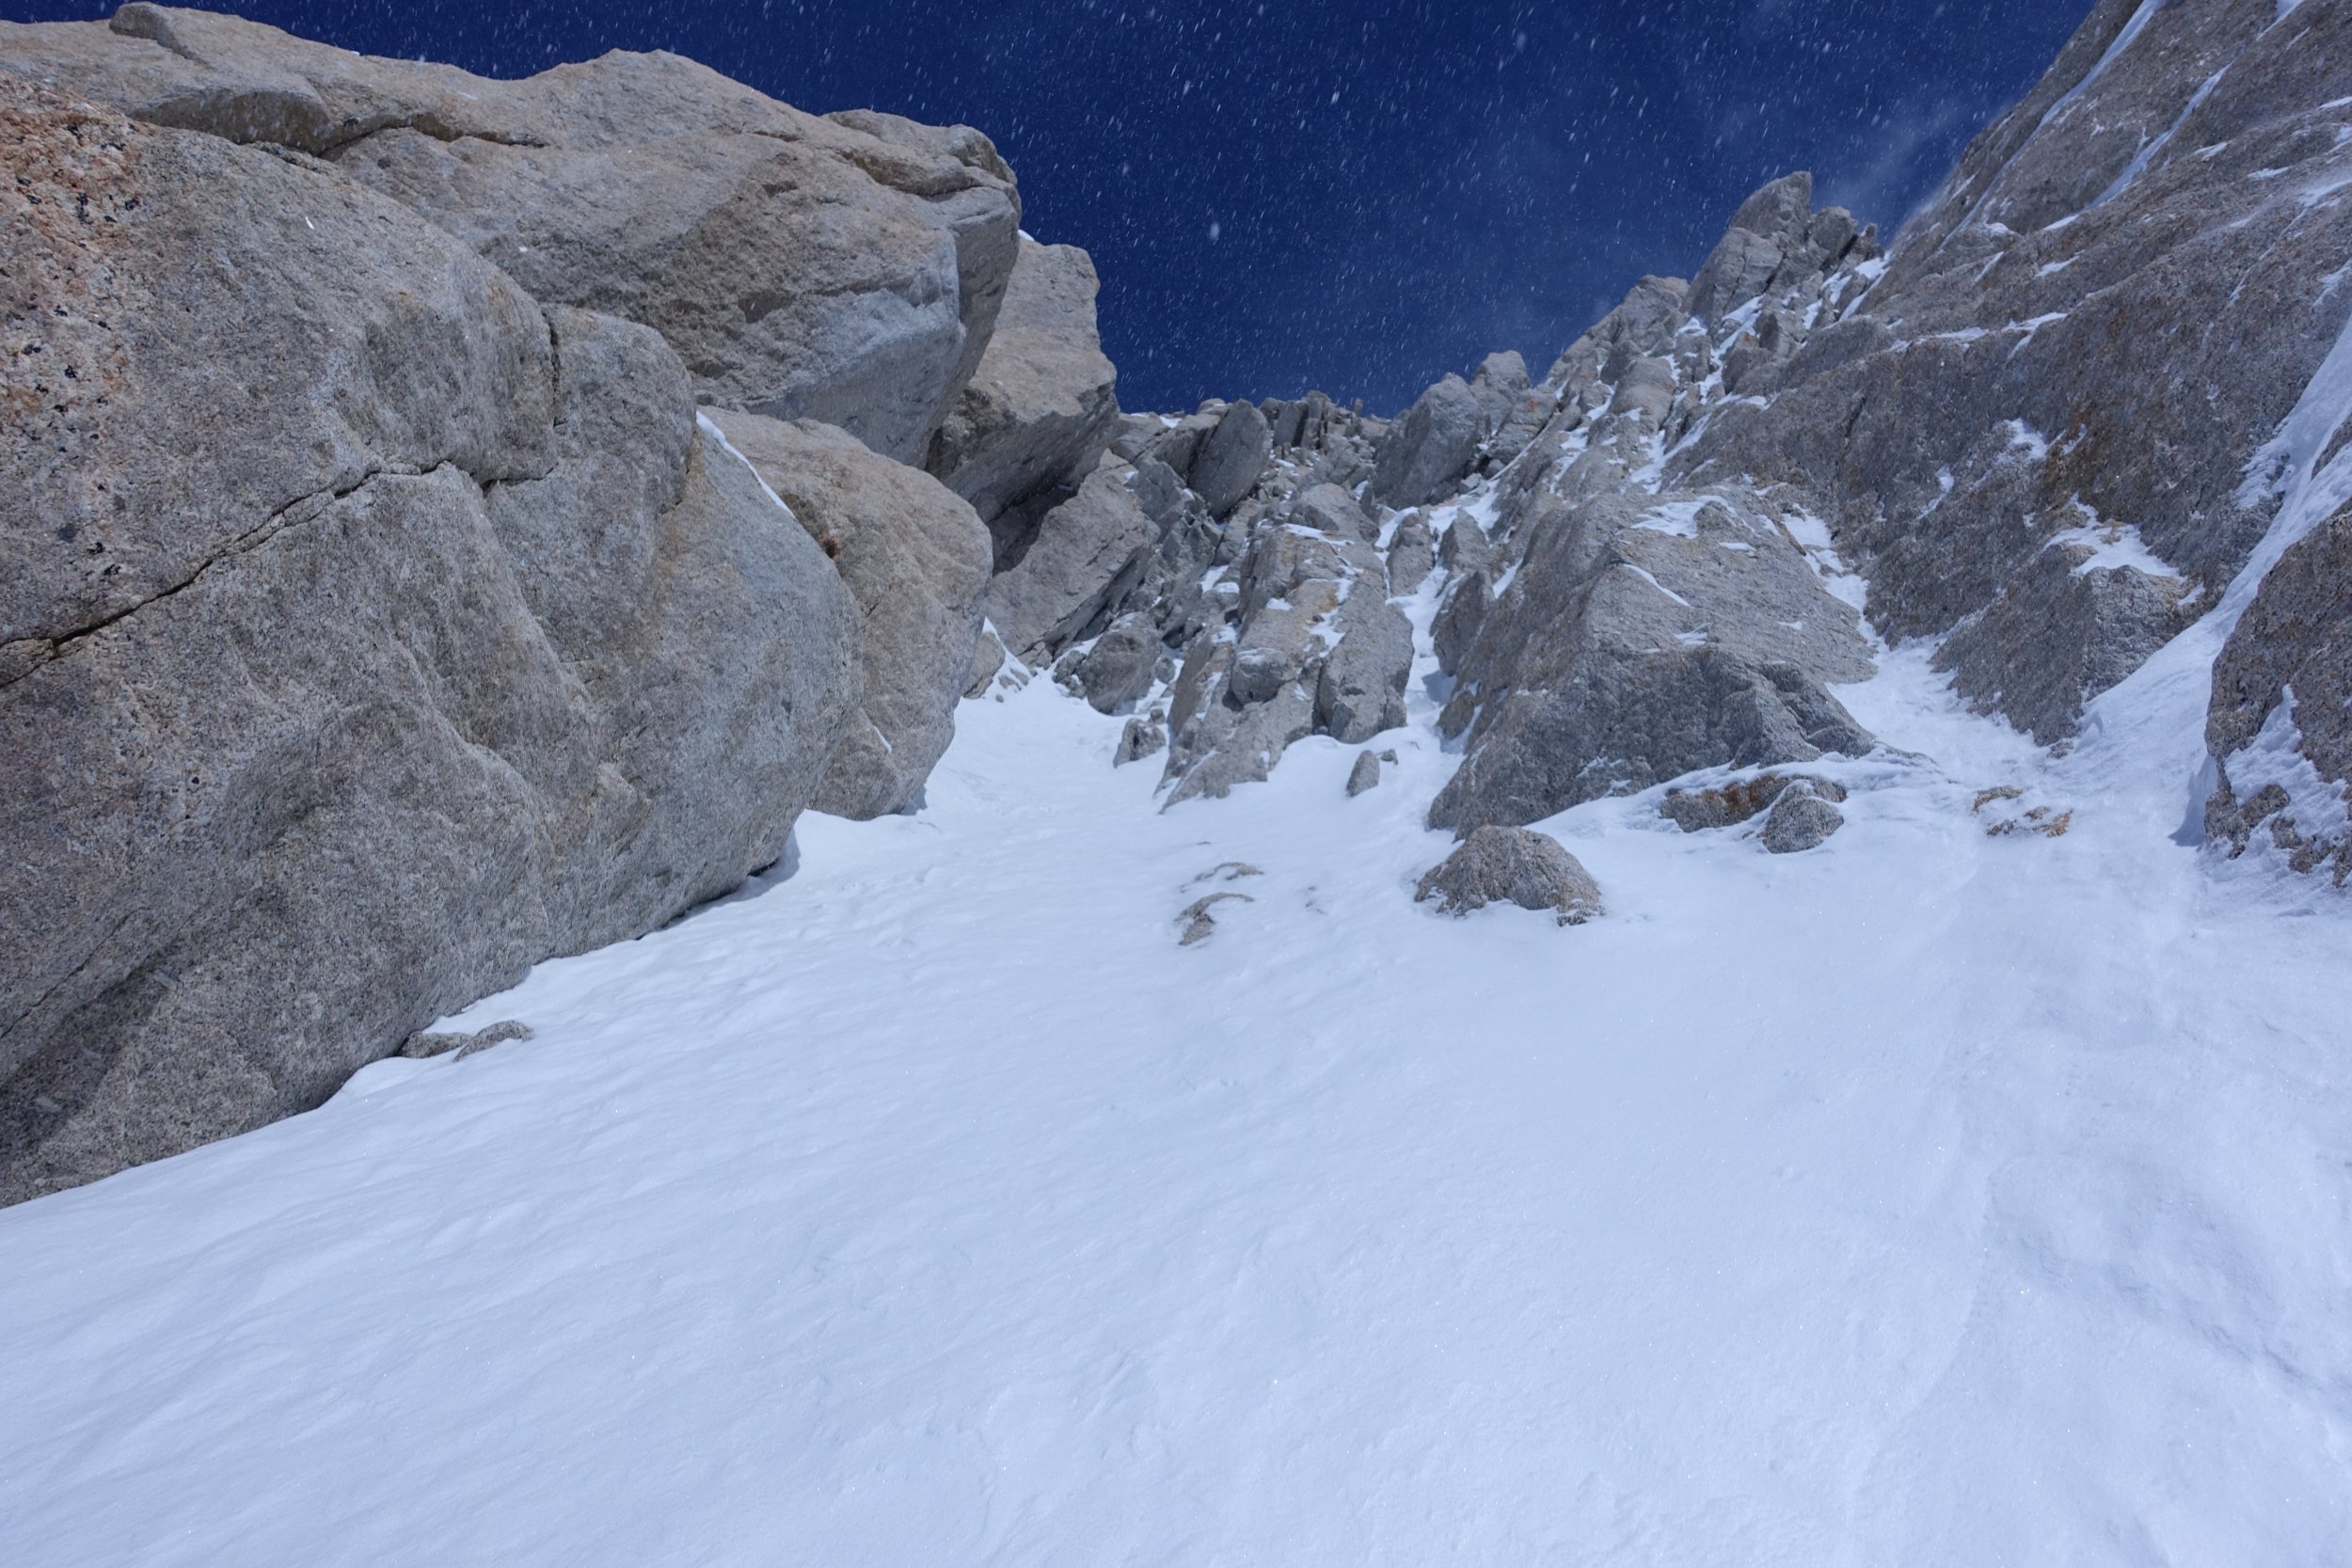
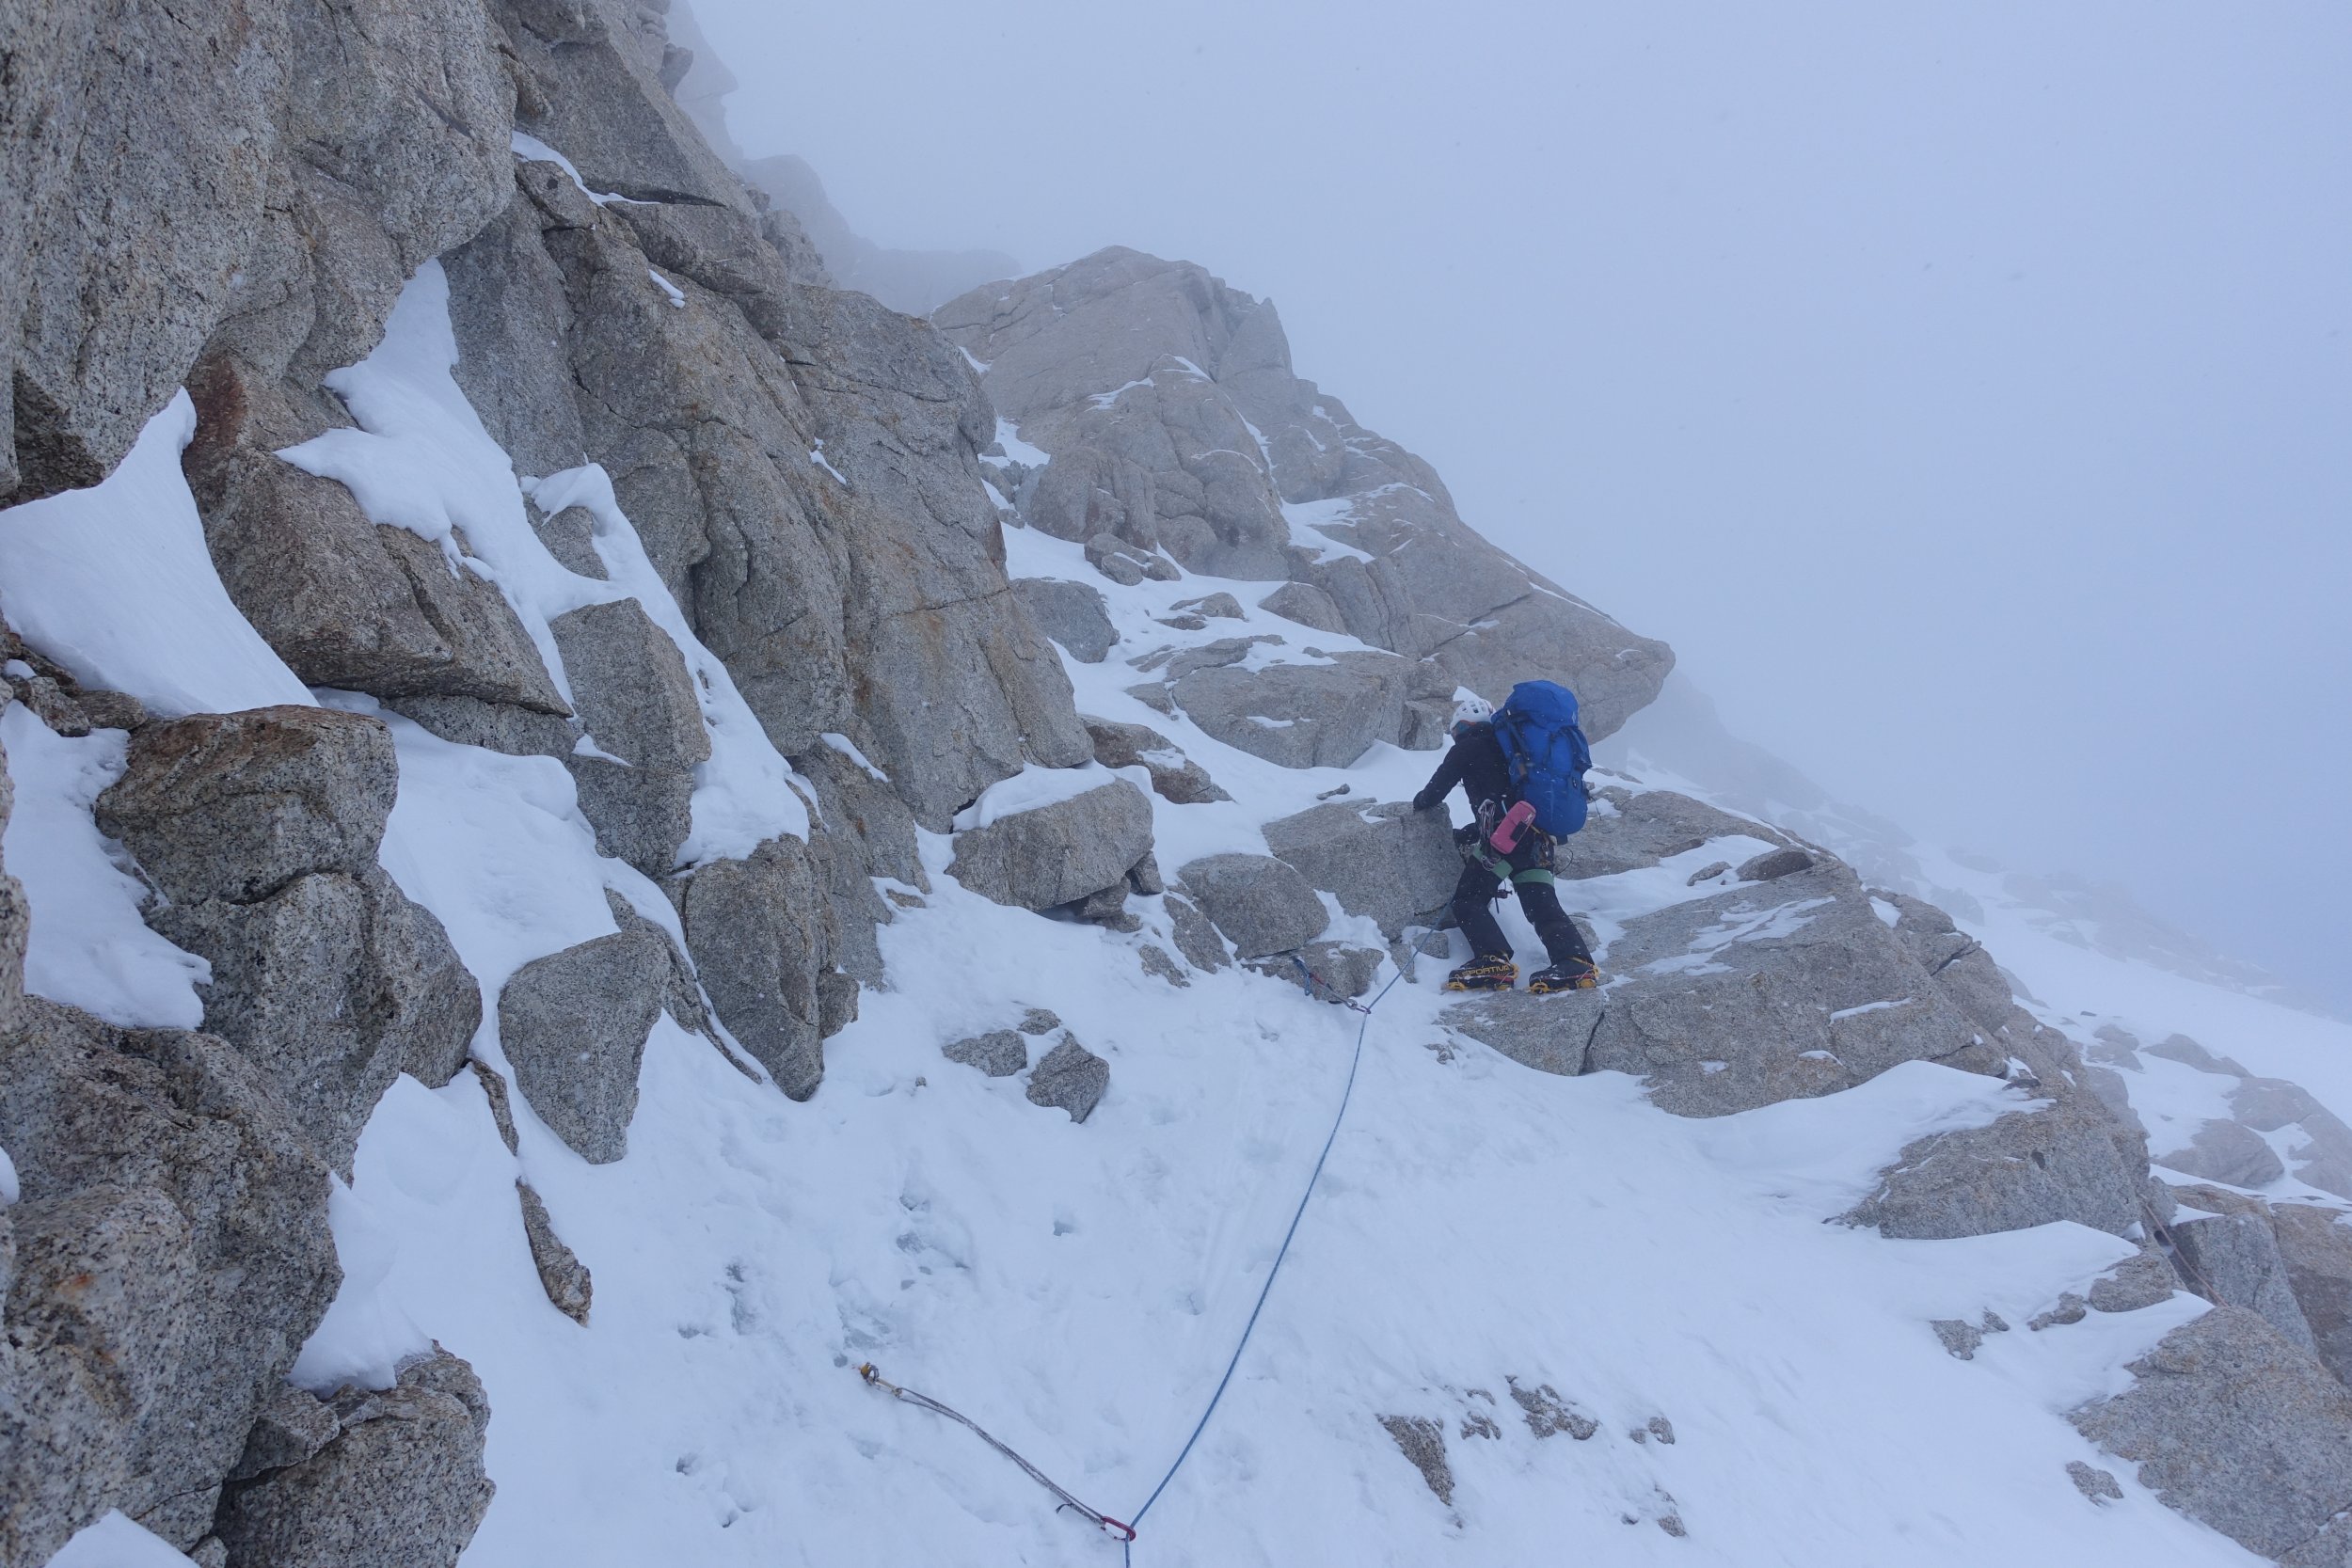
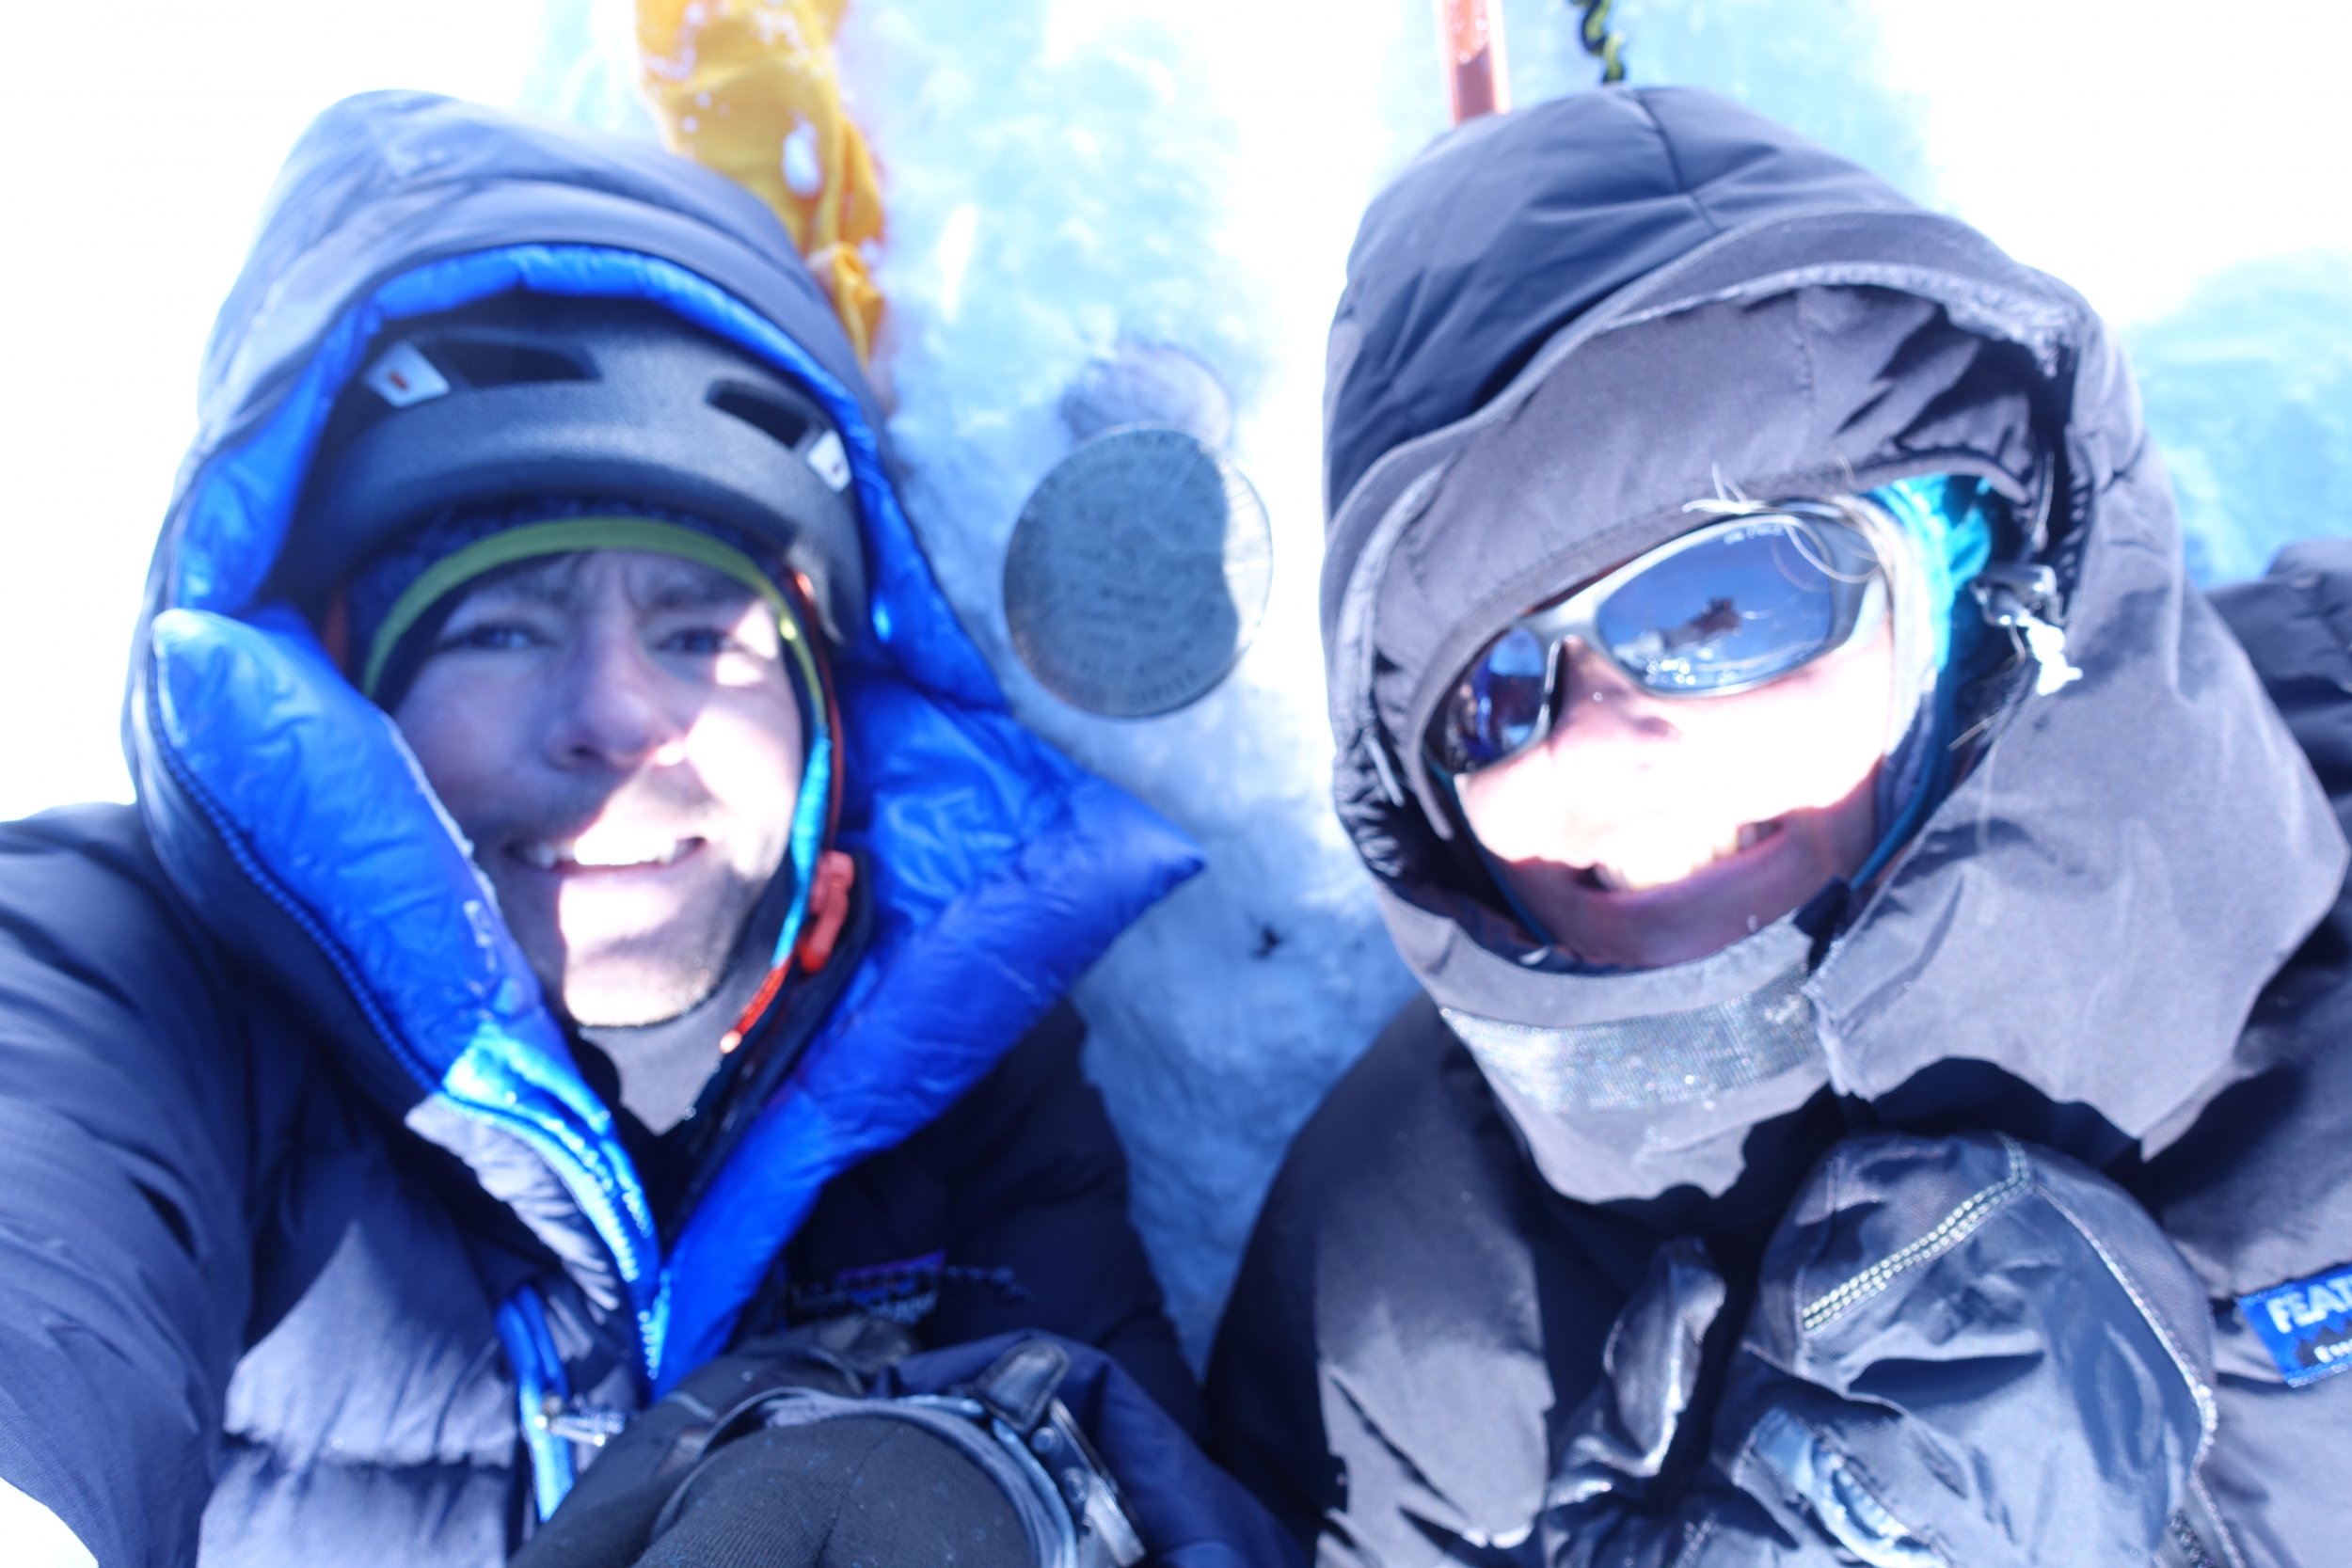
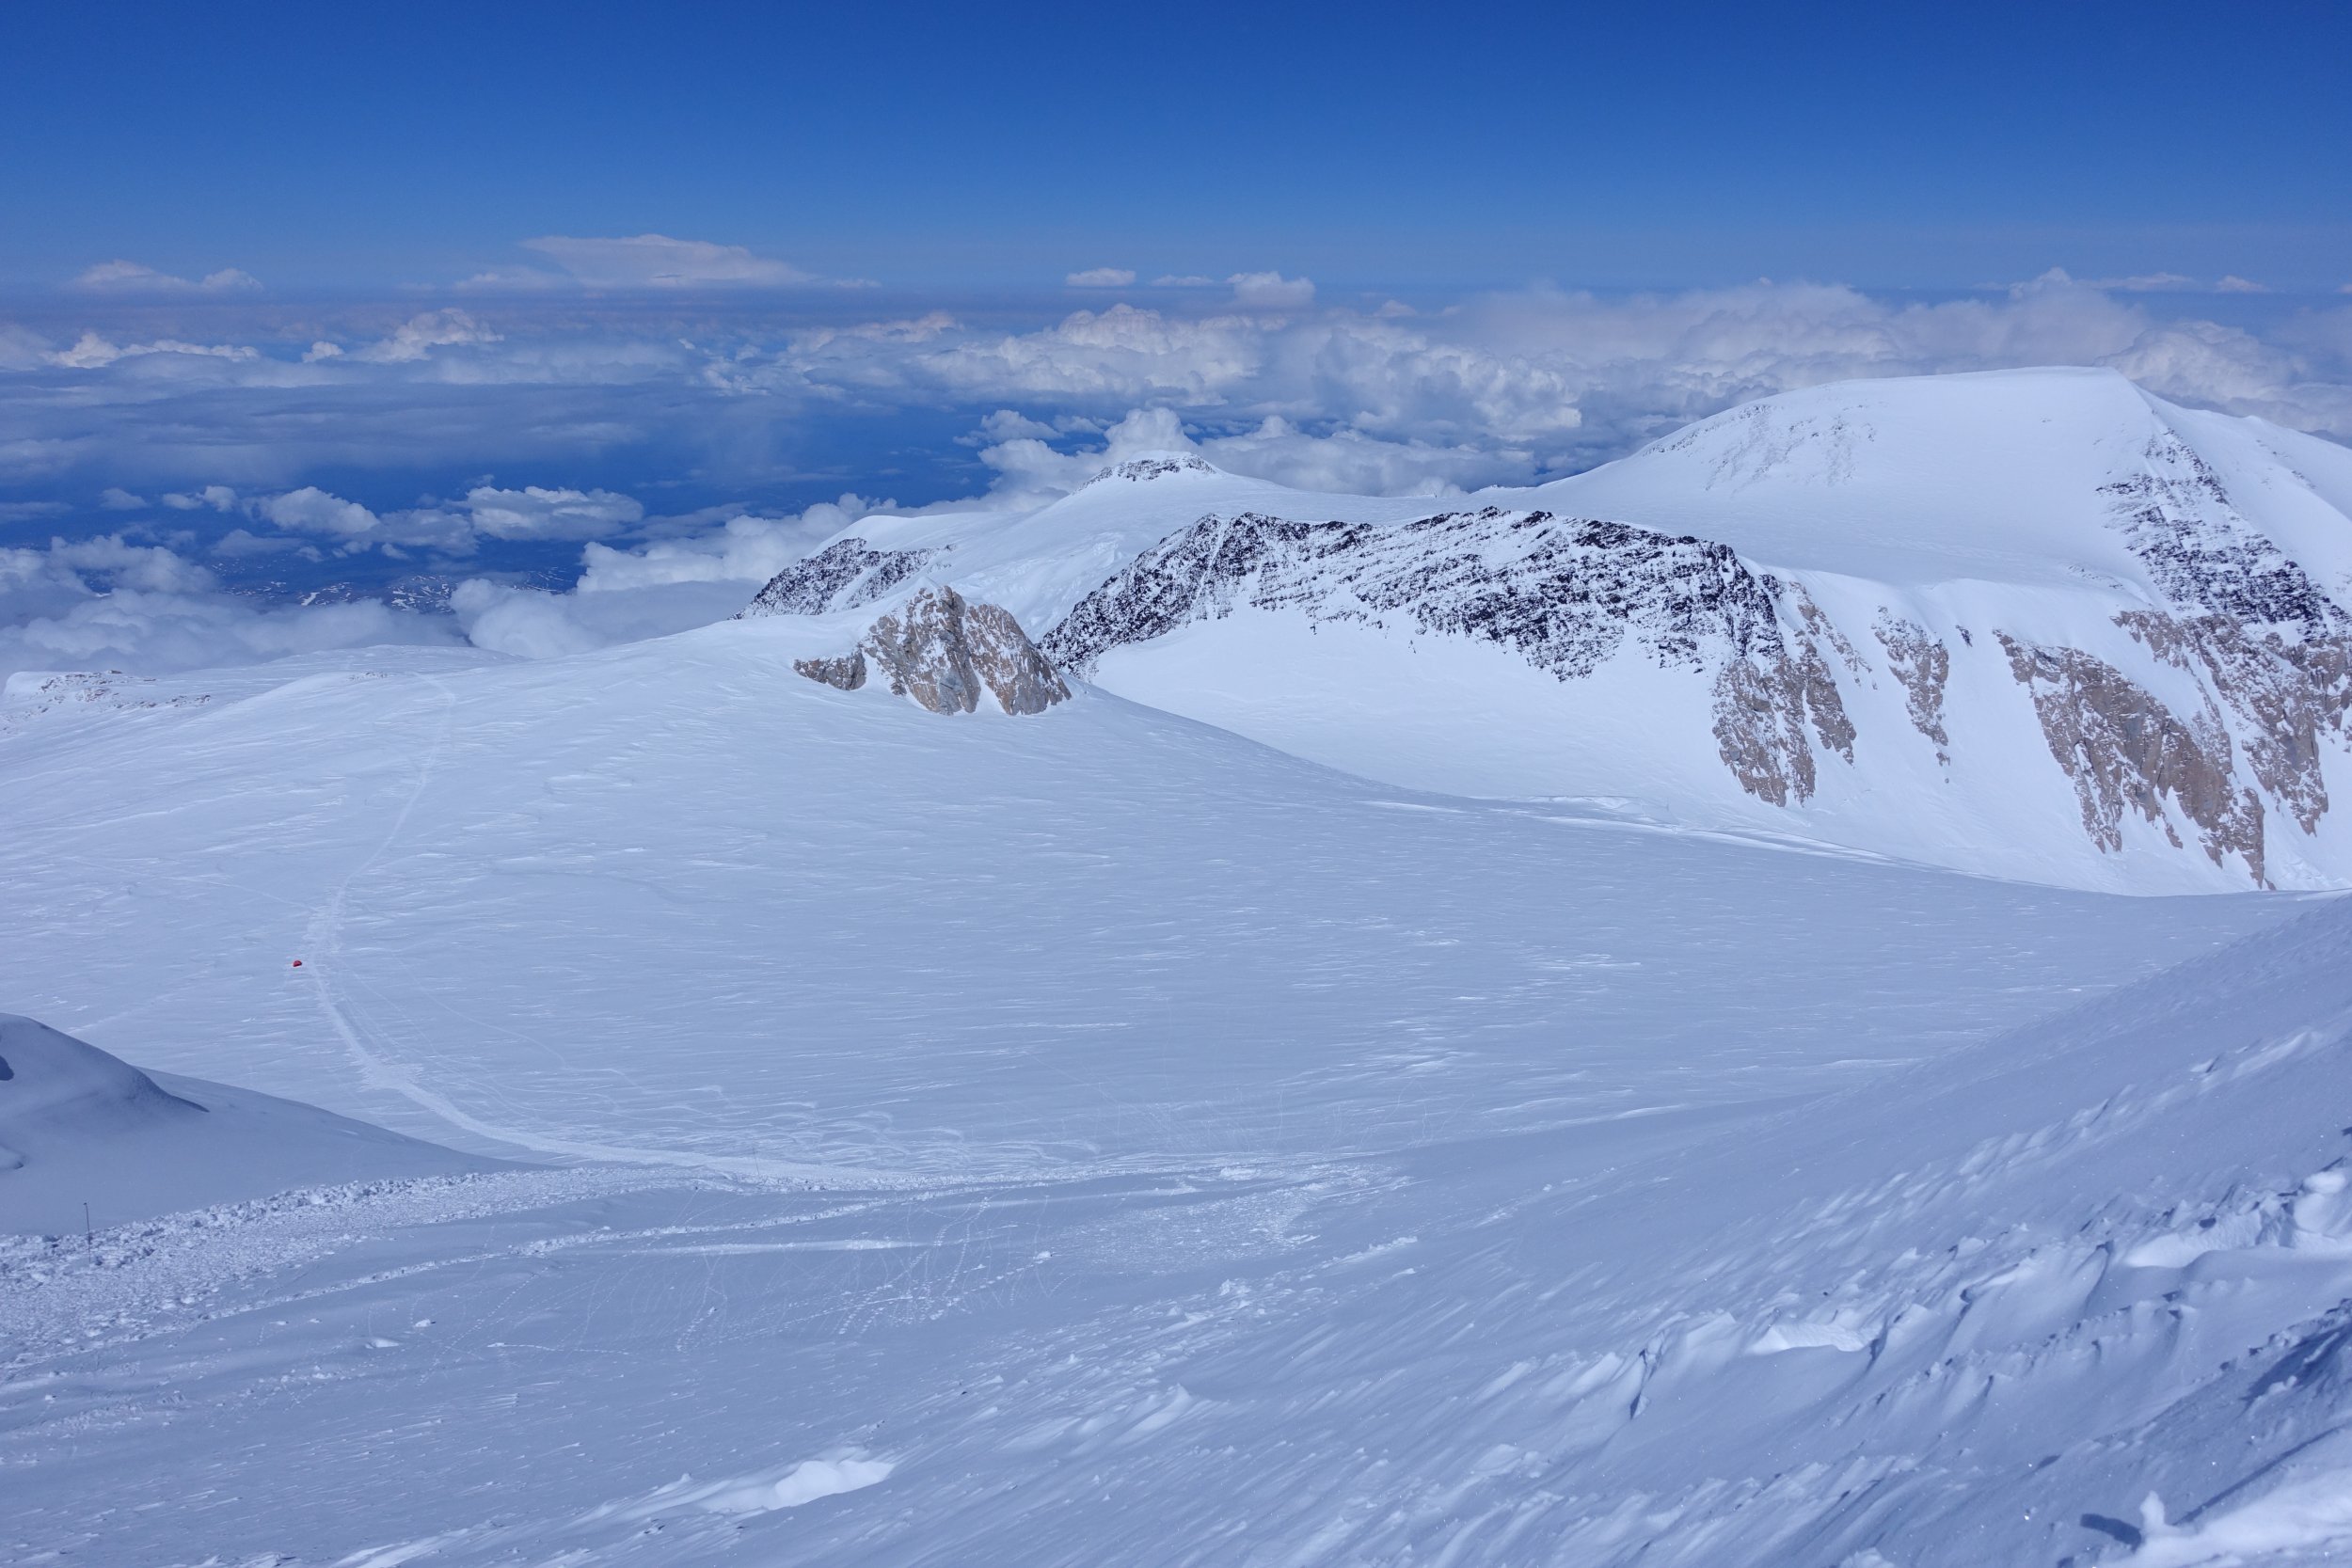
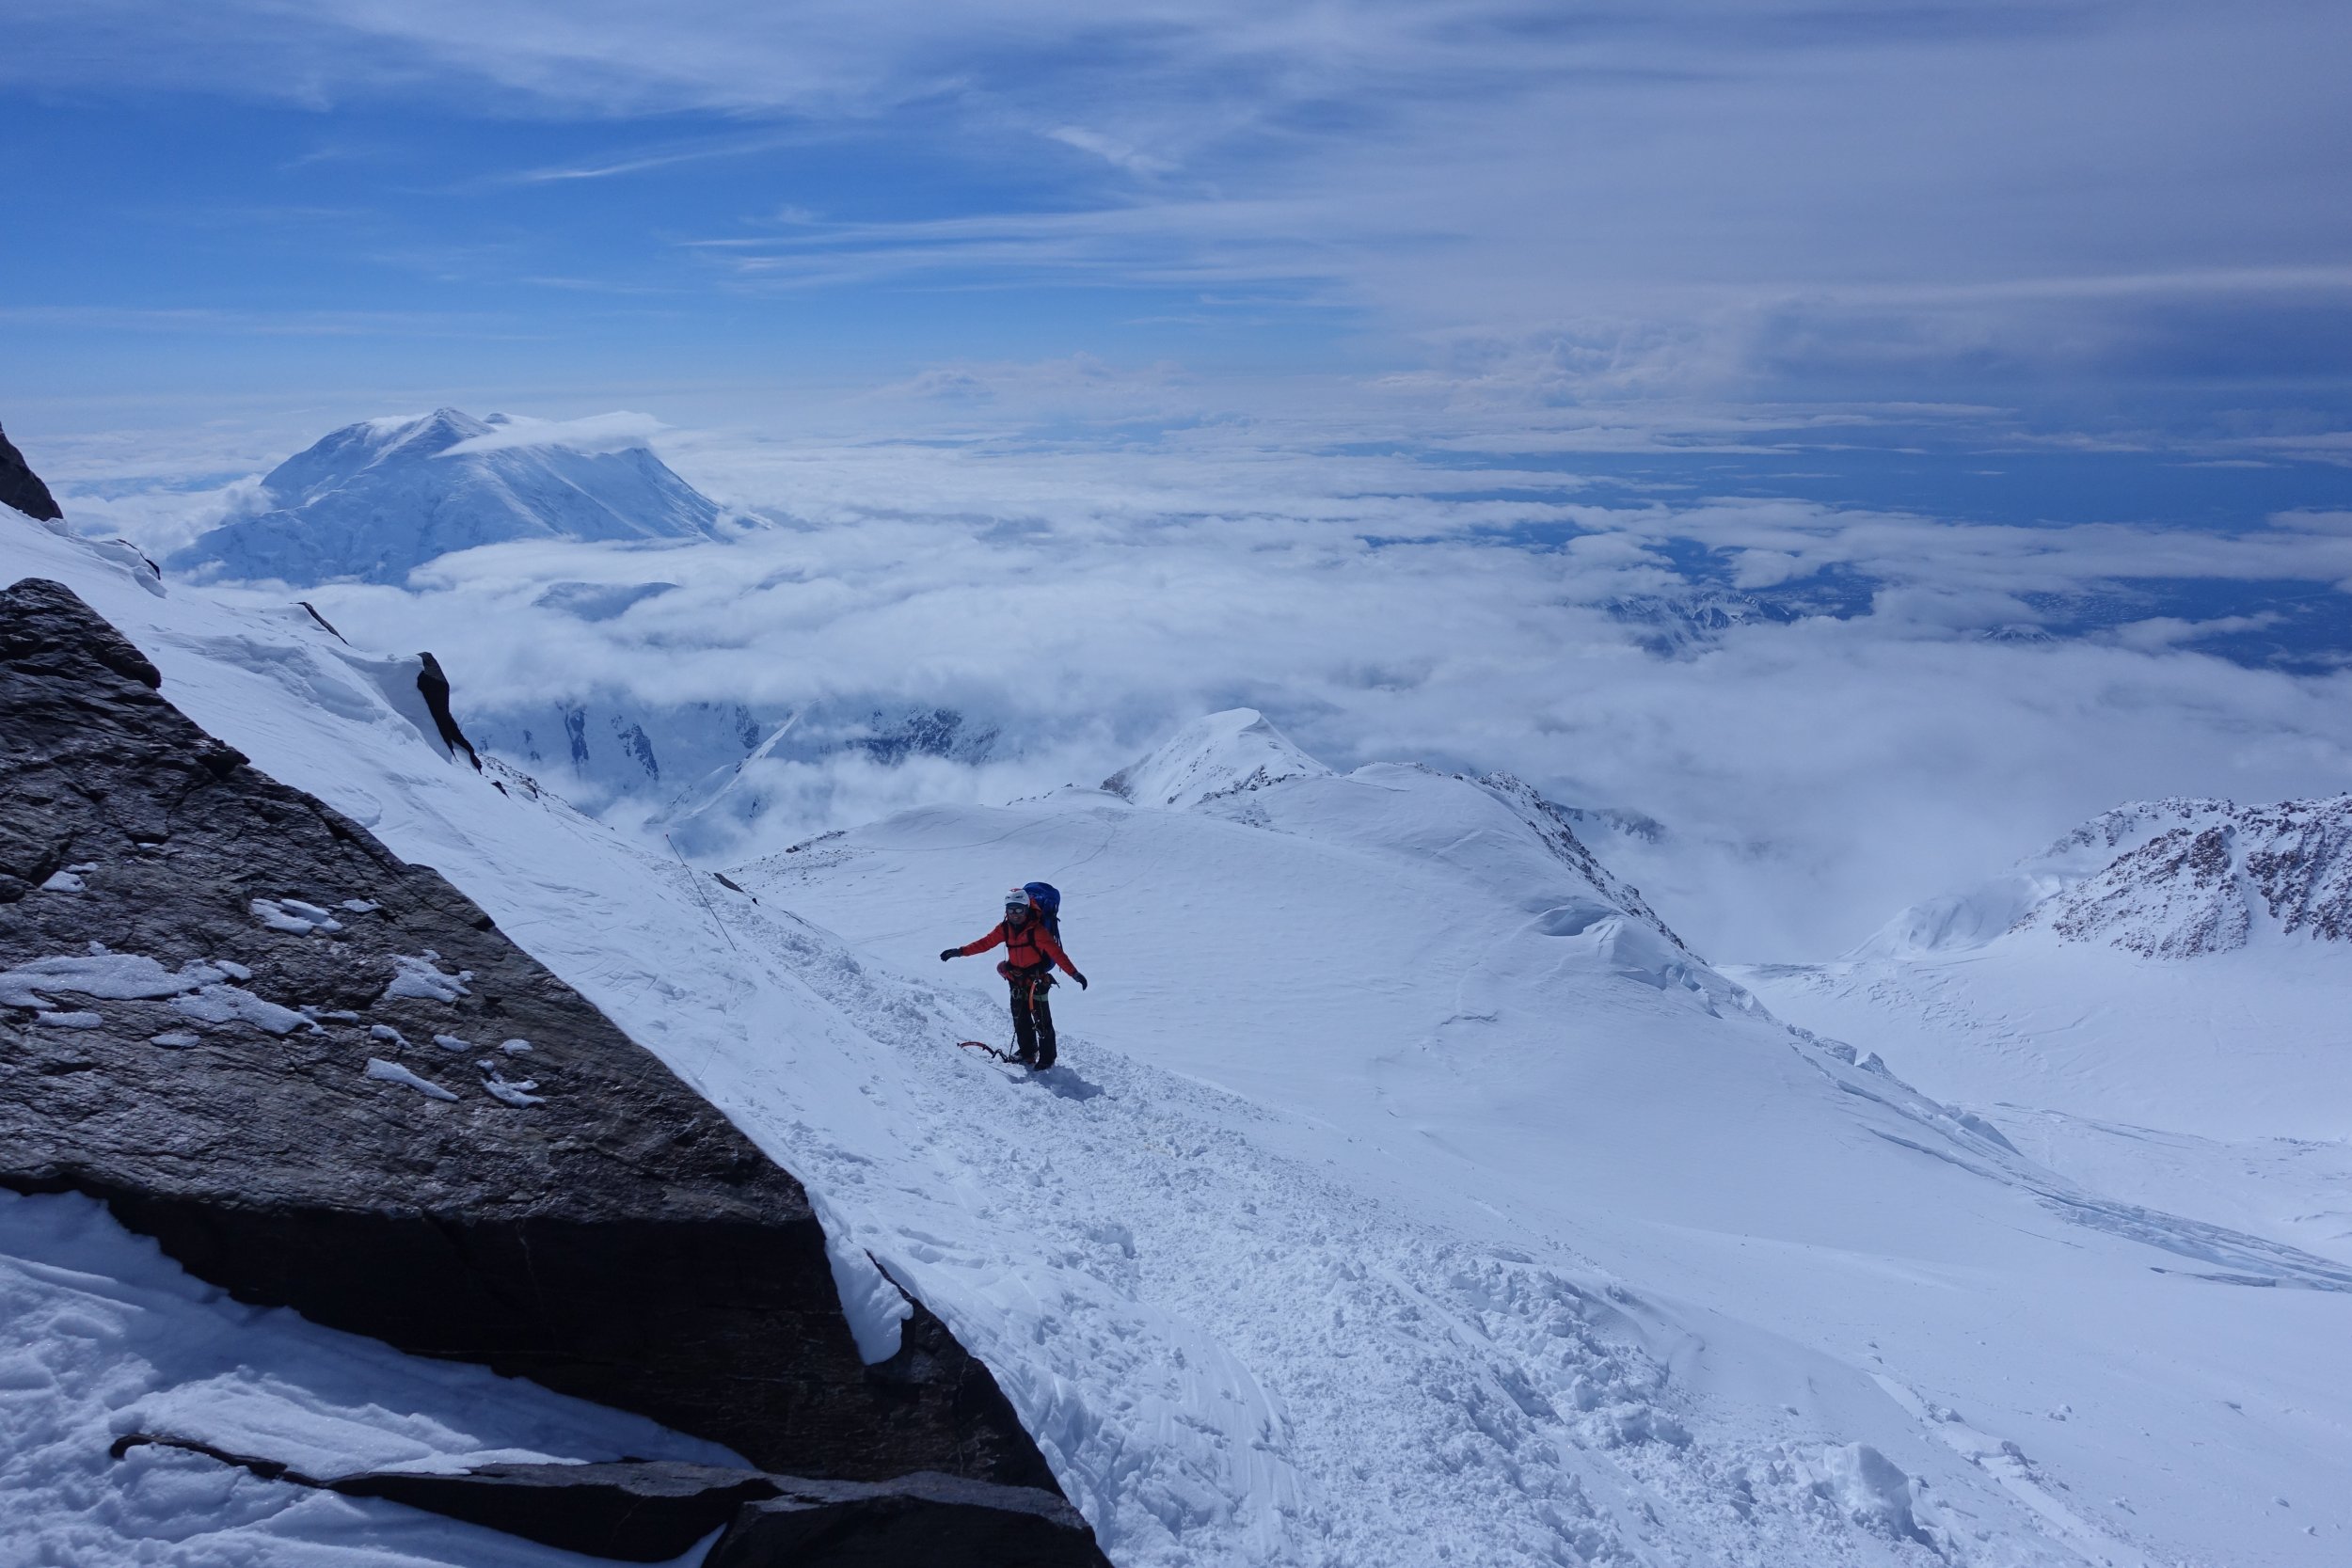
Trip: Denali - Cassin Ridge (Alaska Grade V, 5.8, AI4, 8,000ft), Alpine Style* Trip Date: 06/09/2018 Video: Between June 2 and June 11, Priti and I climbed the Cassin Ridge on the South Face of Denali approaching via the NE Fork of the Kahiltna Glacier (the “Valley of Death”), spending 6 days on route (including 1 rest/weather day at 17,700ft), summiting on June 9, and descending the West Buttress route. The whole trip was 10 days 7 hours door-to-door from Seattle. The Cassin Ridge is the second most popular route on Denali, with an average of 9 successful climbers each year, compared to an average of 584 successful climbers each year on the West Buttress route over the past decade. We carried everything up and over, climbing Ground-Up, with 38lbs packs each at the start, no sleds, and moving camp as we climbed, without caches. It was a Smash ’n’ Grab, meaning we decided to go at the last minute when we saw a good weather window. We watched Denali weather every day since early May until there was about a week of good weather. It took 24 hours from being at work on a Friday afternoon deciding to pull the trigger to being at Kahiltna Base Camp (including packing, Ranger orientation, flights, etc). We climbed Rainier 3 times the month and a half before our trip (Gib Ledges, Kautz, and Liberty Ridge), sleeping in the summit crater the weekend before. Still, we took Diamox while on Denali and had 2 weeks of food/fuel in case we felt altitude on route. Luckily, we had no altitude issues, and were only bounded by our own fitness, weather, and desire to move only when the sun was on us. Overall, weather was windless, clear, and sunny during the days with a few flurries at night. It was an “old-school” style of climbing, slow and heavy, while most folks nowadays opt to acclimatize on the West Buttress and climb the Cassin Ridge starting from 14,000ft camp on the West Buttress, then climb light-and-fast via the Seattle ’72 ramp or the West Rib (Chicken Gully) in a few days — this was our plan for our attempt last year with Ilia Slobodov, but didn’t get the weather window. Overall, a very successful trip, and we’re so excited to have pulled it off, after 3 years of dreaming of this route. *Alpine Style: The route was completed Alpine Style with the following exceptions: -Snowshoes were cached at Camp 1 in case the lower Kahiltna Glacier was sketchy on the way back. Didn’t really ever need snowshoes. The NE Fork was boot-able. There weren’t tracks going up the NE Fork, but it was wanded to the base of the West Rib. -We clipped into the existing fixed lines on the West Buttress descent above 14k, but this was unnecessary since it was basically a staircase. We didn’t clip into the existing pickets on the Autobahn above 17k. Google Street View: Apparently, nobody had done a 360 Photo Sphere Google Street View of the summit of Denali, so we obliged https://www.google.com/maps/@63.0690675,-151.0060278,3a,75y,78.91h,50.18t/data=!3m7!1e1!3m5!1sAF1QipOR4OLfMm5iBn15nn4OdiMbVTWa7lwk40pPUlnH!2e10!3e12!7i8704!8i4352 Itinerary: -June 2: Arrived at Kahiltna Base Camp at 3:00PM and moved to “Safe Camp” in the NE Fork of the Kahiltna Glacier (“Valley of Death”). We cached snowshoes at Camp 1 and took a right turn up the NE Fork. This “Safe Camp” is the widest part of the NE fork, where you are least threatened by avalanches and serac-fall sweeping the entire valley floor. -June 3: Hiked from "Safe Camp" halfway down the Valley of Death and climbed the Japanese Couloir and camped on Cassin Ledge with a sweeping view of Kahiltna Peaks and the entire NE Fork. -June 4: Climbed the 5.8 crux, Cowboy Arete, and Hanging Glacier, camping at the Hanging Glacier Bergschrund at the Base of the First Rock Band -June 5: Woke up to Colin Haley strolling by our bivy site on his 8hr7min speed ascent of the Cassin Ridge (he approached via the East Fork of the Kahiltna Glacier). This was a total surprise and very inspiring see him up there! We climbed the First Rock Band that day and bivied between the First and Second Rock Band just next to the rib. -June 6: Climbed the Second Rock Band and found the crux to be the sustained "Hidden Rock Couloir" at the entrance, which is sustained mixed 70-80deg for about 50m. At the end of the Second Rock Band, a Chilean Team of 2, plus Colin Haley, plus our team of 2 all took the wrong (harder) exit. From the overhanging triangle, we all traversed right about 40ft then went straight up, finding difficulties to M4-M5. We should have traversed right another 40ft or so to find the 5.6 slab pitches and the 5.6 dihedral as described in Super Topo. This ended the technical difficulties of the route. That night, we bivied at Mark Westman’s “excellent bivy site” at 17,700ft. This turned out to be very hard to find and we spent several hours looking around for it. It is way further up and right on the col than expected. -June 7: Lots of snow! So we decided to sleep all day, acclimatize and waiting out the weather. -June 8: So much snow accumulated on the upper mountain the previous day that it took us over 12 hours to ascend the final 2,500ft to Kahiltna Horn. We were knee to waist deep almost the entire day. Mark Westman told us later that he was watching us all day through the high-powered scope from Kahiltna Base Camp and he could see the long trench we left in our wake. Presumably, many day-tourists at Base Camp watched us in our embarrassing slog to the top. This was by far the hardest day of the trip! When we reached Kahiltna Horn at 10:30PM, we had no energy to go to the summit, so we slept on the “Football Field” at 20,000ft. The night was beautiful, calm, and cold! -June 9: Went back up to tag the summit, then descended 12,500ft to Camp 1. -June 10: Got to Kahiltna Base Camp from Camp 1 at 10:00AM but it was overcast all day so TAT could not come and pick us up. -June 11: TAT finally picked us up around noon, after we endured the most miserable and wettest night of the entire trip! Left to Right: Sultana (Mount Foraker), Begguyya (Mount Hunter), Denali Denali, the High One Heading into the NE Fork of the Kahiltna Glacier (the "Valley of Death"), the West Rib visible up the center of the peak The West Rib in the Center, The Cassin Ridge roughly up the right skyline Closer up view of the Cassin Ridge. The Japanese Couloir is the gash on the right. The Cowboy Arete (Knifedge Ridge) is above, followed by the First and Second Rock Bands Looking back at the West Rib and the Chicken Couloir Looking up the Japanese Couloir and the bergschrund at the base of the Cassin Ridge Looking back at the NE Fork Looking up at the crux of the Japanese Couloir (AI4) The Cassin Ledge. Razor thin, great views fo the whole NE Fork, Kahiltna Peaks, and Sultana! The 5.8 Crux just off the Cassin Ledge The Cowboy Arete The Base of the Hanging Glacier, the Cowboy Arete behind A short overhanging step to get over the bergshrund Colin Haley approaches! The crux of the First Rock Band, just above the M-rocks Somewhere near the top of the First Rock Band The South Face! Looking up at the "Hidden Rock Couloir", the beginning of the Second Rock Band, and the crux of the route, in my opinion Just below the V-shaped overhang in the Second Rock Band Slog to the top Denali Summit Ridge Summit Marker The Football Field on the West Buttress Route and our bivouac Heading down the Autobahn, 17k camp below on the West Buttress The Cowboy Arete Base Camp with Moonflower Buttress behind (North Buttress of Begguyya, Mount Hunter) Gear Notes: -6 screws (1x21cm, 2x17cm, 3x13cm) -40m rope -Small Rack of nuts -5 cams (.3-1) -2 pickets (didn’t use on route; just for glacier travel) -5 single alpine draws, 2 double alpine draws (no cordalette) -2 ice tools each (Nomics for him, X-Dream for her) -Monopoint crampons -Boots: Olympus Mons for him, G2SM+overboots for her -MSR AdvancePro2 Tent -Feathered Friends Spoonbill Sleeping Bag -2x Thermarest NeoAir Xtherm + 1x shorty closed cell foam pad (for emergency) -MSR Reactor + hanging kit + 3 medium cans of isopro Approach Notes: Approached via the NE Fork of the Kahiltna Glacier


 1 point
 -
There's always this Van Halen Van Halen1 point
-
Judging by nightly marches in a few big citys bitterness isn't going to disappear instantly.1 point