All Activity
- Past hour
-
 Cool trip and nice pics! EMS looks like particularly good rock -- still on the list.
 -
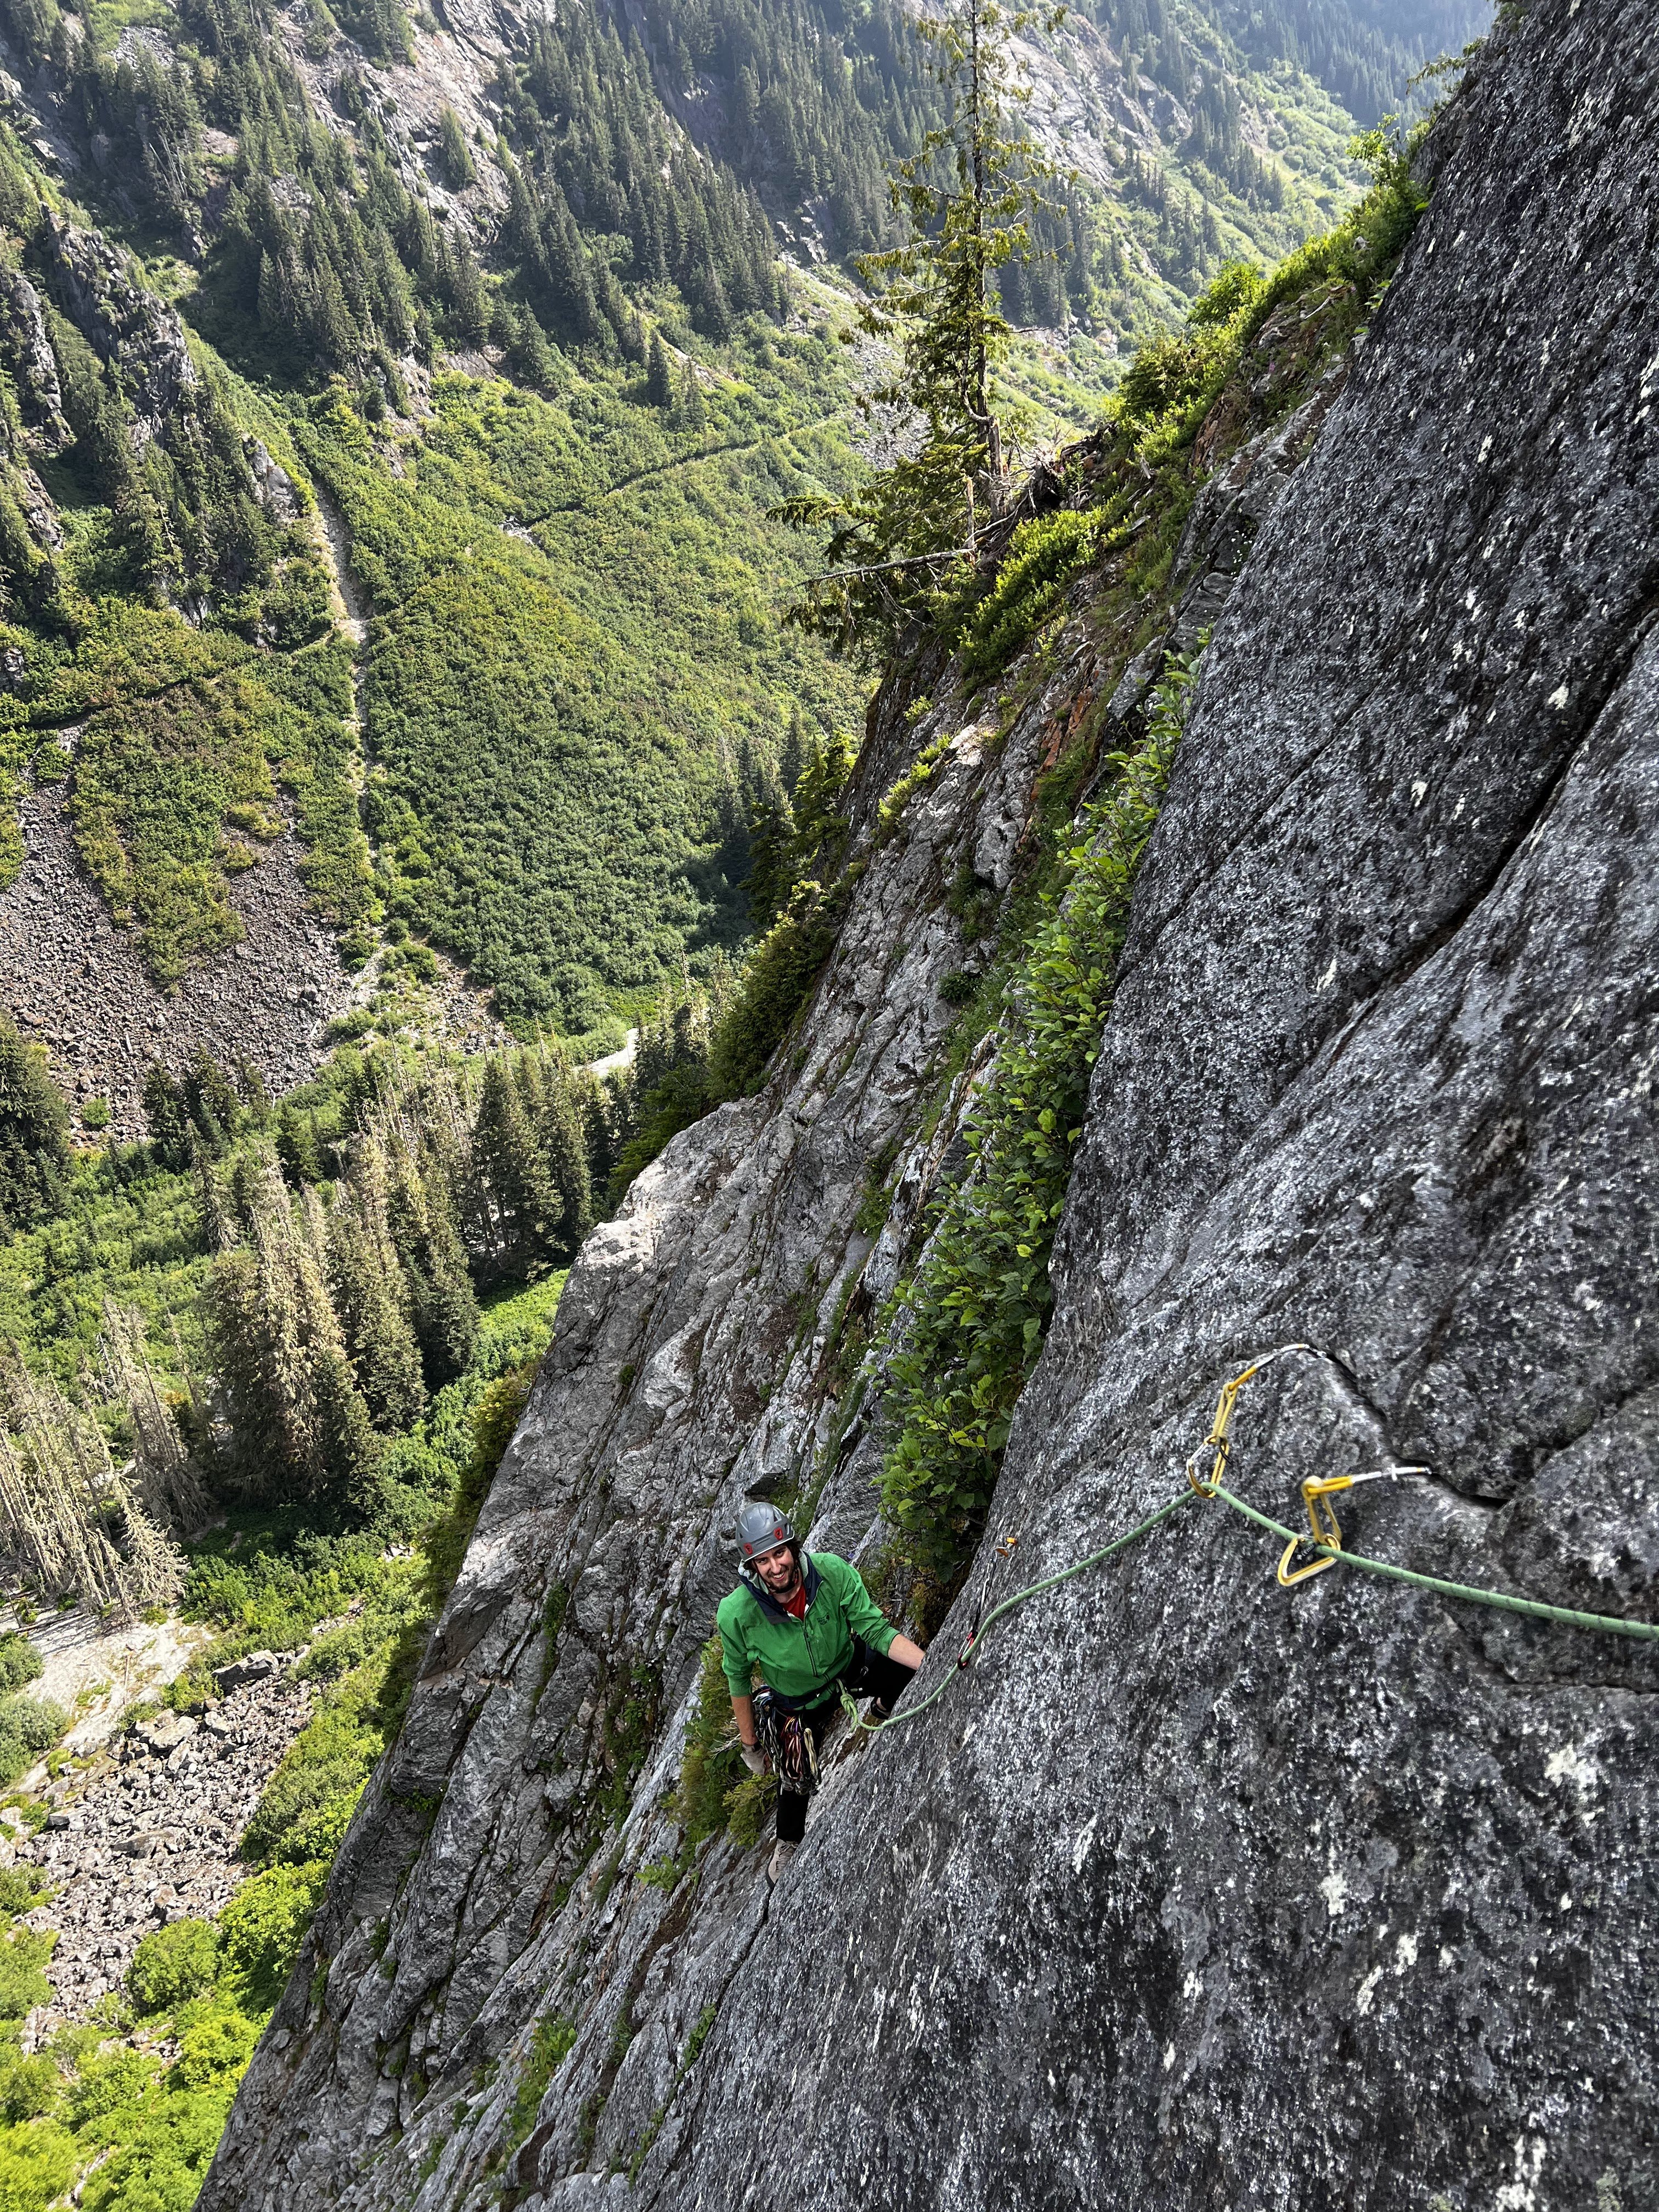
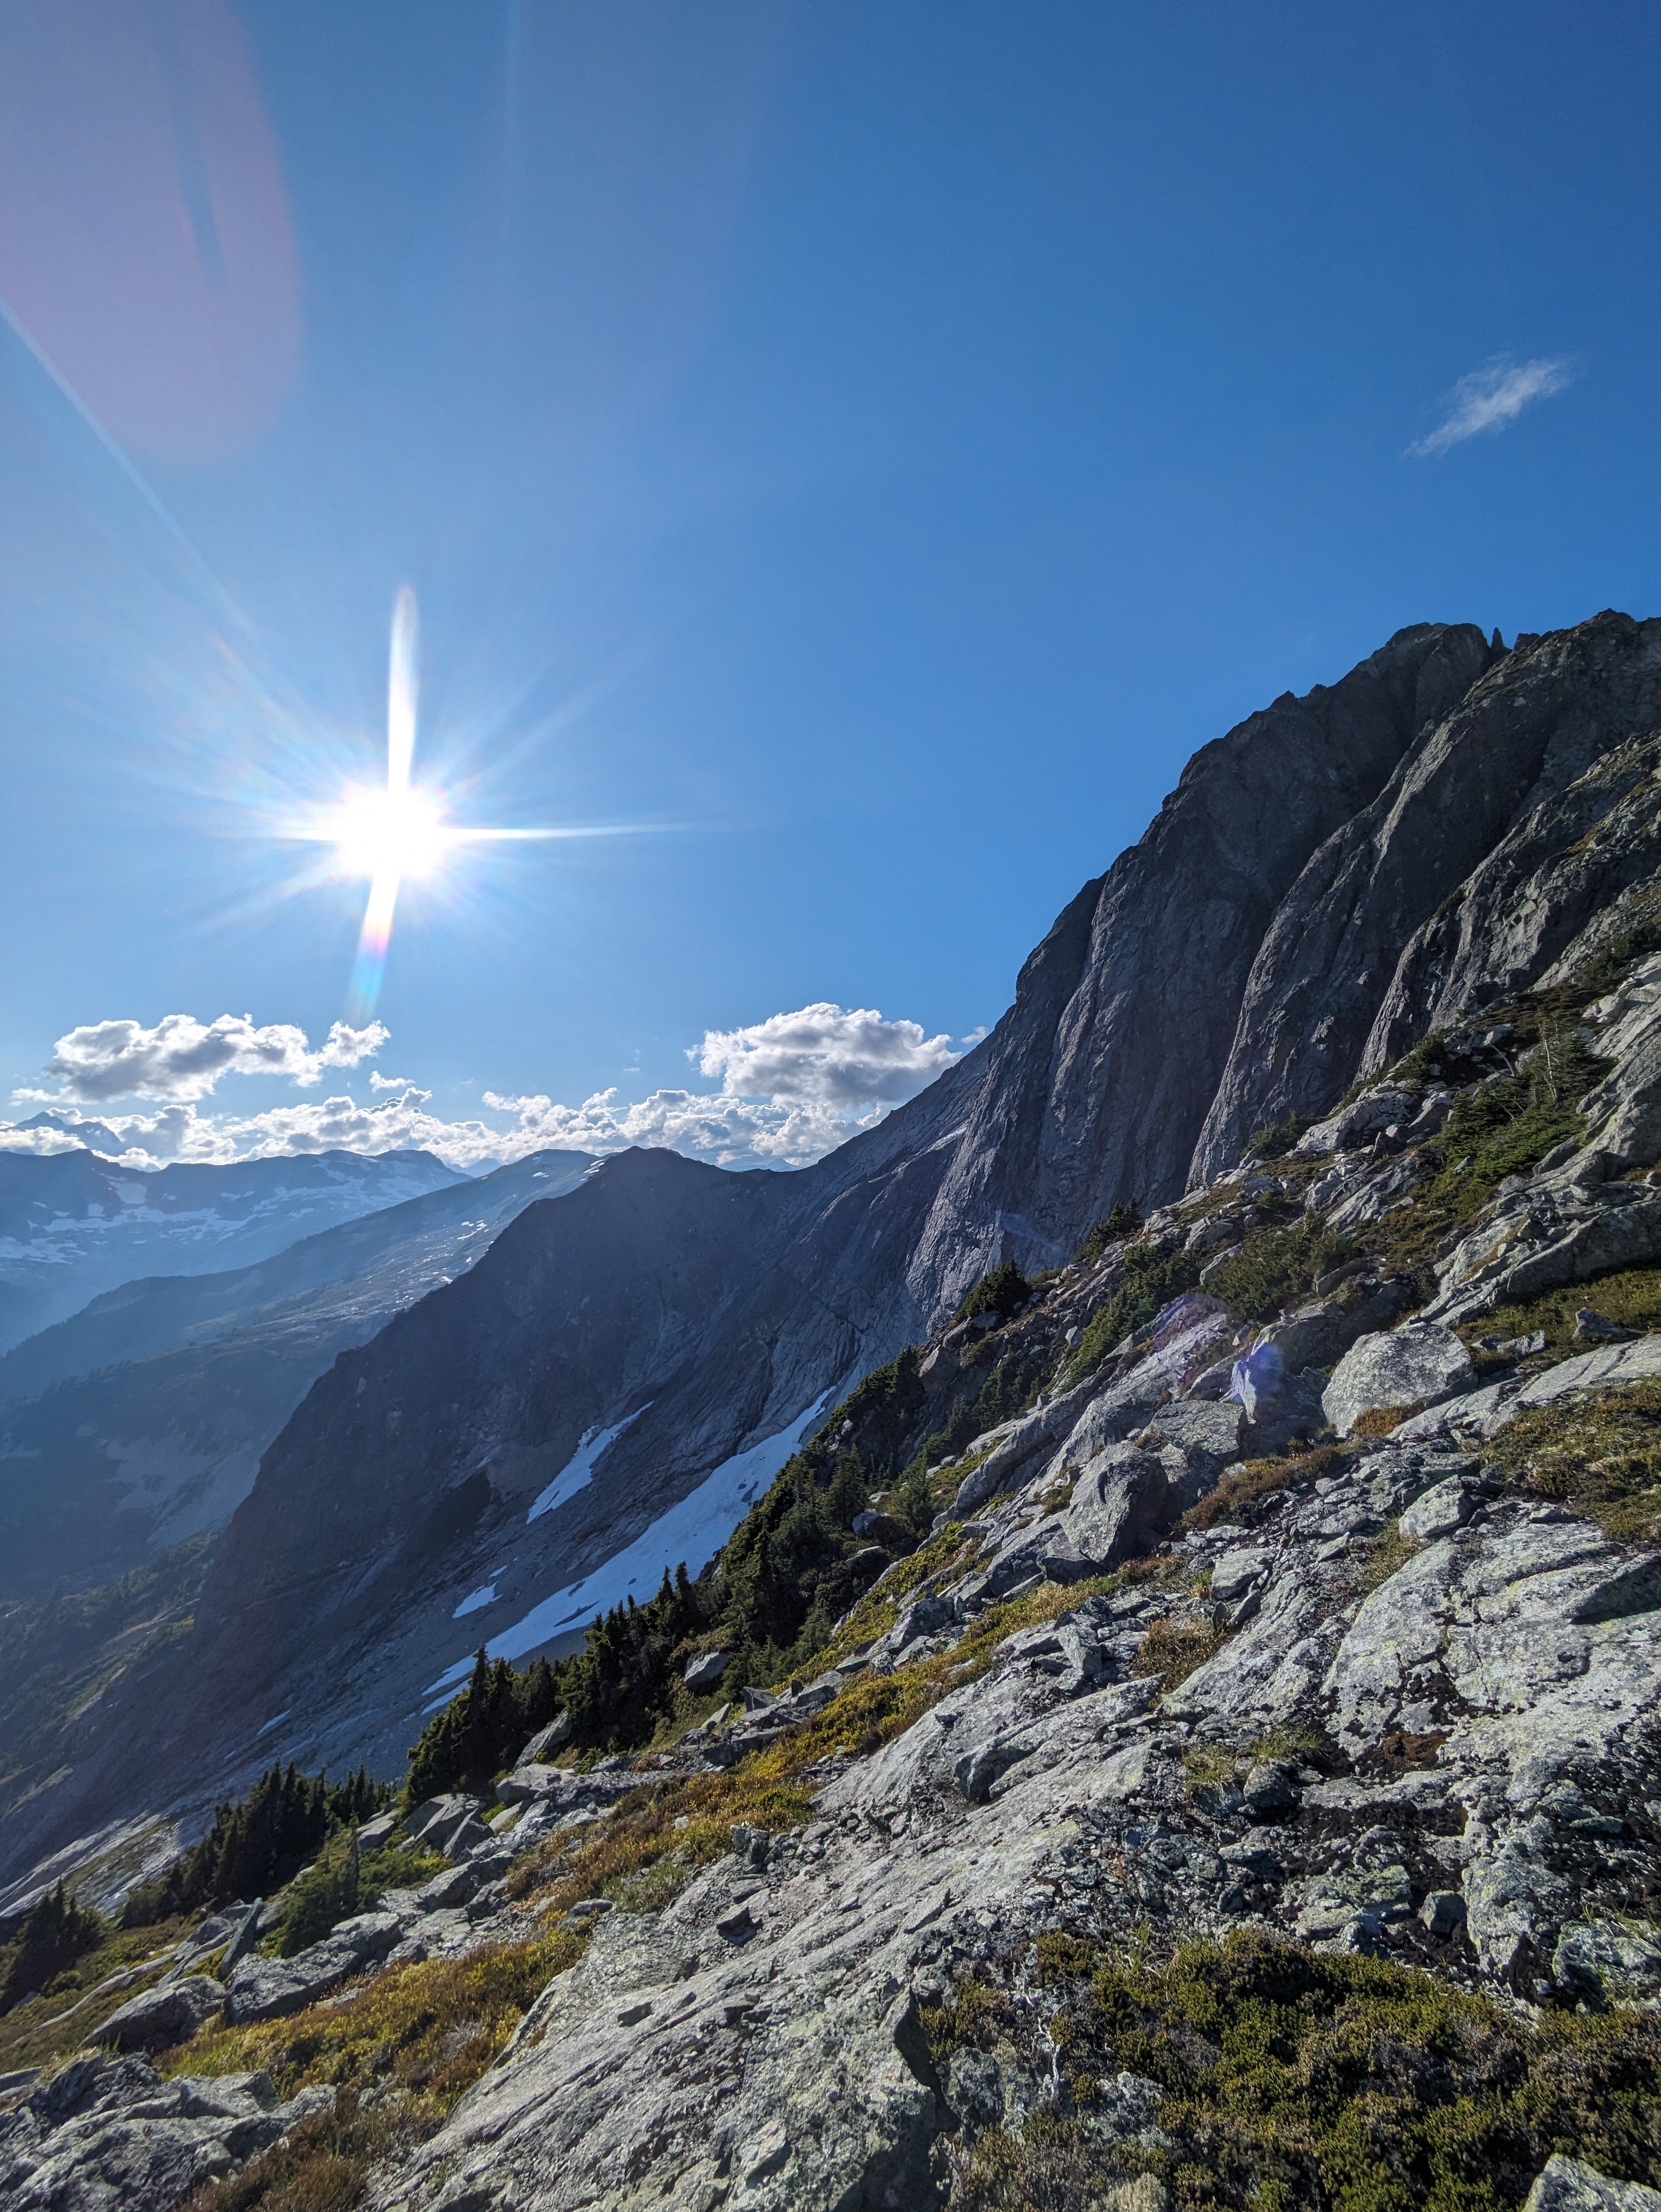
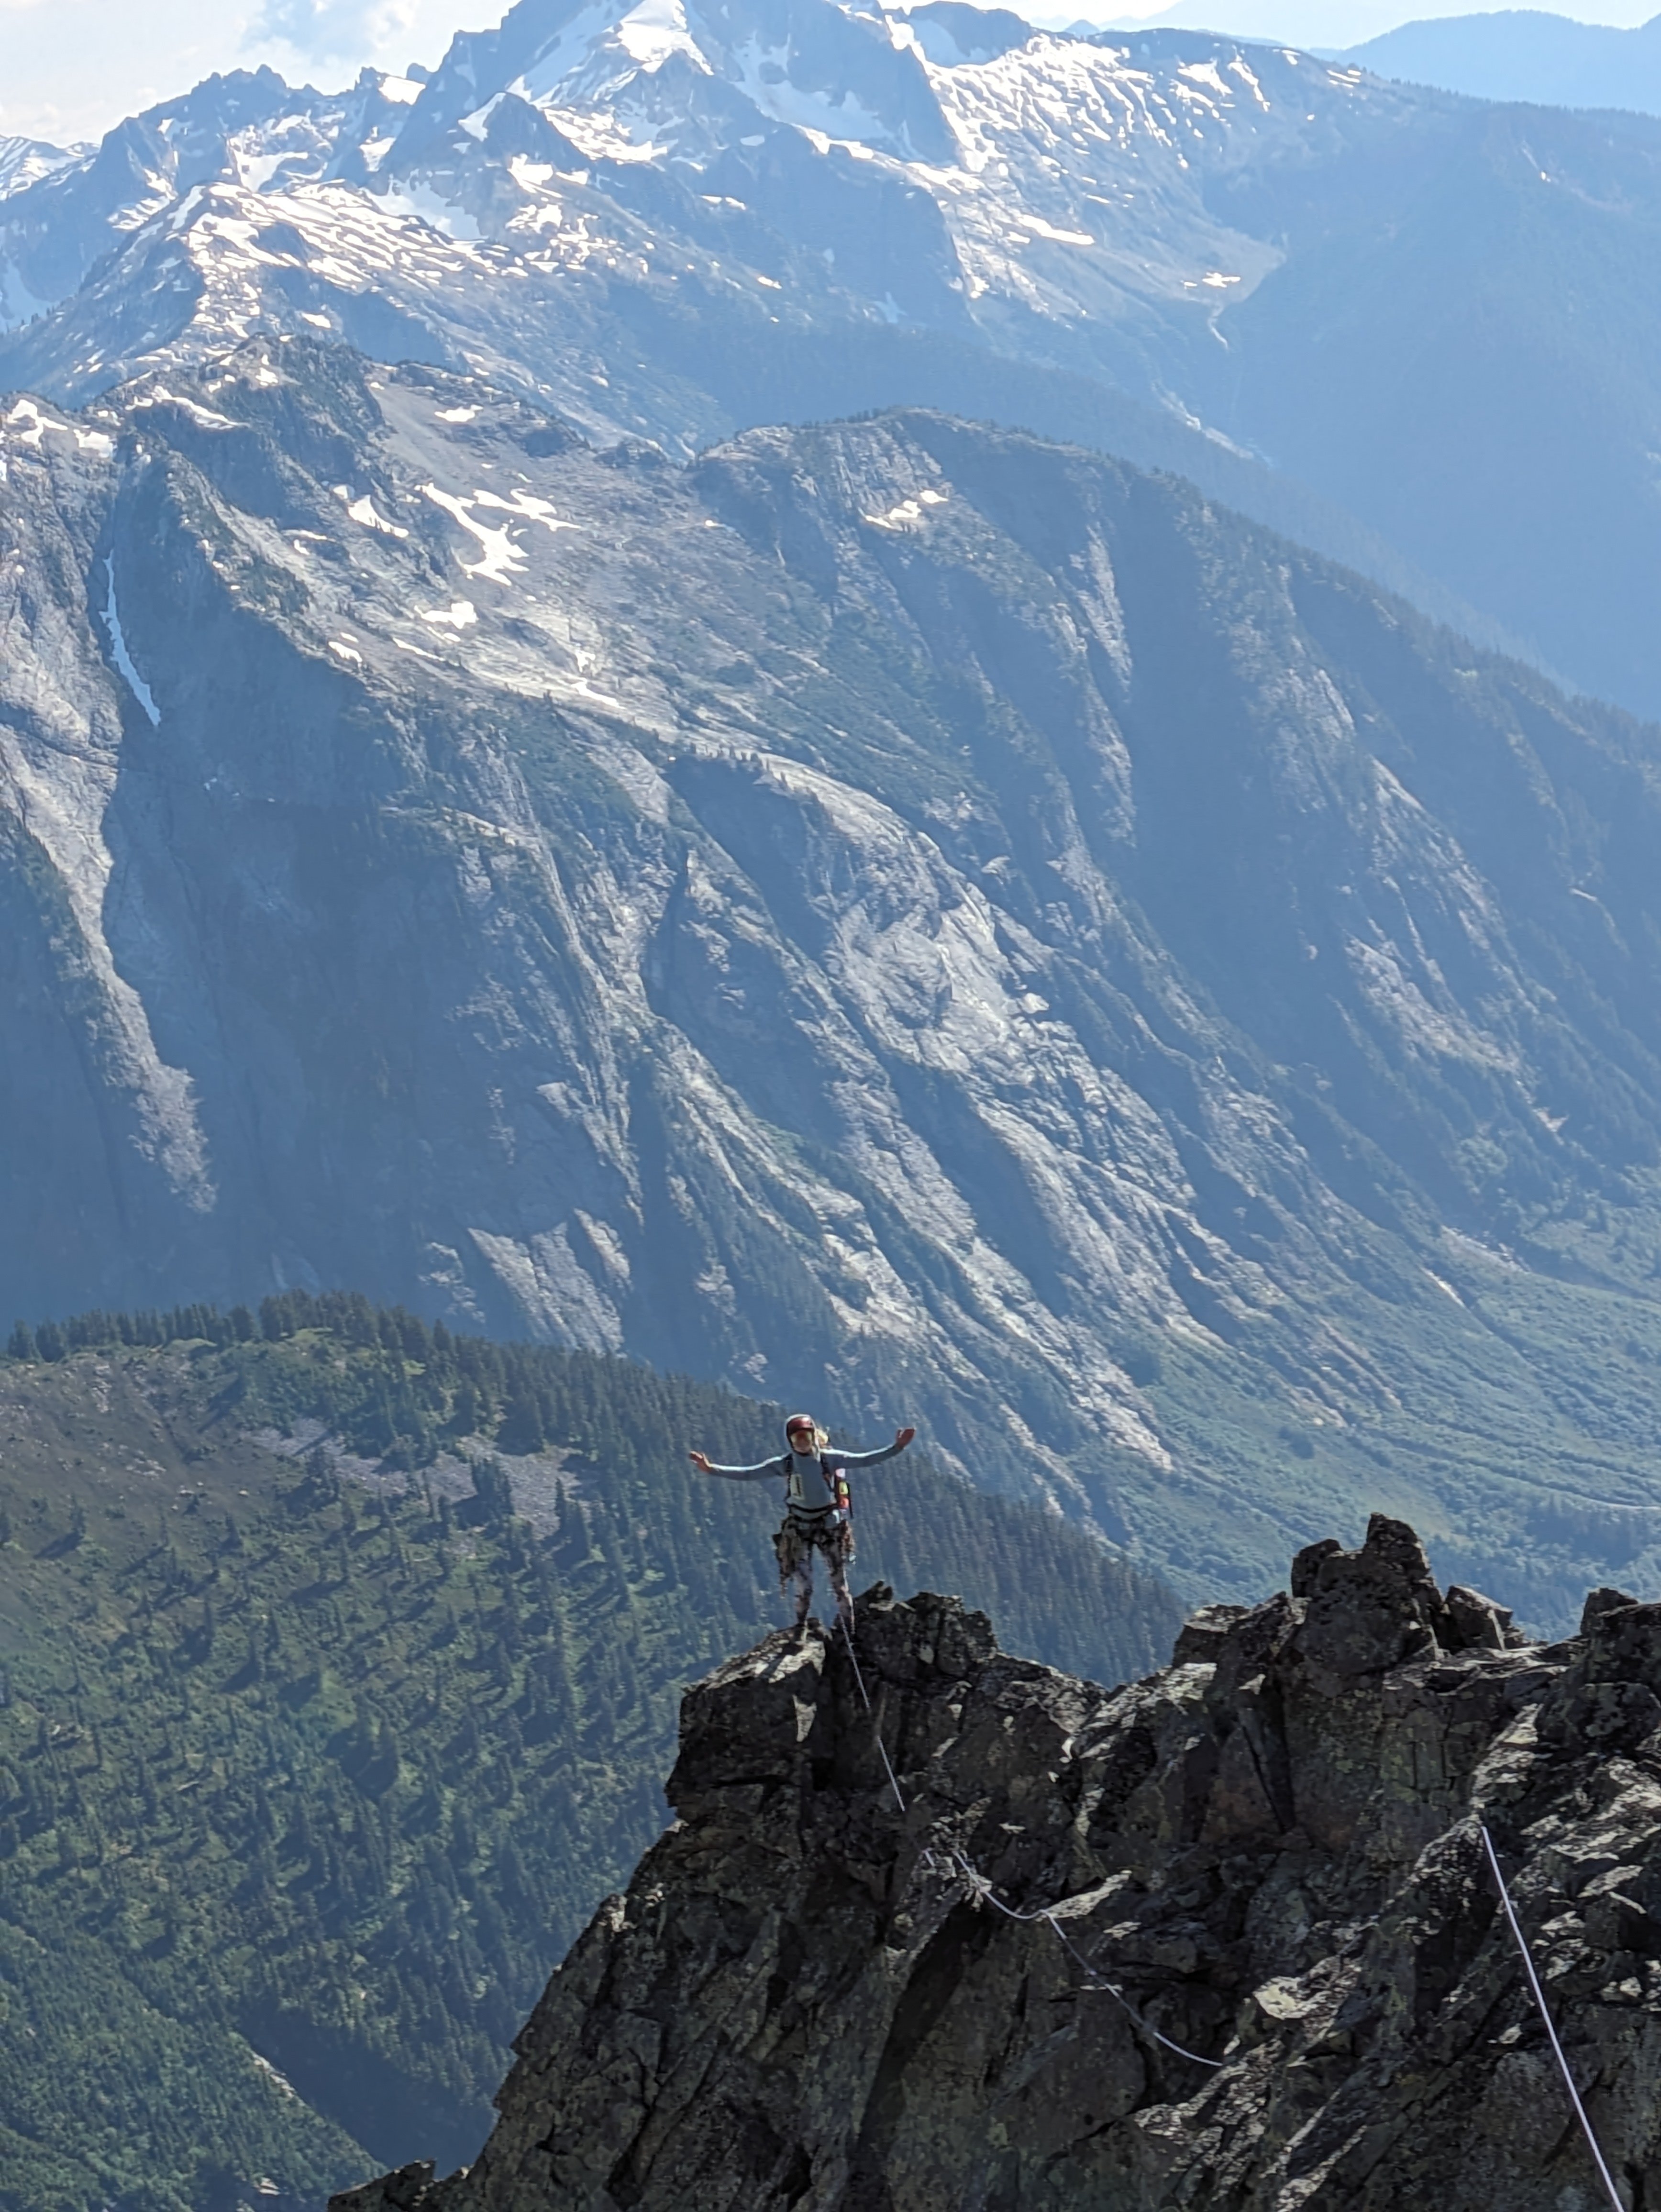
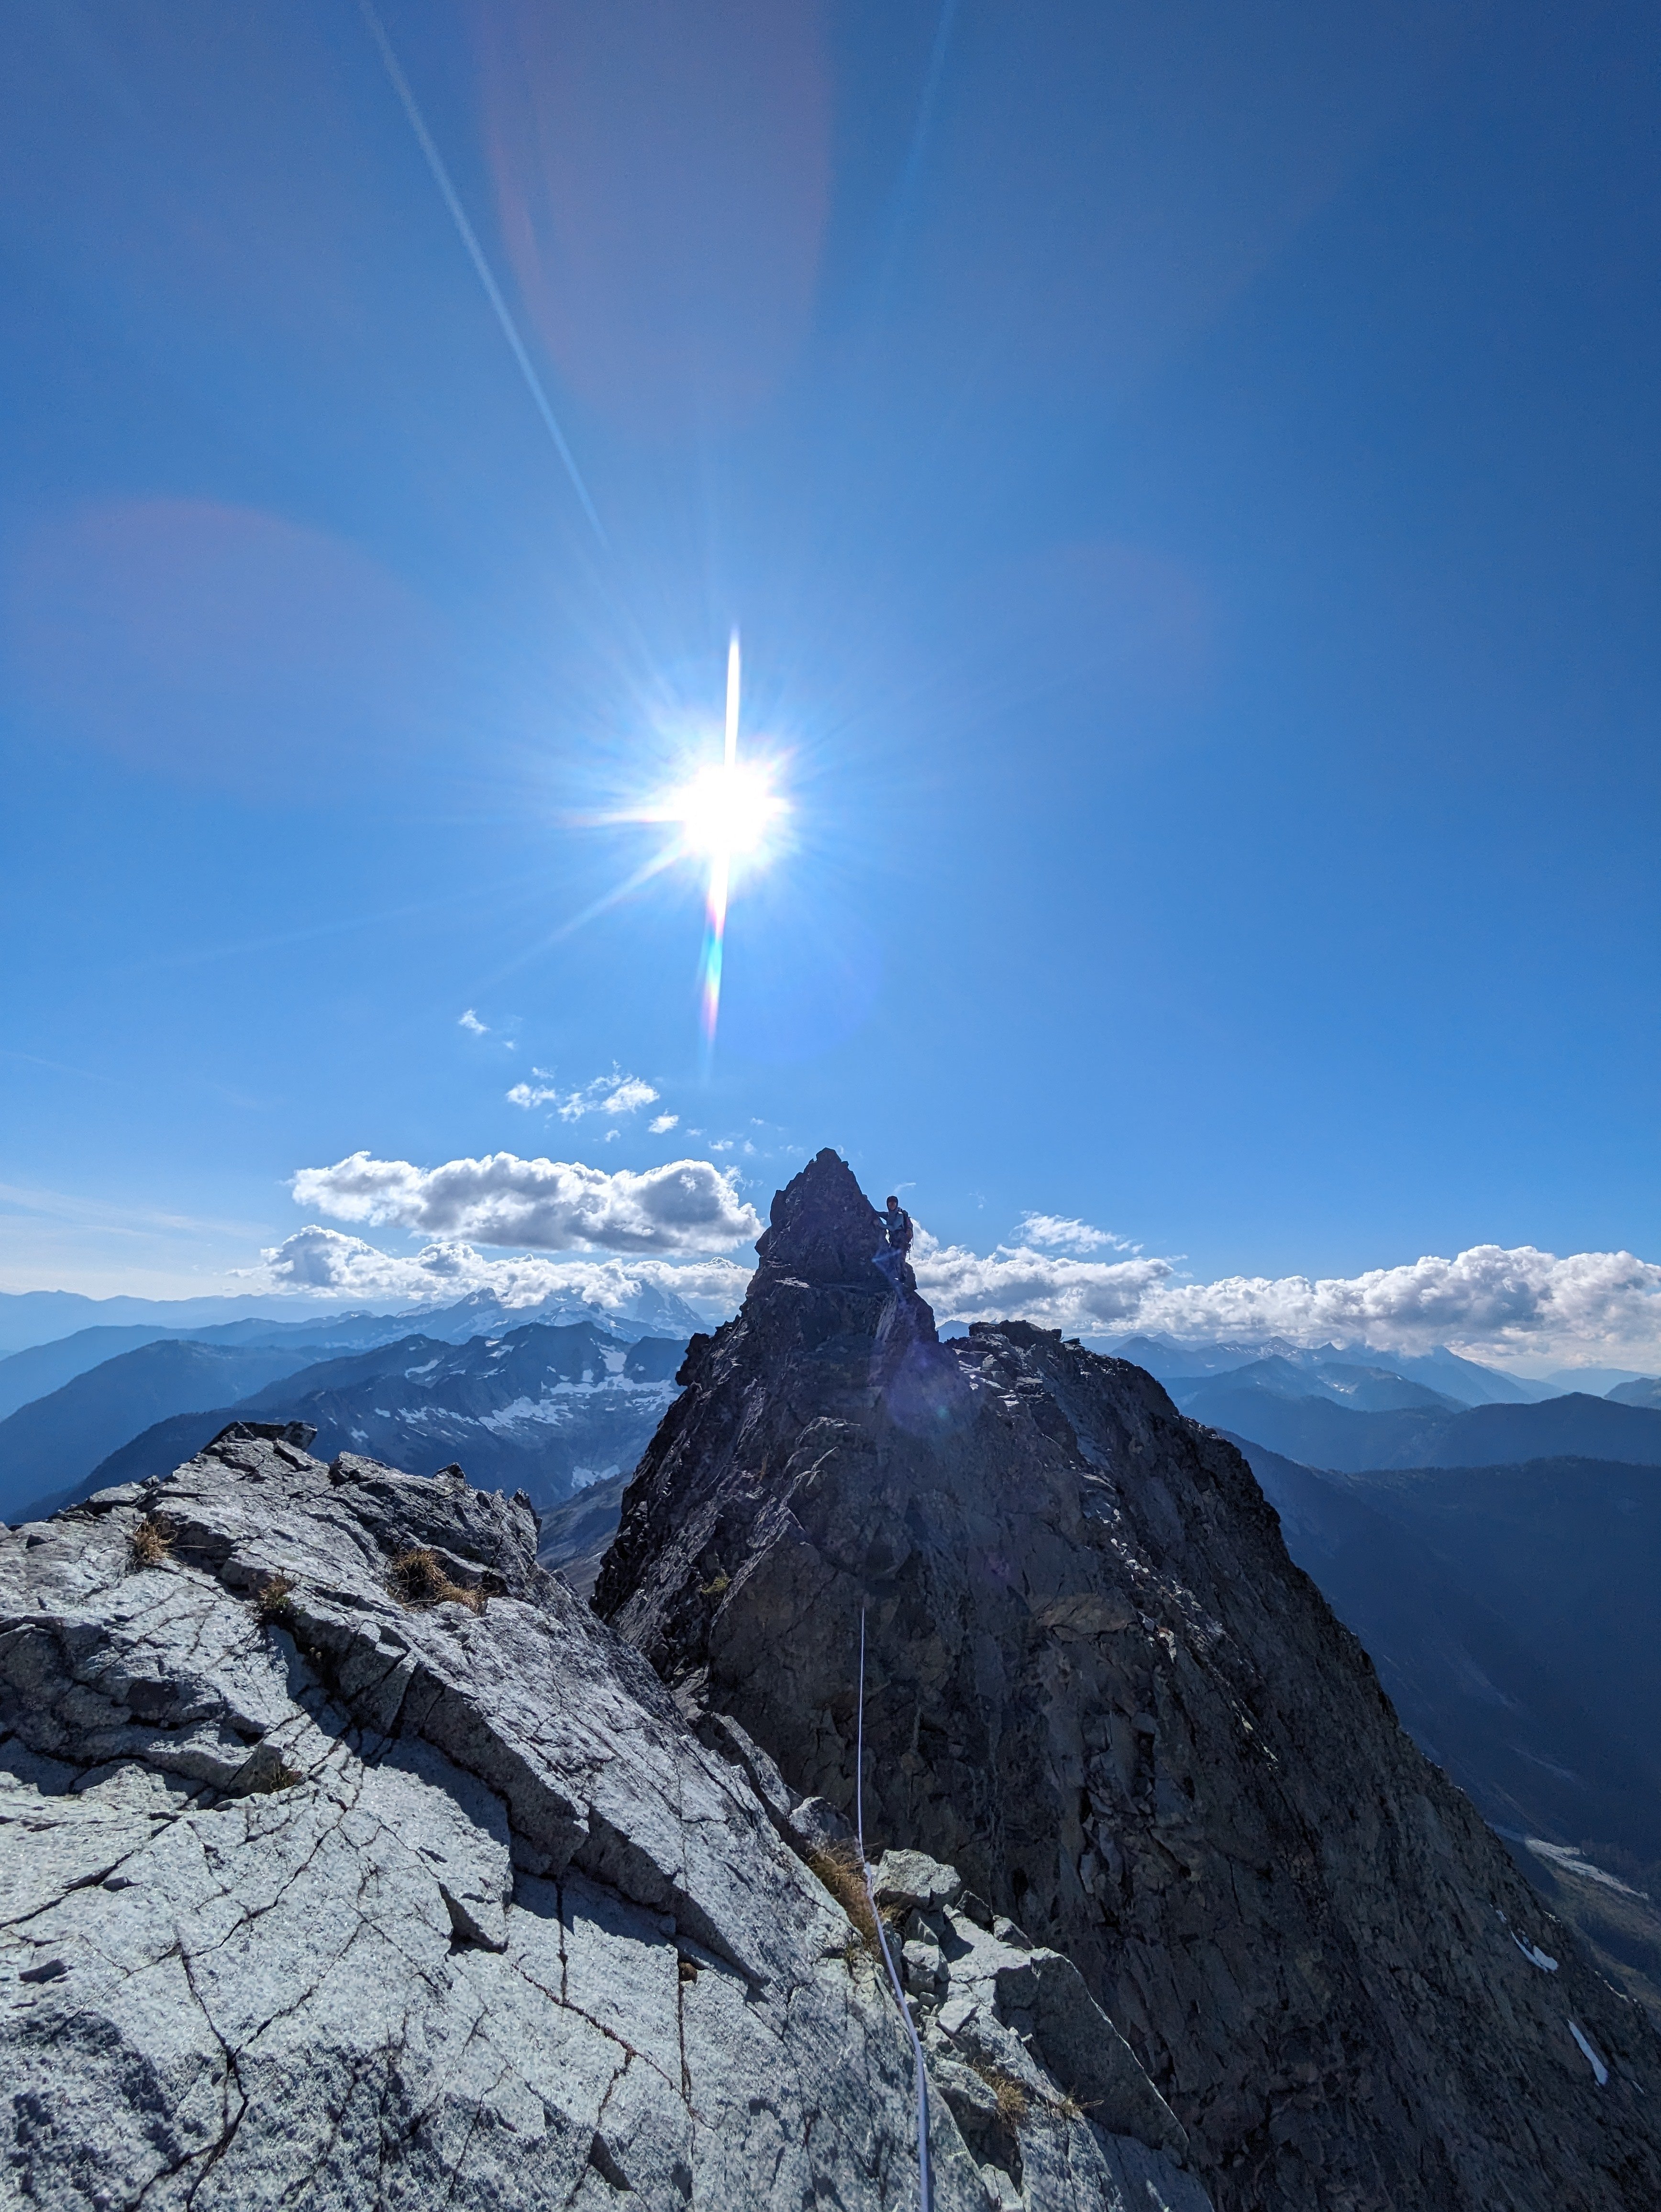
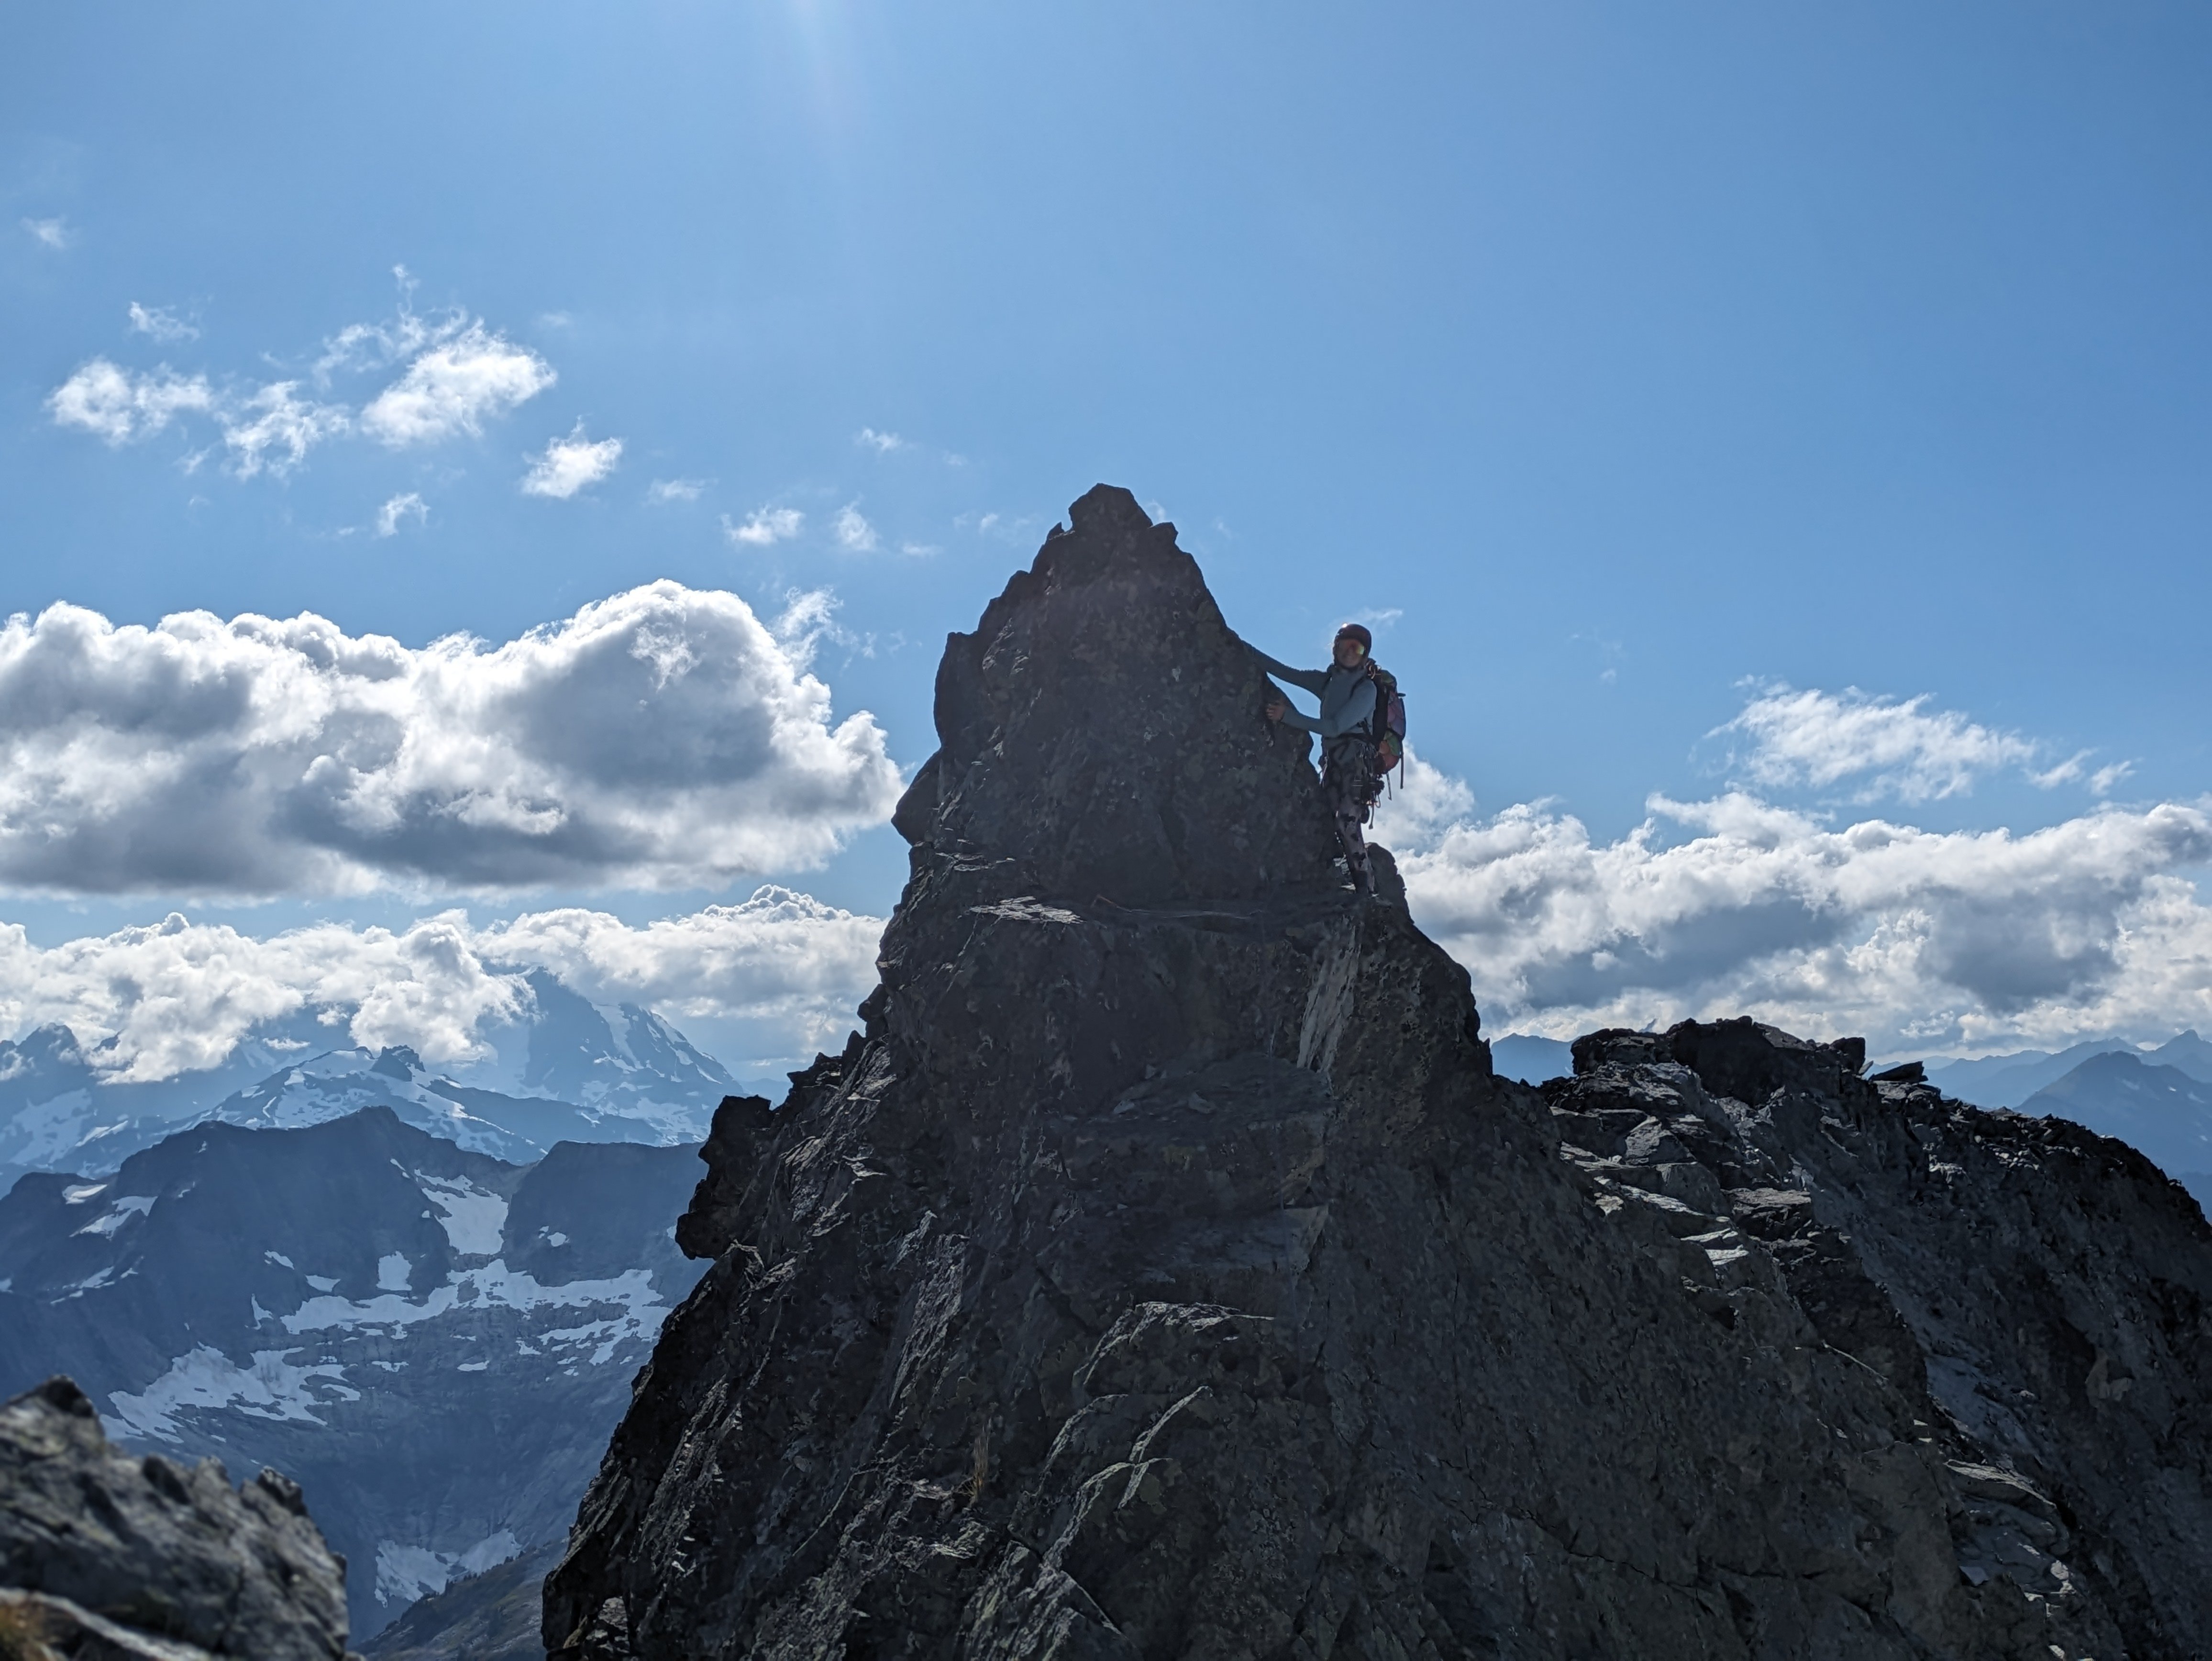
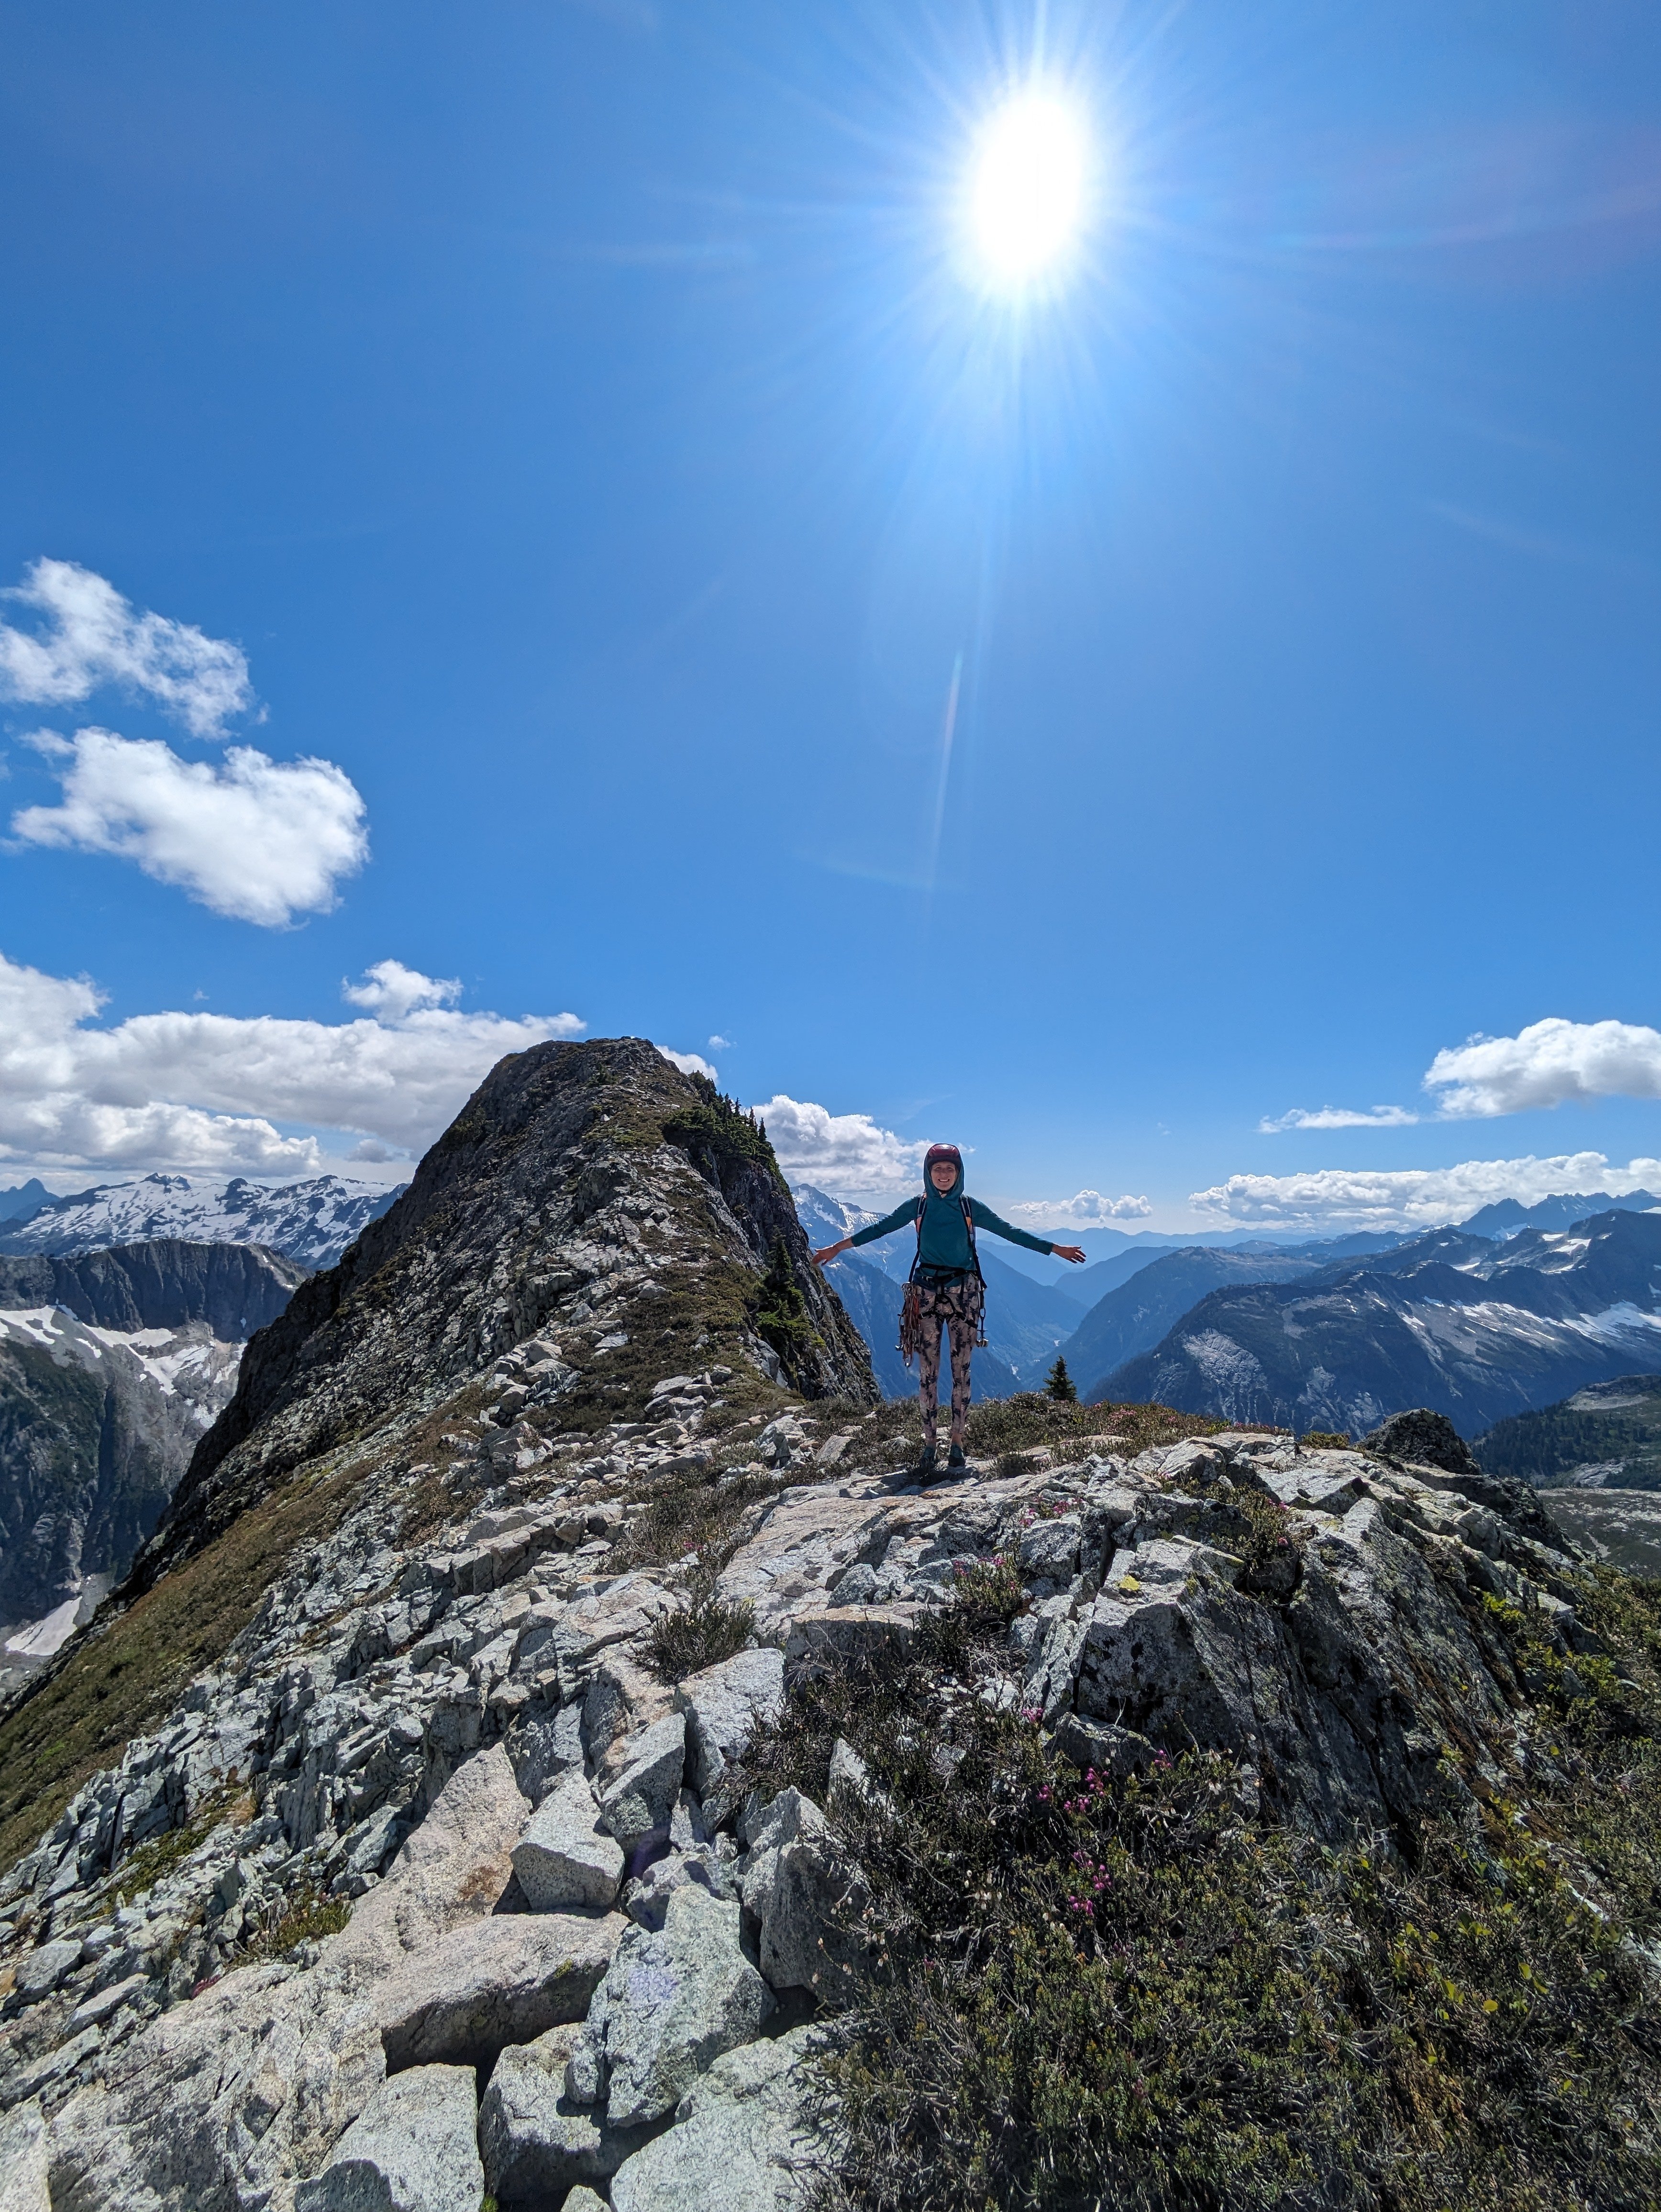
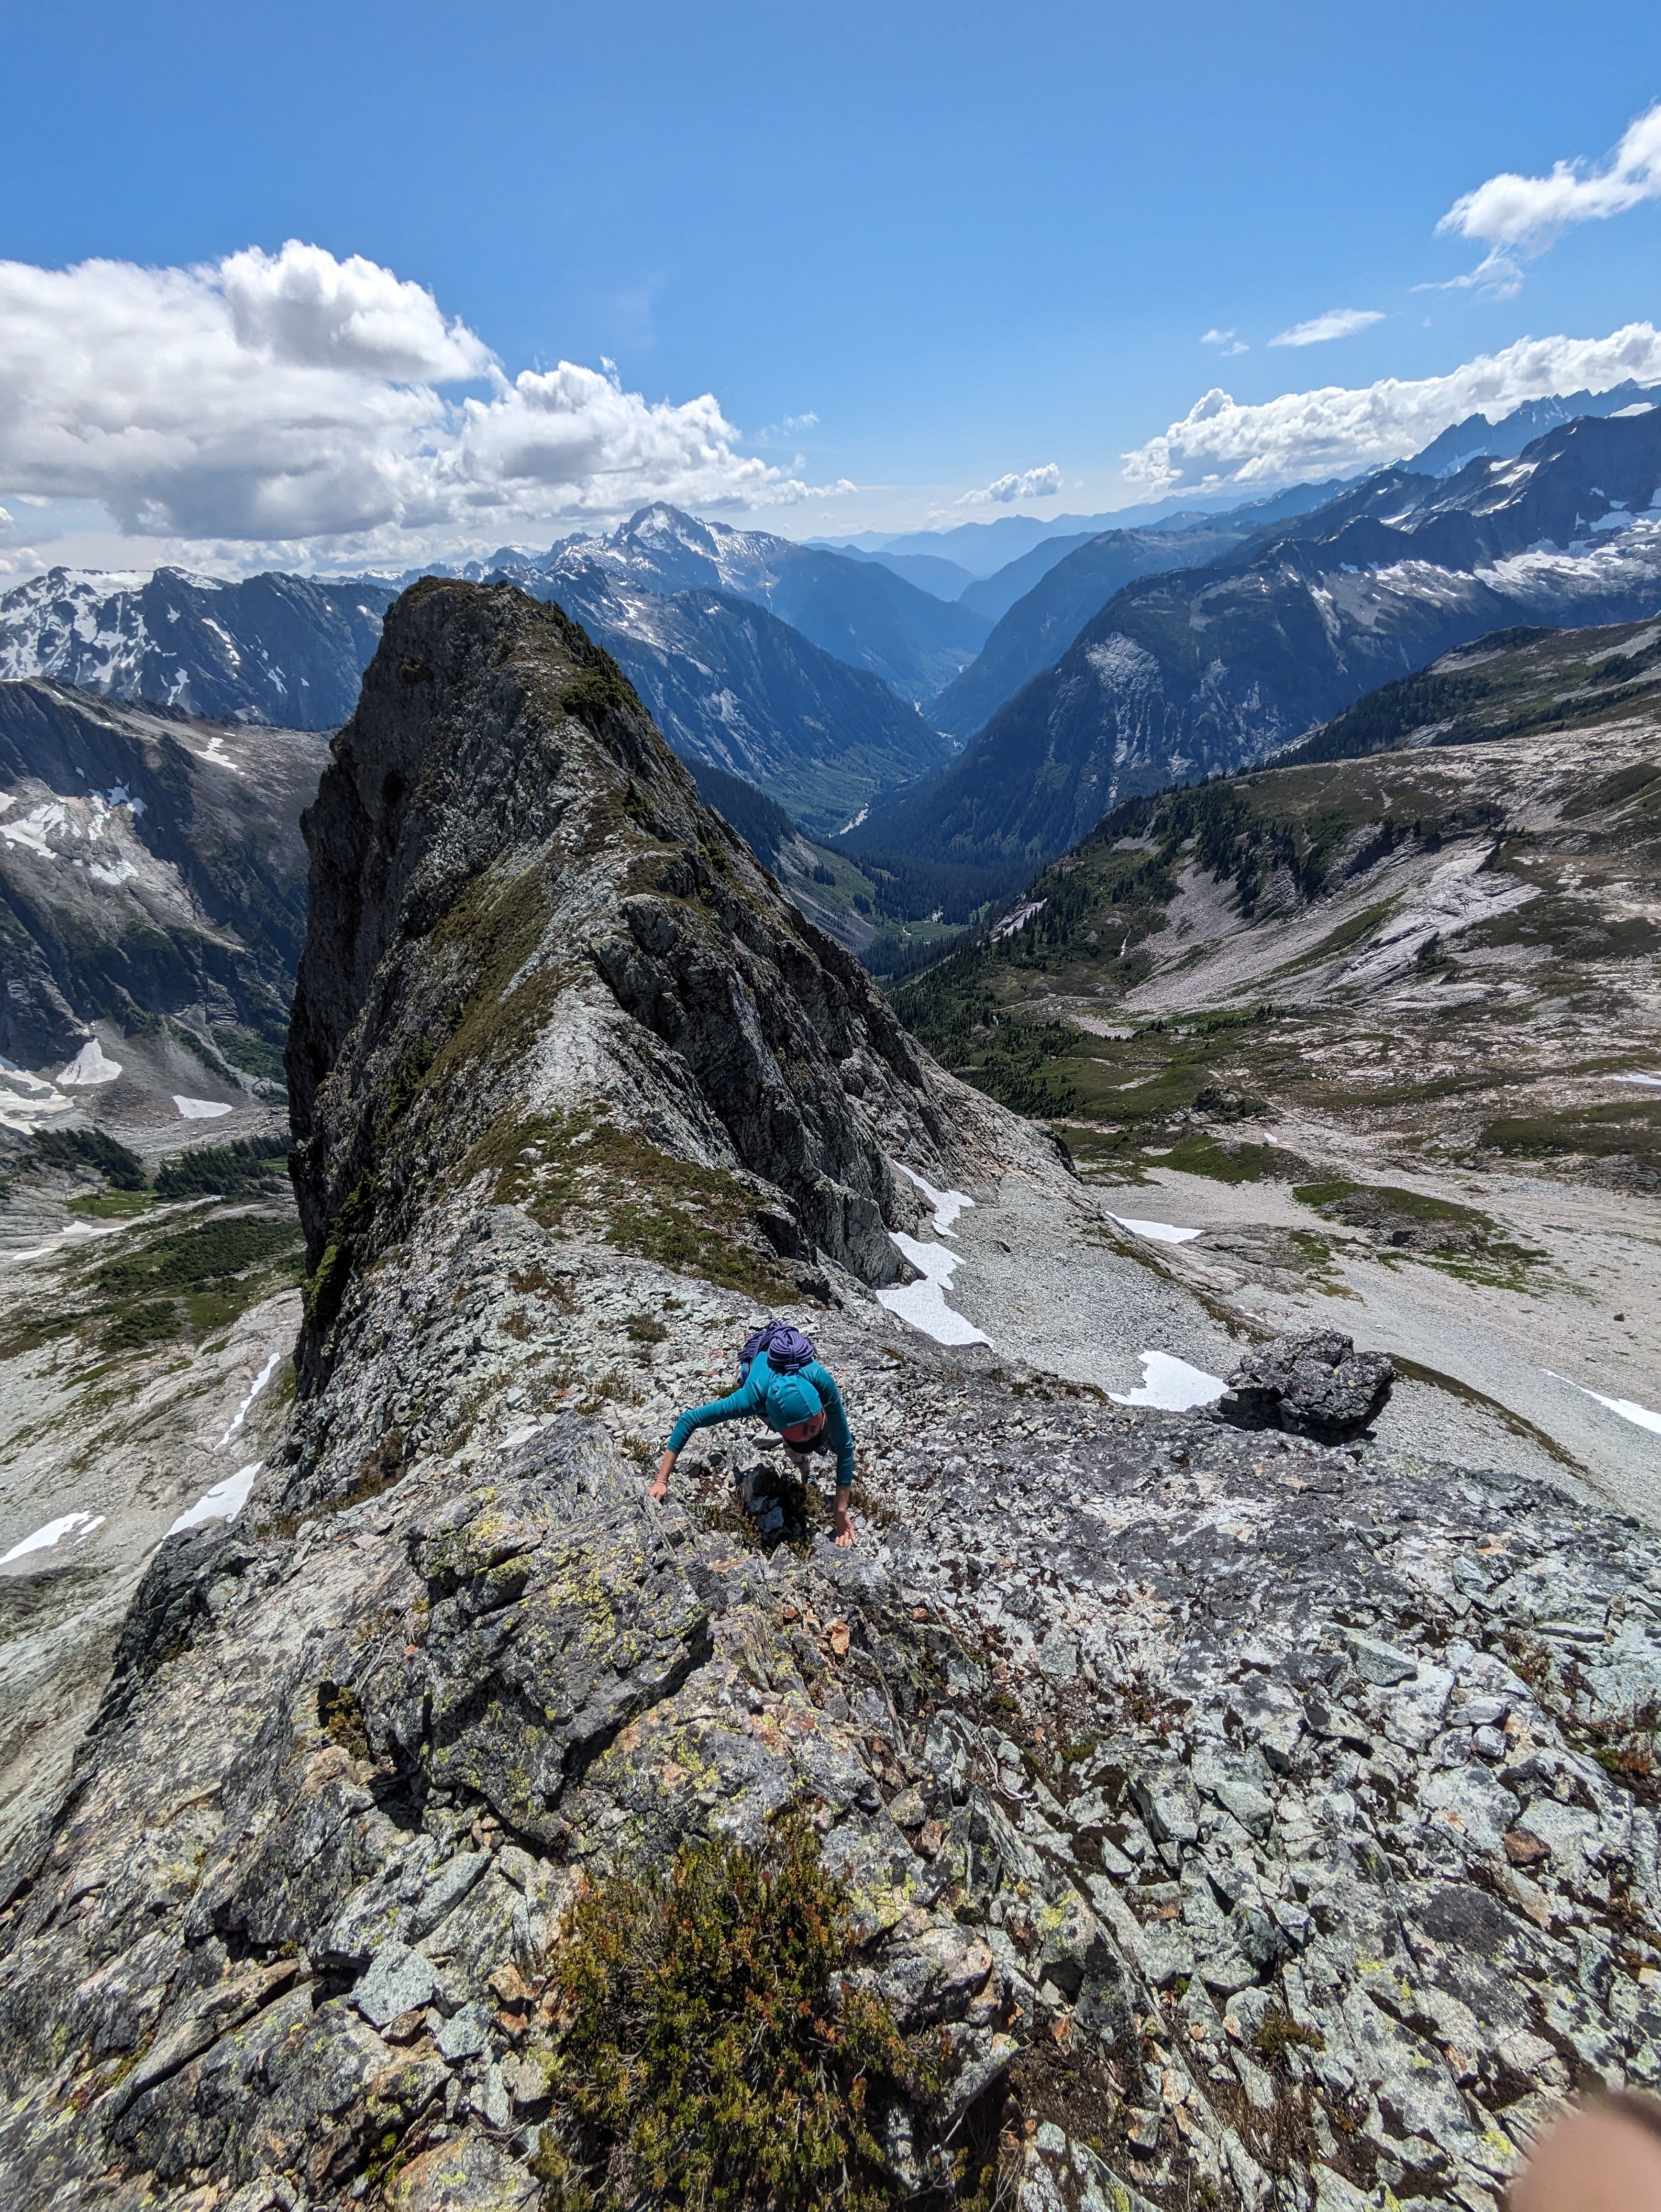
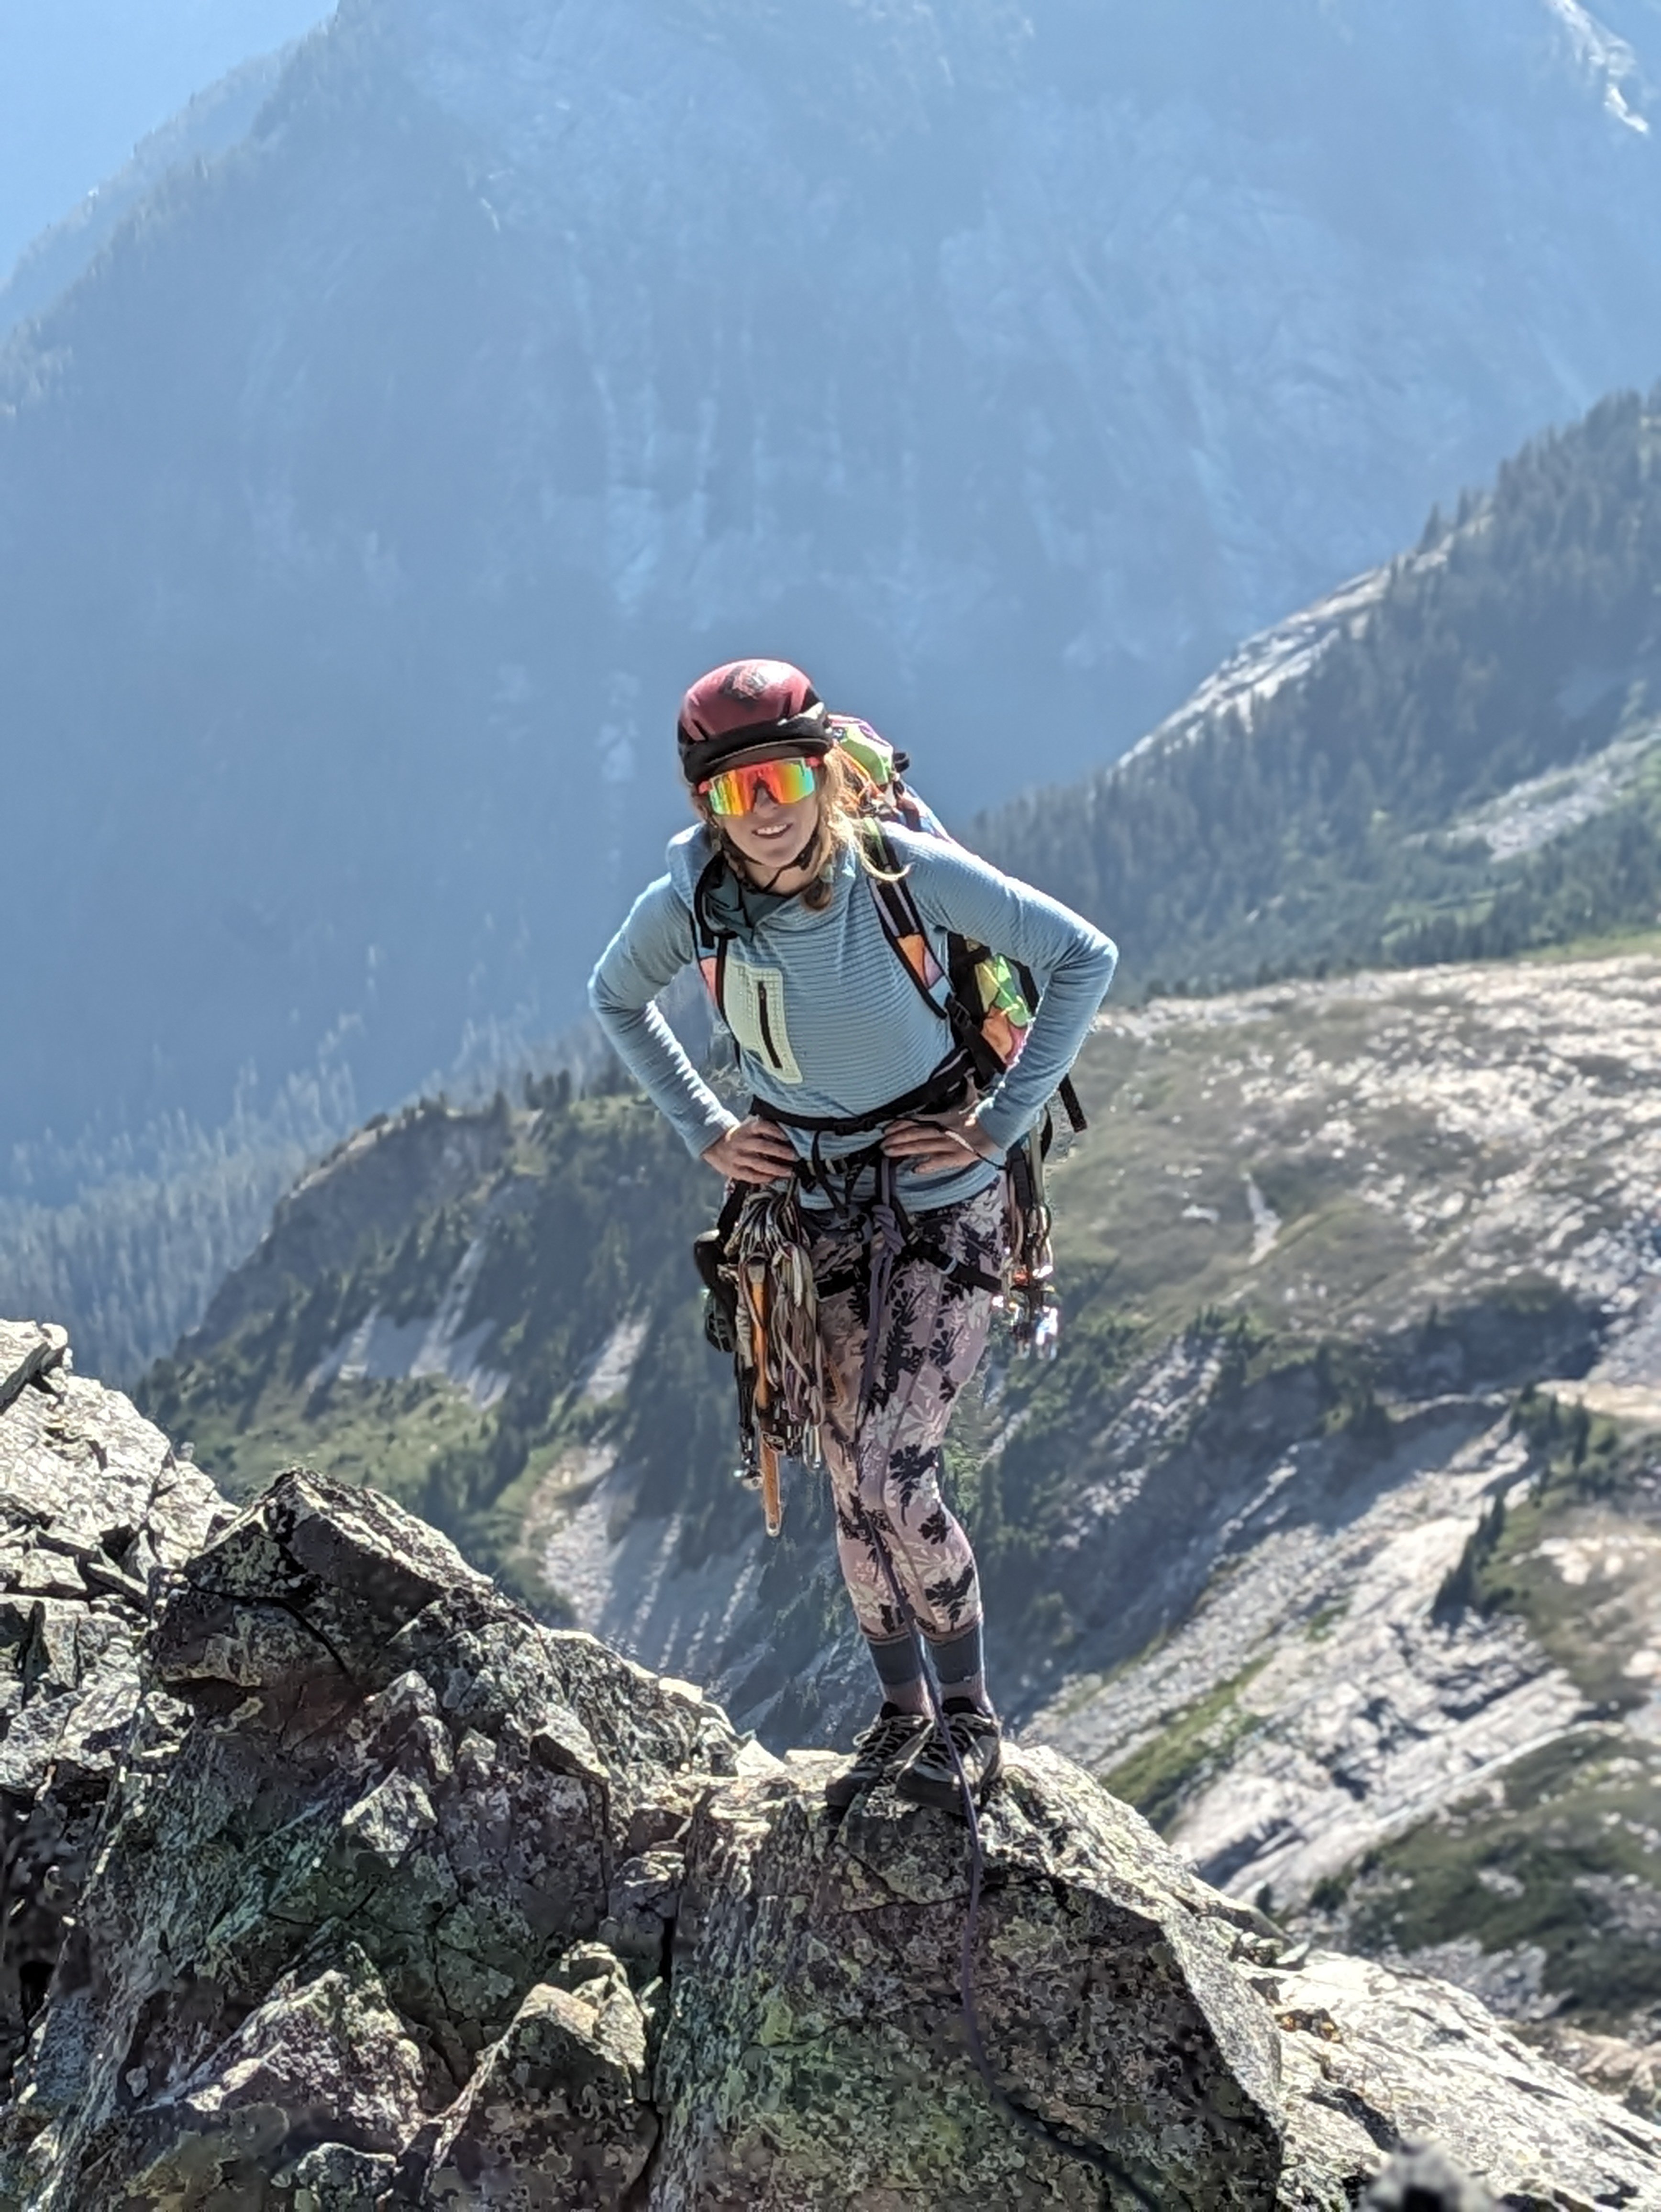
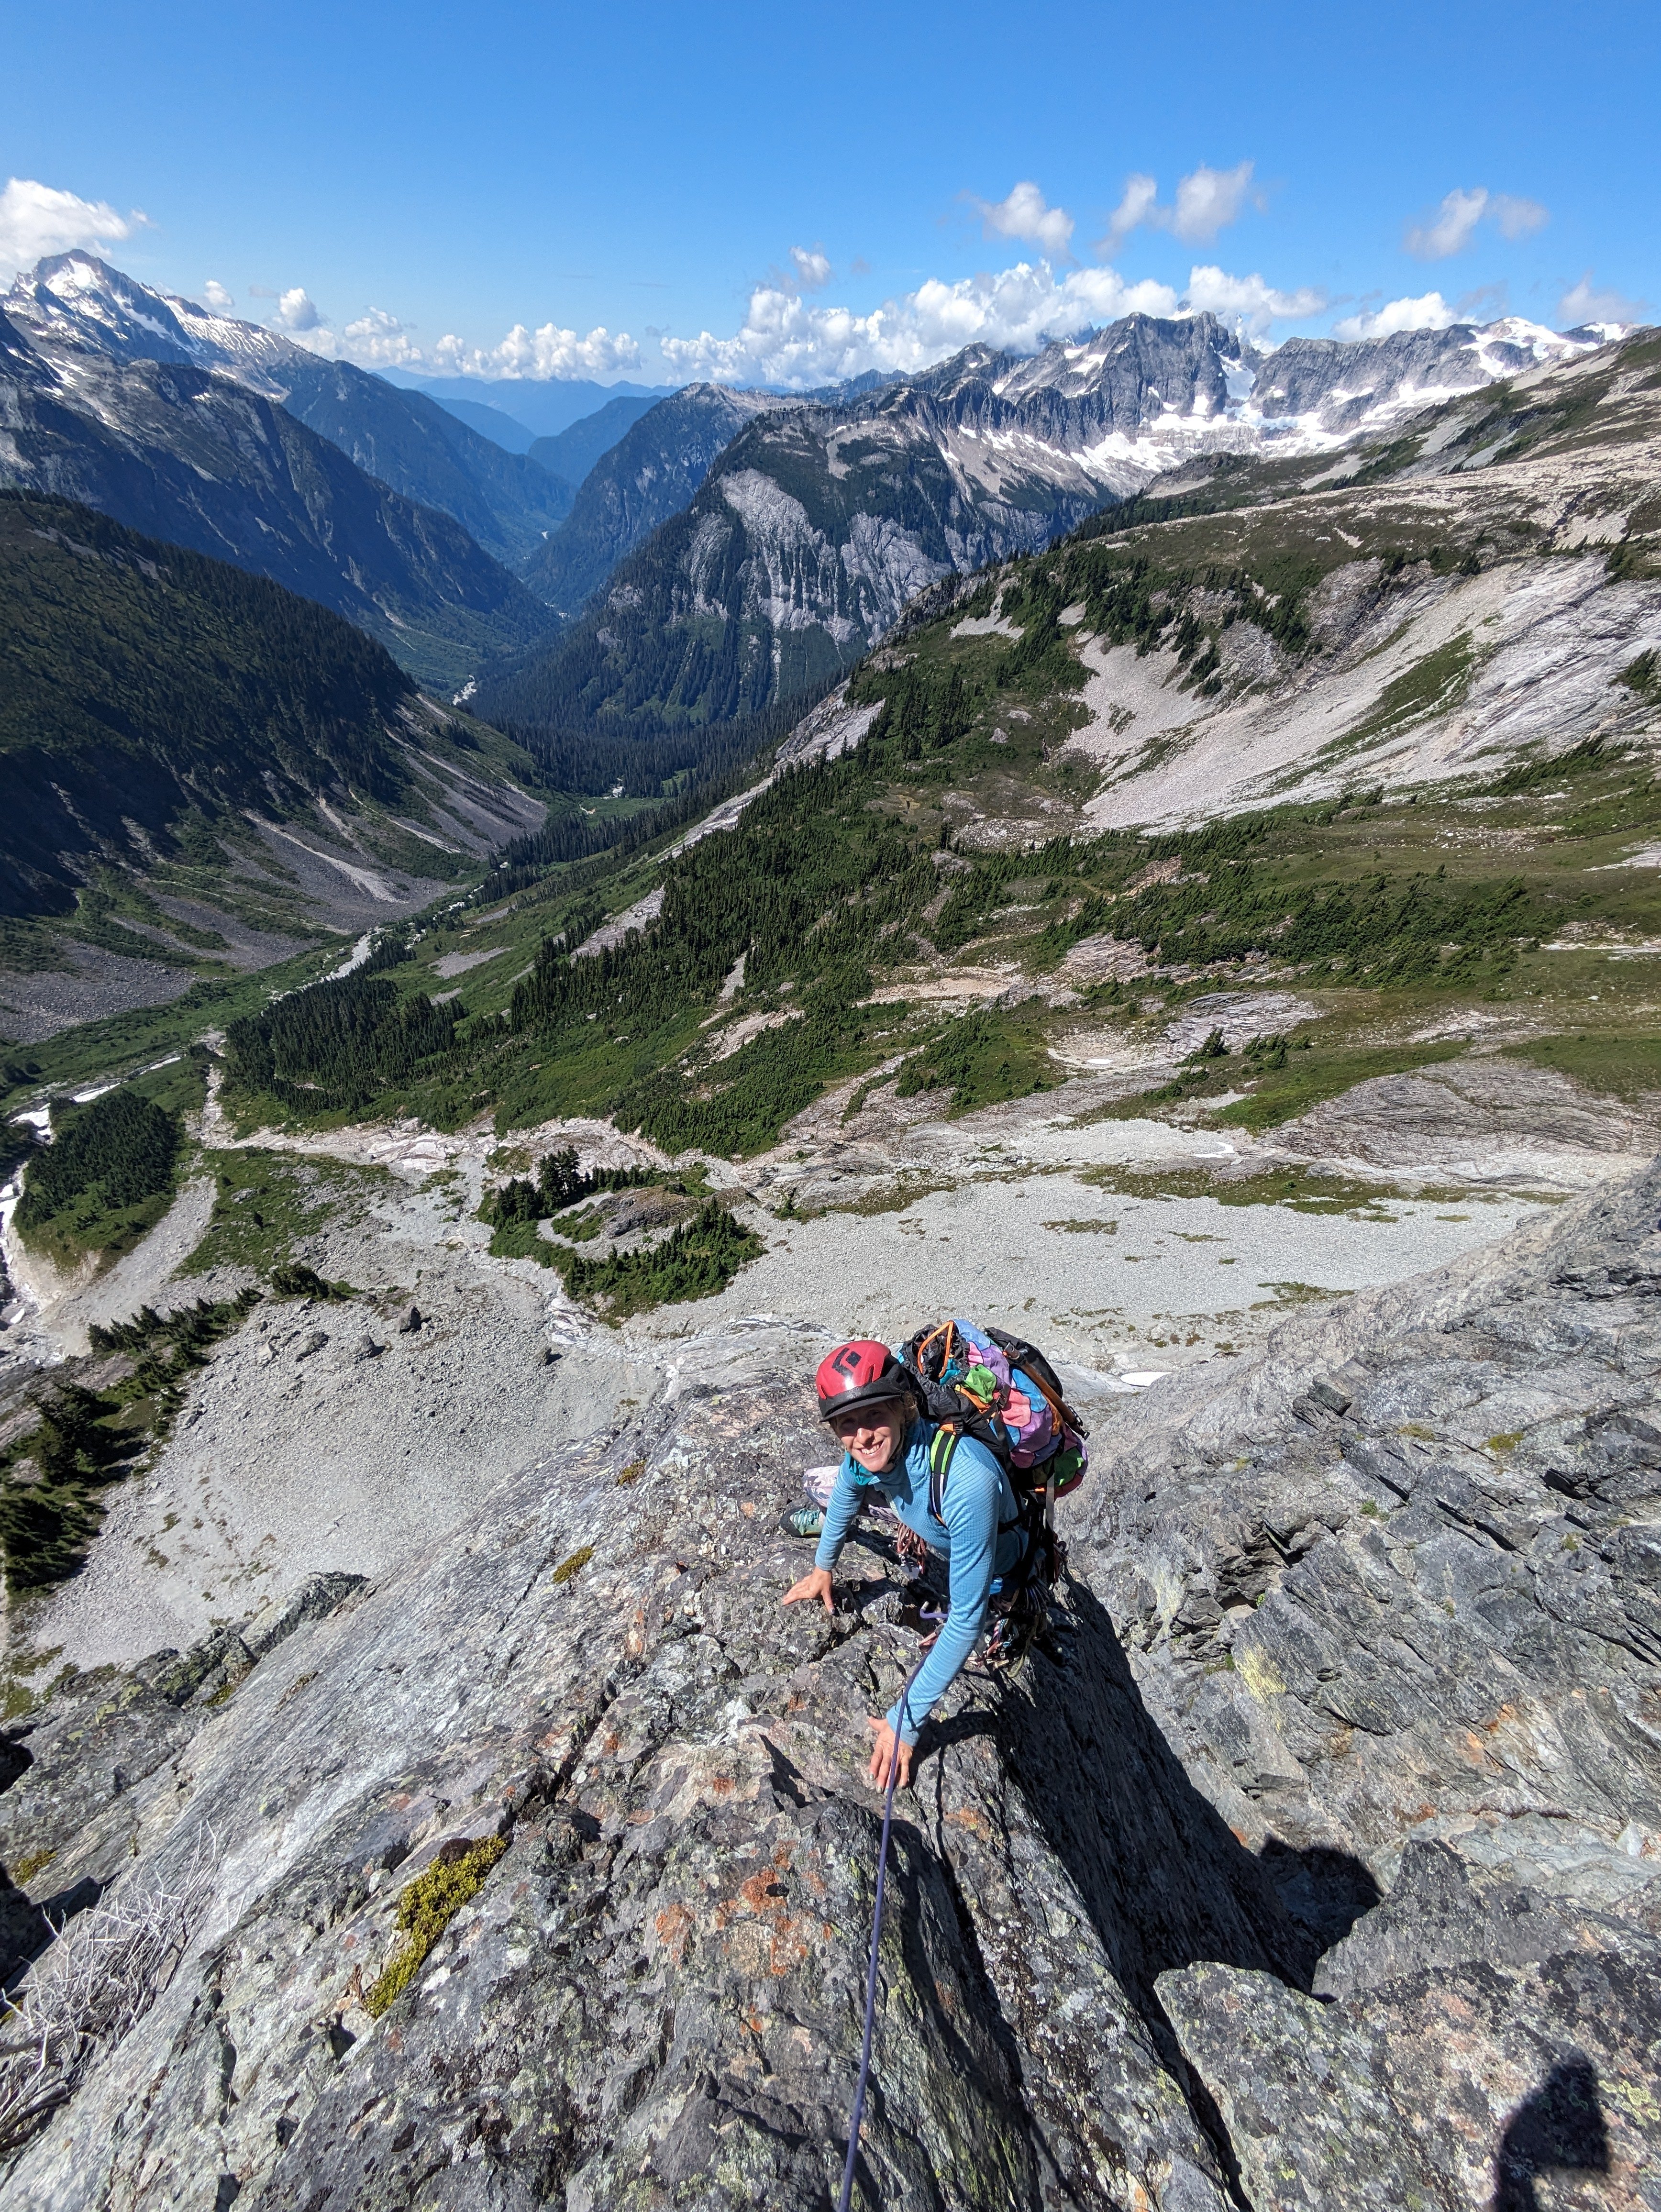
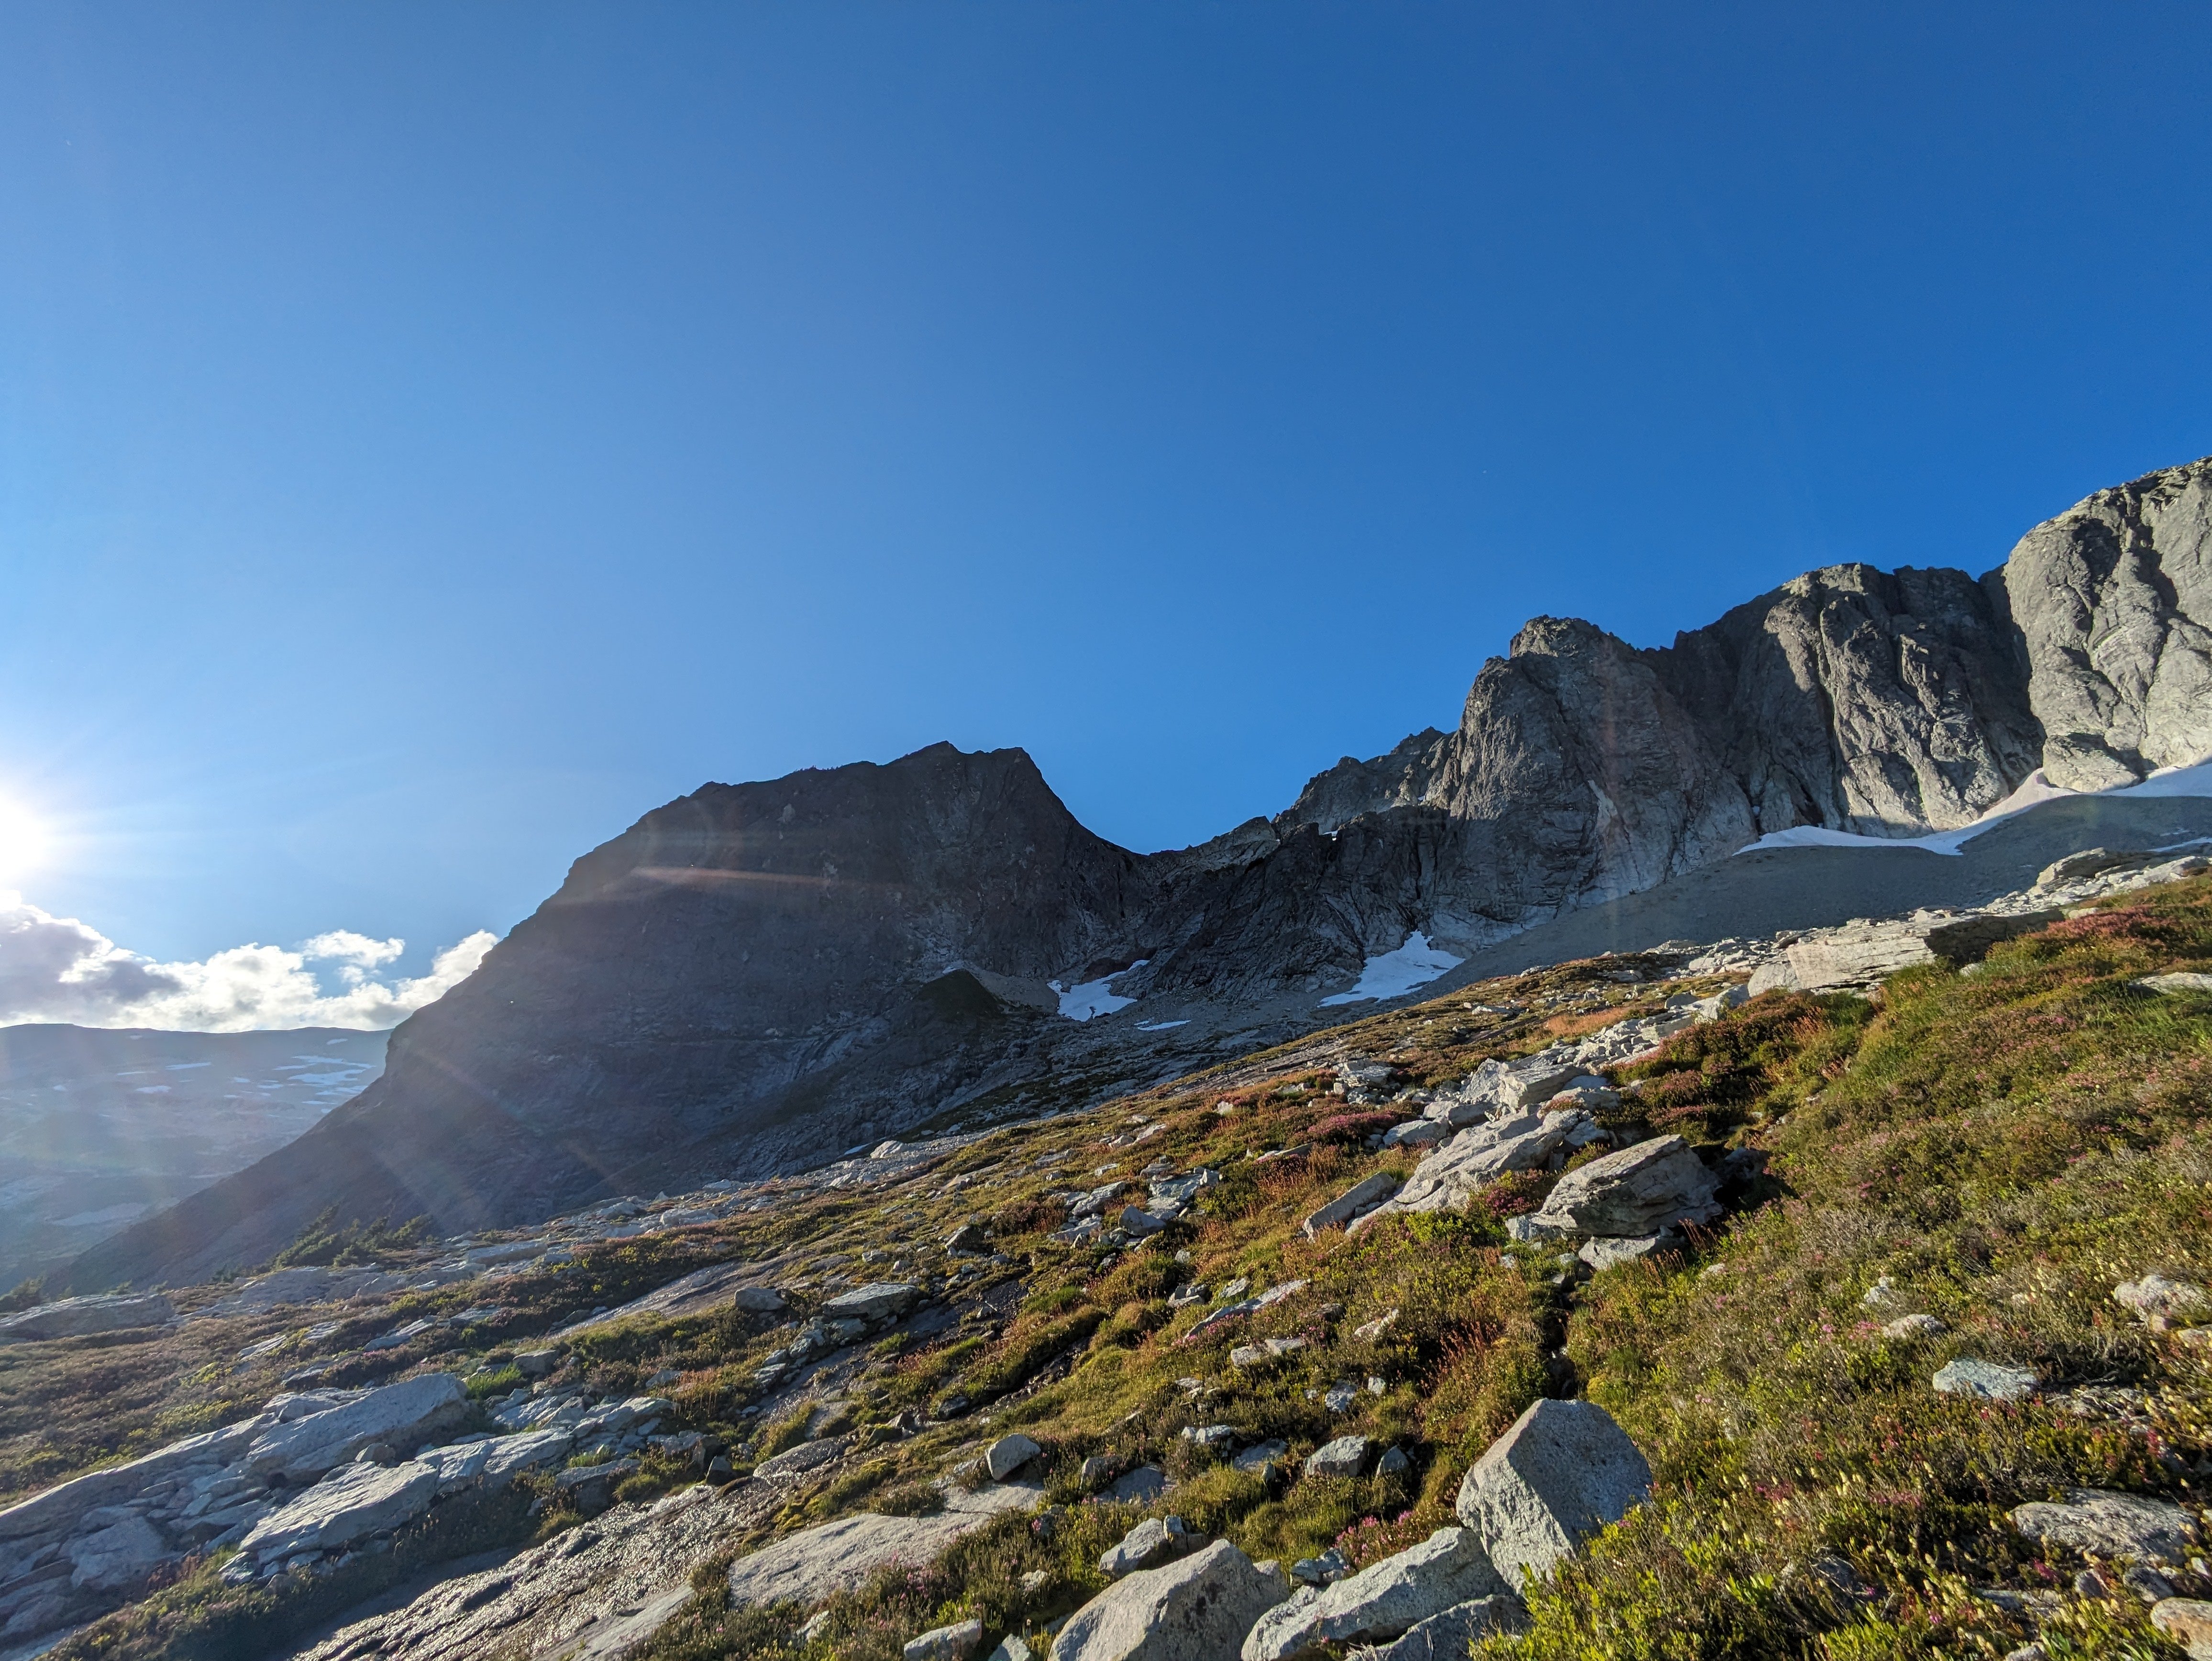
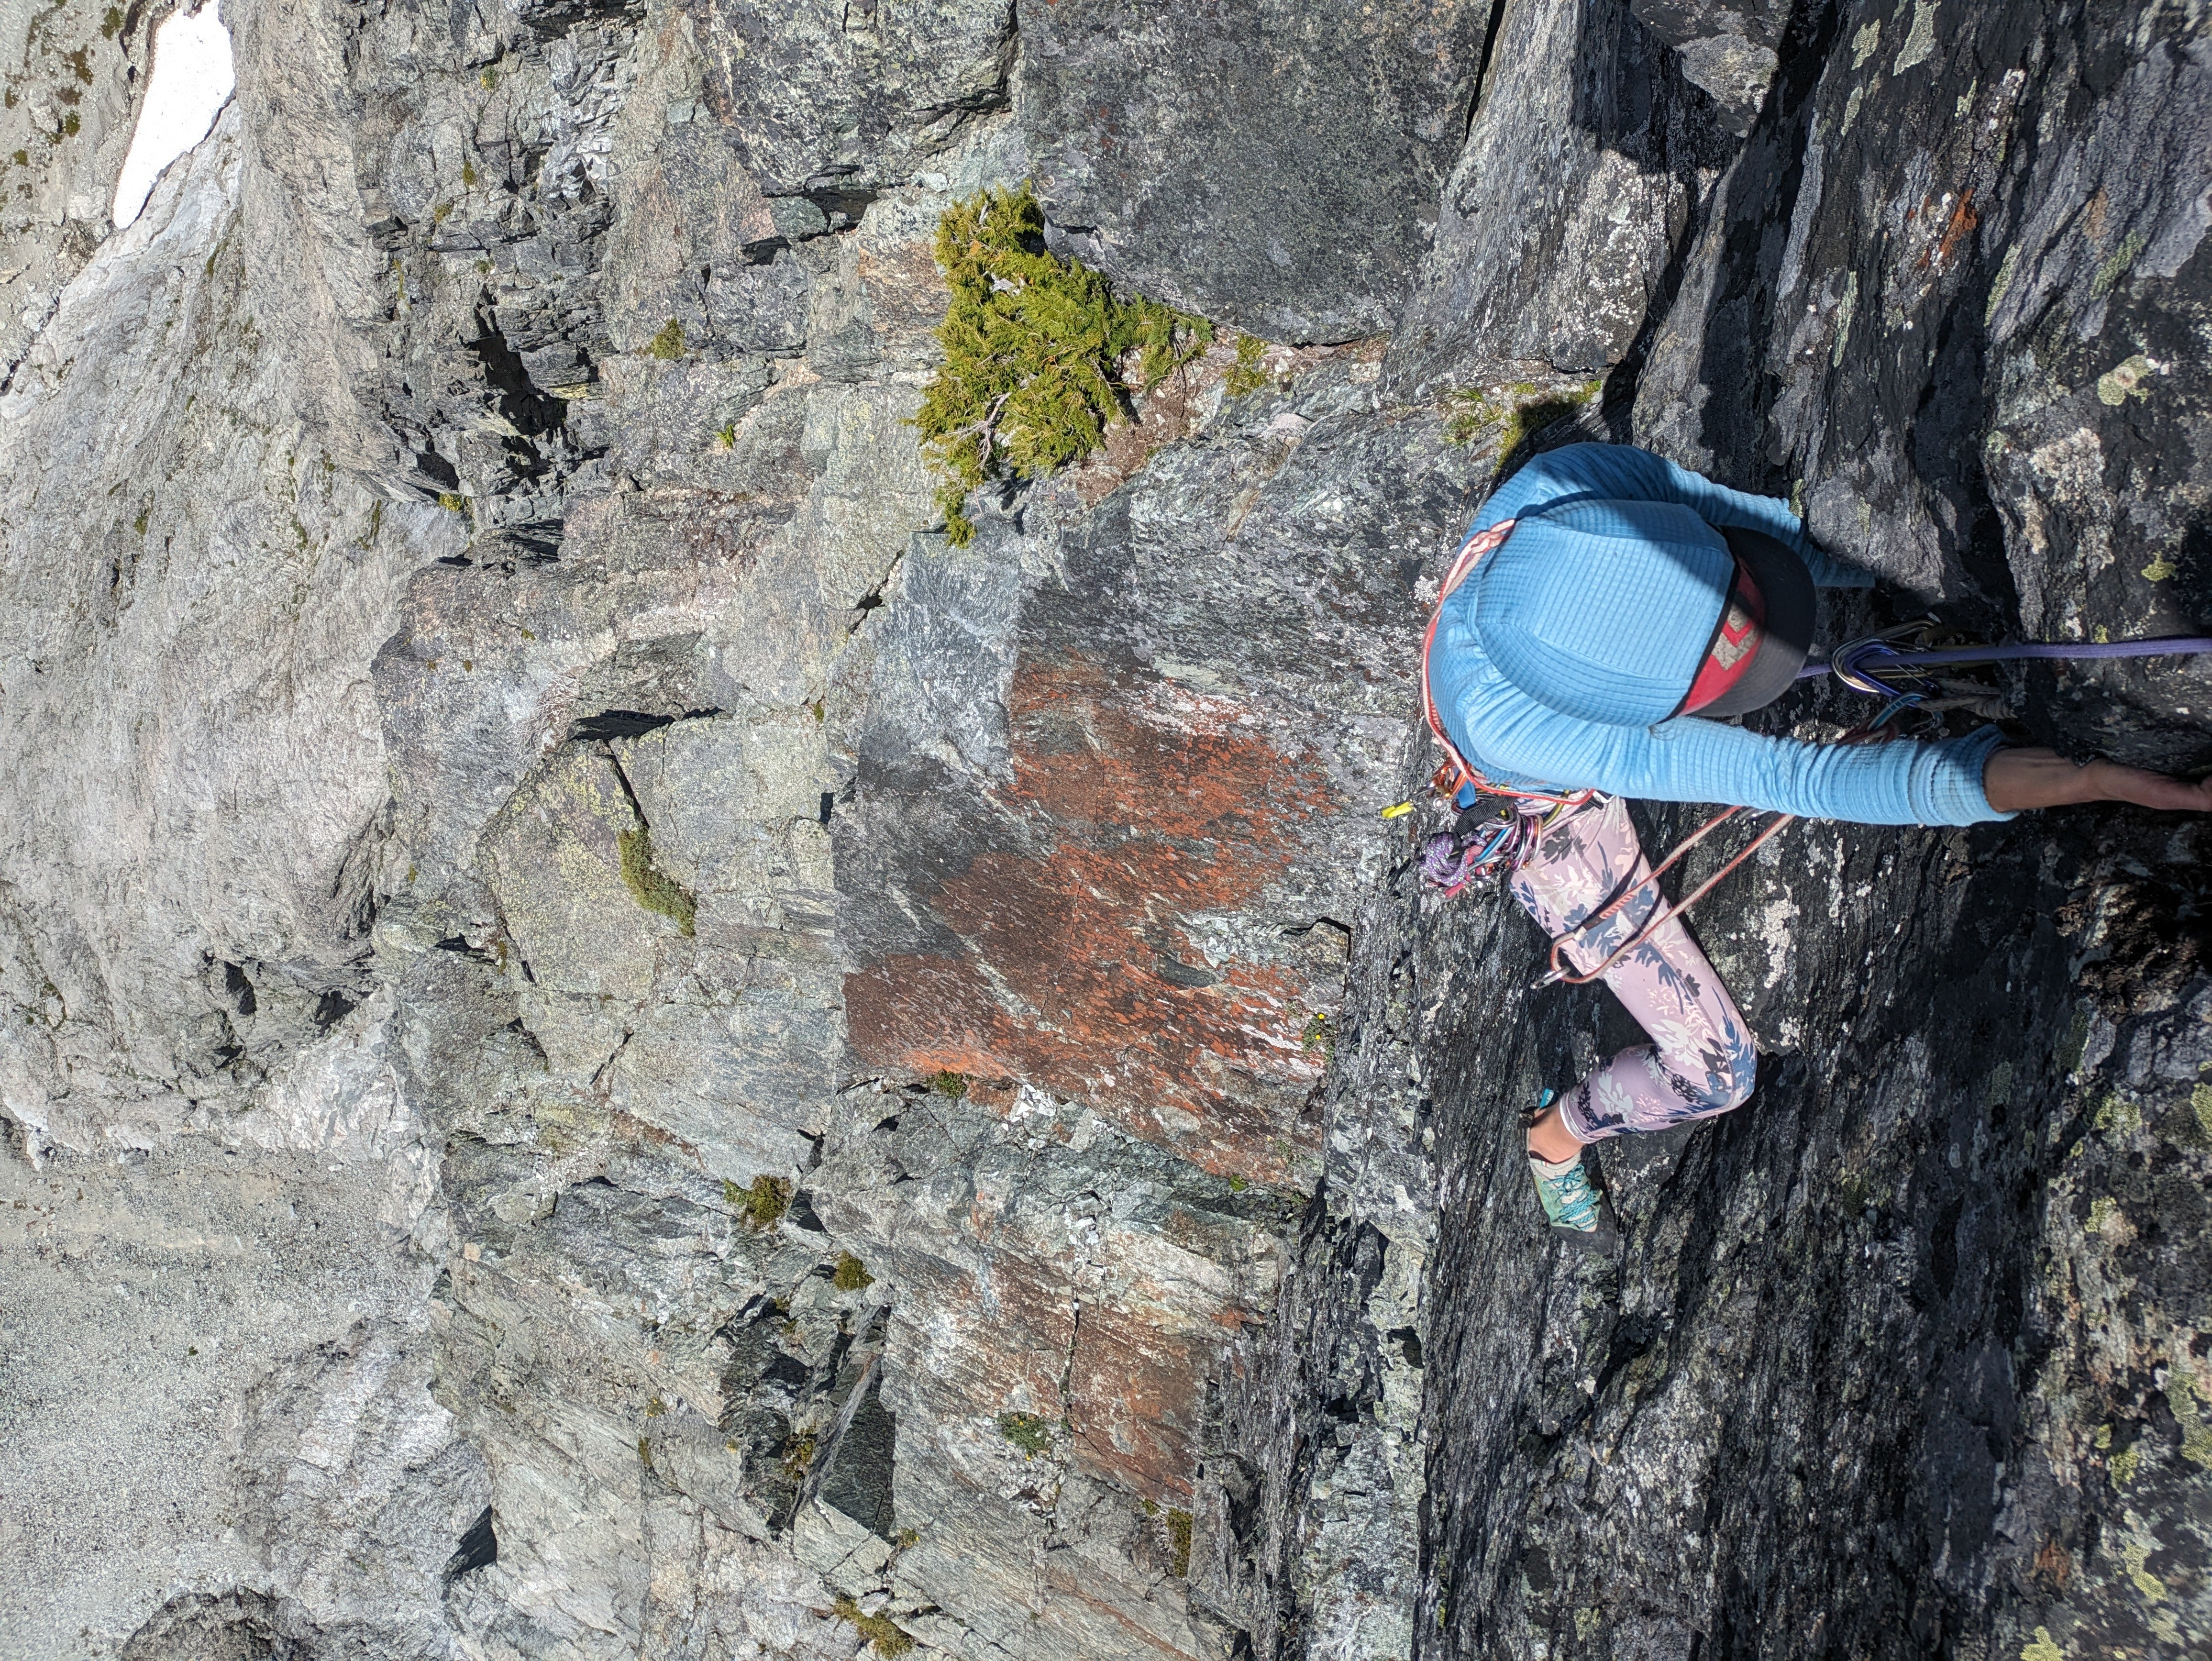
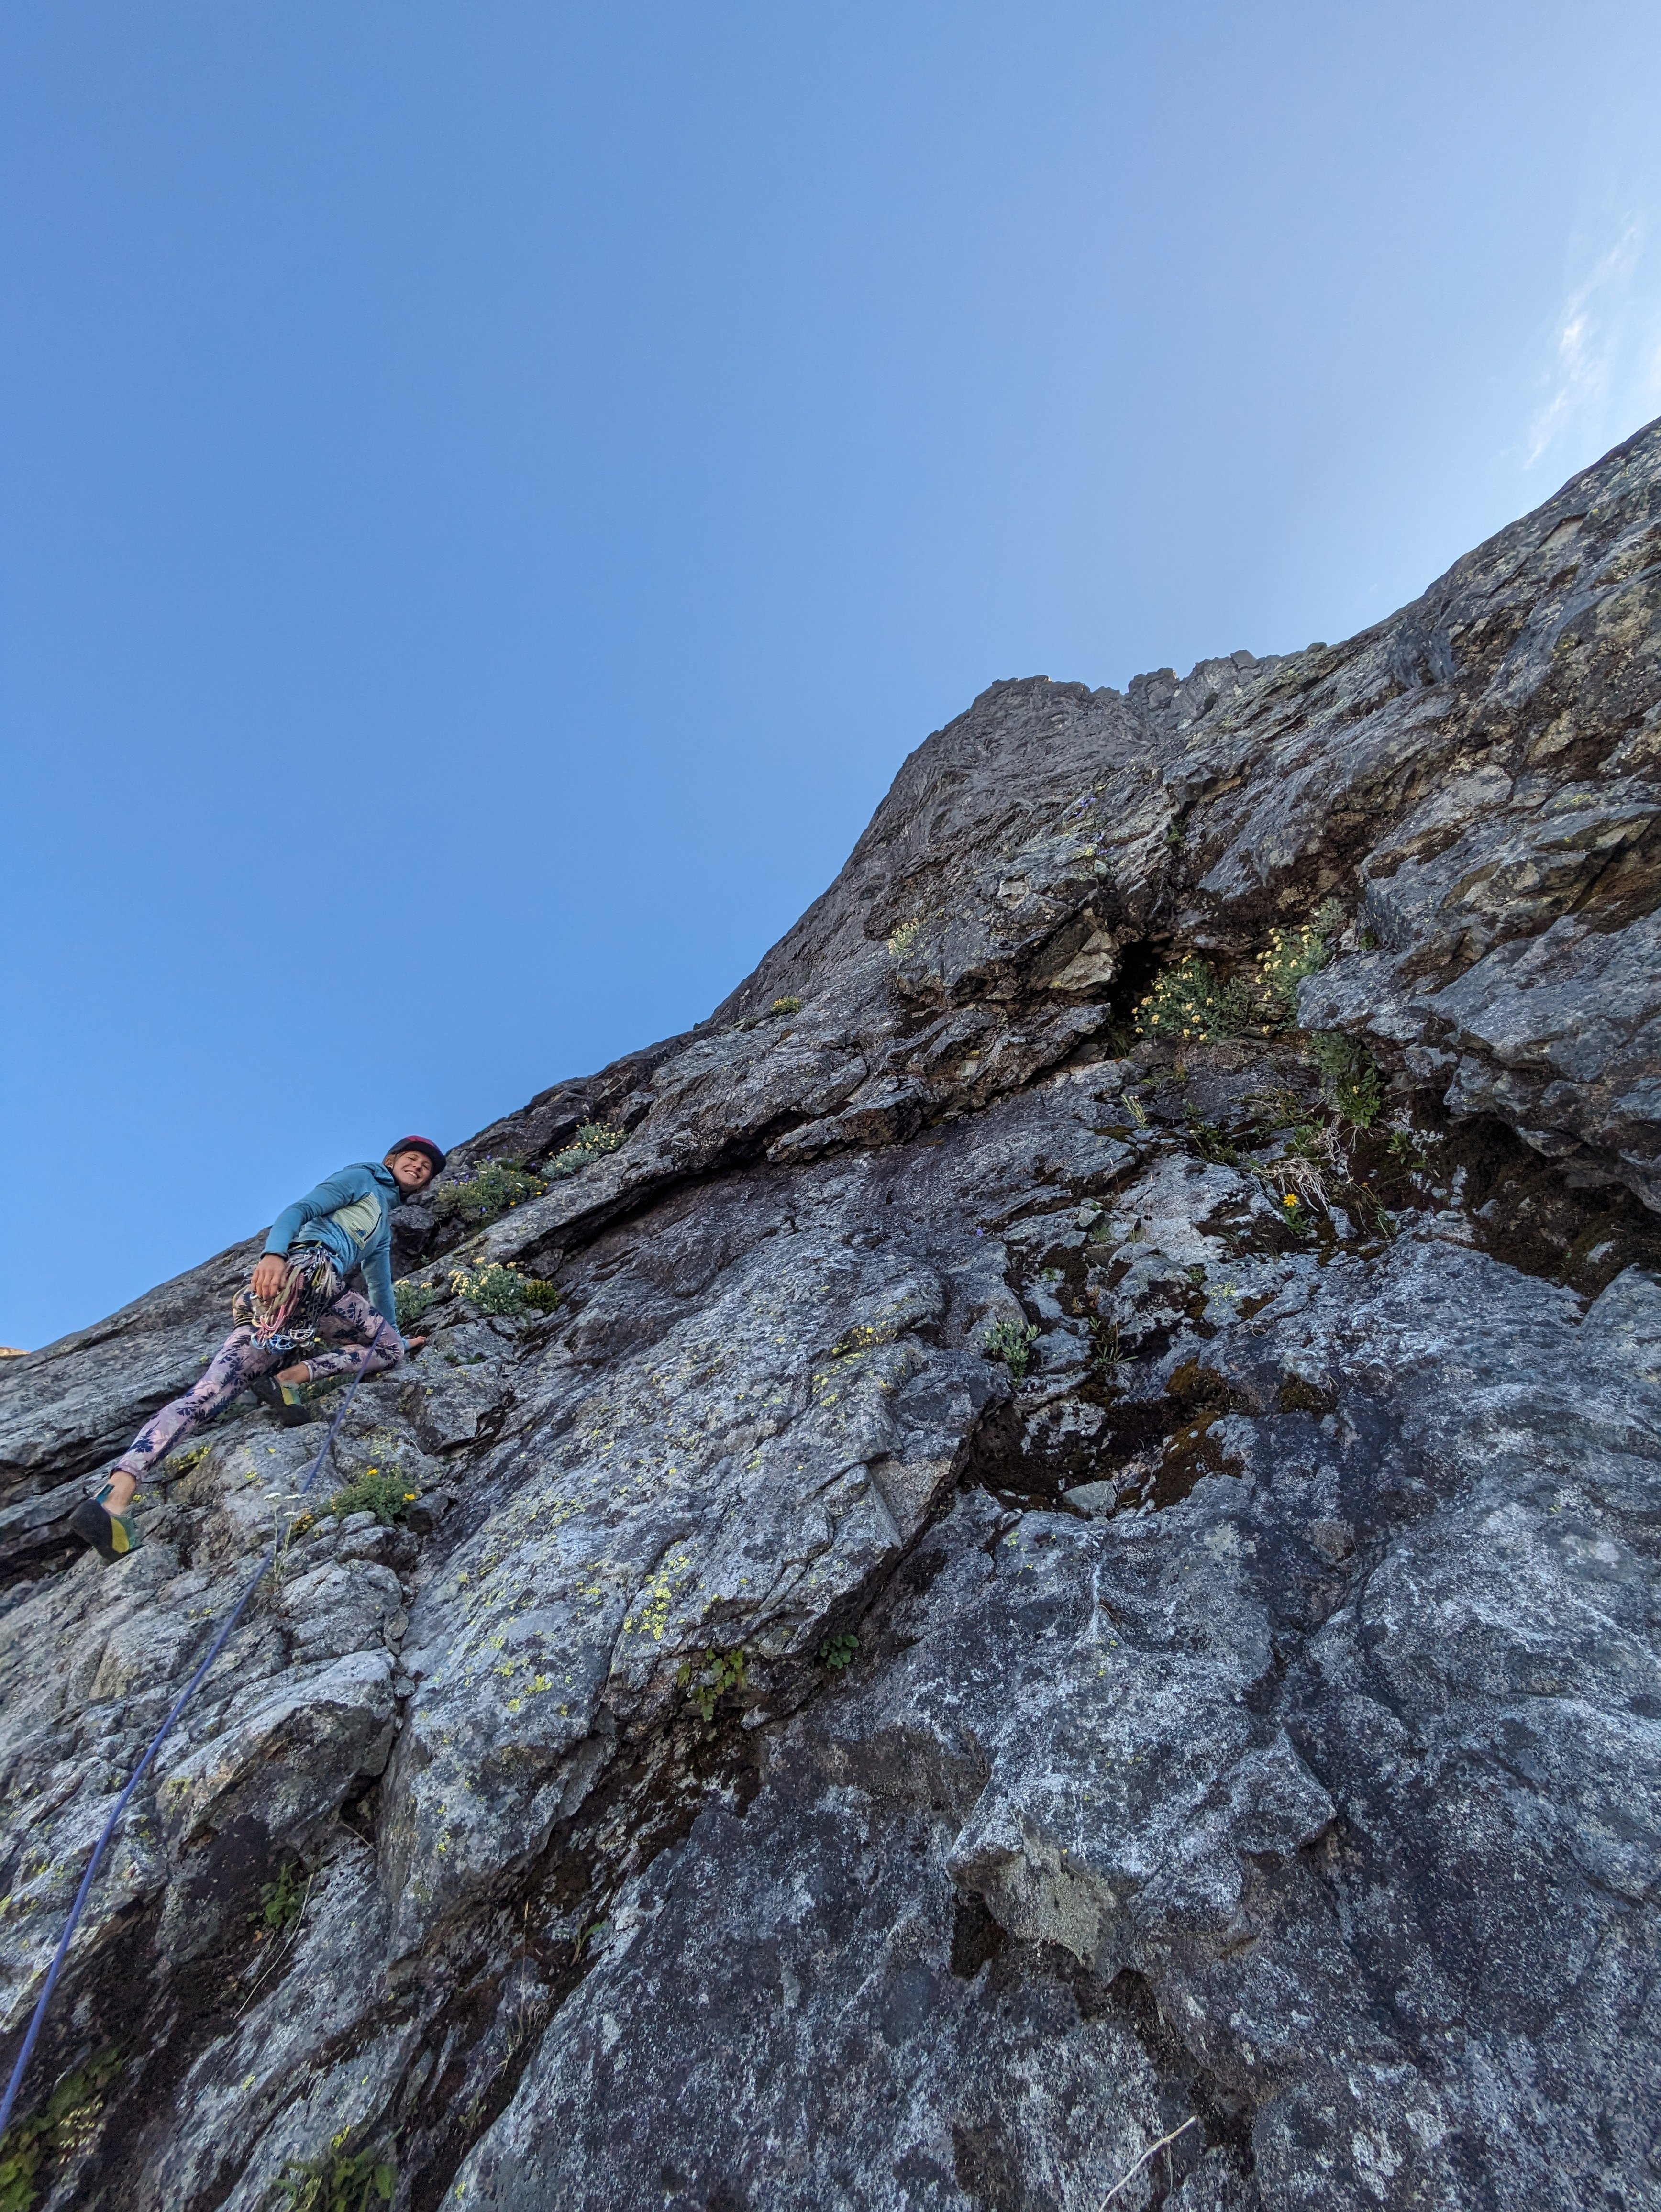
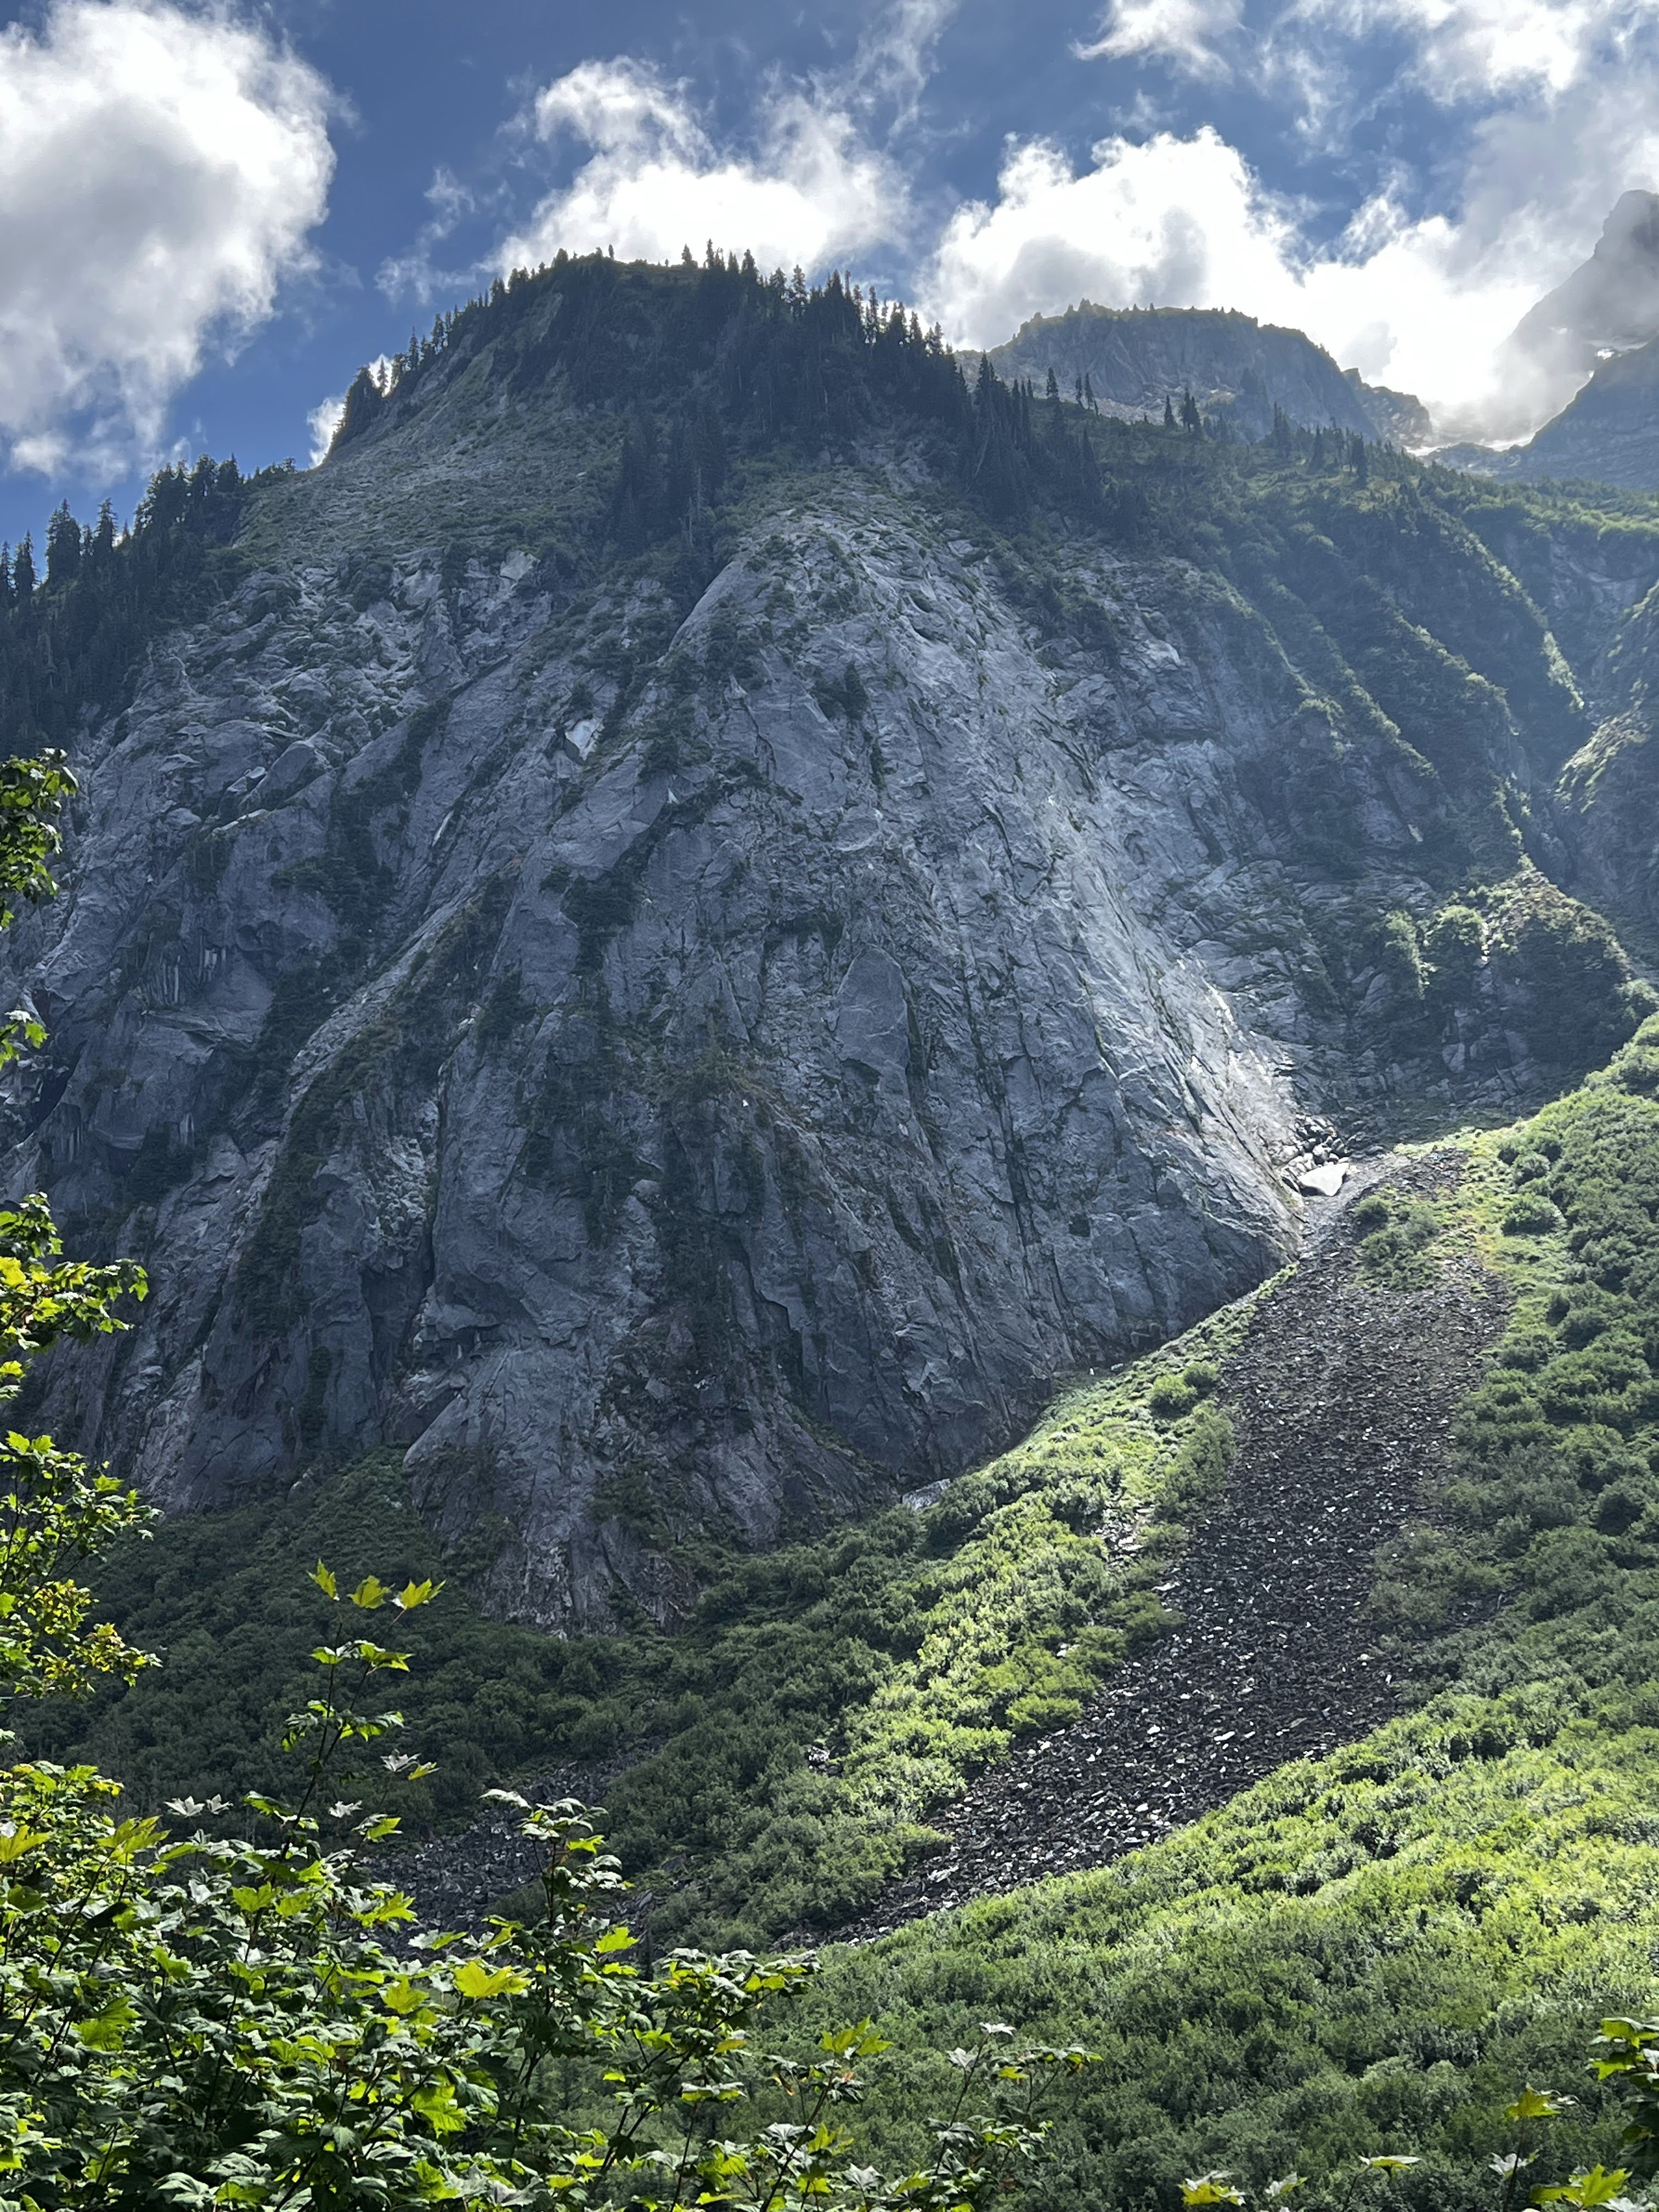
 Trip: Eldorado zone tour, with EMS - South and west ridges of Eldorado, SW face of Early Morning Spire Trip Date: 08/08/2025 Trip Report: Got to do some routes in the Eldorado neighborhood from a base camp last weekend. This was another trip I’ve been meaning to do for a long time where the pieces finally fell into place. Climbed with Ben who has learned quickly in the three years since he started climbing. Solid partner, his only real error was leaving glasses back at the car. On the first day this was mitigated with some tmnt Inuit tech. Cowabunga! Luckily at camp there was a climber who elected to stay there while his guided team climbed the E ridge. Heard the guide had extra shades and we arranged to borrow them for the weekend. Sky harp We set off for the south ridge. I love knife edges so found the route just barely in the worth doing once category. If you don’t particularly enjoy knife edges there’s no reason to do this climb. Unincorporated choss county Some fun atmospherics helped make it somewhat enjoyable despite the rock quality being some of the worst I’ve climbed. We counted it as good mental prep for W arete the next day. At the end of our three hour tour camp to camp we arrived to find the guide-lended glasses waiting for us. Most of the rock climbing in the next two days was in the shade, but this was still quite the score. Got up early the next day for the W arete and kind of raced another party departing camp right after us. There turned out to be a third party on the route that day too (!) Below Dorado Needle col we saw tracks through a snow bench above and left of the tarn, and followed these around to slabs near the sit start of the route. We misjudged the heathery path from below. What looked fine turned out to be dirty, crumbly, overly narrow and exposed, with mostly down sloping rock and dirt. This was a bit of a traverse coming from the NW to the ridge around 6700-6800’. Not at all recommended, there must be a better way, maybe more directly from the west? The other two parties took the considerably higher entrance from snow that bypasses all the green stuff, which seems more appealing in retrospect, though it looks like it has a bit of hazard too (steep, bad runouts). We were glad to be in front. There was one particularly thunderous episode of rock fall accompanied by muffled shouts and we were relieved to eventually see all 5 climbers back at camp that evening. After pulling through some legitimately scary terrain we soloed up briefly sound rock before it got questionable again. Then we started to simul. I think two blocks got us into the gendarmes. We had climbed up a chimney to a piton, but it didn’t look anything like photos of the crux traverse. After some confusion we saw another piton down below and realized we were above that crux. We rapped past it. It looks exciting, kinda wish we climbed it. Unintentionally mimicking the rocks posture. From there two more blocks got us past the snow into lower angle terrain where we unroped. I found mostly pretty good stuff to the summit. The path of least resistance isn’t always the best path. It was so early I proposed heading back down for the SW buttress of Dorado Needle but we elected to rest up for EMS instead. With the south ridge the day before, the weather arete completed the Eldorado compass for me (north and if course east ridges climbed before). I enjoyed solitude on the summit for a while and left as a large group of sunburned youth neared the top. The hours lazily drifted by. We chatted with various day trippers throughout the afternoon. Another early start had us retracing our steps to Dorado col. This time we passed by the tarn and its outlet stream. One slope looked inviting but it cliffed out on the other side. Proceeding lower we found a nice path through trees to cross the ridge with friendly heather downclimbing. EMS presents quite the striking mien all along the approach. We met someone at camp the night before who had his own route beta for EMS which he shared with us. Compared to Nelson’s it had a direct start, and above that, more of a diversion to the right and back left, rather than straight up. Both of these variations turned out to be good calls. The start was a little tricky in terms of climbing and pro. First piece. The climbing quickly got to be really fun. After about 70m I took the lead. After scoping a more direct line I tried the shallow right facing corner diversion to the right, and was pretty delighted with this section. I think this wide low angle splitter was in this pitch. I stopped about 70m later just below the ledge below the crux roof. Ben took over again and dispatched the slightly wet moves and drifted out of sight. This pitch ended up maybe 80m with a little simuling to the slab under to the roof. As I followed pitch 3 the rope hung over some excellent mid 5th friction slabs, where Ben had fortunately not placed pro. I took these optional sections (easier ledges around) to make the pitch even better. Pitch 4 was another rope stretcher with quality stone and low-mid 5th climbing. Ben took off again and neared the ridge crest. He selected a scruffy 5.10 chimney to get us to the slab and stopped there. I got to lead the finger traverse above this slab, another route highlight. I crossed the crest and continued the pitch but placed hardly anything, mostly focused on keeping the trailing rope from crossing the abundant choss that now sadly replaced the excellent rock. A seventh rope stretcher got us near to the summit ridge. We did one more short pitch that turned out to be unnecessary, should have unroped after 7. Tempered expectations may have been a factor, but we reveled in how good this route turned out to be. It’s not Stuart range classic quality but I think it’s up there with some three-four star WA pass routes, with an obviously much more engaging approach and return than you can find there. Our descent began with sandy goat ledges on the south side of the ridge. When this cliffed out we crossed back north. It was very exposed here with a deep moat below, but with bomber easy staircase rock leading down. There was one low 5th body length, an awkward long step and then we were at the moat. The gap was significant but absolutely doable. Still got high dive butterflies before finally making the leap. When Ben’s turn came he sprang from both feet, launching far beyond the gap and came skating into me lol. The hypothetical descent to the south had looked atrocious during the approach, and there is at least one epic going that way documented here on cc. We instead followed the advice to climb snow to the choss saddle north of marble peak. At the crest we saw rather steep snow to the east, so followed the snow up and south to get a look around. This passed so close to the summit we thought we might as well tag it. Took rock down here to bypass the steep snow. I scouted south while Ben scouted north. We never found existing anchors, so when a good crack on the north end below the steep snow presented itself we set an anchor and rapped down. 70m easily made it, might have been 25m or so. Next we crossed the McAllister, almost exactly matching my track from 3 years ago (snow levels early August this year look even lower than early September 2022). Having decided to skip our last night out, we zipped over to camp, packed up, ate dinner, and quickly hiked down, getting past the boulders and close to the bottom before pulling the head lamps out. The dip in the creek at the end was extremely necessary and welcome in a dumbfounding sort of way. Gear Notes: Doubles 0.3 to 1, single 2 and 3. Some C3s and nuts. Ax and crampons. 70m rope. Radios were very useful for our long pitch strategy on EMS. Approach Notes: Counter clockwise


- Yesterday
-
Nice, sounds like a good adventure. I like the single antenna look.
- Last week
-
first ascent "Imperfect Bypass" IV 5.10+R FA of the SW ridge of Whatcom Peak
lunger replied to Sam Boyce's topic in North Cascades
Way to go you two! Each time passing by there, I have wondered about climbing straight up from that spot. Thanks for the illumination, glad you got it done. And Sam, that perspective is valuable in our home range--exploration and freedom are the primary drivers, but you gotta stomach some bad with the good. -
I have Caltopo premium which offers high def satellite photos every 48 hours. Happy to share some photos as you get closer to your objective.
-
 Hi Nick, we followed your TR pretty closely (ty!), I think the conditions probably changed a significant amount in the time between Also thank you korengalois : )
 -
Personally I like it with snow. Definitely go North to South. I wore BD aluminum strap-on pons on Altras when I did it in June one year. Worked well enough but obviously you should test it first. This will give you a good idea of how much snow to expect... https://www.mtbachelor.com/the-mountain/webcams/
-
I love it. Congrats dude! Keep em going.
-
Figured I'd update this thread. Once our second was born last summer it was way harder to get the older sibling out by herself. This summer things have gotten back to "normal" (whatever that is). Some local highlights include TR sessions on the kid slab below Aggro Gully, climbing a rock "summit" on Misery Ridge, and self-selecting and topping out boulder problems at Widgi boulders. We also just did a trip to Washington where a quiet morning scramble up the back side of Castle Rock made for a great mini-summit, I short roped her up the scrambly bits with 20ft of cord. She also hiked Cutthroat Lake the next day and up to Heather Pass (Black Peak approach) and down under her own power on day 3. Took her backpacking for the first time in the Oregon Cascades this week (just one night, 1 mile hike in) and she loved it. Going bouldering with friends again this weekend and she literally screamed with joy and did a dance when I told her. How I lucked into this situation I have no idea. Oh, and her little sister is even more stoked at 18 months... climbs everything... but lacks the danger assessment of her older sibling... maybe destined for sport climbing rather than alpinism?
-
Trying to run the sisters traverse standard route (or reverse) here in a few weeks and wondering what things look like up high. Too much snow on north? Better to start on south or north? Recommendations for crampons for trail running shoes? Any information is much apprecated.
-
 Skydog joined the community
 -
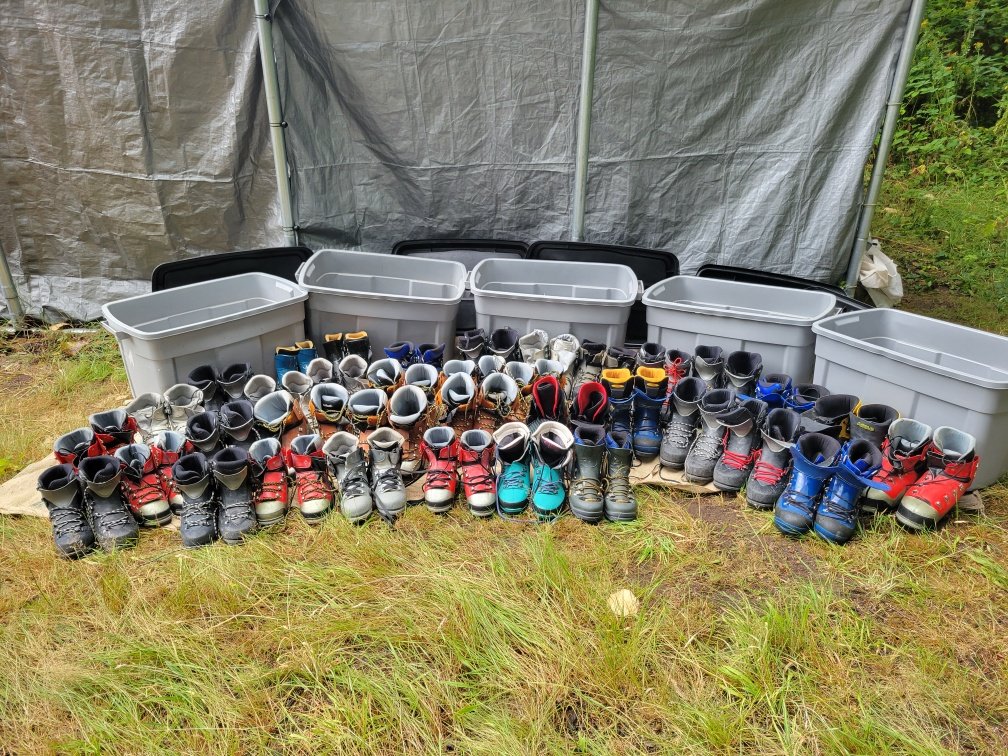
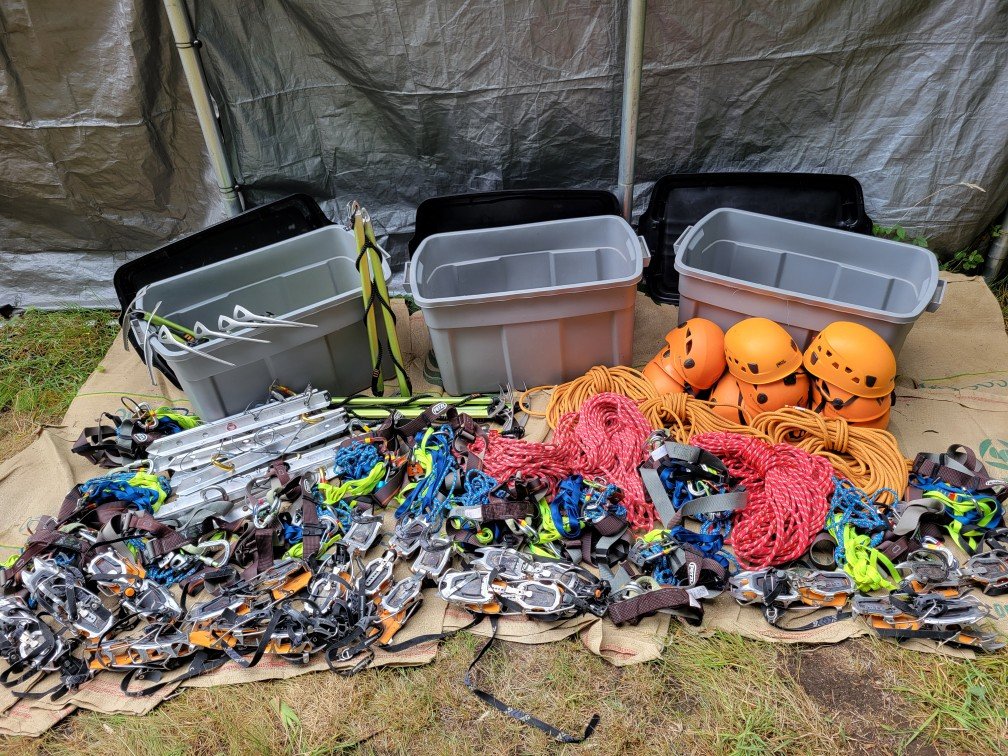
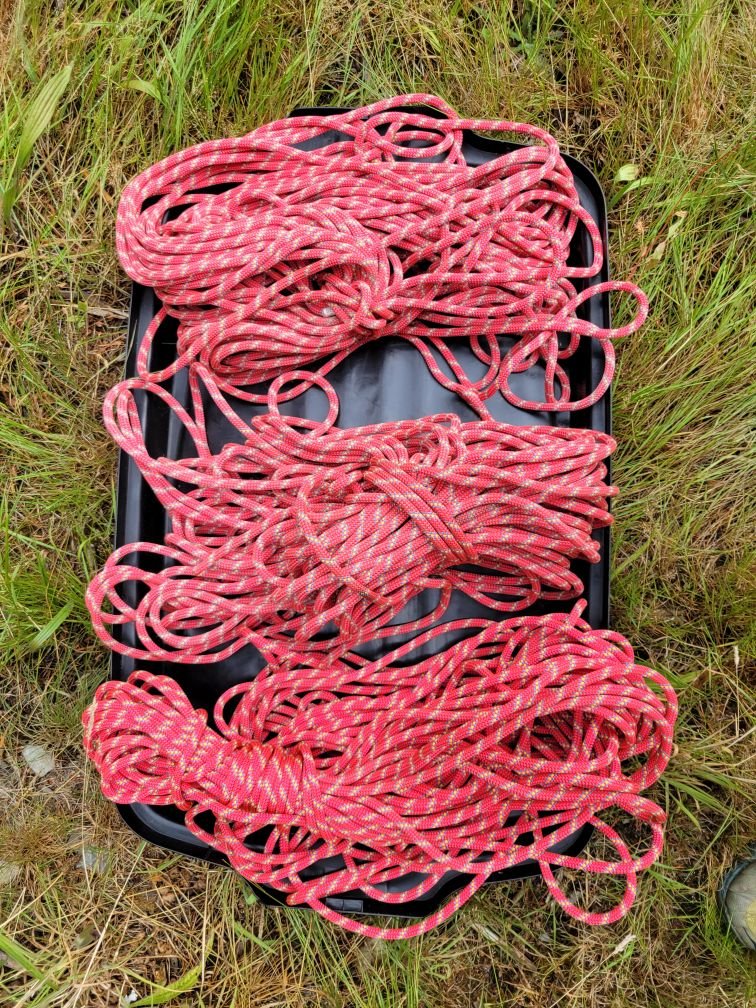
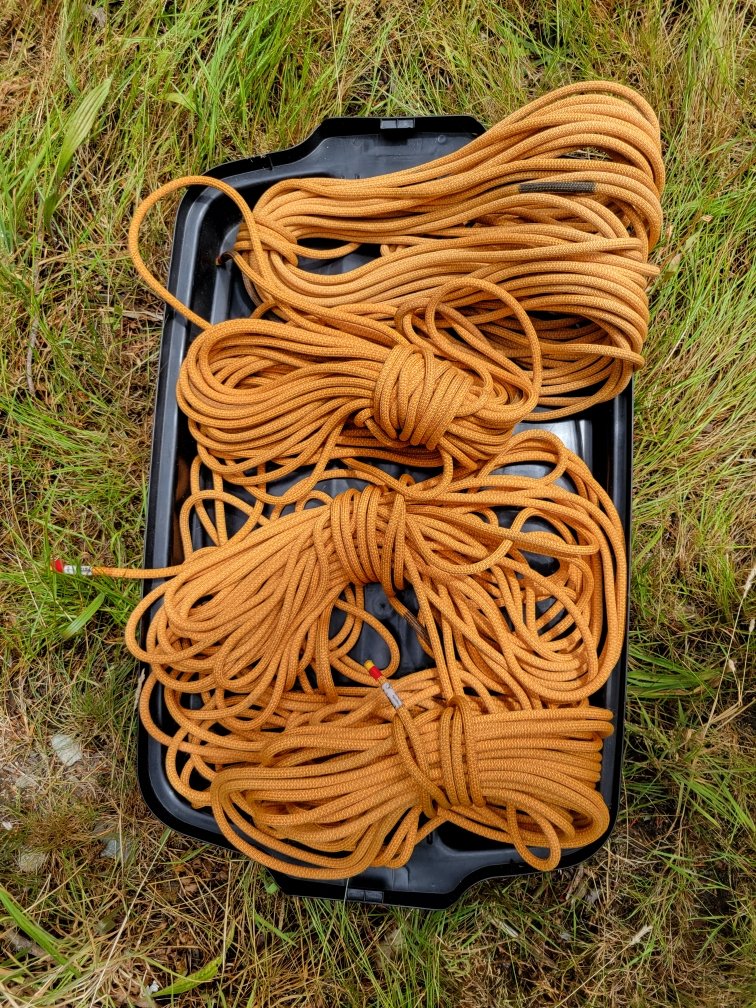
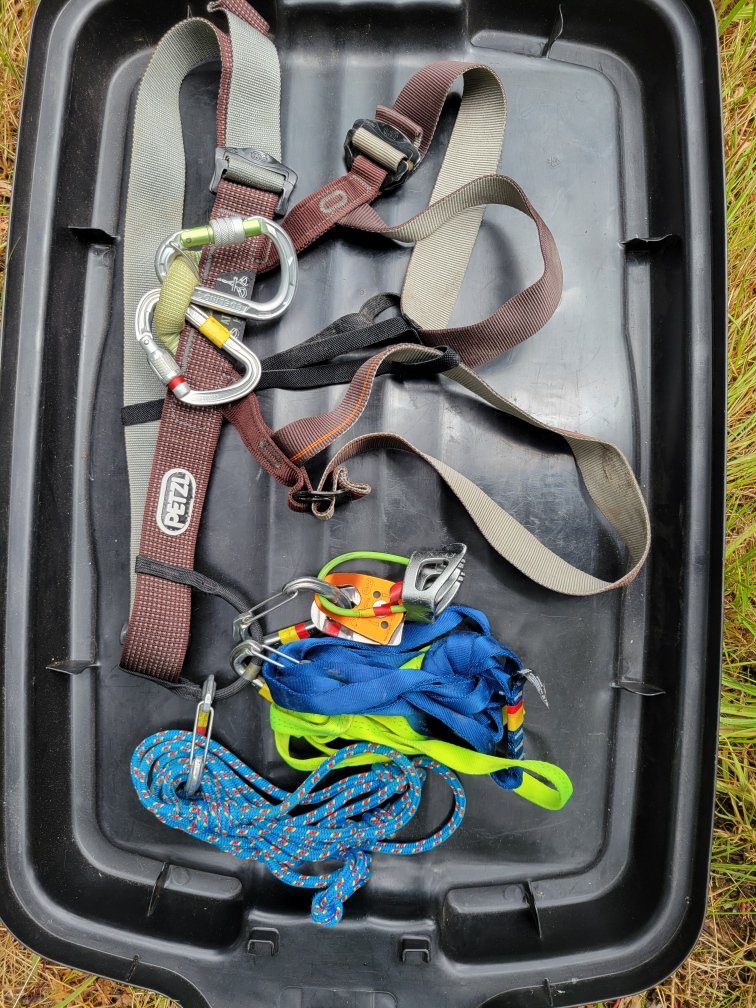
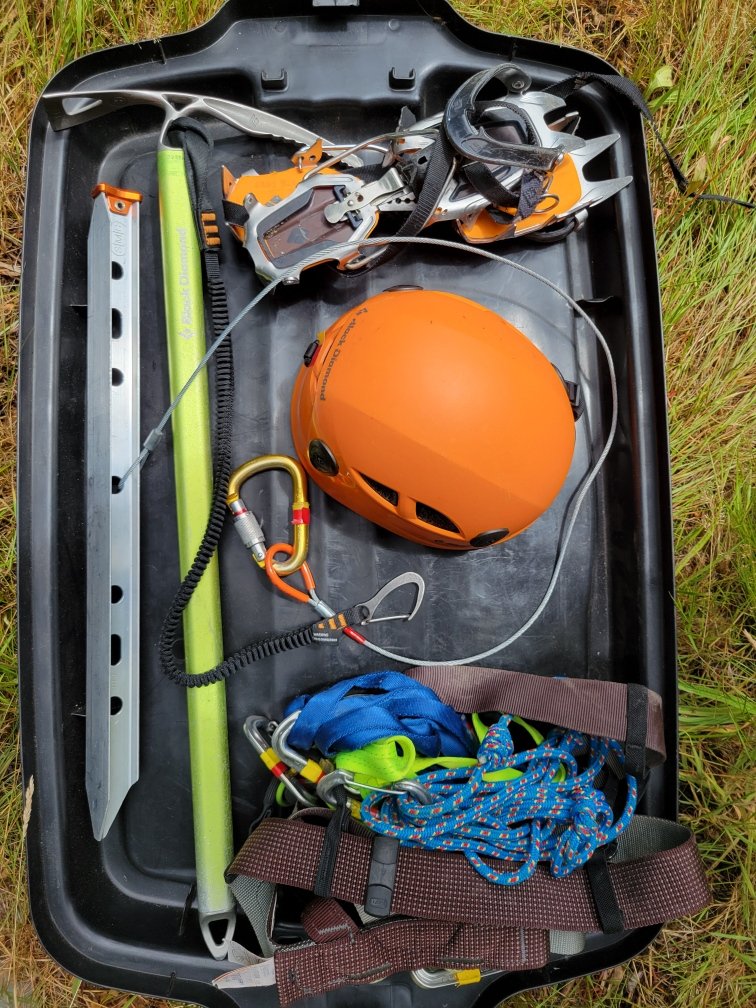
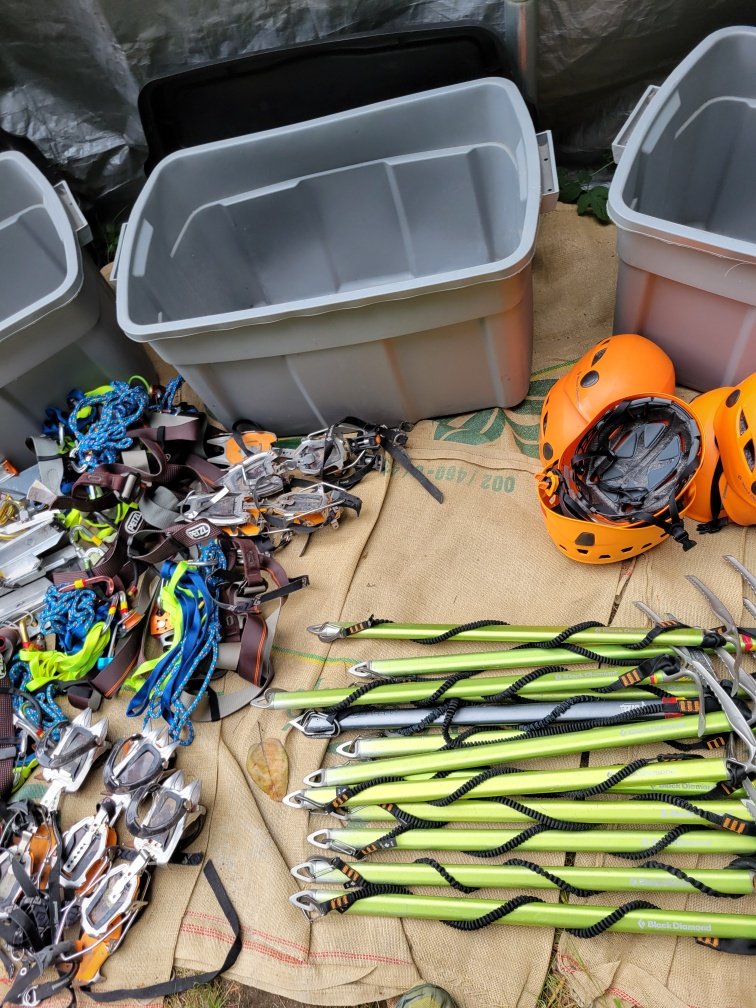
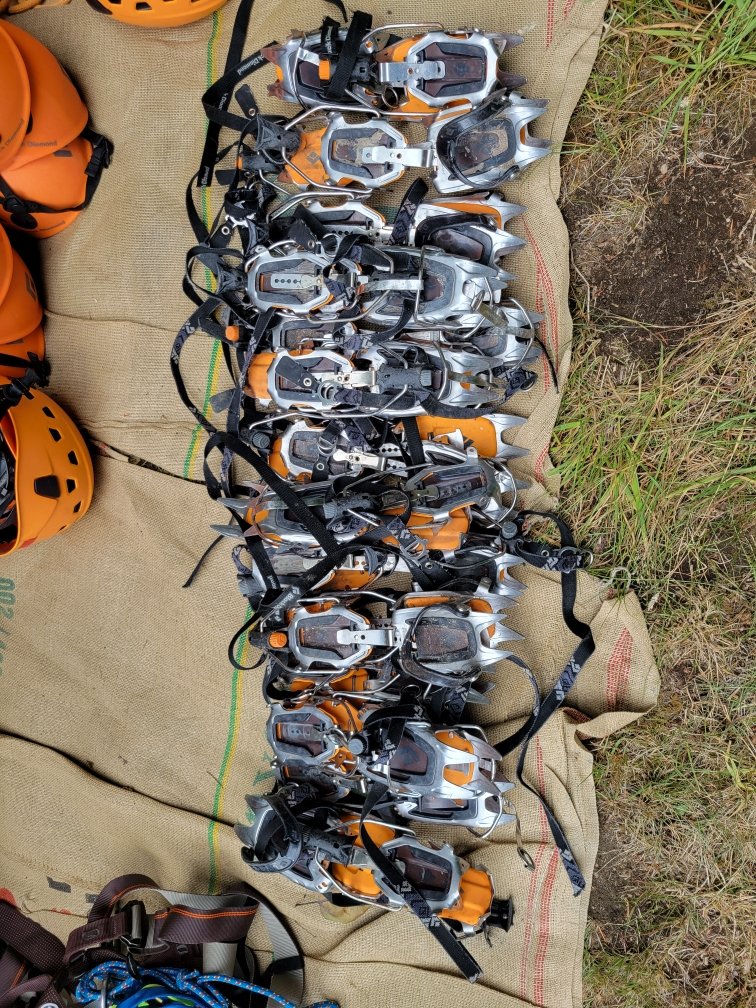
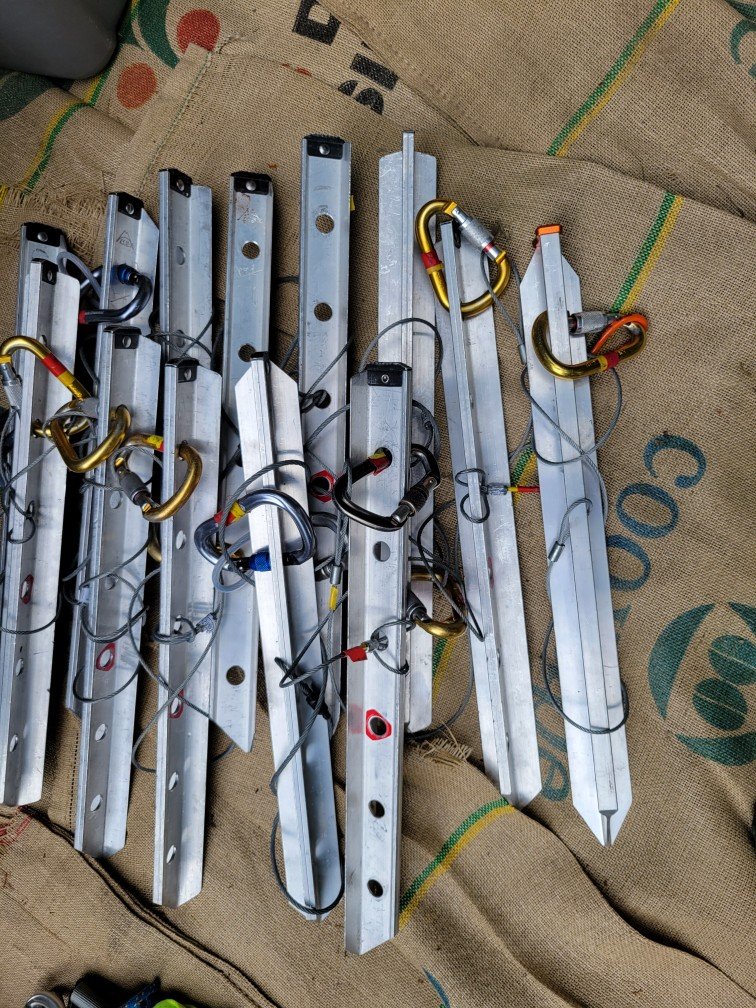
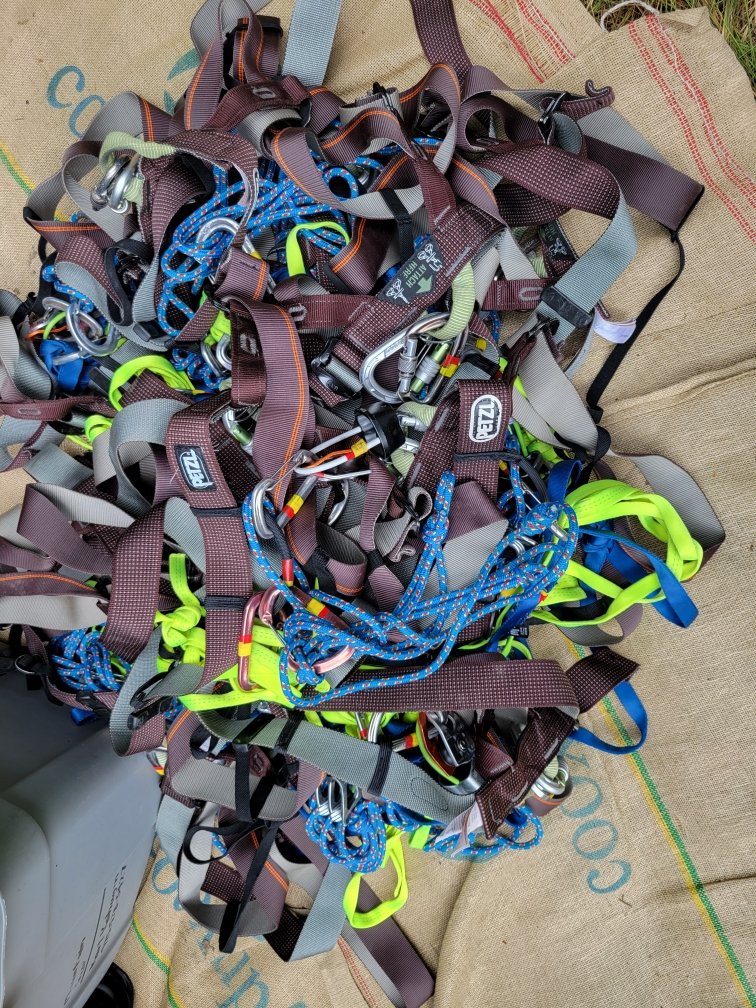
Helping my father in law sell his very large collection of glacier mountaineering gear - he used to rent to scout and church groups. 13 sets of personal glacier climbing kits INCLUDES: 13 ice axes (12 BD raven with slinger leashes, 1 petzl glacier with leash) 14 pairs of crampons (9 BD Serac Pro, 1 BD Serac semi auto, 4 BD Contact semi auto) 12 helmets (10 BD Half Dome, 2 Petzl Panga) 13 pickets with cable runners and locking carabiners (MSR & SMC) 13 harnesses (Petzl Pandion) each with 2 lockers, 3 non lockers, prussic slings, 2 double length runners, belay device and pulley, 4 8mmX30M dry ropes, 3 8mmX50M dry ropes 36 pairs of double plastic mountaineering boots, sizes 4.5-14.0 (Koflac, Scarpa, Asolo, Lowa, Vasquez) FYI : note there's only 12 helmets, only thing needed to purchase is one additional helmet to have 13 complete sets Photos show: One set helmet, ice axe, crampons, picket with cable runners and locking carabiner, harness with 2 lockers, 3 non lockers, belay device, pulley, 2 double length runners, set of prussic slings 4- 8mm X 30 M dry glacier ropes & 3- 8mm X 50M dry glacier ropes 3- 37 gal. tubs with gear, ice axes, crampons, harnesses, ropes, pickets, helmets 5- 37 gal. tubs with 36 pairs of mountaineering boots sizes 4.5- 14.0 13 pickets with cable runners and 13 harnesses with gear 13 ice axes with leashes, 14 pairs of crampons with standard and long bars able to fit all boots Harness and close up of belay loop lockers, 3-non lockers with belay device, pulley, double length runners, prussic sets Selling as an entire collection - not interested in selling al la carte Asking $4,000 total + tax for all of it - value is approximately $8400 so this is a great deal Average price per kit $252 Approximate MSRP per kit $640 Stored in 8 separate 37-gallon Rubbermaid tubs (5 for boots & 3 for gear) Willing to meet within a reasonable distance in Snohomish or King Counties Can transport all 8 tubs to meet up Send a message to toevlugsoord at hotmail dot com if interested and I can put you in touch with my father in law! He is anxious to sell ASAP!
-
 Nice work Sam and Lani!
 -
Sperry Peak – NE Ridge On August 3 Gabe and I climbed the NE ridge of Sperry Peak. Due to low clouds, we had about ~100ft of visibility until we reached 5000ft. As a result, we generally stayed near the crest of the ridge, being unable to see if moving left or right would be advantageous. Given that, our experience of the route could be substantially different from prior or future parties. We suspect that some (but not all) of the more unsavory portions of the route we climbed could be avoided with better route finding. The upper half of the route has some of the best ridge scrambling I have done in the cascades, including a spectacular section of knife edge ridge on good rock with great gear. However, on the bottom half of the route, gear is sparse and it is advisable to make an offering to the veggie gods before your ascent as many pitches are vertical bushwhacking requiring the climber to put full faith into a wide array of plant species to make upward progress. On one particularly memorable pitch I took a breather while standing on a curved cedar branch hanging several feet out from the rock before lay backing up the rest of the branch to reach a belay. For the route we climbed, a modern grade of 5.8R seems about right. Car to car we took approximately 16 hours. Overall, the rock was surprisingly solid (when you were touching it) and we didn’t experience any runout hard moves. For climbers interested in getting a bit off the beaten path with a tolerance for schwacking (both horizontally and vertically), I recommend the route. Approach: Following Beckey we took the Sunrise Mine trail to ~3100 feet and then started contouring north. After a too short and pleasant section of fern bashing, we quickly dove into steep dense jungle. Several cliff bands pushed us downhill toward the top of the slabs with the waterfall you see from the trail. Unfortunately this way doesn’t go, so we turned around and followed a cliff band uphill until finding a short class 3-4 gully which allowed passage. Continuing to contour we crossed several steep gullies (requiring a bit of luck to find reasonable scrambles to get into the gullies) with running water and a couple sections of class 3-low 5th slab before accessing the ridge from its east side at ~3500ft. If we attempted this route again late in the summer (so the water levels are low) we would consider approaching directly from the car. From satellite images it looks like it would be possible to follow relatively open stream beds to almost the bottom of the ridge. Of course we haven’t tried this approach so no guarantees! In the below picture I marked our approximate ( I cannot emphasize enough how approximate this is) approach in green and the possible alternative approaches mentioned above in red. The parking lot is for the sunrise mine trail is circled with blue. Climb: Hit the ridge and follow your nose. Many options are possible. Descent: Descend the standard Sperry scramble route. Gear Notes: We brought doubles in .4-1, a single .3, 2,3, and one set of nuts. For slings we brought 12 Singles, 4 Doubles. We used a 60M rope. Bring a nut tool to clean out placements. If we were to do the route again, we would bring 6-8 doubles and fewer singles. Lower down on the ridge the larger cams were surprisingly useful. Two 3’s and a 4 would not go unused, though they are not necessary. Final Thoughts: We found a couple pieces of fixed gear. Any of them yours? I would be stoked to hear about other people’s experiences on the route. Has anyone done the northwest ridge? The upper portion of it looks interesting! Pictures: The Fixed Gear: The access gulley on the approach. Many of lower pitches on the ridge were similar to this: Some pictures on the lower half of the ridge: Unbeknownst to me, I picked up a stick while following a pitch: And now some upper ridge pictures!
-
 I feel like my primary motivation for fa's is exploration and freedom. If ya can't enjoy the turds ya step in you probably won't stick around in the game very long.
 -
 What a sweet adventure! Nice job on the line. Bout time someone found another way to get into the pickets! 😆
 -

first ascent "Imperfect Bypass" IV 5.10+R FA of the SW ridge of Whatcom Peak
wayne replied to Sam Boyce's topic in North Cascades
Well done!! That’s a huge line for sure ! -
 pdxscotty joined the community
 -
Which side are you approaching from? Could probably get eyes on it before you leave the TH if you're smart about it. I was up by the Prouty Glacier on South Sister today and was surprised at the amount of snow. The summits were socked in so I couldn't see the upper mountains. I would guess there will be some snow and some choss based on what I saw and my experience up on North.
-

first ascent "Imperfect Bypass" IV 5.10+R FA of the SW ridge of Whatcom Peak
JasonG replied to Sam Boyce's topic in North Cascades
Yikes! Well done keeping things from going bad, and thanks for the honesty. Beautiful country to be in, if nothing else. -
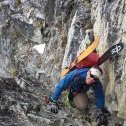
From July 25-27, Lani Chapko and I climbed the SW ridge of Whatcom peak. This is the large, two-tiered ridge that, at its toe forms the imperfect impass. The ridge gains 2400' with 3000' of roped travel. The ridge is generally not very sustained with the upper half being mostly low fifth class. We did it in 14 pitches or simul blocks. The route climbed on generally very low quality shist and required care and deliberate, slow movement the whole time. Protection was surprisingly good through the lower, challenging climbing, but non-existent at times higher up, forcing very long simul blocks to locate anchors. The route follows the skyline Day 1 We left the Hannegan Pass TH around 2pm and hiked to a camp on the summit of easy peak. Day 2 Finish the easy ridge traverse and drop down to the toe of the ridge. We started just left and uphill of the toe on an obvious ledge. Climb then return via easy pass/imperfect impass back to a camp on the summit of easy peak. NOTE: I bolstered the rap anchor above the second pitch of the impasse and added new tat. There is now a small nut and good KB in addition to the sketchy horn that people had been using. Please do not clean this anchor, this section is about 5.5 and often seeps for long after rains. So it can be nice to have the option to rap. Day 3 Wake up late, and hike out, eating copious berries and taking longer than the approach 😅. Here's some photos of the climb Lani starting up the first real pitch Climbing on one of the lower 5.9 pitches Short overhanging crack crux The broad notch halfway up Easy scrambling above the notch Some cool ridge climbing up high A near gendarme towards the top Another view One more view of the ridge, following the skyline. Gear; Single Rack .1 to 3, doubles .3 to .5; small set of nuts and 3 KB's (used extensively). As always, here are my pitch notes, though id hardly recommend this route. In all seriousness, Castle in the Sky is a bonefide modern classic Cascades alpine route, so if you want to do something technical on Whatcom, you should really just do that! P1 100' 5.3 Climb water polished slabs and grooves to a massive ledge (easy solo). Move (or establish) belay to far right end of the ledge P2 200' 5.8 climb a runout mossy dike to a poor belay stance. P3 200' 5.6 Continue up the moss dike to a big ledge system. Traverse the ledge to the right anc belay just before the massive cleft. P4 100' 5.9 Traverse into the gully, climb the sometimes chossy gully and belay below an overhanging OW in a forming cave. P5 100' 5.10a Steep moves to the right exit the gully. Then steep chossy, but well protected climbing gains a ramp then a ledge to belay. P6 100' 5.10+ Trend up cracks to a tree. Awk moves through the tree gain a small ledge. The crux crack lies above. Steep pumpy climbing with barely ok gear leads to a sloping ledge to belay. P7 200' 5.9 Surprisingly techy climbing above the belay relents to chossy low fifth class on the ridge. Stretch your rope and find a belay. P8 200' low fifth Scramble the ridge to some trees. Scramble a few hundred feet to the base of a gendarme P9 250' 5.5 Scramble up a grassy ramp on the right of the gendarme. Belay at a small saddle. A few hundred feet of 4th class through a massive notch in the ridge. This is a possible bivy site or bail point. Several hundred more feet of scrambling up to low fifth leads to a small notch. P10 300' low fifth Scramble a loose gully to where you can find gear to belay. P11 200' 5.5 Continue up the gully to where the ridge knife edges out. P12 200' 5.4 Climb the knife edge ridge to the next notch. P13 600' 5.5 Continue along the ridge to the base of the summit headwall. P14 200' 5.7 Climb the left side of the headwall to a spot just below the summit, then scramble to the summit.
-
 Sure. Mostly I’ll focus on the gear we took from artist point to GP. The gear up Baker was different…sort of standard summer volcano kit… After Baker we treated it more like backpacking. Going as light as we could wherever ~reasonable We used 55L Hyperlite packs. Big enough for all the gear and weeks worth of food. But light enough to accomplish the goal of being under 40lbs fully loaded. tents - we used a big Agnes UL freestanding and a Hyperlite 1p non freestanding. sleeping gear varied by person but for the most part we were using ~20 degree UL quilts and the lightest air pads we could tolerate. I had an old school 3/4 foam pad to supplement footwear was a big topic of discussion in the months (years, really) leading up to the trip. I can’t say enough good things about the scarpa ribelle run xt for the wide variety of terrain out there. They take a crampon really well for being essentially a trail runner. I wish they dried quicker but they definitely met the need without having to wear boots for the endless regular hiking hours various UL ice axes, standard strap on crampons, trekking poles regarding technical gear (which may be more what you actually want to know here)…this too was an endless back and forth leading up to the trip. It would be easy to go way too heavy. But you can’t really head out in this terrain with just hiking kit. Ultimately we ended up with a 30m rad line, a couple small cams and nuts, a picket, couple ice screws. We used everything except the screws, although there was a moment where we considered some funkery that would have employed them. We had some other basic glacier pieces. Grivel screams for rapping the rad line…our harnesses were all super minimal (there’s a few out there that weigh like 2-3oz) food: yes, a ton of freeze drieds. Various other calorie dense snacks. Cashews, MMs. We packed a ton of pizza out with us from the resupply. The calorie deficit was probably the hardest part of the trip. It really wears on your mind when it goes on for that long. Honestly I’m not sure I’d bring that much more food though. Keeping the pack light was pretty important. Perhaps we could have added a resupply at cascade pass and then been able to go with more food/day through the southern portions feels like I’m missing something but I think that’s it other than some other unremarkable items like chargers, cookset etc
 -
Looks like a great route! https://www.mountainproject.com/route/201457237/negligence
-
new route Hannegan Buttress - Negligence (5.10d)
manninjo replied to Zackw7's topic in North Cascades
Looks like a stellar crack climb, nice work! -
What if they were having the most fun? I say if you can’t make it to a main named summit it’s time to submit it to Geographic Names and get your summit named. This will please the sponsors.
- 1 reply
-
- 1
-

-
Super discounted from $180 to $27 USD. Willing to work with the fixed leg loops. https://outlet.arcteryx.com/ca/en/shop/mens/skaha-harness
-
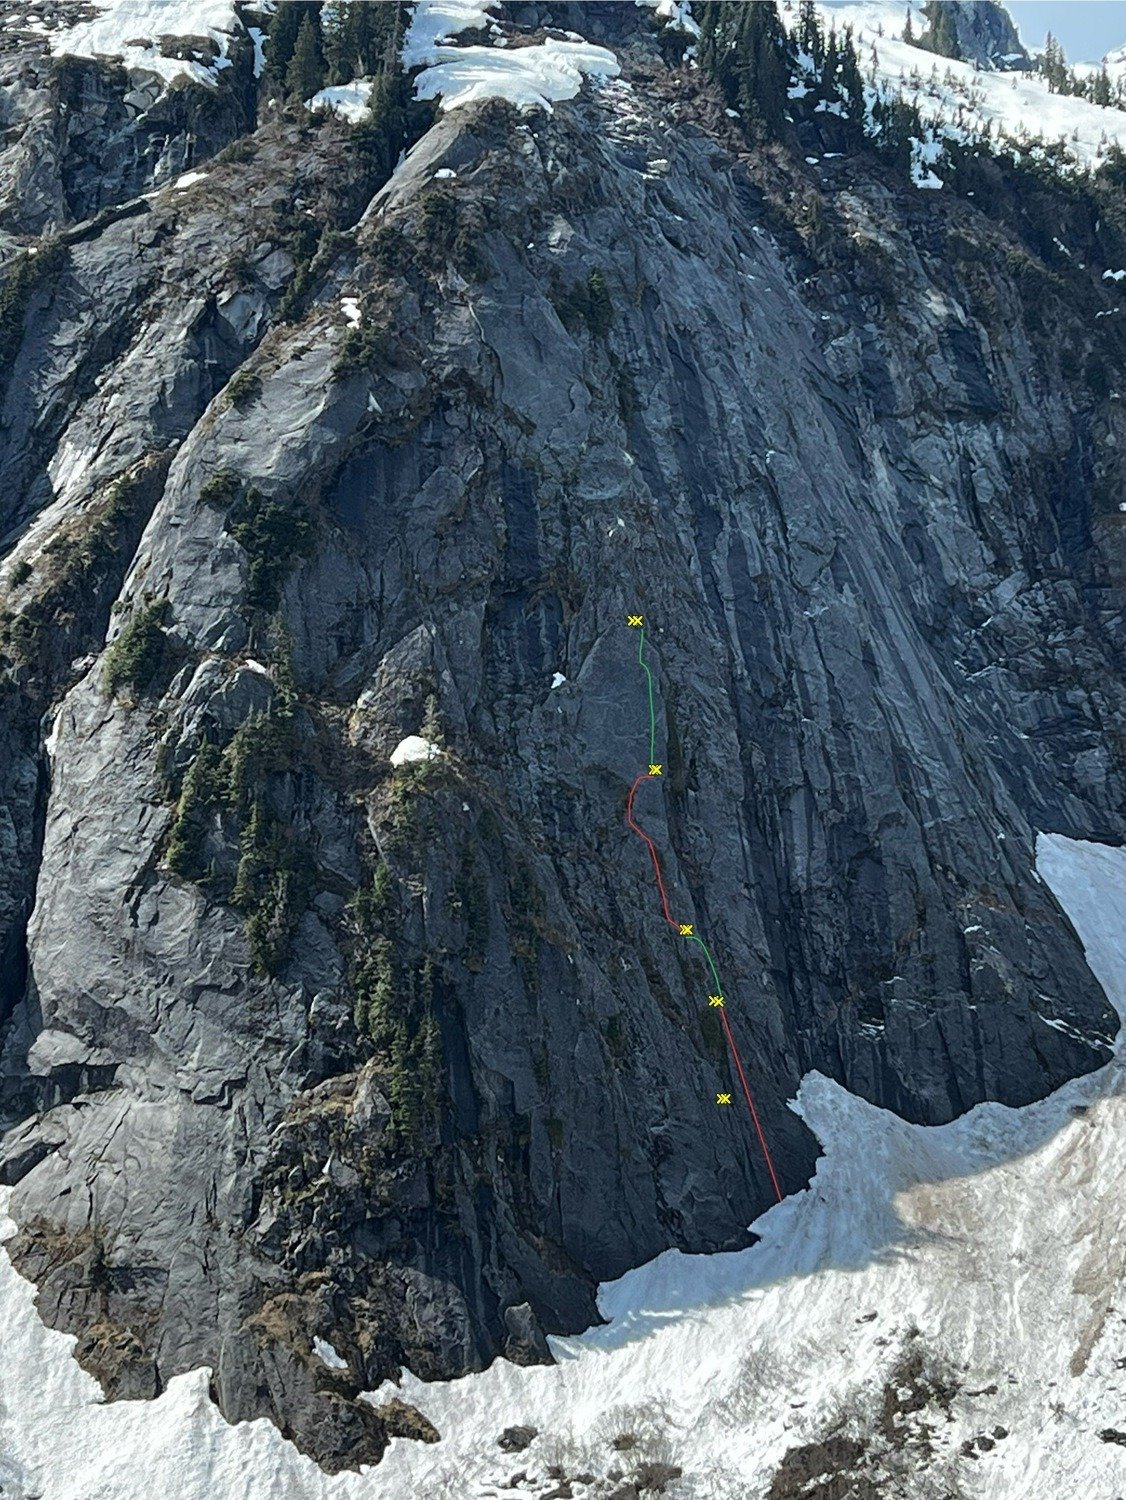
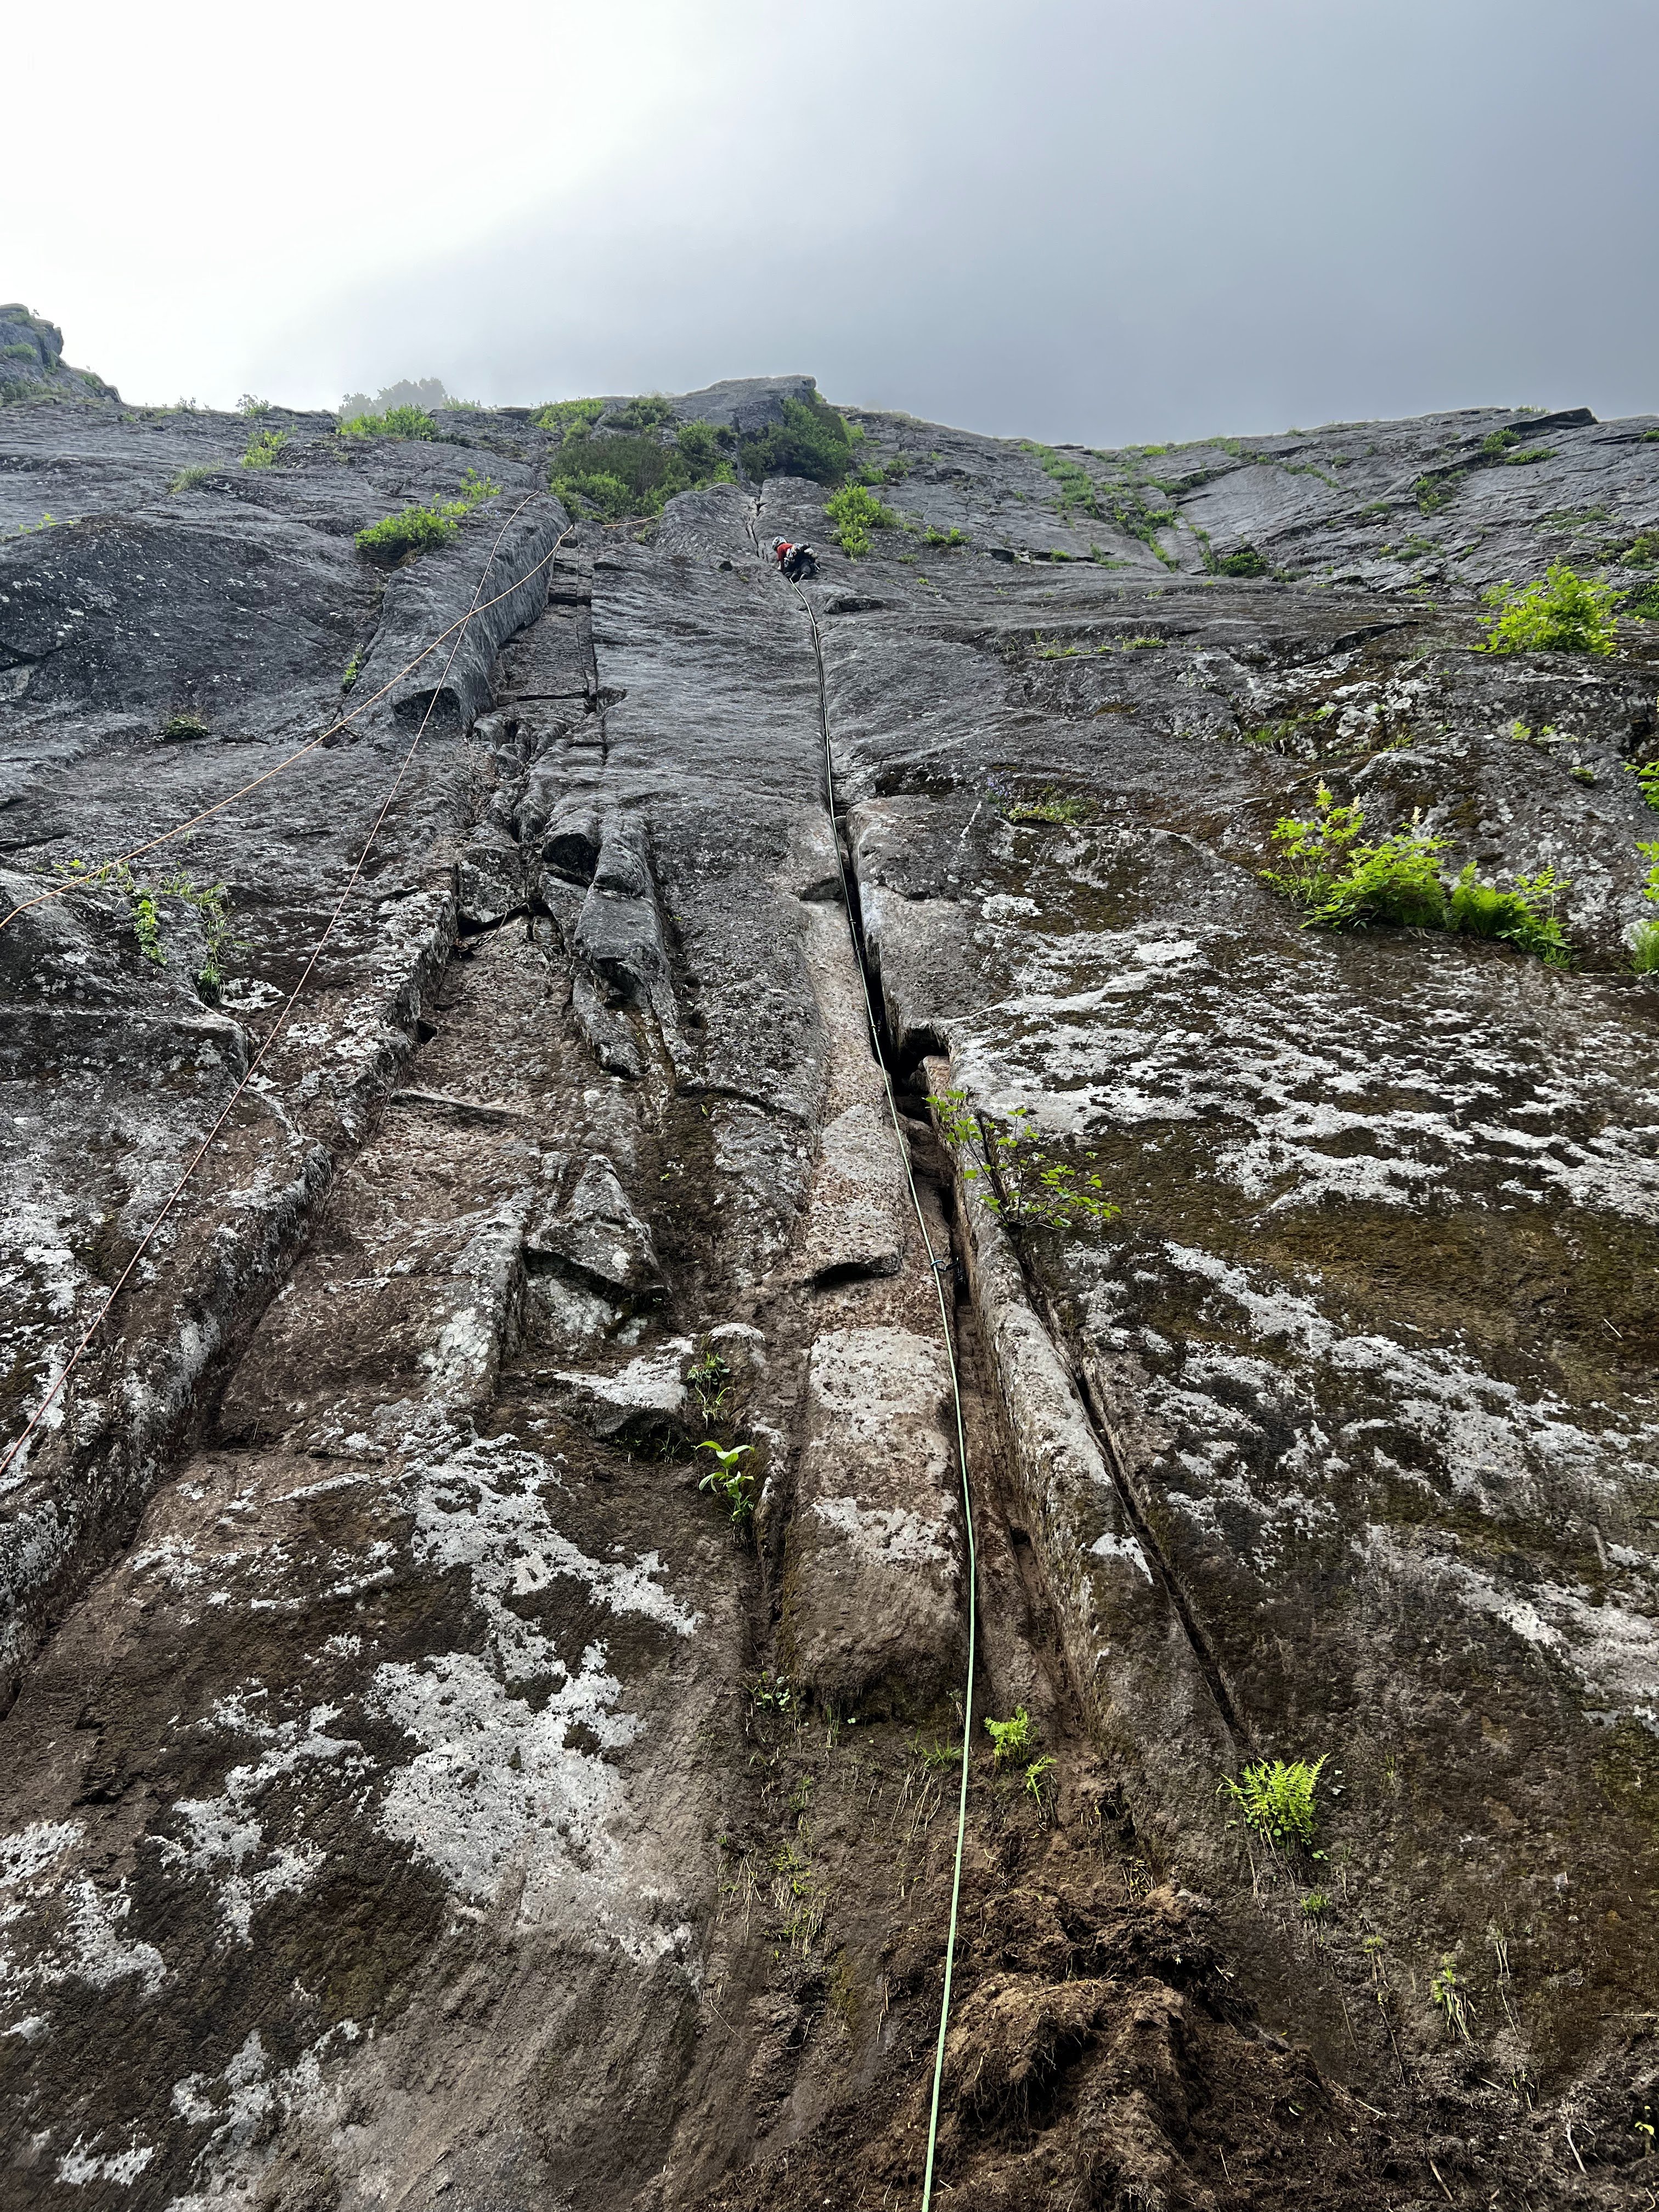
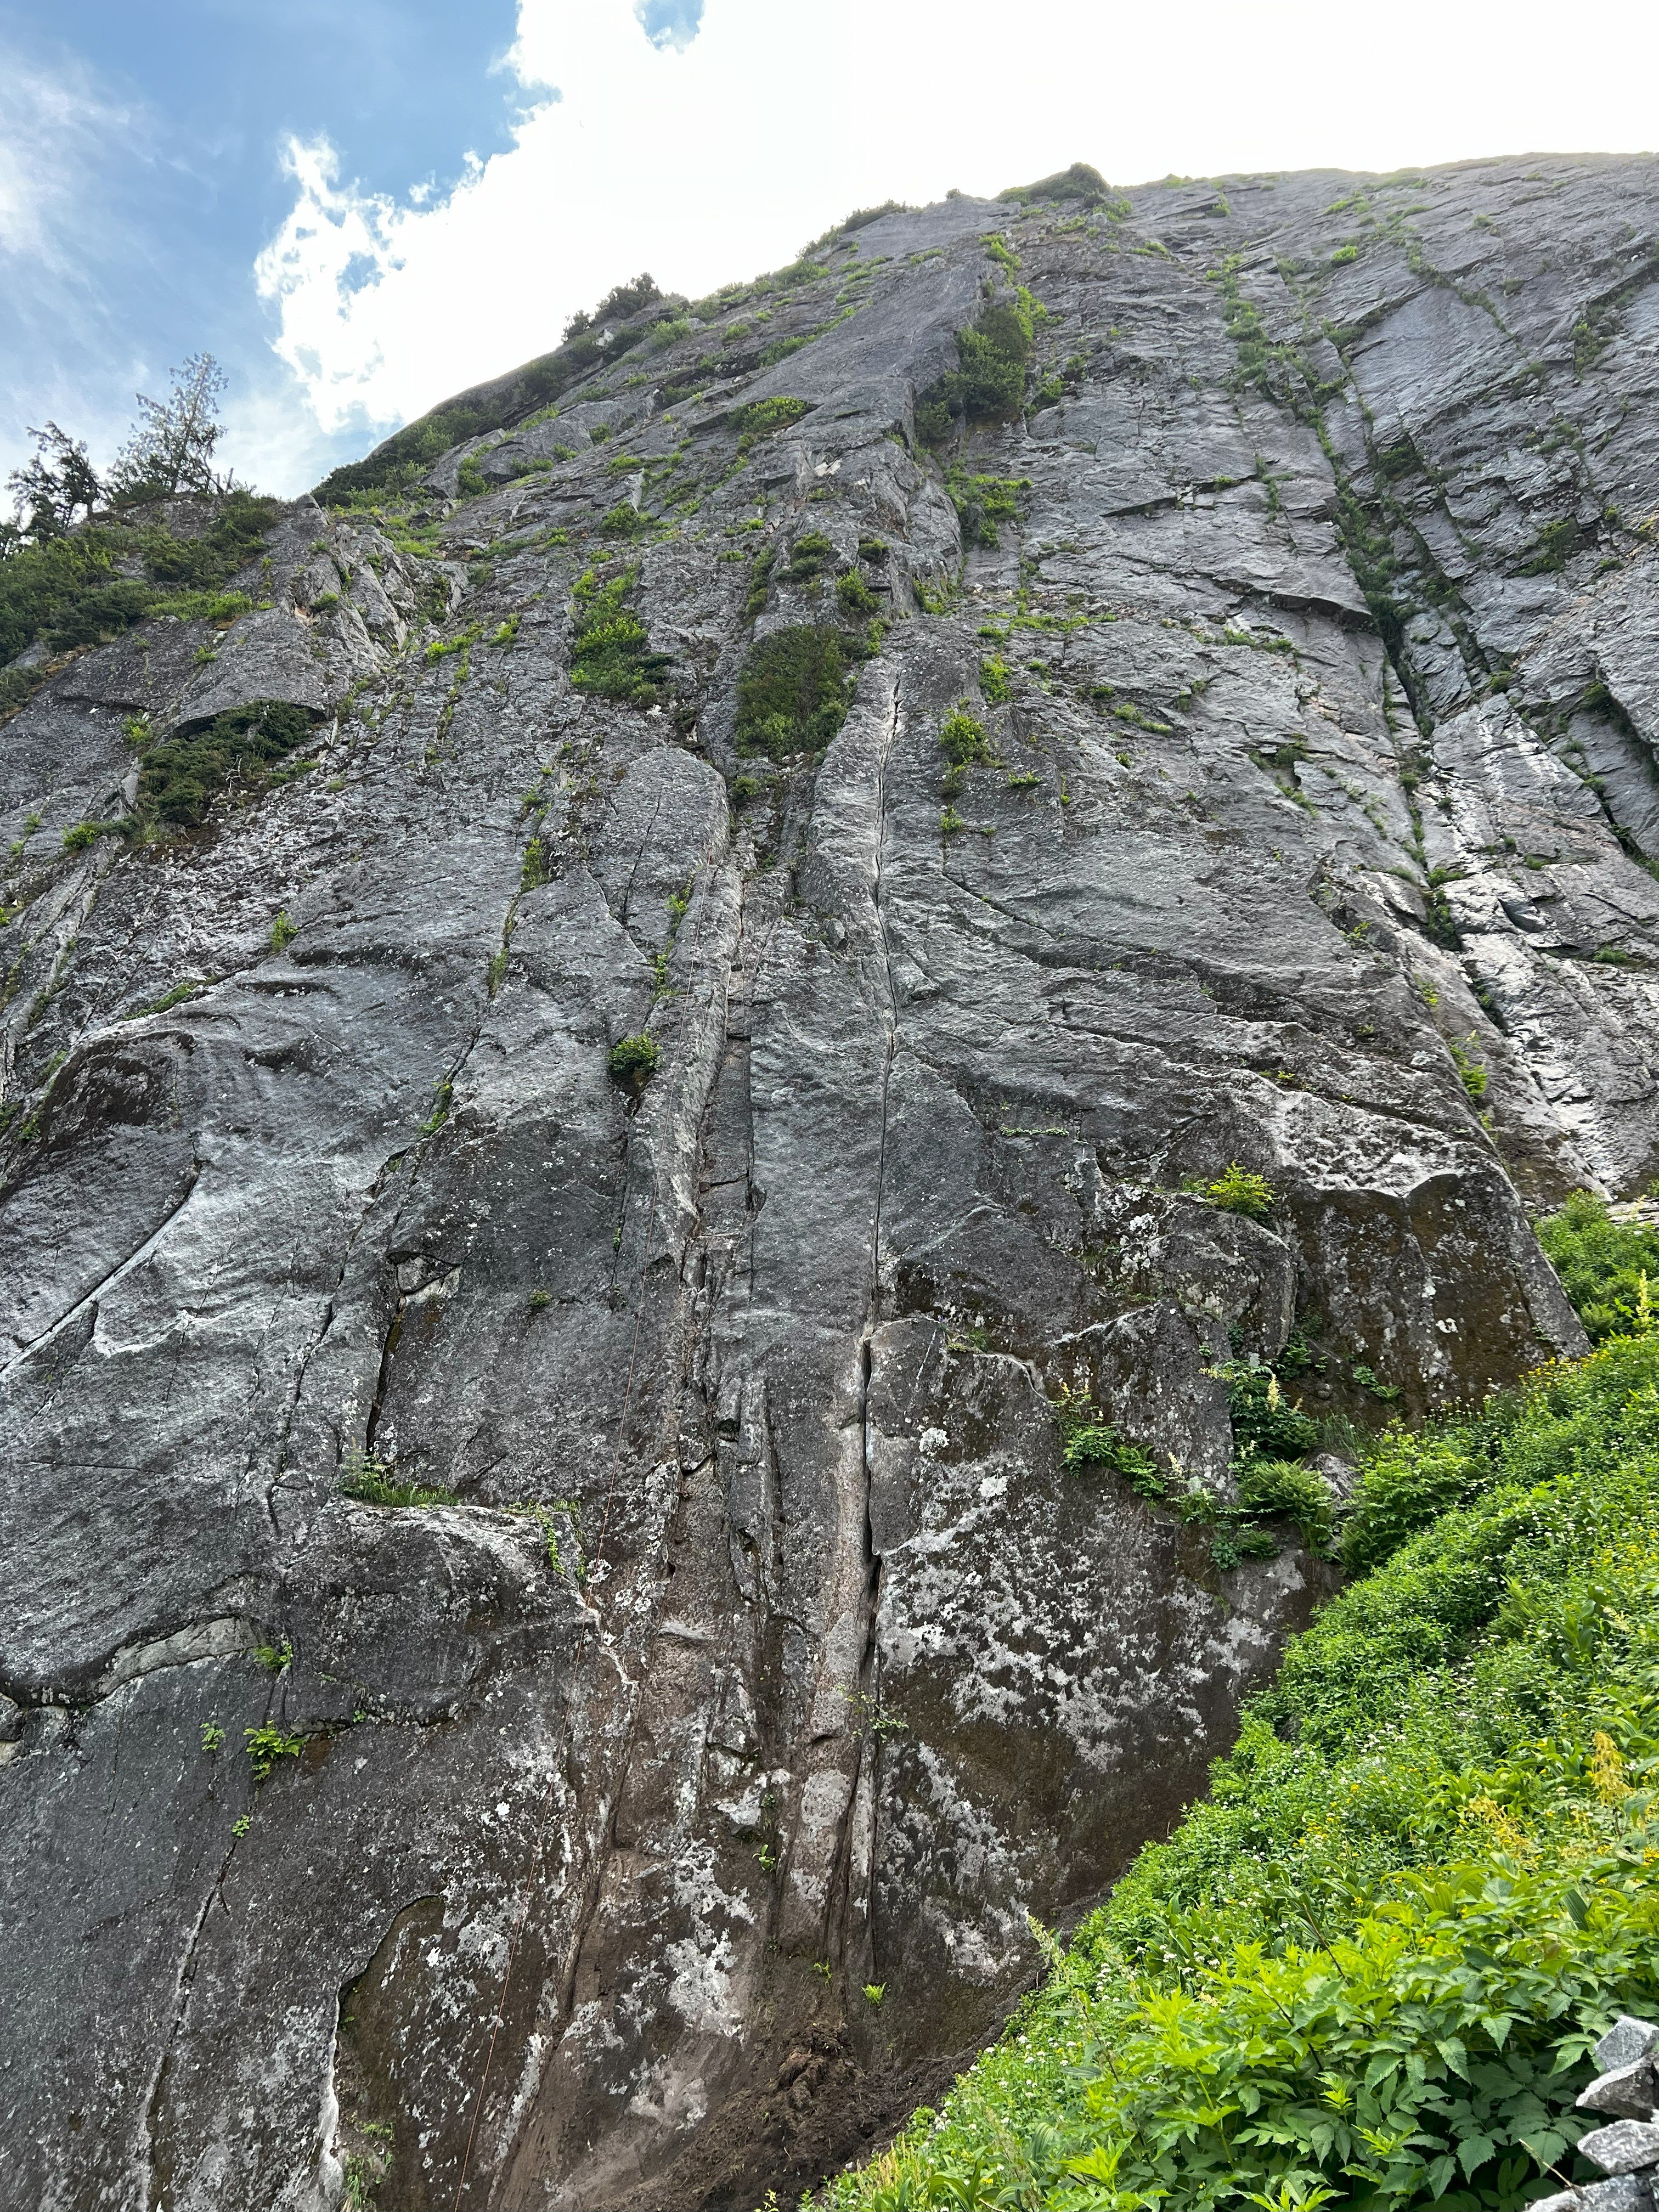
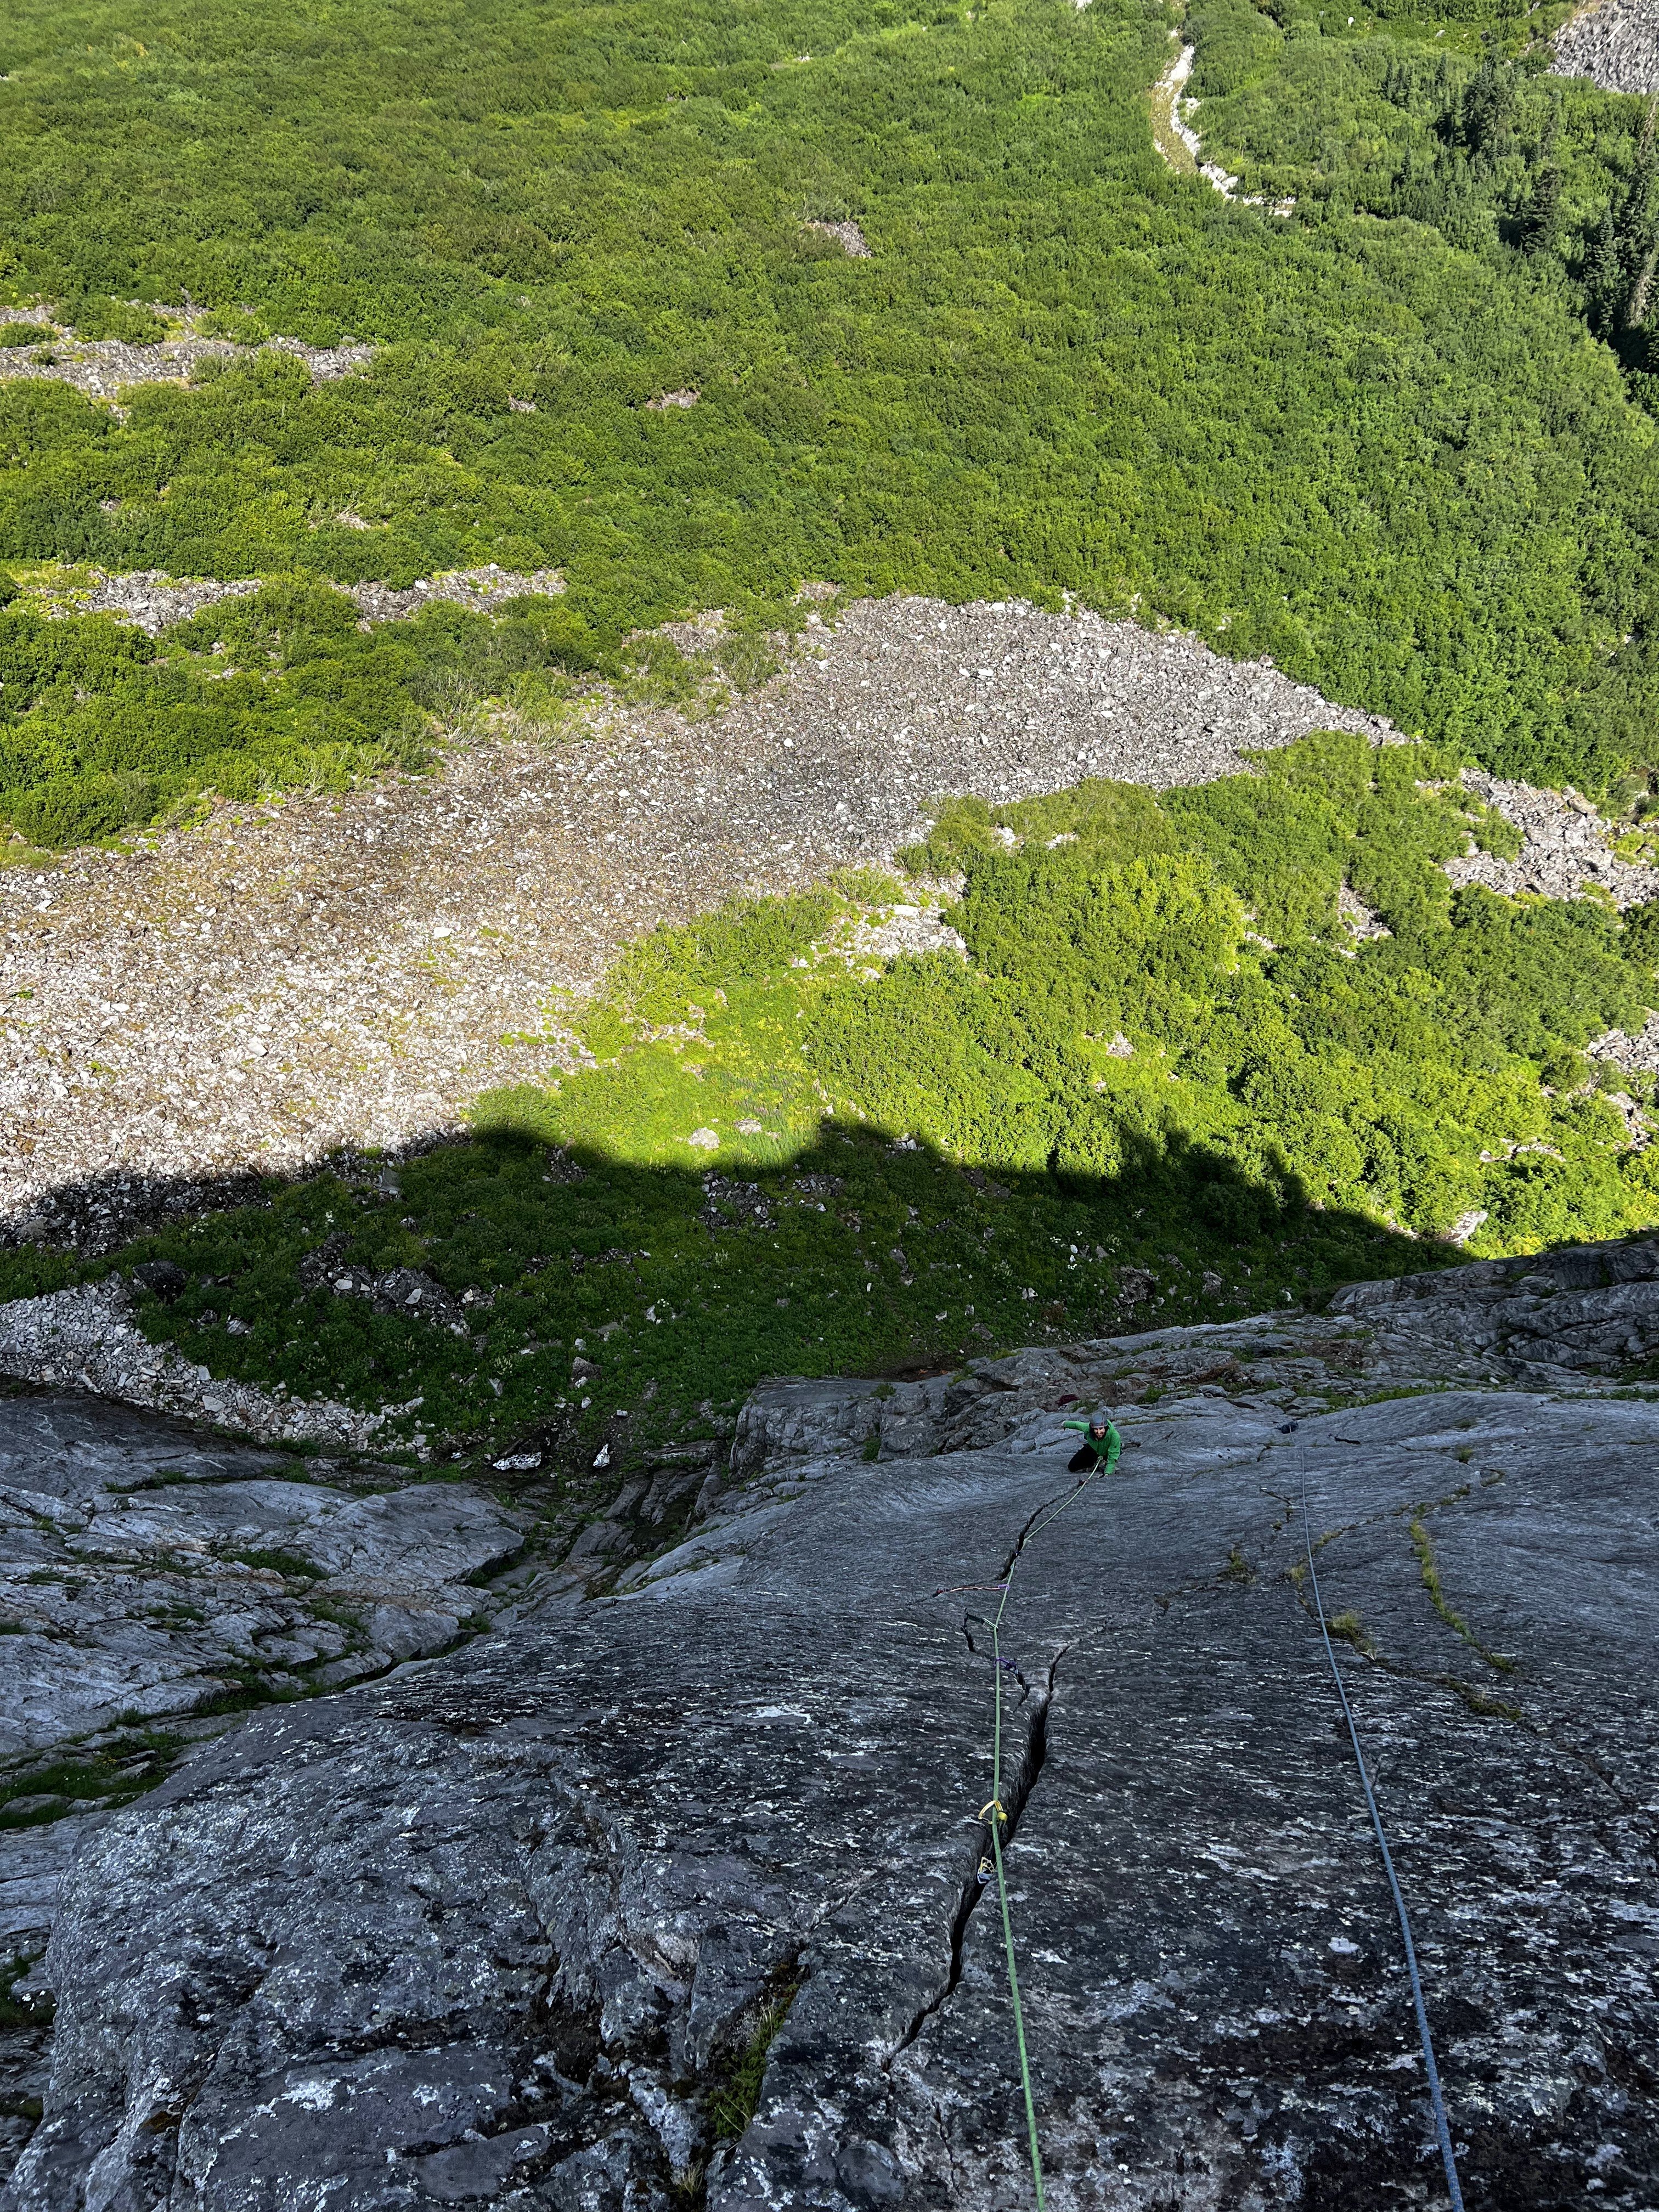
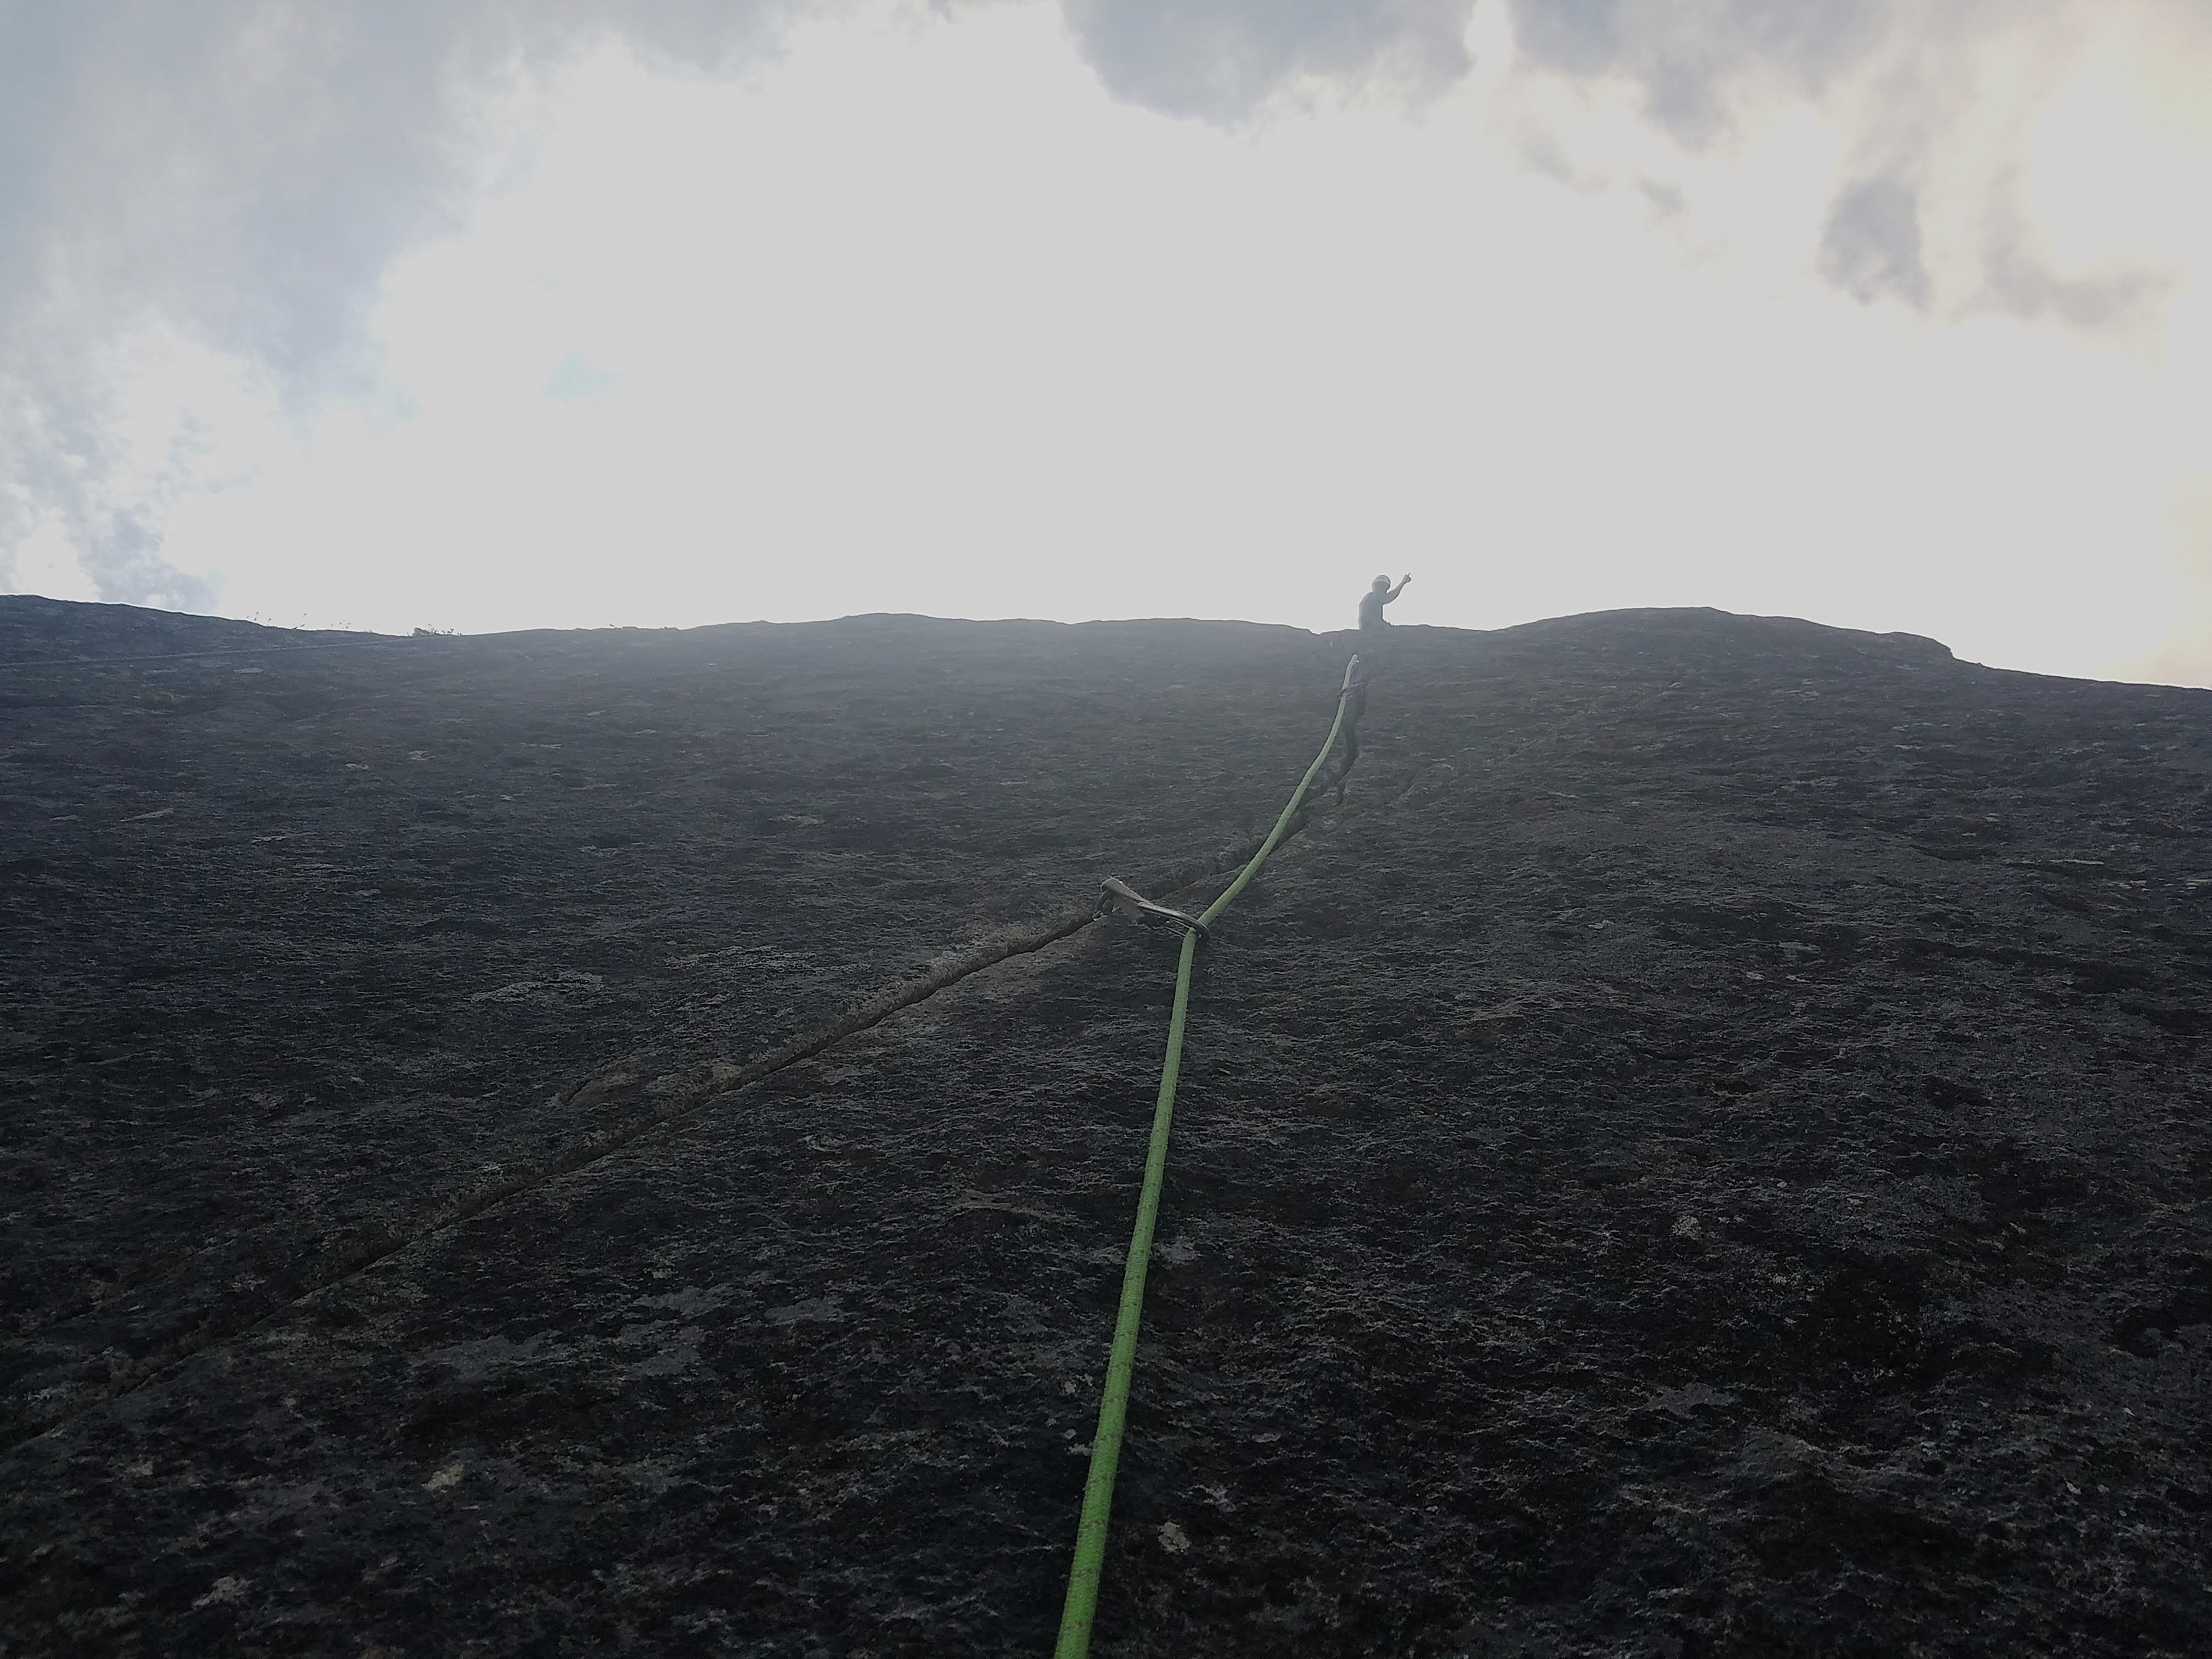
Howdy friends, it's my pleasure to present you all with the newest Washington classic - Negligence located off the Hannegan pass trail. This is a stellar line that links up several crack systems to access a shield about halfway up the large buttress seen across the valley. We spent most of the spring/summer of 2025 developing and cleaning this line and would like nothing more than people to get out there and climb the thing. Approach - From the Hannegan Pass Trailhead, hike Hannegan Pass Trail past the first two switchbacks about halfway to the campsites. Shortly after the second switchback, drop down the open talus field on your right. Continue down the talus almost to the creek, cut right into the woods, then make your way down to the creek from there. Jump from a large log across the first narrow creek band and you’ve found the tunnel through the slide alder. Be bear aware here, we found multiple fresh signs of them (probably due to the golfball sized salmon berries). Follow this until the major creek crossing, then cross the creek. After crossing, head through the trees directly towards the nose of the buttress, hopping another small creek braid before entering into the talus for the final approach. Follow cairns up the talus, then follow the path (likely overgrown) through the underbrush to the base of the wall. The route is located a couple hundred feet to the right of the nose. In total, the approach is around 2 miles, but tends to take around 45 minutes, give or take. Climb - This route takes a series of remarkable crack systems 400 feet up the Hannegan Buttress over four pitches. Protection is traditional, styles vary from off-width to tips, and all anchors are bolted for ease of descent (316SS all around). Each pitch ends at a conferable belay ledge. Pitch 1 - Depending on snowpack, either hop right into the offwidth start, or cross a deep snowfield to dig right into the rest of the pitch. A long continuous crack system varies from tight fingers to the wide stuff, favoring tight hands and good feet. This pitch reminds me of a steeper version of the Apron with lots of flared hands, sustained 5.9 climbing with several good rests. The bottom wide bit is a little dirty and will probably remain so since it gets buried under the snow pack, but it quickly cleans up. This pitch would be a classic all on its own. (5.9+) Pitch 2 - Amble up from the belay towards a notch gully in the leftward wall, clipping in a pin down low, then placing a bit of gear before firing a few fun moves to gain the gully. Make your way up the 4th class to a great ledge to top out this short pitch. (5.8) Pitch 3 - Step left from the belay and begin climbing up a wide box. Tread lightly on the red stone before pulling into the right-facing dihedral towards the alcove. Exit the alcove on thin tips, and continue upwards until bomber hands placements allow you the confidence to trend left in the flake system. Follow the flakes until the roof, then brace yourself for a thin, thoughtful, arching crux protected by small gear as you pull out onto the Shield. Save a .2 and your smallest cam for the business. The crux of this pitch is short and sweet. Its probably easier for folks with thin fingers or long arms and can easily be pulled through on gear. (5.10d) Pitch 4 - This one's in the money for best pitch in all of Washington! Climb the stupendous splitter to the top of the Shield. It is as good as it looks. Some finger crack moves will take you past a loose book size rock (never fear, that thing isn't coming out) to glorious hand jams. It gets a little steeper at the top so be sure to take in the scenery and catch your breath a bit. Top out on a large ledge. (5.10b) Descent: Rap with a single 70m rope. Use the intermediate anchor on the ledge climbers left between the P1 anchor and the ground. Otherwise, just rap the route. Gear - 70m rope Double rack .2 - 3. Singles of 4, .1, and a purple c3 (or equivalent tiny cam, or trango gold ballnut… the best option) to protect the crux. Wires, all sizes. Consider triples in .4 and .5 for the long first pitch and a 5 if offwidths make you shake. Background - The vision and much of the labor for this route came from Nate Fearer with additional help from myself, Neil Miller, Spencer Moore and Alex Pederson. The route name comes from the fact that Nate started this project while on paternity leave and completed it within the first four months of his son's life (he really is a good father and loving husband). The route was established ground up as an aid line, then dug, cleaned, and scrubbed. Then scrubbed, then scrubbed, then scrubbed. Further ascents will clean it even more. Also, we found some evidence of prior development out there including a bolted (2 pitch?) line left of the nose. If anyone has information on this route please let me know.
.jpg.2b582877bdbee4a7e892f3bb36fd185c.jpg)
.jpg.bdabd6c4d8ebc9668d06dd06dc2df6a7.jpg)