Search the Community
Showing results for tags 'first winter ascent'.
Found 19 results
-
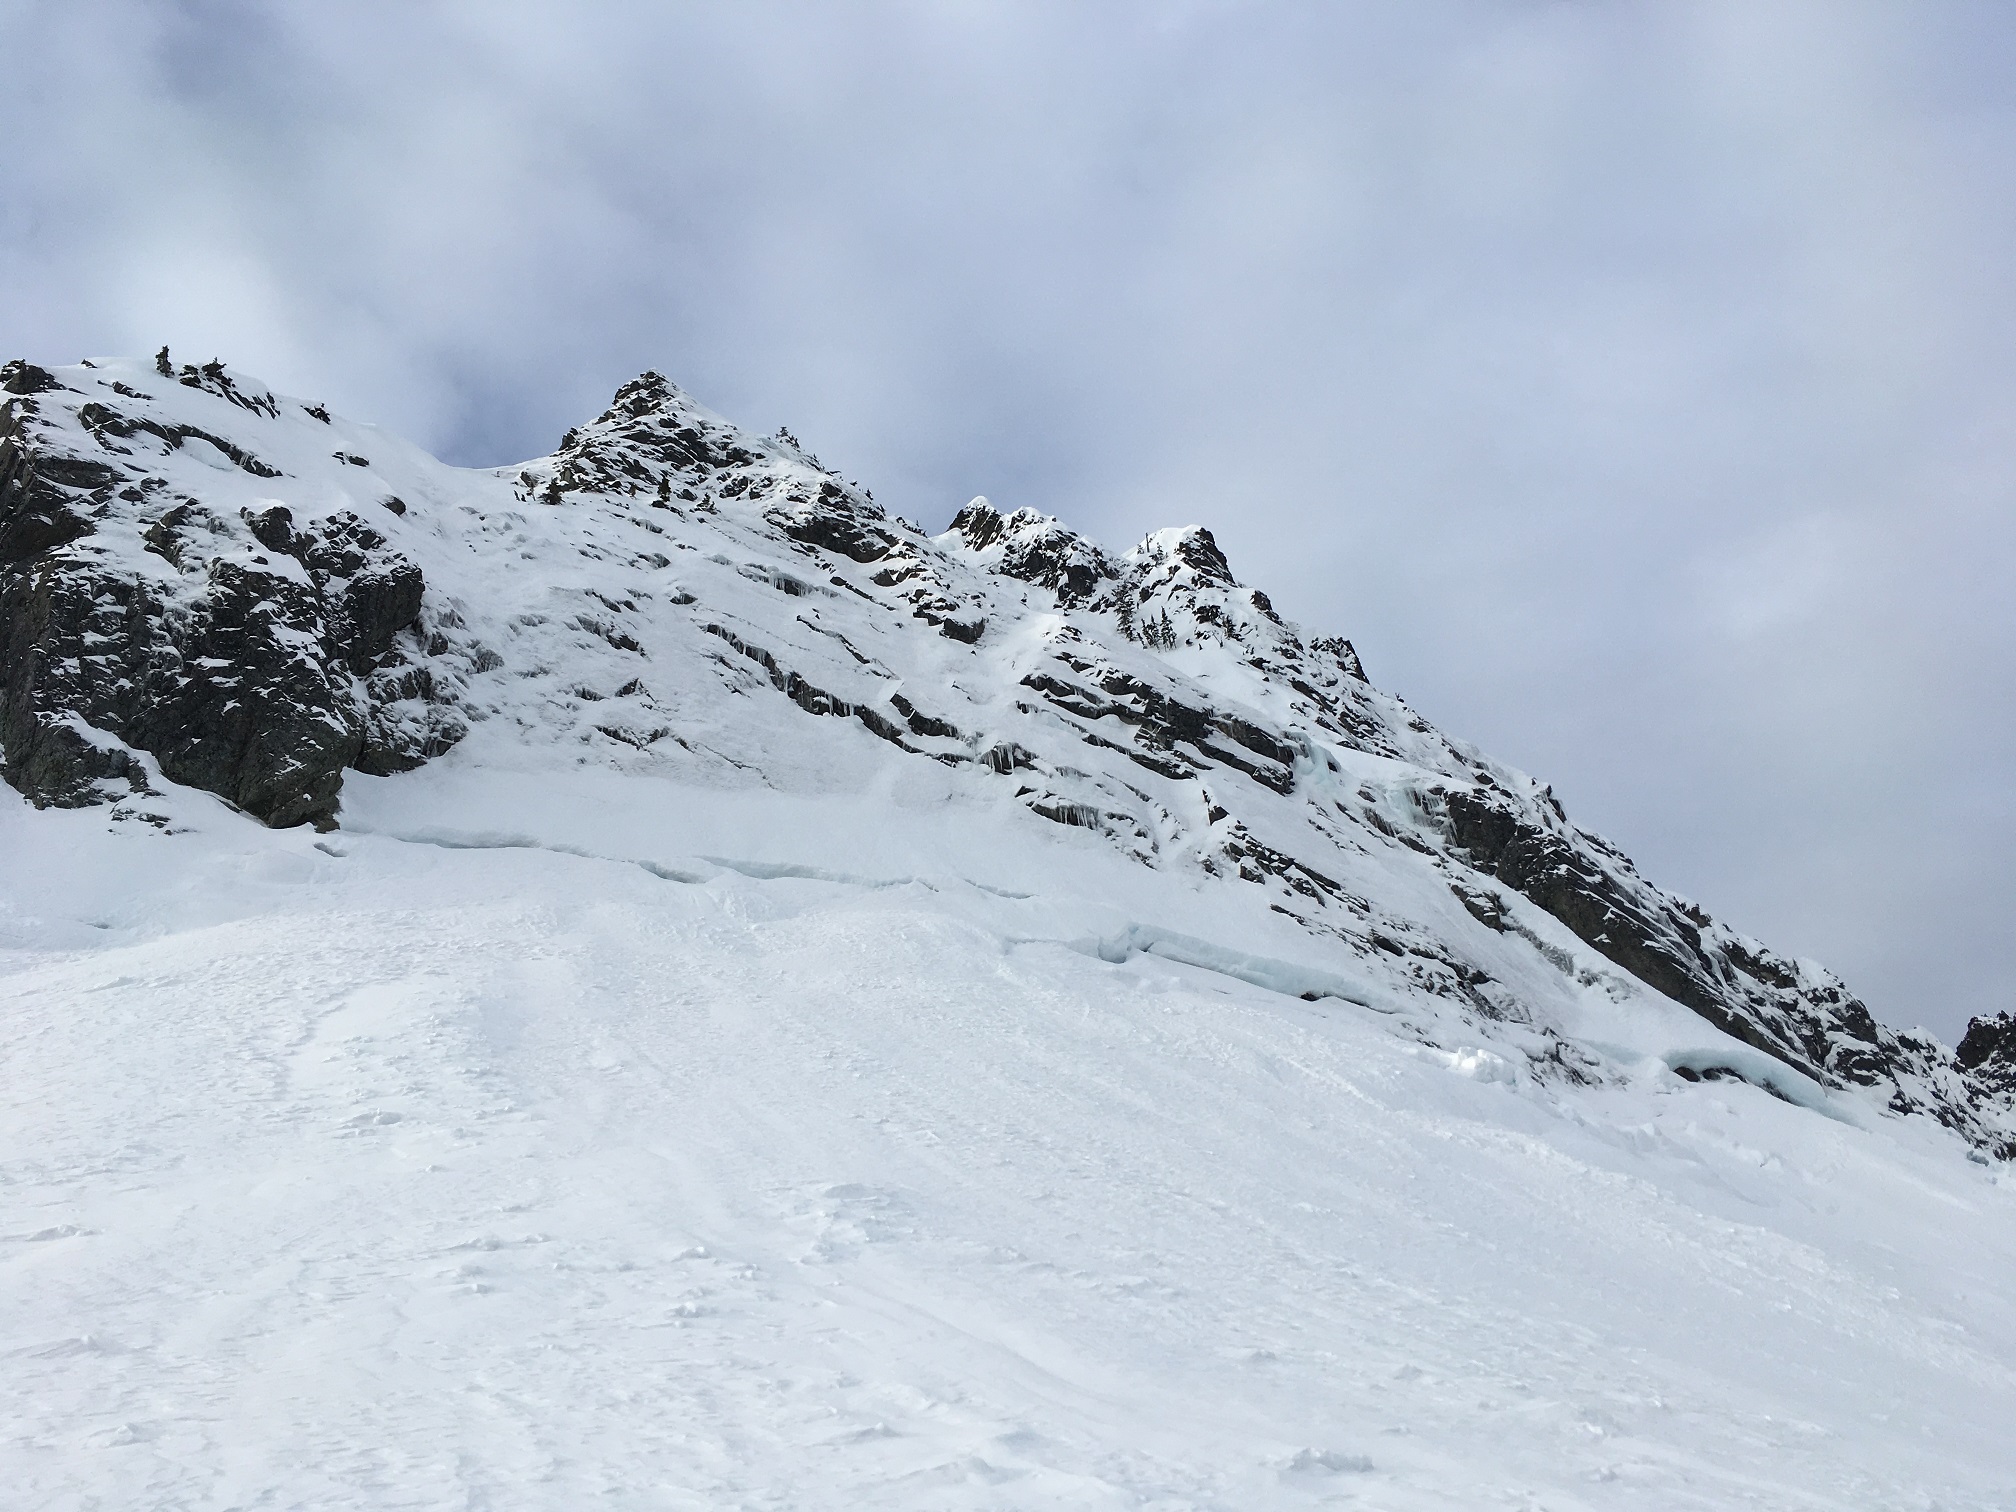
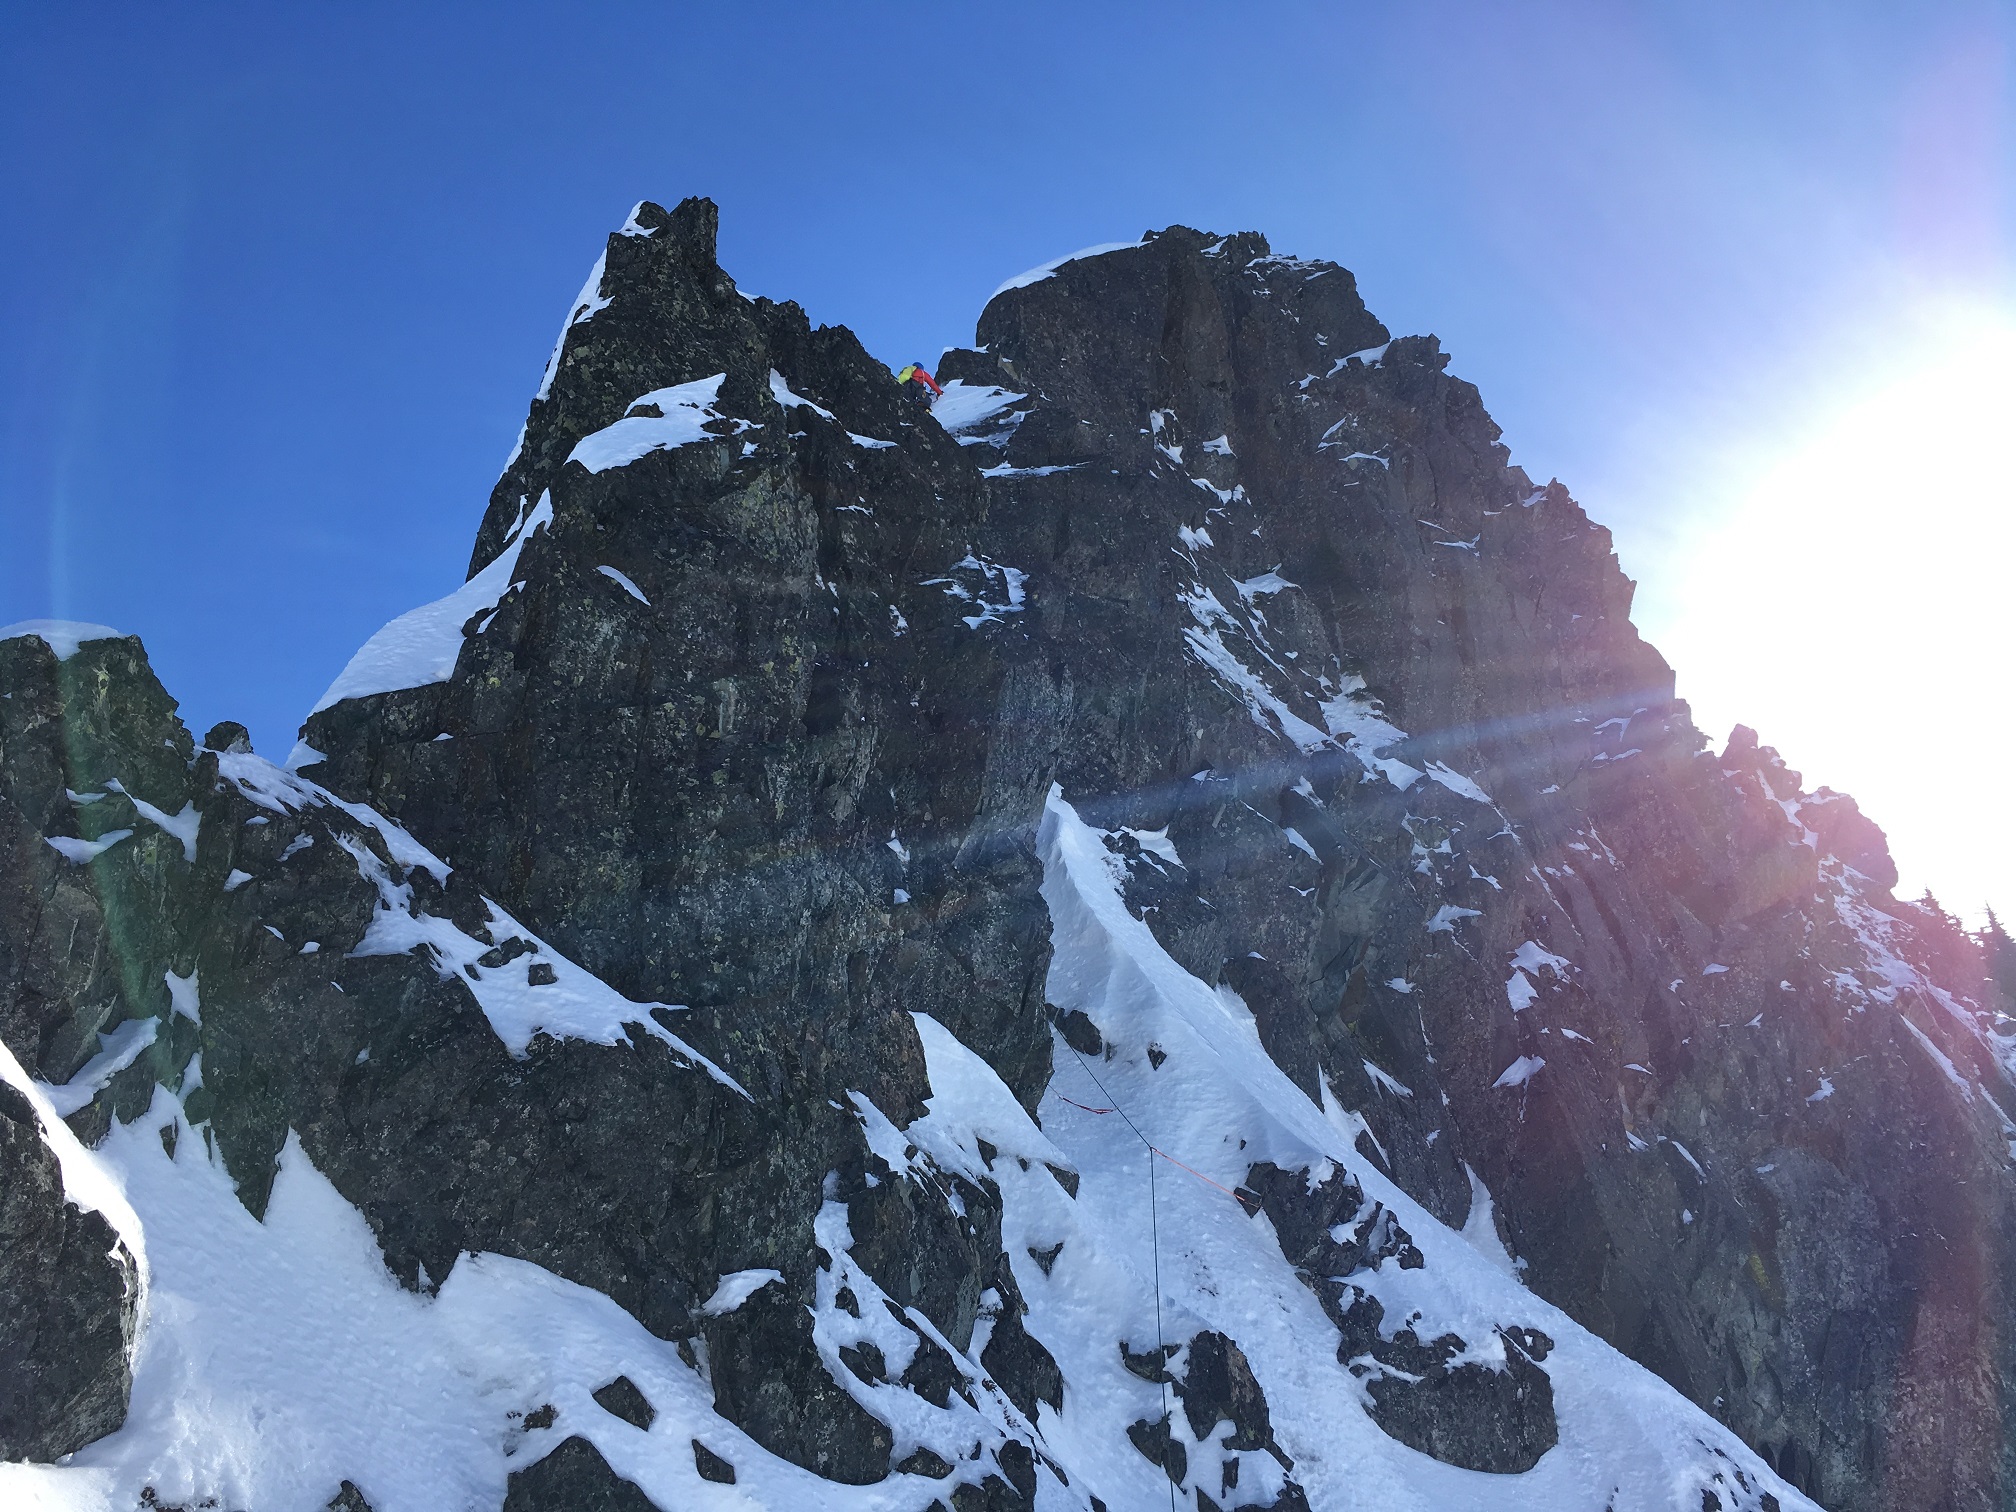
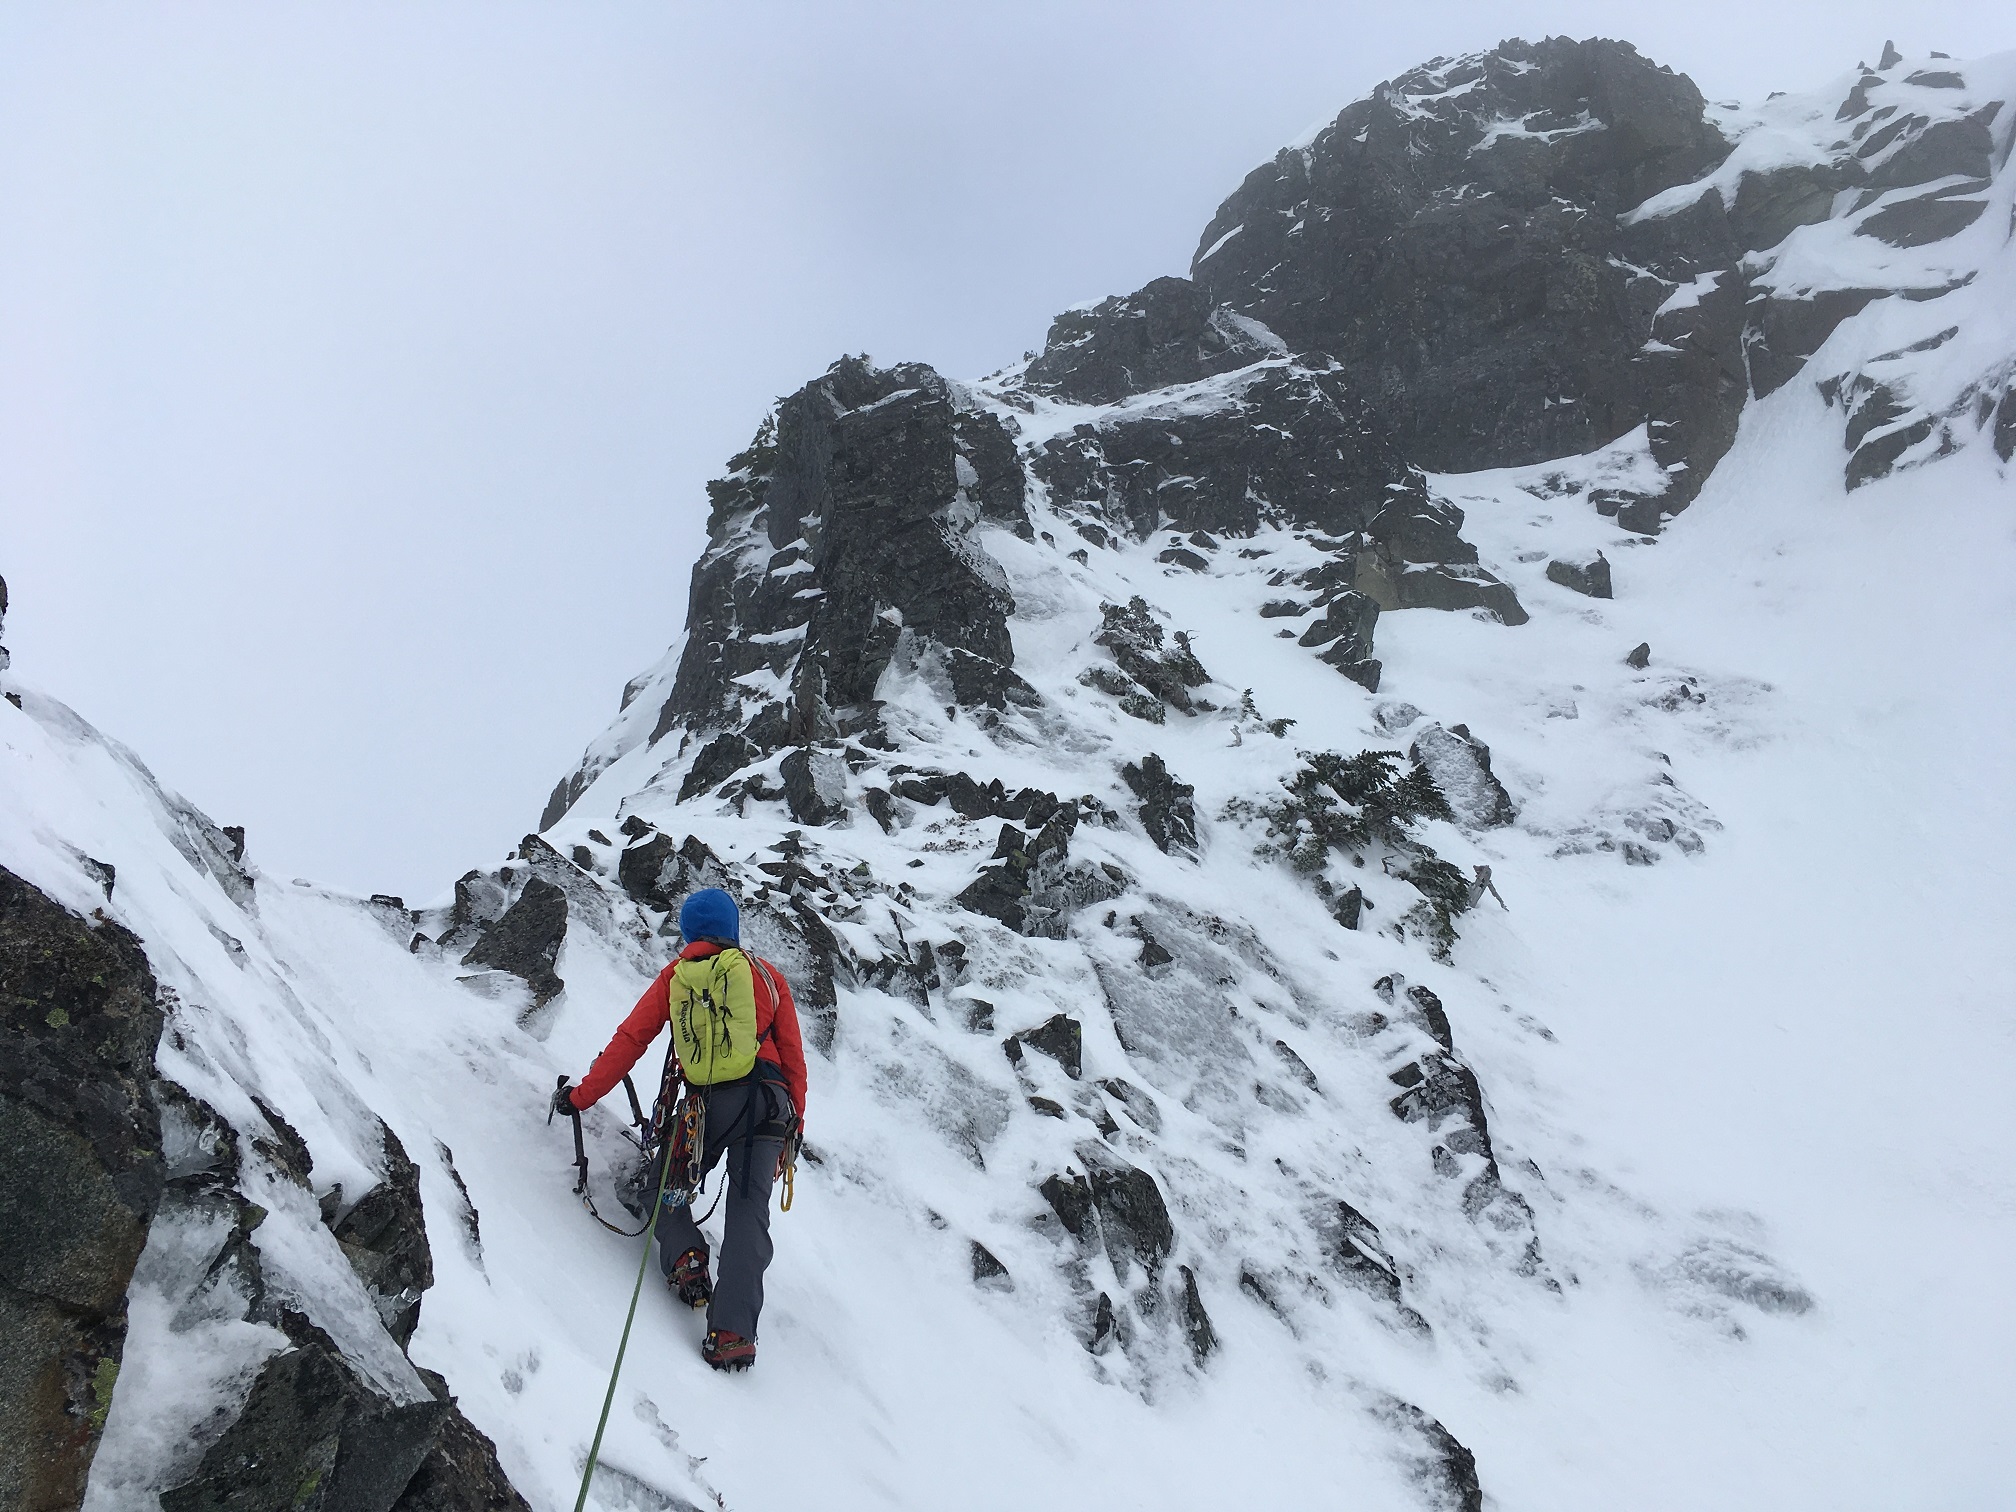
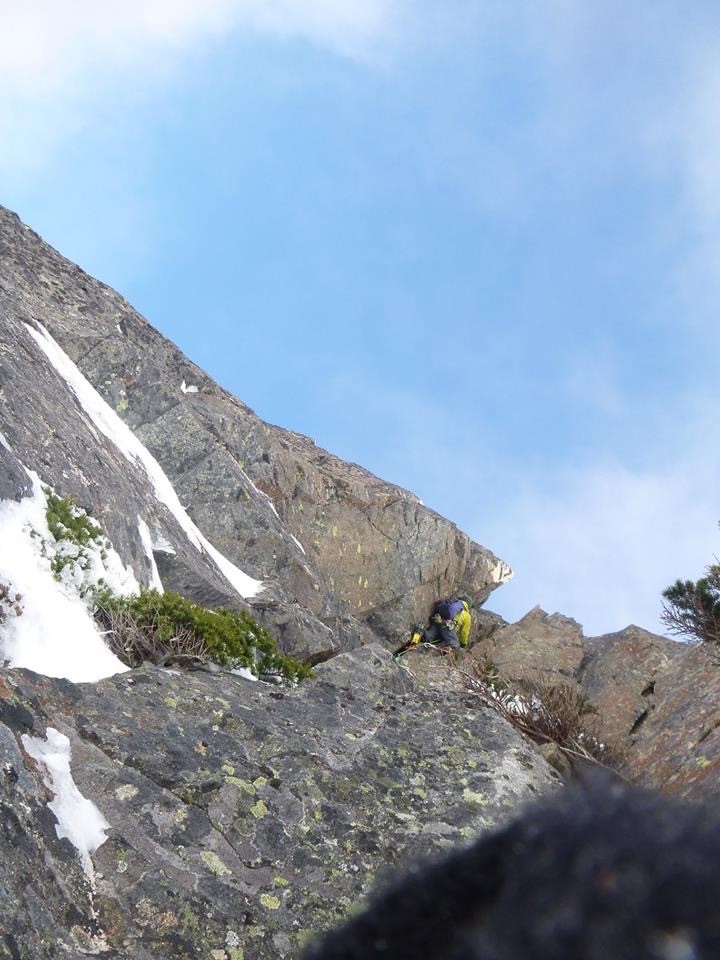
 Trip: Redoubt, Easy Mox - South Face (Redoubt), NE Ridge (Easy Mox) Trip Date: 01/19/2025 Trip Report: Mount Redoubt and Easy Mox First Winter Ascent of Easy Mox, Second Winter Ascent of Redoubt. Jan 17-21, 2025 42 miles hiking, 37 miles boating Eric and Nick 79/100 Winter Bulgers Jan 17 – double carry boat, motor, gear from Ross Dam trailhead to Frontage Road, sleep at trailhead Jan 18 – Carry remaining gear to boat, drag on wheels down Frontage Road, boat up lake 18 miles to Silver Creek, bushwhack to Silver Lake, hike to basecamp below west face of Solitude Peak Jan 19 – Climb Redoubt via south face (M1, steep snow, two roped pitches), return to camp Jan 20 – Climb Easy Mox via NE Ridge (M3, simulclimbed most of route), rap down south face to Col of the Wild, return to camp Jan 21 – Hike out, boat back, double carry boat up to trailhead On the northeast ridge of Easy Mox Some of the most difficult peaks in Washington to climb in winter are located in the Chilliwack range of the North Cascades, near the Canada border. I think these are likely some of the most difficult peaks to climb in winter in the entire contiguous US. Access is extremely difficult, weather is notoriously bad, snow conditions are rarely stable with unavoidable avalanche terrain, the peaks are technical, requiring ice and mixed climbing, and beta is scarce. Most peaks in this area have not previously been climbed in winter. The route I’m working on a project to climb all the Washington Bulgers (hundred highest peaks) in winter, and six of these peaks are in the Chilliwacks. This is the crux subset of project. I’ve spent several years in preparation for winter ascents in this area. I’ve previously climbed all the Bulger peaks in the summer, and that is critical but still not sufficient for success in winter. The first challenge is simply accessing the Chilliwacks area in winter. I’m following a rule that all ascents must be made legally, so I won’t sneak into the area from Canada. Starting in Fall 2020 I began scouting out the optimal winter approach to the area. Detailed route The closest trailheads are Hannegan Pass and Ross Dam, but these require 20-30 mile hikes on trails that are likely snowed over and unbroken. I skied up the Hannegan Pass trail in December 2020, and learned that the last 5 miles of road to that trailhead is closed to snowmobiles in winter, so the approach is even longer. I hiked the approach from Ross Dam in November 2020, and assessed each of those approaches would likely take multiple days in winter. Packrafting Ross Lake, Nov 2020. One option to save time and reduce the approach to a single day is to take a water taxi up Ross Lake to Little Beaver or Silver Creek and bushwhack up from there. However, the Ross Lake Resort water taxi does not run in winter. Ross Lake has no public road access in winter (or summer it seems, until the road in from canada gets completely fixed), so getting a motor boat to the lake is challenging. In November 2020 I packrafted the length of Ross Lake, and that took a full day and is highly dependent on wind conditions. That would be unreliable in winter. I considered a canoe, but that is also highly dependent on wind conditions and is too risky for capsizing in winter. Finally I settled on taking a zodiac boat with outboard motor up Ross Lake. The boat is wide enough to be stable in heavy wind and waves, with enough capacity to haul hundreds of pounds of gear. It can be deflated into manageable loads of a 70lb boat and 60lb motor. Each can be strapped to a backpack if needed. Ross Lake is in the unique situation where it is connected to a lower lake, Diablo, by road (Frontage Road), but the road is not connected to any other roads. Diablo Lake has road access, though. First test voyage on Ross Lake, Oct 2022 I first did a practice trip in October 2022 where I launched the zodiac at Diablo Lake, boated to Frontage Road, then dragged the boat up Frontage Road on deployable wheels, then launched in Ross Lake. I boated up 15 miles to the Little Beaver takeout, then hiked and bushwhacked in to the Chilliwacks. That option depended on Frontage Road being snow free, though, which wasn’t guaranteed in winter. I later did another practice trip where I double carried the deflated boat and motor down the 0.6 mile trail from the Ross Dam trailhead to Frontage Road, then dragged it down on wheels to Ross Lake. I settled on that as the optimal winter solution since the trail could be hiked in snow, and the boat could also be carried down the 0.5 mile road section in snow. The boat has a 5hp outboard motor, which goes 5-6mph when fully loaded. This is as fast as you want to go on Ross Lake in winter, since the lake level is lowered enough that tree stumps stick out of the water (and sometimes are submerged just a few inches under water). The motor is 4-stroke propane, which is clean enough to meet the strict environmental regulations for Ross Lake. The 5-gallon propane tank gives a 50-mile range for the fully-loaded zodiac boat. This is perfect for the ~40-mile round trip to Silver Creek with a little bit of safety factor. And I’ve been told be expert polar mechanics that propane is more reliable that gas for winter boating in sub freezing temperatures. This boat access method meant the hiking access component could be shaved down to 10-15 miles, which made the peaks much more accessible. From Ross Lake there are three main drainages to access the Chilliwacks – Redoubt Creek, Perry Creek, and Silver Creek. I scouted out Perry Creek in October 2023 and made a practice climb of Hard Mox from that approach. Perry Creek provided good access for Hard Mox and Spickard and was accessed from the Little Beaver takeout 15 miles up Ross Lake. First winter Chilliwacks attempt – thwarted by ice, Jan 2023. Redoubt Creek is also accessed from the Little Beaver takout and provides access to Redoubt and Easy Mox. I was not able to scout this approach, though I heard from Cascades expert John Roper it has the most difficult bushwhacking of all the drainages. Silver Creek provides access to Rahm and Custer and is on the north end of Ross Lake, and 18 mile boat ride up. I was not able to scout that approach, but have friends who had made the approach in summer. With the approach logistics sorted out, the next step is waiting for six stars to align. There must be stable snow conditions, stable weather on the peaks, low wind on the lake, no ice on the lake, long weekend, and partner available. Second Winter Chilliwacks trip – bail on first pitch of Hard Mox, Feb 2023 In January 2023 Nick and I made an attempt on Hard Mox Peak with five out of six star apparently aligning. Unfortunately Ross Lake was iced over 0.5 miles before the takeout. We attempted to bushwhack the remaining distance to Little Beaver around the lake, but that took 6 hours and we eventually bailed. That’s when we learned the ice-free star absolutely had to align. In February 2023 we returned when it appeared all six stars aligned. We made it up the first pitch of Hard Mox, but then bad weather unexpectedly came in early and we bailed. Winds were high on Ross Lake and we nearly capsized navigating through whitecap waves in the middle of a stump forest. The low wind and stable weather stars were not in alignment. Third winter Chilliwacks trip – success on Hard Mox, Dec 2023. In December 2023 all stars finally aligned, and we successfully climbed Hard Mox and Spickard via the Perry Creek approach. This was the first winter ascent of Hard Mox and the second winter ascent of Spickard. (The first winter ascent team for Spickard was Bond and Johnson in March 2023, approaching from Canada). On the return trip the outboard motor wouldn’t start, so Nick and I paddled back for nine hours. I couldn’t figure out the problem, so I bought a used gas outboard motor for the next attempt. In February 2024 all six stars aligned and Josh and and I went for Rahm and Custer. But the gas motor failed to start (I later learned residue from ethanol fuel in the used tank I’d purchased had made its way into the carburator and clogged it). One oar lock also broke because it got brittle in the cold. We ended up paddling 10 hours up lake to Silver Creek anyways, using a ski strap to fix the oar lock, then bushwhacked up and still climbed both peaks. We then paddled out 10 hours back. I subsequently started carrying spare oar locks on trips. Fourth Winter Chilliwacks trip – paddling up and down lake with broken oar lock to climb Rahm/Custer, Feb 2024 By January 2025 I had just two winter Chilliwack Bulger peaks remaining – Easy Mox and Redoubt. I had made eight trips up Ross Lake with the zodiac by then either climbing Bulgers in winter or doing practice trips. That month I was fortunate enough to meet Stephen, an expert polar mechanic. He got the propane and gas outboard motors back in working order, so I was good to go back on Ross Lake whenever the stars aligned. After all of these winter trips on Ross I learned a few lessons about the motors. For the propane motor it cannot be carried upside down, it is necessary to use an aluminum tank instead of steel so no rust gets in the fuel line, and the fuel line must be disonnected and excess pressure released before leaving the boat for days on shore in freezing conditions. This prevents liquid fuel from entering the system, freezing, and messing up components. The gas motor absolutely cannot touch ethanol fuel. Different valley options to approach Redoubt and Easy Mox With the boat motor fixed I started doing research on Easy Mox and Redoubt. The shortest approach would be Redoubt Creek, but that also was supposedly the most difficult bushwhack so might actually take the longest. In theory the peaks could be accessed from Perry Creek if we could cross Col of the Wild. However, in December 2023 we noticed the Perry Glacier was melted down significantly from historical levels. This meant accessing the col required climbing a pitch of downsloping snow-covered slab and surpassing tricky cornices. So that approach was likely out. The Silver Creek approach was the longest distance-wise. However, from February 2023 I learned that there is an old trail the first few miles to an abandoned cabin. Beyond that the bushwhack is easy through mostly open forest. That would likely be the optimal approach, with predictable timing to Silver Lake. We would then cross to the Lake Ouzel cirque and access the peaks from there. For the routes I researched that Mt Redoubt had previously seen one winter ascent in February 1977 by Barely and Rowatt via the NE Face. They approached from Canada. I had previously climbed the standard south face route in summer, and I suspected that would in fact be the easiest winter route. But it crossed long stretches of steep snow and required very stable conditions. Easy Mox had never been climbed in winter, and I wasn’t sure what the optimal route was. I’d previously climbed the standard NE Ridge route in July, and that is the least technical route. However, it requires climbing one slab pitch to gain the ridge, and that might be sketchy if only thinly covered in snow. Also, the ridge looked corniced in February 2024 when I saw it from Custer and Rahm. However, in December 2023 it was not corniced when I saw it from Hard Mox. So it was possible it would be climbable in late December or January. Another option was the southeast face route directly from Col of the Wild. This was more direct and not corniced. However, the upper section is slabs that might be sketchy if thinly snow covered. Finally, the west ridge route was a possibility. The only known ascent was the first ascent in 1964, but it appeared to be only a few pitches, though likely the most technical of all the routes. By mid January it appeared all six stars would align over the long MLK day weekend. The snow was very stable with high pressure parked over Washington for the forseeable future and low wind over the weekend. Washington had experienced above-normal temperatures over the previous few weeks, and satellite images confirmed upper Ross Lake was completely ice-free. Nick and I decided to go for Easy Mox and Redoubt. Easy Mox was my crux remaining winter Bulger, and would be great to check off the list. The Monday before the weekend I picked up the propane motor from Stephen up near Bellingham, and he did an amazing job getting it up and running. I did a test ride for a few miles in Lake Sammamish on Tuesday and everything worked fine with the boat. Our plan was to boat up to Silver Creek, then bushwhack in to a basecamp. We would climb Redoubt first since it was easier and would give us views of Easy Mox to plan out the route. We would then climb Easy Mox and hike and boat out. We would use snowshoes to avoid relying on a seventh star to align – skiable snow. On our first Hard Mox attempt we’d brought skis and bailed at Perry Creek when the snow conditions weren’t good for skiing. By using snowshoes we could plod up even if the snow was icy. The only possible question mark was whether it would be getting too cold. The peaks were forecast to be between 5F – 15F, which was cold for technical climbing but doable since the wind was forecast to be low. However, at upper Ross Lake the lows were forecast to be around 15F-20F for multiple nights with low wind. That is the shallowest part of the lake, and with calm nights there was a risk it would freeze over. We could likely boat up on Saturday since that would be the first cold morning and the water would likely still be warm from the previous weeks. But there was a risk we’d return to the boat at the end of the trip and be blocked in by ice. But, daytime temperatures were supposed to be slightly above freezing and we expected the sun would help melt any thin ice. So we decided to go for it. Worst case, if we got blocked by ice getting out we could hike around the north edge of the lake to Hozomeen and hike back out the 30 miles to Ross Dam down the east bank trail, which was likely snow-free. That would not be ideal, of course. Packing up at Ross Dam trailhead Friday Friday I set my NWAC-scraping Python code running to send me daily avalanche forecasts to my inreach. Then we loaded up in my truck and drove to the Ross Dam trailhead by 4pm. That evening we made two carries of loads down to Frontage Road – the first load was the boat and boat accessories bag, the second was the motor and propane. We then inflated the boat and got it set up for a quick getaway. I considered storing the propane tank in the truck overnight to keep it warm, but we decided it would be smarter to leave it out in the cold. This would be the coldest temperatures I’d ever run the motor (~15F). If it started up in the morning from being that cold, we’d have confidence that it would also start up for our return trip. But if I kept the propane in the truck over night we wouldn’t get that data point. We did, however, put the propane tank in a duffle bag next to the boat overnight to protect it from frost, and wrapped a tarp around the motor to keep it a little warmer. Dragging the boat down Frontage Road We slept in the truck that night at the Ross Dam trailhead, and were the only ones there all night. Saturday Our plan was to hopefully make it all the way to basecamp on Redoubt Glacier by Saturday evening, so we needed to start early. However, boating in the dark was risky because of the submerged stumps on Ross Lake. From all my trips on Ross I know the problem areas at different water levels. The water height is controlled by dam operators based on the energy needs of the greater Seattle area, and this varies throughout the year and is hard to predict. But it is published online by USGS (https://waterdata.usgs.gov/monitoring-location/12175000/#dataTypeId=continuous-00065-1922206742&period=P7D&showMedian=false). My usual strategy is to compare current lake level to past levels when I’ve boated on Ross. This weekend was 1564ft, which was 5ft higher than in February 2024 when I’d boated up to Silver Creek. On that trip the only problem areas for stumps had been Devil’s Creek and Silver Creek. (For reference, when it is below 1550ft there are many more problem areas throughout the lake, both near the shore and in the middle, down lake and up lake, and this is very scary at night). With this water height it was ok to boat in the dark until Devil’s Creek, but we wanted daylight beyond that. I’ve previously tried boating with super bright off-roading headlights connected to a motorcycle battery on the front of the boat. But it seems like Ross Lake is always so foggy at night in winter that visibility still isn’t great, even with the special yellow fog lights. That battery is really heavy, so we’d bring two smaller bike lights instead. They could last a few hours on the highest setting, which would be sufficient. And we’d be boating through safe areas at night anyways, so it should be ok. Loading up on Ross Lake This meant we got packed up to go at 4:00am. Just before leaving I remembered to set up four mouse traps in the truck. Ross Dam is one of the top ten mousiest trailheads in the state, and I usually come back to find mouse poop in the truck if I don’t set up traps. We ferried the last load of climbing gear down to Frontage Road, then loaded up the boat. We put the gear as far back as possible over the wheels, then rigged up a climbing rope on front so we could both drag it down the road. It’s important for our steps to be synchronized when walking for maximum efficiency. Down at the lake edge we wheeled the boat around the resort truck parked there, and we were grateful that it was far enough to the side to allow us to squeeze by (this is not always the case). We layed the big tarp in the boat, then put the two packs in. Then we put a bag of sharp objects (snowshoes, ice tools, poles, crampons) double duffled on top, not touching the boat at all. We then folded the tarp over top and strapped it down with bungees. This would protect the gear from water spray in case we encountered heavy waves. We each layered up, put on our dry suits, put on life vests, then put down jackets over everything. Nick wore his 6000m Scarpa double boots and I wore my 8000m Olympus Mons double boots. We knew the boat ride would be about 3.5 hours sitting in the cold, so needed to dress as warm as possible. I got in first, then Nick got in and pushed us off. I retracted the wheels, then rowed out into the middle of the lake and tried to start the motor. It was very reluctant to start, likely because of the cold. I would do 15 pulls, then rest, then repeat, then rest. This went on for about 10 minutes. I started talking about backup options, but then it finally started! One trick is that it needs to be a very sudden jerk for the pull, not just a slow continuous pull. By 5:30am we were finally cruising up the lake. I started out slow so we could make it through the water bar. The resort strings up a bunch of floating logs as a wave break, and there’s one narrow gap for boats to squeeze through. If you were cruising up at night it would be very easy to not see the logs and crash into them. The gap gets moved to different locations every time I go there, so I had no idea where it was. Luckily they place reflective cones on each end, though. This day it was on the far north side. Boating up lake, looking back at Jack mountain We carefully made our way through, then on the other side I turned the motor up to max and we reached cruising speed of 5.7mph. I’ve gotten pretty familiar with all the features of the lake over the years. We soon rounded Cougar Island, and I resisted the urge to cut through the gap with the shore since the submerged stumps were risky there. We went past Roland point, and Big Beaver on the left, with Pumpkin Mountain sticking up in the dark. We then rounded rainbow point and then reached the bridge over Devils Creek just as the sun was coming up. Taking out at Silver Creek Luckily there were no stump problems, but we had enough daylight by then to see at least. We beelined to Tenmile Island, then past Lightning Creek and on to Cat Island. Beyond that we started encountering wind and waves that were apparently coming out of the Little Beaver valley. This was unexpected, and we got sprayed with water as the boat cut through the waves. It was so cold the water instantly froze into verglass on our jackets and on the boat. Luckily the wind was localized and by Jack point it had died down again. Walking to the campground Finally, we could see the fan-shaped outlet of Silver Creek. I wanted to land as close as possible to the campground, but it was located on the north side of the fan. We could see the lake ended just north of that, with many stumps sticking out. That meant shallow water with a higher risk of freezing over, and also more danger from stumps. So at 9am we landed on the south end of the fan where the water was deeper and less risky. We quickly unloaded and left all the boat supplies in a duffle in the boat. We wrapped the motor in a tarp to protect it, then I disconnected the fuel line and used a screw driver to depress a valve to release excess gas. We then put the propane tank in a black duffle so the sun could help warm it. At Silver Creek After a 10 minute walk through beach covered in 5ft tall stumps we reached the official Silver Creek campground. It had a dock that I don’t think has seen water in years (judging by all the grass growing around it). We had a quick snack at the picnic table and left a little bit of food in the bear box, then headed out at 10am. Our packs were very heavily loaded with snowshoes, double boots, and ice tools strapped on the outside. Based on my previous trip I knew the optimal route up Silver Creek was to cross near the outlet to the north side, then pick up the old miners trail. We carefully tiptoed over icy rocks and frosty logs, and made it into the woods on the north side. I had my previous GPS track loaded on my watch and soon picked up the old trail. The woods are generally very open, and the trail long ago abandoned, but the trail still allows for quicker progress than bushwhacking. Bushwhacking to the cabin We cruised up the trail for a few hours and hit snow starting around 2500ft. Shortly after that the trail disappeared at the old cabin site. Unfortunately the cabin got smashed in by a tree and is now just a few wall sections providing no shelter. Beyond the cabin the woods are generally open and travel easy. The ground soon got icy enough that we ditched our hiking boots in a bag tied to a tree and switched to double boots and crampons. The snow eventually got deep enough to switch to snowshoes around 3000ft, but the snow was consolidated enough to not be difficult trail breaking. We took turns and by 3:30pm we reached the head of the valley at the base of the cliffs below Silver Lake. Here we roughly followed my February route, which was to climb up the right side of the drainage following the lowest-angle treed slopes. We got halfway up in snowshoes, then continued in crampons as the terrain steepened and the snow got more firm. Nice open forest above 3000ft. Darkness set in half way up, and we continued breaking trail through mostly consolidated snow on the south-facing slopes. By 7:30pm we crested the outlet of Silver Lake and stopped to top off our water bottles in the surprisingly unfrozen outflow. That would have been a nice place to camp, but would not be close enough to our objectives. We switched to snowshoes and continued across the frozen lake and up through the Spickard-Custer col. On the other side we dropped down to 7000ft and traversed on low-angle slopes to the base of the west face of Solitude, just before the Redoubt Glacier started. We decided that was close enough to be our base camp, and it would be nice to have a camp not on a glacier so we wouldn’t have to worry about crevasses. So we dropped our gear at 9:30pm and set up the mega mid tent. So far everything was going very smoothly and mostly according to plan. Starting up Sunday morning Sunday We left camp the next morning at 7am and roped up for the Redoubt Glacier. We generally stayed on the shoulder at 7000ft traversing underneath Solitude and past Easy Mox. Interestingly, we noticed the slab pitches up to the Easy Mox – Solitude col were covered in snow, which meant that might be a viable route option. Also, the northeast ridge appeared to be uncorniced. We kept that in mind for selecting our Easy Mox route. Approacing Redoubt We transitioned between crampons and snowshoes, but never sunk in the snow too much. Within a few hours we reached Redoubt Col and our first sunshine of the day. Beyond the col we unroped and scrambled through the rocky gap between Redoubt and Redoubt southeast peaks. On the other side we traversed steep snow slopes and decided to ditch the snowshoes and poles. As expected, the steep south facing slopes were well consolidated making for very secure cramponing. At the cannonhole We continued to the middle of the base of the south face, then I led the way kicking steps up with both technical tools out. Around 7900ft when the slope angle eased I traversed left over a ridge then continued up on lower angle slopes. By then clouds rolled in and it started lightly snowing. So much for the sunny weather forecast. I think in the Chilliwacks you always have to round the weather forecast a bit worse than expected. I had last climbed Redoubt in 2018, so my memory of the route was a bit rusty. But Nick had just climbed it in summer 2024 and rememberd the route. He led the way up the appropriate gully on the right. (I’m not sure if this is the normal route, but it certainly worked). By 8500ft we encountered a cliff band, and we did a few mixed moves hooking rocks to climb up and traverse left through it. We then encountered a complex set of snow/ice gullies leading up. Nick leading out of the cannonhole In general we climbed up and left, linking gullies together, and the climbing was fun and secure. With umbilicals on the two tools I was always connected to the mountain. Finally we traversed left to a broad gully I remembered with a big cannon-hole rock at the top. We slung a hurn and Nick belayed me across and up into the cannon hole. This section was 5th class in summer but was covered in snow now and no problem. I found a rap anchor under a chockstone and belayed Nick up. I then passed him the gear and he got the honors for the last pitch. Nick climbed over the chockstone and pass through the canonhole to the north face, then led a short pitch up to the summit. I followed, and was blasted with wind. We both topped out at 1:30pm, and wrapped a cord around the snowed-over summit cairn for an anchor. On the summit Our timing was just as planned, to be doing the technical pitches during the warmest time of day. The views were amazing of British Columbia to the north, Bear Mountain to the south, and the Moxes to the east. The wind surprisingly eased up enough that we hung out for 5 minutes admiring the view. Then we started planning our retreat. Nick remembered a rap anchor on the south edge of the summit ridge, but I dug around and couldn’t find it. That’s a common problem in winter. So instead we slung the summit cairn and rapped off that. I think someone climbing in the summer will be surprised to find that anchor there, but in the winter it’s just as good or better than a snow bollard. Downclimbing the south face The rope barely reached the gully below. From there we slung another horn and did one more rappel down our ascent gully. We then downclimbed unroped, following our up tracks. The temperature felt surprisingly pleasant on the sunny south face with no wind, even though it was probably in the teens. We traversed back over the rock col, and then entered the shade. The wind picked up and it got significantly colder. We roped back up at Redoubt col and returned back to camp through heavy wind that at times jostled us around. That was unfortunately not in the forecast. We got back by 7pm for a 12 hour day. We had removed the poles from the mega mid tent and dropped it down to the ground so it wasn’t affected by the wind, but we knew it might struggle once we put it back up. So we spent an hour building solid 5ft tall snow walls around the tent. Fortunately the snow was compact enough to make excellent bricks. After melting a few liters of water we stuck in our earplugs to help with the flapping tent noise and soon got to bed. Hiking back to camp Monday Easy Mox was the crux of the trip and we knew it would require more techincal climbing. The temperature was still supposed to be cold, so we planned to hit the technical climbing during the middle of the day for maximum warmth. Based on the conditions we’d seen Saturday with the uncorniced NE ridge and snow leading to the col, we planned to climb the standard NE ridge route. I think the West Ridge might have been faster and more direct, but having never climbed it before it seemed like a lower chance of success with too many unknown variables. Approaching the first pitch to the NE ridge We left camp at 7am again and broke trail over our windblown tracks back to the Redoubt Glacier. We kicked steps up to the edge of a bergschrund below the Solitude-Easy Mox col and ditched our poles and shovels there. I don’t recall this bergschrund existing in 2018, so it appears the glacier has been receeding significantly. Luckily there was a good snow bridge on the right side, but I bet late season that is difficult to cross. I took the first pitch, crossing the bergschrund ont the right then traversing way left to a rock outcrop to get a piece in. The snow got very thin at times on the slab, and I was careful to work around those sections. We shortened the rope to 15m for efficiency and simul climbed up, always making sure to have a piece between us. I eventually topped out at the col and belayed Nick up. Starting up the northeast ridge looking back towards Solitude Amazingly, there were fresh mountain goat tracks leading up the ridge in the snow! They came from farther towards Solitude, but I’m not sure how the goat accessed the ridge. The lower ridge was covered in deep snow but was not corniced. I know that will likely change later in the winter, as I observed last February. In summer the ridge is class 3/4 and easy to scramble solo, but there was enough snow and ice that we decided to simul climb it. We lengthened the rope a bit and Nick took over, trying to always keep a piece of pro between us. The ridge was very fun, with great views of Hard Mox and Lemolo to the left and Lake Ouzel down to the right. The wind occasionally blew the rope over the ridge, and I had to be careful it didn’t get snagged. There were a few sections we stopped to belay, and I think the winter route differed from the summer route here. Nick leading the crux pitch Near the summit we dropped down to the south face to avoid a few gendarmes, and the slabs were well-covered in consolidated snow. This was an area we had been concerned about, but it turned out to be no problem. We finally reached the base of the crux pitch to get back on the NE ridge. Nick offered to lead, so I belayed him off a slung horn. The pitch was melted down to rock, so we climbed in crampons with the tools holstered. Nick ended up leading the whole way to the summit, and I followed. The pitch felt like M3 and was the crux of the route. By 1:30pm, right on schedule, we topped out. It was amazing to finish my last winter Chilliwacks peak, and conditions had been perfect. We paused in the pleasant conditions to admire the view over to Hard Mox. Interestingly, this time the whole upper route on Hard Mox was melted down to rock. When Nick and I had climbed it in December 2023 it was plastered in rime ice and completely white. We soon started planning our descent. We had originally planned to descend the NE ridge route, but that sounded sketchy now, requiring simul downclimbing long sections of ridge. It reminded me of descending the west ridge of Forbidden Peak in winter. That took just as long down as up and demanded a lot of care. On the summit of easy mox Another option, though, was to rap down the southeast face to the col of the wild and hike back from there. That sounded like a much faster and safer way down, and gave us a better chance of getting off the mountain in the daylight. Nick had just climbed the southeast face in summer 2024 and remembered it well. That was the fastest and safest option, so we went for it. Downclimbing the southeast face From the summit we soloed down to an existing rap anchor, then rapped down to our slung horn that we’d left our packs at. From there we did a somewhat complicated and non-obvious route of traversing, downclimbing, and traversing back between different snow gullys. If Nick hadn’t recently done that decent I wouldn’t have tried it, but he remembered it well. We soon reached an anchor and rapped down over an ice bulge. We had to leave one new anchor to rap a short distance to a ledge, then were able to traverse across back above the col. We did one more rap off an existing anchor to a lower ledge, then Nick tunneled a path through the snow on a very exposed ledge. Finally we downclimbed a short 5th class step and got back to the col. Hiking into the sunset It took about 2.5 hours down, and we still had daylight. We traversed around back to Redoubt Col as the sun set, then followed our tracks back to camp a few hours after sunset. The wind had shifted to the north, so I spent some time fortifying another snow wall, before we went to bed. Tuesday We wanted to be back to the boat Tuesday early enough so we would have time to paddle out if absolutely necessary. So we were were up and moving by 4am. We made good time back to Silver Lake, which by now was scoured down to ice in the heavy wind. At the outlet we picked up our tracks and cramponed back down, reaching the 3400ft basin by sunrise. The bushwhack out went smoothly following our tracks, and we managed to exactly find our stashed hiking boots without issue. Back to the boat. Just a little bit of ice nearby After the cabin it felt great to switch back into the hiking boots, and we were back to Ross Lake by 11:30am. We ate a quick snack at the picnic table, then headed back to the boat. Boating out There were a few patches of shoreline north of the boat covered in ice, but luckily the area near the boat was ice free. Our strategy of landing in the deeper water had paid off. By 12:30pm we had the boat loaded back up and we pushed off into the lake. Interestingly, the lake level appeared to have dropped by a foot or so in a few days we’d been out. I rowed out until we were well-away from stump danger, then tried to start the motor. This time it started after only ten pulls! I think it helped that it was the warmest time of day, close to freezing, and the propane and motor had been heating up in the sun a while before we got there. Carrying the motor back up the trail The lake was completely calm, and we cruised down making excellent time. After a few hours, though, the wind started picking up between Ten Mile Island and Rainbow point. I guess it’s not possible for every single star to align on a winter Chilliwacks trip, but they almost all did. The waves got big enough to spray us as they hit the boat, and I steered us closer to the east bank just in case we needed to escape to shore. But the waves stayed manageable, and we made steady progress. I definitely appreciated the dry suit. Finally by 4pm we cruised through the water fence and landed on shore. We each did a bunch of jumping jacks to warm up, and stripped off our soaked dry suits. We made fast progress pulling the boat back up Frontage Road, then double carried the gear back up to the truck by 6:30pm. All my mouse traps were empty, so I think the mice have different winter foraging grounds. We were soon driving back home at a surprisingly reasonable hour. The trip had gone amazingly according to plan. Gear Notes: Zodiac boat, 60m rope, rock pro to 2" included hexes (very important for icy cracks), two tools, snowshoes Approach Notes: Boat up Ross Lake to Silver Creek, bushwhack to Silver Lake, hike to base of peaks
- 14 replies
-
- 15
-

-

-

-

-
Trip: Winter Hard Mox and Spickard - West Ridge, South Face Trip Date: 12/29/2023 Trip Report: Hard Mox (8,504 ft) and Mt Spickard (8,979 ft) Winter Ascents Eric and Nick Dec 27 – Jan 2, 2023-2024 First Winter Ascent of Hard Mox, Second Winter Ascent of Spickard On the summit of Hard Mox Dec 27 – Double carry zodiac boat and gear from Ross Dam trailhead to Frontage road, drag boat to Ross Lake, motor to Little Beaver, hike to Perry Creek shelter Dec 28 – Bushwhack to upper Perry Creek basecamp Dec 29 – Climb Hard Mox via Perry Glacier to West Ridge route (M5 WI2 5-pitch), return to basecamp, 18 hours camp to camp Dec 30 – Bad weather day, rest in camp (rain all day) Dec 31 – Climb Spickard via south face Jan 1 – Bushwhack down Perry Creek, hike to Little Beaver, paddle 9 hours down Ross lake when motor doesn’t start, drag boat up Frontage road, triple carry up trail to truck by 3am Jan 2 – Drive home The route Hard Mox is considered the most difficult of the Washington Hundred Highest/Bulger peaks, and had previously never been climbed in winter. I’m working on climbing all the Bulgers in winter and this peak is the crux of that list. Hard Mox has numerous elements that make it uniquely challening in winter. 1. It is very remote. The nearest road on the US side of the border is 15 miles away line of sight (Hannegan Pass trailhead), and the second closest 18 miles away (Ross Dam Trailhead). Hiking mileage from these trailheads is close to 30 miles, and the trails are likely snowed-over and unbroken in winter. Note: I’m following a rule that ascents must be made legally, so I don’t count roads or trails on the Canadian side of the border. One way to shorten the approach is to take a water taxi run by the Ross Lake resort. These don’t operate in winter, though, so that isn’t an option. Detailed route view 2. The peak is technical. The easiest summer route is 4-pitch 5.6. It was unclear if this was the best winter route, though, since the peak hadn’t been climbed in winter. 3. The weather is unstable in winter. Hard Mox is in the West North zone of the cascades, which generally has more precipitation and less stable weather than other zones. This also means the avalanche conditions are more likely to be unstable in this zone in winter. 4. There are no trails to the peak (on the US side). Bushwhacking is required, and this can be very challenging in the North Cascades, especially in winter. Climbing Hard Mox in July 2018 (photo by Steven) I first climbed Hard Mox in July 2018 with Steven Song, and we entered and exited via Canada. We followed the standard Depot Creek approach, crossed the ridge of Gendarmes to the south face of Hard Mox, descended to the base of the south gully, then climbed up the gully and to the summit via the West Ridge. This is the route that nearly all climbers take to climb Hard Mox. In 2020 I started considering how to climb Hard Mox in winter. I’m following a rule that all winter ascents must be completely legaly (no sneaking in from Canada), so I needed to find an alternative approach. I considered three approach options, and made scouting trips to determine the feasibility of each in winter. Over the next three years I would make a half-dozen scouting trips and two unsuccessful winter attempts on Hard mox. Scouting the Ross Dam approach and paddling Ross Lake in November 2020 First, I considered the Ross Dam trailhead approach. This route is to start at the Ross Dam trailhead, hike up the lake to Big Beaver, then hike to Redoubt Creek and bushwhack up to meet the summer route. This route is 30 miles one way. It has the advantage that the first half is mostly low elevation and often snow-free in winter, though it requires crossing Beaver Pass, which would likely be snow covered. In mid November, 2020 I did a trip where I hiked this approach to Redoubt Creek, then continued to Little Beaver and packrafted back to Ross Dam in a big loop. That approach would probably take two days in good conditions in winter. Scouting the Hannegan Pass approach in December 2020 I next considered the Hannegan Pass approach. This would require hiking or skiing in from the Hannegan Pass trailhead to the Chilliwack River, bushwhacking up Bear Creek, then meeting up with the standard summer route at the Redoubt-Easy Mox col. It would be about 28 miles one way. In December 2020 I drove up the road towards the Hannegan Pass trailhead and found a sign that the road is groomed for skiing in winter and closed to snowmobiles. This meant there would be an additional 5-mile approach in winter, making the approach 33 miles. I skied up the trail to near Hannegan Pass, but progress was slow. That approach would probably take at least two days. Those approaches would be too long for me to squeeze Hard Mox in a regular weekend or even a 3-day weekend. Ideally I could find a one-day approach so Hard Mox could be possible in one of my two long holiday weekends of the winter (presidents day weekend and MLK day weekend). I’m a teacher so can’t take vacation days, meaning these holiday weekends are my options in winter. I next considered a boat approach on Ross Lake. I have a packraft, but I discovered it can take most of a day to paddle between Little Beaver and Ross Dam. I really needed that to take on the order of a few hours so the rest of the day can be used for hiking and bushwhacking in. For that to be feasible the boat really needed to be motorized. Ross Lake is in the unique situation that motorized boats are allowed on the lake, but there is no road access for the general public. It is possible for workers at the dam or at the Ross Lake resort to drive to the lake by taking a vehicle ferry from the town of Diablo to upper Diablo lake, then driving up Frontage road connecting the two lakes. This service is not available to the public, meaning Frontage road is not reachable by vehicle from other roads. There exists a road on the north end of Ross Lake – the Silver Skagit Road – and this theoretically allows the public to drive to the lake and launch private motor boats. However, that road was washed out in November 2021 and it is unclear when it will ever reopen. It is possible that the road might be passable to a snowmobile in the winter, and an intriguing option might be to drag a boat behind a snowmobile to access the north end of the lake. I haven’t been able to test this, though, and I’m not sure if it would technically be legal to come in from canada that way if the road is closed and there is no official checkpoint open at the border along the road. There are currently two options to get a personal motor boat to Ross Lake. The first is to carry it down the 0.6-mile trail from the Ross Dam trailhead to Frontage Road, and then take it 0.5 miles down the road to the lake. The other is to put the boat in at the boat launch at Diablo Lake, ride to Frontage Road, then somehow carry or drag the boat up Frontage Road (1.5 miles, 600ft gain). From talking to friends with experience boating I settled on two main options. The first was to use a canoe with an electric outboard motor. This could theoretically be carried down the trail in multiple loads. It could also theoretically be dragged up Frontage road on a dolly, though only if Frontage road were snow-free. However, the canoe has several disadvantages. First, it is not very stable. I have friends who’ve tipped over in canoes on Diablo lake. That would be dangerous in winter, and winter is when the weather is generally worse on Ross Lake. Also, the biggest motors I could find for canoes were electric trolling motors that would struggle to get 15 miles up to Little Beaver, even at a very slow speed. Plus, an electric motor is not as reliable in cold conditions as a gas motor. The zodiac boat’s maiden voyage on Stave Lake during a climb of Mt Judge Howay in BC The other option was a zodiac-style inflatable boat with gas or propane outboard motor. This vessel is much more stable than a canoe and very difficult to tip over. It is made of durable thick material with multiple chambers. It has a much higher capacity than a canoe, and can go much faster and farther with the gas or propane engine. It deflates, so is portable. They even come with retractable wheels that can be deployed to drag the boat along frontage road. This appeared to be the optimal solution. My friend Matt had such a boat and we went on a test trip together in September 2022 in British Columbia to climb Mt Judge Howay (which requires a boat approach up Stave Lake). The boat had a 4-stroke propane motor, which is very clean and reliable and meets the strict environmental requirements for personal motor boats on Ross lake. That trip went well, and I ended up buying the boat from Matt. The boat as a 5 horsepower motor that is about 60 pounds, the boat itself is 70 pounds, and a full 5-gallon propane tank is about 50 pounds. A duffle bag of accessories (wheels, oars, life jackets) weighs about 40 pounds. Each one of these items is manageable to carry, which makes this a good solution. The motor allows the boat to go a max speed of 5.7mph fully loaded, but this is actually a perfect speed for Ross Lake. Taking the boat for a test run on Lake Chelan with my dog Lily, October 2022 Through multiple tests I’ve found that a fully loaded boat and full tank of propane has a range of 40-50 miles. Little Beaver is a 30-mile round-trip journey, so the propane tank is just the right size with a little bit of safety factor. One problem with Ross Lake is that in the winter the lake level drops and submerged tree stumps stick out in seemingly random and unexpected locations. In winter it is likely that boating on Ross Lake to approach Hard Mox will need to be at night, and it is thus dangerous to go too fast in the dark for risk of hitting the stumps. That’s particularly risky in an inflatable vessel. A speed of 5.7mph is slow enough that stumps can most likely be avoided. To make a trip safer, though, I called the Ross Lake resort and had them mail me a map with general stump locations marked. I also found a fishing depth map of the lake and charted a GPS course to follow the deepest section and avoid known stump areas. I would load this track on my GPS watch before boating up Ross Lake in the dark. First test run of the boat in Ross Lake boating to Little Beaver, October 2022 In October 2022 I did the first test run of the boat in Ross Lake. The goal would be a thorough simulation of the entire Winter Hard Mox approach and climb. My friend Ryan Stoddard recommended the Perry Creek approach to Hard Mox based on his approach to the Chilliwacks the previous year. He said the bushwhacking was difficult, but it would give direct access to the south face – west ridge route without requiring a traverse from the ridge of gendarms that might be sketchy in winter. I first wanted to test the Diablo lake + Frontage Road method. Talon joined, and we decided to climb Hard Mox in a weekend. Saturday morning we put in at Diablo Lake, motored through zero-visibility forest fire smoke in the dark, then reached Frontage road. The takeout was tricky to get the boat up the dock, and dragging the boat and gear up Frontage road was very difficult and time consuming, even with the nice deployable wheels. On the summit of Hard Mox in October 2022 with Talon We made good time up Ross Lake moving at 5.7mph, and got to Little Beaver after 2.5 hours on Ross Lake. We then hiked to Perry Creek shelter. To get up Perry Creek I’d seen on an old quad that there used to be a trail up the north and east side of the creek in the 1940s, but it was long-abandoned. Other groups, including Ryans, had followed that side of the creek and it sounded tough. We decided on a different approach. We went straight up the creek, scrambling on boulders on the side. It was actually fun and basically no bushwhacking. Then we hit old growth forest and followed that on the south side of the creek all the way to the edge of treeline. This showed the Perry Creek bushwhack was actually not bad at all! That was valuable information for winter. In the basin below Hard Mox in October 2022 We camped at the basin below Hard Mox, then the next morning climbed up the Perry Glacier. We were unsure if there would be easy passage from the glacier up to meet the standard summer route, but were surprised to find an easy 3rd-class gully connecting to the route. From there we climbed the standard west ridge route, and it was useful to refresh my memory of which of the lower gullies is the correct one (many teams lose time route-finding in that area). We ended up topping out by 9am, then descended all the way back to the boat, rode out, and I got home Monday morning 4:45 am, barely in time to make it to catch a nap before my morning lecture. This scouting trip successfully showed that basecamp could be reached in a single day with the zodiac boat, as hoped for. I also was able to test my new custom offroading headlights with motorcycle battery that I’d velcroed to the front of the boat. This allowed for boating in the dark, which would likely be necessary in winter. Ross Lake was foggy, though, so visibility wasn’t perfect. However, the approach had the one disadvantage that if Frontage road were covered in snow, then dragging the boat up would likely be very difficult. So that approach might not be ideal. Carrying the boat and motor down the trail in late October 2022 Talon had a friend that worked at Ross Dam, but unfortunately they didn’t have anywhere I could store the boat securely for winter access. We contacted the Ross Lake resort, but they didn’t want to store the boat. So, I would have to get it to the lake on my own and store it at home. I next wanted to test the second option to get the boat to Ross Lake, via carrying it down from Ross Dam trailhead. In late October Nick and Talon joined for another mission. My main goal was to test that boat approach, but a secondary bonus goal was to go survey East Fury. I suspected it might be high enough to be a Washington Top 100 peak. To get the boat down the trail I researched different methods hunters use to transport animals on trails. One way is a single-wheeled device with handlebars and a brake, with racks on the side. I bought materials and hatched a design to modify my mountain unicycle into a boat-transporting device. Nick had another idea to strap the boat to his e-bike and wheel it down the trail then use power-assist to wheel it back up. The boat loaded up with survey gear and the new offroading headlights Saturday night we loaded up the bike and strapped the motor to a pack (upside down, since that seemed most stable). Unfortunately the trail was so rocky and uneven that the bike didn’t really work well. We decided that just carrying the gear in multiple trips made the most sense. With a double carry we got all the gear down to Frontage road and inflated the boat. We then slept a few hours back at the truck, then Sunday at midnight dragged the boat and survey equipment down to ross lake. We put in and boated to Big Beaver. We then hiked up to Luna peak with my theodolite and surveyed East Fury (which I discovered is tall enough to be a new WA top 100 peak). We returned to the boat, motored back, dragged it up the road, and double carried back to the truck. Carrying the boat back up the trail From this trip I determined that it is actually a bit faster and easier to get the boat to Ross Lake via the trail than via Diablo Lake. It also works even if Frontage Road is snow covered. So this would be my preferred method to get the boat to Ross Lake. I now had all the pieces in place to mount a winter attempt on Hard Mox. I had figured out an approach that could get me to basecamp in one day in winter, I had verified that the climbing route worked from my planned basecamp, and I had figured out the optimal method to get the boat to and from Ross Lake. Next, it would be a waiting game. I needed many stars to align for a winter Hard Mox trip to be successful, even with all the logistics already worked out. 1. I had to have a partner available on a holiday weekend (my only holiday weekends were MLK day and Presidents day three-day weekends) 2. Weather had to be stable on the Sunday of the weekend, with minimal precipitation 3. Snow had to be stable on the Sunday 4. Wind had to be low for boating on Ross Lake and for keeping snow stable 5. Ross Lake had to be ice-free 6. Snow conditions have to be manageable on skis if skiing 7. The lake level has to be high enough to cover submerged tree stumps if boating at night. Boating up Ross Lake in January 2023 In January 2023 it looked like all stars would align on MLK day weekend. Satellite images had shown ice a half mile south of Little Beaver on the upper end of Ross Lake, but it was forecast to be warm and rainy for the week leading up to the weekend. We expected the ice would melt then, but as a backup we decided we could walk a half-mile along the shore if needed to Little Beaver River, then cross the river one at a time in my packraft, towing it back with paracord or rope. We planned to ski to increase speed. To ensure we knew about up-to-date snow conditions on the route I wrote custom python software to scrape the NWAC avalanche forecast website every evening and send a message with the forecast to my inreach. This would ensure we had the most up-to-date forecast before deciding to go for the summit. Stopped short by ice, January 2023 Saturday morning we successfully got the boat to Ross Lake and boated up, but we discovered that the ice had not melted. We parked the boat on shore a half-mile line-of-sight from Little Beaver, but unfortunately the shore had many impassable cliffs. This was not obvious from the satellite images. We had to bushwhack around the cliffs, then packraft across Little Beaver, and it took us 6 hours to cover just 0.5 miles line-of-sight distance. The next morning we skinned up to Perry Creek shelter, but above that the snow was too icy and crusty for skiing to be safe. Postholing up Perry Creek would be too slow and difficult. Plus, the additional 6-hour deproach to the boat would leave us too short on time. We bailed back to Little Beaver. Crossing Little Beaver with packraft and skis, January 2023 To get back we were able to do what I call belayed packrafting to get around the cliffs in melted-out sections and avoid bushwhacking. The first person would packraft around trailing our climbing rope. Then once around the cliff they would yell and the second person would pull the packraft back, then paddle around the cliff. This way we could inch worm around the cliffs and avoid bushwhacking. We managed to make it safely back to the zodiac and get back to Ross Dam that night. From that trip we learned that the lake absolutely has to be ice-free the whole way in order to attempt the trip. We also decided that snowshoes are a better choice than skis. With snowshoes we wouldn’t really have to care about snow conditions in the Perry Creek basin. Speed might be slower in snowshoes, but it was more likely we could reach the basecamp than with skis. Packrafting back between the cliffs and ice, January 2023 In February it looked like all the stars would align over Presidents Day long weekend. Nick and I decided to try again. This time the satellite images showed no ice on the upper lake. We decided to go with snowshoes. The only marginal star was the weather. It looked like snow and conditions were stable Friday through Saturday late afternoon, but then a storm was supposed to come in. If we could summit and get back below treeline before the storm, we would be ok hiking out in the rain and boating back in stormy conditions. This time we first carried the boat down to Frontage Road Friday night, then slept back at the trailhead. Early Saturday we carried the gear down, inflated the boat, and dragged the boat down the road. We started boating just at sunrise. In February the lake level is lower and more stumps stick out, so it’s more important to boat in the daylight. Days are a bit longer than in January, though, so this is not as big of a problem to wait until sunrise to boat. Successfully reaching Little Beaver, February 2023 We made it all the way to Little Beaver in 2.5 hours, then hiked up to Perry Creek. We were able to bushwhack up Perry Creek in snowshoes. Snow coverage was good, and we could mostly stay in the creek on the lower sections. Once we reached the old growth we made quick progress, reaching basecamp just at sunset. The next morning we left camp at 2:30am following my GPS track from October on my GPS watch. Pit tests showed the snow was stable, though deep, and we made slow progress. By a bit after sunrise we reached the bottom pitch of the route. The wind started increasing then, almost knocking us off balance. Nick led partway up the first pitch, but my route from October was not the best winter route. It had required crossing one sloping slab down low, which was easy in rock shoes but tough in crampons. Bailing on the first pitch when the weather deteriorated, February 2023 Also, it was difficult to find any cracks to stick gear in. Nick tried a few variations, then lowered down. I gave it a go, but couldn’t find gear placements. By then the storm was intensifying and we decided to bail rather than keep trying. We were concerned the increasing wind might start forming dangerous wind slabs down low. Indeed, as we descended the Perry Glacier we triggered a few small slabs. They were no problem, but given a few more hours they would likely get dangerously deeper. We descended all the way down to the trees as it got windier and started raining. We bailed all the way out to Little Beaver that night. The next morning the storm was raging and we started boating out into whitecaps and heavy wind. The boat took on lots of water and I had to navigate through a stump forest in the waves to get to shore and bail it out with my helmet. We then hugged the shore and made it safely back to Ross Lake. Bailing out water with my helmet on the ride back after navigating through a stump forest and heavy wind and waves, February 2023 From that trip we learned that the stars of weather and snow conditions absolutely have to align with the weekend. High wind is not good on Ross Lake, even with a stable zodiac boat. In October 2023 I did one additional test trip on Ross Lake. I bought yellow fog lights to replace the off roading headlights to make it safer to boat at night, when it is usually foggy on Ross Lake. For that trip Matt Lemke and Mike Black joined me to bring survey equipment up Castle peak. We boated up and back in the dark 10-miles up lake, and the new lights worked much better in the fog. This increased my confidence about boating on Ross Lake in the dark on a future Hard Mox attempt. We ended up surveying that Castle peak is over 30ft taller than the quad-surveyed height, so is solidly on the WA top 100 list. In October I started strategizing about how to try for Winter Hard Mox again. With so many stars that needed to align it seemed like relying on only two long weekends the whole winter was not a high chance of success. That only gave two possible summit days all winter. My only longer break was the Christmas-New Years break. I usually leave the country to work on climbing country highpoints during that window, but decided to stick around this year and prioritize a winter hard mox trip. Testing the new yellow fog lights on Ross Lake, October 2023 I would be available for a full week between Dec 26 – Jan 2. In October Nick and I coordinated that we would both be available, and if all stars aligned we’d give Hard Mox another shot. It helped that enough time had passed since our last attempted that we had sort of forgotten all the hardships we’d encountered. That’s always important before attempting a difficult peak again after an unsuccessful attempt. For this third attempt we would try to make further improvements but stick with some methods and gear that had worked before. We would again go by snowshoes, and would carry the boat down from the Ross Dam trailhead. For the boat I would use an aluminum propane tank instead of a steel tank. I had previously gotten myself stranded on Blake Island in Puget sound when the motor wouldn’t start and I had to row back through 5 miles of ocean. I later took the motor to the shop and the issue was that the steel propane tank had rusted on the inside and debris had clogged the fuel system. Hopefully that wouldn’t happen with an aluminum tank. Dragging the boat up Frontage Road, October 2023 For the Perry Glacier we would bring ascent plates. These are small mini-snowshoes that sandwhich between the crampon and boot and are ideal for ascending steep snow slopes where postholing and snowshoeing are inefficient. This would have saved us time on our February ascent. We each machined custom carbon-fiber plates for the trip. For climbing gear, in addition to a single rack of cams and a few pitons and nuts we’d brought before, I’d also bring a set of hexes. I’ve found these can be hammered into icy cracks where cams and pitons won’t stick. Duncan and I had used hexes to protect Forbidden Peak during our winter ascent in January 2021 and they worked very well. We’d also bring a second set of cams up to 2 inches. For technical tools this time I would bring two BD vipers instead of a viper and a venom. The venom is a hybrid with a straight shaft that is good for plunging, but it’s a bit harder to use dry tooling than the curved shaft. The viper is a curved shaft and better for mixed climbing. I decided it was unlikely I’d need to plunge the tool for an anchor. Nick would bring a Beal Escaper device which would allow for full 60m single-strand rope rappels. This would increase efficiency descending. For crampons Nick converted his petzl Lynx to monopoint to make the mixed climbing easier. I intended to convert my Petzl Lynx to monopoint also, but forgot to do that. For boots I would again bring my Olympus Mons 8000m double boots. It’s important on a weeklong winter trip to have a double boot so the liner can be dried out overnight in the sleeping bag. It’s also important to have a built-in supergaiter, since a separate gaiter easily gets frozen with ice and snow and is difficult to deal with. My 8000m boots were a bit overkill with warmth, but those are the only double boot with built in gaiter that I have. Nick had a similar but lighter boot that was a bit more appropriate. For the tent we would bring a modified mega-mid. Nick sewed on special skirts along the edges to anchor down with snow and increase space on the inside. This would be lighter and more spacious than the ultralight 2-man mountaineering tent we’d brought previously. We would each bring vapor barrier liners for our sleeping bags. This would ensure the bags would stay drier than before over multiple nights in potentially wet weather. Nick would bring a dry suit for the boat ride. I already use one every boat ride and it is much warmer and safer than a rain jacket and snow pants in choppy conditions. I would bring a new SUP hand pump for the boat that would make inflation faster. Plus, this would give us a backup pump in case anything went wrong with the primary pump. In the fall we also got a bit more serious about training for mixed climbing. We did a practice trip together dry tool climbing at Wayne’s World crag off I-90, and Nick did a bunch of additional dry tooling sessions. By mid December it looked like the stars might finally align for the trip. December had been unusually warm and satellite images showed Ross Lake ice free. The weather forecast looked favorable and there was a good chance there would be a window of stable snow. Ross Lake was 15ft higher than it had been in January (based on publicly-available USGS height data), so stumps were unlikely to be problematic. The first potential summit window looked like Friday Dec 29. We decided to give ourselves two full days to get in, to give buffer time for having heavier packs with more days of food. Then we’d establish basecamp at upper Perry Creek as before. We’d have three or four potential summit days, then a day to get out. Hard Mox was the top priority, but if we somehow managed to climb it we’d use our other days to climb other Bulgers in the area. To make our plan completely legal we emailed North Cascades National Park and got a permit for the trip. I flew back from visiting family on Dec 25, then Dec 26 spent the day packing and preparing. I took the zodiac boat out for a short test run in Lake Washington and everything worked fine. Finally we were ready to give it another go. Dec 27 Carrying the boat down to Frontage Road, December 2023 (photo by Nick) I picked up Nick in the morning and we drove up to Ross Dam trailhead by 9am. In our first load I carried the boat motor and propane while Nick carried climbing gear. I think it’s important to bring the motor down in the first load since that is the item most likely to get stolen if left unattended at the trailhead. Next I carried the boat while Nick carried remaining boat accessories and climbing gear. We got the full load down efficiently in two hours. Once all the gear was at Frontage road we pumped up the boat, which went twice as fast with the new hand pump as with the old foot pump. I mounted the wheels, mounted the motor, then we loaded all the gear as far back as possible to be as directly over the wheels as possible. Nick rigged up the rope on the front, then we each put the rope over our shoulders and started dragging the boat. We made sure to keep our steps in synch to minimize bouncing of the boat. Dragging the boat down to the lake We soon got the boat towed down to the lake edge. As usual, a truck from one of the resort workers was parked at the edge of the water. Luckily there was just enough space to squeeze the boat around to get to the water edge. There we each changed into dry suits, water shoes, and put on our life jackets. We loaded the sharp objects wrapped up inside packs or duffles. We placed a tarp on the bottom of the boat, loaded two climbing packs and one accessory duffle on top, then wrapped the tarp over everything and bungied it to the boat. This would protect the gear from waves splashing over and filling the boat with water. Starting the motor (photo by Nick) I pushed off in the boat, wading slightly into the water, while Nick went to the nearby dock. I then retracted the wheels and rowed over to pick up Nick. This allowed him to keep his feet dry. He then pushed off, and I rowed a bit deeper into open water. I connected the propane tank, turned the motor to neutral, plugged in my key, pulled out the choke, turned the handle to start, and gave the pull cord a pull. On the fourth pull the motor started, which is really good for starting cold. Usually it starts on the tenth pull. I then depressed the choke and we started off by 11:45am. Boating up lake I went at half speed to the water gate, a small gap in the floating log fence that protects the resort buildings from waves. We found the gate at the far end of the lake, marked by green cones, Once through I cranked the motor to max speed and we cruised along at 5.7mph. I’d gotten pretty familiar with Ross Lake after all the scouting trips and attempts and knew all the landmarks. We cruised around Cougar Island to the east, avoiding the temptation to cut the corner in the gap with the coast, since I’ve found this can be deceptively shallow. We passed close to Roland Point, but not too close since I recalled a few stumps in that area. Taking out at Little Beaver After passing Pumpkin mountain we rounded rainbow point and on to Devils Creek. That’s the site of a big stump forest which was luckily submerged today. From there I crossed to the west side following my memory of the lane of deepest water. We passed tenmile island, which was still an island at this water level, and then passed Lightning Creek, which surprisingly had deeper water coverage than in October. Loaded up and hiking up the trail (photo by Nick) Cat Island was barely an island, and I hugged the west coast. I was careful, though, since I recalled a few rogue stumps across from Cat Island on the west side. This time they were submerged. The only issue we encountered was a big floating log just past Cat Island. That would have been hard to spot at night, but I easily steered around it in the daylight. By 2:15pm we cruised up to Little Beaver Camp. The upper lake was ice-free as expected. The water level was not ideal for docking, though. The regular dock was high and dry, and the lower bench of shore was submerged, so the whole shoreline was kind of steep. We found one boulder that was kind of flat and were able to deploy the boat wheels and drag it up there. We tied it off on a stump, raised the motor, raised one wheel so the boat could rest level, and removed the gear. At the Perry Creek shelter We double carried the gear all up to the Little Beaver Shelter and took a short food break. We then ditched the boat gear in a bear box, packed up our climbing gear, and started up by 3pm. The trail was snow-free so we started hiking in light hiking boots with extra gear strapped on the packs. After three miles we hit deep snow, and switched to double boots and snowshoes as it started to rain lightly. I was happy to have my waterproof hyperlite pack to keep the gear dry. We continued to the shelter shortly after sunset around 5pm. It was very nice to get out of the rain in the shelter and not have to set up the tent. We each threw out bivy sacks and sleeping bags, cooked up some dinner, and were soon asleep. Starting up Perry Creek (photo by Nick) Dec 28 We got up at sunrise the next morning and were moving by 9am. It seemed unwise to be bushwhacking in the dark, so we wanted to be sure to start the bushwhack in the daylight. We ditched our hiking boots in the cabin and proceeded in mountaineering boots and snowshoes. I had loaded my October GPS track on my garmin Fenix 6 watch to help with navigation, but I pretty much remembered the whole route since I’d already done it a few times. From the shelter we stayed on the left side of the creek, and the snow soon got thin enough that we ditched the snowshoes. In general we tried to stay as close to the creek as possible, only bushwhacking around cliffs and waterfalls. Often there are good open lines next to the creek that allow for fast progress. Scrambling up the creek (photo by Nick) This time the creek was flowing much higher than it had been in October, while the snow coverage on the side was much less than it had been in February. This seemed to be a sweet spot that made the creek as difficult to follow as possible. If the flow was lower and the sides drier, it would have been easy to walk on sloping slabs on the side. If the slabs had been covered in a foot of snow, it would also have been easier to walk on them. But this time they were usually covered in a thin sheet of ice. That meant we had to bushwhack around more often than my previous two times. Navigating a slide alder thicket One time the bushwhack around verglassed slabs required crawling up through steep slide alder with slippery mud underneath. I pulled up with my right hand at an awkward angle and slipped in the mud. Immediately I felt a painful pop and realized my shoulder became dislocated. Ever since I dislocated it in the Khumbu Icefall on Mt Everest last spring it’s been more vulnerable, and the heavy pack with awkward fall was enough to pull it out. I howled in pain, but luckily I knew a trick to get it back in on my own. I immediately clasped my hands, relaxed my right arm, and pushed my knee through my clasped hands and pushed. The shoulder popped right back in and the pain soon subsided. It had only been out for about 5 seconds. I vowed to be extra careful going forward with pulling with my right arm. Finally into the old growth forest (photo by Nick) This and a few other detours slowed us down a bit. Higher up we had to pass through one slide alder thicket I hadn’t remembered. I think in October I’d stayed in the creek, and in February it had been covered in snow. That was the only memorably tough section, though. By 3400ft after rounding the corner we hit the old growth forest, which was a welcome relief. I knew it would be smooth sailing from there all the way to basecamp. It had been drizzling all morning and we were both soaked, but at least there would be fewer bushes to brush against in the old growth and our body heat might start drying things out. We ascended steeply up into the forest, and soon the snow got deep enough to warrant snowshoes. From there the woods were nice and open and progress was fast. It was fast until we started having snowshoe issues, though. One by one each of the four snowshoes failed in some way. The metal supports under each of my feet cracked, making the rotating part of the snowshoe detach. I ended up using ski straps to strap the part back on, and the stretchiness in the straps allowed my foot to rotate. First view of Hard Mox (photo by Nick) For Nick almost every individual strap ripped off. He ended up using a long ski strap to strap one foot to the shoe, and some spare cord to tie the other shoe in. I guess this is normal for an expedition to improvise when gear inevitebly fails. Finally we resumed our fast pace through the old growth. I recalled in February we had strayed a bit too high to the south, which forced us into side hilling to maintain elevation. This time I made sure to stay closer to the creek, and the terrain was nice and flat. As we got closer we started looking for a good stick for the middle of the mega mid. Usually on single-night trips I strap to ski poles together for the middle pole. But if we were using the tent as a dedicated basecamp I would want those poles on day climbs. I had a separate carbon fiber pole for the middle support, but wanted to save weight so left it in the truck. Nick managed to find a perfect stick on the way, and we took turns carrying that up through the woods. Basecamp at 4500ft By 6pm we reached the edge of treeline at 4500ft on the edge of the talus field. The snow coverage was much lower than in February, and many more trees and slide alder patches were sticking out. This time the bushwhack took 9 hours instead of the 6 hours it had taken us in February. This slower time was likely because of the unfavorable creek level and snow conditions, necessitating more side bushwhacks. Also the heavy packs, shoulder injury, and broken snowshoes slowed us down. But we successfully reached camp approximately on schedule. We had considered the possibility of pitching camp at 6700ft on the Perry Glacier that night to make summit day shorter. But the snow conditions were not stable that day, and getting up to 6700ft required crossing avy terrain. So we decided to pitch camp at the same place as before at 4500ft. This had the advantage that we knew there would be running water there, which was indeed true. Moving up the next morning We leveled out a spot, mounted the stick, and pitched the mega mid tent. Nick’s skirts on the tent worked great for piling snow on the outside while maintaining space on the inside. We dug out a ditch for our feet and cooked up dinner. At 7pm I got my inreach messages with the updated avy forecast. Friday looked like stable snow conditions and dry weather, as expected. So we decided to go for it. We ideally wanted to get to the base of the rock climbing at sunrise to be able to climb in the light. We expected our speed to be a bit faster than in February with the more consolidate snow and the ascent plates. Also, sunrise was later (8am), so we decided to start up at 4am this time. Dec 29 Looking down to Perry Creek basin It drizzled into the evening but eventually ended. I was unfortunately still wet from the approach hike, and made the unwise decision of putting my wet socks and wet liners in my sleeping bag to dry them out for summit push. This indeed dried them out, but left me damp all night and I ended up getting very little sleep. The 3am alarm came way too early, and we reluctantly started nibbling on bars and getting out of our sleeping bags. The drizzle had stopped, the skies had partially cleared, and a nearly-full moon illuminated the sky almost enough to not need headlamps. This was much better than in February when it had been blowing snow and low visibility as we had ascended. This time was much warmer also, which would be nicer for climbing. On the upper Perry Glacier We were suited up and moving by 4am. I had my October track loaded on my watch, but navigation was easy even without that in the moonlight. The east face of Lemolo loomed above us, with the true summit of Hard Mox just hidden behind. We alternated leads breaking trail in 15-minute shifts up to the cliff below the Perry Glacier, then right into the lower-angle gully. We hiked up some old avy debris that had more consolidated snow underneath. After reaching the first shoulder we hooked left, then found a weakness in the upper steeper slopes. We eventually reached a flat area at the toe of the Perry Glacier. Switching to ascent plates At this point in October I had continued directly up slabs to avoid the glacier, and in February we had continued left onto the glacier with lower angle terrain. This time we decided to avoid glacier travel and ascended right of the slabs. The snow was well-consolidated and travel efficient with the heel risers lifted on the snow shoes. We crested the flat area above the slabs, then ascended higher onto the Perry Glacier. We soon reached a cliff at the top of the glacier and decided to ditch the snowshoes there. It was getting too steep for them to be efficient, so we switched into ascent plates. Looking up at the climb Nick led the way and travel was again very efficient. Each step required only one kick, unlike in February with snowshoes when we had to clear snow with hands, then knees, then double kick to make progress. We made it up the snow gully to the point where the summer route descends and traverses climbers right to the final gully. The terrain got briefly icy, but the ascent plates allow the crampon frontpoints to stick out, so this was not a problem. Nick leading up the first pitch We continued up with our whippets for protection until we reached the based of the first pitch. Here Nick put a cam in a crack, then we clipped in and kicked out a nice platform below the shelter of a rock wall by 10am. Nick is the stronger climber so he took all the gear while I took the pack with a little bit of food, water, and warm clothes. We ditched our remaining gear at the platform and pulled out the technical tools and clipped them to our umbilical cords. The summit was socked in the clouds, but it wasn’t very windy and this time the weather was predicted to improve throughout the day. I always like climbing into improving weather rather than racing to beat a storm that might come in early. Nick at the first crux Nick optimistically started up into the chockstone gully to try to climb directly up. This appeared to be full of ice, which might make it easier than the rock slab. However, he found the ice was hollow and not safe to climb, so backed off. He then climbed directy up the rock wall to the right, where I had climbed in October. He got a piece in down low, then got above the lip, reaching the same highpoint as before. This time he was able to excavate out a crack on the left that took a hex pounded in. That seemed to be the key to getting past this lower crux. He continued up to the bench above the chockstone, and made an anchor slinging horns. Me leading the gully pitch I soon followed, and manged to get decent sticks in thin neve above the lip, and a few good hooks. Of course, I had the advantage of a top rope, so felt much safer. At the anchor Nick handed over the remaining gear and belayed me up the gully. In October I had soloed the gully since it wasn’t too steep or exposed, but in winter it’s fully of ice and you wouldn’t want to fall. It’s kind of long, but not hard, so we decided to simul climb it. I got a few pieces in on each sided, including a good hex hammered in a crack that wouldn’t take a cam. I soon reached the col above and clipped on to the rap anchor at the horn. Nick leading out of the col I belayed Nick up, then handed the gear back over. I recalled the next pitch had been the crux in October, and I was happy Nick was OK leading it. Getting out of the col was a little tricky, and I pushed Nick’s back as he pulled on the lower moves. He got good pieces in going up and right on the face. The next move was to cross over to the right into a gully and ascend. That ended up being the crux. I suppose in summer I’d frictioned up slabby bits in my rock shoes with no problem, but that’s hard in crampons. Nick somehow managed to bang a hex in a crack and excavate out a key micro ledge for the front points. This allowed passage, and he climbed all the way up to the pedestal anchor above. I was yelling out directions from below since I was familiar with the route, having climbed it twice before. Me following the first pitch I followed, and was starting to get a bit nervous about our speed. We really wanted to top out by sunset, but the days were short and sunset was around 4:15pm, which wasn’t too many hours away. So I tried to climb up as fast as possible. Since Nick had already excavated out the good footholds and tool hooks I was able to make fast progress up to the pedestal. The pedestal anchor is kind of awkward since it requires a semi-hanging belay. To increase efficiency we decided to swing leads again. This was kind of nice that I didn’t have to stay at the awkward anchor, but the pitch above looked kind of tricky. I took all the gear and started up. Me leading up the next pitch above the col The rock was interesting since it was all plastered in tiny white rime ice feathers. This made it very slippery, but that wasn’t a problem with crampons and ice tools. I delicately hooked ledges and got a few cams in until I reached a vertical section. There I traversed up and left to a good ledge climbed on top. Above me I could see a nice bench on the ridge, but it looked like an unprotectable slab for 20ft to get to it. I optimistically started digging and clawing around with my tool and luckily found a few cracks under the snow. With cams in I continued up getting good sticks in the neve and hoooking ledges until I reached the bench. I recalled the next rap anchor was just above this bench, but it was a 15ft tall vertical wall that looked tricky. I was running low on gear and Nick was far enough below to not be able to see me there. It seemed like the kind of section where you want good pro and an attentive belayer, so I decided to make an anchor there and bely Nick up. Nick at the pedestal anchor Nick soon climbed up and said he was OK leading the next bit. I told him the anchor was just above, and this should be the last pitch up to the summit. Nick got in three solid pieces on the upper step, then pulled himself over. He made steady progress above that, topping out almost exactly at sunset. Meanwhile, I was admiring the amazing view opening up below me. The clouds were gradually clearing revealing the pickets to the southwest, Easy Mox and Redoubt to the west, and Custer and Rahm to the north. Climbing the last gully to the summit Nick put me on belay and I carefully surmounted the vertical bit. Luckily there were very solid hooks at the top I trusted to pull myself over. I walked past the rap anchor, brushing some snow off, then walked through the low-angle bowl section to the final gully. I was impressed to see nearly every piece of pro was a hex! I had brought six hexes and they all got used on that pitch! And to think, those hexes almost never get used on any other occasion. They really are the right tool for the job in icy cracks, though. Summit panorama I made the final pull over the upper chockstone and reached the summit ridge at 4:35pm. From the anchor it was On the summit a short walk over to the highest little pedstal, which we both did unroped. Our timing was perfect just around sunset with the last rays of sun lighting up the surround peaks, which were passing in and out of thin clouds. That was probably the most scenic time of the whole day. We took turns posing for summit pictures and taking videos and panoramas. It felt amazing to finally reach this point after so many scout trips and failed attempts. I spent a few minutes trying to dig around for the summit register, but couldn’t find it. That’s usually the case in the winter on peaks like this. Nick on the summit After 10 minutes on top we decided to head down. I recalled the main anchor is a small slung boulder on the edge of the cliff that doesn’t inspire much confidence. In October I’d backed it up to a bigger boulder, and saw that was still in place. We backed it up another time and I rapped down first to the next anchor. Nick soon followed by the time it was dark enough to need headlamps. Rapping off the summit At the next anchor I knew a 60m rap would reach the col. We rigged up Nick’s Beal Escaper and planned to do a single-rope 60m rappel. The device is kind of like a chinese finger trap wrapped around the rope. The way it works is once you’re at the bottom you do about 20 pulls and releases, and it gradually releaseas the rope from the trap. I was a little skeptical since I’d never used it before, so I went first and had it backed up. By now the wind really picked up and it was hard to lower the rope down without it blowing away to the side. The rappel is a little awkward to begin with too, since it kind of goes down a ridge. I somehow managed to keep the rope untangled and safely reached the col. I then tugged twice on the rope to make sure it would start passing through the escaper device. Rapping down Nick assessed that conditions were not good for the Beal Escaper to work properly, so he pulled the rope up and made a standard 30m rappel to the pedestal, then another 30m rappel to the col. The wind had really picked up and it was started to get pretty cold, so I was happy when he arrived down safely. At the col we attached the beal escaper and I made a full 60m rap down the gully. I had recalled seeing an intermediate rap anchor on a slung horn, but by the end of the rope I was still 15ft above that anchor. Maybe someone with a 70m rope made that anchor. Luckily I found some cracks in the wall and was able to make an anchor with a few nuts and a girth-hitched constriction. At the col Nick came down and we did 20 pulls and the beal escaper magically released. That was pretty nice to get the full 60m rappel in with the 60m rope and save some time. I next rapped off my anchor and easily reached our platform and gear. It felt great to finally be done with the technical section. Nick followed and did the same trick with the 20 pulls until the beal escaper released. This time, though, the rope got stuck on something just above the chokstone. We tried flicking the rope all directions, and finally pulling down as hard as we could. It was no use, though. The rope was officially stuck. Downclimbing to the snowshoes At that point we had two options. First, one of us could lead back up the lower crux on the other strand of rope and get the top end unstuck, then build another rap anchor and rappel down. That sounded dangerous. It would be tempting to just prussik up the stuck end, but that was also dangerous since we didn’t know how much weight it could bear. Second, we could cut the bottom of the rope off as high as possible and leave the remaining piece. Both of us were planning to return to Hard Mox the coming summer anyway (I wanted to take my differential GPS up to get an accurate elevation reading), so we decided to cut the rope and retrieve the other end in the summer. Descending the Perry Glacier That was the safe decision and felt like the correct decision. So we cut the rope at the middle marker and packed it up. We were soon all packed up and downclimbed back to our snowshoes. We then packed up the snowshoes and continued down our tracks in our crampons. The tracks were nice and visible and not drifted over, which was a good sign that no new wind slabs had formed. We made good progress all the way off the glacier and back down to camp by 10pm for an 18 hour day. Descending the Perry Glacier We checked the latest avy and weather forecast on my inreach and the next day was supposed to be stable snow also, but rain and snow and socked in all day. Sunday was supposed to be better weather, though. So we decided to take a rest day the next day. I definitely needed one anyways. Dec 30 I slept in to 10am, which felt great. It had started drizzling around 3am and would continue on and off throughout the day. Indeed, it looked like a bad day to be above treeline. I stayed drier that night by not putting any wet items in my sleeping bag and diligently staying inside the vapor barrier liner. Rainy rest day in camp We soon discussed objectives for the rest of the trip. Hard Mox had been the primary objective, but we wanted to Resting in the tent tag any other Bulgers nearby that made sense. From the summit of Hard Mox we realized that Redoubt and Easy Mox would be very difficult to access from our camp. We had optimistically hoped to be able to cross over col of the wild to access these peaks. But the glacier north of Hard Mox was heavily crevassed. It looked like steep slabs to gain the col, which had a huge cornice overhanging to the east. That option would not work. The only remaining Bulger accessible from our camp was Spickard. We decided to go for Spickard Sunday, then hike and boat out Monday and Tuesday as originally planned. Rain was supposed to end around 5am, so we would start up at 6am to give a bit of buffer time. Starting up Spickard We spent the rest of the day eating and drying out clothes and socks using body heat. Dec 31 The rain ended as schedule and we were up and moving by 6am. We had planned a route using shaded relief maps to minimize exposure to steep slopes. We took turns breaking trail, and now the once-slushy snow had firmed up with an icy crust on top. This was good news for stability. Good views of Hard Mox We followed the left-most and largest of four snow gullies to our north, soon reaching a low-angle shoulder at 6000ft. From there we traversed right to a big drainage, then hiked up to the toe of the Solitude-Spickard glacier. By then the sun came out and we were treated to great undercast views below. We met up with the standard Spickard route I recalled from my previous ascent, and traversed right on a ledge between two cliff bands to gain the south face of Spickard. Spickard started out socked in the clouds but they gradually cleared and we could see a route up. We ascneded low-angle slopes almost to the ridge, then traversed right below a steeper band. The snow was stable with only a thin unreactive wind slab in a few isolated places. Climbing Spickard Below a small saddle we ditched the snowshoes and switched to ascent plates. From there we easily marched straight up to the saddle, then continued along the ridge until we were blocked by gendarmes. There we noticed a nice snow traverse on the north face. We ditched the ascent plates and got out our ice tools. One by one we traversed the icy face, reaching the summit by noon. The undercast views were amazing, and with no wind and sunshine it was actually kind of pleasant. This was a rare treat to be able to spend more than a few minutes on a winter summit. We took tons of picture and admired the views. On the summit I recalled last year Stu Johnson and Max Bond had climbed Spickard via the NE ridge in what was likely the first winter ascent. I peered over the ridge and it looked way more difficult than what we had done. I think the south face is the easiest way to go in winter if the snow is stable. We soon dropped back down, traversed the north face, and took a food break in the sun on the south side. We downclimbed back to our snowshoes, packed them up, then cramponed back down of the face. We made excellent time retracing our route back down, reaching camp a bit before sunset. It felt great to get both Bulgers bagged from the Perry Creek drainage. I still have four left in the Chiliwacks in winter, but I’ll have to figure out a different way to access those. Summit panorama Leaving camp in the moonlight Jan 1 Our goal was to get all the way back to the trailhead the next day if possible, so we were up and moving by 6am. We made good time following our snowshoe tracks through the old growth, and switched to boots back at the creek at 3400ft. The bushwhack and scramble down went smoothly, and we reached the Perry Creek shelter by 11:30am for a 5.5 hr descent. There we switched into our stashed hiking boots and made fast time back to Little Beaver shelter. Nearing Ross Lake It felt really cold down there, and that may have been associated with the clear weather that day. By 3pm we were bundled up in dry suits and down jackets and soon had the zodiac boat loaded up and pushed off into the lake. For some reason, though, the motor wouldn’t start. I fought with it for 30 minutes before finally giving up. I suspect it was related to the cold. I’ve never taken it out in this cold of temperature, so some possible problems are that the propane was too cold or the motor oil wasn’t rated to the cold temperature. I’m working on debugging that issue still. Trying to get the motor running The boat has a set of oars as a backup, and we started rowing. It would be a 15-mile trip back to Ross Dam and we would try to be efficient. I’d previously packrafted from Little Beaver to Ross Dam and that had taken all day, even with a tail wind. This time luckily the wind was calm, though generally it comes from the south in the evening on Ross Lake. The zodiac oars seemed more efficient than packraft paddles, luckily. We measured that pulling hard and fast we could get up to 3.5 mph, but pulling at a comfortable pace was closer to 2mph. Broken oar lock fixed with bungee cord We took 10-15 minute shifts, rotating out when the person in the bow got too cold. Every shift I would play around with the motor trying to get it to start. We even dunked the propane tank in the water to try to warm it up, but that didn’t work. It soon got dark and we were paddling by starlight. Our strategy was the person in front would give directions until the heading was appropriate, while the roarer would pick a point in the distance to the north and keep the back of the boat pointed at that to maintain heading. Back at Ross Dam When we were near Rainbow Point, a bit over halfway, one of the oarlocks broke so that the paddle was no longer connected to the boat. This looked like bad news. It would be very tough and slow to row out with just one paddle, or even to detach both paddles and row out like a canoe. The oar orientation was way more efficient. Luckily I was able to jerry rig a solution with bungy cords to reconnect the oar to the boat, and we continued on at our normal speed. By 11:45pm we finally reached the takeout at Ross Dam. We pulled the boat out of the water, deployed the wheels, and dragged it up Frontage road. From there Nick immediately took a load of climbing gear up while I packed up the boat and motor. I then hiked up with the boat. Nick came down and got my climbing pack and the propane tank while I returned to get the motor. Finally, Nick made one more trip to get the boat accessories. So it was a 2.5-carry up while it had been a double carry down. I think if the propane tank had been empty as it would have been if the motor had worked, we could have gotten it up more easily in a double carry. By 3am we were loaded up back at the truck. We slept a few hours until sunrise, then drove back to Seattle. 62/100 Winter Bulgers Movie of the trip: Gear Notes: Technical tools, double rack to 2in, hexes (very useful), pitons (unused), 1 stubby screw (unused), ascent plates, zodiac boat, dry suit, double boots, NWAC-scraping-to-inreach python script, beal escaper, single 60m rope, avy gear Approach Notes: Carry boat to Ross Lake, boat to Little Beaver, hike to Perry Creek shelter, bushwhack up Perry creek
-
Trip: Chair Pk - NW Ridge Trip Date: 02/11/2018 Trip Report: More fun in winter I thought, especially with the amazing conditions. More alpine ice well adhered to the rock than I've ever seen in the Snoq area, neve even! Don, my long time climbing partner, and I had a blast in this puppy yesterday. The last 10' of the first pitch gaining the ridge was a good opener. The second pitch we traversed on the south side of the ridge up to a small notch with a chockstone, then up a short runout slab then a downward traverse to a small tree belay on the right. The third pitch went straight up to a steep hard (for me anyway) chimney topping out on the crest. Fantastic hooking! Running belay along the sharp crest and on to the top. I hope folks got out and got some in these incredible conditions! Left side of N face (yep, that's all good alpine ice and neve!): N Face route: 1st pitch top out: Don on runout slab (red dot), belay tree barely visible down and right: 3rd pitch: Looking down 3rd pitch top out: Running belay toward top: Gear Notes: Rock rack, no pins or screws needed Approach Notes: Casual, no floatation needed/wanted

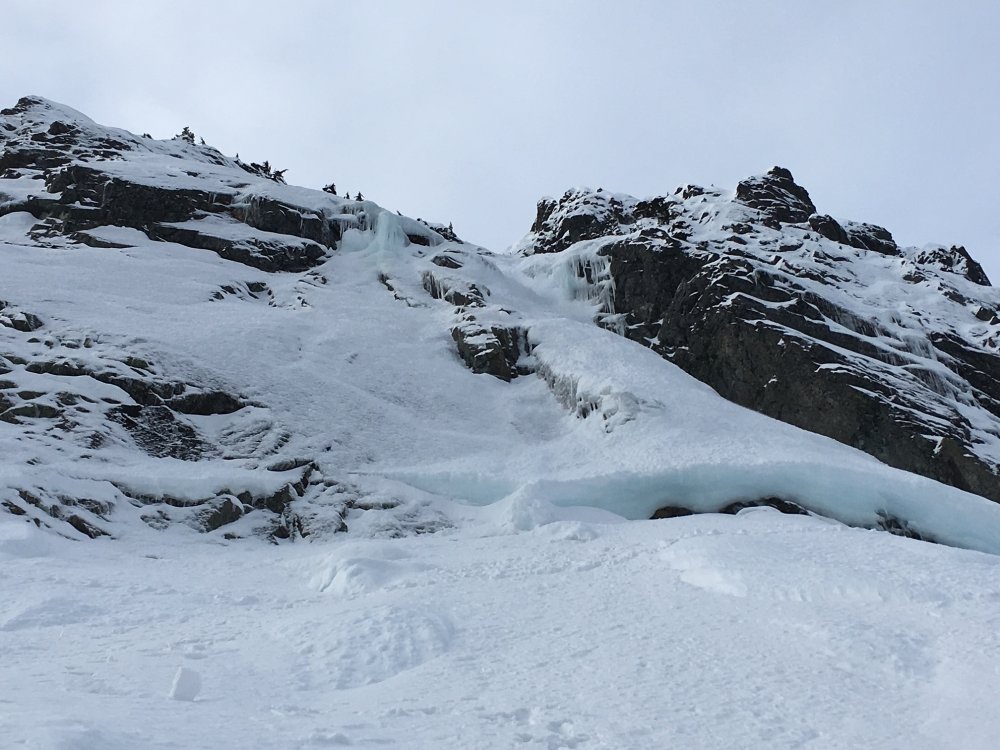
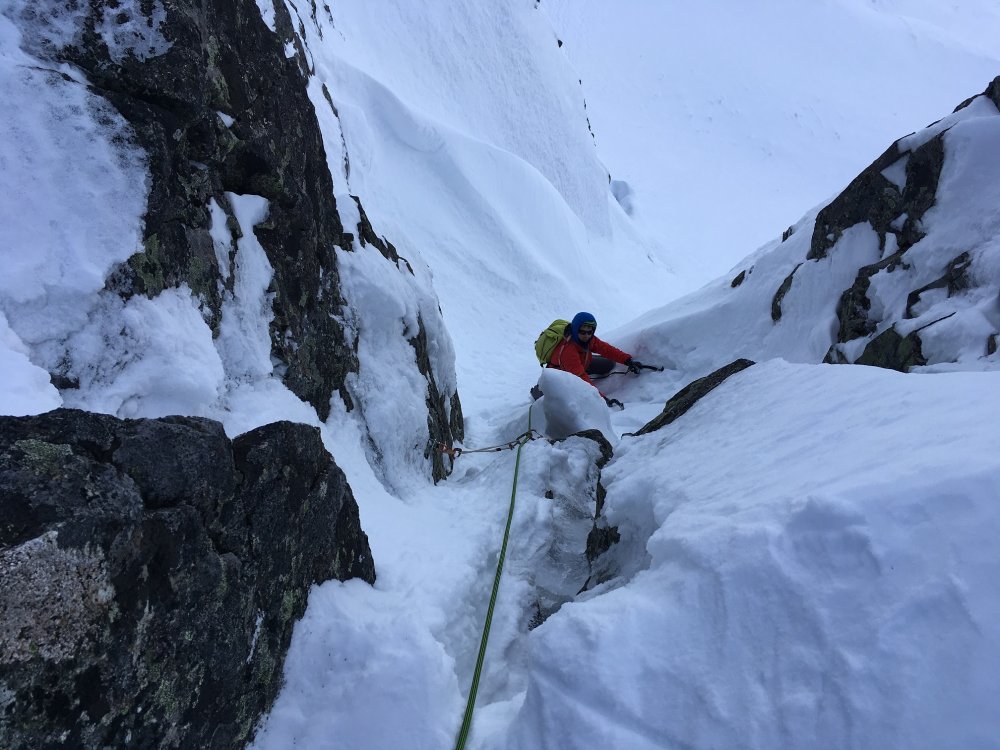

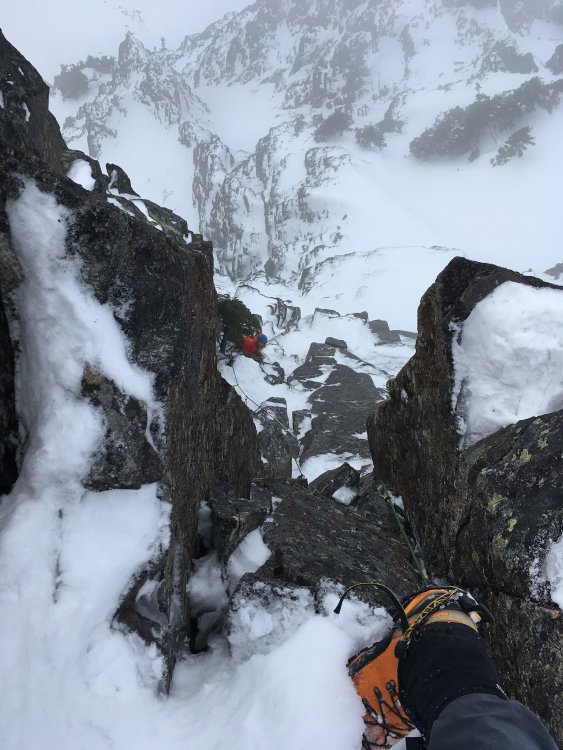
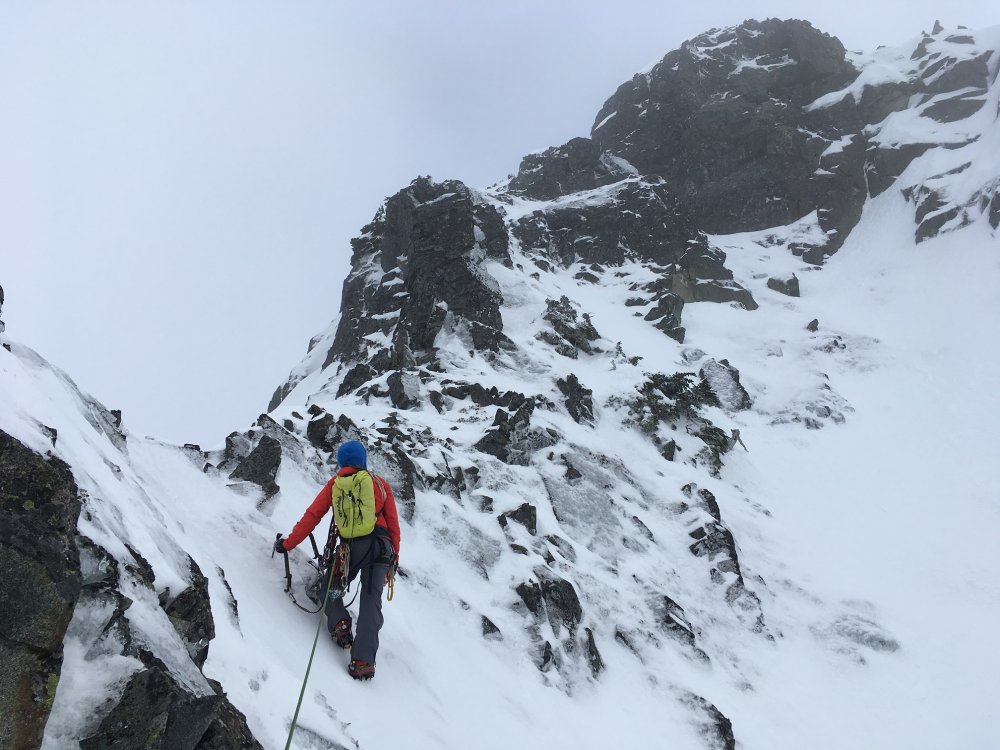

-
 Climb: White Chuck - East Face Couloir Date of Climb: 2/27/2005 Trip Report: Look at the pics then read Justins post "A Message from Necronomicon:" a little further down the page. It's far better than my slop In the beginning of February, when Dave Brannon and I were finishing up the Northeast Ridge, it became readily apparent that the east face of White Chuck was big, steep and split by a very deep coulior. With a little help from John Scurlock I managed to get an excellent photo of the east face. Ummmm....that looks good. Gene Pires, Justin Thibault and I climbed the route on our second attempt on February 27th. First climbed in September 1970 by Ron Miller and Ben Guydelkon, it had all the making of an un-classic. The CAG admonishes, "best climbed in late summer when dry", "scare protection" and "hard hat recommended". In a veil of ice and neve we figured it might be a very good climb. On the first attempt too much new snow and too little time turned us around before we even saw the face. Though the weather had become unseasonably warm we returned over the weekend to try again. On Saturday morning Justin managed to coax his truck up to 3100’ on FSR 2435. From there we slogged up logging roads and a scenic wooded ridge reaching the basin below the south side of the peak in the late afternoon. At around 5000’ temps in the shade hovered around forty degrees. But north-facing slopes still held fine powder snow giving me some sweet turns, and us hope for decent conditions in the shady couloir. Justin and I passed out in the sun while Gene summoned the energy to pack down part of the approach for the following morning. Just before sunset John Scurlock made a serious of terrifyingly fast and tight circles around the peak in his yellow rocket plane. Sunday we left camp at 4 AM and traversed up to a “chair-like” pinnacle on the southeast ridge of the peak. We dropped down a very steep ramp to the base of the face and began a long, miserable traverse through breakable crust. At first the route appeared to start with a blank rock wall. As we ascended the debris cone at its base a beautiful ice-choked chimney appeared, leading up to the left. Starting up the first pitch Ultimately the climb was far better than we could have imagined. With occasional simu-climbing we broke the climb into seven long pitches, the last ending forty feet from the summit. Two pitches in the middle consisted of steep neve. The other five were primarily beautiful runnels of water ice sometimes no more than 1’ wide. While a majority of the climbing was WI3 or easier the second pitch had a difficult crux of vertical and rotten snow covering thinly iced chockstones with hard-fought protection that felt pretty serious. All photos by Justin Thibault. Below the long, beautiful runnel of pitch 3 Leading off for the summit Descending the Northwest Ridge One of the boyz below P6 We topped out maybe eight hours after starting the climb and took a long rest before beginning the exposed and tedious descent back to camp. Justin, Gene and I all felt that this route was quite classic and deserving of repeats. During a normal snow year there would likely be more wallowing, less ice and a big cornice to surmount at the top. We thought a fair rating in current conditions was WI3 mixed 5.8 R. Gear Notes: Plenty of screws Pickets Pins - KB to Baby Angle small rack to 2.5”
- 15 replies
-
- 1
-
-
- first ascent
- north cascades
- (and 1 more)
-
 Trip: Lincoln Peak - Wilkes-Booth Route (NW Face) Grade 4+ AI4+ Date: 3/13/2015 Trip Report: Lincoln Peak Wilkes-Booth Route (NW Face) AI4+ Grade 4+ ~2000 ft. FA- M. Rynkiewicz, D. Coltrane 3/13/2015 Michal Rynkiewicz and I climbed the NW face of Lincoln peak via a combination of glacial, alpine, and water ice, with steep snow fields and amazing ridge traversing mixed in. I was inspired to climb this route by a 2010 TR of Assassin Spire by the phenomenal Cascade hardman Tom Sjolseth. His trip report included a few choice picture of the NW face of Lincoln with big inspiring flows that would possibly lead to the summit of Lincoln. Given that and the great snow conditions we have been having this year I didn't really have a choice but to go out and give it a try. We were a little concerned with the warm temps and recent snow, but upon views of the start we couldn't resist. We climbed the route in a single push from the Heliotrope ridge trailhead ascending the NW face and descending the SW face (Standard) route. It was a big day and one of the most amazing routes I have had a chance to climb in the Cascades. I feel very fortunate to be blessed with outstanding partners and to be allowed passage by this amazing mountain. Sunrise on the Sisters Looking at first pitch on Descent. This is the same start as for Assassin Spire and the route shares the lower portion with Shooting Gallery until you get to the upper Ampitheatre. Starting up the first pitch. The upper half of this pitch is the crux with poorly protected overhanging ice of dubious quality. looking down at the overhanging glacier while cruising up through the first snow field. Vertical ice curtain headed up to the glacier. Michal climbing the glacier to gain the upper amphitheater. This was a fun step of glacial ice with good protection. First views of the ampitheatre. We climbed the obvious flow in the middle. It was about 120m of amazing WI3+ plastic ice like I have never seen in the Cascades. We climbed it in two long pitches. There are other climbs to be had along the face. Climbers right is a slightly easier variation that would traverse in to the main flow, and climbers left the gully would probably go with a bit of shenanigans at the top. Setting up an anchor for the first pitch. Michal Starting out the first pitch, this pitch was a full 70 meters with a little simuling on 60m ropes. this was the harder of the two pitches with a few vertical step of ice that had good features. So Much Ice! Starting out the second pitch. This was the easier of the two with one short 85 deg. section at the start and about 50m to the top of the flow. Cruising the upper snow field with the amphitheater below. Amazing ridge climbing along bomber snow and rime. Assassin Spire is the rocky spire down and right. Navigating the upper ridge to the first sub summit. From here we had to downclimb a short portion of rime ice to get to the last pitch to the summit. Looking back at the downclimb section. Such amazing position. Michal Working his way up the last technical pitch to the summit. Looking up the gulley to the summit. This was another full 60m pitch, but relatively easy. Summit Selfie! All that was left was getting off #2 on the hardest peaks in Washington. Just downclimb 2000 ft of steep snow... Out of the danger zone and glad to be heading back. From here we traversed back along the north side of the peak to Heliotrope ridge. Thanks again to my amazing partner for the commitment, and strength to get this huge climb done. Special thanks to The Tom Sjolseth for getting after it and sharing the stoke! I would have never known this was an option without his beta. Daniel Coltrane Gear Notes: 9 screws, 3 pickets, small rack to 2", set of Nuts, and small set of pins, 60m rope Mostly used screws and pickets. Approach Notes: Approached from Heliotrope ridge across the lower portion of the Thunder Glacier.
 -
 Climb: Mount Outram-Ghost Passenger (FA/FWA East Face) Date of Climb: 3/12/2005 Trip Report: I have been scheming to climb the East Face of Outram for a couple of years now. The large, gullied face is hard to see from most roads but you can get glimpses from some other peaks, and the view from Snass (Justin Brown has some awesome shots on bivouac.com) is quite impressive. In August 2003 Fred Touche and I hiked up the standard route on Outram and I took a look see down the face and deemed it possible. In 2004 Merran and I hiked in in May planning to go up the standard route, drop down a gully at the S end of the e face and climb back out up another gully. However this approach, due to weather and also the fact that all the gullies are too steep to be comfortable descents, failed and we ended up bagging the standard route once again. I know Justin and Jordan also made one attempt and had the same problem. For 2005 I decided to head in via the old Ghost Pass trail and up the creek draining the east face. I gleaned some beta on this approach from the usual online sources and prepared for windfall and thrashing. The nice descent down the standard route means the best climbing choice is to carry over bivi gear and I packed accordingly. No stove, cold food, two tools, crampons, a few jacket layers, a -7C sleeping bag for a possible long night bivi and a 3/4 length z-rest. I parked at the wooden marmot around 12:30 on Saturday and started hiking the Ghost pass trail. this leaves the old Engineers' Road about 2 km east of the Outram Trail and cuts over the ridge into the valley of Eighteen Mile Creek. The trail was overgrown and had lots of windfall but wasn't as hard to follow as I had feared it would be. After about three hours of hiking I left the trail and cut up an obvious side valley towards Outram. By the time I reached treeline it was getting near dark and I was tired. There were lots of possible lines so I elected to bivi overnight and make an early start instead of picking one line and giving it by headlamp Fred Touche style. There were no real flat spots to bivi not covered in wet snow but I found a good hollow in the ground, filled it in with dead branches and laid the z-rest down on that; it was quite comfortable. For some reason all I could think of all night long was zombie movies and wild animals. I had found fresh cougar tracks not far from my bivi site when approaching and kept waking up in the night in a state of mild panic whenever the wind blew through the trees. Around 5 AM I got up, packed my bivi up and got out of the trees onto the approach slopes to the east face. The face is a very large one with numerous gullies, and is composed of a long face on the SE ridge, and a higher face directly below the summit, in a bit of a cirque. Because of the slanting valley and ridge slopes pretty much all the options on the face are about 400 to 500m high and there are at least a dozen unclimbed gullies here, They pretty much all had a mix of ice and snow in them too. It was hard to make a decision but I ended up heading up to the headwall, mostly because I couldn't see it from lower in the valley and didnt want to pick a good looking line only to find out that the headwall had better lines that I couldn't see. East face at sunrise from treeline near bivi Unclimbed gully with WI3? step Narrow and potentially mixed unclimbed couloir line. When I got up into the east face bowl there were three options... a shady, scary looking couloir and chimney line with chockstones on the left, an open face with a couple of vertical water ice steps in the middle, and a slanting line on the right. The slanting line looked the easiest and had the smallest cornices above it so that was what I chose. It had one narrow kink but most of it looked like snow climbing. East face headwall. Arrow marks line climbed. NS and SS are north and south summits (I had no idea where the summits were when I took the photo). Details might be too small to see in thumbnail, in that case check the gallery. I climbed up into the couloir and the climbing turned out to be awesome with well-frozen neve and little bits of ice where seepages from the sidewalls came in. It was mostly 45 degree climbing with short steeper steps. There was a constant flow of 'hail' on the gully bed as ice fell off the sidewalls and broke up, but almost nothing larger than golf ball size...only two fist size chunks came down and both of them bounced well clear of me. Looking up the gully from near the bottom. I was not climbing too fast and I was also worried about the cornices. The climbing was fun but I wasn't enjoying it much. I came around a corner into the kink I had seen from below and found a 25m step of 70 degree WI3. After climbing this I got above most of the falling ice and the snow relented to 45 degrees again. A few hundred meters higher I got close to the ridge exit and came very close to a big looming house sized cornice. Fortunately the cornice line was not continuous. I picked a line up to where the lip was amost non existant, and although the angle steepened through 50 to almost 65 degrees (tools over head) the exit move was only vertical for less than a bodylength. I pulled onto the ridge to find I was exactly half way between the two summits, which was the point I had been aiming for, but did not know I was about to arrive at. Also, the ridge between the two summits, which is Class 2-3 rock in summer, and that I had thought might be scary and double-corniced, was pretty much a broad easy walk. Almost immediately on topping out my fear went away and I felt a great sense of happiness and relaxation. Tracks on the ridge with north summit behind. By the time I got to south summit it was probably 11:00 or 11:30 AM. I drank the last of my water, ate some PowerGels and took a few photos before starting to descend. Rideout and Payne - Sumallo Valley Mt. Grant, Eaton Peak and Cheam Range behind. The uppermost slopes were pretty wind-blown and icy, then as I went lower the snow softened and the temperature rose. I shed crampons and layers as I descended and even got in some good glissading. It is a very long way back down to the highway (almost 2000m) which I reached around 2:30 for a car-to-car time of 26 hours or so. Obviously that includes a 12 hour bivi and so theoretically a day trip is doable, but if I did it again I would still biv in order to get good early morning snow conditions. The approach is not onerous but does take about 5 hours all told. Since there are so many other unclimbed lines on the face I decided to give the climb a name to distinguish it from other routes that will later be done. I ended up calling it "Ghost Passenger" since the approach is via the Ghost Pass trail and because I was somewhat scared for a lot of the climb. The overall difficulty is probably Grade III, Alpine Grade AD+, WI3 and snow to 65 degrees. The climbing felt quite similar to Central Couloir on Joffre, not as sustained and no rockclimbing exit but with a slightly harder crux than existed the one time I climbed CC on Joffre. Gear Notes: 4 screws, 2 pickets and 2 pins would be an adequate rack for a party of two. Approach Notes: Via Ghost Pass trail, 4-5 hours in. Plan on taking bivi gear up and over. Food notes: In 26 hours I ate 5 powergels, 1 halvah bar, one chocolate bar, a couple of fruitleathers, and a sesame snap packet. I think this is the least amount of food I have ever eaten on an overnight trip. Certainly for most of the climb I did not want to eat at all. I'm still not very hungry. it is possible thatt if I had eaten more and had higher blood sugar levels I might not have felt so scared, I have noticed before that I start to get spooked sometimes when climbing and not eating.
 -
 Trip: Mt Huntington - French (NW) Ridge (FWA) Date: 3/1/2014 Trip Report: Summary: On March 1st, Brad Farra (Portland, OR), Jason Stuckey (Fairbanks, Alaska) and I, John Frieh (Portland, OR), flew from Talkeetna to the Tokositna Glacier (~8600') below the west face of Mt. Huntington. We skipped establishing a base camp and instead immediately started climbing the French (NW) ridge, reaching an elevation of ~10,500' before bivying for the night. On March 2nd we started climbing around 8 am and reached the summit of Mt. Huntington just under 16 hours later around 11:30 pm. Due to the late summit we enjoyed a second bivy just below the summit at >12,000 feet. Six hours later we defrosted ourselves with mass quantities of coffee before beginning a descent of the West Face Couloir (Nettle-Quirk) around 9 am. As Jason and I had climbed and descended the WFC in the winter of 2011 we were able to move quickly down the route and reached landing zone around 3 pm on March 3rd, making for ~51 hours on route. I believe this was the first winter ascent of the French Ridge of Mt Huntington during the winter season and the third overall winter ascent to date. Bob Butterfield's photo of the French Ridge (sun/shadow line): Brad on route; Jason Stuckey photo: Itinerary: Feb 28/March 1: PDX -> ANC -> Talkeetna March 1: Paul/TAT flew us to the East Fork of the Tokostina Glacier (~12 pm). Climbed to ~10,500' March 2: Mt Huntington summit March 3: Descent via the WFC; evening pick up Back story: I would be willing to bet most would agree Mount Huntington is a beautiful mountain. Classic lines, big faces, no "easy" way to the summit... dig out Alpinist 20 for a sweet mountain profile. For no particular reason the French ridge has always appealed to me... part aesthetics, part history (Lionel Terray!), and part commitment (you can't exactly bail off the route easily if conditions change). I knew the amount of snow and the size of the cornices would determine how quickly one could climb the ridge (if not summit at all) so I started considering the French ridge as either a fall climb or a late winter/early spring climb in hopes of finding ideal conditions. My thought was if one timed it just right this would be the best time to encounter minimal slogging and more importantly minimal cornices. I almost attempted it a few times over the last few years but something always prevented me from trying or a different line in the range looked better. Finally it all came together so we went for it... and it just so happened to be winter. That is to say I wasn't intent on making the FWA; I just wanted to climb it. This trip likely would never have happened if it not for the excellent beta that Paul Roderick of Talkeetna Air Taxi provided on conditions. Best pilot and best flight service in Alaska. Also Mark Westman has been an excellent source of AK beta for me over the years; I know I asked him for his opinion of my Huntington idea more than once. Pictures: Early on climbing to get onto the ridge top: Almost on the ridge: First bivy: Second day sun: Early on second day: Getting closer... but not that close: Gear Notes: Light is Right! Petzl Quarks + Vasaks, new Arcteryx FL 45 liter pack (so sweet!), coffee Approach Notes: Talkeetna Air Taxi
 -
 Trip: Colchuck Peak - Northeast Buttress FWA Date: 3/8/2013 Trip Report: We never get to relive these moments in life. Even Though you may be scared or anxious from thoughts that bubble out from your own mind, the focus should be centered on enjoying the climb and to remind ourselves that that is why we are here and this is what it takes to accomplish these goals we have. Sometimes its not the most enjoyable times but the ending result can be life changing. I have been fortunate enough to partner up with Jens on a few demanding climbs. His ethic and focus are inspirational to say the least. The seriousness that overtakes Jens as he hammers incredible and often quite hard on-sights in the mountains is unreal. He becomes a warrior and fights for what he believes in, and that is ground up alpine ascents. I heard somewhere that "It's not what you do, but how you do it." Jens, just keep doing your thing man. We took off from Icicle canyon at daybreak on Friday. The sky was clear and the sun was shining on the snow-covered Stuart Range; who could ask for more than that? We took our first real break In the middle of Colchuck Lake, and from there we could for the most part see our line up the NEB of Colchuck Peak. After Lunch we began the approach to the buttress. The snow was soft and slowed down our pass a bit, but we were hyped to see a group of skiers that were tearing the place up. At least someone enjoyed the snow conditions that day. We got to the moraine and looked at the time. It was a little before 2:00 and Jens felt we could make it to the intended bivy spot: one that he had used on a previous attempt with Dan Hilden. We climbed two difficult mixed pitched to get to the bivy as the sun was setting. We brought out the headlamps and got to kickin’. Unfortunately we encountered rocks that hindered us from making an adequately sized platform to fit the Firstlight tent. We ended up tying the guy lines on one side of the tent to make it narrower, "We can for sure fit our feet over there" A picture of me standing where our tent was “just fitting" That morning Jens proceeded to throw down on 4 pitches of traversing "The snow ramps" We encountered soft snow, which was not ideal but it worked out. Next came the two slab pitches. The sun was shining on us as we wandered up the snow-covered slab into the beautiful left facing corner. One of the most breath taking features on the route was the next pitch; this for us was pitch 9. A beautifully stacked narrow snow fin with mass exposure on either side. We simul-climbed this pitch into what would have been at least one more pitch with a large chimney. At this point Jens looks at me and says "Lets get the headlamps out. We are going to summit this thing." There was nothing in the world I wanted to hear more than that. We figured we had 2 or 3 pitches to go, and at this point calmness came over me and I really enjoyed the last pitches spent on the buttress. We finished in 2 pitches making a total of 12 (I think). After reaching the false summit we decided to spend the night a few hundred feet from where we topped out. After dropping the bags we walked over to the true summit turned the headlamps off and soaked in this moment that we will only live once. Gear Notes: We brought a double rack of C3s to #2 plus one #3 and #4 Camalots, and some pins. Approach Notes: Gate is closed. Nice packed in trail to the Colchuck Lake.
 -
Trip: Three Fingers - Northeast Face (FA); FWA North Peak Date: 2/3/2007 Summary: First Ascent of the Northeast Face Three Fingers WI4+, M3 Grade IV. Feb 3rd 2007 Dave Burdick and John Frieh We believe this was the FWA of the North Peak of Three Fingers by any route. Also... we both wanted to make sure and tag the high point which prior to today we both thought was the south summit. By the time we reached the top of the ice the weather was already crapping out so we hit the North peak instead (which I think most would agree is the more aesthetic finish to the route). Dave checked today and according to Beckey's book the North peak has been the true summit since 1931 as in 31 they blasted 15 feet off the south peak, thus making it lower so we did the highest summit by accident I guess!?!? Hopefully someone can provide some further insight on either one of these... Northeast Face of Three Fingers courtesy of the great John Scurlock: topo (dots mark approximate belays): Conditions the week prior (taken jan 28th): Quick note for the newbs: Comparing John Scurlock's photo (top pic) with the conditions last week photo is a great illustration of how foreshortening works. blah blah blah: Ummm... where to start? Dave, Micah and Keith attempted this line some time last year (2006) but a combination of factors (deep snow, later start, etc) resulted in them coming up short... Jump forward a year. Dave, Pax, Keith and myself hiked in last Sat Jan 27th. With a little work we managed to get to the trailhead. WA state representatives: We hiked in and camped in the valley below the face at the last available running water. Dave and myself headed up the following morning... we had just gained the glacier when a healthy avy came down near the entrance to the couloir... we took a vote and bailed. On the hike down Dave and I joked about the bad luck the two of us have had with avyies (we've bagged a few attempts in the years due to avy) and this came out of it (Alpinedave's excellent artwork): Stay tuned for Volume 2! Never the less as bad as it sucks to get skunked we agreed we needed to come back before this weather window expired (which according to NOAA was roughly noon on Saturday) as the route looked to be in great shape. So Saturday it was! We left the car at 2 on Saturday and made good time to the face thanks in part to the boot pack we had installed the weekend prior and a full moon to light our way: We managed to find the access couloir that gains the glacier with relative ease and traversed over to the start of the route. We started the NE face couloir about first light. Dave fired through the initial step (a wee bit of 3/3+) and when the rope ran we began simuling. We covered approximately 1000' of mostly neve mixed with patches of ice and snow before arriving at the ice step. Dave on the initial step that starts the couloir: Lower couloir: So the ice... 600' of fat ice as blue as your balls are going to be after you look at the pics Pitch 1: Pitch 2: Looking down from the top of 2: Pitch 3: Pitch 1 was solid 4+... I could see it easily being a 5 in thinner conditions. Pitch 2 was 3+ and Pitch 3 was a 4. All 3 pitches were 60 m in length minimum (we climbed on a 70 m). From the top of the ice step we simul slogged for the north summit. To The Top! We encountered a short mixed step followed by a ramp that put us on top The mixed step: The ramp: Dave on top So we had topped the ice around noon and it started lightly snowing at 12:05 (why is it that NOAA is always right when ever you hope they are wrong ). We summited the north peak at 1:30 and by this time it was a healthy snowfall... we took a quick snack break and headed for home. Marco Polo on the descent: We wasted some time finding the access couloir that connects the glacier to the valley floor but we managed to find it before dark and followed our boot pack out and headed to Darrington for burritos at the Shell Station Gear Notes: 11 screws 1 picket (used a few times) Rock gear we brought: 4 cams to #2 camalot 7 nuts Rock gear we used: .75 and #1 camalot few nuts (larger size) Dave would likely recommend 1 set of ear plugs for this route or for that matter any route you climb with me ... 2 sets if I have dehydrated food for dinner Approach Notes: Darrington Music Notes Pete Murray, Bloc Party
-
 Trip: Enchantments, The Flagpole FWA 2-7-2009 - The Flagpole Date: 2/8/2009 Trip Report: Saturday Kyle Flick and I climbed the Flagpole in amazing weather: Warm sun in the day, full moon at night that was our headlamp all the way back to Icicle Road. We started around 4:30am on skis at Bridge Creek Campground. The dirt patch near the start of the road is slowly getting bigger, but the road is still skiable from the trailhead down to that point. We skinned up to the Colchuck Lake turnoff and stashed the skis, since we knew the trail up to the lake is icy and totally not worth the skin nor the ski down. As it turned out, no where in the Enchantements is worth skiing at this point. Maybe in March? We had perfect cramponing up Asgaard, and across the upper plateau. No postholing whatsoever. We climbed Flagpole last Sprng, so we had the approach dialed in. We approached via the dry gully just West of Little Annapurna. By the time we reached the base of the climbing, 10 hours had elapsed. We knew when we started climbing at 2pm we would be deproaching in the dark, but with these perfect conditions we weren't in any hurry. Kyle led the first mixed pitch, easy terrain with a snow/ice ramp to a bush belay. On the second pitch, I threw on my rockshoes, and Ade's lucky legwarmers. The climbing was on warm rock free of any snow or ice, which brought us to the base of the Flagpole's bolt ladder. I clipped through the ladder, using my rivet hangers on the old bolts which don't accept carabiners of any size. The finishing 5.8 offwidth move takes a #5 (new size) camalot, followed by some easy but very exposed moves on the arete. Kyle lowered me off and clip cleaned the ladder. By the time he touched down, it was dusk. Having two ropes for the two raps is very useful. We slogged back out the gully and popped out onto the upper Enchantments in bright moonlight. We would not use the headlamps again until we got into the trees. I've skied the trail from the trail cutoff three times so far this season, and not once have I done it without the skins still on. It's total survival "skiing". We chatted with a couple poor souls walking the road, who had climbed the Colchuck's NBC, which looked okay by the way. There does appear to be a couple rock steps with no ice in it. However, they had no problems surmounting those. By 1:30am 21 hours after starting out, we staggered back to the car, vowing to never slog that road again until the f$@%er is melted out! Contrived mixed hike up Asgaard Pass. This can be easily avoided. The upper Enchantments. Looking South towards Mt. Rainier, Ingalls Creek. Descent down gully. The Flagpole and Pennant Peak On the approach. Kyle on the first mixed pitch. Me starting the second pitch, replete with Ade's lucky legwarmers. Starting the bold ladder. On top. Looking down from the top of the Flagpole. Kyle Flick photo. Looking East from the top of the Flagpole. Kyle Flick photo. Stuart in the sunset. Kyle Flick photo. Thanks to Ade Miller who let us use some critical gear, not least of which were the '80s era legwarmers, which have quite a bit of magic left in them.
 -
 Trip: Dragontail - Chasing the Dragon Part 2 - Backbone Ridge, FWA Date: 1/16/2009 Trip Report: Here's the TR and some pictures. You can find even more pictures in my gallery here. When John Plotz emailed me last weekend completely convinced that conditions on Dragontail’s Backbone Ridge were going to be perfect I have to say I was skeptical. Previous experience told me the Colchuck Lake basin was bitterly cold most of the winter. But local knowledge is local knowledge and it’s not like I had anything else planned for the end of the week. So… Thursday morning found me standing at the Eight Mile trailhead waiting or John and Kyle to arrive so we could ski into the lake. If winter climbing in the Cascades demands nothing else it demands optimism. We skied up the road in the cold fog convinced warmer air lay above the inversion. Kyle had originally planned to accompany us to the trailhead and possibly further but a fall the previous week had left him with a back injury and he wished us luck and turned back shortly after we left the cars. John and I continued skinning up the trail. The previous week’s rain had reduced the snow cover and it was mostly easy going all the way to the lake. Either that or my skinning has improved which doesn’t seem that likely. At the lake we retrieved a cached rope and some large cams and pitched a tent on the edge of the ice. We planned to climb the route in a single day figuring we might be able to rappel from the base of the Fin into the top of the Triple Couloirs route and climb that for a quick finish if darkness looked like it was going to overtake us. Being benighted would not be fun. An early start was in order… John gearing up at the base of the route. The following morning John and I left the tent just before six and hiked the twelve hundred or so feet up from the lake up to the base of the route at 6,800’. The snow was really well consolidated so we made really good going and reached the base by around dawn just after seven. We geared up on the moraine and I set off to the start of the route. In winter the lower part of the route climbs a shallow gully and then traverses easy angled snow slopes first left and then back right to the base of the 5.6 corner a pitch below the off-width. We simul-climbed the snow to the corner using trees as belays. Soft snow made it seem like hard work but at least it was really easy climbing. There are actually two obvious corners below the off-width, in winter the left hand one looks to be the better option. It had less ice than on my previous attempt a few years ago with Alasdair. The snow ended in a short ice smear up the base of the corner. We drytooled and then rock climbed the corner to the obvious tree anchor. Probably at about M4 or so – because every Cascades route seems to get M4 these days. John following the last of the snow above the mixed corner. We put away the boots, crampons and ice tools and put on rock shoes and, in my case, attractive 80s style leg warmers. The warm temps and rock shoes allowed John to make short work of the pitch Alasdair and I had spent ages aiding on our last attempt. Heavy packs made the first 5.6 moves feel like hard work though. By 9:30 we we at the base of the off-width corner which had some snow deep in the crack but was pretty much dry. We broke out the aiders and big green Camalot. I was worried the corner might really slow us down but a combination of aid, French free and free climbing soon had me hauling packs and John following the corner. The wall above looked largely free of snow. John belaying the off-width. We were able to free climb the 5.8 pitches above the off-width to gain easier ground on the ridge crest below the Fin. We simul-climbed the forth class pitches to the base of the Fin. All really fun climbing without much of the unpleasantness usually associated with winter climbing. In fact other than the overly heavy packs, it was all starting to seem a bit too easy. Leading the 5.8 pitches above the off-width. Very dry conditions. From the base of the Fin we could see directly into the upper of the Triple couloirs. Like everything else on the face snow cover was thin. As we were watching a TV sized block came bouncing down the gully dislodging other rocks and taking them into the lower couloir. This made our cunning escape plan seem a whole lot less cunning. John led the first pitch up from the base of the Fin across the ledges. Which is where Dragontail started to bite back. There was a lot more verglass on the slabs and icing in the cracks than we’d found lower down making the climbing somewhat harder and hard to protect. John did a great job of making it to the belay ledge in the middle of the Fin without being able to get much gear. Working up towards the ledge belay on the Fin. I led a short pitch up the face but was stopped as grove above me was filled with snow. Further up the remainder of the crack system was completely iced in and not in a fun mixed sort of way. I belayed John up to our high point and we examined our options. These seemed somewhat limited given that we are over a dozen pitches up the route and our bailout option of the Triple Couloirs looking very unattractive. Other than the groove leading right there was another set of cracks to the left. I remembered a topo showing the left hand variation so we opted to give it a go, neither of us actually having done it before in summer. It seemed like the only, and therefore best plan. John starting the left hand variation on the Fin. John headed up the first series of cracks to a great belay at the start of a rightwards traversing rack system. While the cracks weren’t iced in you definitely had to be careful where you put your hands and feet as there was much more icing than lower on the route. I climbed the cracks right and ended up in an obvious notch in the crest of the fin and belayed John up. We were rewarded with a fantastic position and amazing view of the surrounding peaks and the lake far below. On the minus side the sun was starting to set over Colchuck and it was getting cold. The Fin traverse. OK. So it's now cold. I’d been to the notch before in summer while exploring another variation – usually called “being off route” - and vaguely remember a loose ledge system on the back side of the fin. The ledges led to another notch, onto the front of the Fin and then ultimately to the summit. Of course in winter this turned out to be covered in either ice or soft snow. We quickly changed out of rock shoes and into boots. It was now past 4pm and darkness would be on us in under an hour. John doing the business on the final section of ridge. The traverse was slow going with many loose blocks waiting for the unwary. After a little aid and a lot of cursing we regained the ridge crest just as it got truly dark. Rather than continue traversing the summer route’s iced in ledge system we opted to put rock shoes back on and simul-climb the crest of the rock ridge. I belayed in the dark as John grunted up another easy (in summer, in daylight) off-width to the ridge crest and continued along it. He ran out of gear just below the summit. I followed the cracks - more swearing and grunting - and finished off the final fifty feet of mixed rock and snow gaining the top just after 6pm (total time on route about eleven hours). I know what you're thinking. We did NOT stop to take drugs on the summit. It just looks that way. We took a few photos and headed down. The descent was straightforward except for a short section of scree at the top of Asgard Pass we were able to plunge step most of the way to the tent for a round trip time of about fourteen hours. Next morning we left camp early the and John skied and I slid down the the trailhead. Yes, there is a difference. How anyone can ski with a forty pound pack on is beyond me, I half expected John to rail slide the handrails on the bridges over the creek. Either way we made it to the trailhead were we were met by Kyle. We swapped stories and then skied down the road to the cars. John skiing out across the lake. By 2pm I was waiting in Starbucks in Leavenworth with the other sheeple trying to get a coffee for the drive home. A full value trip and the weekend wasn’t even half over with. Thanks to... This has been a project of mine for the best part of five years since climbing the Serpentine Ridge in winter with Alasdair Turner in 2005. Numerous winter attempts with Alasdair, including one that failed above the off-width, and several summer rehearsals with Forrest, Justin and John and Kyle Flick all contributed to being able to make the most of the weather this time and get it done. Thanks to everyone who’s tried this route with me – summer or winter – and especially John for watching the weather and being an excellent partner for the trip. Summary First Winter Ascent of the Backbone Ridge (Weigelt-Bonneville, 1970) with Fin Direct left hand variation (Anderson-Brugger, 1974). Ade Miller and John Plotz, Jan 16th 2009 (2000’, 5.9 A1 mixed). The route follows the summer line climbing easy snow to the base of the 5.6 corner. Climb the corner system (mixed) to a tree (possible belay) and continue up rock to the base of the offwidth. The the route to the Fin crest is as described in Beckey. On reaching the crest traverse the south side of the Fin on loose icy ledges (mixed, one pt. aid) to regain the crest at an obvious notch. We avoided further ledge systems on the north side of by climbing up to the crest and traversing towards the summit. Gear Notes: Full rock rack to #6 Camalot with some doubles in the mid-sizes. Pins (KBs and Angles) not used. Ice tools and crampons required, we took one heavy set for the leader and a light weight set for the second. Double ropes increase your options should you have to bail. Approach Notes: Ski or snowshoe from the Icicle road. Good trail to lake. See Colchuck Lake conditions thread for more details.
 -
Trip: Mt. Huntington - Nettle-Quirk Date: 3/12/2007 Trip Report: On March 10th, Jed Brown (Fairbanks, Alaska) and I flew from Talkeetna to the Tokositna Glacier below Mt. Huntington. On March 12th we climbed to the summit of Mt. Huntington via the West Face Couloir (Nettle-Quirk), and descended via the same route, in just under 15 hours roundtrip. We believe this might have been the first ascent of Huntington during the winter season. Although many teams descend from the top of the ice ramp, we found it to only be half-way to the summit, in terms of time and effort. Conditions and weather were excellent, although the temperatures were quite cold; we both frostnipped a few digits. After a few days contemplating other objectives, we gave in to the cold nights and flew out of the range on March 16th. A few lessons learned: -bring two pee bottles instead of one -bring mittens that you can actually do technical climbing in -bring a face mask that covers your nose -bring a sleeping bag rated to -30F instead of -10F -bring a larger than 2-person tent to basecamp -bring a thermarest to basecamp -muffins are very difficult to bite at -20F -bring basecamp down booties -don't go to Alaska before April!
-
 Climb: When Triumph Feels Like Failure -NE ridge FWA Date of Climb: 2/26/2005 Trip Report: [pictures will come later] I had a hot date planned for Sunday night; super cool girl. We’d been out a couple times before, and I was really looking forward to seeing her again. She was going to return on Sunday from the ski vacation she’d been on in Steamboat with her family all week. Then Colin called. When Colin calls, it means only one thing – weekend plans ruined. What was it this time? The NE ridge of Triumph hasn’t been climbed yet in the winter? And yeah, the weather forecast is perfect, and yeah, the ski season sucks and my season pass at Crystal is a sunk cost, and yeah, Triumph has been on my list for a long time (I made one attempt several years ago but got turned back by rain). But I have a date! I gave in. I told Colin we could go, as long as we make it back to Seattle by 8:00 pm on Sunday night. I convinced myself it was possible… the moon was nearly full, so we could conceivably climb a lot at night. Colin said we could drive all the way to the trailhead. And he’s fast. I made a schedule in my head… Wake up at 1:00 am, summit by noon, back to camp by 3:00 pm, back to the car by 5:30, then back to Seattle by 8:00. Ambitious? You think? Anyone else? Can we get a consensus here? No? I emailed said super cool girl in Steamboat. I sent her a link to the summertime route description and my planned schedule. I assured her everything would work out… and she assured me that I should definitely go for it. I met Colin at the Ravenna Park & Ride at 5:00 on Saturday morning, and decided to take my car because it has a CD player and Colin really wanted to listen to some political rap. There was some snow in places on the road to the trailhead, but by that time the music had changed to Rob Zombie and Marilyn Manson so we got through it fine. Colin realized he’d forgotten his sunglasses, but fortunately I had a pair of way rad purple reflective jobbies I could loan him… wearing those, he was unstoppable; even more than usual I mean. We left the car at about 8:00 am. The only people who had been up the trail recently had been on skis; we could see the remnants of ski tracks where there was snow, but certainly now there’s no way to make it all the way with skis on. Typical of late February days in the Cascades, it got hot very quickly and we had to strip down. For those keeping track of snowpack, after the 2-mile section of flat overgrown-road trail (which still had some snow in shady places), we didn’t hit snow again for another mile up the switchbacks, and snowshoes were still impractical until a mere 500 vertical feet below the ridgeline. We thrashed up a steep & deep hillside (must have been off trail there) to the ridge, then thrashed down a steeper and deeper hillside to the lower Thornton lake (off trail there too for sure). The Thornton lakes were frozen over, but the lower one definitely looked thin in places… We went for it anyway though, just ‘cause it’s such a pain in the ass to go around, and accomplished the transit with ease and without incident. By the time we got to the upper lake, it was so hot… We were standing there in the middle of a frozen lake, our shirts off, waves of heat coming off our foreheads, eating Clif bars, wearing way rad sunglasses. The hump up to “the col” (or alternatively “the notch”) had patchy snow, but the glacier beyond “the notch” (or alternatively “the col”) had snow aplenty, and we were very glad to have our snowshoes there. We found a flat spot on top of what probably would have been a cavernous crevasse in the summer, not too far below the approach gully for the NE ridge, and set up our camp there. We stomped around with vigor to make a tent site as flat and level as a billiards table. It was 3:30. Time to eat dinner & hit the sack! I lobbied hard for the 1:00 wake-up time. Colin lobbied hard for 4:00. I whined “But I have a date tomorrow night! If I’m late you’ll be sorry!” Colin said “No, you’ll be sorry, sucker!” We compromised on 3:00. Shortly thereafter, I realized I had left my harness in the car. And belay device. And cordalette & locking biners. “That’s interesting,” I said. Colin pointed to the wad of ½” rap-sling webbing I had insisted on taking and said “That’ll make a nice swami belt, sucker!” However after a bit of discussion, we decided he’d be the one to wear the swami belt and I’d wear his harness. After 4 hours of sleep spread sporadically throughout 10, I was relieved when the alarm finally went off. The moon was bright, the snow was firm, and Colin’s swami belt was tight. We soloed up the gully to gain the ridge; the climbing was easy. We stayed left of the crest at first, until we gained the top of a small side-buttress, then we roped up and Colin led a steep mixed pitch to the actual ridge crest. I think that way is significantly different than what would be feasible in the summer. The sky was beginning to get light as I took over and led a long simul pitch that was mostly snowy and pretty easy; there were a couple rock outcroppings I could get gear in. Finally, I went up a steep gendarme with a few hard moves, after which I decided it was time to belay. We pitched it out from there through the crux (with little bits of simul if the rope wasn’t quite long enough to get to a good belay position). The very edge of the ridge on the SE side was exposed rock, due to sun exposure, so often it was possible to walk along that and use ice tools in the snow on your right for balance. When we got to the crux it happened to be my lead (fancy that), and I opted for the right-hand variation. All of this climbing was on the NW side of the ridge, so it was really covered in flutings. Fortunately beneath the flutings there was water ice, or frozen heather, or positive rock holds… so as long as I could keep excavating, I could proceed. I took a rising traverse up and right, past the bottom of the 5.7 offwidth (which was choked with snow), around the corner to sort of chimney with more exposed rock. Gear wasn’t ubiquitous, but I could get enough in to remain confident. Above the chimney I had to wallow up some more steep flutings, which took a lot of time & effort (reminded me a bit of Watusi Rodeo!), but I eventually reached the large ledge that marked the end of the difficult climbing after about 55 meters. It felt good to suddenly be in the sun again, and there were rappel slings right there to belay from. After Colin followed the crux, he led one long simul pitch from the ledge, across the face to the left, up a 60º snow & heather slope, to the summit. It was 12:30! We were standing on the summit! That wasn’t too far off my schedule! Maybe we can make it! We just have to descend in 2 hours, hike out in 2 ½ hours, and drive home in 2 ½ hours! We can do it! Yeah right. The first decision we had to make at that point was which way to descend. Neither of us knew the south ridge descent route, but I thought it must have to be faster than going down the way we came up. It turned out that there was certainly less snow on it, it was rock almost the whole way. And it probably was quicker overall. But we only had one 60m rope, and I think we didn’t get the route exactly right, because we had to set all our own rap stations after the first three. We ended up going right down the south side of the east face, in a total of 7 raps, and eventually connecting with a ramp of snow that we could downclimb to the glacier. That put us almost directly above our camp, but in the end it took 3 ½ hours to descend, putting us at camp at 4:00. Hmmm… Schedule slipping… We packed quickly & were snowshoeing back to “the notch” by 4:45. The lakes were still frozen, fortunately, but there were definitely more holes of liquid water showing on the lower one than before! We walked across it anyway, skillfully avoiding the holes. It was deep twilight as we hauled ourselves up 400 feet of deep powder to the ridge, where we saw the footprints of… other people! We tried to avoid them, but finally succumbed to their direction. You know the drill from there… dark slog long knee pound occasionally satisfy hunger yearn for car hike fast through pain. Almost 9:00. That’s when we got to the car. Hey, 4 hours isn’t bad to cover all that distance, with the snow & all, eh? But that wasn’t fast enough for my date. We threw our stuff in my car and I rallied down the road, finally getting cell phone reception in Sedro Wolley, My phone beeped. “2 Messages” it said. I listened to them. “Hi Dan. I didn’t expect to get your voice mail. I’m back from Steamboat, but I don’t know where you are. I’ll try calling back later.” “Hi Dan. I thought I was going to see you tonight, but it’s getting late and I’ve had a long day and I need to go to bed. Hope you’re ok, I guess I’ll talk to you later…” Triumphant failure. Gear Notes: Small rock rack (1 Ti piton, several nuts, 6 cams to 2") Worked great. There was not enough ice for screws.
 -
 Climb: Three Fingers-FWA East Face Couloir Date of Climb: 2/19/2006 Trip Report: Three Fingers East Face Couloir a.k.a. "The Last Hurrah" a.k.a. "Journey to the Heart of the Spirit World" Darin Berdinka and myself climbed the East Face Couloir on Three Fingers. We believe this to be the first winter ascent of the route, which was a fine climb in a spectacular alpine setting, positioned as it is underneath the complex east face. We chose to forego any summit bid, deciding instead to traverse steep sugar snow above a 1500' abyss and descend mysterious snow slopes on the North side of the mountain. One rappel was made on the descent from a picket set as a deadman. No spirits were met at the Heart of the Spirit World, which was a good thing from our perspective. -Justin Thibault oops...picture HERE
 -
Yup, finally got 'er. It was damn fun.
-

first ascent [TR] Welch Peak- NE Face FA/FWA 3/13/2005
Don_Serl posted a topic in British Columbia/Canada
Climb: Welch Peak-NE Face FA/FWA Date of Climb: 3/13/2005 Trip Report: The relatively poor rock in the Cheam Range is best enjoyed when nicely frozen together, and it's no surprise that the few hardish routes that exist in the group are mostly winter climbs. And given the fact that the 15km of approach road via Jones Lake is usually impassable because of snow from December thru March or April, it's no news that such ascents are very rare. It does surprise me some, however, that the biggest face on the highest summit in the range has apparently passed thru the 80 years since the first ascent of the mountain without (so far as I am aware) a single attempt, especially since the discerning eye can pick out a pretty reasonable-looking line weaving around and between impregnable cliffs. With a high snow-line, several weeks of warmish daytime weather to consolidate the snow-pack, and a solid weekend forecast, it was obviously time to go. Andrew Rennie and I relaxed out of town mid-morning and started the walk up the Lucky Four trail at 1 p.m. Actually, the first hour-and-half of the walk is on old back-filled logging road [from about 750m to about 1220m], but after that the trail is remarkable pleasant. At 5 p.m. we pulled into camp, on a super-scenic knoll at about 1650m. We could see Fern and Jesse camped about 200m higher, but we were headed off on a traverse next morning, so there was no point in climbing further. We set the alarm for 2 and got away at 3:15. We surprised ourselves by reaching the glacial basin beneath the face in only 1 hour - fast cramponning on hard-frozen crust, but a considerable strain on our ankle ligaments. We had a bite and put on the harnesses on the flats [about 1700m], then started up the still-dark initial slope at 4:45. There were two or three crevasses to cross/bypass, and a sorta sketchy bridge at the schrund, but the snow was good and the frost inspired lots of confidence. We gained about 250m, then left the major snow-cleft leading to the col between Welch and the eastern gendarme and angled up right maybe 50m or so to confront our first significant challenge, a 10m Grade 3 waterfall step. 5:45, the ropes and gear came out, a belay went in, and the fun began. I got the first lead, placing both our screws in the ice to back up the rather mediocre belay, then climbing a right-angling snow-gully beyond to a good rock belay on the left at full 60m length. Andrew climbed the remaining 20m of the gully, then fought thru a short squeeze chimney, then continued up snow with intermittent ice beyond. I abandonned the belay and moved up about 10m to allow him to reach a secure stance - it pays to be sure of your partners in this kind of climbing, cuz you can't really communicate effectively, and you need to understand what is going on at the other end of the rope, and to have confidence that the other guy is not going to fall off for no good reason. My practise is simply to give a big yell when there is 10m of rope left, to give another big yell when the rope runs out, and if tension stays on the rope for a couple minutes, to tear down the belay and start climbing. I popped around the corner from Andrew into a left-angling gully, the key to the upper face, not visible from the campsite, but plainly visible from back down the valley. This had a tricky, thinly-iced exit, then we had to move together nearly 30m for me to reach a belay on the left side of a snow trough. Andrew continued right up the trough, passing above a little promontory and climbing a couple ice-steps. I moved with him about 20m to allow him to reach the rock-wall at the top of a major snow "Y". Here we needed to choose. We could continue right up and across a snow shelf maybe 2 pitches, then break back left thru the final significant rockwall to reach the summit snow-slopes, or we could go left and kinda end-run the rockwall. I went left, and in 60m just reached a flow which took 3/4 of a screw, backed up with a poor nut, for a belay. Andrew climbed the flow and disappeared around the corner. The rope fed out slowly while I got colder in the intermittent north wind, so I knew there was "interest" to the pitch. He finally ran the rope out and eventually a call came to follow - and what a fine pitch it was, with considerable ice, and two short vertical steps. Unfortunately, there wasn't much gear, most of what there was was poor, and since we only had two screws and one of those was most of my belay, his belay consisted of his two tools buried into a snow-fluting. Most uninspiring, but you can't be going falling off on these things anyway. The cornice beckoned a ropelength above, and I got a pretty good screw into ice after maybe 10m and another at 30m, then 3 rock pieces into a wall 5m below the crest. The snow under the cornice was horrendously powdery, and collapsed away underfoot to reveal slabby rock, but I managed to squirm my way up to where I could reach the crest by kinda semi-chimneying between the snowy slabs and the underside of the cornice overhang. There was a crack that I had convinced myself would be easy to enlarge to enable exit, but I fought and hacked and pulled and struggled and swore and came close to pitching off a couple times over the next half-hour before finally managing to belly-flop out onto the sunny east ridge. It was 2:45, and we were up. We were tired, and it was late, so we declined the pleasures of trudging up thru the sun-softened snow the extra couple hundred metres to the summit. We rapped once on the east ridge, into the first south-facing gully, then the descent and trudge back to camp were uneventful. By 8:30 we were well-fed, well-hydrated, and soon deeply asleep. Fern and Jesse must have cruched by sometime in the dark (ah, the perils of Monday to Friday work...), but we didn't hear them, and after a fine breakfast and a relaxing morning, we wandered out to rejoin the world Monday afternoon. Seldom can I recall a climb of such seriousness coming together so smoothly and - despite wishing it otherwise - I'm sure it'll be quite some time until the next such event. Isn't it just so great to be alive when these special climbs and special times happen though? Gear Notes: 2 screws (4 woulda been nicer) 6 nuts (smallish to medium) 5 cams (finger to wide hand) 7 pitons (2 long thin LAs - don't ever leave home without them! 1 medium blade and 1 long blade. 1 baby angle. 2 Leepers, which we did not use. Approach Notes: the Lucky Four Mine trail is a delight! go there! -

first winter ascent Mt Olympus, First Winter Ascent
Lowell_Skoog posted a topic in Olympic Peninsula
I've long been puzzled by the lack of information about the first winter ascent of Mt Olympus. In the Climber's Guide to the Olympic Mountains (3rd Ed., 1988, p. 220), attempts by Pete Schoening and friends in the late 1940s and early 1950s are mentioned. These attempts are documented in the Mountaineer Annuals (1948, p. 54, and 1959, p. 63). In one attempt, Schoening reached the foot of the summit rocks, only to find them so coated in rime as to be unclimbable given the group's limited equipment. The Climber's Guide mentions the International Geophysical Year (IGY) party led by Ed LaChapelle, which wintered on the Snow Dome in 1957-58. It says they did not climb the main peak of Olympus. The guide concludes: "In all likelihood, Olympus has now been climbed. Unfortunately, there is no record." Well, that's not right. In the March 1965 issue of Summit magazine (p. 18) Richard Springgate writes that on New Year's Day (presumedly 1965) he, with John Norgord, Jan Still and John Wells, all members of the University of Washington Climbing Club, made the first winter ascent of Mt Olympus. They approached on foot via the Hoh River, climbing to the summit from the IGY hut during their fifth day out. How could the authors of the Olympic Climber's Guide have missed this? Is there a later edition of the guidebook where this has been corrected? The 1965 climb may deserve credit as the first winter ascent of Olympus made conventionally from the Hoh Ranger Station. But, in fact, it was not the first winter climb. In a 1997 interview with Stella Degenhardt of the Mountaineers History Committee, Jim Hawkins of the IGY team revealed that he climbed the true summit solo on January 5, 1958, during one of his stints at the research station. We was accompanied by Roger Ross, a U.W. meteorology student who, according to Hawkins, "was not a mountain person at all and would have no part of it." If you know anything more about the history of winter climbing on Mt Olympus, or any reason why the Hawkins and Springgate climbs should not be recognized as pioneering ascents, let me know. -
Climb: Mt Buckner-North Face Date of Climb: 2/20/2004 Trip Report: Sky, Corey, and myself left Seattle butt-ass early on Thursday morning with plans to climb and ski the north face of Mt. Buckner. After a brief delay to discuss speed limits on hwy 20 with Trooper Joe, we were on our way up Cascade River Road. We were stopped by a large blowdown just past m.p. 18. One final gear organization, and we set off walking up the bare road. ~1/2 mile later we found continuous snow and were able to start skinning. The trip up the road was uninspiring as the views up to the peaks was obscured by low hanging couds. We left Cascade River Road just past Midas Creek. Skinned through open slopes and timber generally following near the creek until we broke above timberline. Here visibility began to become an issue. Solid white out conditions made the going a little slower than normal. But periodic clearings gave us glimpses of the route up towards the Quien Sabe Glacier. Up and around the moraine, and it was moderate slopes all the way up to near 8,000'. There the clouds broke and the peaks began to appear. Johannesburg, Forbidden, Eldorado, Boston, looking like islands floating in the clouds as the layer began to lower and break apart. We camped at ~8200' below a rock outcropping very close below Boston Peak. The next morning crystal clear skies greeted us and lifted spirits. After a leisurely breakfast and gear packing session we were off. Sky lead up the slopes towards the notch immediately S. of Boston Pk. that we were hoping to use to gain access to the Boston Glacier. Postholling was a pain, but it got worse as we entered the gully and encountered sloping slabby chossy crap covered by powdery, thin snowcover. Crampons were employed and a few tricky moves over a couple of rock steps led us to a steeper snow gully leading right for the notch. Sky was leading up and when he shouted "Holy Shit!, Holy Shit!" I thought that things were either really really good or really really bad. When he yelled again, "It's all good!", all questions were erased. The Boston Glacier reached right up to the notch where we were standing, and rolls endlessly away to the NE. To the E. was Buckner with the NF clearly in view. Man it looked sweet. With little time to enjoy the views we donned skis and enjoyed nearly 1500 v.f. of pure Boston Glacier pow. From our low point we put skins on and began climbing towards the face. And we kept climbing, skinning all the way to just past the bergschrund. There we strapped skis to packs and kick-stepped up the face. Climbing was straightforeward, and moderately steep. Highly enjoyable, with the Boston Glacier rolling away far below. Summited at 2:00, and enjoyed the views to peaks in all directions. The notch where we accessed the glacier looked so far away and our ski tracks down the glacier seemed insignificant on the mass of ice. With little time to linger Sky began the ski descent. He stopped a little ways down to shoot some pics of Corey and myself on the descent. The skiing was simply awesome. Wind buffed, soft, powder down the entire face from the summit. All to quickly we were back at our skin track, and began to climb back up to the notch. At the notch we decided to rappel rather than deal with downclimbing, and although it took a bit longer, provided much more piece of mind. At camp we decided to spend the night rather than ski out in the dark. The next morning was another blue bird day and we packed camp and enjoyed ~3000' of fine buffed out powder before finding crusty conditions lower down in the forest. A quick ski out the road and back to the car. PBR's were cracked and swilled, and the outing came to an end. ~Ross
-

first winter ascent [TR] The Chopping Block- SE Route 2/15/2004
Colin posted a topic in North Cascades
Climb: The Chopping Block-SE Route Date of Climb: 2/15/2004 Trip Report: I climbed the Chopping Block today after hiking in yesterday via Goodell Creek and The Barrier. The entire Goodell Creek valley (and I would imagine most N Cascade valleys) has plenty of evidence of November's torrential rains. The Goodell Creekbed is about 4 times wider in places, and the landslide that came down the opposite side of the valley is enormous. The SE route was moderate - mostly steep snow with a couple tricky mixed sections. I originally planned to stay up for Monday, but the avalanche hazard seemed to be rapidly growing. I believe this was probably the first winter ascent of The Chopping Block - If you think or know otherwise, please let me know. Gear Notes: -altimeter would've been useful -50m 6mm cord -Camp XLH 130 harness (4.5oz) -DMM Bugette -Snowshoes very useful