
Search the Community
Showing results for tags 'canada'.
-
 Looking for Motivated Mountaineers/Alpine Climbers to Explore Different Areas and Travel. My ability is - Rock Sports - 5.10 Trad Alpine - 5.6/5.7 Skiing - Single Black Working on - Snowkiting. Side Hobbies - Taking picture on mountain My Aspirations are to go climb different areas of the world including but not limited to - Seattle/Canada/Alaska - Peru - Ecuador - Patagonia - Nepal - Indian Himalaya - Himachal/Garhwal/Ladakh - Baffin Island Would like to form a Team with the individuals who are interested in taking trips and enjoy the Mountaineering/Climbing with adequate mountain skills. Regds TG
 -
 Trip: Victoria Peak- Vancouver Island - New Route: Summit or Plummet, 5.10a, Aid 1 Date: 8/10/2017 Trip Report: A quick discussion at the Victoria Valhalla store about an unclimbed face one Tuesday afternoon and the next thing you know Karsten Klawitter and I were driving up island late one Wednesday night with thoughts of what could be on the horizon the following day. I had attempted the climb a few weeks back with Andreas Hinkkala- On the initial attempt we climbed three pitches up the face before getting weathered off, so I knew the approach and the first 3 pitches would go quickly. Here's Karsten getting his stoke on while we rack up. There are a few options on how to get off the main ramp and up to a vegetated area above. We climbed the gulley behind Karsten here- a couple 5.4 moves and one more low fifth bulge will get you on your way to the large gulley system that makes up pitches 2-(5.6) and 3-(5.7/5.8 depending on line taken). Once atop pitch 3 you'll find yourself on a large ledge system that connects the West Ridge and Sceptre gulley. The natural line that holds you to the middle of the face is half a rope length to the right of where you top out of the 3'rd pitch. Another large open gulley is an option on the left as well as another crack system to it's right. If a party wanted to avoid the 10.a pitch they could possibly enter the Sceptre gulley and return to the face higher up, furthest right in this picture. Pitch 4 has a little scrambling with a few 5.7 moves- 35 meters out you'll find yourself on a nice hidden ledge looking up the first business pitch the route has to offer. Pitch 5 was a solid 5.9 pitch with a couple moves that felt 10.a. Here's Karsten lower down on pitch 5. Once up the 10.a corner we opted to sneak out right, avoiding the short upper gulley. Here we once again had options as to where we should climb. The natural line as seen from below took us up a dihedral crack into some steepness. Here's a picture as seen from the ledge below- we were both shocked as to how steep this corner was. A nice 30 meter pitch of 5.8 landed me on a small one person only ledge. We set up shop here for the difficulties above. Once past the anchor pitch 7 gets real, really fast. Thin face moves along side a finger crack in the corner had us aiding pretty much from the anchor onwards. Here's Karsten dealing with the roof on pitch 7. After aiding thru and my attempt at climbing the pitch on top rope we both felt this pitch would go free in the 5.11a or 5.11b range. Once past the difficult aid section we scooted out right. Pitch 8 went at 5.7 and led us to let another ledge system that connects the West Ridge and the Sceptre gulley. With the upper headwall in mind we plotted a route up and left looking to gain the West ridge below the upper head wall. Here's Karsten on lead climbing pitch 9 (5.8). Here's Karsten coming up to the anchor on pitch 10, which went at 5.7. Karsten pulled his camera out and snapped this view up pitch 11, which had some memorable moves in the 5.9 range. Here's Karsten topping out on pitch 11. Once on the upper head wall the North Glacier came into view making for a memorable alpine pitch. Pitch 12 was short and had us packing up our climbing shoes and looking to simul climb some easier terrain en route to the summit. Little did we know but there was one more short section that required a belay. Pitch 13 had an airy 5.8 traverse on a slopping ledge- once past this we scrambled our way to the summit. All in all it took 12 hours to climb the route. With night fall closing in on us we opted to down climb the south face and make a long traverse down the South ridge then bushwhack our way back to the high logging roads. If we had half ropes I think we would have rappelled down the Sceptre gulley, but we were tired and looking for the path of least resistance. Summit or Plummet- 13 Pitches, 5.10a, Aid 1, 600 Meters Gear Notes: -Single Rope -Half set of nuts -Cams to #3. (doubles 0.4 thru #3) Could have plugged a #4 numerous times though not critical Approach Notes: Detailed approach maps and beta for this side of the mountain are found in Island Alpine Select, by Phillip Stone. http://www.wildisle.ca
 -
 Trip: Cathedral Provincial Park / Pasayten - Faith FA, Sentinel Direct, Grimface traverse Date: 7/19/2015 Trip Report: Unstable weather in the Bugaboos sent us to Pasayten via Cathedral Provincial Park, and at Blake's recommendation we focused our attention on the Deacon. It was a fantastic trip. We repeated the Sentinel Direct route, did the first ascent of Faith (5.10, 6 pitches, grade III, ground-up, onsight) on a cliff that we don't think has been climbed before, and finished with a classic ridge traverse on Matriarch, Macabre, and Grimface. Team shot at the trailhead. There is more fuel in the Wall Creek forest than I've seen anywhere. It's just a matter of time before the whole area explodes in a firestorm. Be careful. We lost the trail in a swampy area and were escorted up valley by a squadron of black flies. Yes, they're trying to bite you, but don't let them get into your head or you're going to be miserable. Zen. [video:youtube] The forest gave way to alpine meadows ringed by granite towers. The natural beauty of this area is just as inspiring as the climbing. Meditating on the hard-won view while ignoring the cloud of flies. At the trailhead, I discovered I'd left my sleeping bag in Seattle. Oops. A few layers of extra clothes and our tent made the nights bearable, but Brandon spurned my spooning overtures, so I usually woke up around 4 when it was too cold to sleep. By 5 it was getting light anyway. Dawn among the larches. The meadows come to life. We headed for the Deacon, a North-facing cliff with a few routes. We did Sentinel Direct, which starts in the right-facing dihedral on the left side of the wall. Brandon lead the first pitch, a lovely splitter crack and corner. Brandon lead the second pitch in good style. It involved an awkward move into a small corner with 5.10 fingerlocks before escaping left to a more moderate hand crack. I made the mistake of pulling out on a crack getting into the corner and pulled off a toaster-sized block. We both launched off the wall. The rope caught me and the block sailed to the talus below. The third pitch was a 5.7 blocky, rampy, chimney to the top of a tower. I started on my block by leading a fun 5.9 stem pitch. Apparently you're supposed to traverse right on a ramp before the top of the offwidth crack. I ended up doing a hand traverse and heel hook to get past a large wobbly block guarding the belay without weighting it. The next 10- pitch was fun face and flake climbing. It's important to always maintain 3 points of contact. Very serious business, this climbing is. A 5.10 face move led to a nice chimney. I lead a 70m 5.8 rope stretcher and Brandon took us quickly up another blocky pitch to the top. Thunder boomed around us as we unroped and headed for the summit. There is some fantastic, exposed block hopping to get you past a tower over to the summit. When I raised my hand at the summit it buzzed from the electric charges in the air. Time to go down. Cathedral Peak was getting soaked but it looked like we might stay dry. Or not. [video:youtube] We quickly headed down the E gully, which we learned is quite friendly even when wet. The evening cloud formations were beautiful and bizarre. And the sunset was lovely. The next morning we got an earlier start and focused our attention on an unclimbed line we'd spied on the large cliff to the right of the Deacon. We're calling this cliff the Bishop, because the central feature looks like a giant chess piece or pointy church official. It's the same height as the Deacon and has clean, steep rock. Our line went up an obvious corner on the right side of the cliff just right of where I'm pointing. I lead up a series of corners and small roofs on super clean rock. 5.9 45 meters. One of several good, short corners on the pitch. Around 35 meters I escaped right up a clean, blocky buttress leading to a large ledge. Brandon lead the second pitch, which had one 5.9 move and continued for 35 meters to a small belay. Future parties could link this with the first part of pitch 3. I then lead up the third pitch, stepping right onto a lovely but unprotected buttress next to a super thin crack. I was able to garden just enough gear placements to make this safe and arrived at a giant ledge after 60 feet. Above us, the cracks looked like dead ends or unprotectable seams. And the rock was steep. We thought if we traversed left toward the main wall we might find a passage. Bailing would not be easy as there were not a lot of cracks up here, but we had faith something would work out. At a large ledge I headed left for about 50 feet, including a couple of exposed moves, to a good belay at a ledge and crack. We'd call pitch 3 5.7R, 30 meters. Following the first part of the third pitch before the ledge traverse. Brandon continued left, not sure if anything would go. He worked his way up and left past the left end of a large roof. This was the key to the route. It opened up a magical passage on a rightward trending ramp through otherwise steep and blank terrain. Pitch 4 ran 5.7R, 45 meters to another giant ledge. We moved the belay left 80 feet and up 20 feet to the base of a corner below several cracks. I chose the one that went straight up from the belay. It turned out to be quite physical. At the crux, I had a crappy heel/toe cam, my hands on rounded holds, and had to blindly place a #3 in a flare. I find that the best climbing experiences are the ones where the outcome is in doubt but you somehow keep it together and succeed. I was unsure if I would send or whip off this pitch until I sank my hand into a great jam just below the lip in this photo. 25 meters, 10c. Brandon lead a wonderful series of hand cracks that went straight to the top of the wall. A finish with an explanation point! 35 meters, 5.10a. It's hard to explain the feeling of launching up a wall into the unknown. I've only done it a few times, but it's not like any other type of climbing I've experienced. You must solve the physical and mental puzzles of climbing and placing all your own gear as you go, as with any trad onsight, but you also have to figure out where the route should go, how to handle loose rock, what gear to save that you might need above, and how much risk you are willing to take. It's about having faith in your partner, faith in your abilities and experience, faith in the gear, faith in the rock, faith that you'll be able to piece together a clean line to the top, and faith that you can back off safely if necessary. Not blind faith, mind you, but faith borne out of experience and a deep awareness of each of these elements. As you climb, a stream of details are gathered by the conscious mind and merged with a river of intangibles that filter in through the peripheral subconsciousness of your mind's eye. They combine, as in a flow state, and turn thoughts into actions. Actions into experience. Experience into memory. The satisfaction that comes from a ground-up, onsight, multi-pitch route worthy of repeat ascents runs deeper than words can convey. It is the joint creation of the climber as artist and the natural canvas of the rock. Authorship is shared. It is vertical wilderness exploration. There is only so much you can see from the ground. You have to go for it to see what will emerge. The world is not completely known, despite what the internet might lead you to believe. Adventures can still be found by those who seek them. Partnership makes it richer still, a shared experience. I am deeply grateful for all of these. This time there was no thunderstorm. We marveled at the summit tower and dreamed of future lines on the wall. The backside of the mountain is a low angle plateau with great views of Cathedral and many other peaks. More alpine wild flowers. The descent was a super easy walk down a solid low angle ridge to the Northeast back to Deacon's basin. The next morning we tried a new route on another cliff, but what looked good from a distance turned out to be vegetated and unpleasant up close. So we down climbed and headed off to do the Matriarch, Macabre, Grimface traverse. It was a lovely and relaxed afternoon outing in our approach shoes. There are lots of interesting rock features, bolts where you need them, And great views on a perfect summer afternoon. More wildflowers. Views of the Deacon and Bishop are in the upper right, with Cathedral in the background. The perfect end to a perfect trip. A chill in the air socked in the peaks as we left for home. The climbing is stunning here, but the nature was even more inspiring. Please tread lightly if you visit this pristine wilderness. Back at the car, we were eager to dive into the river and start planning our return. Special thanks to Blake for providing great suggestions and Brandon for being the perfect partner, even if he does hog the only sleeping bag! We had an odd conversation at the US Border at Sumas: Border guard: Where do you live? US: Seattle, Mt Vernon. Border Guard: Do I know you? Have you come through here before? Me: We were here a few weeks ago, were you here? Border Guard: No. Are you wanted anywhere? Me: (Pause) Just at home by our wives. Border Guard: Well, don't hurry back. He handed our passports back and waved us through. We ignored his advice and hurried home to our loved ones. Gear Notes: Doubles to #3 Camalot plus single #4 Camalot. We had a 70 meter rope, but a single 60 meter cord will suffice. A sleeping bag would be nice! Approach Notes: Approach via Wall Creek. Stay on the trail on the East side of Wall Creek. There are good campsites in the top of the basin. Please keep this area pristine.
 -
 Trip: Leaning Towers - First Ascent - east face of Hall Peak Date: 8/16/2014 Trip Report: Are you an alpinist or alpine rock climber or even just a frequenter of the Patagonia catalog? If the answer is yes then chances are you’ve heard of the Bugaboos and chances are… you haven’t heard of the Leaning Towers. They are a group of three notable peaks 50 miles south of the Bugaboos. They feature similar age granite (granodiorite) to that of the Bugs but the 16 km approach that requires a significant amount of bushwhacking keeps the crowds away. The first ten days of August Winter Ramos and I spent bushwacking our way to the best alpine granite that either of us have climbed on. In our days in the range, we established two new routes on the east Face of Hall Peak: - The Direct East Buttress of Hall Peak (IV, 5.9+, 17 pitches, ~2000') - Post Credit Cookie (II, 5.10A, 4 pitches) The Leaning Towers are best viewed from the air; they are composed of three major named peaks. Given a hint after two of our friends had put up a new route on the east face of hall peak the previous year , we aimed directly at the largest buttress on Hall Peak's East face. The LT's are ~50 miles south of the Bugaboos. One of the best (legal) ways to get into the range is via the Dewar Creek Trailhead and then a hike up the pass just above Bugle Basin and down into the drainage below hall peak. This trailhead is accessed out of Kimberley, B.C. ~50 km of dirt roads. We horse packed in the first 12 k; then shouldered our big packs to hike up and over the pass. If you hit it early season enough there will be plenty of snow to make for easy going. At the top of the pass, we found our first view of Hall Peak's DRAMATIC east face. A night at the pass was followed by an epic descent into the most remote and exclusive bouldering area in all of British Columbia. Only a two day approach! This bush on the up had us hiking straight up the creek. UP, UP and UPPPP! we went until we were camped just below Hall Peak and our prize. The "Direct East Buttress" is in the centre of the above photo. This comes after a compilation of others routes in the ranges shows how much rock remains untouched! (Lines courtesy of Ryan Leary) With a bit of a rest day and a chance to scout around for our descent route, we racked up very soon after arriving to try for the Direct East Buttress. A 20 minute walk from camp at 5:00 AM had us at a nice ledge below our first pitch of climbing. The most intimidating feature on the lowers portion of the route is a large roof we could see through camp. Expecting something super hard, we brought out aiders and a few pitons. Winter found a sneak through on airy 5.9 moves. The rock was SPECTACULAR, lots of cracks only requiring moderate cleaning in spots where a bit more traffic would make for perfect climbing. Awesome face climbing just to the right of the main ridge (which is overhanging at this point), we connected cracked systems with a bit of slab all at 5.9! Winter led the crux pitch of the route, 40m of 5.9+ splitter hands! Our face climbing ended a the notch below a large gendarme on the direct south buttress, from here it was meandering mid-5th ridge climbing. After 17 pitches, some shortened for lack of gear and rope drag, we reached the summit!!! WOOT! From here it was a bit of down climbing 4th class slab, a few rappels, some steep snow and we were back to the col where we rappelled onto the snow field above camp. (image courtesy of Ryan Leary and John Scurlock) (image courtesy of Ryan Leary, NOTE, WE FOUND YOU NEED A DOUBLE ROPE RAPPEL TO REACH THE GROUND ON THE NORTHERN TIP OF HALL PEAK) Followed this climbing day with a day of rest, when we slept and played around placing pitons in our campsite practice wall The day after a much needed 24 hours of rest; we felt just leaving would be a bit sad. After taking two days to get to such awesome granite, why not keep rock climbing? A jaunt placed us just below the shorter northern aspect of Hall Peak. We spied a good crack system and ended up putting up a four pitch 5.10a we called "Post Credit Cookie" The first pitch was the 10a crux, clean cracks and fun lie backing and stemming moves gave us a fantastic intro to this face of hall peak. Then came another quality 5.9 pitch. The third pitch was 5.9 with an exposed slab and then low-5th You top out 100m to the south of the fixed rappel anchor. A quick double rope rappel takes you back to the snowfield above camp. We descended, packed up, and hiked partway out. We tried the high road on the way out, sticking to moraines and sidehilling on moraines on the northern side of the peak just adjacent the pass we were aiming for. A cold campsite for the night, then more STEEP bushes followed by three single rope rappels through vertical bush put us on an endless block field to the pass, we recovered some stashed gear and then down the other side. Even though it was incredibly hot, we relaxed our weak knees at Dewar Creek Hotsprings. Finally back at the trailhead several hours later we headed back down that isolated dirt road, looking forward to dinner in British Columbia's own Bavarian Village (Kimberley, B.C.). Block Tower and Wall Tower still offer large and probably HARD objectives. Wall Tower has no completed routes up its east face Hall Peak, thanks again! Get after it! Will be posting more writing and photos at my blog Gear Notes: We brought 2 60m half ropes. Full double rack to 3, with one 4. Could probably get by with single rack to bd .5 then doubles .5 to 3, single 4. If you are thinking of leaving the 4, we used it every pitch Approach Notes: Horse packers help a lot! http://raftkimberley.com/land-adventures Brad helped pack us in the first 12 km. Give yourself two days on the approach. Also! Would like to thank the Mazama's for helping to support our expedition!
 -
 Trip: Mt Rideout - Minus Six (NE Face) - 400 m WI3 70 deg. Date: 3/10/2015 Trip Report: The north couloir (aka Minus Five) on Mt Rideout was first climbed by Don Serl, Joe Bajan and Joe Buszowski in January of '83. A classic line that runs straight to the summit. In Feb. 1994, Rob Nugent and Bob Koen took an obvious left forking ramp out of the north couloir, traversing a couple hundred meters left across the midheight ledge of the face to reach a parallel gully to the left, which was followed to the summit ridge with some slabby 5th class rock to exit. Last Tuesday, Maxim de Jong and I climbed a separate gully left of the North Couloir to reach the same Nugent/Koen traverse and finishing gully. I guess the question that is brought up by this is, when is a variation to a variation a new route or not? The line we climbed was independent of the North Couloir throughout, so going by the numbering scheme for the Sumallo Cirque Max thought up in the 90s, our route would be Minus Six Couloir as it's the next line left of Minus Five, which is itself five gullies left of Zero Gully. I'd thought of Sumallo Cirque winter routes for a couple weeks but couldn't find an interested partner and/or was too busy with work. When Max became free, we originally tried to climb this on Sunday the 8th but only brought his pickup, no quad. When we ran into deeply rutted ice crust/snow at the gated bridge, 5 km down valley from the road end, we decided to come back in the midweek with his quad. With the quad, we were able to follow past snowcat, snowmobile and quad trails all the way to near the pulled-out bridge over the west fork of the Sumallo. We walked from there to the base of the face in about an hour. I thought we were there to climb Minus Five, but when we neared the base, I ended up heading into the next gully to the left, just following my nose. Max came along behind and said "Oh, this is where we retreated the last time". Max and Shaun had tried it once before but retreated from below the crux WI3 due to heavy spindrift and wind slab avalanches.We looked at the potential lower traverse into Minus Five and it looked like crap - unbonded melty ice over sloping rock - which left the straight up option as our only option Max coming up to where we started to belay. The straight up option was a narrow runnel of good ice but it was also a spindrift chute from the upper ledge. We waited out a few white powder douches before getting a stable spell. I led through and Max followed. Heading out from the belay, bottom of the ice visible A 60m pitch of WI3 with 5m of near-vertical to start and a long runnel of moderately good ice and snice followed, a couple screws and a couple good nuts helped. I belayed at a widening in the gully above as it opened out to the base of the mid-height ledge that crosses the face. Max led thru and out onto the ledge. We headed right and up to a point overlooking the North Couloir, which we still thought we were going to climb. Max heading to the junction with the Nugent/Koen. I had been supposed to bring pickets but forgot them, so at this point I had untied from the rope and was soloing next to it as that seemed a marginally safer technique. The snow was pretty stable, and there wasn't ,much chance of either of us coming off. The descent down the Nugent/Koen ramp to get into Minus Five looked feasible, but 100-150m of steep downclimbing didn't seem like the best way to make progress either. We saw a lwdge that might cross directly into the north couloir, but it also crossed a couple ribs, with unknown difficulty on the far side of the larger one, and we thought it might be time consuming. So we decided to head left and into the upper Nugent/Koen couloir line, even though we'd seen from below that it had a humungous cornice at the top. We traversed back left across the upper edge of the shelf for about two and a half pitches (some simulclimbing) to get into the upper gully. The rock varied between OK and total shit, so I ran it out 50 m, found a nut, simuled another 50 m, found a horn to sling to back up a crappy pin, and then belayed just beyond when the rock changed back to OK and a splitter nut crack appeared. Max led through into the Nugent/Koen gully. Traversing The upper gully was moderately angled but the cornice at the top looked like a cruise ship's bow hanging out over us, and it had not one but two crown line fractures! It was kinda intimidating. We found one or two sheltered belay spots along the sides of the couloir to huddle under while picking our way up. Max in the couloir Trying to decide which exit to take. We could see two possible ways around the cornice - a gully out right, or traverse a shelf right below he cornice to turn it on the left. I elected to go left. Heading up to the left exit. The left exit was one of the scariest places I have ever been in in the mountains. My helmet was a few centimeters from bonking the underbelly of the cornice, which hung out over my head a couple of meters. I know people bivy under these in the Himalaya and stuff but I couldn't help but think "this thing could drop at any second and if it does I'm fucked." When I got out to the left edge of the cornice, where it kicked back to just less than vertical, I was so relieved, and so worried about the rope cutting in to the overhanging part if I went any further, that I buried Max's old "experimental design" snow fluke and my tools in the snow and belayed right there. Max came up and led through over the bulge and onto the welcome flatness of the east ridge. Max with a couple of meters of steep snow left to go to the top. Once we topped out on the ridge we thought briefly about summiting but weather coming in and a desire to get off the mountain down a gully that we knew had more large cornices saw us decide to just head down. We found away around those cornices, and downclimbed the Silvertip-Rideout col gully all the way back to our tracks from the morning, where snow conditions relented enough that we could finally take off our crampons and plungestep back down the hill. We got back to the quad right at dark, for about a 12 hr round trip day. It was a good route - certainly not the longest on the mountain, but involving some fun terrain. I suppose I still need to go back to summit Rideout, though. Gear Notes: Small-med nuts, a couple pins, 4 tricams, 2 hexes, 4 ice screws (1 ea. 10 cm, 14 cm, 17 cm, 19cm), one "experimental design" flexible aluminum snow fluke from 1990. Should have broght a couple pickets. Single 8.something mm 60 m rope. Approach Notes: Big pickup with quad in back.
 -
 Climb: Mount Outram-Ghost Passenger (FA/FWA East Face) Date of Climb: 3/12/2005 Trip Report: I have been scheming to climb the East Face of Outram for a couple of years now. The large, gullied face is hard to see from most roads but you can get glimpses from some other peaks, and the view from Snass (Justin Brown has some awesome shots on bivouac.com) is quite impressive. In August 2003 Fred Touche and I hiked up the standard route on Outram and I took a look see down the face and deemed it possible. In 2004 Merran and I hiked in in May planning to go up the standard route, drop down a gully at the S end of the e face and climb back out up another gully. However this approach, due to weather and also the fact that all the gullies are too steep to be comfortable descents, failed and we ended up bagging the standard route once again. I know Justin and Jordan also made one attempt and had the same problem. For 2005 I decided to head in via the old Ghost Pass trail and up the creek draining the east face. I gleaned some beta on this approach from the usual online sources and prepared for windfall and thrashing. The nice descent down the standard route means the best climbing choice is to carry over bivi gear and I packed accordingly. No stove, cold food, two tools, crampons, a few jacket layers, a -7C sleeping bag for a possible long night bivi and a 3/4 length z-rest. I parked at the wooden marmot around 12:30 on Saturday and started hiking the Ghost pass trail. this leaves the old Engineers' Road about 2 km east of the Outram Trail and cuts over the ridge into the valley of Eighteen Mile Creek. The trail was overgrown and had lots of windfall but wasn't as hard to follow as I had feared it would be. After about three hours of hiking I left the trail and cut up an obvious side valley towards Outram. By the time I reached treeline it was getting near dark and I was tired. There were lots of possible lines so I elected to bivi overnight and make an early start instead of picking one line and giving it by headlamp Fred Touche style. There were no real flat spots to bivi not covered in wet snow but I found a good hollow in the ground, filled it in with dead branches and laid the z-rest down on that; it was quite comfortable. For some reason all I could think of all night long was zombie movies and wild animals. I had found fresh cougar tracks not far from my bivi site when approaching and kept waking up in the night in a state of mild panic whenever the wind blew through the trees. Around 5 AM I got up, packed my bivi up and got out of the trees onto the approach slopes to the east face. The face is a very large one with numerous gullies, and is composed of a long face on the SE ridge, and a higher face directly below the summit, in a bit of a cirque. Because of the slanting valley and ridge slopes pretty much all the options on the face are about 400 to 500m high and there are at least a dozen unclimbed gullies here, They pretty much all had a mix of ice and snow in them too. It was hard to make a decision but I ended up heading up to the headwall, mostly because I couldn't see it from lower in the valley and didnt want to pick a good looking line only to find out that the headwall had better lines that I couldn't see. East face at sunrise from treeline near bivi Unclimbed gully with WI3? step Narrow and potentially mixed unclimbed couloir line. When I got up into the east face bowl there were three options... a shady, scary looking couloir and chimney line with chockstones on the left, an open face with a couple of vertical water ice steps in the middle, and a slanting line on the right. The slanting line looked the easiest and had the smallest cornices above it so that was what I chose. It had one narrow kink but most of it looked like snow climbing. East face headwall. Arrow marks line climbed. NS and SS are north and south summits (I had no idea where the summits were when I took the photo). Details might be too small to see in thumbnail, in that case check the gallery. I climbed up into the couloir and the climbing turned out to be awesome with well-frozen neve and little bits of ice where seepages from the sidewalls came in. It was mostly 45 degree climbing with short steeper steps. There was a constant flow of 'hail' on the gully bed as ice fell off the sidewalls and broke up, but almost nothing larger than golf ball size...only two fist size chunks came down and both of them bounced well clear of me. Looking up the gully from near the bottom. I was not climbing too fast and I was also worried about the cornices. The climbing was fun but I wasn't enjoying it much. I came around a corner into the kink I had seen from below and found a 25m step of 70 degree WI3. After climbing this I got above most of the falling ice and the snow relented to 45 degrees again. A few hundred meters higher I got close to the ridge exit and came very close to a big looming house sized cornice. Fortunately the cornice line was not continuous. I picked a line up to where the lip was amost non existant, and although the angle steepened through 50 to almost 65 degrees (tools over head) the exit move was only vertical for less than a bodylength. I pulled onto the ridge to find I was exactly half way between the two summits, which was the point I had been aiming for, but did not know I was about to arrive at. Also, the ridge between the two summits, which is Class 2-3 rock in summer, and that I had thought might be scary and double-corniced, was pretty much a broad easy walk. Almost immediately on topping out my fear went away and I felt a great sense of happiness and relaxation. Tracks on the ridge with north summit behind. By the time I got to south summit it was probably 11:00 or 11:30 AM. I drank the last of my water, ate some PowerGels and took a few photos before starting to descend. Rideout and Payne - Sumallo Valley Mt. Grant, Eaton Peak and Cheam Range behind. The uppermost slopes were pretty wind-blown and icy, then as I went lower the snow softened and the temperature rose. I shed crampons and layers as I descended and even got in some good glissading. It is a very long way back down to the highway (almost 2000m) which I reached around 2:30 for a car-to-car time of 26 hours or so. Obviously that includes a 12 hour bivi and so theoretically a day trip is doable, but if I did it again I would still biv in order to get good early morning snow conditions. The approach is not onerous but does take about 5 hours all told. Since there are so many other unclimbed lines on the face I decided to give the climb a name to distinguish it from other routes that will later be done. I ended up calling it "Ghost Passenger" since the approach is via the Ghost Pass trail and because I was somewhat scared for a lot of the climb. The overall difficulty is probably Grade III, Alpine Grade AD+, WI3 and snow to 65 degrees. The climbing felt quite similar to Central Couloir on Joffre, not as sustained and no rockclimbing exit but with a slightly harder crux than existed the one time I climbed CC on Joffre. Gear Notes: 4 screws, 2 pickets and 2 pins would be an adequate rack for a party of two. Approach Notes: Via Ghost Pass trail, 4-5 hours in. Plan on taking bivi gear up and over. Food notes: In 26 hours I ate 5 powergels, 1 halvah bar, one chocolate bar, a couple of fruitleathers, and a sesame snap packet. I think this is the least amount of food I have ever eaten on an overnight trip. Certainly for most of the climb I did not want to eat at all. I'm still not very hungry. it is possible thatt if I had eaten more and had higher blood sugar levels I might not have felt so scared, I have noticed before that I start to get spooked sometimes when climbing and not eating.
 -

best of cc.com [TR] Mt. Robson- North Face 8/14/2004
Colin posted a topic in British Columbia/Canada
Climb: Mt. Robson-North Face Date of Climb: 8/14/2004 Trip Report: I climbed the North Face of Robson on Saturday, after biking/hiking into the Robson-Helmet col on Friday. Descent was made by the Kain Route. I didn't have a watch and so I don't know times of specific parts of the trip, but I left the Robson-Helmet col at sunrise and got back to the trailhead at 8:15pm. The approach rock buttress is tedious, but there are lots of cairns, so routefinding is easy. The glacier from the top of the buttress to the col is very broken up, and some tricky navigation is required. The North Face is in good condition - icy enough for good sticks the whole way, but soft enough to rest one's calves often. On the upper Emperor Ridge I traversed on the north side for about 200 ft. The Kain route seemed fine as well, but had one large crevasse/bergsrund that will provide a bit of difficulty. Getting from the base of the Kain route back up to the Robson-Helmet col is straightforward, but puts you under a large cornice for the last 200 ft. Gear Notes: -30m rope -2 screws, 2 pins, runners, harness Approach Notes: -Take a mountain bike (one can bike the first 7km) -Hike in a pair of tennis shoes. Not only will they be more comfy, but you can ford the river in them (crossing barefoot was quite painful). -
 Trip: Waddington Range - Bicuspid Tower - FA of "On a Recky" Date: 7/23/2013 Trip Report: This is the follow up to Ben's McNerthney Pillar trip report. I was waiting to confirm some details of past routes on the face and I got backlogged getting my place ready to sell here in Boulder so we can move back home to Washington. It’s time to end my 5-year hiatus from the Cascades! And for the record, that jump shot with Peter Rabbit only took one go… [img:left]http://farm4.staticflickr.com/3686/9556712328_58681c0bd1.jpg[/img] Now then, after a much-celebrated rest day wandering around in the hot sun after coming down from Waddington, Ben and I went on a reconnaissance trip to scout out the Stilletto Glacier approach and potential new lines on Dentiform Peak. With Bicuspid Tower as a secondary objective for the day, we planned to leave a rope and rack at the base for a full attempt the following morning. The idea was that with the path dialed and lighter packs the next day, the approach could be done in 1.5 hours. I had called Graham Zimmerman from the sat phone the day before to see what he knew of routes up there. I just happened to catch him after he flew out of the Revelations with Scott and gleaned some more beta from their 2012 trip. After all, we still had a few more days of high pressure overhead so we wanted to make the most of it. As we left camp at 5:30am, our packs still felt heavy. I struggled to keep up with Ben on the initial third class scramble to the snow ramp leading to the middle section of the glacier. Could it have been that I wasn't fully recovered from McNerthney? Hmmm... We threw in the occasional wand to track our path but, this being our first go; we traversed too high and had to retrace our steps to reach the opposite end of the Stilletto Glacier. And with only a hundred feet to go, we came to a rather intimidating snow bridge requiring a narrow traverse and steep exit on soft snow. I believe Ian Nicholson had a similar obstacle in 2005 that he dubbed "Crunch Time.” After 2 short belays, we were across and at the base in 3 hours from Sunny Knob – turns out GZ was right on about approach time first go. [img:left]http://farm4.staticflickr.com/3704/9553979235_cd8a362826.jpg[/img] Serras, Stilletto, Blade, and Dentiform [img:left]http://farm8.staticflickr.com/7301/9553987657_1faed1ec9f.jpg[/img] Phantom Tower and Grand Cappaccino centered in photo Yet, bone-white granite and clean continuous cracks caught my eye on the steepest face of Bicuspid, and I soon lured Ben into my increasing frenzy to attempt a new route ground up and onsight. While much shorter, Bicuspid's splitter cracks looked more appealing than the various potential lines up Dentiform. And as if I needed any more justification, continuous cracks on clean granite were the perfect juxtaposition from McNerthney’s complex, adventure climbing. Only a tiny moat lay at the base and we found a nice ledge to switch into rock climbing mode. We left a pack, boots and crampons at the base of the climb with the plan of rapping back to the base. Bicuspid Tower sits just west of ridge line proper. If you plan on climbing Stilletto, Blade, or Dentiform from the Stilletto Glacier, it is far easier to rap down the opposite side onto the Upper Tellot. A short jaunt will take you to Plummer Hut. Ben led off the first series of 5.8 clean cracks rightward to reach a prominent ledge below the steepest part of the face. From here, it was like being in a candy store with numerous cracks to salivate over! The two furthest right led to a massive left facing corner crack, but thin unprotectable seams blocked the way and I wasn’t interested in aiding. I considered traversing high into one, but the possibility of a 40-foot sideways whip if I slipped out of a thin 5.11 corner did not sound…fun. On the far left, numerous wide cracks had their appeal too, but I had a hunch Ian may have climbed that part of the face. [img:left]http://farm8.staticflickr.com/7321/9553995917_4a85d09610.jpg[/img] Pitch 1 Instead, We opted for the center crack splitting the face with changing corners. Fortunately, narrow ledges off right and left provided options for pro and stances to suss out each section. I led up with an ice tool and a few knifeblades in case I had no other gear options. Fun 5.10 climbing, some flaring cracks, and a hand traverse with a quick heal hook led to the first crux of the route, a tricky 5.11 sequence of slopers and crimps where the crack pinched down to a thin seam. [img:left]http://farm4.staticflickr.com/3736/9556739566_e269e2603d.jpg[/img] Pitch 2 Pumped and psyched to get it clean, I set a belay after the crux in a small alcove since I was running out of gear. The third pitch only proved to be more amazing! A thin 5.10 crack with perfect pro and stems lead into amazing splitter hands on par with the middle 5.9 section of Thin Fingers at Index. And that’s no exaggeration! Ben took the 4th pitch, a 5.9 V-slot angling right. Most of the chock stones were solid yet he moved with stealth around a few loose blocks since I was right below. [img:left]http://farm6.staticflickr.com/5460/9553951403_fa7b876b87.jpg[/img] [img:left]http://farm4.staticflickr.com/3773/9556713334_8be3219efe.jpg[/img] Photos of splitters on Pitch 3! [img:left]http://farm4.staticflickr.com/3705/9556804042_1161e6a05c.jpg[/img] Pitch 4 - the V-slot We made it through the steep section of the face, but the climbing difficulty didn't subside. Directly above, we climbed a short 5.10 corner into 5.9 face cracks to a large ledge. I initially climbed further up and left but the face blanked out and I down-climbed to the base of an intimidating R-facing crack. Ben came up and I passed the remaining gear to Ben. Ben headed up the 6th pitch, but we left behind a couple finger-sized pieces at camp and the rock around the crack flaked off small chips as Ben worked his way up. Ben led through some strenuous finger locks to reach a tricky pod. After a few solid goes and proud whips, we swapped sharp ends and I climbed up to Ben’s high point. A wide stem on a small flake and mantle move brought us above the pod, but the crack above required an insecure layback. Past this 5.11 section, I continued up and around a tricky 5.10 stem to reach the top of the east summit. [img:left]http://farm8.staticflickr.com/7381/9556794352_dae9e2eda0.jpg[/img] Pitch 6 - the second crux pitch Wowie! Amazing cracks and stout cruxes on a clean continuous 6-pitch new route is dubbed “On a recky” since the best climbs are often those unplanned and not in a guidebook. [img:left]http://farm4.staticflickr.com/3794/9553939105_5747127b11.jpg[/img] Route topo with previous known routes roughly marked We slung a large block and completed three full 60-meter raps down to our packs. We radioed Tim once we were across “Crunch Time” and wandered back into camp just after dark. After 17.5 hours, we were back in camp enjoying a hot meal and taking in the stark contrast yet unreal fortune of adding this spectacular new route to our second ascent of McNerthney. The next day, day 7 of the trip, I woke up exhausted, debating whether to join Tim and Ben on a final mission to hike up to Plummer Hut that day for another climb. Tim heads off mid-day while Ben and I rest a bit more at Sunny Knob. After eating, sleeping, and wandering around aimlessly a bit, we take off around 6:30pm. I plug the headphones in and head across the lower Tiedemann to the 1000-ft moraine of loose ball bearings. With that surmised, easy snow leads up and around the Claw peaks to Plummer Hut with only a short gully of rotten orange rock in between. 2.5 hours later, we plop down next to the Hut and eat a small meal to enjoy the sunset. Tim has his eyes set on Serra One in the guidebook and we make plans to head up the next morning. [img:left]http://farm6.staticflickr.com/5494/9553971985_e089688abc.jpg[/img] [img:left]http://farm4.staticflickr.com/3731/9556734840_5bcc6e9481.jpg[/img] [img:left]http://farm6.staticflickr.com/5345/9556711448_9f91a72656.jpg[/img] [img:left]http://farm3.staticflickr.com/2834/9556751366_3bb01053a7.jpg[/img] Sunset and dusk shots from Plummer Hut A long but straightforward approach up the Tellot Glacier led us to the base. We stepped across a small schrund and traversed across ice to the base. We roped up midway, which was smart because the snow bridge eventually collapsed leaving one of us dangling our feet in the crevasse. Tim led off and we started simuling behind. Fun moderate climbing up to 5.7 brought us to the summit of Serra One. [img:left]http://farm4.staticflickr.com/3693/9556727370_45f0f0949d.jpg[/img] [img:left]http://farm4.staticflickr.com/3830/9553935431_5a5e5f2d10.jpg[/img] The ridge travels down to Stilletto Needle, Stilletto, and the Blade. Behind us, the Serras’ complex ridgelines lead into the Asperity/Tiedemann massif. We could see Sunny Knob far below as well as the upper half of McNerthney Pillar. Yet another amazing 360 degree view of the Waddington Range with bluebird skies and peaks as far as the eye could see! It’s never a dull moment tied in with Ben and Tim and they break into a Spanish conversation as we summit, capping the trip off with wild shouts of “quesadilla” and “seven layered burritos.” [img:left]http://farm6.staticflickr.com/5336/9556731716_777bf6ac85.jpg[/img] [img:left]http://farm4.staticflickr.com/3818/9556715102_5488148549.jpg[/img] We head back to the hut, repack, and charge back down to Sunny Knob, psyched with the continued fortune. We verify that weather is on its way so we opt to fly out 3 days early. We do our best to finish the booze and eat all the left-over goodies that night, prepping to fly out the next morning on day 9 of the trip. The chopper arrives on time and we enjoy our final ride out back to civilization. 5 years in Colorado with only a short trip to the Ruth Gorge back in 2011 meant I hadn't been in real mountain terrain with complex glaciers for far too long. I was lucky to have 2 great partners I'm psyched to rope up with when I return to Washington. Hope to see you out there! [img:left]http://farm4.staticflickr.com/3725/9556712888_d0daabac3c.jpg[/img] [img:left]http://farm6.staticflickr.com/5322/9553940011_1dbebb37cc.jpg[/img] [img:left]http://farm4.staticflickr.com/3690/9556727314_91b3ee69e6.jpg[/img] Map of the Waddington Range with our travel shown in blue over the course of 8 days Photos by Joe, Ben, and Tim
 -
 Trip: Waddington - Second Ascent of the McNerthney Pillar Date: 7/20/2013 Trip Report: Growing up directly on the Strait of Georgia on Vancouver Island, I grew up staring at the Coast Range. I watched those magnificent mountains appear each May above the waters– perfect images of forested slopes giving way to snow-capped summits. In the picture perfect Coastal British Columbia summers, my childhood friends and I would troll around on the beach collecting logs for homemade rafts. I would slip into day dreams of crossing the Strait and getting closer to those mountains. By October, those magnificent mountains disappeared behind a blanket of clouds and mist. Rare clear winter days gave me magnificent glimpses of these white cloaked mountains rising above the turbulent winter sea. I'd like to believe that's where this Waddington dream started! Sarge, our Sprinter, packed up and ready to go! Despite pretty darn meticulous planning for almost a year, we didn’t leave Seattle until past midnight. We cruised (with fingers crossed) over the Sumas border-crossing and then made our way up to Hope and up the Coquihalla highway under a starry night. We took turns catching a few cat naps in the back of Sarge (our Sprinter van) and kept on till we were in Cache Creek at 6am! I was delighted to see that the town hadn’t changed from my childhood memories (Cache Creek still doesn’t have a Tim Horton’s!!) of travelling north on Hwy 1 and then on to Hwy 97 to the Cariboo and beyond. Onward to 70 Mile House and then 100 Mile House where we stopped for produce and bacon at Safeway. The 100 Mile House Safeway still looks like the Courtenay Safeway we shopped at before the bigger groceries came in and changed everything. We turned West onto BC Hwy 20 at Williams Lake to rise up onto BC’s wild and open Chilcotin! Nothing but lodgepole, open rolling hills and meadows and fully-loaded logging trucks (with Bella Coola coastal timber!). It’s truly a magnificent landscape—one perfect for big horn sheep, moose, eagles and bears! I love Beautiful British Columbia—especially in summer! We arrived at Bluff Lake, a beautiful lake that sits at the eastern foothills of the Coast Range in the Western Chilcotin. It’s here that Mike and Audrey King run White Saddle Air Services. Mike is famous in the Coast Range climbing circles for his knowledge of the Waddington range and his easy-going and welcoming nature! Their range on the south end of Bluff Lake is what rural BC dreams are made of! Flying into the Waddington range is one of those spectacular experiences. It’s amazing for anyone, but if you’ve poured over guidebooks, trip reports and studied every piece of writing you can find on the range, it’s really something!! I was so giddy I was bouncing in my seat in the back of the heli! When we rounded the icefall above the Tellot Glacier, we zoomed into the Tiedemann Glacier and the cirque of Waddington, Combatant, Tiedemann, Asperity and the Serras. It’s mind blowing! It’s more massive than any photo can describe. And the Munday Group to the South is astounding—never ending icefalls capped by glacial plateaus for as far as the eye can see! Tiedemann Tower We climbed the McNerthney Pillar on the north face of Mount Waddington. This route was first completed by the McNerthney brothers, Pat and Dan McNerthney, back in 1986. Despite the appeal of this beautiful rock pillar and “providing far and away the most powerful climbing line of this face of Waddington”, it had yet to see a repeat ascent. To repeat this line would be our goal! Over three and half enduring days, we climbed this amazing mountain. The challenges, the suffering, the beauty and the camaraderie is really beyond words! Luck and weather was on our side and we crested the McNerthney Pillar and summited Waddington in heavy winds but under sunny skies! The McNerthney Pillar Our Strategy Our plan was to ask really, really politely if we could fly into Sunny Knob, deposit our basecamp gear efficiently (quickly!), load back in the heli with a pack each and drop us at the Waddington/Combatant Col. This plan would avoid the dangerous upper Tiedemann Icefall. Mike heard us out on our proposal, laughed a bit and told us we could try it, but landing at the col is rare (we had about a 20% chance of that plan working). If it didn’t work, he’d dump us somewhere in the middle of the icefall – wherever he could safely land!! Pretty intense but we went for it. So we packed alpine style with food for three, maybe three and half days, two half ropes, 5 ice screws, two pickets, smallish rack, 5 pitons, 4 tools (2 for the leader, 1 each for the follower) one Reactor stove, 1.5 canisters of fuel (was more than we needed), one bivy sack, one First Light tent, one Mountain House per night per person, about four bars a day and light sleeping bag and pad. Not exactly going light, but as light as we dared since we had no idea what we were getting in to. Well, the flight in happened way too fast and the next thing we knew we had dumped our bags at Sunny Knob and we were flying up to the Col. I thought at any point, Mike would tell us over the radio that we were bailing. In what felt like 30 seconds or so, we landed at the Col, unloaded and were alone on the Waddington/Combatant Col with our packs and no wind. It was friggin surreal! It felt like only a few minutes ago, we were back at Bluff Lake, swatting flies and contemplating using the outhouse one more time! Now we were alone on the massive Col surrounded by massive walls, particularly Waddington’s North Face with the McNerthney Pillar egging us on! The Waddington/Combatant Col We sort of talked but didn’t say much. Then Joe says, “I think we should go for it.” It was a little after 9am. The McNerthney Pillar was mostly in the sun (specifically the bottom ice runnels and bergschrund) but nothing had fallen down the face… yet! So we talked a little about descent options and the like, but it was just burning time so we could make our own decisions in our heads. I was busy weighing taking advantage of the good weather and starting versus bivying a night and starting super early to get the lower bergschrund conditions in as best shape as possible. Starting up the bergschrund Day 1 Begins About a half hour later, we were going for it. We walked across to the start of the route and started to realize that the scale was unperceivable. It was taking us awhile to walk up to the bergschrund that looked like it was right there! Joe took the first lead up the vertical schrund… it was in the sun, it was melting and water was pouring down icicles and down our jackets. Joe placed a screw and then traversed right and up… it didn’t take long for us to be simulclimbing and it didn’t seem like he was getting close to a belay. I started up the first vertical section and it was super tricky trying to do this with one tool. Joe soon shouted that we were on belay. Thank God! Tim and I climbed close together and found a way to pass tools back and forth for the steep sections. We were all pretty damn soaked by the first belay… not an ideal start but it was happening! The belay position was cramped and Tim and I had crazy screaming barffies (which Joe seems to be immune to). He led on and as he was leaving the belay, I told him to lead on one line and leave the blue line unclipped in case we needed him to deliver his tools to us. It was good that he did that as the next 200+ foot lead had plenty of blue 60+ water ice! Took some time to get those tools down to us, but it was well worth it. One-tooling it I took off on the next few rock leads which weren’t particularly difficult, but you couldn’t trust the rock for shit. Almost every move required some cleaning and testing, and gear was fiddly to get. This route was beginning kill time no matter how efficient we were at belays and what tricks we tried to pull out. It was steep enough, the bags big enough, the rock loose enough plus the involved route finding—damn if it wasn’t already 4pm by the time we reached the steeper part of the first buttress. Our hopes were dashed of getting to the top of the second buttress bivy site that Dan McNerthney had told us about! Maybe we’d find a lower bivy—we sure hoped so! The next three hours were burned hitting a few blank sections and rerouting via downclimbing and a tension traverse!! I think Tim was sitting at one belay for over two hours while we shenaniganed around. I remember Tim following that pitch: he bolted out of that belay, raging up the pitch in a flurry of grunts, power moves and alpine ninja magic! Too bad he was about to arrive at another very crowded uncomfortable hanging belay! What the hell? Next, a series of cracks were negotiated that led a path up and left to awesome climbing, relatively secure moves and pretty good rock! All I know is that we made hay while we could and moved up several hundred feet in a relatively short stint! The sun was setting and we had made it to the snow benches below the second buttress. Some futzing, some searching and some hoots and hollers brought us to a small, snow and ice covered bivy ledge… it’d do the trick. We chopped snow and ice, melted snow for dinner and water, gawked at the insanely beautiful surroundings and settled into “bed”! It was past midnight already. Day 2 We awoke the next day at first light (5am ish?)! Breakfast seemed like a waste of time so I was leading off at 6:30am. We were pumped and ready to climb hard, climb smart and maybe get up this pillar!!! I made relatively good progress on good rock and generally fun climbing. The climbing gave way to lower angle terrain with more snow. We quickly learned that snow really meant a light covering of snow over ice, so we either had to get into crampons and mix our way up that or try to piece together rock outcropping in rock shoes and place screws for pro in the ice between! Tim ran another full length pitch after mine which was interspersed with the classic quote for the day. Joe and I were busy talking about important subjects such as the latest bikini styles and Hawaiian Tropic vs. Banana Boat when Tim yelled out from above, “Is it stupid to climb ice with rock shoes?” We shrugged at each other and returned, “Of course not! Go for it!” 6:30am lead Note the rock shoes on ice Tim had taken us to the Promiseland, the base of the second buttress—which we were sure would be the crux of the route. I led us out, up and left, downclimbed, then back up, searching for passage that would connect to cracks and what looked like a good dihedral out left. I traversed farther left, lightly face climbing on good stone but with no pro. The pendulum I was looking at wasn’t reasonable, but neither was the climbing, so I continued on. Then the climbing got unreasonably insecure and a fall wasn’t in the cards, so I retreated all the way back to the belay, back cleaning all the way. I shouted to the others to put on their boots and crampons. We’d have to traverse on the snow and ice below to try to get to the base of that dihedral somehow. Switching to boots and crampons at semi-hanging belays with two others is a frightening concept. Drop a boot, drop a crampon, hell drop anything and you’re pretty much screwed. Screw up on the remote North Face of Waddington, well, you get the picture. Needless to say, we gripped our shit pretty damn tightly! Joe got us under that dihedral. It was pouring water from the day’s heat on the snow and ice above the buttress, but definitely climbable. It looked hard, but doable. However, there was this damned flake perched up against the bottom of the dihedral—like a really big flake—right where you’d have to climb to get into the system. The walls were vertical and blank around it. And that block was wickedly loose… ready to tumble. Trundling the block would likely take out our belay and us, no matter which way we went about it. We hummed and hawed… tried to make a decision. Tim peered out further left but it didn’t go. Our only other option might be to traverse back to where we started and beyond and climb way right of where we’d come up. Time was ticking. So we went for it. Tim lead a rope stretcher traverse way out right which sported some spicy, balancy ice moves, though the pro was there so it all worked out. Tim traversing back (climber's) right Back into rock shoes and up we went. Shit, we’d burned almost four hours with that debacle. At no point had any of us really wasted much time—we were always doing something—just doing the wrong thing I guess!! The next three pitches went slowly due to loose rock. The leaders had to pick, dodge and finagle themselves and ropes around loose sections so as to not take out the belay team directly below. And that afternoon, the wind picked up like no other. It was cold, cold, cold hanging out at those belays. But that’s what suffering is all about! We made it through and Tim scored a killer lead taking us on the top of the second buttress, in, yet again, fading sun! Joe and I took a fast 200 foot lead each in search of bivy sites. What was found was the tippy top of the second buttress, a view to the snow arête that joins with the third buttress… and a big fat moon mocking us as we fought the incessant wind. We took stock of what lay ahead. An icy third buttress and some huge seracs coming off the Angel Glacier above! But it looked doable… sort of! But that’d have to wait till tomorrow. We rapped down a pitch and found a crappy ledge, started clearing snow, melting snow, and doing all that bivy crap. We were back in our bags by just before midnight. Hey, we’re getting a bit faster at this!! Another bivy We actually slept ok that night and awoke to a glorious sunrise. Waddington’s north face is a glorious place and looking out at Combatant, Tiedemann, Asperity, the rest of the remote Coast Range is something to behold!! Day 3 We ascended our lines (since we rapped to sleep) and were ready to attack the third buttress, the chaos of ice behind them and go for the summit! We make quick work of the three leads up the snow arête and some mixed terrain that took us to the toe of the third buttress. The wind was howling though and conditions not ideal. Joe put on rock shoes and led up and left. As soon as he was far enough from us, he began the task of testing blocks and finding passage amongst the rock and ice filled sections between. Tim and I did our best to stay warm but it was pointless. Talk was muted while we endured the situation in our own worlds. Tim took the next lead which looked like it might, just might take us to the top of the buttress. Joe and I watched as spindrift cascaded down the headwall above until the wind picked it up and litters it in every which direction. Upper snow arete to the third buttress The spindrift pitch Tim’s lead looks heinous. Steep, iced up rock with a barrage of snow and ice chunks coming from the unknown above. Soon he disappeared up and onto the headwall. The rope was almost all out but we heard nor sensed anything… for a long time. The inevitable questioning began: “What’s he doing up there?” “No pro for anchor maybe?” “Is he waiting for us to do something?” “We’re ready to simul if he keeps moving.” “It must be so shitty up there in the wind and snow… I’m sure that spindrift is getting bigger all the time!” “What’s he looking at do you think?” Tim finally yelled off belay and we followed the pitch in a flurry of jerky movements that would never pass for a beginner rock climbing class! I was absolutely flabbergasted at the headwall climbing. The rock is sound, the holds are there but it’s covered in snice and getting more covered every few seconds. My boots are managing to edge on the small holds, but barely and I can’t see anything with all the blowing snow! I can’t stop thinking how ridiculous this all is. But halfway up the headwall, I start to get into it and I start hooting and hollering and taking it for what it is! We both congratulate Tim for his bold lead and he laughs back at us, but we can barely hear each other over the wind! We’ve reached the glacier and magically there is passage through the seracs—a 50+ degree? ice slope leads up and bypasses the overhanging giant seracs to our left and right—unbelievable really! Tim has used 3 screws for his anchor. I remove one and take the other two and two pickets and start up. I want to place a screw after some initial front pointing, but I’ll run out of screws way to fast with that sort of climbing. I force another ten moves. Then another ten moves. I dump in a screw, happy for the Express knobs that make spinning those babies in so efficient! Another 50 feet and I put in another screw! Sweet. The wind is horrendous but being on lower angle ice like this is just like Peru I tell myself. And the wind too! Joe and Tim fall out of site and I start counting my steps so I have some sort of idea of how much rope I have out. I coult 100 steps and dig in a T-slot in sugar snow. We’re gonna do this I say to myself! Tim and Joe come raging up and we nod to each other and start simuling on one rope (and put the other away). The upper slopes of the Angel Glacier feel like the moon. There is so much spindrift getting tossed around that we only get glimpses of the NW Summit from time to time. There’s no features other than the arching snow slope, and we are getting knocked down by the wind—hell we might as well have been alpine pirates just getting our land legs back! It was unreal. All that work on those buttresses for this wind?! Ha! We huddle up under the NW summit block, dump our packs, dump in a picket and clip them in. Up we go with a picket and a few screws. As we near the final ice pitch to the summit, we get a glimpse of Waddington’s Main summit. It’s all iced up and looking steep as all hell! It might as well have been Cerro Torre to us at that point! The final summit section We huddle on the NW summit together, shoot some vid and stills and shout meaningless sounds at each other! It’s awesome! The relief around us is spectacular. The wind is blowing so hard it’s almost silly! We haven’t felt our toes in hours and we can’t wipe the stupid grins off of our faces! Windy, windy summit shot! We downclimb from the summit, the final climber grabbing the screws on the way down, and jump across the mostly filled in bergschrund and collect our bags. We head off in search of a couloir that joins Waddington’s NW slope to its heavily glaciated NE face. We find the right one and the snow in the couloir is in good shape for the first hundred or so feet. Downclimbing goes easily, but the wind still whips at us in the couloir where we thought we’d for sure find refuge. I downclimb first and soon I hit ice. I try with all my might to front point and get us out of the couloir but with one tool it’s just too slow. I climb back up to the boys and we start v-threading. Two full length raps take us out of the couloir, over a yawning bergschrund to more benign glacier slopes below. Unfortunately, our ropes only took us to the edge of the schrund and we were right in the middle of a bunch of jumbled crevasses. Arriving at the end of the rappel, I find Joe frantically deadmanning a picket to anchor to while we pull the ropes and change over to glacier travel mode. As I transition, I unclip my tool from my harness and swing it into the snow, forgetting to clip it to my umbilical. Joe turns around and accidentally kicks my tool and it starts down the NE Face to our horror. We start shouting at it to stop, to hook an ice runnel, to stick its pick into the firm neve… anything! And it did—several hundred feet below us! But I can get it! There’s no ice fall between us, no yawning bergschrund, just more glacier and some elevation! So we set up and I tiptoe down the glacier, careful not to disturb the snow and ice too much, as if some sudden movement will send it tumbling off the face, never to be found again! We can see the Stroll now, the only easy mountaineering on the whole mountain, which spans a mostly horizontal strip of glacier under the summit towers. We start yelling, whooping and marveling at the towers above us! We could have started the descent off the mountain at that point but it was getting late, we were tired and the views were spectacular. We took a gamble on the weather holding another day and set up for the night, this time on FLAT ground!! Tim and I took stock of our feet and it seemed that we might have let them go too long without some love. Tim had no feeling in 9 of his toes; I had no feeling in either of my big toes. Turns out that we both got mild frostnip, but Tim significantly worse than me. Our final bivy--flat ground! On the descent, Munday's north face behind me Lower Bravo Glacier Day 4 We slept well and awoke pre-dawn to start our decent. The first 2000 feet went smoothly and soon we were at Bravo Col looking down at the Cauldron, a mess of icefall, crevasses and threatening slopes. This is bypassed mostly by two raps down to the lower Bravo Glacier and some tedious and lengthy crevasses navigation. We got down, not without some crevasses shenanigans of course, and slogged our way over the immense Tiedemann Glacier to Sunny Knob where we were greeted by the Swedish Bikini Team and a Norwegian Ice Bar complete with bottomless vodka and Red Bulls! I'll let you figure out what is what! Chocolate Peter Rabbit!!! There’s more to our trip to the Waddington, but that’s it for the McNerthney Pillar. Mad props to the strong band of brothers, Dan and Pat, on their visionary first ascent! If you haven’t heard of them, do a little digging in the Nelson guides and you’ll get a taste of what these boys were up to a few decades back!
 -
 Trip: Slesse Twice in a Day - Date: 7/15/2013 Trip Report: It's been a long time since I posted a report here. But I think some of you may enjoy this read. Here's a link to the report on my blog. Slesse Trip Report Cheer, Marc-Andre Gear Notes: Rock shoes, one tool, strap on pons for my tennies. Approach Notes: Watch out for bears.
 -
 I'm wondering if anyone has any info about a possible 2nd ascent of the McNerthney Pillar on Waddington. Kevin McLane thought Colin Haley might have done it, or at least knew something about it, but (a) he hasn't and (b) he thought he'd heard that from ME! Most curious... (p.s. I'll duplicate this posting in the Climber Board, cuz not everyone visits the BC section, if that's OK with you mods...) Cheers, p.p.s. As a reward for reading this posting, here's a photo to stoke you thru the rest of the winter. The route takes the obvious 3-stepped rock pillar..
 -

bugaboos [TR] Bugaboo's Canadia - Various 9/27/2012
linkalpa posted a topic in British Columbia/Canada
Trip: Bugaboo's Canadia - Various Date: 9/27/2012 Trip Report: Late Summer Bugaboo Trip Two of my buddies and I recently took a few days to drive into the land up North. Driving nearly nonstop to check out the granite that we gawk at, on our yearly pilgrimage to Banff. The several year long wait did not disappoint! We loaded the Suby with enough shit to last us until the North Korean invasion and set forth, our only objective being to have a good time. Made the drive in roughly eleven hours from Olympia/South Tacoma, pulling in the porcupine herding corrals around 4, took off for the hut and made it in around two hours. By the time we arrived at the hut the light was diminishing, but we pressed on to the "Rock" to a night of lovely slumber. We awake at a leisurely time to leaf thru the guide book and decide the trip for the day, Bugaboo it is! Via the Kain route we ascend after an insignificant approach. The route proves to be a complete joy with tons of very enjoyable scrambling and fairly easy low five moves. We rope up for the Gendarme' due to its very "airy" nature and rap off after enjoying the incredible views. The next day is equally beautiful and we shoot for Pigeon Spire. The col on the approach has iced over considerably and front pointing ensues with chilly hands on dirty snice. Pulling up and onto the glacier is unbelievable with nearly endless views of the Howser Towers and on. Before we know it we have arrived at the base of the classic ridge and lay in the sun for a bit to give a party in front of us time to get up a bit higher. As expected the views are unreal, with an exposure that adds to the experience. The granite is superb, much like the previous day! We top out with another party and a solo dude, to share the summit with prior to two short raps to retreat back to the decent. Even the down climbing ends up being enjoyable, we find ourselves grinning the entire time. Two double length raps aid us down the icy col and over the 'shrund after waiting out a party that was less than confident with their footwork in running shoes. We arrive back in the Taj' with enough time to hang with our very cool neighbors whom are kind enough to share their bottle of twelve year scotch with us over some good conversation. The morning arrives with another unbelievable sunrise and the decision is made to head up to snag the McTech Arête'. The rumor of weather from our friendly hut attendant back down the trail leads us to choose this route after our original plans of the North/East ridge of Bugaboo. The route is quite enjoyable, with amazing territorial views down the valley and into the Bugg's. Five pitches put us on top, after forgoing the final scramble to the true summit due to fading light. A few nervous moments of not easily being able to find the second station and having to pull a "cliffhanger" move to reach the third, ends up slowing our decent to the rubble below the route. More whiskey (this time our own, but certainly not enough) greets us at our stupendous campsite. We close the night down listening to music and bullshitting about the amazing place we are lucky enough to be in. We were rustled awake early the next morning with a steadily increasing breeze and a drizzle of rain. We slam down some grub, packed the gear and have just shouldered our packs when the HAMMMER of THOR' comes crashing down. RAIN, Massive lightning strikes onto the spires, and eventually hail chased us out and back to the car. We end up snagging some burgers and pints in Radium with minor flooding wreaking havoc in the streets. With a few more days to kill we ended up driving to Vantage, sleeping at the Feathers trailhead only to be rocked in the middle of the night by multiple gunshots less than 30 meters from our car. That morning, after some Jet Boil Via, we set out looking for a body with no such luck. We don't know the story behind it, but it certainly scared the shit out of us! Plans were made over coffee, and then some more coffee and yet again another cup of coffee in E-burg to hit the NR of Stuart. Although the stoke had fizzled after it was confirmed how un-God-lee smokey it was over the pass. We were in good spirits, choosing to end the trip on a highpoint. Overall the Bugaboos were incredible, easily making for the most enjoyable trip of my life. Good friends, good climbing, good times! When January roles around and we do our annual ice trip to Canmore, I'll surely look over and see those beauties calling for next summer. (I must say that I am a little embarrassed, as this is my first trip report. I have been greedily stealing information and gawking over pictures for as long as I have been climbing, but have never considered posting. Hopefully it doesn’t suck!) Jeremy Gear Notes: Standard rock rack, took a number four up the McTech which was very nice on the second roof. More booze and less food. Approach Notes: Flat...than, not so much. Good Peekaboo views, with larch trees and hucklberries dotting the way above treeline. -
 Trip: Valhalla Range, South Selkirks - FA:Étoile Filante IV 5.11c, 300m, S face of Asgard Date: 7/23/2011 Trip Report: A new route put up this summer by David Lussier and Cam Shute. full trip report here with photos . Étoile Filante IV 5.11c, 300m, South Face of Asgard Peak F.A. David Lussier and Cam Shute, July 2011 The story behind the line The South Face of Asgard has attracted climbers for almost 40 years. The first route up this sheer featured wall, the “Center Route IV 5.8”, was climbed by Valhalla pioneers Peter Koedt, Peter Rowat along with Greg Shannon in 1973. Peter Koedt returned to Asgard a few years later, in 1975, to climb the “Left-Center Route IV 5.8” with James Hamelin and Jara Popelkova. These two traditional routes follow the most dominant features on the face and continue to challenge climbers to this day. They offer varied climbing (cracks, flakes & chicken heads) with interesting route finding along with sustained difficulty. Up until now these where the only established routes on the south face. The vision of a new route on this face has been shared by many over the years. From various trips in Mulvey Basin over the years, I had always been interested by the complexity of the upper right side of the wall. It wasn’t until July 2010 that Cam Shute and I ventured into Mulvey with the intention of exploring that potential. Due to the disconnected nature of the crack systems, some blank looking section and the steepness of the wall, we decided to bring a hammer drill along with some bolts. This exploratory trip, culminating with a high point somewhere half way up the steep upper right wall, revealed the potential for a great line on featured but compact rock. We were already planing our return. Our vision evolved some more before we returned in July 2011. With a greater knowledge about the nature of the rock and the various line options we decided to bring the drill again. We were considering bolting an interesting looking blank arête to help straighten the lower part of the route and also using bolts for adequate protection on the upper compact wall. If the route turned out to be good quality, we also contemplated bolting the belays to facilitate rappelling. All of this would of course be done while climbing from the bottom. We were very excited about possibly finishing the route. The end result was greater than anticipated. The vision, our skills and luck combined with our commitment allowed us to complete a new modern mixed (bolts/trad) route up the beautiful right side of the South Face. A lot of the visioning and actual route location decisions beautifully came together over the 4 days Cam and I were working on the wall. The climbing on the direct arête lower down (pitch 2) was challenging and quality while providing a more direct line. The intricacies of the steep upper wall revealed themselves after a few days of committing route finding on the sharp end. In someways the route revealed itself and we basically connected the dots. Completing it was very satisfying but putting the puzzle together was the best part. We really hope that others get to enjoy this quality and modern alpine rock route, feel free to download the topo and route description just below. Access and Description topo Name background “Étoile Filante” is french for “Shooting Star”. The name choice comes as a tribute to Valhalla pioneer Peter Koedt who sadly passed away in the fall of 2010. The inspiration for the name comes from the song “Étoile Filante” by “Les Cowboy Fringant”. This beautiful song compares each human’s life existence, turmoils, successes and absurdity to the passage of a shooting star. We feel Peter was a visionary climber who put lots of skills and creativity amongst the Valhalla peaks. We will remember his passage and contribution as a brilliant shooting star.
 -
 Climb: Stonerabbit Peak-Southeast Face Date of Climb: 8/1/2004 Trip Report: What do you call 1,200+ meters of bush free, loose rock free, and lichen free big wide open slab scrambling? Base of Stonerabbit's southeast face. Go ahead...scramble and climb straight up! Reinhard going solo. 1000 meters of air from the summit of Stonerabbit A little summit bouldering on the Rabbit. We called our route Rabbit's Coat. Gear Notes: Food, water, rock shoes, and tranquilizer if you get nervous on big slabby face. Approach Notes: Chehalis FSR, Skwellepil road
 -
 Trip: 4 climbs in the Canadian Rockies - Yukness, Hungabee, Huber, Temple Date: 8/24-28/2010 Trip Report: Scott Bingen, Steve Trent, and I just got back from a climbing road trip to the Canadian Rockies. We climbed 3 summits in Yoho NP (BC) and also climbed Mt. Temple in Banff NP (Alberta) before heading home. It was a fun trip, full of massive mountains, spectacular scenery, and ubiquitous Rockies choss. Day 1 - Aug 24 - Yukness Mtn The first day we took the bus to Lake O'Hara (avoids walking 11km along road), hiked a couple of hours to the basin below Opabin Pass where we established camp, and then scrambled up Yukness Mountain for some stellar views of the park. A friend named Demetri (from Canmore) joined us. Day 2 - Aug 25 - Hungabee Mtn + Abbot Hut The second day the four of us (Scott, Steve, Demetri, and I) climbed the West Ridge of Hungabee Mountain, which is the highest summit in Yoho National Park and lies on the continental divide between BC and Alberta. This climb represents the epitome of Rockies climbing: massive, chossy, tricky route-finding, and spectacular summit views. We had reservations at Abbot Pass Hut, so despite the fact we got down to camp as the sun was setting, we packed up to hike 3.5 hours to Abbot Pass. Demetri had to work the next day, so he hiked out. The grueling ascent in the dark was all worth it when we were greeted with a fire burning in the wood stove and water already boiling on the stove. Day 3 - Aug 26 - Mt. Huber The third day we woke up to a brilliant morning at the cozy Abbot Pass Hut. After the long day the day before, it was nice to just relax in such a beautiful spot. But it wasn't long before I began to get antsy to climb some of the mountains towering around us, so I left to go climb Mt. Huber (via the Huber Ledges route, since I preferred to have a partner if I went up the more technical route from Abbot Pass), while Scott and Steve opted to hang out at the hut. I reconnected with Scott and Steve evening at the Lake O'Hara parking lot, and we drove to Canmore to stay with some friends. Day 4 - Aug 28 - Mt. Temple Finally, before heading back to Seattle, we took advantage of a 1-day weather window to climb the nearby Mt. Temple in Banff National Park. Interesting note: Mt. Temple had been the location of my first hike and camping trip when I was 3 months old (see photo below). As usual, I've posted a full trip report on my website: Canadian Rockies Part I (3 climbs in Yoho NP): http://www.stephabegg.com/home/tripreports/britishcolumbia/yoho Canadian Rockies Part II (Mt. Temple): http://www.stephabegg.com/home/tripreports/britishcolumbia/temple
 -
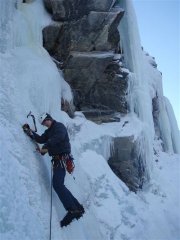 Trip: Strathcona Provincial Park, Vancouver Island, B.C. - Black Knight (FA) Date: 8/21/2009 Trip Report: A climb from summer 09' Mission: To climb Paupers Buttress, 300m 5.7, or put up something new. Paupers Buttress is on the Queens Face, next to Kings Peak. Located in Strathcona Provincial Park, Vancouver Island, British Columbia. Left after work Friday, August 21st. Drove to the Kings Peak trailhead. Got to the trailhead about 6pm, and got to the lower meadow around 7:30pm. Beautiful weather, with the exception of a faint Smokey smell, complements of forest fires to the South-East. Set up camp, had dinner, and prepped out gear for the following morning, which according to the weather reports, was going to be balmy. August 22nd, 5am: Up for breakfast and last minute gear checks. 5:30am: Hiking to upper meadow, then took the gully towards the hikers ridge, then about 2/3's of the way up, you cut up a short 15' rock band, and your on the lower moraine. This saves from needless 3rd class up the foot of the moraine. Handrailed the ramparts (on the right) and made our way to the toe of the glacier. 7:00am: Roped up for the short crossing. Global warming stole about 50 feet of glacier since last summer. Quite disappointing. 7:45am: Base of buttress, now all we had to do was to choose which corner system we wanted to take. We chose the furthest one, roped up and set off. Heres a breakdown of the pitches: P1: (5.9) Head up the corner, when it ends, traverse right, and belay from small corner (small gear in belay) P2: Head right and up small grassy gully, making an exposed hop onto the arete on the right. Continue straight up. Belay from tree. P3: Continue up grassy broken 4/5th class and belay from one of many trees. P4: Head straight up. # 2 Camalot in horizontal just off the belay, then up right on small step. Continue up and build belay in small "half-moon" flake. P5: Go up steep 12ft. high wall directly above belay. Head up, trending left, away from obvious arete on the right. Top-out on the huge ledge. Belay by slinging massive block on ledge. P6: Go right for exposed and loose traverse through huge gully. Go right and up 10' wall (red camalot) and go right, and belay from horn. Should still be able to see last belay. P7: Go straight up, small pro. 30m pitch, to gear belay. P8: Up to right facing corner. Pull on top of arete on the left. a 6" offwidth awaits you. I placed 2 chockstones in crack to help. Climb this, and climb a ramp leading left on good rock. Grey alien finger crack, follow that to the summit! On the route at 8am and at the summit around 2pm. And I'll try to include some pictures. Lower meadow Campsite Last minute business before getting on the glacier. Paupers Buttress (in the middle) Looking towards the arete and some other routes A glance down Kings Peak from mid-route Looking down from the summit Good day! Smoke blurred view of Colonel Foster (7000') Overall, super good trip. Lots more to come! Gear Notes: Rack: 1 set Aliens .75 -> 2 Camalots 1 set offset stoppers 1 set Superlight rocks 12 extendable draws Handfull of misc. Pins & hammer 60m rope & 8mm tagline Approach Notes: 2.5 to 3 hours to lower meadow. Approx. 1.5 to base.
 -
 Trip: First Ascents in the Stikine Area - Various Date: 8/9/2007 Trip Report: Well, I know that the title promised multiple first ascents, but what we really have is one first ascent, one failed fA, and one second ascent. But, that is a rather long title. I'll be brief here, and direct people with more interest to my website: http://www.pierce.ctc.edu/faculty/cwillett/scud/index.html'>http://www.pierce.ctc.edu/faculty/cwillett/scud/index.html'>http://www.pierce.ctc.edu/faculty/cwillett/scud/index.html'>http://www.pierce.ctc.edu/faculty/cwillett/scud/index.html The website has vastly more photos and text. Myself and two Vancouverites headed up north for another trip into the Stikine-Edziza area. We float planed into Yehiniko Lake, shown on this fine map: From Yehiniko, we bushwhacked and swam our way (70 stream fords!) up Quattrin Valley and onto Quattrin Glacier, climbing it to a col that was to be a basecamp for about a week. We first tried a new route on White Rabbit: The West Ridge. White Rabbit has been climbed once before, via a different route, mostly snow and a short ice pitch. The West Ridge is substantially longer and all rock. Below is a shot showing White Rabbit and our general route: We approached up a glacier, climbing approximately 1500 feet to the top of a ridge that we called Blaster. Even in August, the glacier was in excellent condition. From the top of the ridge, we traversed along and then descended deeply to a notch, where we could gain the West Ridge itself. The rock quality changed radically from the notch. Blaster Ridge was generally solid and strong, whereas the West Ridge of White Rabbit was truly a horrifying experience. I would have loved to be on the nice, solid rock of the Olympics. It was poor enough that we only roped for one pitch, as there were few places strong enough to take protection and not rip out. The route is mostly exposed fourth class on crumbly rock, with some extensive sections of mid fifth class work. A white out came, making it difficult to gauge our progress. After approximately 8 hours of climbing, we decided to turn around on the ridge, as we had not brought bivy gear with us. The photo below shows our approximate ending location Being in a white out, it was difficult to tell exactly where we ended our climb. From subsequent observations, I believe the higher one to be correct, though there is a chance the lower one is. We pounded two pitons to rappel past a particularly difficult section of rock. On this rappel, rock broke loose (oddly enough, not caused by the rope or us - It just came loose) and cut most of the way through one of our half ropes at the 40 meter mark. This left us with 60, 40, and 20 meter strands. We rappelled once more, slinging a large block with webbing. We made it back to camp in the middle of an ice/rain storm around 7 pm. I,personally, was glad to have survived. After a day of rest, we headed to the other side of the col to try for a reasonable looking peak above us. As far as we know, this has not been climbed before by any route. We've taken to calling it Doormouse, a bastardization of Dormouse, from Alice in Wonderland, wherefrom White Rabbit is also taken. The Doormouse yielded easier than did White Rabbit. From our camp at the col, we climbed scramble up rock and snow to gain the moderate glacier below the peak. In the photo below (taken from two days earlier on White Rabbit), you can see the approximate approach route. The glacier started at a moderate 30 degrees, but quickly stiffed to 40 degrees, and eventually to 45-50 degrees near the top. The glacier gained us approximately 2000 feet and dropped us at the base of the East Ridge. The rock here was much better than that found on White Rabbit. We climbed 4th class and low fifth class rock, trying to get on top of the ridge. We roped for one pitch of 5.6 rock and that got us to the top of the ridge itself.In the below photo, you can see me coming up this pitch. From there, easy class 2-3 terrain, non-exposed, led along the ridge. The ridge narrowed to a knife edge and then dropped into a notch. We built an anchor there and set out 20 meter strand to rappel down into the notch. We left the rope in place to use to climb back out on our return. This was a fine idea, as none of really wanted to lead the off width to get back up. It runs about 5.9 or 5.10a. From the base of the notch, we built another anchor and Mike led the 5.6 pitch up and out of the notch. The below photo shows us rappelling it on the way down. The climbing route runs to the right of the rope. Once we were all up, the rest of the route was easy class 2 walking over talus to make the summit. Views from the summit are extensive. The below photo shows the Scud glacier. The prominent peak to the left is Mount Hickman, which has seen one ascent, by Fred Beckey and others. To the far west, there was several prominent peaks. The right most peak is, I believe, Mount Ratz. The left most is, I think, The Devils Thumb. Sorry for the grain, but this is a 100% crop taken from a 70 mm lens. To the south and east is Mount Hoole, named for a Matis guide for Campbell, one of the early explorers of the region. As far as is known, it has not been climbed. It doesn't look easy,though the approach isn't too difficult. It is the prominent peak in the center of the below photo. Finally, we got a good look at Dokdaon, which was first climbed in 1967 by a group of four from Seattle and Alaska. It has not been climbed since. We built a cairn on top and then retreated back down the peak, retracing our climbing route. The climb up and out of the notch proved to be a rather challenging off width affair, with lots of the obligatory cursing and swearing. It is in the 5.9-5.10a range, but because we left the 20 meter strand, we could do it on top rope. Round trip was in the 12 hour range. After another day of rest we moved our camp from the col down to the base of Dokdaon, where we also had a food cache. Weather was cooperating and we intended to summit Dokdaon the next day. However, this is the Coast Range and good weather just doesn't last. For five days we were pinned down by unpleasant weather. It usually didn't rain/sleet too hard or too long, but visibility was poor enough that climbing wasn't really an option. The above photo shows a stretch of nice weather when Mike and Bob went for a stroll to the top of the Scud. They summited a minor peak, presumably also a first ascent, in a white out. We called it The Count, though they thought it more of a bump than a peak. Our time was running out, so one morning we forced the issue and went for it. From our camp on the Scud, we climbed glacier, generally in good condition though with some snow bridges of dubious quality, to gain the south face of Dokdaon. We should have continued traversing the snow around the mountain, but instead took to a snow finger than gained us a lot of elevation. Here is shot of Bob on the traverse around the mountain. You can see that here, on top of the glacier, the terrain is really rather moderate. Why we gave it up for the snow finger is unclear at this moment. In the below photo, the red route is the climbing route, the blue the descent. It would have been better to take the blue route on the way up. Our climbing route eventually dumped us onto more difficult class 4 terrain that was necessary, with some loose rock thrown in. There were some exposed sections. Here is a shot on a higher up snow finger. The weather, of course, closed in on us and we were in a complete white out when we summited. Fortunately, there wasn't much precip. Below is summit shot of Bob with the cairn that we found from the 1967 group. We also found an empty tin of sardines. As we descended it was clear that there was a better route down: Just go straight to the snow. This was much easier than our climb and we got to the glacier fairly easily. In the white out we had to be careful not to get lost (visibility was under 20 meters), but came across some cougar tracks in the snow to follow back to our ascent tracks. Round trip was about 10 hours. Our time was more or less up, for we still had to traverse the Scud glacier, then the Scud Valley, out to the Stikine for a jet boat pick up. Here is a map showing our entire route. In the below photo, the top lake is Yehiniko, where we flew in, and the ending point is the Stikine. The big glacier is the Scud. The traverse out was, shall we say, painful. The bushwhacking was really nasty and I would not do it again. Instead, I would fly in and out of Yehiniko. Here are some shots of the traverse out. Looking north back to Dokdaon. Looking south down the Scud - our route out. Nearing the end of the Scud, we start to worry about ice falls, as we getting close to the 1000 feet in elevation level. We reached the end of the Scud and found nothing to worry about for ice fall. The next day the weather took a turn for the worse, and this misty crappy would sit on us for the next few days as we bushwhacked. For a while the flood plain of the Scud was nice walking, except when we got stuck in quicksand. But the river is big enough that we were not about to try to ford it, and when the river pinned us against the edge of the valley, we had to bushwhack through thick Devils club and slide alder to get over these headlands. This is a "clear" section of bushwhacking. When we were lucky, we found some rocky areas to traverse, instead of fighting the bush. Below is one of the headlands we had to cross. Here is Mike on a nice section. We frequently found grizzly trails to help us along. Bushwhacking is never fun, but when you have a mountain axe, two technical tools, and a picket on your pack, it is even worse. To get down off of one headland, we rappelled down a steep gully using slide alder as a rope. Bob's mother made us about 15 pounds of raspberry fruit leather. We never got tired of eating it. Here, you can see true joy in Bob's face as he digs into some of it. The sun also came out for the first time in 3 days, so we were able to dry out soaking gear. On the next to last day, we had some furious bushwhacking to do. Here, I fight my way into a wall of green. Believe it or not, I found a squirrel trail to follow. The "trail" was perfect for someone standing 10 inches off the ground. We had a harder time of it. We made it to the Scud Portage, a short cut between the Scud and the Stikine. We had hoped it would be a pleasant meadow walk. Well, it wasn't. In fact, the first time we tried it we got so turned around that after 2 hours of work, we ended up back at the Scud. The next day we walked a bearing instead. The devils club was thick. Finally, we made it out to the Stikine. I was very happy. Our jet boat got us a few hours later and took us upriver to the hamlet of Telegraph Creek. Along the way, we passed the spectacular Sawtooth Range. From Telegraph Creek, we flew back to Yehiniko and then drove back to Vancouver. -------------- So, what is left to do up there? Everything. Almost nothing has been climbed. The 1967 group also summited Ambition and Endeavour. We had plans for these but weather didn't work out for us. Here is the east face of Ambition. The 1967 people did not take it, but instead snuck around the left. Their route is a scary class 4 traverse, according to them. I suspect their class 4 is rather more difficult than what we think of class 4. Endeavour is the mountain to the right of Ambition. It is in the left of the below photo. The peak to the right is unnamed and unclimbed, but we took to calling it The Nipple. The snow route on the left we scoped out from Dokdaon and looked like a good climb in the 50 degree range. Access to the area, via Yehiniko Lake, is very straightforward and much easier than most in the Coast Range. Again, lots more information and text can be found at http://www.pierce.ctc.edu/faculty/cwillett/scud/index.html One last photo before I end this thing. Taken on the flight out. It speaks for itself. Gear Notes: See http://www.pierce.ctc.edu/faculty/cwillett/scud/index.html Approach Notes: See http://www.pierce.ctc.edu/faculty/cwillett/scud/index.html
 -
 Trip: Jubilee/Waddington Knight Inlet - Various Date: 7/18/2008 Trip Report: Finally, the long “awaited” promised TR to Jubilee/Waddington. Sorry for delay, been sick. It is also a bit long. To all mountaineering aficionados: Perusing the book shelves is a very dangerous proposition. For lo and behold I spied a glossy book with this breathtaking picture on the front. Not only on the front but throughout the book. Guide to the Waddington Range by Don Serl. Very dangerous stuff books. Instead of lining some helicopter pilots pocketbook we figured we could build our kayaks and get an enjoyable slightly extended trip out of it. 2 years of saving vacation and a couple grand to build our kayaks later and we were ready. Dreams of perfect weather and solid snow bridges girded our enthusiasm. Food, um yummm: Basically it came down to SUGAR/NUTS/BEEF JERKY/SALT. For sugar we got 10lbs of chocolate from Boehms Candy only took 7lbs though. Tons of Candy bars and Pecan Rolls with extra pecans and butter. Salted Almonds 4lbs, toasted pecans 1.5lbs. 10lbs of beef jerky we made ourselves from meat we got on sale for $2lb. We also took 3 loaves of banana bread since it keeps for 3 weeks. For salt we took fritos and corn nuts. Did you guys know that fritos have 3100 cal/lb??? Corn nuts are 2600cal/lb. Dang they tasted good. Expensive though. Only thing higher per lb is butter and pecans/almonds. Took several forms/flavors of crackers. Took spaghetti noodles with beef bullion and cup-o-soups for flavor since they pack very nicely. Why would anyone buy “dried noodle anything” at REI is beyond me. Buy the noodles for a fraction of the price and add your own spices. Noodles by definition are “dried” food. Not to mention the packaging those foods come in are VERY heavy!!! Well….. I was sick for several months leading up to the trip, the story of my life, making me rather out of shape for hauling 90+lb packs around. Left 2 days late on our 4 week trip. Not an auspicious start, but it was a start! We drove North from Issaquah in my Brothers Mazda RX-7 with both kayaks on the roof, 4hp engine in back with enough gas for 200 miles worth(20+gallons)cruising with all of our food and gear for 4 weeks. Took the ferry to Nanaimo on Vancouver island and drove north to Kelsey bay. There we met a local who showed us a map allowing us to take logging roads 20 miles north saving us several hours in the kayaks. Packed the kayaks and took off in the morning with the tide. At noon we stopped on a rock outcropping for lunch as we headed out up the fabulous Knight Inlet. Now our cruising speed is around 7 knots and Knight inlet is not a kind place for those who are having engine trouble. There is no place to “beach” we found a rock shelf and wiggled around on it to get the engine off and cleaned. The engine would not restart without being very rich. We thought the choke lever had popped off leaving it running rich. Nope. After several hours of fiddling around we finally pulled the entire carb off and tore it down finding tons of black crud in the carb from when we had burned some old gas in a previous trip trying to get rid of it. DOH!!! <> Oh well. Lesson learned. The wind had kicked up and was whipping along at 20+ knots creating 3 to 4 foot waves. When you are sitting in a kayak with your butt 4 inches below the water surface a 2 foot wave means that your eyes are basically level with the top of it. Now 3 and 4 waves swallowed and wallowed our kayak as we chugged along. You would get on top of a wave and would “surf” down at 15 knots speed and then come to an abrupt halt as you climbed up the other side of water. In the meantime the next 4 foot wave decides to crest over the rear of the kayak and sending foaming water up to my brothers chin. I so wished I had a waterproof camera!!! We were desperately trying to find a beach as we had our outrigger kayak loaded too front heavy and was being buried completely under water and we were getting worried. The only thing we saw were cliffs. I saw a small speck of island on the map and hoped it had at least a nook to hide in. Instead it had a shingle of rock that was accessible at high tide. Lucky us, it was high tide. We hauled the kayak and outrigger out of the water onto the barnacled rock shelf. Now we are sitting perched on a rock shingle/shelf watching the water receed from high tide and found ourselves perched on top of a cliff. OOPS! Looking at the tide charts we see that the next high tide at 5:30 in the morning is 30inches lower than high tide today!!! Oh crap. Oh well, time to eat and sleep! We found the best sleeping spots imaginable, 4” thick moss. SWEET. At high tide the next morning we pushed the kayak and outrigger kayak over the cliff and finally got it into the water at high tide without falling over the cliff edge ourselves and going for a swim. In an hour of cruising we found the only beach in the entire 75 mile trip going up Knight inlet. An absolutely stunning spot. Ate Breakfast and kept cruising. We thought we would get some water from a stream entering Knight Inlet… oops a 200 foot waterfall greeted us instead. Knight inlet is an amazing spot. Ringed in cliffs on all sides. Here is one mountain rising 7500 feet straight out of the water. Several thousand foot granite cliffs are common and unclimbed. If they were in Yosemite they would be exceptional. We finally hit the end of Knight inlet and ditched our kayaks on the loggers platform at the Dutchmans Head where their fuel tanks were. We got permission from loggers who were there. HOLY COW THE HORSE FLIES!!! The only good thing was that as soon as the sun goes down they all dissapear. Killed 10 in one swat! It wasn't the only high count swat either. I am not pulling your leg either! Lets just say we didn't stick around to take pictures! Thankfully the loggers gave us a ride to their loggers camp saving us 3 miles of walking through bear country. Did I mention Bears? Yea, bear poop everywhere on the road. The loggers joked that the bears never crap in the woods, but only on their logging roads! Think cow patties littering the road like goose poop. We only saw 1 bear on the trip to camp though. Loggers Camp With some judicious begging the loggers took us up the road as far as they could towards Mt. Jubilee saving us an added 10 miles of walking in bear country with nothing more than "pepper spray". Lets just say that after being dropped off and looking at the littering of bear poo everywhere, we uh, made some "noise" as we walked and hoped that mama grizzly bear wasn't too hungry. The easy walking didn't last as we got off the main logging road and onto an old "logging road" We camped on the only flat spot we could find, an old log bridge. Oh did I mention that my brothers toe was over twice its normal size. He limped to this spot and we did not move for 5 days. It seems he had picked up the kayak trying to move it off the rock shelf 2 days previous and dropped it on his toes. The next day Nate tried walking on it and in less than a half mile was huge and very painful. Then the weather moved in. Our spirits were bleek to say the least. A clearing in the clouds for a couple hours and we packed quickly and sprinted up a couple thousand feet through logging slash and cliff bands as we dodged into heavy timber wherever we could find it. It turned to rain again and we found the last bit of old logging road and stayed there for 2 days collecting drinking water off the tent. Weather cleared again and we lugged our +90lb packs up into the alpine terrain. Couldn’t see a thing as it was nothing but clouds but we got to dry out and sleep on heather!!! 3 more days of rain, sleet, snow and it cleared finally!!! Nate's toe never really healed but was ok to at least walk on slowly. TONS of FRESH SNOW up higher and very warm temperatures made very slow going with fresh snow on top of slush. We decided to go on the south side of Jubilee on the Chaos glacier since the views were so much better! We spent several hours trying to get down onto the glacier itself in order to gain access to Mt. Jubilee’s East Ridge our desired route. Anyone up for some icefalls? With the warm temps there were huge blocks ripping off of them. The Whitemantle range is spectacular from the Chaos Glacier. Climbing on 45 degree slush deeper than the knees with cliffs below is draining to say the least and threw down our tent on the first flat spot we found that wasn’t a crevasse. Our hopes buoyed by some of the best scenery in the world we set off for the summit of Jubilee and the east ridge. It was not to be, Giant crevasses littered our path. Tried left, center, and right. 20 foot, 40 foot gaps rent the east ridge route with ice cliff steps above the rents. The route had obviously changed than what was published as a gentle walk in the guide book. These crevasses wouldn’t even have had snow bridges in mid season let alone on August 1st. Looked at the SE ridge route and it was cut several spots by more giant crevasses and nasty loose red crumbling rock to bypass around them on its ridge which we had scrambled over the day before to gain access to the Jubilee Glacier. Moved Camp to a more scenic spot on the East ridge of Jubilee with monster crevasses around us and hoped for some colder temperatures as we were wallowing in slush. Since the night before we had been aruging about the fact that we were sleeping with our heads in a downward position we decided to do some snow engineering creating a "bubble-level". The guide book said the North ridge was a spring only option, but we had already decided that the SE ridge was a loose rock death ride, and the east “gentle” ridge was impassable. So, off we set. The weather changed and was nice and cold. We got to the schrund right beneath the summit and were turned back by yet another gaping crevasse. To the true north face were more gaping monster crevasses and the summit schrund joined the east ridge impassable crevasses. Skunked on a mere 9000 foot summit!!! You have got to be kidding me right? Guess not. To see how Gigantic these crevasses are. Look at this picture. Follow our tracks over the snow bridge down to the black spot which is our tent. These babies were easily 200 feet across and who knows how deep, I didn't go checking out the edge all that closely!!! It was now 2 weeks into our trip, and 0 summits, 1 broken toe, and horrible snow conditions. We looked at eachother took in the sights, sighed and said, “I think we have pushed our luck far enough. There is no way we will be able to get up Waddington in conditions like this, not to mention to it and back before our vacation runs out even in perfect weather conditions.” We packed, dumping extra food into a crevasse and watched the cirrus clouds as they told us what waited for us if we stayed, more crummy weather. Now that we knew the crevasse maze, we practically sprinted off the shoulder of Jubilee, broken toe and all. Walked out with the advantage of gravity back to our Kayaks and took off before we were eaten by a grizzly bear, cougar, or horseflies. On a humorous note, we walked back through where we camped and noted that there is no need to bury your poop. Every spot we had “done our thing,” it was completely cleaned out paper and all!!! Nice!!! An all new meaning to bear breath! Fired up the engine and made a most memorable trip out knight inlet to the one beach in the entirety of knight inlet. Next day made it back to the car 3 weeks after we had left it. Put the spark plugs back in since the engine floods when it sits, hooked up the battery and headed for home. After taking the ferry back to Vancouver side our battery died. So we bumbled into a gas station and begged charge time off of people all night long. The battery was old and needed replaced. After the charge time from good Samaritans we made it back across the border and coasted into a Wal-Mart parking lot where we bough a new battery and made it home. Will I go back??? OH yea! Saving vacation time as we speak and thinking of going up Bute inlet and taking bikes for the 20+ miles of main logging roads to the Waddington glacier. Will just pay the helicopter guys the money to drop food in for us. 95lb packs are NOT enjoyable at all. When on snow, they aren’t bad, but going through logging slash? Someone shoot me please. Actually, it wasn’t that bad. Entire time in the brush was probably less than a day of cursing, but we spread it out over a week due to a broken toe and RAIN. What was bad was the soaking wet brush above your heads. Most importantly will also pay attention to snow conditions better the year before and the weather.com reports for the area. If we had paid better attention we would have known that the weather had been very good in the spring and early summer and the crevasses wide open and left sooner.
 -
Trip: Mount Sloan - First Ascent South Central (III, 5.9) Date: 9/13/2008 Trip Report: Doug and I climbed the central rib on the south face of Mt Sloan on Sunday Sept. 14. We drove up the Hurley on Friday night and camped near the hydro gauge. Woke up to a flat tire on my borrowed Forester and the spare was almost flat too, got it sorted in Gold Bridge and were at the trailhead around noon and at the lake and campsite around 2. Little bit late for starting a route (we had originally hoped to do two climbs in the area) so instead we went bouldering. Awesome full moon rise over the lake that evening. Up on Sunday morning and up the talus to the base o the face. We chose the rib directly east of the standard scrambling route gully as it has some white headwalls with splitter cracks I have wanted to check out for years. In the event our route avoided these splitters - bring three or four cams in the thin-hands range if you want to sample them. We climbed seven roped pitches (but two were really more like roped scrambling, 3rd class and 5.1ish) and then did about 250m of scrambling above on the lower-angled portion of the rib to summit. Route description: Pitch 1: Beginning right on the arete bounding the gully right of the standard gully, climb cracks and arete to a large ledge (30m, 5.7). Move belay 15m across ledge to next wall. P2: Climb large corner, avoiding greenery via face climbing up featured right wall. Good horizontal cracks for gear. Belay on ledge above (55m, 5.7) P3: Cut back left and pull short bulge to gain hanging slab left of corner. Climb slab to arete, then go right and up short overhanging stemming corner to belay above on arete with many blocks (35m, 5.8) P4: Move belay 30m along low angle arete to base of vertical white wall (30m, Class 3) P5: Move left and climb arete on good holds but poor pro (small wires behind flakes) for 10m or so until able to stem left to corner system. Continue up to ledge below second white wall. Climb right-hand vertical corner (awkward at first, then good stemming) to belay above (40m, 5.9) P6: Move right into large corner/ramp, climb to its end (60m, 5.1) P7: Climb wall left of arete up flakes and blocks, finishing right of fresh rockfall scar. Inobvious route finding but good pro. (45m, 5.7) From here, 250m of scrambling reaches the summit - either the lower-angle ridge crest or the gully immediately to the right can be used. Pics: On the approach Bouldering Moon and fire Approach Da route, and the headwall with splitter cracks we aimed for and then avoided on the left. P1 P2 P5 Routefinding on p7. Actual route went up to the right of this. Scrambling Doug posing down on the summit View south to Sampson area Bridge Gl./Tchaizakan area far to the NW Google Earth topo showing routes: Blue is the Southwest Buttress route from 2005 Green is the standard gully route. Although not shown in the interests of clarity, all of the other gullies on the face have been climbed - see BCM a couple years ago (2004?) for details. Red is the line of our new route. Orange is the SE Buttress Purple is the classic NE Ridge. Gear Notes: Light rack from small wired nuts to #3 Camalot. Bring triples of red TCU and/or red Camalot size for splitter cracks on white headwall. Approach Notes: Ault Creek road is 4wd, need about the clearance of a Forester to make it through - Legacy wouldn't cut it in the waterbars. Trail to upper lake is well-flagged and well-maintained but meanders annoyingly through bush. Direct approach from clearcut next to creek and waterfall as far as lower lake works better.
-
 Trip: The Sphinx - N Ridge, Phyllis' Engine - Std Route Date: 9/6/2008 Trip Report: Fifteen years ago I was sitting in Westerns' Wilson Library flipping through Canadian Alpine Journals when I came across an amazing photo of a guy climbing some of the cleanest most splitter granite I had ever seen. The route was Vertex on the west face of Isosceles Peak located in a remote corner of Garibaldi Park. The climb sat on my short list of places to go but never made the top until last week when Gene Pires and I found ourselves staggering up the Helm Creek Trail under heavy packs laden with rock gear and aspirations for an aggresive four day itinerary. The following morning as we stumbled across loose talus and suffered demoralizing losses of elevation it became apparent that we were no longer the paragons of fitness nor the alpine titans we once thought we were. Isosceles would be left for another journey and we instead settled for several less commiting climbs located above the Sphinx Glacier. The following photo is as close as we got. Isosceles Peak, Crosscut Ridge and Mount Luxor THE APPROACH Garibaldi Park is different. The rugged and steep valleys of the North Cascades are replaced by the gentler sculpted terrain typical of volcanic areas without being dominated by the classic volcanic cone. The high peaks in this area are granitic and Garibaldi itself sits far to the south. With the exception of the long drop to Gentian Pass the entire eleven mile approach to the alpine is a gradual ascent on good trails, open meadows, mellow glaciers and gentle ridges. Helm Meadows The infamous Black Tusk towers over the first part of the approach. Cinder Hills If you follow the Alpine Select approach description literally by hiking all the way to Cinder Flats and then circling around The Cinder Cone you'll add an extra hour of wandering through a chaotic and tortured landscape of shifting cinders, dust and scattered animal bones. Both tiring and interesting. Helm Glacier The Helm Glacier is an oddity. More arctic than alpine, it oozes down across an otherwise barren landscape. Why is it here? How much longer will it last? First View of Castle Towers and The Sphinx After about 8 miles and 4000' of gain you finally get see your destination. Unfortunately you also see the steep 800' drop to Gentian Pass. Nothing comes easy. Gentian Pass No trails, no cairns, no footprints. The Perfect Campsite After eight-and-a-half hours of travel we finally scrambled off the backside of Polemonium Ridge to find a perfect campsite. Flat heather meadows, a small stream, boulders to sit on and an impeccable view. Garibaldi Sunset Tantalus Range at Sunrise Garibaldi Lake in the foreground. The Sphinx - North Ridge II 5.8 Campsite near the Glaciers Edge As described earlier, on the morning of the second day we found difficult and time consuming terrain between Polemonium Ridge and The Sphinx Glacier. Realizing that we didn't have the time or energy for Isosceles we set up camp on an airy perch near glaciers edge and climbed The Sphinx that afternoon. Crossing Sphinx Glacier An absolutely wonderful journey. It's almost three miles across with numerous deep schrunds and crevasses to navigate. Threading the Shrunds Garibaldi Lake in the background. Near the Base of the North Ridge The route is only about 500' in length. We climbed a 200+' pitch of low-5th class on blocky granite, then another 200+' pitch up a fine slab split by numerous enjoyable cracks. The final pitch is short and stout, starting up a steep crack and corner system before finishing with a wild slightly overhung handcrack. Near the top of Pitch 1 looking east to Isosceles Fine cracks on Pitch 2 Sphinx Summit Pose Based on the summit register the Sphinx appears to receive one to two ascents a year. A majority of those are by the North Ridge and a majority of those are by Garibaldi Park Rangers. Presumably they canoe across Garibaldi Lake, significantly shortening the approach. N-E-S Facing Panorama from Summit of Sphinx In every direction there are endless glaciers and summits even more remote. How often do they get climbed? PHYLLIS' ENGINE - Standard Route II 5.8 The Smokestack On the third day we climbed Phyllis' Engine. The tower is about 300' tall and is made of some the cleanest, finest stone I've climbed in the mountains in recent memory. The standard route climbs the convex slab on the right side then the back of the summit block in three short pitches of 5.8. There are several other excellent looking lines as well. Heres a view of The Entire Engine. Summit Block Geometry The geometry was more reminicent of a desert tower than of your typical northwest spire. Looking down at the first belay Starting the Second Pitch We skipped the see-through chimney in favor of some nice looking cracks to climbers left. Second Pitch cracks Gene following the easy cracks. Looking South from below the summit block Glaciers everywhere. THE DEPROACH Descending Polemonium Ridge After climbing Phyliss' Engine we packed up camp and begin the long trip back home. Black Tusk in the distance. Iceman or Gene? Helm Glacier Pass Helm Glacier Basin One last night was spent in the barren plain below the Helm Creek Glacier. We stayed up late bullshiting and watching the stars come out. The following morning we reached the car in a little over three hours. Total travel time of seven hours from the Sphinx Glacier to the parking lot. One last look - Sunset over Sphinx Glacier Gear Notes: Lightest 50m rope you can get Set of nuts and cams to #3 Camalot Approach Notes: 30+ miles ~10k feet of vertical 6 pitches
 -
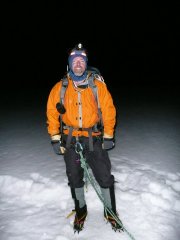 Trip: Rostrum Peak, B.C. - Attempted new route East Ridge, 2 first ascents Date: 7/7/2008 Trip Report: My original plan was to climb Mt. Sir Donald and Mt. Forbes, but between daily rain and a washed out access road, the plan changed to Rostrum Peak and it's surrounding mountains. Larry Dolecki, a professional guide I had climbed with in Switzerland, wanted to try a new route on Rostrum's east ridge. We did a fun river crossing, bushwack (no trails) and set up camp in the rain. The next day we crossed a moraine and started up an interesting icefall. There were some 70 degree to vertical steps of ice, but mostly crevasse dodging up to the glacier below Rostrum's east ridge. After a steep snow slope/arete we reached a rock band, when the weather turned to a mini blizzard and the rock got very slick and hard to protect. So, we descended and did a first ascent of an unnamed peak adjacent to Rostrum's east ridge. The next day we did a first ascent of Ruby Peak (near Icefall Peak)as a traverse in the rain up the northwest ridge (lower 5th class) and down a steep snow gully down to a nicely unbroken-up glacier and back to the tent. It wasn't the classic Sir Donald and Mt. Forbes, but for a casual weekend old fart climber like me, it was a good adventure. Gear Notes: Standard glacier gear, small alpine rock rack. Helmet a must with the loose shattered limestone. Approach Notes: Transcanada Highway 1 east from Rogers Pass to the Bush River road. 4 wheel drive helped over a log and washouts. We parked just below Mt. Aras next to a big washout. A thigh deep river crossing, bushwack through small trees to a canyon, onto the moraine and a nice camp spot on heather benches.
 -
 Trip: anderson river valley, les Cornes - FA of "Voodo child" and FA of " Srung Cock Errect" Date: 9/17/2007 Trip Report: Hello yall. Did a few new routes in the Anderson River valley last year. I've been meening to get a post out forever. Here is some route info so you can do them. the Sprung Cock Errect (sorry but we couldn't stop calling it that) is excelent !!! It has the best climbing on the mountain. I have climbed all the routes on the mountain and can safetly say that it is the best. All pitches are high quality and very clean. Another great option would be to climb the first 3 pitches of SCE and continue up the original route when you hit the easy ramp. This avoids the total choss of the SBA and climbs 2 pitches of 3 star 5.10 and one pitch of 5 star 5.10+ ( overhanging hands!) The first 3 pitches have bolted belays and a few protection bolts as well. Voodo child has a five star Split pillar on the second pitch (very close to the pillar in Squamish, but a harder size) Topo: Discrip: photo of routes: Gear Notes: Voodoo Child, double set of cams from #1 TCU's to #2 BD, Single Small TCU's and #3 and 4 BD. Sprung Cock Errect, double set of cams to #4 BD (you can bring one #4 for the OW if your feeling strong, its only 5.7) extra finger peices for the top 5.11- pitch. Approach Notes: for more info contact me at craigskibum@yahoo.com
 -
Climb: Rexford-South Pillar of The False Summit -FA - III 5.11 Date of Climb: 7/2/2006 Trip Report: Shaun Neufeld and I first saw this feature in 2005 from Labour Day Summit in the Slesse Group. Although hidden from many vantages to the north, from Labour Day and points south the pillar stands out cleanly. We first tried the route in August 2005. At that time we ended up climbing three short pitches P1 : 30m traverse and climb up flakes and ramps to belay ledge, 5.8 P2: 30m, 5.11b? and one point of aid (Shaun) or 5.10+ and 3 points of aid (me) - climb amazing corner after making one aid move at bottom to get past giant sod guarding corner. Crux at top where corner thins to tip size. P3: 15m 5.10 Climb corner to giant scary loose block. Traverse left to offwidth. Decide it is too hot and the OW looks scary with no #4 Camalot. Set up belay on opposed nuts. Escape by rappel. While rappelling down the face left of the corner we saw this amazing finger crack, and decided to come back and climb it this year. Shaun in the corner - 2005 Topo - red line is this year, green line is 2005. So this year we hiked in after leaving Chilliwack at 4:30 Am Sunday morning. we got up to Rexford base camp, kibitzed a bit with other climbers and took a nap. Slesse from hike in Climbers on lower west ridge of Rexford South Nesakwatch Spire from camp. Around noon-thirty we decided to go and climb something. Somehow our plan changed from climbing something easy as a warm up, to hopping on the pillar. We got to the base around 2. Descending into the south bowl from the west ridge. Left view of the pillar. Right view of the pillar. I got the first pitch which turned out to be an excellent 5.9 up flakes and chimneys. From a perfect ledge belay Shaun took over and jumped on the finger crack which turned out to be the crux of the route, and pretty hard. Shaun barely managed to onsight it, saying it felt like the hardest thing he'd ever onsighted and felt harder than the first pitch of the Daily Planet, but not sure of the grade because he was not in perfect climbing shape. as a guess it would be in the 11b to 11d range. Anyways when I heard it was that hard I decided to follow on prussiks in order to be able to make it up. Prussking in the hot sun is not fun, which is why Jumars were invented. Still I made it up. This pitch has perfect clean rock except for the scary "Caulk Boot Flake" 1/3 of the way up which is barely attached to the wall. You can layback it and stand on it, but don't put any gear behind it, and stay out of the fall line... It's gonna peel sooner or later. Shaun climbing the crux pitch. From this belay, where we met our 2005 highpoint we climbed three more pitches. The next pitch started with a steep (overhanging) offwidth, maybe 10c or 10d, in a right facing corner and then turned into lower angle cracks and flakes with a very weird bulge move to finish. This put us at the base of the "Patagonian Headwall", a vertical wall of clean featured granite with many cracks. The crack Shaun picked went at 10+ or 11a and varied from fingers to offwidth to back-and foot chimney, with lots of strange exfoliation flakes inside the main crack system on which you could pinch, layback, or jam. Again the exit move was weird, chimneying out a flared roof with an offwidth in the back. On both of these pitches, Shaun managed to send them cleanly, and I managed to follow by freeing as much as I could, dogging to rest, and occasionally pulling on gear. The 5th and final pitch took 5.8 corners and got us to the top of the wall. We scrambled up one more pitch of 4th class, and then traversed through a notch, and below the west face of the false summit to gain Rexford's west ridge route and the descent. We got back to camp just at sunset, and spent a while socializing with the other climbers camped up there. This morning we slept in until 9. We felt too worked to do another climb and so decided to bail. The other parties that had camped up there all ended up climbing routes on South Nesakwatch that Shaun had put up - two parties on the West Butt and one party on Dairyland - he can be very persuasive when recommending a climb. As we hiked out we saw one more party climbing on the west ridge of North Nesakwatch. We also ran into a pika in the meadows. On the trail down, two hikers warned us about a mother bear and cubs but they were gone when we arrived at the clearcut. We got back to the cars around 1, and went to Vedder Crossing in search of ice cream. Then home to beer! We couldn't decide if the route name should be "In The Loop" or "Common Knowledge" but both names reference people in the Chilliwack area, and in general, who think that certain crags are their own "secret areas" and get upset when you post about them on teh Interweb The grade is III 5.11, maybe 11+ but needs a repeat for confirmation. The route consists of 5 pitches plus scrambling but most are about 40m long, the pillar is only about 200m high. Grade III may be pushing it but it did take us about 6 hours to climb the route. Gear Notes: Full rack of wires (BOOTY ALERT: two nuts left or dropped on the climb) One 60m rope Full set of cams to #4 Camalot with doubles up to #1 Camalot - could also use double #2s, and three or four yellow TCU size for the crux pitch. Five Tricams - won't need these if you bring the extra cams. Fourteen assorted draws from dogbone to shoulder sling length. Didn't take a stove as there is lots of snow, but finding drips can be hard - better to take stove. Approach Notes: Almost 2wd to Slesse trailhead (saw a 2wd car parked there but it looked pretty beat up by the drive, with grated bumper and bust headlight) 4wd to rexford trailhead Little bit of snow high on the trail - snow in the boulderfields but approach shoes OK as snow is firm.
-
Trip: Mount Brice - FA North Face "Graveyard Shift" ~1000m, IV WI3 Date: 12/8/2007 Trip Report: I have been eying up the unclimbed North Face of Mount Brice for a while. It rises c. 1200m out of the valley of Twentysix Mile Creek and can be seen in partial view from a few nearby summits and from one narrow section of the Hope-Princeton. The face is bushy low down and split by many parallel gullies - not a great choice for summer but perfect for winter conditions climbing. A few people I know have climbed Brice over the years via Silver-Skagit Valley and the Star Creek mine road to Mt Andrews then a traverse around and up the SE ridge of Brice. They reported the rock to be not bad. How to get to the base of the face? Two options. One was to come in via the Silverdaisy Mne road to the high col east of Hatchethead and descend into the valley to the base of the face. I skiied that a couple years ago as far as the col and it was not the greatest as a climbing access route. Tha left an approach from Sumallo Grove and a shwack up the valley of Twentysix Mile Cr. from near Delacey Camp. Checked this out with a hike a few weeks ago and it seemed OK. With apparently excellent alpine winter-style climbing conditions prevailing, Jesse Mason and Graham Rowbotham decided to come along with me and check out the face. We made plans for a 4am departure from Chilliwack, planning on making Delacey by sunrise and having daytime vis. for the bushwack. I thought it would be about 3 hours to the base of the face. From the views I had of the face I expected that the main gully on the face would give a climb like a longer North Ramp on Harvey and we could solo it all pretty quickly, maybe 4 hours up. Then a quick descent back down Brice's SW ridge and back to the cars in around a 15 hour day. NE face from Hatchethead Col. It turns out that you can only see the top half of the face in this photo. Our route took the main gully line in the centre of the face. View of the upper NF of Brice from Skagit River. You can see the finishing ramp of our route on the left. So my alarm went off at 3:30 AM (oi! alpine start!) Jesse and Graham picked me up at 4:20 and we were at the parking lot at 5:30 AM. We started hiking down the trail by headlamp. Along the way we heard scary loud drumming noises from the forest. Apparently a tree in a log jam in the river was thumping or something? It was unusual, anyway. Around 6:15 we got to Delacey Camp and found the spur trail off up 26 Mile Cr. that actually apparently leads up the ridge to the Moles and Hatchethead. Headlamps off on this trail, the sun came up and we could see the rhododendrons, bear tracks in the snow, etc. Sunrise on Silvertip Well, the valley was cliffy and canyony and bushy and travel was much slower than anticipated. Not hideous, but time-consuming. By the time we got to the base of the route it was 12:30, in fact. Graham crossing a log over 26 Mile Creek. We had a brief discussion about how much it would suck to turn back and about how we needed to move fast, then geared up and started climbing. The first section of the route was not a nice snow ramp like I had thought it was going to be. It was a series of ice pitches in a narrow gully, with snow slopes and spindrift pouring down. Real alpine climbing yeehaa! A couple went at solid WI3 with short sections of up to 80 degree ice and dinner-platy conditions. We all soloed the first couple pitches. Then Jesse and Graham did a bit of simul-climbing and I soloed one pitch and avoided another via a mixed snow and tree 60-70 degree ramp on the right. There were 8 or 9 ice pitches in all, but lots were WI2, maybe 3 or 4 were WI3, and the one I avoided via the ramp may have been WI3+, it was pretty steep and Graham placed a couple screws. Graham soloing the first pitch And the third pitch. By the time we got into the upper gully it was getting pretty late in the day. The gully forks and we took a mixed traverse across snow and tree and rock ribs to get into the left fork that leads to the upper ramps on the face, putting on headlamps just after getting established in this fork, and climbing the rest of the gully via headlamp. The upper gully was mostly 35 to 60 degree neve and powder with a couple of short 50-60 degree ice and neve bulges. The very top of the gully had 20-30cms of windloaded spindrift and was a bit slabby but serious avalanche conditions did not occur. Graham found a way through a short section of overhanging cornice and we pulled onto the summit ridge around 6:30 PM. Sky looking up the gully at headlamp time Sunset We started walking off and by some fluke of luck, were able to link together features I had remembered from a brief scan of the topo map the day before, and find our way onto, and follow, Brice's SW ridge all the way down to the Skagit Trail. By this time we were mostly out of food and our remaining sips of water had frozen so we started to go slower and slower what with stopping to rest evry 15 minutes or so. We followed goat tracks for part of the way down the ridge and did not get cliffed out too many times, too badly. It took about 7 hours to descend the SW Ridge and then another 4 or so to hike the relatively flat and level trail back to the car, we were really dragging our asses by the end - 3 or 4 5-minute nap breaks between the gold mine and the trailhead in fact! That strange drumming thing was still drumming when we hiked by on the way out too. By the time we reached the car it was 4:40 AM, 23h 10m car-to-car. We put on some cold, dry clothes, ran the heater 15 minutes, then drove to Hope. At 5:30 AM not even the Husky truck stop was open so we napped for an hour until it did then had trucker breakfasts washed down with coffee, tea, pop, anything liquid in fact. If the soup had been on I would have had soup too. What with work and school and life and stuff it has been more than a year since my last big alpine route so it was nice to finally get up something serious in 2007! Thanks Jesse and Graham for the fun day out Gear Notes: Carried a light alpine rack but only the screws got used by J and G while simulclimbing. Did not see many possibilities for rock pro placements. A couple of trees could have been slung off to the side for belays but screw belays were better. Approach Notes: Hiking trail for 4km then the bushwack starts
-
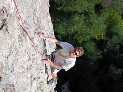 Trip: Cathedral Park, BC - Macabre to Grimface Traverse + possible F.A. Date: 7/1/2007 Trip Report: Quick photo TR of a trip to Cathedral Park over the weekend. I had heard great things about the Matriarch to Grimface Traverse and with the weekend forecast looking soggy for Canada Day on the coast we decided that we would head to the dry side of the Cascades and hope for better weather. First day we hiked in via Wall Creek. The Wall Creek approach is highly recommended. It's a cruisy 4 hour affair to the meadows with excellent camping and bouldering! There are a lot of blowdowns but it's still a great approach. The next day we went up to look for things to climb on Matriarch, Macabre, or Grimface. We were looking for a nice line to climb, and preferably something that might be unclimbed. We didn't have the beckey guide so we were going by what we had seen on bivouac and the pages I had cut out of the Fairley Guide. The description in Fairley is vague at best and didn't help much. The buttress just to the right of the South Buttress looked quite nice and we thought it might be unclimbed so we decided to give it a go. The climb was 8 pitches long and mostly easy except for a very short but difficult roof we rated at 5.11a. Most of the climbing was pretty easy 5.6, 5.7, 5.8 type of stuff. We finished the climb just below the bolt ladder on Macabre. From the summit of Macabre we continued on the traverse to Grimface. With the exception of two rappels we kept the rope in the pack the rest of the day. We were back in camp a few hours later. Gear Notes: set of nuts, full rack of cams from #0 tcu to #3 camalot. Approach Notes: Wall Creek Trail from the Ashnola River Road
