Leaderboard


Popular Content
Showing content with the highest reputation on 09/07/21 in all areas
-
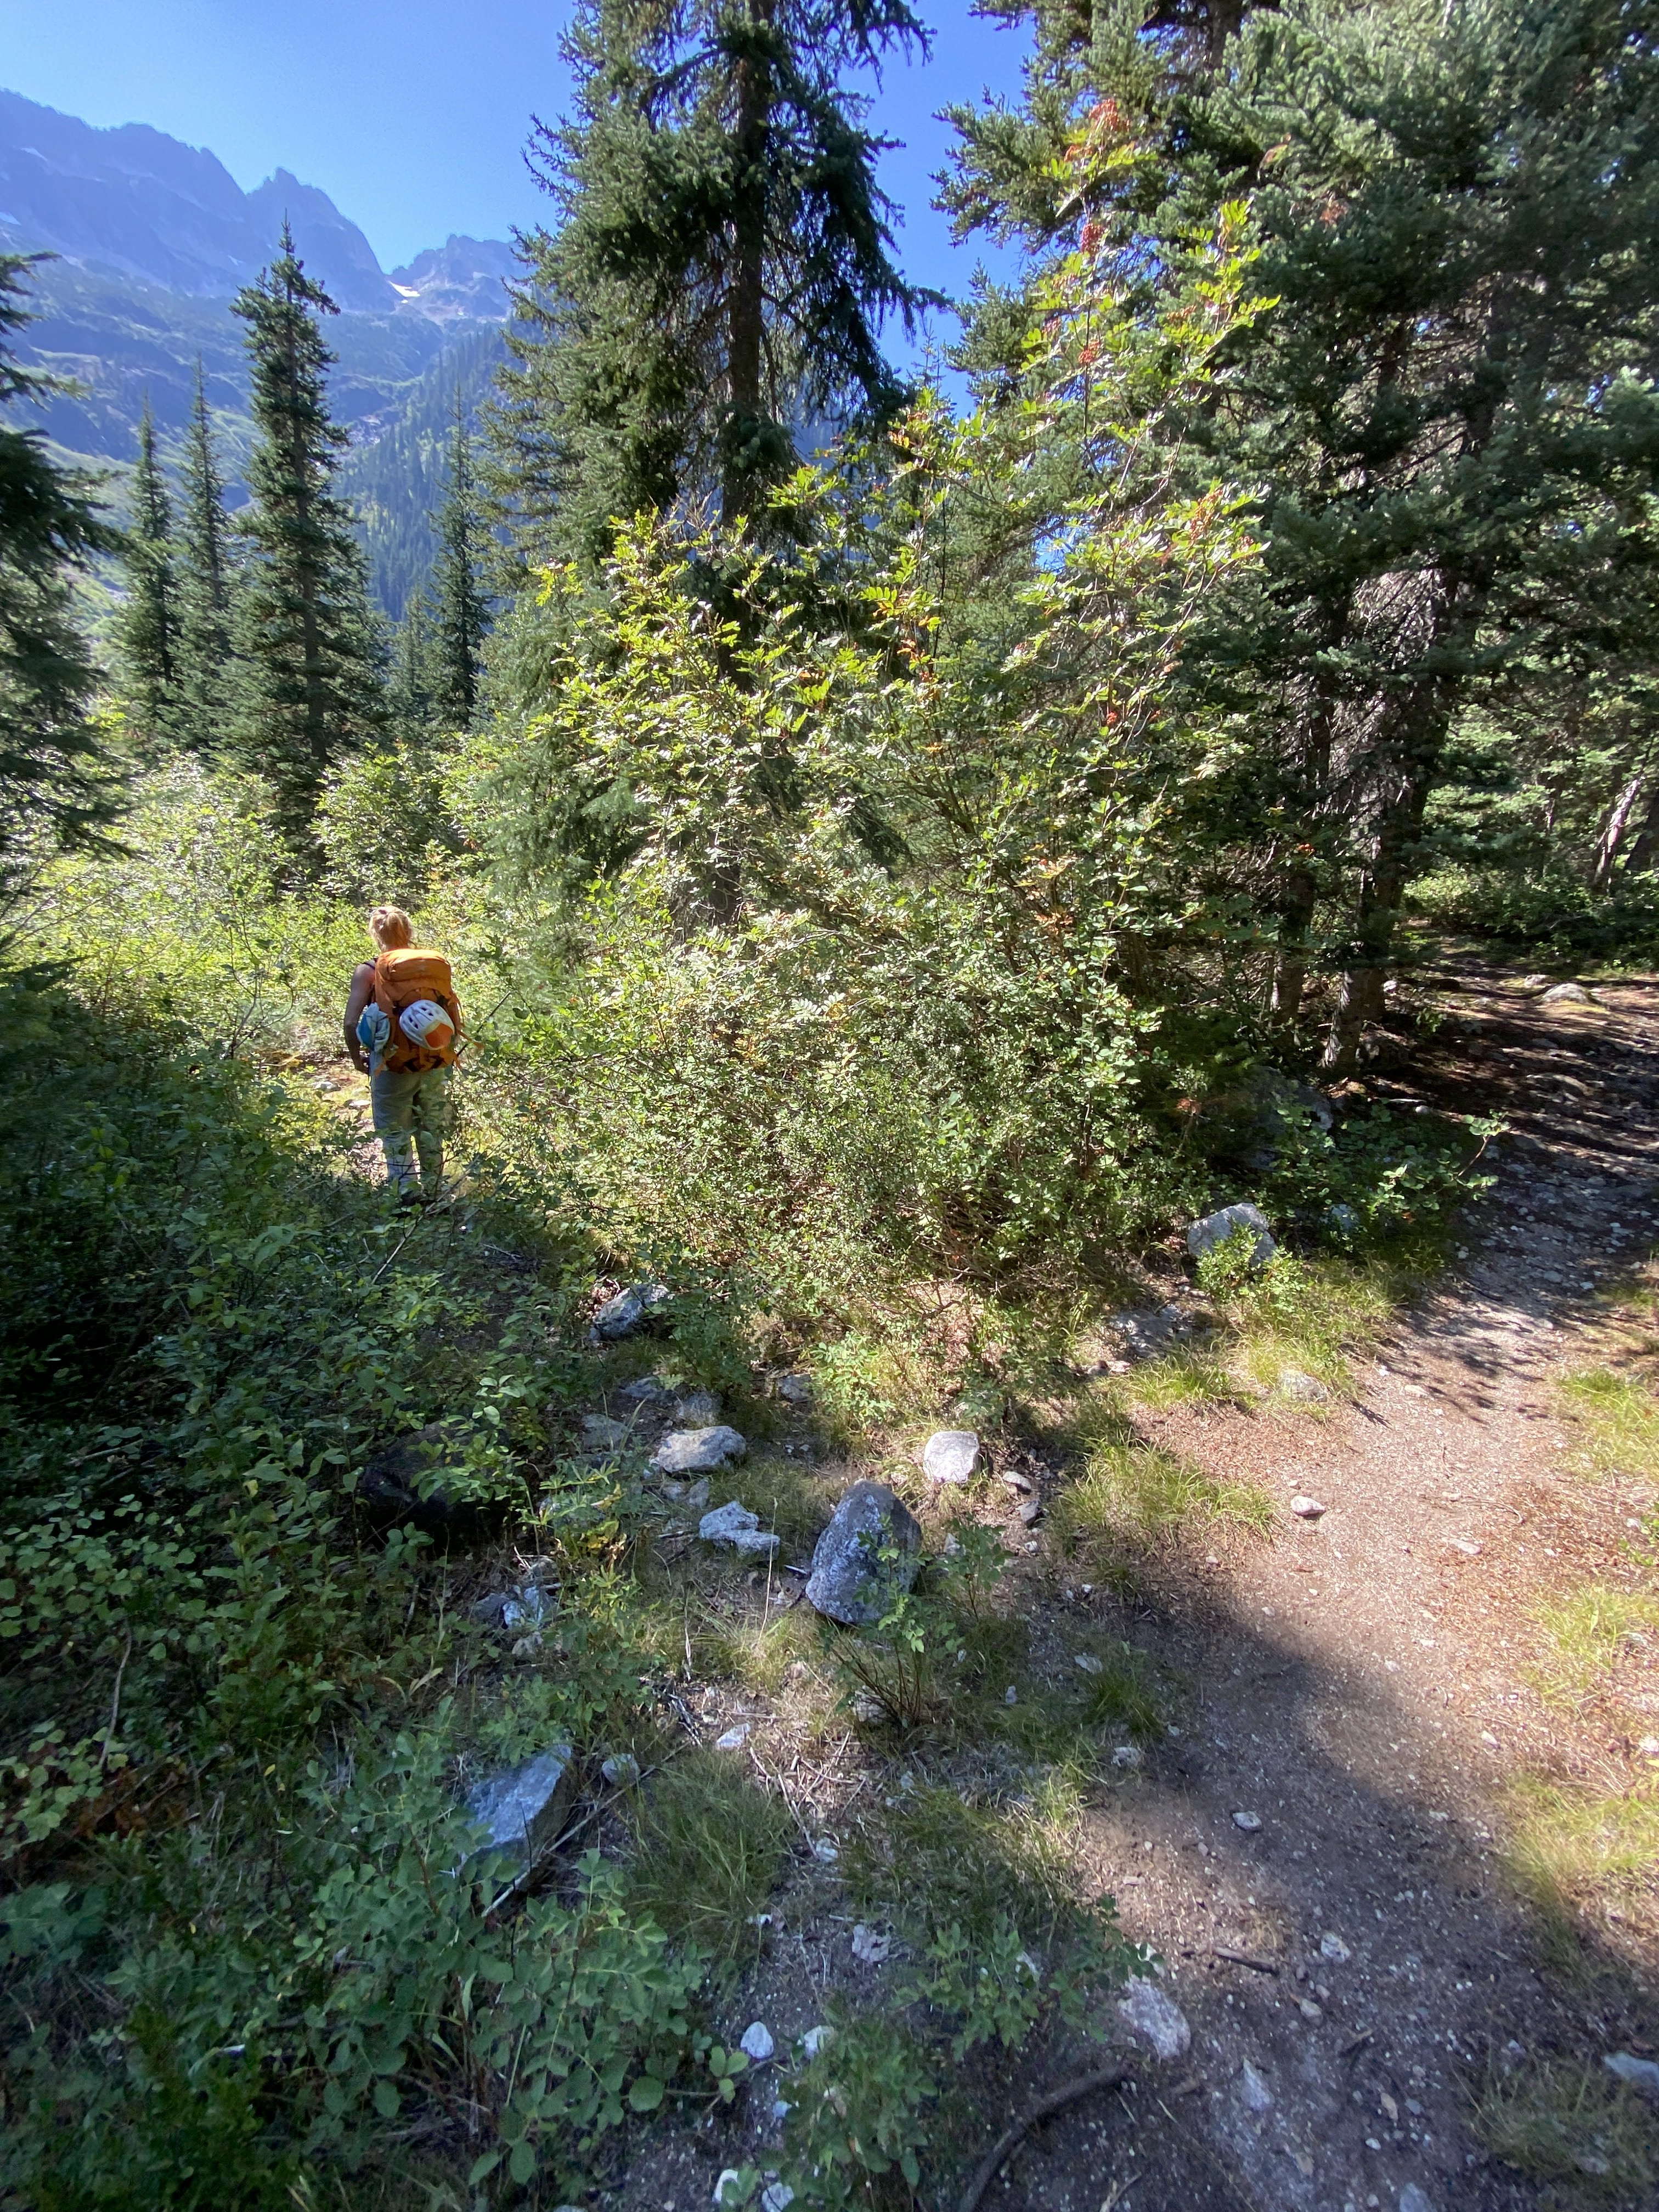
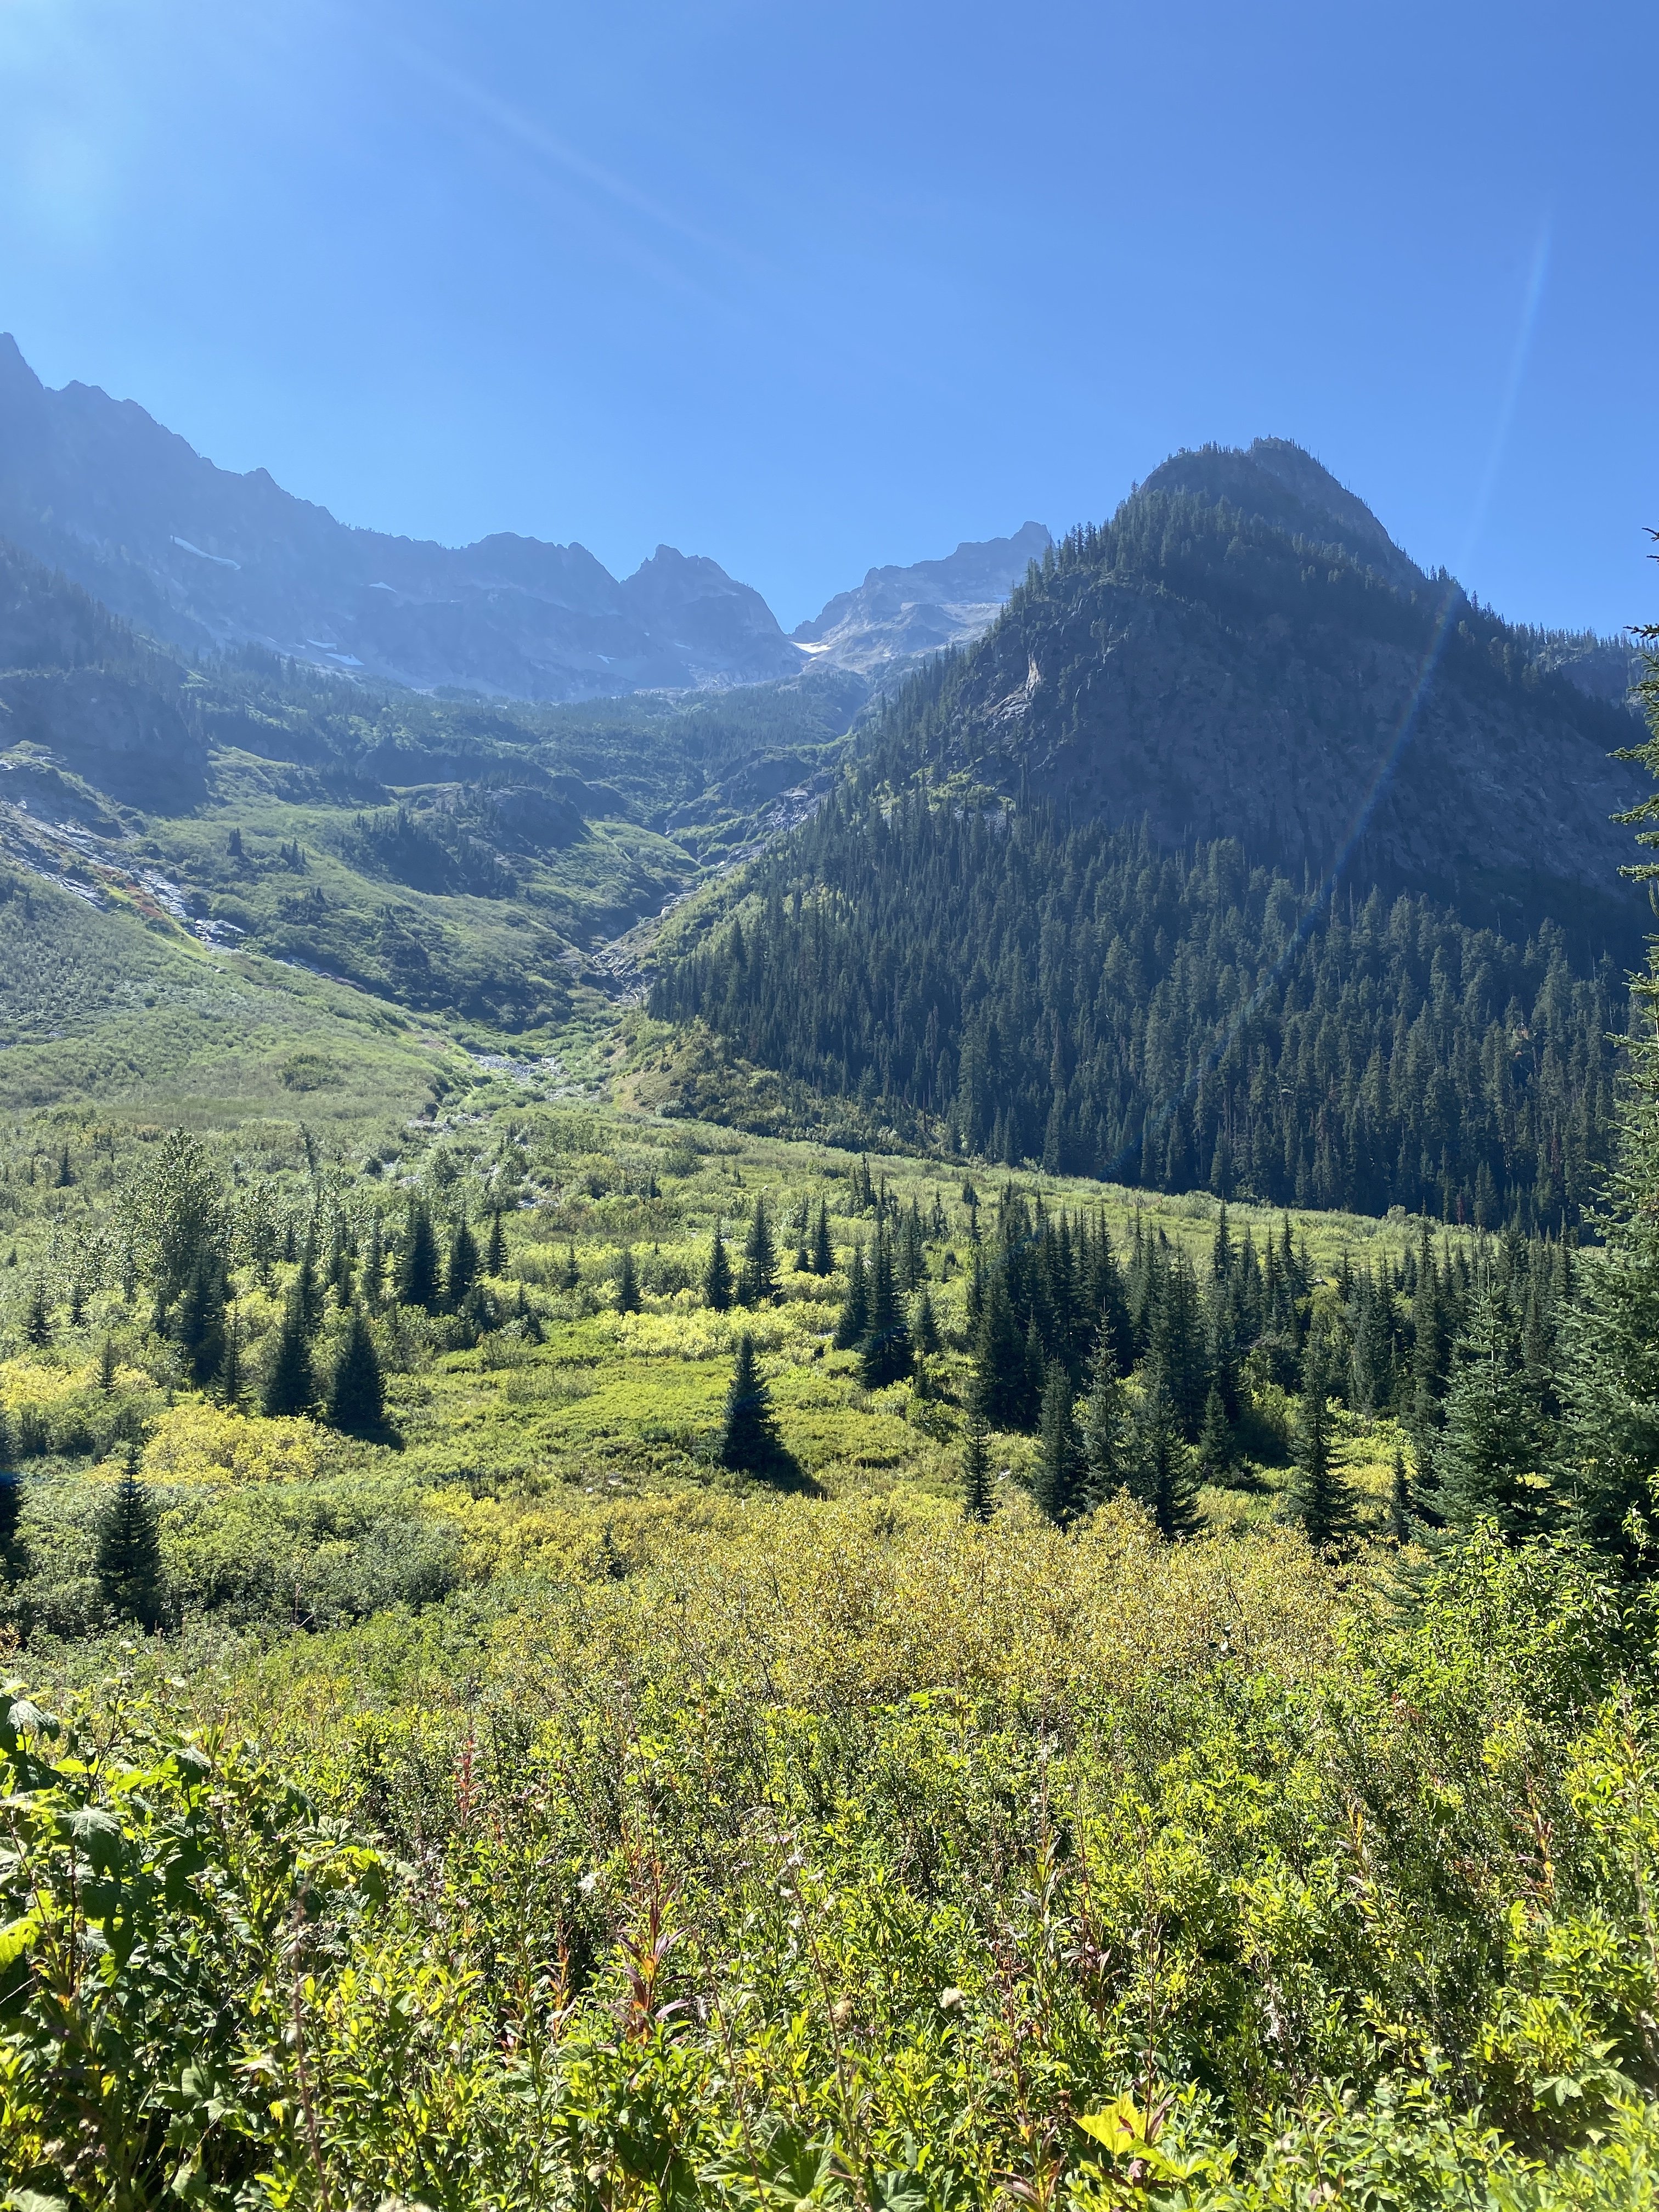
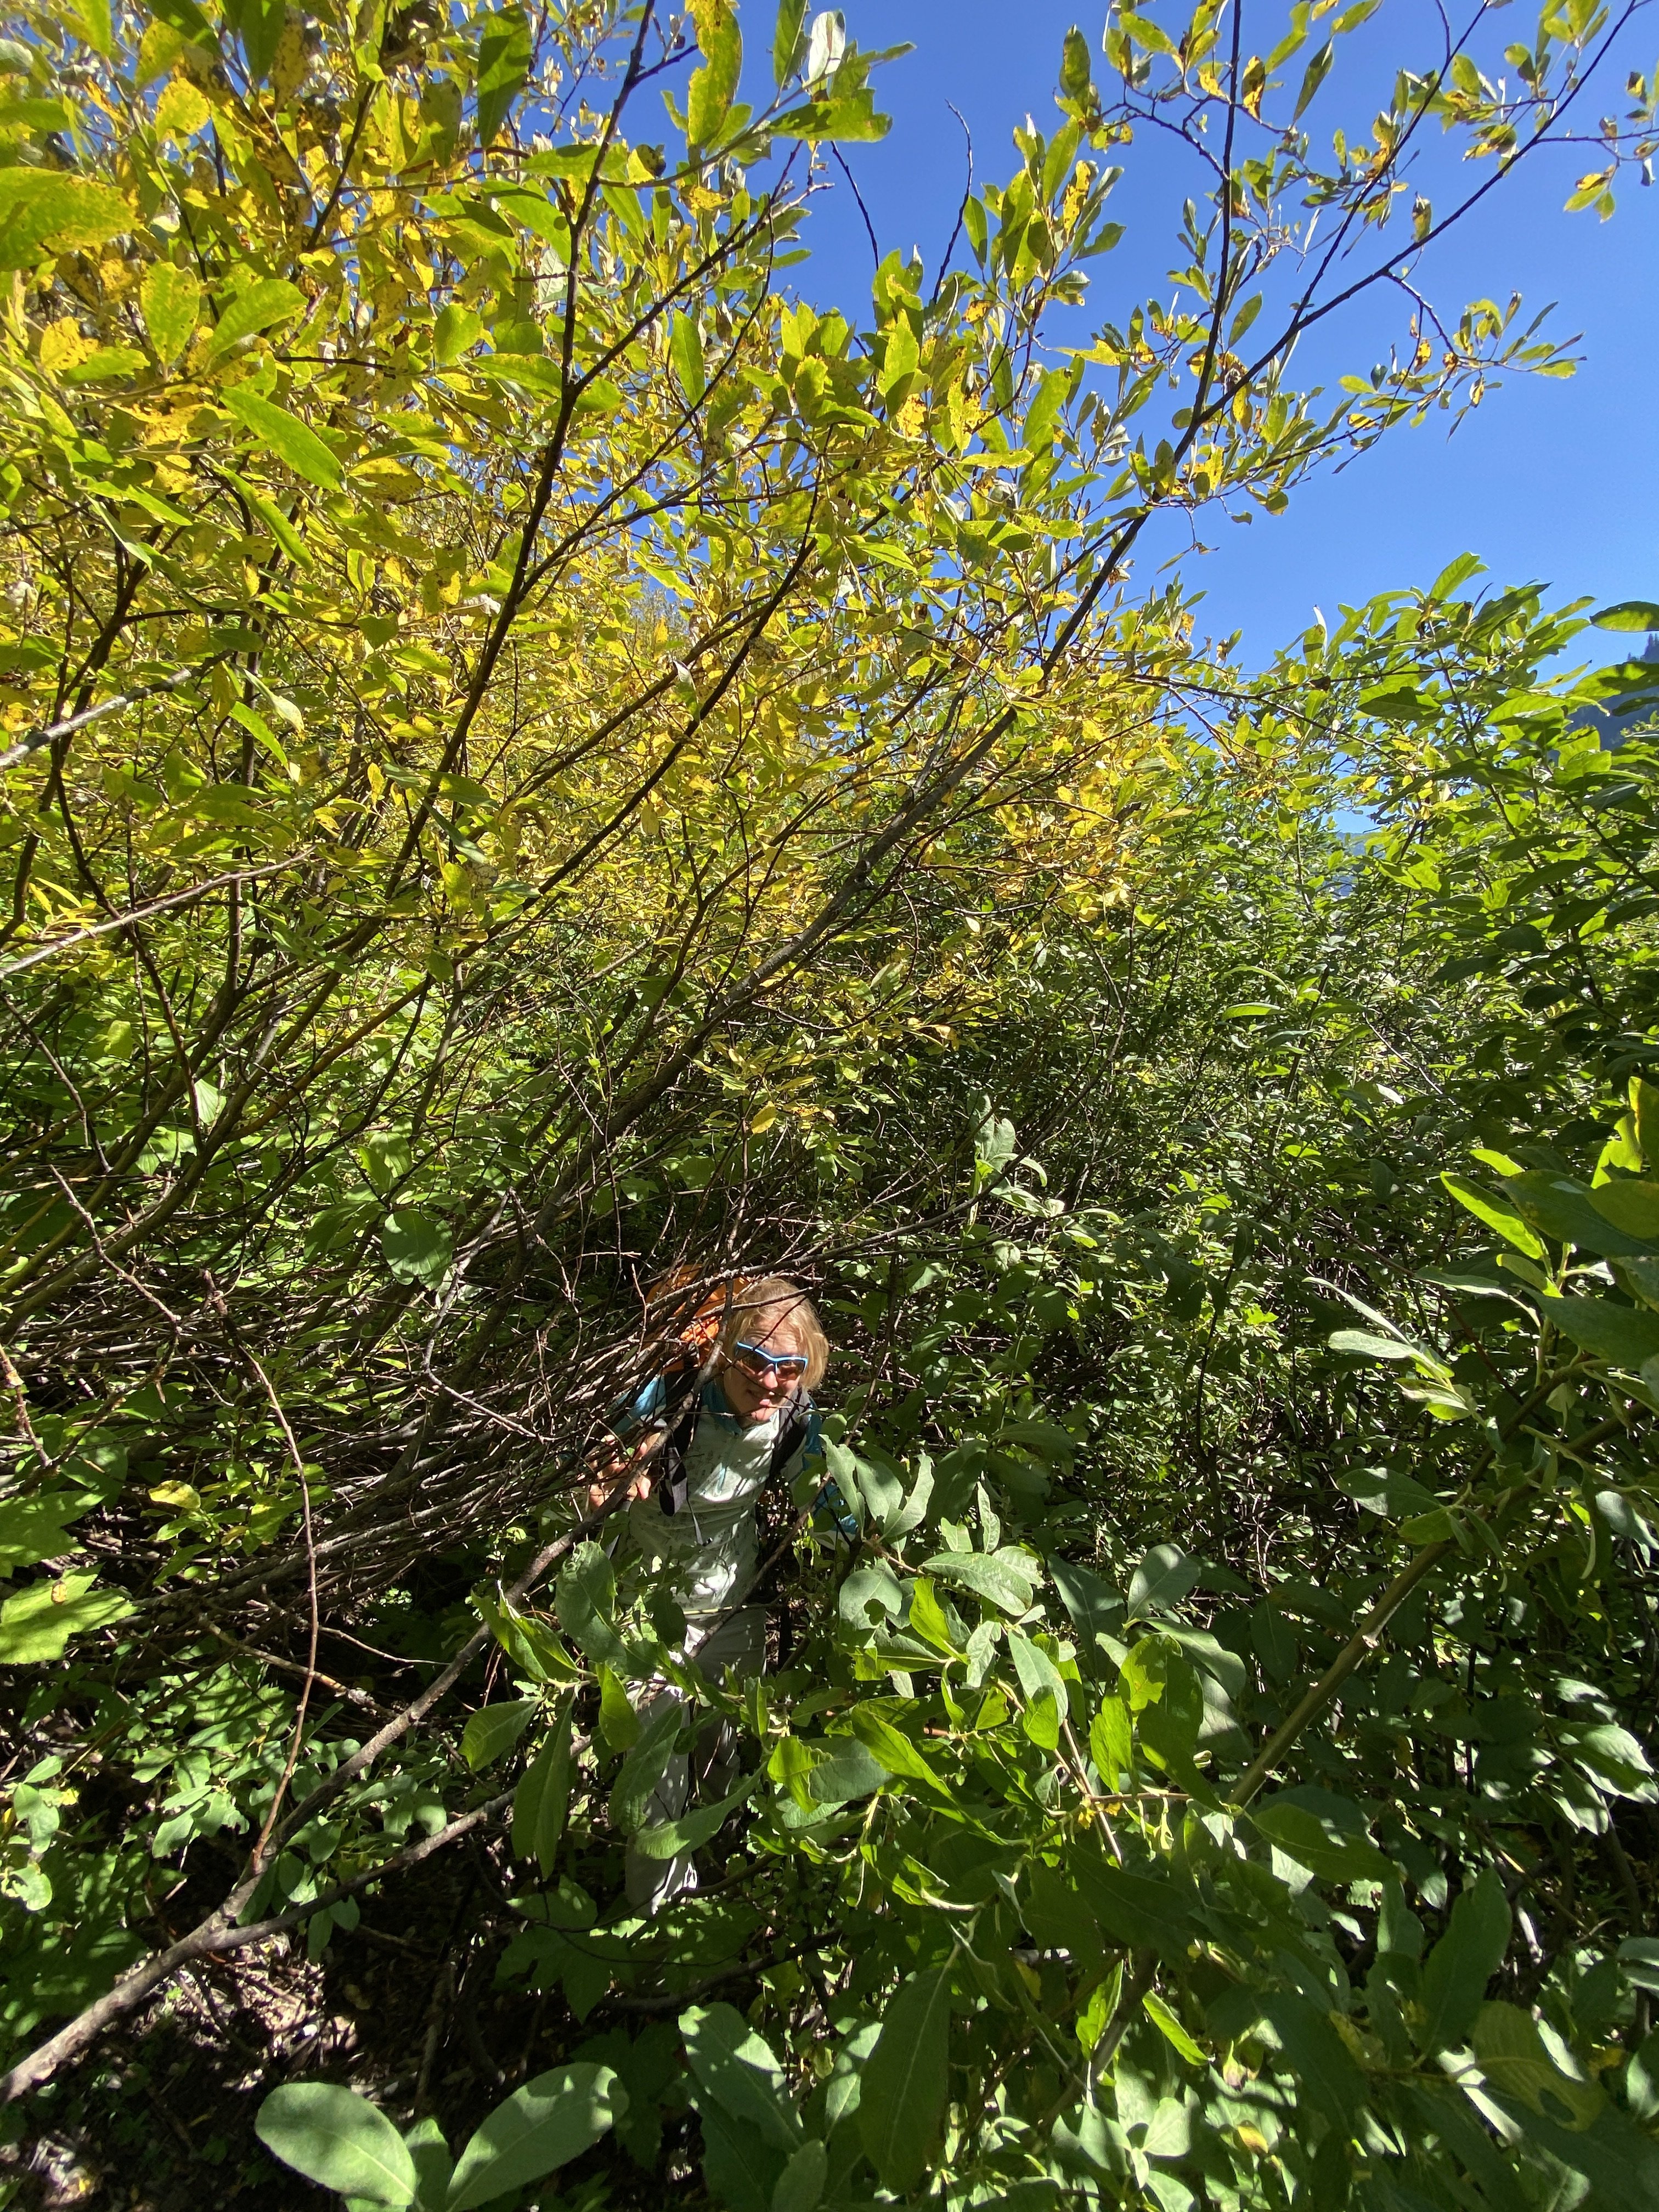
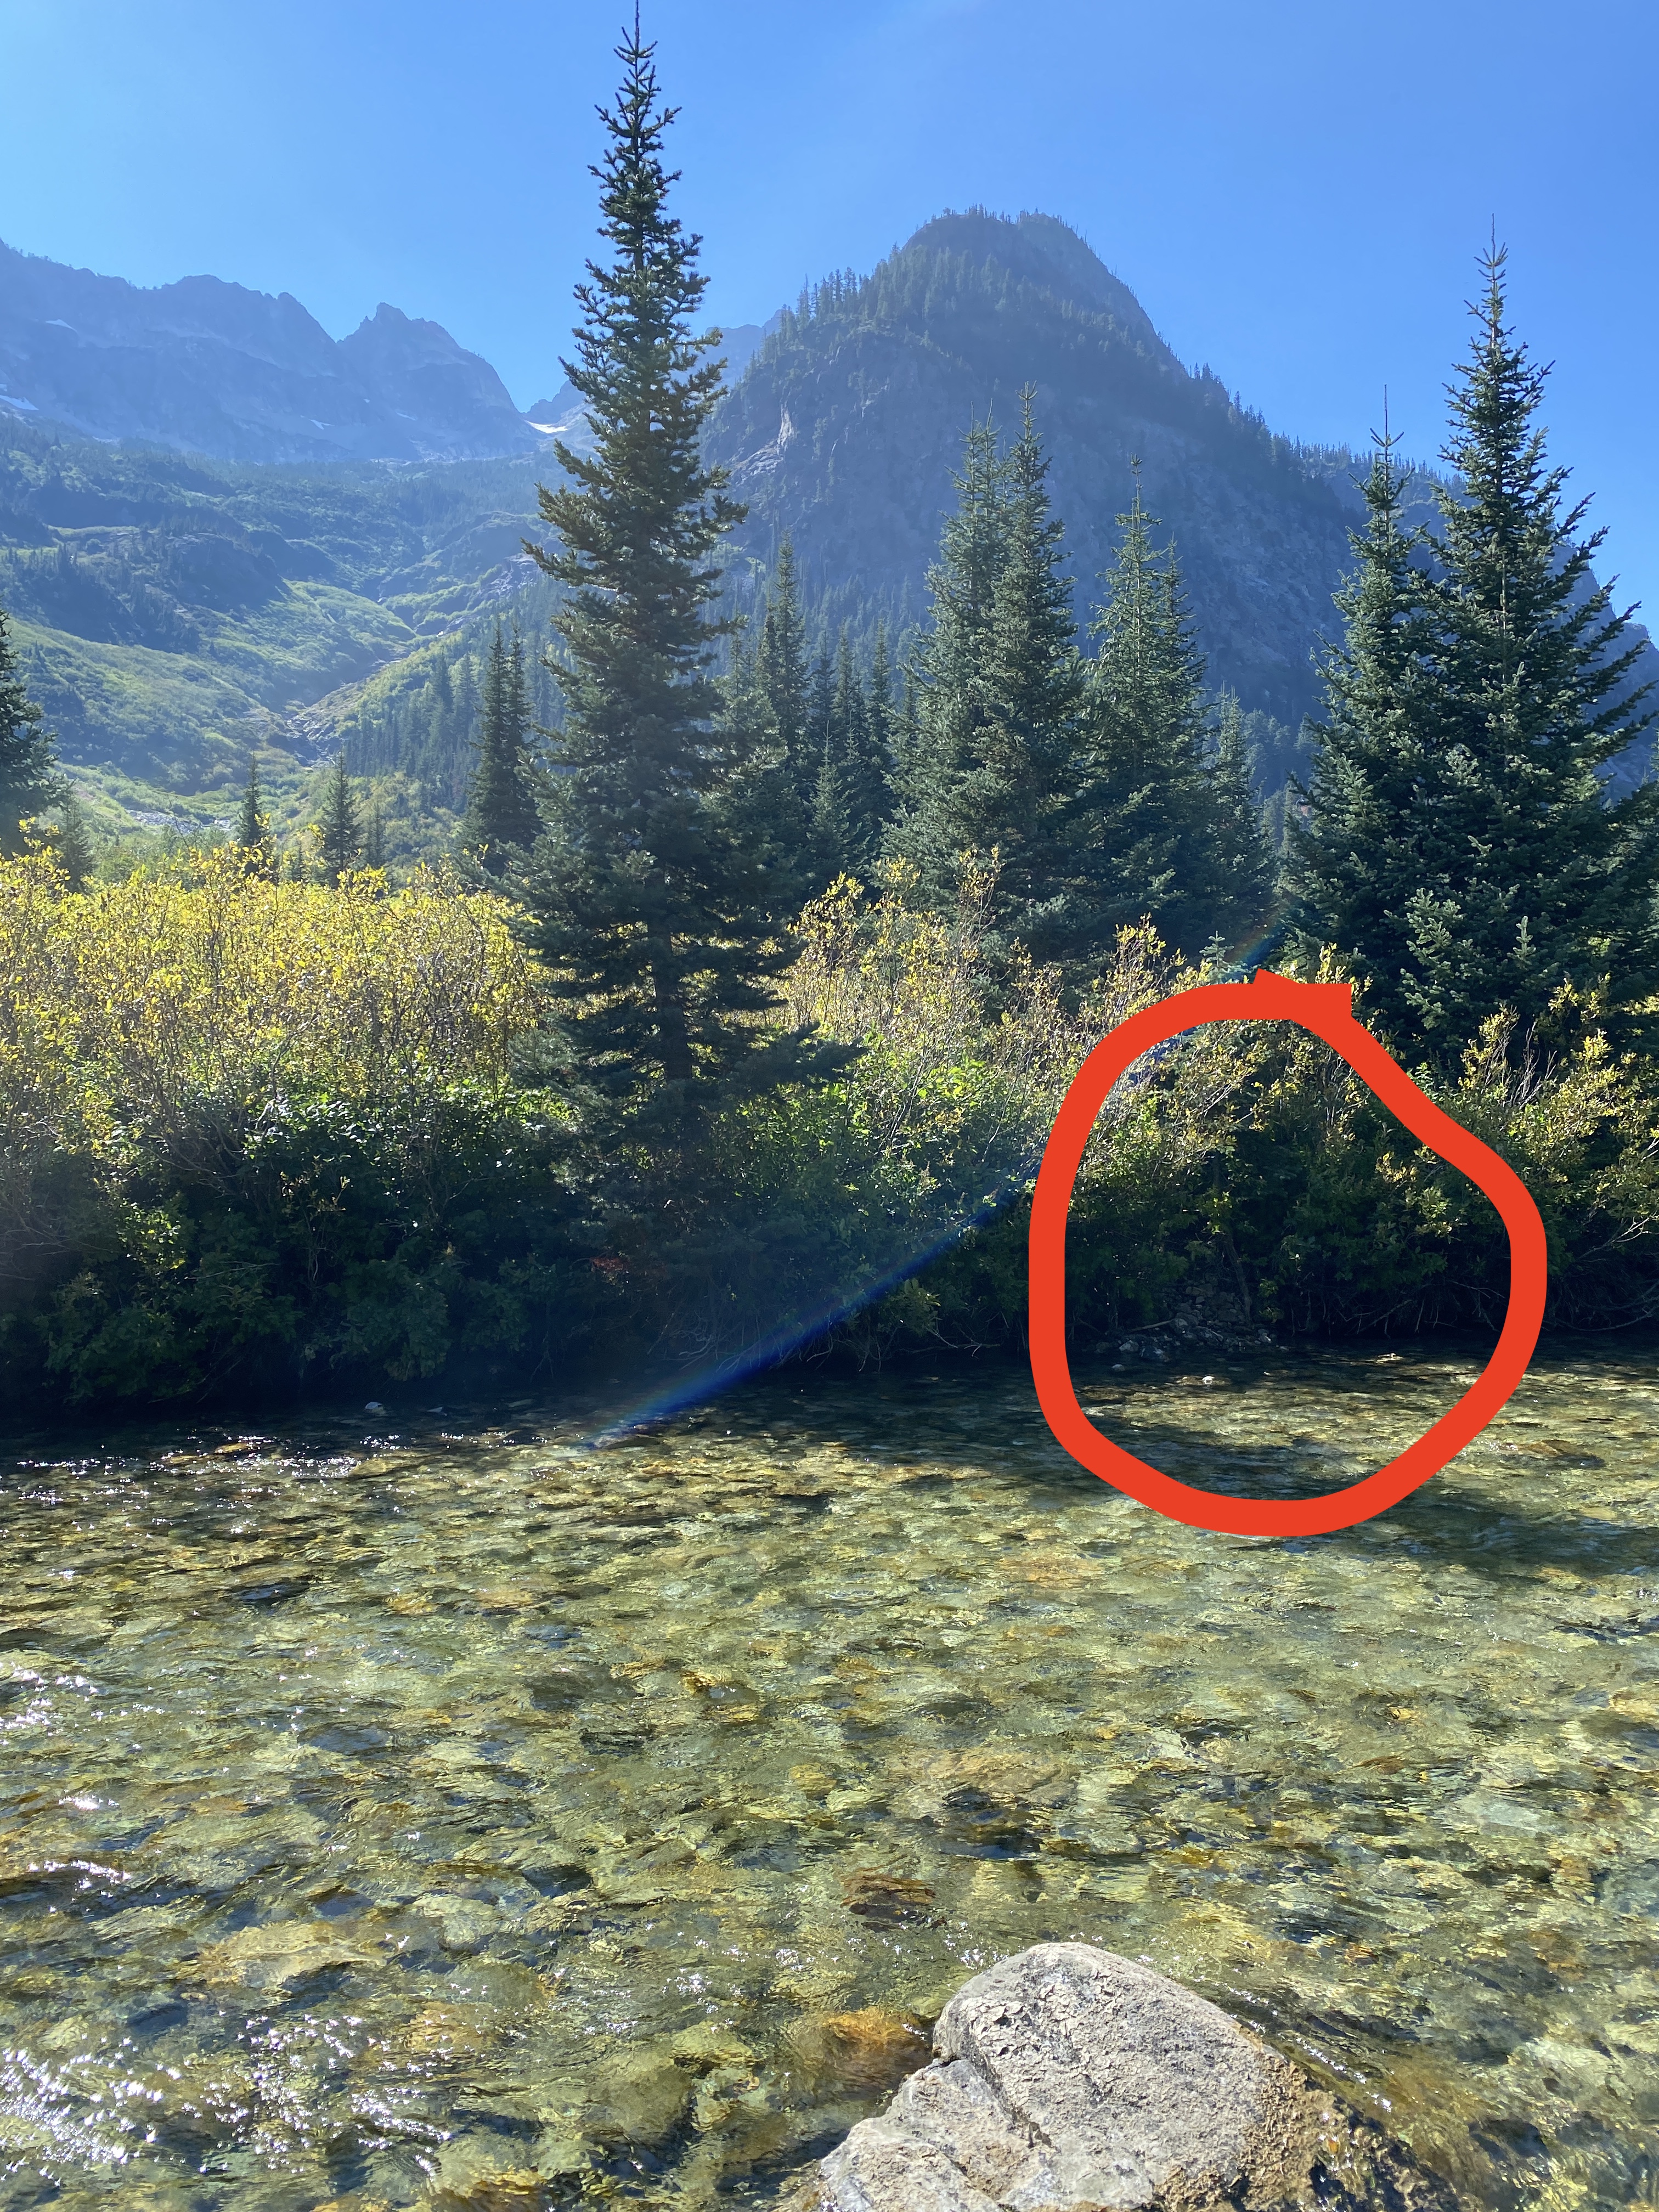
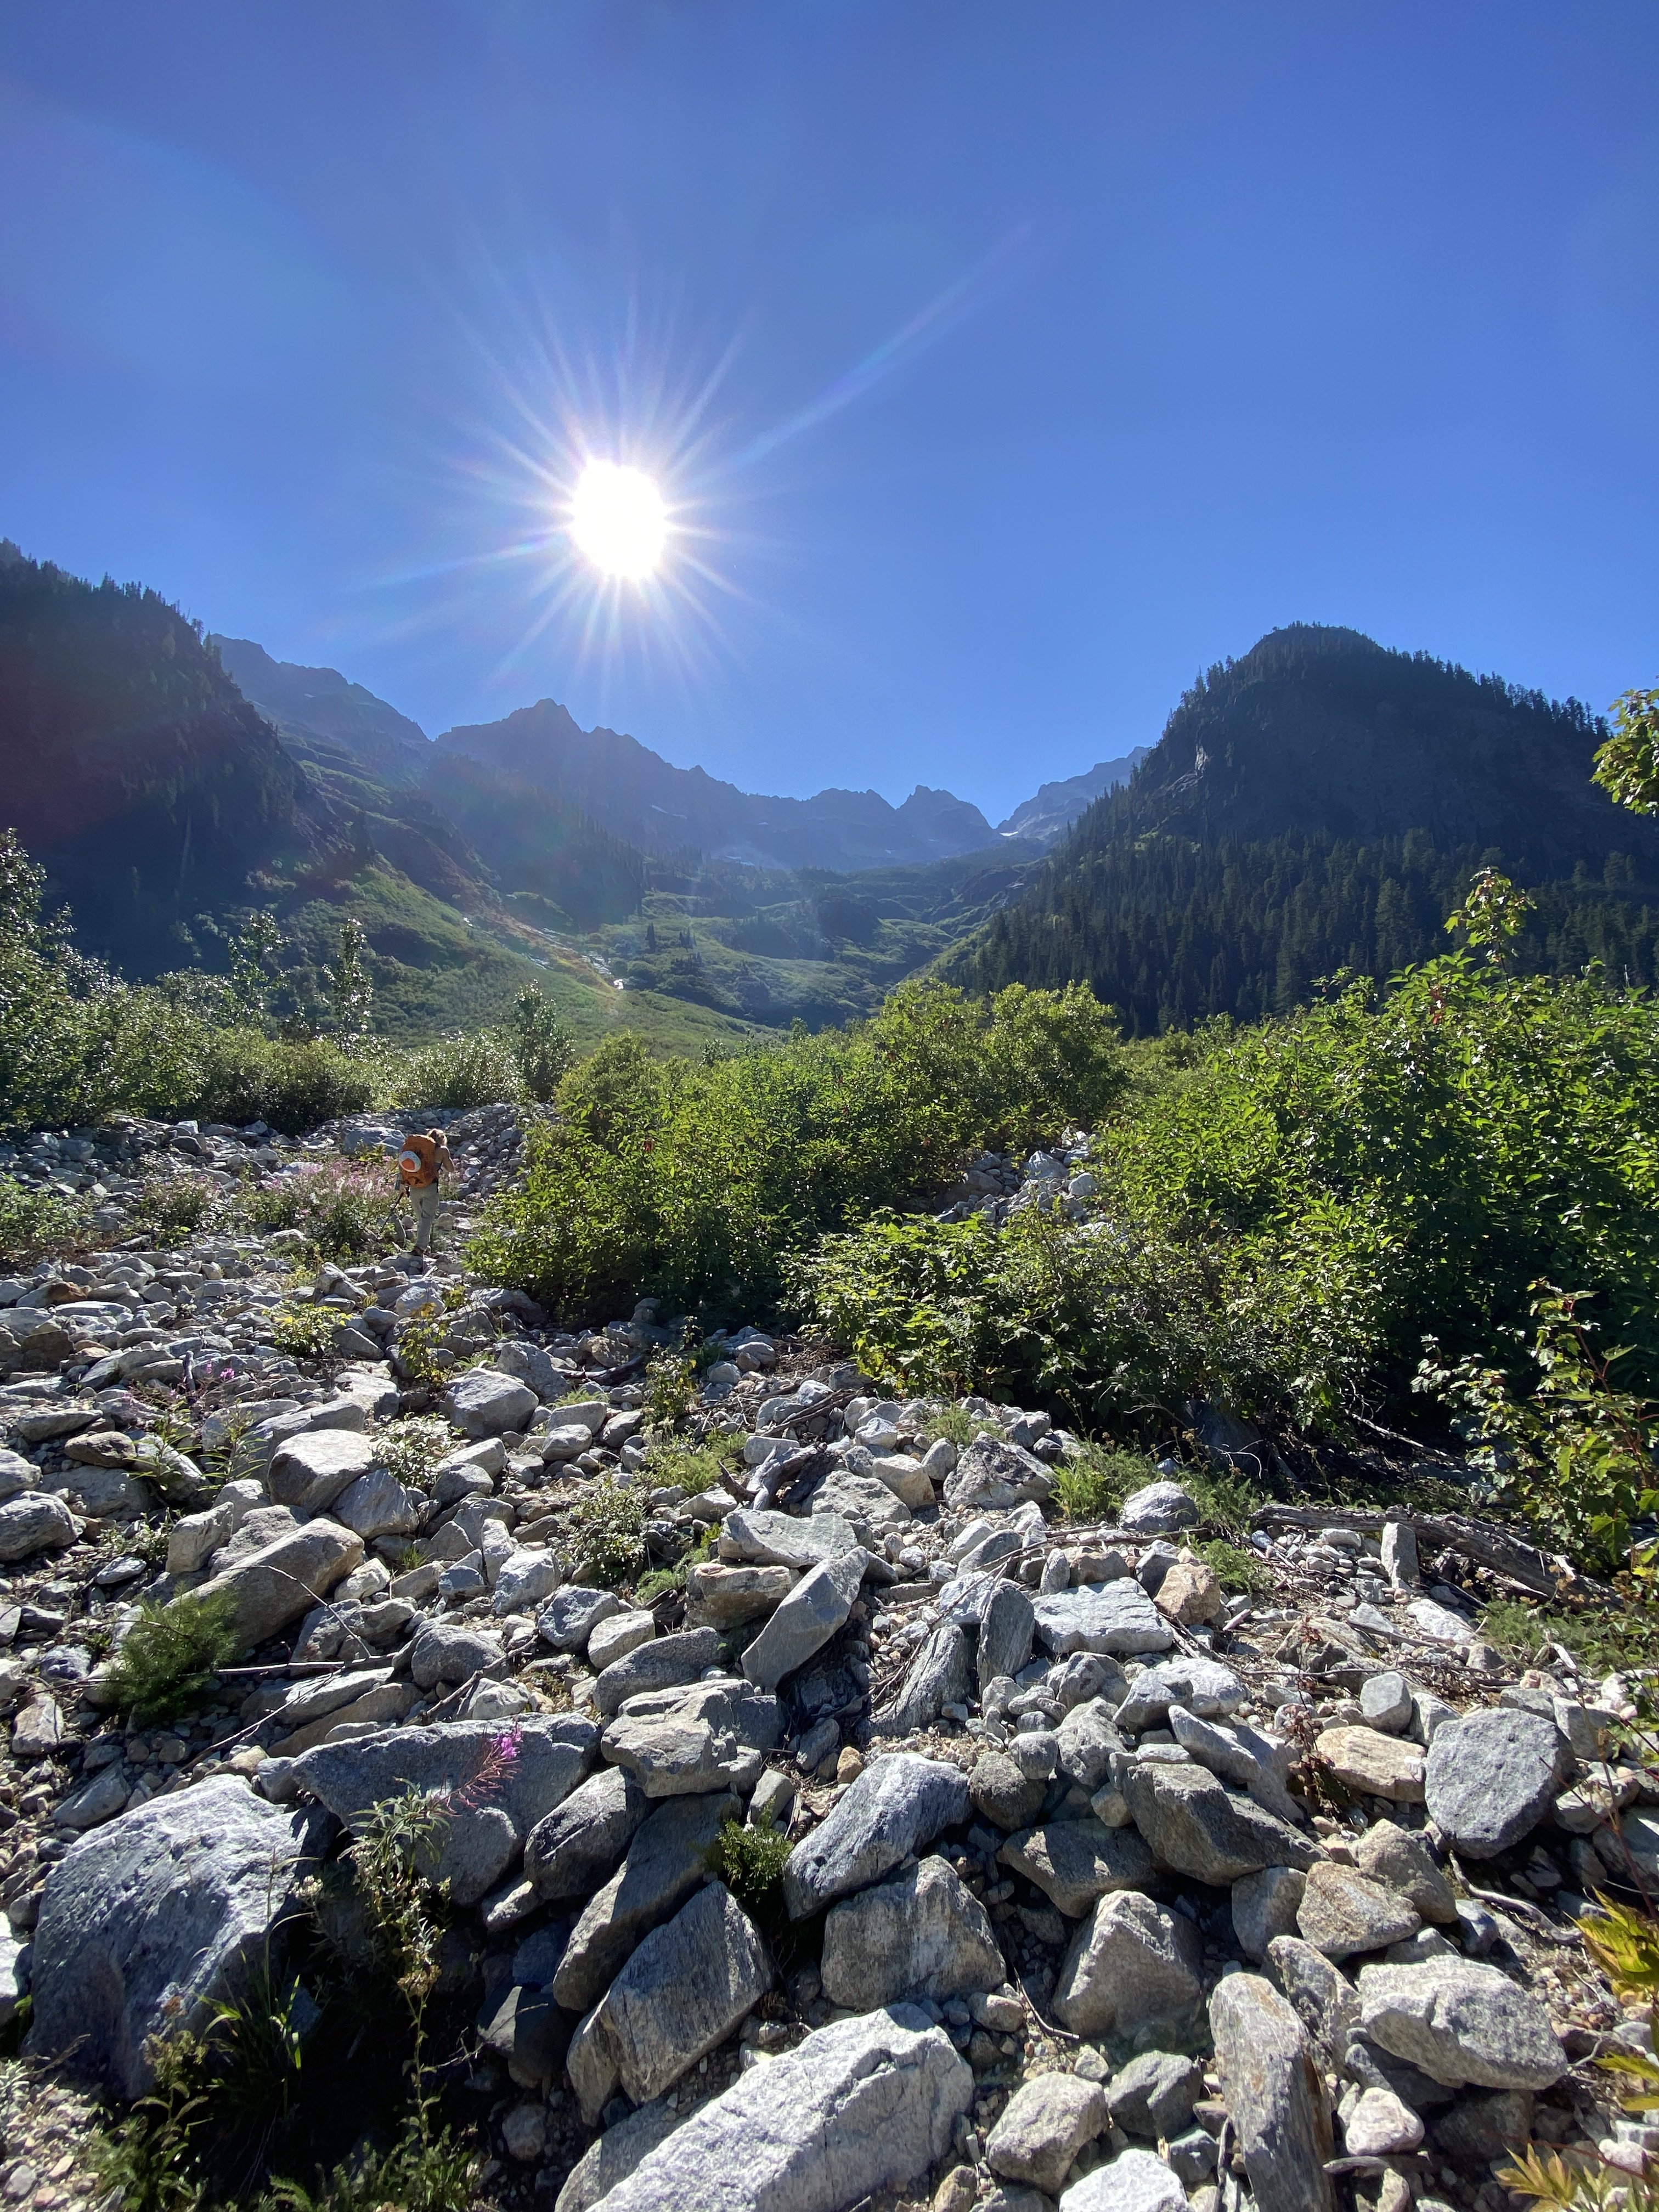
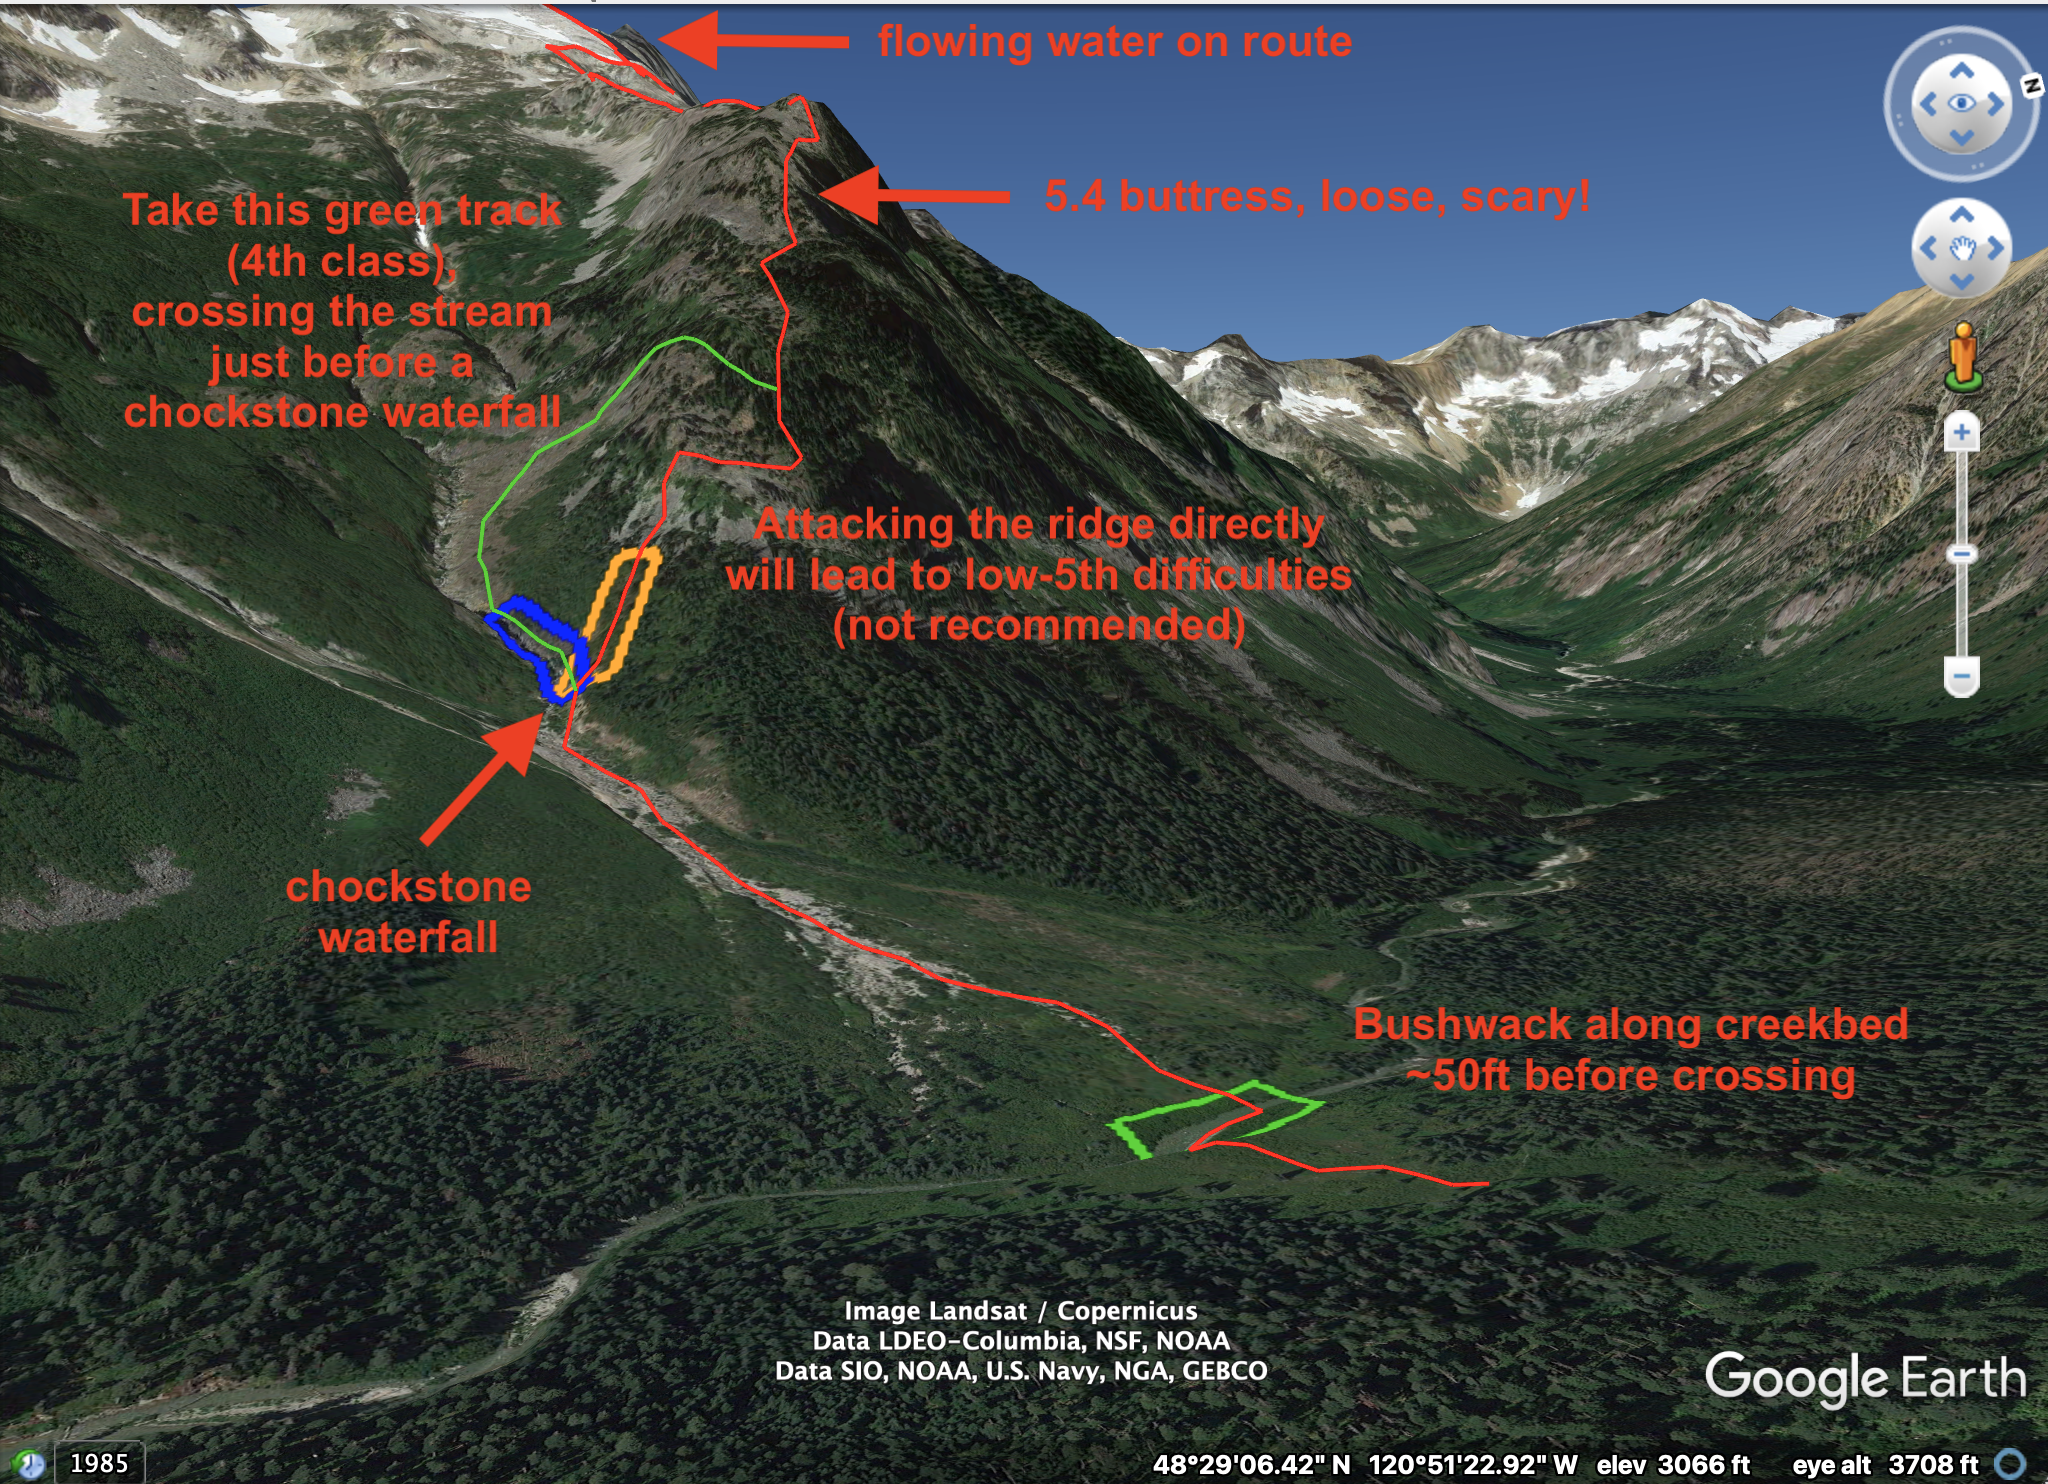
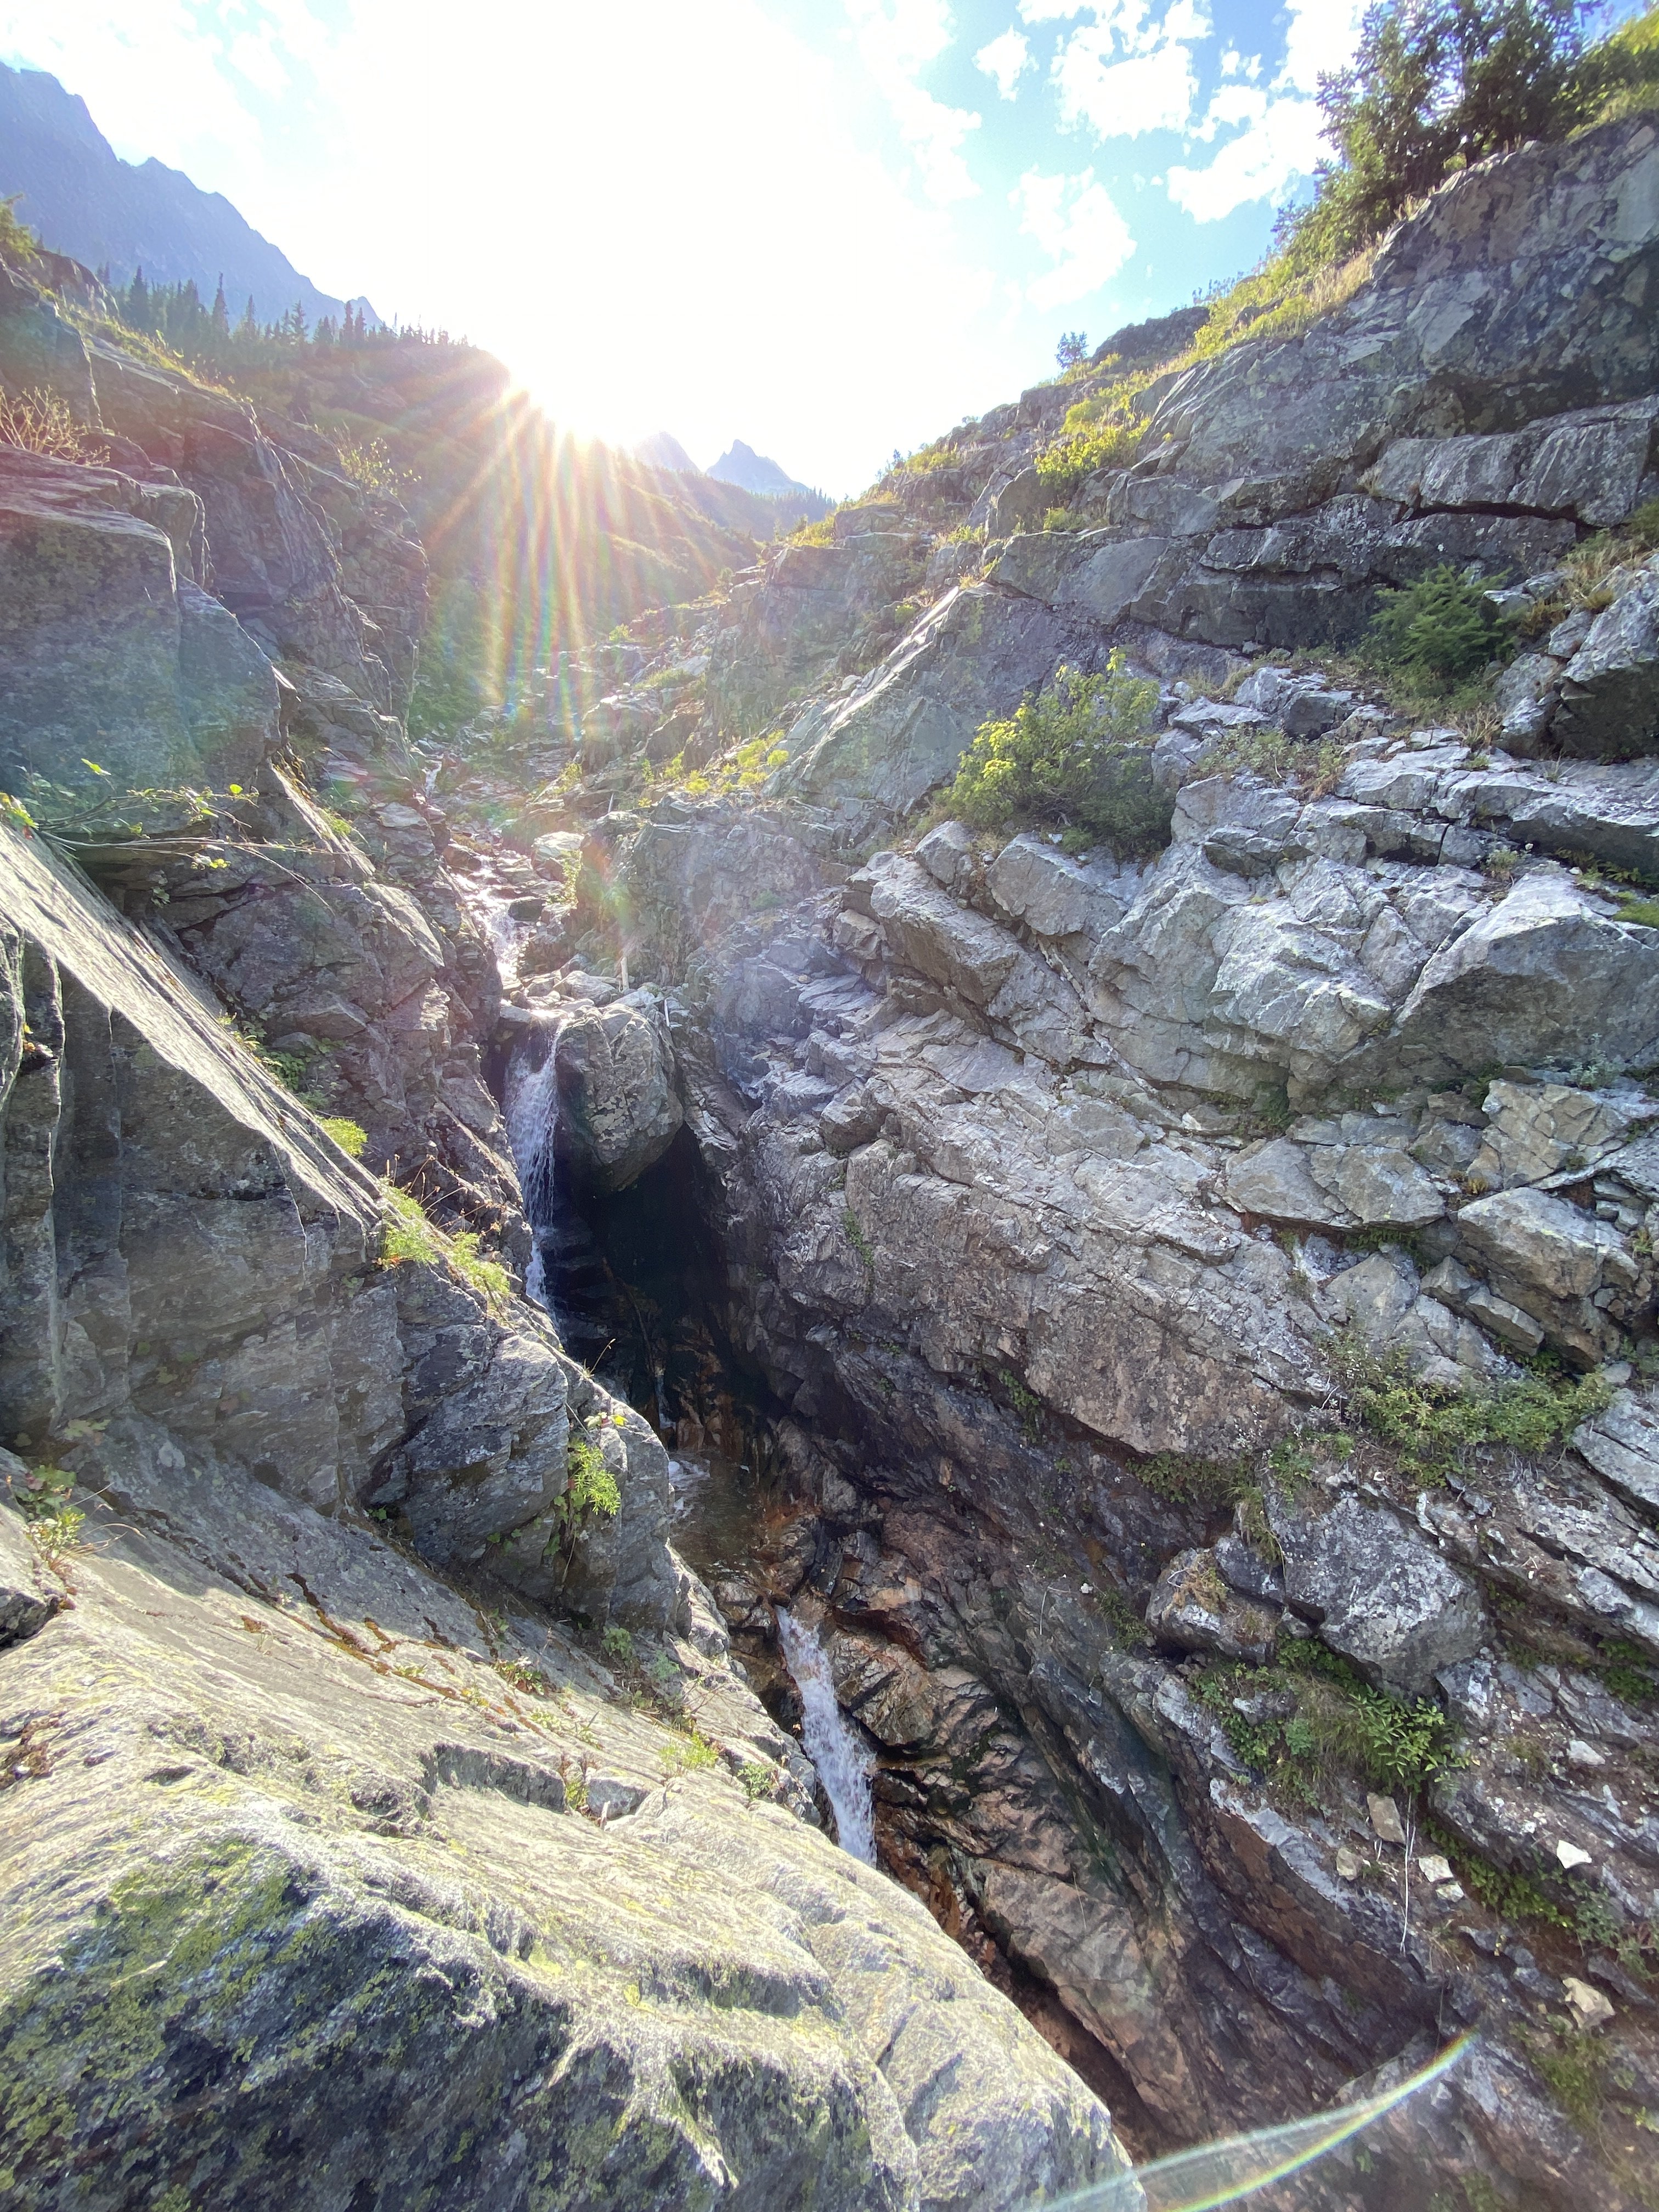
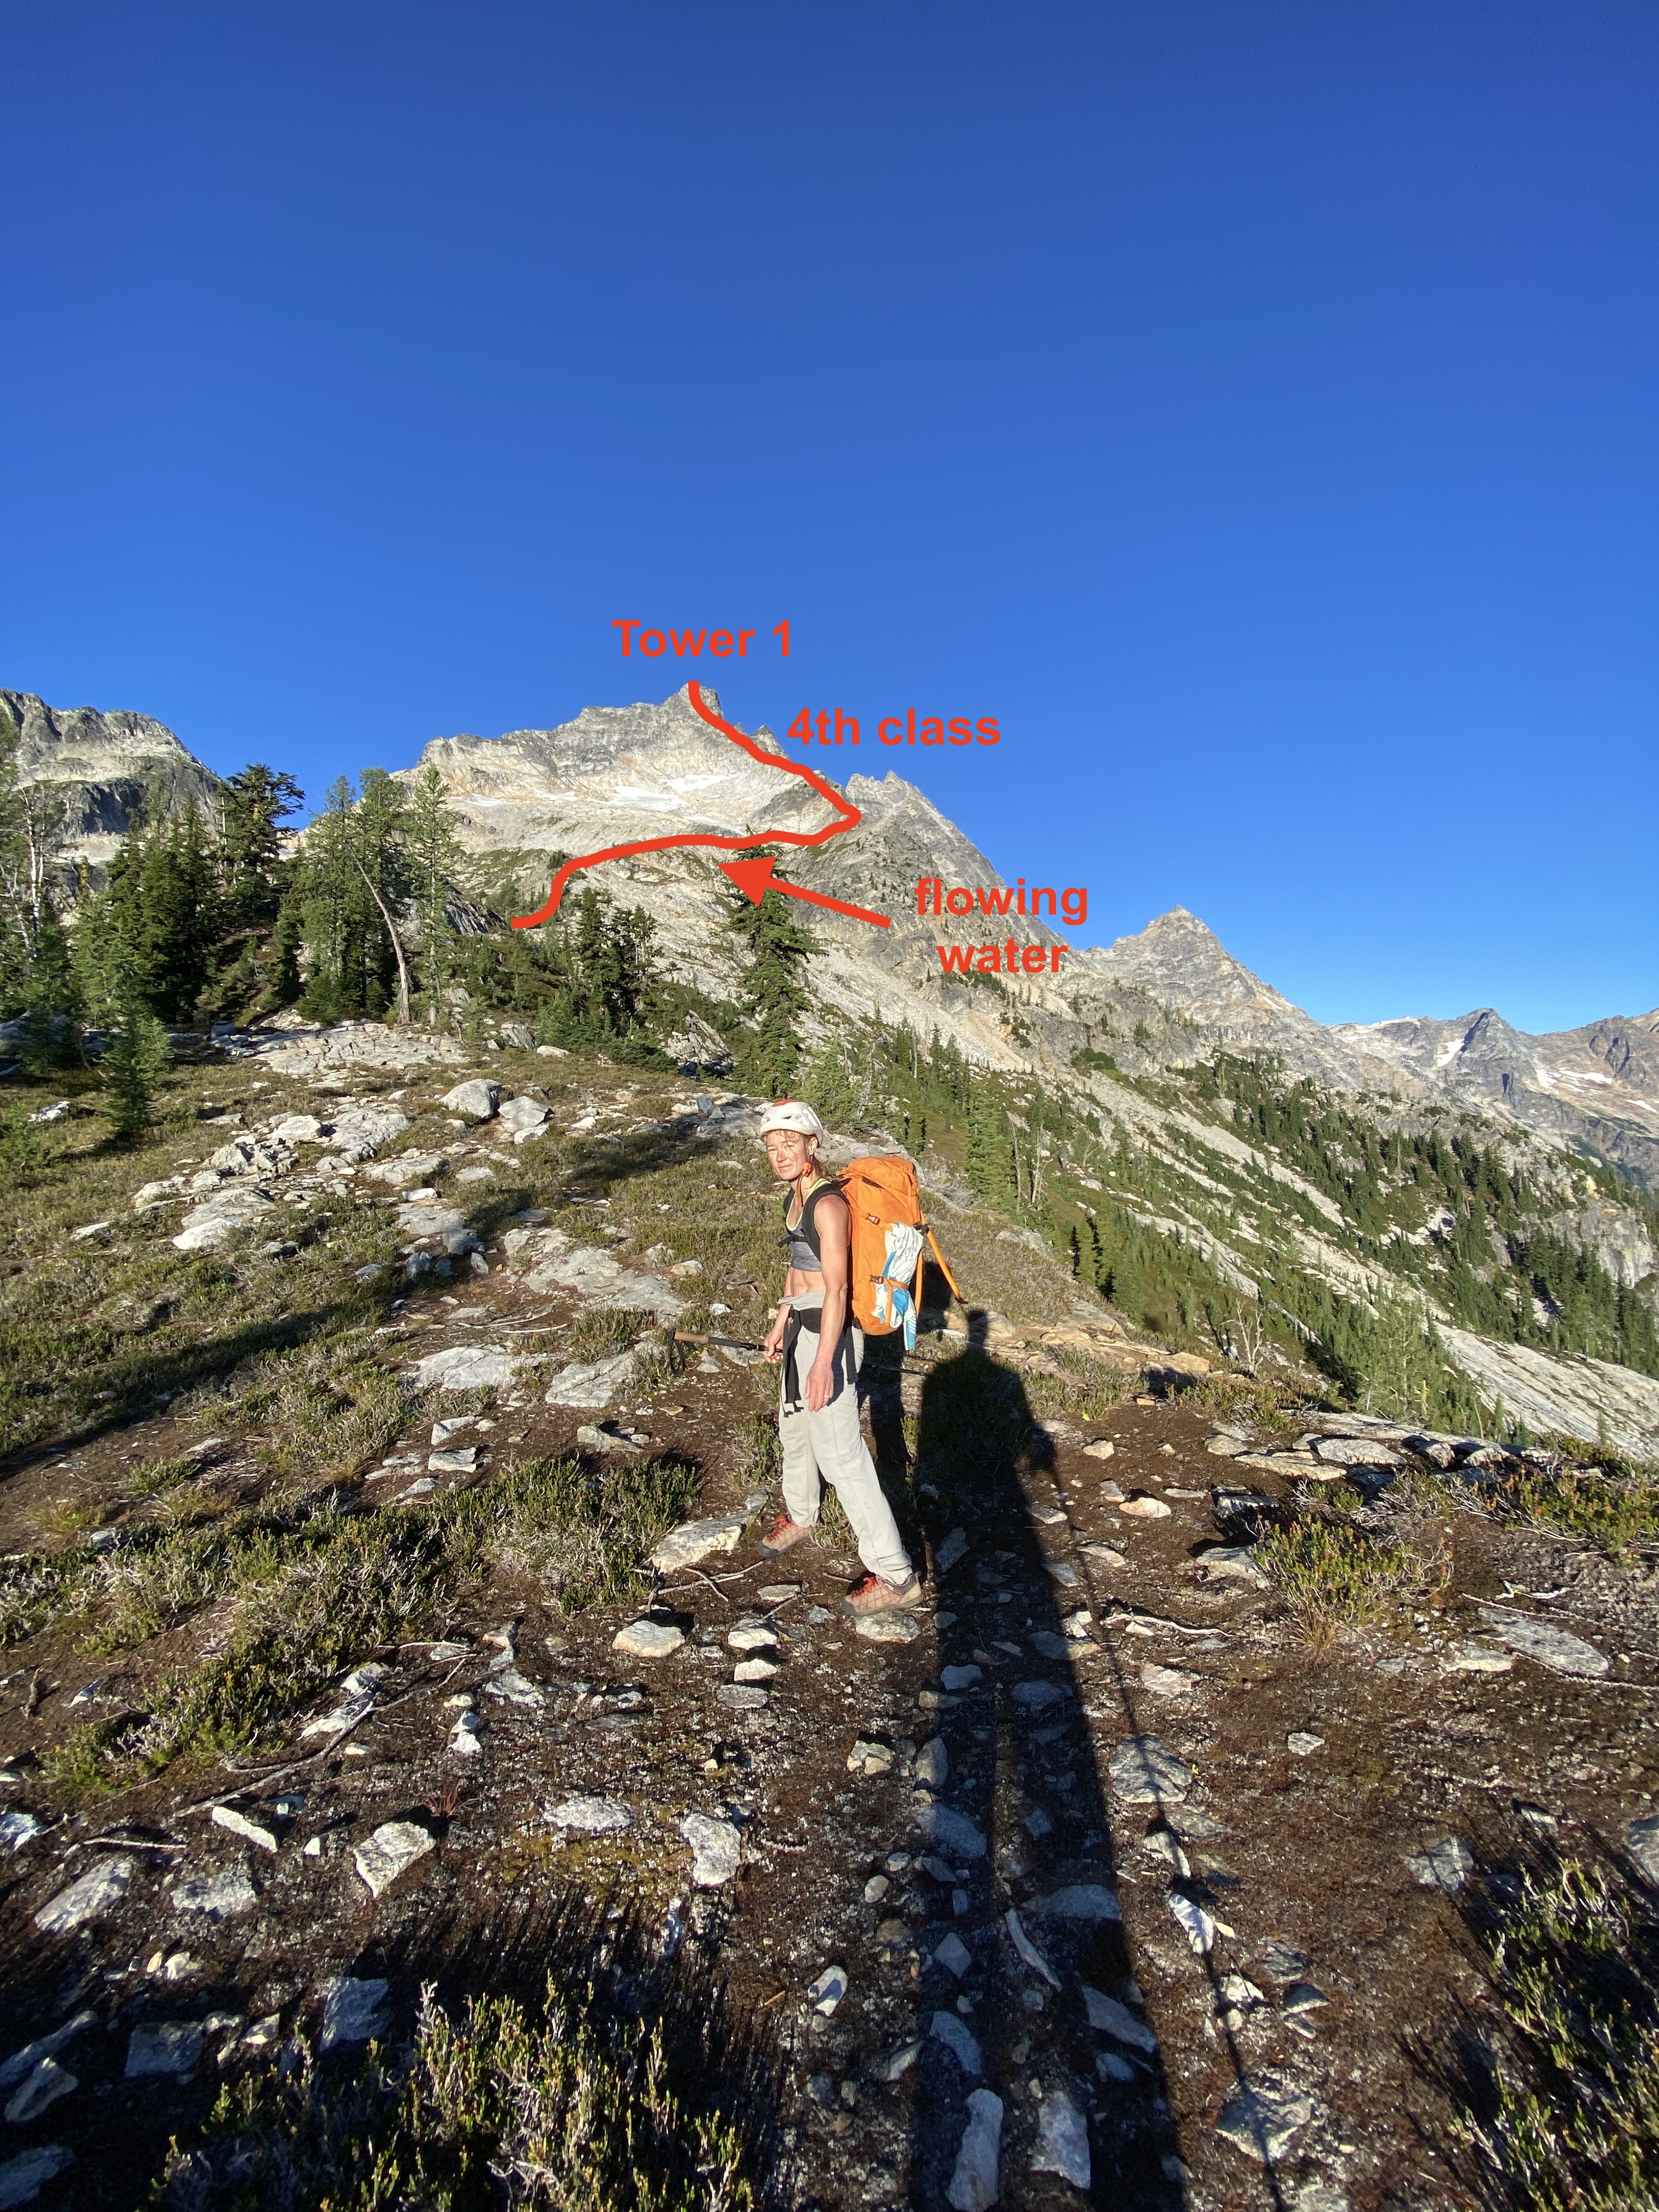
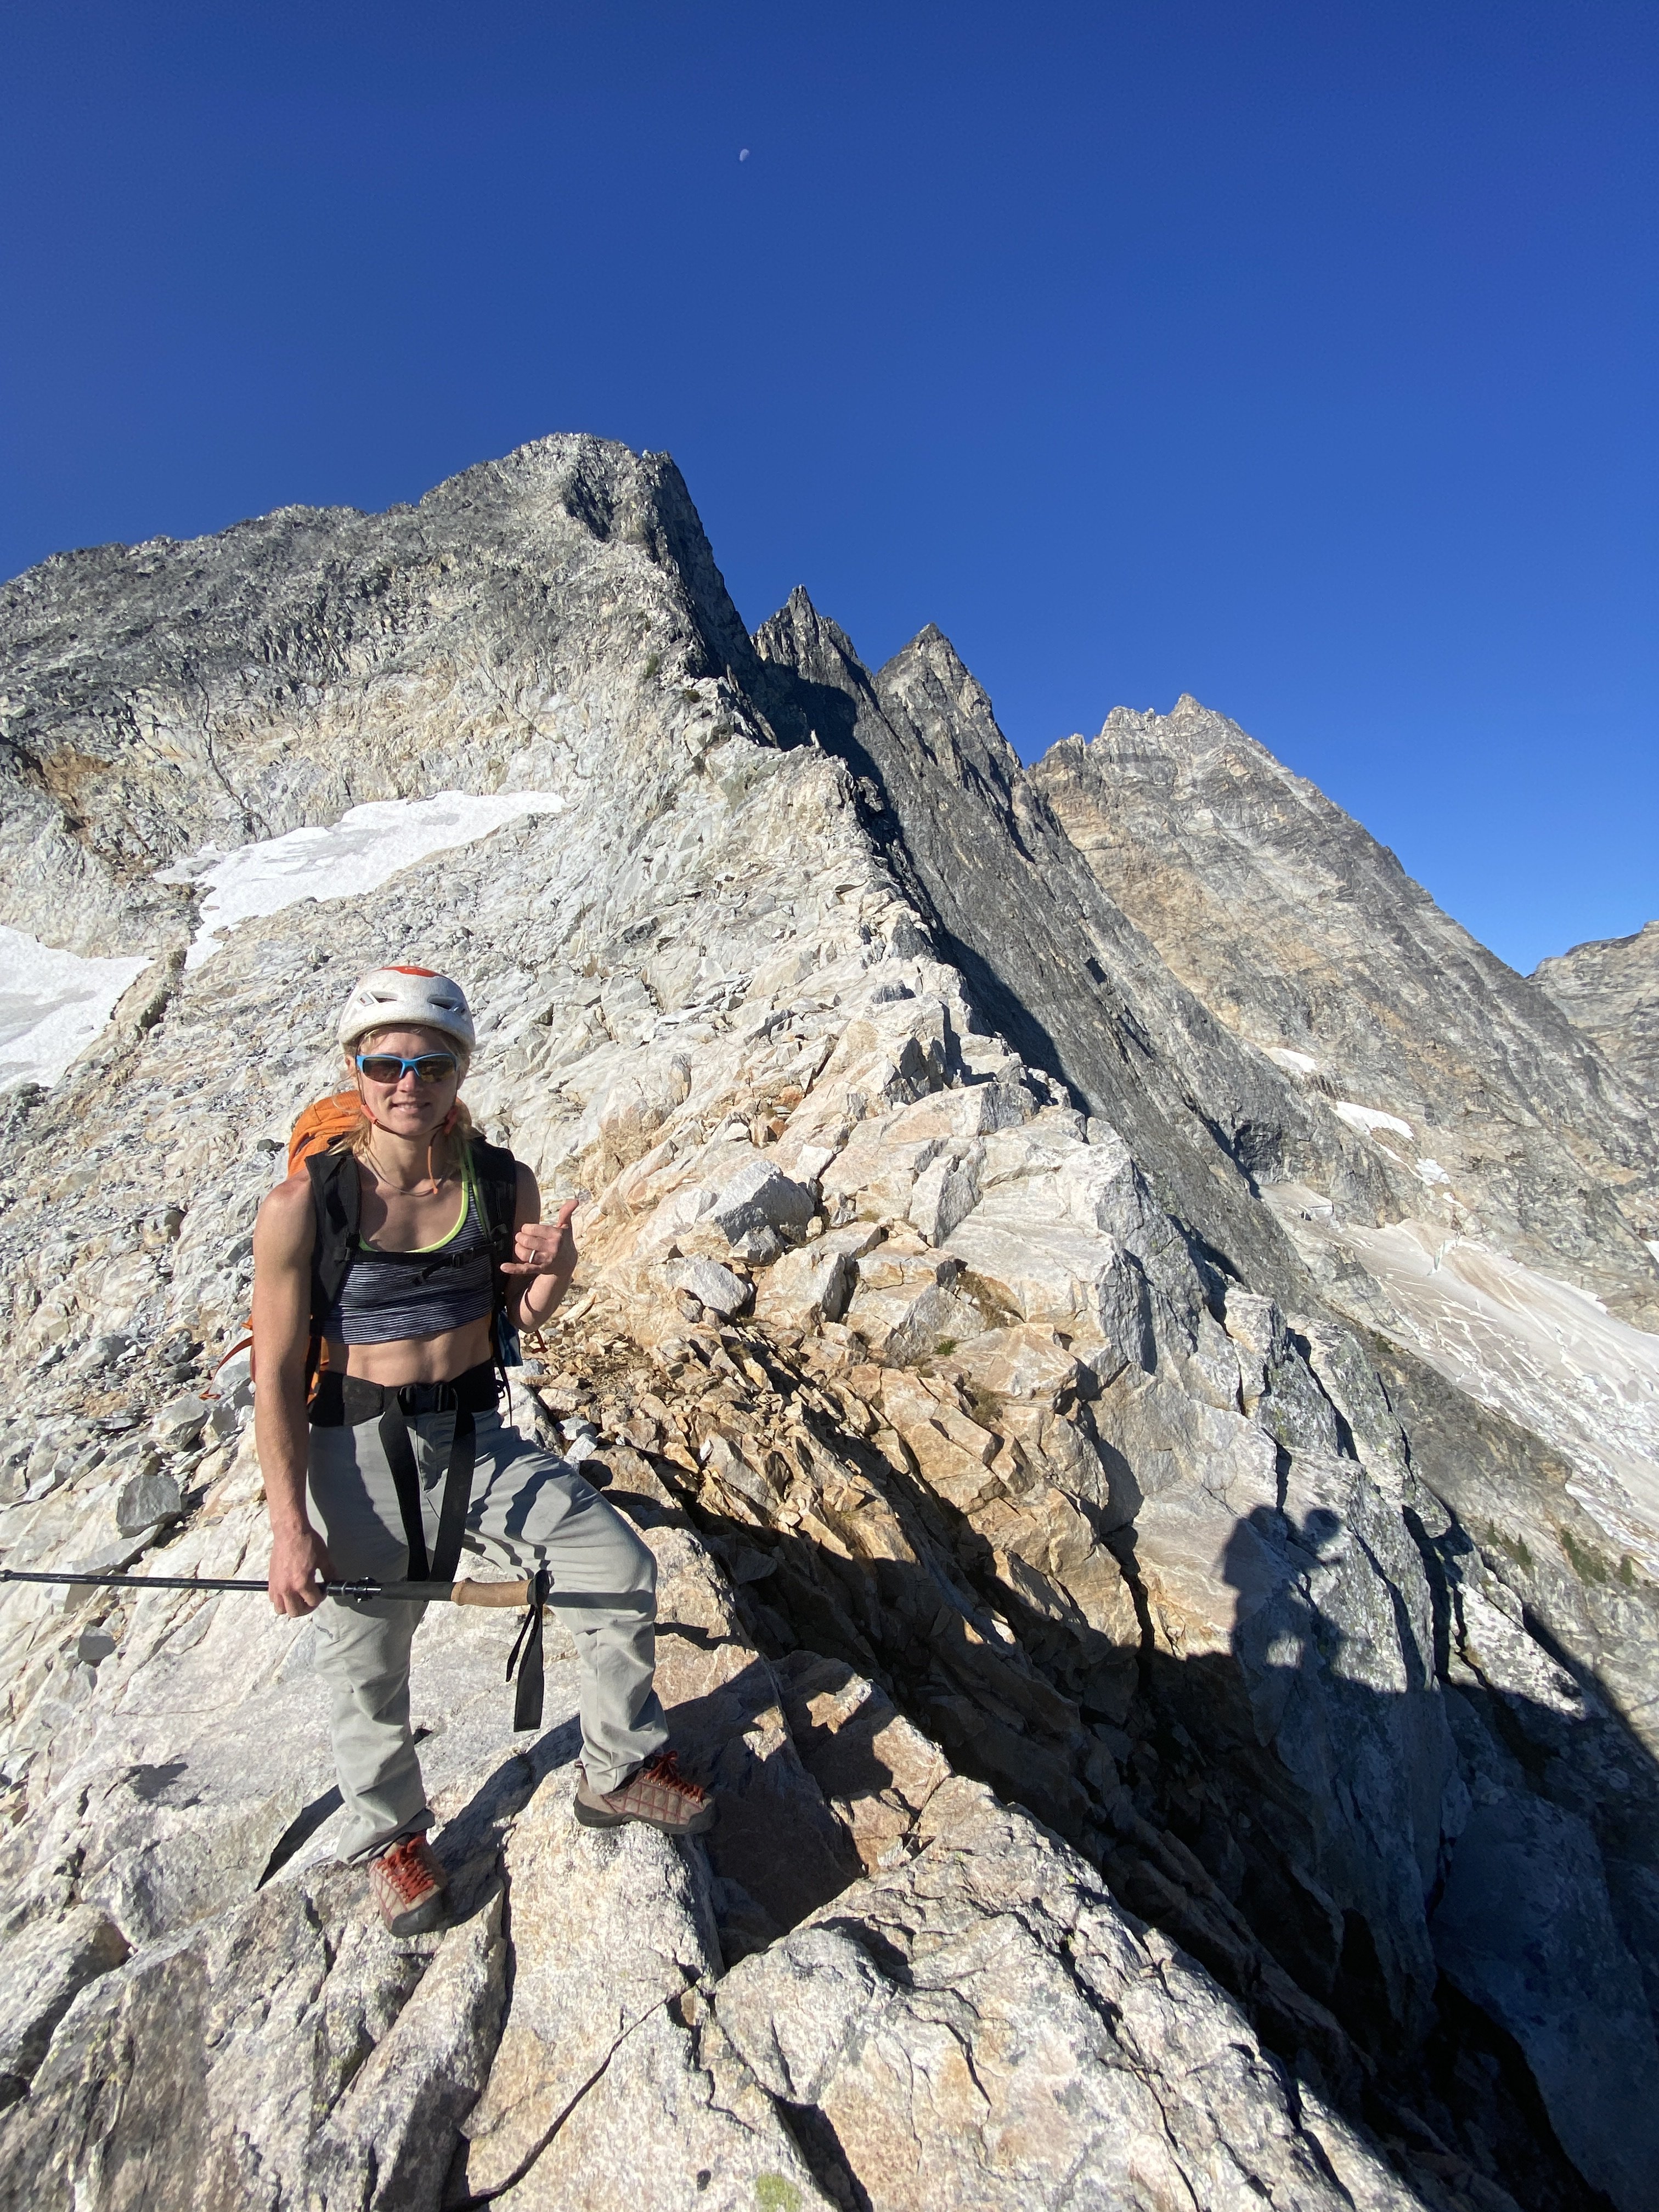
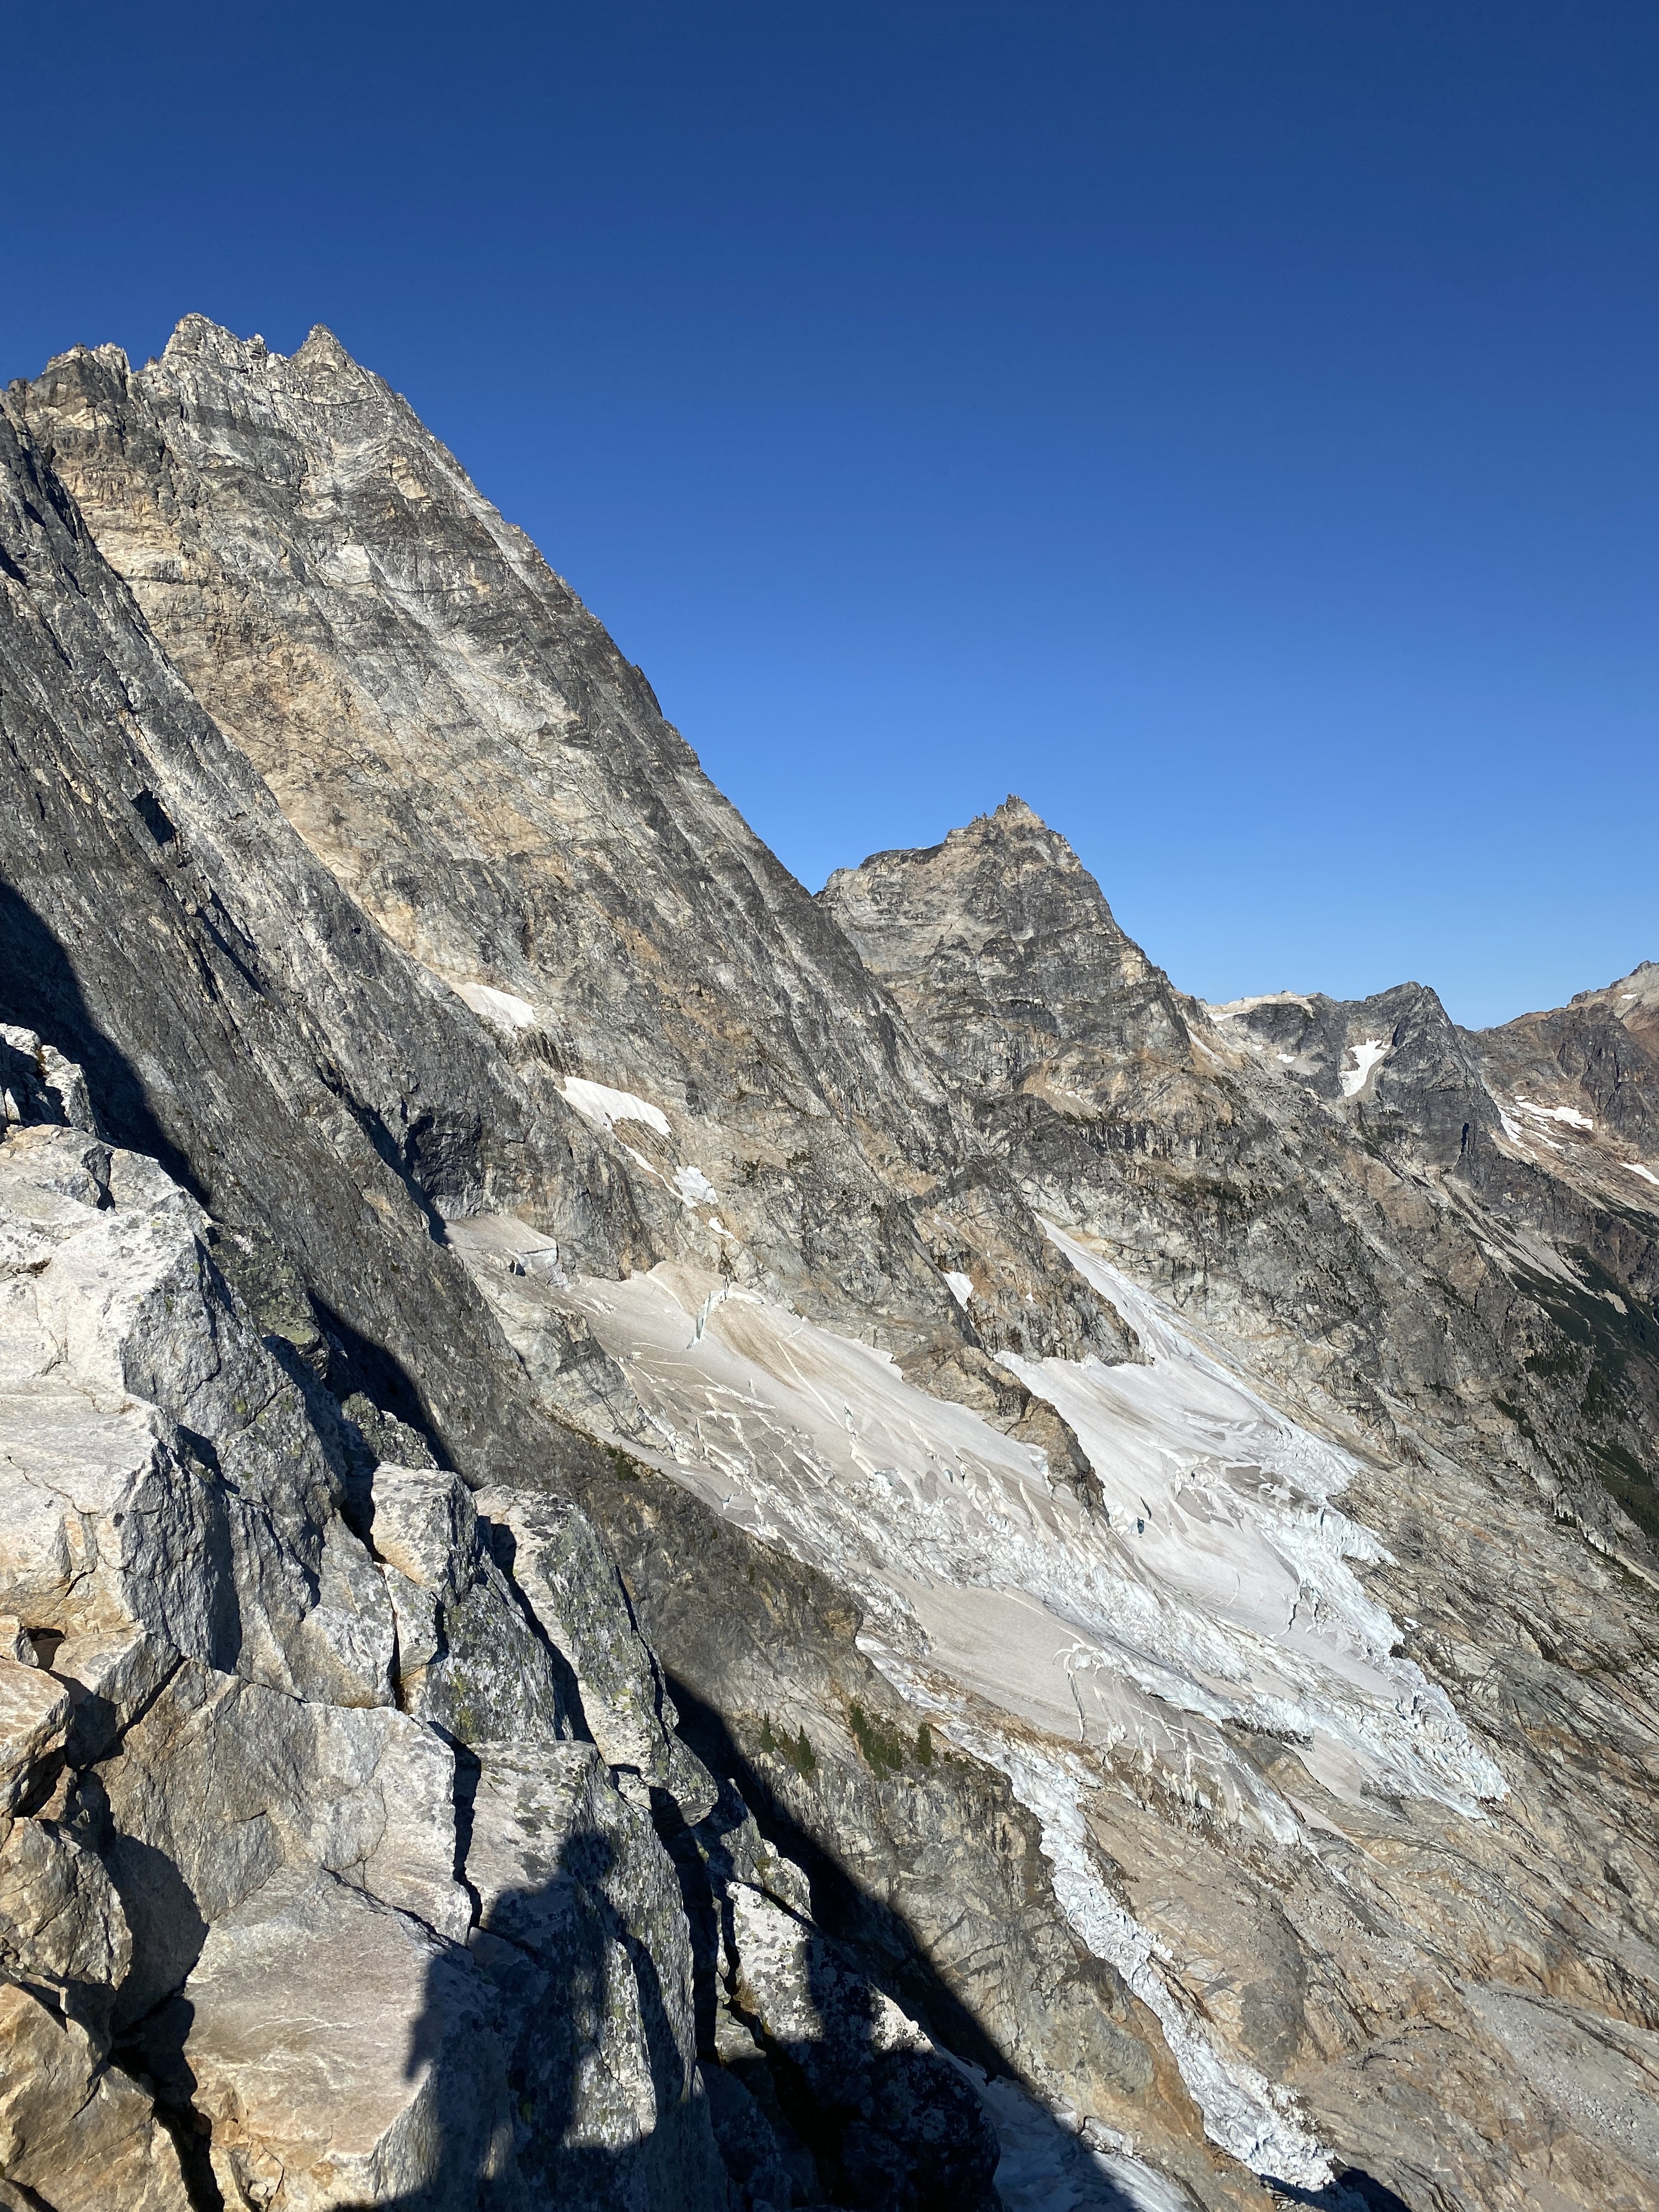
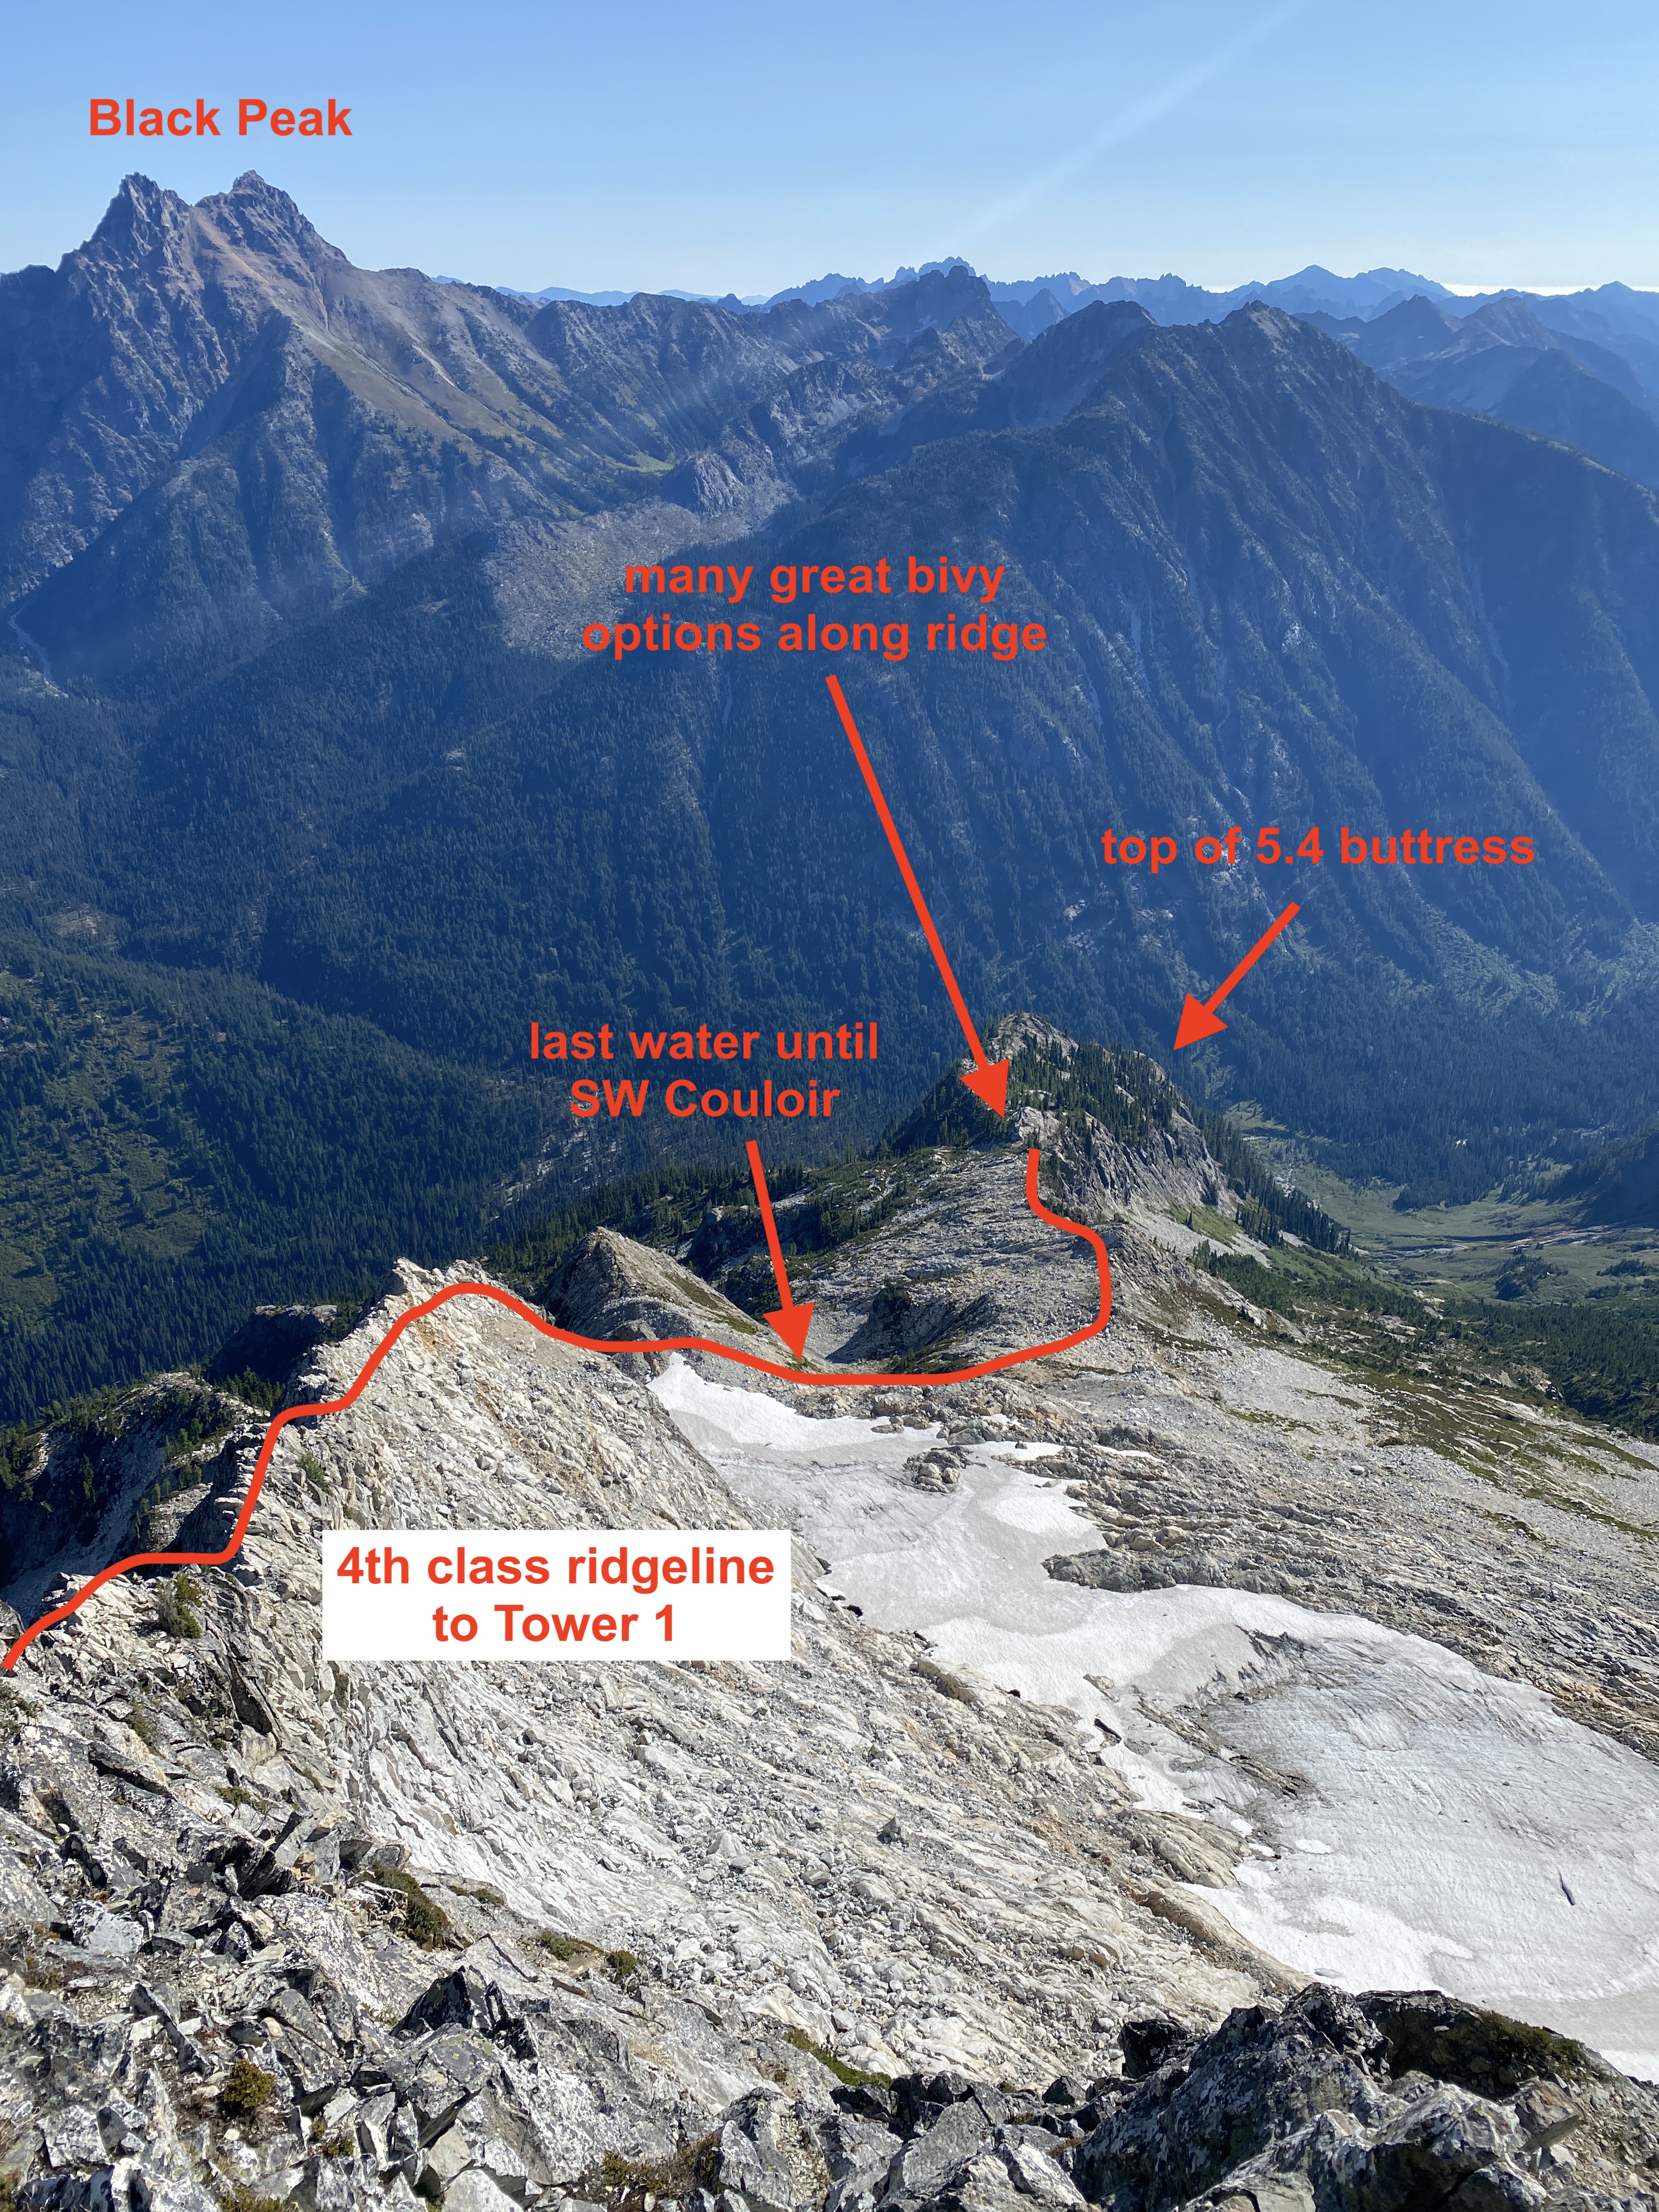
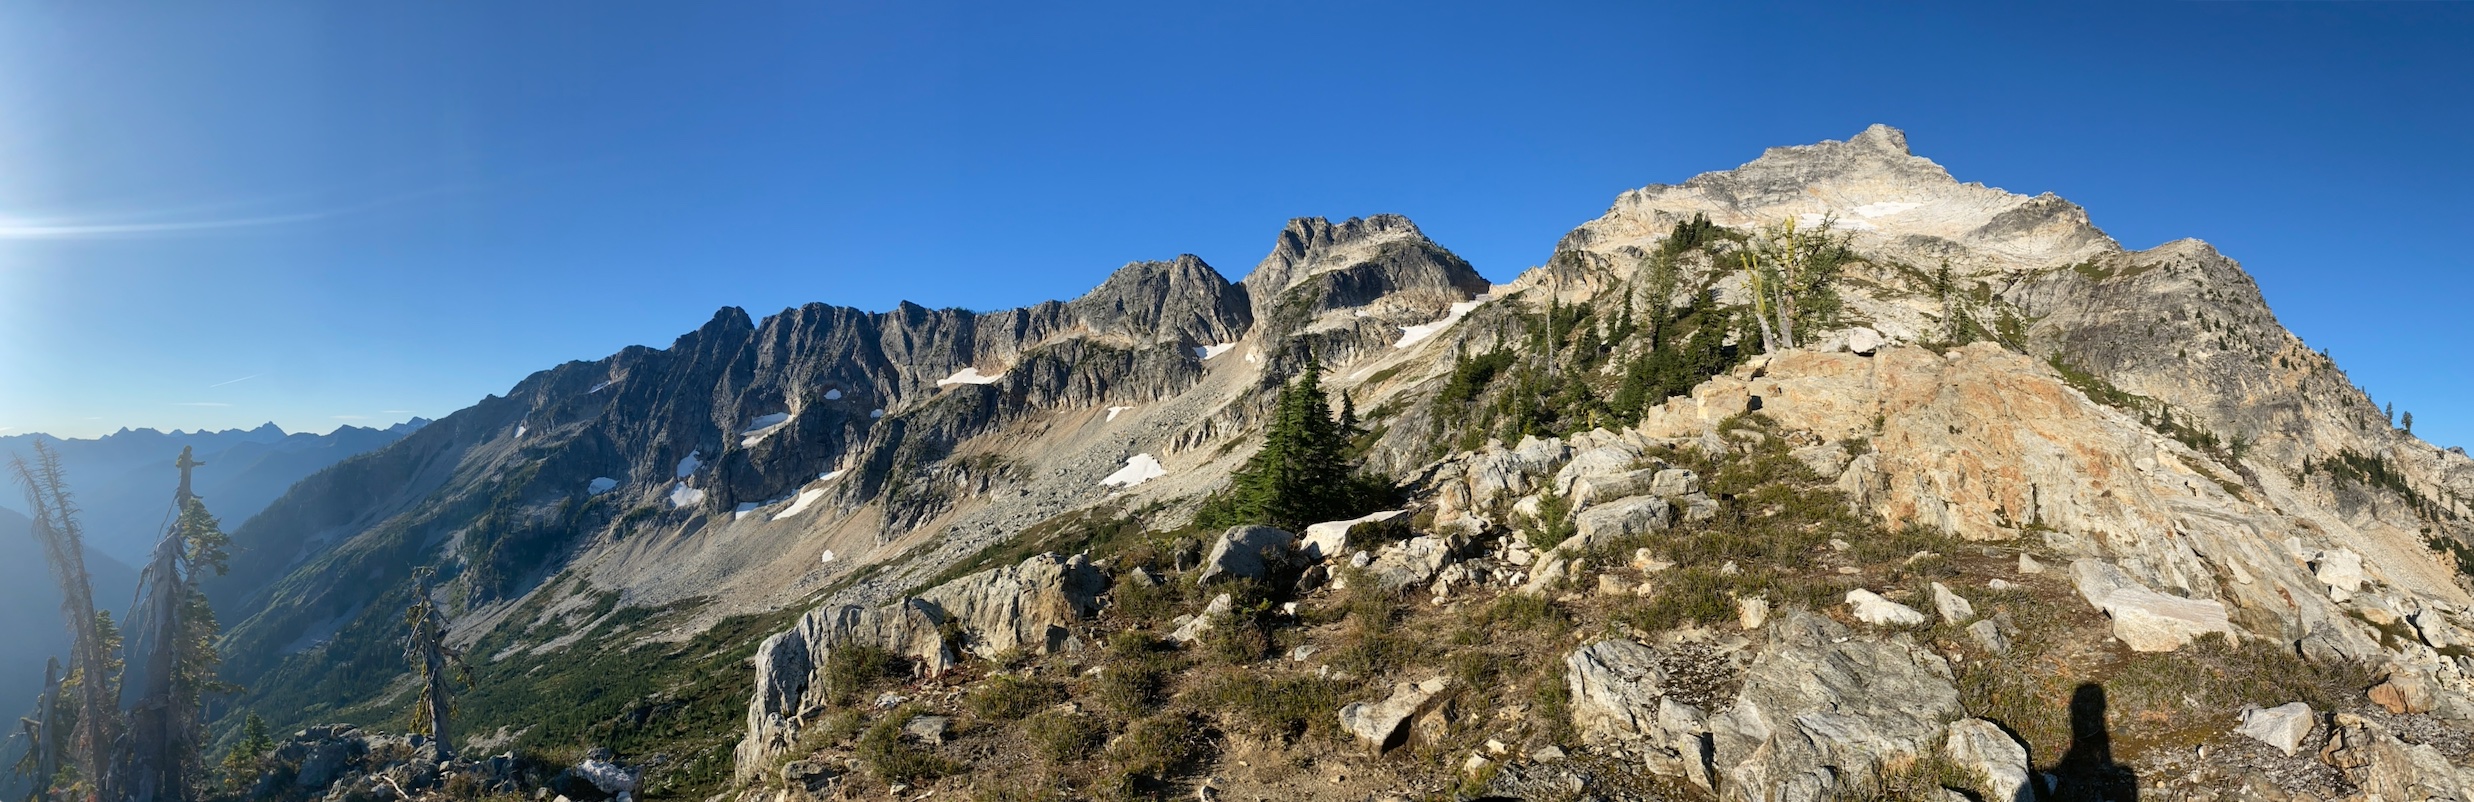
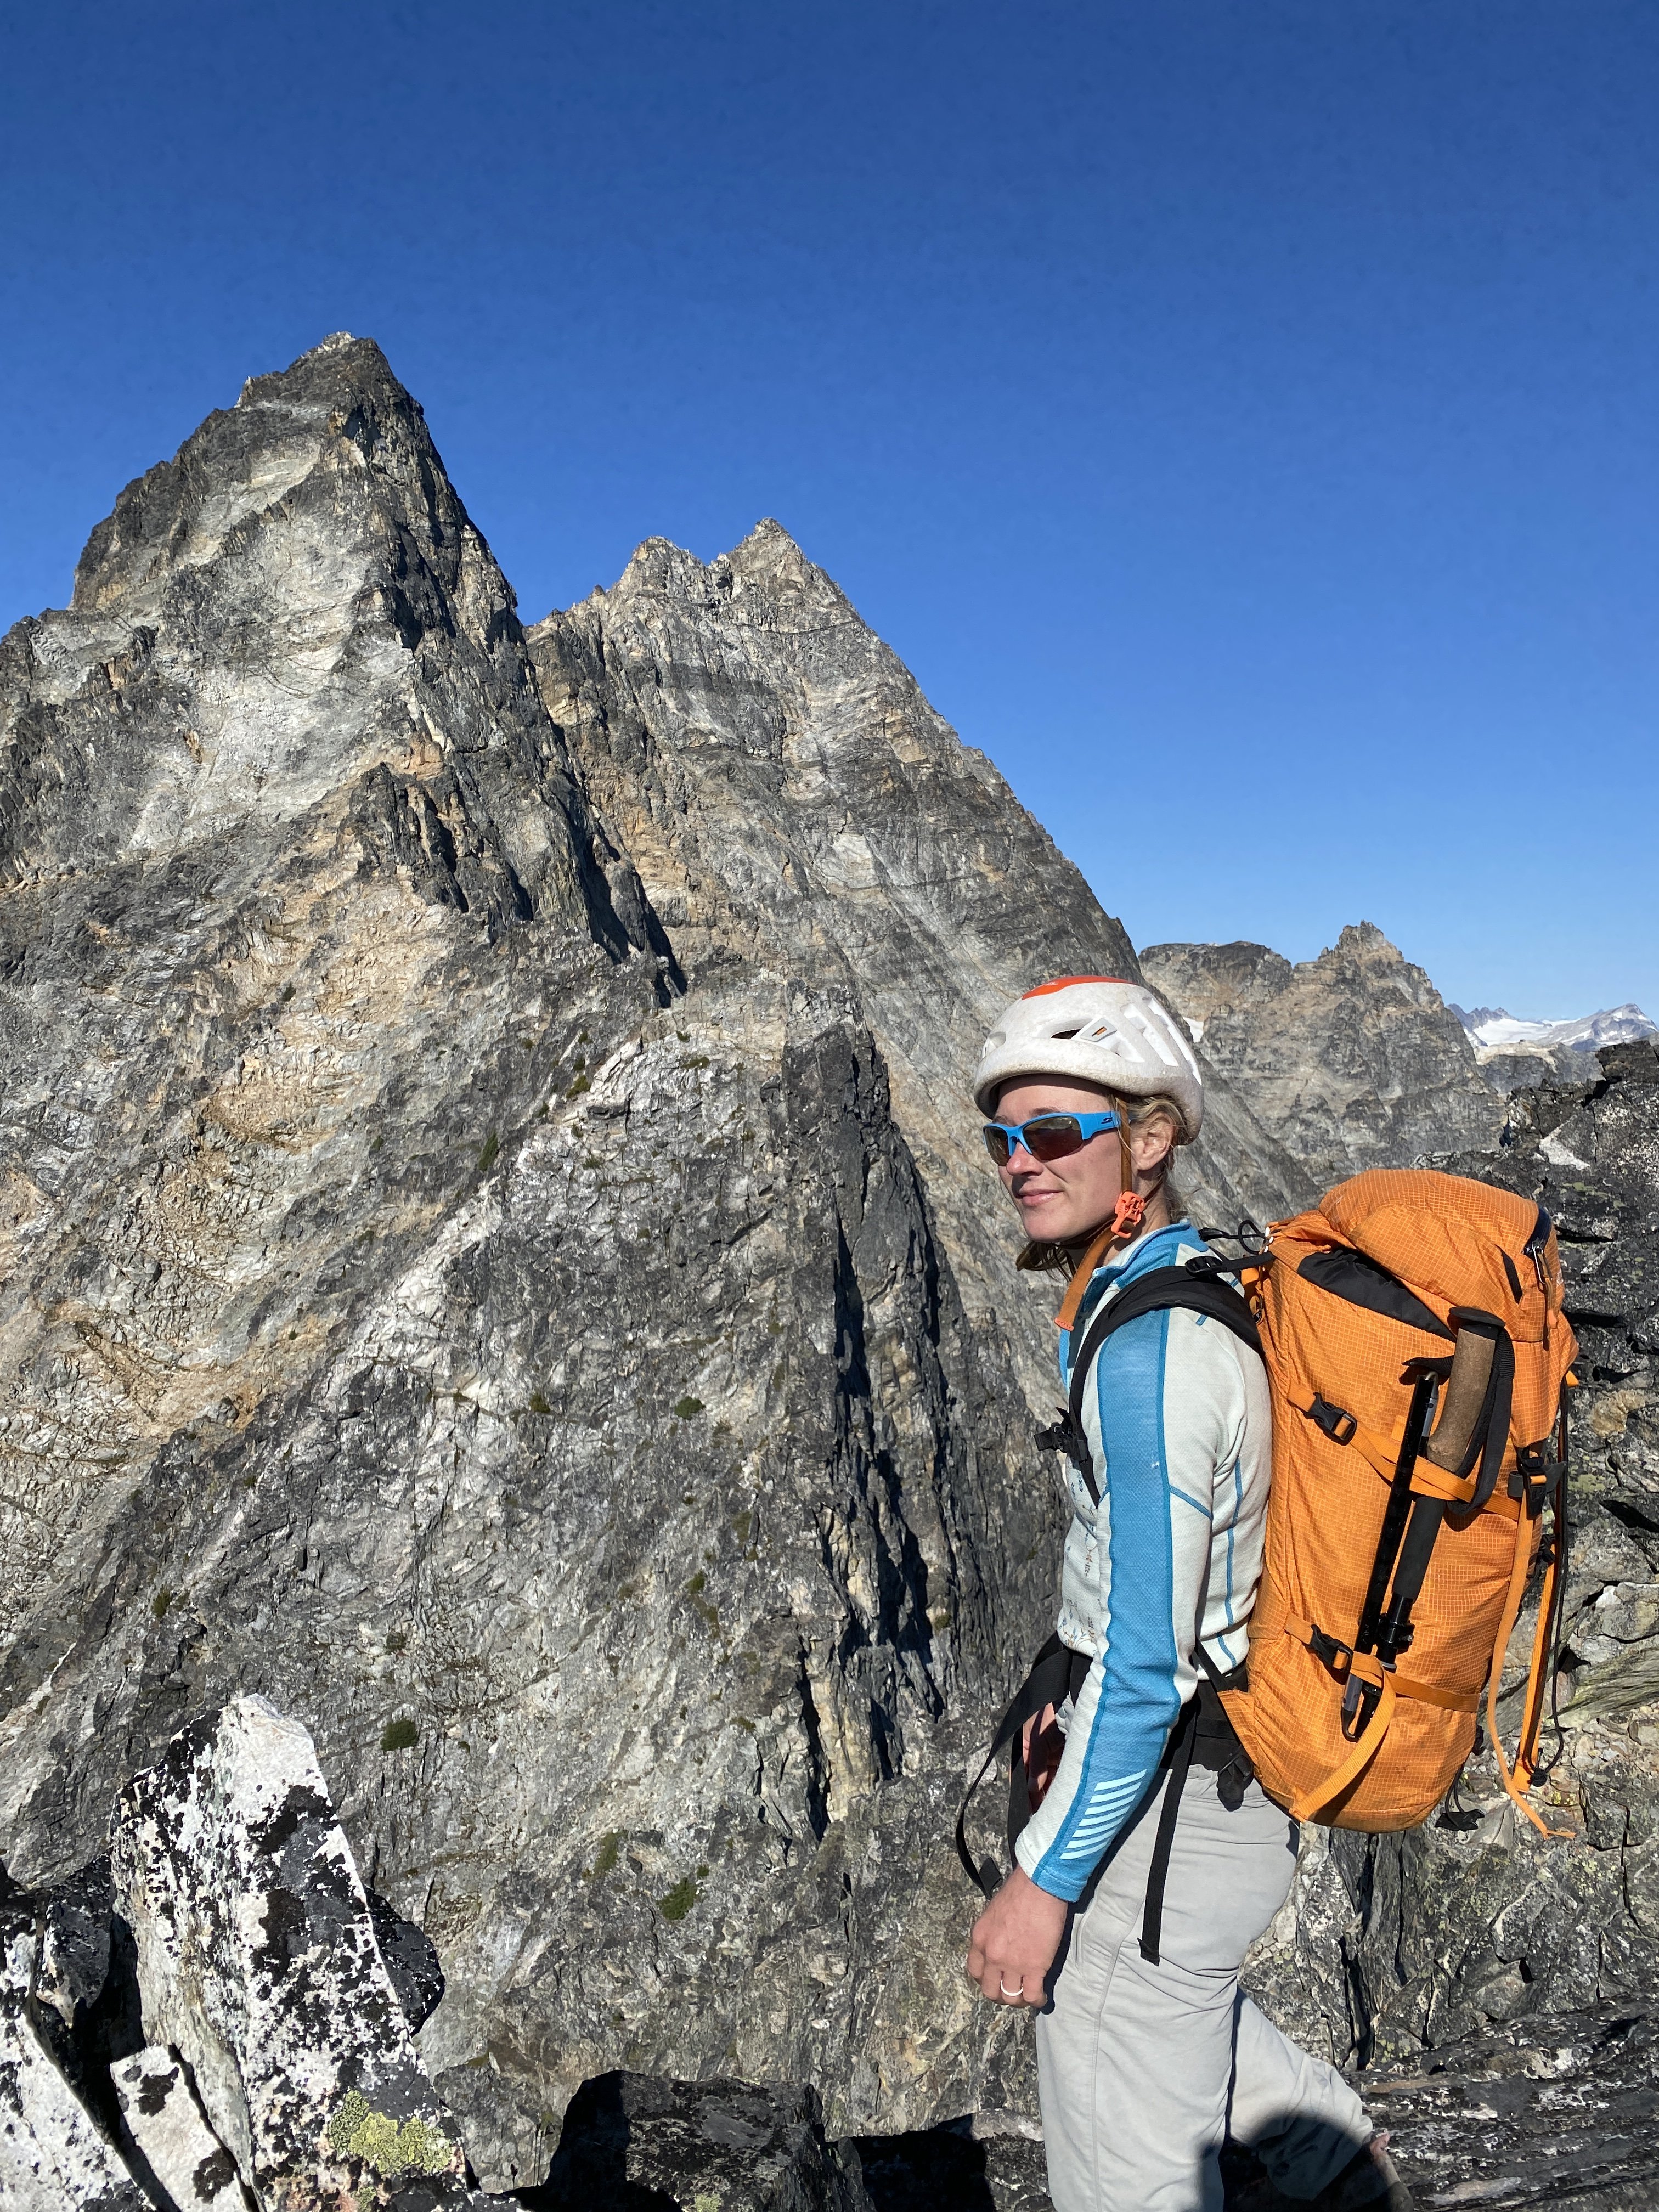
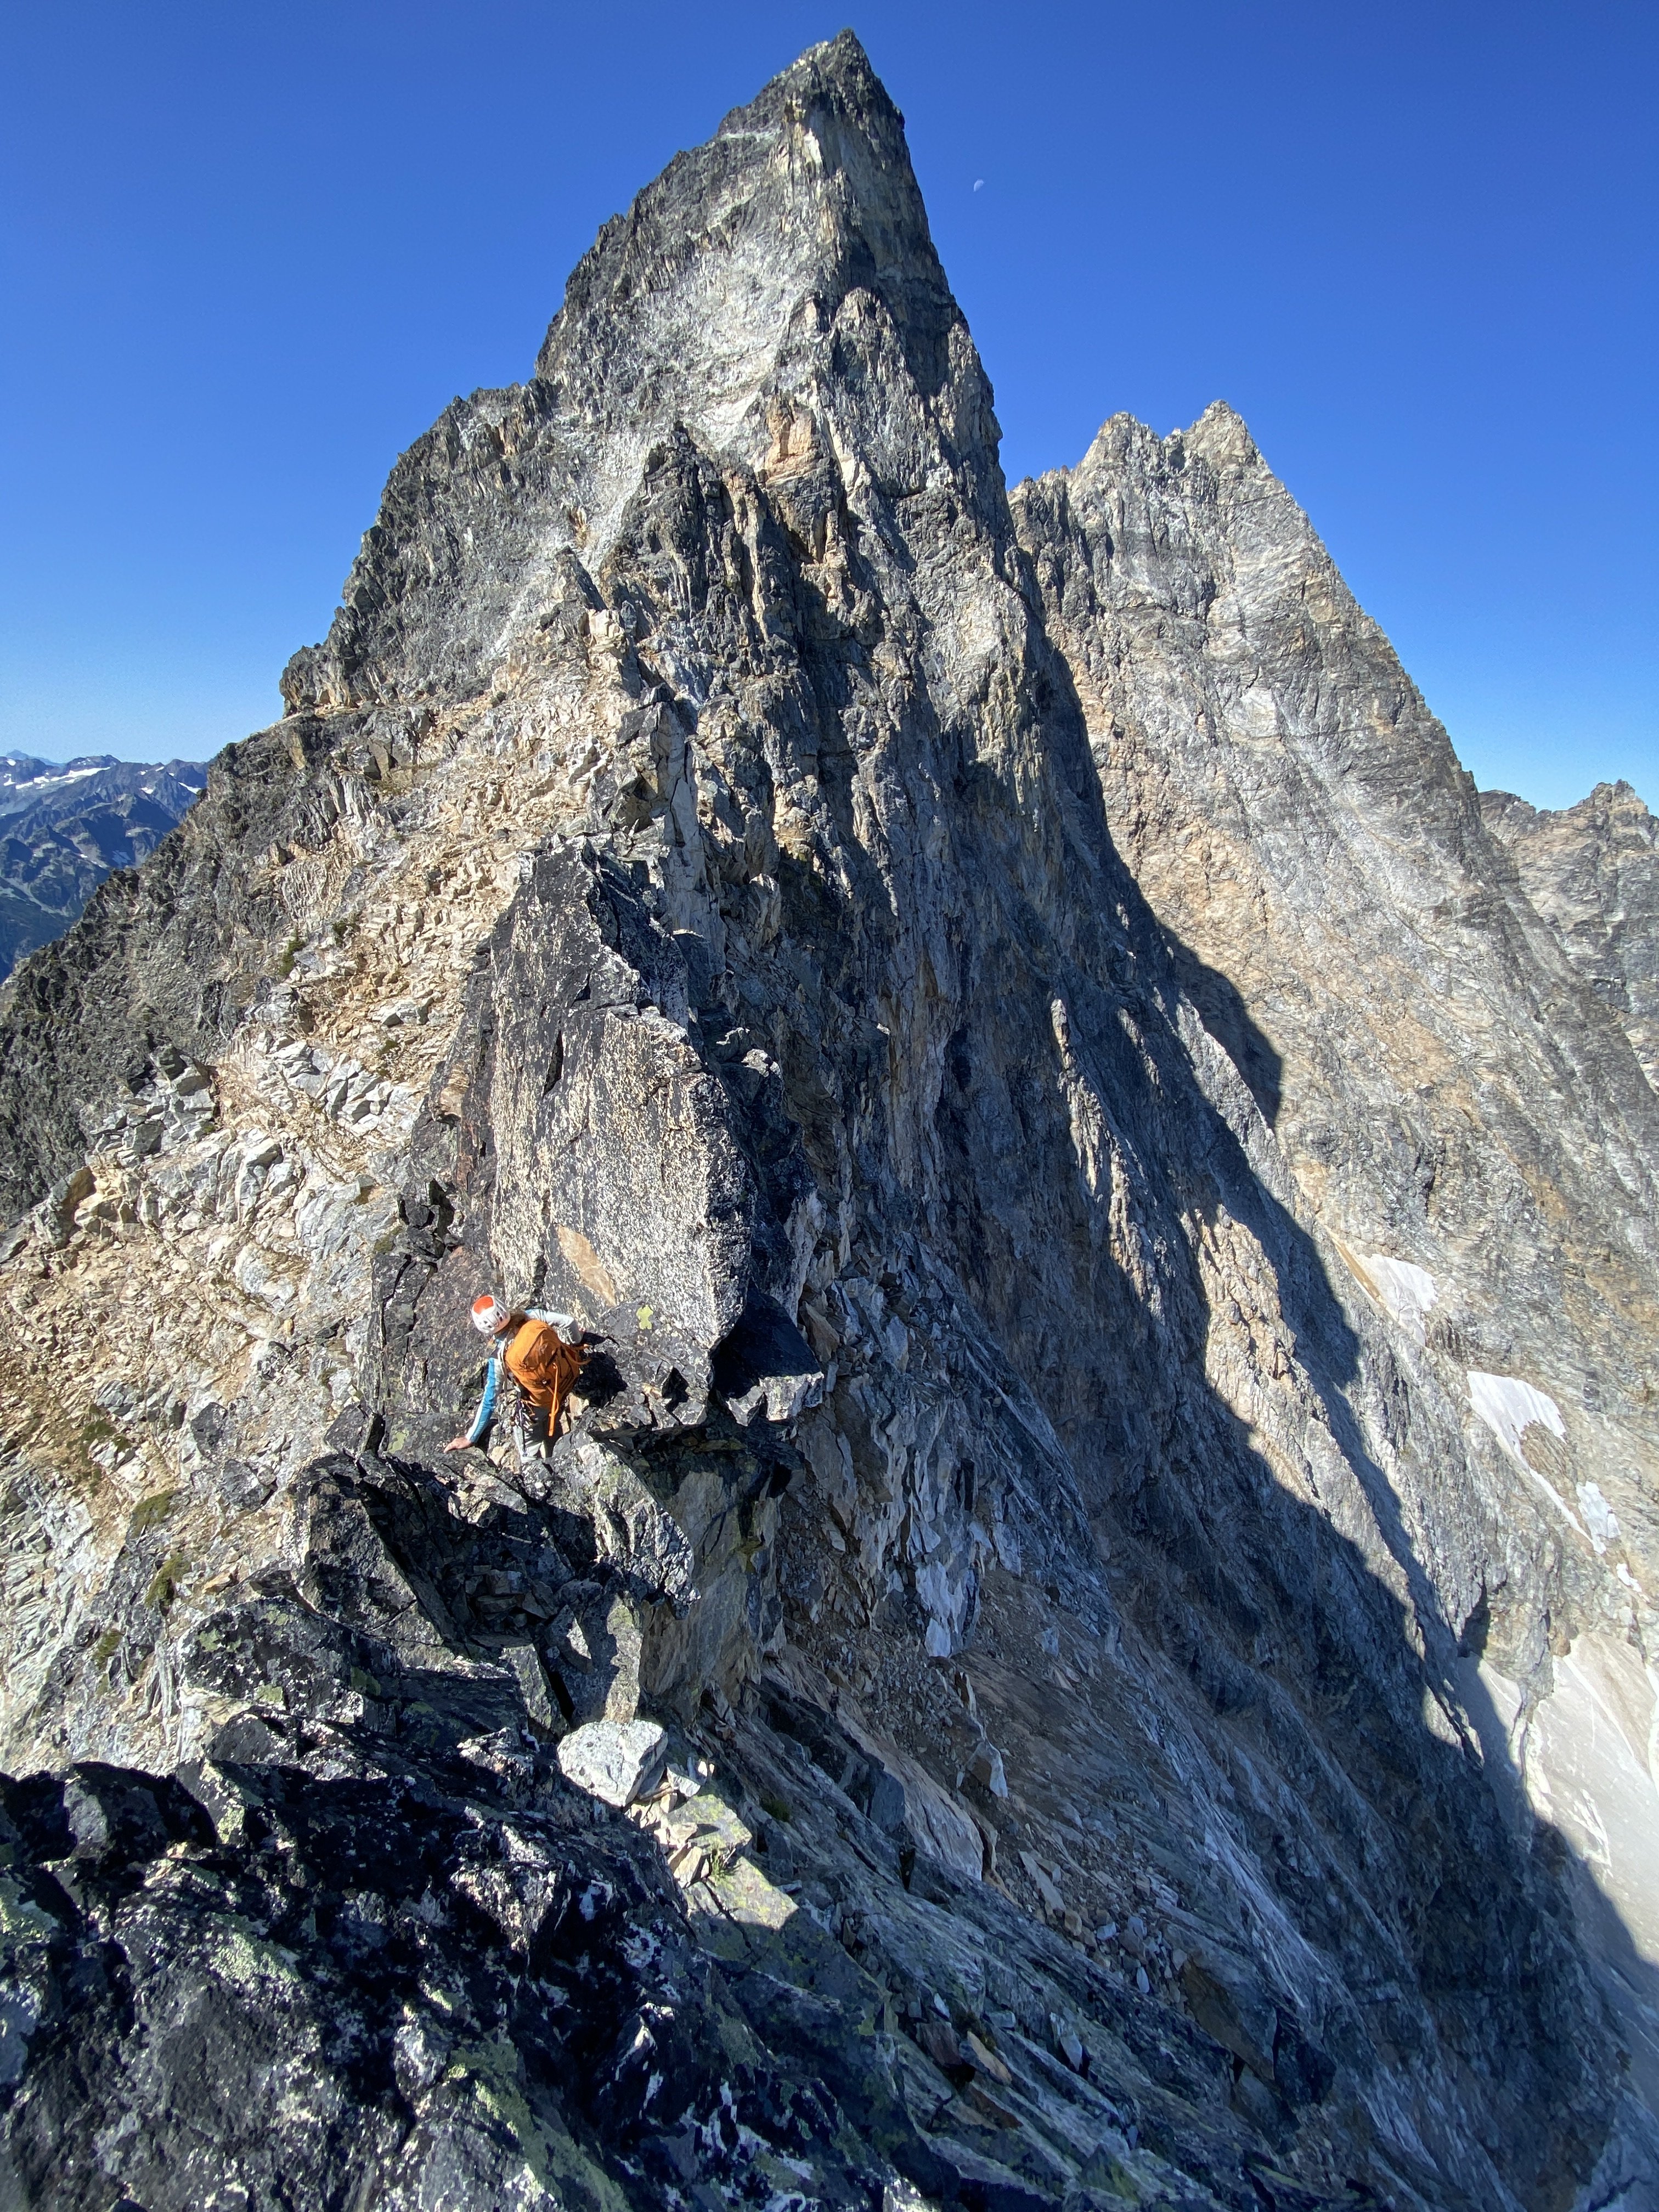
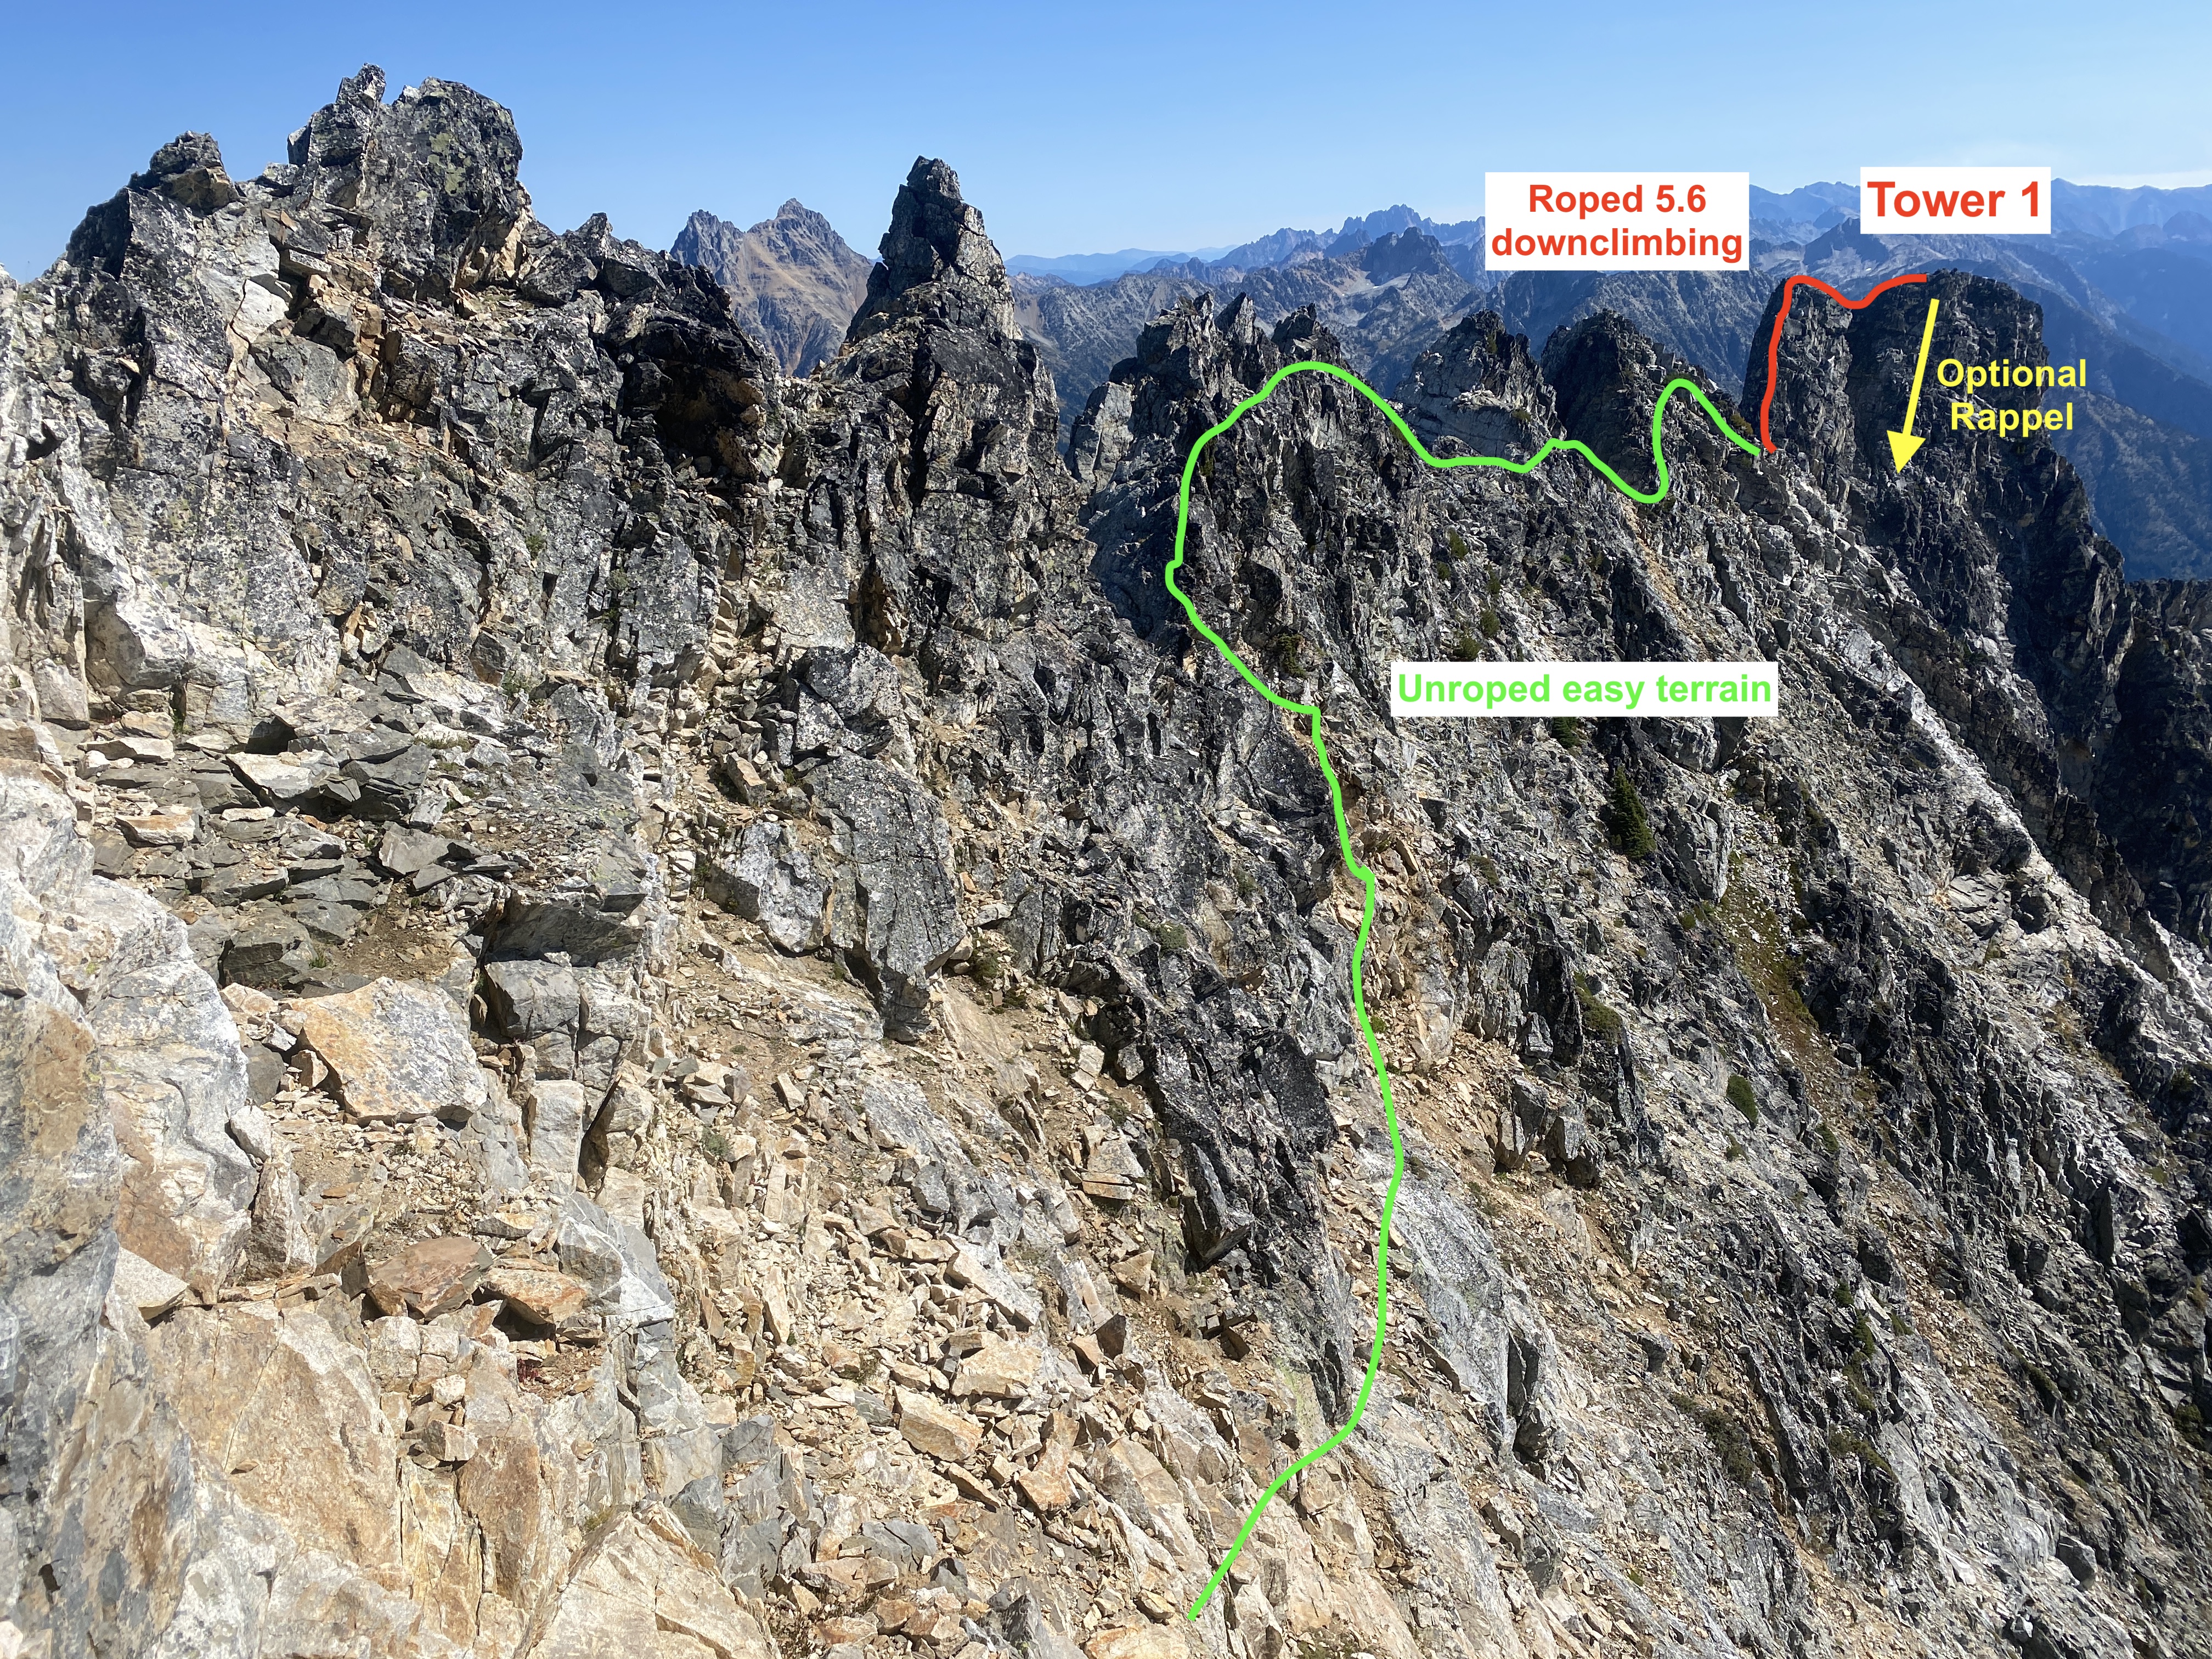
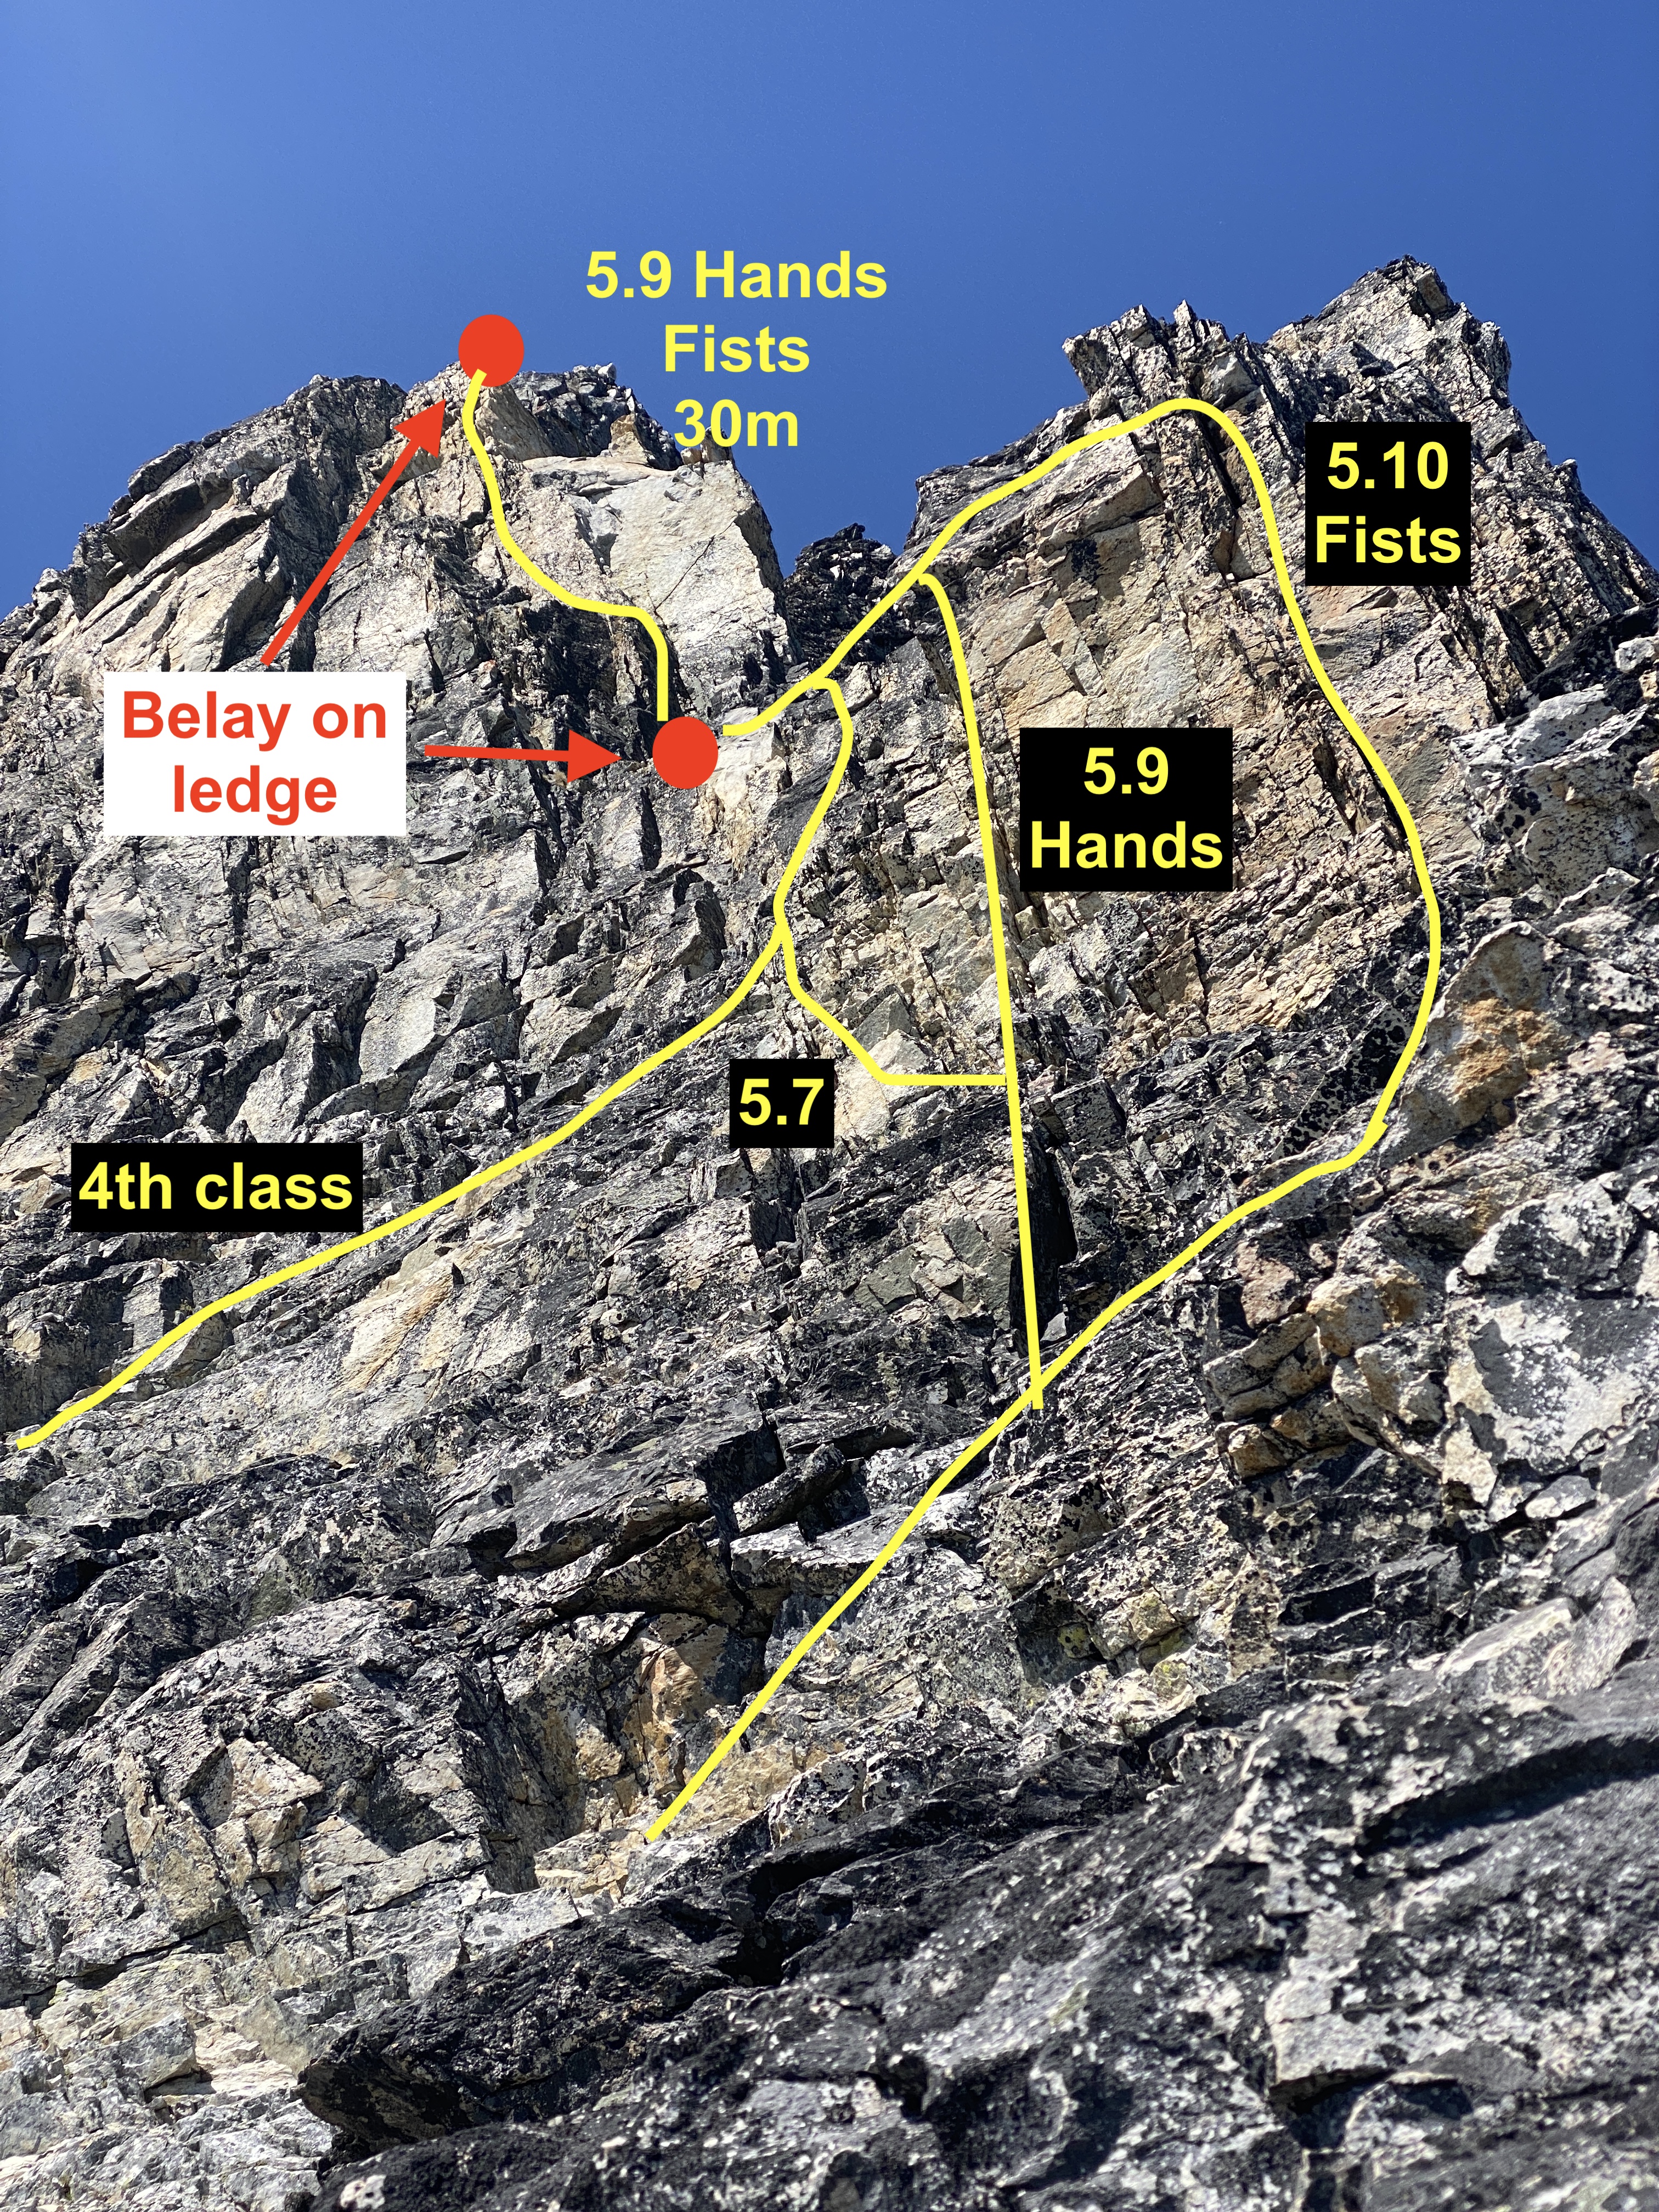
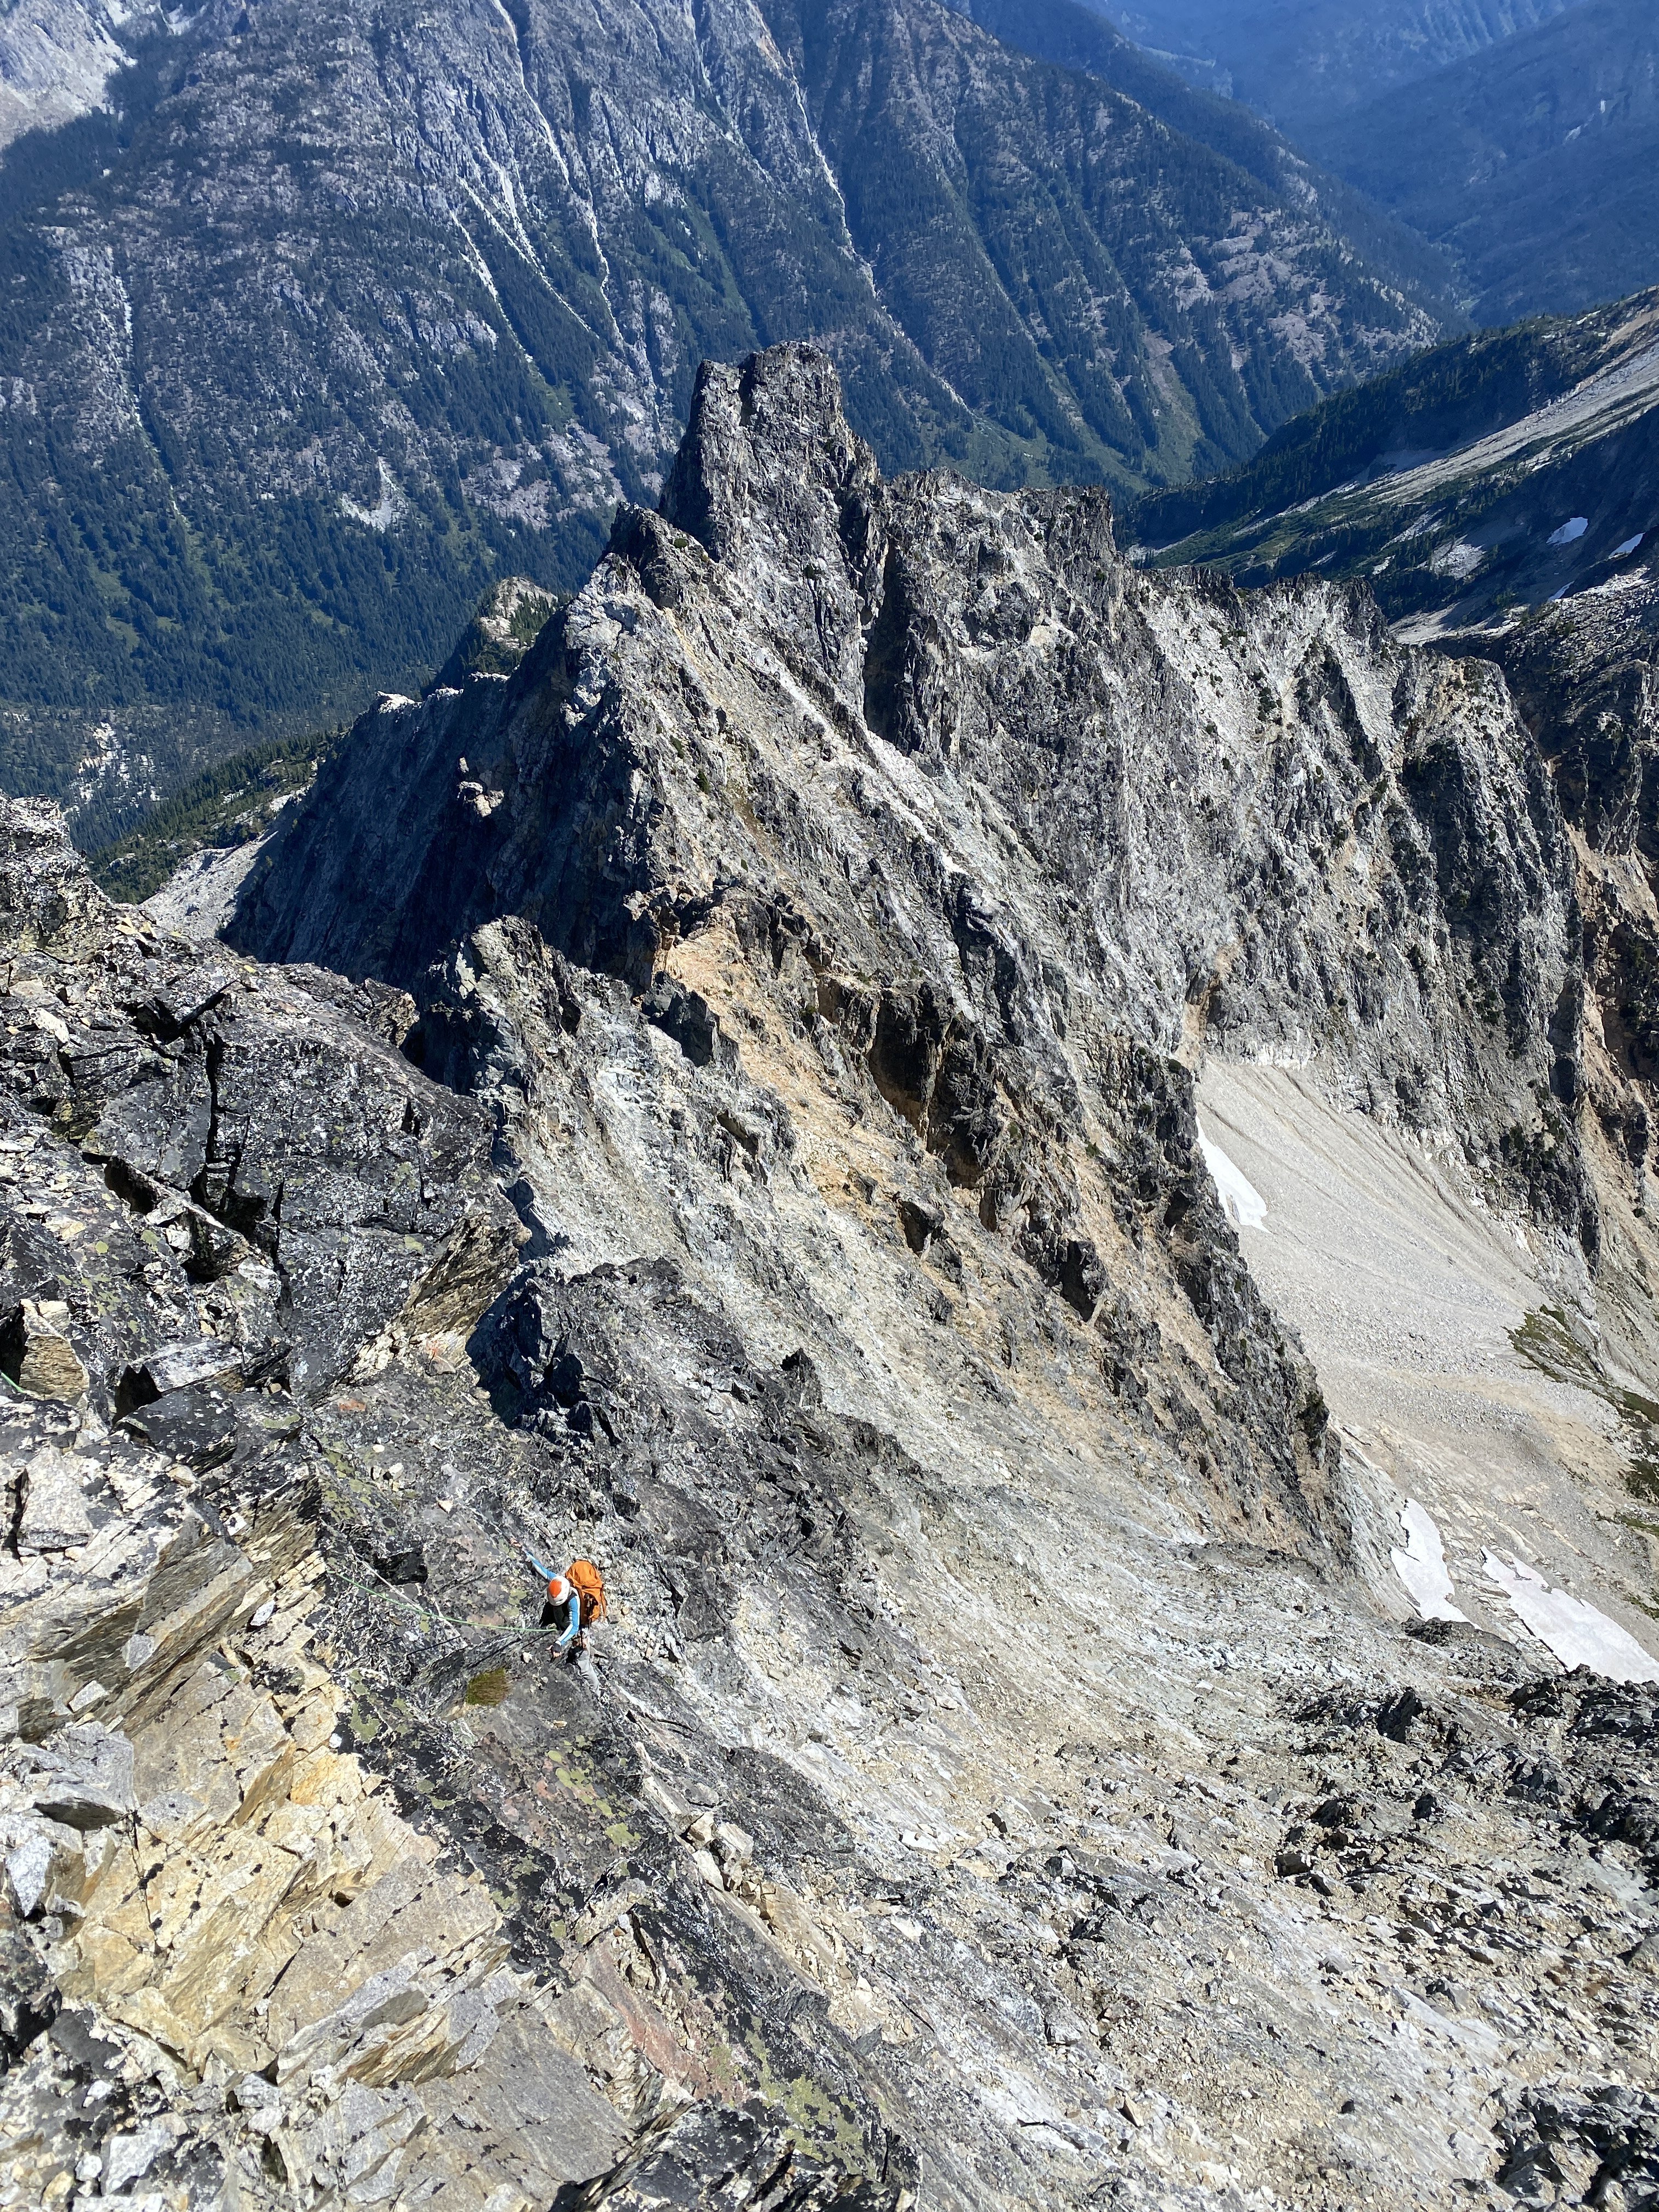
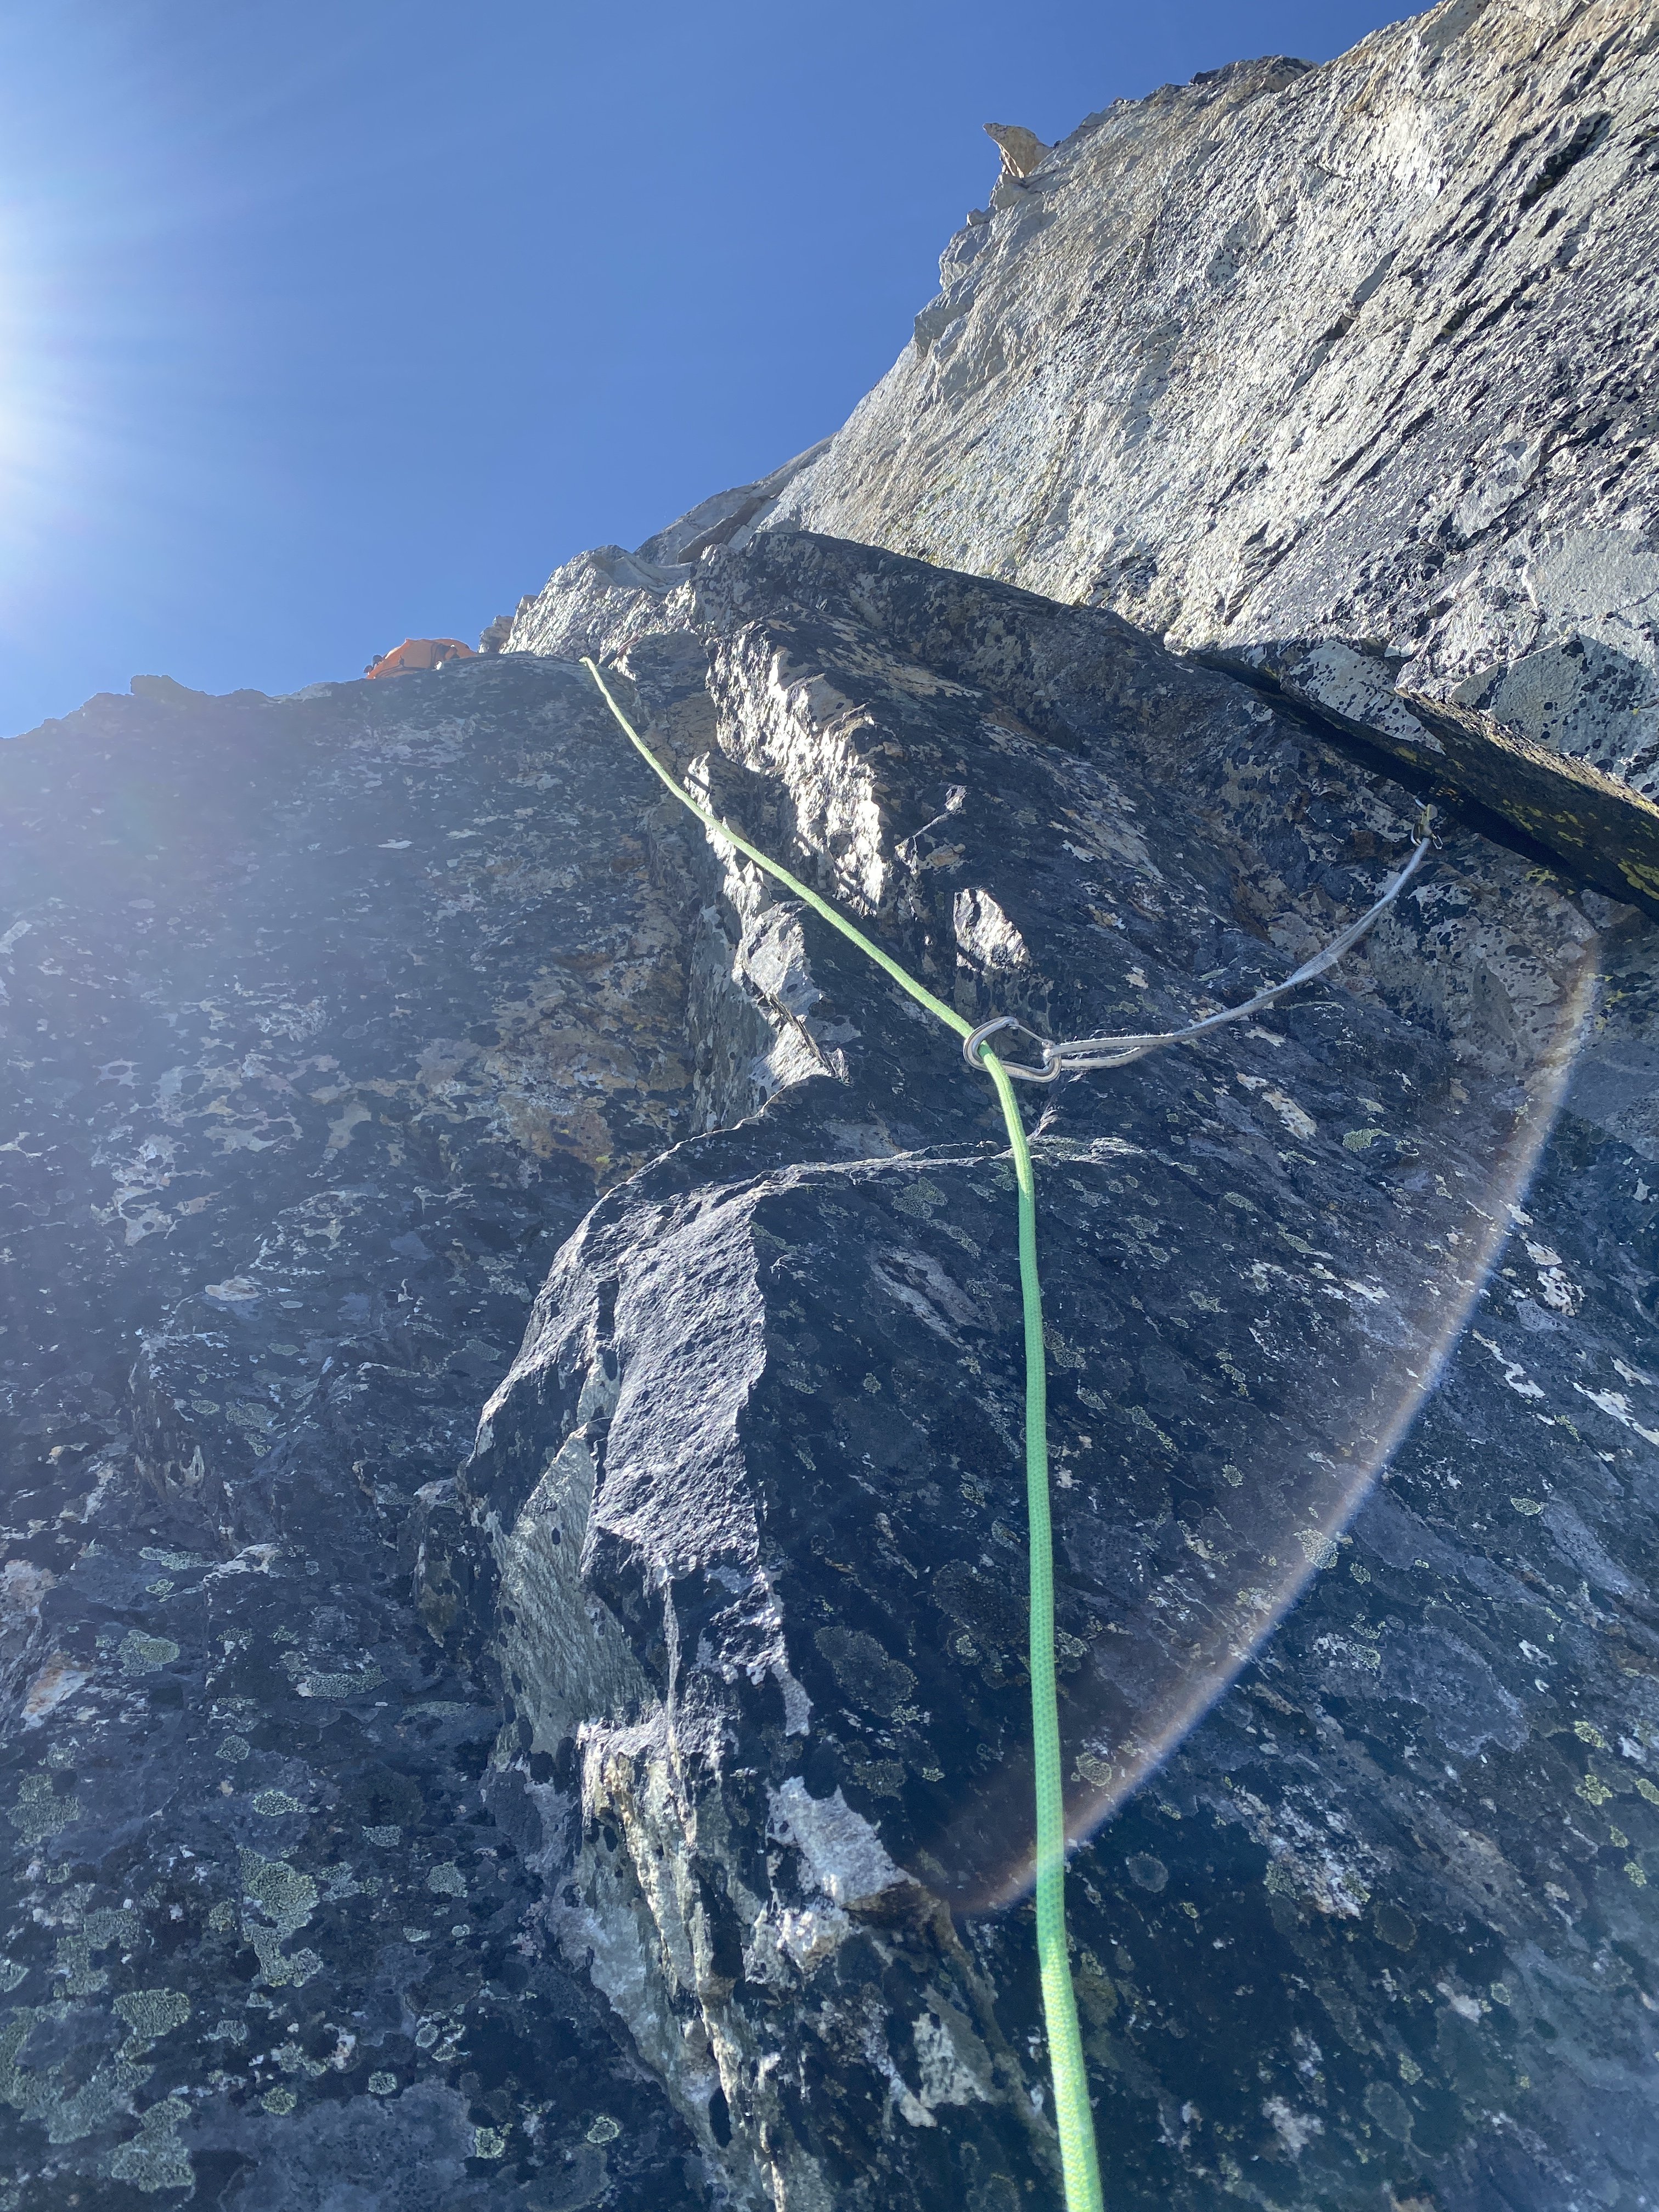
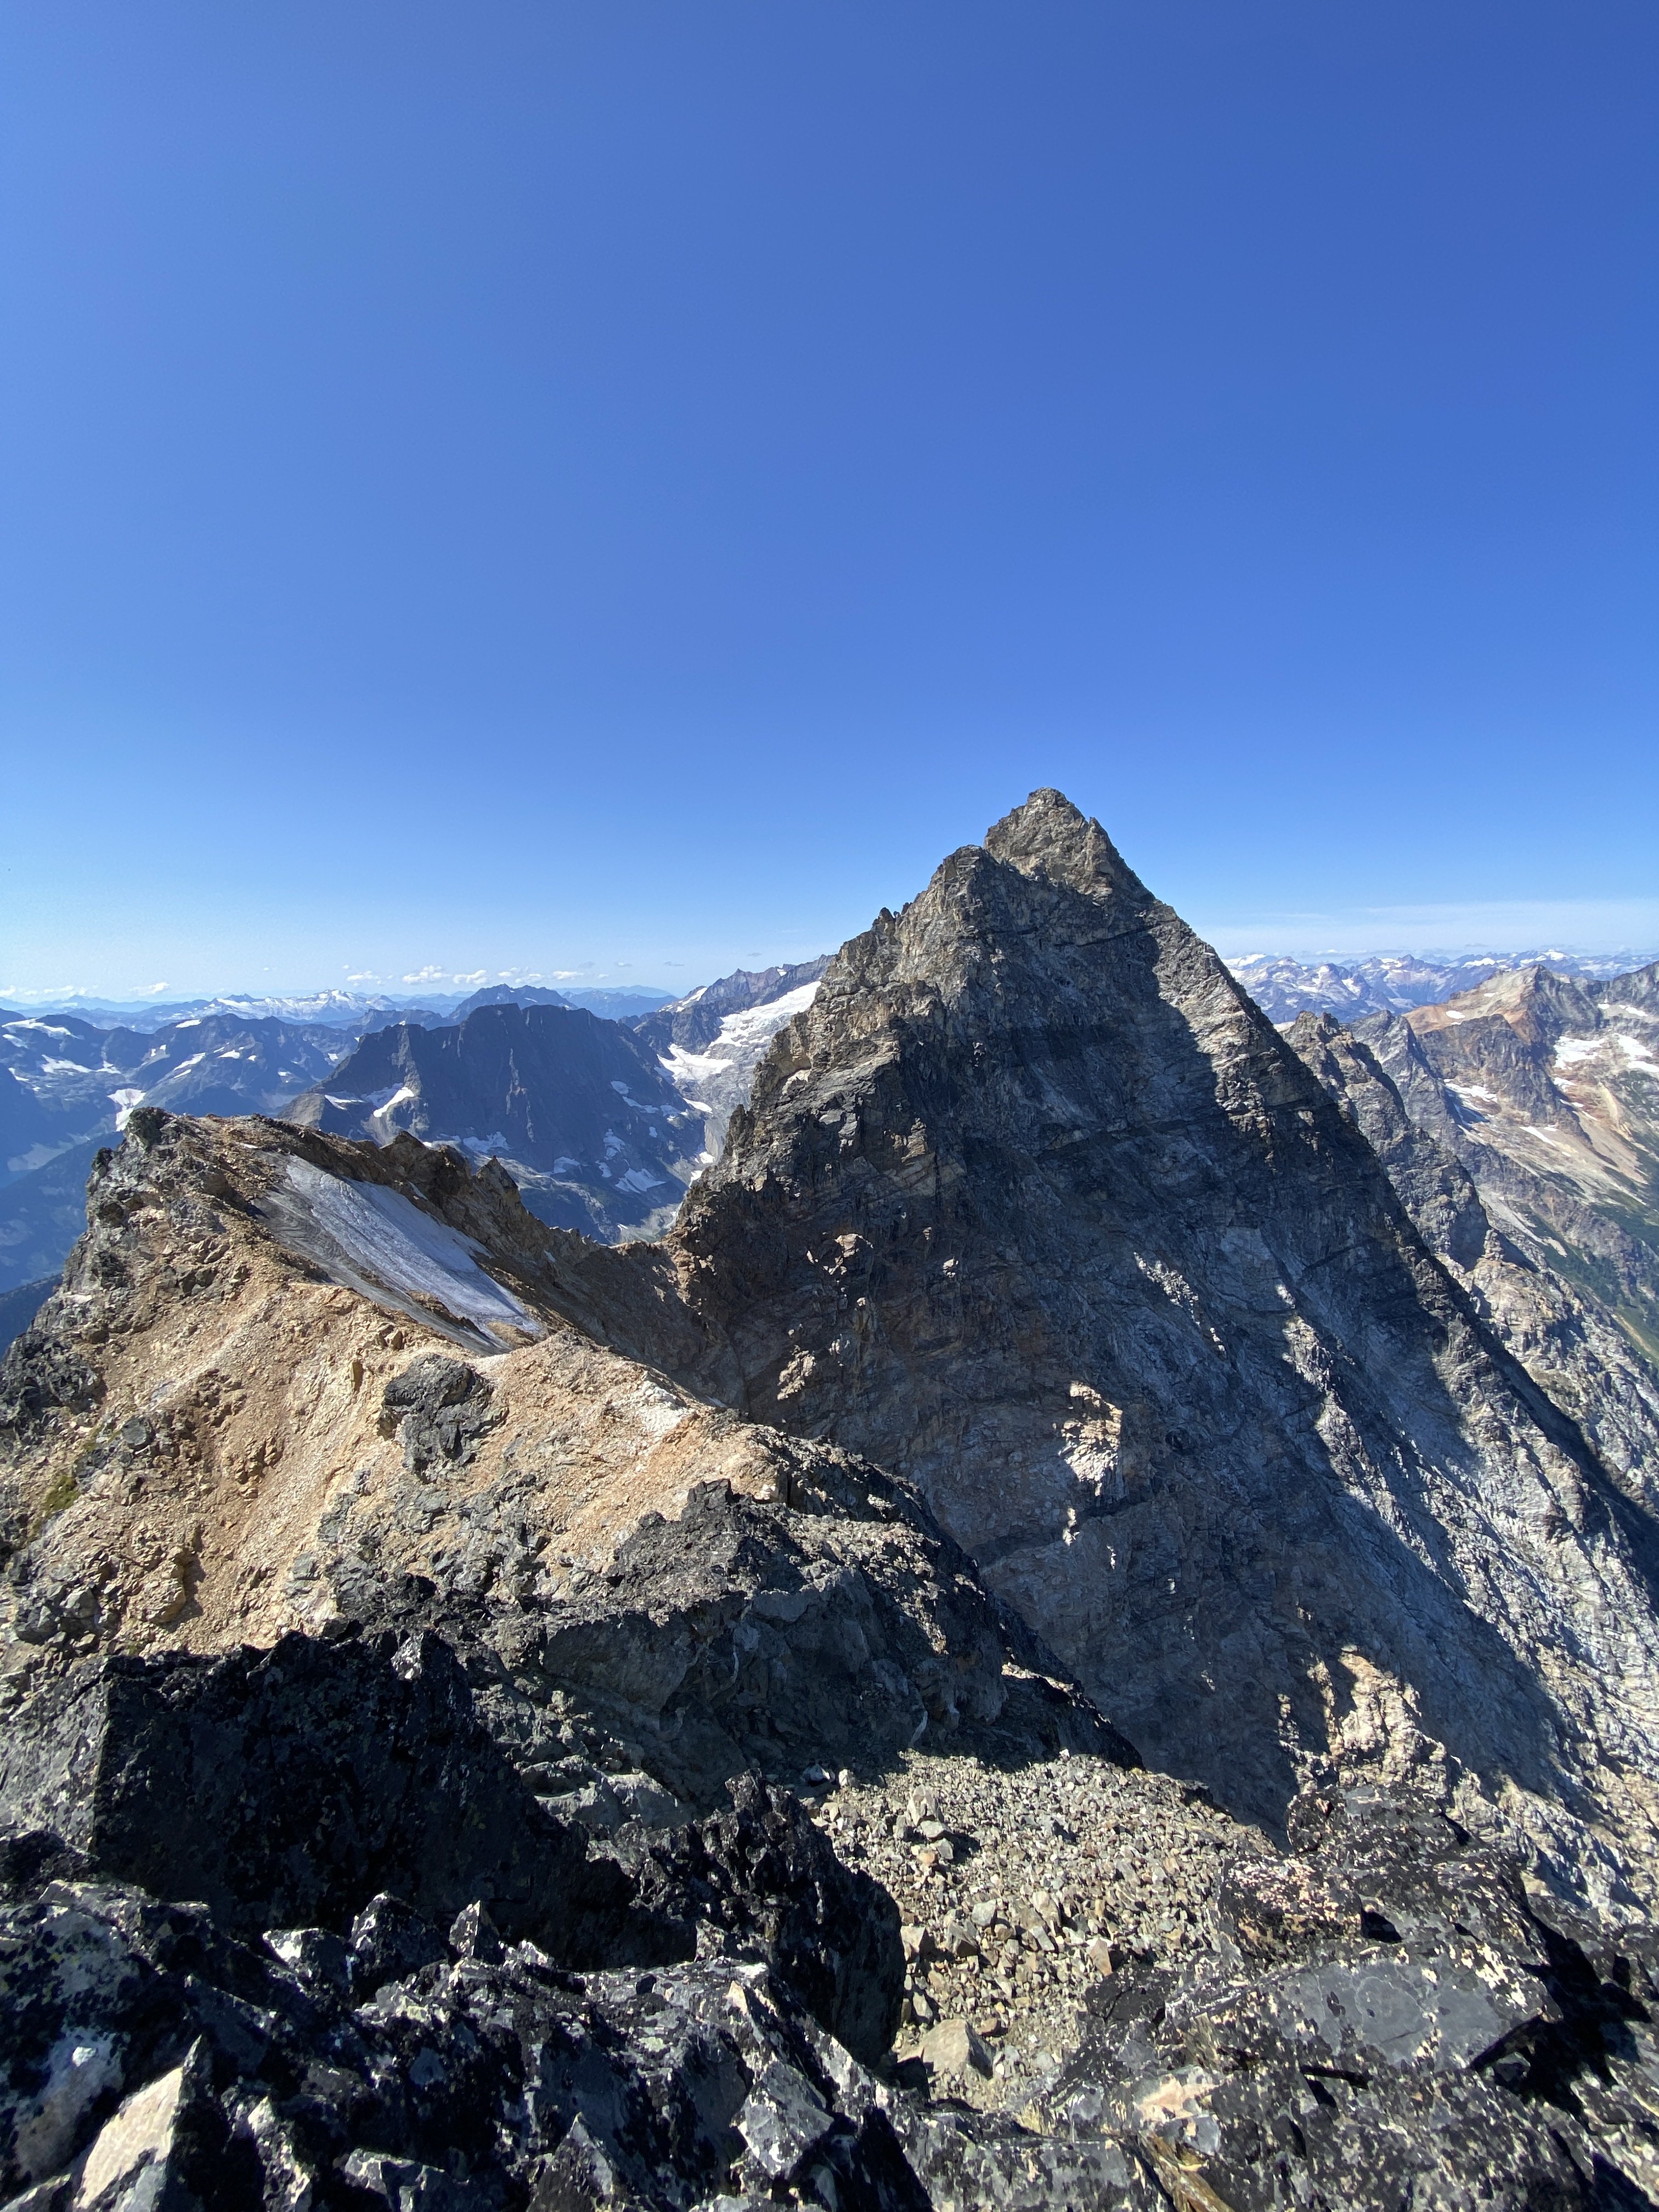
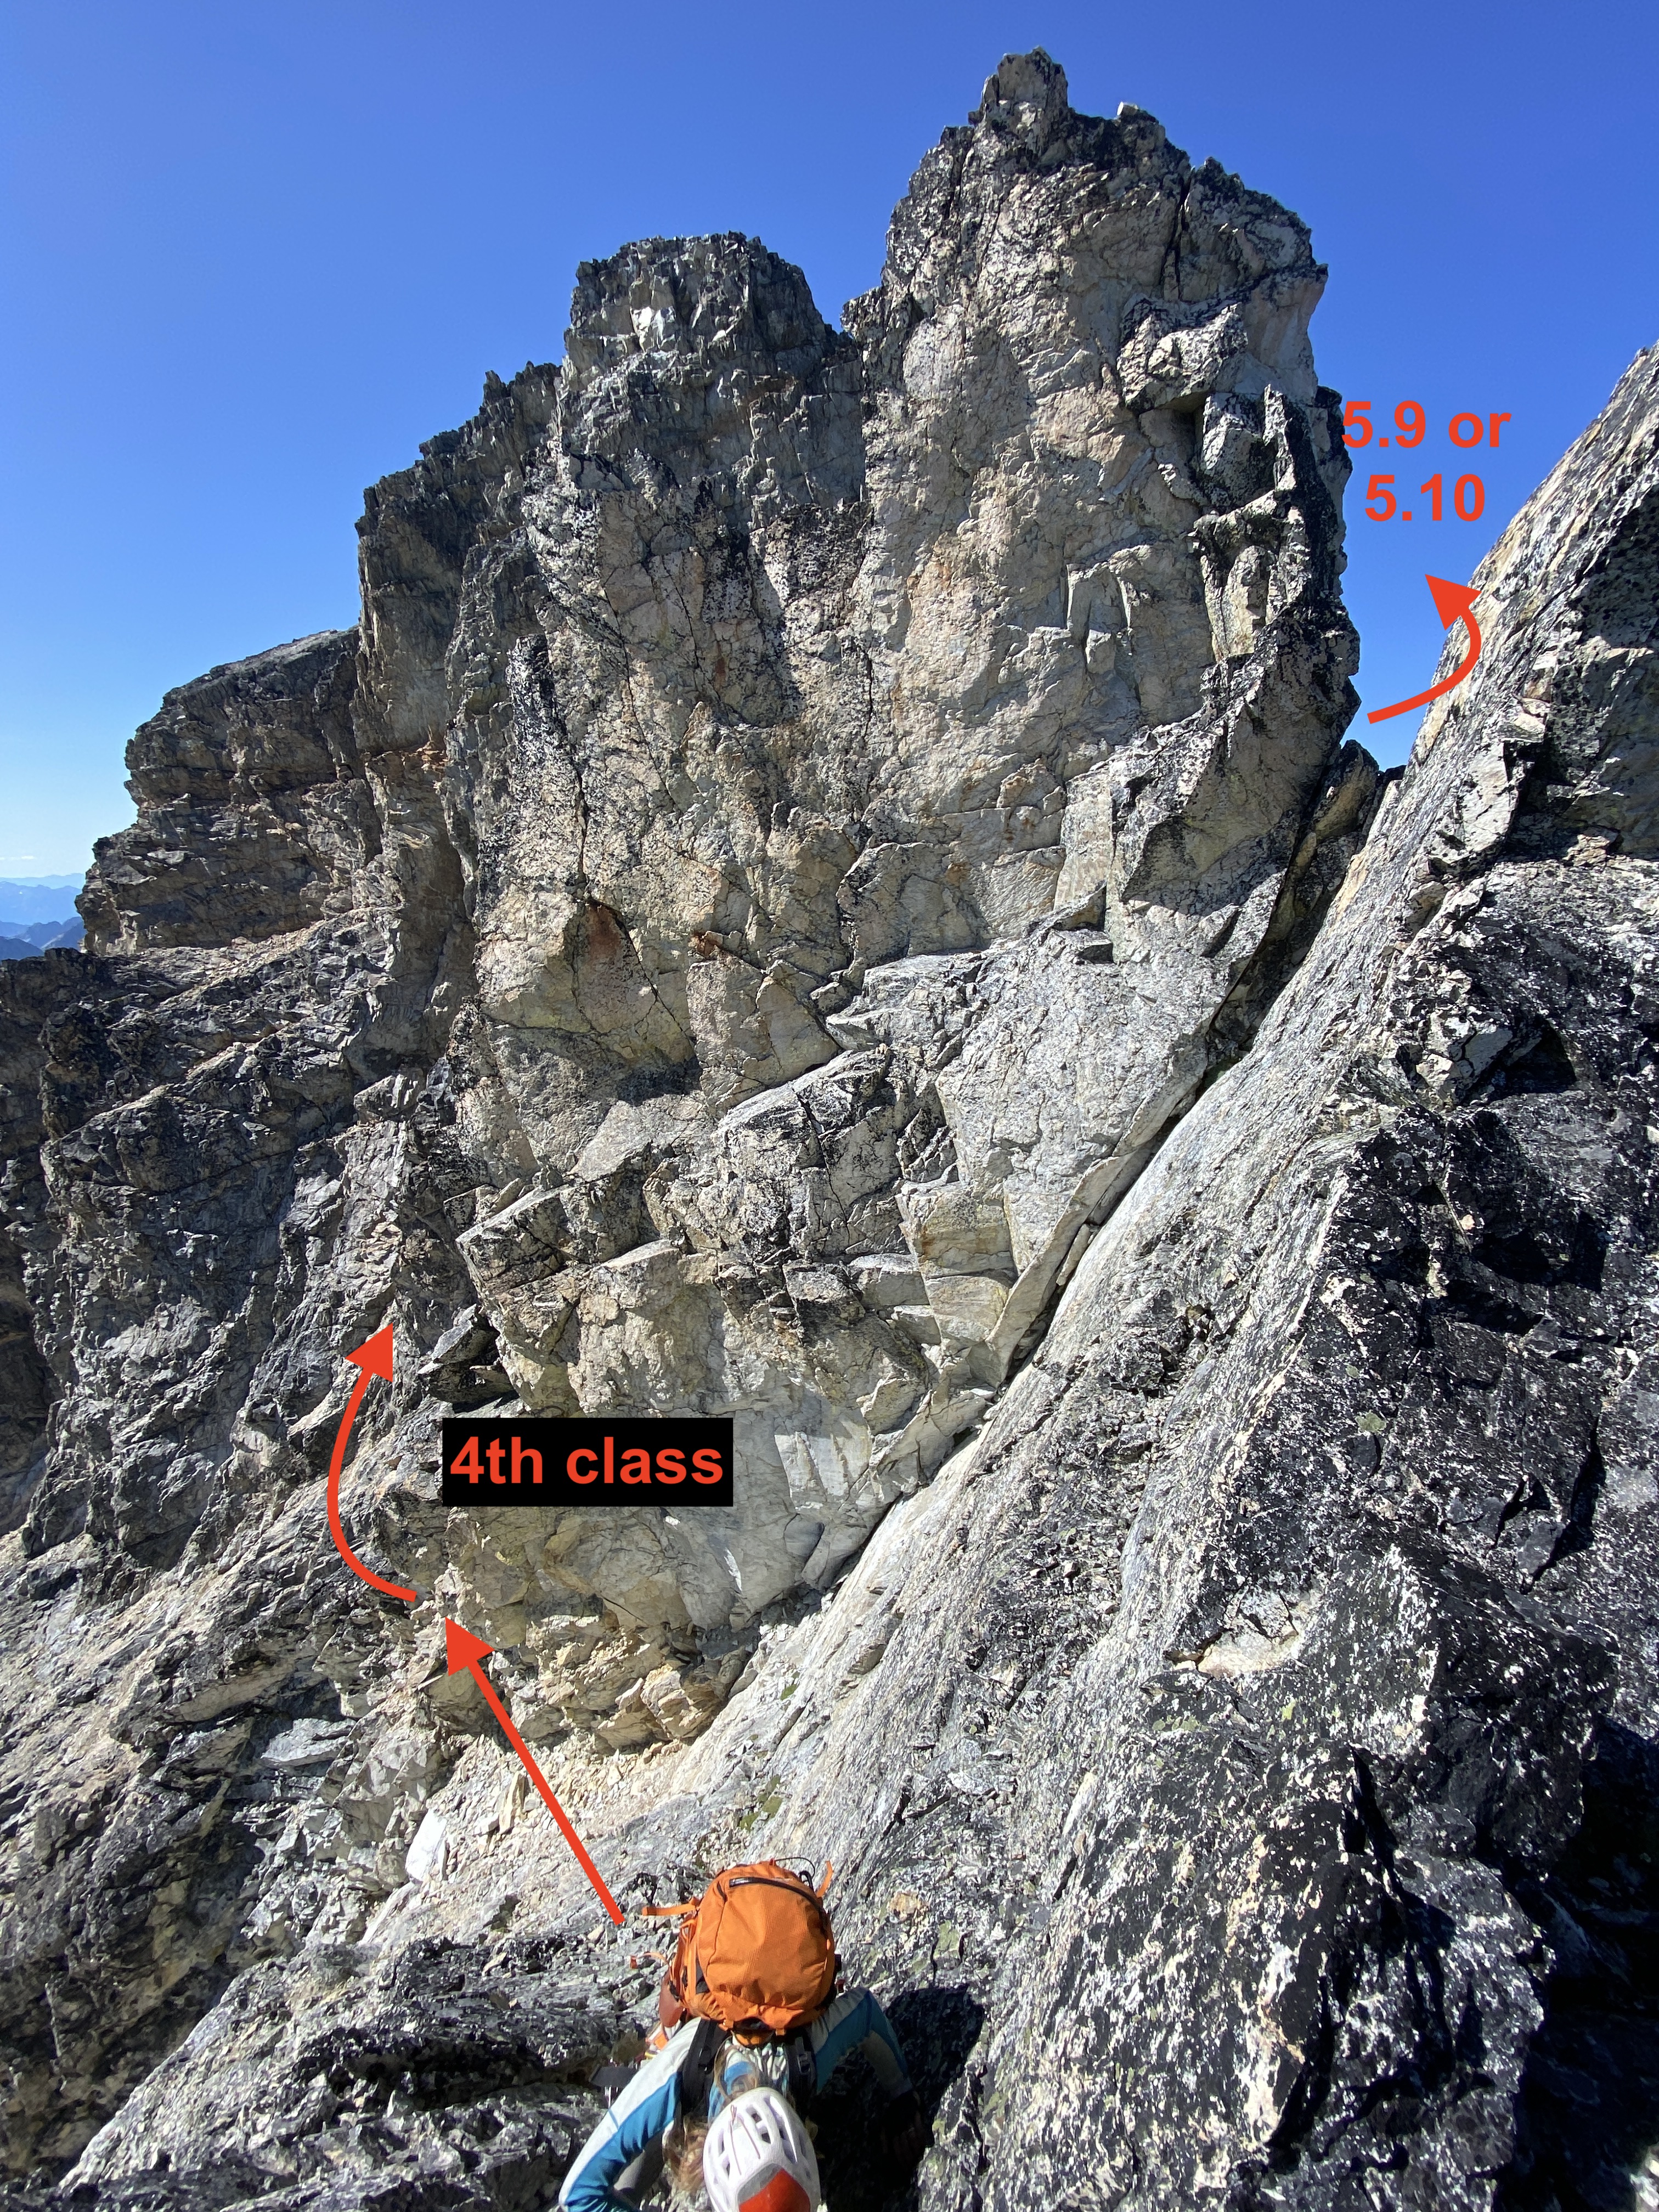
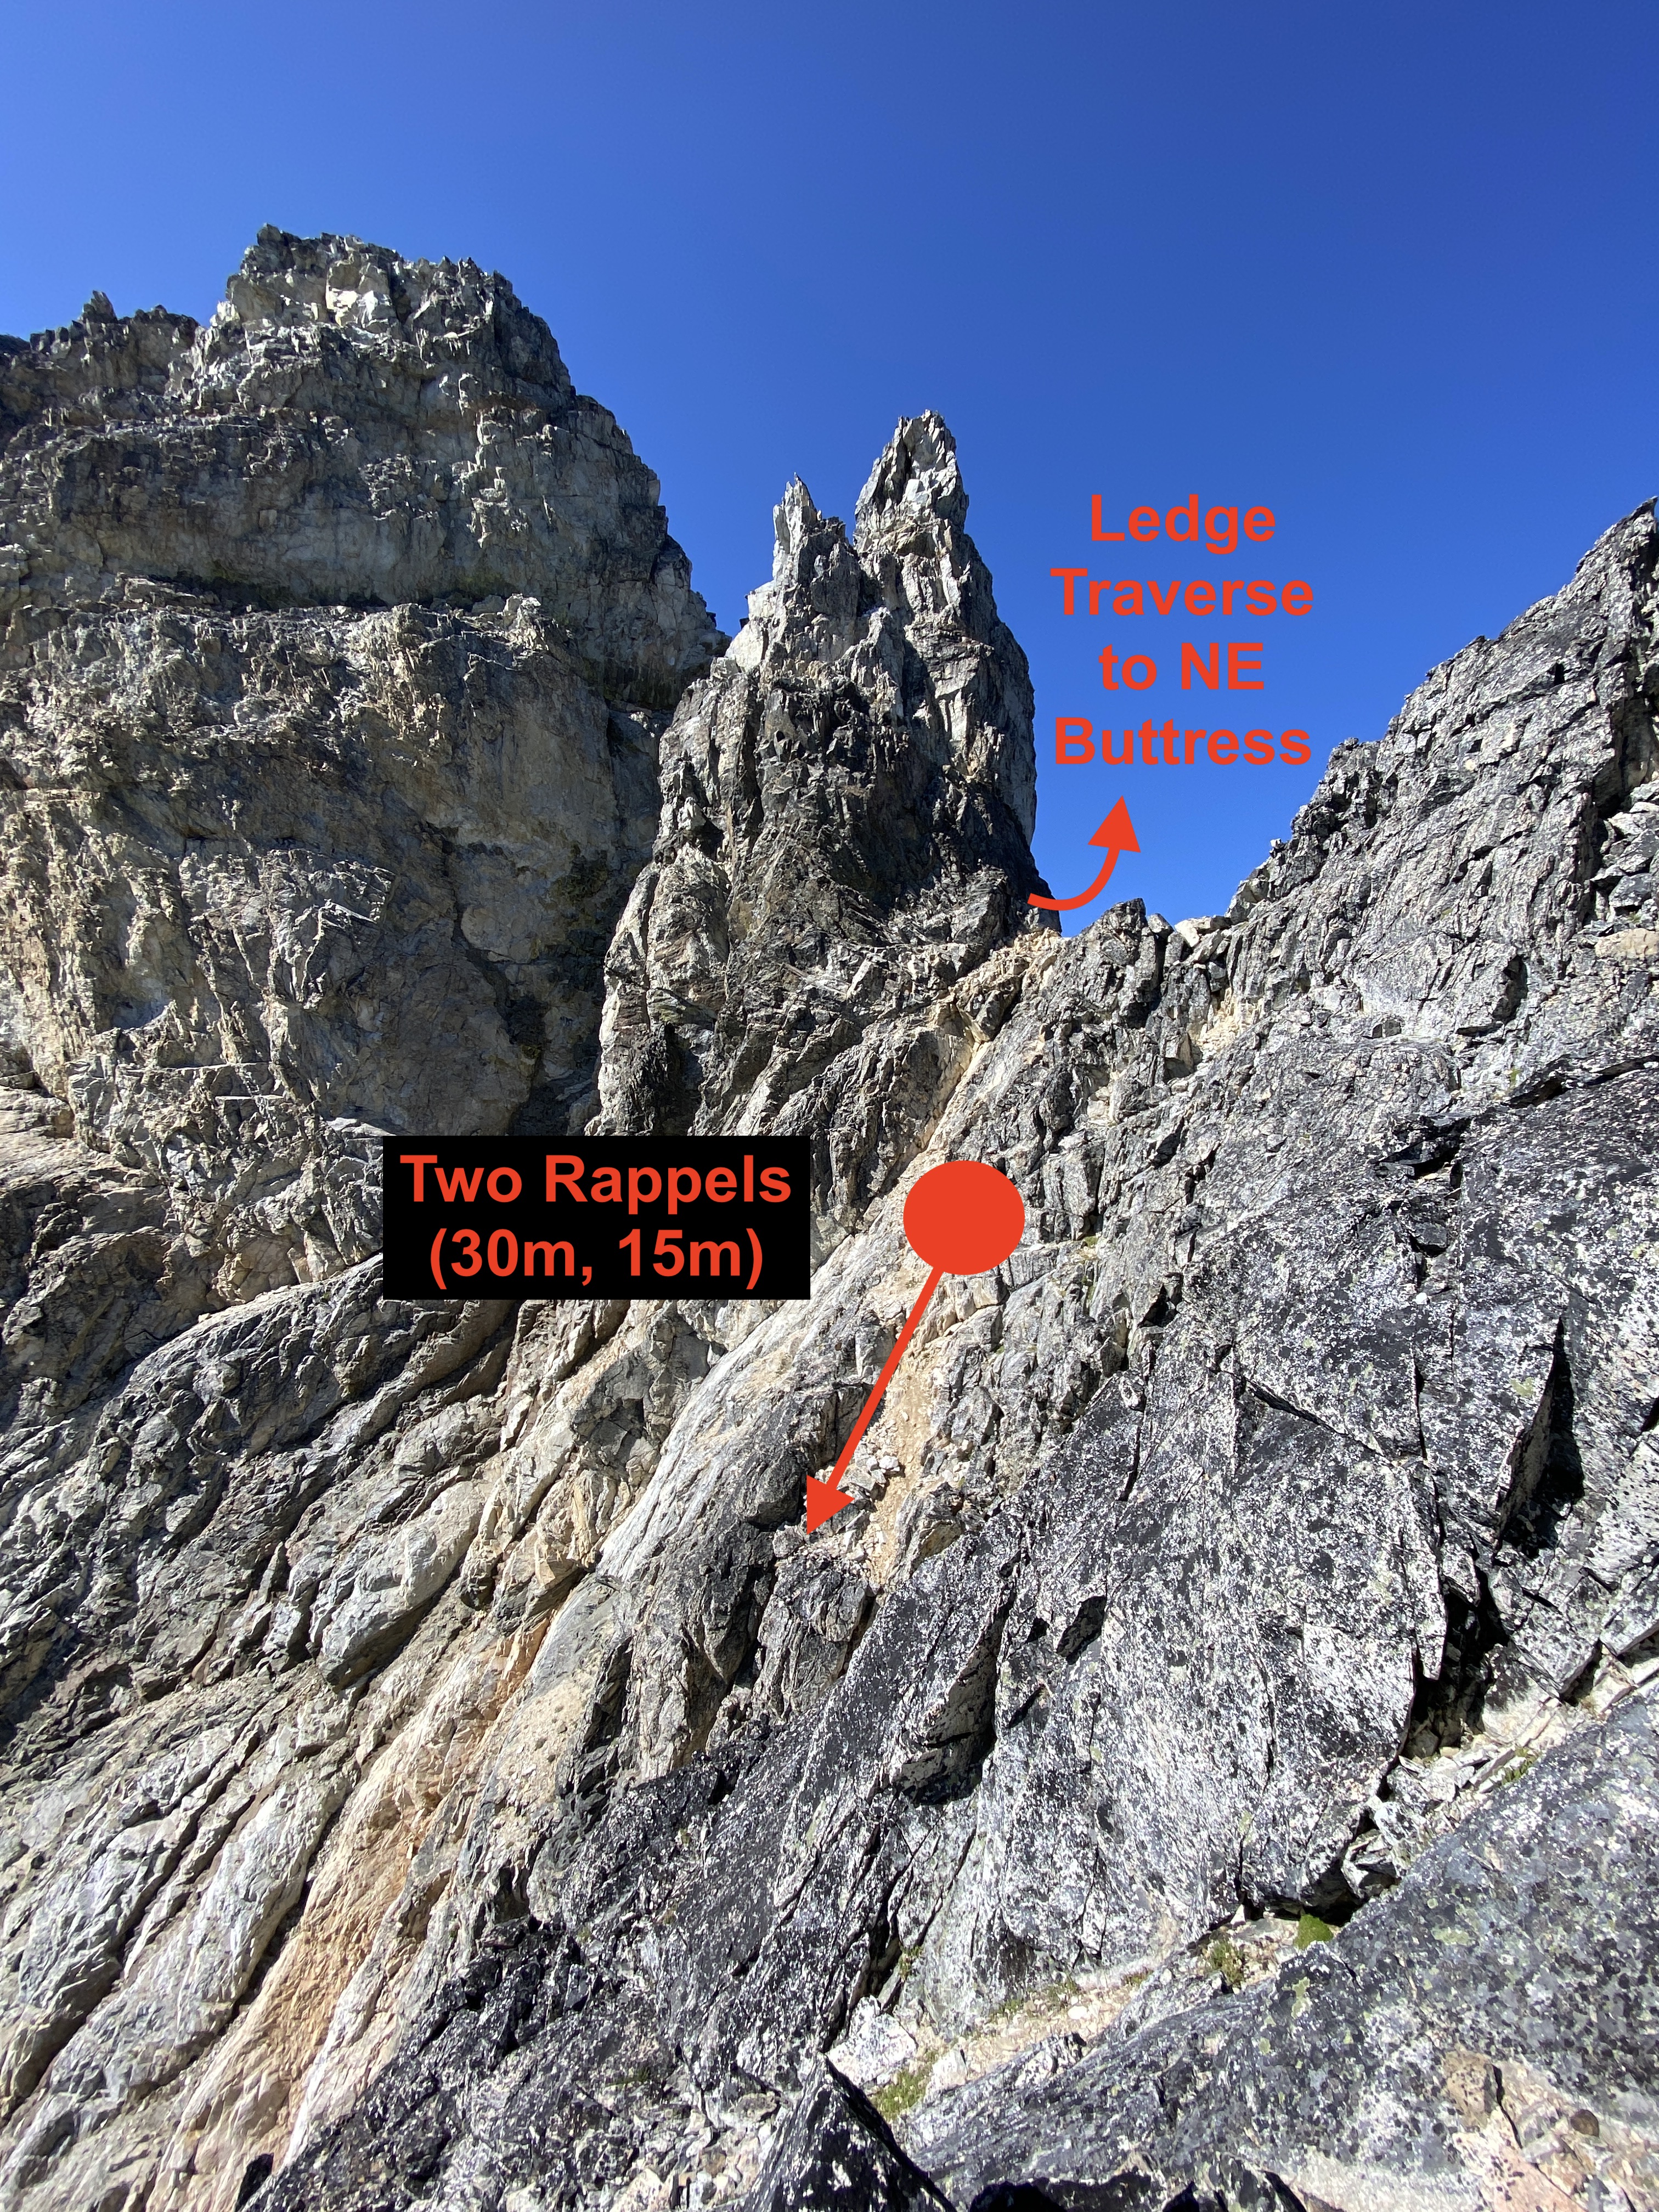
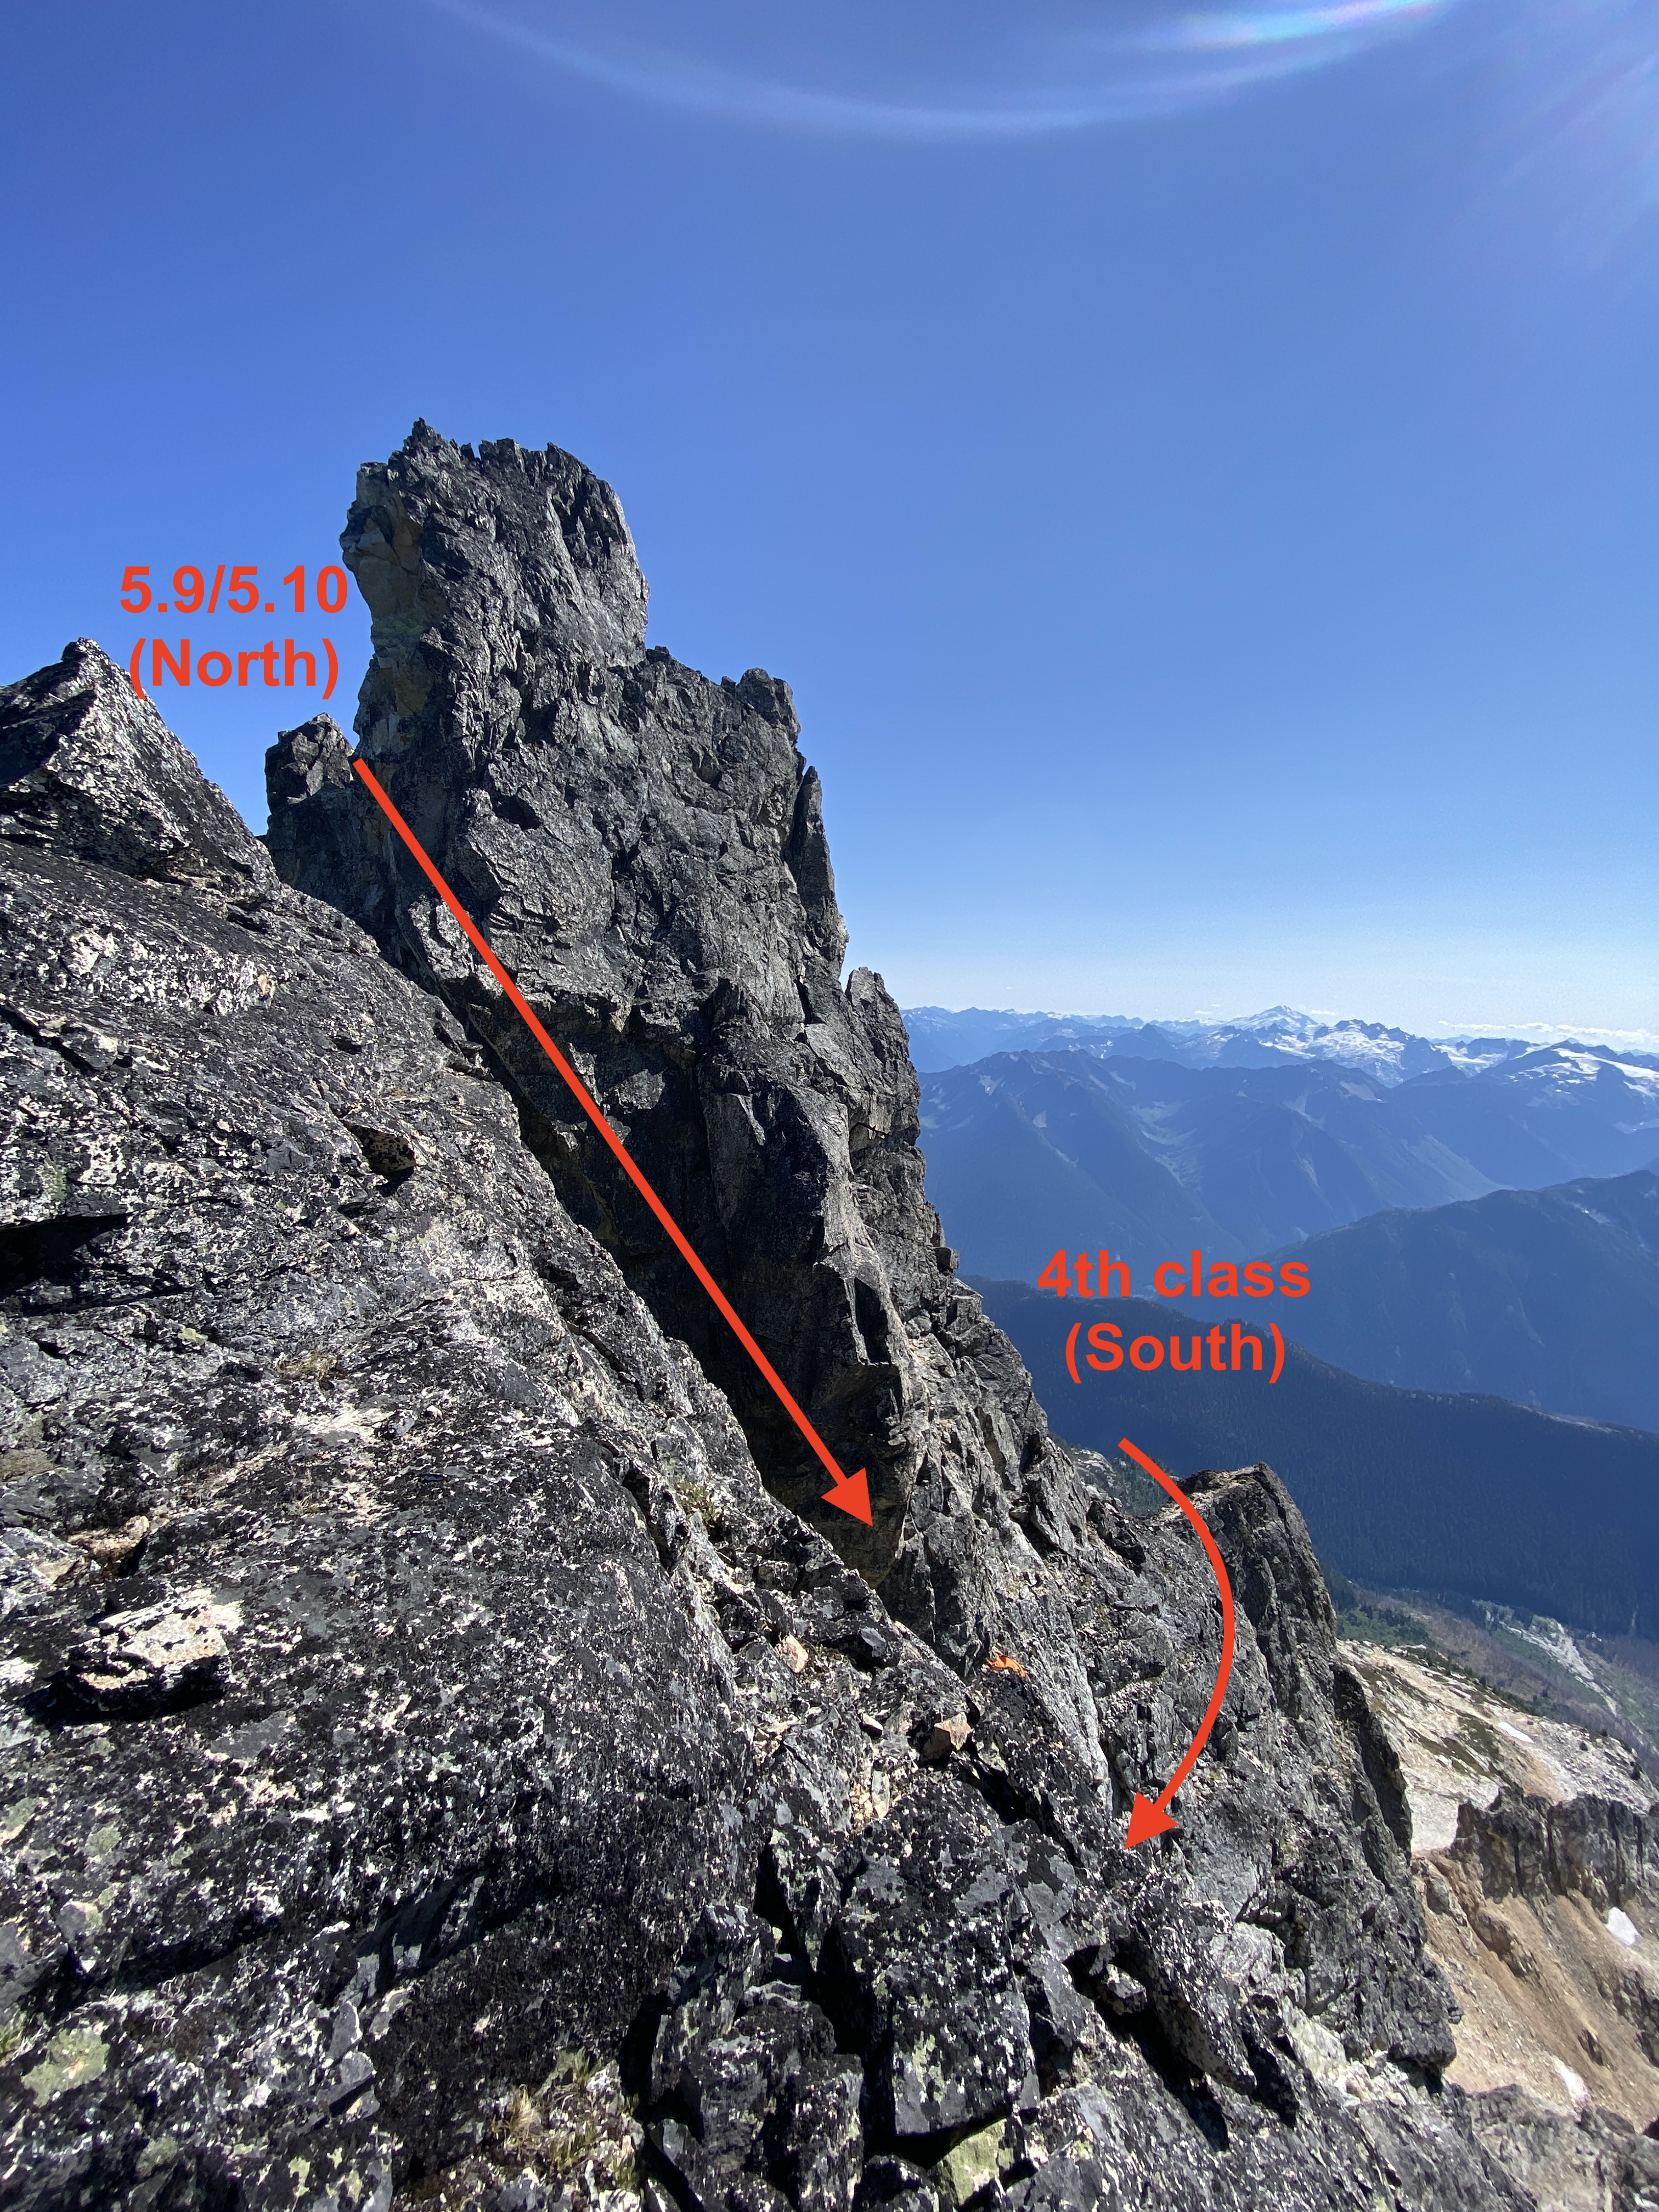
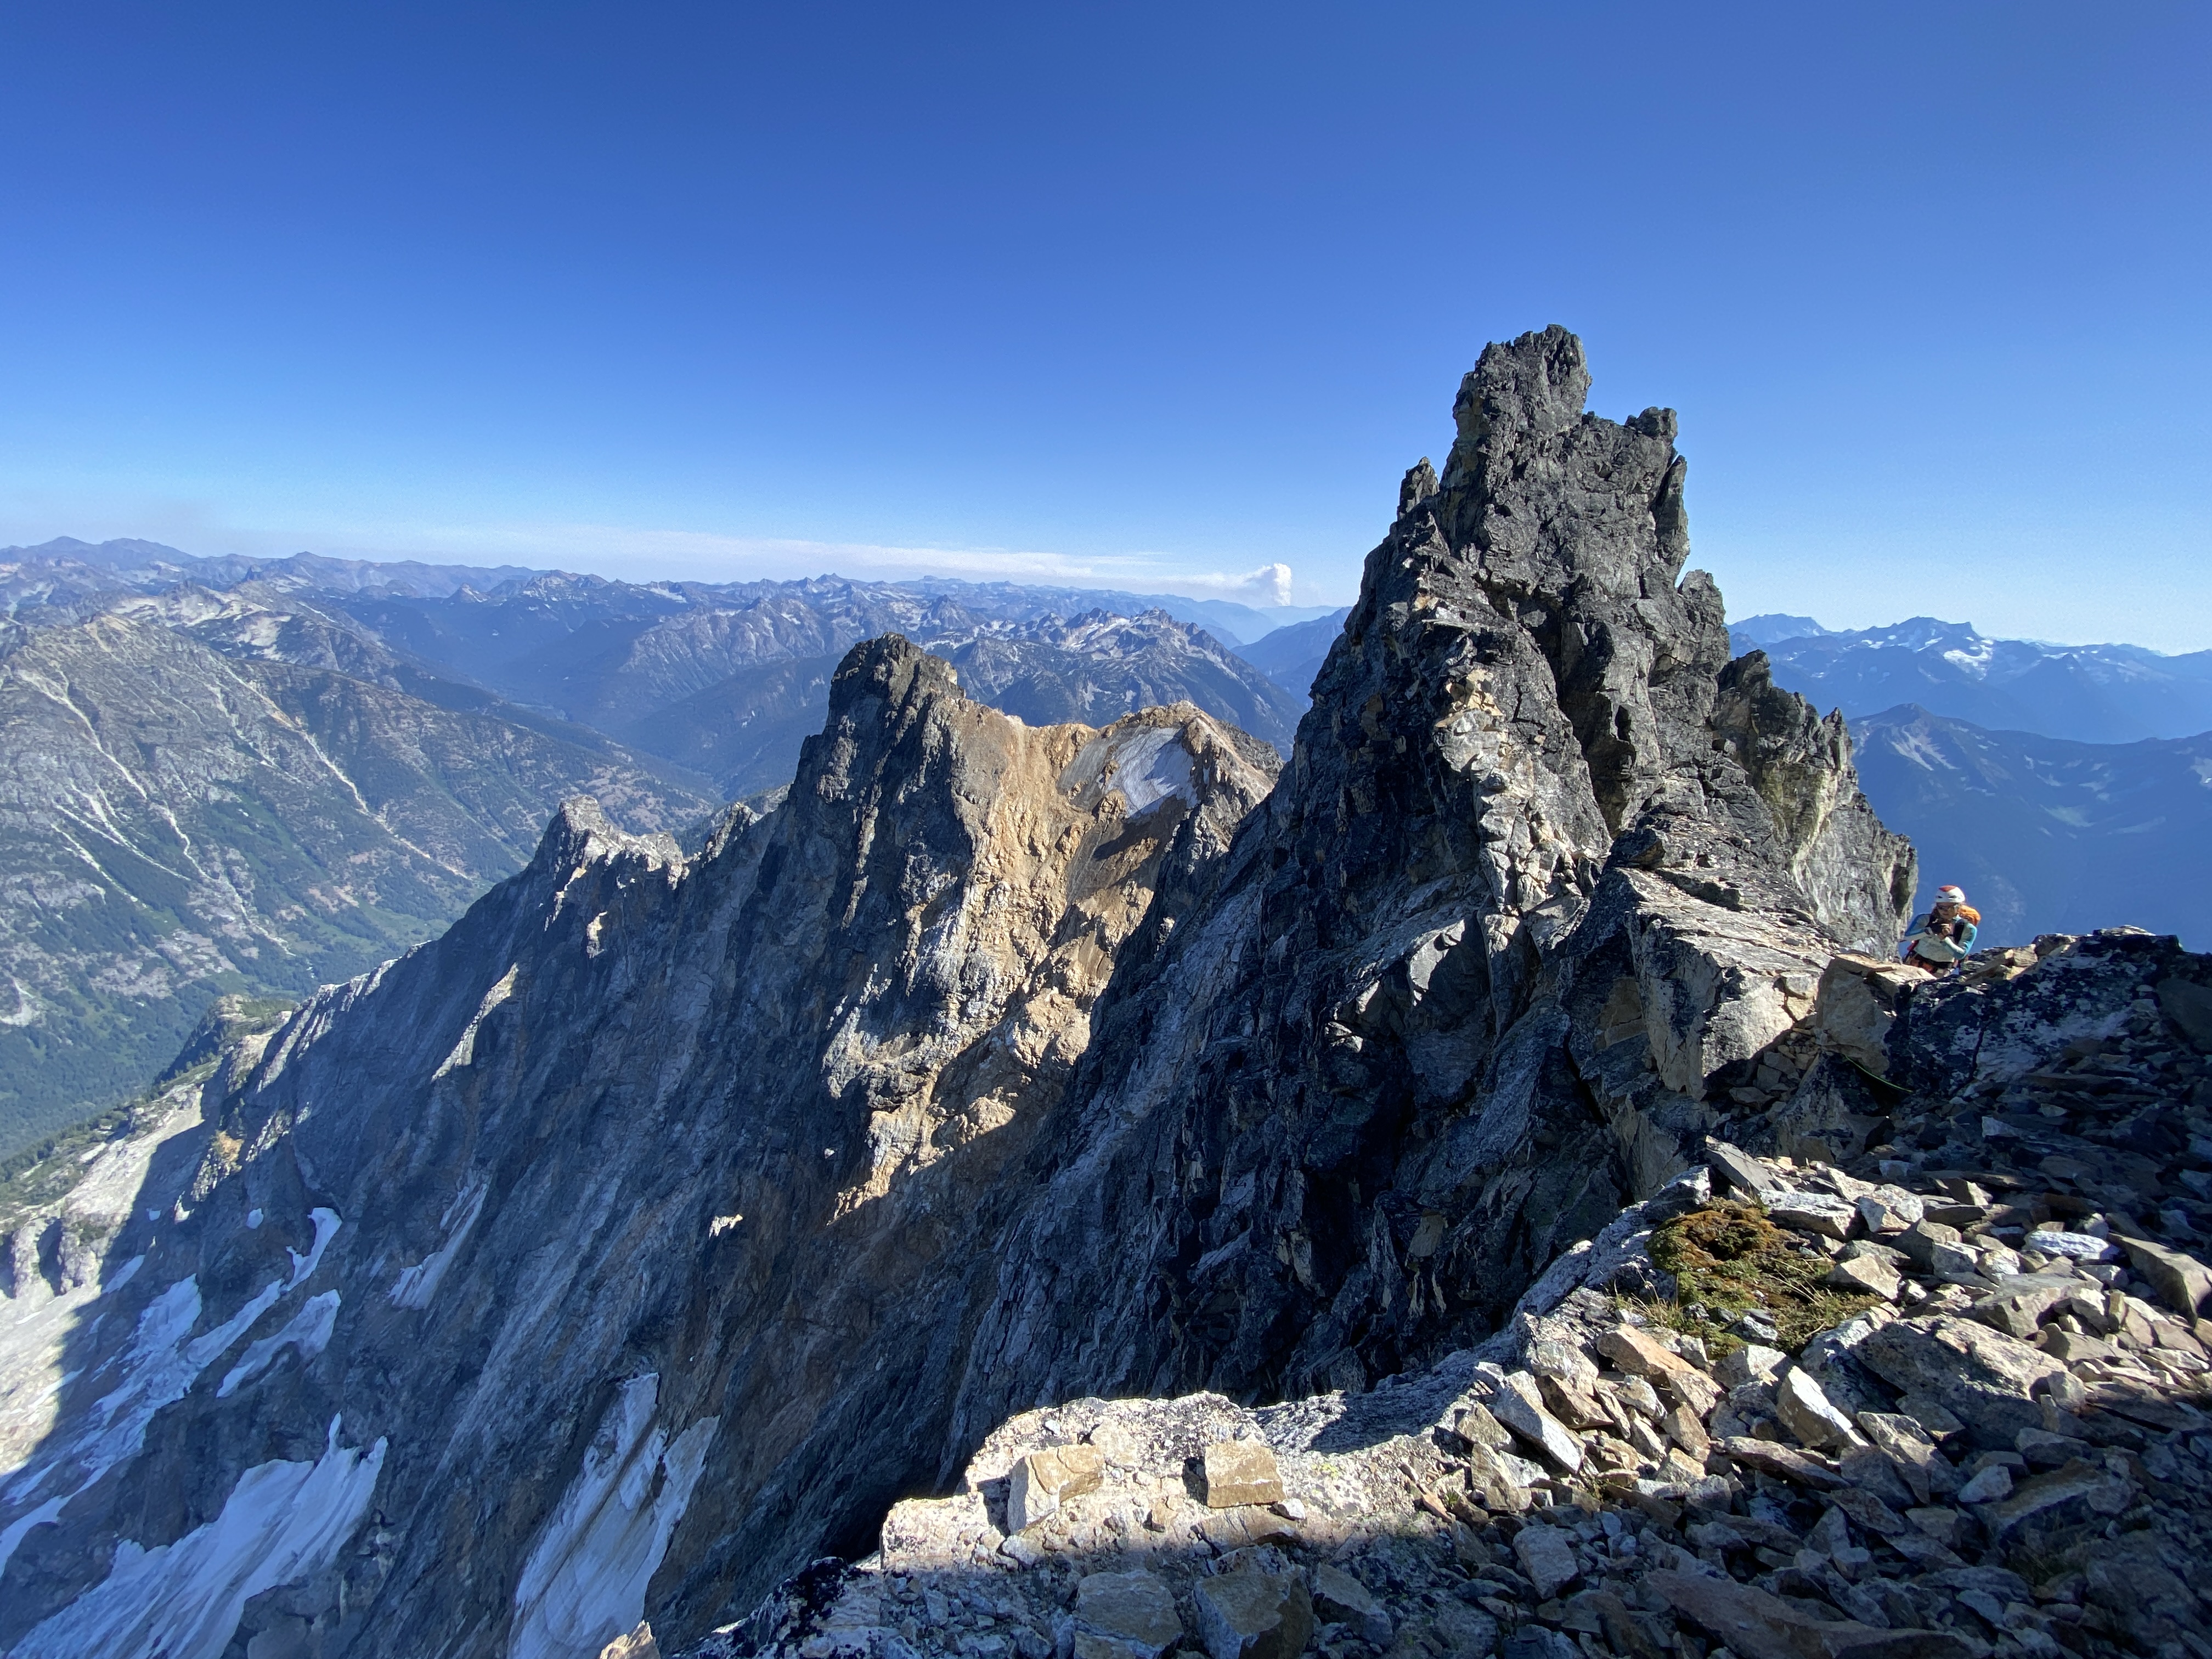
Trip: Goode Mountain - Megalodon Ridge Trip Date: 08/29/2021 Trip Report: Megalodon Ridge. An evocative name for an evocative climb on Goode Mountain, the tallest peak in the North Cascades National Park. Priti and I have been struck by its lore ever since we were students learning to alpine climb. It is another one of those mythical Cascades test pieces that rarely sees ascents (although it really should get more attention). Megalodon Ridge is the East ridge of Goode, joining with Memaloose Ridge and Goode Ridge from the Southeast before it reaches the summit. The climb ascends with foreboding views out onto Goode’s impressive North Face and the highly aesthetic, classic NE Buttress. Put up in 2007 by local legends Blake Herrington and Sol Wertkin over three days with recon by Dan Hilden, we were maybe the sixth known ascent. Dan and Jens Holsten made the second ascent in 2010 over a blistering 27 hour single push. FA TR: https://cascadeclimbers.com/forum/topic/53892-tr-mt-goode-megalodon-ridge-iv-510/?_fromLogin=1 Second Ascent TRs: - http://jensholsten.blogspot.com/2010/09/sound-of-goode.html - https://cascadeclimbers.com/forum/topic/76094-tr-mount-goode-megalodon-ridge-932010/ Other folks who have successfully put their hat in the ring include local heroes of ours: Alex Ford, Laurel Fan, Austin Siadak, Michael Telstad, and Sean Fujimori…all people we have no business having our names in the same sentence…which added to the improbableness of this climb. With new standards in moderate 5th-class choss tolerance, however, I think it’s time to lift the veil on this elusive climb. Named after the prehistoric behemoth of the ocean, fish-themed snacks are a must. 33.5miles and 8,500ft vert round trip make this climb a relatively chill 3-4 day outing, an ambitious 2 day outing if you’re a pro climber, and an unfathomable single push outing if you’re a demi-god. Being mere mortals, we did this as a casual 3-day outing with lots of time to spare. Since its inclusion in Blake’s 2015 “Cascades Rock”, those pages went unconfronted for six years until Michael and Sean posted of their adventure this past July, reigniting its possibility. Michael TR: https://cascadeclimbers.com/forum/topic/104101-tr-mount-goode-megalodon-ridge-07192021/ Michael had an amazing trip report that helped us immensely. The purpose of this TR is to sprinkle in some more micro beta if you choose to have less of an adventure. Strategy Tips The route could feasibly be done in 2 days by a very fast team of folks who are used to covering many miles of trail quickly. But it is actually a very moderate outing when done in 3 or 4 days. I'll outline all bivy options. You never really need to carry much water with you unless you plan to bivy on the summit. We chose to carry less water on the route, and skip the summit bivy, since it's just an hour or two down the SW Couloir to flowing water. The Goode Mountain summit bivy is truly remarkable and a destination in and of itself. There are two ledges at the very top which can fit four, then two more ledges 60m below the summit which can fit four more. Sleeping on top is REALLY COLD, however, and you can get away with bringing less clothes if you don't sleep on top. You really don't need to have a stove on this trip either since there is enough flowing water (unless the daily high's are below freezing in early season). We regret bringing a stove. Save every ounce In all of my anecdotal polling data, nobody has taken the alternate wraparound descent as described in Cascade Rock. Seems to be generally difficult and sketchy, requiring gnarly glacier travel and crampons. Most parties who do the NE Buttress go down the SW Couloir to Park Creek, and it's kind of nice to just take the normal descent and avoid any extra shenanigans. So...recommend just taking the normal descent. There is still some weirdness going down to Park Creek, however, and we had to check our tracks frequently. Many tracks are available on Peakbagger.com You can probably skip crampons and ice axe. The SW Couloir doesn't really require it, although you will find chill snow travel on descent. There is a snow ridgeline along Megalodon Ridge (the ski descent). Depending on the time of summer, you may be on top of the snow, in a moat, or in choss. If you're on top, you can probably get away with just belaying across if you're worried about the exposure. Pair down the weight!! We brought light glacier harnesses and loved it! We clipped gear onto our backpack waist straps and all draws went around the neck. There is really only 4 roped pitches. The descent is between 2 and 6 rappels depending on how much down-climbing you're comfortable with, so you don't really need a regular harness, unless you're bringing more than a single rack. A single rack .2-3 and a few small nuts is more than enough if you plan to solo <5.6 terrain. Bring more gear if you plan to simul. You can even skip the #3 if you are really confident at 5.9. Less is more. Headphones and downloaded podcasts make the 20 mile hike out go faster. Skip the chalk bag. Maybe bring a tiny tube of liquid chalk. If you're confident in climbing 5.8 in techy approach shoes, you could maybe skip rock shoes altogether. Cache beverages at Maple Creek on the way in so you have it on the way out! There are really just 3 mandatory pitches of climbing all stacked on the headwall, and two additional optional pitches (the rest is 4th class and low 5th). To start off, I personally highly recommend roping up at the top of Tower 1 for the downclimb to the first notch since it is megaloose 5.6 downclimbing with mega exposure (Note: the FA party rappelled 50m to the south, not recommended). Then unrope for the traverse up/over/around gendarmes until the headwall pitches (4th class and low 5th). Bypass gendarmes logically via lines of least resistance (sometimes up and over, sometimes around). Rope up for the three headwall pitches to the summit of the SE summit: 1) 35m of LOOSE 5.7-5.10 (depending on which variation you chose), 2) 30m of 5.9 (technical crux of route) with many hand cracks, 3) 70m (simul) of LOOSE 5.7 to the SE summit (you can stop before summit if you don't want to simul). Then unrope again, pass over the "ski descent" snow ridge, downclimb talus Gain the rocky ridgeline again and pass a prominent col (not to be confused with Black Tooth Notch) Continue on the rocky ridgeline, passing a piton and an old sling (5.6), continuing mostly on top of the ridgeline to the final gendarme just before the Black Tooth Notch. Blake describes it as "a pitch of well-protected 5.10 climbing on the north side of the crest down into the notch" (Michael down-graded it to 5.9). We found a 4th class route on the South side (climber's left) which bypassed the gendarme entirely, if you want to lose cool points. Cross over the Black Tooth Notch (the SW Couloir), notice the rap stations, then an exposed traverse (cairn here) meets up with the NE Buttress. Three 30m pitches of exposed and quality 5.6 (angling severely up and right) take you to the summit. We downclimbed the 5.6 back to the Black Tooth Notch, skipped the first rappel at the notch, scrambled down 15m to the next rappel, then made two raps (30m then 15m). I highly recommend not trying to downclimb these two rappels...just take them, it's steep, loose terrain. Approach Start from Bridge Creek Trailhead (just East of the Rainy Pass Trailhead) and take the PCT south, leaving it for the North Fork Bridge Creek trail (this is also the approach for the NE Buttress of Goode). Starting from the Bridge Creek TH instead of Rainy Pass saves an extra mile of hiking. Our downloadable tracks once you leave the North Fork Bridge Creek Trail and getting up on to the ridge are here: https://www.peakbagger.com/climber/ascent.aspx?aid=1748765 Pictured above is the turnoff from the North Fork Bridge Creek trail which matches the tracks. It's an obvious boot pack that quickly turns into easy bushwhacking through alder. This turnoff is approximately when the trail is closest to the creek. Pictured above is the minor bushwhacking (knee to waist) over the creek (hidden) to gain Megalodon Ridge (right side of the frame). The bushwhacking will be much harder if it's just after a rain. When you get close to the creek the bushwhacking goes over head just for a little bit. We took lessons that Michael and Sean learned and stayed on land through the dense brush, heading upstream for ~50ft along the creekbed instead of attacking the creek directly and wading upstream in the icy water. When you pop out onto the creek, don't get in the creek until you confidently see your egress point. You don't want to spend more time in the creek than necessary. I got screaming barflies just from our straight-line crossing. If you don't see the super obvious exit point (circled in red above), keep plowing upstream through the dense brush. Once on the other side of the creek, a little more bushwhacking takes you to a rocky stream bed which you follow for a ways until you reach a chockstone waterfall (get water here). You have 2-4hrs until you reach water again (approximately 1/4) up the ridge, so you don't need to carry too much. Chockstone Waterfall. Follow ledges high and right until it opens up. Follow the stream until you get to the chockstone waterfall (where the green track diverges). Cross the creek over to the North (Megalodon) side and skirt the the top of the canyon wall until it opens up...don't go straight up the ridgeline. Follow open slopes up to the top of the ridgeline until you get to a small saddle and a 5.4 buttress. This 60m buttress is super loose and scary, so spend some extra time looking for a safe route up. Above the buttress is a few more hours of 4th class hiking and scrambling to the top of Tower 1. There is mild exposure on the final ridge to the top of Tower 1, but it's easy climbing. From the top of the buttress to the water are several really good bivy sites. At the water source is flat snow and boulders (not really a good, dry bivy site), so find something lower down on the ridge and hike up to retrieve water. This is the last flowing water until the Goode High Camp basin below the SW Couloir (1-2hrs after reaching the summit), so fill up a day's worth or more if overnighting on the summit. You also have the option to melt snow at "ski descent" along the way if you chose (no flowing water here). 4th class ridge to the top of Tower 1. Looking over onto the North Face and the awesome NE Buttress route. Neat pic. Pano of Memaloose Ridge as it meets up with Megalodon at Tower 1 on the right. From the top of Tower 1. The "headwall" is on the left (SE Summit) which contains three roped pitches. The FA party rappelled 50m to the South then traversed to the notch (not recommended). Other parties since have downclimbed. The downclimbing is loose, exposed 5.6...highly recommend roping up! You can unrope again down at the notch (~2 rope lengths). Unroped, easy scrambling up/over/around several gendarmes to reach the headwall. The traverse from Tower 1 to the SE Summit Headwall. Once at the headwall, choose your own adventure. The first pitch is 30-60m (depending on how high up you start belaying) of 5.7-5.10 climbing. Belay under an obvious corner on a ledge. The second pitch is quality 5.8 or 5.9 (the technical crux of the route) hands and fists for 30m to a ledge below the final ridgeline to the summit. The third pitch is 70m of unprotect able 5.7 ridge climbing (stacked, loose blocks) to the SE summit. You can stop short of the summit if you don't want to simul. Blake suggested the SE summit as potentially a good bivy, but I didn't see anything that looked mildly comfortable. Press on to the summit or the Goode High Camp. Looking down from the belay at the top of Pitch 1. You can see the ridge traverse down to Tower 1 (center), Megaladon Ridge (left), and Memaloose Ridge (right). Could be a neat trip to take Memaloose into Megalodon Ridge! Looking up at pitch 2. Start in the corner and traverse left. From here we unroped for the rest of the way (and we're not very good rock climbers either). You can also put on your approach shoes for the talus. Cross over the snow (it is all choss now). Melt snow here if needed, no running water. Downclimb talus and start back up the ridge, staying mostly directly on the ridge. The final obstacle is a gendarme guarding the Black Tooth Notch. Go right (North) for the 5.10 original route (5.10 or 5.9) or downclimb and go around left (South) for our 4th class cheater-bypass route to gain the Notch. Once at the Black Tooth Notch, traverse right (North) to join the NE Buttress. Climb 3x 30m pitches of quality, exposed 5.6, trending right to reach the summit. You can then make 3 traverse-y rappels back down to Black Tooth Notch or downclimb. Recommend taking two rappels down Black Tooth Notch (30m, then 15m) since it is very loose and steep. Here is a really good description of the descent: https://engineeredforadventure.com/goode-mountain-northeast-buttress/ Looking back at the final gendarme before the Black Tooth Notch at the two route options (photo taken from Black Tooth Notch looking East). Photo of the entire Megalodon Ridge! By now, you should be able to pick out "Tower 1", "SE Summit", and "final gendarme". I'm not going to overlay them for you . The photo is taken from the ledge traverse on the North side looking back at Black Tooth Notch. Another view of the "final gendarme" and the 5.9/5.10 downclimb on the North (shady) side that we did not do. Fish-themed snacks are mandatory. Looking up from the normal descent towards the SW Couloir. A long, but straight-forward descent down to Park Creek Trail and 20miles on trail back to the car. There is a good High Camp bivy site with water in the basin below the couloir: N 48.48025° W 120.91991° Gear Notes: single rack .2-3, few nuts, 8 single alpine draws, 3 double alpine draws, light glacier harness Approach Notes: Tracks: https://www.peakbagger.com/climber/ascent.aspx?aid=1748765
 2 points
 -
Trip: Les Drus, Chamonix - American Direct/Classic north face finish Trip Date: 08/14/2021 Trip Report: The nearest big peaks to me are those above Chamonix (I am aware of how lucky this makes me), and from the valley floor, none call quite so strongly as the Drus. When I first went to Chamonix in November 2019 for some skiing, I was actually in a pretty bad mental state, tired and depressed. The initial views of Mont Blanc and the Chamonix Aiguilles kind of failed to light my internal fire, but once we reached La Praz, the almost overwhelming view of the Drus rocketing above their surroundings snapped me out of my stupor (I'm doing better these days). The seed was planted. This summer in northwestern Europe has been pretty much the opposite of the summer in the northwestern US, unusually cool and wet. I'm certainly not complaining, but it's made climbing a lot harder to do and I have done a lot fewer pitches of climbing this summer than last, which has not been good for my fitness. At the same time, this is the last summer of my work contract in Geneva, and the knowledge that I would have to make the absolute best of any weather windows that I could get only served to swell my ambitions, admittedly a bit of a dangerous combination. I'd engaged in semi-serious talk with an American I met last summer via Mountain Project named Jared about getting after the Drus via the proudest line we could think of, the American Direct. By late last July, the above factors put me in the psychological position where I was willing to put all of my chips down and try to go as big as possible on the Dru if I could get the point, and I let Jared know. The start of August sucked in the mountains, and I had a few climbing trips in a row get canceled by high winds, snow and avalanche danger, or more high winds. Suddenly, things cleared around August 10, with the promise of a long period of high pressure that might melt some of the snow and ice covering basically all of the rock above 10,500' or so. The long awaited weather window had arrived. I arrived at the Montenvers train station and hotel early afternoon on Friday, August 14. It was super hot, so once Jared met me we decided to wait until a bit before 5PM to start the supposedly roughly 3 hour approach hike to the base of the wall. This left plenty of time to stare at the wall and get intimidated. The route, as planned, starts from basically the lowest part of the face and heads up trending right in the orange-gray rock, until encountering the gigantic light gray rock scar left behind by the collapse of the Bonatti Pillar in huge landslides in 2005 and 2011. Here we would diverge from the original Hemmings and Robbins route via an aid pitch to scoot left onto the shady north face, and then follow the classic 1935 Allain-Leininger north face route to the top. From the base of the rock to the summit is about 3300' of wall. The near-catastrophic retreat of the Mer de Glace has exposed hundreds of feet of blank slabs that were buried under ice just 200 years ago. Luckily, guides have installed ladders to overcome this obstacle. After crossing the Mer de Glace, a series of exposed 4th class scrambles protected by fixed ropes (no ladders on the far side, not enough traffic heading to the Petit Dru to justify them, I suppose, which makes sense) lead to a barely-there climbers trail that traverses a lot of nice meadows. It's kind of like the North Cascades, but with much bigger mountains in the background. Approaching the objective, can you spot the trail? Actually it wasn't too hard to follow, there were cairns and occasional ribbons in trees. Eventually the trail kind of petered out into the sort of loose moraine that we all know and hate, and at the point I made two key fuck ups. First, in the last vegetated area, we stopped to refill our water. This required me to empty my pack in thigh-deep vegetation in order to access my Camelbak. More on that later. Second, Jared and I kind of naturally drifted apart as we picked our was through the shitty moraine mixed with pools of water. The complexity of the terrain meant that we lost visual track of each other, but we weren't concerned because we were pretty experienced with this kind of slog. Eventually I picked up a faint trail and followed it up a long, loose moraine crest to a good rest spot, and waited for Jared, who had been behind me, to catch up. When he failed to appear or answer my calls, a bunch of highly unrealistic but very worrisome scenarios started to creep into my brain, and I dropped my pack and hiked hundreds of feet back down the loose crap. Eventually, I managed phone contact with him and learned that he had opted to contour around the moraine and then climb up the other side of it from where I was. When I described my location, it turned out that my little hike down looking for him had managed to give him a solid 30-40 minute lead on me. Oops. View from the top of the moraine. Finally, we reached the bivouac sites atop the Rognon des Drus, shortly after sunset and nearly an hour later than we'd hoped for. Exhausted and hungry, we started to prepare for dinner. It was then that I discovered, to my horror, that the gas canister I'd been carrying was gone. I can only assume it was lost in the vegetation below the moraines from where I'd refilled my water. This was clearly a pretty bad mistake, and made me really upset and embarrassed. After some thought, we still had running water, and cold food is still edible, so no plans were changed. Dinner was cold, crunchy pasta in a freeze-dried bag meant for boiling water but with snowmelt instead. Oops. Also, I realized that in the chaos of our separation and my abandoning and hiking back to my pack while trying to look for Jared, I'd lost my expensive glacier goggles. Oops. We awoke by 4AM under an astoundingly starry sky and got moving under what I hoped was a fresh start from the previous day's amateurishness on my part. We had vague ambitions of reaching the summit bivouacs but mostly wanted to get high up the wall before the Niche des Drus started dropping big rocks on the start of the route, which is probably the most dangerous part of the route for rockfall. The snow moat at the base of the wall was thankfully minimal, but the start of the route itself was a bit harrowing. It consisted of 5.4ish slabs and grooves with a literal waterfall running down it, enough that water would run down my sleeves as I tried to climb through it. It was also pretty much entirely unprotected save for a single shallow 0.2 X4 placement I found behind a flake, and we were moving together, so a slip by either or us would have been a catastrophe. After this exceptionally rude awakening, we reached a dry ledge with a bolted anchor, changed into rock shoes, and got the first dawn light to see where we were going. We simul-climbed the next 6 pitches of 5.7 to 5.9 in 2 blocks, which felt honestly great and we kept moving along at a good pace. I did notice I was sipping on my hydration hose worrisomely fast, probably a result of my lack of acclimatization (the bottom of the route is at 9000'), but this didn't feel like an enormous problem yet, as we were climbing in the early morning on a west face in the shade. By 8AM we reached the golden rock of the headwall and the climbing quality went from really good to spectacular. This is the first money pitch (pitch 11), the 40m dihedral, which is probably about 5.10d. It is as fun as it looks. Our strategy was to climb with our packs on unless the climbing was hard enough to make it really impractical. For us, that meant the packs were pretty much always on, but we hauled the 40m dihedral, which Jared found to be fairly miserable experience between the weight of the packs and how thin the 6mm tag line was that we used for the task. After that, we stopped hauling. I started slowing down between the increased difficulty of the climbing and mounting fatigue. We largely stopped simul-climbing, and I was also beginning to become acutely aware of my dwindling water supplies, as there was no snow or water available anywhere on the wall, it was just too steep to hold moisture. I also wasn't eating enough because of how dry my mouth was, which further cut into my energy levels. Jared following pitch 14, another nice 5.10 corner. We kept moving upwards with very few breaks (Jared had to coax me to adhere to this) until we reached the very nice jammed block bivy site atop pitch 20 at about 1:30PM, at about the same time that the sun did. As things tend to do when the sun comes out, it got a lot warmer really fast and I finished off my water. I was very dehydrated, so I wasn't able to get much food down, so my energy levels were a bit shit. Grateful to be climbing with a stronger partner, I told Jared he'd have to lead the crux pitches to come, which he was fine with. This is the crux of the route and it's crowning jewel, the so-called 90 meter dihedral. It's a long, smooth-sided finger crack dihedral in very smooth and top-quality granite. After an approach pitch up the start of 5.9+ or so, it gets broken into two long and pumpy pitches of 5.11b or so. Jared led the first pitch with no pack on and then hauled his pack up in a fine effort. To save him some suffering, I kept my pack on as the follower and commenced one of the hardest fights I've done on rock in a long time. A full pitch of fingerlocks, smearing, painful toe jams, and palm presses got me to just a few moves below the anchor when I needed to take. The 2nd pitch, if anything, is even cooler, but probably harder. Hauling again was miserable, so Jared tried to lead with his pack on, which proved very difficult-looking when the climbing turned into 5.11 laybacking off of a finger crack with smears for feet. After quite a few hangs and some pulling on gear, he made the anchor. At this point, I was completely gassed and I basically aided the pitch, standing in slings, pulling on whatever gear I could, the works. I regret this, but it's hard for me to feel too bad about being unable to climb 5.11 granite 23 pitches up with a big overnight pack on. After the 90m dihedral, the original route heads right towards the rockfall zone via a pendulum. Instead, we opted for the "German Rescue Traverse," which follows a bolt ladder to the left over the void towards the junction with the classic north face. Jared on the aid pitch. This one is just as much fun for the follower, and I was sloooow on it. The fixed rope is apparently pretty new, as are a couple of the bolts, since some of the horrifying old bolts that used to comprise the traverse appear to have broken. Reaching the comfortable bivy spot at the end of the traverse was a relief, and we decided to stay there for the night. Luckily there was snow and a bit of dripping water, though without gas it was definitely still a deprived situation. I ended up sleeping with a camelback full of snow in my sleeping bag with me to melt it for the next day, though not before realizing I'd forgotten my wag bag and shamefully pooped on the ledge and then flung it off the cliff into the abyss as far away from the standard north face route as I could manage (I swear that's the first time I've ever done that). Oops. The sunset from the bivy site was divine. My "cozy" little spot. I definitely woke up and checked to make sure I wasn't sliding towards the edge a couple of times in the night. We awoke at 5AM in order to get moving again, I was still pretty tired from the previous day but had grim determination to see it through. Ahhh. Alpine starts. It was extremely cool to get to climb on the historic 1935 route up the north face of the Drus. The face was considerably less chossy than its reputation and appearance from afar had led me to believe, and the rock was generally good. We started by simuling a couple of pitches, then I led the Fissure Martinetti bypass to the original crux, figuring getting to the top by the path of least resistance was challenge enough. We immediately canceled out this energy-saving measure, however, by getting a bit off route, with Jared leading a thin finger crack in a slab that felt like 5.10c or so, but it was hard to tell because it was a bit wet and I stood on a piton to get past the snowy start. Once back on route, we quickly pushed to the upper face via a couple of blocks of simul climbing, with ever expanding views. As we got higher, the rock got wetter and the ledges had more loose rock and snow on them. Near the top of the face, there was a bit of easy chimneying kept interesting by ice in the back and water running down one side. Classic north face stuff, I presume. Never hard enough to be a big problem though. North face ambiance. Yes, I was kicking steps up the snow in my TC Pros towards the end. Eventually we found the fabled hole through the mountain towards the south face, and opted to pass through it to finish up, mostly because climbing in the sun on drier rock again sounded nice. A couple rope lengths and a couple of route finding errors later, and I found myself with no higher to go. The summit of the Petit Dru! I had expected catharsis, but felt mostly mild relief that I could stop going up (at least for a moment). It's hard to relax much on a summit like that with such a long descent ahead. Nonetheless, I scrambled down to pay my respects to the summit Madonna. Can't imagine dragging that thing all the way up there. The next task was to traverse over to the Grand Dru with it's rappel descent. This consisted of a short scramble down followed by a few short, wandery bits of crack climbing up to 5.9 that culminated in a wet squeeze chimney. Entering the chimney, I very briefly considered taking my pack off and committing to the free grovel, but quickly decided that the knotted rope in the back looked more appealing, so an aid pitch it was. Finally, we found ourselves on the summit snowfield of the Grand Dru. Jared on the highest point of the Drus. Summit panorama. Not a bad view at all. Amazing spires all around. Not much can be said about the rappel descents on the south face of the Grand Dru other than that they were long, wet, and tiresome. The rope got hopelessly stuck on the pull after the very first 45m rappel, forcing Jared to lead 2 pitches to get it out of the flake that had eaten it, which definitely soured the mood. Mercifully, there were no more incidents for the next 10 rappels down to the Charpoua Glacier. The glacier was in decent shape, but the snow was incredibly soft and repeated post holing got my socks quite wet. Once we neared its bottom though, we were confronted with a small ice cliff of about 40 degrees that we had to front point down. I'd compare it to a short version of the first pitch of the Kautz. The mountains refused to just let us go easily. Steep wet snow. The small ice cliff we had to downclimb. The two summits of the Drus on the left from once we were finally below the glacier. The Aiguille Verte is on the right. Finally we were able to unrope and a short hike brought us to the Charpoua Hut, where we were able to get a nice dinner. It was clear that the weather was taking a turn for the worse and also that our plans to hike out that day had been thwarted by general slowness. The decision was made to get as low as possible before finding a place to bivy. Sunset from the Charpoua Hut. The next few hours were quite unpleasant. The trail followed easily enough until it got completely dark, and it became clear that my Swiss map app that I had on my phone did not have the right trail positions marked for these very French mountains (go figure). We wasted lots of time, energy, and patience with each other repeatedly losing and refinding the trail, including a big detour following a trail that petered out. It later turned out that the trail we tried to go down had been abandoned because it was exposed to serac fall from the Charpoua Glacier and in the dark we didn't really realize the danger. Oops. Finally, however, we got on the correct trail and things were going pretty well, except for the increasingly frequent but still silent flashes of lightning coming from the west. At about 11:30PM, we figured we were getting pretty close to where the trail descended steeply to the Mer de Glace and not wanting do deal with that, we looked for a place to sleep. Jared quickly found a very inviting-seeming cave with a nice flat floor formed by a large boulder. I crawled in to the back (the ceiling was pretty low) and Jared set up his bivy closer to the entrance. All seemed well. A mere hour later we were brought to attention by several very loud and very close thunderclaps, followed by a quick start to what sounded like an impressive downpour. In the back of the cave, I felt a bit of mist in the air, but Jared gave a cry of alarm. Close to the mouth of the cave, the wind was blowing rain on him, and water running across the roof was dripping on him and to a lesser extent on me. I moved to shove myself farther back to give him room to seek more shelter. Jared, however, sounded increasingly frantic, followed by cries of "there's a hole, there's a hole!" Not understanding, I turned on my light, only to see to my horror that my inflatable groundpad was surrounded by a flood of water between 1 and 2 inches deep, making it basically a life raft in our flooding bivy cave. I grabbed a rock and started digging a trench to drain some of the water out and prevent myself from being overtopped. Jared's situation was much worse. When scooting his ground pad towards me, he had popped it on something underneath him (the "hole"), causing it to rapidly deflate and drop both him and his down sleeping bag into a pool of freezing cold water. Luckily, the rain slowed and stopped as quickly as it began, and we managed to spend the rest of the night partially sharing my sleeping mat (though I must confess I took more than an even share) and huddling for warmth. The water drained away once it was not being replenished. Once their was light at about 5:30, we packed up our things, I silently thanked the weather gods that it wasn't raining, and got ready to move out. I'd been in the back of the cave between Jared and the entrance, so I remarked "at least that little breeze was nice," thankful for the ventilation. Clearly irritated, Jared snapped back that the breeze had kept him up all night shivering, and I remorsefully realized he'd had a much rougher night than I had. Despite that, he again put me to shame by setting a strong hiking pace out that I struggled to match, which is worthy of all respect. The cave as seen the morning after. We slept down and to the right in the slot. The south face of the Drus from the morning wet hike out. There were lots of ladders, both in the morning and all over the trail the previous night while we hiked in the dark. Morning on the Mer de Glace. Almost at the end of our hike out, the clouds parted one last time to give us a final view of the Dru, a source of a great adventure I'll remember for a long time. Writing this TR 5 days after that morning hike out, I can safely say that I'm still pretty tired and sore, and some of my toes are still a bit numb from all the jamming, but despite the low points and many small screw ups, it felt like a good experience worth doing. As of June 2013, the Old Chute route on Mount Hood was probably the most intense alpine climb I'd ever done. It's been wild to progress to a climb like this and I'm definitely interested to find out what the future holds, but I'm pretty sure at this point the remainder of my summer will be dominated by low altitudes and beers in the sun more than north faces and cold bivouacs. Once that bad alpinist memory kicks in though, well, I guess we'll see. Gear Notes: All the alpine stuff Approach Notes: straightforward by alpine standards1 point
-
Trip: Stuart Range - Stuart Range Traverse Trip Date: 08/30/2021 Trip Report: I was Initially a little hesitant to write this report as it was certainly nothing groundbreaking, I don’t really have any super helpful beta and it just kinda felt like I was stroking my ego. Anyhow, here is a short report of beta I wish I had for the traverse. I'd also like to echo that this is basically a long dry sidehill. If you are expecting a bunch a great climbing, think again. It felt like a dangerous hike. The other day I climbed the Stuart Range Traverse over about 31 hours, including a 7ish hour nap near Prusik. I decided to start on the W-ridge of Stuart via Ingalls and out to the Snow Lake Trail. This is the straightest line on the map, and that appealed to me for some reason. Thankfully my friend Alastair was generous enough to shuttle me back to my car the next day. Thanks bud! The first crux for me was getting over to the east side of Sherpa. It seemed that one with a rope could easily rap over the other side of the summit and continue on their way, unfortunately I didn’t have that luxury. I chose to down climb the S couloir a little ways, and then follow a ledge system around the mountain to the east. This worked out in the end, but was time consuming and a bit circuitous. The next crux for me came at Argonaut. In classic fashion, I had only gathered just enough beta (literally just a picture looking up the S-face) to not fully epic, but not quite enough to know where I was going. I opted for the first gully (pictured below) up to the ridge, hoping for straightforward traversing to the base of the S-face. I encountered anything but. This side of the mountain consists of an incredible grouping of gullies, towers and fins. While striking, it makes for slow arduous travel. I later learned that other solo travelers had dropped low down to approach the face straight on. This would probably be faster/less stressful, but not nearly as cool. I eventually got where I needed to go. Getting off of Argo was definitely the most stressful part, and the spot that I really wish I had a rope. I ended up walking down to a 2-bolt 1-pin rap anchor, and down climbed from there. This bit was loose, slabby and just no fun. While not necessary, a rope here would be really really nice, especially after all the terrain you’ve already covered for the day. This spot also seems to seep earlier in the season, so a rope might be required most of the year. I believe there is a rap/downclimb route to climbers left that may skip it. More downclimbing on better rock took me down to the basin. A small snow patch below Argo provided a tiny trickle of water for me to fill up with. If It wasn’t for this, I would have only had one liter for the rest of the traverse. The rest of the traverse is mostly walking unless you stick to the ridges. The snow free walk off of D-tail is chill and cairned right now. I’ll certainly be taking this route in the future for getting off D-tail late season. There is a small glacier at the pass between Boola Boola Buttress and Lil A. When I hiked by, there was standing water between the dirt and ice. This may be a spot to fill up, but I didn’t look too closely at how nasty it was. GPS track found HERE Here's a photo dump for inspiration Gear Notes: 60m 6mm tag line, Dyneema sling for harness, Reverso + Locker would be a perfect rap kit. Minimum 3L water storage. Good music to keep you company. Brought rock shoes but never used them. Trail gaiters are $$$! Approach Notes: Choose your own adventure1 point
-
Great route, Joe and Joseph up one of the last great trailless valley approaches in the North Cascades. Thanks for clearing up that we were not “sandbagging” Mike and Wayne when telling them about our Baker River approach to Spectre. Our 1980 party (carrying 60-pound packs) made it to a 5000-foot camp on Pioneer Ridge on the first day out from Baker Lake.1 point
-
Some things Joe did not mention: Joe is responsible for the vision, leading through all the difficulties and figuring out the route finding, and tolerating my moments of doubt. As I told my wife before the trip, I only hoped to keep up with him, and I barely did! In all seriousness, this is easily one of the most adventurous trips I've done and I felt really fortunate to get to do it with Joe!1 point
-
Gorgeous! An awesome adventure. Thanks for posting. Such sweet granite in that small area. Too bad the rest of the Pickets isn't that good. I'm blown away that you were bushwhacking without gloves. It feels so luxurious to have good, light gloves to pull on the shrubbery. Maybe I've just gotten soft. Can't wait to see what you do next!1 point
-
Thanks for writing up a nice report on my favorite valley in the state. I headed up to explore Picket Creek yesterday, and was very surprised to see the first boot print I have ever seen on my trips up the Baker above Pass Creek. That approach ridge is a little harder than it looks from afar, eh? I've only been up it to about 6,000 ft, so good on ya for pushing it through to Challenger. Once you learn where not to go, you'll be surprised how fast you can get to the toe of that ridge. Glad to hear your enthusiasm for all the unclimbed walls in there. There is a lot of variety just waiting for an adventurous sort. Also, if this was your first trip up the Baker, incredible job! I didn't get nearly that far on the first couple attempts.1 point