bellows
-
Posts
214 -
Joined
-
Last visited
-
Days Won
16
Content Type
Profiles
Forums
Events
Everything posted by bellows
-
Hopefully! Buckner and Sherpa left, both relatively easy compared to CR.
-
If you list it, they will peakbag it. There's been at least 3 other ascents in the past week since my trip. 21 ascents in a year seems crazy, but its prominent position on the Snoqualmie Crest begs for it to be climbed. And despite Potterfield's recount of the mountain, the rock is fairly good where you need it to be. I'm guilty of Smooting as well. Chimney Rock was 98/100 for me.
-
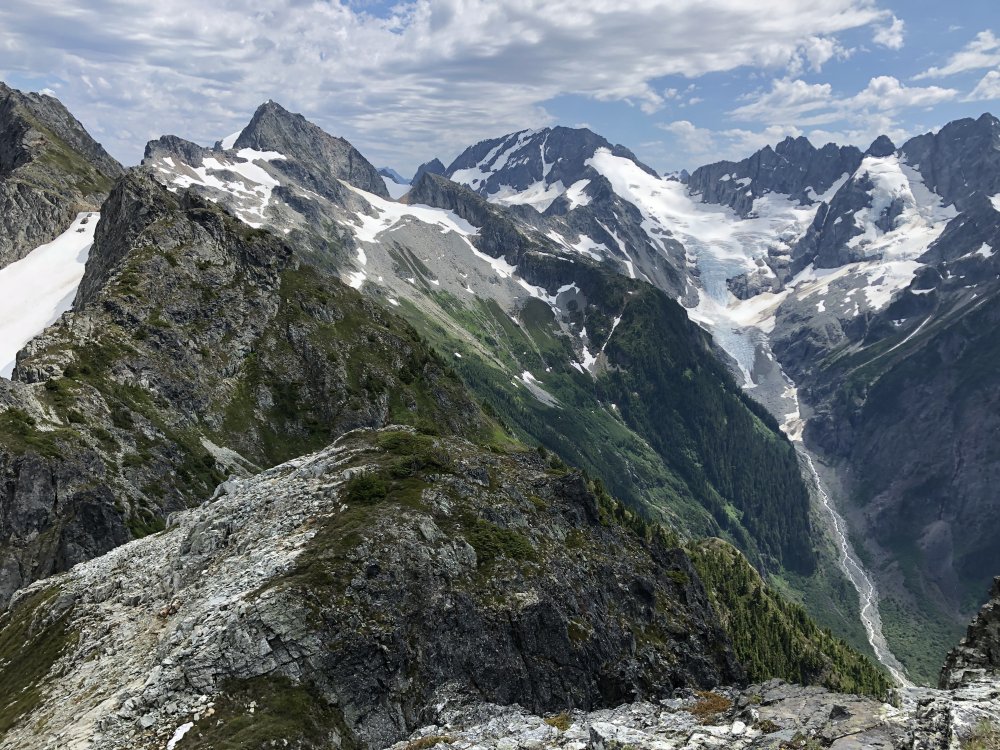
Trip: Chimney Rock - East Face (U-Gap) Trip Date: 08/24/2020 Trip Report: Are blue collar classic climbs becoming in vogue this year? I was the 18th person of 2020 to sign the Chimney Rock summit register this past Monday! I was inspired by solo trip reports from Jon Parker and Eric Eames (nwhikers) earlier this summer. I always thought I’d need a partner for Chimney Rock, but I enjoy traveling solo and their reports planted the seed that maybe I could do this one alone. Late Sunday afternoon I left the Pete Lake trailhead with a bit of anxiety about what lay ahead. It took just under 4 hours to get to the bivy boulder at 4800’. I was moving quick and racing daylight so I didn’t have to bushwhack in the dark, but I needn’t have worried, the climbers trail is pretty beaten in and was relatively easy to follow. Monday morning I was moving shortly after first light. I accessed the Chimney Glacier at the flat spot @ 6400’ immediately below the imposing North Peak. An easy traverse of the glacier and then up the U-Gap couloir and gully which was heavily moated and a took a lot of weaving back and forth to get through. At the top of the U-Gap came the section I was most anxious about. Super exposed class 3/4 ledges that look quite improbable from far and from near. The ledges had my complete attention. Early on there are a couple blind corners that seem to lead to nowhere but 1000+ feet of air. Once you commit the traverse is quite easy, but the exposure is quite heady. After the exposed traverse the white rocks and hidden ramps went quickly. The three rock pitches felt easy with rock shoes and the benefit of a self belay taking away the exposure anxiety. Views from the top were sublime. The hike out was long but it felt good to reflect on a climb well executed. Gear Notes: 60m rope, light rack Approach Notes: leave PCT at the second switchback to minimize brush
-
 High adventure!
 -
Hey Kyle, thanks again for sharing this. You did a wonderful job of capturing the pure joy of “cruising and floating“ in the mountains. Peace my friend.
-
Dang, that looks like a lot of quality scrambling. Nice trip, thanks for sharing!
-
[TR] Monte Cristo - Standard 06/22/2020
bellows replied to KaskadskyjKozak's topic in North Cascades
Super cool! I have two preschool kids, trip reports like this inspire me for the future. Thanks for sharing, nice pics. -
Trip: Mt Index - Hourglass Gully Trip Date: 06/05/2020 Trip Report: "The struggle of man against man produces jealousy, deceit, frustration, bitterness, hate. The struggle of man against the mountains is different. Man then bows before Something that is bigger than he. When he does that, he finds serenity and humility, and dignity too." - Northwest local & former Supreme Court justice William O. Douglas Seeking some serenity in these nationally troubled times, last Friday I headed up Mt Index via the aptly named Lake Serene. Spent the night in my truck at the trailhead and headed out under headlamp at ~2AM. Reached the lake in a couple hours, then another hour around the west side of the lake as dawn broke. From the snowy saddle above the lake at ~3050’, it’s a choose your own adventure up the brushy east ridge with two distinct class 4 slabby steps the way I went. After the ridge leveled out, I traversed to the left for a bit, turned the buttress at 4200’, and then had continuous well consolidated snow all the way up the hourglass gully to the ridgetop below the summit. From there an easy walk to the summit going somewhat clockwise to avoid cliffs and cornices. Some moats are developing at the hourglass constriction, and in the center/left couloir immediately above. They were well bridged, but could get difficult getting in/out/over when they melt out. Looking down at Lake Serene from near the 3050' saddle: Looking up the first slabby 4th class step on the East Ridge: Upper East Ridge, hourglass gully on the left, mostly out of sight : Good snow conditions inside the gully: Looking down from partway up the gully: Summit views! The descent took almost as much time as the ascent, mostly due to copious breaks enjoying the scenery, but also some downclimbing in the couloir and the hourglass constriction, and two rappels on the east ridge. After not seeing a soul all day, I ran into TONS of hikers on the trail to Bridal Veil Falls and Lake Serene. Lots of younger and diverse folks enjoying nature. I think that’s a good thing, and look forward to this new generation getting bored with the trail hikes and venturing further and higher into the mountains to find some serenity and humility, and dignity too. Back to the truck early afternoon feeling very mentally refreshed. Gear Notes: Crampons, axe, 60m rope for 2 raps on the east ridge Approach Notes: Lake Serene
-
[TR] Cerro Aconcagua - Ruta Normal 02/02/2020
bellows replied to bellows's topic in The rest of the US and International.
Good observation @ScaredSilly. Despite the low o2 readings, ultimately I think I acclimatized to the altitude fairly well. My only real symptoms throughout the trip were a little trouble sleeping and headaches in the middle of the night, especially the first nights at each camp. The first night at Nido I woke up thinking my head was going to explode, took an o2 reading in the 60’s, and sat up and took deep breaths for awhile watching it climb into the 80’s and feeling the headache dissipate. I did this every couple hours. During the daytime things were relatively good and I felt strong. In retrospect, the pulse oximeter probably caused me more stress than anything. I’m still not exactly sure how to correlate the readings with how I felt. -
Trip: Cerro Aconcagua - Ruta Normal Trip Date: 02/02/2020 Trip Report: Back when the world was more normal, I took a solo two week trip to Argentina to climb Aconcagua: Day 1 (Thursday January 23rd): Fly out of Seatac – Santiago - Mendoza Day 2: Land in Mendoza, get permit & supplies, drive to Penitentes (el ~8500) for the night at Hotel Ayelan Day 3: Start of climb. Hike to Confluencia (el ~11,100) Day 4: Side trip to Plaza Francia at the base of the South Face for acclimatization, second night at Confluencia Day 5: Move to Plaza de Mulas (el 14,100) Day 6: Scramble nearby Cerro Bonete (el 16,417), second night at Mulas Day 7: Carry water & gear to Camp Canada (el 16,600), third night at Mulas Day 8: Carry gear to Nido de Condores (el 18,200), fourth night at Mulas Day 9: Move to Nido, skipping over Camp Canada Day 10: Acclimatization hike to Camp Colera (el 19,700), second night at Nido Day 11 (Sunday February 2nd): Summit (el 22,841), return to Nido for the night Day 12: Descend to Mulas Day 13: Hike out, return to Mendoza, rearrange flight home Day 14: Fly out of Mendoza - Santiago – LAX - Seattle Day 15 (Thursday February 6th): Land back in Seattle It’s hard to capture two weeks in limited pictures, but here goes. The park entrance off the main highway between Mendoza and Santiago, Chile has a great view of the mountain with the summit visible as the bump on the right. With limited vacation time, I increased my time efficiency (and fuel inefficiency) by renting a car at the airport in Mendoza and driving myself around. This meant I didn’t have to faff around with bus schedules and figuring out transport to/from the trailhead, and also allowed me to get my permit in Mendoza, get some last minutes supplies of fuel, lighters, meat & cheese, and drive up to Penitentes all in the first day so I could spend my first night at elevation. As an added bonus, I drove up to the Christo de Redeemer statue on a winding mountain road to a pass at El 12,572 where I spent 30 minutes walking around at altitude. The start of the hike to Confluencia was beautiful on wide trails through grassland with the mountain dominating the view in front. Confluencia, home for my first two nights on the mountain. My North Face Assault-2 tent is barely visible near the big yellow and white domes on the lower right. The first night at Confluencia when my appetite was high, I splurged a bit and bought a nice dinner from my mule service provider. From then on out it was lots of ramen, rice, and freeze dried. To help my acclimitization, I took a side trip up to Plaza Francia and the massive South Face of Aconcagua on my second day of the climb: Heading up to Plaza de Mulas on the third day. Helicopters were a common sight shuttling gear & supplies & the occasional climber up the valley. Even more common were the mules who do the bulk of the heavy lifting. I used Grajales Expedicions mule service to carry ~50lbs worth of gear from the trailhead straight to Mulas. I was relatively cheap and well worth it. Along with shuttling your gear, it comes with filtered drinking water and toilets and trash service at Confluencia and at Mulas. Plaza de Mulas is a bustling place with tons of climbers from all over the world. There are rangers and doctors at Plaza de Mulas checking on climbers from both independent and guided climbs. I brought a pulse oximeter to periodically check my SpO2 which hovered in the 70's for much of the trip. The rangers also posted a weather report every couple days. Mulas has cell reception (Verizon) so I was also able to check mountainforecast and other websites, but invariably the ranger forecasts were more accurate. My ideal itinerary had me planned to summit on the 4th or 5th, but forecasted high winds had me push the envelope a bit and go for the summit a couple days earlier. Summit day! I got up at 2AM and was hiking by 3AM. I hiked relatively fast early on, but as I got higher my pace slower considerably. First light right below Independencia: Traversing the Gran Acarreo. By this time my pace had slowed to about 5 second rest steps. Resting at La Cueva below the Canaleta. The summit looked SO close from here, but was still over an hour away. On the summit ridge: On top about 1pm in the afternoon. I spent all of two minutes on top. I had severely rushed my acclimatization schedule because of the weather forecast, and my hypoxic addled brain was well aware that I needed to get down quickly. Looking back a couple months later and summit day is definitely a fuzzy memory. A day later back at Plaza de Mulas I splurged on the best pizza I've ever had. Mules once again carried the bulk of my gear down from PdM to the park entrance, and I had a pleasant hike out enjoying the thick air and satisfaction of a climb well done. And finally beer in Mendoza! Gear Notes: Carried an ice axe and crampons but never used either since it was an incredibly dry year. For footwear I wore trail runners all the way to Nido. For the upper mountain I used La Sportiva Baturas with Mountain Tools Supergaiters. Approach Notes: Grajales Expedicions is top notch for mule service A rental car can save a few days on the trip total if you don't have three weeks of vacation. Easy free longterm parking at the trailhead.
-
Crushing it! Way to go you two. Your TR is fantastic. Reading accounts of previous ascents it’s tough (at least for me) to understand how tenuous the climbing and exposure really is. I stood at the base of it two summers ago. Here’s the more cowbell you missed: IMG_0484.MOV
-
Trip: Mt Logan - Fremont Glacier Trip Date: 08/04/2019 Trip Report: "Did you go far..." a gray haired lady happily chirped at us, 100 feet from the parking lot. "Yeah..." John and I muttered back at her in unison, giving her the shortest answer possible, not breaking stride as we trudged past. We weren't trying to be rude, but our minds were focused on the truck, cold drinks, clean clothes, and comfortable shoes. The longer answer is that we climbed Mt Logan over three days via the Thunder Creek valley and the Fremont glacier. And yeah, it was far, clocking in around ~46 miles total. Thankfully much of that is on trail, ~18 miles to Thunder Basin Camp on Saturday. Temps were cool enough and with enough shade that the hike in was relatively pleasant. John and I had each been up the trail on independent solo attempts in the past couple years. Sunday we were moving my 8AM, up towards Park Creek Pass then the long traverse across alp slopes towards the Fremont Glacier. We lost the climbers trail several times, but it was never critical. Just keep traversing. A tough aspect of Logan is you never really see the summit until you’re on top of it. The snow feature to access the scramble is melted back quite a bit, but not overly concerning. We lugged a rope which was nice to have for peace of mind, but not a critical piece of gear. The backside was more exposed than I expected, but is well cairned and stays mostly 3rd class unless you get off route. Views were worth it! Seems like you can see EVERYTHING from up there. Monday was a long hike out on sore feet. Sorry to the nice lady trying to say hi... Gear Notes: nothing unusual Approach Notes: long
-
The register went back to 1992. I saw your name in there. Simpler times... before wife & kids? I thought it was a fantastic climb and very worthy of a repeat. It's an easy approach, pretty mellow climbing, and the east face stairs are total type 1 fun.
-
[TR] Sinister Peak / Dome Peak - West Ridge 07/21/2019
bellows replied to Ian Lauder's topic in North Cascades
Nice work. Your video commentary is surprisingly upbeat for being stuck in the gully without a rope! Attitude is everything. -
Trip: Mix Up Peak - East Face Trip Date: 07/22/2019 Trip Report: The weather was too nice on Monday to spend it working for the man, so I ditched work and headed out to the alpine. The east face of Mix Up is a fun moderate climb with a couple pitches of low fifth and some of the best 3rd class scrambling I’ve ever seen. Good times! Views from Cascade Pass and Mix Up arm. First view of Mix Up East Face. Go through the lefthand U notch and circle around back to the righthand V notch. The moat was fine on the left. I self belayed a short low fifth class 10m pitch directly up from the V notch to a rap anchor, then scrambled up to the top of the east face shoulder. Surprisingly I ran into a party of 4 out-of-staters climbing the route right before the infamous white staircase. The staircase looks intimidating from afar, but the rock is clean, grippy, and FUN! And mostly only 3rd class despite the exposure down to the Cache Glacier. A final low fifth class 20m pitch at the top brought me just right of the summit. The summit register was a fun read and I spent some time snacking, enjoying the views, and chatting with the other 4 climbers as they made their way up. One of them “Ram” was making his fifth ascent of the peak. Fred Beckey June 25th, 2006, age 83! Two raps off the summit block and two raps down to the V notch got me off the technical terrain and a nice walk back to the truck ~10 hours after leaving. Overall a very worthwhile climb, I can understand why Ram was making his fifth trip up there. Gear Notes: 60m rope and light rack to 2" worked well Approach Notes: Easy peasy
-
FWIW, here’s a pic of Spider, Formidable, and the Middle Cascade Glacier from Mix Up peak yesterday. The Cache glacier was also in good shape. Not sure beyond that, but there were several parties headed out on the traverse.
- 1 reply
-
- 1
-

-
[TR] Sherpa Balanced Rock - West Ridge 06/15/2019
bellows replied to JeffreyW's topic in Alpine Lakes
Unique report Jeff! Good stuff -
[TR] Stuart/Enchantments - The Enchanted Enchainment 06/30/2019
bellows replied to tylerhs01's topic in Alpine Lakes
Woah, those stats don’t do your trip justice. That’s a crazy amount of terrain to cover in a single push! Nice job, way to inspire. -
Good stuff! That area is my favorite in the Olympics. I agree, the standard scramble up Clark is quite nice. Heather and Deception basins (Mt Mystery!) are well worth a return trip. I'm working my way through the Smoot book too. To copy the Bulger lingo, I'm at 90/100. I need to start signing non-Bulger summit registers that way to confuse folks...
-
I really hope this can be fixed. There are TONS of trip reports prior to the site change where the photos no longer show up, including ones where the pics were hosted in the cc.com gallery. I know it can't be fixed for non-existent sites, but if the photos were on cc.com then hopefully it can get corrected.
-
Trip: Buckhorn Mountain - High Traverse Trip Date: 11/18/2018 Trip Report: Sunday was summer-like t-shirt weather in the Olympics! I took advantage and did a high traverse over Buckhorn, NE Buckhorn, Iron, and Worthington from the Big Quilcene valley. The views were incredible and the terrain was engaging albeit a bit chossy. Surprisingly, despite the traverse being well above 6000' elevation, there was zero snow on the entire thing. The difference between the Olympics and Cascades right now is significant. Approximate route: Foreshortened view of Buckhorn(s) and Iron from the Big Q trail: Marmot Pass: Buckhorn from Marmot Pass. The main peak is an easy walkup on trail: Constance, Warrior, and Inner Constance from Buckhorn trail: Mystery, Fricaba, and Deception from Buckhorn trail: View of the traverse from the top of Buckhorn. NE peak in the middle, Worthington on the left. Iron is hidden behind the NE peak. The descent off NE Peak (pictured here) was easily the crux. In general, stay on the east side and pick your way down various chimney/groove/ledge systems. It's never more than 4th class, but a rope could be useful here. Choss lovers delight: Easy slopes up to Worthington: Looking back on the traverse from Worthington. Iron Mountain is middle left, NE Buckhorn middle right, and Buckhorn proper on the right. Big Q Valley from Worthington: After tagging Worthington I dropped down on the east side and traversed below cliffs back to ~4800' on the Big Q trail to avoid any bushwhacking. A staged bike and a continuation over Hawk, Welch and all the way to Townsend (pictured here) would be a great alternative exit: That'll do summer 2018, that'll do... Gear Notes: Helmet! Approach Notes: Nice trail
-
Ah, I can actually see it in one of your pics. Good stuff!
-
Looks wintery! I’m amazed at the snow level difference between the Cascades and the Olympics right now. I was on & around Buckhorn on Sunday, almost a thousand feet higher than Lundin, and was in a t-shirt all day and didn’t come close to stepping on any snow. Maybe it’s the rain shadow, but what a difference.
-
Cool! Curious, what’s your lead solo set up?
-
Awesome, thanks Jason