


tlinn
-
Posts
241 -
Joined
-
Last visited
Everything posted by tlinn
-
Extremely light and packable but I didn't find it too comfy. Guess you can't have everything.
-
I`d say the grades are the same as Squamish. Most of the climbing is well protected but I found the last pitch in Yak Crack before you start to go into Reality Check (the pitch before the one through the arching overlap) was pretty run-out. It was scary mostly because the rock turns into kitty litter and you're freaked your holds are going to come off on you.
-
Wow!!! Don't tell your mom about this Jordan!! Glad you guys are fine in the end!!!!
-
I'm pretty sure Drew has a great photo with all of the routes listed...just can't seem to find it... DOH!
-
Does someone mind posting or giving me the link to where I can find a picture of the South Face of Matriarch and Grimface? I'm trying to get a photo of it so I can describe the route that Nick, Sarah and I did last summer for the CAJ and I haven't had much luck finding a picture. I would look on bivouac but I don't have an account anymore...
-
first ascent [TR] Mount Brice - FA North Face "Graveyard Shift"
tlinn replied to G-spotter's topic in British Columbia/Canada
Drew, that route looks really nice!!! Maybe a classic if it wasn't for the long approach! Great job, way to get in there and get 'er done!!! Wish I was back in BC! Very jealous! -
[TR] Hope Mountain - Poker In the Rear 70m WI2 11/24/2007
tlinn replied to G-spotter's topic in Ice Climbing Forum
Look at the guide Westcoast Ice. -
- warm up A LOT before you get on hard crimpy routes (at least 10-15 mins). Increases the synovial fluid in the joints, more blood flow, etc. - stretch out your forearm flexors. I usually go up against a wall and stretch them out by placing the palms of my hands against the wall and lean into it a bit. hold for 30 - 45 seconds, rest and then repeat. - if you feel pain after climbing ice it. 10 minutes on, 10 minutes off, 10 min. on, 10 min. off...every time! - mobilizations may help. Try taking each of the joints of your fingers and moving them towards and away from your palm 6 to 8 times per joint after climbing. - tape for proprioception, so that you get a better idea of when you are pushing it too hard and you are about to blow out your pulleys so you stop before it is too late!!! I've blown a pulley before and it sucks! It takes a really long time to heal so you are much better off to do a lot of prevention so that you don't end up blowing your pulley and spending 3 months without any climbing at all!!! Hope this helps, sure Layton will have more to add!
-
Keep your youthful enthusiasm cheamclimber!! Yeah, rock in the Cheam Range isn't the best and the route you are looking at is probably quite low angled and maybe not the best for technical rock climbing. If it holds snow in the winter you can bet that the angle must be down around 50 degrees or so in spots. You never know though, it might be a fun climb especially if you are just getting into mountaineering...having said that any day in the mountains is a good day. Go do it and tell us!
-
What about El Portrero Chico? I hear that can be nice.
-
Twinkies!!! Haha! Maybe if I lose 10 pounds and she gains 10 it would work but I already suggested that and she said she doesn't want to become a heffer! I don't really want that either.
-
Any good tips for climbing with an extra light partner? I had to set up all my belays for an upward tug to keep her on the ground. Maybe in the alpine a pack would help? It's going to be far more gear intensive to set up all belays this way. Anyone have any good ideas to keep things fast and simple at the belay?
-
SCHAWEEEET!
-
Nicolum Knob is the granite slab you pass on highway #5 (the Coquihalla Hwy.) just a few minutes east of Hope. You can see a lot of the climbs quite easily from the highway, as clean white streaks. The easiest access is still to take the Highway 3 exit, turn around and head back towards Hope at the Nicolum Creek campsite and then take your first right onto the on-ramp to get back onto highway 5. Park along the on-ramp. From here walk across a bridge on highway 5 until you see some hubcaps on a tree marking the start of the trail. Blowdown from last Fall has made the trail a little difficult to follow there has been a new trail made and marked. There is orange and blue trail markings on the trail. The crag is basically split between climbs on the far left side of the cliff and climbs on the far right side. Kokanee Slab is on the far right and the Highway 12 area is on the far left. There are trails to both areas but the route finding is a bit difficult at the moment until the trail gets a bit more use. Basically if you follow the left branch and get to a Highway 12 sign you should be able to see some of the climbs to your right. If you take the right branch of the trail to get to Kokanee Slab you will know you are on track when you find a rope ladder that has been constructed by some local hikers. To find a topo and route description go to Cheyenne Sports in Hope on Wallace Street. Route conditions (as of August 2007): Highway 12 - a bit scruffy but still fun. Be aware that I removed some hangers on the last pitch (p.4, the last two pitches are known as "two bee or not two bee"). I know this makes things more confusing so I would like to just call the whole route Highway 12...the gear is good so don't worry that the hangers are missing, just bring a #4 or #3 camalot. Kemosabe - very scruffy and needs a re-scrub. It's pretty shady down there so it grows in very fast. New route to the left of Highway 12 - something Mike Warn is working on. I don't think he's named it yet and he's still projecting it. It's a clean sport route with 4 bolts. Kyle Hudie - nice and clean. First Blood - fairly clean but it's 5.6 and will clean up with a bit of traffic. Dead Soles - clean and good to go. The Exaggerator - a bit scruffy at the bottom but still climbable with a few moves of aid on the bolts near the bottom. Land Down Under - clean and good fun. Bring a big cam (#4.5) Life on a Chain - was never climbed this summer. Still a project that either needs a lower belay station or a bolt to aid through the crux. Have fun!!!!
-
Someone needs to put out a Hope and Harrison Guidebook!!!!
-
Cool! Looks like you've been having fun! In the second pic it looks like you are going out right...did you finish out right or go left?
-
[TR] Anderson Range, BC - Springbok Arete, Les Cor
tlinn replied to tlinn's topic in British Columbia/Canada
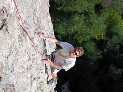
One more photo. This one is of the cool "au cheval." It's not that hard but very exposed!!!! -
Trip: Anderson Range, BC - Springbok Arete, Les Cornes and SE ridge, Ibex Date: 8/24/2007 Trip Report: This has been a pretty lucky summer for me because many of my best climbing friends have been on holidays, unemployed, underemployed, or all of the above. This has made trip organization pretty easy and flexible, so when high pressure finally rolled in on a Tuesday I had Krystil, Nick and Richard at my doorstep in Hope. I have been living the student life but I've been trying to make some money working for my dad part time this summer. It's pretty nice to have such a flexible schedule! I had only been to the Anderson once previously. This was 4 years ago when my dad and I went to day trip the North Buttress of Chamois and got a late start from the cars. Half way up the route we were caught in a downpour and finished the route, climbing the last 6 pitches through a waterfall. Needless to say this was a terrible day in the mountains, one that I still remember as the worst ever but I was impressed with the area and wanted to come back. Nick had been talking about this route for a while and he sparked my interest again a few weeks previously in Squamish on a sunny afternoon of climbing. I was also keen so we decided it would be now or never. After all, I had to find out whether a year of studying in Toronto had turned me soft (what Krystil would call an alpine baby). Because we had a few days on our hands to enjoy the area we thought we'd try camping at the Steinbok-Ibex col. This would give us a few options for climbs on the first day to warm up for Springbok Arete. We started a little late on the Tuesday the 24th so by the time we reached the col and melted snow for dinner it was pretty late. We were thinking of climbing Drew's Proof is in the Pudding route the next day but by the time we went to bed we decided that we wanted to have a nice sleep in/relaxation day so we could snooze on the rocks and enjoy the spectacular scenery. We decided that the southeast ridge of Ibex would fit the bill quite nicely. It's hard to find better views then the Steinbok-Ibex col. Steinbok is right in front of you and there are breathtaking views of Urquhart, Baker, the Old Settler, Slesse, Silvertip, Redoubt, and just about everything else in the North Cascades. The southeast ridge had some great climbing. Krystil and I climbed together and Nick climbed with Rich. We left camp around 10:30 and were on top a few hours later napping and taking in the views. I was impressed by some of the granite domes around Vicuna, Llama and Alpaca. It was also nice to get a break from the swarms of mosquitos at the Steinbok-Ibex col. That night Krystil and Richard decided to move their camp back down to the road so that they could climb the North Buttress of Chamois. I felt sorry for them thrashing through the alder. If I was them I would gone over the top of Ibex, over the top of Chamois, through the Anderson Mountain-Chamois col and then climbed the North Buttress of Chamois, just to avoid that alder. If someone wants to drop napalm on that valley I would gladly support them. The slide alder jungle sucks ass down low. The next morning it was time for the business!!! Nick and I left camp at 4:30 and hiked down to the route. We had scouted out an approach option the day before and we decided to go for it so we didn't have to drop down and around the rock ridge that runs halfway between Steinbok and Les Cornes. While heading down through the notch everything was going well until I slipped on some loose rocks and landed on my left hand. I was left with quite a gash but the band-aids did the trick and I was back moving in a few minutes. Our next challenge was beginning the rock climb itself. There was a large moat and snow patch blocking the first pitch. Once we crossed the moat we had to contend with a big block of snow choking the first pitch. First I tried going right up and around the patch but the rock was some of the worst gravel/kitty litter I had ever seen. It was wet and the holds were ripping off under my feet. I was not willing to run it out on that kind of wet kitty litter and there were no guarantees we could get around this way anyway, so I decided to come back down and climb around to the left. I went under a snow overlap and started climbing between the rock and the snow. I placed a 4.5 camalot which seemed pretty solid. I continued upwards and I thought I could probably wiggle my way up between the snow and the rock. Unfortunately I got my helmet stuck as soon as I tried this and I had to un-do my chin strap to free my head. I decided to try moving further left onto the rock so I placed a piece of pro further out to my left and then moved out onto the rock. After a few run-out slab moves I got back on route above the snow. I felt a relief to at least be on the route but I knew things were just getting started. Pitch 2 climbed some of the best rock on the lower pitches climbing further up the ramp along corners and cracks. Pitch 3 was my lead again and I climbed up along a dike trying to place decent pro amongst the kitty litter. I belayed just above a couple trees. The next pitch helped us save a tonne of time. Nick ran it out 70 meters on the rope and then we simul-climbed to the start of pitch 6. We stopped for a pee break here and had a bite to eat. The rock improved dramatically above this point. Pitch six was absolutely stellar moving between cracks and then finishing on steep jugs. I tried to link pitch 6 with pitch 7 but I wasn't sure I would have enough gear to set up a bomber belay below the first 5.10 pitch through the overhanging roof so I decided to belay at a couple of nice trees. Nick led the next pitch up the awkward off-width to the base of the overhang and the start of the headwall pitches. From here on the climbing gets super exposed and every pitch is pretty sustained. The grades are pretty burly and strenuous, especially up the headwall. Pitch 8 was no exception and Nick had to work hard to protect it climbing above the belay. We were both very happy we had cams as big as #4.5 camalot (old sizing) or he would have been facing a bad fall onto the belay. From the top of this pitch I took Layton's beta and climbed straight up above the belay on the nice 5.10 finger crack linking the next pitch to get us to "two tree ledge." The pitch had some amazing climbing along a funky hand traverse with major exposure underneath and almost nothing for your feet. The holds are bomber but the exposure makes it one of the most memorable pitches on the route. Nick led the next pitch (the crux) in fine style above two tree ledge. I'm pretty sure he linked it with the next pitch which had some incredible, steep 5.9 crack climbing to the start of guidebook pitch 14. The climbing was still amazing and I worked my way up the hard layback flake to the slabs at the top of the pitch to a belay below a big roof. From there, Nick linked two more pitches of crack climbing, stopping just short of the top. I led one final short pitch to the summit where we sat, rested, and ate luch on top. The time was 3:30pm and the route had taken us 9 hours to climb in 12 pitches. I was pretty dehydrated because I drank most of my water after the first 6 pitches. I had had the company of a hummingbird at most of the belays on the way up. We were also visited by a very persistent bee that liked the orange/yellow design of Nick's rope. The mosquitos bothered us on the first few pitches but left us along once we reached the headwall. The descent was not nearly as bad as we thought it was going to be. We were thinking of passing over the twin summits of Les Cornes and then climbing over Ibex to descend to our campsite. This looked like a great option from the top of Ibex the previous day but once we were on top of the route we saw that there was a huge chasm between Ibex and Les Cornes. You could rappel into it but it would be very difficult to climb back up towards Ibex. Instead we did the standard descent with the very fun "au cheval." We used a 7mm static tag line and our 70 meter dynamic. It worked well, there were no rope snags and we only had to back up one rappel anchor with fresh cord. It was refreshing to rappel through the waterfall and fill up our nalgenes on the way down too! The next day we returned to the cars to meet our friends. We got pretty wet walking through the slide alder on the way out but it was good to hear about their day on Chamois. Especially while enjoying a sapporos. It's amazing how delicious warm beer is after a few good days in the mountains! Our camp at the Steinbok-Ibex col Krystil on the SE ridge of Ibex Me on the last pitch of Ibex. Richard rapping down the SE ridge of Ibex. Steinbok in background. The headwall pitches of Springbok Arete from the approach to the Steinbok-Ibex col. Crossing the moat at the base of the route. Note the rock ice axes. Me at the belay for pitch 8. Pulling through the overhang on pitch 8. Me leading pitch 14 below the layback flake. Nick seconding the slabby top part of pitch 14. Gear Notes: Full rack to #4.5 camalot with doubles of mid-sizes. Approach Notes: Pick up a gate key from Cattermole Timber in Chilliwack. Drive 45 km north of Hope on Highway 1 until just past the Alexandria Bridge. Turn right 500 meters past the bridge onto the Anderson Mainline. Follow for 18km and go over a bridge across the Anderson River. Turn left and follow until road end at km 25. From here follow an overgrown road for 20 minutes until dropping right down across the river and onto other overgrown roads. Follow up through cut blocks until below the route and thrash up through the bush.
-
Does anyone have any updated conditions on the pocket glacier?
-
No pudding...did southeast ridge of Ibex though. Sorry no TR yet, will try to do it next week if possible.
-
Sounds like you might want to go with a lightweight single and then get a light 7mm static line for making double rope rappels. I've been using this system and it's actually lighter and cheaper then buying two double ropes. I have the Mammut Revelation 9.2mm with dry treatment. I love this rope but it is now just a 50 meter after it was chopped by rockfall on Slesse. The only negative is that your 7mm line will feed more quickly through your ATC then the 9.2mm so you have to make sure your rappel knot is on the 7mm side of the cord you are rapping on so that the ropes won't move on you and burn through your anchor. Pretty easy to prevent this by using a quicklink instead. Make sure you buy at least 5 meters of extra 7mm static line for use with your single rope to make up for the rope stretch of your dynamic rope (even more if you are using a 70m single or if you want to use this stuff as rappel material). It comes in very handy for this purpose but you may quickly run out of static line if you are constantly chopping bits of it off to back up sketchy alpine rappel anchors. Other then the friction issue the only other negative I can think of is that you have to be careful rappelling over sharp edges with the 7mm line. Oh yeah, you should probably use a prussik if you are doing a freehanging rappel. Once again, it feeds pretty fast through the 7mm and you don't want to rapp out of control. hope this helps! cheers,
-
Yeah, seriously wicked route! The headwall pitches are unreal!!!! OK, need to get going on this TR! BTW Layton, we printed out your pitch by pitch details and they were a big help! I think we ended up doing it in 12 pitches plus some simul-climbing through the low-fifth section. Cheers!
-
One thing I might add: BRING bug spray! I never bring the stuff but I really wish I had it this time!
-
Climbed Springbok on Thursday. TR to follow. Route is in good condition but there is some snow blocking the first pitch so you have to be prepared to run it out on the face. This isn't much worse then the pitches to follow so it should be no sweat. The road is in 2wd high clearance to the end at 25km. The gates were all open but I would pick up a key from Cattermole just in case. From the parking, the approach on the road is slide alder hell. The switchbacks should be no problem to see, you just have to keep your eyes peeled and remember to add a bit more time because the road has aldered in so much since Alpine Select was published. TY
-
But where are all the trip reports...lame! Is Dru the only one who writes around here???? I do miss a good trip report. OK, I guess I should put my foot in my mouth and start writing too!