Sam Boyce
-
Posts
50 -
Joined
-
Last visited
-
Days Won
20
Everything posted by Sam Boyce
-
"Route 66" V 5.10 AI2 FA on the NE face of Johannesburg
Sam Boyce replied to Sam Boyce's topic in North Cascades
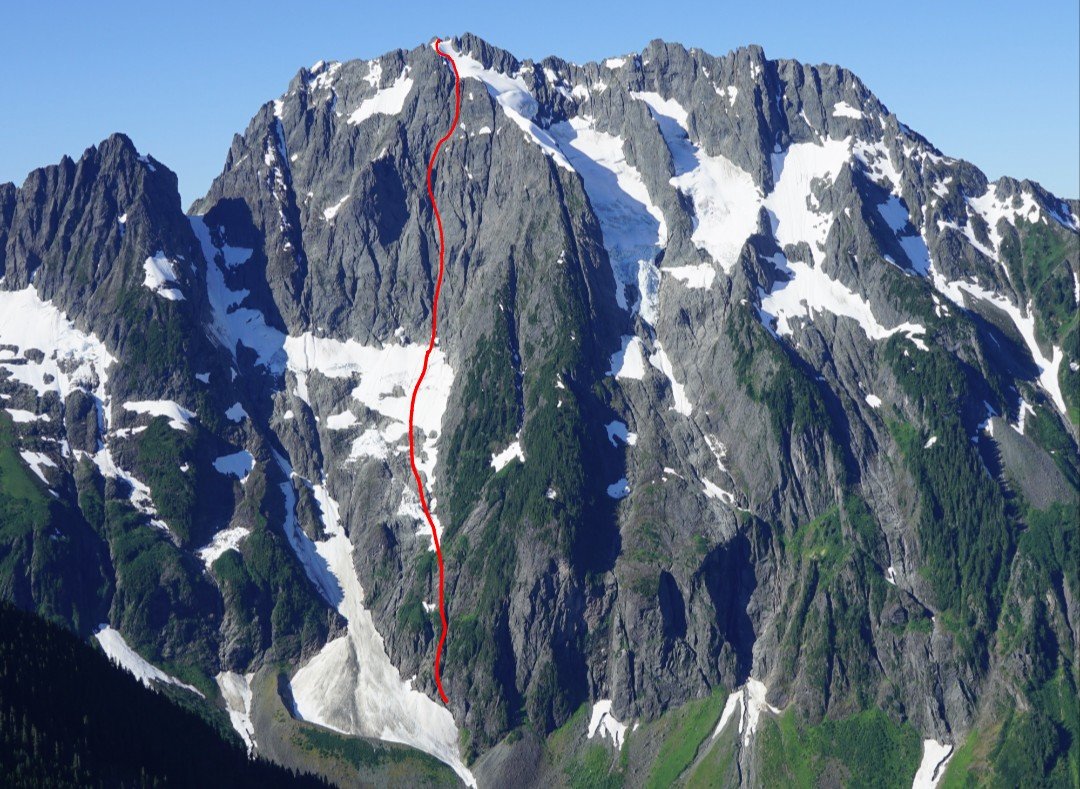
Im not to sure on the history, but would guess nothing up there was ever "popular". We had 3 potential routes in mind and brought a small scope to choose once at the hanging glacier. The big appeal of the line we chose was the big shield of silver rock and the cat scratches that we didn't end up climbing. Very few cracks present themselves in that rock. It truly is one of the biggest walls in the Cascades and worthy of attention (winter ascents would be MEGA) -
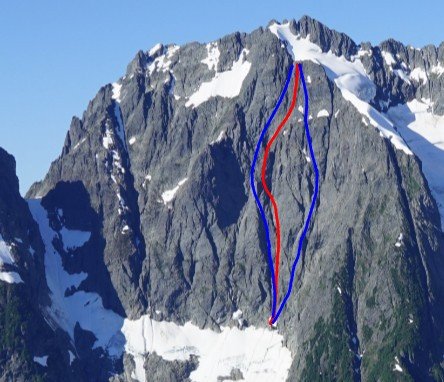
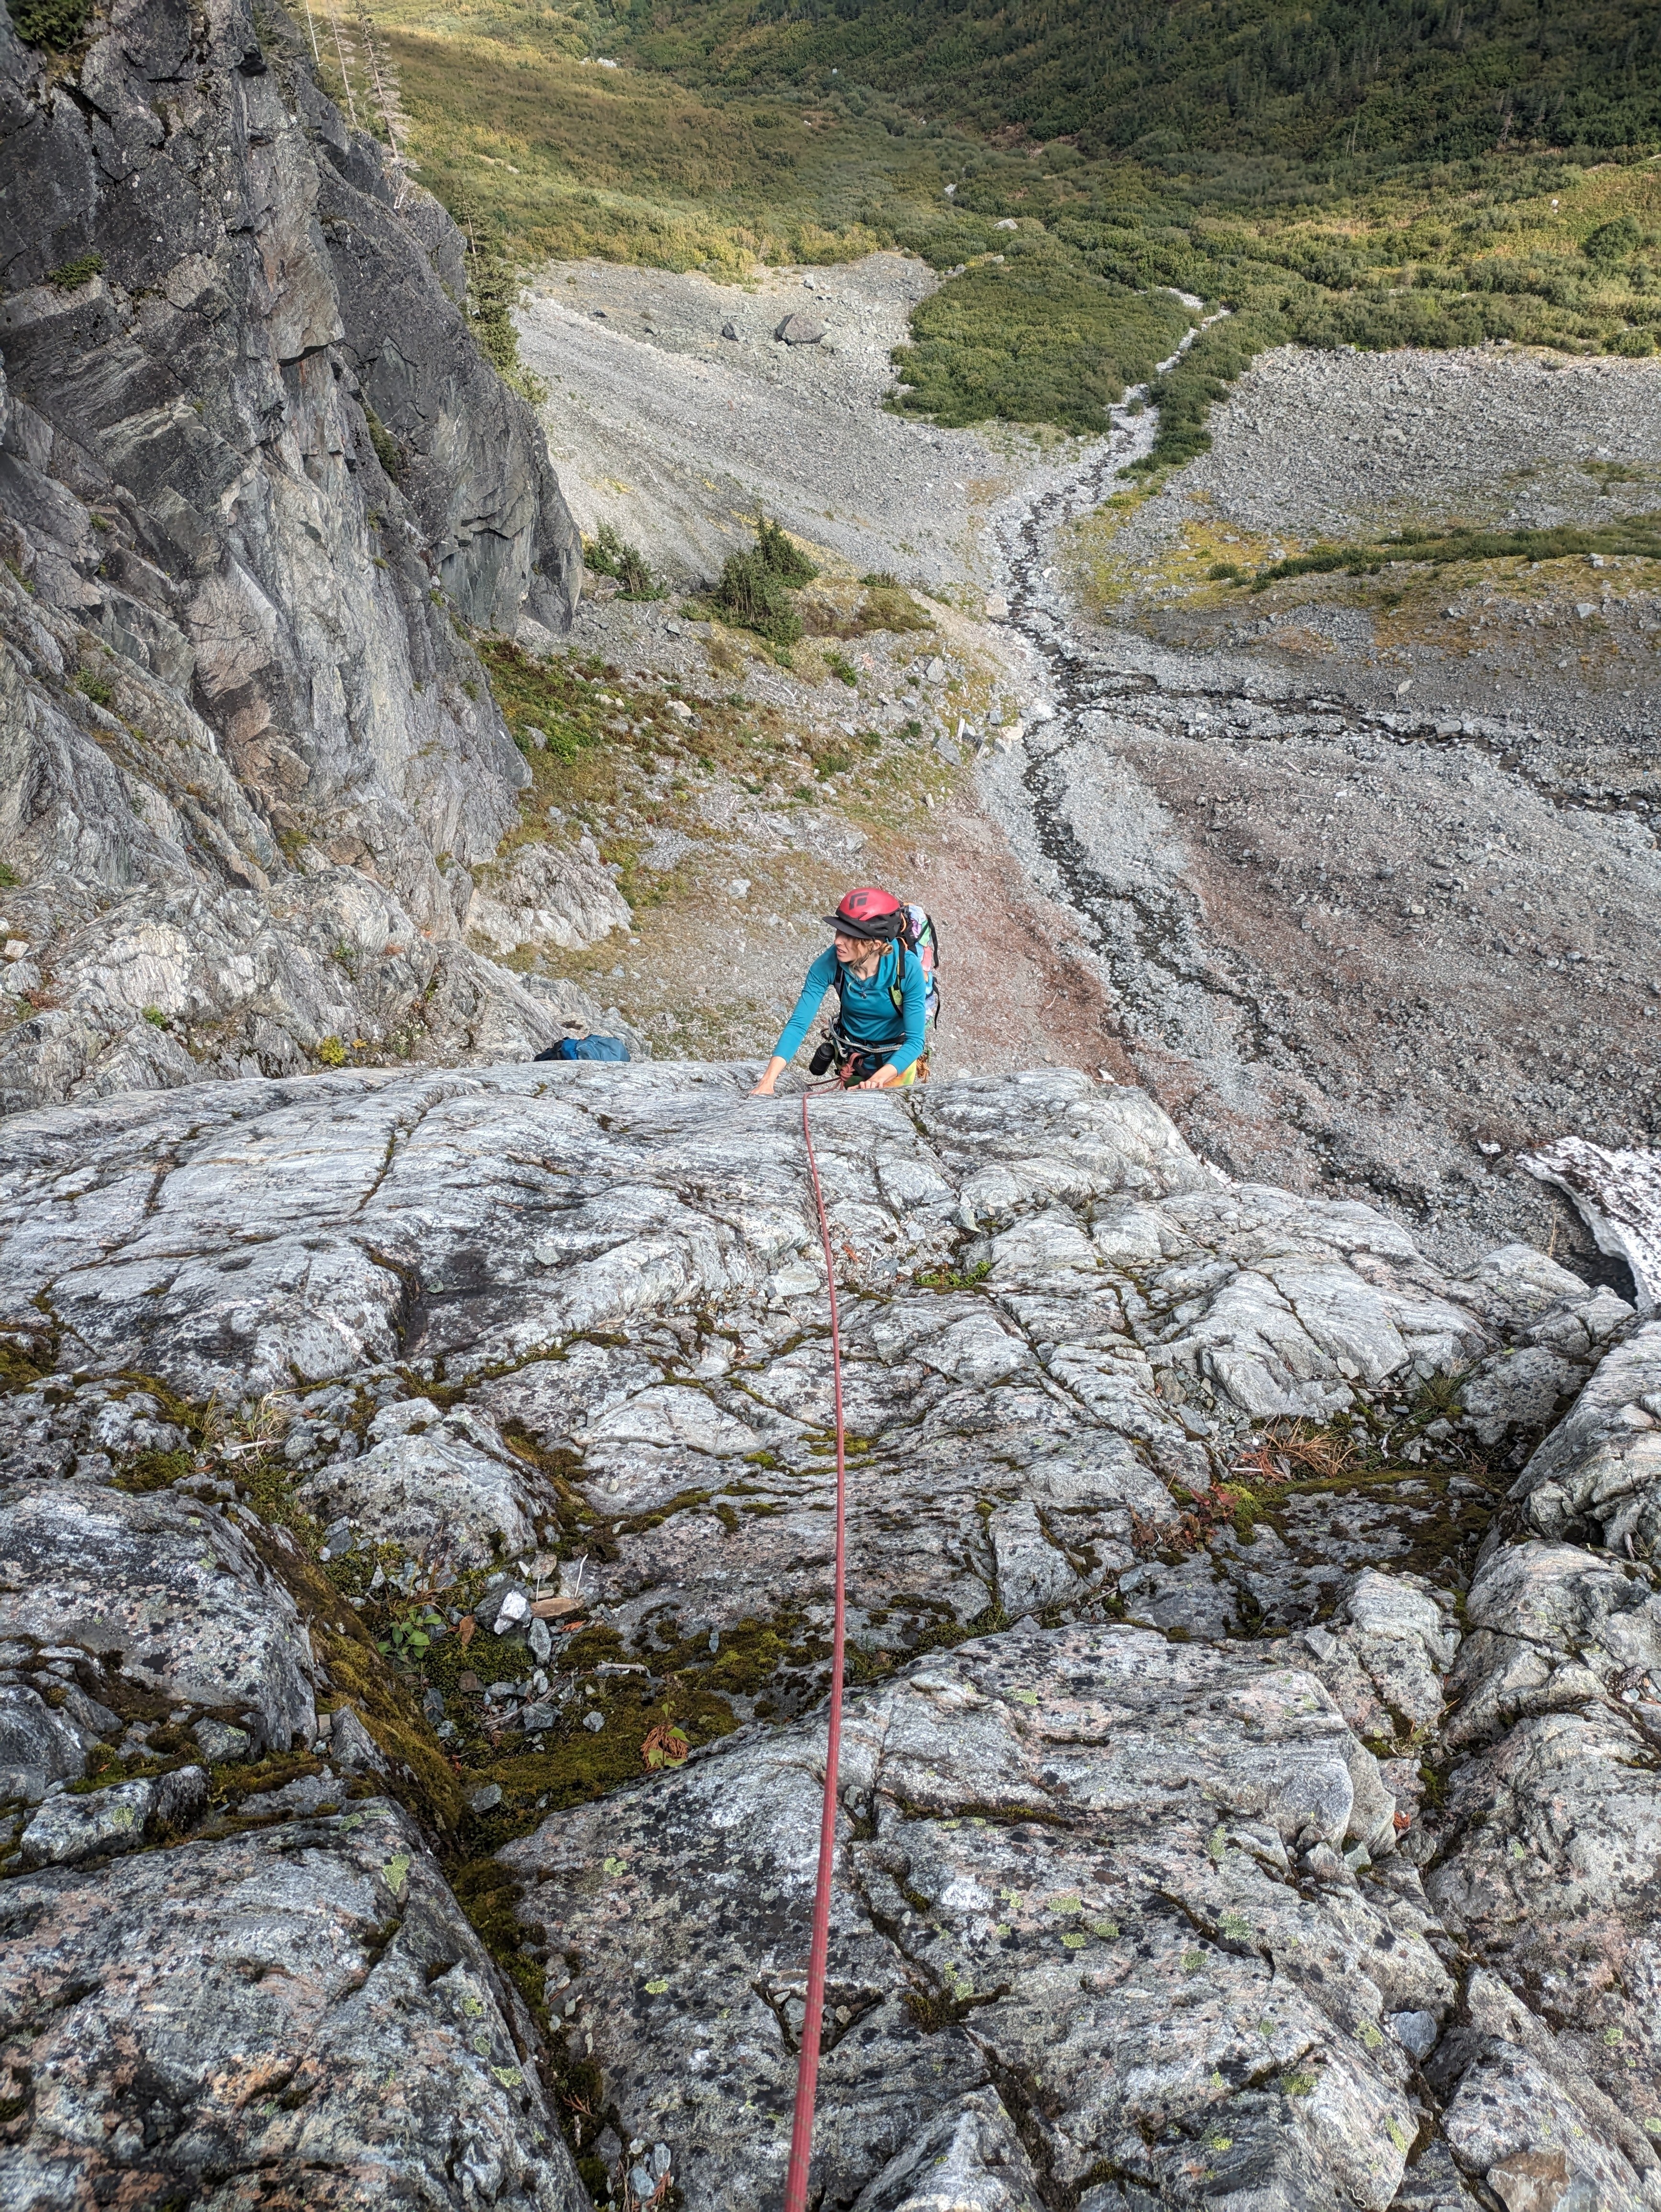
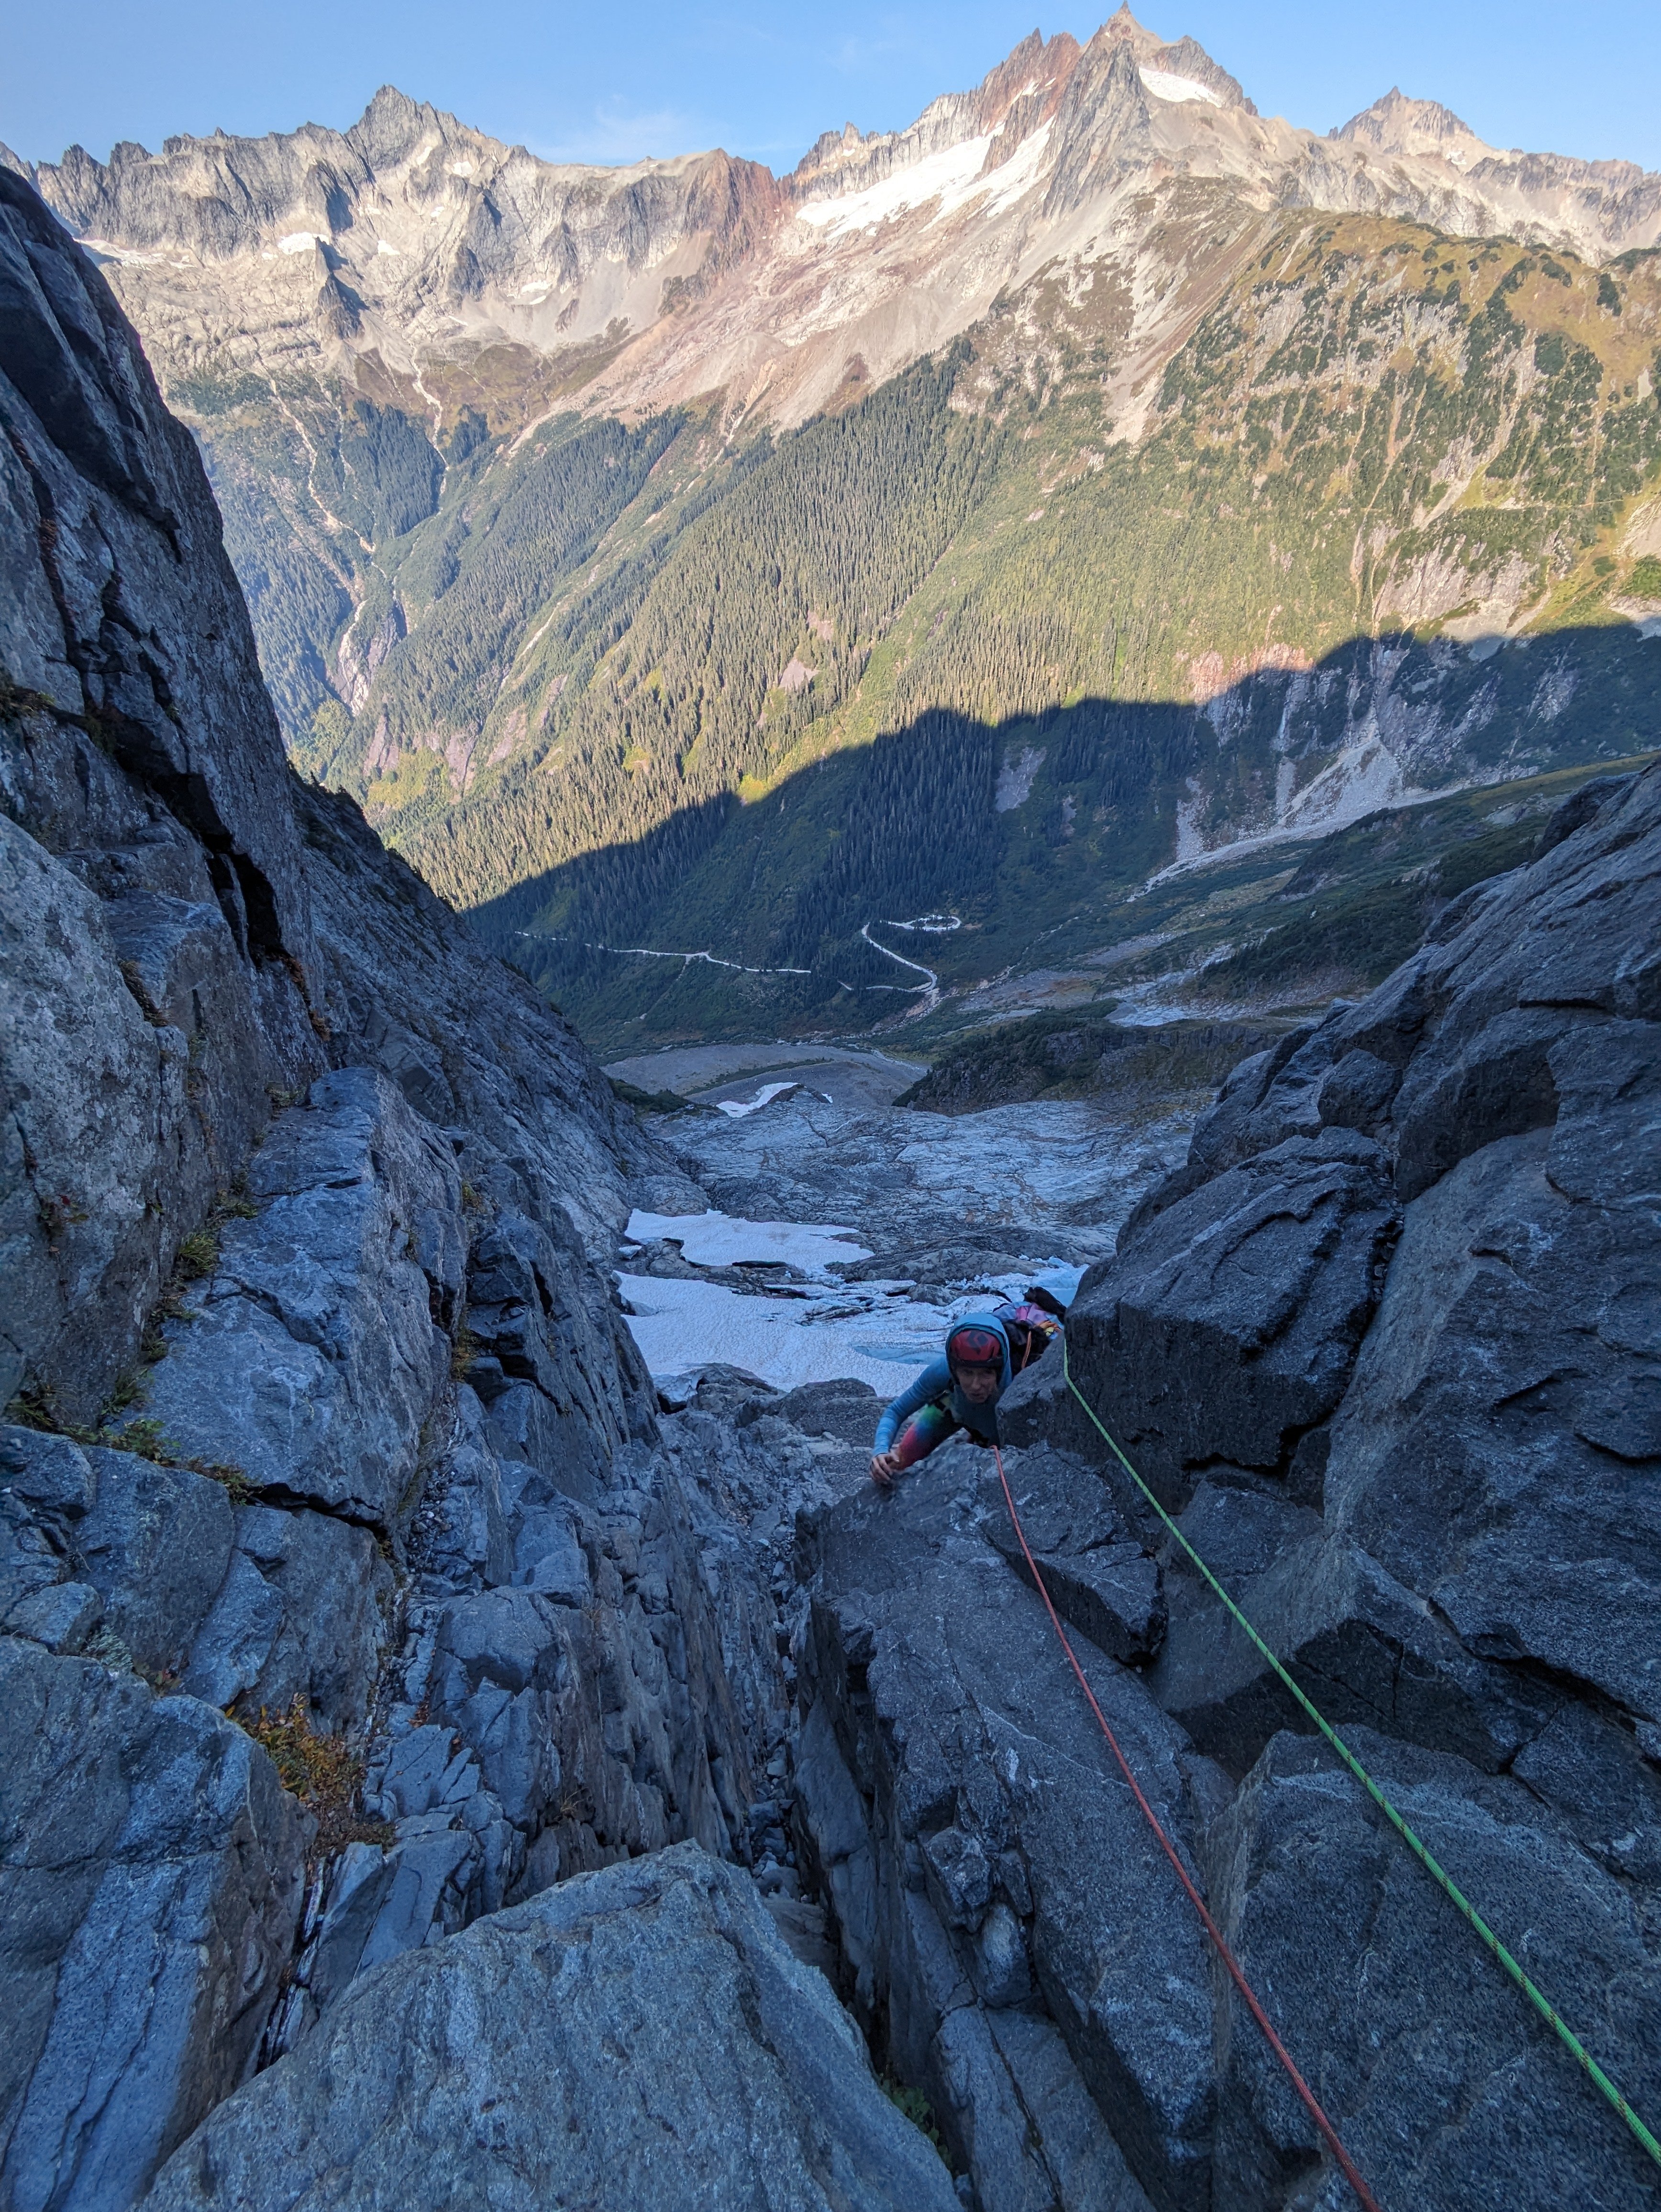
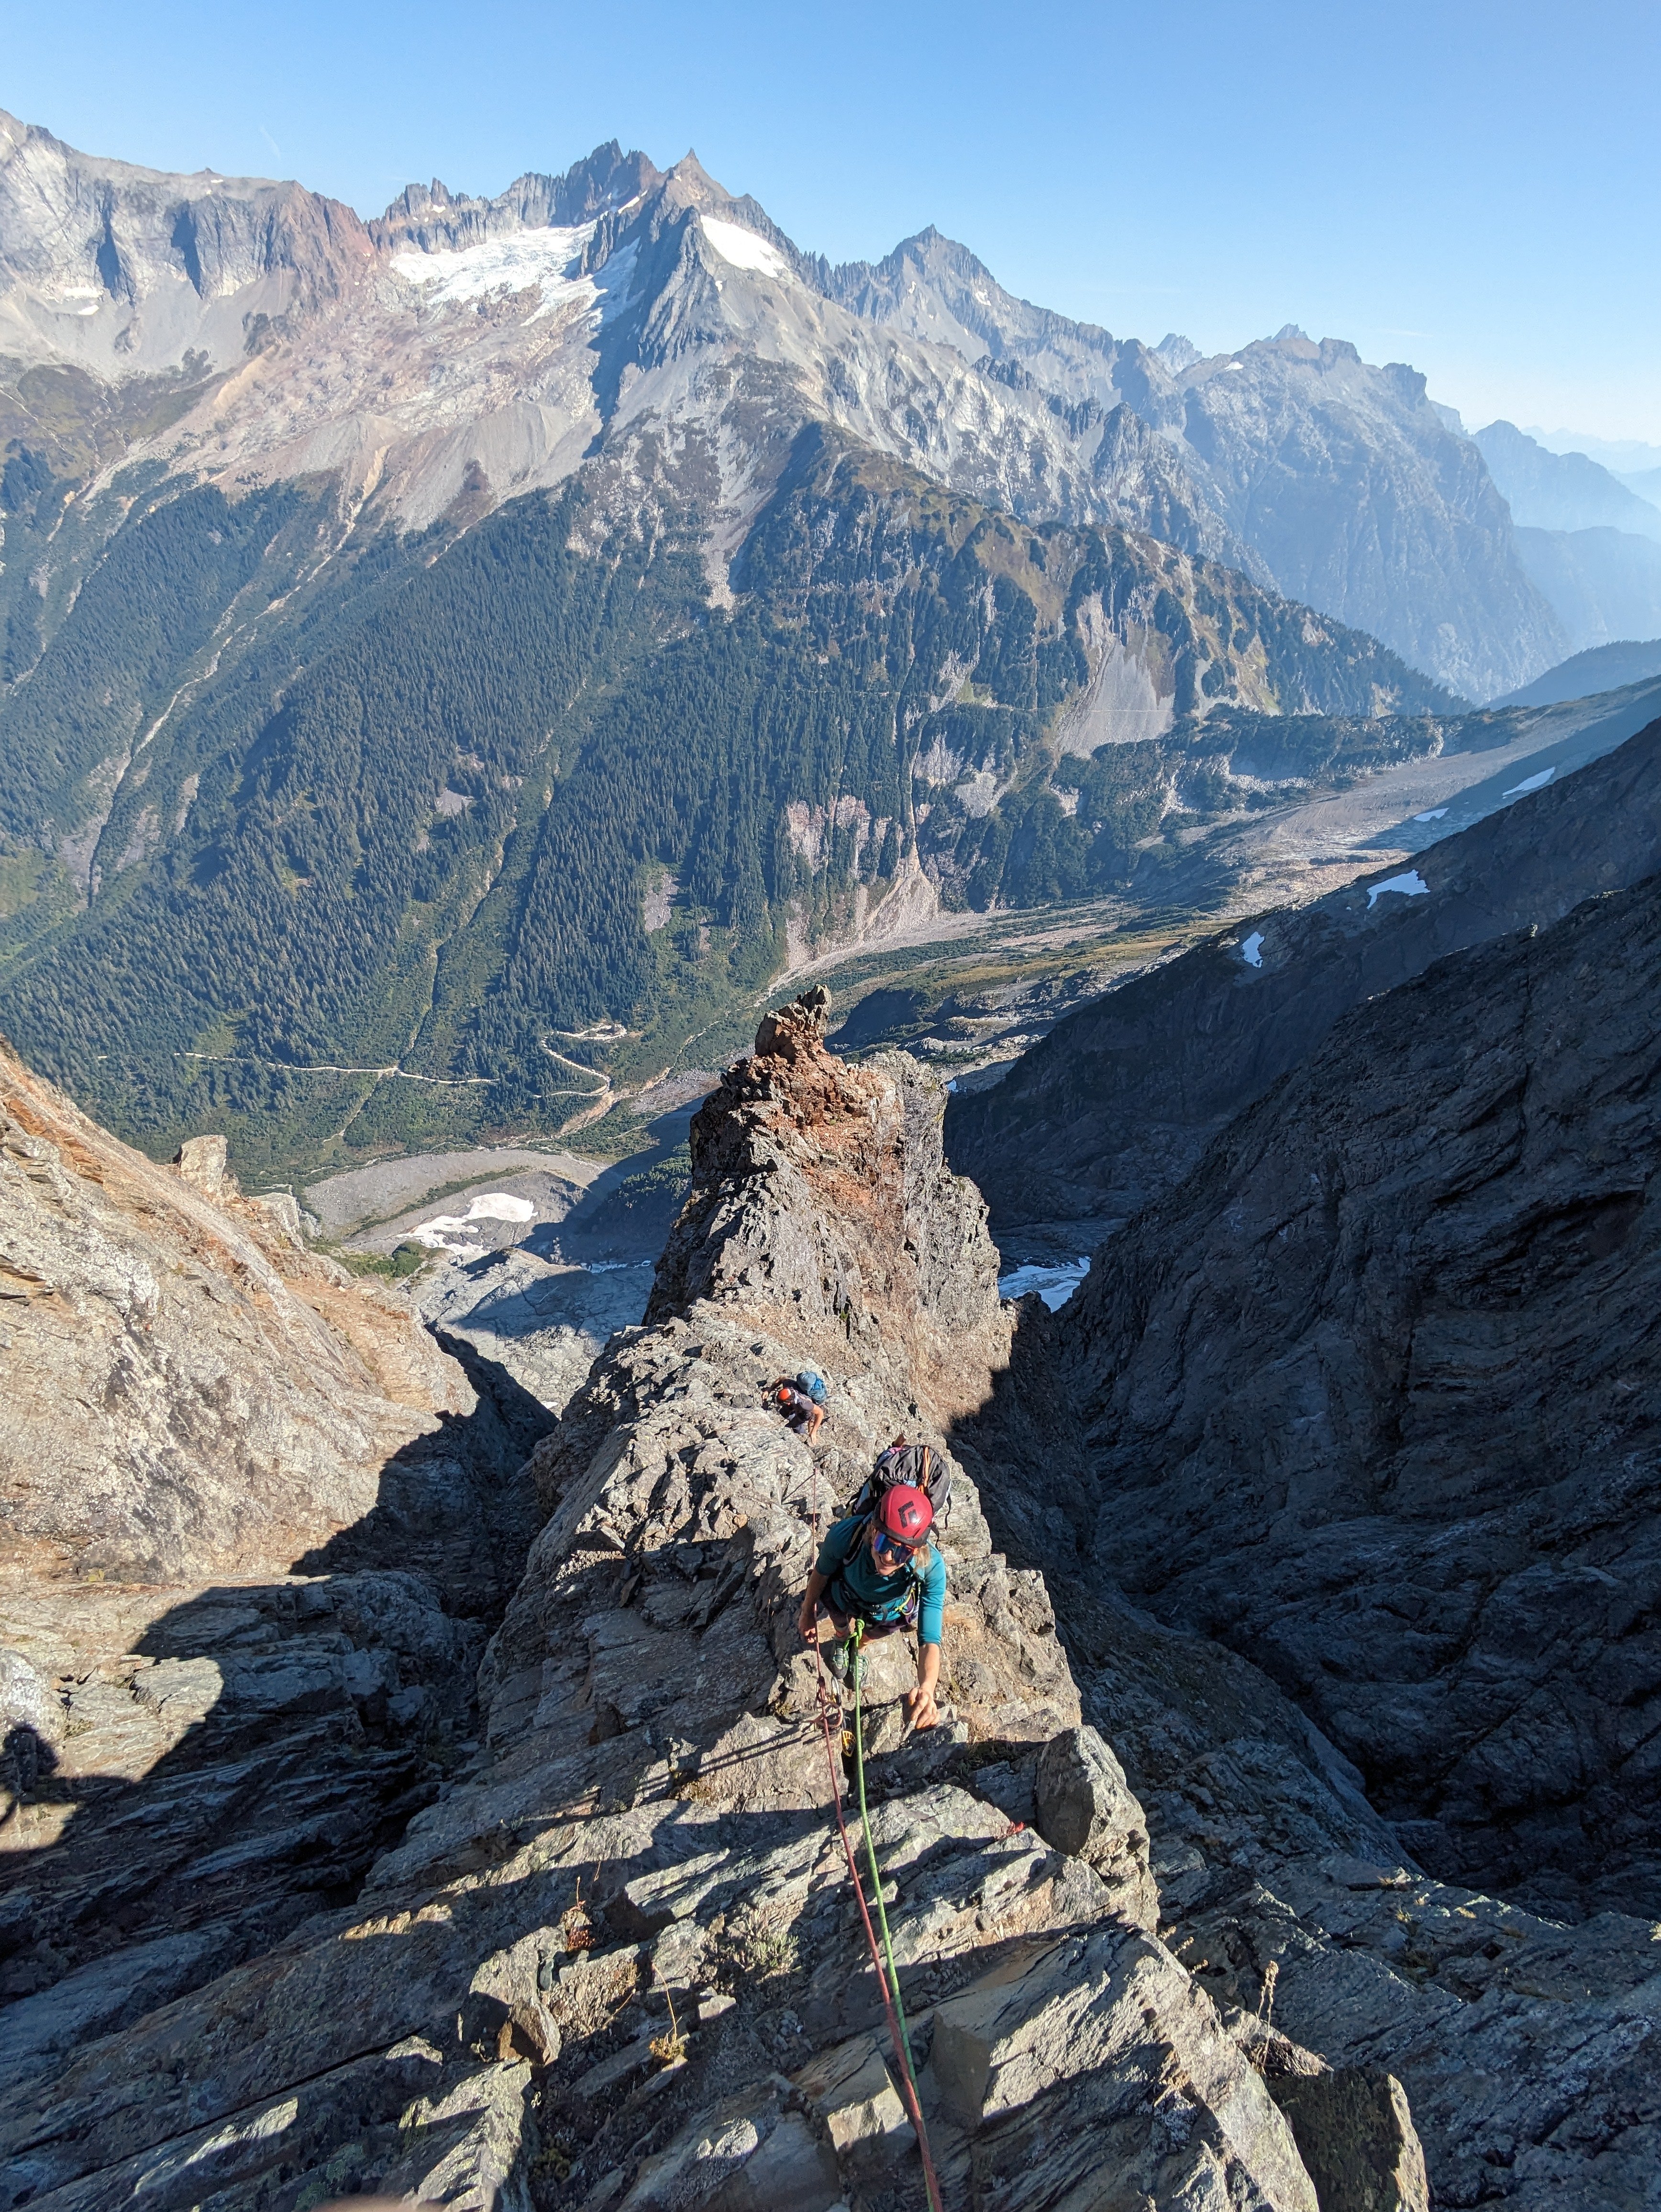
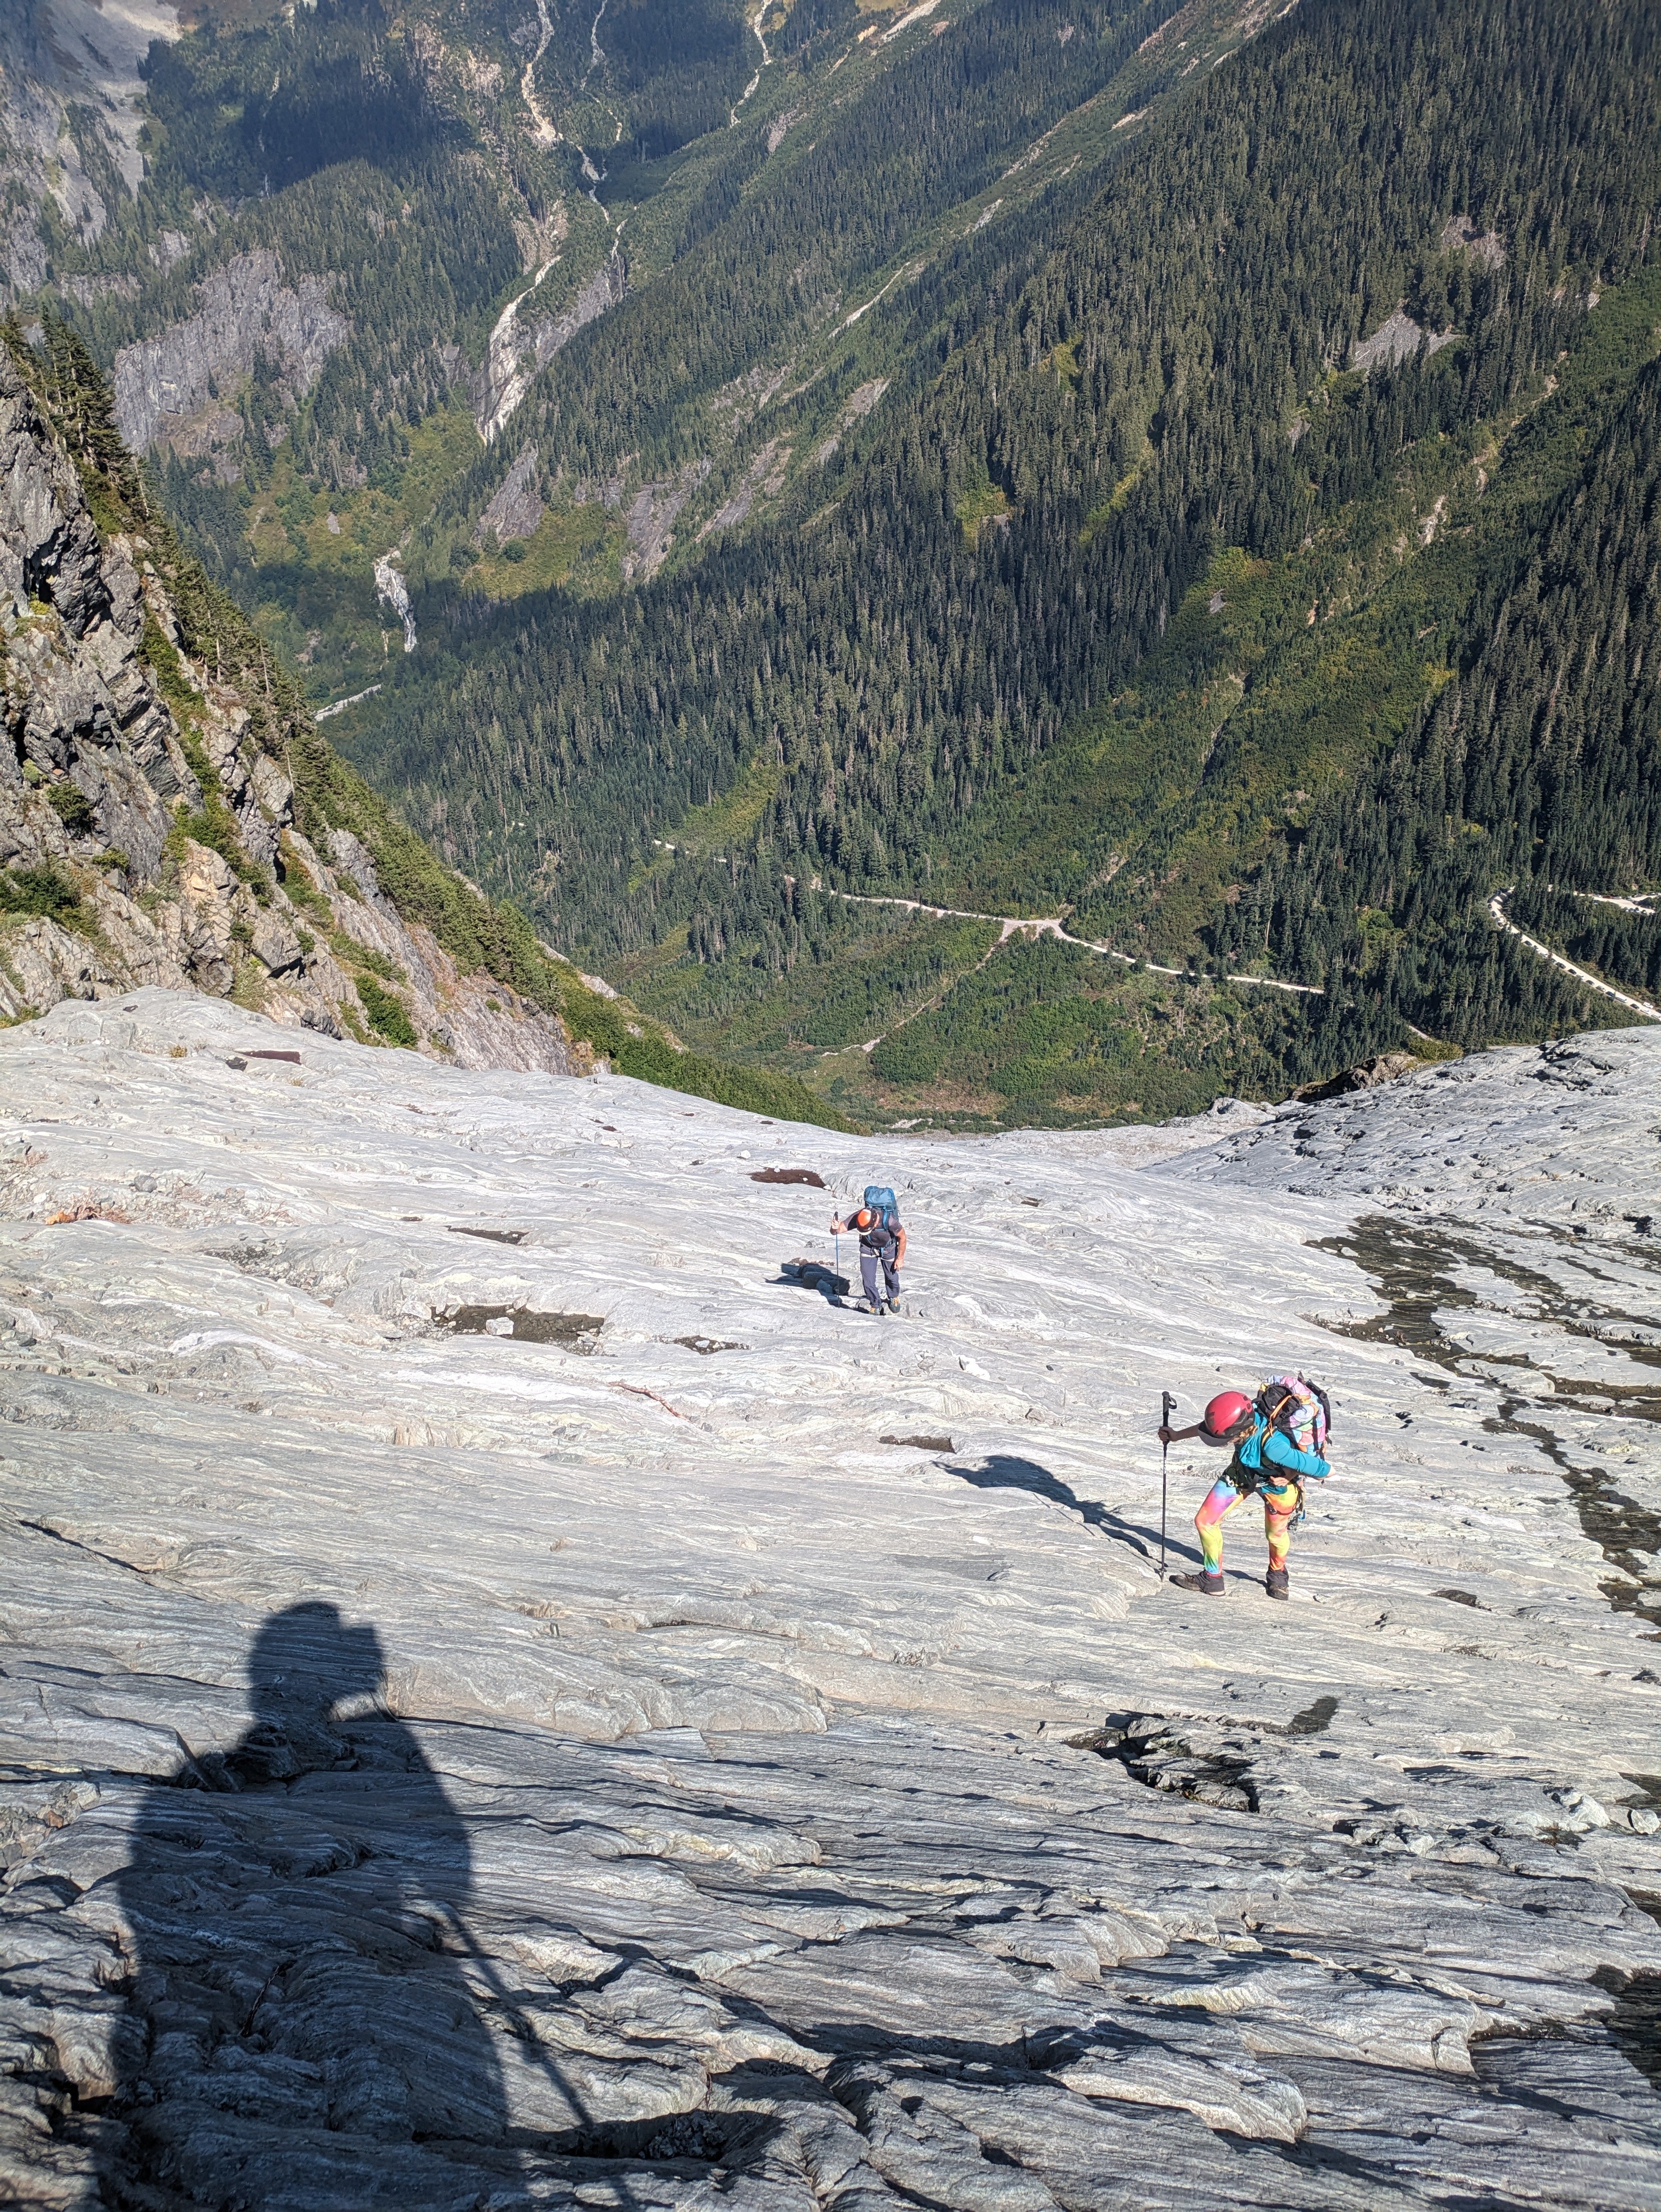
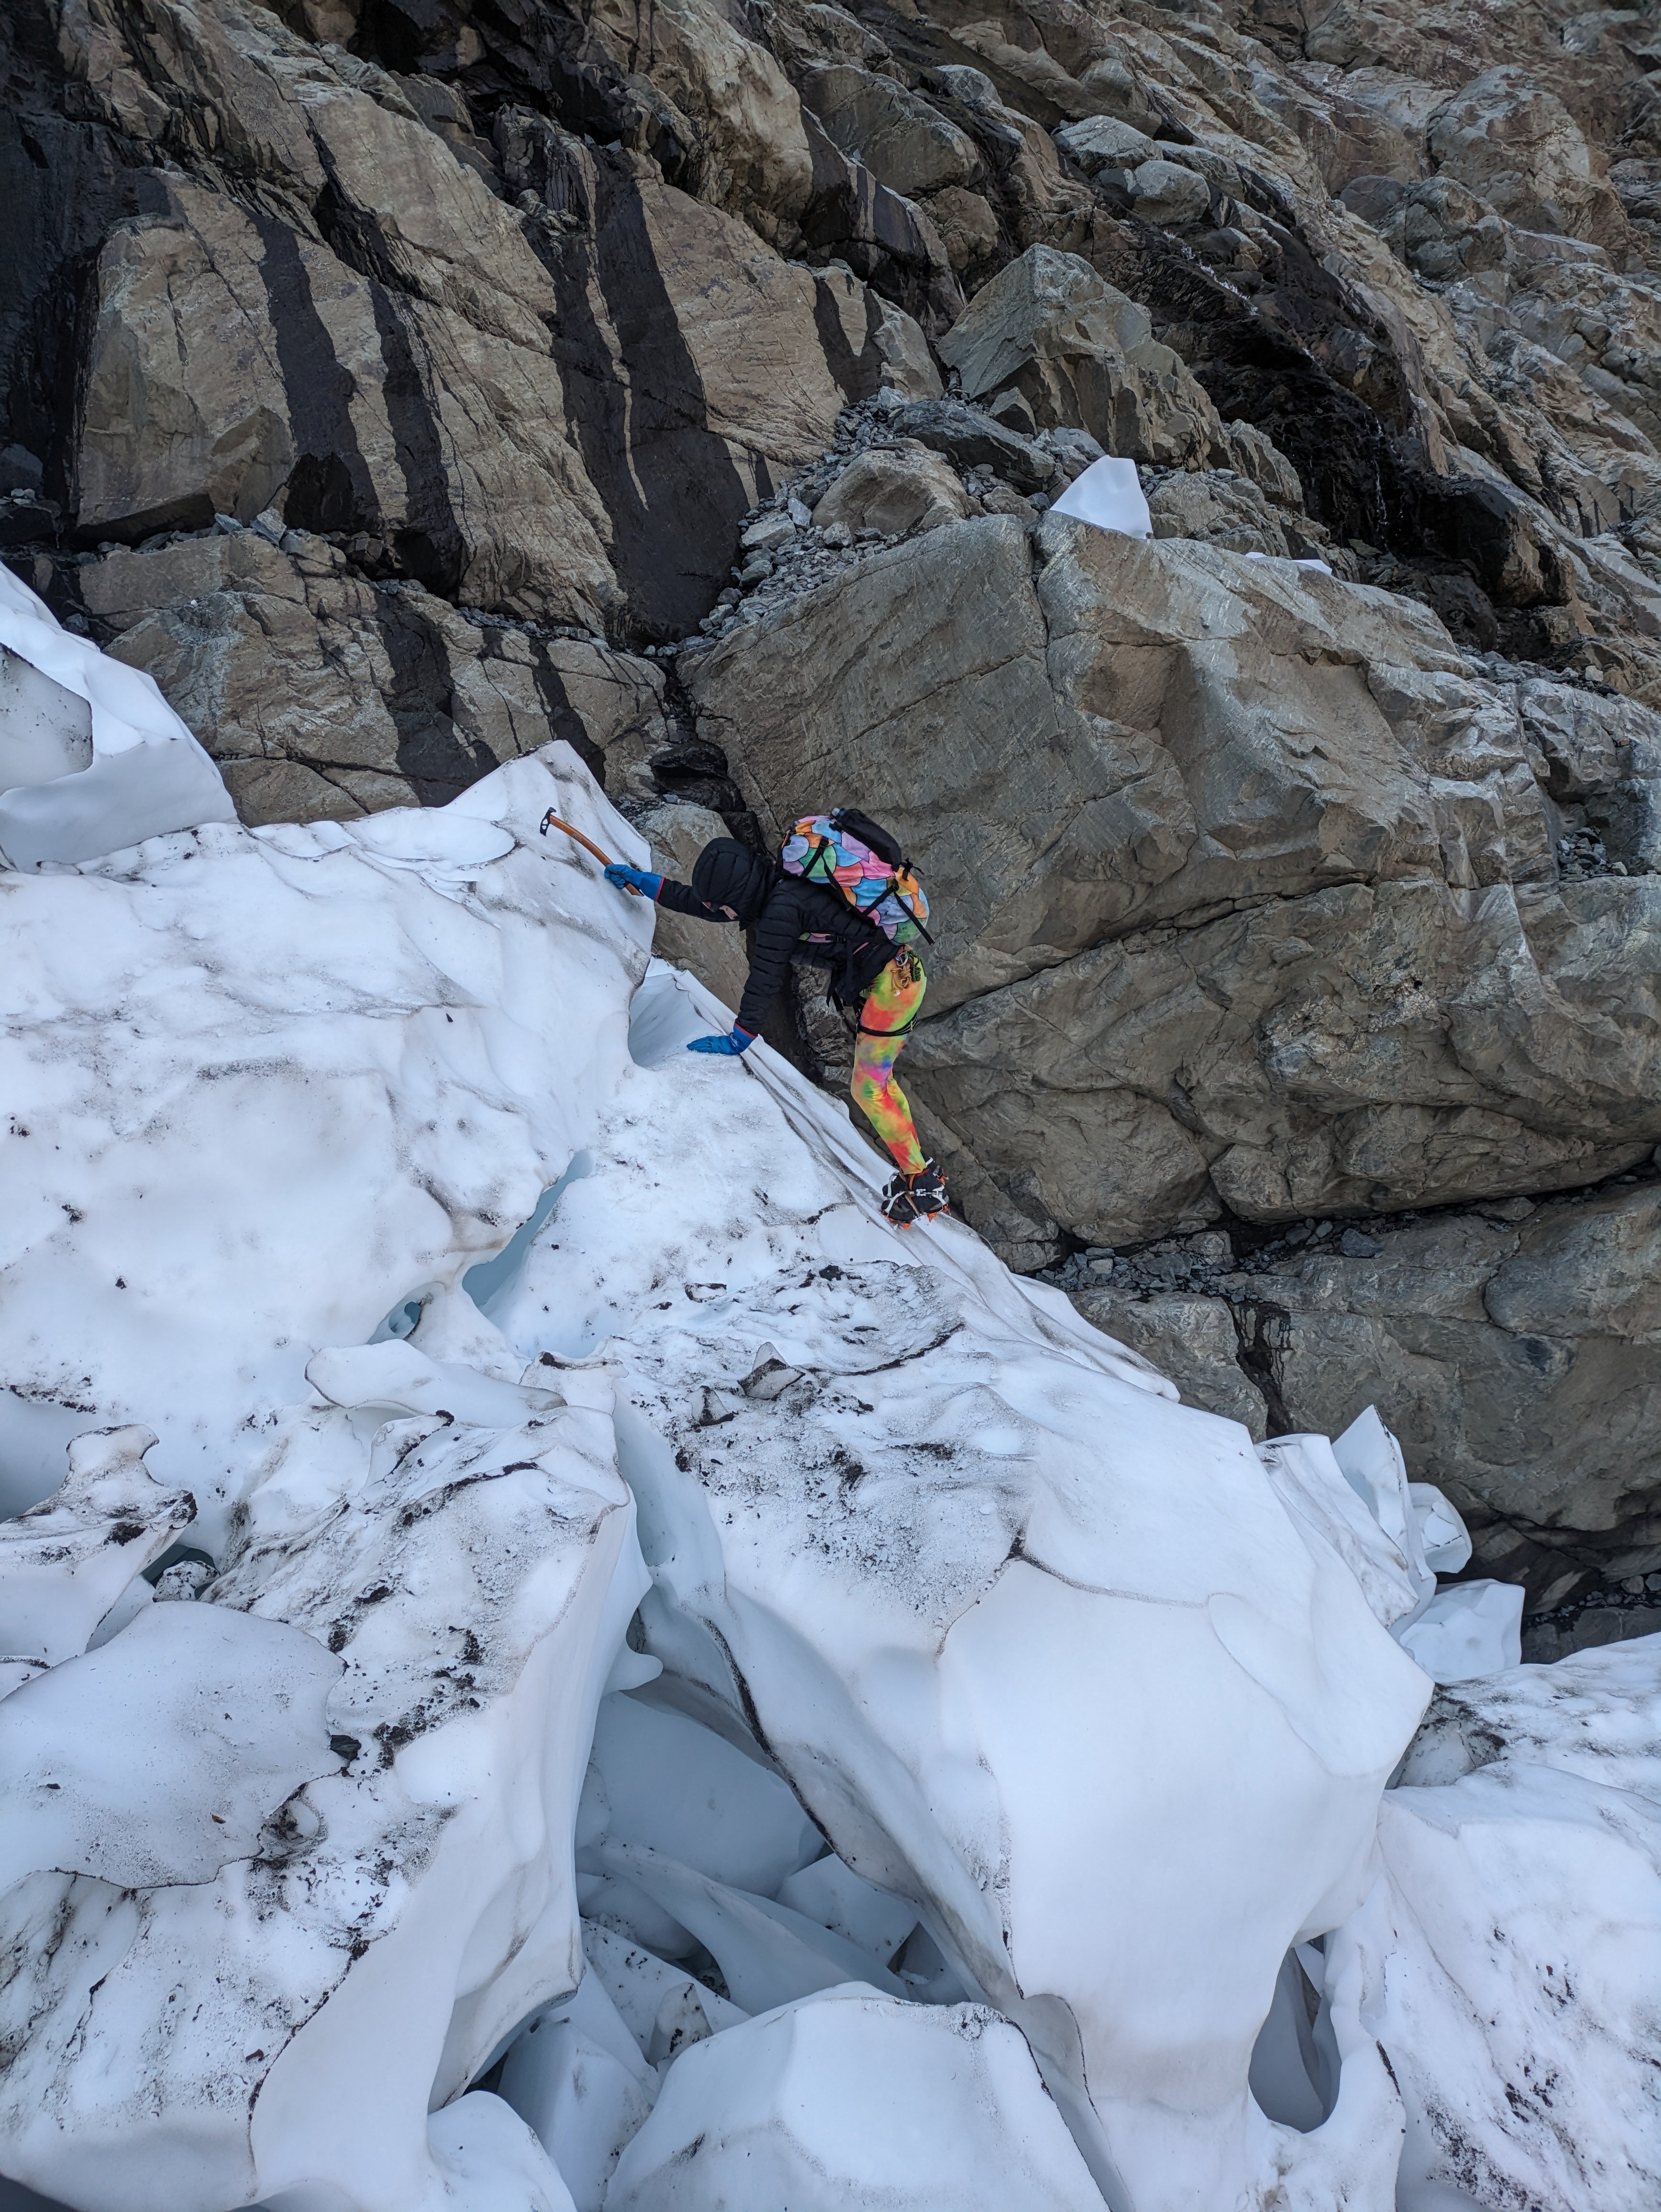
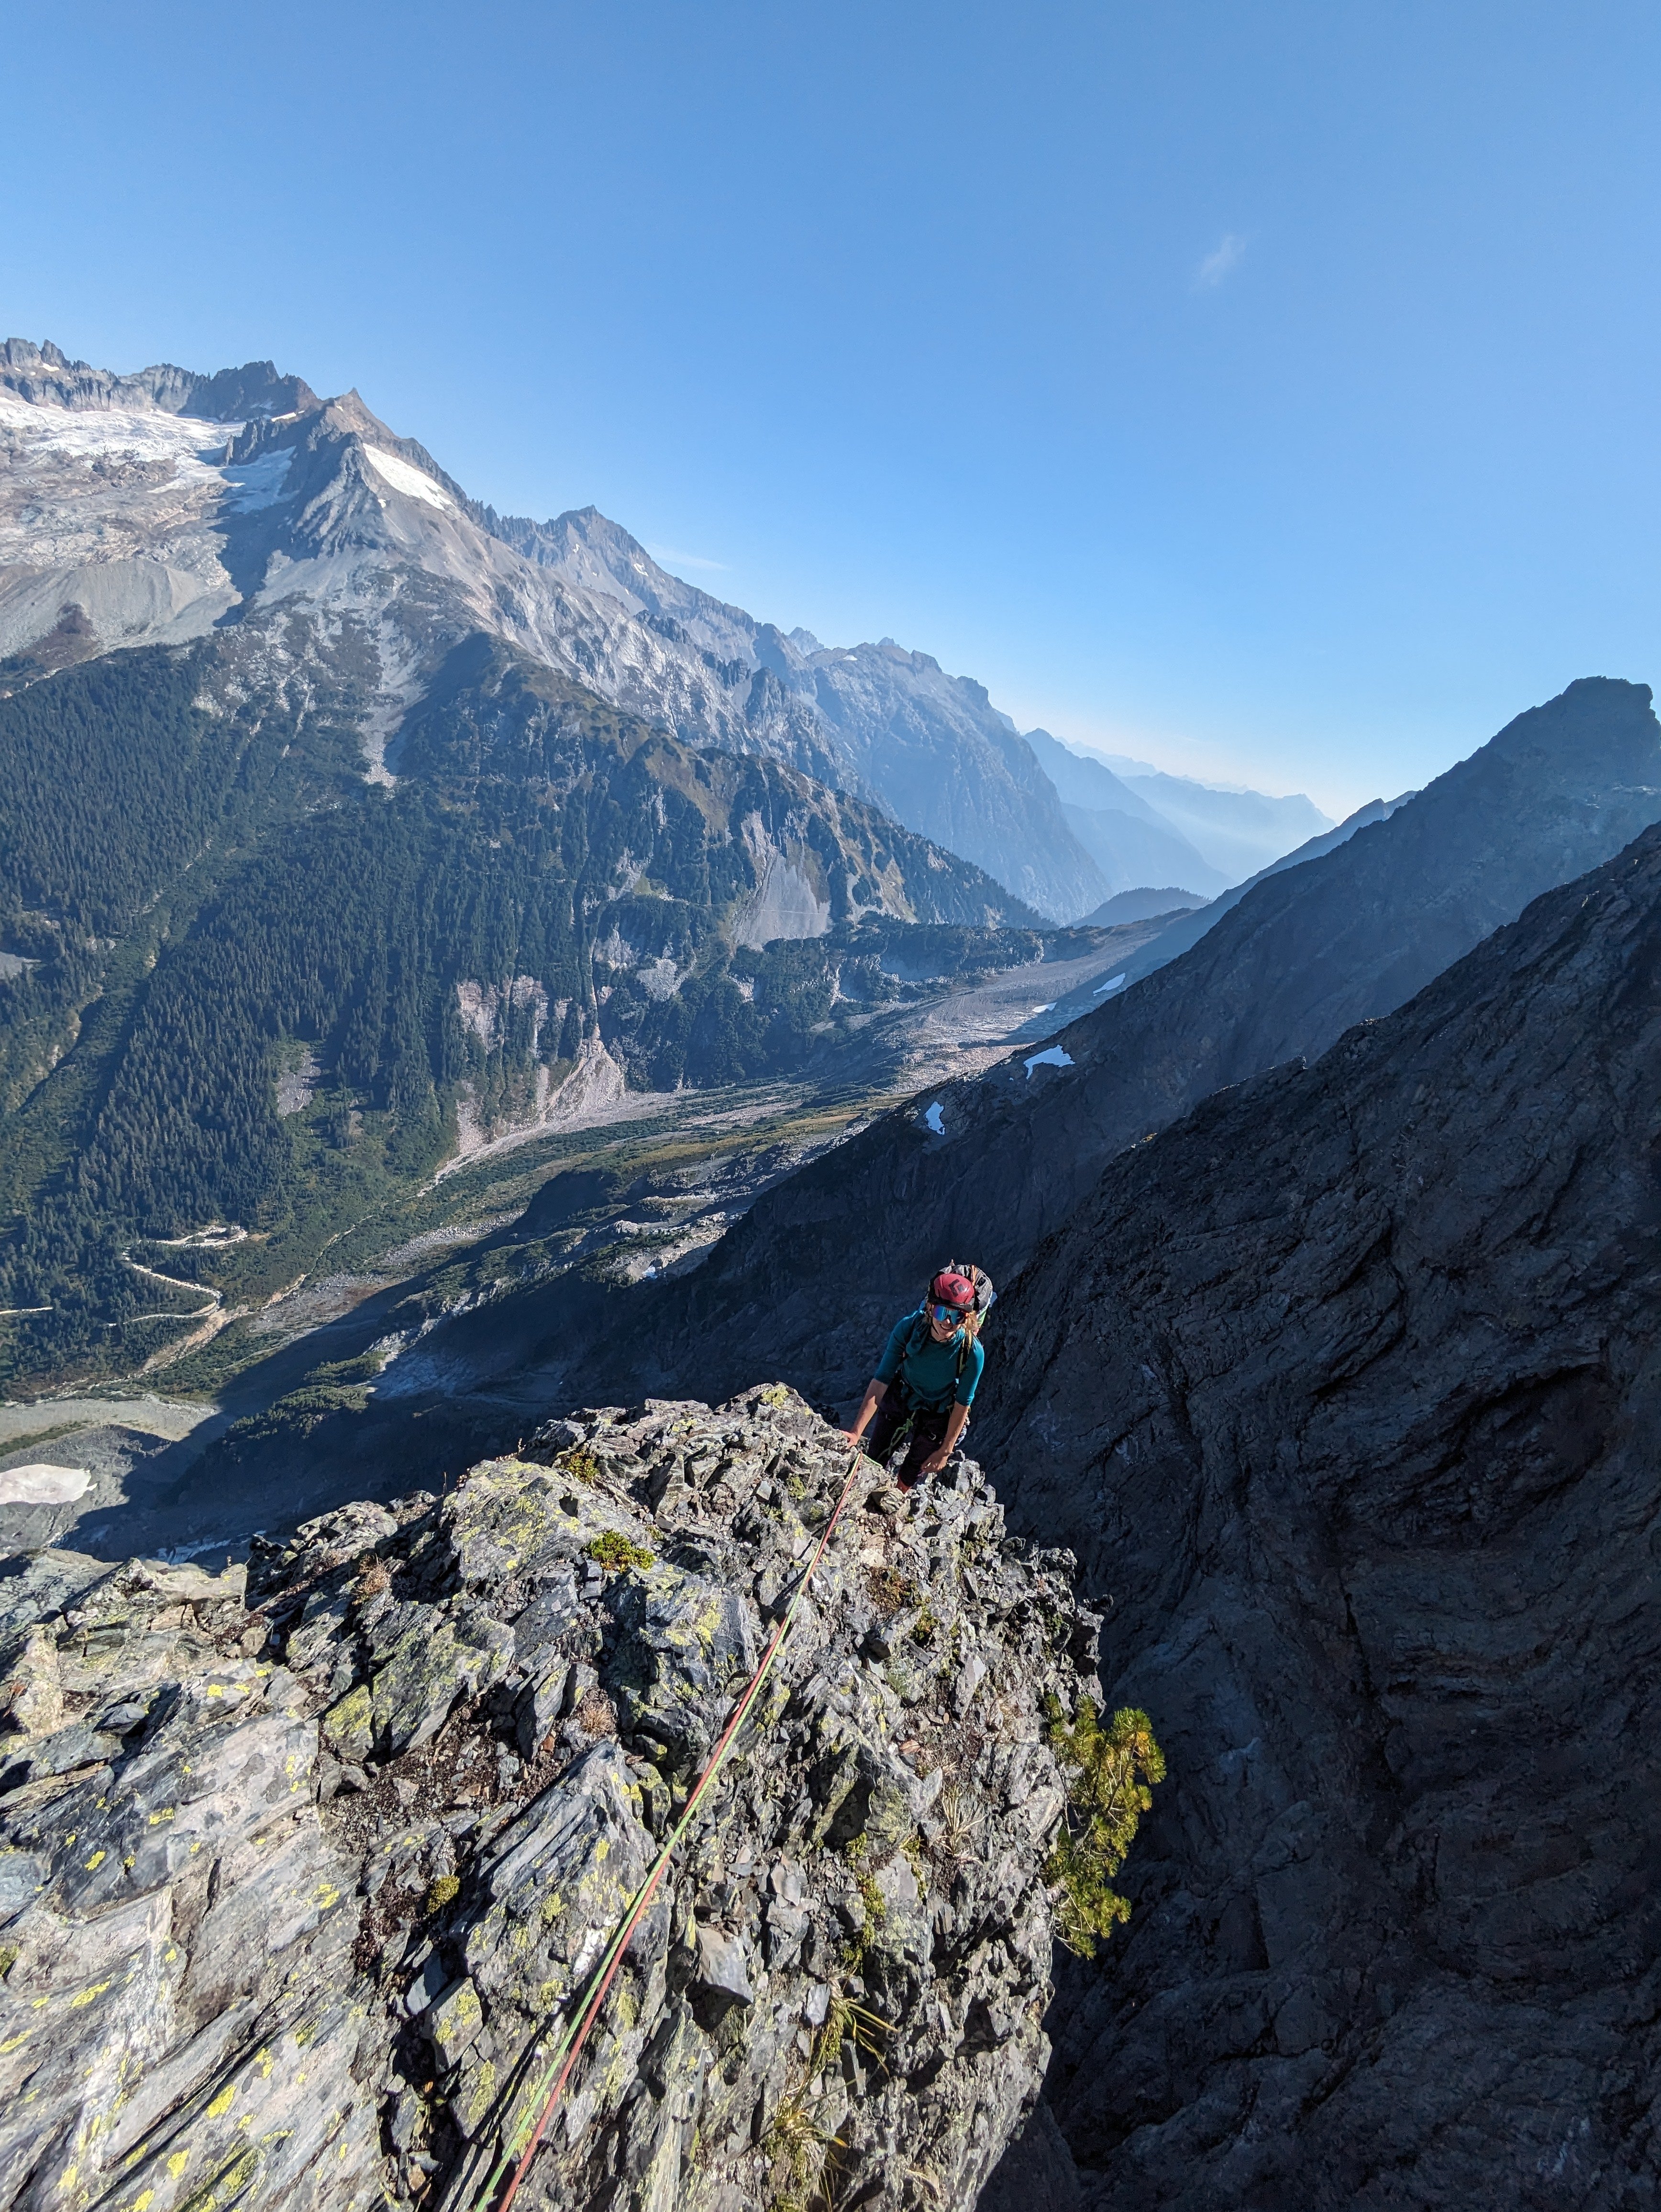
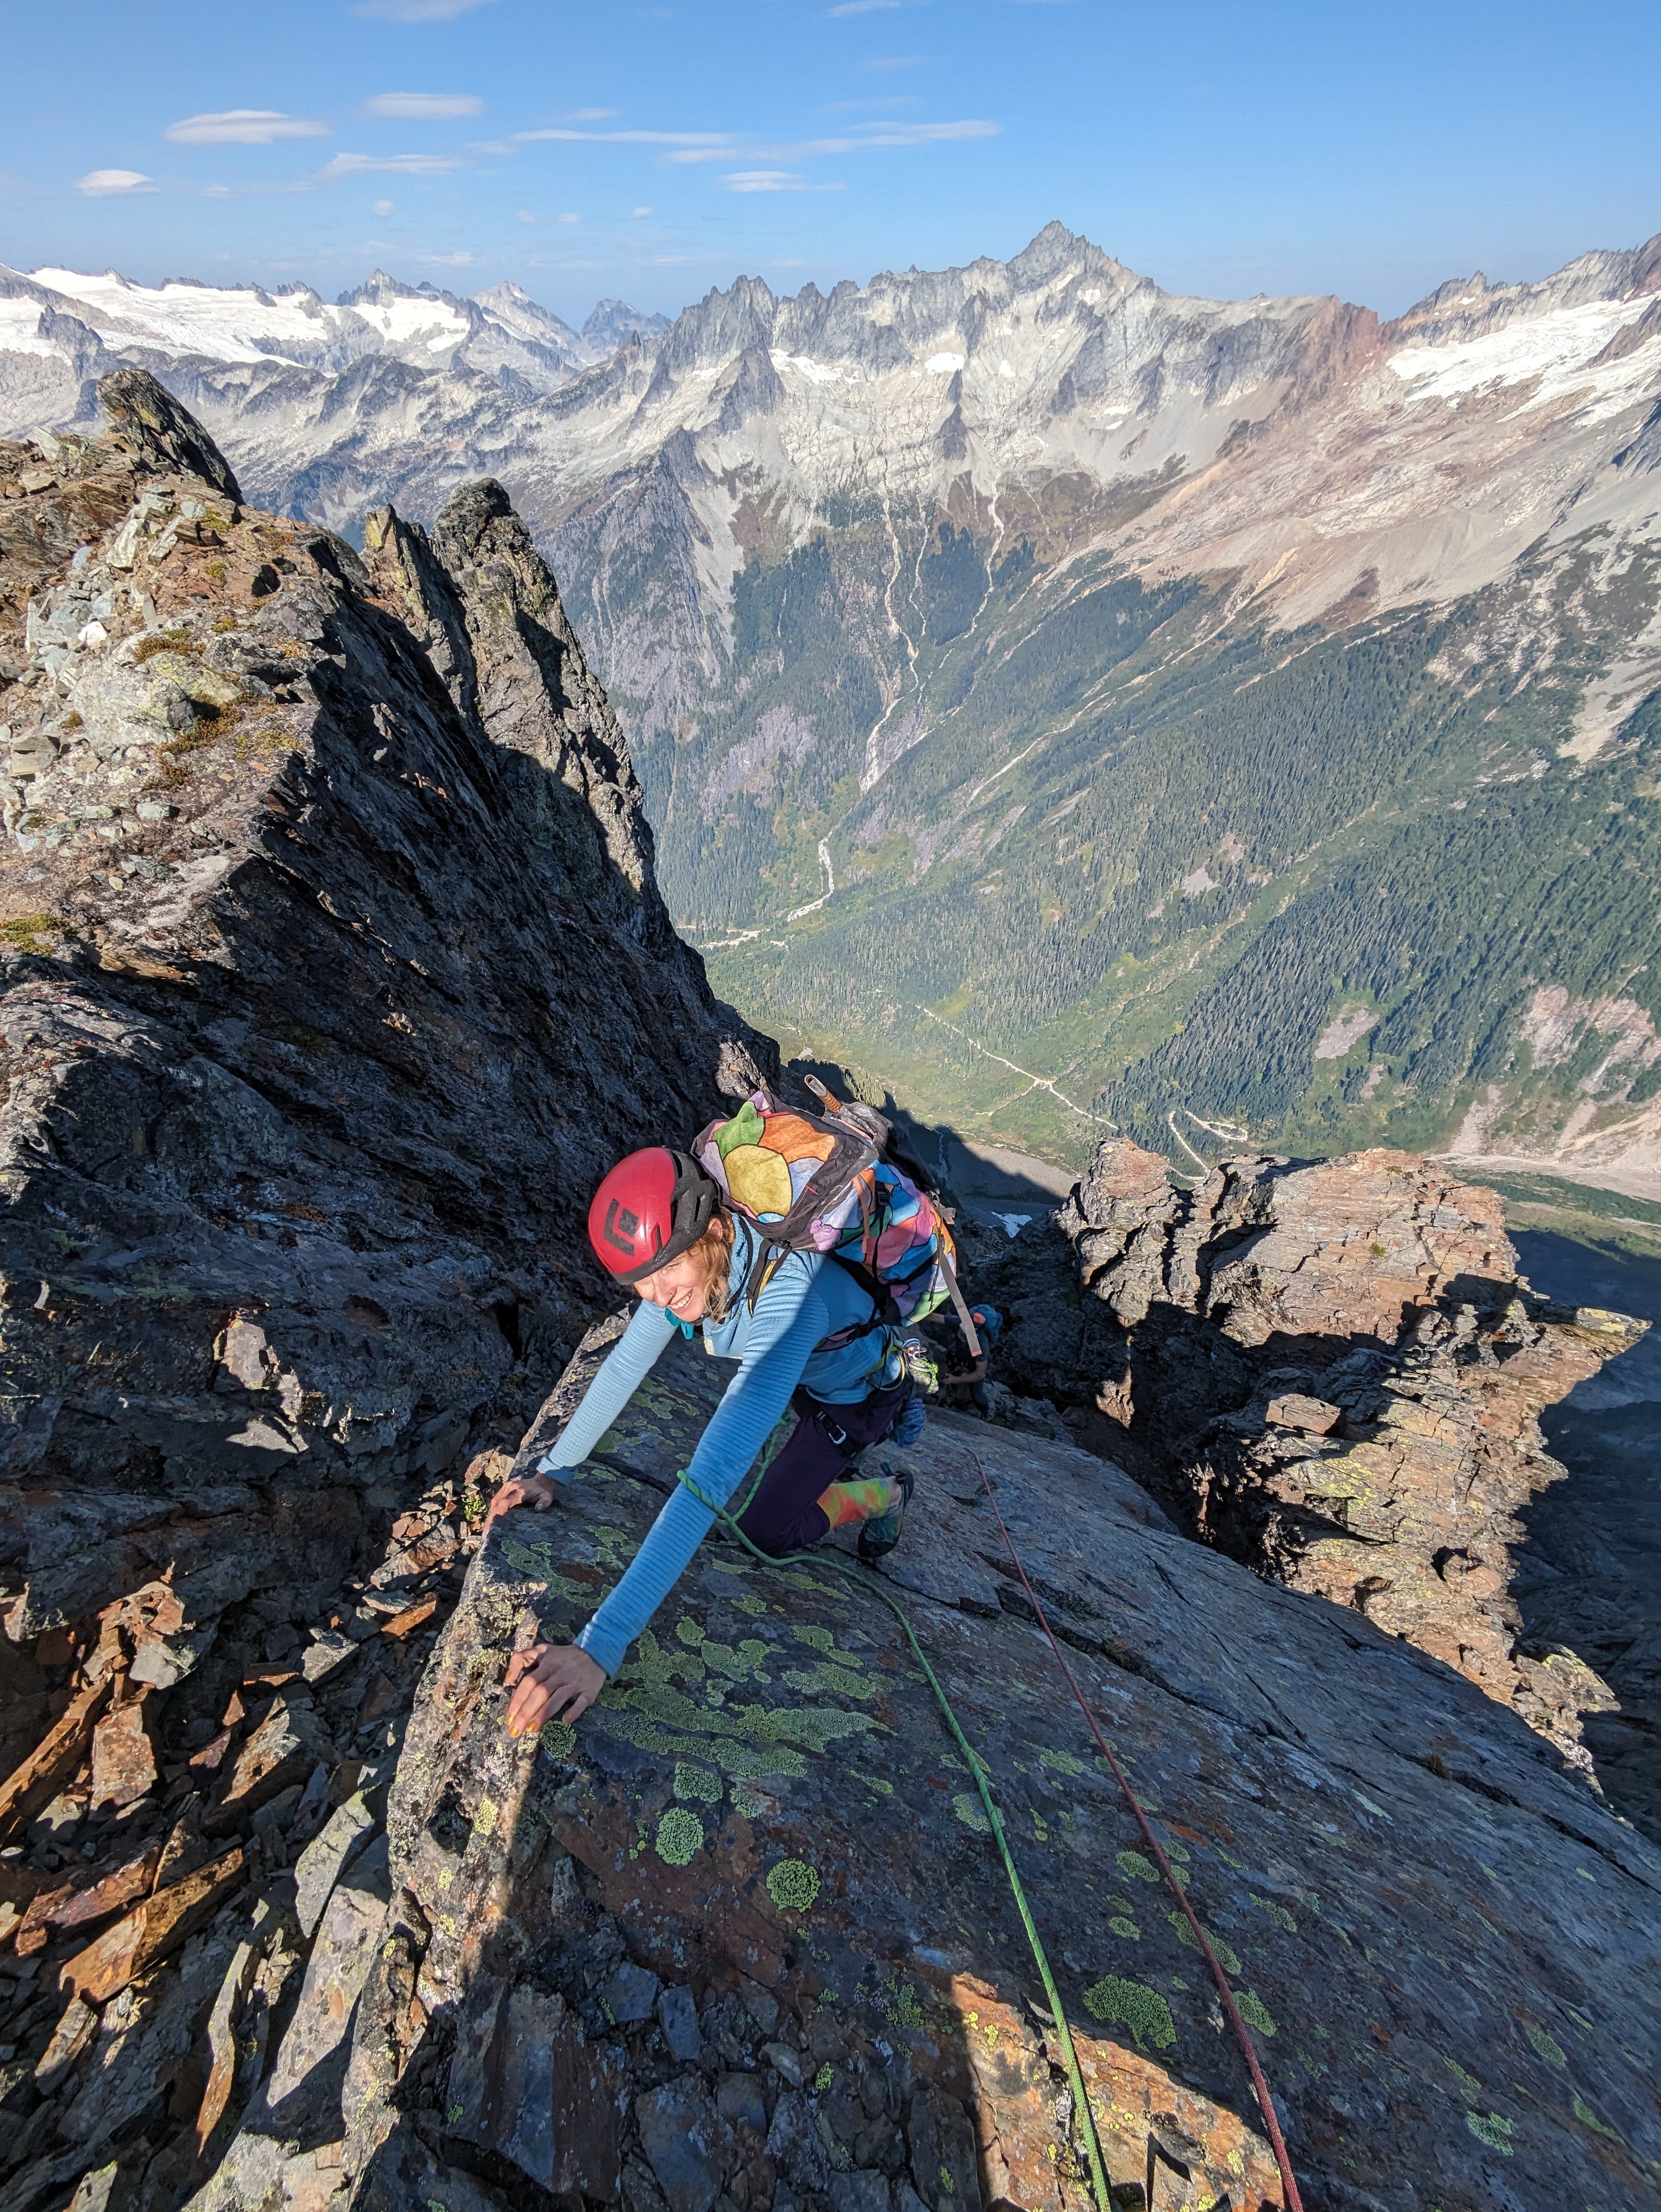
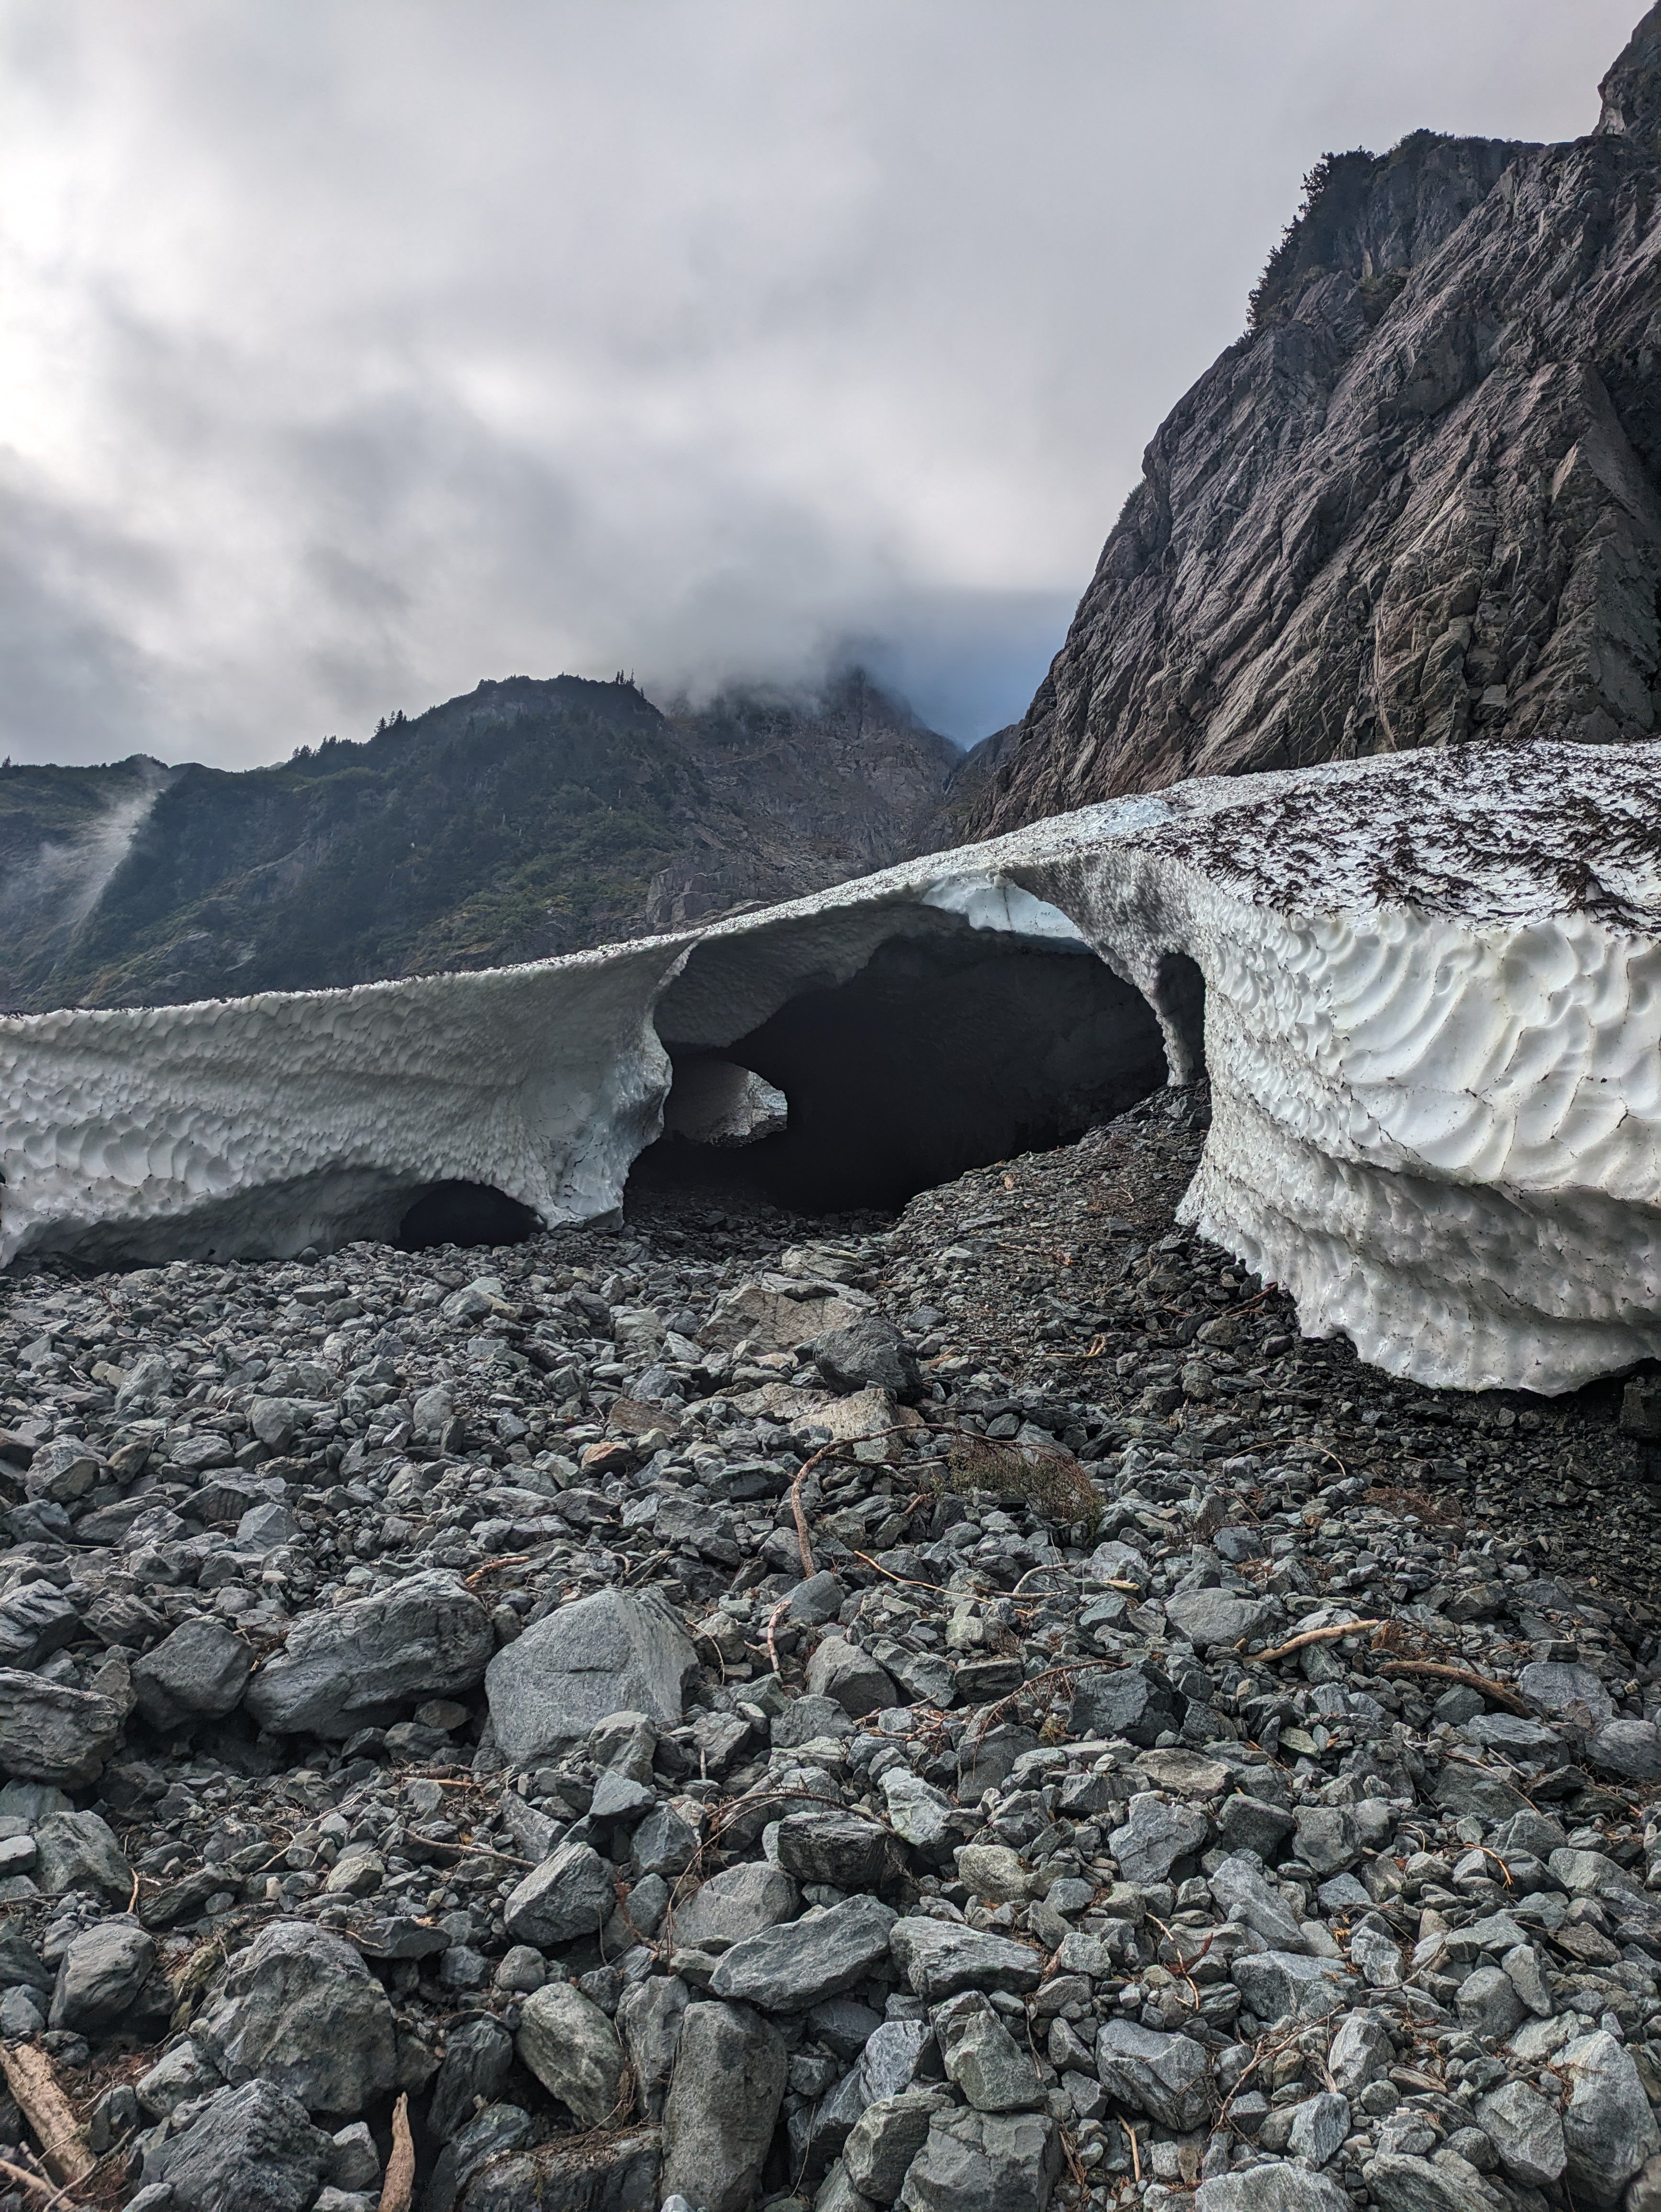
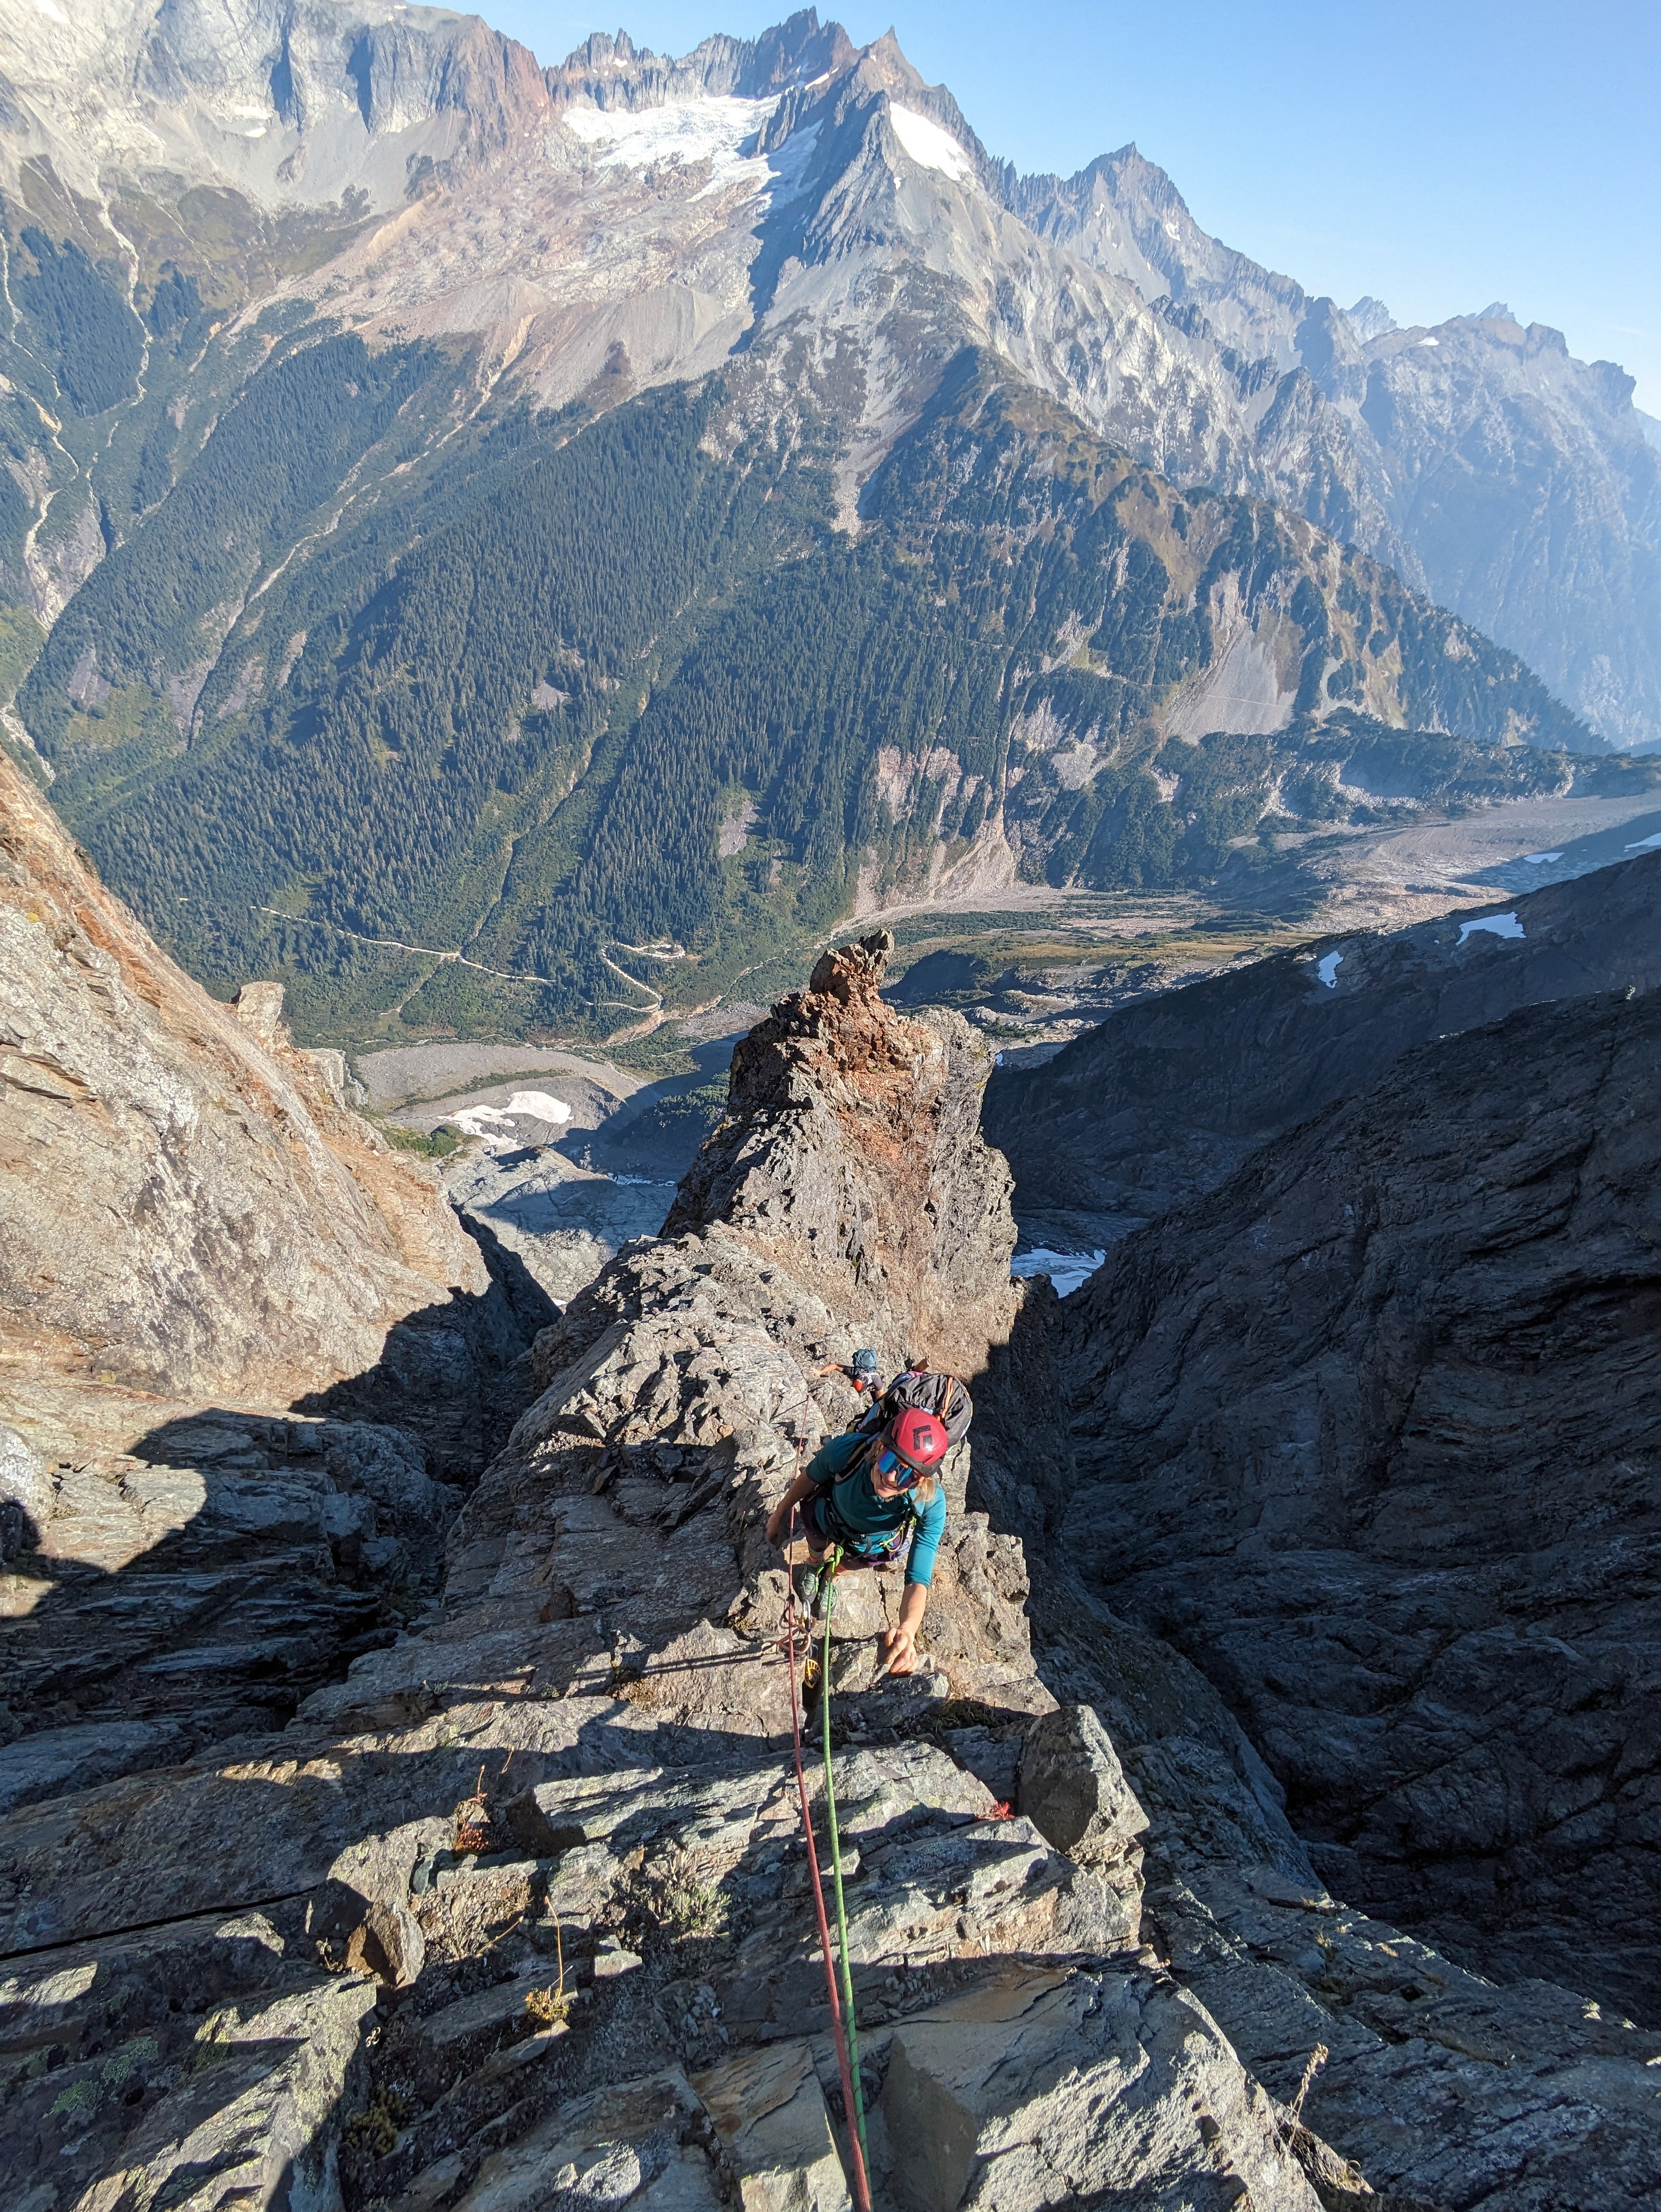
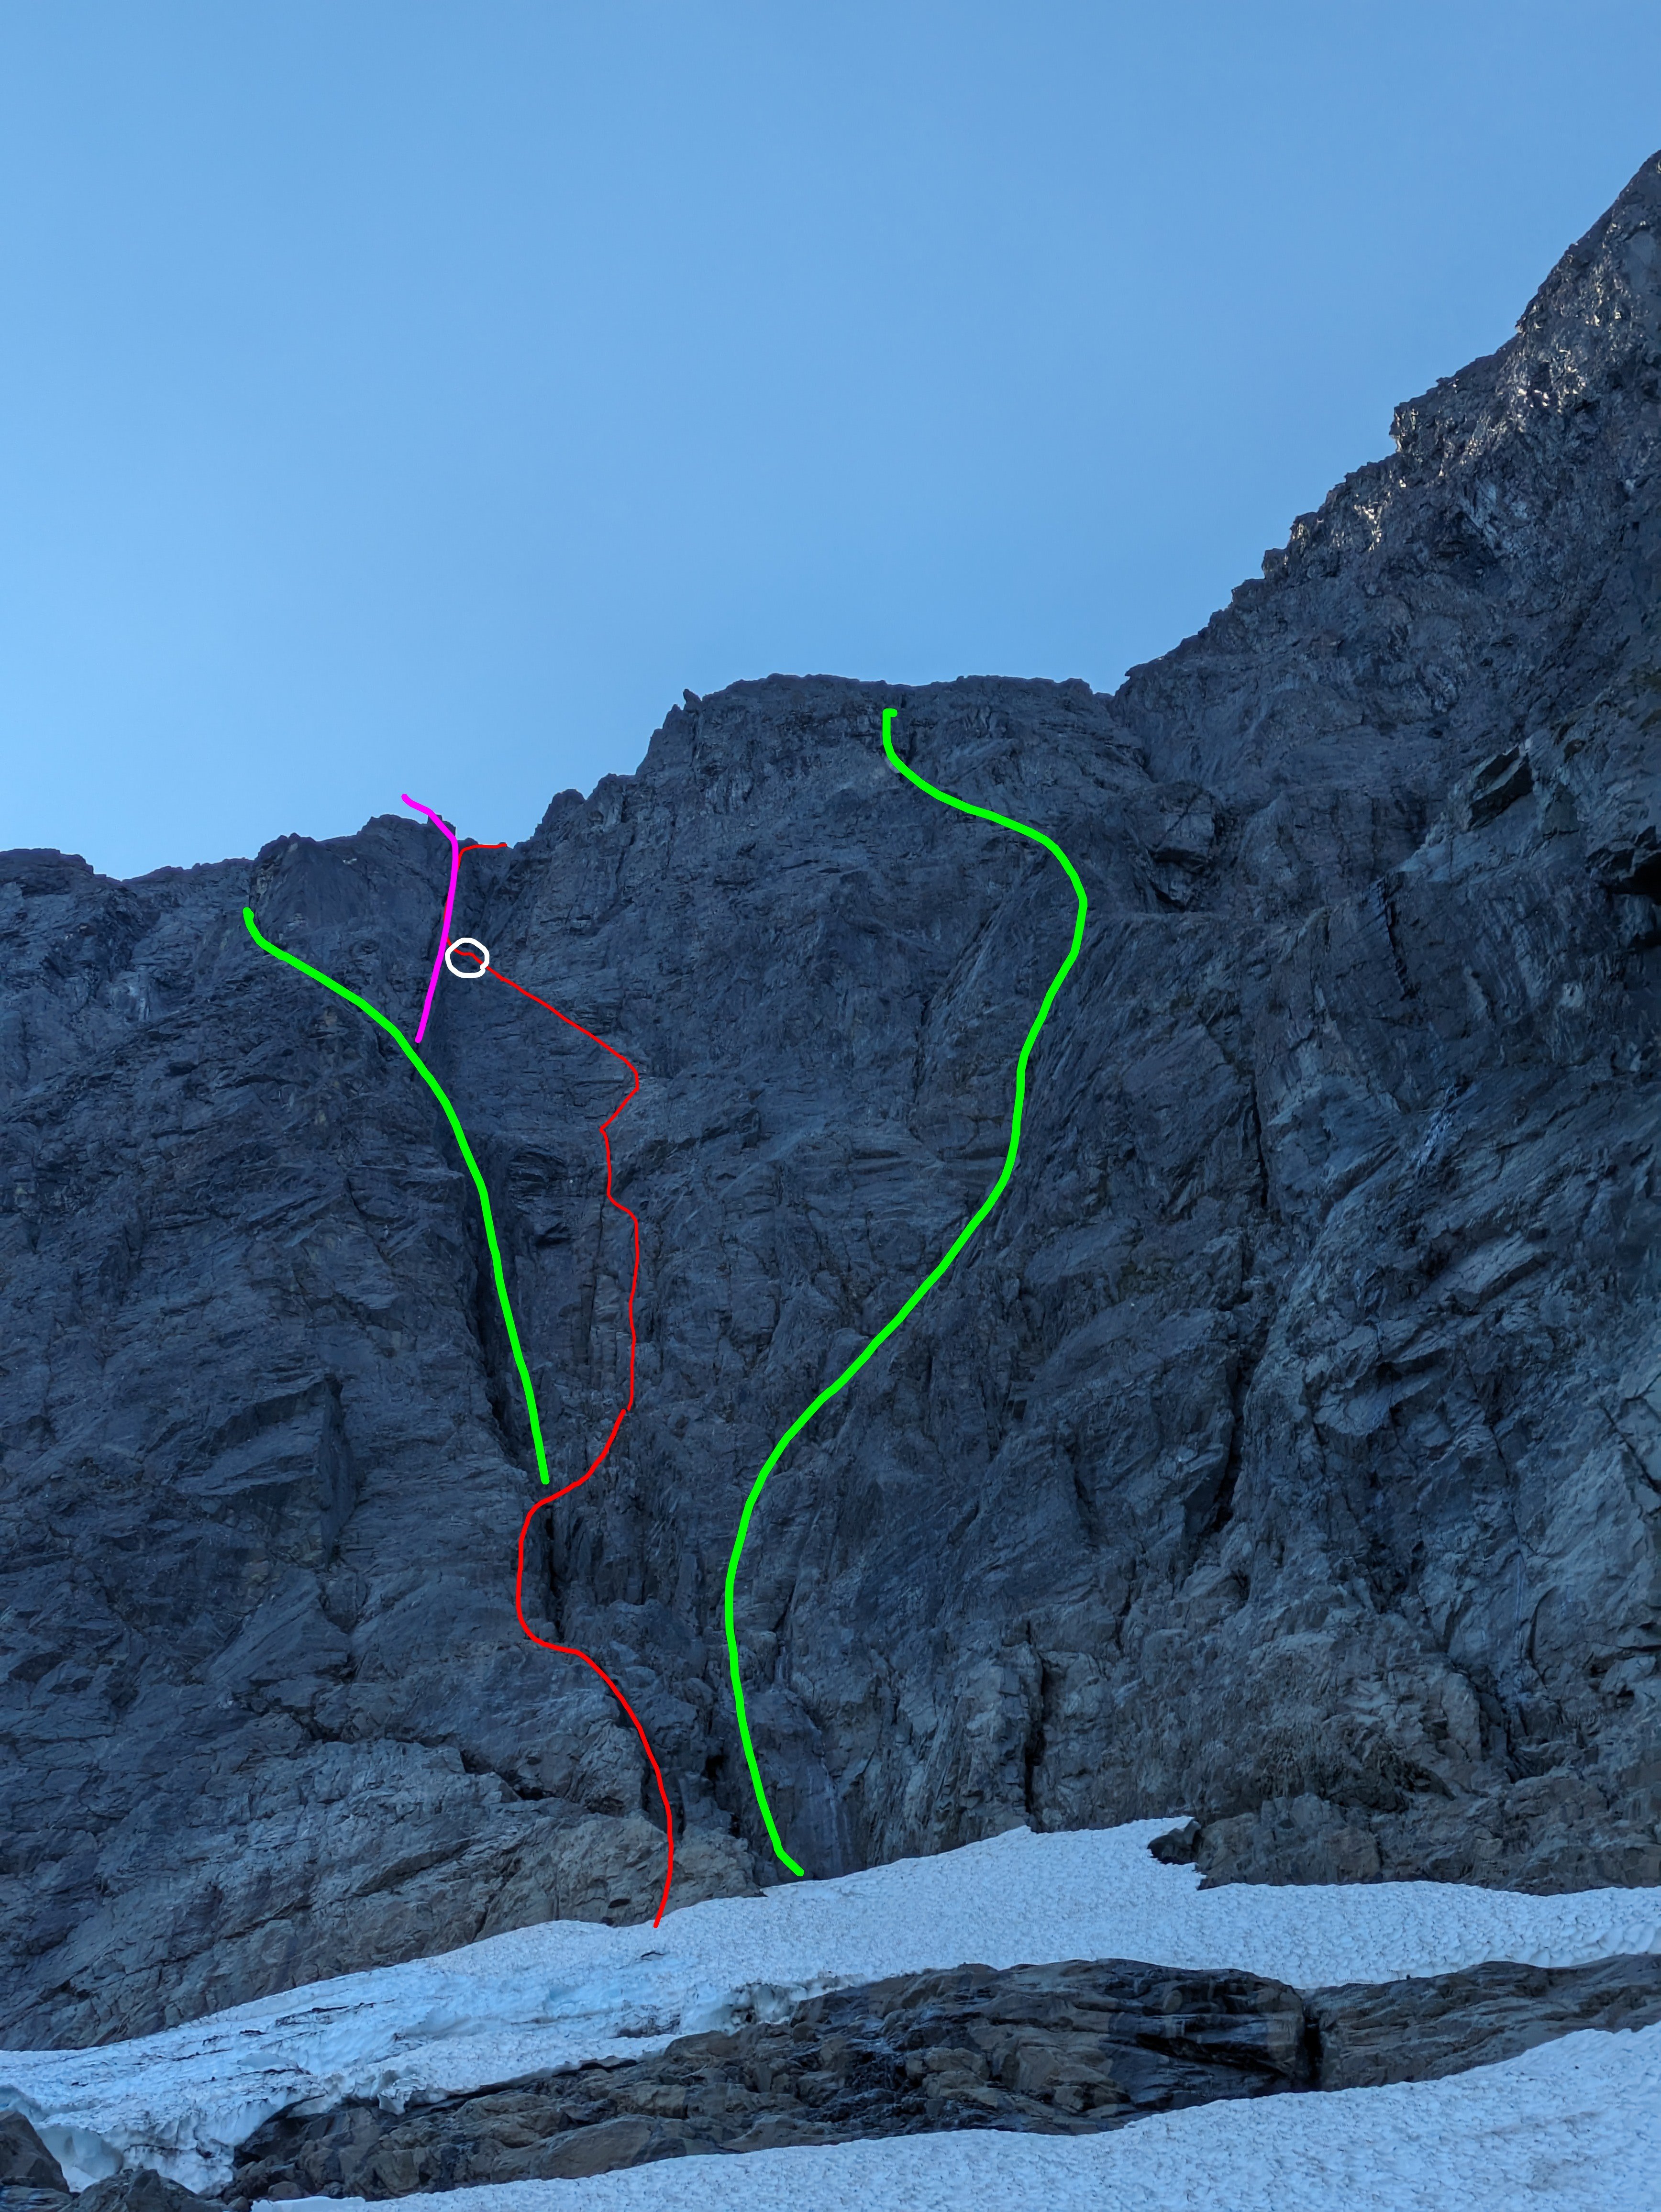
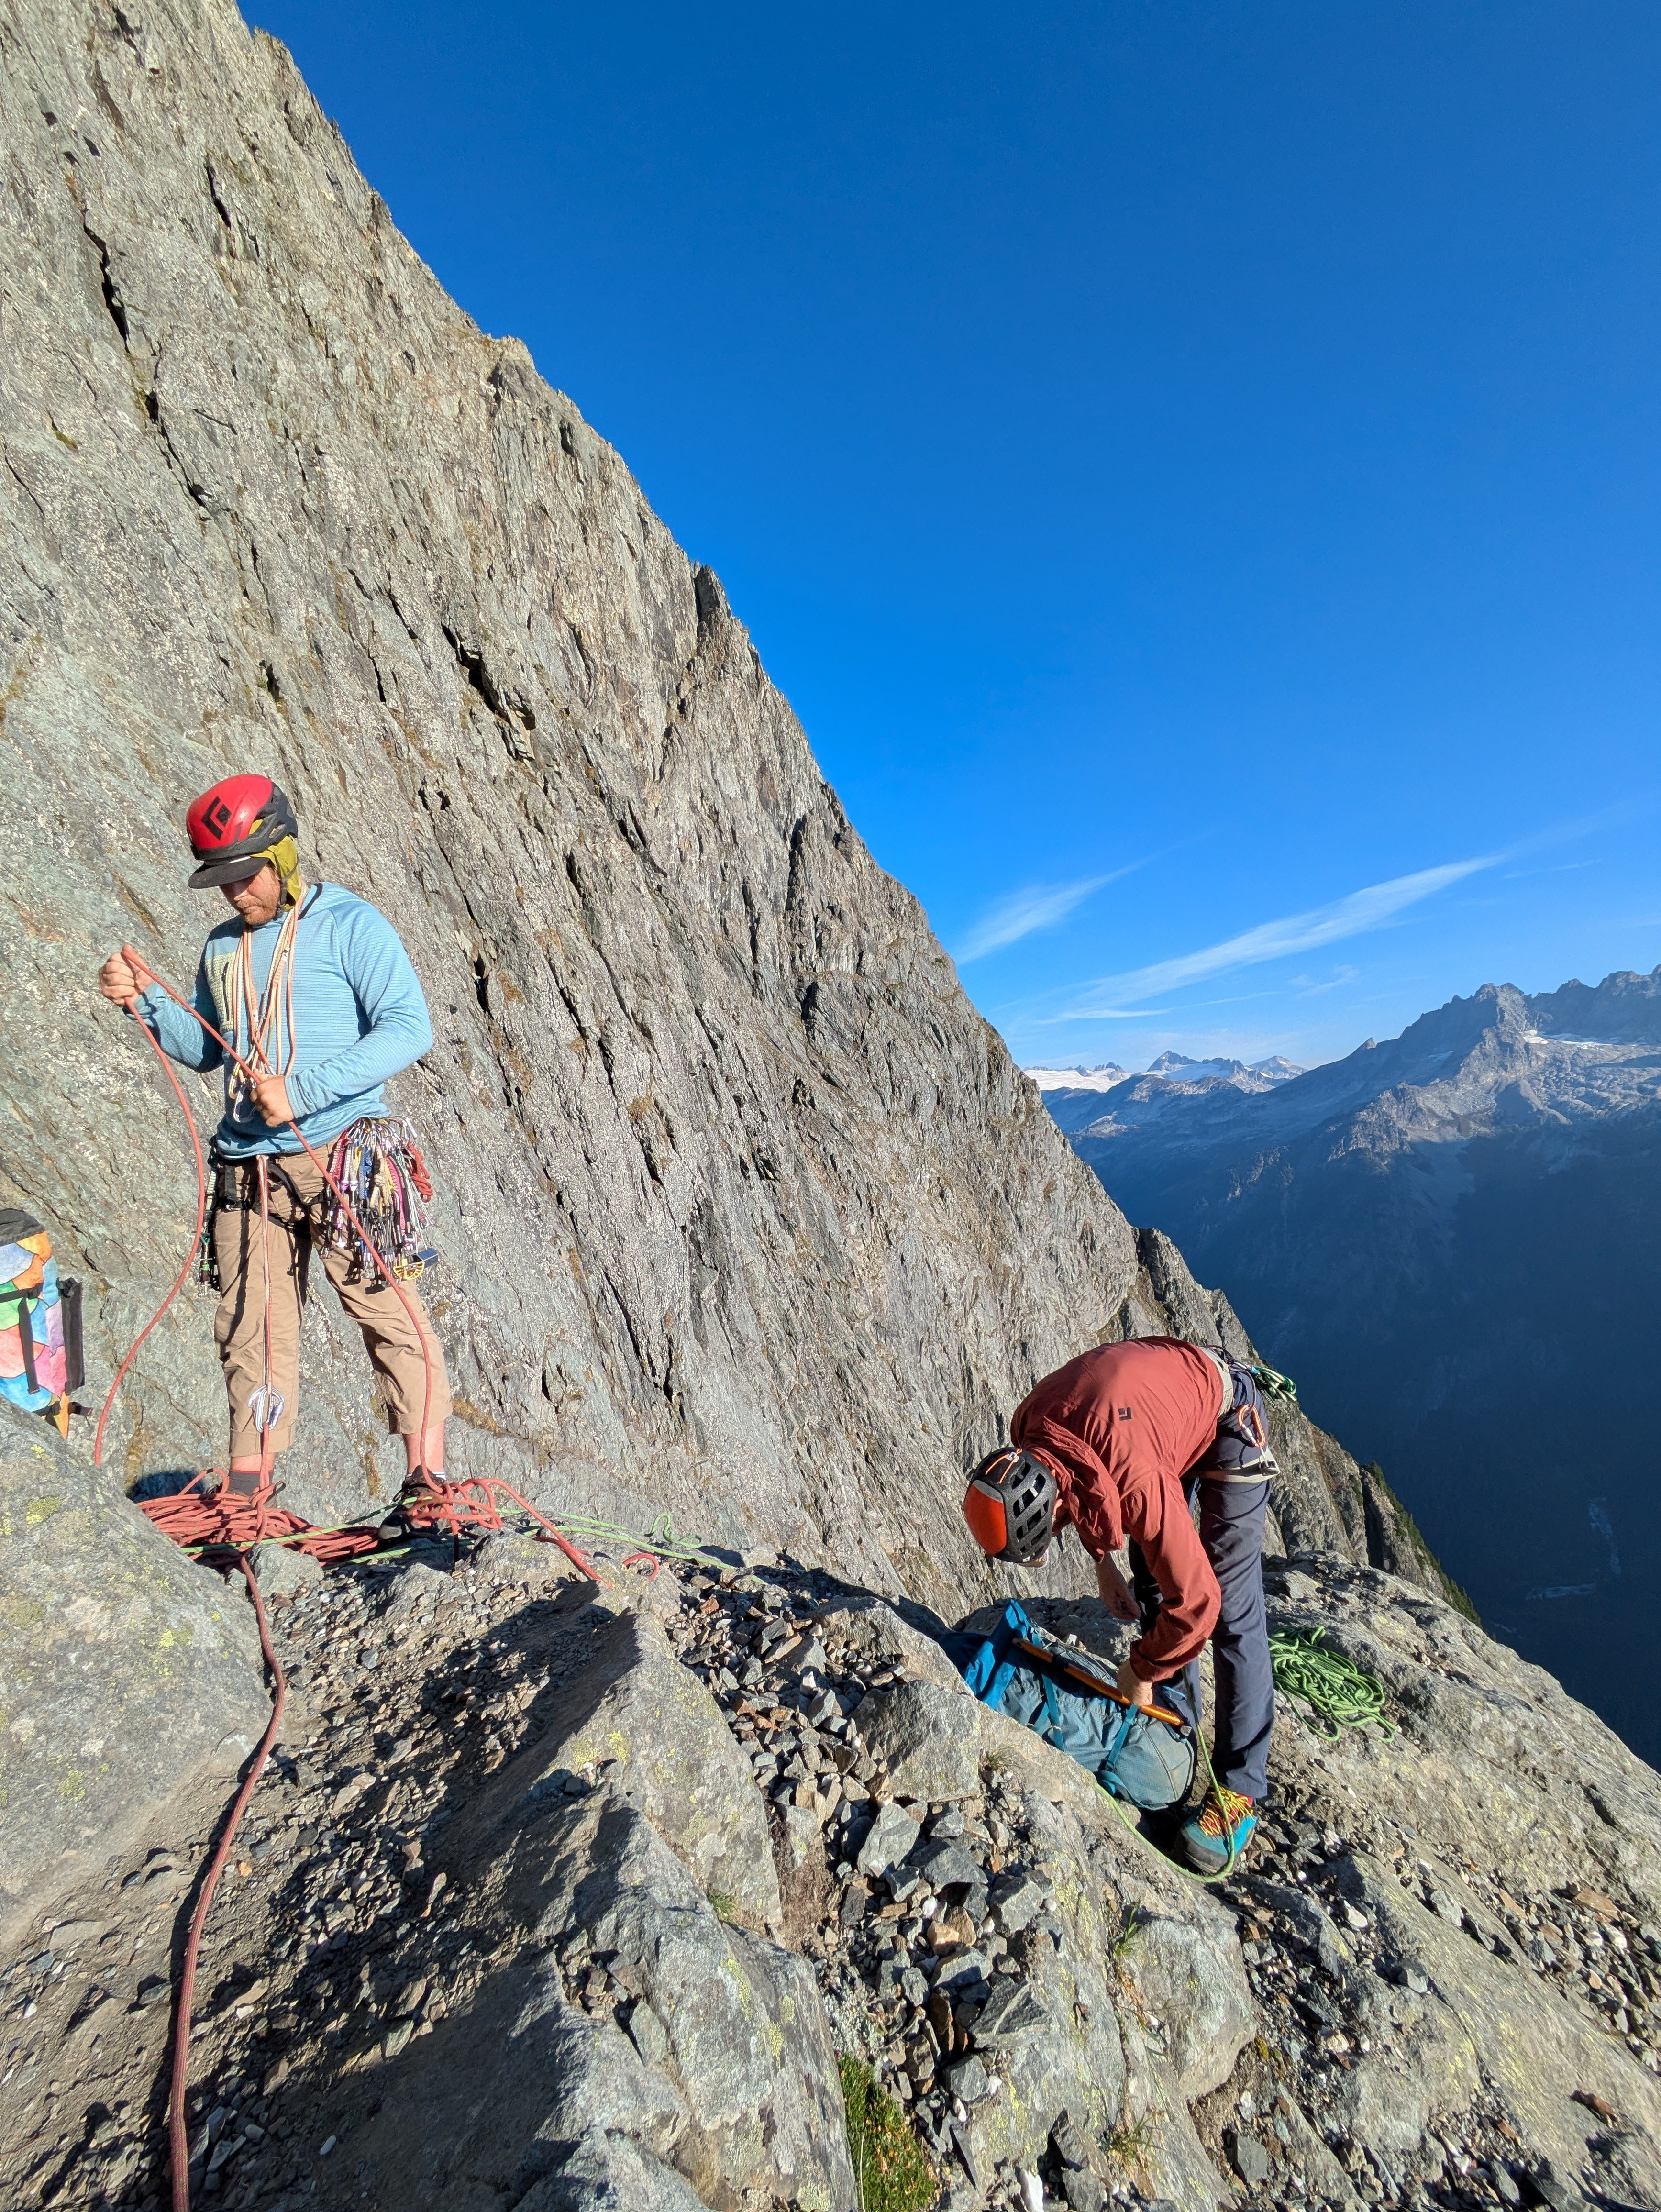
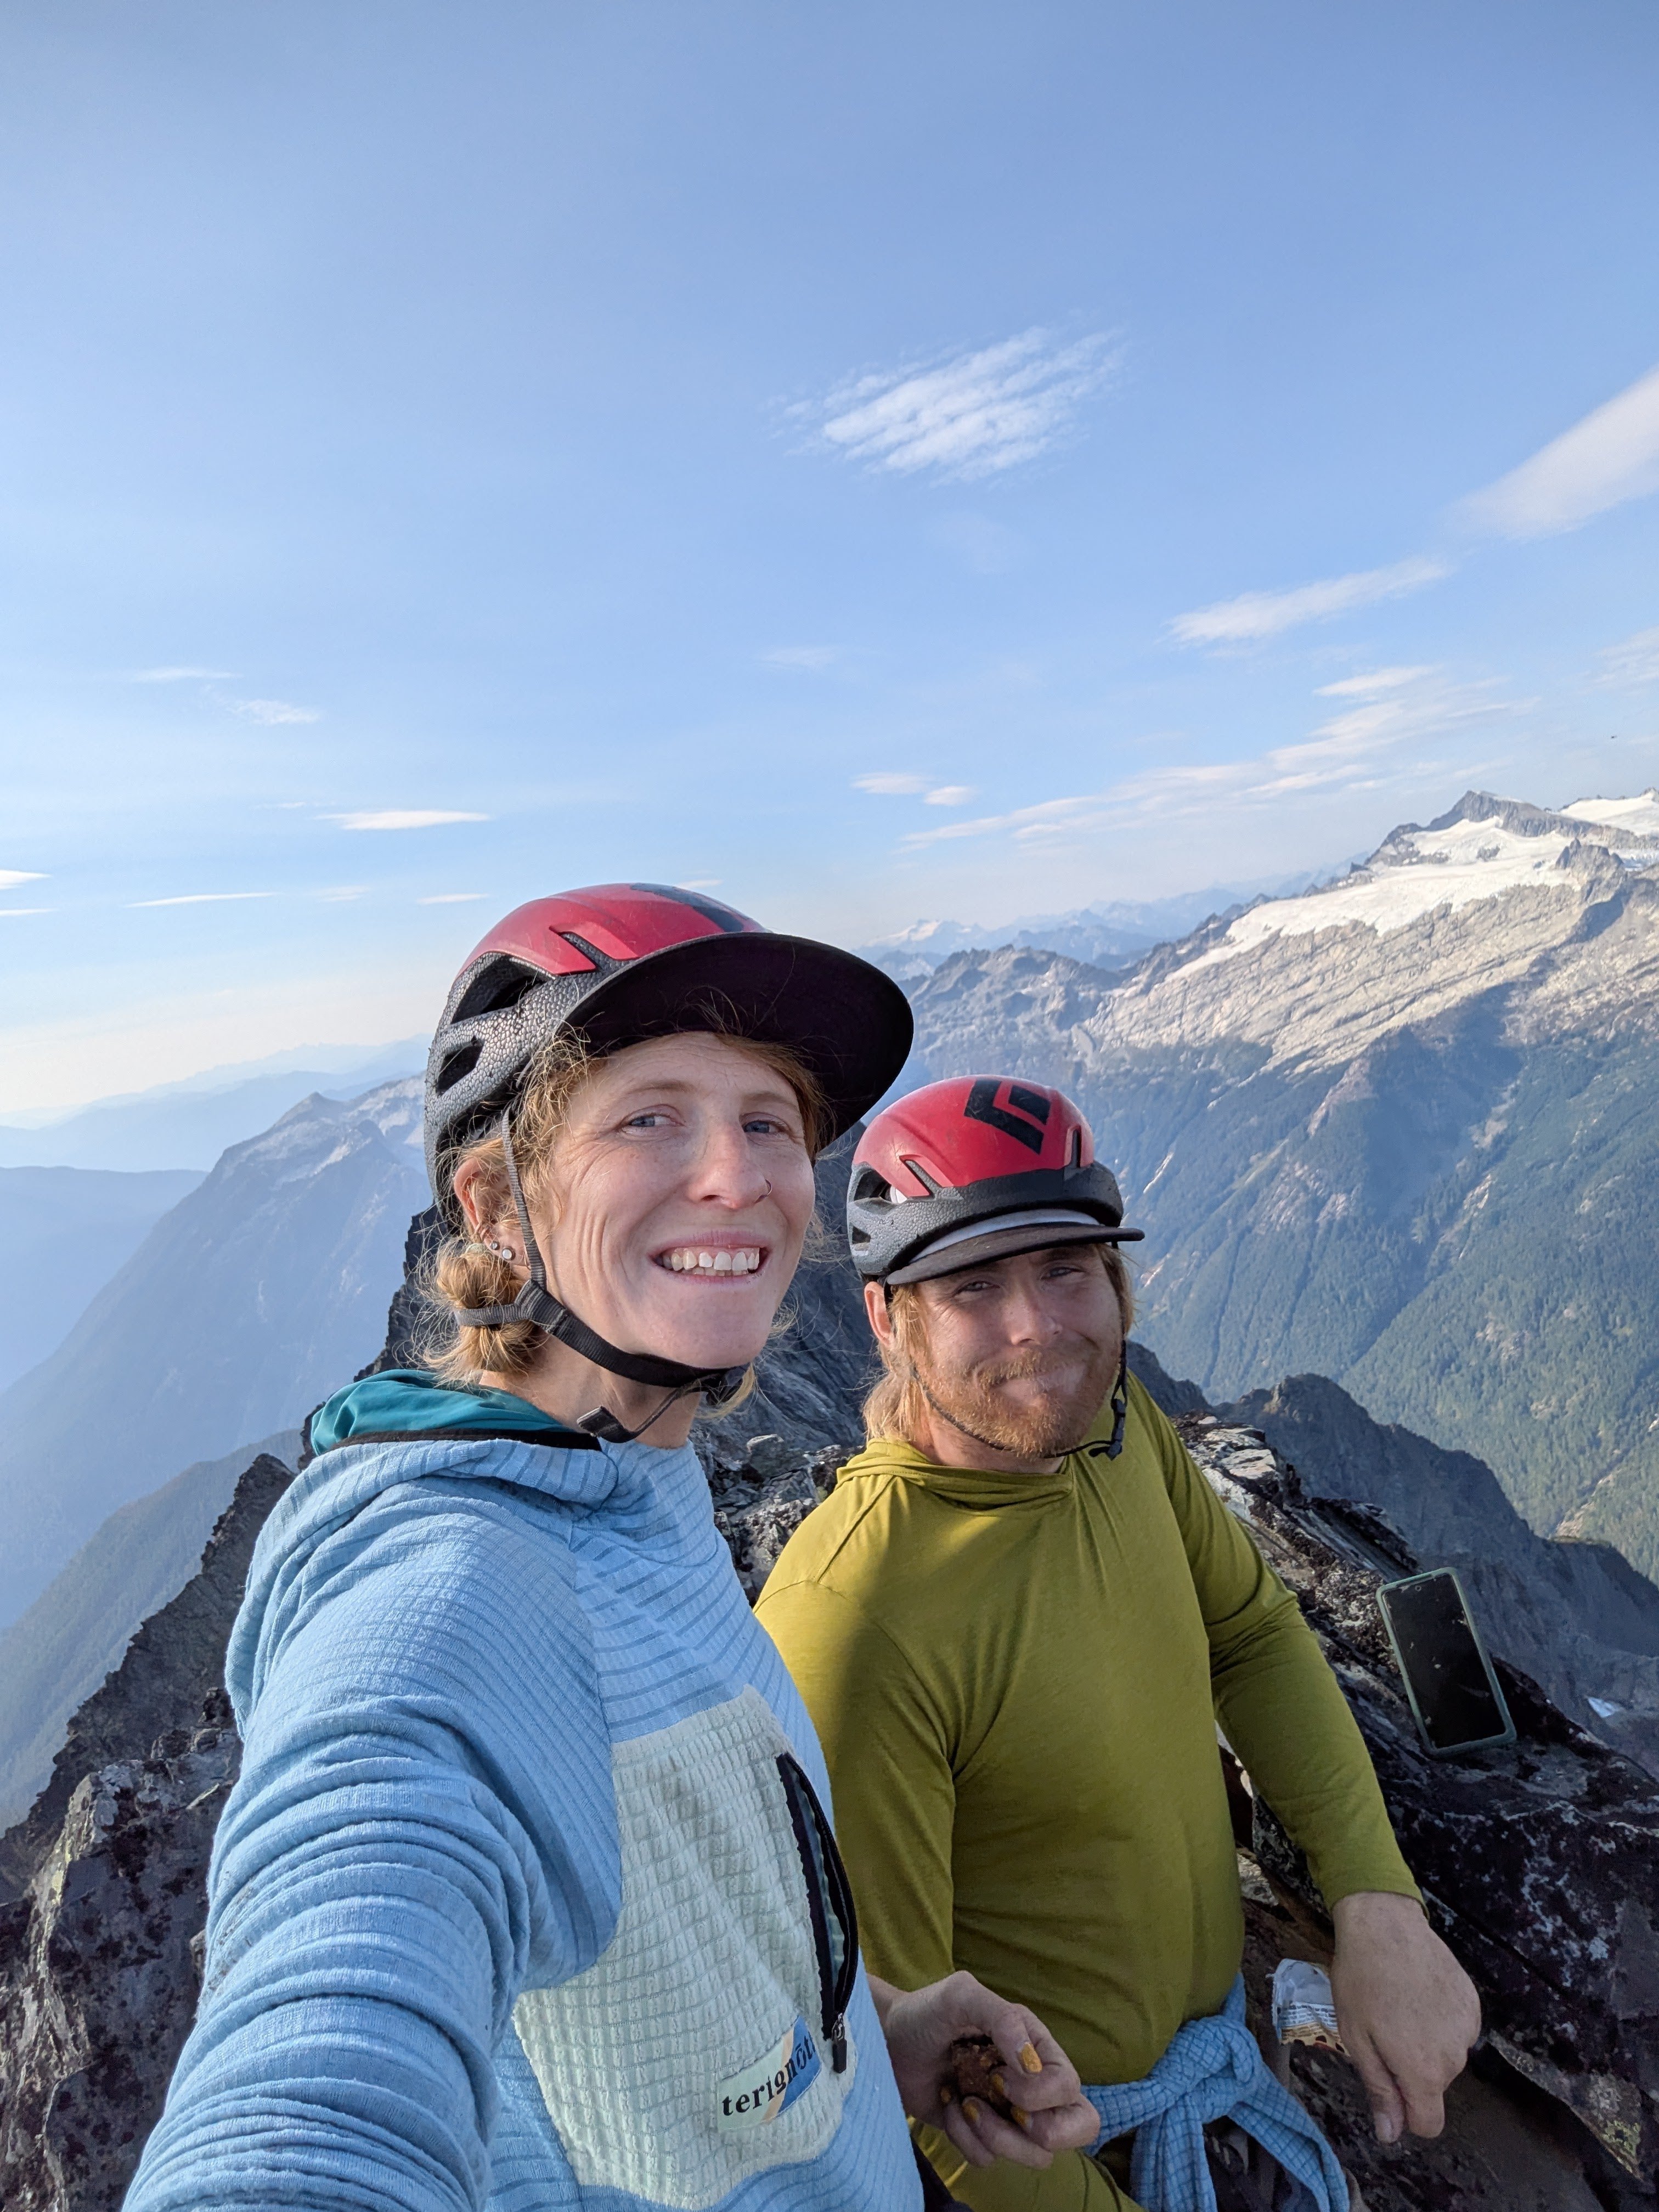
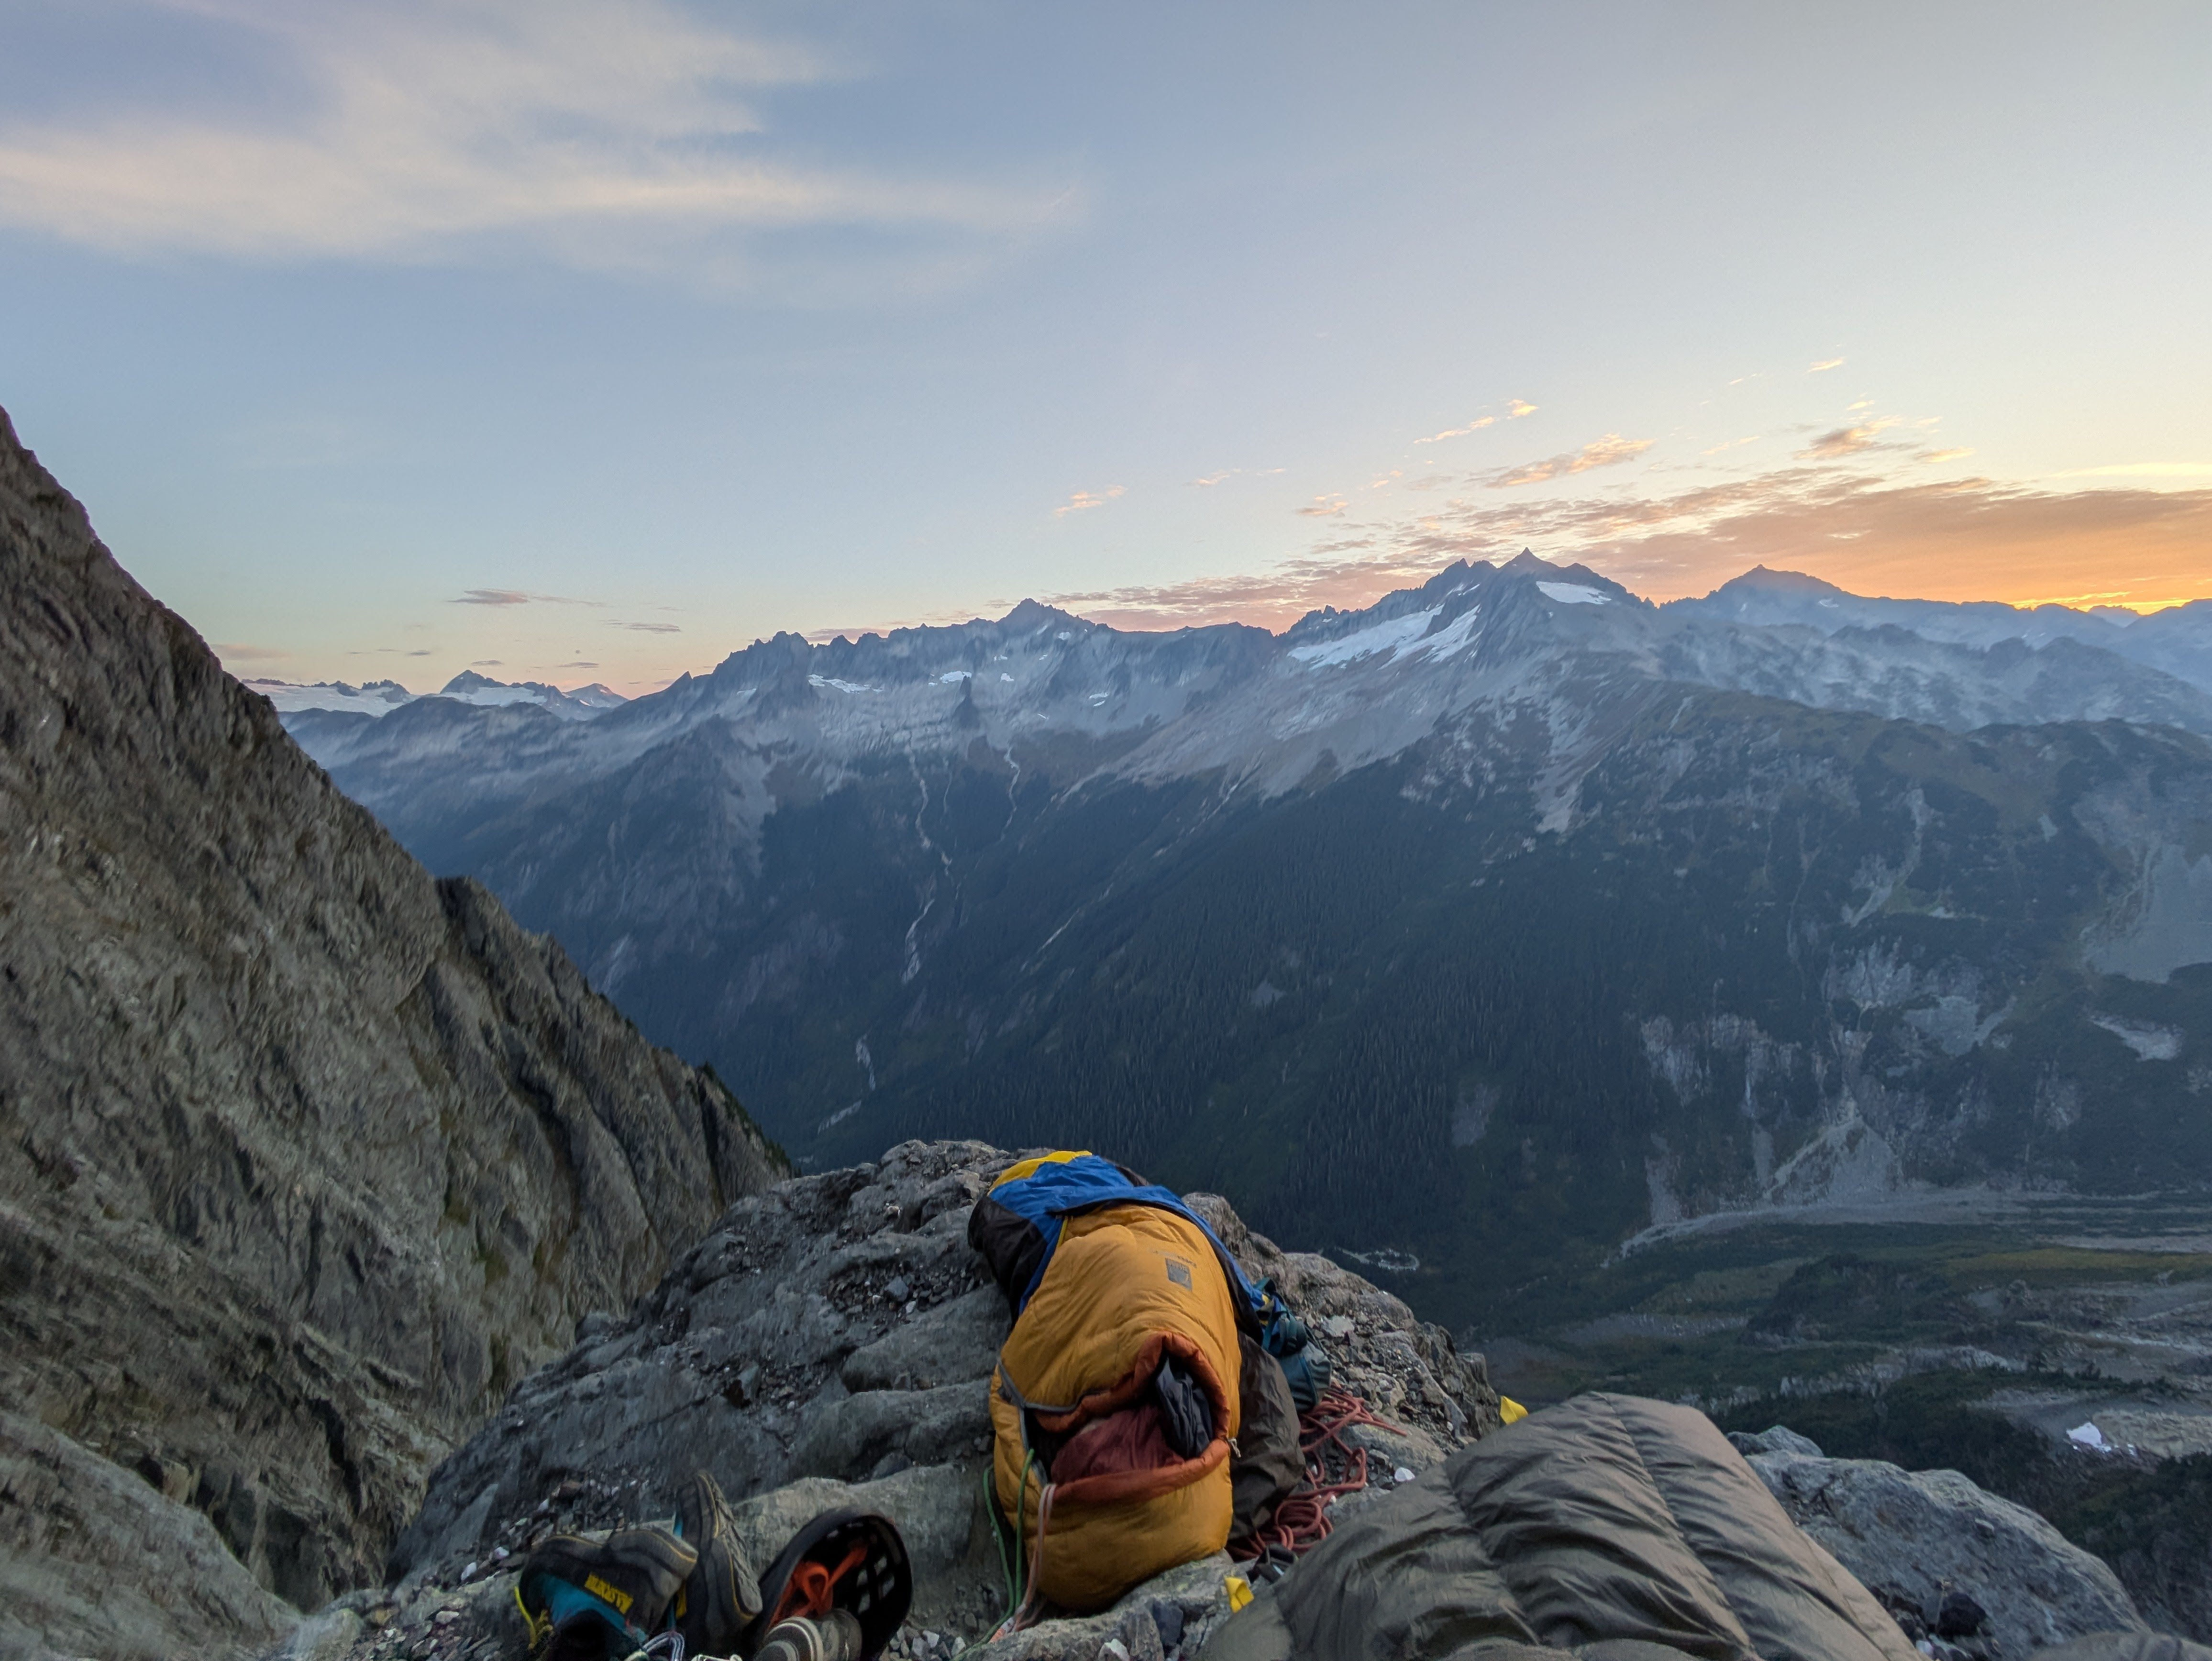
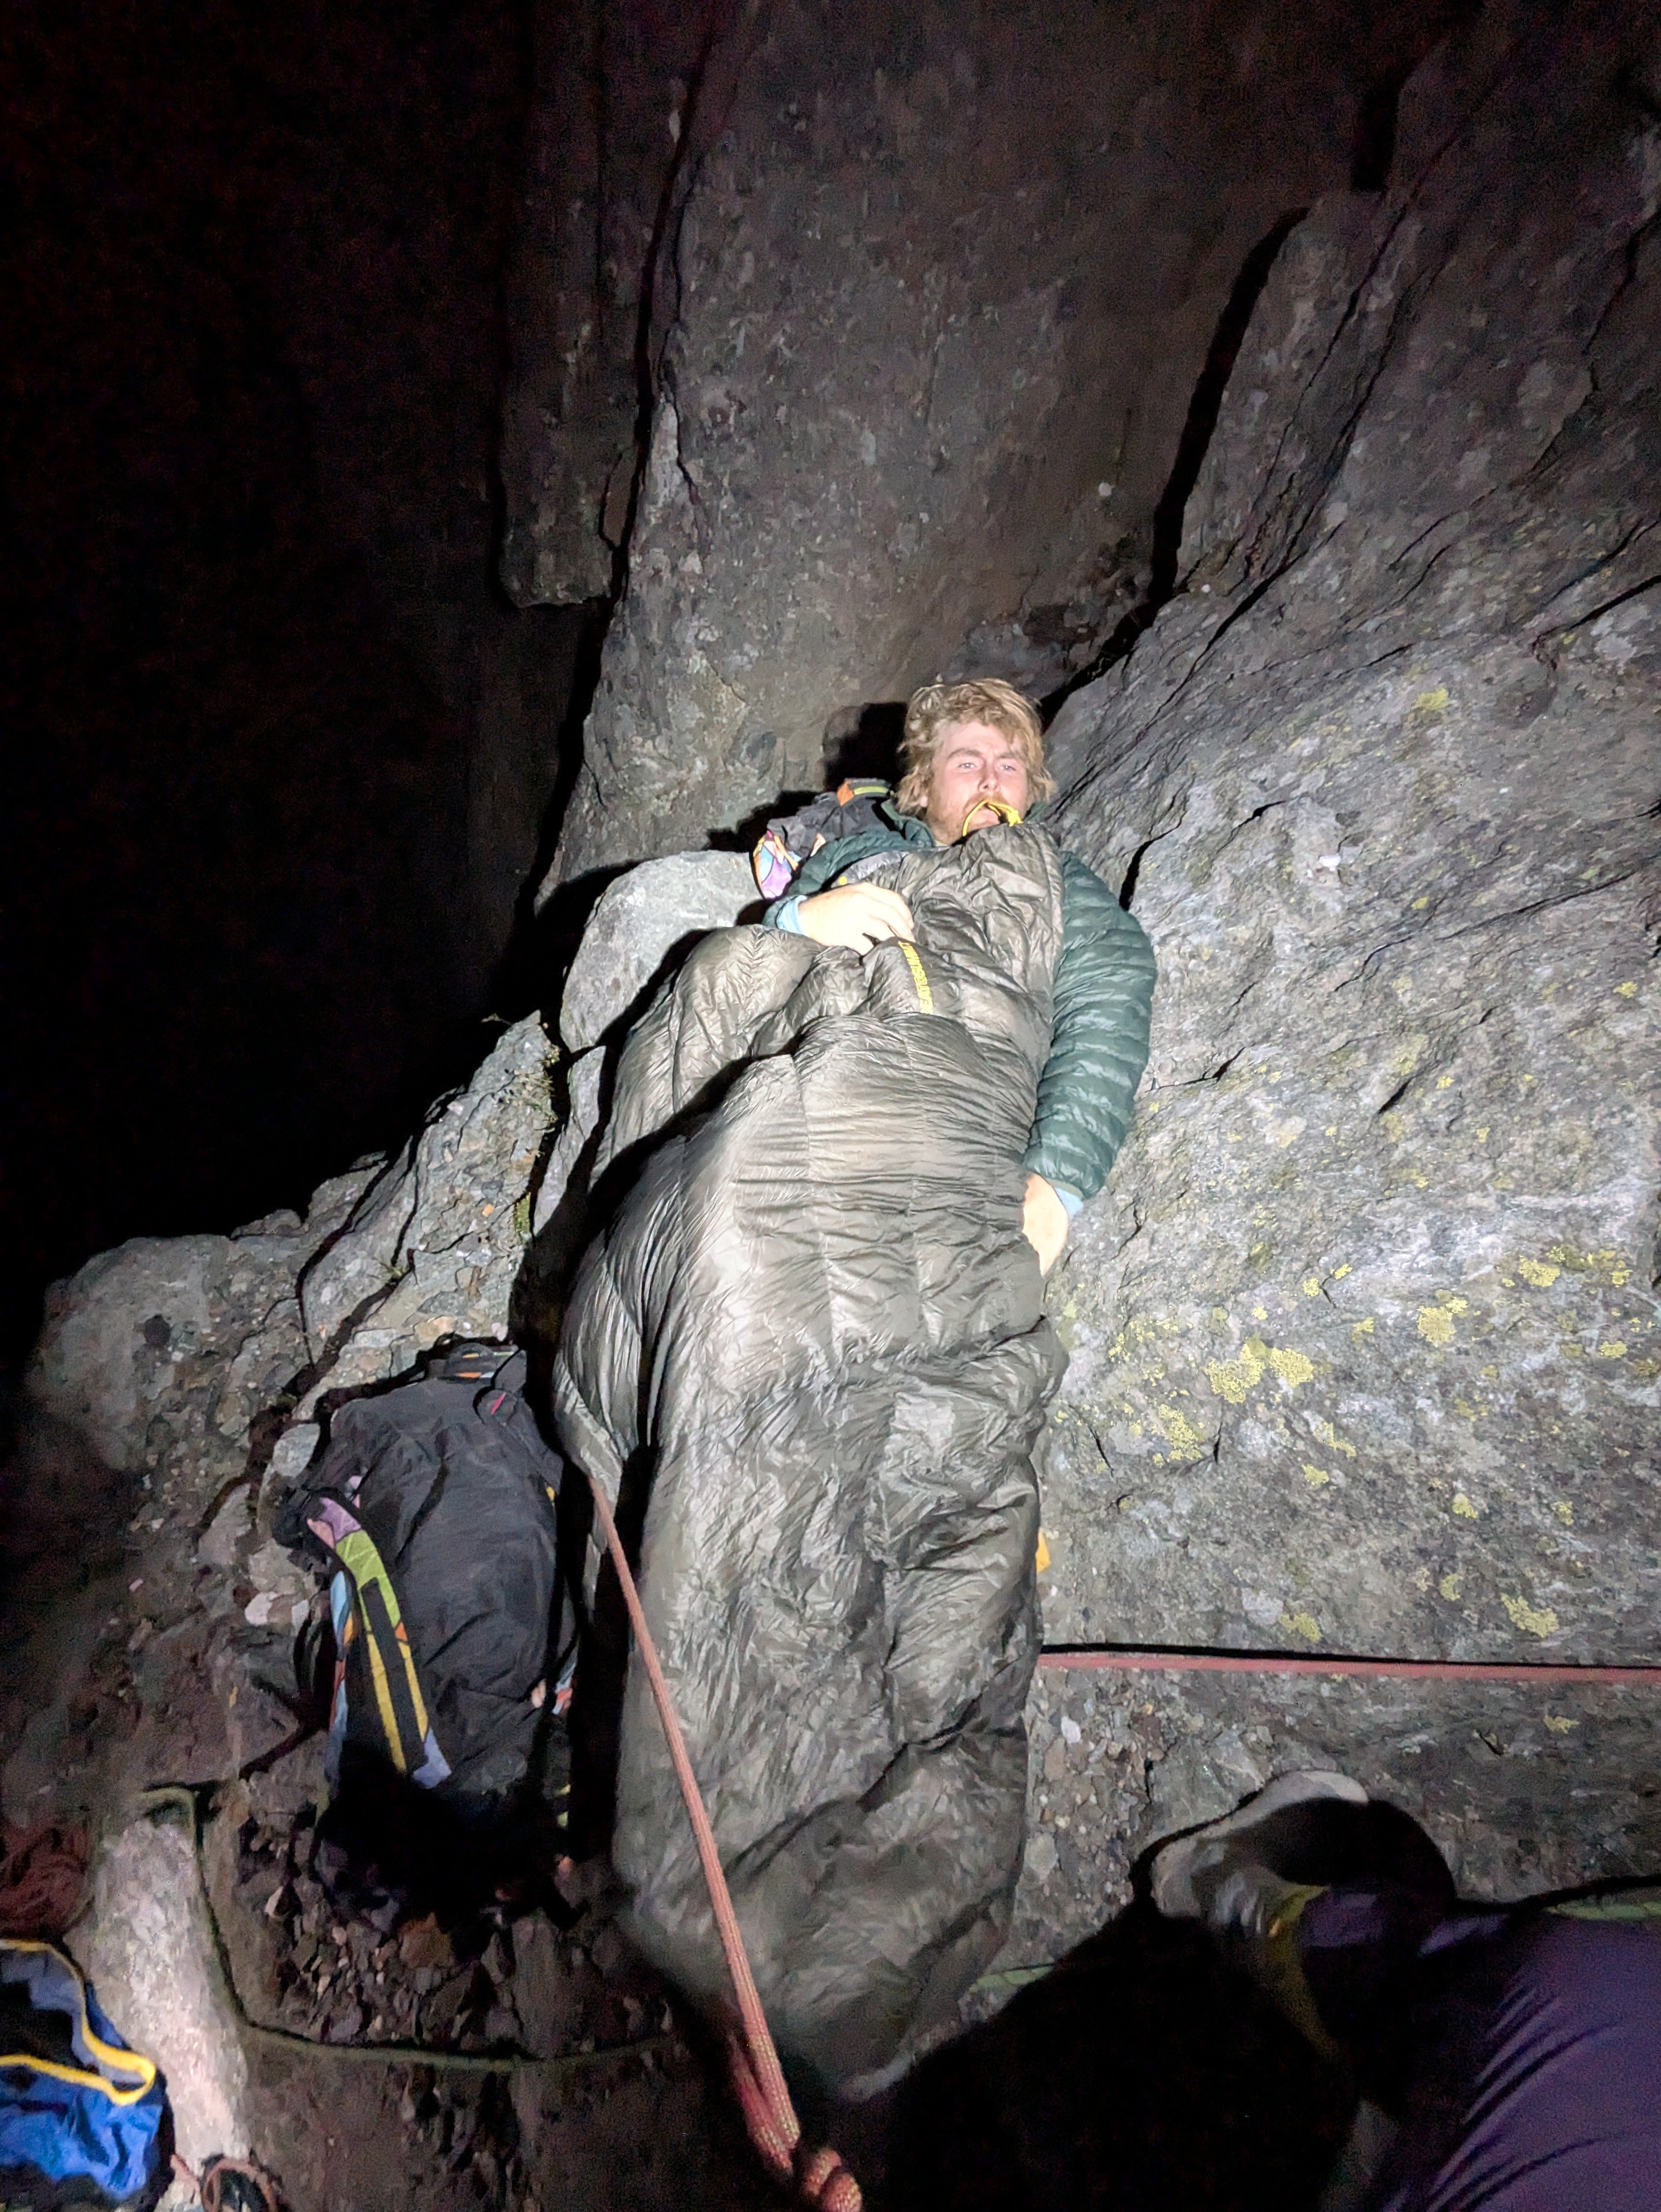
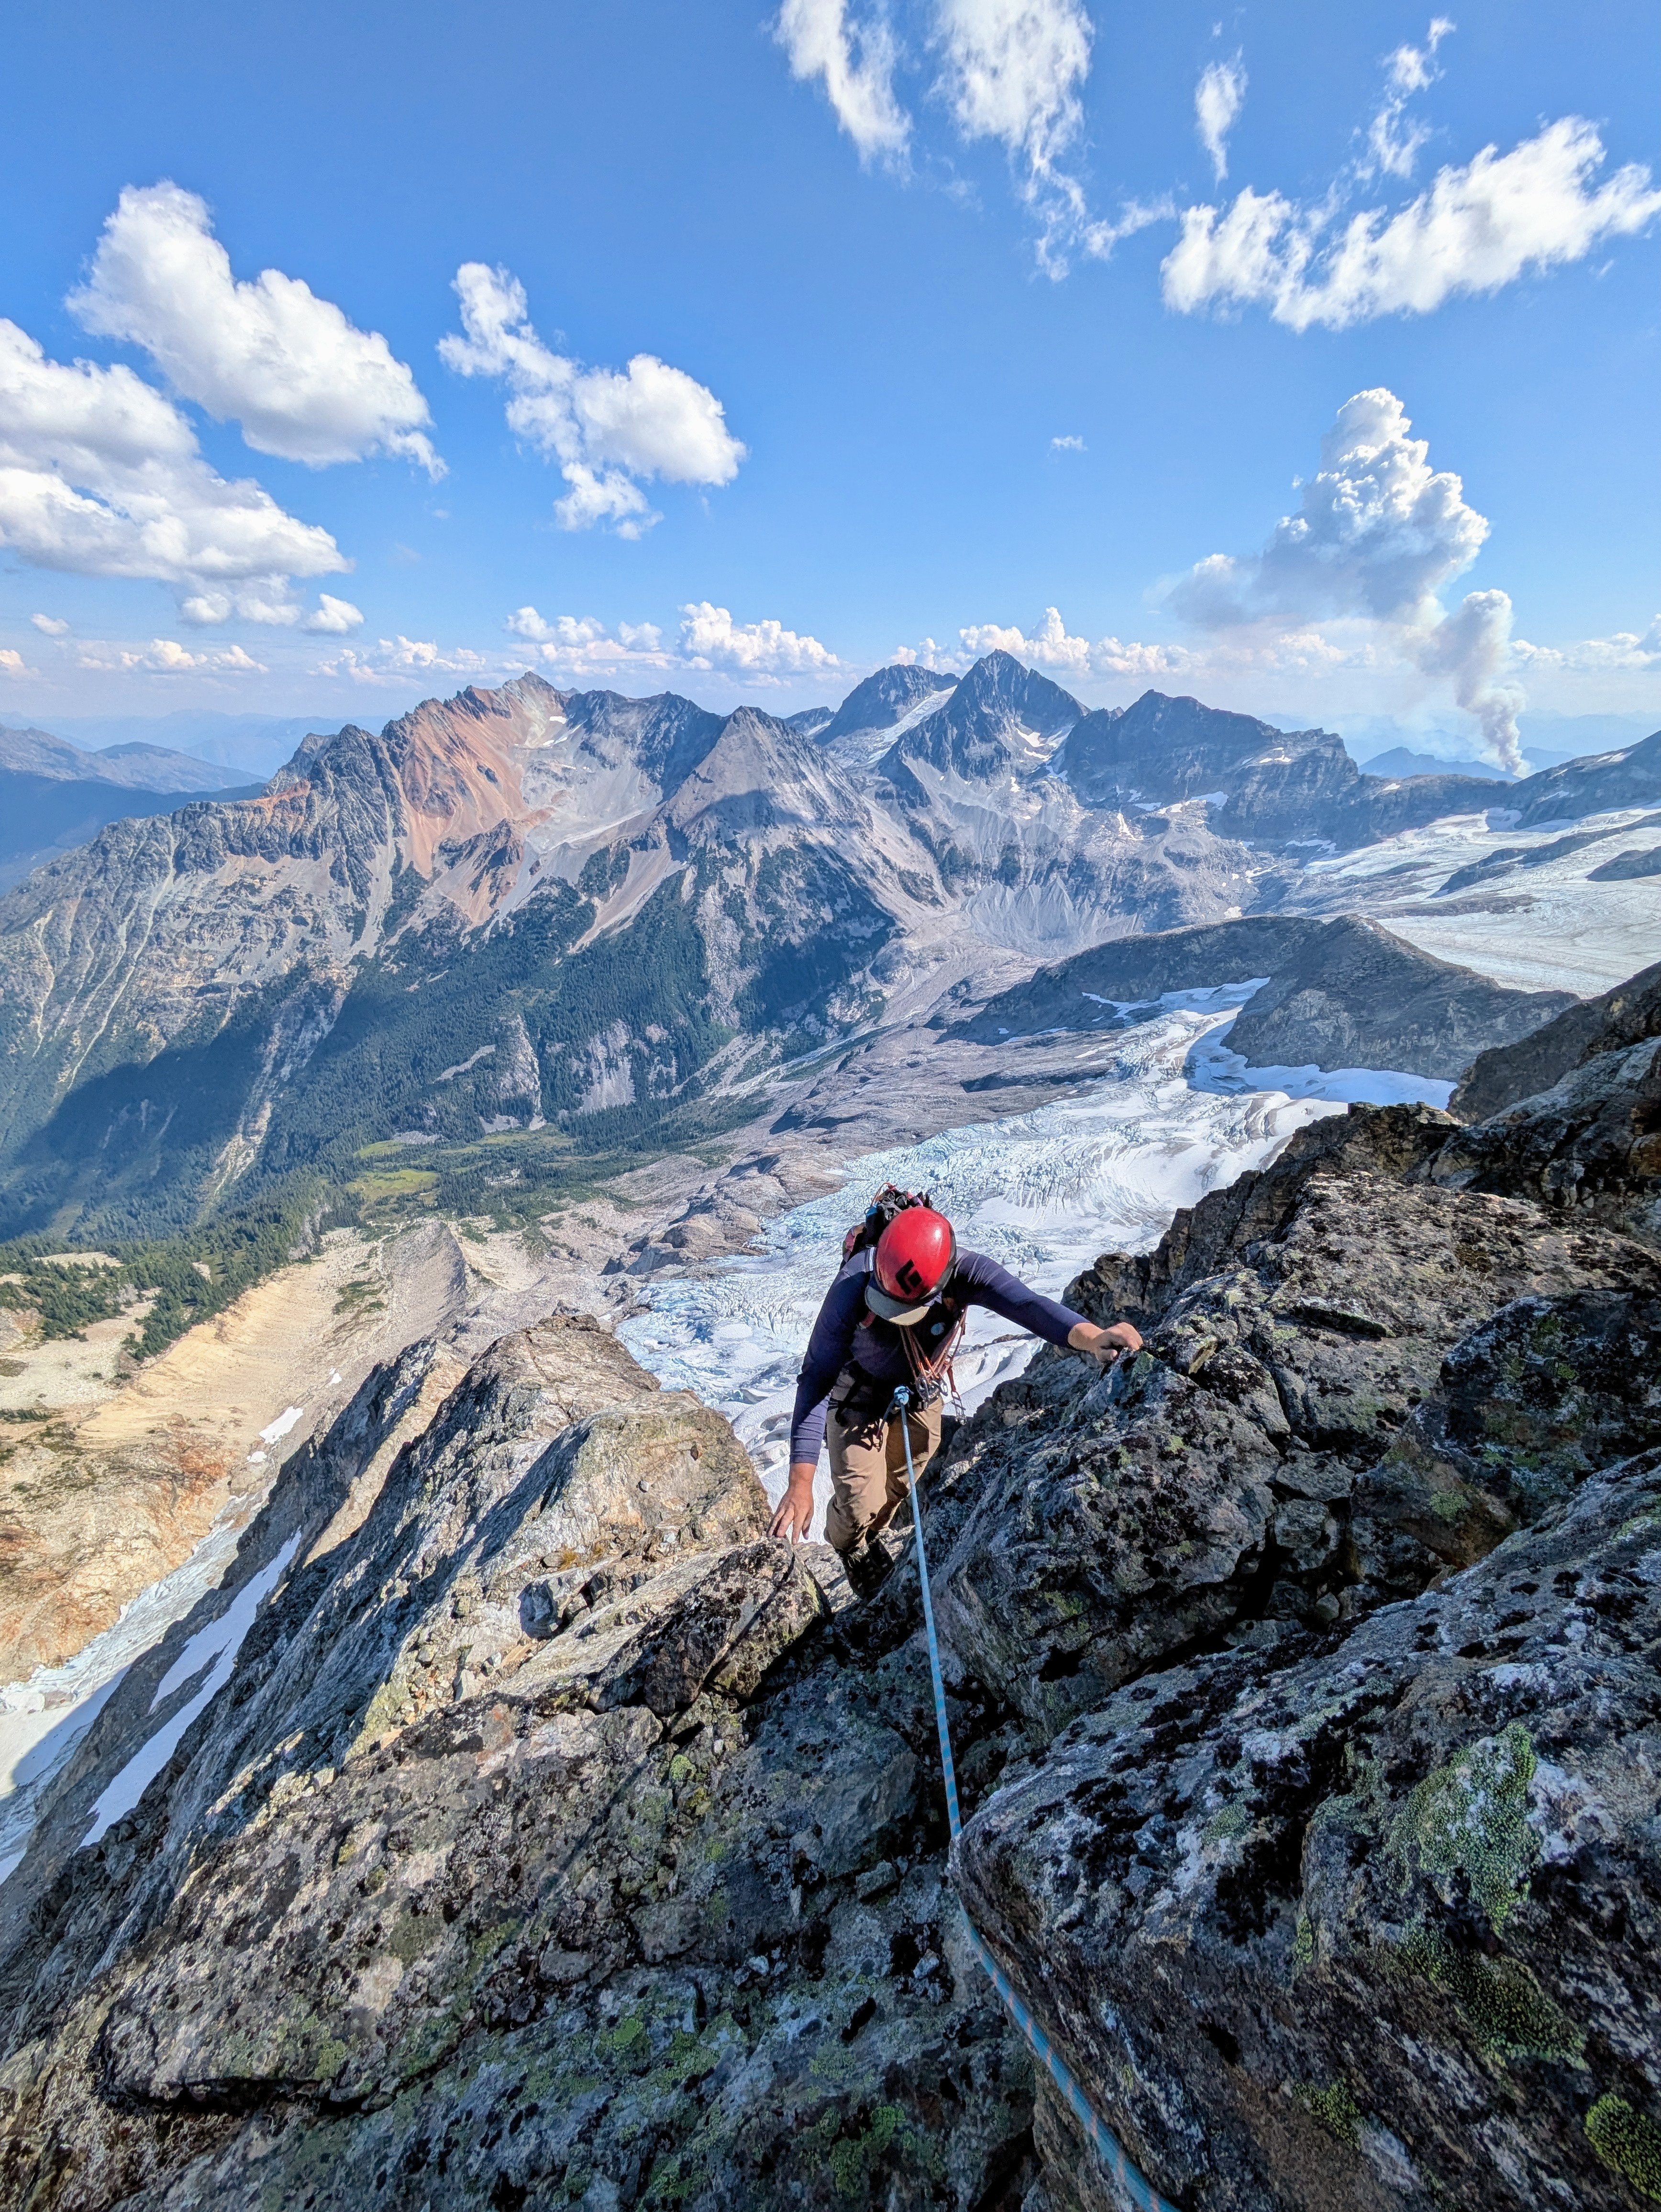
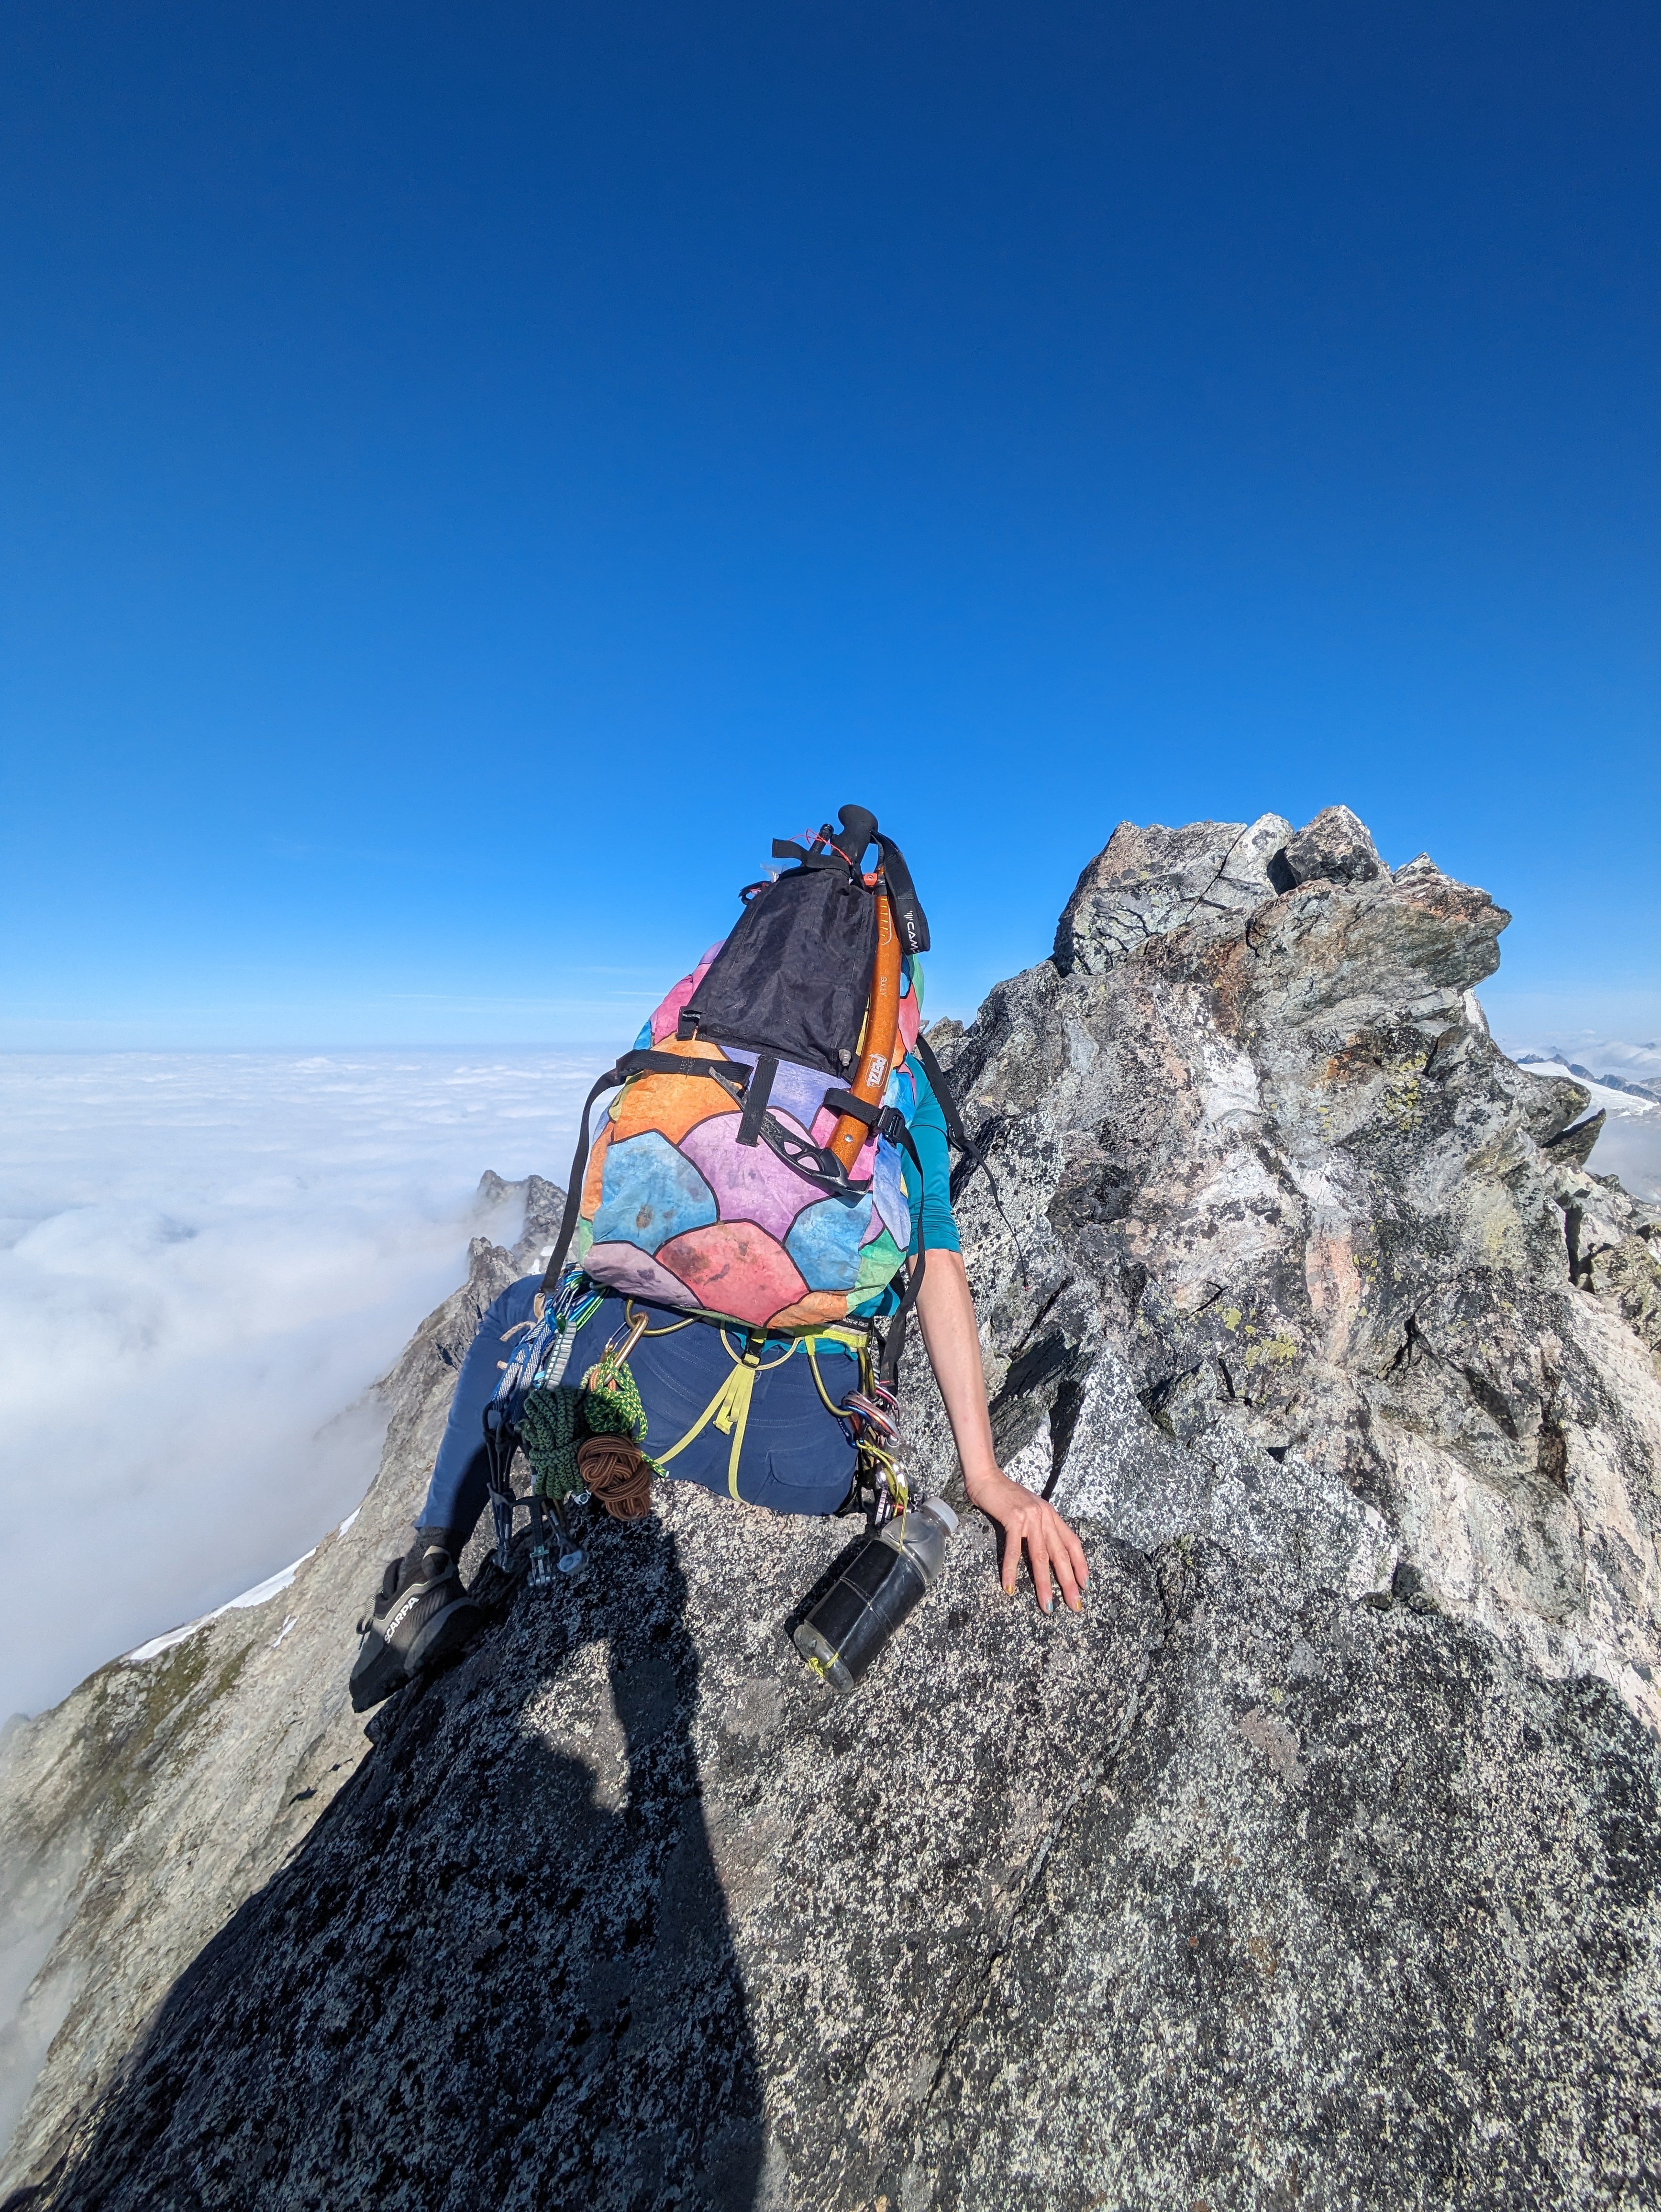
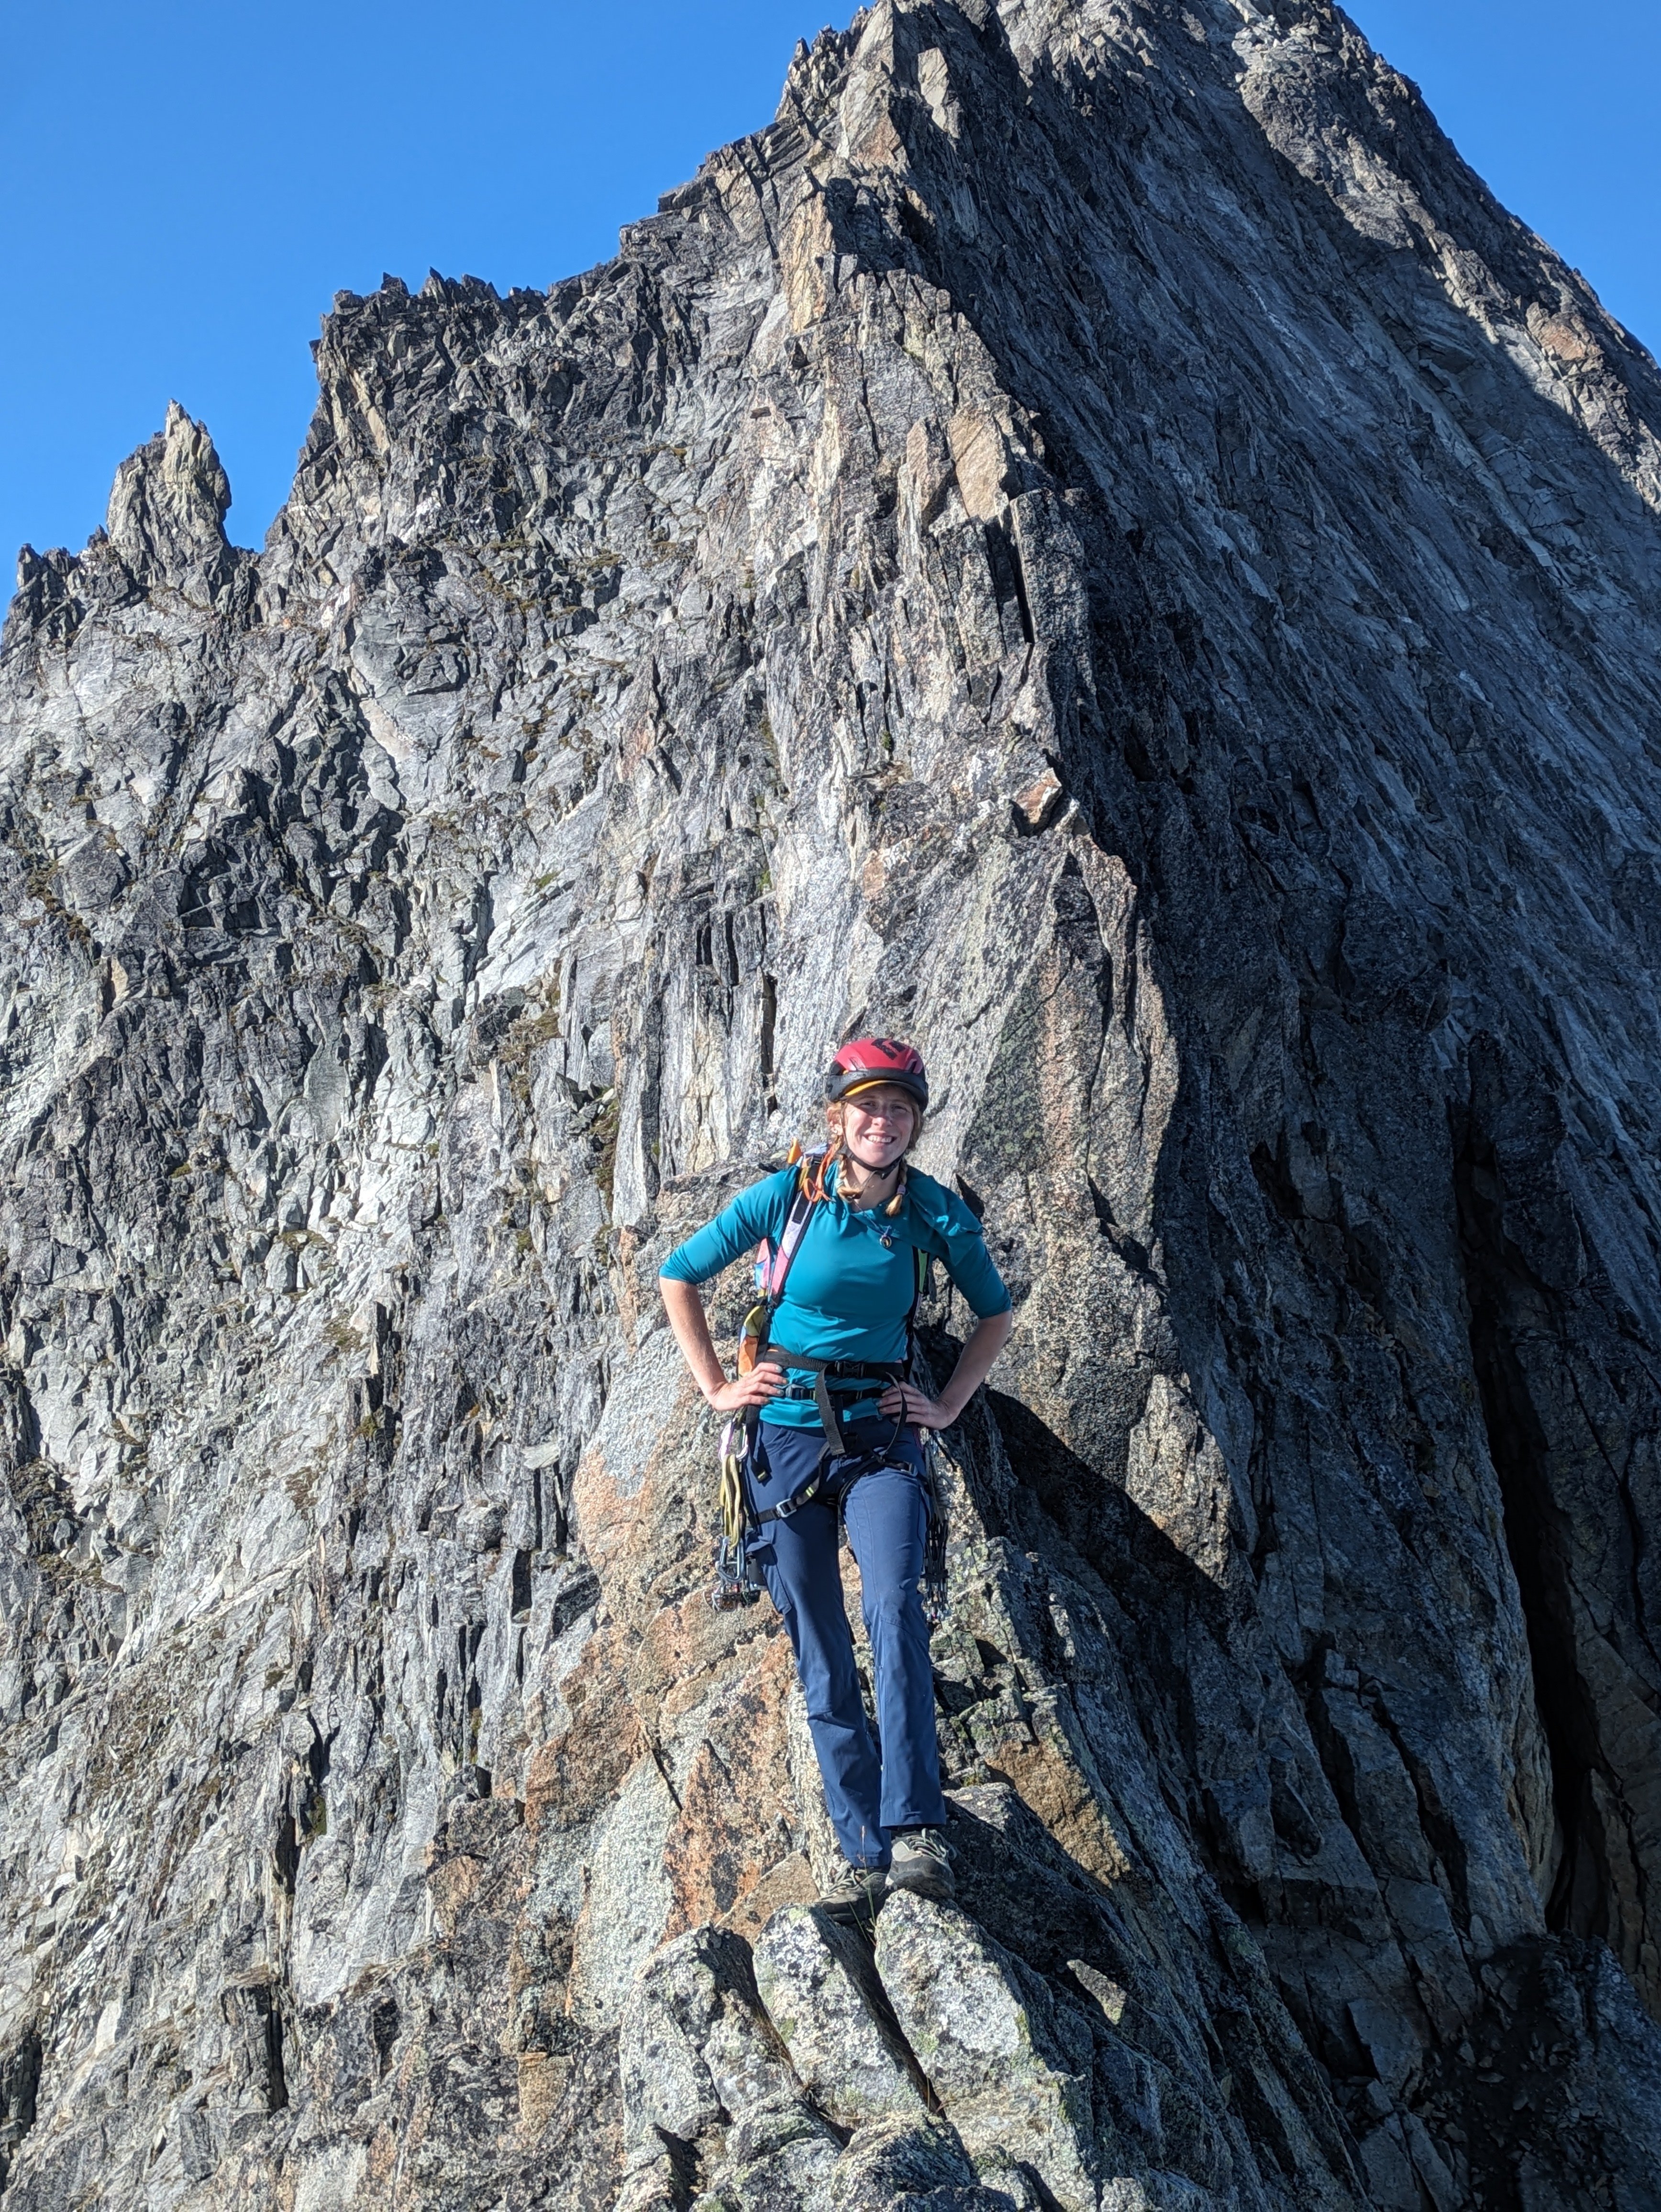
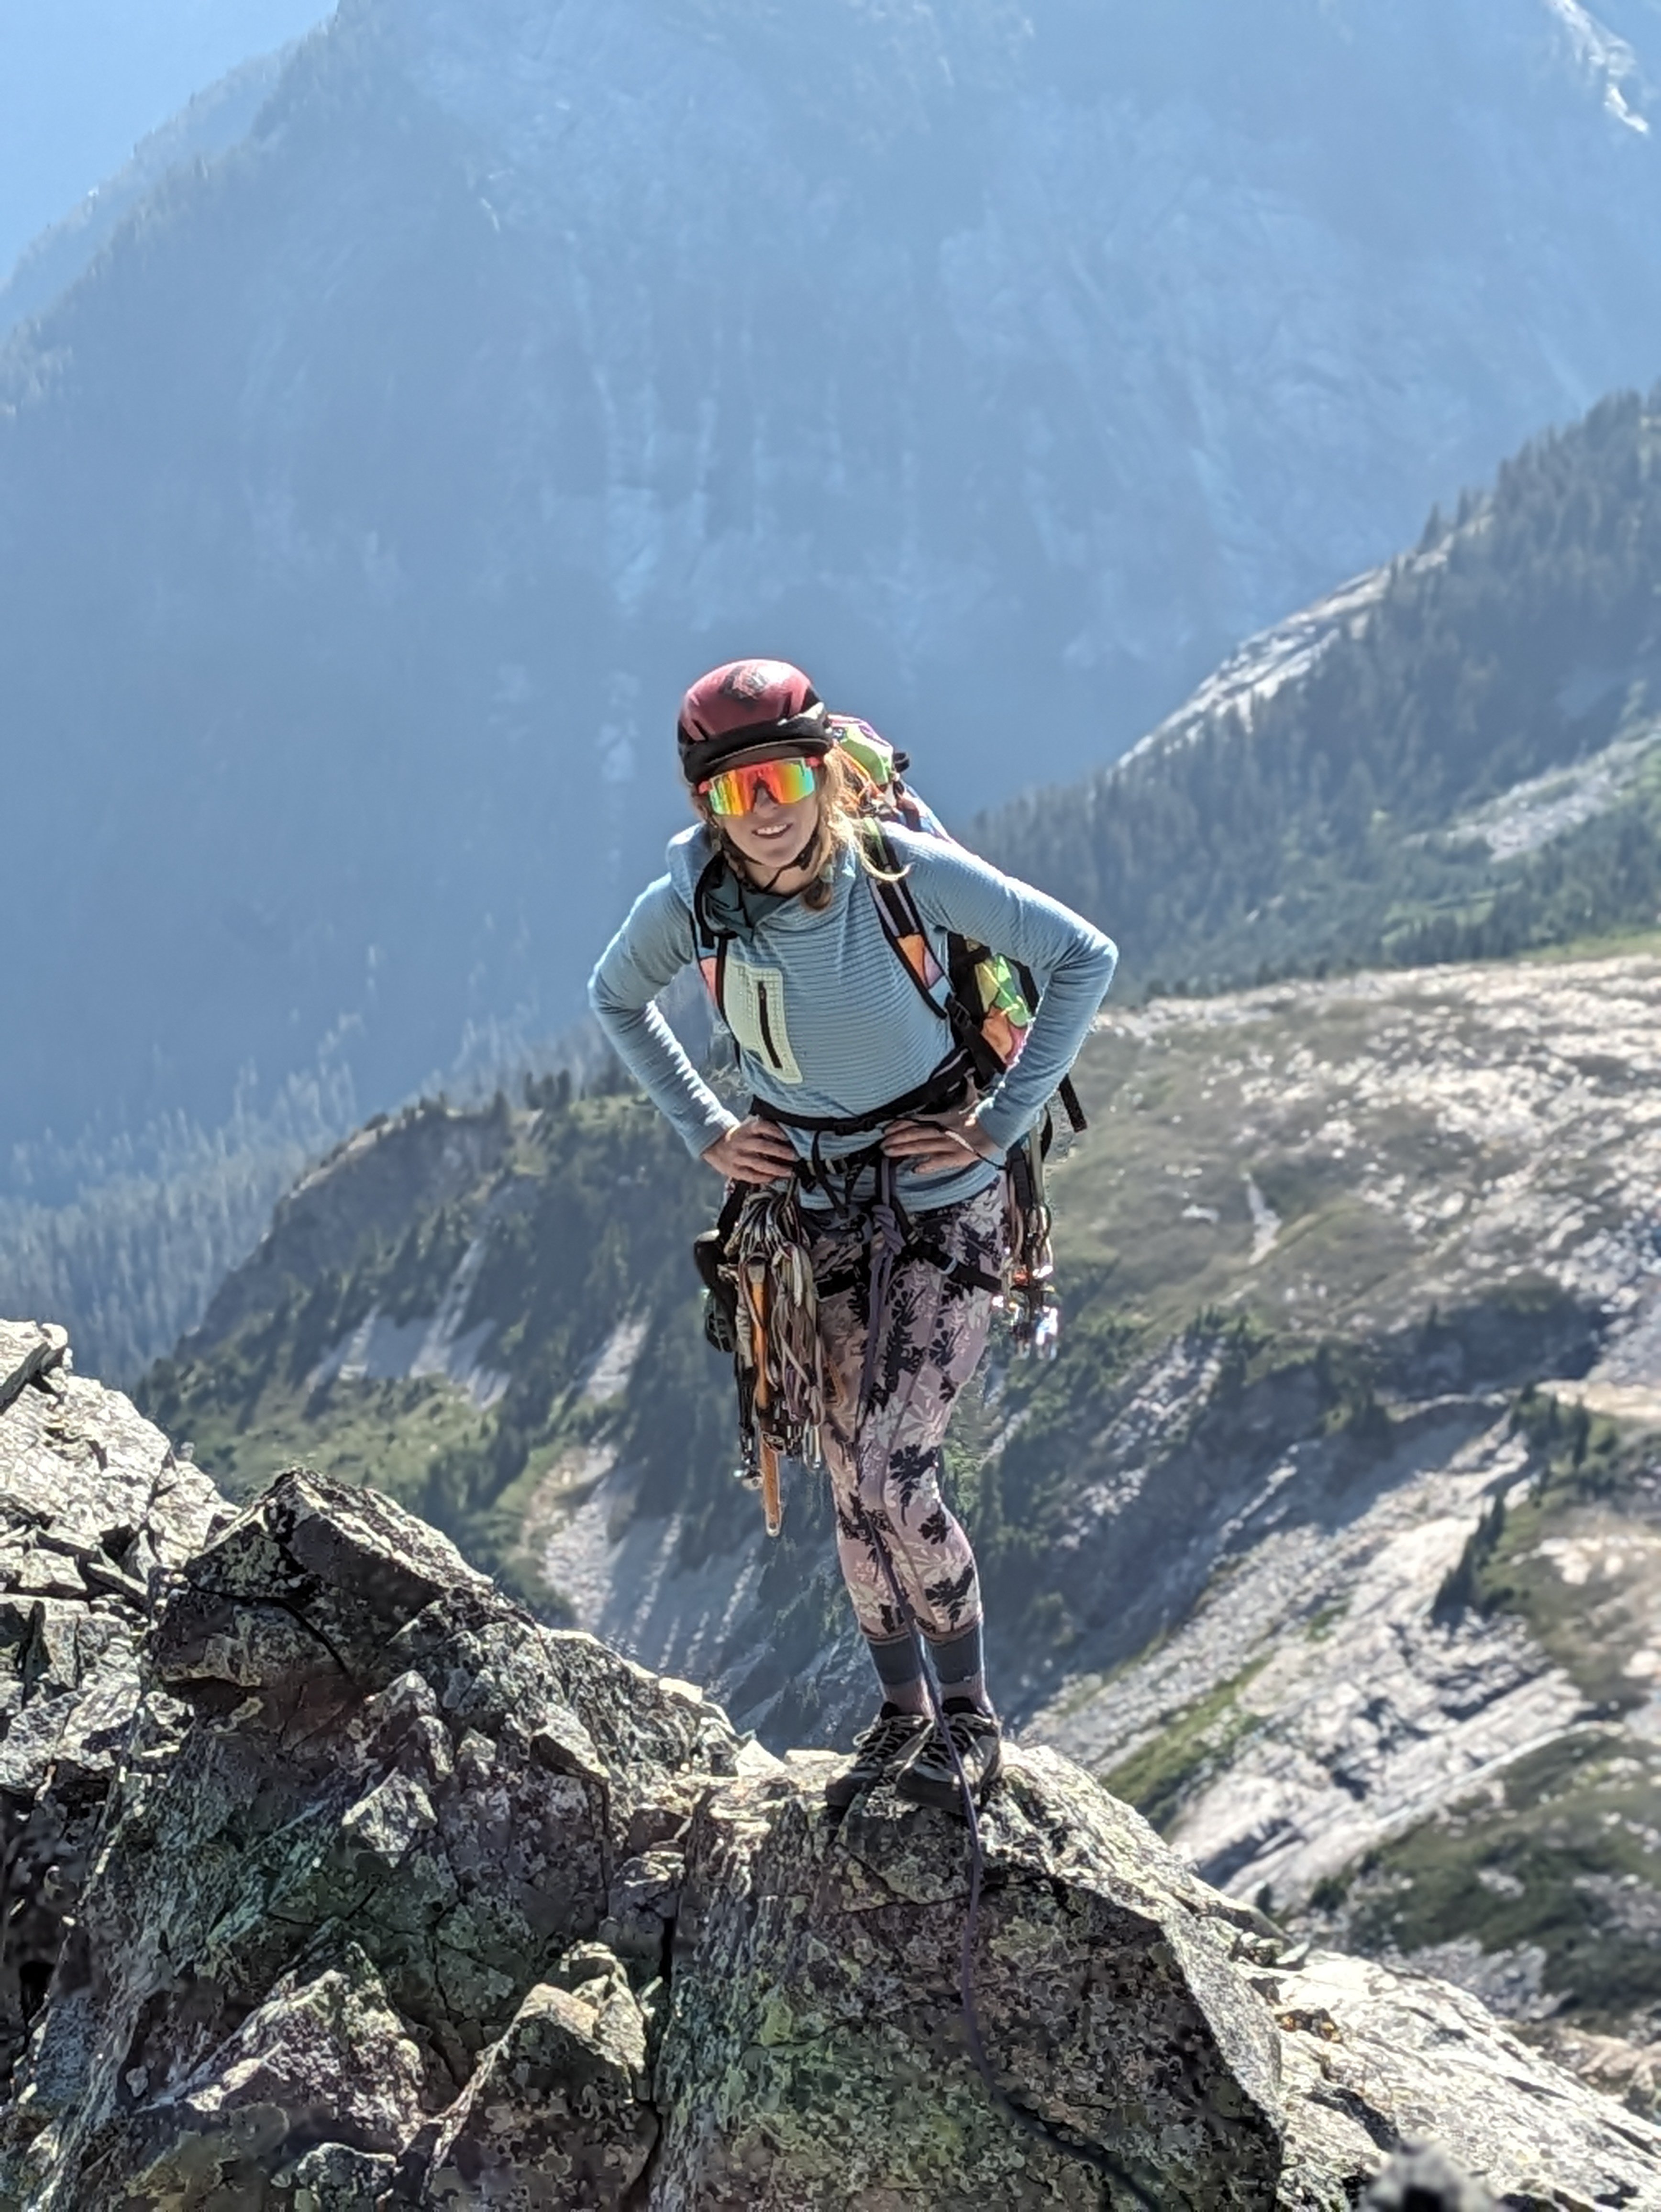
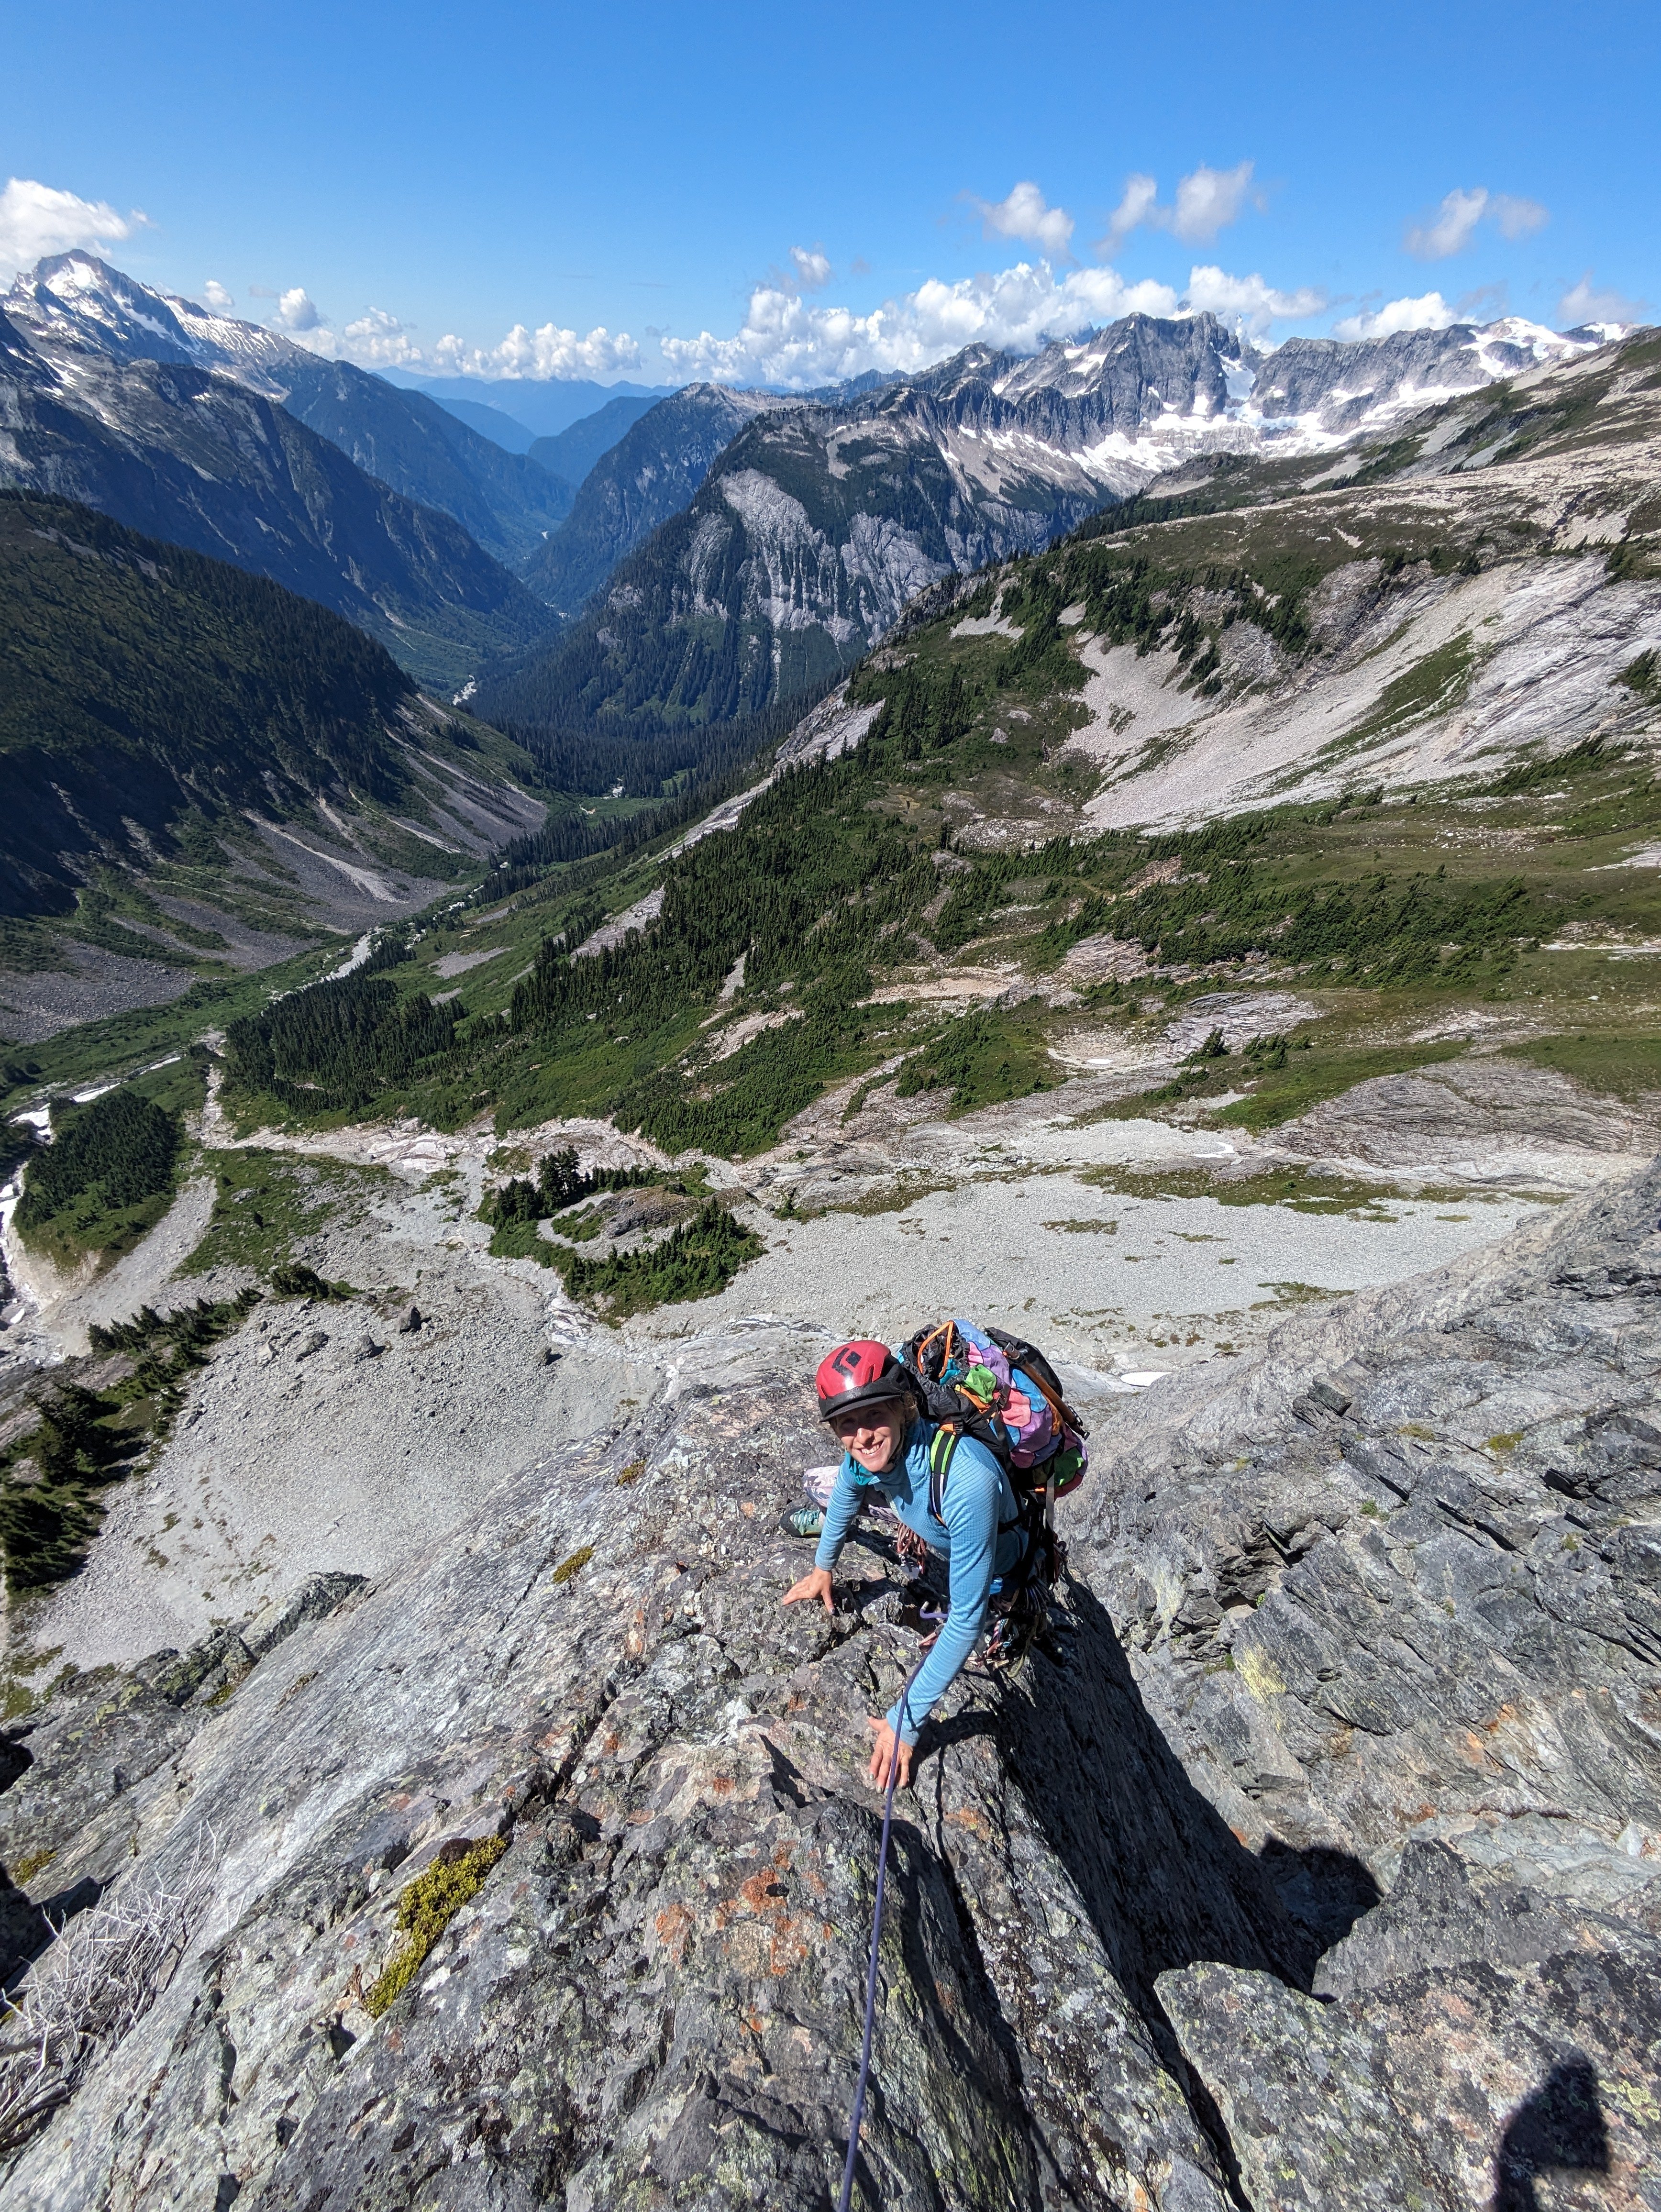
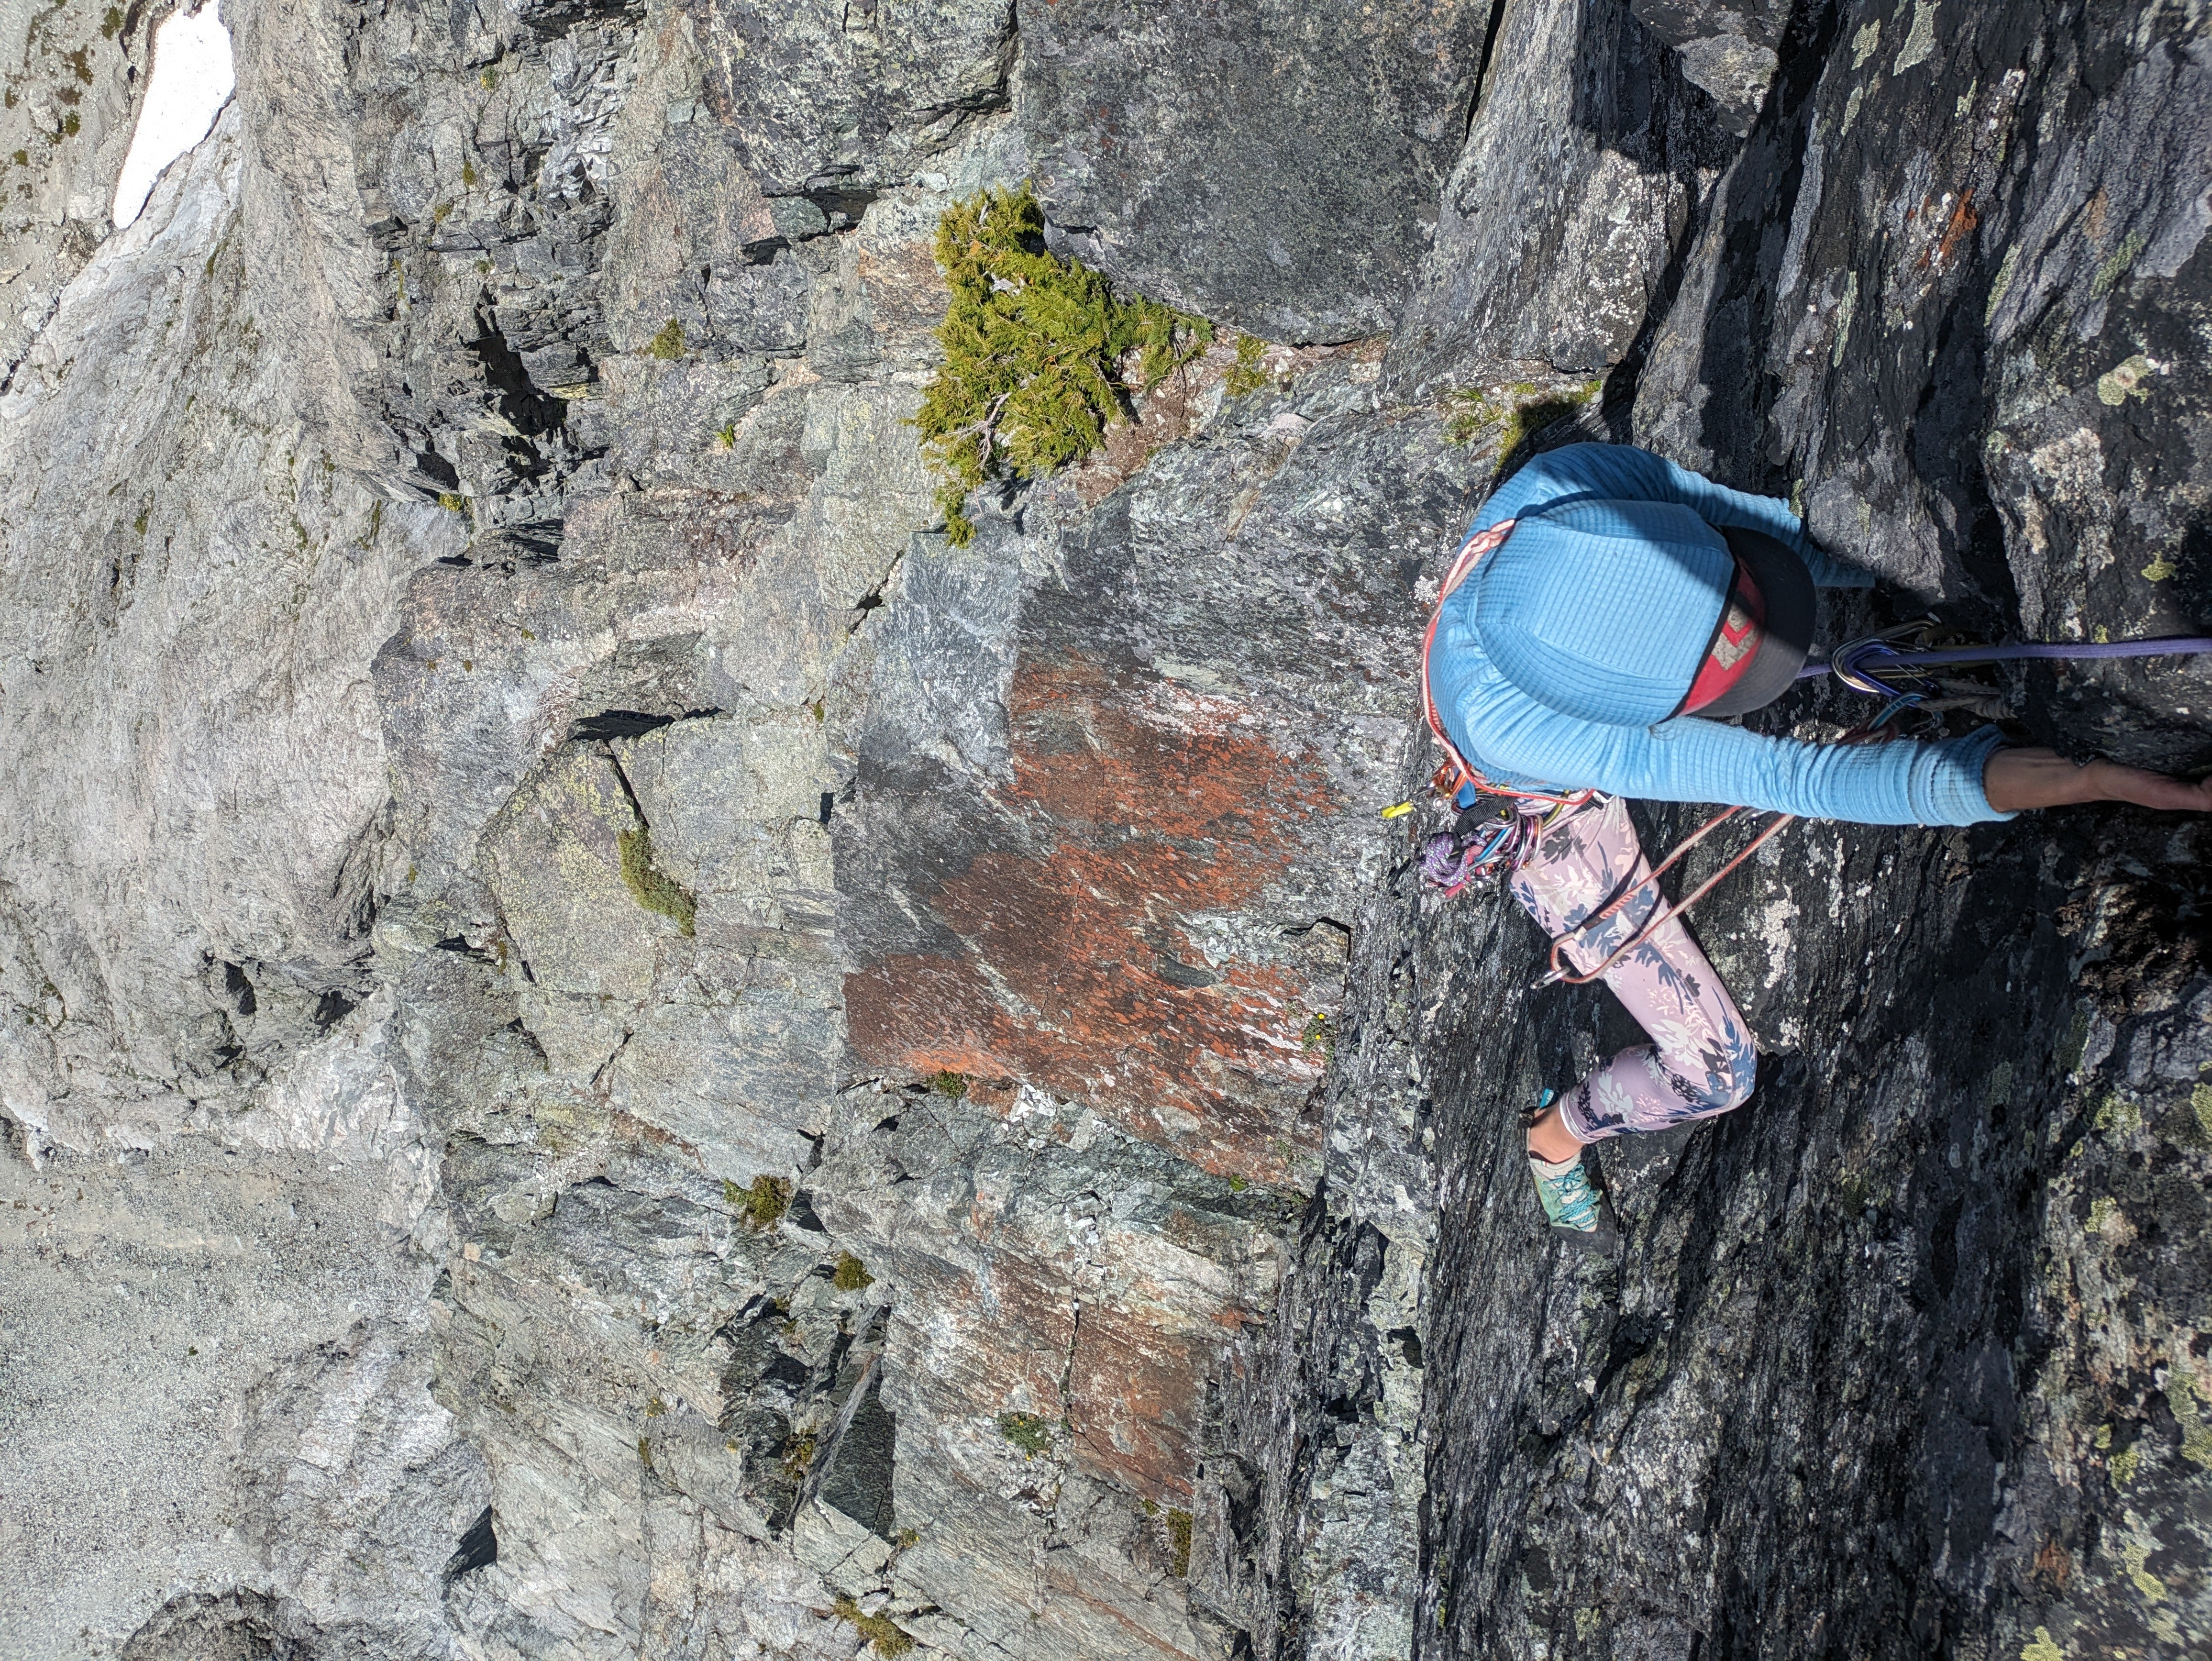
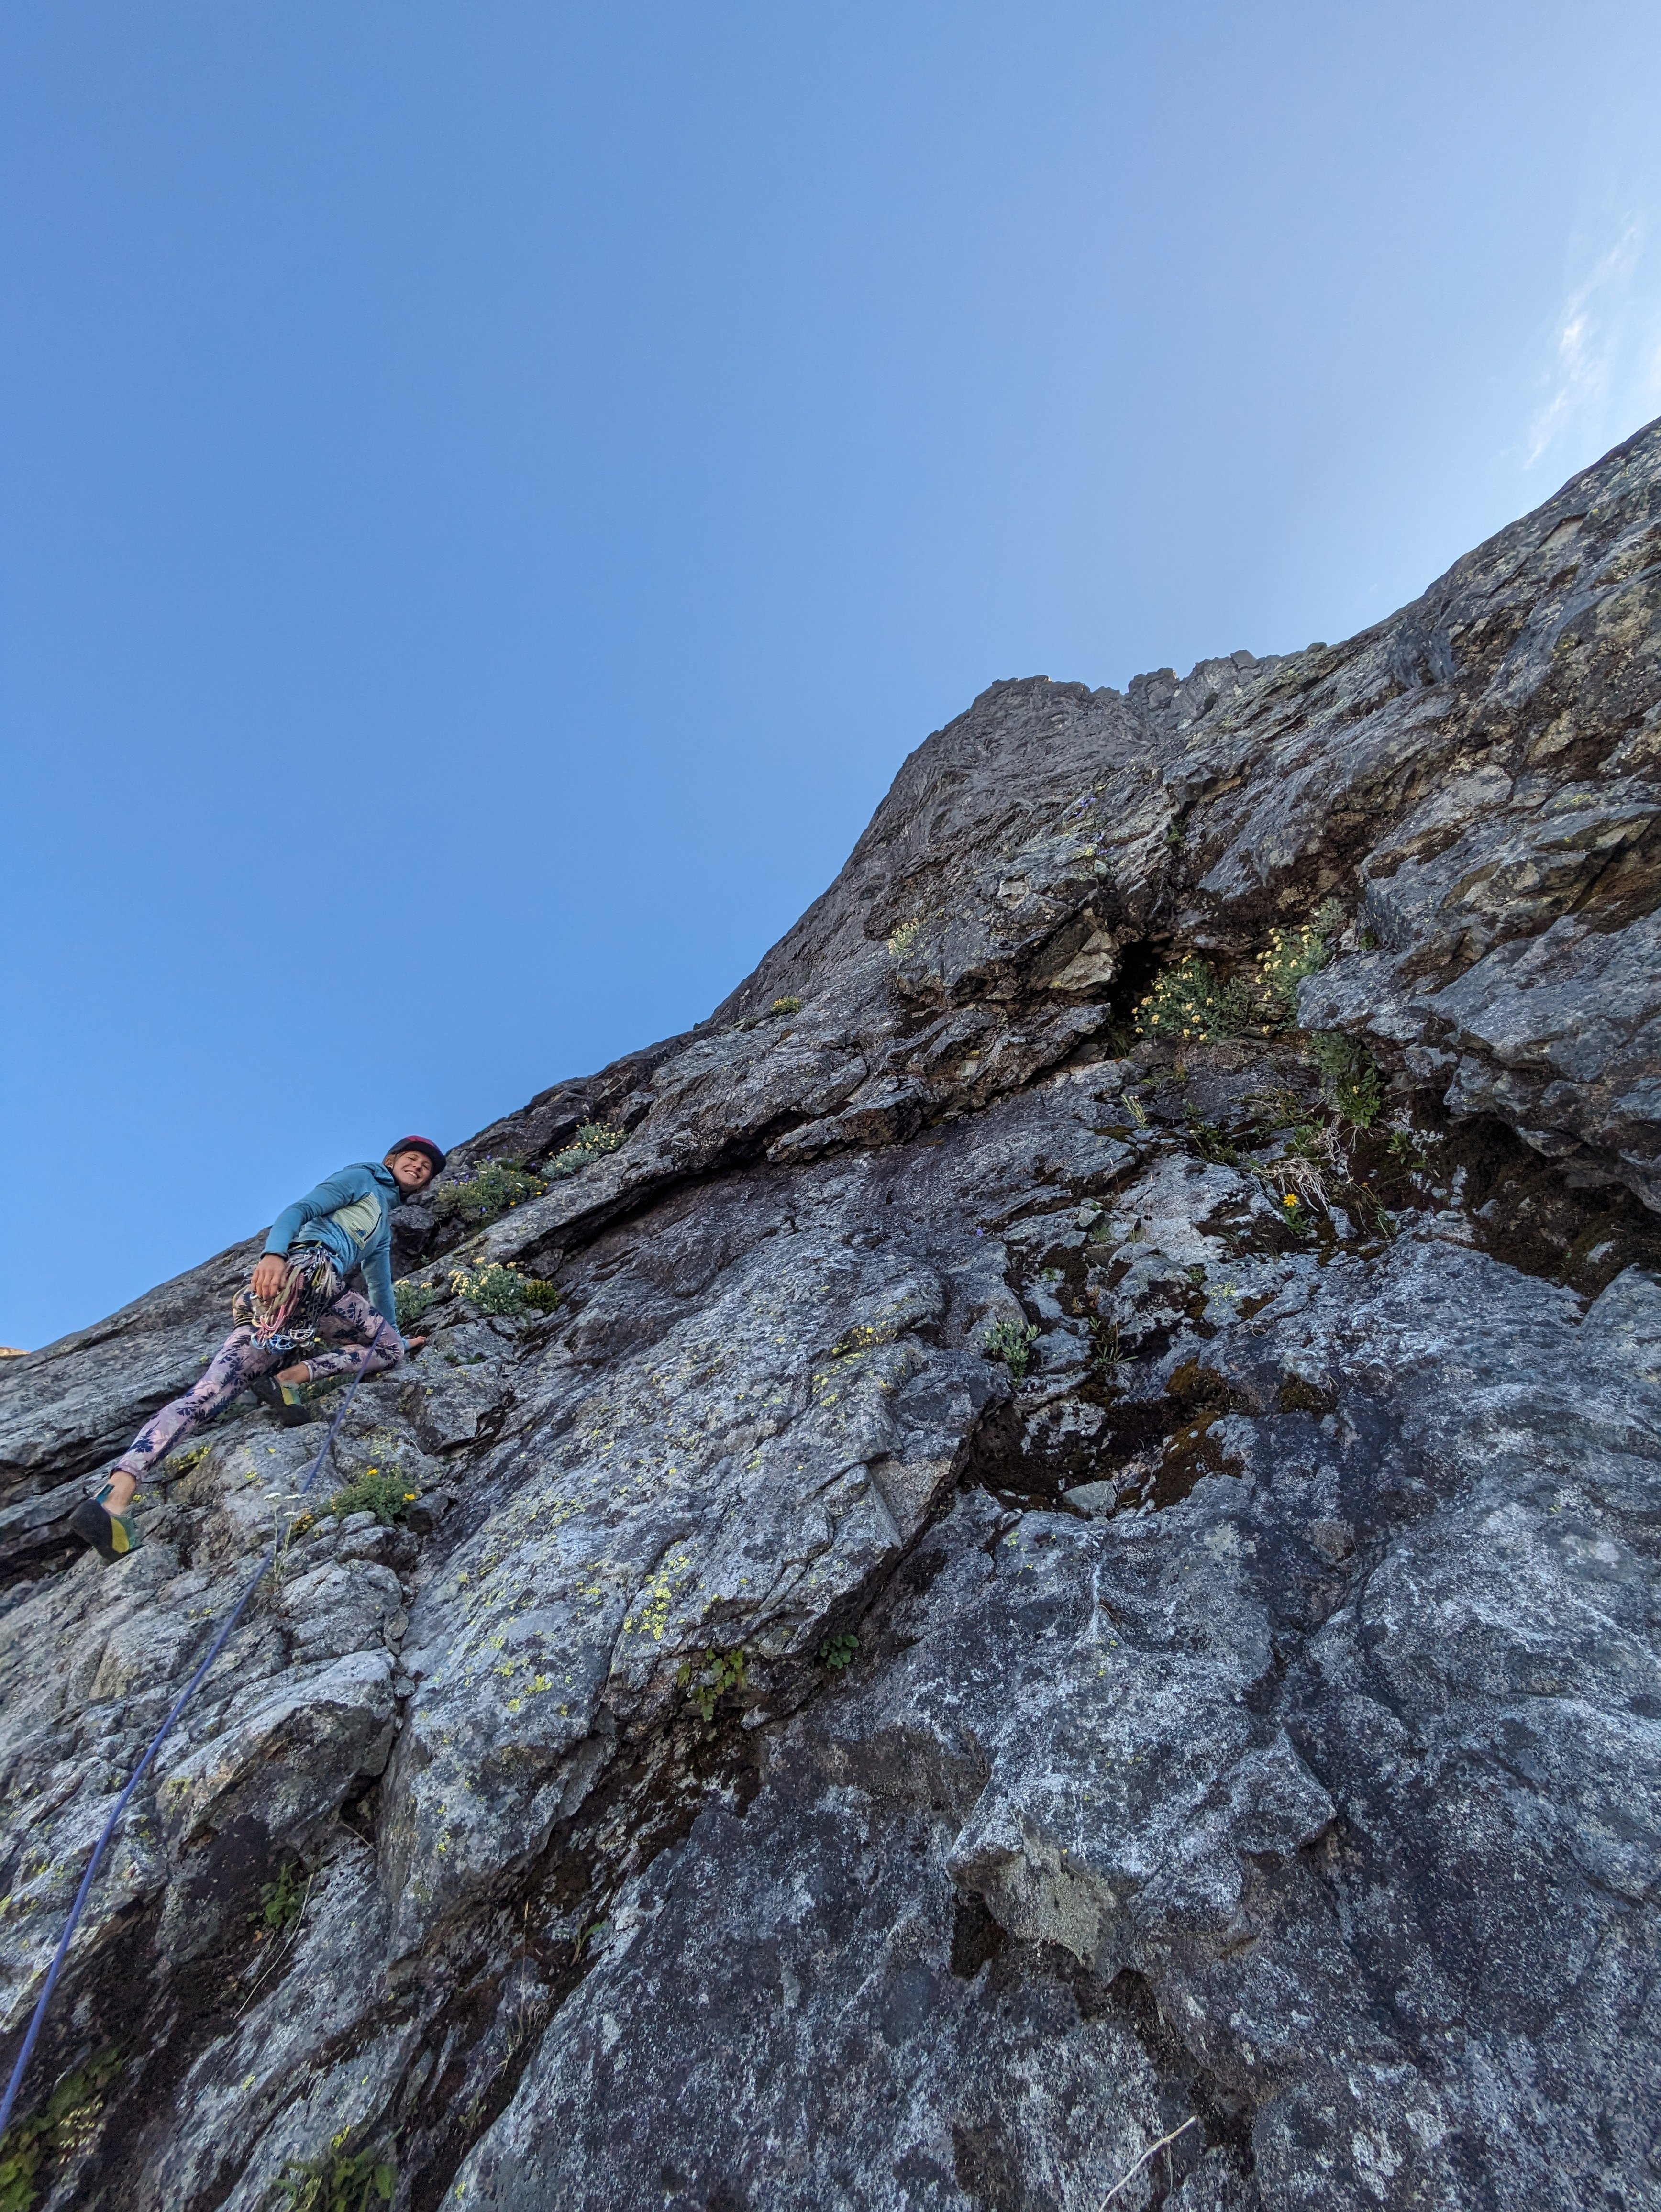
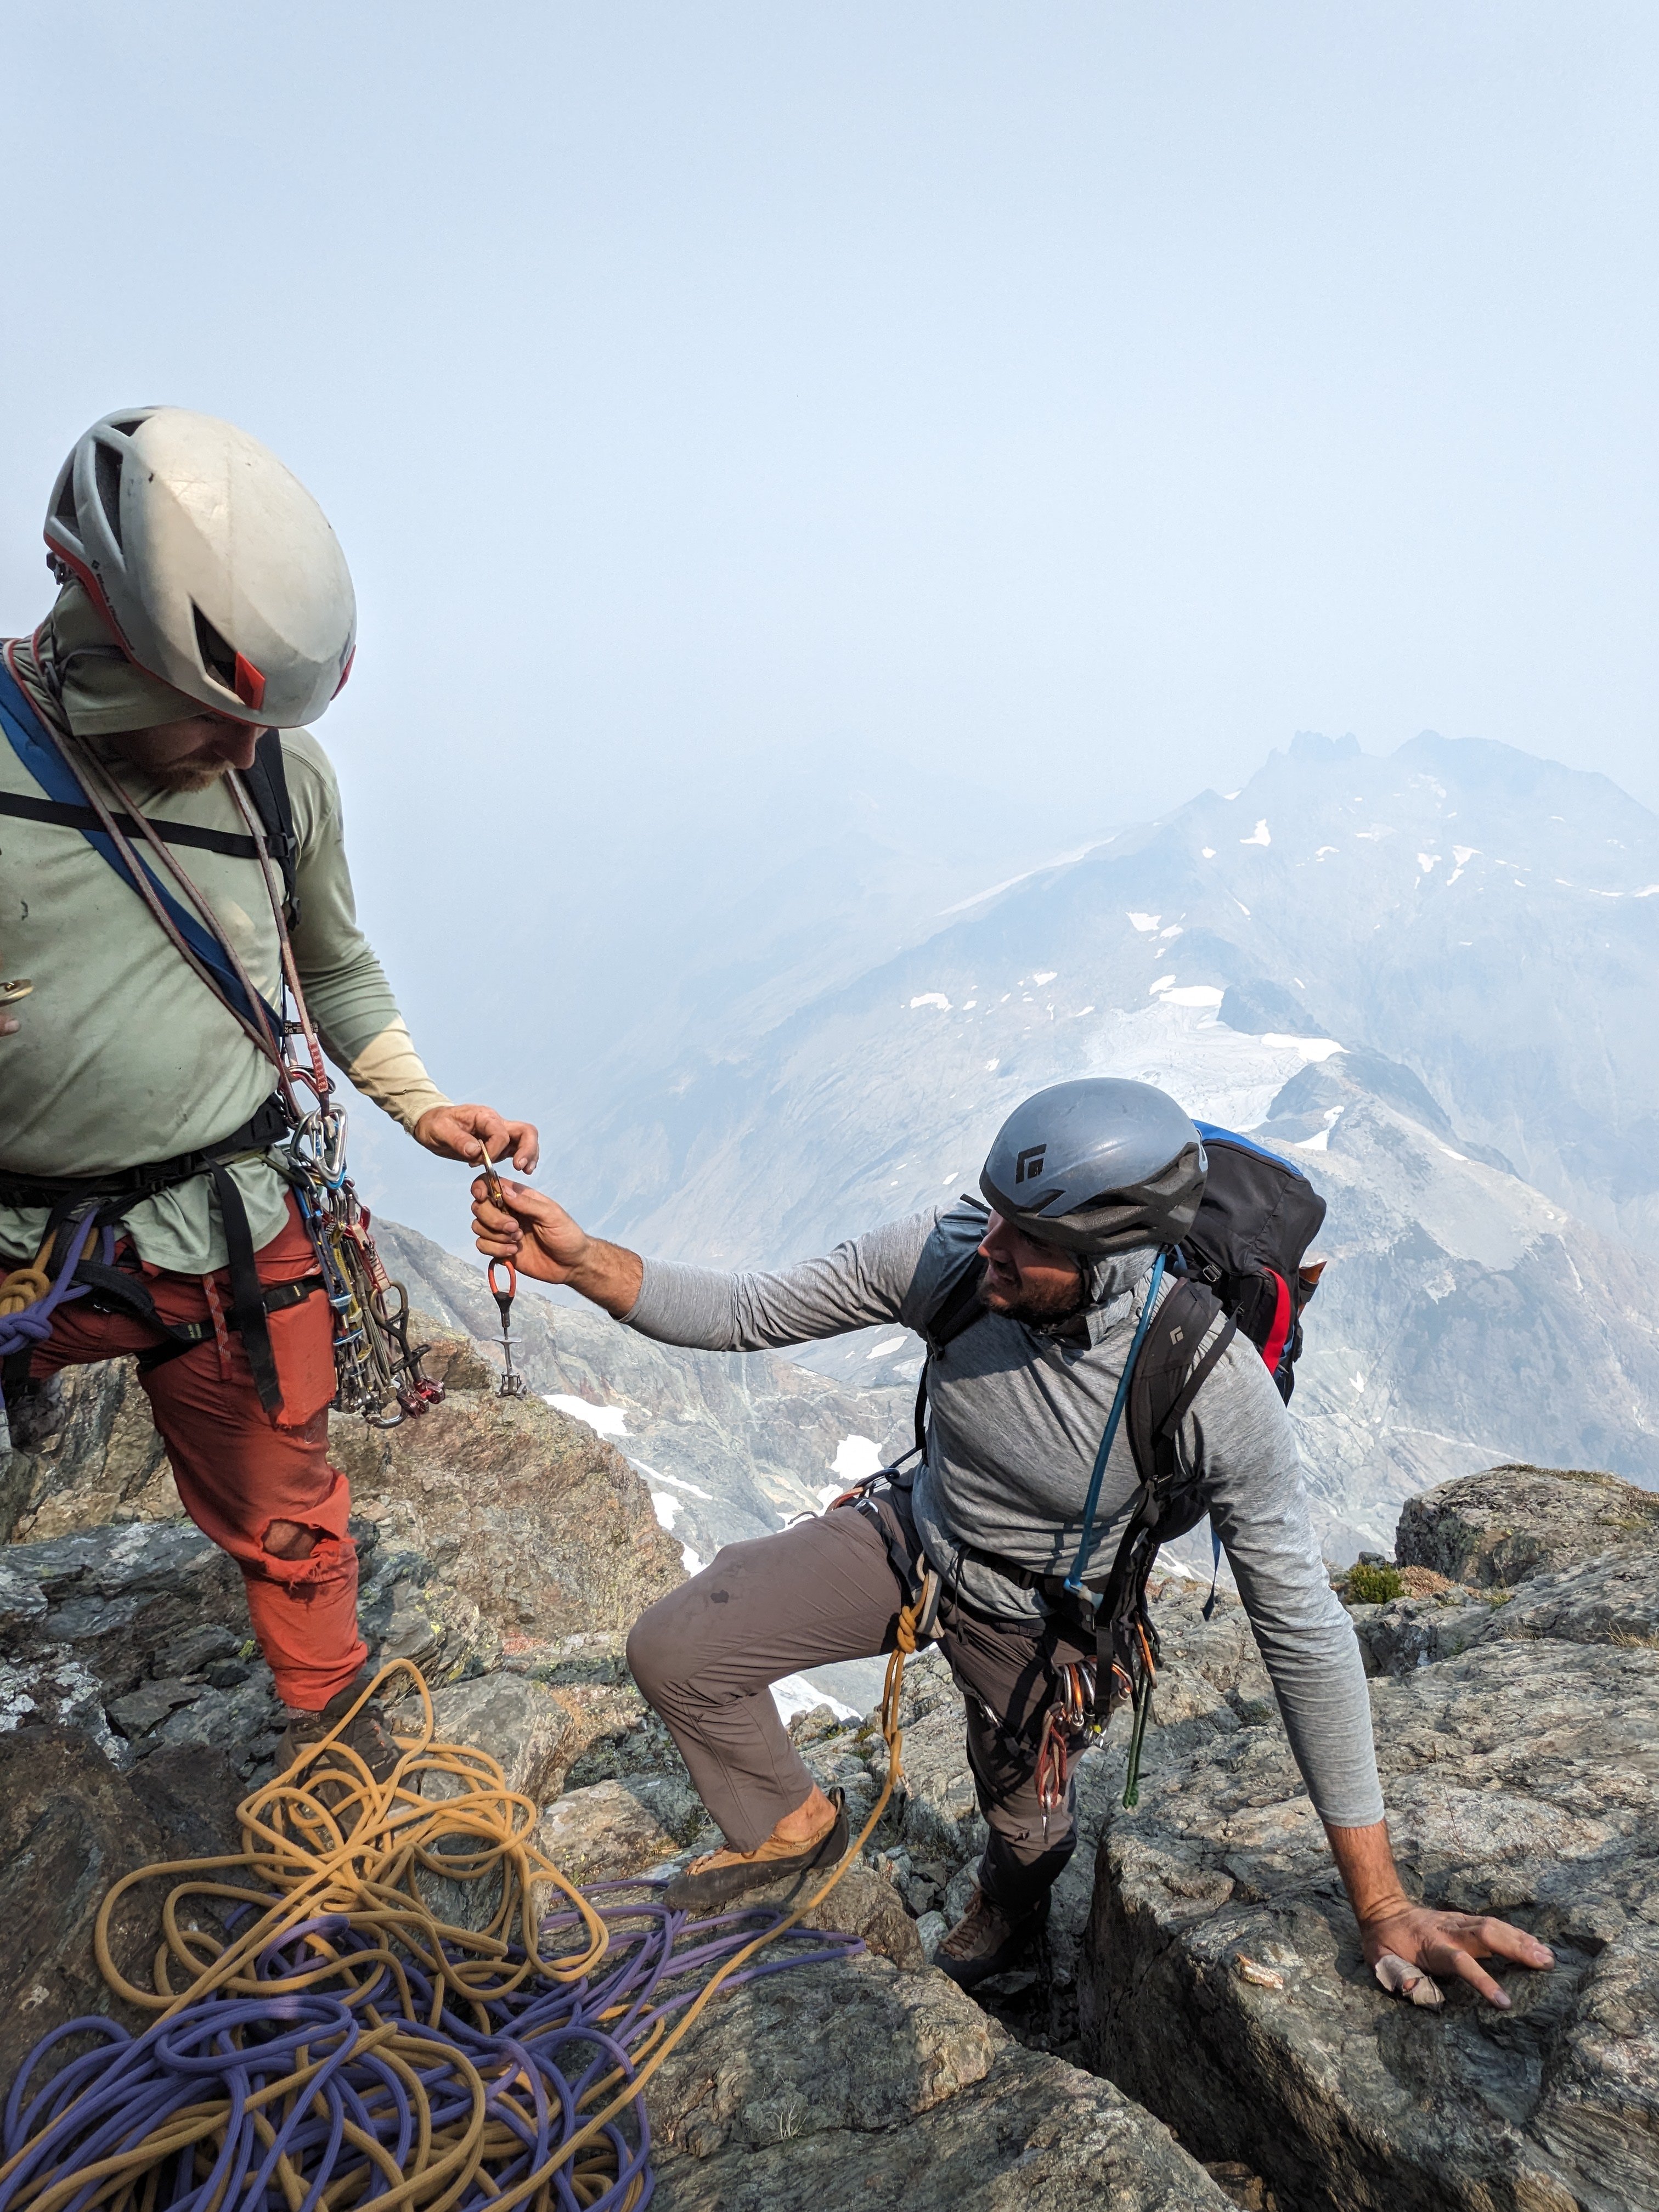
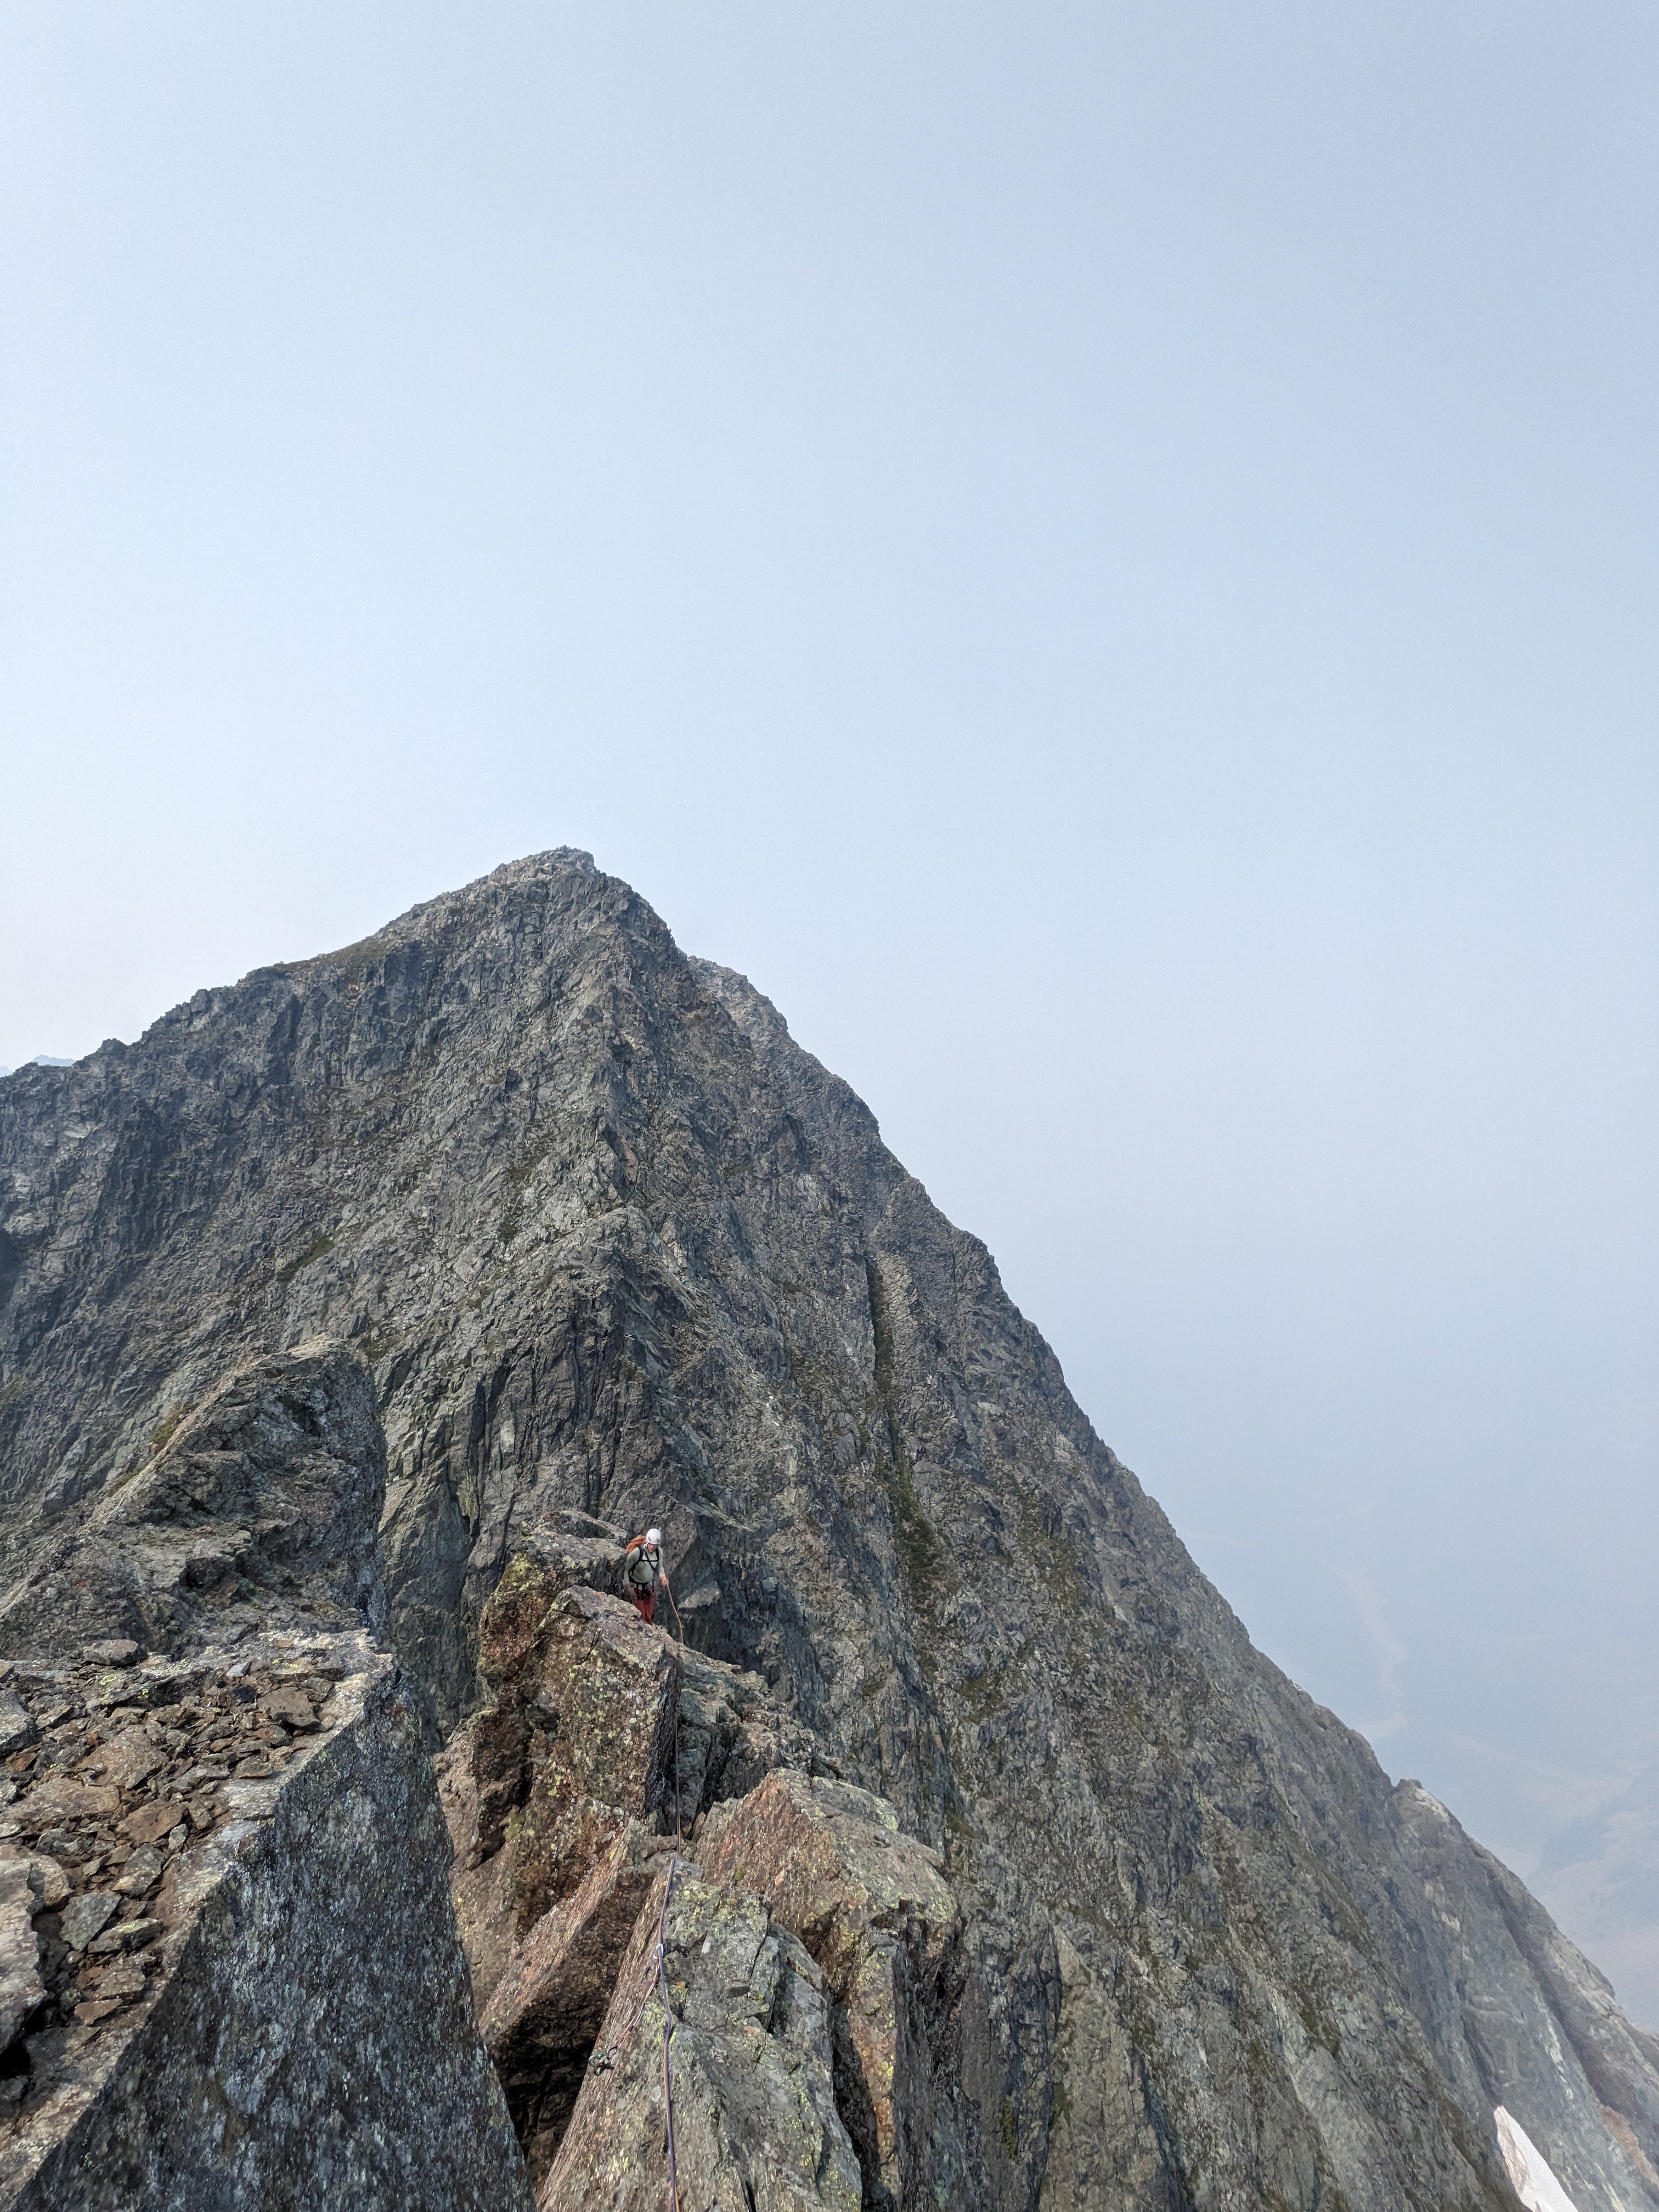
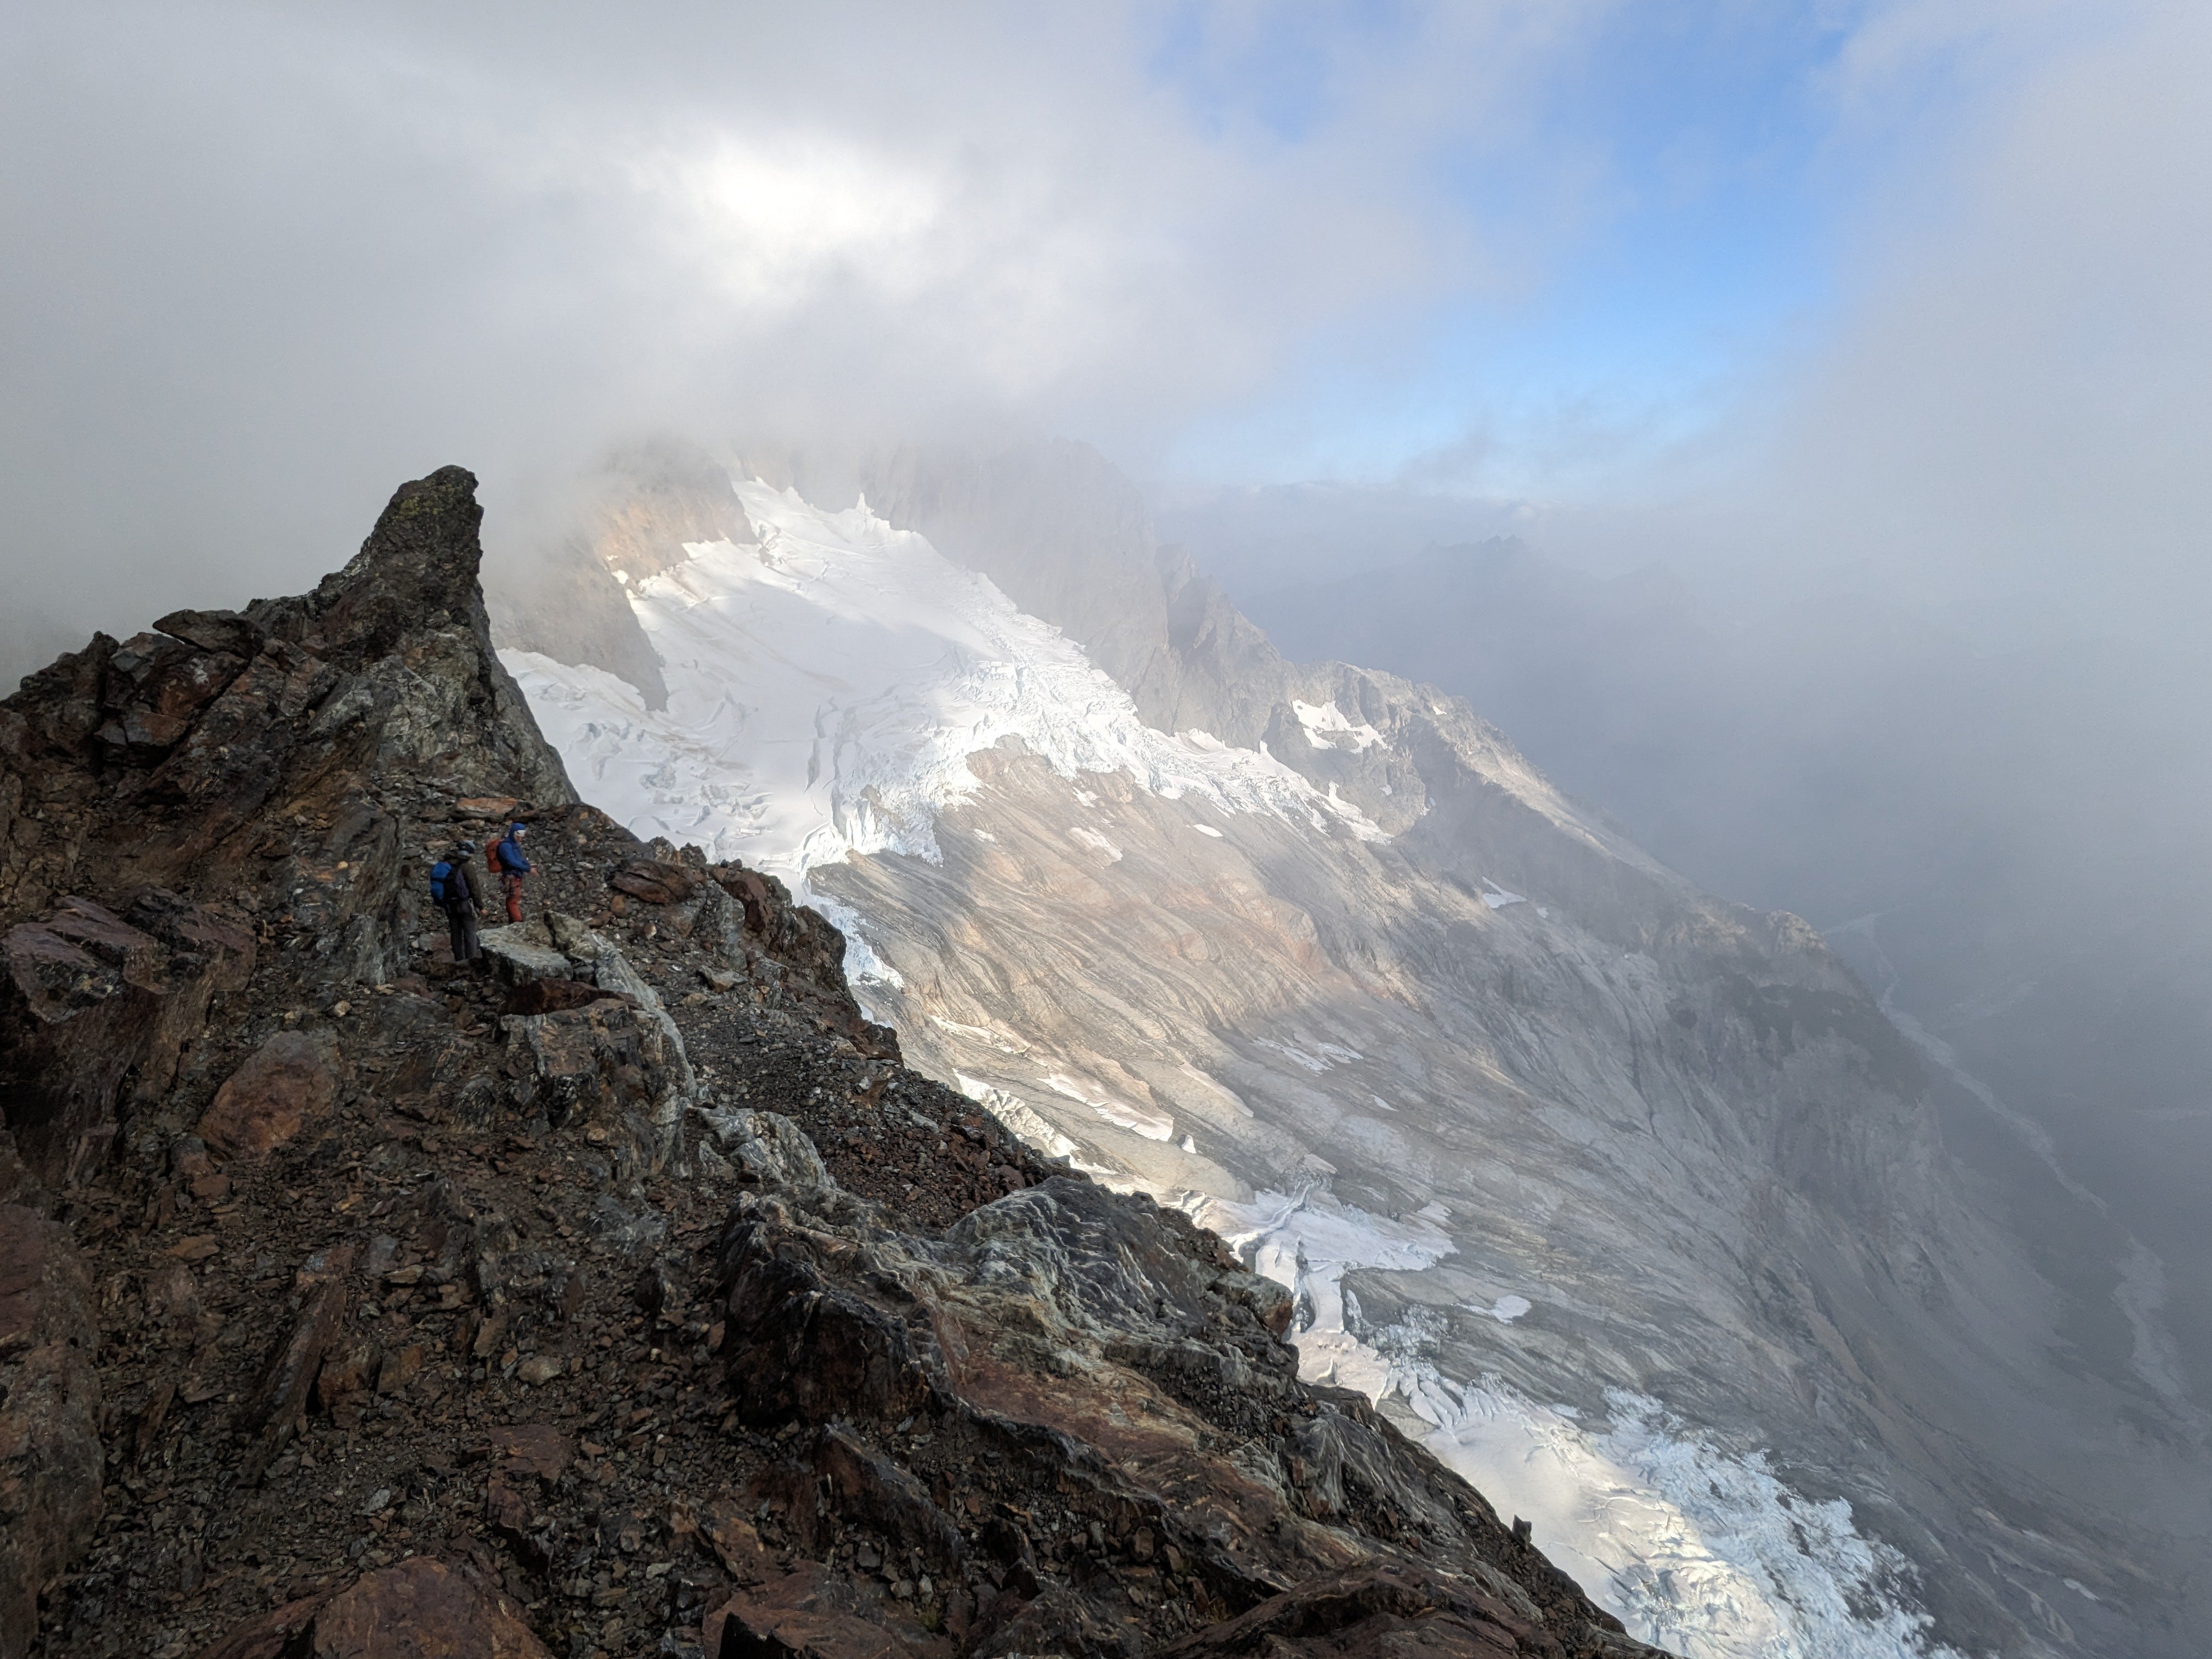
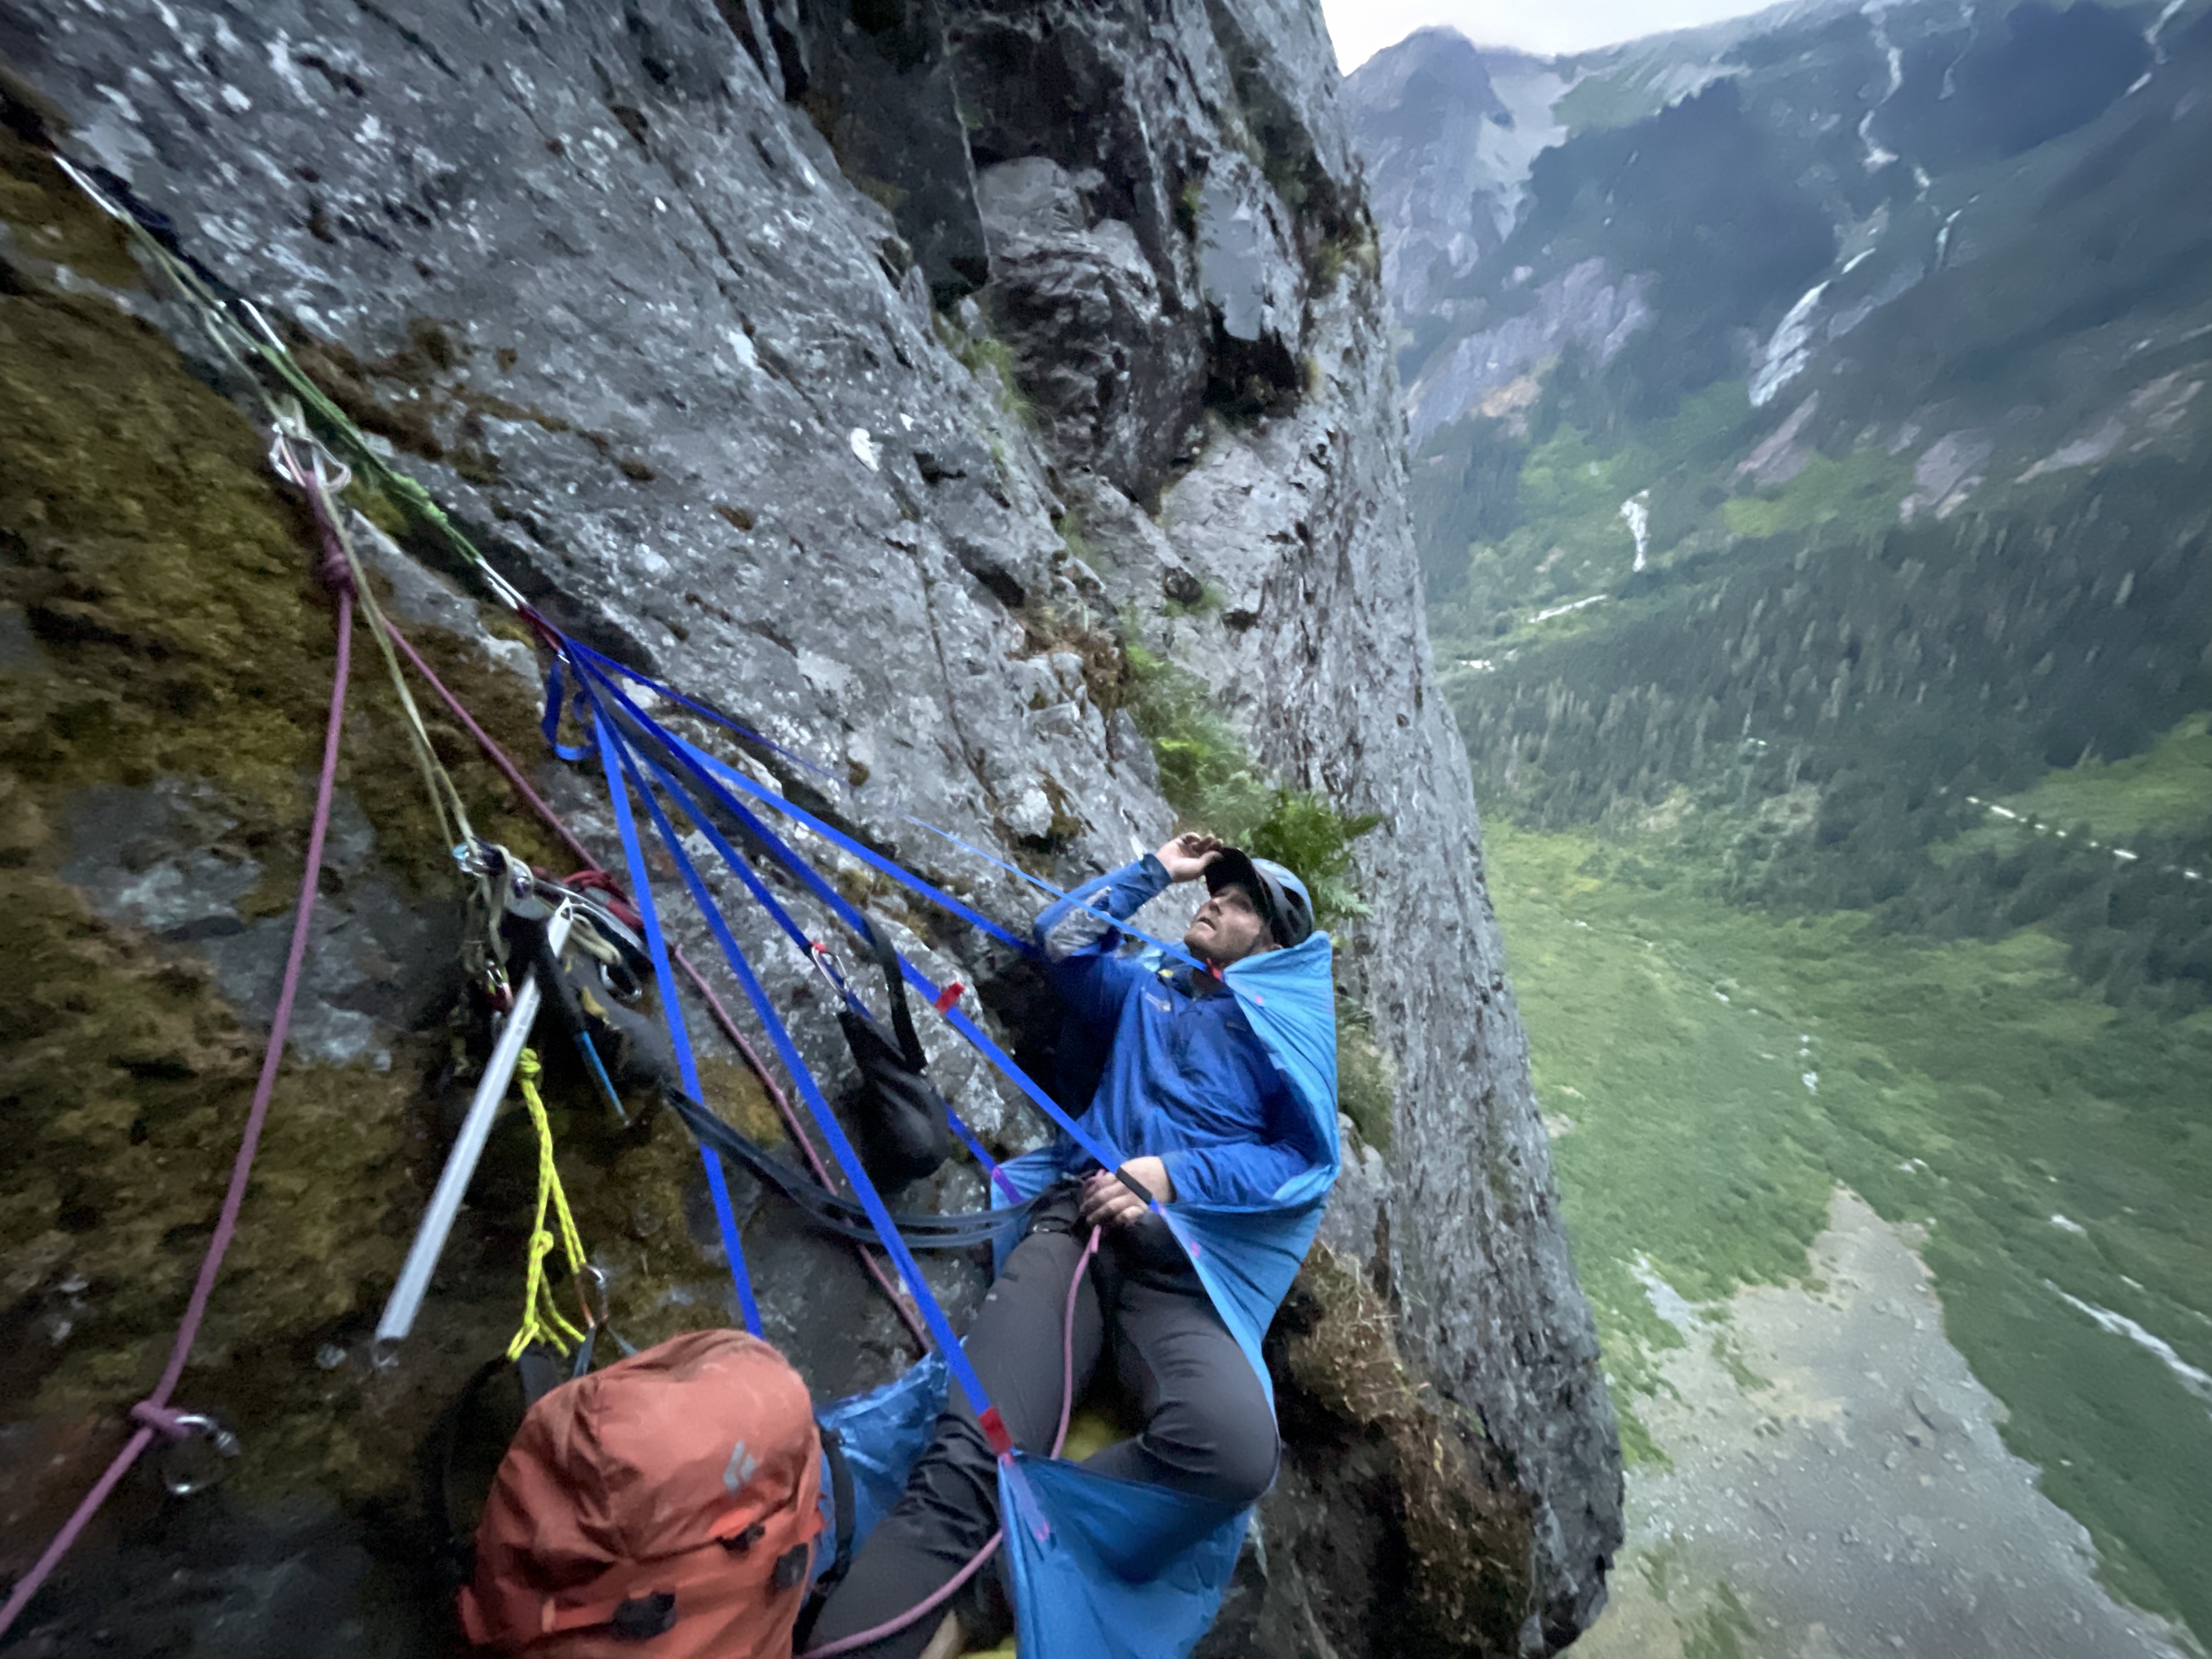
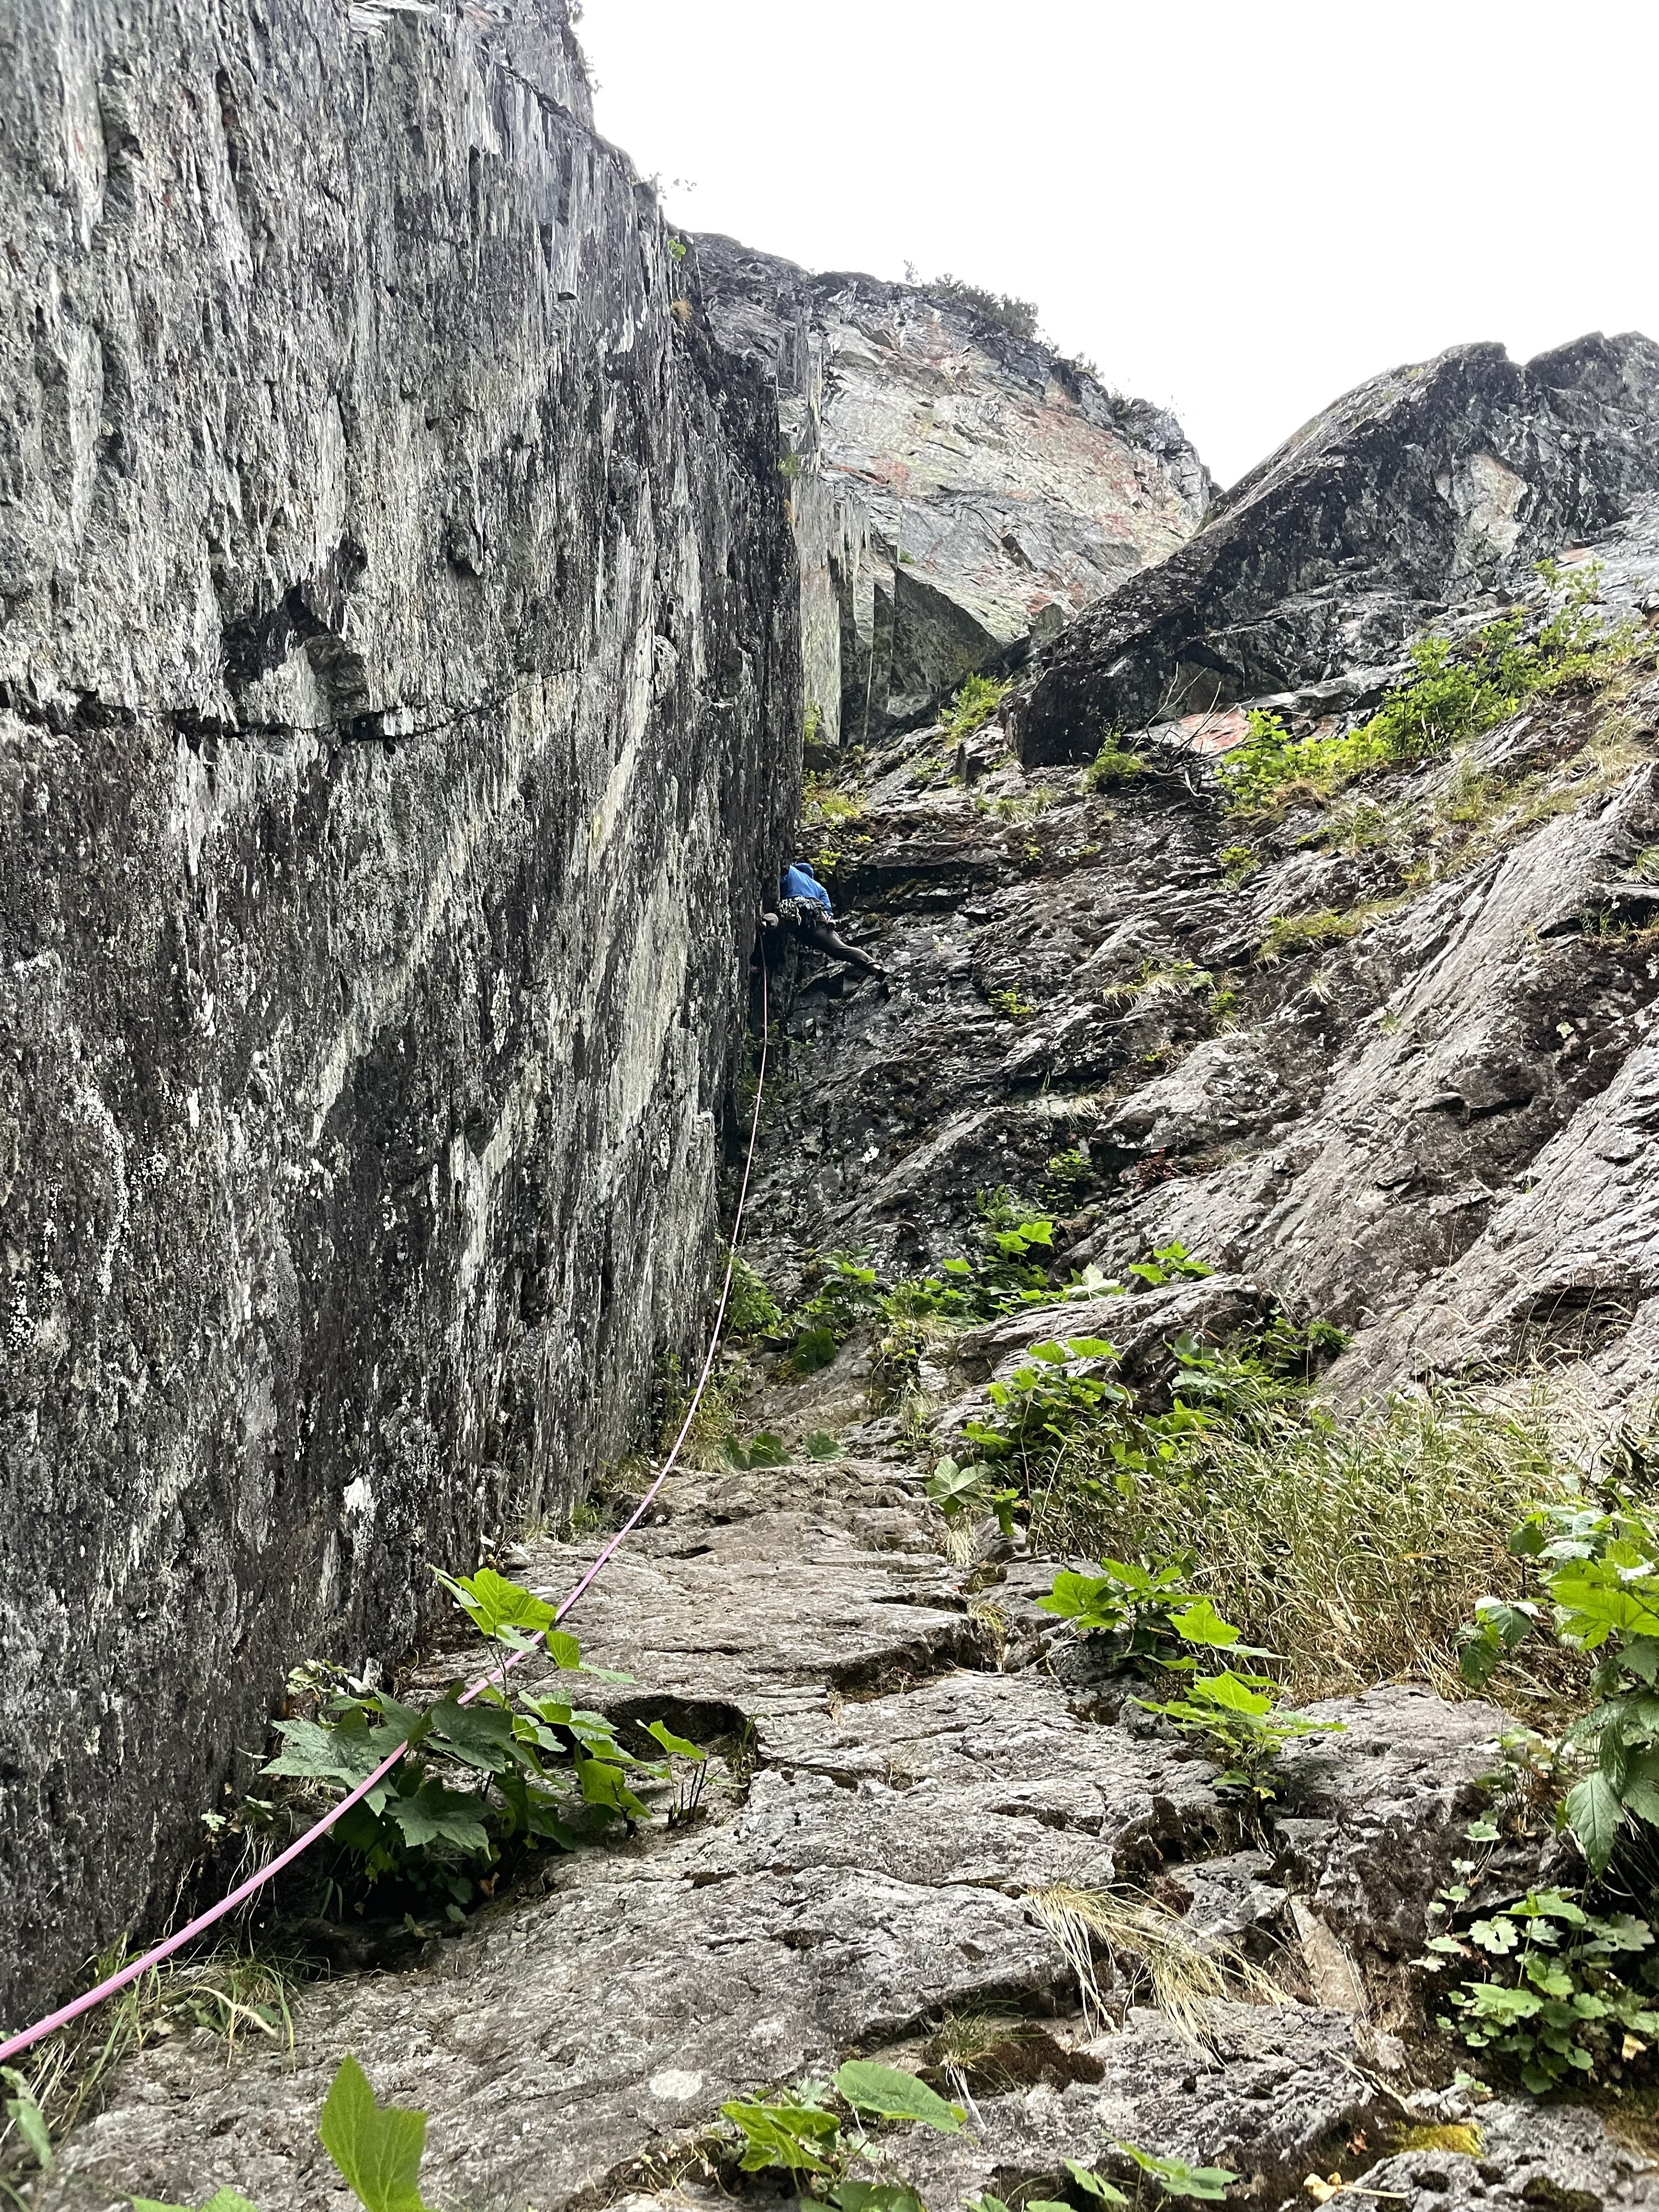
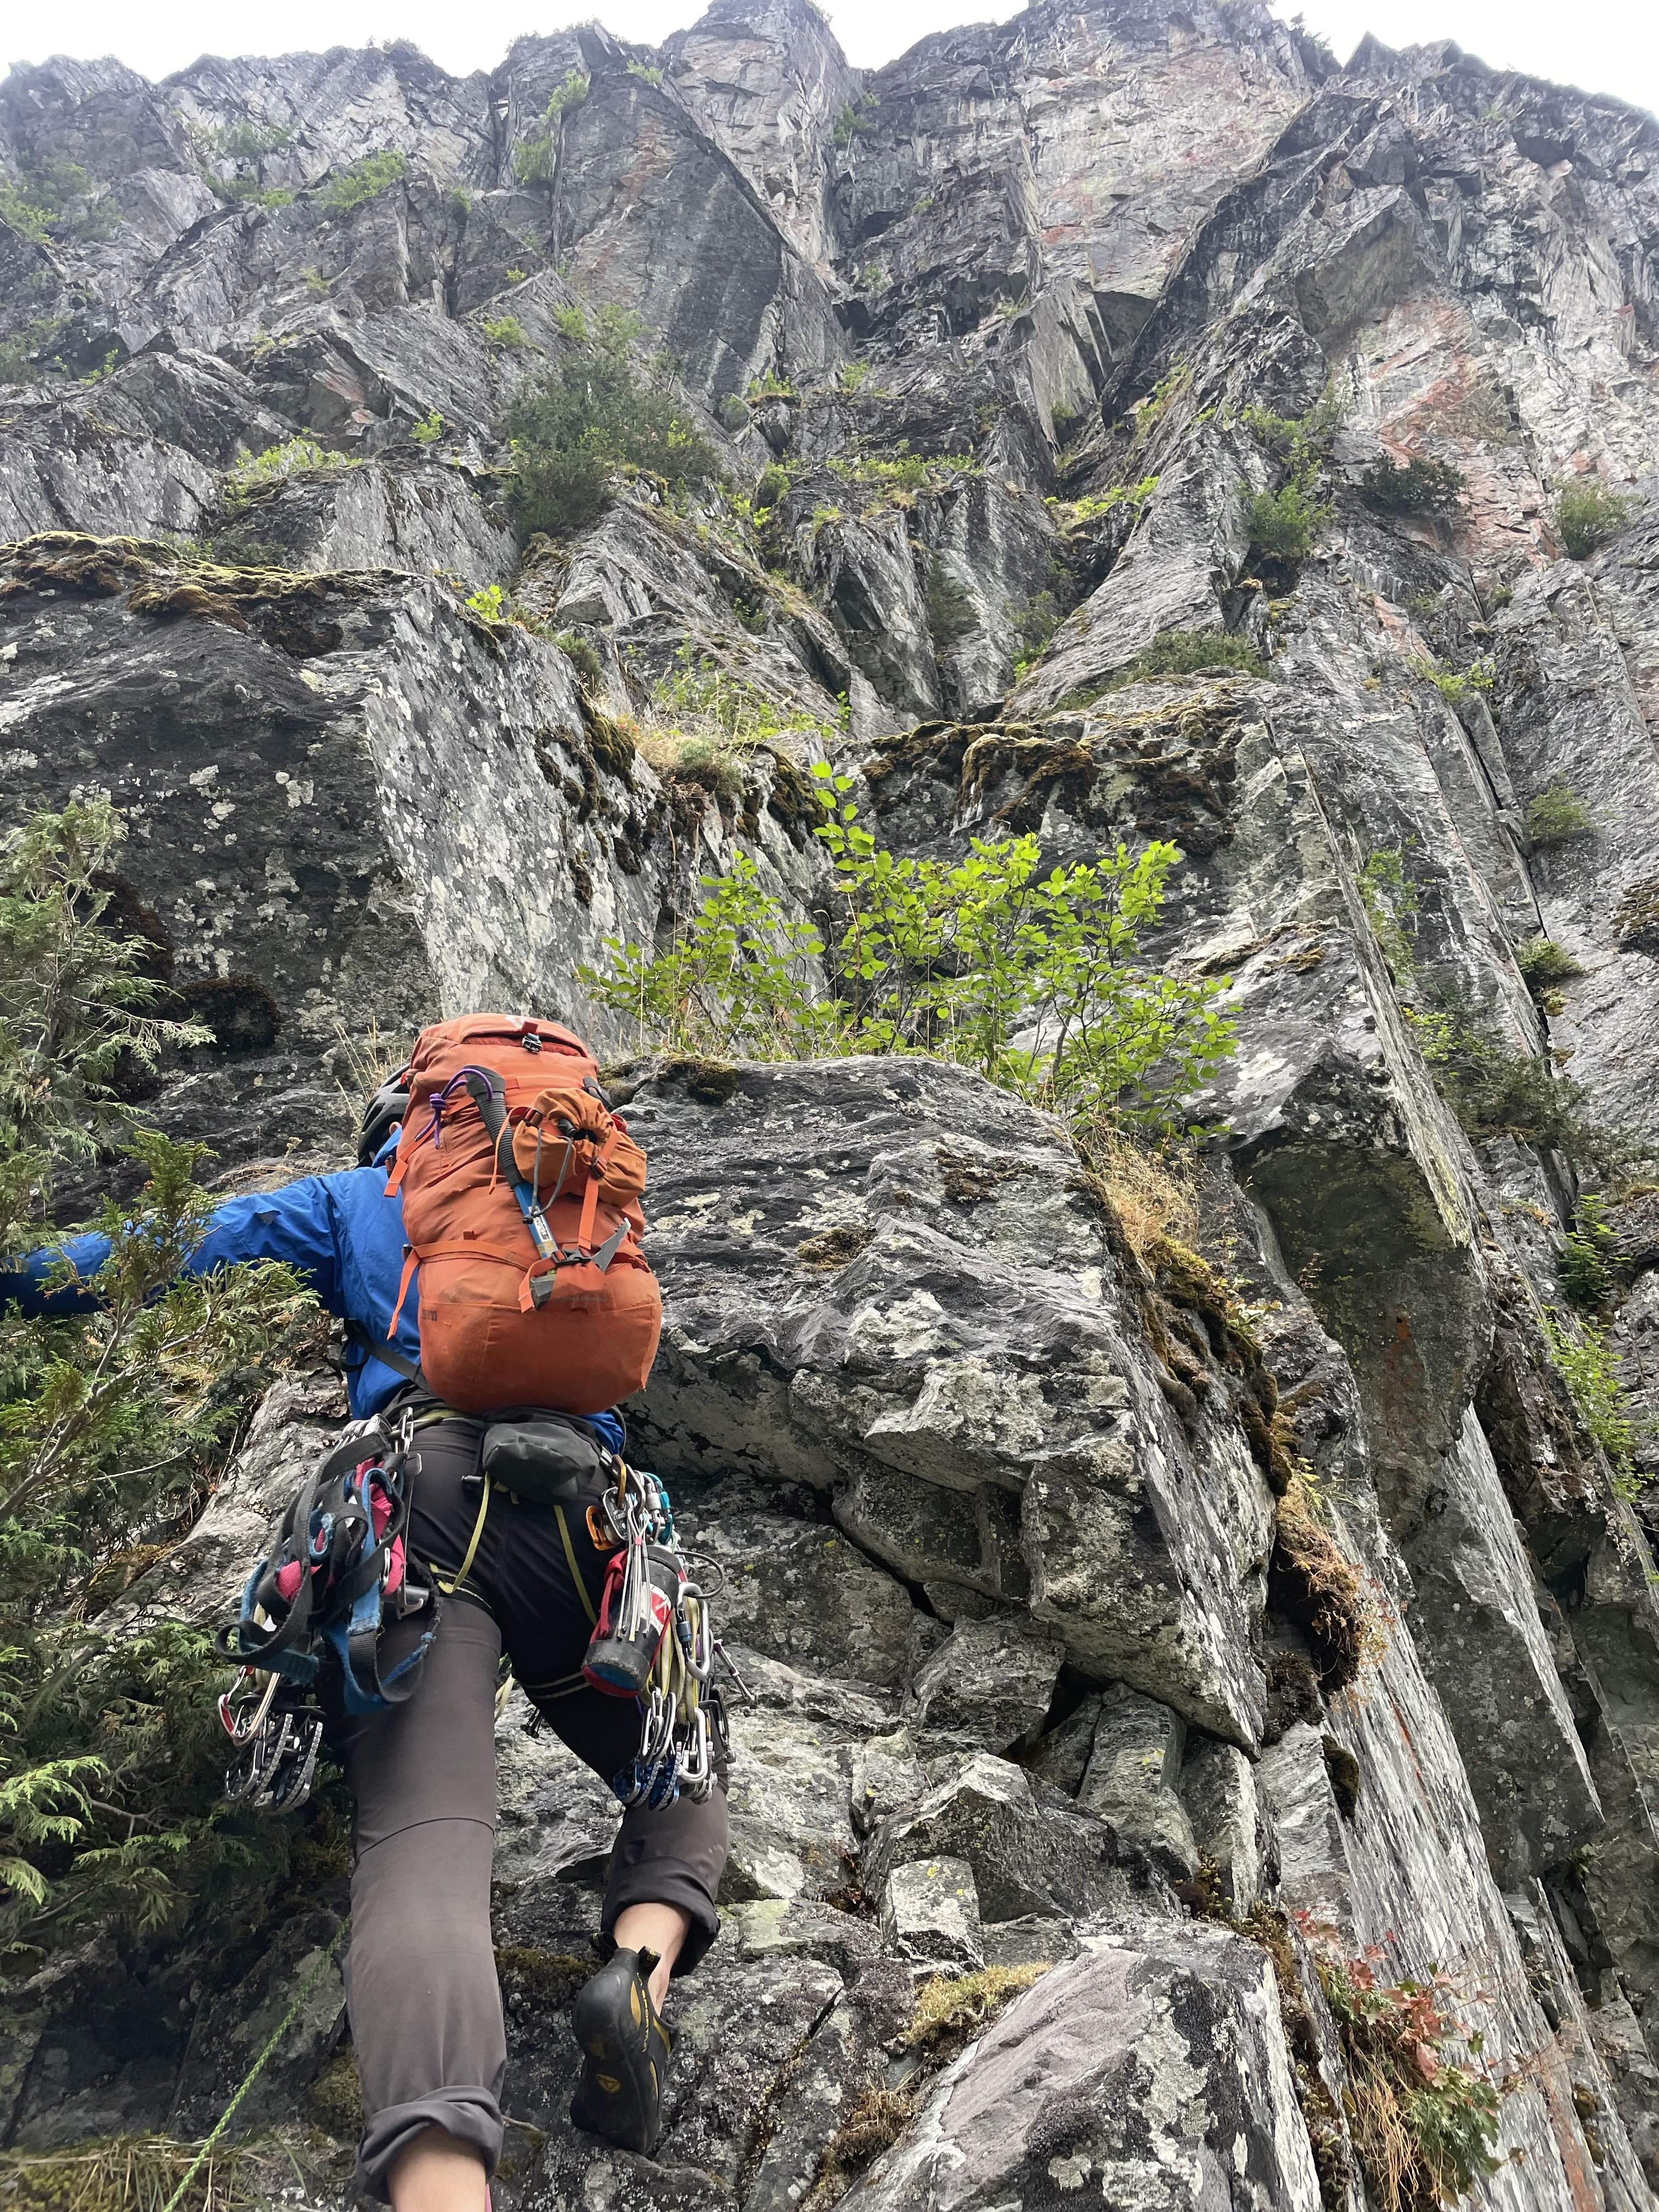
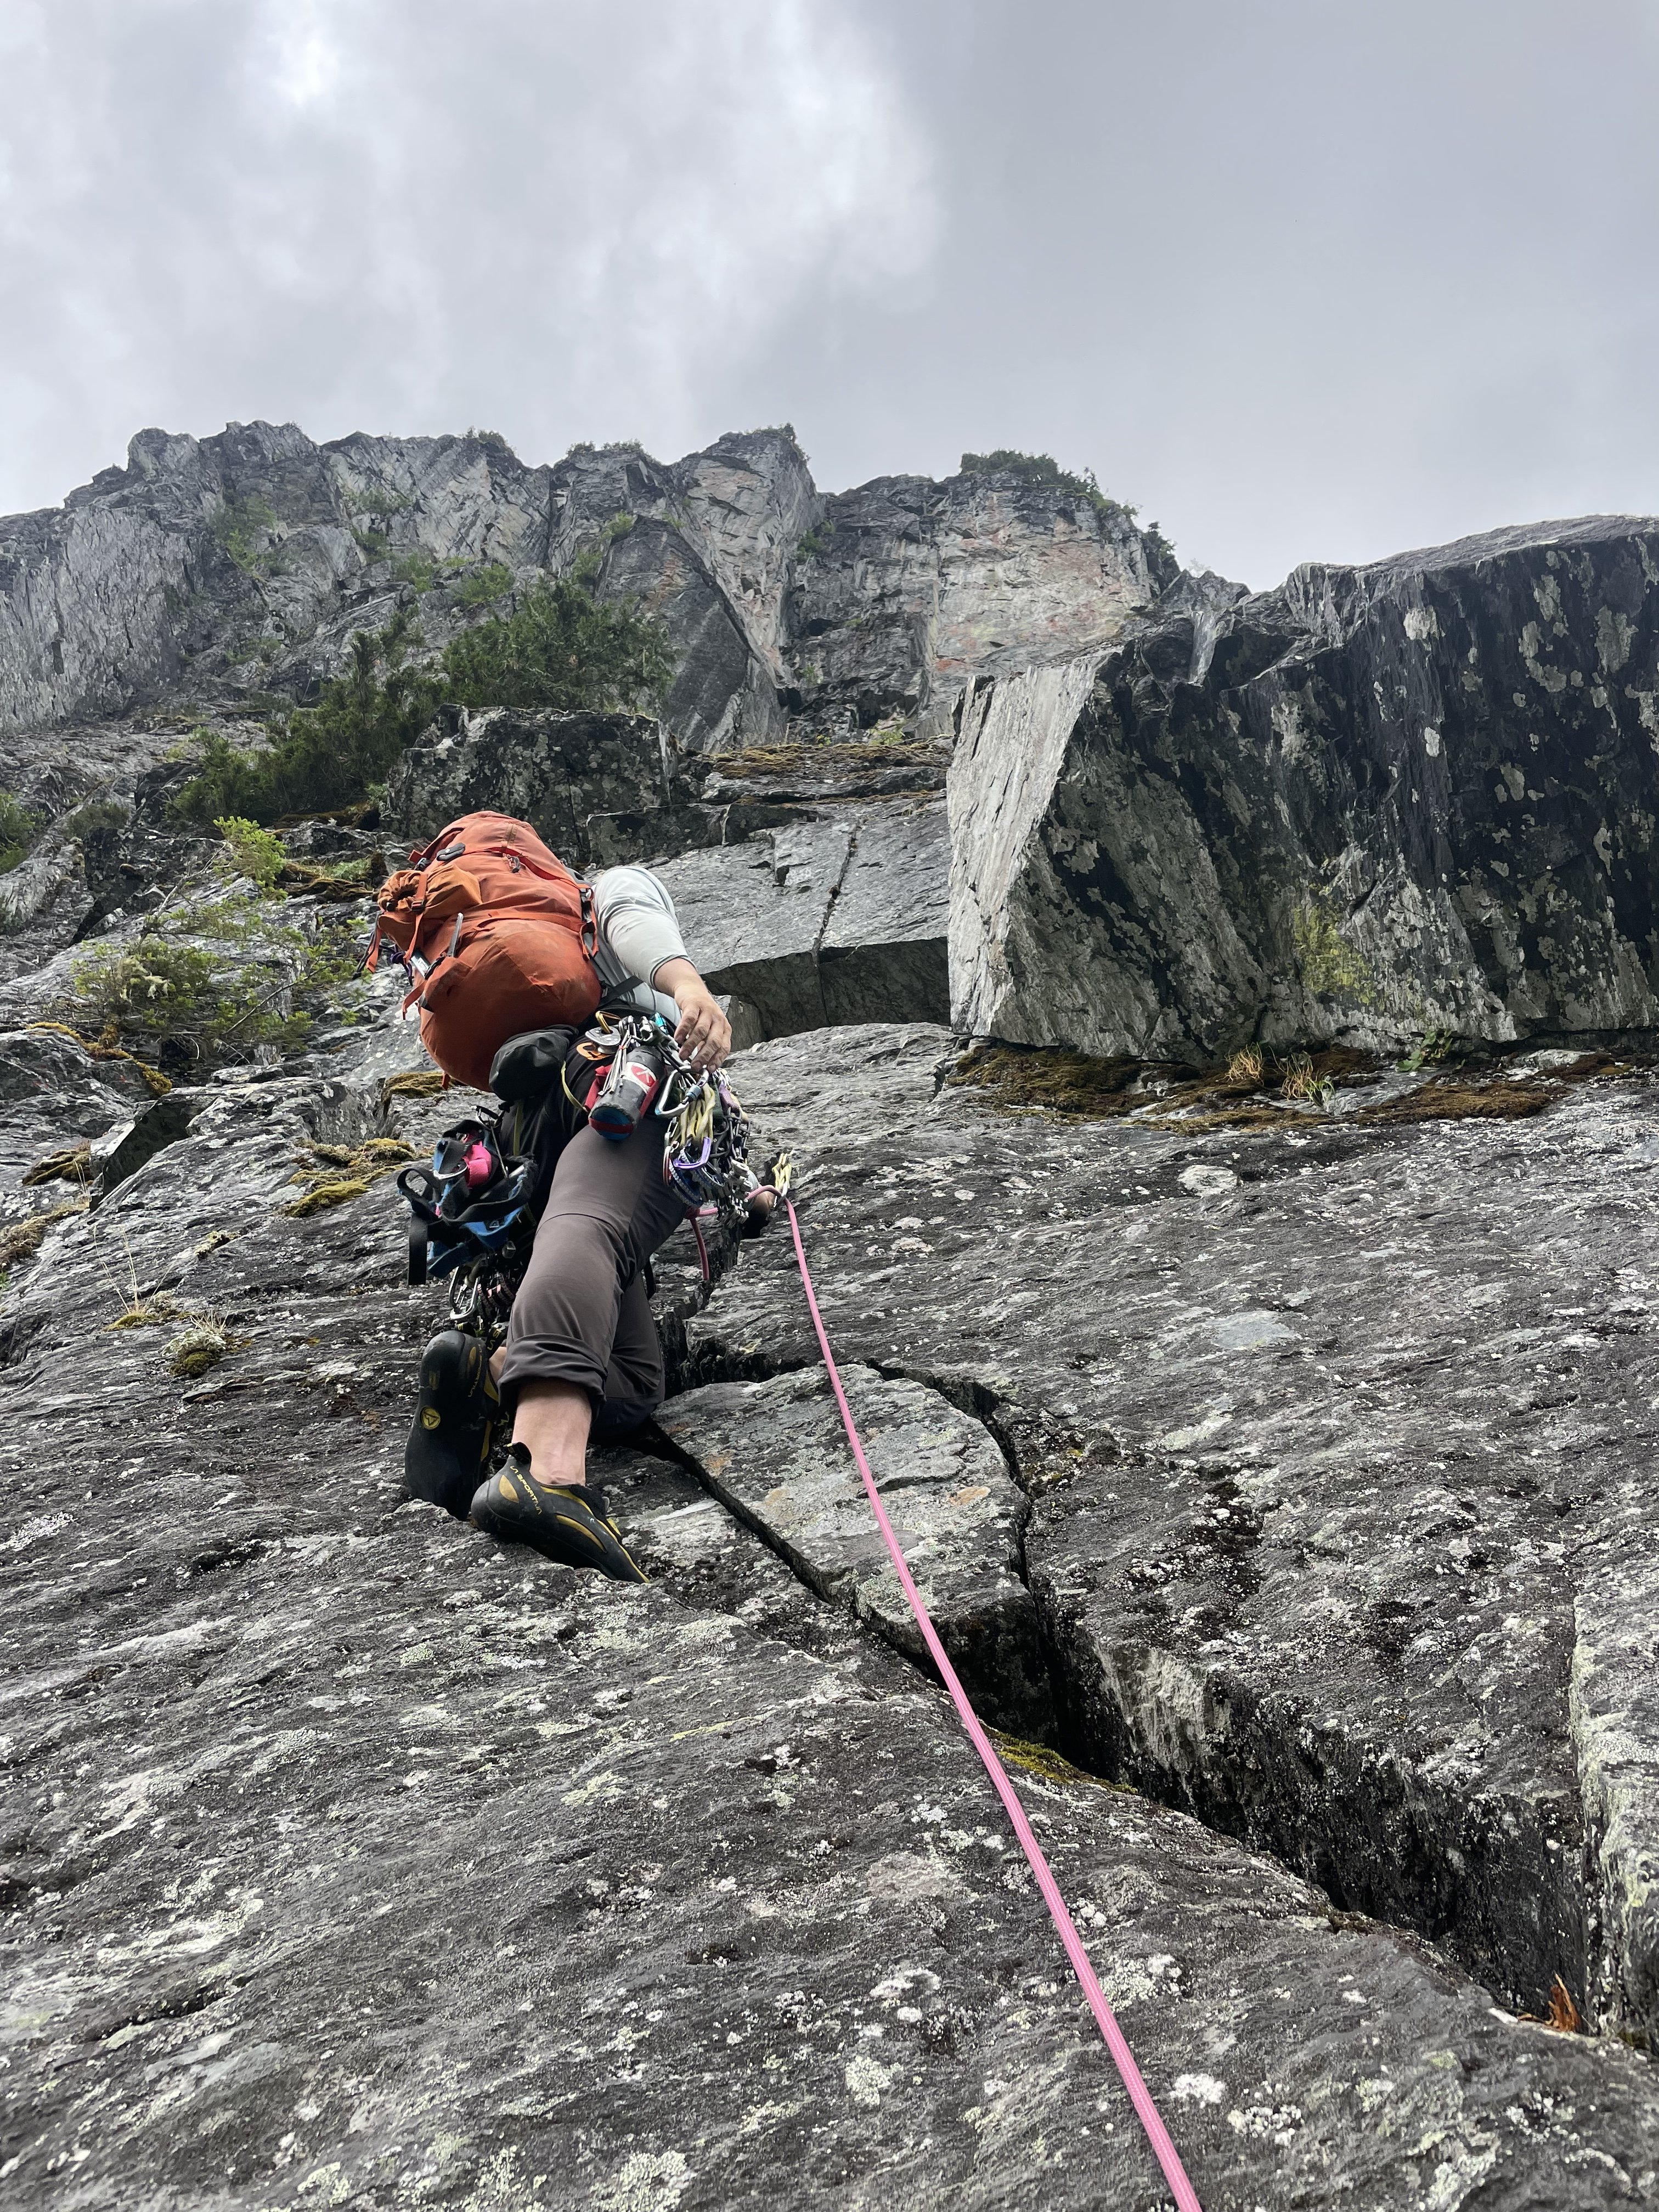
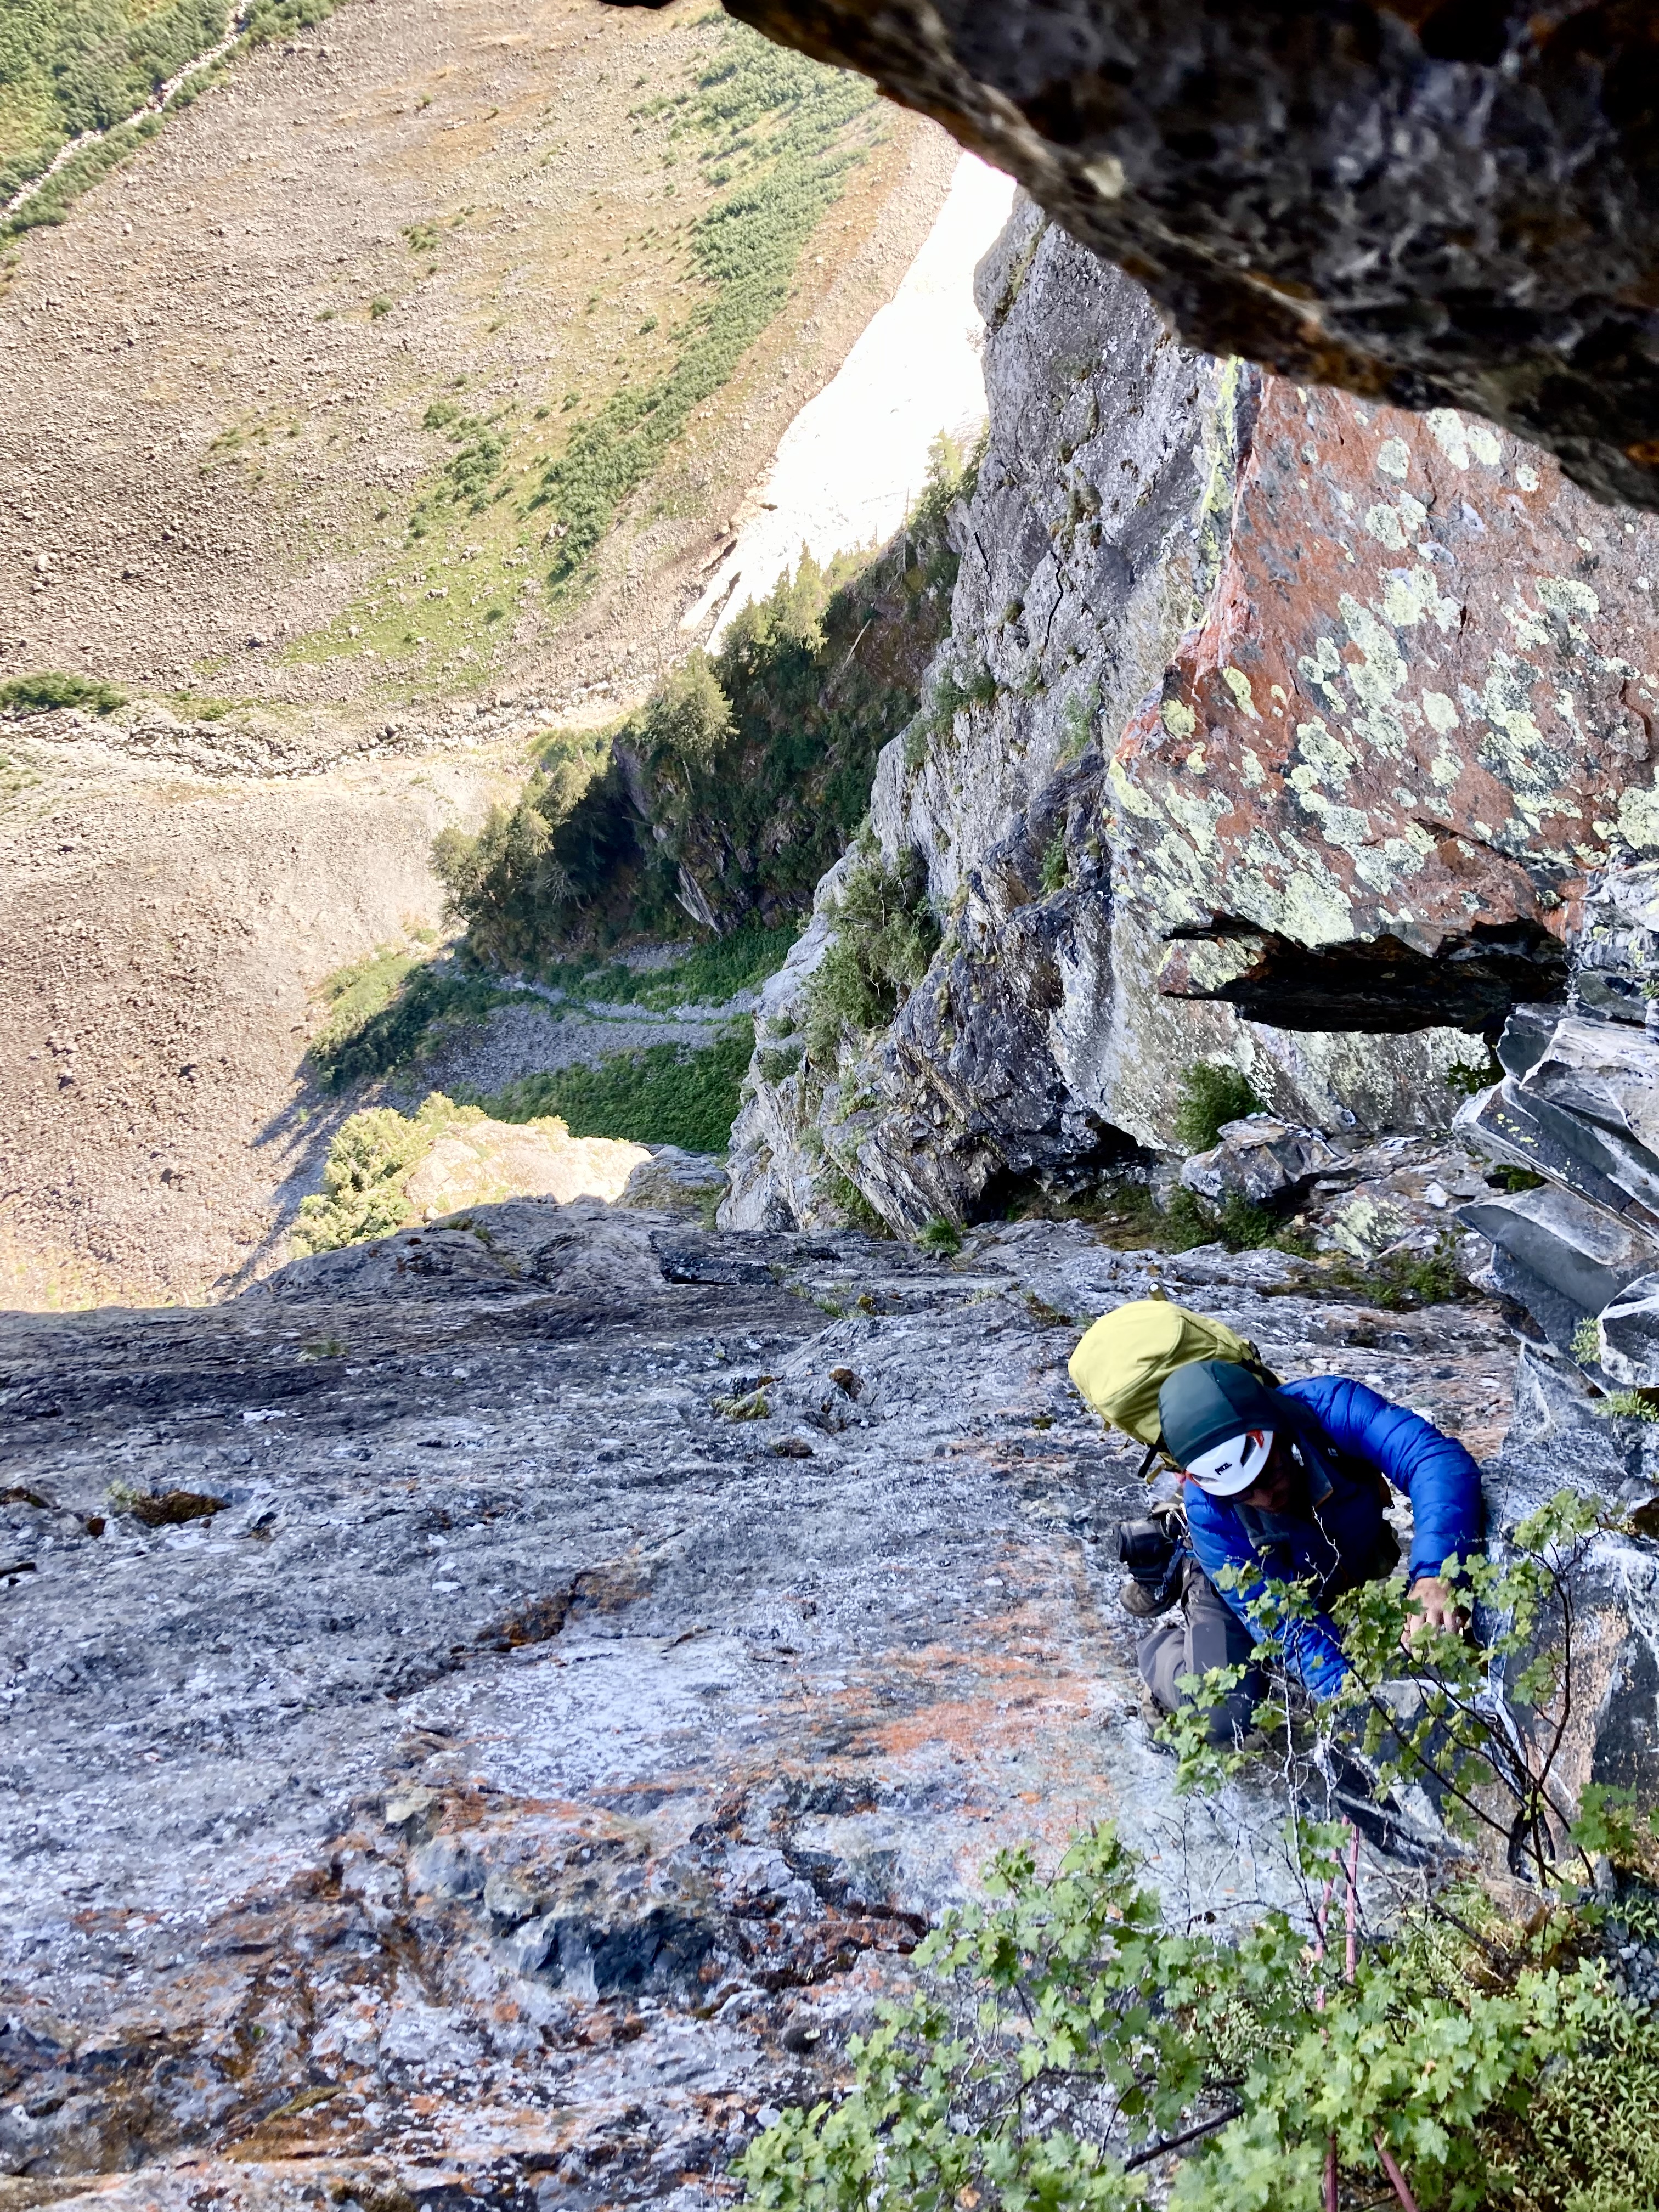
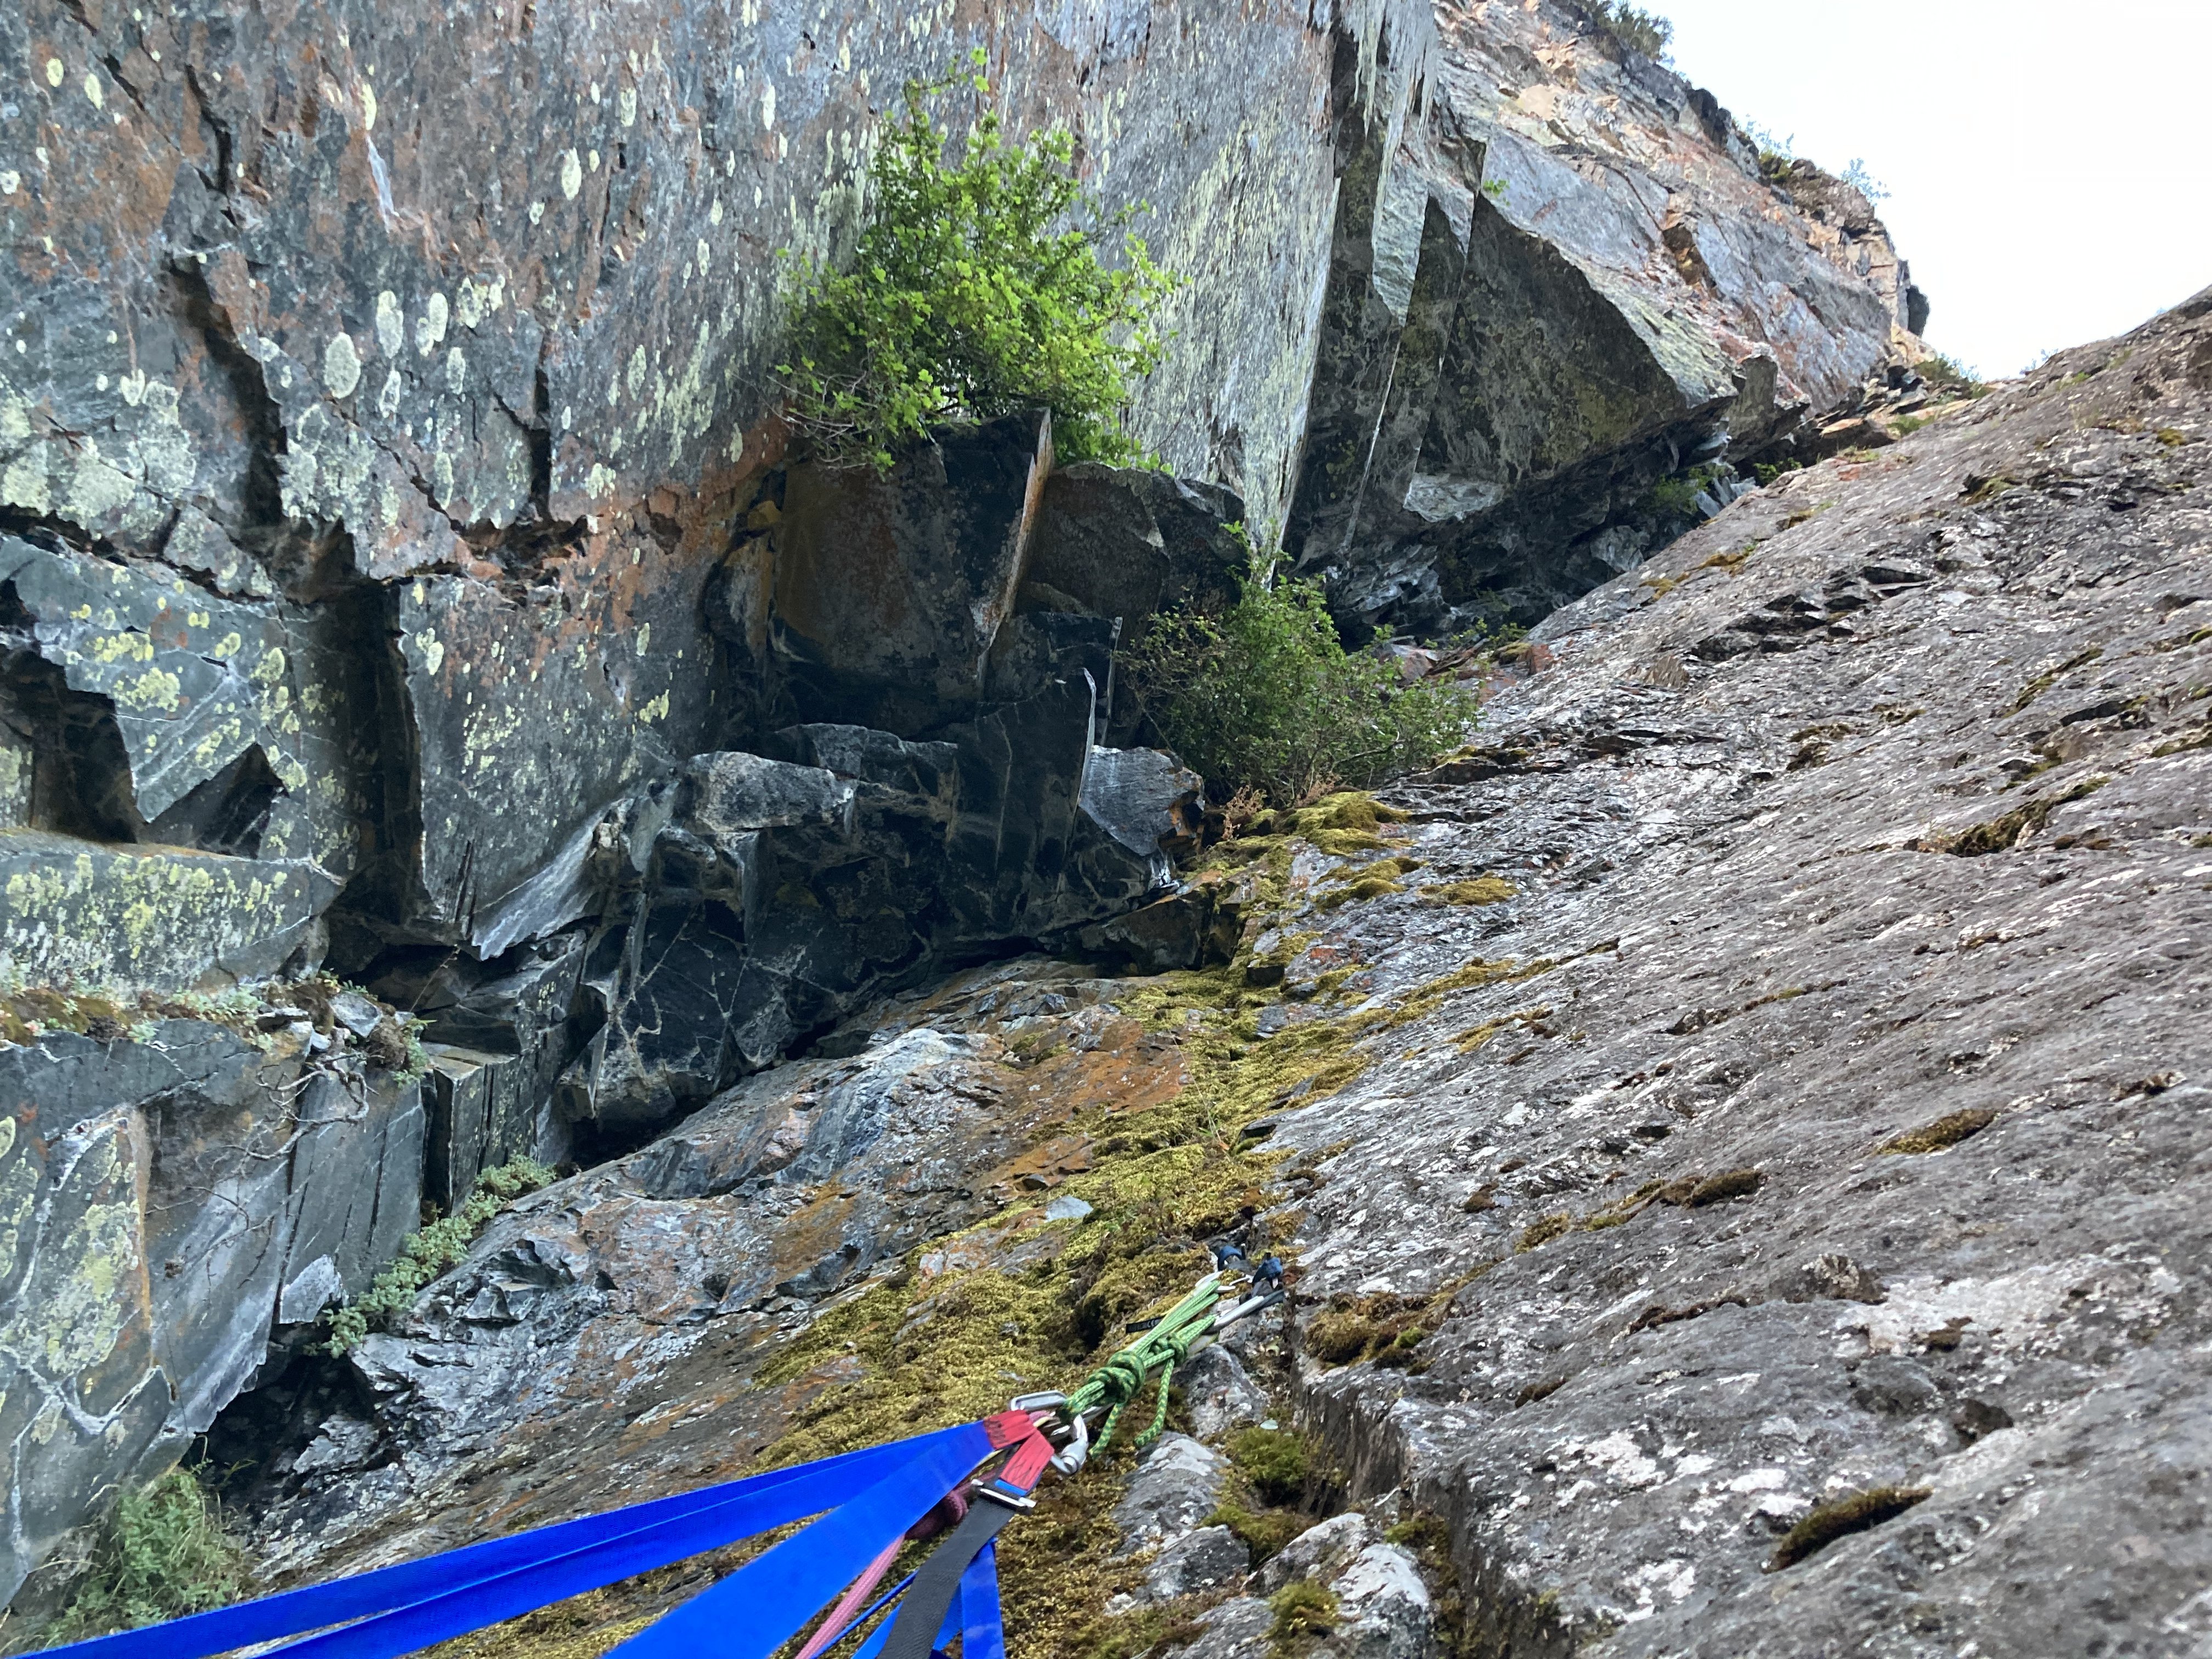
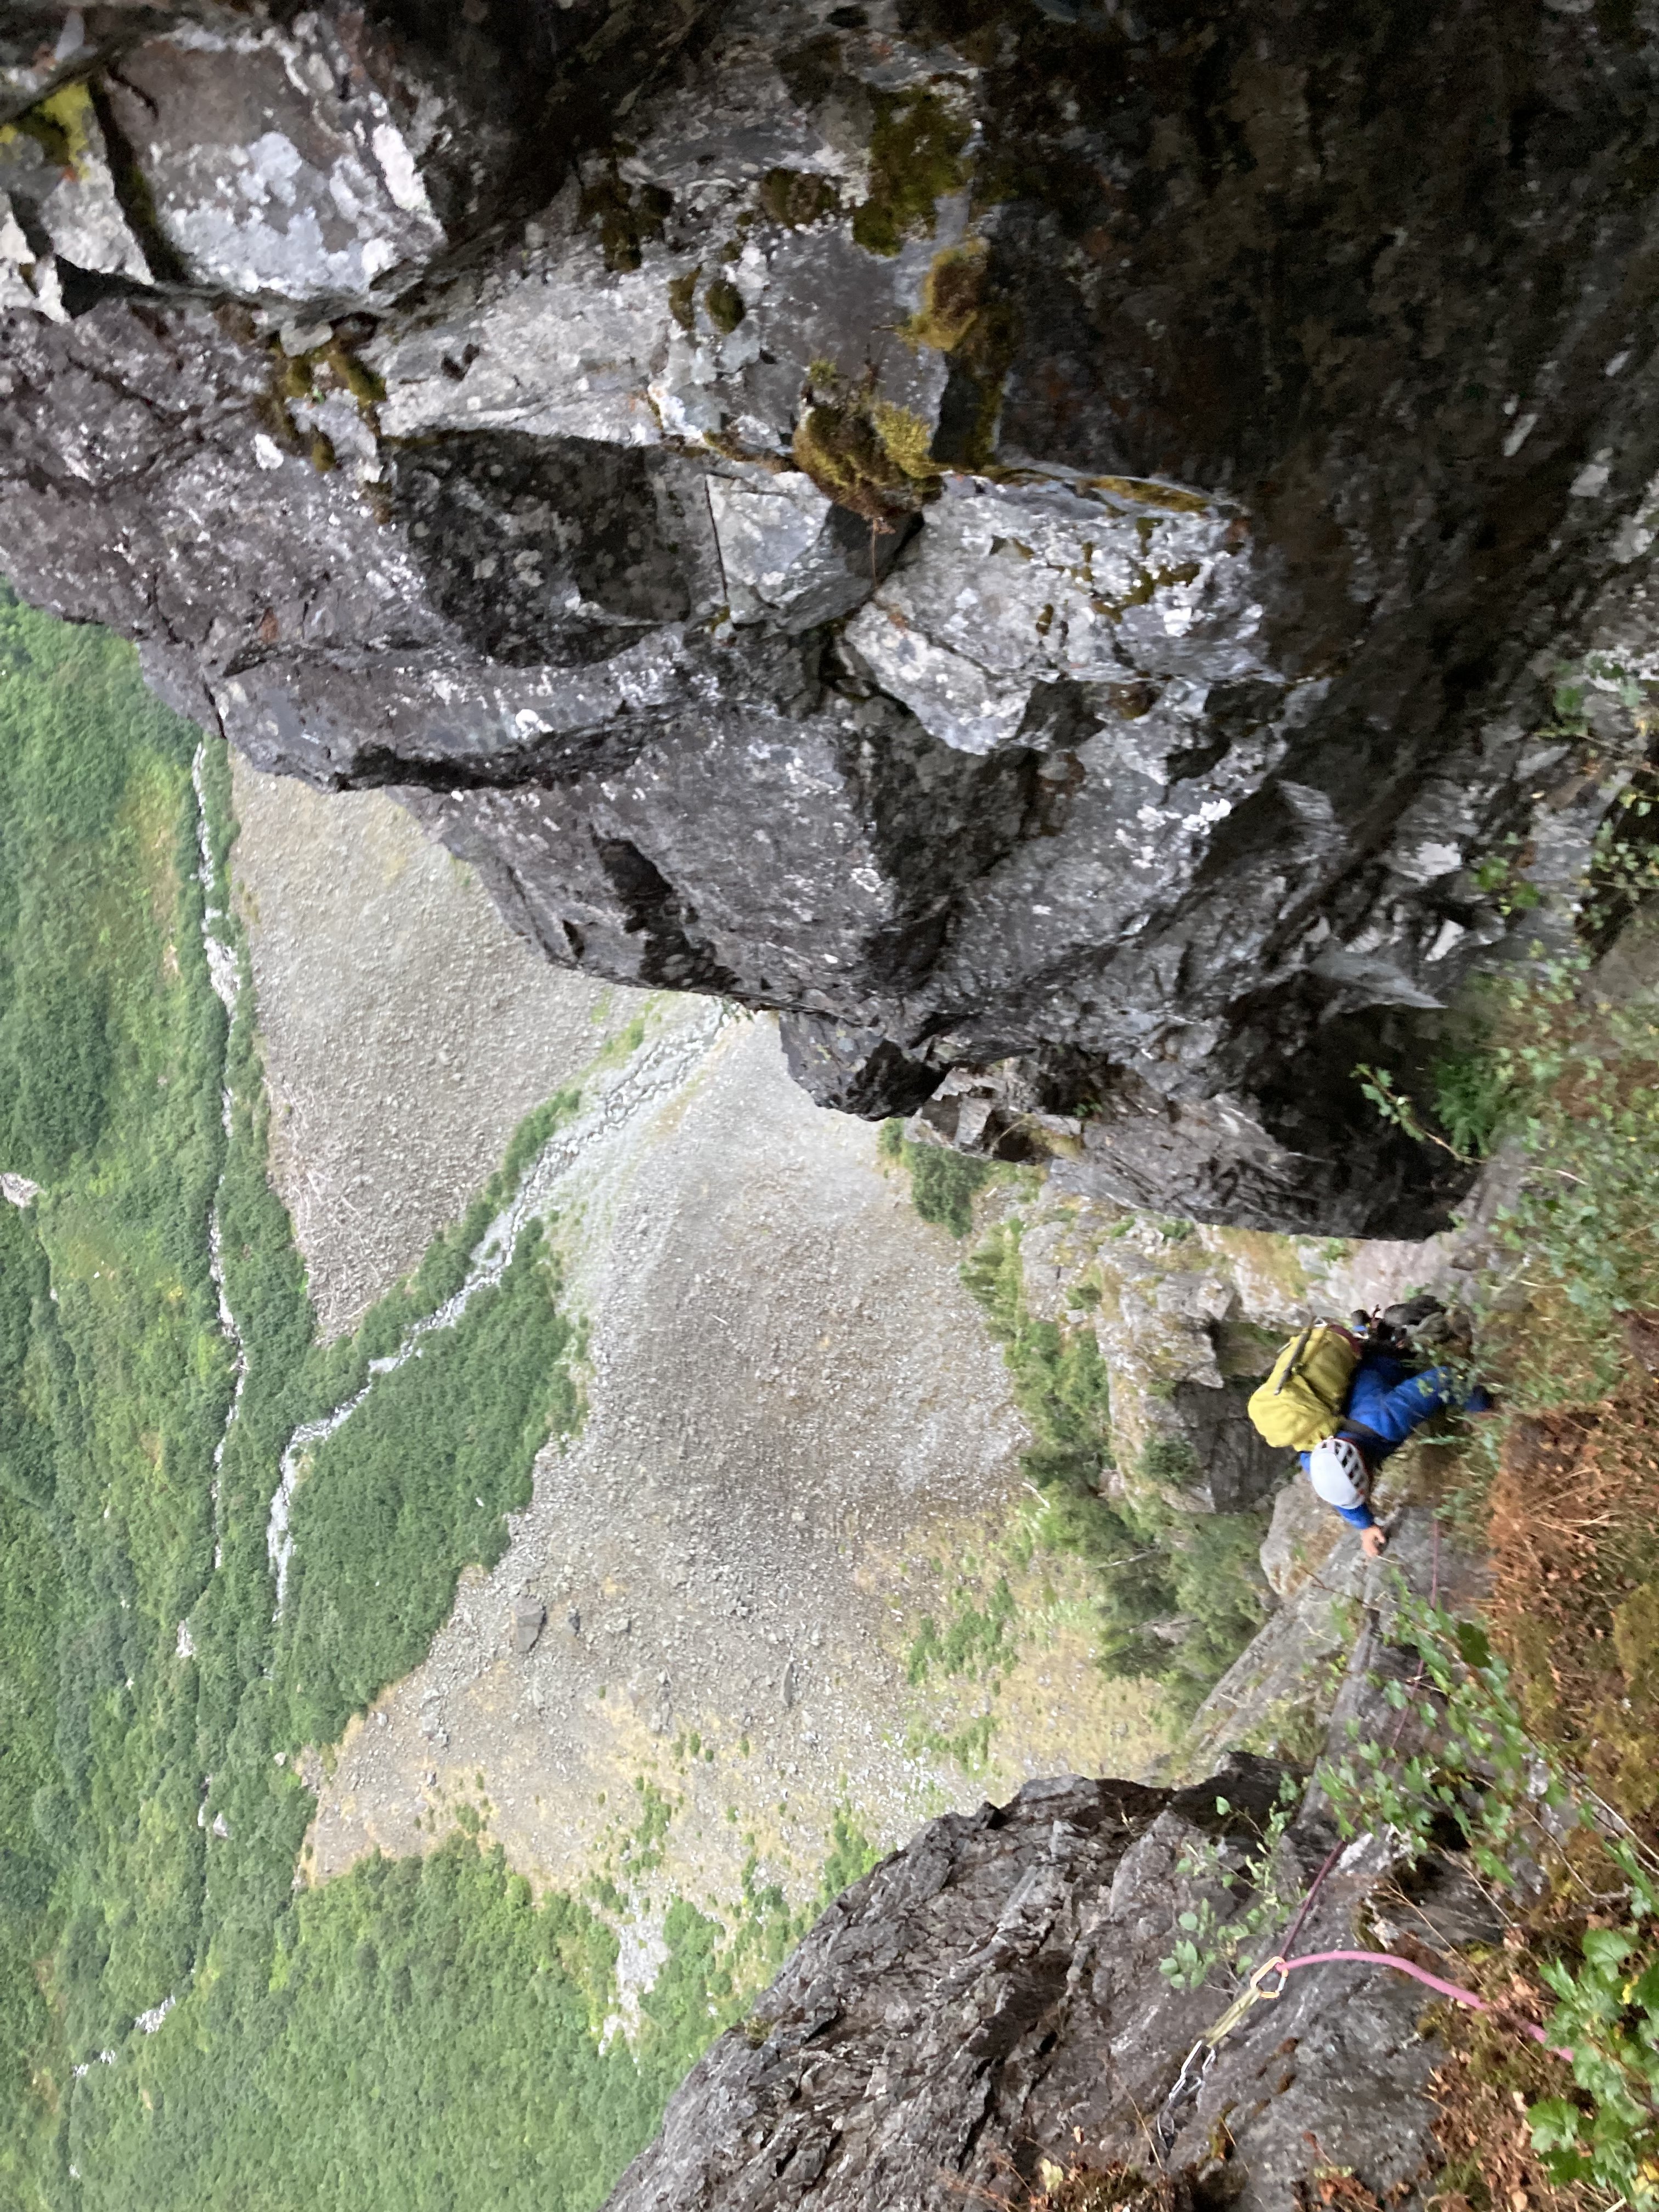
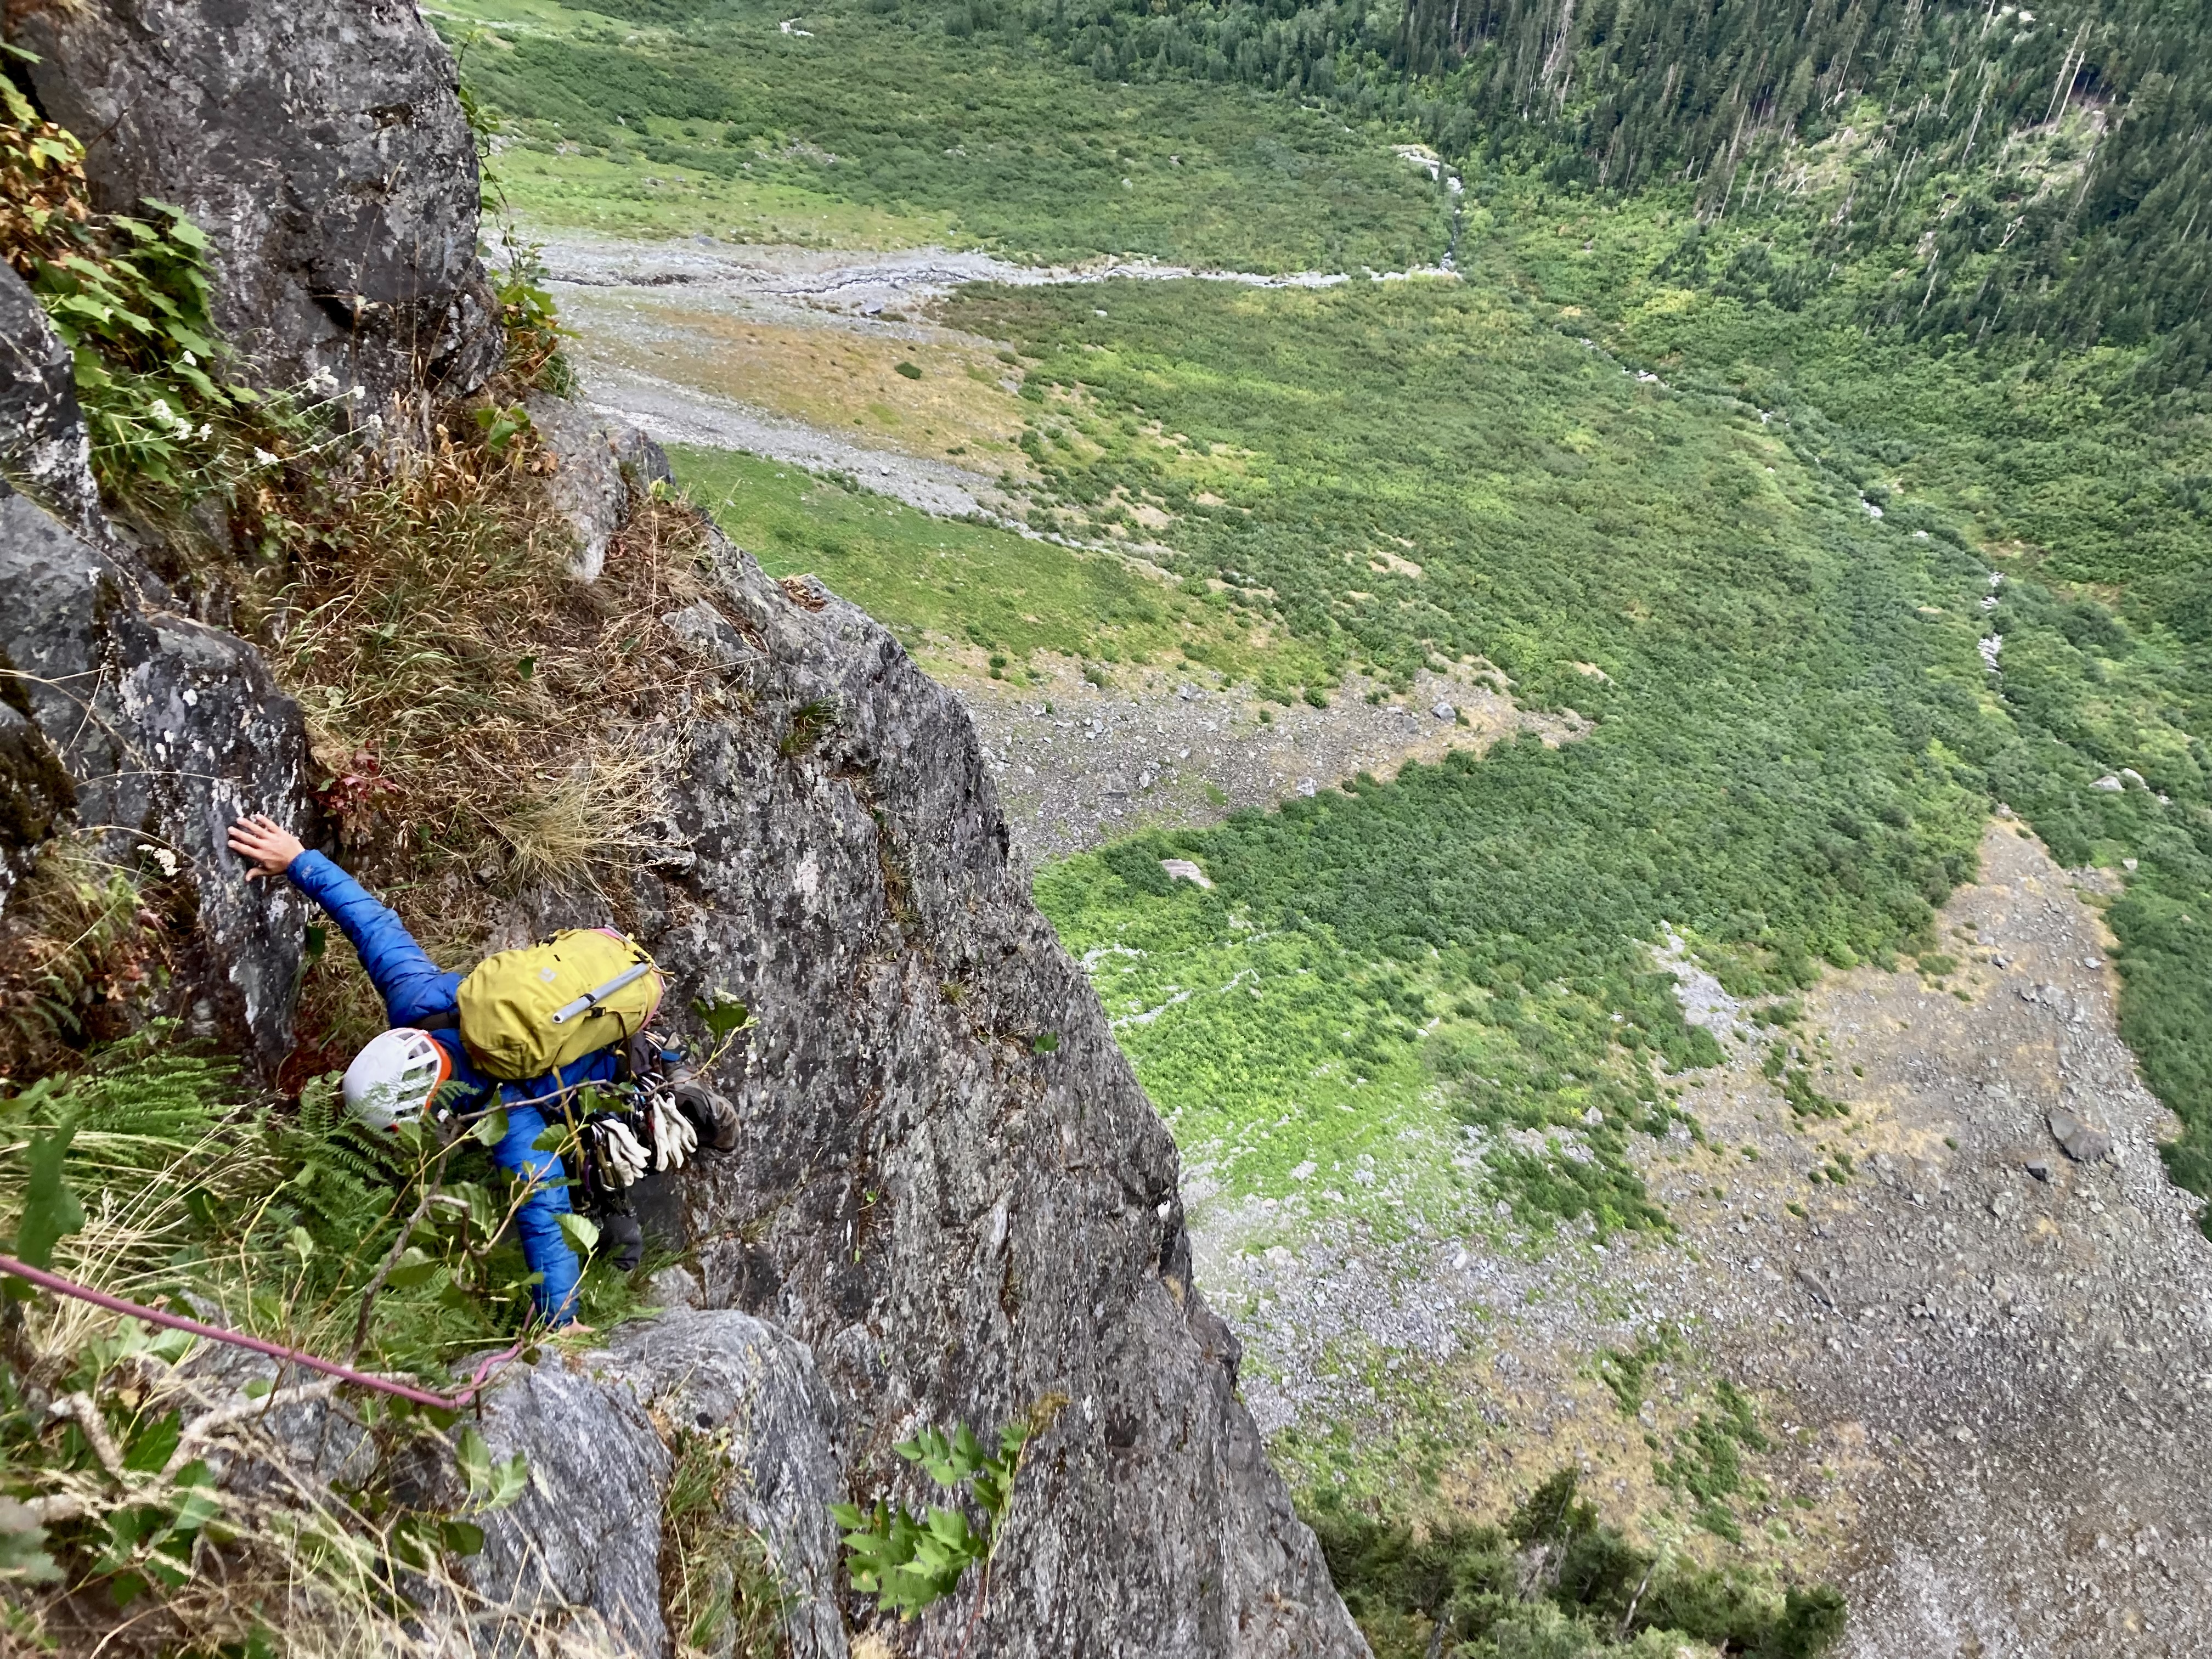
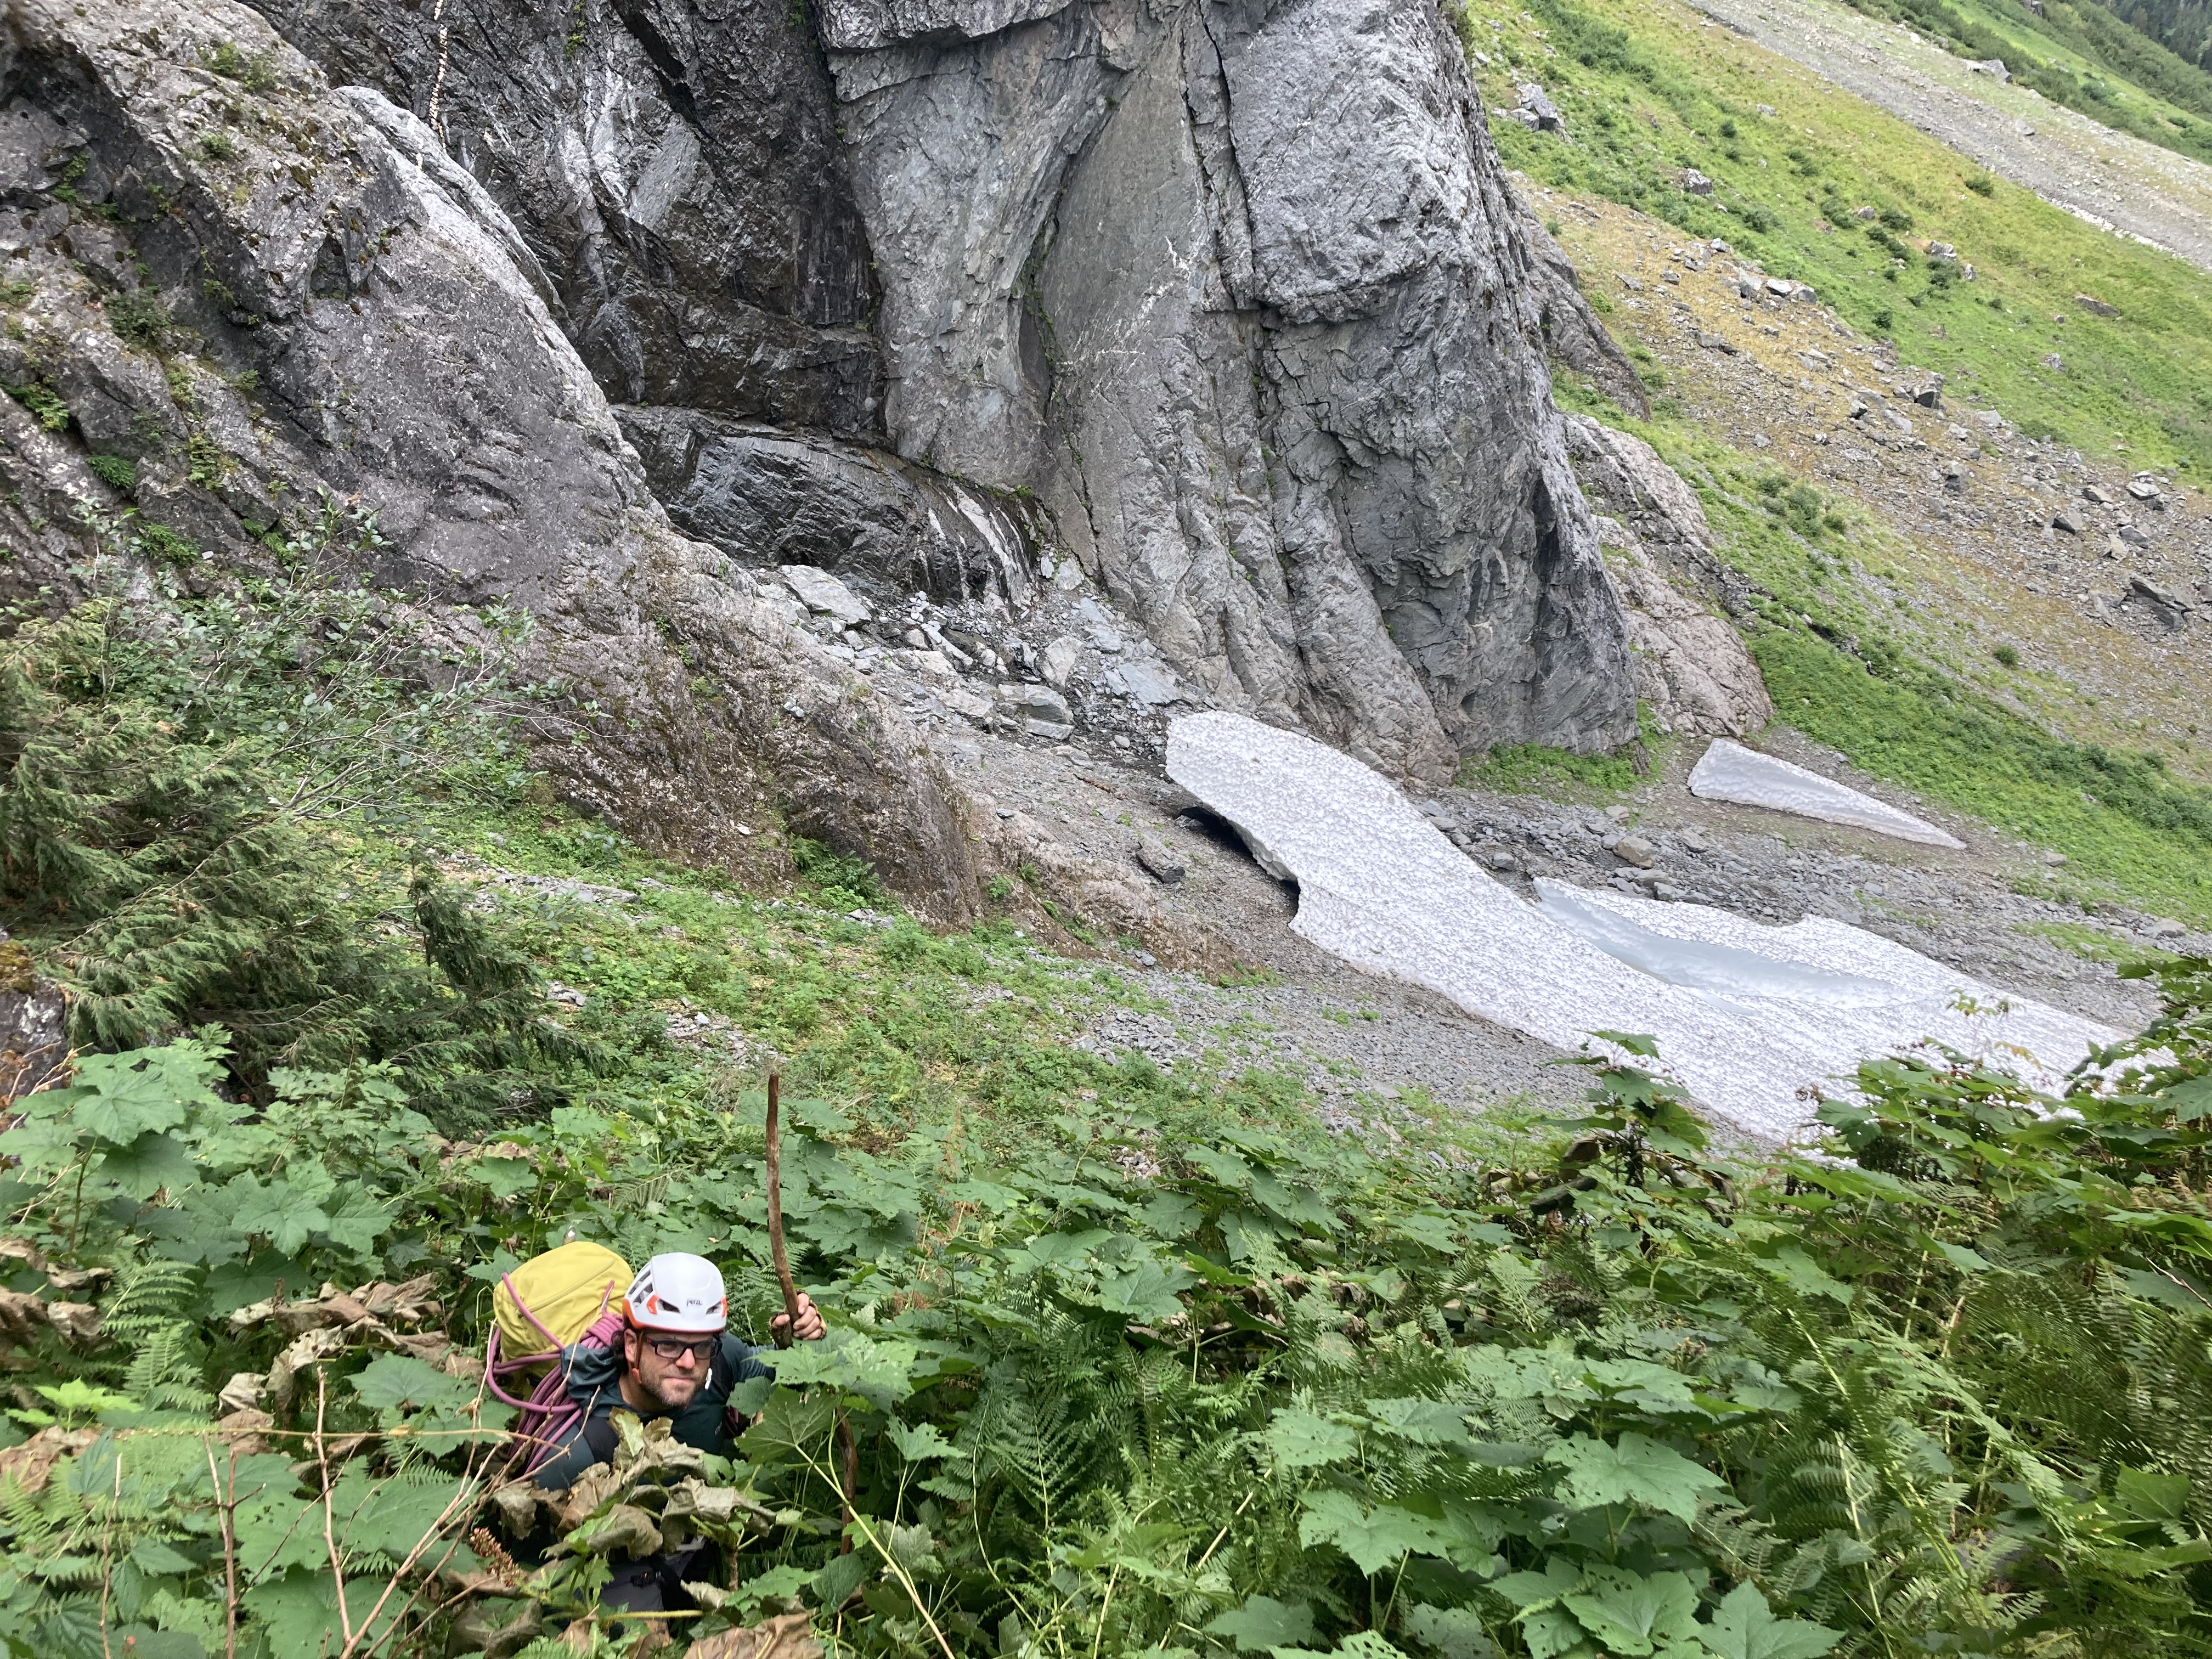
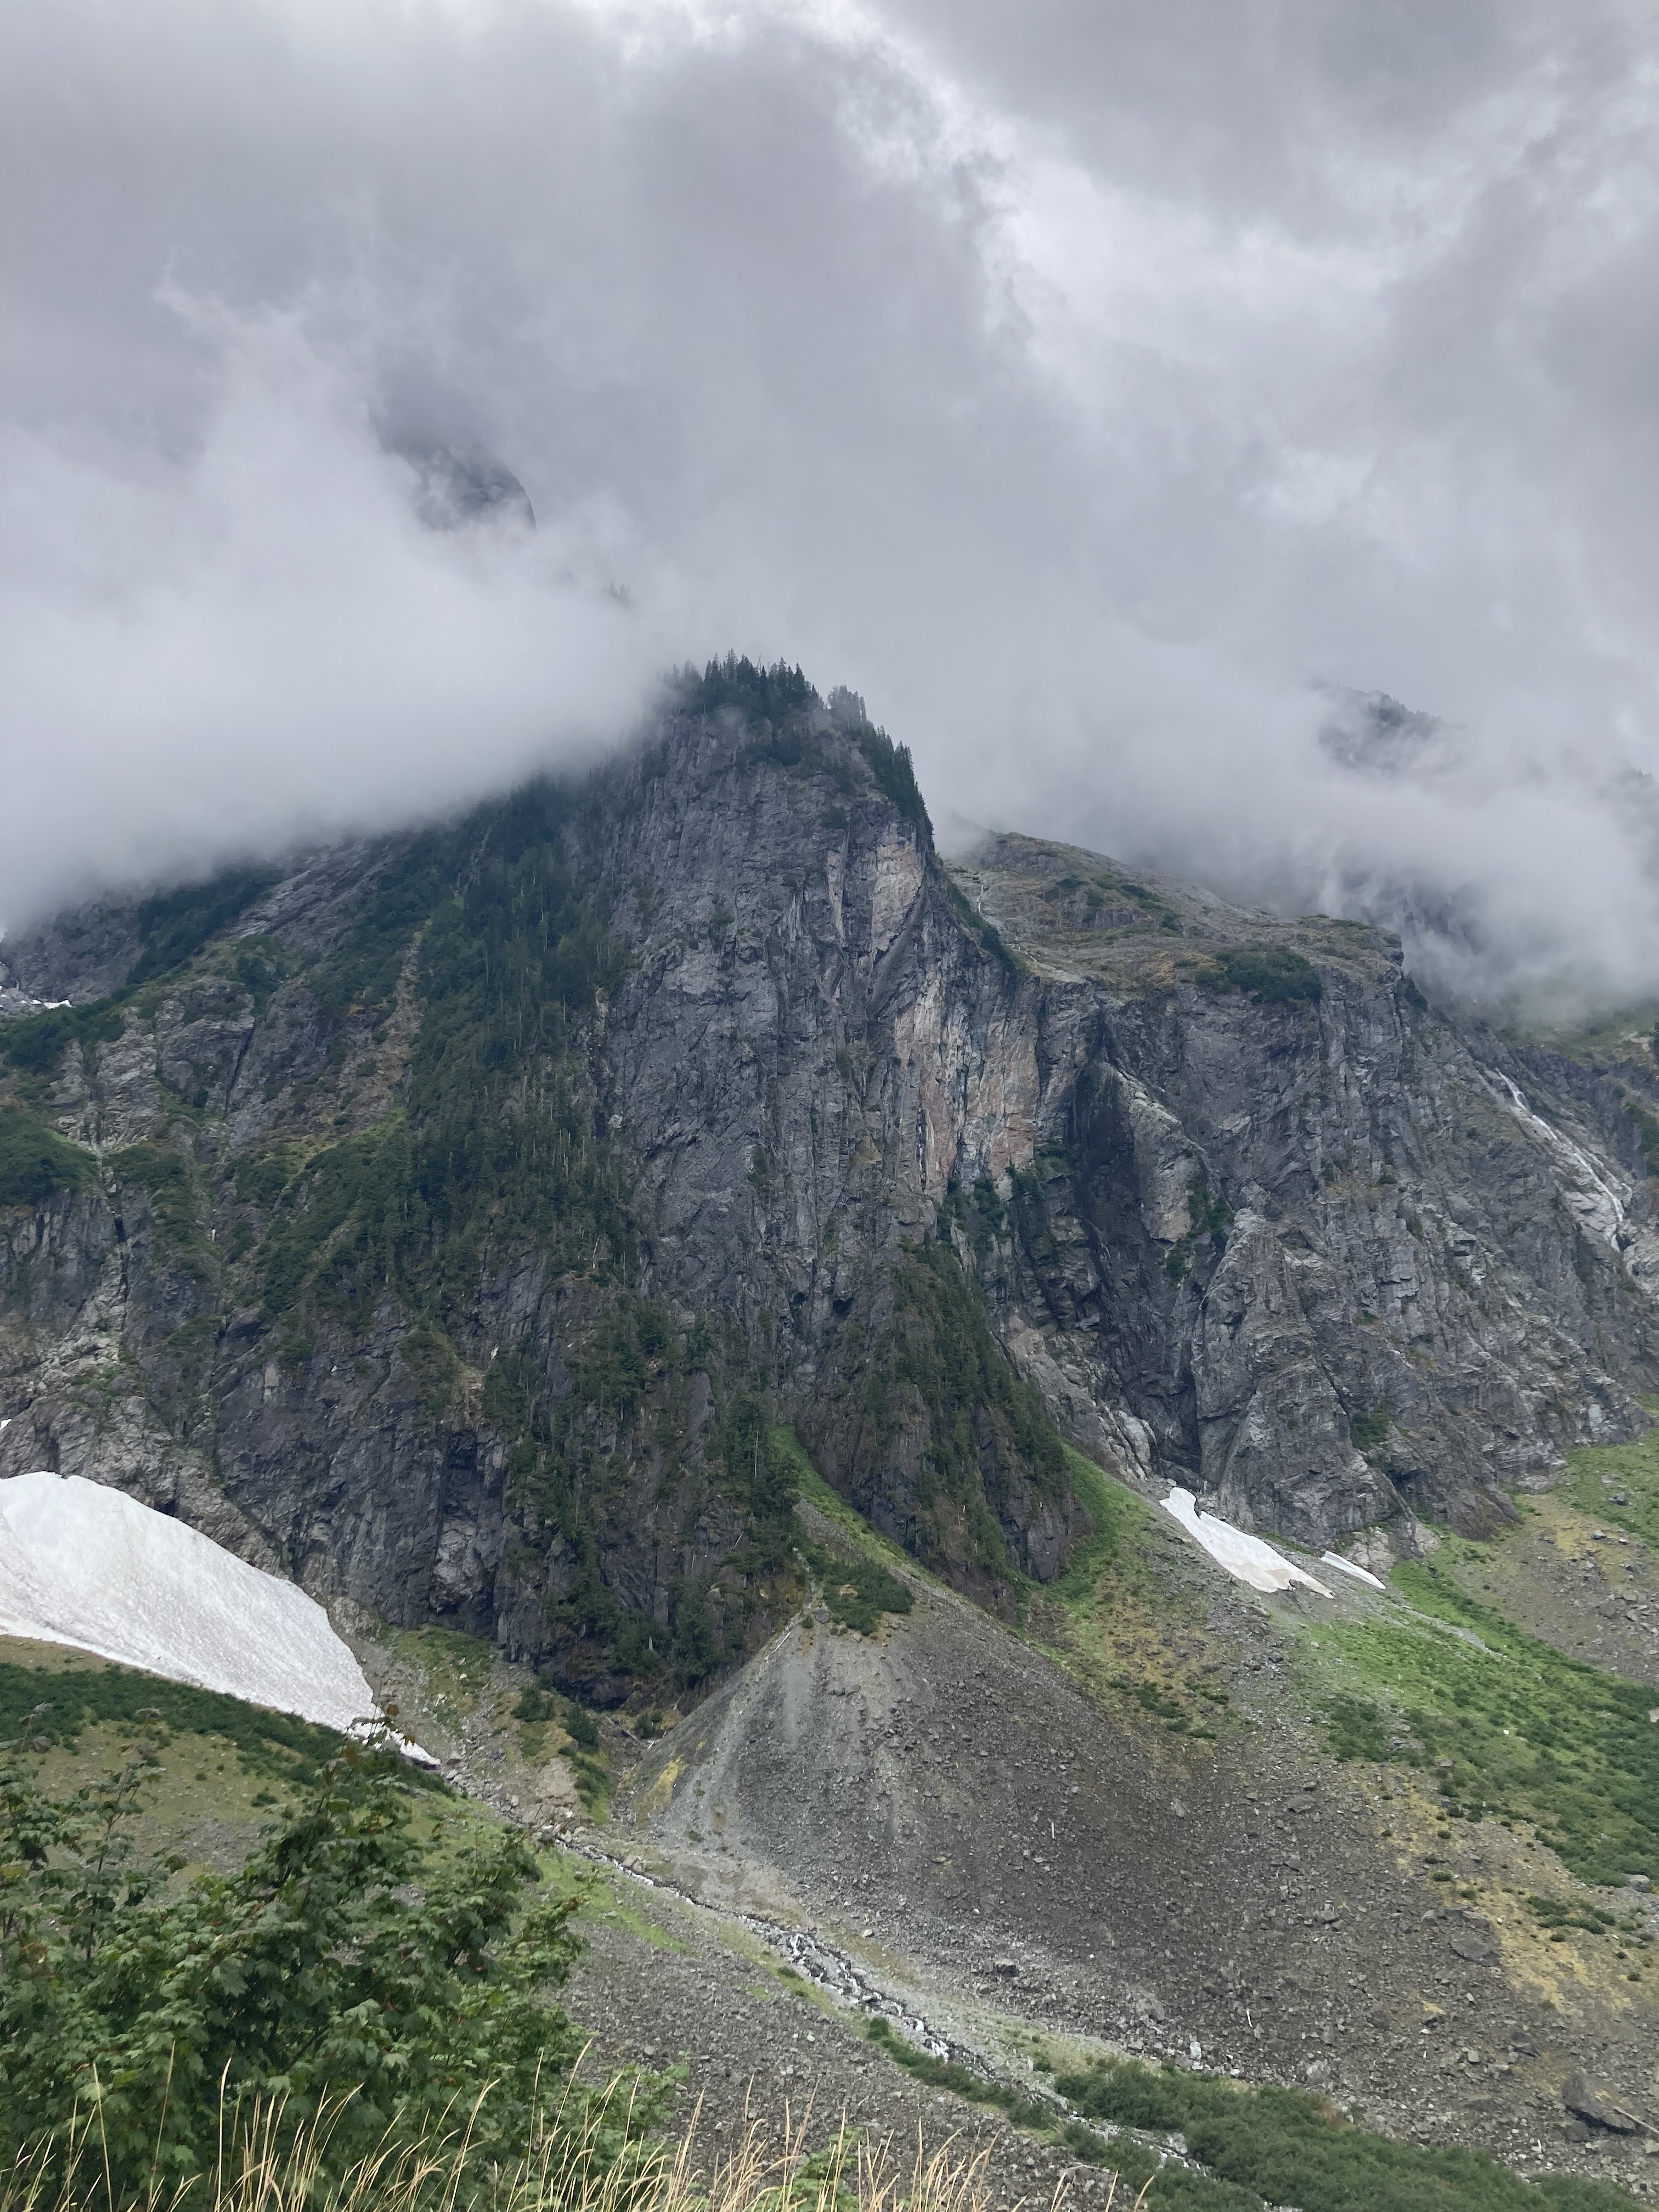
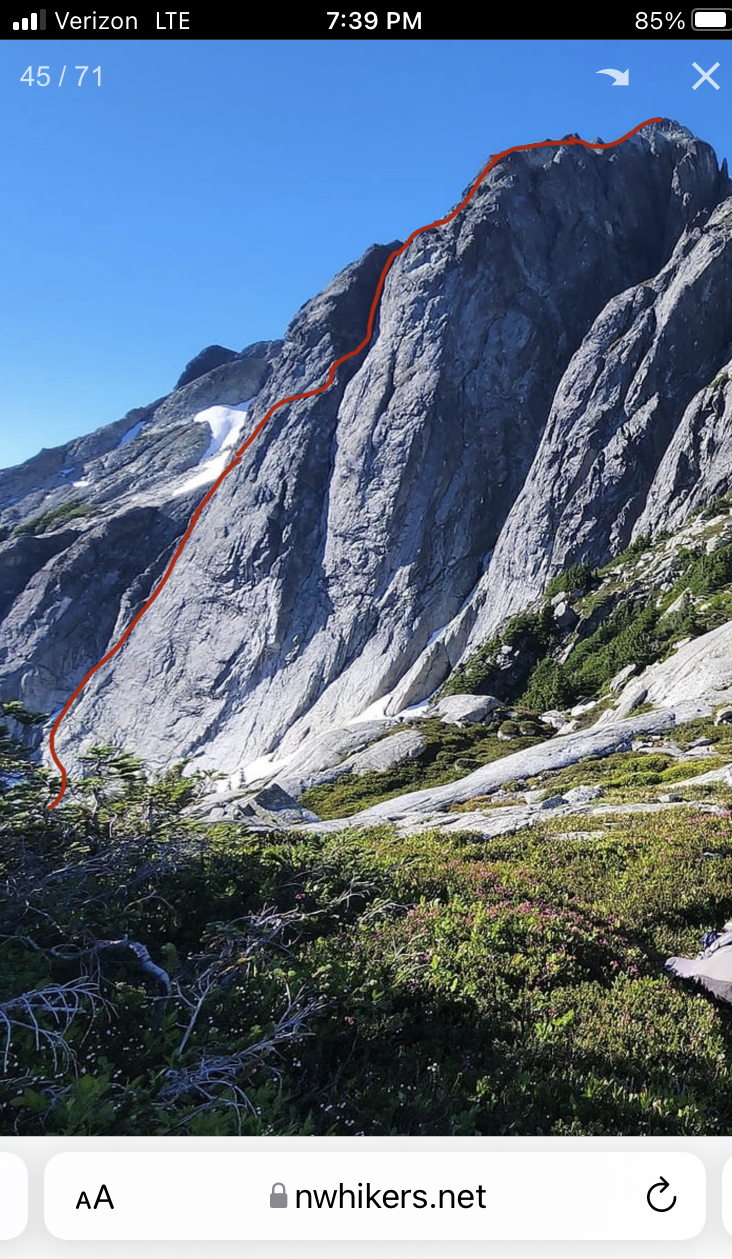
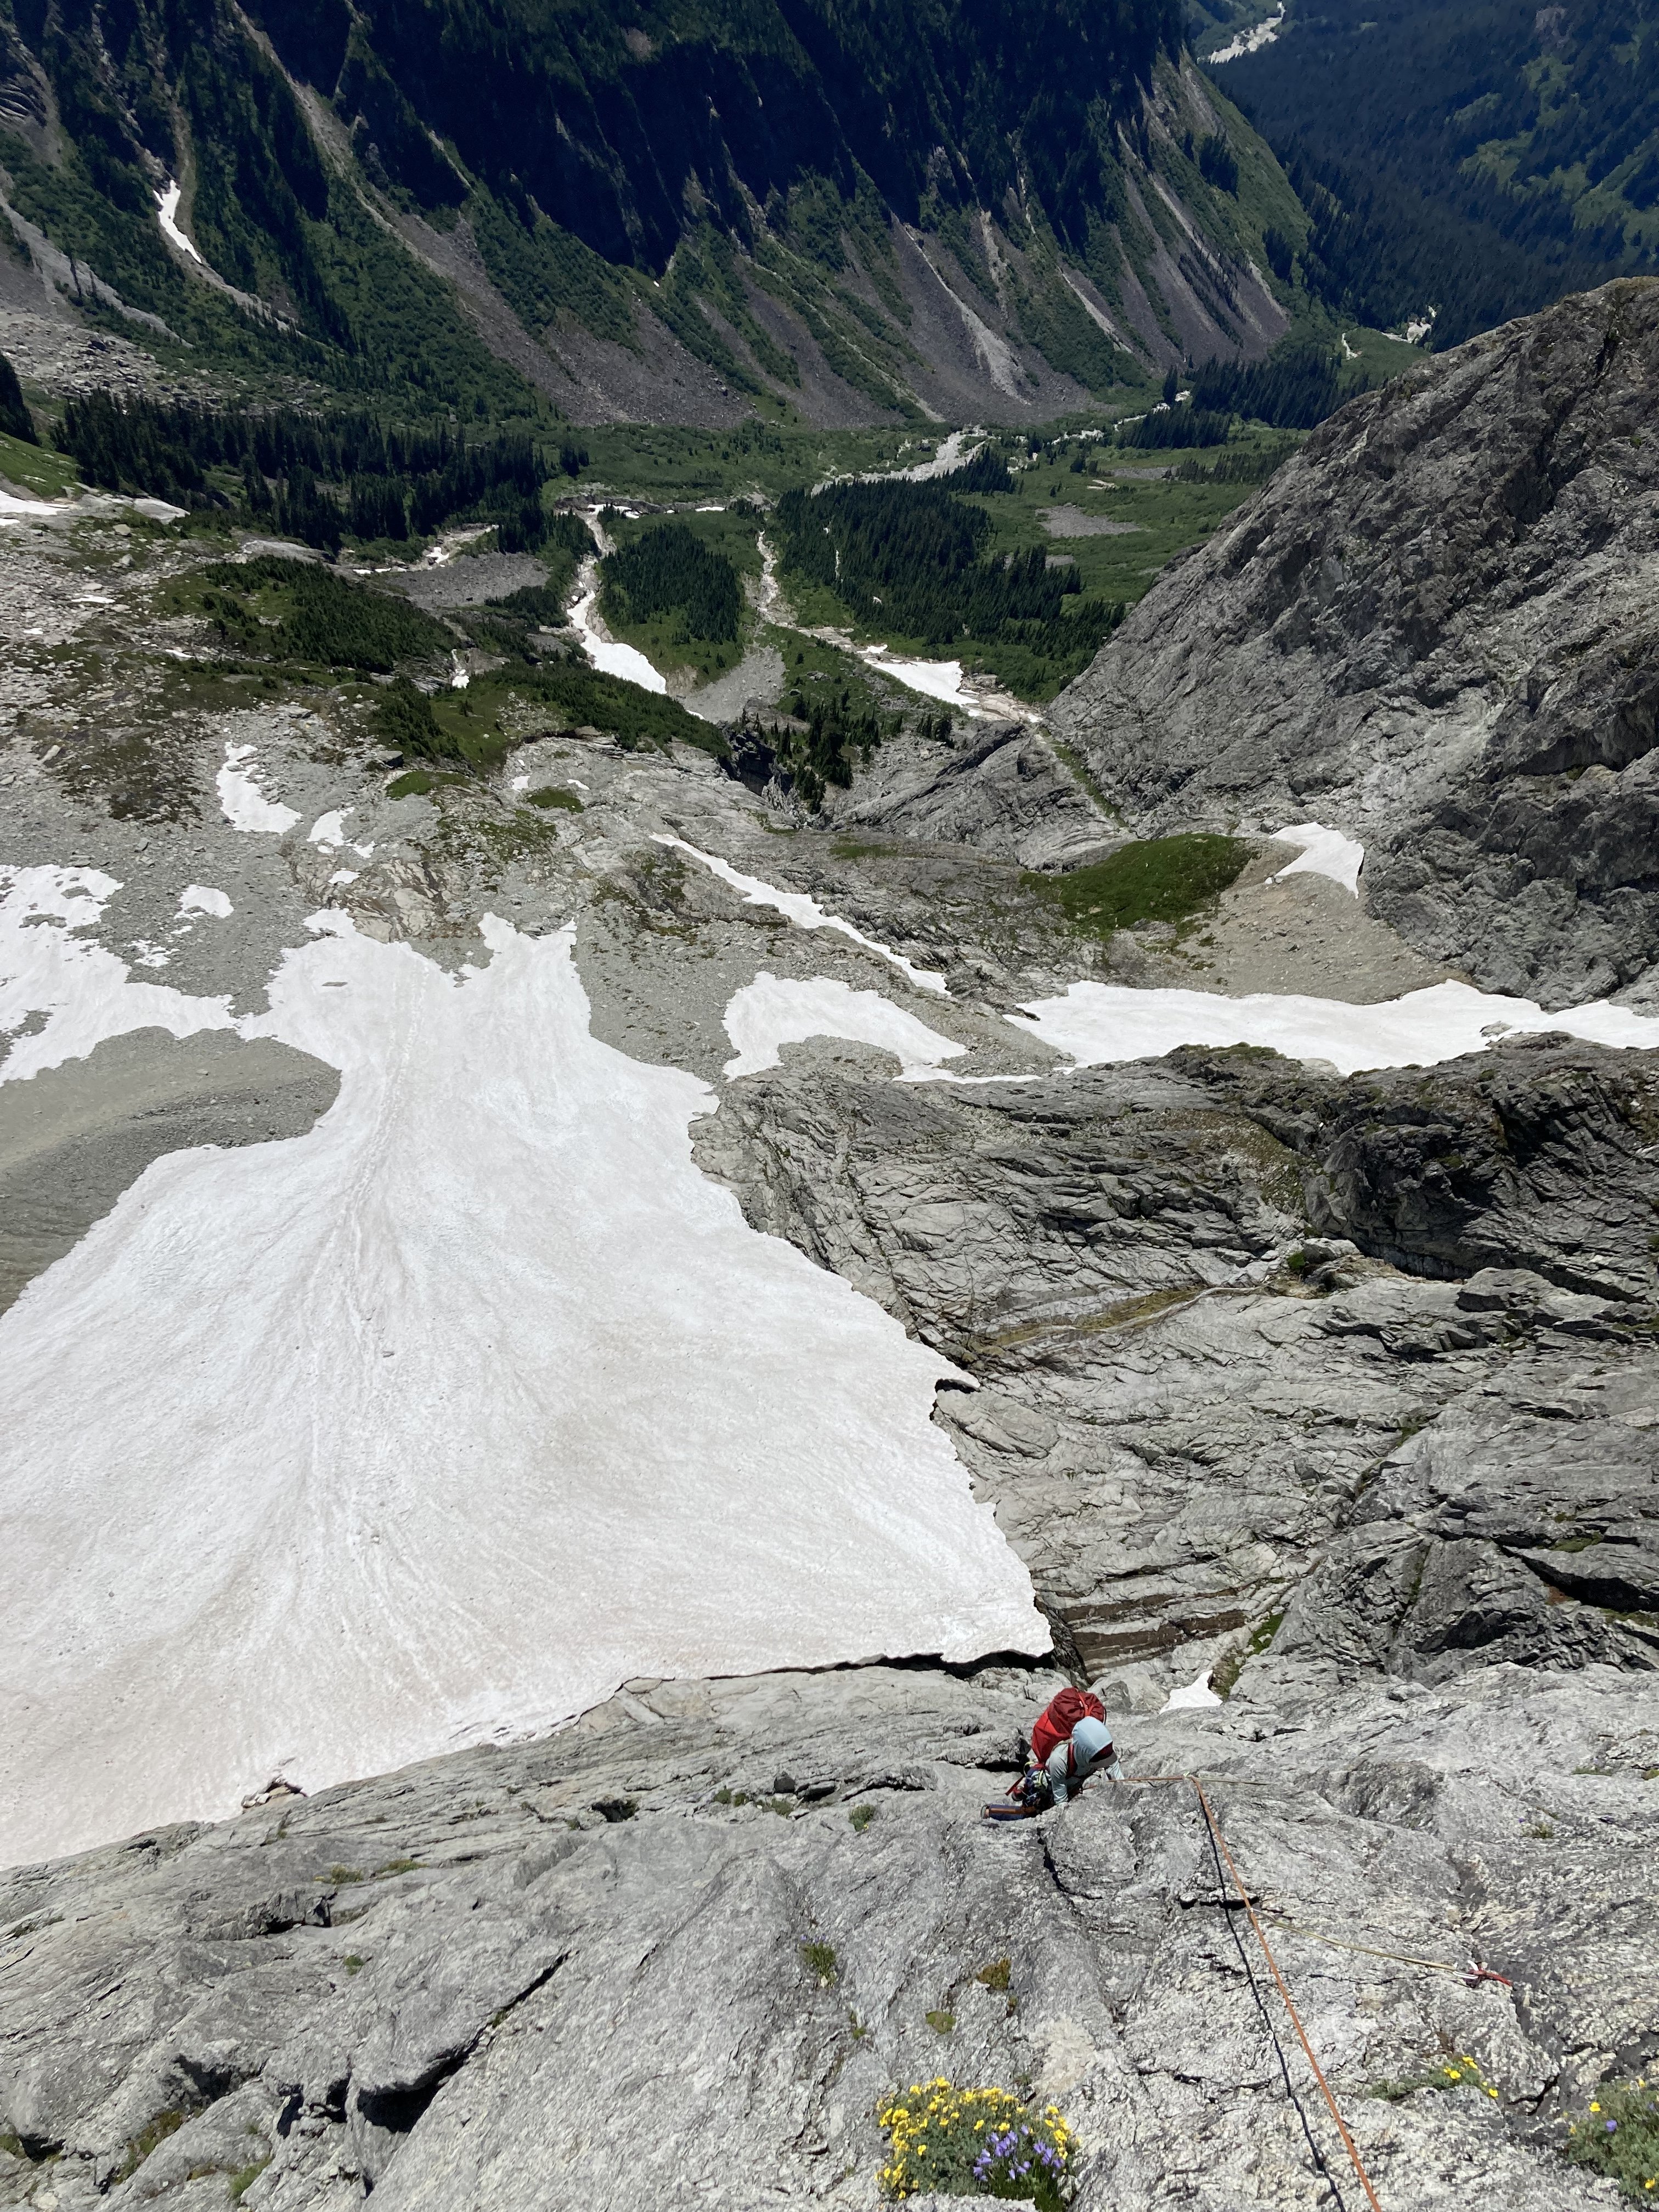
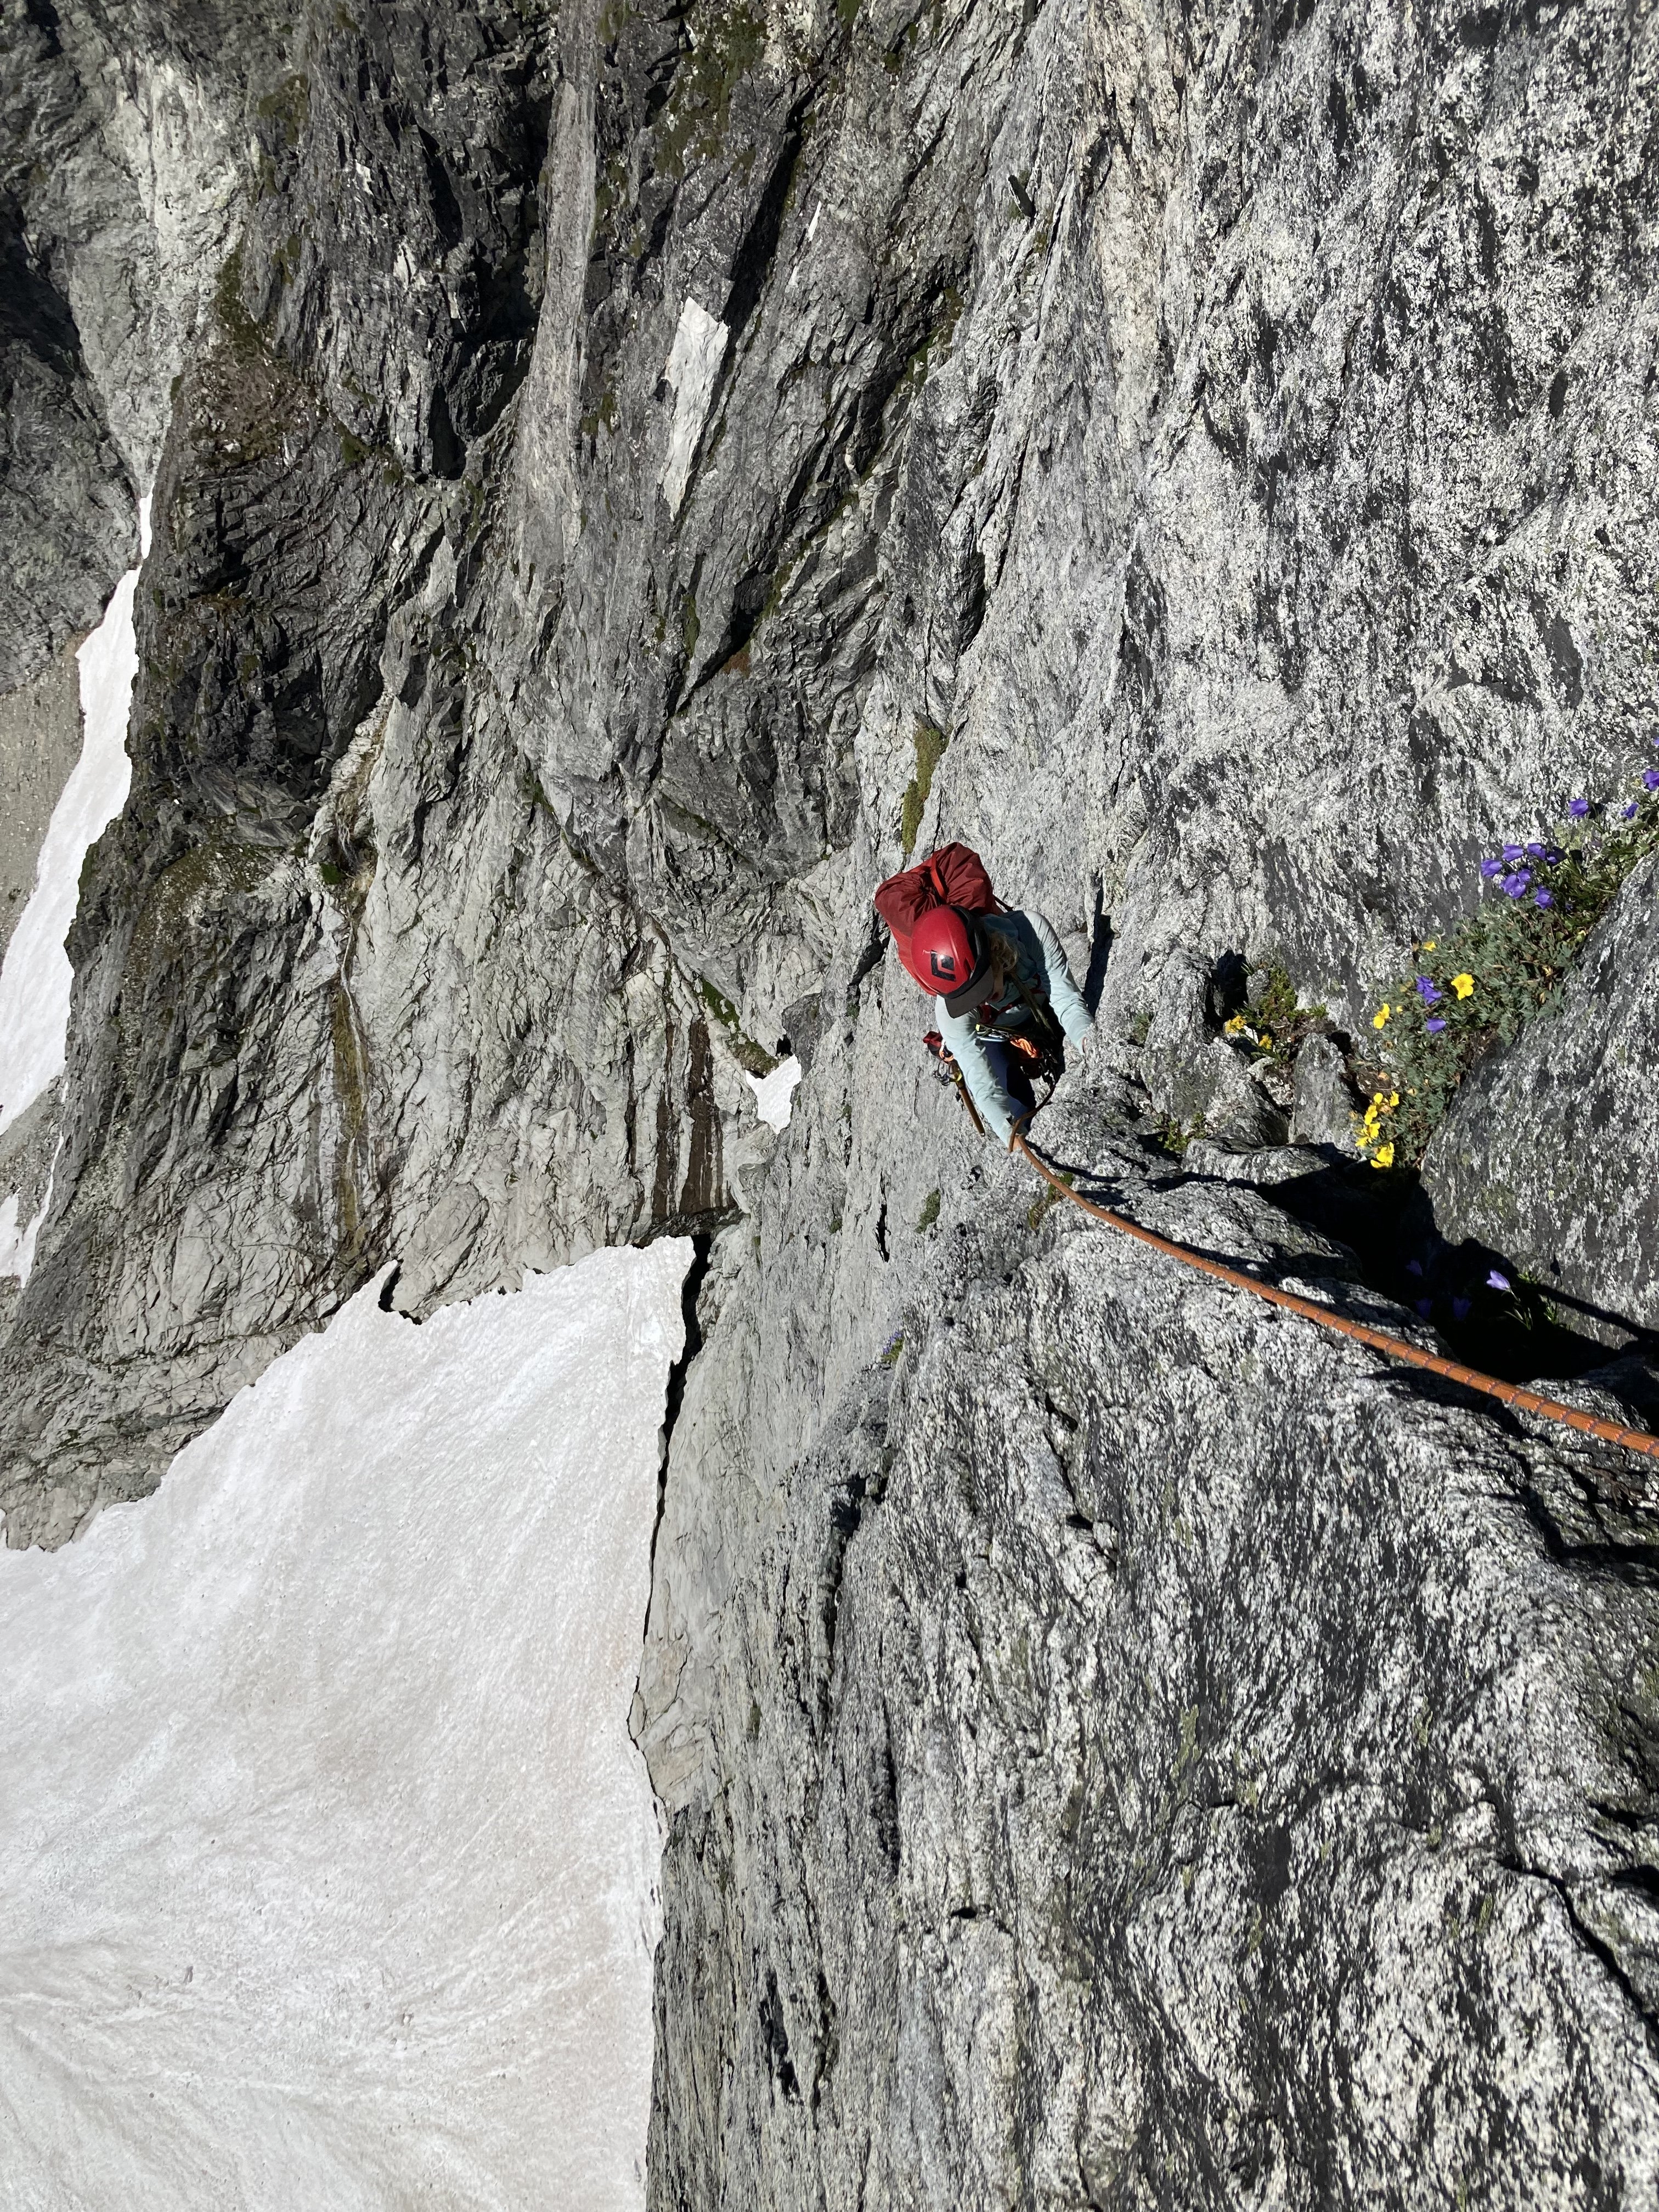
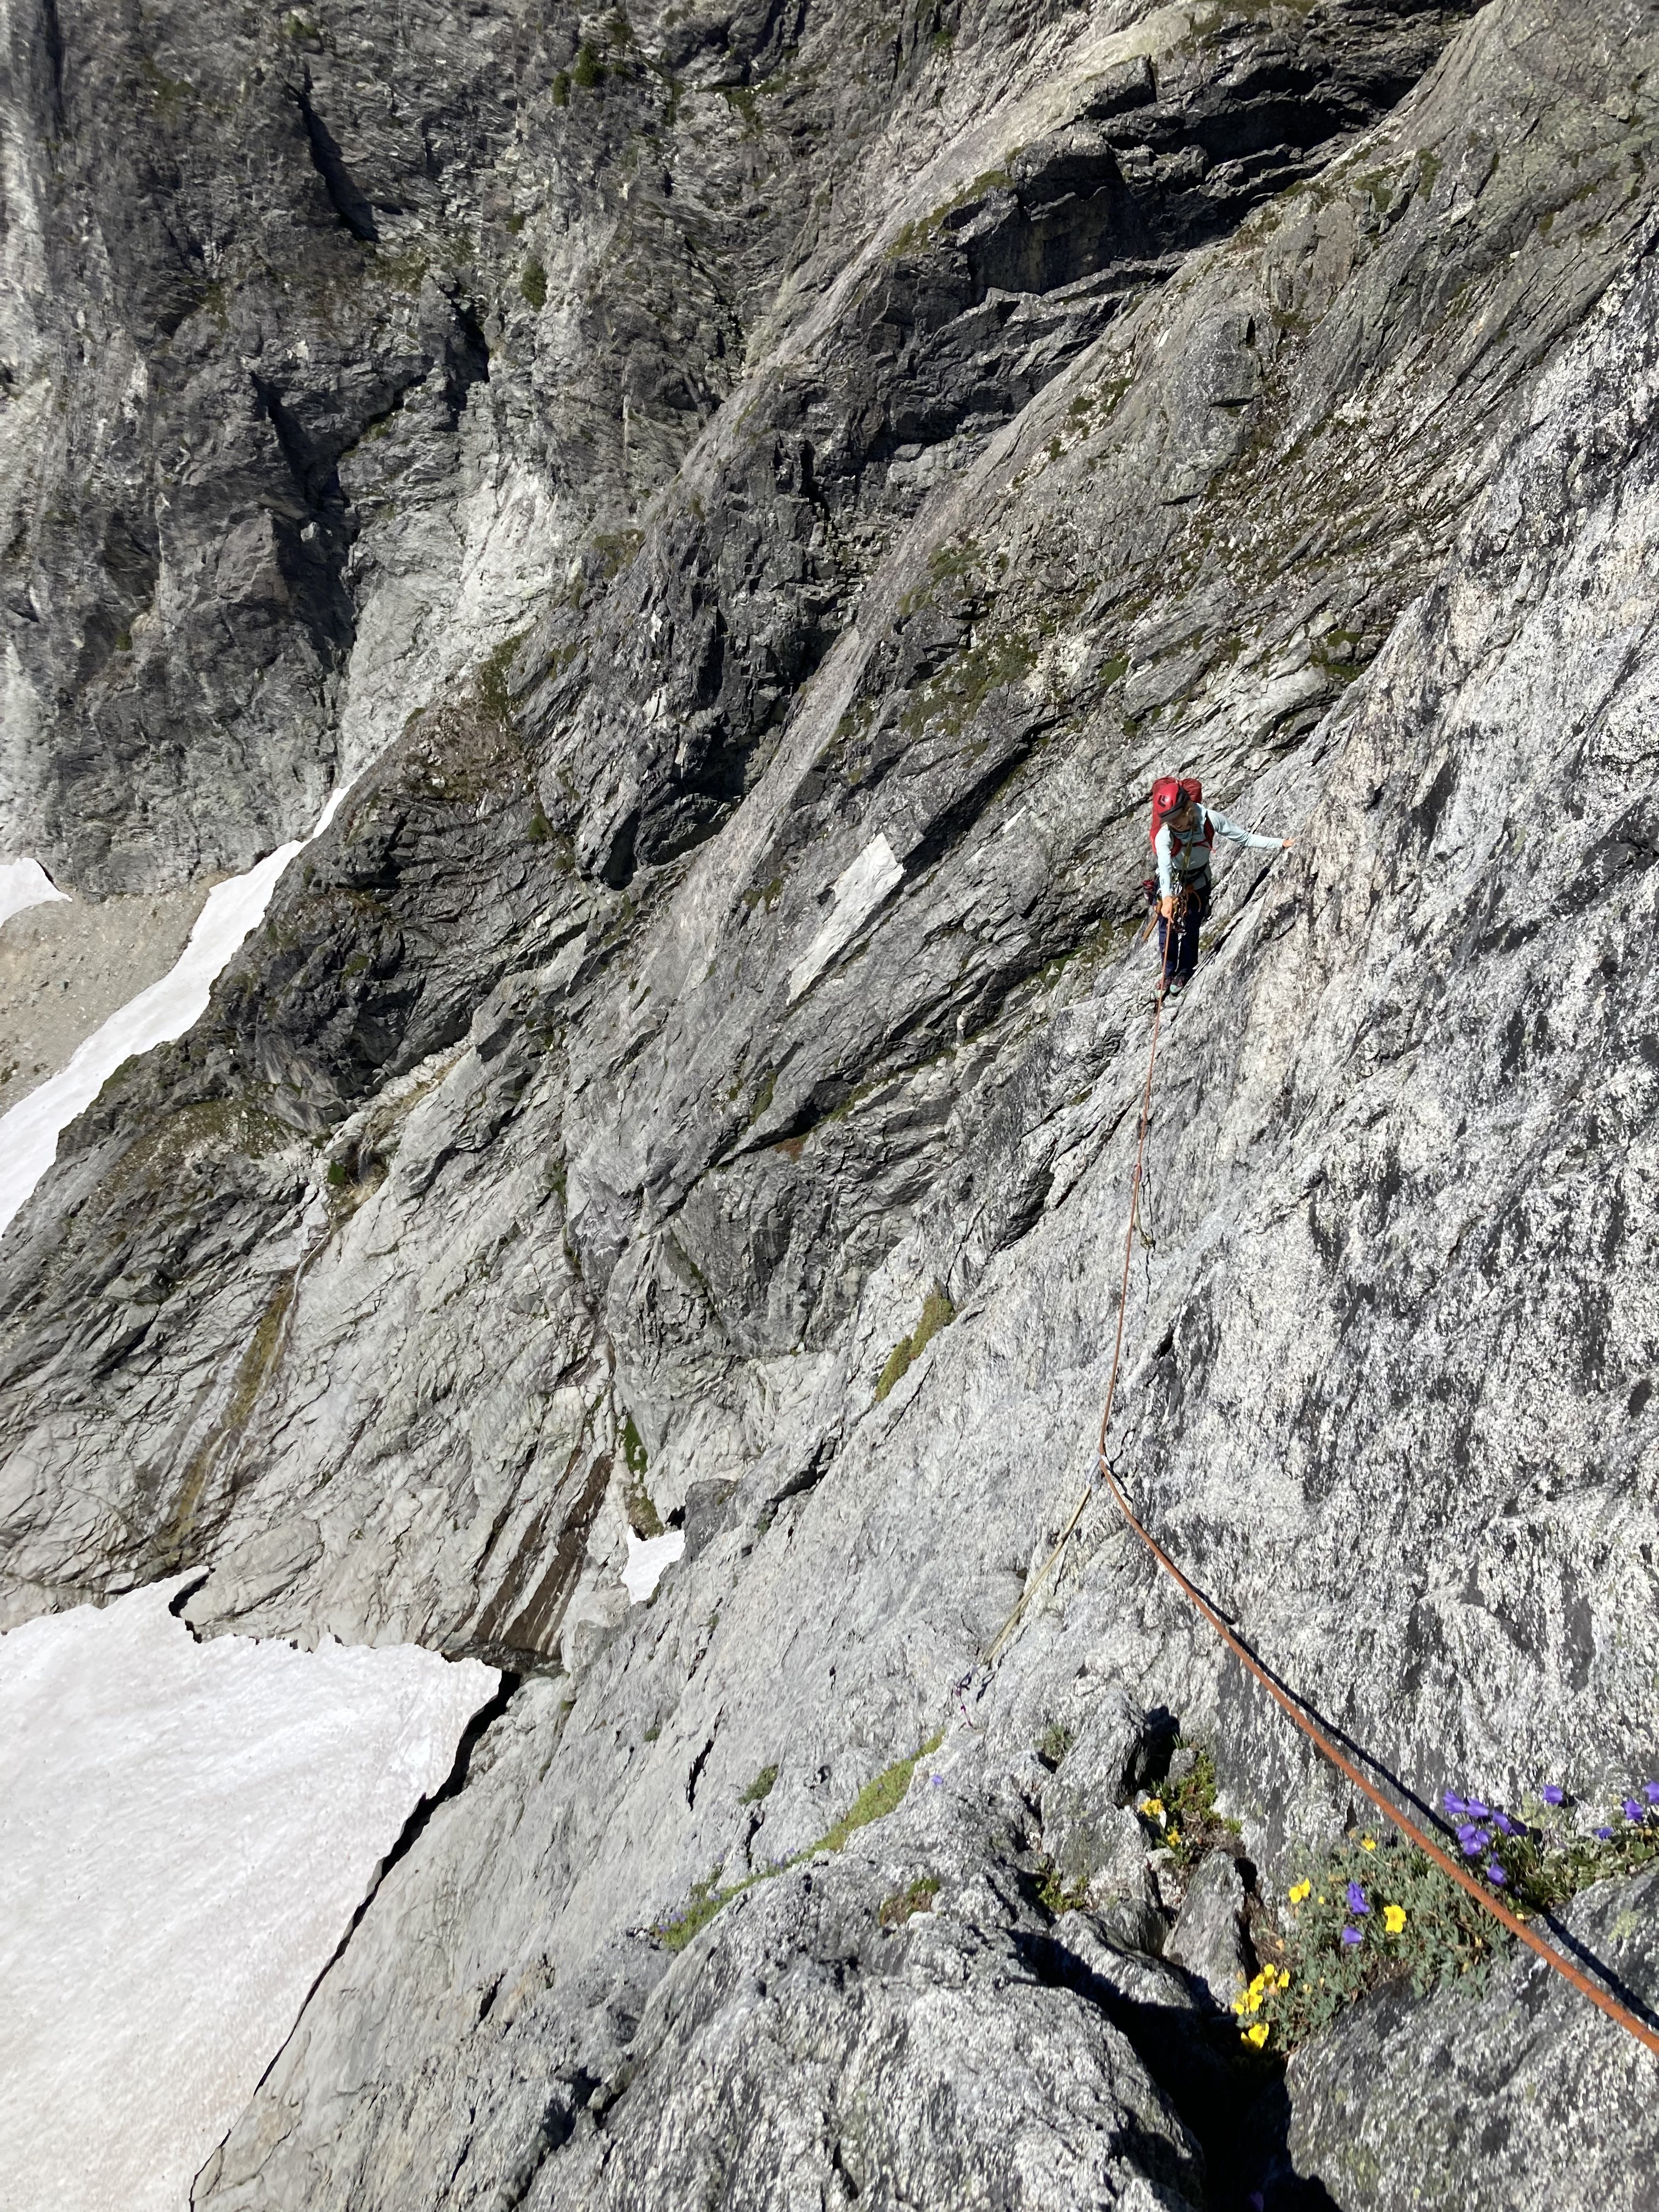
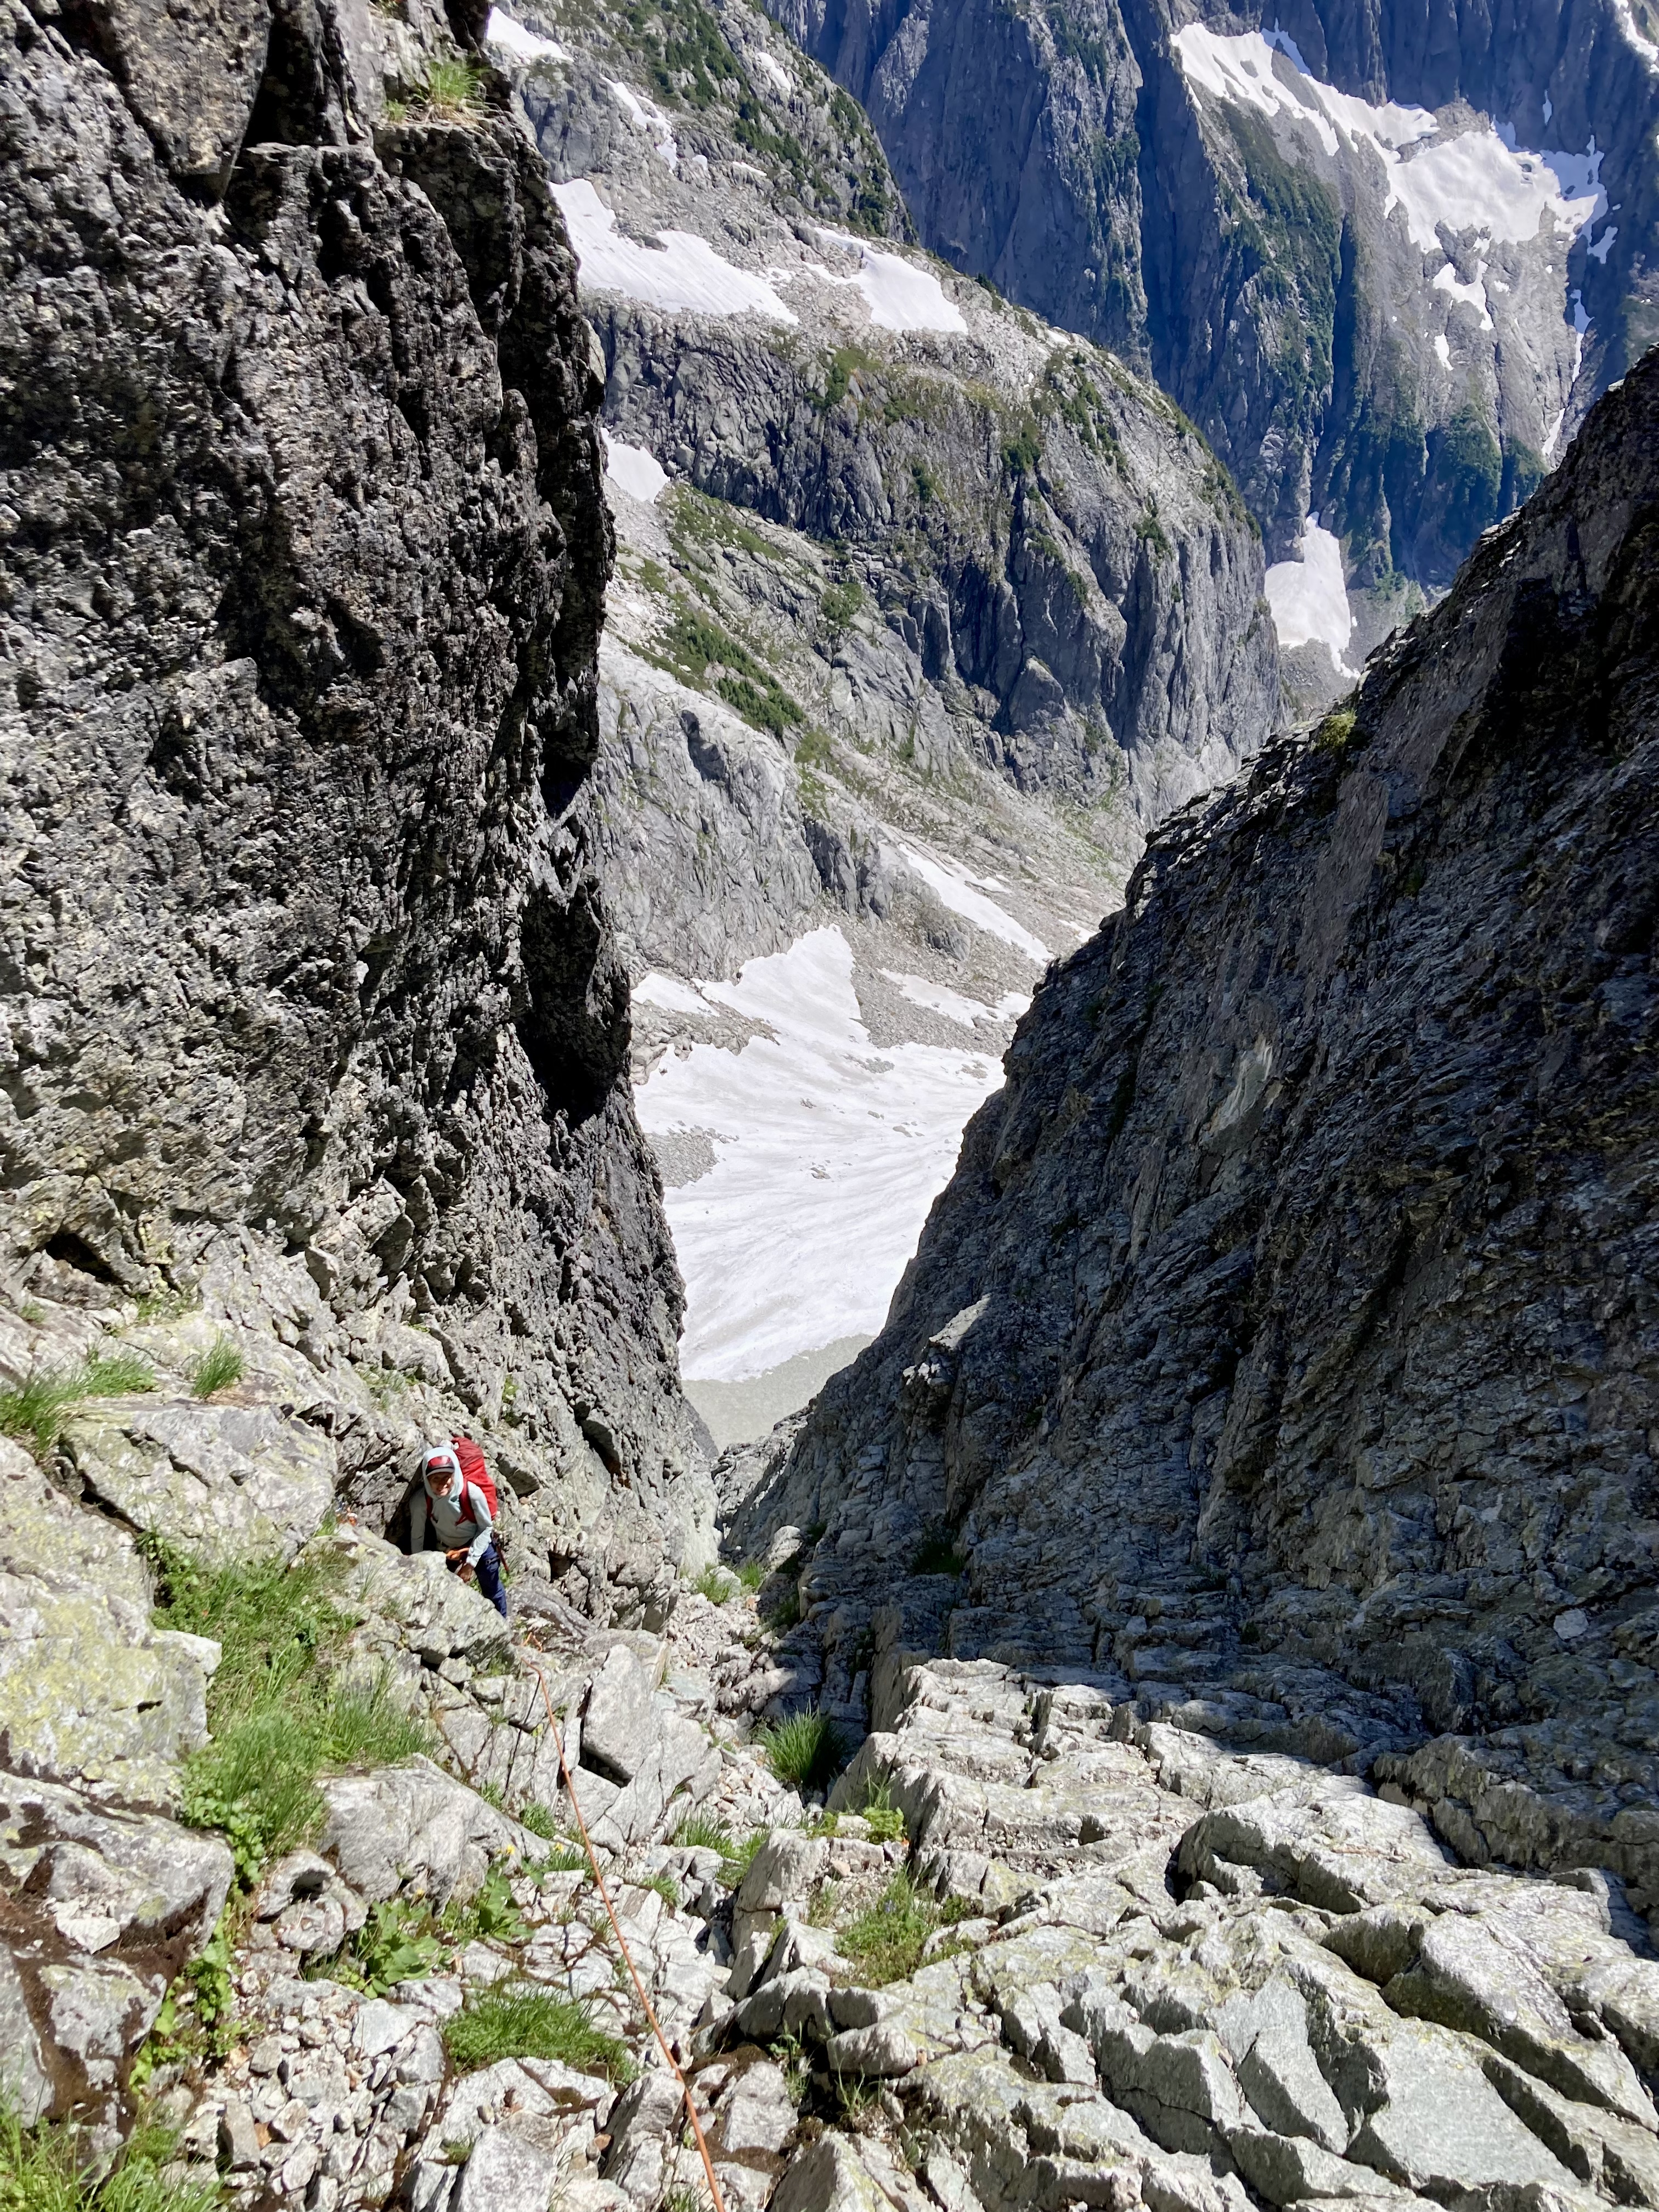
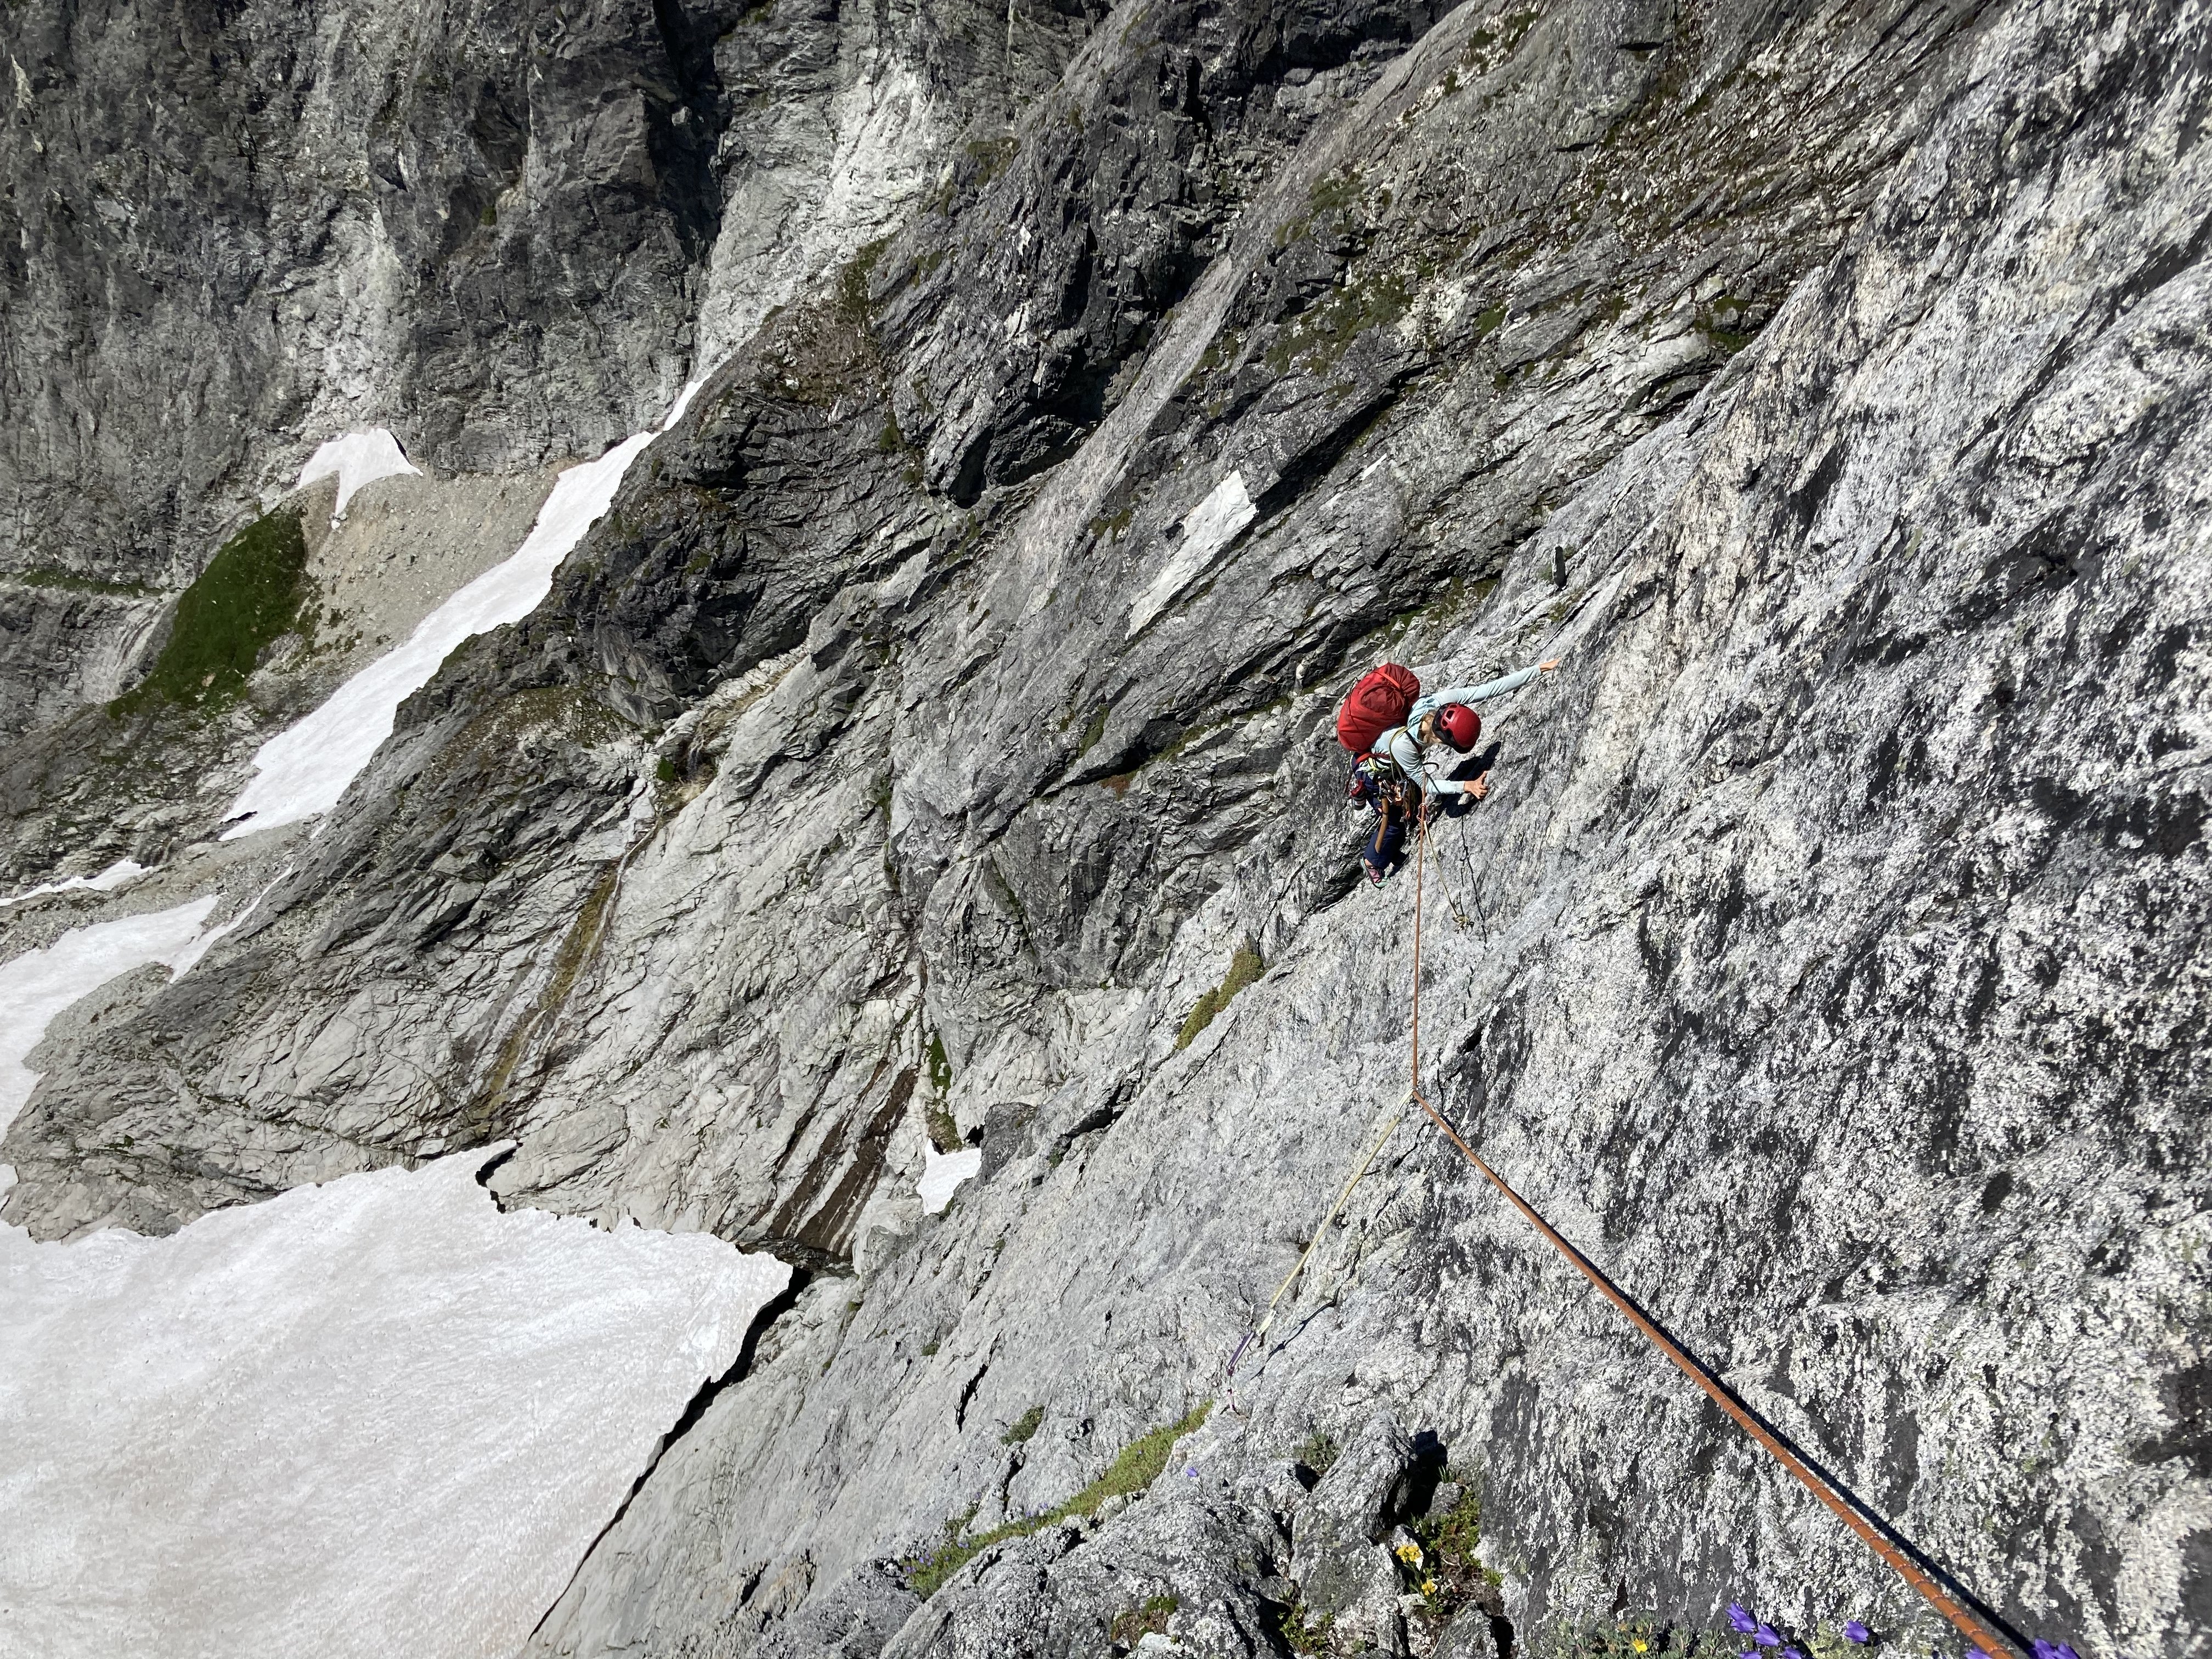
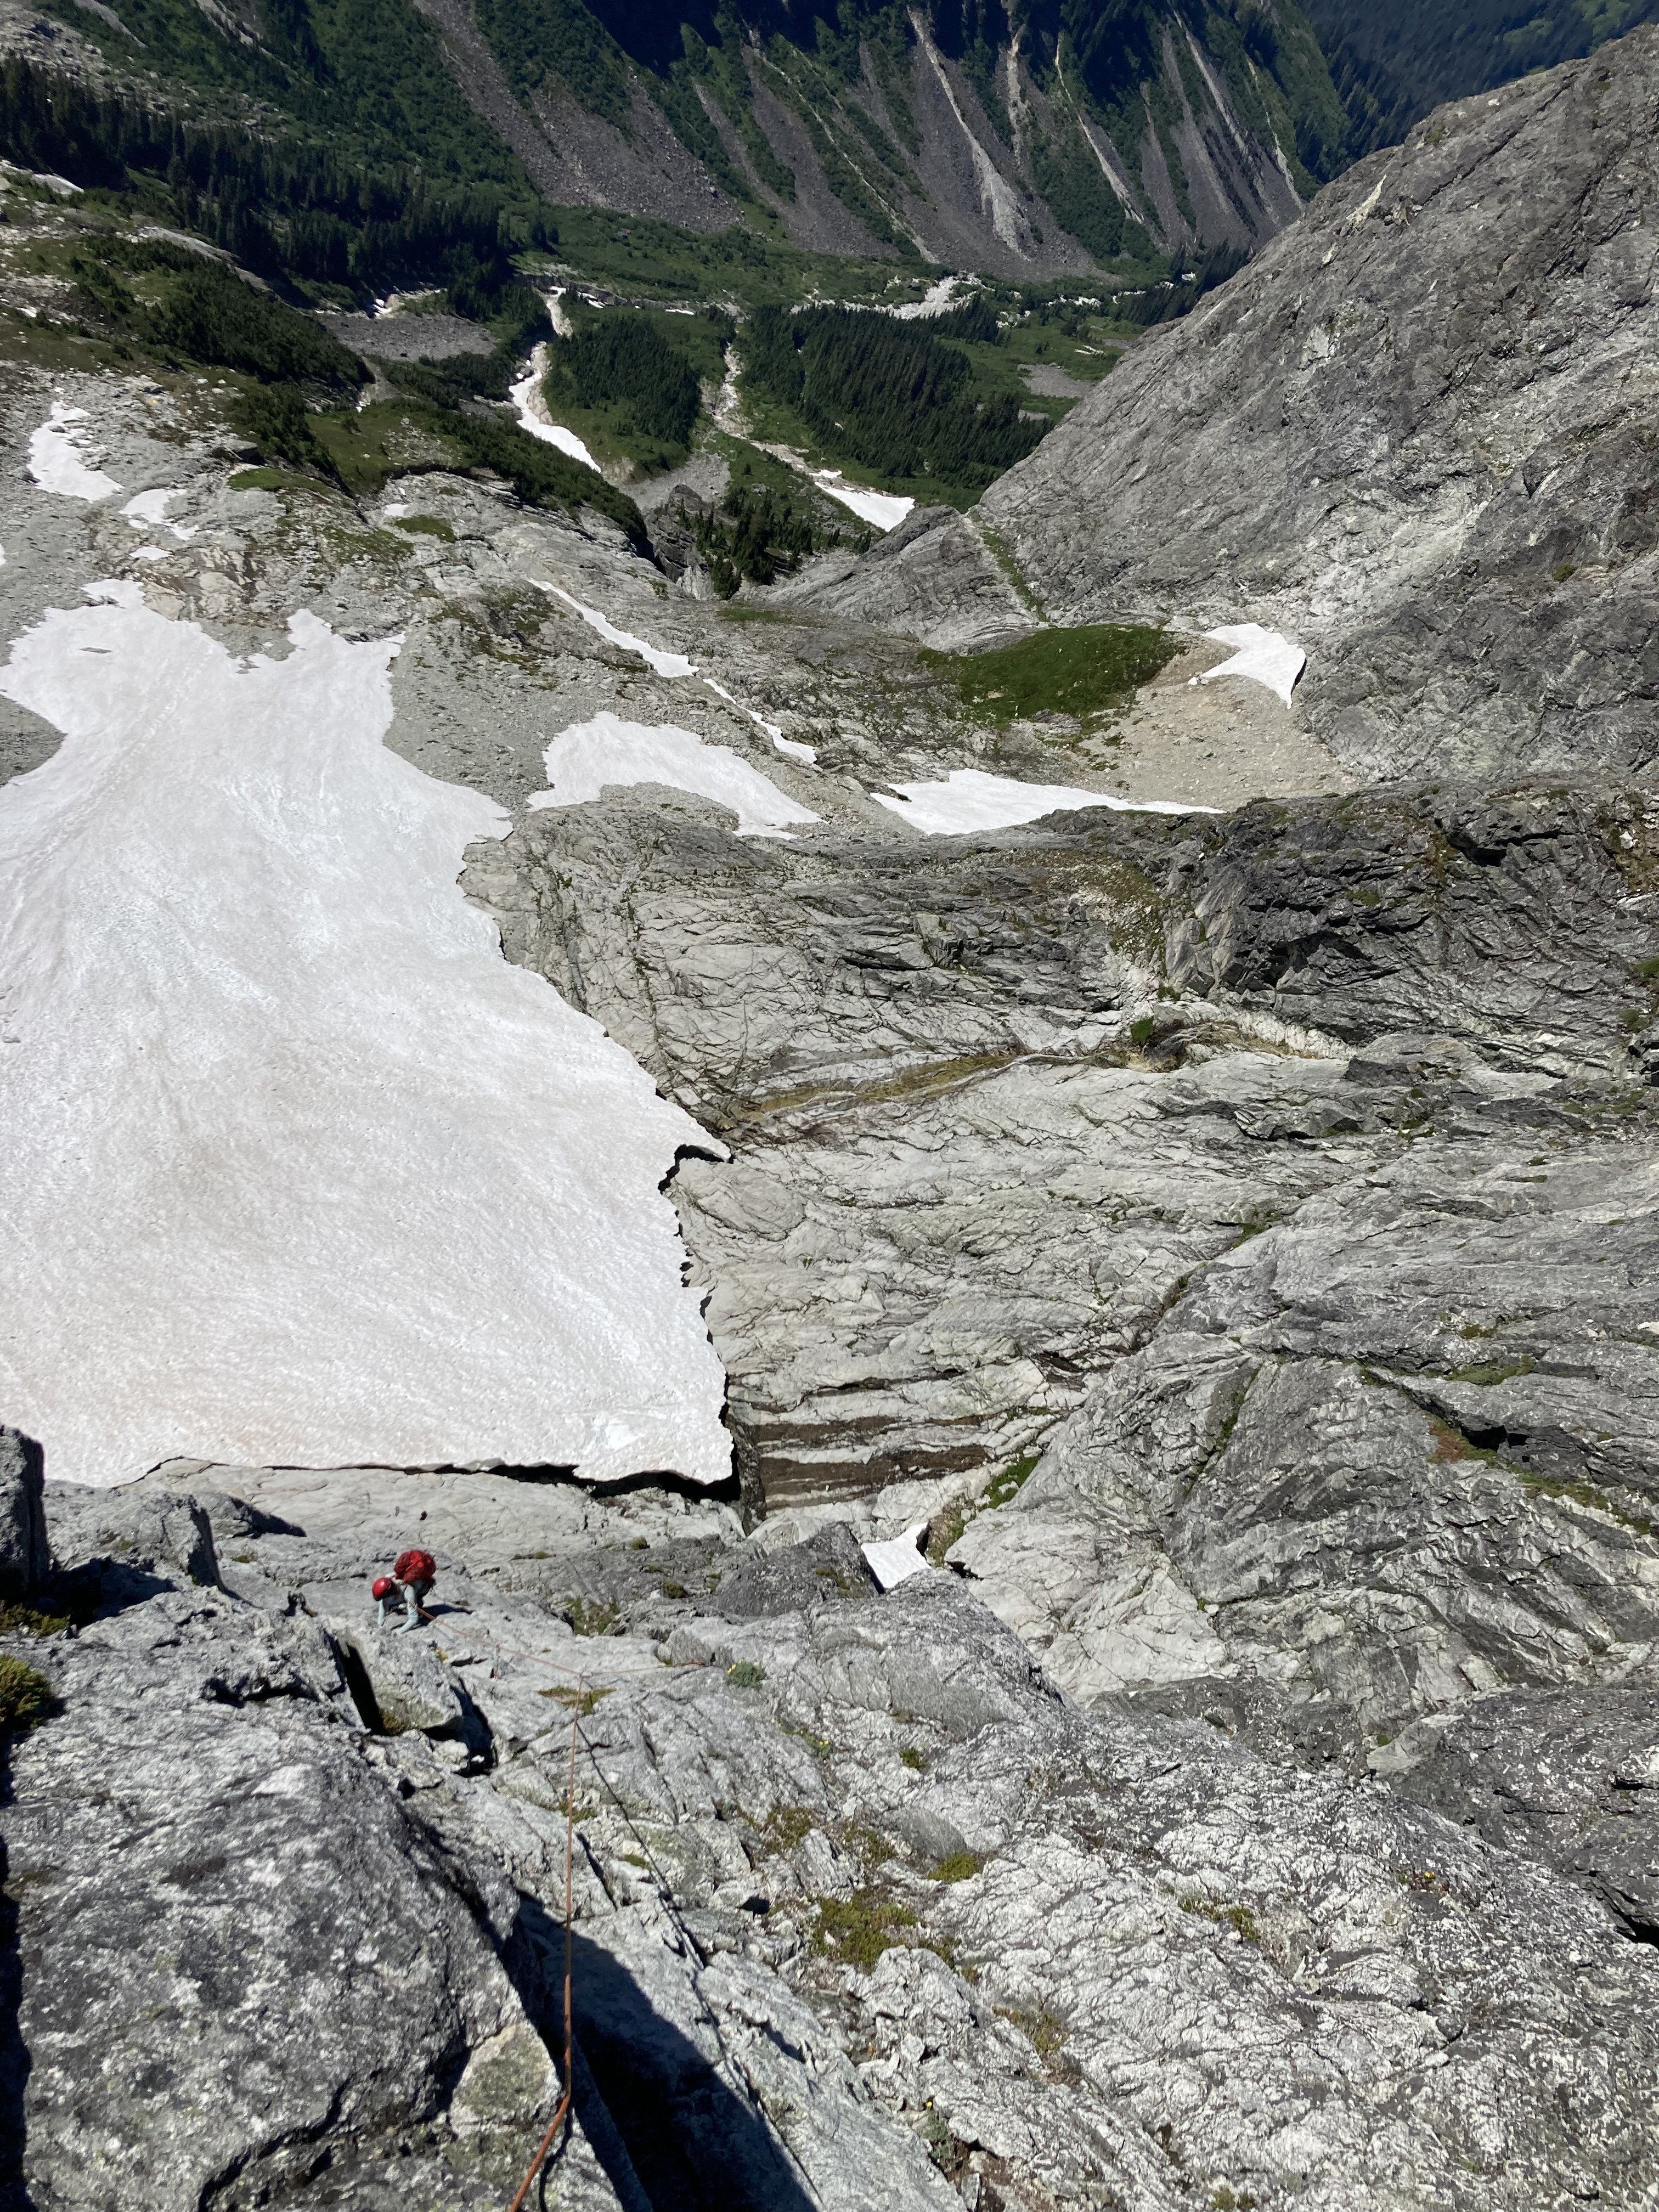
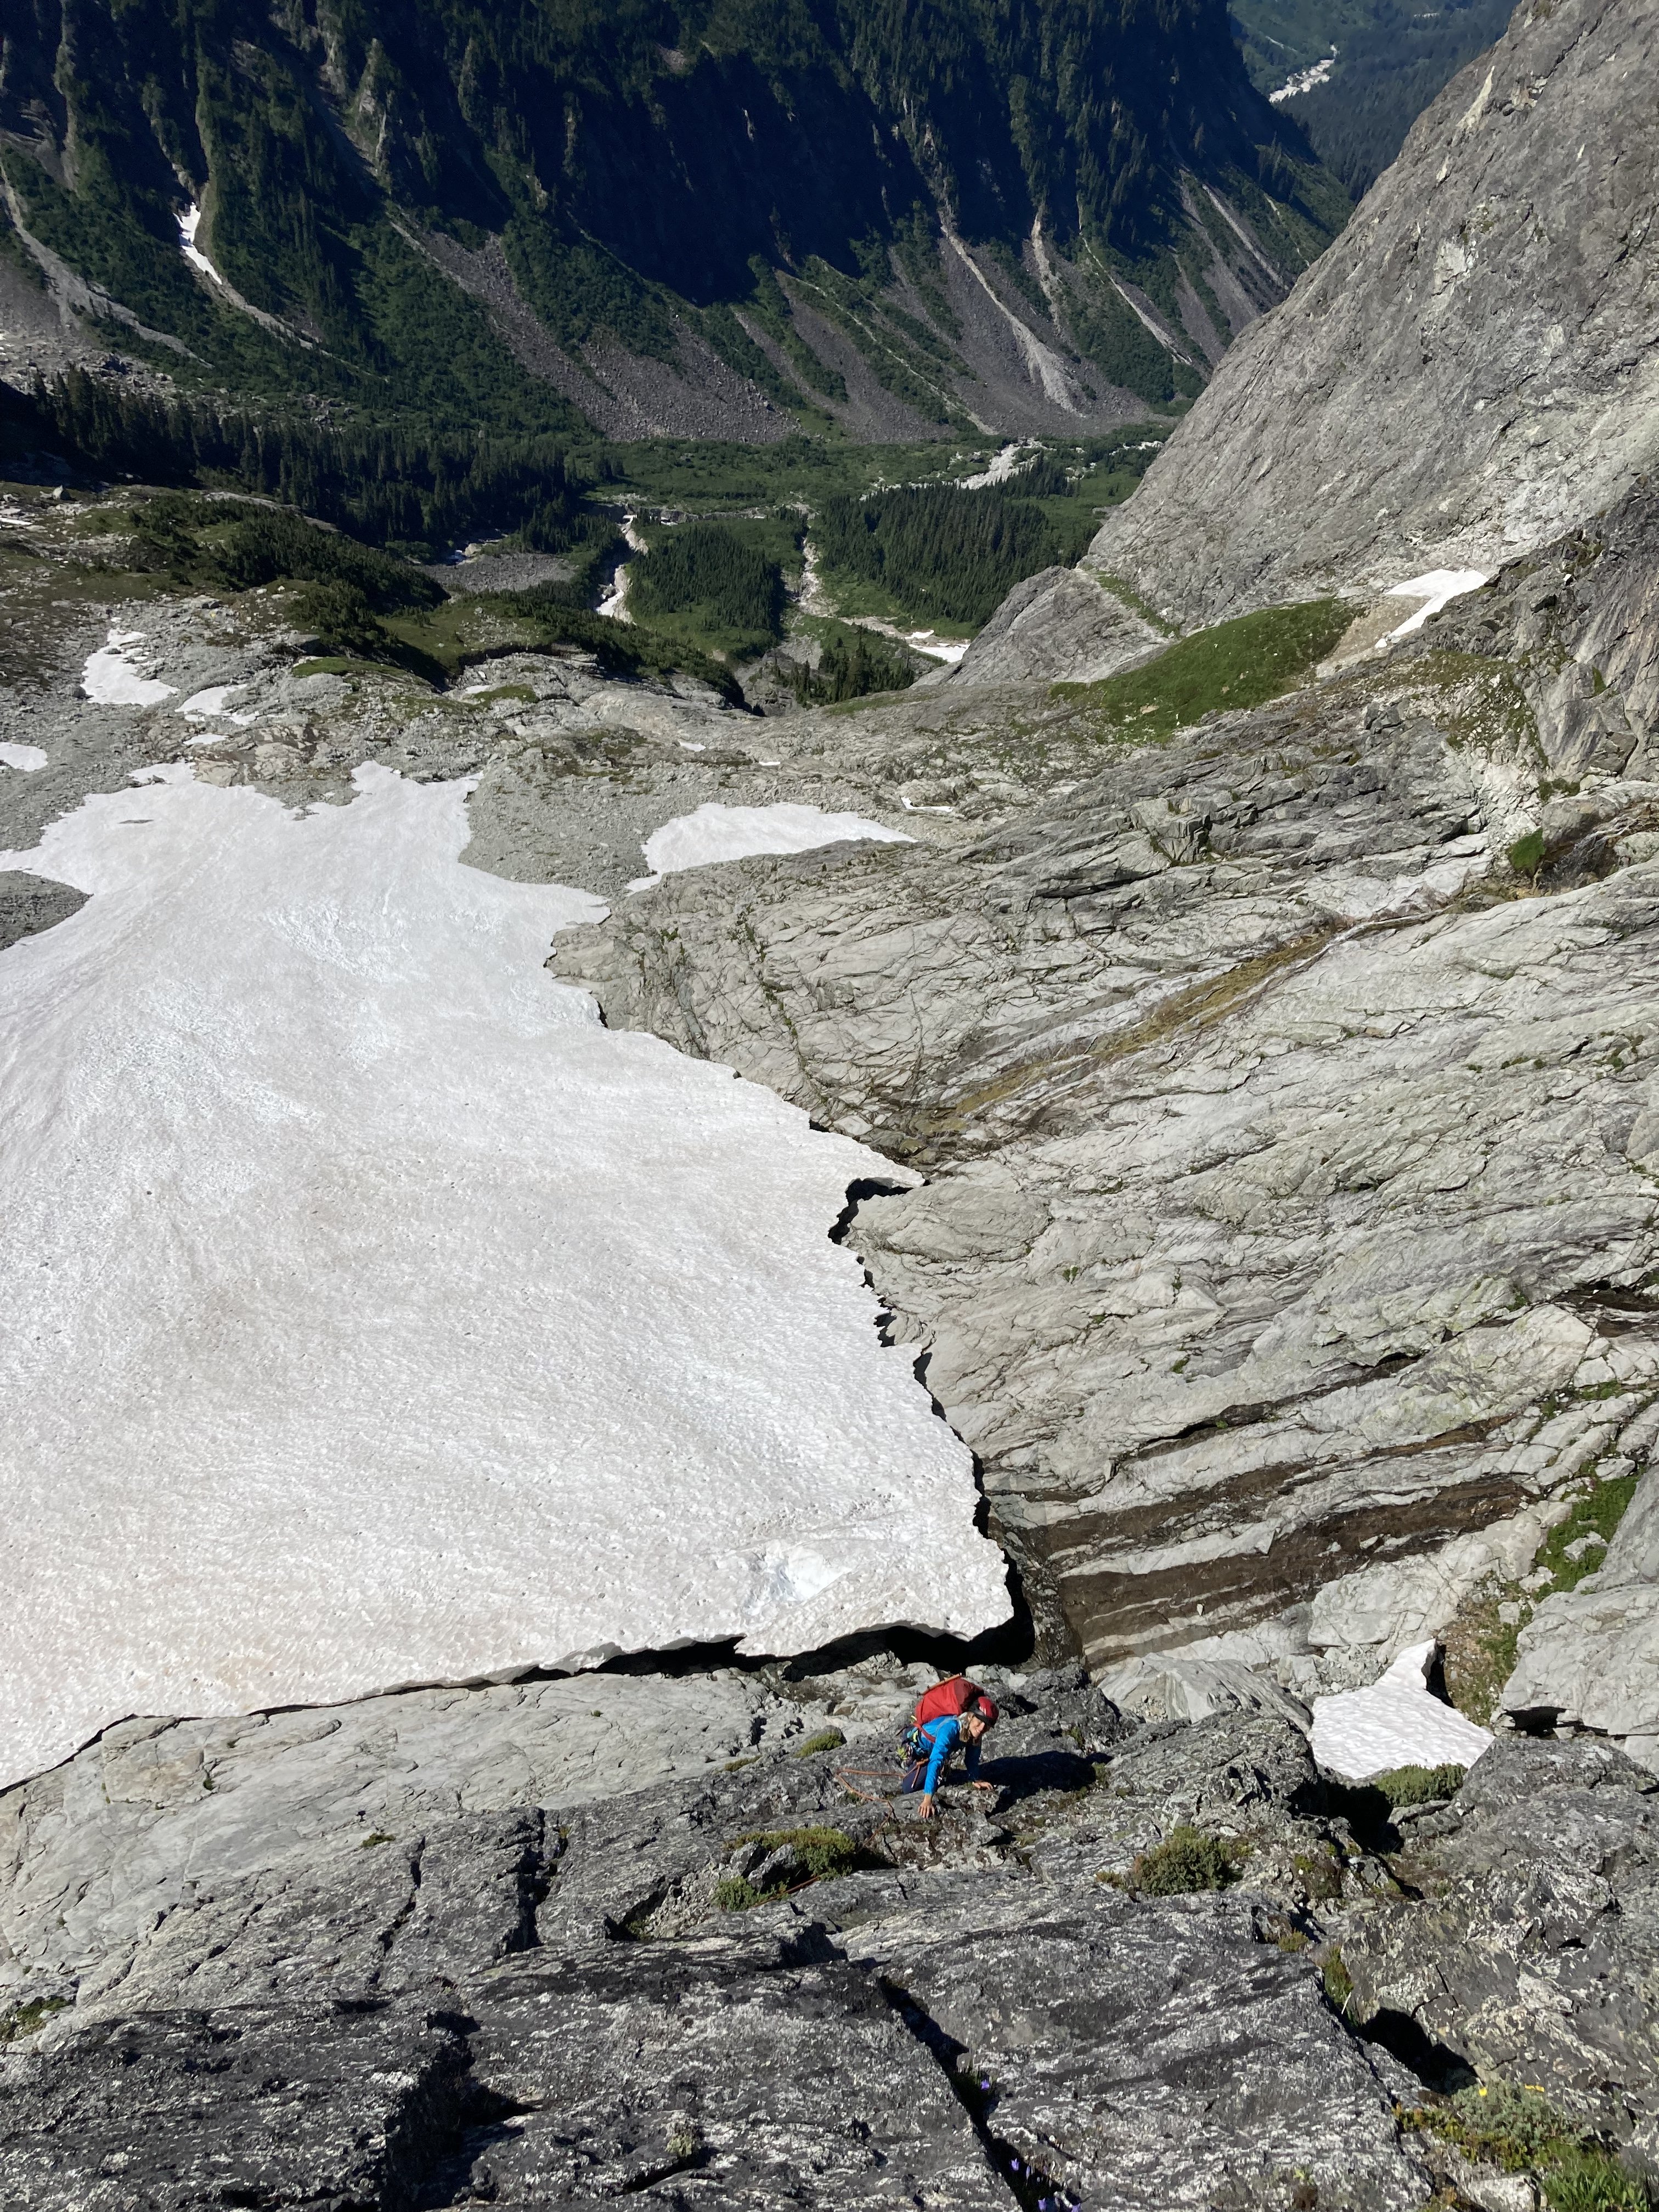
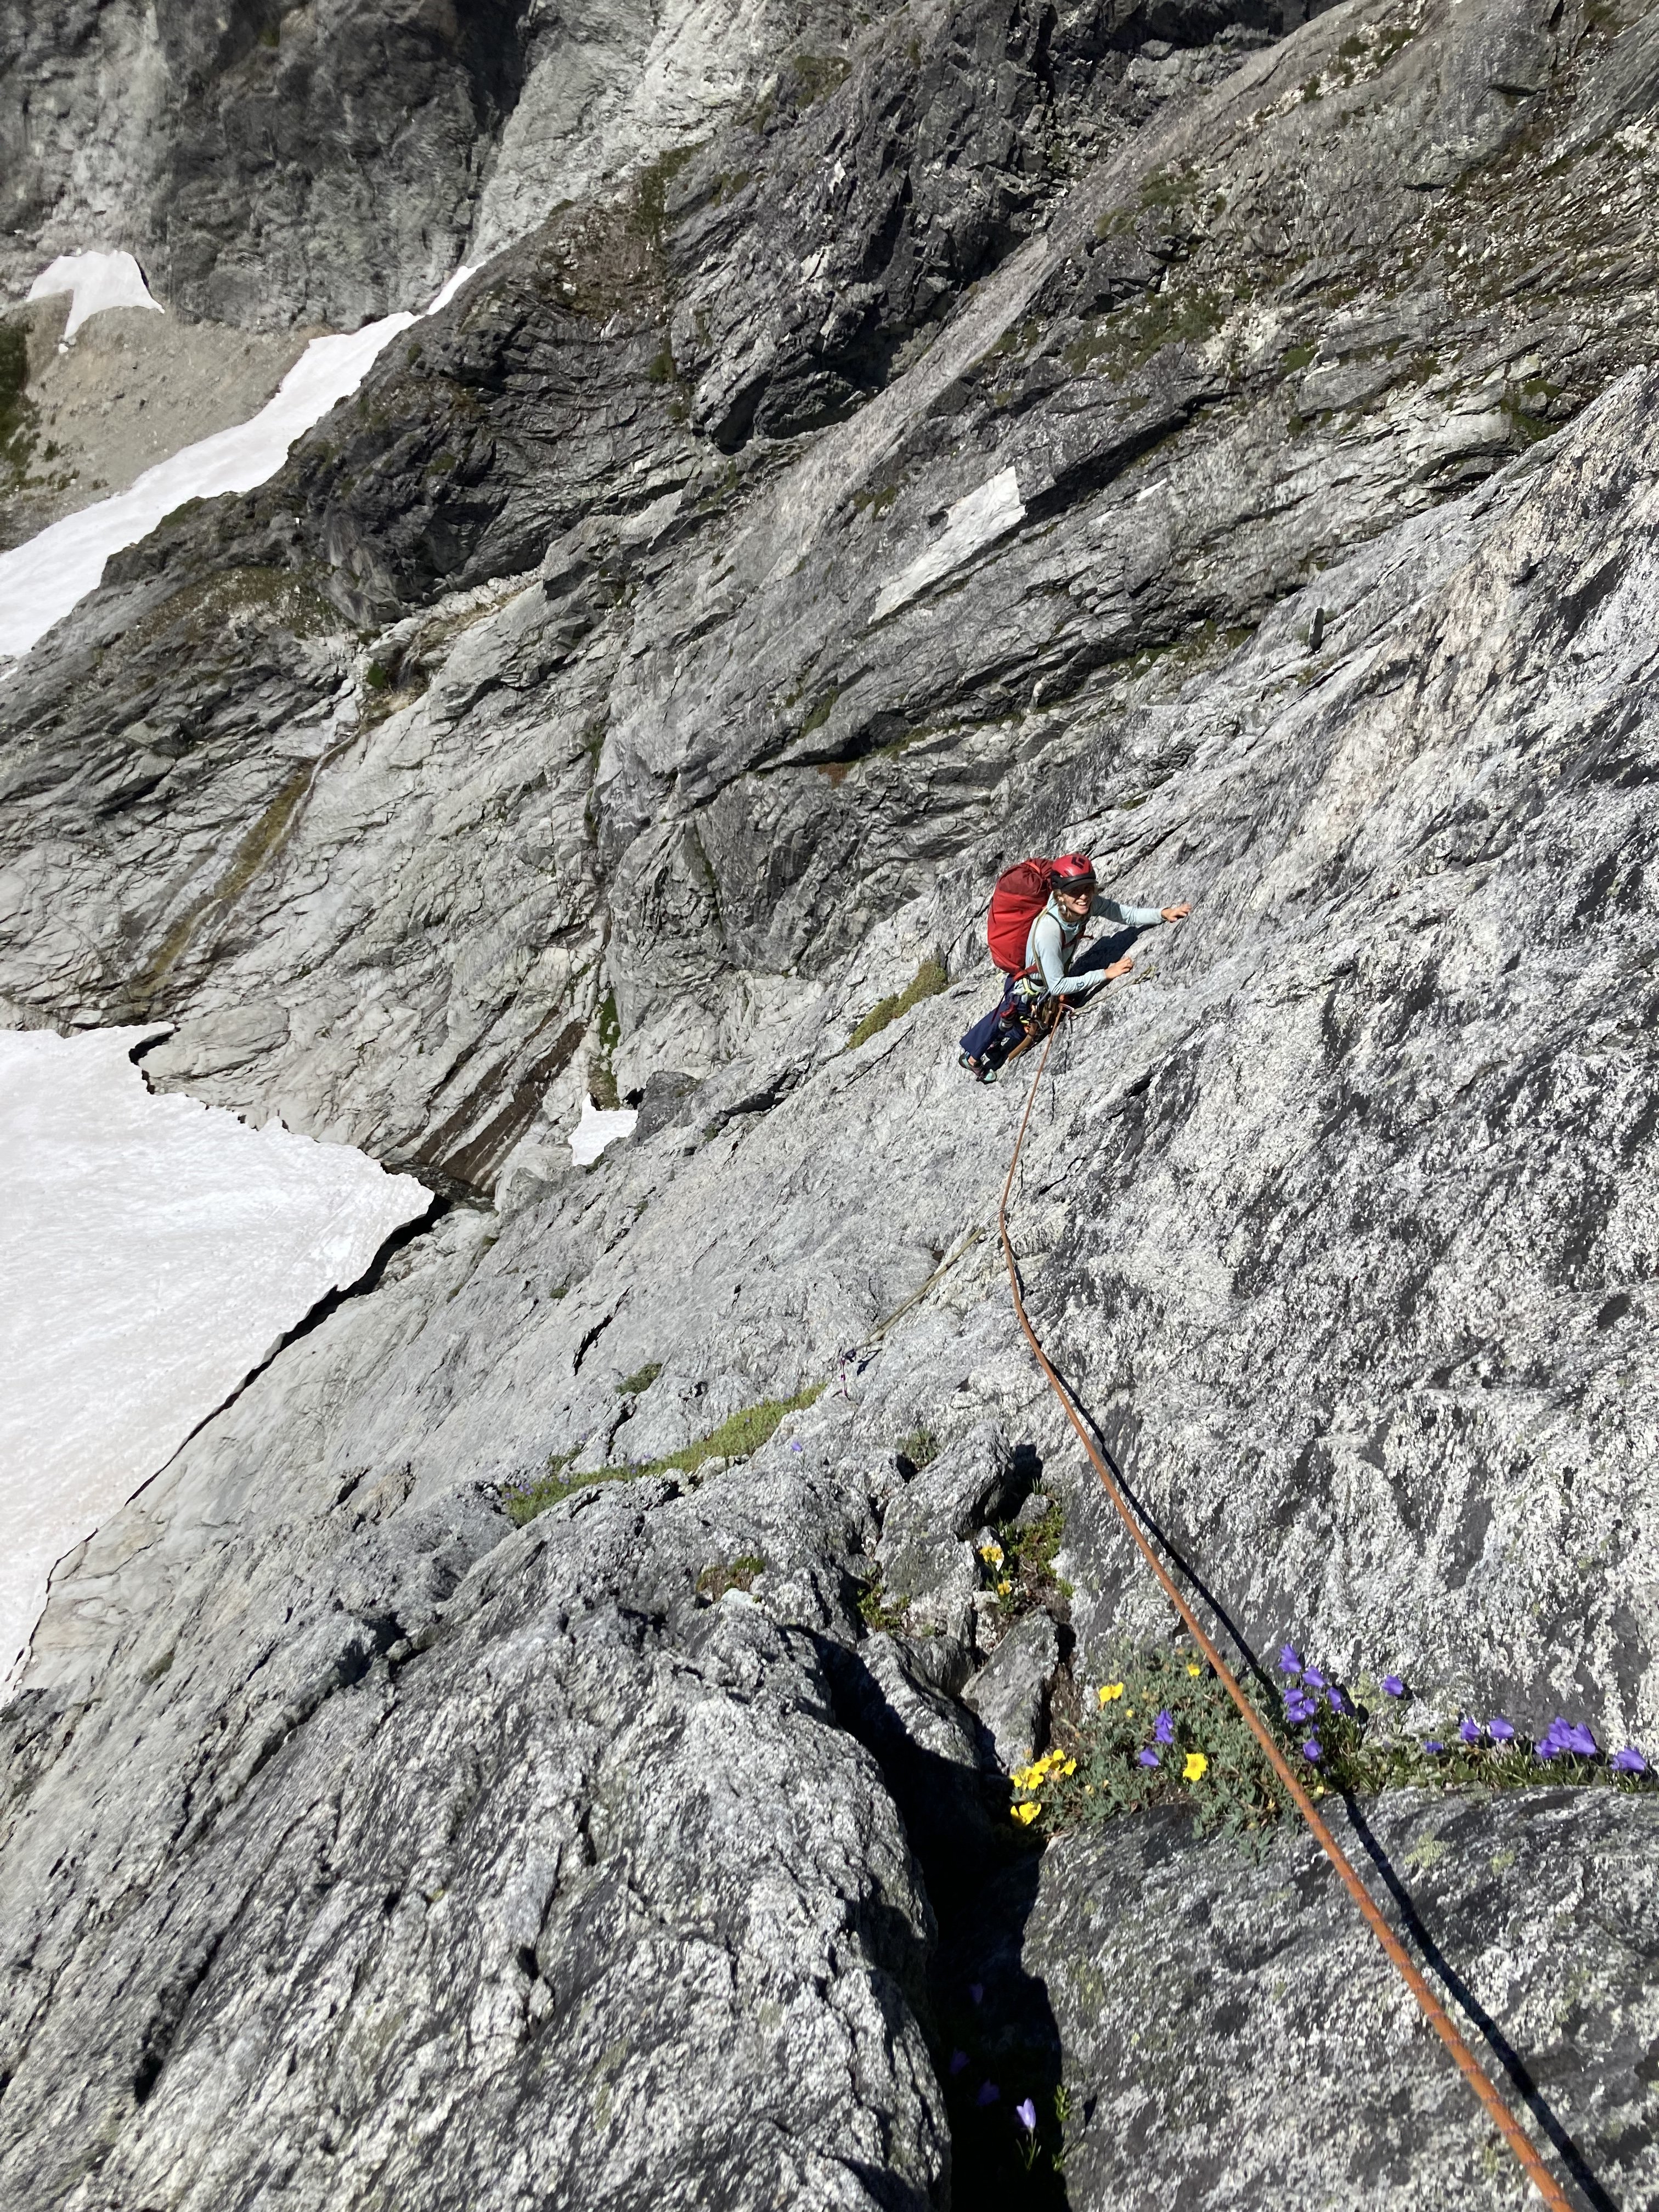
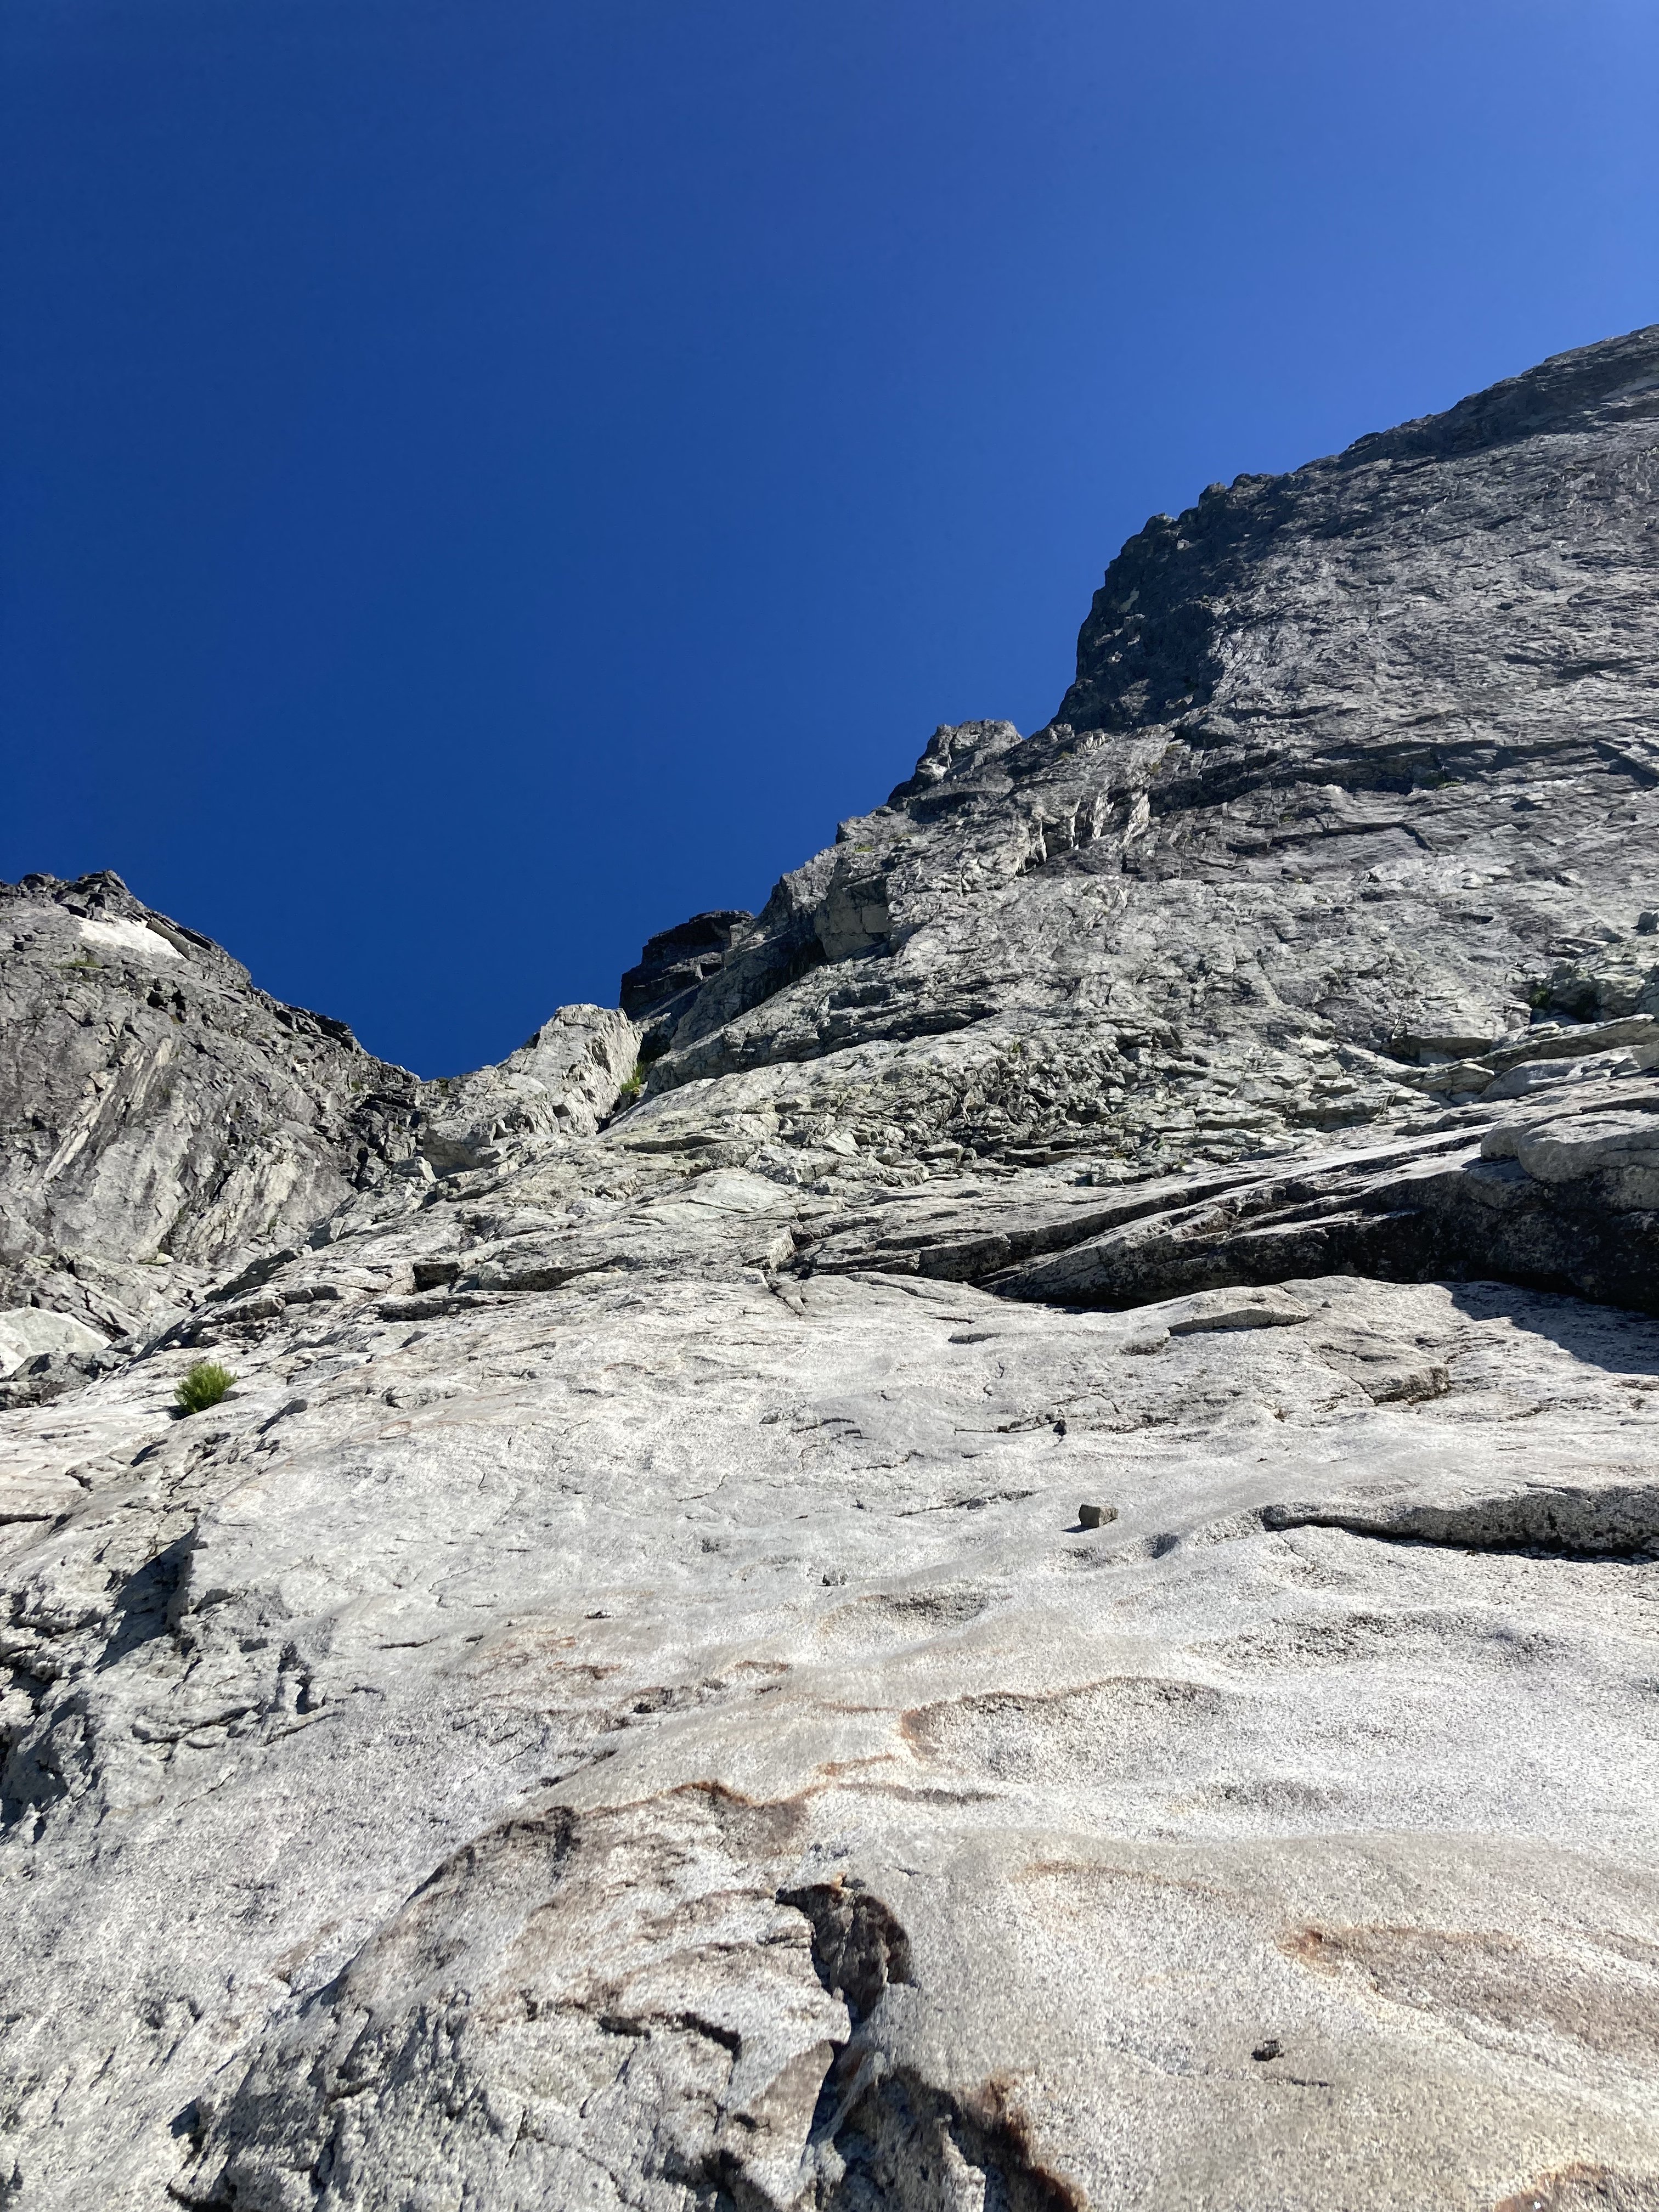
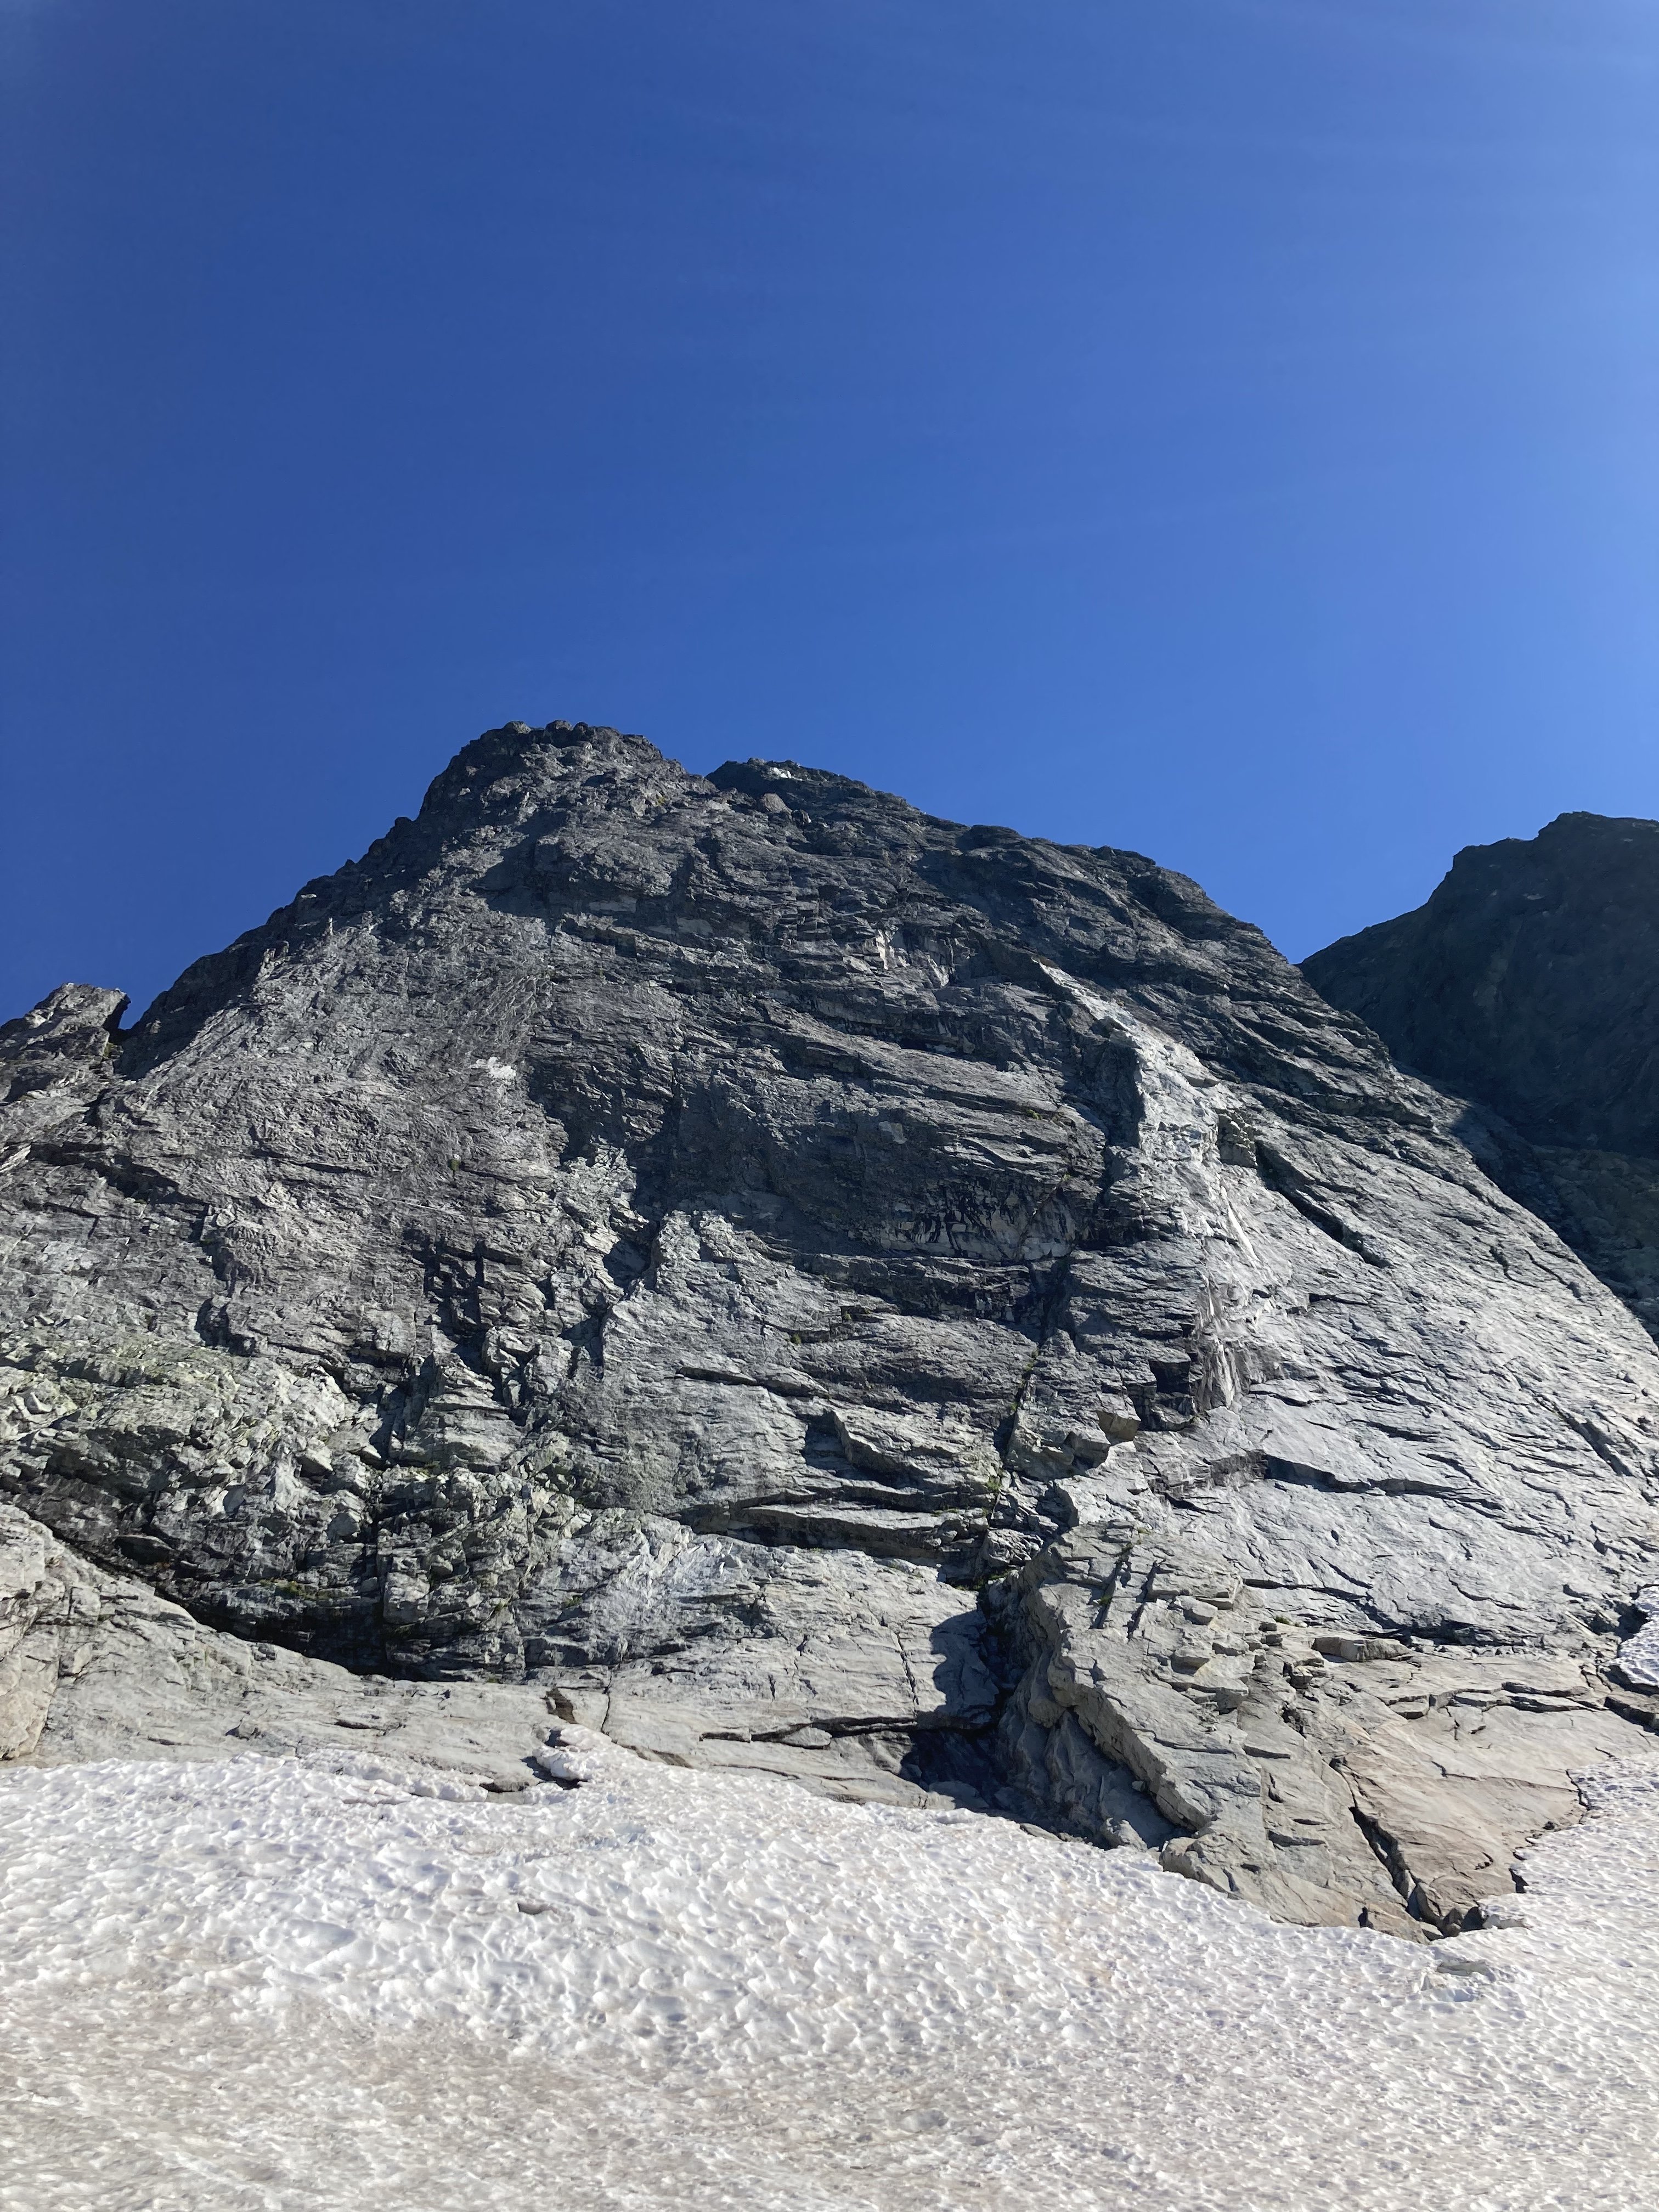
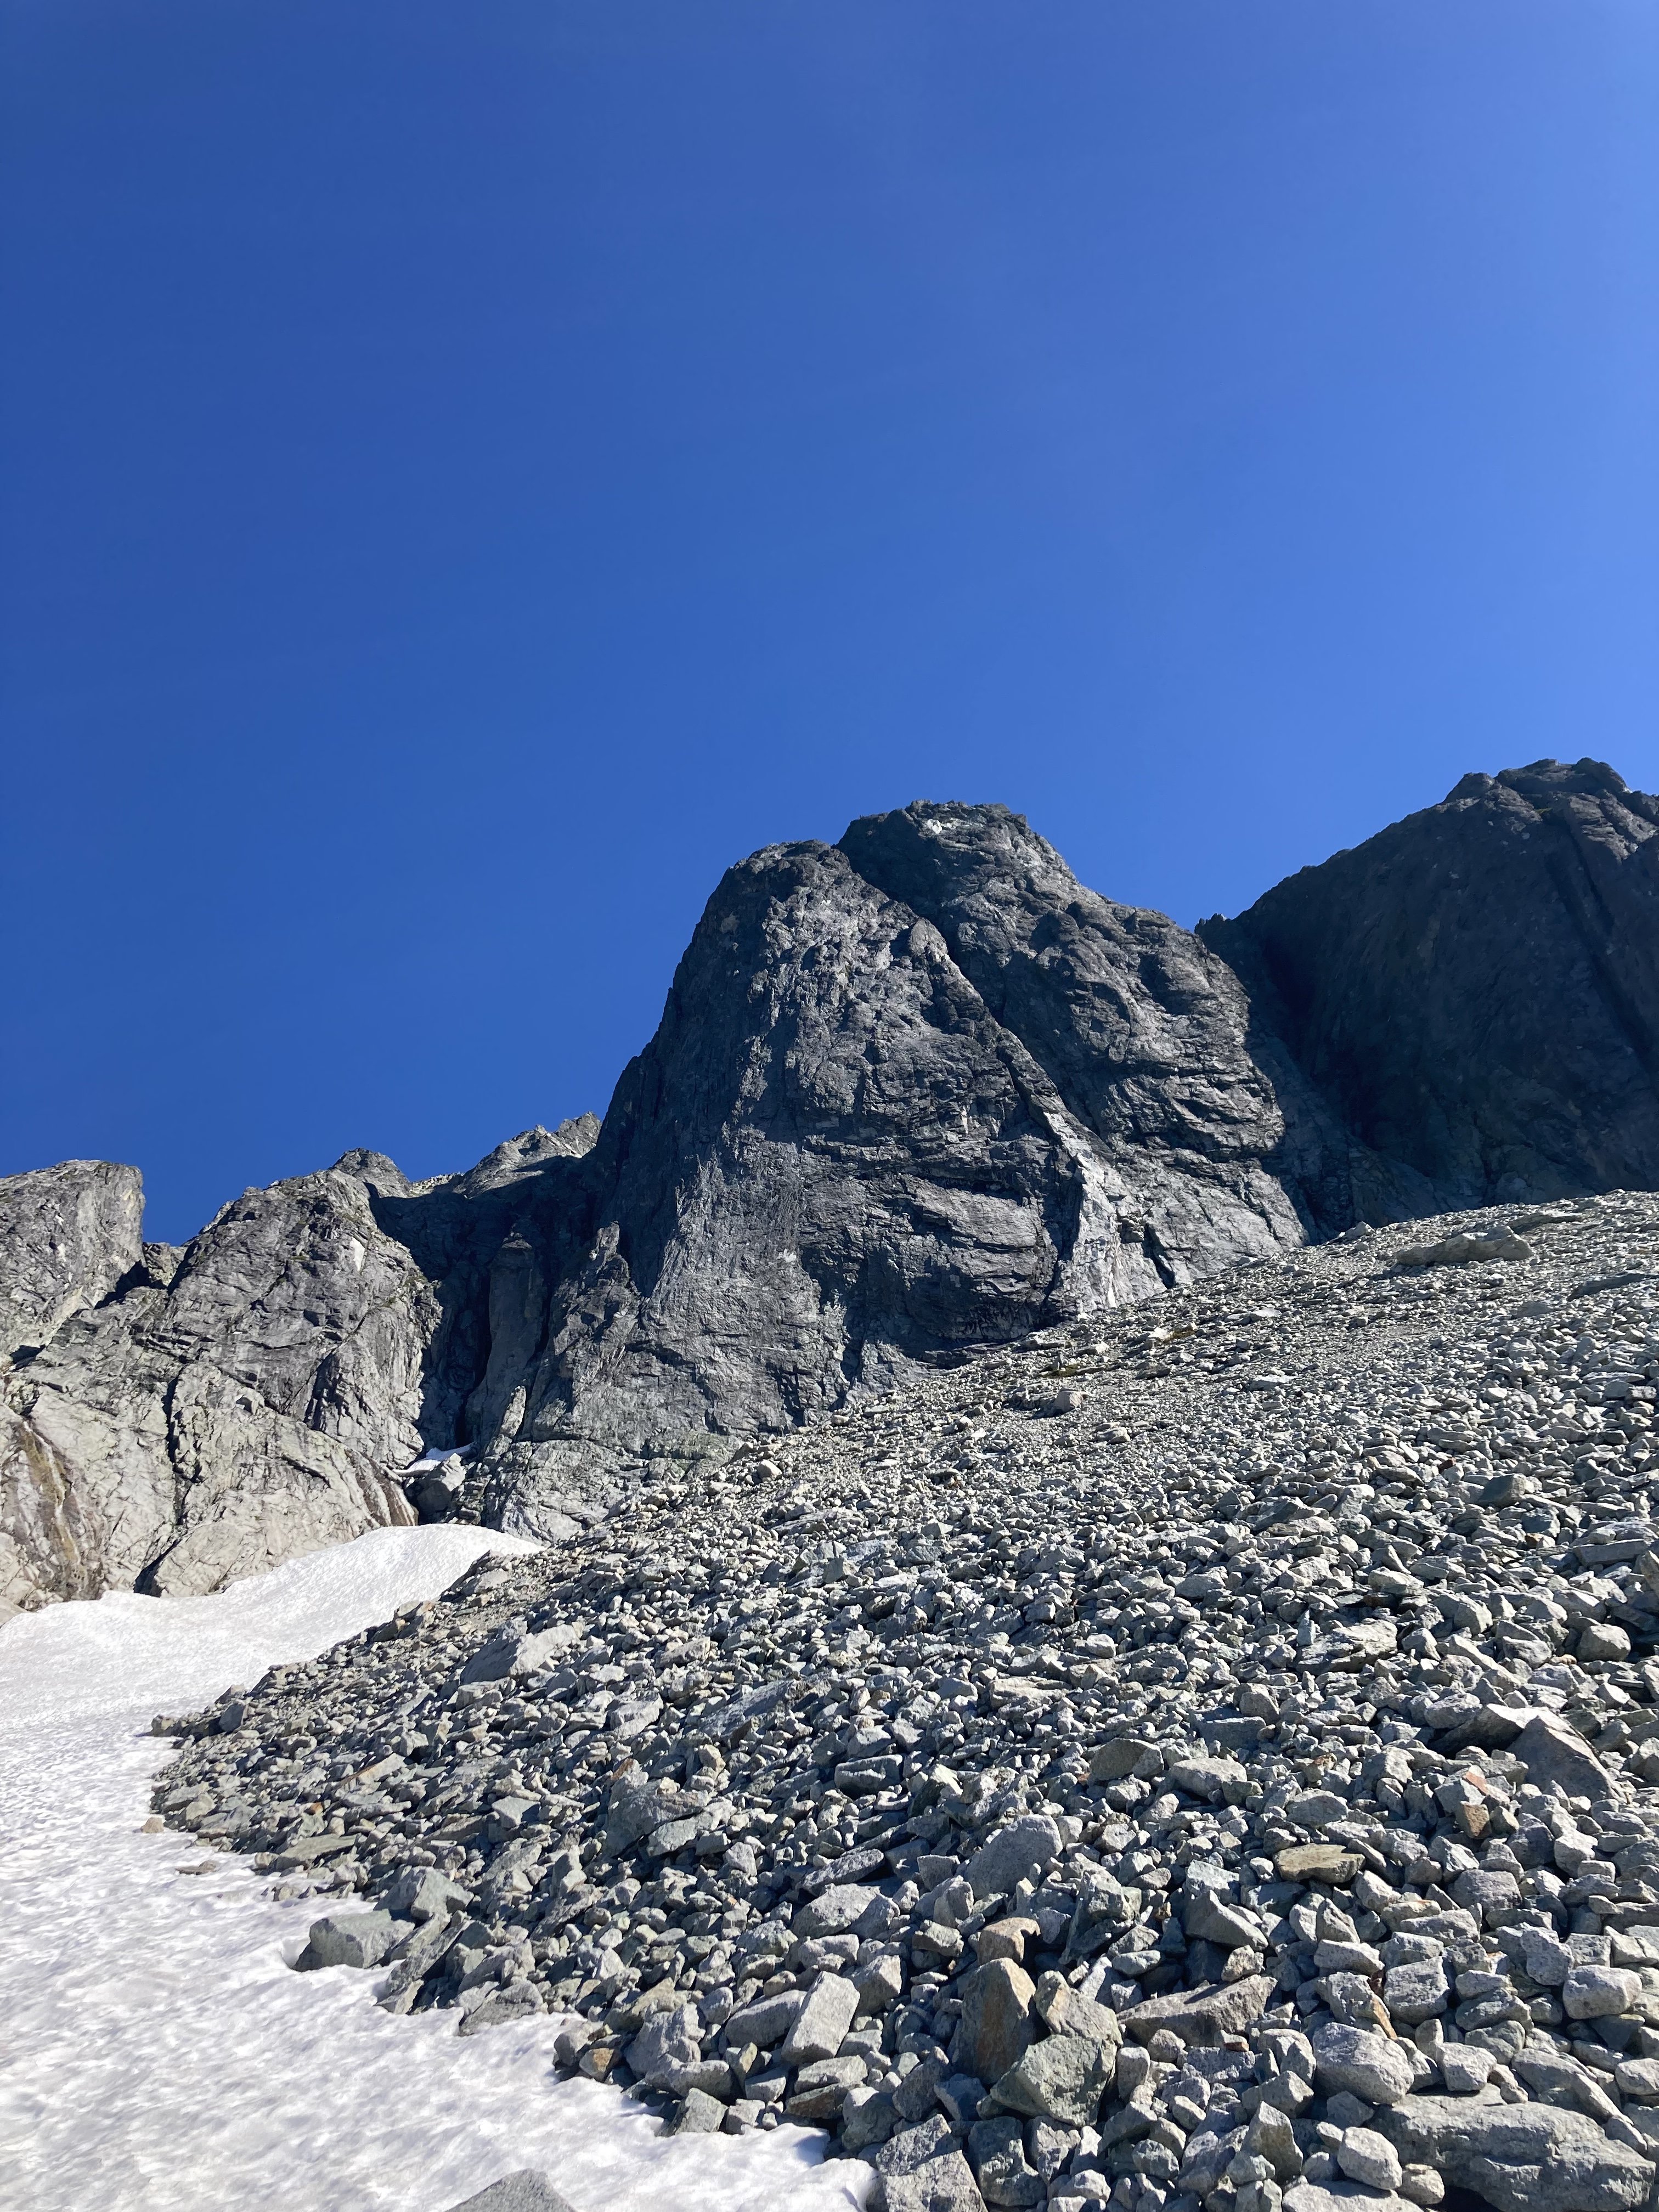
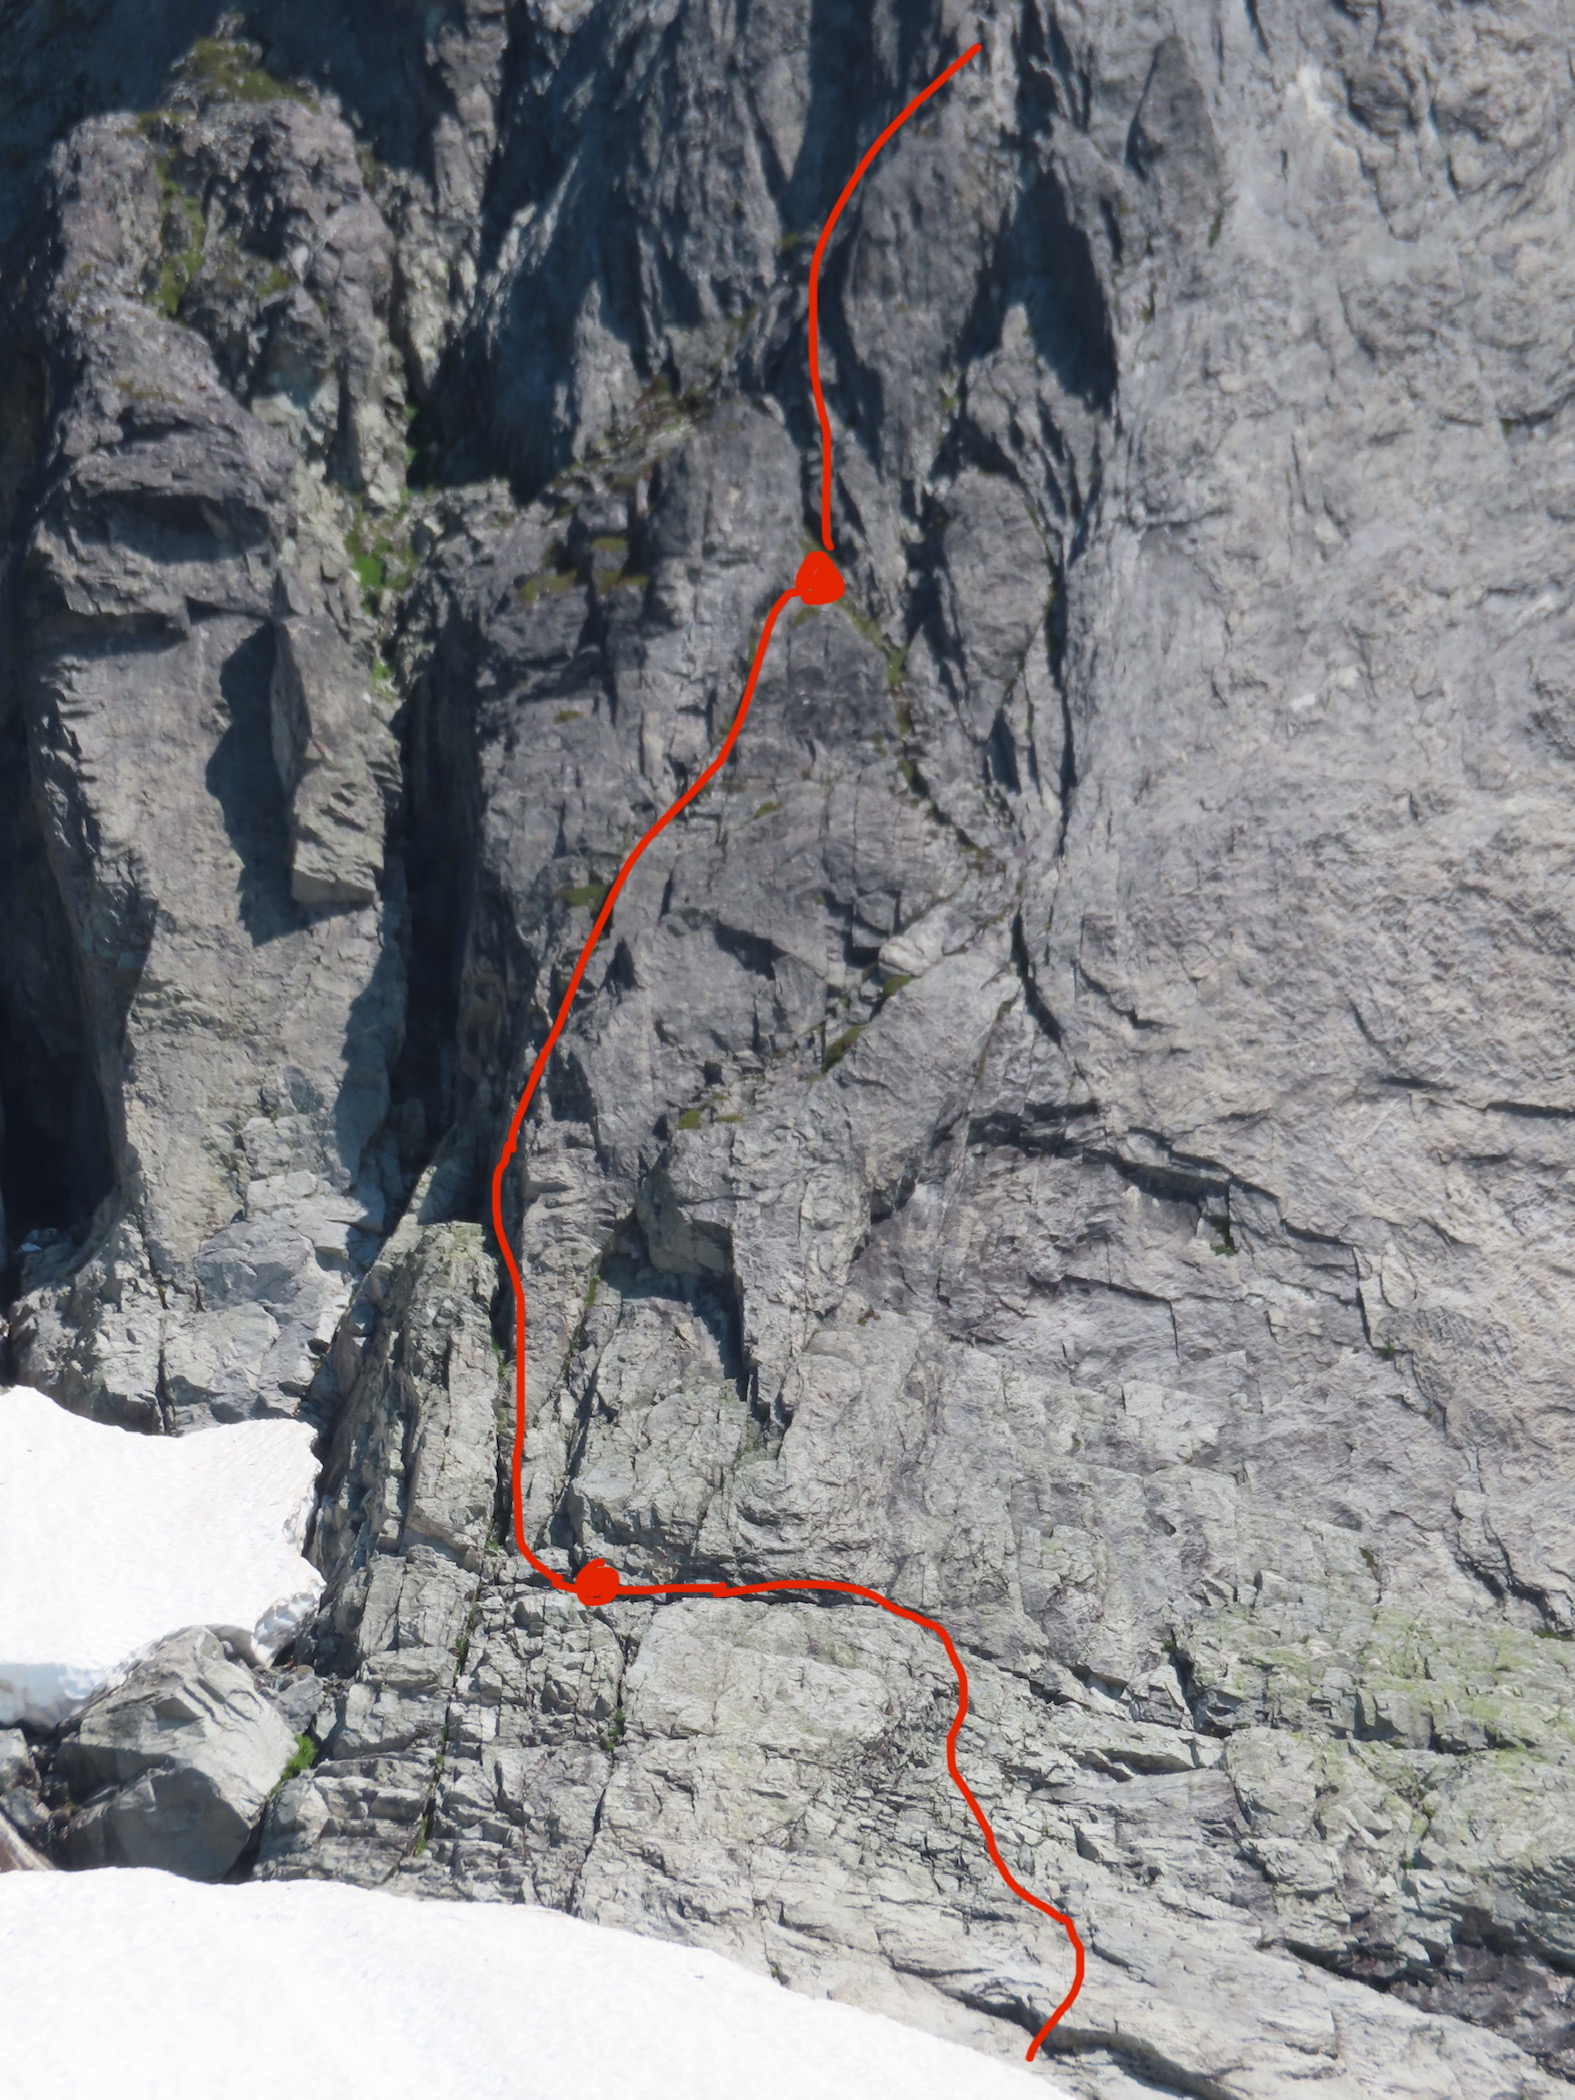
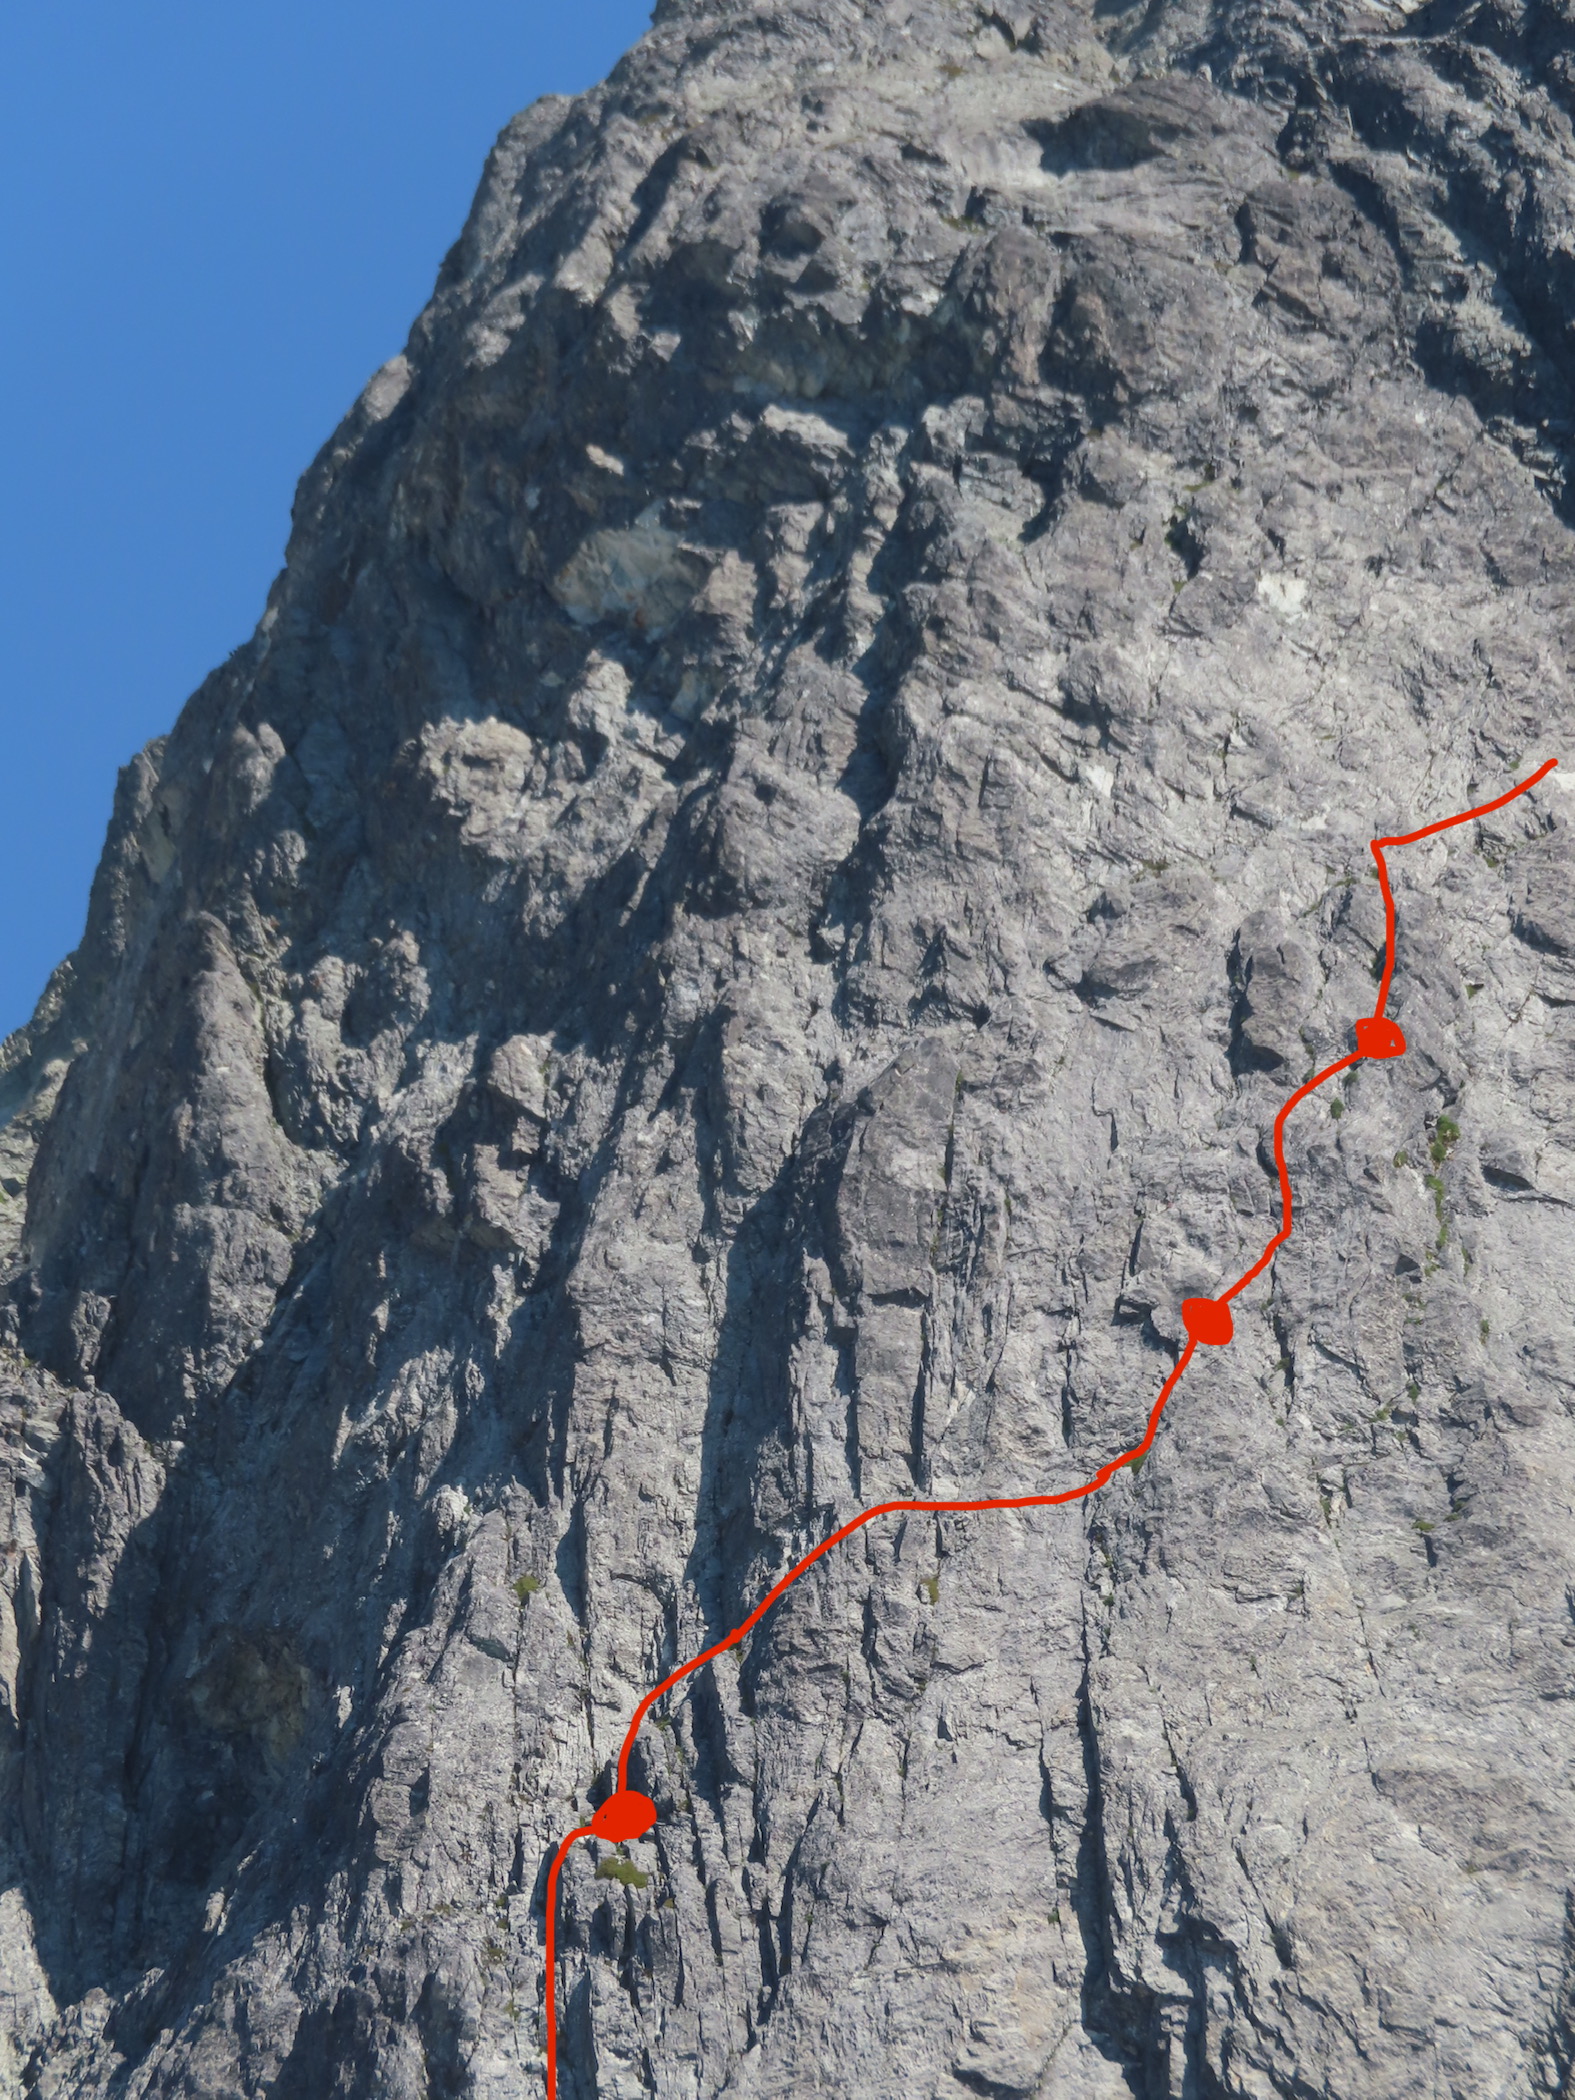
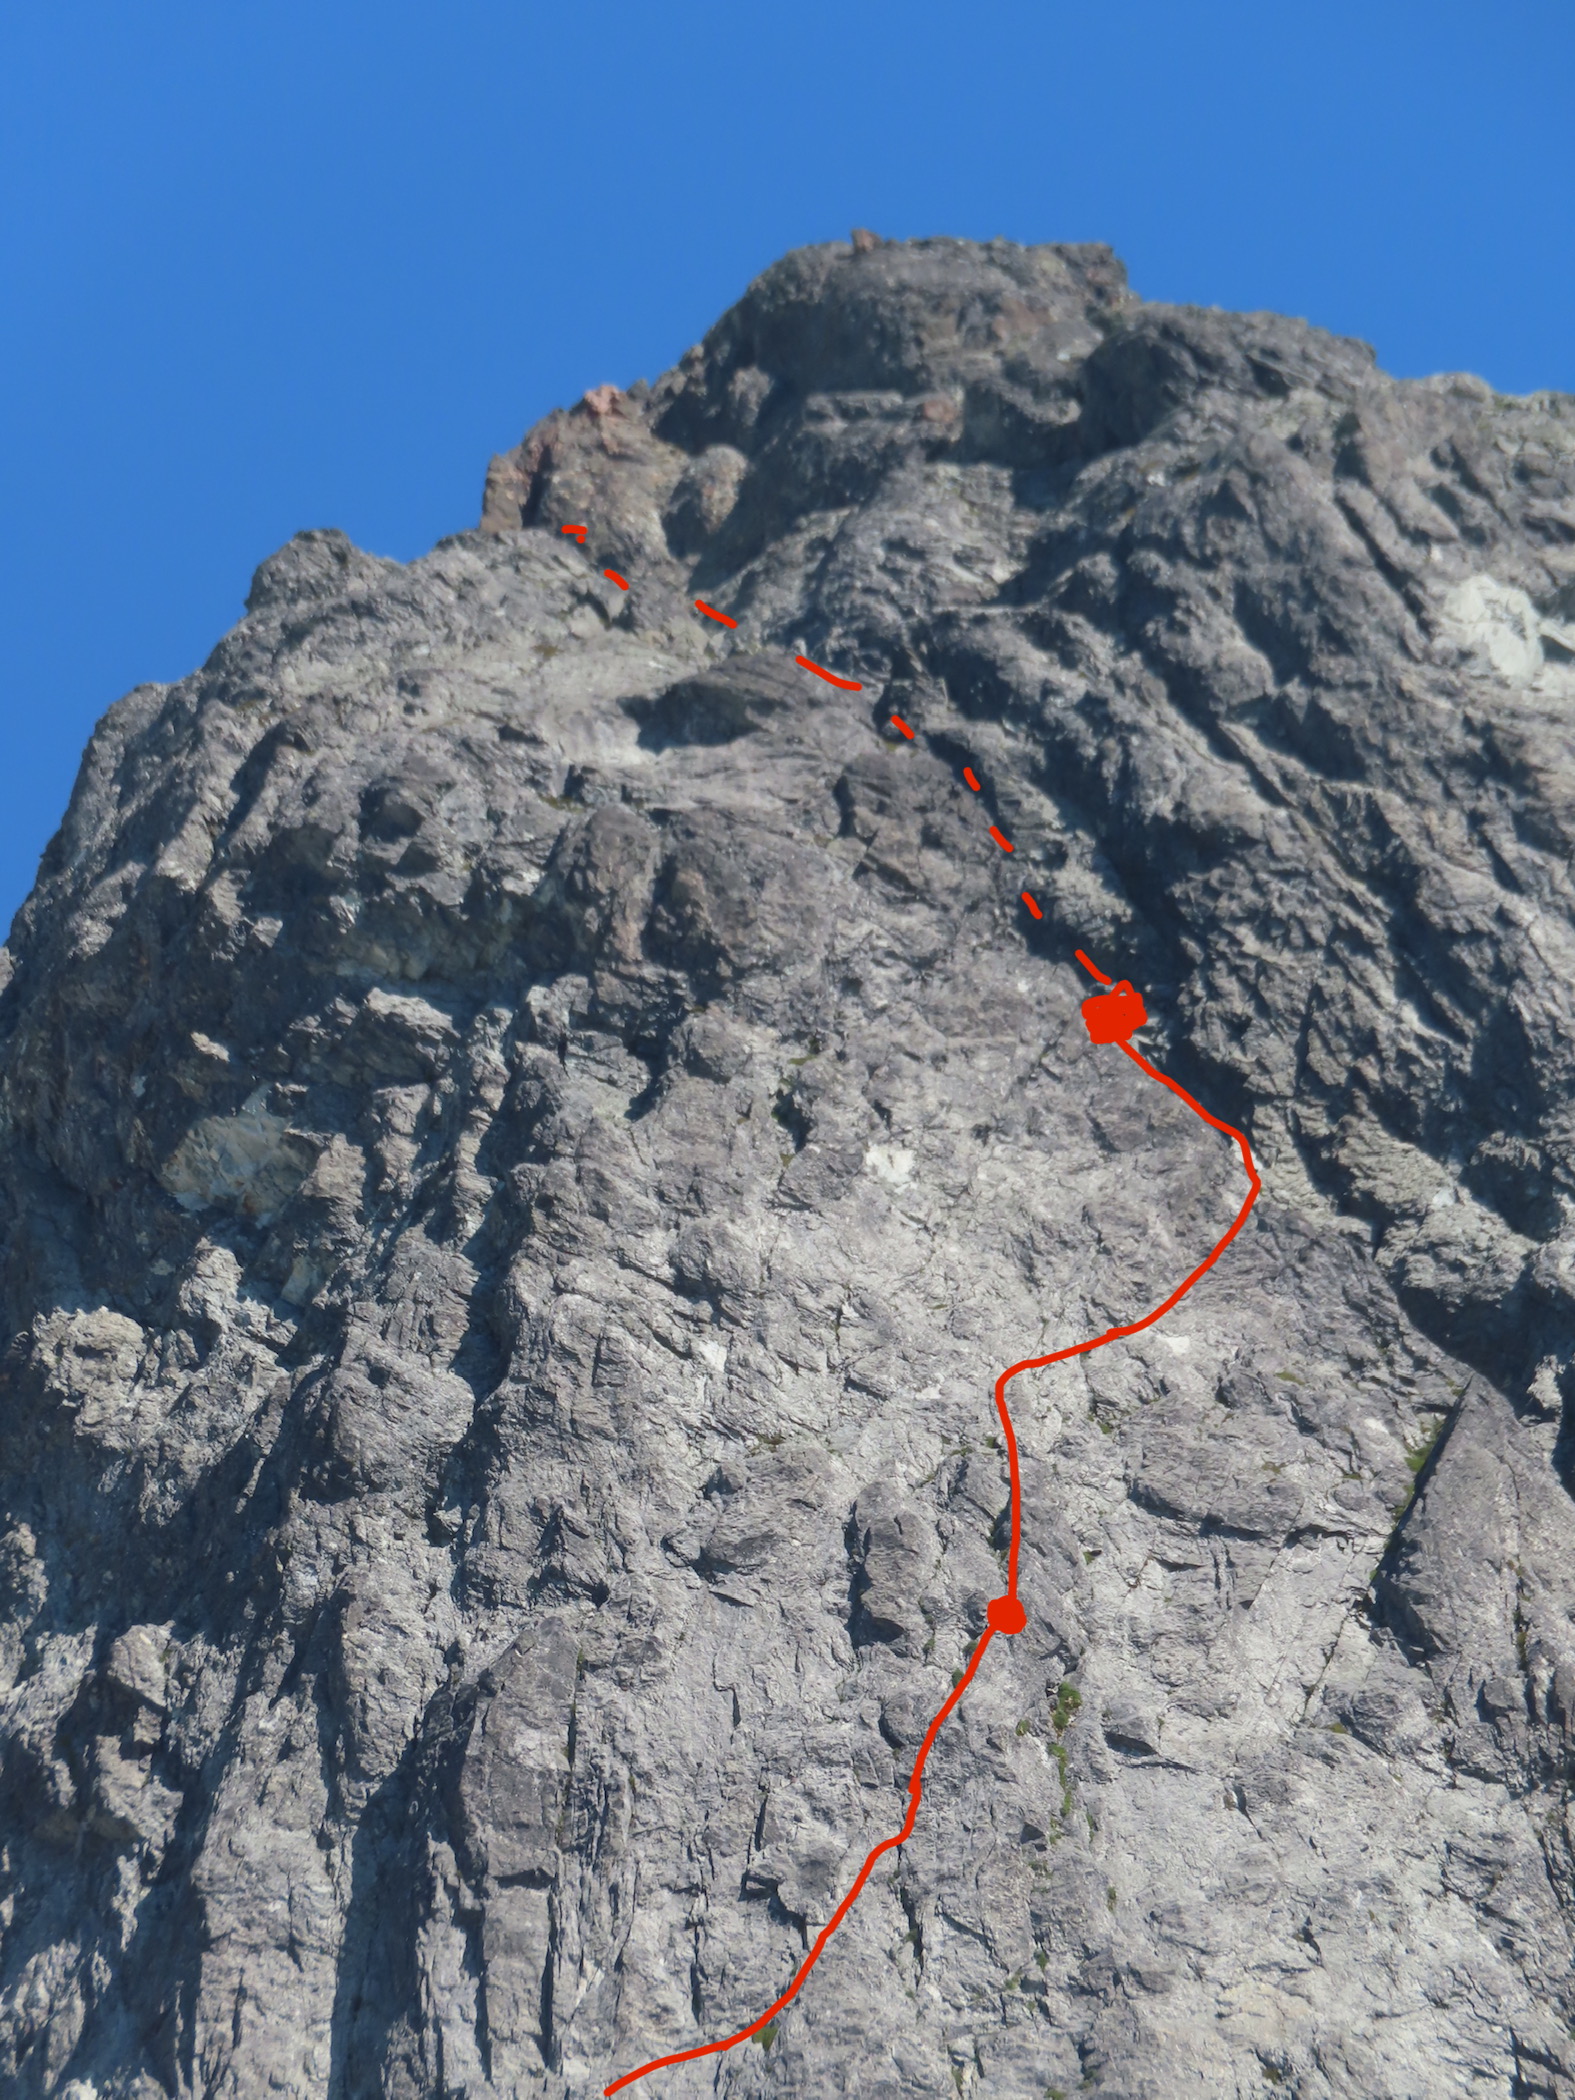
Over Sept 12-13 Eric Wehrly, Lani Chapko and I Climbed a new route on the NE face of Johannesburg. Like many features on J-berg, the scope of the NE face is overshadowed by the shear mass of the mountain. The face proper gains over 2000', with the entirety of the north face stretching nearly 5000'. We approached via the start of the NE buttress lines, then up glacial slabs directly under the hanging glacier, eventually climbing over the hanging glacier to access the face. We roped up for 23 pitches, totalling 3900' of belayed travel with 17 hours of climbing time split between two days. Our line of travel up the face Rough overview of the '65 route (left), Route 66 (middle), and the '67 route (right) Closer view of the 3 routes. Pink is where the Becky book shows the 65 route going (sharing a pitch with our line) but the green line is where we believe is more likely they went. The white circle is where we bivied. The forecast on the morning of the 12th showed fog, eventually clearing to blue skies. We opted for a somewhat late start and arrived at the TH to dense white out conditions. Our forecast all seemed to believe it would clear up, so we started hiking down towards the lower buttress hoping it would clear up. Lani going full euro The conditions did pretty quickly start clearing as we arrived at the base, but the rock and, more importantly, plant life was still wet. We decided to access the NE face via the first portion of the NE rib routes, as the CJ was an impassable death gully spitting rocks. The access climbing went generally pretty well, though we ended up unexpectedly roping up for a few pitches. None of us felt like dieing slipping off of wet moss... An early pitch on the approach Eventually we hit the hanging basin where the buttress lines turn right up into the thick cedar forest. We continued up slabs below the hanging glacier and found easy travel. The glacier presented with almost no hangfire this time of year, but early season, this would have the potential for overhead hazard. Lani and Eric on the nice approach slabs Broken ice on the hanging glacier The hanging glacier itself was mellow, though season and conditions will greatly impact this. We ended up chopping a bollard and doing a short rap into the moat at its top to gain access to the rock. Looking back at the bollard belay/rappel Climbing on the second pitch We likely shared some terrain with the 65 route here as we used the gully to access our intended crack system. The Becky topo makes it a little unclear where they went here, though you could probably assume they went up the gully. After a bit of gully travel we were able to escape to our objective face. The angle slowly steepened as we approached our "hand crack". The proposed crack turned out to be filled with gnarly munge, so we aimed for a thinner looking crack to its right. Eric leading the crux 5.10 crack The crack proved to provide the crux of the route, luckily it was relatively well protected... For the crux section. While perched here, a huge natural rockfall ripped down the 65 route gully, validating our concerns of gully trqvel and questioning the sanity of our ancestors. As Eric led the pitch, it became clear that we were about to loose the last bit of light, so we got our our headlamps and prepped for some night climbing to go in search of a ledge to sleep on. Two more 200' pitches gave access to a workable ledge. Lani and I somehow fit in this footprint, while Eric was on some downsloping round ledges below Morning at the bivy Racking up in the morning We all woke up a little creaky and waiting for the sun to warm us. Above presented with 3 options. Our original intent was to traverse right and climb a series of catscratch cracks. These however looked steep, and filled with munge. So we opted to work up and left to climb the top of a ridge feature (not even considering option 3, the unclimbed gully above). Its possible we share a pitch here with the 65 line, though the written description of their climb makes much more sense to have climbed an obvious ramp a couple hundred feet below (avoiding what would have been a gnarly mandatory impasse to gain their upper headwall cracks). Lani topping out the worst pitch on the route... A fun corner brought us near the ridge crest, where we climbed 2 awful choss pitches up to a gendarme, above here, the rock luckily turned back to decent quality shist. Eric starting up his choss ridge pitch Climbing on the pitch above the red gendarme Here we worked up and right on moderate terrain and eventually gained access to another big gully system that we believed to be the 67 line. We climbed this gully for 2 shared pitches to gain a notch on the NE buttress by the glacier. The final moves on the NE face Different view, same spot One mellow ice pitch brought us into some more easy scrambling to the summit. We all had approach shoes and aluminum crampons so ended up roping up for 3 total pitches of easy ice. Had we had boots or had early season snow coverage over the ice we likely wouldn't have needed to rope up for these pitches. Then we were in for the long descent down the East ridge and back over Doug's direct. Steep moraine dirt below the CJ We ended up getting back to the cars pretty late and made the rough late night drive home. Overall, the route only really had a couple pitches of bad rock. There were some tricky belays to build and some pitches were runout. Though very rarely was it hard and runout. It seems like the objectively safest route on the central part of the NE face as it climbs the least amount of gully of any existing route. We collectively give it a solid recommendation for the Cascades connesouir, or anyone keen on climbing the upper NE face. As always, here are my pitch notes.. Route 66 V 5.10 AI 2 Rack: Triples .3/.4; Doubles .1-.75; singles 1-3; full set of nuts; 3 KBs (used extensively for belays) P1-4 700' Alpine boulder problem pitches getting to the base of the NE face (up to 5.8 and AI2) P5 130' 5.7 A transition pitch up into the gully. P6 200' 5.6 Climb the gully, belay in the gully. P7 200' 5.9 Climb the rib left of the gully, stepping back right to belay in the gully again. P8 150' 5.6 Exit the gully to the right. Belay on a good, medium sized ledge below where the wall steepens. P9 100' 5.10- start with a steep, juggy roof to the right, then trend up ramps to a small ledge to the right of a large tombstone flake. P10 200' 5.10 Start up the flake (crux), then trend left on low angle terrain to meet the main weakness. Follow this up to a large ledge system. P11 200' 5.6 Traverse slabs rightward into a gully, follow it to a good ledge below a big roof P12 200' 5.8 "money pitch" Follow the gully, pulling the roof to its left, and continuing to another good ledge P13 250' 5.4 Scramble up the gully, exit left and belay at a ledge positioned below a big open book corner. P14 160' 5.9 Work your way into the corner, belay at its top. P15 170' 5.6 Ramble up loose terrain on the ridge crest P16 100' 5.8 Climb the super chossy ridge to a notch by a red finger P17 200' 5.5 Climb past the finger then scramble up to your end of rope P18 200' 5.8 Climb the grassy cracks above to gain the big chimney on the right, follow this to a stance in the chimney P19 200' 5.6 Trend up and right past two gullys towards the larger drainage feature P20 150' 5.9 Climb a face to gain a corner, follow this to a ledge at its top P21 200' 5.7 Continue up the gully P22 200' 5.7 Continue up the gully, belay at a notch on the NE butt by the glacier P23 200' AI2 one pitch up the glacier.


- 12 replies
-
- 14
-

-

-

-

-
first ascent "Calcifer's Ridge" III 5.7 FA of the North Ridge of Redoubt
Sam Boyce replied to Sam Boyce's topic in North Cascades
Thanks John! Crazy to see what the glaciers looked like then. Seems like a big portion of this ridge used to be covered. -
Over the last 3 days, Lani and I climbed what we believe to be the FA of the North Ridge of Redoubt. This is the long, NW trending ridge that looms over the North Face glacier route. The route was actually quite classic and comes with a high recommendation. It is by far more enjoyable than the standard route scree encountered on the descent. The route was primarily low fifth class and fourth class scrambling and we roped up for roughly 1100', though snow coverage and comfort sloping may drastically impact this number. The ridge gains a bit over 2000' over around .5 miles of horizontal. The name is inspired by the little ball of fire, Calcifer, from howls moving castle, as we watched the Perry Creek fire grow in the distance. Day 1 We approached and bivied at Ouzel lake. A bird tells me the Depot Creek "trail" is in particularly excellent condition, requiring NO bushwhacking, and they said handlines are even avoidable. The same bird mentioned that current logging roads take you all the way to the border, making the approach to Ouzel Lake 4.5 miles. We bivied all the way up at Ouzel lake as we were initially planning on climbing Spickard the next day, but growing smoke from the Perry Creek fire changed our minds on that plan. There is also an excellent potential camp at the top of Depot Creek falls, potentially allowing for a direct approach, though this would require bushwhacking of unknown taste... There are also potential bivy options on route to help facilitate a 2 day itinerary. Day 2 From the lake, we made a long contour on talus, loosing only around 400', once near and below the objective, we made our way up talus and slabs to the toe of the ridge. Excellent running water out of the toe of the glacier. We initially attempted the cracks smack on the toe of the ridge, I bailed around halfway up after encountering some 5.11 tips and entering unpleasant looseness. There is an obvious corner left of the toe that potentially holds a very classic potentially moderate direct start. The unsent directismo After bailing off the toe, we looked to the right and zig-zagged up ramps to gain the buttress crest. Snow coverage will drastically impact your experience here. Once on the ridge crest we found thousands of feet of enjoyable scrambling on mostly sound rock. Lani compared it to the NE buttress of triumph but with mostly better rock. We roped up for the occasional pitch, but mostly soloed. There is a broad saddle at 7600' where things begin to steepen subtly. This would also make an excellent bivy with a permanent snowfield for water access. Above the notch, the climbing steepened and we climbed a few back to back pitches until we were below a prominent gendarme. Unsure what the top of the gendarme would be like we traversed into the chossy gully to climbers left and climbed a short, overhanging pitch of surprisingly solid shist. After topping out the gully, we found the descent off the gendarme would have been chill, so Future parties should consider a direct line up the cracks on the gendarme for a more classic finish. Once at the notch in the ridge we met up with the large talus fields that define the slopes on the south summit. The traverse over the sub summits to the true summit was generally easy but involved a few sections of fifth class. Once on the summit, we began the "joys" of doing the standard route late season. Lani in the canonball hole Once at the base of the gullies we encountered awful scree, one could only imagine how much more awful it would be to go up, so there is that... The entire day we had been watching a fire grow in the East. Seeing it expand so quickly and already beginning to envelope spickard in smoke we decided early on our descent to forgo spickard and plan on hiking out the next day. Mordor to the East Day 3 Hike out, blueberries... Suggested Rack Single Rack .3-1, optional 2; full set of nuts; we had a single 60M rope, but it could be done with a 30M line to save weight.

- 6 replies
-
- 11
-
-
-
-
A few days ago Lani and I did a fun link up on forbidden. We climbed the East ridge North Ridge and West Ridge. This is a rad way to move through a lot of scrambling terrain. Uncertain weather before the atmospheric river gave us a pretty narrow window to work with, so we headed up the evening before and bivied at the base of the East ridge. We left the B basin trail around 5pm and set up camp around 8 for an early night. The cloud ceiling quickly raised up, putting us in a thick,misty whiteout for the whole of the night. We woke up to even more whiteout and low confidence, expecting to bail we went back to sleep for a few hours. We ended up leaving the bivy around 8am. We climbed up the East ridge, then down climbed the north ridge. Down climbing the North Ridge was surprisingly mellow, we didn't end up needing to rappel. And the route finding was almost easier on the way down than the way up. There is only one 20' section of 5.5 at the very bottom, otherwise it's all sustained 4th class and secure low fifth. Once at the low bivy of the north ridge, the clouds again threatened us. So we sat and weighed our options. We ended up watching the clouds for an hour before deciding our fate. Our original idea was to traverse the glacier and climb the NW face/rib. But whiteout and impending rain steered our decision to "bail" back up the north ridge. Though the north ridge is such a fun knife edge it's hard to complain. We then down climbed the West Ridge. We hit the base of the West ridge 6 hours after starting up the East ridge and made it to the car just before 5, almost 24hrs after we left. The epic rains to come that night validated our decision to limit our time in the mountains on this one. For those who don't know yet, you no longer need to touch snow to climb either the west or east ridges. The glacier below the cat scratches is more or less completely gone. While sad, it does mean you can do this whole link up in approach shoes without carrying axe/crampons. Starting up the East Ridge Headed down the North Ridge, with clouds threatening to spill in from the west. Headed back up.
-
I feel like my primary motivation for fa's is exploration and freedom. If ya can't enjoy the turds ya step in you probably won't stick around in the game very long.
-
From July 25-27, Lani Chapko and I climbed the SW ridge of Whatcom peak. This is the large, two-tiered ridge that, at its toe forms the imperfect impass. The ridge gains 2400' with 3000' of roped travel. The ridge is generally not very sustained with the upper half being mostly low fifth class. We did it in 14 pitches or simul blocks. The route climbed on generally very low quality shist and required care and deliberate, slow movement the whole time. Protection was surprisingly good through the lower, challenging climbing, but non-existent at times higher up, forcing very long simul blocks to locate anchors. The route follows the skyline Day 1 We left the Hannegan Pass TH around 2pm and hiked to a camp on the summit of easy peak. Day 2 Finish the easy ridge traverse and drop down to the toe of the ridge. We started just left and uphill of the toe on an obvious ledge. Climb then return via easy pass/imperfect impass back to a camp on the summit of easy peak. NOTE: I bolstered the rap anchor above the second pitch of the impasse and added new tat. There is now a small nut and good KB in addition to the sketchy horn that people had been using. Please do not clean this anchor, this section is about 5.5 and often seeps for long after rains. So it can be nice to have the option to rap. Day 3 Wake up late, and hike out, eating copious berries and taking longer than the approach ?. Here's some photos of the climb Lani starting up the first real pitch Climbing on one of the lower 5.9 pitches Short overhanging crack crux The broad notch halfway up Easy scrambling above the notch Some cool ridge climbing up high A near gendarme towards the top Another view One more view of the ridge, following the skyline. Gear; Single Rack .1 to 3, doubles .3 to .5; small set of nuts and 3 KB's (used extensively). As always, here are my pitch notes, though id hardly recommend this route. In all seriousness, Castle in the Sky is a bonefide modern classic Cascades alpine route, so if you want to do something technical on Whatcom, you should really just do that! P1 100' 5.3 Climb water polished slabs and grooves to a massive ledge (easy solo). Move (or establish) belay to far right end of the ledge P2 200' 5.8 climb a runout mossy dike to a poor belay stance. P3 200' 5.6 Continue up the moss dike to a big ledge system. Traverse the ledge to the right anc belay just before the massive cleft. P4 100' 5.9 Traverse into the gully, climb the sometimes chossy gully and belay below an overhanging OW in a forming cave. P5 100' 5.10a Steep moves to the right exit the gully. Then steep chossy, but well protected climbing gains a ramp then a ledge to belay. P6 100' 5.10+ Trend up cracks to a tree. Awk moves through the tree gain a small ledge. The crux crack lies above. Steep pumpy climbing with barely ok gear leads to a sloping ledge to belay. P7 200' 5.9 Surprisingly techy climbing above the belay relents to chossy low fifth class on the ridge. Stretch your rope and find a belay. P8 200' low fifth Scramble the ridge to some trees. Scramble a few hundred feet to the base of a gendarme P9 250' 5.5 Scramble up a grassy ramp on the right of the gendarme. Belay at a small saddle. A few hundred feet of 4th class through a massive notch in the ridge. This is a possible bivy site or bail point. Several hundred more feet of scrambling up to low fifth leads to a small notch. P10 300' low fifth Scramble a loose gully to where you can find gear to belay. P11 200' 5.5 Continue up the gully to where the ridge knife edges out. P12 200' 5.4 Climb the knife edge ridge to the next notch. P13 600' 5.5 Continue along the ridge to the base of the summit headwall. P14 200' 5.7 Climb the left side of the headwall to a spot just below the summit, then scramble to the summit.
- 6 replies
-
- 10
-
-
-
-
-
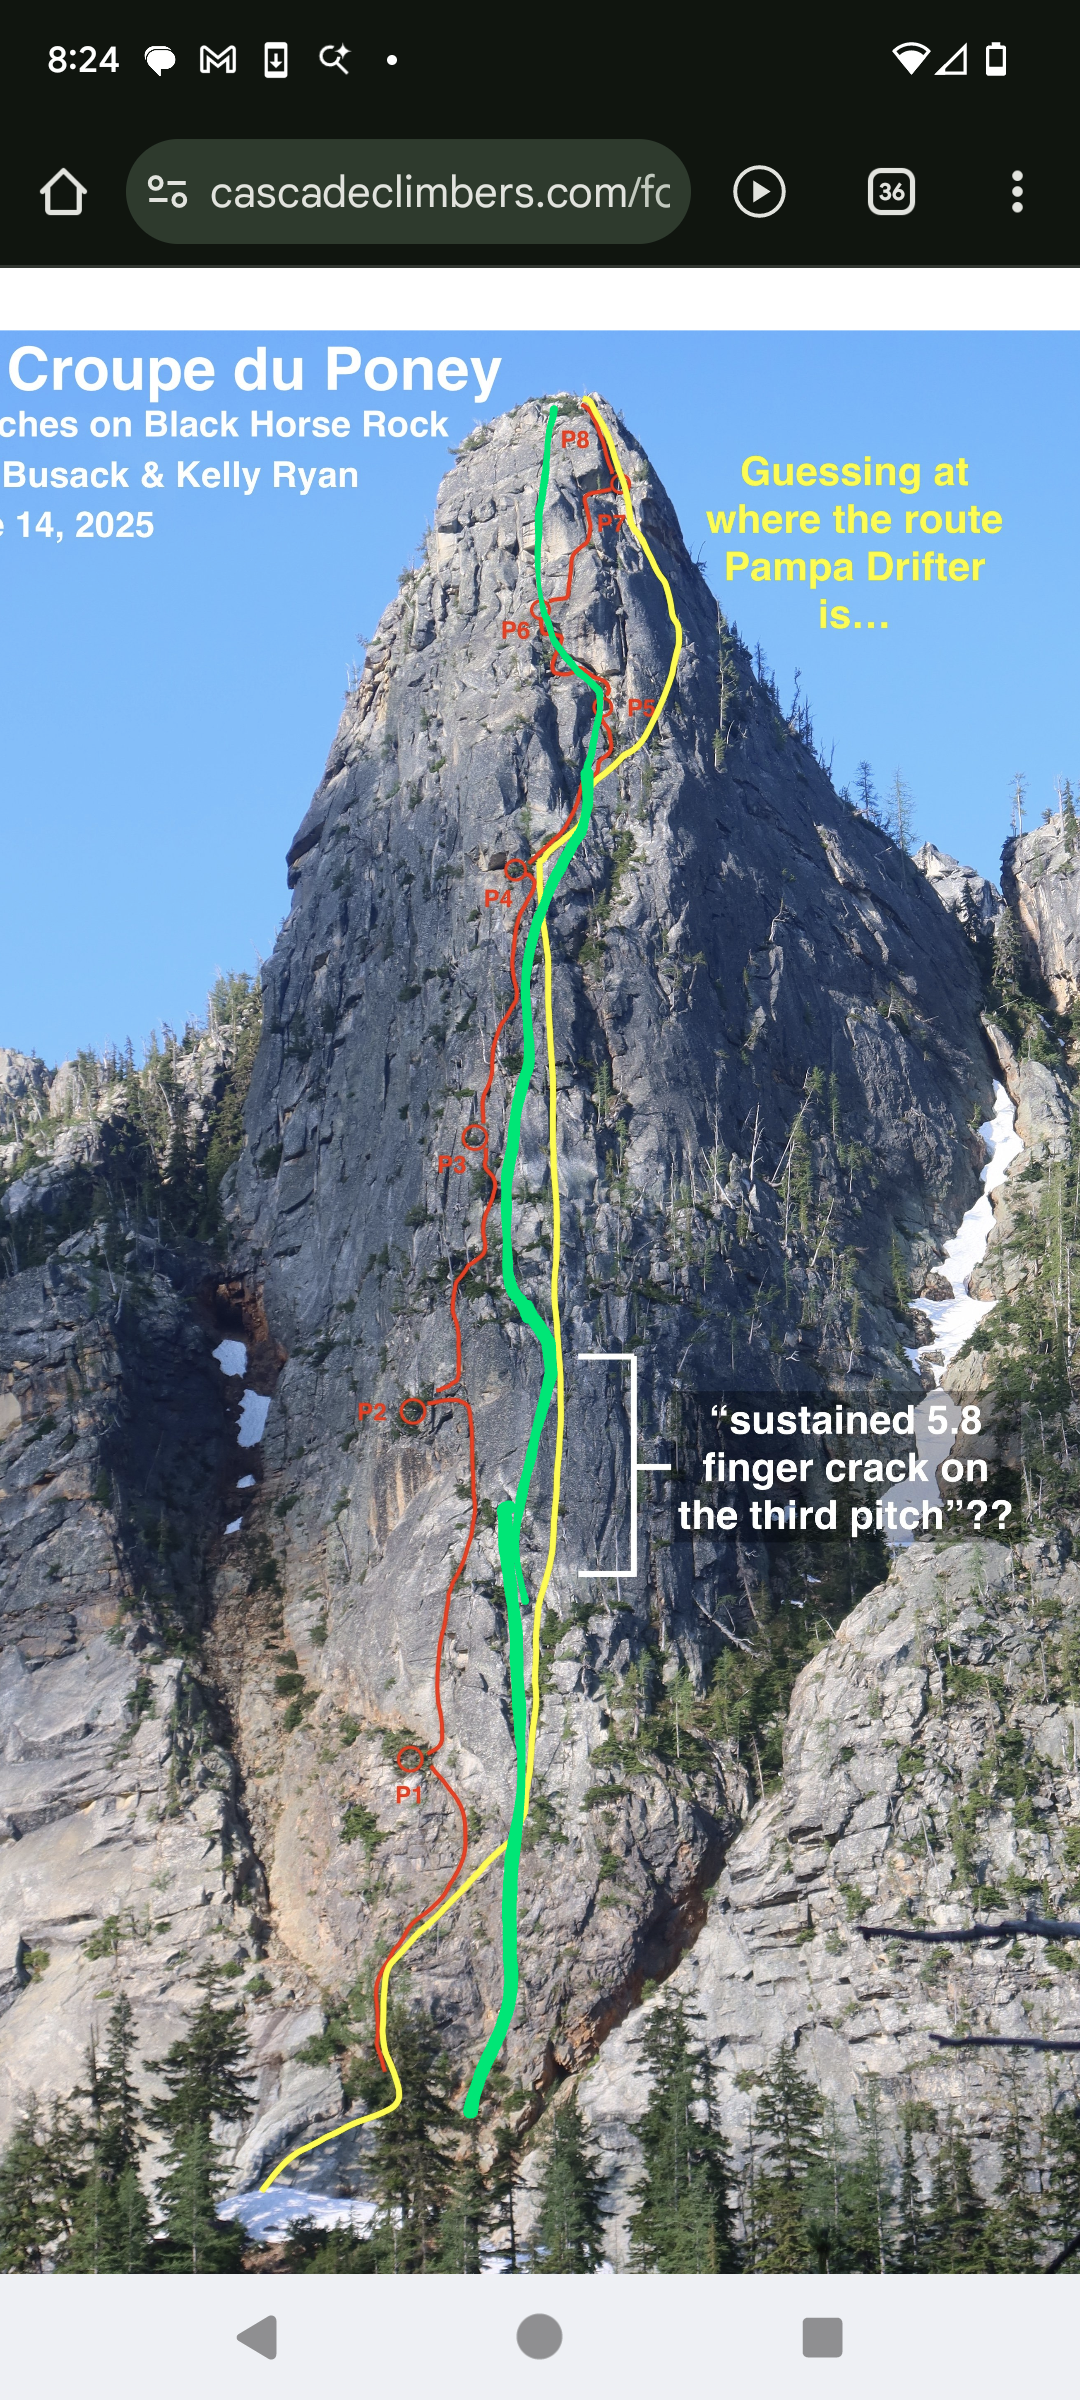
Eric and I did do something up there a couple years ago. I added a very rough photo of where I think we went. Kind of a blur though. We found some nice cracks and a lot of moss. Observed tat all over the place on various trees. I do remember we descended via the le petit cheval gully.
-
Lani will be putting on a sideshow of this climb and a couple others at the mountaineers this coming wed. You don’t have to be a member and they are offering free beer! https://www.mountaineers.org/locations-lodges/seattle-program-center/events/beta-and-brews-lani-chapko-on-castle-in-the-sky-tanuki-ridge-and-planning-a-first-ascent?fbclid=IwAR1iojfALeXLUC5YL4jJX4qEtWqOp3JsWczdOolPKGBmH1FpiKr8mvrI33o_aem_ASHUtgeL2Jfs6GJ7zdPvlY_cXrgrVMB9aihwVIL8Bkk5a_YJw8Z2nqrkXM7_bUJhVuE
-
The name is inspired from the Japanese film Pom Poko. The movie follows some shape shifting raccoon dogs known as Tanuki in a not so subtle commentary on modern development. On The first attempt, we rolled into the crystal creek basin to find that all of the underbrush was trampled, like a herd of dozens of bears had rolled through (with plenty of scat to back it up). It was quite spooky to bivy in the valley. The smoke was epic and there was no signs of life in the valley, quite and desolate. It felt like the Tanuki were fucking with us.
-
Here are the pitch notes I took while on route, for anyone ever interested in repeating. I always try to take pitch notes, both from a sense of eternal optimism and my absolutely horrible memory... There were bouts of really awesome climbing, and a couple engaging pitches with minimal protection, hard climbing and consistently portable holds. P1 5.4 220’ Scramble up white slabs to a good stance below the large, steeper band of darker rock. You are aiming for an obvious, large open book for the next pitch. P2 5.8 190’ Head up into the open book, climbing to its top. Traverse left back into low fifth terrain to a talus covered bowl. P3 5.6 260’ Climb the rib to the right of the bowl past a bunch of scrambling to another large talus ledge. P4 5.9R 140’ Climb through a heinous choss band into a gully with better rock. P5 Low fifth 230’ Scramble up the gully to a solid belay. P6 low 5th 150’ gully P7 5.7 100’ Start up the face. Trend Left to a Left facing corner. Follow this to a good ledge on the prow. P8 5.10a 110’ climb the face past a roof and up a ramp to a second roof. Belay on good ledge. P9 5.10 200’ Climb the thin Right facing corner to a ledge. Then a short steep section takes you to a ramp. Follow this to a Right facing corner. Climb up this to some scrambling that leads to a large ledge. P10 5.7 180’ Climb the low angle, loose face to a shit belay. P11 5.10R 150’ Quest up the face to a decent ledge with a tricky anchor P12 5.10R 180’ Another vision quest pitch to the notch on the shoulder of the ridge. P13 5.10+ 60’ Climb the overhanging splitter to a chossy ramp. P14 5.9 170’ Start up a nice varnished corner that eases to chossy mid fifth P15 5.8 110’ Traverse to the ramp on the right. Follow it to the S ridge P16 4th 250’ A short scramble takes you to the SW summit.
-
I finally was able to figure out getting the heic photos to display correctly in the forum. Apple has unfortunately and intentionally made it almost impossible to change photos to jpegs. Its one of their obnoxious attempts at encouraging people to commit to their entire platform. Luckily though, this is probably my last iphone, after the last IOS update, I have lost a lot of signal sensitivity in the mountains. I also added some rough maps to show where we went and potential optional routes for future parties. @manninjo The best approach in general is via baker river and crystal creek, this is fairly direct, with minimal bushwhacking and the least amount of gain. The best way to return to the Baker River TH without linking into the traverse would be to descend the standard E ridge route on Seahpo, then descend the first immediate drainage down into crystal creek basin (following somewhat closely underneath the ridge). We have been most of the way down these slabs, but not all the way, it looked like you would have to establish a few raps near the bottom when the slabs steepen. There looked to be ample trees and the terrain looked fairly easy/non-committing. Another approach would be to come in via the Ruth-Icy traverse. Then set up a camp at the Icy-Seahpo col, doing this slab descent as your approach to the climb. If done this way, it might be possible to do the whole ridge in a mega push and return to camp at the col. There appears to be two options to bypass Tanuki Tower for those who prefer to avoid the munge. Option 1 would be to climb the slabby ridge feature to the left of the ridge amongst the waterfalls. This looked no harder than 5.8 and would provide access to the glacial basin on the S side of the ridge. This approach would have the benefit of looking fairly munge free while avoiding a potentially questy and undone bushwhack. Option 2 would require an approach from the baker river side, the maps suggest its possible to bushwhack up the ridge to the climbers left of crystal creek, aiming for the talus and slabs that lead to the hanging glacial basin that could provide access for a bypass. All that being said, the munge pitches aren't that bad and are fairly short lived, anyone accustomed to the style of blue collar munge found in the cascades shouldn't be too phased by the climbing on Tanuki Tower. Think like a 5.9 version of Jo-Berg or N face of Index...
-
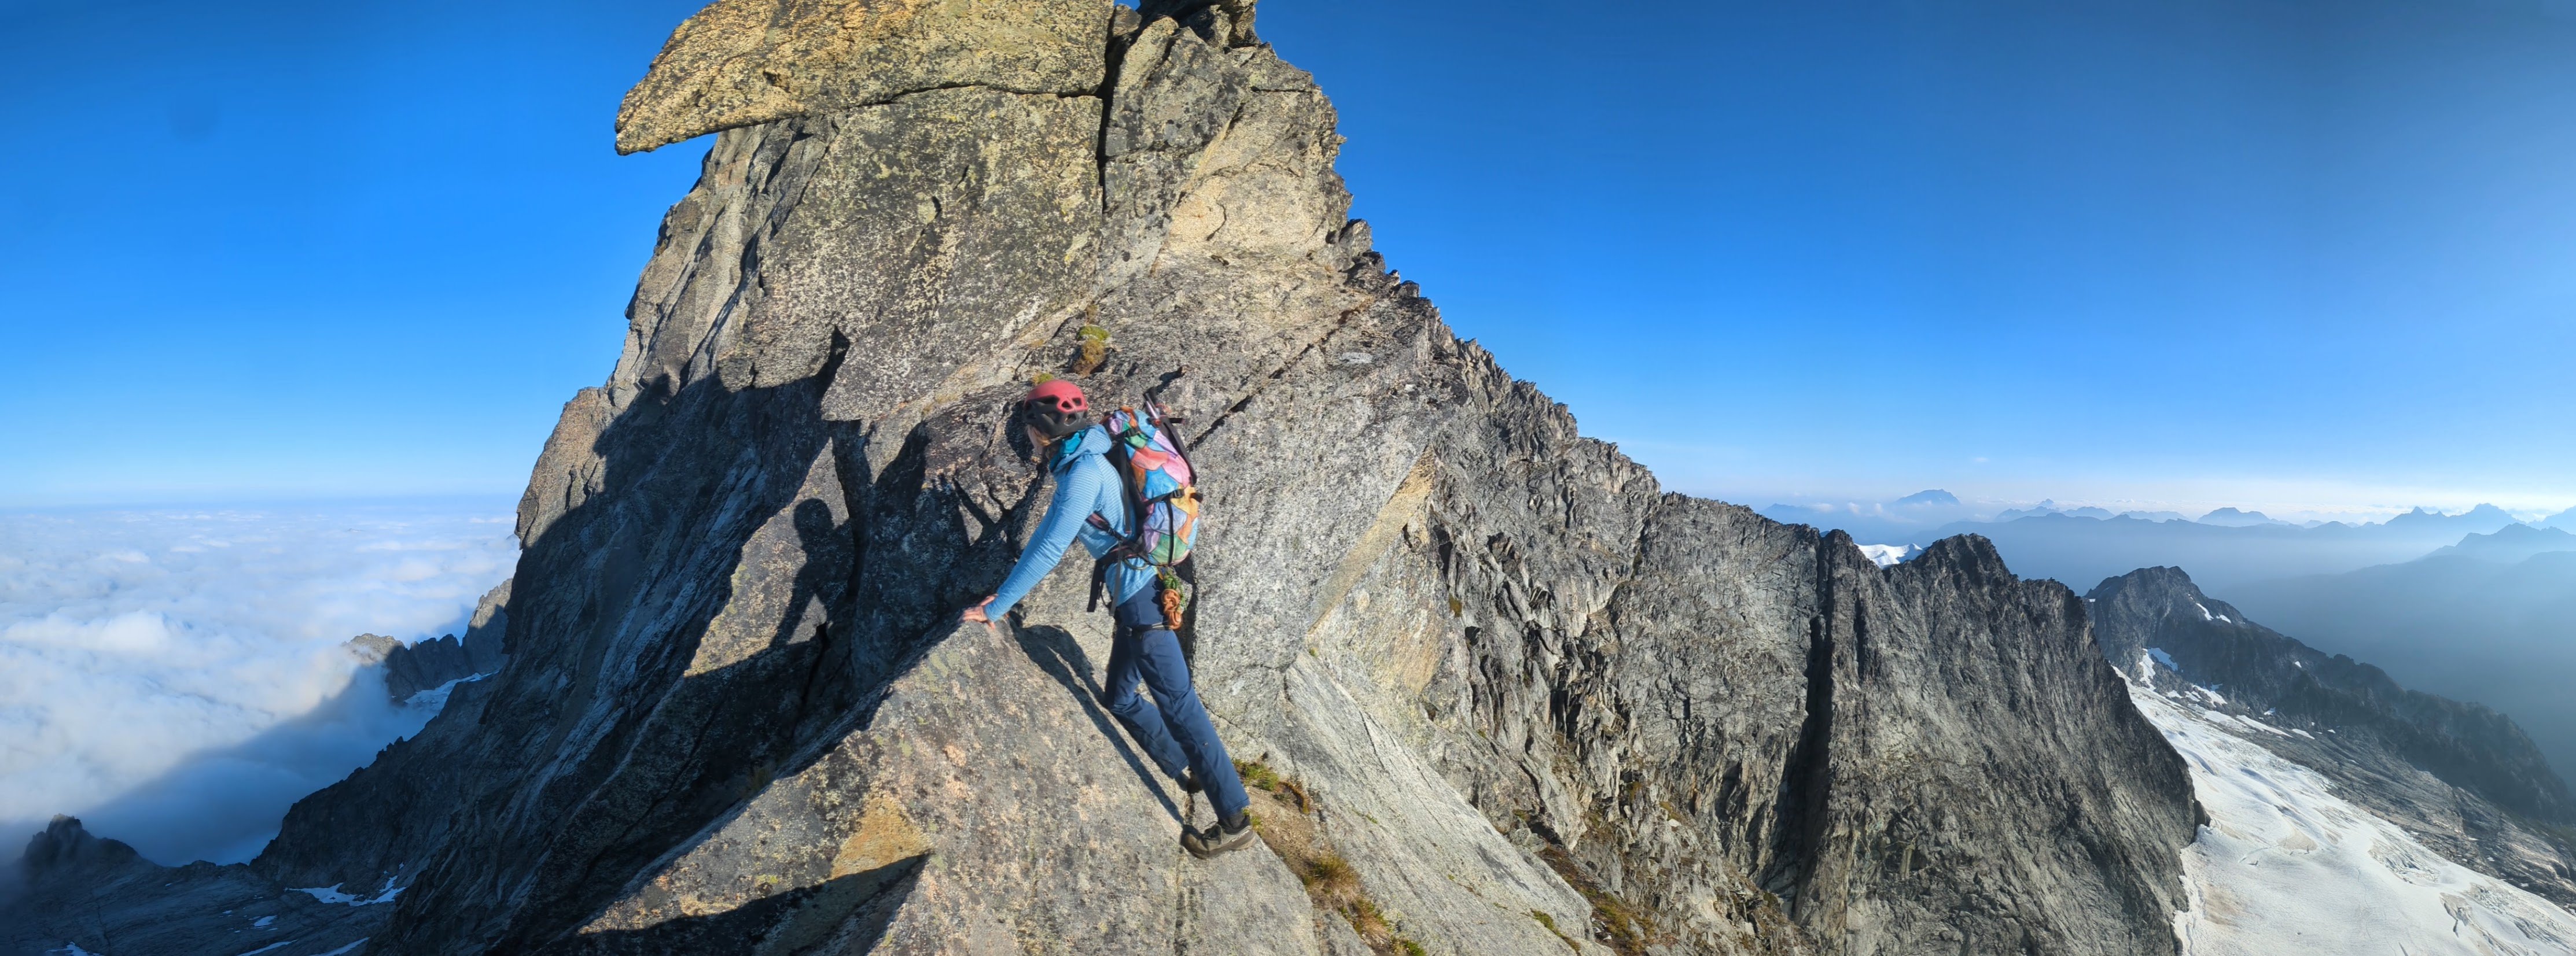
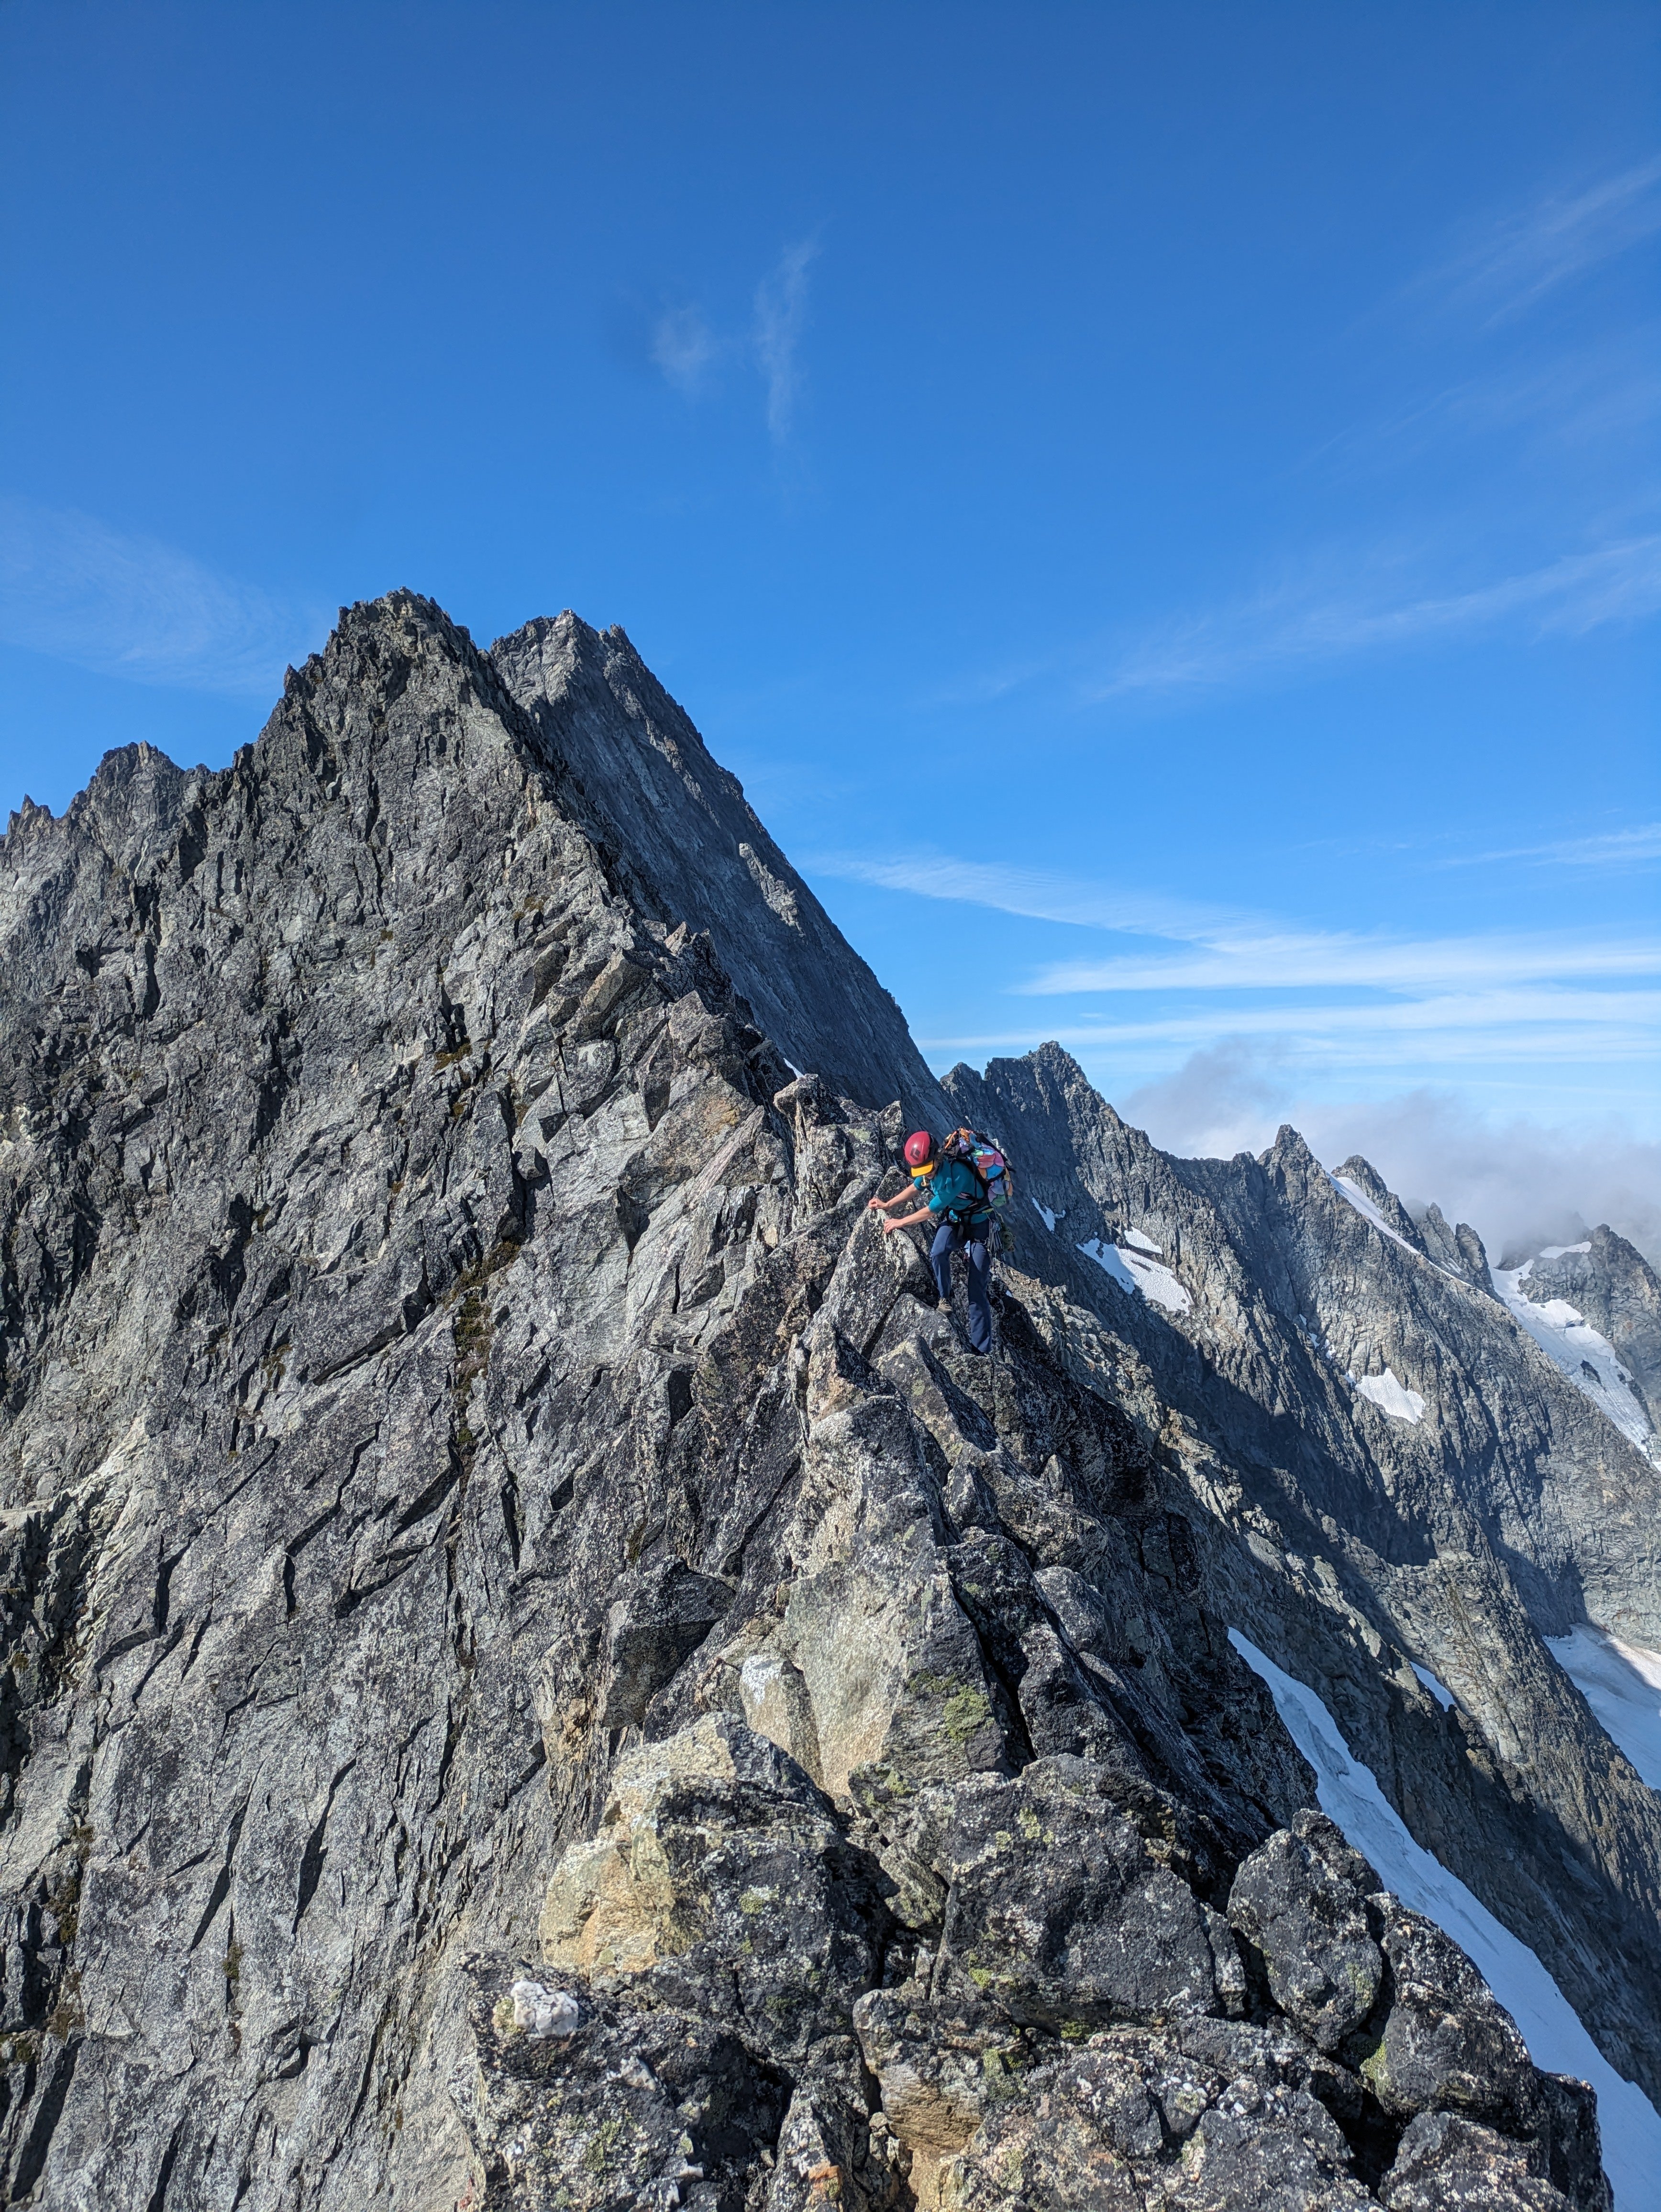
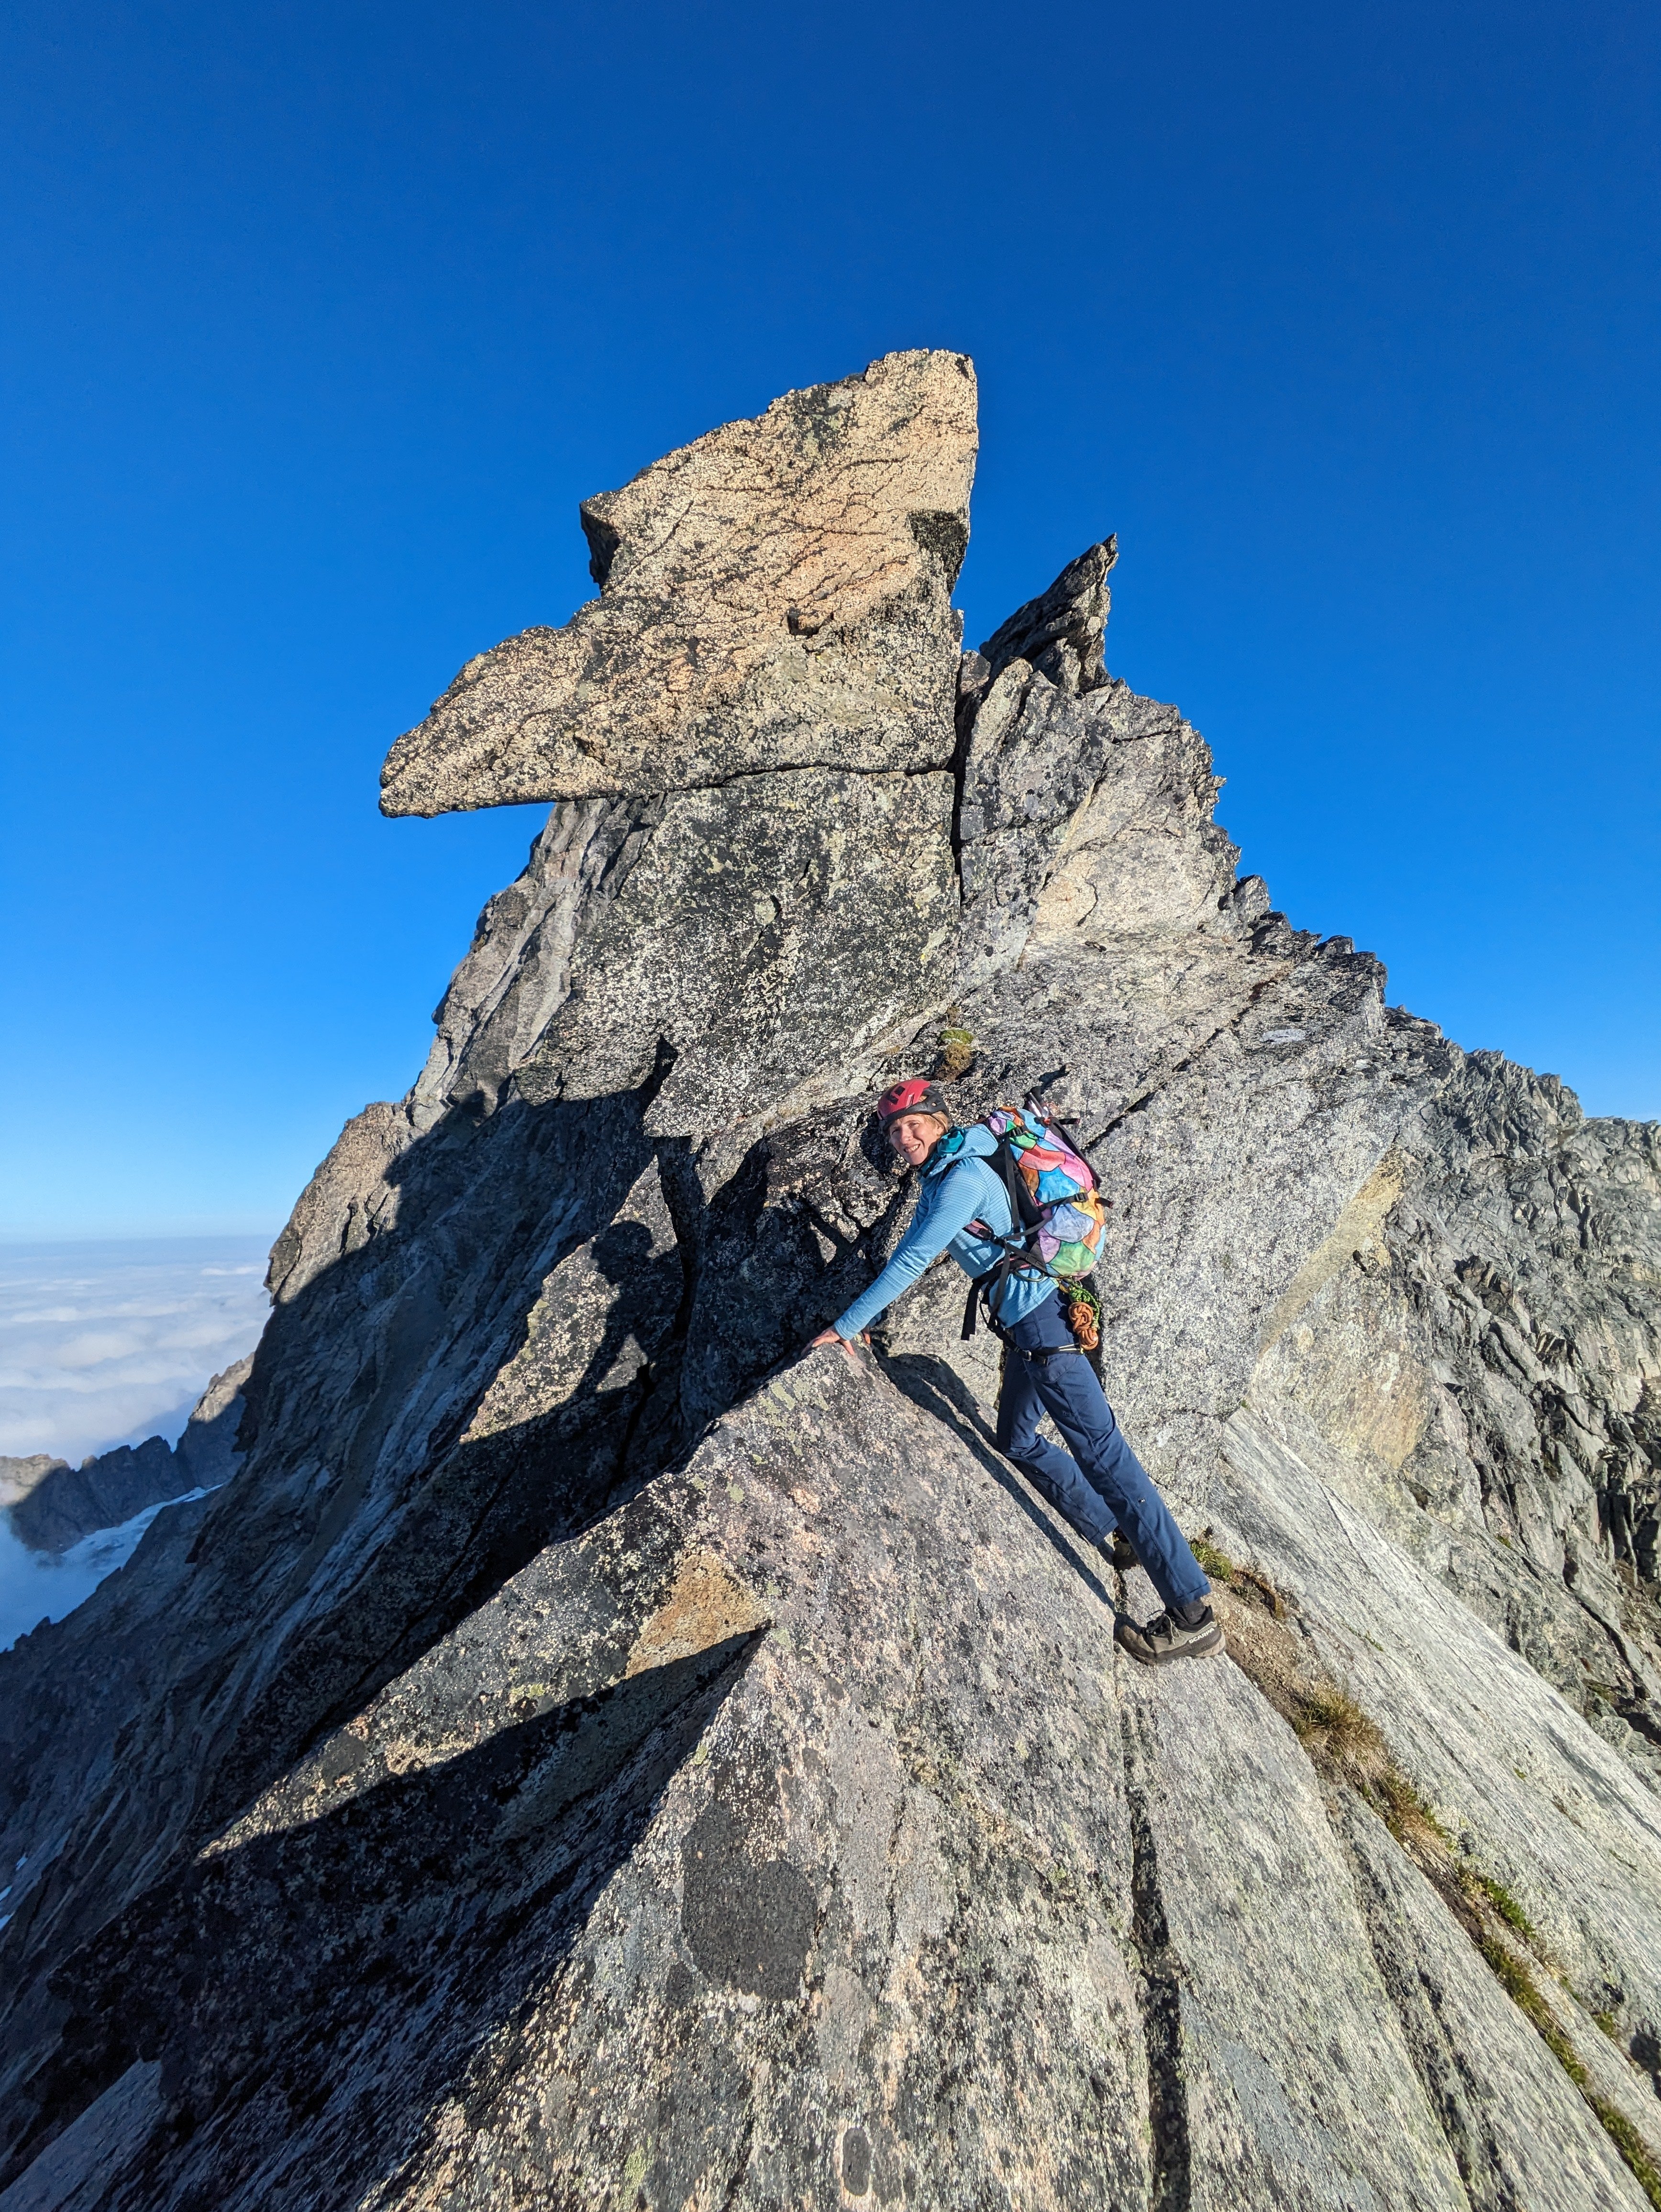
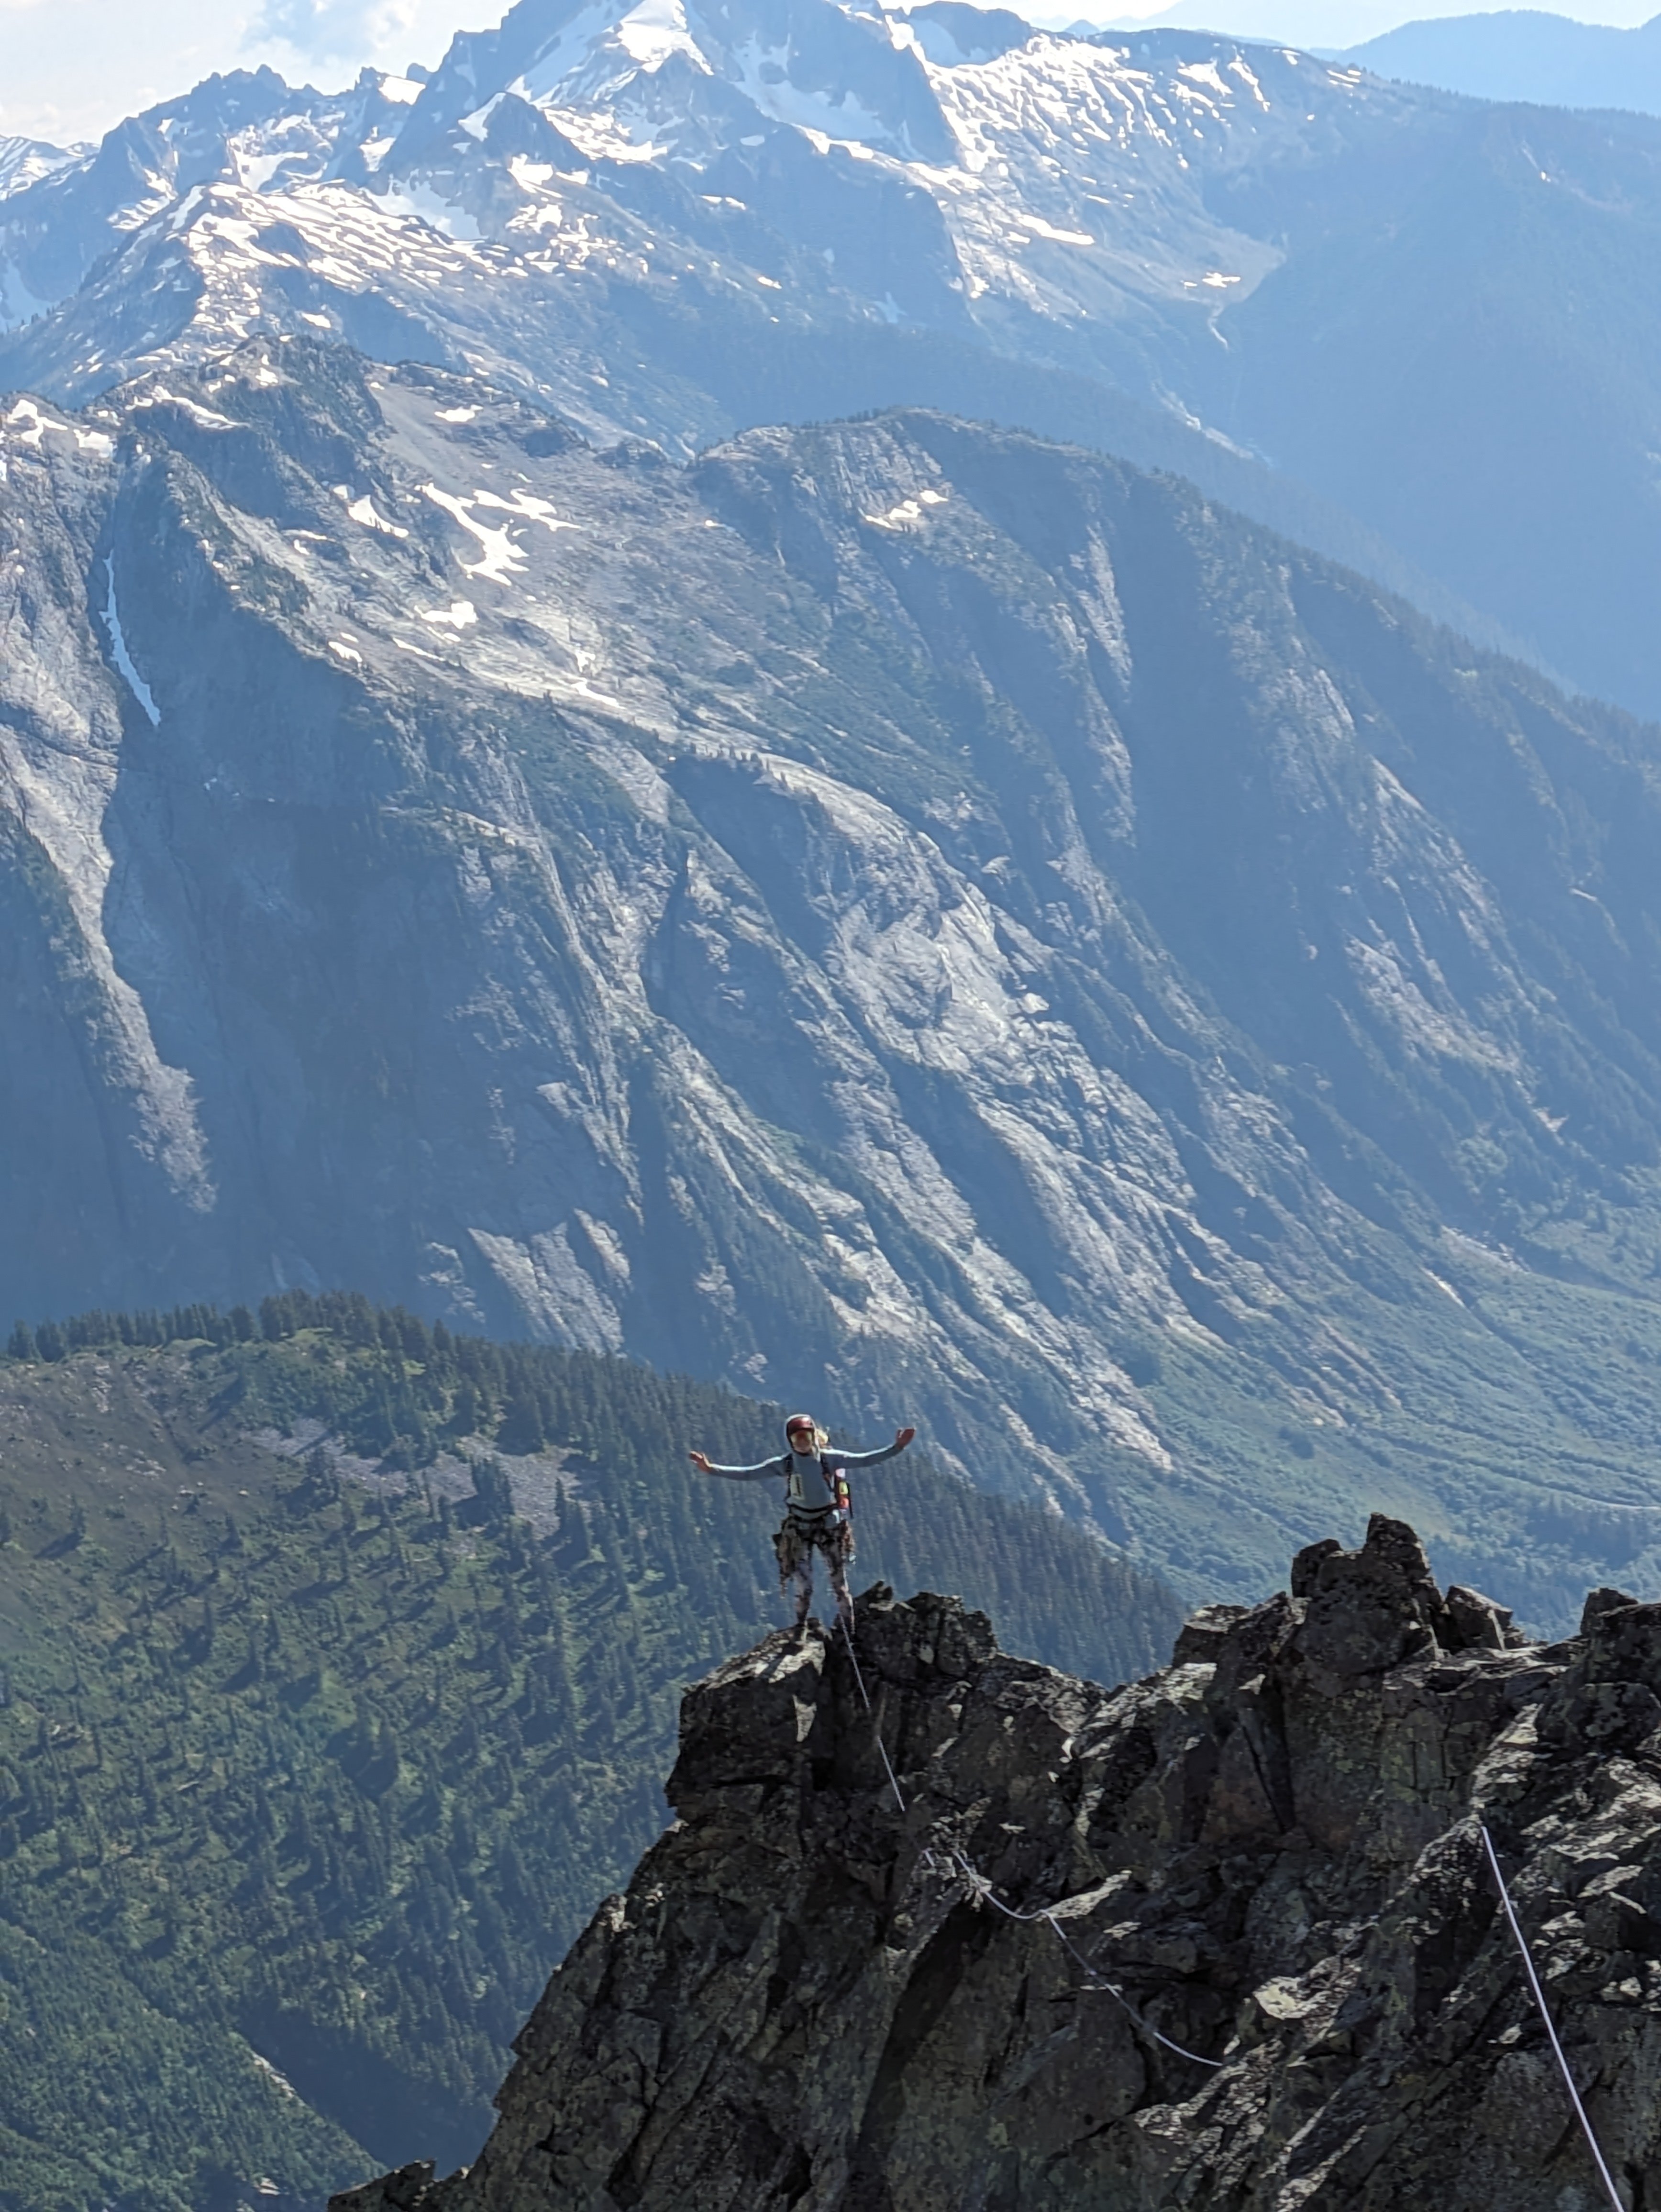
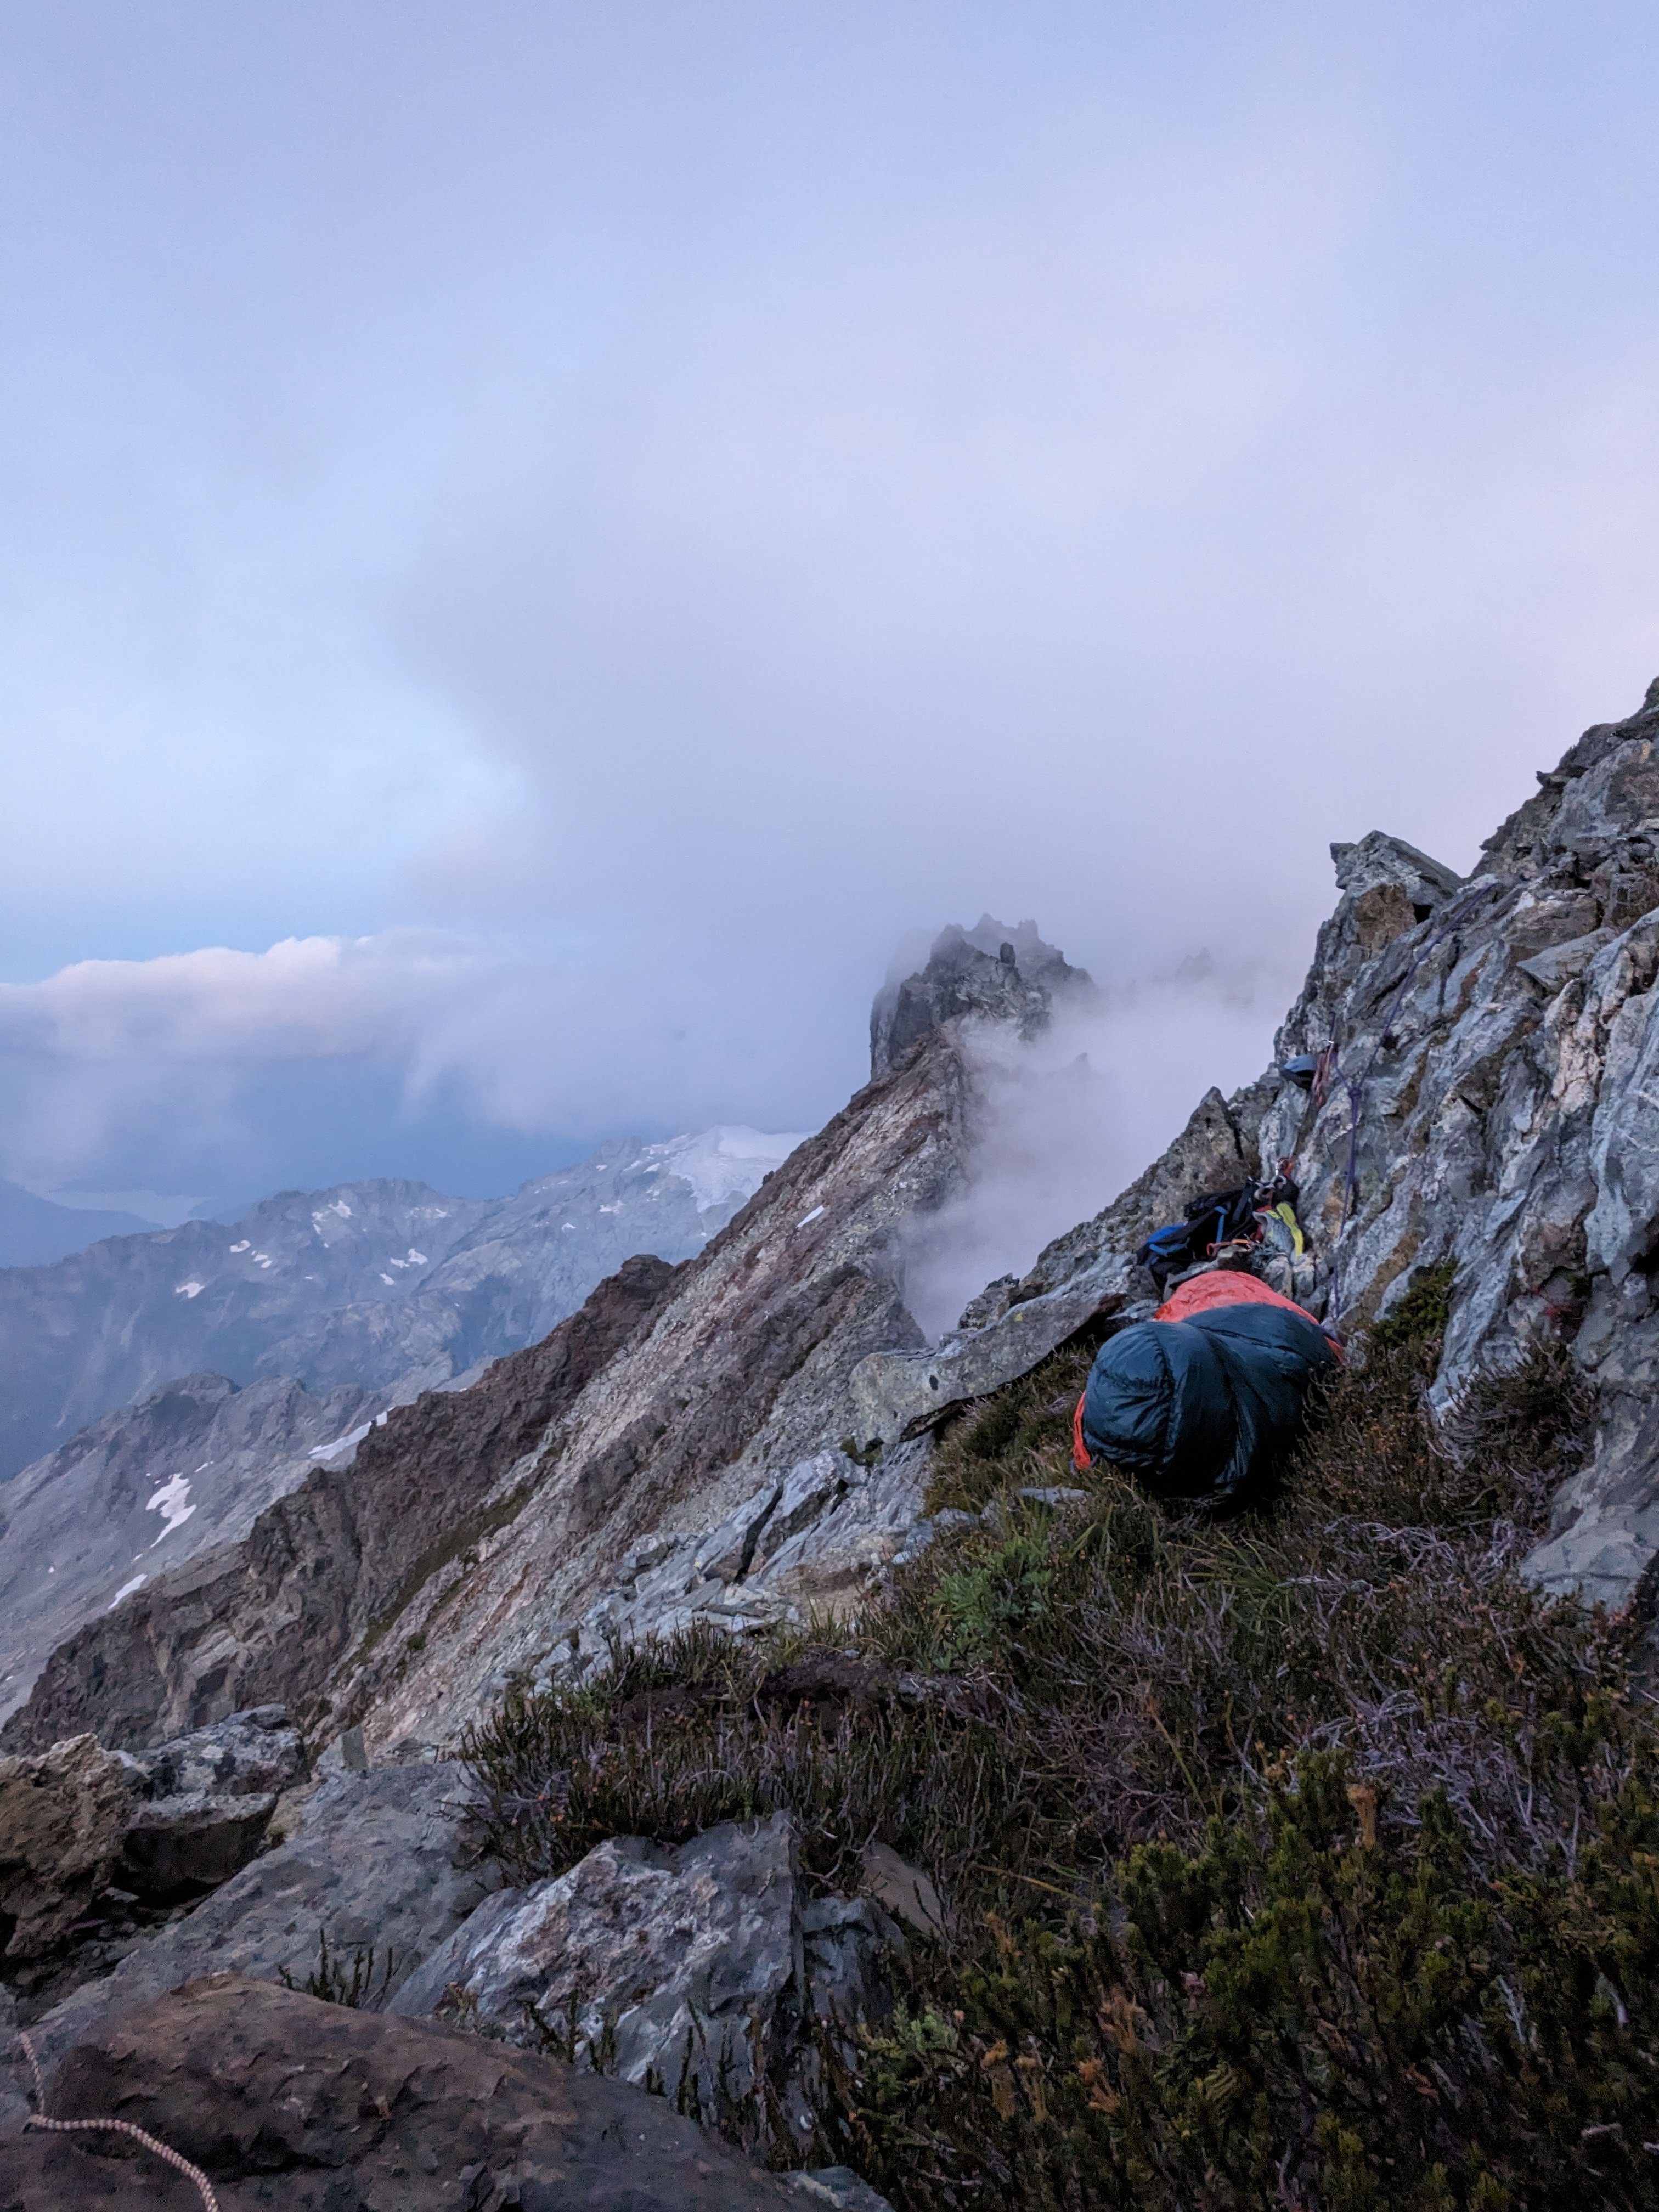
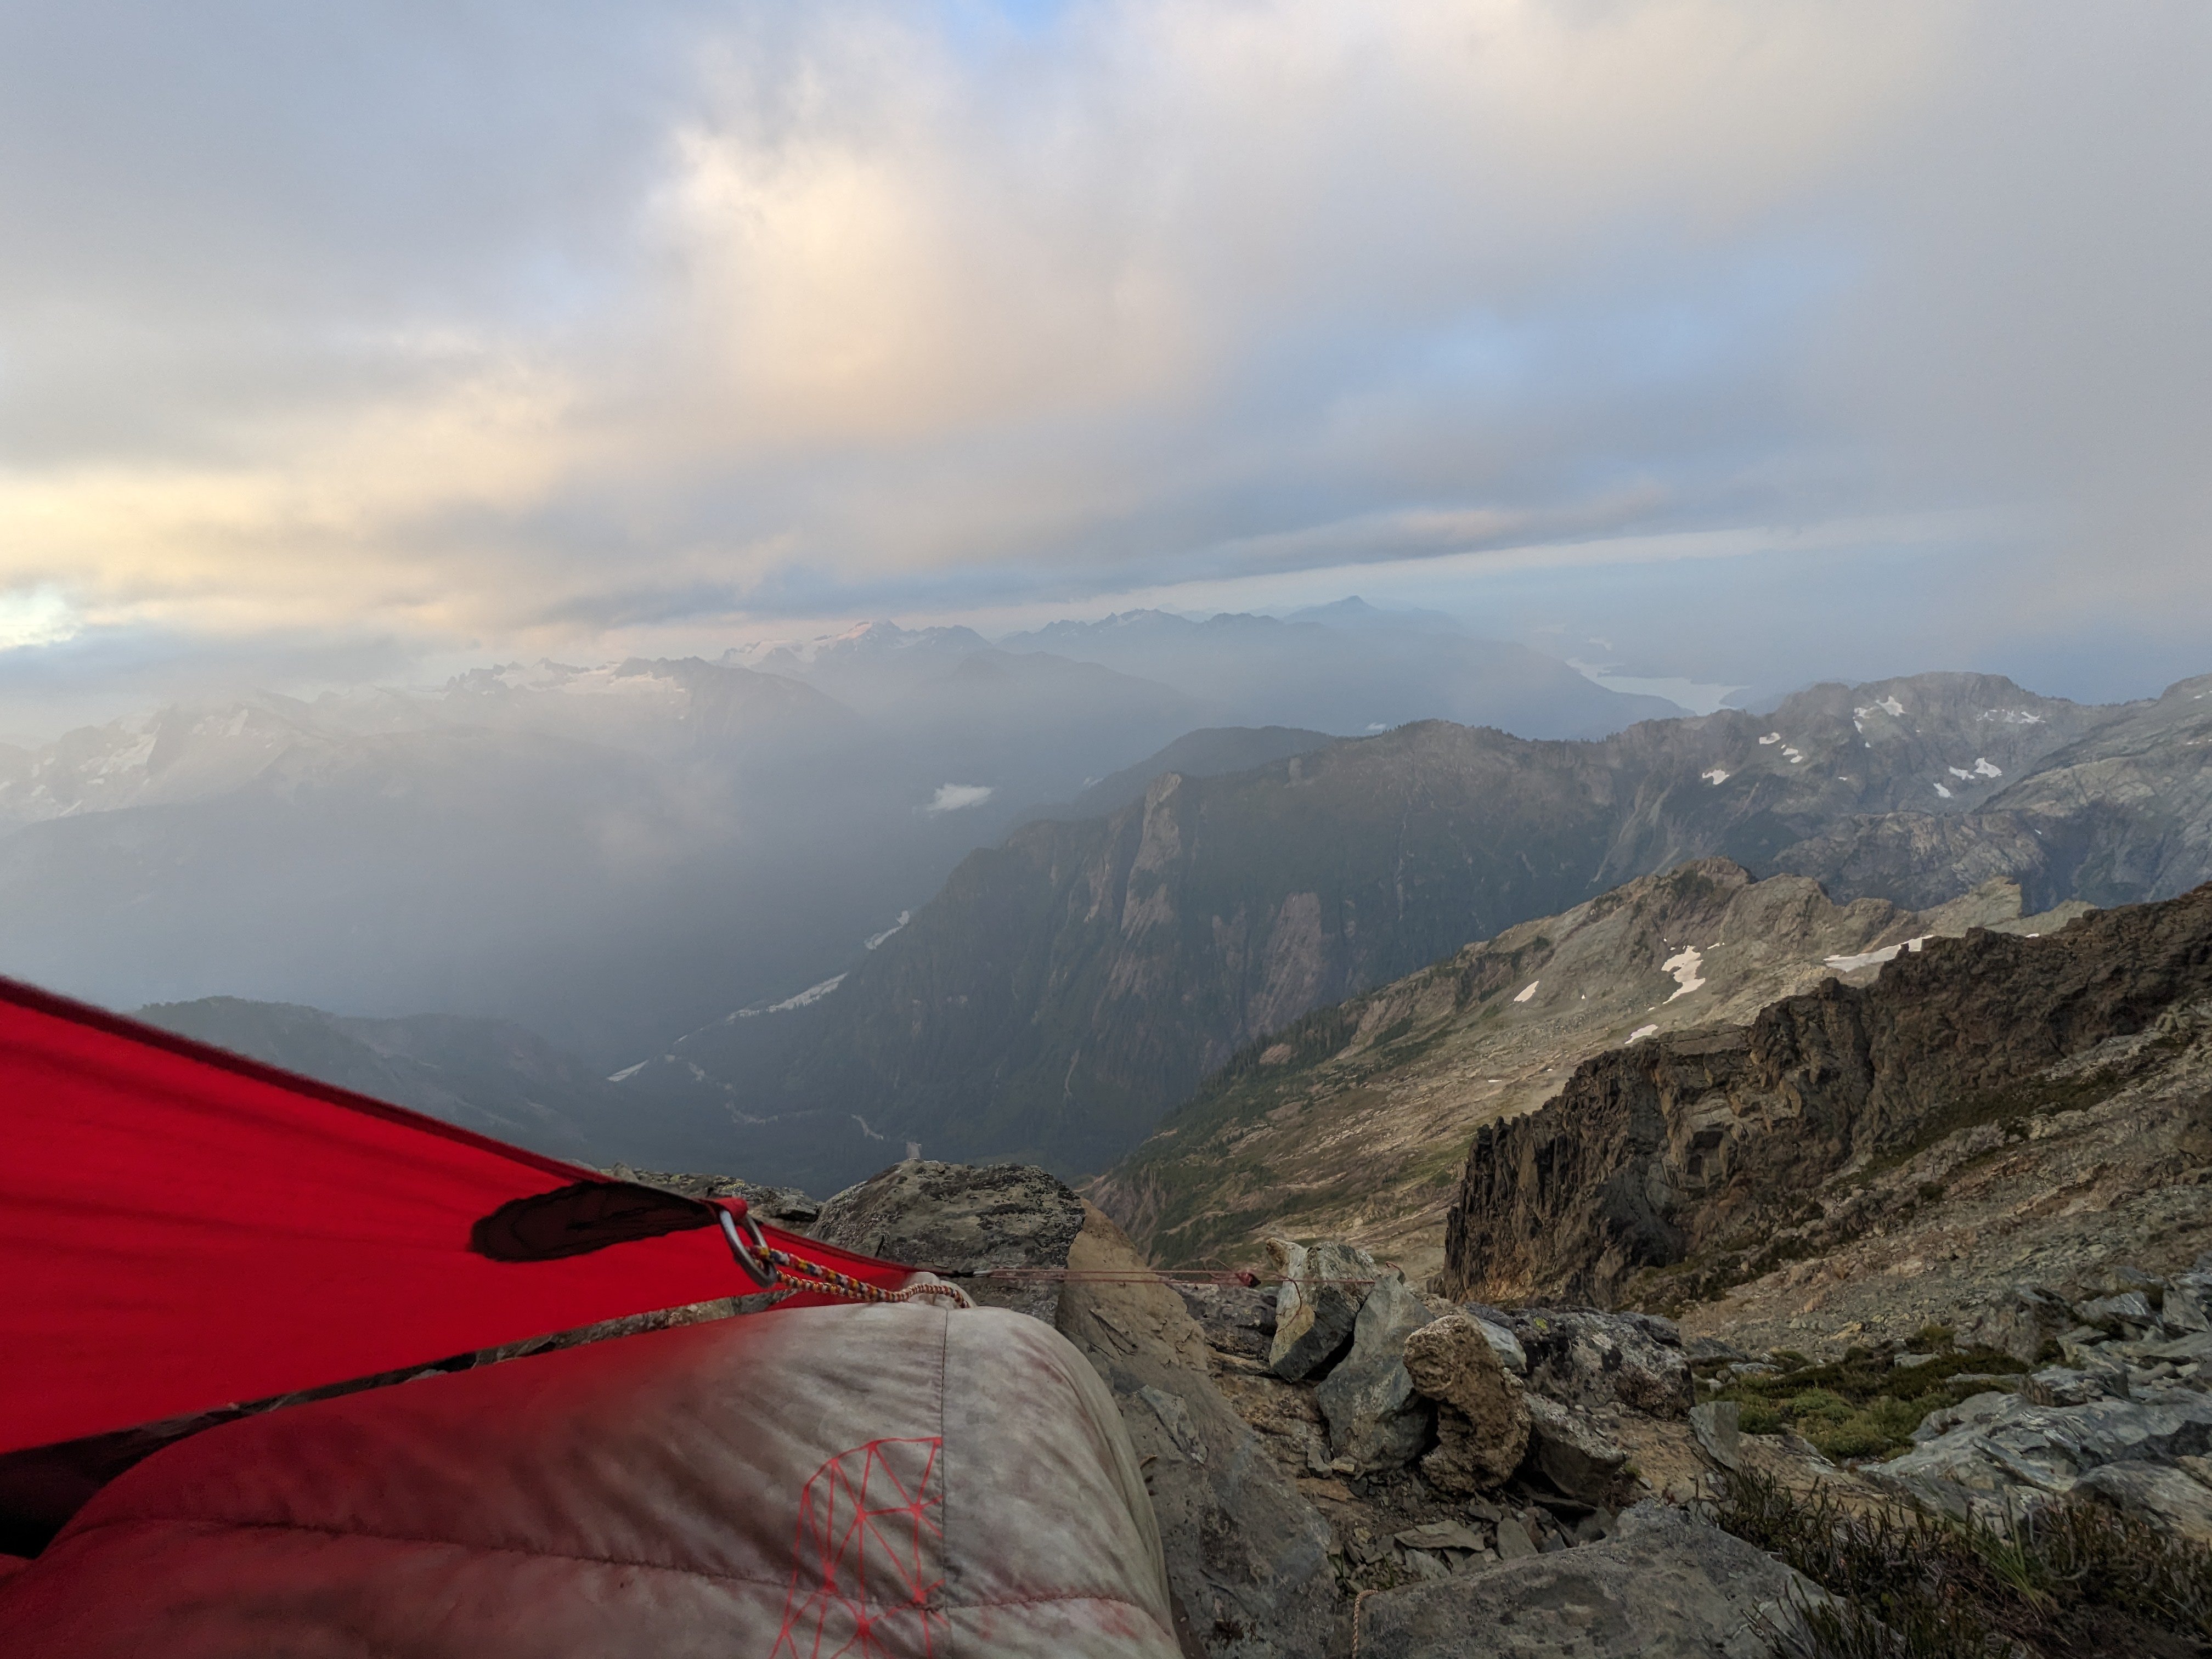
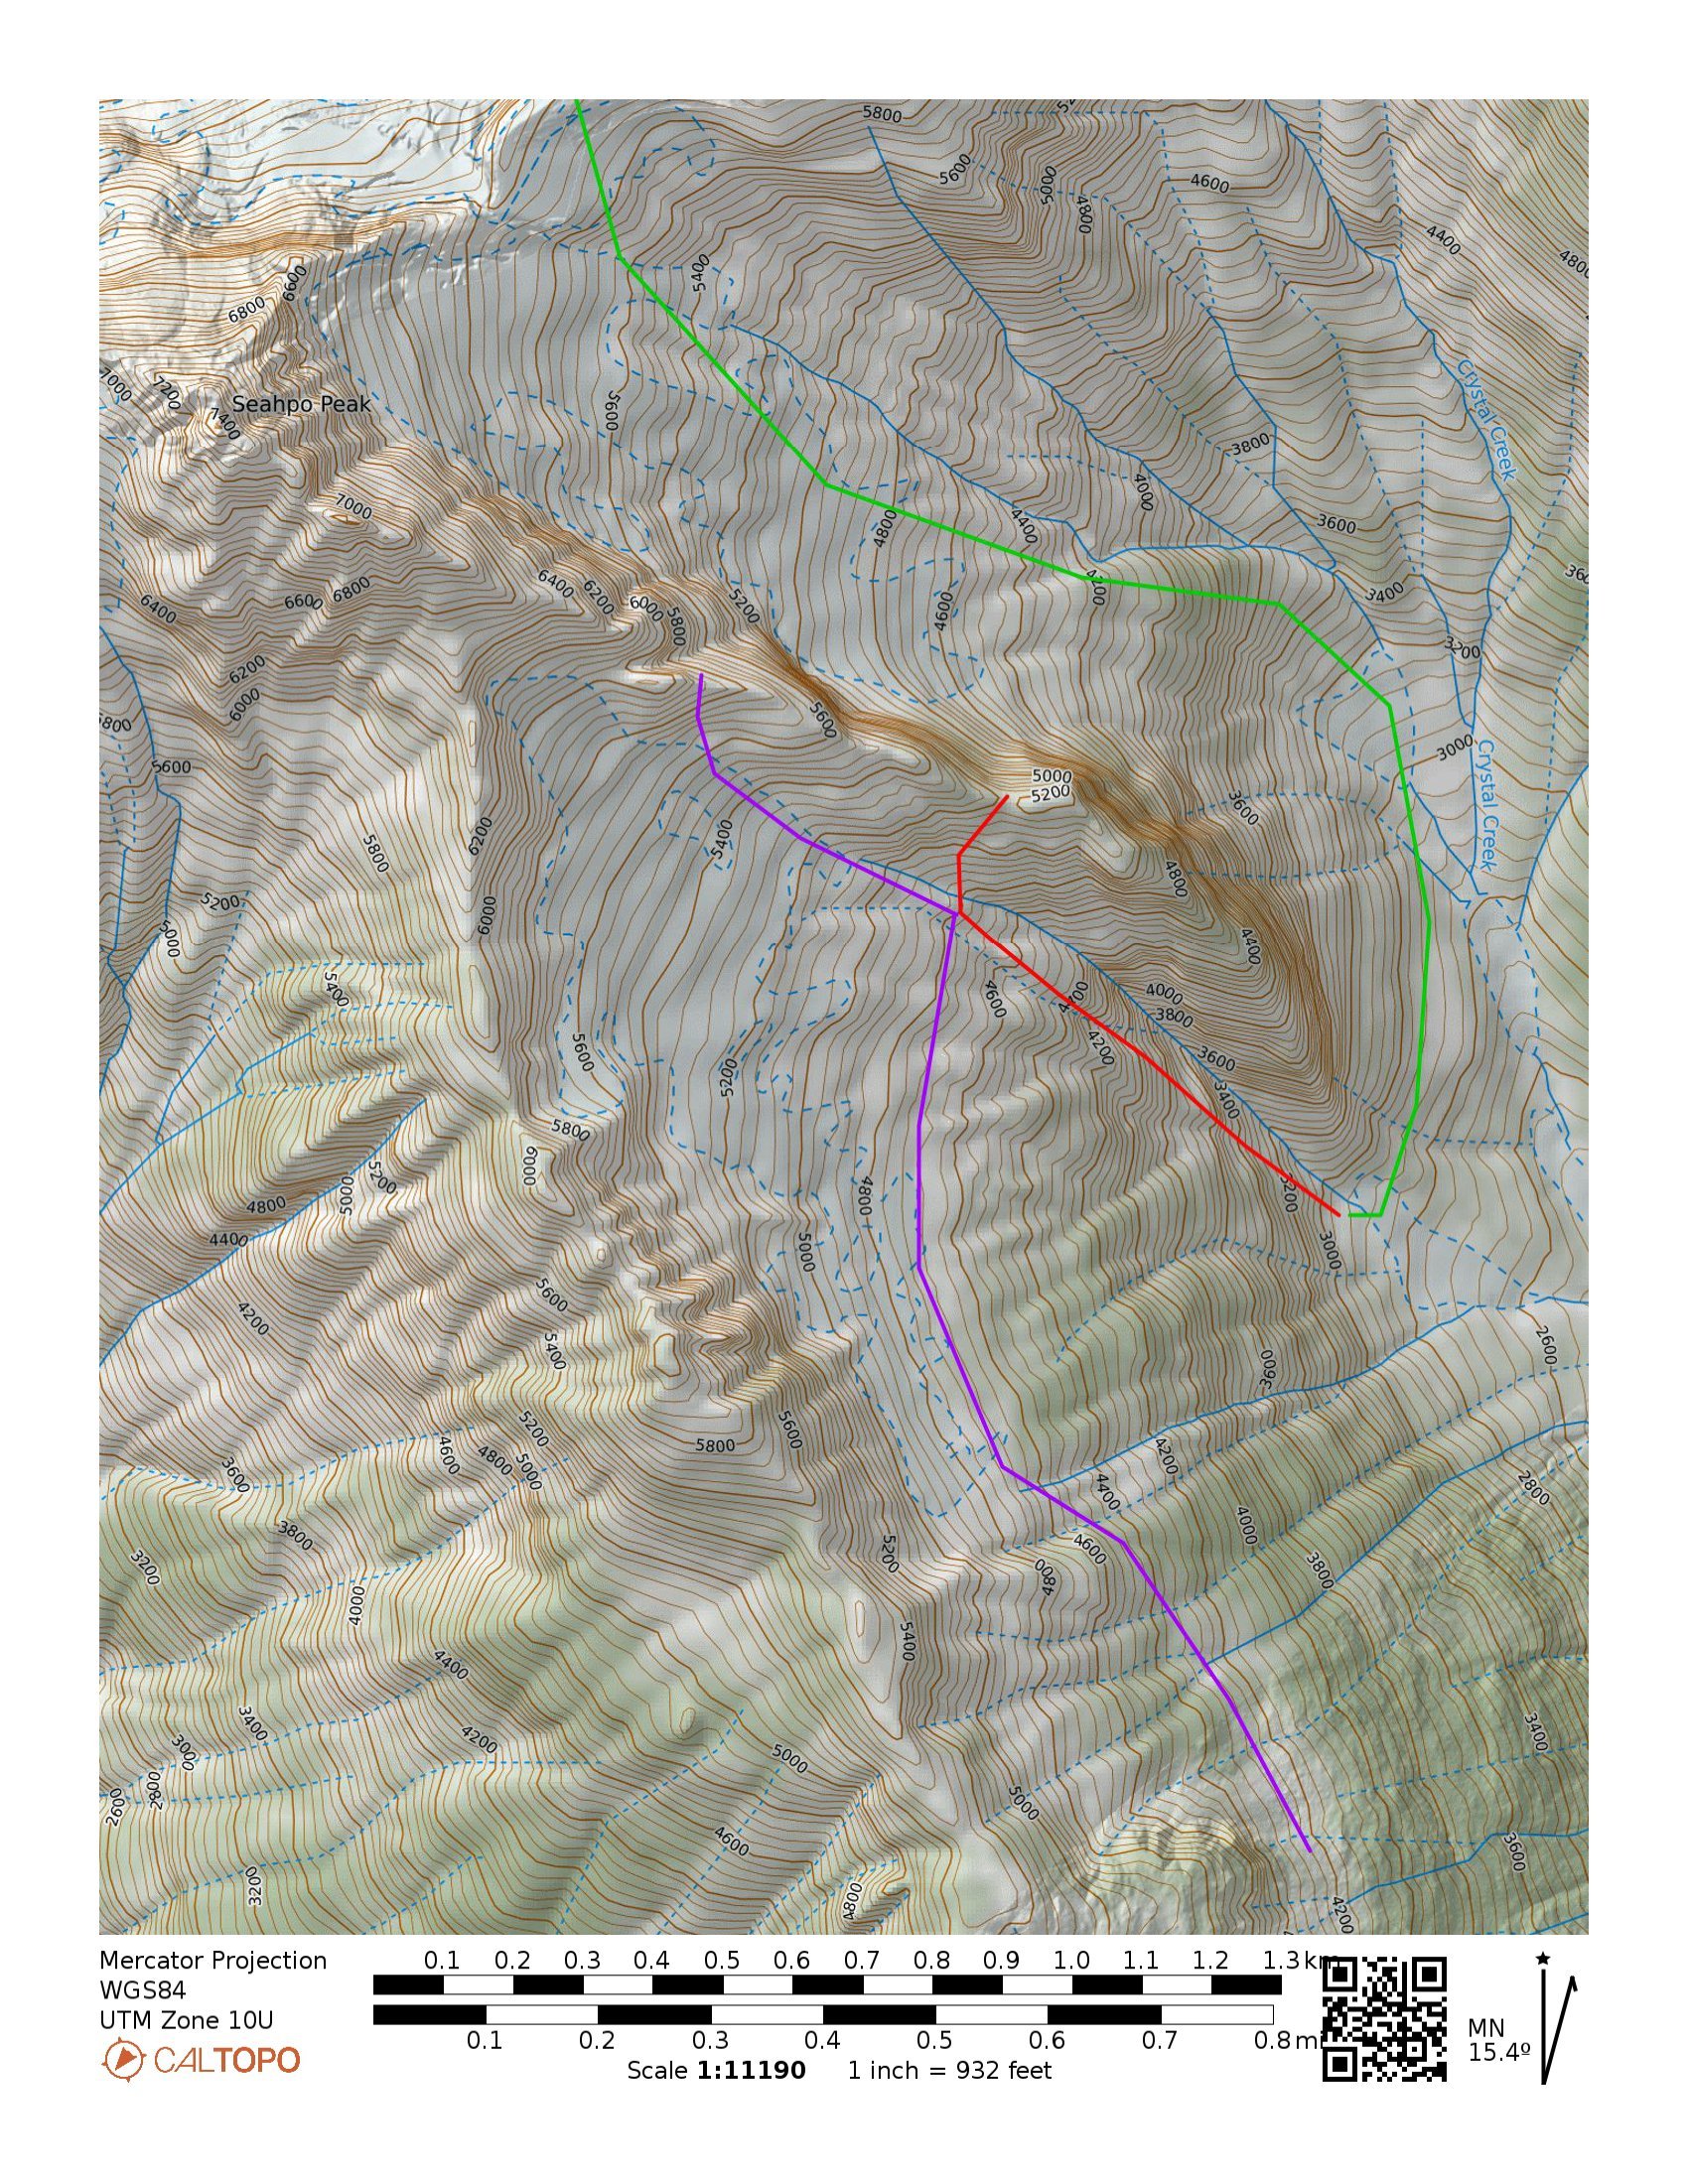
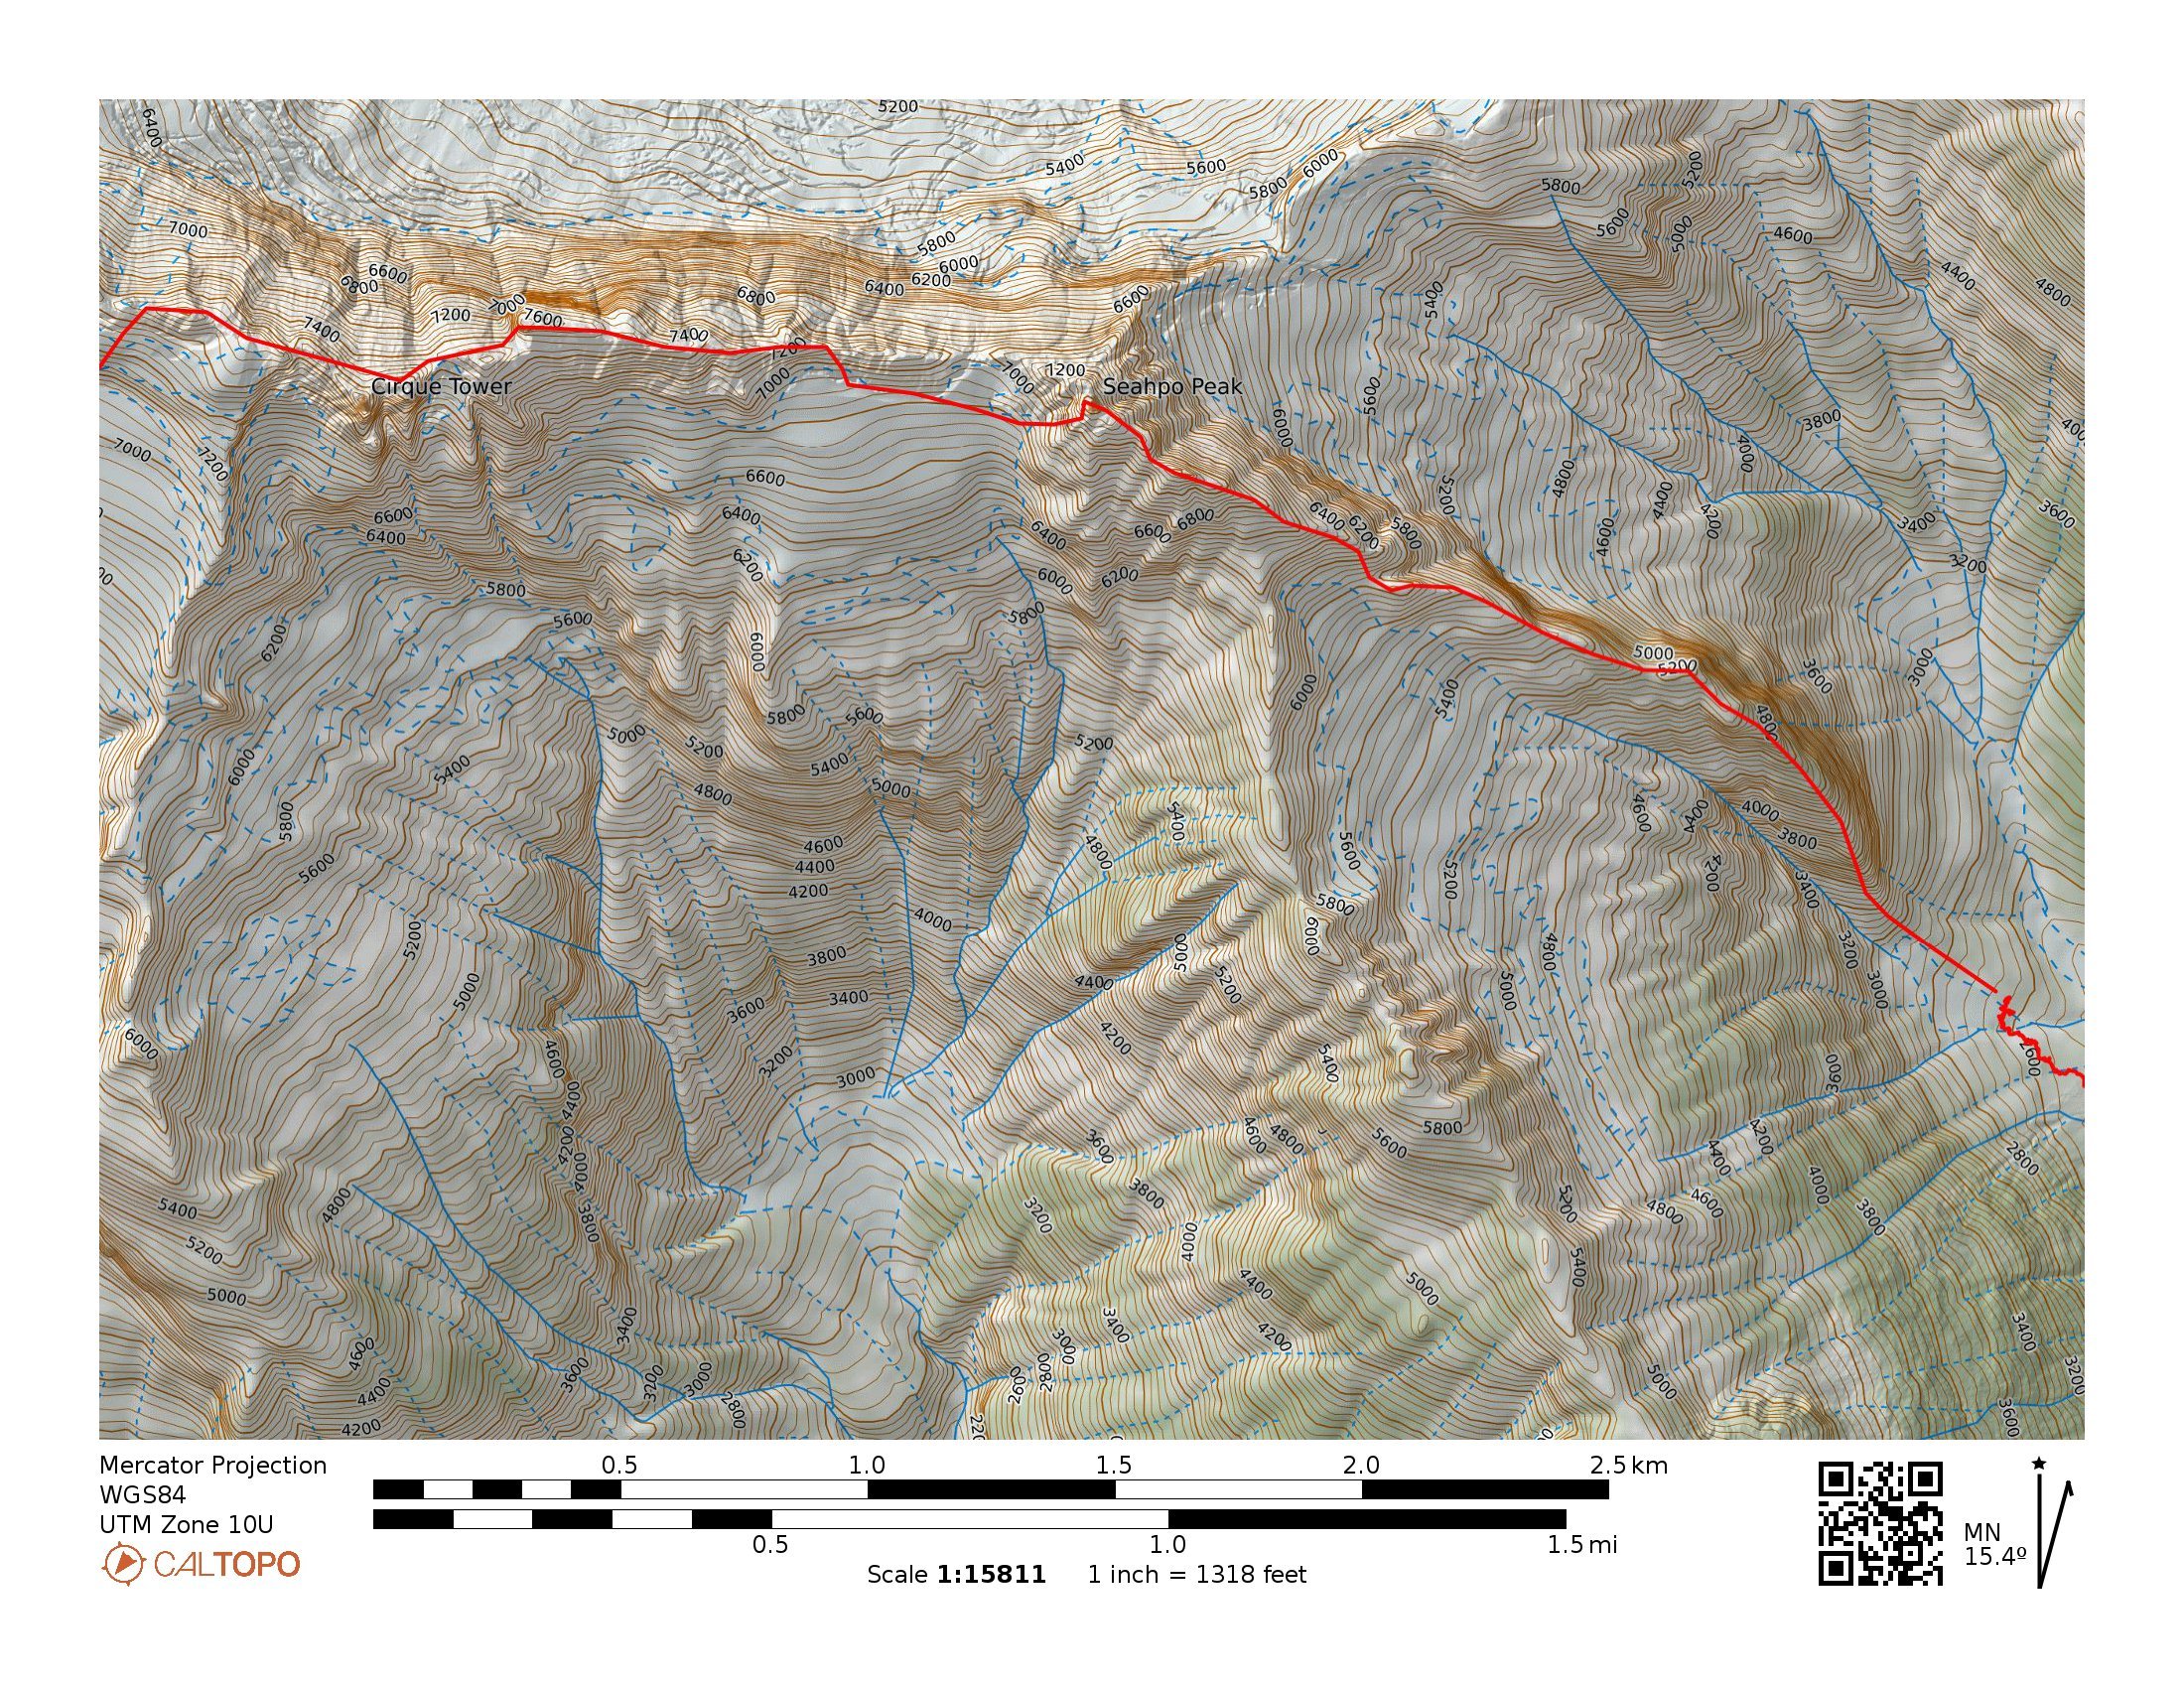
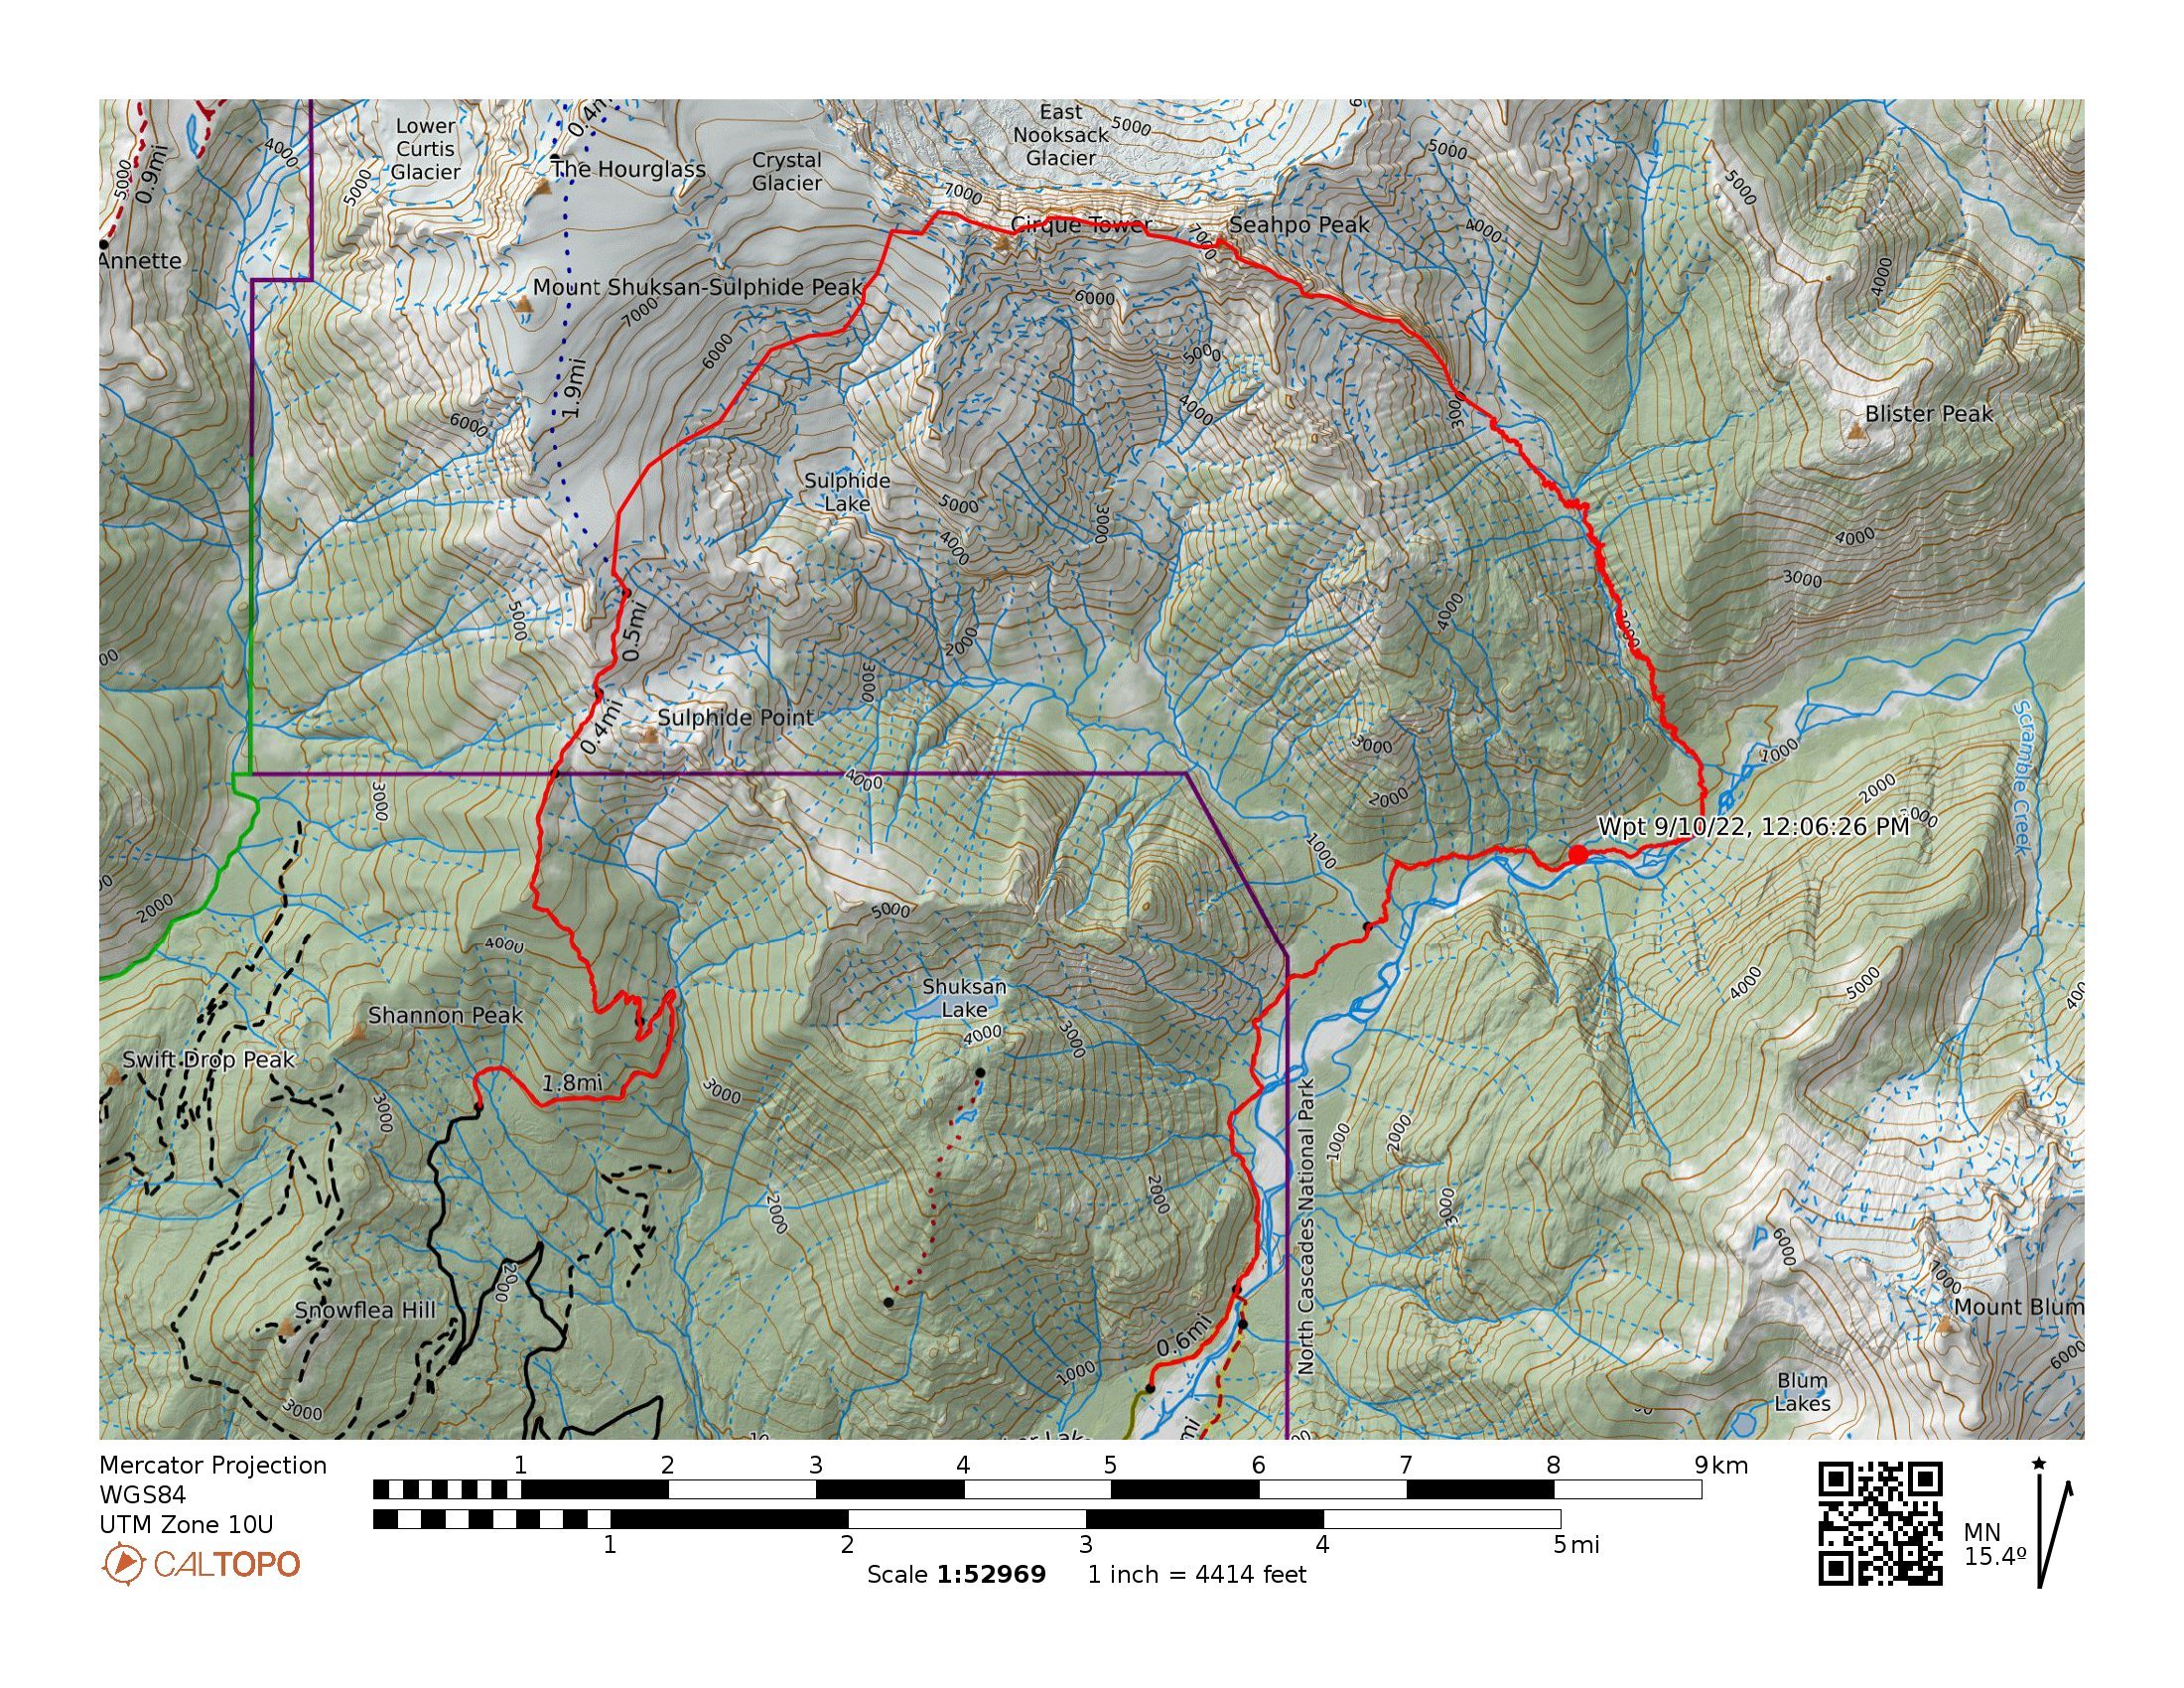
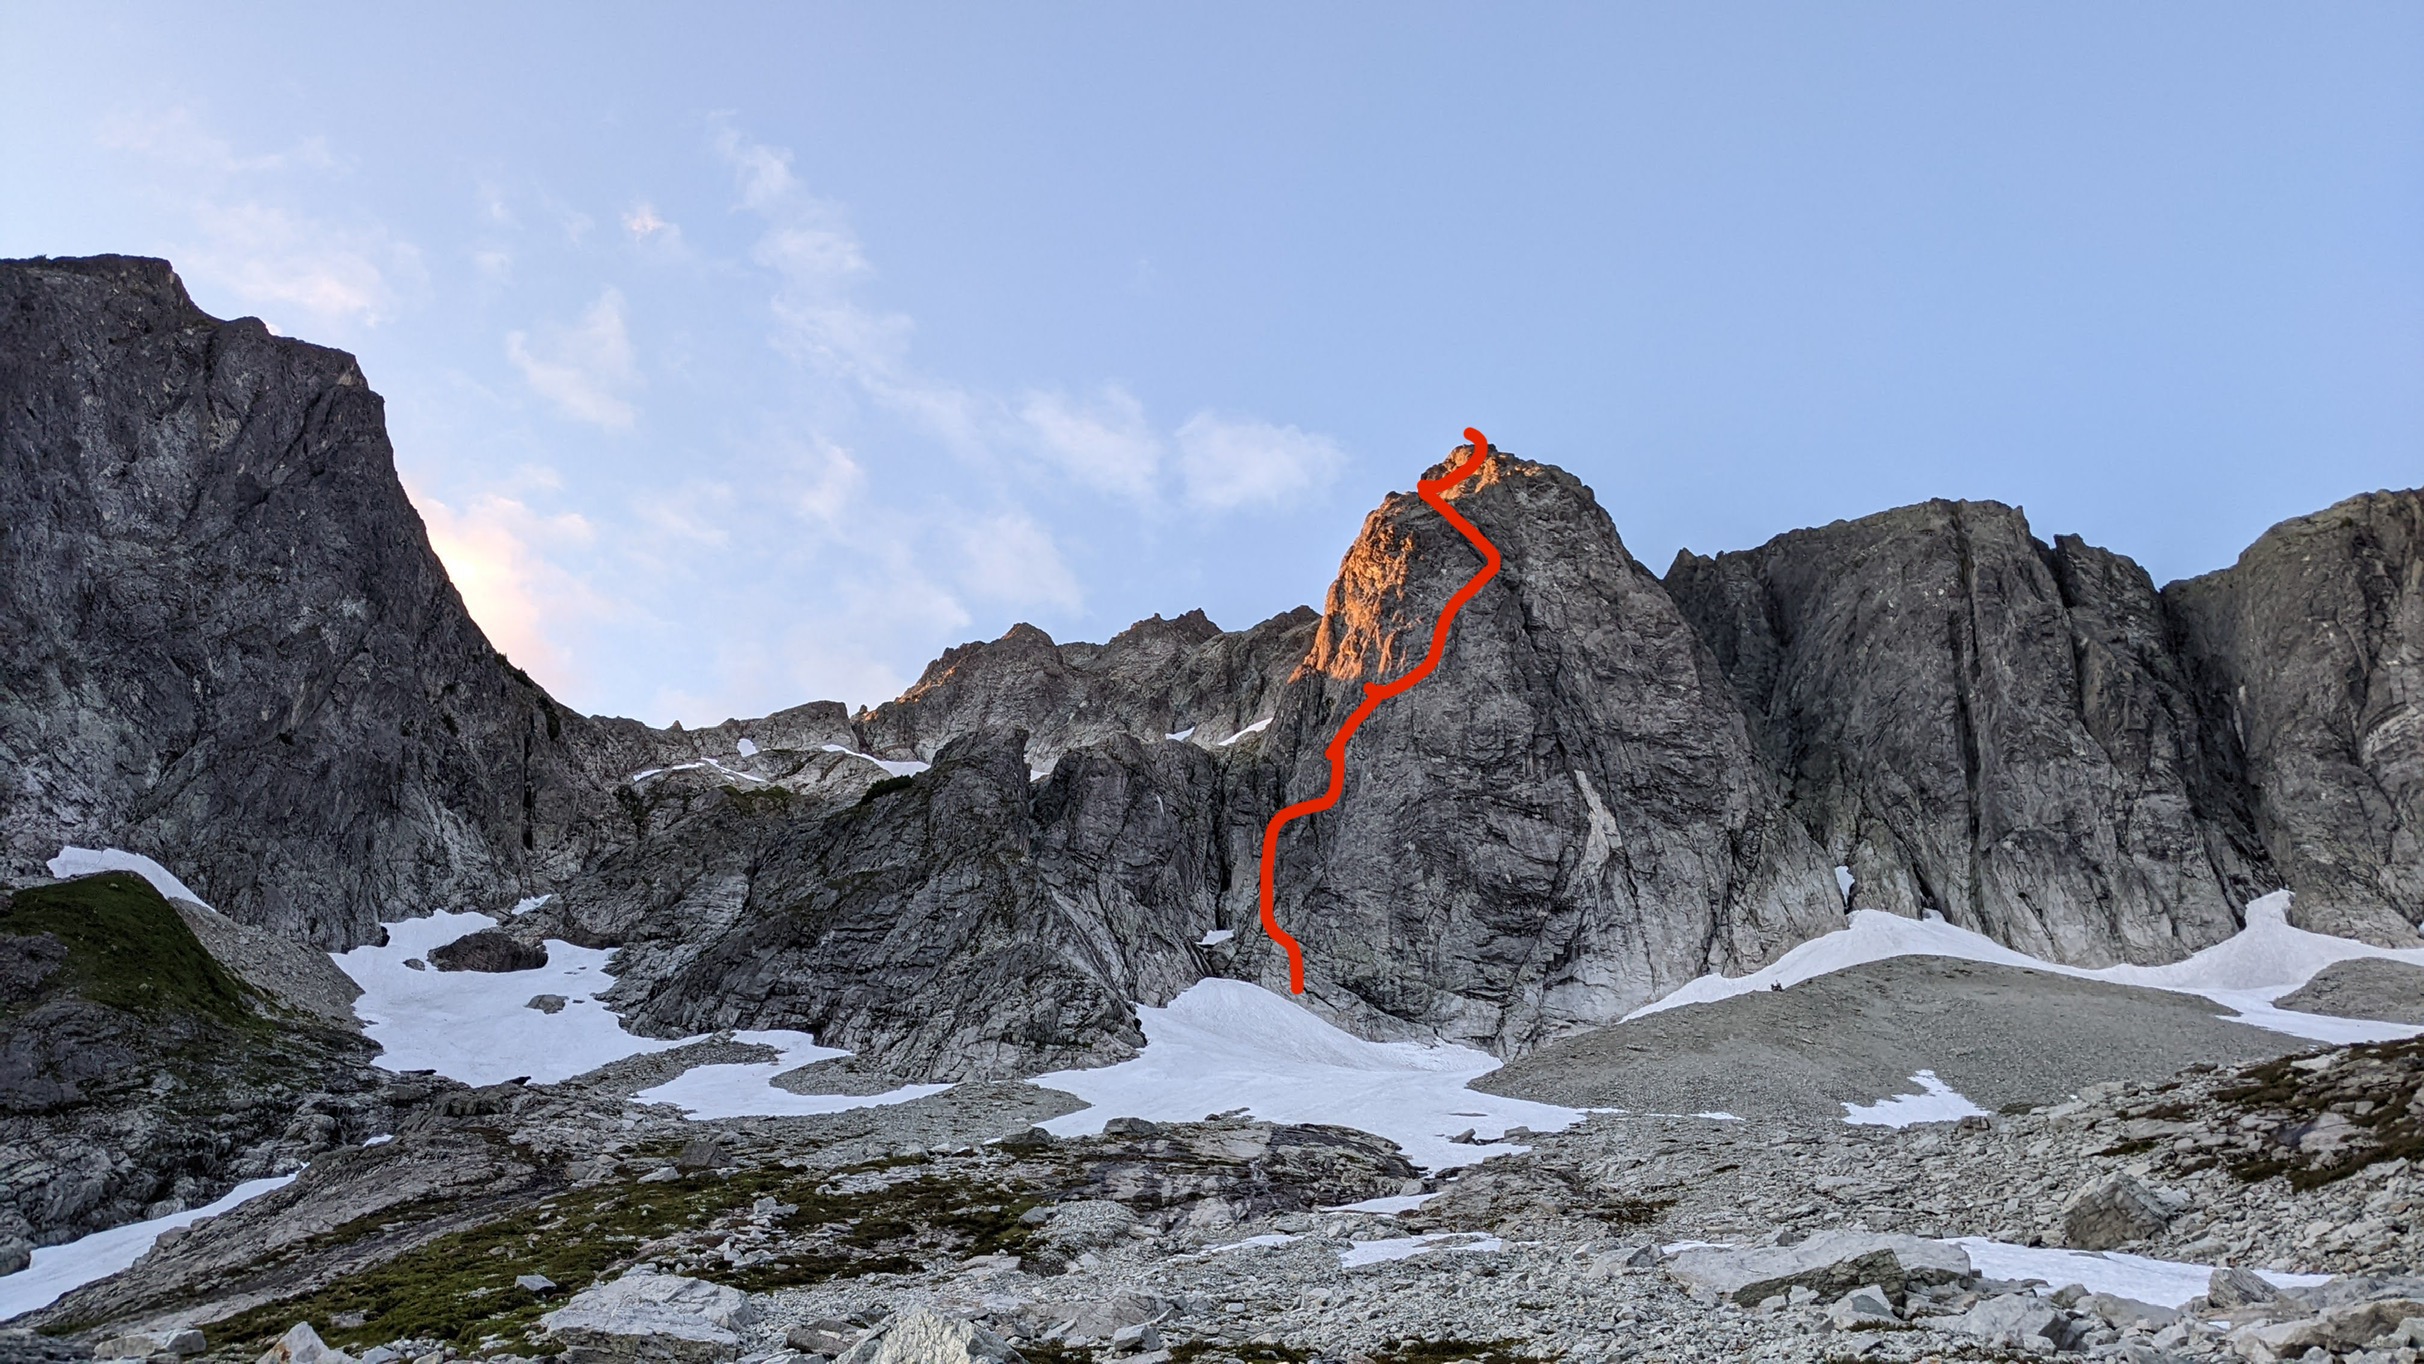
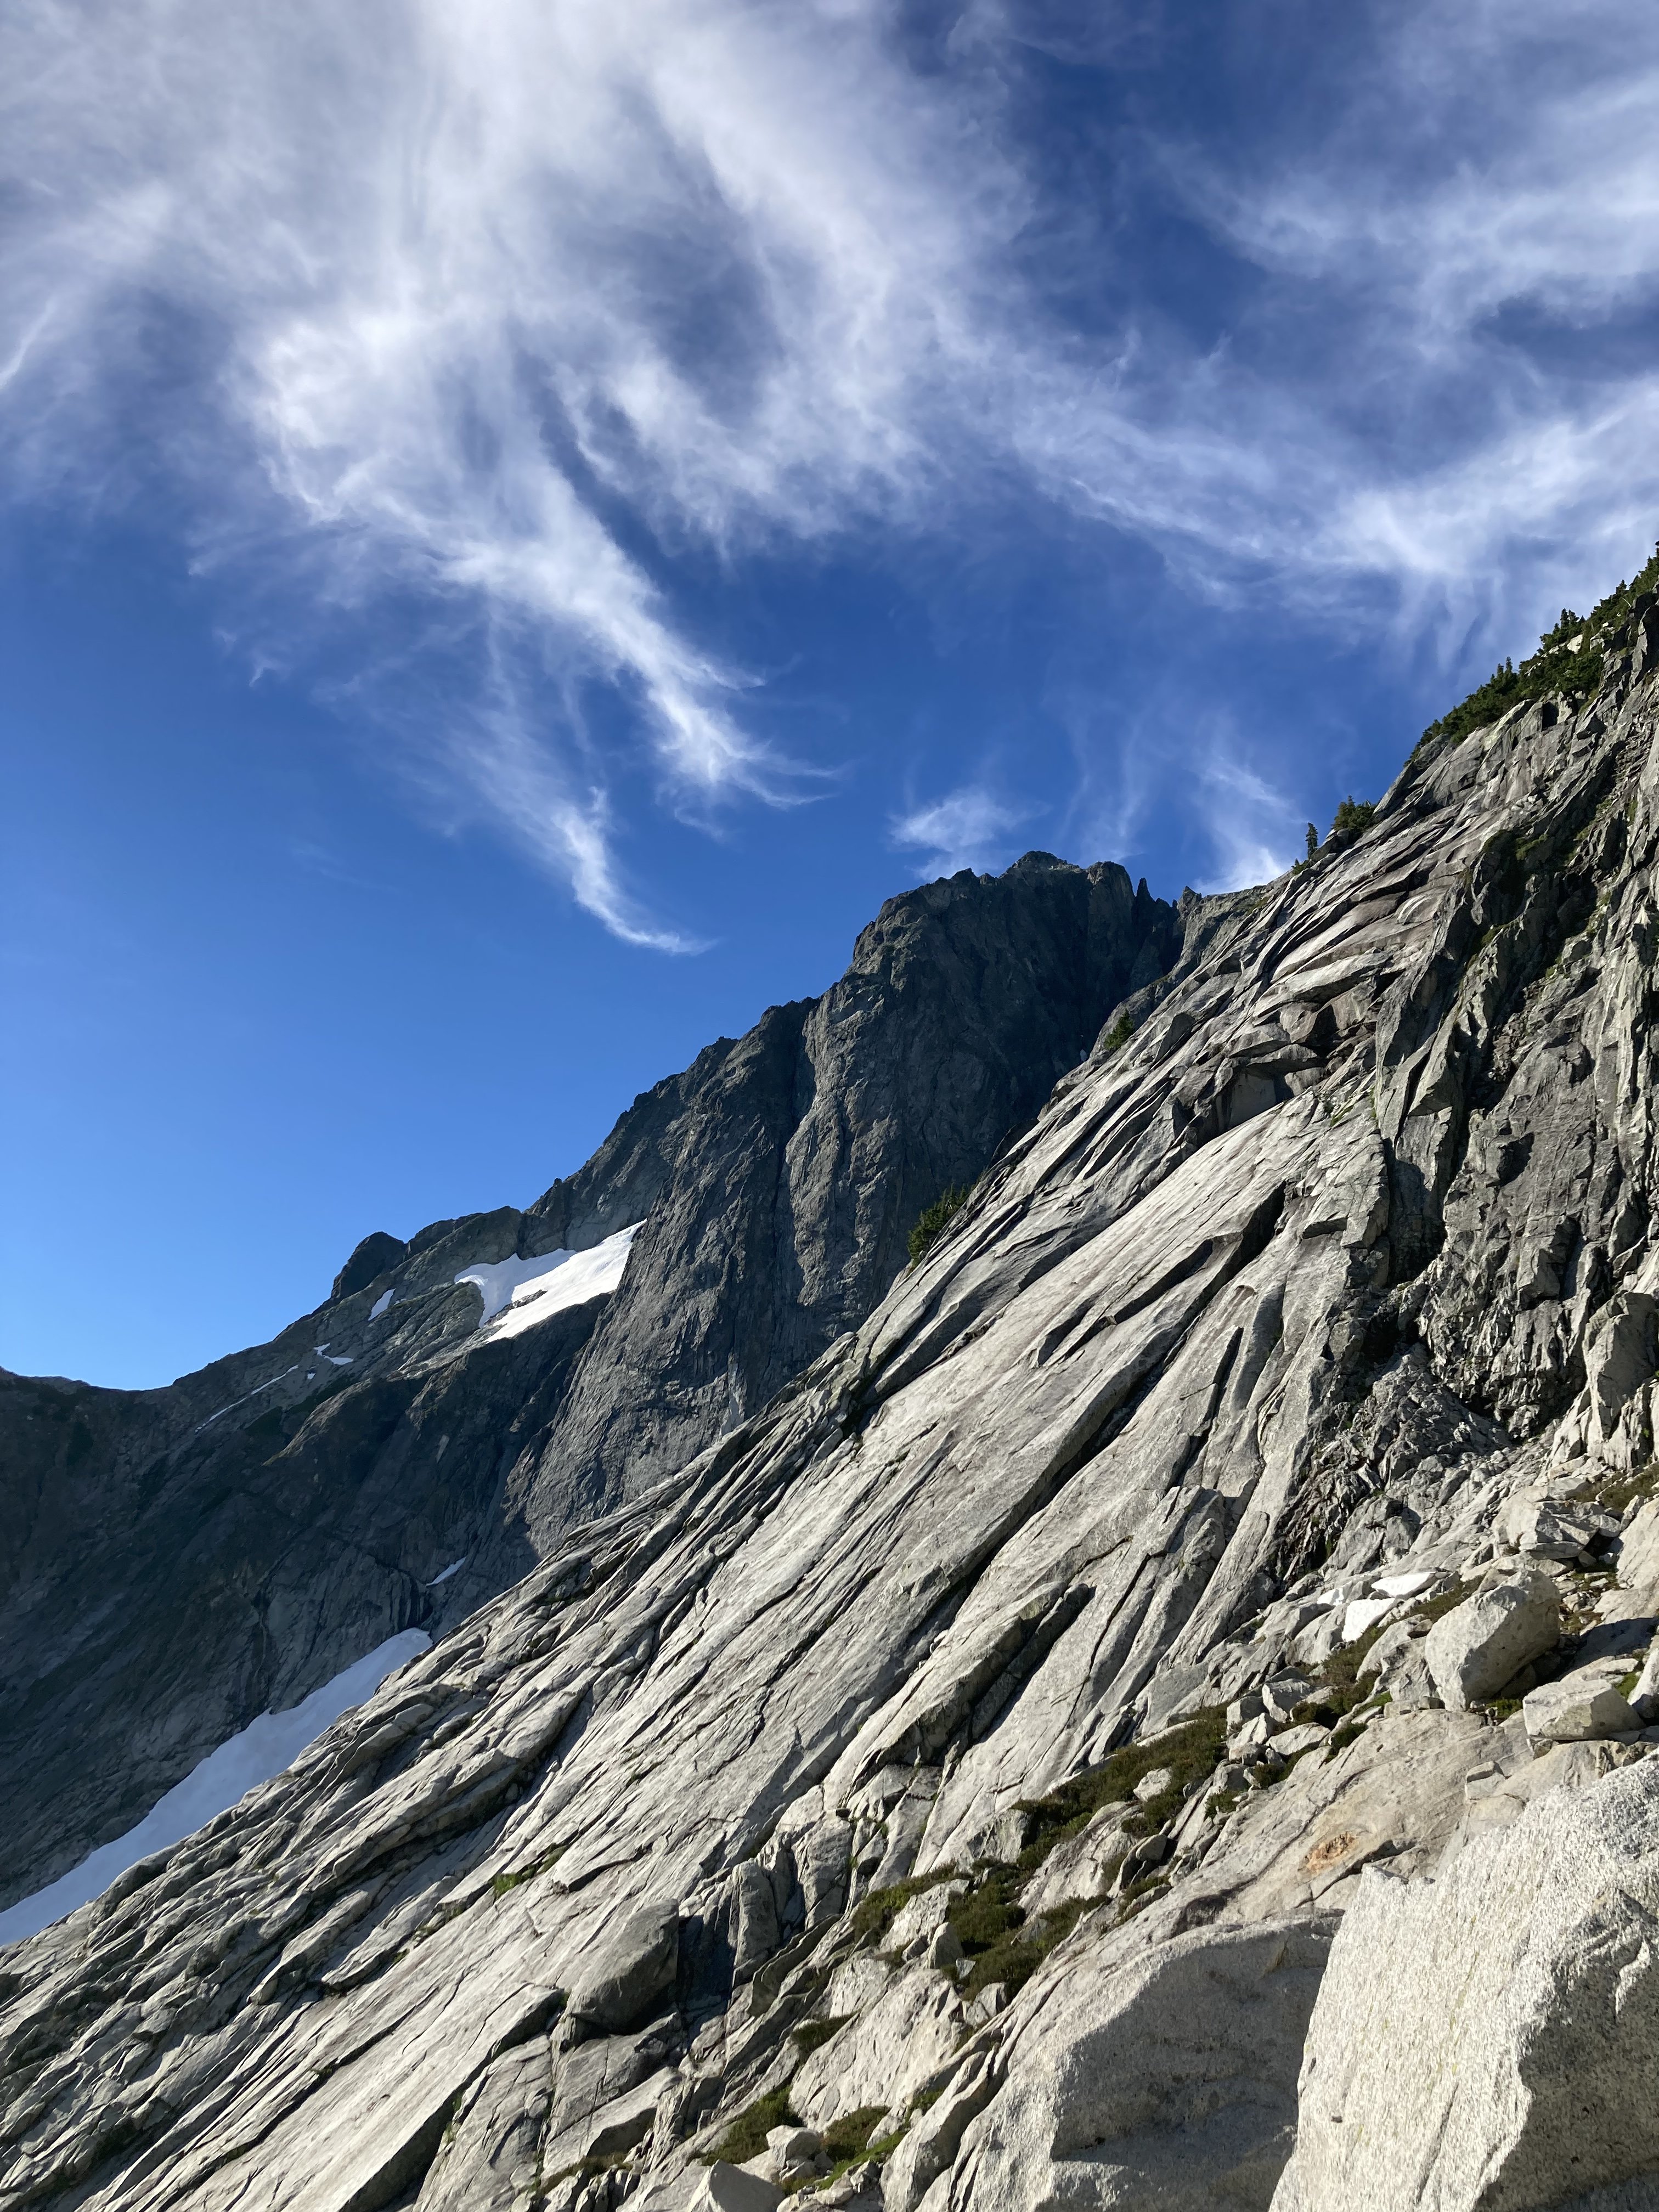
From Aug 20th to 24th Lani Chapko, Nick Gonzalez and I did the first ascent of the direct SE ridge of Seahpo Peak. The SE ridge gains roughly 4400' over around 1.5 miles of horizontal. Jagged Ridge adds roughly another 1.5 miles of ridge traversing. We climbed roughly 30 pitches on the SE Ridge of Seahpo with another 6-8 or so on Jagged Ridge. I would consider the SE ridge a Grade V as a stand alone if a team were to descend the standard route, and while maybe controversial, consider it a Grade VI with its continuation through the Jagged Ridge (Grade V 5.6). We had 18 hours of climbing time on the SE ridge and around 12 hours of climbing time on Jagged, totaling just shy of 30 hrs of climbing time over the course of 3 long days. Lani and I's climbing time on Mongo Ridge was around 17 hours and our non-speed-climber NIAD time last year was 16 hours. While not really relevant, these seem to be common benchmarks that people like to compare to. Photo I found last year from the summit of Icy showing the entirety of the ridge (sorry i don't remember who took it...) Early Attempts: I first spotted the line last year when Joe and I went in to do Spectre. It is a sneaky ridge that is only visible from a fairly narrow window of the North Cascades. We both agreed it looked massive and epic. I convinced Lani to give it an attempt late September. This was a couple weeks after a bad ankle sprain on Jo Berg. We ended up bailing after around 800' of climbing because of extreme heat, dry conditions and mild hallucinations from intense smoke. We approached via the Baker River and Crystal Creek. This year in July we had a window and decided to give it another go. We figured the Baker River approach would not go smoothly so we decided to try a high route approach via the Ruth-Icy traverse. Once at the Icy-Seahpo col we dropped down the head of the Crystal creek cirque and tried to find an access point to the ridge from the north. The climbing looked like 5.10X with minimal anchors, so we ultimately bailed out with the knowledge that we would have to repeat the heinous munge we found on the ridge last year. Day 1: We knew we were heading into dry conditions, so we sought out a third person to join the party to help distribute water weight on the harder climbing near the toe of the ridge. We reached out to Lani's friend Nick the morning of to see if he would be down, and he somewhat reluctantly joined knowing he would be procrastinating some work. The last minute shuffle meant we were in for a bit of a long packing session and late start. We got to the Baker River Trailhead in the mid afternoon and started our approach around 3PM. The approach went smoothly as the Baker River was super low and the crossings were super chill. We again picked up the old trail up crystal creek. We were initially super confused about the existing trail until we consulted with Eric W and learned that there used to be a trail up crystal creek. We got up into crystal creek basin right as it was getting dark and decided to set up camp in the trees just after crossing crystal creek. Near the end of our approach, Nick got stung by a ground wasp and started developing some full body hives. He had previously never been allergic to any kind of stings so this was a new development. Luckily we had just added some Benadryl to the first aid kit. He reacted well to the Benadryl and the hives subsided after around 20 min. Day 2: We started out the day finishing our approach up the crystal creek basin. This involves some mellow, but overhead grassy bushwhacking. When we were here in 2022, there was clear evidence that a ton of bears had trampled the valley. Adding a very eerie feeling to the endeavor. We felt like we were being taunted by Tanuki, hence the name. The climbing on the ridge starts around 2900-3000' depending on how your device is feeling. Once at the base of the ridge again we were back in familiar terrain. Ignorance may have been bliss... The first 1000' of the climb involves some substantial, runout and sometimes challenging munge-a-neering. Lani following one of the 5.9 munge pitches on the first attempt Looking up at the crux munge pitch after bailing on attempt #1 After reaching our high point, we continued questing upward. We had a hunch that we were through the major difficulties of the lower ridge on the first attempt, and luckily that prior assumption was true. 1000' more munge led us to the summit of the first major tower. This tower rises over 2000' over crystal creek basin and feels like a major accomplishment in and of itself. Lani and Nick Following near the top of Tanuki Tower Looking back down at the long scrambling section in the middle of the route After reaching the summit of the first tower, which we later dubbed Tanuki Tower, the ridge eased back for a massive, long section of 3rd and 4th class scrambling, separated by the occasional pitch. We were able to make good time to the base of an obvious gendarme to camp at 6900'. When we arrived at camp we were able to locate a 3rd class access ramp that allowed for access to the glacier on the south side of the ridge. This allowed for a much needed water top off. Future parties could consider gaining the upper (more classic) ridge via this hanging basin and scrambling access ramp to avoid the munge on Tanuki Tower. Looking up at the upper ridge from camp. Day 3: We started by climbing the obvious Gendarme above camp and traversing to the main summit massif and upper ridge. Classic moderate climbing on the Gendarme above camp The upper ridge provided a ton of clean, moderate ridge climbing with a bunch of awesome position and good climbing. Nick leading the upper crux, a clean 5.8+ lieback After a bunch of false summits, gendarme traverses and generally entertaining ridge climbing, we finally found our way to the summit of Seahpo. Stoked on our success we started the debate about continuing. We all had trail runners and light aluminum snow gear. After an hour long debate we decided thin conditions meant we could work around the snow and manage the little that we had to, so we began our committing raps off the summit of Seahpo. We started off with the moderate snow traverse across the glacier to regain the ridge. Conditions were super firm, so while only being around 30 degree traversing terrain, we ended up pitching out this short section. Looking out from the start of the Jagged Ridge Traverse Clean Rock on Jagged Ridge Once back on the rock, we were able to make super quick progress soloing a bunch of 4th class terrain to near the mid point on the Jagged Ridge traverse. There were minimal opportunities for bivies, but we found a reasonable, albeit exposed ledge near the ridge crest. If we would have been able to continue for another 20 min, we would have made to to a kush ledge on the north side of the ridge that would have been sheltered from winds. A nice ledge amongst the choss traversing near the end of Jagged Ridge Day 4: The remaining part of Jagged Ridge was honestly kind of awful without snow coverage. Very loose compact dirt and unstable talus traversing above big exposure. There was the occasional pitch but mostly scrambling. We ultimately made it to the final group of towers that define the exit to the ridge. We didn't really find the "lethal choss chimney" described in other reports, though there was a low angle choss gully with a 5.6 boulder problem around a chockstone. The final pitch to exit was the definitive crux and decent climbing, though a bit steep and committing for 5.6. Once off the traverse, we realized our mistake in equipment selection. It was clear that heading up onto the crystal glacier with so much blue ice exposed would be an awful test of our mediocre snow gear. That and a whiteout shielded the bergshrunds from our vision, so we didn't have a clear view of our exit. Our original plan was to head up and maybe tag the summit pyramid, though we decided to bail onto the slabs below the crystal and sulphide glacier. There was a level of uncertainty with terrain and overhead hazard, though the seracs looked quiet enough to feel comfortable with the traverse. The 2 mile long slab traverse took what felt like days, but we were able to link into the sulphide route right at the standard sulphide camp, avoiding all of the steep exposed ice. We took the slabs just below the snout of the crystal, then back up the rocky passage on the Sulphide Typical terrain on the slabs after a waterfall crossing A quick jaunt down the shannon ridge trail got us back to civilization, but not out of the clear... as we opted not to spend the time to set up a car shuttle. Nick in all of his glory had volunteered to run the shannon ridge trail and road all the way back to baker lake trailhead to shuttle the car, for a total of an 11 mile run to finish off the trip!! Overall, this was a grand journey up one of the largest technical features in the lower 48. I would recommend the whole ridge as an awesome cascadian, blue collar route! Rack: Singles Single Rack to 3 with doubles up to .75, optional KB's, Single 60M Rope A rough track showing our approximate route TH to TH A Close up showing our rough track on route Potential alternate approach tracks; Green showing an early season approach via the Icy-Seahpo col, this route may require some rappels down low angle slabs. Purple being a potential high route that would require a bushwhack up the ridge to the left of Crystal Creek. And Red showing a technical track up low angle waterfall slabs that would access the hanging basin to bypass Tanuki Tower. The two access points (red and purple) seem like equally easy and viable ways to access the ridge.
-
Look familiar? Parker still has it.
-
Planned iten was to bivy on the wall the first night, then climb up to the bivy at the snow arete high on route the second night. So we went relatively light on water. No water on route. We carried 5 liters total. We tagged the leaders pack through some of the harder pitches when it looked like we could find anchors within 100’. Followers pack was likely sub 30 pounds. Stopping on the route where we did meant a night/morning without water which ended up being not that bad because there is water near the base.
-
My best guess is the 51 route because of steph abeggs beta…
-
Didn’t see anything. I did the ‘51 route back in 2019 with my friend Parker. We found half of a carbon black prophet (the head half) that had been there for many years… always wondered who’s it was. I think Parker still has it.
-
A high level of tolerance and stupidity mixed in with a short term memory are staples for the cascades climber.
-
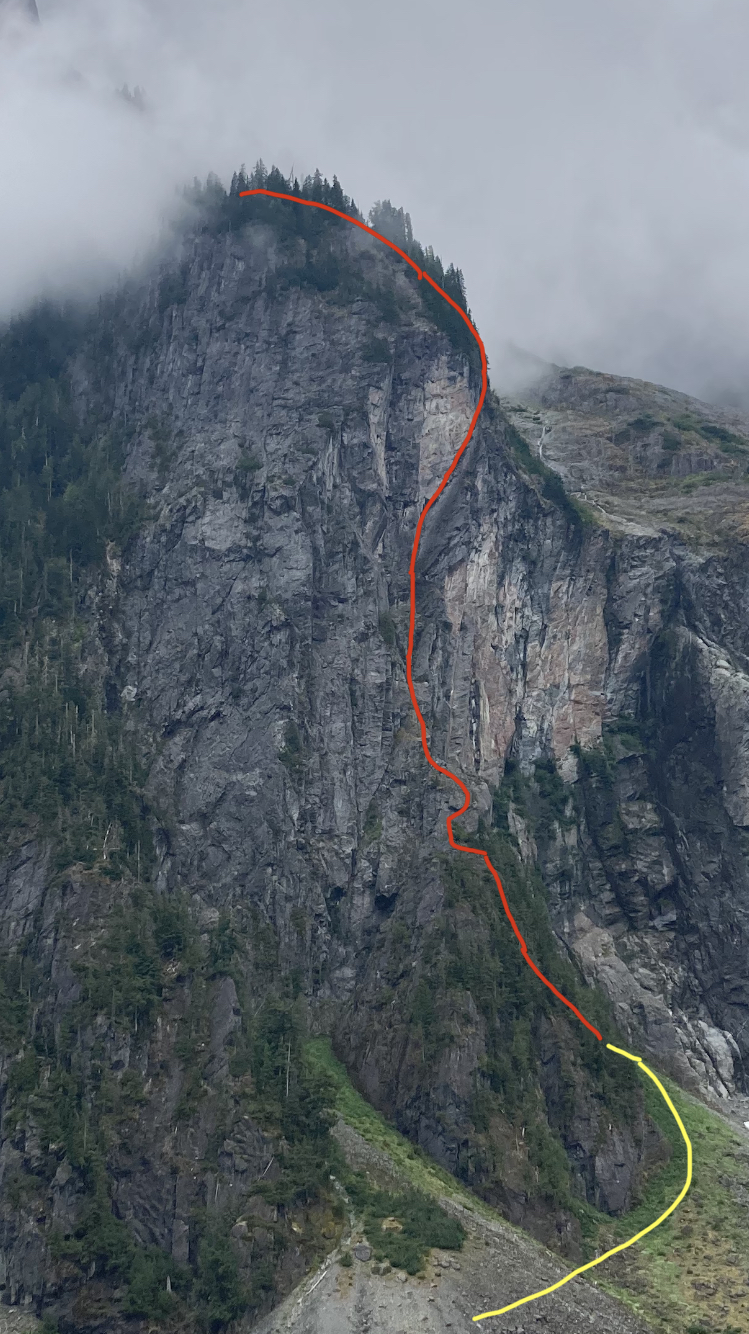
Yellow is approach. Red is our line to the top of the tower.
-
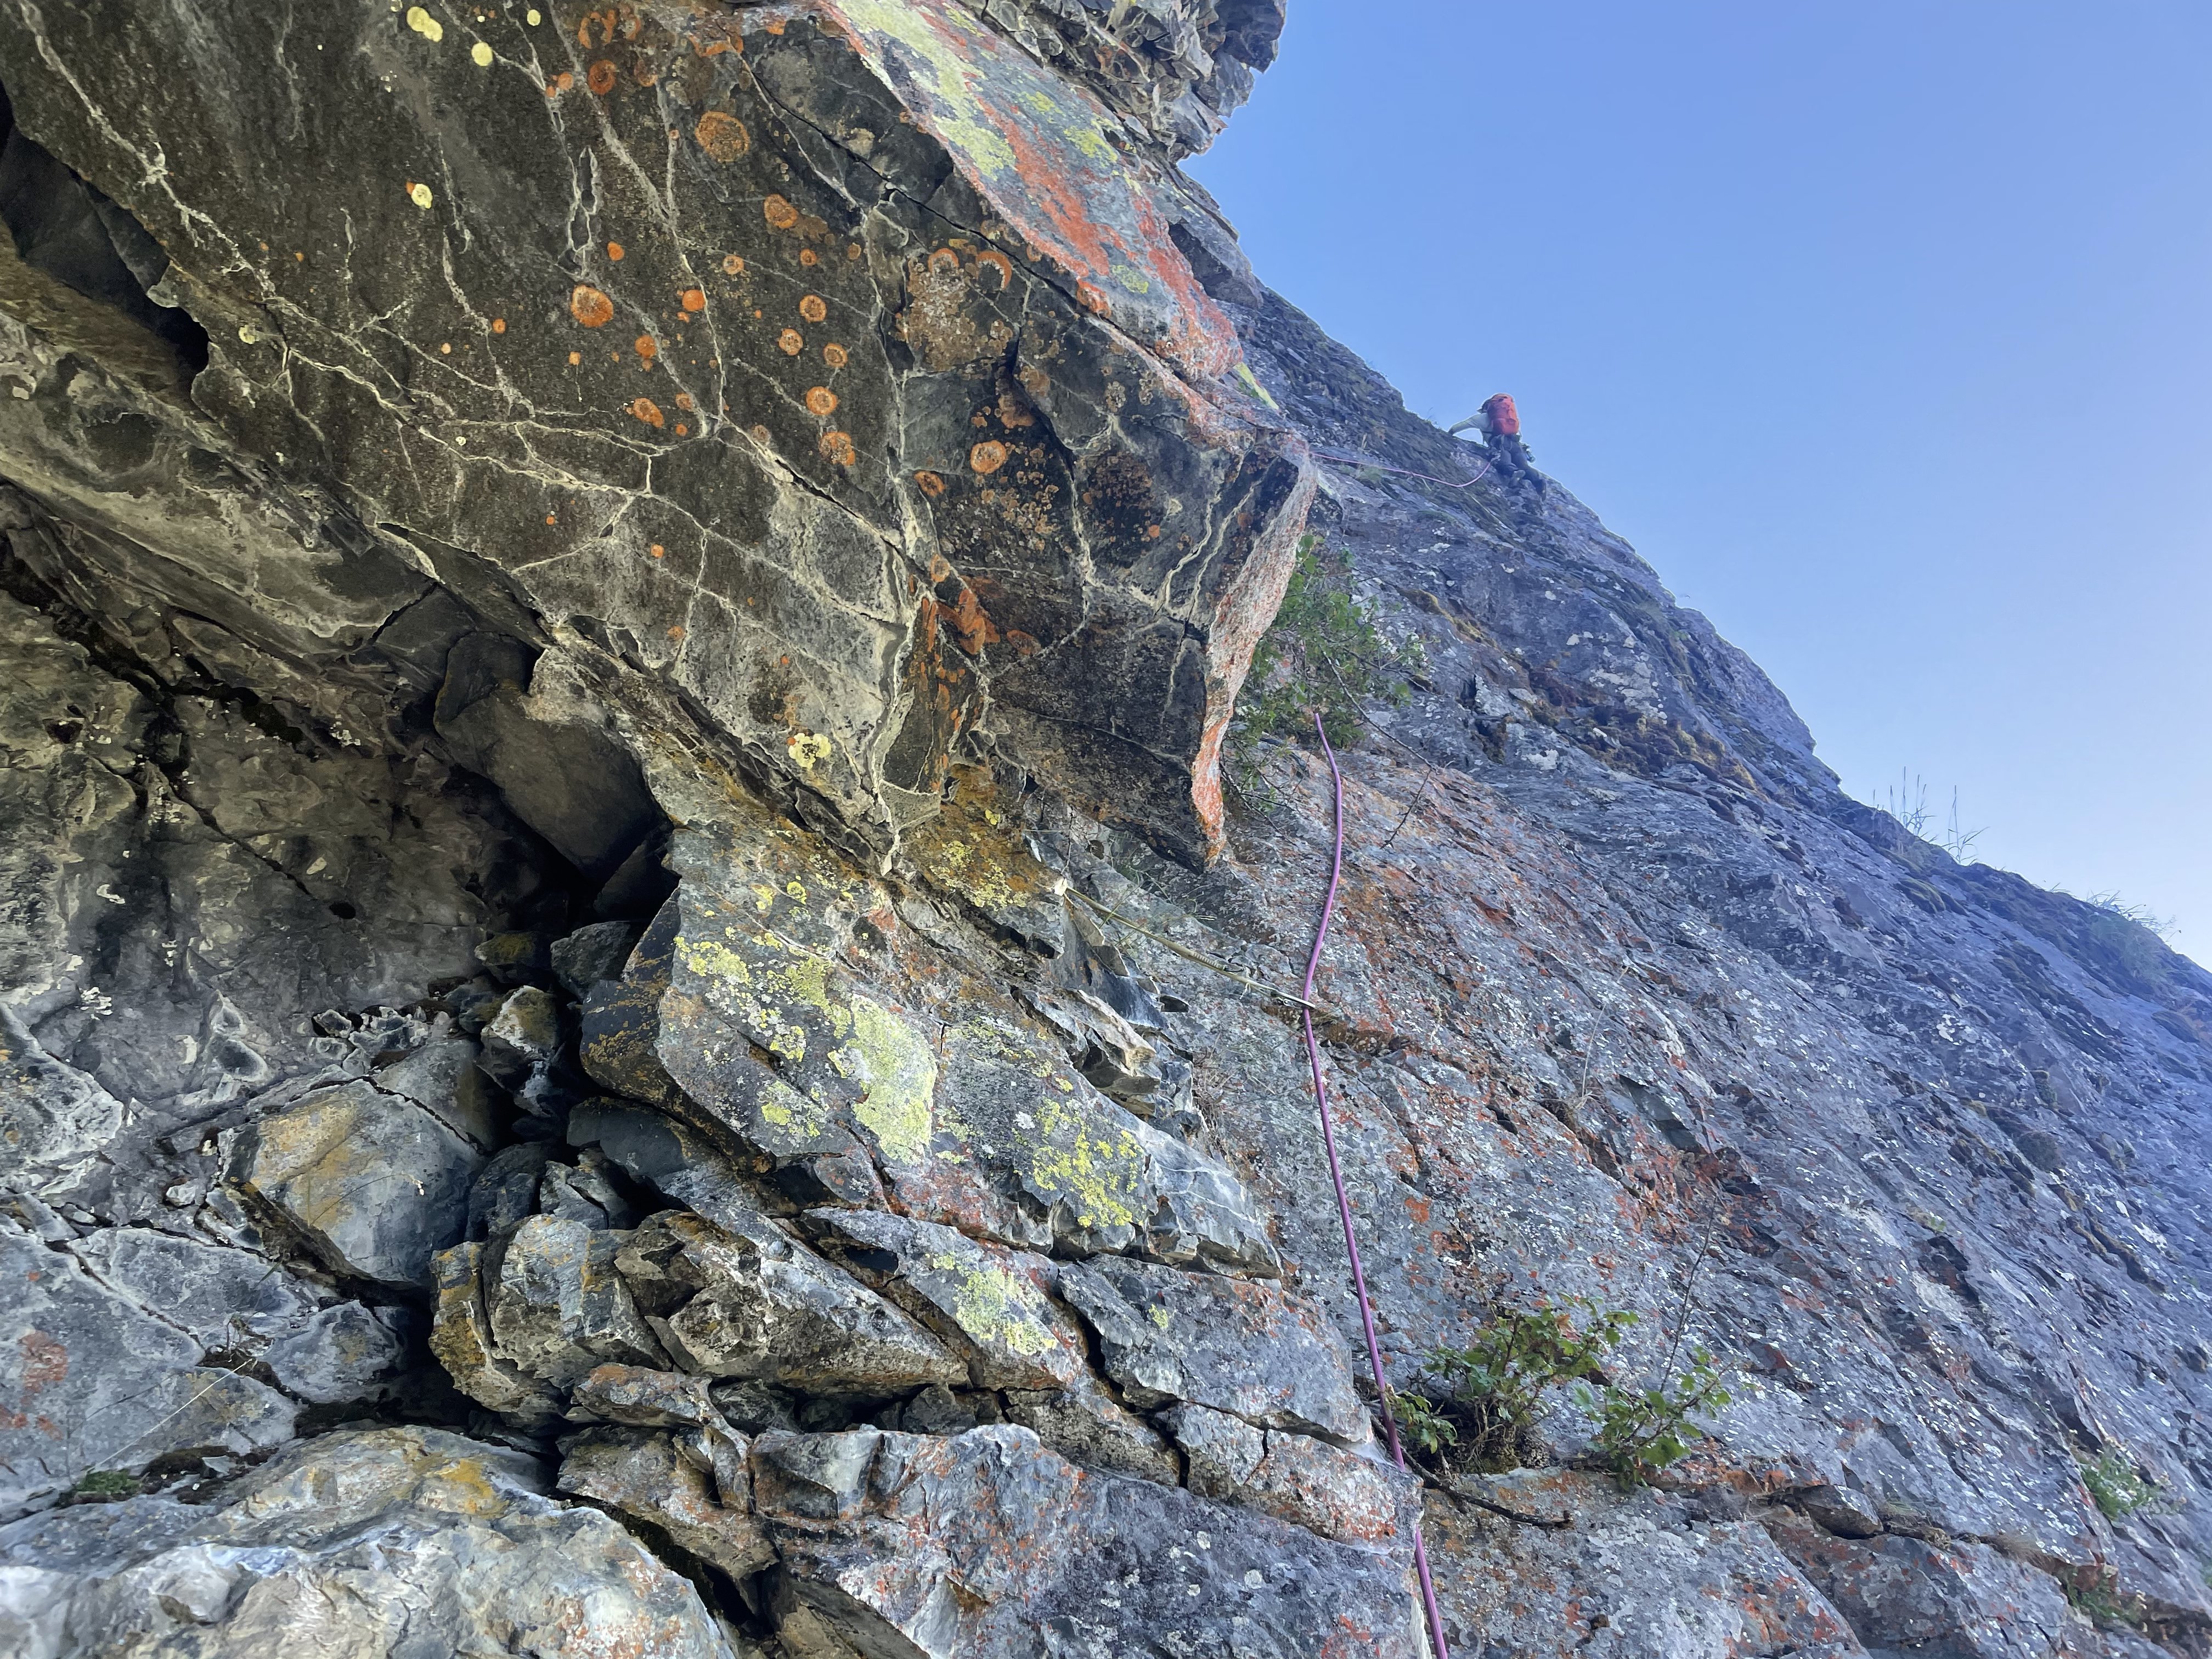
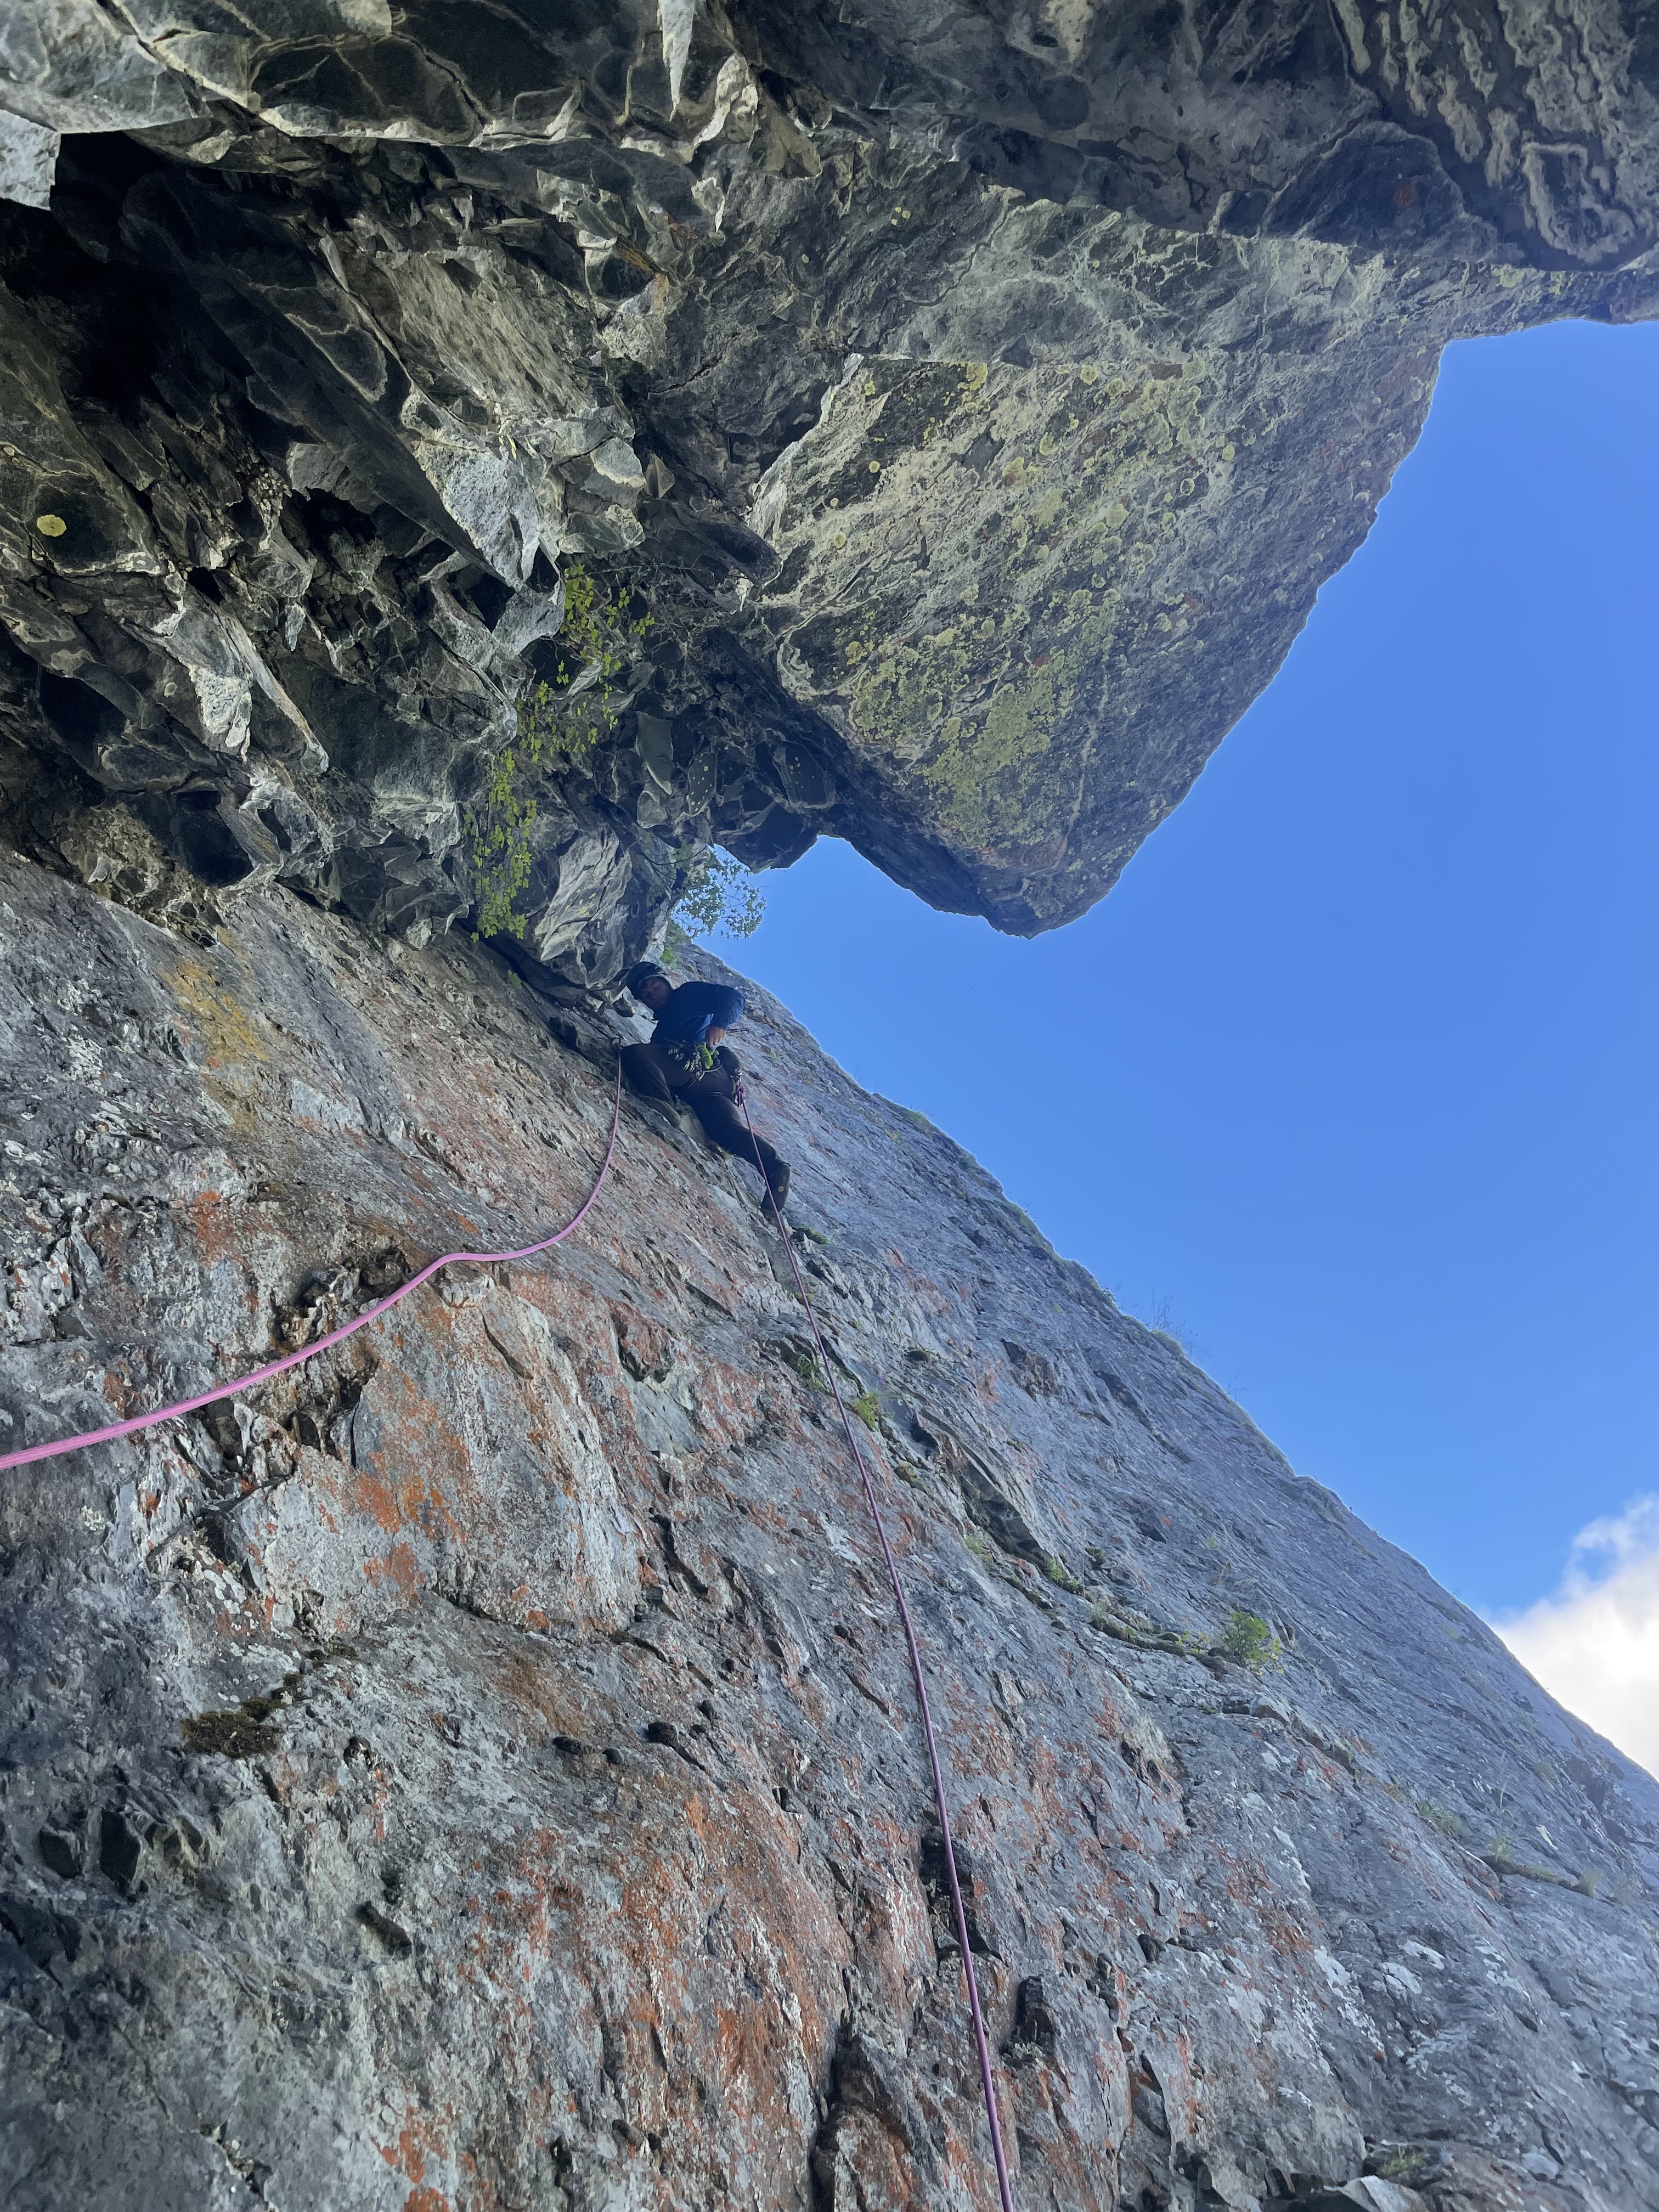
Trip: Johannesburg - “Flight of the Bumblebee” FA of the sit start to the NE Buttress of J Berg TD 5.9+R 1500’ Trip Date: 08/27/2022 Trip Report: This weekend, Kyle and I climbed the sit start to the NE buttress of J-Berg. We ended up rappelling due to injury after linking into the ‘57 route on the NE buttress. We added about 1500’ of steep and challenging climbing. The sit start climbs a tower with a bit of a distinct summit, so I don’t feel too bad claiming an FA. Becky likely wouldn’t have given us credit for anything, so judge it how you will. If linked to the summit, it would likely be one of the biggest monolithic climbs anywhere. TD+… ED…? Only one way to find out. This is likely a one and done for me, when we topped out the lower buttress I thought to myself “the climb we did so no one else had to”, but rapping where we did leaves the door open for at least one suitor to up the ante. The lower buttress in moody, morning fog We had a late start sat morning. The uncertain weather had us sleeping in and waiting. Lani and I had attempted the line a couple years ago and ultimately bailed because the climbing looked like it was going to be far more time consuming than our 2 day itinerary would have allowed. This time around, kyle and I packed a couple taco portaledges in case we had to bivy on the steeper lower wall. The approach involves a good bit of blueberry and devils club laybacking in high exposure. We came prepared this time and had leather garden gloves to grab the clubs… Kyle on the approach The approach is a bit of foreshadowing for what to expect on the rest of the buttress, but simply steeper… The first pitch was a long moss gully with difficulties that felt about like 5.7. For the second pitch, we discovered a sick splitter hand crack. Too short and too easy… Starting up the second pitch The third pitch was ledgy and mossy hand crack steps that fed into the main gully/corner that defines the route. This was the previous high point. starting up the third pitch The fourth pitch is what intimidated Lani and I off the route before. Steep, mossy overlapping roofs and steep corners loom above. This time around we were prepared to aid if needed and had a good bit of iron and a real hammer. We didn’t end up using the ladders and battled the moss with a nut tool and clawed our way up the slightly overhanging corner past a roof to a sloping ledge. We decided to start hauling the leaders pack at this point and ended up needing to tag the iron up for this belay. Kyle on the traverse above the P4 roof pitch 5 was more of the same, but with a chimney. Pulling through the chimney made me happy about the decision to haul packs. I ended up climbing a steep crack on the face to diverge from the main corner. To make faster upward progress, Kyle ended up climbing the thorn bush corner. He ended up unintentionally releasing about a ton of gravel when he stepped in the wrong spot. That reinforced the decision to take the spicy looking face. We ended up setting up a bivy at the top of this pitch. Glad to have the tacos as it was completely hanging. heading into the chimney on P5 kyle following the choss corner at the end of P5 chilling at the bivy in a super taco looking up at the upper corner from the bivy The next few pitches were actually pretty fun. Steep face and corner climbing on surprisingly solid rock. starting up P7. 5.7R up to the roof. kyle following the roof at the top of P7 The 8th pitch was the start to the sting in the tail. We climbed a runout face to the right of the corner. This took us up to the edge of the wall. The wall pinched off to a blunt, knife edge arete. A 5.8 downclimbing traverse into a rock scar was probably the most dangerous point on the climb. The last piece was maybe about 60 ft away and around the arete. A fall would likely chop the rope along the arete. Strong R. The rock scar was overhanging 5.9 stemming on less than ideal rock but with good gear. climbing up near the arete on pitch 8 kyle finishing up pitch 8 Once on the prow of the wall we had a few options. None of them looked good. The chimneys above looked truly awful, so we opted to traverse the arete to the right and found a mossy ramp that took us out onto the NW face. I belayed short for communication and to help make decisions. The next pitch was bleak, dead vertical terrain everywhere and so much munge. We ended up making a huge S shaped traversing pitch to work our way up moss covered 5.8 sketch blocks. We named this pitch “Phil’s Traverse” as we were intending on calling the route “the land of confusion”. The sting in the tail continues… kyle following the zag on Phil’s Traverse A long pitch of overhanging 5.7 tree climbing spat us out on a decent ledge where we transitioned out of rock shoes to prepare for the Forrest. I was nearing the end of the rope on a classic J-Berg tree pitch and grabbed a tuft of moss, as you do. This particular tuft was a bees nest. I felt stinging and saw a few on my right hand and about 100 bees shot out of the hole, dead set on face fucking me off the mountain. I let go in a knee jerk reaction and went for a slow motion, sports action highlight style whipper. I kind of wish I had a video camera on as it had to have been funny to watch. I ended up grabbing, and swinging off a tree on the way down, making a single rotation tomahawk and falling onto my feet as the rope caught me. Glad I took a lead belay. I ended up rolling my ankle and was otherwise unscathed. I belayed Kyle up and we weighed our options. We decided to find a place to bivy and wait until the morning to make any decisions. We ended up climbing up another 300’ of forest munge to the top of a heather slope. The top of the slope was a comfy knoll that marked the summit of the lower tower, and an awesome bivy! This was our summit and the first point where it was obvious we had linked into the ‘57 line. kyle rapping a steep section of the wall Waking up, my outlook was pretty grim. I could barely hobble around, so we decided to descend our route. I couldn’t really put weight on my ankle so I ended up glissading the last 100’ of 35 degree heather. Once back at the tree line we began rapping. We ended up rappelling about 1800’. Primarily rapping on trees and using an escaper we were able to get away with only leaving a couple gear anchors along the way. Traversing the talus back to the car was kind of miserable, but manageable. My ankle is starting to feel better already, crossing my fingers for a minor sprain. For the aspiring munge warrior, here’s pitch notes P1 5.7 180’ head up moss gully on the left to a big ledge with trees. P2 5.7+ 180’ traverse to left edge of ledge. Head up good hand crack. Traverse slab to the right and climb a nice finger crack up to a large ledge on the ridge crest. P3 5.8 150’ head up into the large mossy corner. Climb up to a distinct roof with hands to fists gear for anchor. P4 5.9 100’ continue up the corner. Mossy crack climbing leads to a rightward roof traverse. Pull past the roof onto the large sloping ledge. Two beaks in place for anchor P5 5.9 100’ continue up main corner on clean slab. Past a short chimney and a crack on the right face (5.9+). Belay at uncomfortable stance below a striped roof in a good crack in the main corner. P6 5.9+ 85’ continue up main corner past a small roof (crux) to an alcove at the base of the massive looming roof above. #4 critical for belay. P7 5.9+ 70’ climb the face to the right of the corner (5.7R). Up past an off width section to a section of steep crack/stemming on good rock. Belay in a cave. P8 5.9+ 160’ traverse out of the cave. Climb the face on the right up to a knife edge arete (5.8R). Traverse the slab rightward into a steep rock star (5.9+ spicy). Continue up past low angle broken terrain. Belay by a bush on a small ledge. P9 5.7 60’ head up and around the arete to the right. Traverse over on mossy ledges and build an anchor P10 5.8R 100’ “Phil’s traverse” traverse right. Up mossy blocks to trees. Traverse back left to a big tree for a belay. Heinous drag. P11 5.7 150’ climb the belay tree. Then continue up until rope drag stops you. P12 5.6 200’ trees up to the ridge crest to join ne butt route. Gear Notes: Double Rack .2 - 1 Singles 2 - 4 no nuts placed. Pins in place. Approach Notes: Park at cascade pass. Traverse talus to the base of the “munge cone”. Traverse to the right up steep ferns. Gain a steep ramp that cuts up and left on 4th class devils clubs. Mandatory devils club laybacking. We brought leather gloves for this. Traverse the ledge to an exposed perch by a steep gully.
- 39 replies
-
- 10
-
-
-
-
Hopefully this helps. The lower part and traverse pitch are compressed at that angle so it’s probably not exact, but this should show the upper part well. We climbed that giant cleft at the top of the wall for 2 long pitches and were surprised not to find loose rock. It ended up being a lowish angle (low fifth) water polished slot canyon.
-
Photo dump. These are kind of in order (reverse order that is, starting at the top and working down to the bottom)


-
Here are some high res photos that We got on Joe’s camera. I drew in our route line and put dots at all of the belays.

-
Trip: Whatcom Peak - “Castle in the Sky” FA of the South Buttress of Whatcom 5.10b TD Trip Date: 08/06/2022 Trip Report: Yeeehaw! What a weather window it’s been! From Aug 5-7th Lani and I climbed the first ascent of the south buttress of Whatcom. This route came as a suggestion from Wayne. Thanks! It was excellent climbing on great rock in the most perfect of settings. I would say it’s one of the finer alpine routes I’ve had the pleasure of climbing in the cascades! We would highly recommend the route! There is certainly some choss and some runout but it is the pickets. I have to start work today so a hasty trip report will have to do. Here’s a link to the report I wrote up. Sorry for the forced click through, I’m rolling out the door and don’t have time to format photos for CC. Thanks for the stoke y’all! Go get it while the gettins still there! https://www.theclimbingguides.com/post/castle-in-the-sky-first-ascent-of-the-south-buttress-of-whatcom-peak-iv-5-10b-td Gear Notes: Single rack .1-3 doubles .2-1 full set of nuts. Optional #2 and 3 KB’s. Single 60M rope Approach Notes: We took easy peak to the imperfect impasse.
- 14 replies
-
- 11
-
-
-
-
Trip: Spectre Peak - “Spirited Away” FA of the S Ridge of Spectre Peak 2000’ 5.8 Trip Date: 07/26/2022 Trip Report: Joe Manning and I just got out of the Northern Pickets. We did the first ascent of the South Ridge of Spectre Peak. We had excellent weather and were out for 4 days. I’m having trouble loading any photos from my phone on here so this will be super brief. For extensive photos and whatnot check out my trip report on our blog… https://www.theclimbingguides.com/post/spirited-away-first-ascent-of-the-south-ridge-of-spectre-peak-2000-5-8 Gear Notes: Singles .1-2 doubles .3-1 light rack of nuts and optional 3. 40-50ft of cord and a single 60M rope. Approach Notes: Easy peak to improbable impasse to perfect pass to challenger col to phantom to pickle pass.