


-
Posts
51 -
Joined
-
Last visited
-
Days Won
32
3 Followers


Eric Gilbertson's Achievements
")


-
I'm looking for a partner to climb Shkhara (5200m), the Georgia highpoint, via the south side Beknu route (Russian grade 5B), between mid July and mid august. Beta on the route: https://mountainworld-com-ua.translate.goog/blog/shhara-b-hergiani-5b-opisanie-marshruta/?_x_tr_sl=auto&_x_tr_tl=en&_x_tr_hl=en&_x_tr_pto=wapp Route picture attached below. It's about 19 pitches, rock/mixed/ice climbing. Likely six days on route plus weather buffer and travel. Probably two weeks total including acclimation. My background - I've led routes up to Russian grade 6A (Pobeda via abalakov), climbed K2 no O2. I attempted Shkhara in 2016 from the russia side but had to bail due to weather and that side is not currently accessible. It would be great to have an experienced partner I could swing leads with or simulclimb for efficiency, and maybe do some practice climbs in WA beforehand. I'm based in WA. Thanks. Eric Gilbertson

-
[TR] Jack Mountain - Nohokomeen Headwall 01/26/2025
Eric Gilbertson replied to Eric Gilbertson's topic in North Cascades
This is the view from the ridge looking due south. I think that's the standard south face route in the picture. It looked much mellower than the nohokomeen, though the snow was powder under crust on that side so would have been slow going to climb without ascent plates I imagine.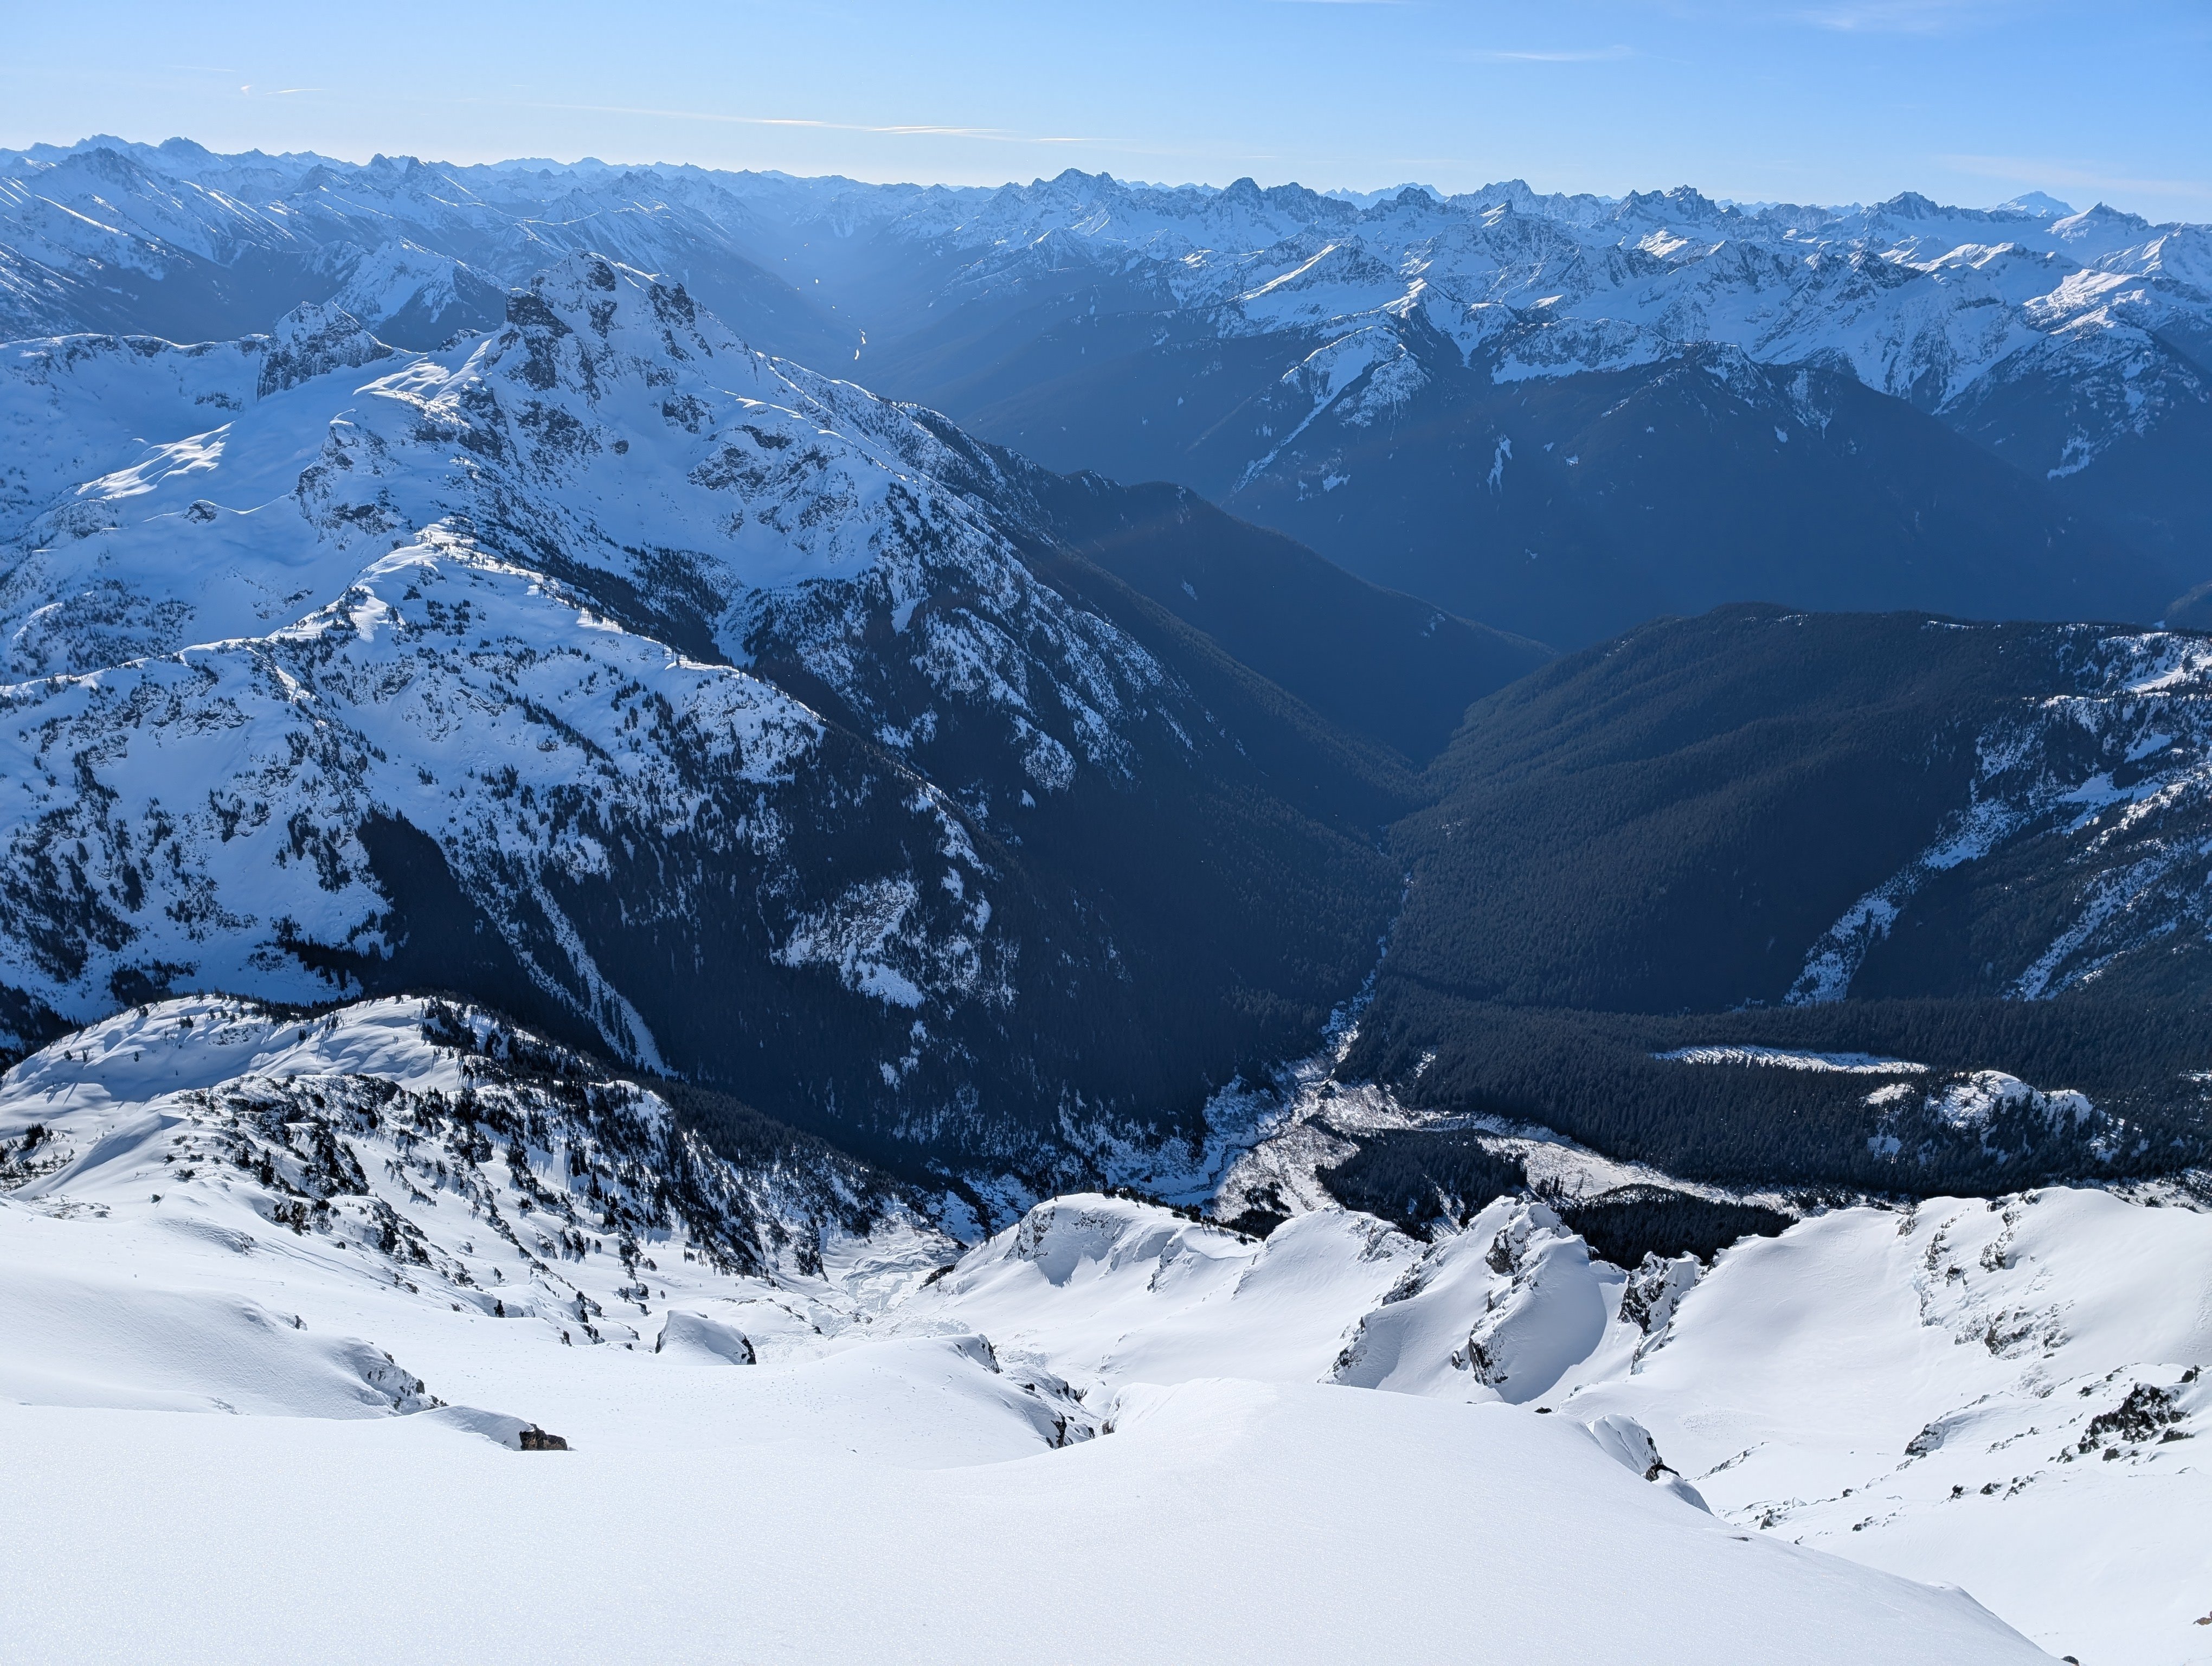
-
[TR] Jack Mountain - Nohokomeen Headwall 01/26/2025
Eric Gilbertson replied to Eric Gilbertson's topic in North Cascades
Yes, this was definitely worth spreading over two days to get that amazing sunset view over camp! I'm glad it was a two-day window so I wasn't tempted to do it c2c. -
[TR] Jack Mountain - Nohokomeen Headwall 01/26/2025
Eric Gilbertson posted a topic in North Cascades
Trip: Jack Mountain - Nohokomeen Headwall Trip Date: 01/26/2025 Trip Report: Jack Mountain via Nohokomeen Jan 25-26, 2025 Eric and Ryan 25 miles hike/ski, 8 miles biking 80/100 Winter Bulgers On the summit Jack Mountain is a 9,000ft peak in the cascades and one of the Bulgers peaks, so it’s on my list for a winter climb. The two most common routes on the mountain are the south face and the north face nohokomeen headwall. The south face is a class 3/4 rock scramble that is generally climbed in summer or early fall when it is snow free. The Nohokomeen Headwall is generally climbed in spring when it is a steep snow climb. The route As far as I’d researched Jack had previously been first climbed in winter by Anderson and Wald on Jan 4, 1981 via Nohokomeen. I’d previously climbed the Nohokomeen Headwall route in early June 2018. At that time it was a pure snow climb, and there were problems crossing a bergschrund which usually shuts down the route in summer. While boating back from Easy Mox and Redoubt on Ross Lake the previous weekend I got a good view of the Nohokomeen headwall and it looked like there might just barely be enough snow on it to provide a smooth route to the summit. That route is very steep so requires stable snow, which luckily has been the case in WA for most of the month. Ryan and I decided to go for it before the stable snow window shut. The route involves bushwhacking up May Creek to access the glacier. There are a few options to get to May Creek. The first would be to boat up Ross Lake, and I have a zodiac boat that would work for this purpose. (Note: The Ross Lake Resort water taxi does not run in winter). Biking up highway 20 The other option is to bike or snowmobile 4 miles down highway 20 from milepost 134 closure to the east bank trailhead, then hike or ski from there along the east bank trail to May Creek. Both approaches start from the Ross Dam trailhead. Since I had just been there the previous weekend, I knew highway 20 was snow free, and the east bank trail would also be snow free. Based on my June ascent I estimated 3.5 hours to get to May Creek via biking the road and hiking. Boating would take about the same amount of time, since it takes a few hours to triple carry and drag the zodiac to Ross Lake, and an hour to boat to May Creek. Mostly open forest I had just finished a big boating trip for Easy Mox and Redoubt, so decided to mix things up a bit and instead do the bike approach. We would do an overnight trip camping up on the Nohokomeen glacier since that would give amazing views across Ross Lake. We planned to ski since that would increase fun and the snow on the north aspects would likely be skiable, based on my experience in the adjacent west north zone a few days earlier. Friday night we slept at the Ross Dam trailhead and we were moving by 4:30am Saturday. I estimated that timing would get us to camp in the daylight so we could enjoy the sunset view over the Pickets and Ross Lake. First view of Jack The road was frosty as expected, so we brought mountain bikes for improved traction. The first mile was slightly up hill, but the remaining 3 miles were down and went by quickly. It was very chilly biking in the predawn cold and I wore mittens and my down jacket. After half an hour we reached the East Bank trailhead and locked up our bikes. We hiked up the bare trail in hiking boots and trail runners, and were only slowed down occasionally by a few blowdowns. By 8am we reached May Creek, just after sunrise. I recalled the forest was generally nice and open in 2018, and that was luckily still the case this time. We followed my previous route up to a gap in the cliff band around 4,000ft. There we made a short but steep scramble and found a rap anchor around a tree above. It appeared we were on the standard route. Skinning up the glacier Just above the cliffs the snow started, so we ditched our approach shoes and switched to ski boots and crampons. Around 4500ft the snow finally got deep enough that we could put the skis and skins on. At 5000ft we crested the ridge and got our first good views of the summit. The lower glacier was very icy and cracked up on the right side, and the headwall looked thin, with lots of rocks poking out. But there appeared to be a viable snow route up, as I’d seen the previous weekend. We generally traversed around 5000ft east to May Creek, then skinned up aiming for the left side of the glacier. The cold temperatures and a few wind squalls made us consider sleeping in the trees, but the view would be so much better up on the glacier that we continued with the plan. Sunset views We took turns breaking trail up, and passed through an interesting half-pipe feature before reaching the glacier. There we roped up, and continued up. The left side looked very steep, so we angled more towards the middle of the glacier. Unfortunately up higher we got partially blocked by crevasses, but we found a way through and made it to a nice flat campsite at 7800ft by 4:30pm, right on schedule. The sunset was amazing, and I set up a timelapse with my gopro360 camera as we set up the mega mid tent. The headwall We got to sleep early, and decided to sleep in a bit to climb in the daylight. The forecast lows were in the single digits, and that sounded really cold to be climbing in the dark. But hopefully it would warm up once the sun rose. Sunday morning we left camp at 7:15am and skinned up to the headwall. Unlike in June 2018, when the face was mostly snow, this time there was a cliff band near the bottom that spanned nearly the entire face. There was luckily one narrow snow/ice finger crossing the cliff band, located directly beneath the summit. So we aimed for that. The final push to the summit Just before the wall got steep we ditched skis and switched to crampons. I led the way up with a solid rack of four pickets, cams, nuts, hexes, and screws. One way or another I was determined to find pro on the climb. We each climbed with one technical tool and one straight shafted tool for plunging. I made it through the narrow icy gap in the cliff band, then in general climbed up and right. I made a huge traverse right until just below the low point in the ridge, then climbed directly up to the ridge. In general there were enough rock outcrops that I could get rock gear in between us most of the way, with occasional picket placements. After 3 hours I topped out on the ridge and ran out of gear. So I found a flat area out of the wind and belayed Ryan up on an ice ax anchor. By then we were in the sun, out of the wind, and the weather felt pleasant. Ryan took over and led one last simul pitch up to the summit by 10:45am. Summit panorama We had great views north to Ross Lake, and I could pick out Redoubt and Easy Mox in the distance, where I had been a week earlier. The south face was very snowy, and it looked like possibly-recent avalanches debris at the base. Inerestingly, there were mountain goat tracks on the SE ridge almost reaching the summit! I’d seen tracks near the summit of Easy Mox the previous weekend, and it’s amazing what the mountain goats can climb in winter. I don’t really know if they’d find any food up that high with all the snow though. Downclimbing the headwall We soon simulclimbed back down to the low point on the ridge. From there it made most sense to just downclimb the route, since our 60m rope would require many rappels and leaving lots of gear. I led the way simul downclimbing, placing the exact same gear as before. Skiing out By 12:30pm we were back at the base of the route, and made a quick ski back to camp. After packing up we skied back out, this time hugging the skiers right side of the glacier to avoid all the crevasses. The snow was wind affected and kind of tricky skiing up high, but lower we encountered some pockets of powder. The half pipe was very fun skiing. Back in the woods we transitioned to crampons around 4500ft, then rapped down the cliff and bushwhacked out to the trail by sunset. From there it was an easy hike back to the road, and we biked back to the trailhead by 9:30pm. Gear Notes: Skis, 60m rope, four pickets, rock rack to 2" Approach Notes: Bike to east bank TH, hike to May Creek, bushwhack up -
Yes, that old red edelrid helmet is my favorite - it's indestructible! I usually use the foam yellow one for ski/snowmobile approach trips, and I guess I just grabbed the wrong one this time since we were snowshoeing and boating.
-
Cool! I've wondered how the waterfall section would be coming in from the Canadian side in winter. That might cause problems.
-
Thanks! I think Goode is the biggest/toughest one I have left now.
-
Trip: Redoubt, Easy Mox - South Face (Redoubt), NE Ridge (Easy Mox) Trip Date: 01/19/2025 Trip Report: Mount Redoubt and Easy Mox First Winter Ascent of Easy Mox, Second Winter Ascent of Redoubt. Jan 17-21, 2025 42 miles hiking, 37 miles boating Eric and Nick 79/100 Winter Bulgers Jan 17 – double carry boat, motor, gear from Ross Dam trailhead to Frontage Road, sleep at trailhead Jan 18 – Carry remaining gear to boat, drag on wheels down Frontage Road, boat up lake 18 miles to Silver Creek, bushwhack to Silver Lake, hike to basecamp below west face of Solitude Peak Jan 19 – Climb Redoubt via south face (M1, steep snow, two roped pitches), return to camp Jan 20 – Climb Easy Mox via NE Ridge (M3, simulclimbed most of route), rap down south face to Col of the Wild, return to camp Jan 21 – Hike out, boat back, double carry boat up to trailhead On the northeast ridge of Easy Mox Some of the most difficult peaks in Washington to climb in winter are located in the Chilliwack range of the North Cascades, near the Canada border. I think these are likely some of the most difficult peaks to climb in winter in the entire contiguous US. Access is extremely difficult, weather is notoriously bad, snow conditions are rarely stable with unavoidable avalanche terrain, the peaks are technical, requiring ice and mixed climbing, and beta is scarce. Most peaks in this area have not previously been climbed in winter. The route I’m working on a project to climb all the Washington Bulgers (hundred highest peaks) in winter, and six of these peaks are in the Chilliwacks. This is the crux subset of project. I’ve spent several years in preparation for winter ascents in this area. I’ve previously climbed all the Bulger peaks in the summer, and that is critical but still not sufficient for success in winter. The first challenge is simply accessing the Chilliwacks area in winter. I’m following a rule that all ascents must be made legally, so I won’t sneak into the area from Canada. Starting in Fall 2020 I began scouting out the optimal winter approach to the area. Detailed route The closest trailheads are Hannegan Pass and Ross Dam, but these require 20-30 mile hikes on trails that are likely snowed over and unbroken. I skied up the Hannegan Pass trail in December 2020, and learned that the last 5 miles of road to that trailhead is closed to snowmobiles in winter, so the approach is even longer. I hiked the approach from Ross Dam in November 2020, and assessed each of those approaches would likely take multiple days in winter. Packrafting Ross Lake, Nov 2020. One option to save time and reduce the approach to a single day is to take a water taxi up Ross Lake to Little Beaver or Silver Creek and bushwhack up from there. However, the Ross Lake Resort water taxi does not run in winter. Ross Lake has no public road access in winter (or summer it seems, until the road in from canada gets completely fixed), so getting a motor boat to the lake is challenging. In November 2020 I packrafted the length of Ross Lake, and that took a full day and is highly dependent on wind conditions. That would be unreliable in winter. I considered a canoe, but that is also highly dependent on wind conditions and is too risky for capsizing in winter. Finally I settled on taking a zodiac boat with outboard motor up Ross Lake. The boat is wide enough to be stable in heavy wind and waves, with enough capacity to haul hundreds of pounds of gear. It can be deflated into manageable loads of a 70lb boat and 60lb motor. Each can be strapped to a backpack if needed. Ross Lake is in the unique situation where it is connected to a lower lake, Diablo, by road (Frontage Road), but the road is not connected to any other roads. Diablo Lake has road access, though. First test voyage on Ross Lake, Oct 2022 I first did a practice trip in October 2022 where I launched the zodiac at Diablo Lake, boated to Frontage Road, then dragged the boat up Frontage Road on deployable wheels, then launched in Ross Lake. I boated up 15 miles to the Little Beaver takeout, then hiked and bushwhacked in to the Chilliwacks. That option depended on Frontage Road being snow free, though, which wasn’t guaranteed in winter. I later did another practice trip where I double carried the deflated boat and motor down the 0.6 mile trail from the Ross Dam trailhead to Frontage Road, then dragged it down on wheels to Ross Lake. I settled on that as the optimal winter solution since the trail could be hiked in snow, and the boat could also be carried down the 0.5 mile road section in snow. The boat has a 5hp outboard motor, which goes 5-6mph when fully loaded. This is as fast as you want to go on Ross Lake in winter, since the lake level is lowered enough that tree stumps stick out of the water (and sometimes are submerged just a few inches under water). The motor is 4-stroke propane, which is clean enough to meet the strict environmental regulations for Ross Lake. The 5-gallon propane tank gives a 50-mile range for the fully-loaded zodiac boat. This is perfect for the ~40-mile round trip to Silver Creek with a little bit of safety factor. And I’ve been told be expert polar mechanics that propane is more reliable that gas for winter boating in sub freezing temperatures. This boat access method meant the hiking access component could be shaved down to 10-15 miles, which made the peaks much more accessible. From Ross Lake there are three main drainages to access the Chilliwacks – Redoubt Creek, Perry Creek, and Silver Creek. I scouted out Perry Creek in October 2023 and made a practice climb of Hard Mox from that approach. Perry Creek provided good access for Hard Mox and Spickard and was accessed from the Little Beaver takeout 15 miles up Ross Lake. First winter Chilliwacks attempt – thwarted by ice, Jan 2023. Redoubt Creek is also accessed from the Little Beaver takout and provides access to Redoubt and Easy Mox. I was not able to scout this approach, though I heard from Cascades expert John Roper it has the most difficult bushwhacking of all the drainages. Silver Creek provides access to Rahm and Custer and is on the north end of Ross Lake, and 18 mile boat ride up. I was not able to scout that approach, but have friends who had made the approach in summer. With the approach logistics sorted out, the next step is waiting for six stars to align. There must be stable snow conditions, stable weather on the peaks, low wind on the lake, no ice on the lake, long weekend, and partner available. Second Winter Chilliwacks trip – bail on first pitch of Hard Mox, Feb 2023 In January 2023 Nick and I made an attempt on Hard Mox Peak with five out of six star apparently aligning. Unfortunately Ross Lake was iced over 0.5 miles before the takeout. We attempted to bushwhack the remaining distance to Little Beaver around the lake, but that took 6 hours and we eventually bailed. That’s when we learned the ice-free star absolutely had to align. In February 2023 we returned when it appeared all six stars aligned. We made it up the first pitch of Hard Mox, but then bad weather unexpectedly came in early and we bailed. Winds were high on Ross Lake and we nearly capsized navigating through whitecap waves in the middle of a stump forest. The low wind and stable weather stars were not in alignment. Third winter Chilliwacks trip – success on Hard Mox, Dec 2023. In December 2023 all stars finally aligned, and we successfully climbed Hard Mox and Spickard via the Perry Creek approach. This was the first winter ascent of Hard Mox and the second winter ascent of Spickard. (The first winter ascent team for Spickard was Bond and Johnson in March 2023, approaching from Canada). On the return trip the outboard motor wouldn’t start, so Nick and I paddled back for nine hours. I couldn’t figure out the problem, so I bought a used gas outboard motor for the next attempt. In February 2024 all six stars aligned and Josh and and I went for Rahm and Custer. But the gas motor failed to start (I later learned residue from ethanol fuel in the used tank I’d purchased had made its way into the carburator and clogged it). One oar lock also broke because it got brittle in the cold. We ended up paddling 10 hours up lake to Silver Creek anyways, using a ski strap to fix the oar lock, then bushwhacked up and still climbed both peaks. We then paddled out 10 hours back. I subsequently started carrying spare oar locks on trips. Fourth Winter Chilliwacks trip – paddling up and down lake with broken oar lock to climb Rahm/Custer, Feb 2024 By January 2025 I had just two winter Chilliwack Bulger peaks remaining – Easy Mox and Redoubt. I had made eight trips up Ross Lake with the zodiac by then either climbing Bulgers in winter or doing practice trips. That month I was fortunate enough to meet Stephen, an expert polar mechanic. He got the propane and gas outboard motors back in working order, so I was good to go back on Ross Lake whenever the stars aligned. After all of these winter trips on Ross I learned a few lessons about the motors. For the propane motor it cannot be carried upside down, it is necessary to use an aluminum tank instead of steel so no rust gets in the fuel line, and the fuel line must be disonnected and excess pressure released before leaving the boat for days on shore in freezing conditions. This prevents liquid fuel from entering the system, freezing, and messing up components. The gas motor absolutely cannot touch ethanol fuel. Different valley options to approach Redoubt and Easy Mox With the boat motor fixed I started doing research on Easy Mox and Redoubt. The shortest approach would be Redoubt Creek, but that also was supposedly the most difficult bushwhack so might actually take the longest. In theory the peaks could be accessed from Perry Creek if we could cross Col of the Wild. However, in December 2023 we noticed the Perry Glacier was melted down significantly from historical levels. This meant accessing the col required climbing a pitch of downsloping snow-covered slab and surpassing tricky cornices. So that approach was likely out. The Silver Creek approach was the longest distance-wise. However, from February 2023 I learned that there is an old trail the first few miles to an abandoned cabin. Beyond that the bushwhack is easy through mostly open forest. That would likely be the optimal approach, with predictable timing to Silver Lake. We would then cross to the Lake Ouzel cirque and access the peaks from there. For the routes I researched that Mt Redoubt had previously seen one winter ascent in February 1977 by Barely and Rowatt via the NE Face. They approached from Canada. I had previously climbed the standard south face route in summer, and I suspected that would in fact be the easiest winter route. But it crossed long stretches of steep snow and required very stable conditions. Easy Mox had never been climbed in winter, and I wasn’t sure what the optimal route was. I’d previously climbed the standard NE Ridge route in July, and that is the least technical route. However, it requires climbing one slab pitch to gain the ridge, and that might be sketchy if only thinly covered in snow. Also, the ridge looked corniced in February 2024 when I saw it from Custer and Rahm. However, in December 2023 it was not corniced when I saw it from Hard Mox. So it was possible it would be climbable in late December or January. Another option was the southeast face route directly from Col of the Wild. This was more direct and not corniced. However, the upper section is slabs that might be sketchy if thinly snow covered. Finally, the west ridge route was a possibility. The only known ascent was the first ascent in 1964, but it appeared to be only a few pitches, though likely the most technical of all the routes. By mid January it appeared all six stars would align over the long MLK day weekend. The snow was very stable with high pressure parked over Washington for the forseeable future and low wind over the weekend. Washington had experienced above-normal temperatures over the previous few weeks, and satellite images confirmed upper Ross Lake was completely ice-free. Nick and I decided to go for Easy Mox and Redoubt. Easy Mox was my crux remaining winter Bulger, and would be great to check off the list. The Monday before the weekend I picked up the propane motor from Stephen up near Bellingham, and he did an amazing job getting it up and running. I did a test ride for a few miles in Lake Sammamish on Tuesday and everything worked fine with the boat. Our plan was to boat up to Silver Creek, then bushwhack in to a basecamp. We would climb Redoubt first since it was easier and would give us views of Easy Mox to plan out the route. We would then climb Easy Mox and hike and boat out. We would use snowshoes to avoid relying on a seventh star to align – skiable snow. On our first Hard Mox attempt we’d brought skis and bailed at Perry Creek when the snow conditions weren’t good for skiing. By using snowshoes we could plod up even if the snow was icy. The only possible question mark was whether it would be getting too cold. The peaks were forecast to be between 5F – 15F, which was cold for technical climbing but doable since the wind was forecast to be low. However, at upper Ross Lake the lows were forecast to be around 15F-20F for multiple nights with low wind. That is the shallowest part of the lake, and with calm nights there was a risk it would freeze over. We could likely boat up on Saturday since that would be the first cold morning and the water would likely still be warm from the previous weeks. But there was a risk we’d return to the boat at the end of the trip and be blocked in by ice. But, daytime temperatures were supposed to be slightly above freezing and we expected the sun would help melt any thin ice. So we decided to go for it. Worst case, if we got blocked by ice getting out we could hike around the north edge of the lake to Hozomeen and hike back out the 30 miles to Ross Dam down the east bank trail, which was likely snow-free. That would not be ideal, of course. Packing up at Ross Dam trailhead Friday Friday I set my NWAC-scraping Python code running to send me daily avalanche forecasts to my inreach. Then we loaded up in my truck and drove to the Ross Dam trailhead by 4pm. That evening we made two carries of loads down to Frontage Road – the first load was the boat and boat accessories bag, the second was the motor and propane. We then inflated the boat and got it set up for a quick getaway. I considered storing the propane tank in the truck overnight to keep it warm, but we decided it would be smarter to leave it out in the cold. This would be the coldest temperatures I’d ever run the motor (~15F). If it started up in the morning from being that cold, we’d have confidence that it would also start up for our return trip. But if I kept the propane in the truck over night we wouldn’t get that data point. We did, however, put the propane tank in a duffle bag next to the boat overnight to protect it from frost, and wrapped a tarp around the motor to keep it a little warmer. Dragging the boat down Frontage Road We slept in the truck that night at the Ross Dam trailhead, and were the only ones there all night. Saturday Our plan was to hopefully make it all the way to basecamp on Redoubt Glacier by Saturday evening, so we needed to start early. However, boating in the dark was risky because of the submerged stumps on Ross Lake. From all my trips on Ross I know the problem areas at different water levels. The water height is controlled by dam operators based on the energy needs of the greater Seattle area, and this varies throughout the year and is hard to predict. But it is published online by USGS (https://waterdata.usgs.gov/monitoring-location/12175000/#dataTypeId=continuous-00065-1922206742&period=P7D&showMedian=false). My usual strategy is to compare current lake level to past levels when I’ve boated on Ross. This weekend was 1564ft, which was 5ft higher than in February 2024 when I’d boated up to Silver Creek. On that trip the only problem areas for stumps had been Devil’s Creek and Silver Creek. (For reference, when it is below 1550ft there are many more problem areas throughout the lake, both near the shore and in the middle, down lake and up lake, and this is very scary at night). With this water height it was ok to boat in the dark until Devil’s Creek, but we wanted daylight beyond that. I’ve previously tried boating with super bright off-roading headlights connected to a motorcycle battery on the front of the boat. But it seems like Ross Lake is always so foggy at night in winter that visibility still isn’t great, even with the special yellow fog lights. That battery is really heavy, so we’d bring two smaller bike lights instead. They could last a few hours on the highest setting, which would be sufficient. And we’d be boating through safe areas at night anyways, so it should be ok. Loading up on Ross Lake This meant we got packed up to go at 4:00am. Just before leaving I remembered to set up four mouse traps in the truck. Ross Dam is one of the top ten mousiest trailheads in the state, and I usually come back to find mouse poop in the truck if I don’t set up traps. We ferried the last load of climbing gear down to Frontage Road, then loaded up the boat. We put the gear as far back as possible over the wheels, then rigged up a climbing rope on front so we could both drag it down the road. It’s important for our steps to be synchronized when walking for maximum efficiency. Down at the lake edge we wheeled the boat around the resort truck parked there, and we were grateful that it was far enough to the side to allow us to squeeze by (this is not always the case). We layed the big tarp in the boat, then put the two packs in. Then we put a bag of sharp objects (snowshoes, ice tools, poles, crampons) double duffled on top, not touching the boat at all. We then folded the tarp over top and strapped it down with bungees. This would protect the gear from water spray in case we encountered heavy waves. We each layered up, put on our dry suits, put on life vests, then put down jackets over everything. Nick wore his 6000m Scarpa double boots and I wore my 8000m Olympus Mons double boots. We knew the boat ride would be about 3.5 hours sitting in the cold, so needed to dress as warm as possible. I got in first, then Nick got in and pushed us off. I retracted the wheels, then rowed out into the middle of the lake and tried to start the motor. It was very reluctant to start, likely because of the cold. I would do 15 pulls, then rest, then repeat, then rest. This went on for about 10 minutes. I started talking about backup options, but then it finally started! One trick is that it needs to be a very sudden jerk for the pull, not just a slow continuous pull. By 5:30am we were finally cruising up the lake. I started out slow so we could make it through the water bar. The resort strings up a bunch of floating logs as a wave break, and there’s one narrow gap for boats to squeeze through. If you were cruising up at night it would be very easy to not see the logs and crash into them. The gap gets moved to different locations every time I go there, so I had no idea where it was. Luckily they place reflective cones on each end, though. This day it was on the far north side. Boating up lake, looking back at Jack mountain We carefully made our way through, then on the other side I turned the motor up to max and we reached cruising speed of 5.7mph. I’ve gotten pretty familiar with all the features of the lake over the years. We soon rounded Cougar Island, and I resisted the urge to cut through the gap with the shore since the submerged stumps were risky there. We went past Roland point, and Big Beaver on the left, with Pumpkin Mountain sticking up in the dark. We then rounded rainbow point and then reached the bridge over Devils Creek just as the sun was coming up. Taking out at Silver Creek Luckily there were no stump problems, but we had enough daylight by then to see at least. We beelined to Tenmile Island, then past Lightning Creek and on to Cat Island. Beyond that we started encountering wind and waves that were apparently coming out of the Little Beaver valley. This was unexpected, and we got sprayed with water as the boat cut through the waves. It was so cold the water instantly froze into verglass on our jackets and on the boat. Luckily the wind was localized and by Jack point it had died down again. Walking to the campground Finally, we could see the fan-shaped outlet of Silver Creek. I wanted to land as close as possible to the campground, but it was located on the north side of the fan. We could see the lake ended just north of that, with many stumps sticking out. That meant shallow water with a higher risk of freezing over, and also more danger from stumps. So at 9am we landed on the south end of the fan where the water was deeper and less risky. We quickly unloaded and left all the boat supplies in a duffle in the boat. We wrapped the motor in a tarp to protect it, then I disconnected the fuel line and used a screw driver to depress a valve to release excess gas. We then put the propane tank in a black duffle so the sun could help warm it. At Silver Creek After a 10 minute walk through beach covered in 5ft tall stumps we reached the official Silver Creek campground. It had a dock that I don’t think has seen water in years (judging by all the grass growing around it). We had a quick snack at the picnic table and left a little bit of food in the bear box, then headed out at 10am. Our packs were very heavily loaded with snowshoes, double boots, and ice tools strapped on the outside. Based on my previous trip I knew the optimal route up Silver Creek was to cross near the outlet to the north side, then pick up the old miners trail. We carefully tiptoed over icy rocks and frosty logs, and made it into the woods on the north side. I had my previous GPS track loaded on my watch and soon picked up the old trail. The woods are generally very open, and the trail long ago abandoned, but the trail still allows for quicker progress than bushwhacking. Bushwhacking to the cabin We cruised up the trail for a few hours and hit snow starting around 2500ft. Shortly after that the trail disappeared at the old cabin site. Unfortunately the cabin got smashed in by a tree and is now just a few wall sections providing no shelter. Beyond the cabin the woods are generally open and travel easy. The ground soon got icy enough that we ditched our hiking boots in a bag tied to a tree and switched to double boots and crampons. The snow eventually got deep enough to switch to snowshoes around 3000ft, but the snow was consolidated enough to not be difficult trail breaking. We took turns and by 3:30pm we reached the head of the valley at the base of the cliffs below Silver Lake. Here we roughly followed my February route, which was to climb up the right side of the drainage following the lowest-angle treed slopes. We got halfway up in snowshoes, then continued in crampons as the terrain steepened and the snow got more firm. Nice open forest above 3000ft. Darkness set in half way up, and we continued breaking trail through mostly consolidated snow on the south-facing slopes. By 7:30pm we crested the outlet of Silver Lake and stopped to top off our water bottles in the surprisingly unfrozen outflow. That would have been a nice place to camp, but would not be close enough to our objectives. We switched to snowshoes and continued across the frozen lake and up through the Spickard-Custer col. On the other side we dropped down to 7000ft and traversed on low-angle slopes to the base of the west face of Solitude, just before the Redoubt Glacier started. We decided that was close enough to be our base camp, and it would be nice to have a camp not on a glacier so we wouldn’t have to worry about crevasses. So we dropped our gear at 9:30pm and set up the mega mid tent. So far everything was going very smoothly and mostly according to plan. Starting up Sunday morning Sunday We left camp the next morning at 7am and roped up for the Redoubt Glacier. We generally stayed on the shoulder at 7000ft traversing underneath Solitude and past Easy Mox. Interestingly, we noticed the slab pitches up to the Easy Mox – Solitude col were covered in snow, which meant that might be a viable route option. Also, the northeast ridge appeared to be uncorniced. We kept that in mind for selecting our Easy Mox route. Approacing Redoubt We transitioned between crampons and snowshoes, but never sunk in the snow too much. Within a few hours we reached Redoubt Col and our first sunshine of the day. Beyond the col we unroped and scrambled through the rocky gap between Redoubt and Redoubt southeast peaks. On the other side we traversed steep snow slopes and decided to ditch the snowshoes and poles. As expected, the steep south facing slopes were well consolidated making for very secure cramponing. At the cannonhole We continued to the middle of the base of the south face, then I led the way kicking steps up with both technical tools out. Around 7900ft when the slope angle eased I traversed left over a ridge then continued up on lower angle slopes. By then clouds rolled in and it started lightly snowing. So much for the sunny weather forecast. I think in the Chilliwacks you always have to round the weather forecast a bit worse than expected. I had last climbed Redoubt in 2018, so my memory of the route was a bit rusty. But Nick had just climbed it in summer 2024 and rememberd the route. He led the way up the appropriate gully on the right. (I’m not sure if this is the normal route, but it certainly worked). By 8500ft we encountered a cliff band, and we did a few mixed moves hooking rocks to climb up and traverse left through it. We then encountered a complex set of snow/ice gullies leading up. Nick leading out of the cannonhole In general we climbed up and left, linking gullies together, and the climbing was fun and secure. With umbilicals on the two tools I was always connected to the mountain. Finally we traversed left to a broad gully I remembered with a big cannon-hole rock at the top. We slung a hurn and Nick belayed me across and up into the cannon hole. This section was 5th class in summer but was covered in snow now and no problem. I found a rap anchor under a chockstone and belayed Nick up. I then passed him the gear and he got the honors for the last pitch. Nick climbed over the chockstone and pass through the canonhole to the north face, then led a short pitch up to the summit. I followed, and was blasted with wind. We both topped out at 1:30pm, and wrapped a cord around the snowed-over summit cairn for an anchor. On the summit Our timing was just as planned, to be doing the technical pitches during the warmest time of day. The views were amazing of British Columbia to the north, Bear Mountain to the south, and the Moxes to the east. The wind surprisingly eased up enough that we hung out for 5 minutes admiring the view. Then we started planning our retreat. Nick remembered a rap anchor on the south edge of the summit ridge, but I dug around and couldn’t find it. That’s a common problem in winter. So instead we slung the summit cairn and rapped off that. I think someone climbing in the summer will be surprised to find that anchor there, but in the winter it’s just as good or better than a snow bollard. Downclimbing the south face The rope barely reached the gully below. From there we slung another horn and did one more rappel down our ascent gully. We then downclimbed unroped, following our up tracks. The temperature felt surprisingly pleasant on the sunny south face with no wind, even though it was probably in the teens. We traversed back over the rock col, and then entered the shade. The wind picked up and it got significantly colder. We roped back up at Redoubt col and returned back to camp through heavy wind that at times jostled us around. That was unfortunately not in the forecast. We got back by 7pm for a 12 hour day. We had removed the poles from the mega mid tent and dropped it down to the ground so it wasn’t affected by the wind, but we knew it might struggle once we put it back up. So we spent an hour building solid 5ft tall snow walls around the tent. Fortunately the snow was compact enough to make excellent bricks. After melting a few liters of water we stuck in our earplugs to help with the flapping tent noise and soon got to bed. Hiking back to camp Monday Easy Mox was the crux of the trip and we knew it would require more techincal climbing. The temperature was still supposed to be cold, so we planned to hit the technical climbing during the middle of the day for maximum warmth. Based on the conditions we’d seen Saturday with the uncorniced NE ridge and snow leading to the col, we planned to climb the standard NE ridge route. I think the West Ridge might have been faster and more direct, but having never climbed it before it seemed like a lower chance of success with too many unknown variables. Approaching the first pitch to the NE ridge We left camp at 7am again and broke trail over our windblown tracks back to the Redoubt Glacier. We kicked steps up to the edge of a bergschrund below the Solitude-Easy Mox col and ditched our poles and shovels there. I don’t recall this bergschrund existing in 2018, so it appears the glacier has been receeding significantly. Luckily there was a good snow bridge on the right side, but I bet late season that is difficult to cross. I took the first pitch, crossing the bergschrund ont the right then traversing way left to a rock outcrop to get a piece in. The snow got very thin at times on the slab, and I was careful to work around those sections. We shortened the rope to 15m for efficiency and simul climbed up, always making sure to have a piece between us. I eventually topped out at the col and belayed Nick up. Starting up the northeast ridge looking back towards Solitude Amazingly, there were fresh mountain goat tracks leading up the ridge in the snow! They came from farther towards Solitude, but I’m not sure how the goat accessed the ridge. The lower ridge was covered in deep snow but was not corniced. I know that will likely change later in the winter, as I observed last February. In summer the ridge is class 3/4 and easy to scramble solo, but there was enough snow and ice that we decided to simul climb it. We lengthened the rope a bit and Nick took over, trying to always keep a piece of pro between us. The ridge was very fun, with great views of Hard Mox and Lemolo to the left and Lake Ouzel down to the right. The wind occasionally blew the rope over the ridge, and I had to be careful it didn’t get snagged. There were a few sections we stopped to belay, and I think the winter route differed from the summer route here. Nick leading the crux pitch Near the summit we dropped down to the south face to avoid a few gendarmes, and the slabs were well-covered in consolidated snow. This was an area we had been concerned about, but it turned out to be no problem. We finally reached the base of the crux pitch to get back on the NE ridge. Nick offered to lead, so I belayed him off a slung horn. The pitch was melted down to rock, so we climbed in crampons with the tools holstered. Nick ended up leading the whole way to the summit, and I followed. The pitch felt like M3 and was the crux of the route. By 1:30pm, right on schedule, we topped out. It was amazing to finish my last winter Chilliwacks peak, and conditions had been perfect. We paused in the pleasant conditions to admire the view over to Hard Mox. Interestingly, this time the whole upper route on Hard Mox was melted down to rock. When Nick and I had climbed it in December 2023 it was plastered in rime ice and completely white. We soon started planning our descent. We had originally planned to descend the NE ridge route, but that sounded sketchy now, requiring simul downclimbing long sections of ridge. It reminded me of descending the west ridge of Forbidden Peak in winter. That took just as long down as up and demanded a lot of care. On the summit of easy mox Another option, though, was to rap down the southeast face to the col of the wild and hike back from there. That sounded like a much faster and safer way down, and gave us a better chance of getting off the mountain in the daylight. Nick had just climbed the southeast face in summer 2024 and remembered it well. That was the fastest and safest option, so we went for it. Downclimbing the southeast face From the summit we soloed down to an existing rap anchor, then rapped down to our slung horn that we’d left our packs at. From there we did a somewhat complicated and non-obvious route of traversing, downclimbing, and traversing back between different snow gullys. If Nick hadn’t recently done that decent I wouldn’t have tried it, but he remembered it well. We soon reached an anchor and rapped down over an ice bulge. We had to leave one new anchor to rap a short distance to a ledge, then were able to traverse across back above the col. We did one more rap off an existing anchor to a lower ledge, then Nick tunneled a path through the snow on a very exposed ledge. Finally we downclimbed a short 5th class step and got back to the col. Hiking into the sunset It took about 2.5 hours down, and we still had daylight. We traversed around back to Redoubt Col as the sun set, then followed our tracks back to camp a few hours after sunset. The wind had shifted to the north, so I spent some time fortifying another snow wall, before we went to bed. Tuesday We wanted to be back to the boat Tuesday early enough so we would have time to paddle out if absolutely necessary. So we were were up and moving by 4am. We made good time back to Silver Lake, which by now was scoured down to ice in the heavy wind. At the outlet we picked up our tracks and cramponed back down, reaching the 3400ft basin by sunrise. The bushwhack out went smoothly following our tracks, and we managed to exactly find our stashed hiking boots without issue. Back to the boat. Just a little bit of ice nearby After the cabin it felt great to switch back into the hiking boots, and we were back to Ross Lake by 11:30am. We ate a quick snack at the picnic table, then headed back to the boat. Boating out There were a few patches of shoreline north of the boat covered in ice, but luckily the area near the boat was ice free. Our strategy of landing in the deeper water had paid off. By 12:30pm we had the boat loaded back up and we pushed off into the lake. Interestingly, the lake level appeared to have dropped by a foot or so in a few days we’d been out. I rowed out until we were well-away from stump danger, then tried to start the motor. This time it started after only ten pulls! I think it helped that it was the warmest time of day, close to freezing, and the propane and motor had been heating up in the sun a while before we got there. Carrying the motor back up the trail The lake was completely calm, and we cruised down making excellent time. After a few hours, though, the wind started picking up between Ten Mile Island and Rainbow point. I guess it’s not possible for every single star to align on a winter Chilliwacks trip, but they almost all did. The waves got big enough to spray us as they hit the boat, and I steered us closer to the east bank just in case we needed to escape to shore. But the waves stayed manageable, and we made steady progress. I definitely appreciated the dry suit. Finally by 4pm we cruised through the water fence and landed on shore. We each did a bunch of jumping jacks to warm up, and stripped off our soaked dry suits. We made fast progress pulling the boat back up Frontage Road, then double carried the gear back up to the truck by 6:30pm. All my mouse traps were empty, so I think the mice have different winter foraging grounds. We were soon driving back home at a surprisingly reasonable hour. The trip had gone amazingly according to plan. Gear Notes: Zodiac boat, 60m rope, rock pro to 2" included hexes (very important for icy cracks), two tools, snowshoes Approach Notes: Boat up Ross Lake to Silver Creek, bushwhack to Silver Lake, hike to base of peaks
- 14 replies
-
- 15
-

-

-

-

-
Trip: Rainier - Elevation Survey Trip Date: 08/28/2024 Trip Report: Mt Rainier Elevation Survey Aug 27-28, 2024 Eric Gilbertson and Josh Spitzberg Summary of Results (NGVD29 Datum): Columbia Crest has melted 21.8 ft since 1999, revealing a new summit location on the SW Rim Columbia Crest: 14,389.2 ft +/- 0.1 ft (lat/lon 46.852950, -121.760572) SW Rim: 14,399.6 ft +/- 0.1ft (lat/lon 46.851731, -121.760396) On the SW Rim looking back towards Columbia Crest Introduction Mt Rainier is the tallest peak in Washington, the most topographically prominent peak in the contiguous US, and the most heavily glaciated peak in the contiguous US. Until recently, it was one of the few peaks in the contiguous US with a permanent icecap on the summit (the others are Eldorado, Colfax, and Liberty Cap, a subpeak of Rainier, all in WA). The peak is very significant in Washington – it is easily visible from Seattle on a clear day, and its picture is even on the state license plate and the state quarter. Some people refer to it simply as “The Mountain.” [1a] The summit region of Rainier from the USGS quad, with Columbia Crest and the SW Rim labeled. The elevation of such a significant peak is important, and surveyors have been measuring the height of Mt Rainier since the mid 1800s (see Table 1). Early measurements using barometers brought to the summit were prone to high errors, but later triangulation measurements were more accurate. The triangulation method involves pointing a theodolite at the summit from a location of known elevation and position. An angle is measured to the summit and, using the angle and trigonometry, the summit elevation can be calculated. Measurements can be taken from multiple locations, and the results averaged to give a final summit elevation. It is important that the measurement of a peak like Rainier be taken at the appropriate time of year. For a peak with a permanent icecap on the summit, the accepted elevation is the elevation of the icecap at the lowest snow time of year. This is generally late summer, when the seasonal snow has melted off the most and autumn snows have not yet started accumulating. Measuring at this time of year ensures seasonal snow does not count towards the summit elevation. The view of Columbia Crest from the SW Rim in 2009 [13] The summit area of Mt Rainier has a crater rim that melts out to rock every summer, but there has historically been a permanent dome of ice on the west edge of the rim. This ice dome is referred to as Columbia Crest, and has historically been the highest point of the peak. Thus, the elevation of the highest point of ice on Columbia Crest in late summer has historically been considered the elevation of Mt Rainier. The triangulation method was employed in the summer of 1914 and again in 1956 by the USGS (United States Geological Survey) to measure the elevation of Columbia Crest [1]. The 1956 survey measured the elevation 14,410ft, and this is the elevation printed on the quads (official USGS topographic maps). This is also the elevation used by Mt Rainier National Park [6]. (Note: this elevation is in the NGVD29 vertical datum. I will be reporting all elevations in this datum so they can be fairly compared. A datum is essentially what surveyors use to define mean sea level extended across land. See appendix for results in NAVD88 datum). Triangulation can be subject to small errors in the measured angles and the distances between the theodolite and the summit. This can lead to small errors in the final result. Starting in 1988 several surveys have been performed using GPS (Global Positioning System) technology to increase accuracy. This involves bringing a GPS unit to the summit and collecting data from many satellites to measure the summit elevation. In July 1988 surveyors from the Land Surveyors Association of Washington (LSAW) mounted a GPS on the top of Columbia Crest and measured an elevation of 14,411.1ft [1]. On August 27, 1999 [1], and again on July 23, 2010 [2], surveyors from LSAW conducted more GPS surveys, finding essentially the same summit elevation, 14,411.0ft. Table 1: Rainier surveys over time [14] The GPS units used in these more recent surveys are much more accurate than handheld consumer-grade GPS units, like those found in a phone. Consumer-grade units can have very high vertical errors, up to +/-50ft, as a result of effects like atmospheric distortion, multipath errors, and a limited number of available satellites. Survey-grade GPS units, called differential GPS units (dGPS), can get errors down to +/-0.1ft or better. They generally have access to more satellites, have external antennas to help with multipath errors, and are capable of correcting for atmospheric distortions using base stations located around the state. Data usually needs to be collected over a long period of time (like ~1 hour), then post processed at least 24 hours later. Nowadays the US government provides a publicly-available software tool, OPUS (Online Positining User Service) to process the data [3]. There was one other summit measurement taken in 2007 [4] by a a different method, LiDAR (Light Detection and Ranging). This involves a plane flying over the summit and measuring the time for a signal to bounce off the summit back to the plane. The plane’s position is known very accurately, and the time for the signal to return can be used to calculate the elevation of the summit. This measured a summit elevation of 14,405.6ft. Lidar has higher errors than using a differential GPS. Errors in flat terrain can be as low as +/-0.4ft [5], but signals can miss some features in terrain that’s not flat, so errors in mountains can be a bit higher. The gold standard for elevation measurements with the least error is differential GPS measurement. Until now the 14,411ft measurement has been the officially accepted elevation of Rainier. (Though, Rainier National Park still uses the 14,410ft number from the 1956 survey) [6]. Starting in 2023, however, I started hearing from friends that guide climbs of Rainier for RMI (Rainier Mountaineering Institute) that it appeared that Columbia Crest was melting down significantly. They said it now didn’t even look like it was the highest point in the summit area. A rocky point on the southwest edge of the rim appeared higher. Rainier climbing guides go to the summit many times over the summer and return every summer, so they are uniquely qualified to make these observations. I’d personally climbed Rainier four times by 2023, and this matched my observations. In August 2007 I climbed Rainier and Columbia Crest clearly looked like the highest point. However, in February 2015 I climbed again and I couldn’t tell if the SW rim or Columbia Crest was higher, so I went to both locations. I climbed again in May 2018 and May 2019, and again couldn’t tell for certain which was higher, so visited both locations. I’ve recently built up skills in surveying peaks, and by 2023 I was equiped to actually measure the current elevation of Rainier and determine if, in fact, Columbia Crest was melting down. Since 2022 I’ve been working on a project to survey the 100 highest peaks in Washington to find up-to-date elevations. I use a 20-arcsecond mechanical theodolite, 10-arcminute 5x and 1x sight levels, and a survey-grade differential GPS unit (Spectra Promark 220 with Ashtech antenna). I’m a teaching professor in mechanical engineering at Seattle University and the Civil Engineering department allows me to borrow surveying equipment for this project. Using the differential GPS I’ve usually taken 1-hour long measurements on summits and gotten errors down to +/-0.1 ft. I also survey peaks internationally to determine the elevations and locations of country highpoints. I’ve discovered and surveyed new country highpoints of Uzbekistan [7], Saudi Arabia [8], Togo, Guinea-Bissau, and Gambia. 2023 Survey Attempt Melted out conditions in September 2023 In the summer of 2023, while I was in Uzbekistan climbing and surveying the highpoint, I first heard about the melting down of Columbia Crest on Rainier from friends. That was a particularly warm summer in Washington, and by mid August the climbing routes on Raininer had melted out so much that all guiding companies ceased guiding. Snow bridges across crevasses melted out much more than normal. Guided groups generally put laders across crevasses on the most popular route, Disappointment Cleaver (DC), but by mid August the crevasses were too wide even for the ladders, so the ladders were pulled. This was very unusual. I’d never heard of the routes melting out so much. I really wanted to survey the elevation, but I unfortunately didn’t get back to Seattle until early September. In a normal year climbers would still be summitting then, and it would be the perfect time to survey the elevation at the lowest snow time of year. But, according to the Rainier climbing blog (maintained by climbing rangers for the park), there was no known viable route to the summit. However, one of my friends had managed to reach the summit via the DC route a few days after the ladders got pulled. So I was hopeful maybe I could find a way following his route. The upper route in september 2023 Nick and I brought my survey equipment up on September 8 to attempt the DC route. We were the only ones attempting it, and it was very icy and melted out. We managed to climb to 12,800ft, but then got stopped by a huge crevasse spanning nearly the entire face. The snow bridge my friend had used had melted out. We couldn’t find a way across, so we had to retreat. It appeared there was no safe route to the summit since the glaciers had melted down so much. I did manage to get one measurement from that summer, though. One of my friends sent me a picture taken on July 23 from Columbia Crest looking towards the SW Rim. I used the GeoPix photographic analysis surveying software written by Edward Earl [9] to measure the relative height of the SW Rim. This involves identifying known peaks in the background of the image, then using the known locations of Columbia Crest, the SW Rim, and the background peaks. I measured the SW Rim was 8.0ft +/-0.5ft taller than Columbia Crest. The 2007 Lidar survey included the elevation of the SW Rim (which is rock so wouldn’t have changed), so I could subtract 8.0ft from that and get a measurement of Columbia Crest. This yielded a measurement of 14,390.7ft. The error would be approximately the sum of the Lidar error (+/-0.4ft) plus the photographic analysis error (+/-0.5ft). So the error would be approximately +/-0.9ft. This measurement was consistent with the guides’ observations. Columbia Crest had melted down significantly (20ft) and the highest point had changed to be the SW rim. In order to get a result accurate enough to be accepted as official, though, I really needed to bring a differential GPS unit up and survey both Columbia Crest and the SW rim. That, unfortunately, would have to wait basically a full year until it was again late summer. I hoped there would be a safe route to the summit in late summer 2024 to try again for the measurement. 2024 Survey Hiking up the Muir snowfield in low visibility I’m usually out of the country most of the summers on mountaineering expeditions, and in summer 2024 I was on an expedition to make the first SE-NW traverse of Greenland. I planned to be home by Aug 1 so I would hopefully have time to survey Rainier during late summer before the route might melt out. However, the Greenland expedition took a bit longer than expected. Finally, by August 22 I made it back to Seattle. Luckily, according to the Rainier climbing blog and my friends observations, the DC route was still in safe conditions. Apparently this August in Washington has been a bit cooler than normal, which is good for snow bridges staying intact. I took a few rest days, but didn’t want to wait too long in case the route melted out more. I wanted to climb the route with the highest chance of success for reaching the summit, and that was the DC route. Sunset from Camp Muir Josh was in town visiting from Boston, and we decided to go for the next summit window, which appeared to be Wednesday August 28. That day the winds were forecast to calm a bit (to 20-30mph) and it was supposed to be sunny. Freezing levels had been low all the previous week and were expected to stay below the summit that day, so the route would likely be safe. My classes at Seattle University don’t start until mid September, so I was available weekdays. This date would be very similar to the date of the 1999 LSAW survey, which was Aug 27. So data comparison should be fair. We planned to go for a two-day climb to help with acclimation. I’ve done single-push ascents of Rainier without issue, but on those trips I generally didn’t linger long on the summit. For the surveying trip we’d need to spend at least 2-3 hours up there, which I know can be a bit riskier if unacclimated. The surveying plan was to take one-hour measurements on each of Columbia Crest, the SW Rim, and the USGS monument (if I could find it). I would also take sight level measurements between Columbia Crest and the SW Rim as a backup measurement to determine the relative height. Sunset at Camp Muir On Monday I took the dGPS outside to take a test measurement to verify everything was in working order. I mounted it on my mini tripod and turned it on, but after an hour it still was not able to acquire satellites. I had last taken measurements with it on Mt Fuji, in Japan, and sometimes if I bring it overseas to a location far from the last location measured, it takes a long time to start collecting data. I was worried I might not get it working in time, though. Luckily there was a backup unit at Seattle Univeristy. I drove in, picked up the other unit, then took a 30-minute test measurement outside. It worked fine and was able to acquire plenty of satellites. So finally I was good to go. Monday evening at 7pm I reserved a timed-entry permit for the park. We drove through the entrance gate Tuesday at 11am and then at Paradise we checked in at the Wilderness Information Center. We got a permit for Camp Muir for that night, though the rangers said the shelter might be full. So we reluctantly packed a tent just in case. Starting up in the dark We made good time hiking up, and there was a lot more snow than I remembered. In Septemer 2023 I was able to hike completely on rock and dirt to Camp Muir except for a short 20ft section of snow. This time nearly half of the ascent was snow covered. We reached the shelter after about 3 hours and luckily there was space for us inside. The ascent had been socked in the clouds with occasional snow showers. It was apparently unseasonably cold for late August, with freezing levels down to 6500ft, just above Paradise. At 5pm a climbing ranger came in and described the conditions on the upper mountain. He’d just been up DC Monday and said it was in good shape. There were a few ladders across crevasses and they were solid. There was a guided group camped at Ingraham Flats going up, another at Camp Muir, and there were three independent teams going up plus one solo climber. Looking back at Cathedral Gap Many groups start between 10pm-1am from Camp Muir so they can tag the summit at sunrise and get down before it gets too hot and snow bridges get weaker. Our calculation was a bit different, though. We knew the wind was supposed to be decreasing over the day and it would start off unseasonably cold at sunrise but gradually warm up to near freezing at the summit. I was nervous high wind might knock the antenna over and make it very cold waiting around for the measurement. The temperature wasn’t forecast to be getting warm enough to jeopardize the safety of the route, though. So we decided to sleep in a bit. Sunrise above Little Tahoma We were up and moving by 3:45am. We traversed the Cowlitz Glacier, shortened the rope to hike over Cathedral Gap, then crossed Ingraham flats to the base of Disappointment Cleaver. We had to cross two ladders at the upper Ingraham flats, and these were no problem. We then shortened the rope again and hiked up close to each other in crampons up the cleaver. At the top we were hit by strong wind and caught up to a guided group and a few independent groups resting. We passed them and continued on Climbing steep snow above the cleaver to the upper Ingraham glacier. Luckily there were no groups immediatly above us, so we wouldn’t have to worry about bottlenecking. I’d heard that earlier in the summer teams would have to wait an hour or more at the ladder sections on the upper route, but we could avoid that. We zig zagged up the face, crossing a snow bridge around 12,800ft at the exact place Nick and I had bailed last September. It was way easier now with that snow bridge. Past that we climbed one single ladder, then traversed right below the “wave” feature. This is a huge crevasse with an overhanging ice wall at the top that would be very challenging to ice climb. The wall drops to about 15 ft at the shortest, and here the guides/rangers have placed a double ladder. The ladder getting past “The Wave” The ladder reminded me a bit of the Khumbu Icefall on Everest, but less extreme. There they have over a dozen ladder sections, sometimes triple ladders. Above the double ladder the route wove through more crevasses until we got near the rim. A solo climber ran down, then a team of three descended. By that elevation the wind started picking up as expected. We reached the southeast rim around 8am, took a short break on the leeward side, then crossed the crater rim to Columbia Crest. There was a bit of shelter on the southwest side, and we stopped there to prepare the survey equipment. The summit was covered in a few inches of fresh powder from the Tuesday snow event, but the highest point was a patch of dirty ice, clearly not the fresh snow. The wind was 20-30mph and gusty, making this one of the more challenging surveys I’ve done. I quickly opened up the pelican case, screwed the antenna onto the antenna rod and mounted it on the tripod. I planted the tripod securely in the snow, connected the cable to the GPS, and started logging data. Setting up the GPS on Columbia Crest I then ran down out of the wind to warm up a bit. When my fingers regained sensation I went back up with my sight levels and took angular inclination readings up to the SW Rim highpoint, then returned to the sheltered area. Josh took out our emergency sleeping bag and pad and crawled inside to wait out the one hour measurment. I then ran over to register rock and found the summit register. This was the first time out of my five summits I’d actually found it. Previous times it was always buried in the snow. I signed us in, then looked around for the USGS monument at the coordinates indicated on the quad. The monument is a big metal rod that was pounded into the ground with a USGS marker on the top. The 2010 LSAW team surveyed the monument and I wanted to get another measurement there for comparison. The 2010 report showed a picture of a distinctive rock next to the monument, and I located that rock. However, there was no monument there. It appears to have gotten stolen. There was no use taking another measurement if there was no monument there, since I could not be certain I was in the exact same location as the previous measurement, so at least that saved us an extra hour on the summit. This problem of missing USGS monuments appears to be common on Rainier. The 1999 LSAW survey team reported not being able to locate the monument. It’s unclear from their report if they installed a new one or not. The 2010 team reported the monument had been removed from the ground and vandalized, and they had to pound it back in the ground. The dGPS set up on the SW Rim After the 1 hour timer ended I ventured back up to Columbia Crest, logged the data, then packed up. I then hurried over to the SW Rim highpoint. With my sight level I verified that the highest point was a large rock laying on the dirt on the north edge of the rim. I mounted the tripod directly on top of the rock, and used a few smaller rocks to stabilize the legs. The wind was even stronger there, but the tripod held solid. I started logging data, then used my sight levels to measure angular declinations down to Columbia Crest. I also verified that the monument location was shorter than the SW Rim. The SW Rim was definitely the highest point on Mt Rainier. To stay warm I ran back and forth between the monument, Columbia Crest, and the SW Rim a few times, then ate some snacks at the sheltered area. Running at 14,000ft+ definitely got me breathing hard. We noticed the big 6-person guided group reached the southeast rim, but they didn’t come over to the summit. I’ve heard this is common for guided trips up Rainier, and I’m kind of confused why they get so high up but don’t continue the short distance across the rim to the actual summit. Descending the DC route Finally the one hour clock ended, and we both went to the SW Rim and packed up. The wind never let up, and I was relieved the tripod held without blowing over. We hiked back over to the SE rim, roped up, and started down the mountain around 10:30am. The descent went smoothly, and luckily all other groups had already gotten below the ladder sections, so there was no bottlenecking. It also hadn’t gotten too warm yet, and the fresh coating of powder snow from Tuesday stayed cold and never glopped up. There were no particularly worrisome snow bridge crossings. We soon reached the top of Disappointment Cleaver at the same time as a guided group around 12pm. We made good time down the cleaver, then retraced our route back to Camp Muir by 1:30pm. By then the Muir snowfield was nice and soft in the afternoon sun, making for excellent boot glissading down. We reached the visitor center just in time to turn in our permit to the rangers, and were soon driving home. Discussion After 24 hours I processed the measurements using OPUS, then converted to NGVD29 vertical datum using NCAT [10]. I found Columbia Crest is 14,389.2 ft +/-0.1ft and the SW Rim is 14,399.6 ft +/-0.1ft. This means Columbia Crest has melted down 21.8ft since the 1999 LSAW measurement, and the SW Rim is now the true highpoint of Rainier at 14,399.6ft. These values are consistent with my sight level measurements, which were that the SW Rim is 11.0ft +/-1.3ft taller than Columbia Crest. When I got home I learned that just within the past few weeks a new Lidar dataset had been published from a measurement flight in 2022 [11] (data is often not publicized immediately, and this one hadn’t been published when I checked a few weeks earlier). I analyzed this data using QGIS surveying software [12] and it measured Columbia Crest at 14,392.3ft and the SW Rim at 14,398.7ft. This means Columbia Crest has melted down 3.1ft since 2022. Figure 1: Columbia Crest and SW Rim elevations over time since 1988 Interestingly, the height for the SW Rim from the 2022 Lidar measurement is 0.9ft lower than I measured. This difference is exactly the height I measured with a tape measure of the summit rock above the surrounding dirt (0.9ft). This likely means the 2022 Lidar pass measured the dirt but missed the rock. This is not unusual, as Lidar data is taken only every 3-6ft horizontal spacing, and can thus miss a rock smaller than that width. The 2007 Lidar data measured the SW Rim as 14,399.5 ft, which is within 0.1ft of the dGPS measurement. Because the dGPS measurement has an error of +/-0.1ft and the Lidar measurement has a nominal error of +/-0.4ft (in flat terrain), then these two measurements are consistent and within the error bounds of each other. Figure 2: 2007 Lidar point cloud data To understand how the elevation of Columbia Crest has changed over time, Table 1 shows all elevation measurements of Columbia Crest and the SW Rim from 1841 to present, including the exact date and measurement error when known. Table 1 shows that the early measurements in the 1800s were prone to high errors, but the measurements got significantly more accurate by 1914 and 1956. Figure 1 is a plot of the elevations of Columbia Crest and the SW Rim over time for the period since the 1988 measurement, the first measurement with errors less than 1.0ft. Figure 3: 2022 Lidar point cloud data The plot shows how Columbia Crest has been losing elevation at an increasing rate since 1999. (Note: the 2010 measurement is shown as an outlier because the expedition report only described measuring the USGS monument and not Columbia Crest, so it is unclear if Columbia Crest was measured). Before 1999 the elevation stayed relatively constant. Between 1999 and 2007 Columbia Crest lost on average about 0.7 ft per year. This rate increased to 0.9 ft/year between 2007-2022, then 1.6 ft/year between 2022-2023, then 1.5 ft/year between 2023-2024. The rate of elevation loss during the past two years is the same within the error bounds of the measurements, so it is unclear if the rate is increasing, decreasing, or staying constant. This plot shows that in approximately 2014 the SW Rim overtook Columbia Crest as the highest point on Mt Rainier. Figure 4: The view from the SW Rim looking towards Columbia Crest in 2009 (elevation interpolated from Fig 1) [13] To visualize the extent of melting of Columbia Crest, Figure 2 shows the Lidar point cloud data for the western crater rim from 2007. Figure 3 shows Lidar data from 2022. The upper region is Columbia Crest and the lower region is the SW rim highpoint. Pixel colors represent elevation, ranging from 14,390ft (light blue) to over 14,400ft (dark red). In the 2007 image Columbia Crest is clearly larger and taller than in the 2022 image. It is taller than the SW rim in the 2007 image and shorter in the 2022 image. Figure 5: The view from the SW Rim looking towards Columbia Crest in 2024 Figure 4 shows the view from June 27, 2009 looking from the SW Rim towards Columbia Crest [13]. Figure 5 shows the same view from 2024. Columbia Crest is clearly much larger and taller in 2009 vs 2024. Conclusion The Columbia Crest icecap that used to be the highpoint of Mt Rainier has melted down 21.8 ft since 1999. Columbia Crest is no longer highest point on Rainier, and instead the SW Rim is the highest point at 14,399.6ft. Appendix Note that in this report I have reported all elevations in the NGVD29 vertical datum so that historical measurements can be fairly compared to more recent measurements. This is consistent with the LSAW reports from the 1988, 1999, and 2010 surveys where all data was converted to NGVD29. A vertical datum is how surveyors define a zero elevation, essentially mean sea level extended across land. The NGVD29 datum was created in 1929. An updated datum, NAVD88, was created in 1988. Elevations from one datum cannot be directly compared to elevations in a different datum. OPUS gives raw output in NAVD88 datum and I used the NCAT tool [10] to convert to NGVD29. For reference, the raw output from OPUS was: Columbia Crest: orthometric height 4387.835m +/-0.028m (14,395.8ft +/-0.1ft) NAVD88 computed using Geoid18 SW Rim: orthometric height 4391.000m +/-0.032m (14,406.2ft +/-0.1ft) NAVD88 computed using Geoid18 If anyone has a pre-2009 picture taken from the SW Rim looking towards Columbia Crest I'd really like to see how much bigger it was back then! Acknowledgements Funding was provided by the American Alpine Club, with equipment provided by Seattle University. Katie Stanchak advised on methodology and equipment and data analysis. Dustin W provided summit pictures for photographic analysis. Kyle B helped with Lidar processing. Rainier climbing rangers and guides kept the DC route open so we could make it up to the summit. References 1a. Barcott, B. . “The Mountain is Out”, April 27, 1999, Western Washington University 1. Signani, L., “The Height of Accuracy,” July 19, 2000, Point of Beginning, https://archive.ph/IVhw#selection-1113.5-1113.26 2. Schrock, G. “Rainier – The Unforgiving Mountain,” Jan 27, 2011, The American Surveyor, https://amerisurv.com/2011/01/27/rainier-the-unforgiving-mountain/ 3. Online Positioning User Service (OPUS), NOAA, https://geodesy.noaa.gov/OPUS/ 4. USGS Lidar Explorer Map https://apps.nationalmap.gov/downloader/ 5. USGS, “What is Lidar and Where Can I Download It?”, https://www.usgs.gov/faqs/what-lidar-data-and-where-can-i-download-it 6. Mount Rainier National Park, https://www.nps.gov/mora/index.htm 7. Gilbertson, E., “Alpomish, First Ascent and New Country Highpoint,” 2024, The American Alpine Journal, https://publications.americanalpineclub.org/articles/13201216908 8. “Surprise – Al Sawda is not the highest peak in Saudi Arabia,” Anas Al-Yousef, Okaz, https://www.okaz.com.sa/last-stop/na/1667177 , Aug 29, 2018 9. Earl, E., 2017, “GeoPix Photo Analysis,” available for download at https://github.com/ericgilbertson1/PhotoAnalysis/tree/main 10. NGS Coordinate Conversion and Transformation Tool (NCAT), https://www.ngs.noaa.gov/NCAT/ 11. Washington Lidar Portal https://lidarportal.dnr.wa.gov/ 12. QGIS.org. QGIS Geographic Information System. QGIS Association. http://www.qgis.org 13. Rainier summit view June 27, 2009, @arhuber, https://www.youtube.com/watch?v=qDQ6jqAs2h0 14. Matamoros, F., “Taking the measure of a mountain,” The News Tribune, Nov 16, 2006 Gear Notes: Standard glacier gear, differential GPS, tripod, surveying sight levels Approach Notes: Standard DC approach
-
Trip: Choral Peak - North Face Trip Date: 05/05/2024 Trip Report: Choral Peak First Ascent of North Face (WI3 M3 Steep Snow, 300m) May 5, 2024, 12:30am – 6pm 18 miles, 5kft gain Nick and Eric Starting up the first pitch In late April 2020 I was skiing Choral and Gopher, two top 200 peaks in the Entiat River drainage, and I noticed a big ice line on the north face of Choral. I was going solo and didn’t have climbing equipment, but I vowed to return again and try to climb it. The route Access to the area is a bit difficult when the ice is in season. The road is generally either snowed over or gated during ice season, adding many miles to the approach. On that trip patchy snow had started on the road 10 miles before the trailhead. I’d skied in partway then road walked the rest in my ski boots, then hiked farther in to get to snow line to start skiing. Usually between December and early April the entiat river road is a snowmobile route for the last 10 miles to the trailhead. Then sometime in April when the snow partially melts the road is gated 6 miles before the trailhead until sometime in May. I have a snowmobile now, but I’ve been prioritizing Bulger peaks in the winter and never got around to the climb. Finally in November 2023 I decided to give it a try. The road was still snow-free to the trailhead but I was hopeful maybe enough ice had formed for the route to be climbable. Francis and I were able to drive to the trailhead and skin from there. We got to the base of the route, but the ice was extremely thin and sketchy looking. So we bailed and instead skied Gopher. Closeup of route I again prioritized Bulgers this winter, and by early May I thought I’d give Choral another try. I suspected this would be the time of year with the thickest ice. The ice is between 7,000ft – 7,500ft on a shaded gully on a north face with a snow bowl above feeding it. That likely won’t start melting down until mid May in a normal year. Based on recent satellite images the road was snow-free to the trailhead, but I expected it to be gated 6 miles before the trailhead (as it has been in previous years in early May). So we planned to bring bikes for the road section. The satellite image showed the trail mostly snow-free. I’ve previously biked that trail, and it could save a lot of time. It’s popular with dirt bikers to access Myrtle Lake, so gets cleared semi regularly. So the plan was to bike as far as possible, maybe to the wilderness boundary near Myrtle Lake, then bushwhack straight up to Choral. This was the route I’d taken in November and it had worked well. The route viewed from Gopher Peak Because less than half of the approach was snow we decided to leave the skis at home and snowshoe. We would do a car to car trip to avoid carrying the extra weight of overnight gear. Sunday looked like perfect weather for the trip – cloudy and cool, with just a slight chance of afternoon snow showers. Biking up the trail Saturday evening we drove to Entiat River Road, and were surprised to find the gate open! We drove the whole way to the trailhead, and it looked like the road had recently been logged out. We got a few hours of sleep then were up and moving by 12:30am Sunday. Amazingly, the trail was completely logged out too! The area is in a recent burn zone so every year many trees fall over the trail. But it appeared some dirt bikers had just gone in and cleared it out. We had fun biking up the low-angle trail. I was occasionally stopped by my chain getting stuck in the front derailleur (I had forgotten to lube it before). But we soon made it to patchy snow at the Myrtle Lake turnoff. Bushwhacking to Choral The dirtbike tracks turned off, and bikes no longer made sense in the snow with blowdowns likely. So we locked them to a tree and continued on foot. We hiked another mile to the wilderness boundary, then cut up right into the woods. I found an easy open route and we made fast progress up the slope. Around 3am near snowline we stopped to rest and I noticed my headlamp light reflecting off two eyes about 50 ft away. We both turned our headlamps to full power and it was a cougar sitting there looking at us! I wasn’t too thrilled to have it following us, so I chucked a snowball at it and it bolted back away. Luckily we never saw it again. Approaching the climb Around 5,500ft we hit continuous snow and switched to snowshoes. Skis would have been nice, but I appreciated not having to carry the extra weight on the approach. We made fast time to a flat bowl at 5800ft, then topped off water in Choral Creek. We then continued to the north face of Choral Peak by sunrise. This time the ice was nice and fat, even better than the time I had first seen it in April 2020! Maybe a few extra weeks of spring melt-freeze cycles got more ice forming. We ditched snowshoes and one pack at the base then cramponed up the snow to the base of the ice. Nick on the first pitch We built a rock anchor on the wall on the right and I took the first lead. I climbed up over a fun ice bulge, then followed a snow ramp to the base of the main flow. From there I had several options. Straight up the middle or up the left looked steepest, probably WI4. The right side was lower angle and went through an interesting constriction/chimney between the ice and rock. That looked fun, so I continued that way. Following the second pitch I got a few rock pieces on the wall then the ice steepend. I ran out of gear and rope at the base of the chimney and built an anchor there. As I was belaying there was occasional spindrift flying down the face and covering me in powder. I guess it had snowed a few inches of fresh powder on Saturday and that was now blowing down. Luckily it wasn’t enough to be conerning. Nick followed up then took the next lead. He wriggled up through the chimney and found a nice ice ledge shortly above for a two-screw anchor. I followed, and the chimeny was pretty fun. I could lean my butt against the rock and kick my crampons in the snow. It was easy to take breaks. The rock made swinging the tools a bit trickier though. The third pitch After reaching Nick I continued on the next pitch. I followed the line of least resistance, which was traversing left to the middle of the face, then climbing up over another bulge. I then traversed to the left side of the face and got in a nut in a crack. I had three screws left and it looked like just enough to reach the top of the ice. From there I expected I would reach trees or have cracks in the rock on the side. I put my last screw on near the top of the final ice bulge, then found good rock pro on the side. I ran the rope out to its end and found a nice tree to build an anchor. Nick followed, and from there we unroped and continued up the steep snow. The snow was surprisingly powdery for May, and trail breaking was challenging. We definitely should have brought our ascent plates. We took turns, and when I was in front I had to clear snow with my hands, then with my knee, then pack down with my foot, then step up. It took a while. Climbing up the steep snow Finally I reached the rocky headwall and traversed up and left on a good ledge. The ledge ended at some small trees and the terrain above us steepened. We decided to rope back up there. Pitch 4 Nick took over and led up, climbing what turned out to be the crux of the route, an M3 mixed pitch. I followed up and there were a few interested rocky sections partially covered in snow. I had fun hooking ledges, torquing some cracks, and balancing my frontpoints on small rock features. Mixed Pitch I met Nick at a rock anchor then I led the final short pitch. I climbed snow and rock and managed to get a hex in a good crack. Finally I topped out just left of the summit cornice and slung a tree. Nick soon arrived and we unroped there and made the short snow scramble over to the summit by 1pm. On the summit We were treated to amazing views of snowy peaks in all directions, and it looked very wintery. The afternoon snow showers were still holding off, but it was nice and cloudy so the sun wasn’t warming things up to much. We soon returned to the rope, packed up, and headed down. I kind of wished I had skis then, but they would have been challenging to carry up the climb. We plunge stepped down the east ridge to Choral Lake, then wrapped around the north face back to our stashed gear. We made quick progress back down to the trail and soon reached our bikes. Biking out The bike ride out was amazing, and I got some practice with taking gopro footage through some stream crossings. By 6pm we were back to the truck, just as a light rain started, and we were soon driving home. Gear Notes: 60m rope, ice screws, hexes, double rack of cams to 2", ice tools Approach Notes: Bike to Myrtle Lake turnoff, bushwhack to base of route
-
Ok, I posted my Kangchenjunga report now. Thanks!
-
Trip: Kangchenjunga - SW Face Trip Date: 06/01/2023 Trip Report: Kangchenjunga (28,169ft/8586m) Highpoint of India Third highest mountain in the world June 1, 2023 Eric Gilbertson On the summit (photo by Anna Gutu) May 27 – Heli from Kathmandu to Lukla, delayed by bad weather in Lukla May 28 – Heli to Tapethoke village, delayed there by bad weather May 29 – Heli to Kangchenjunga basecamp May 30 – Climb to camp 2 May 31 – Climb to camp 4, start for summit 7:30pm June 1 – Summit 5:30am, descend to basecamp June 2 – Heli to Taplejung, jeep to Suryodaya June 3 – Jeep to Bhadrapur, flight to Kathmandu June 4 – Flight to US Location of Kangchenjunga Kangchenjunga is the third highest mountain in the world and straddles the border between Nepal and India. It is officially the highest mountain in India, but is closed to climbing from the India side for religious regions. So it is only climbed from the Nepal side. The name means “The five treasures of the high snow” and indeed the peak has five sub summits. This very often leads to confusion with climbers taking routes to a summit that is not the true highest point. Aside from routefinding issues, the normal route to the summit is technical with steep rock and snow sections. I was in Nepal for the spring and my goal was to climb Mt Everest and Kangchenjunga. I’m working on climbing country highpoints and this would theoretically get the highpoints of China, Nepal, and India. The normal climbing season for both peaks is mid/late May, and it is difficult for me to get time off this time of year due to my teaching schedule. So if I could get time off for one peak I might as well try to squeeze them both in. The route I officially got time off to climb Mt Everest, so I needed to go for that one first. Then if I happened to finish that climb early enough, was still feeling ok, and the monsoon and high winds hadn’t yet started yet, then I could give Kangchenjunga a shot. I would theoretically already be acclimated so Kangchenjunga should only take a few extra days to climb. I arranged logistics with the cheapest company I could find, Seven Summit Treks, and paid for basecamp services for each peak and helicopter transportation between basecamps. I was planning to climb both peaks without supplemental oxygen and without personal sherpa support, just on my own above basecamp. This was mostly to save money so I could afford both peaks in the same season. I had previously climbed K2 this way in the summer of 2022, so the strategy seemed feasible. Climbing with supplemental oxygen and personal sherpa support significantly increases the price. Flying out of Kathmandu Three partners – Matthew, Steven, and Darren – would join for Everest, but I would be on my own for Kangchenjunga. On May 22 I made my solo no O2 summit attempt on Mt Everest, but had to turn around at 8500m after showing signs of HACE. I had been troubled by a dislocated shoulder in the Khumbu Icefall, two weeks of being sick from a respiratory infection, and not enough time for all the rotations I had intended. Unexpected wind had then delayed my summit push making me spend 40 hours above 8000m without oxygen and pull two consecutive all-nighters before moving up from camp 4. It seemed like luck was not on my side that attempt, though I did make it back down unscathed to basecamp with just a bit of sunburn on my nose. The Khumbu Icefall was effectively closed a few days after I descended (ie all ladders across crevasses were pulled), meaning there was no time for another attempt, unfortunately. After hiking two days down to Lukla I caught a late-morning flight to Kathmandu May 26 and considered my options. Flying to Lukla I was using weather forecasts from professional meteorologist Chris Tomer, and he told me there was still a summittable weather window on Kangchenjunga in late May and early June. It appeared the weather on Kangchenjunga was a bit different than on Everest, since the Everest season effectively ended May 26 due to increasing winds. I had already paid for permits, transportation, and logistics support for Kangchenjunga. And I was already acclimated. The elevation I had reached on Everest was approximately the elevation of the summit of Kangchenjunga. The only potential reasons not to go were that I was still exhausted from Everest and the hike out, and I might end up being alone on the mountain. But I had heard that a group from Elite Expeditions was planning to head from Everest directly to Kangchenjunga, so I wouldn’t be alone. And perhaps if I rested a few days I could regain some energy. I met in person with Dawa and Thanes from SST shortly after landing. It turned out there were currently two solo no-O2 clients of SST in trouble on Everest and Kangchenjunga and rescue teams were being sent to help. Suhajda Szilard, who I knew from basecamp and some of my rotations, had attempted to climb Everest solo with no O2 two days after me on May 24 but had not made it down. He was last seen laying down below the Hillary Step. SST was scrambling to send a rescue team to find him (the search would end up being unsuccessful). Also, skier Luis Stitzinger had failed to return from his solo no-O2 summit bid on Kangchenjunga also on May 24. SST was currently organizing another rescue team to look for him (he didn’t survive and his body was later found at 8300m). With this situation unfolding, understandably SST did not want another solo no-O2 client up on one of those mountains. I was told I needed to go with sherpa and supplemental oxygen. I was confident I was acclimated enough to summit without oxygen, but it appeared my options were to either summit with oxygen and personal sherpa or go home and lose all the money I’d already spent on permits and logistics. Grounded in Tapethoke village It would cost another $11k to hire sherpa and oxygen for Kangchenjunga, and I could just barely afford that if I zeroed out my bank account. That would be cheaper than losing all the money I’d already invested and then paying more a future year to come back, so I reluctantly agreed. Dawa made some calls and indeed a team of four clients and eleven sherpas from Elite Expeditions was planning to helicopter to basecamp the next morning and start a summit push. I would have the highest chance of success if I went on the same schedule as that team. I would go with Pemba Sherpa and he would bring three oxygen cylinders for me to use on summit day. He would bring a spare regulator and he knew how to fix any issues with the system. Approaching basecamp So I had that afternoon and evening to quickly cram in some resting and eating before heading out at 5am the next morning. Most of the SST climbers were back from Everest now and everyone was at the Fairfield or Aloft hotels. It appeared I was one of the few cheapskates who hiked out and most other climbers helicoptered back from basecamp. I met up with Matthew and Steven for a big Indian lunch, then Steven and Elena for a buffet dinner at the Aloft hotel. I tried to cram in as much food as possible since I’d lost a lot of weight on Everest, but it’s not possible to make up for all that in just two meals unfortunately. Made it to basecamp After dinner I quickly repacked one duffle worth of gear for Kangchenjunga. Unfortunately one of my bags of gear was still stuck at Lukla, but Steven lent me crampons, harness, and helmet just in case I couldn’t recover my gear. May 27 The next morning I left the hotel at 5am and met up with Pemba and a three-man rescue team at the airport. We would all head to Kangchenjunga together. We crammed our packs and gear into a helicopter and soon took off. The plan was to stop at Lukla, which was on the way, then change helicopters and continue. It was a scenic one-hour flight, and we soon made it to Lukla in increasing clouds. I found my duffle in a pile of bags under a tarp outside the airport, and switched out my crampons/harness/helmet from the bag for Stevens. I was soon ready to go again, but the weather had different plans. The clouds got thicker and it started raining. I hung out in the helipad terminal with a bunch of other climbers killing time. I’ve found that basically all expeditions are characterized by the “hurry up and wait” situation. That morning I had rushed to make an early morning flight, only to wait and kill time the rest of the day. Indeed, the weather never improved, and I spent the whole day milling around the terminal killing time. In basecamp By 4pm Pemba made the call that it was too late to fly out and we needed to spend the night in Lukla. We walked over to the Everest House Hotel, ate dinner, and soon went to bed. I was instructed to be back at the terminal ready to go by 5:30am the next morning. May 28 I got to the terminal a bit early at 5:15am, and was of course the only one there for the next hour. The weather was still socked in, and I suppose I could have easily slept in a lot longer. Over the next few hours some climbers trickled in, until the terminal was full by 11am. The clouds gradually started lifting and a few helicopters flew in and out. By mid afternoon the SST helicopter made it to the helipad. It had to make a few trips before it could take us last, though. It made a shuttle trip to Namche first. Then they removed all the seats to save weight and headed up to Camp 2. The rescue team looking for Szilard on Everest had made the summit but found no trace of him, unfortunately, and had descended back to Camp 2. The Khumbu Icefall had been closed by then with all ladders removed, but the team got extracted by the helicopter from Camp 2 back to Lukla. By mid afternoon it was our turn. I loaded up with Pemba and the rescue team and we finally took off. We headed due east in marginal weather, zipping above jungle and villages. We went for around an hour, starting to head up valleys to the northeast, but then the pilot suddenly descended and landed on a small helipad at Tapethoke village. The pilot had been on the radio with a pilot from an Elite Expeditions helicopter up ahead of us and the weather was too bad to make it to basecamp. The other helicopter had been stopped at Tseram, so we decided to stop there. In basecamp A few locals got out to help direct the landing, then they showed us to a small guest house. The village was pretty small and I bet they don’t see too many outsiders. There was a very rough jeep track going through, so it is accessible, barely, by road. They killed a rooster and we had chicken soup with dahl bat that night. The sherpas tried to convince me to eat sherpa style with my bare hands but I managed to find a spoon to eat with. It seems a lot cleaner to eat rice with a spoon to me. May 29 The next morning the skies were clear and we took off at 5:45am. It was a short and scenic flight up the valley to the edge of treeline at Tseram at 3700m. The helicopter couldn’t go fully loaded all the way to basecamp at 5400m so had to make shuttle runs from there. We unloaded everything, then Pemba and I got in with our gear while the rescue team waited. We helicoptered up to 5400m and landed on a small pedestal of rock sticking up from basecamp. The view from basecamp The basecamp location was amazing. It was a peninsula of rock jutting out between two glaciers and sticking up enough that it was sheltered from any avalanches from above. Even at its height there were small patches of grass growing on it. Kangchenjunga loomed above behind camp, and yellow tents were scattered all over the peninsula. It appeared only Seven Summit Treks and Elite Expeditions still had camps there. A handful of climbers were milling around, having recently successfully summitted. I got out and soon ran into Flor, whom I’d met on K2 last year. She’d summitted a few days earlier and had known Luis, the climber the rescue team would be looking for. There were a half dozen climbers all getting ready to fly out on the same helicopter. Lots of Sherpas would stay to run the camp while we were there. I was ushered into the dining tent and served a great breakfast. I stuffed as much food down as possible since I was still kind of in recovery mode from Everest. The helicopter did one more shuttle run and got the rescue team in, then shuttled a bunch of climbers out. More basecamp views The rescue team quickly packed up and started up, but it didn’t seem like Pemba was in much of a hurry. It was only 7am and there was plenty of daylight left, and the weather was perfect. My forecast from Chris was for great weather today, and sunny for the next four days, but increasing summit winds each day. It seemed to make the most sense to me to summit as soon as possible before the winds got too high. I told this to Pemba and he went and talked to the Elite Expeditions team, which had just arrived. Their plan was to take a rest day in basecamp and start up the next day. This didn’t make any sense to me. All packing could be done within an hour and we would have plenty of time to make it up to camp two or three. We had just rested the past two days with the bad weather delays. The rescue team had just started up and they were planning to make it to camp 3 that night. But since the Elite Expeditions team wasn’t going up we had to also wait. This is one reason I like going unguided, so I can make all decisions on my own. But I was basically obligated to go with everyone else. So I reluctantly unpacked my gear, found a tent, and tried to nap the rest of the day. I suppose one good thing about all these delays was that I actually got three unexpected rest days, which I probably needed anyways. And the delay in Tapethoke village gave me another night at low elevation, which probably helped with recovery. Hiking up to camp 1 The Elite Expedition Sherpas were planning to move to camp 2, then camp 4, then summit June 1. Chris’s forecast was for summit winds 25-35mph on June 1, which seemed marginal. Generally I want winds less than 20mph for summitting without O2. With O2 I’ve heard a common threshold is 30mph. Supplemental oxygen warms the body up so you can tolerate more extreme wind chills. So June 1 would be marginal while May 31 would have been acceptable in my view. But the Elite Expedition Sherpas said the route up the southwest face is generally sheltered from the winds, so you really just experience them briefly on the summit ridge. Chris confirmed the winds were indeed from the WNW and that ought to leave most of the route sheltered. The sherpas had done this mountain plenty of times so I had to trust they knew the conditions. May 30 The next morning we got ready early and by 8:30am the Elite Expedition team started up. So we started up behind them. Pemba and I split the group gear (tent, stove, fuel) and he said the rescue team had taken up a few extra oxygen cylinders. Still, my pack was around 65 pounds with the down suit, -20F sleeping bag, and tent strapped on. Nearing camp 1 I noticed the clients with Elite Expeditions didn’t seem to be quite as loaded down. They just had small day packs. It appeared there were a lot more sherpas in that team to help carry gear. There was even a professional photographer along and a few guides! I’m quite certain I paid a lot less than they did, though, and I was fine with carrying all my own gear. Despite this, Pemba and I still somehow managed to pass most of the climbers and ended up near the front of the pack. We started out hiking through a talus field, then went up a gradual snow slope and eventually hit a set of fixed lines. The slope was steep enough that you didn’t want to fall, so I was happy clipping my ascender on. It made me a little nervous that most of the sherpas tended to just clip a beaner on but not their ascender. This meant if they slipped nothing would stop them and they would run in to the climber below. In fact, I’d heard on Dhalguiri earlier this season a sherpa in this situation had slipped, crashed into the climber below, and broken his leg! Traversing to camp 2 Luckily no incidents like that happend on this trip. We made steady progress up the snow slope, which eventually got quite steep. We then made a long traverse and hit camp 1 at 6100m on a ridge. I’ve heard camp 1 is really just used on early acclimation rotations, and indeed there was no evidence left of a camp there. We stopped briefly for a snack break, then continued. From that ridge the route actually descends a bit to the glacier below and very soon reached camp 2. We dropped down the opposite side of the ridge and arm-wrap descended a gradual slope. I rappelled one short and steep dirt section down lower, then made a short and flat hike to camp 2 around 2pm. It was only about an hour between camps 1 and 2, so I can see why camp 1 soon gets skipped. Camp 2 was on a large flat section of glacier at 6200m and looked very safe from any rock or ice fall. There were already three tents set up there from Satori Expeditions and 8K, and I think Elite Expeditions had arranged for those to be left there for them. The other climbers jumped in those tents while Pemba and I set up ours. I’m glad we brough the SST tent because it weighed about the same as mine but was 50% bigger! Camp 2 We soon threw our stuff inside and Pemba started melting snow. A steep icy headwall loomed above between us and the summit and I could make out an orange tent on a bench near the top. That was camp 3, where the rescue team had made it the previous night. Higher up in the distance we could make out a snow gully leading up towards the summit, and there were a few climbers in it. That appeared to be the rescue team searching for Luis. We rested the remainder of the afternoon, and after an early dinner went to bed at sunset. May 31 The sun woke us up at 4:30am and we were soon packed up. This time we all started out in down suits and I left some extra gear to try to save weight. Pemba advised that I could just wear a base layer under the down suit and leave my jacket, snow pants, and extra layers behind. On Everest I had worn absolutely every layer and been barely warm enough, but I guess breathing supplemental oxygen would take care of keeping me warm. Climbing up to camp 3 The thought had crossed my mind to just hang the oxygen mask off my neck and not use it so I could still get a no-O2 ascent. But the more I thought about it the worse that idea seemed. We were already planning to go up in conditions that were too windy to safely go without O2 in my mind. Pemba said the group planned to start at 7:30pm that night to summit at sunrise. That gauranteed going mostly at night, when I was at most risk of getting frostbite with no O2. I would really want to start more like 1am to minimize time at night, but I had to go with the group so that was not possible. Also, I would be carrying two oxygen cylinders, which each weighed 10 lbs. It would be silly to carry 20 lbs of unneccessary and unused weight on my back if I didn’t use the O2. I couldn’t just leave the O2 and go on my own schedule because SST had told me I was required to go with O2 and sherpa. So I was basically cornered into going with the group with the O2. At least it increased chance of success, even if a bit less honorable than I had hoped. So I ditched the unneccessary gear, and since I wore my down suit my pack was considerably lighter. I kind of wanted to leave my sleeping bag too, since we only planned to rest a few hours in the daylight and not sleep at camp 4. But based on my experience on Everest pulling all-nighters at camp 4 there without a sleeping bag I figured it was wise to bring it just in case plans changed and we ended up needing to sleep at camp 4. Above camp 3 By 5:30am we rolled out of camp and started up the flat glacier. As before, Pemba and I soon found ourselves near the front of the pack. As we reached the base of the steep headwall we saw the rescue team of four sherpas coming down. They were dragging something in the snow and that didn’t look good. As they got closer I could tell it was the body of Luis wrapped up in a tarp. It had been nearly a week between his accident and them arriving due to the weather delays, so I suppose it had always been unlikely they would find him alive, unfortunately. We jugged up the steepening ice and snow slope, and it soon leveled out just below camp 3. A small ice avalanche had wiped out part of the fixed lines there, so we had to unclip briefly. Higher up I took a few ice screws from a sherpa and built some new anchors for the rope and did some re-directing to make improvements. We soon reached the small bench that is camp 3 and took a break. By this point some of the Elite Expedition clients had already started using oxygen, I think starting around 6500m. The plateau at 7100m There was a single tent there and some Elite Expedition sherpas took it down to move it to camp 4. They had really planned things out well, having tents left on the mountain for them so they didn’t have to carry as much from basecamp. The route got quite steep just above camp 3, but then did some traversing and climbing over small shoulders. Eventually Pemba, I, and Dawa were far in the lead and Pemba took over breaking trail. The rescue team had been up there that morning but the wind had drifted their tracks over. When we hit 7100m the slope leveled out to a big bench and I mistakenly thought this was camp 4. But Pemba said it was the next higher bench. We took a brief rest then continued. The route dropped down into a small valley then ascended up a steep ice slope. There were no steps kicked in and we took turns on the rope. Just around the corner from the ice slope we finally arrived at camp 4 at 7300m by 2pm. The short descent before camp 4 As before Elite Expeditions had an 8K tent already set up waiting for them. Dawa jumped inside while Pemba and I kicked out a platform and set up our tent. The slope wasn’t too steep, but it did still take a lot of effor to kick out the platform without ice axe or shovel breathing the thin air at 7300m. More Elite Expedition crew soon showed up, and everyone except me, Dawa, and Pemba was breathing supplemental oxygen. I was feeling pretty good at that elevation. I’d already spent about 48 continuous hours above 8000m without oxygen on Everest a week ago so 7300m wasn’t a problem. Dawa had been very generous to melt us some snow while we were making our tent platform, so we threw all our gear in the tent and laid down to rest. Pemba put his oxygen mask on and started breathing, but I thought I should save any oxygen for summit push emergencies. And I was breathing fine anyways. Arriving at camp 4 Pemba then gave me a lesson in how to use the system. I’d never used oxygen before so had no idea what was going on. He had brought a third regulator as backup, which comforted me. We tested that two cylinders fit in my backpack with the pressure valves visible. He showed me how to put the mask on, and said I shouldn’t wear a helmet since that made taking the mask off to eat or drink difficult. I said I didn’t care and I was definitely going to wear a helmet. There’s always risk of rockfall or icefall in the mountains. I said if I was thirsty I’d just take the helmet off then take the mask off. The regulator went in increments of 0.5L/min up to 4L/min flow rate. I’ve heard more expensive setups go up to 8L/min and lots of Everest climbers use that flow rate. But that means they need to have more cylinders brought up. Pemba said 2L/min would be a good rate and that should last 6-9 hours. We would start that immediately and that would probably get us to the summit. Then we would switch to a second bottle for the descent. I would carry both bottles, and he would carry a third as spare just in case. Then he would just use two. I think the plan was each of us would just use two but the third was a spare for either in case of emergencies. Testing out the mask I’ve had multiple friends have their regulators break on summit push on Everest. I also heard Darren had his oxygen run out before his sherpa noticed on his Everest push and he was feeling pretty crappy and starting to black out before it got switched. These stories make me nervous about relying on a mechanical system like that when unacclimated. I was comforted by several facts, though. I was already acclimated enough to summit without oxygen, so would be perfectly fine if the system didn’t work. I just might move slower and get colder. Pemba had a spare regulator that we verified worked. And, we were with a big group so among all of us there were plenty of spare components and cylinders. We took naps in the afternoon, then had an early dinner. I had a very strong appetite and had no problem finishing my two packs of Ramen noodles and quarter pound of extra sharp cheddar cheese. I don’t often have that strong an appetite above 7000m, so this tells me I was in fact very well-acclimated. By 7pm the sun set and we started getting ready, and by 7:30pm we were out of the tent and moving at the back of the big pack of 15 other climbers. Starting out just after sunset This was the first time I had breathed supplemental oxygen, and I was very curious how it would affect me. I’ve heard people say it lowers the apparent altitude by a few thousand meters, so I expected to feel like I had down at basecamp. It was still kind of hard work walking around down there with a pack so my expectations weren’t too high. Maybe it would help an extra 20%. What I actually experienced felt like an extra jolt of energy with each breath. After a few steps I’d get a little tired, then I’d suck in a breath and instantly be back up to full strength with energy ready to power forward. I kind of thought of myself like a cyclist on EPO in the Tour de France. I basically had unlimited energy, and something felt not quite right about that, like I hadn’t earned it. Hiking up with the EE team I could basically go twice the speed as I could without supplemental oxygen, and never got tired. And this was on a modest 2L/min. Could people on 8L/min on Everest be getting 4x the extra energy boost as me? I’m not sure if it scales that way, but no wonder oxygen use is common 8000m peaks. I think the only people that truely understand this advantage are the ones that have climbed 8000ers without oxygen and also tried it with oxygen. (I’d previously climbed Broad and K2 without O2 and gotten to 8500m on Everest without O2). As an added bonus, my fingers and toes never got cold. Not even a hint of being numb. If I was without O2 like on Everest I’d have to be stopping every 10 minutes to warm things up. But now I could just go continuously for hours, never needing to rest or warm up appendages. In my experience it is an order of magnitude easier to climb with supplementary oxygen than without. For better or worse, I was definitely going to make the summit this time. Looking back towards Jannu in the moonlight We generally stayed together as a big 17-person group down low, and I commend the sherpas in the front for breaking trail. Fortunately the tracks from the rescue team were still around so I don’t think it was quite as bad breaking trail. As we got higher the team started spreading out, with two EE sherpas and client in the front, then me, Pemba and Dawa all making up the lead group. Behind us the remaining climbers started slowing down more. Progress was slow and steady, and we didn’t stop for any breaks for the first five hours. That’s the power of supplemental O2 for you. By 1am we took a 5-minute break to eat some snacks, and then a few hours later we stopped again for a quick water break at the base of the rocks. Navigation can sometimes be problematic on Kangchenjunga I’ve heard, but an advantage of us coming at the end of the season was that other climbers had already figured out the route and left the fixed ropes there for us. We just had to jug up them. Sunrise on Yalung Kang June 1 The steep snow slopes got a bit tedious but then around 3am the climbing got more interesting when we hit the base of the rock band. There was a little bit of a traffic jam going up but when I got to the rocky section it just seemed like fun scrambling to me. Maybe that’s since I do a lot of mixed climbing in the winter in washington that I knew exactly how to wriggle up the features. We crested one rocky section, then started a traverse. We were then stalled a bit as the three lead climbers figured out a way up a tricky section. By then it had been 8 hours and I was worried about my oxygen canister running out at in inconvenient spot. Since we were already stopped I asked Pemba to check, and indeed it was about empty. He quicky switched the hose to the other canister and we continued up. Hiking up the final snow slope We scrambled up one final rock section then topped out on a snowy ridge just as the sun was coming up around 5am. From there it was a short snow traverse, then climbing up another short steep snow slope to the final summit pyramid. We traversed on rocks around the base of the pyramid, passing one old dead body lower on the rocks. Up until that point the wind had been mercifully light, but above us on the summit it looked like it was ripping very fast. Maybe Chris’s 25-35mph forecast was actually an underestimate! Though he did say it would be at its lowest at 6am, and it was almost that time. The group of three in front of us crested the ridge and I soon followed. Amazingly, once I poked my head up over the ridge the wind seemed to die down and was almost calm! I had feared it would be a knife-edge rock ridge but, while my side was all rock, the other side was a gentle snow slope. The final rocky bit before the summit I easily marched up the snow slope and reached the summit at 5:30am, ten hours after starting. I was the second one up there. The photographer for Elite Expeditions had gotten their first and was waiting to take pictures of the clients. Conditions were perfect. Only partly cloudy with great views around, almost no wind, and not even too cold (probably because I was breathing the oxygen). I got a few pictures and a brief video, then Anna Gutu from EE made it up and I took some pictures of her. She returned the favor for me, but then my camera froze and wouldn’t turn on! I thought keeping it warm in my inner pocket would help, but I guess it was actually kind of cold up there (forecast -15F) and it had gotten too cold. The only way to salvage it in this situation I’ve found is to plug it in to an external battery. But I didn’t want to fool around with that on the summit so I called that good enough for pictures. I yielded the top to the other climbers coming up and stood off to the side admiring the view. But I soon started getting a little nervous. More and more climbers were trickling up and it seemed risky somebody would knock another person over the edge with all the jostling for pictures. So I told Pemba I was good and we should head back down. On the summit Ten minutes had been plenty up there to admire the view, plus if we were the first ones down we could rappel all the steep lines and not have to wait in a queue. This would be especially important if the weather turned sour, and it was indeed supposed to get windier over the day. We made fast progress down, and took turns rappelling the steep lines and arm wrap descending the others. Pemba was much faster so he went first, and we soon spread out enough that I didn’t have to wait at all to rappel. At the base of the rocky section I noticed a pack sitting by itself in the snow with a set of skis sticking up next to it. This must have been from the climber Luis that the rescue team found. Way lower on the slope I had seen a few stuff sacks earlier, also likely from him. I arm wrapped down the snow slope, though managed to rappel a few of the steeper sections. By 8:30am, three hours after summitting, we both staggered back into camp 4. It felt good to pull off the oxygen mask and finally be breathing normally. It turned out we had a lot of extra oxygen. I had only used a little over one canister and Pemba the same. So we had a few extra canisters. There was no need for any oxygen going down, and empty canisters are much lighter, so we opened the valves and released the extra gas. It felt kind of wasteful, but didn’t make sense carrying so much extra weight down. Back at camp 4 Pemba proposed a two-hour break, then we would descend back to basecamp. So I repacked everything, then laid down for a brief nap. We had just pulled an all-nighter so both appreciated the rest. By 10:30am we got out of the tent and started taking it down. There had been a suggestion that we just leave the tent there, but there were no other teams coming up that season that could use it, and it would just become trash. I volunteered to take it down since I’d carried it up. By 11am we were all packed up and heading down. My pack was now monstrous again since it was too hot to wear the down suit and I had to put it in the pack. By then some of the EE team had made it back, but most were still working their way down from the summit. I think our time of 3 hours down was kind of fast. Descending back down We made good time down from camp 4, again enjoying the benefits of being first since there were no queues to wait in and we could rap down any line we wanted. (For reference, two people can climb up a rope at the same time but two cannot rappel down a rope at the same time – they must take turns, which can slow things down descending). We passed through camp 3, then took an extended break at camp 2. It was getting hot and I was out of water by then. The rescue team had been in camp 2 the previous day and was hoping for a helicopter extraction, but for some reason conditions weren’t good and the helicopter couldn’t land. So they had moved everything to camp 1 and would get extracted from there. Meanwhile, they had generously melted a pot of water and left it for us, and left a bag of coke bottles for us! Last look at the upper slopes I chugged the water and Pemba cracked open some cokes. I don’t really like carbonated beverages, but I was low on energy and liquid and figured the sugary beverage might help. Pemba passed out more cokes to EE sherpas coming down and everyone was in good spirits. Some clients came down and took naps in the three tents remaining there, and Pemba and I soon packed up and headed out. I really was not looking forward to the uphill to reach Camp 1 after already putting in a big day. I think the coke didn’t agree with my stomach since I don’t usually drink carbonated bevereages. At any rate I was not feeling 100% approaching that hill, and it took me twice as long as it should have to make it up. Descending below camp 1 I eventually made it and caught up to Pemba resting at Camp 1. From there it was easy arm wrap descending down. A few sections of the route had been hit by small loose wet avalanches, likey earlier that day. It was indeed kind of hot there in early June. But by the time we got there evening clouds had built and the slopes were stable. We dropped back down and eventually staggered in to basecamp around 530pm for a 22 hour day. We had an excellent chicken and spaghetti dinner, and I even got to take a warm bucket shower before bed. June 2 Back to basecamp for dinner An Elite Expedition helicopter arrived at 6am and immediately started shuttling climbers out. That would be the only helicopter and it had to service everyone. I quickly packed up and took my turn to shuttle down to Tseram. There we all waited for a few hours drinking tea at the local teahouse. When all the climbers and sherpas were out the helicopter then started shuttling us all to the Taplejung air strip. This was the closest village with a paved road to basecamp. I had been told the whole SST crew would get flown to Kathmandu that morning. This was important since I had purchased a flight out of Kathmandu for that evening. I had purchased it just before heading in to Kangchenjunga, and thought building in four buffer days would be enough. But with the weather delays and the delay in starting out of basecamp it had eaten into my buffer time. The flight could still work, but then Pemba told me we would not in fact be going to Kathmandu that day. The one helicopter would take the elite expedition clients back, but the sherpas and I would be taking a 10-hour jeep ride to the nearest major airport at Bhadrapur and taking a scheduled fixed wing flight to kathmandu the next day. Flying out That was a little frustrating, but I guess it was my fault for not building in enough buffer days. I called up the airlines and it turned out the flight cancellation fee was almost exactly the price of the flight. So I basically lost $1000 by that mistake. However, I decided I’d rather stick it to the airline and just not show up instead of cancelling. That way they couldn’t resell the ticket to make more money. I lost an extra $30 or so but it felt worth it to me. I figured I basically gained $1000 by hiking out of Everest basecamp instead of flying out, so maybe now I was even. That afternoon Pemba and I hopped in a jeep with the rescue team and we started the long, windy drive out. We crossed mountain passes and dropped way down to cross river valleys. Basically the whole way was blind turns on the side of cliffs down in the jungle. Eventually we reached Suryodaya eight hours later and stopped there for the night. June 3 The next morning we drove two more hours to Bhadrapur, then got on the 9:30am flight to Kathmandu. In Kathmandu I took a taxi to the Fairfield Hotel, and Thanes brought over my bag that SST had gotten from Lukla. I had enough spare time to meet a friend Sandro for dinner, then made my 2am flight back out for Seattle. Gear Notes: Standard 8000m gear Approach Notes: Helicopter to basecamp
-
Thanks! Yes I wrote a report for kangchenjunga. I wasn't sure if it met the bar to be posted on cc since they made me go with sherpa and oxygen. I posted it here though: https://www.countryhighpoints.com/kangchenjunga/ Eric
-
[TR] Argonaut Peak - East Ridge/NE Couloir 03/09/2024
Eric Gilbertson replied to Eric Gilbertson's topic in Alpine Lakes
Thanks! My favorites so far are definitely the ones in the chilliwacks I've gotten this winter (Hard Mox, Spickard, Custer, Rahm). I guess that's four. It feels kind of like an Alaska expedition to get in there by boat up Ross Lake then bushwhack in and find glaciated peaks. It's amazing WA has places like that! -
[TR] Argonaut Peak - East Ridge/NE Couloir 03/09/2024
Eric Gilbertson posted a topic in Alpine Lakes
Trip: Argonaut Peak - East Ridge/NE Couloir Trip Date: 03/09/2024 Trip Report: Argonaut Peak (8,455 ft) March 9, 2024 East Ridge/NE Couloir 18 miles skiing/climbing, 10 miles snowmobiling, 8300ft gain 73/100 Winter Bulgers Eric and Nick On the summit The weekend looked to be stormy but the Enchantments zone seemed to be getting hit the latest. I’d previously bagged all the Bulgers peaks in the Enchantments in winter except Argonaut, so we decided to go for it. The route I’ve previously climbed Argonaut twice via the south face route (May, August), which ascends a steep gully to the summit ridge followed by a class 3/4 scramble to the summit. This is not necessarily the best winter route, though. In February 2022 Nick and I had been camped near the base after climbing Sherpa and planned to climb the south face route, but my updated NWAC forecast on my inreach made us too nervous about snow stability. So we bailed that time. Our East Ridge/NE Couloir route (drawn on picture taken by John Scurlock from the north) This weekend the snow stability conditions didn’t look great for that route either. But Argonaut has many different route options, generally all technical. I noticed we could ascend gentle slopes up the Porcupine Creek drainage on the south side to gain the Argonaut-Colchuck col at 7700ft keeping the slope angle low. From there we could climb one of the technical routes up to the summit. The routes might require crossing short snow slopes, but we would be roped up clipped in to gear in the rock so would be protected. We would bring a 60m half rope, hexes, nuts, cams, and technical tools. I would bring one technical tool with a hammer (for the hexes) and one ultra-light corsa straight shafted axe with a custom 3D-printed adjustable pinky rest Nick had just printed. This would allow me to plunge in snow and save some weight. We’d also each bring our custom carbon fiber ascent plates Nick had CNC milled. Unloading the sled The main route options from that col appeared to be the East Gully, the East Ridge, and the NE Couloir. Neither of us had done any of these routes but we figured we could see what looked the most reasonable based on conditions and climb that. The first record I could find of a winter ascent of Argonaut was via the NE Couloir (Lurie, Feb 2006, NWMJ). But climbing the full couloir seemed too risky with the snow conditions since it’s a ~3,000ft long snow gully and I wouldn’t want to be in the bottom if it slid. Worst case we would just cross the top of it, roped up, which would be much safer. At the Beverly Creek trailhead The shortest approach would be from the Beverly Creek trailhead, which is accesible by snowmobile. In order to beat the incoming storm we wanted to summit by noon, so that meant leaving very early. We decided to do a car-to-car push to avoid carrying overnight gear over the fourth creek pass. Friday evening we got to the Twentynine Pines staging area on Teanaway River road, unloaded the sled, and went to bed. Saturday we were up and moving by 12:30am. The road had just been groomed and we made excellent time, hitting 40mph in places. The Beverly Creek turnoff was a bit rougher, but we reached the trailhead 20 minutes after leaving the truck. Interestingly, there was a nice skin track already going up from the trailhead. This is very unusual for winter Bulgers trips. Crossing Bean Creek We followed the tracks across Bean Creek, but then they diverged west after a few miles. It looked like they might have been heading for Iron Peak. We then broke trail up to the Fourth Creek saddle, and transitioned to ski mode. We had fun turns going down fourth creek, then transitioned to skins as it flattened out. We skinned down to Ingalls Creek, trying to set a good track for our return trip. Ingalls Creek The creek was too high to rock hop across, but we found a nice fallen log across near the trail crossing. It was 8″ wide with a foot of snow on top and lots of branches sticking out. I strapped my skis on my back and started over au chaval. I karate chopped the icy snow off the top, then used an ice tool to bang off the branches. Progress was slow but this worked and made for a nice smooth crossing on the return journey. On the other side we skinned up to the Ingalls Creek trail, followed it east for a half mile, then left the trail heading up the Porcupine Creek drainage. The slopes were nice and mellow angle and the forest was mostly open for easy travel. As we got higher to more open areas the snow had a firm sun crust. We started on the west side, then crossed over to the east side and ascended into the large bowl flanked by Argonaut, Colchuck, and Dragontail. Conditions were pleasant with no wind and great views of the summits. We knew that would change by afternoon, though. Approaching Argonaut in the upper Porcupine Creek drainage We noticed the East Gully route looked like it might go, though was kind of steep. We decided to head to the Argonaut-Colchuck col to scope out the East Ridge and NE Couloir to see which one we preferreed. As we crested the ridge the wind picked up from the south, and we noticed the north side would be much more sheltered. It looked doable to ascend the East Ridge then cross over the top of the NE Couloir to gain the upper north face of Argonaut. That sounded appealing given the wind direction, so we went for that route. At the col We ditched skis at the col, then roped up. Nick started first and we shortened the rope to 30m and simul climbed. The East Ridge started getting steep soon so we dropped onto a snow ramp which we traversed across to enter the NE Couloir. We got good gear in the rock to protect a fall in case the snow slid. On the opposite side of the Couloir Nick built an anchor and we swapped leads. I kicked steps up the right side of the couloir for 30m then when the couloir dead ended at a rock face I exited up and right. Crossing into the NE Couloir This section was the crux of the route. The snow got thin and steep on a rock slab except for a thick wind deposit about 3ft deep. I had to tunnel through it Cerro-Torre-style, digging down to the thin icy layer on top of the slab to get good purchase with my front points. I kind of wished I had the custom wings on my ice tools. Eventually I excavated out an old rap anchor, clipped it, and tunneled the last bit up to the low-angle north face snowfield. In the upper NE Couloir I belayed Nick up there with a solid hex anchor and we swapped again. Nick led up the left side of the snowfield, getting a few gear placements in the rocks on the side. We eventually simul climbed up to the summit ridge, and swapped leads again. I traversed the ridge, weaving the rope around horns and getting a few intermediate pieces in. I had to make a few mixed climbing moves getting over one rock step. At last, I saw the famous tunnel under the summit boulder, and luckily it had a big enough gap to squeeze through. Nick on the summit By 1pm I made the final short mixed scramble to the summit. I belayed Nick up off the summit horn, and we were soon both on the summit. It was windy, but luckily not snowing yet. It appeared the storm was coming in a bit later than forecast, which was great news. There was no view in the whiteout, so we soon regrouped and headed down. I led the way back as we simul downclimbed the ridge and retraced our exact track back down the snowfield. We regrouped above the crux, and we decided to simul downclimb that as well. Now that the snow was excavated and good steps were kicked it wouldn’t be too hard. I put the exact same gear placements in as on the way up, and we simuled back down to our previous anchor point. There Nick took over and led back across the ramp to the Argonaut-Colchuck col by 2:30pm. Descending the summit ridge Now the storm had hit with full force, and it was extremely windy and snowy. I was jostled off balance a few times. Back at the skis we put goggles on, and decided to crampon down in the whiteout until it got more sheltered. I followed the track on my watch since our up tracks were drifted over. After 10 minutes we got back into intermittent trees and the wind died down. Unexpectedly, it then cleared out and was partly sunny! It appeared to be a brief break in the storm, and came at the perfect time. We switched to skis and had fun turns down the big open slope. Though, lower down we hit sun crust which made skiing challenging. Hiking down in the storm We switched back to crampons and descended down into denser trees. Back in the trees the sun crust disappeared and we again skied back down. The icy lower sections had changed to a small layer or corn and made for excellent skiing. We eventually reached the Ingalls Creek trail as the sun gave way to heavy graupel and snow. There we skinned back to Ingalls Creek and scooted back across the log. Last view of the south face of Argonaut We then followed our tracks back up fourth creek as darkness set in. At the pass we switched back to ski mode and made a high traverse back down the Beverly Creek drainage. Interestingly, we encountered a set of snowshoe tracks that had followed our tracks up to 5000ft. This appears to be a relatively popular area in winter! I guess the road approach is only five miles, so a snowmobile isn’t really necessary. Though I certainly appreciated being able to sled in and out instead of walk. Sledding out It was fun cruising down the drainage, and we made it back to the sled by 8:45pm. We then strapped our gear on and got back to the truck around 9:15pm for a 21-hour push. Gear Notes: Snowmobile, 60m rope, skis, technical tools, hexes, nuts, cams, ascent plates (unused but we probably should have used them) Approach Notes: Sled to Beverly Creek TH, ski to Argonaut-Colchuck col