altasnob
-
Posts
24 -
Joined
-
Last visited
Everything posted by altasnob
-
I'm thinking of heading to Vertical World Ballard this afternoon (12/12) if anyone is interested.
-
planning on Stiletto Lake area via the spur route from Bridge Creek TH a la: http://www.nwhikers.net/forums/viewtopic.php?p=425994#425994 Any takers?
-
where ever the weather is nice, preferably in the North half of the state. Open to suggestions. Got a car and can drive.
-

best of cc.com [TR] Ptarmigan Speed Traverse - 8/14/2008
altasnob replied to off_the_hook's topic in North Cascades
"At Yang Yang we were met by a couple climbers who had fallen very ill and could not complete the traverse. We took their contact information and passed on their desire to be rescued to the rangers and sheriff’s office." I was camping up at Cache Col and ran into a party of four doing the traverse as an out and back. They said the sick climber had pneumonia and was rescued from Yang Yang lakes with two helicopters. Nice work saving his life. -
Trip: The Brothers - South Peak, Route 1 variation Date: 6/1/2008 Trip Report: The slide path if you miss the fork in the creek The hourglass and lunch rocks We did the route 1 variation that is to the right of, and parallel to, the standard southeast couloir. The route is steeper and narrower, and is a good break from the sea of footsteps up the standard route. The couloir ends with a single pitch of 5.4 to the summit The payout Here's a pic for those thinking of doing the traverse Gear Notes: We used crampons early in the morning but by 9 am the snow was soft enough to kick steps without them. Approach Notes: Spotty snow up through the Valley of the Silent Men. Easy to post hole through the snow to the logs and debris below.
-
More snow is on the way. NWS is saying a couple inches Thursday and Friday.
-
Heading to the Mt Maude area this weekend. Not sure what what peaks and what routes but I would like something in the 4th class/easy 5th class range. Leaving Sat morn, returning Mon eve. I have a car and can drive from Tacoma or meet up somewhere else. Email jay_wilkinson @ hotmail dot com if interested.
-
Trip: Longs/Ingalls Pass - Date: 6/2/2007 Trip Report: My aspirations to climb and ski Stuart quickly diminished after seeing how dry to route is from Longs Pass. Instead, I opted for a short ski tour around the Longs and Ingalls Pass area. Still quite a bit of snow up towards Ingalls Peak but the couloirs on Stuart look like scree slogs for the rest of the year. In a week or so, the trail up to Ingalls Pass should be snow free. Here's some pics:
-
In Leavenworth this week for work and am sticking around for the weekend. Looking for folks to either climb/ski Mt. Stuart or I could be persuaded to do some long moderate trad routes in the Leavenworth area. Email jay_wilkinson at hotmail dot com if interested.
-
I'm heading over from Tacoma area and have a room for a few others. Email jay_wilkinson at hotmail dot com if you need a ride.
-
I've heard the library in Ellensburg has a copy
-
Just curious, can you legally snowmobile to the top of Longs Pass? That's where the Wilderness area begins, correct?
-
[TR] Enchantment Lakes - Car-to-Car Loop 3/18/2007
altasnob replied to zoroastr's topic in Alpine Lakes
I was up there that day too and think I ran into you on the way up to the Colchuck Lake. The road up is 80% covered with snow but even after it melts out, there is some washout damage that needs to be repaired before you can drive up to the trail head. Here's some more pics from the area. Stuart Dragontail and Colchuck Hidden Couloir (start of TC) Northeast Couloir Looking down off Aasgard Prusik and the Upper Enchantments -
Stuart West Ridge-more beta than you take part 2
altasnob replied to altasnob's topic in Alpine Lakes
Try again-Cluck’s excellent TR helped us immensely on the West Ridge so I feel obligated to help future Stuart climbers by making a few amendments: Timeline: 6:30 am - left bivy near the top of the first couloir you head up. 10:30 am - reached W Ridge Notch 2:00 pm - summit 6:00 pm - arrived at Ingalls Creek trail via Cascadian couloir 9:00 pm - back at car Rack: Small rack with gear to 3 inches. Lots of slings of various links for hooking horns and rapping in a pinch. Route: Approached via Ingalls pass to Ingalls Lake. There were a few snow patches on the route but its wise to carry up all the water you’ll need from Ingalls Lake. Went on the right side of the lake and followed the obvious trail across towards the West Ridge of Stuart. Follow the trail up straight towards the vertical rock on Stuart. Traverse right when the trail ends the rock slide begins. Go past the first gulley (which you can see dead ends) and start heading up the second gulley. http://static.flickr.com/86/260291343_679ca637e6.jpg?v=0 Up the gulley: Scramble excellent 3rd class granite straight up this gulley all the way to the top. There are some minor branches & forks but just stay in the main gulley or take whichever branch looks like it will go further. We bivied halfway up this gulley, which appeared to be the most established camp spot on the entire route. There was room to pitch a small tent. The beginning of the gulley and the excellent 3rd class granite. http://static.flickr.com/105/260291345_79a3a98bbc.jpg?v=0 From the top of the first gulley traverse across the next gulley (not up towards the ridge crest). Climb the 3rd/4th class rock to easy ground where you can see to next gulley and Long John Tower. Long John Tower: LJT looks very imposing from here but it’s much easier than it looks. The easier rout is starts off towards the right and makes its ways back towards the saddle to the left of LJT. This picture shows both route options: http://www.cascadeclimbers.com/plab/data/503/3363LJT_Routes_V2.jpg LJT to West Ridge Notch: From the saddle between LJT and the main ridge, follow a sandy path across and down a gulley for about 100 feet and then traverse left on a ledge around a rock buttress. You’ll have to make an awkward move that will probable require you to take off your pack to get around this ledge (see red dot in picture below). Once around the ledge, scramble back up the next gulley about 200 feet and look for the sandy path up the dark flake to your right. Traversing left around the rock buttress: http://www.cascadeclimbers.com/plab/data/503/3363IMG_9892.JPG http://static.flickr.com/103/260291348_63f4481db8.jpg?v=0 This sandy path leads you up to a cairn where there is a tunnel underfoot. Tunnel underfoot: http://www.cascadeclimbers.com/plab/data/503/3363IMG_9896.JPG The tunnel leads to an obvious trail on a ledge. Follow this ledge past a narrow, downward sloping slab (butt scootching may be required) and up an easier-than-it-looks chimney to another ridge crest. Butt-scootch Slab: http://www.cascadeclimbers.com/plab/data/503/3363erica_butt_schootch.jpg Easier-than-it-looks Chimney: http://www.cascadeclimbers.com/plab/data/503/3363EasierThanItLooksChimney.jpg There is actually another “tunnel” or boulder that you will pass under climbing up this chimney http://static.flickr.com/92/260291351_657025821e.jpg?v=0 From here, look across polished granite slabs and easy ground towards “God’s Cairn,” which is a crazy balanced boulder on top of a tower. God’s Cairn is hard to make out until you’re right up next to it (see the red dot in the pic below). http://static.flickr.com/96/260291352_53ec4e094b.jpg?v=0 Traverse slightly downward across another gulley or two passing below God’s Cairn. Then turn left and walk up an obvious gulley that leads to the West Ridge notch. West Ridge Notch to Summit: Don’t bother roping up at the notch. Instead, scramble up on right of the ridge crest about a rope-length to a flat spot where the traverse over to the north side begins. Here is a good spot to rope up and several bivy spots. Traverse out onto the North side of the ridge for about 20 feet on easy but exposed 4th class ledges and then take the first obvious path back up to the right and end at easy ground with another makeshift bivy. This pitch is almost exactly 30 meters. You will pass one piton on the pitch. Starting out onto the north side of the ridge: http://www.cascadeclimbers.com/plab/data/503/3363IMG_9899.JPG Scramble right up blocky 3rd/4th class and then make your way back left up a 5.4 move for a rope length until you regain the ridge crest at a very sharp feature. From here, you can see a large, sandy ledge below and to your right. Down climb off the knife ridge and back up towards the sandy ledge and bivy. Knife-edge ridge and ramp: http://www.cascadeclimbers.com/plab/data/503/3363IMG_0002.JPG Sandy ledge and bivy, which is the start of the two final 5th class pitches: http://static.flickr.com/90/260294265_bf59614cba.jpg?v=0 From here you’re only about 2 pitches below the summit but there are several variations. There is an initial route up the West Ridge that’s in the Becky guide. I saw slings on this route and am guessing it’s the rap route: http://static.flickr.com/98/260294269_362e023302.jpg?v=0 If you traverse out right from the sandy bivy spot, you will find the 5.6 layback crack variation. We took the blocky chimney directly above the bivy spot. The chimney we took had some trickey 5.7 moves: Chimney above bivy spot: http://static.flickr.com/94/260294272_2ae2a2cf49.jpg?v=0 Regardless of which route you take you will likely end at another sandy, but smaller, bivy site. Continue up to the right around an awkward boulder on onto the final pitch. The last pitch follows a 5.4 dihedral with a 5.7 crux. There’s piton with a blue sling half way up. The pitch ends with 4th class to the summit. Descent: To descend, down climb 100 follow a well-cairned path just below the ridge crest out towards the false summit. The basin/couloir coming off the true summit is Ulrich’s couloir (don’t take that). Continue either over or down and around to the right of the false summit into the Cascadian Couloir. There are several variations down Cascadian Couloir but they all involve a loose, steep decent (although never any harder than 3rd class). If you stay on a major route, you’ll minimize the bush whacking you’ll encounter at the bottom. Find the major trail up Ingalls Creek and head back to the car via either Longs (shorter) or Ingalls Pass. Descent options: http://www.cascadeclimbers.com/plab/data/503/3363Descents1.jpg -
Cluck’s excellent TR helped us immensely on the West Ridge so I feel obligated to help future Stuart climbers by making a few amendments: [b]Timeline:[/b] 6:30 am - left bivy near the top of the first couloir you head up. 10:30 am - reached W Ridge Notch 2:00 pm - summit 6:00 pm - arrived at Ingalls Creek trail via Cascadian couloir 9:00 pm - back at car [b]Rack:[/b] Small rack with gear to 3 inches. Lots of slings of various links for hooking horns and rapping in a pinch. [b]Route:[/b] Approached via Ingalls pass to Ingalls Lake. There were a few snow patches on the route but its wise to carry up all the water you’ll need from Ingalls Lake. Went on the right side of the lake and followed the obvious trail across towards the West Ridge of Stuart. Follow the trail up straight towards the vertical rock on Stuart. Traverse right when the trail ends the rock slide begins. Go past the first gulley (which you can see dead ends) and start heading up the second gulley. [url=http://static.flickr.com/86/260291343_679ca637e6.jpg?v=0]http://static.flickr.com/86/260291343_679ca637e6.jpg?v=0[/url] Up the gulley: Scramble excellent 3rd class granite straight up this gulley all the way to the top. There are some minor branches & forks but just stay in the main gulley or take whichever branch looks like it will go further. We bivied halfway up this gulley, which appeared to be the most established camp spot on the entire route. There was room to pitch a small tent. The beginning of the gulley and the excellent 3rd class granite. [url=http://static.flickr.com/105/260291345_79a3a98bbc.jpg?v=0]http://static.flickr.com/105/260291345_79a3a98bbc.jpg?v=0[/url] From the top of the first gulley traverse across the next gulley (not up towards the ridge crest). Climb the 3rd/4th class rock to easy ground where you can see to next gulley and Long John Tower. Long John Tower: LJT looks very imposing from here but it’s much easier than it looks. The easier rout is starts off towards the right and makes its ways back towards the saddle to the left of LJT. This picture shows both route options: [url=http://www.cascadeclimbers.com/plab/data/503/3363LJT_Routes_V2.jpg]http://www.cascadeclimbers.com/plab/data/503/3363LJT_Routes_V2.jpg[/url] LJT to West Ridge Notch: From the saddle between LJT and the main ridge, follow a sandy path across and down a gulley for about 100 feet and then traverse left on a ledge around a rock buttress. You’ll have to make an awkward move that will probable require you to take off your pack to get around this ledge (see red dot in picture below). Once around the ledge, scramble back up the next gulley about 200 feet and look for the sandy path up the dark flake to your right. Traversing left around the rock buttress: [url=http://www.cascadeclimbers.com/plab/data/503/3363IMG_9892.JPG]http://www.cascadeclimbers.com/plab/data/503/3363IMG_9892.JPG[/url] [url=http://static.flickr.com/103/260291348_63f4481db8.jpg?v=0]http://static.flickr.com/103/260291348_63f4481db8.jpg?v=0[/url] This sandy path leads you up to a cairn where there is a tunnel underfoot. Tunnel underfoot: [url=http://www.cascadeclimbers.com/plab/data/503/3363IMG_9896.JPG]http://www.cascadeclimbers.com/plab/data/503/3363IMG_9896.JPG[/url] The tunnel leads to an obvious trail on a ledge. Follow this ledge past a narrow, downward sloping slab (butt scootching may be required) and up an easier-than-it-looks chimney to another ridge crest. Butt-scootch Slab: [url=http://www.cascadeclimbers.com/plab/data/503/3363erica_butt_schootch.jpg]http://www.cascadeclimbers.com/plab/data/503/3363erica_butt_schootch.jpg[/url] Easier-than-it-looks Chimney: [url=http://www.cascadeclimbers.com/plab/data/503/3363EasierThanItLooksChimney.jpg]http://www.cascadeclimbers.com/plab/data/503/3363EasierThanItLooksChimney.jpg[/url] There is actually another “tunnel” or boulder that you will pass under climbing up this chimney [url=http://static.flickr.com/92/260291351_657025821e.jpg?v=0]http://static.flickr.com/92/260291351_657025821e.jpg?v=0[/url] From here, look across polished granite slabs and easy ground towards “God’s Cairn,” which is a crazy balanced boulder on top of a tower. God’s Cairn is hard to make out until you’re right up next to it (see the red dot in the pic below). [url=http://static.flickr.com/96/260291352_53ec4e094b.jpg?v=0]http://static.flickr.com/96/260291352_53ec4e094b.jpg?v=0[/url] Traverse slightly downward across another gulley or two passing below God’s Cairn. Then turn left and walk up an obvious gulley that leads to the West Ridge notch. West Ridge Notch to Summit: Don’t bother roping up at the notch. Instead, scramble up on right of the ridge crest about a rope-length to a flat spot where the traverse over to the north side begins. Here is a good spot to rope up and several bivy spots. Traverse out onto the North side of the ridge for about 20 feet on easy but exposed 4th class ledges and then take the first obvious path back up to the right and end at easy ground with another makeshift bivy. This pitch is almost exactly 30 meters. You will pass one piton on the route. Starting out onto the north side of the ridge: [url=http://www.cascadeclimbers.com/plab/data/503/3363IMG_9899.JPG]http://www.cascadeclimbers.com/plab/data/503/3363IMG_9899.JPG[/url] Scramble right up blocky 3rd/4th class and then make your way back left up a 5.4 move for a rope length until you regain the ridge crest at a very sharp feature. From here, you can see a large, sandy ledge below and to your right. Down climb off the knife ridge and back up towards the sandy ledge and bivy. Knife-edge ridge and ramp: [url=http://www.cascadeclimbers.com/plab/data/503/3363IMG_0002.JPG]http://www.cascadeclimbers.com/plab/data/503/3363IMG_0002.JPG[/url] Sandy ledge and bivy, which is the start of the two final 5th class pitches: [url=http://static.flickr.com/90/260294265_bf59614cba.jpg?v=0]http://static.flickr.com/90/260294265_bf59614cba.jpg?v=0[/url] From here you’re only about 2 pitches below the summit but there are several variations. There is an initial route up the West Ridge that’s in the Becky guide. I saw slings on this route and am guessing it’s the rap route: [url=http://static.flickr.com/98/260294269_362e023302.jpg?v=0]http://static.flickr.com/98/260294269_362e023302.jpg?v=0[/url] If you traverse out right from the sandy bivy spot, you will find the 5.6 layback crack variation. We took the blocky chimney directly above the bivy spot. The chimney we took had some trickey 5.7 moves: Chimney above bivy spot: [url=http://static.flickr.com/94/260294272_2ae2a2cf49.jpg?v=0]http://static.flickr.com/94/260294272_2ae2a2cf49.jpg?v=0[/url] Regardless of which route you take you will likely end at another sandy, but smaller, bivy site. Continue up to the right around an awkward boulder on onto the final pitch. The last pitch follows a 5.4 dihedral with a 5.7 crux. There’s piton with a blue sling half way up. The pitch ends with 4th class to the summit. Descent: To descend, down climb 100 follow a well-cairned path just below the ridge crest out towards the false summit. The basis/couloir coming off the true summit is Ulrich’s couloir (don’t take that). Continue either over or down and around to the right of the false summit into the Cascadian Couloir. There are several variations down Cascadian Couloir but they all involve a loose, steep decent (although never any harder than 3rd class). If you stay on a major route, you’ll minimize the bush whacking you’ll encounter. Find the major trail up Ingalls Creek and head back to the car via either Longs (shorter) or Ingalls Pass. Descent options: [url=http://www.cascadeclimbers.com/plab/data/503/3363Descents1.jpg]http://www.cascadeclimbers.com/plab/data/503/3363Descents1.jpg[/url]
-
Here's the pic I took zoomed in
-
We went up the "U". Getting off the glacier was no problem but climbing the the loose top part of coloir wasn't particularly fun. It's only about 100 ft. and 4th class, but there is more dirt than there is rock. There are rap anchors to get back down.
-
Climb: Magic Mountain -SE Couloir Date of Climb: 8/6/2006 Trip Report: Magic Mountain as seen from Cascade Pass (the true summit is the pointy part) On the way out to Cache Col, we decided to head up Gunsight Col to check out the beginning of Mixup. Here's the "U" and the "V" coiloirs Looking up at Cache Col Looking back at Cascade Pass with Sahale and Forbidden Ripsaw ridge and Buckner We found a kick ass bivy site at the top of Cache Col. Room for two tents a bit east of the Col; a one spot site sits just west of the Col. The great part is that since its outside of North Cascades National Park, you don't need a permit to camp here. Most people out this way are doing the Ptarmigan Traverse and crowd around Kool-Aid Lake so you should have the Col to yourselves. Johanesburg and Mixup The views from our campsite were epic, just remember to pack up water or be prepared to melt dirty glacier. Here's Formidable. Formidable a bit closer up and closer Spider Mountain sitting nearby Our route up Magic followed the broken 4th and 5th class to the ridge west of the summit. Our route went straight up to the V just left of the summit. After getting within a pitch of the summit and popping out on the exposed North Face, we decided we were entering terrain where our 8.5 mm, 30 m glacier rope just wasn't meant to be. Gear Notes: Didn't really need crampons or ice axe to get up Cache Col, but they helped a bit. Full length climbing rope and small rack if you're doing Magic.
-
The scramble up Old Snowy is very easy (the PCT goes to within 500 ft and there is an easy to follow trail from there; my dog made it to the top). Plenty of water all the way up because there are still quite a few snow patches melting out. You'll definitely encounter other people in Snowgrass Flats but it wasn't too crowded. I'm guessing the alpine camp you are referring to is the one with rock wind shelters built, up above Snowgrass Flats. It was empty when I passed it on the way up. I think most people, inlcuding our group, assumed it would still be snowed in when in fact, its completely melted out. We also crossed Cispus Pass on the trip and it didn't appear many parties had been through before us this year (the only prints in the snow/dirt were from goats). Again, there's still some snow but no trouble getting through in just boots.
-
Climb: Goat Rocks-Old Snowy Date of Climb: 7/15/2006 Trip Report: Ives, Big Horn, and Curtis Gilbert from the top of Old Snowy Goat Lake and Mt. Rainier Mt. Adams from Snowgrass Flats Big Horn from Cispus Basin Approach Notes: Mostly melted out with just patchy snow throughout the Goat Rocks above 6,000 ft. You can get just about anywhere you need to go without crampons or ice axe.
-
Climb: Ingalls Peak-South Ridge Date of Climb: 7/8/2006 Trip Report: Definitely nothing harder than 5.4 on the route. Both our group, and the 20 other people on the route that day, rapped the route despite the Beckey guide telling us not to. Gear Notes: small rack to 2 inches. Ample selection of fixed anchors on the way up. I used tennis shoes but hiking boots would help in the snow. Ice axe and crampons not necessary. Approach Notes: patchy snow from Ingalls Pass to Ingalls Lake. Mostly snow from there up to the base of the climb. Here's some pics http://static.flickr.com/71/186120047_cc58959f76.jpg?v=0 http://static.flickr.com/70/186120049_8b00bf14d8.jpg?v=0 http://static.flickr.com/45/186120050_1e1088d107.jpg?v=0
-
Climb: Mt. Washington-South Face (route 1 in the guidebook) Date of Climb: 7/4/2006 Trip Report: A bit of snow left on the upper portion of the mountain, but crampons and ice axe are not really necessary.
-
I'd like to do the climb in a day, and could go either Saturday July 8 or Sunday July 9. PM me or email at: jay underscore wilkinson at hotmail dot com Driving from Olympia and will be over on the dry side of the mountains all weekend. http://physics.uoregon.edu/~belitz/db_virtual/db_climbing/peaks/ingalls_pk.html
-
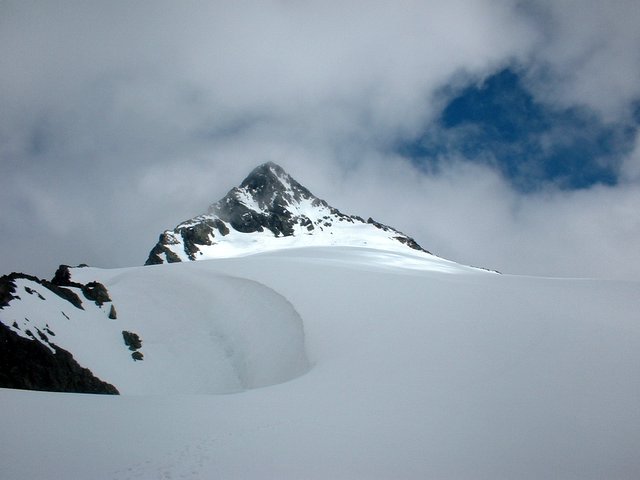
Here's a pic of the summit pyramide taken 6/18/06