Christopher Fisher
-
Posts
9 -
Joined
-
Last visited
-
Days Won
2
Everything posted by Christopher Fisher
-
[TR] Forbidden Peak - North Ridge 07/12/2025
Christopher Fisher replied to Christopher Fisher's topic in North Cascades
Happy to have helped! I believe it, those slab sections were no joke. I think I recall a trip report noting a fatality years ago on that section. Thankfully our navigation of it ended up being relatively straightforward. -
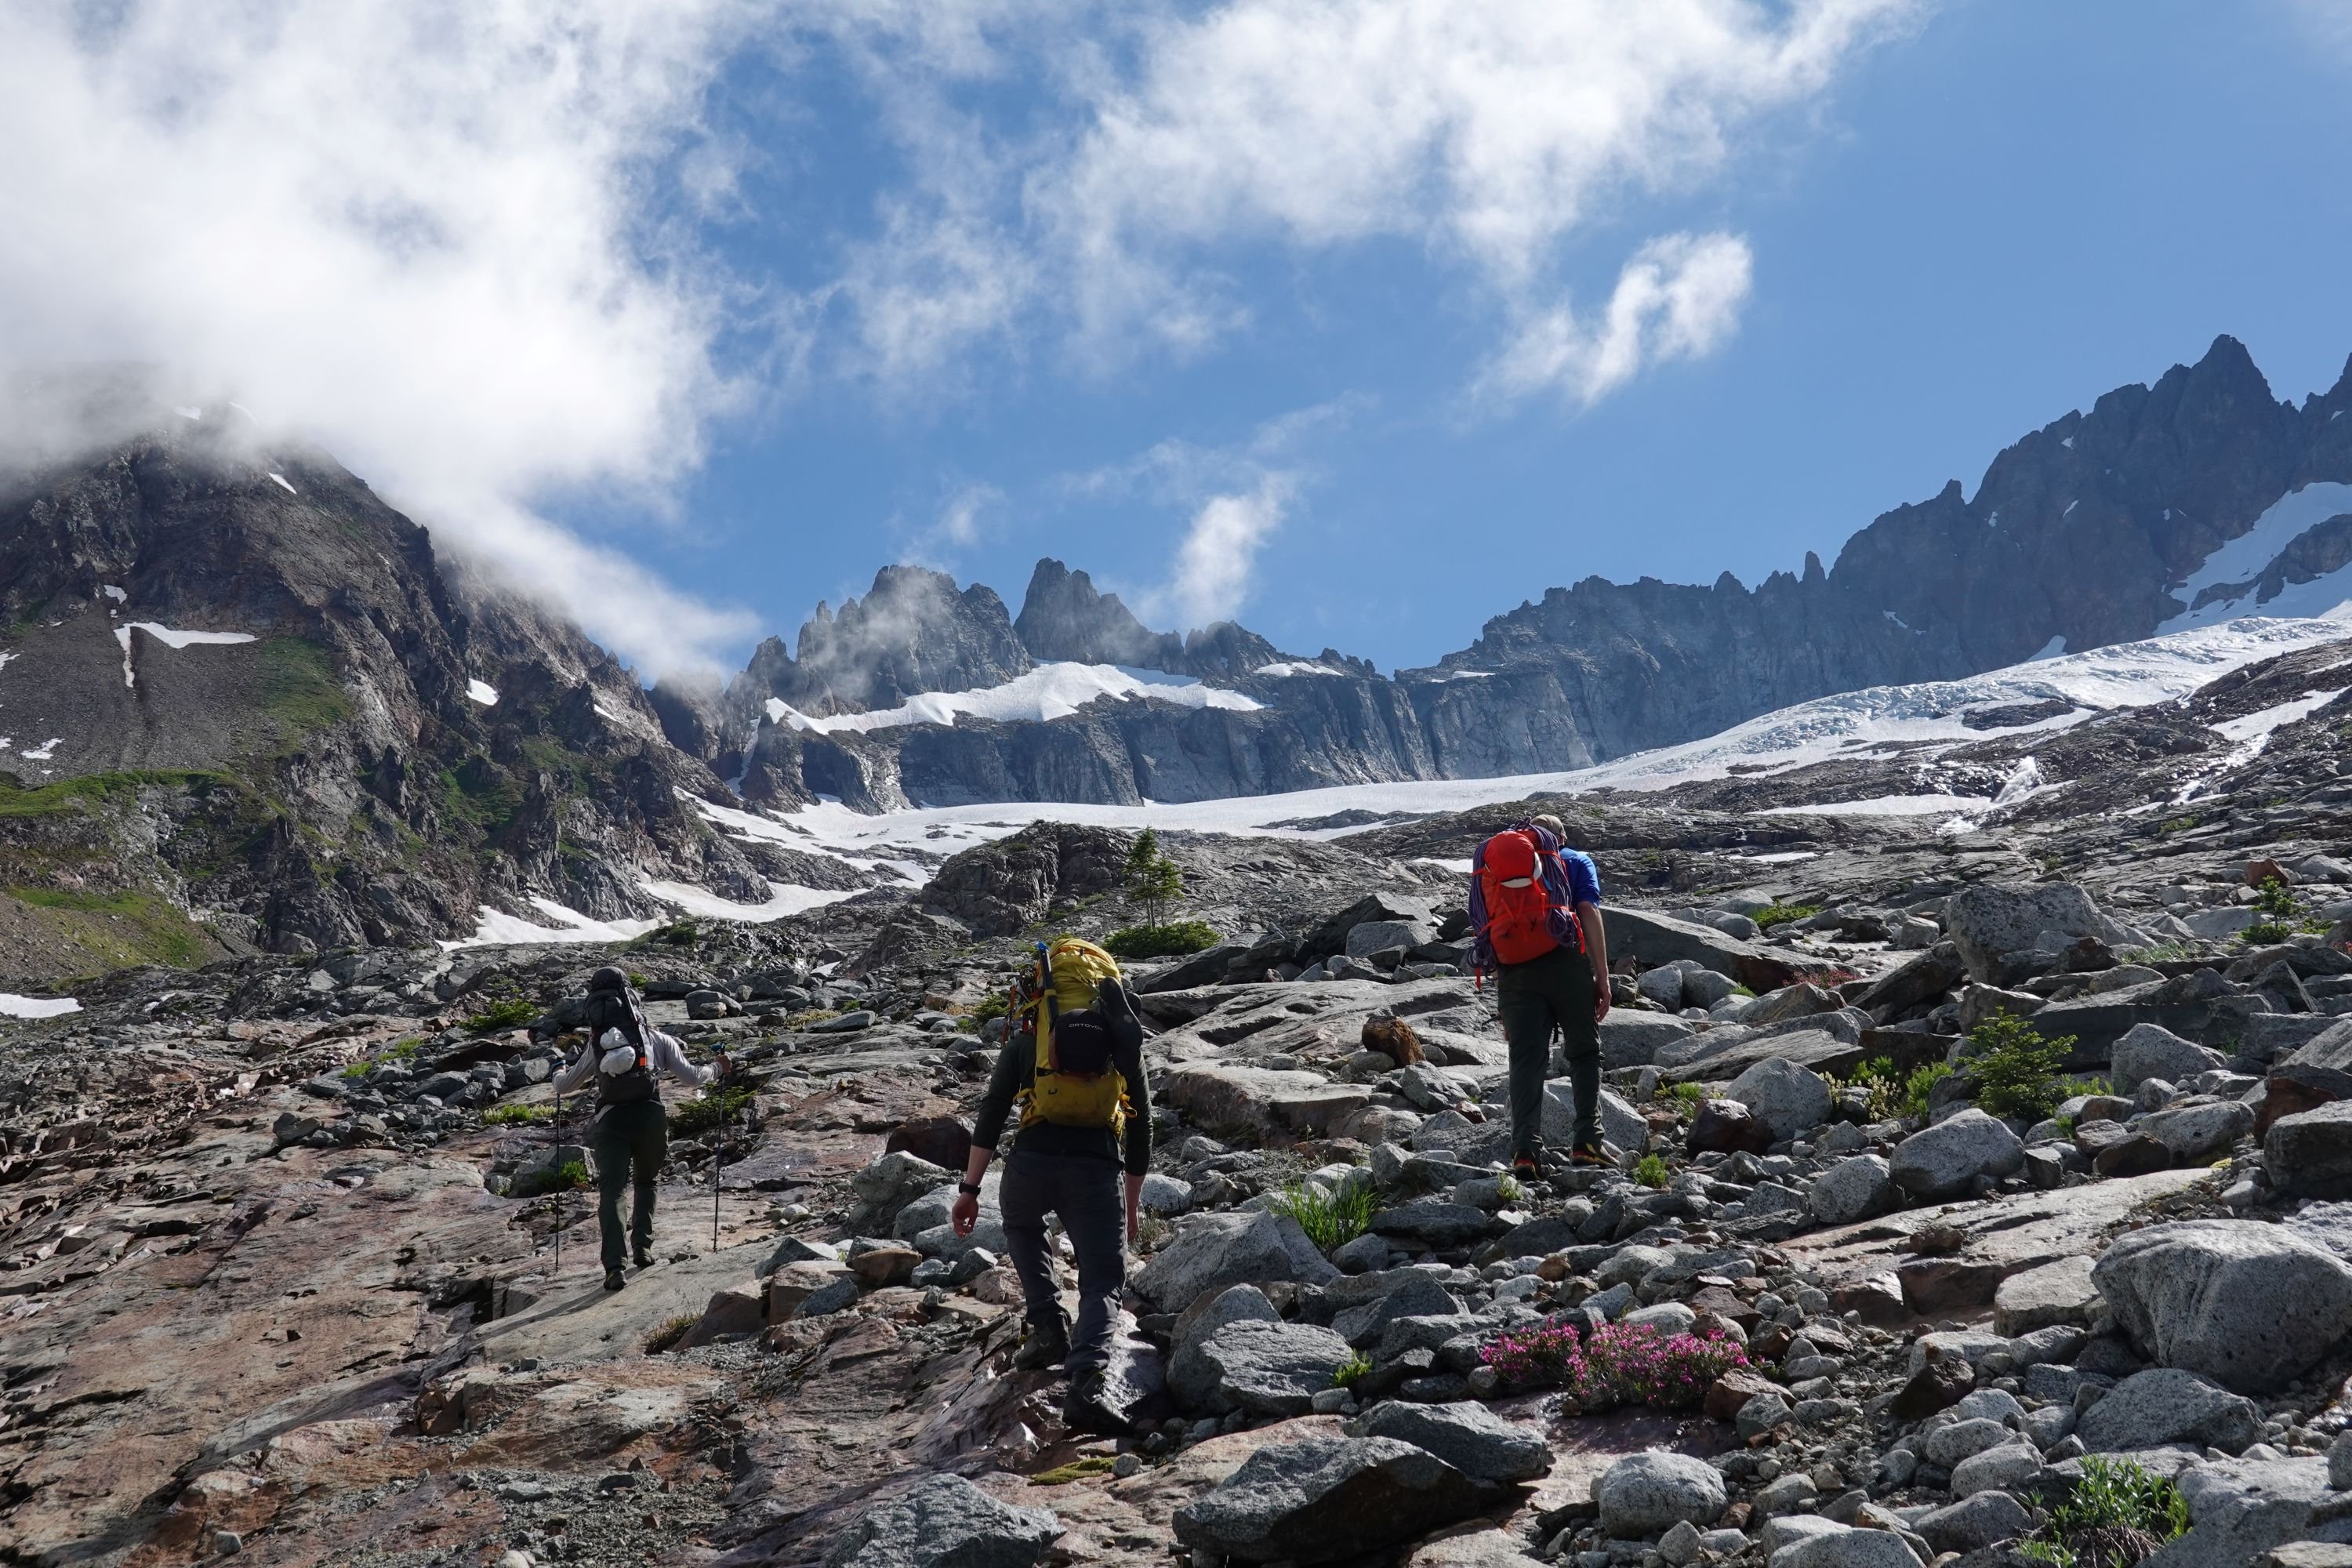
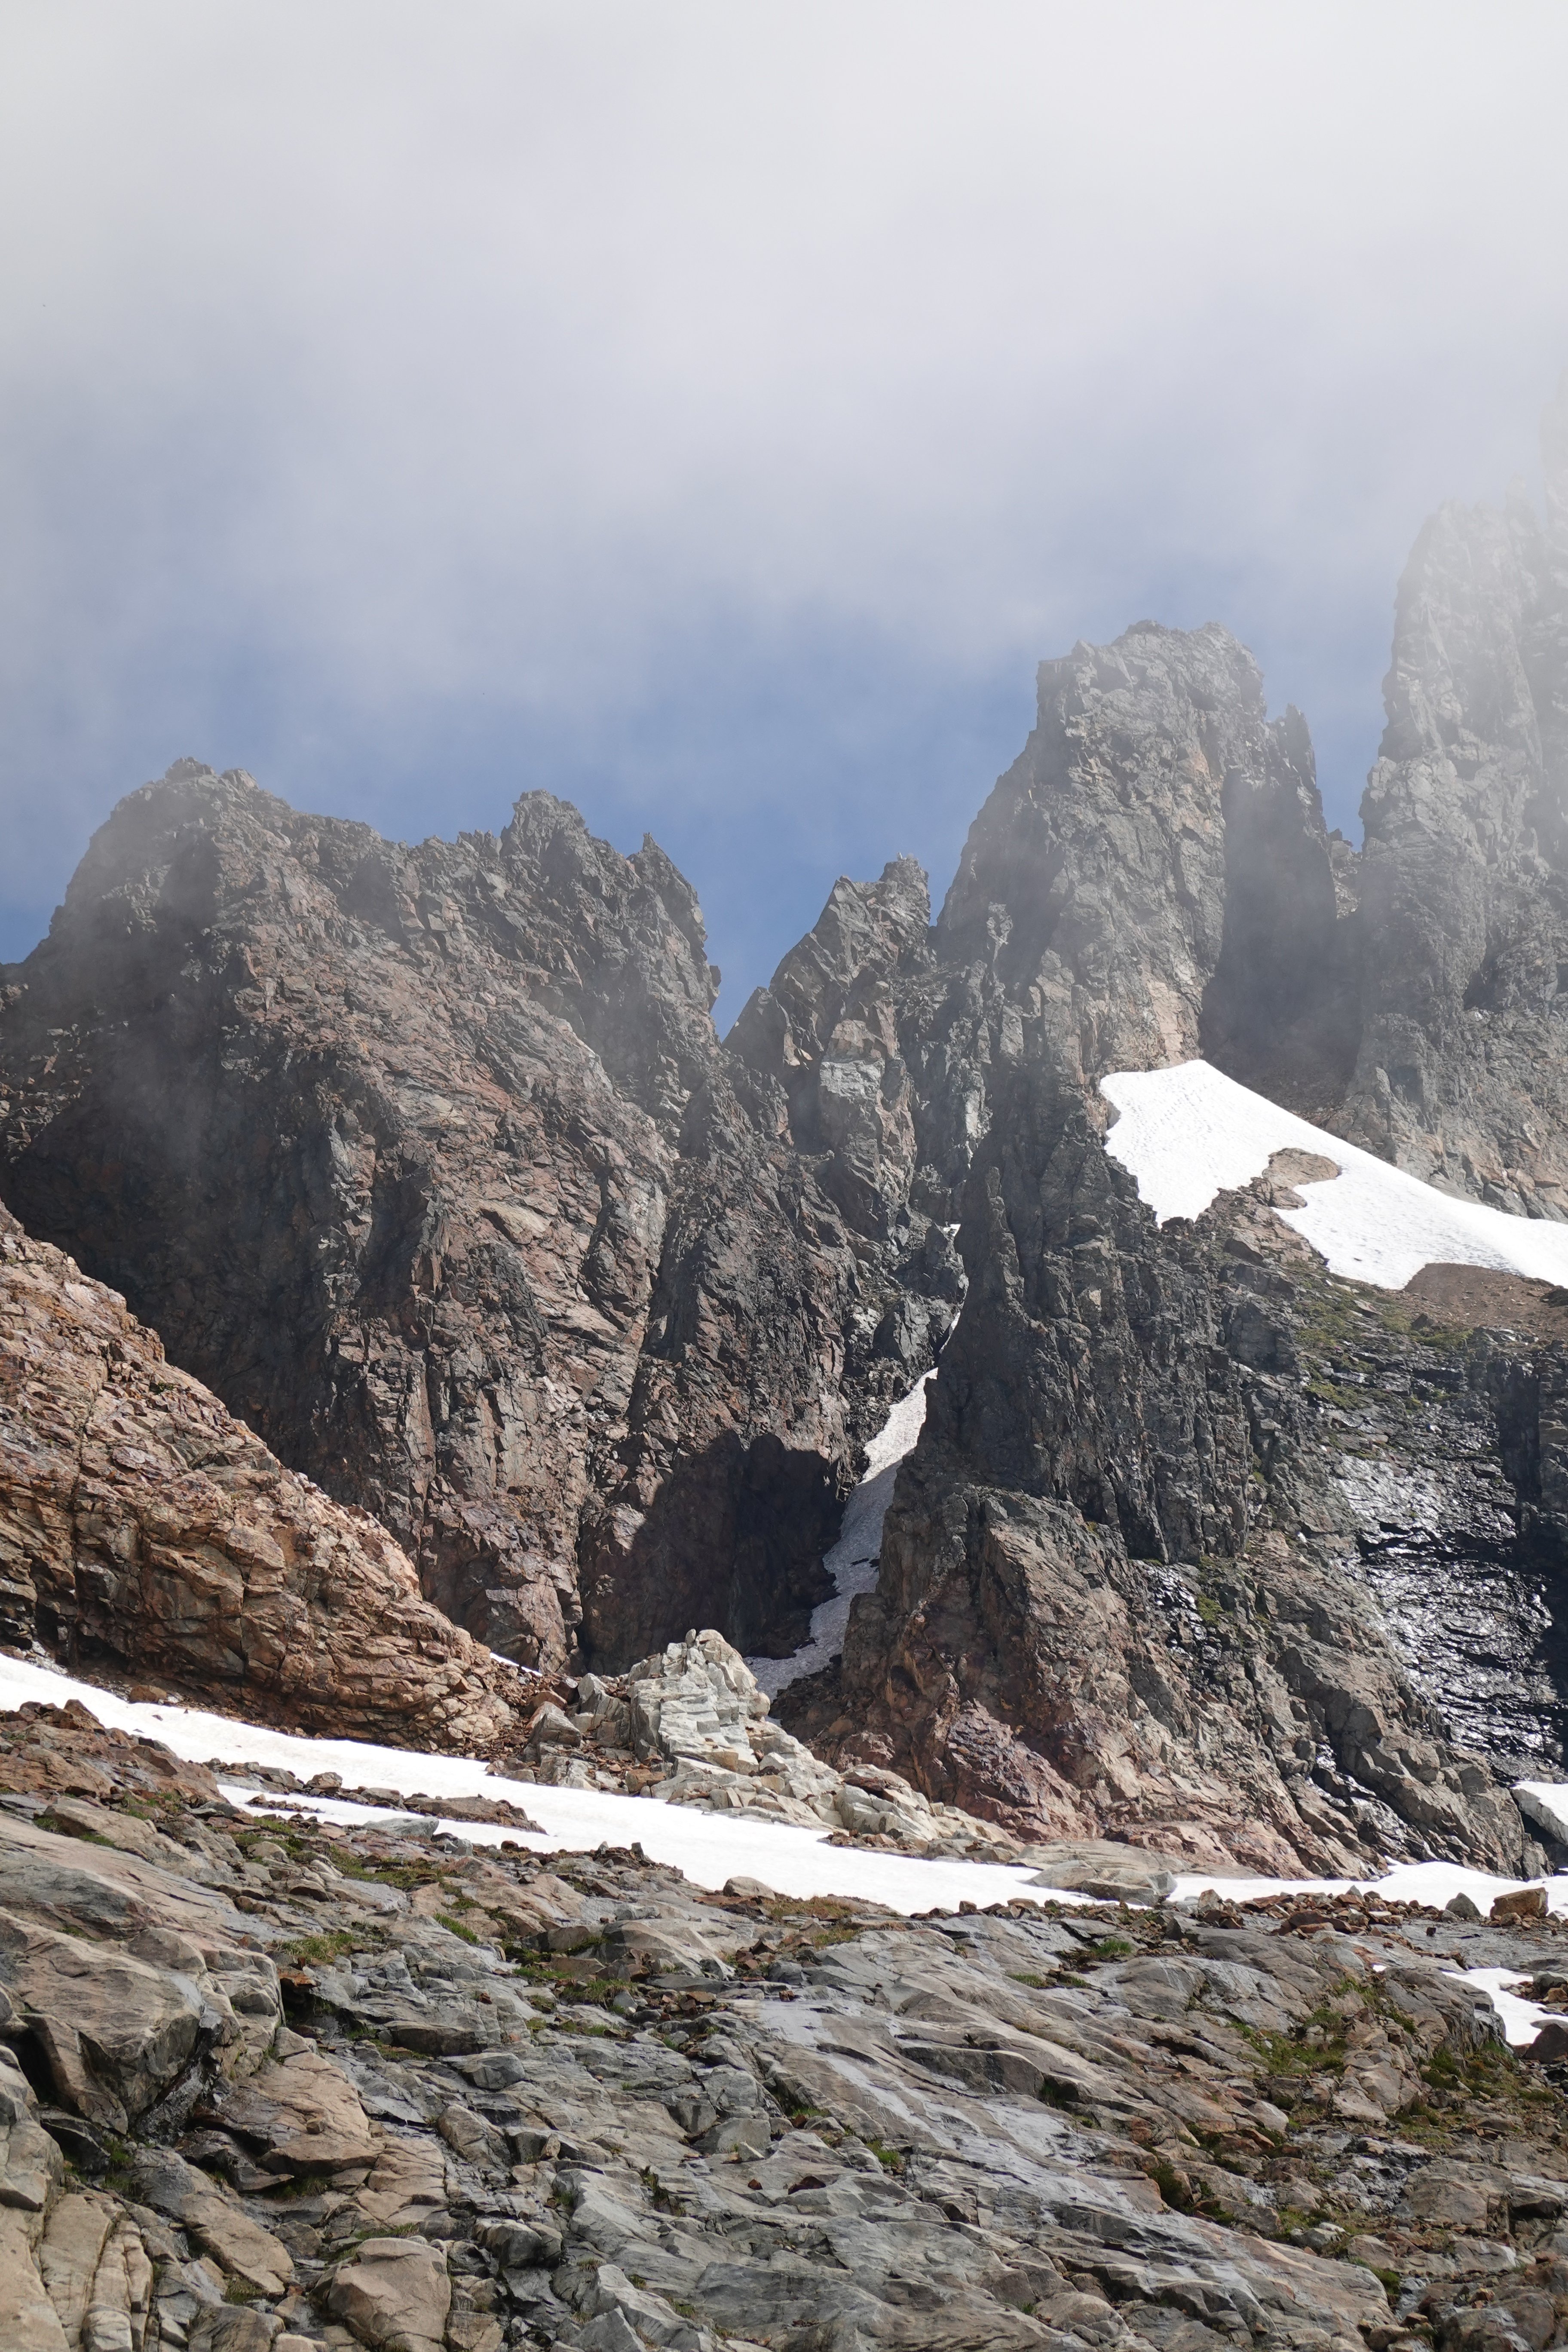
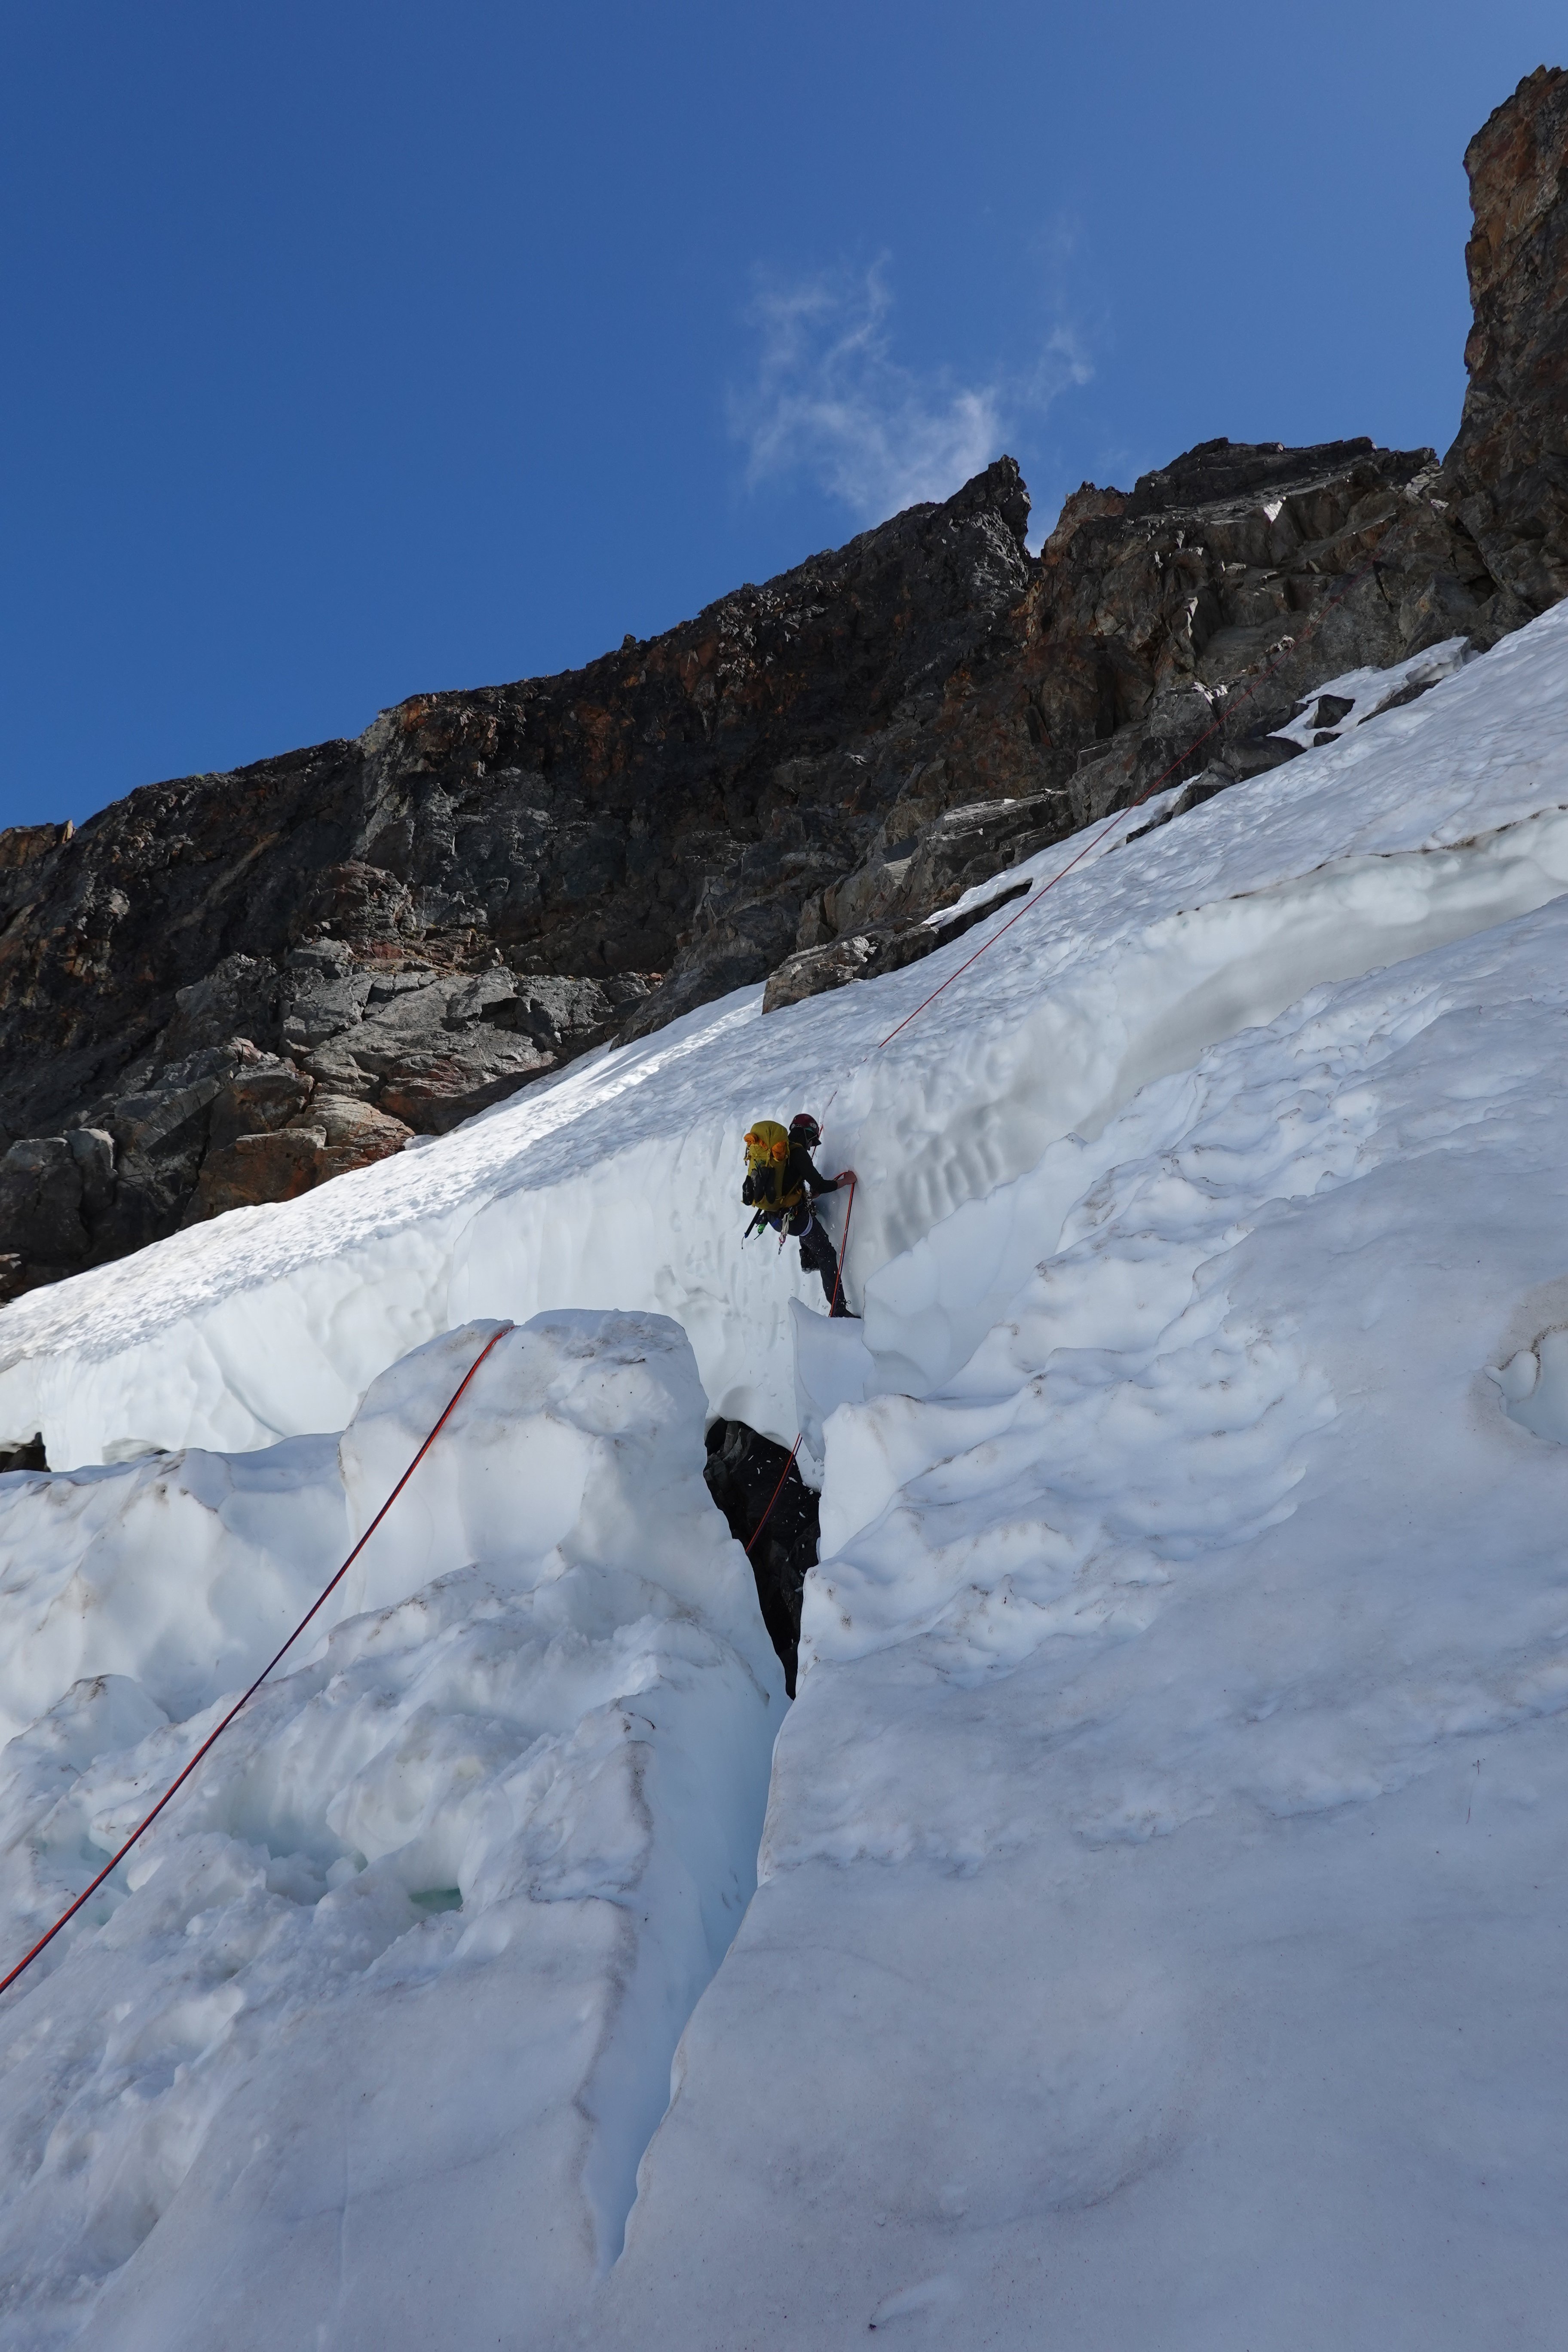
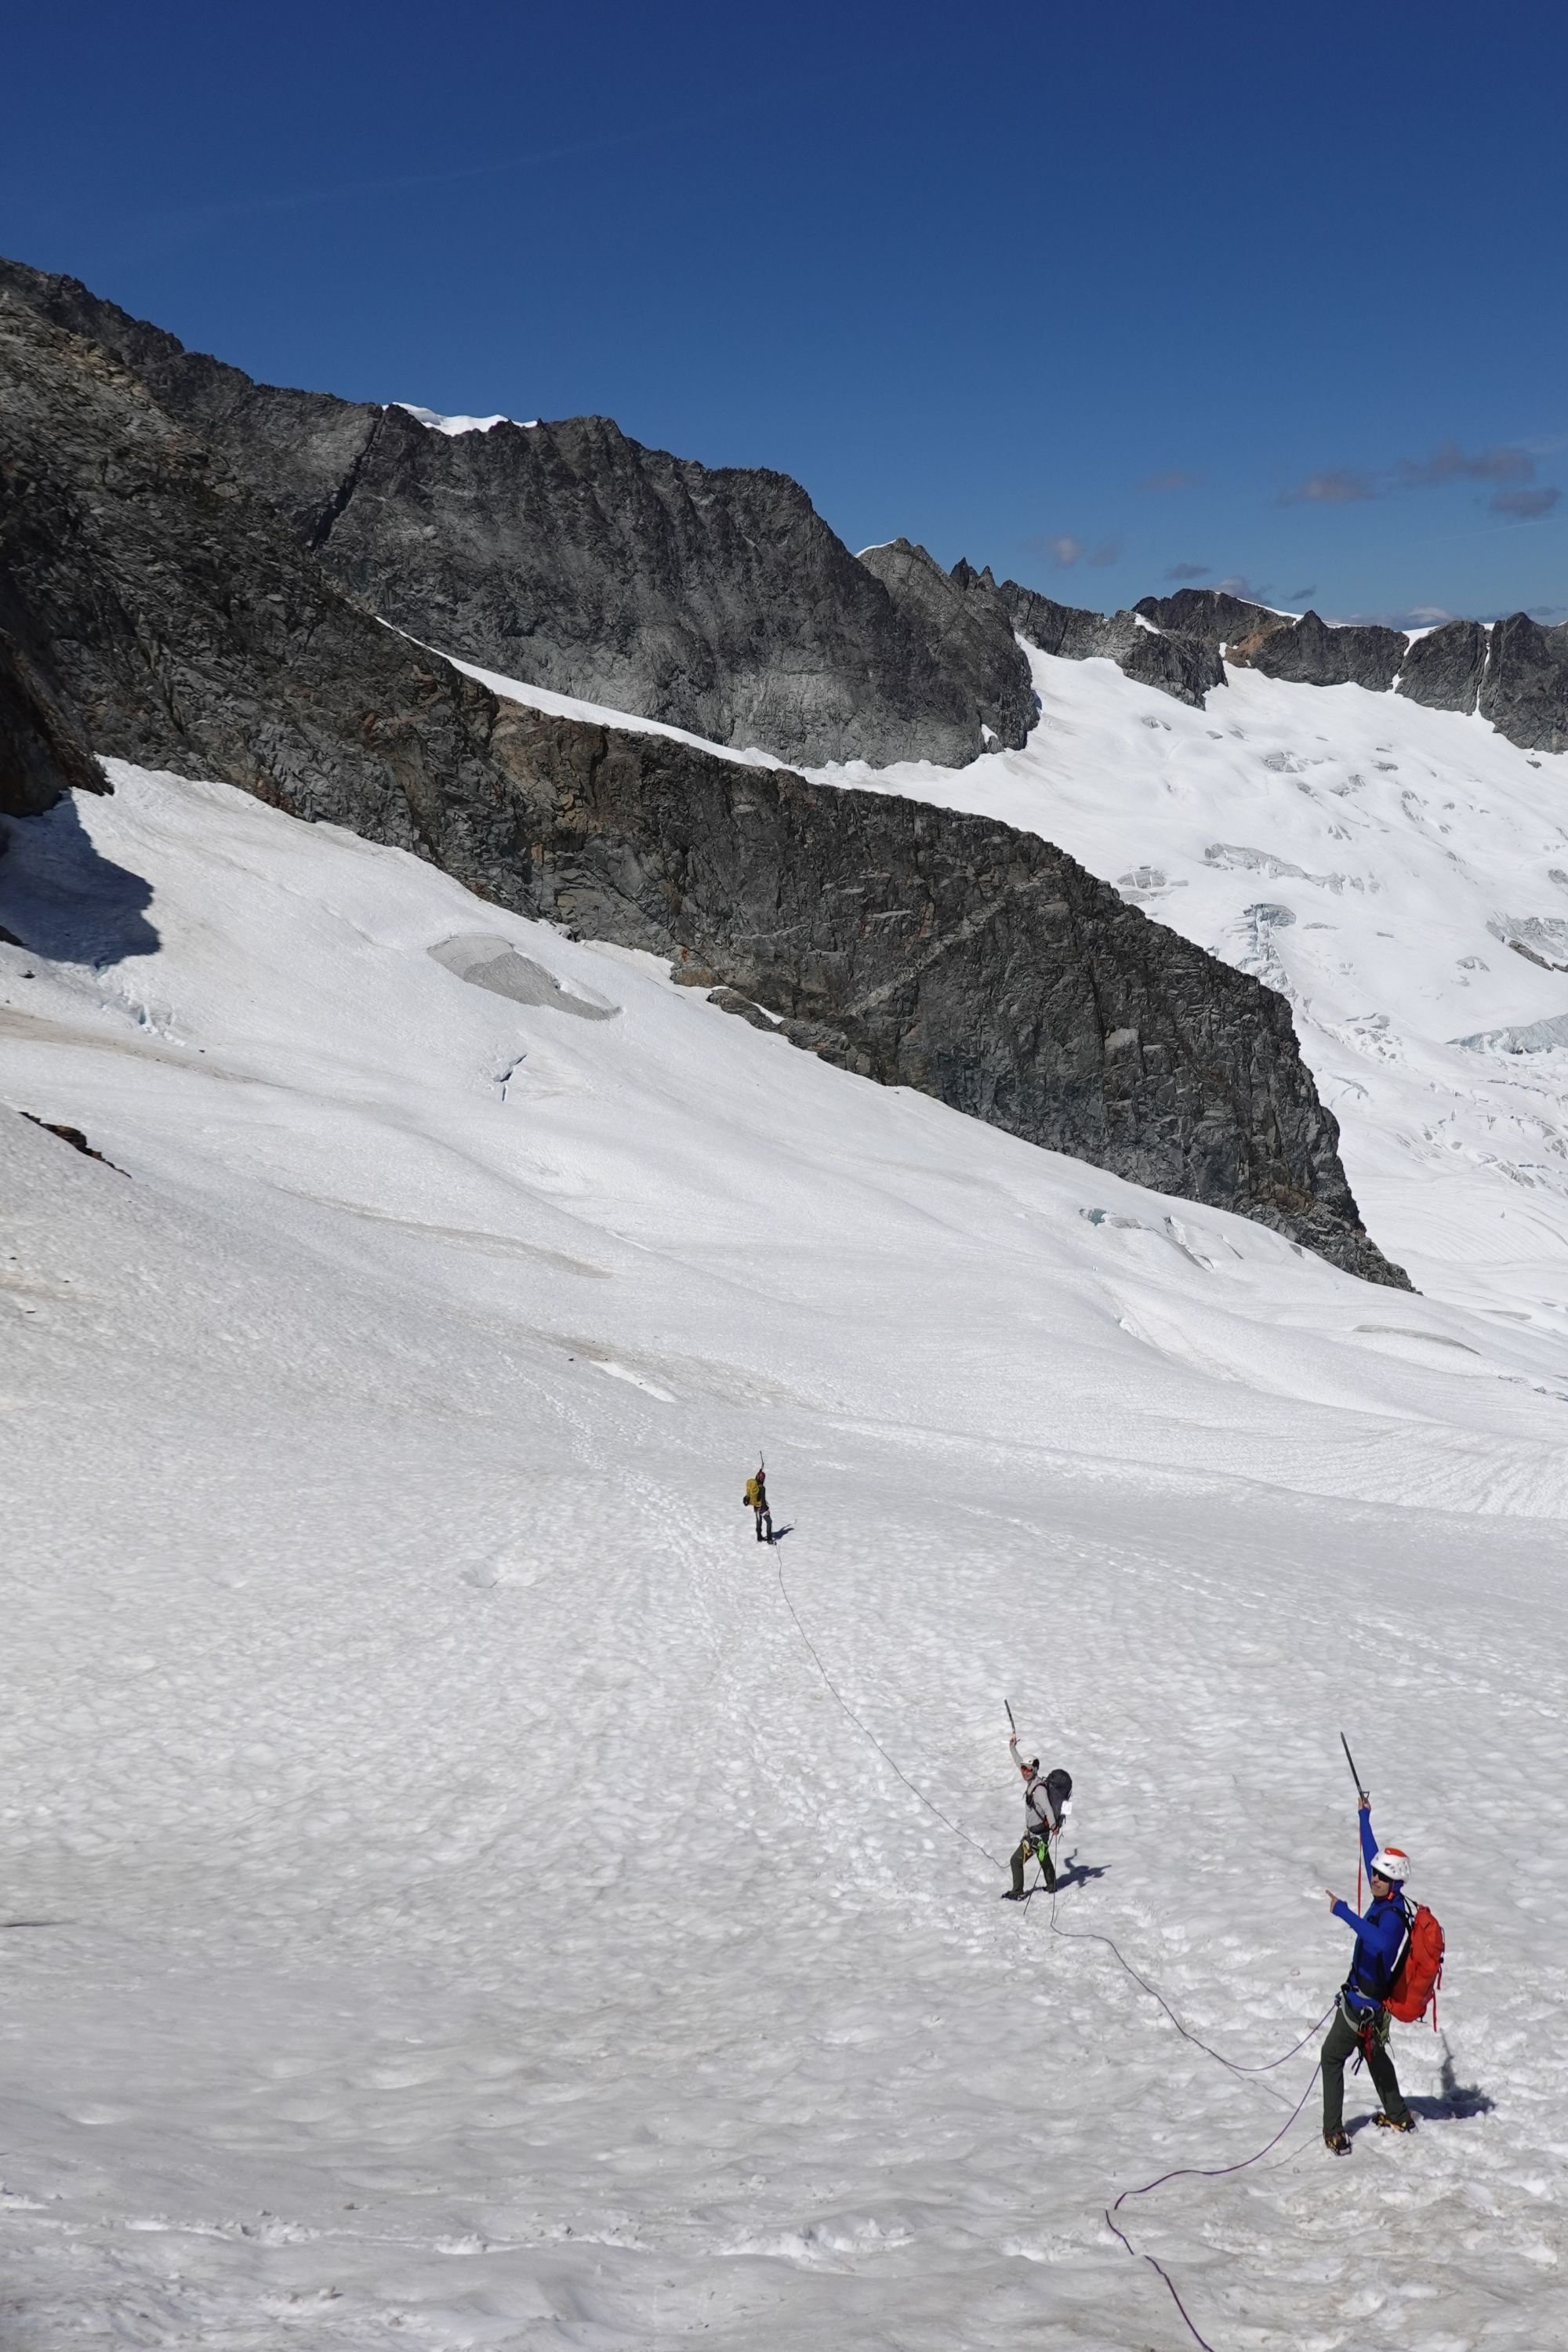
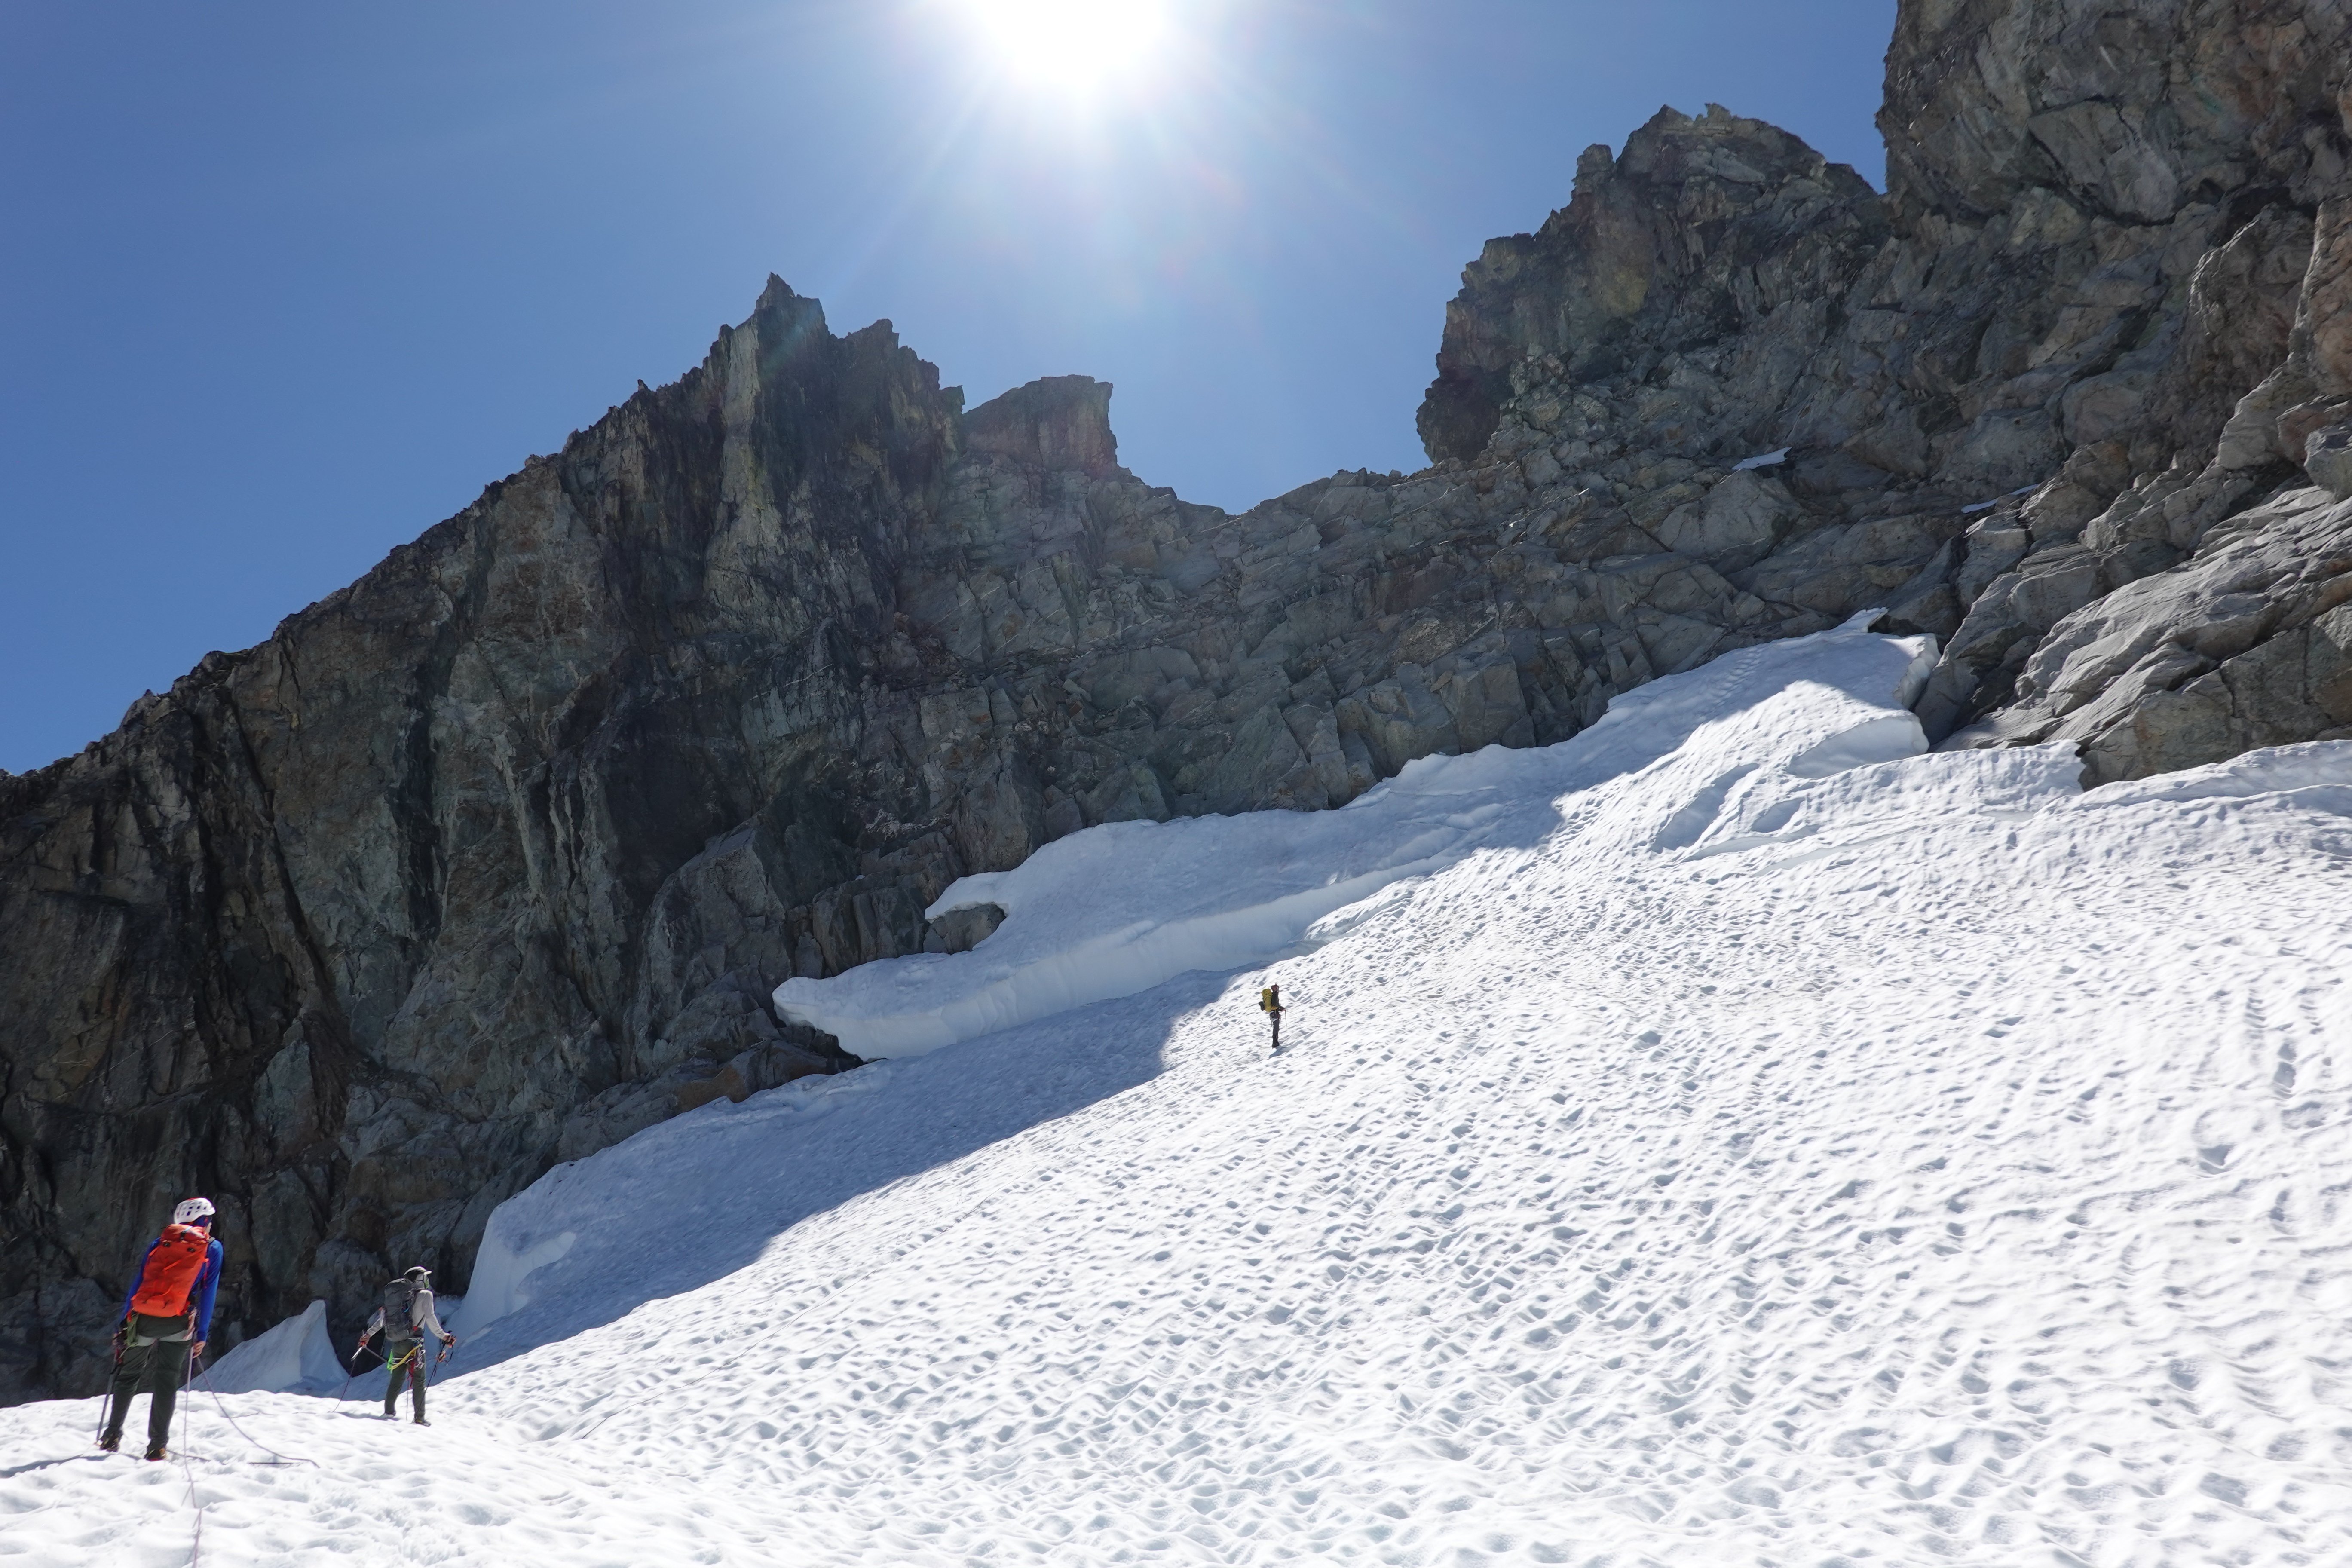
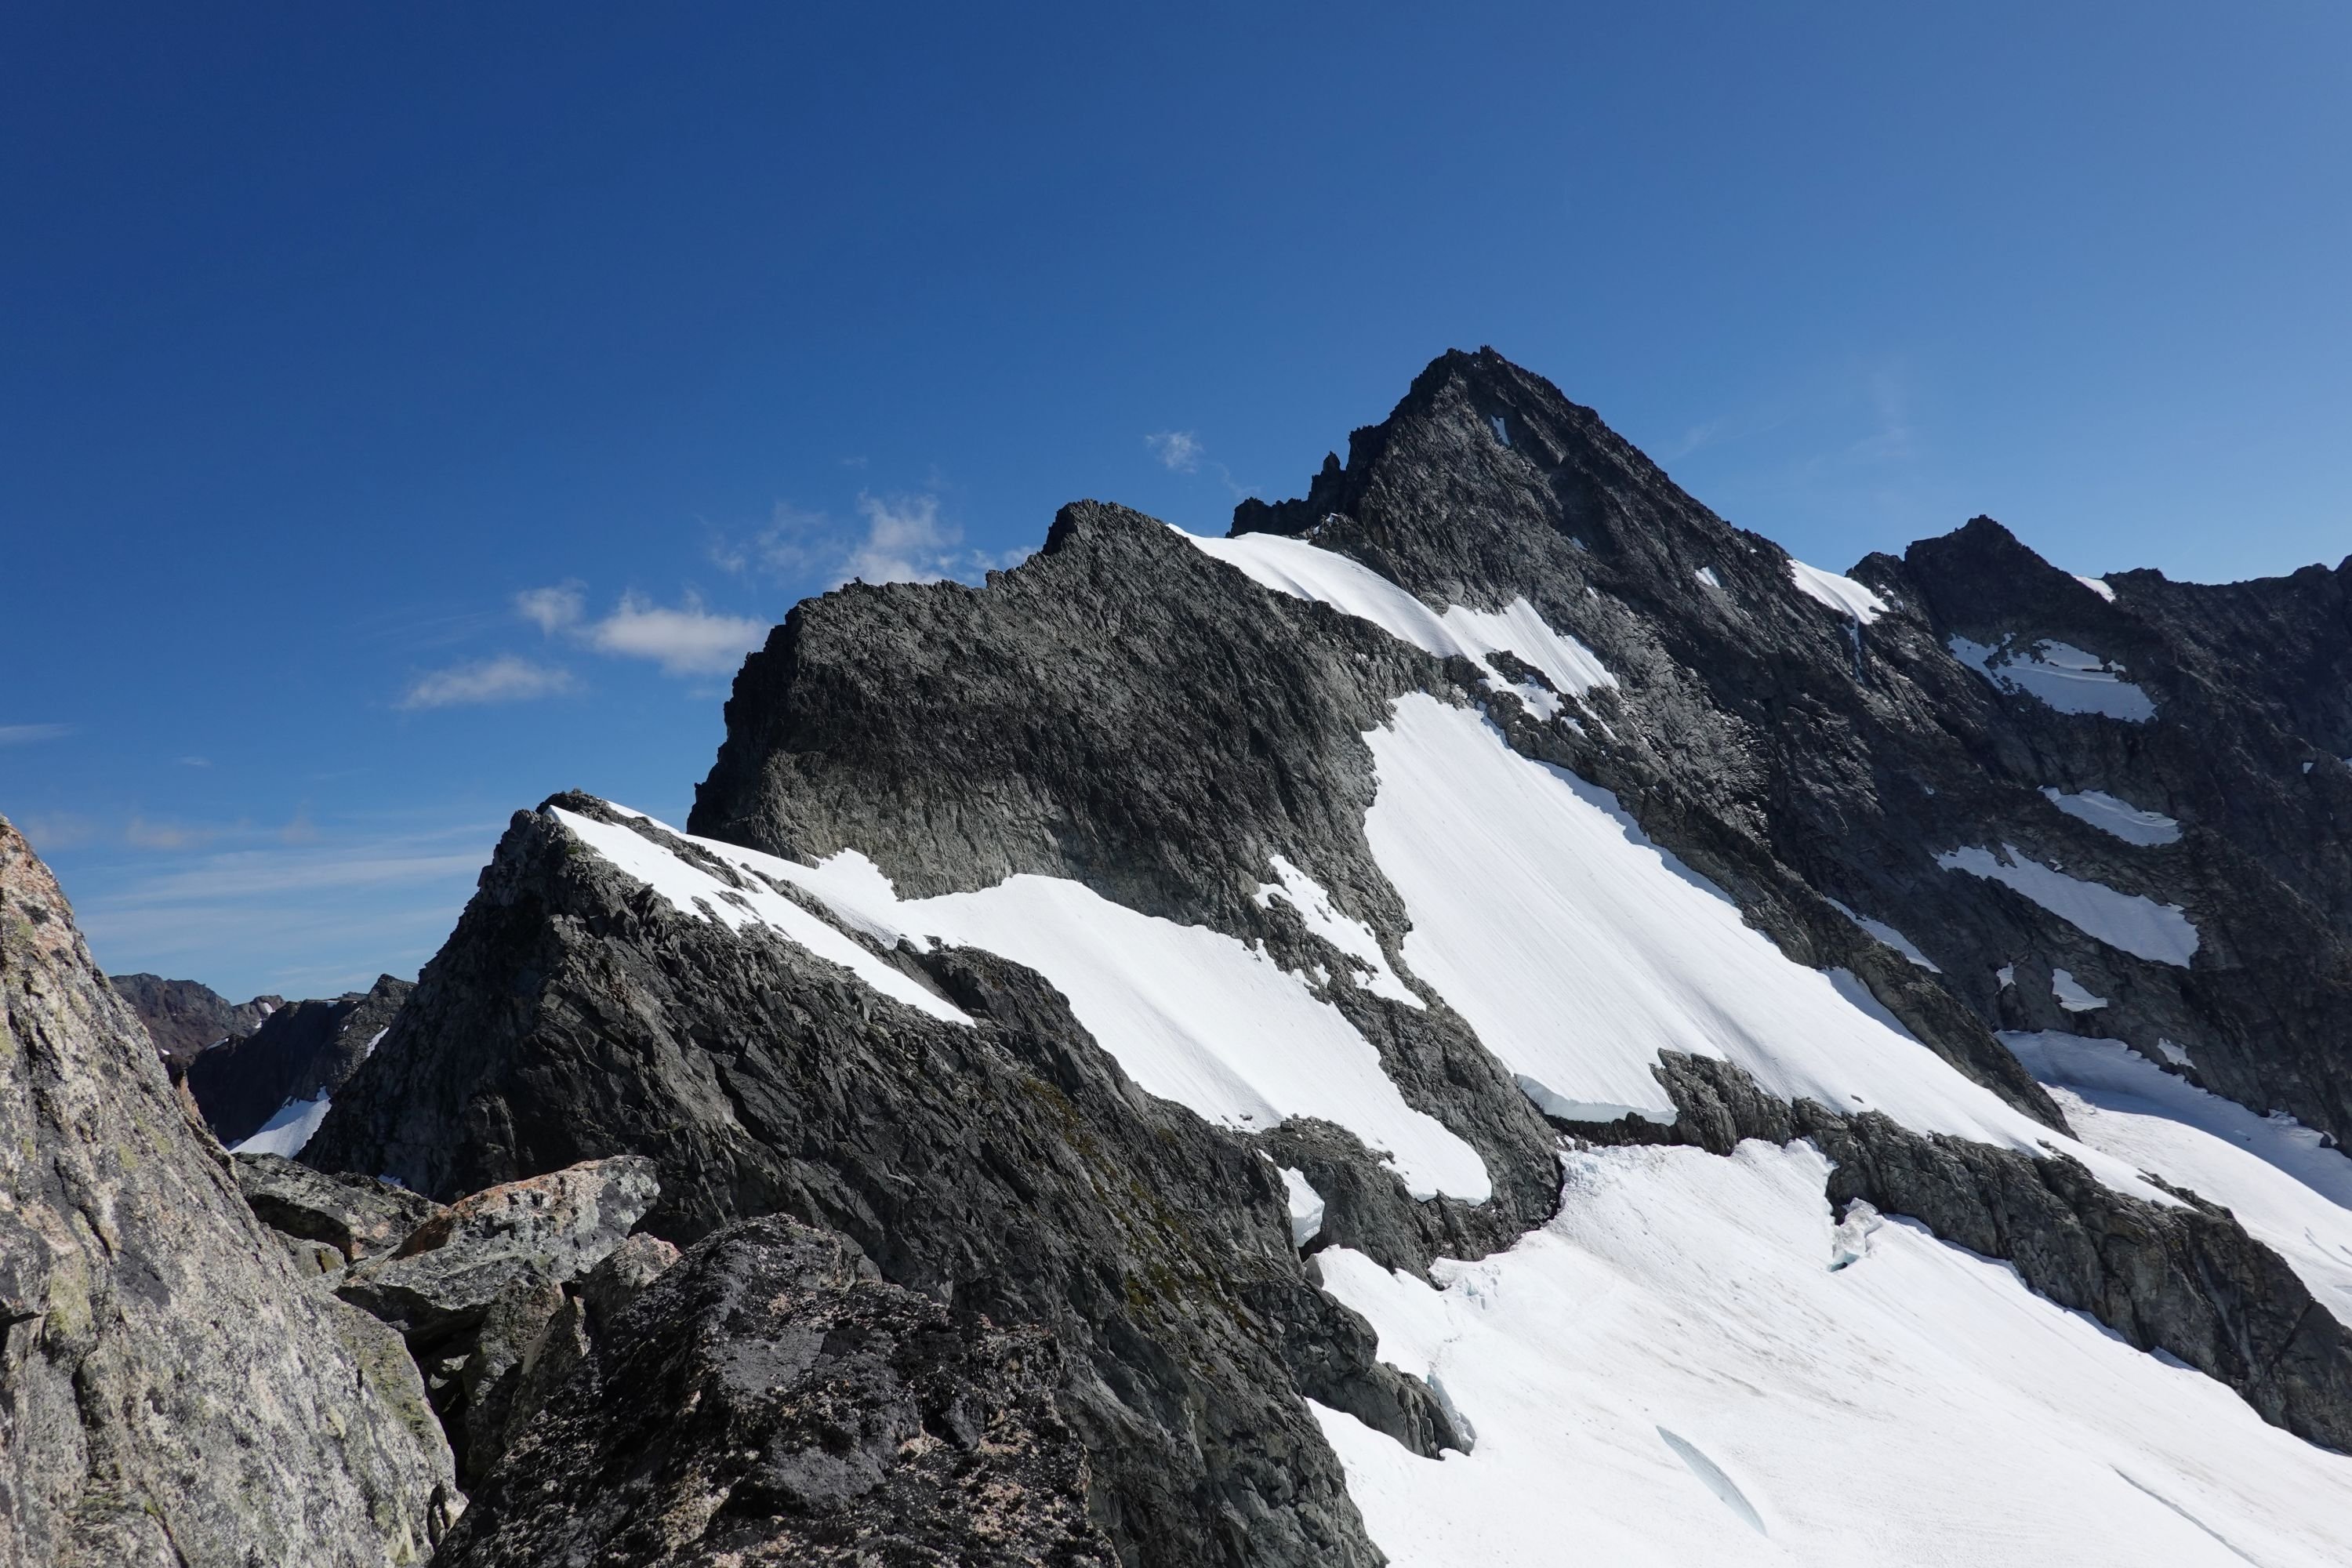
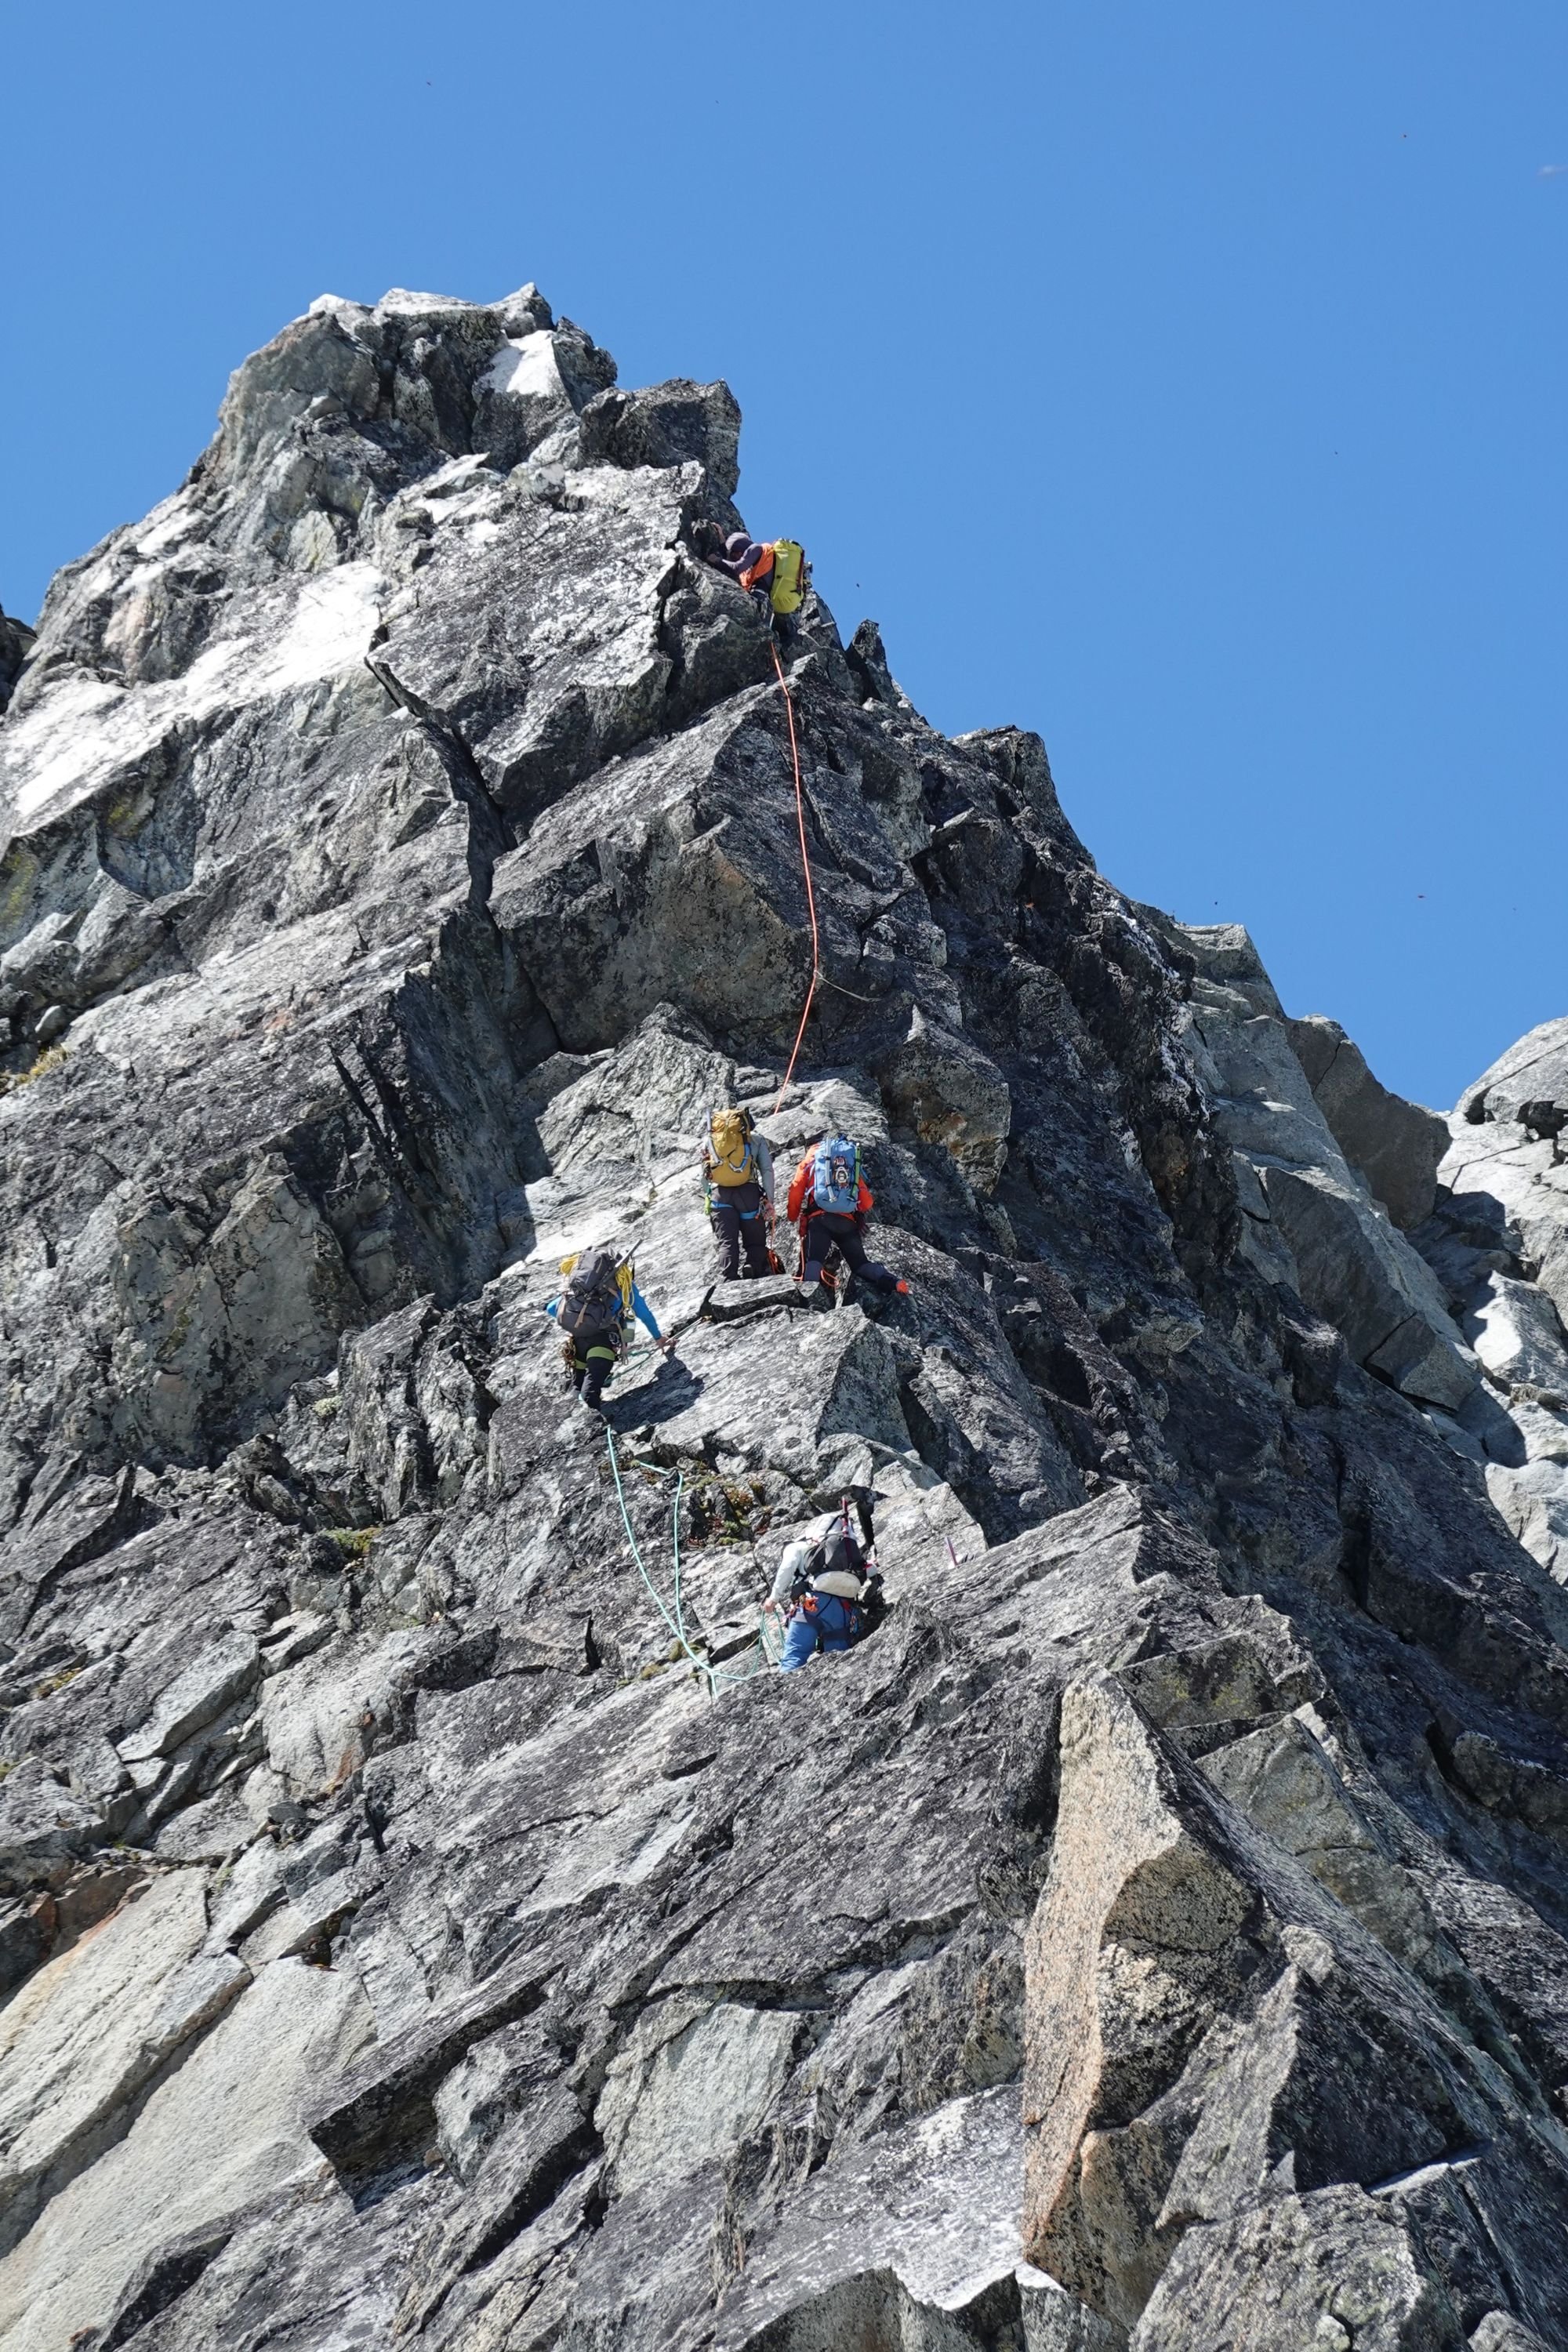
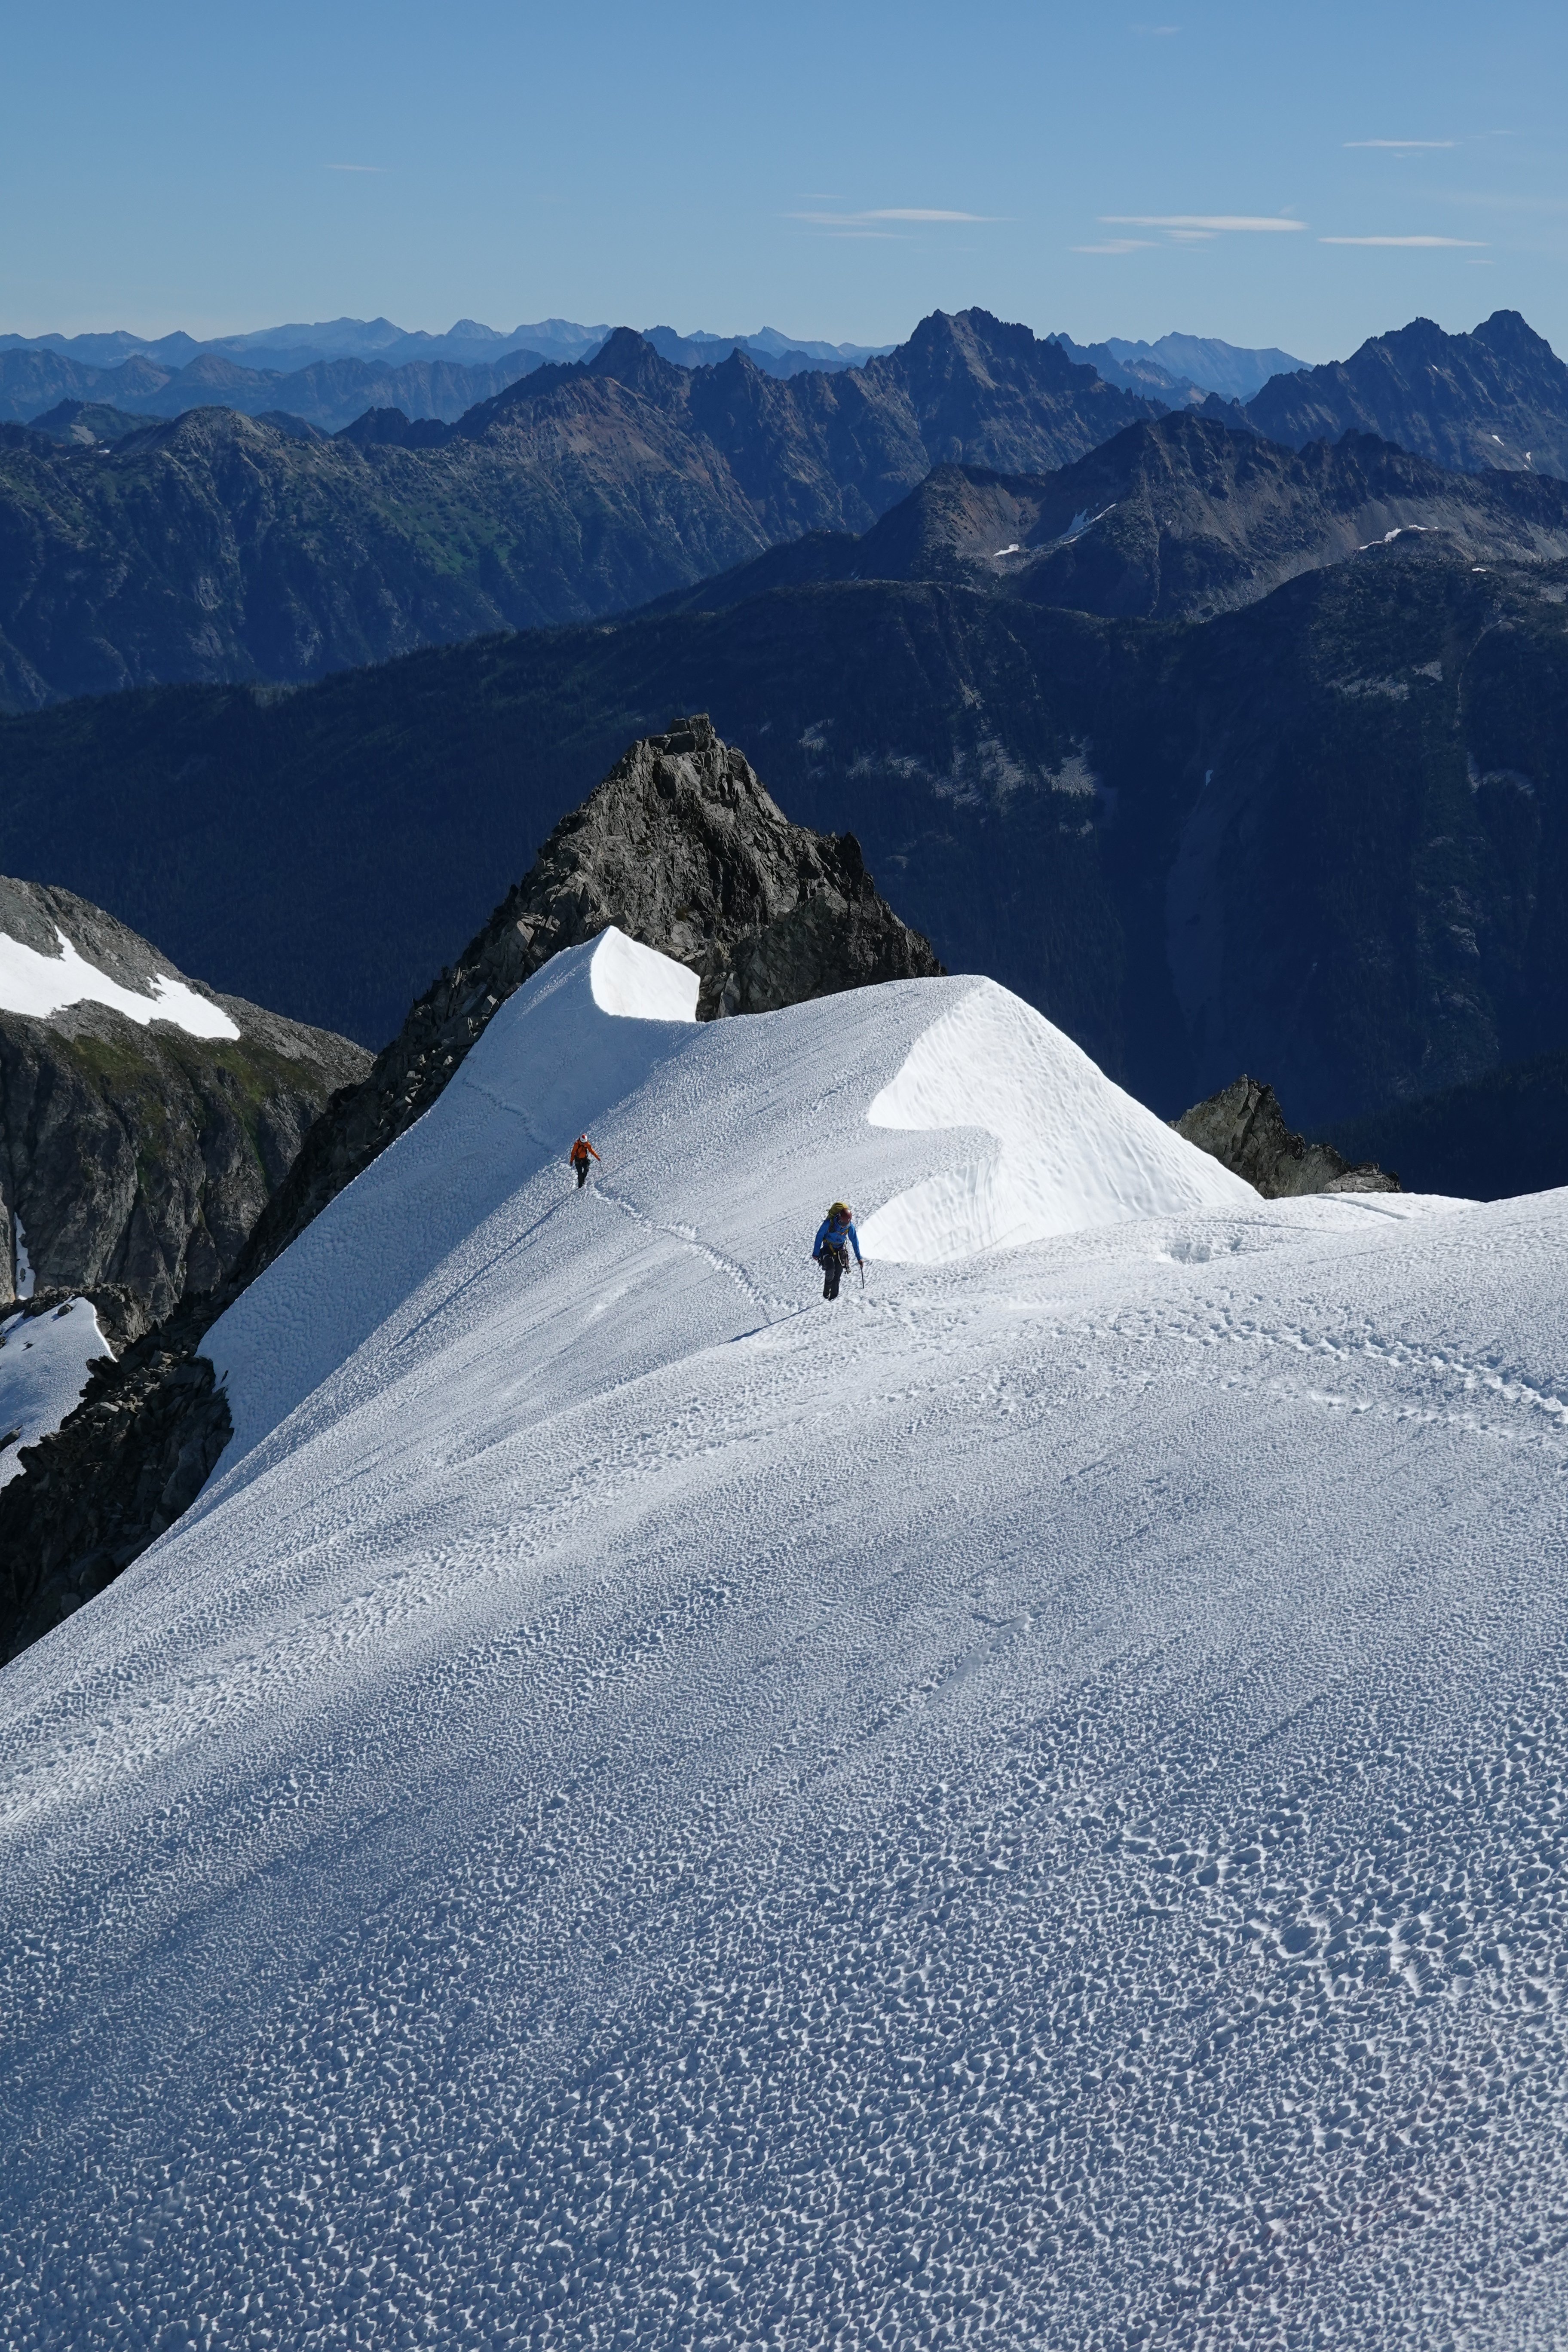
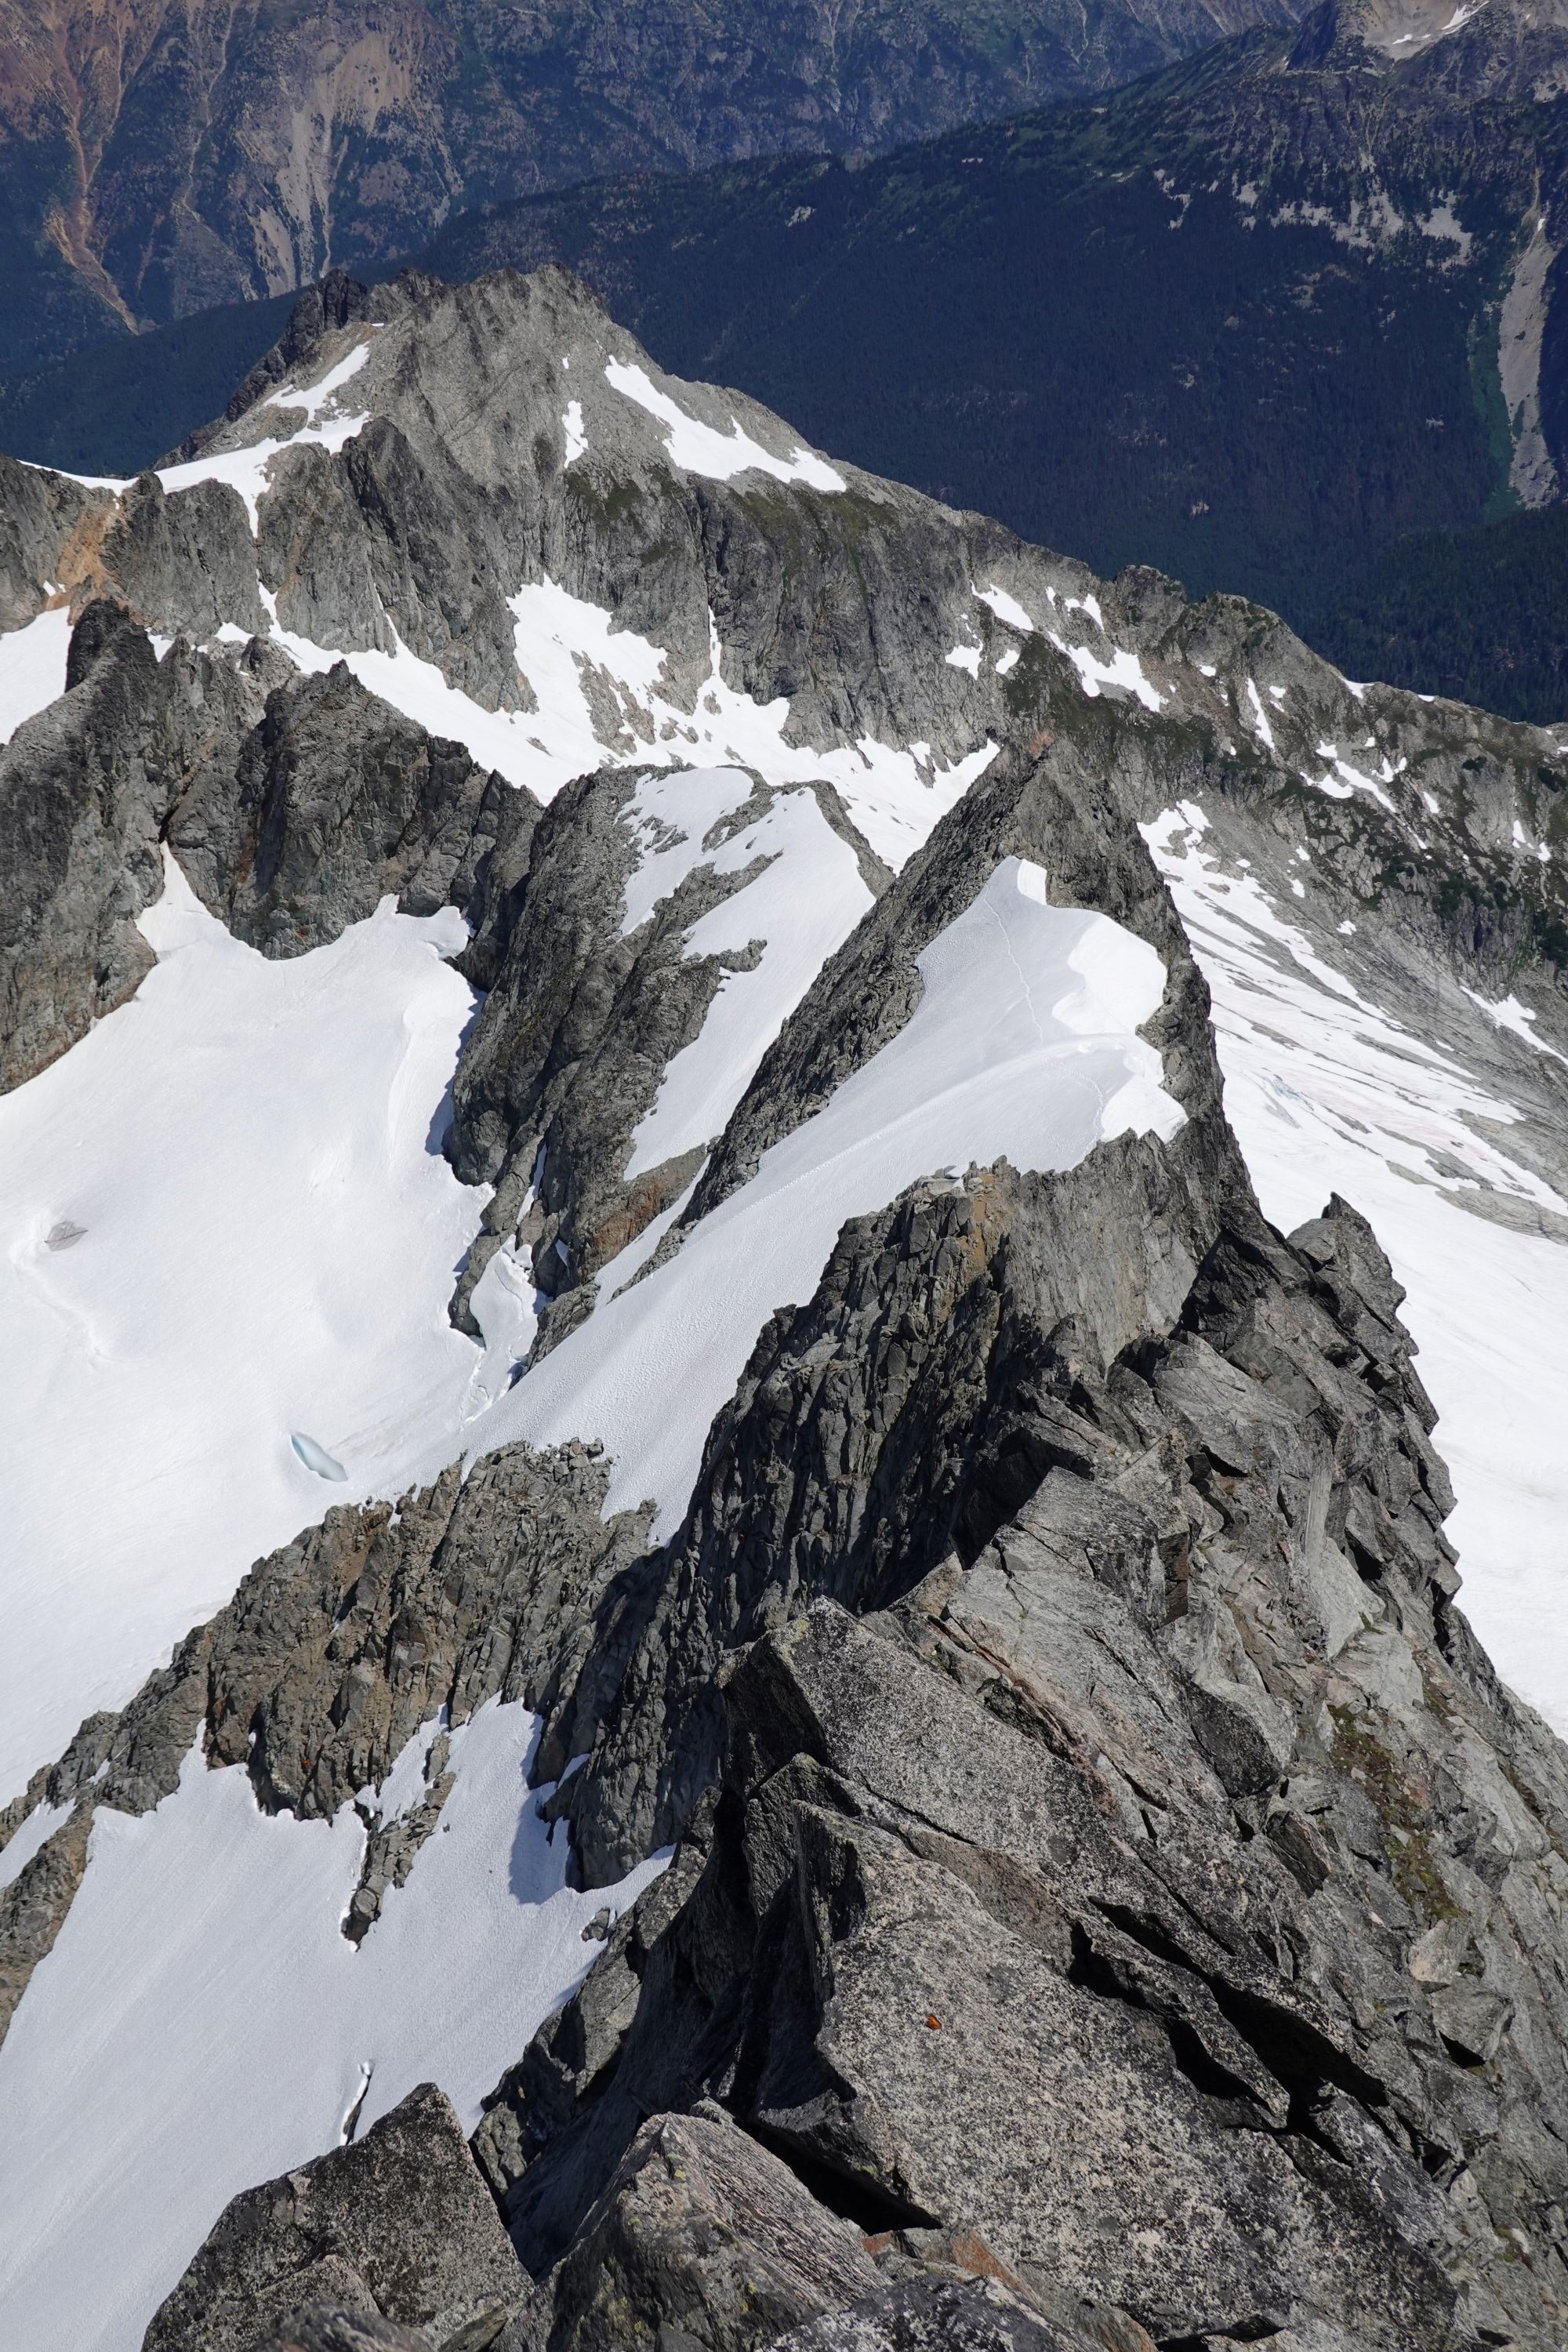
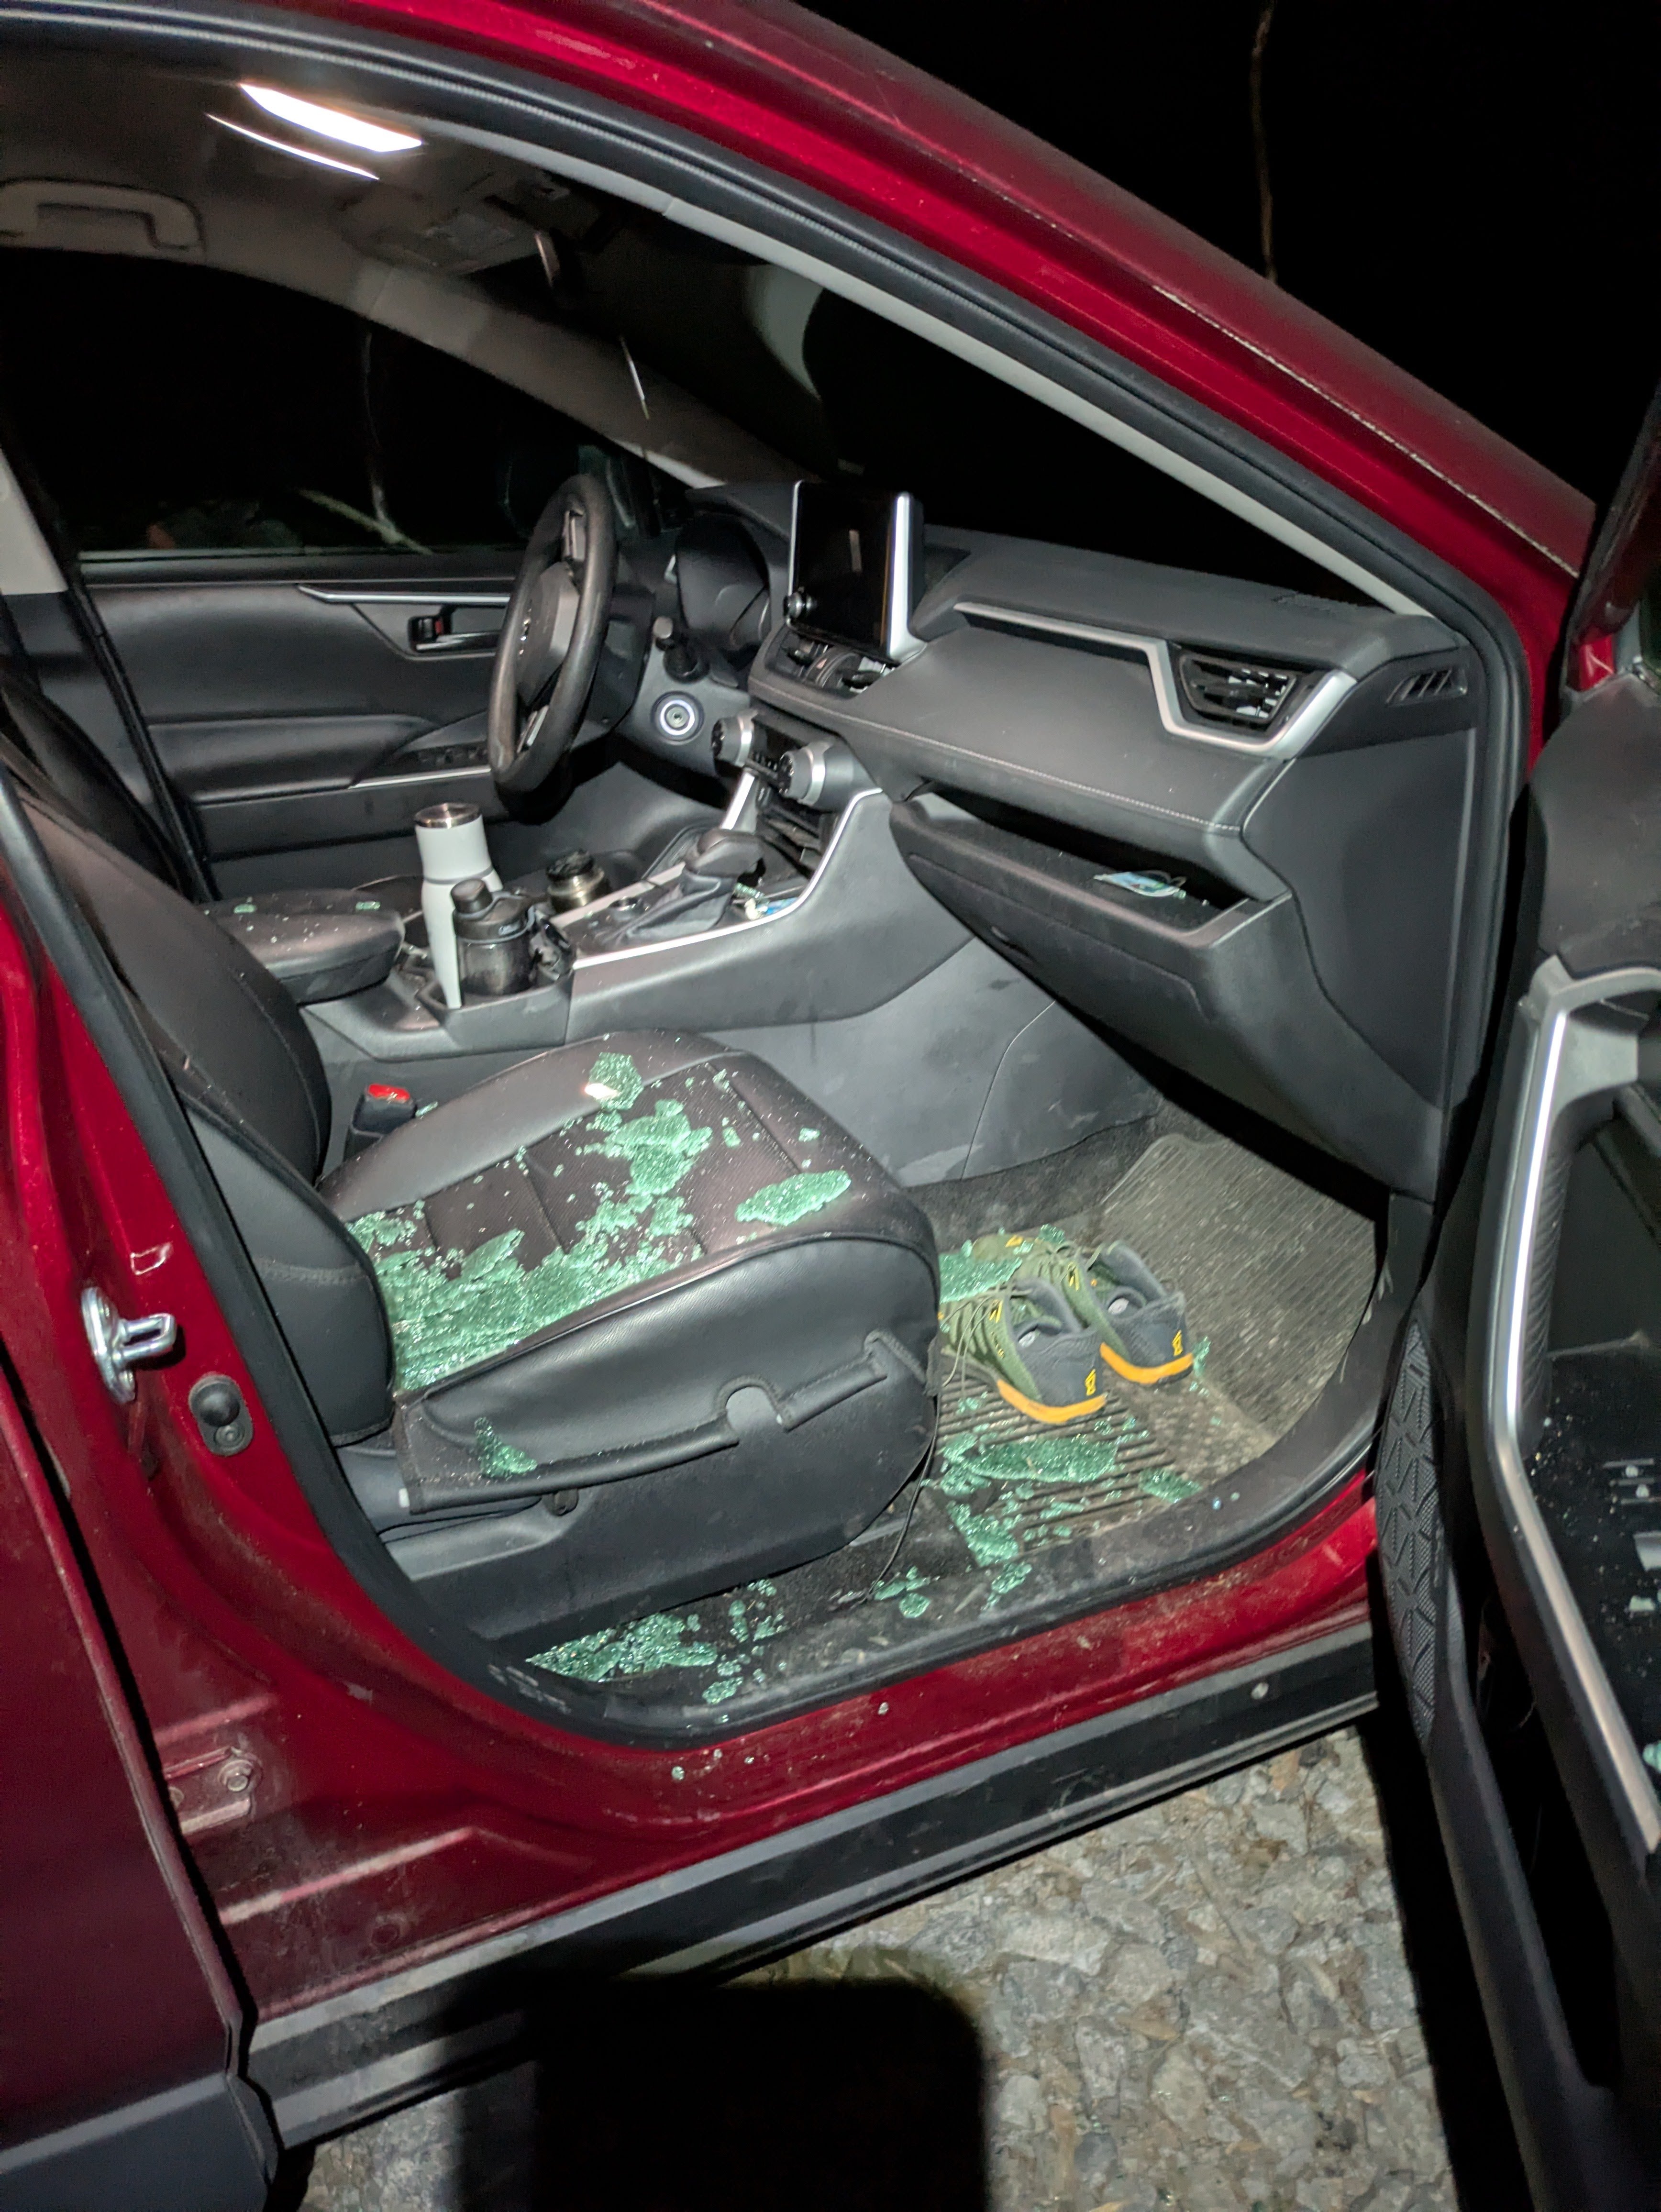
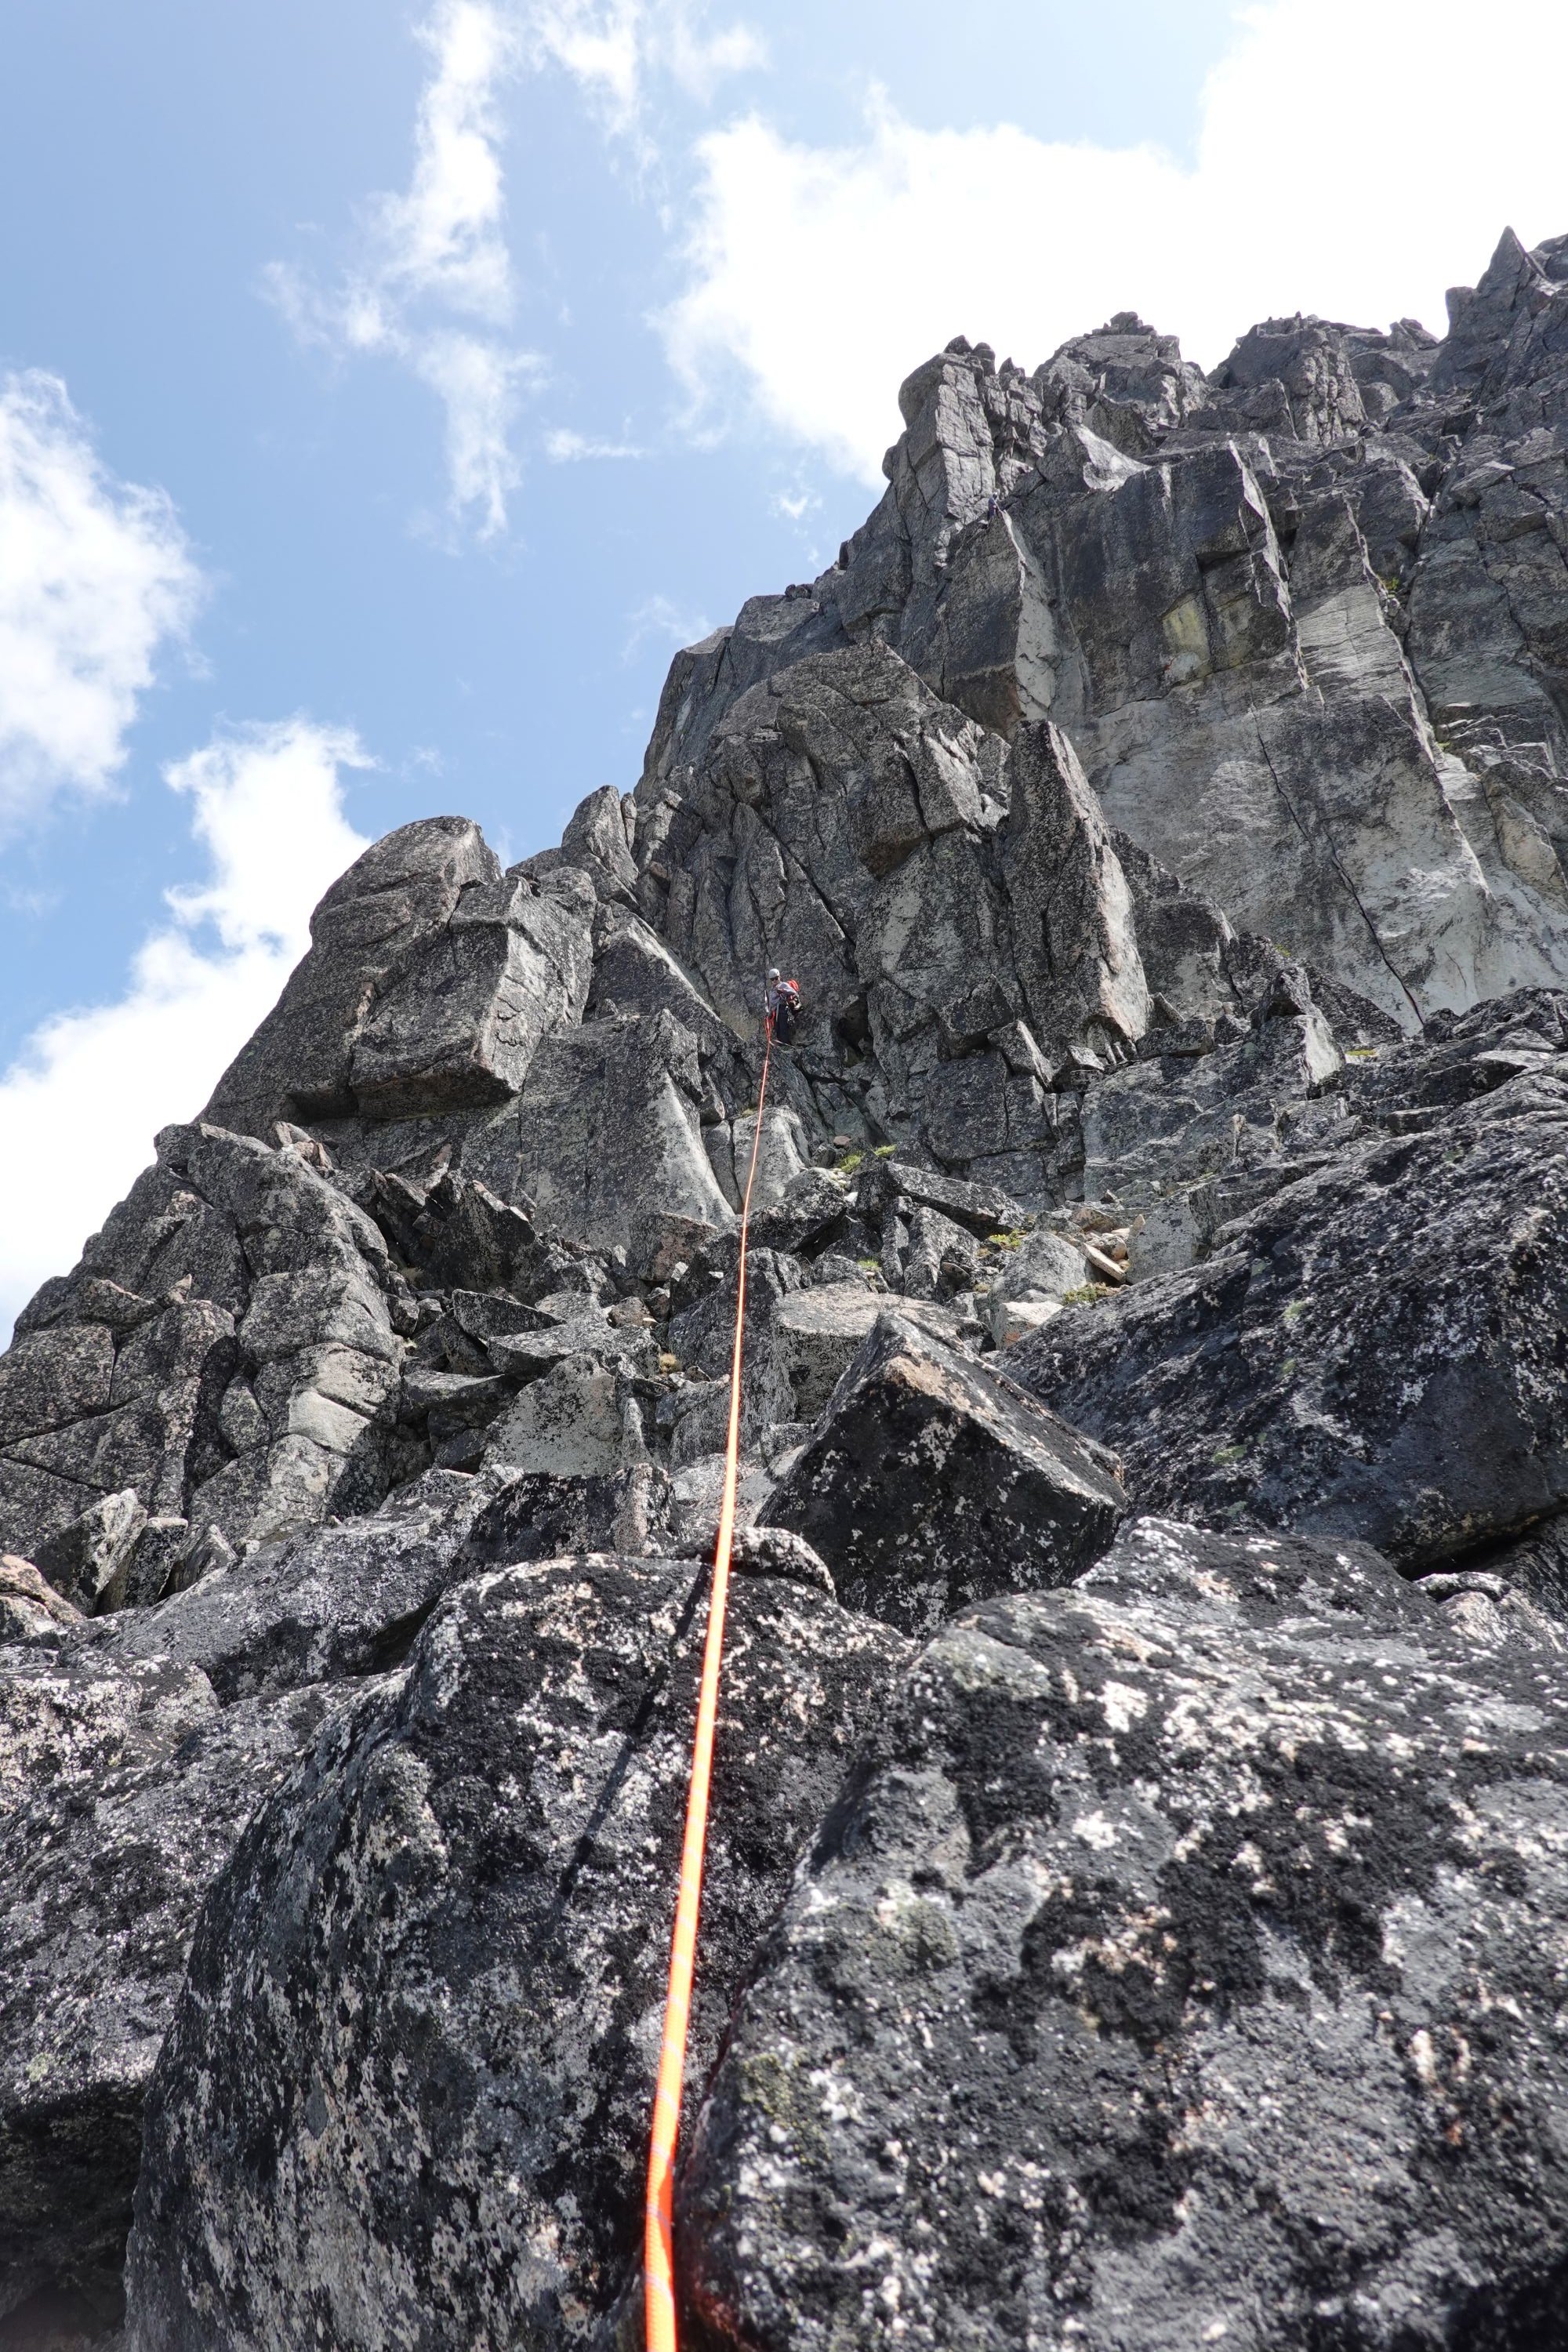
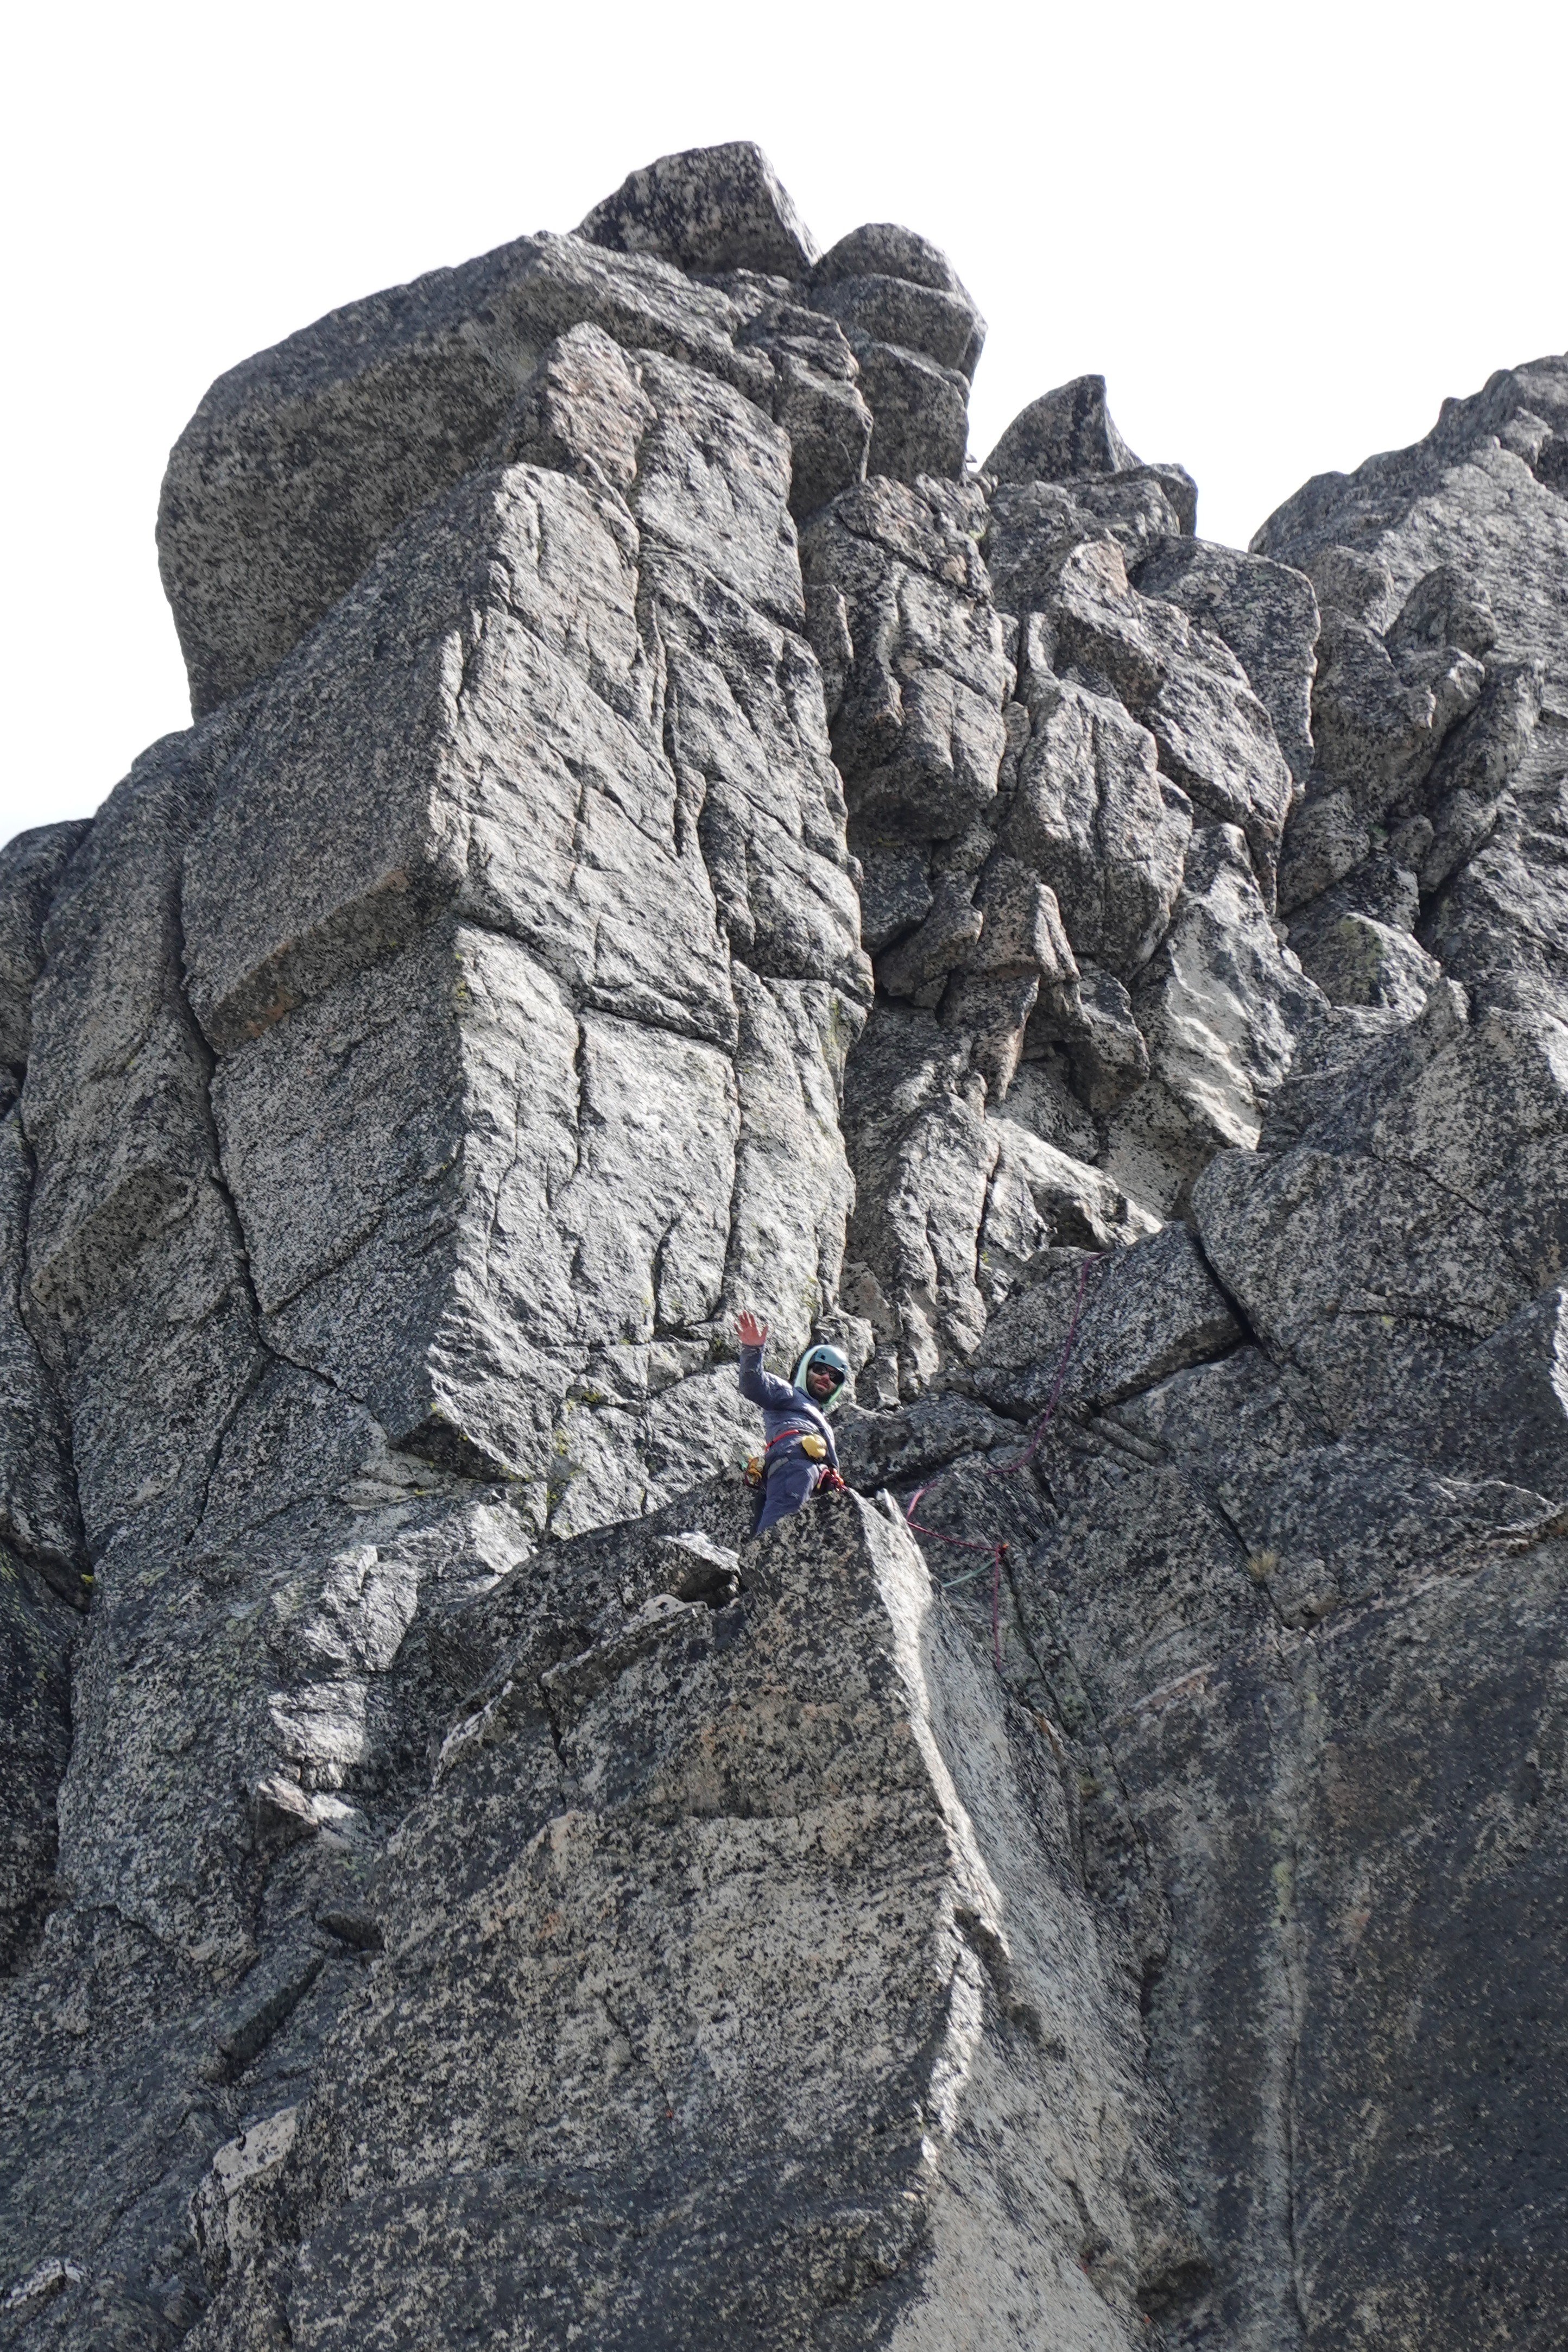
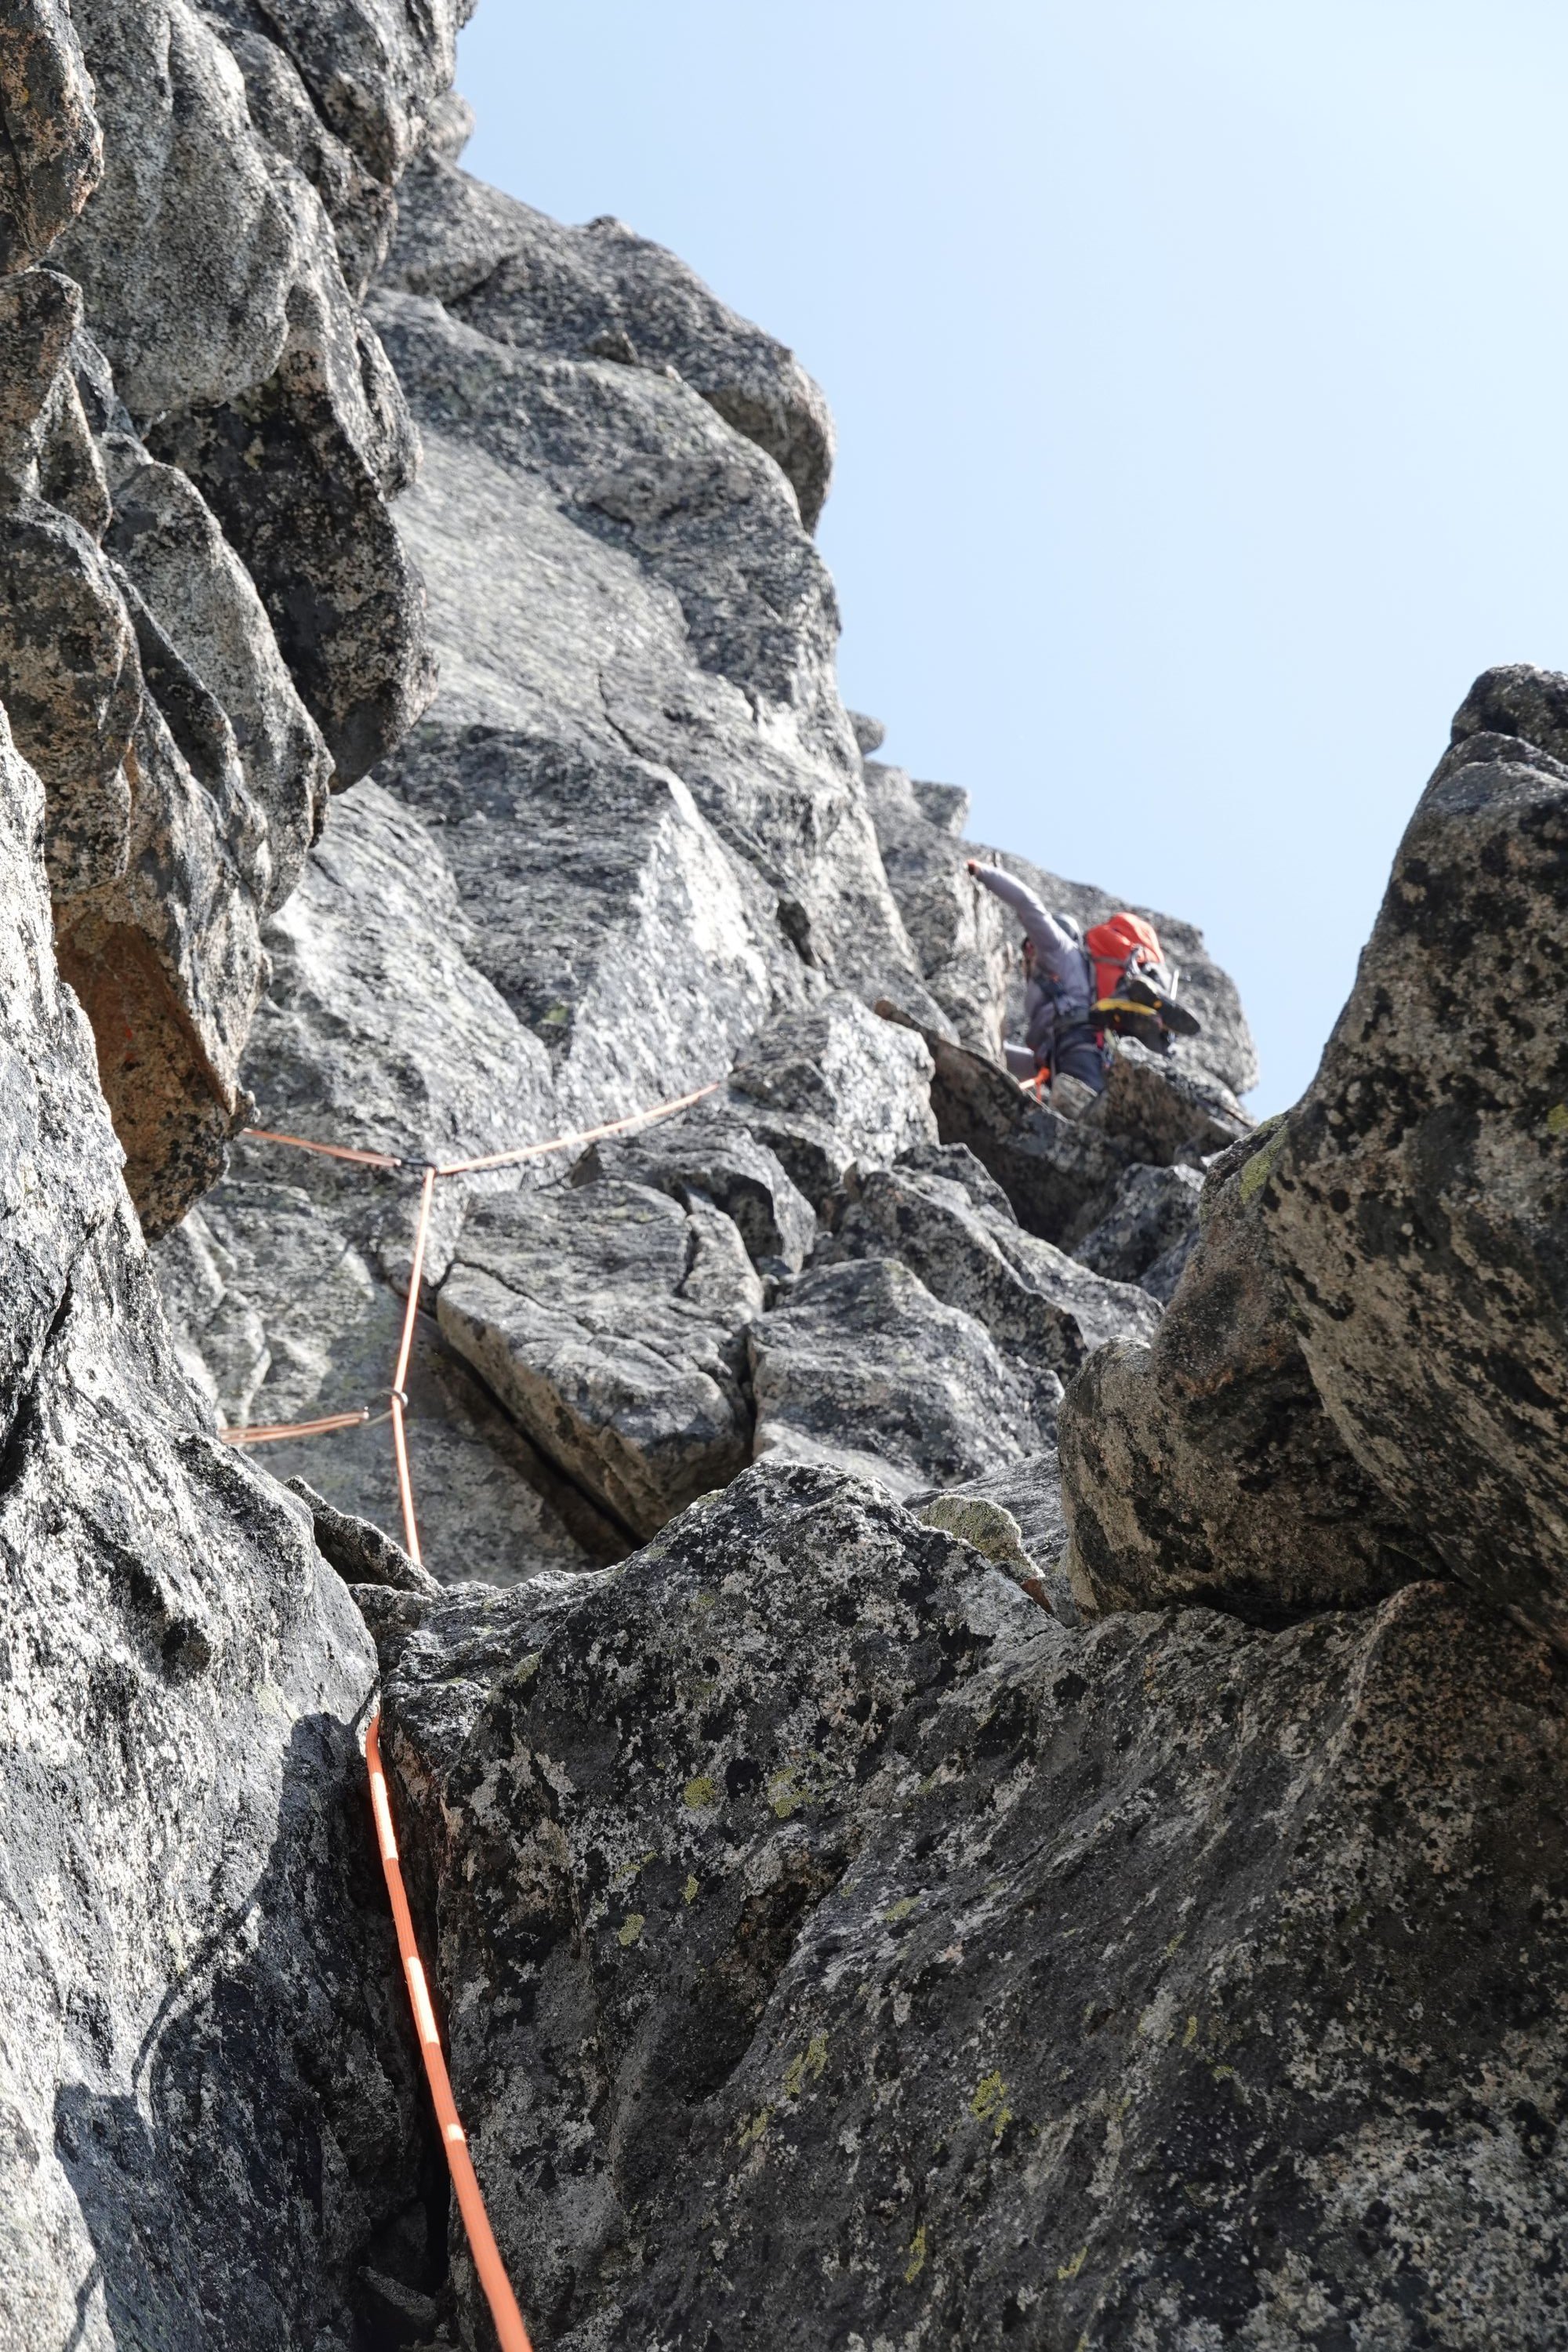
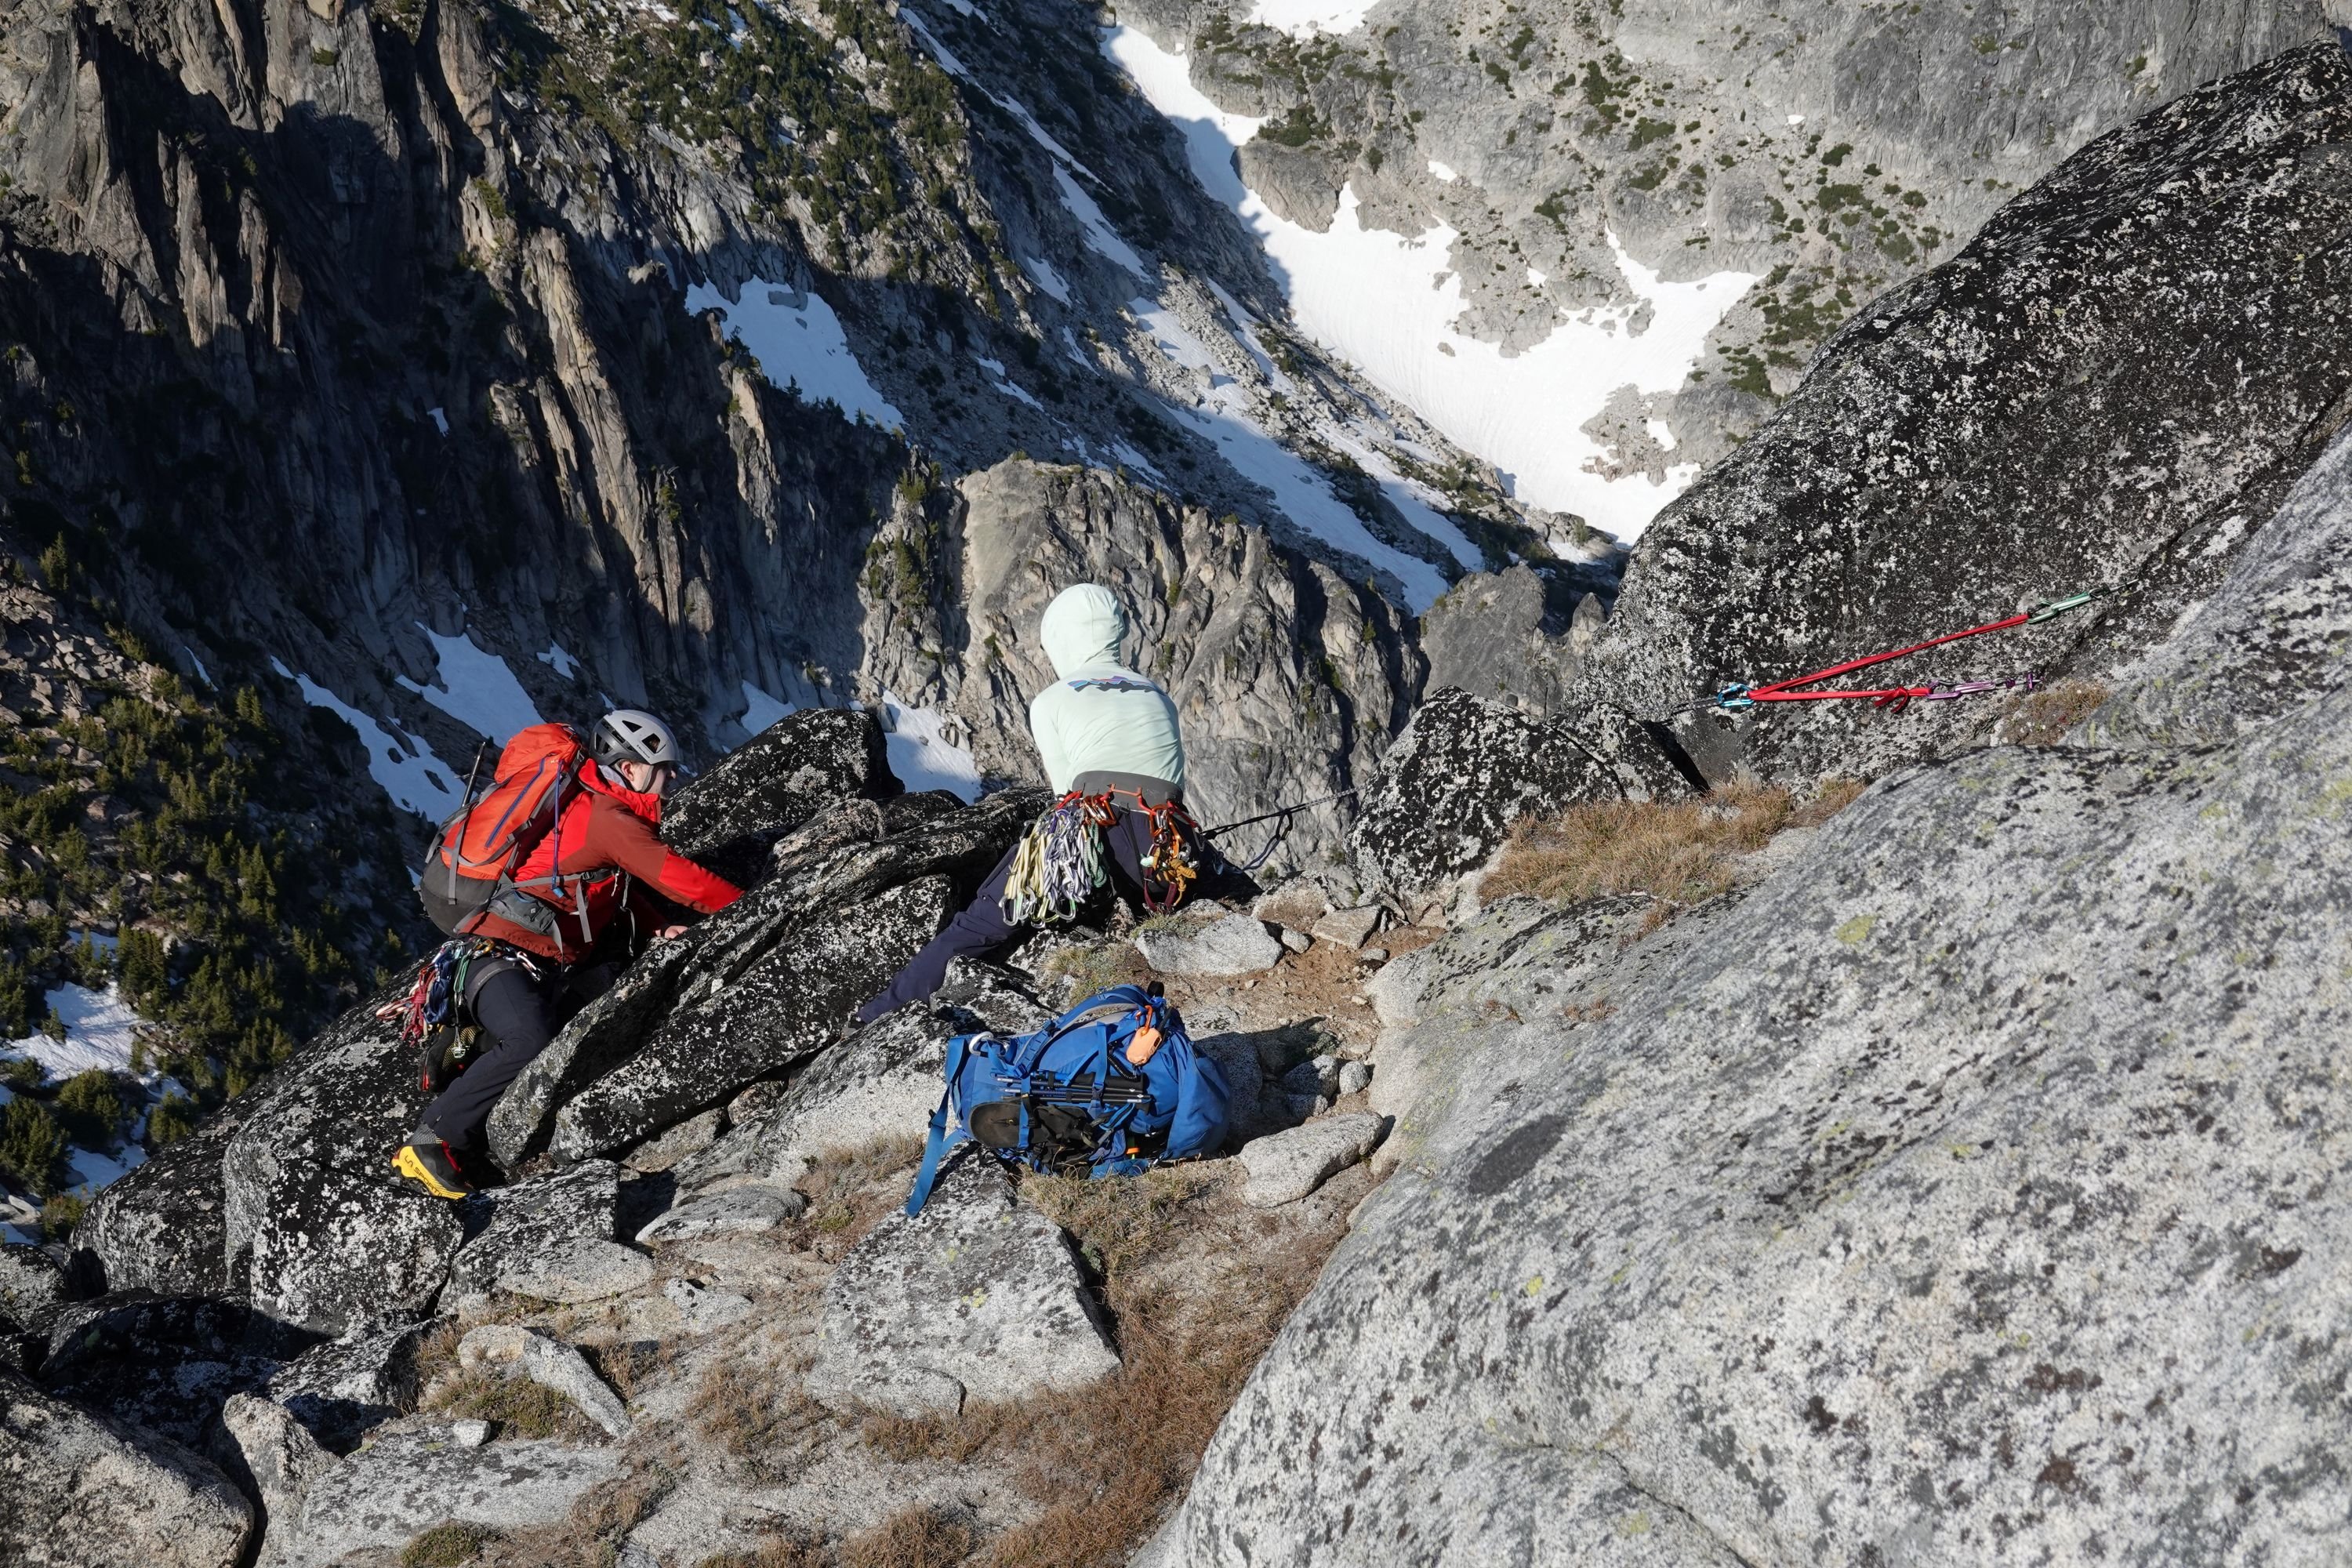
Trip: Forbidden Peak - North Ridge Trip Date: 07/12/2025 Trip Report: Spent the weekend climbing the North Ridge of Forbidden Peak (a climb so remote you have to climb over another ridge just to get to it) with a team of 4! It was a full value Alpine climb that doesn’t go too hard at any individual point, but requires the full suite of mountaineering skill sets, and is jam packed with them. This comes out as one of my all time favorite climbs, but had a bittersweet ending due to coming back to the trailhead at 1:30AM only to find two of my car windows smashed, and our happy bags stolen. Rough end to a 21 hour day climbing. GPS tracks here Our timeline was roughly: -7:45AM departure from trailhead -12:00PM Base of the gulley to go up Sharkfin Ridge -1:30PM over the ridge, and rope up for crossing Boston Glacier -3:45PM on the North Ridge -6:15PM stopped at bivy site -5:15AM Sunday started climbing -3:00PM Both parties summited, starting descent -7:00PM Arrived at the Notch of West Ridge Coulier -9:15PM Finished rappelling down the WRC -10:40PM Past the last major creek crossing and back on the main trail -1:30AM back to cars The approach was straightforward up through the Boston Basin. The creek crossings were reasonably low in the morning. As we got up to the start of the snowfield we caught sight of the gulley we were aiming for to get over sharkfin ridge. We briefly lost sight of the gulley we were aiming for as the cloud cover dropped, but thankfully we already had a general sense of where we needed to go before that happened. The gulley up to the notch we needed was thankfully still fully snow covered, but was quite thin in sections, and will probably start melting out soon (the exposed sections we saw in the gulley had very unconsolidated dirt and rock, and I’m glad we didn’t have to climb it). We did a double rope rappel down into and out of the bergschrund onto the Boston glacier (there was a 2nd rappel station for single rope rappels). We then roped up as a team of 4 to cross the Boston Glacier. Crevasses are definitely opening up on the glacier, but we didn’t have any major issues moving around them. Reading up on beta, there are two primary entrance points to get onto the North Ridge, and we chose the first and steeper option. This seemed to be the right call as we had minimal issue transferring from the snow onto the rock, and talking with another team heading out to do the NW Face who took the other option, they didn’t have kind things to say; it sounded like the other entrance point was sketchily wet and hard to protect when getting on the rock. After a scramble up to the ridge proper, we got our first sight of the full climb! Ryan C on Peakbagger very graciously marked bivy sites on the North Ridge. We stopped at the 2nd to last bivy site on the ridge. Our timeline was going well enough that we decided to start the climb and see how far we could get before dinner. We ended up simul’ing up to the first snowfield, where we opted to stop for the night. The snowfield was nice as we were able to melt some snow on the ridge for the next day. There was no running water between Boston Basin and the end of the rappels down the West Ridge. Sunday morning we got up and did the rest of the climbing, mostly simul climbing. Most of the ridge was 5th class fun with ~4 sections of 5.5-5.6 climbing (a fun challenge with mountaineering boots and a carry over pack, but still manageable), and longer stretches of class 3 scrambling on the flatter sections. Almost all of the climbing stayed close to the ridge, but there were a couple notable spots you had to get off the ridge slightly to stay in the low/mid class 5 climbing. We could have been a couple hours faster on this section, but a combination of a traffic jam right before the summit + one of our rope teams getting off route, and having to deal with some spicier sections pushed our summit time back a bit. Snowfield crossing on the ridge Summit traffic jam View close to summit looking back down on the North Ridge I found the crux of the climb to be the descent (via the west ridge), possibly the hardest mountain I’ve had to get off of. I think a major portion of the challenge was descending a 5th class route other than the one we went up. We made the mistake of trying to rappel right off the summit (should have downclimbed the section), and ran into some shenanigans. Once we were done with that, we did 3 more rappels down the face, traversed back left to the ridge, and did 1.5 pitches of downclimbing on the ridge to get down to the notch of the West Ridge Coulier. There were plenty of rappel stations down the gulley, almost too many (it made it challenging to find the right one). We found a big one that seemed to have more tat then the others, and rappeled off it4-5 single rappels later, plus a final double rappel, and we hit the snowfield below! We finished the rappels right at sunset, and had to break out our headlamps as we finished the snowfield and started hitting the slab. Getting down the slab sections almost became a serious navigational issue in the dark, as we couldn’t easily tell where the slab bands cliffed out, and it was very easy to slip on sections. Thankfully, with some aid from GPS racks we had, we were able to trend down and right until we found a weakness in the rock face that allowed us to go down and left below the cliff bands. We found a trail leading back to Boston Basin that faded in and out. Then with the aid of GPS tracks + plus another team that rappelled down just after us, we managed to find crossings through the two fastest flowing creeks. And the rest of the way down was just a normal slog to the trailhead. We got back to the trailhead around 1:30AM, only to find two of my car windows smashed open, and our happy bags stolen): Thankfully most of our valuables were locked away, but the loss of our happy bags were devastating after a 21 hour day climbing. And when it rains, it apparently pours, because about 1 hour into our drive back my car’s low tire pressure light came on. Turns out I managed to puncture the sidewall of my back right tire. Best guess is that it was from a rock on the turnout I parked my car on. Thankfully I had an air pump stowed just for this (and it wasn’t stolen!). It took three stops to refill my tire, but we were able to limp home on it so that I could deal with it later. All in all, one of my all time favorite Alpines, but a very expensive weekend for my car! Gear Notes: 60m rope, mountaineering boots, stove for dinner and melting water on the ridge Approach Notes: See GPS tracks above
-
[TR] Argonaut Peak - NW Arete 06/14/2025
Christopher Fisher replied to Christopher Fisher's topic in Alpine Lakes
I sadly did not take any photos of that area. Closest I got was the last pic on my post (showing the first anchor). The background of that image was the pass heading up to Colchuck/Dragontail -
[TR] Argonaut Peak - NW Arete 06/14/2025
Christopher Fisher replied to Christopher Fisher's topic in Alpine Lakes
I enjoyed it quite a bit! 5 long pitches of 5.6/5.7 climbing, not sustained, but some good variety. Great views on the way up too -
[TR] Argonaut Peak - NW Arete 06/14/2025
Christopher Fisher replied to Christopher Fisher's topic in Alpine Lakes
Thanks! The traverse over to Colchuck Glacier wasn't too bad. The only challenges were dealing with the continuous rock/snow transitions as the snow had firmed up quite a bit since we didn't wrap up the rappels until close to sunset (and we didn't feel like putting on crampons until we hit the constant snow higher up), and the unfortunate uphill to get up to the pass between Colchuck and Dragontail. But that stuff was just your typical slog after dealing with the technical climb/rappels on Argonaut (we decided it better than going back through the trees/slide alder in the dark though). -
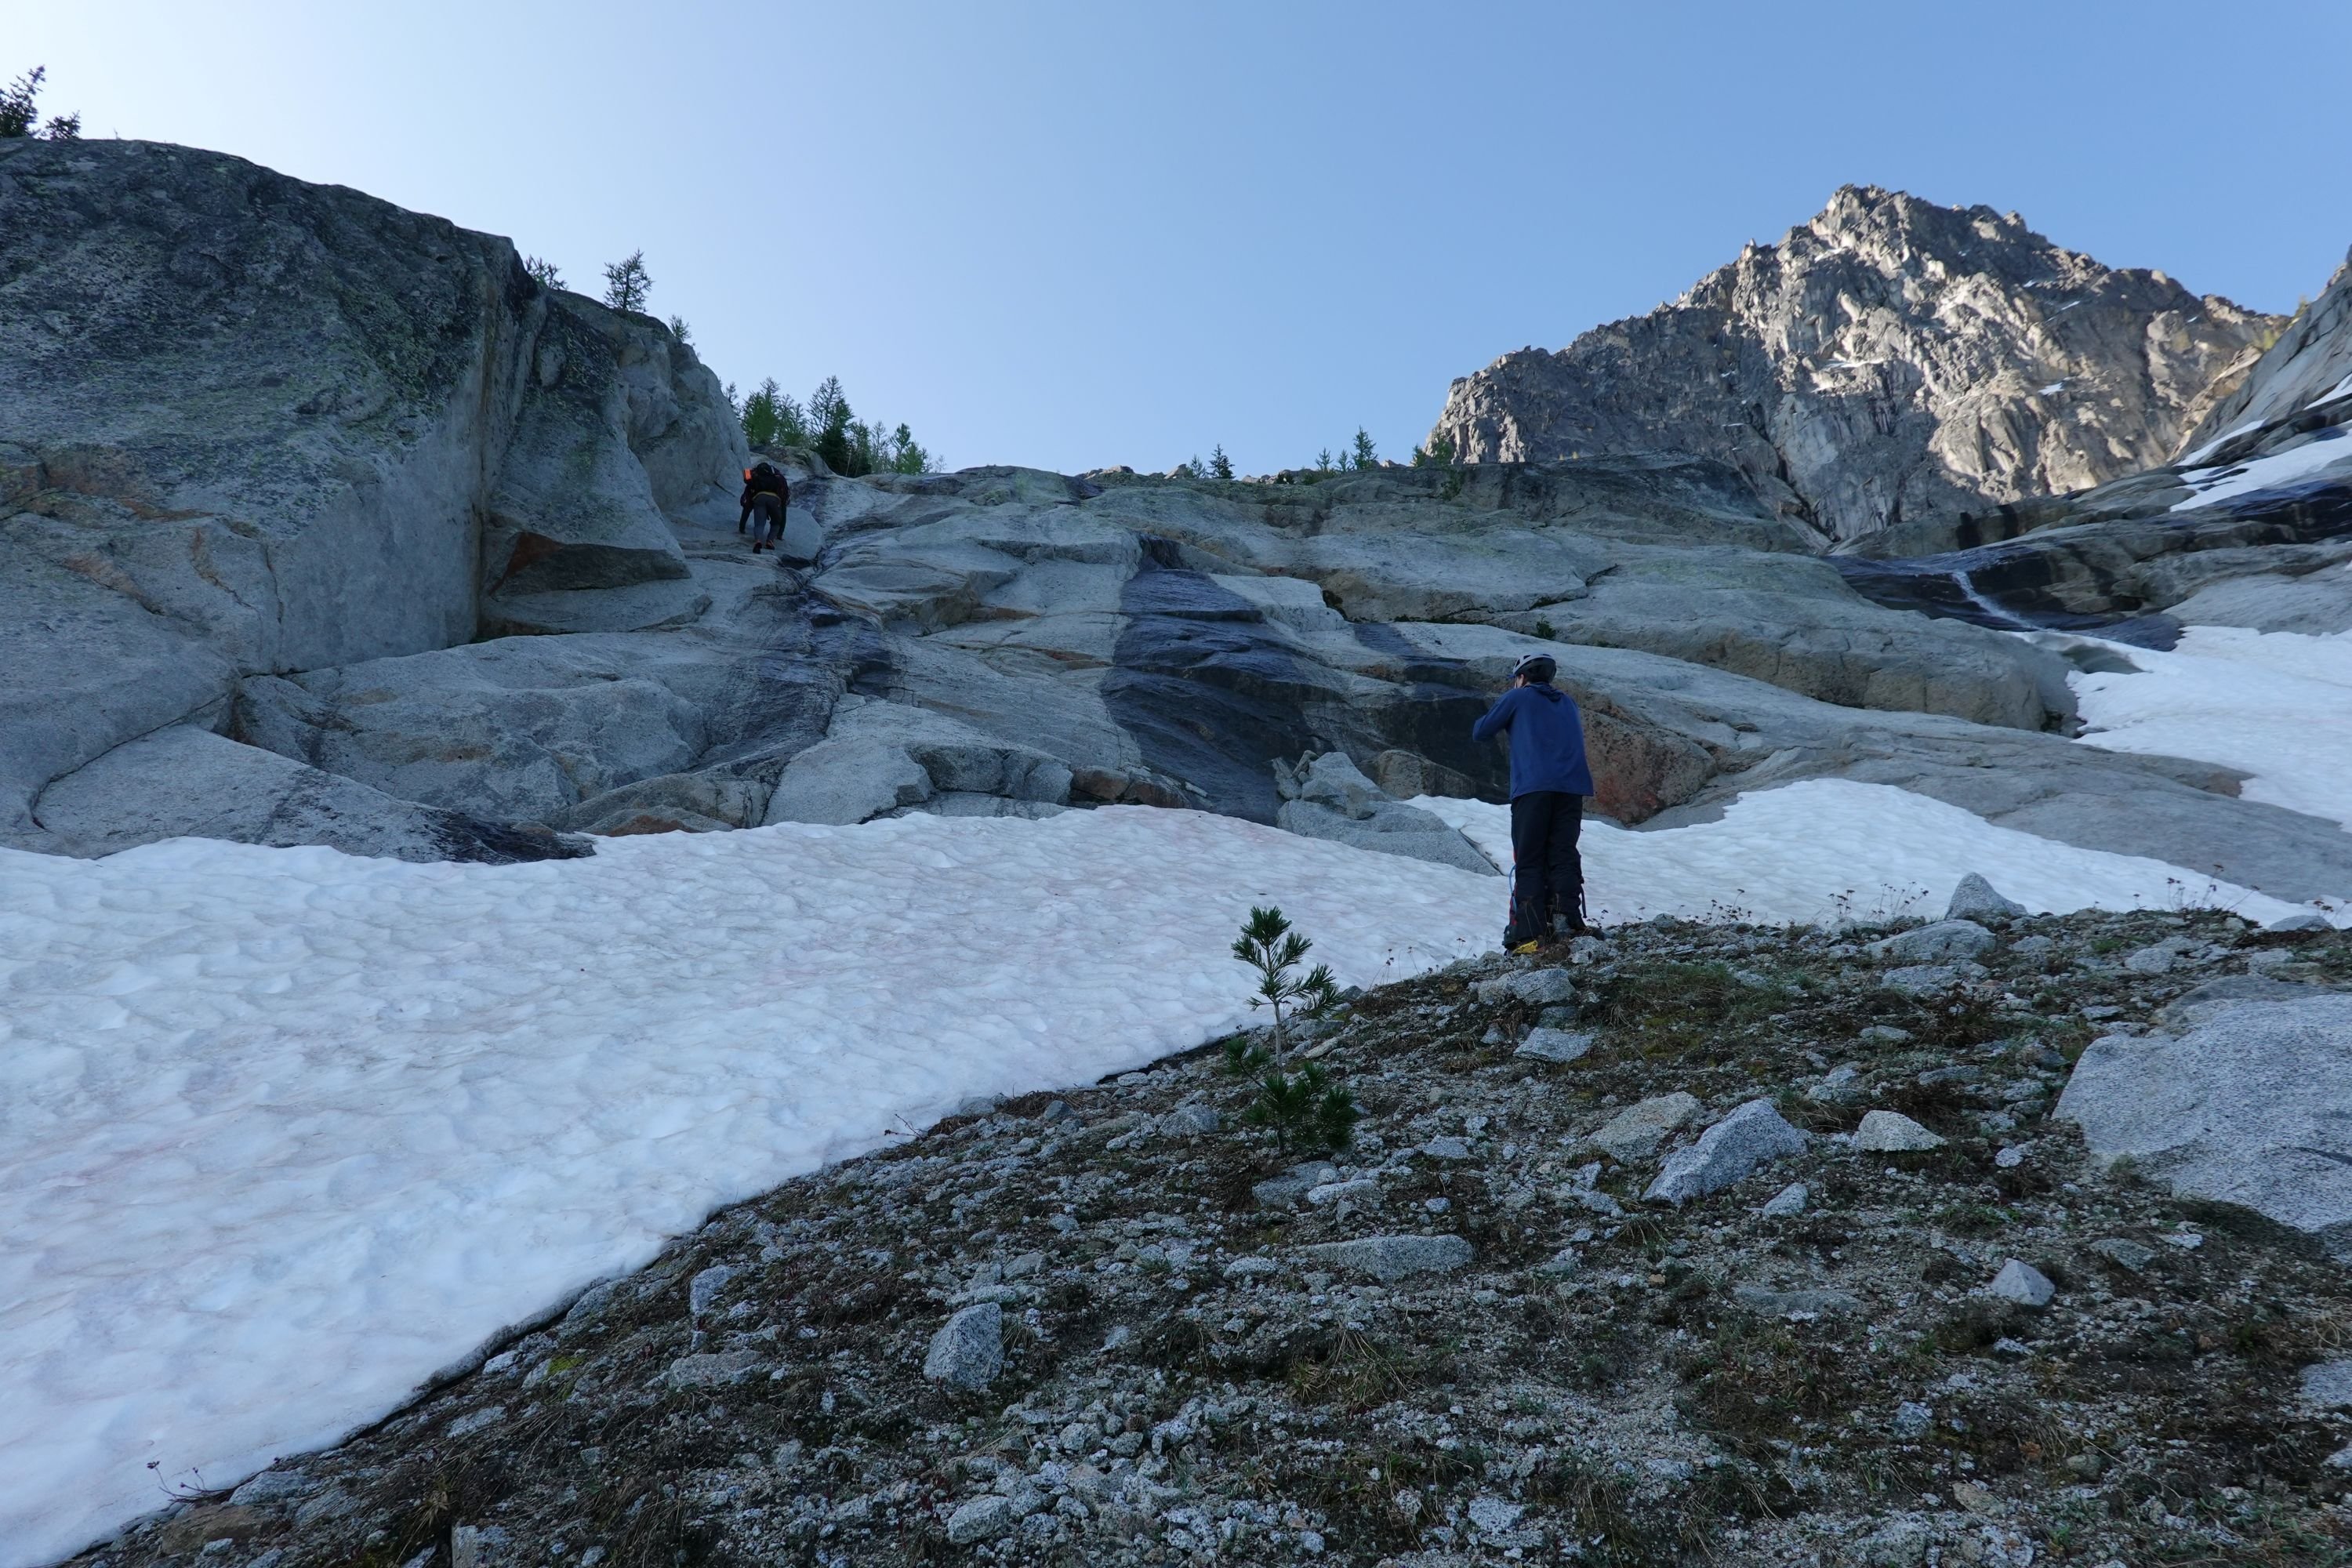
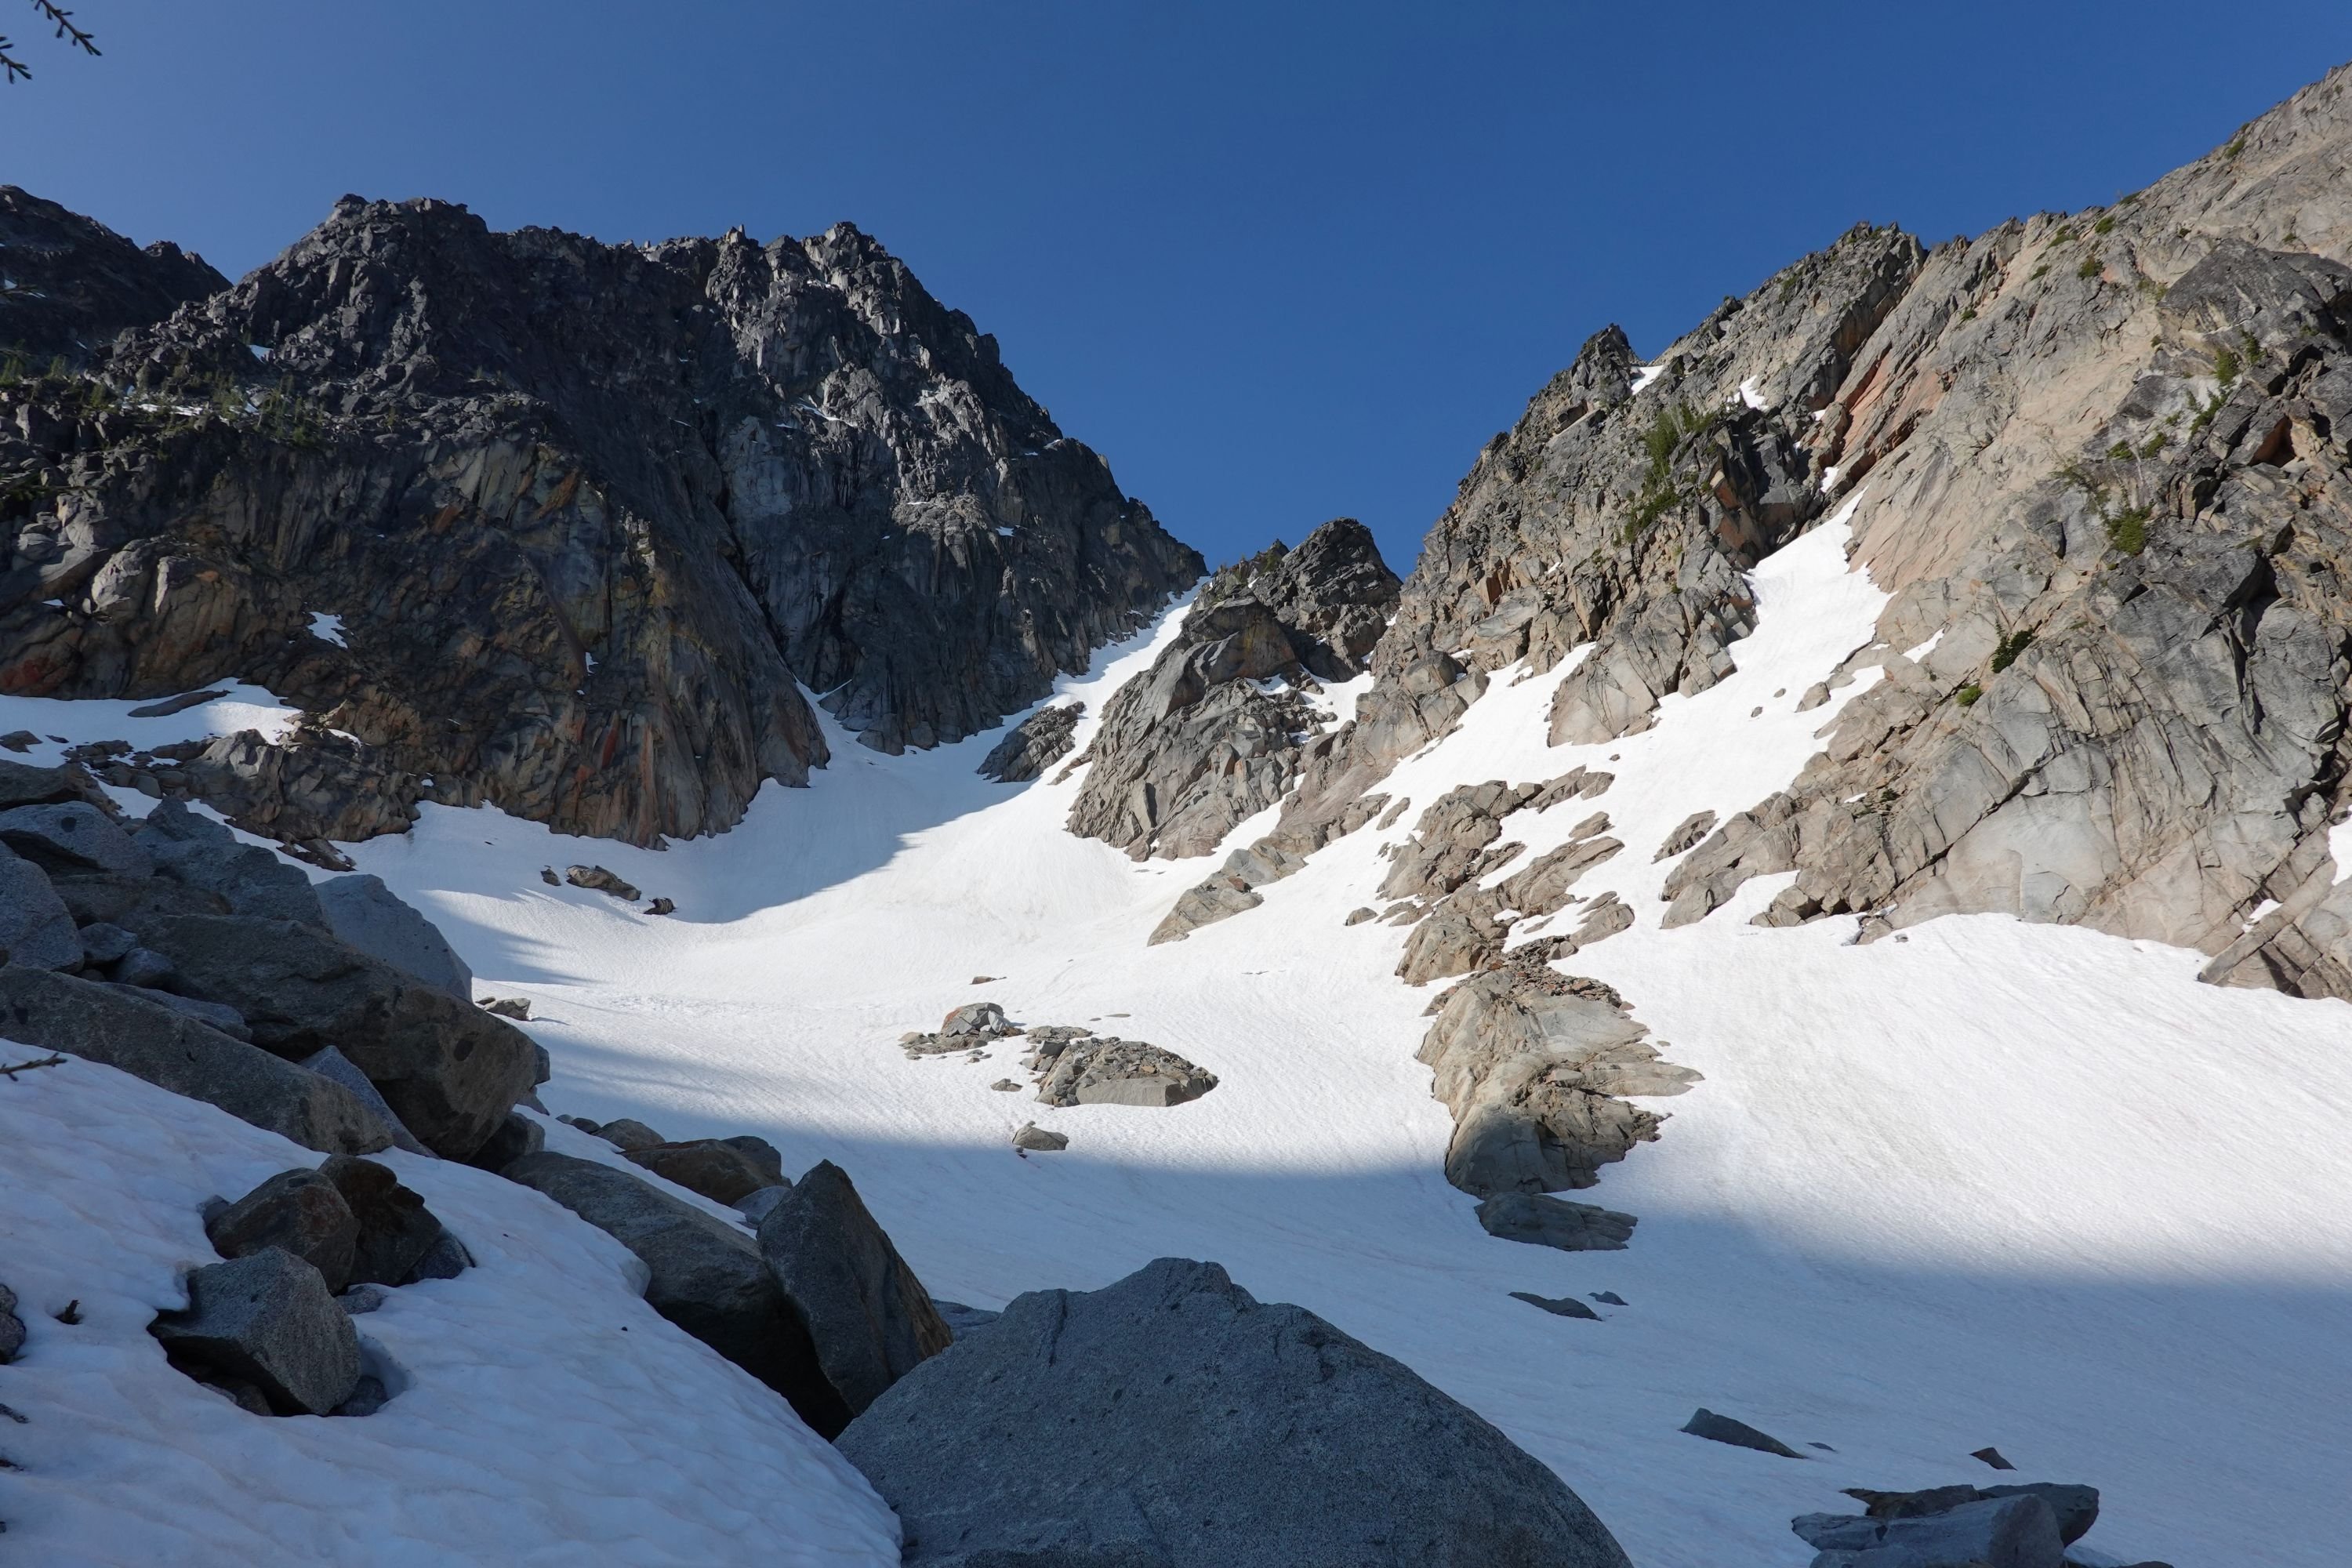
Trip: Argonaut Peak - NW Arete Trip Date: 06/14/2025 Trip Report: Climbed the NW Arete of Argonaut over the weekend with a party of 4! Haven’t seen any trip reports yet this year, so here is a relatively brief one outlining conditions. Our plan to split the climb into a Friday evening approach + Saturday climb did not quite go as planned, and ended up becoming my longest summit day yet at 21 hours… But we got the summit! Our timeline was roughly as follows Friday: 6:45 PM - Departure from trailhead 8:15 PM - Start of climbers trail 11:30 PM - Finally broke out of the treeline 12:30 PM - Bivy Saturday: 6:15 AM Start 7:20 AM - Slab crossing 9:40 AM - Top of notch 5:00 PM - Summit 8:50 PM - Bottom of rappels 11:50 PM - Back to main trail on Colchuck Lake 3:00 AM - Back to trailhead Notes on the route: -Navigating the off trail portion out of the treeline is nontrivial. We lost a lot of time trying to do this by headlamp, as we weren’t able to see the most efficient route out of the trees/slide alder. -For navigating the slab before the snow climb, we had one person solo it, then build an anchor and drop a rope for the rest of us. -I believe the snow finger going up to the notch where the climb starts usually defines if the route is still in. There was still a reasonable snow finger for us to climb up. -There’s a topo and route description floating around that describes the route in 5 long pitches, which we found generally as advertised. - We got off the summit in two double rope rappels. I hadn’t seen this mentioned in other trip reports, but the first rappel was the sketchiest rappel station I’ve ever used. It’s just a mid sized detached rock with webbing wrapped around its contact point with the ground. We backed this up with a gear anchor for everyone but the last to rappel. -Most of our trip after this was by headlamp. Thankfully I had been out there two weekends ago for Colchuck Peak, and was able to help plot a reasonably efficient path down Colchuck glacier and the boulder field in the dark. We dipped left into the moraine, then skirted the left side of the boulder field down until the lake. -The rest after this was an eventful if slow hike back to the trailhead due to navigating by headlamp + the fatigue starting to set in. Long day, but a fun climb! Has about all you can ask for in an alpine climb (could maybe do without the slide alder though lol) Route overview, including the bivy sites I saw on route Slab crossing Current snow finger conditions Top of pitch 3 Top of pitch 4/start of pitch 5. If using the topo map, I believe this station is actually ~10 meters earlier than recommended, and we needed to simul ~10 feet so that my partner could build an anchor at the actual end of pitch 5. Climber crossing the flakes on pitch 5 Backing up the sketchy first rappel station Gear Notes: Full rack. Not all was needed for the climb, but was helpful in completing the climb in 5 long pitches Approach Notes: see report above

-
Happy to share the beta! Especially for a route as popular as Ragged Edge that got a new potential crux at a higher grade than it was previously.
-
Trip: Vesper Peak - Ragged Edge - Rockfall Beta - Ragged Edge Trip Date: 10/12/2024 Trip Report: TLDR: Recent rockfall on Ragged Edge has made the climb even more ragged. Summary at bottom. I followed Ragged Edge on Vesper Peak last year, and I decided to wrap up my alpine season this year with a victory lap leading Ragged Edge on 10/12 to celebrate my hard earned leading skills. Reading up on the beta, I discovered that sometime last month (first mention I saw of it was Sep 17th), rock fall at the pitch 4 anchor modified the route. Beta on how the new route is still minimal (best report I found on Cascade Climbers here), but what I found implied the route was still climbable. So I decided to go check it out and try to write up a more detailed report on what changed. I don’t imagine too many more attempts will be made on Ragged Edge on Vesper Peak this year, so this is more of a heads up to next year. This is my best guess of the rockfall that occurred (picture taken from a screenshot of this video) Having climbed it, and because the new route has now been gardened a bit, I did not think that the difficulty of pitch 4 has been impacted (I would say that 5.7 is still reasonable). The main difference is that you now have to do face climbing to get to the anchor. Protection opportunities were limited, but still there. ***Beta Ahead*** There is a thin crack vertical system where I managed to put a size 3 or 4 nut. Above that, there was a small crack that you could probably place a .75 cam (I didn’t place because I put my foot there), and higher up, I was able to get a sub par .5 cam in (crack wasn’t very deep to get great teeth engagement). See pic below for my nut and cam placement.***Beta Done*** Top is pre-rockfall (screenshot from here), bottom is current I did not see any obvious signs of damage to the pitch 4 anchor (I don’t think the rock that fell was ever directly connected to the wall the anchor was on). And the only impact I saw to Pitch 5 was the first move to get onto it. I really struggled with finding a remotely ergonomic position to belay from. Here is a pic of me belaying, and I recommend flipping positions from what I did to the position shown in the post I referenced above, because the way I was positioned resulted in the rope going over my leg while belaying. The start of Pitch 5 is what I would call the new crux of the route, though difficulty will be quite dependent on your height and arm span. To add to the difficulty, a fall at the start will drop you over the edge. At about 6’, my partner made it look pretty easy to make the transfer over. At 5’7”, the move was close to my full arm span, and I thought the transfer quite challenging. I’d personally put that single move at 5.9. A recommendation to the leader, is after making the transfer over, to place the first piece as high as possible in the first crack system, so as to reduce the risk of follower going over the edge if they fall on the first move. ***Beta Ahead*** This is roughly what I did to transfer over to pitch 5. Just up and to the right of the anchor there is a vertical edge for your left hand, then there is a very small divot in the wall roughly halfway across that you can put your right foot. From here, I was able to reach over and grab the right side (another vertical edge). Then with my arms near full span on the holds, I swapped to my left foot on the divot, then (it gets a little hazy), I took my left hand off the hold, and with most of my weight on that left divot, very carefully moved my left hand and right foot over to the crack system and pulled myself up onto a nice step on the side of the crack system. ***Beta Done*** Left is new route, right is old Due to how popular this climb is, I think there are a few adjustments that could be made to keep the route at about the same grade. To start, moving the pitch 4 anchor up 3-4 feet would make belaying much more comfortable. Also, because of how committing the move to the start of pitch 5 is now (if you fall before placing a piece, you’re going over the edge), I think it also makes sense to add a high bolt between the pitch 4 anchor and the crack system at the start of pitch 5. This would help reduce the risk of you going over the edge if you fall on the first move, and could also be potentially used to “aid” the first move if you don’t have the arm span to make that transfer. This way the climb won’t have a new crux that is potentially significantly harder than the rest of the climb. I would also keep an eye on the remaining stacked blocks that are on the route of Pitch 4. They did not appear to be connected to the section that broke off, but they did appear to take a glancing blow on the side when the rocks fell. I did not see any obvious signs of rock shifting, but it was definitely a little unnerving climbing that section, knowing that another section just above it broke off the wall. Summary: -Rock fall modified the end of Pitch 4, but not in a way that I thought changed the grade at 5.7 -I did not see any obvious damage to the pitch 4 anchor -Only the first move of Pitch 5 has been impacted, and depending on your height and arm span, might be the new crux of the climb. At 5’7”, I thought the transfer quite challenging at 5.9 (or maybe a touch higher). -Current belay at the pitch 4 anchor is quite awkward. Adding an anchor 3 feet up would make it much more comfortable. -Because of how committing the move to the start of pitch 5 is now (if you fall before placing a piece, you’re going over the edge), I think it also makes sense to add a high bolt between the pitch 4 anchor and the crack system at the start of pitch 5. -I would keep an eye on the remaining stacked blocks that are on the route of Pitch 4, to make sure they don’t start shifting too. A few good links showing the rock section that fell: Old Pitch 4 belay stance: https://youtu.be/v7txavGSxUY?t=223 Old start of Pitch 5: https://youtu.be/3LhEzi3i8go?t=170 Old start of Pitch 5 (with a 360 camera): https://youtu.be/RIifPYskm-Q?t=58 Looking down at the Pitch 4 anchor: https://youtu.be/twQmCoWF_dA Drone footage of the face (will need to pause, and possibly go frame by frame to a view of the side): https://www.youtube.com/watch?v=vOYiEt3aCFA&t=29s Gear Notes: Unchanged, except maybe also bring a small nut in the 4/5 size range for the new end of pitch 4. Approach Notes: Unchanged


-
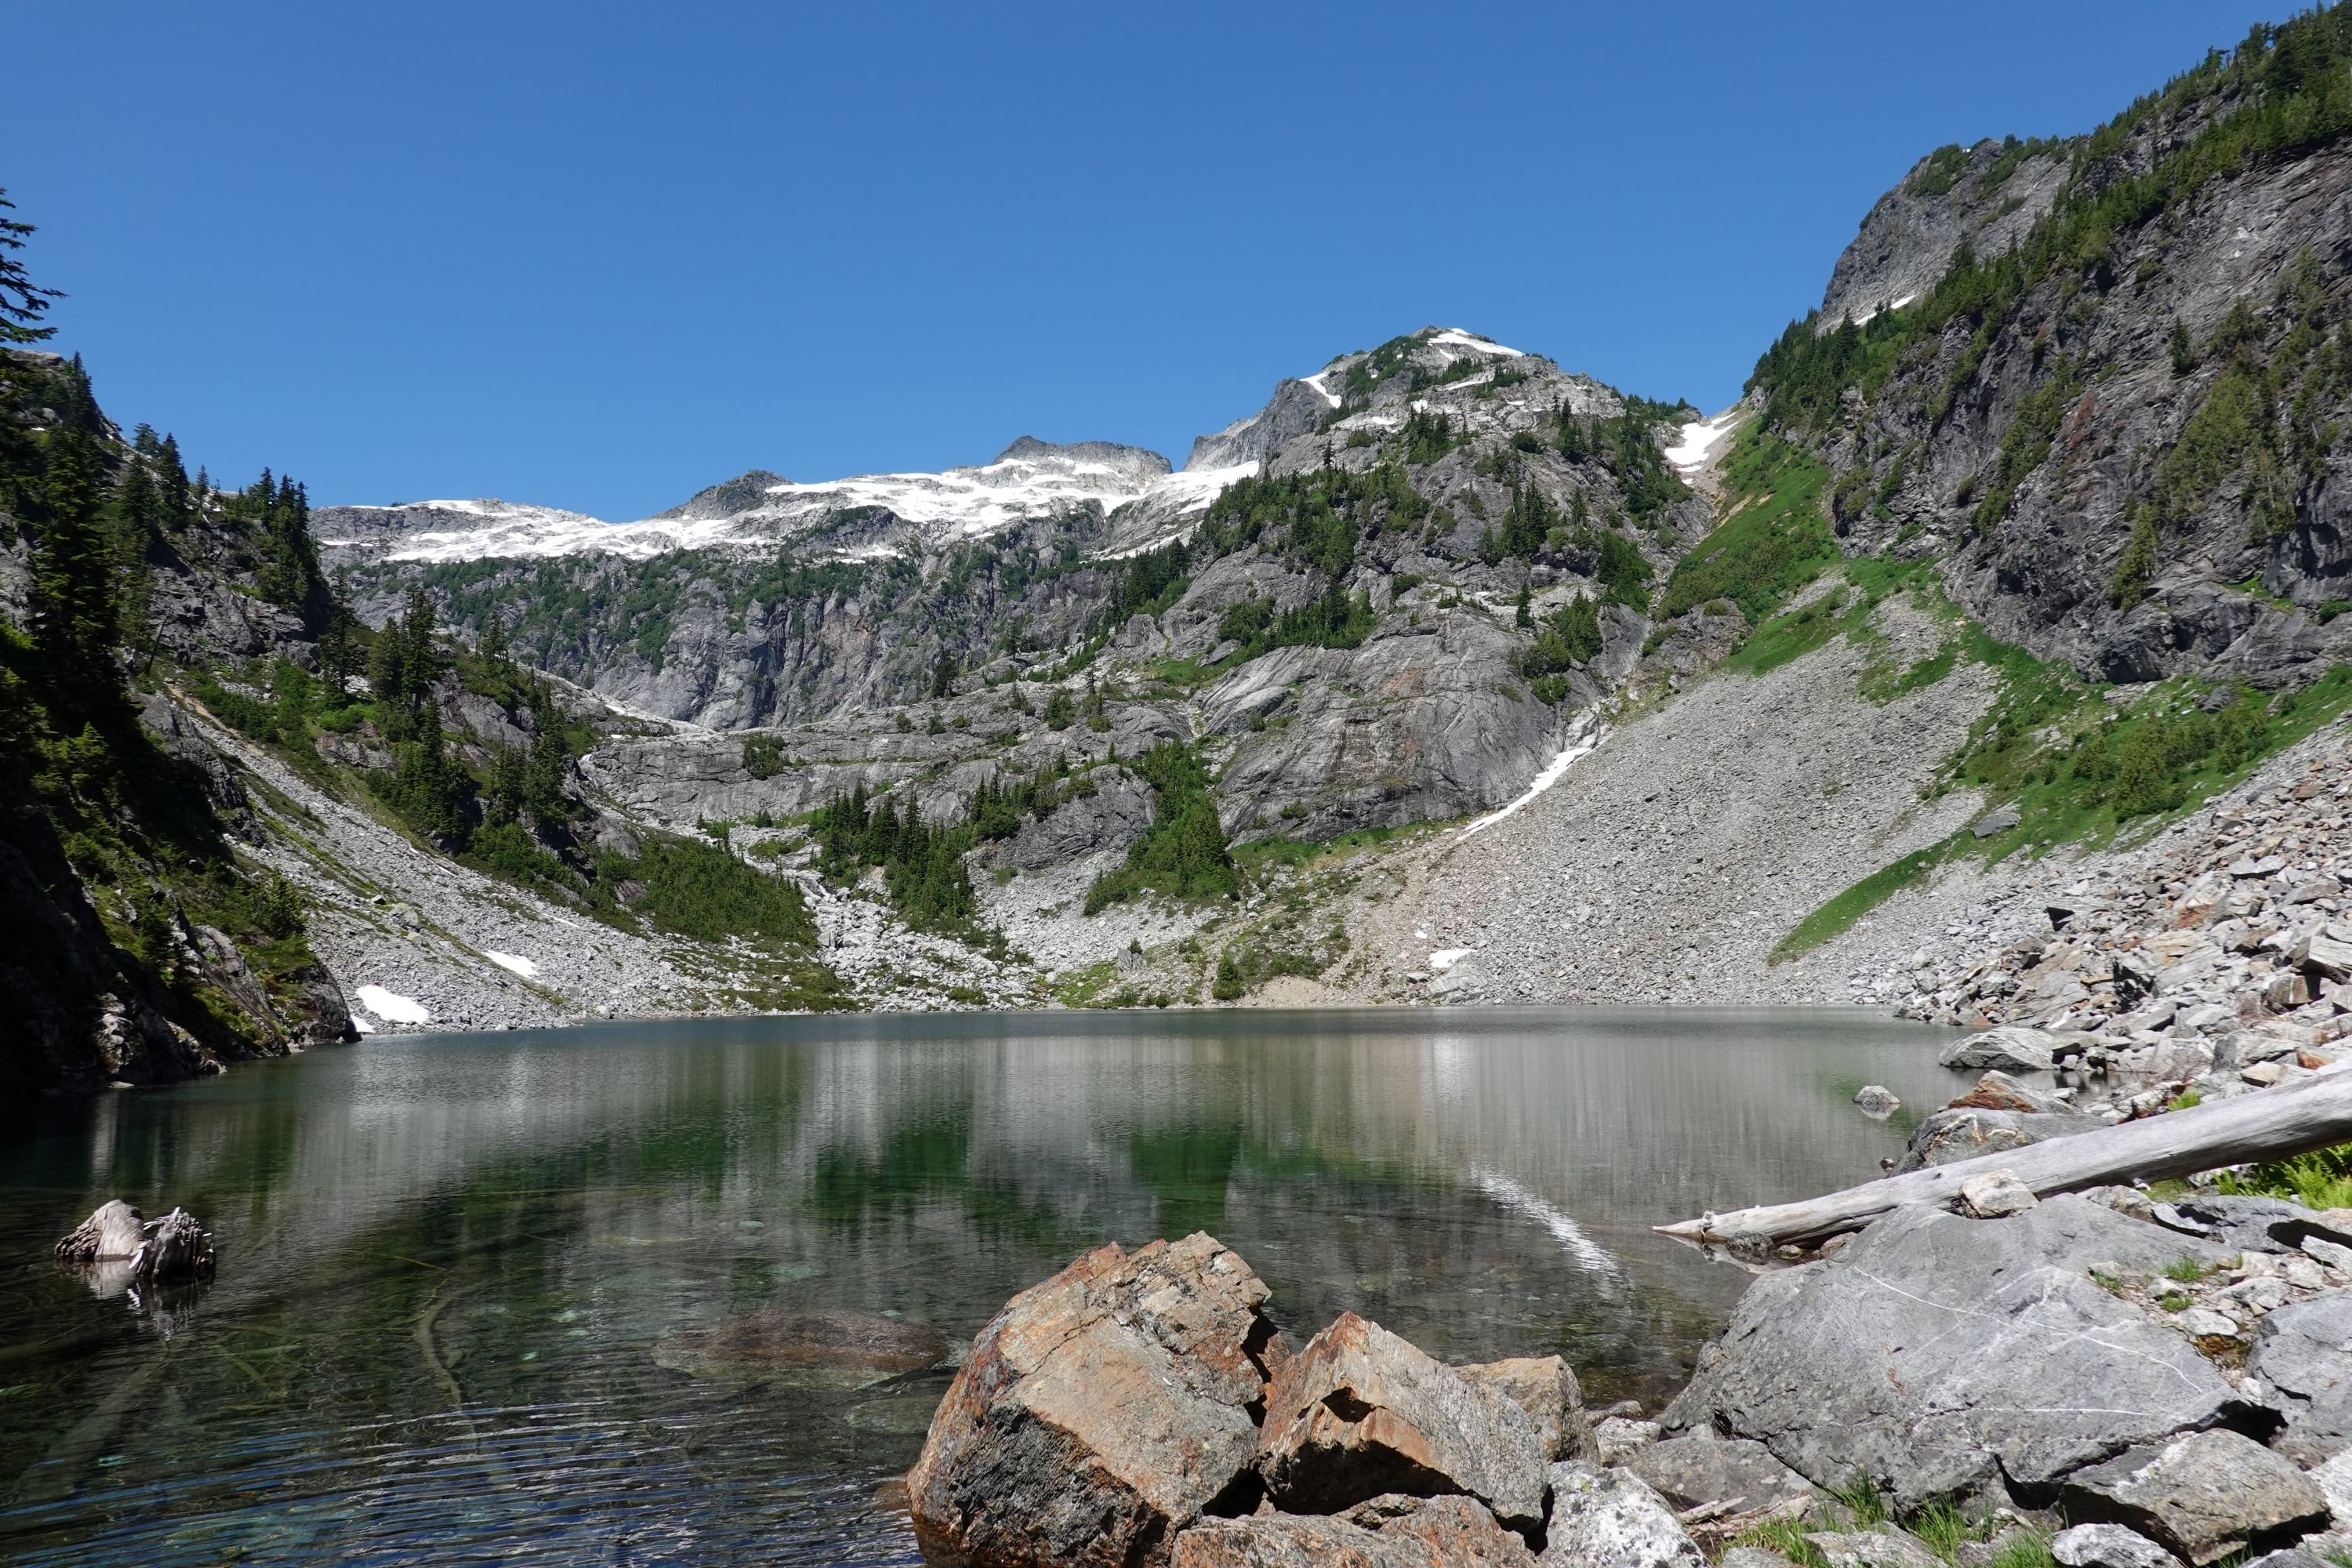
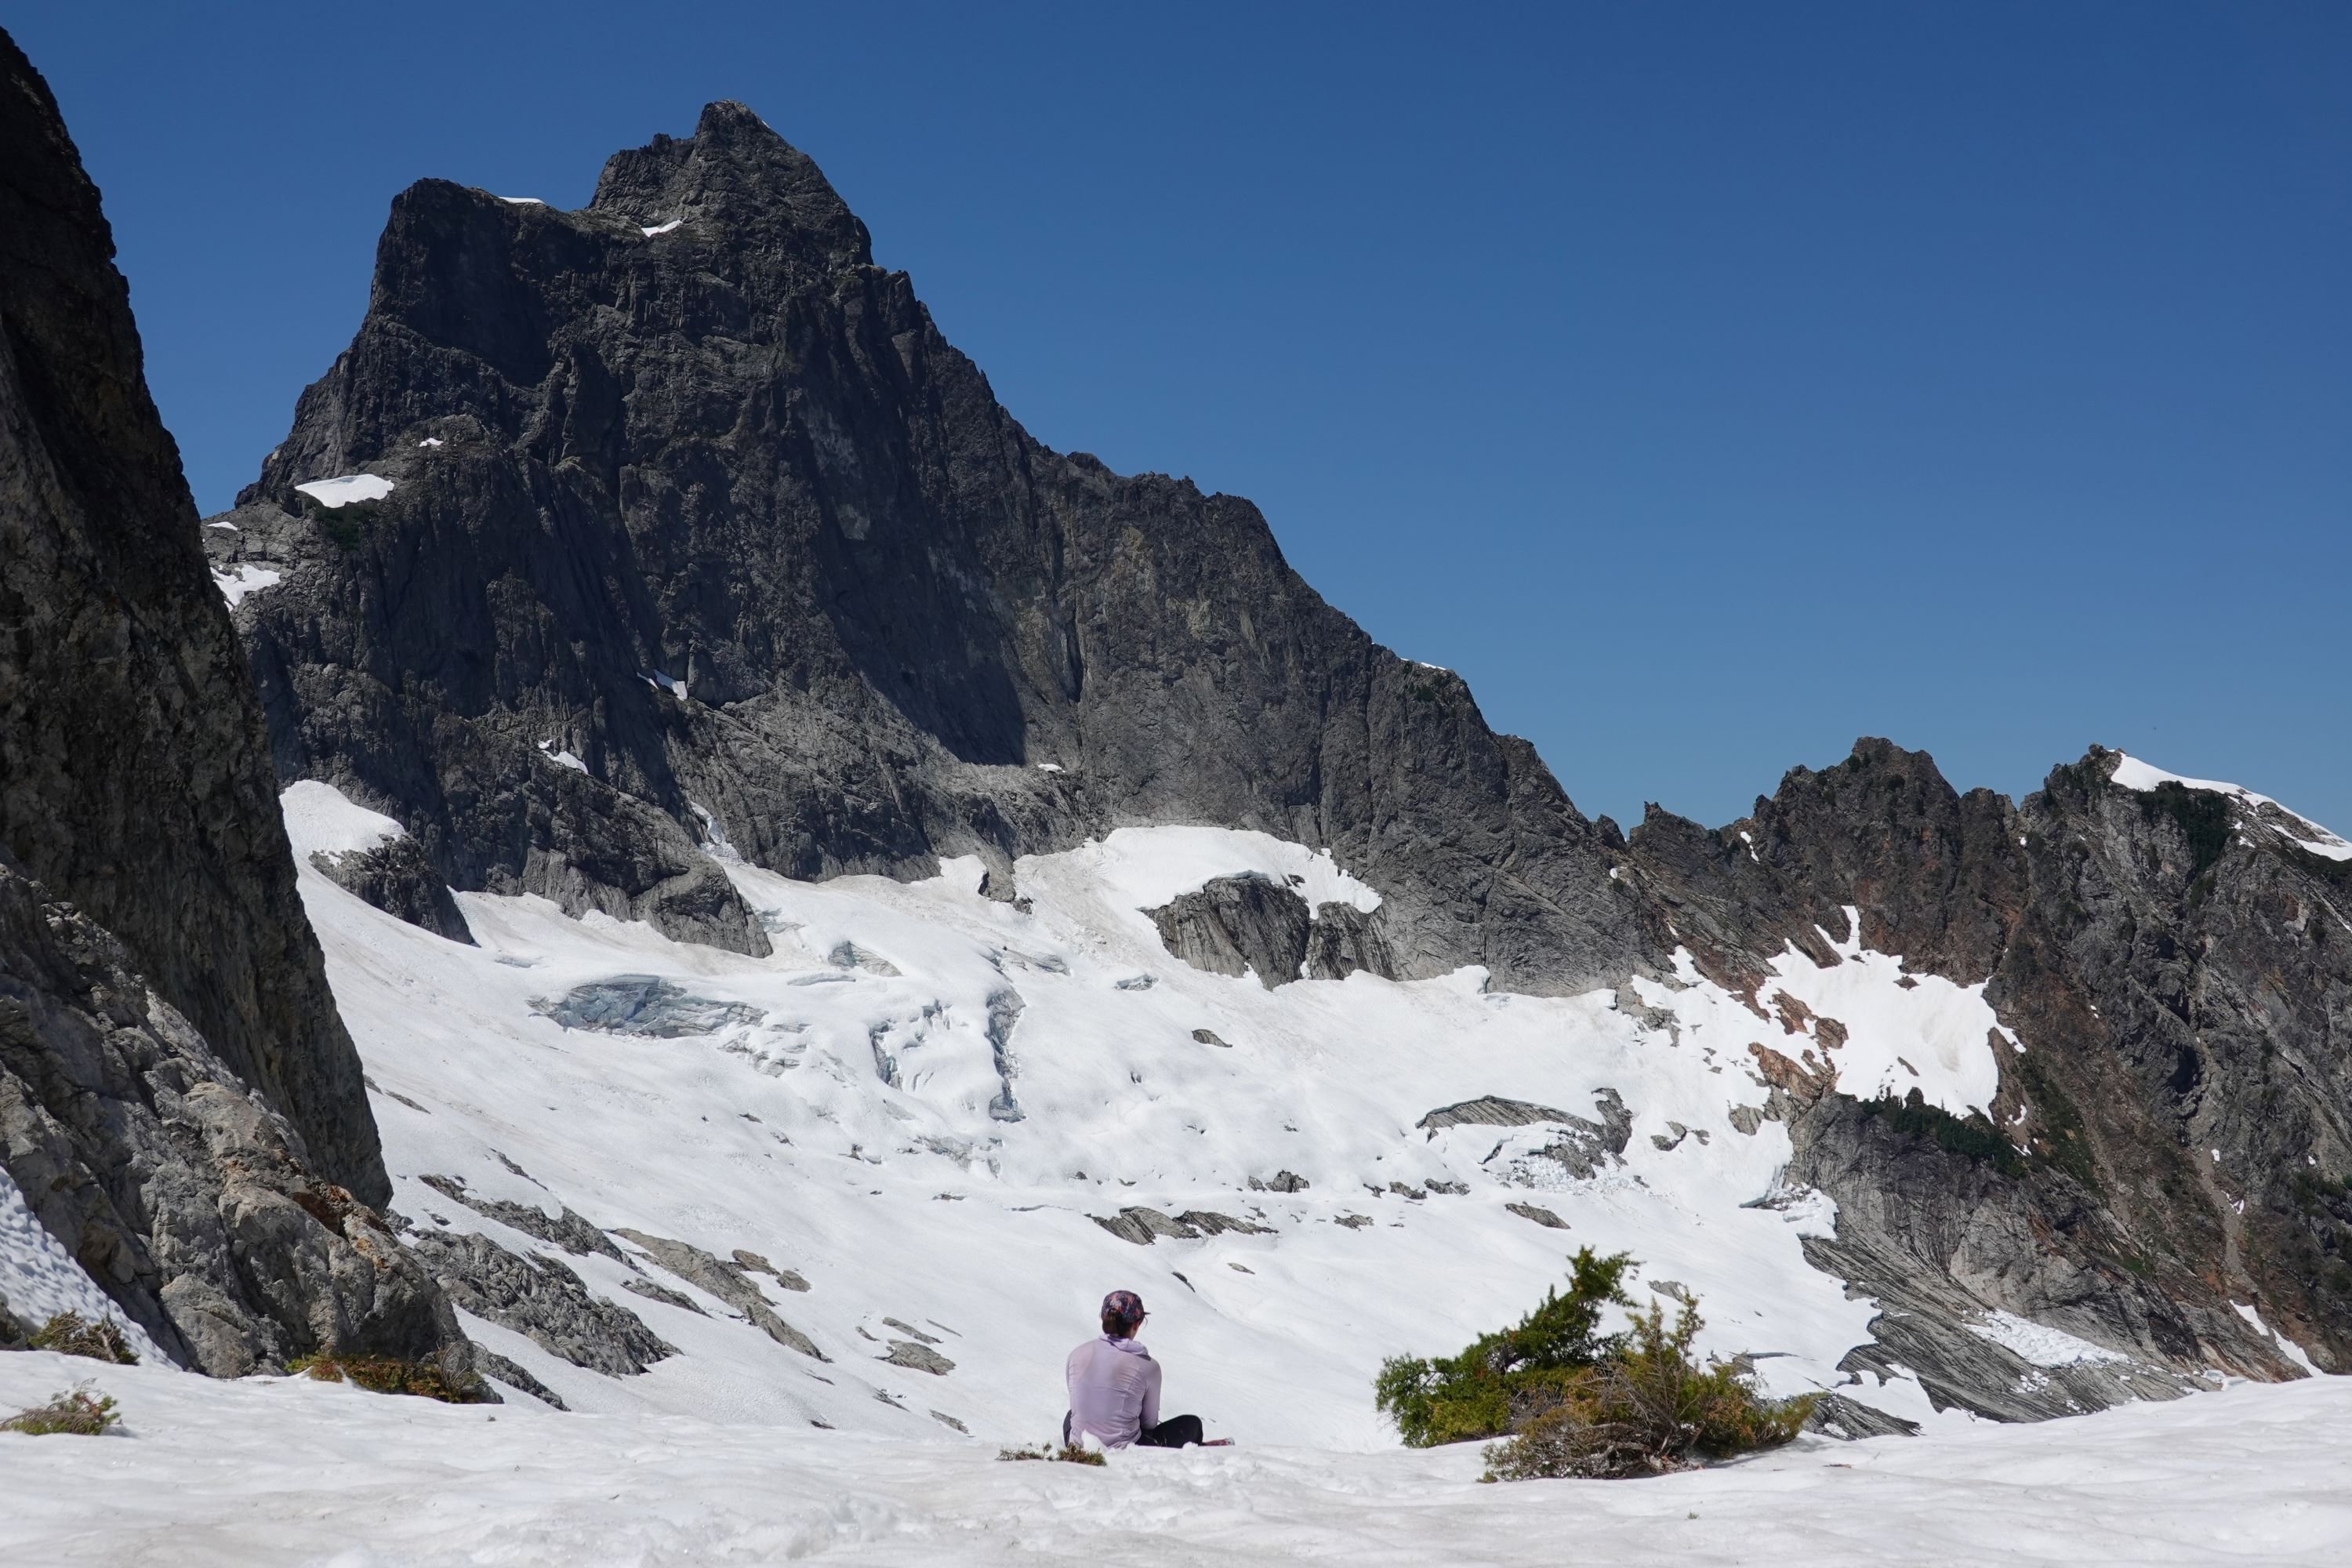
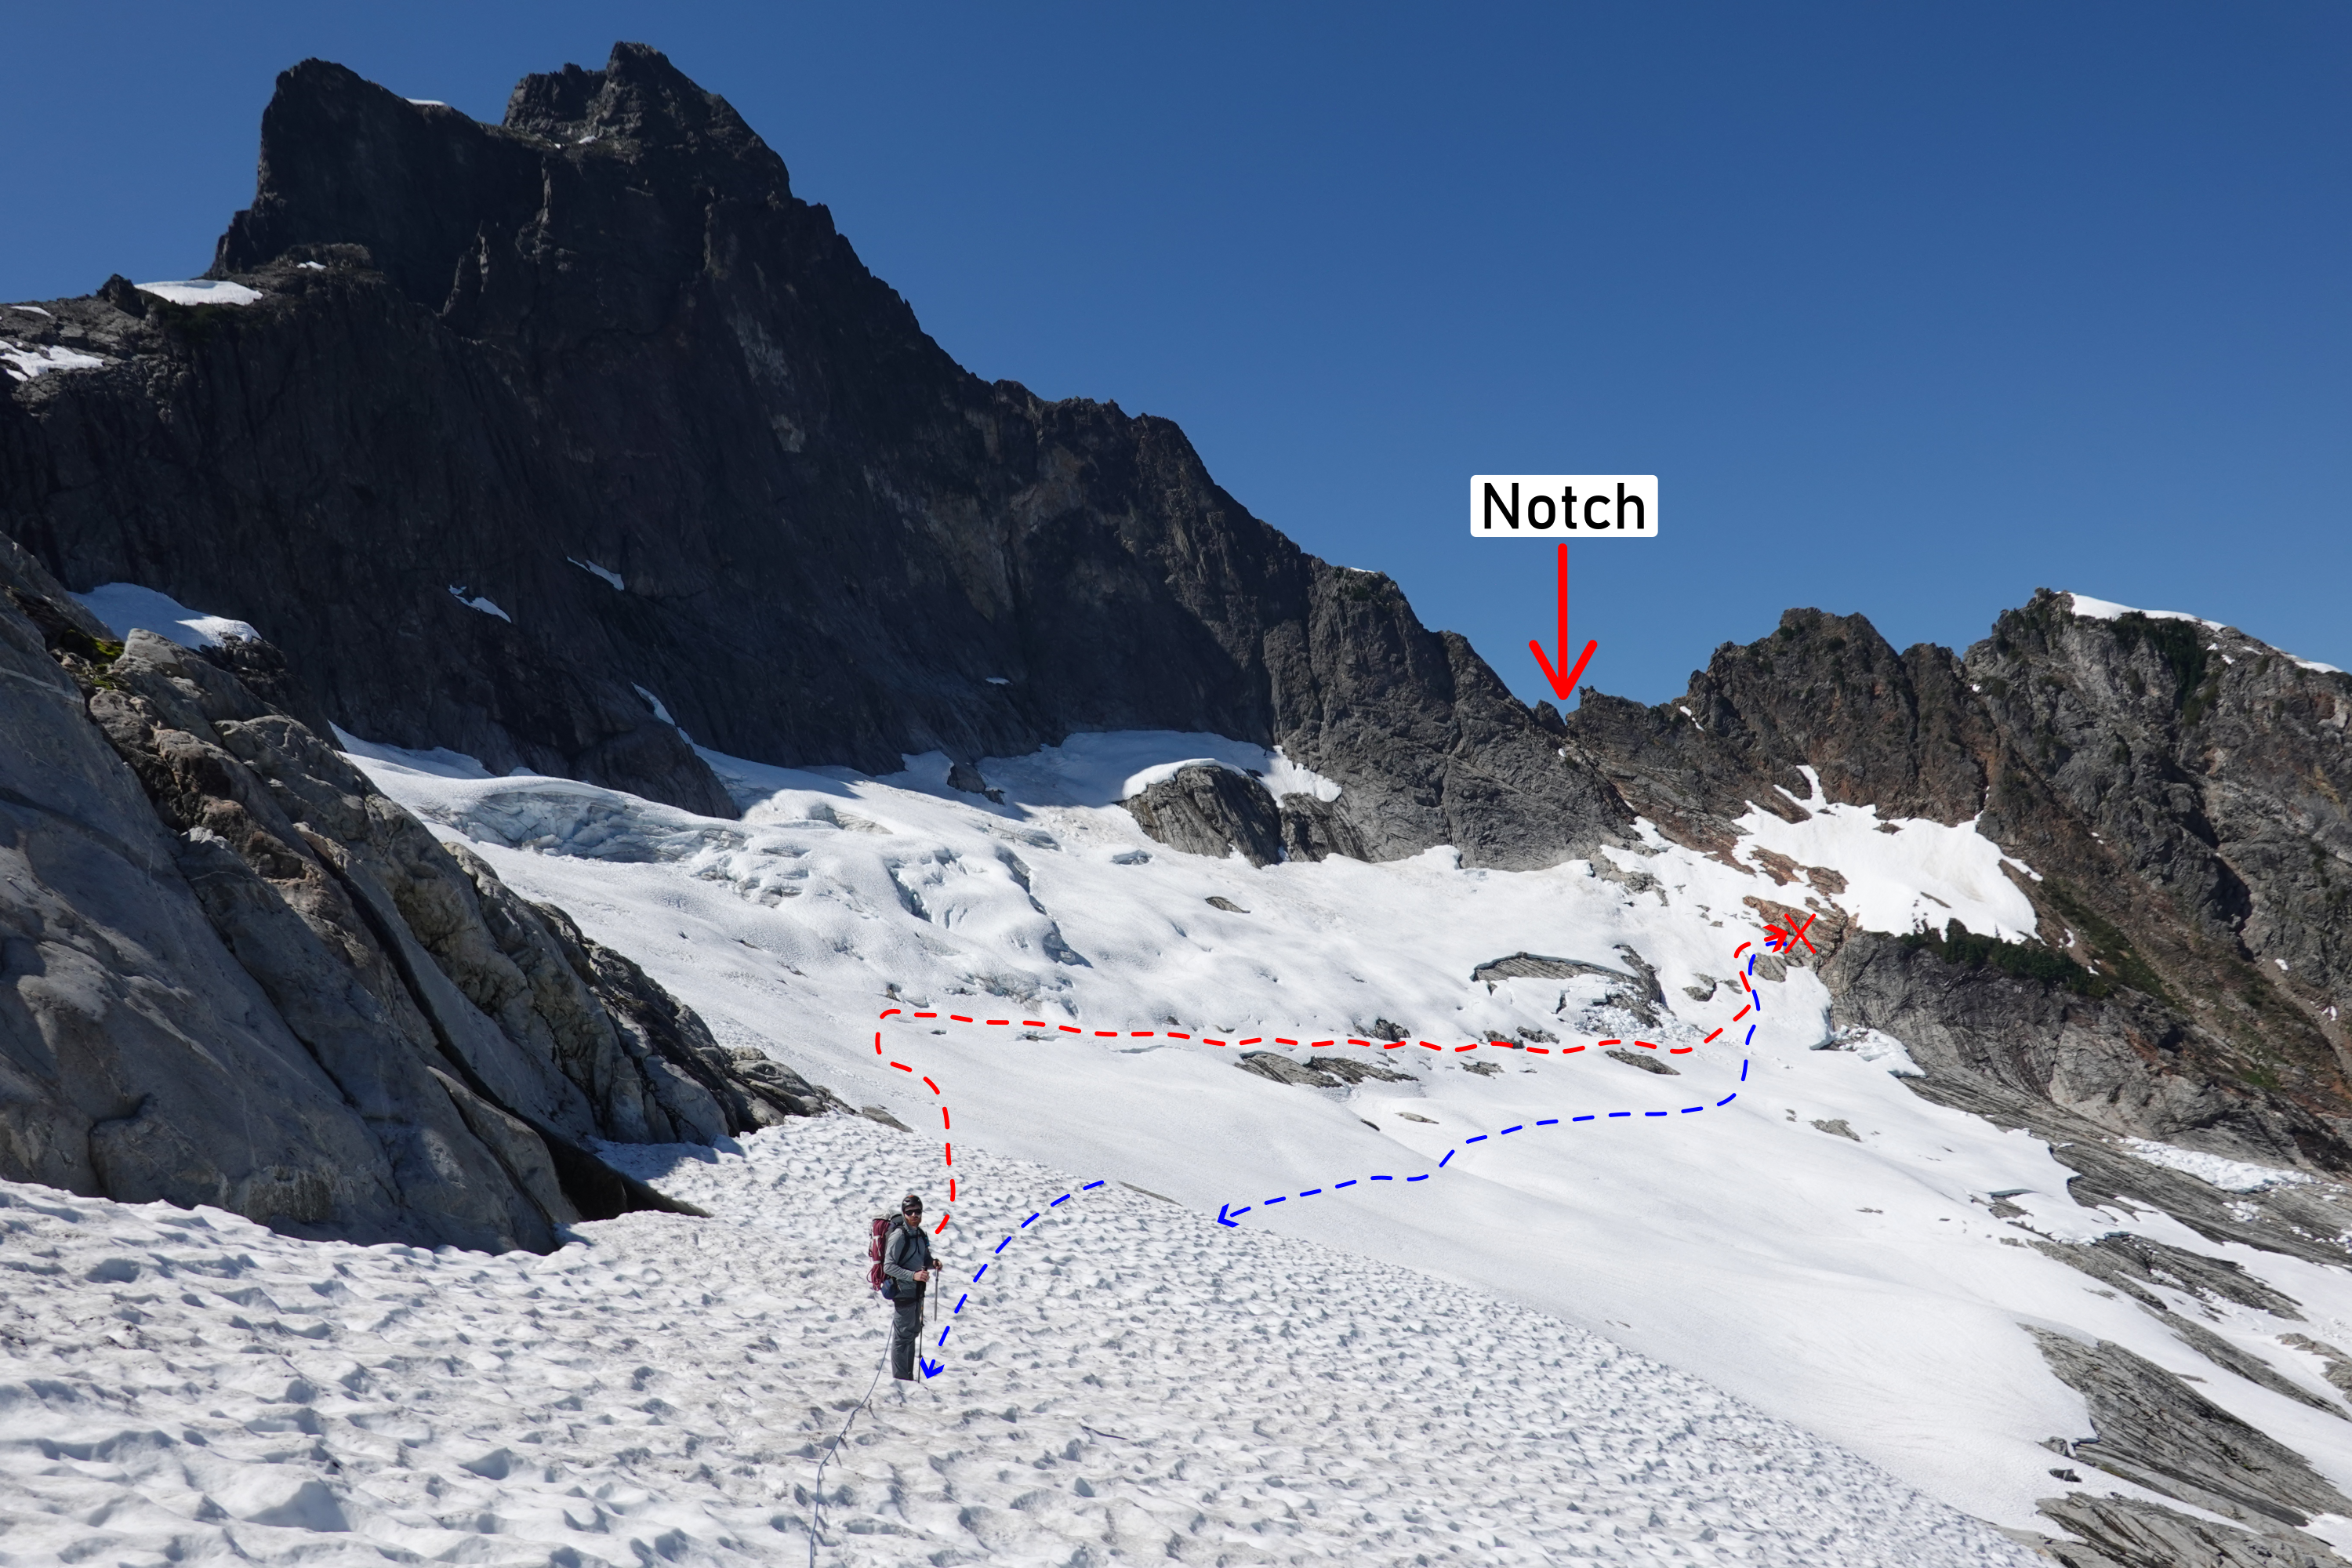
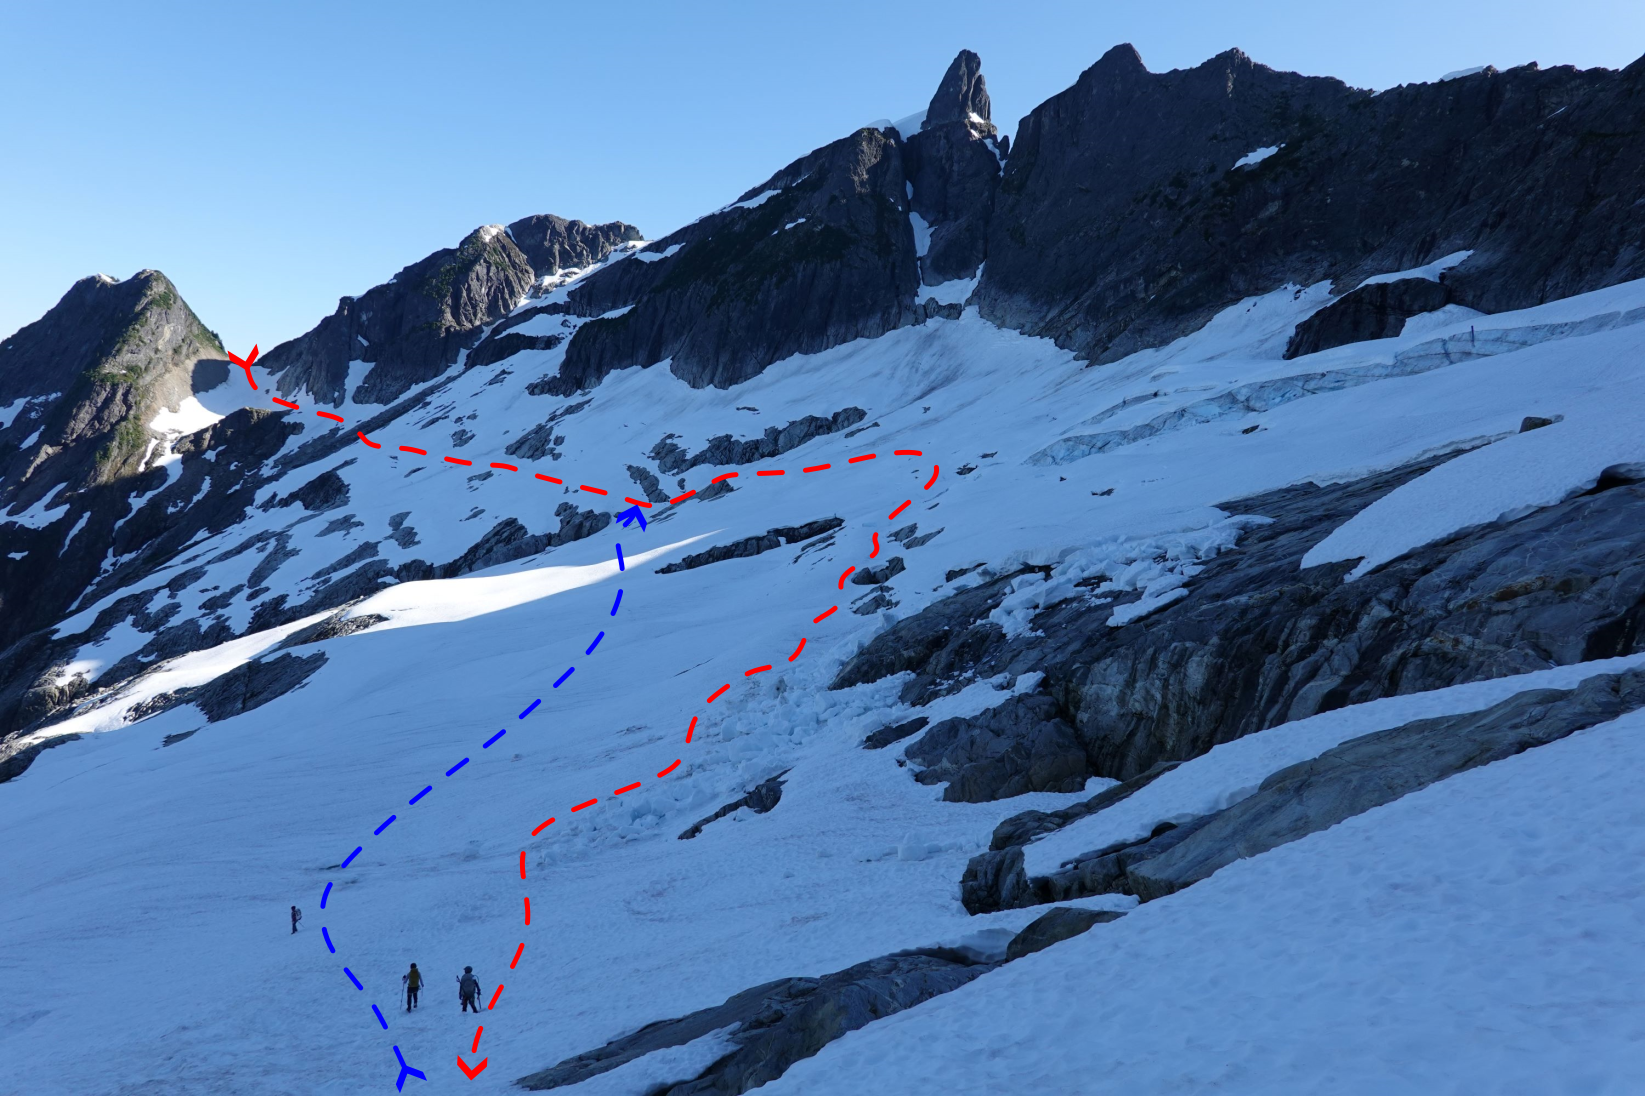
Trip: Mount Triumph - NE Ridge Trip Date: 07/13/2024 Trip Report: TLDR: The snowfield crossing to the NE Ridge still has significant objective hazards. I would expect hazards to be similar for a little while longer before enough snow melts/sloughs off that the risk is minimized. I believe I can claim the first trip report of Mount Triumph in 2024. Sadly, I can’t claim the first summit of the year. I was a part of a team of 4, and our plan was to climb Mt Triumph over 2 days, camping at the bivy site 2 pitches up the start of the NE Ridge climb. Our timeline was as follows: Depart Seattle Area 4:00 AM Leave Thornton Lake Trailhead 7:15 AM Reach the first Thornton Lake 10:15 AM Arrive at the top of the Saddle above the 2nd Thornton lake. 2:00 PM Arrive at the base of the notch 3:45 PM Departed the base of the notch 5:15 PM Returned back to the Saddle above the 2nd Thornton lake. 6:15 PM Back to the trailhead 11:15 PM Conditions on the way to the climb: -The trail up to the first lake is well maintained -The trail to the 2nd lake is a little bushwacky, but there is a defined trail up to it -There were a couple creek crossings, all were manageable (trekking poles were nice, but not required) -After the 2nd lake, you need to cross a boulder field that then transitions to heather/scree as you go up the col to the saddle above the 2nd lake. I’d recommend hugging the cliff to climbers right as you go up; the heather is easier than the loose rock and there is a faint trail to follow. Above the heather you get into much more loose rock, and though manageable, it becomes rather difficult to avoid dropping rocks on team members below you. -For the time being, there is still plenty of snow and running water nearby this saddle if you plan to bivy here. -The snow crossing was by far the most challenging part of the approach. After reviewing the objective hazards for a bit, and debating the best path, we opted to follow relatively closely to what I had read most trip reports follow, which is along the bench that leads to below the notch. Only one part of the bench showed any signs of recent snow/ice fall, which was unfortunately at the end, where we couldn’t travel too far below it since we need to start going up the face to get to the notch. We opted to move as fast as possible to minimize our time in the hazard zone. Even trying to minimize exposure, we still had a bit of excitement as some snow blocks broke off while our last team member was under the main hazard zone. Thankfully the snowfall behaved as we expected (if it were to fall) and stopped short of our crossing path. So the team member wasn’t in direct danger, but it certainly looked like it, and in the process of trying to get out the way, they unfortunately sliced their leg with a crampon. We took a break on a rock outcropping directly below the notch to bandage up the leg, and decide what to do. We decided the injury was significant enough that we didn’t want to spend another day on the mountain, and planned to make the descent back to the trailhead. We had dinner on the little rock outcropping, and spent the time re-evaluating our path on the snowfield. We saw one more exciting ice block fall, this time off the old glacier. This block made it all the way down to the bench that we crossed, and because of that, when we headed back we decided to traverse below the bench to better stay out of the path of any potential snow/ice fall. The snowfield was shaded on our way back, which helped with snow/ice fall risk. Also worth noting, the mosquitos were bad on the way up in the heat of the day, but were downright miserable on the way back; didn’t matter if we were stopped or moving, they followed us relentlessly. DEET had a minimal impact, I’d recommend bringing a bug head net. Lessons learned include: - We picked about the worst time of the day to cross the glacier (hottest/direct sun). Unfortunately, if you are trying to do Mt Triumph in 2 days, it’s very challenging to avoid crossing this snowfield mid/late day; your best bet is to wait for the sun to dip below the peak of triumph and cast a shadow over the snowfield, which happened around 5:15PM for us. You can push the first crossing to early in the morning day 2, but that will just push back the 2nd crossing on the way back. -We opted to rope up the first time we crossed the snowfield. This was to have a chance of protecting against additional glide avalanches. But because we were roped up, the last person on our team spent the longest time under the primary hazard zone as the steepness increased significantly above that zone and those of us in the front of the rope team slowed down on the uphill. This is why we opted not to rope up on the way back 2nd Thornton lake, col you go up on right First good view of Mount Triumph and the snowfield you need to cross View of the crossing we took on the way out (red), and back (blue) based on our changed opinions of the biggest objective hazards. Red X is far as we got View of our path from the opposite side Gear Notes: -Crampons were quite nice for the snow crossing, even with the heat the snow had some spots on the traverse that were quite firm -Brought a decent sized trad rack, but I didn't actually use it (so can't give any feedback there) Approach Notes: GPS Track available on Peakbagger: https://www.peakbagger.com/climber/ascent.aspx?aid=2573855 I also shared a few more pictures on the PNW Peakbaggers Facebook page: https://www.facebook.com/groups/209335589972834/?multi_permalinks=1572843873621992