JeffreyW
-
Posts
67 -
Joined
-
Last visited
-
Days Won
28
Content Type
Profiles
Forums
Events
Everything posted by JeffreyW
-
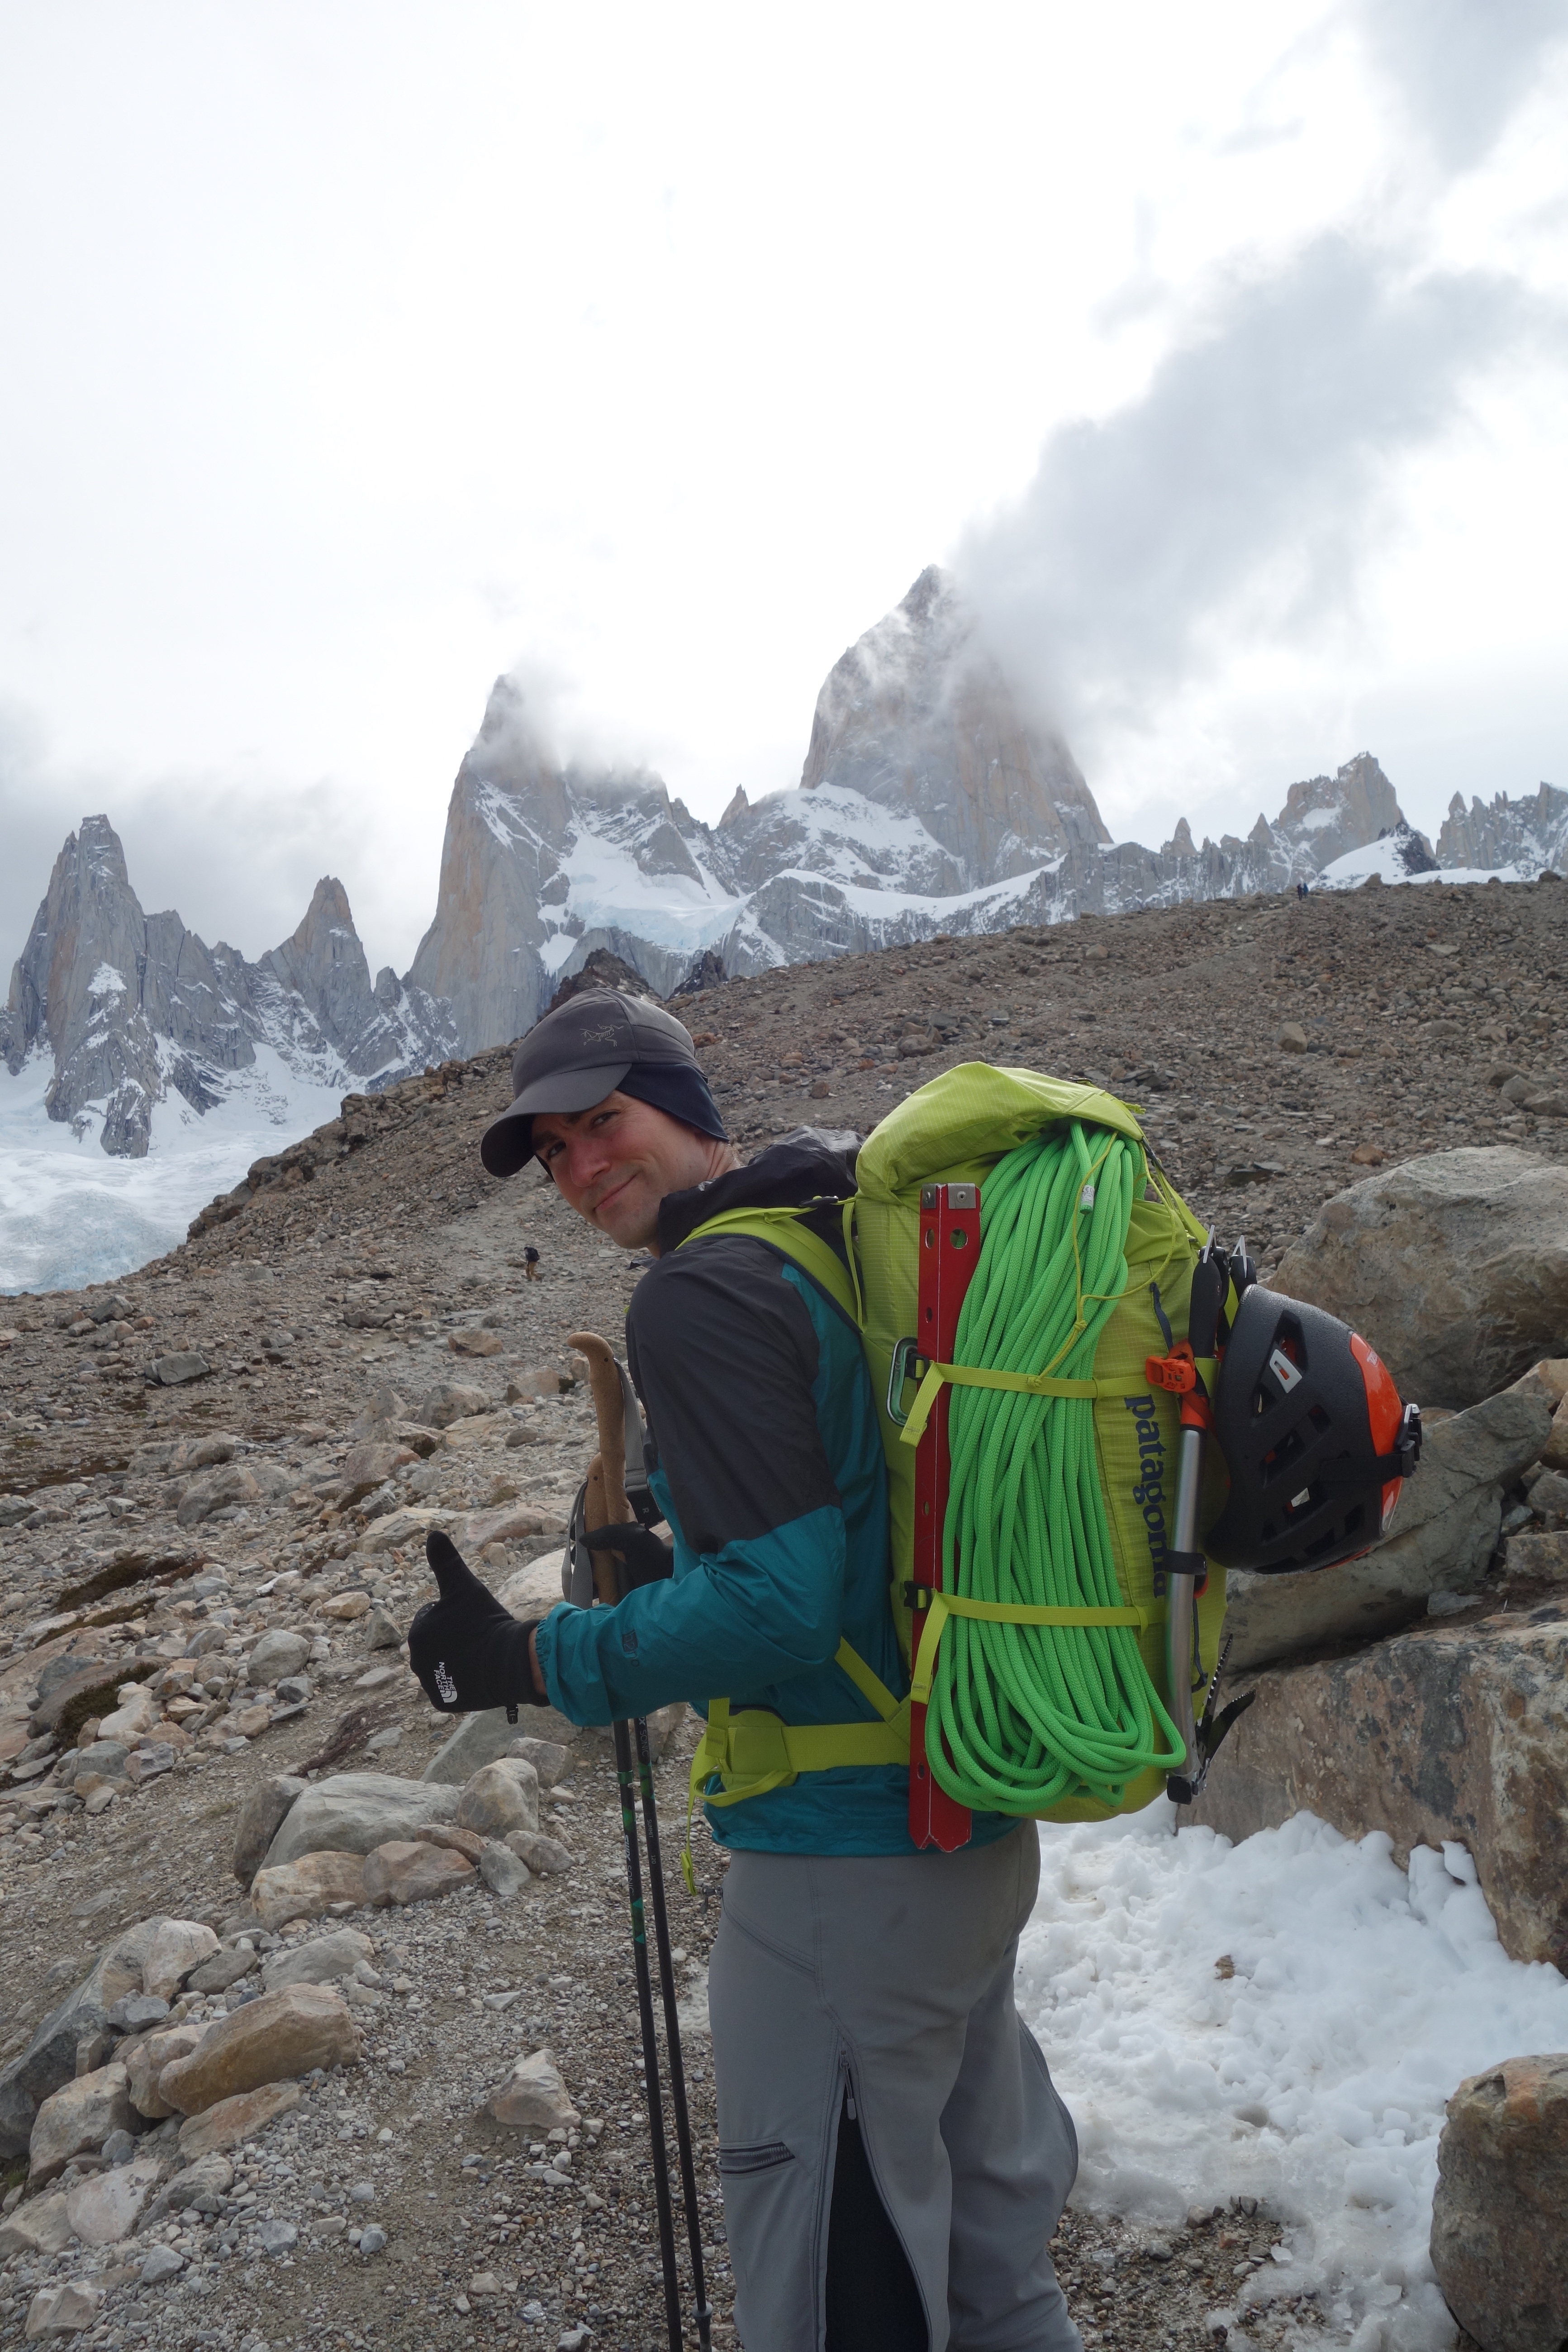
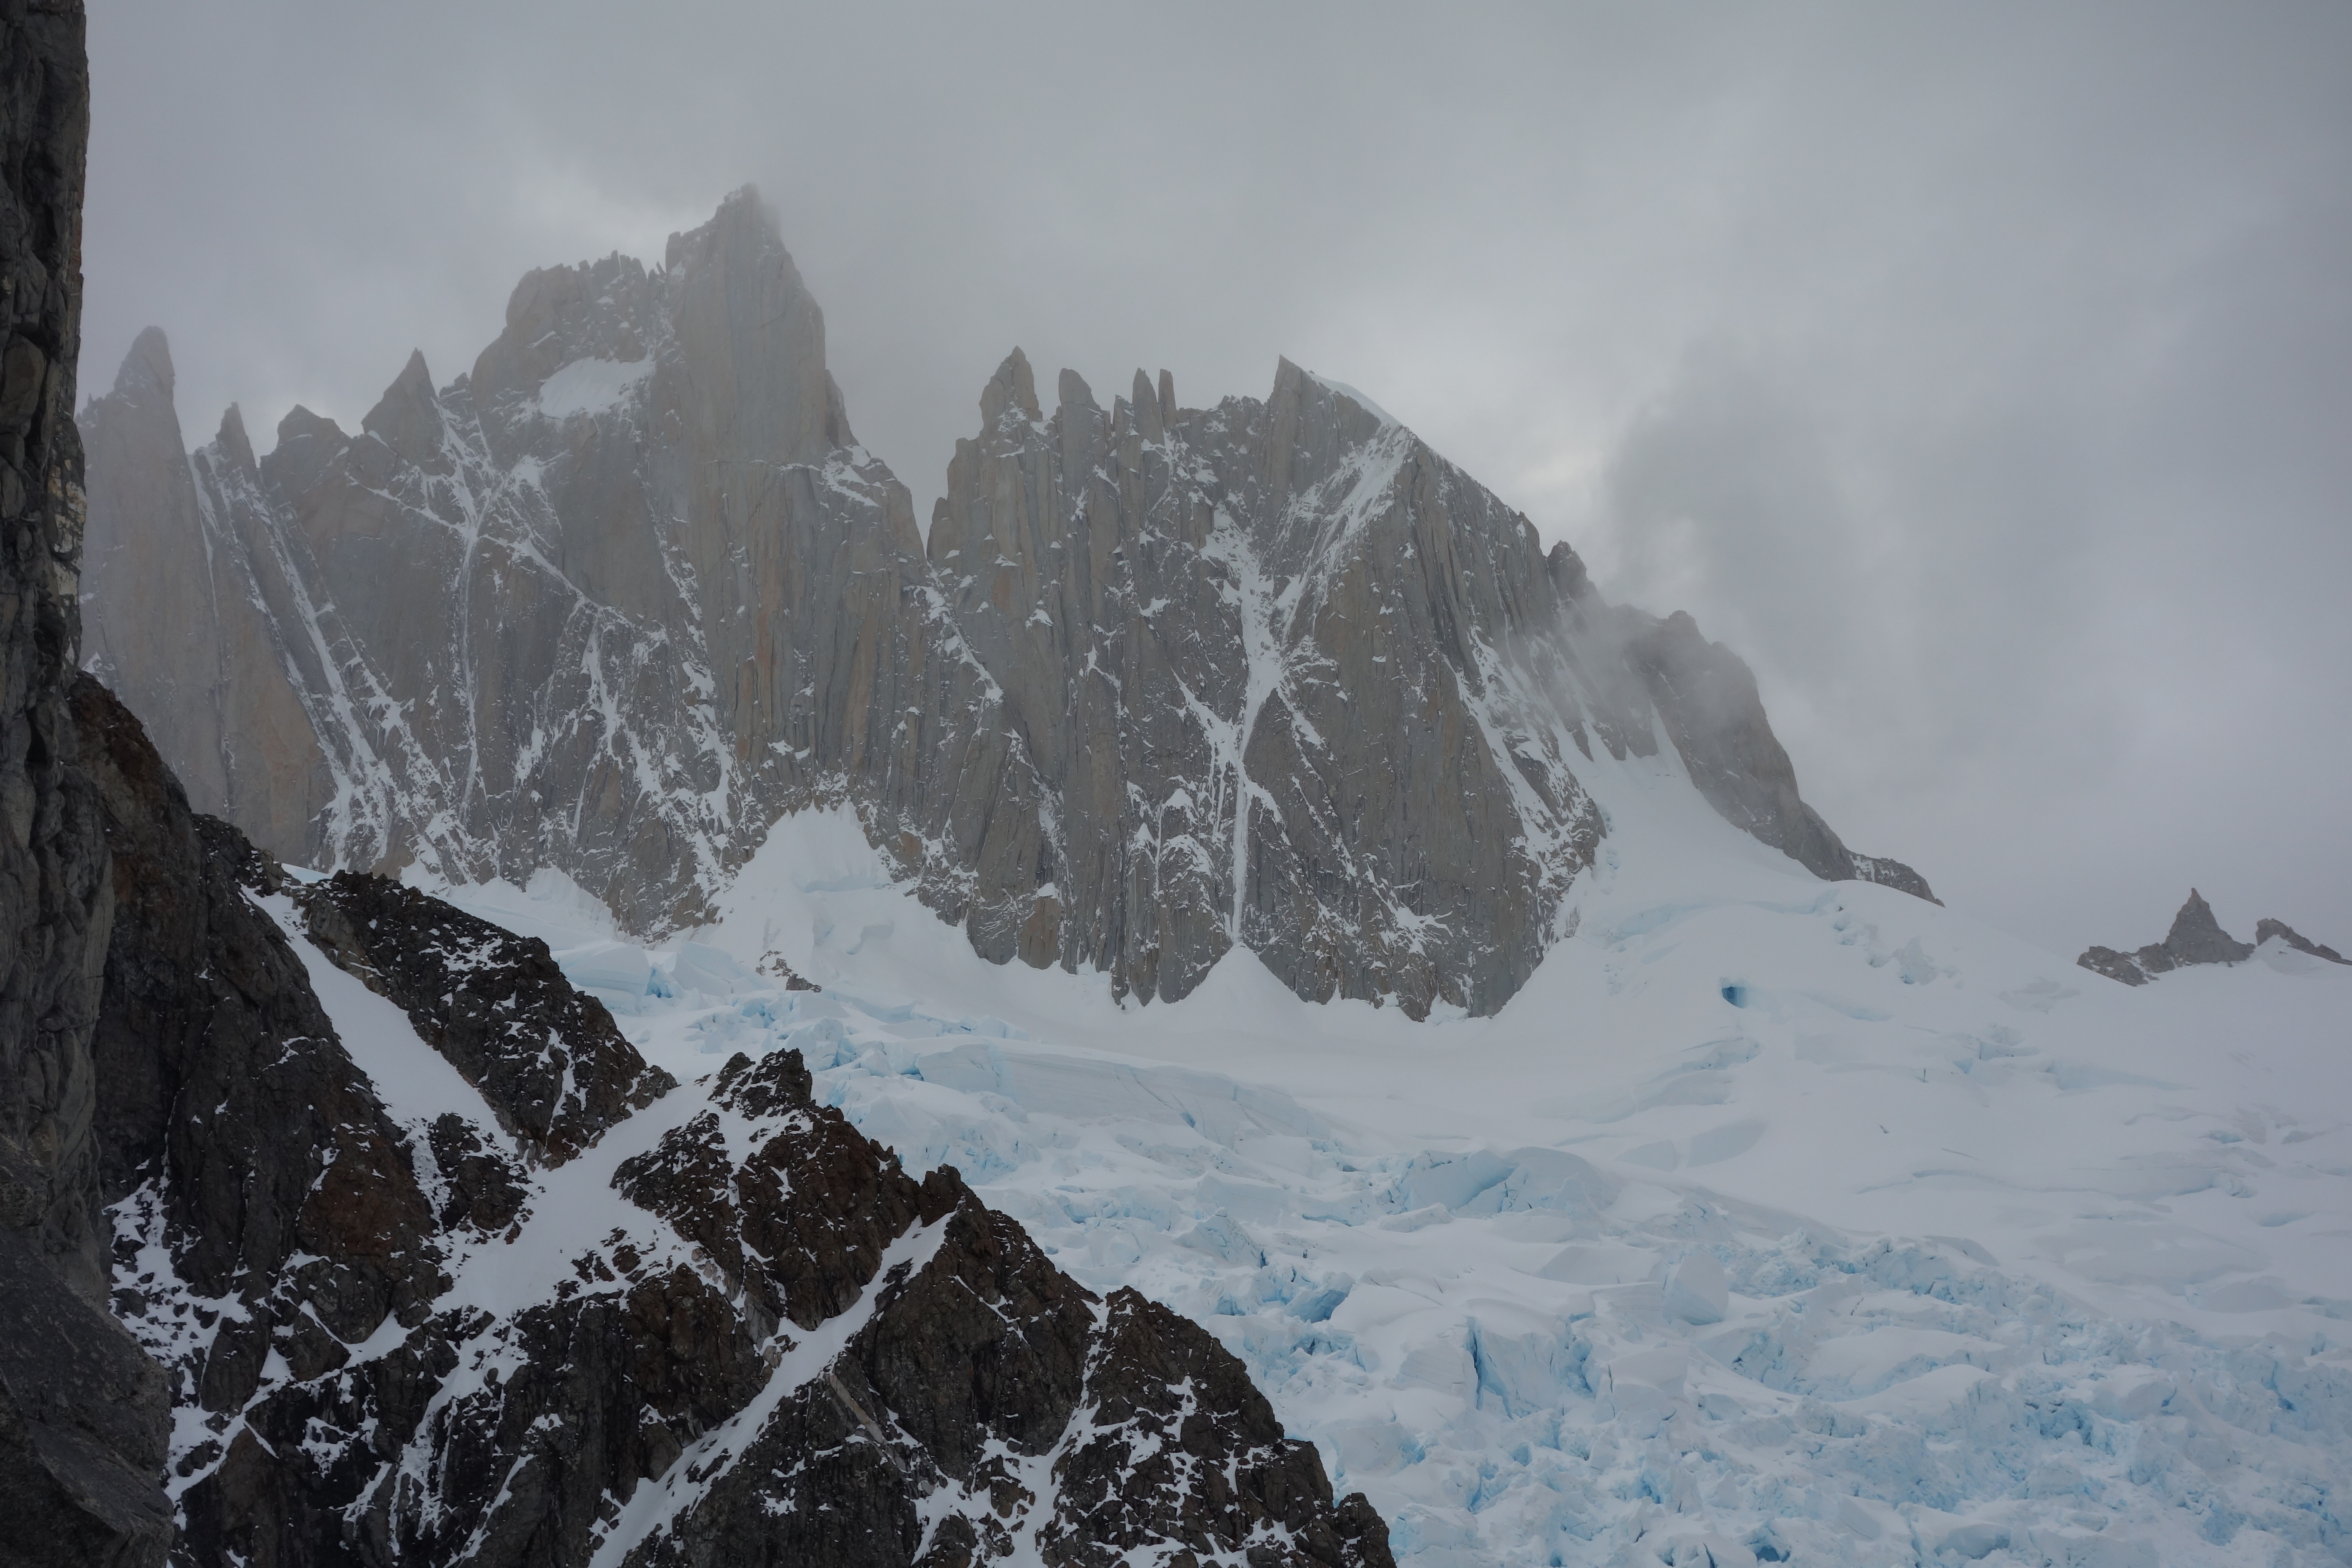
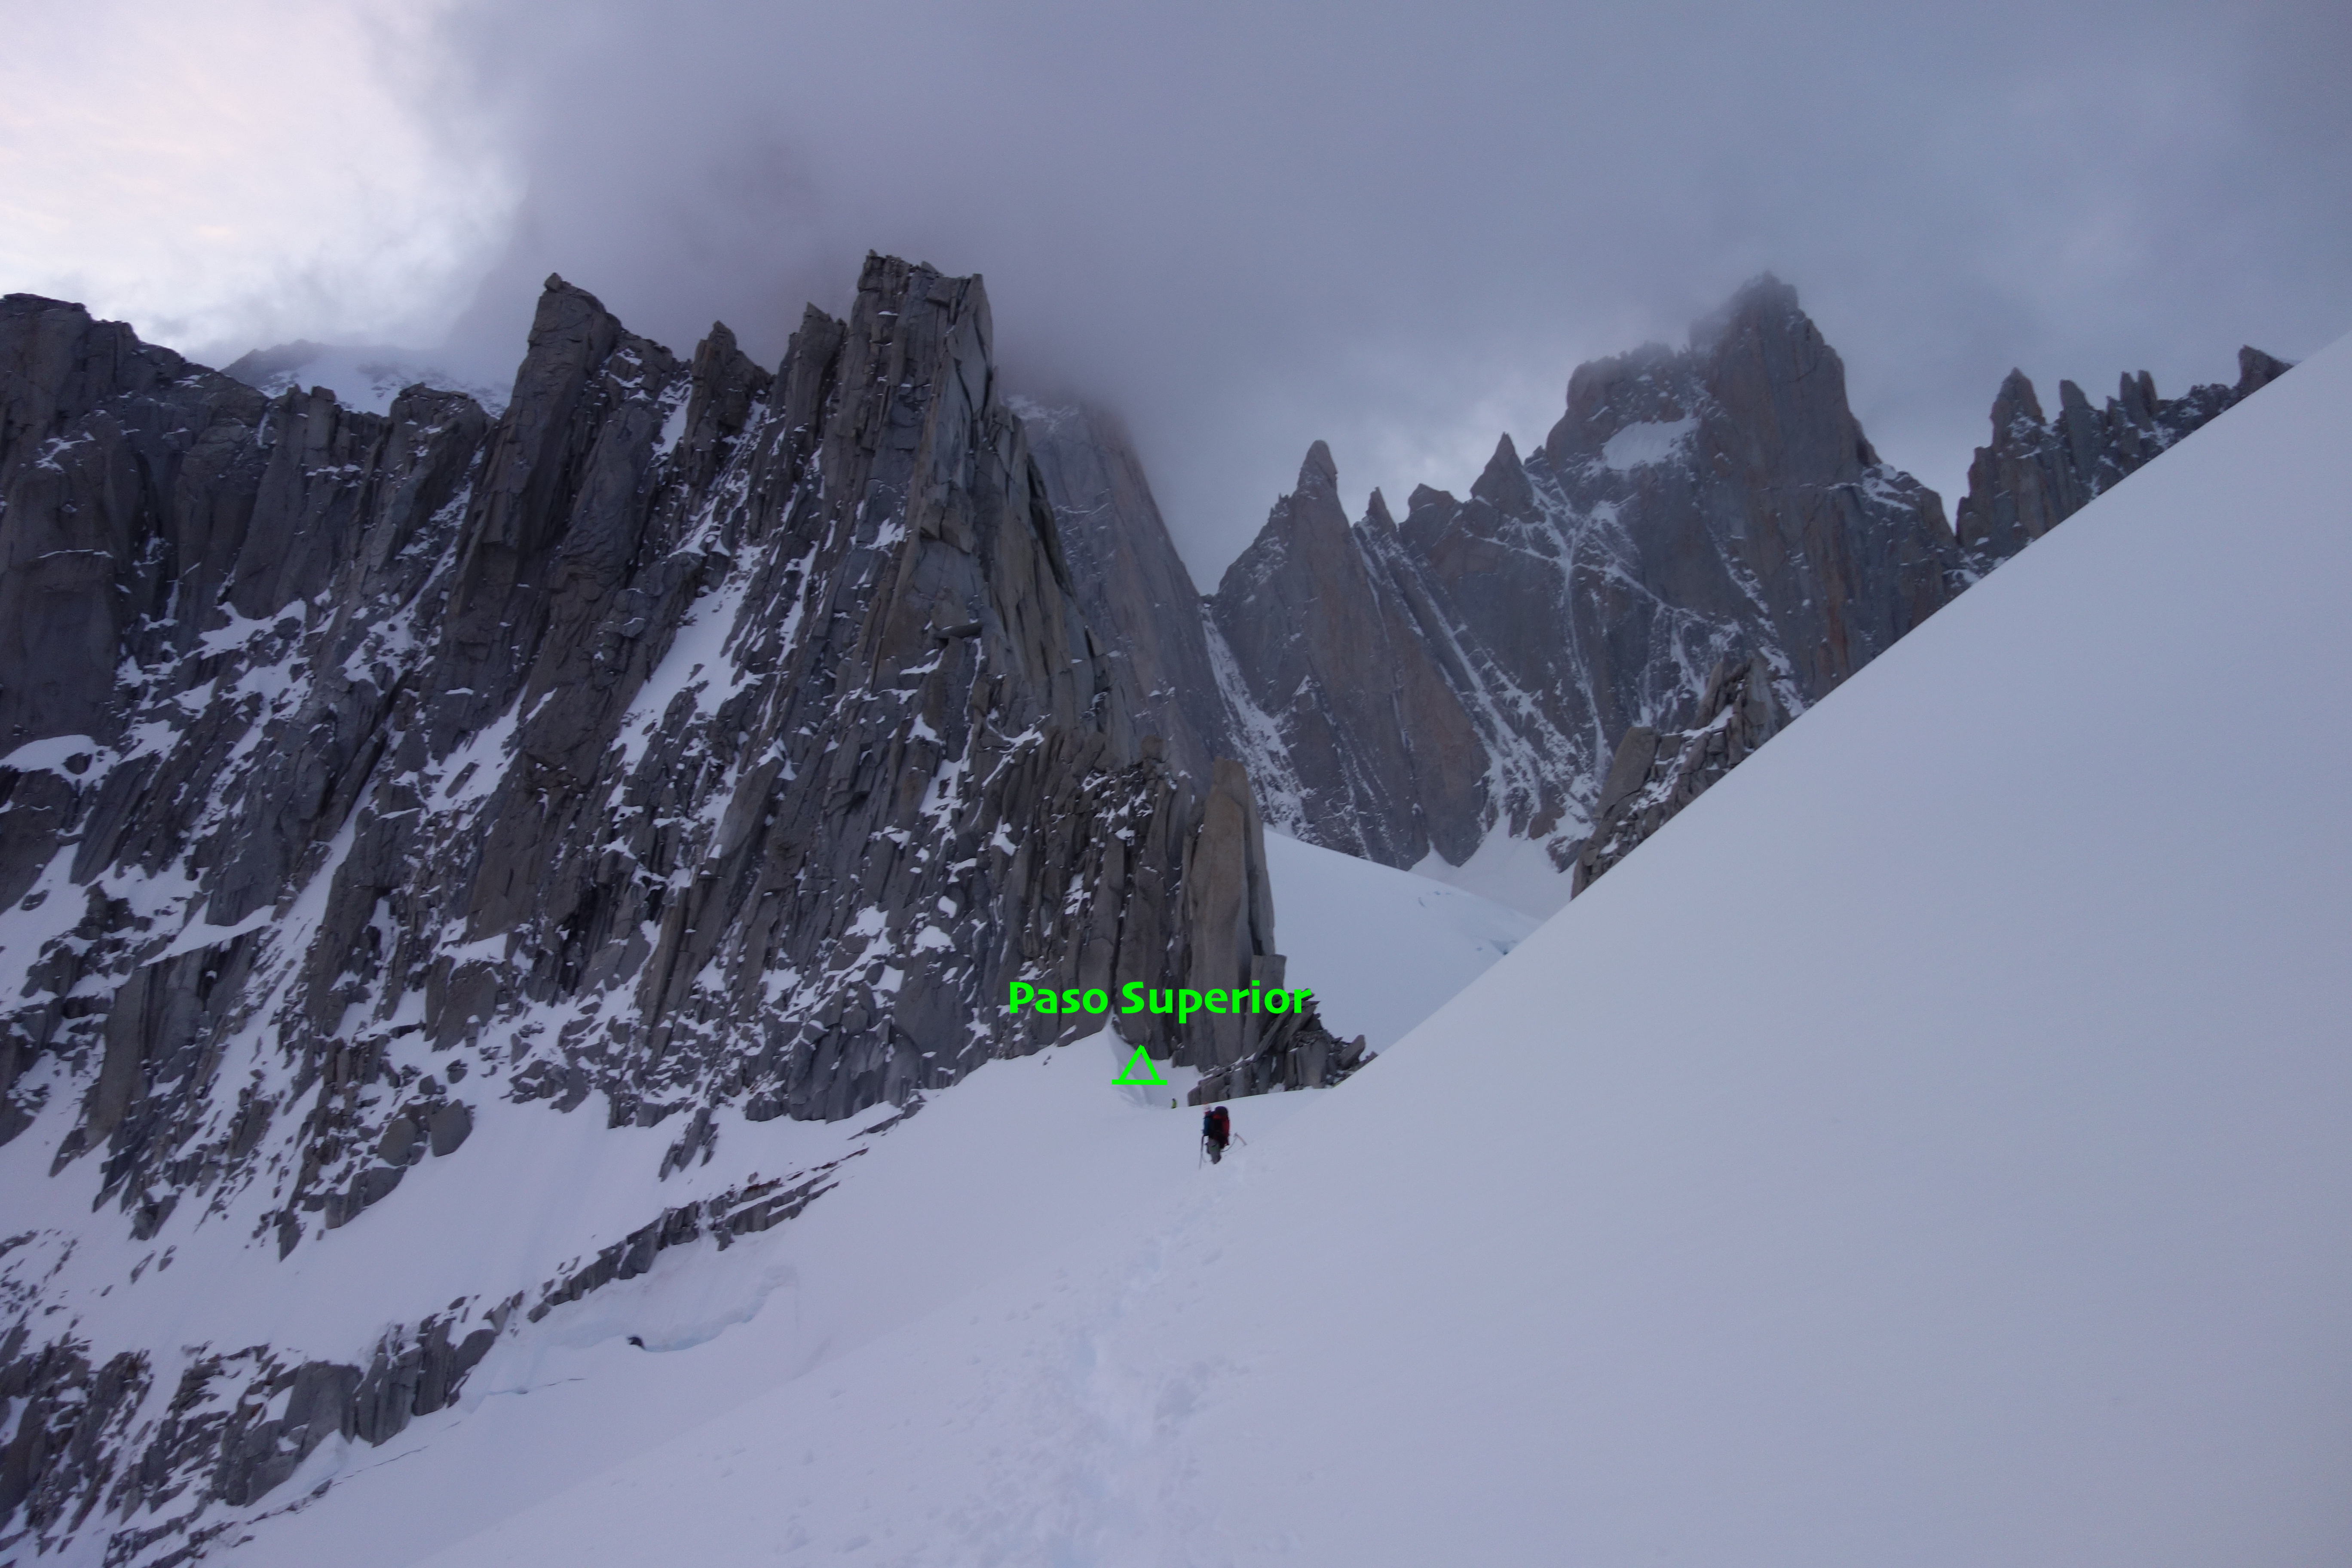
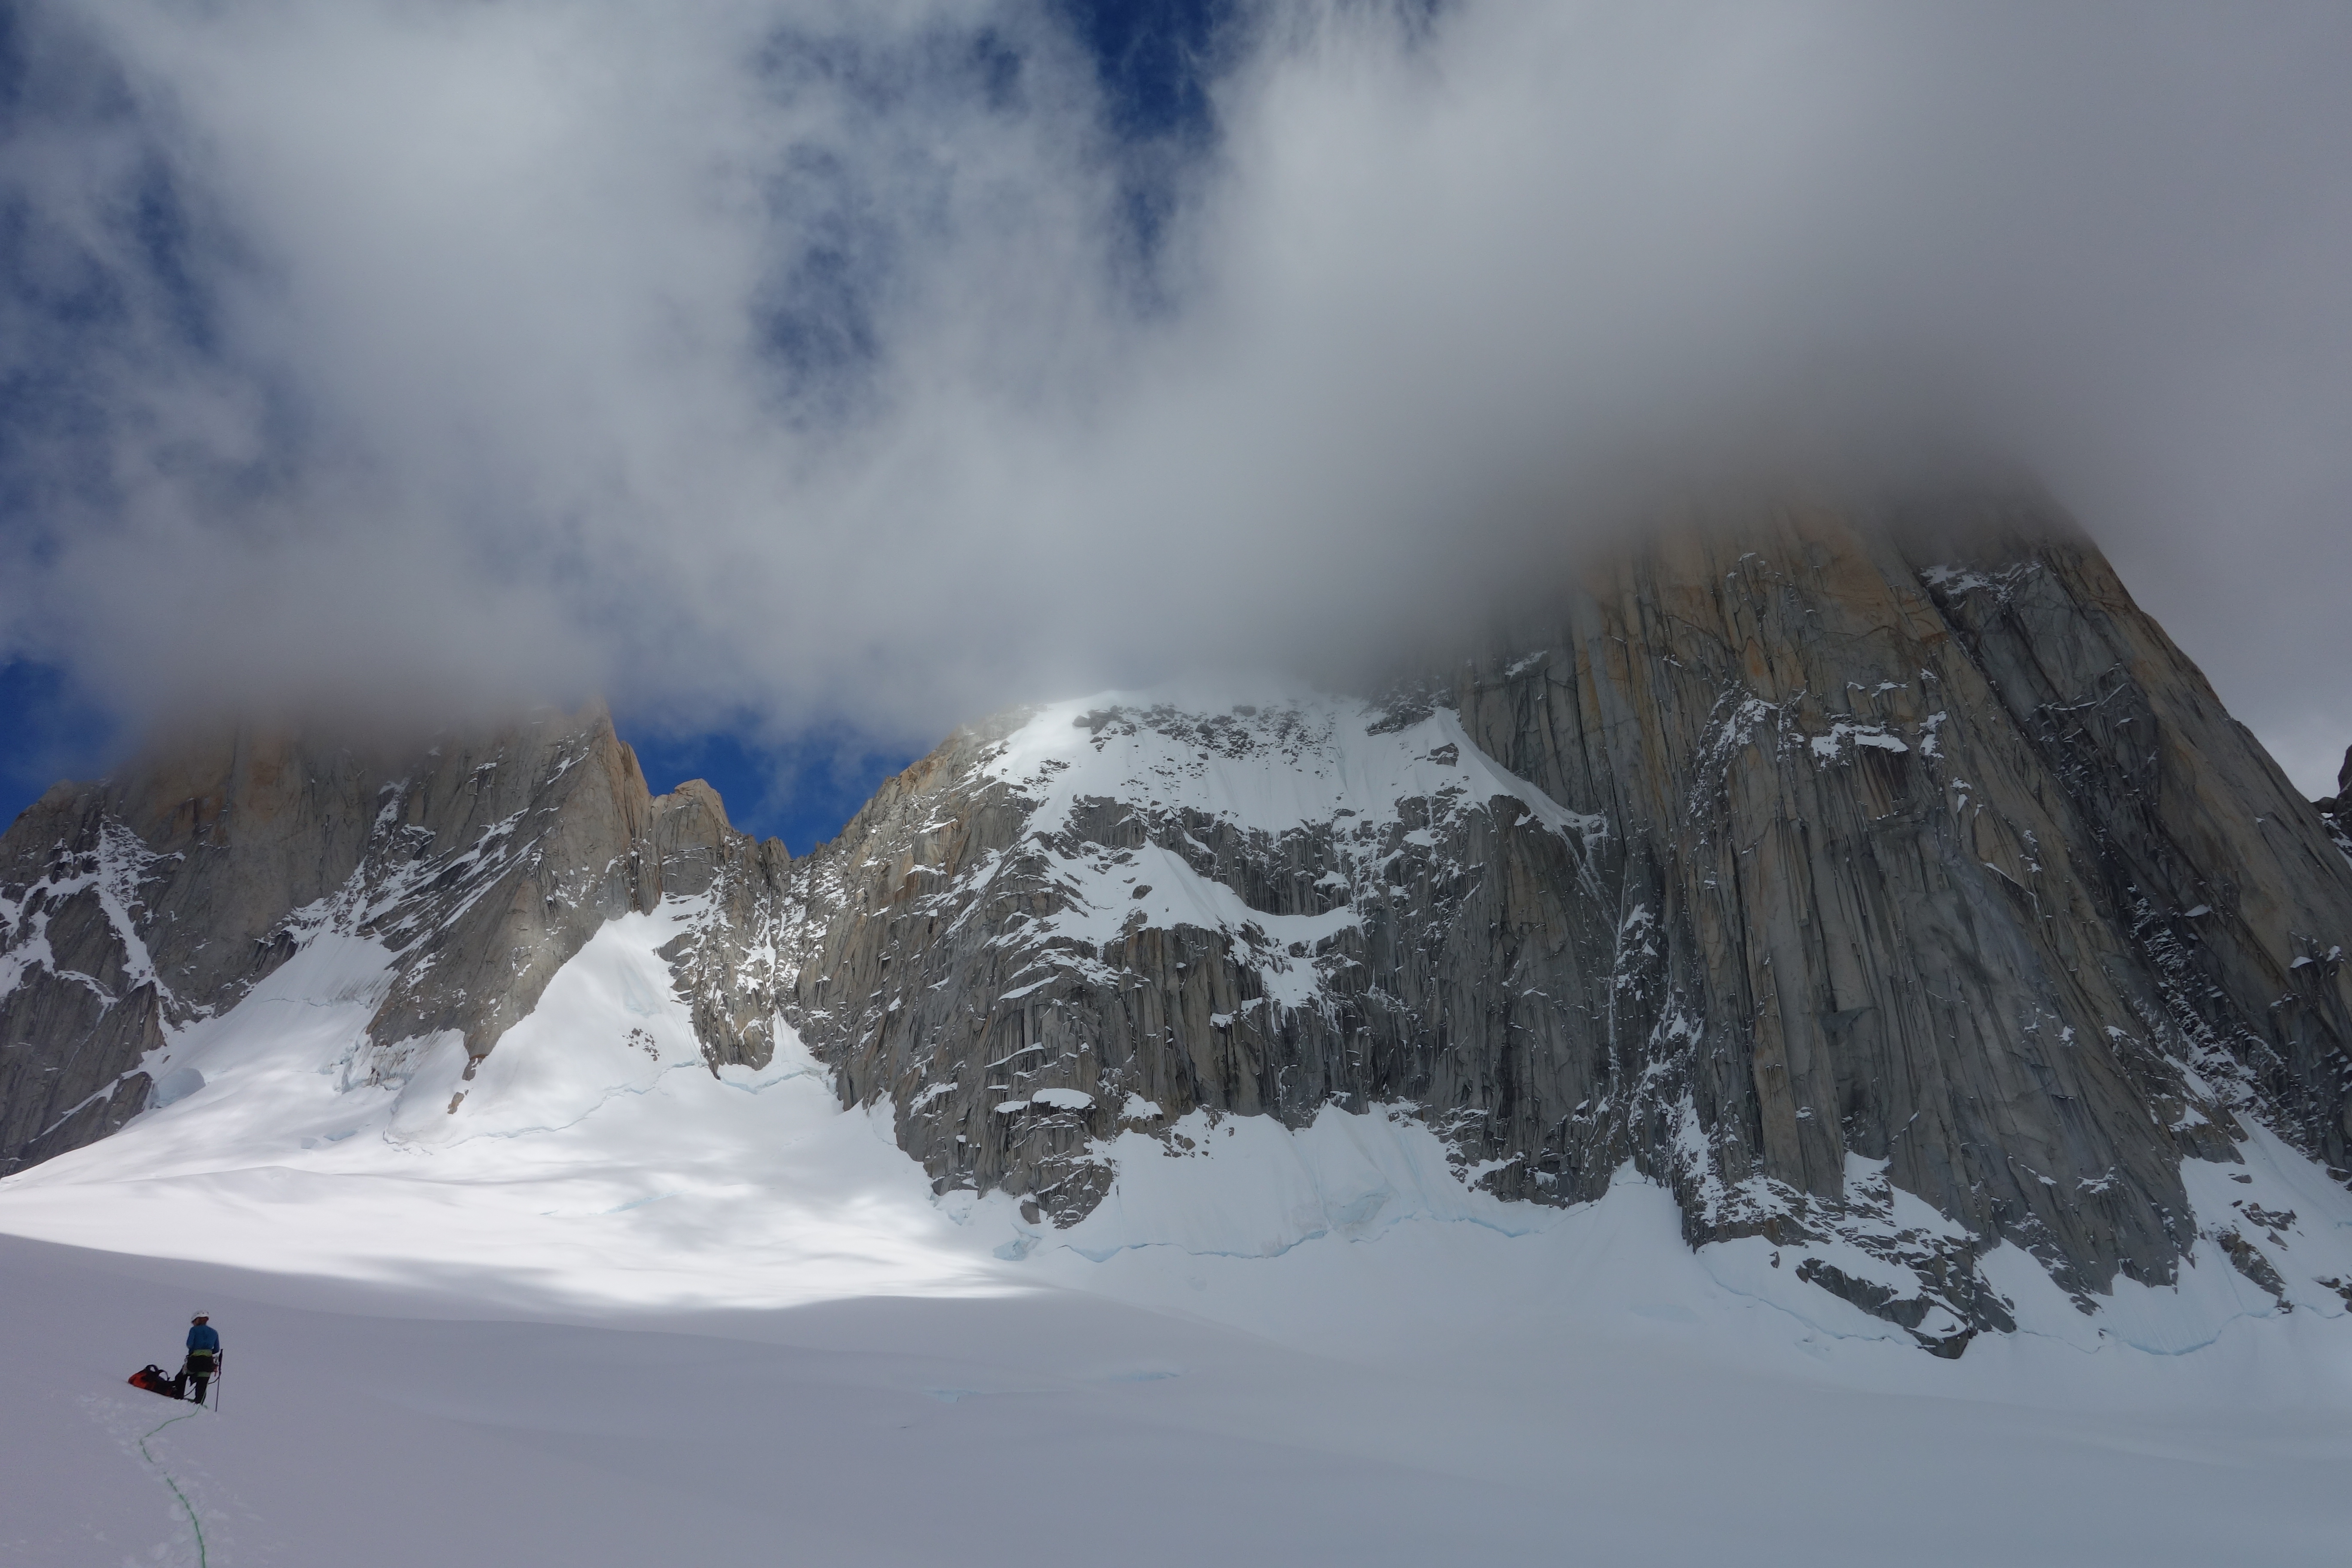
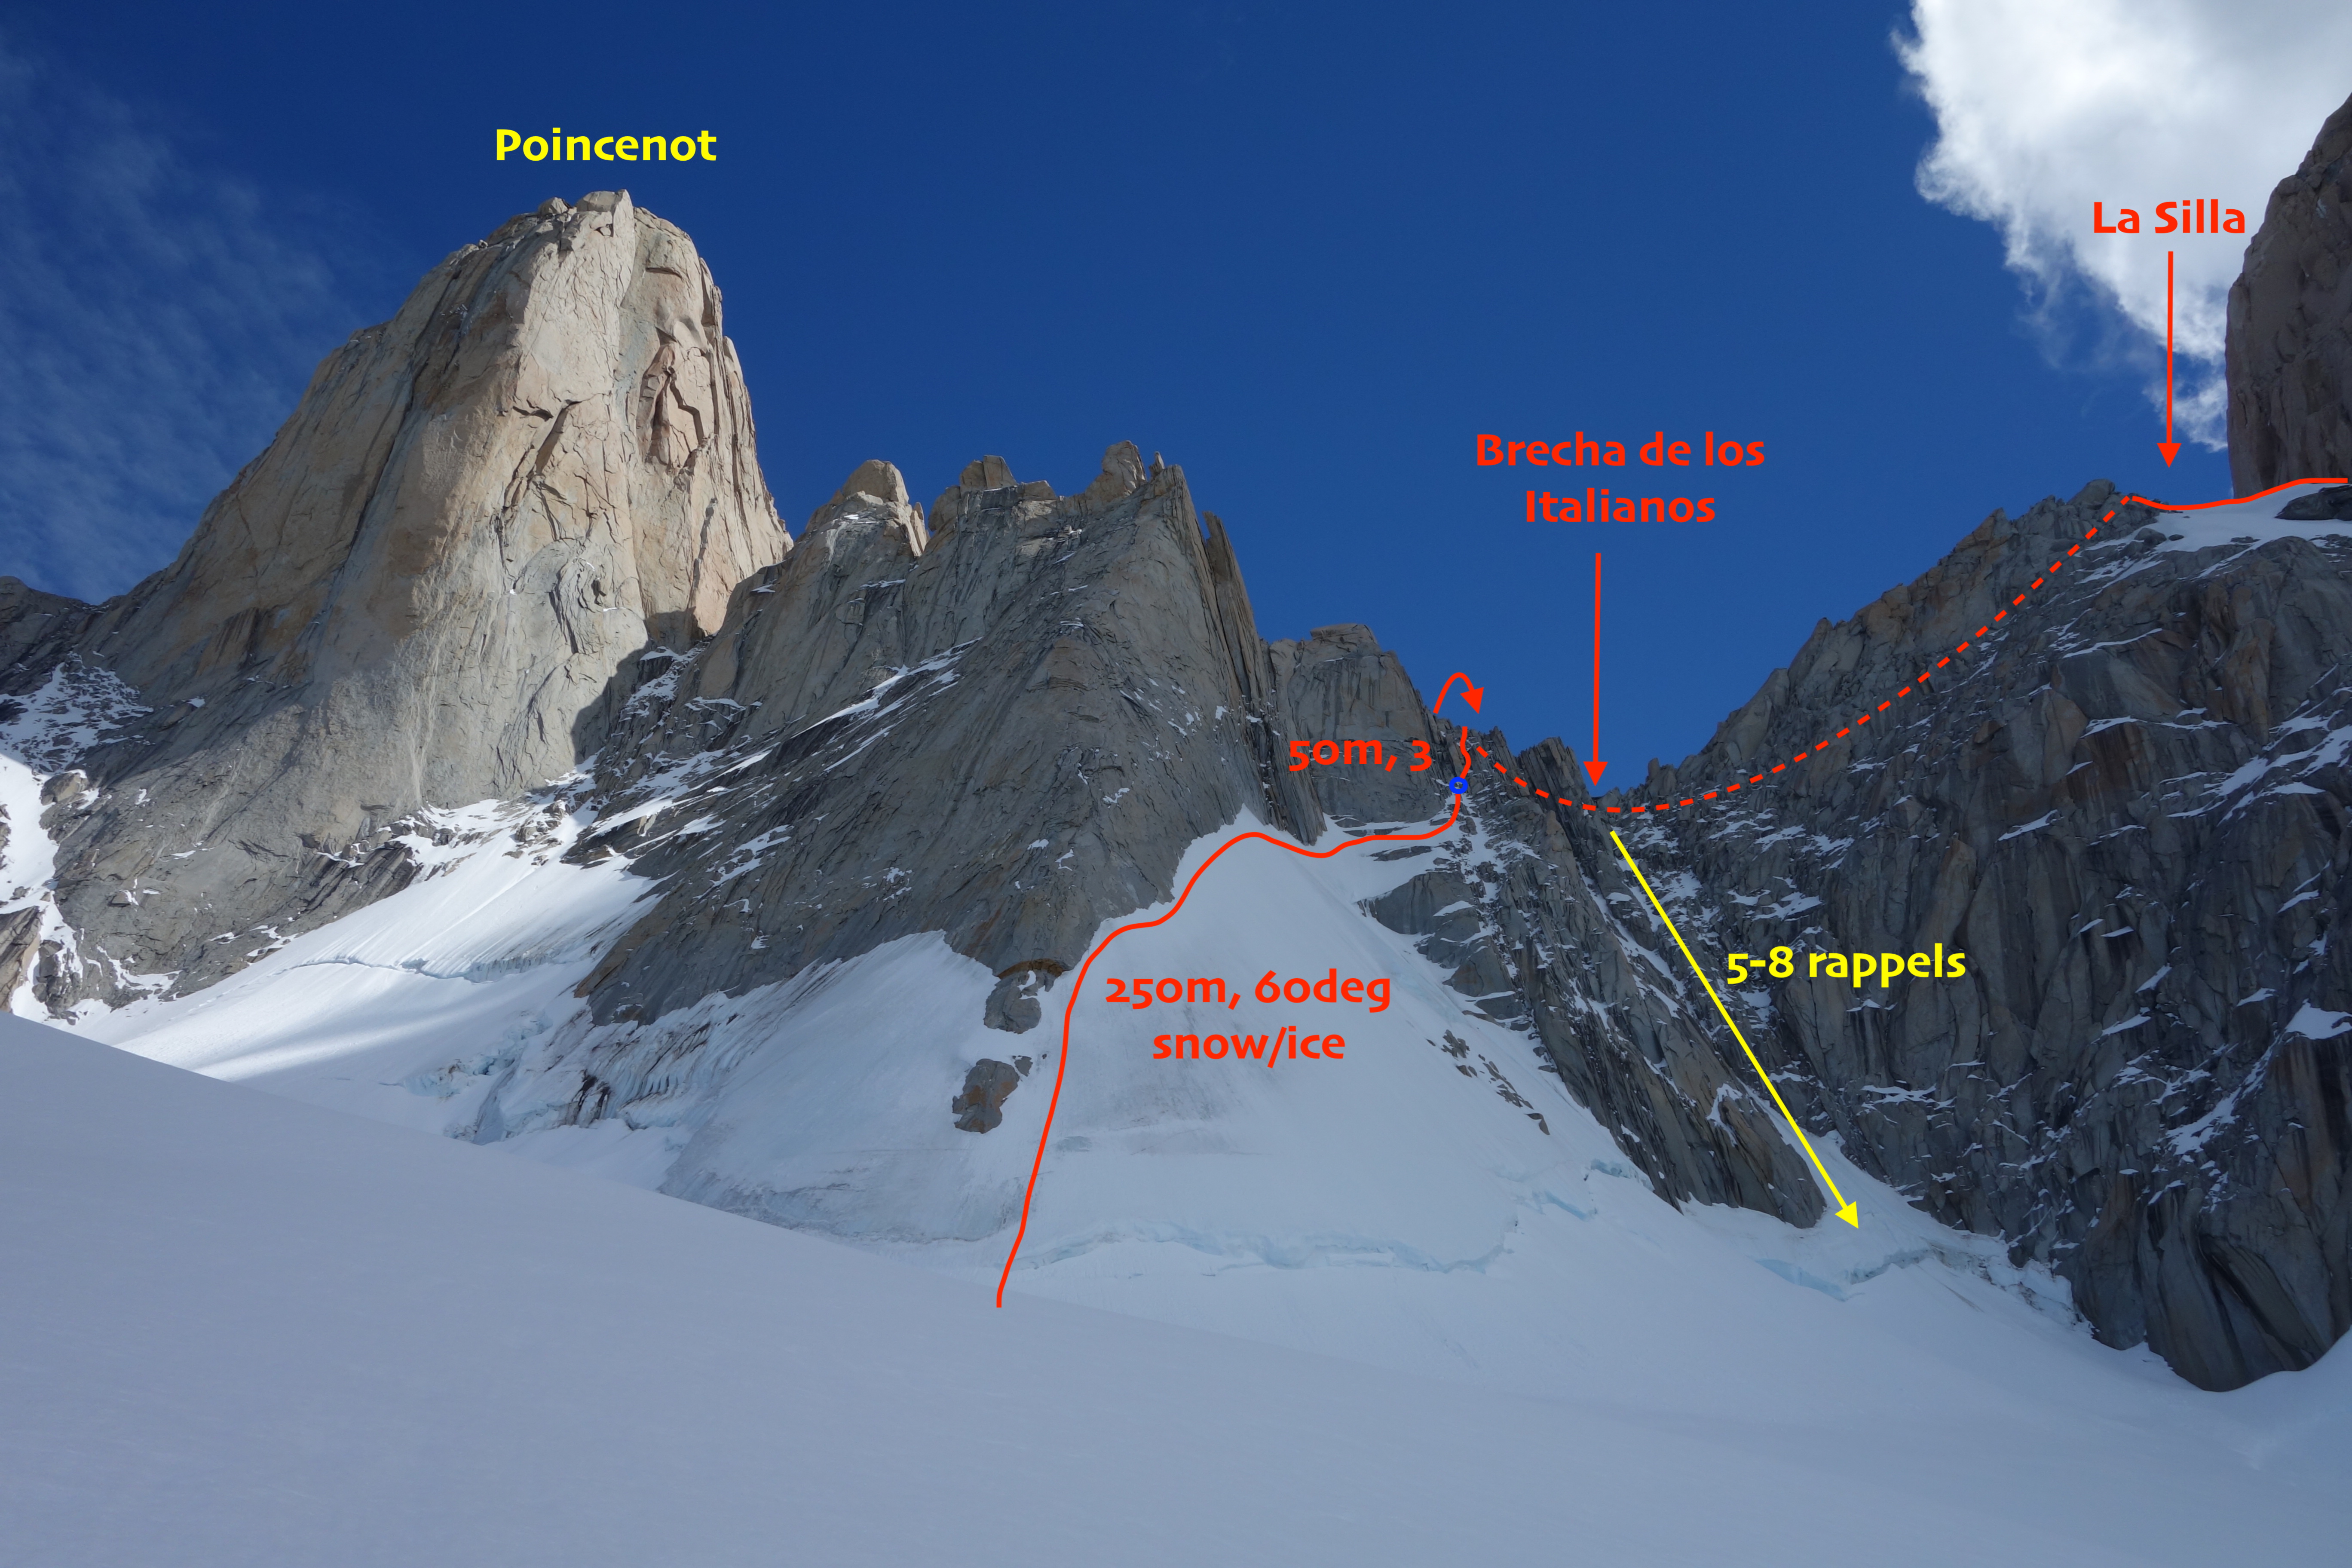
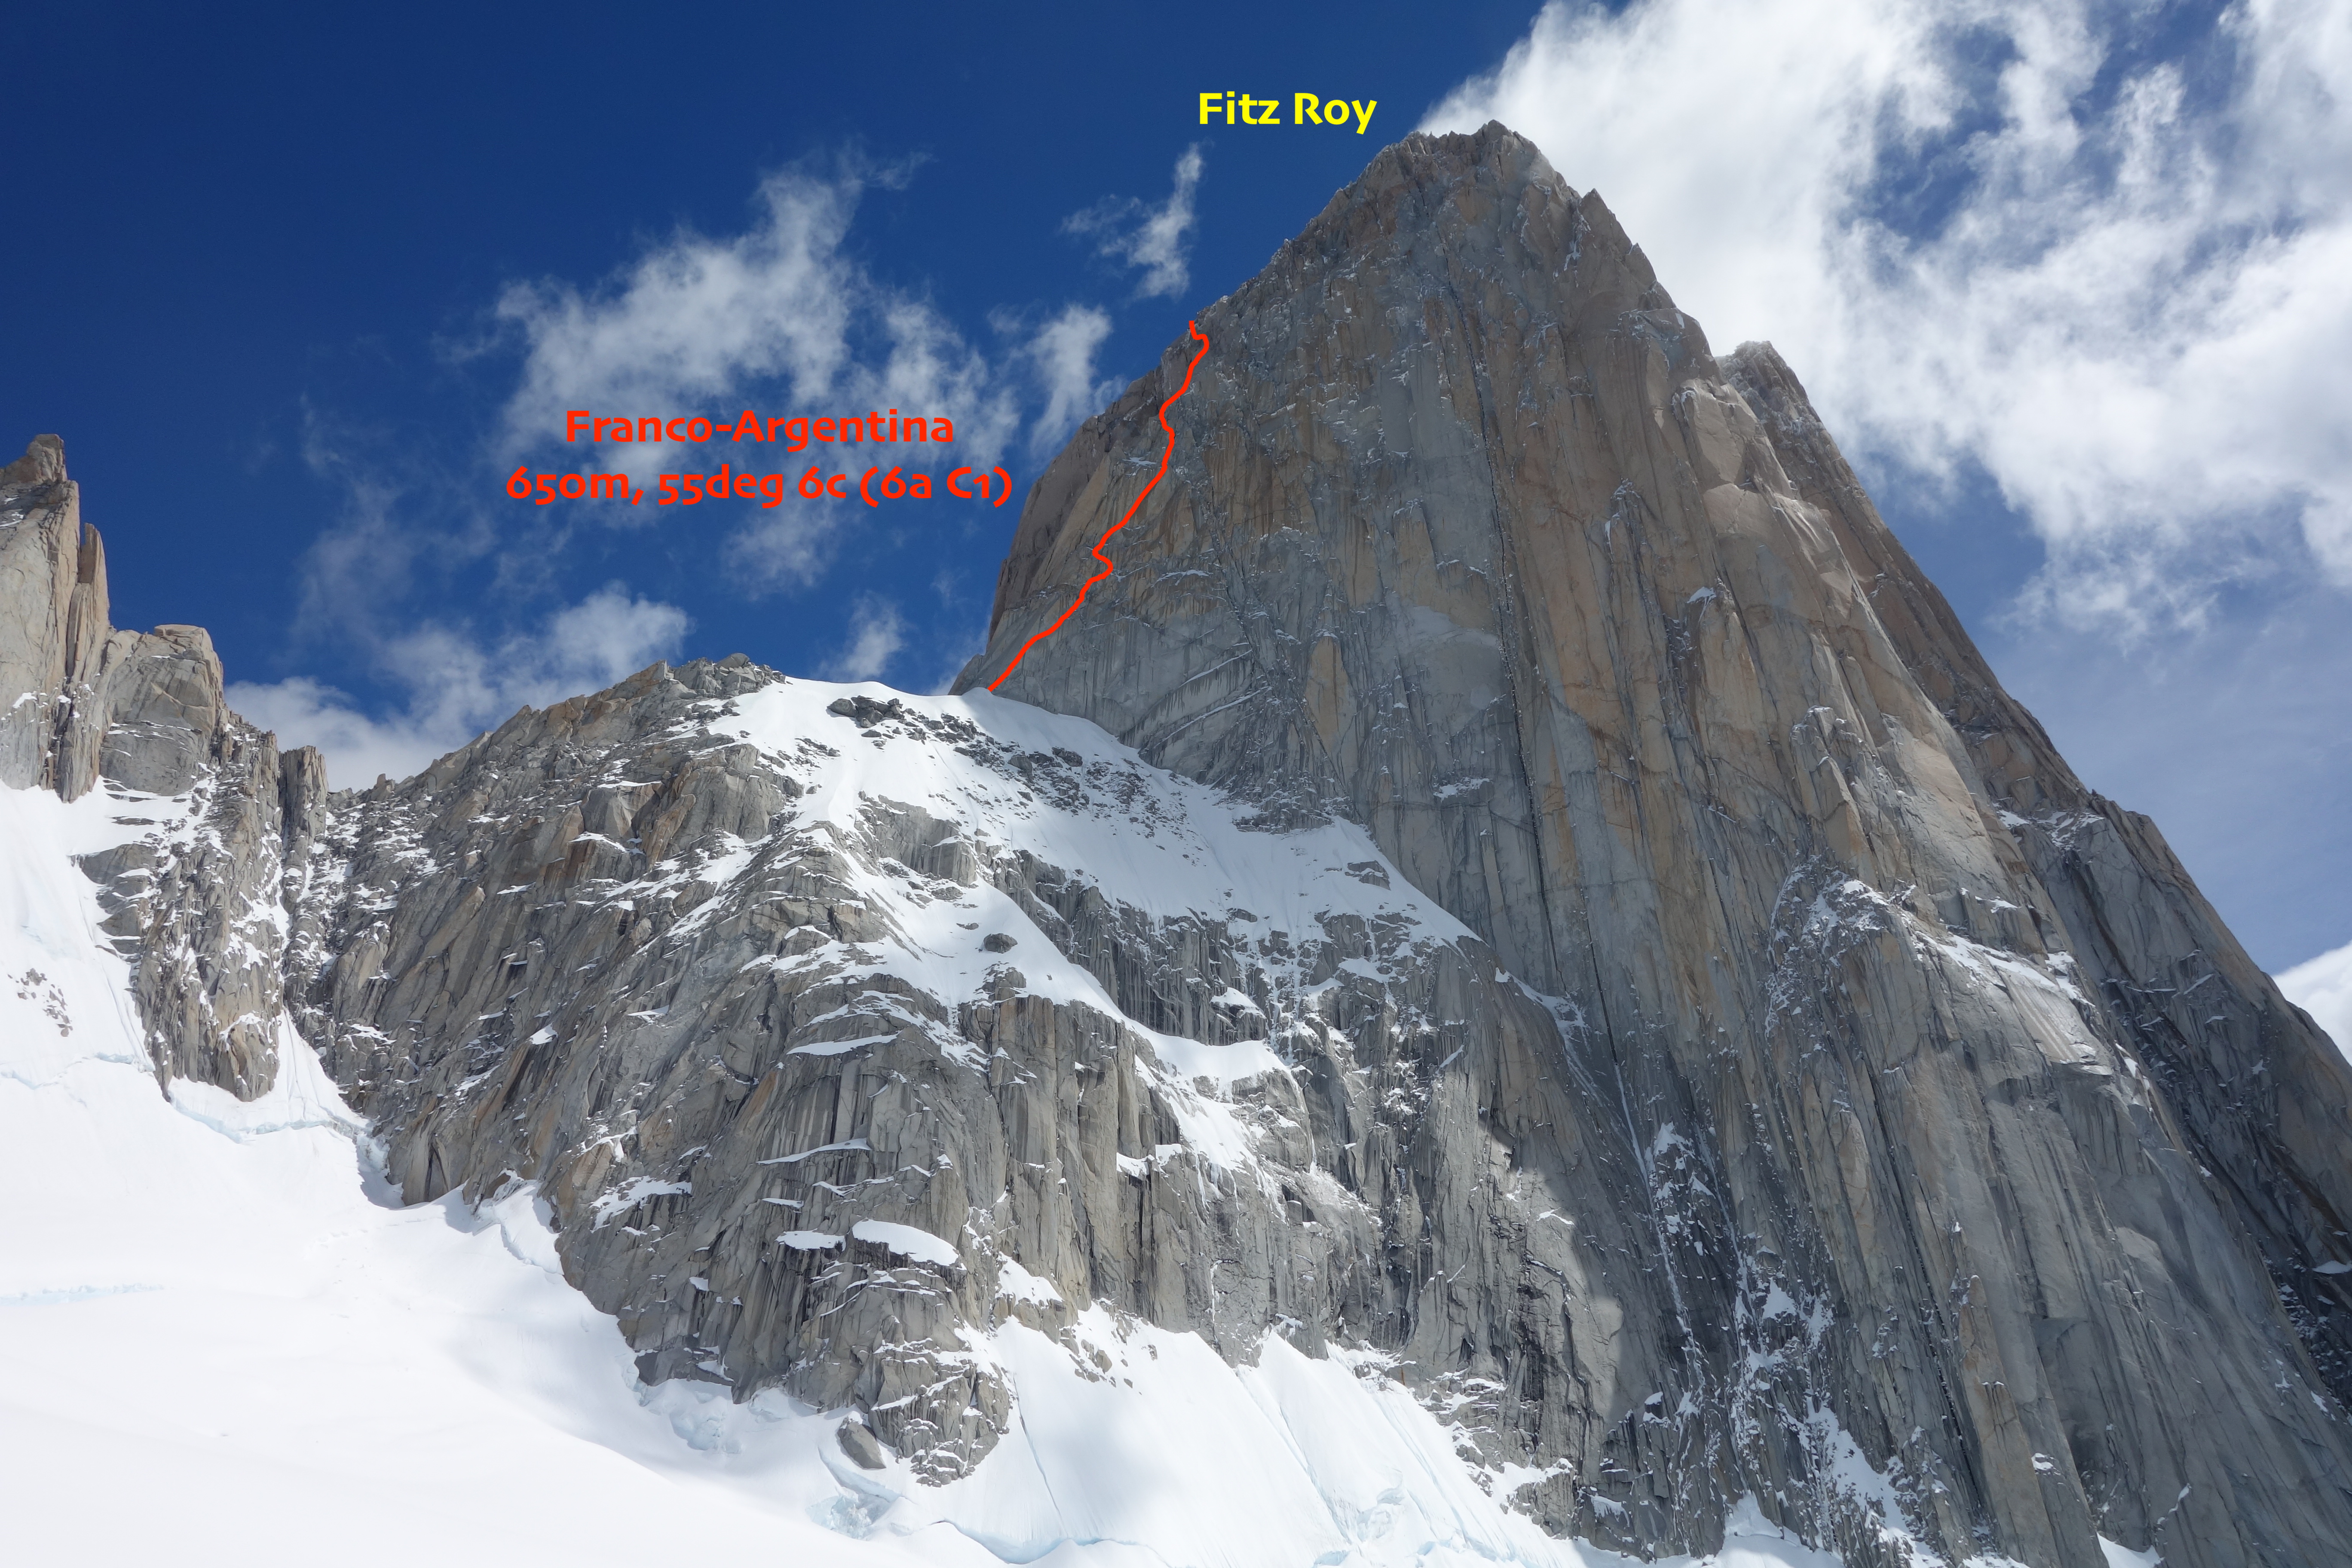
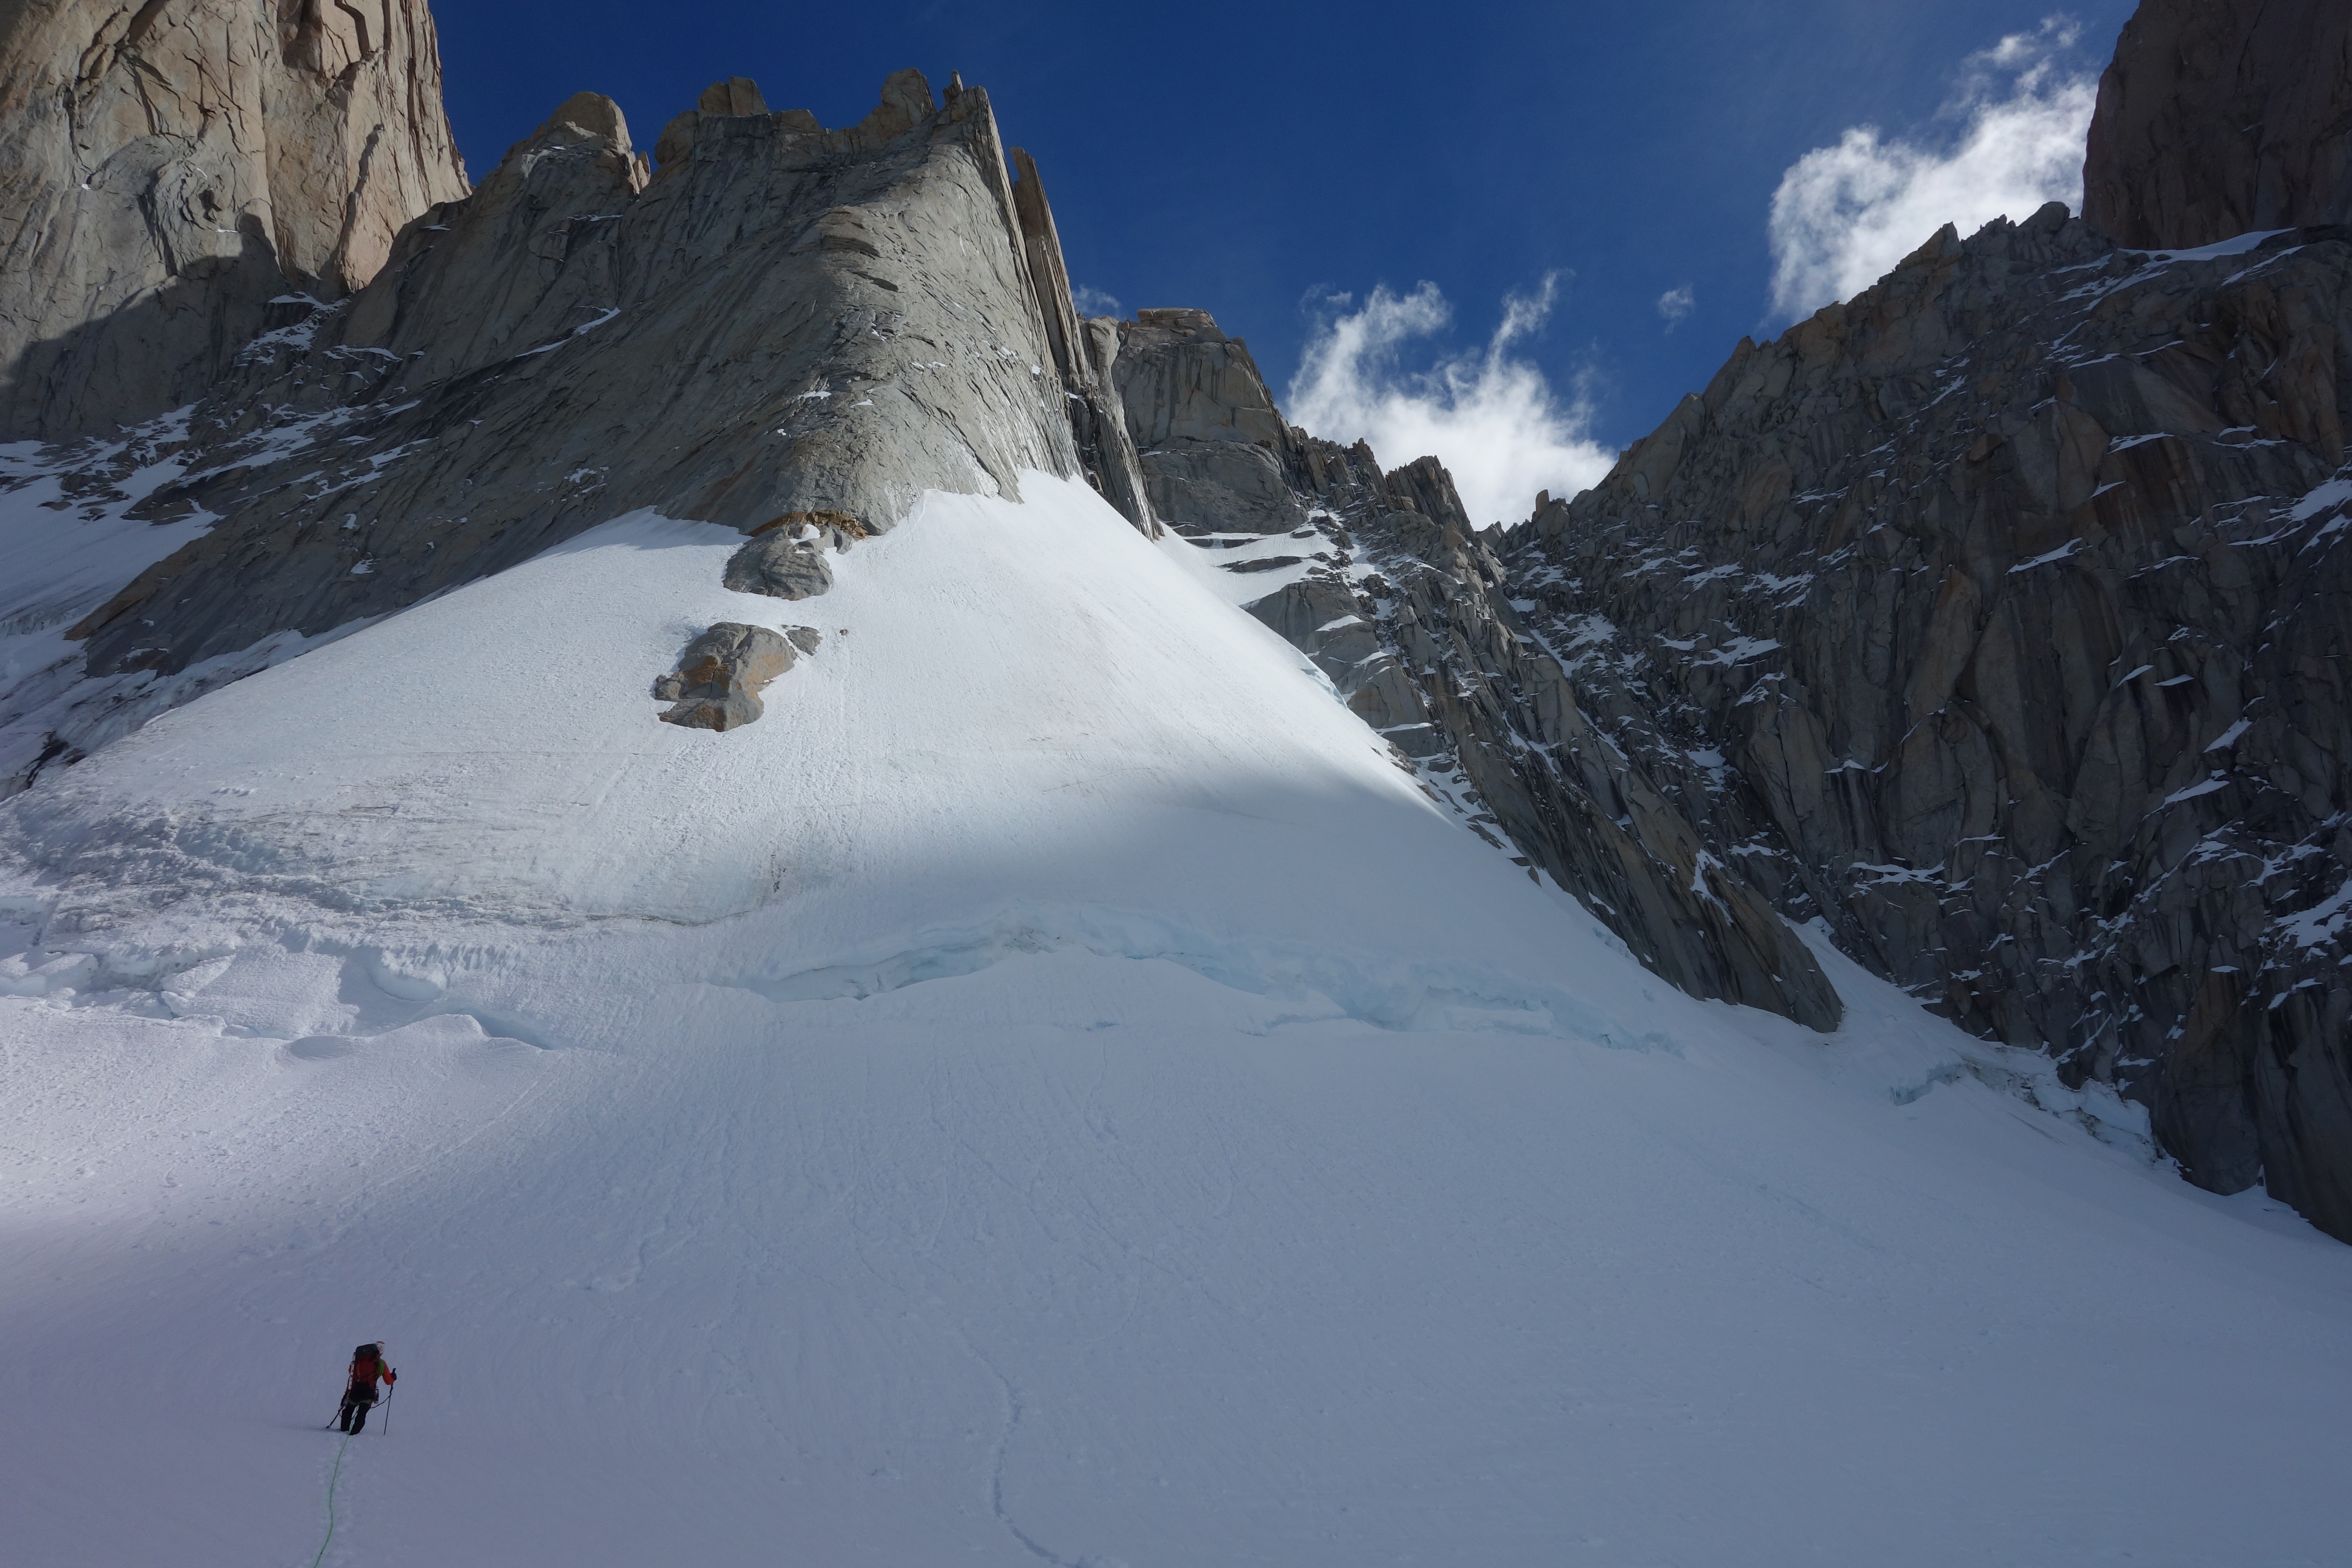
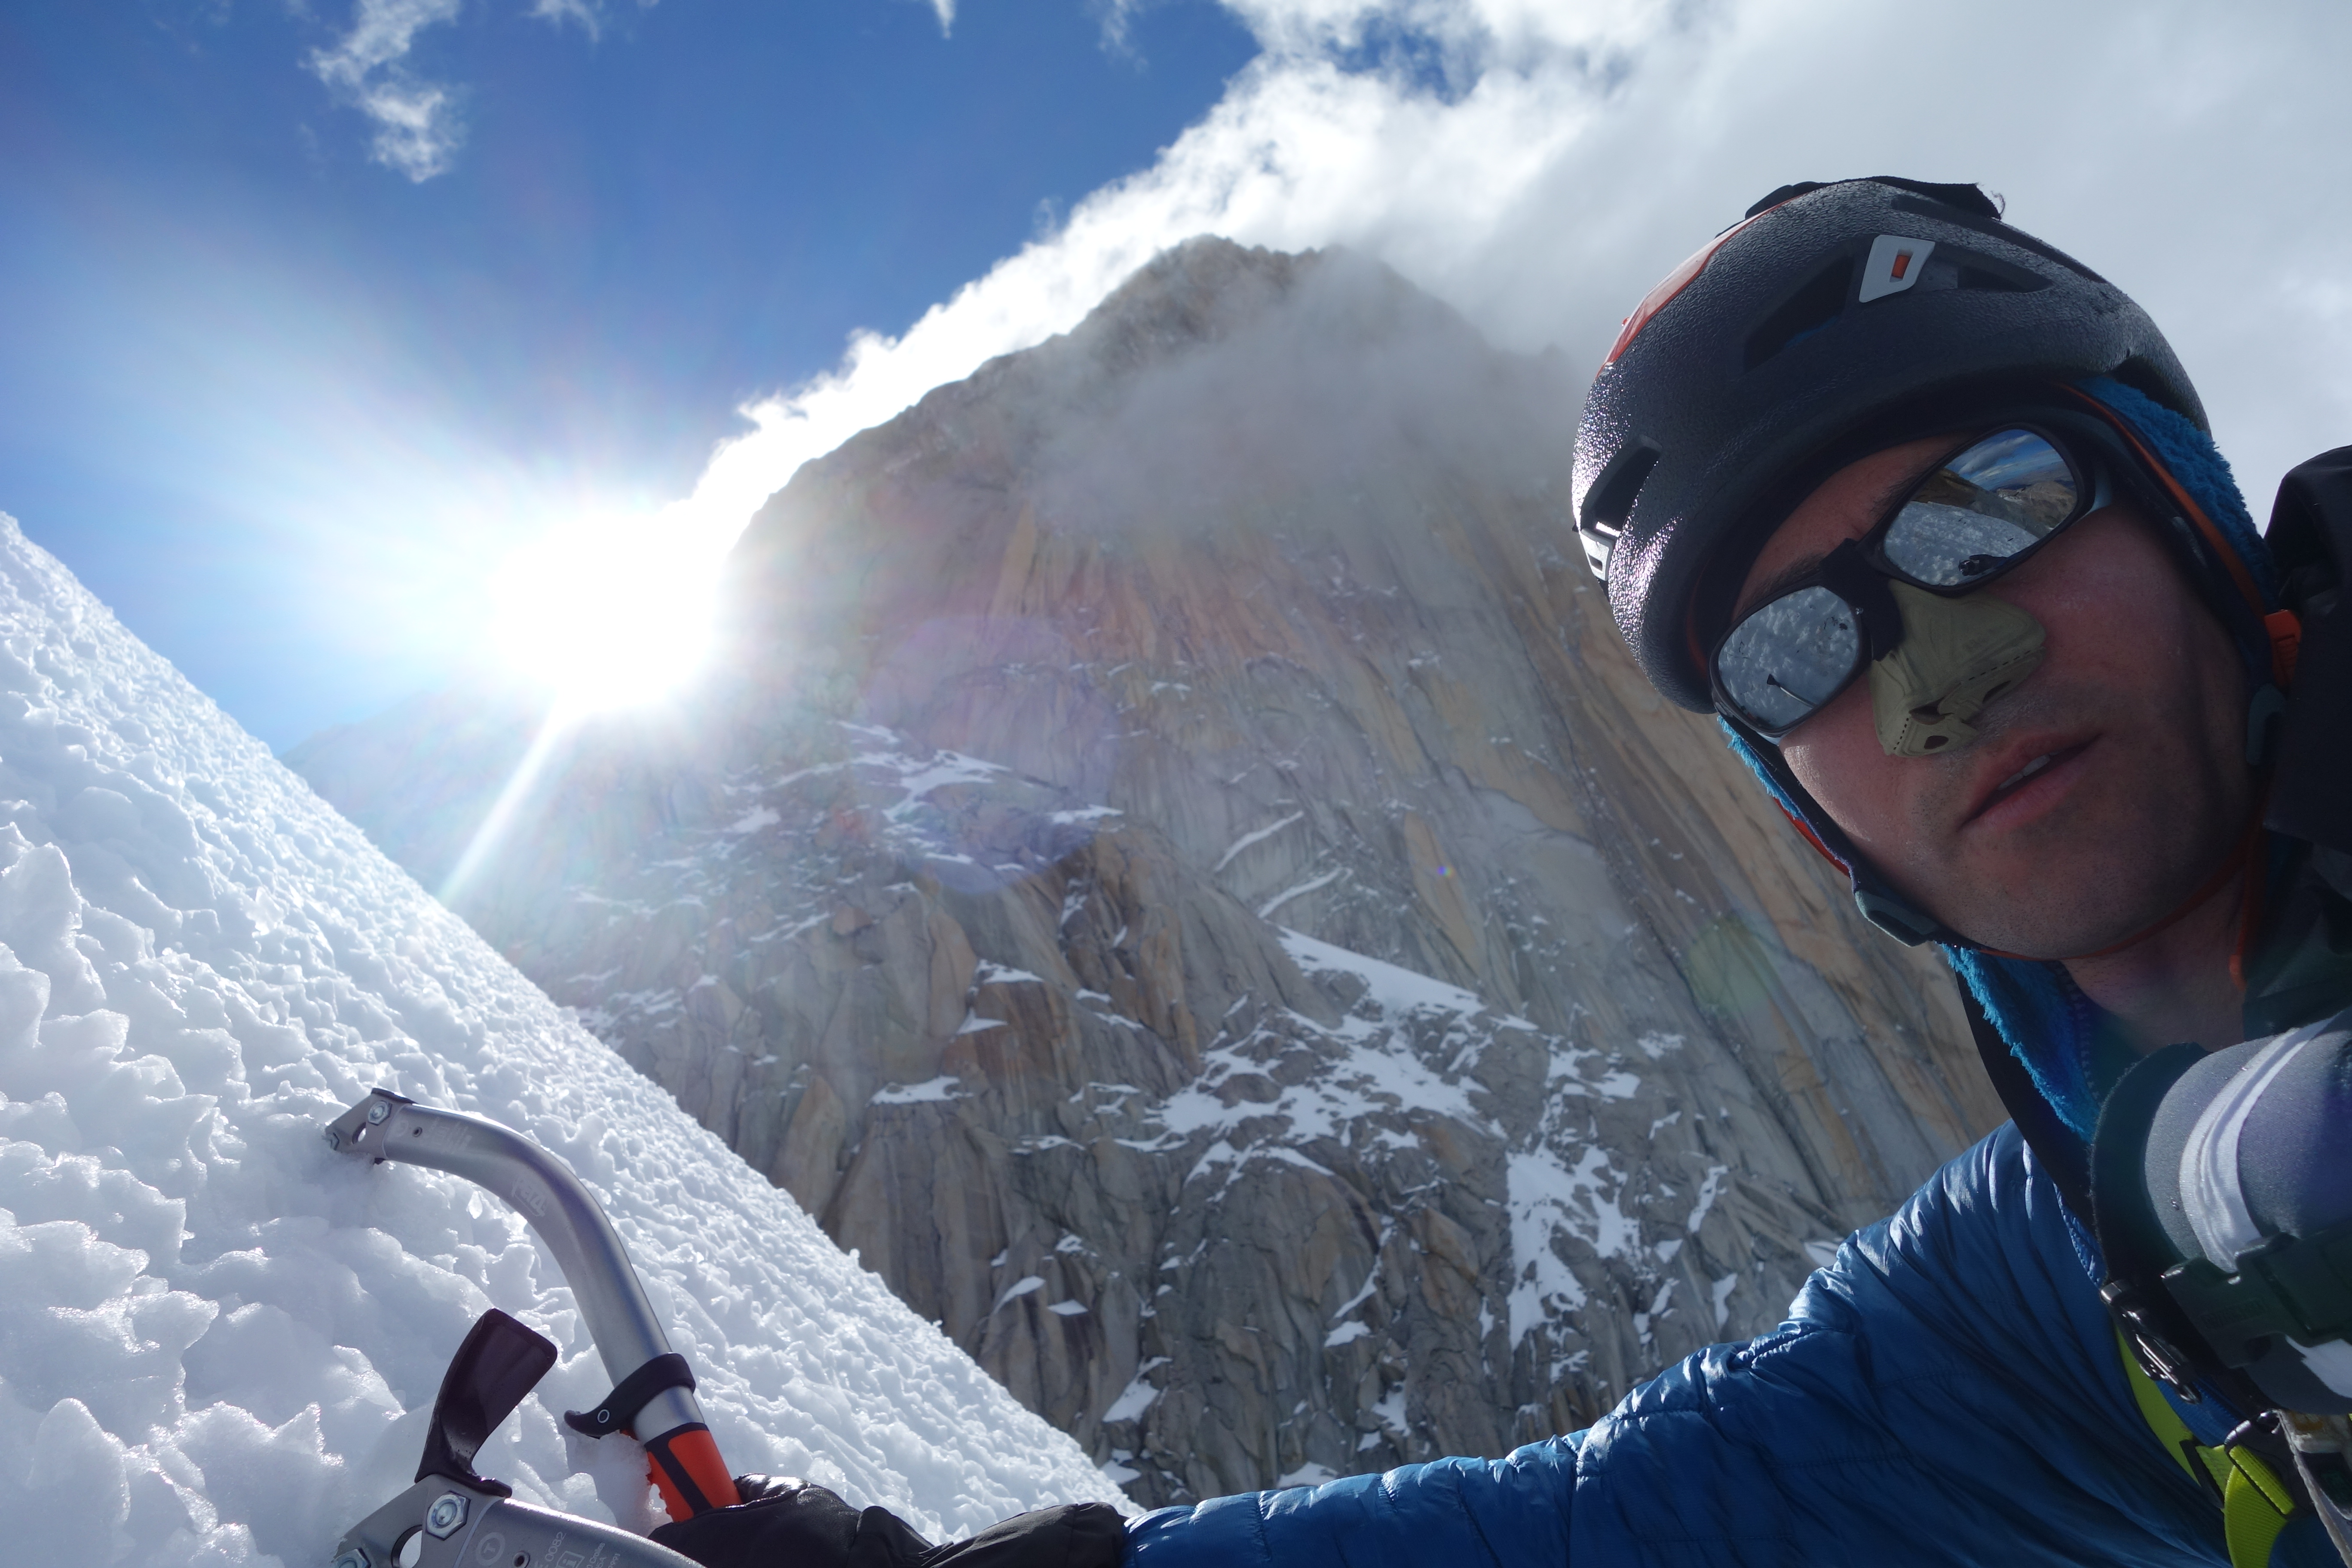
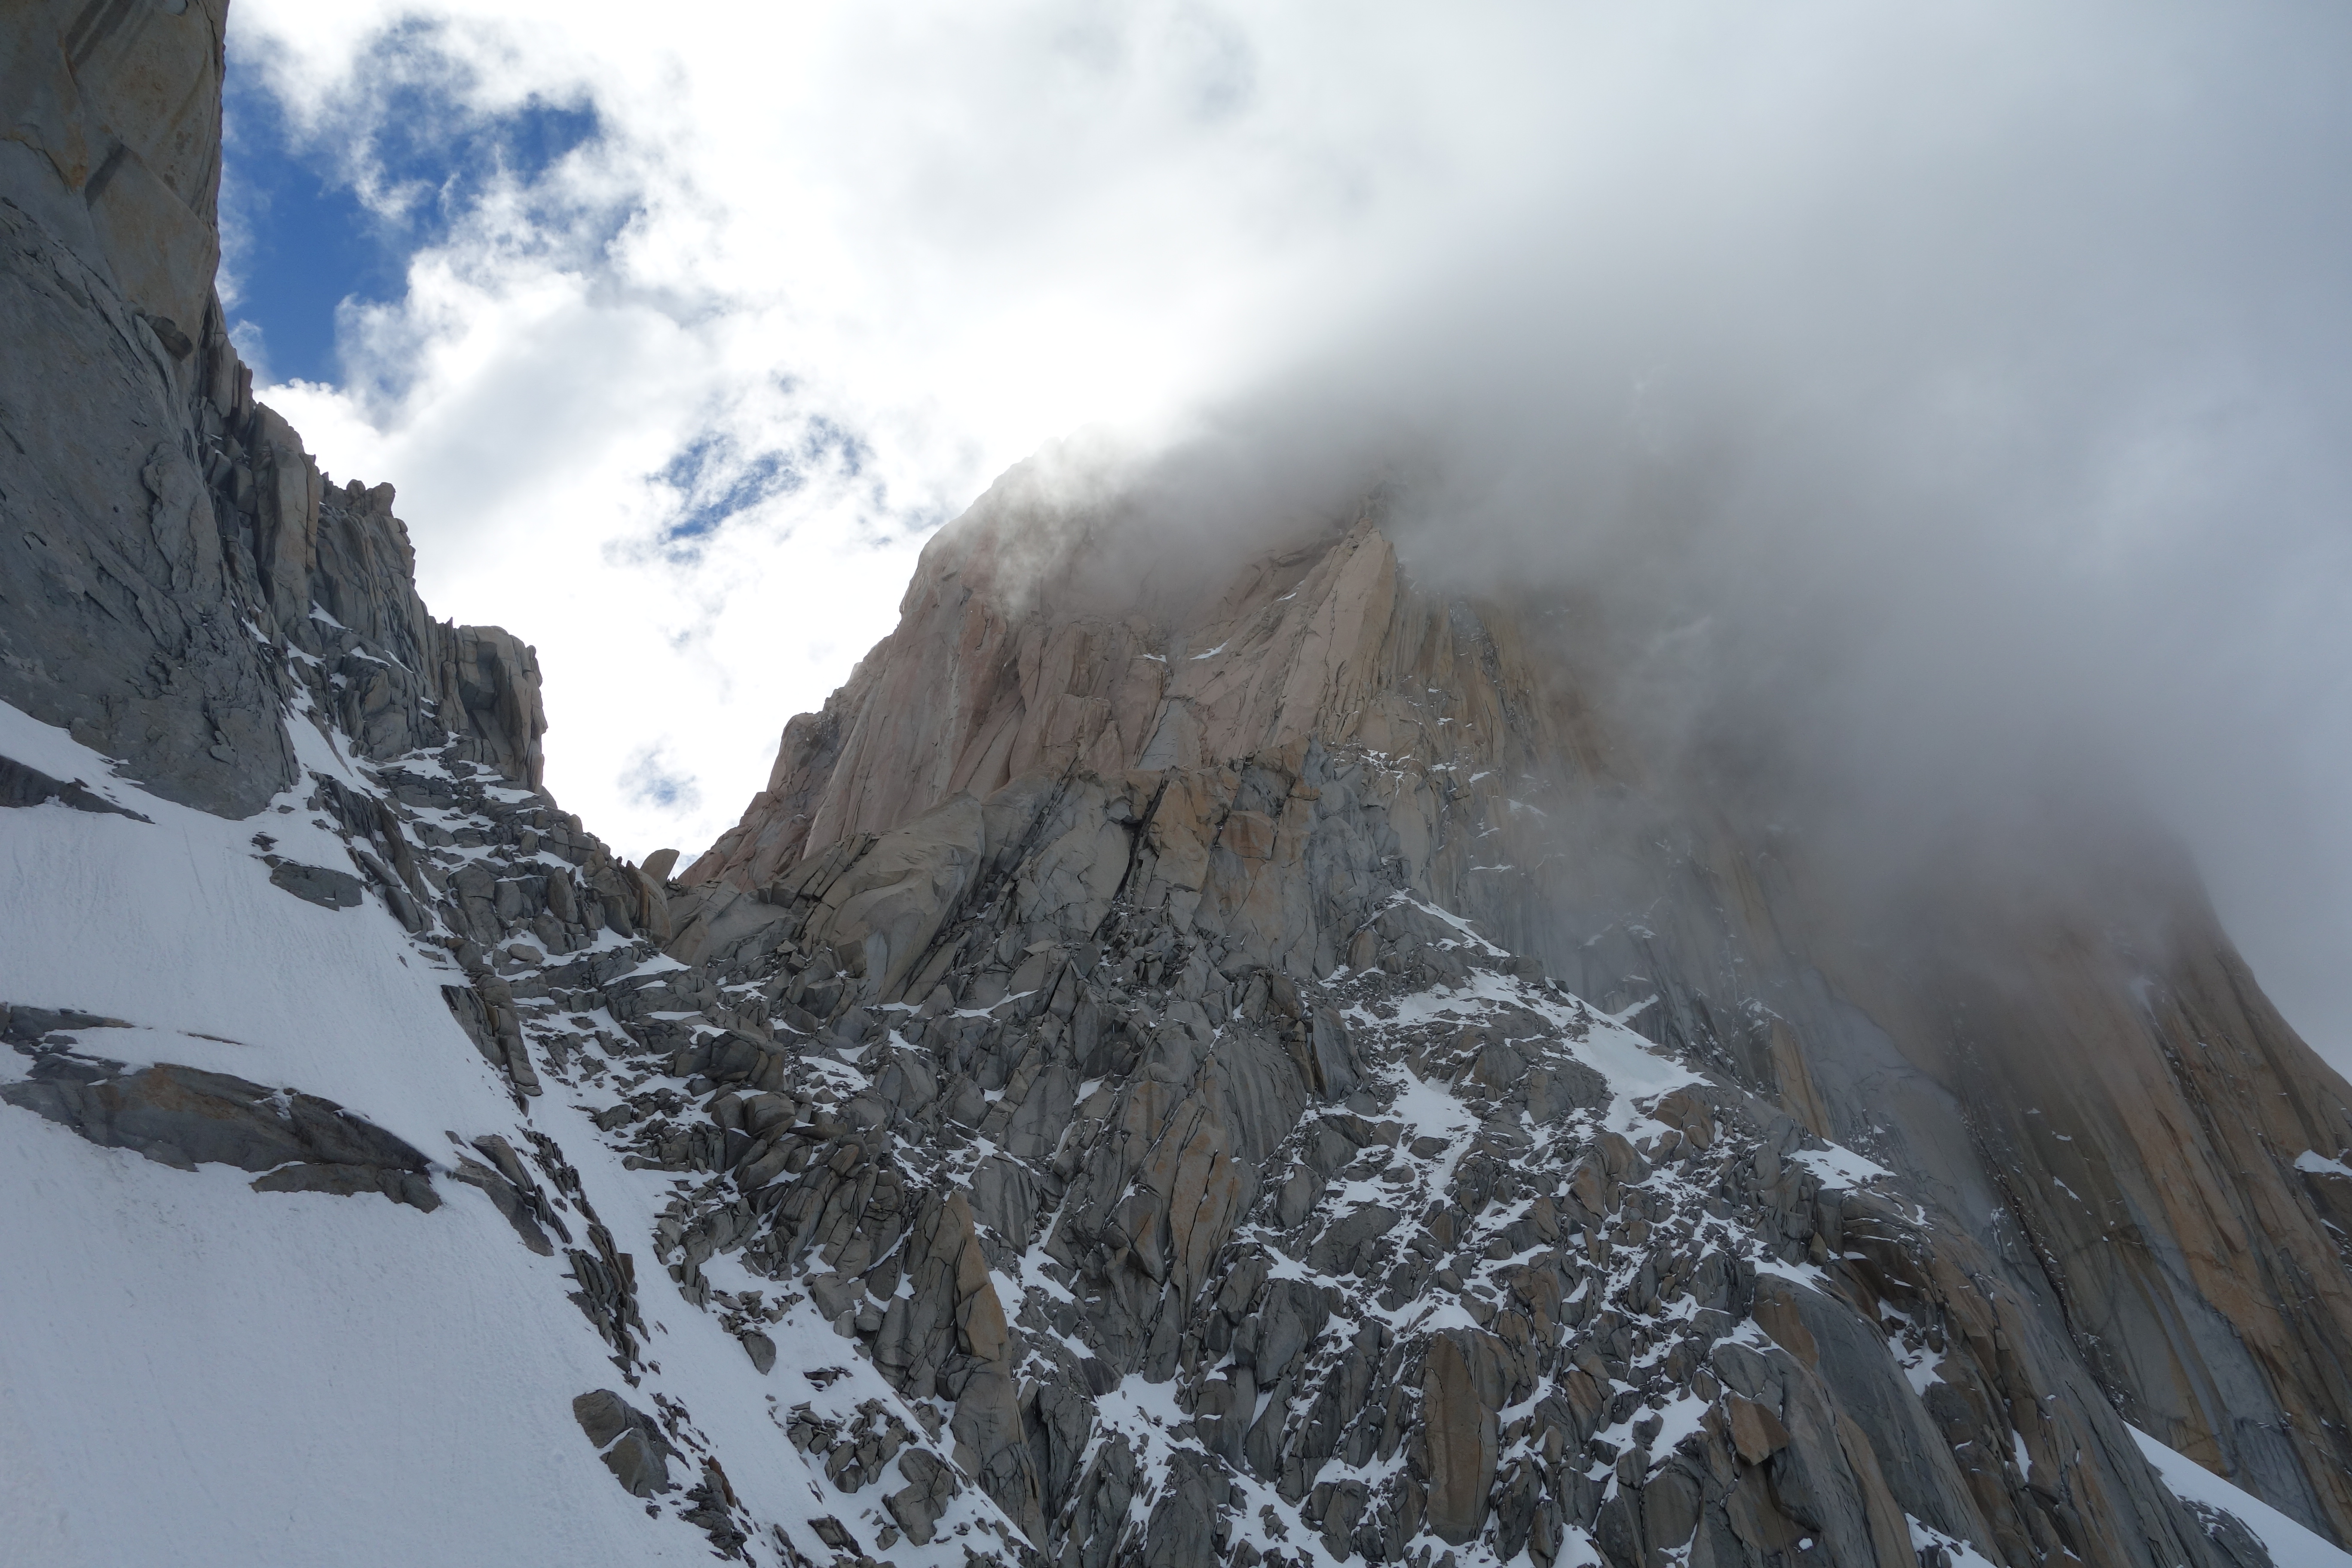
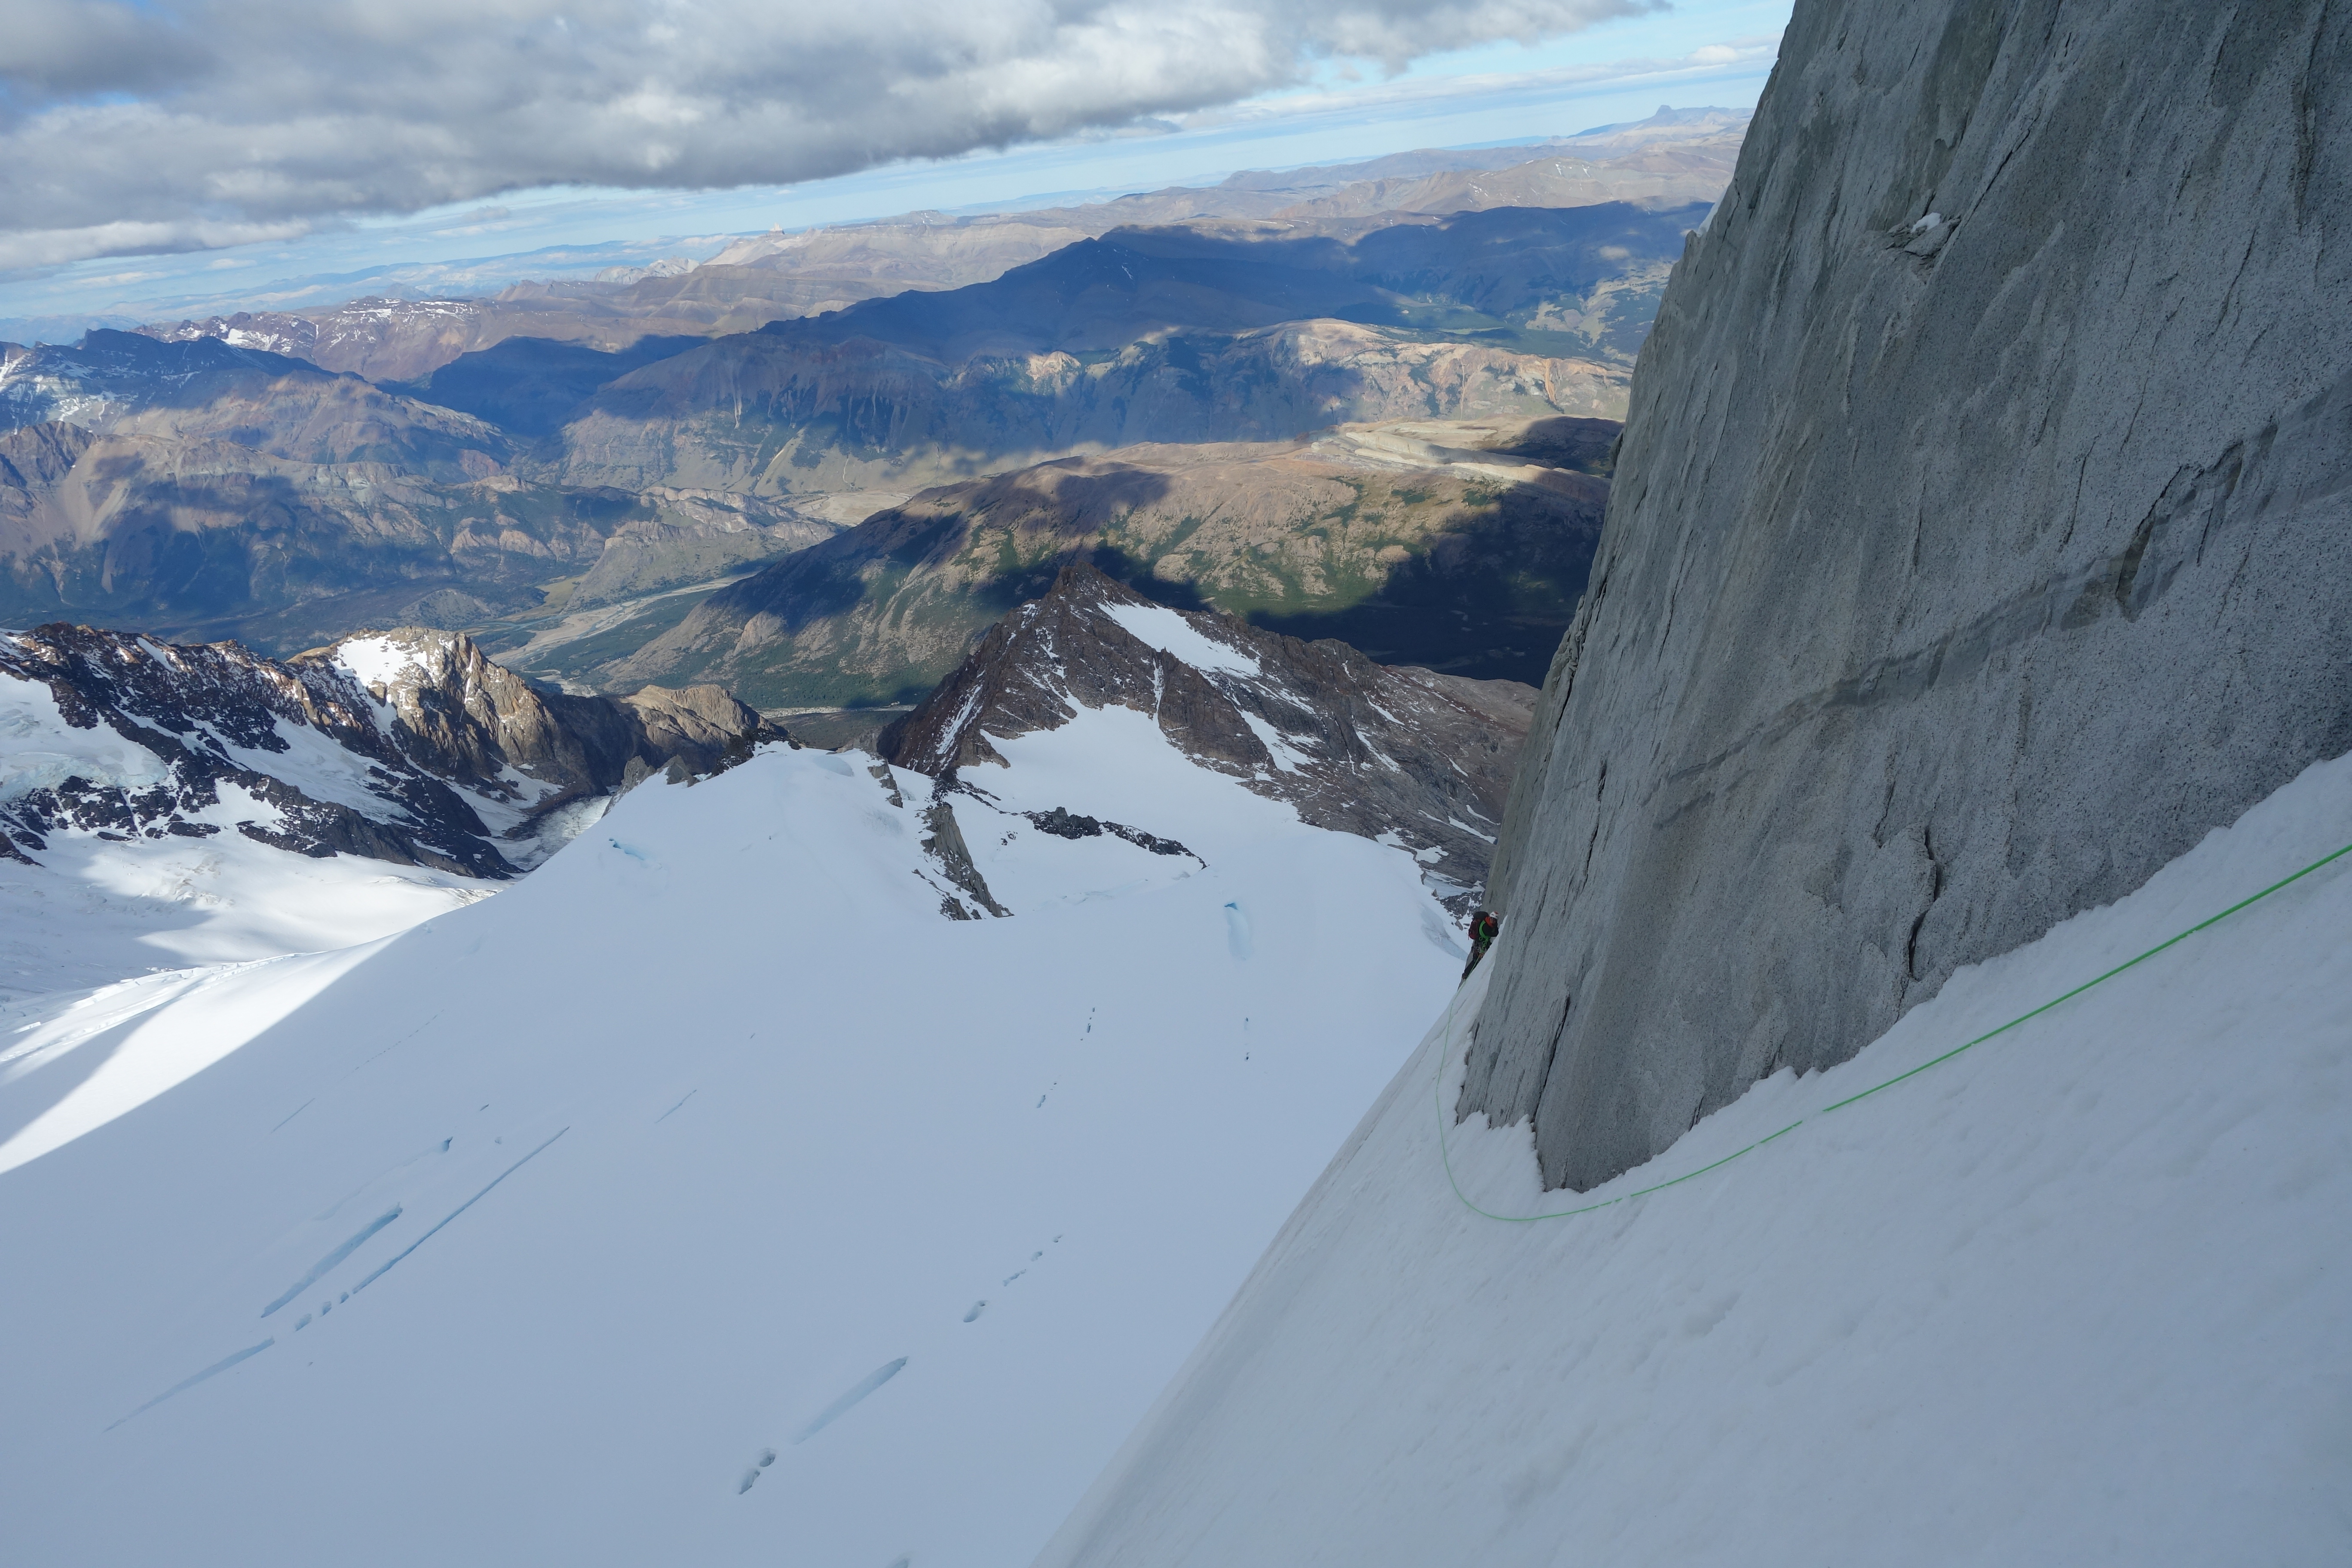
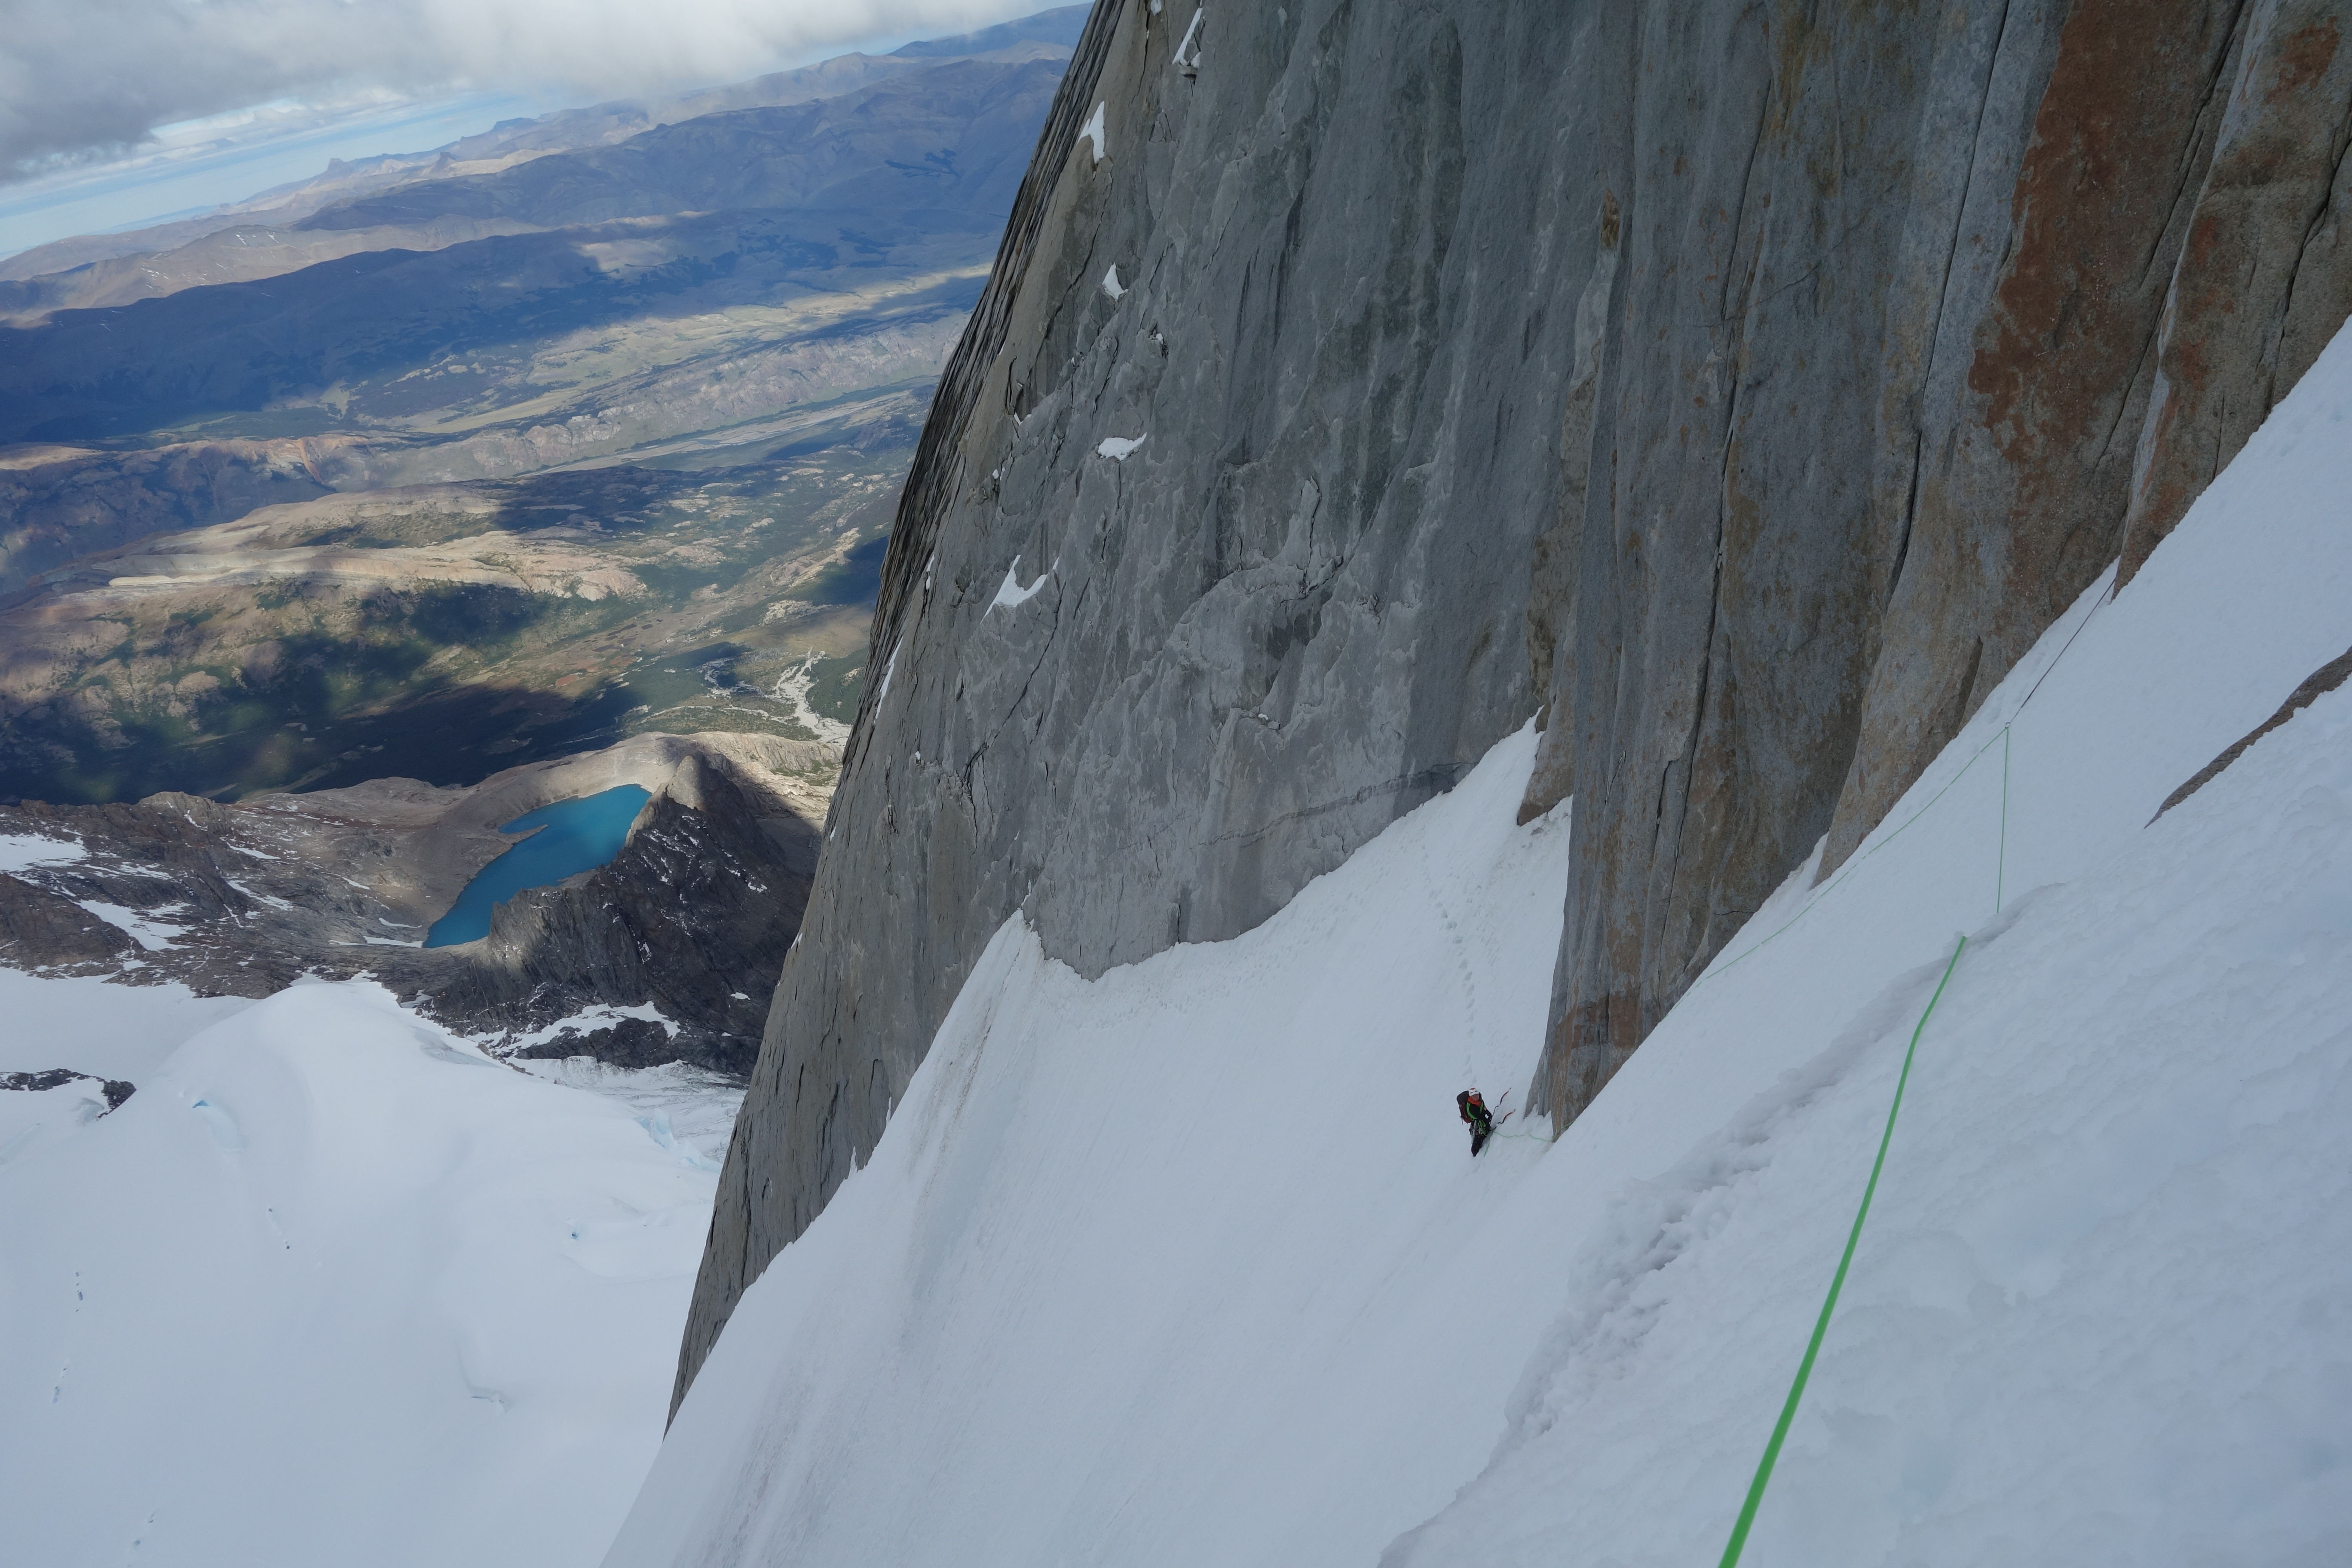
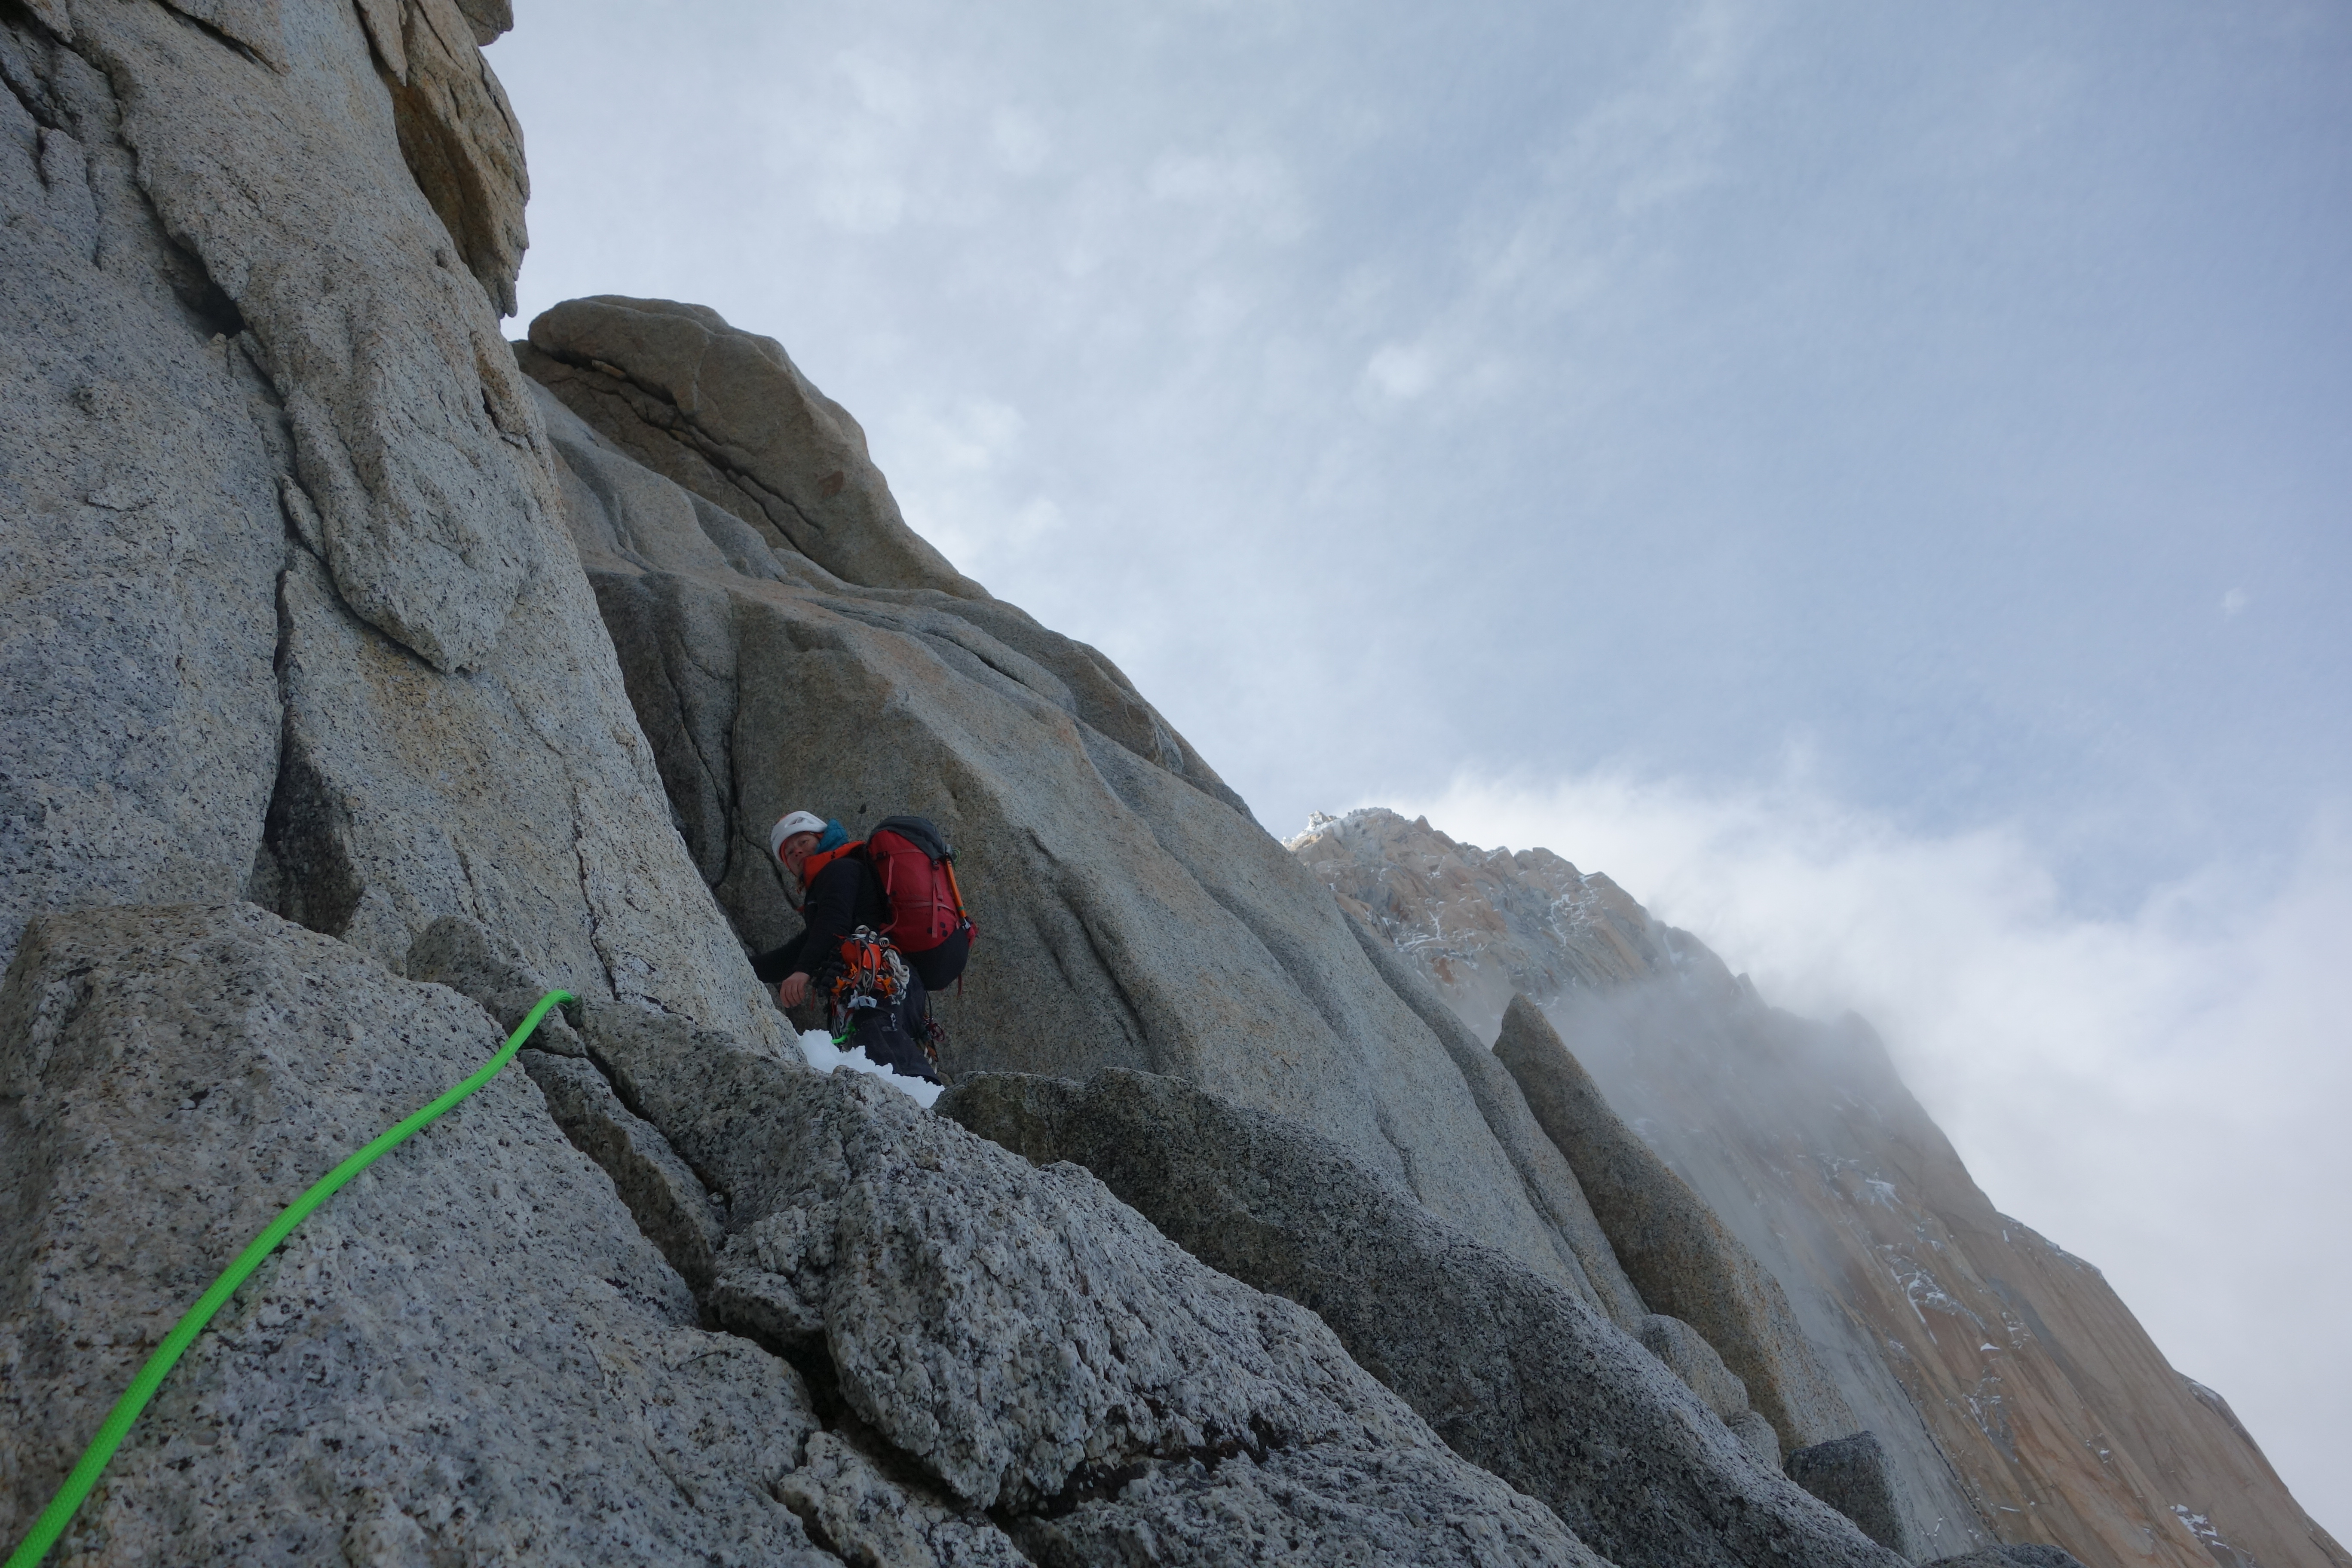
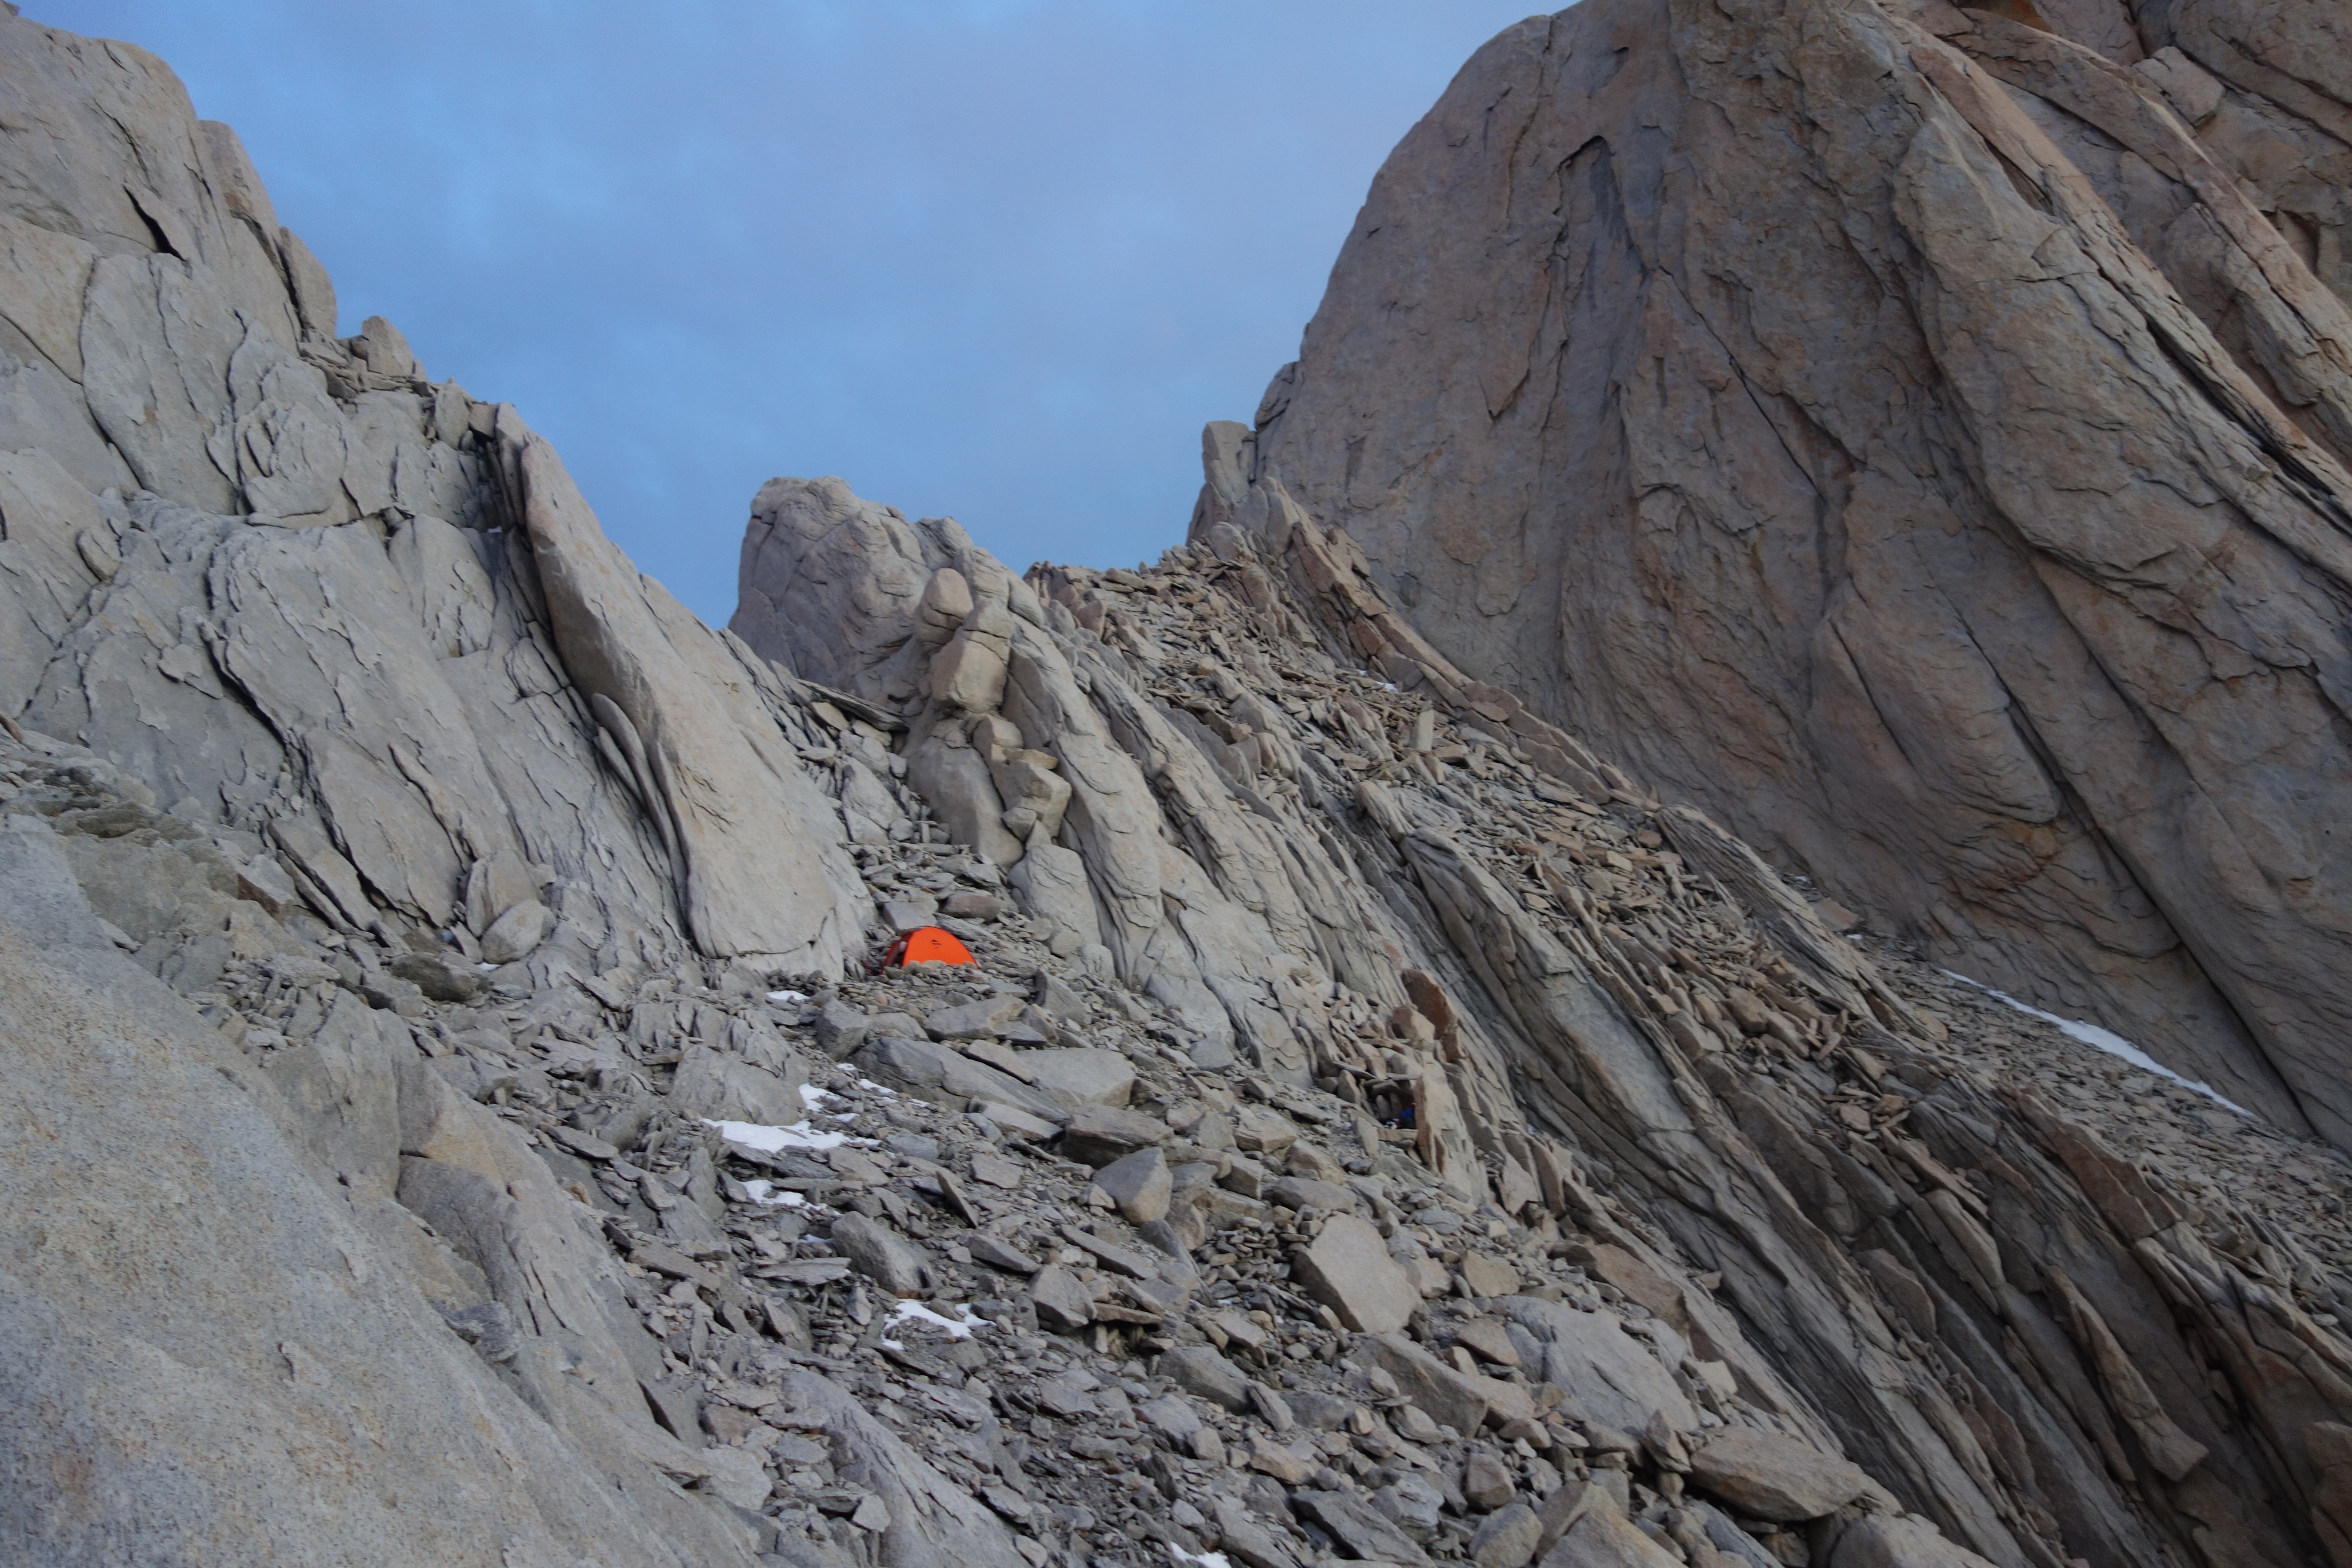
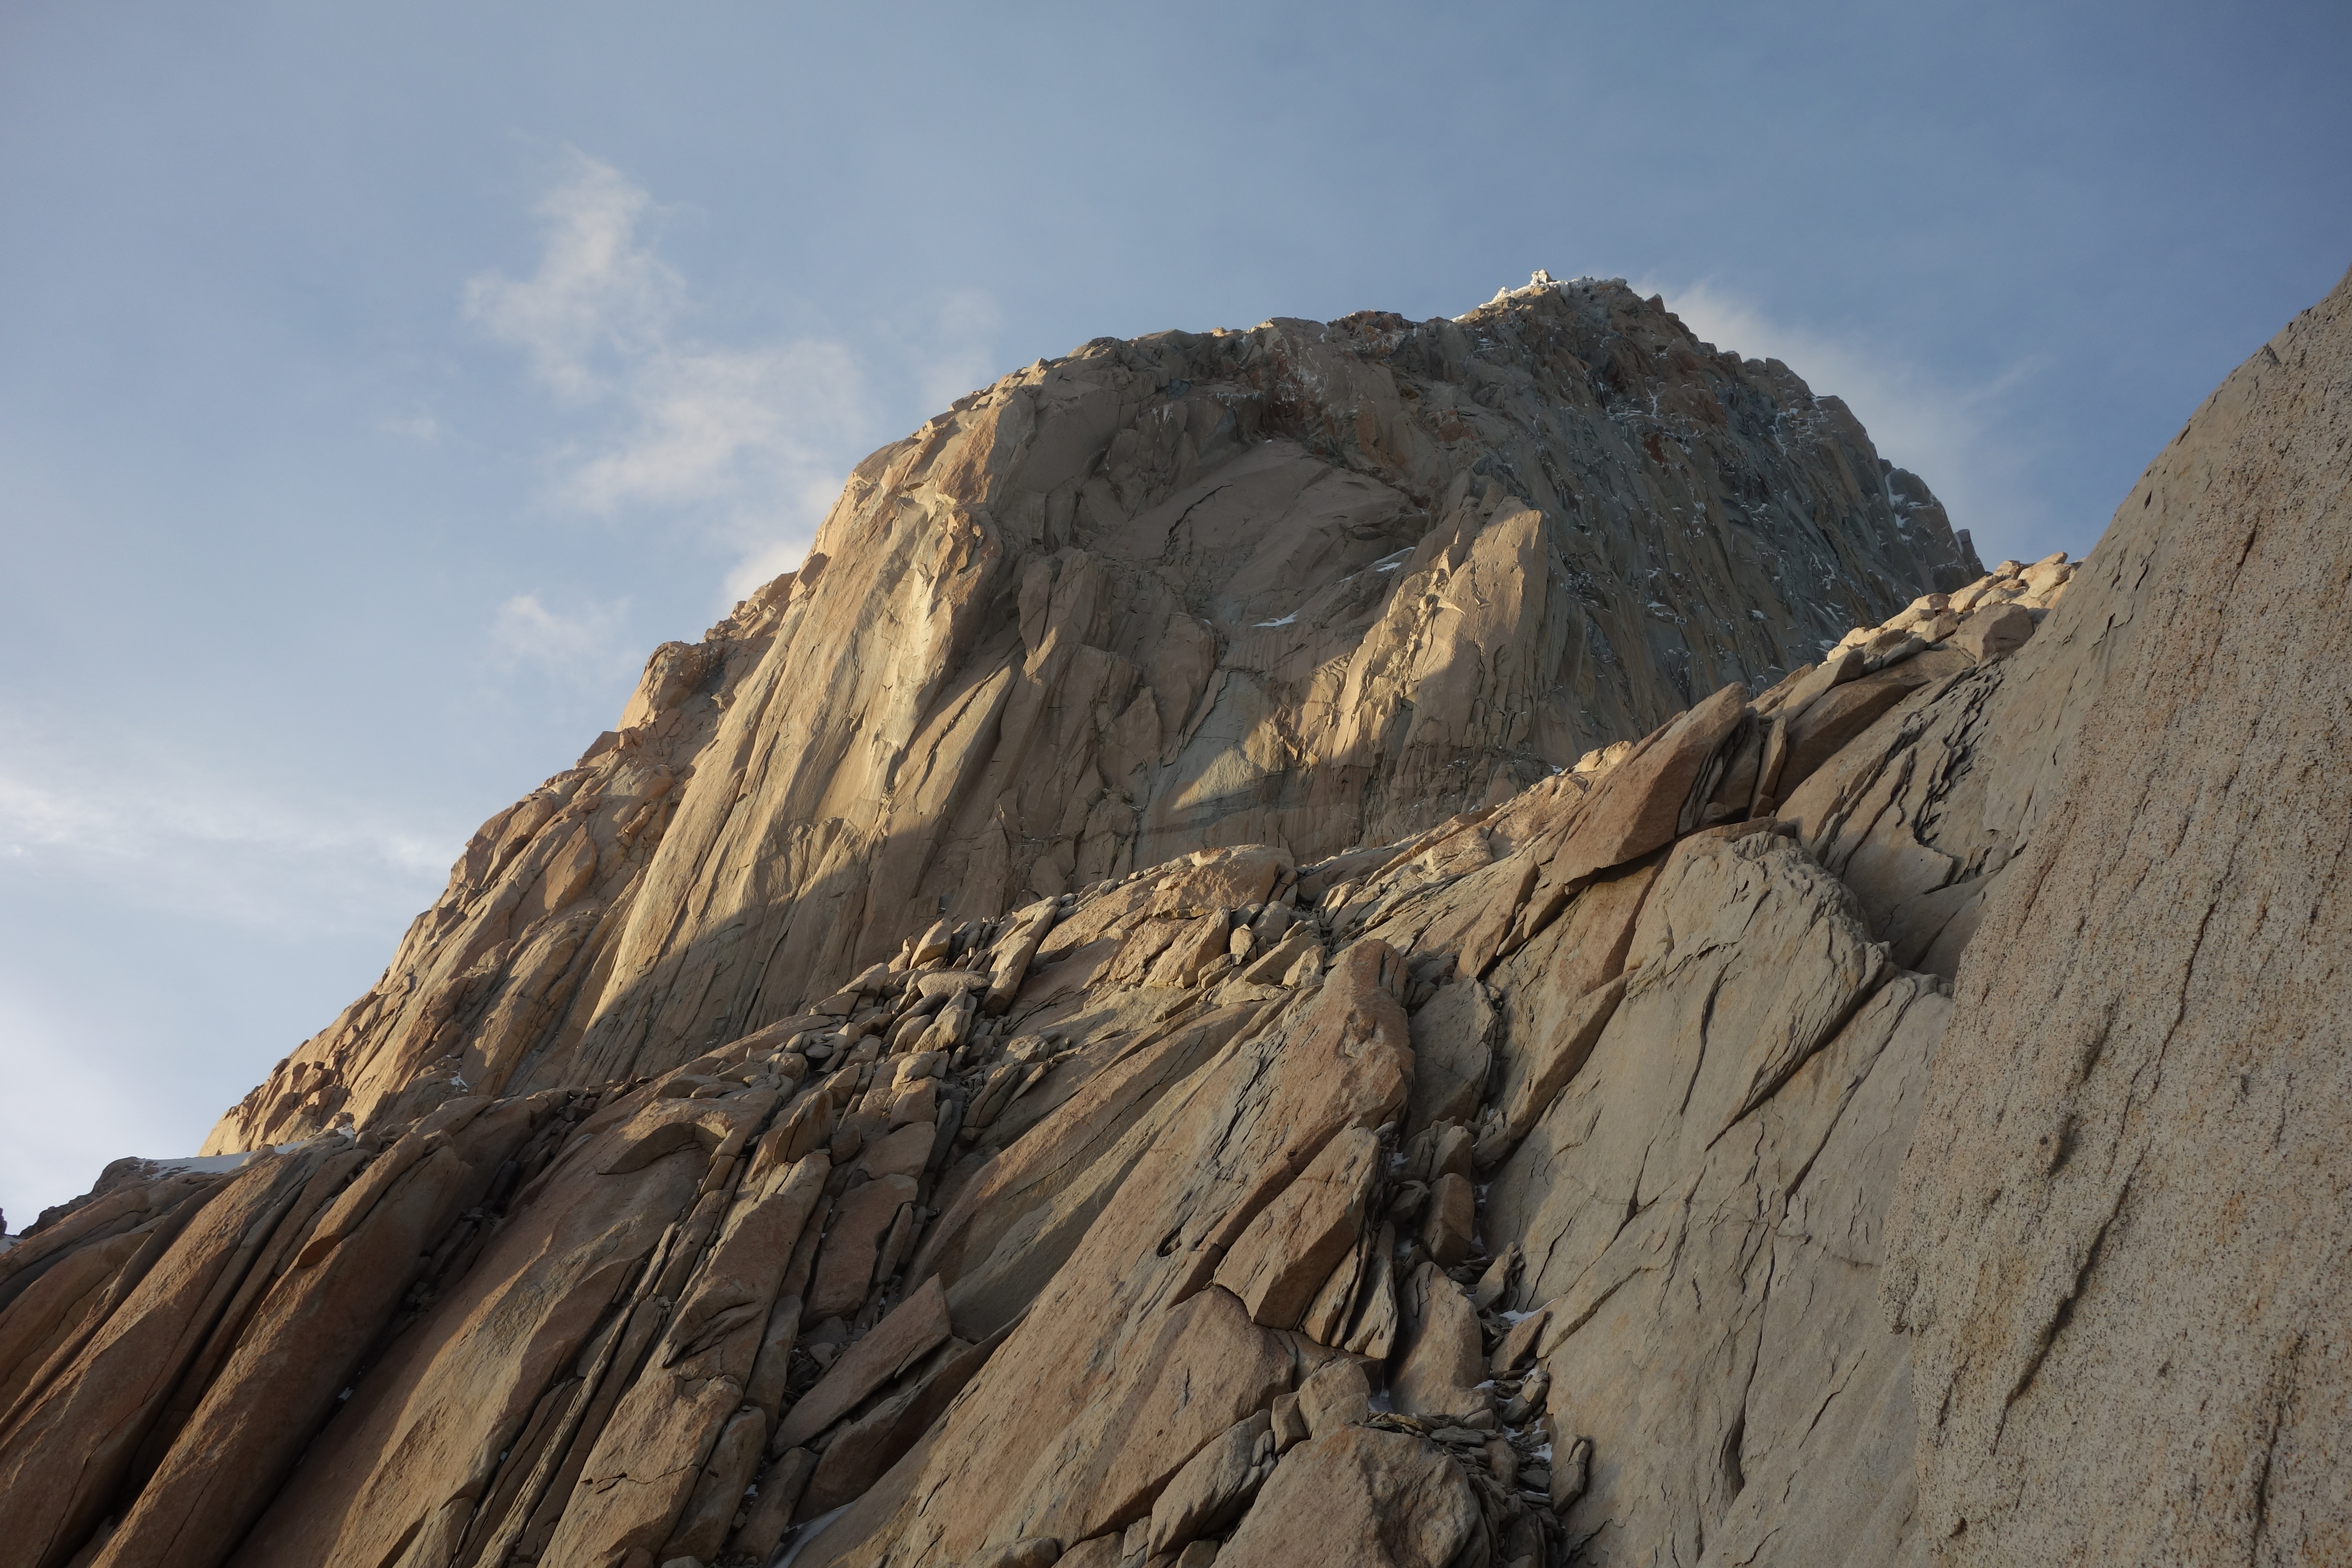
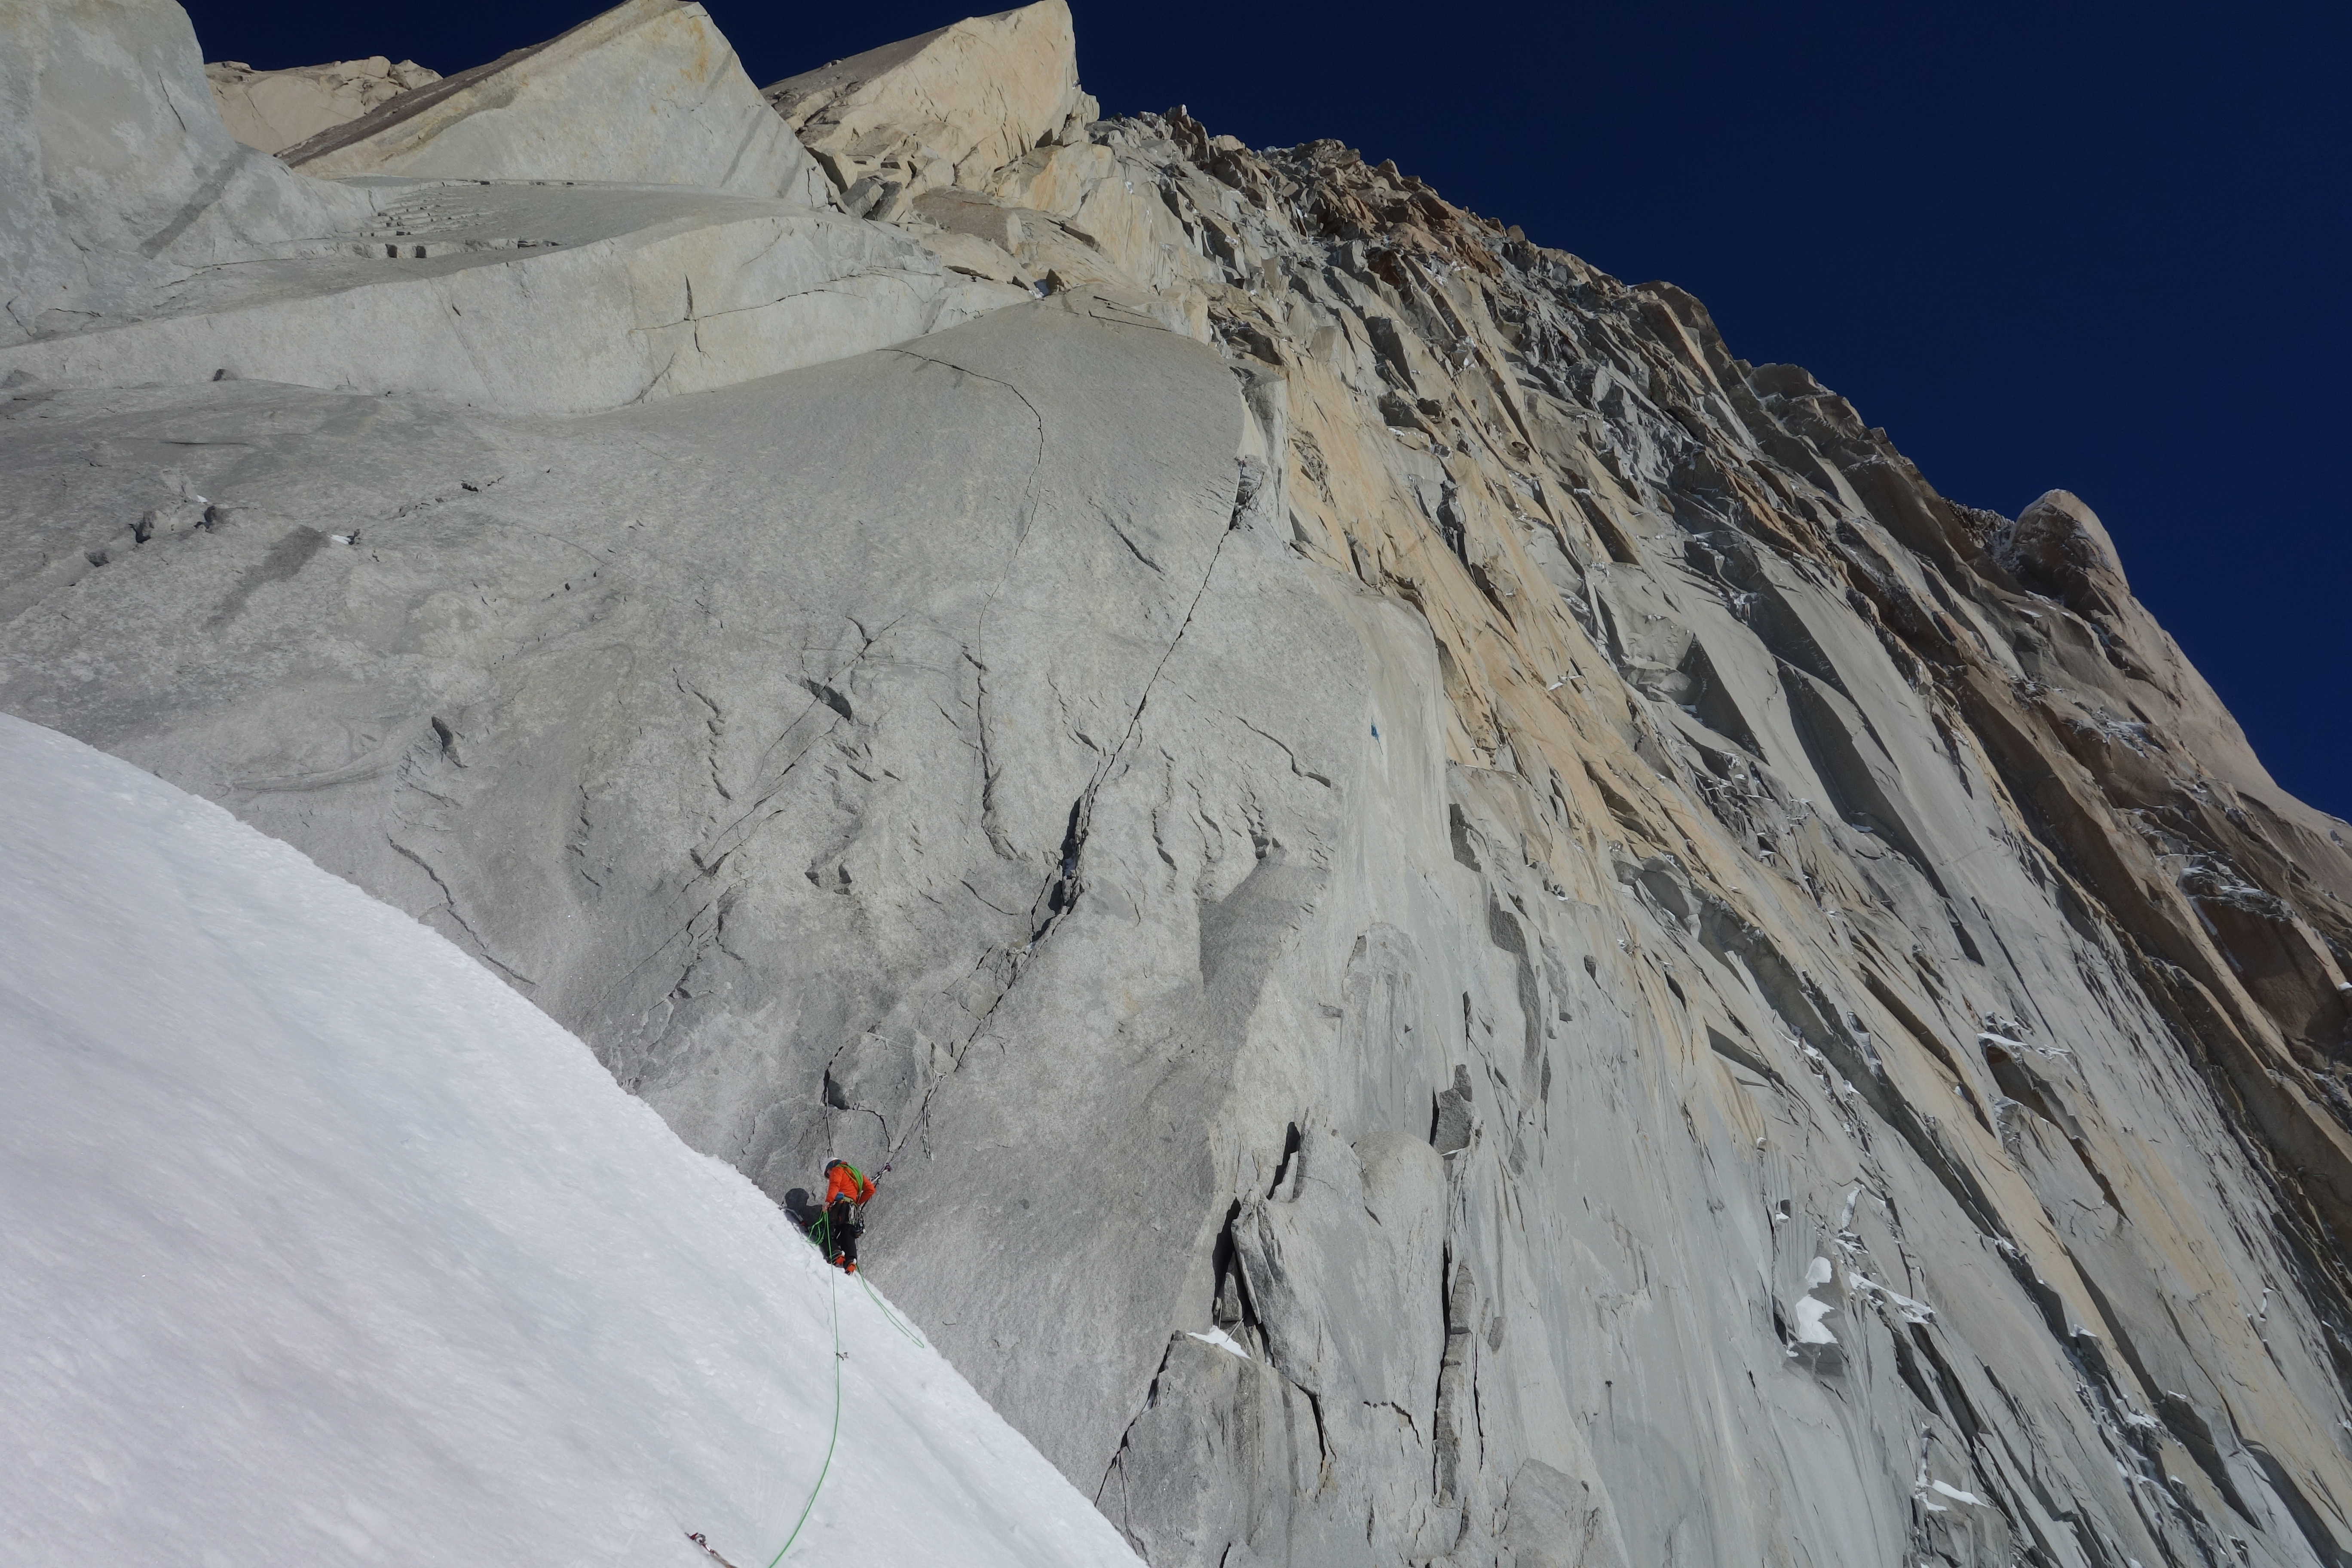
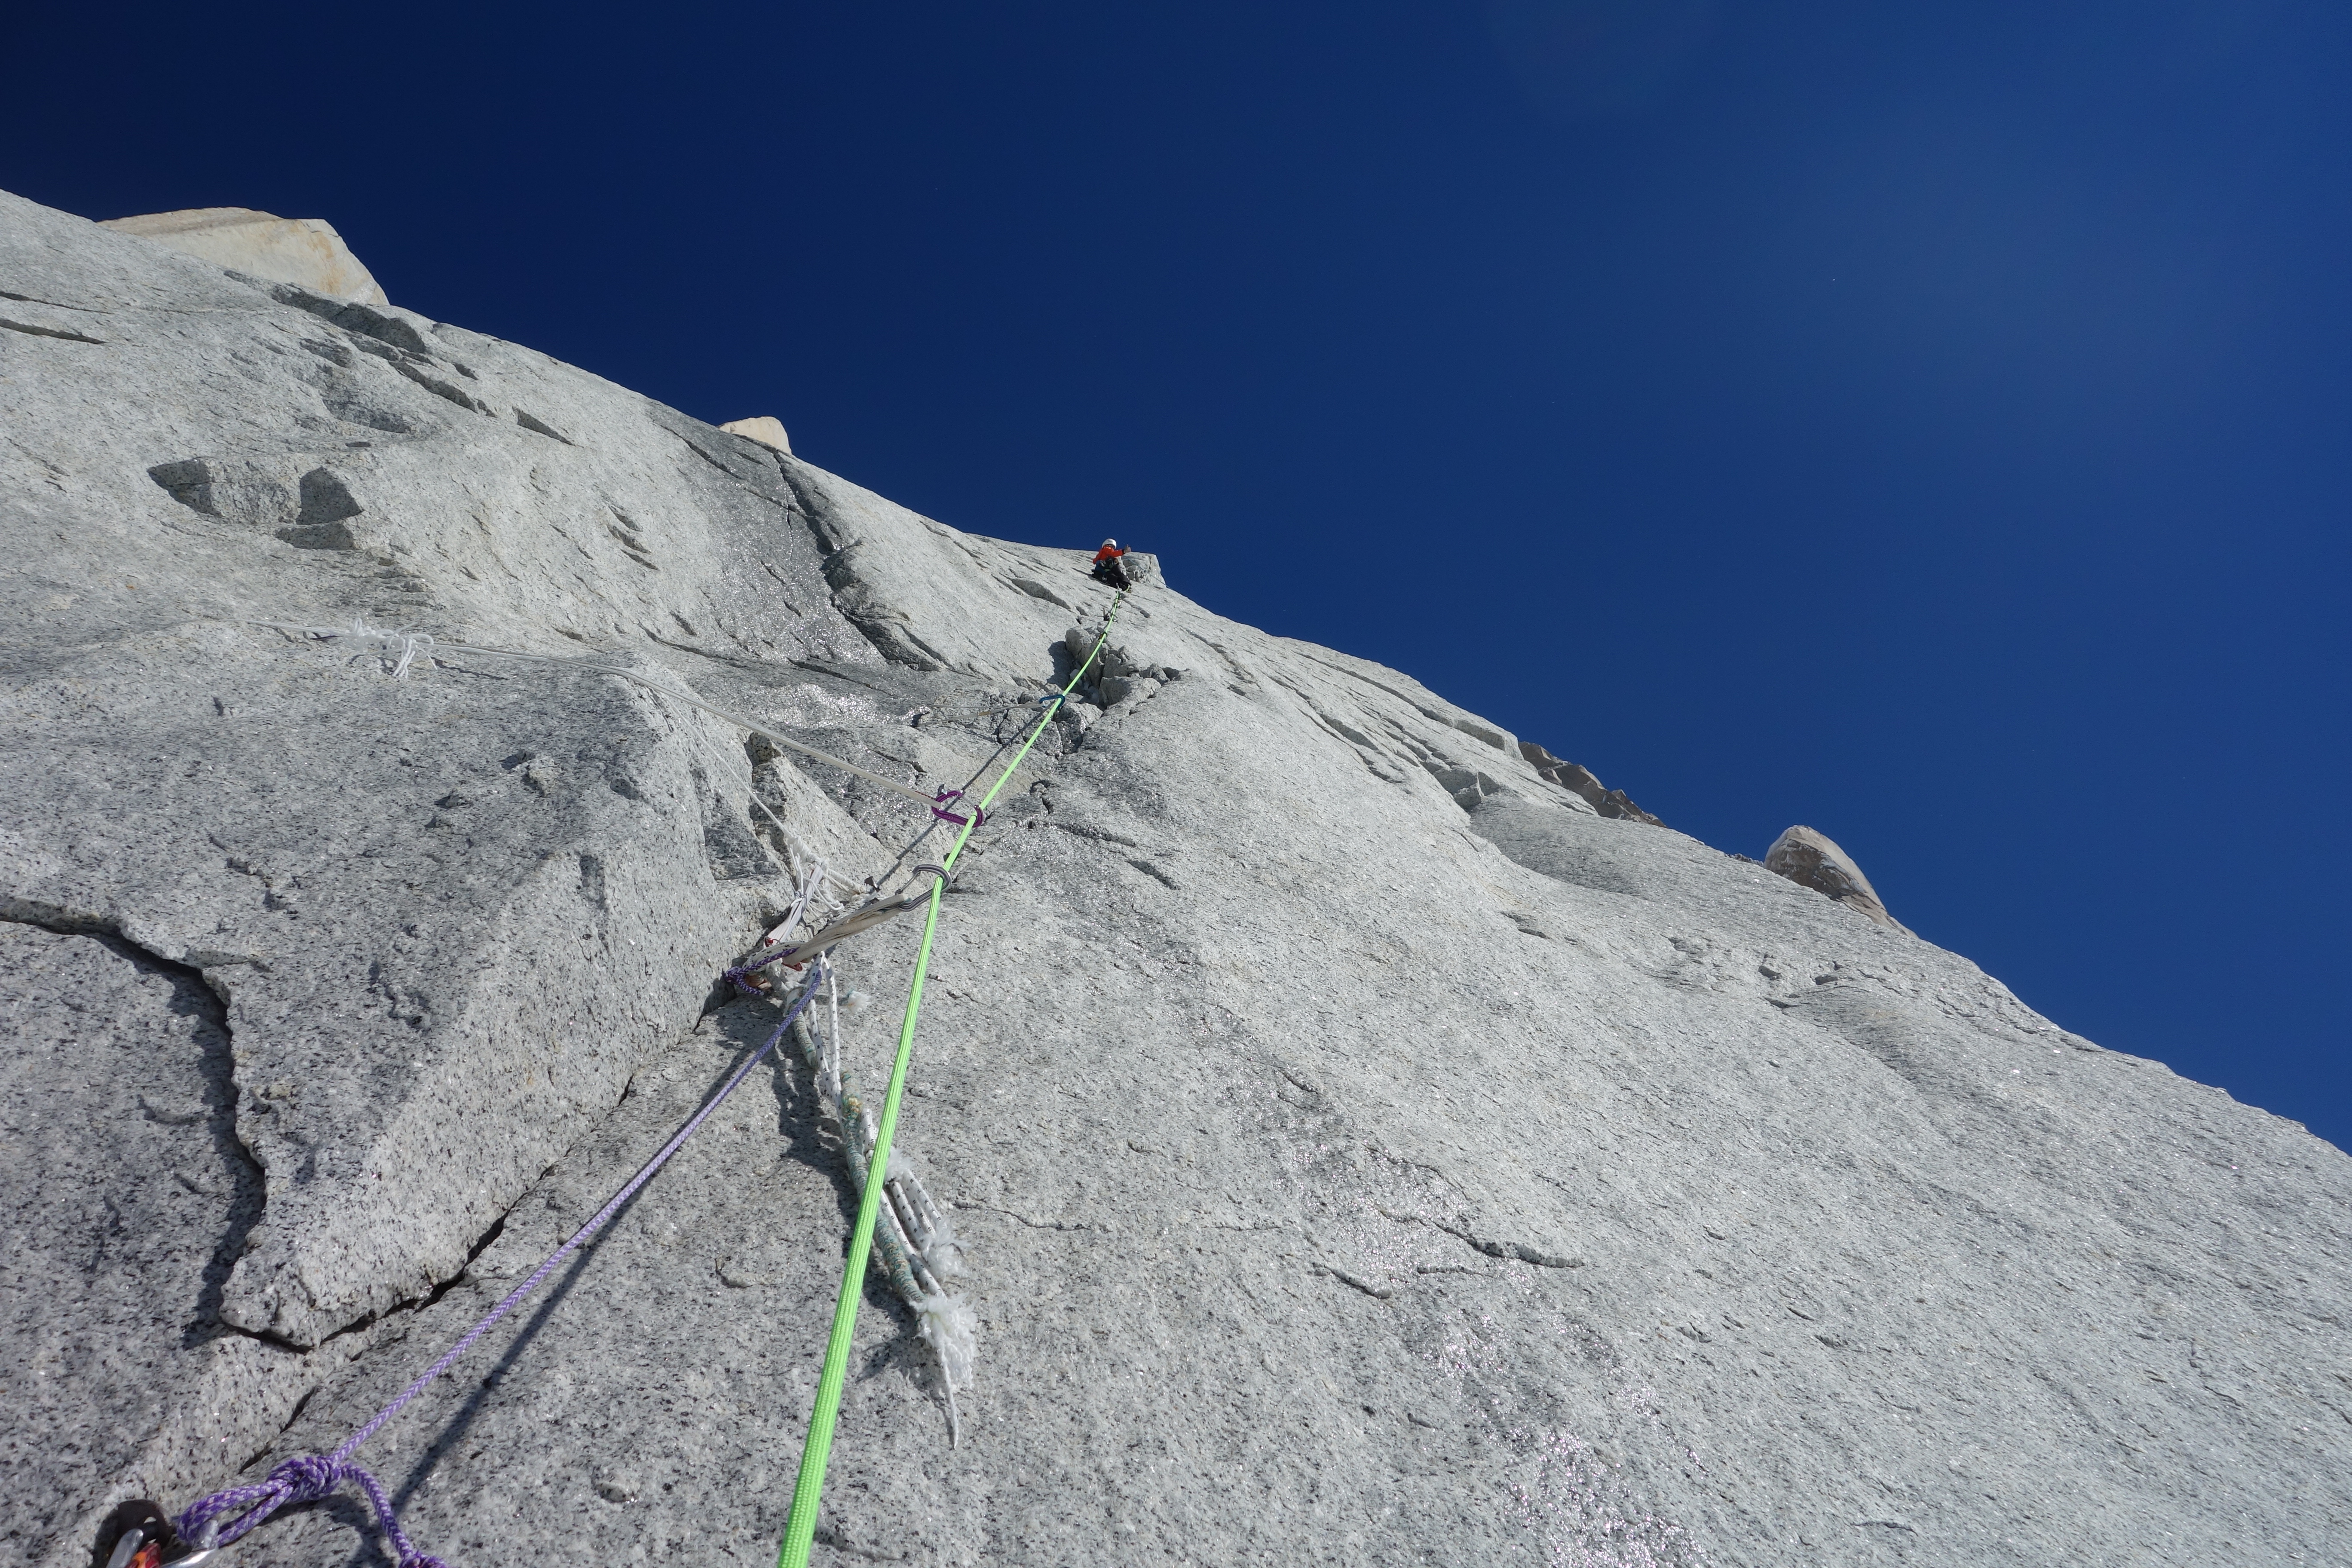
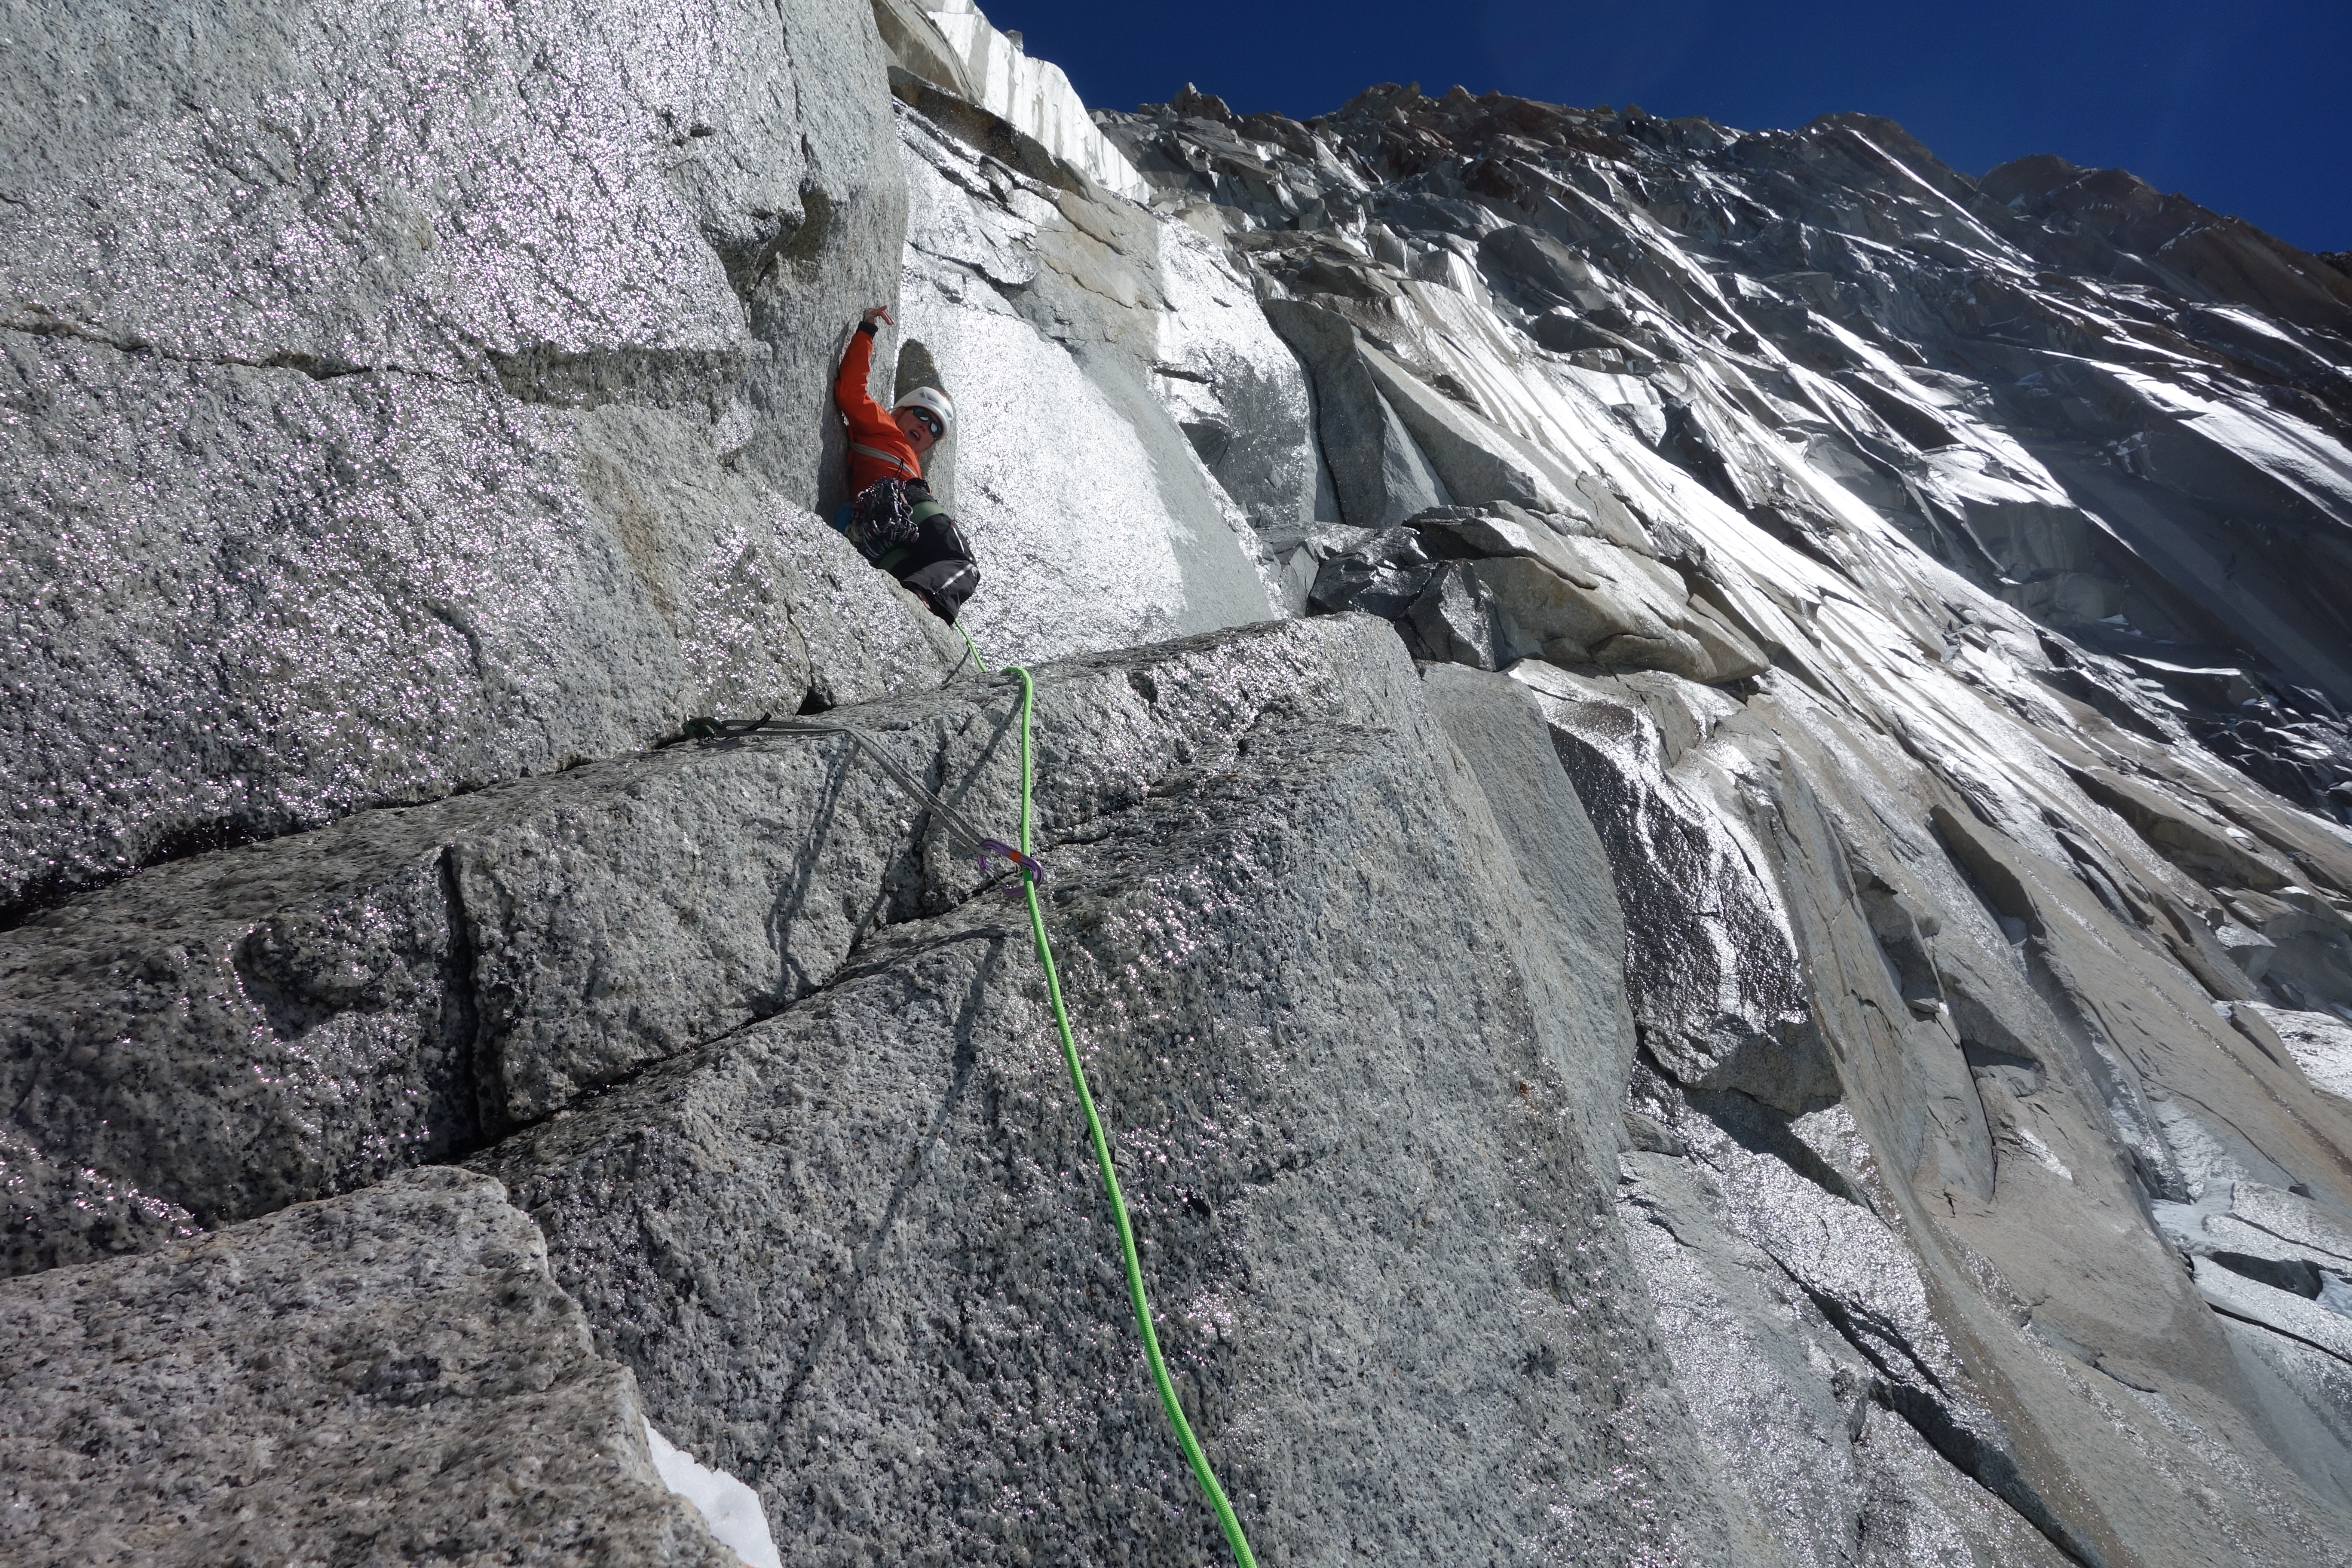
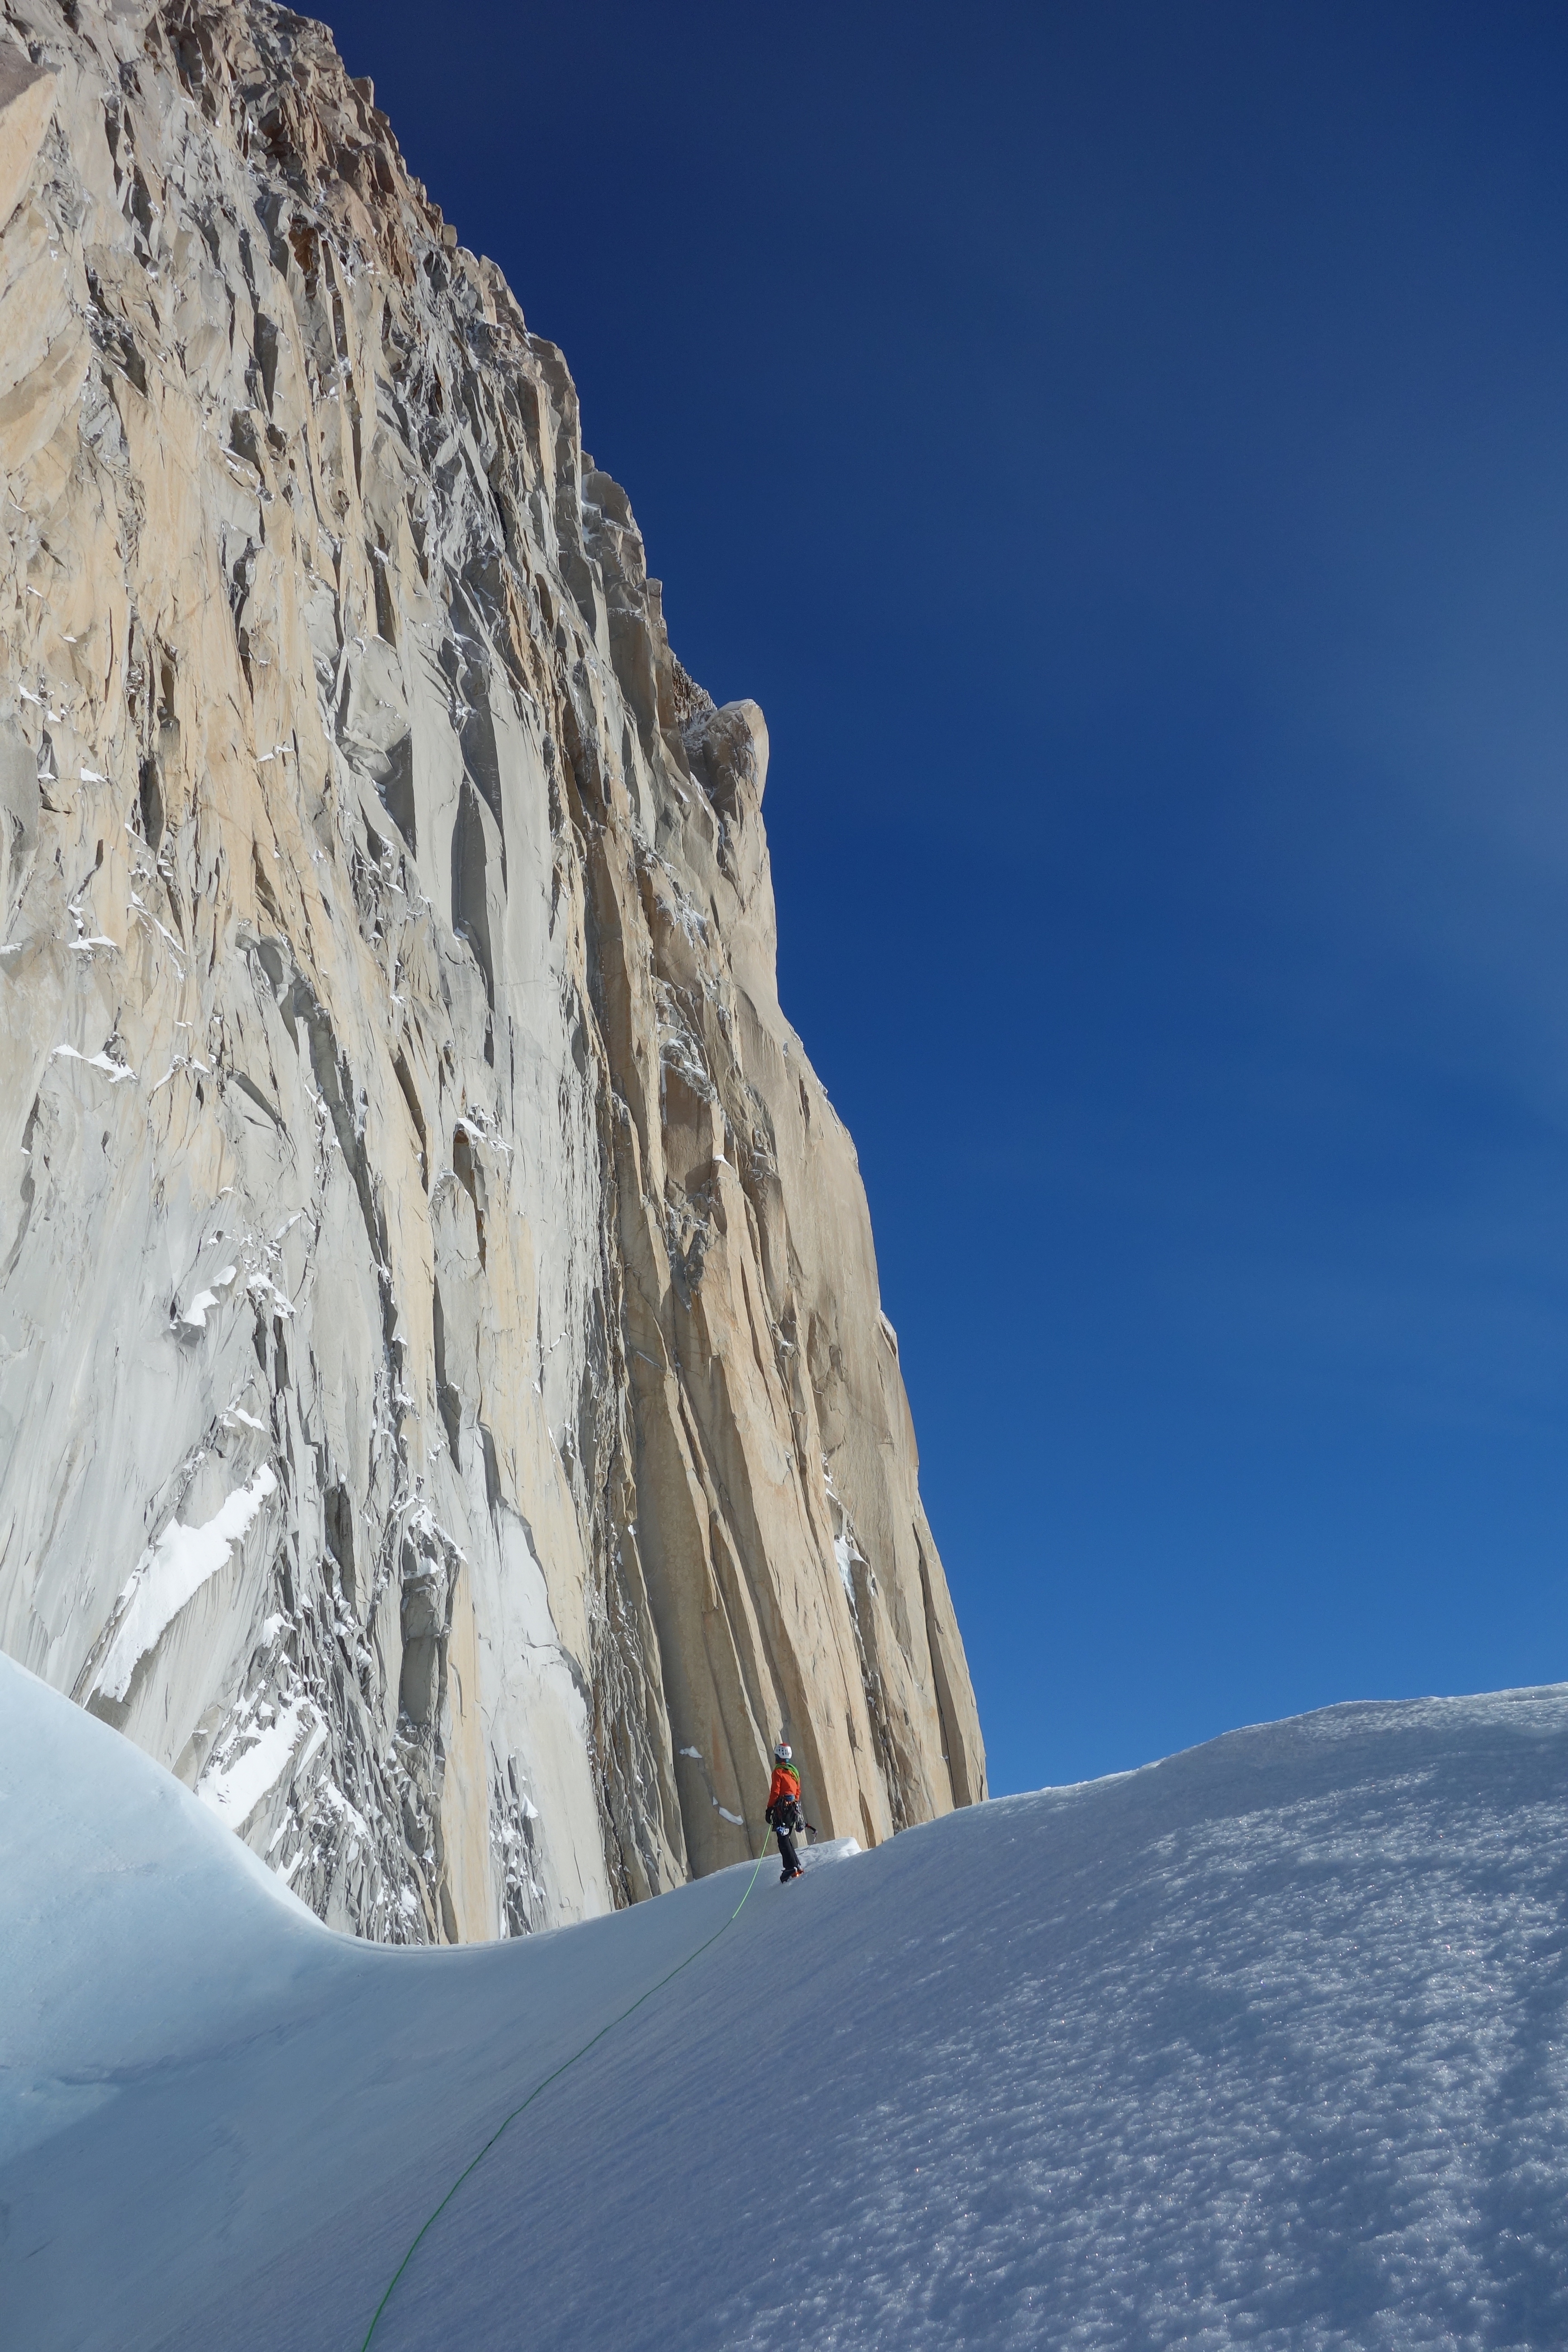
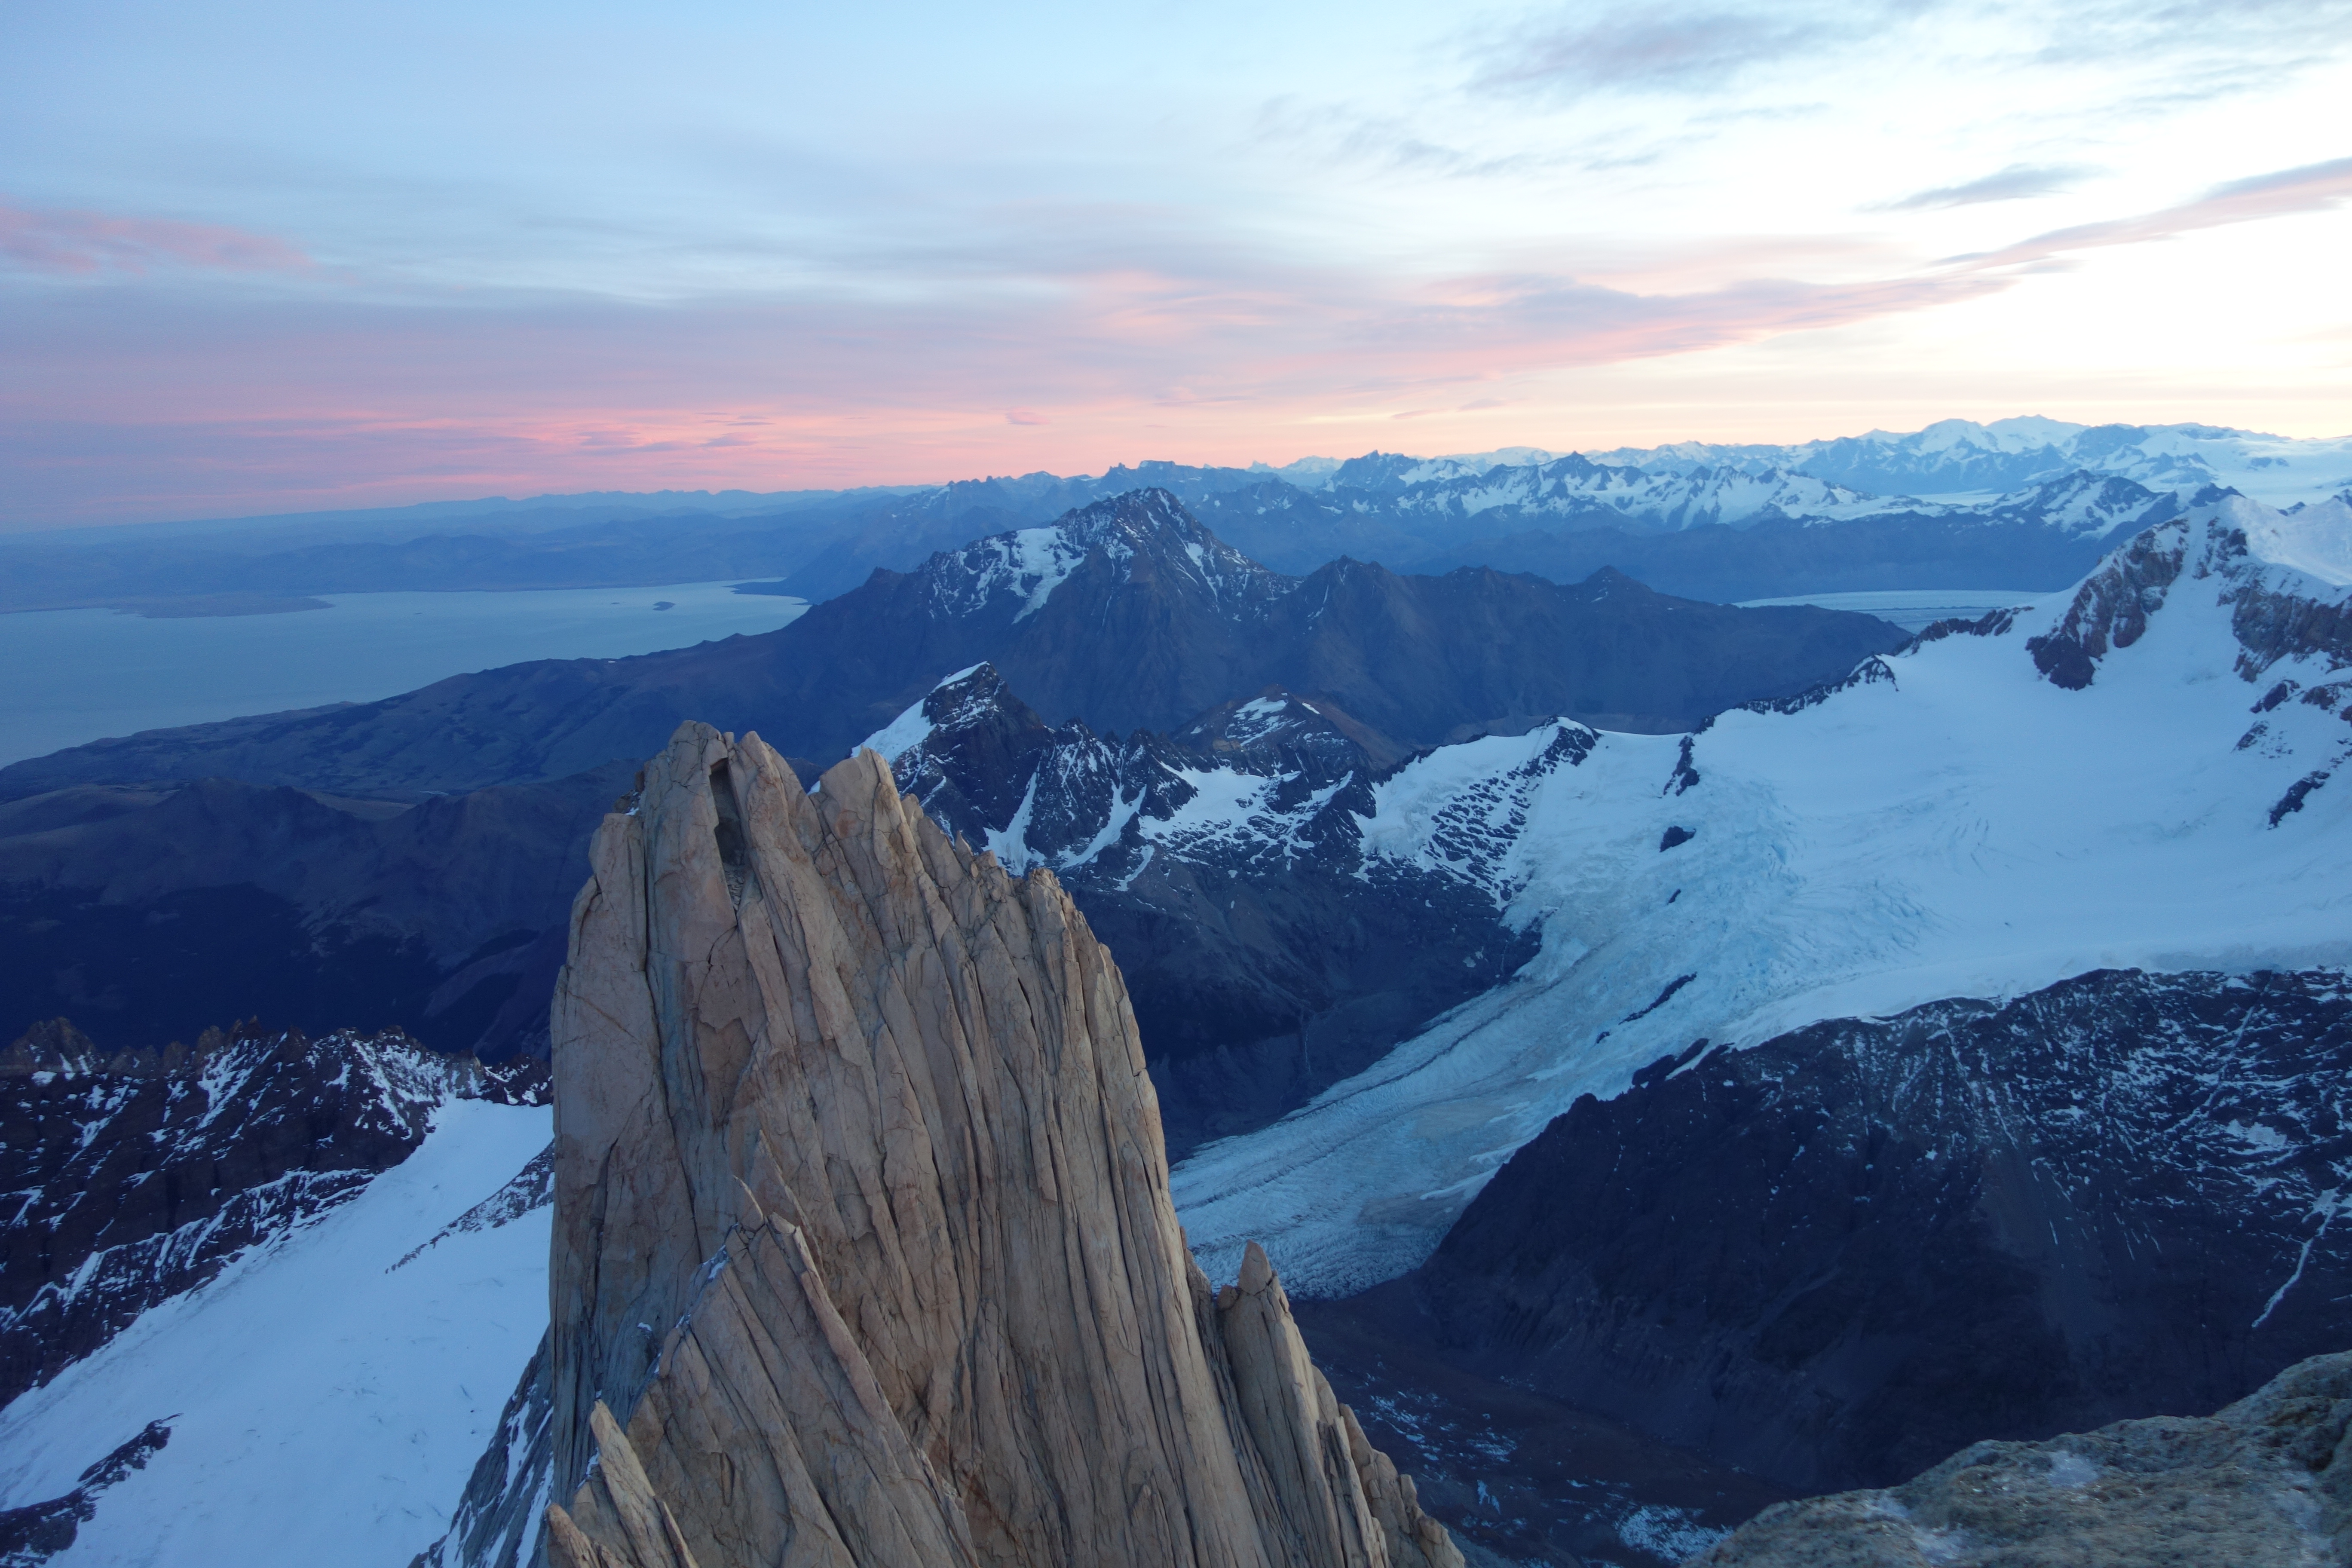
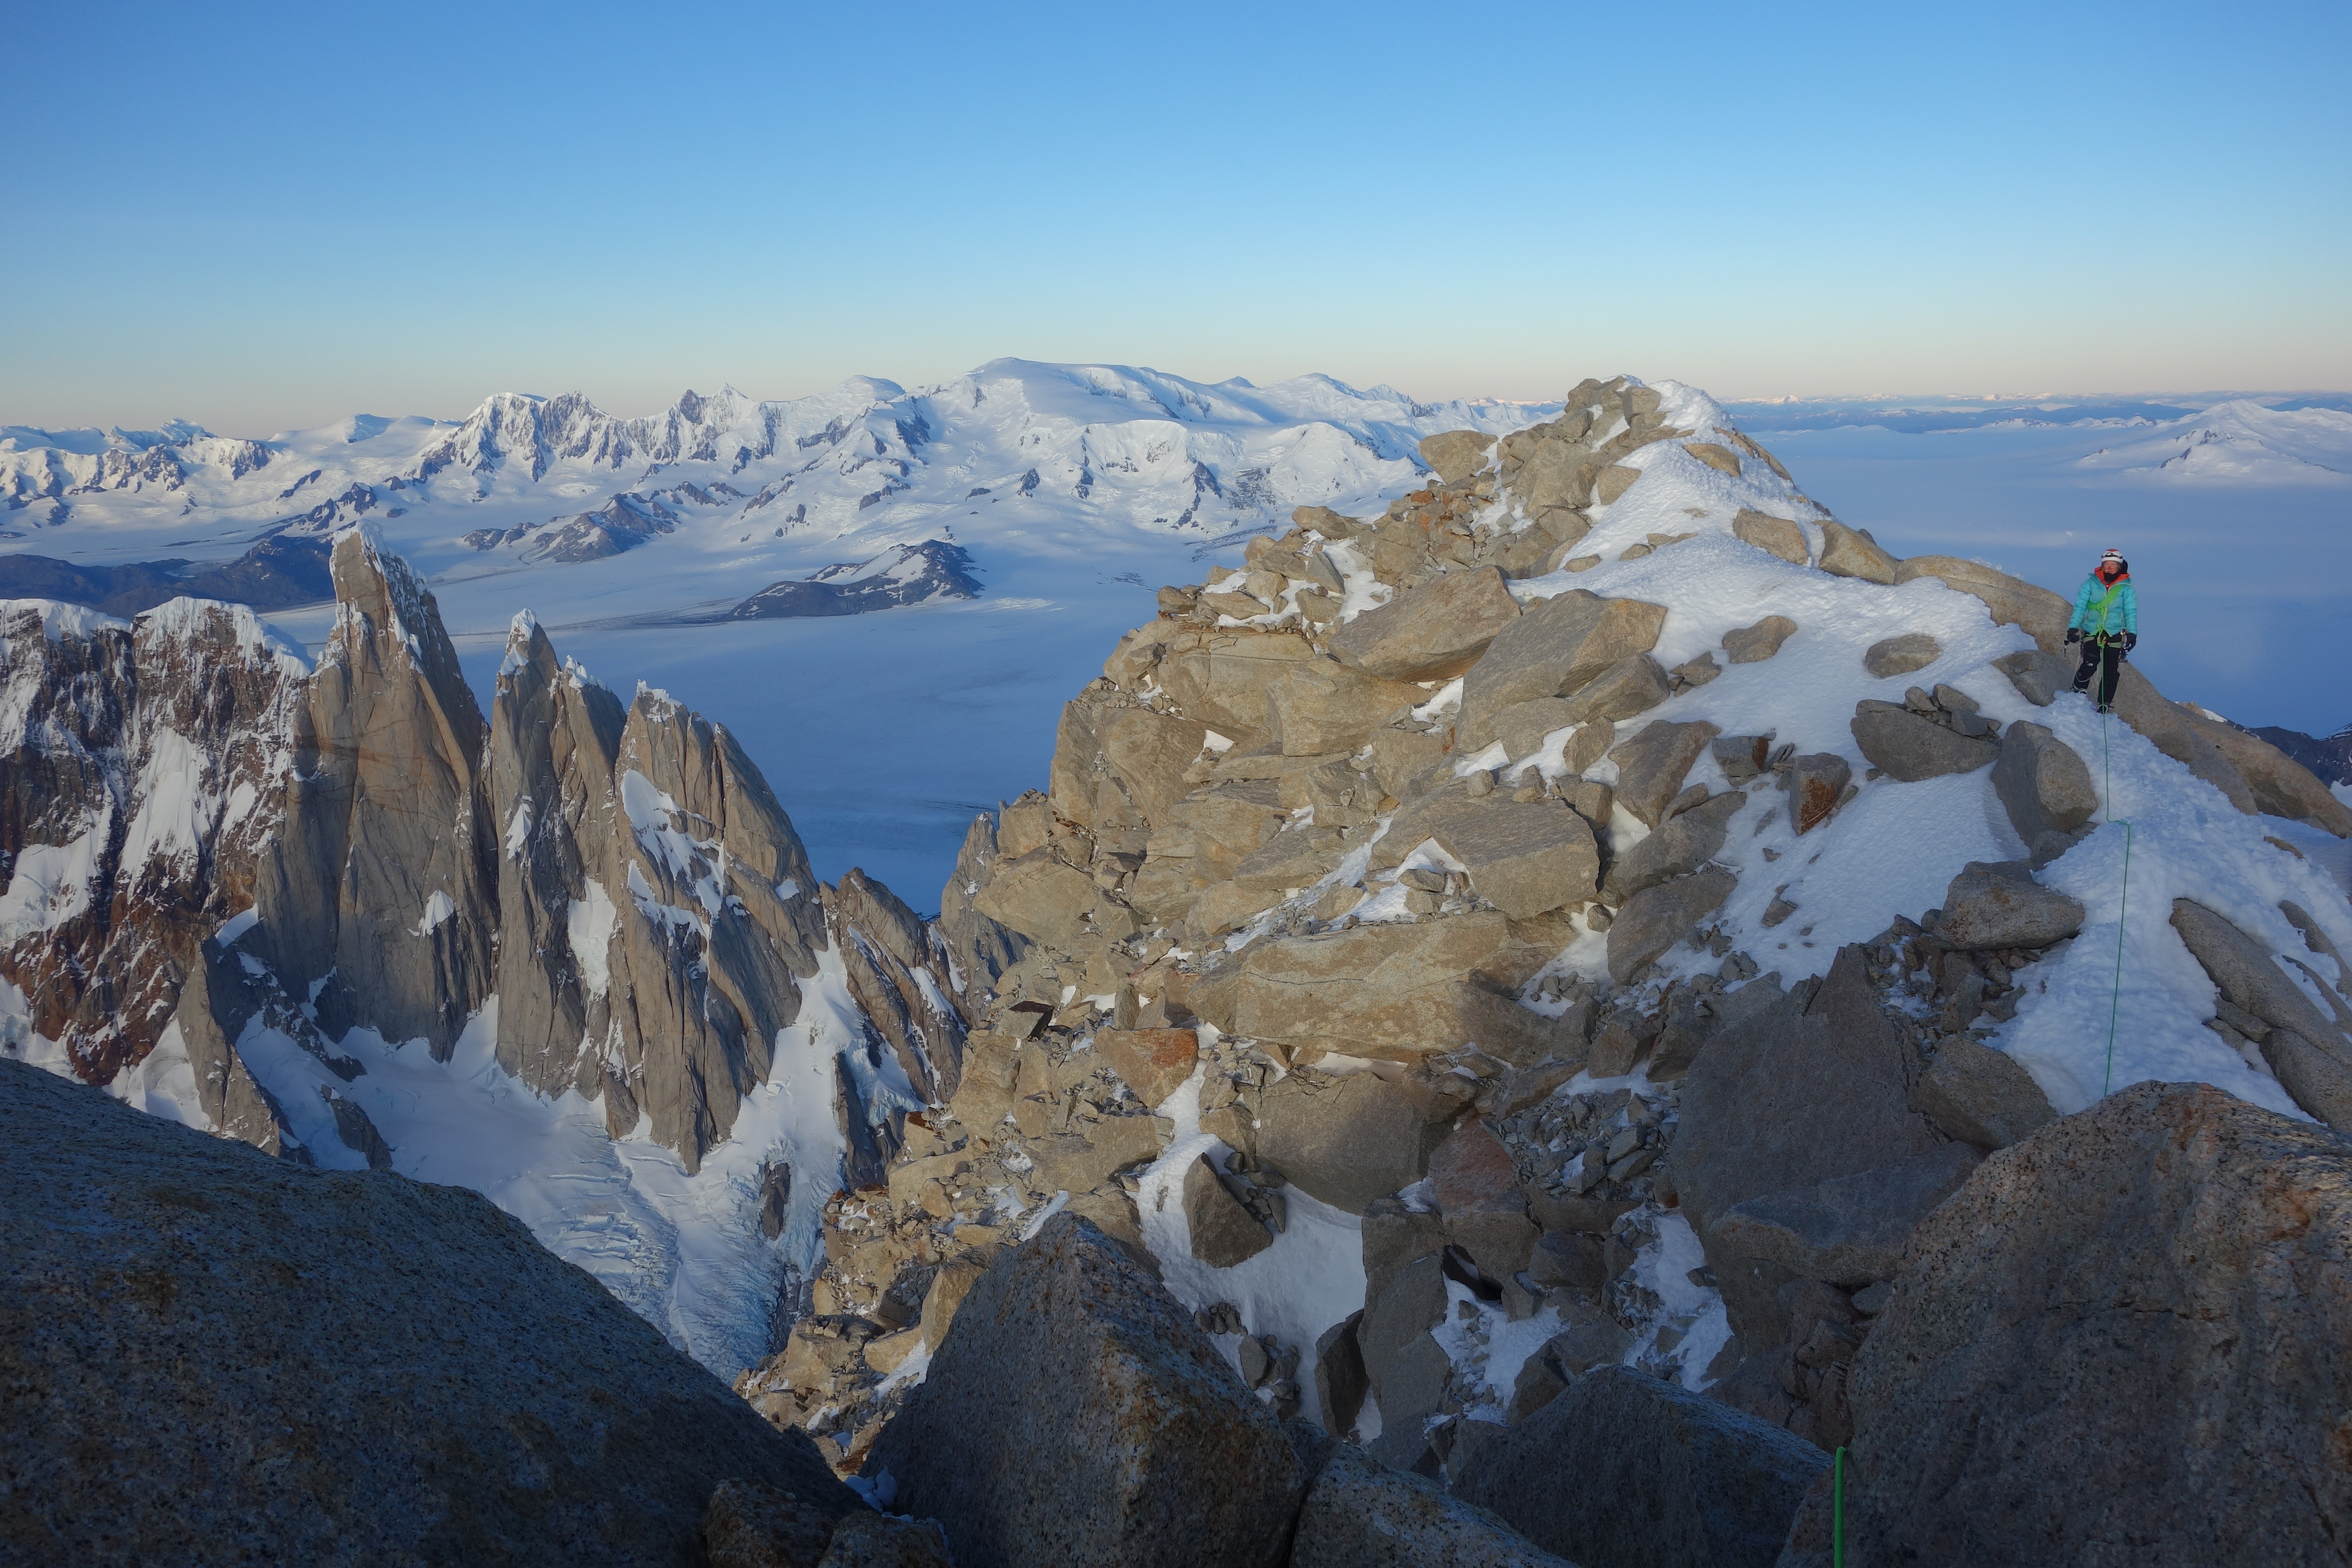
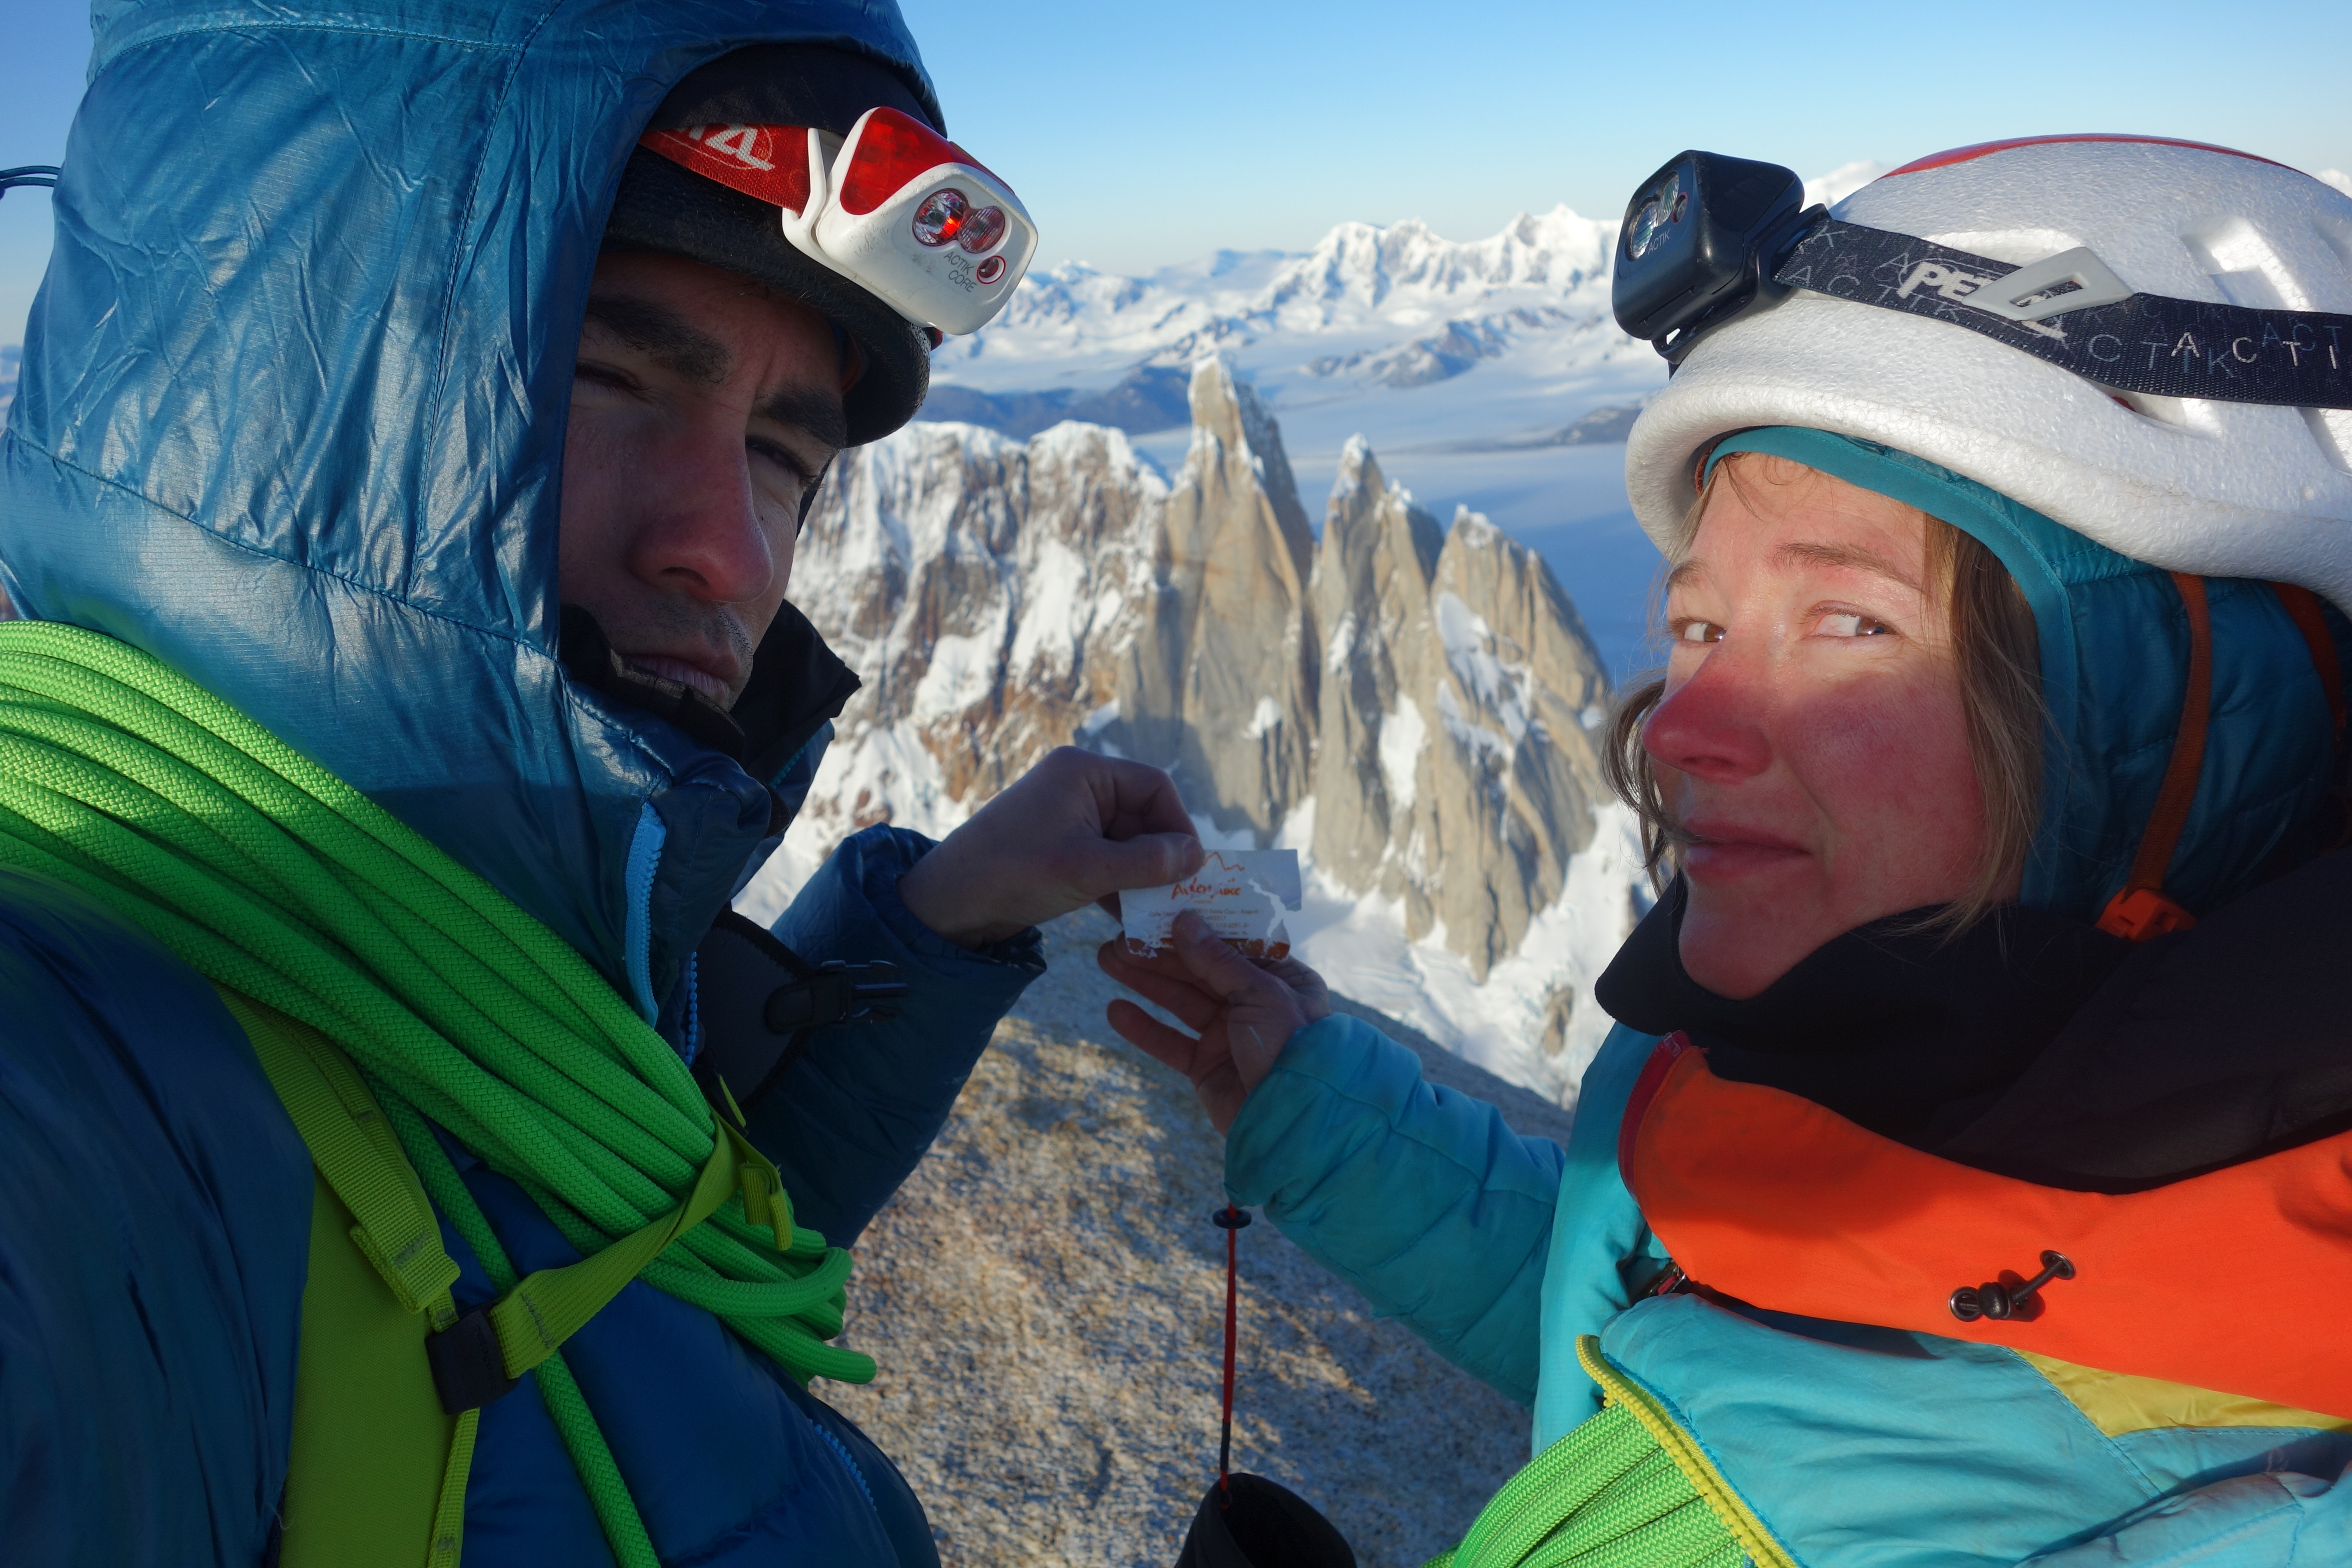
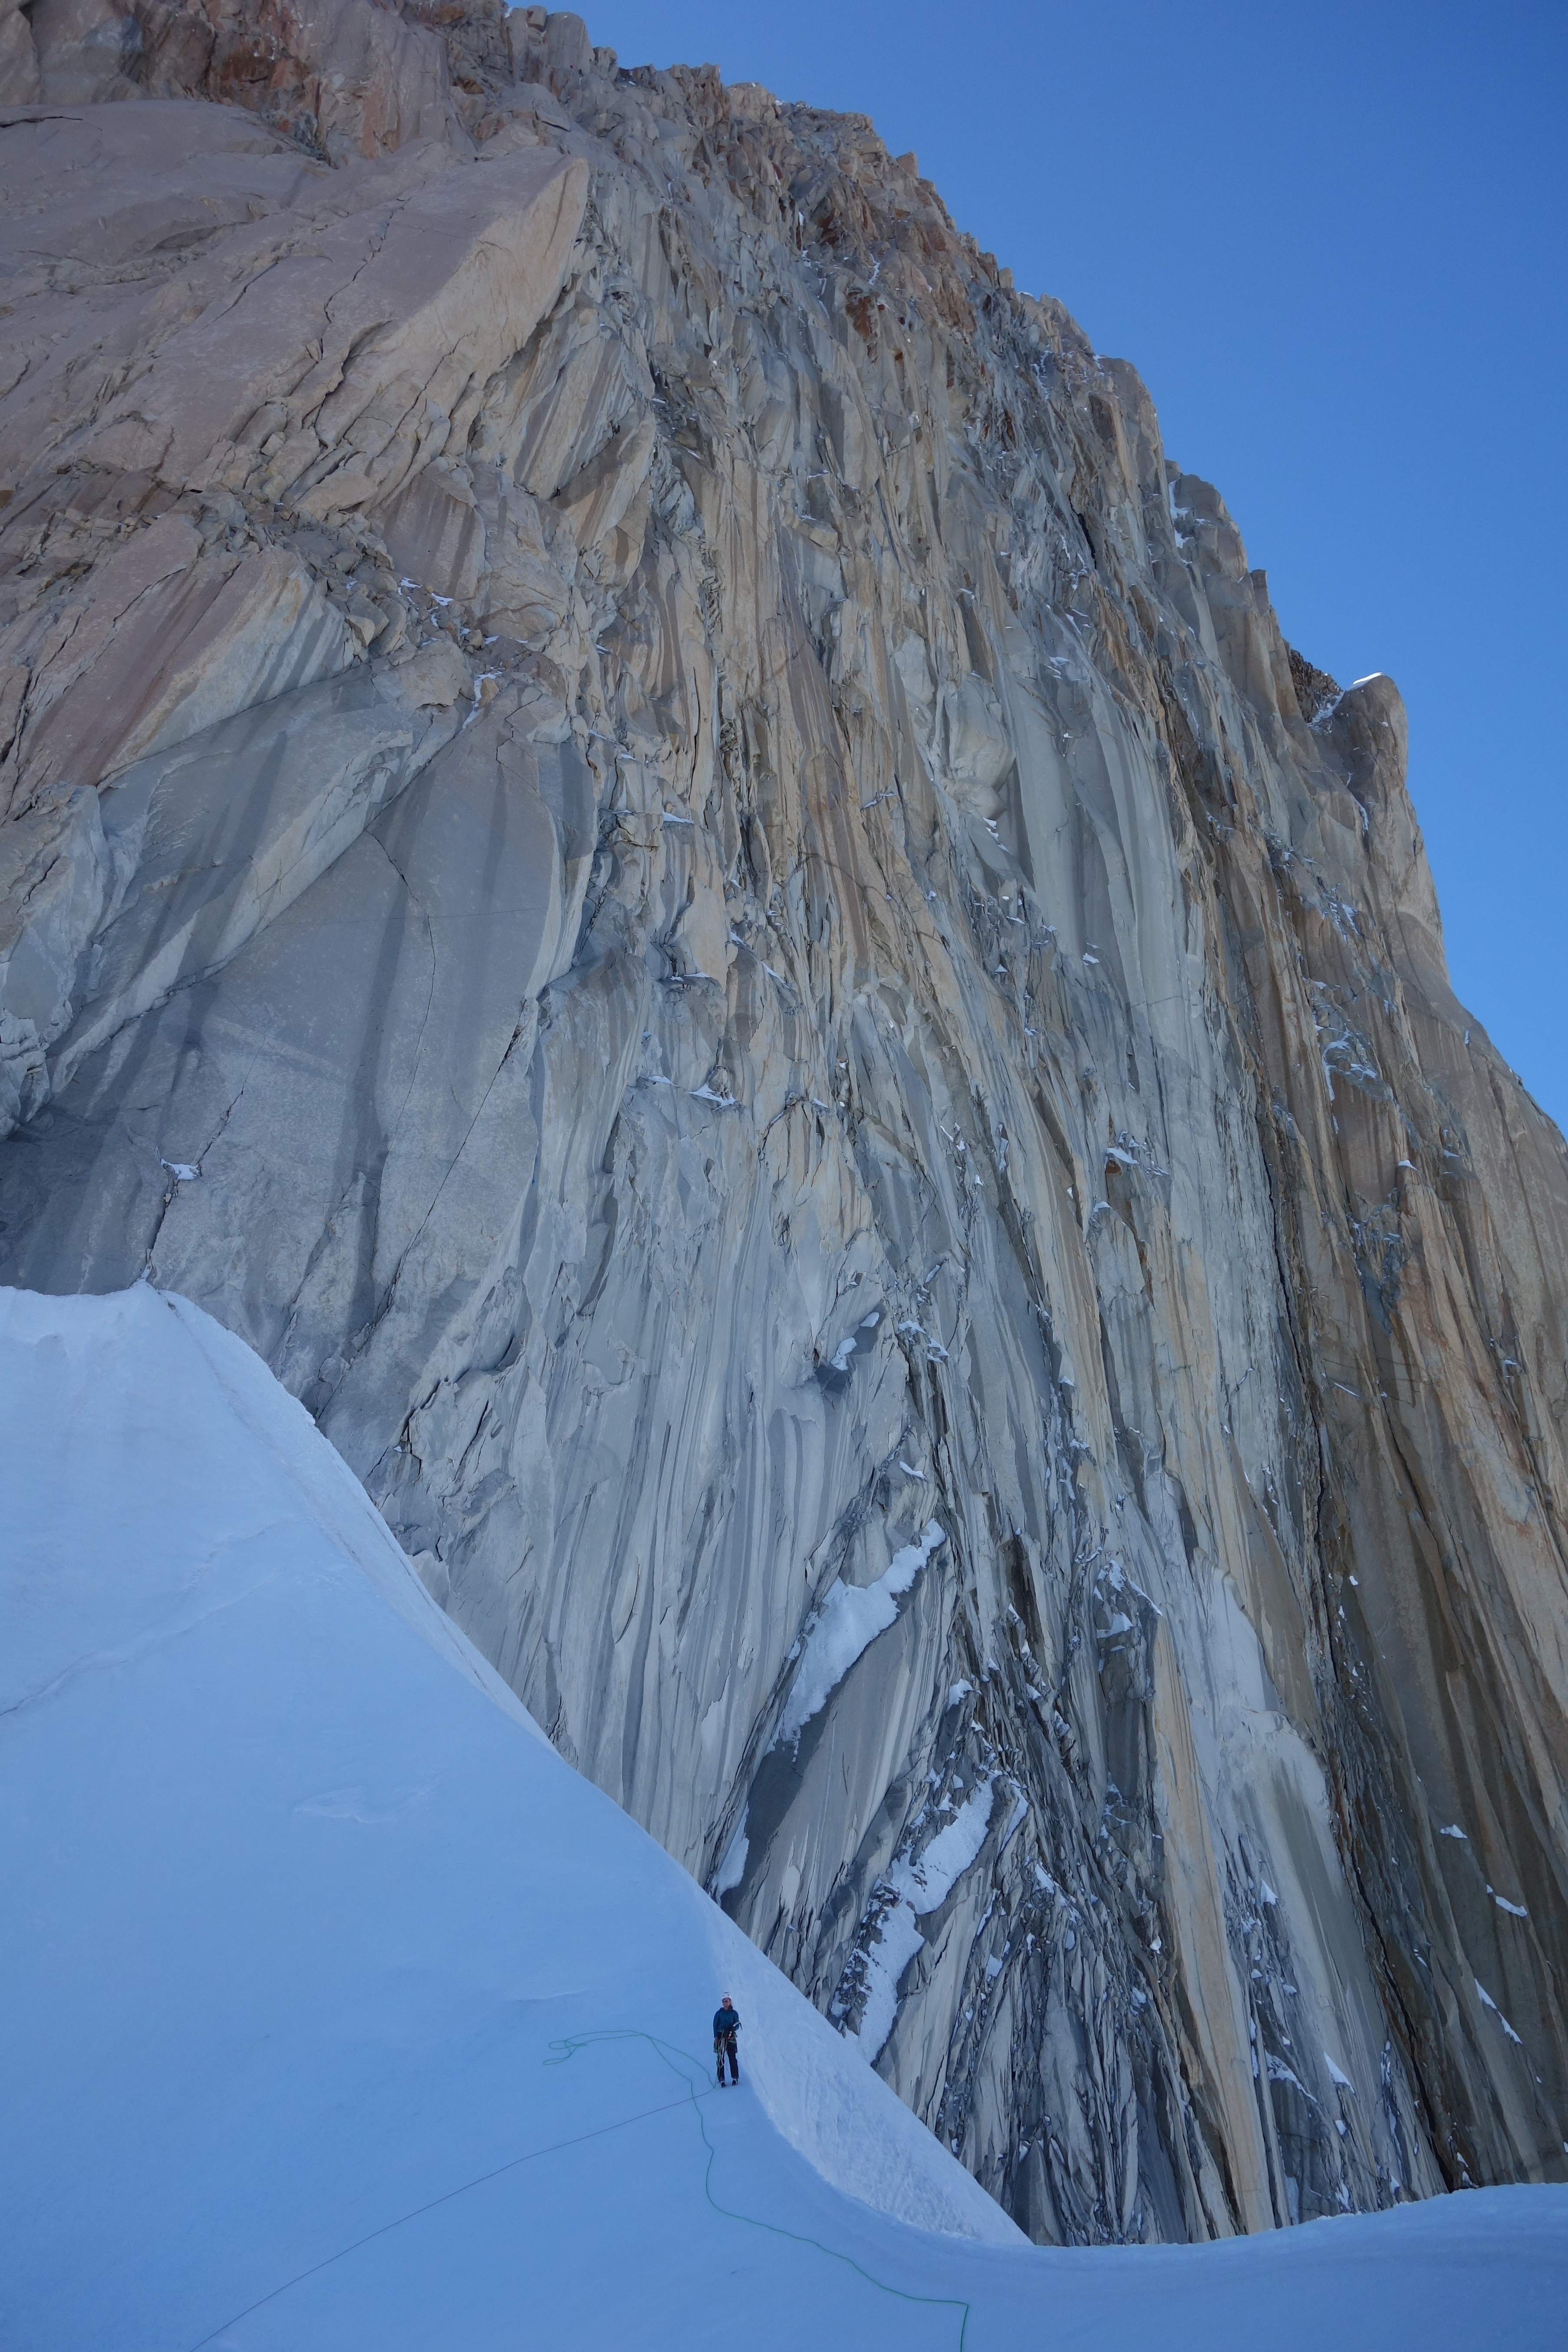
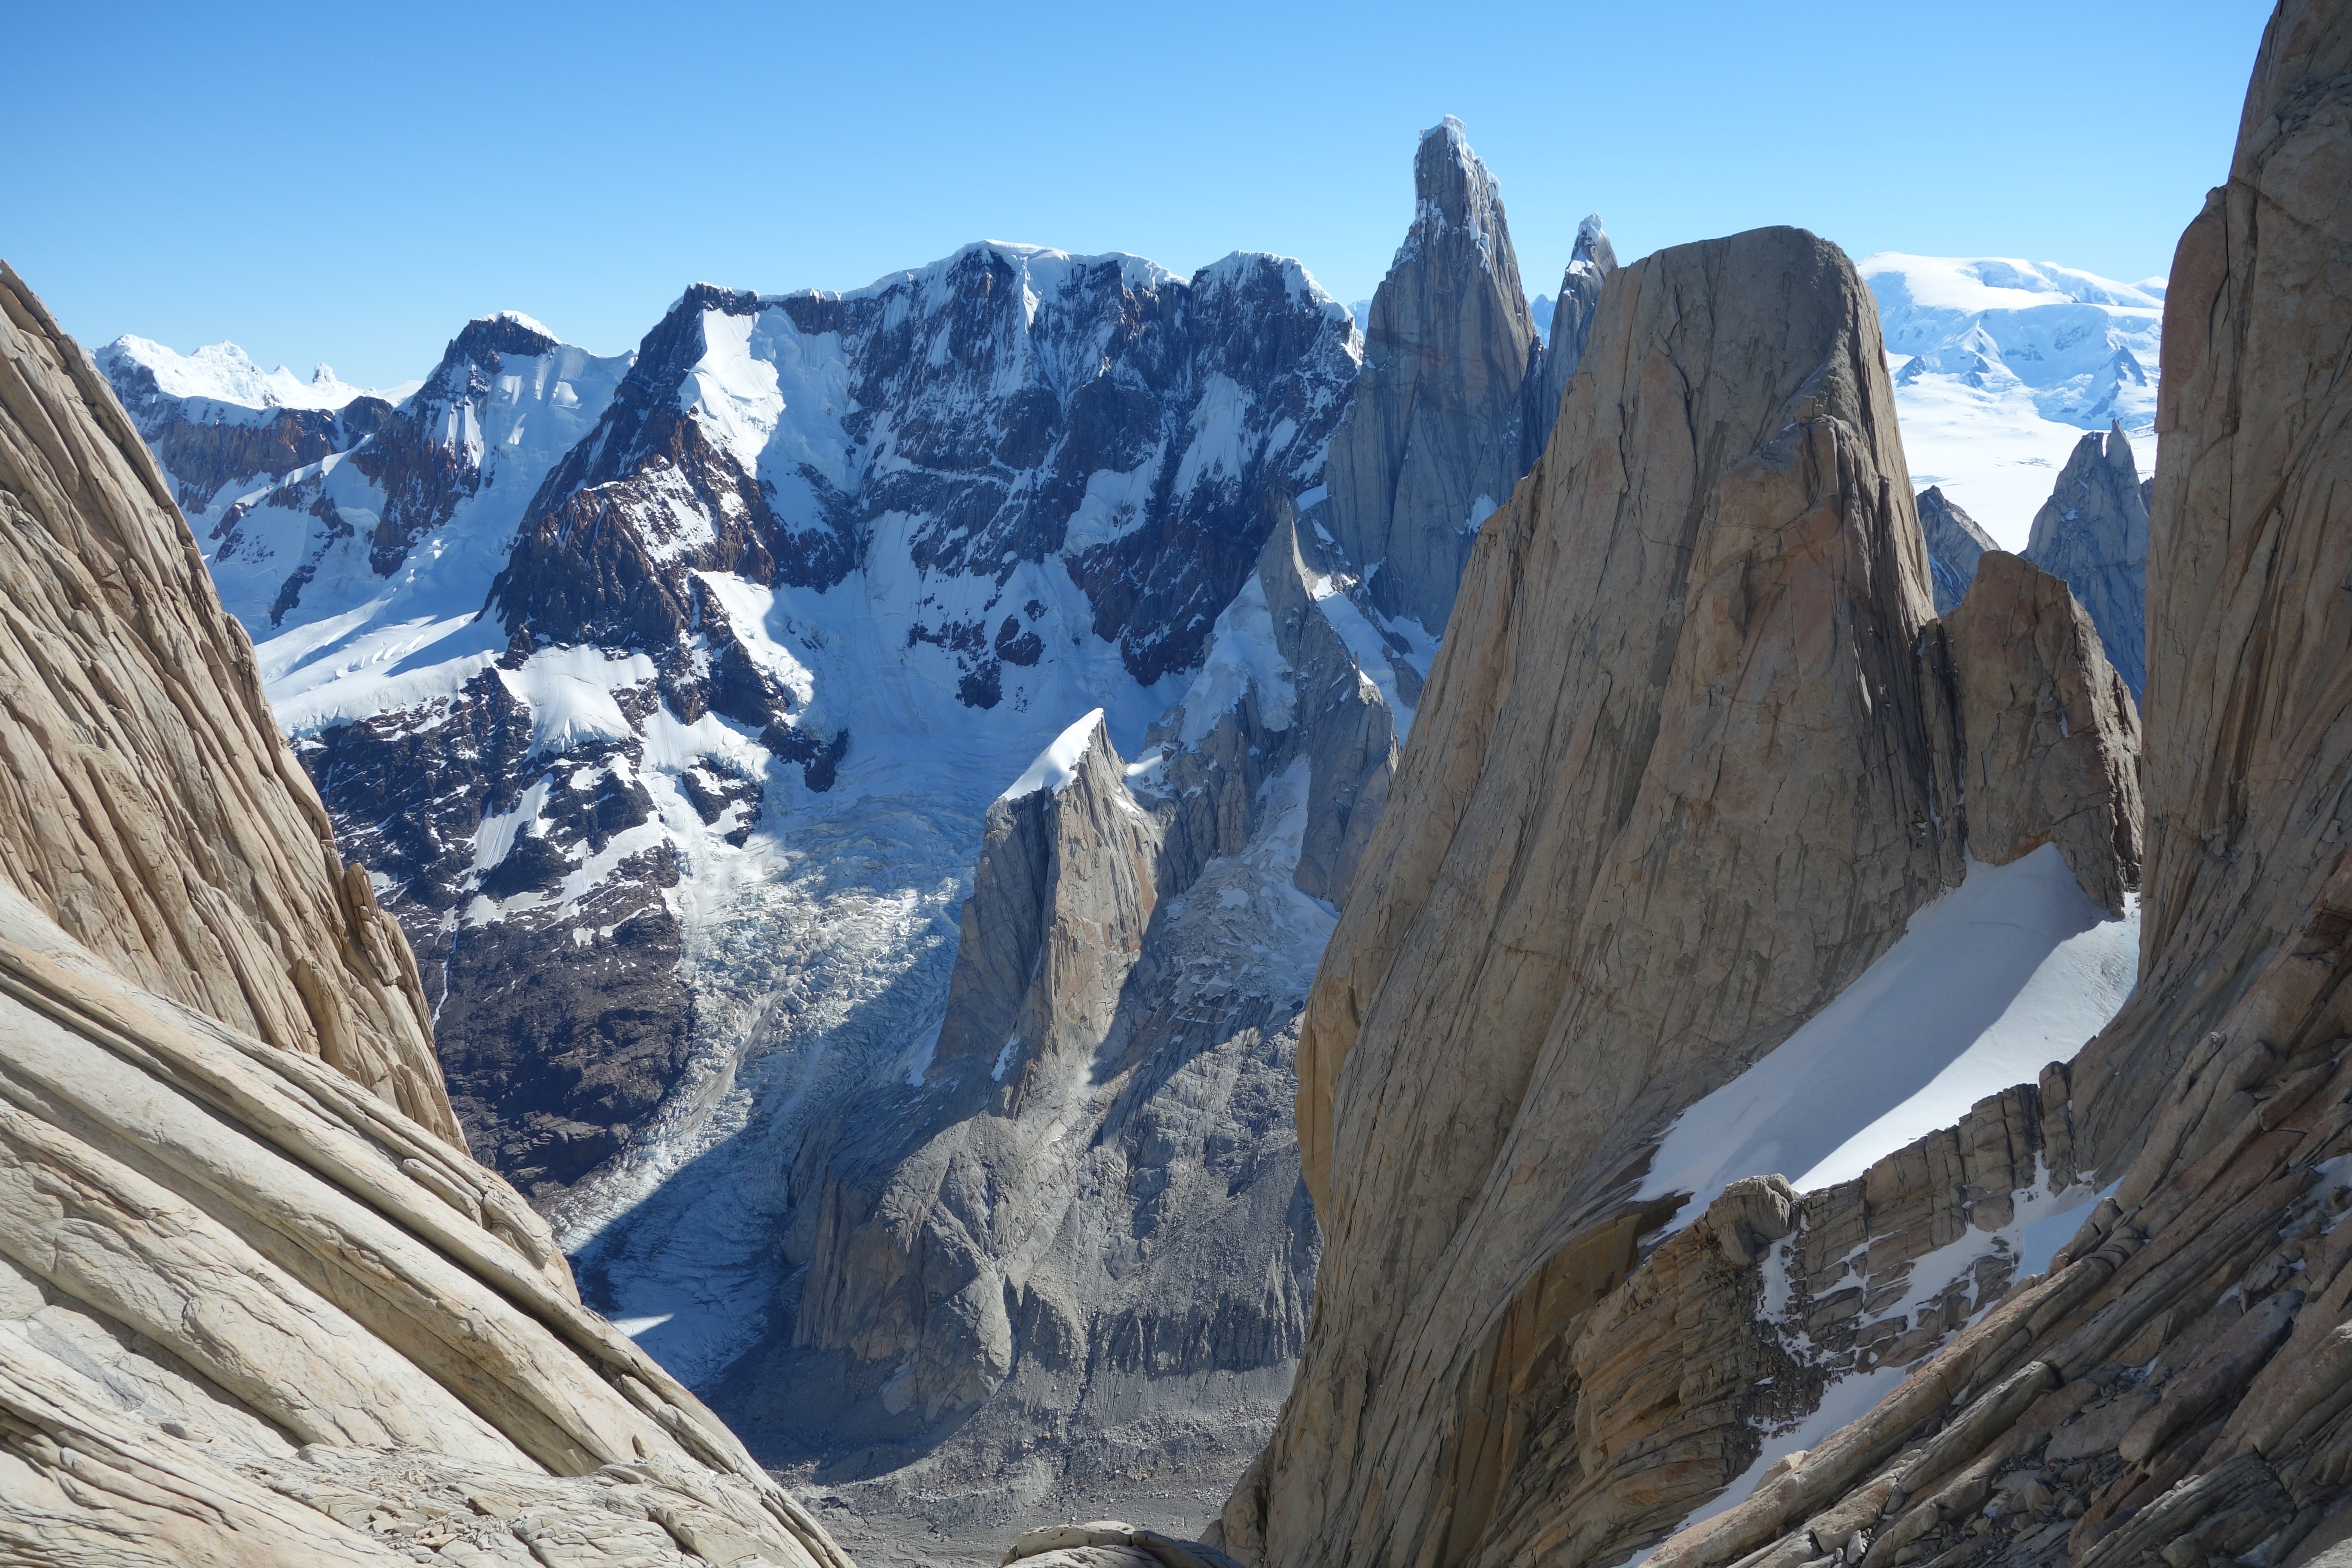
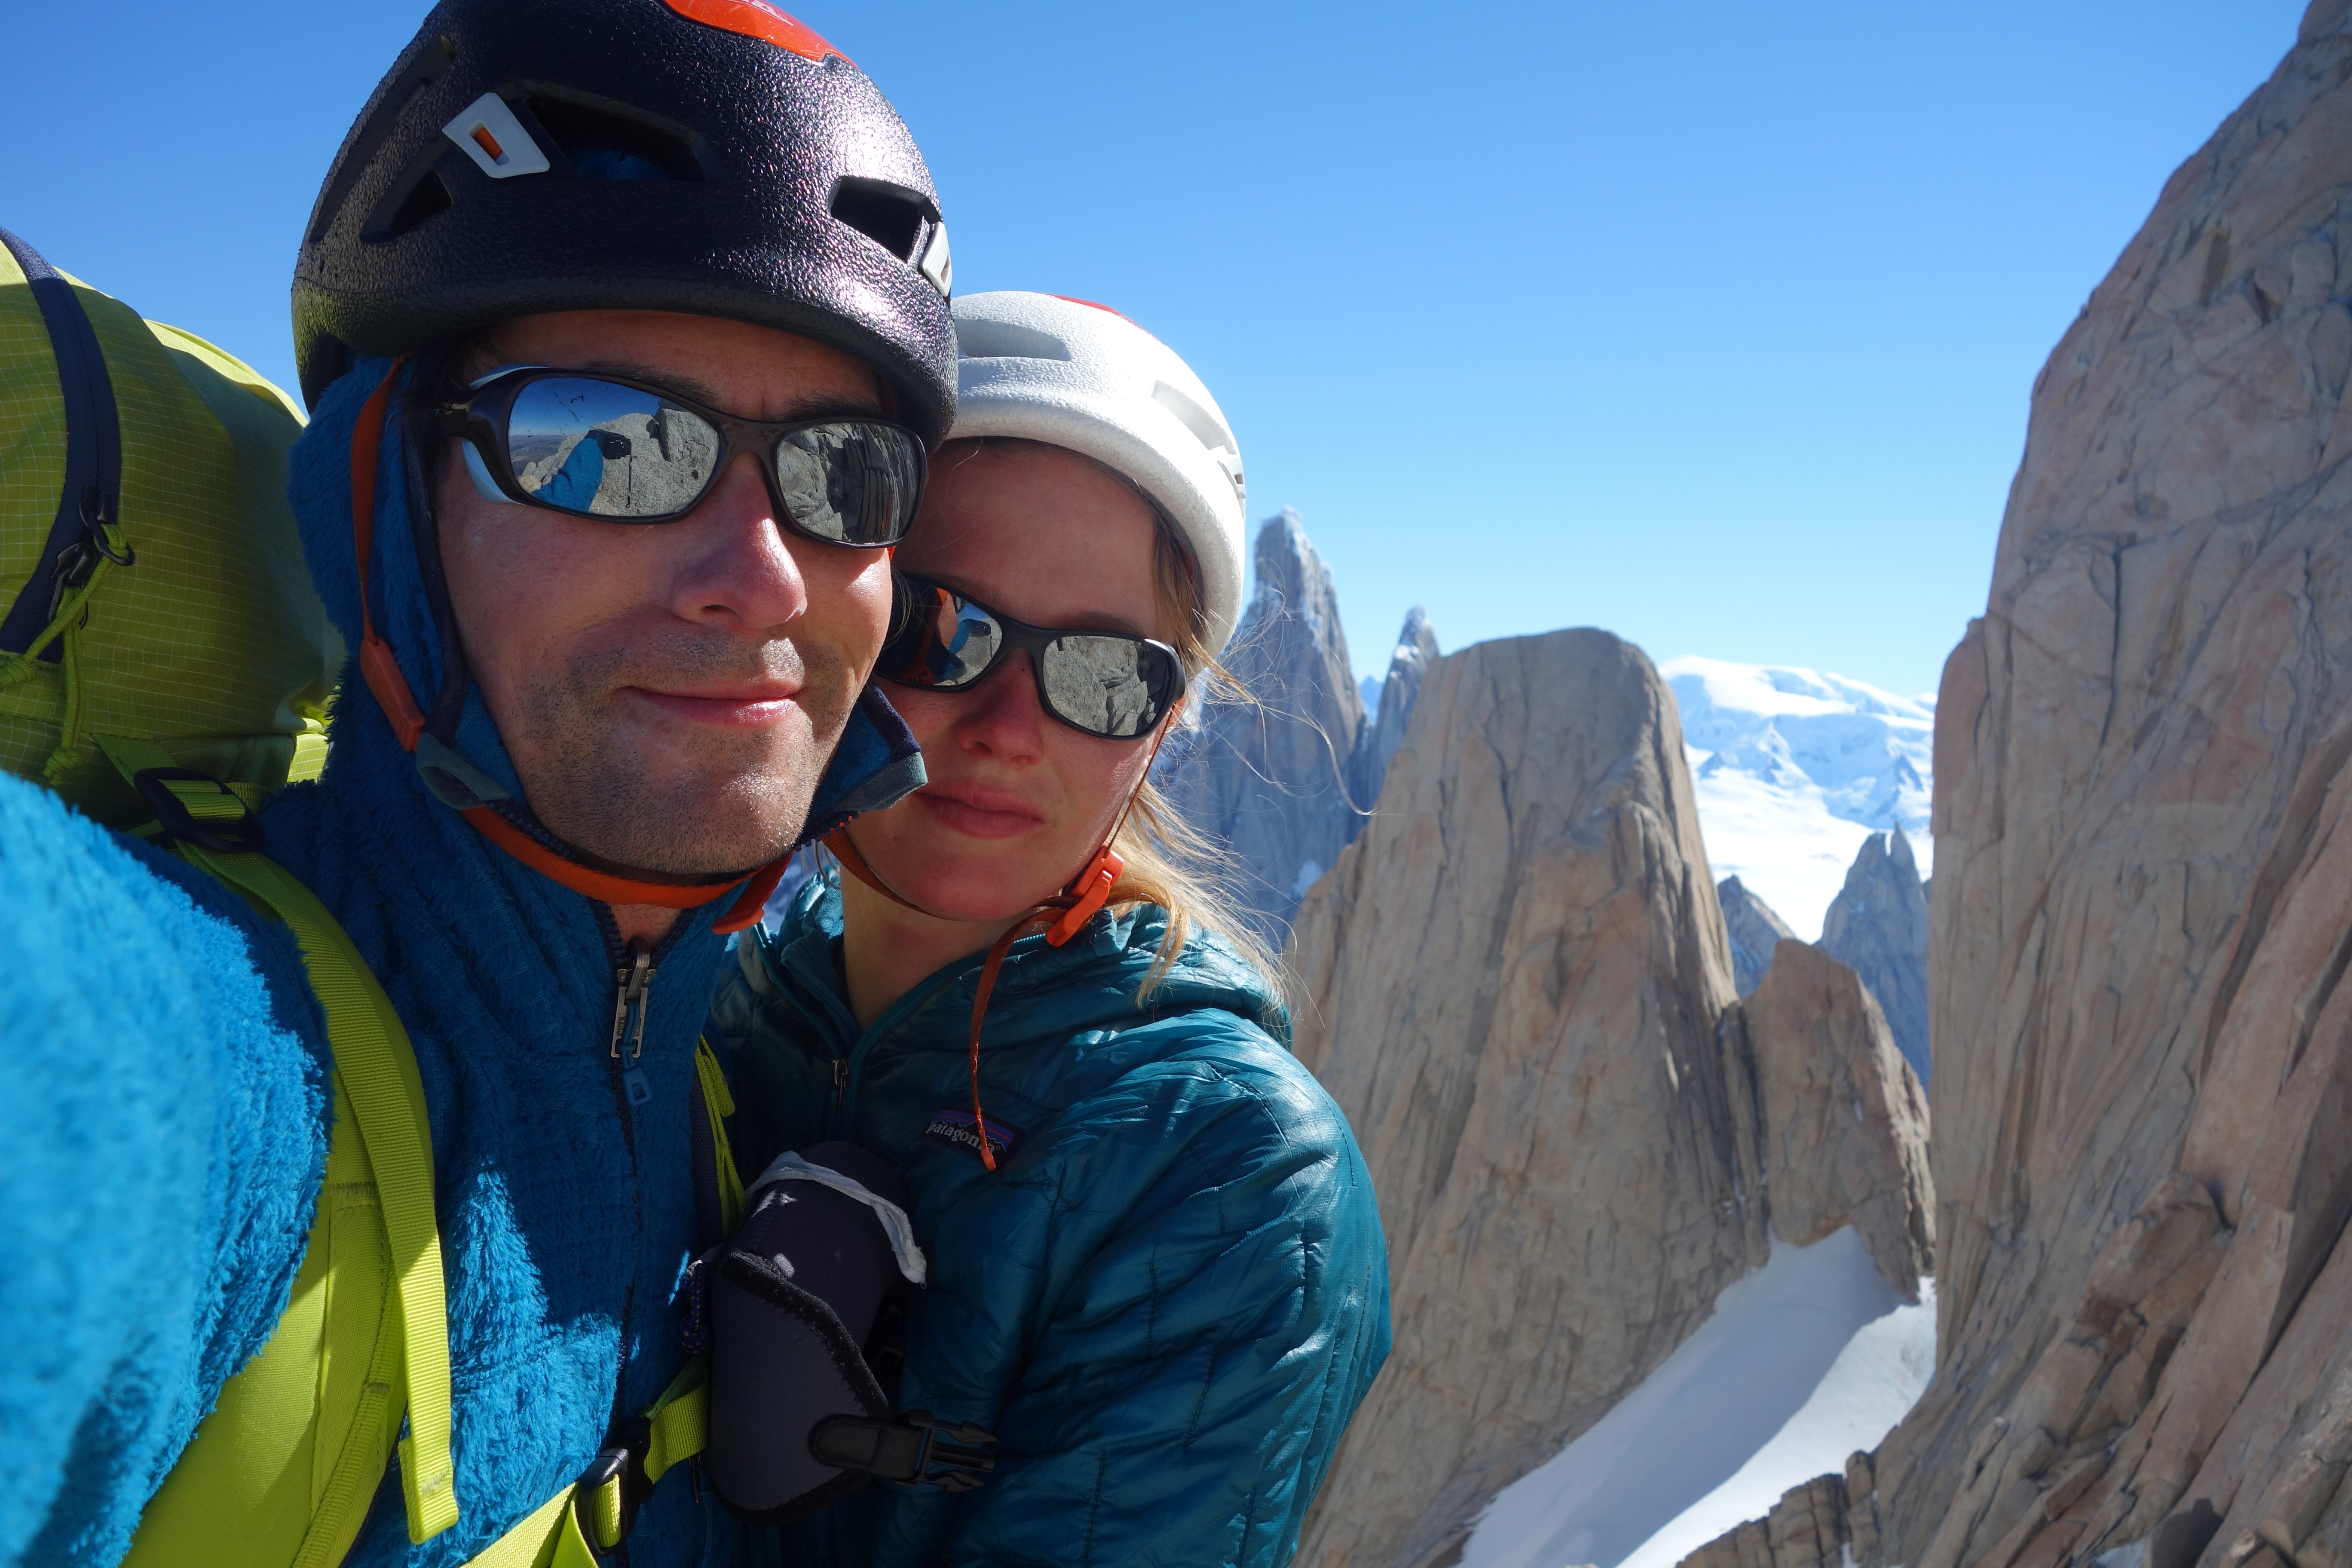
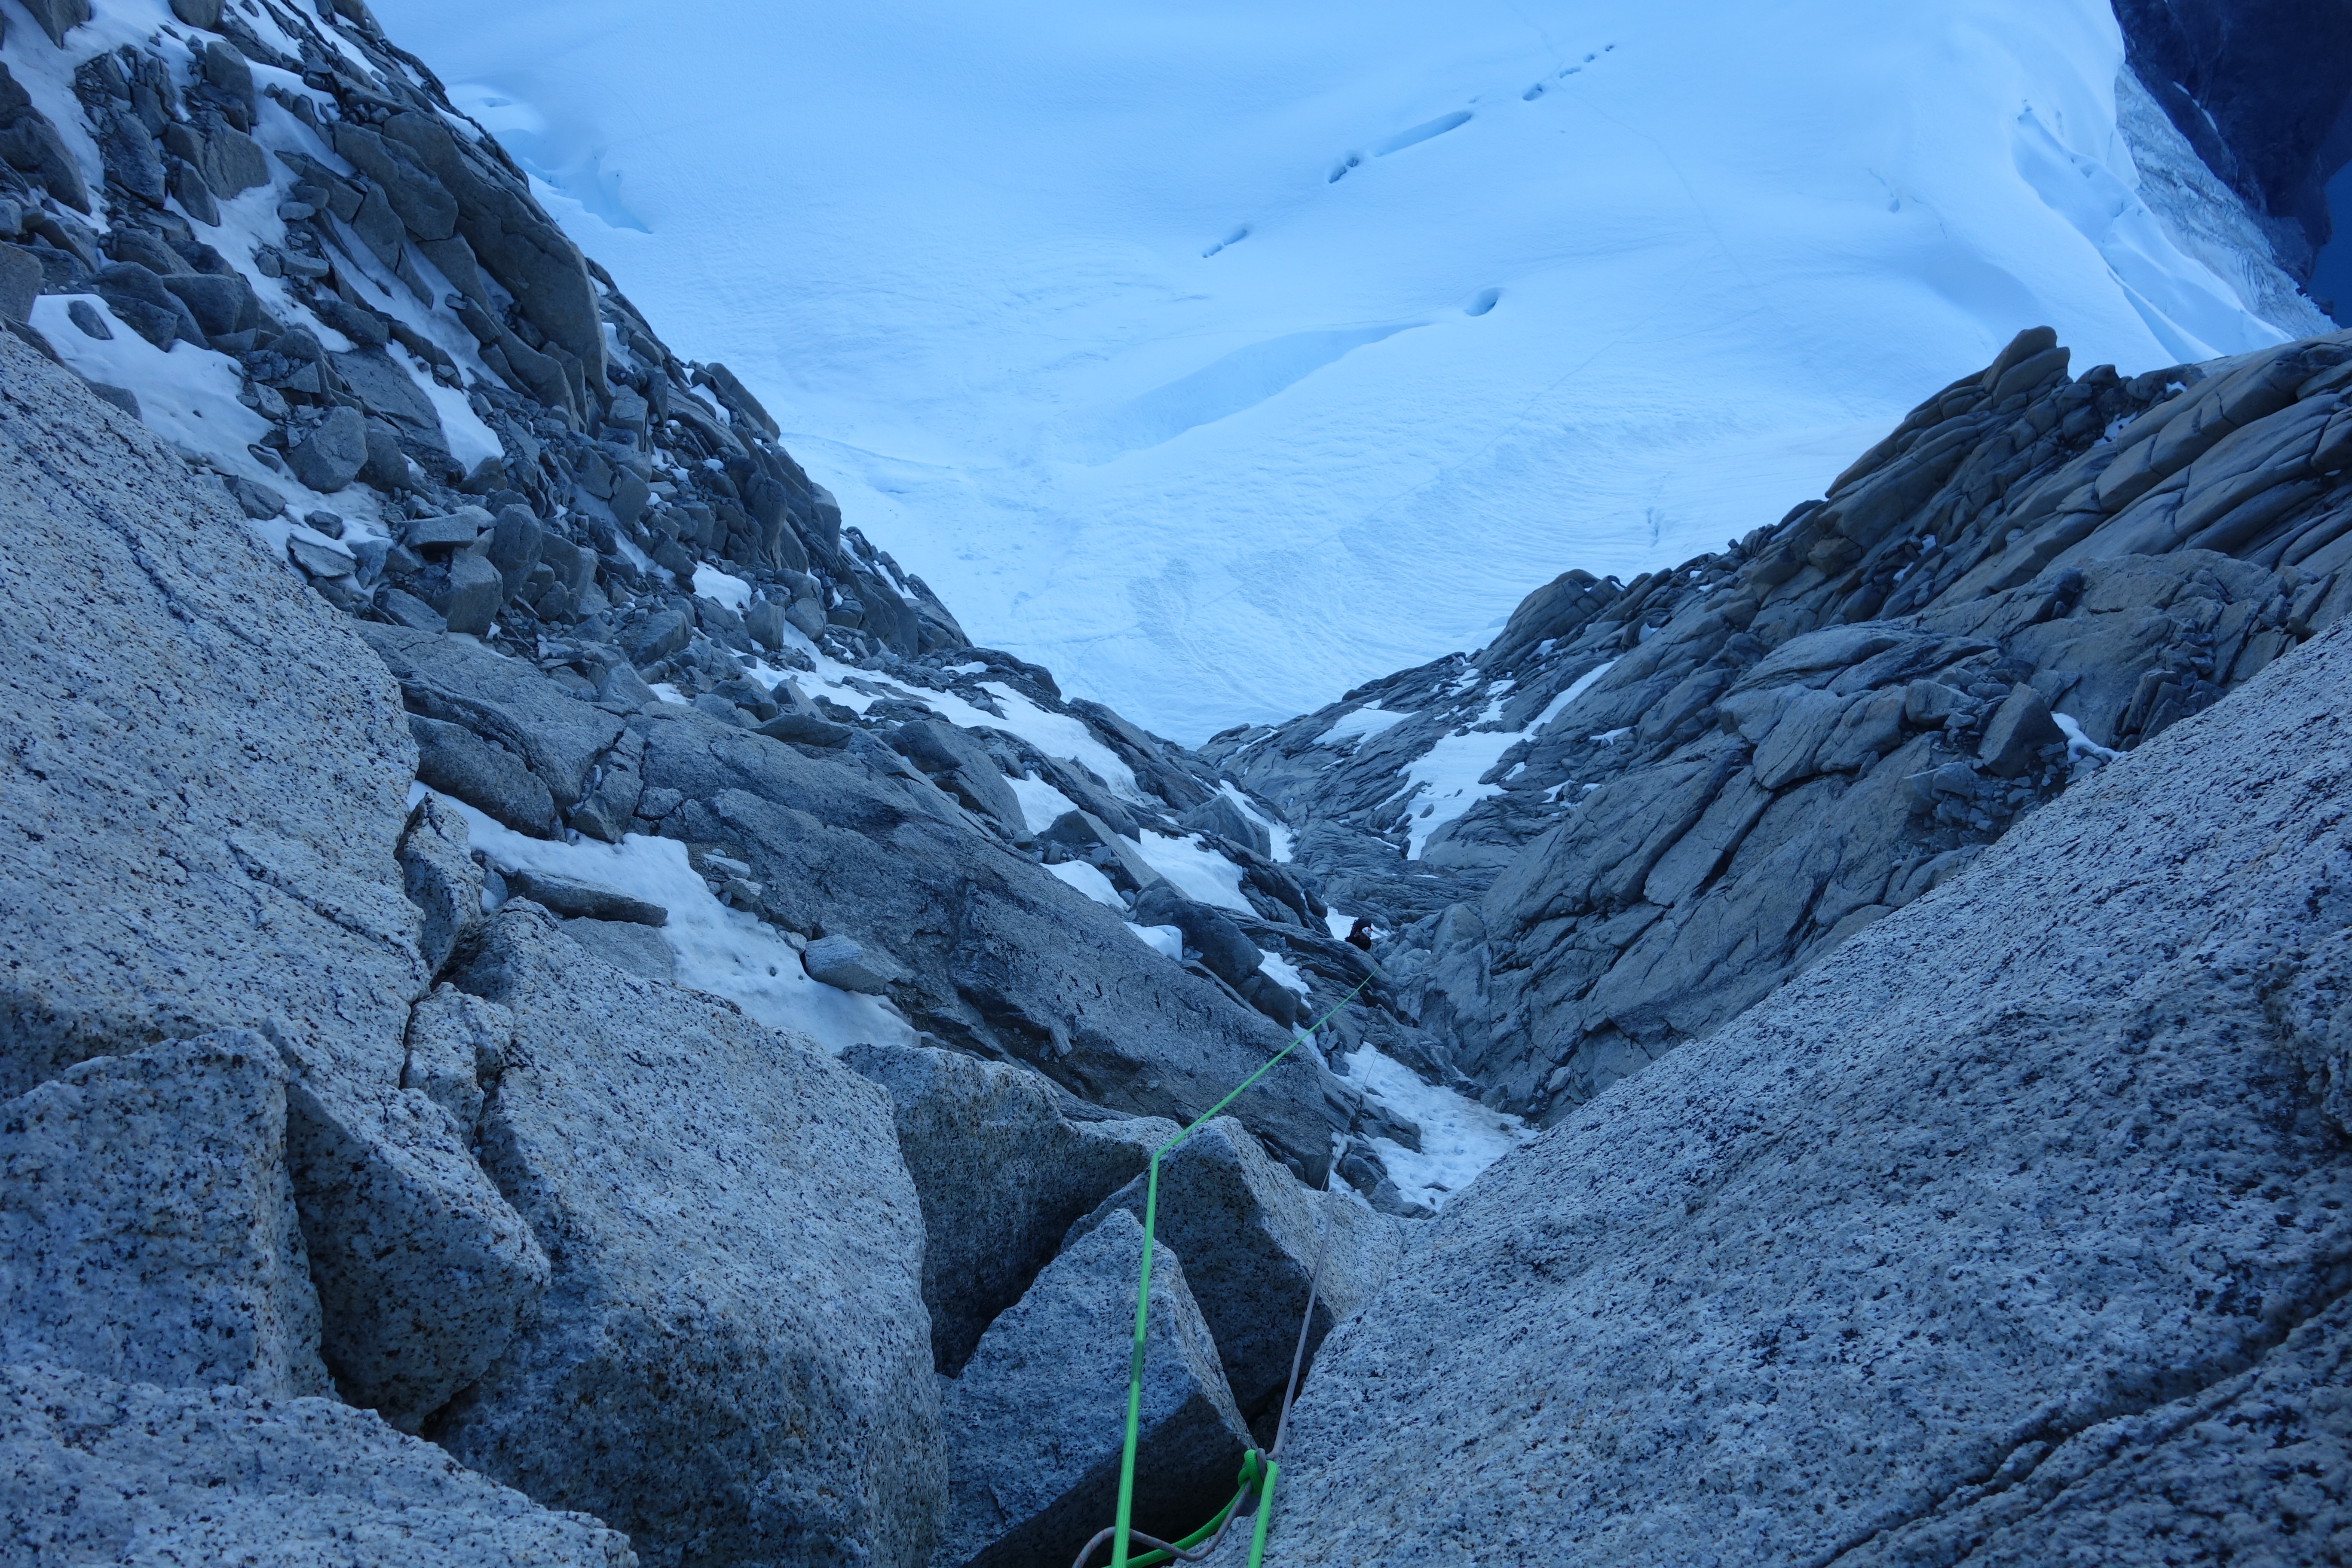
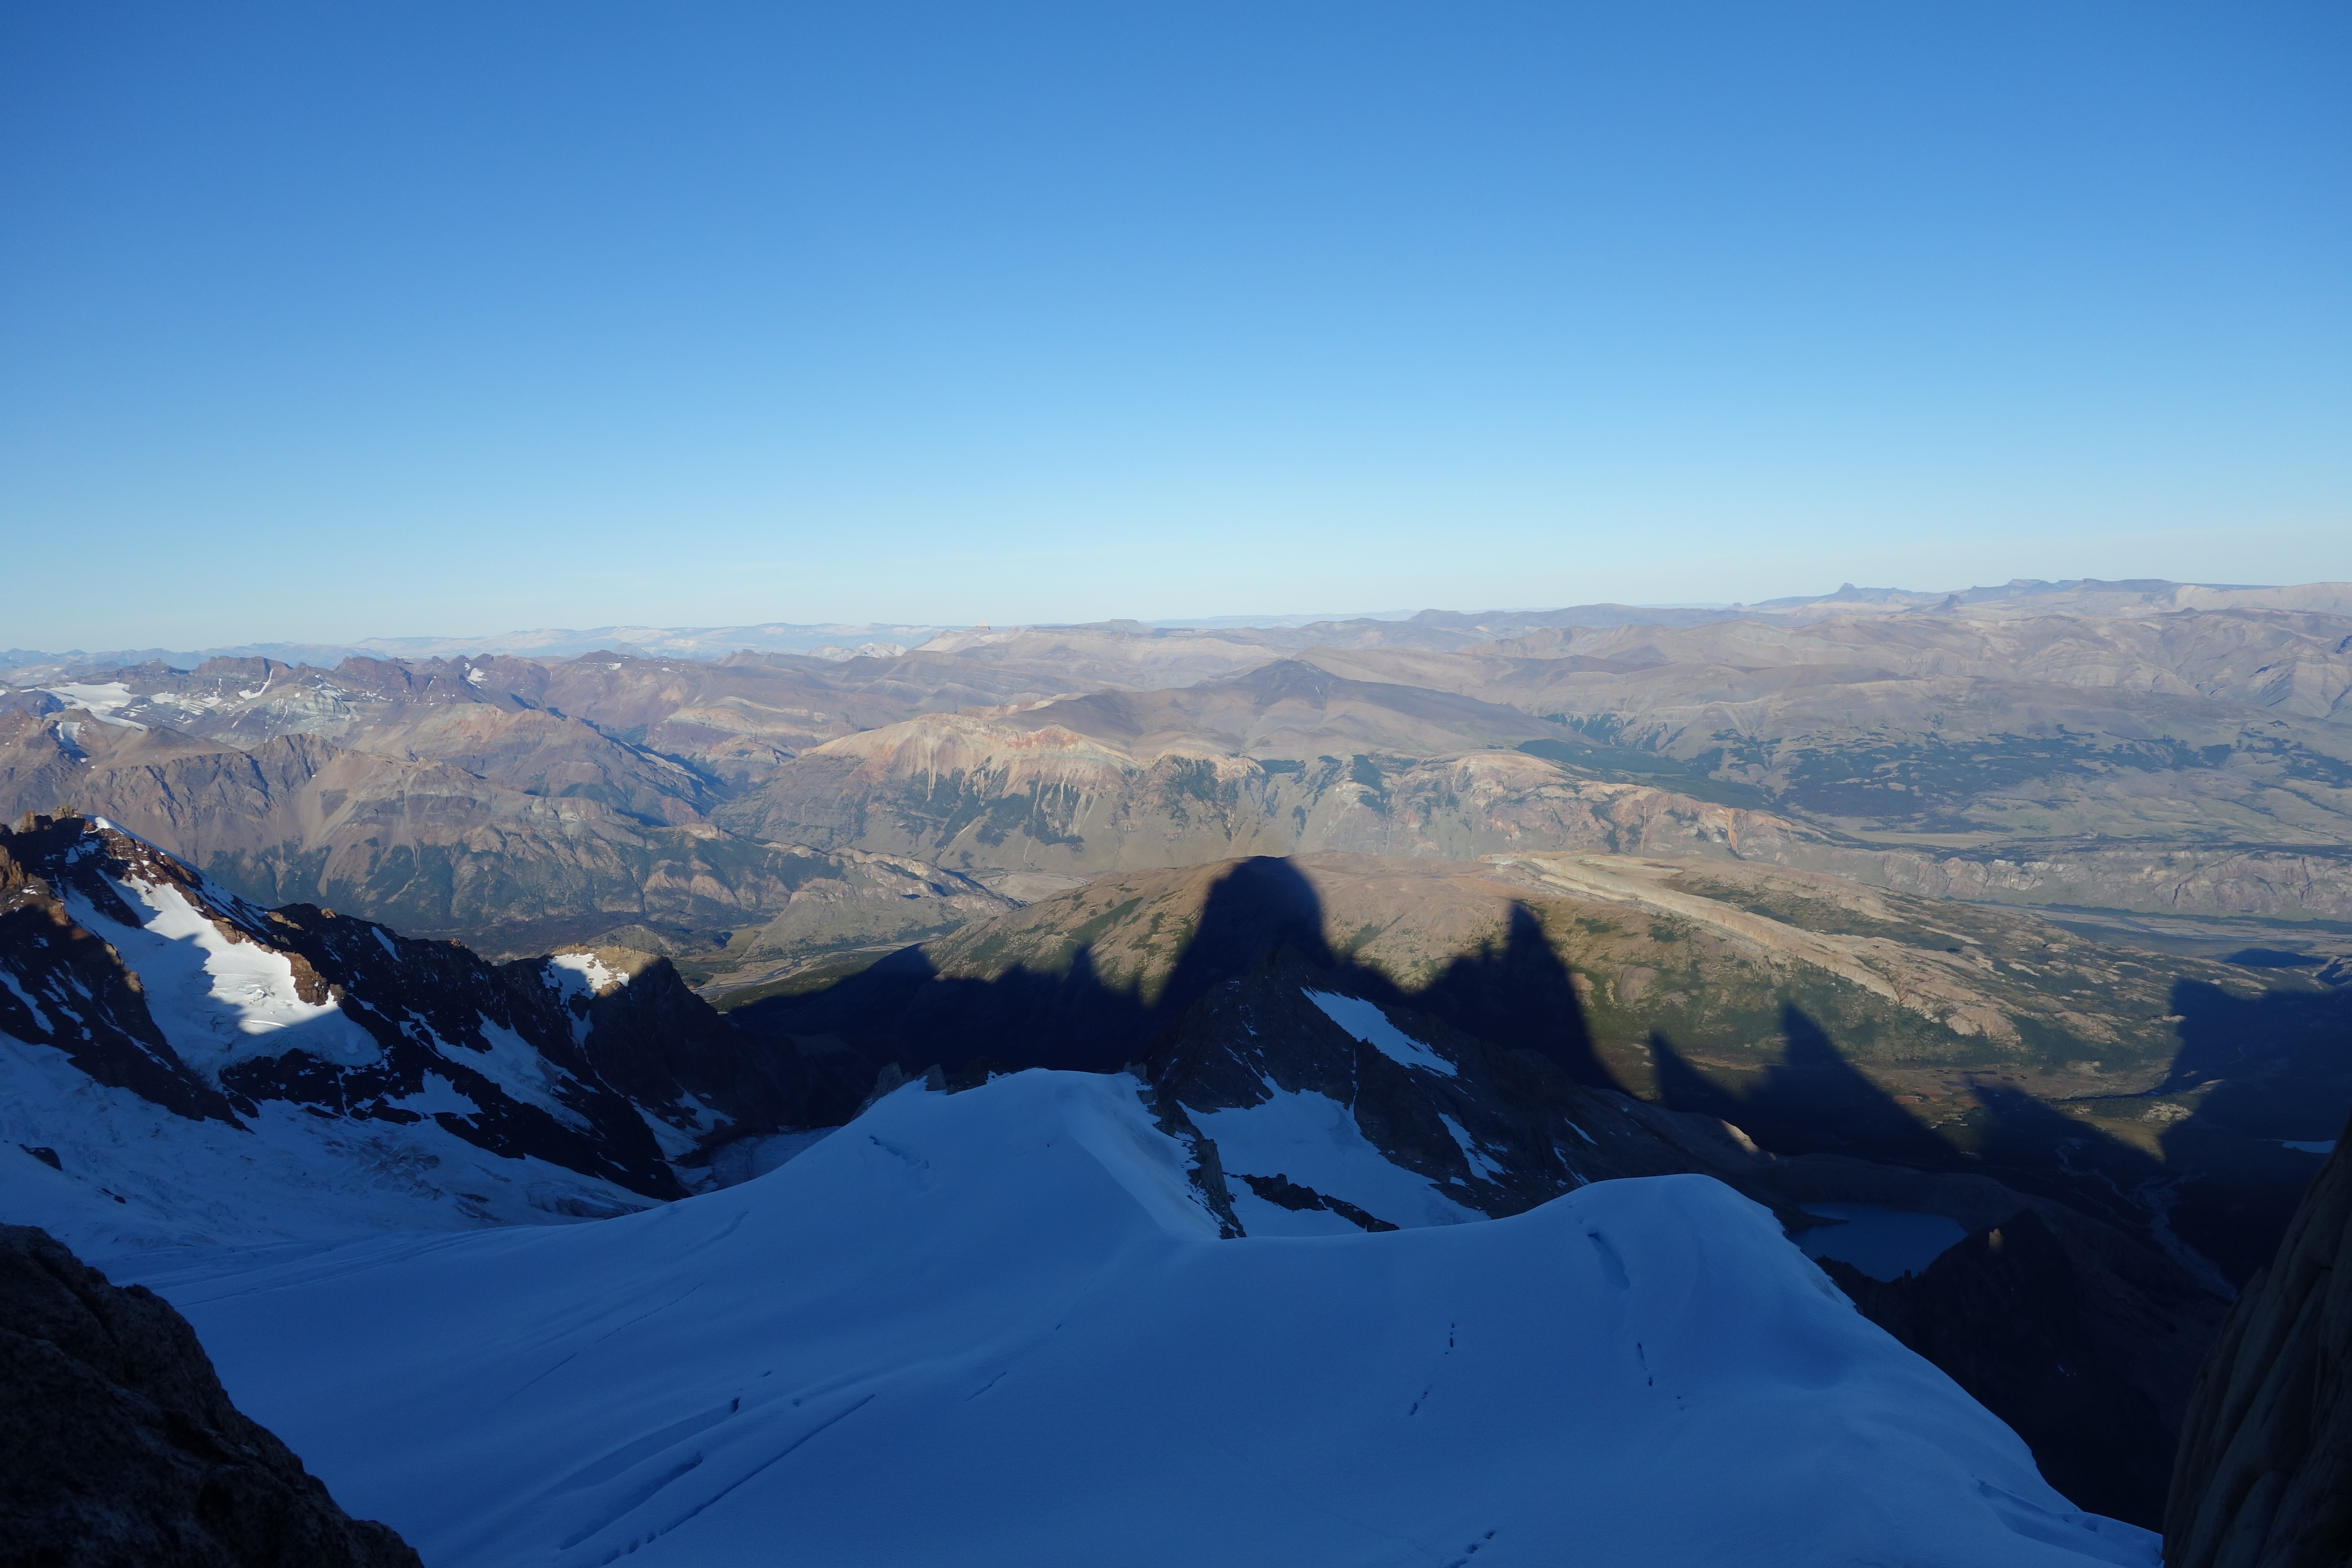
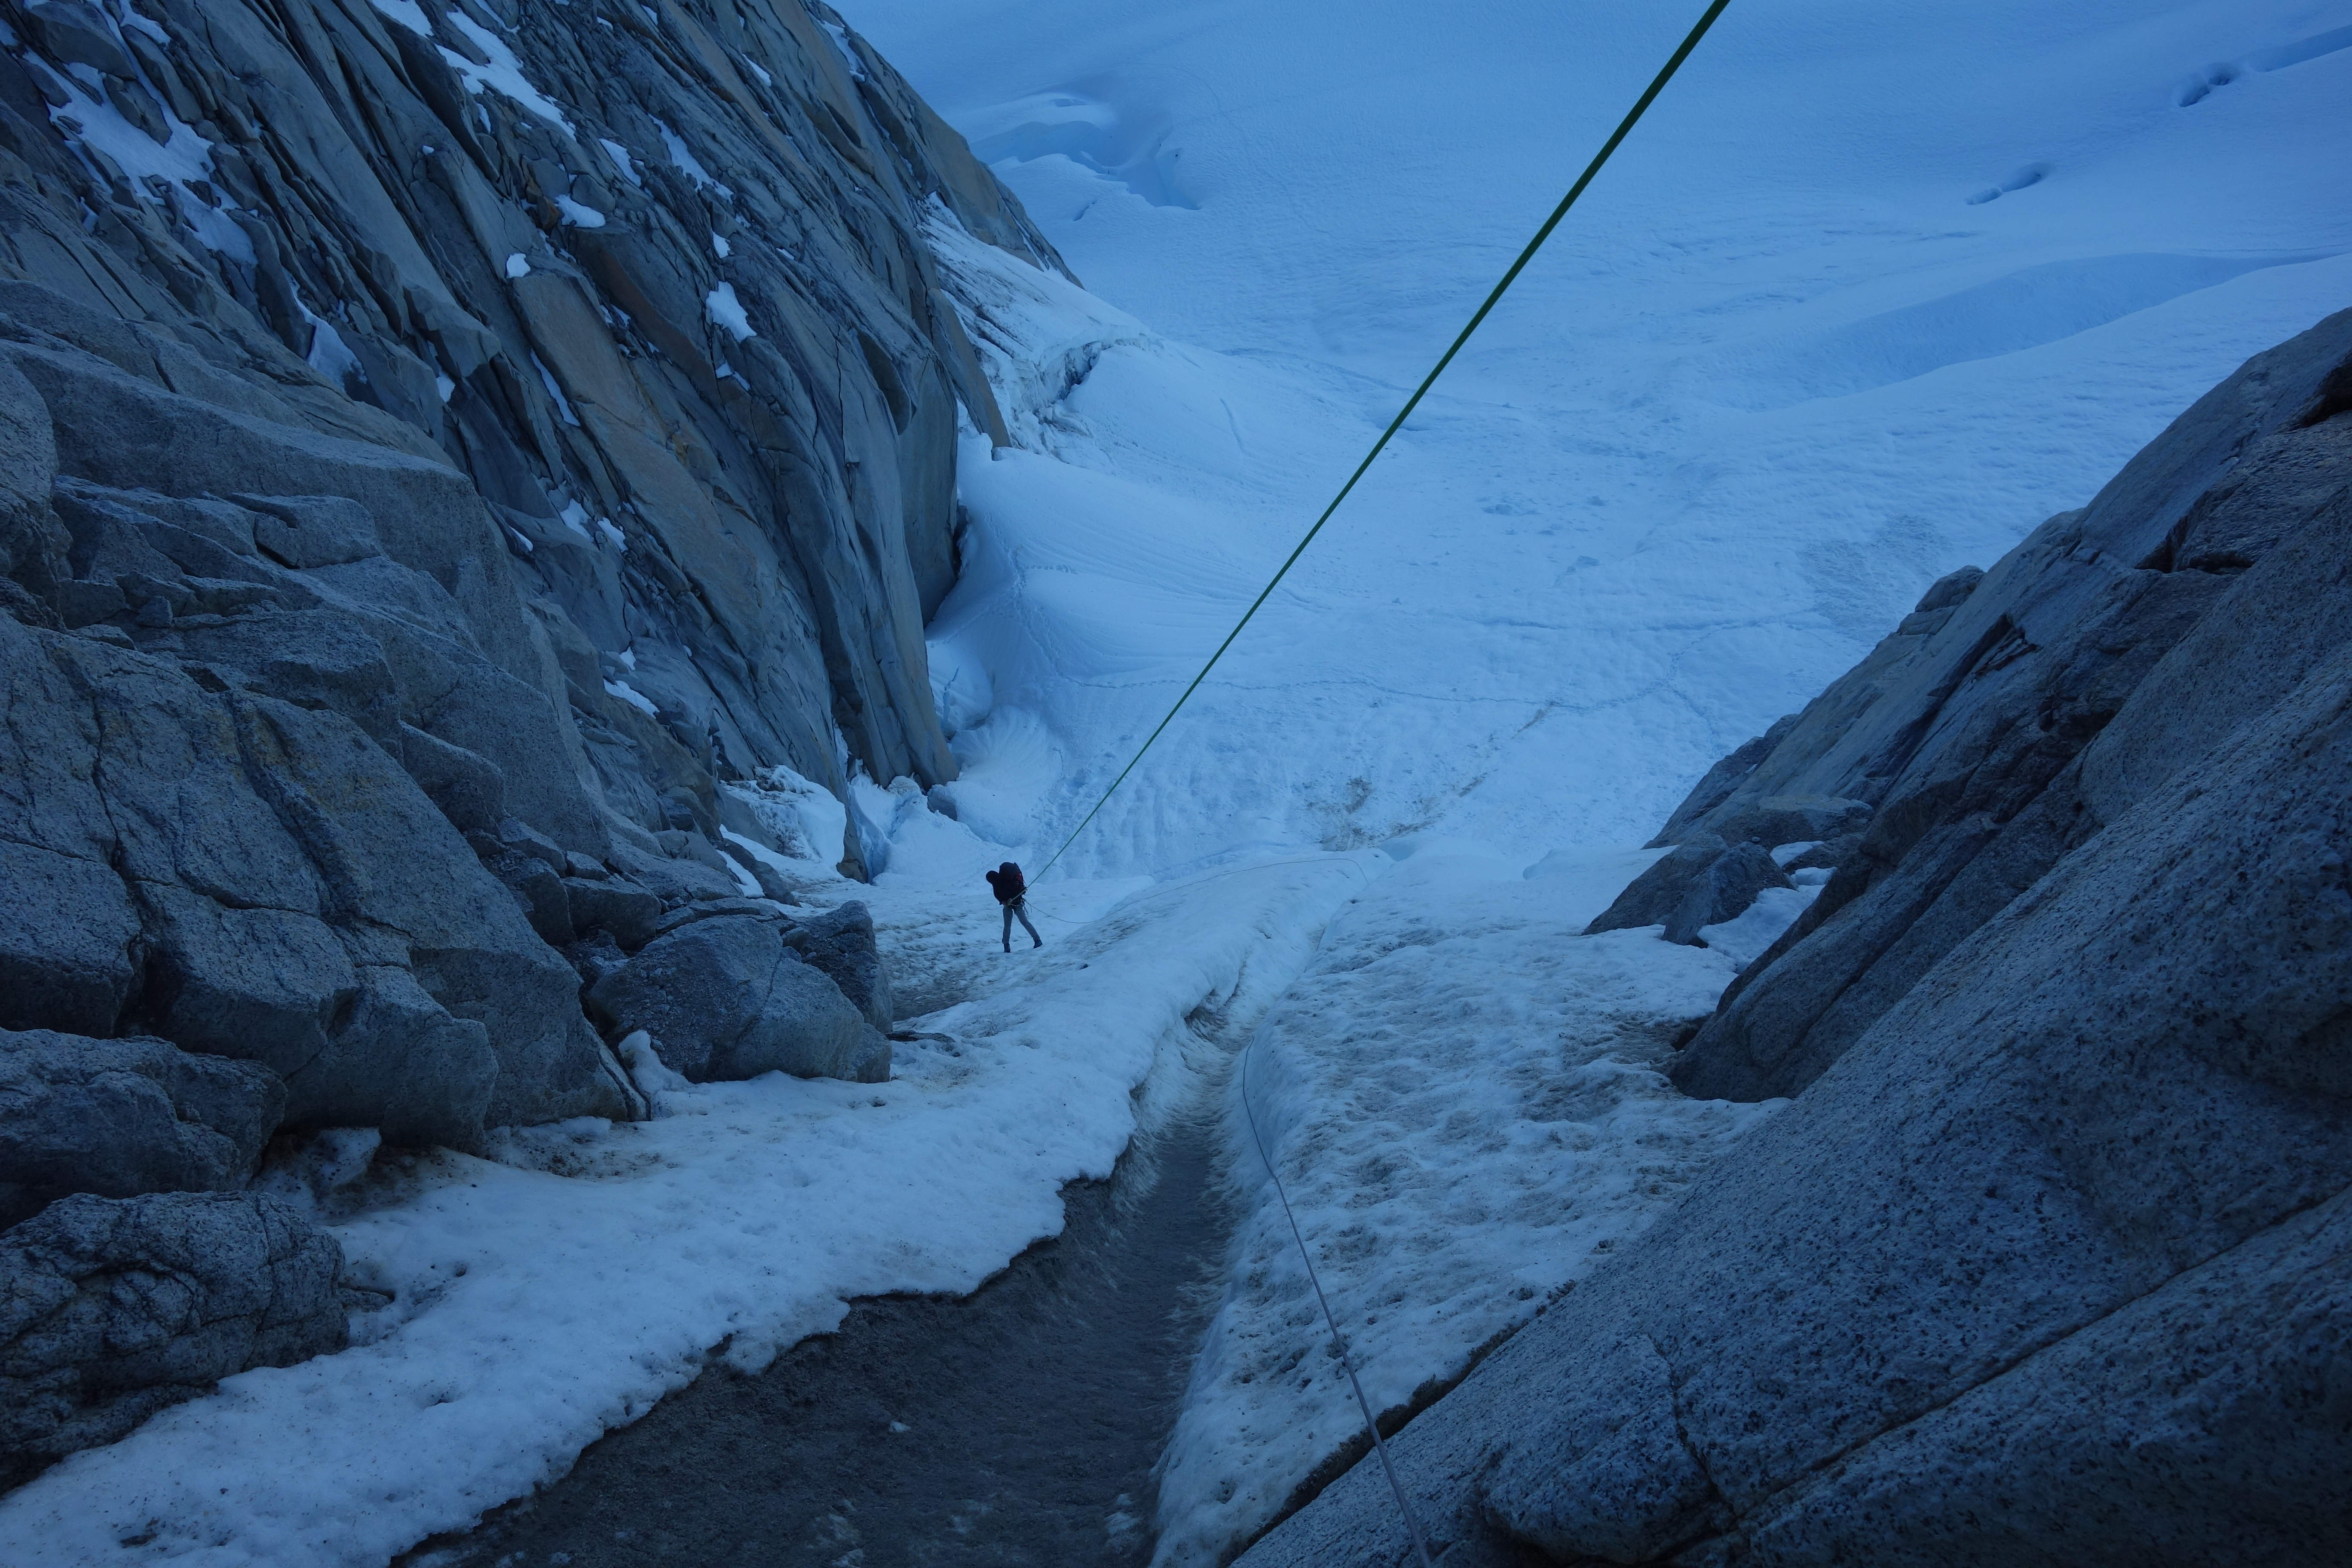
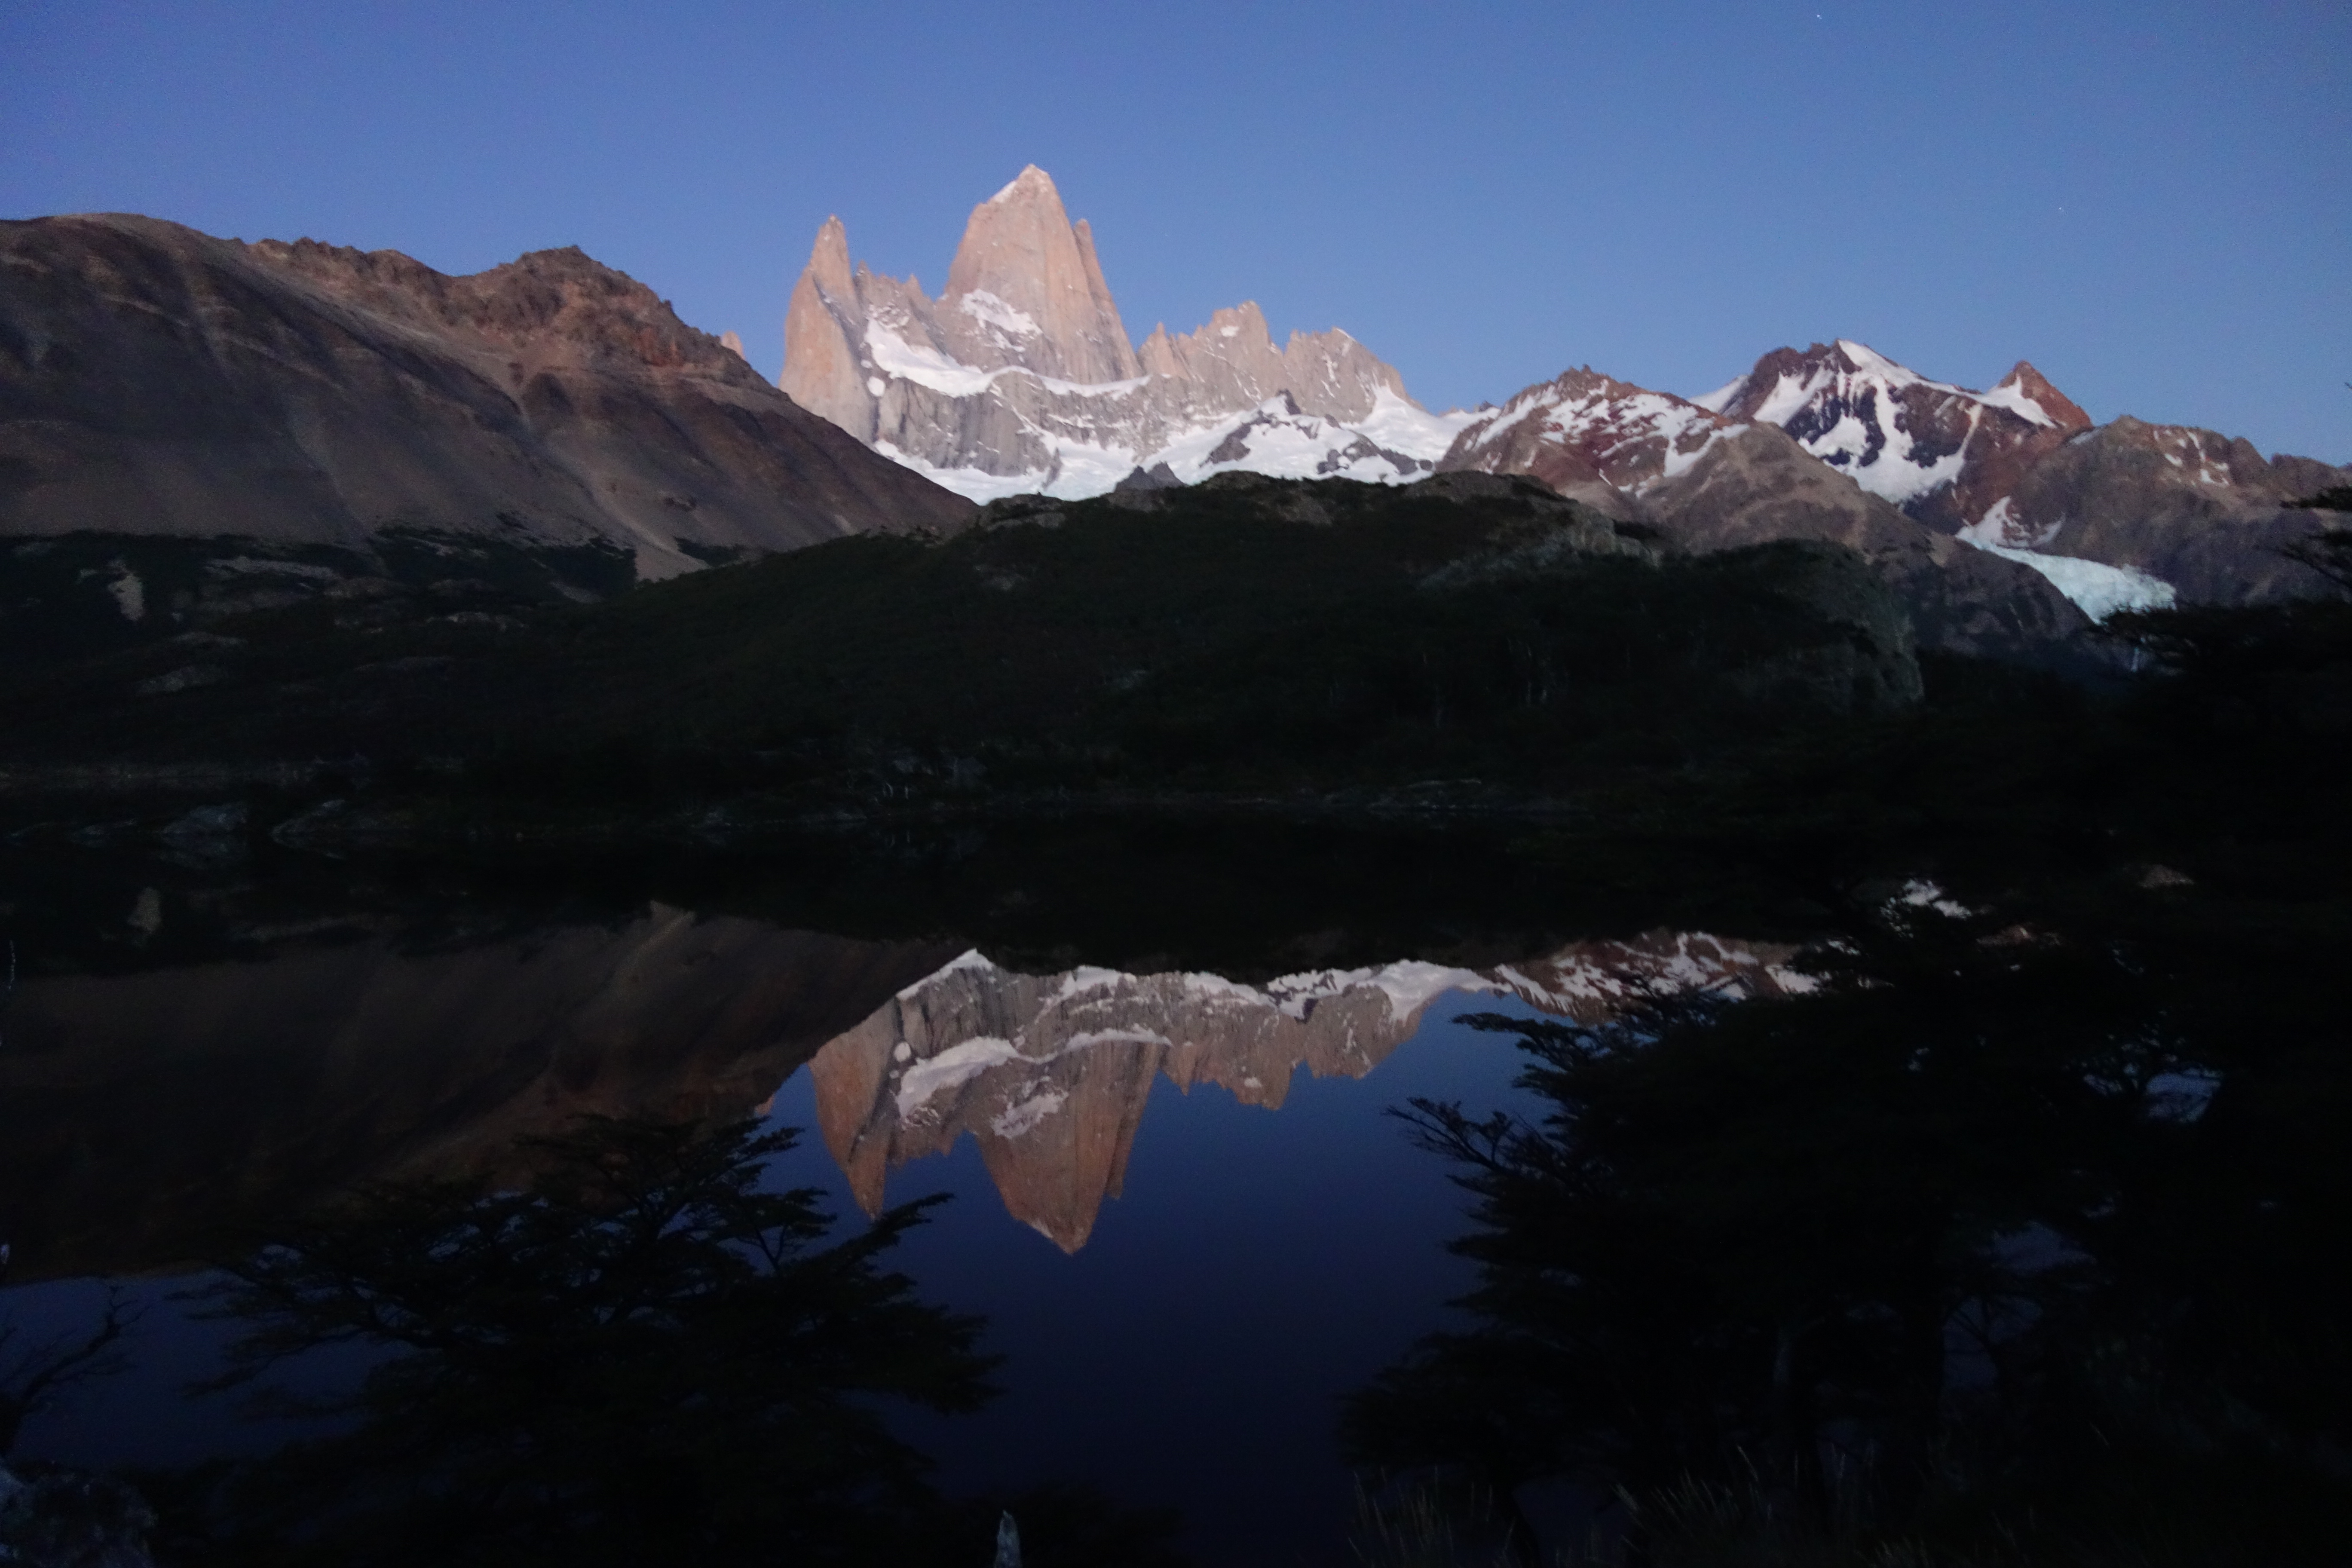
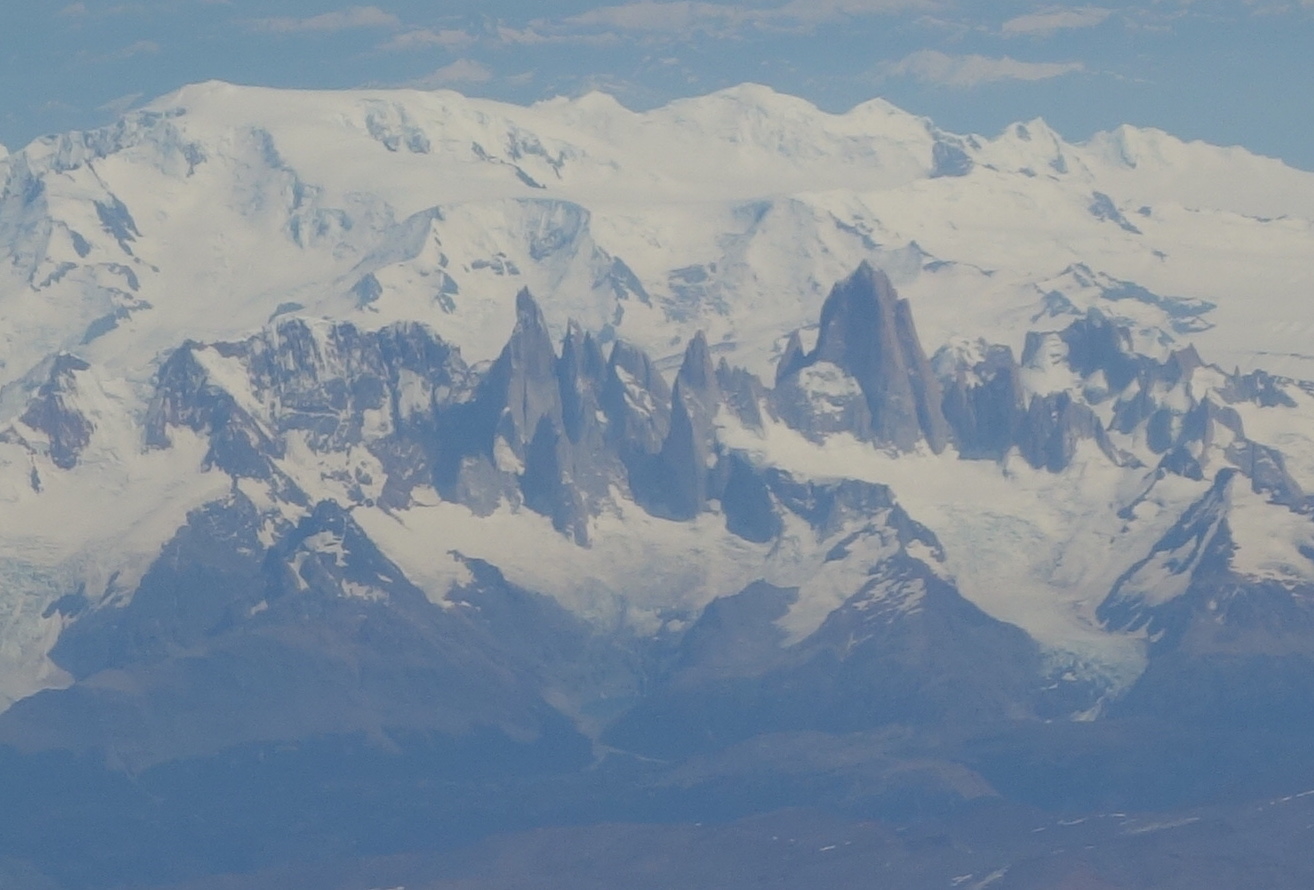
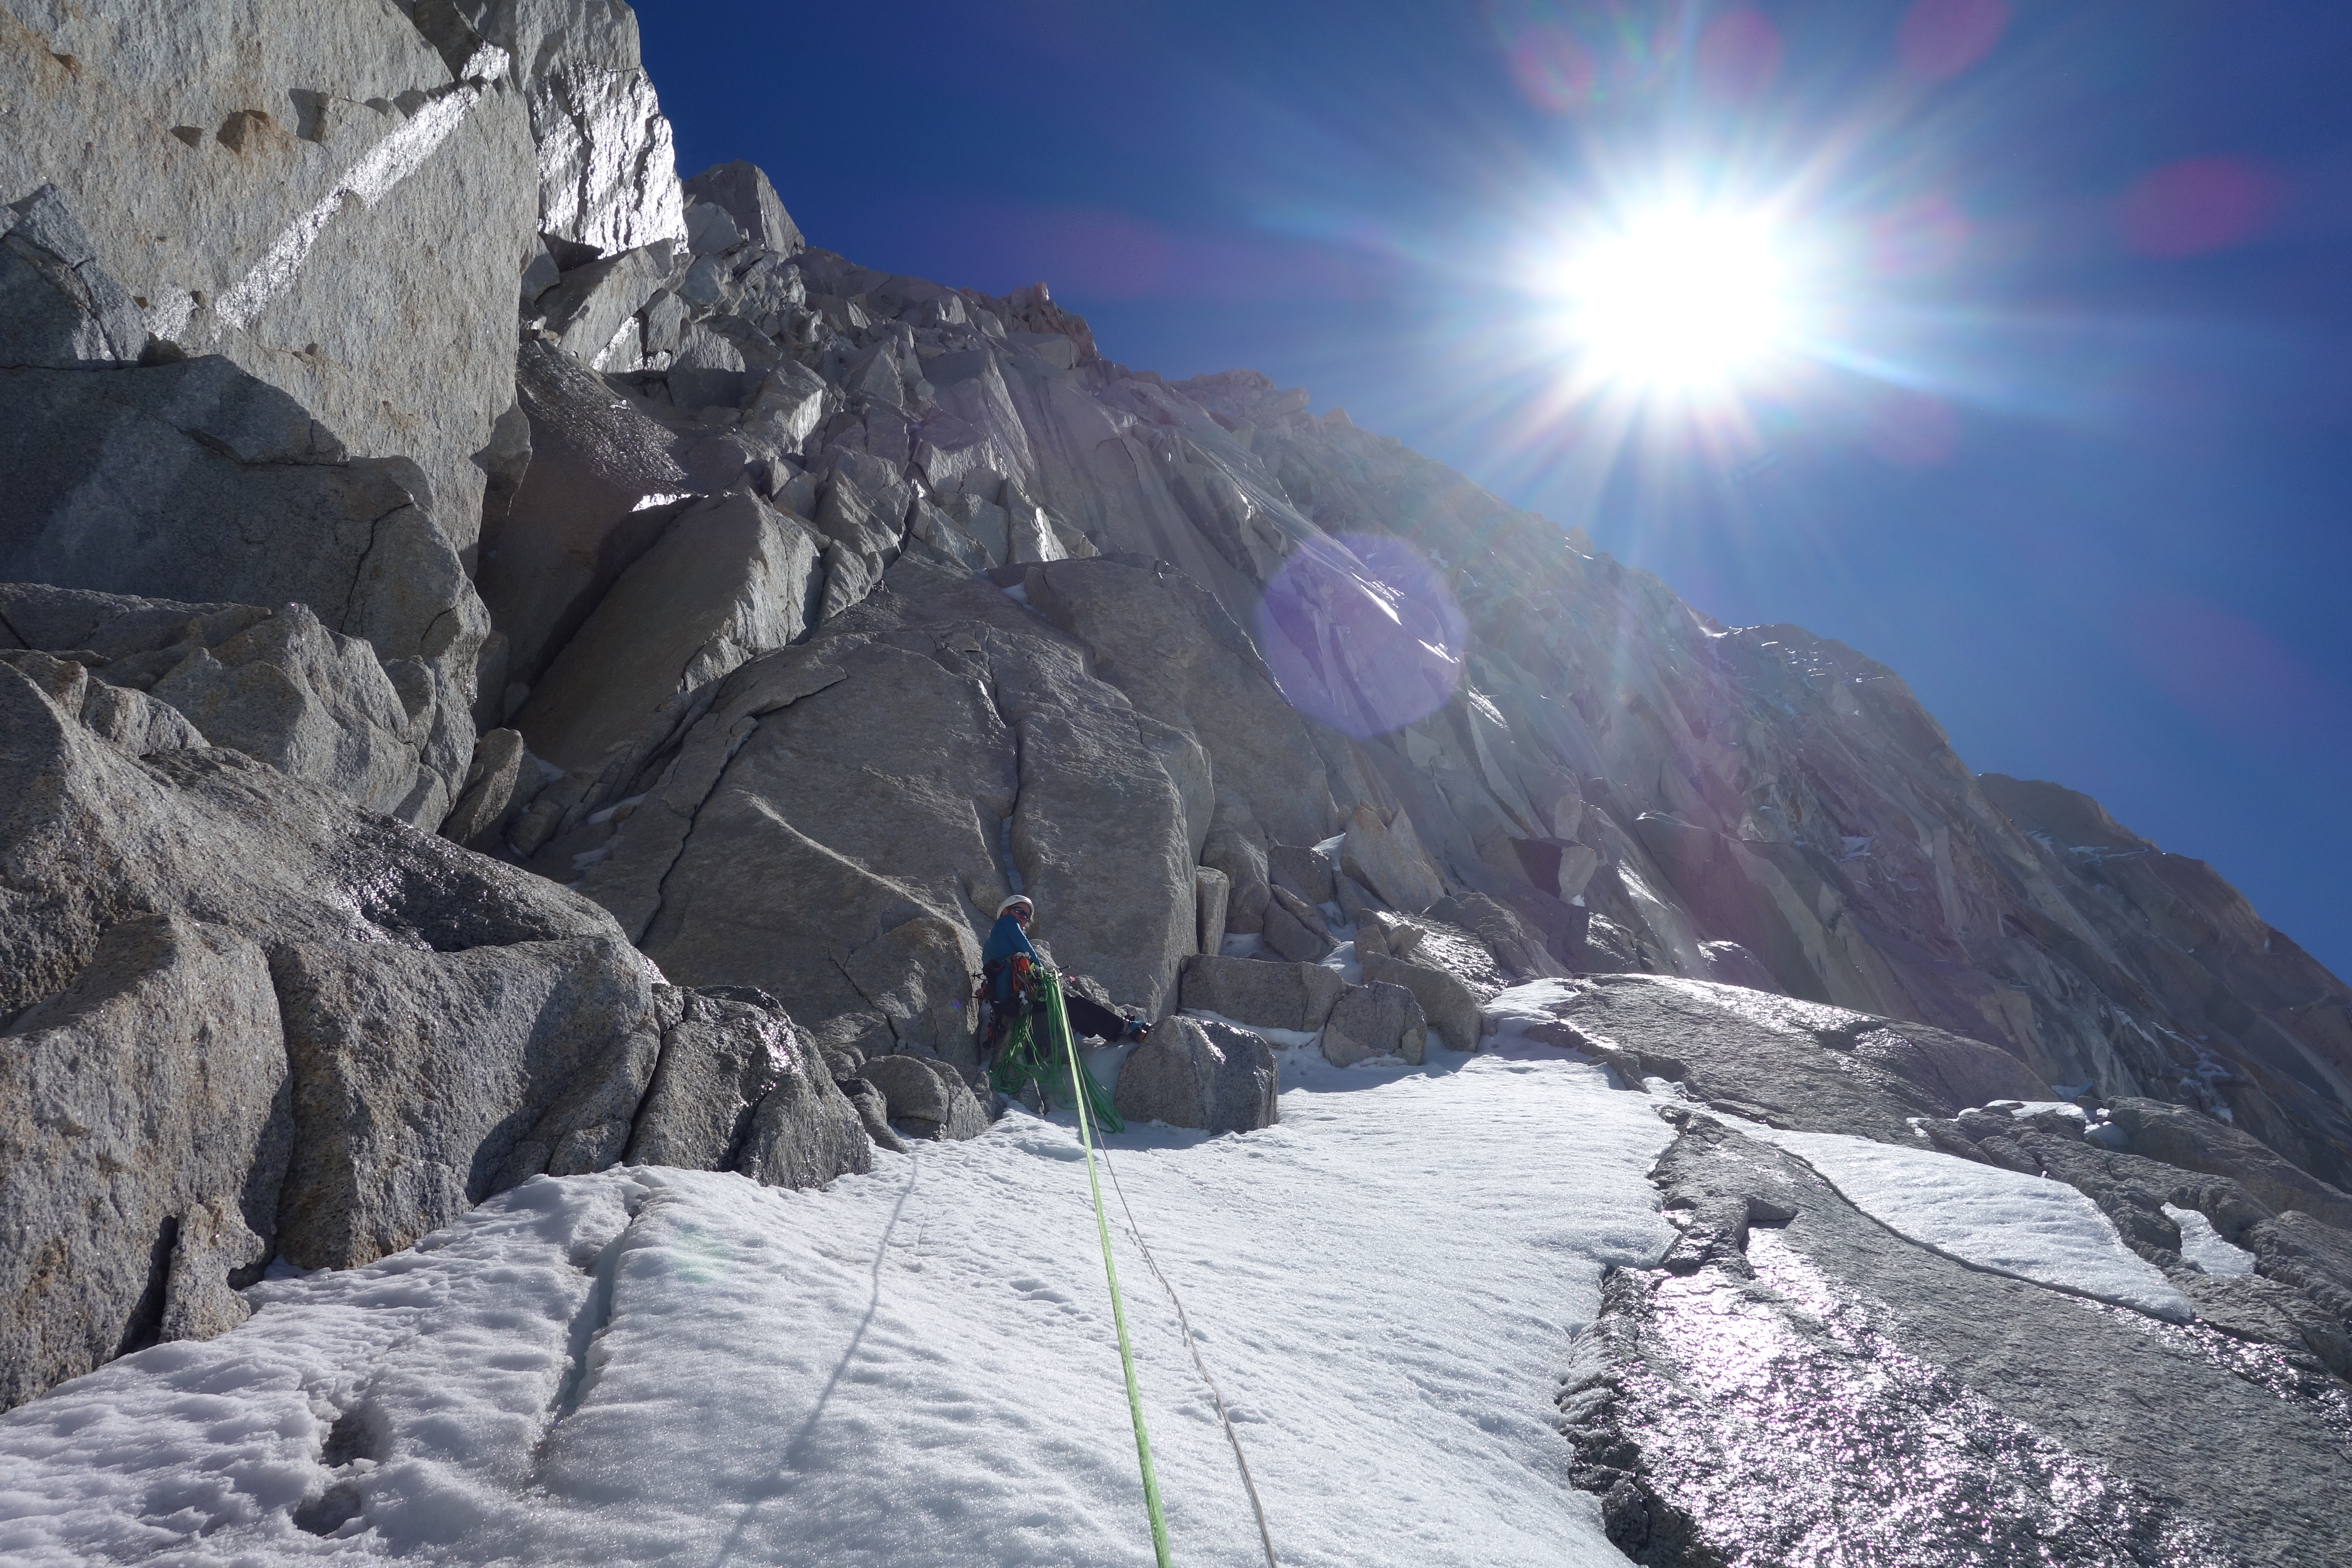
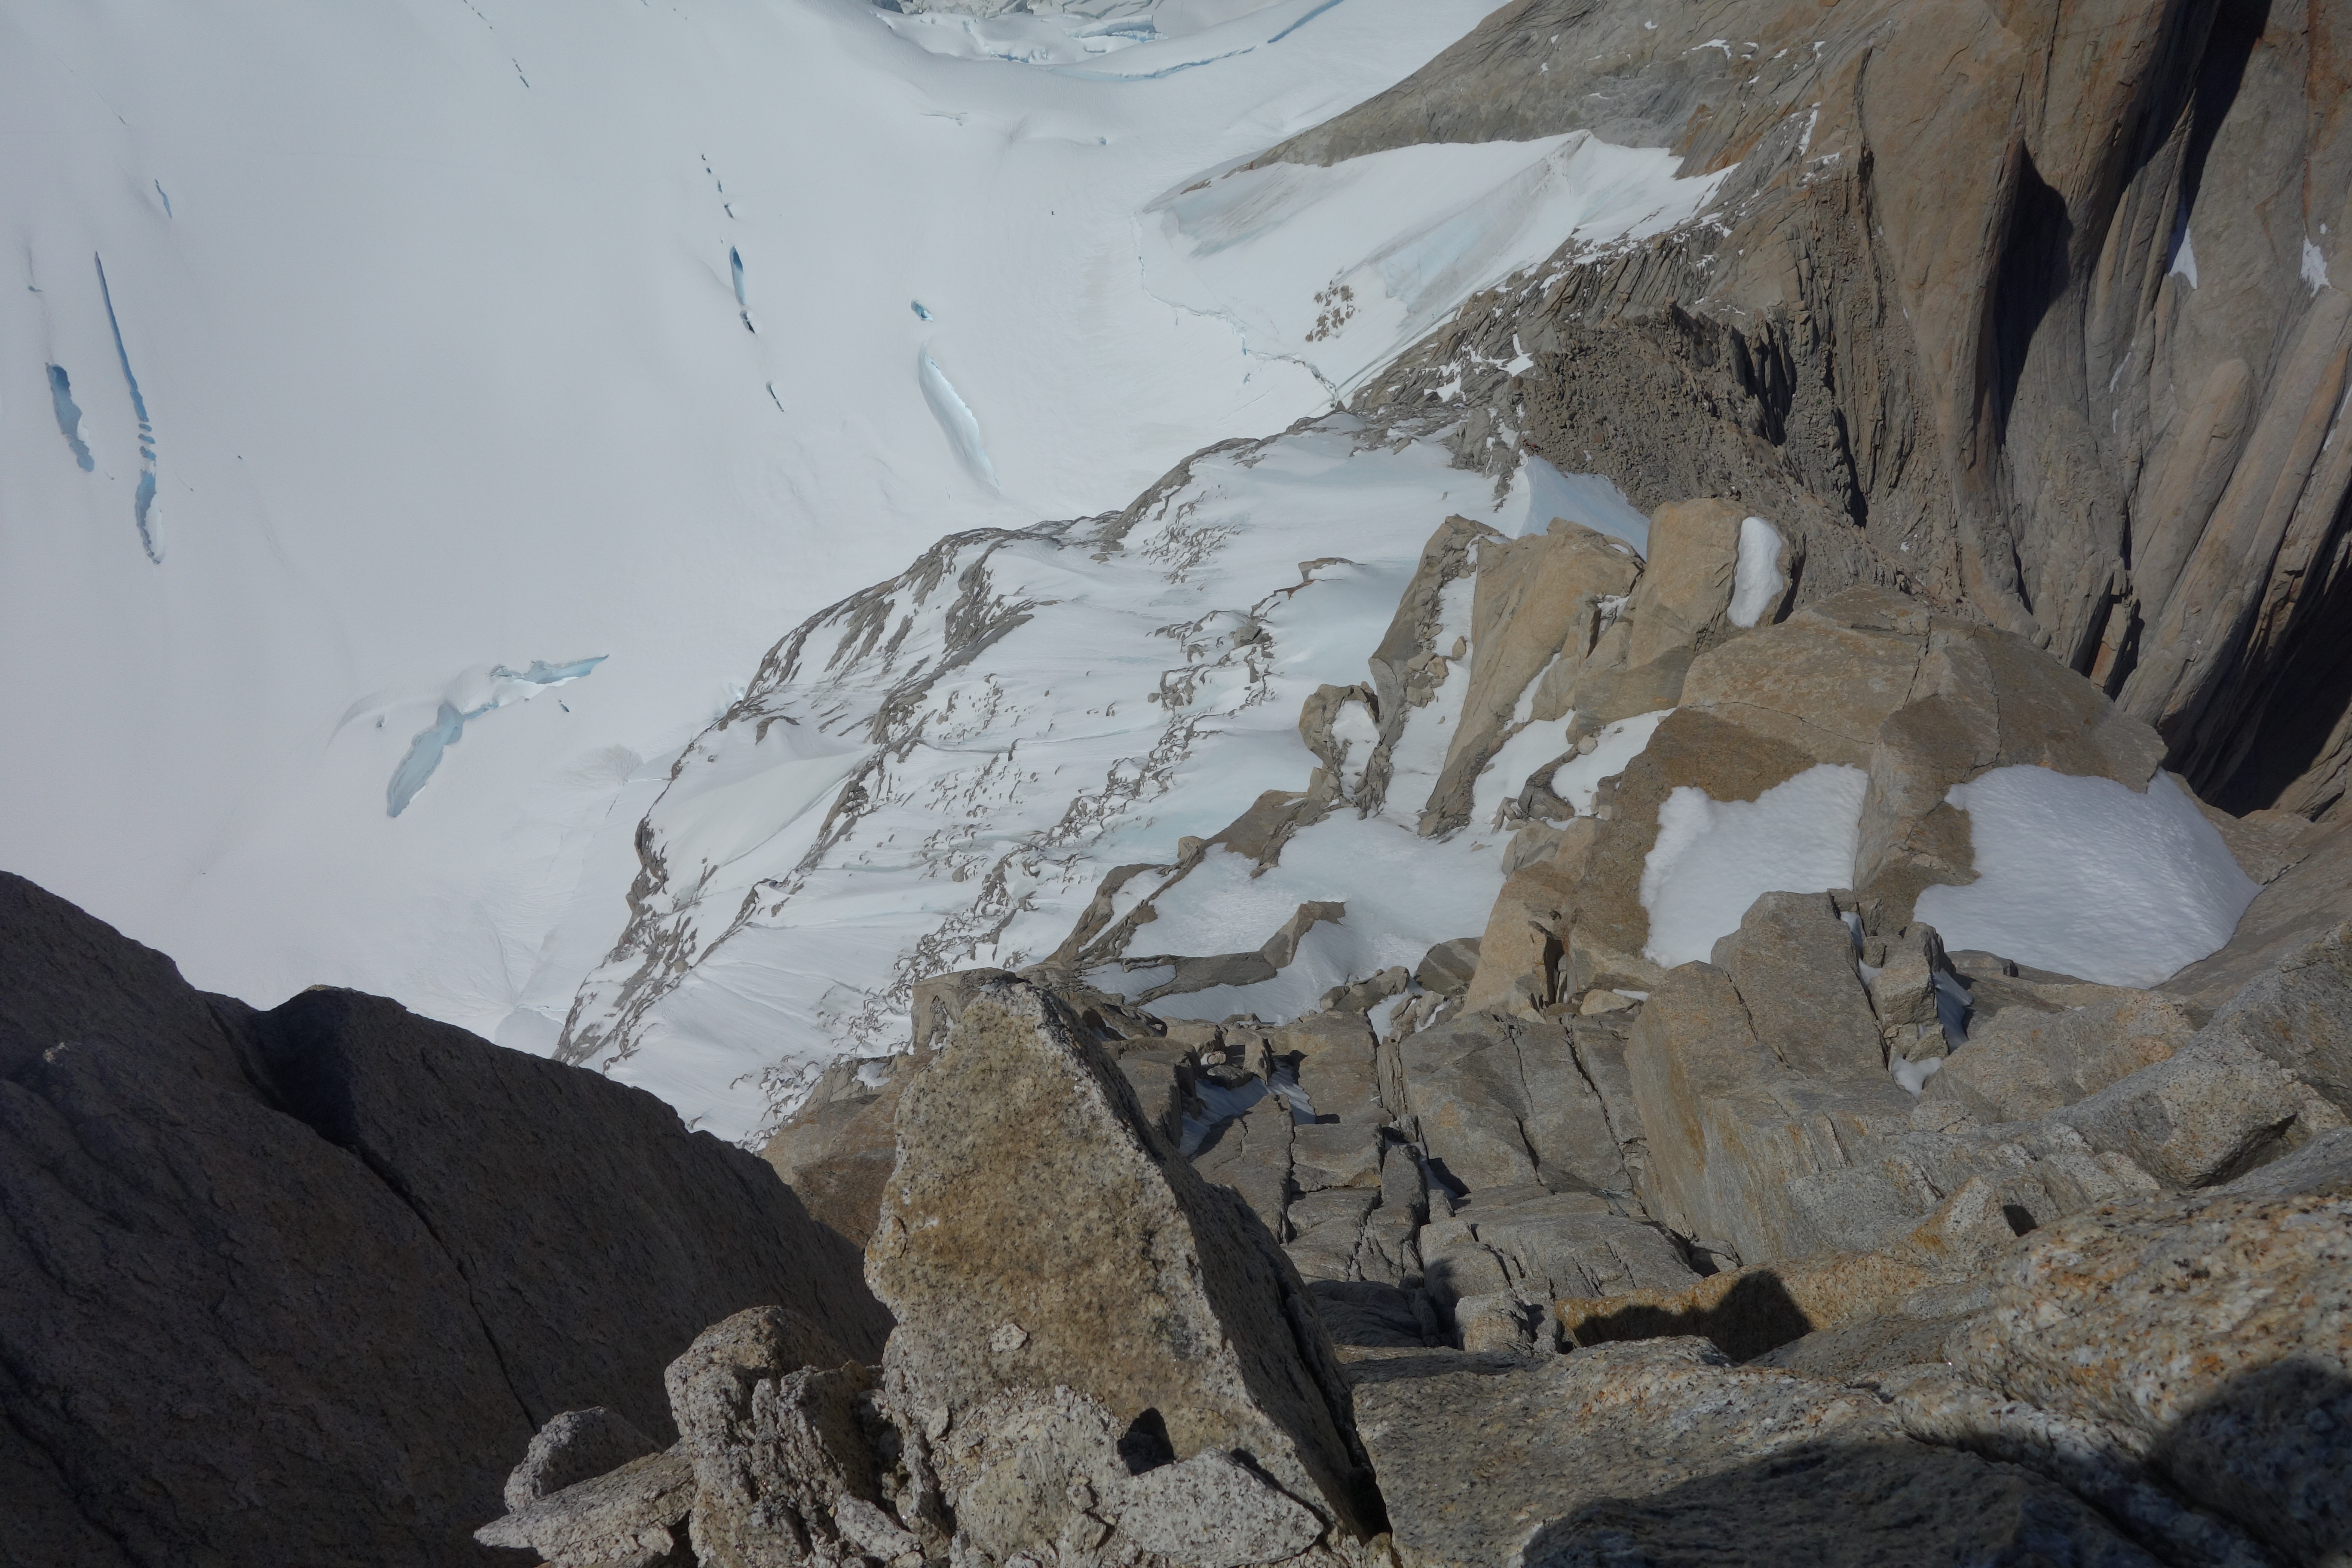
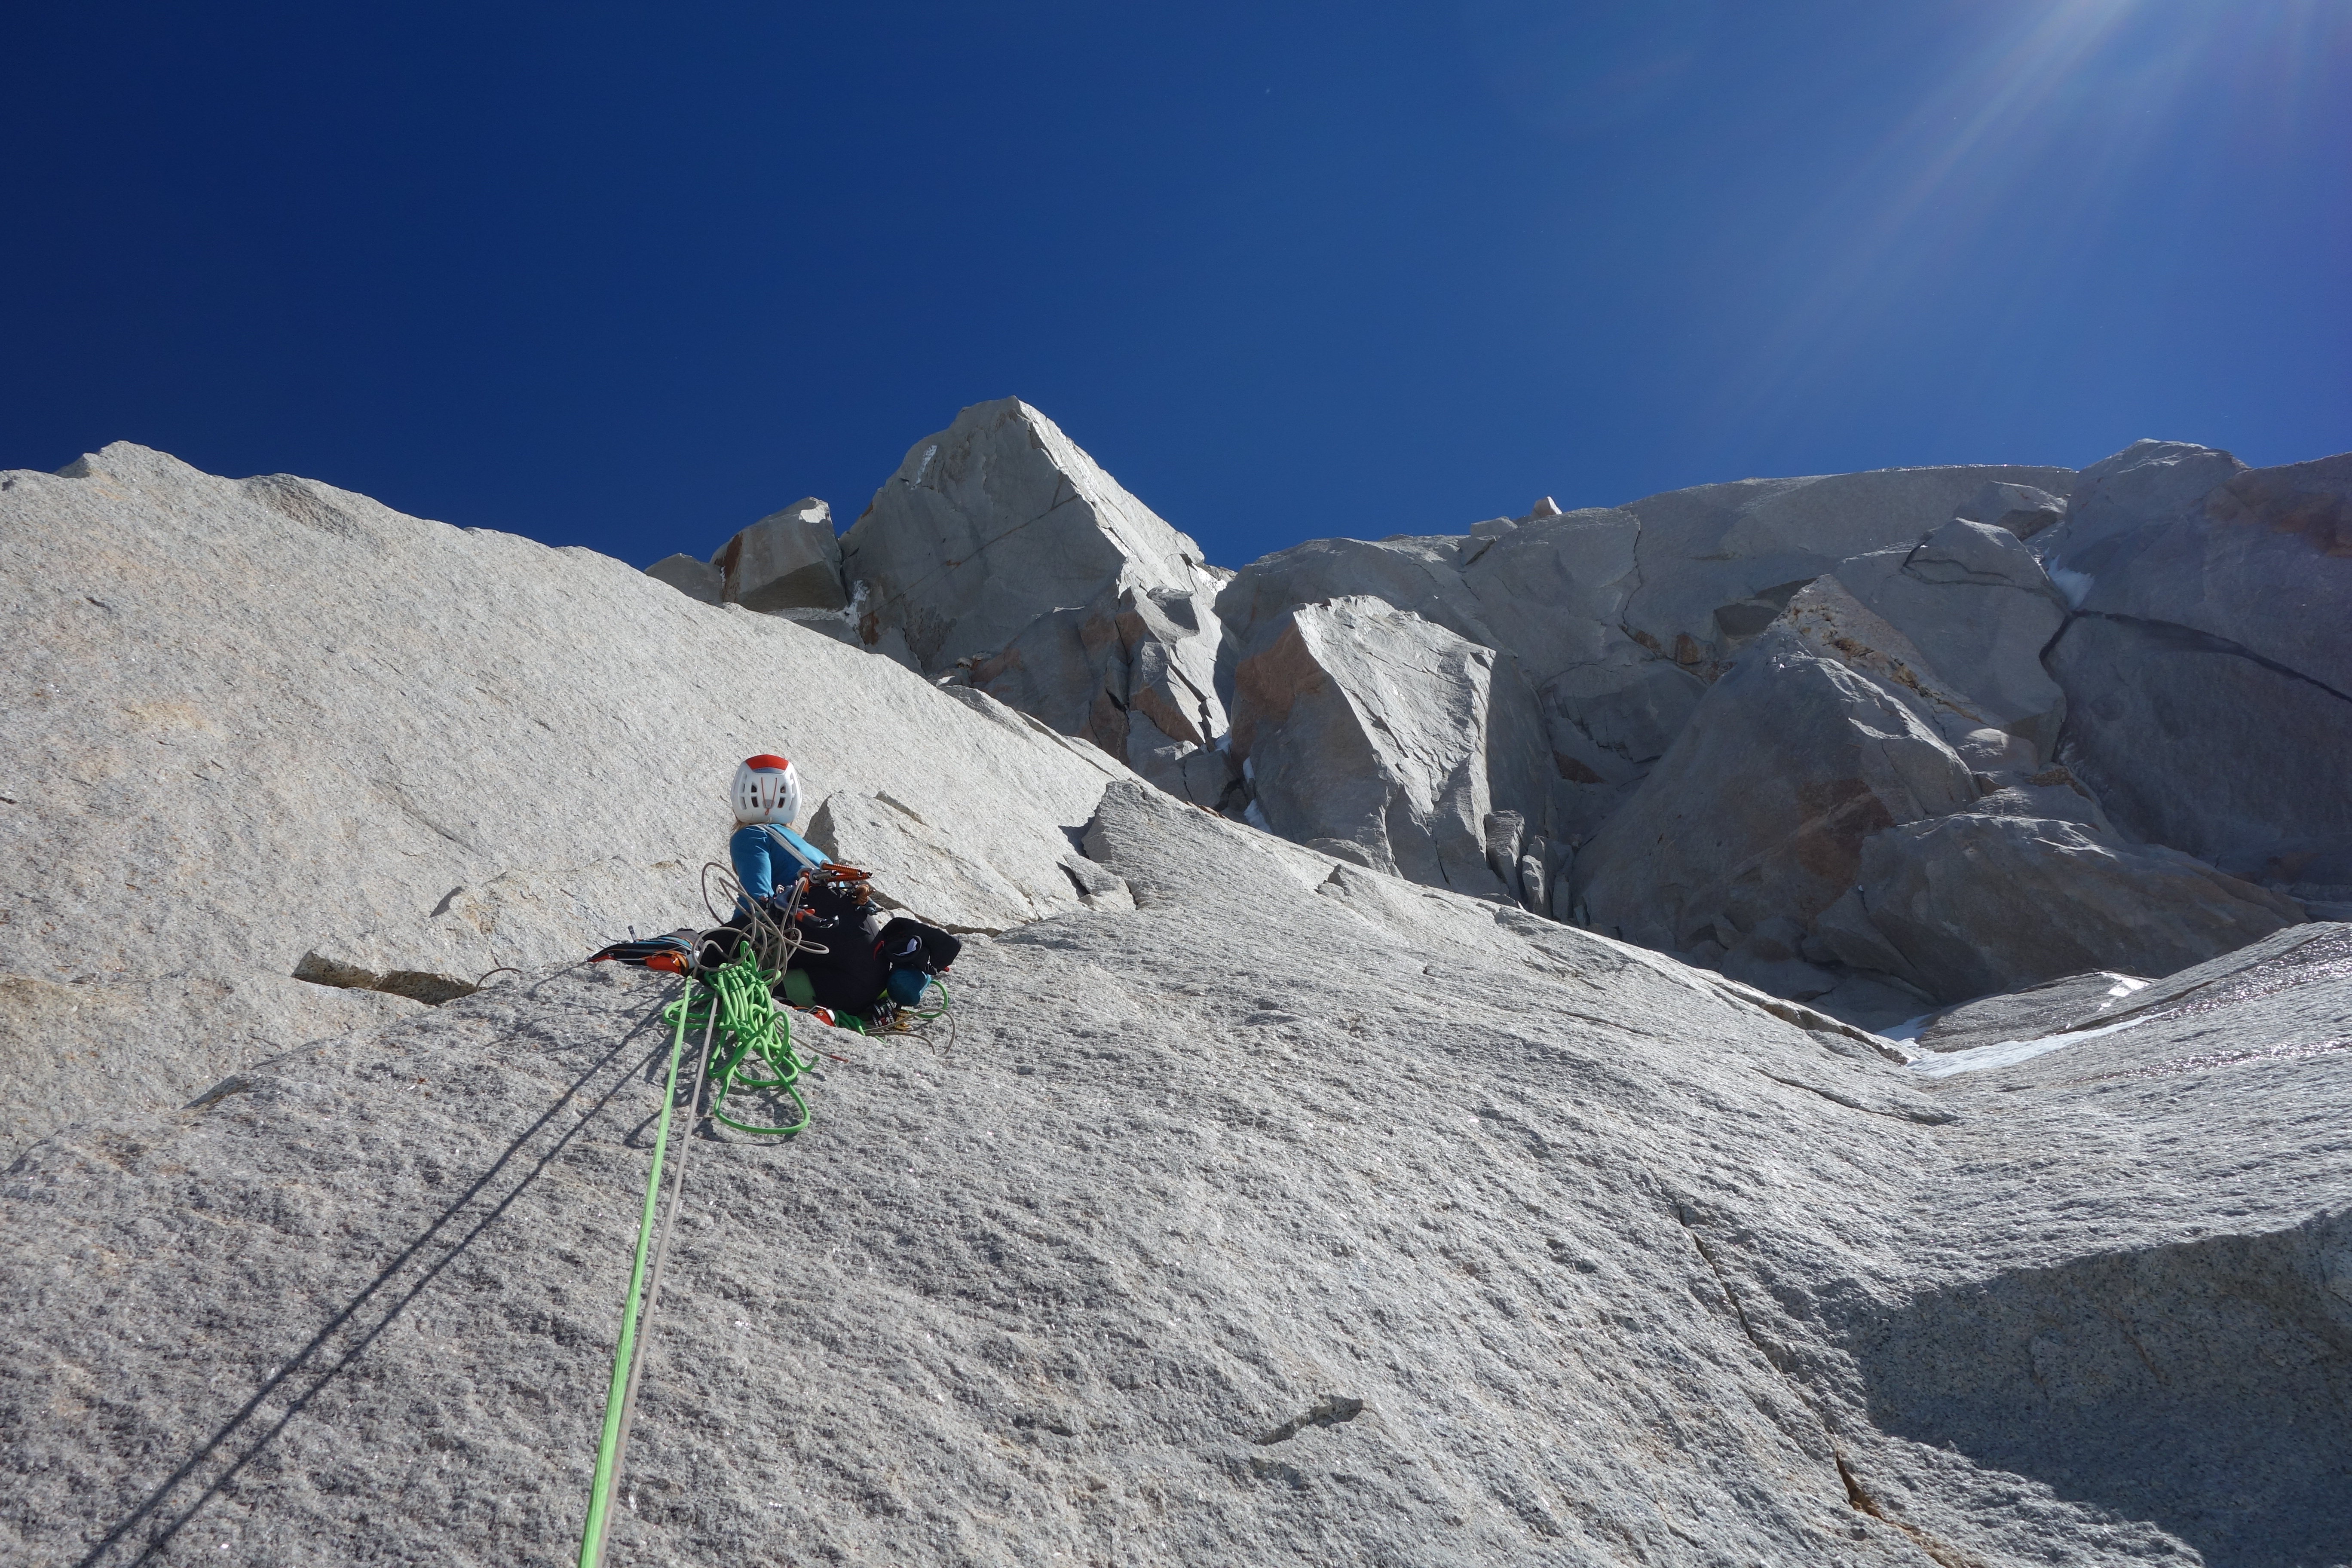
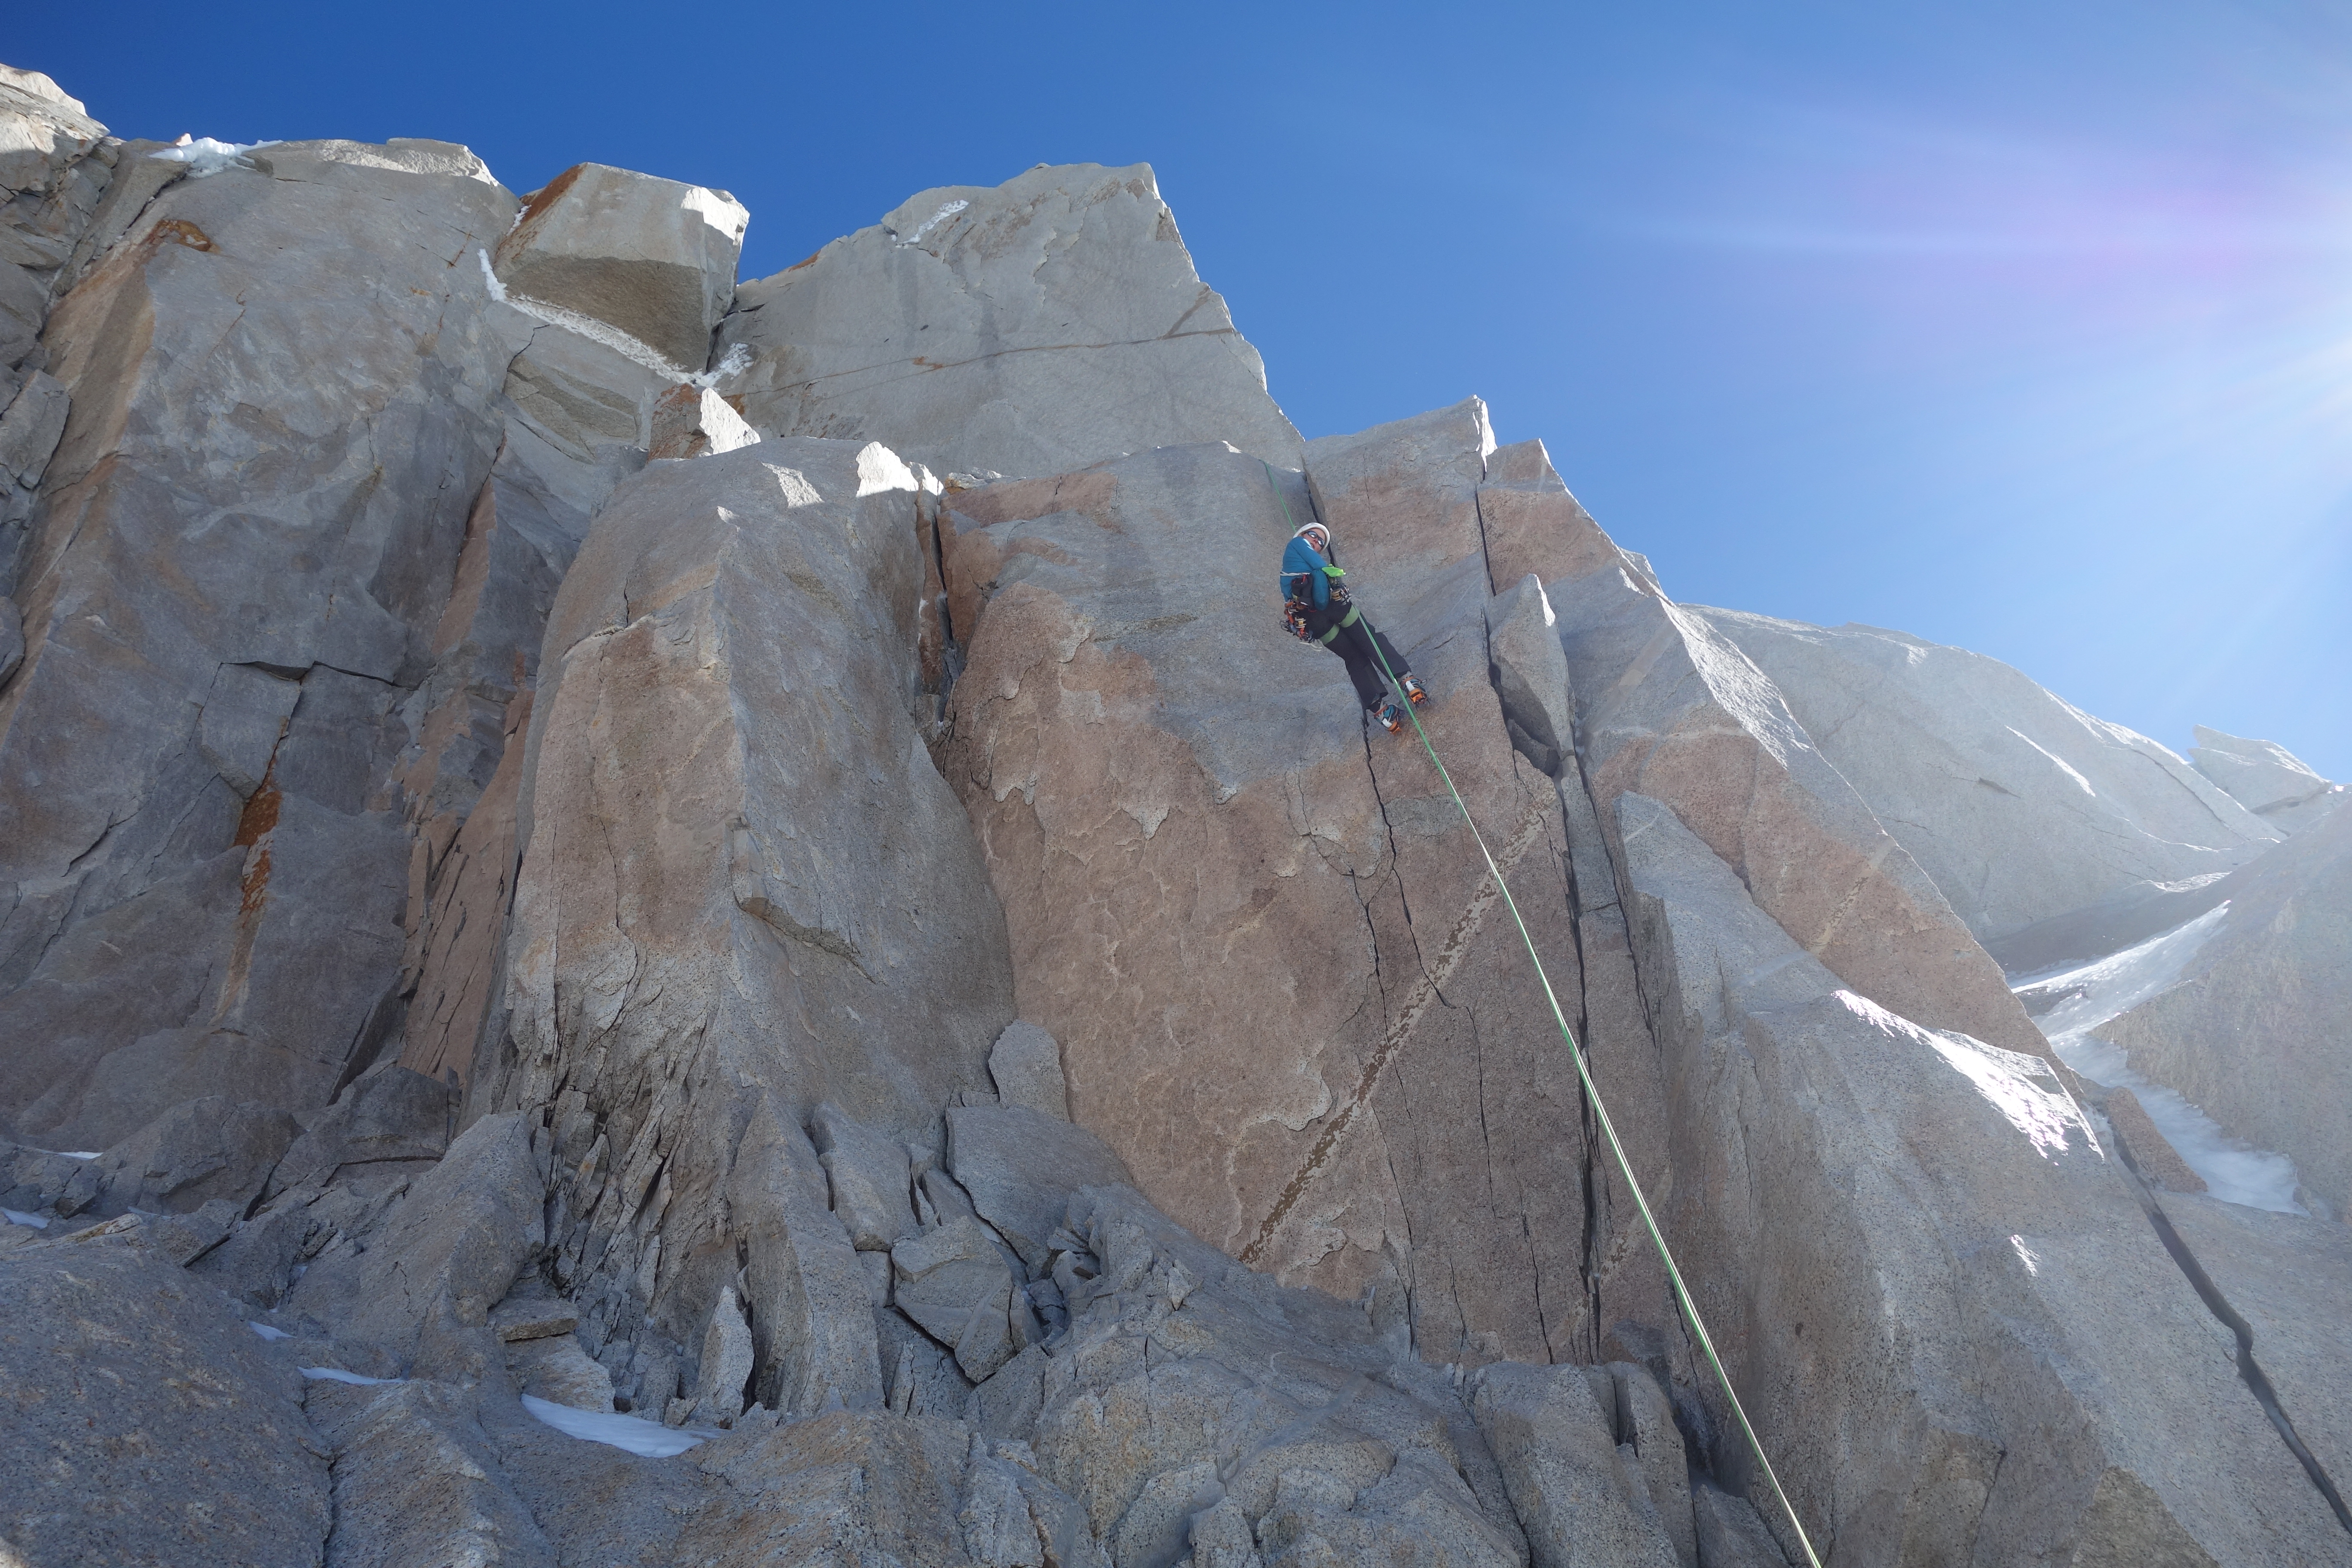
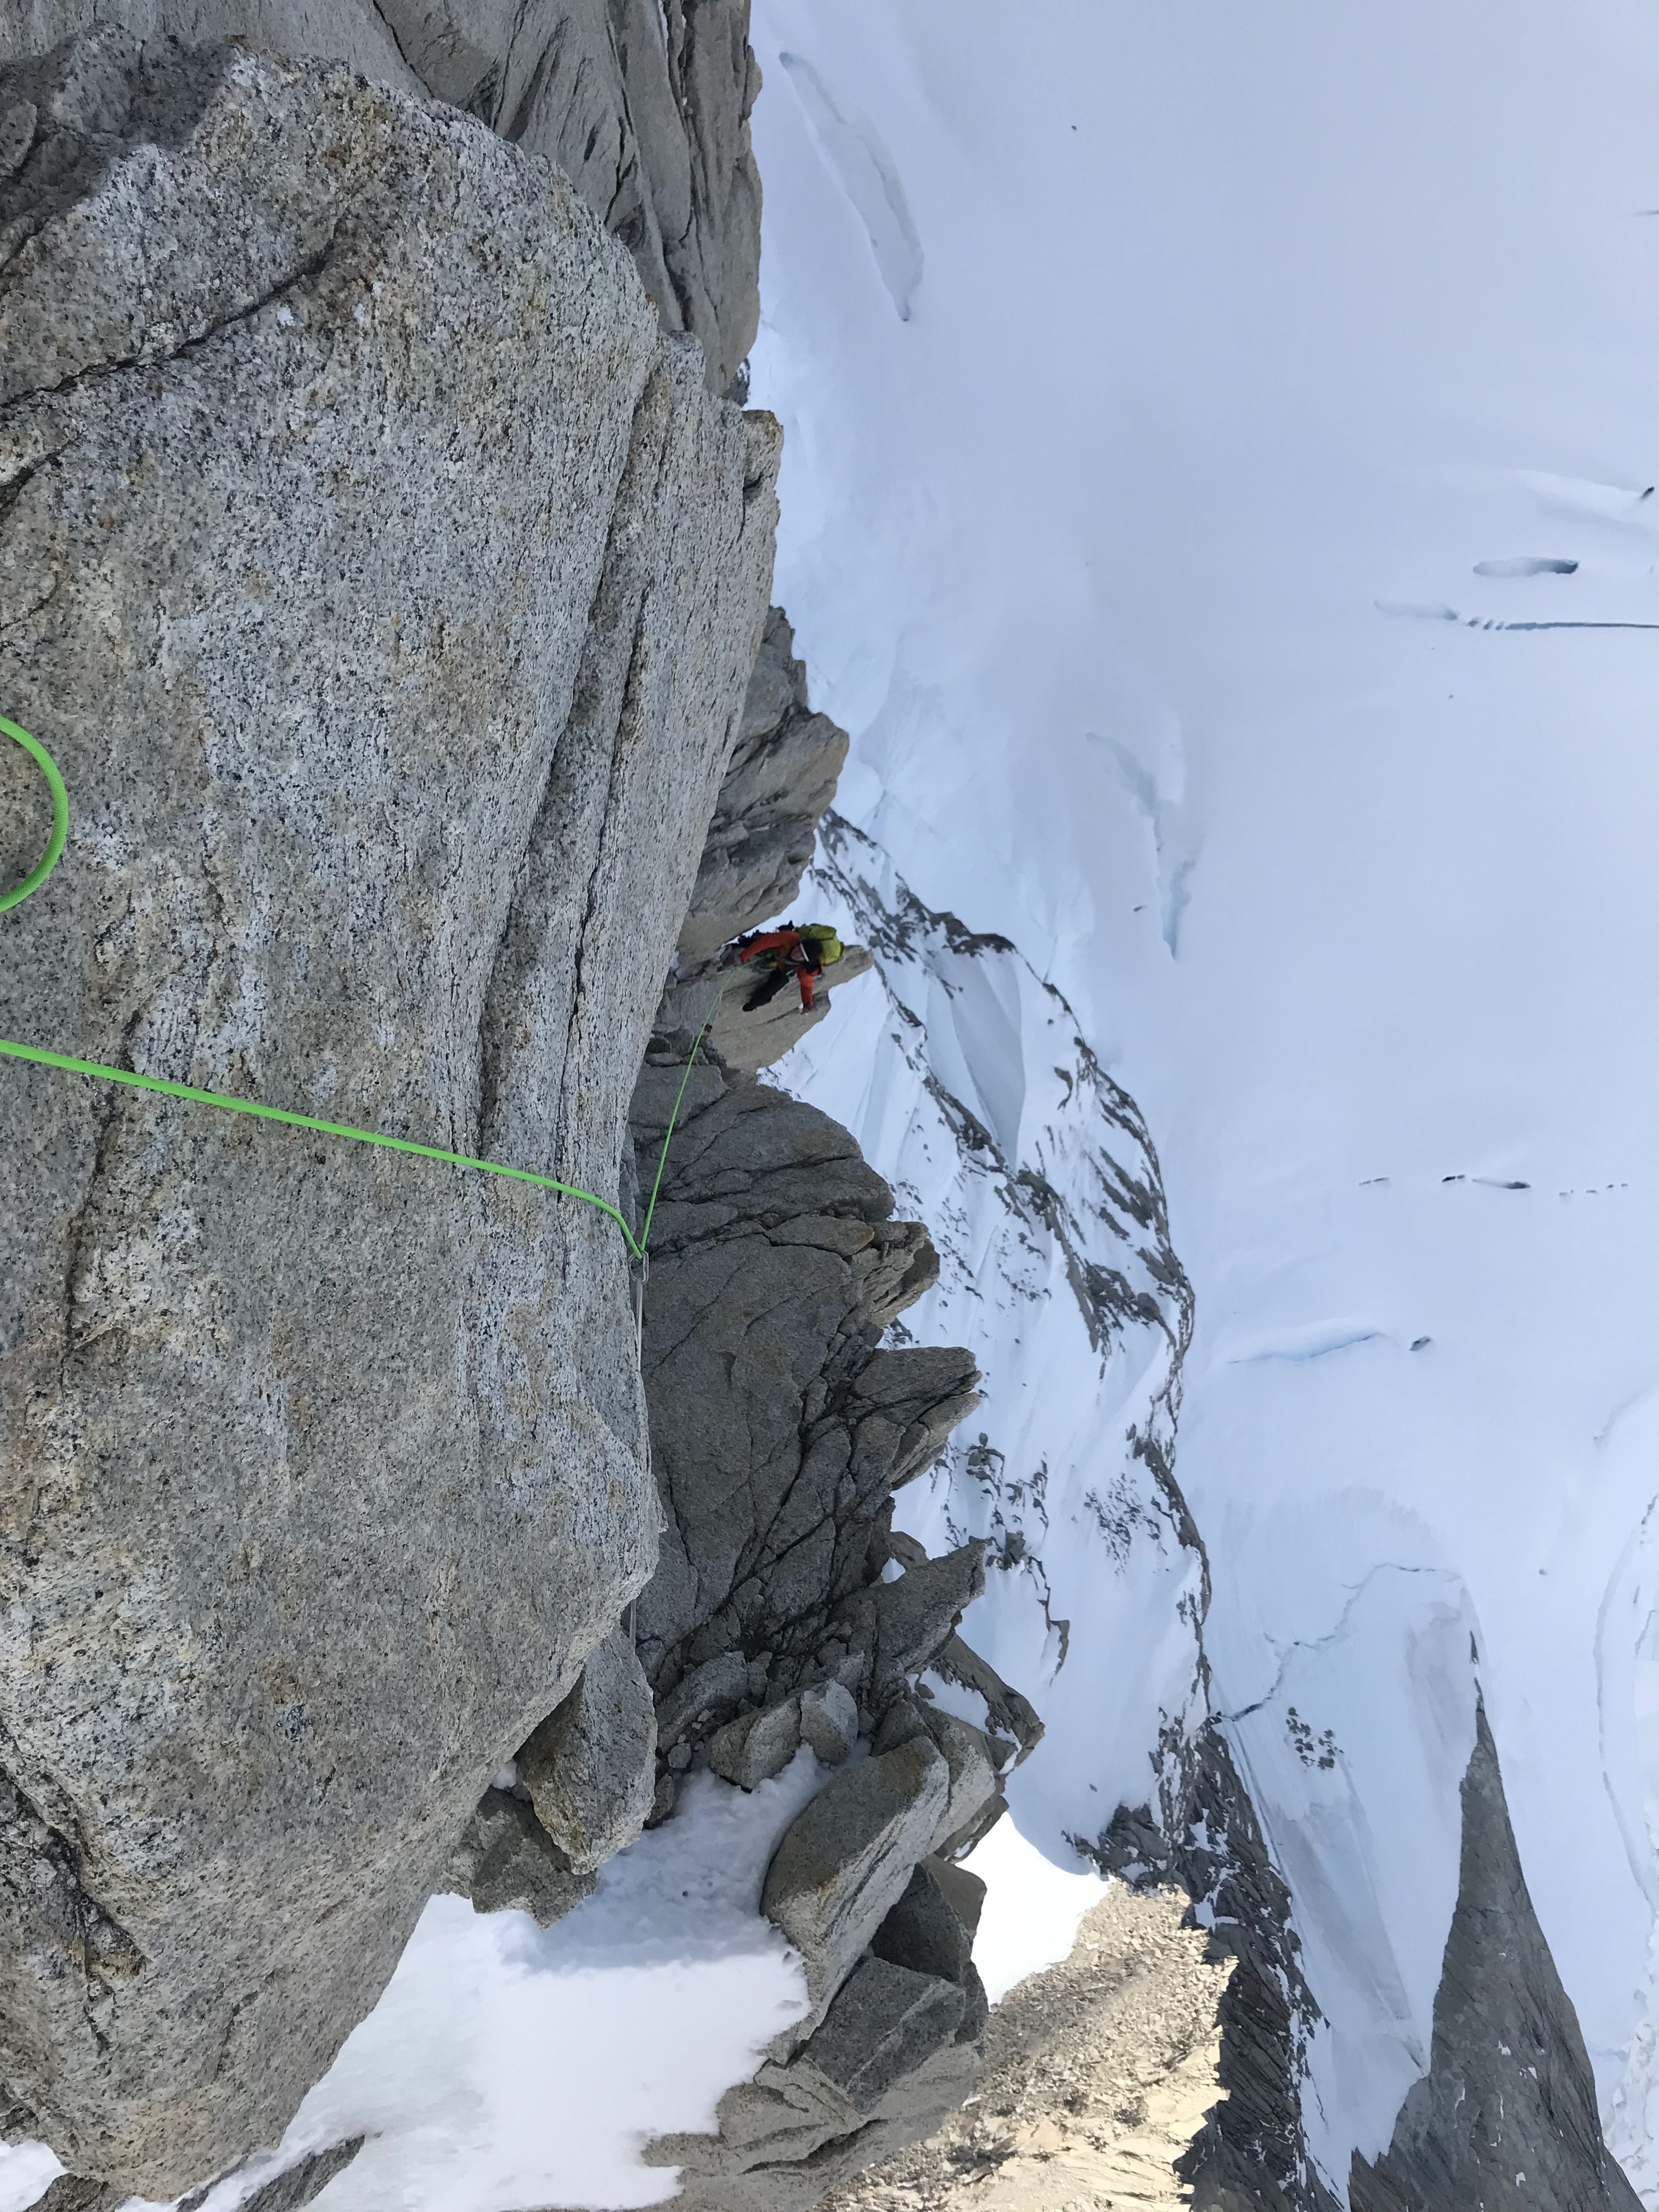
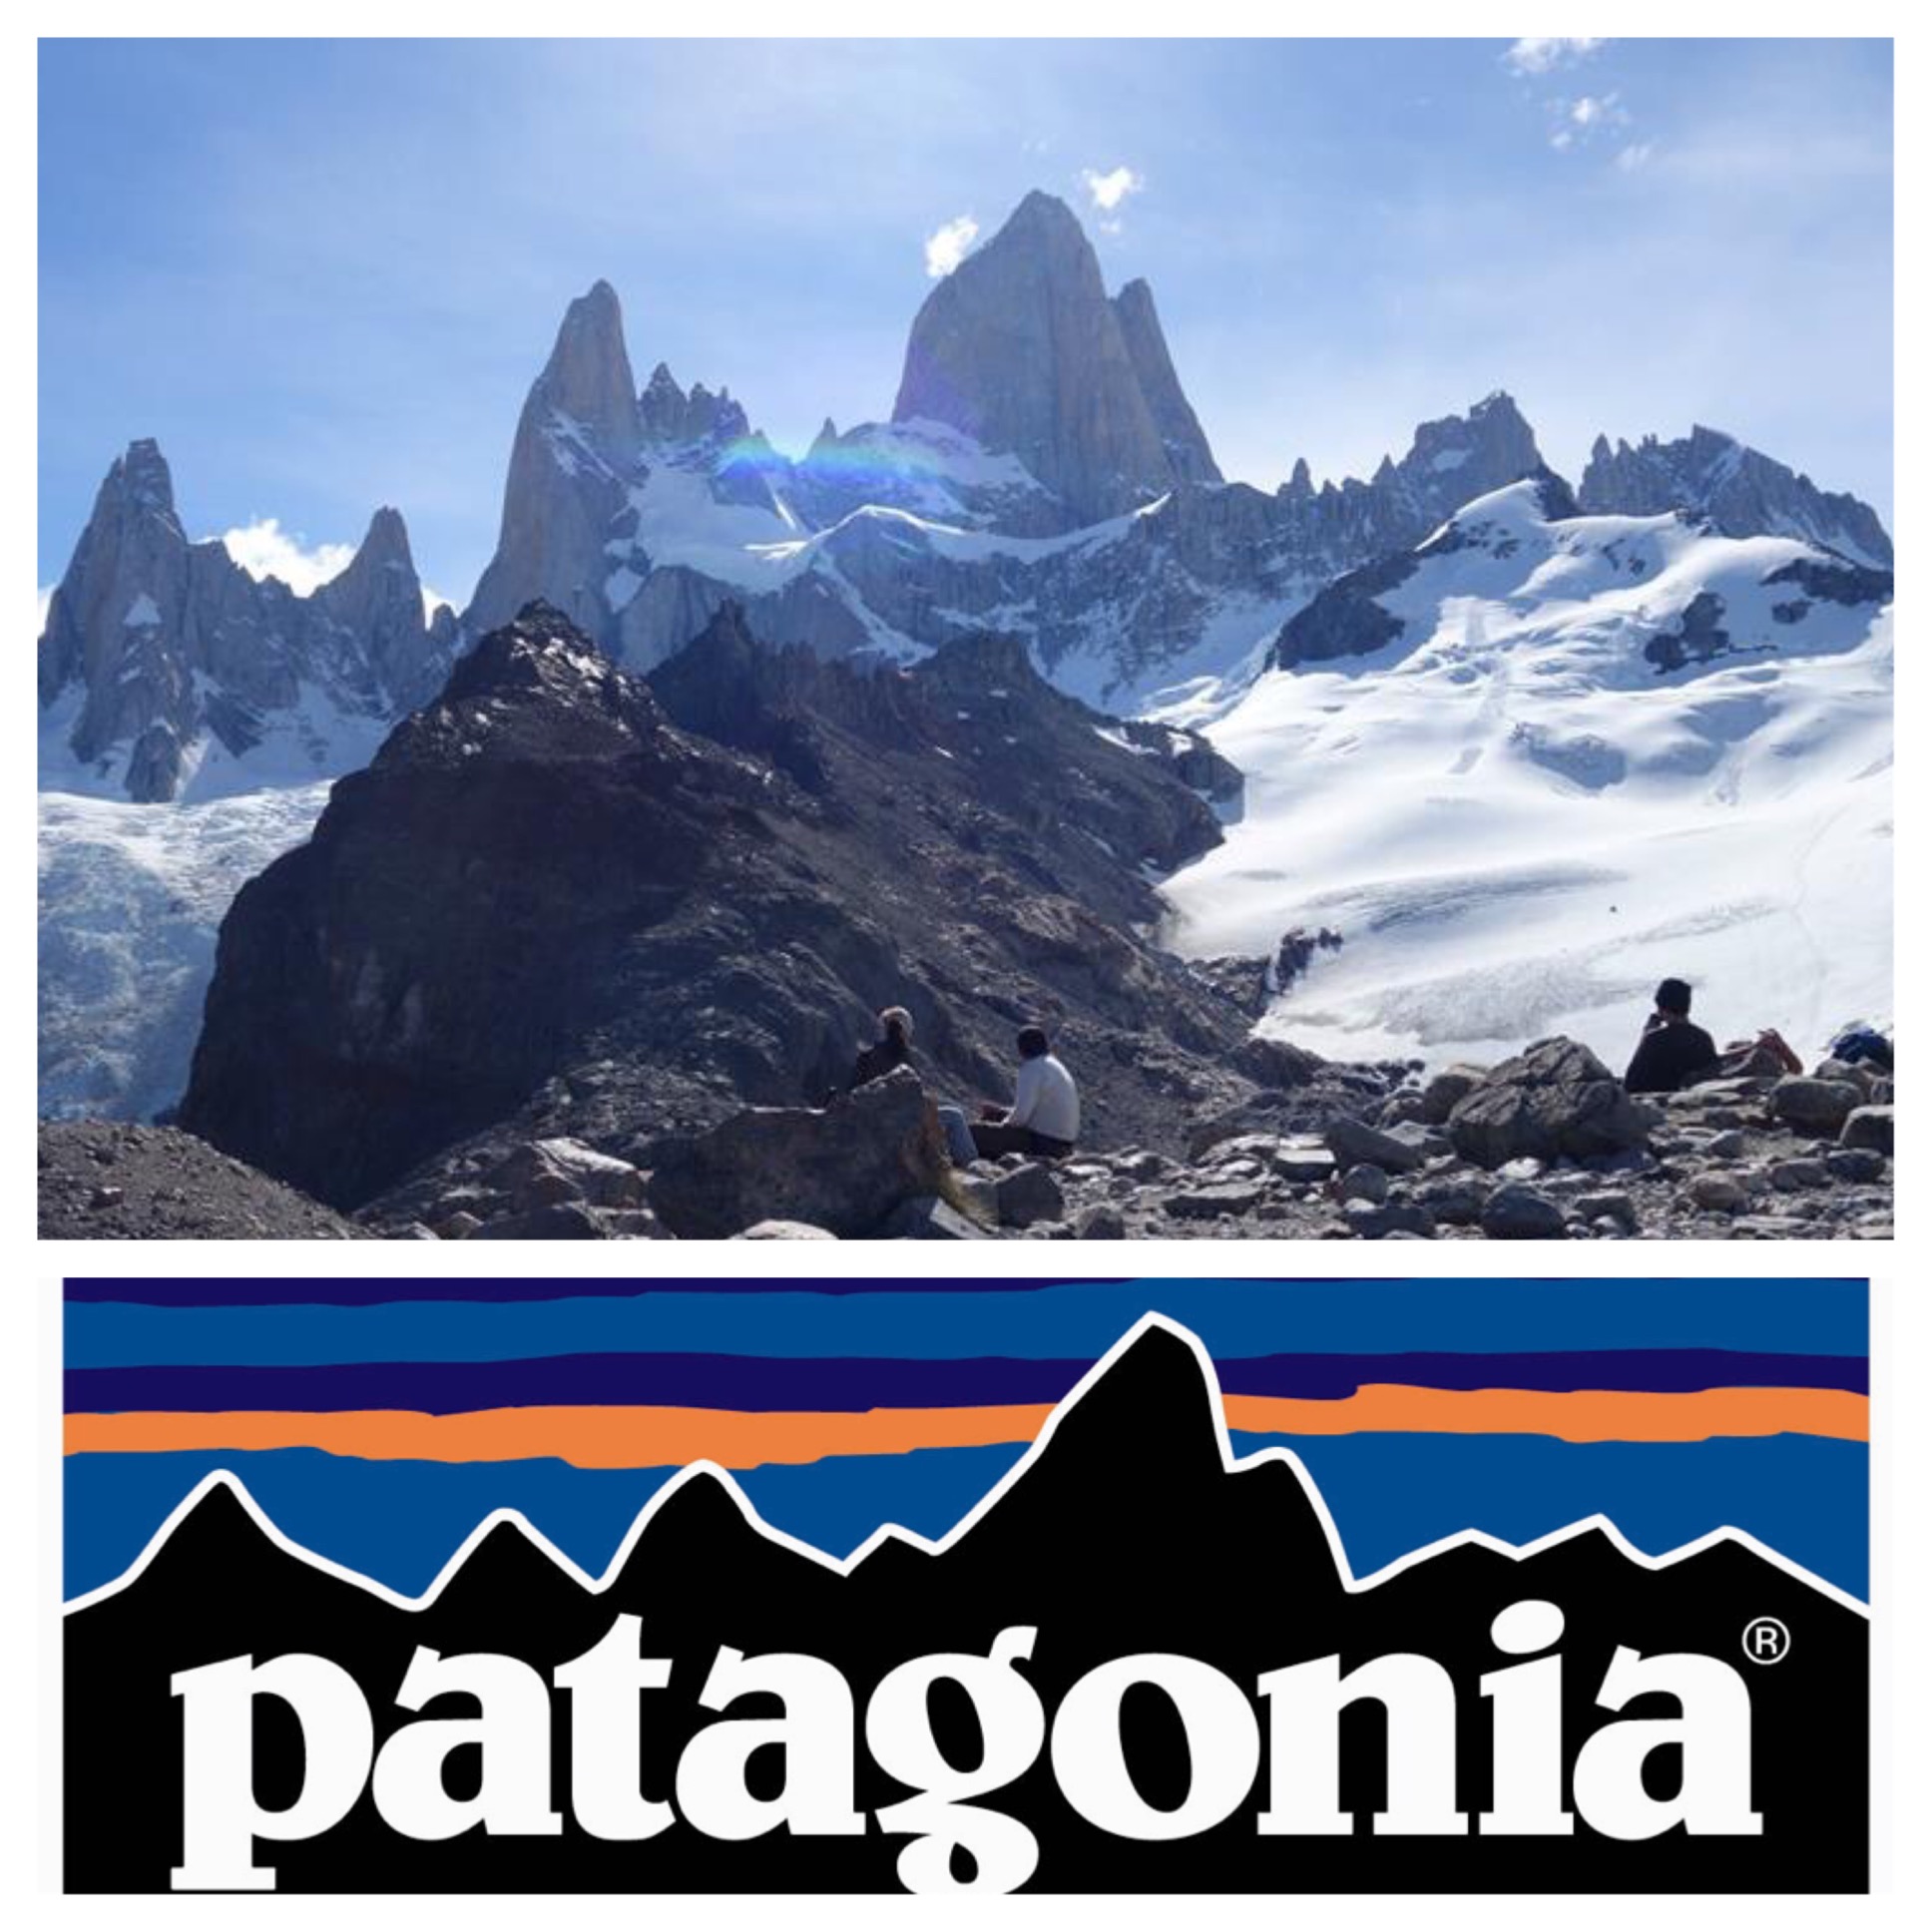
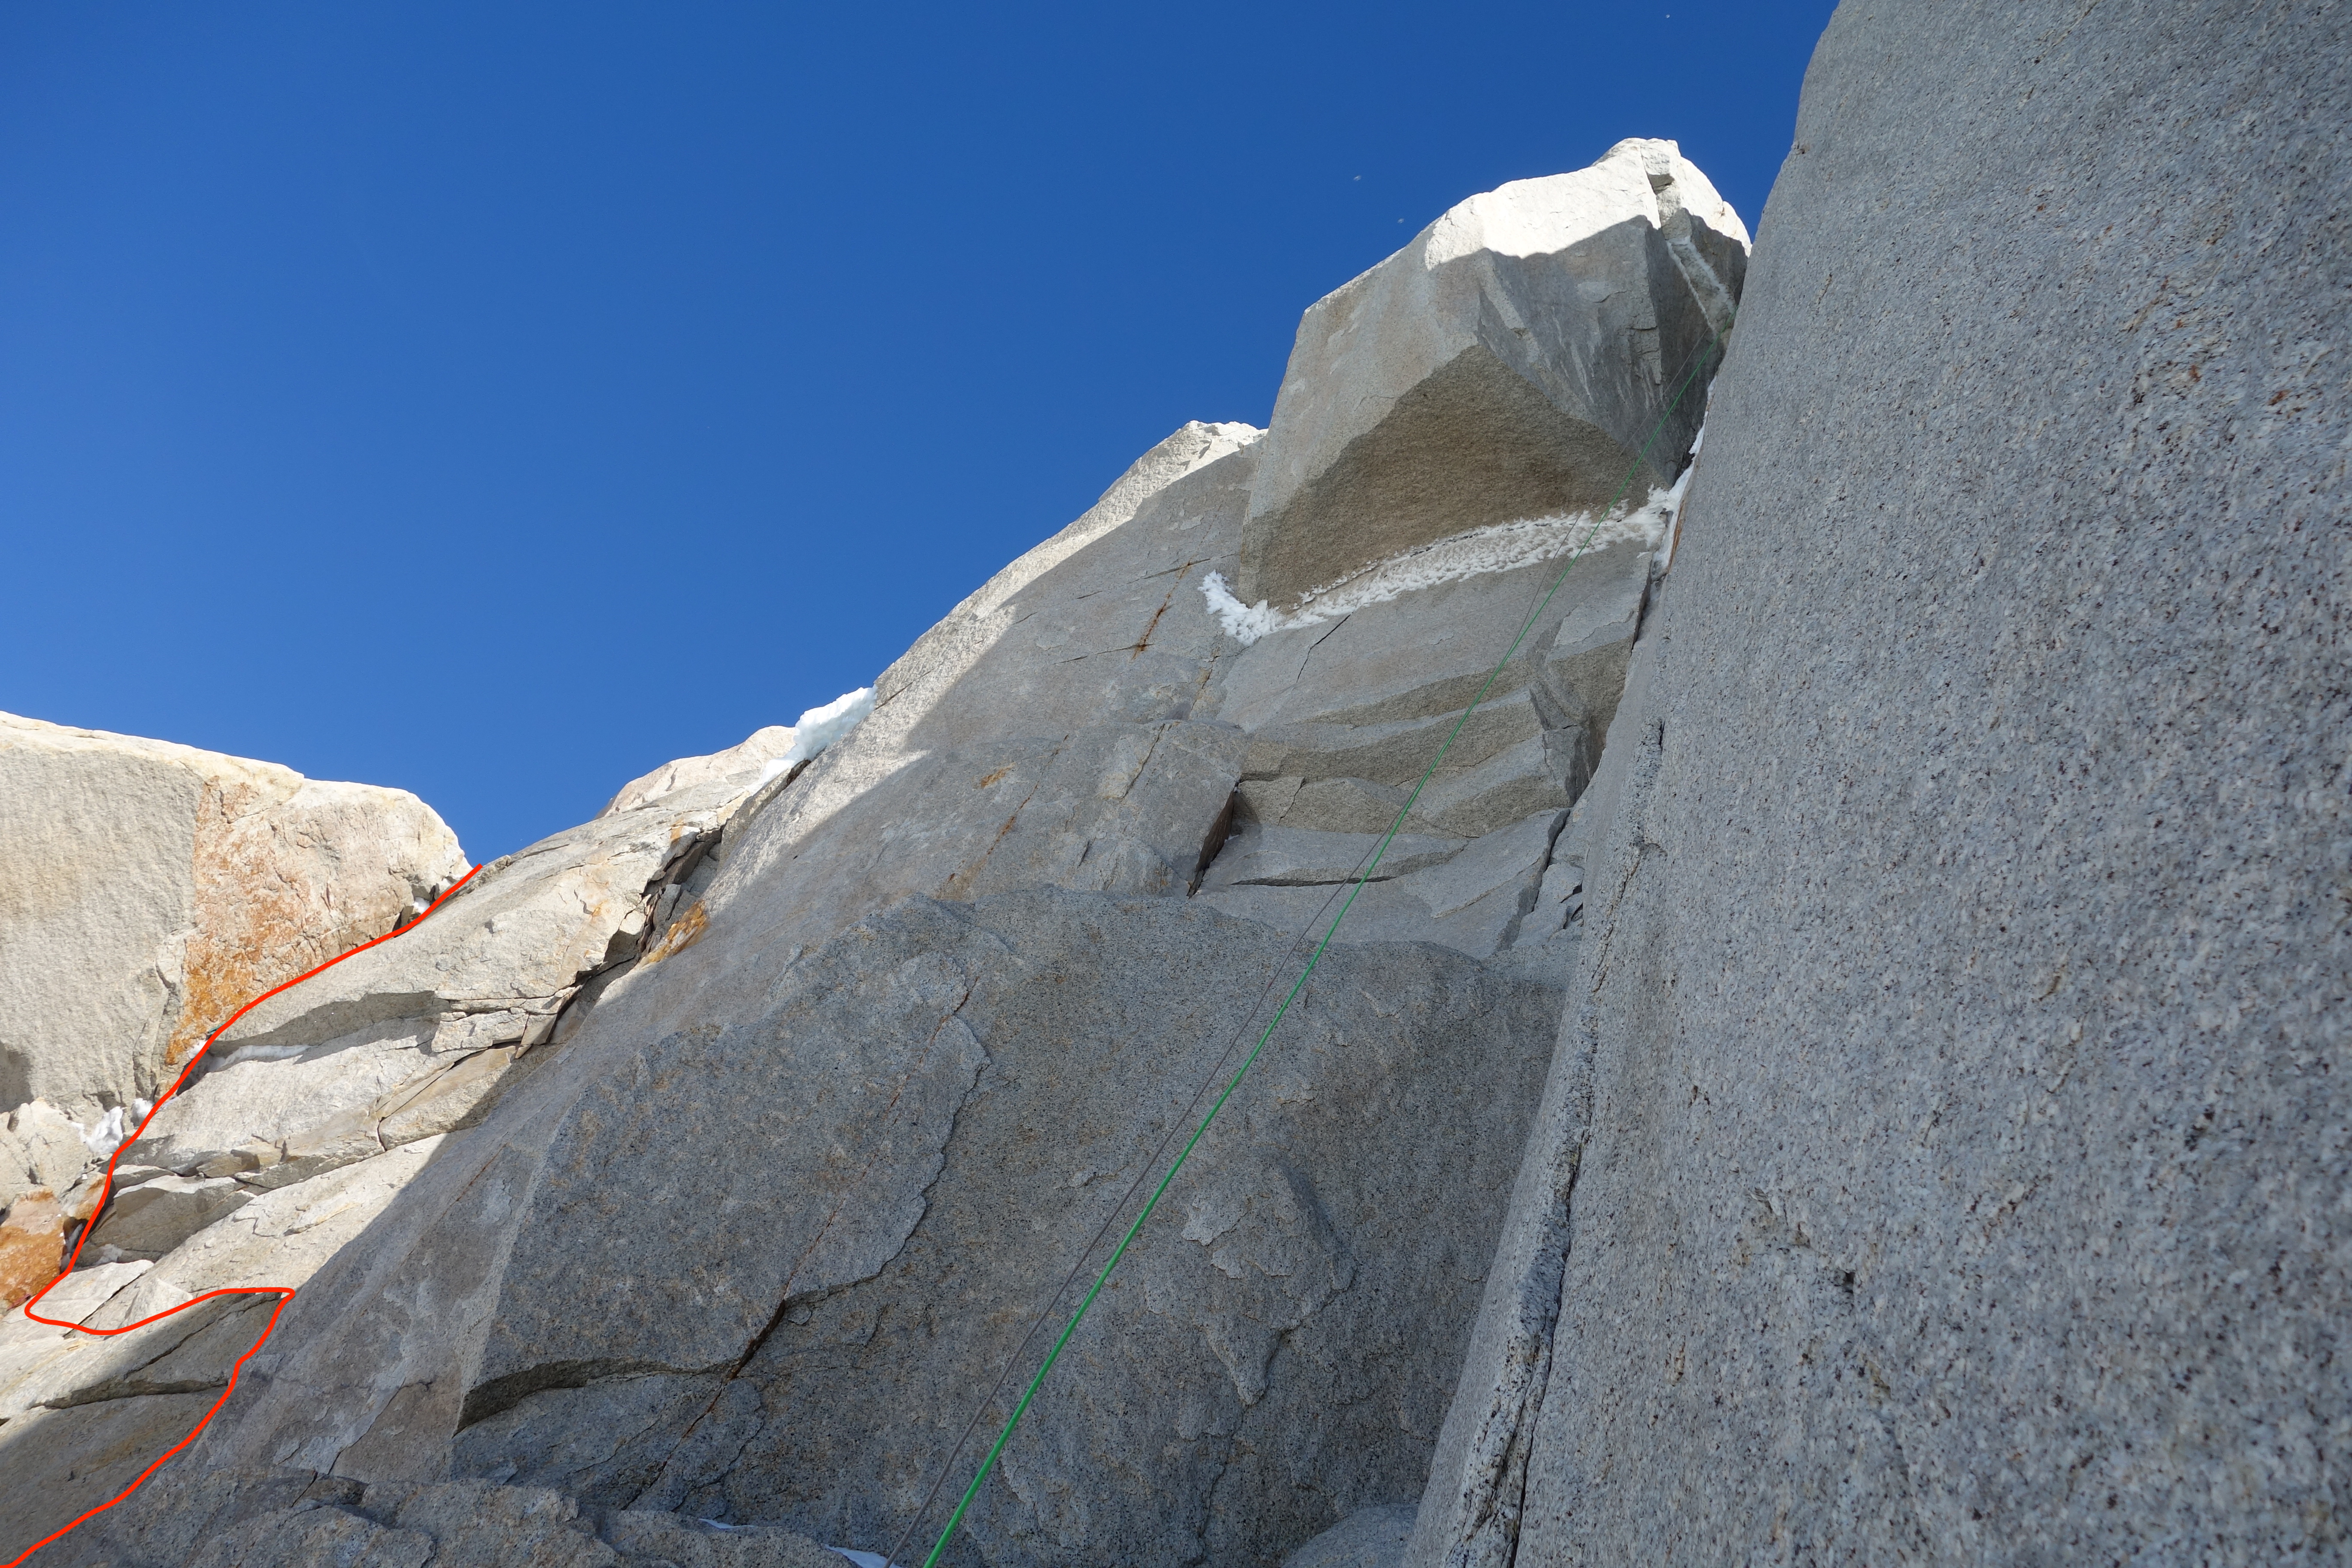
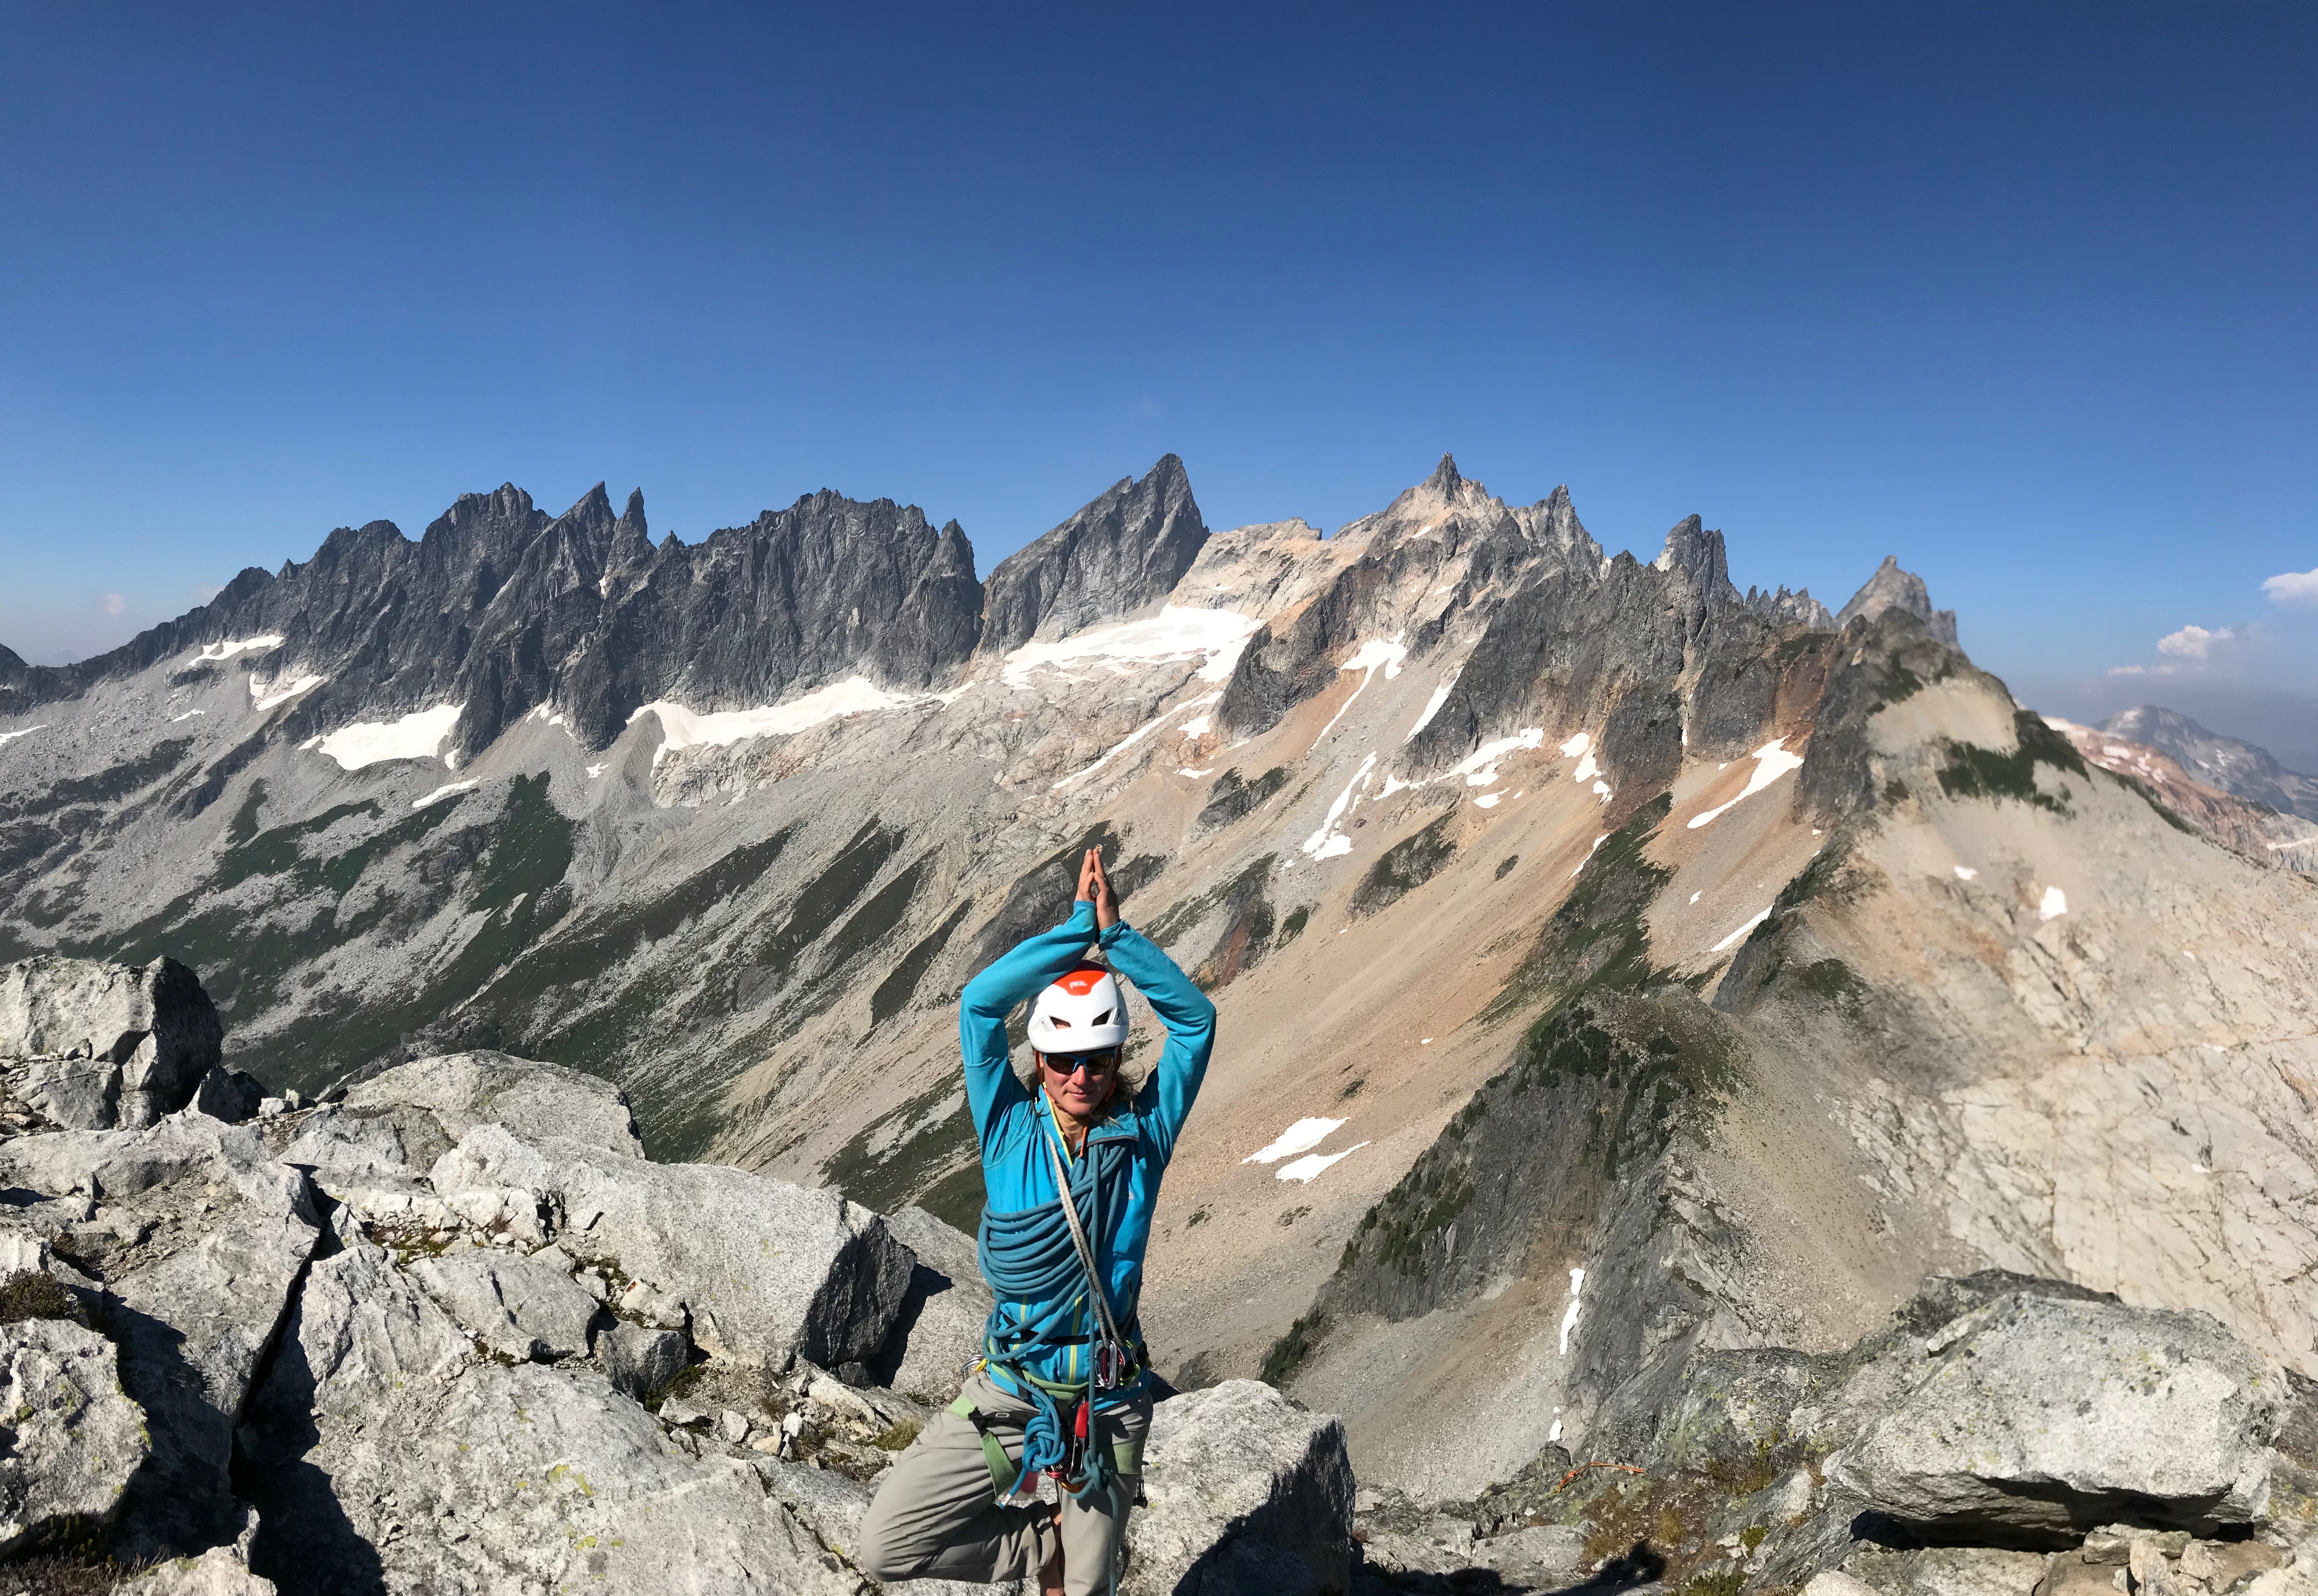
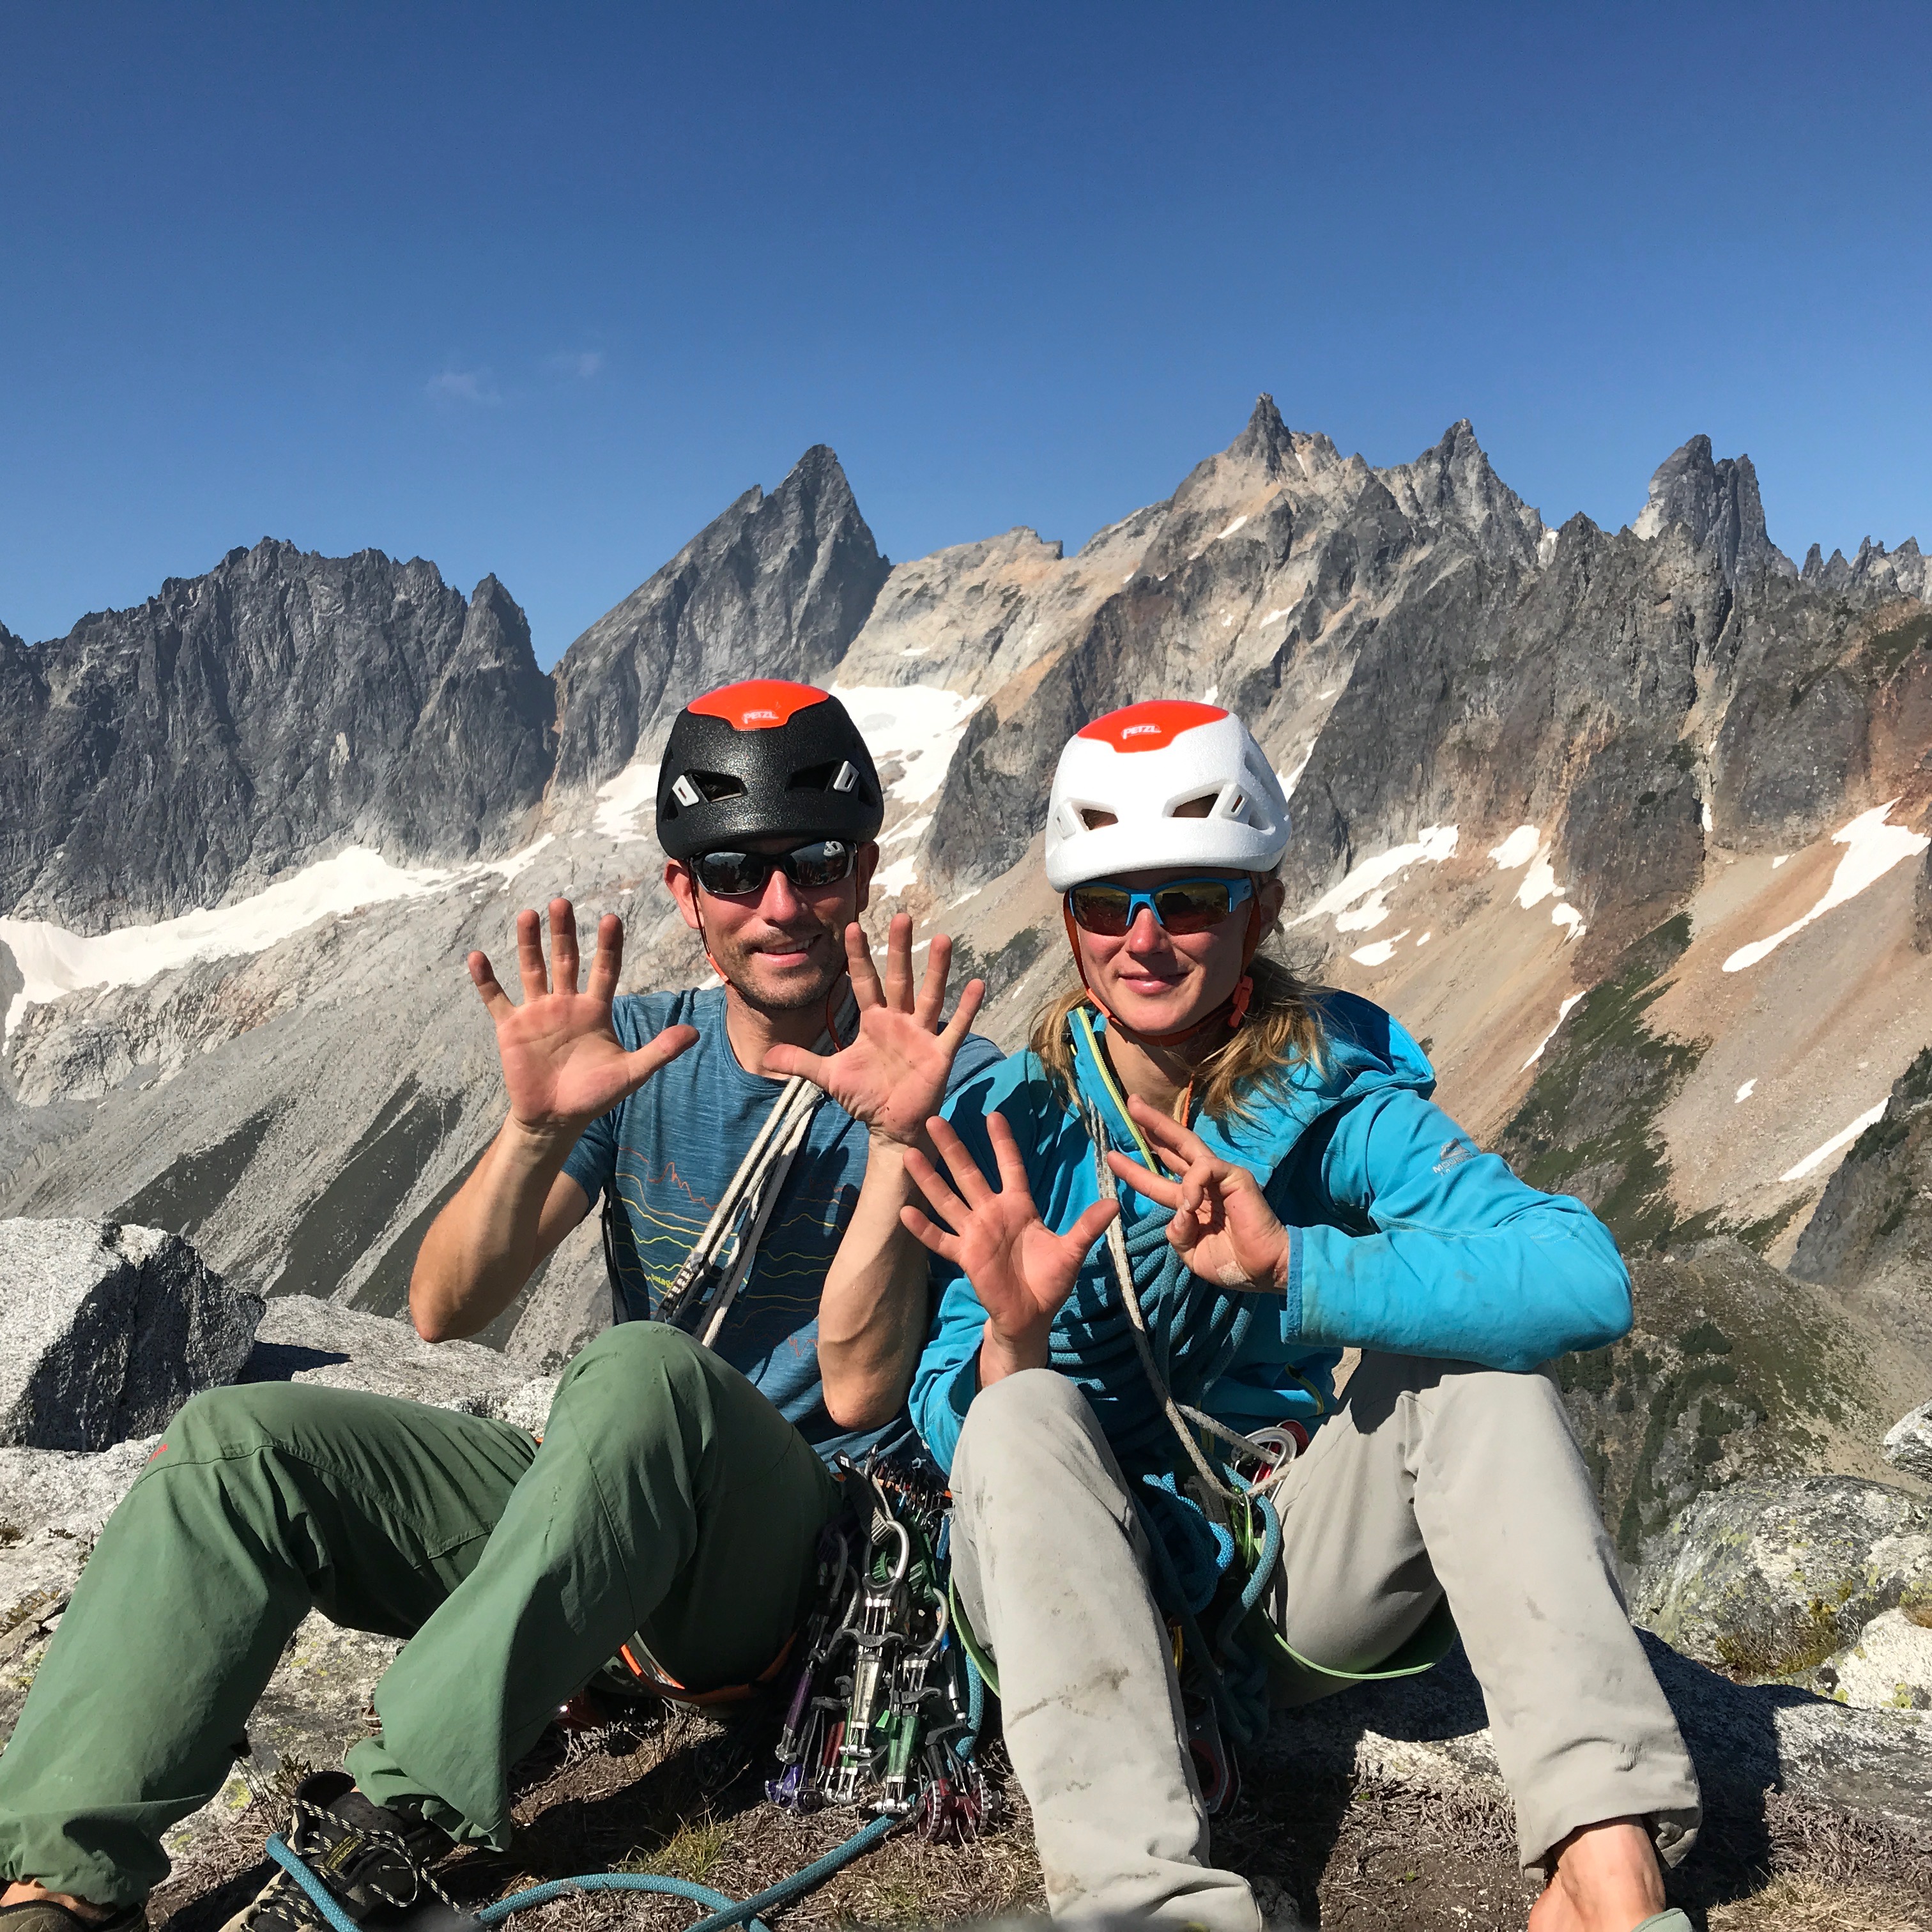
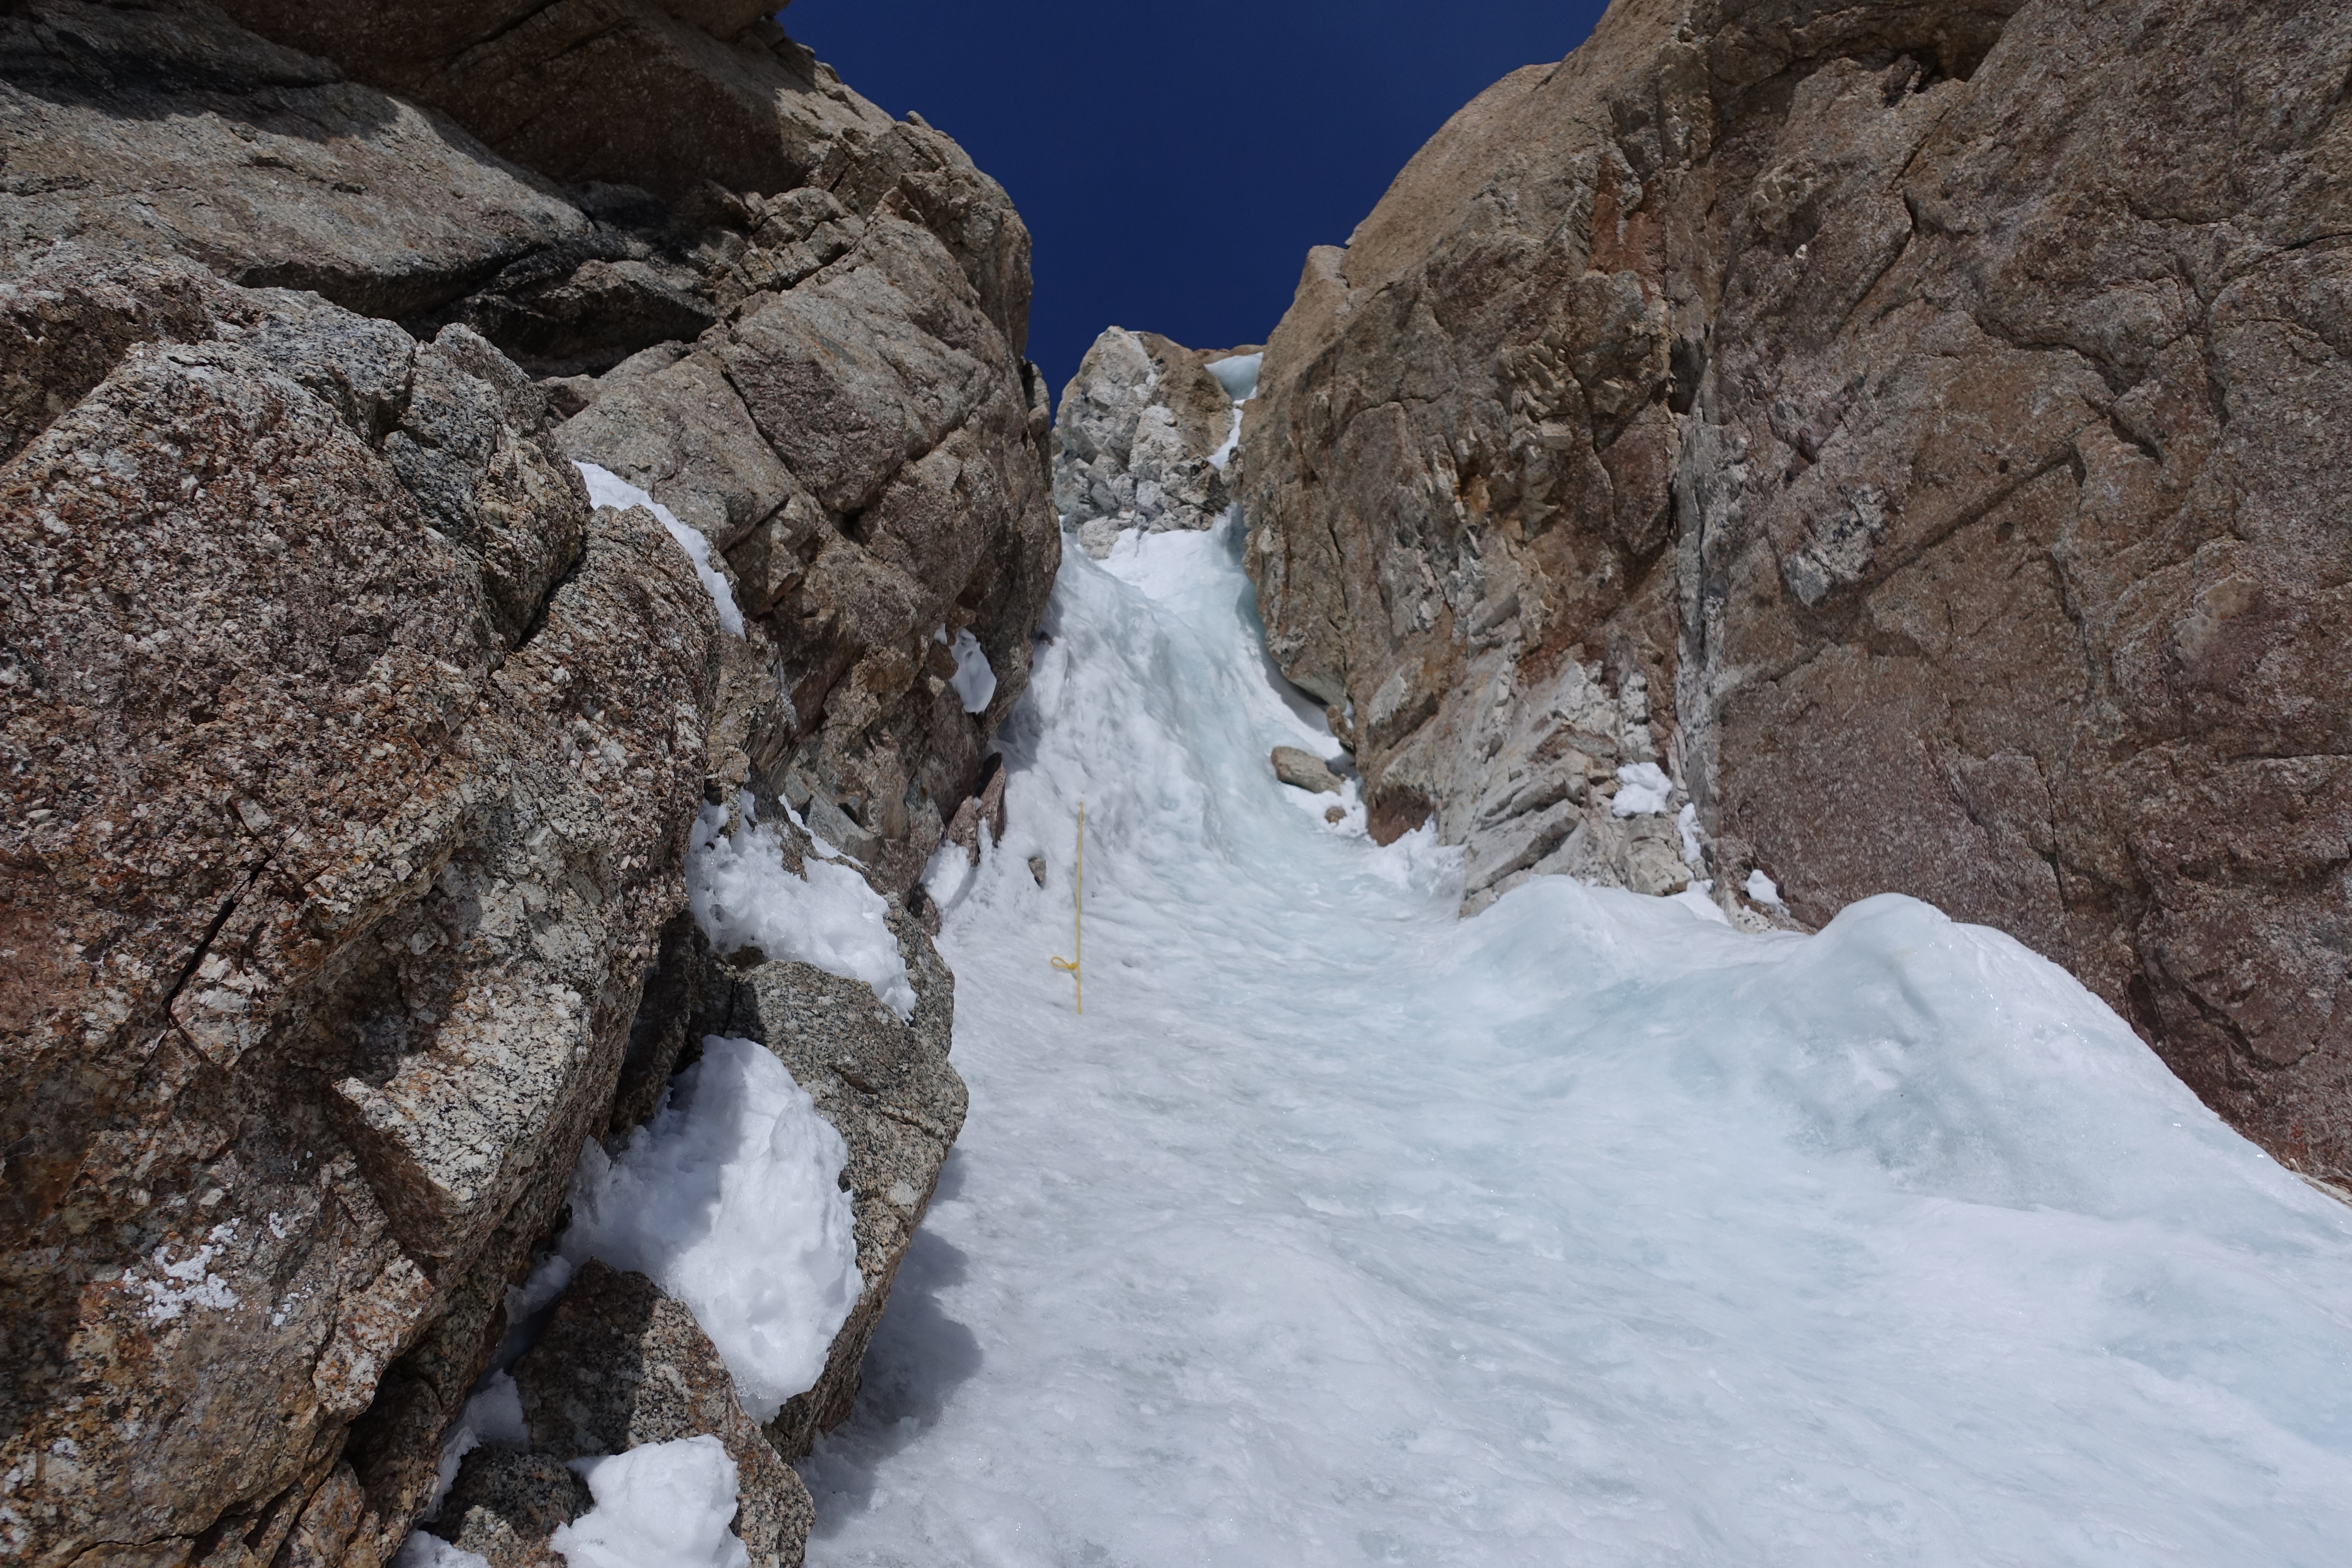
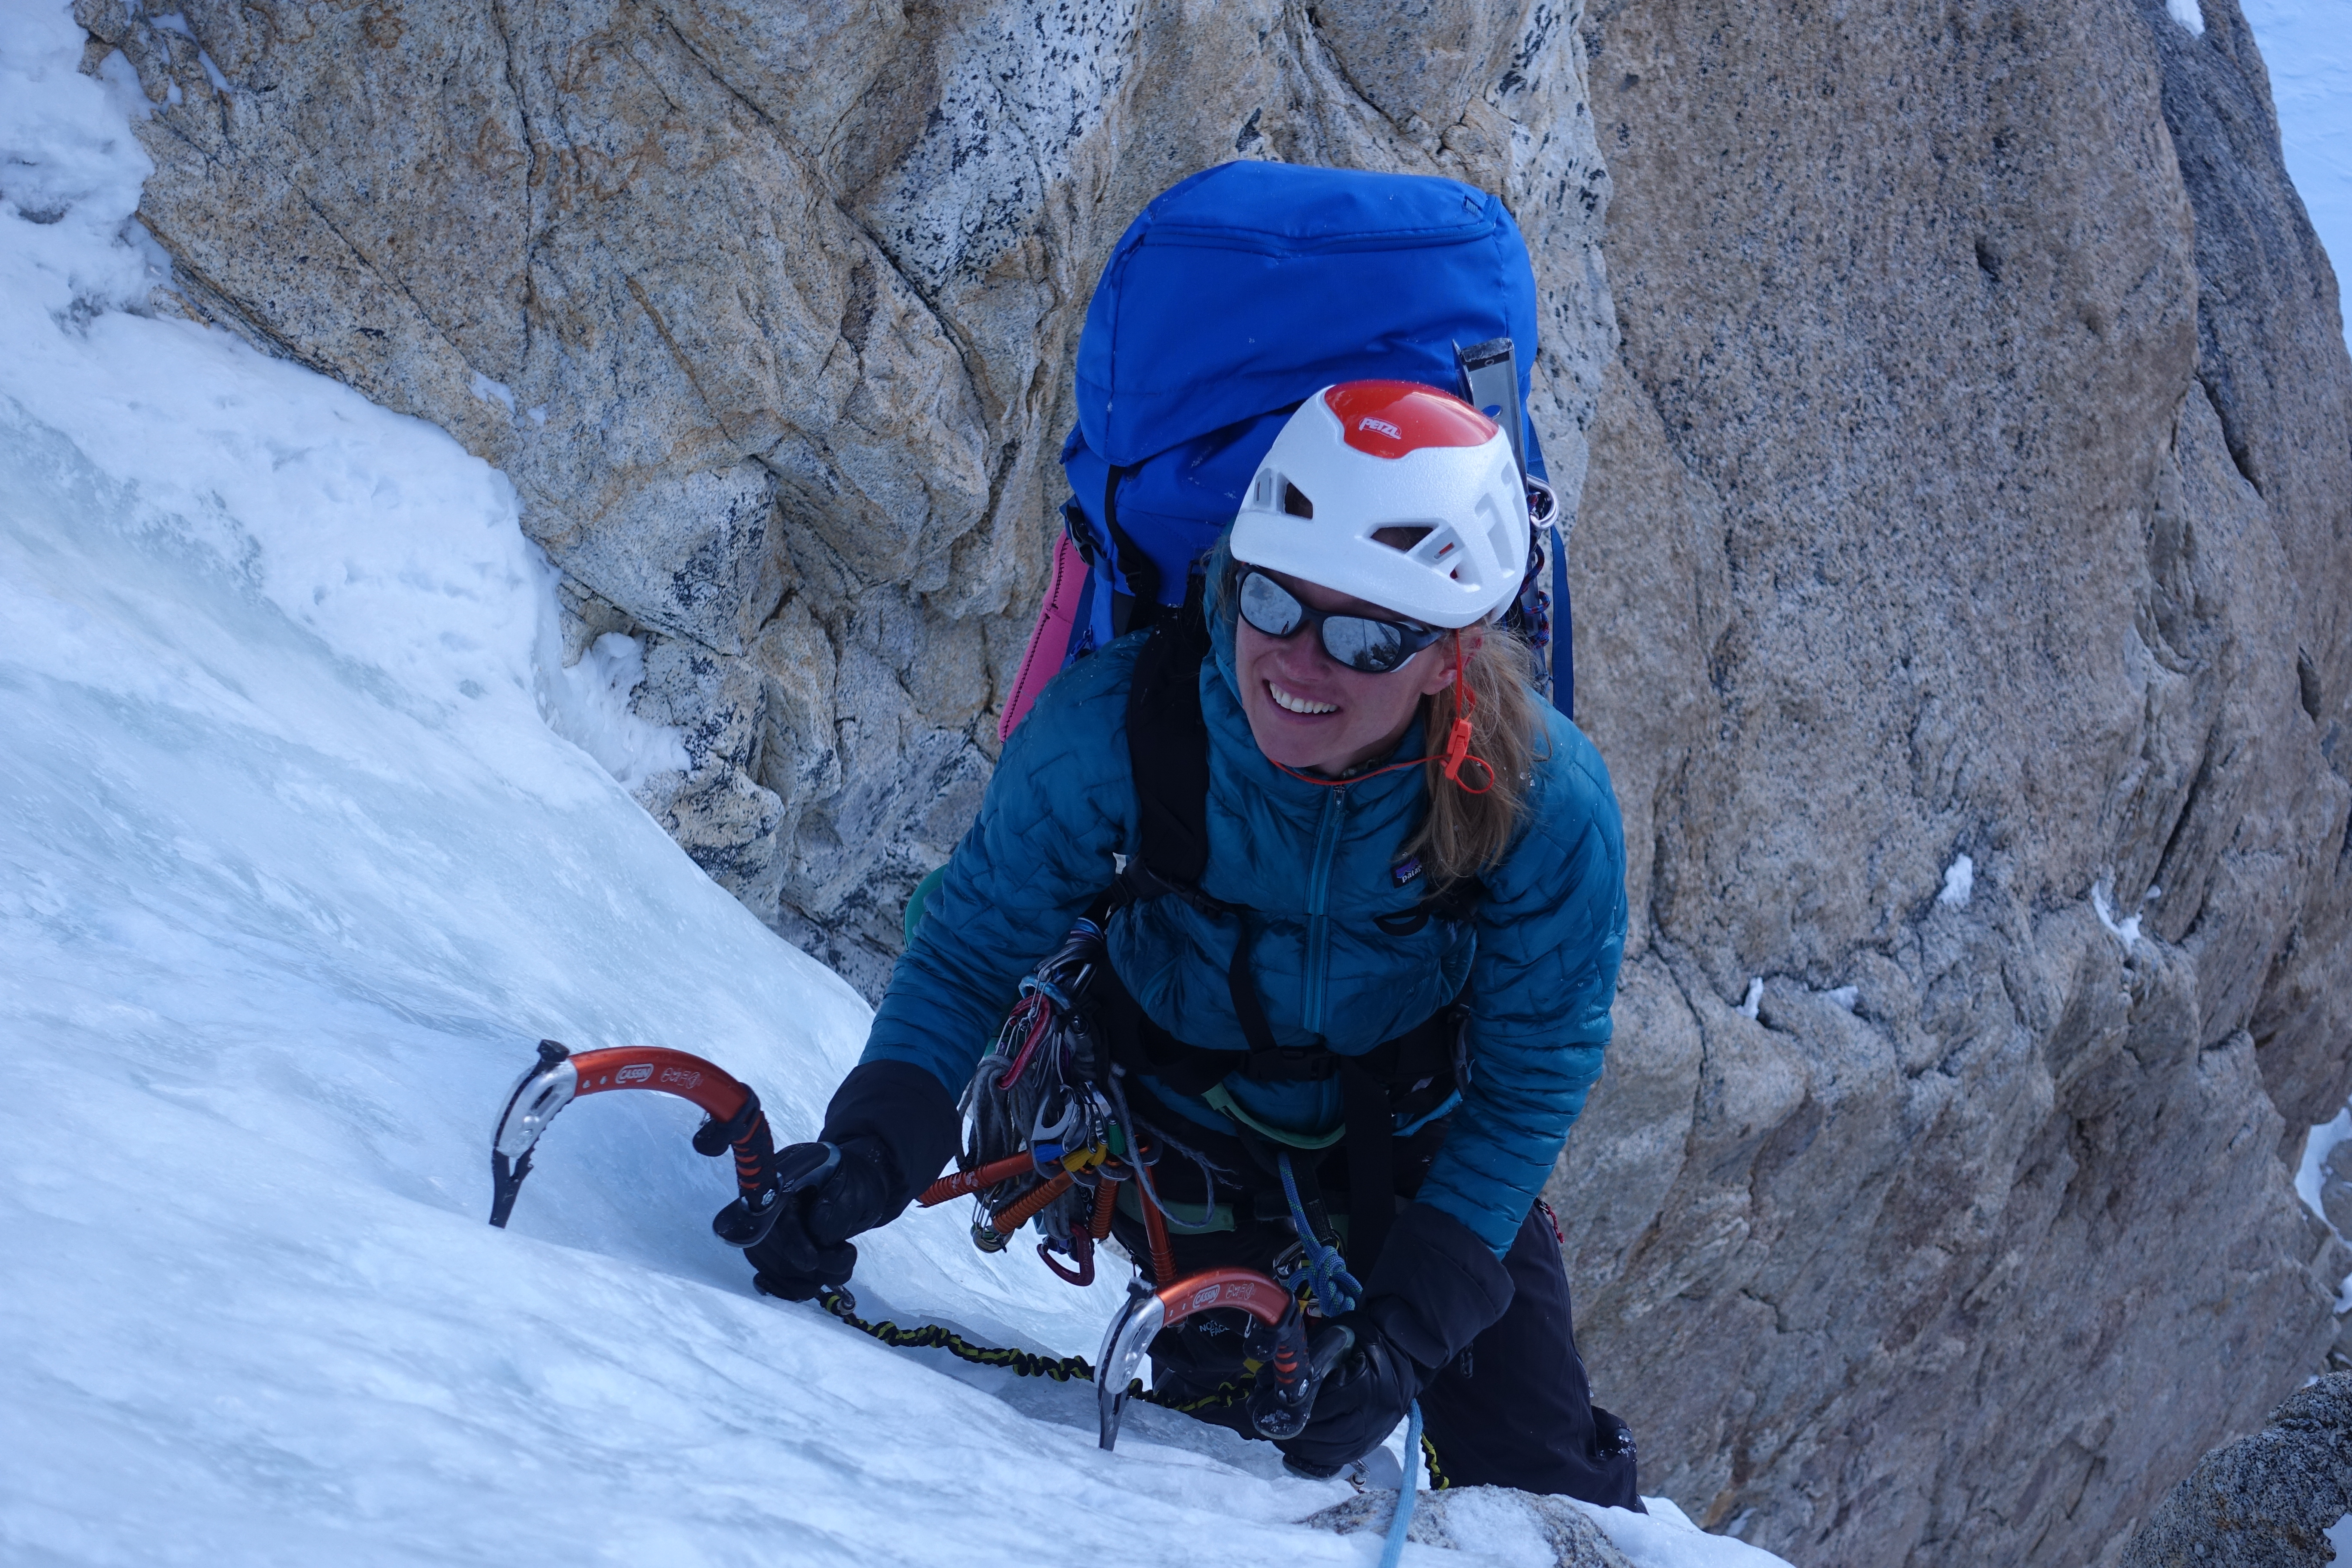
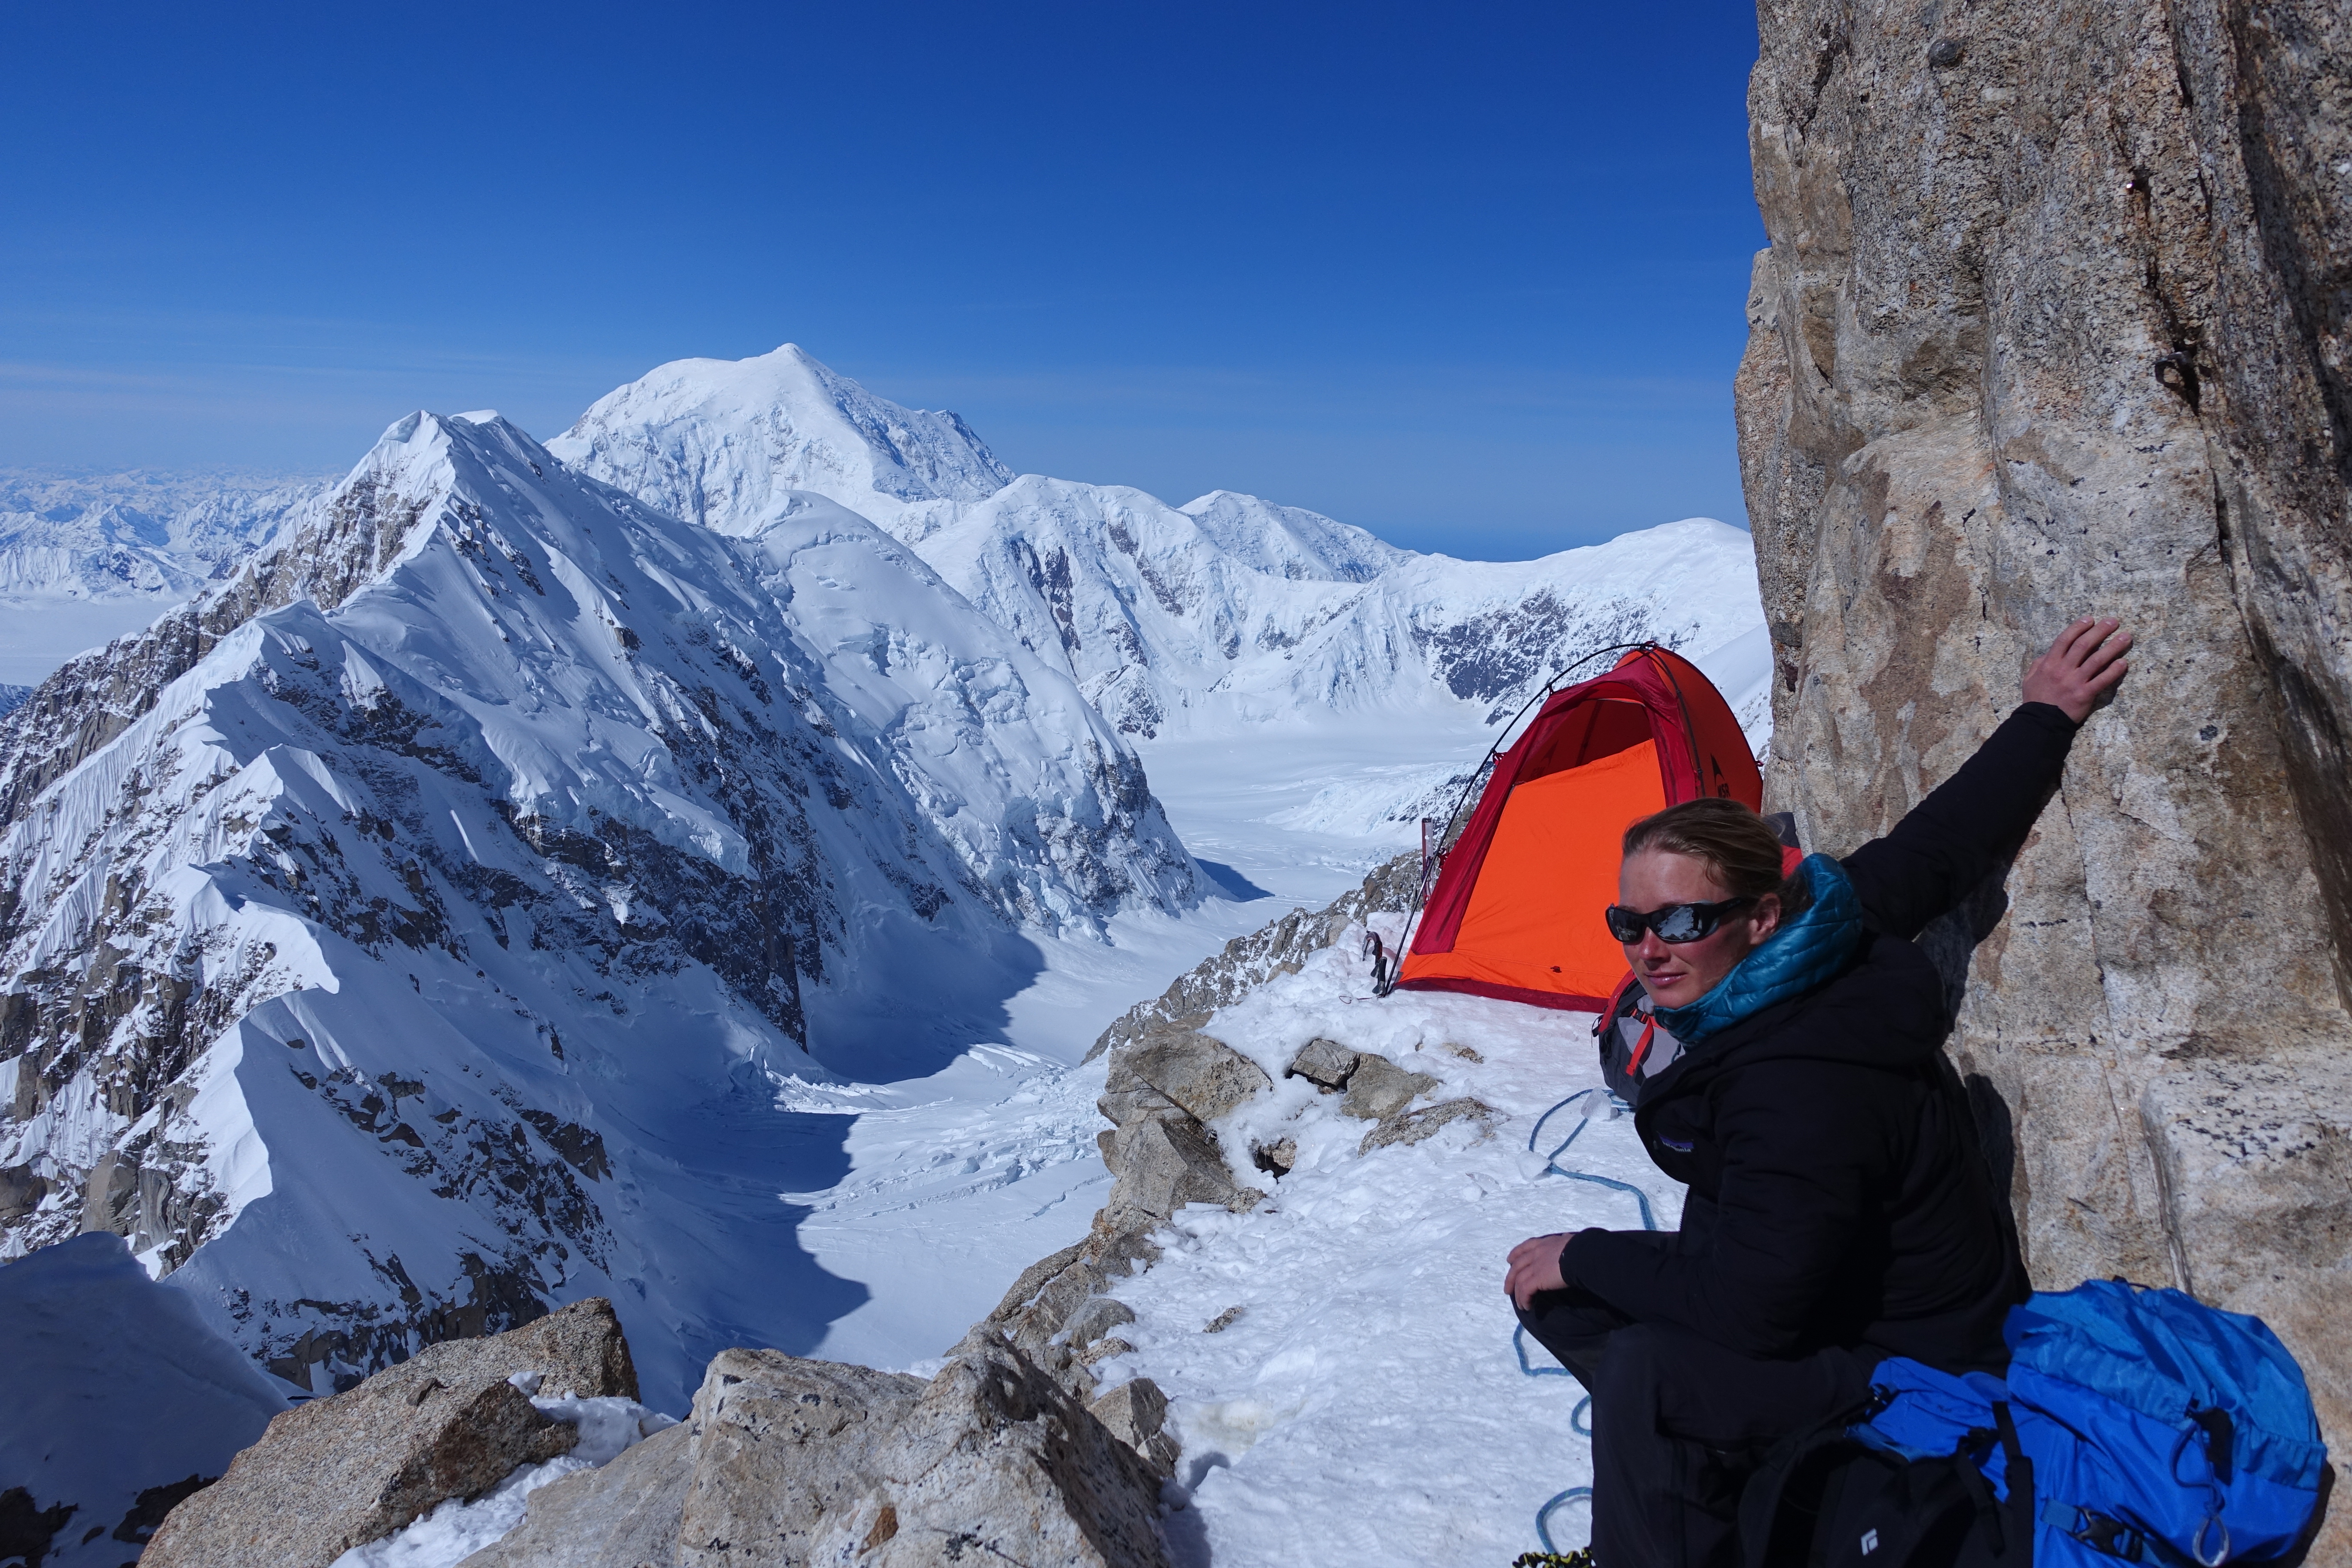
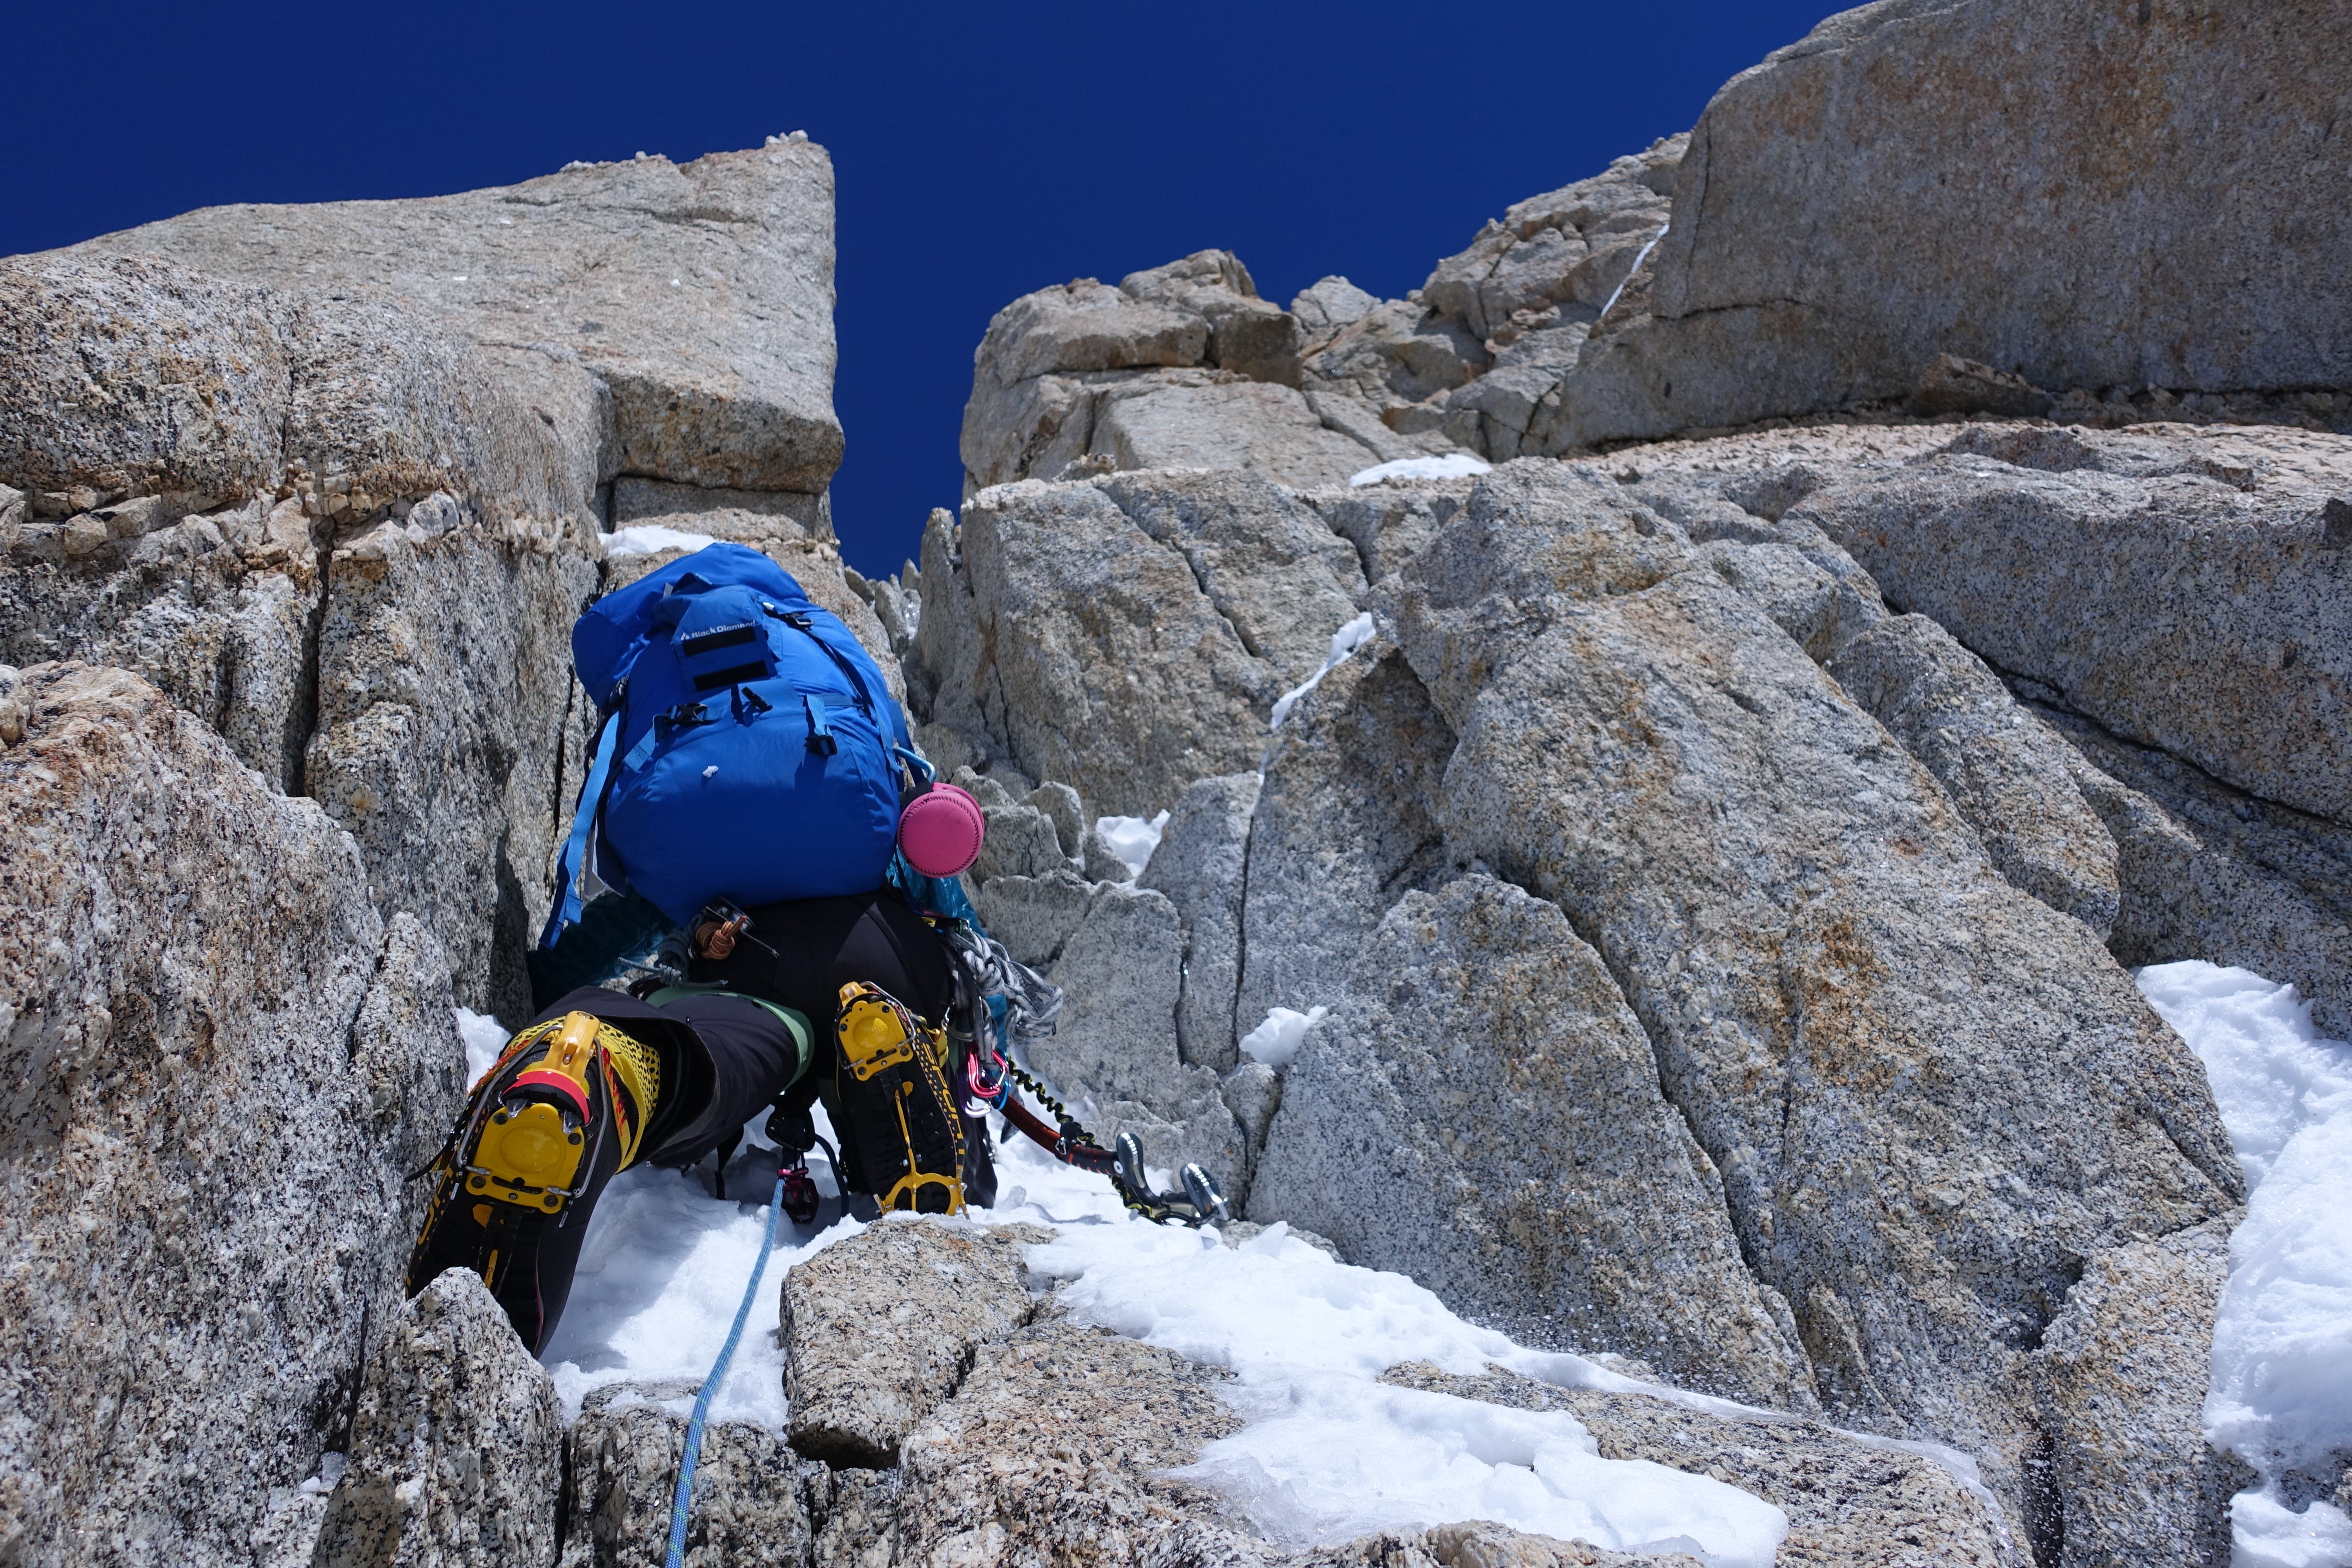
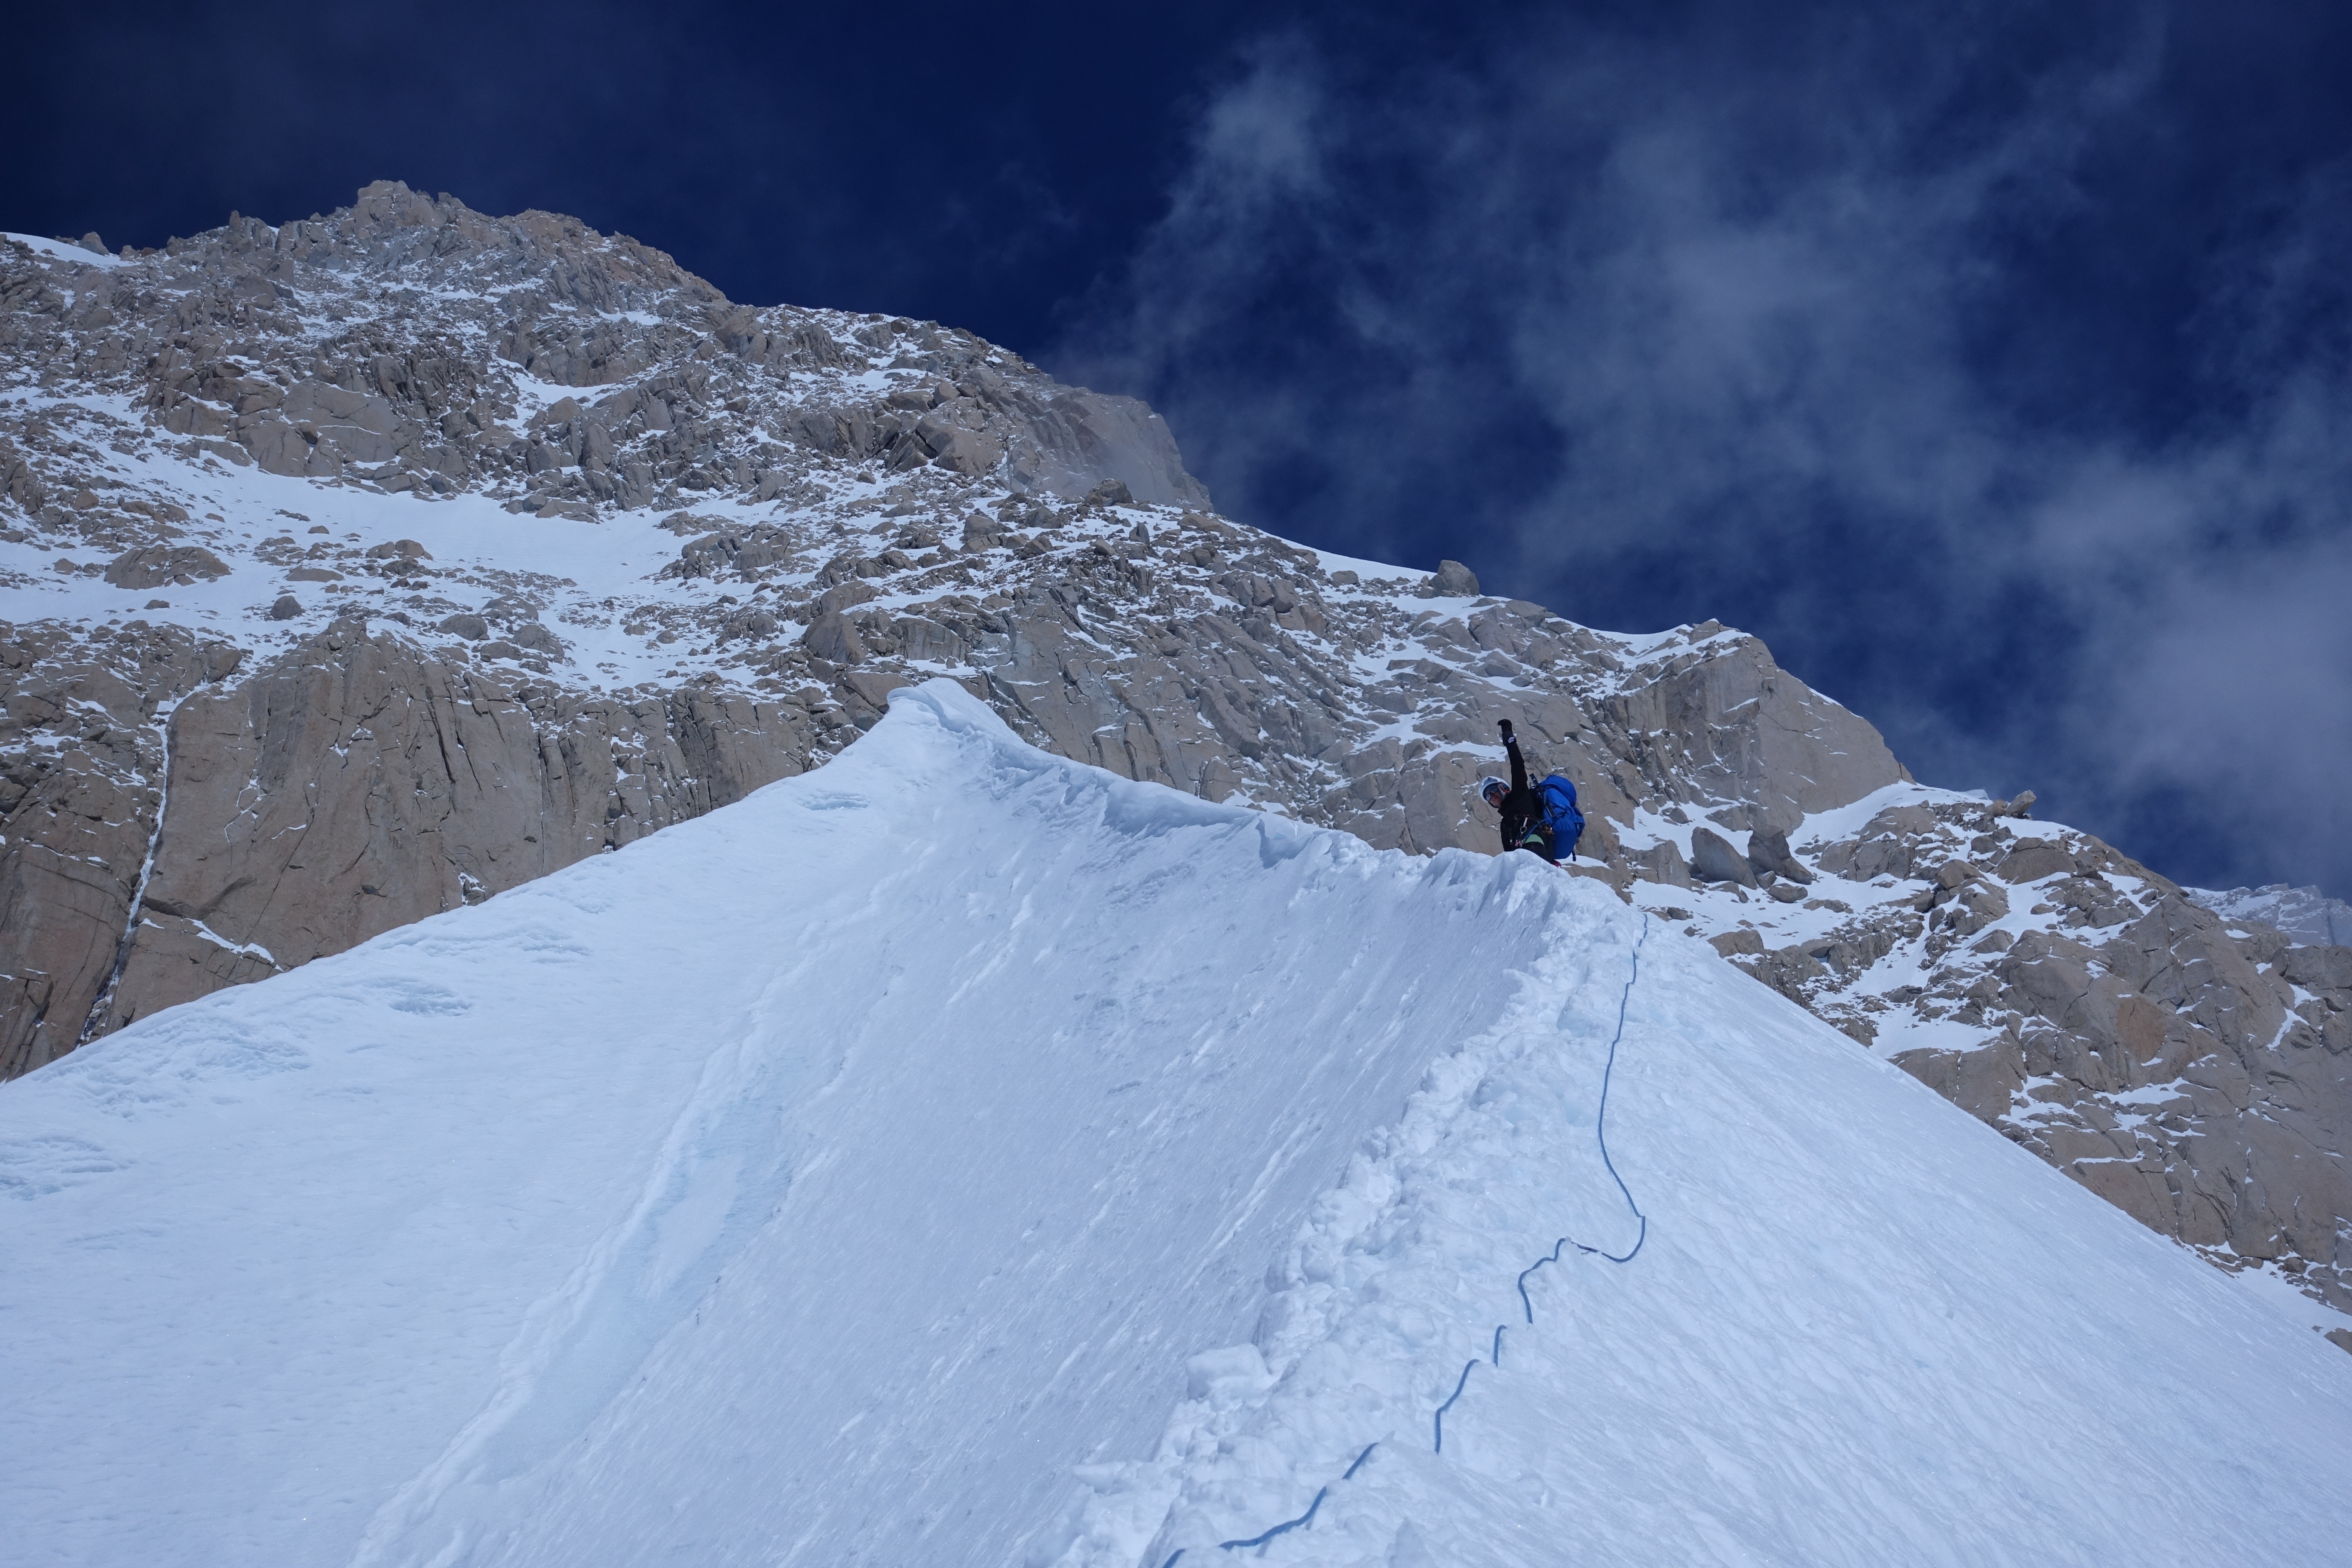
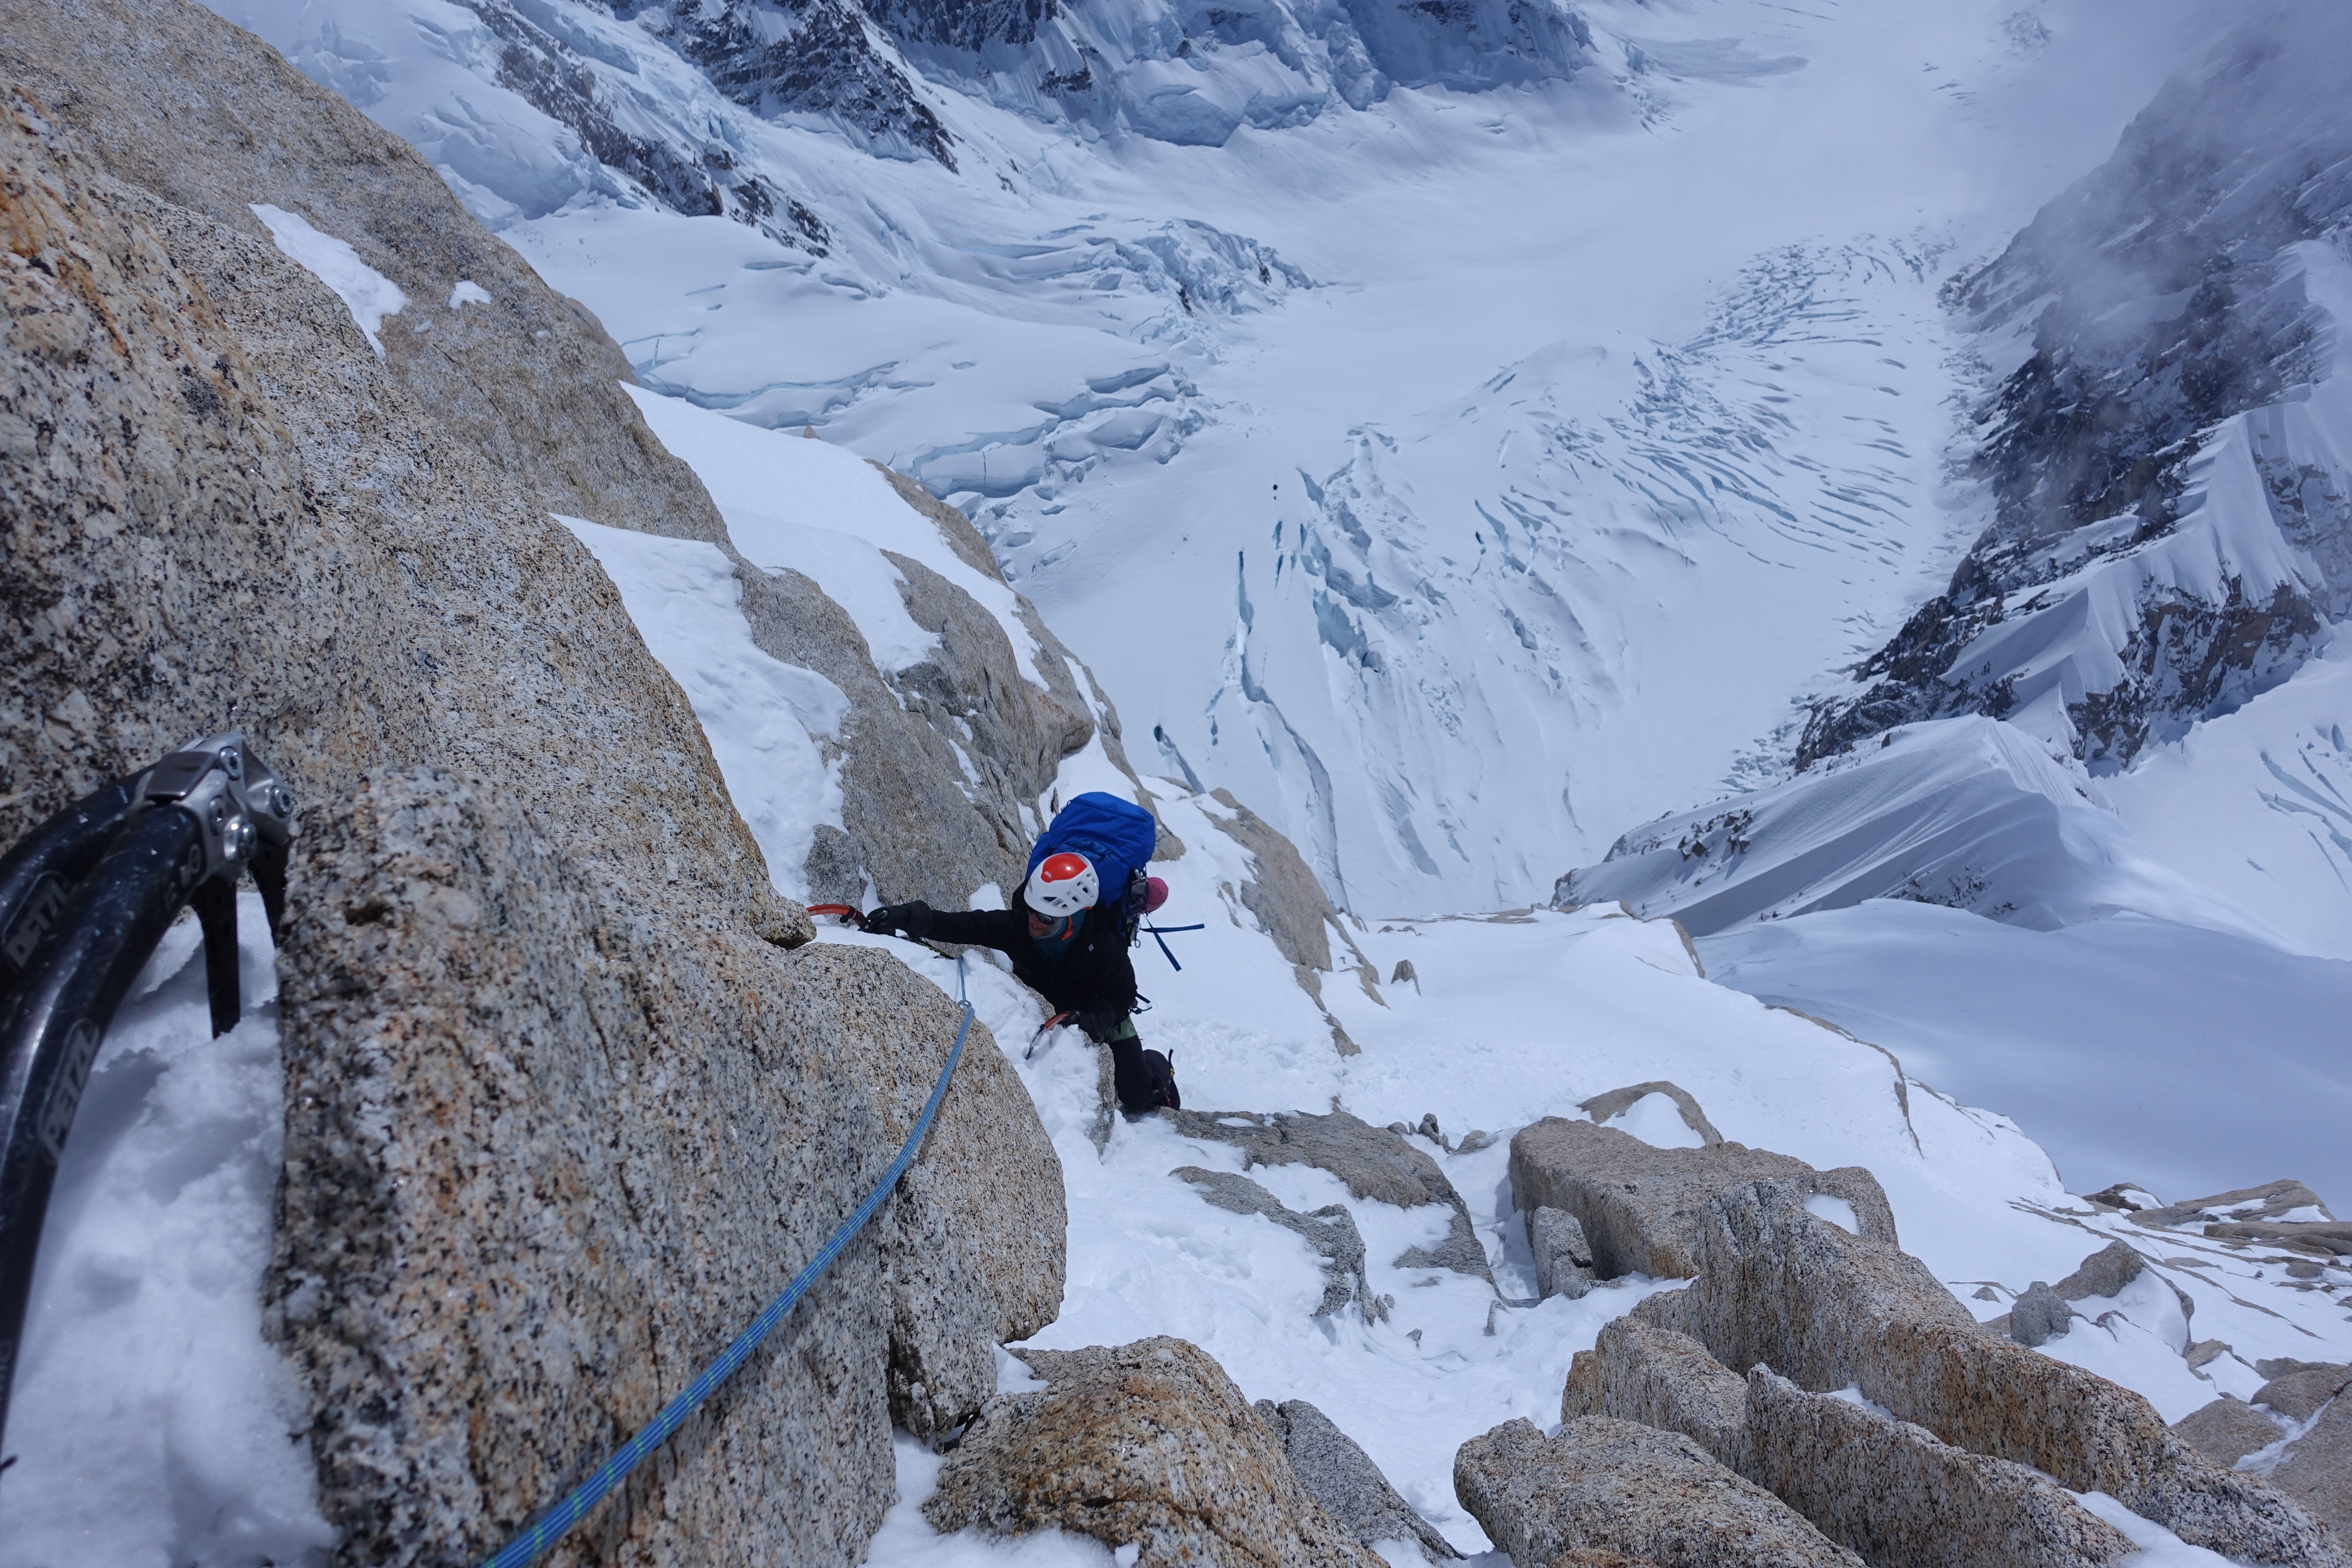
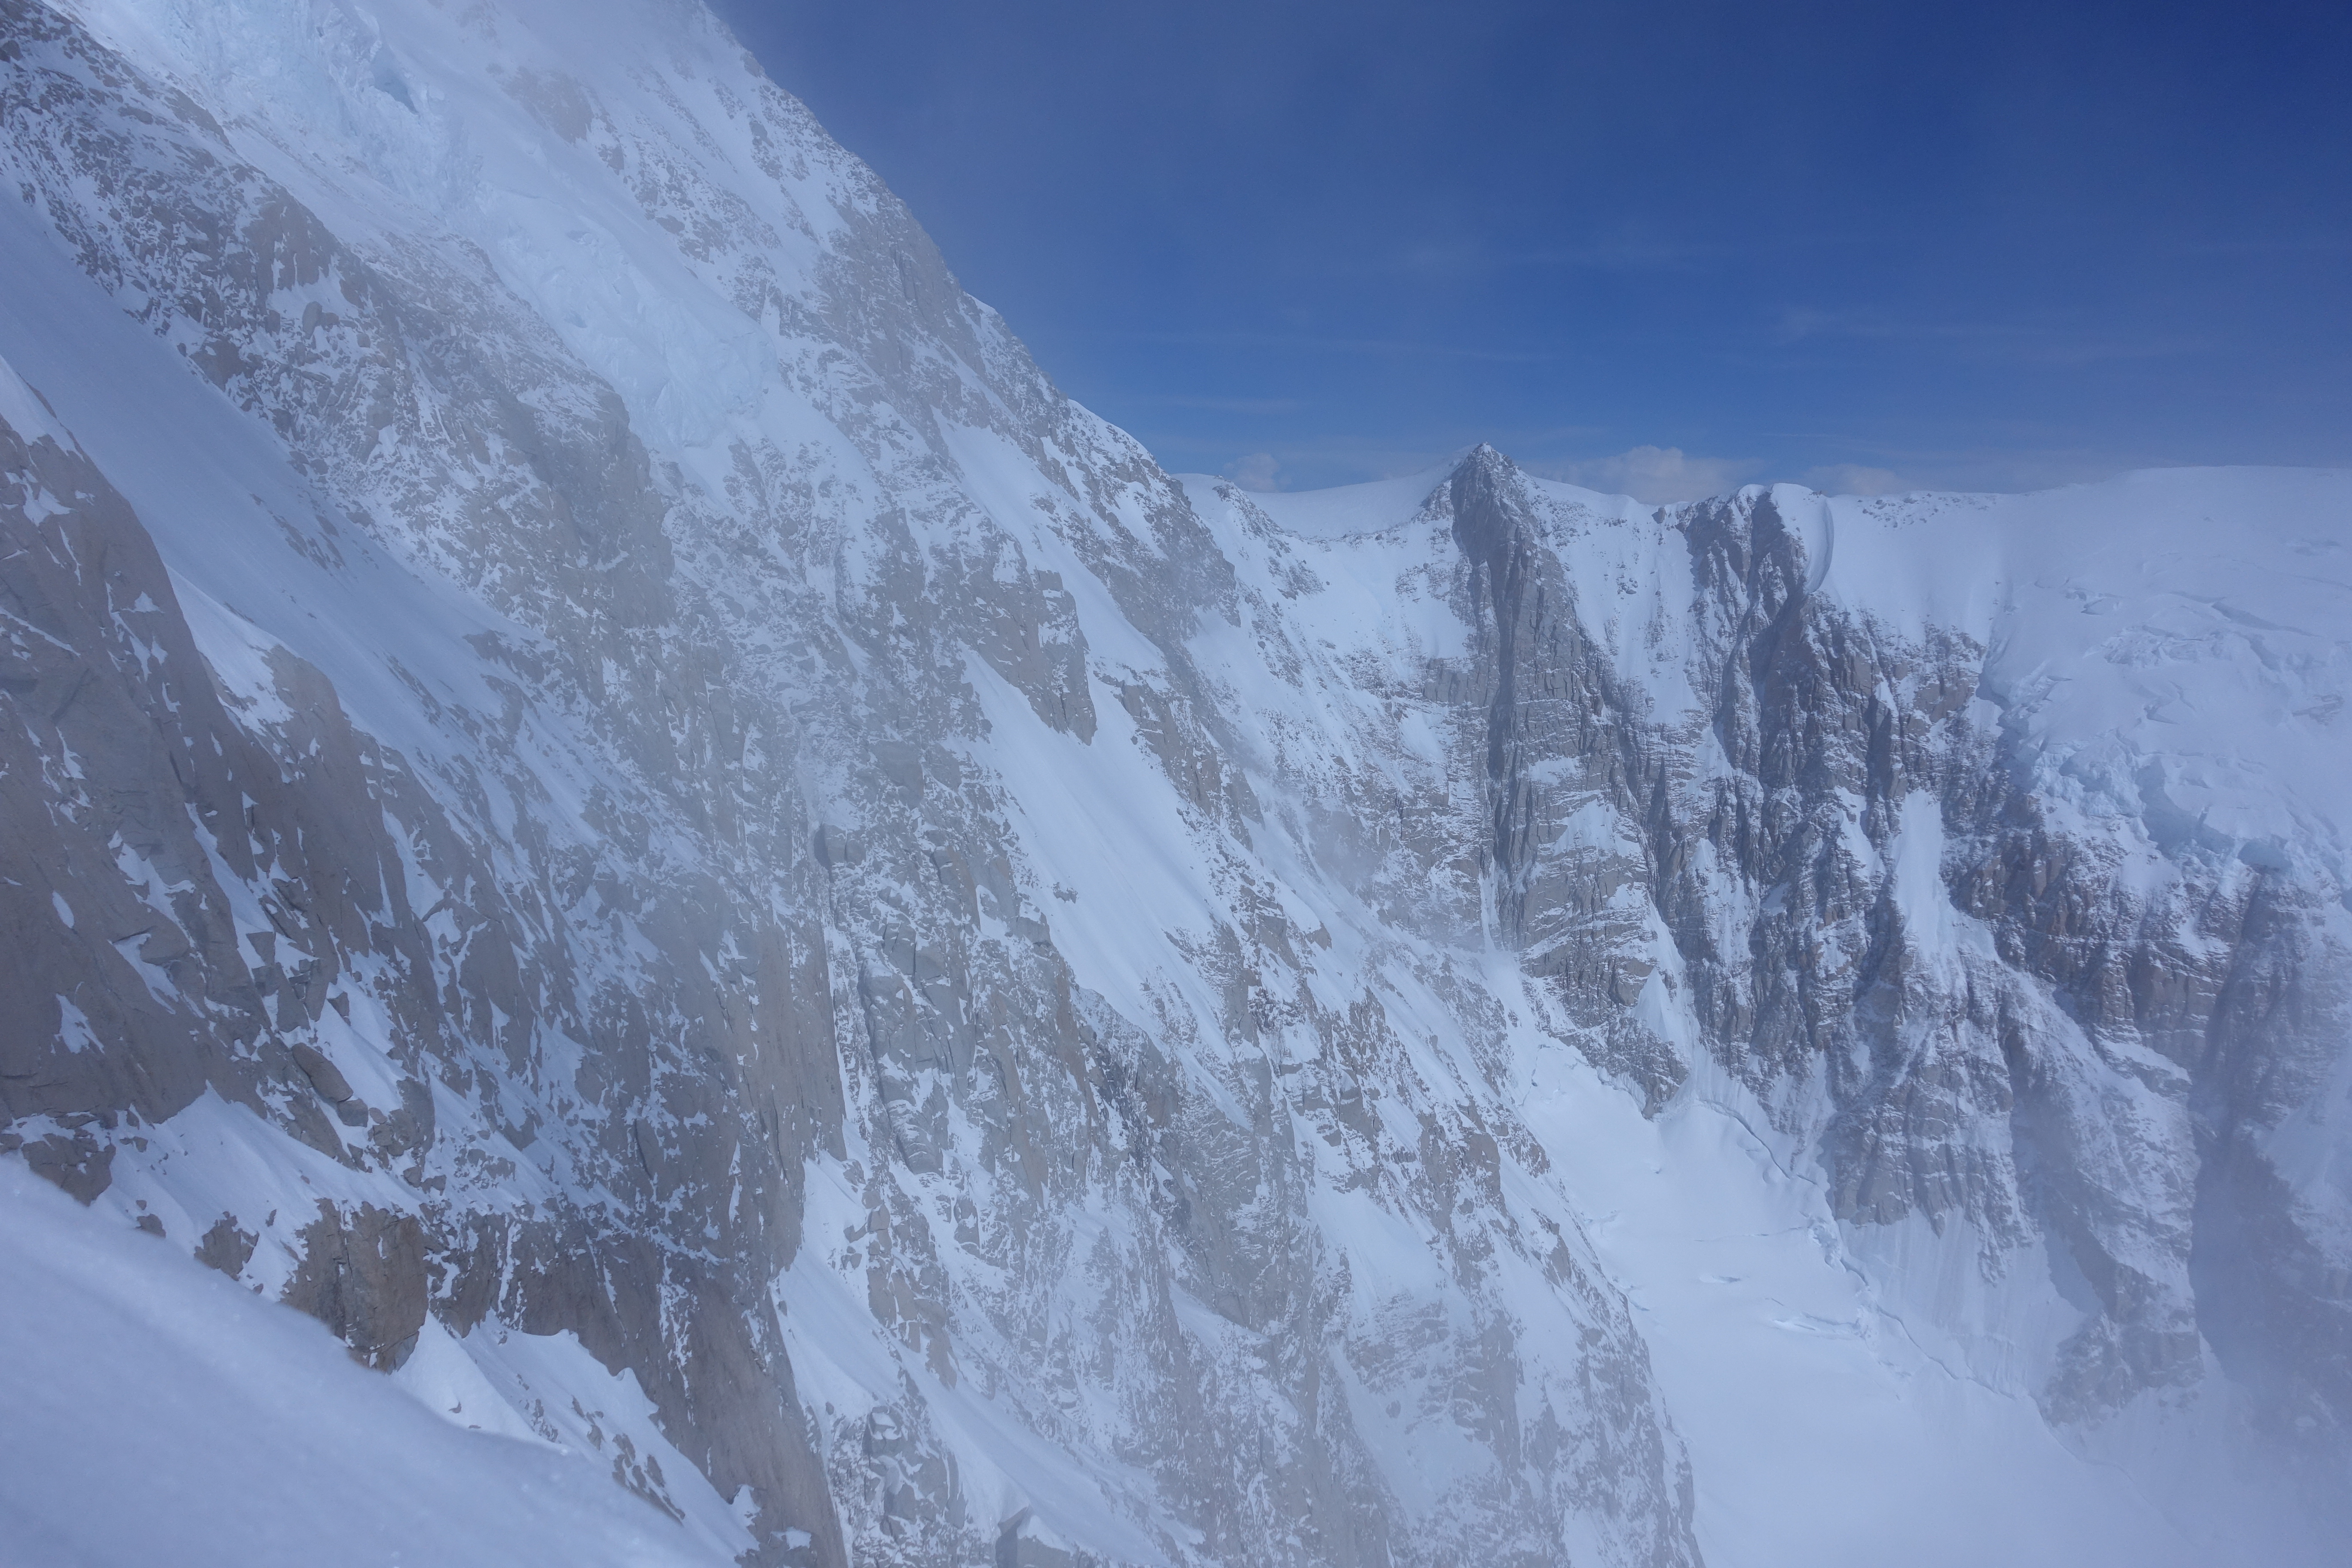
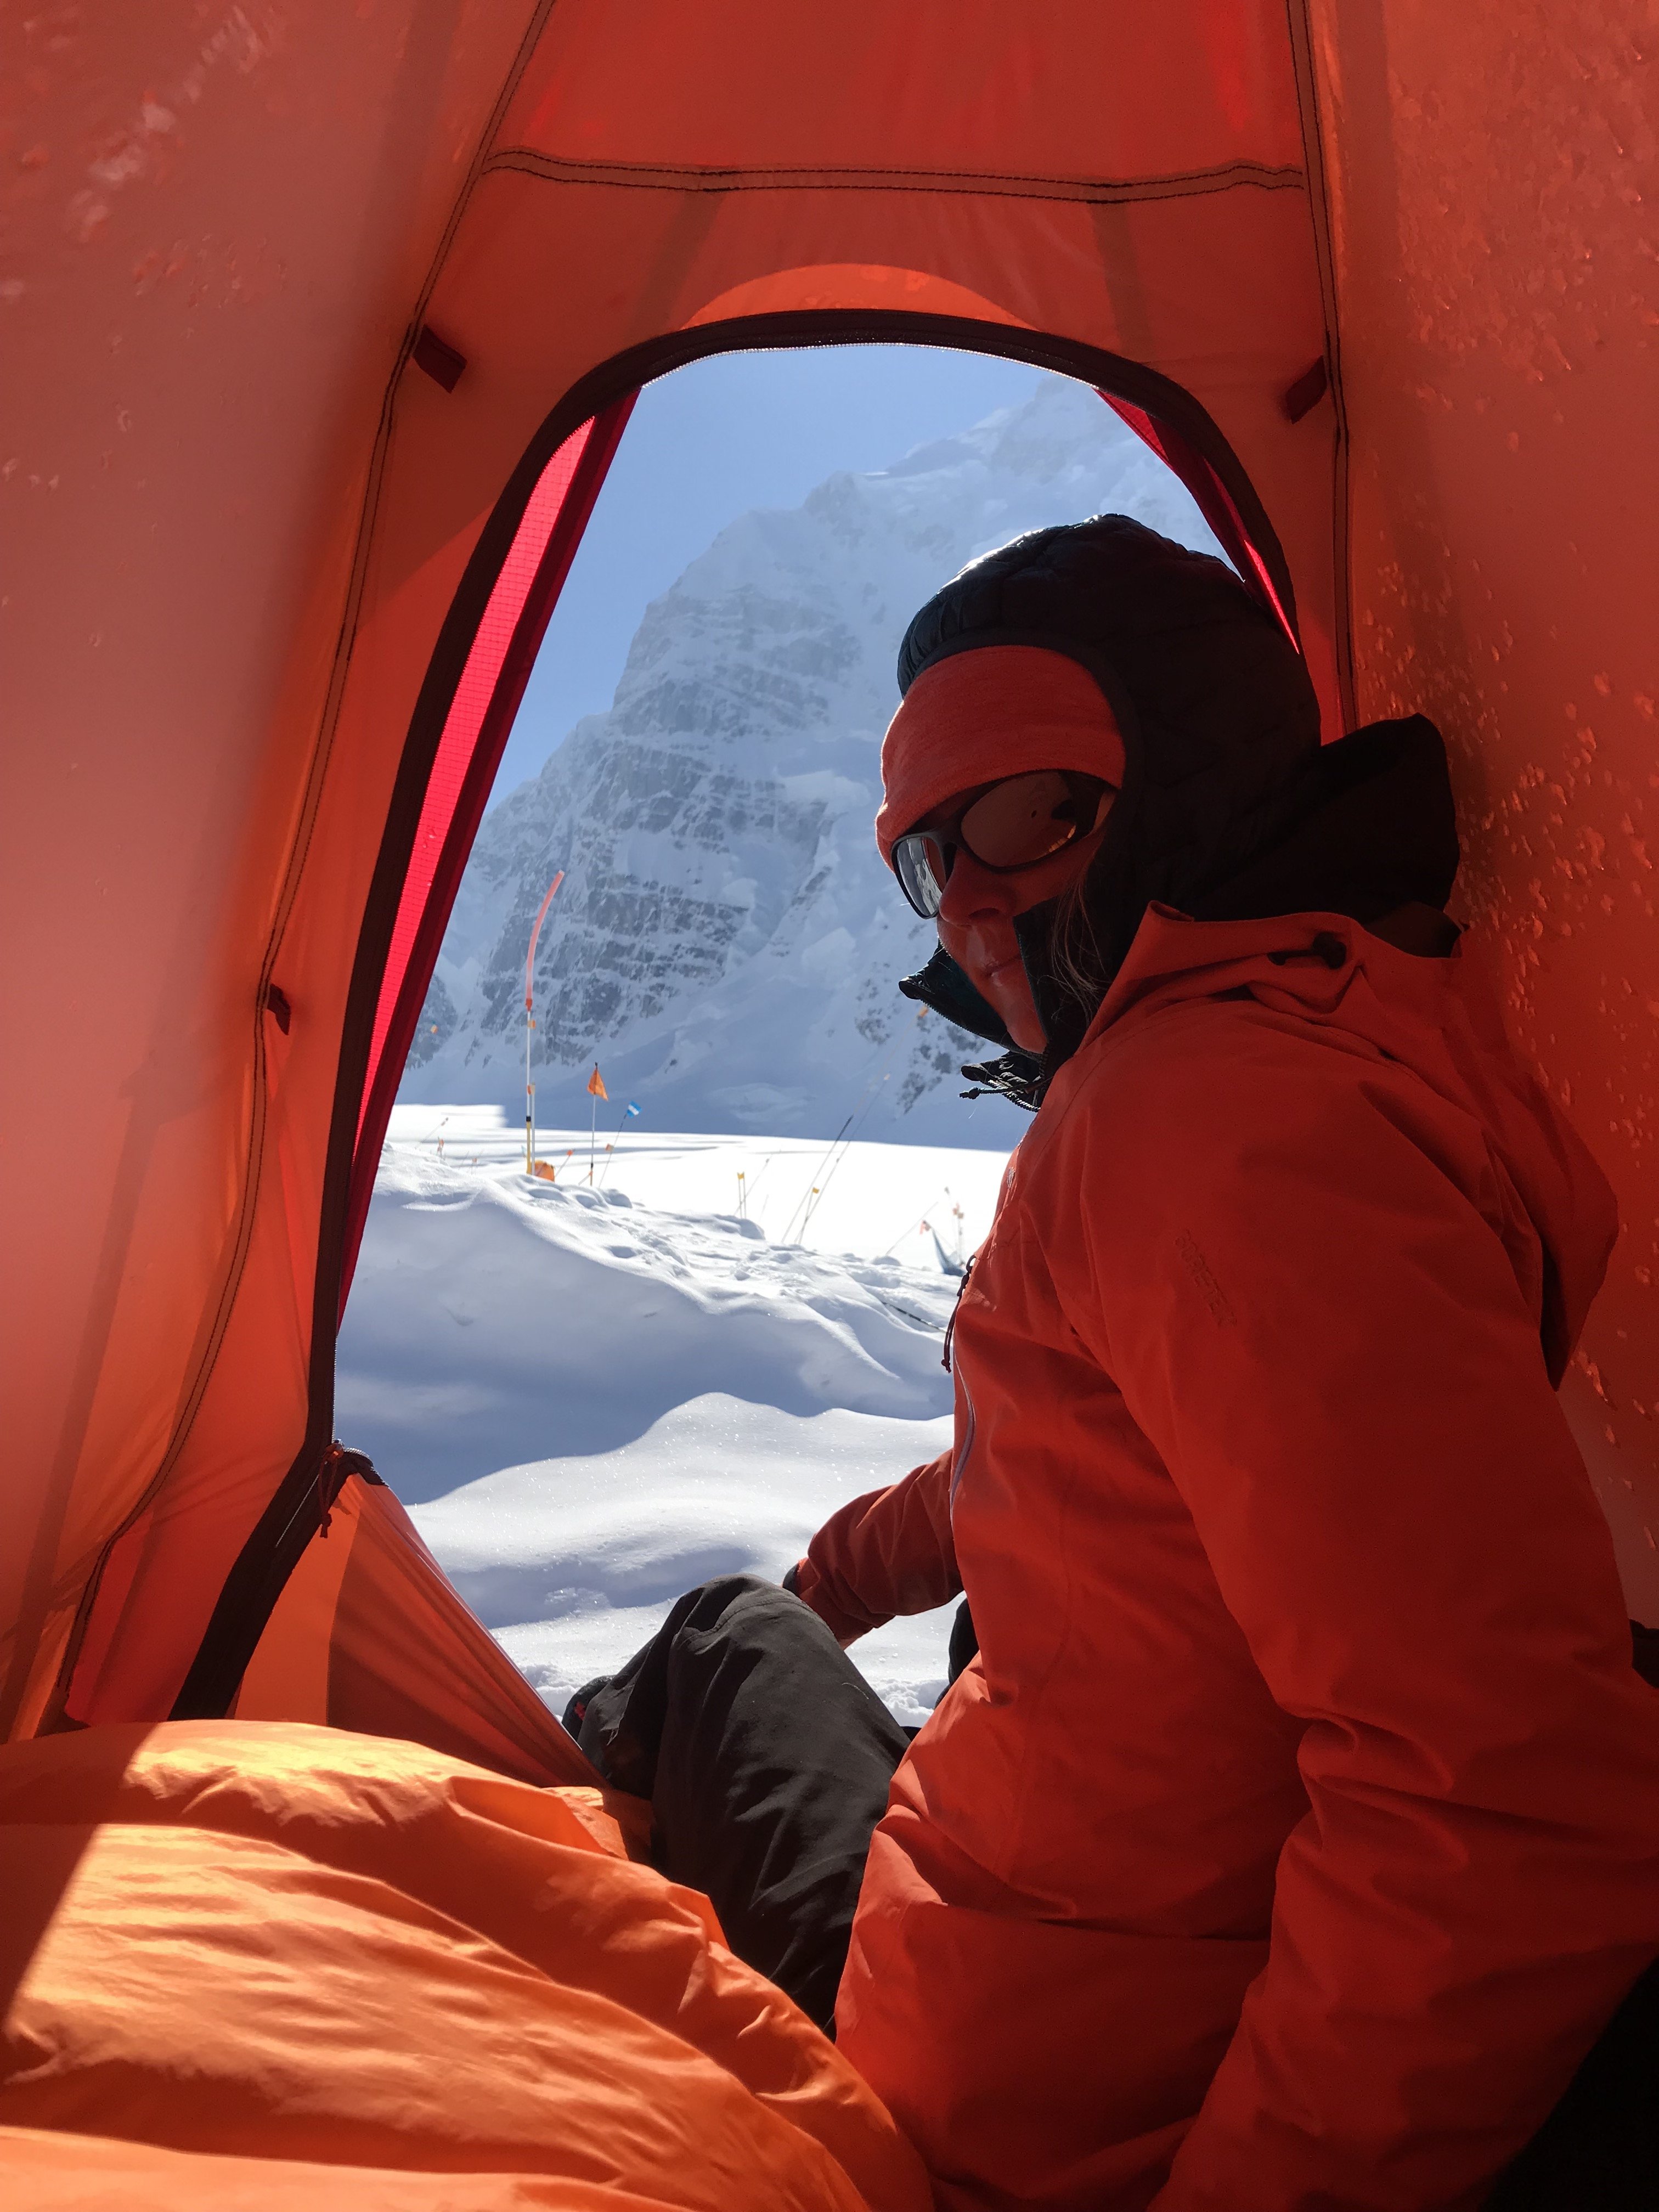
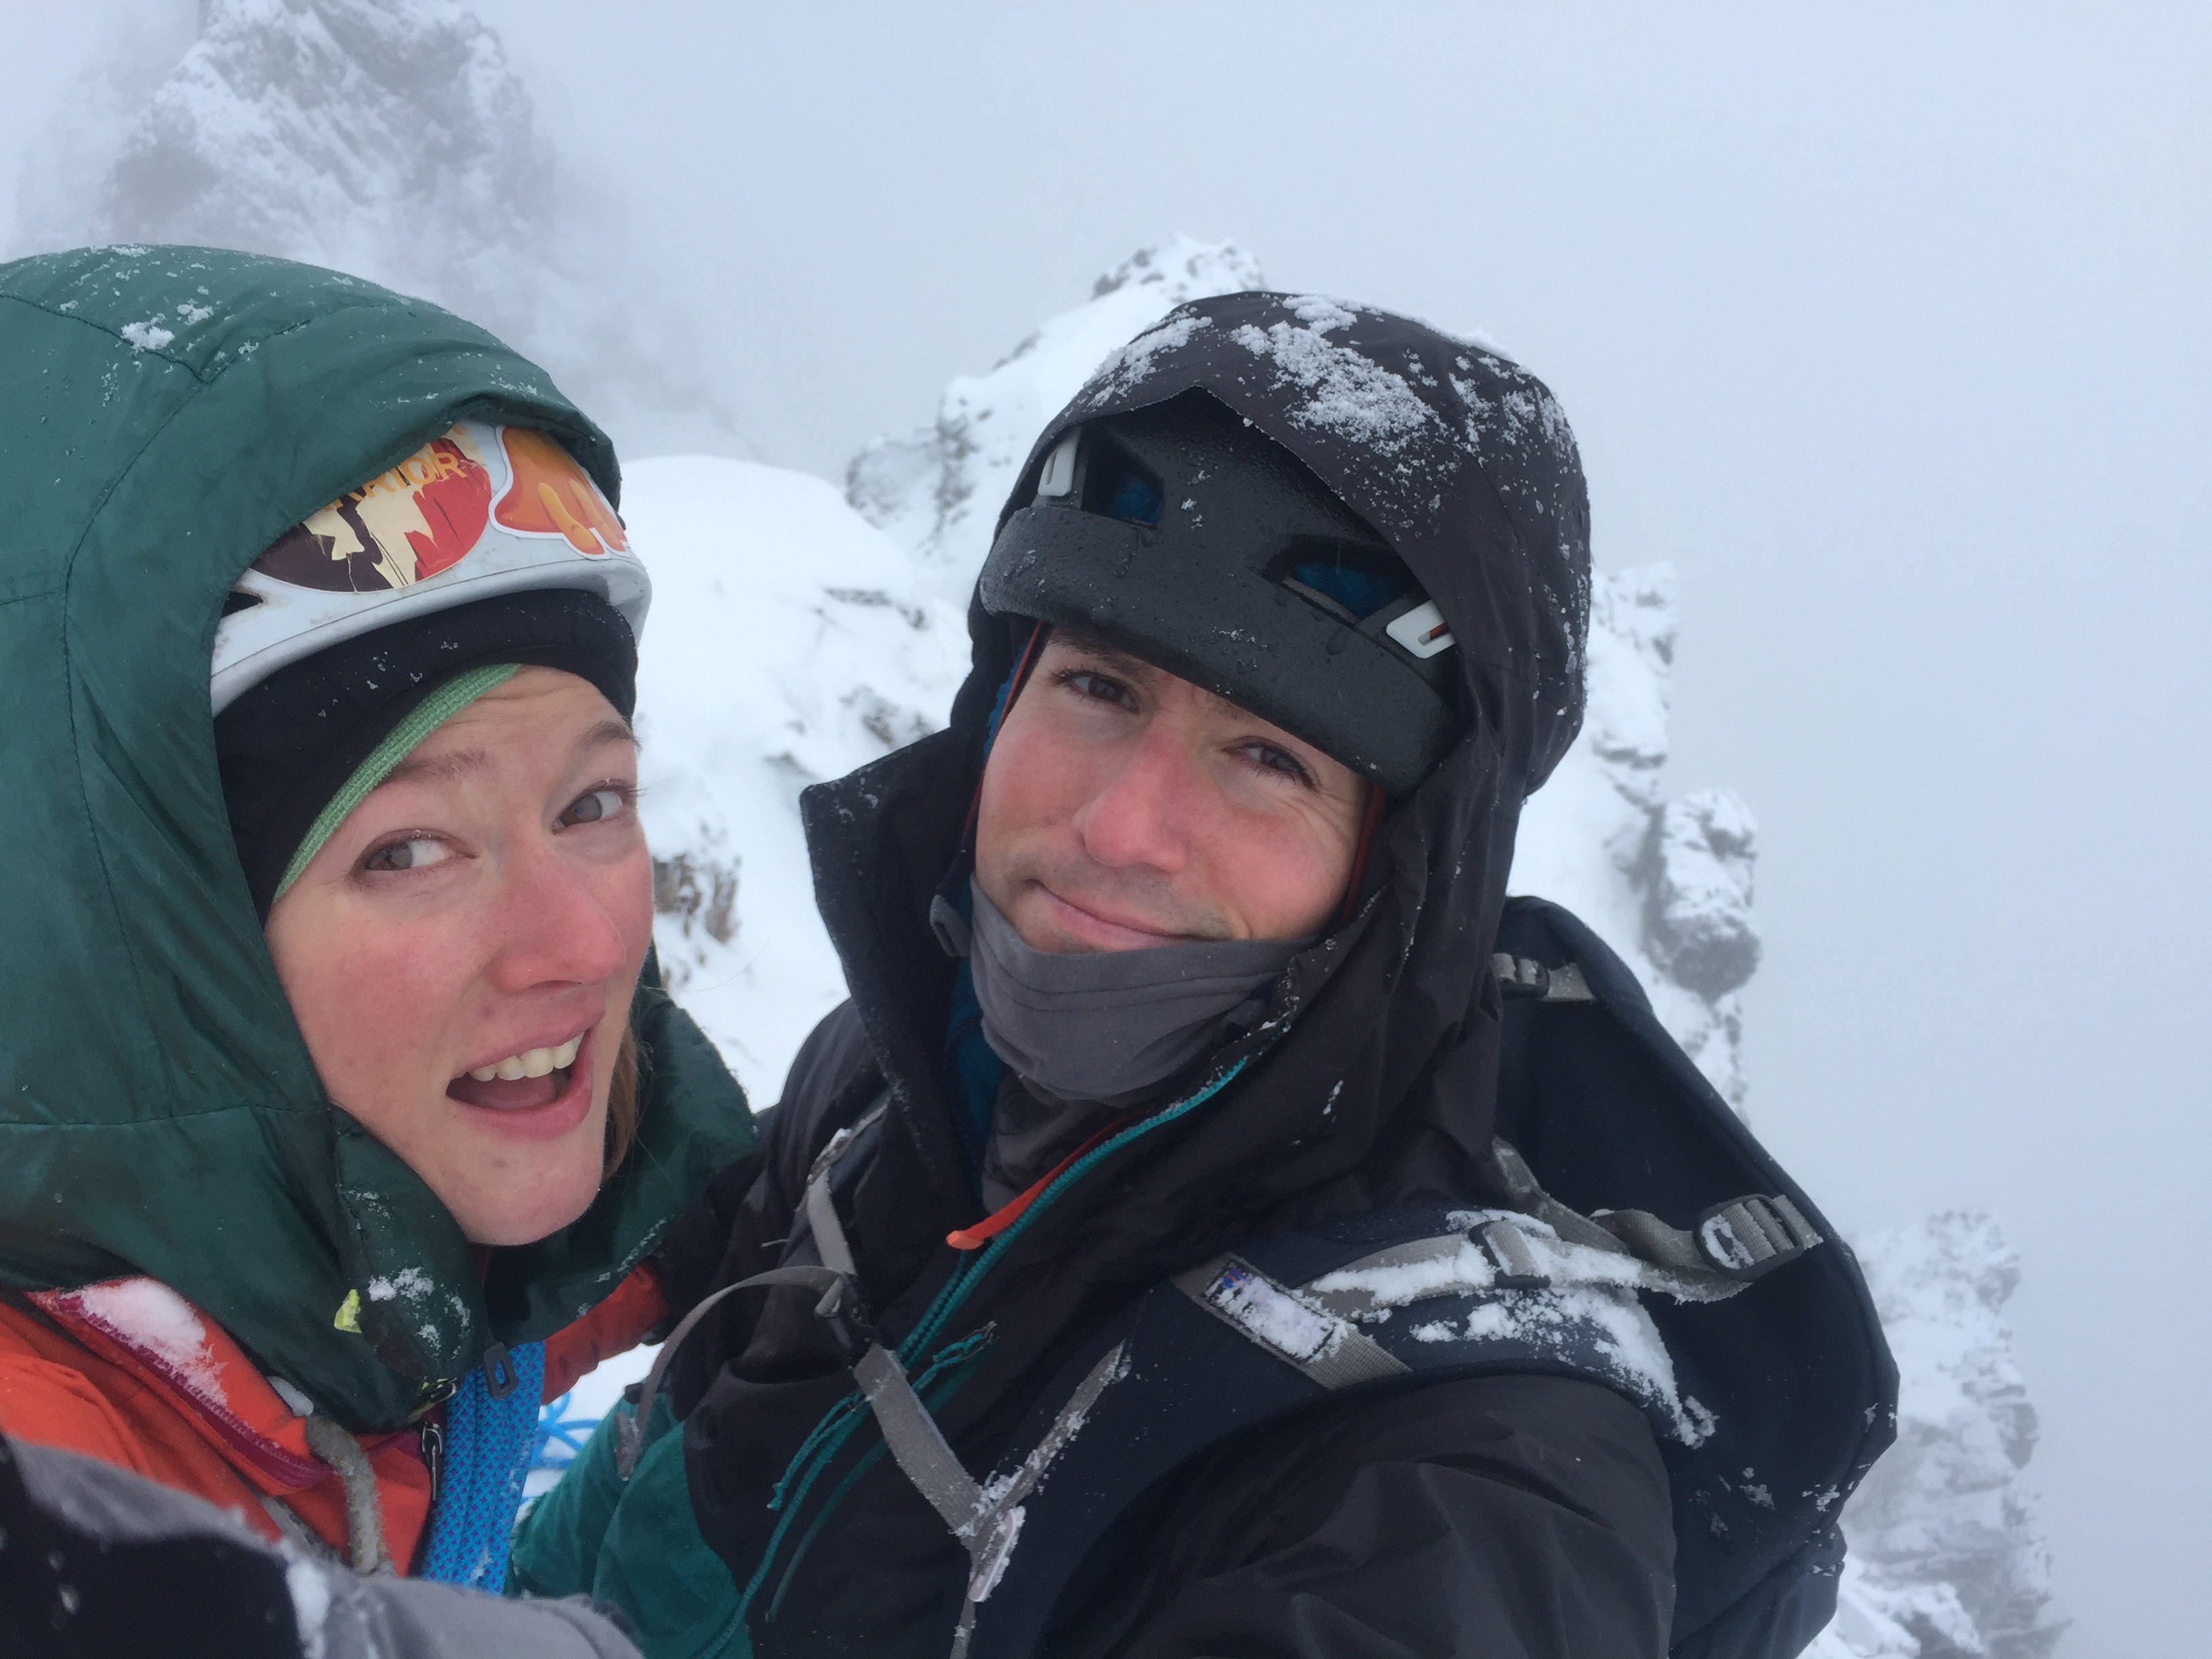
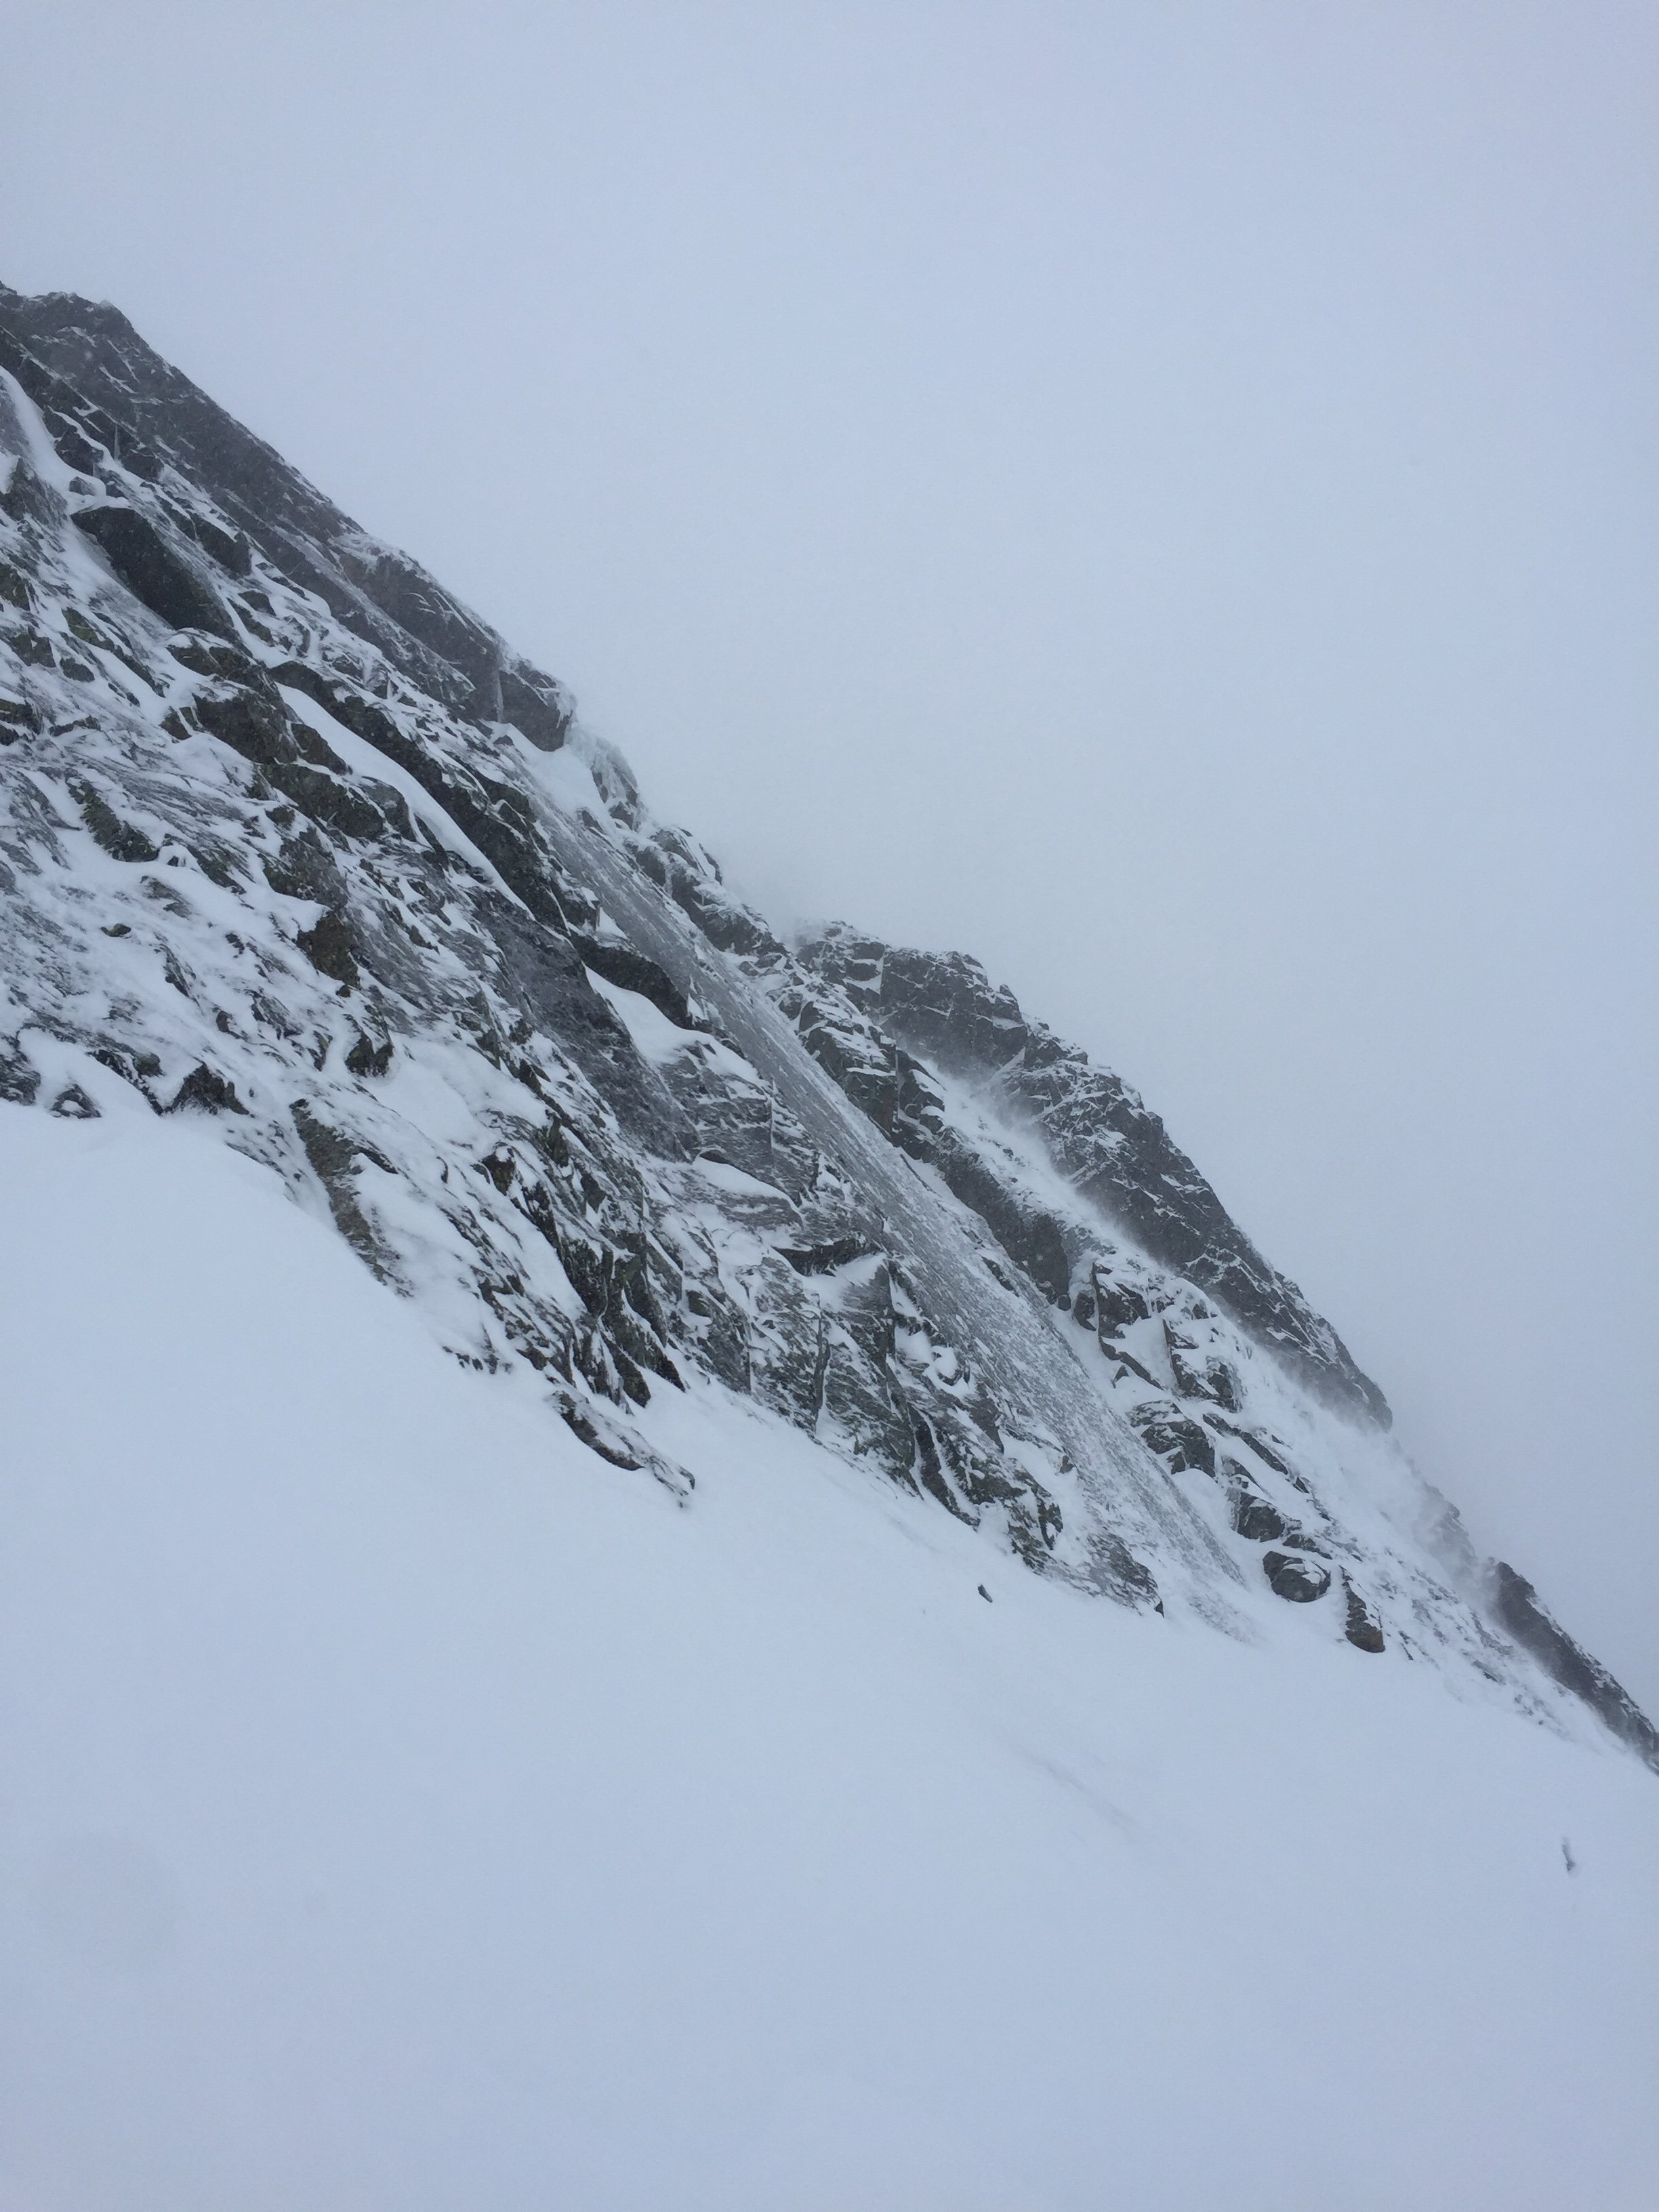
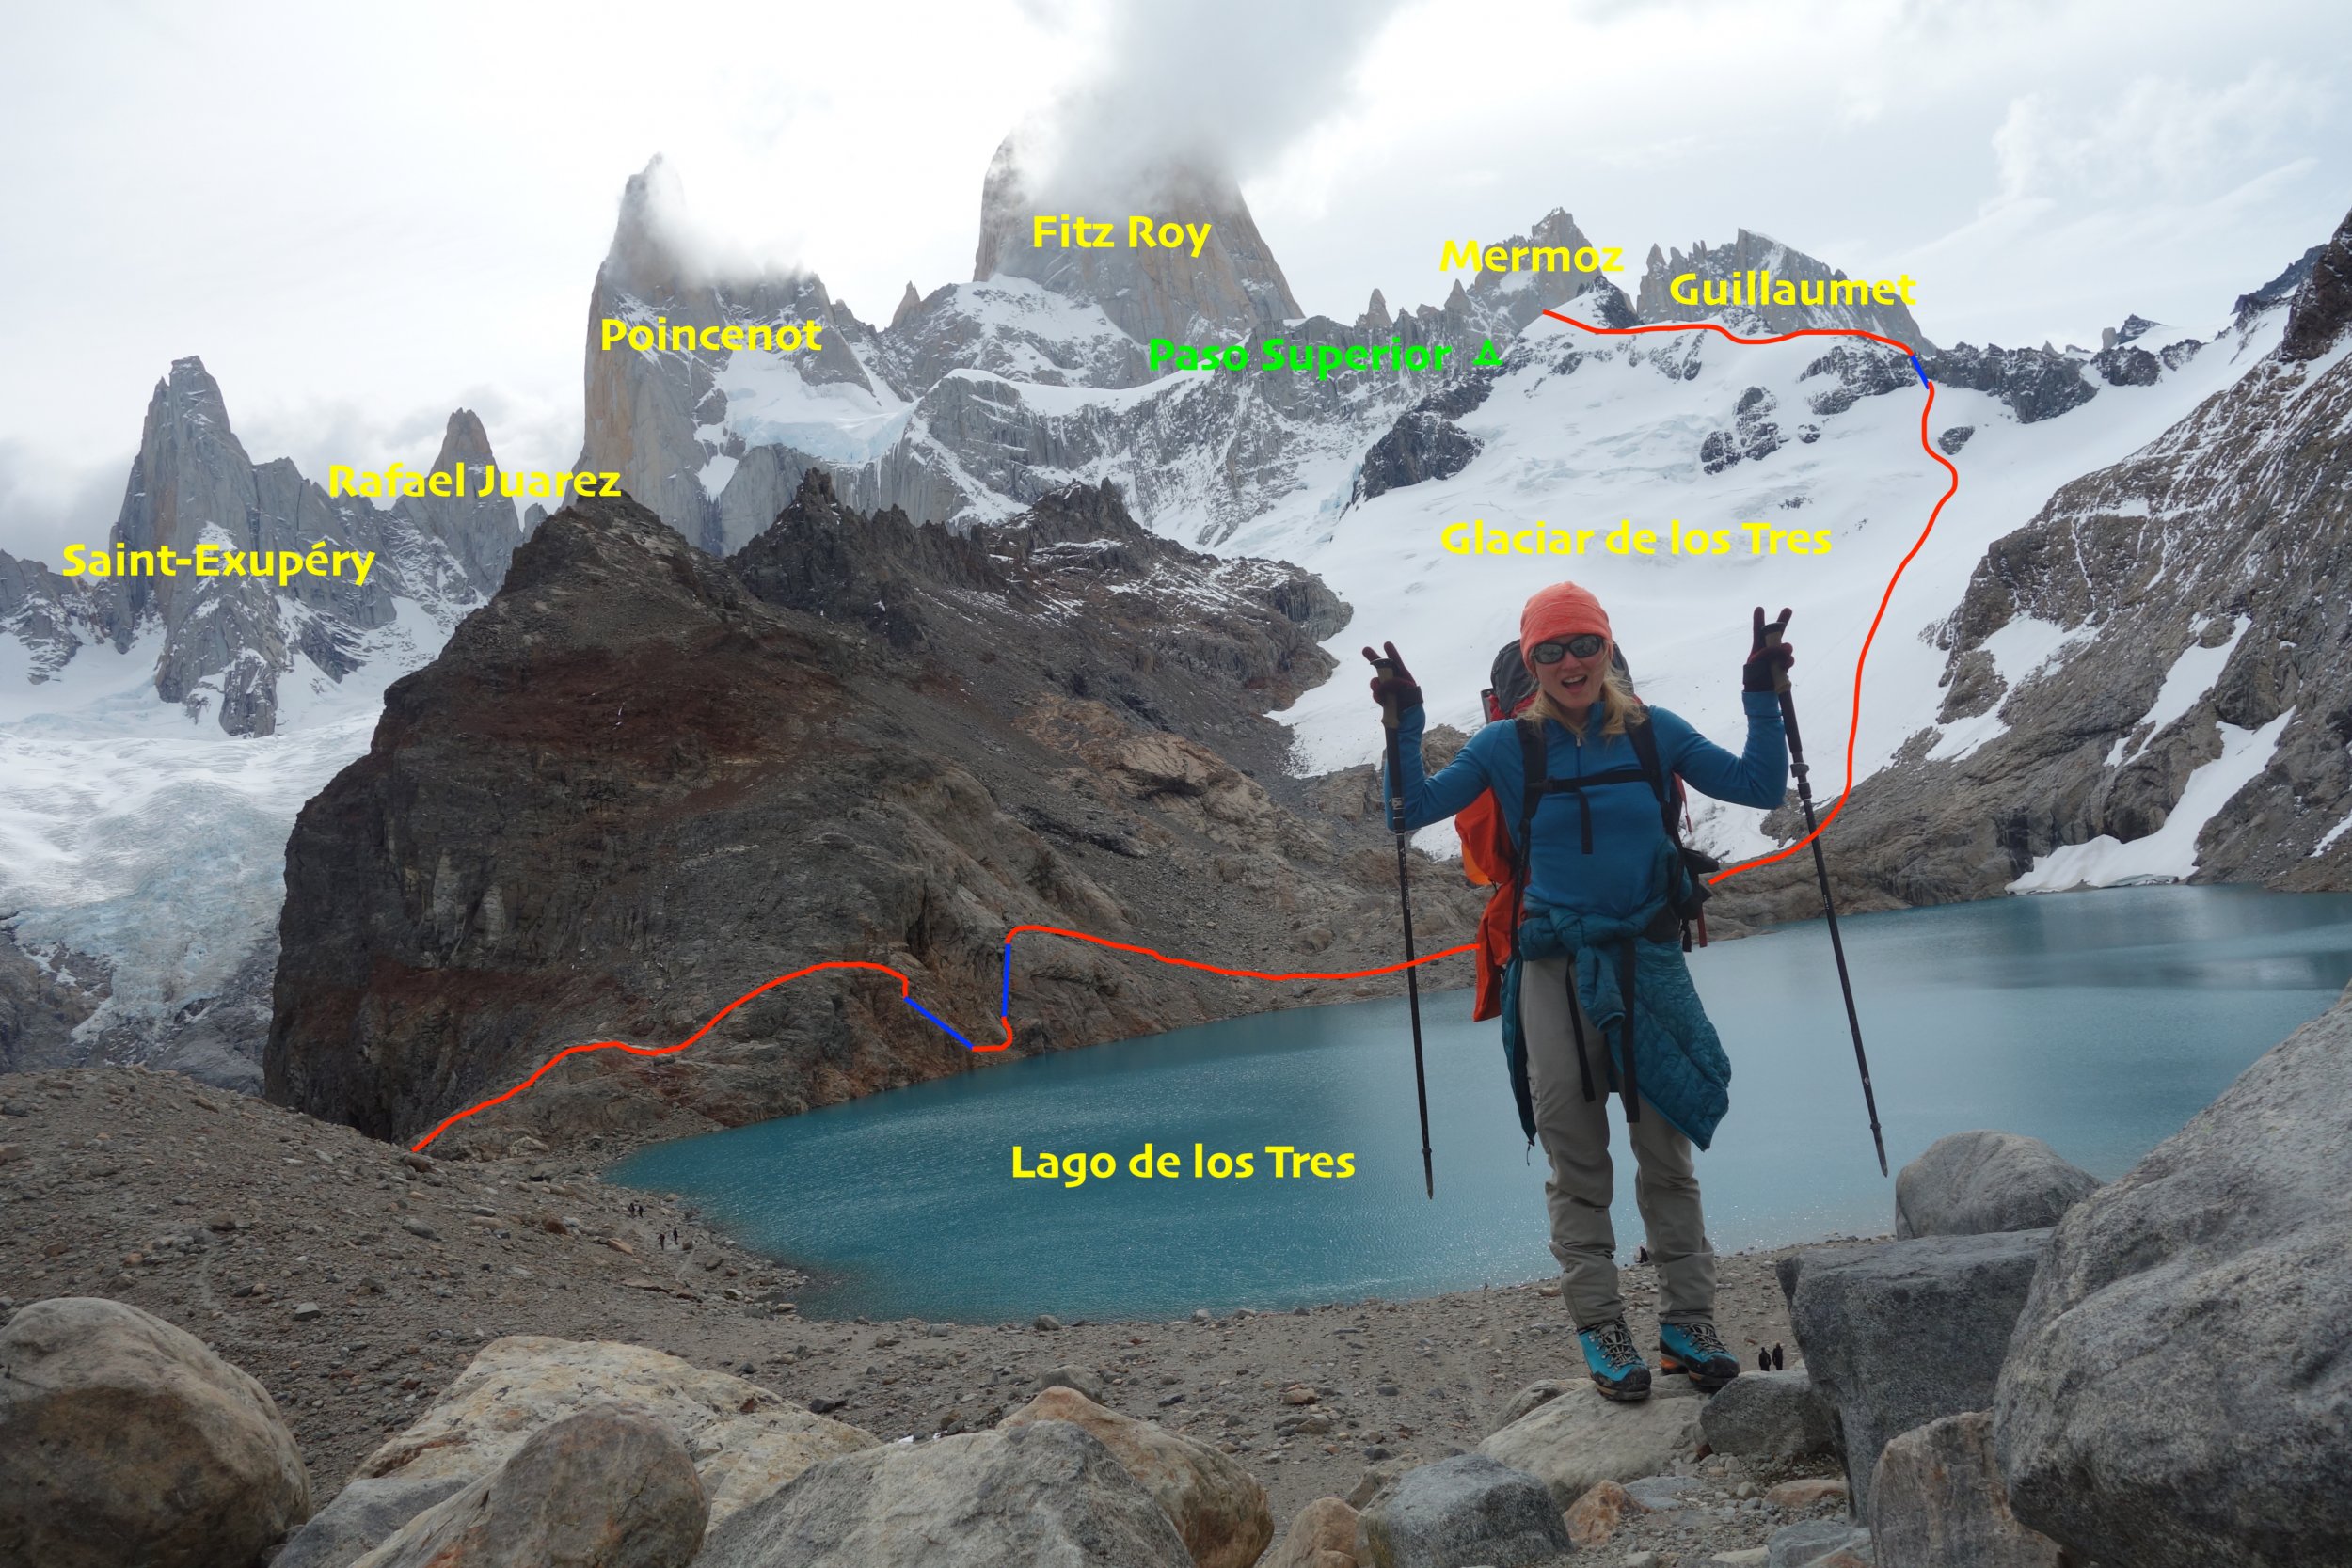
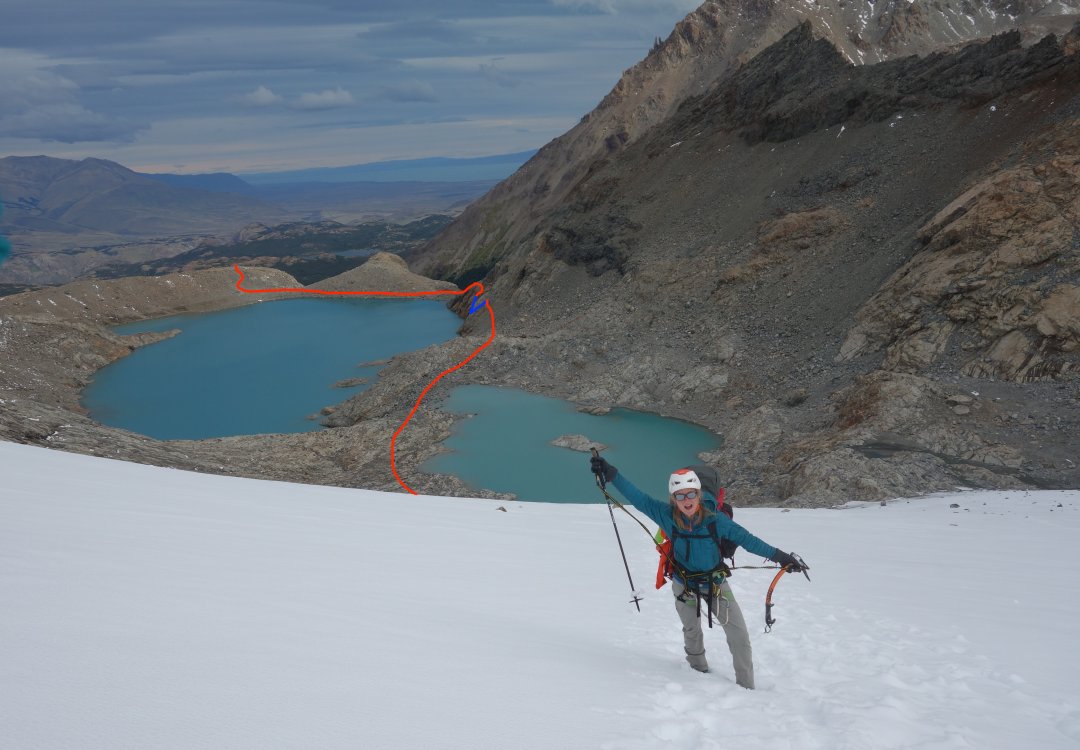
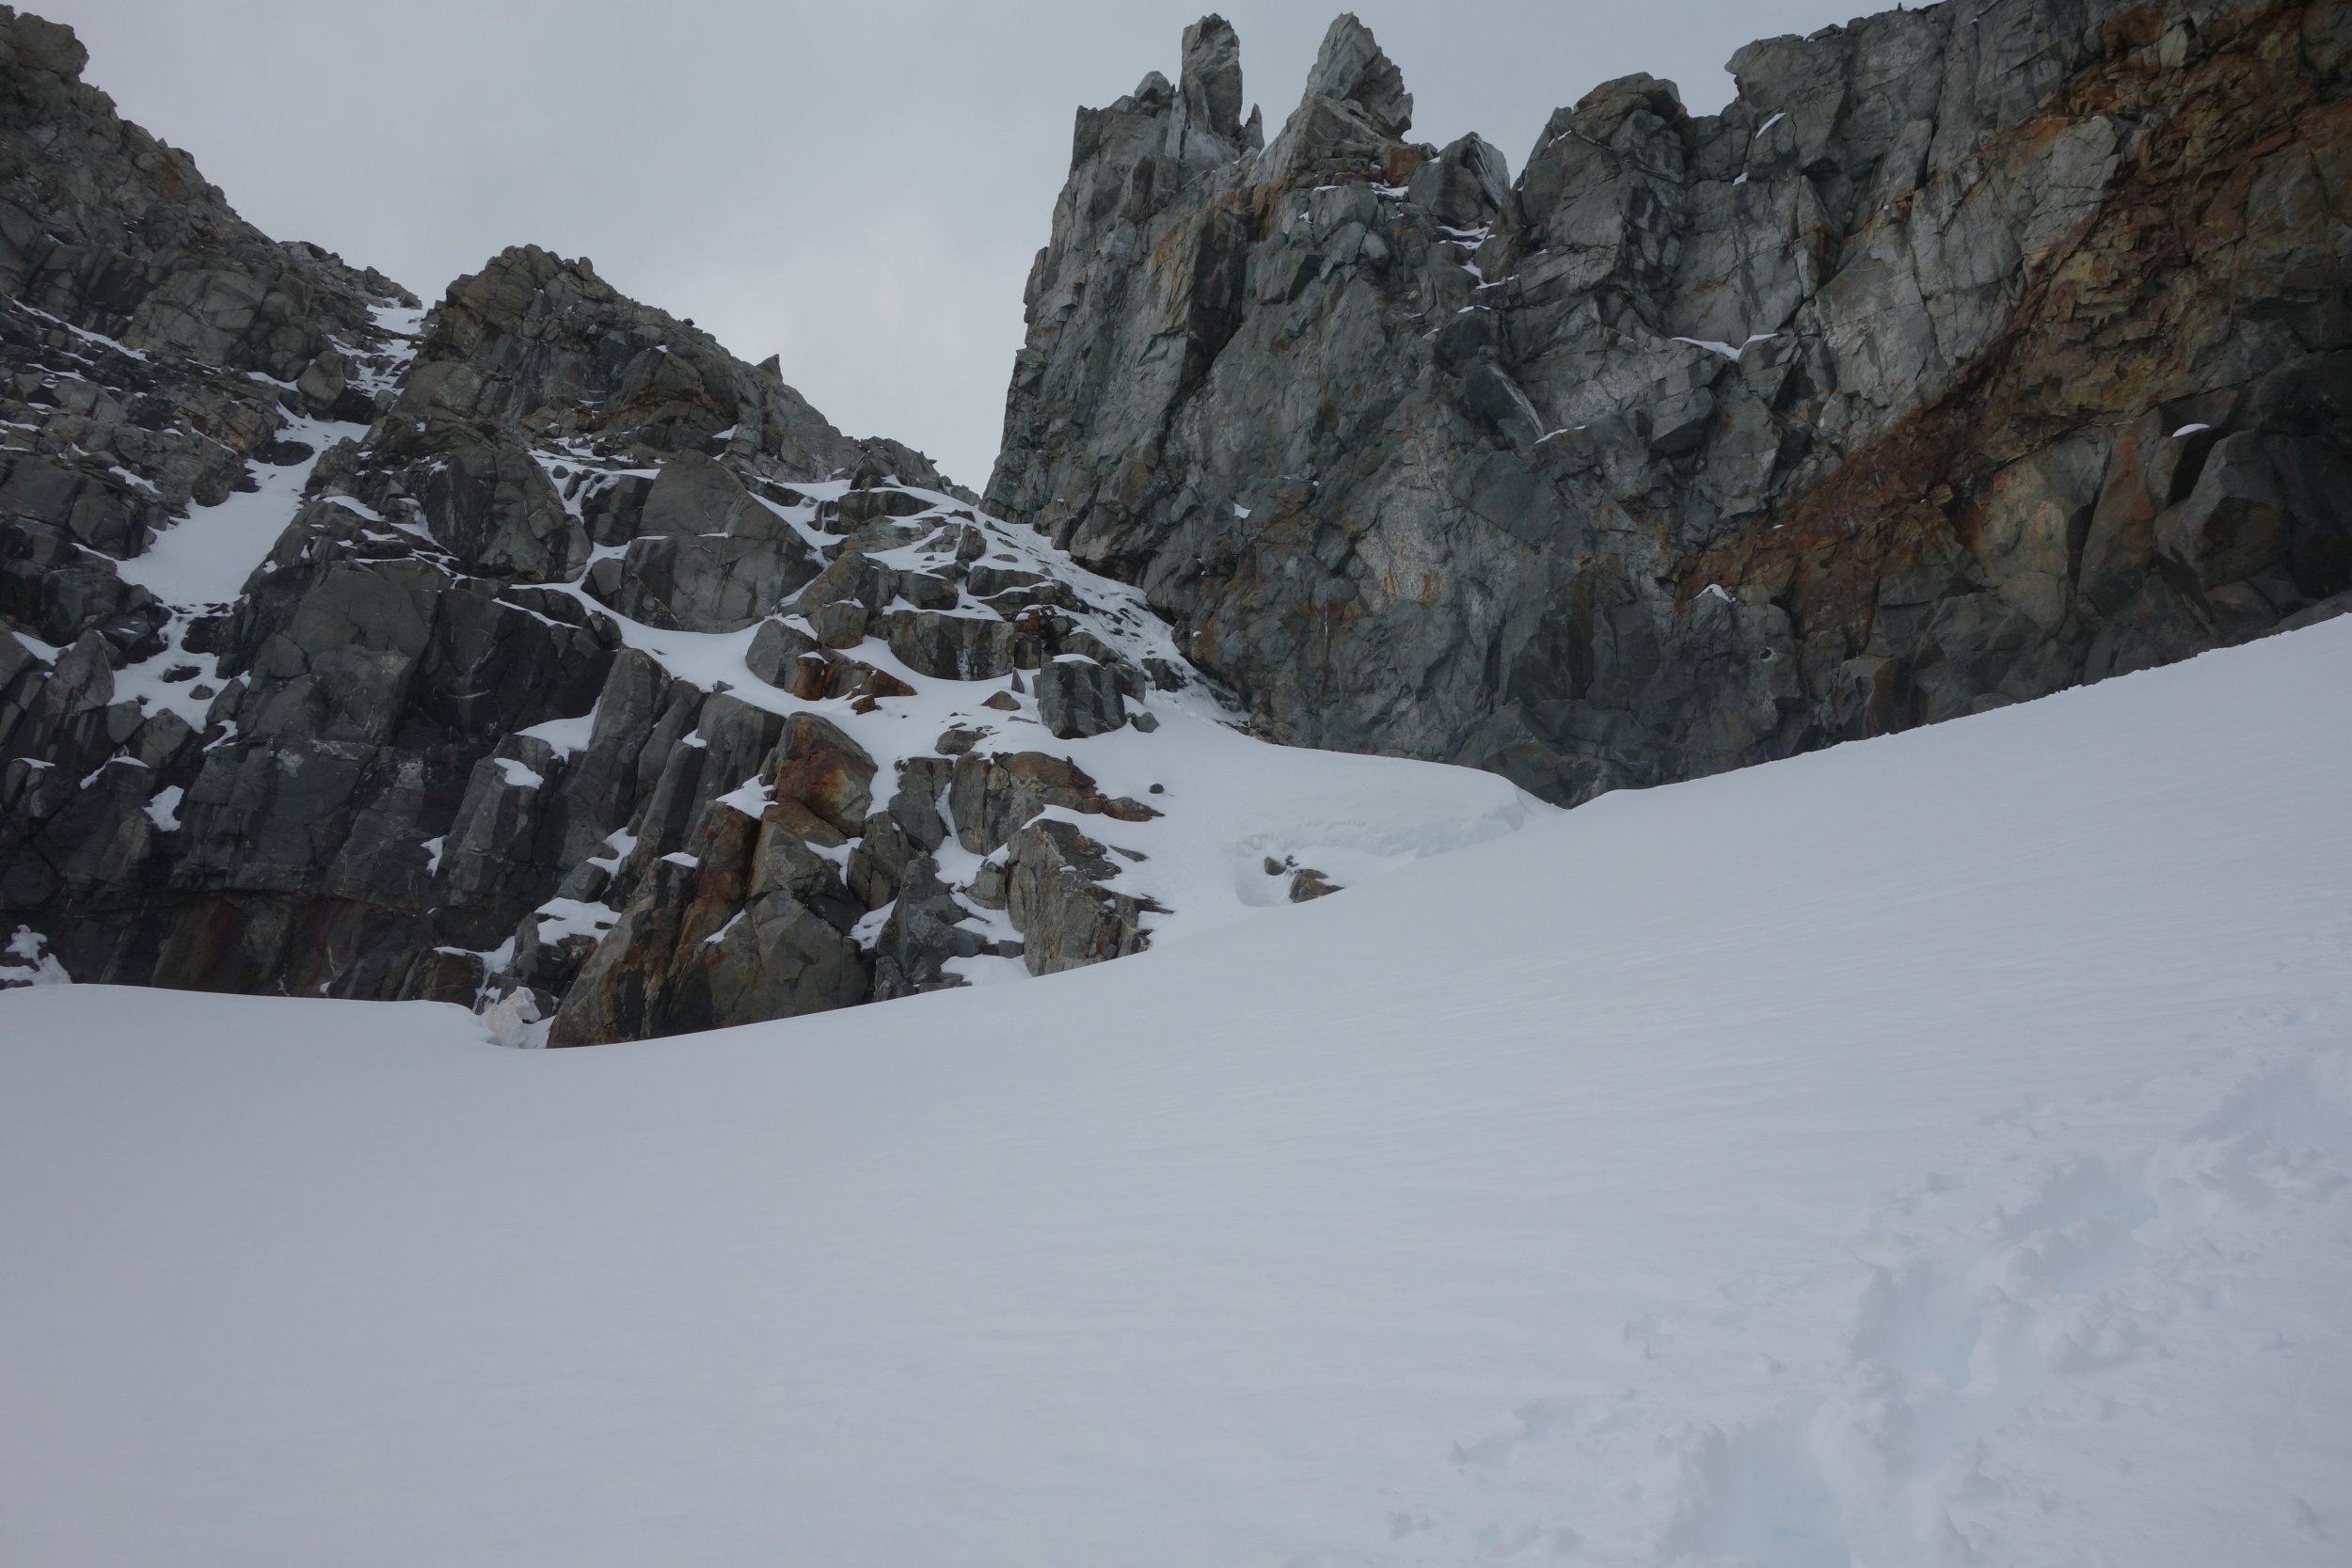
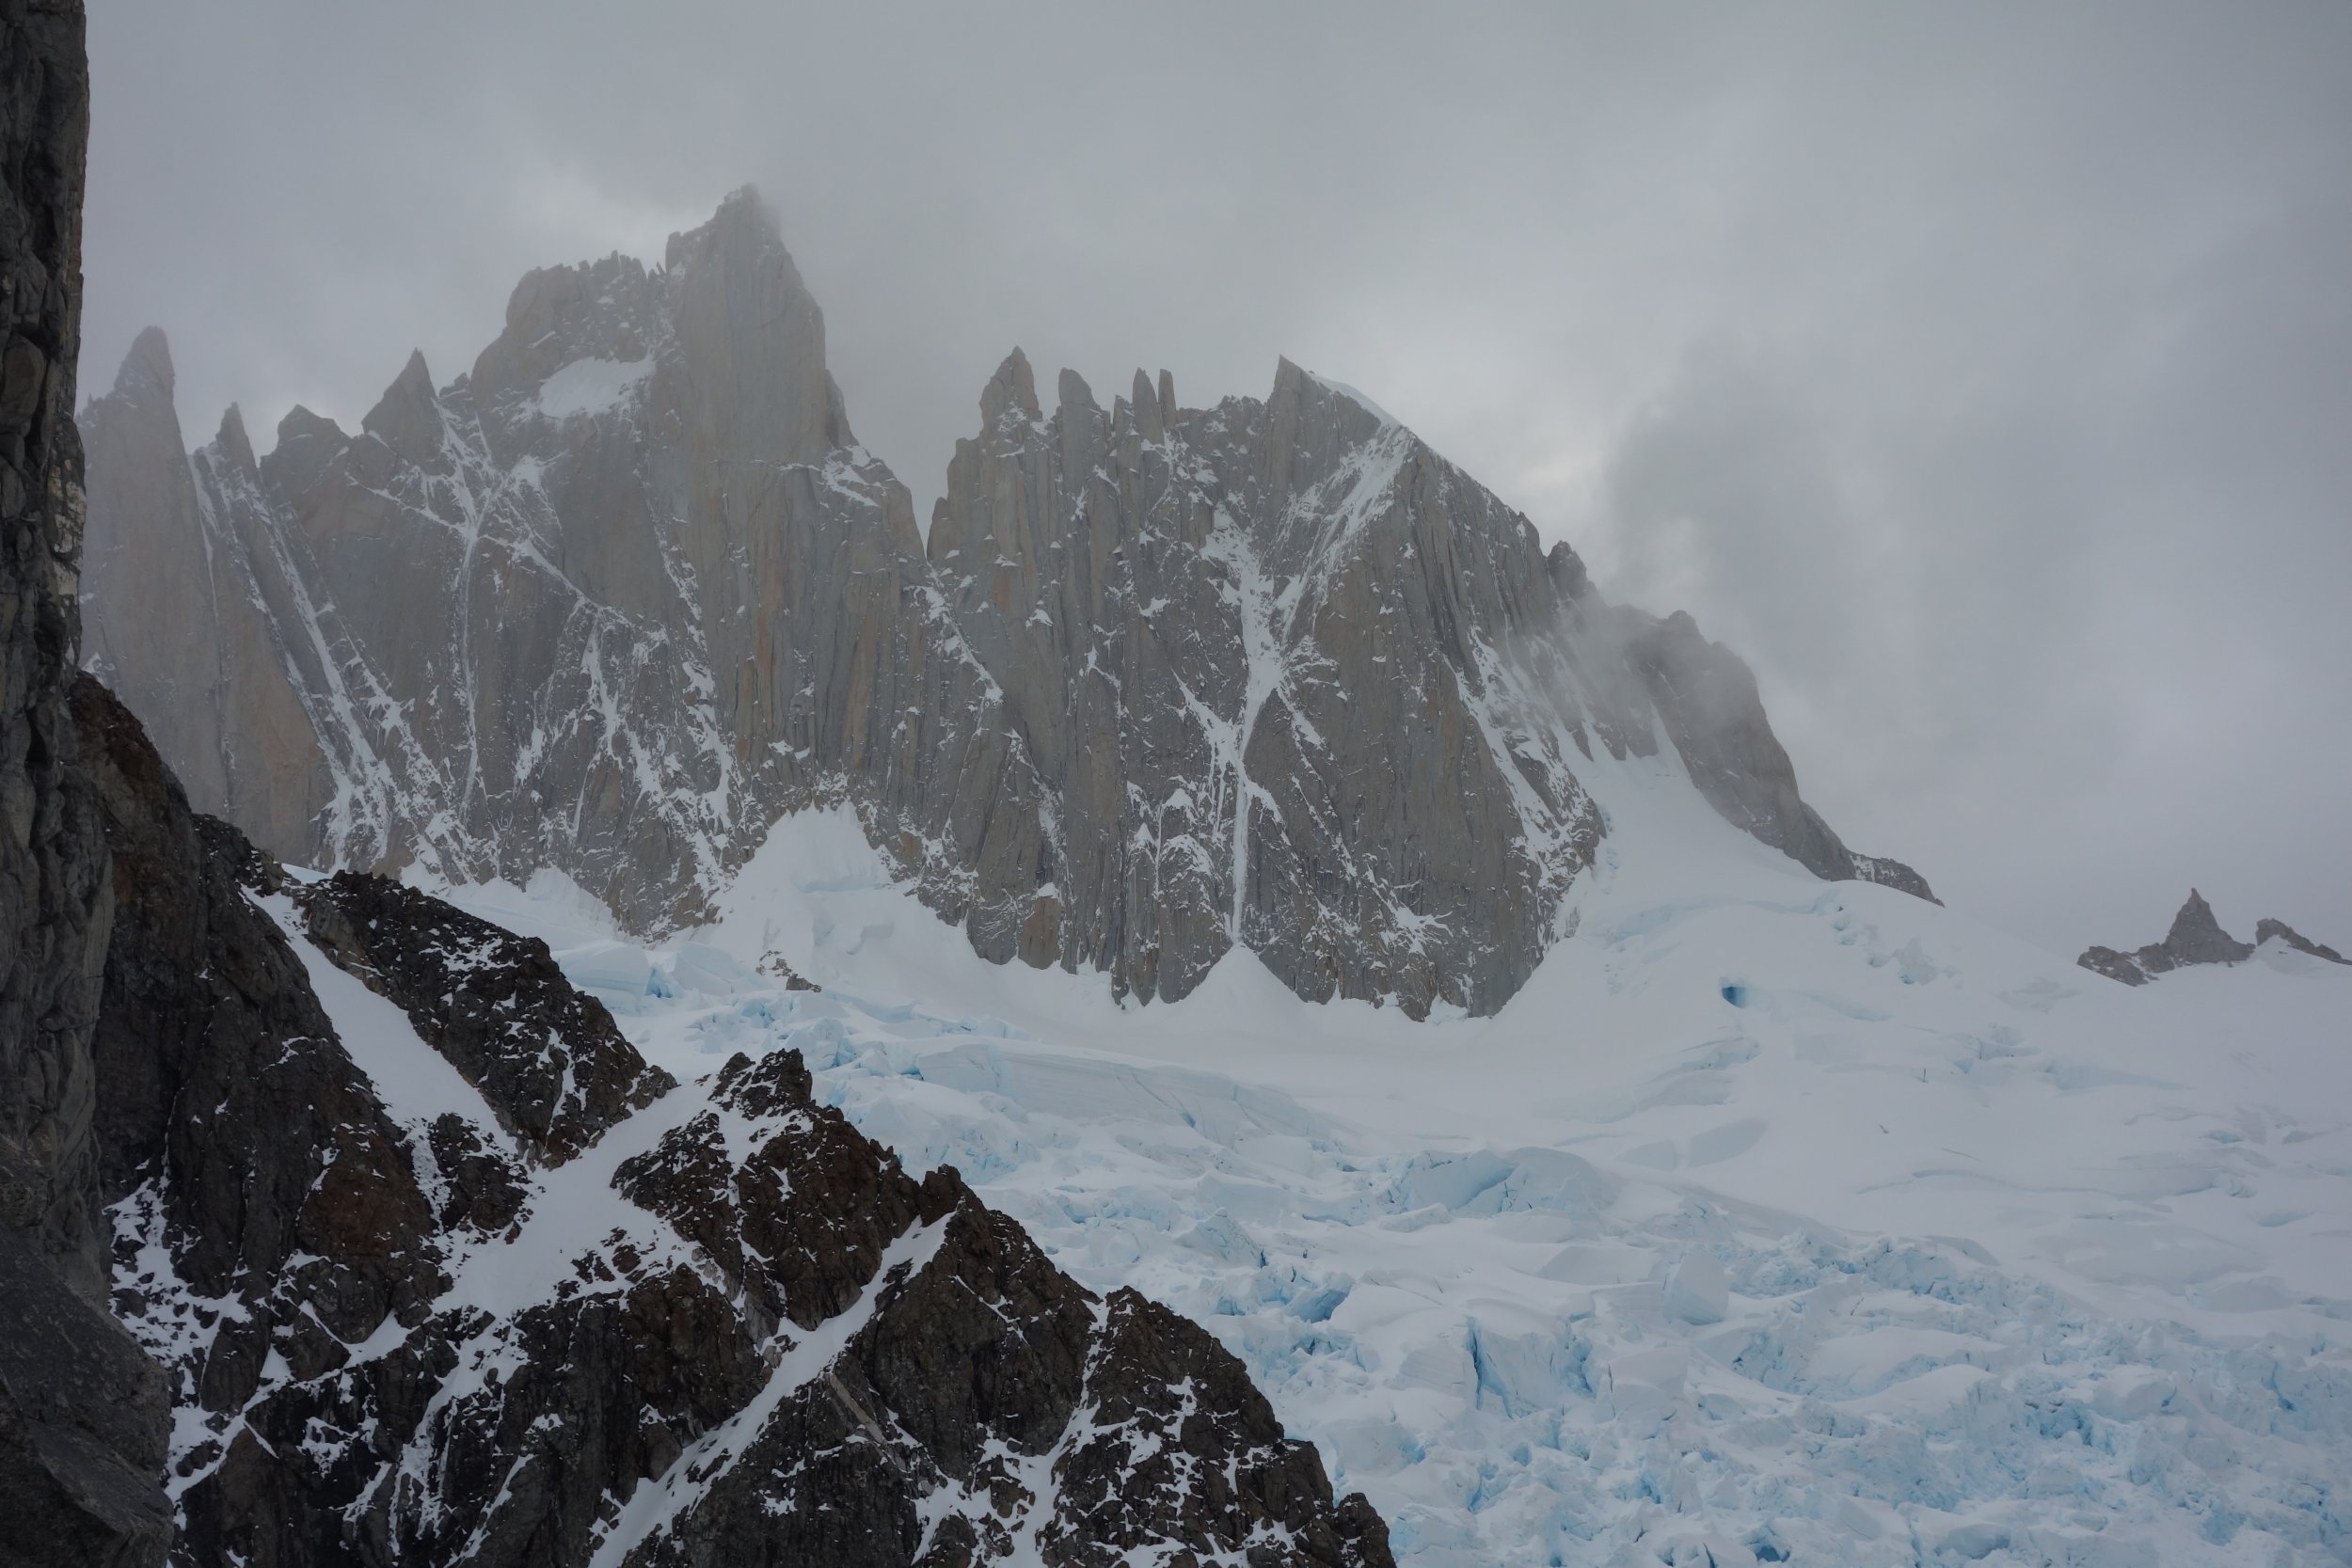
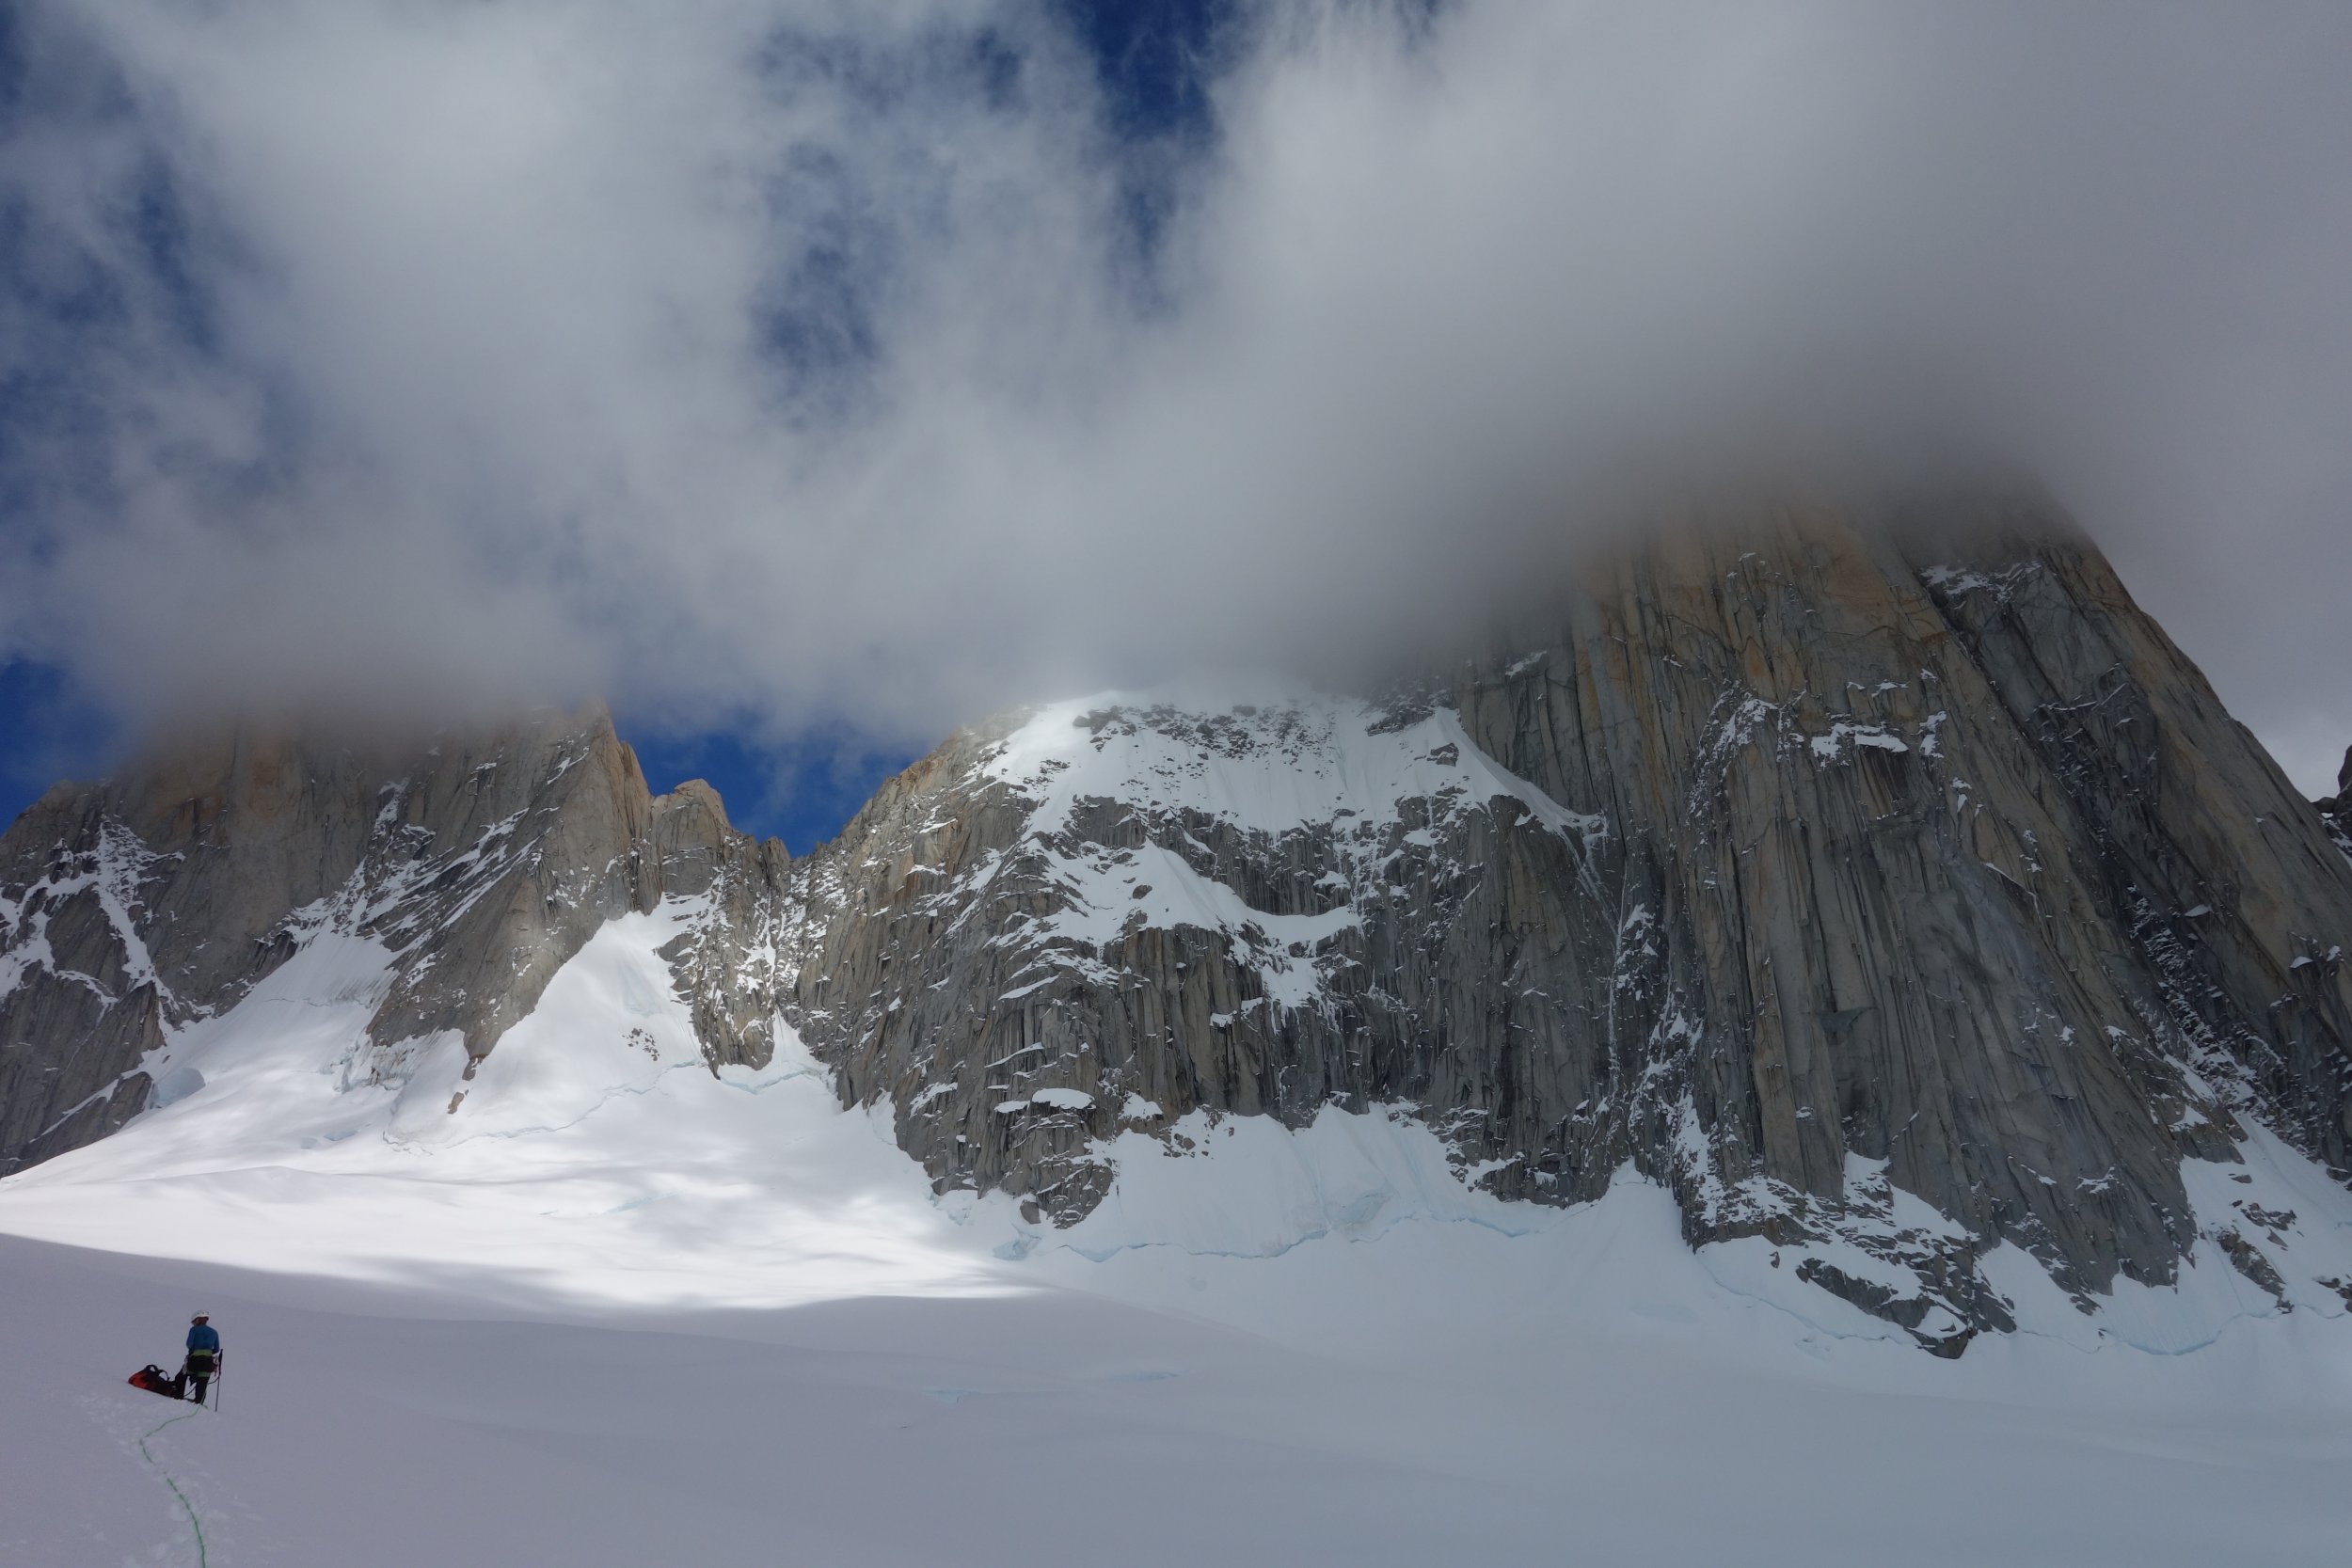
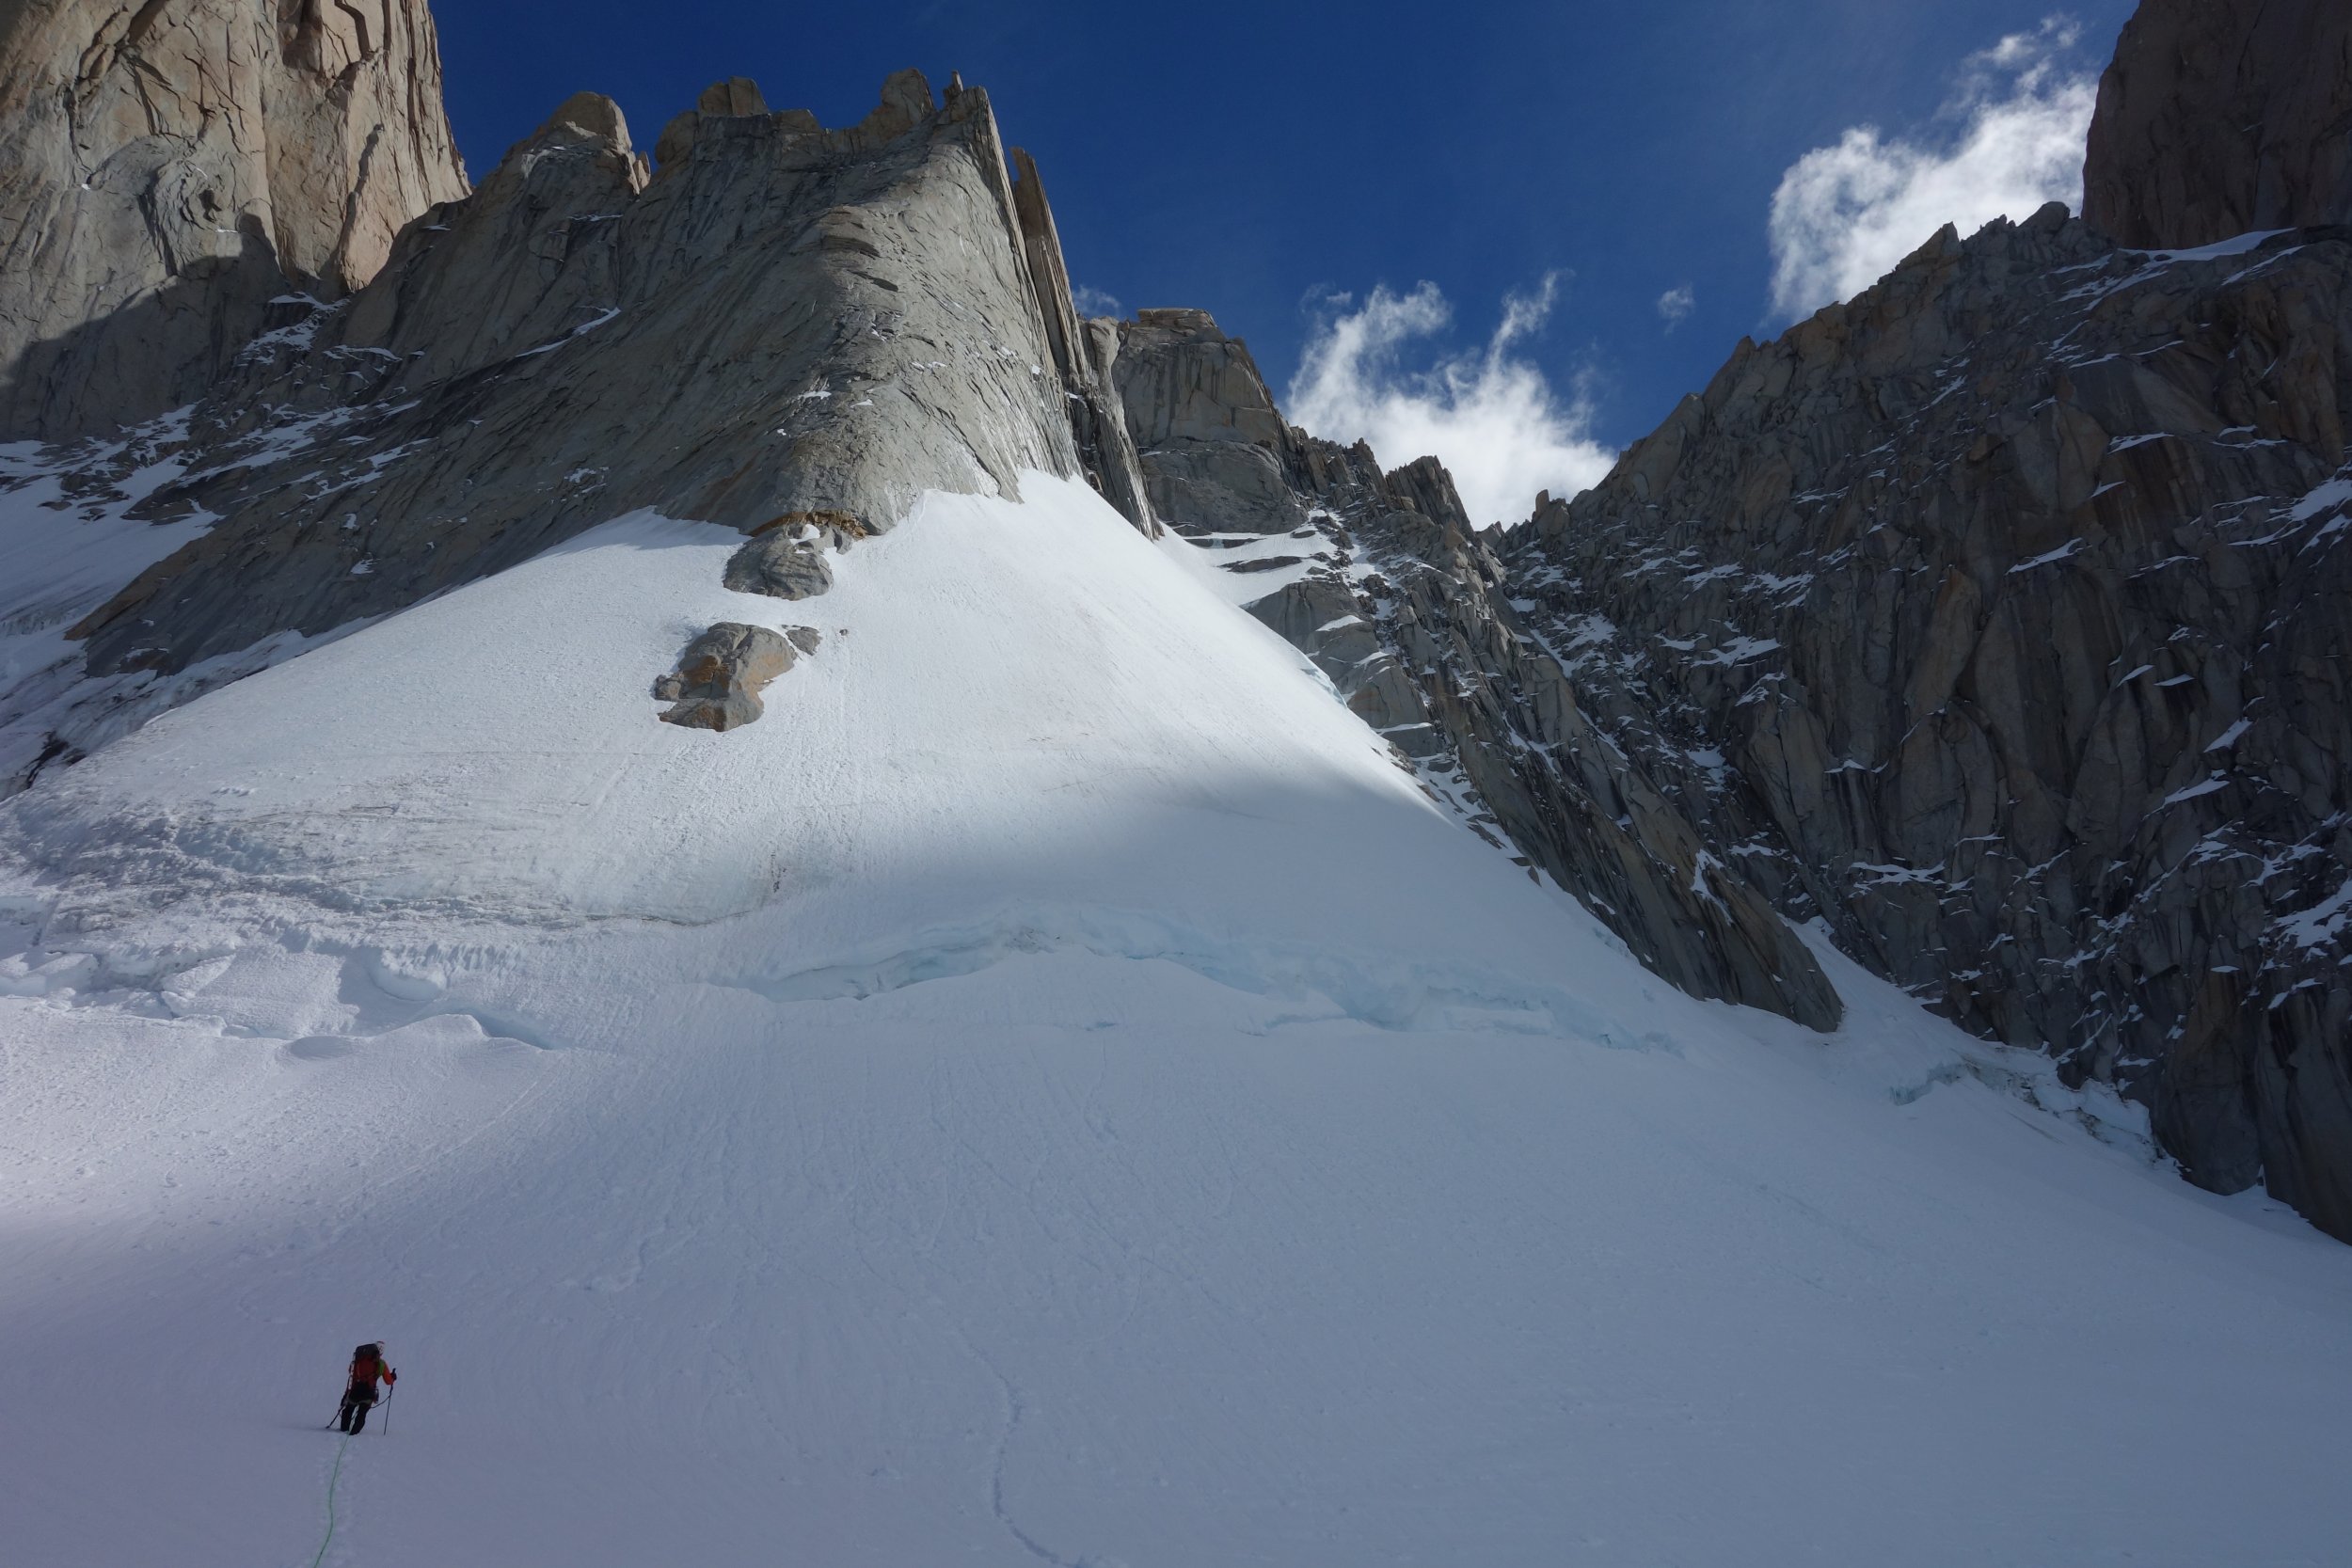
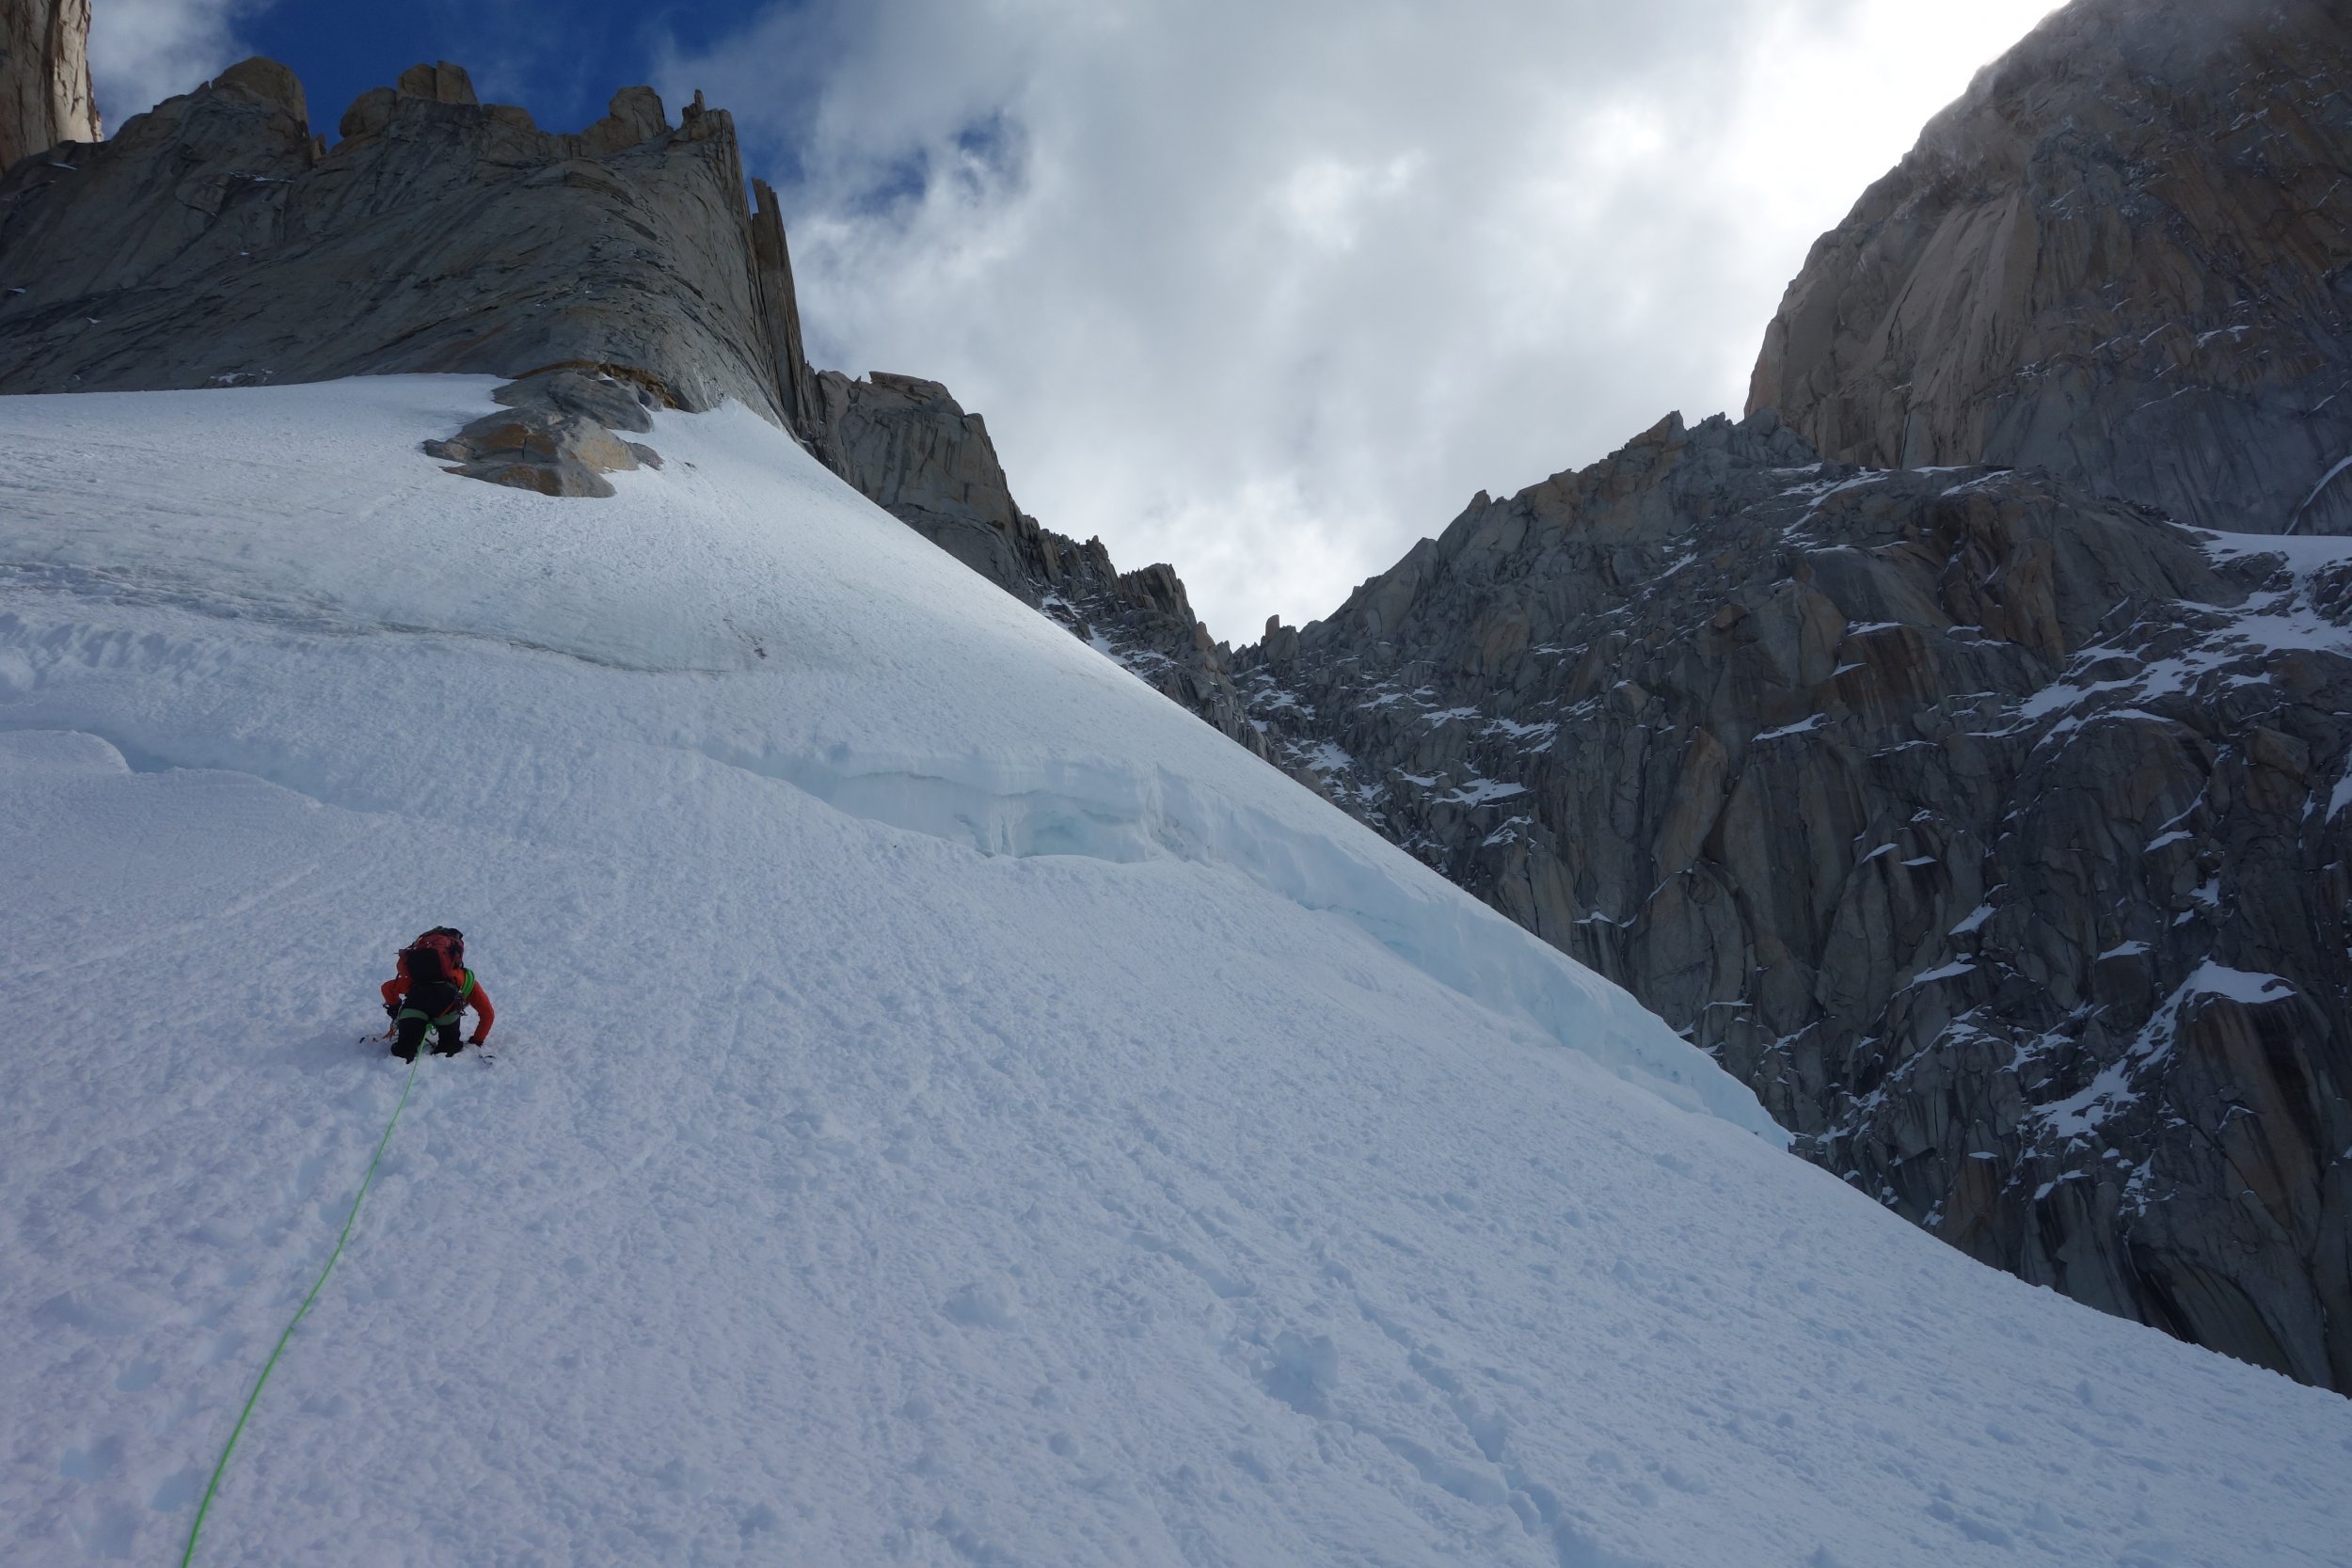
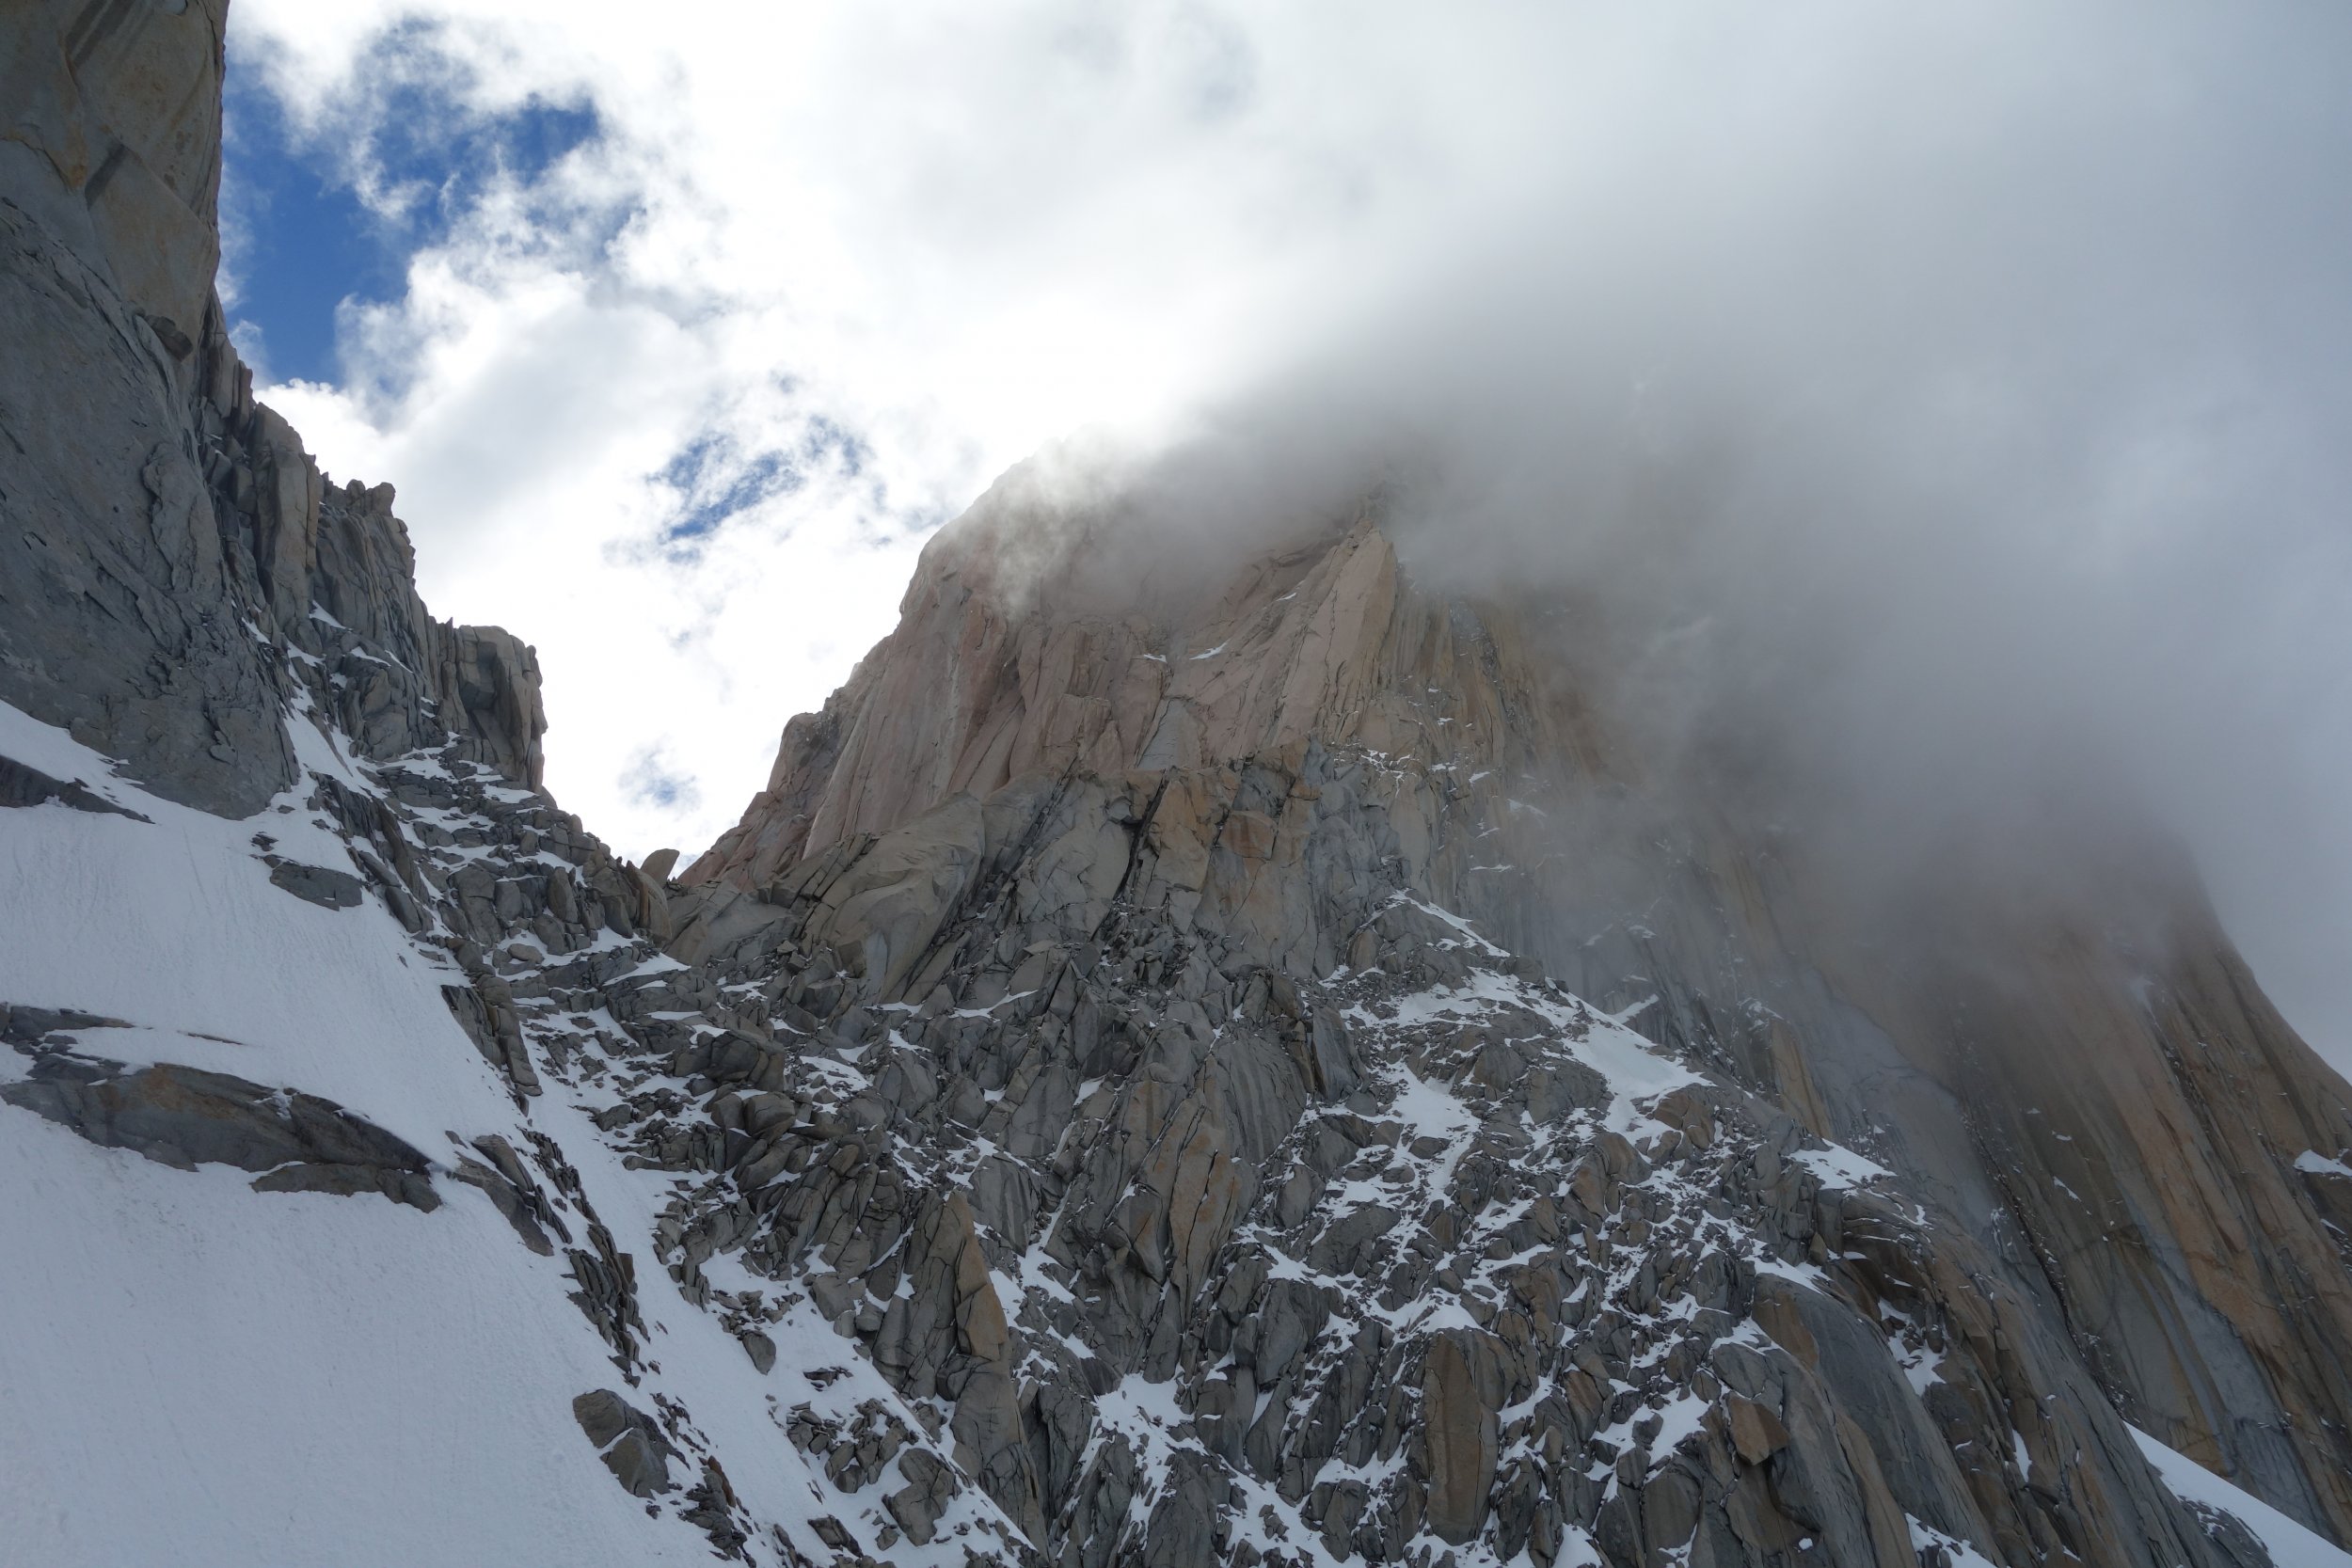
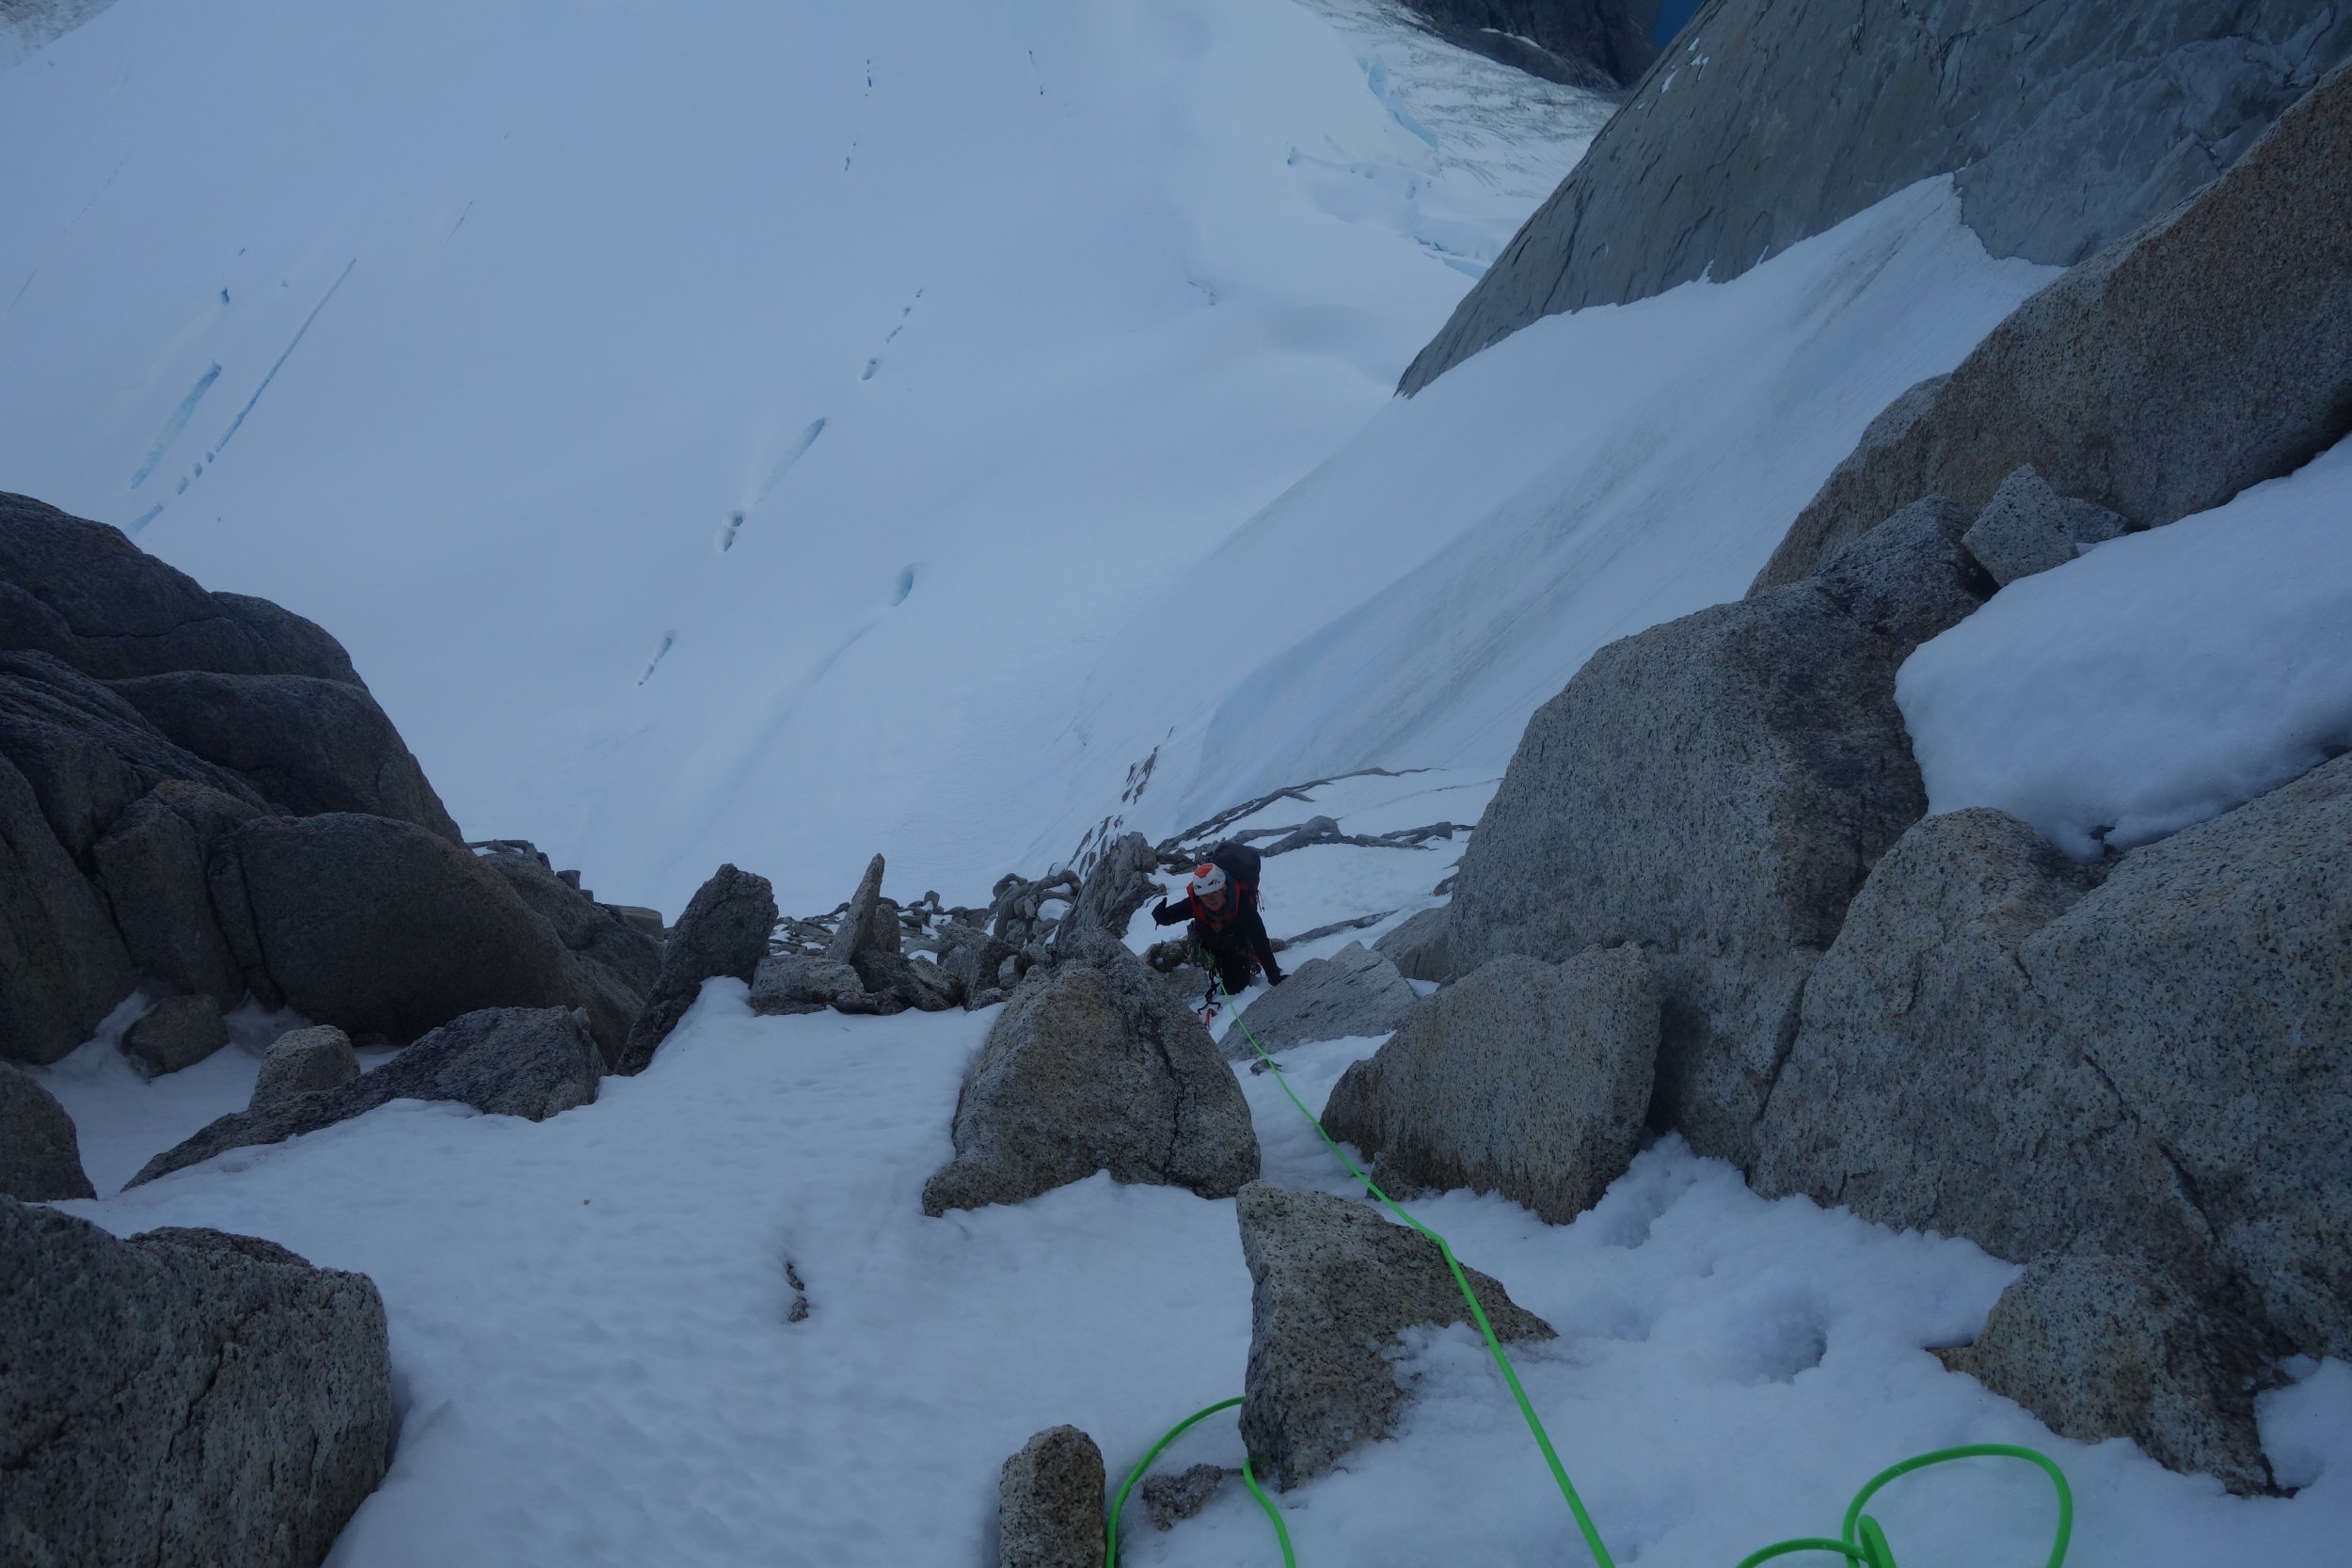
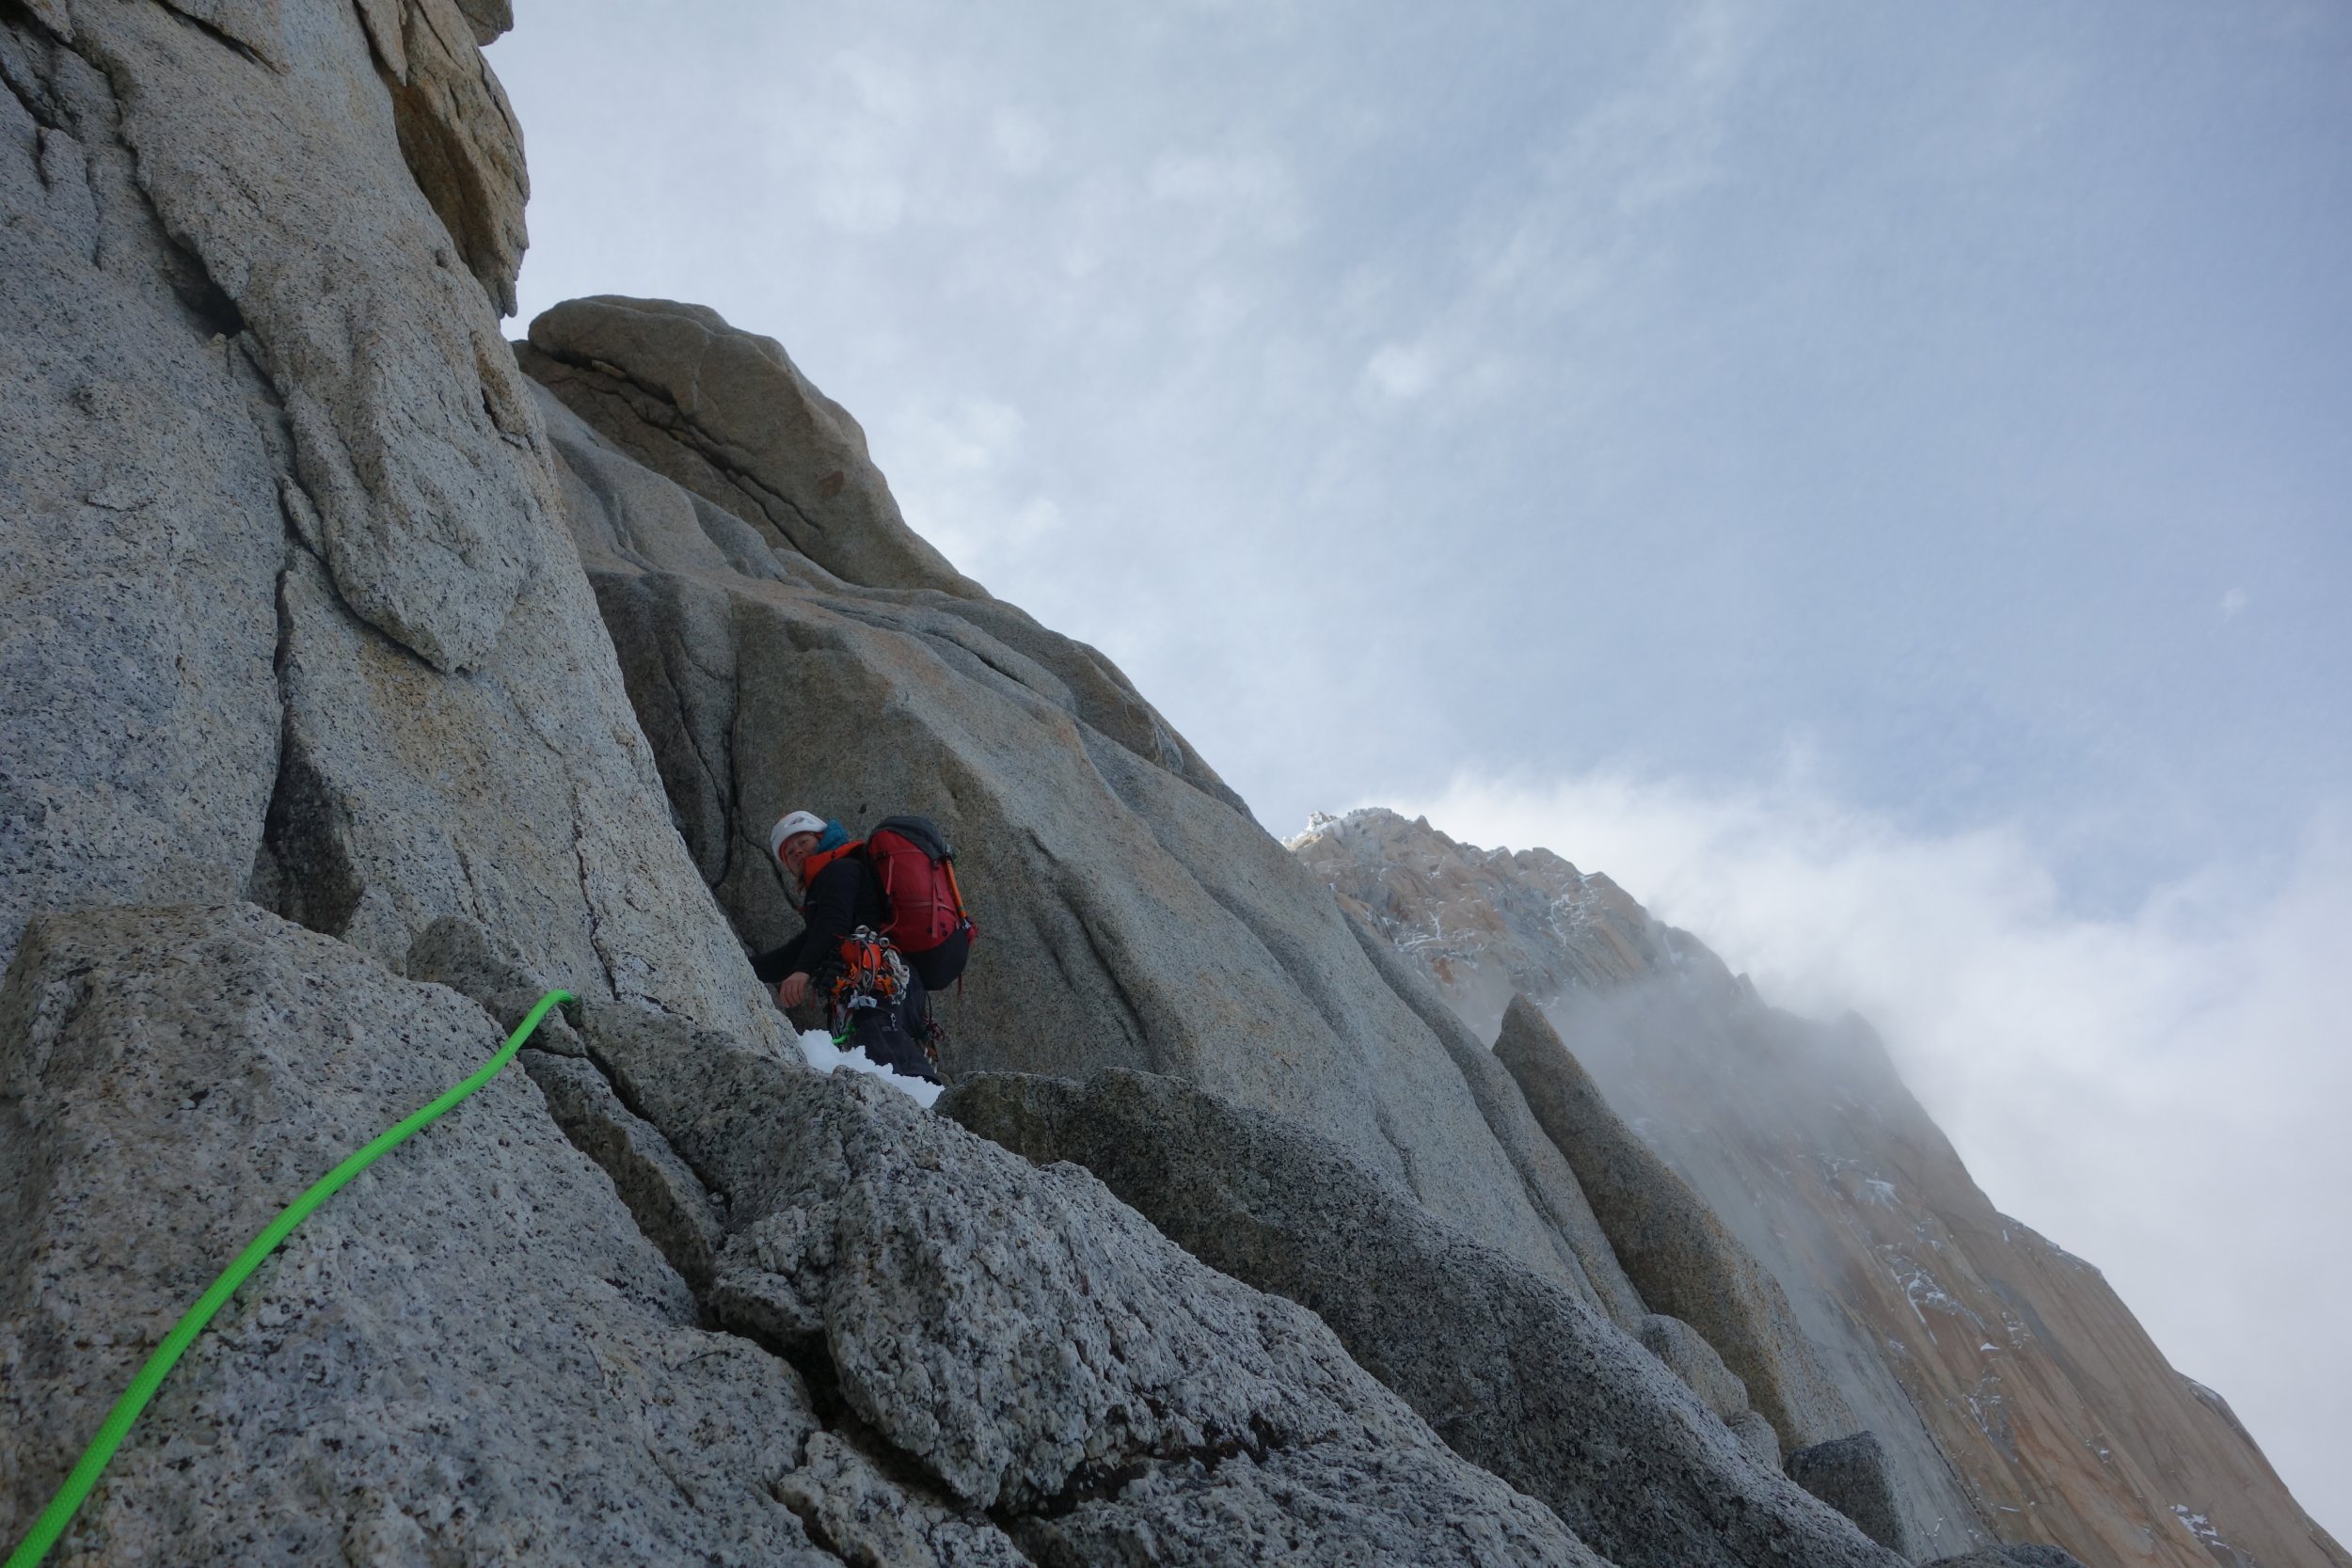
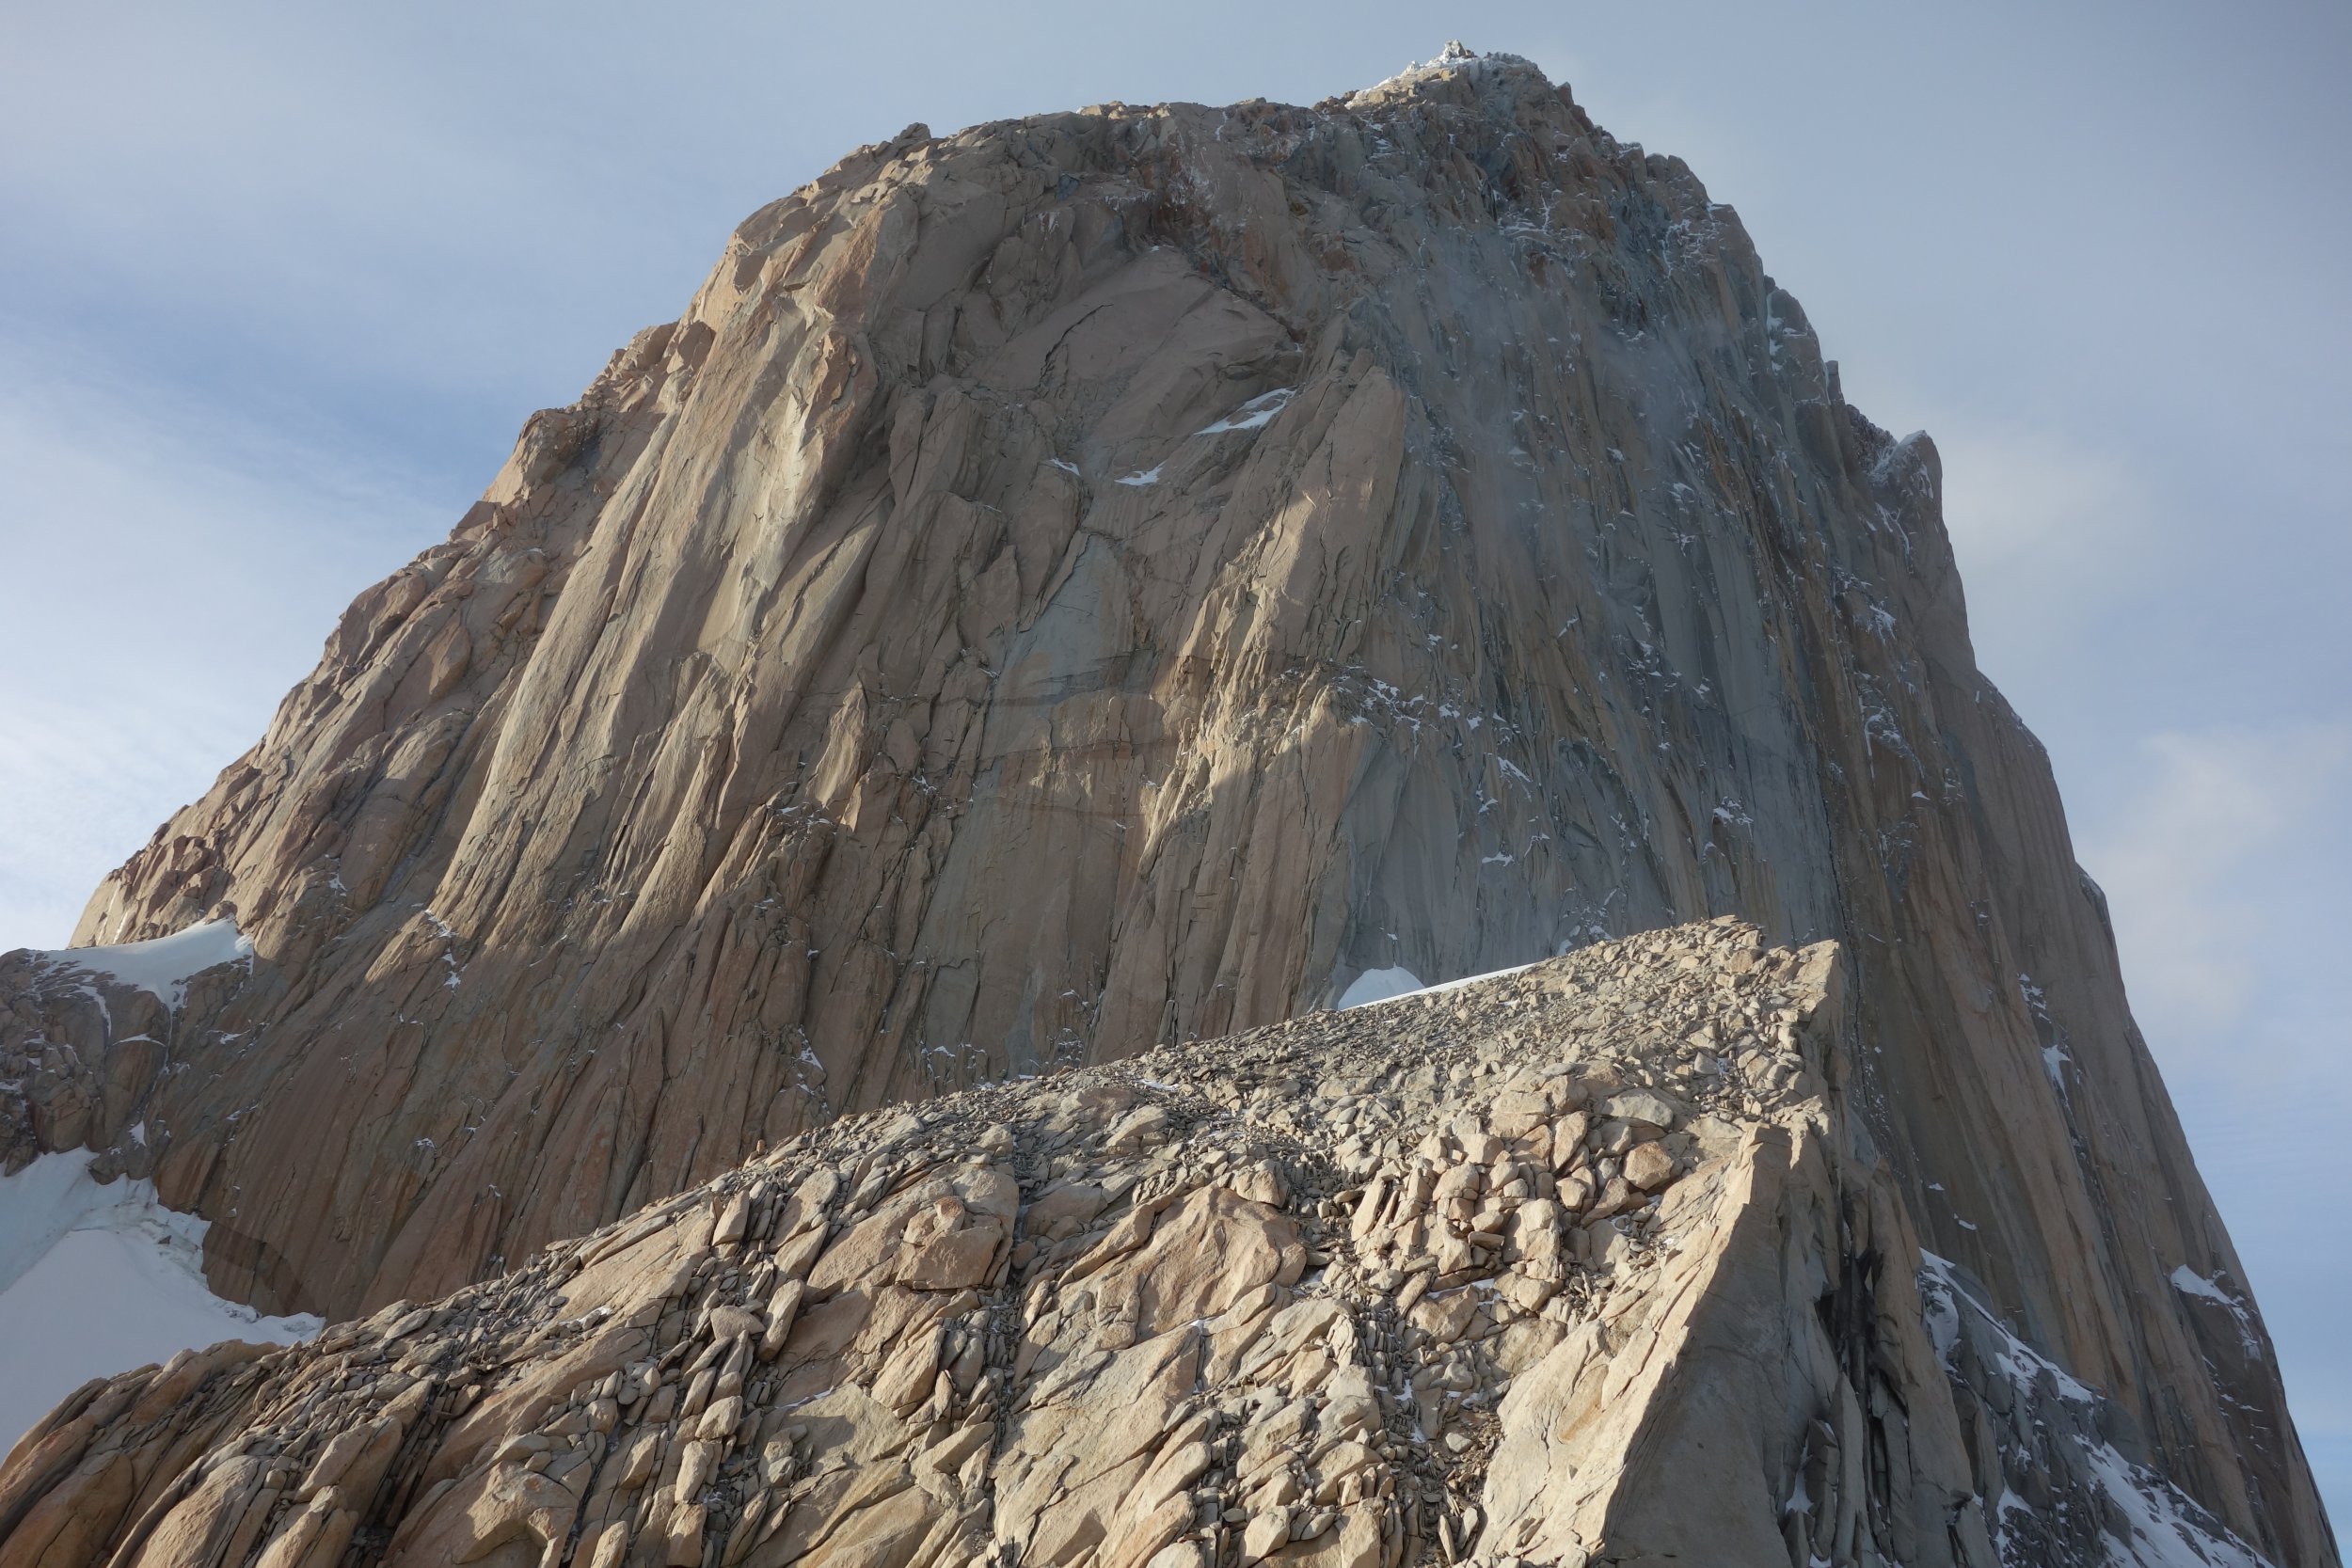
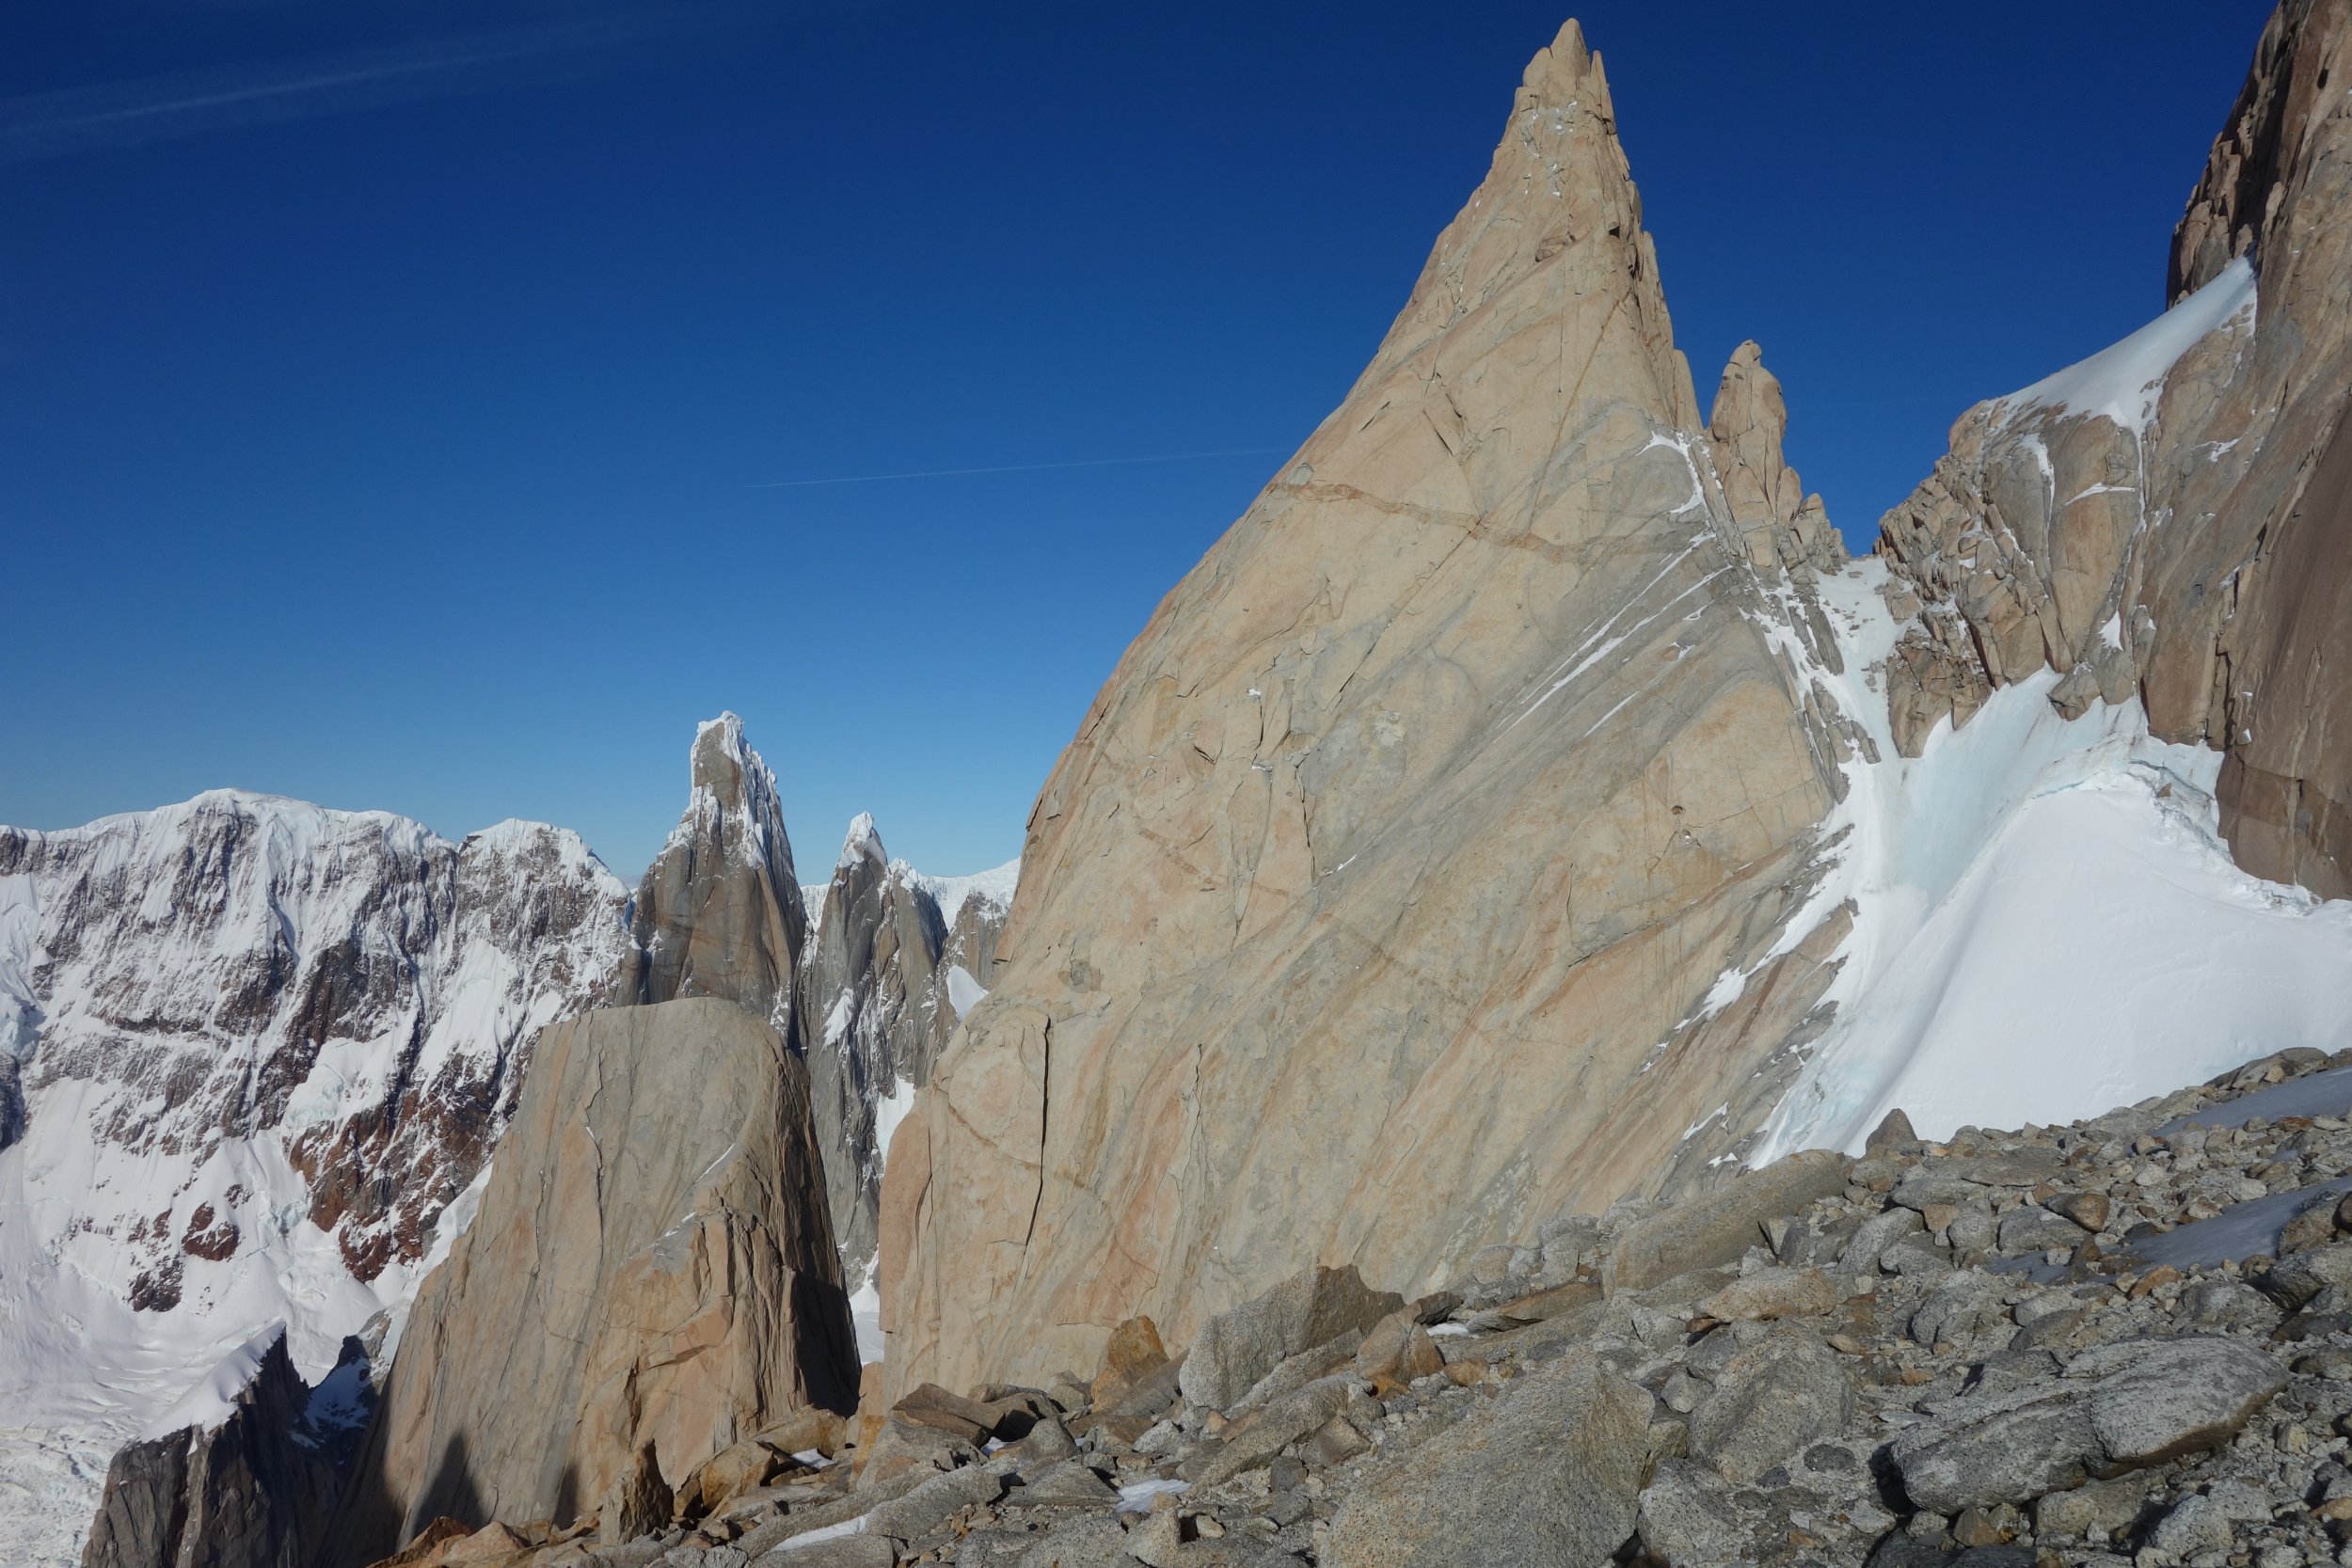
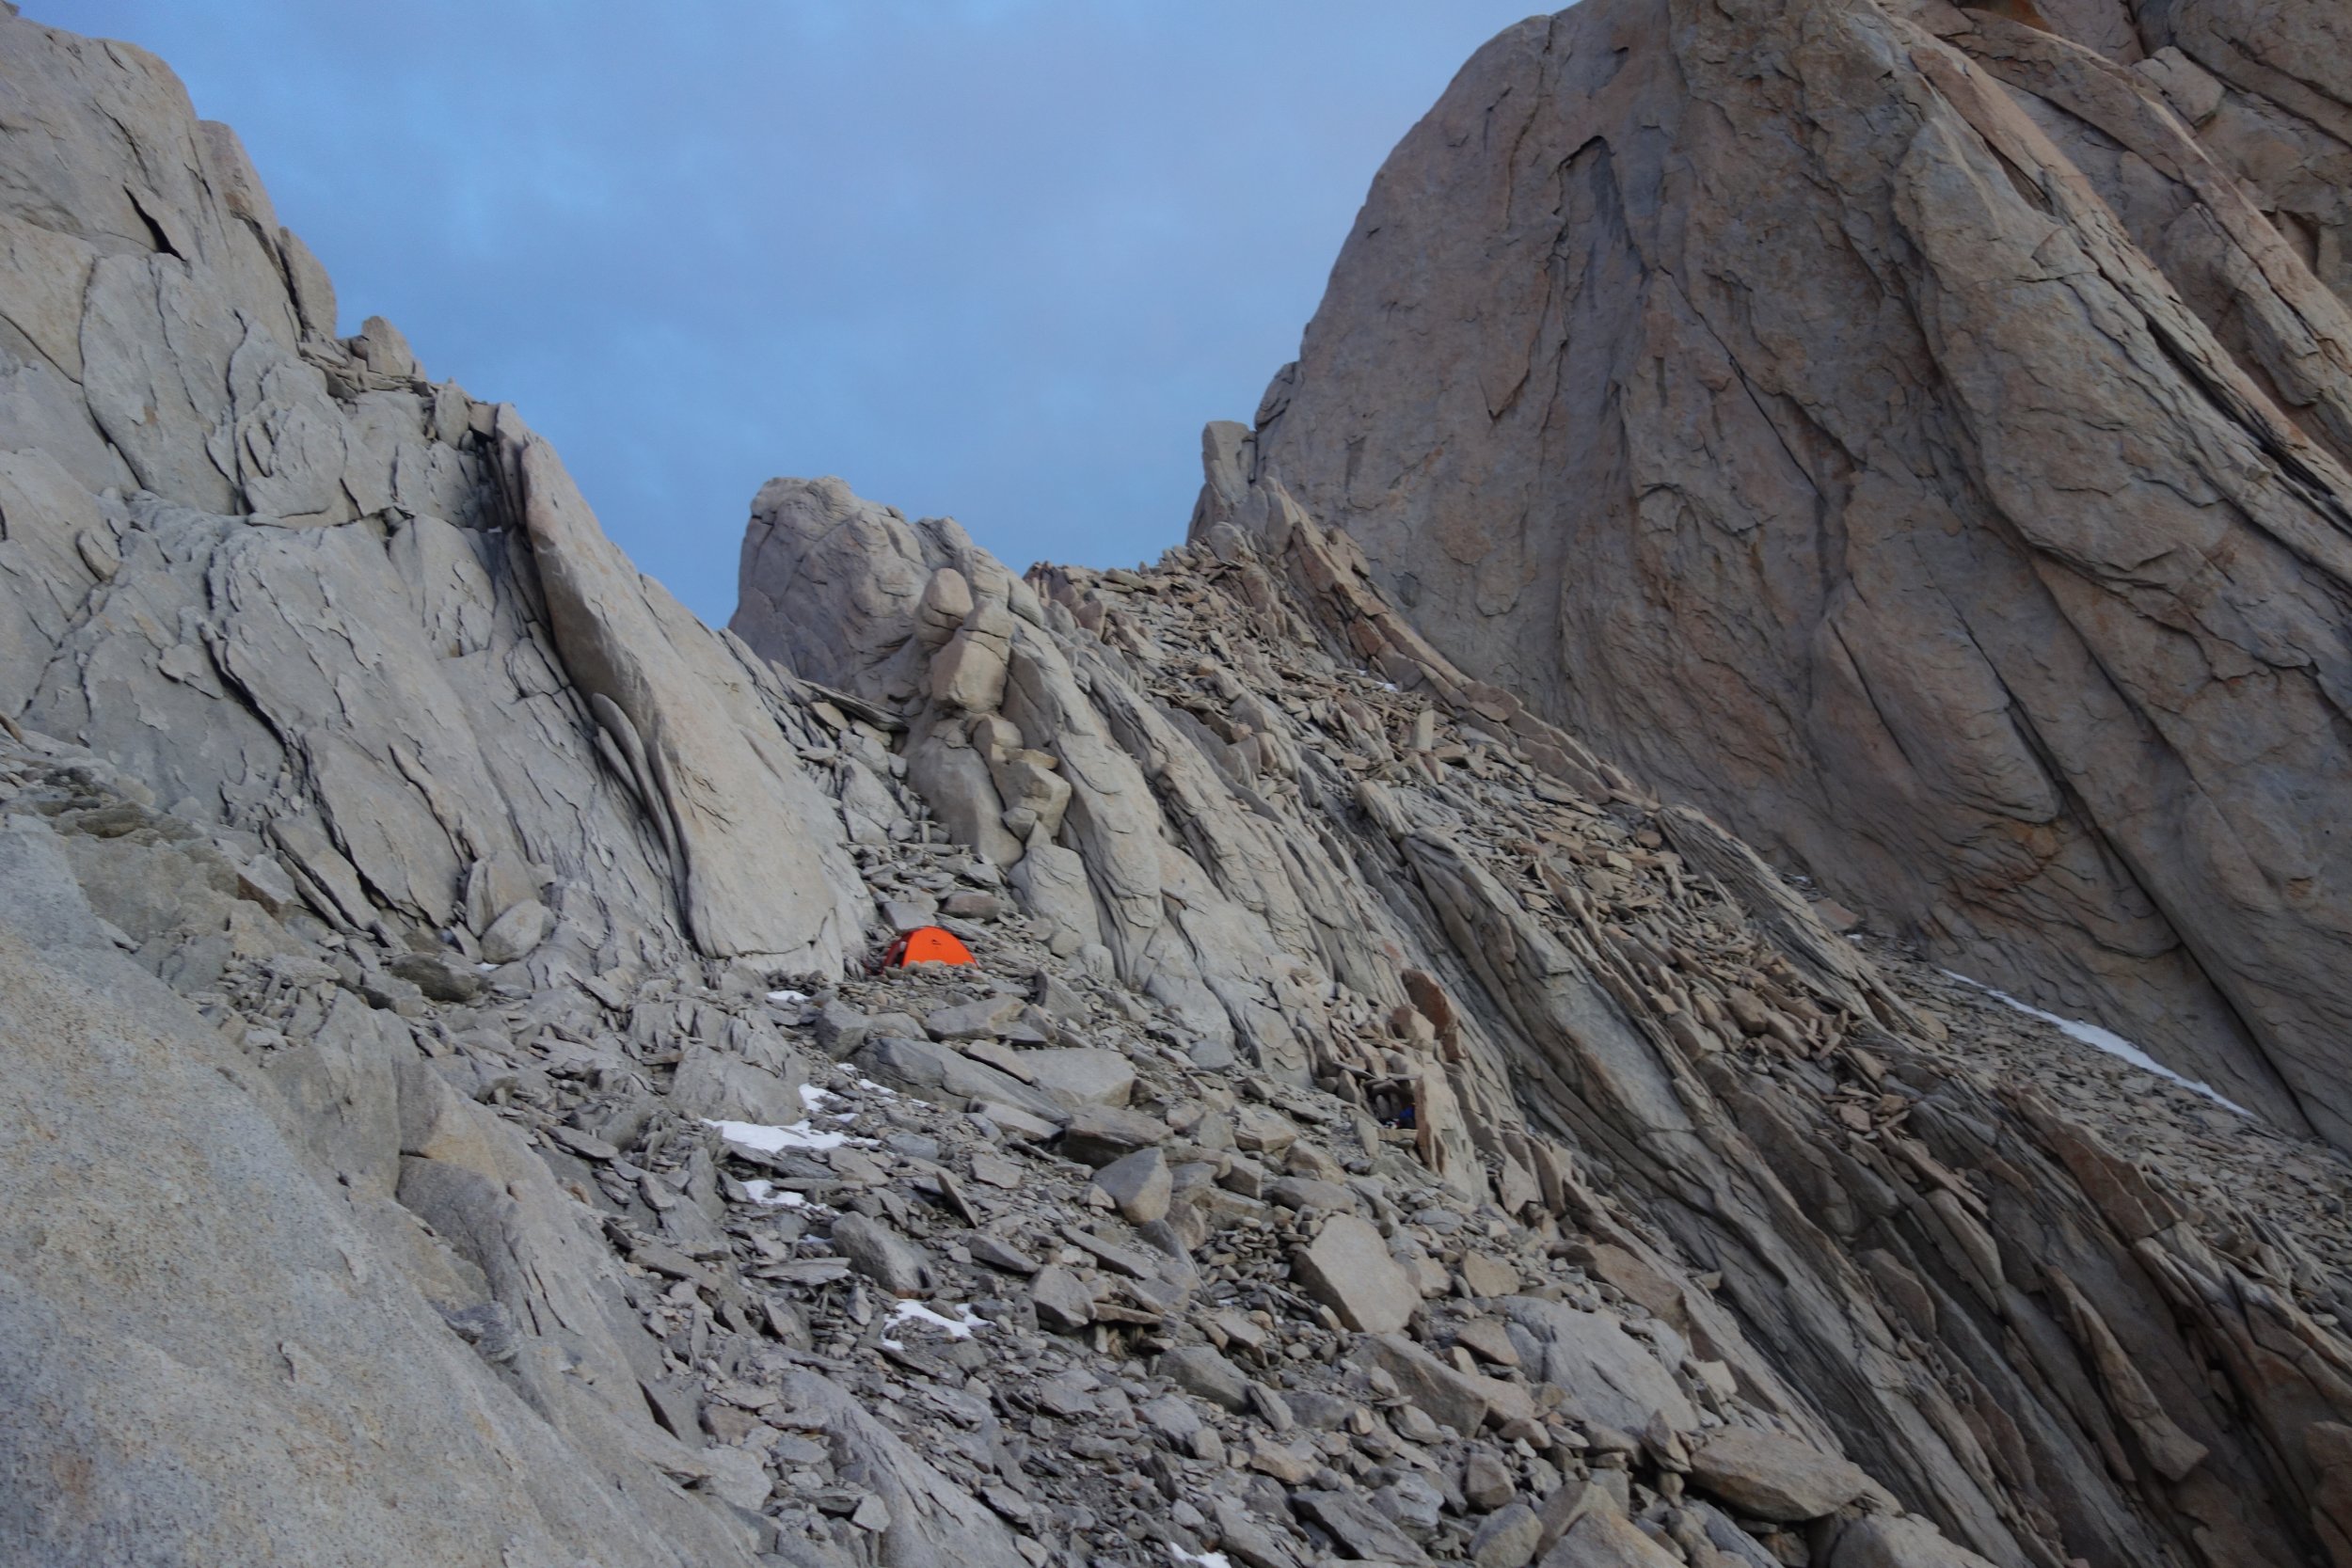
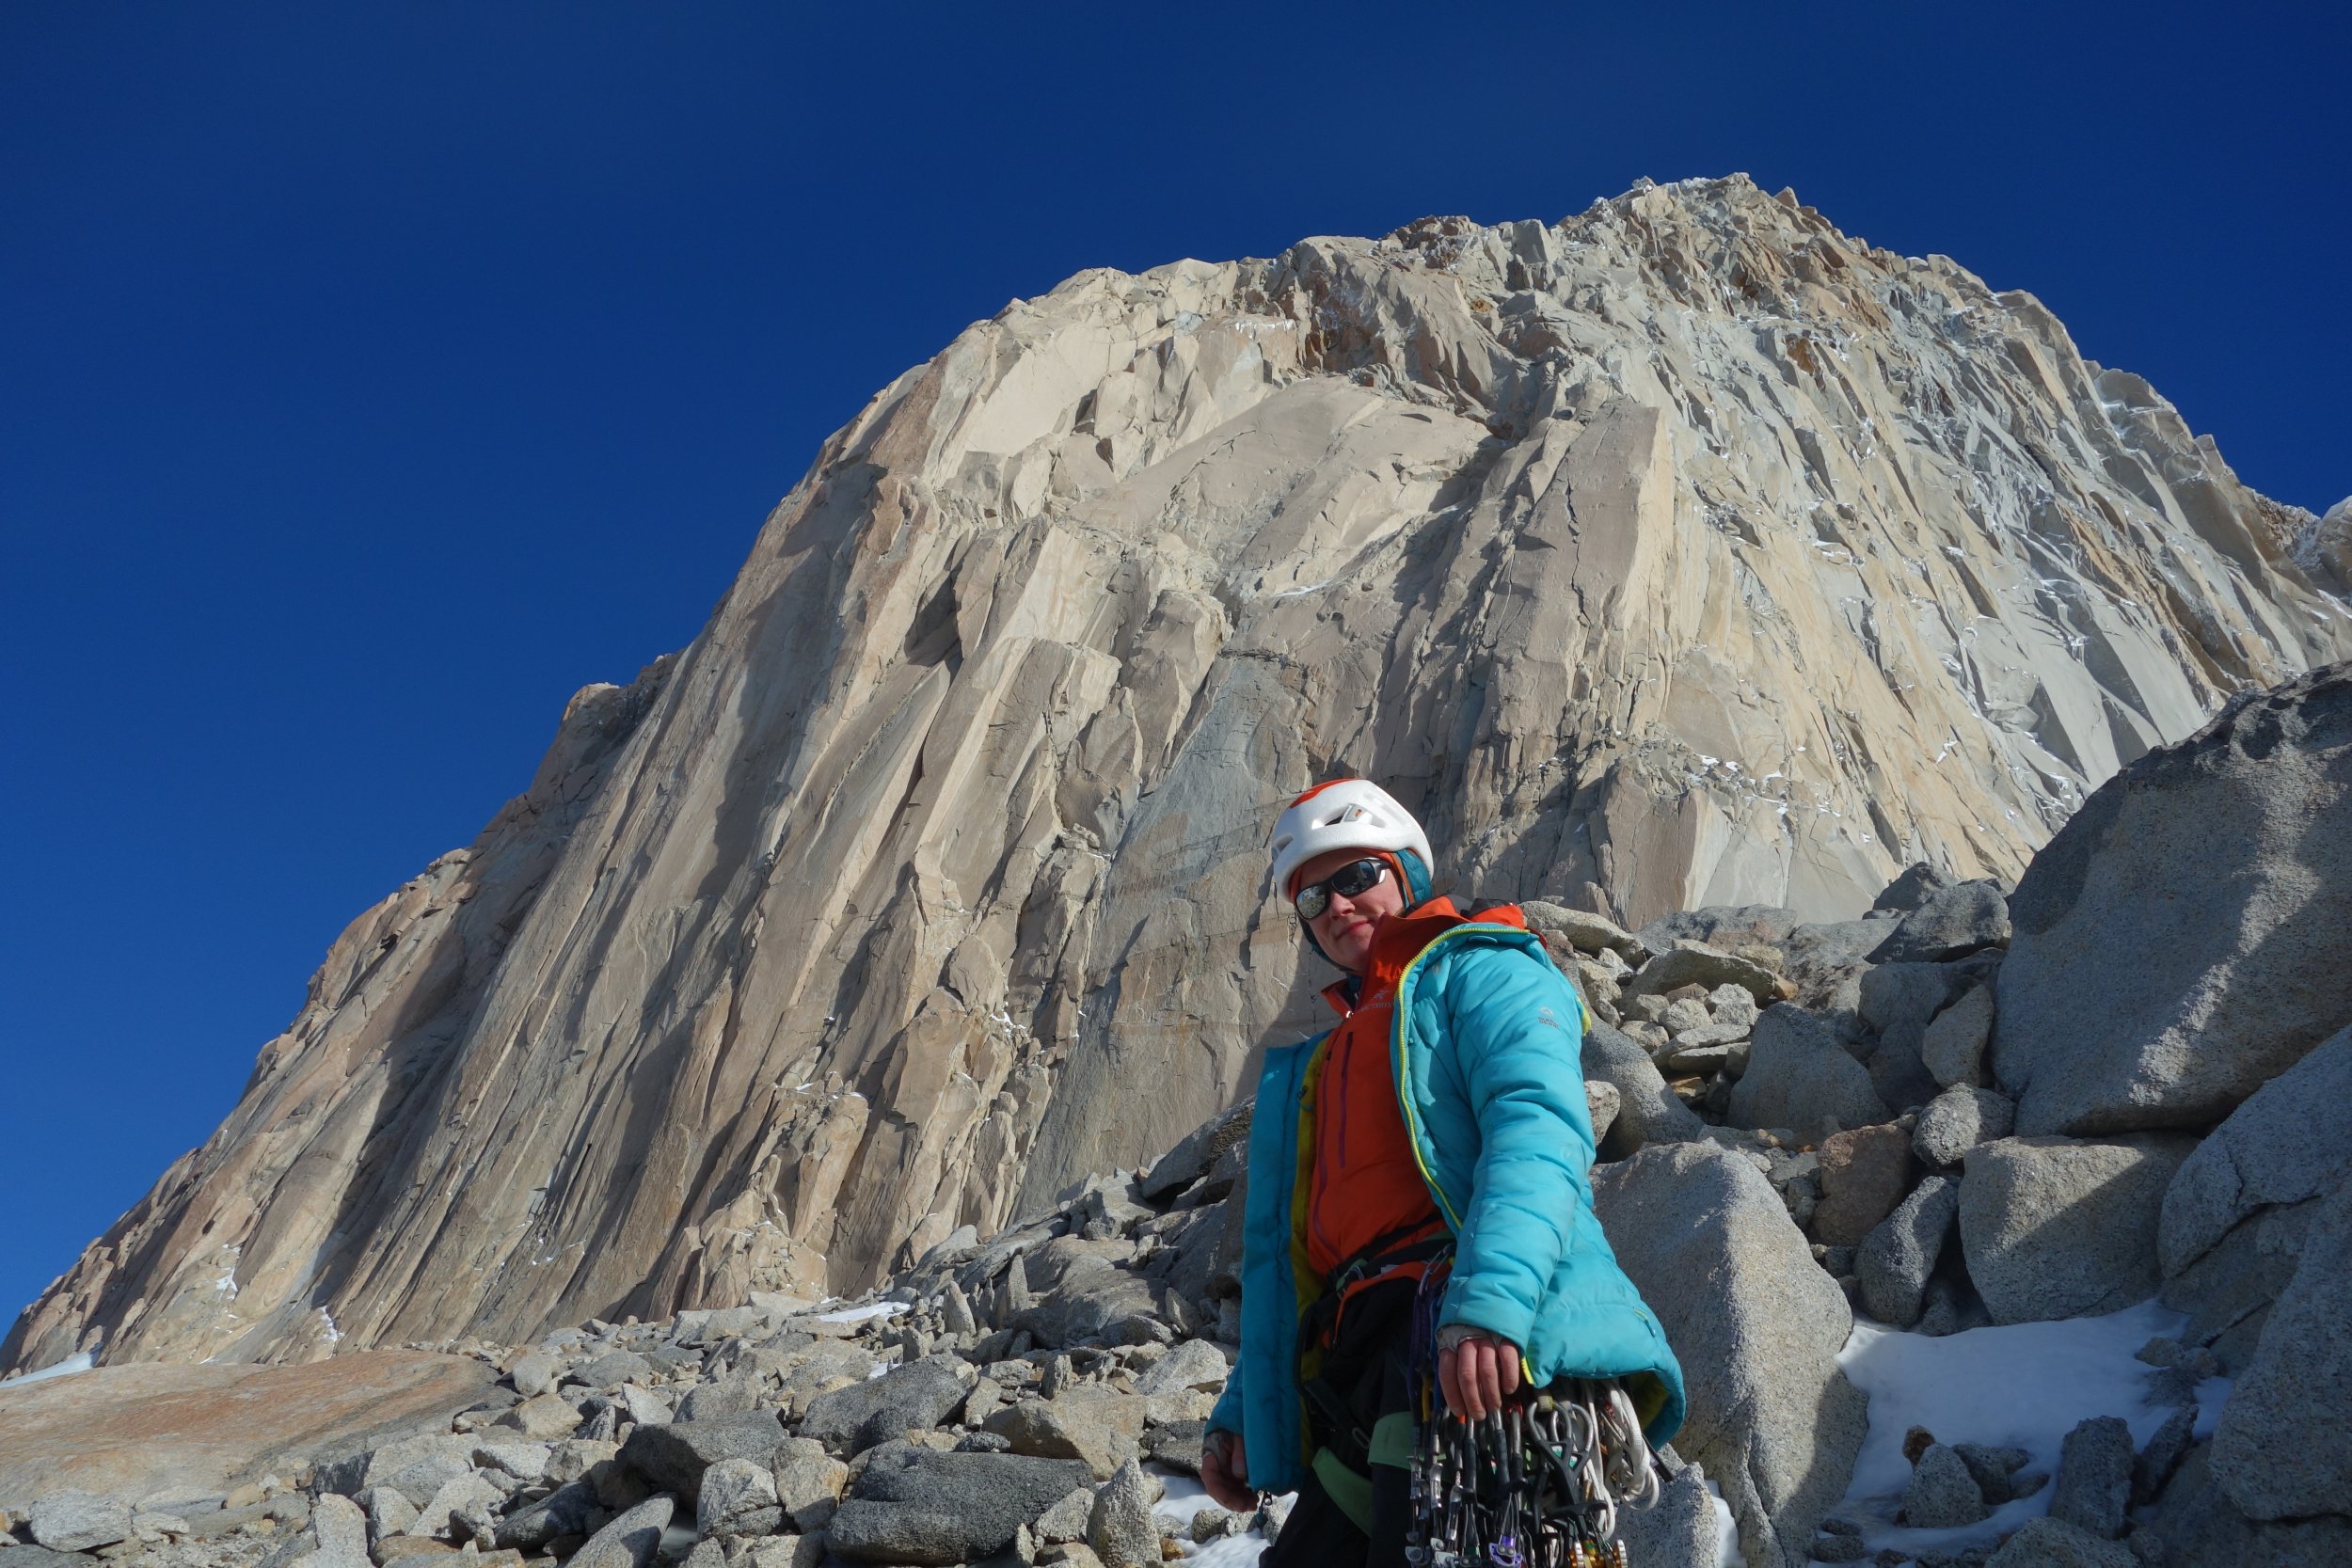
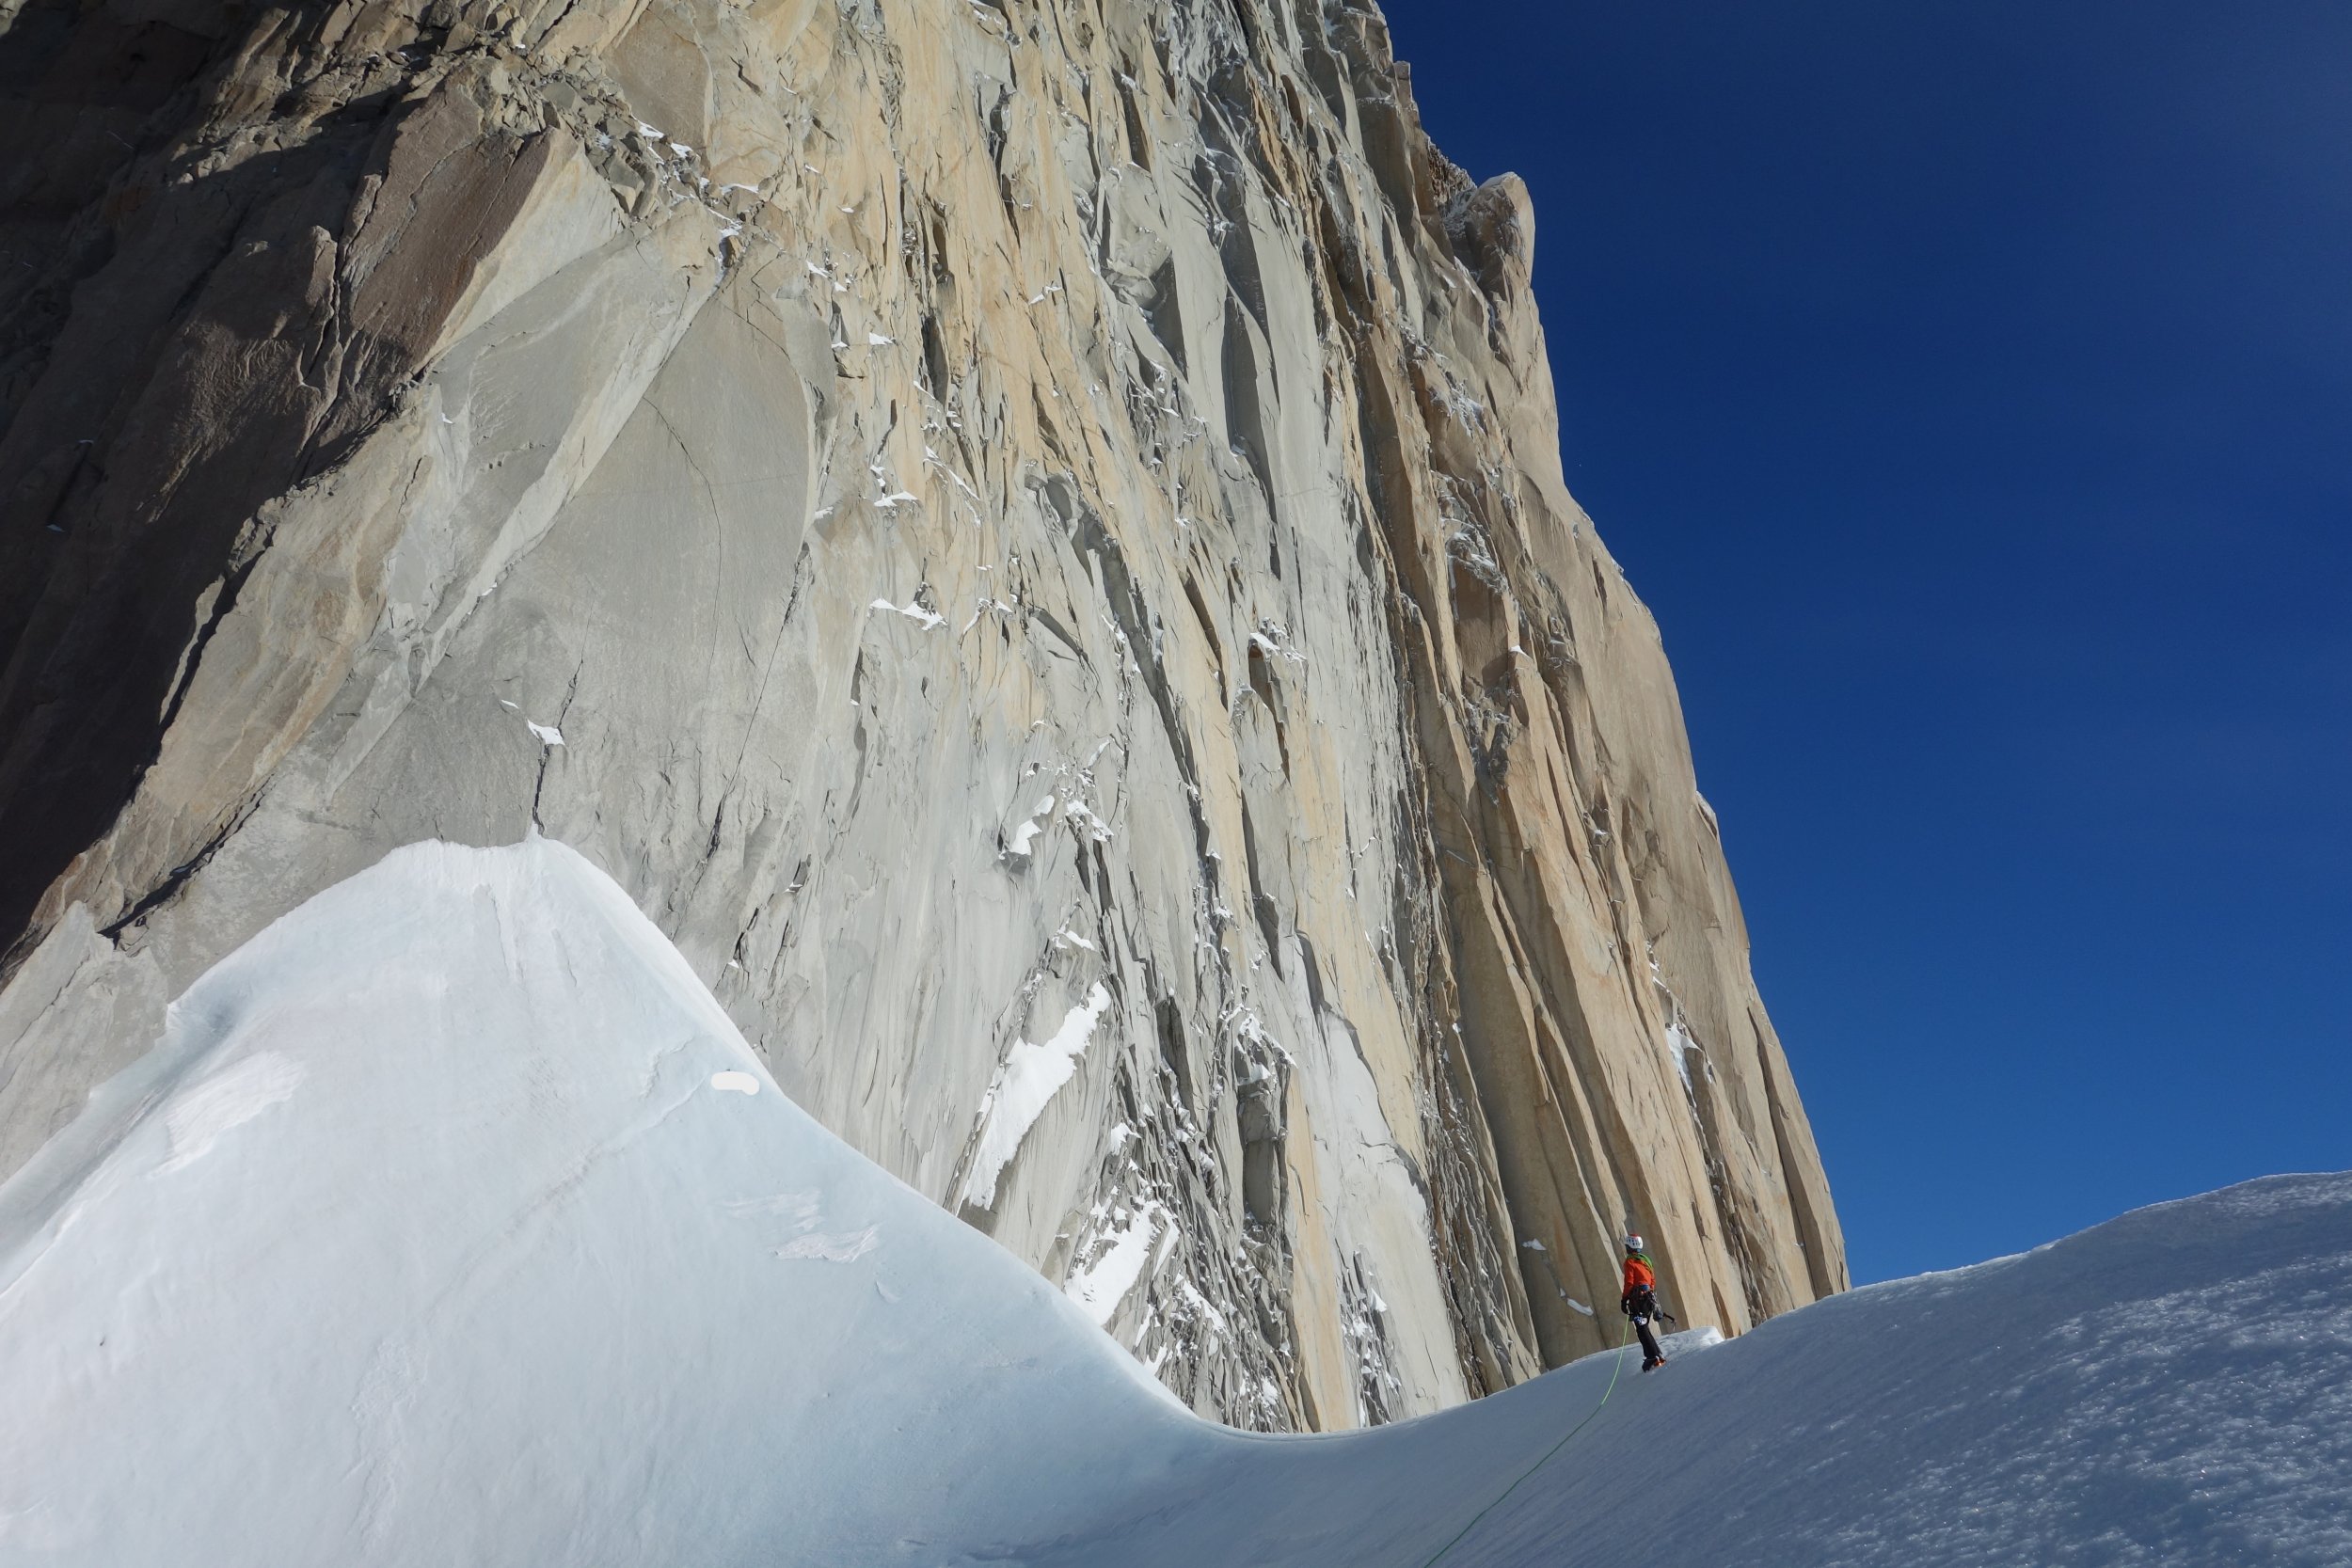
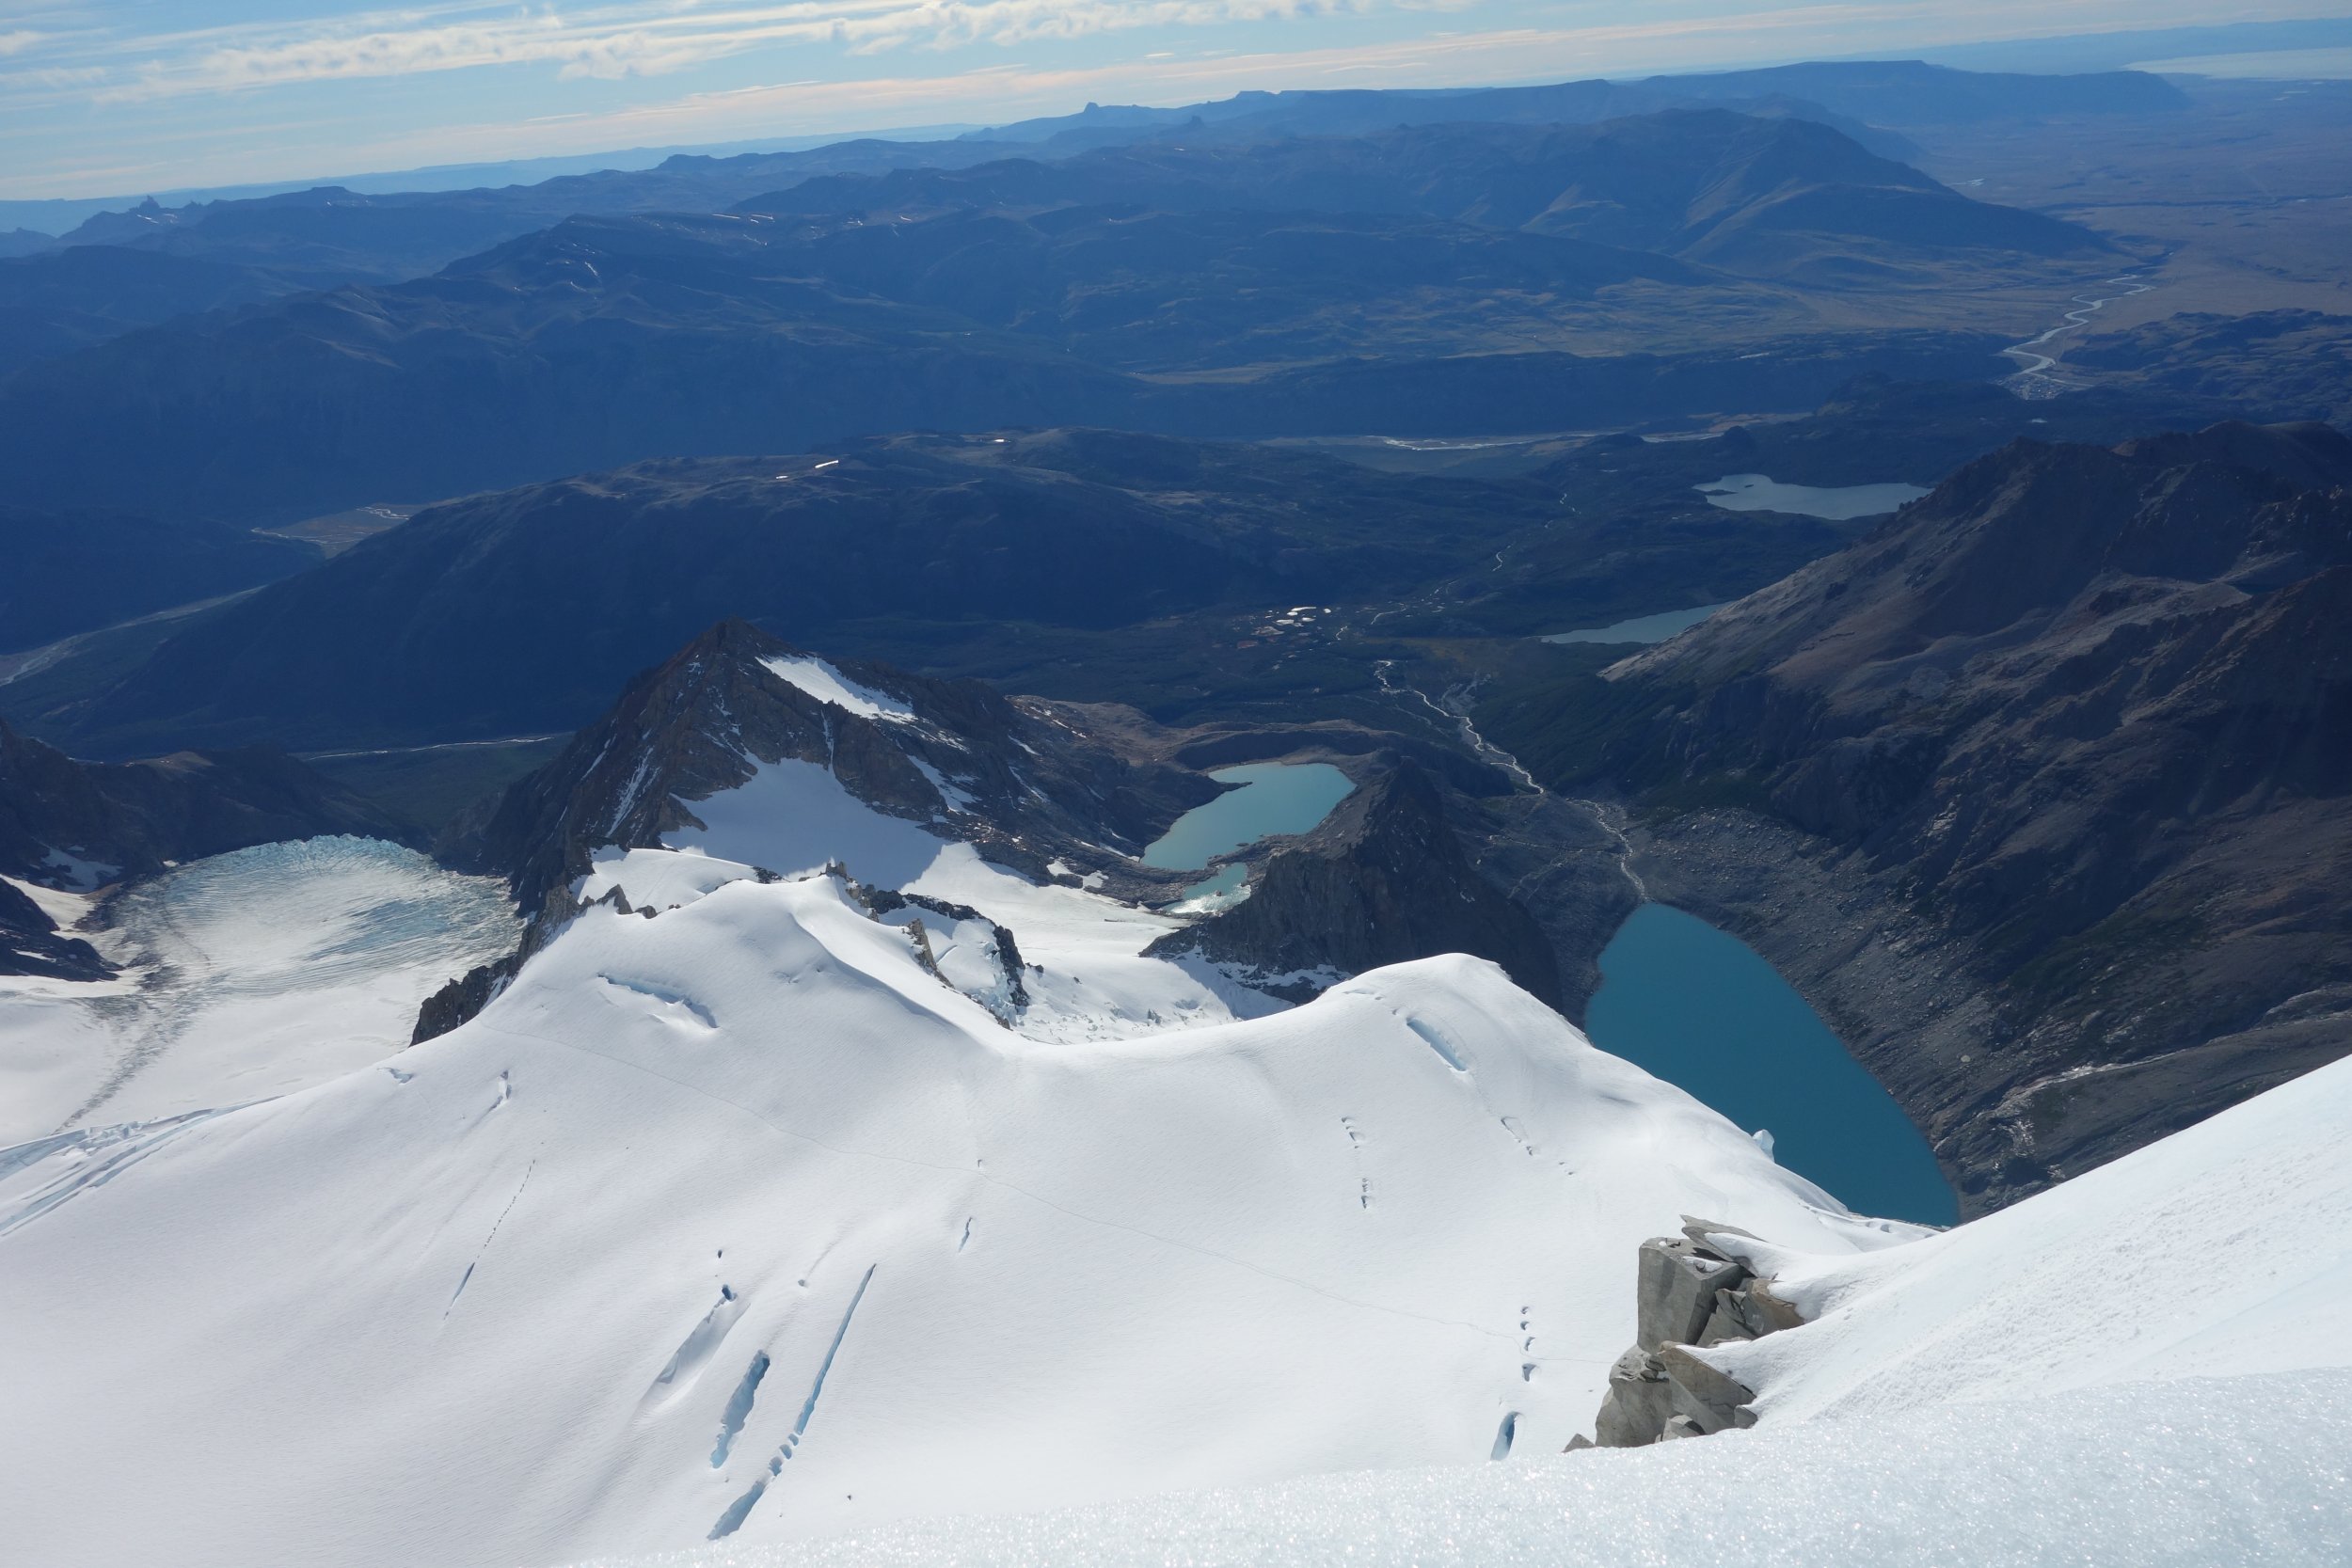
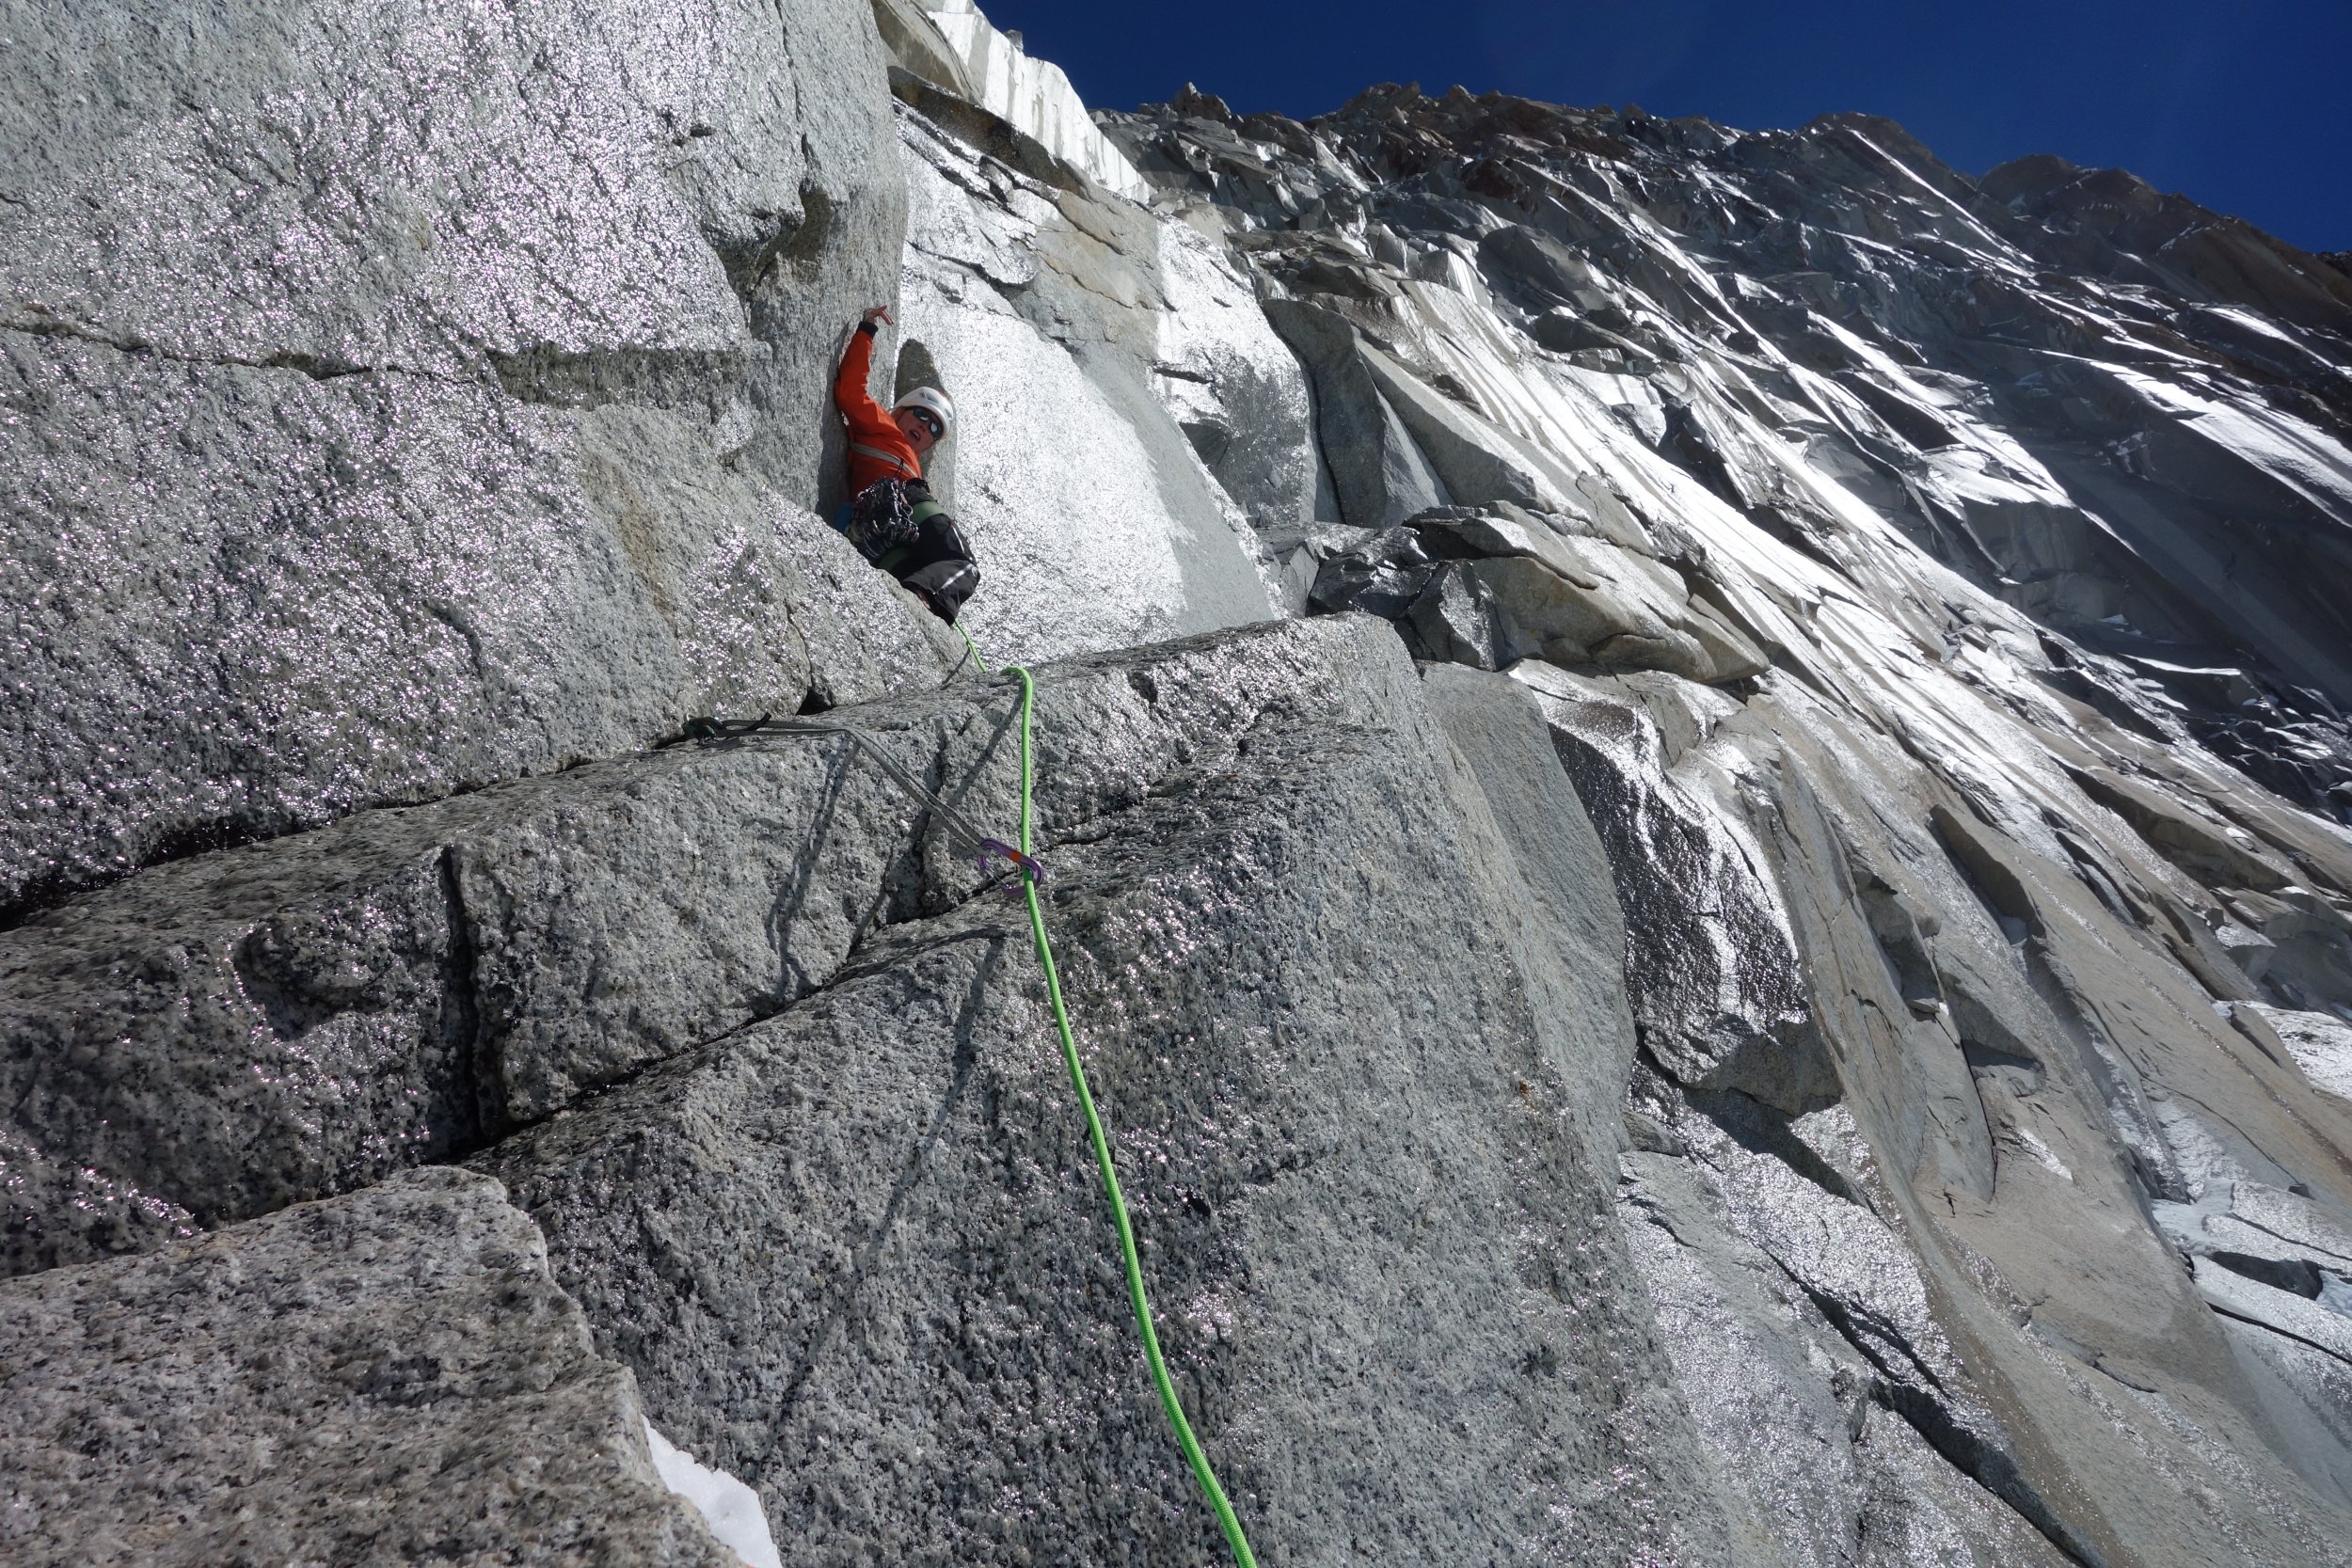
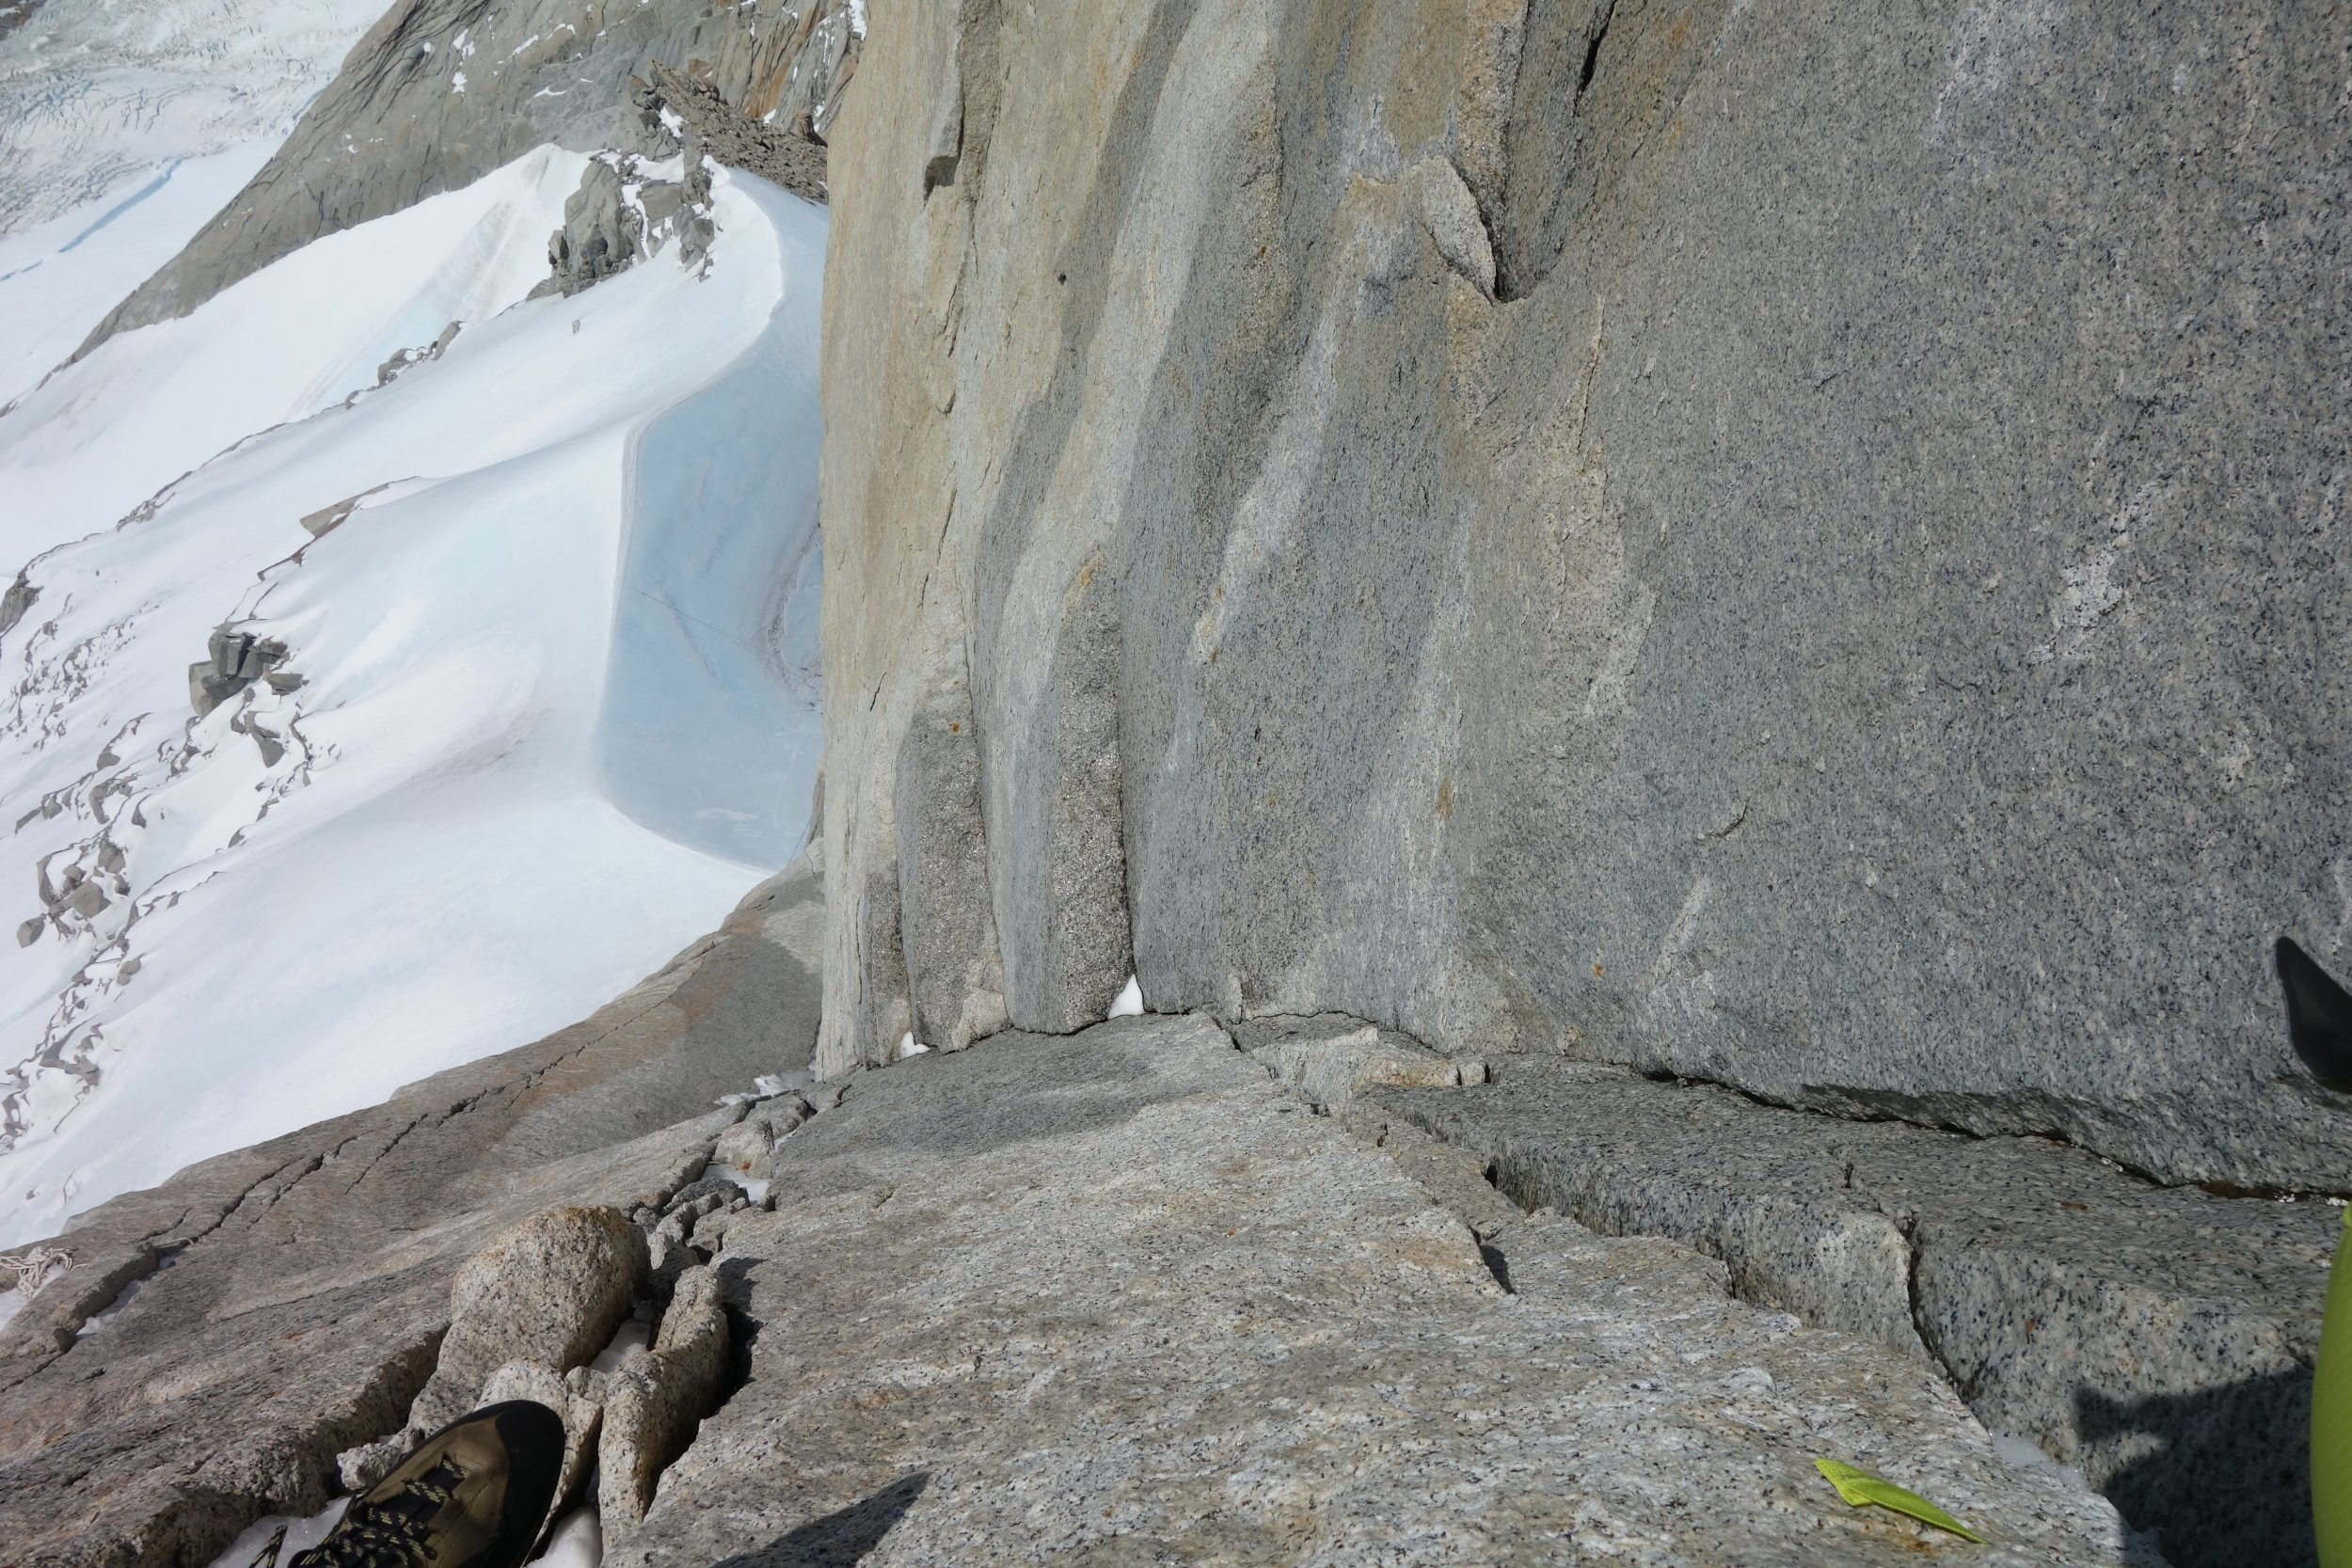
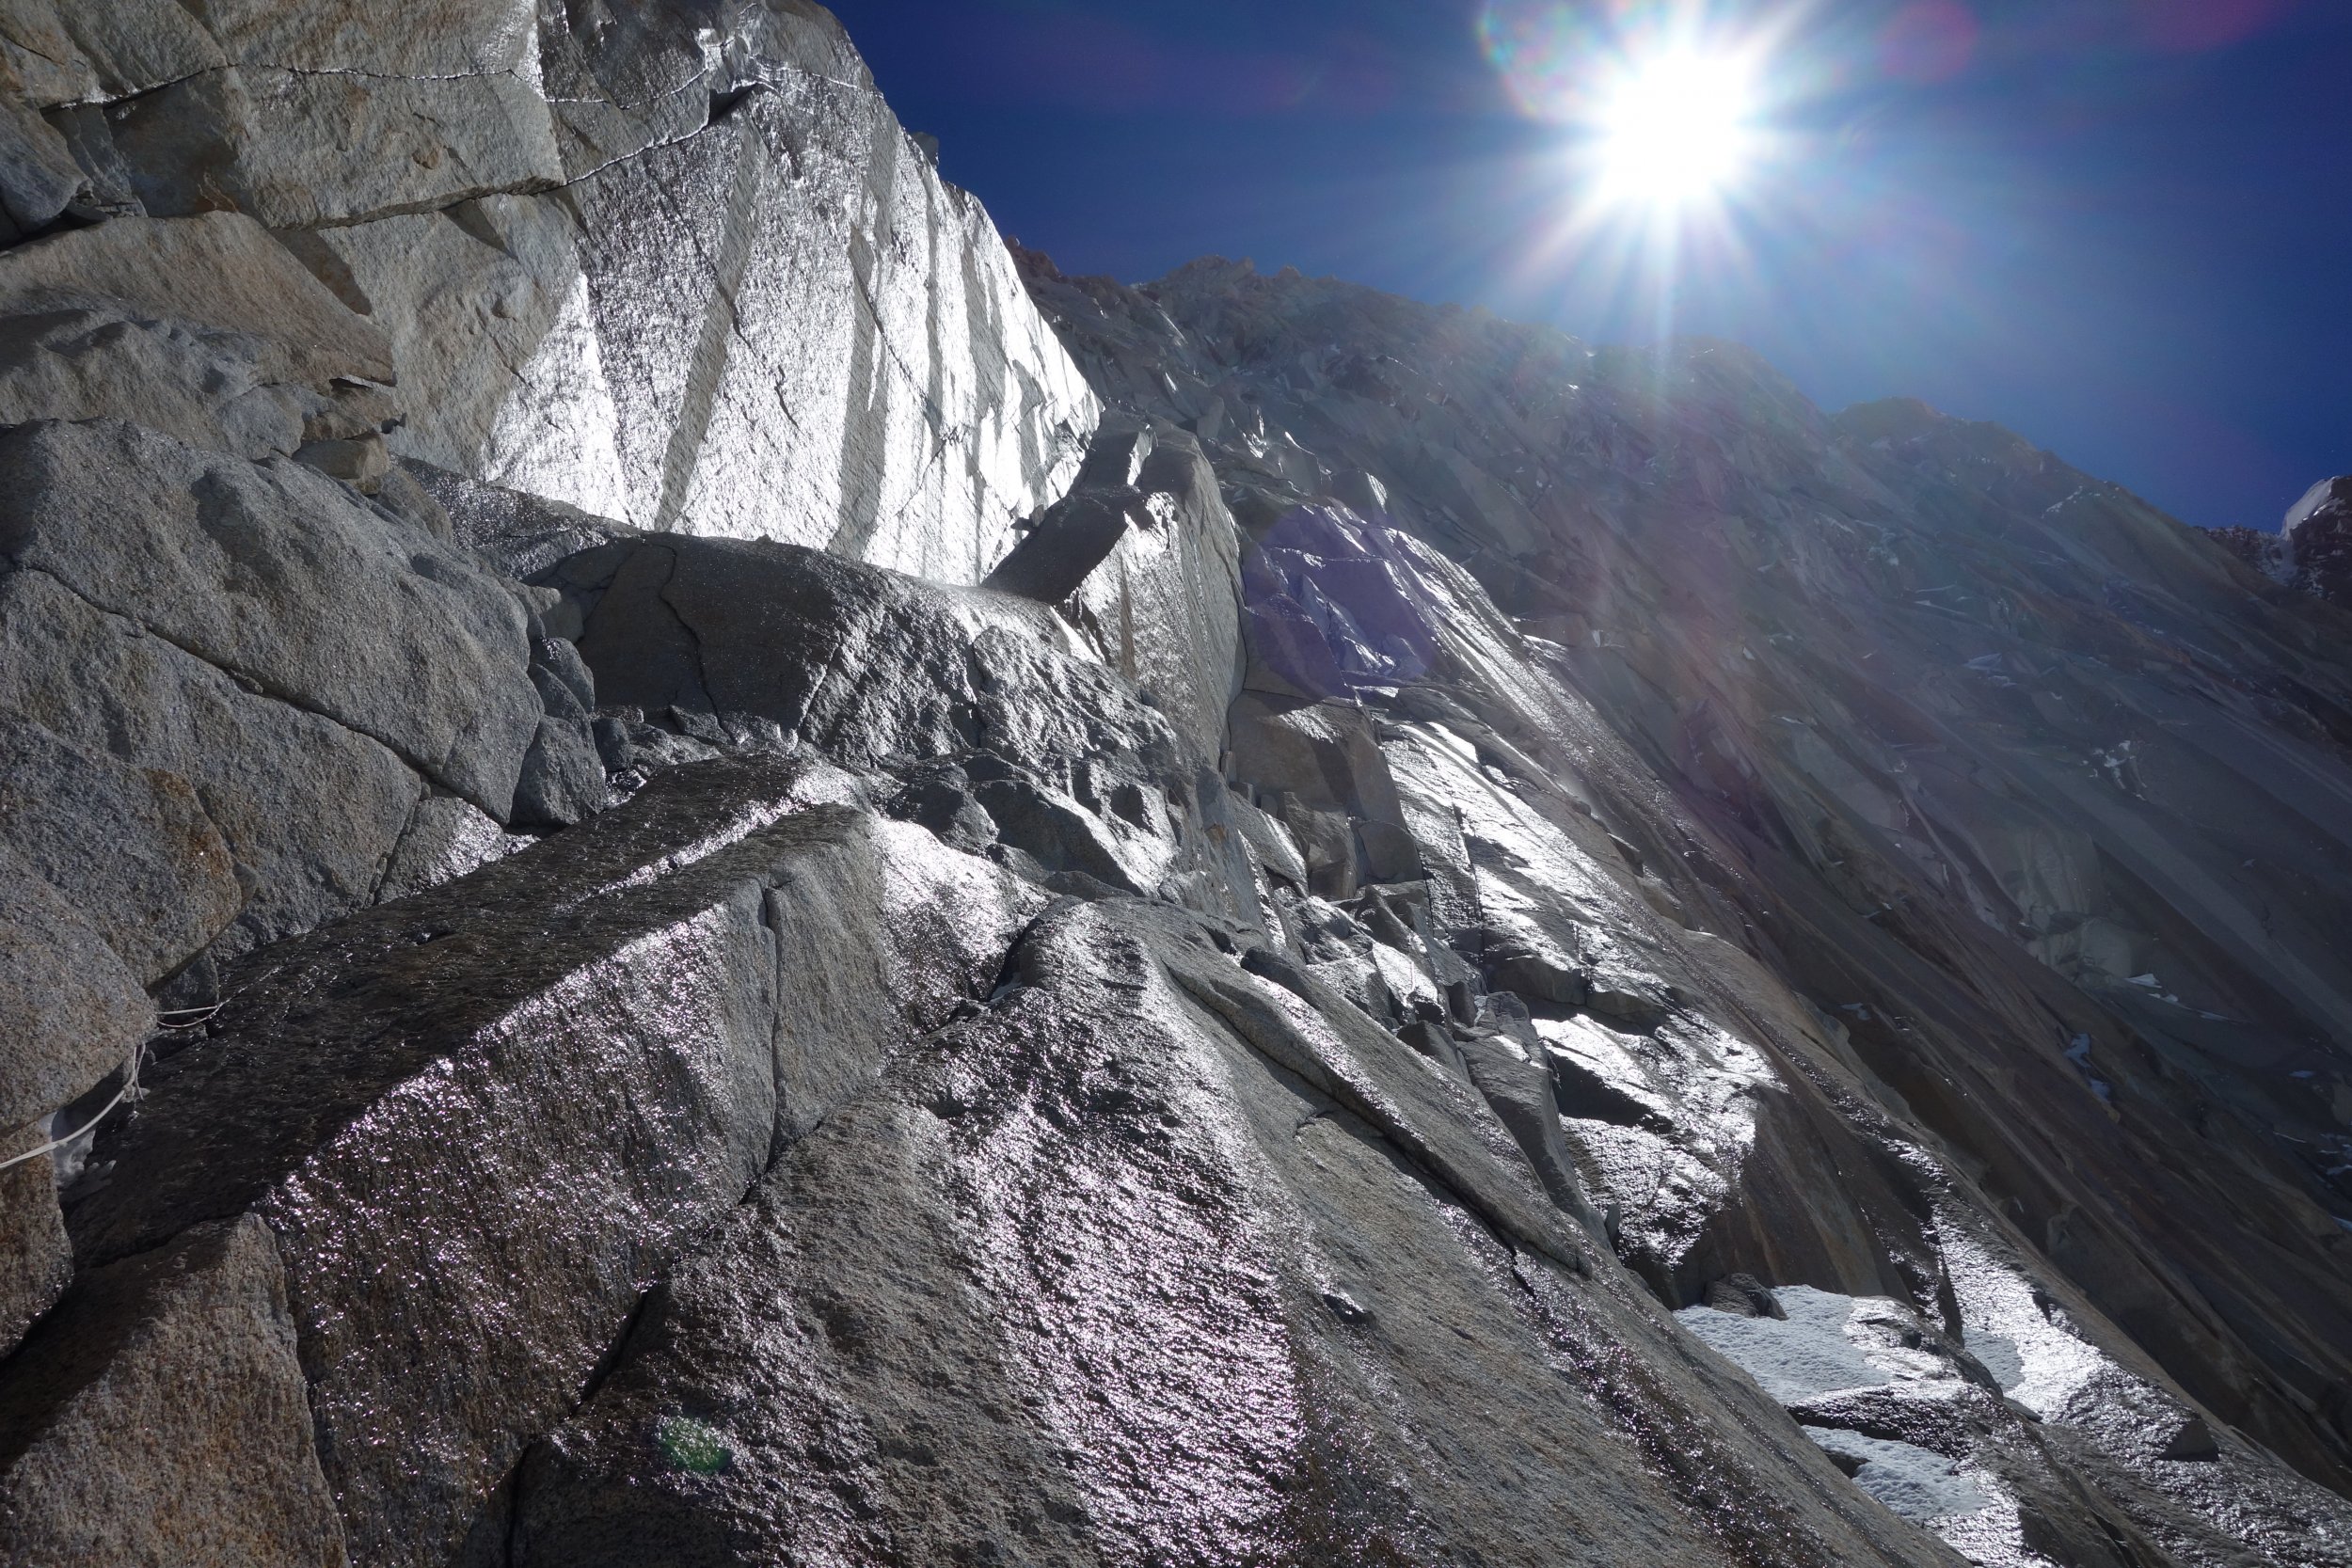
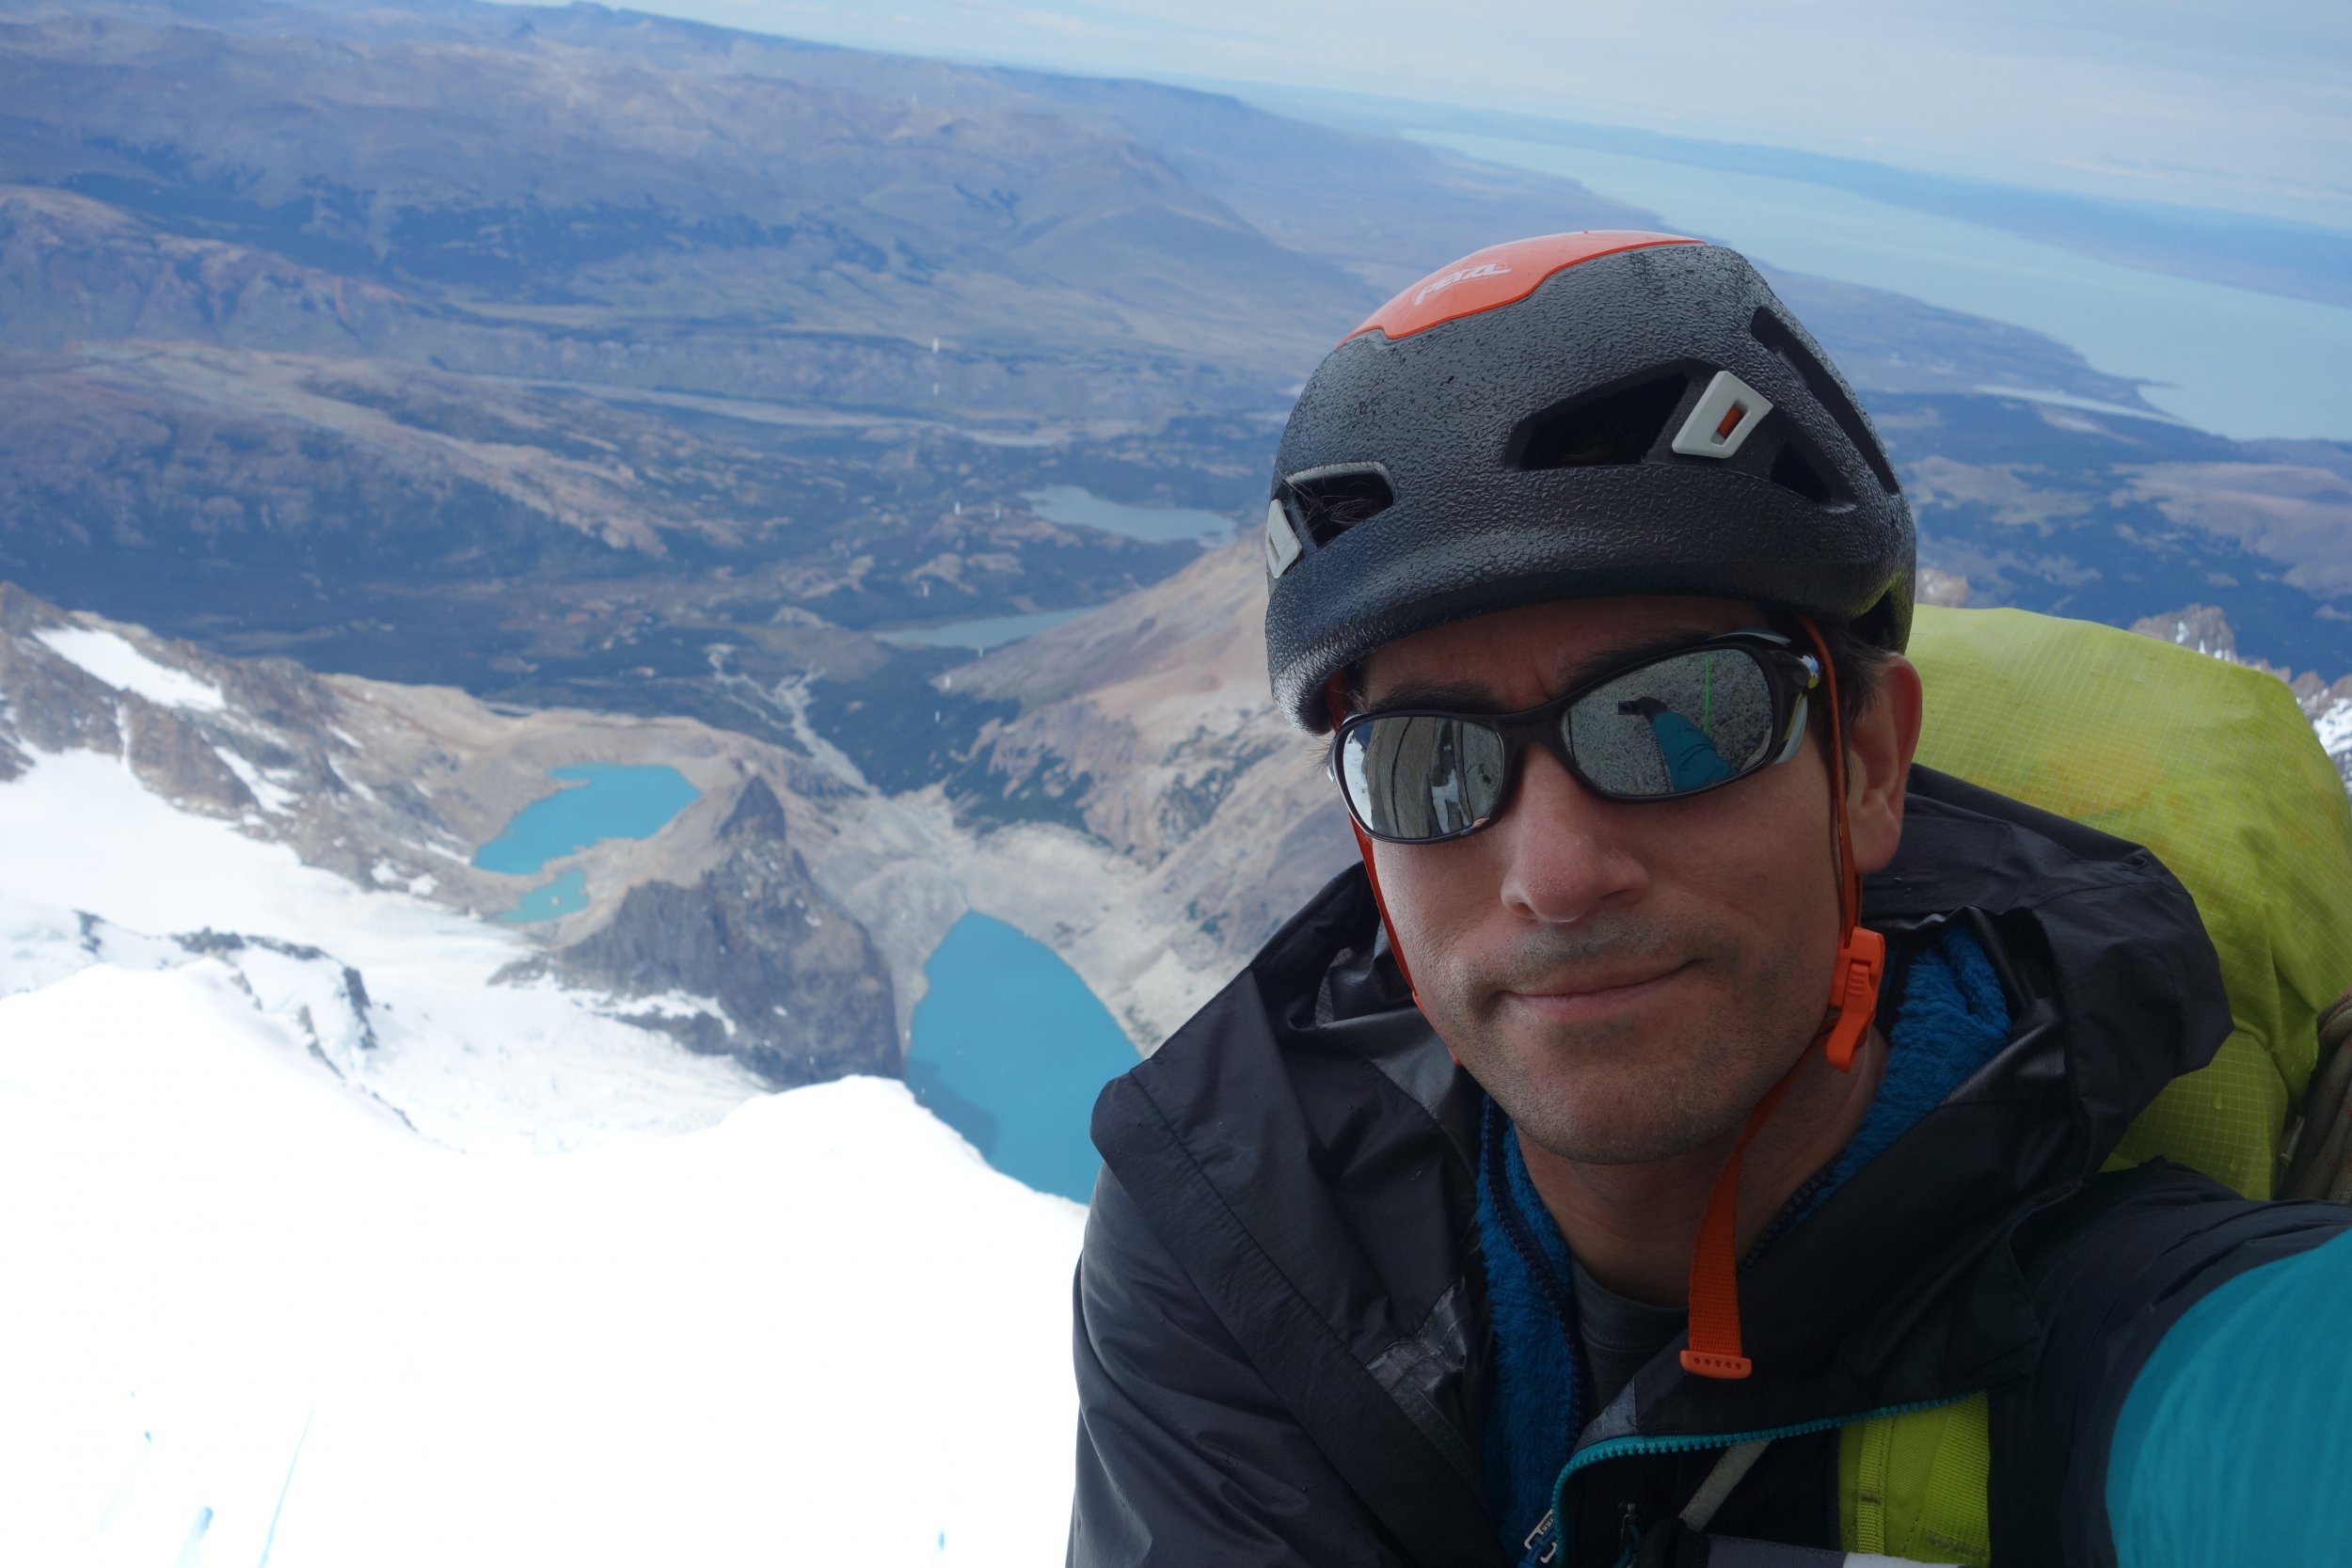
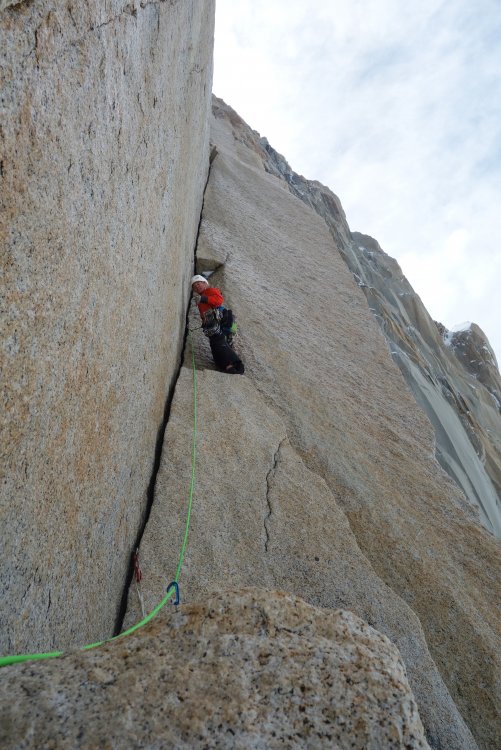
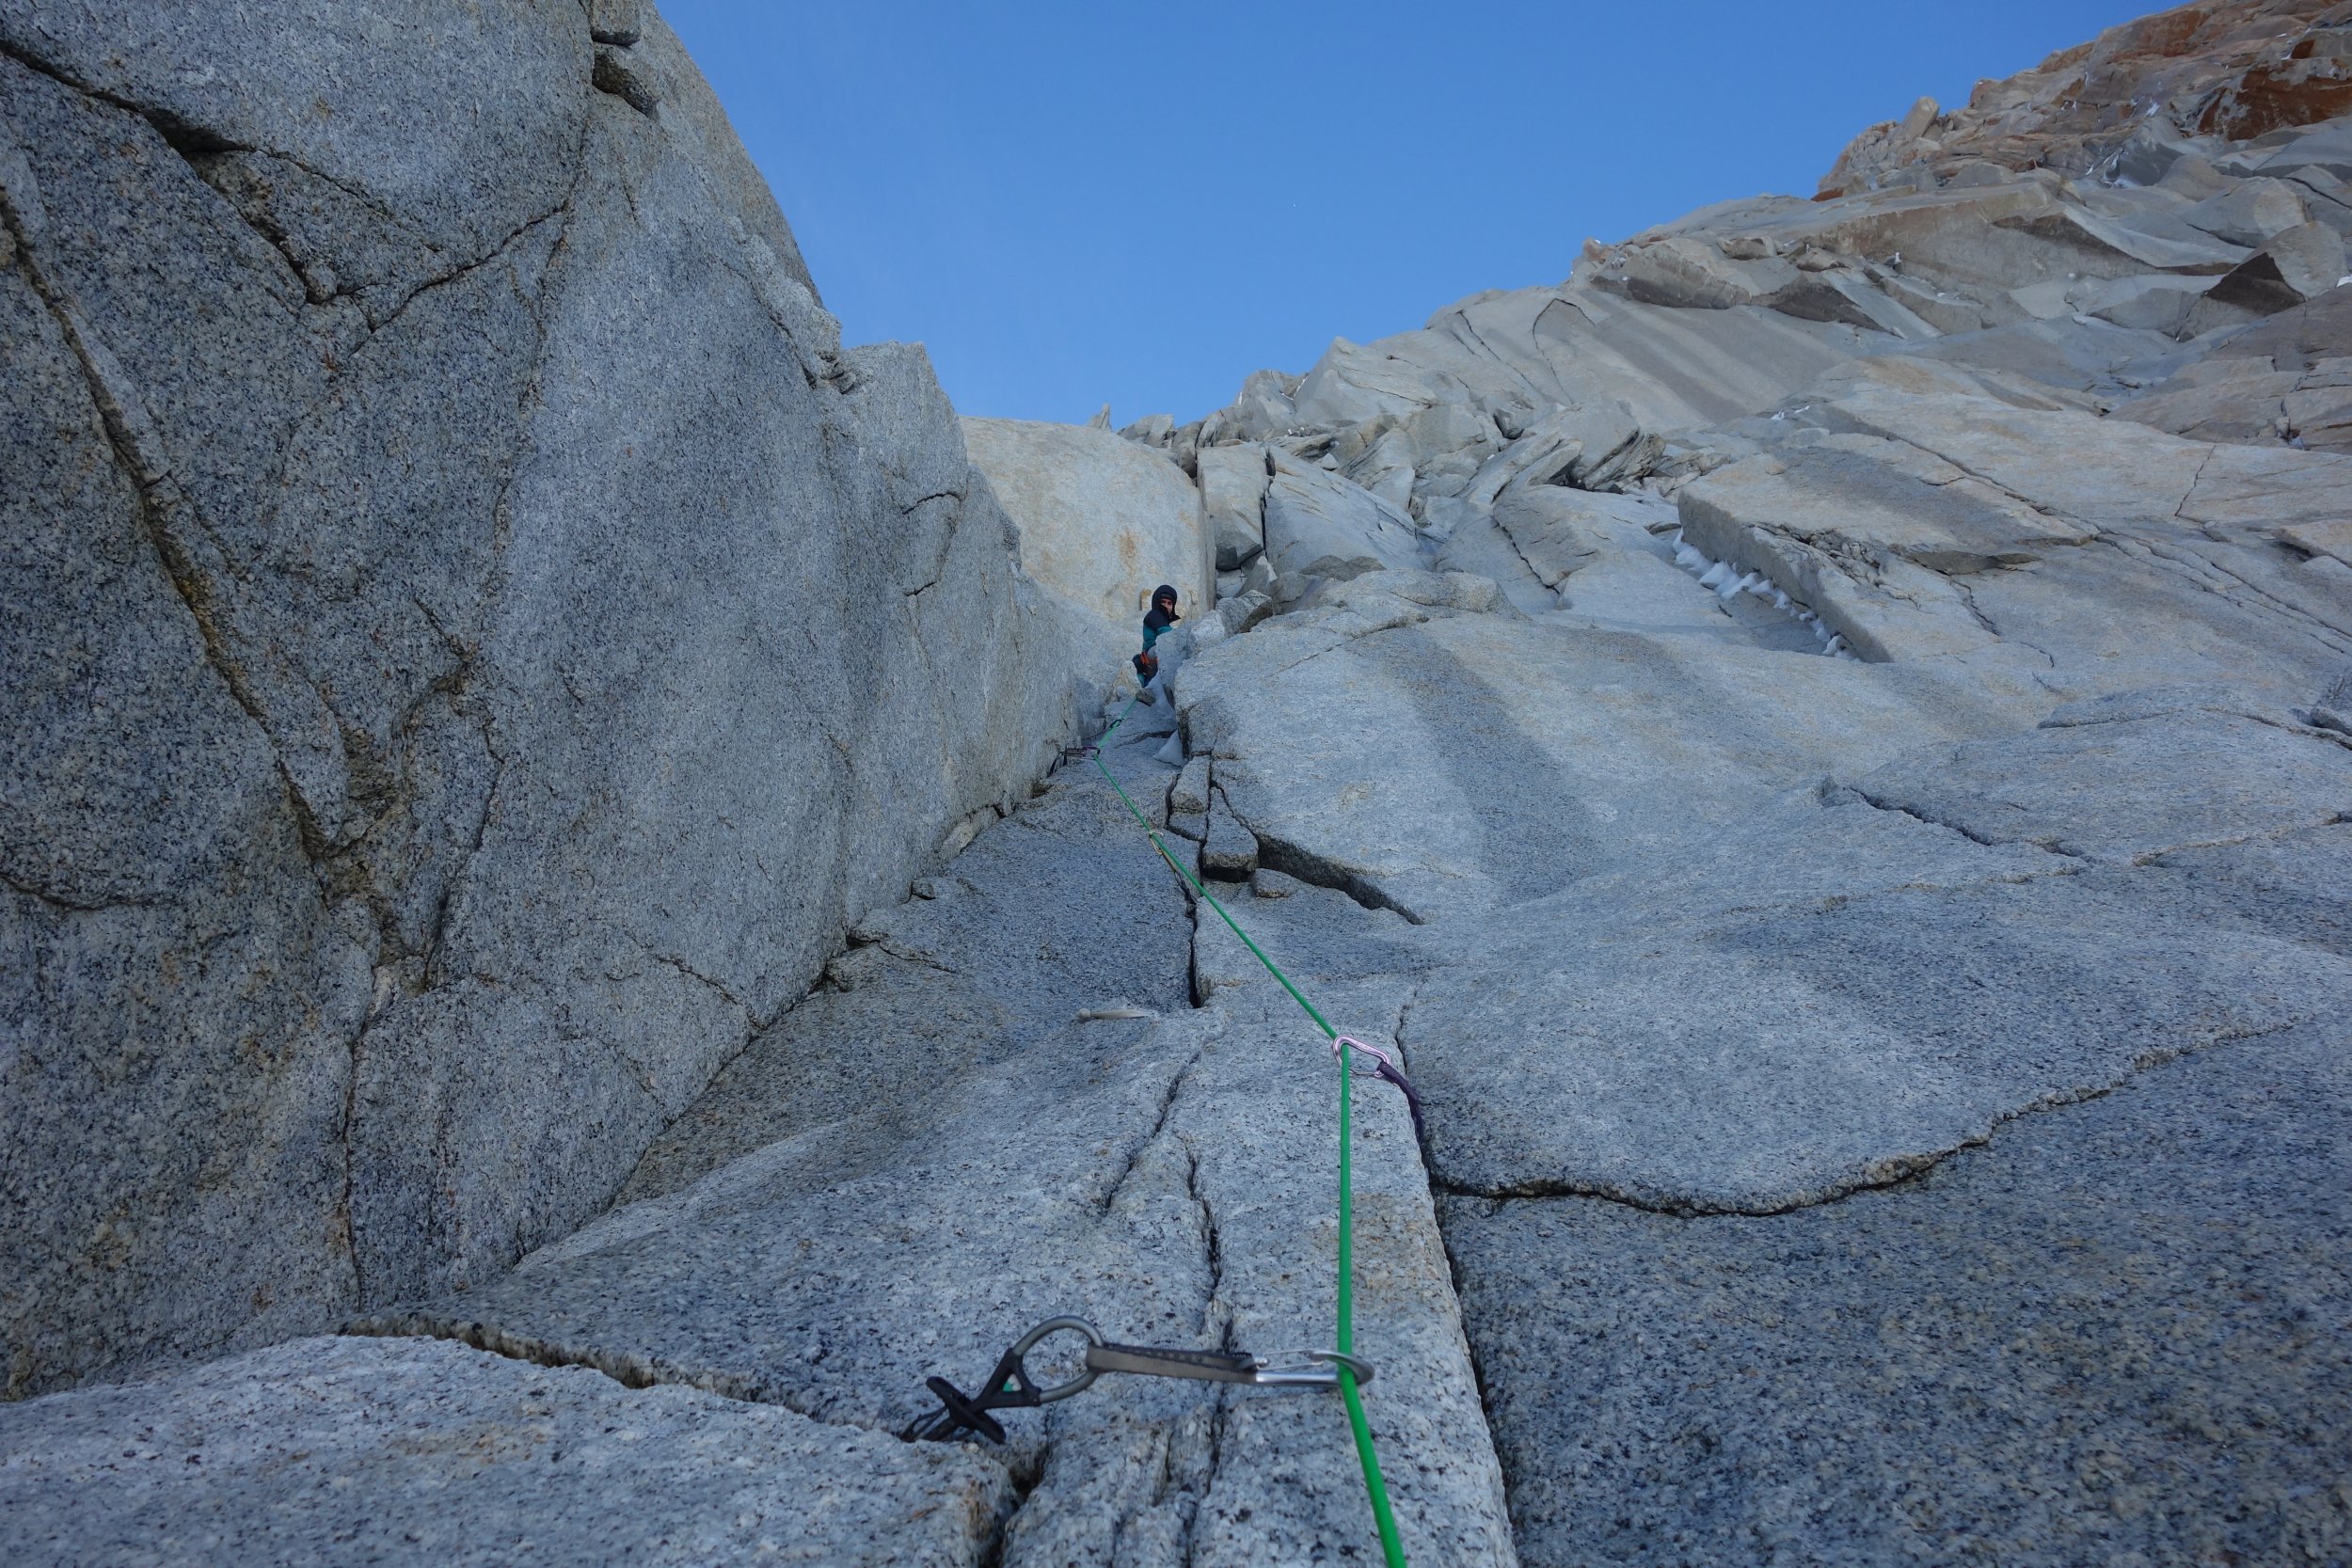
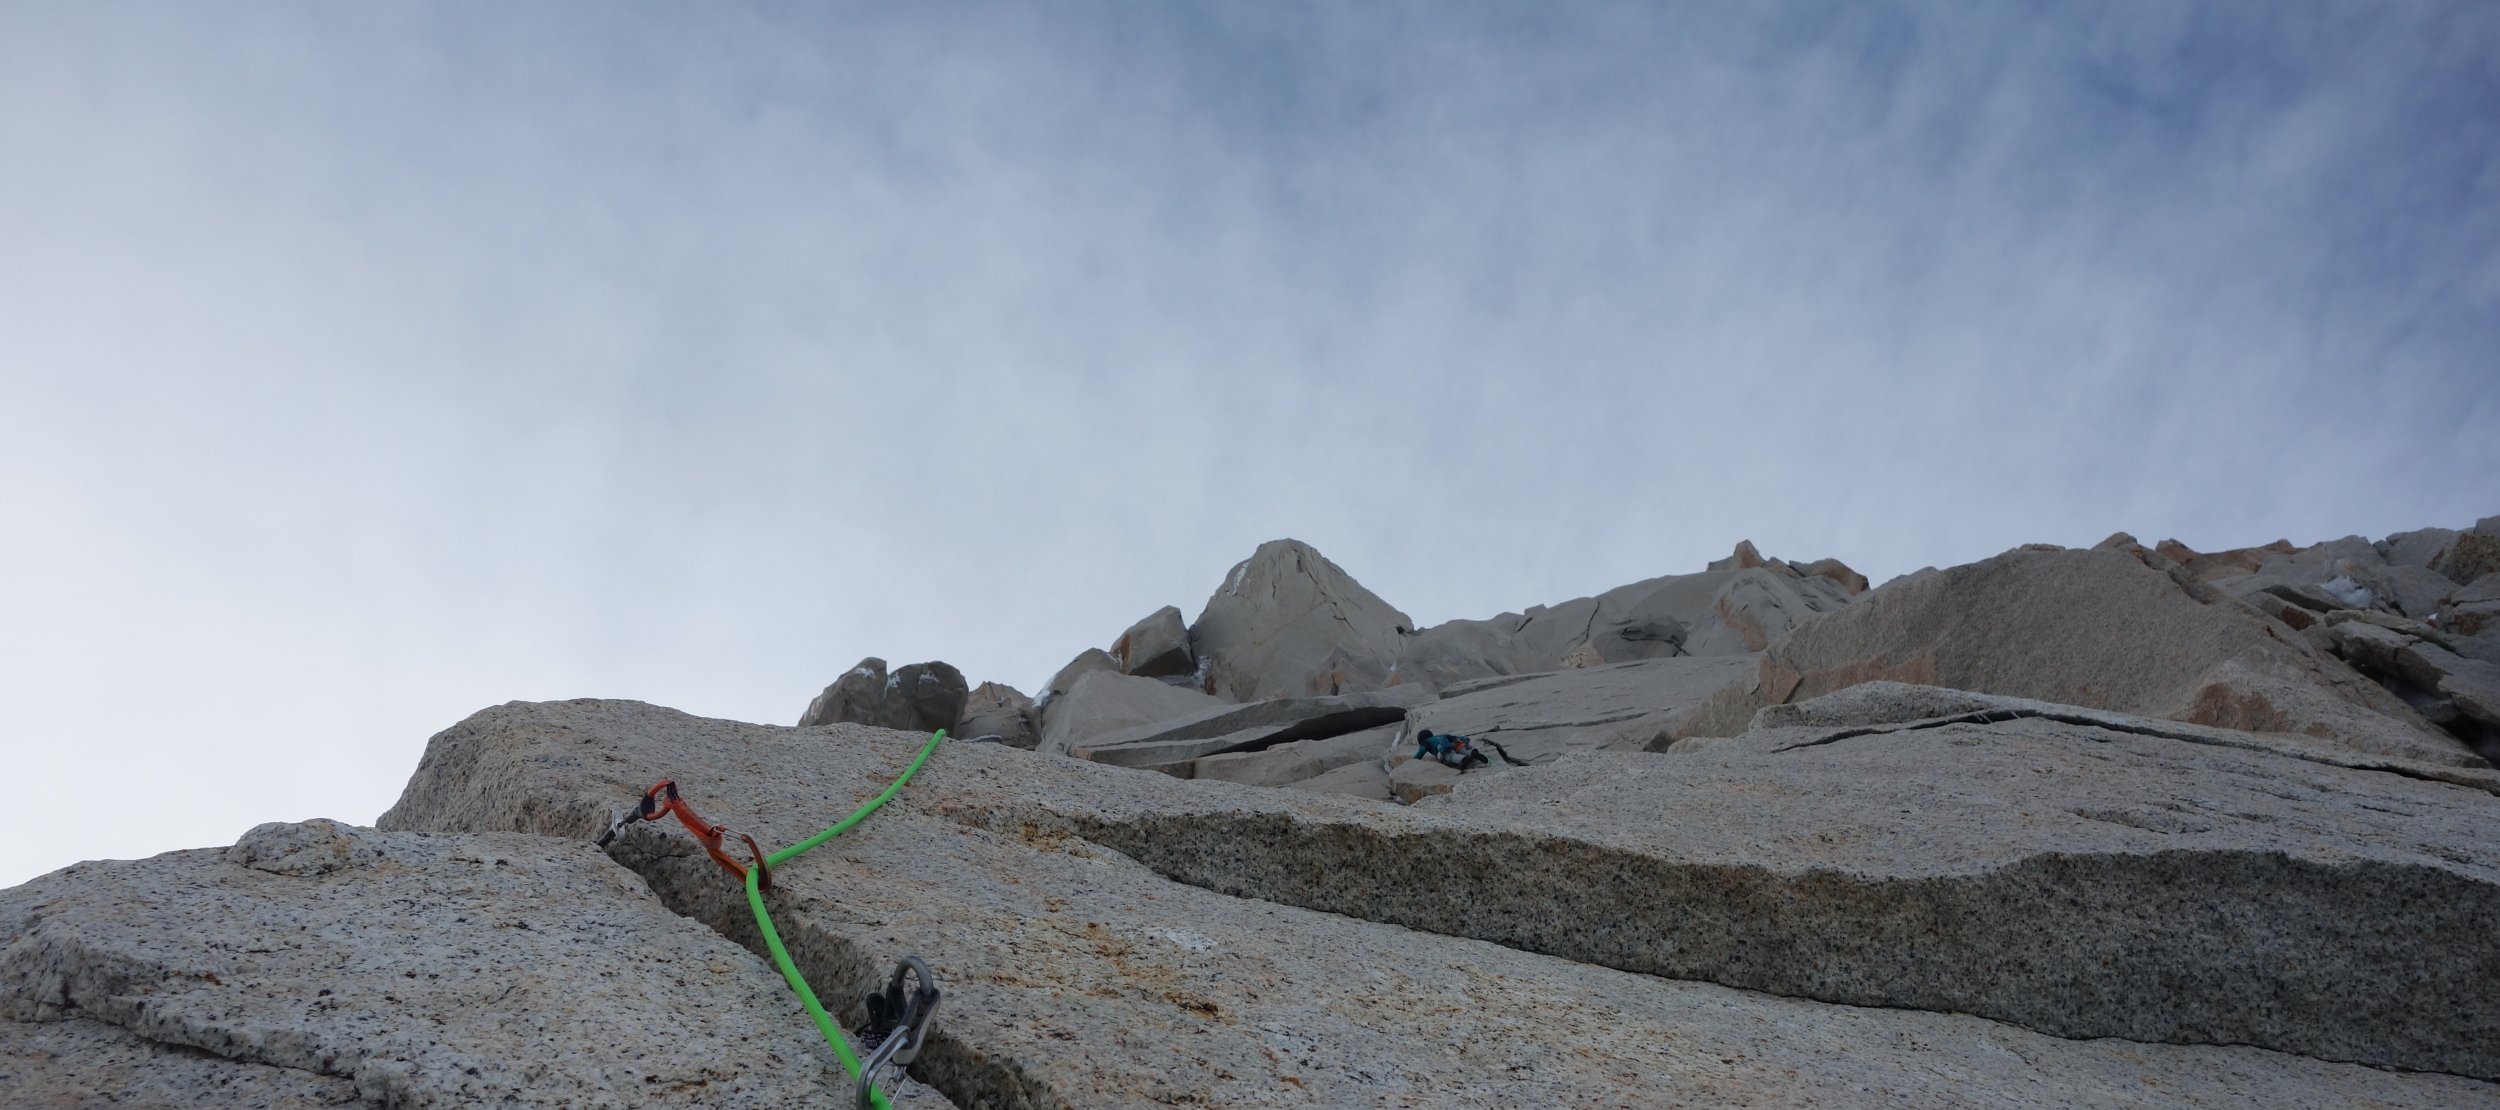
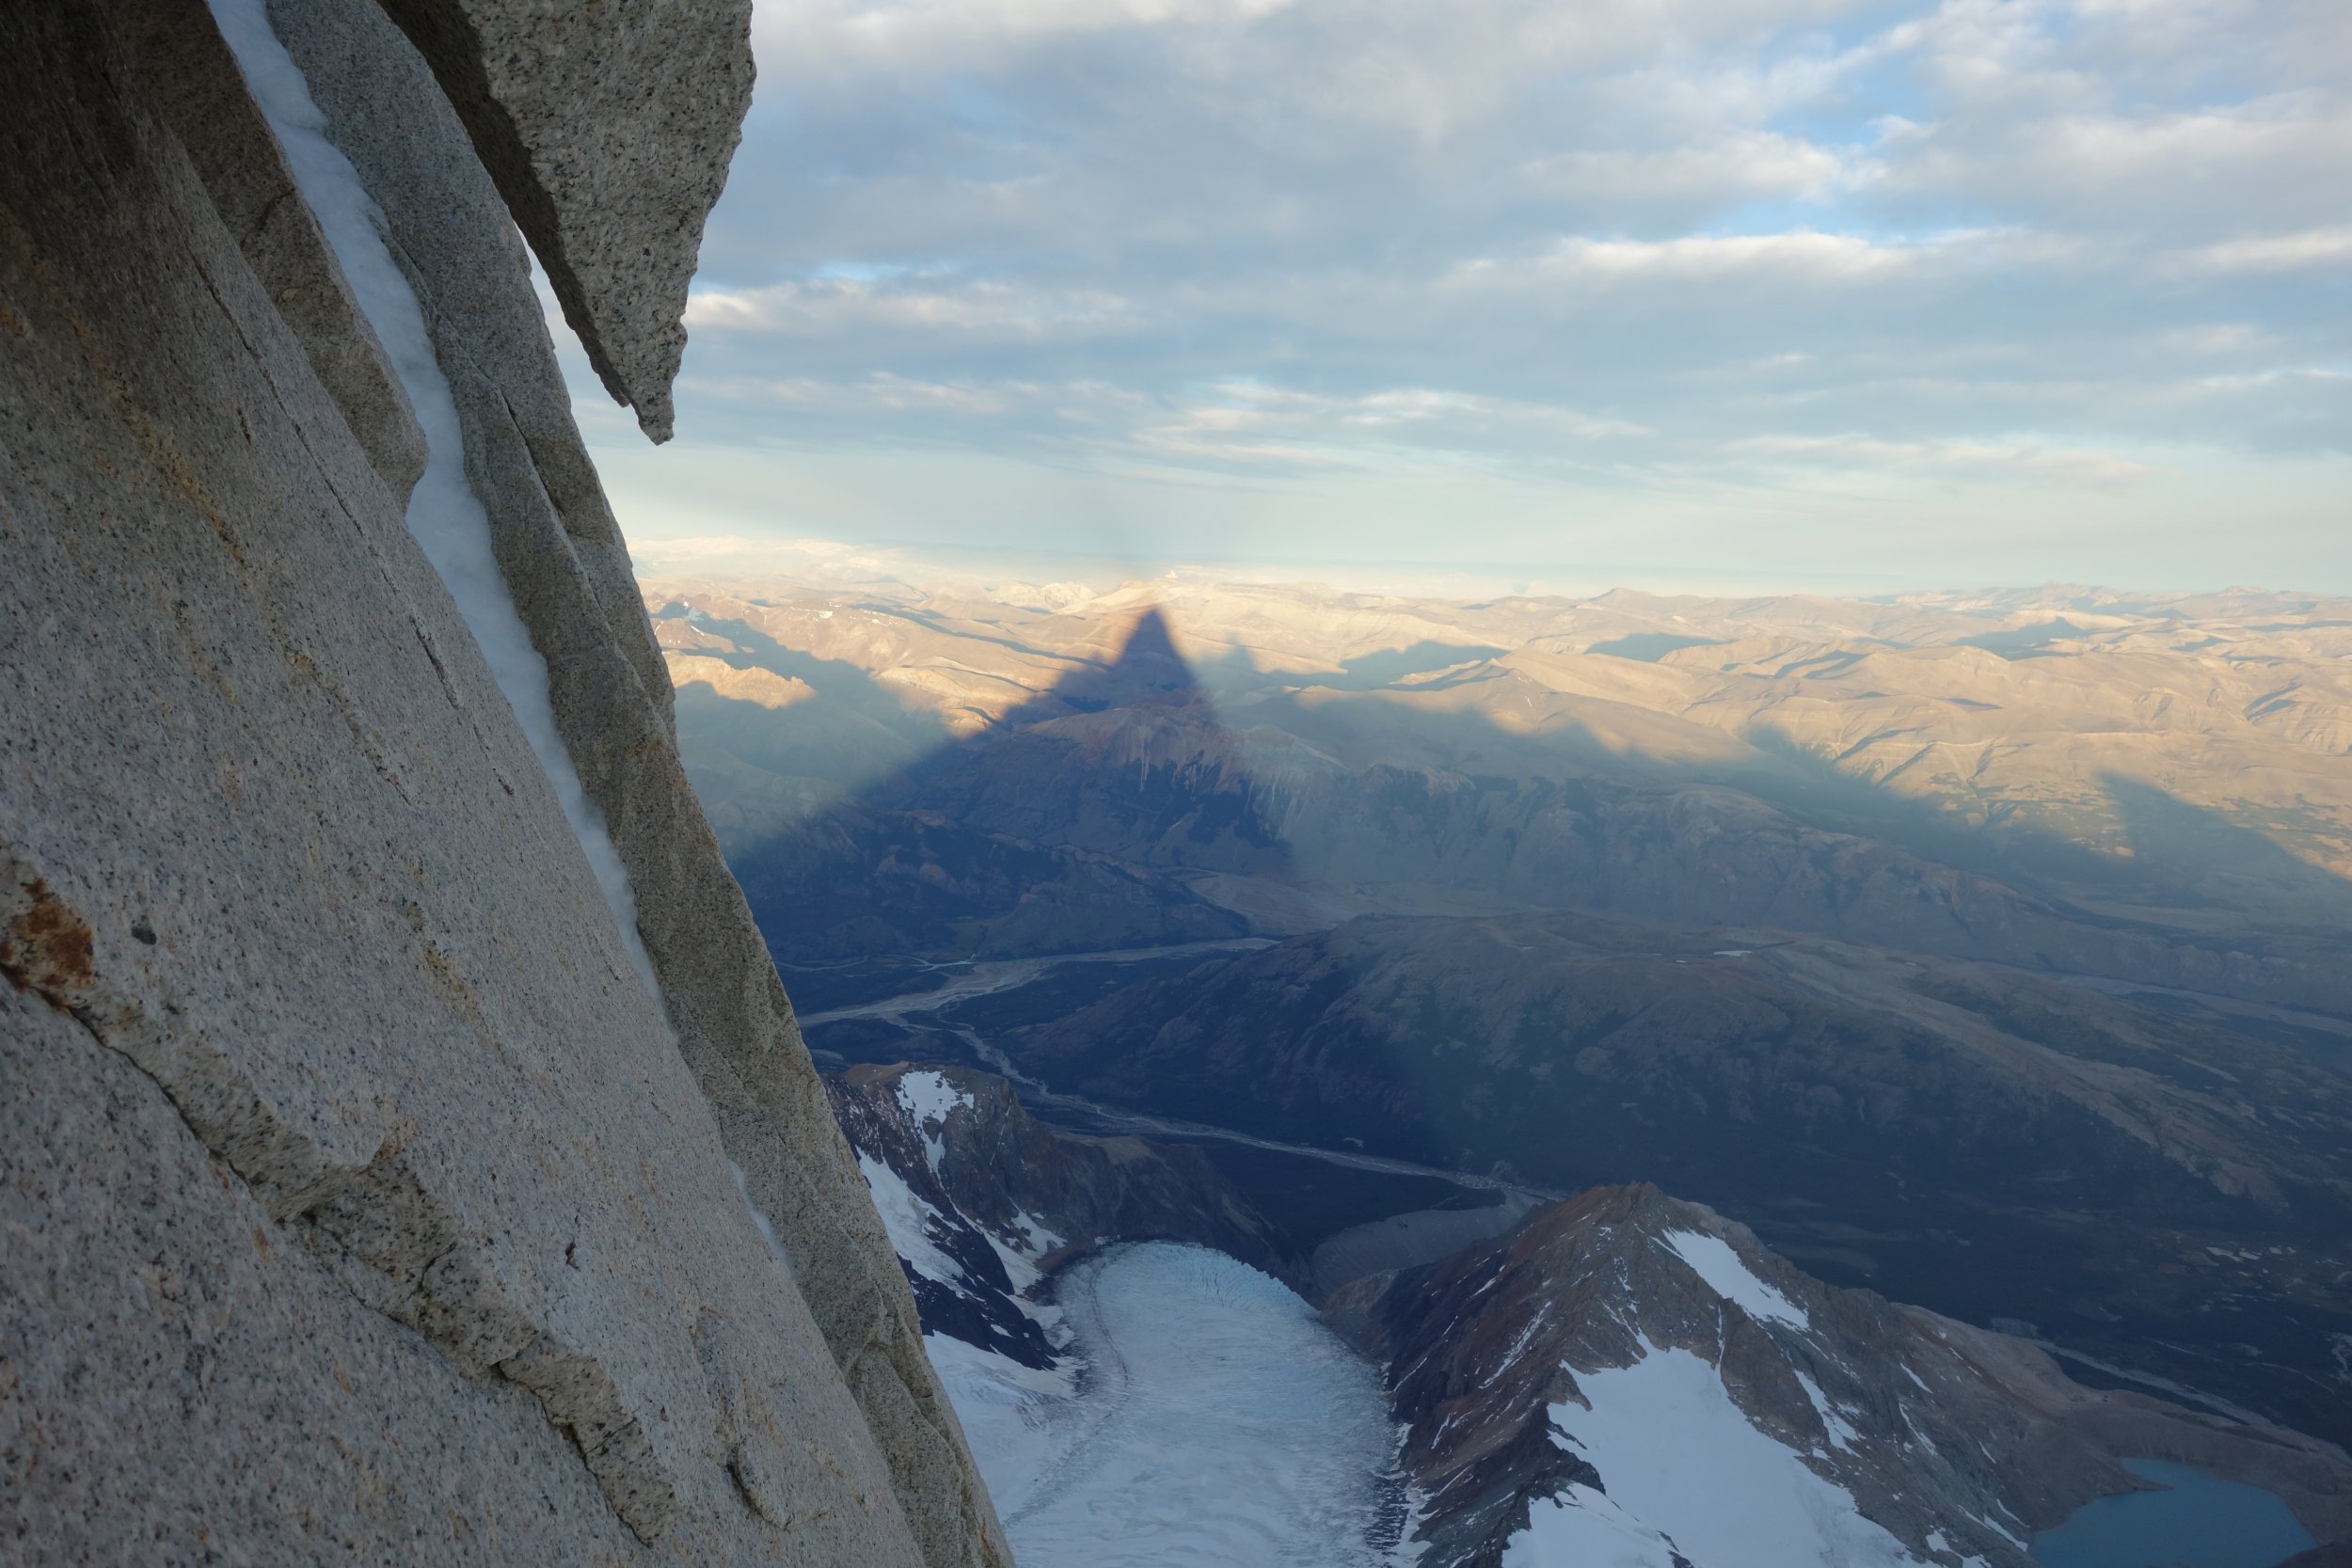
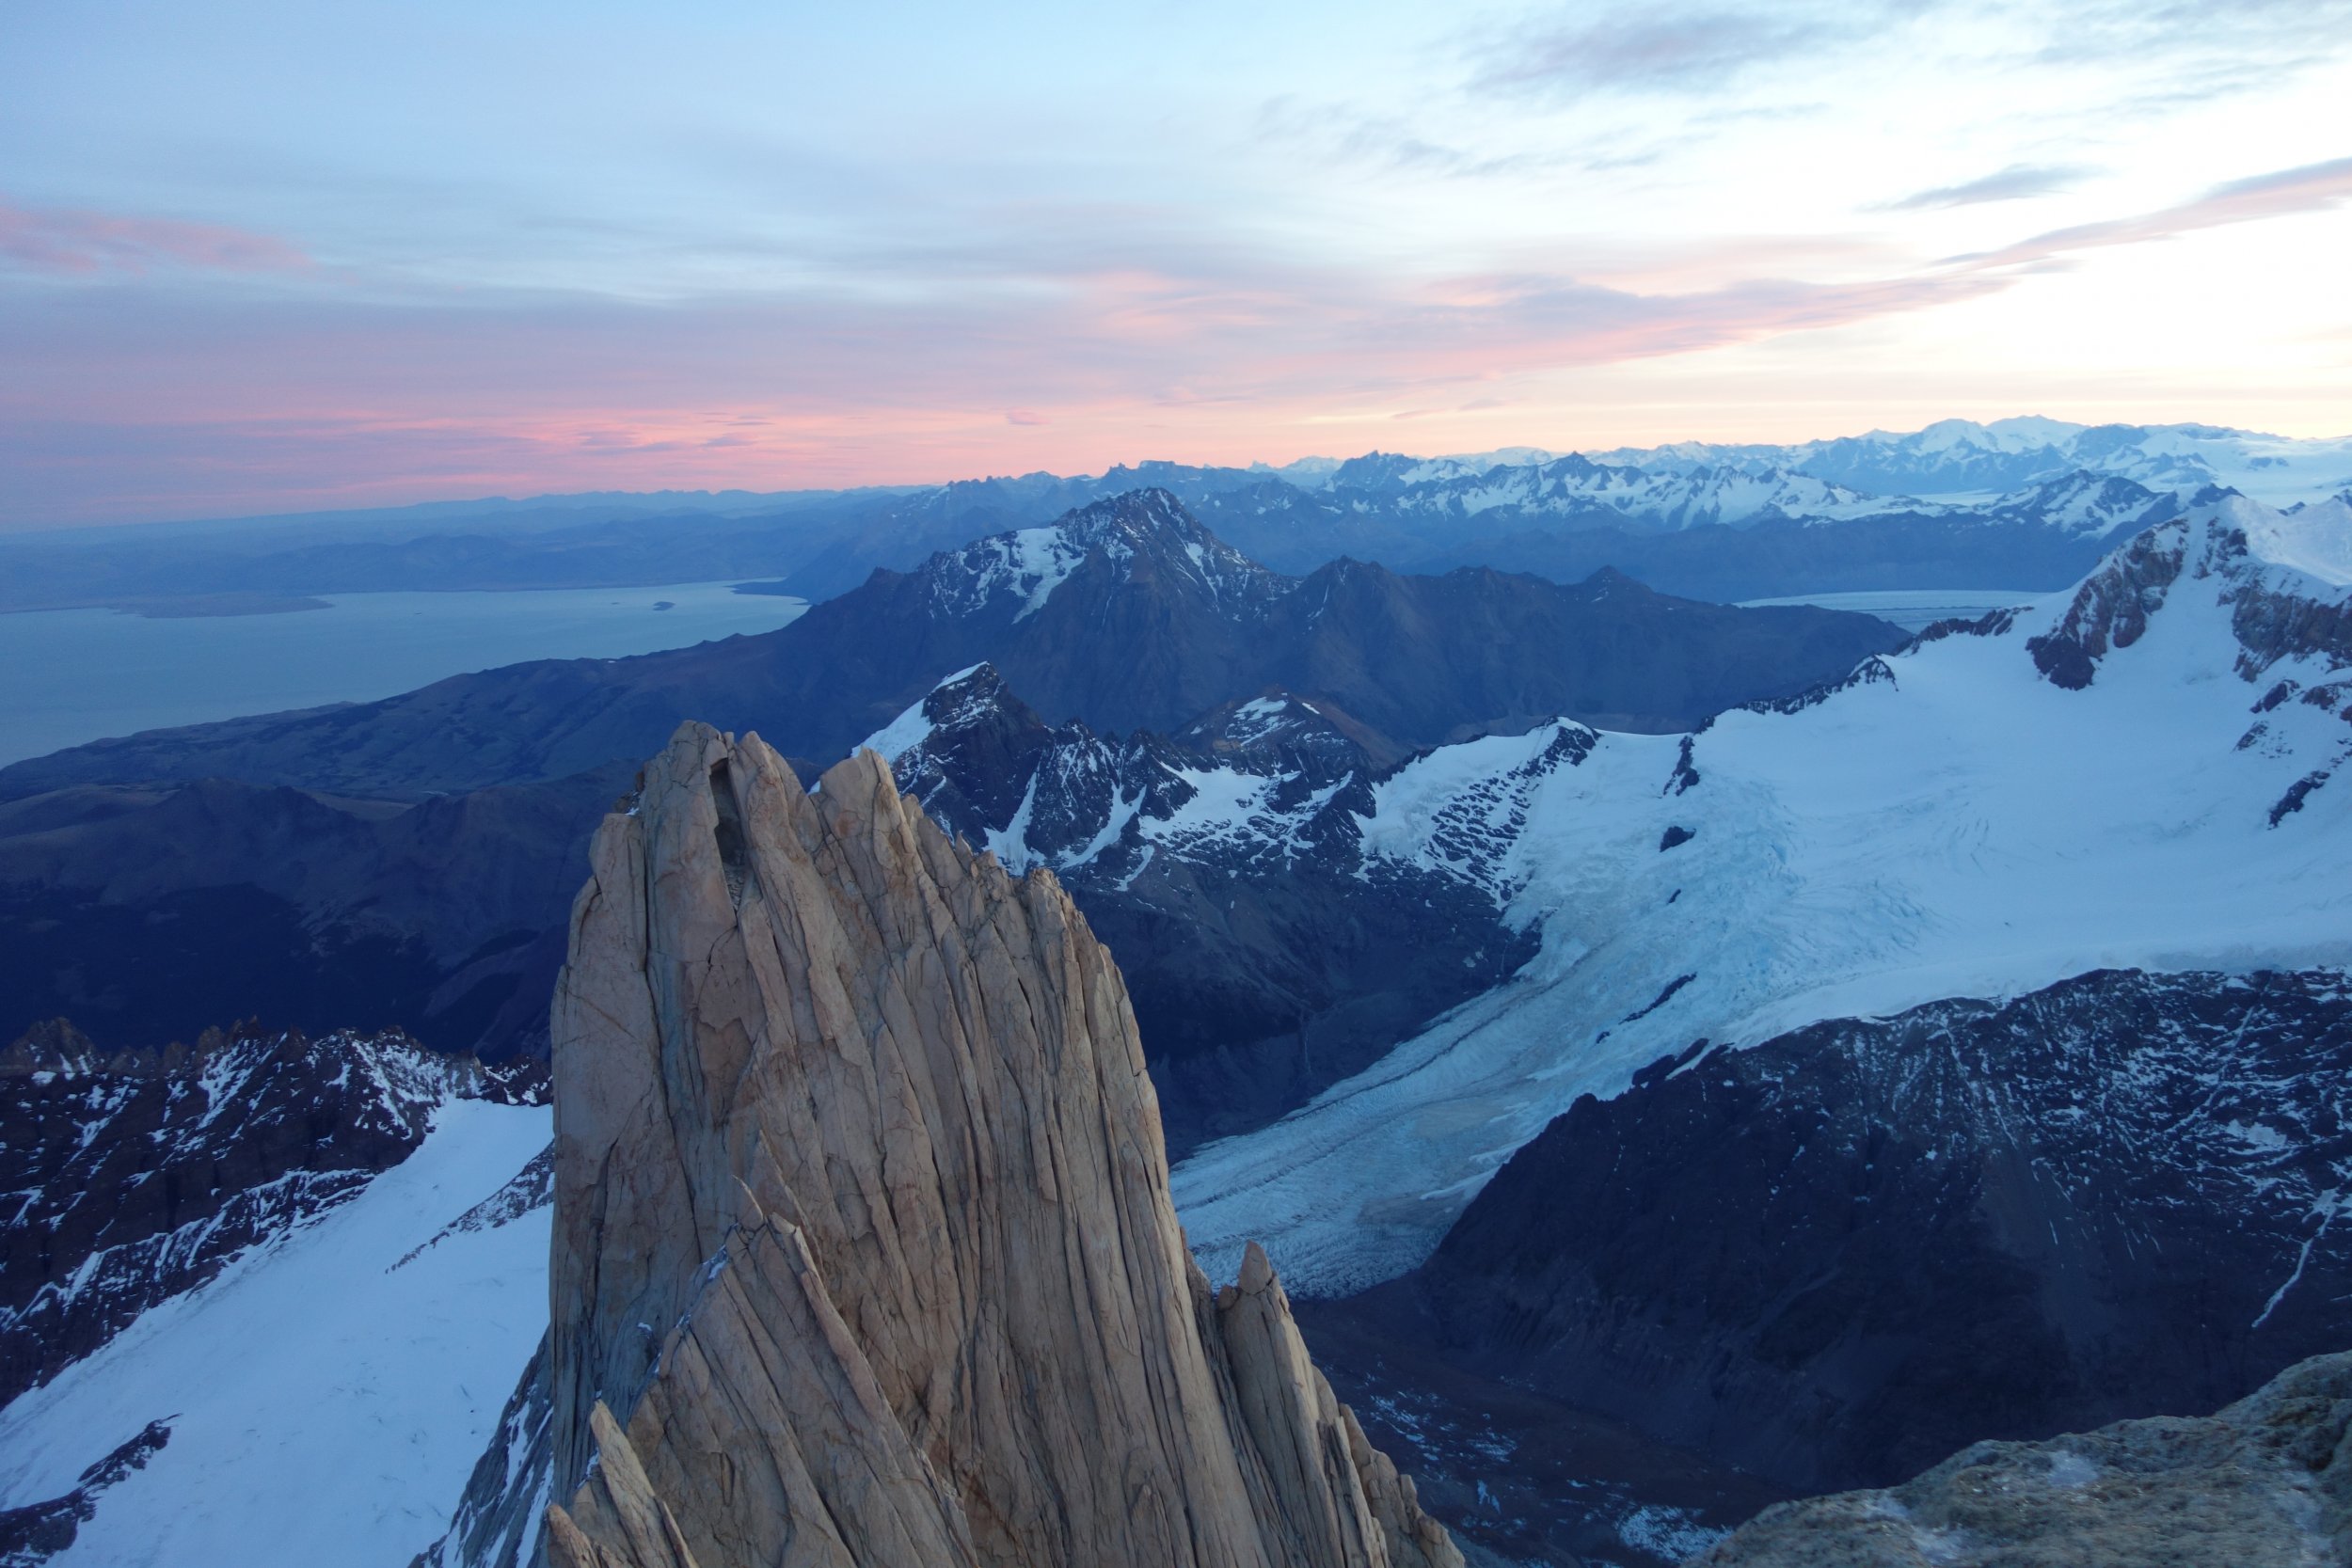
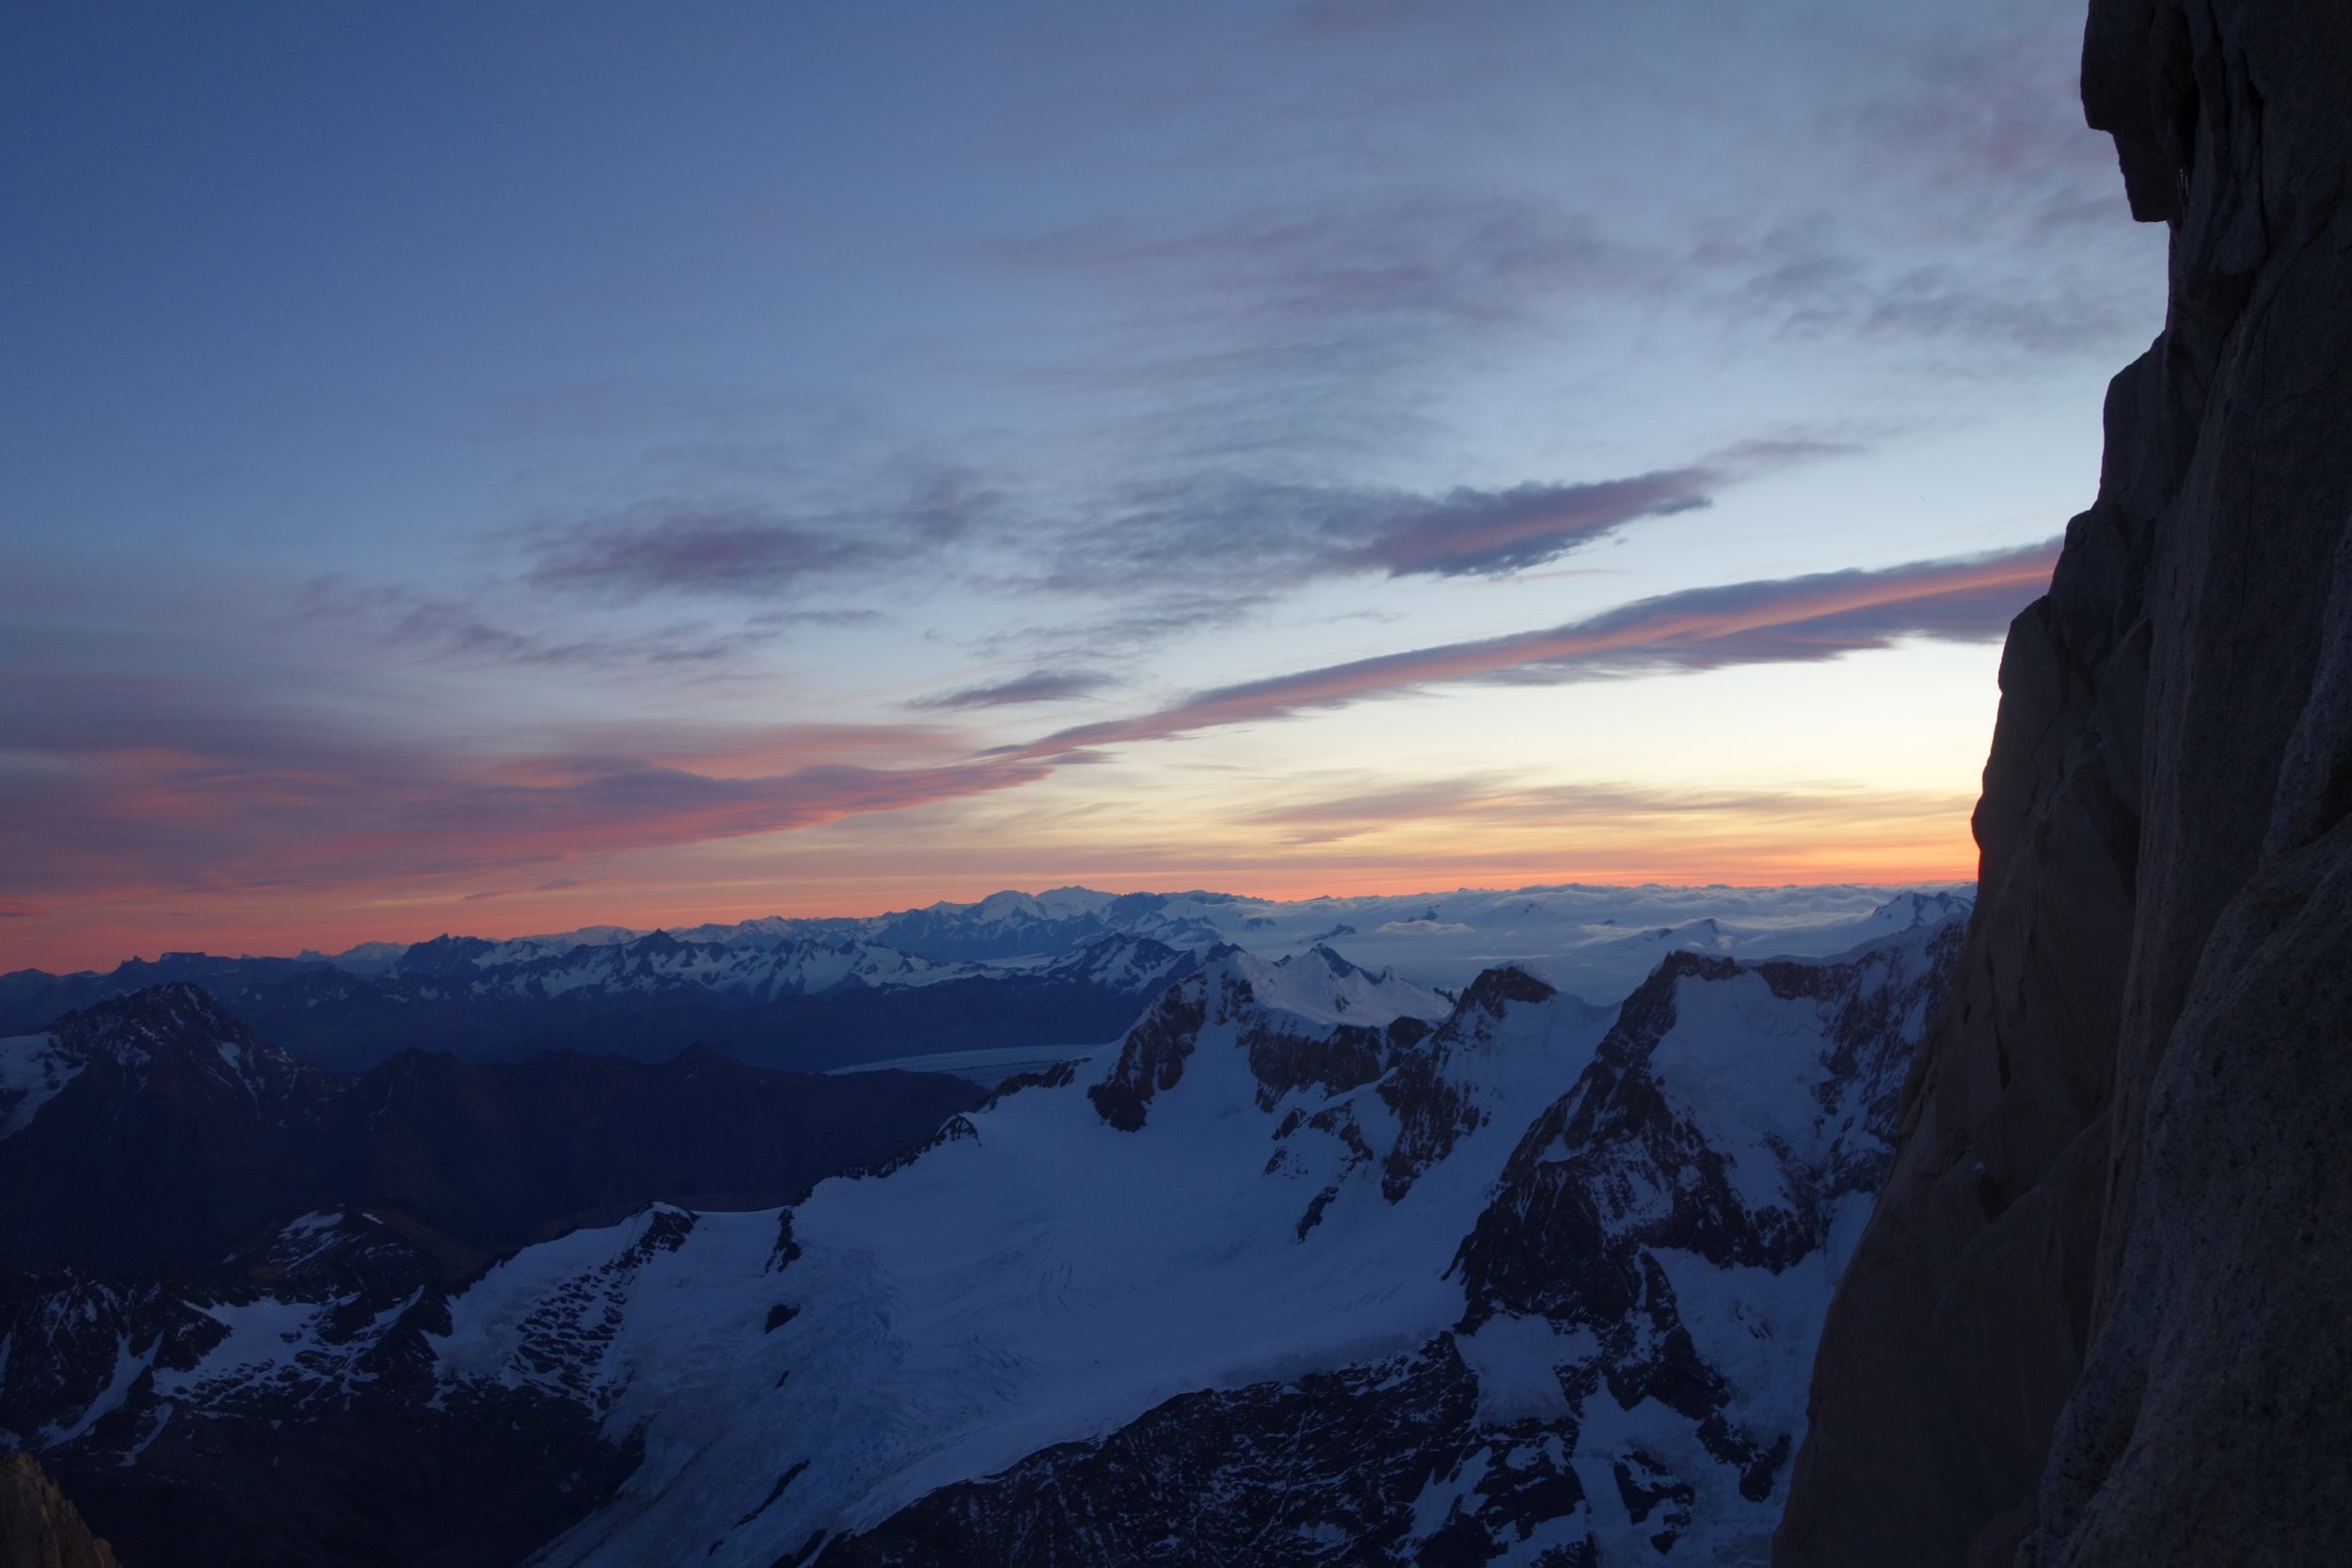
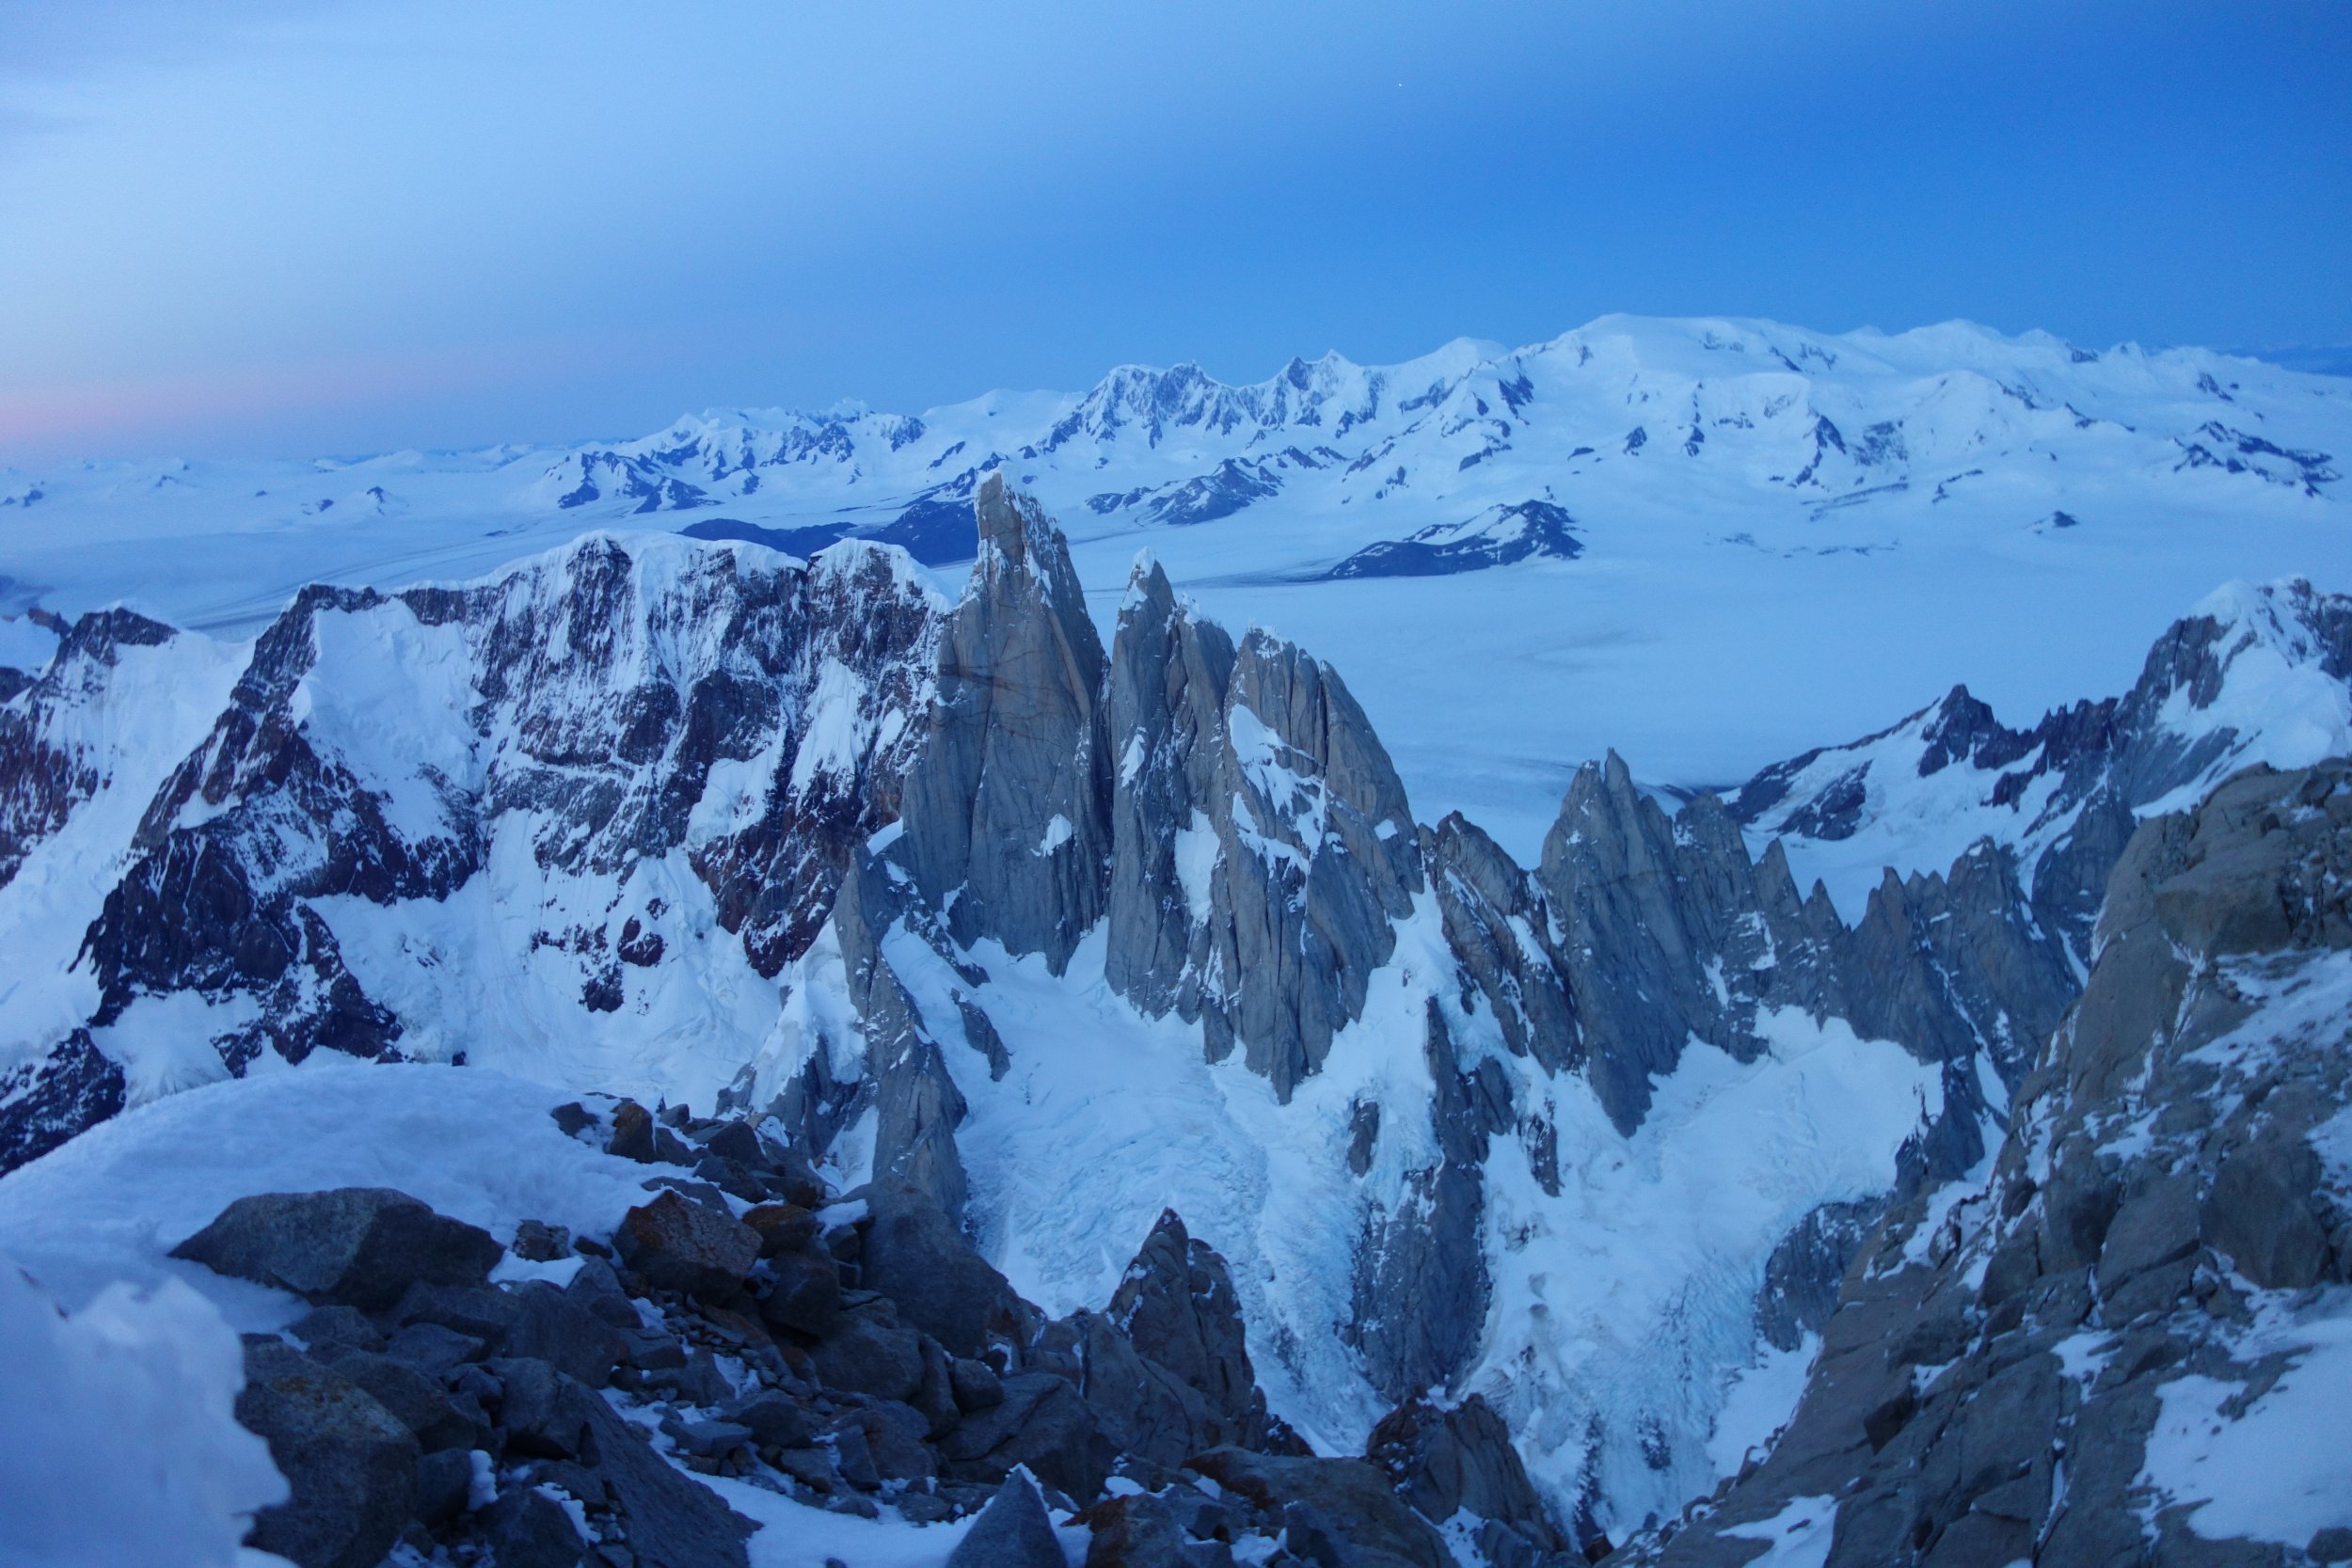
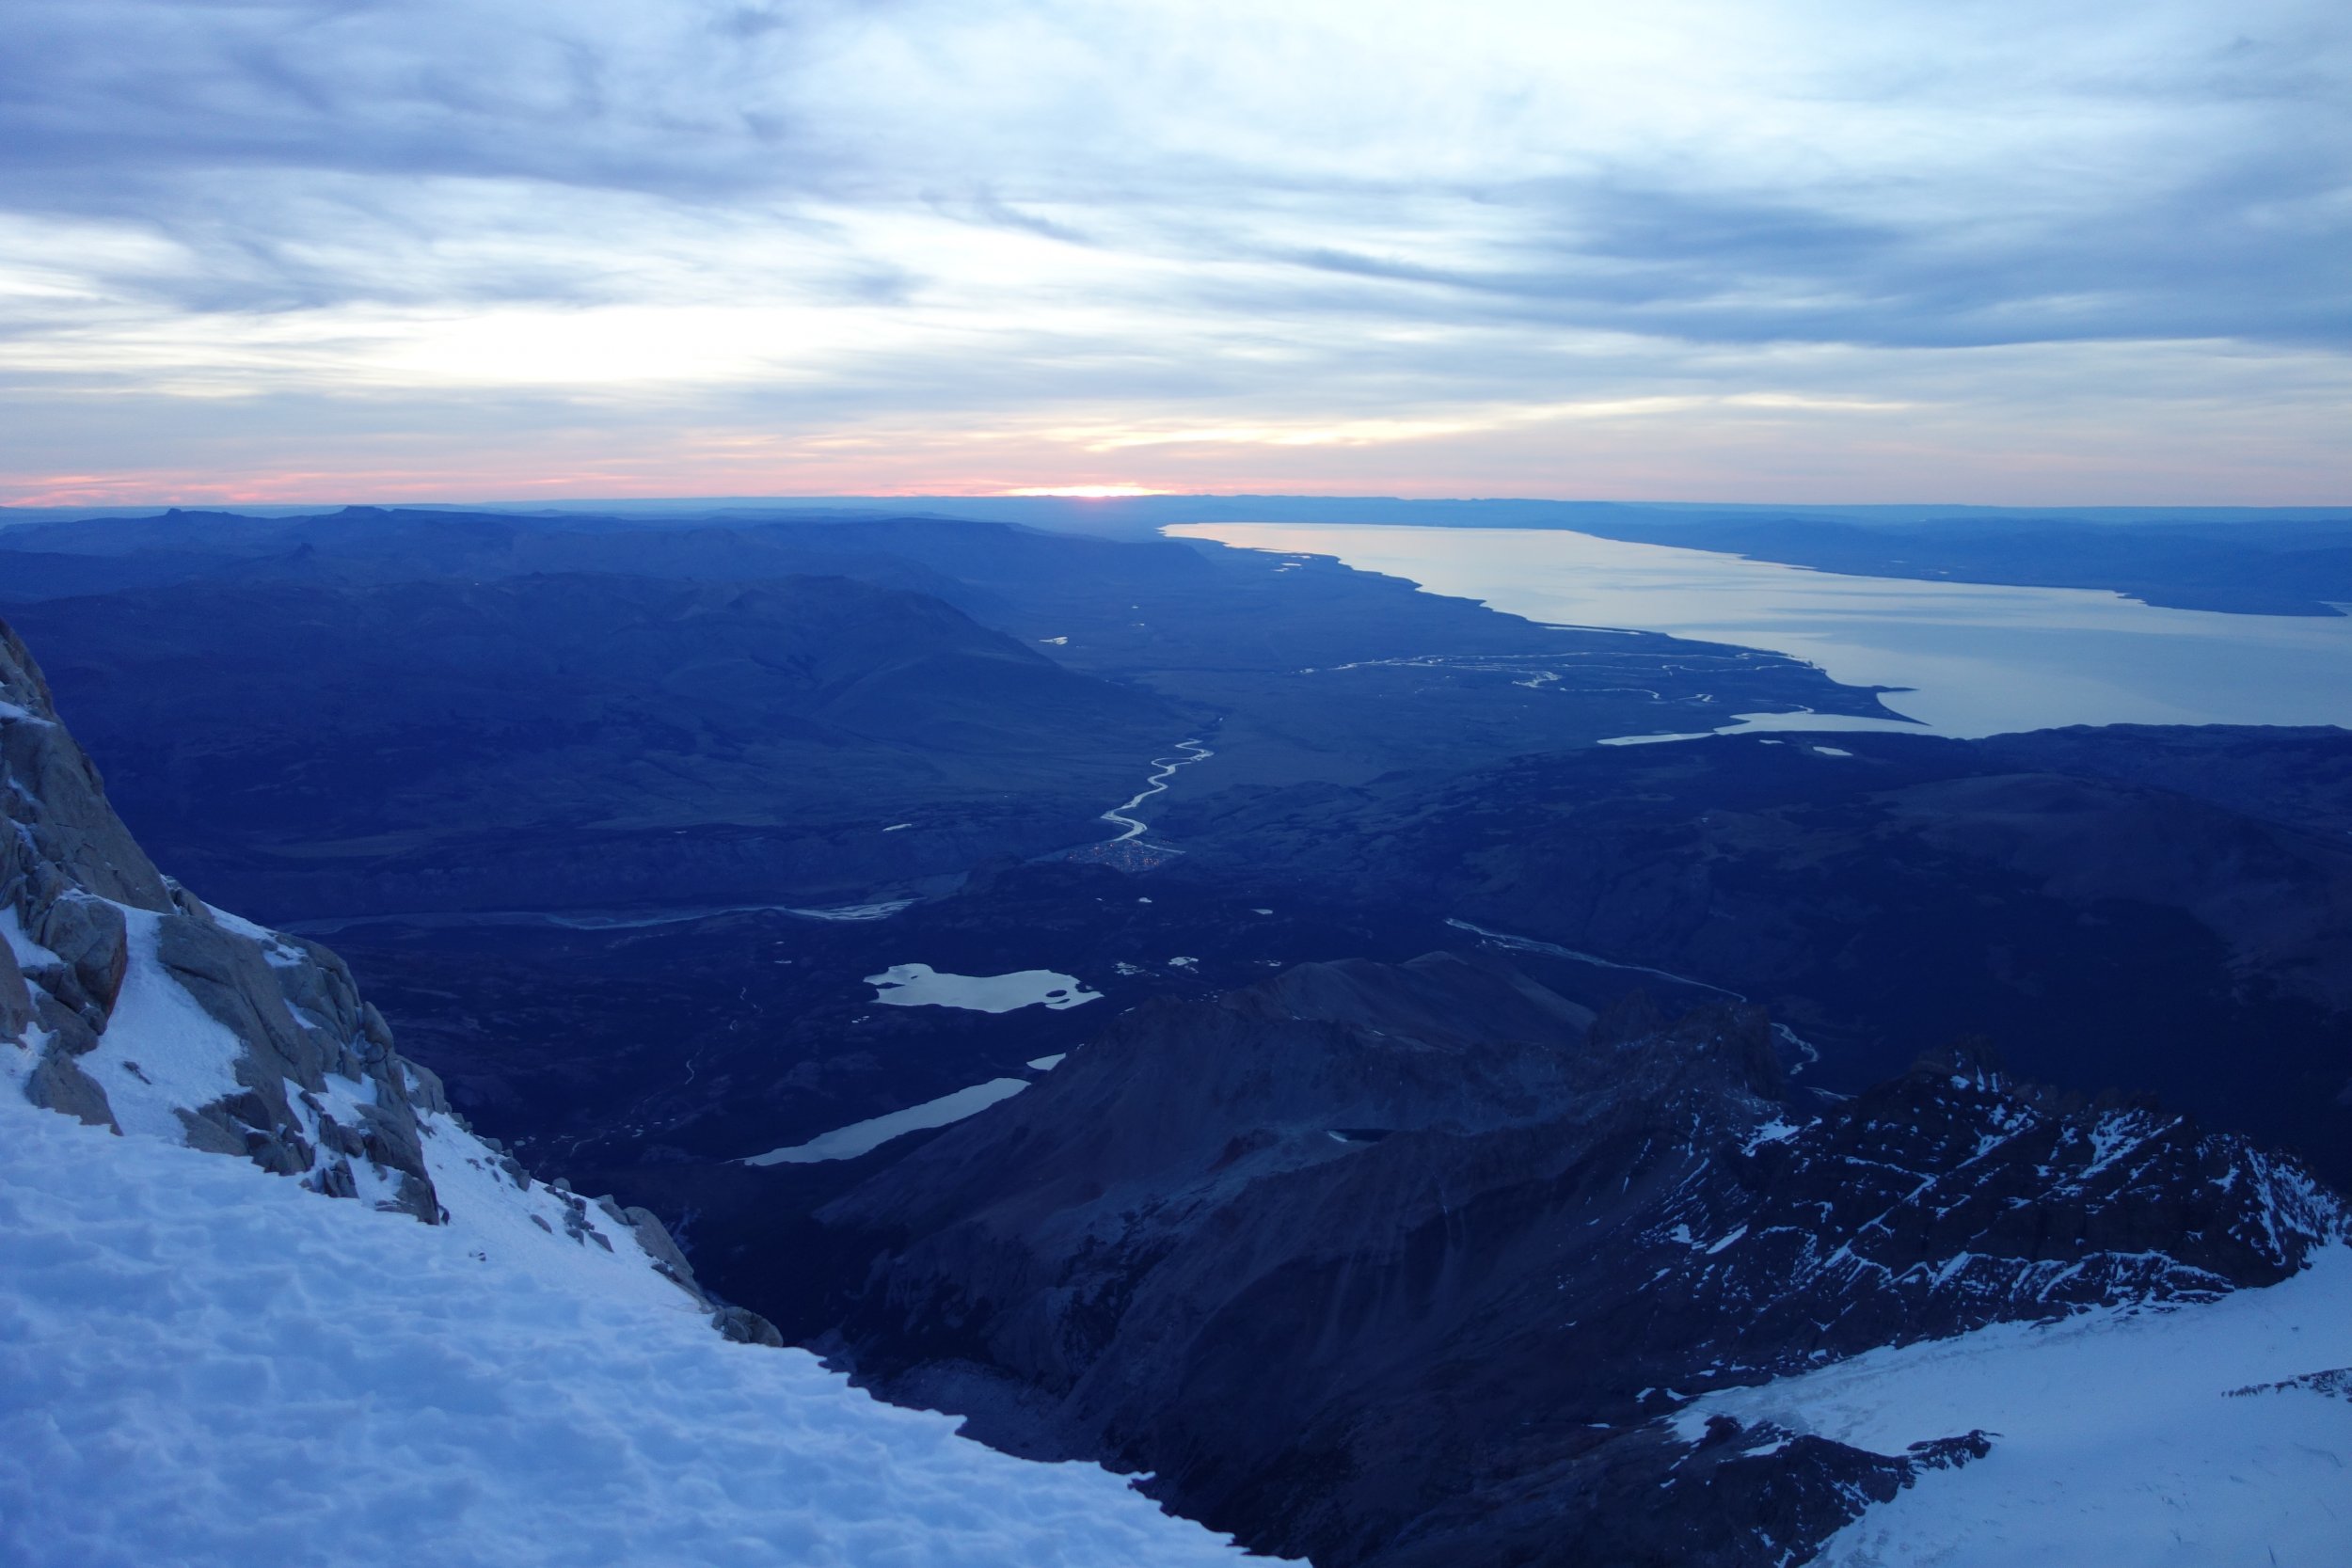
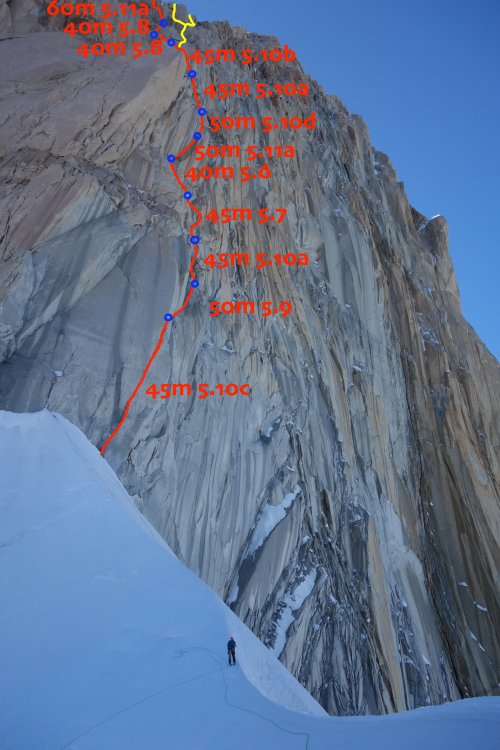
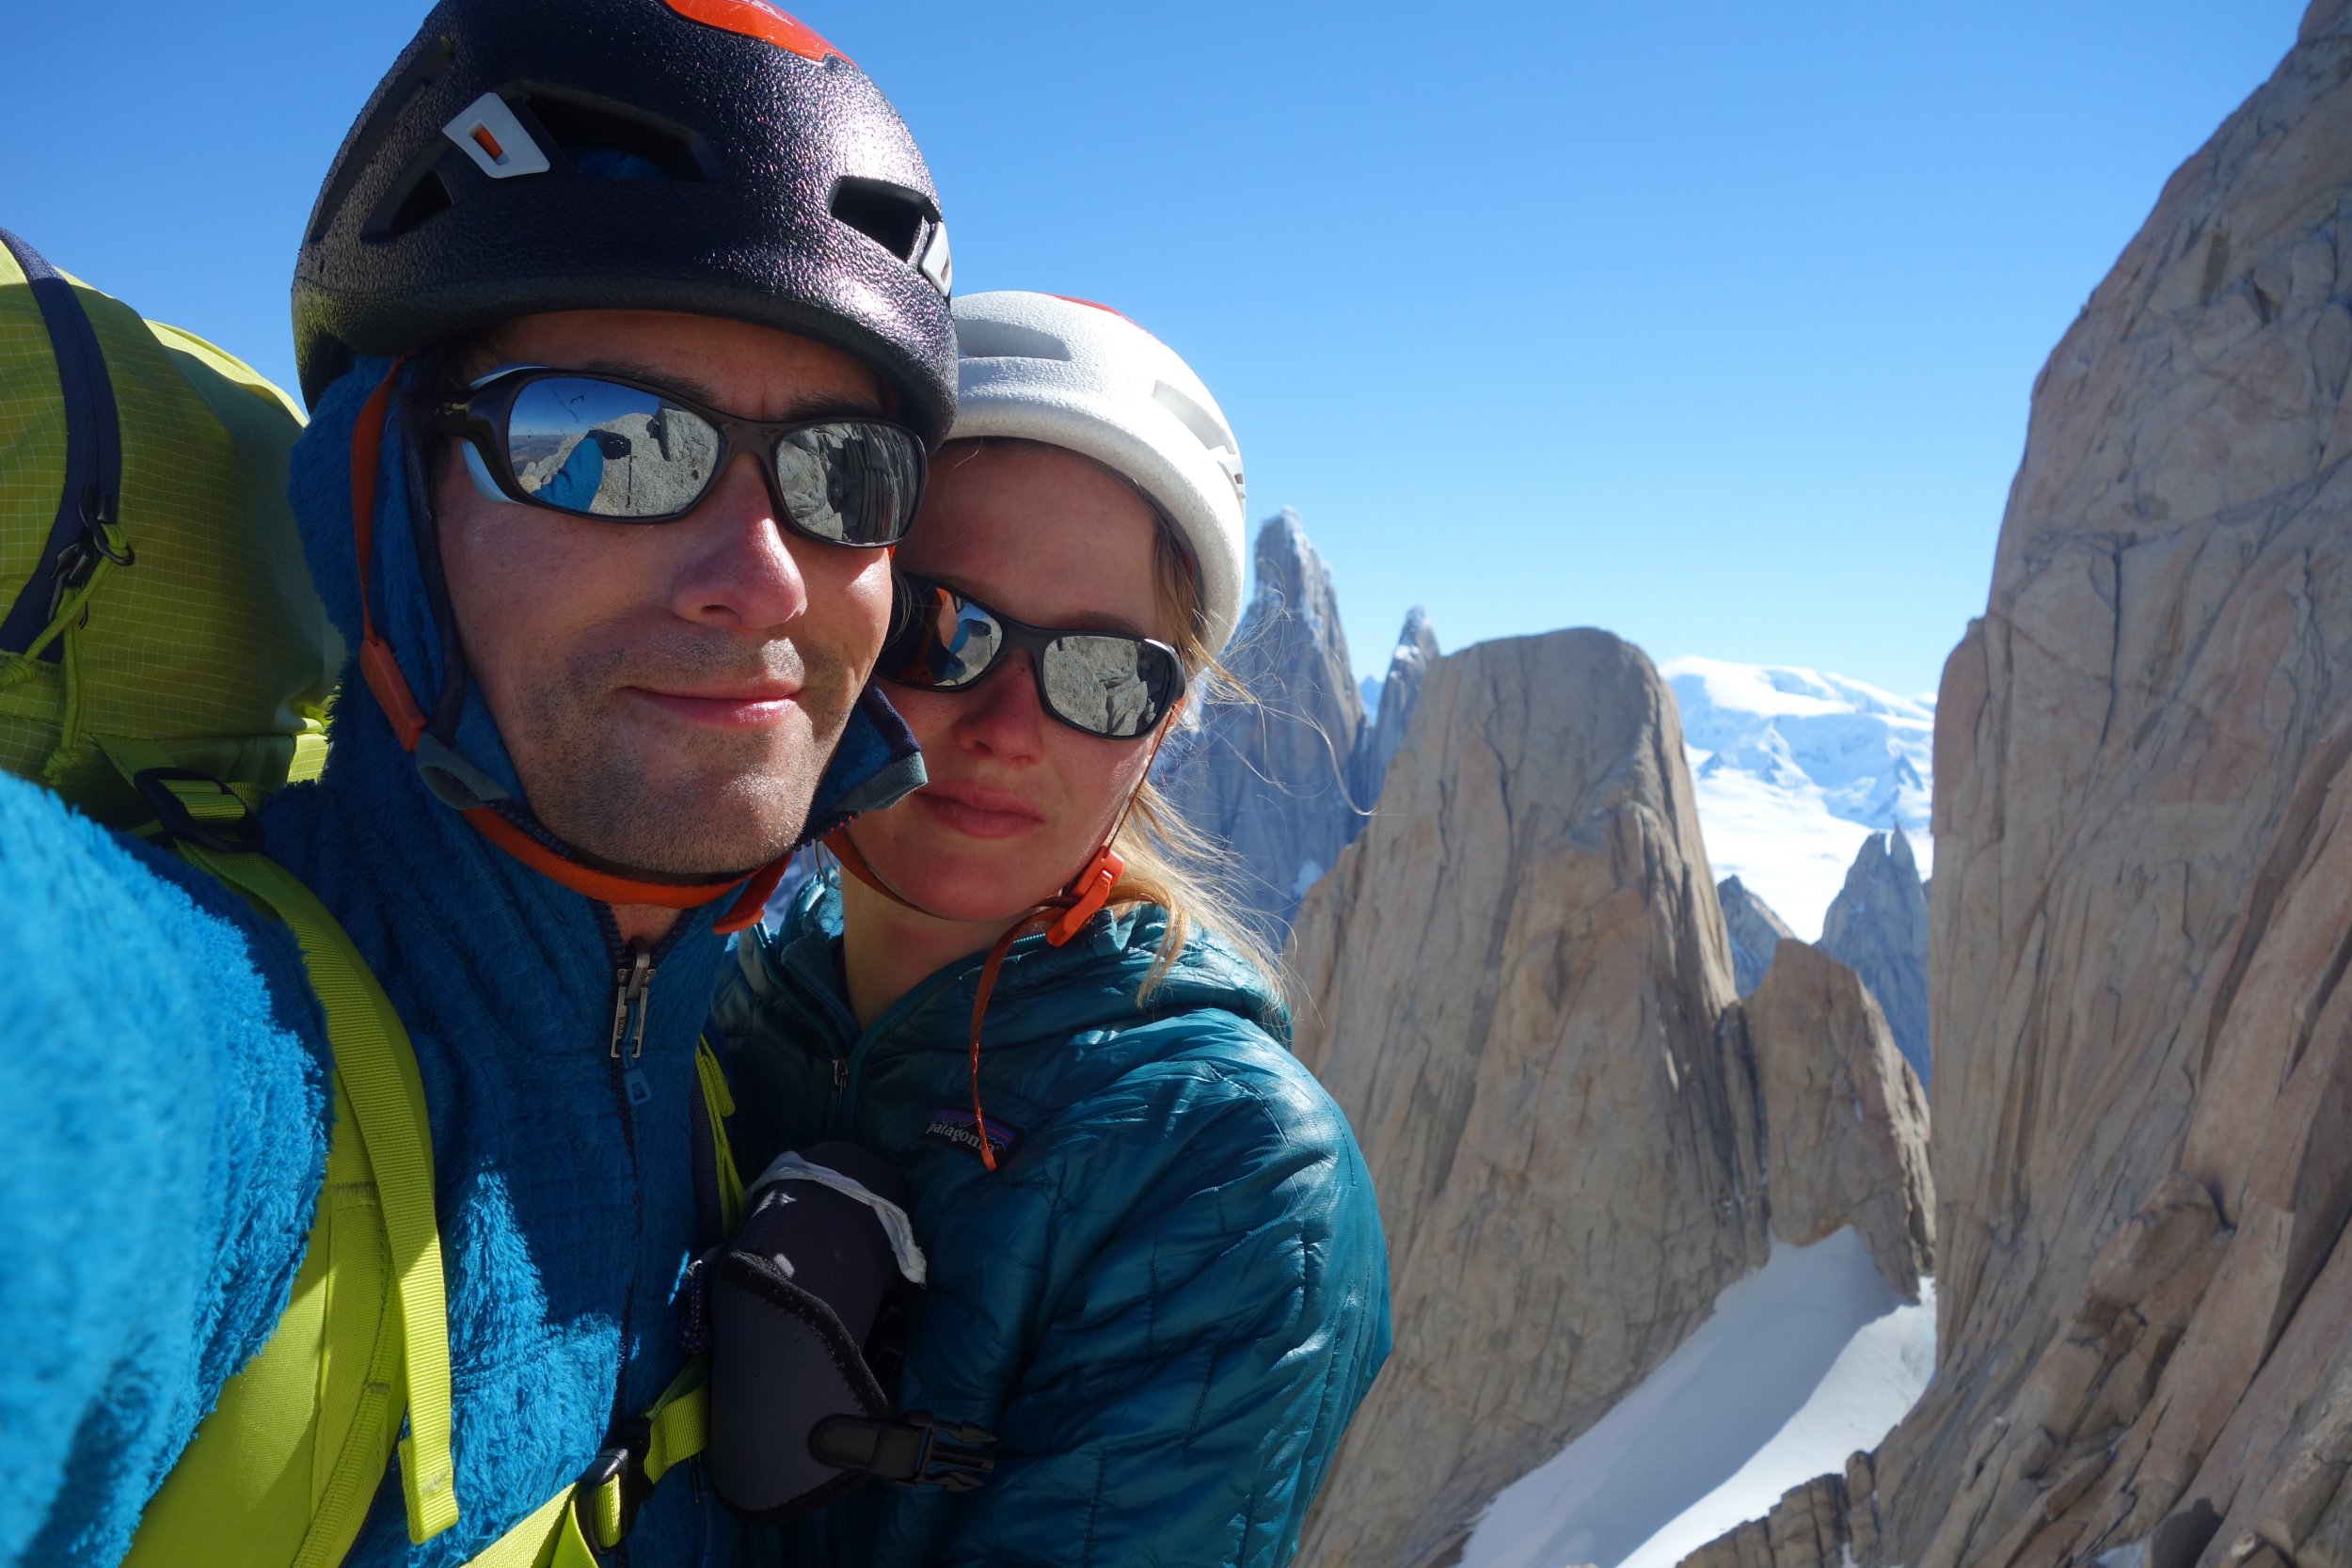
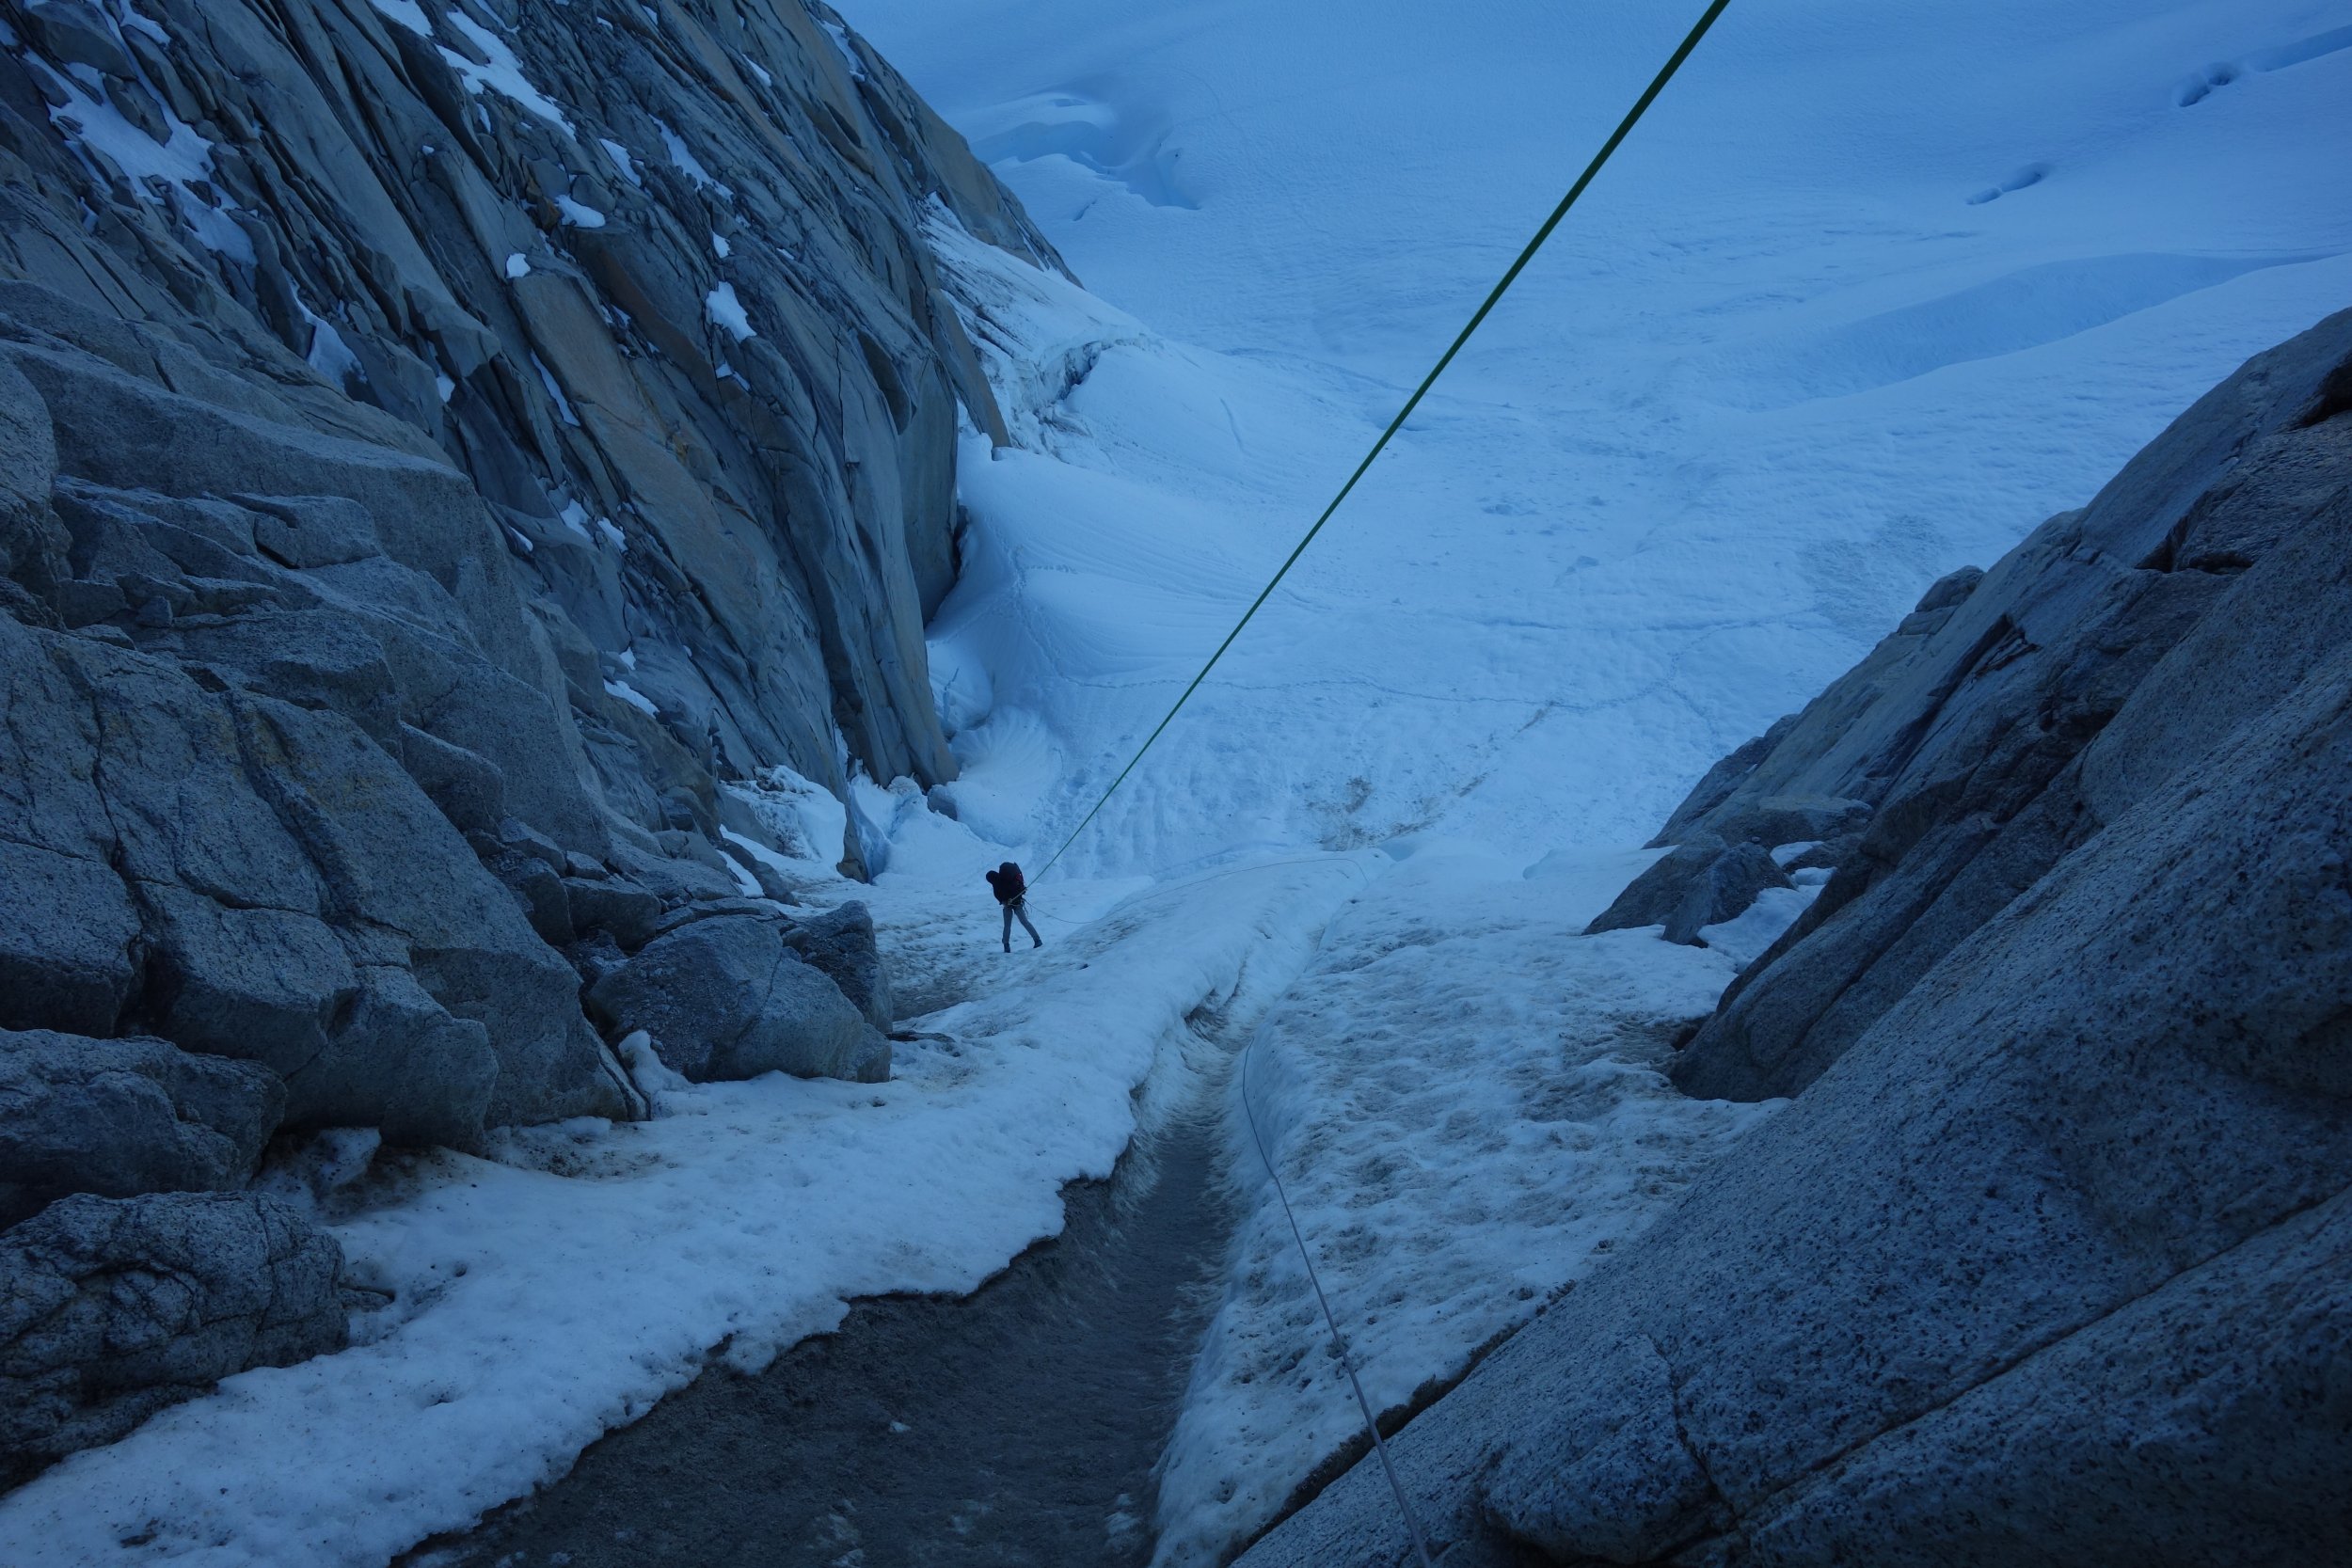
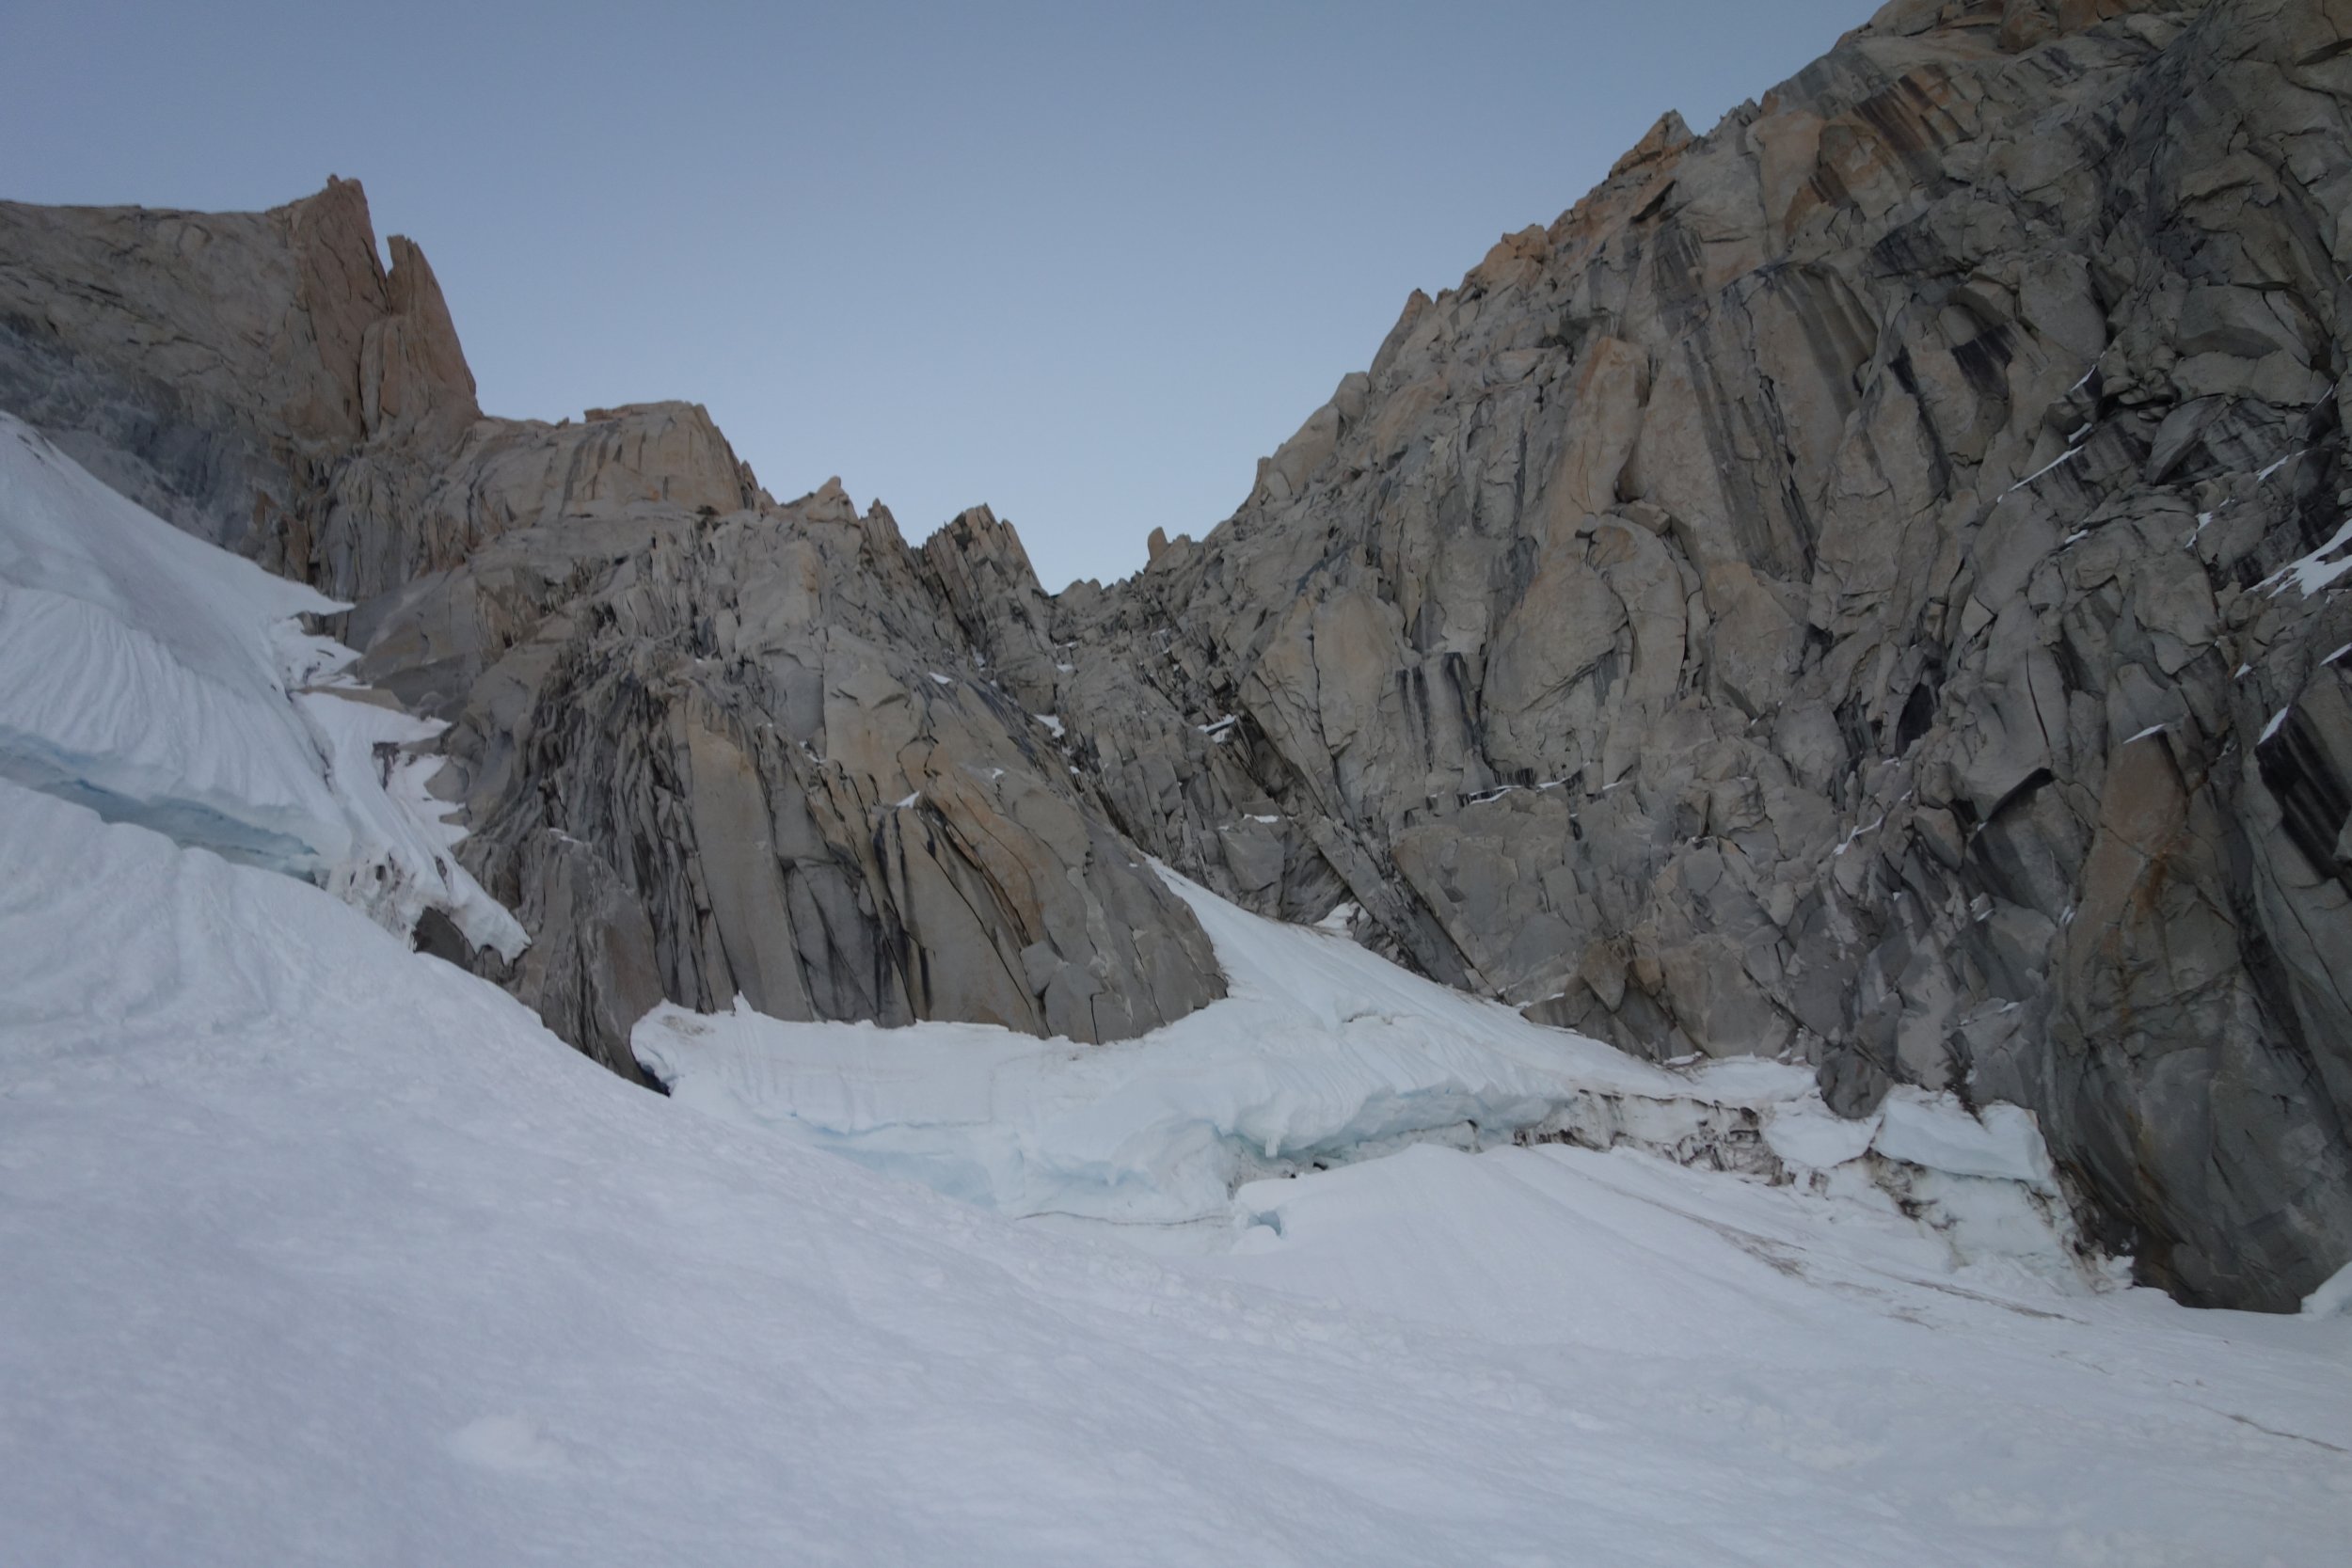
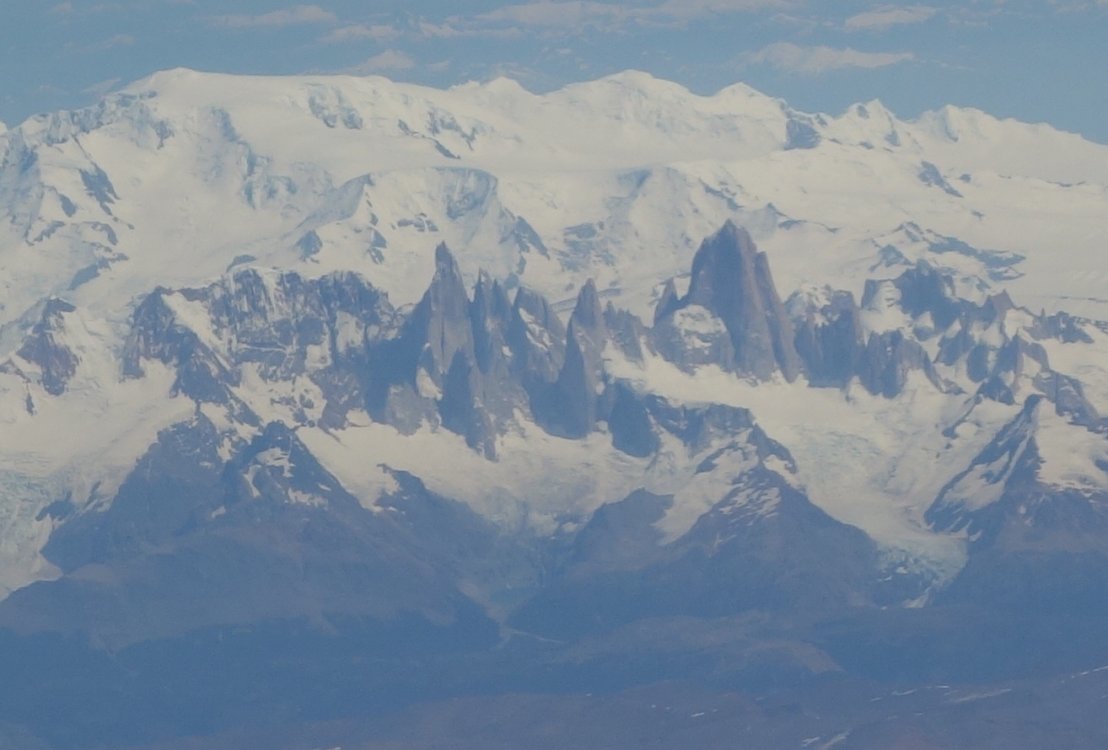
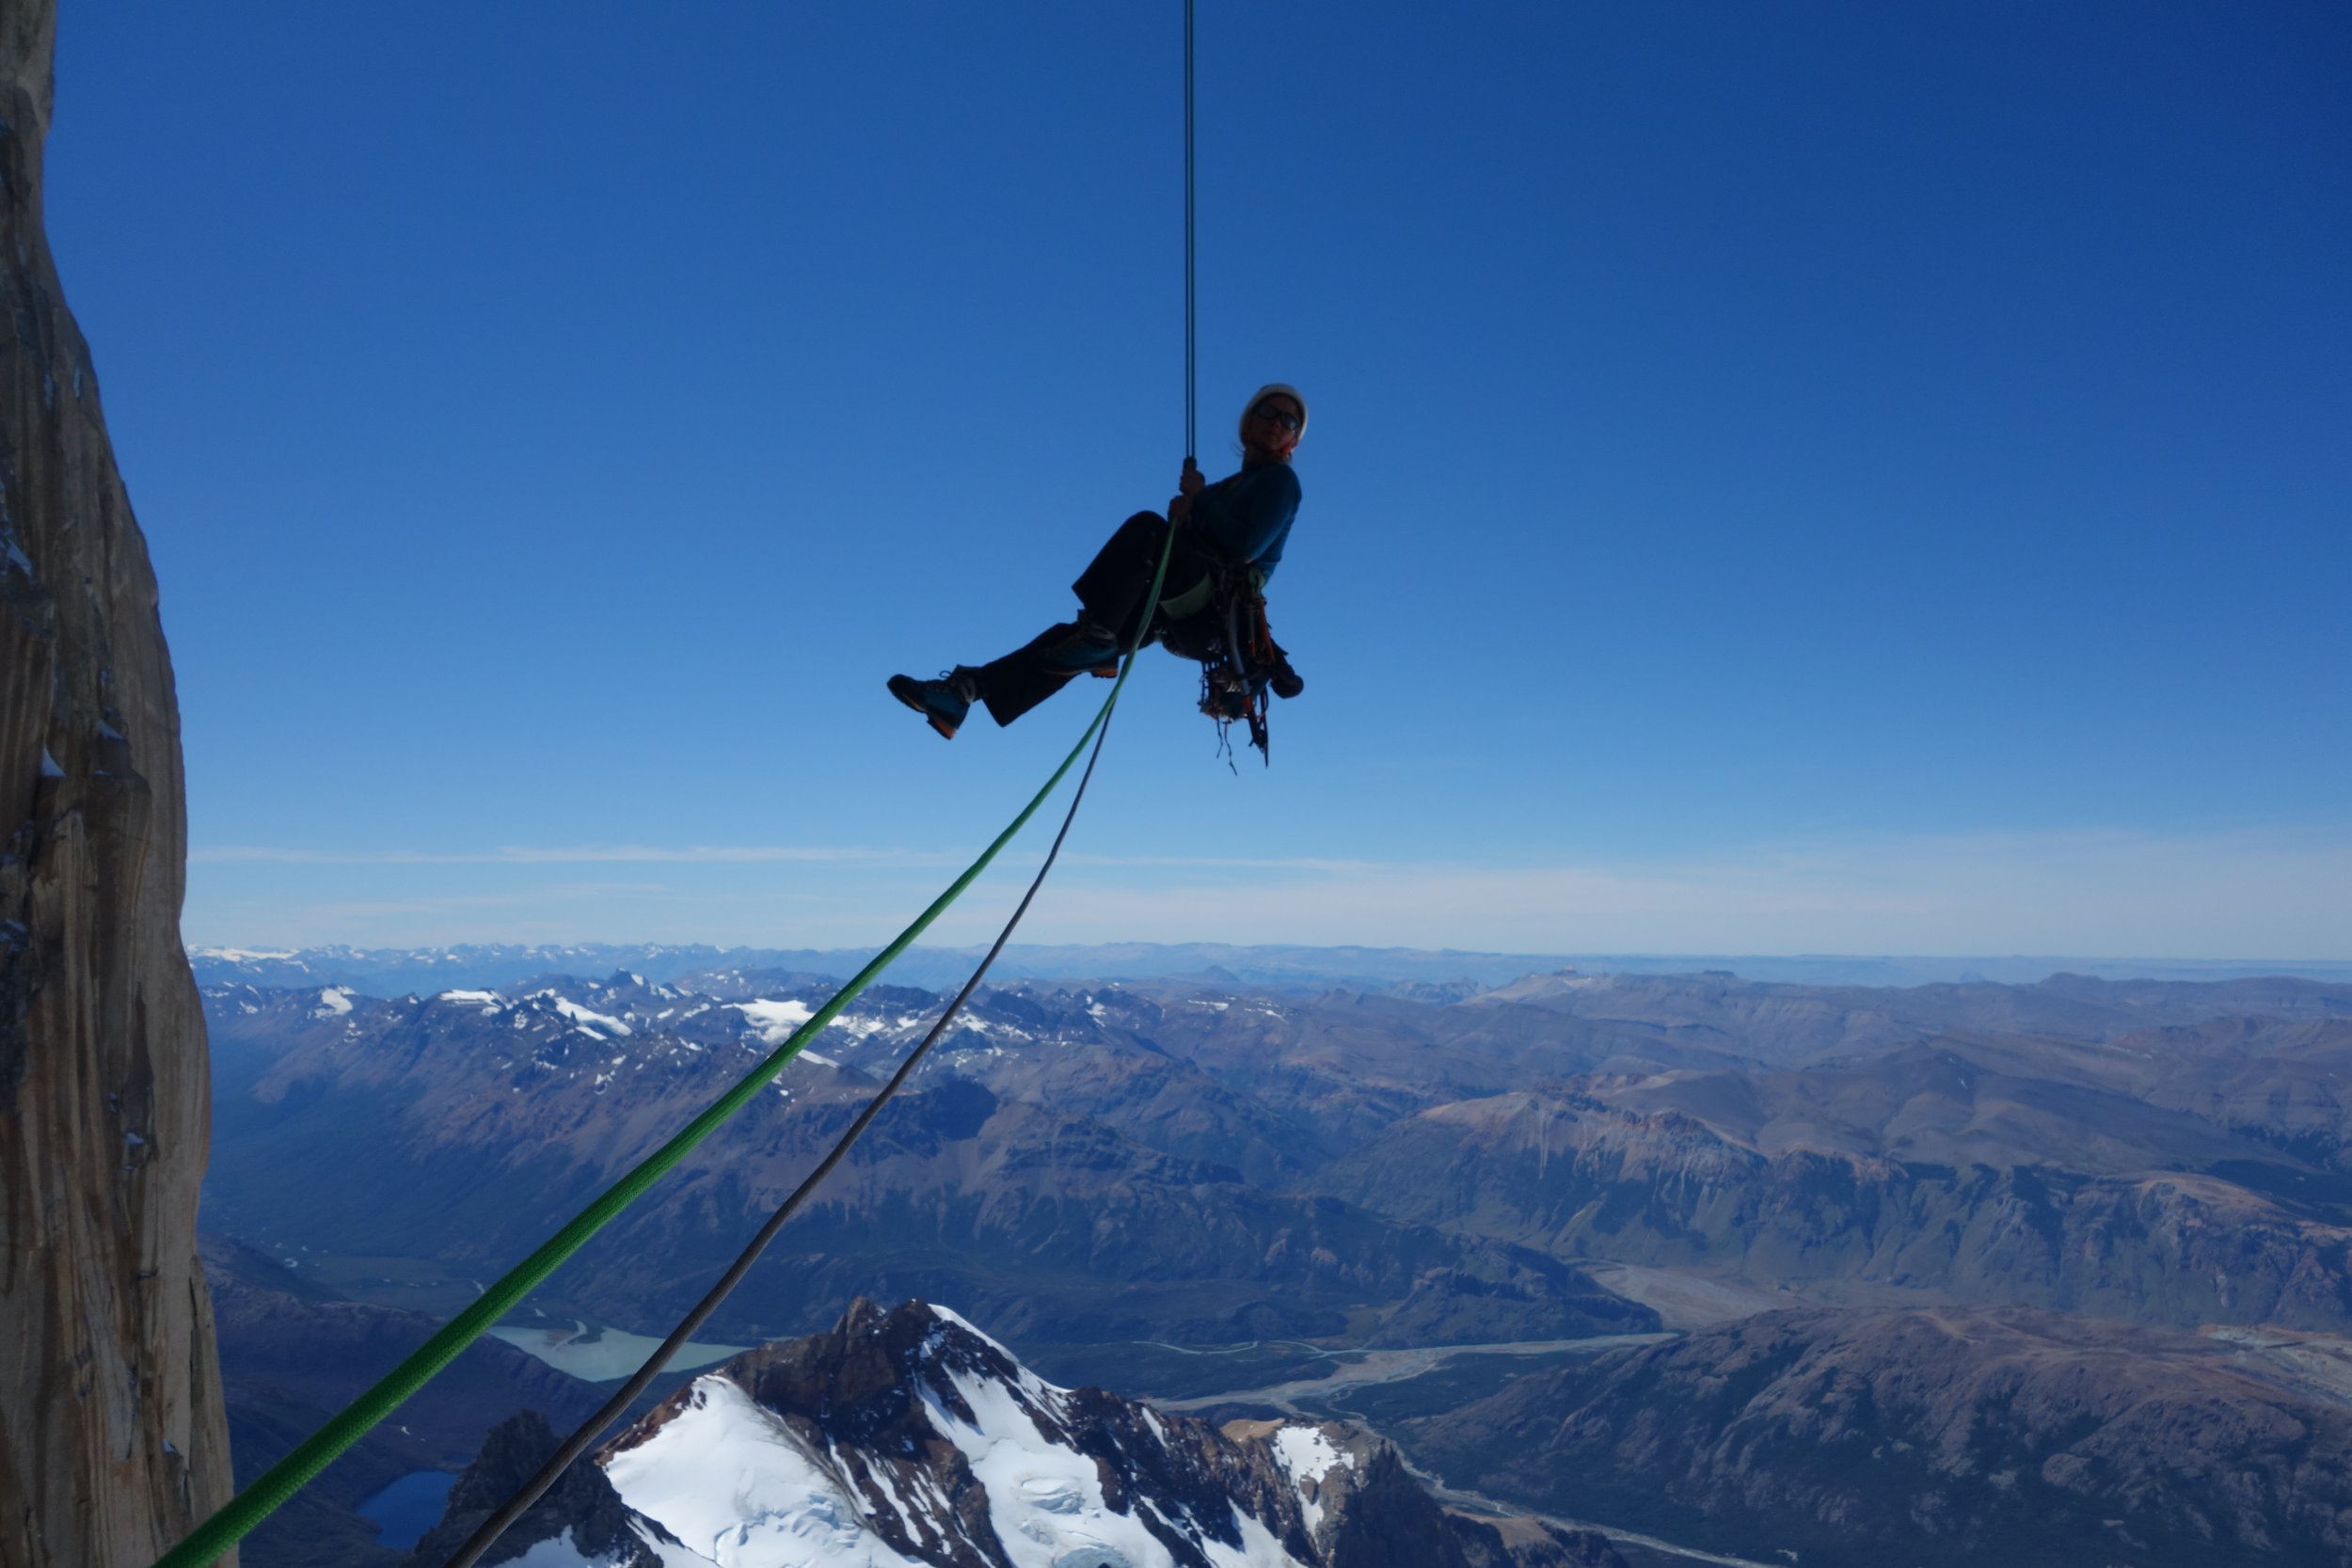
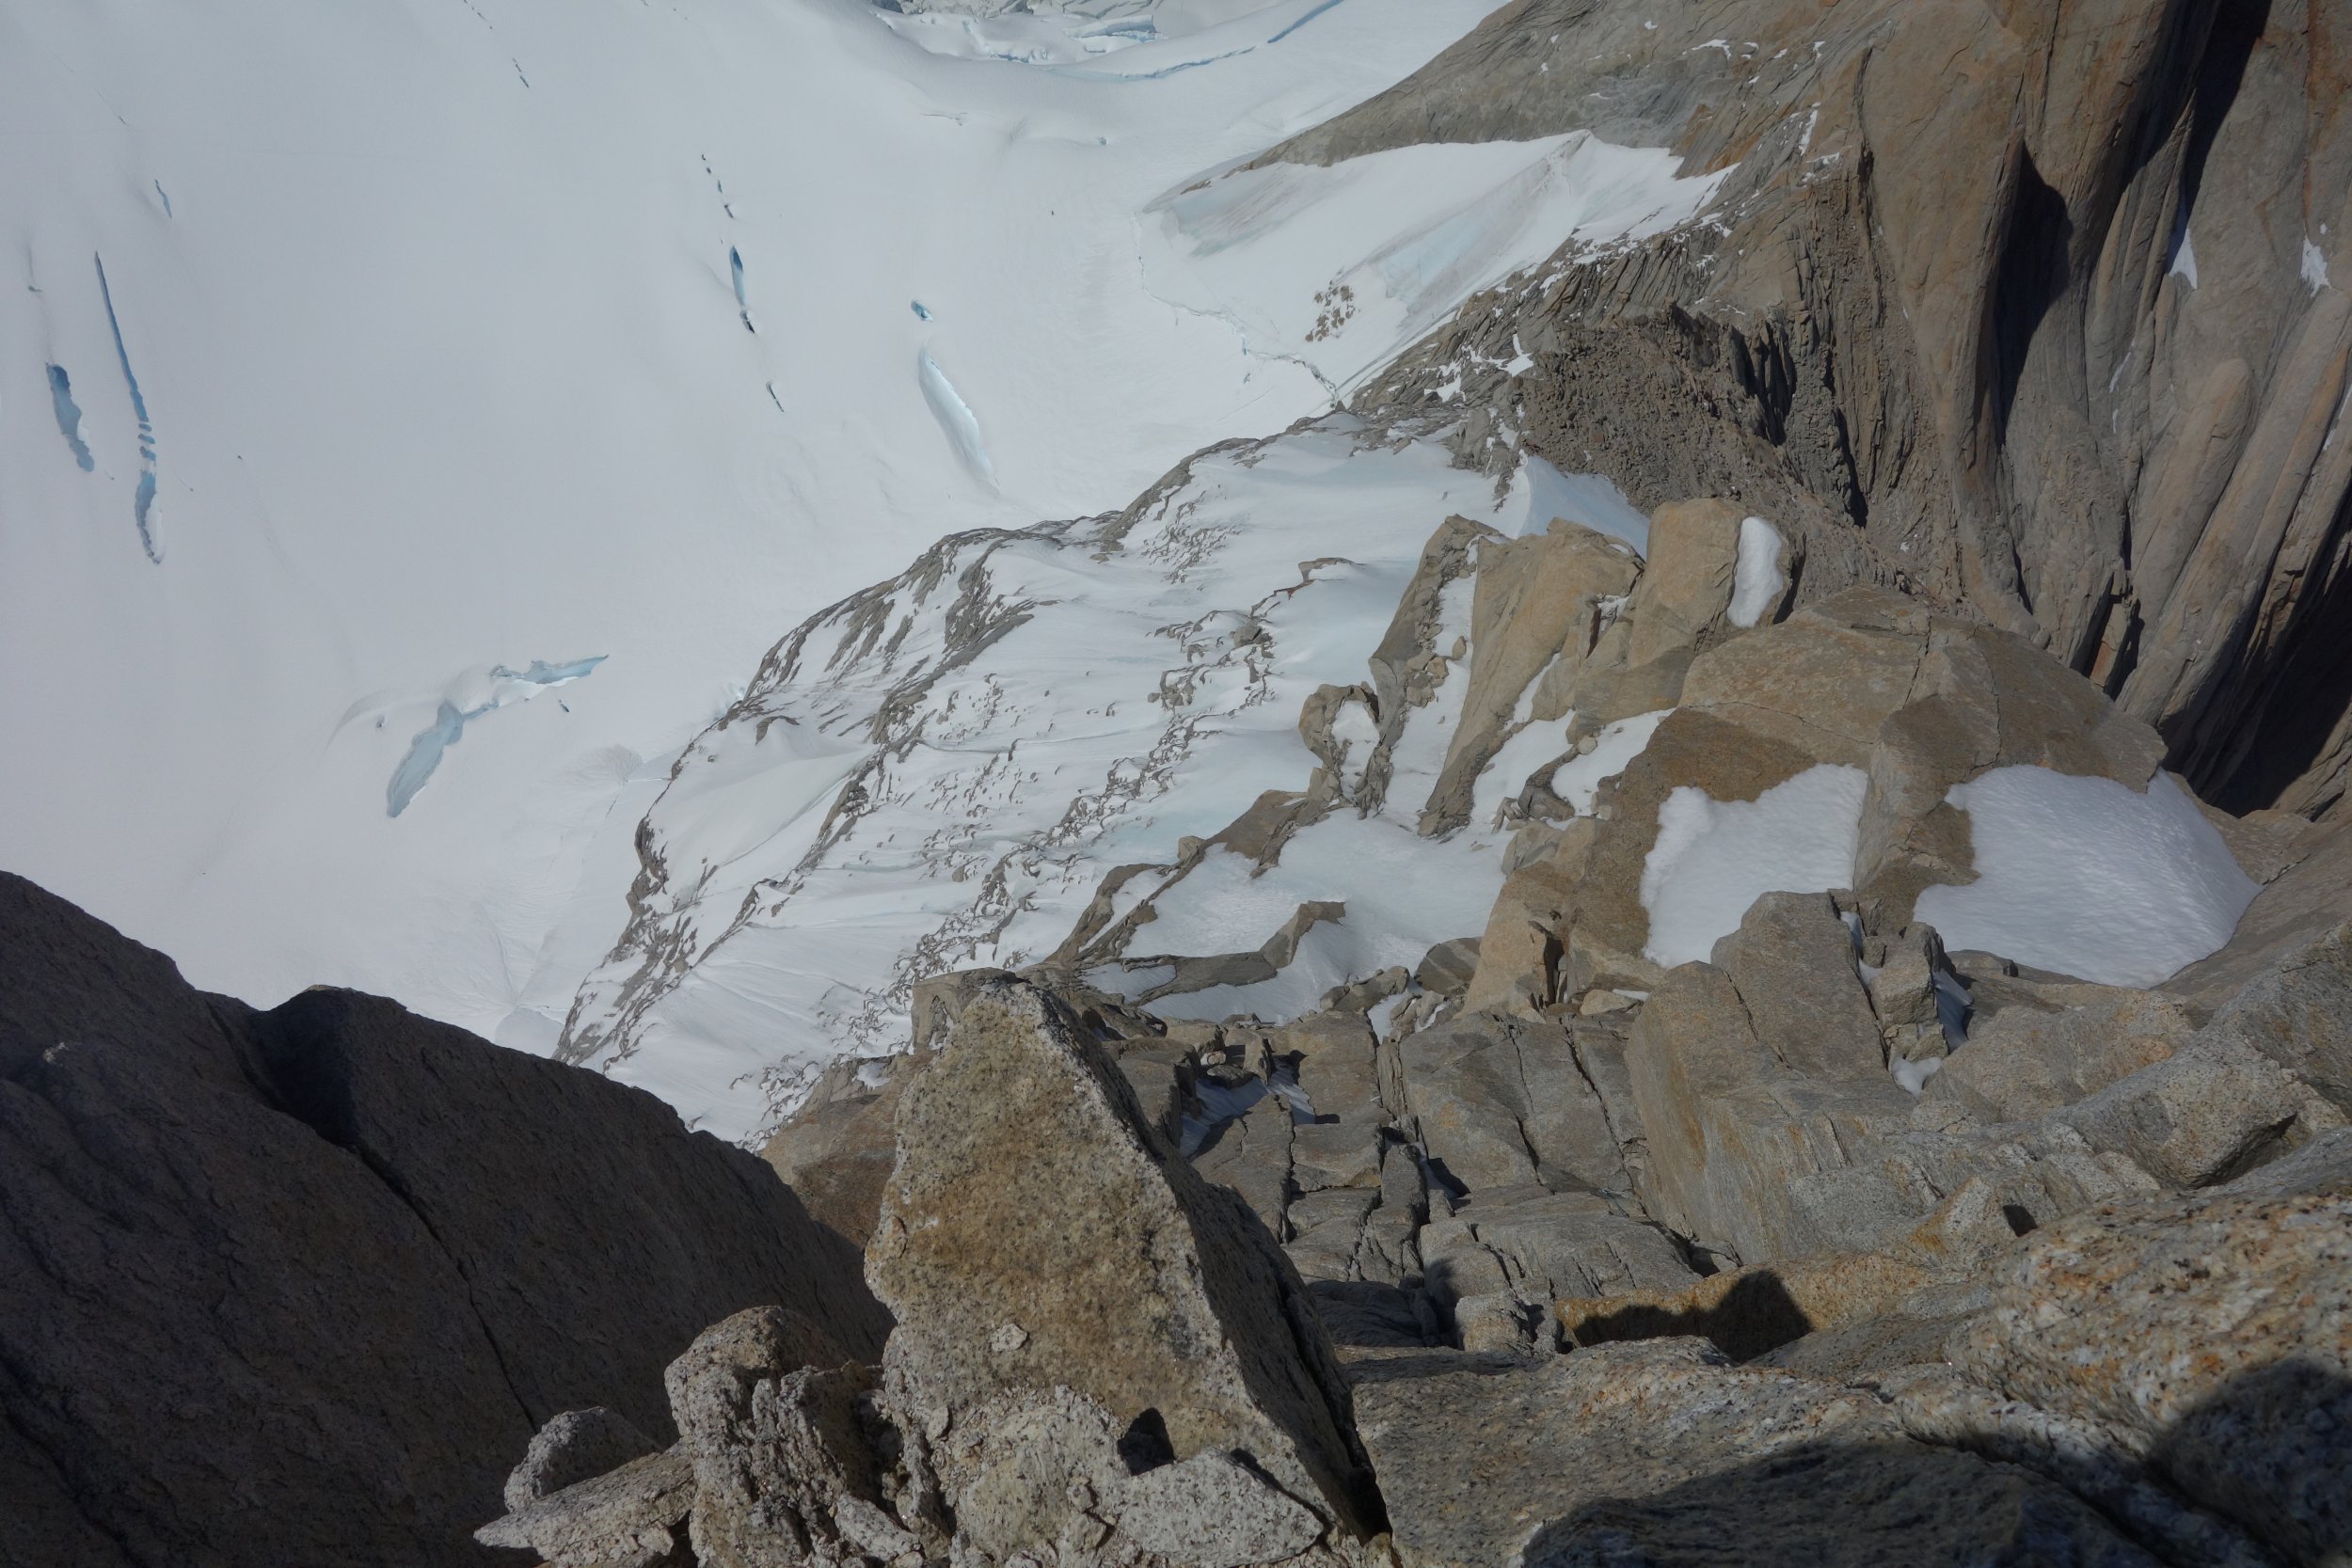
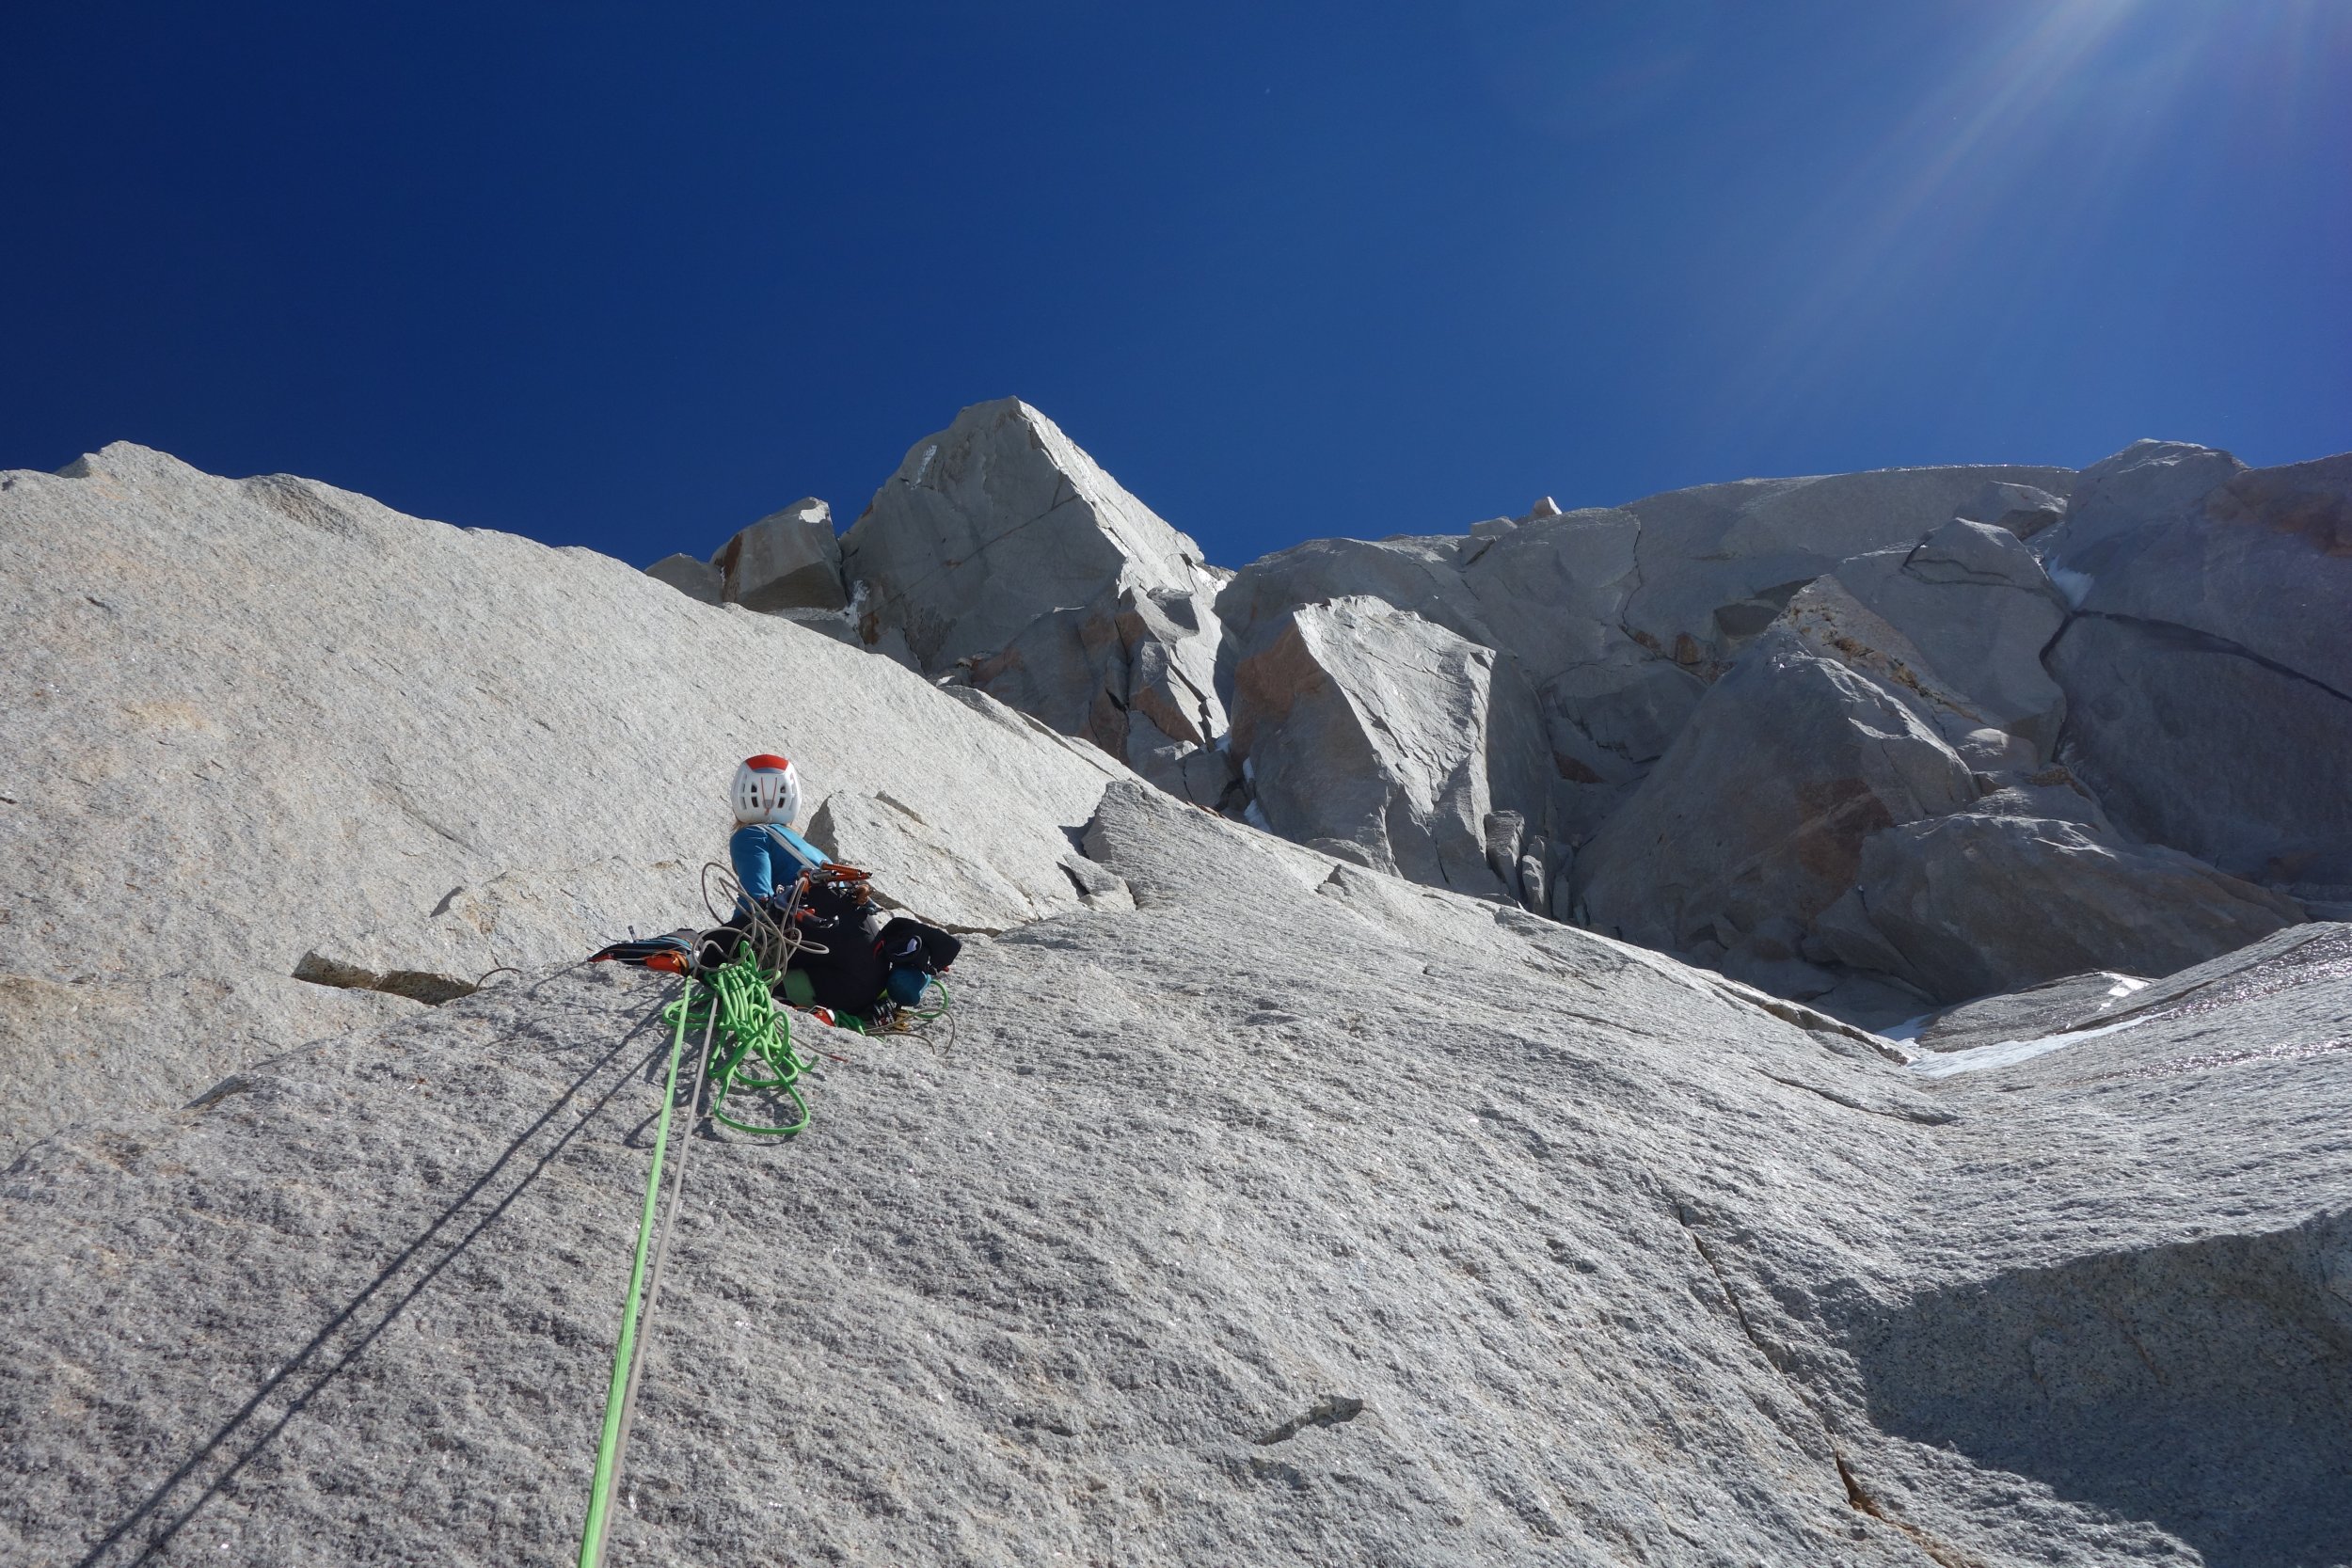
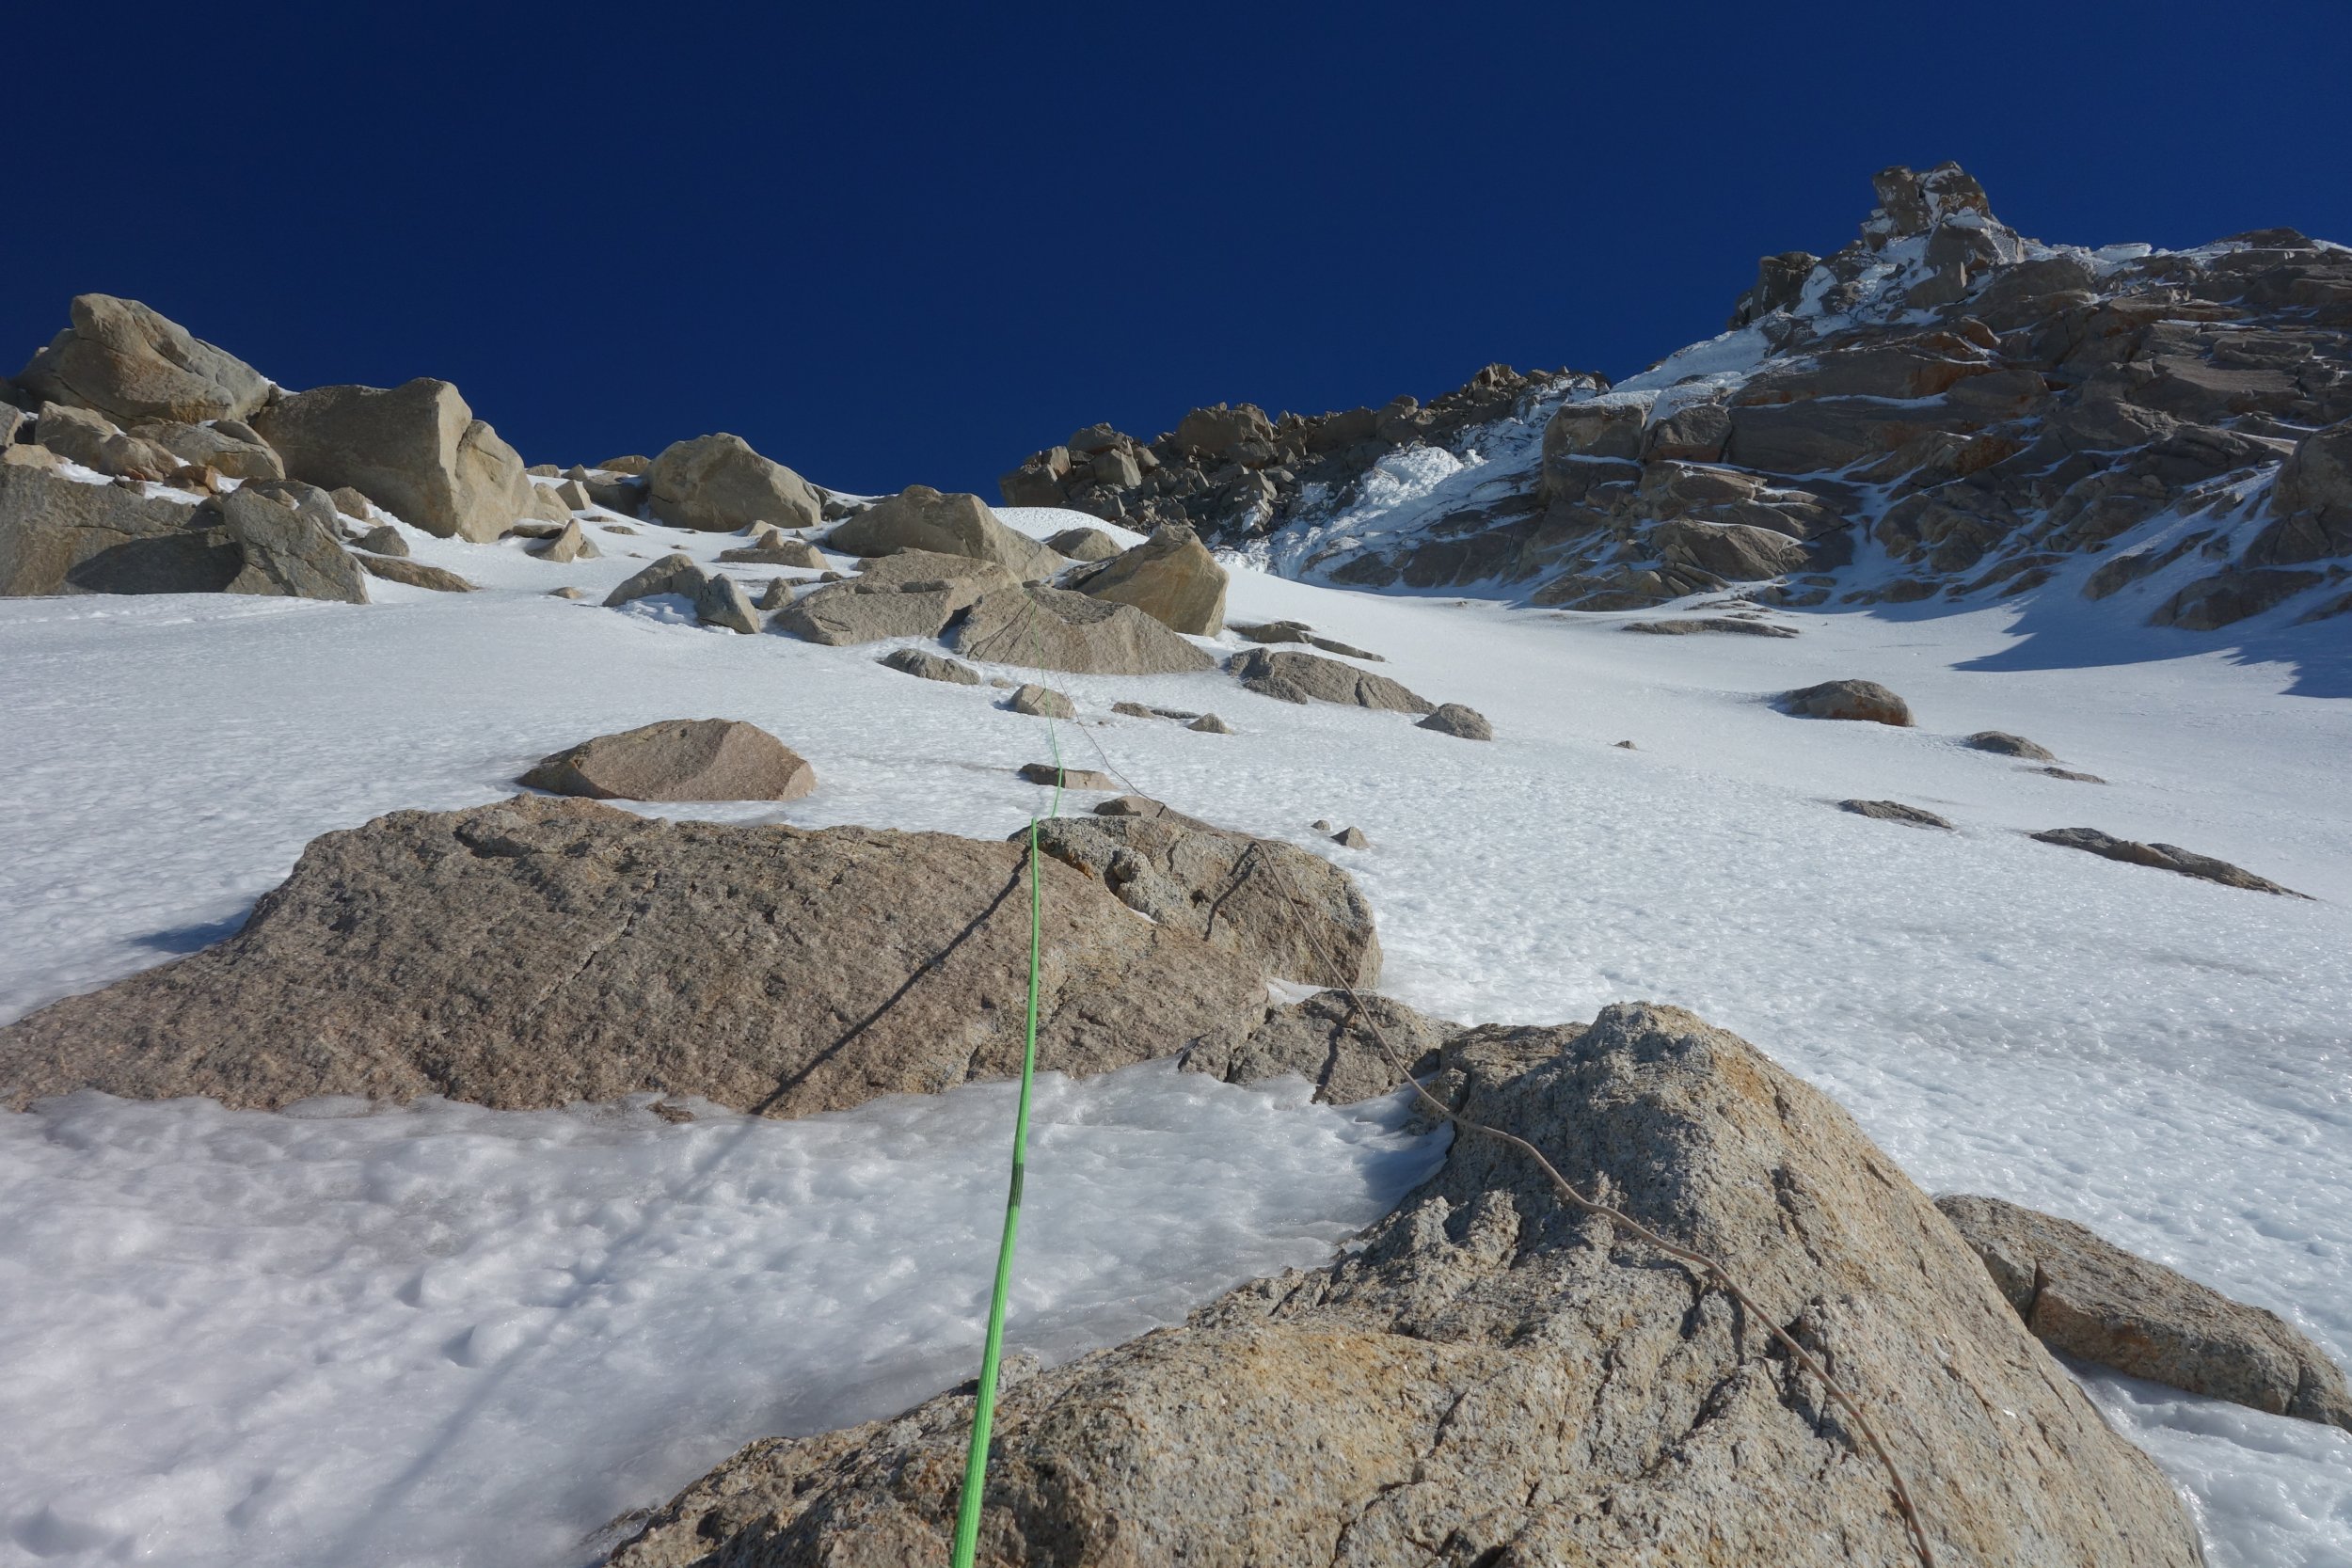
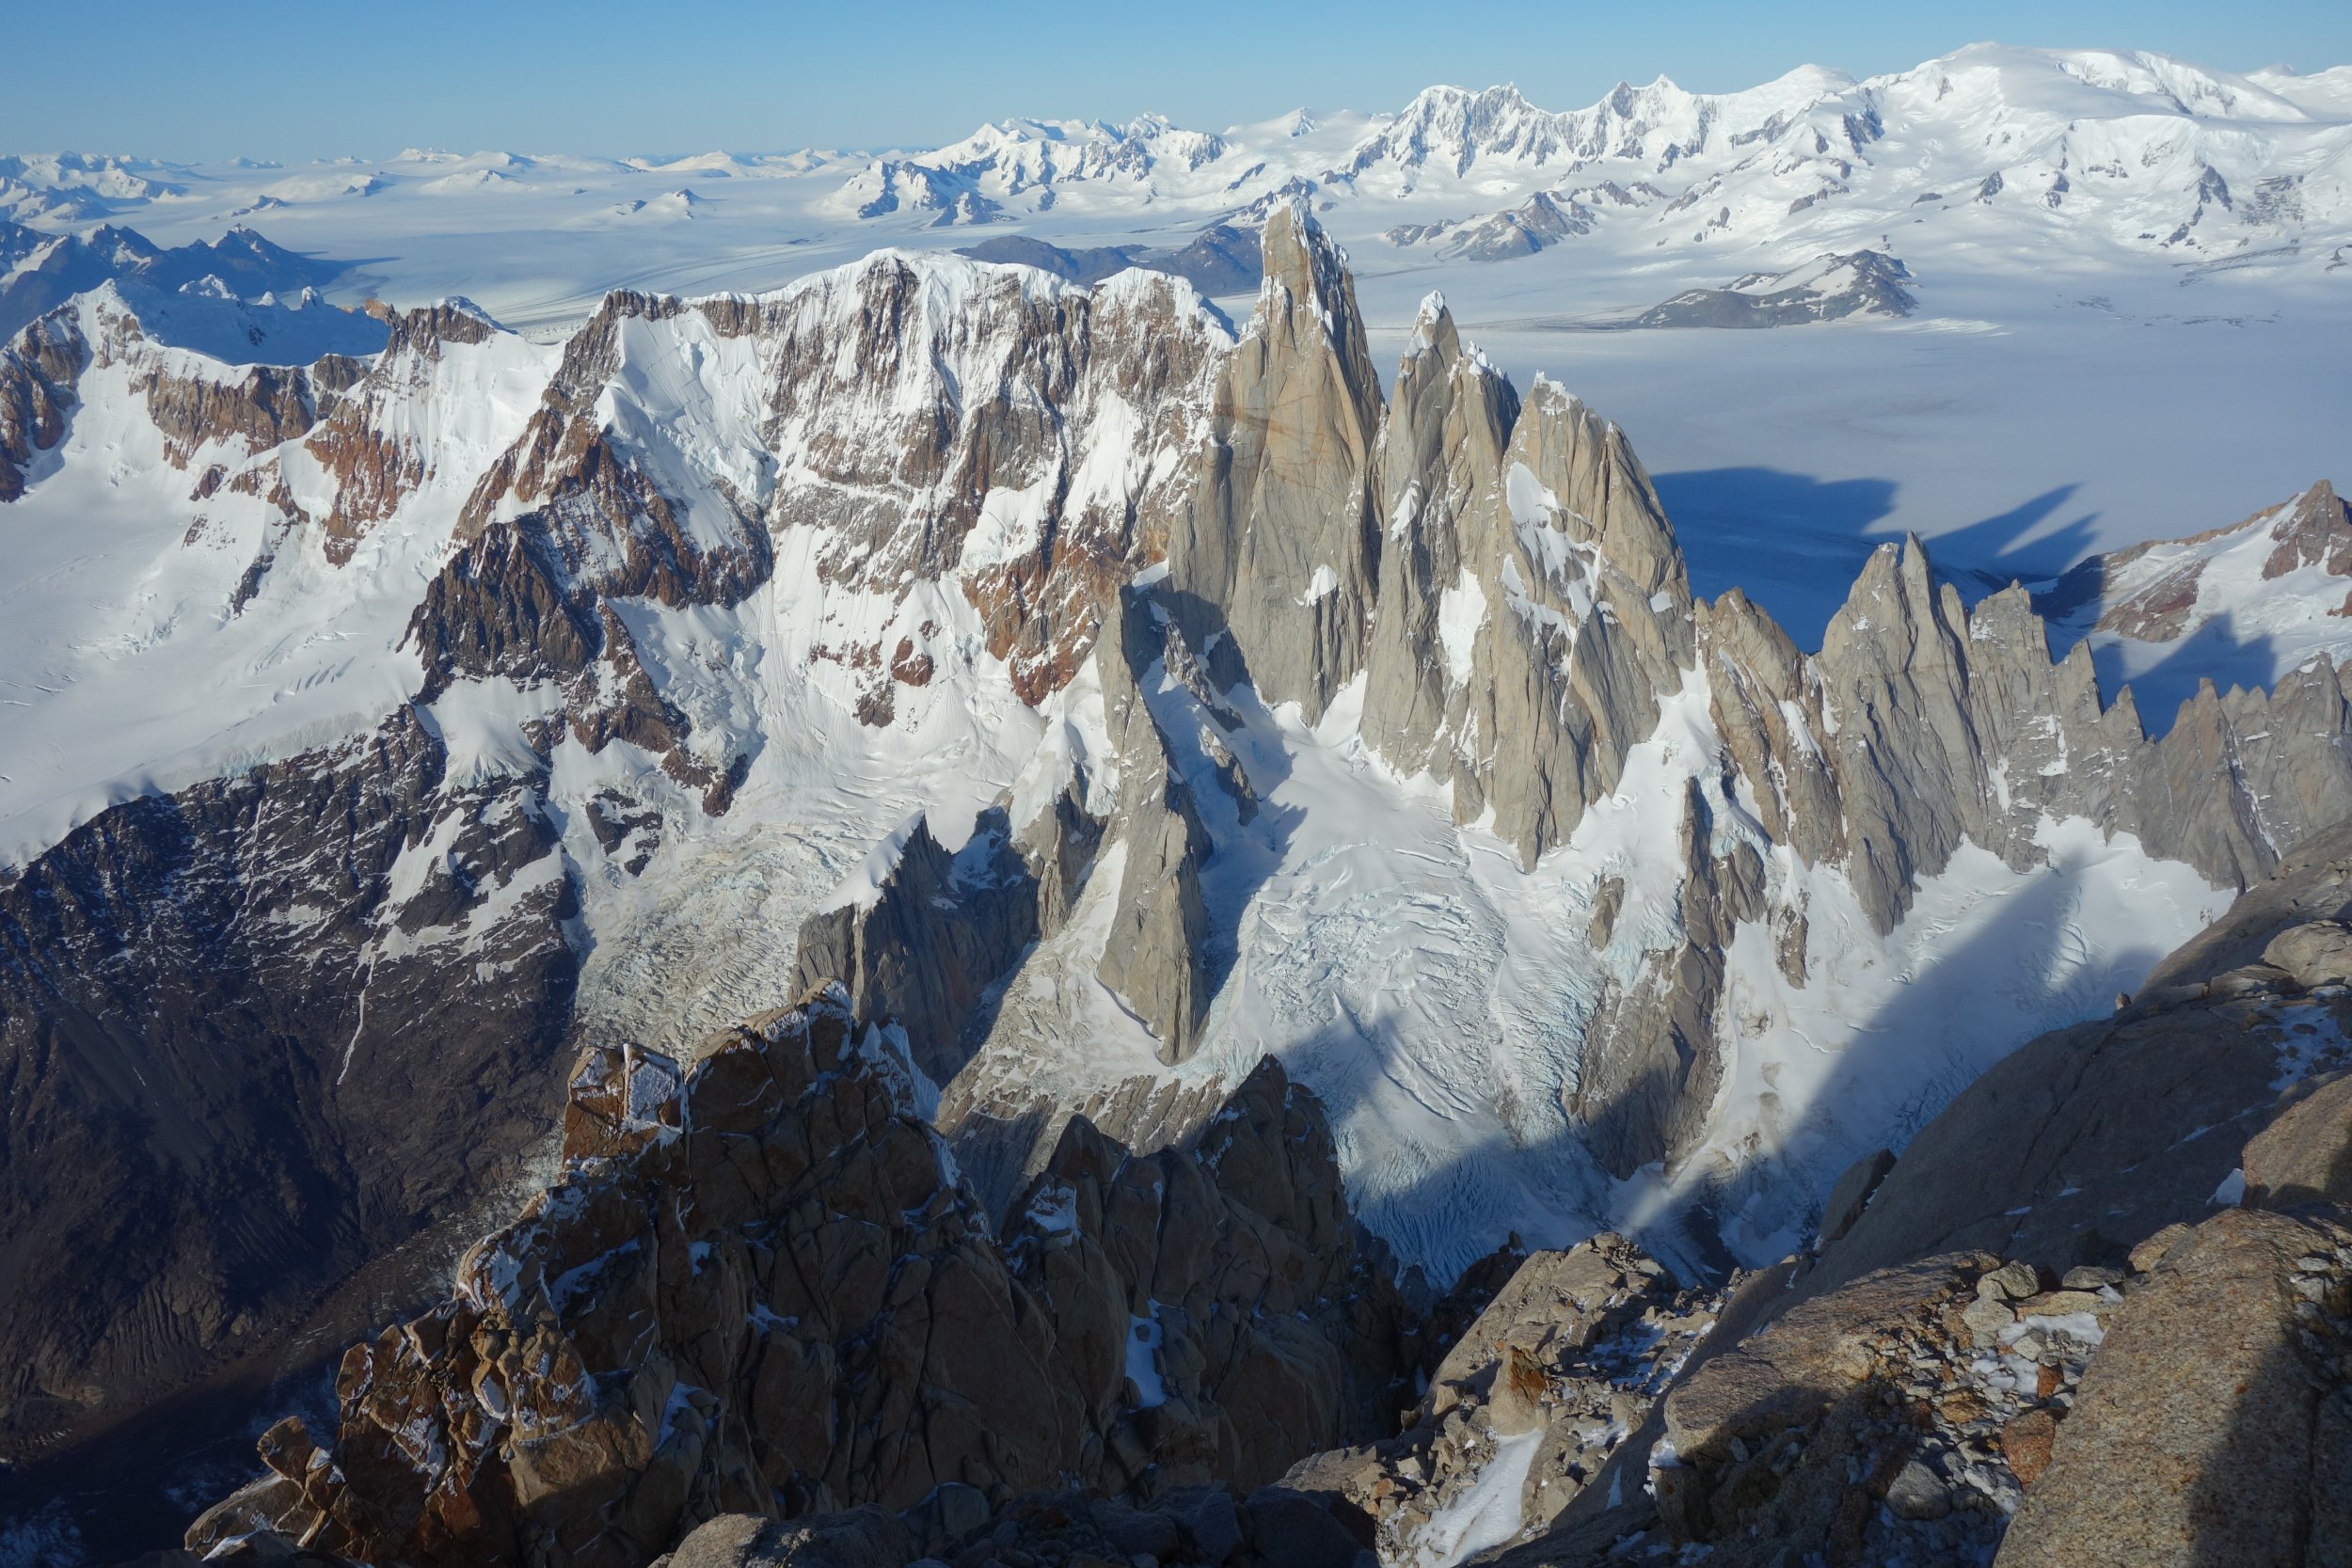
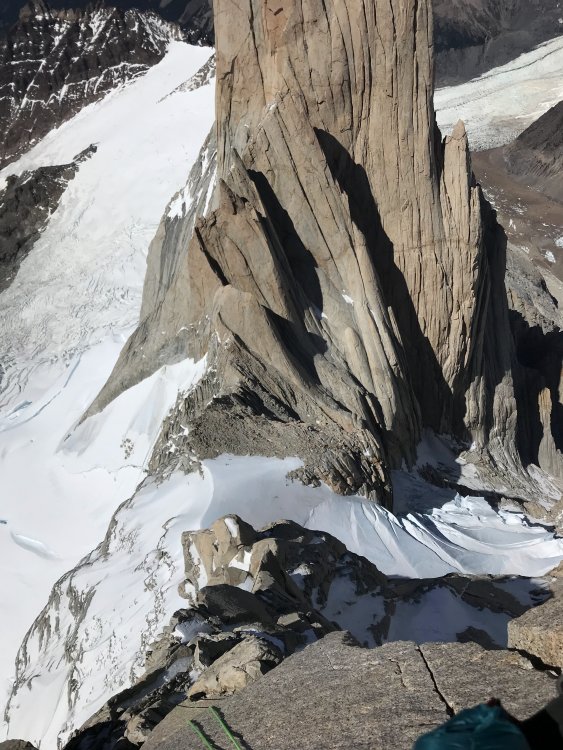
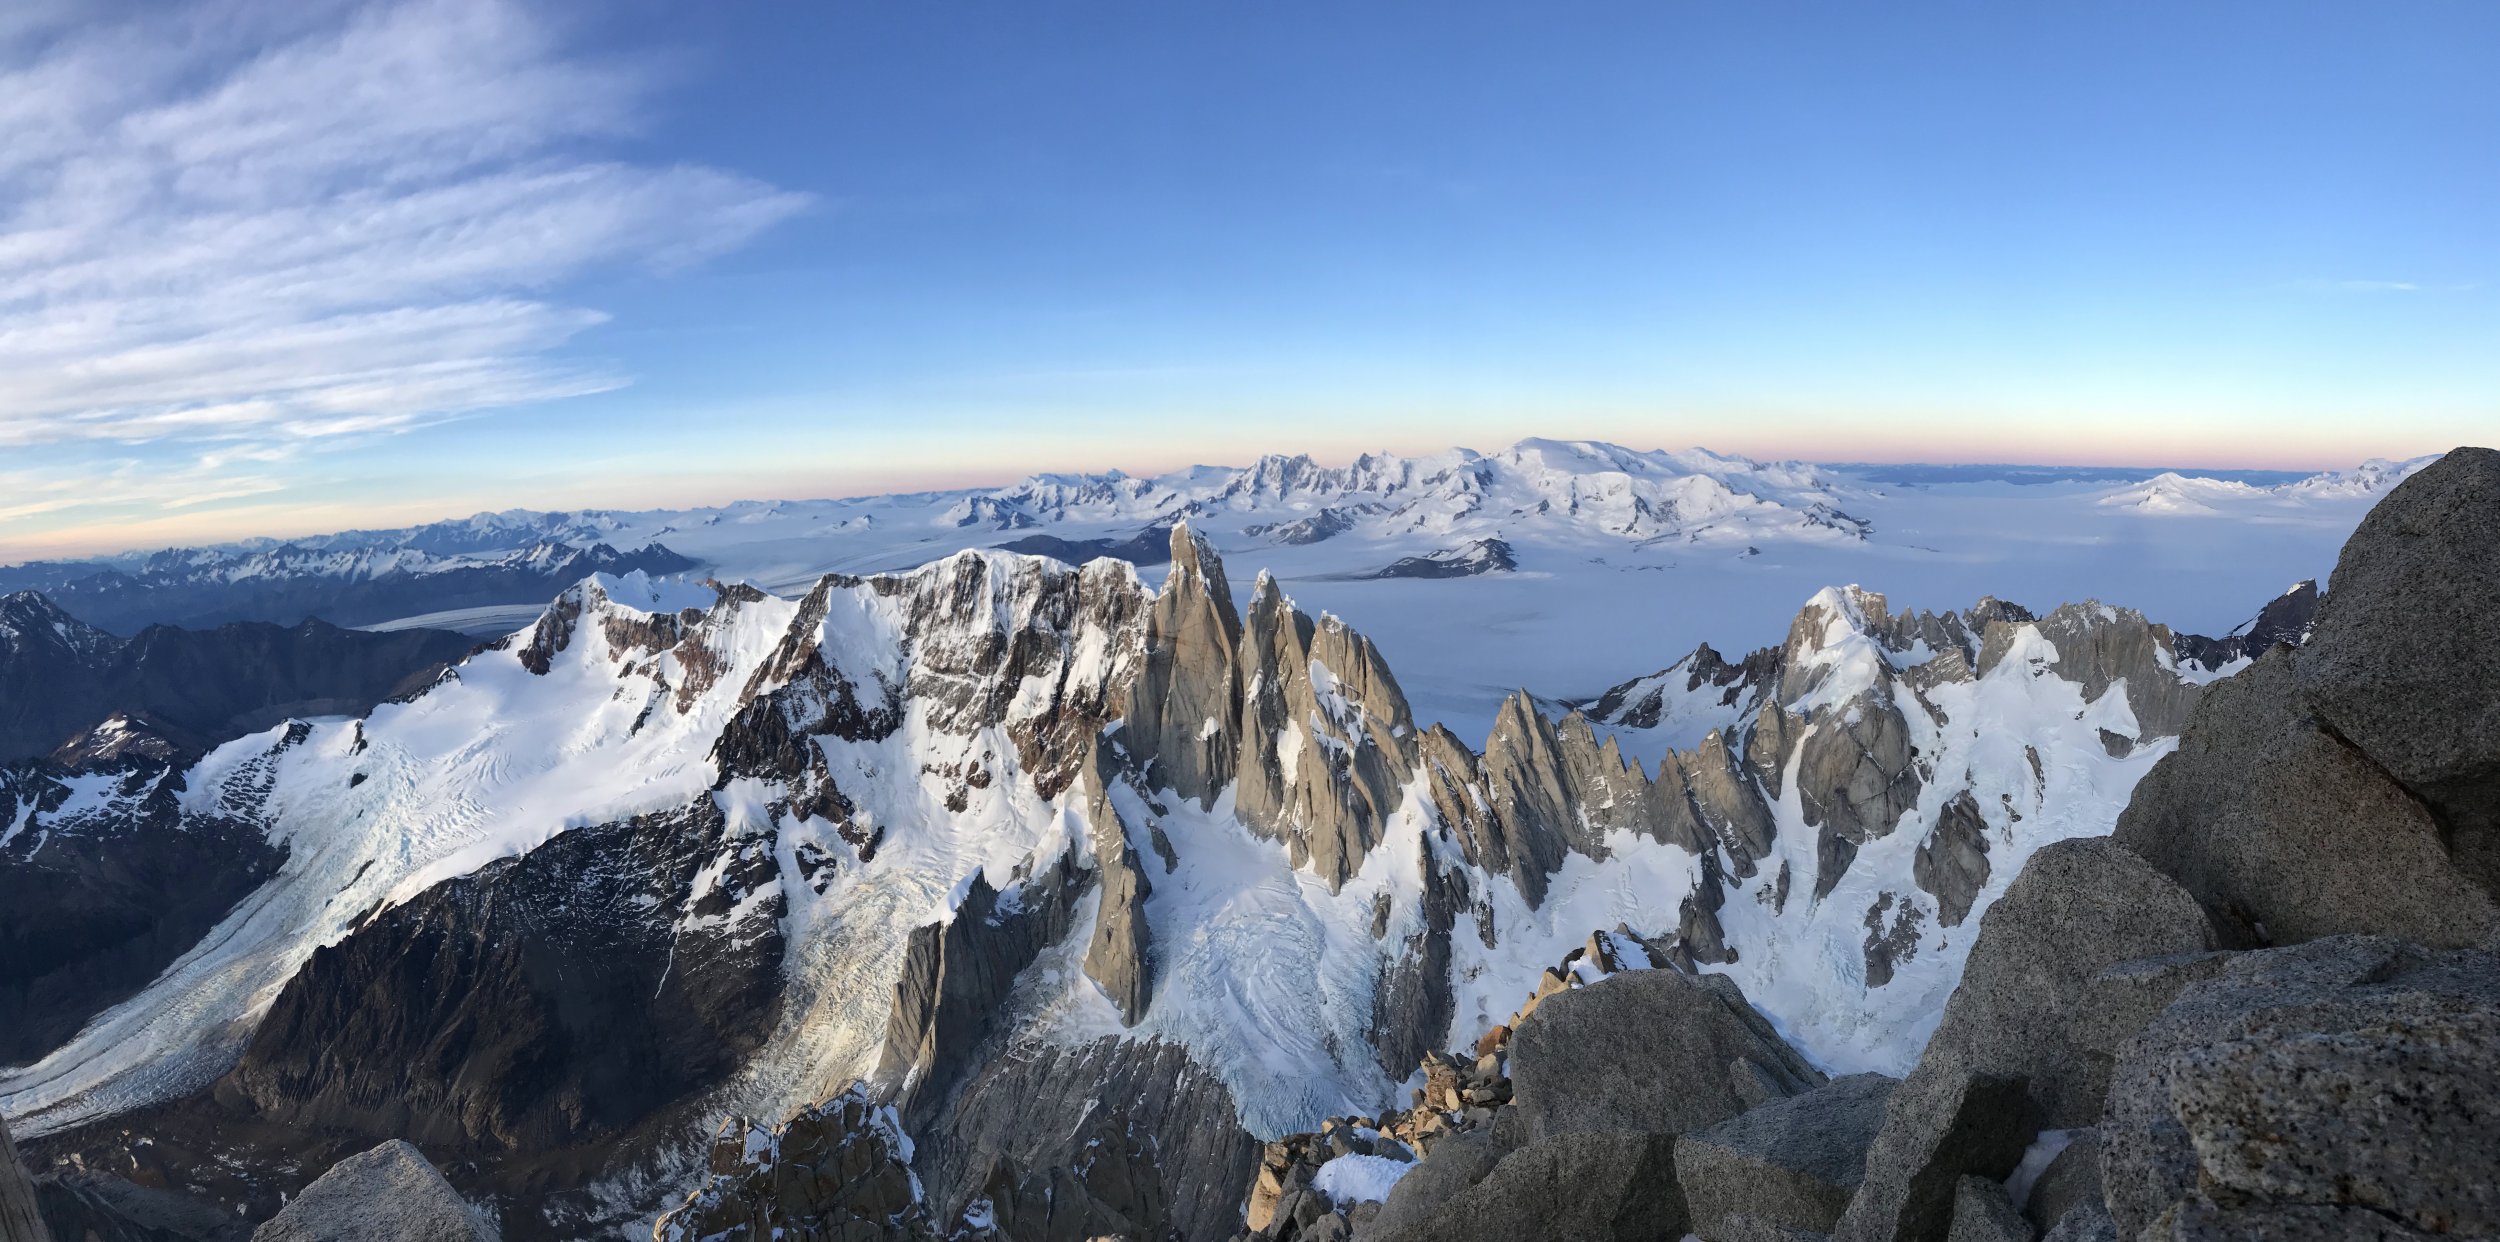
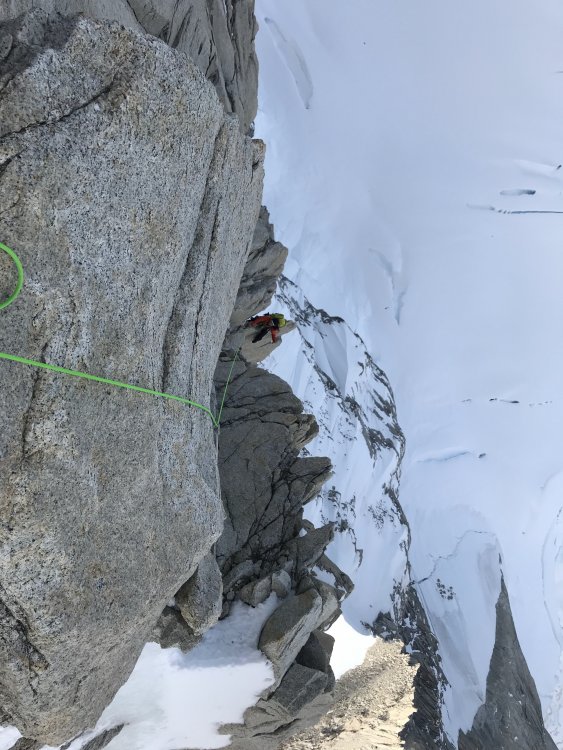
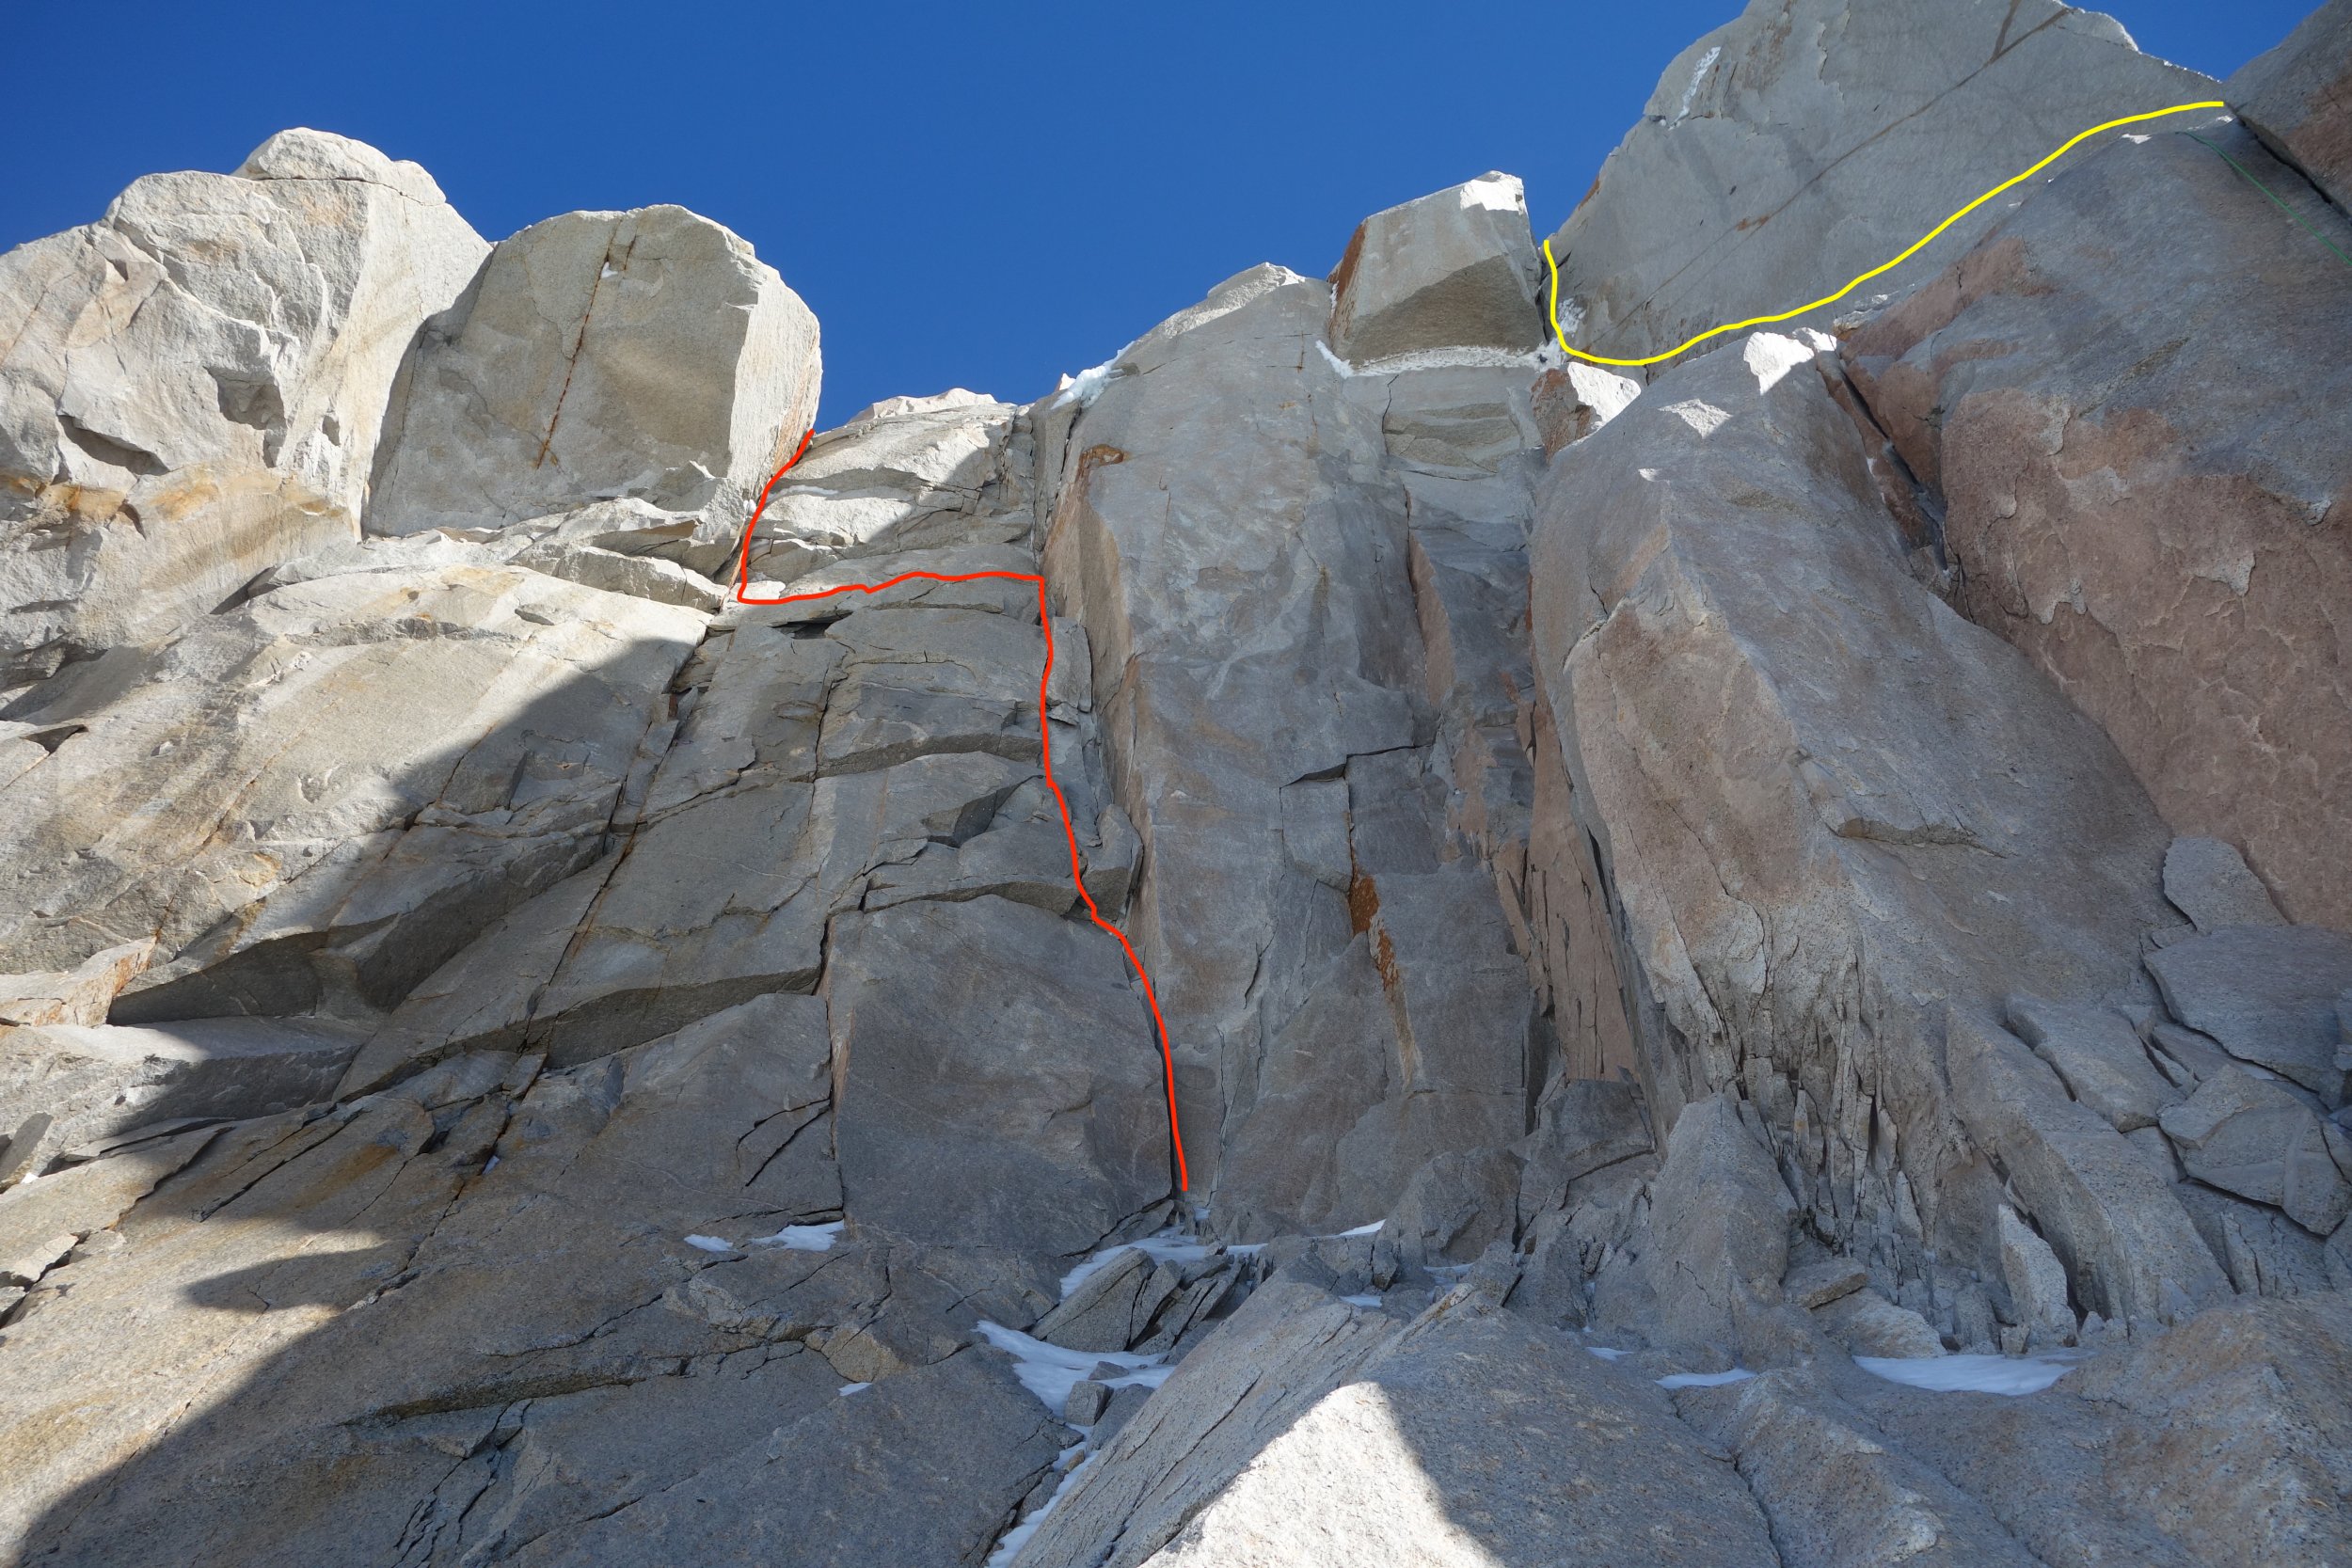
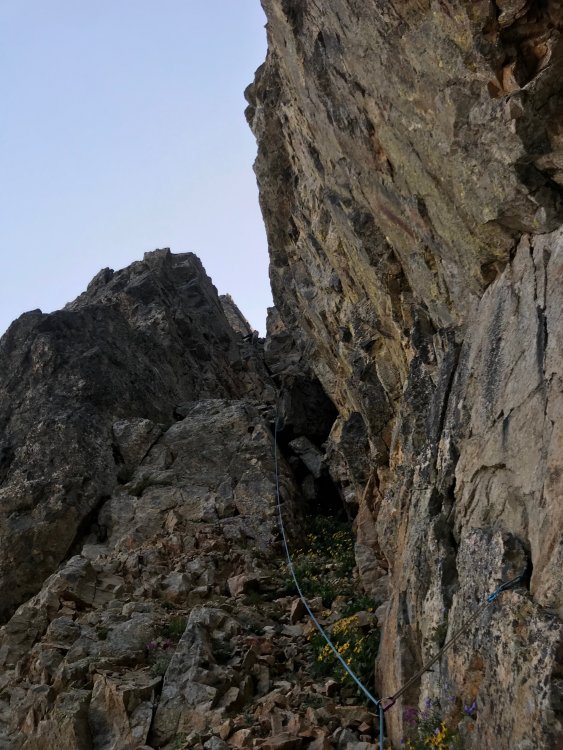
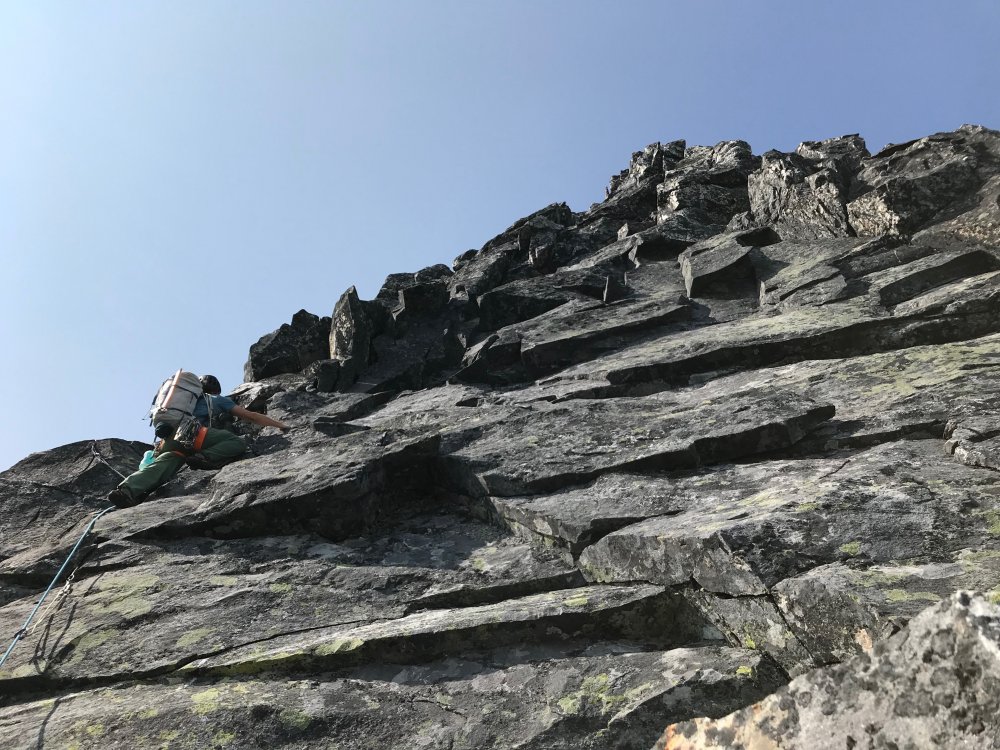
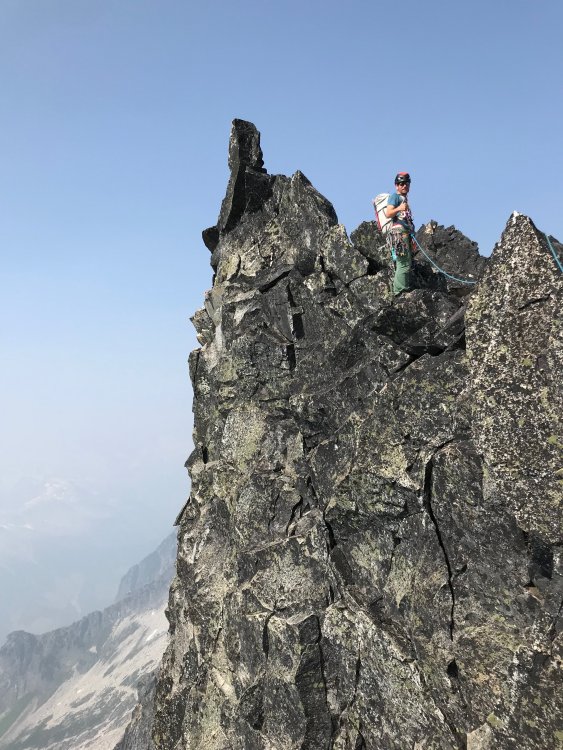
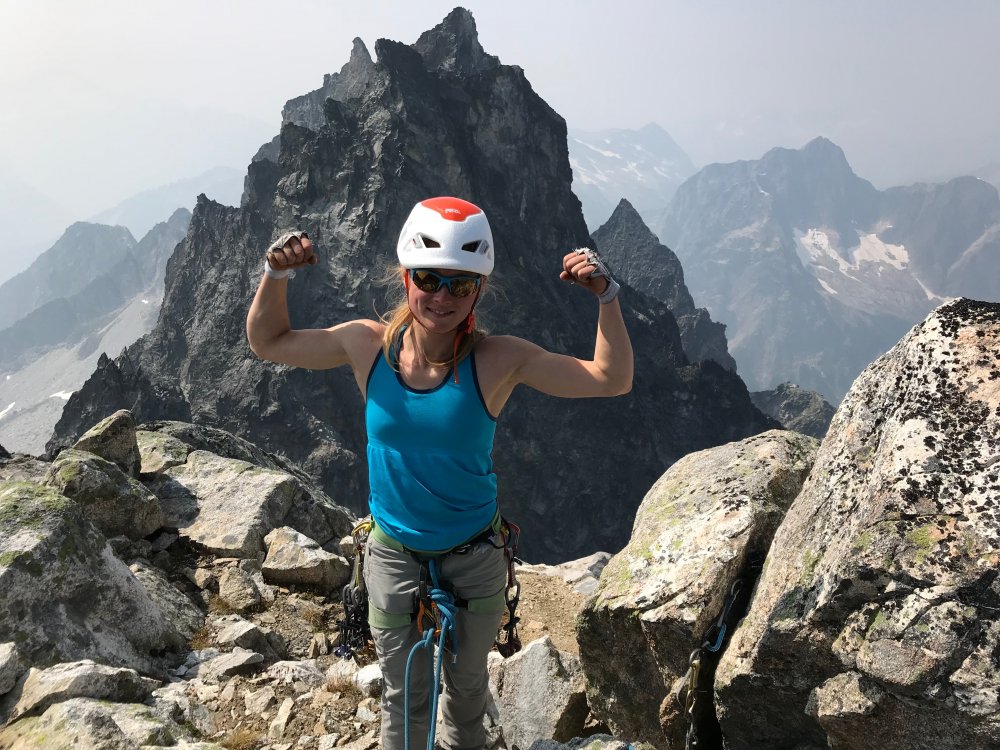
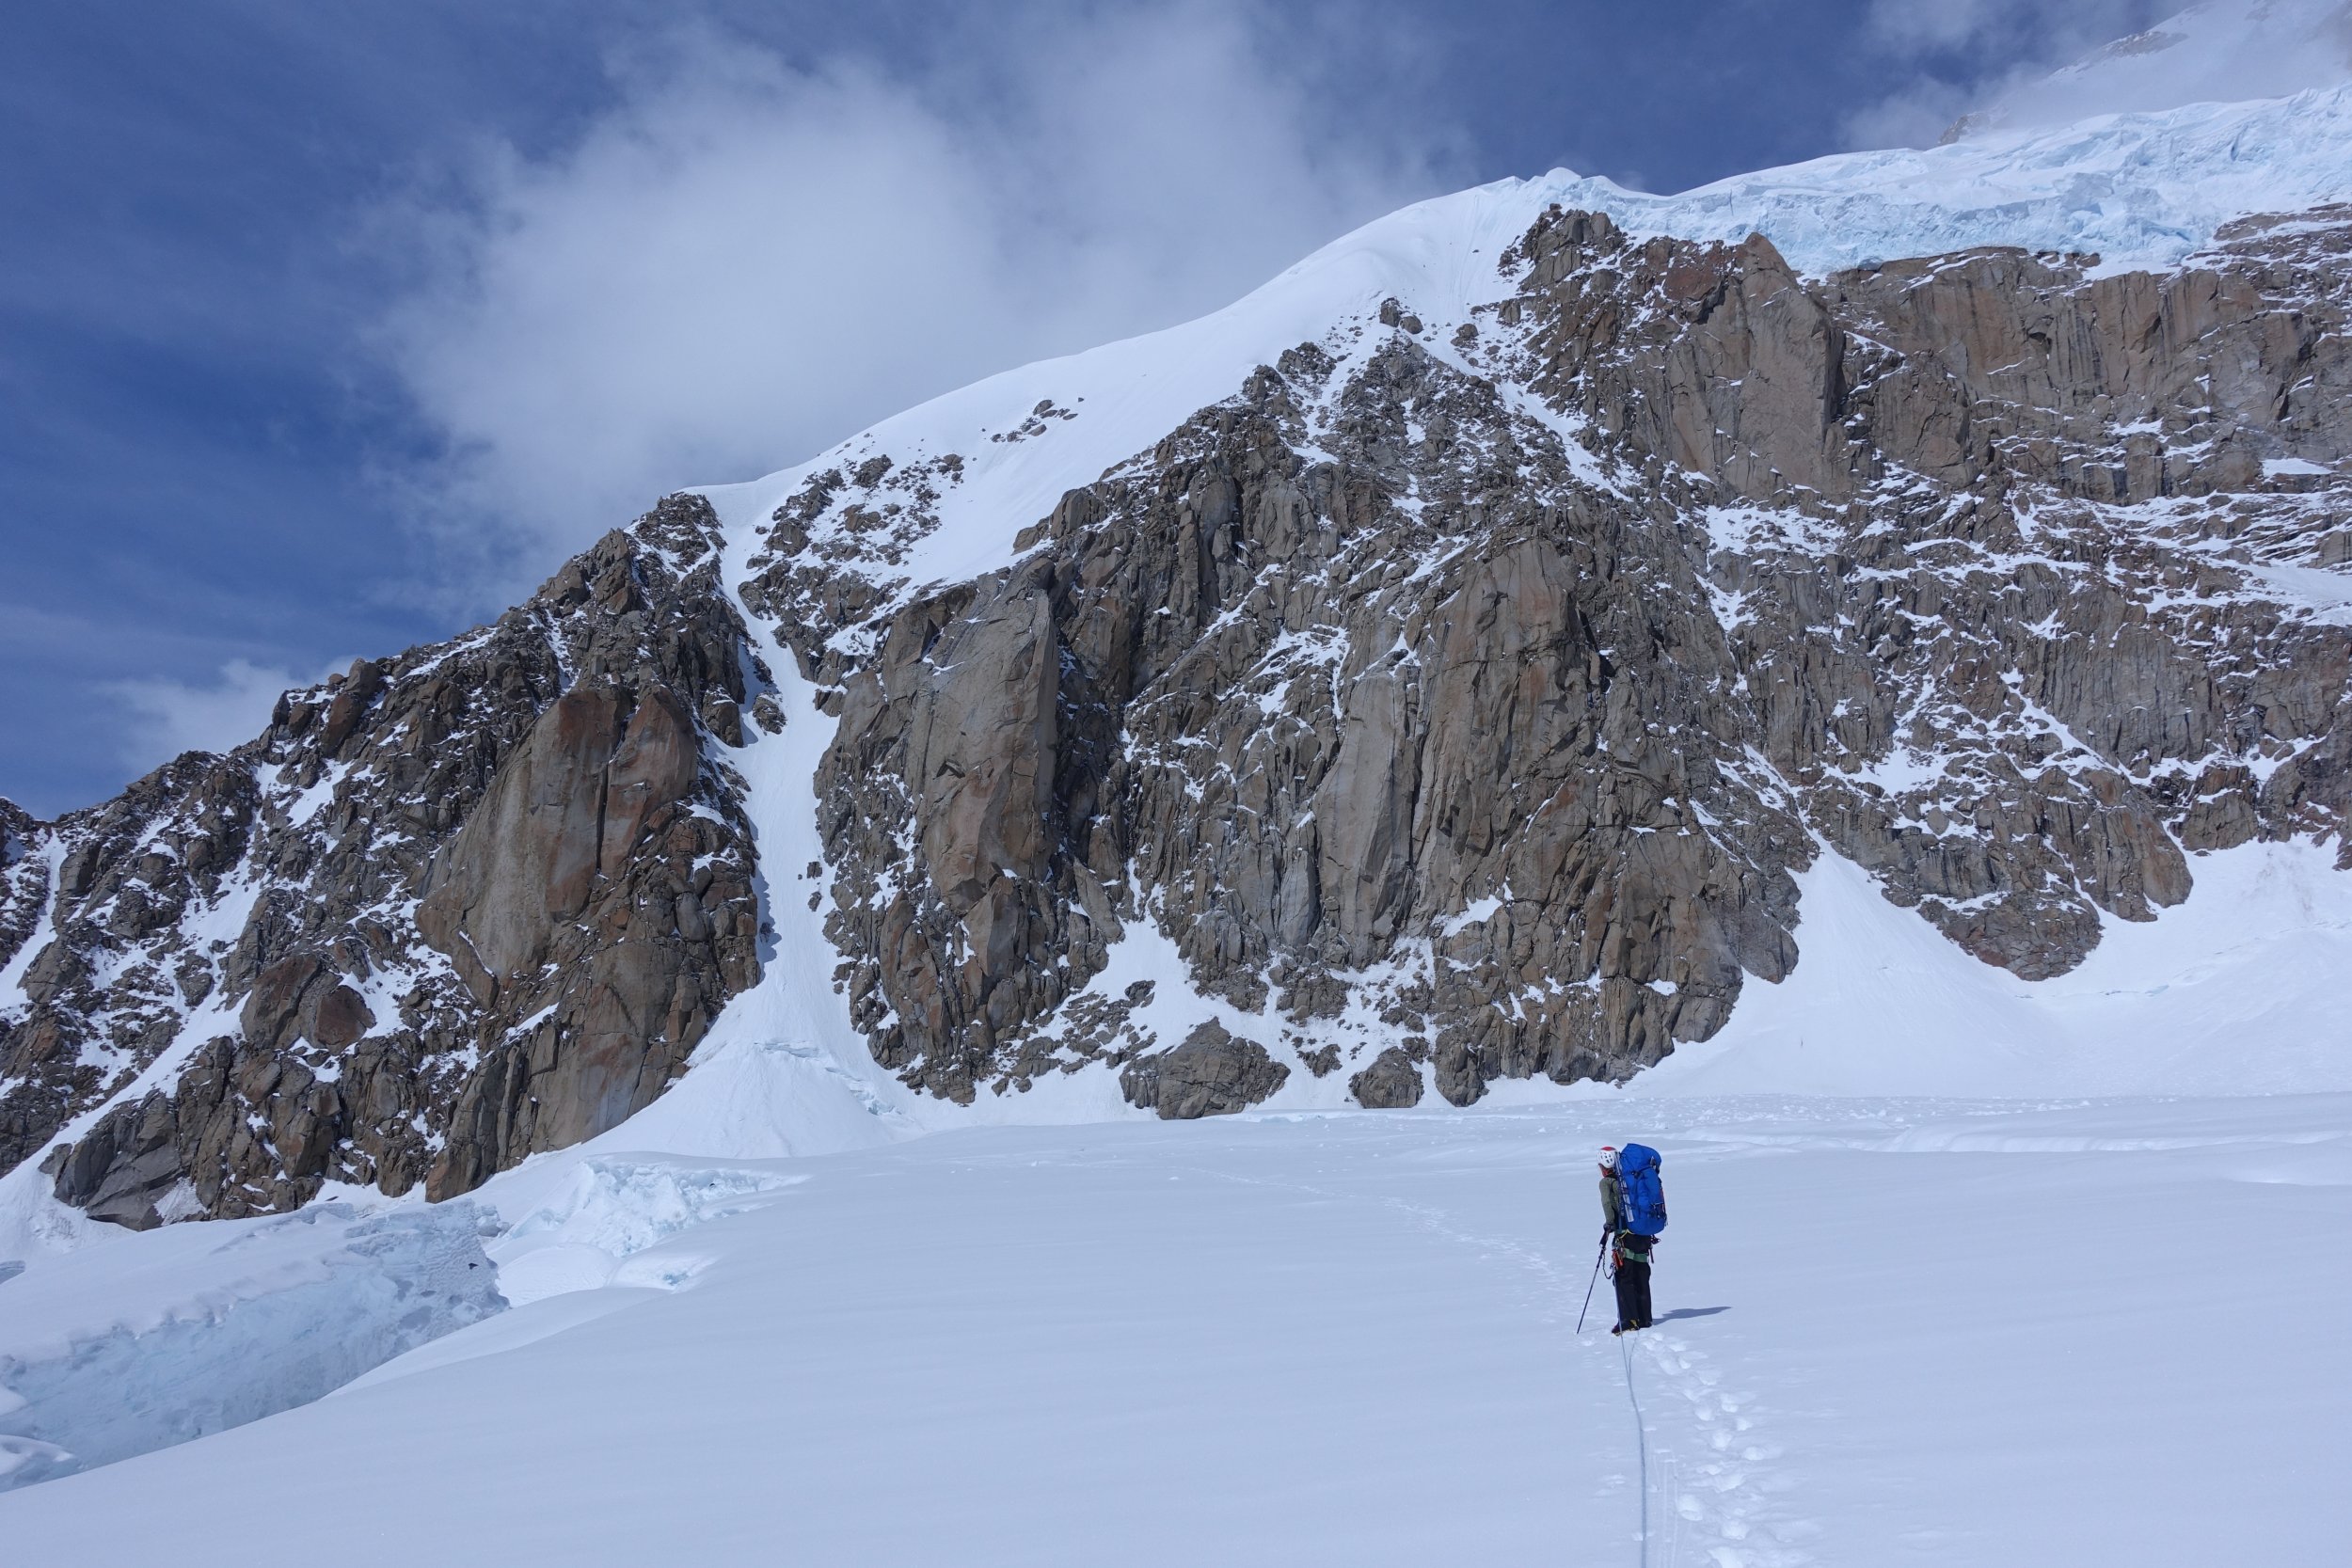
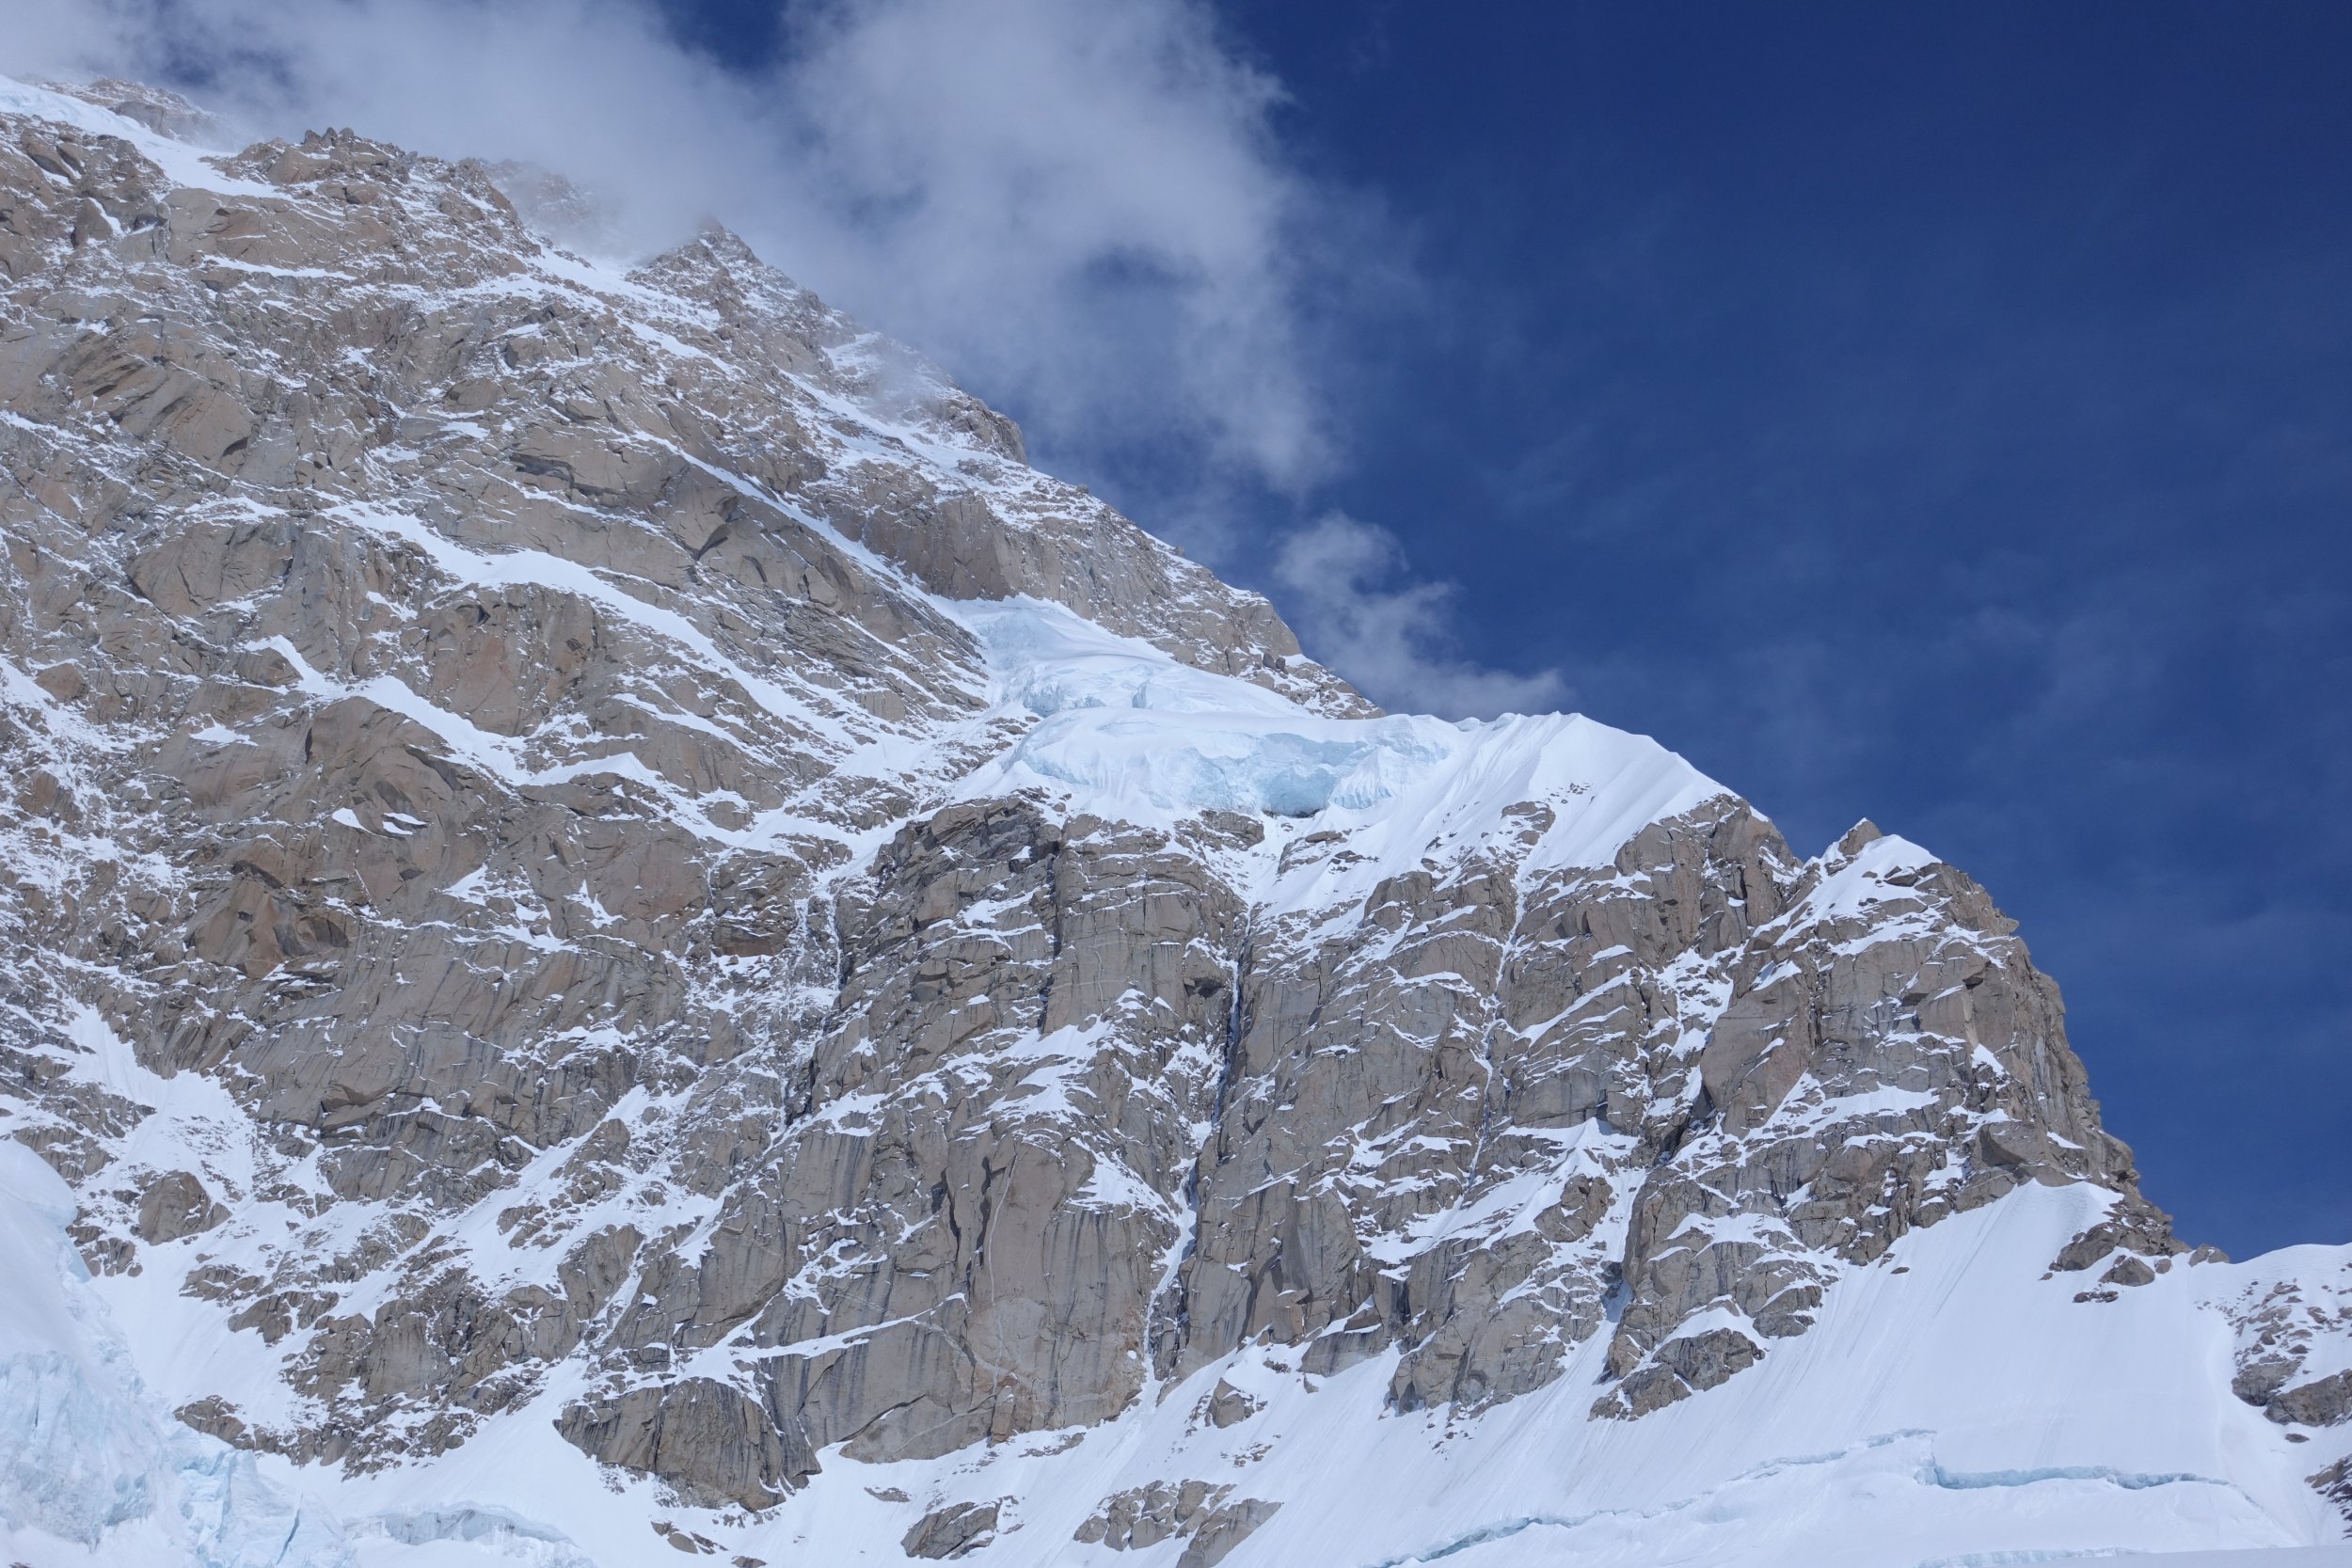
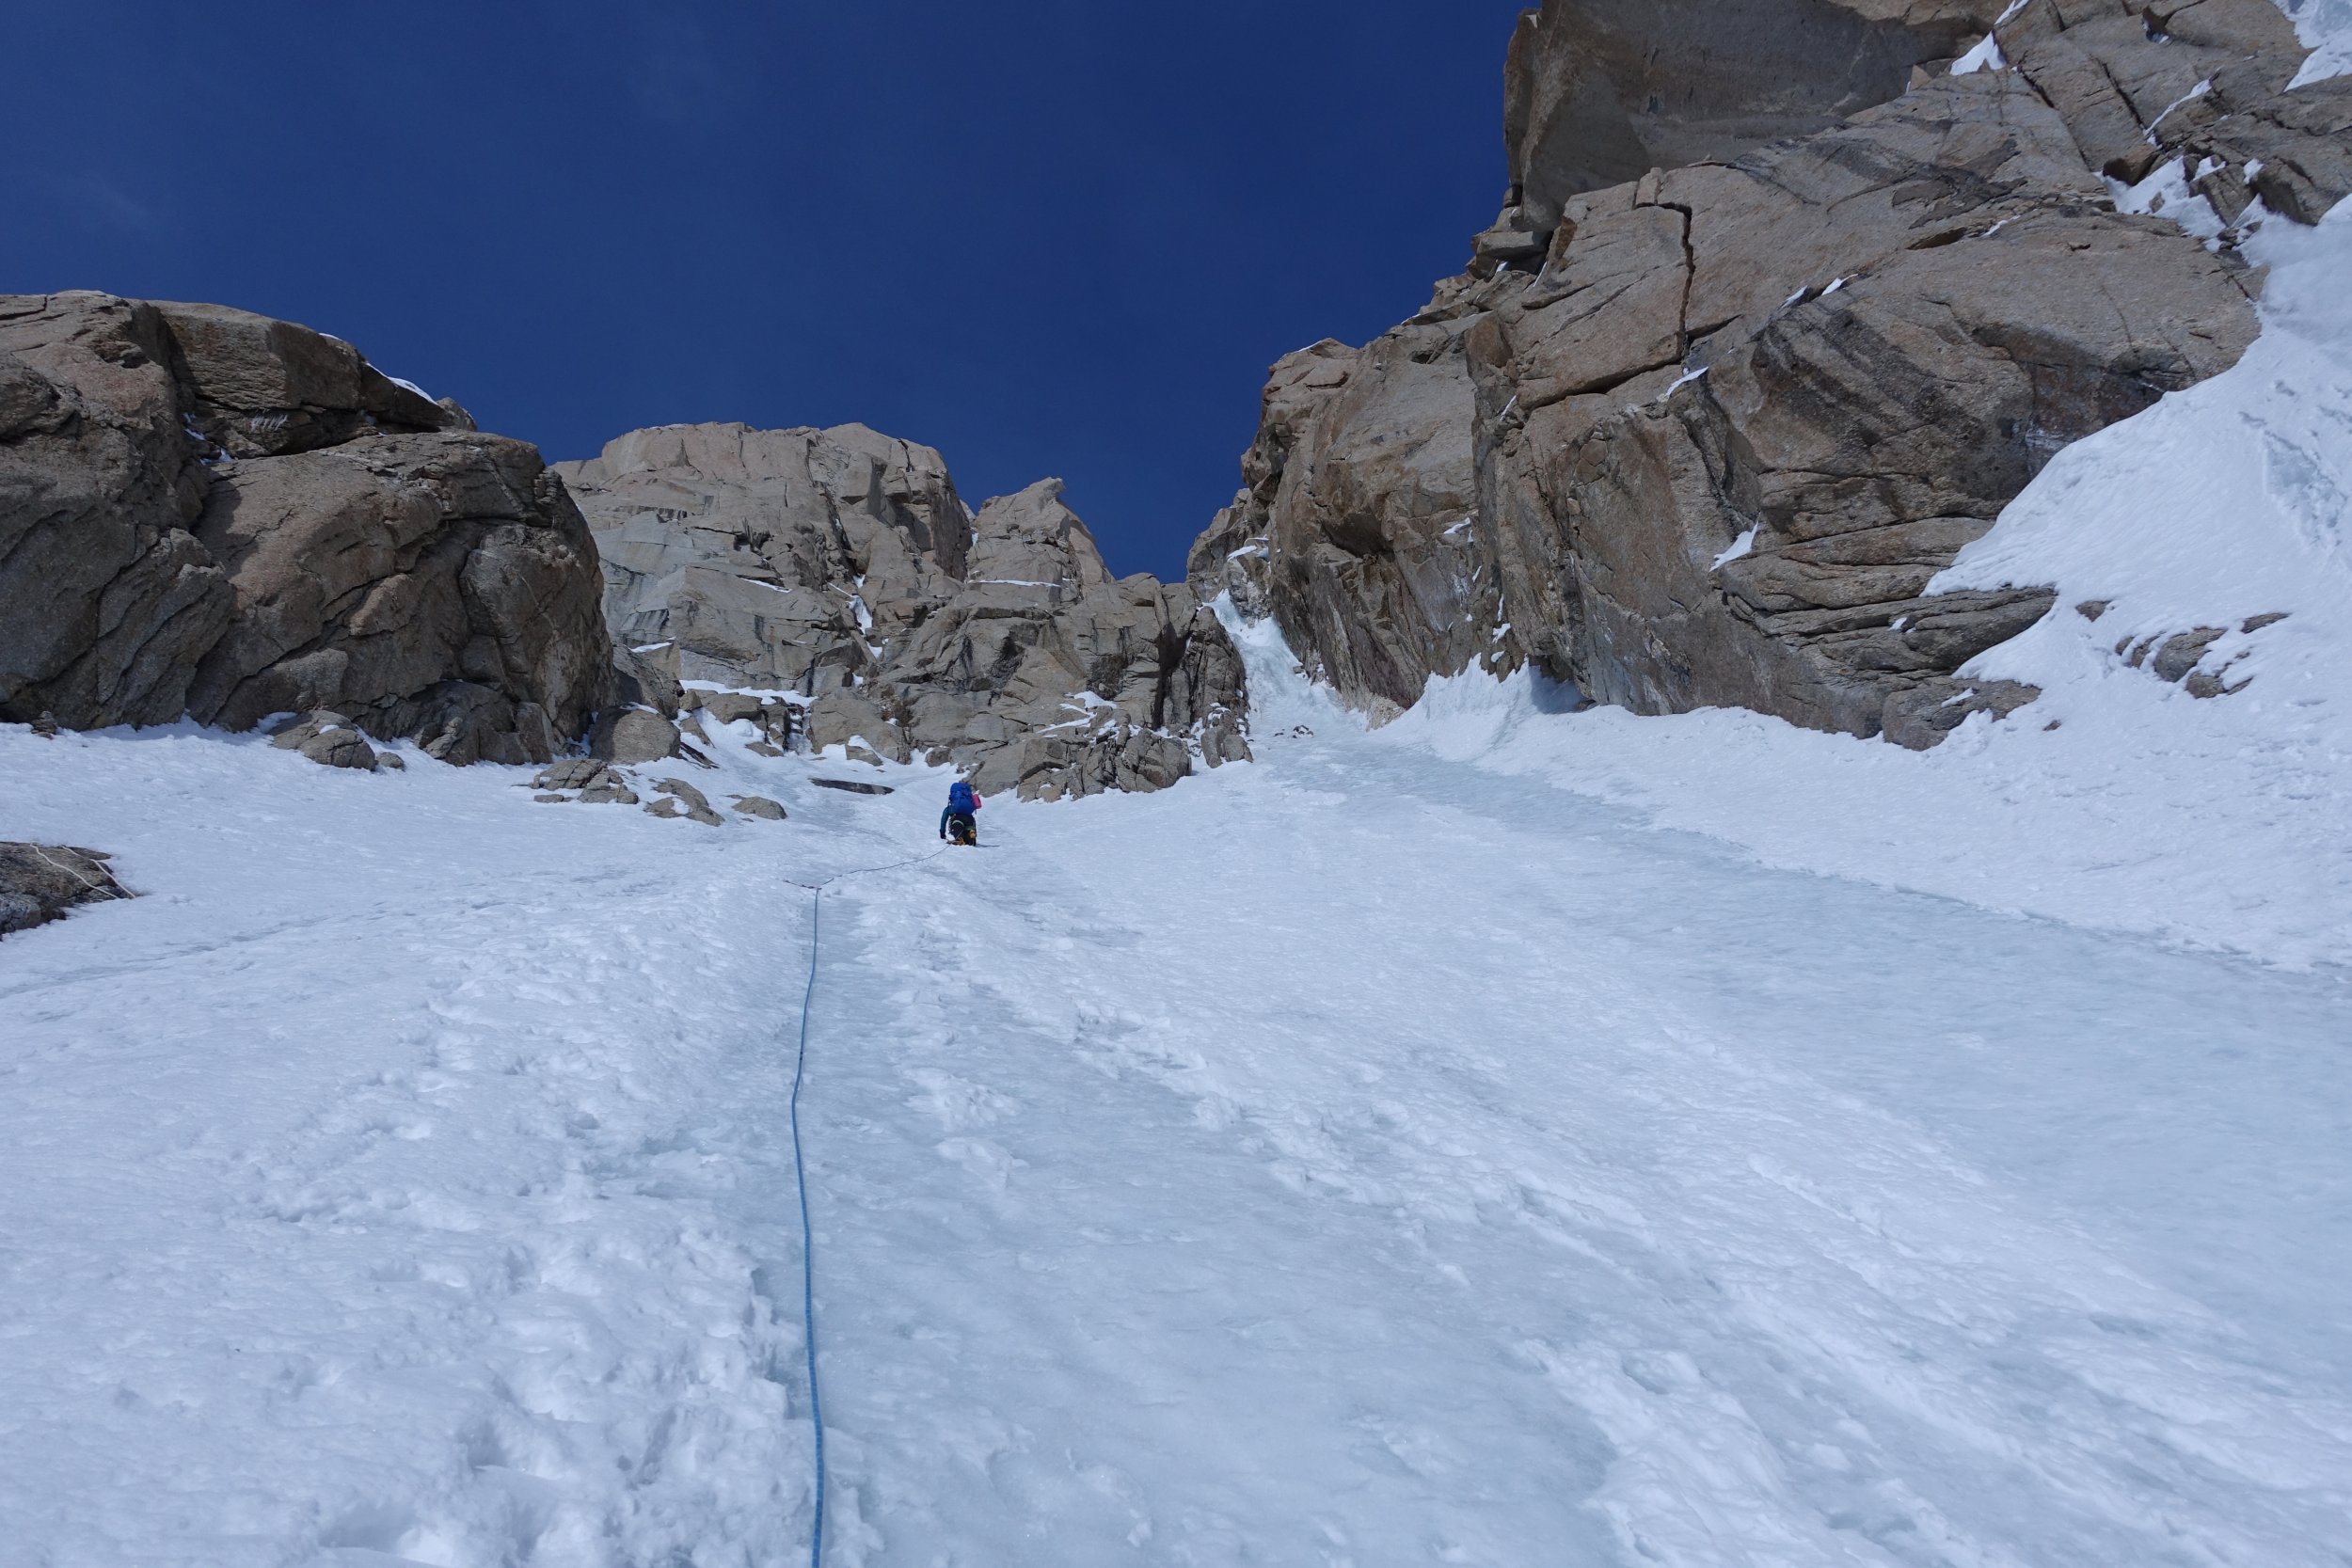
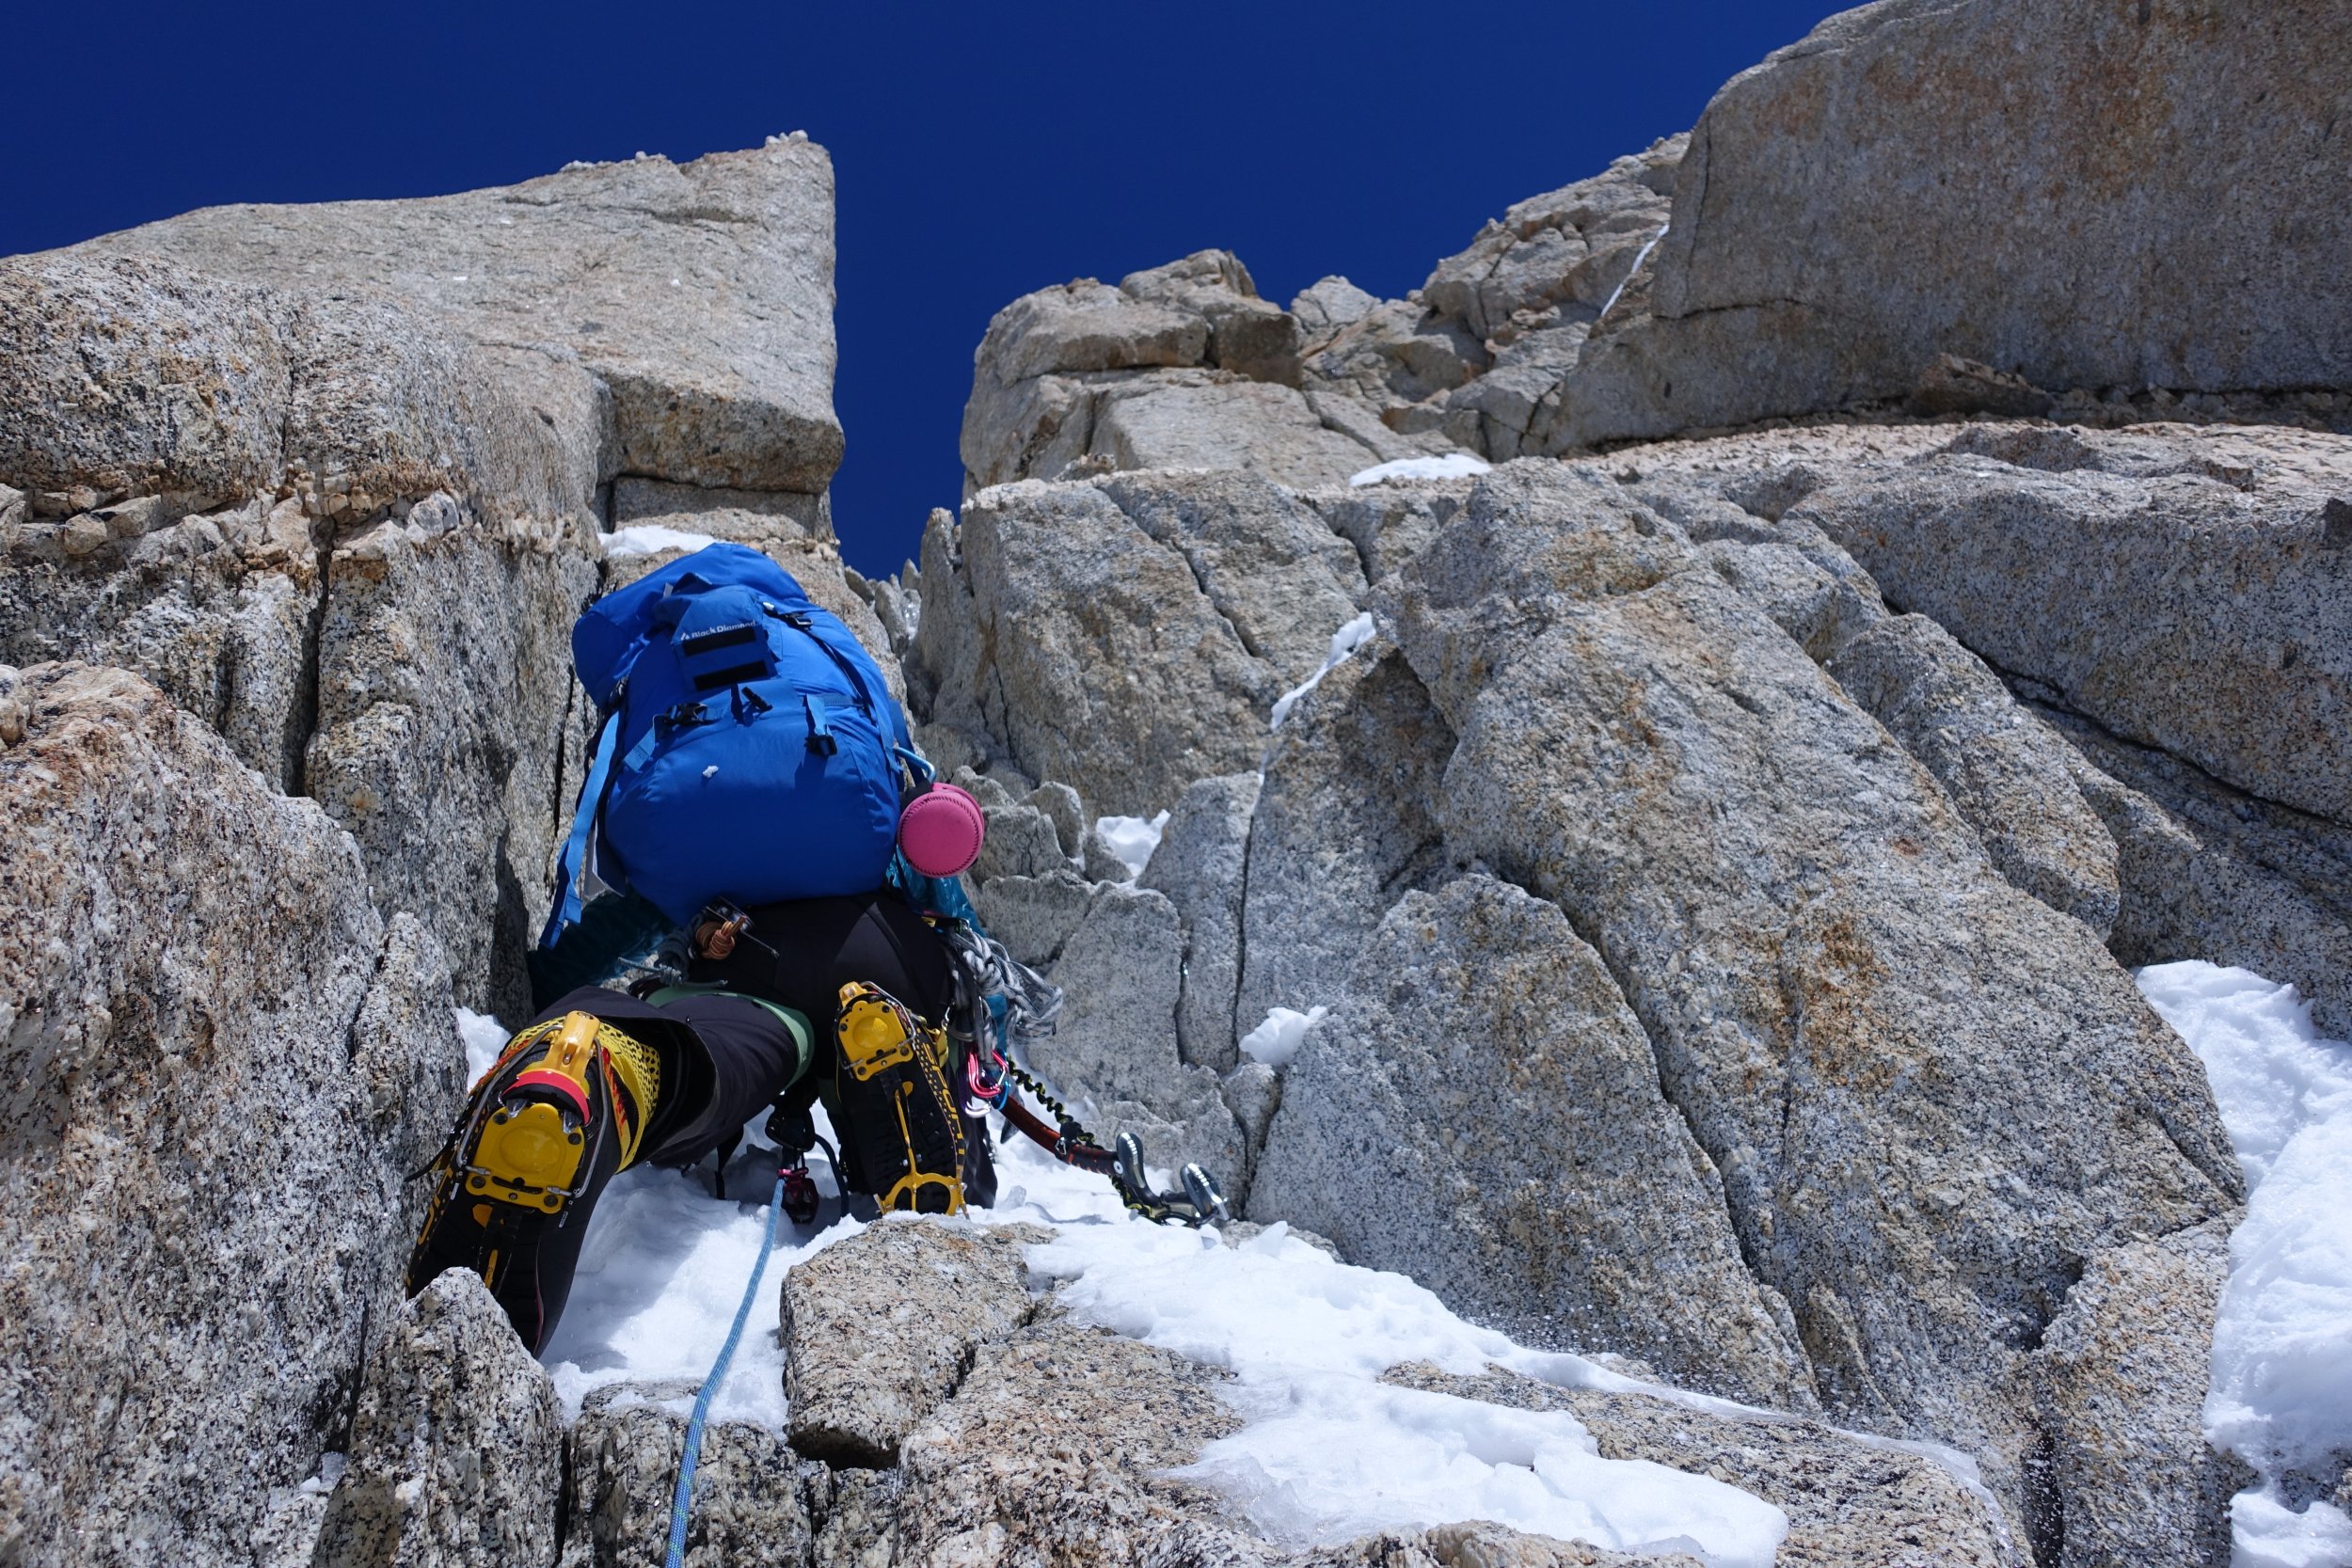
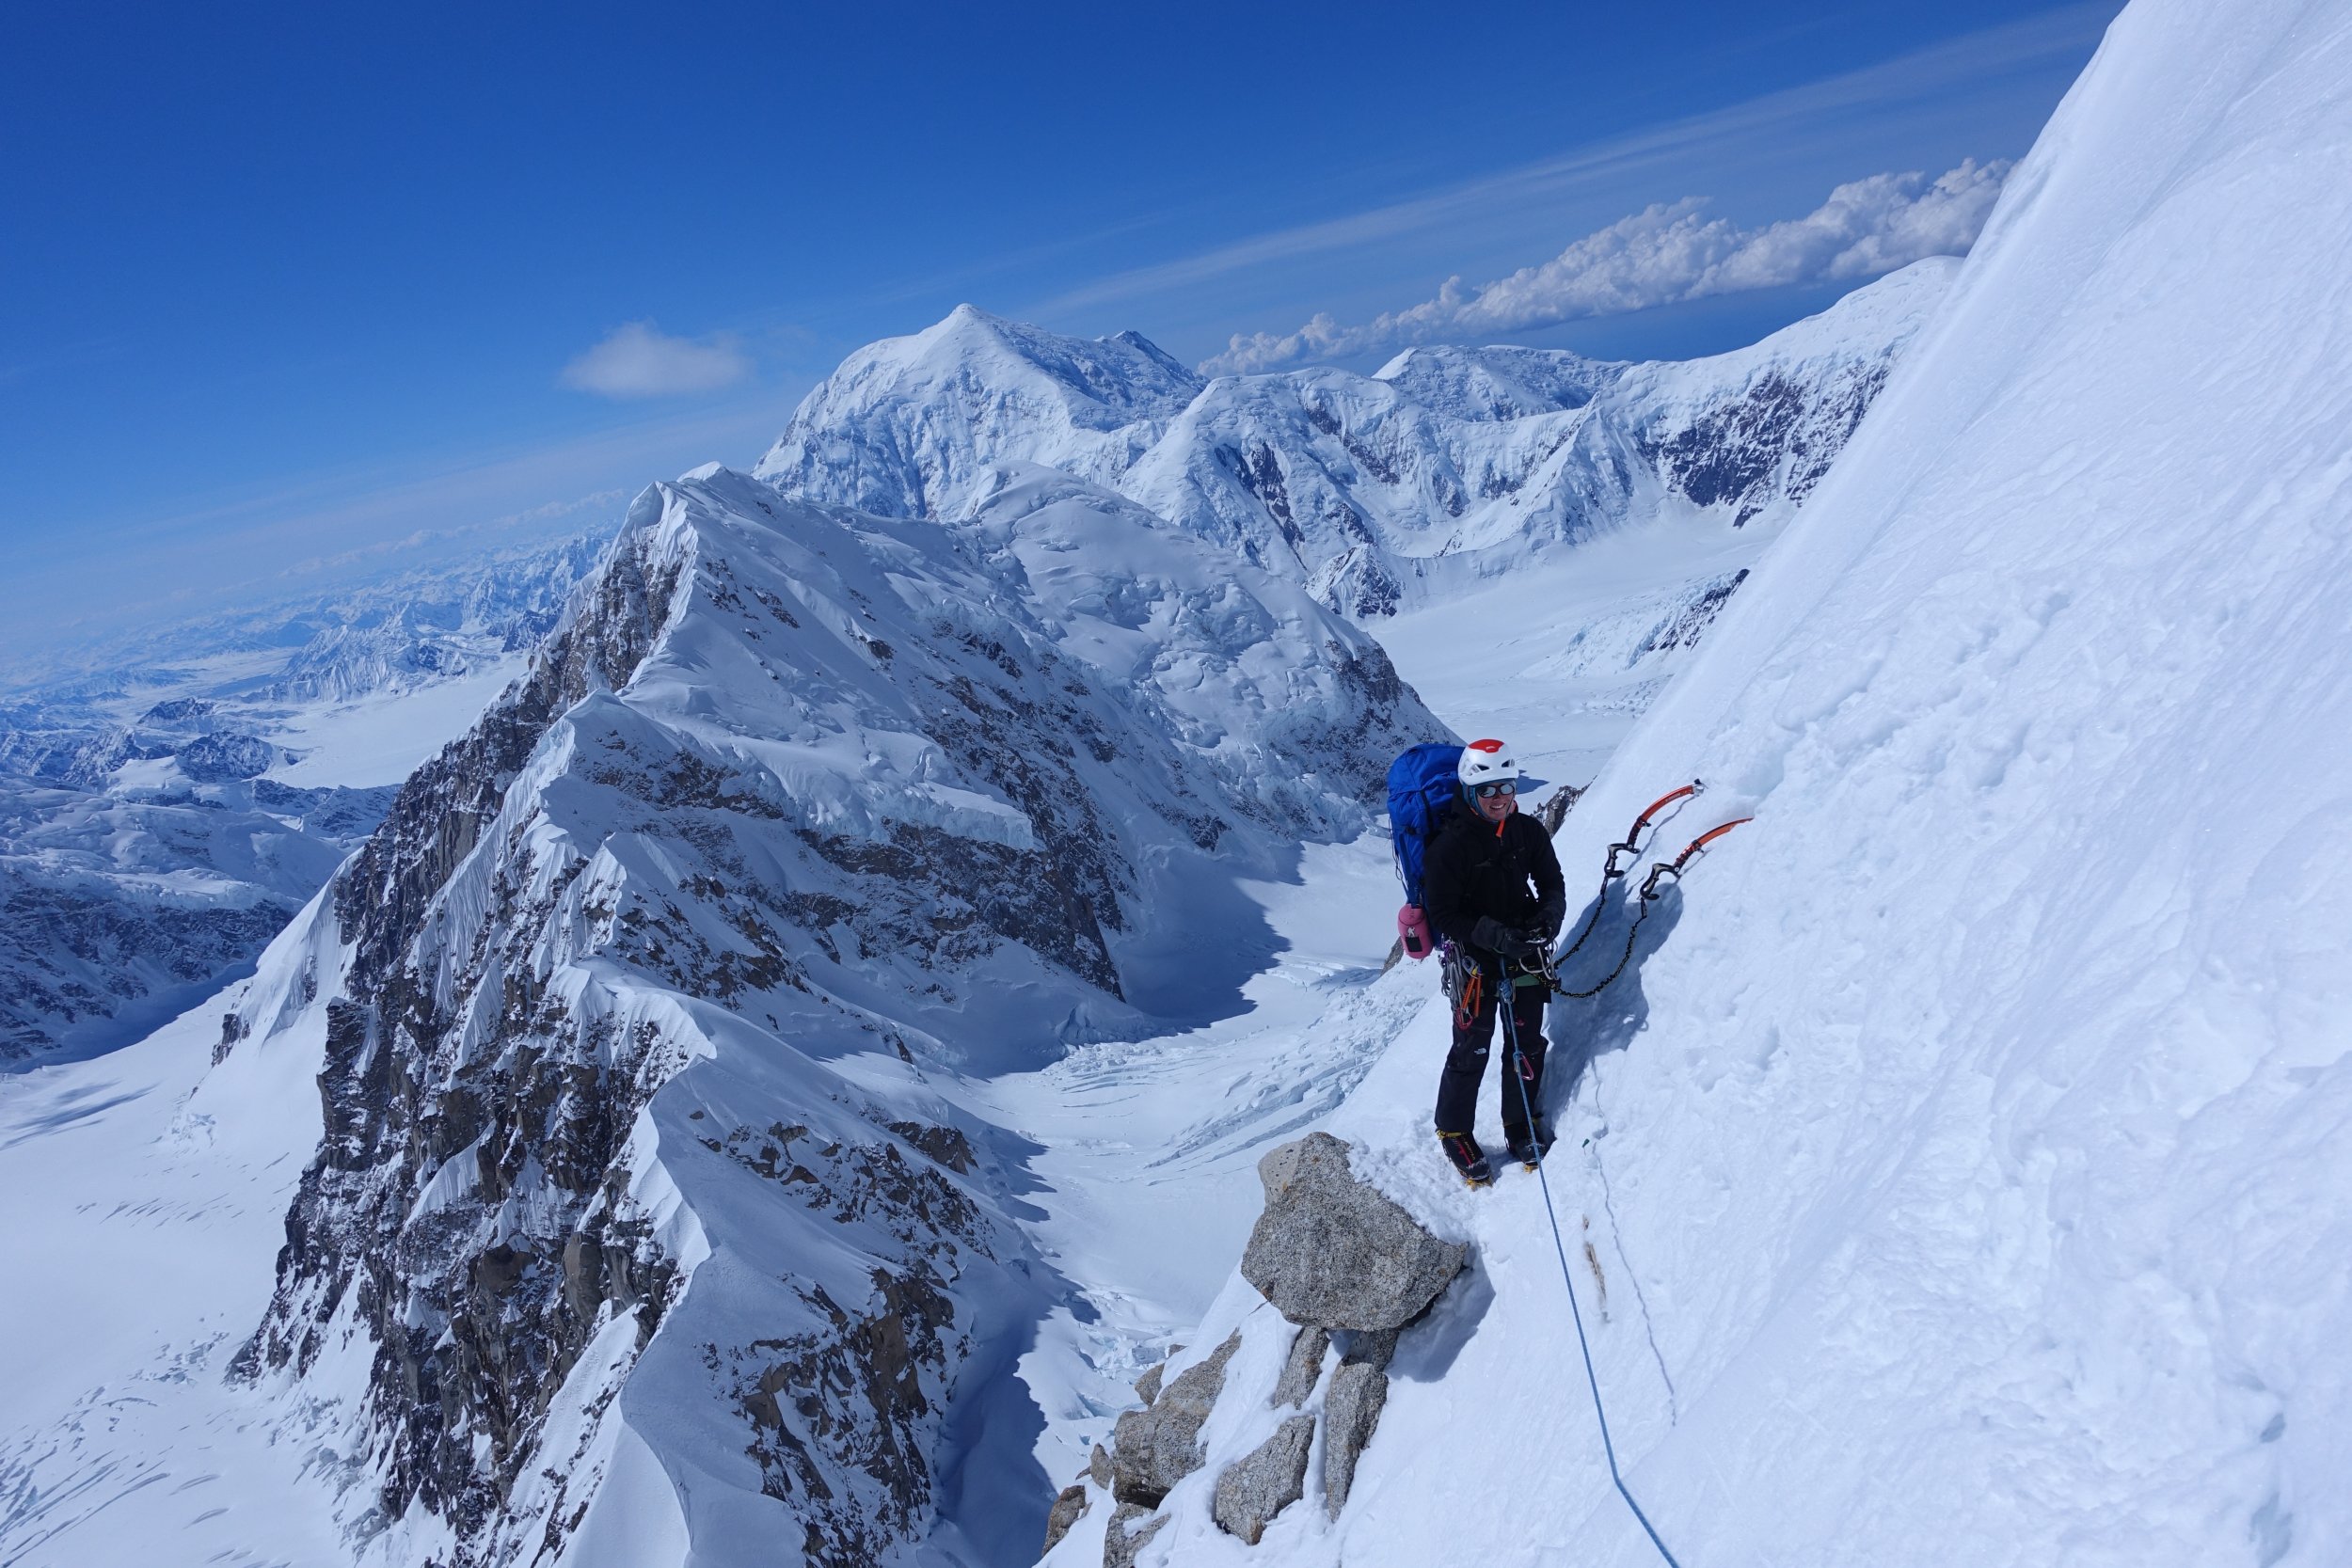
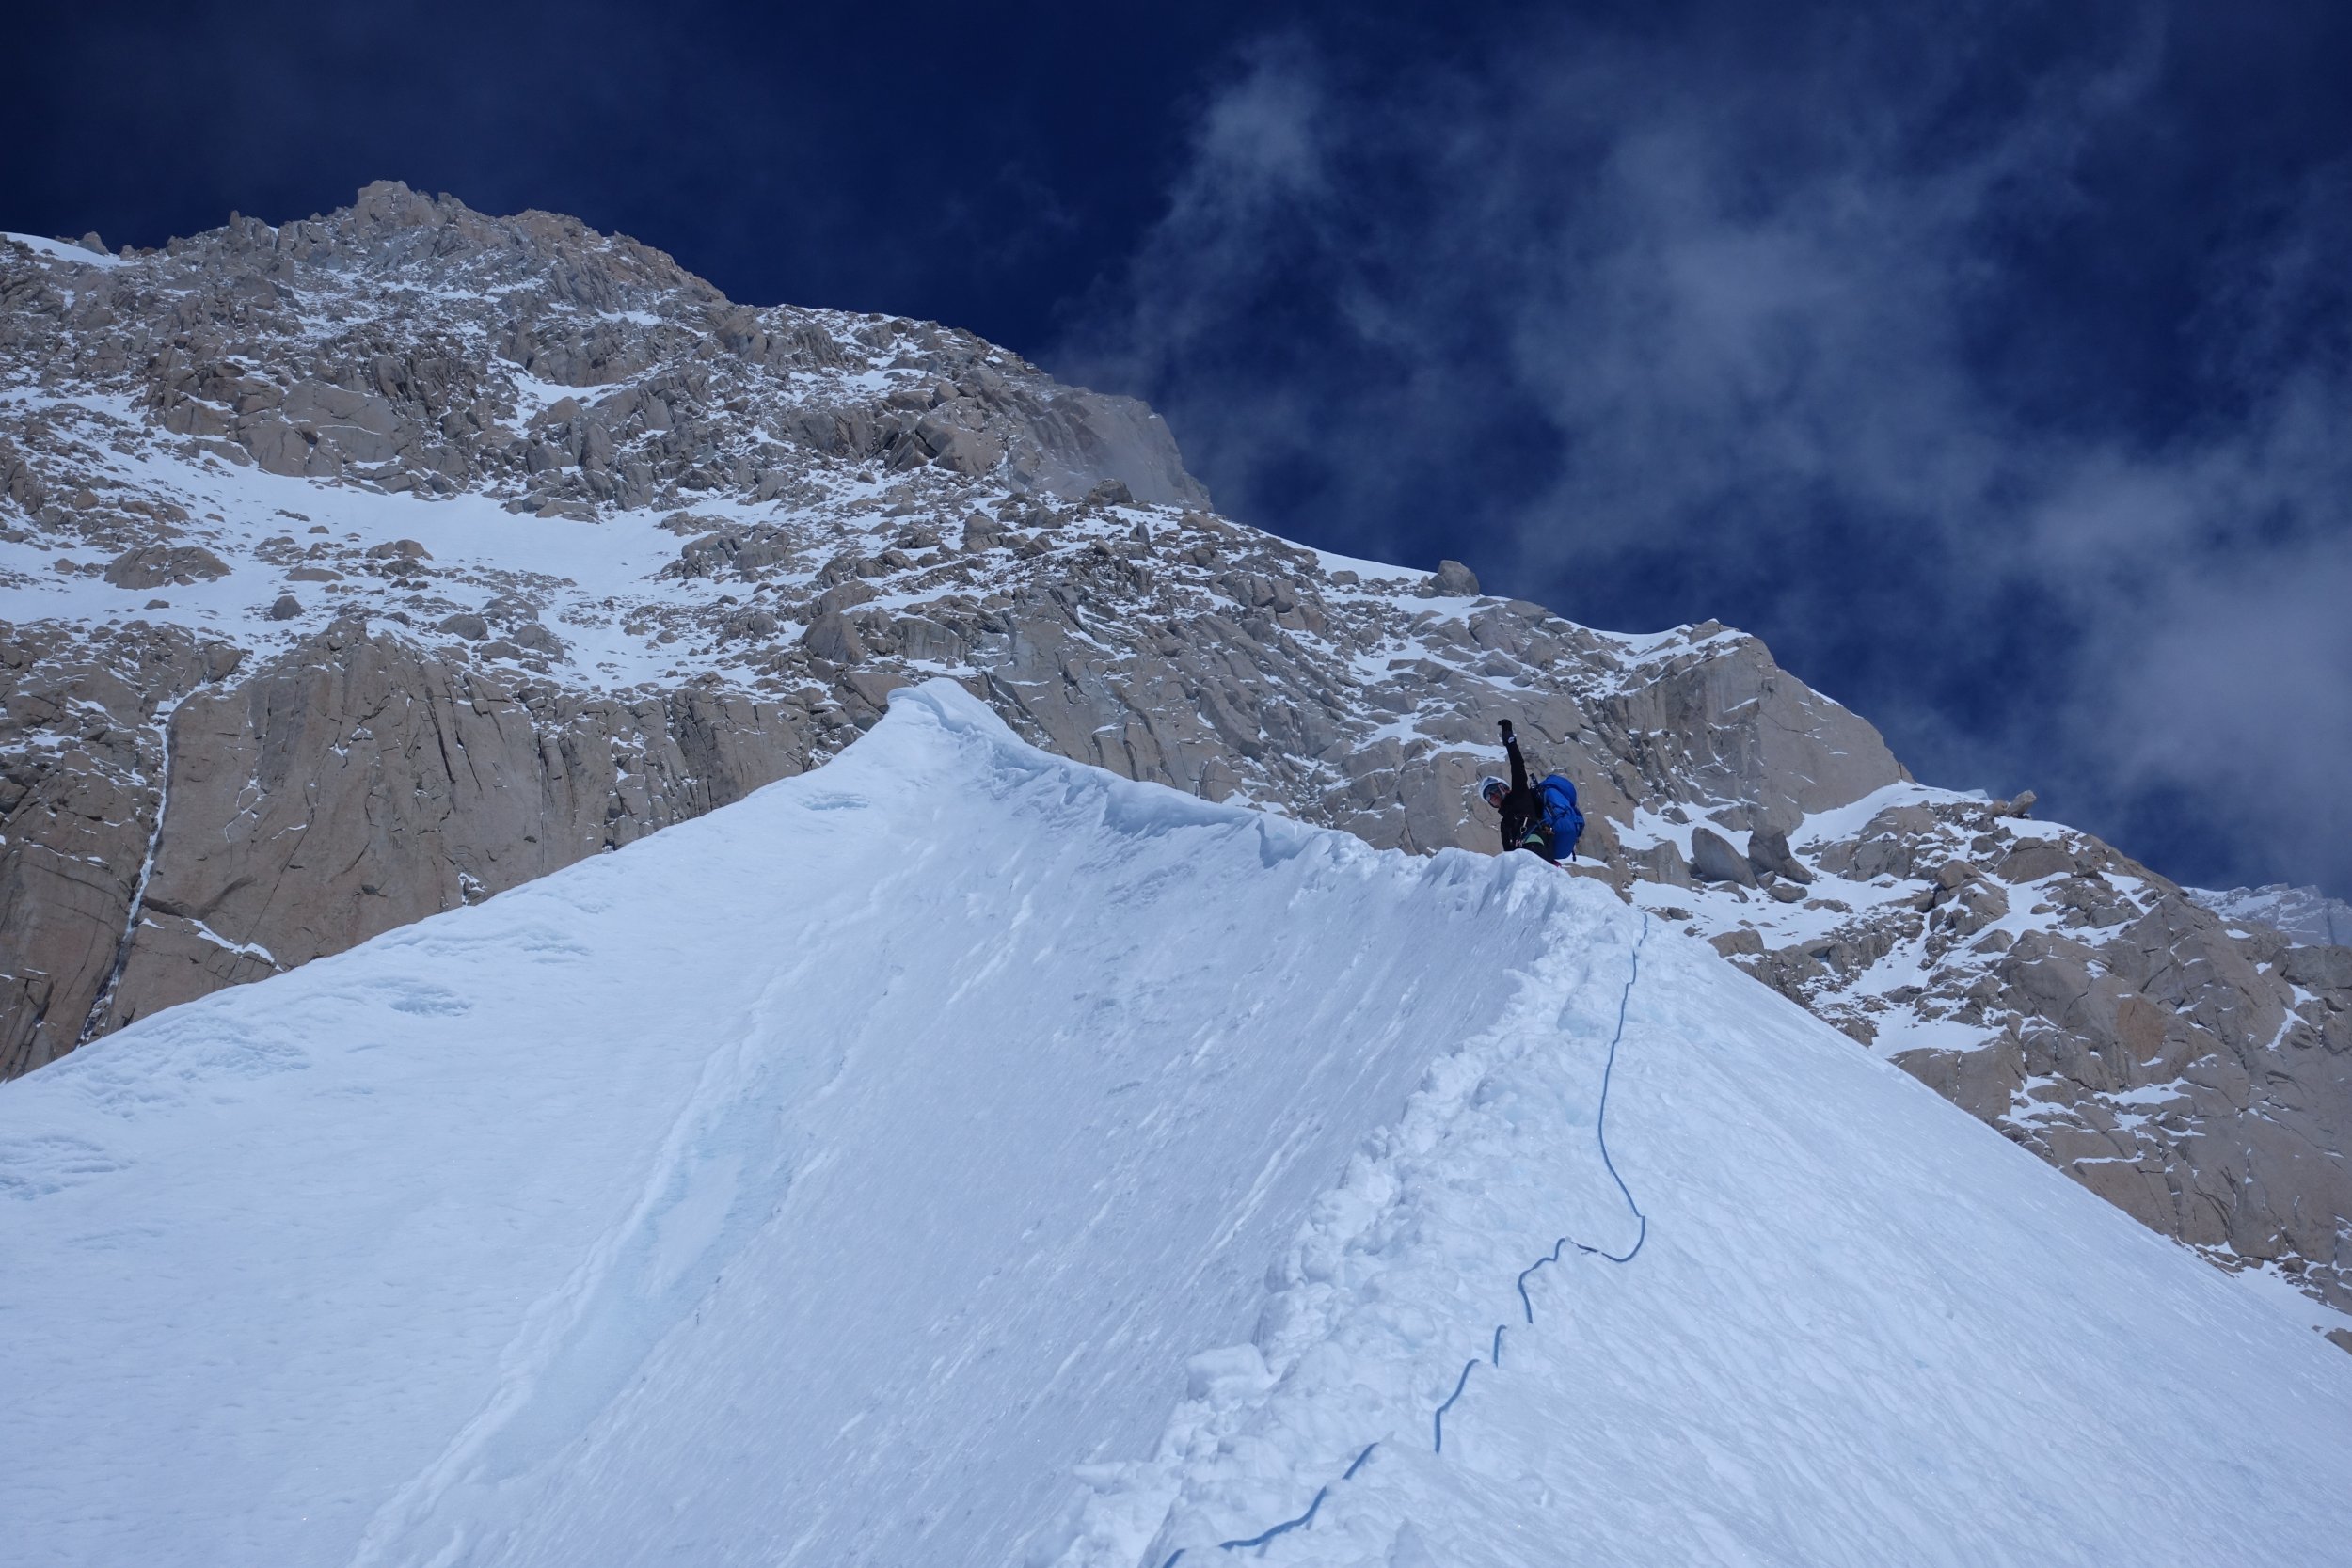
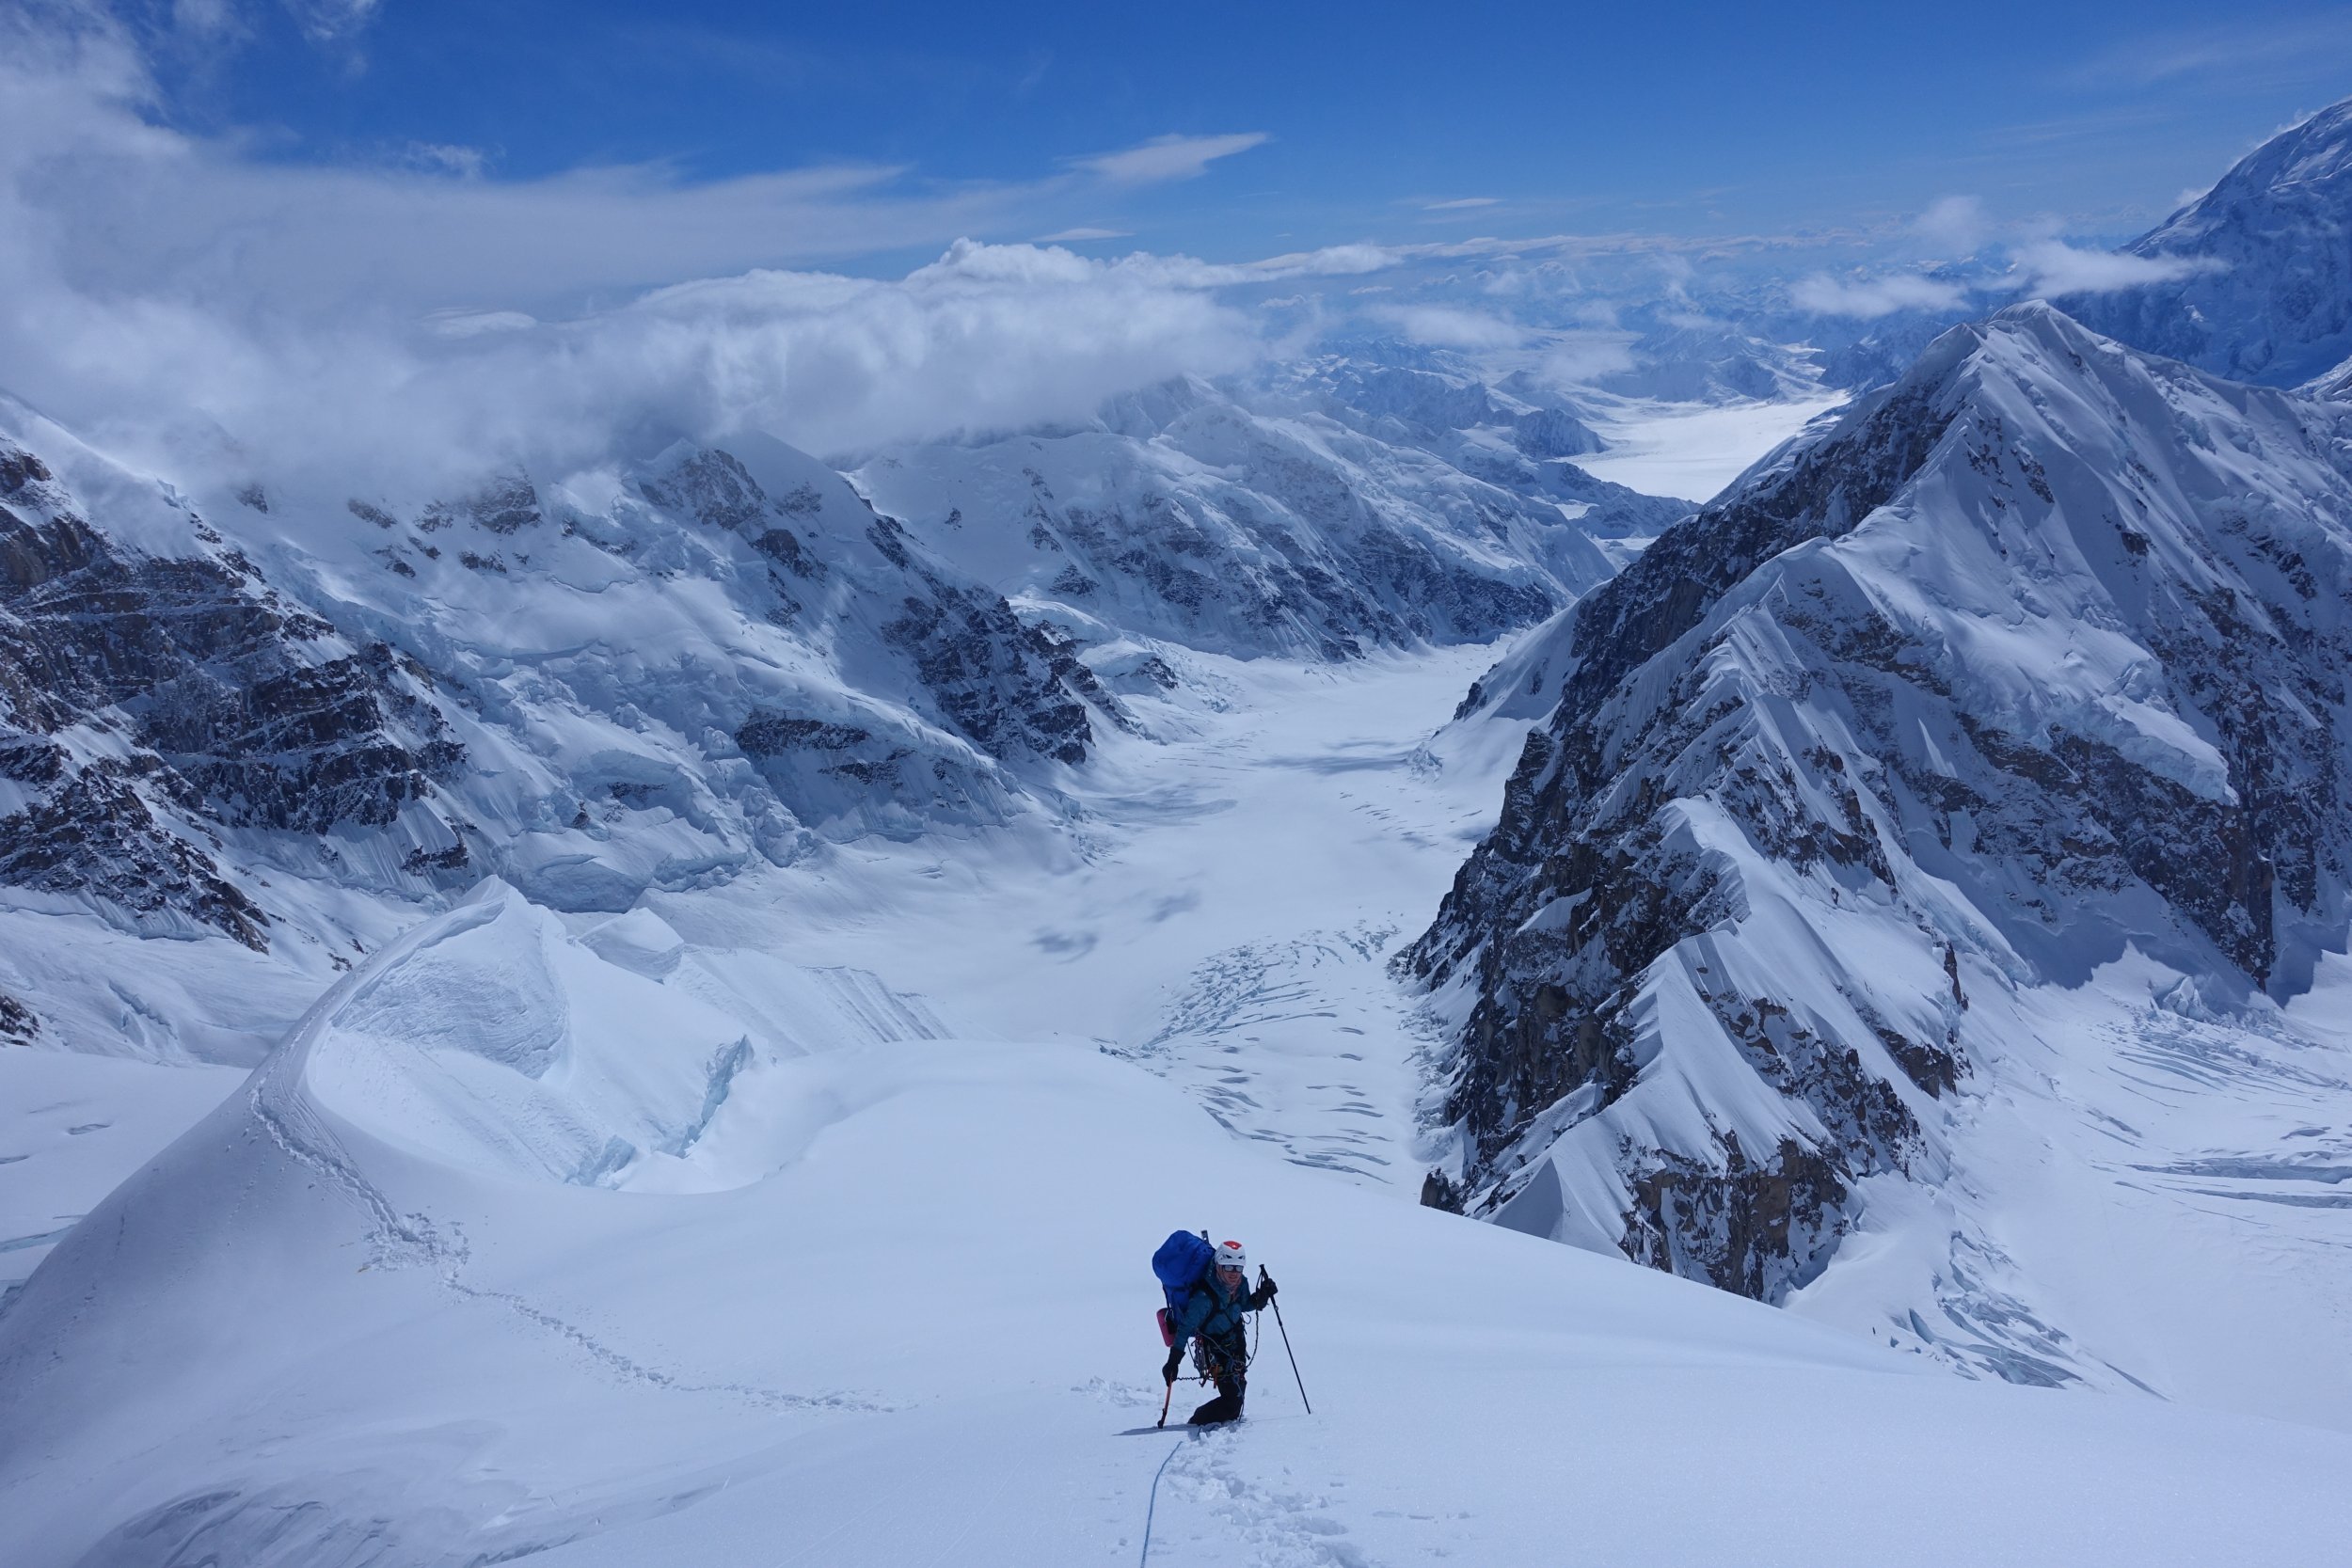
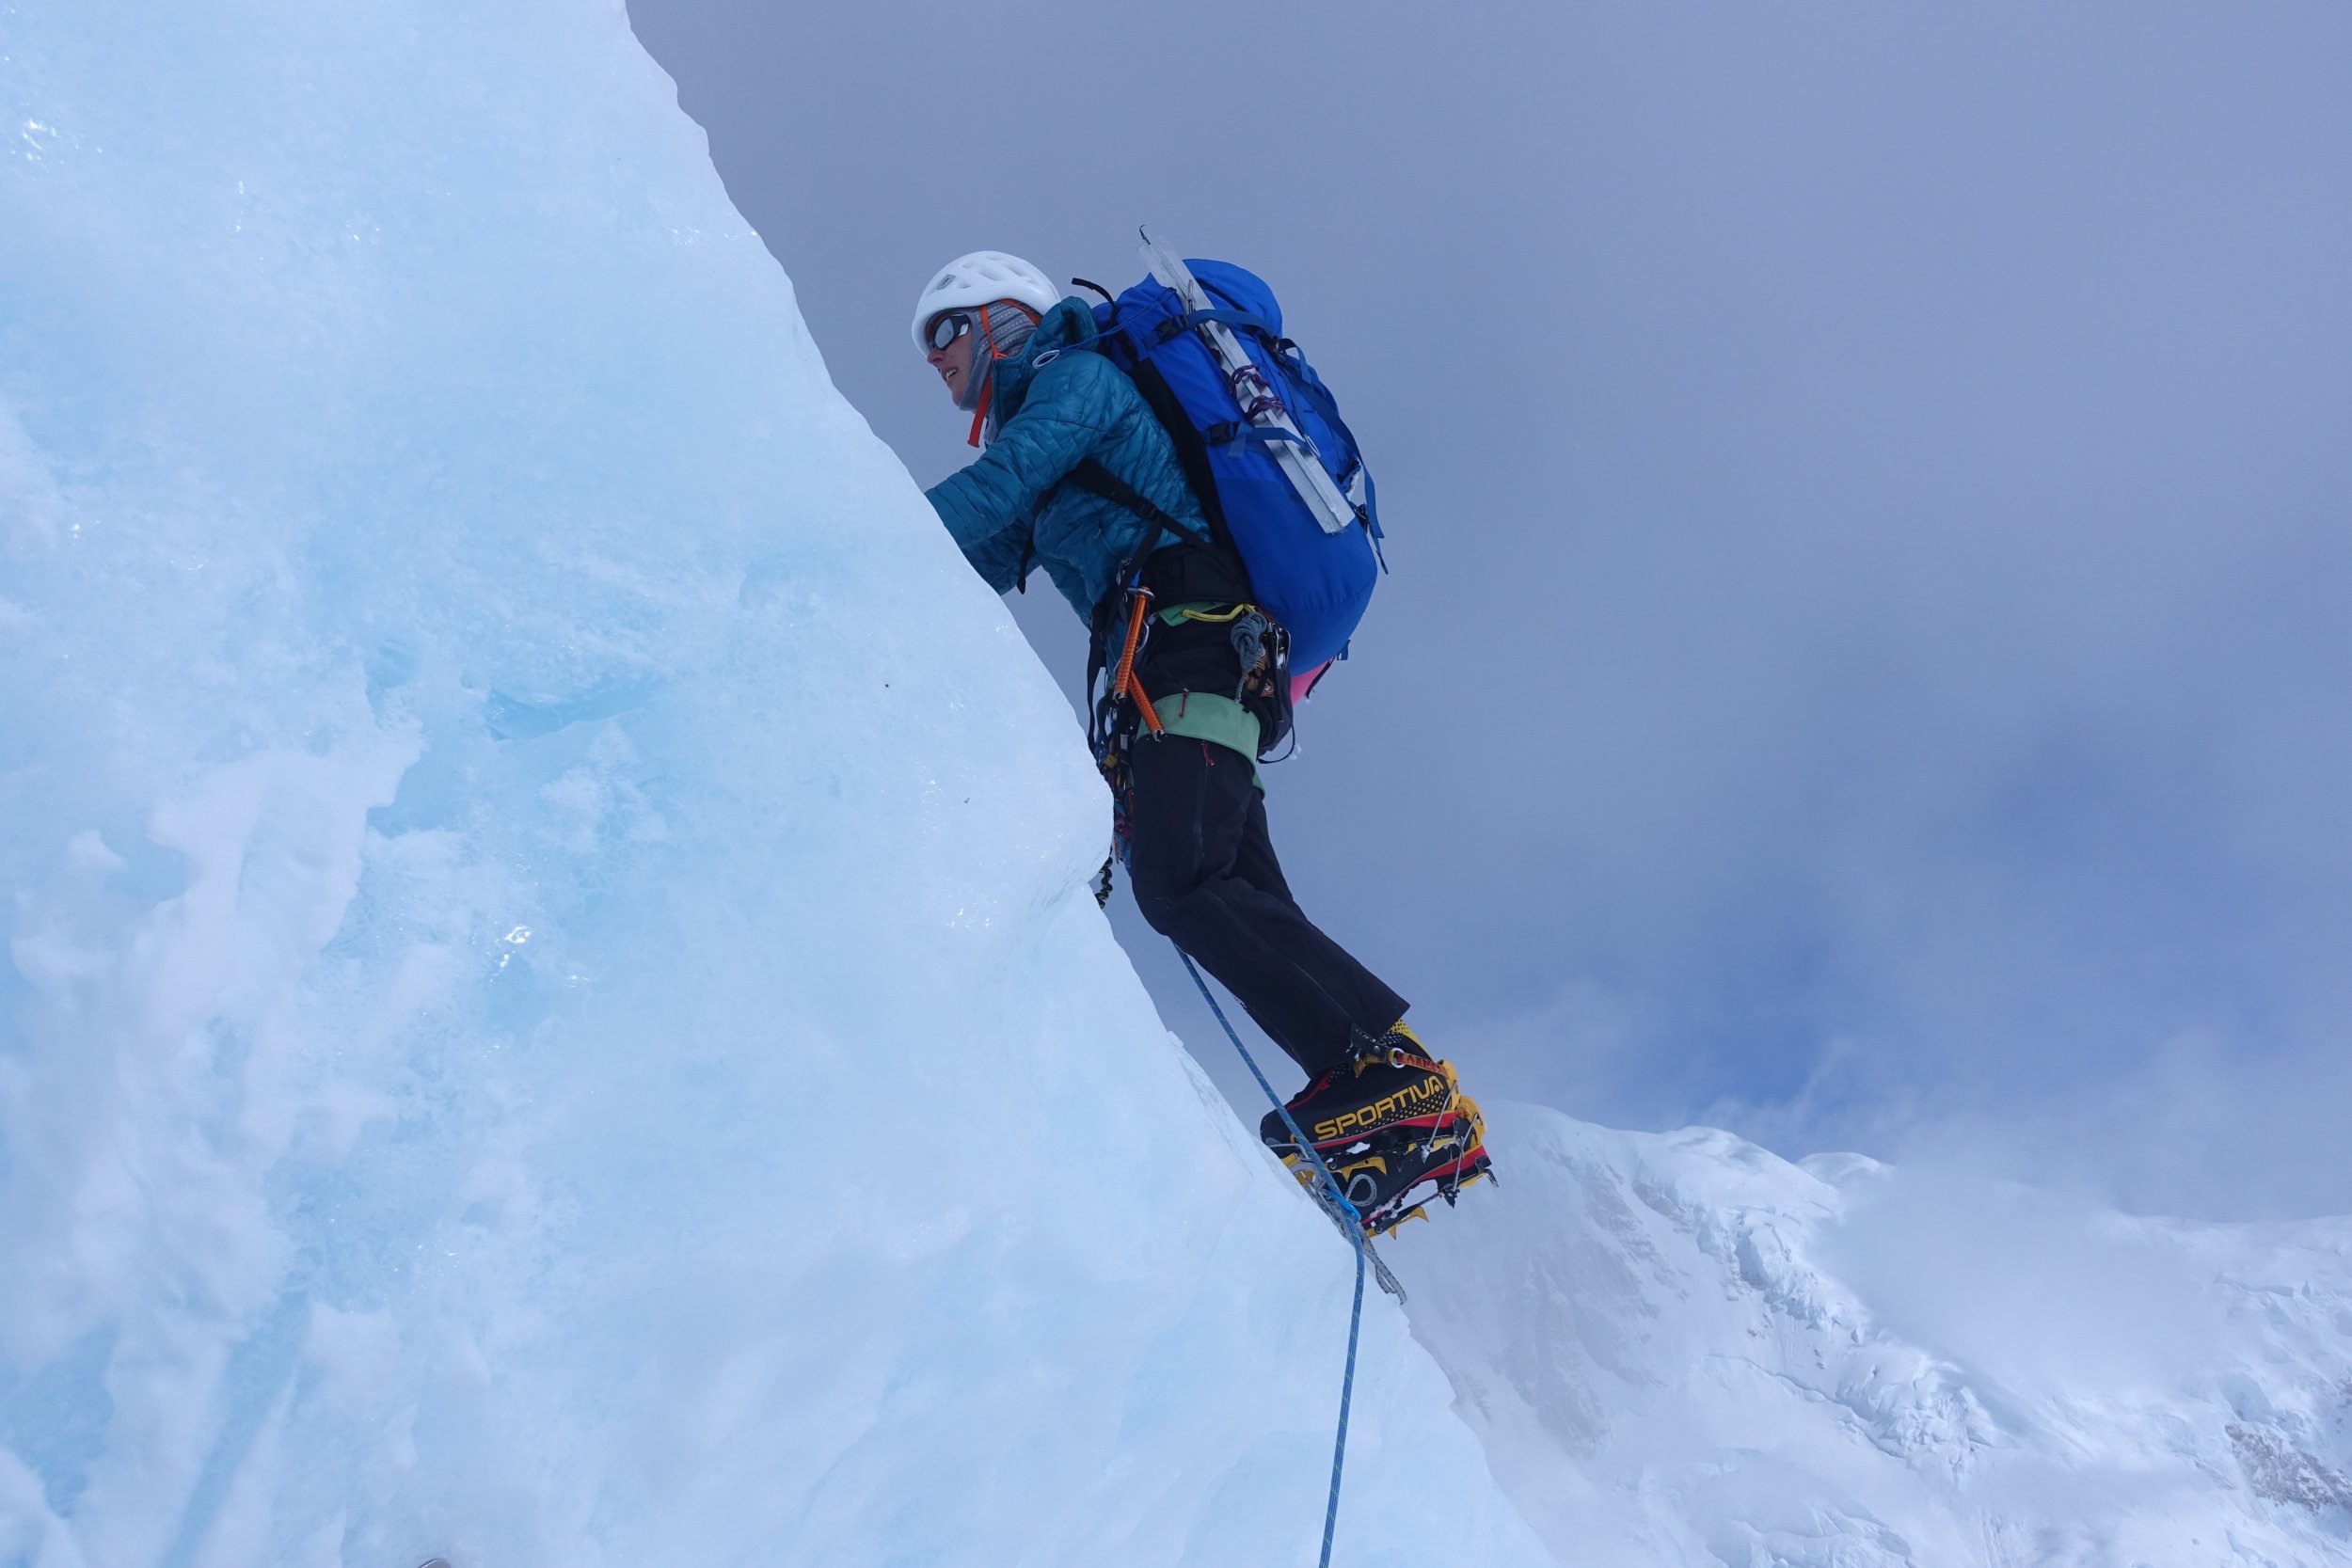
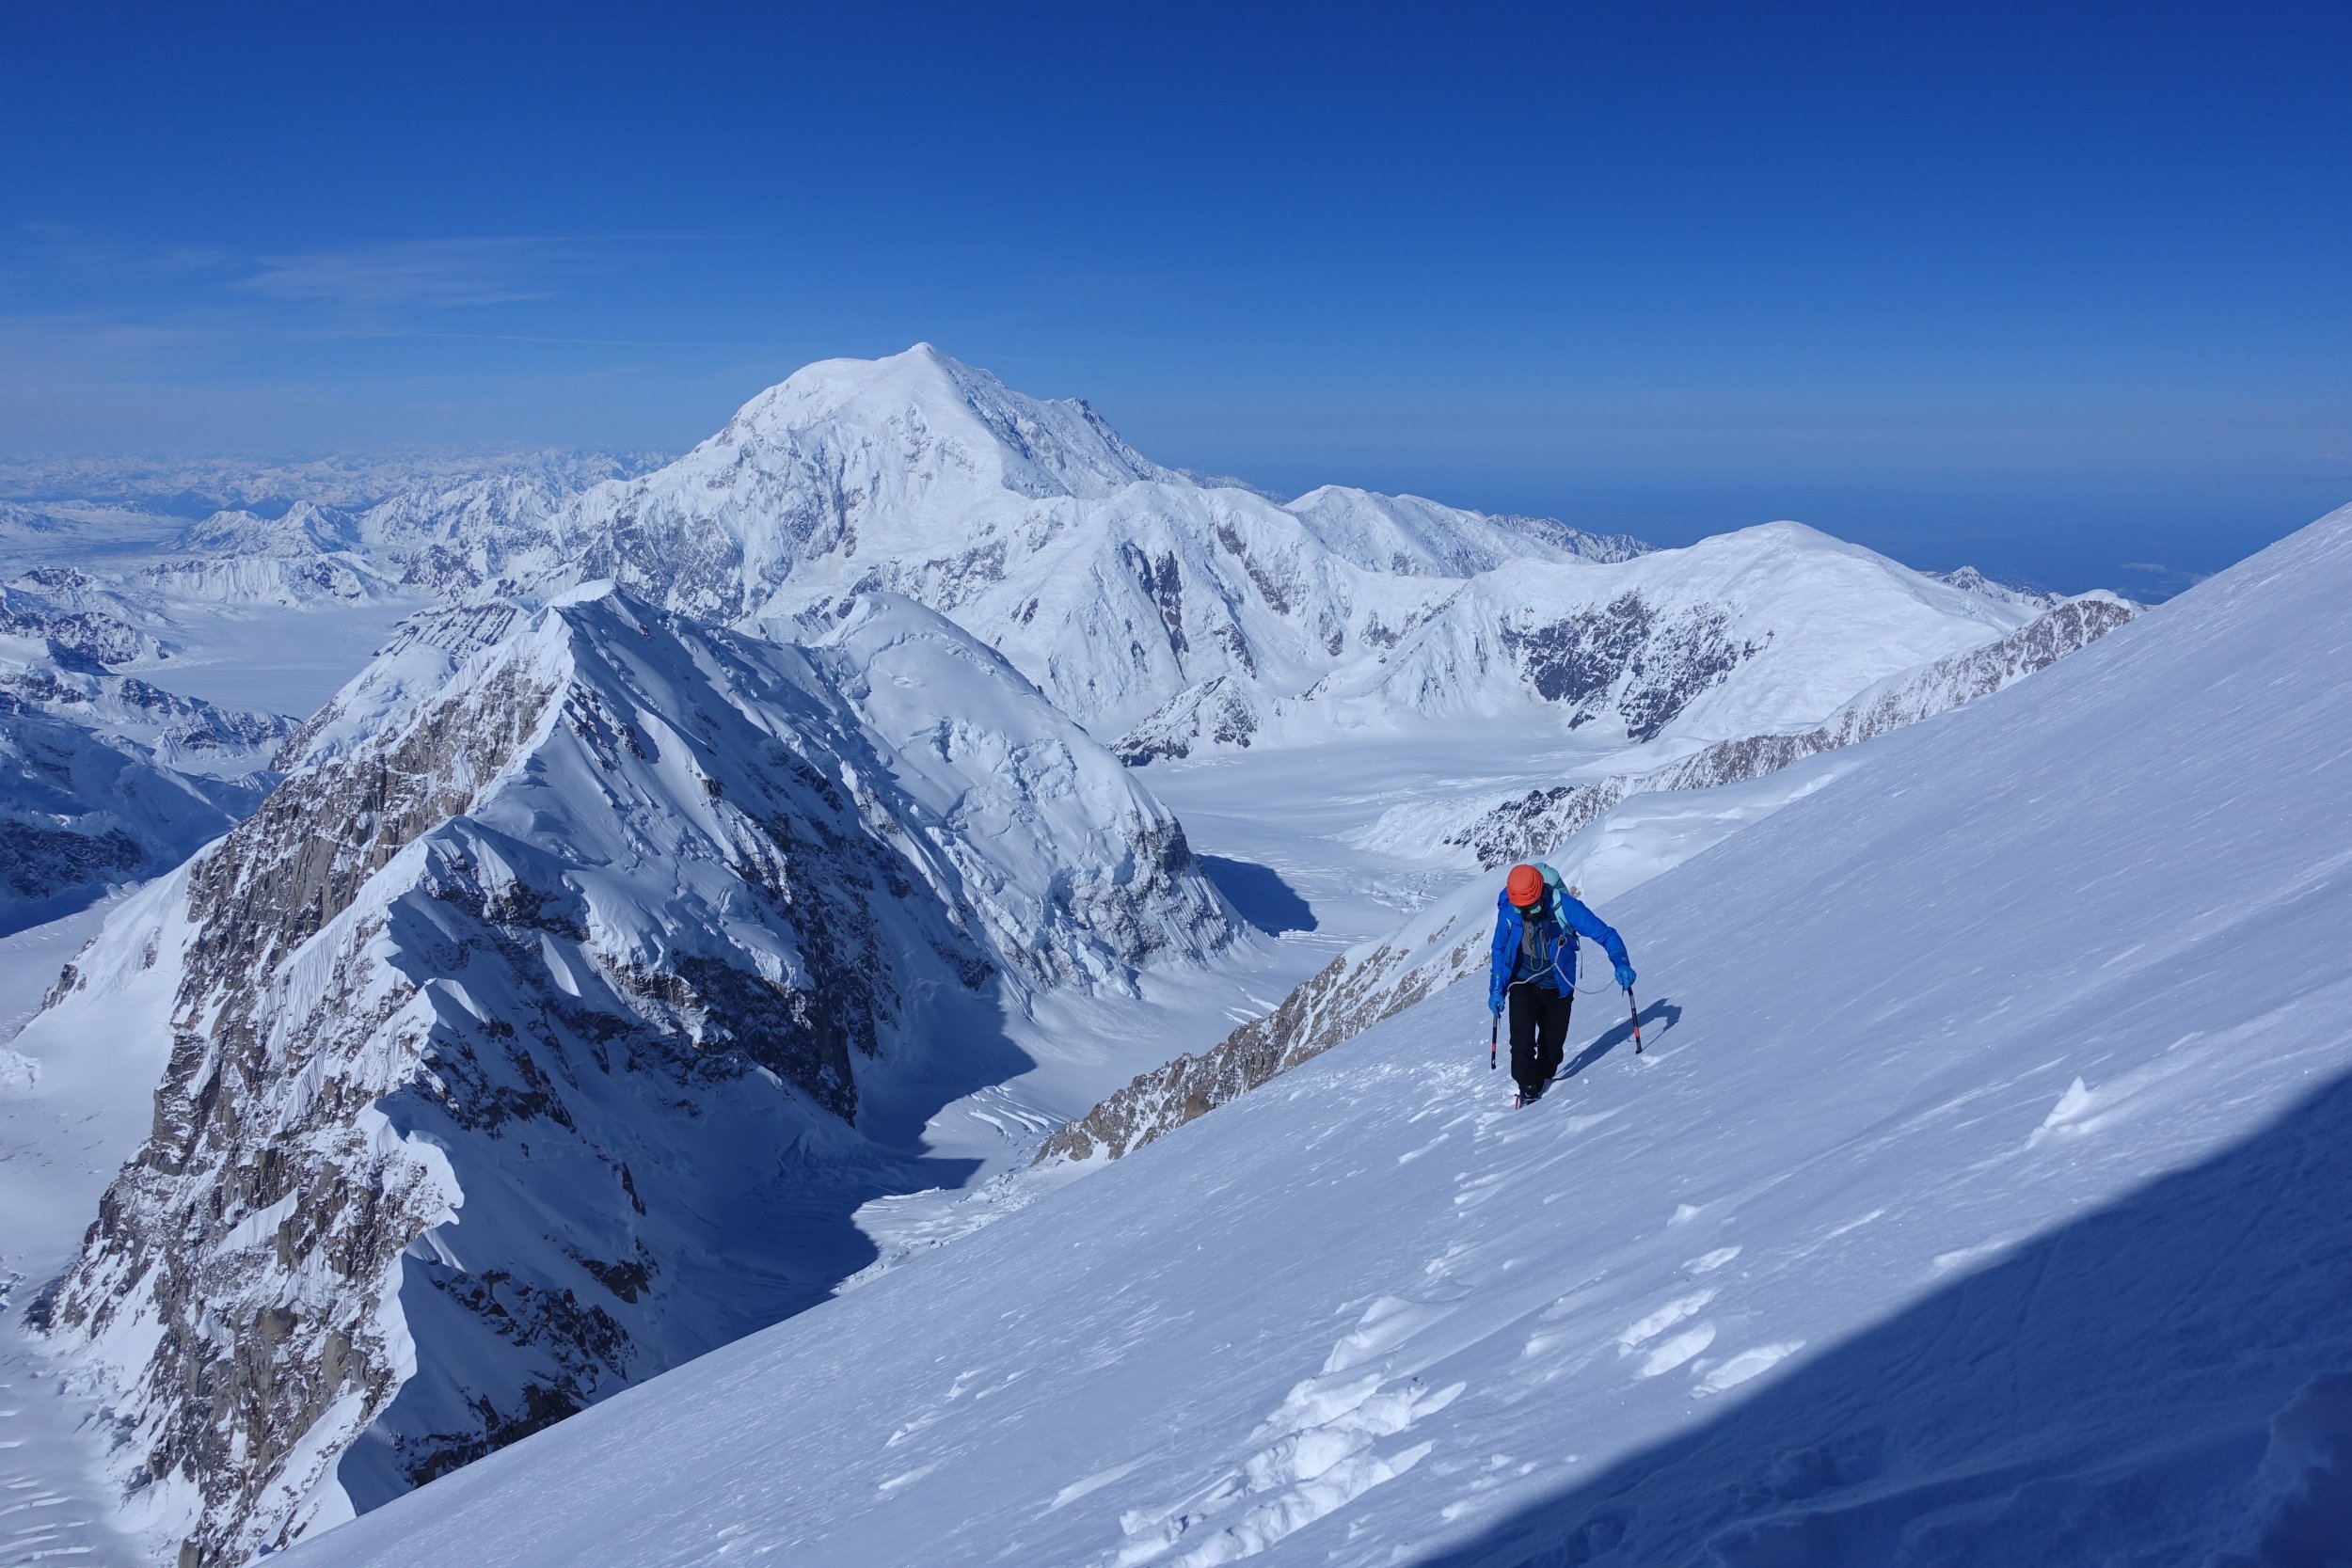
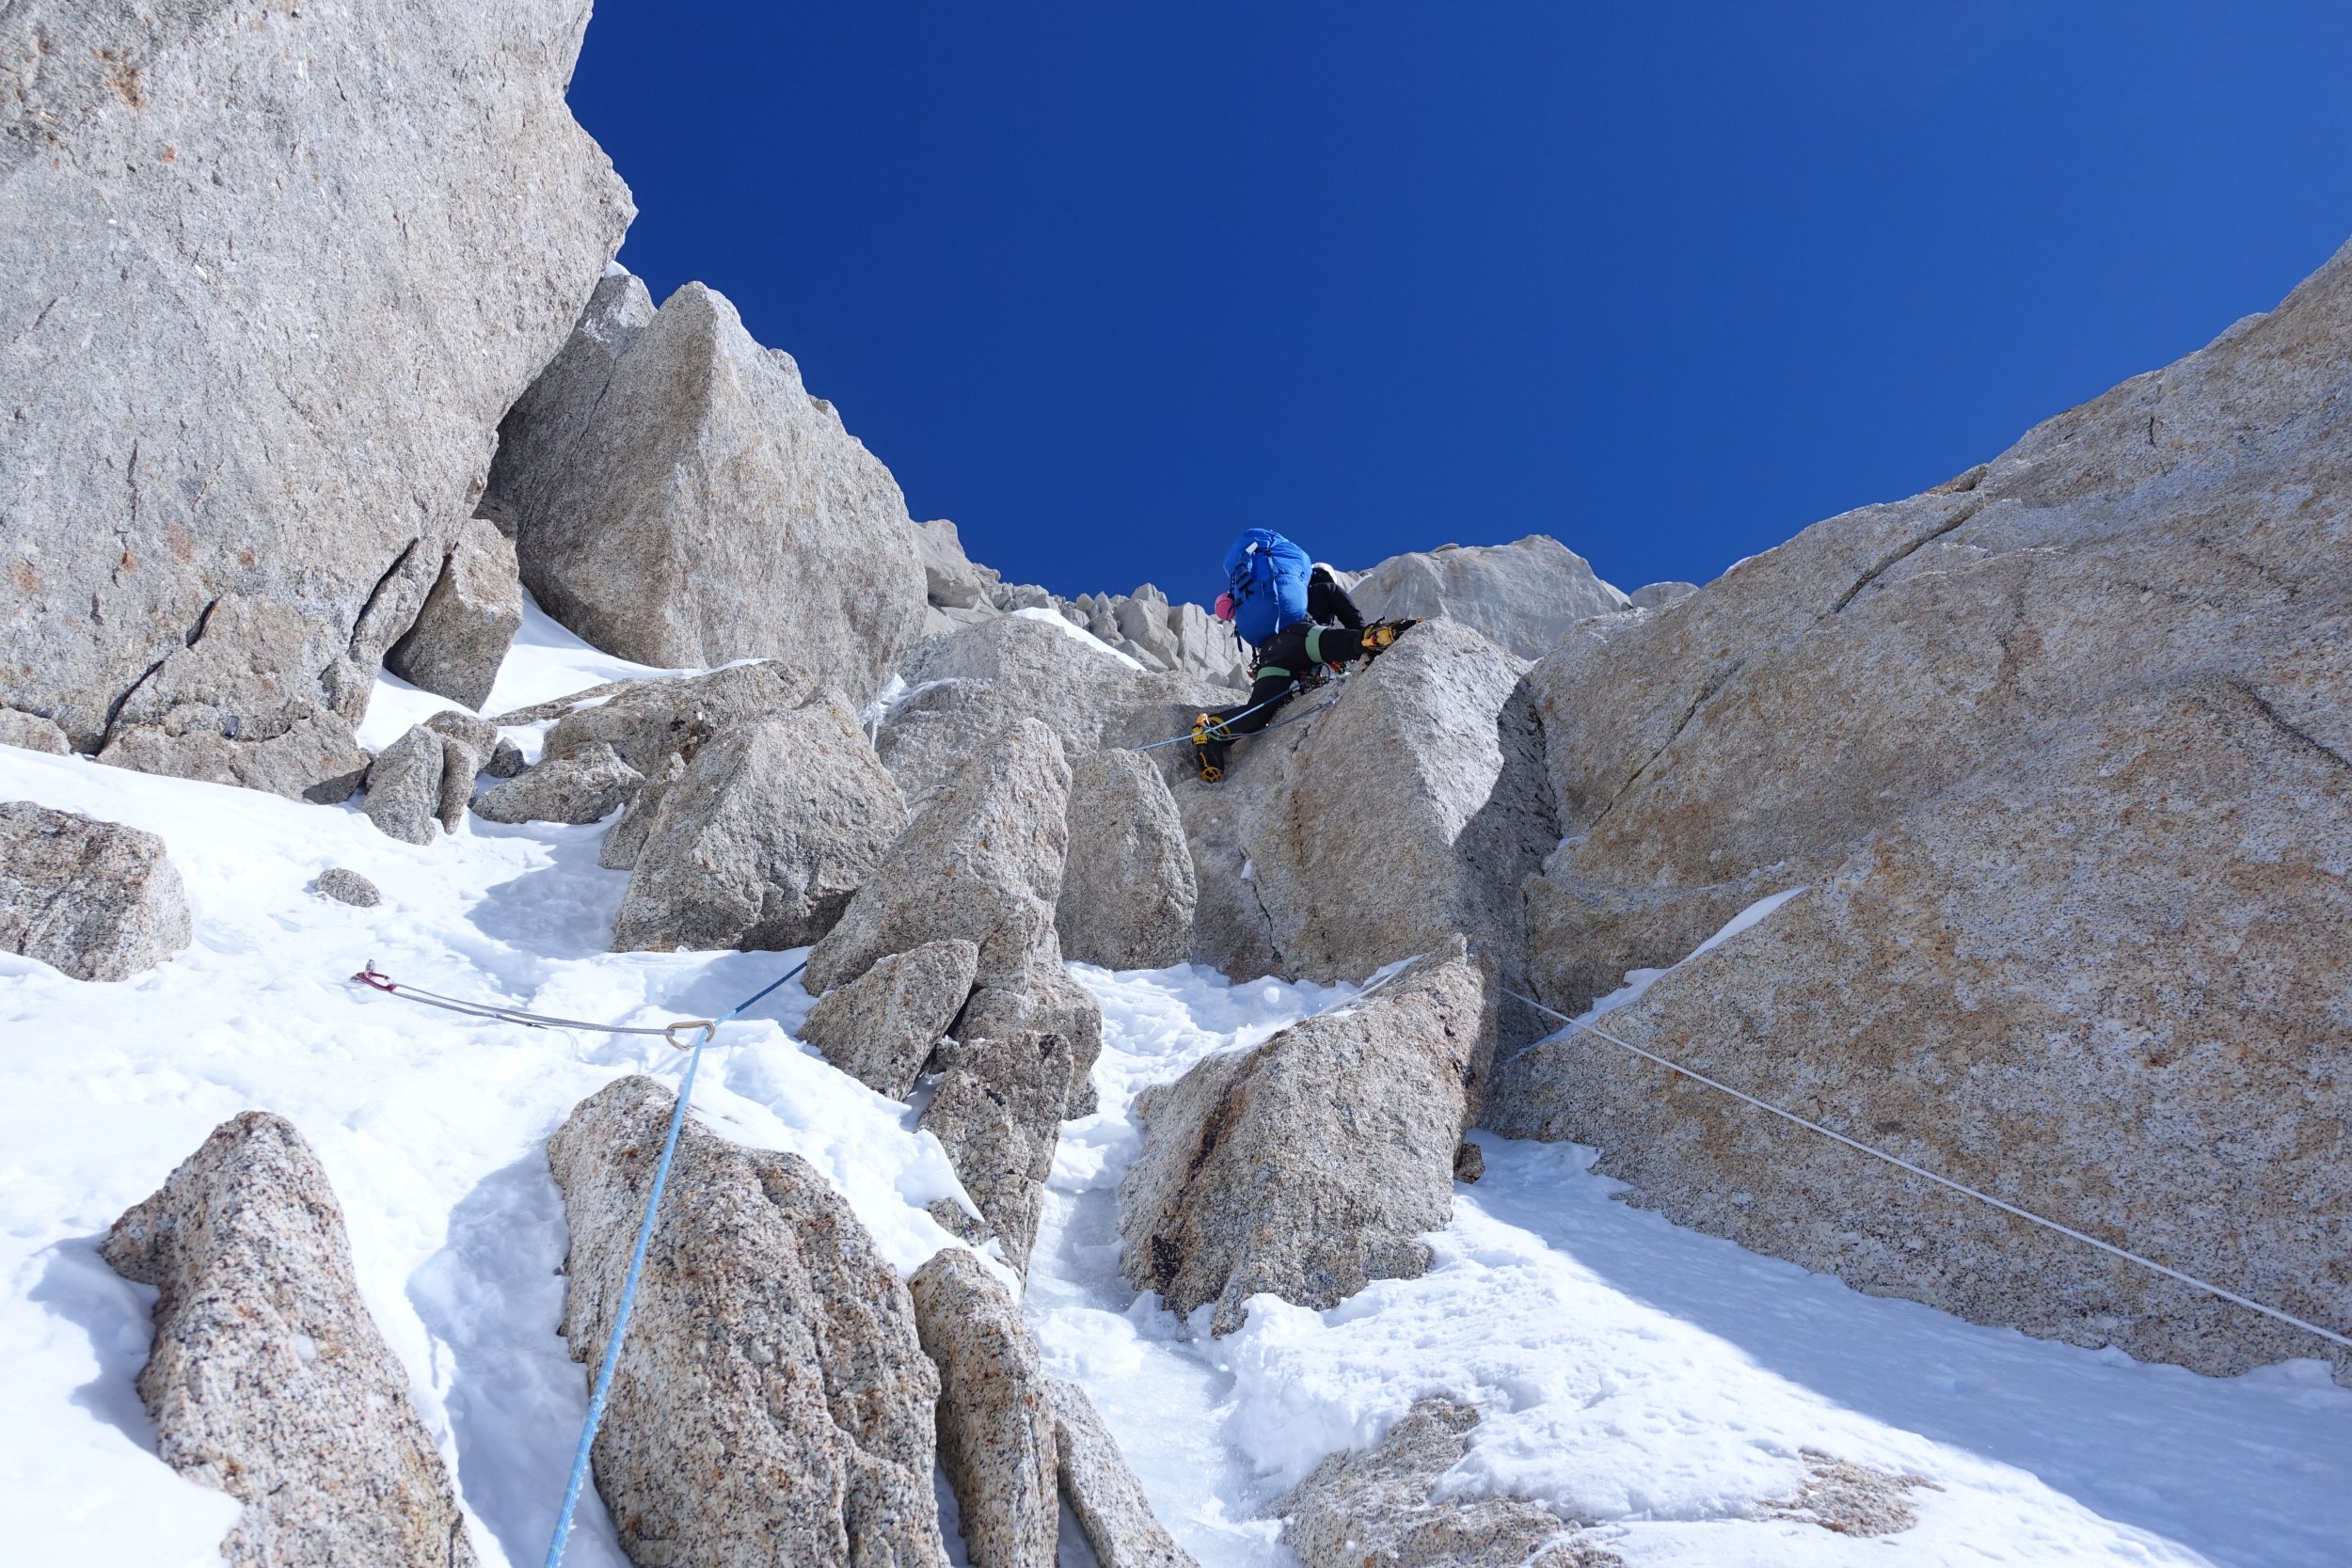
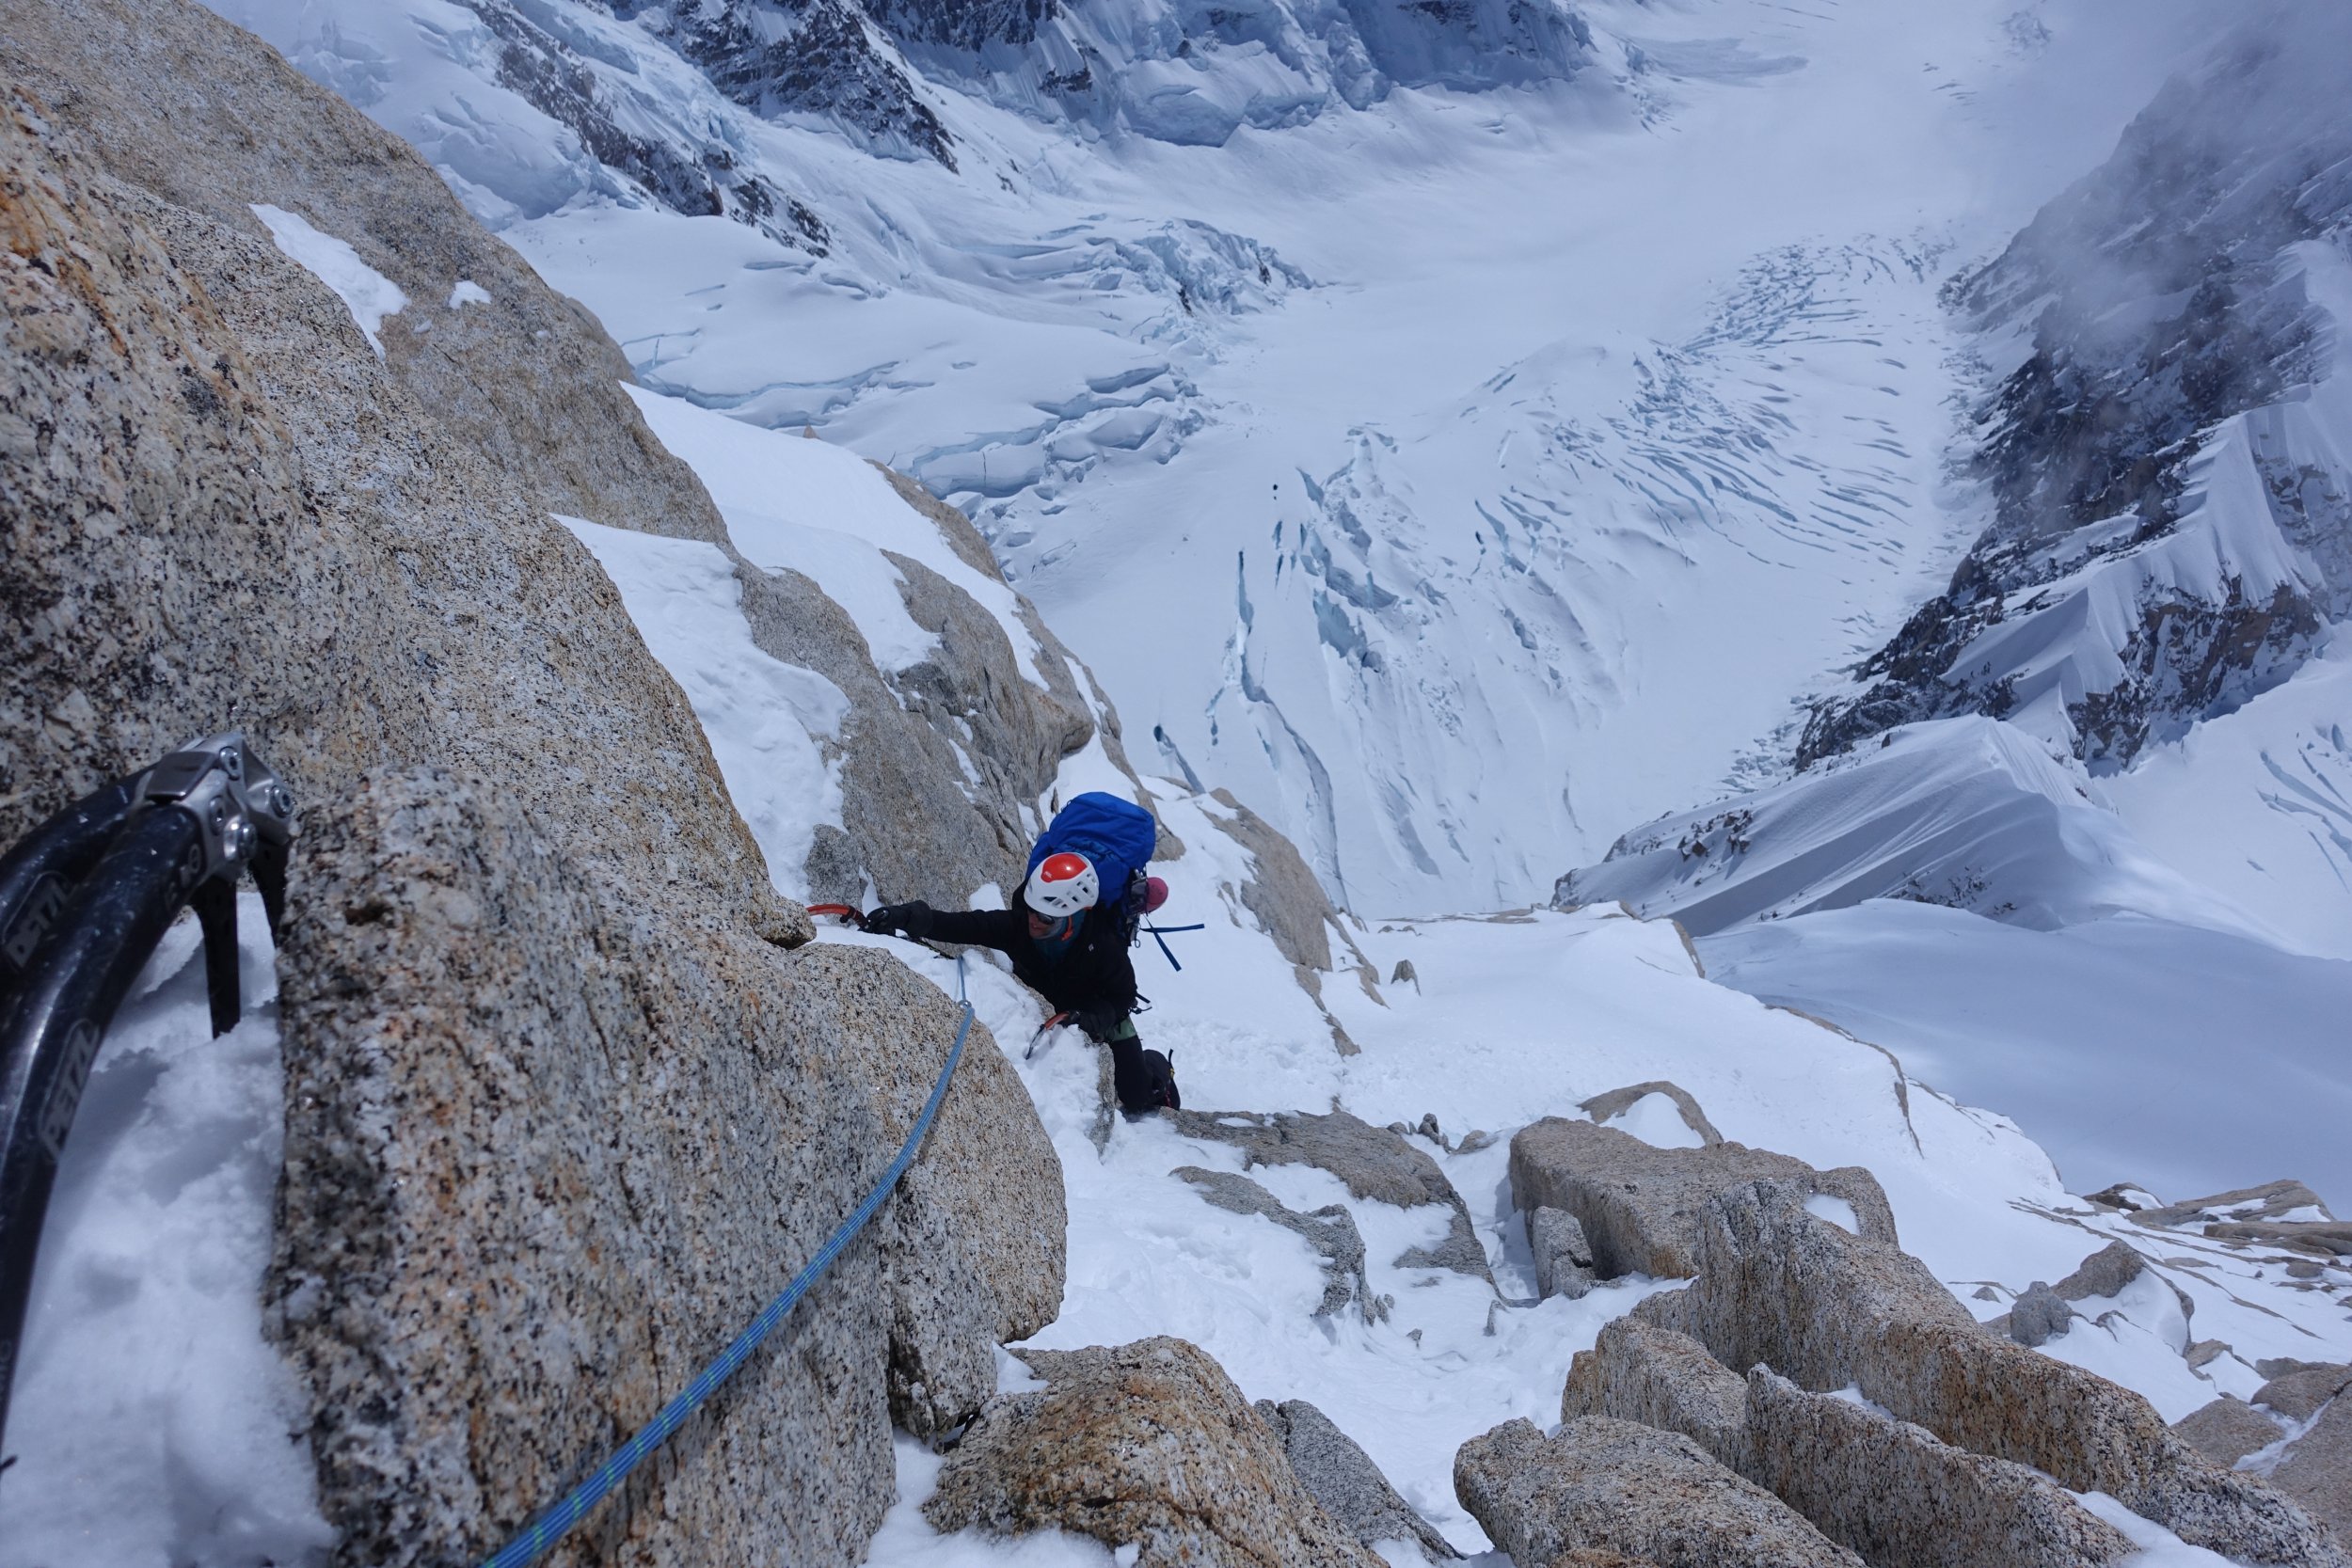
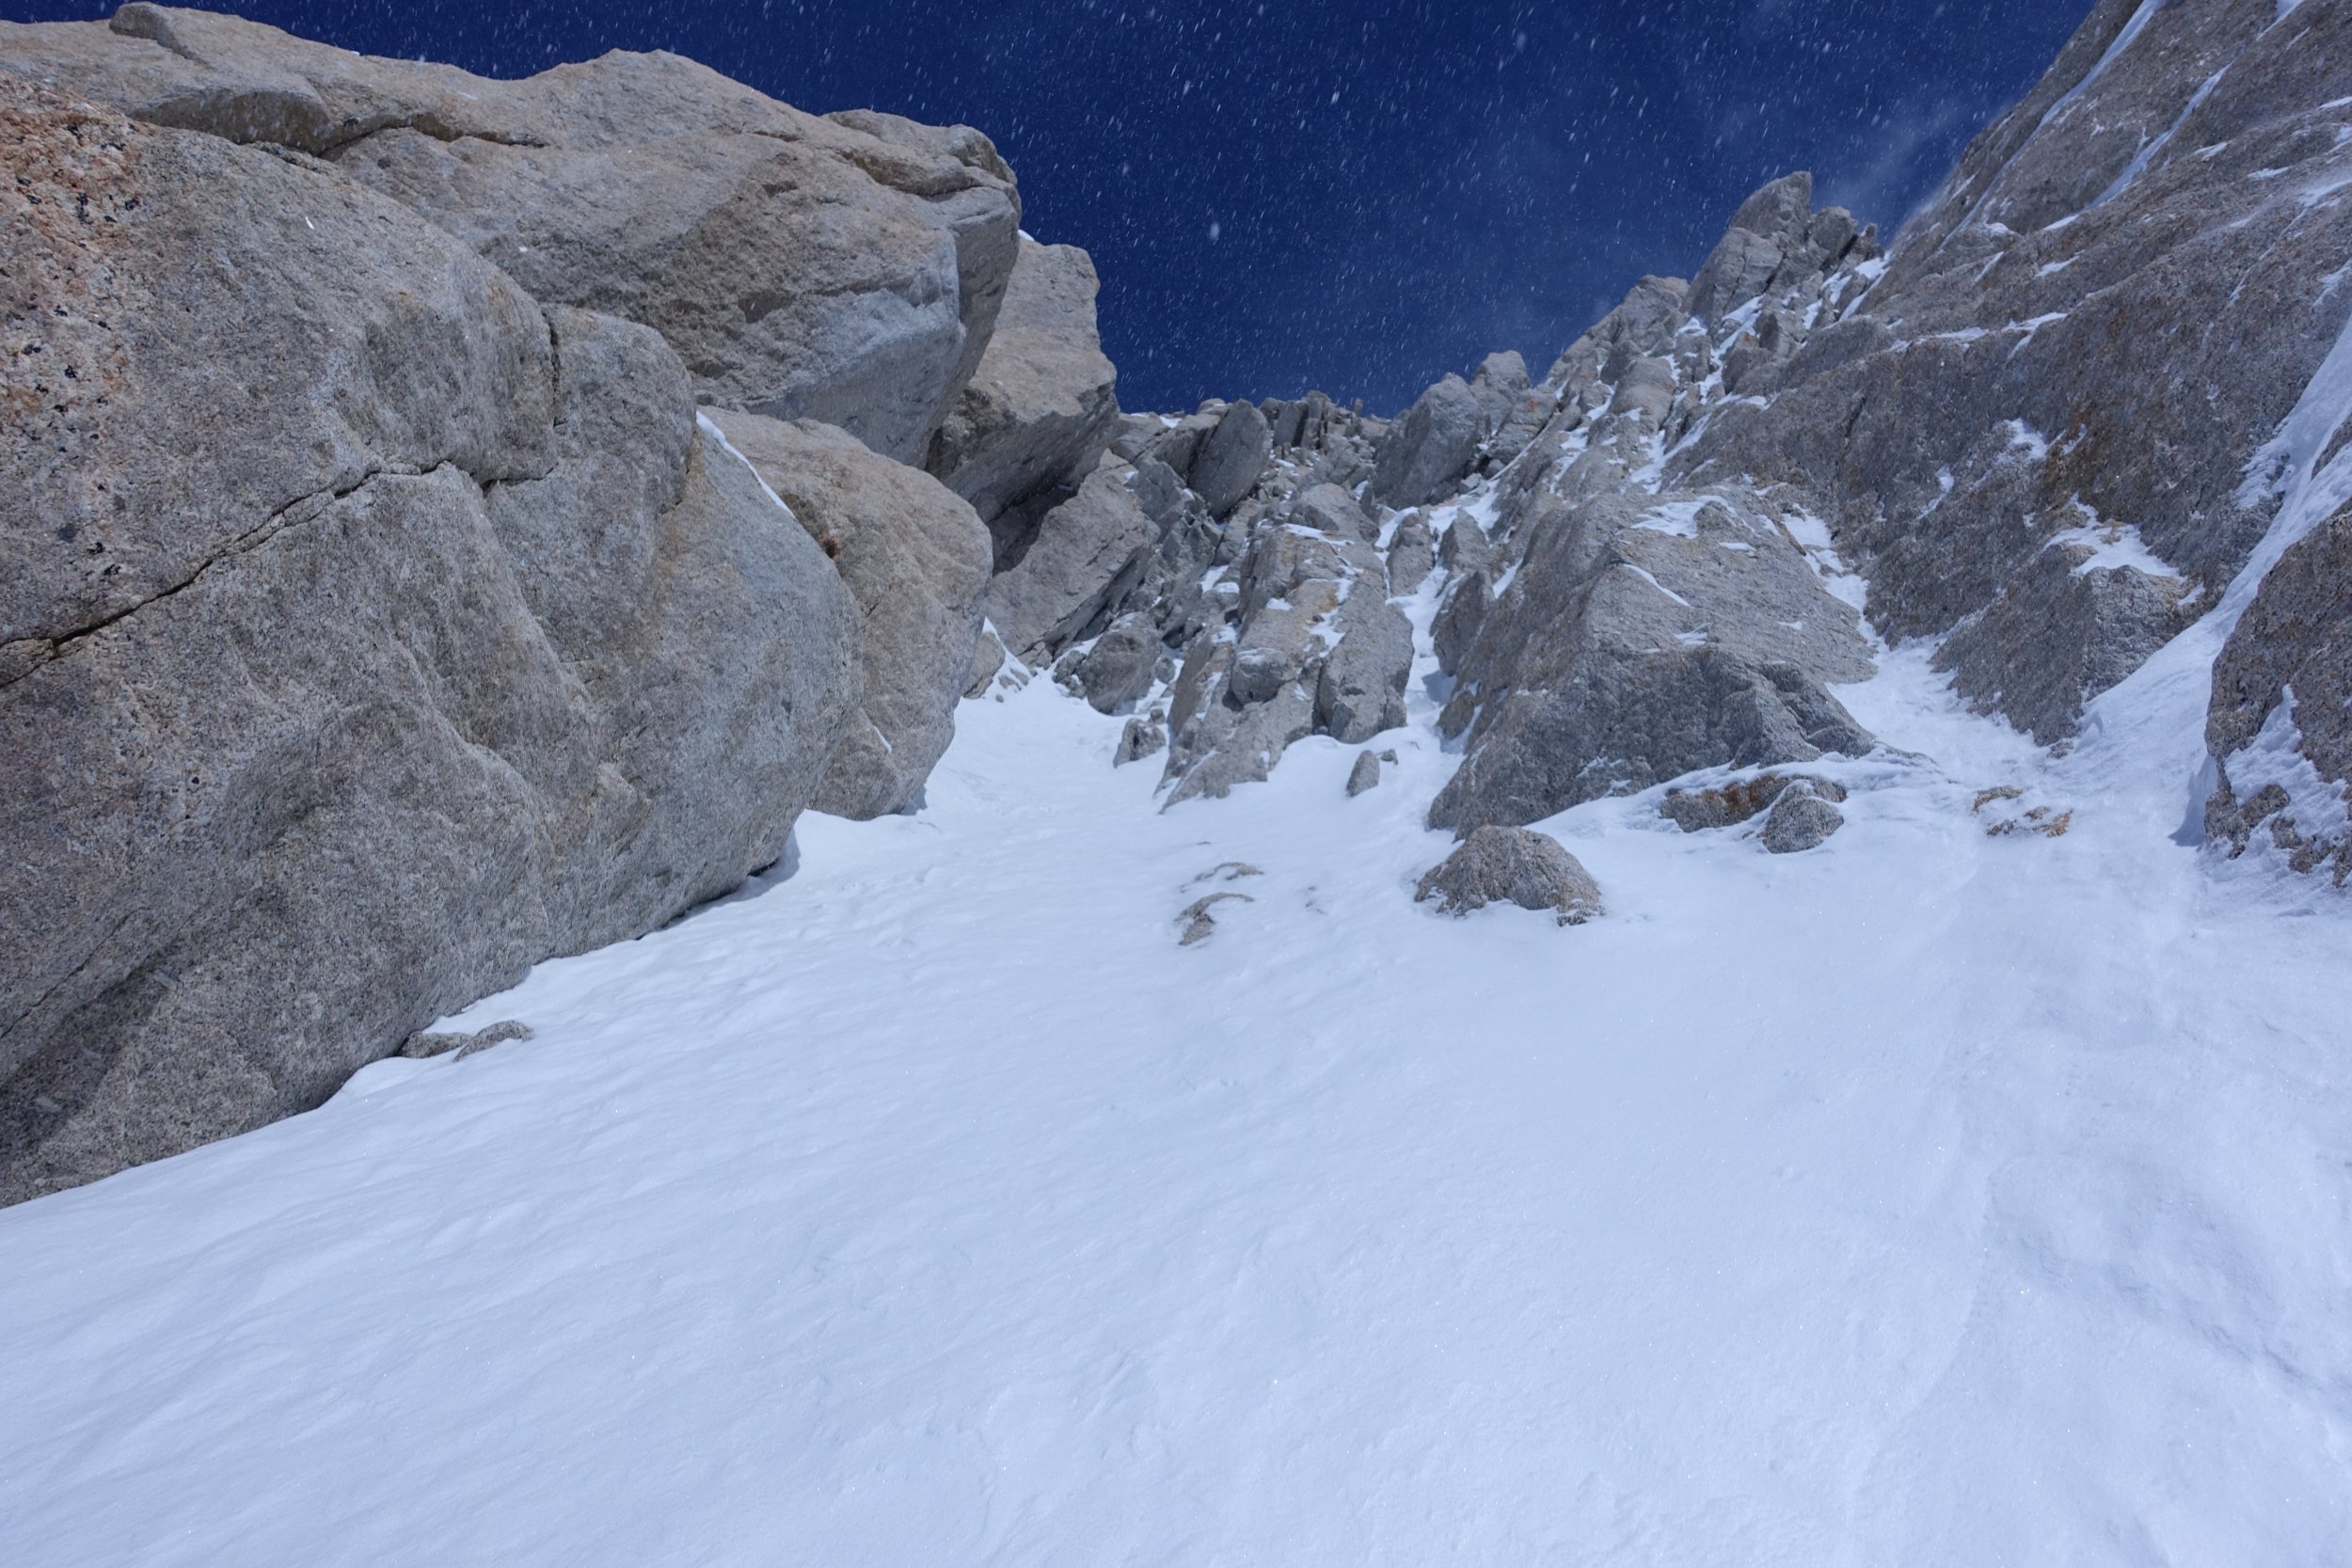
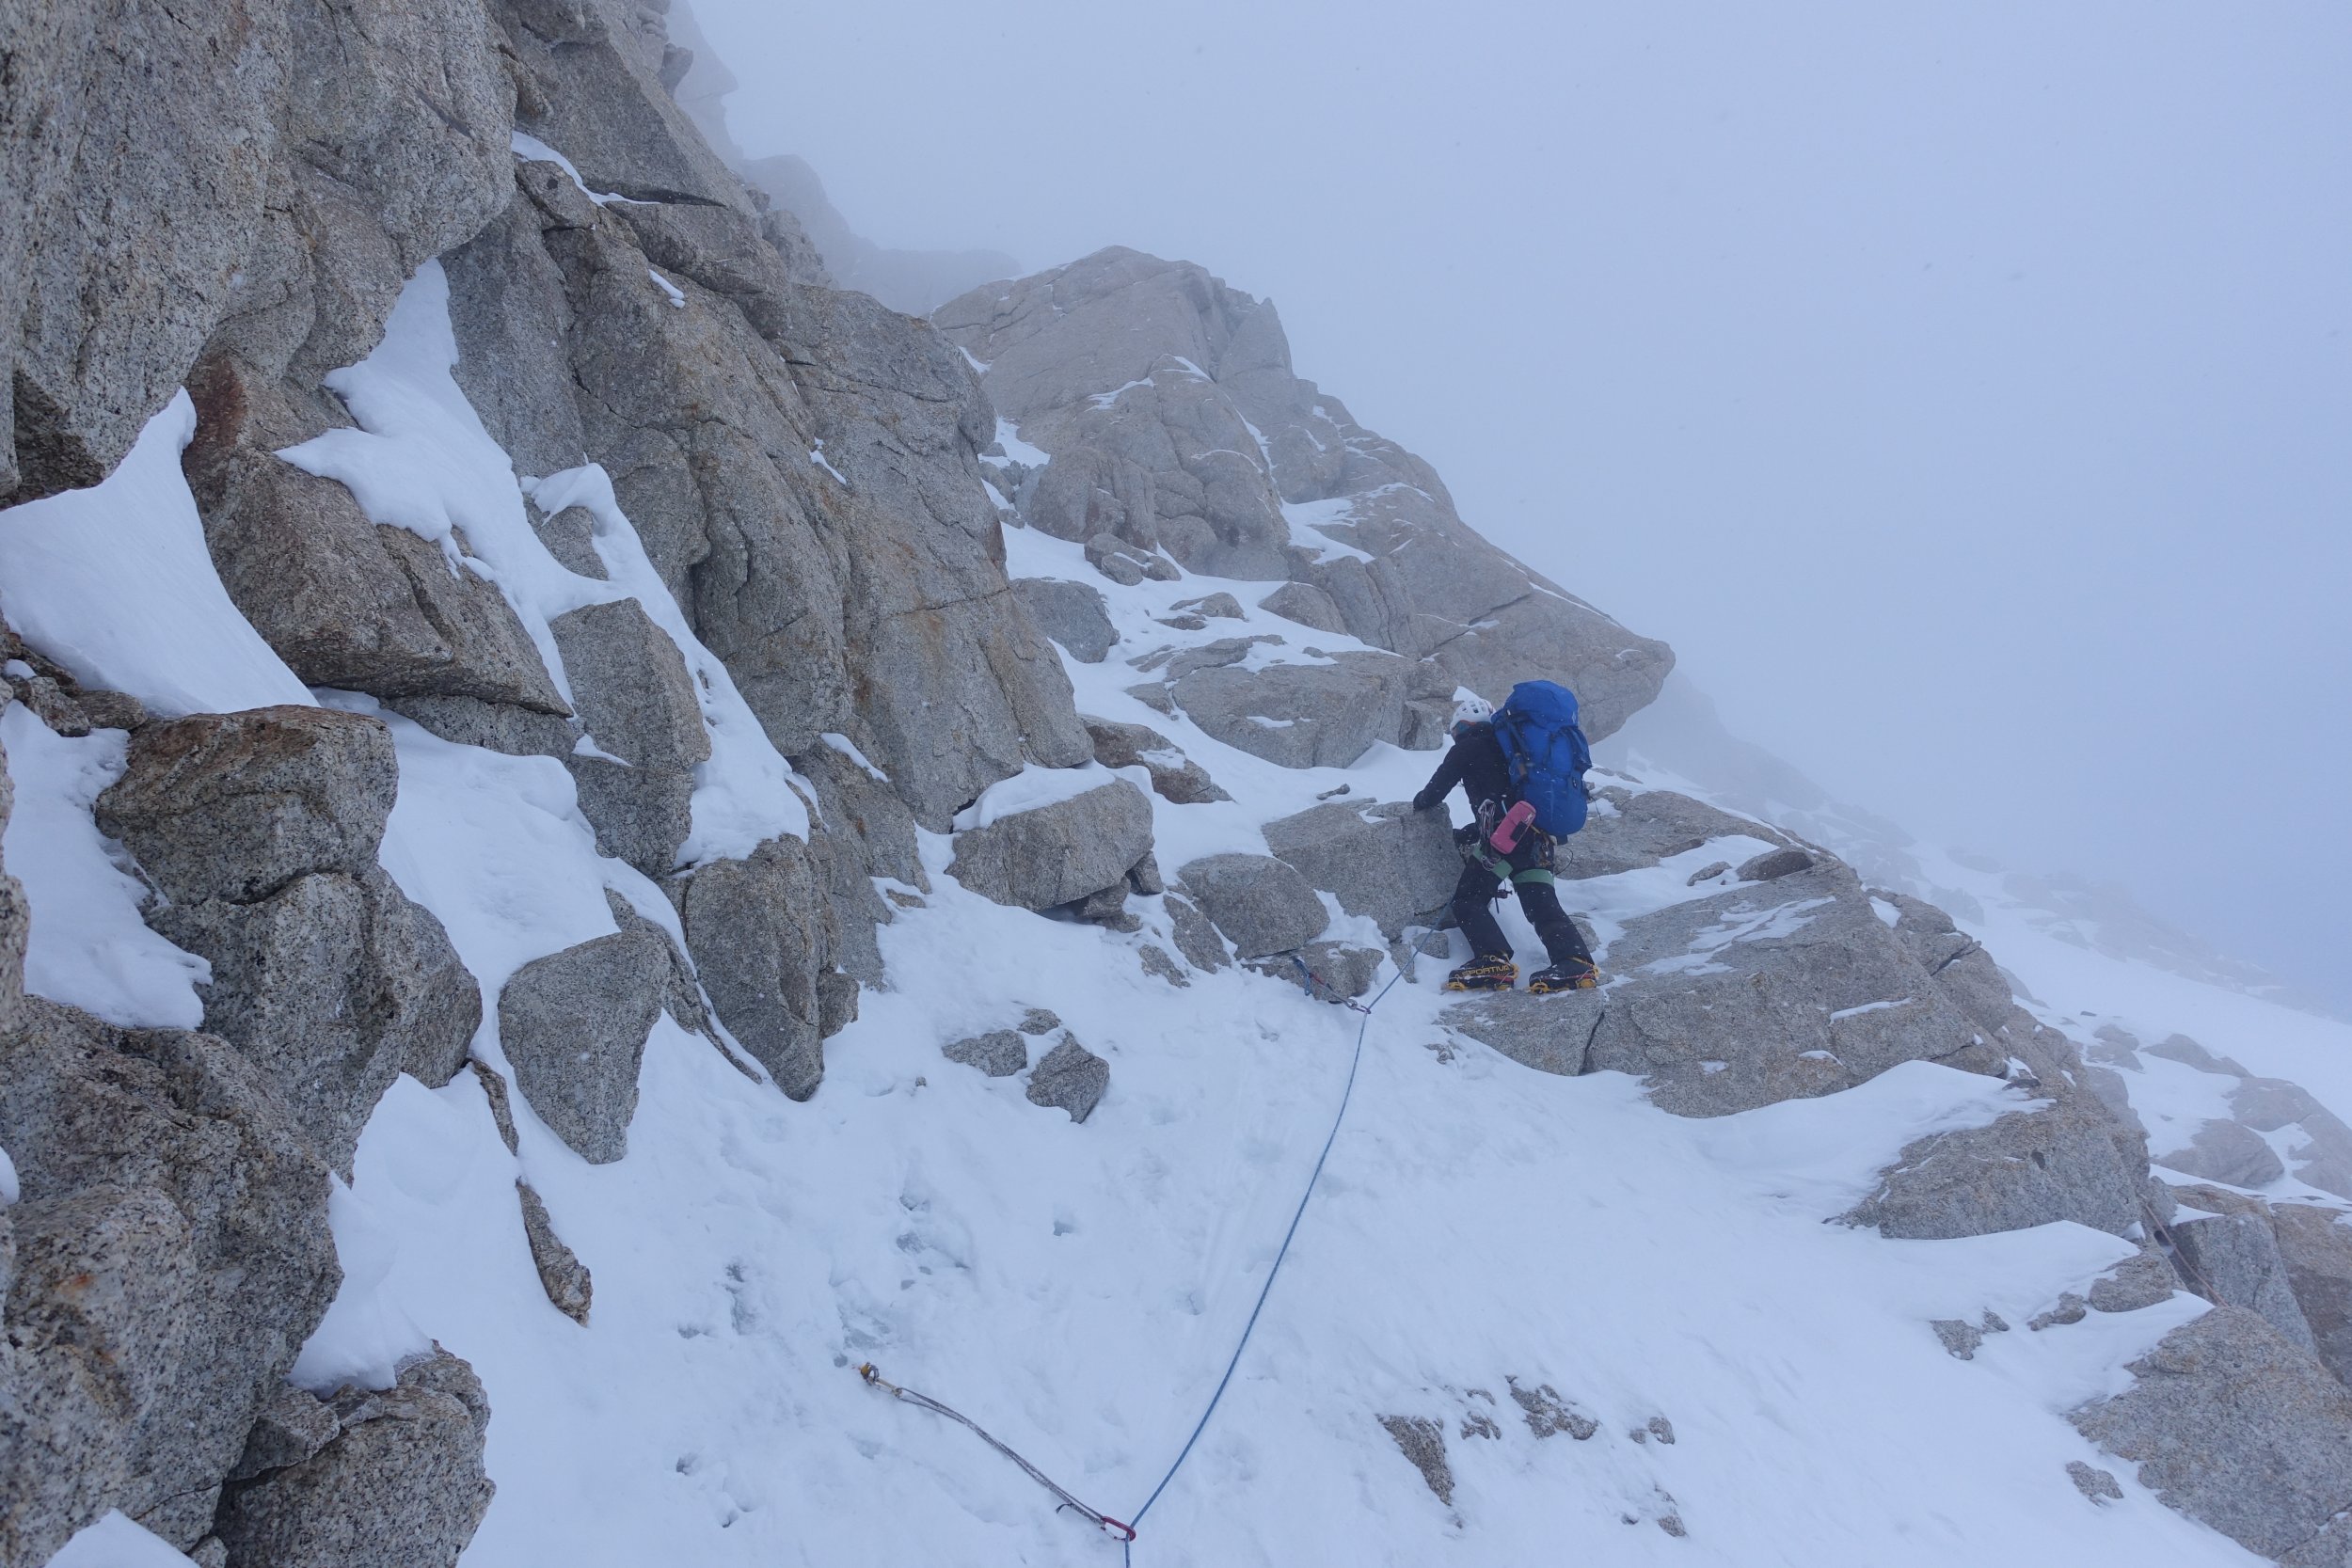
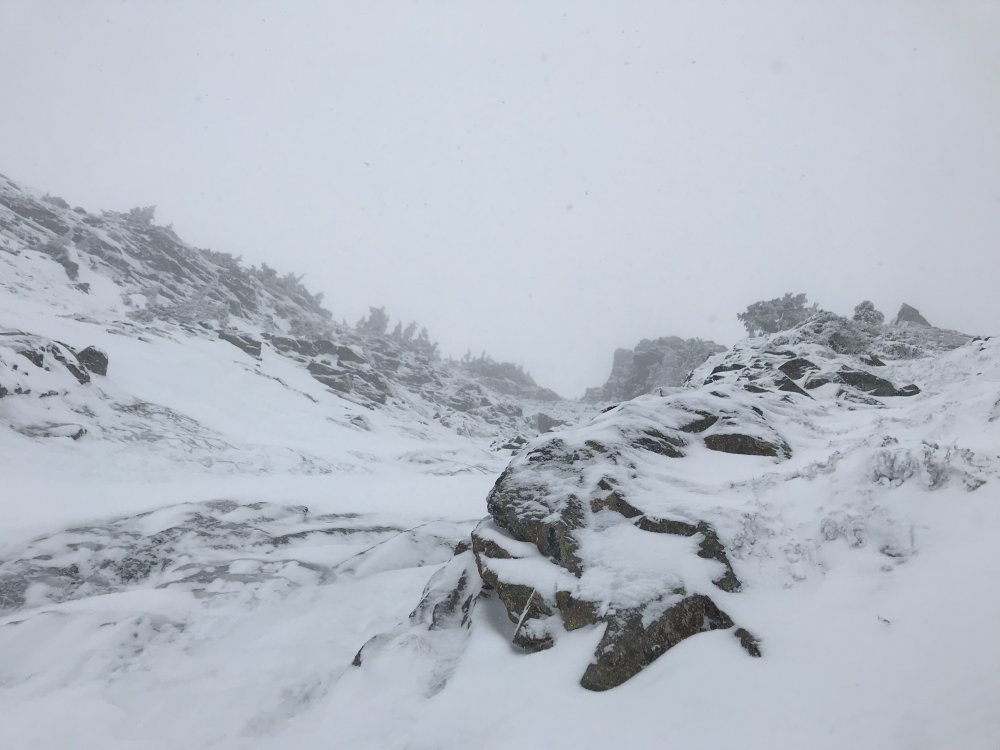
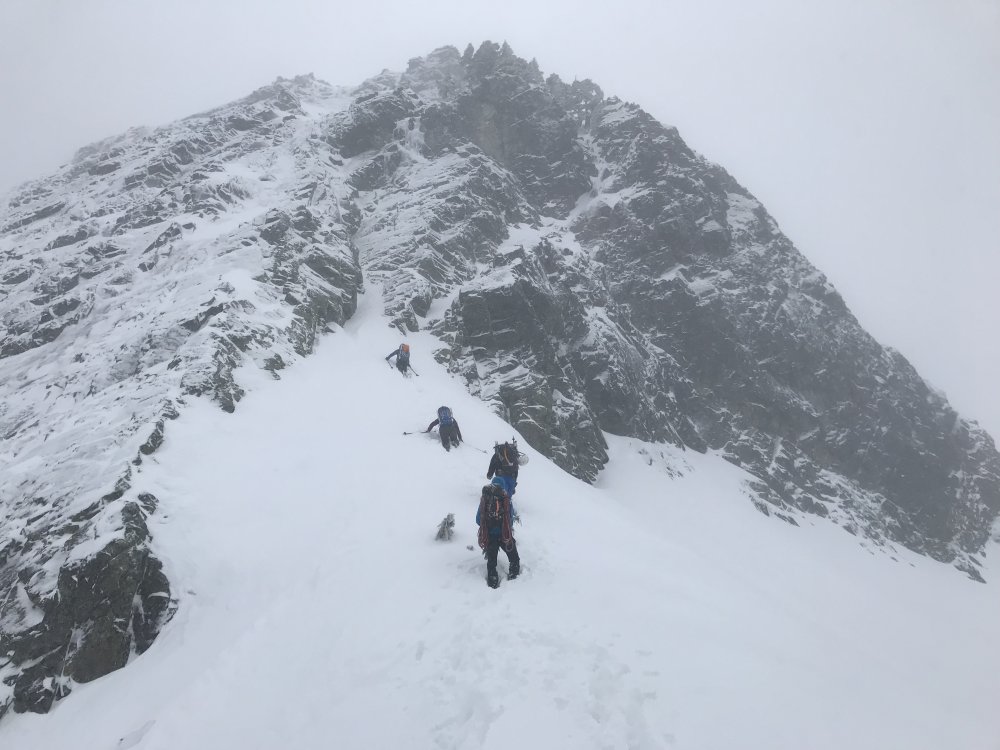
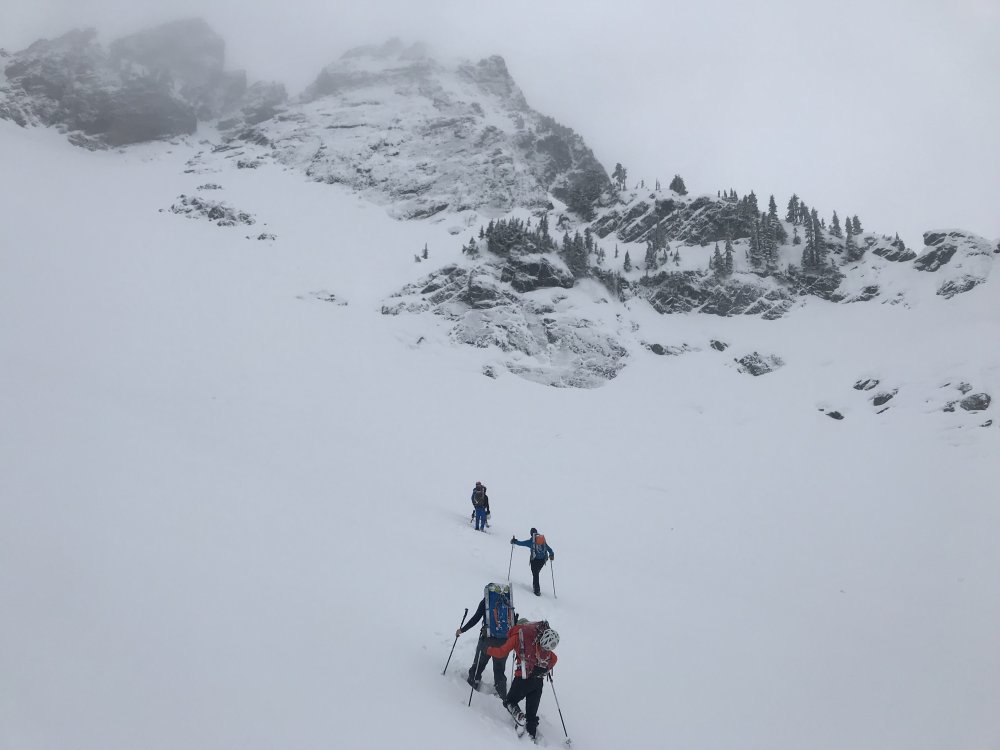
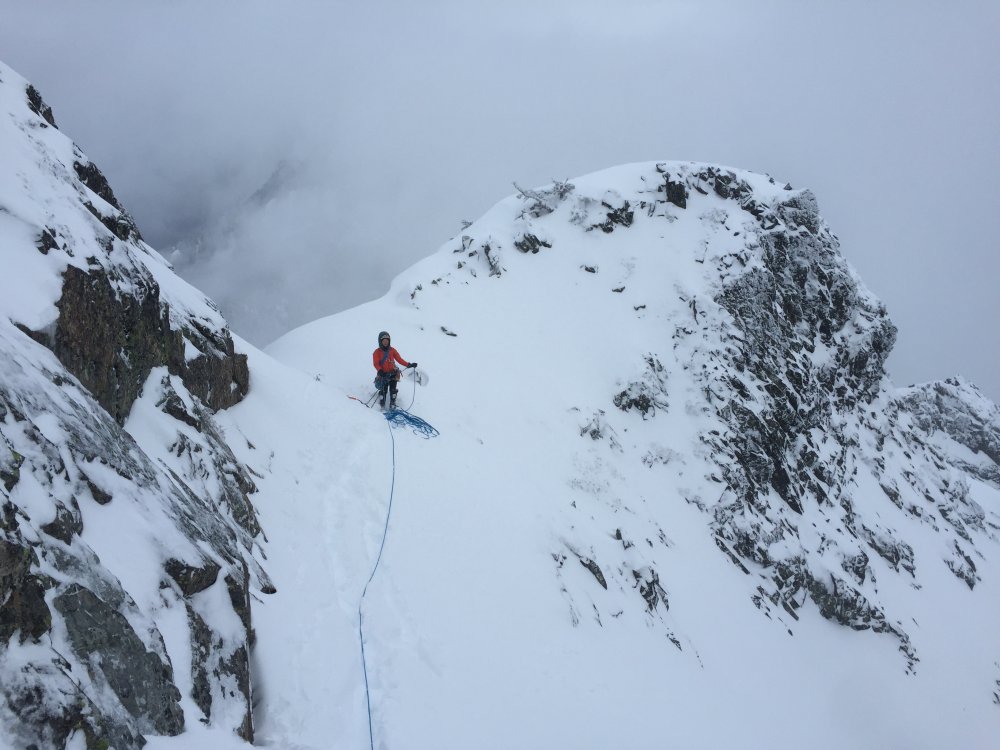
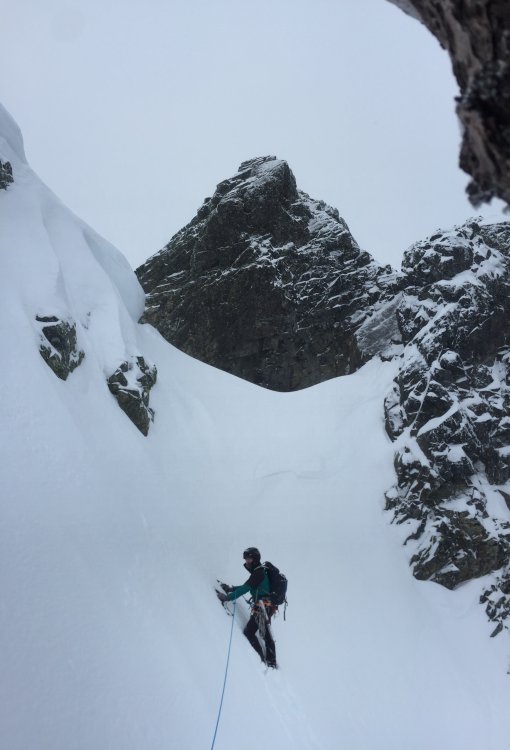
Trip: Patagonia - Fitz Roy Smash 'n' Grab 9 Days Seattle-to-Seattle Trip Date: 02/03/2019 Climbers: Jeff and Priti Wright Location: Patagonia - Chaltén Massif - El Chaltén, Argentina Peak: Monte Fitz Roy (Cerro Chaltén) Route: Franco-Argentina 650m, 55deg 6c (6a C1) High-Res Video (turn up the volume!): Google Street View Photo Sphere: https://goo.gl/maps/nLvcGHAQTqu Trip Report: Feb 3, 2019 Priti and I summited Monte Fitz Roy in Patagonia near El Chaltén, Argentina via the Franco-Argentina Route. We had been watching the weather every day each season for the past three years and finally saw a good enough window to buy last-minute flights and make use of the beta sheets we made four years ago. The trip was 9 days Seattle-to-Seattle. We climbed the Franco-Argentina link-up which is a variation on the first ascent route and is the "normal" route up and the standard rappel line for all routes on the mountain. Franco-Argentina is a highly aesthetic line combining glacier travel, steep snow, mixed terrain, and hard/pure rock climbing. The technical portion of the route is 650m long containing 14 (or so) rock/mixed pitches up to 5.11b (or 5.10b/C1...heavy emphasis on the C1) and many hundreds of meters of 45-55deg hard snow/ice. Starting from the town of El Chaltén which sits at roughly 1,300 feet, you ascend 9,710 vertical feet over 10.5mi to reach the summit of Cerro Fitz Roy (Cerro Chaltén) which towers over all the surrounding granite spires of the Chaltén Massif. The upper summit slopes require crampons, boots, and ice tools which were carried in a single pack by the follower. We were four days and four nights away from town which included bivouacs at Paso Superior, La Brecha de los Italianos, the summit (for a 1hr sit-rest waiting for sunrise pictures), then hiking all night back to town on the fourth/final night. From La Brecha, we woke on the third day and moved sleeplessly for 48 hours to get back to town so we could make our bus for our flight back (and we had 20min to spare!). We were lucky to experience rare, cloudless, windless, perfect weather in this harshest and otherwise unforgiving land. We've suffered so much in these mountains on our previous two trips; this was a welcome change. For those of you who don't know, the Patagonia (r) logo (tm) is an actual range, called the Fitz Roy range which is located in the Chaltén Massif. The big peak in the center of the logo is Fitz Roy. The founder, Yvon Chouinard, was a member of the Fun Hog Expedition in 1968 who road trip'd from California to Argentina, surfing and skiing along the way. They completed the third ascent of the mountain and established a new route, Californiana (or the "Fun Hog Route"). Note: whenever I mention "the topo", I'm referring to the topo as found in the 2nd edition of Patagonia Vertical, by Rolando Garibotti and Dörte Pietron, published by Sidarta Guides, which can be purchased online or in the States at most Patagonia retail stores. Rolo has a companion website to the book, PATAclimb.com, which is an equally invaluable resource. All pictures below are high resolution. Click on the pictures to open them in a new tab and zoom in. The adventure begins from the town of El Chaltén where you hike the popular trail approximately 10km to Lago de los Tres. Then scramble up the left (Southern) slopes of the lake to find a fixed line. The fixed line is hidden away from tourists and is very difficult to find. Stay low as you scramble up the slopes, maybe 30m until you find an obvious, lone, random bolt along a ledge. If you were to continue from here, you would see a smattering of 4 more random bolts which (I assume) make a rappel anchor for guided parties. Instead, go straight downhill from the first bolt to a large cairn and another bolt with the fixed line. 3rd class down climbing will take you back to the shores of the lake where you will soon see the second fixed line which ascends the 4th class hillside to a scree field. Cross the moraine (bivy options here) between the larger and smaller lakes to the glacier (Gl. de los Tres). Ascend the glacier to find yet another short (15m) fixed line on a low-angle rock or mixed corner (shown below). Ascend the ridge on the North side (climber's right) and make your way back to the South side (climber's left) to gain the upper snow field. Follow easy snow to Paso Superior (high camp). A very snow Mermoz and Guillaumet Paso Superior is a popular advanced base camp from which most objectives in the Massif may be accomplished in a push. It is relatively sheltered in a snow bowl, but may be exposed in high winds. On the back (North) side, there is a fixed rope down 20m of 4th class terrain to get down to the glacier (Gl. Piedras Blancas). Ascend the glacier to get to the bergshrund (1-2hrs). According to the guidebook, there are three ways to gain the ridge: the rappel couloir (just below the Brecha de los Italianos), the rock spur just left of the couloir, and the steep snow further left. Approximately 100% of all parties (give or take) approach via the steep snow (the third option), as we did. From the bergshrund just below the toe of the rock (usually just a step-across, but may go "out" in late season), we harnessed up with rock and ice gear, ascending steep snow and ice (up to 60deg) for 250m. We stayed close to the rock and protected with rock gear since the angle was steep enough and the consequences fatal enough, but many parties solo the snow/ice, roping up for the last rock portion. Since the steep snow was endless, calf-burning front-pointing, we were glad to have steel, hybrid, horizontal crampons here and also on the summit slopes, although many climbers just wear strap-ons (of the aluminum variety). Once near the ridgeline, there are likely a few ways to ascend the rock from 3rd class to low 5th but rock shoes are not necessary. Choose your adventure. The entire technical portion of Franco-Argentina is shown in red, above, which starts at the end of the snow bench ("la Silla"). Once over the ridgeline and on the West side, you are rewarded with views of Desmochada, Cerro Torre, and Aguja de la Silla. There are a couple bivy spots where a tent can be set up just under Brecha de los Italianos (shown above). From here, in order to gain the ridgeline from la Brecha to la Silla, there are many possible low-5th class routes. However, the best way is to find a 45m fixed line on the right, just past la Brecha and climb 4th class terrain to a 3rd class walkway just under the ridgeline (still on the West side) until you get to the snow. You can also climb various 4th/low-5th class gullies (seen below). La Silla is usually always icy but is low angle (and exposed!) to the base of the route and may be protected with ice screws if you like. Crossing la Silla to the base of the route. Looking back down at Glaciar Piedras Blancas. Our tracks from Paso Superior can be seen, faintly. Pitch 1, finally!! 5.10c diagonal hand crack. There is a rappel anchor just at the end of the pitch, over the edge, but there is a comfortable belay if you go up on top of the ledge. Approximate pitch layout shown side-by-side with original photo (open picture in new tab to zoom in). The lines in yellow are the two options for the actual Franco-Argentina route as shown in the topo. We diverged (on purpose) where the actual route is in yellow. Priti high on Pitch 1. Above: Looking back down Pitch 2 which takes a corner then goes out on an easy crack system on the face (5.10b). Priti leading Pitch 3. Looking up at the 5.11a corner system (Pitches 6-7) while on Pitch 5. Another view of the corner system (Pitches 6-7) while on rappel. Above: Priti starting up Pitch 6 corner system (5.11a). We swapped leads after Pitch 7, and I started up the 5.10a corner/chimney system on blocky terrain. Pitch 9 was harder corners and chimneys (5.10b) and the cracks started to get icy up here! Looking down the blocky Pitch 9. This view is just nuts! Crazy granite monoliths that look like a cluster of orange crystal formations. Looking down, you can see the swirly line of snow on La Silla which separates Aguja Poincenot from Fitz Roy. Pitch 10 (5.9) and looking up at the remaining 4-5 pitches on the upper headwall. It was during this pitch that the cracks became prohibitively icy on the standard route which would have required two tools and crampons for the leader, so I chose to explore off-route. Just above where you see me in the picture above is a long roof. There is a rappel anchor (off-route) out left of the corner system. This anchor is shown in the topo with three pitons on a ledge and is normally only used as a rappel anchor. I bailed to this anchor, then continued left (left of the prominent arête as shown on the topo) and found icy, mid-5th class ledges. The final 5 pitches were off-route from the topo but made for a fine alternative if the cracks are too icy on route. The final pitch! In yellow on the right, the 6c (5.11b) variation as shown in the guidebook topo. This overhanging crack was chock full of weak ice when we rappelled it and would have been nearly impossible to climb free or even get any pieces in to French Free it. We took the variation in red (left), not shown on the topo, which has many fixed pieces and pitons from previous parties and probably also goes free at 5.11a, although we climbed it French Free due to the icy cracks, darkness, and weak climbing abilities! Priti followed in the dark, jugging with two Petzl Micro Traxions. I would recommend following the zig zag in red (as we did) and not going straight up as that would be much harder. This is a good alternative if the rest of the route is icy, although you have to get off route during Pitch 11 (much earlier) to get to the base of this variation. Note: two more pitches of low-to-mid 5th class were required above this pitch before getting to the snow field. Rappel ropes shown going down the 6c variation. For reference, the line we took (red) is also shown again. Once past the technical climbing, you reach 250m of hard snow/ice up to 50deg (more endless front-pointing). This leads to the summit mound, which looks intimidating, but we went hard left to the left-most rocky ridge which was easy 3rd class scrambling to the final summit ridge. There is a small bump along the summit ridge which is not the actual summit although appears to be the high point! Continue to the end of the horizontal-ish summit ridge to reach the actual summit. There is an AMAZING bivy site for 1-2 with a roof and walls just under the summit block. Advertising for our awesome hostel, Aylen-Aike, from the summit. Cerro Torre behind. The first rappel down the upper snowfield. After 3-4 rappels down the upper snow field, we couldn't find the rappel anchor that's shown in the topo which is just (climber's) left of the prominent prow/arête at the top of the route. Instead, we rappelled straight down the 6c (5.11b) variation from the topo with no difficulty. If in doubt, just rap down this 6c corner. The next rappel (shown above) is from a ledge just to the left of the prominent prow/arête. You can see a giant block jutting out in the photo above. To the right of this block is the 6c (5.11b) variation. This is generally the most popular way to finish the technical portion of the ascent. The 5+ variation is further right (out of view) from the prow. In general, the rappel lengths and locations of anchors were spot-on on the topo. There are so many anchors everywhere, so be sure to follow the topo guidance for rappel lengths if you want to skip some anchors and have longer rappels. The rappel block above "La Araña" snow patch, which looks like a spider halfway up the route. A particularly harrowing rappel just below La Araña which goes down the shear, overhanging wall which is above the dihedral (Pitches 6-7). The leader has to make sure not to miss the belay ledge and do some free-space swinging to catch the ledge. The first rappel down the East side of la Brecha de los Italianos. The second to last rappel. Stick to the (skier's) right in this photo and hug the wall. There was an anchor just above the bergshrund where you make the final rappel. The Chaltén Massif from the air. Tracks: https://caltopo.com/m/CVF0 More info: https://pataclimb.com/climbingareas/chalten/fitzgroup/fitz/french.html#franco https://pataclimb.com/climbingareas/chalten/fitzgroup/fitz.html https://www.summitpost.org/fitzroy/153622 Gear Notes: Double Rack to 3 with triples .4-1, single #4, 4 ice screws (1 shorty), 1 picket each (approach only), 60m single rope, 60m Esprit pull cord, steel hybrid crampons, 2 tools each on approach (we brought two tools total on route, although many parties bring three tools total on route). On route, the follower carried a single 40L (Patagonia Ascensionist) pack with both of our boots, crampons, pull cord, 1 sleeping bag, one therm-a-rest pad, water/food for both, summit jackets, summit mittens, and two tools (total). For the upper slopes, each person had a single tool, but two each would have been luxurious. Approach Notes: Approach on steep snow left of serac ('S2c' from the guidebook)


-
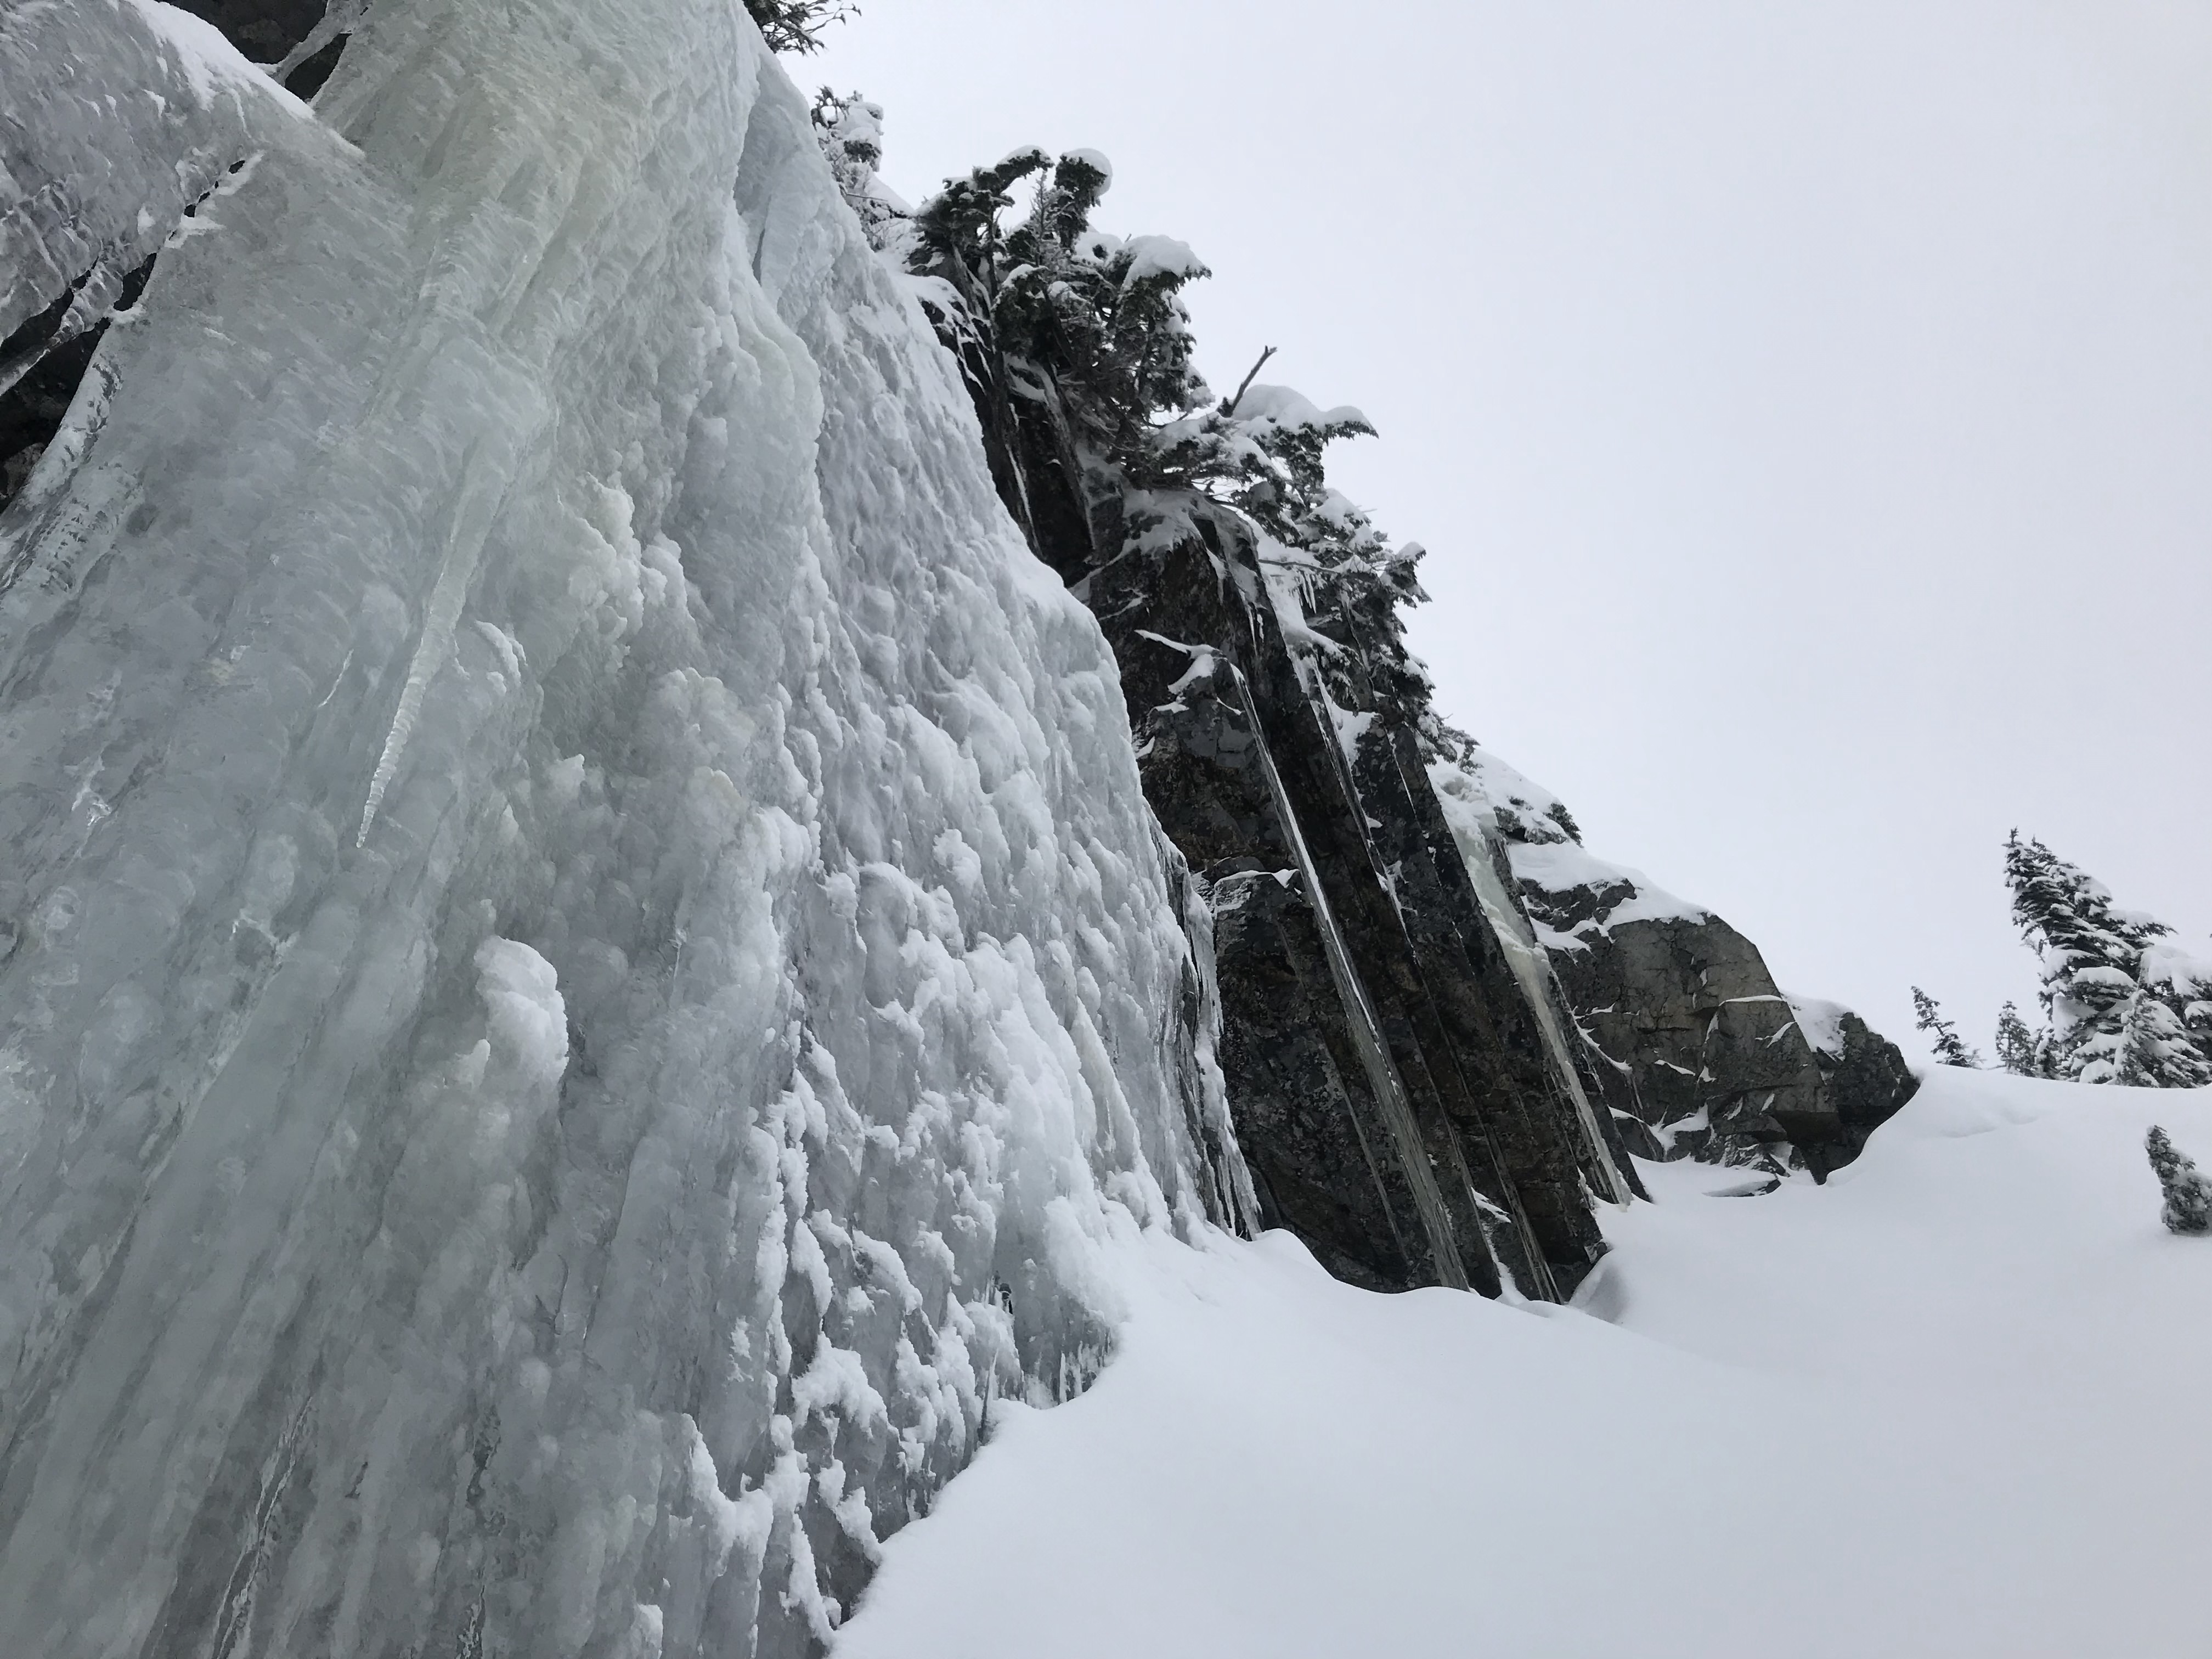
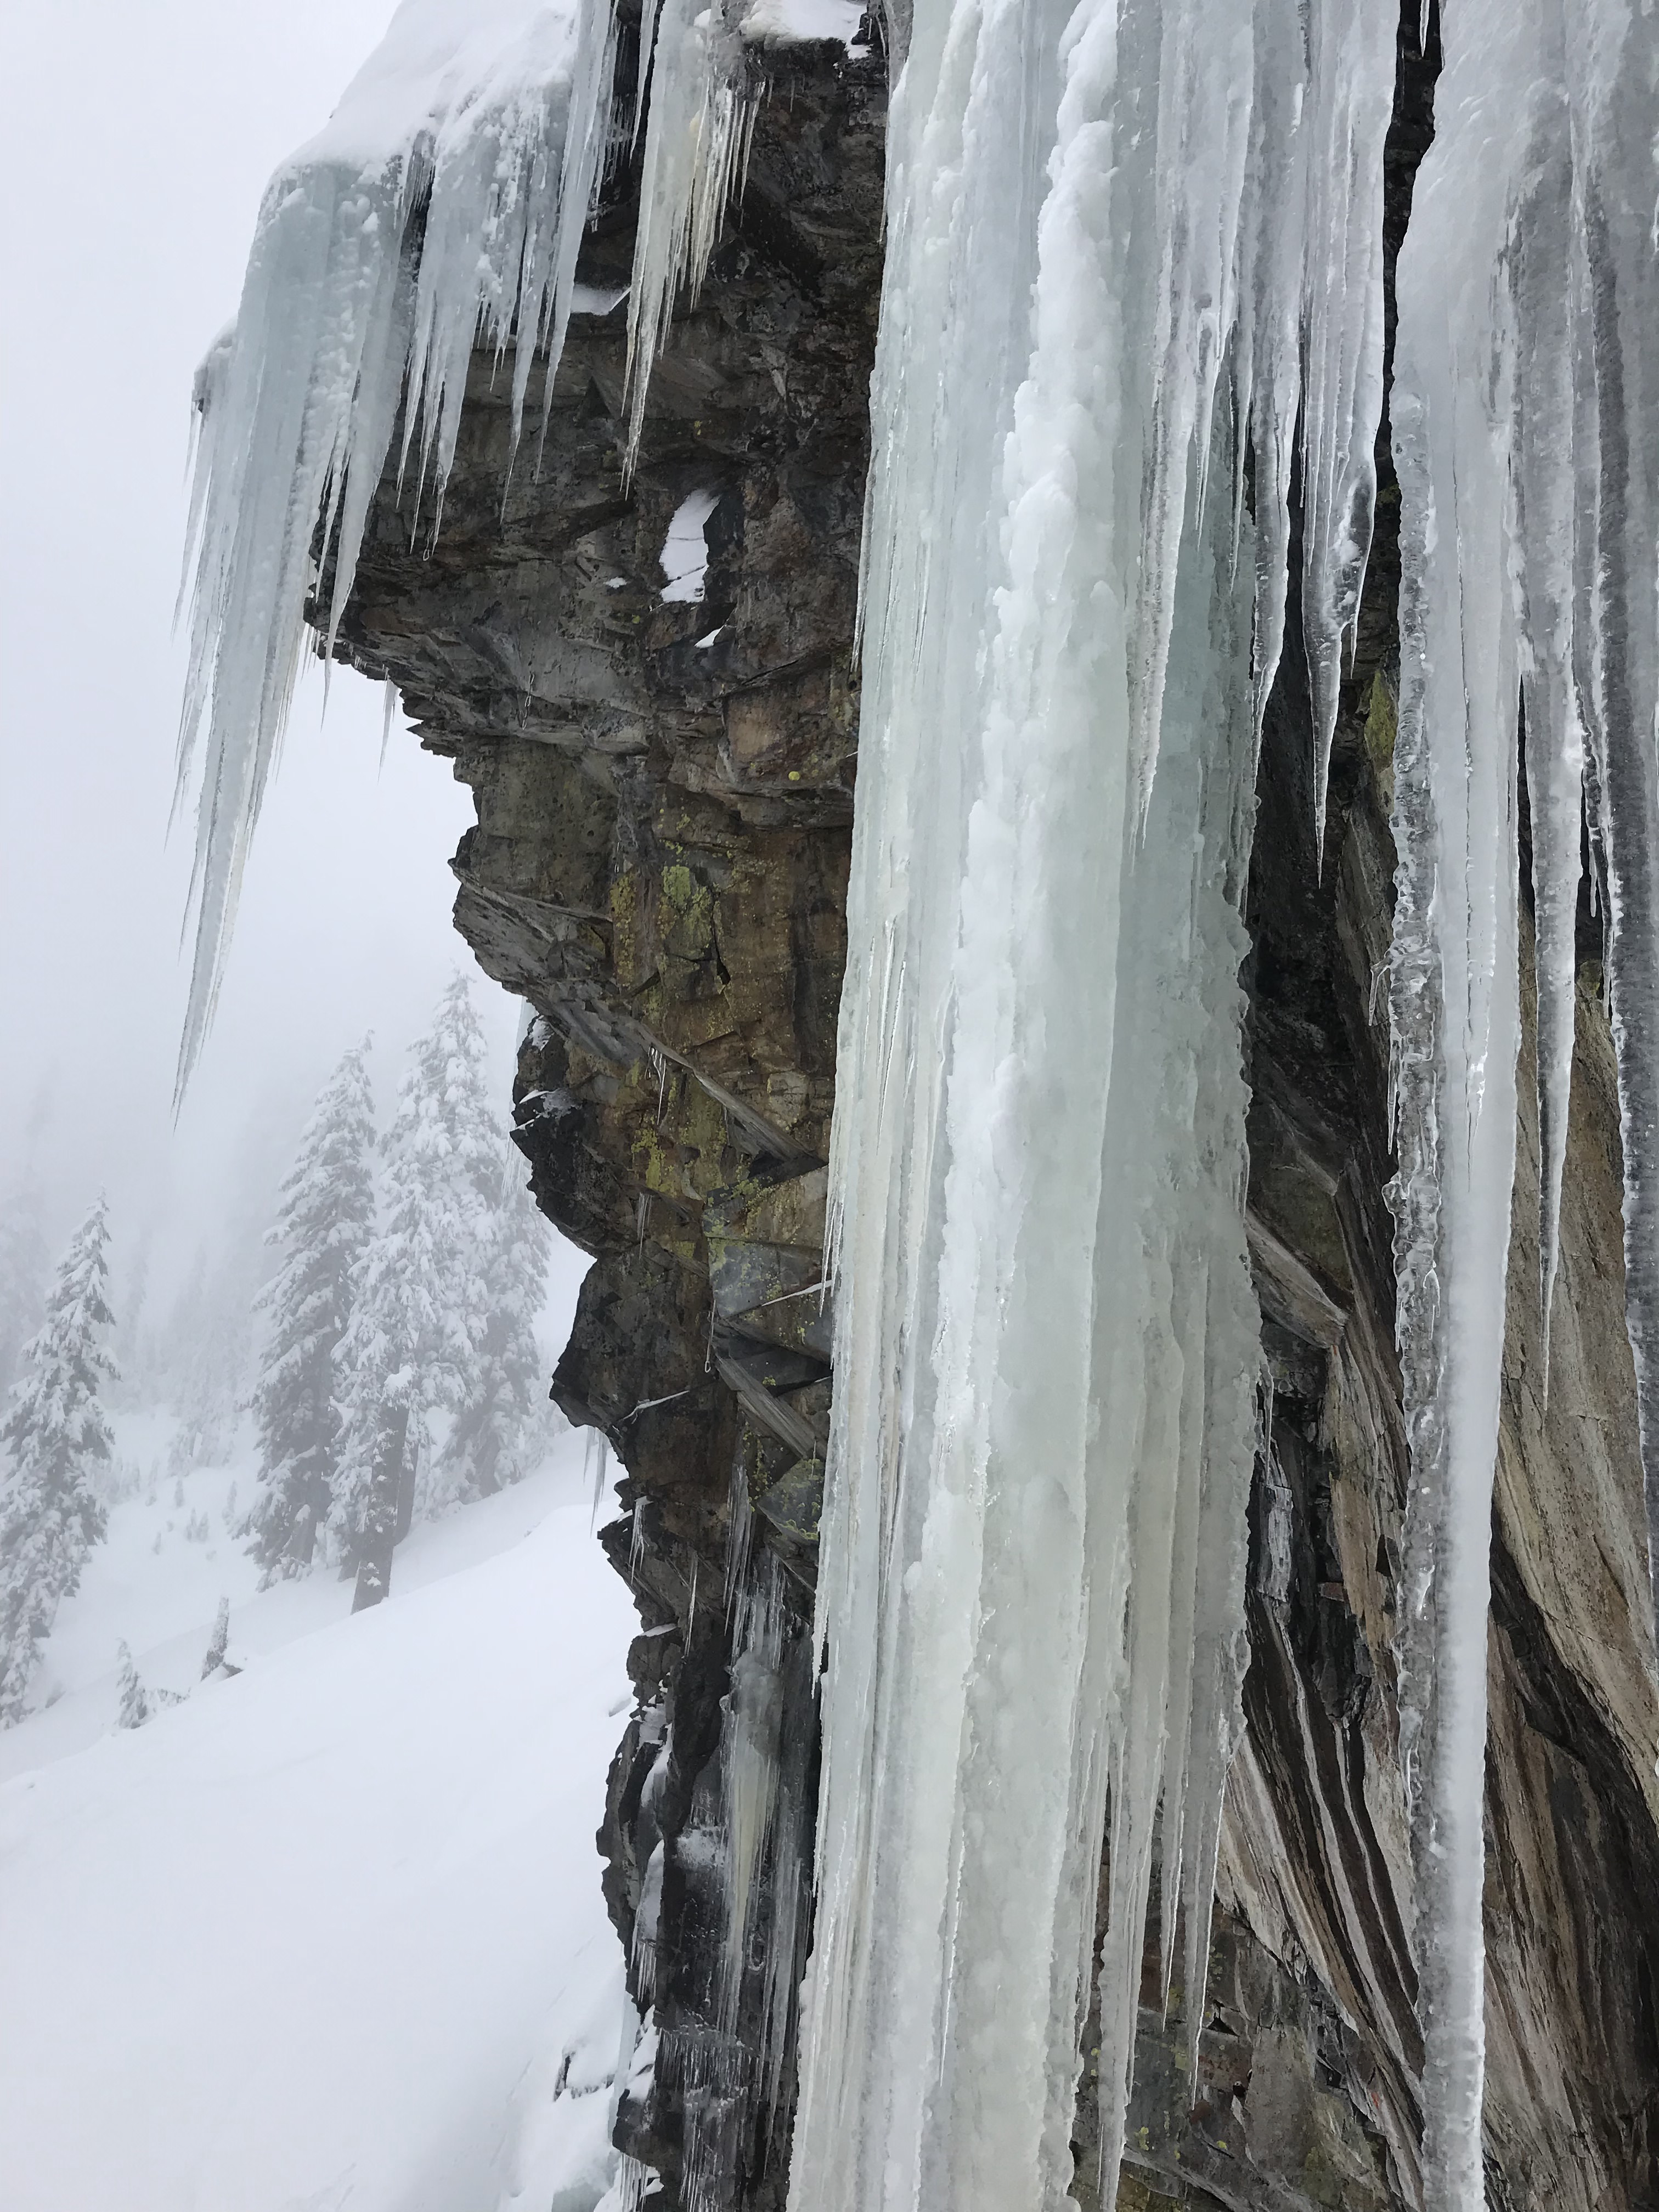
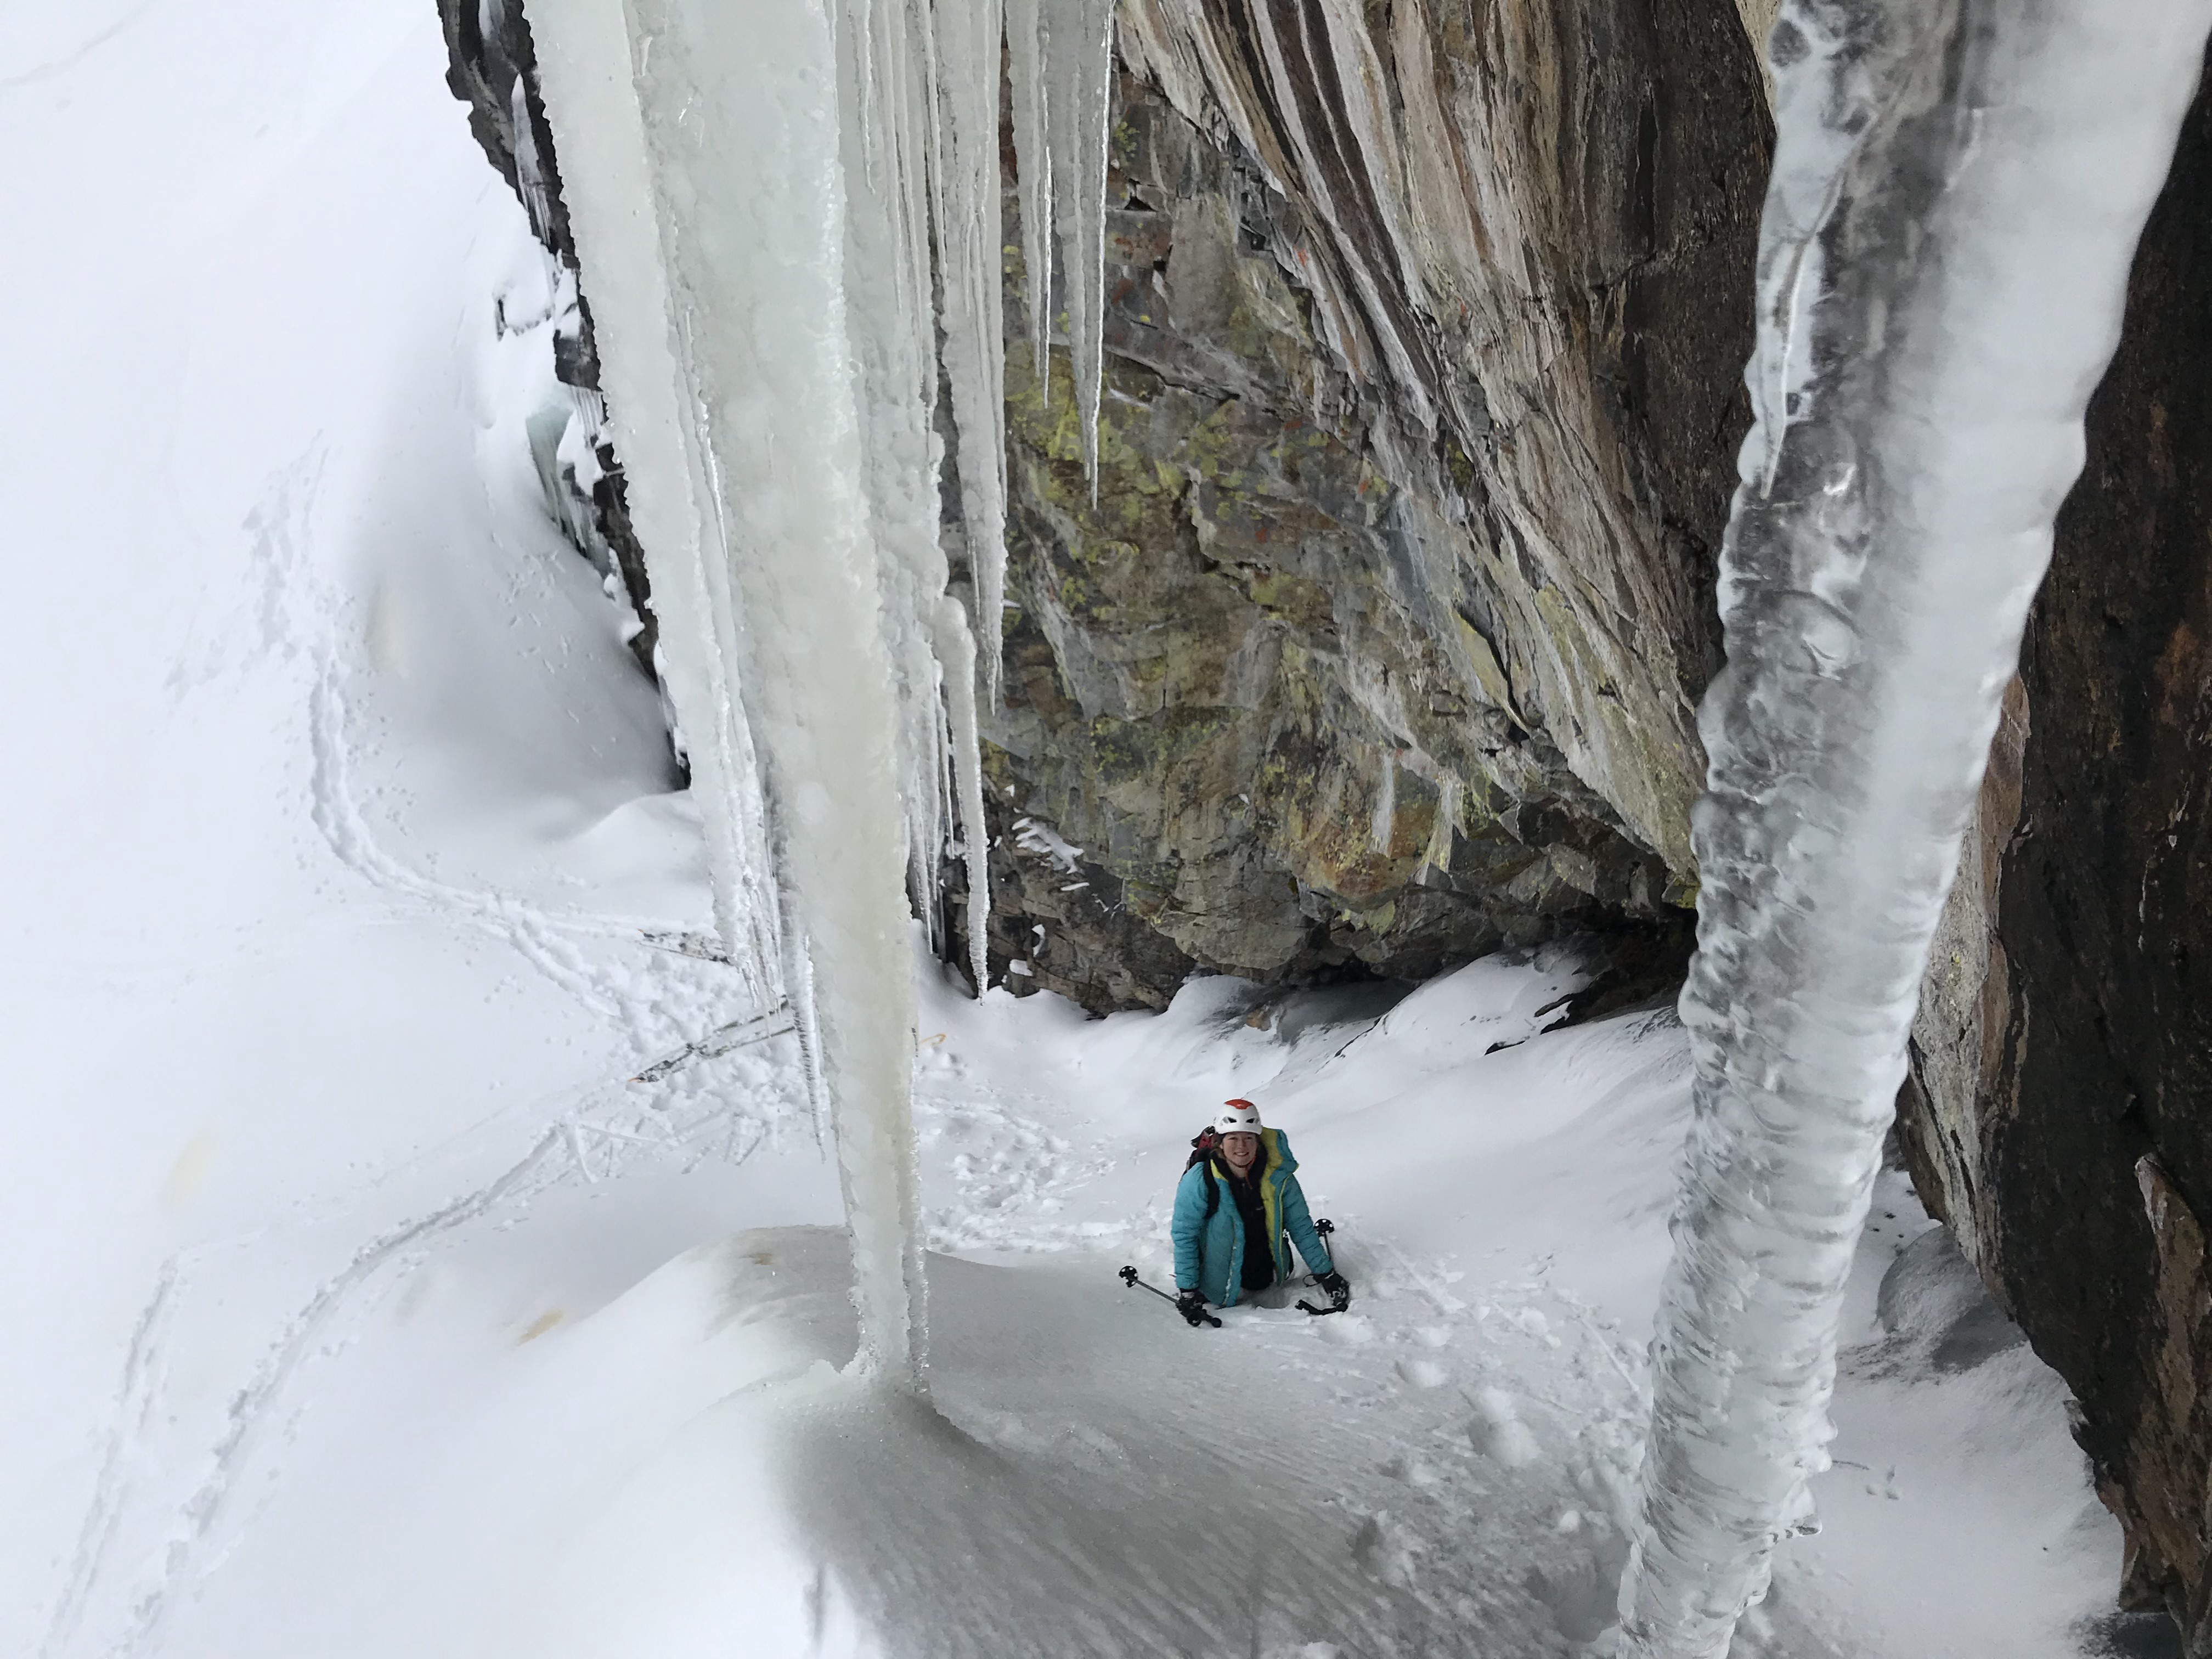
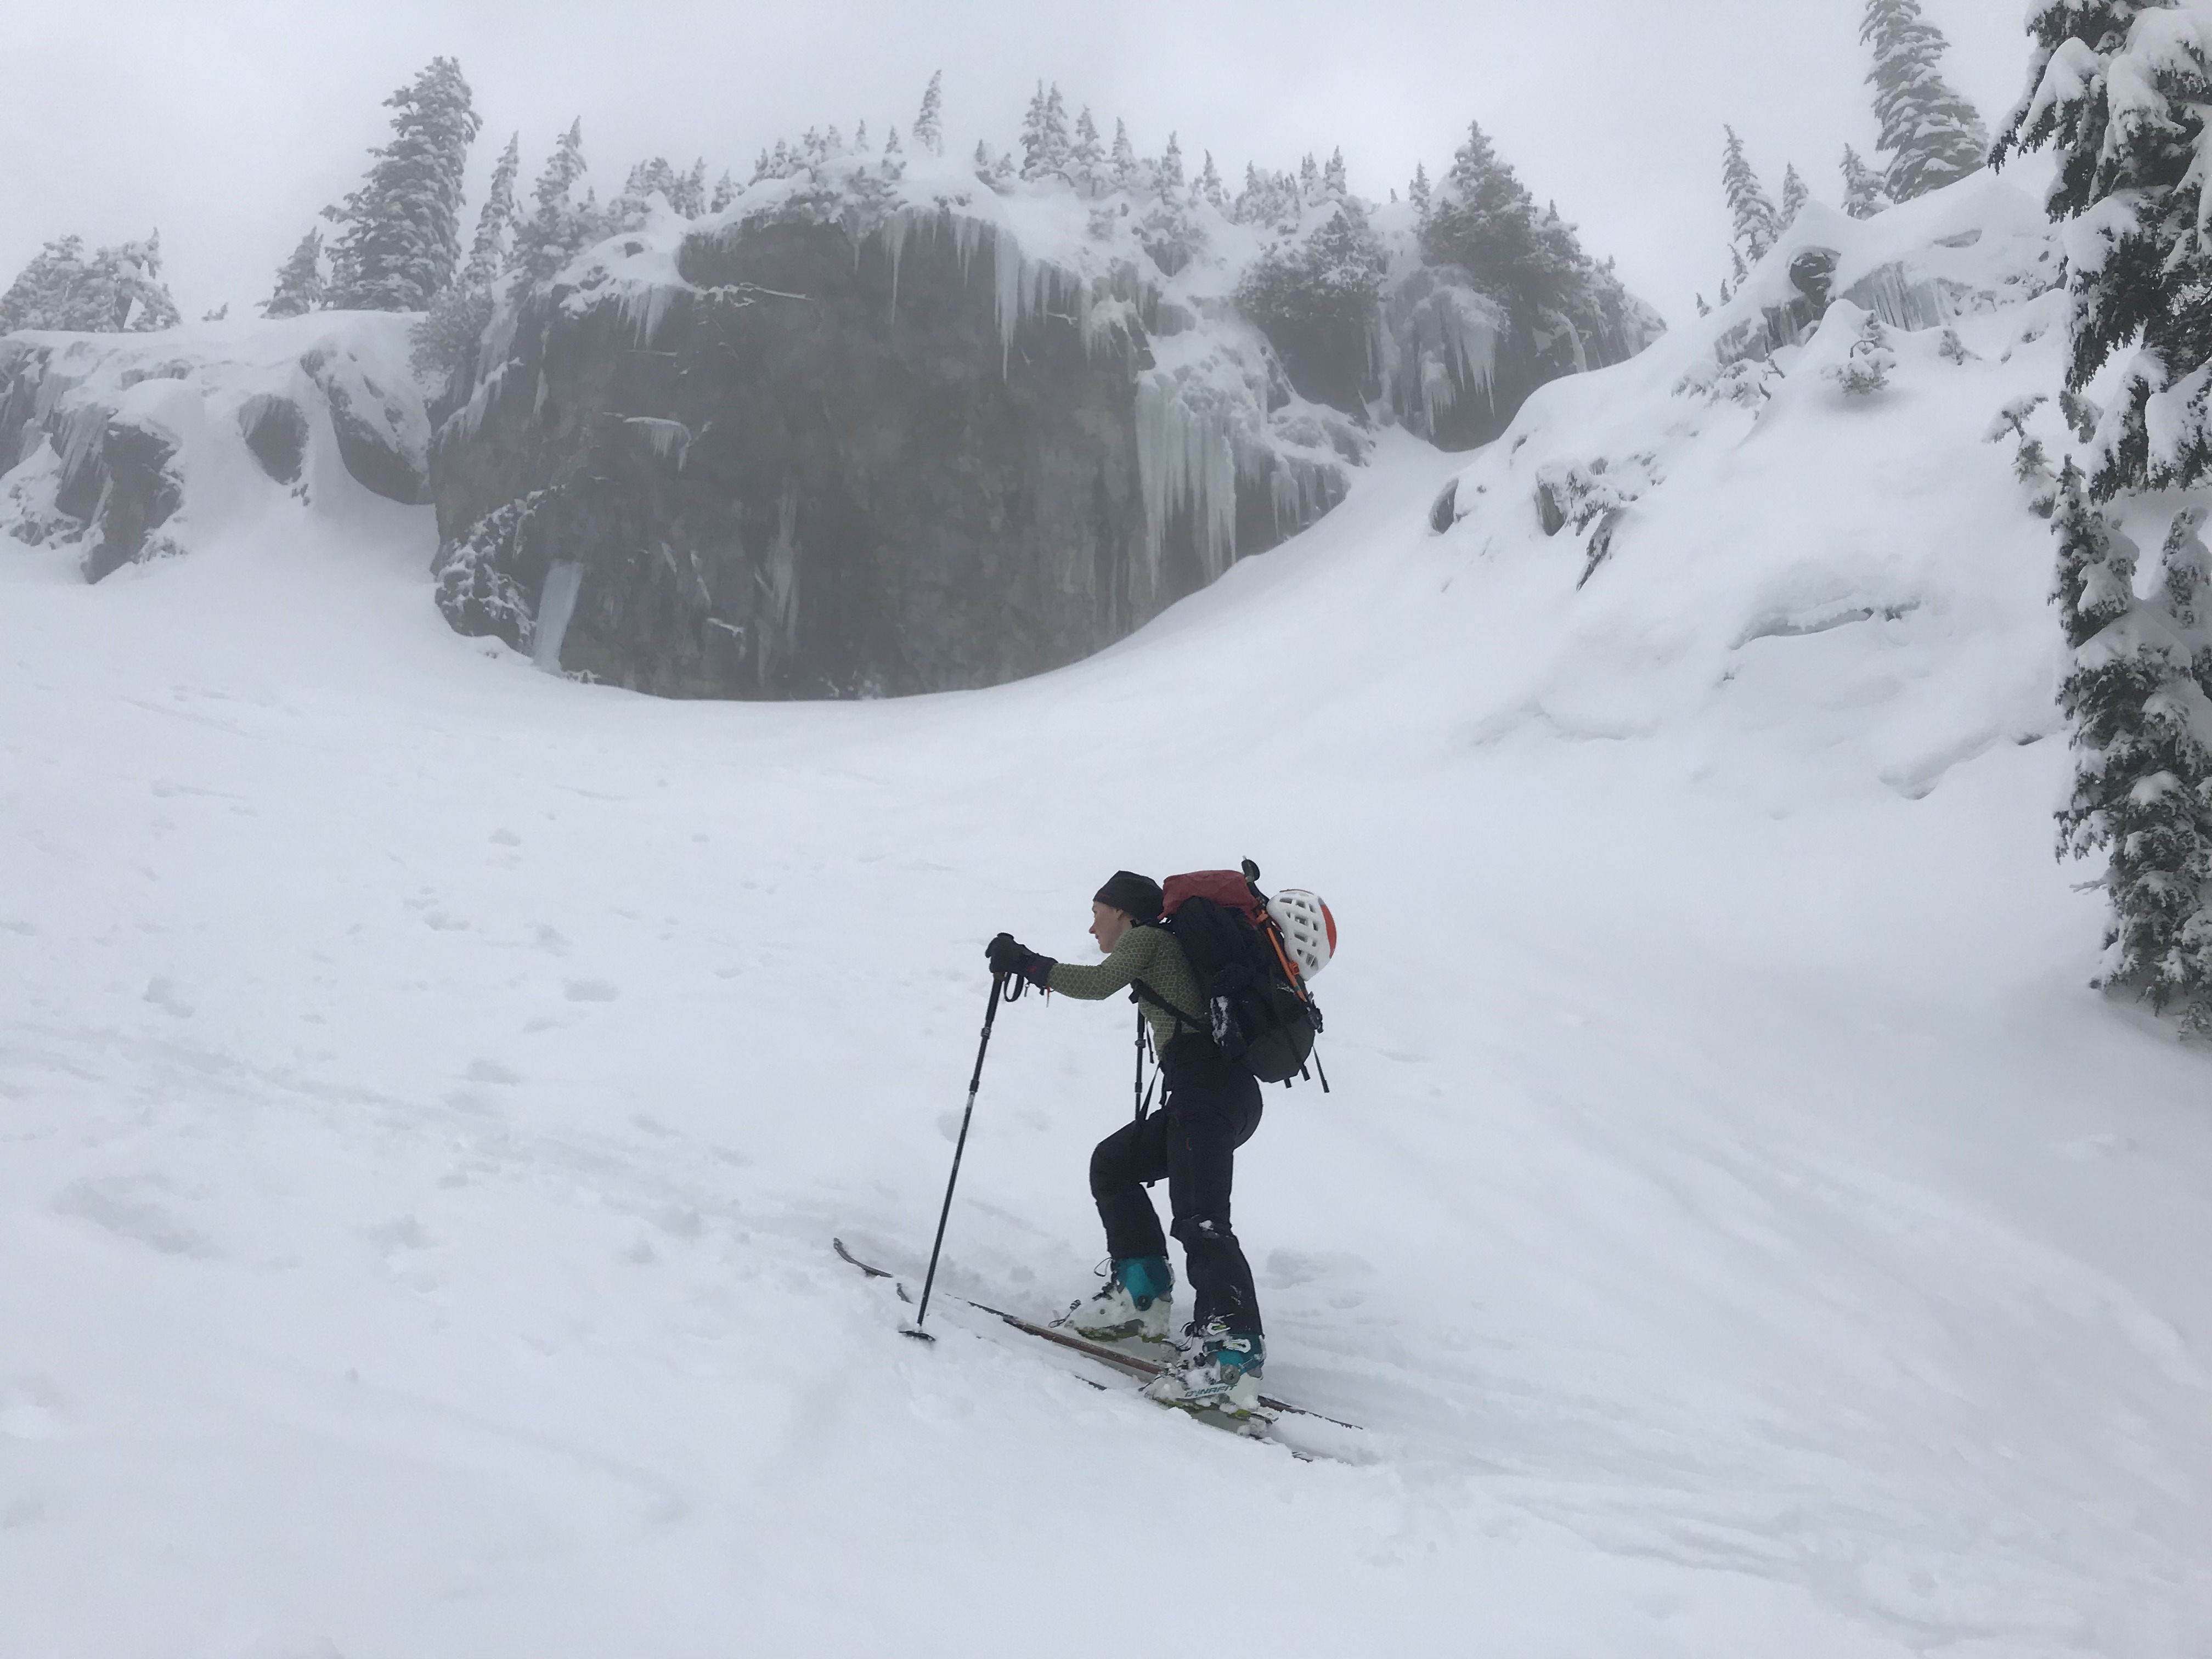
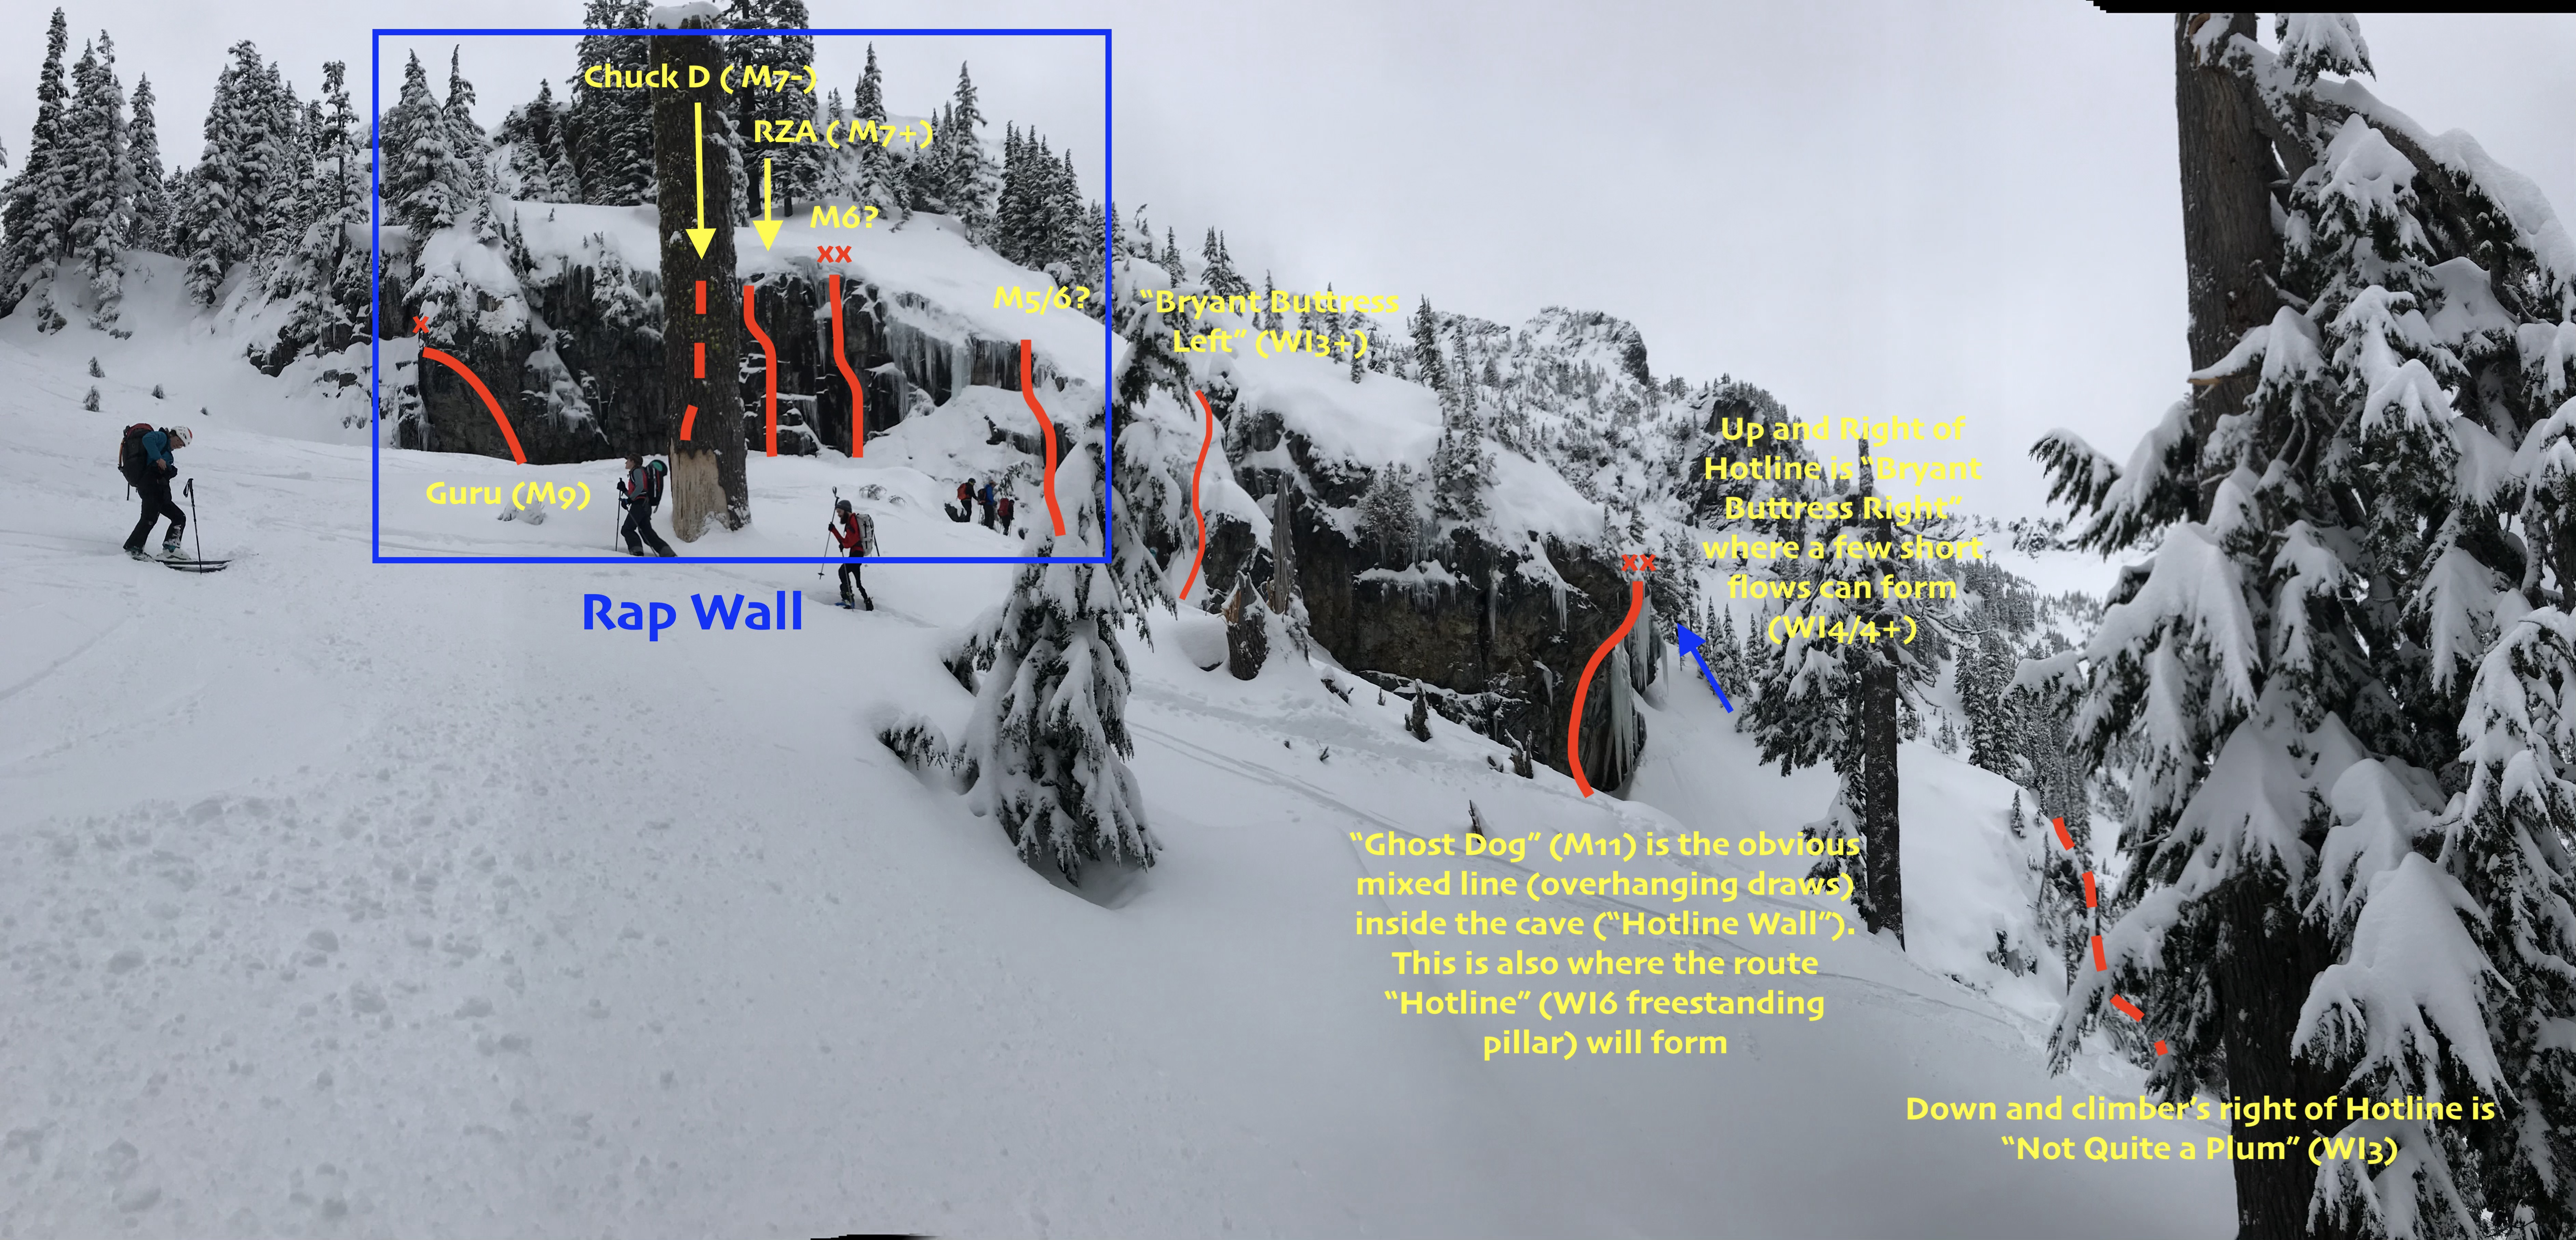
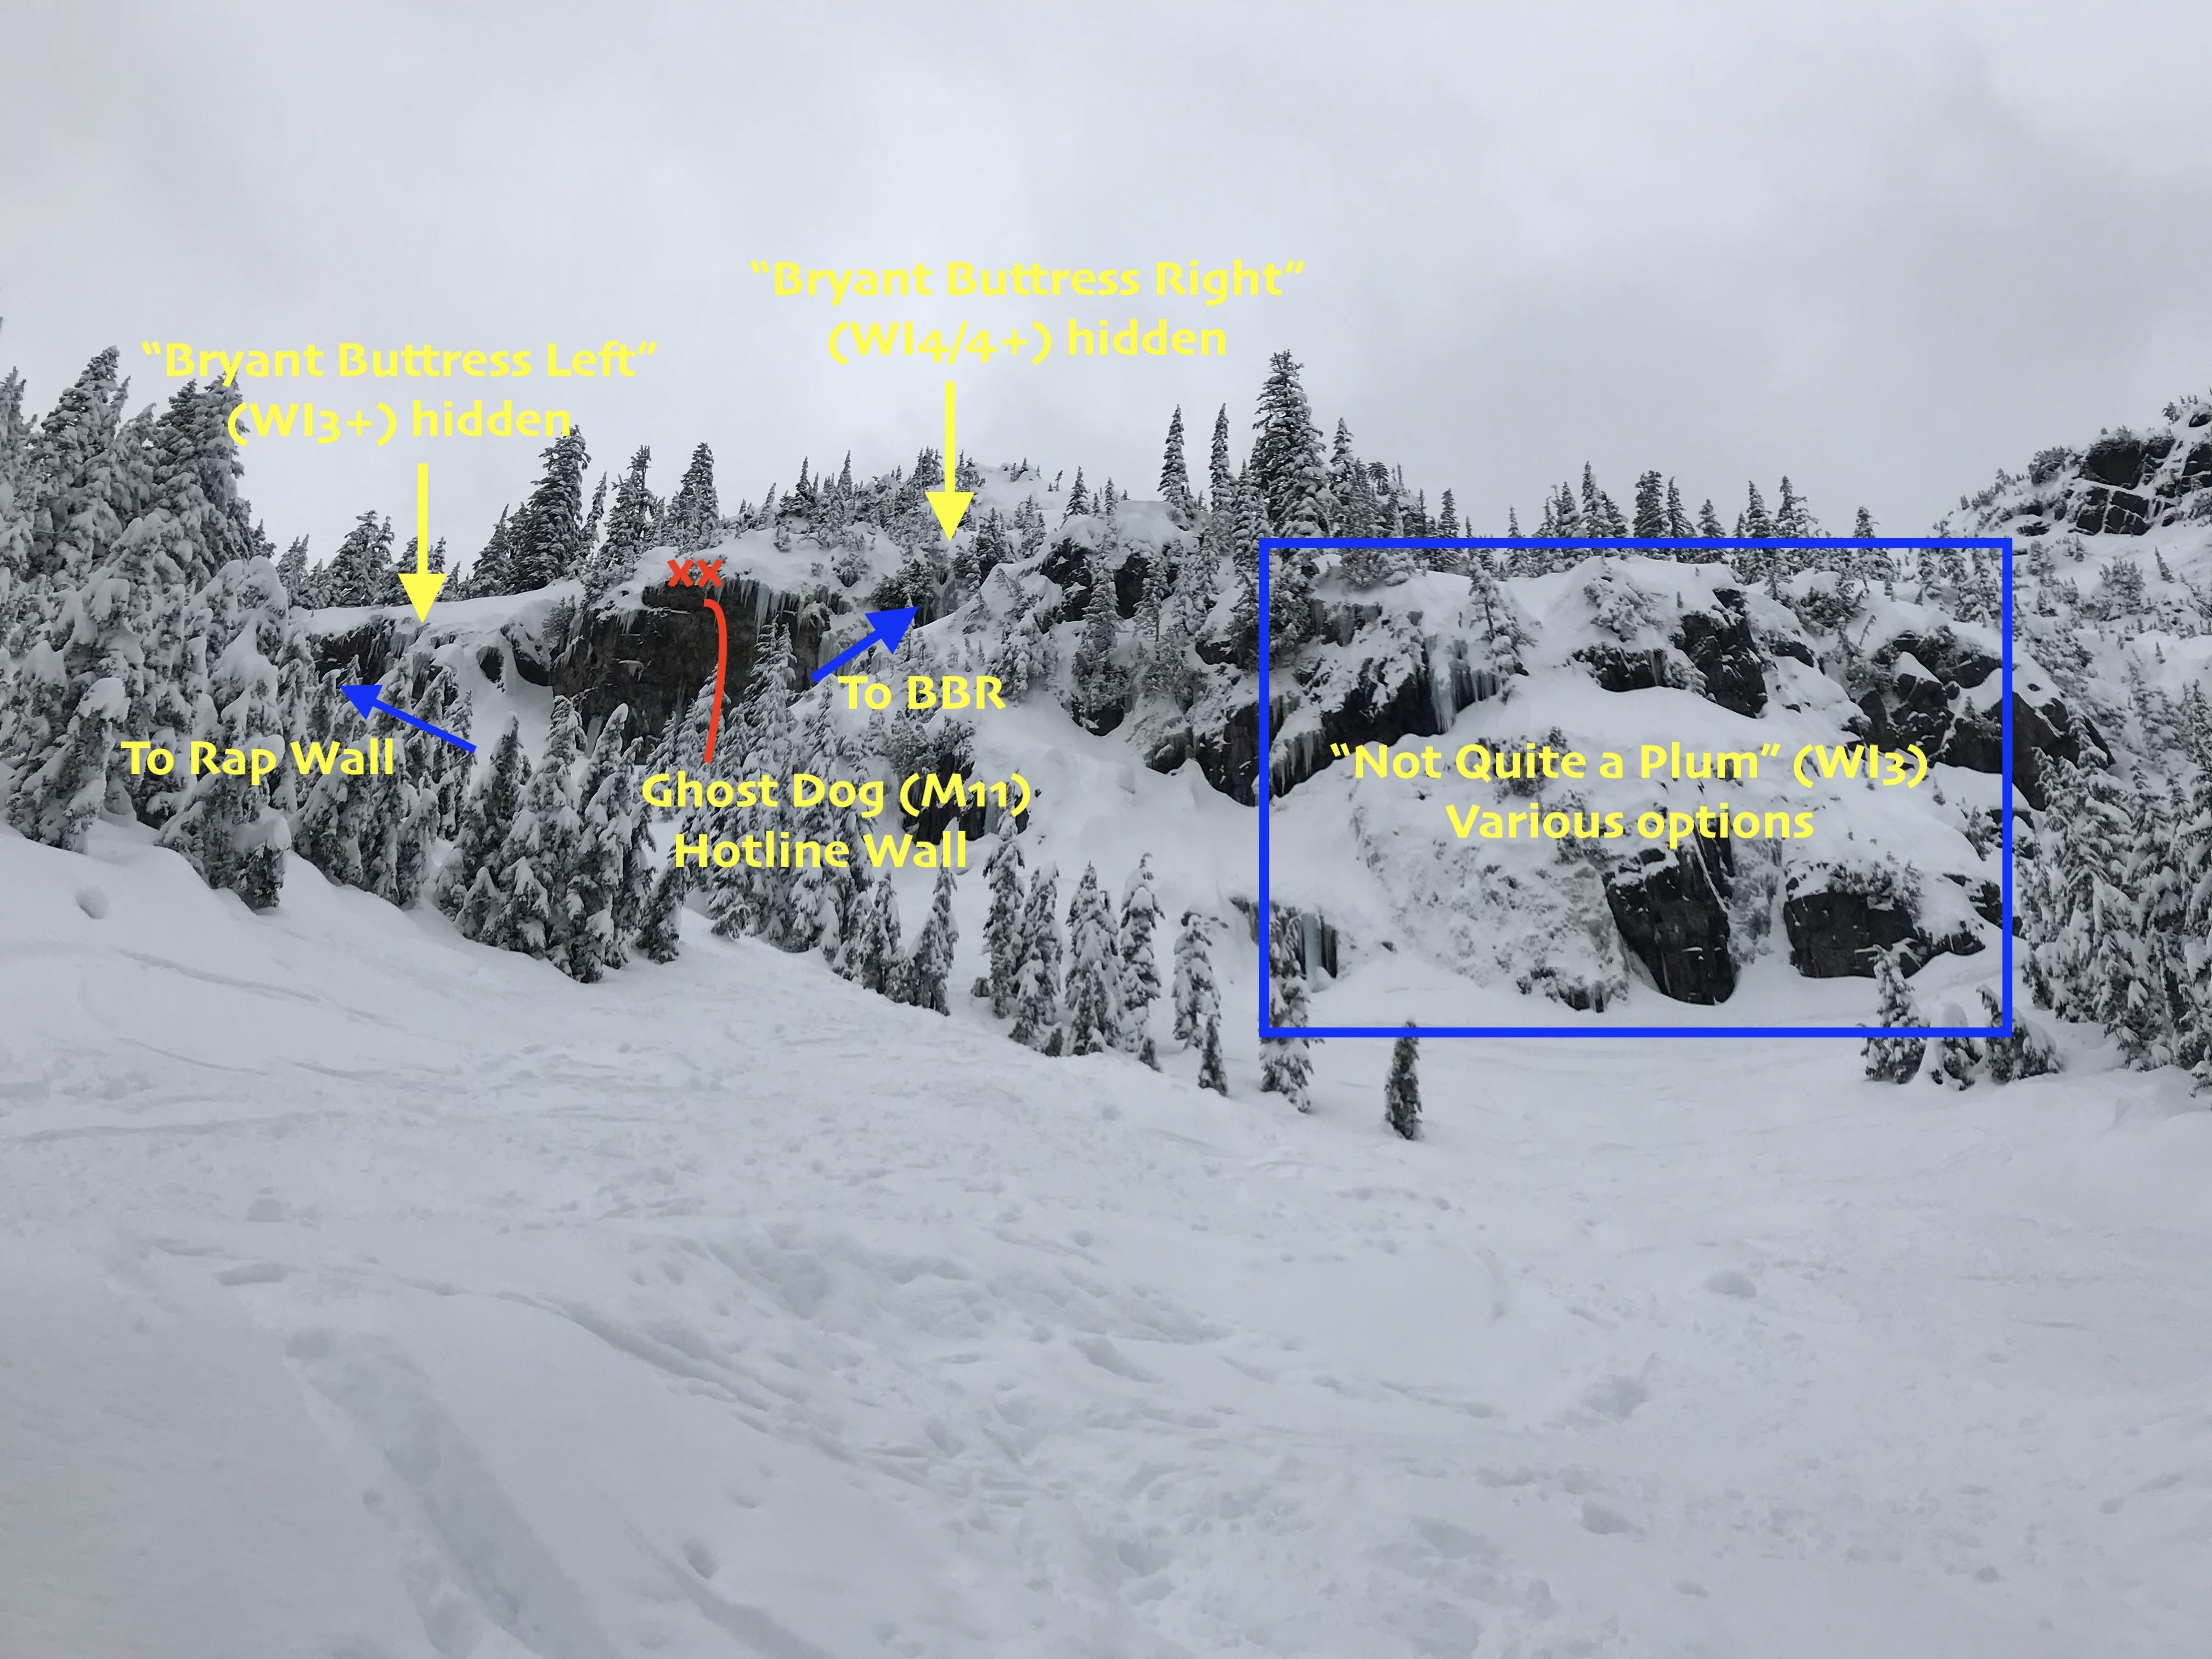
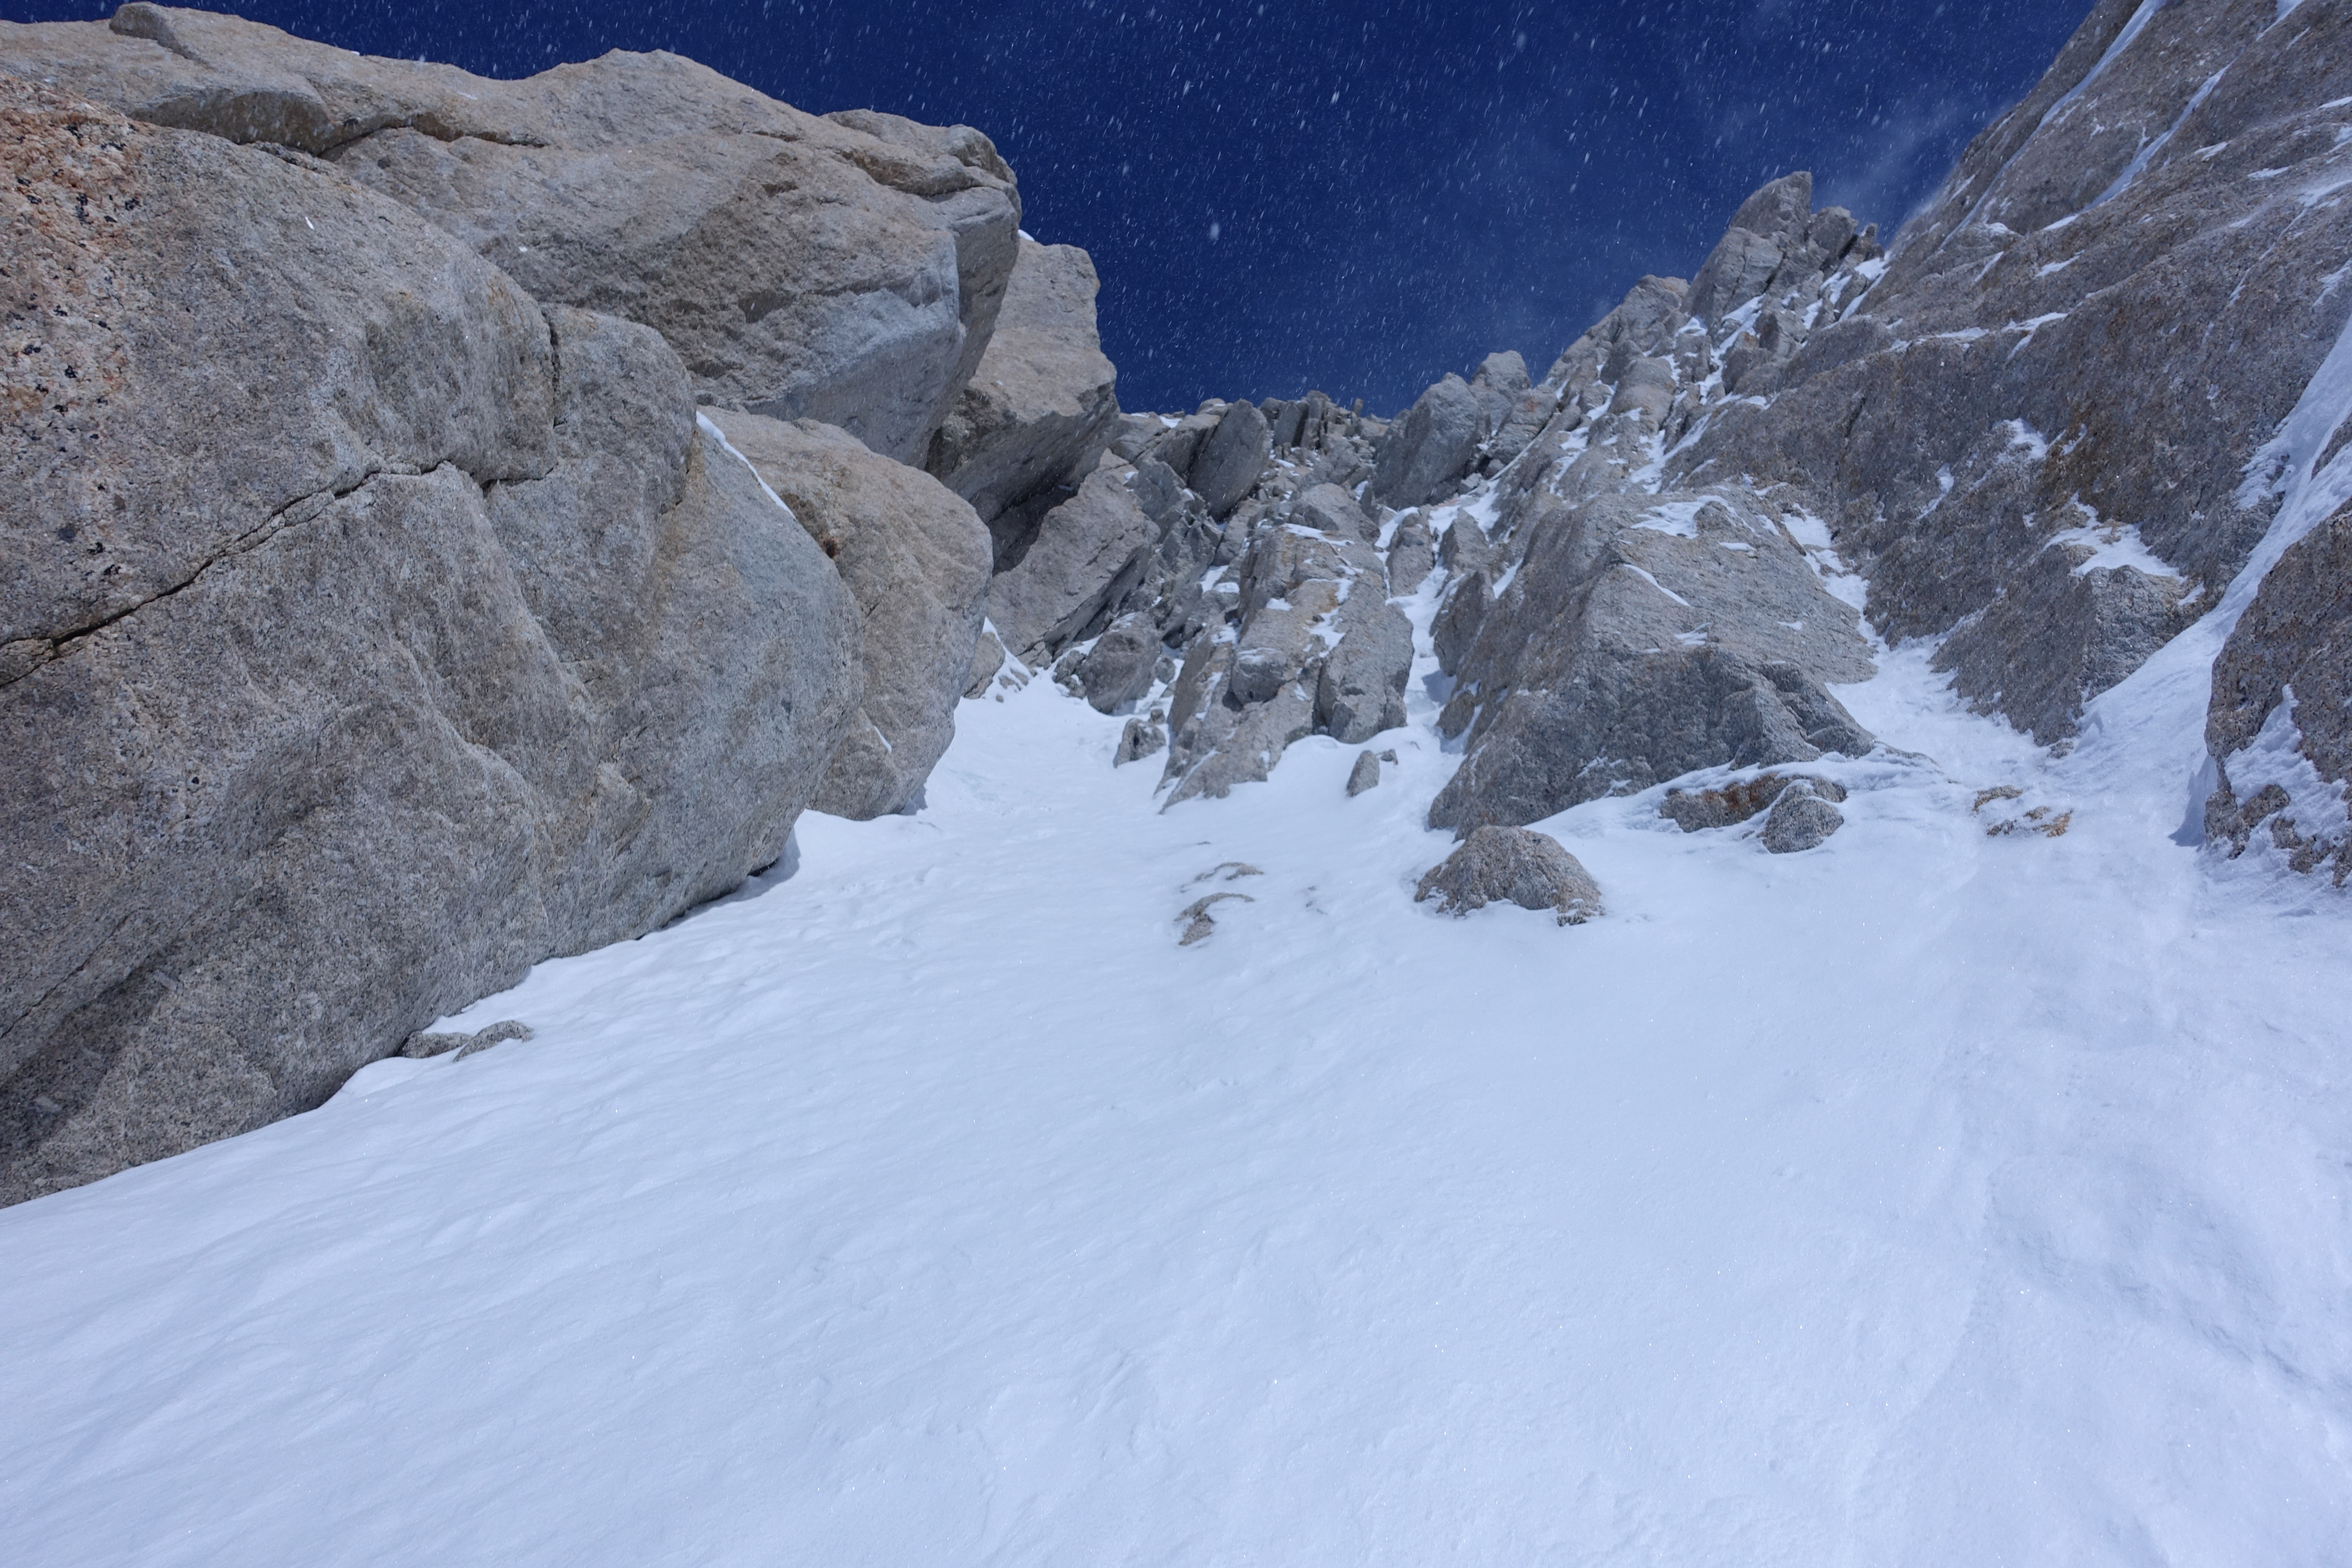
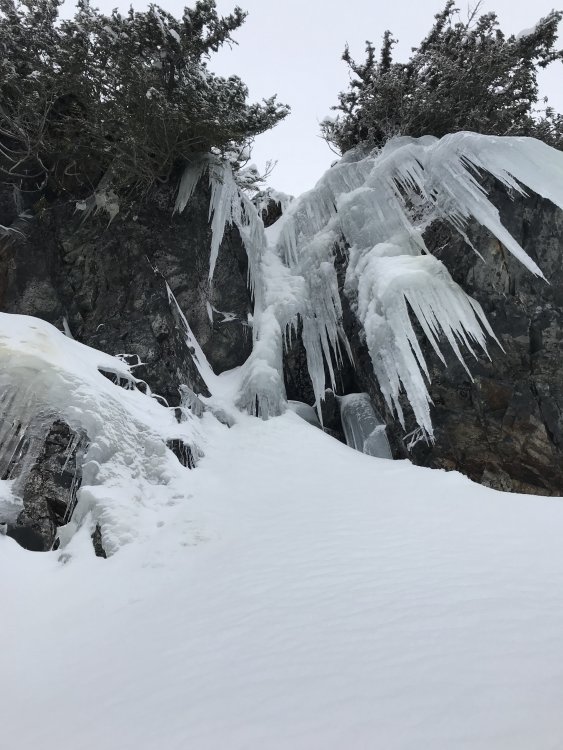
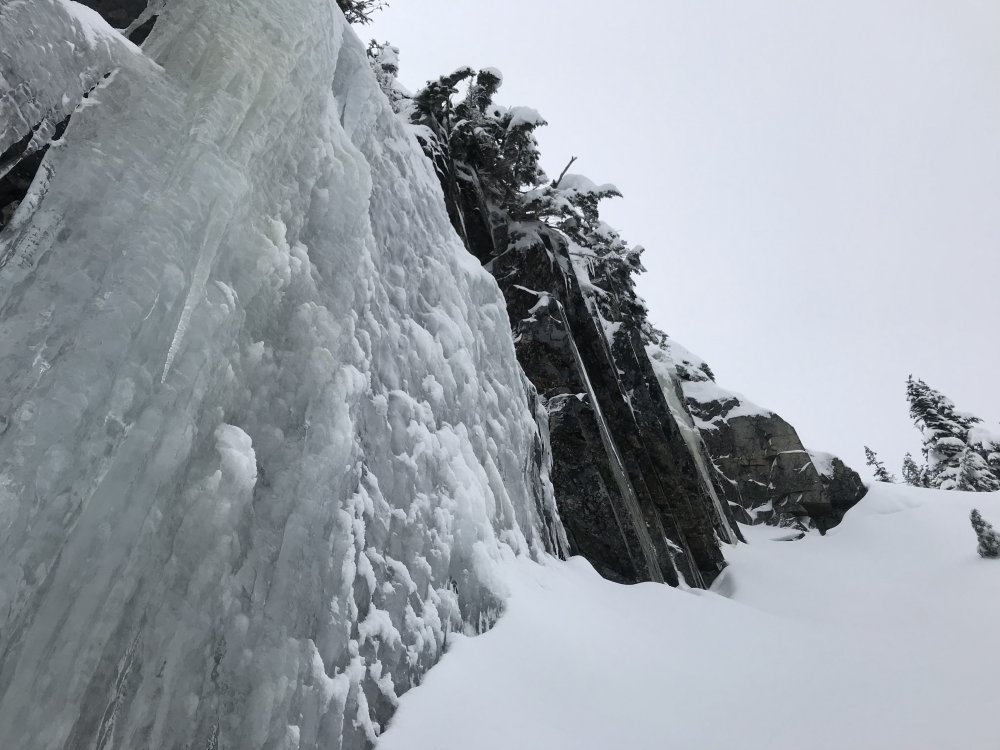
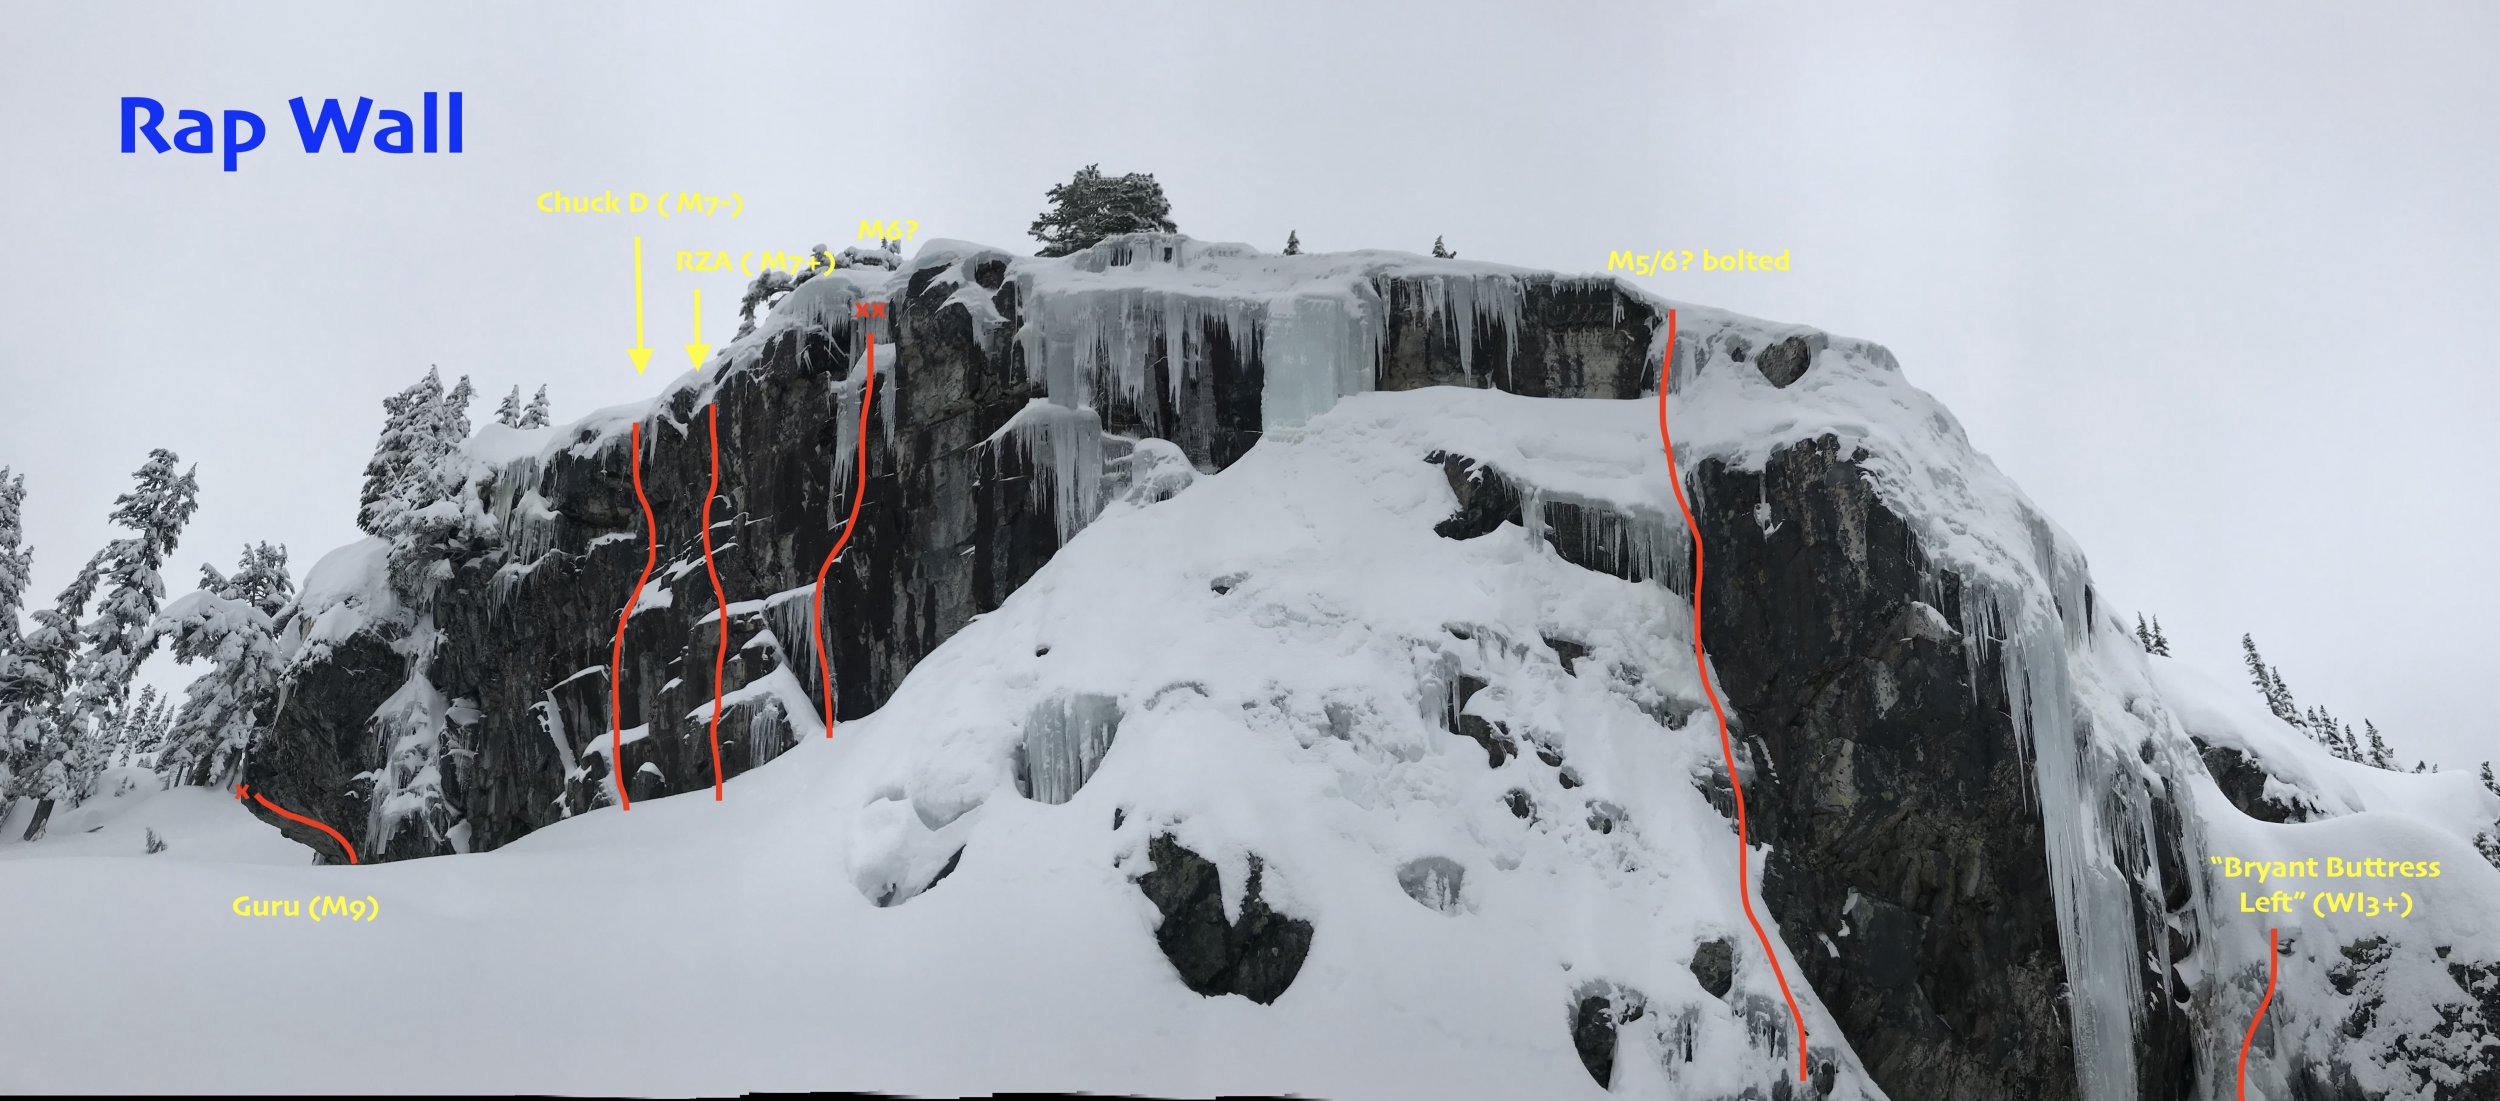
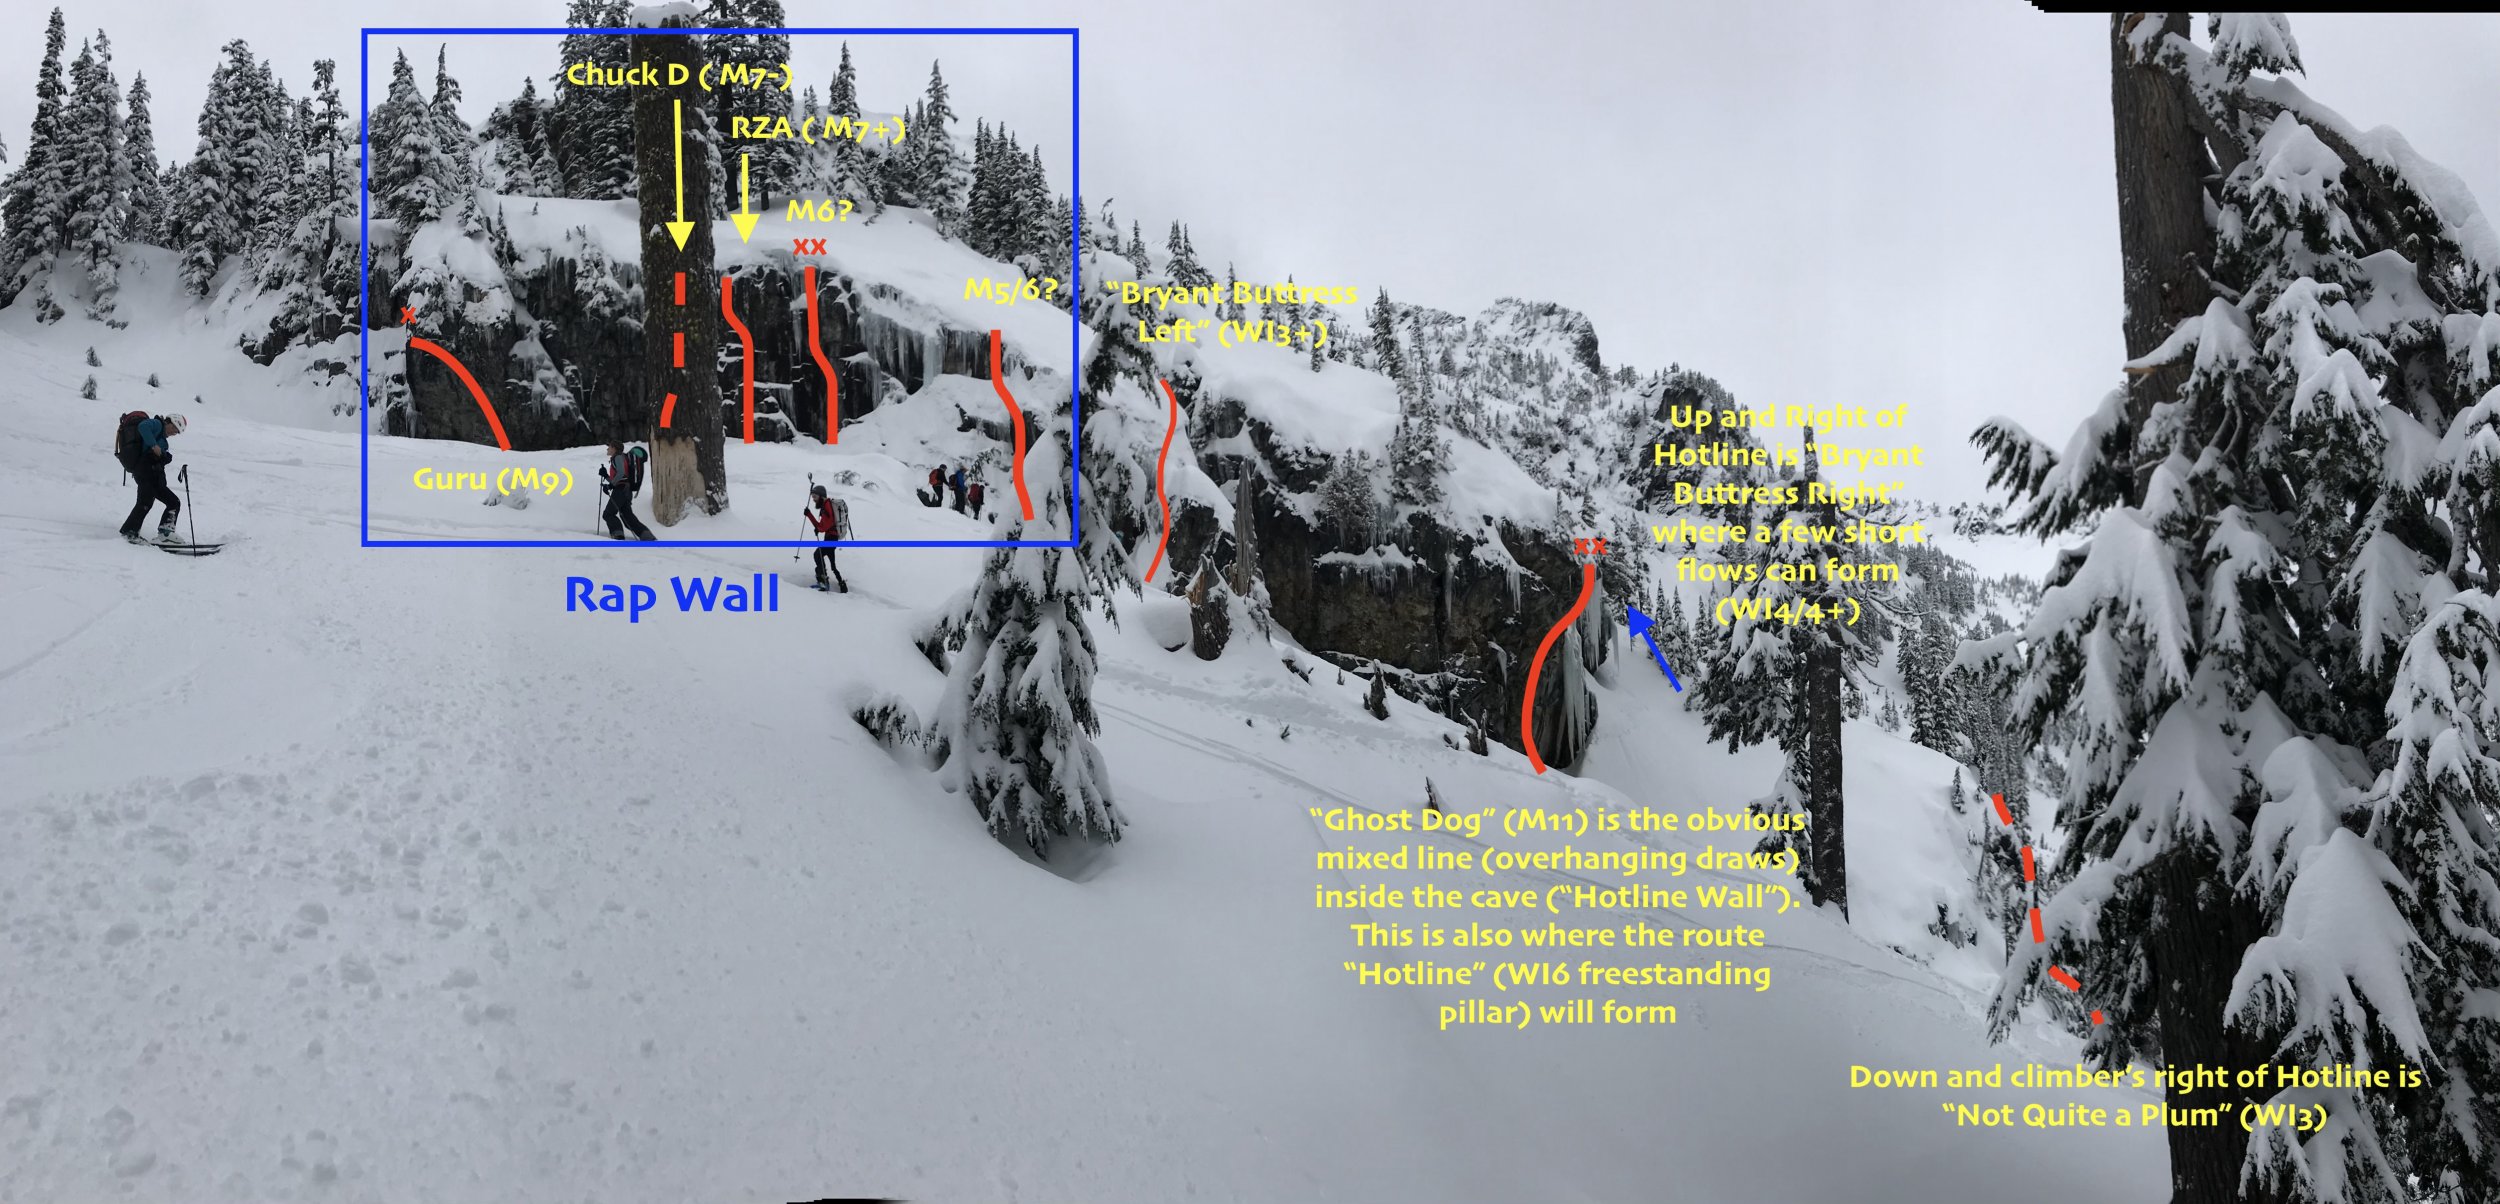
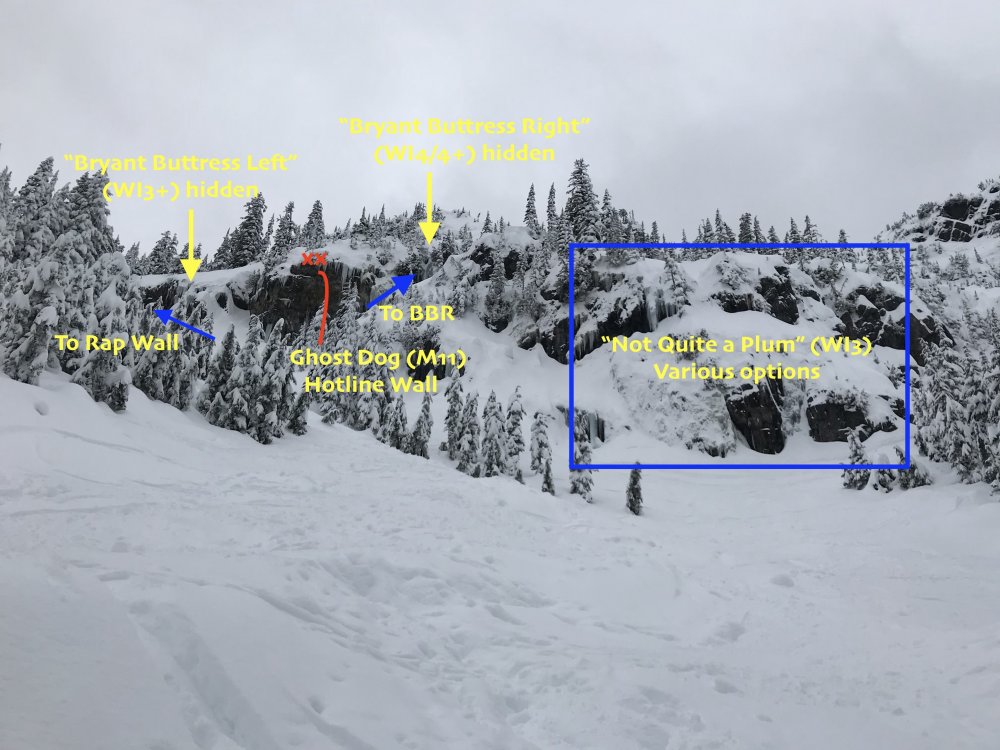
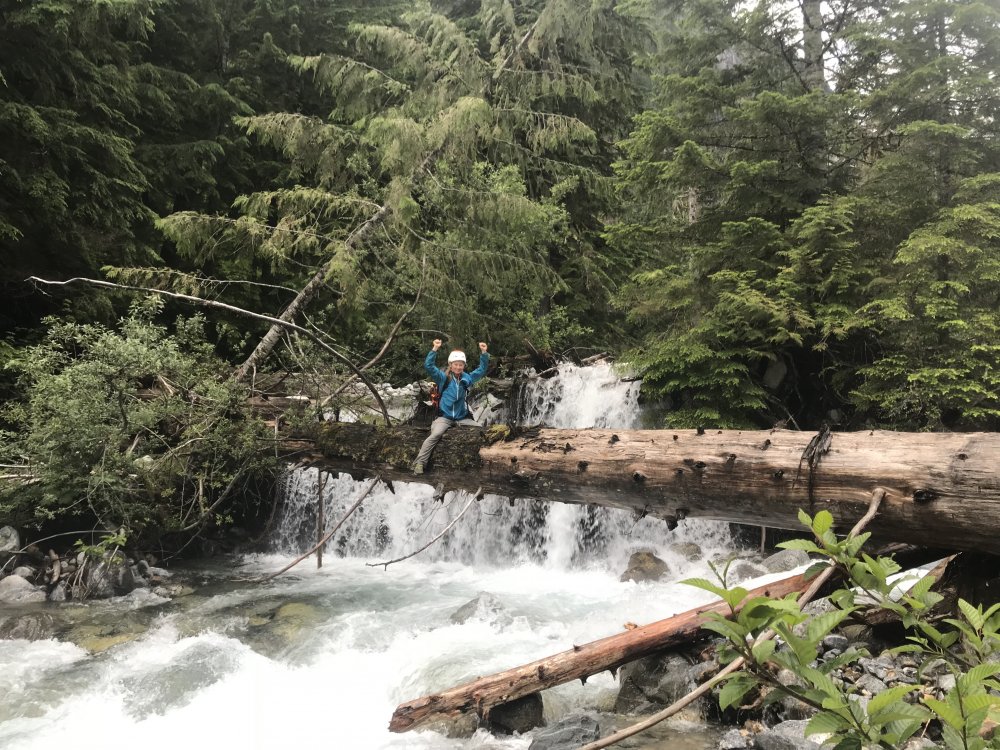
Trip: Alpental Source Lake - Rap Wall Trip Date: 01/20/2019 Trip Report: This was Priti and I's first pilgrimage to lay eyes on and pay homage to Rap Wall. We brought the tools and rope for a walk but had no idea what we were in for. This was a scouting mission to a get a lay of the land. I've since pieced the various Bryant Buttress routes together using the Washington Ice book and various trip reports/blog posts. The GPS Coordinates in WA Ice are spot on, btw. For an aerial view, see page 24 in the book "Backcountry Skiing Snoqualmie Pass": the number "2" is just over the climber's left-most flank of Rap Wall. Also, GerritD has a good far-away look in his comment here: Route Overlays: Since I couldn't find a good topo of the area anywhere, I overlaid some photos with some of my guesses. Please *respectfully* correct me, and I will update the overlays. Left to Right: Rap Wall, Bryant Buttress Left, Ghost Dog (the only route in the cave, aka "Hotline Wall"; the "Hotline" route is a freestanding pillar that will occasionally form over the cave), Bryant Buttress Right. Below Hotline Wall is Not Quite a Plum Conditions: -Alpental Falls: Not in -Kiddie Cliff: Not in (some short, thin ice on the right?) -Not Quite a Plum: short ice steps and deep snow -Bryant Buttress Right: Interesting, thin WI4/4+ flows! -Hotline: the right side of the Hotline Wall has an interesting-looking, steep WI4 traverse-y thing -Bryant Buttress Left: In mixed conditions (gear?) -Rap Wall: Icicles at the top of the cliff band. May want to rap in and hack them off first, so you protect the belayer? Some interesting WI3/M4 lines on the right side of Rap Wall (visible in pictures above) Approaching just beneath Hotline Wall (Ghost Dog) Interesting traverse up and right of Hotline Wall. Looks like WI4 traverse out left, then up for ~15m with good stubbies. Short, wide, thin sheet of WI4 on Bryant Buttress Right (further up and right from Hotline Wall). Continuing even FURTHER up and right from Hotline Wall (right of Bryant Buttress Right) is little mixed gully which could be fun. The cave at Hotline Wall Overhanging top of Ghost Dog Peering up at Ghost Dog. Can you pick out the swaying quickdraws? Very comfy spot to stash packs at Rap Wall (between Guru and Chuck D) Approach: Park in the furthest lot up Alpental, then take winter trail to Source Lake. Once you arrive at the lake and the terrain flattens and opens, up and climber's left is an open gully (visible in the third picture below) and you will see "Not Quite a Plum" and "Hotline Wall" (the cave where "Ghost Dog" is). You can easily skin up the left side of this gully. Gaze upward at the visionary line of Ghost Dog in the cave and pick out the dozen or so quickdraws blowing in the wind up and through the roof. In the book "Backcountry Skiing Washington Pass", this line is called "No Fog" and is also the approach to The Tooth (which cuts back way climber's left). If you were to continue up and left, you will get to Great Scott Bowl, Pineapple Pass, and The Tooth. If you are skiing down, stay in the open glade just below Rap Wall ("one of the best pow runs in the valley") since the open gully on skier's left (just below "Not Quite a Plum" is chunky and unpleasant right now. Gear Notes: Bring lots of stubbies. An adze to chop out bolts and anchors. Pickets if you're trying to rap in and set a top rope. Some routes are truly mixed, so sharpen those points. Approach Notes: Deep snow. Floatation required.


-
[TR] Mt. Hood - North Face Right Gully 01/02/2019
JeffreyW replied to landoclimb's topic in Oregon Cascades
Just climbed this route yesterday (1/13/19) and it's still in great shape. Thanks for the beautiful trip report and inspiration! -
[TR] Mt. Hood - North Face Right Gully 01/02/2019
JeffreyW replied to landoclimb's topic in Oregon Cascades
Nice work. That's a BIG day! -
[TR] Washington Pass, Liberty Bell - Thin Red Line 09/01/2018
JeffreyW replied to ahparker's topic in North Cascades
Wow! Super impressed. Congrats guys! -
Incredible pictures and great style! I'm truly amazed by your eye for photographing these beautiful peaks and landscapes.
-
Honestly, I was surprised at the quality of the 5th class terrain. There is so much incredible 5th class terrain, and the rock quality was surprisingly good. We never had any random hand-holds or foot-holds break loose, unexpectedly (but perhaps we were just lucky on both trips). We tread slowly and carefully, and any loose stuff was obvious (standard Cascades climbing). There aren't too many places on the planet where one can get endless 5th class like this with such incredible purchase. It definitely deserves more traffic!
-
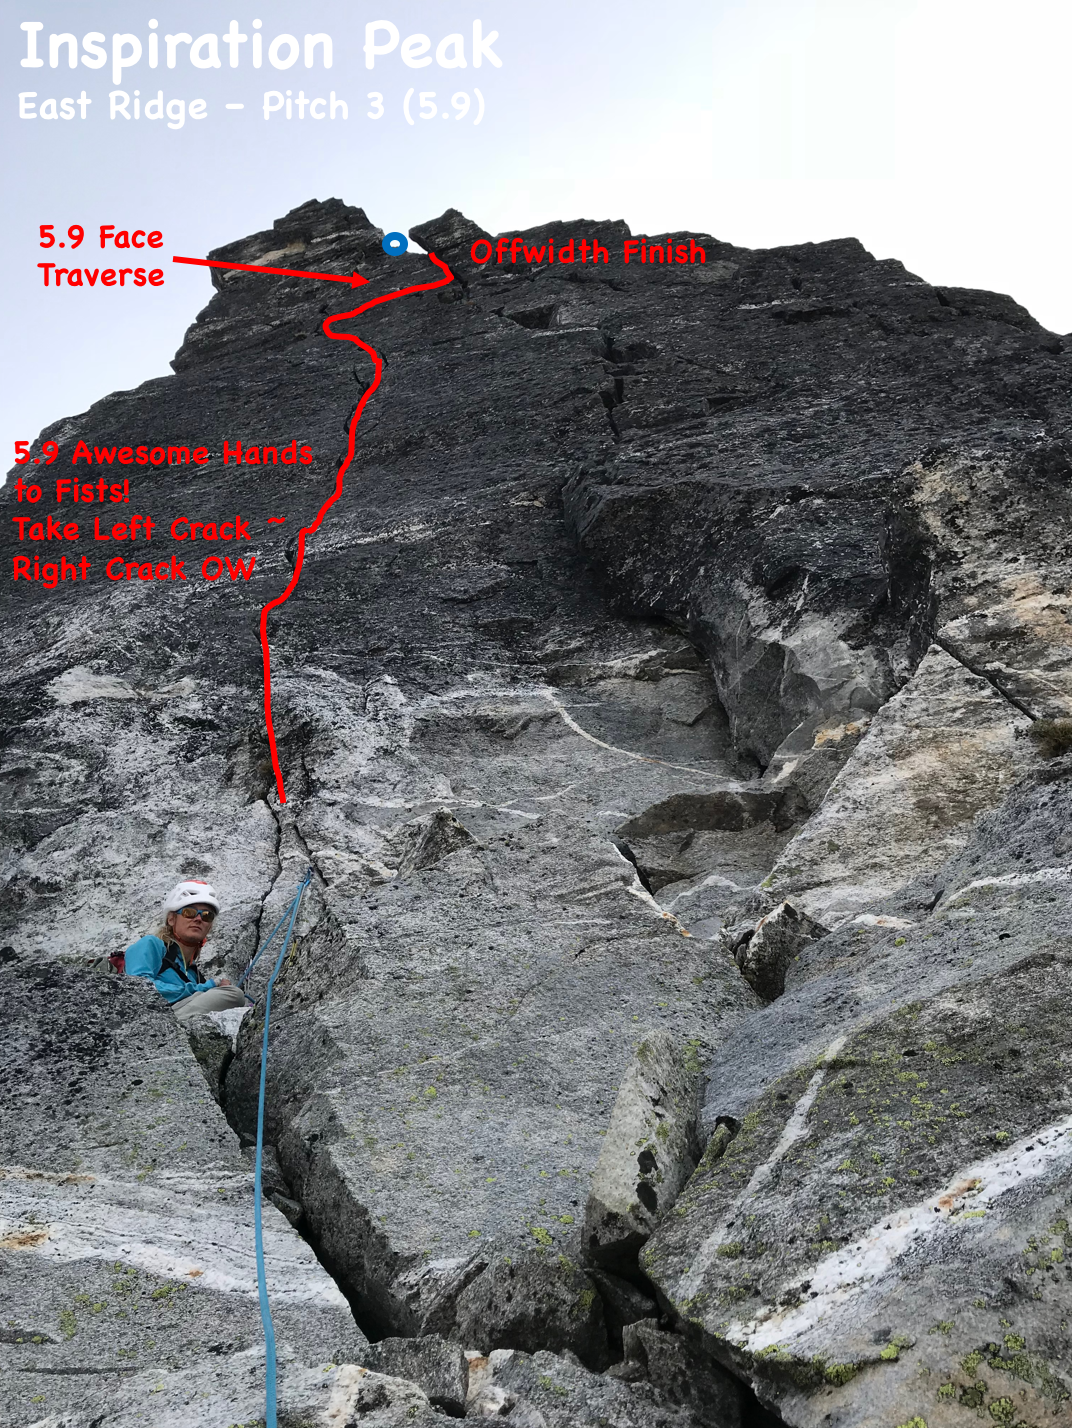
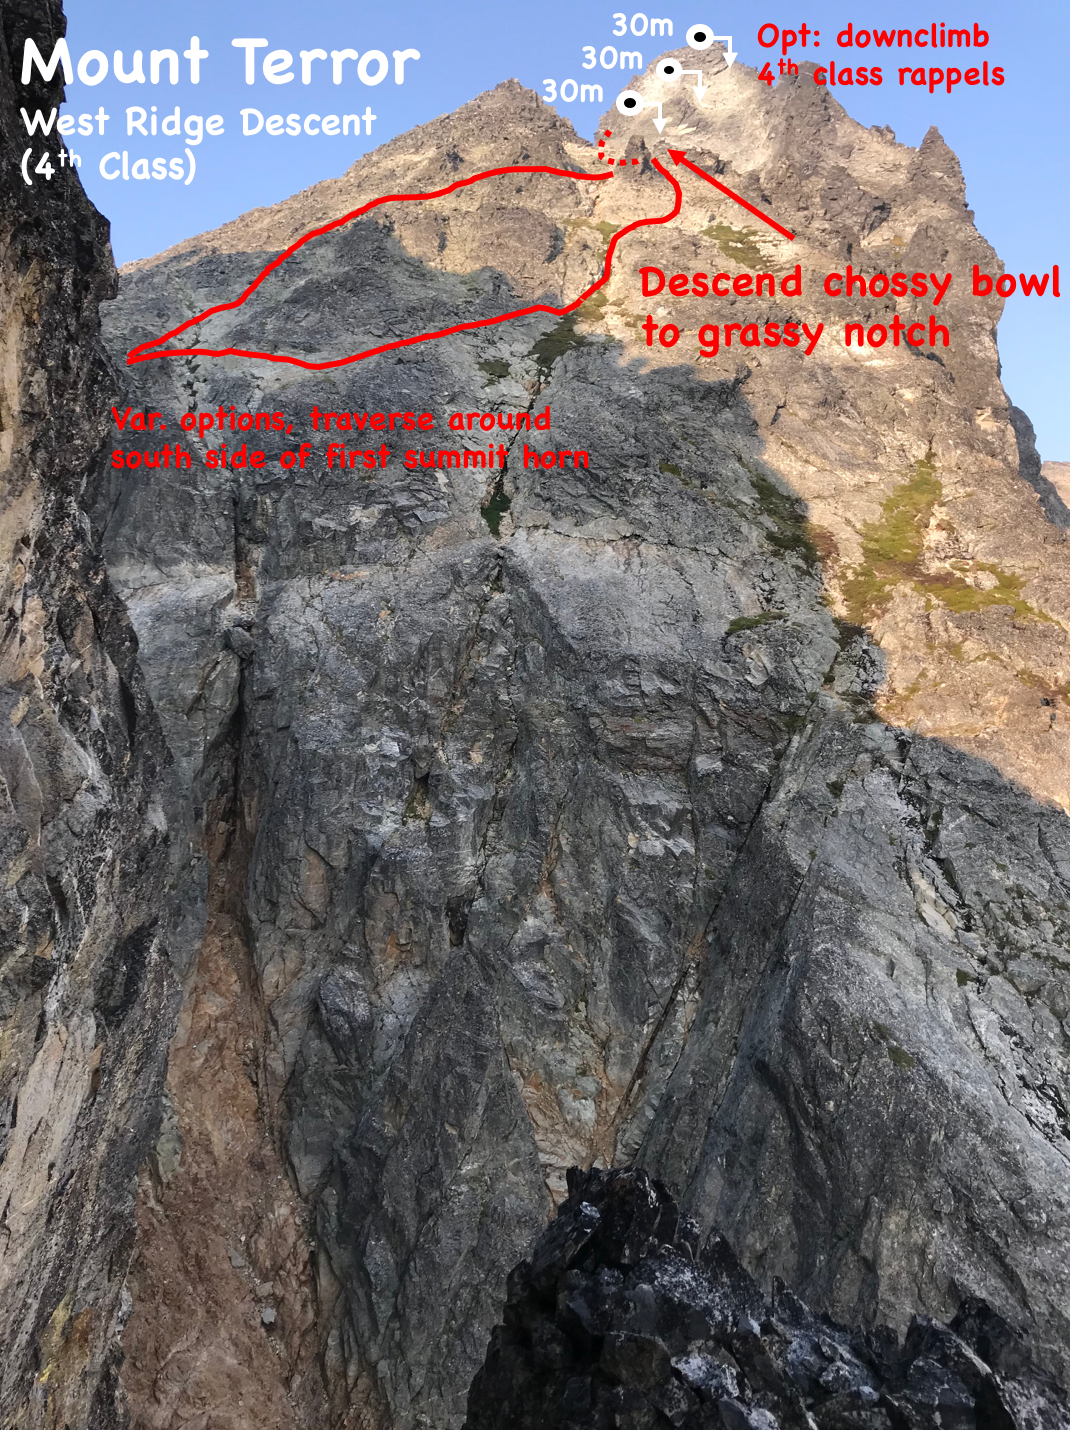
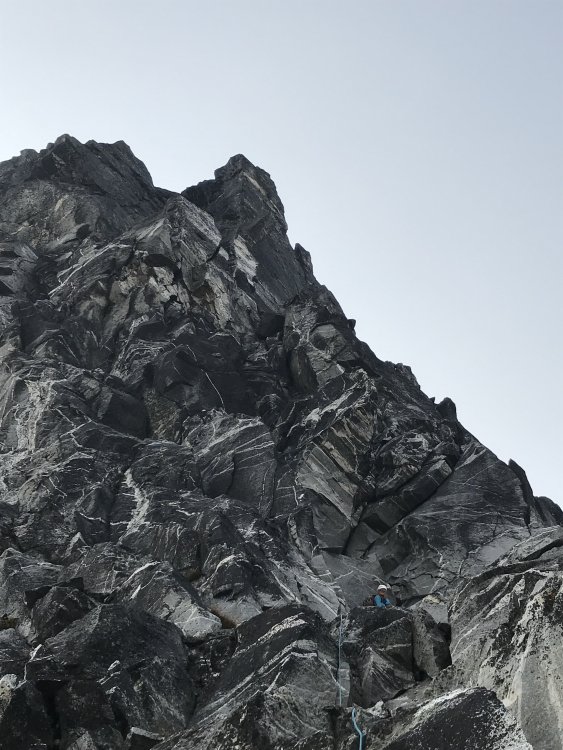
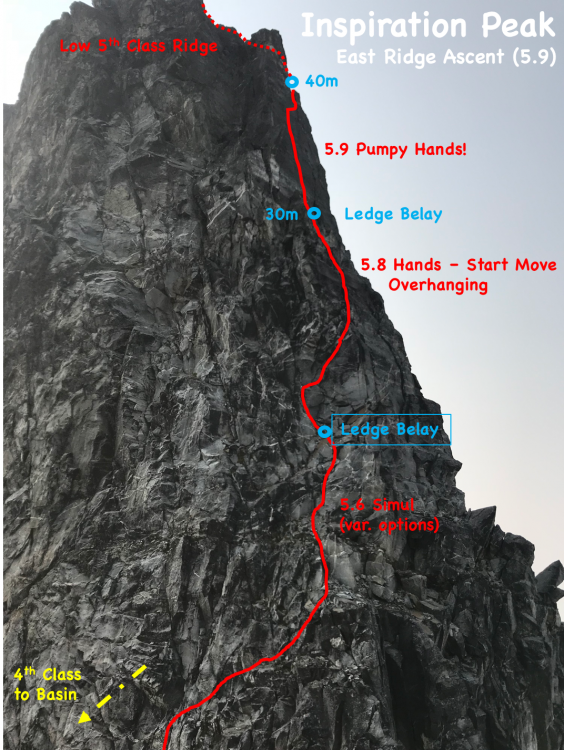
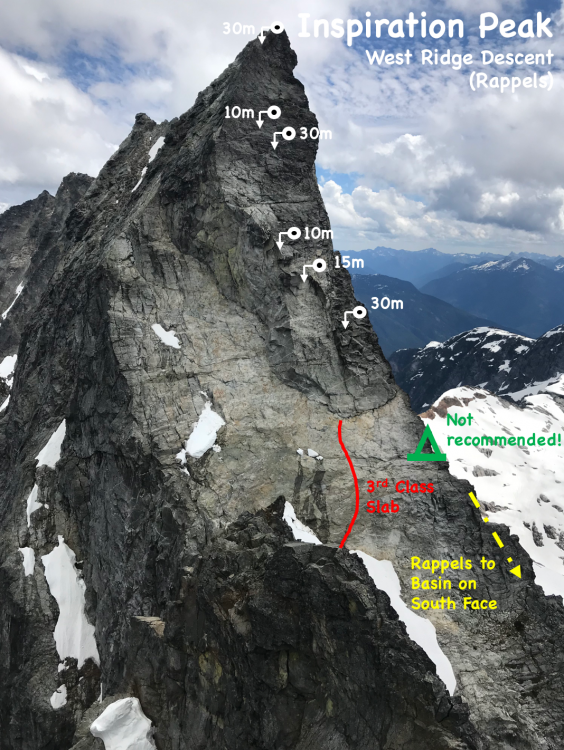
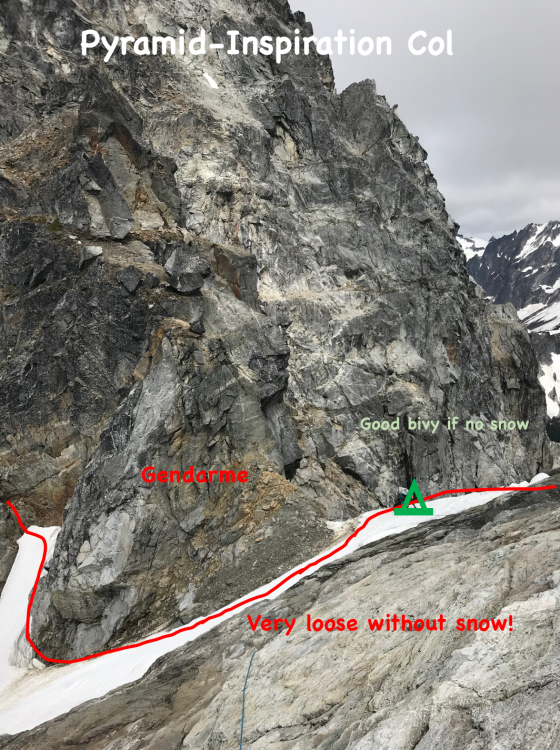
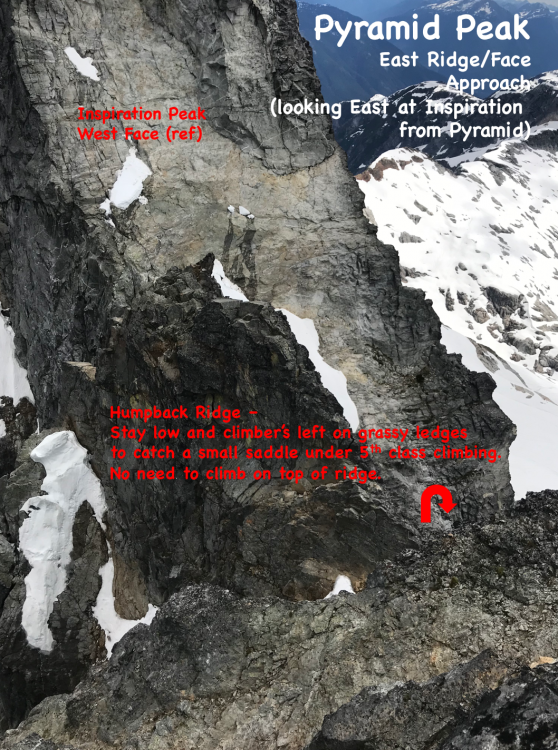
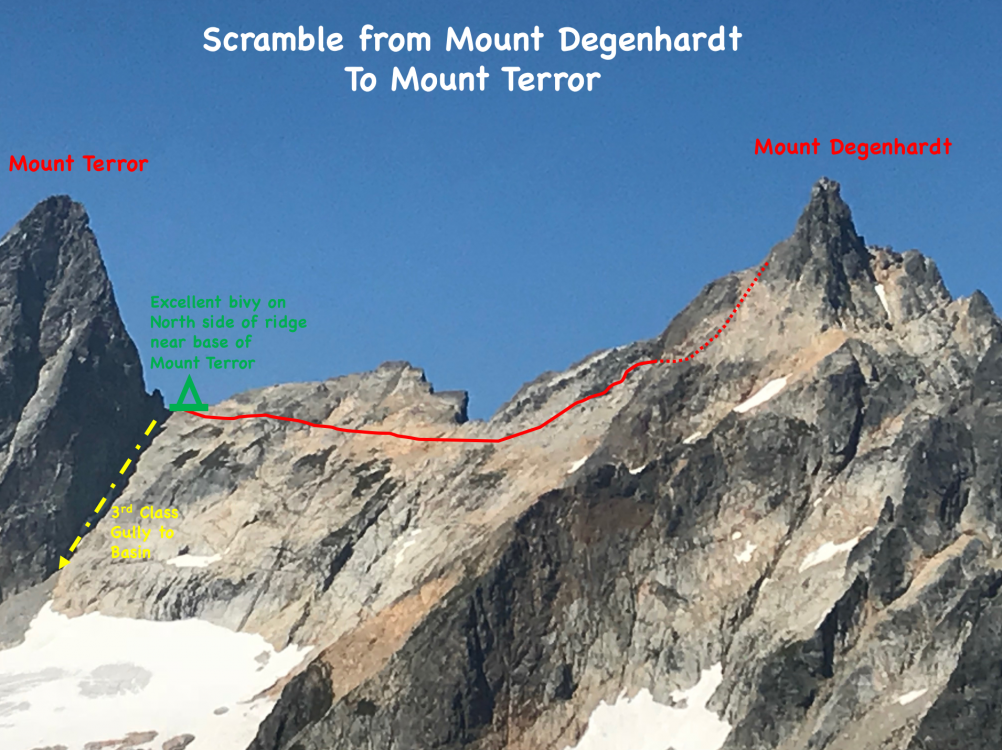
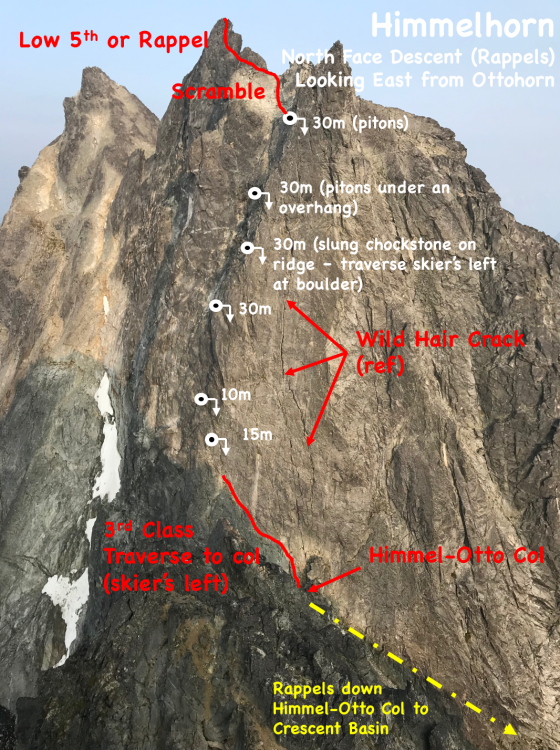
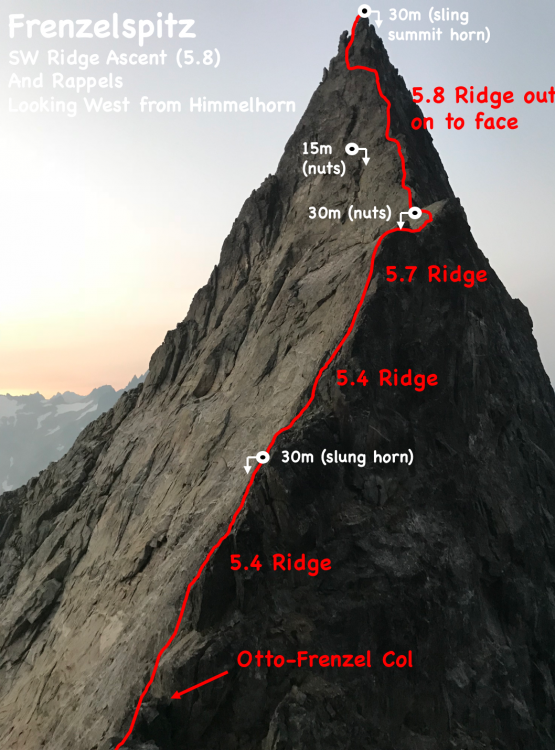
Thanks everybody for the appreciation of the beta! We made half of these topos after our first attempt, and brought the topos with us on the final attempt to make markups and corrections. We recorded voice memos at the end of each day to capture the specific beta and routefinding. Our hope is that more of this terrain gets traffic since most of it was high-quality technical choss with astounding position. Any of the linkups of smaller segments of the Enchainment would be an excellent weekend outing. Of course, it was a fun adventure to pick our own way much of the time! Leave the beta sheets at home if you want extra adventure. The approach into the Pickets is way too long just to go climb a single peak (been there, done that!). Probably my favorite segment would be Terror-Rake col to Otto-Himmel col. East Face of Inspiration was the single best pitch of the Enchainment imo. The approach to Frenzelspitz was really scary (especially in the dark), and I wouldn't recommend it unless you're going for the full Enchainment. Also, we still want to go back to also climb the Wild Hair Crack on Himmelhorn which looks incredible!
-
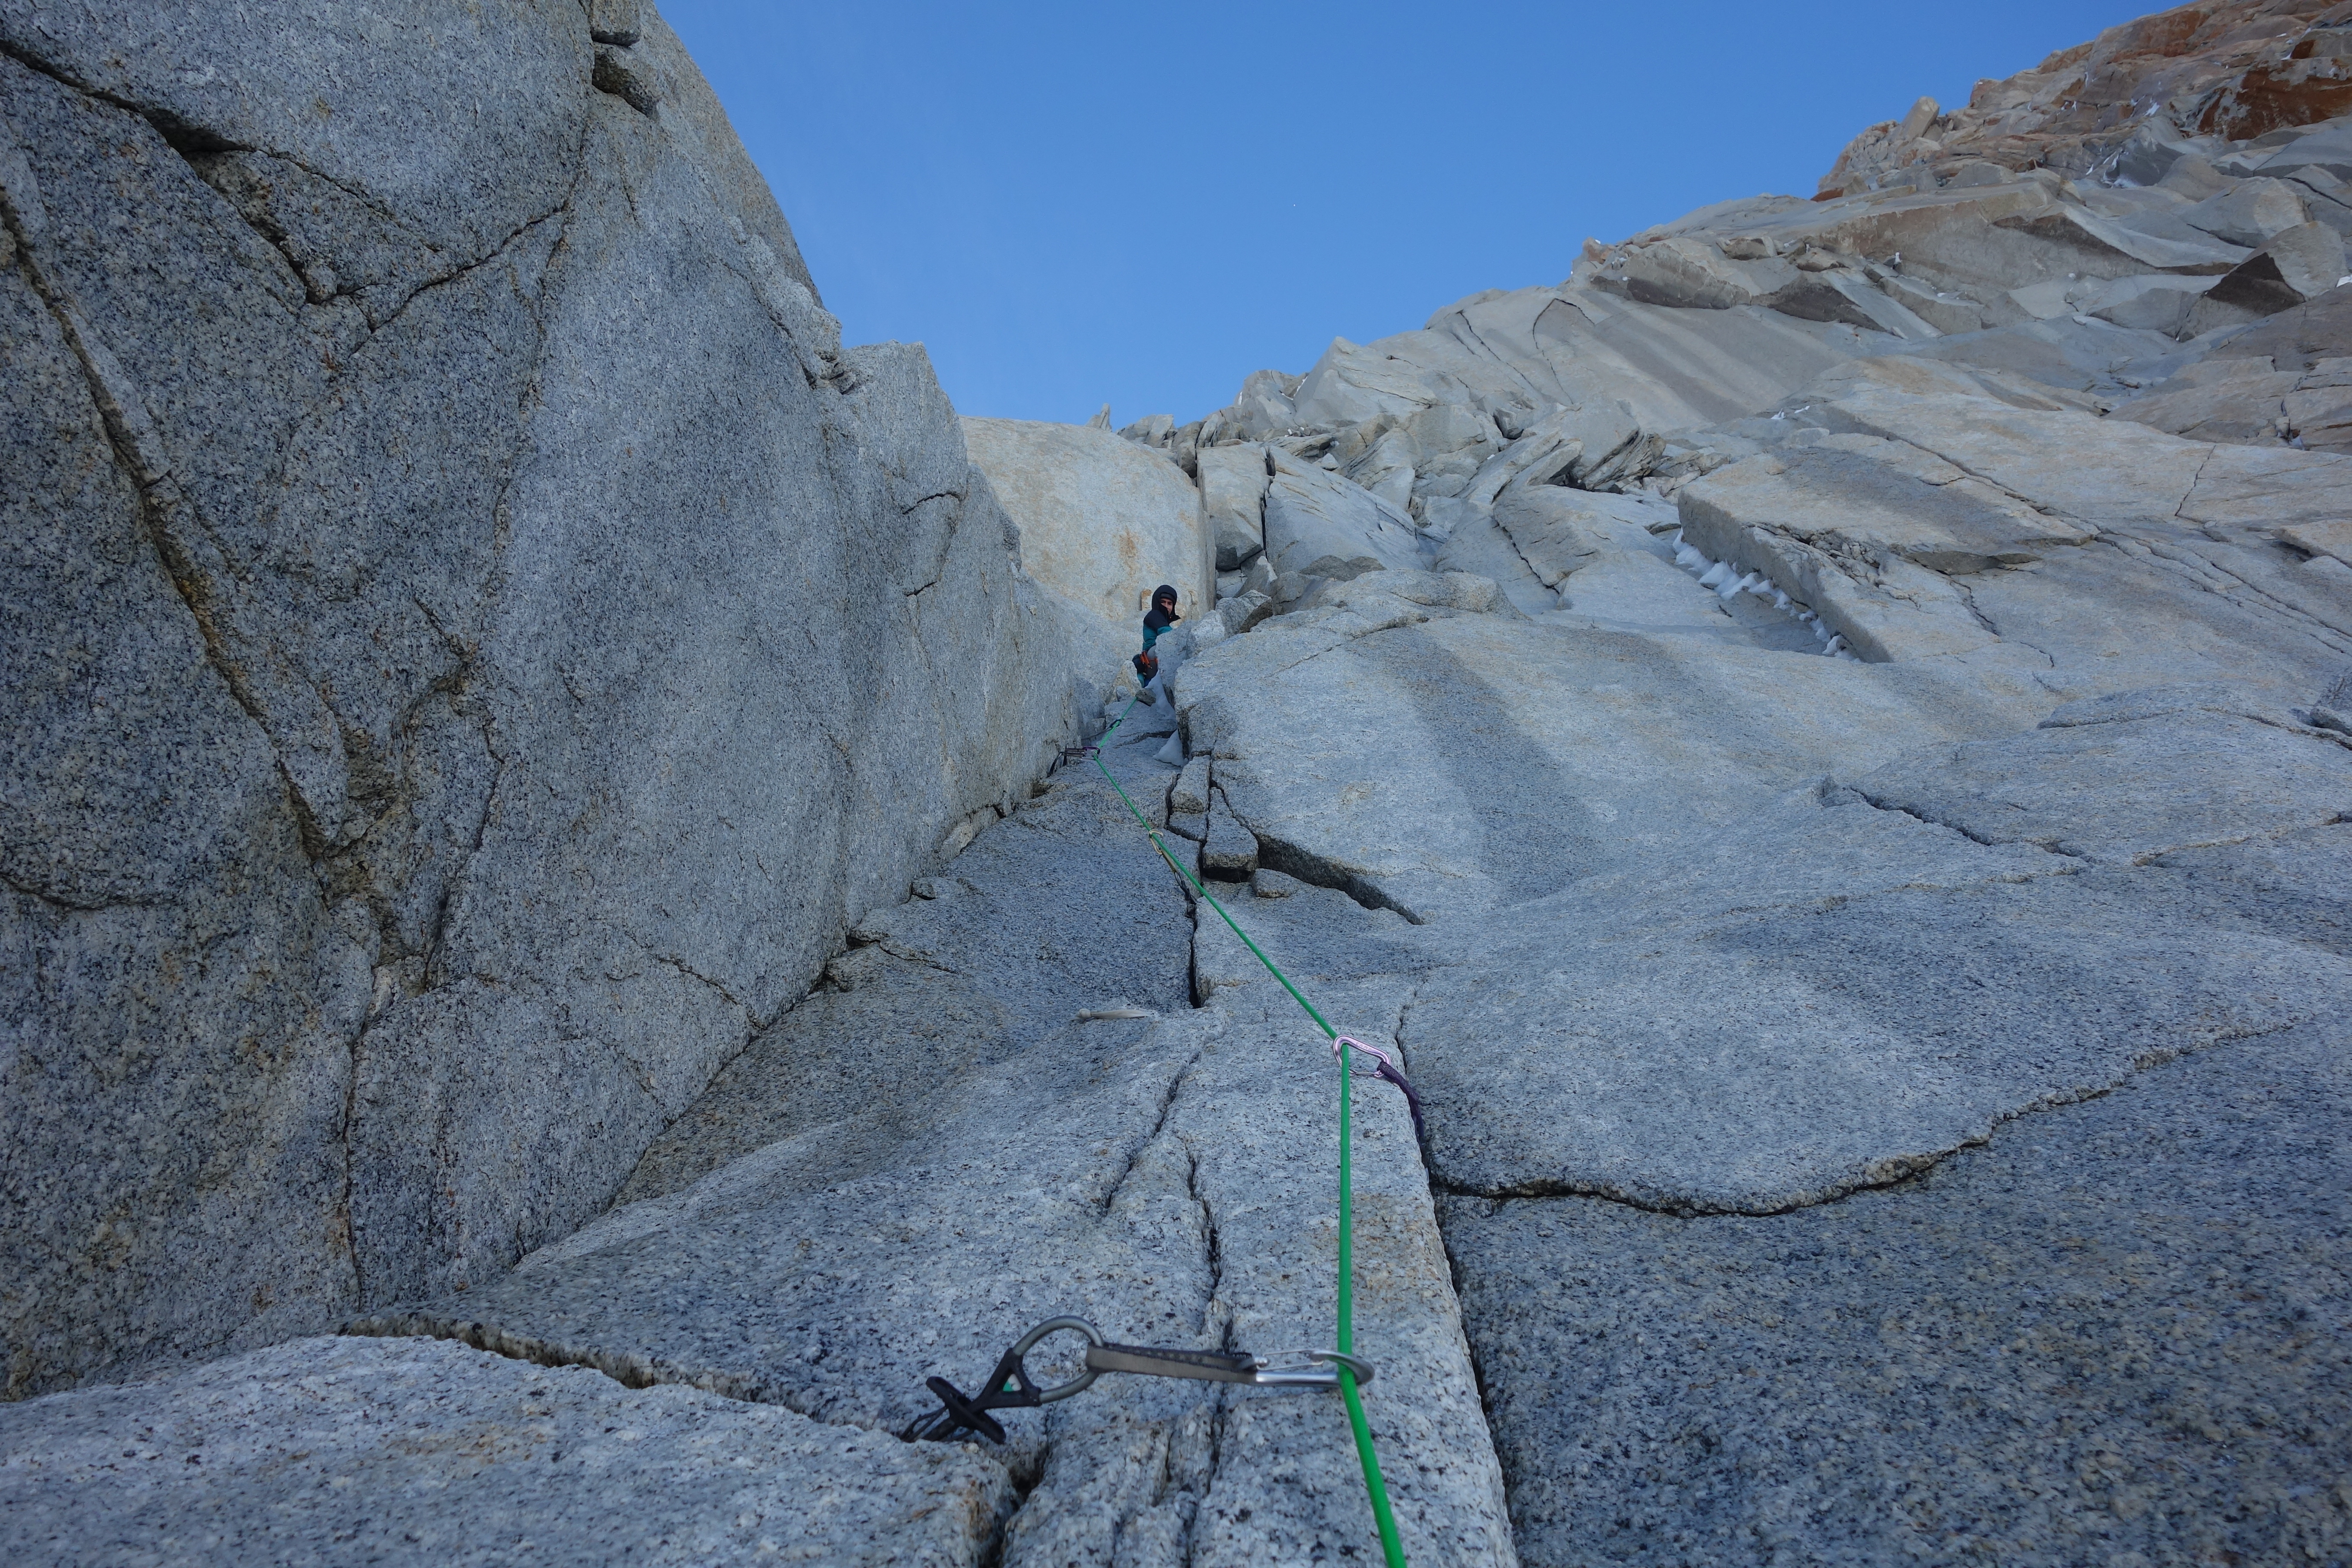
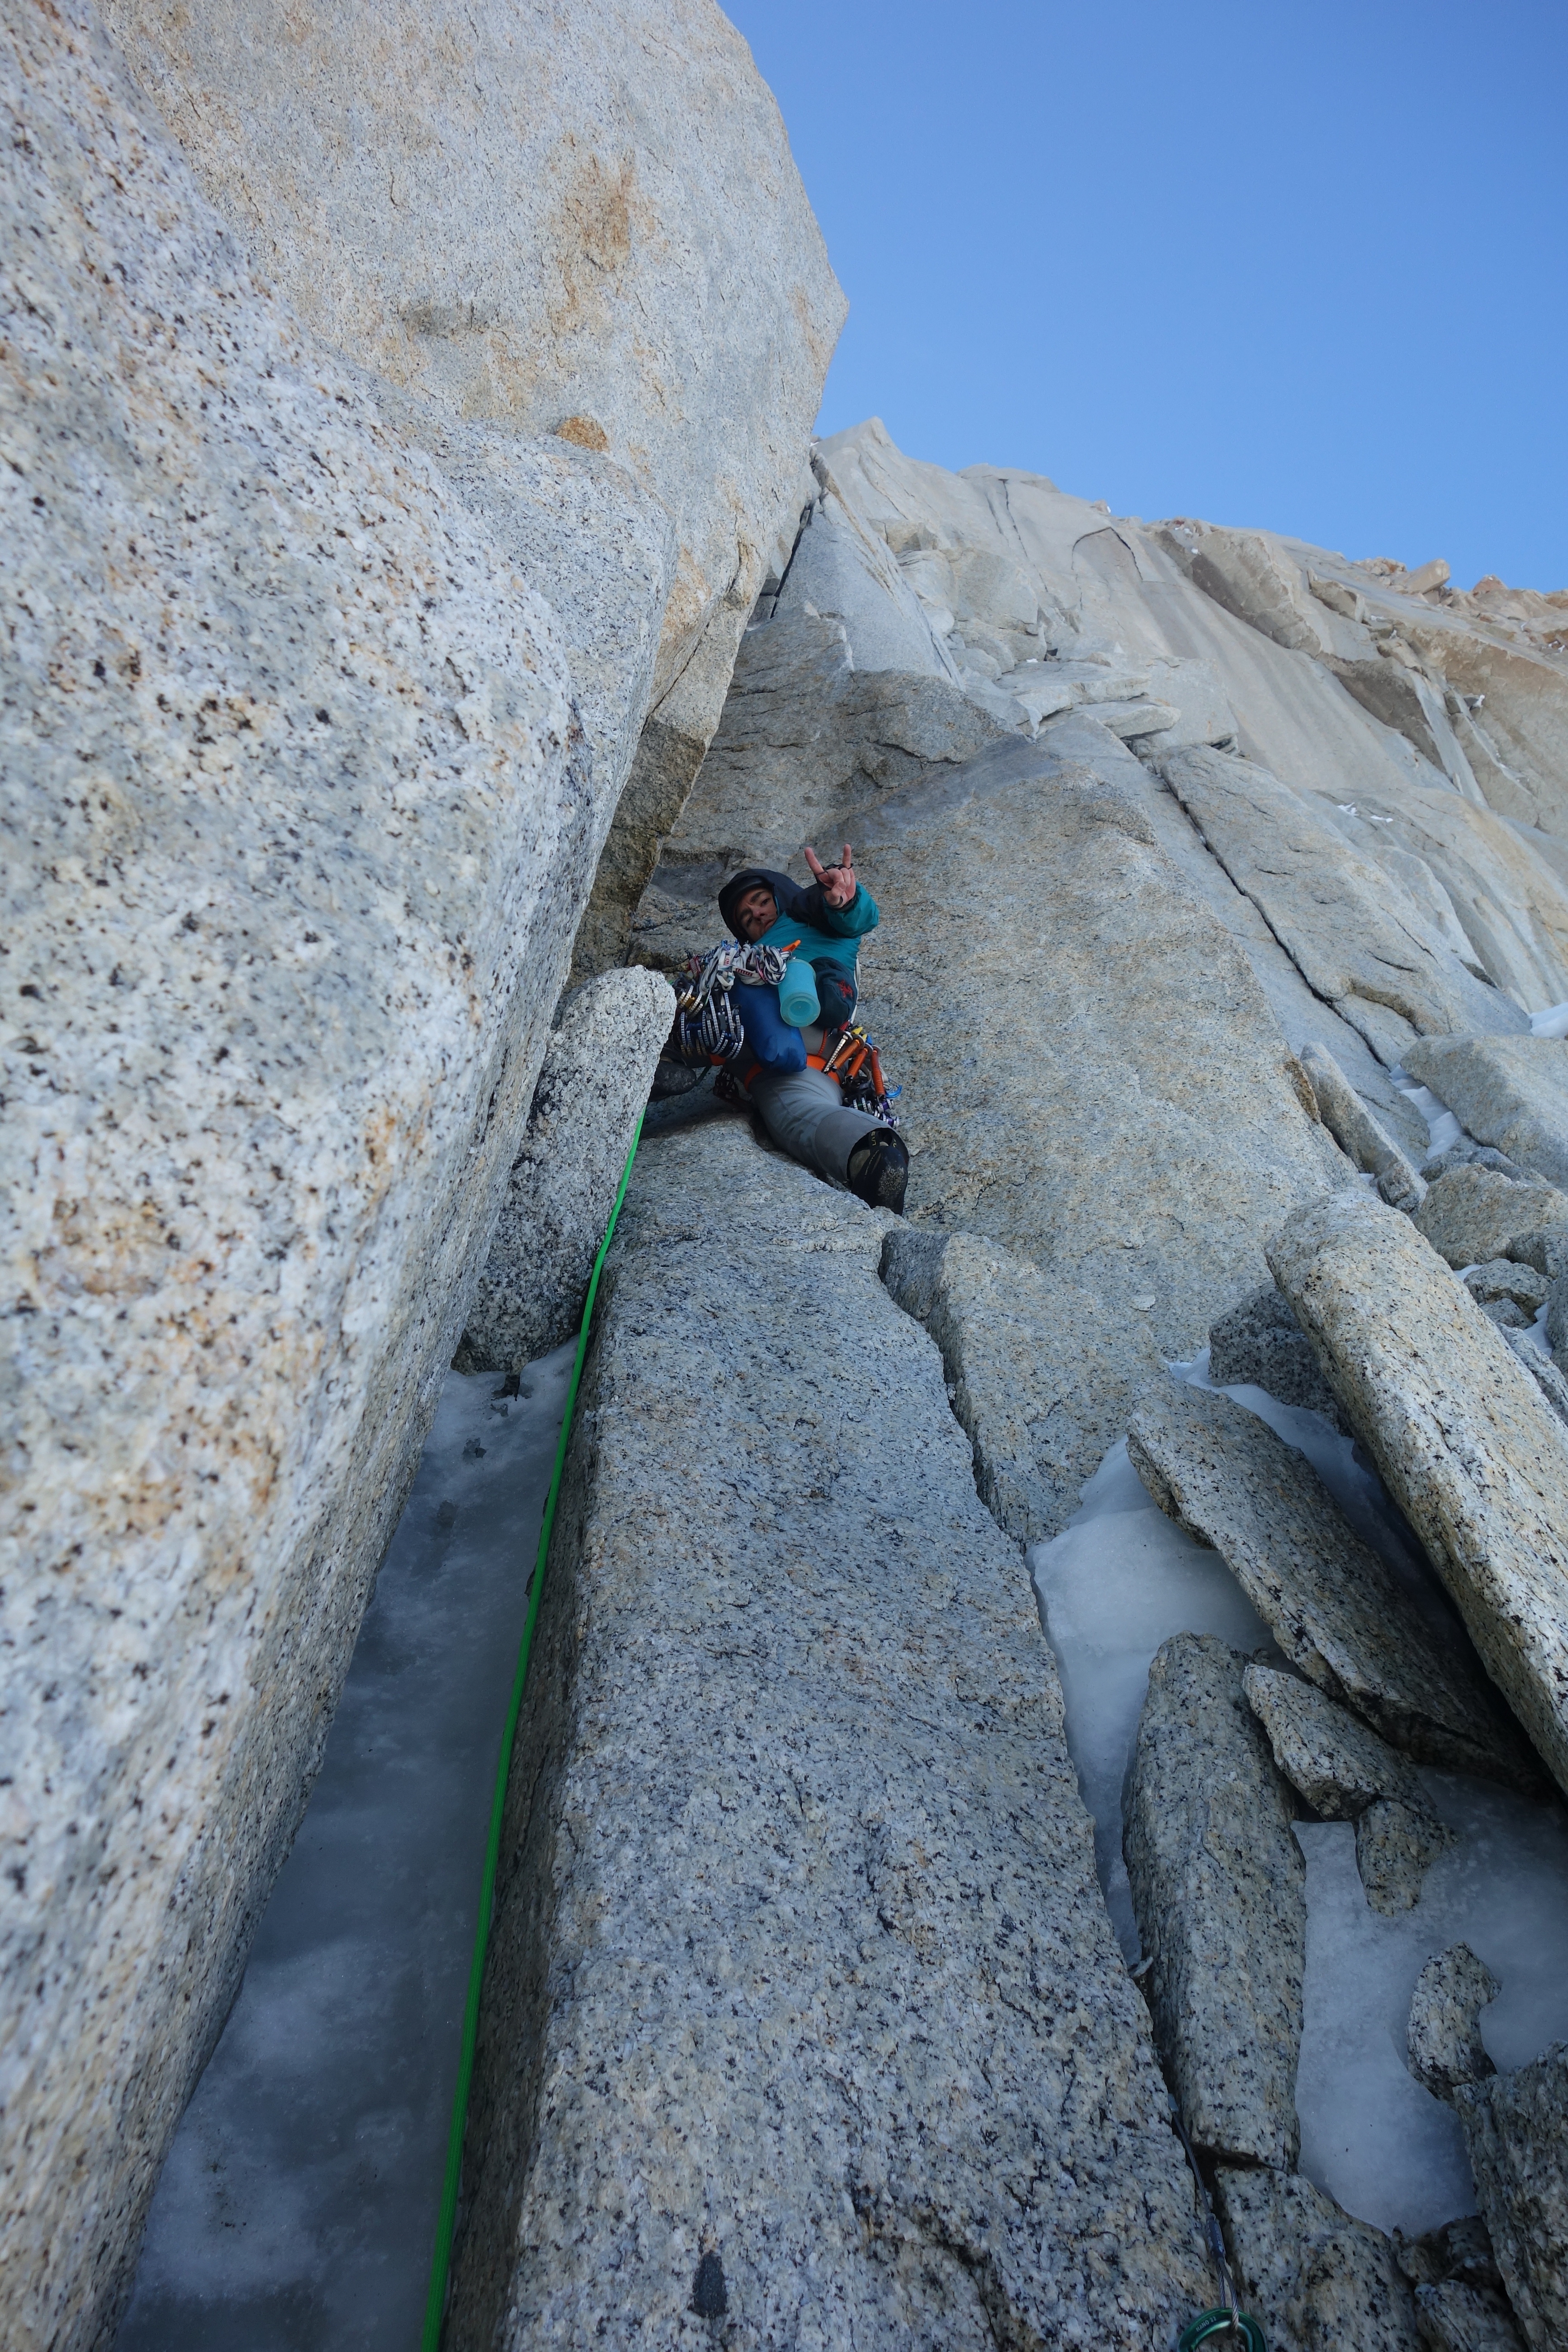
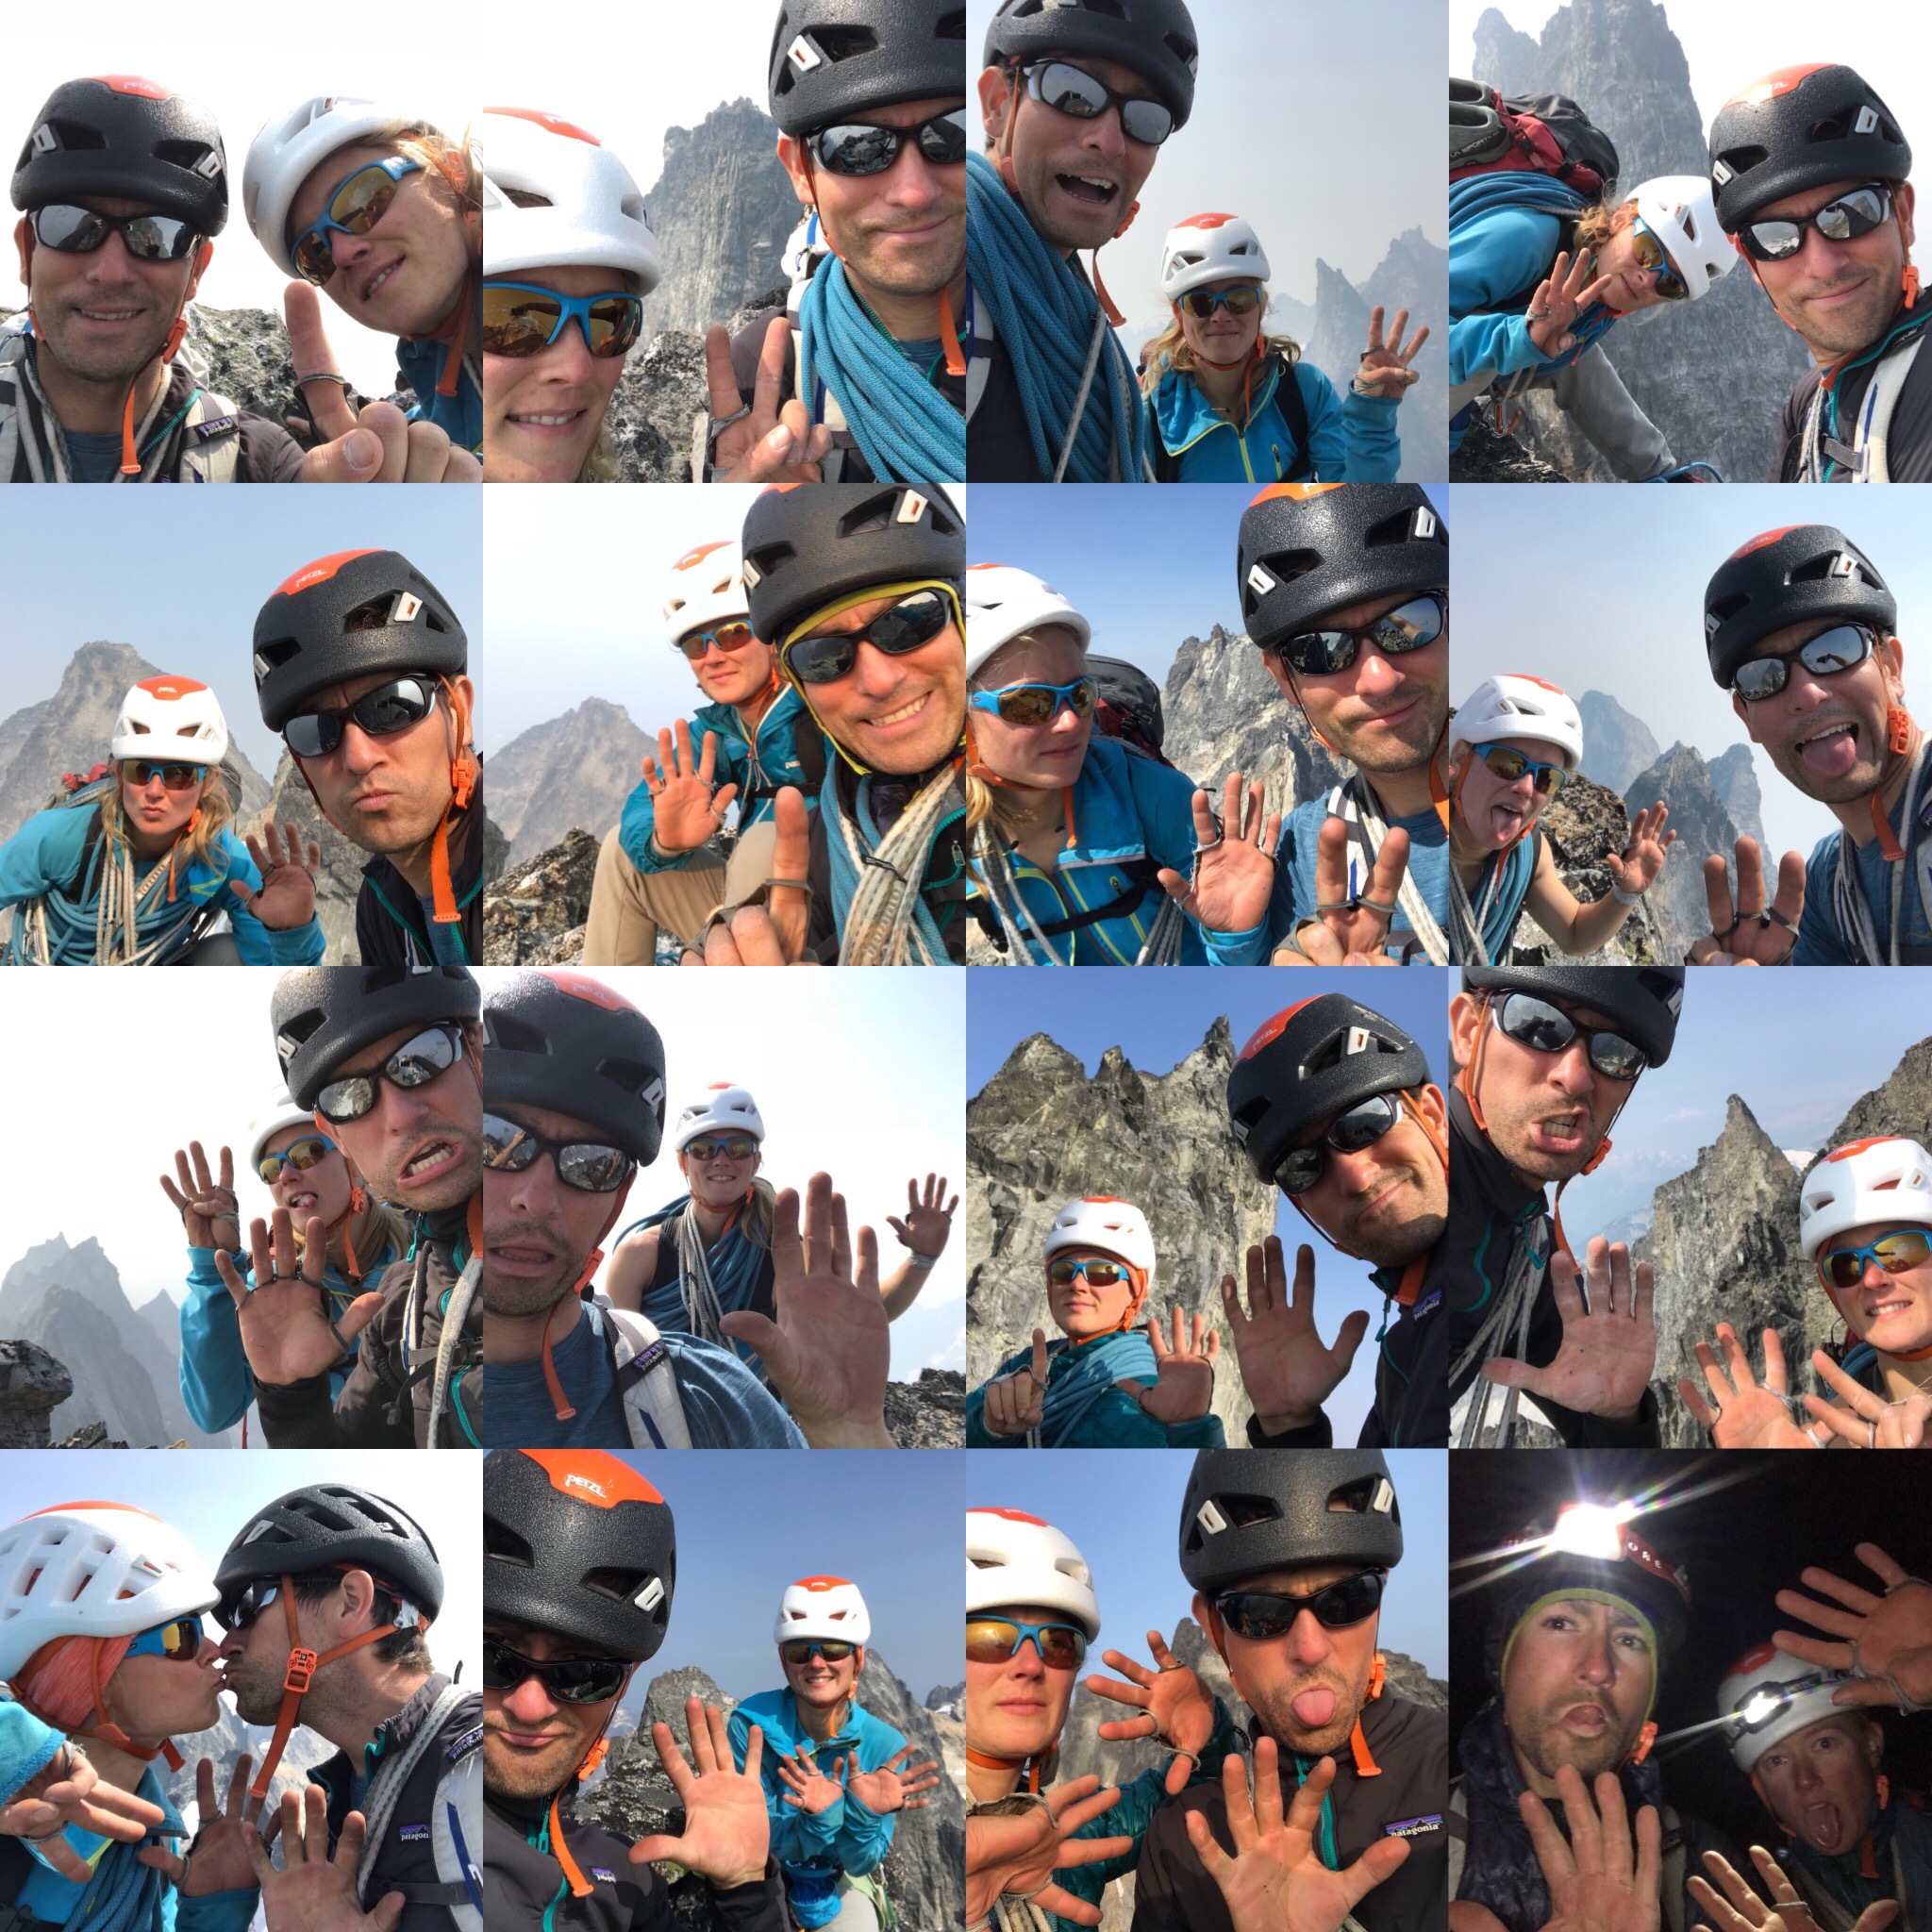
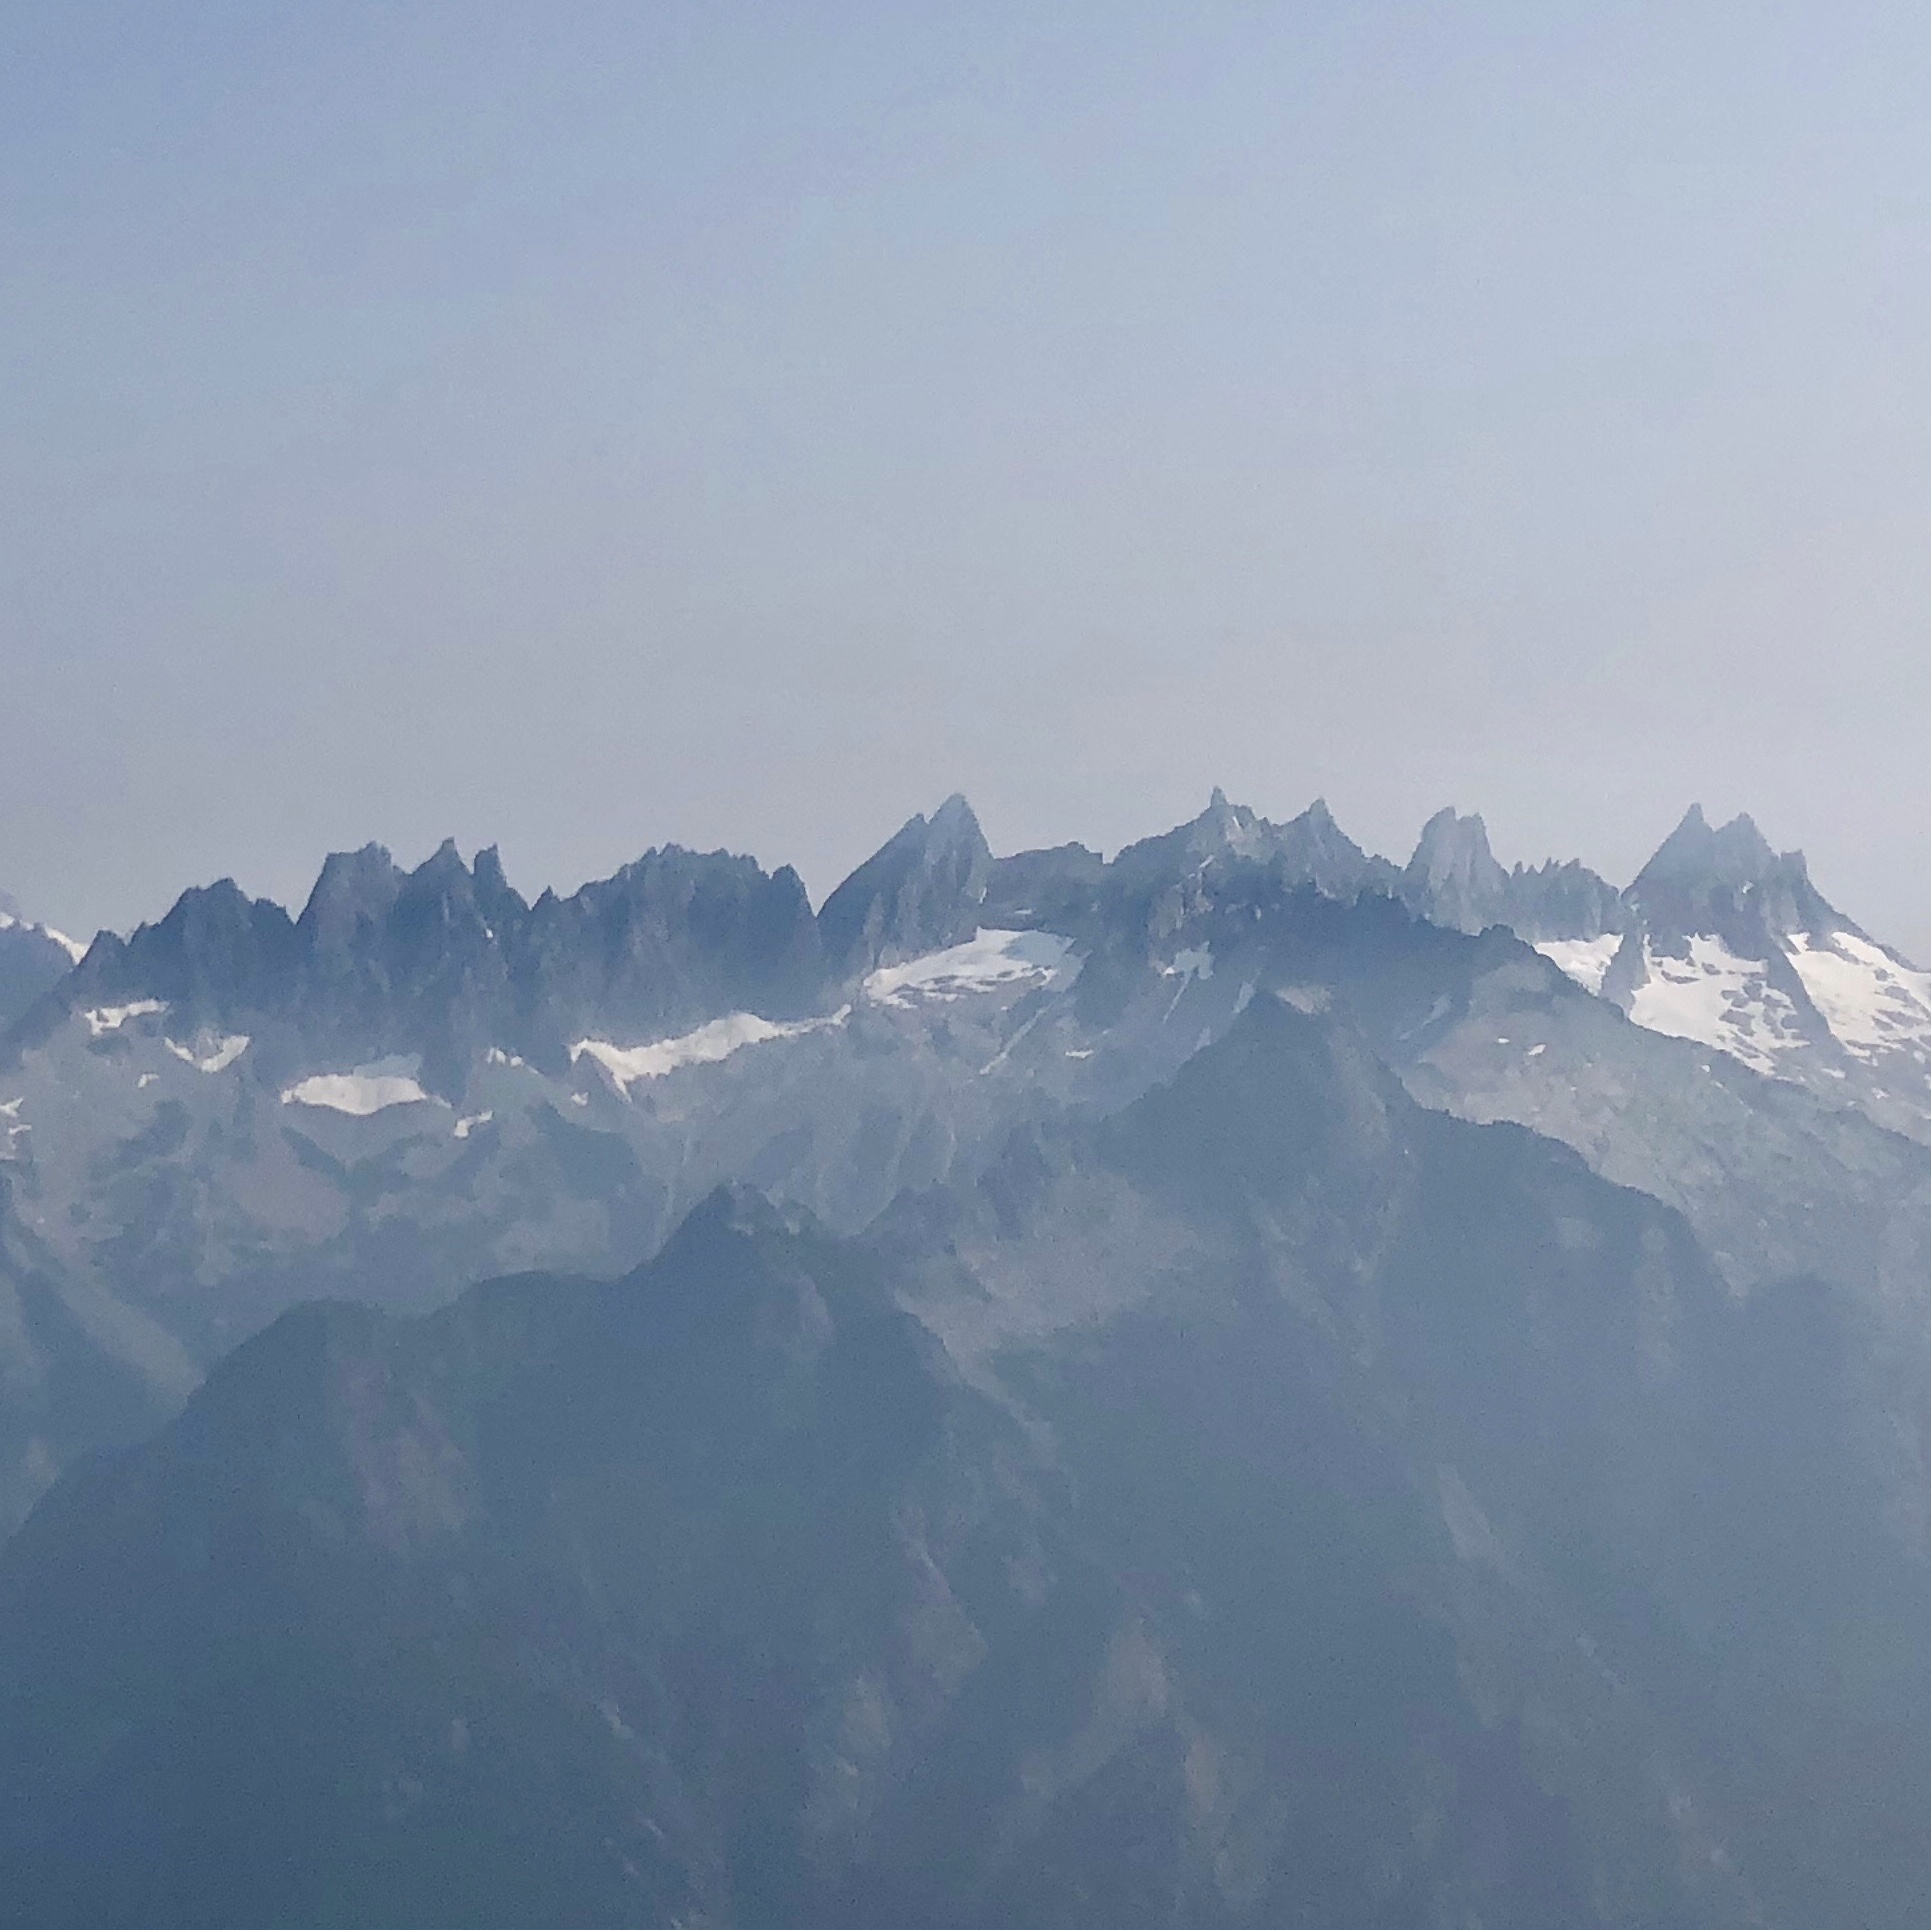
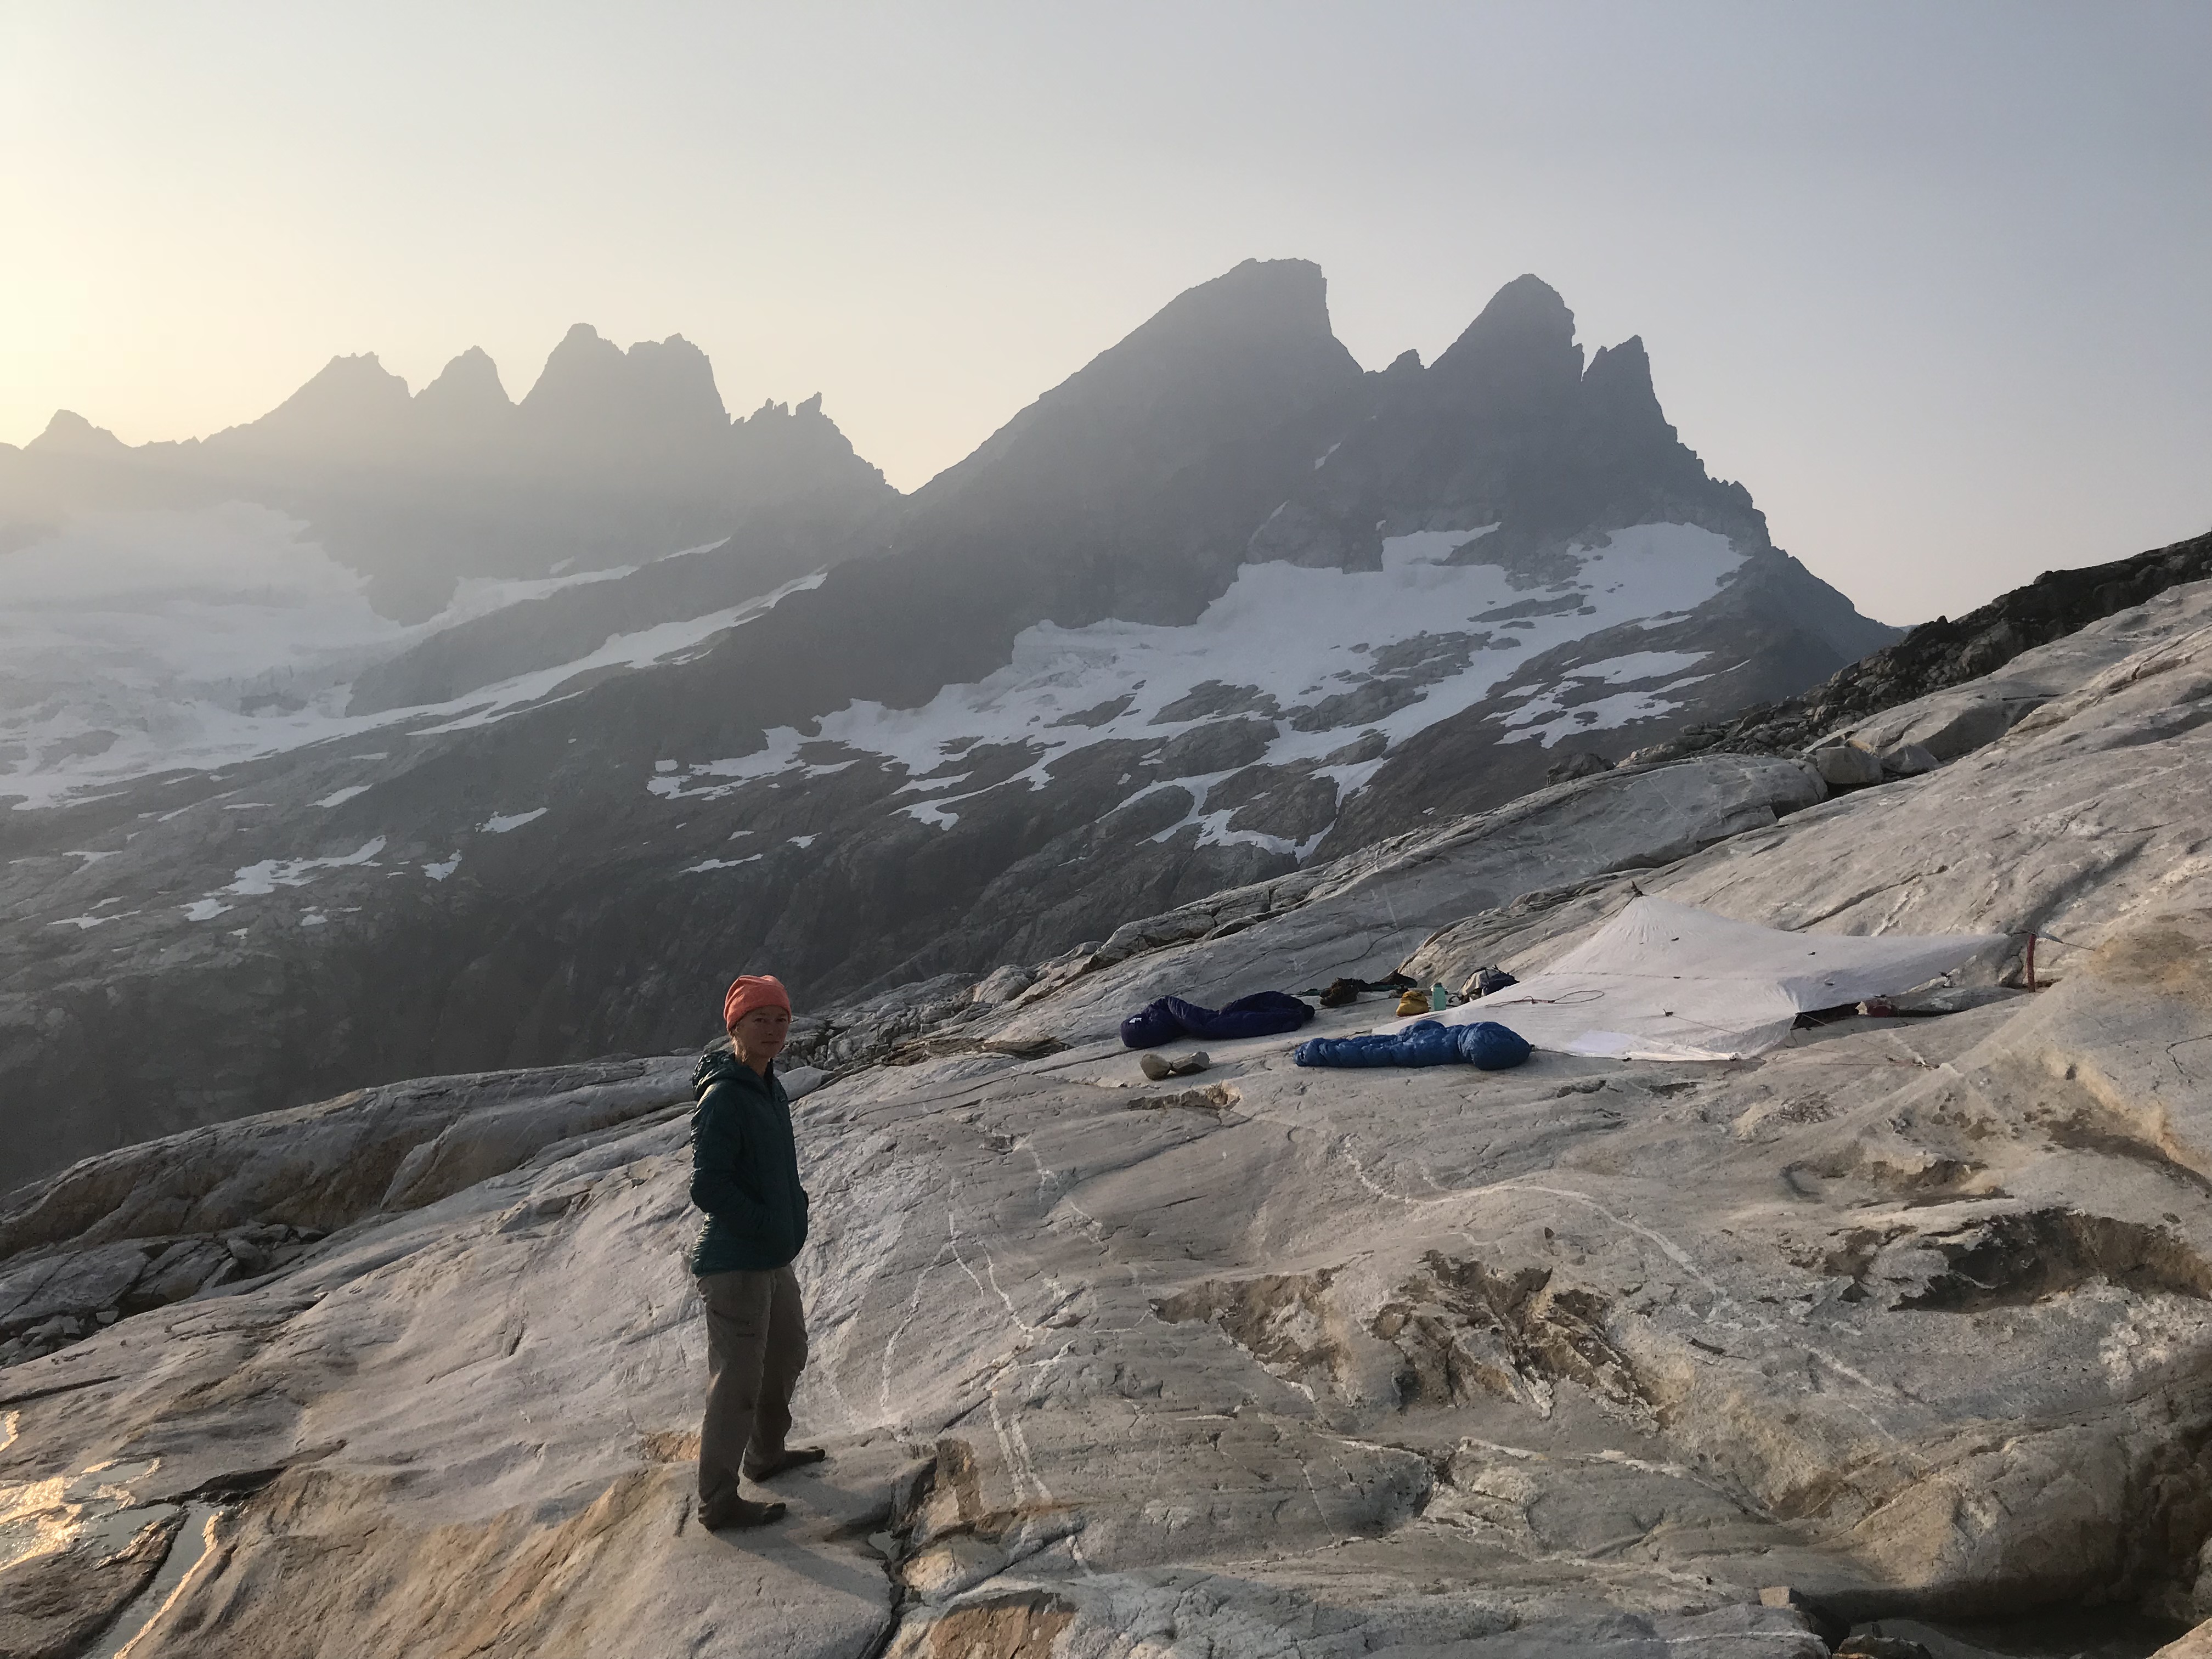
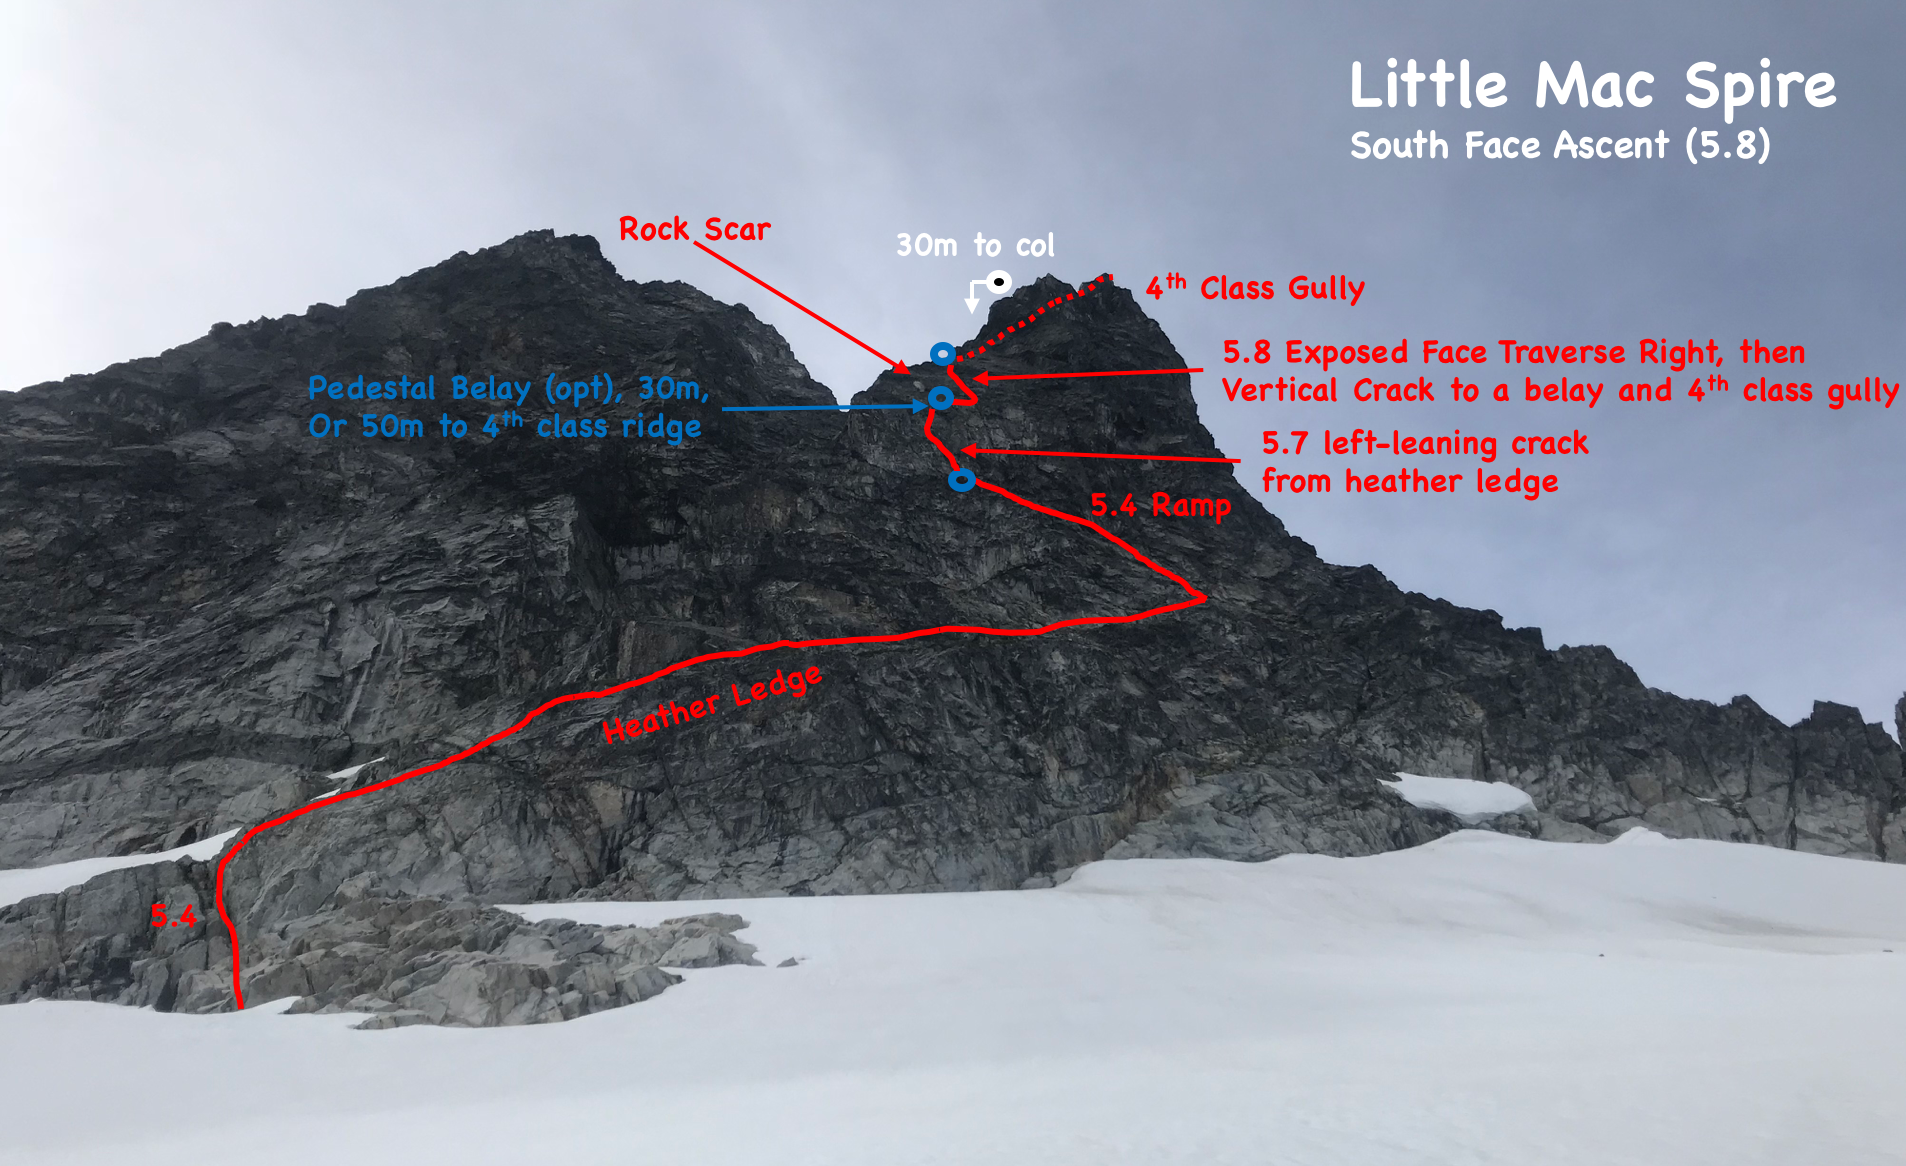
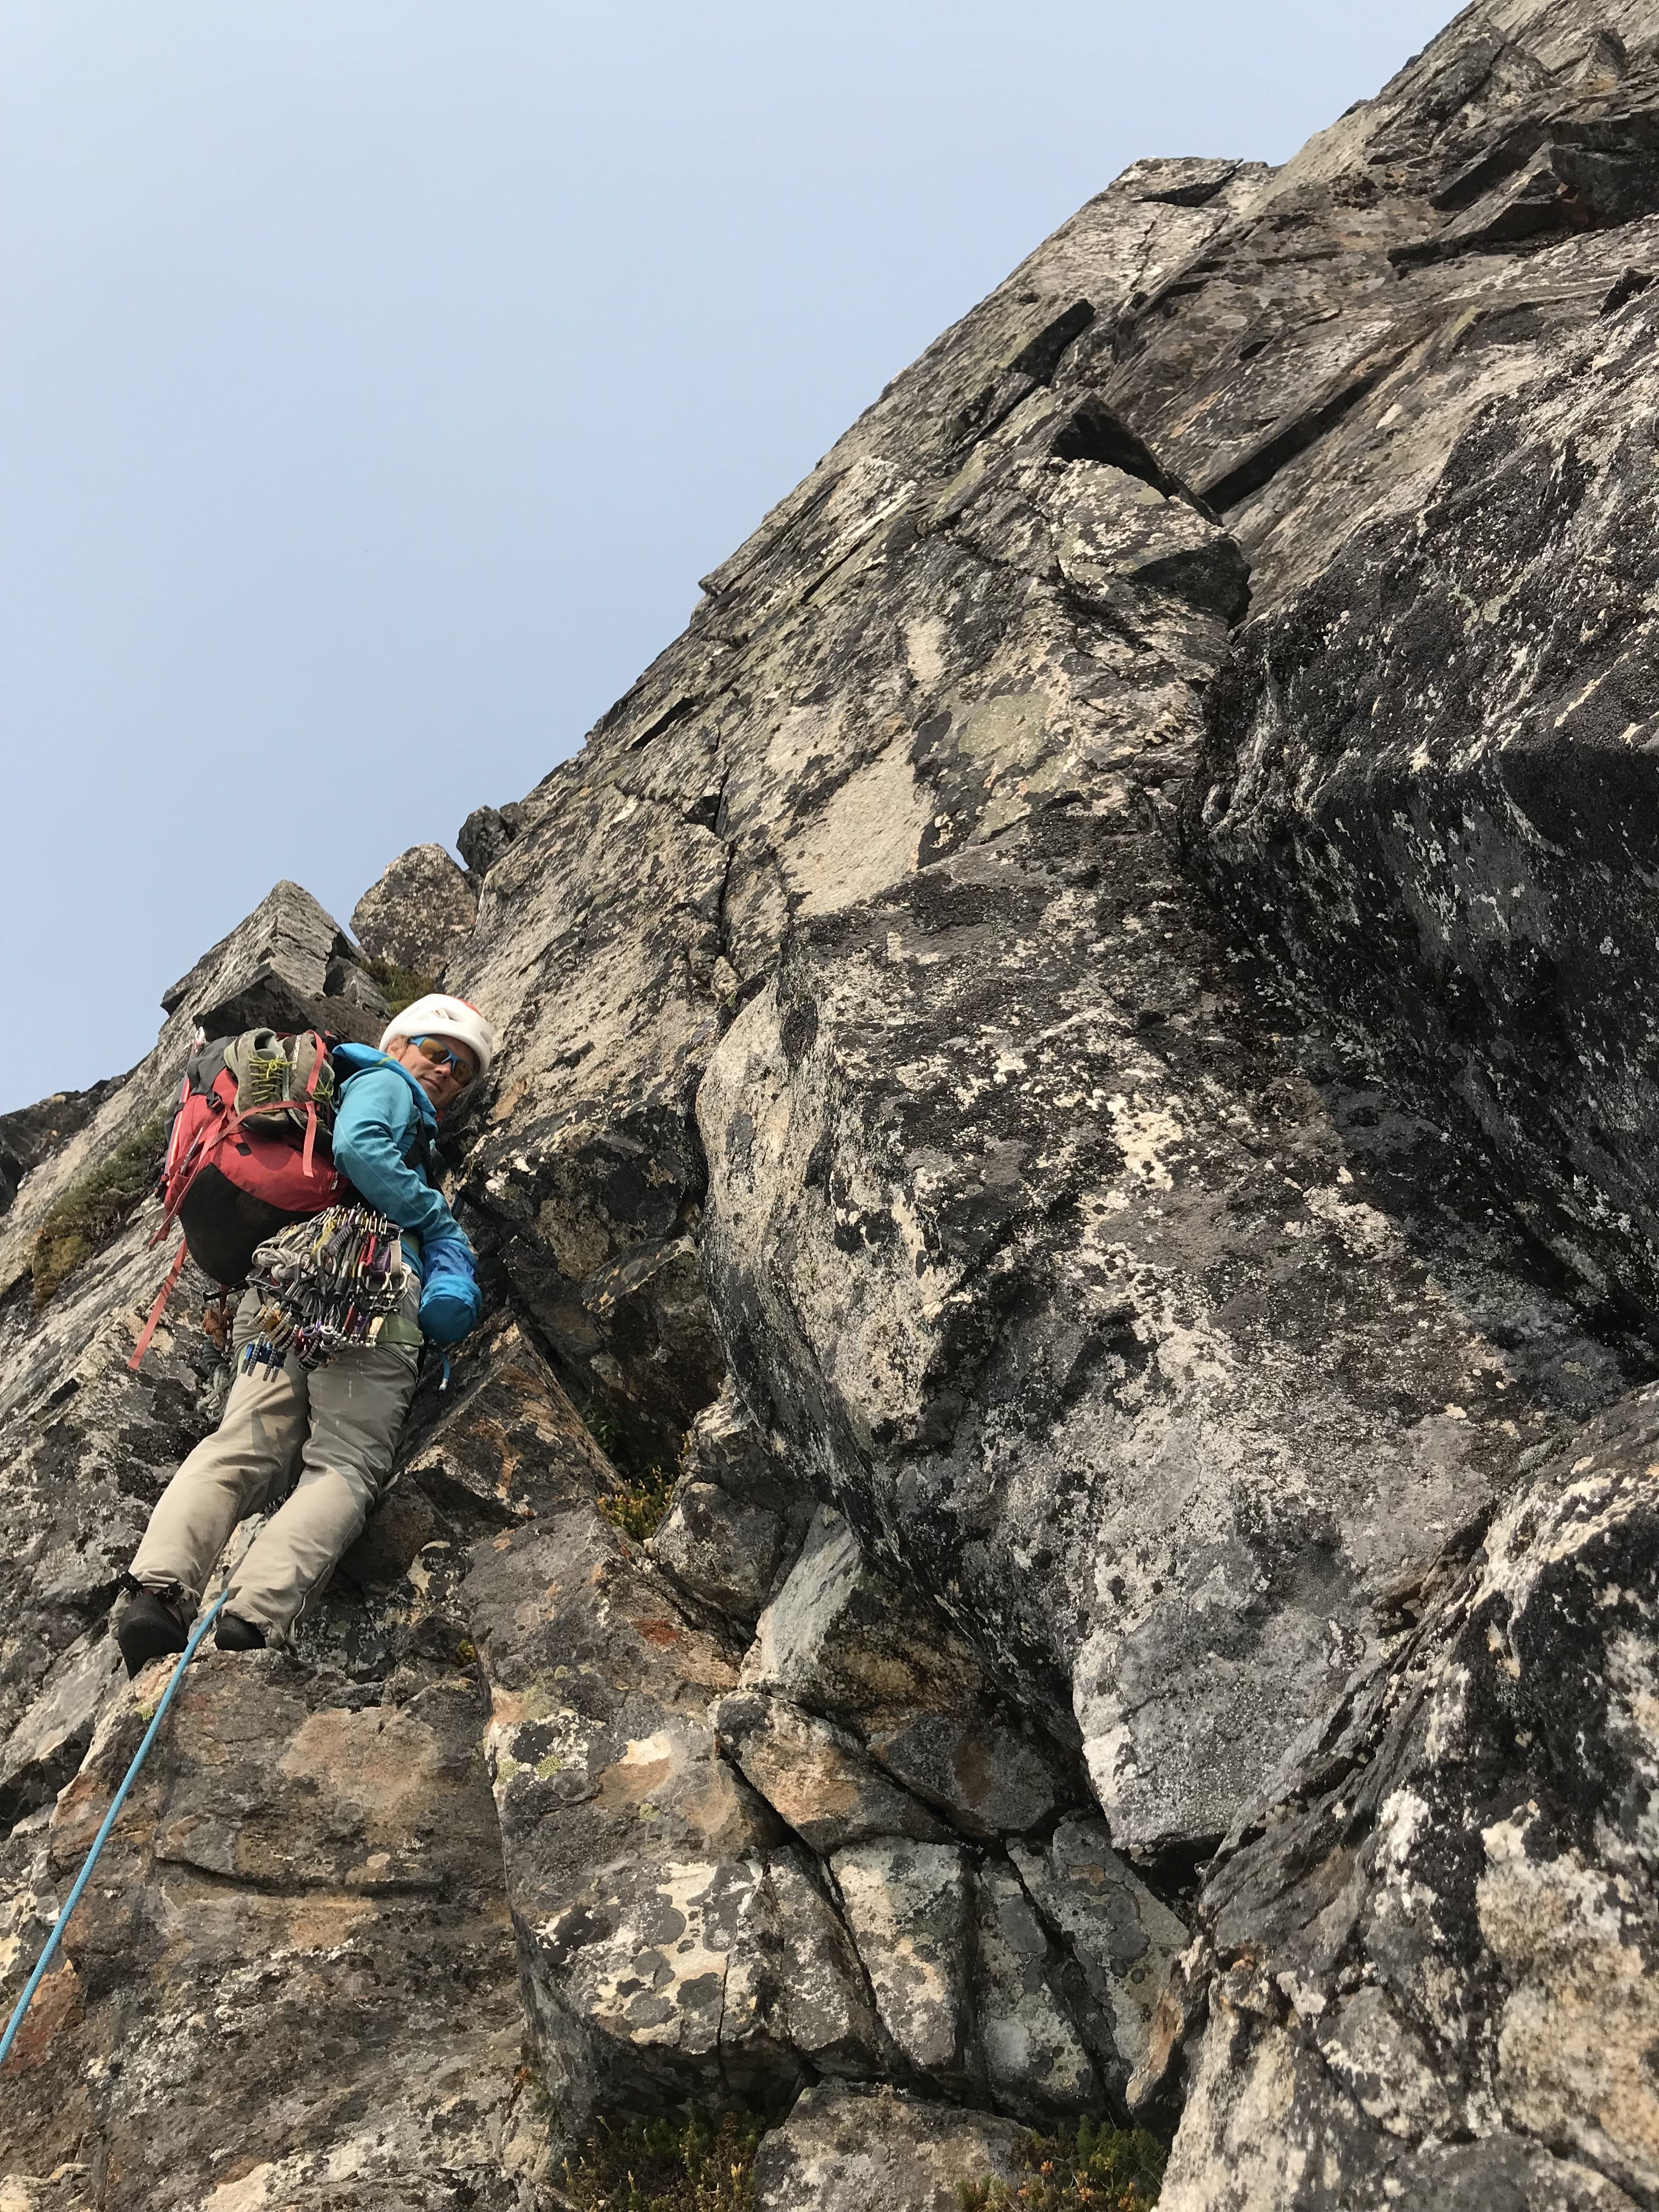
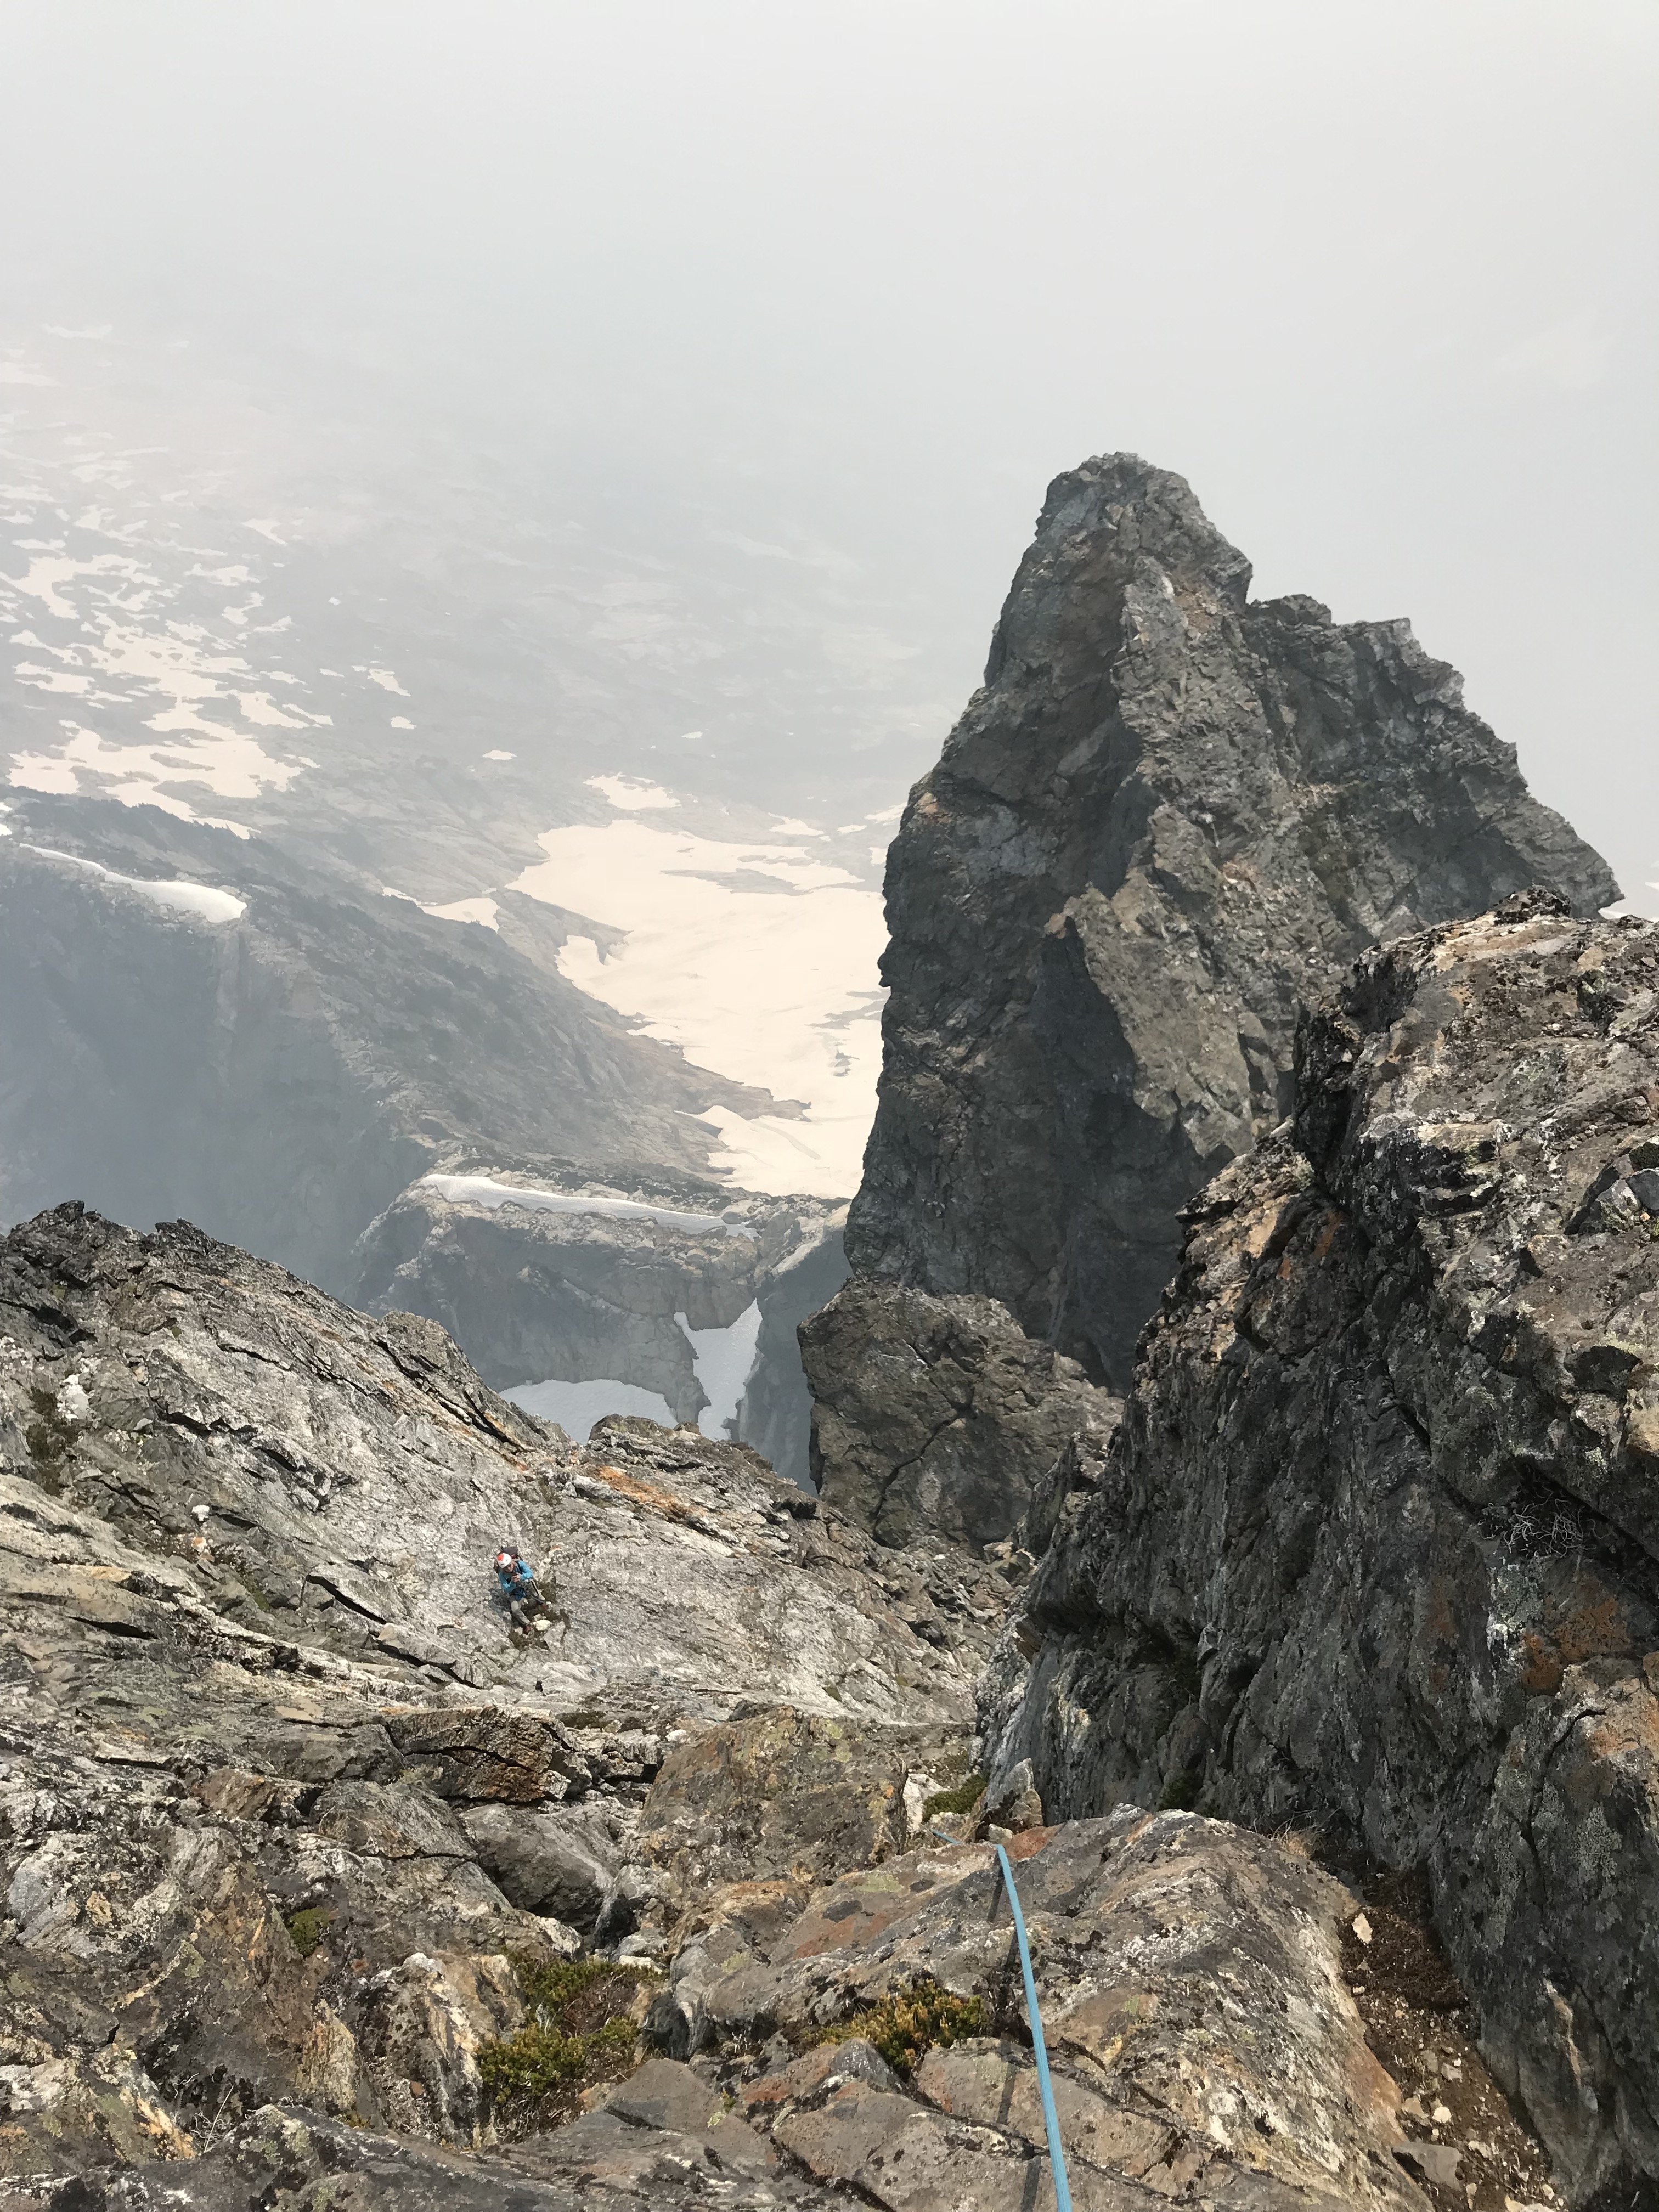
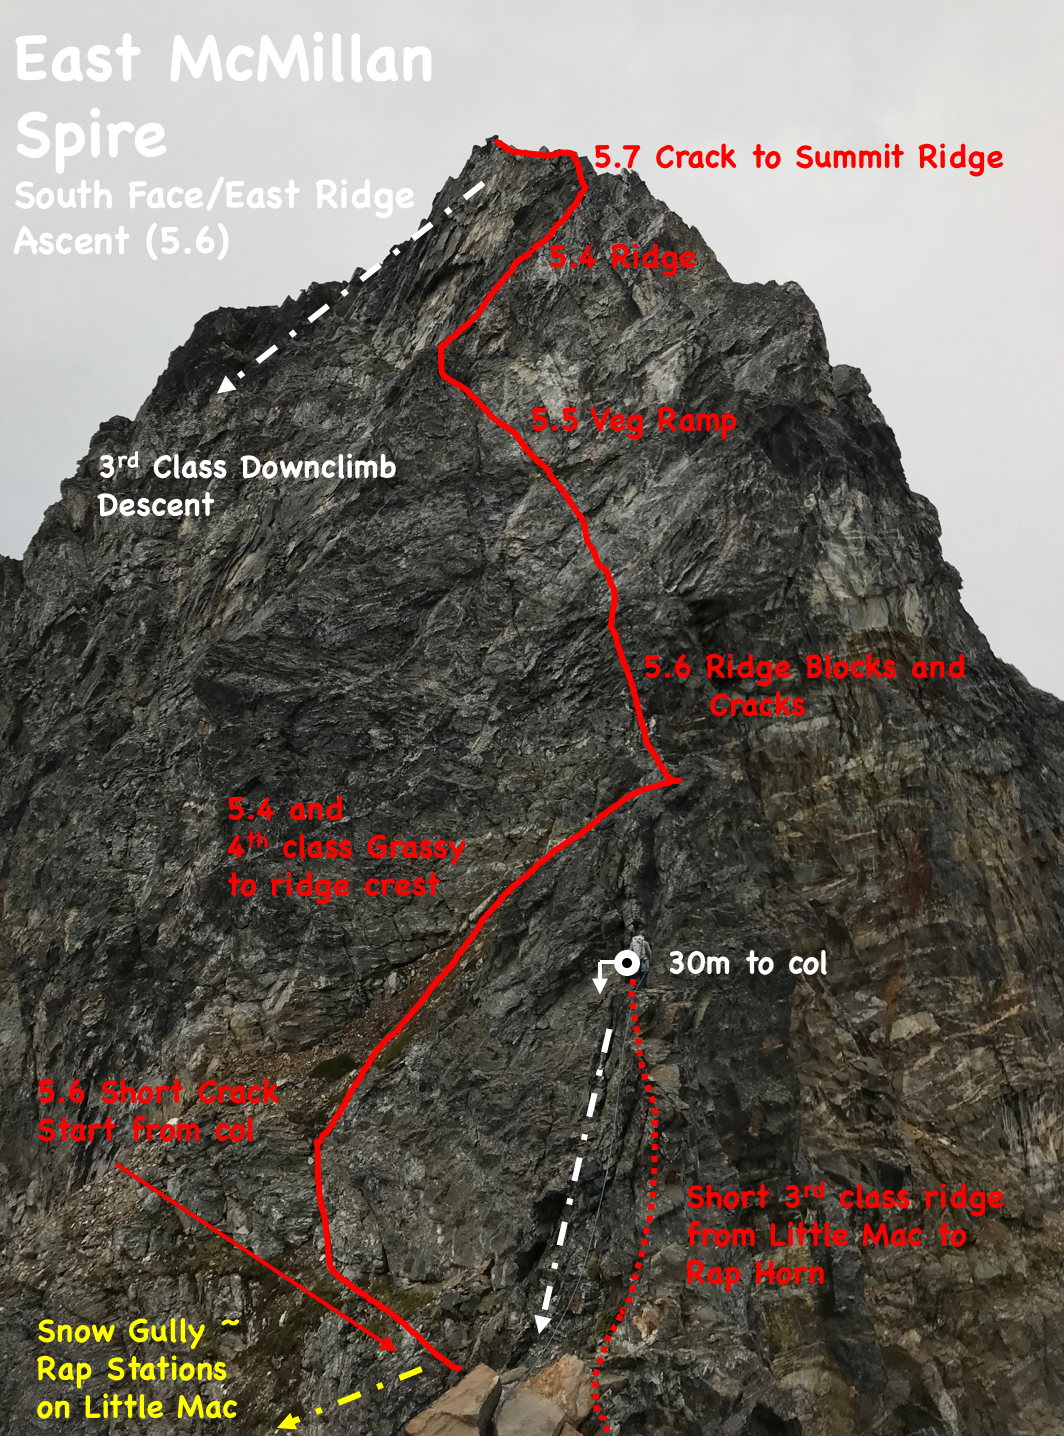
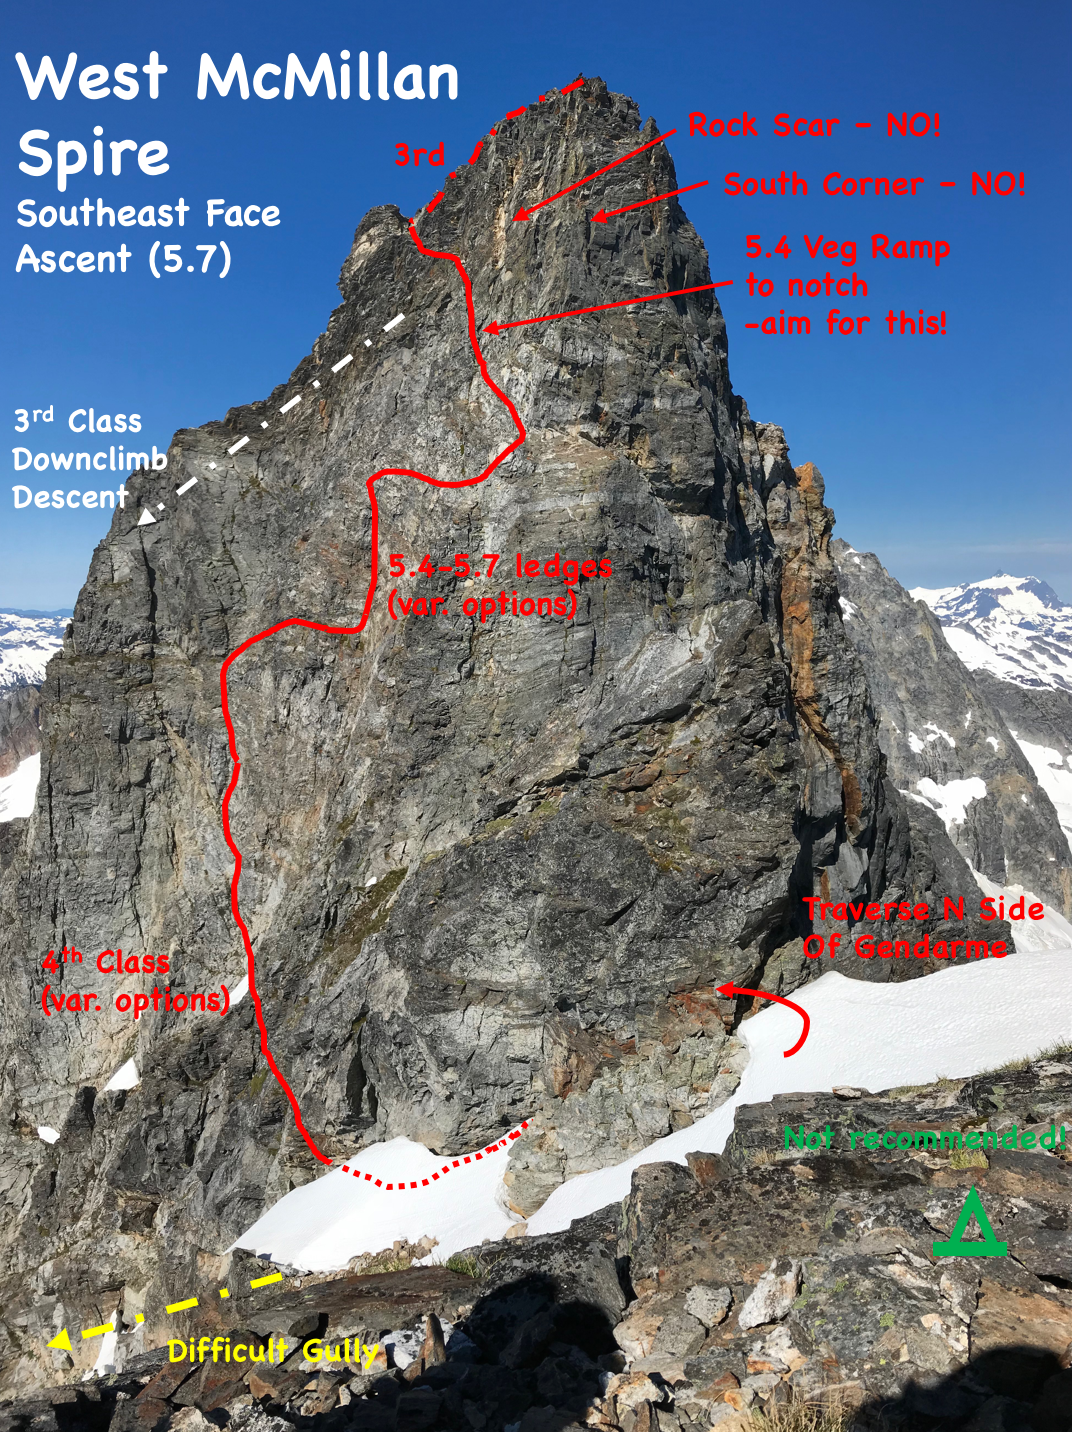
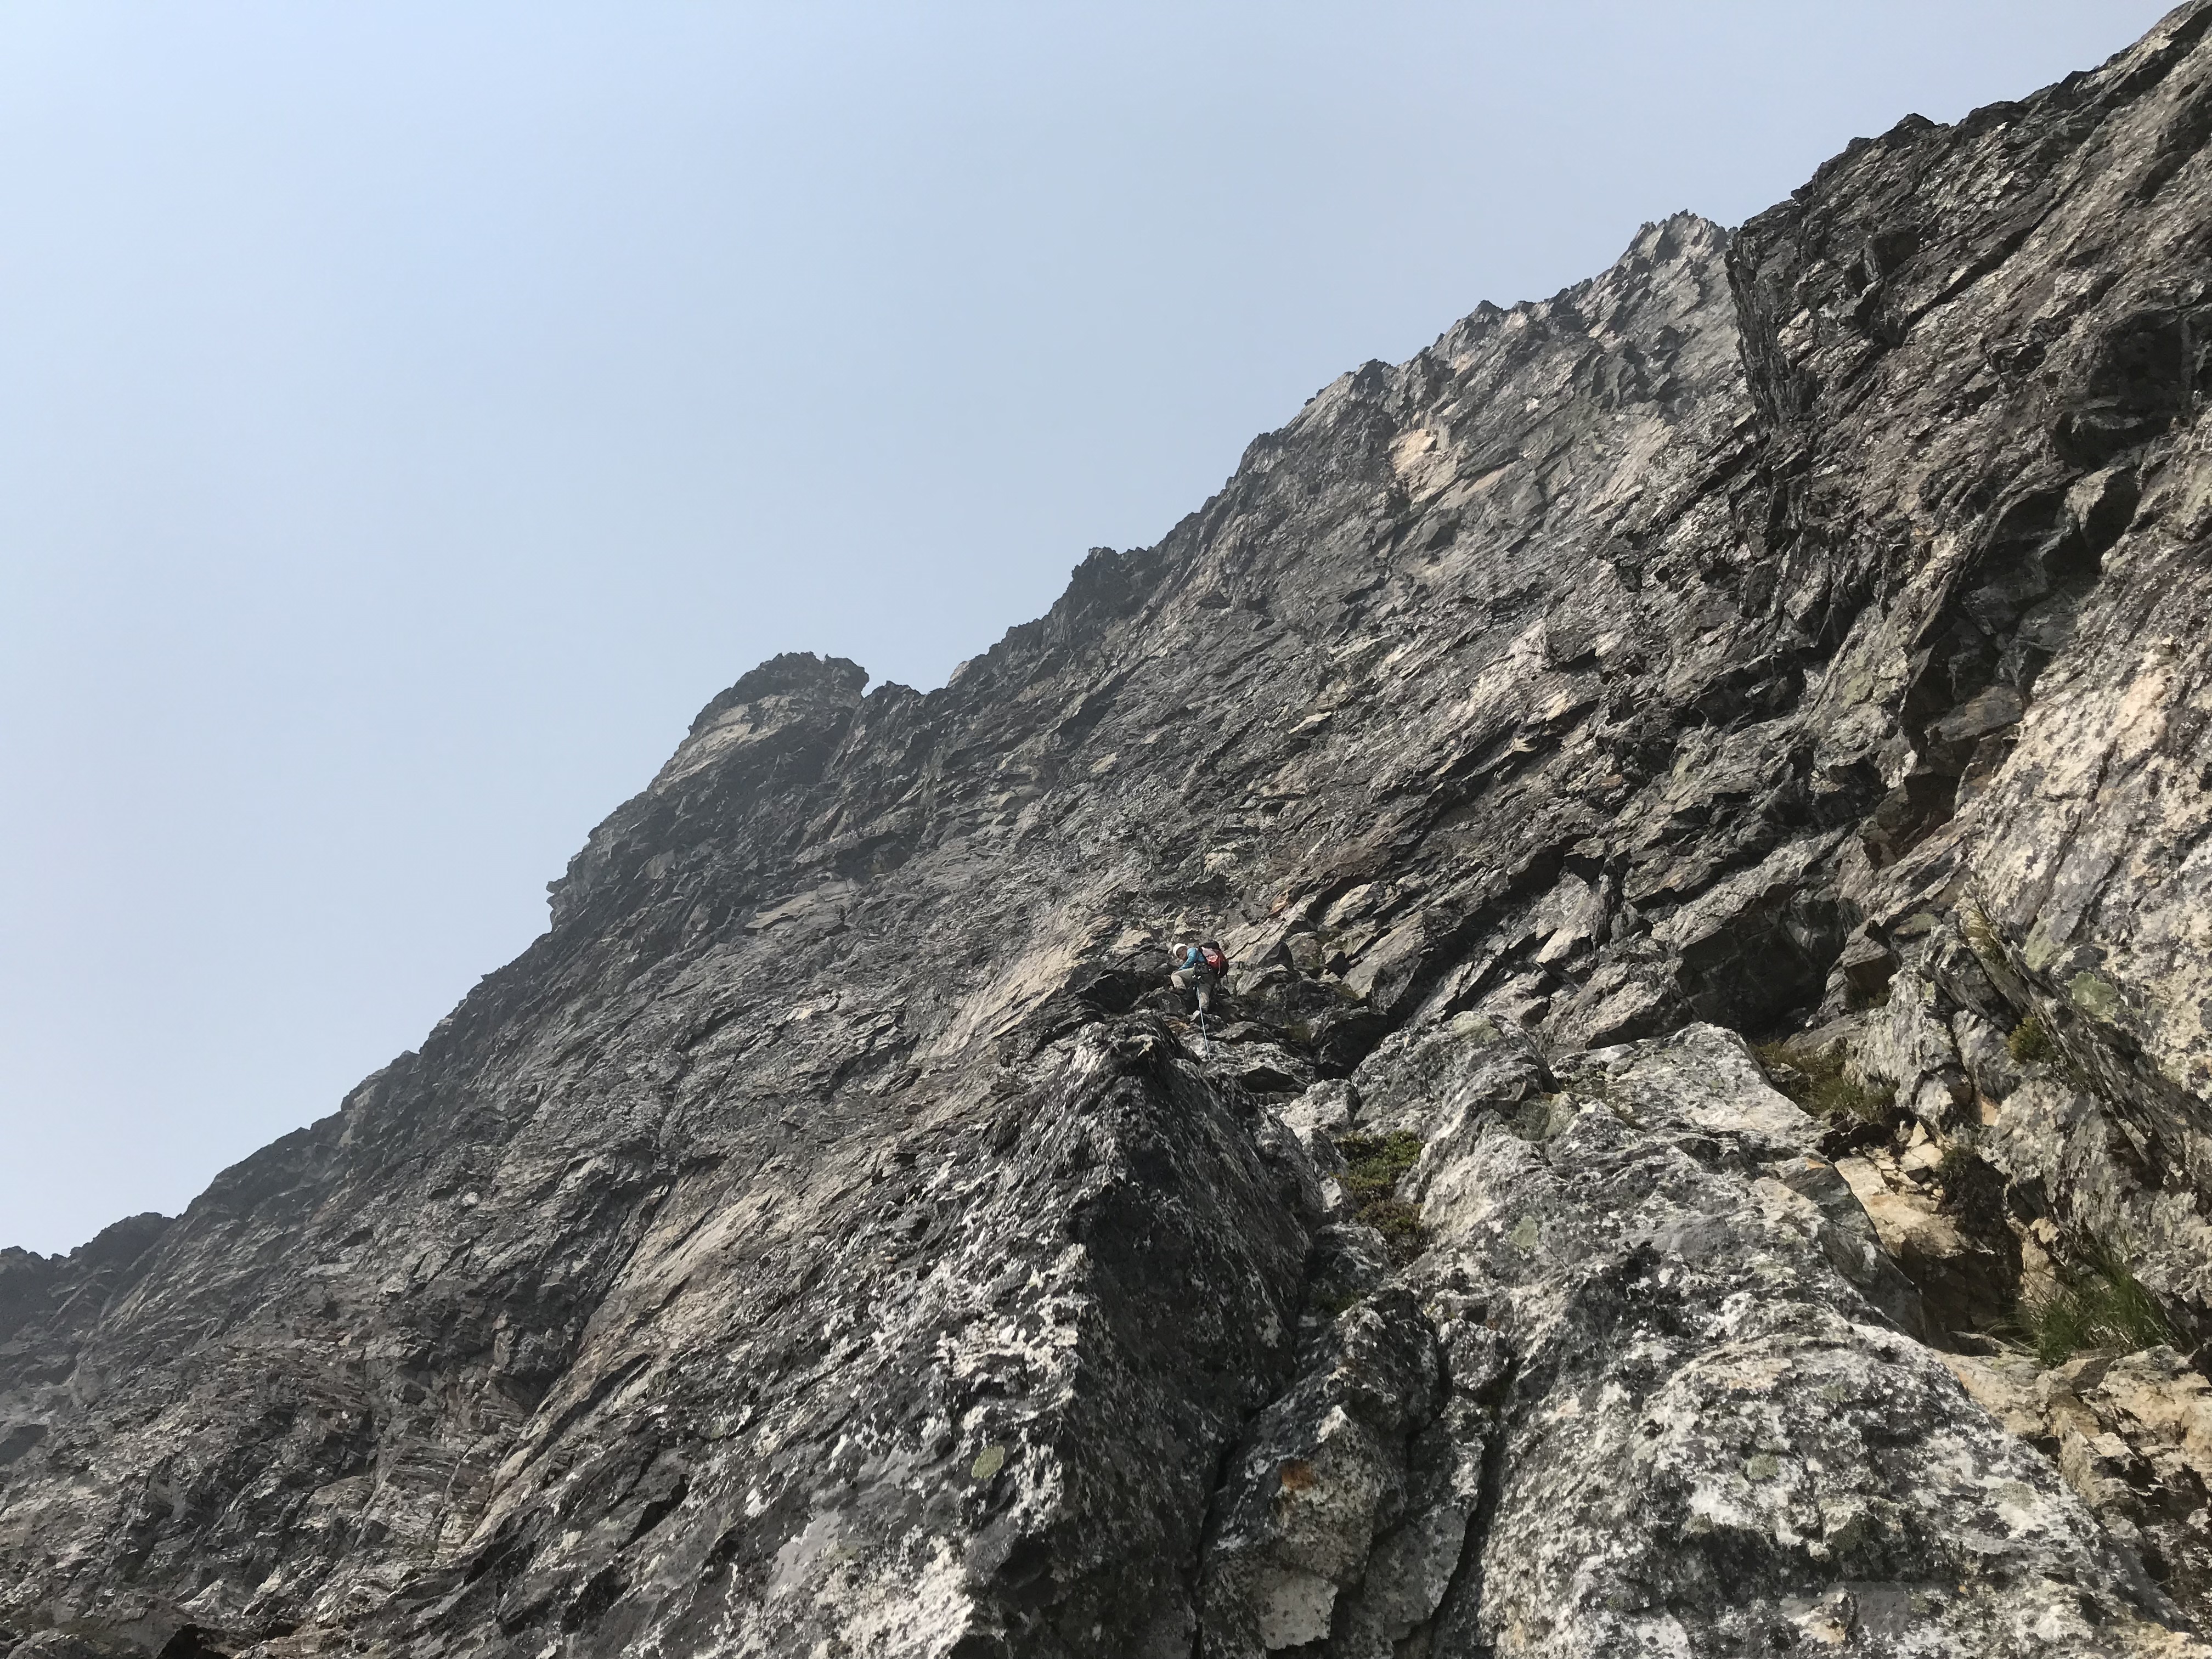
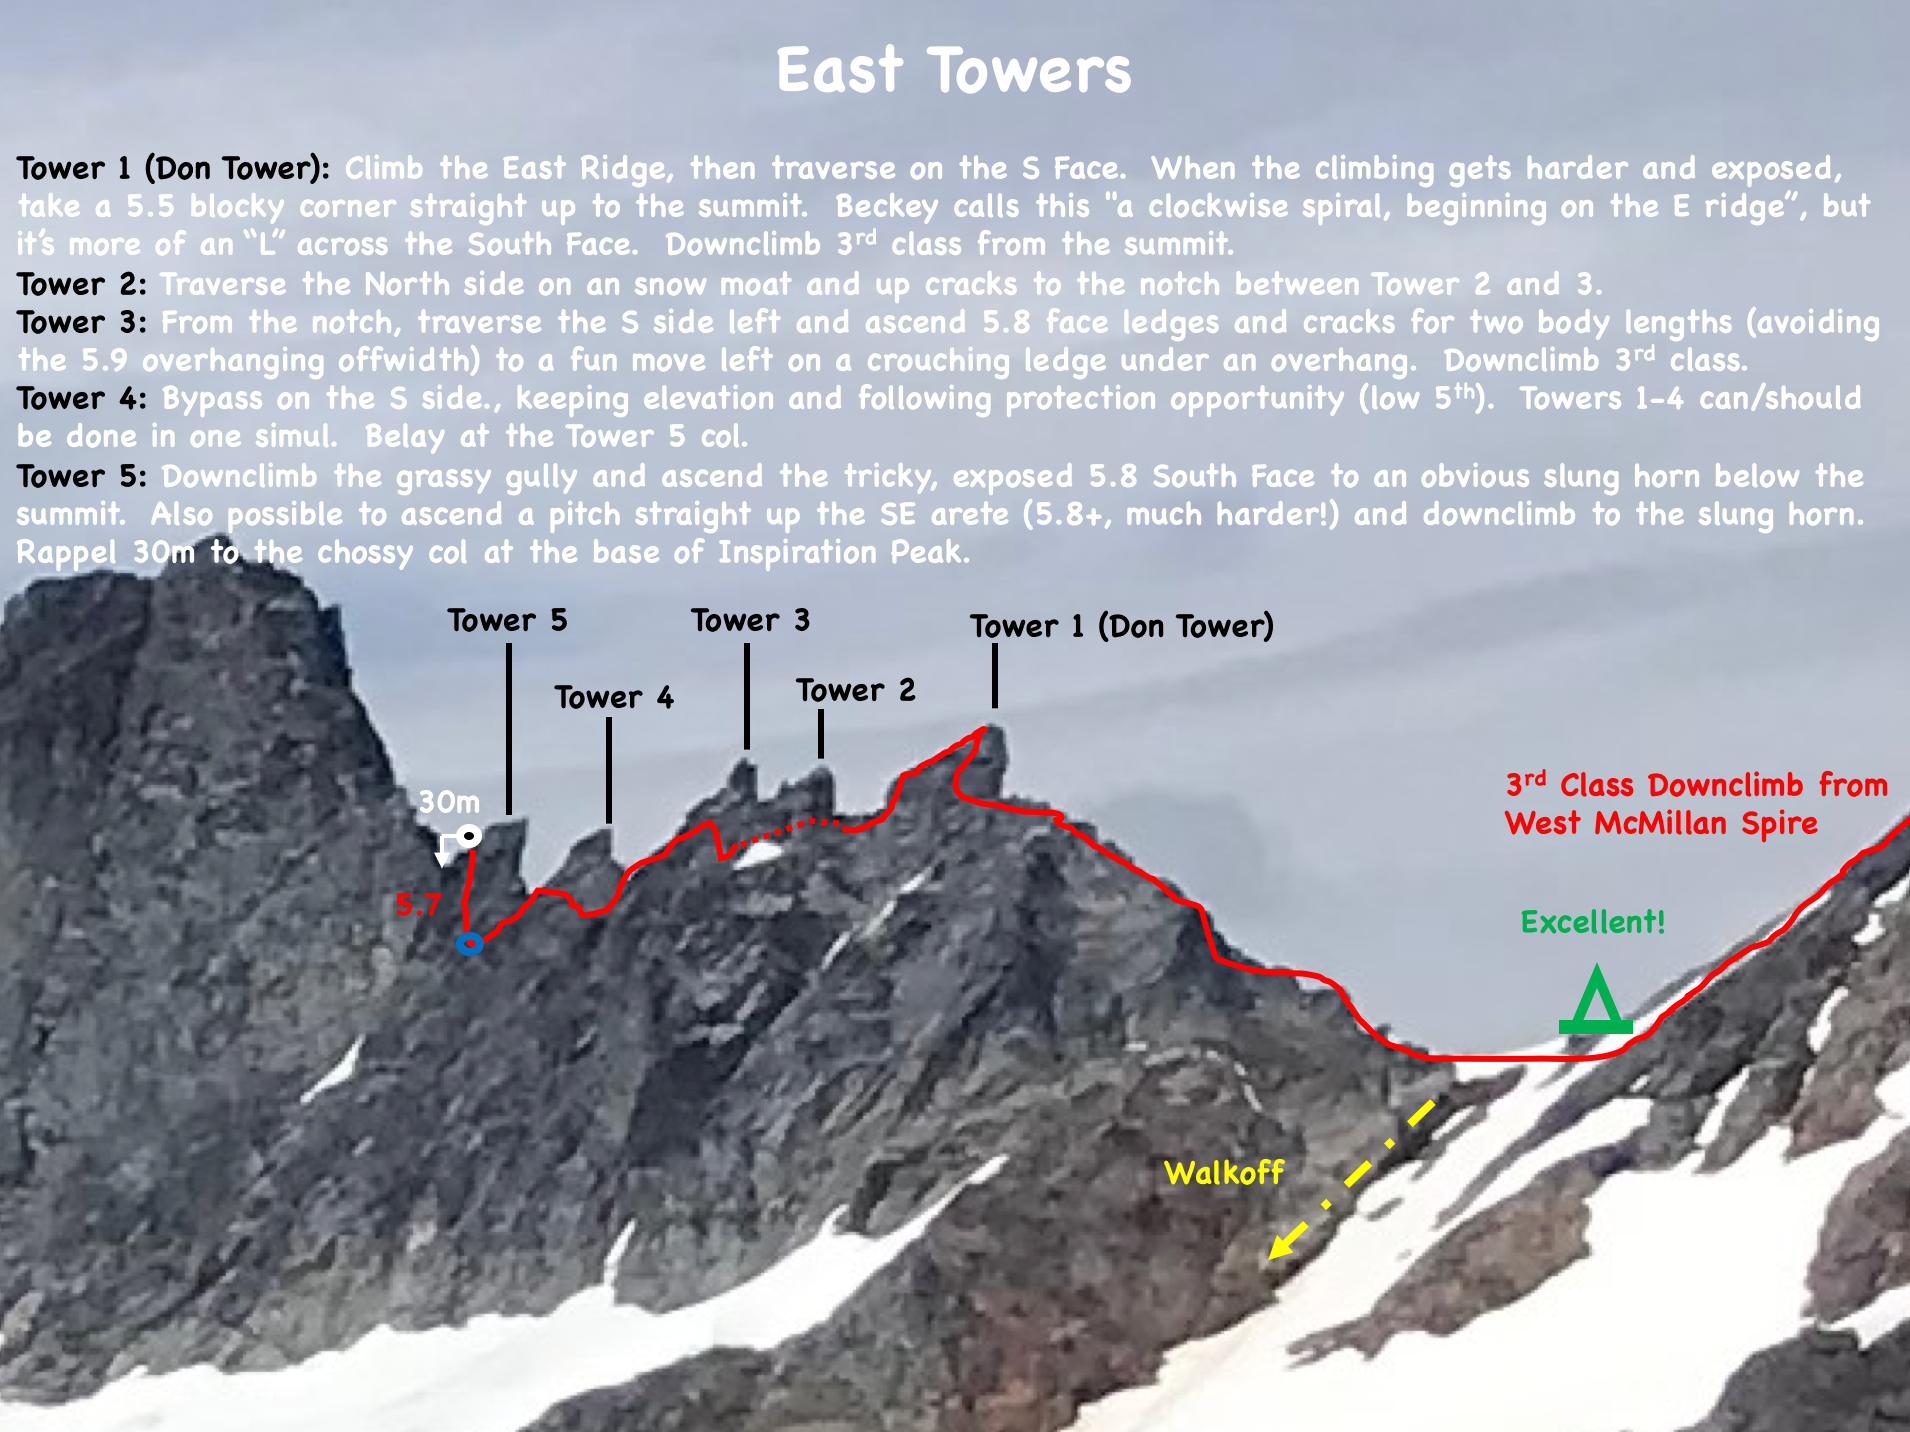
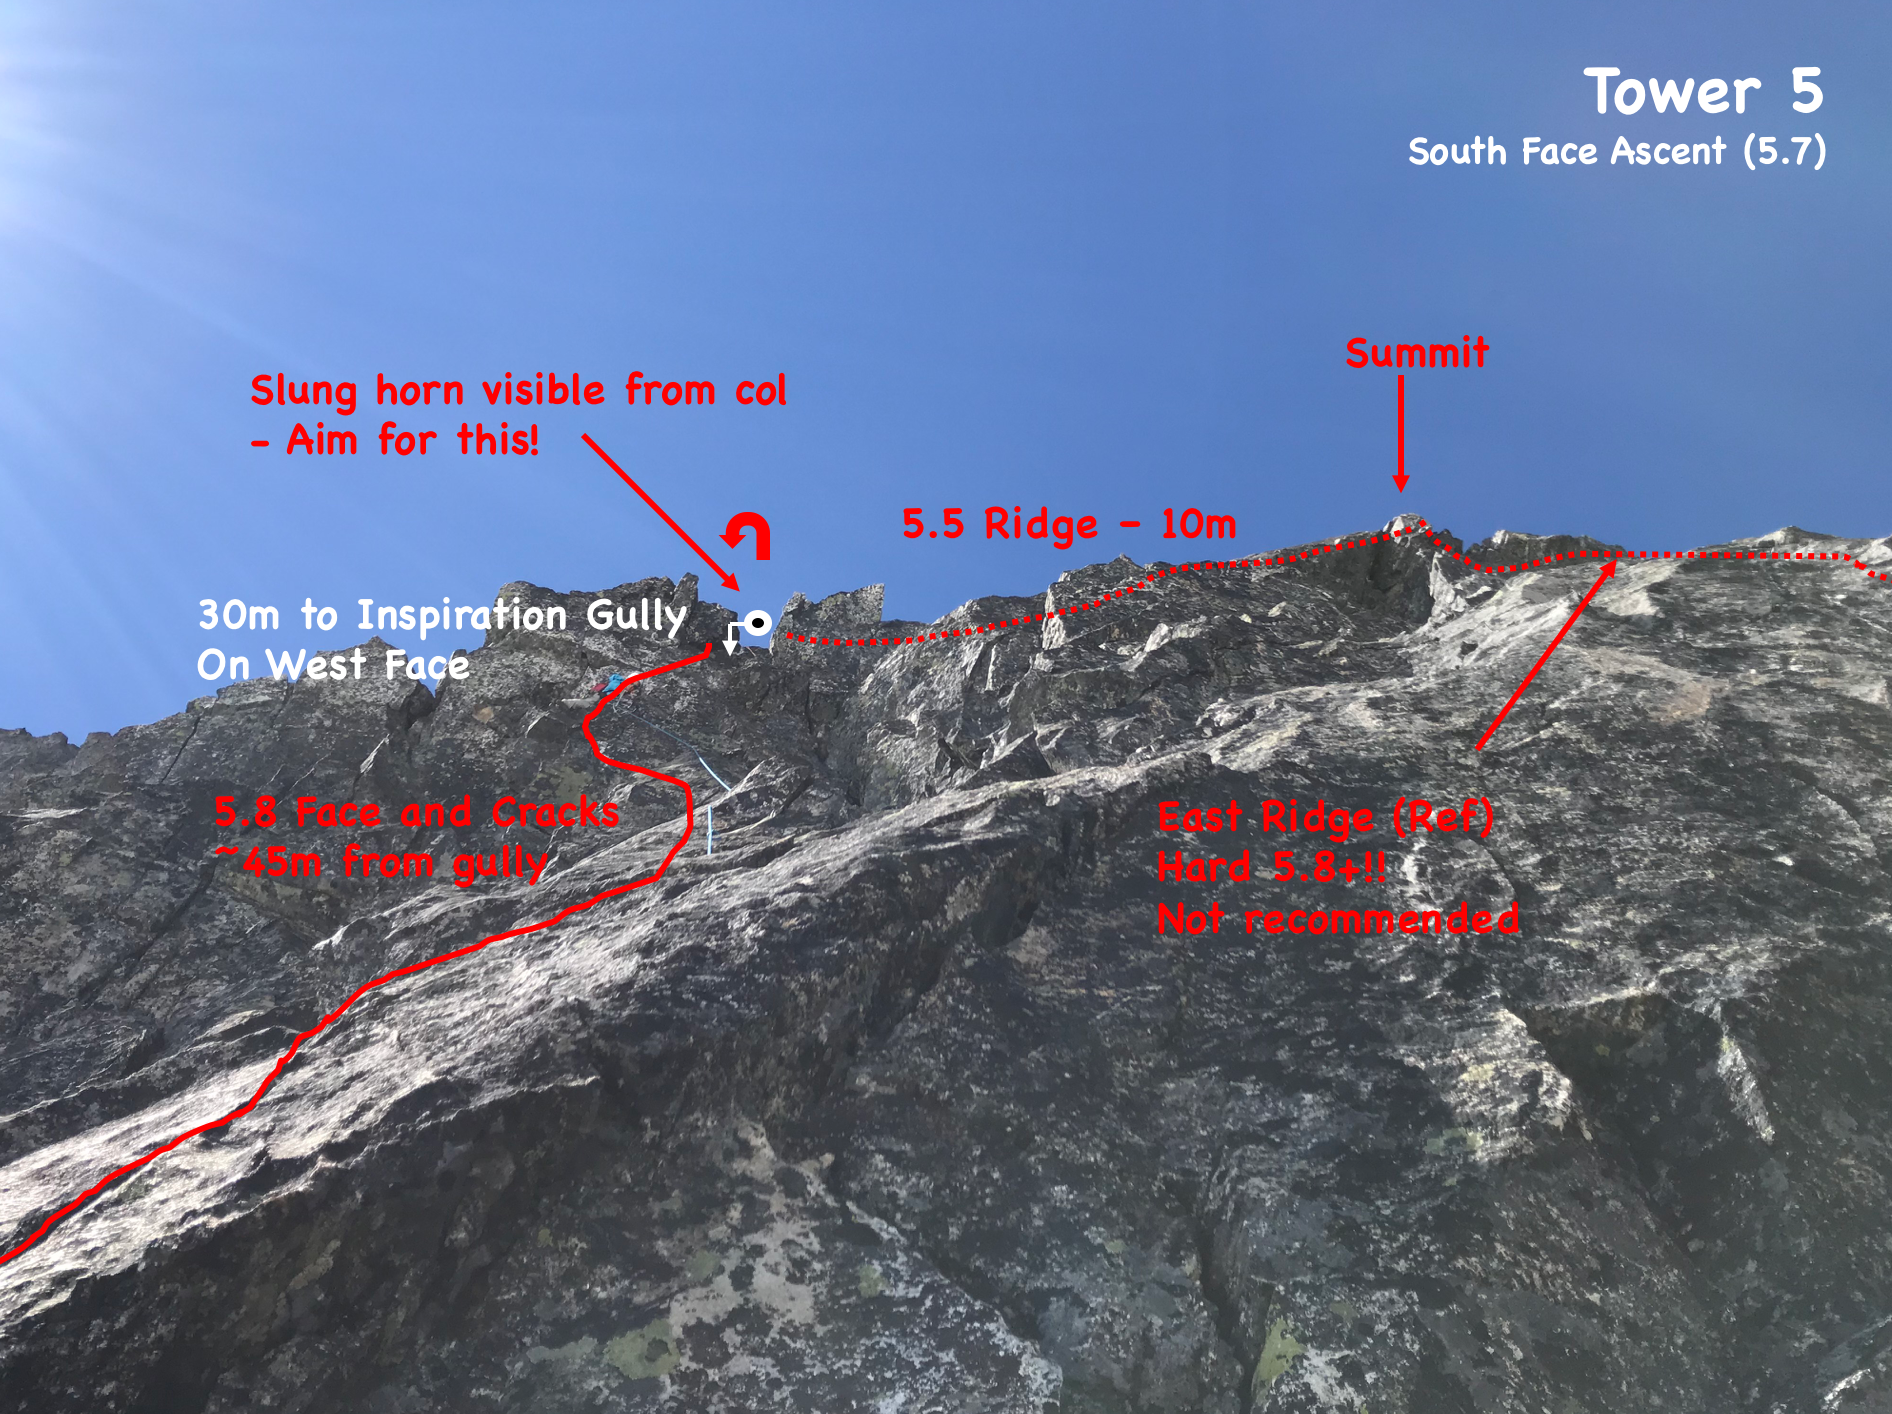
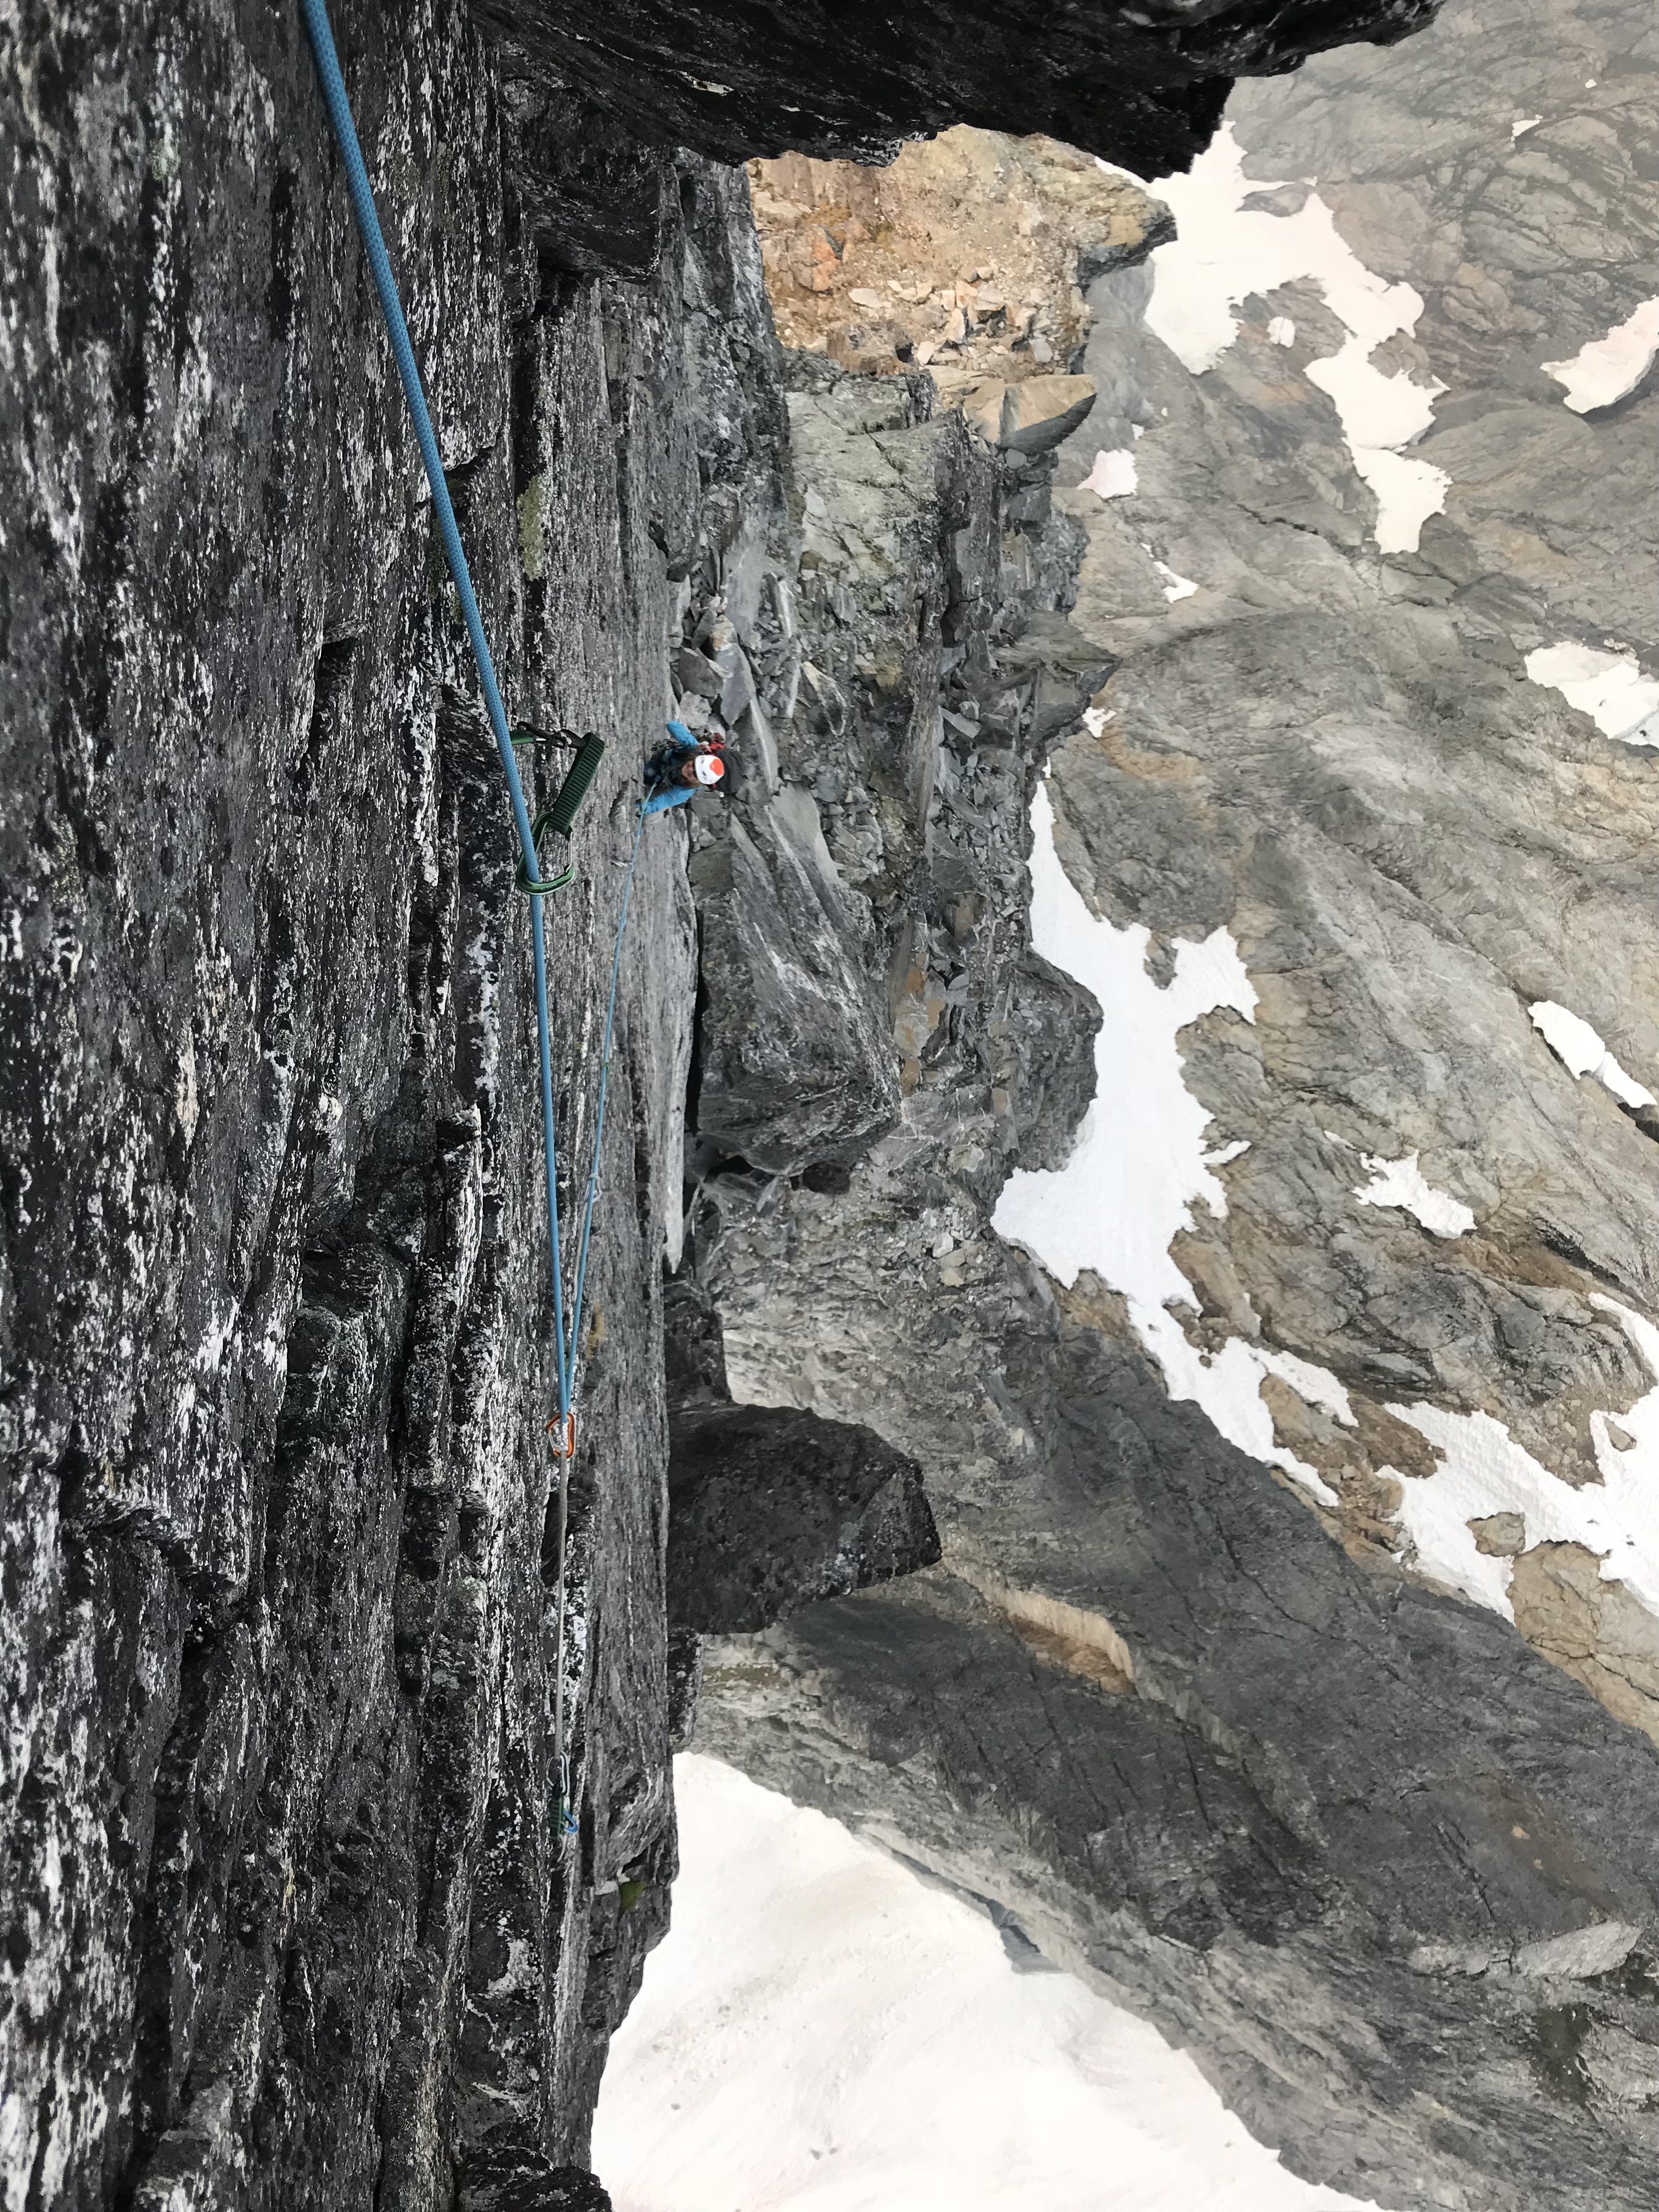
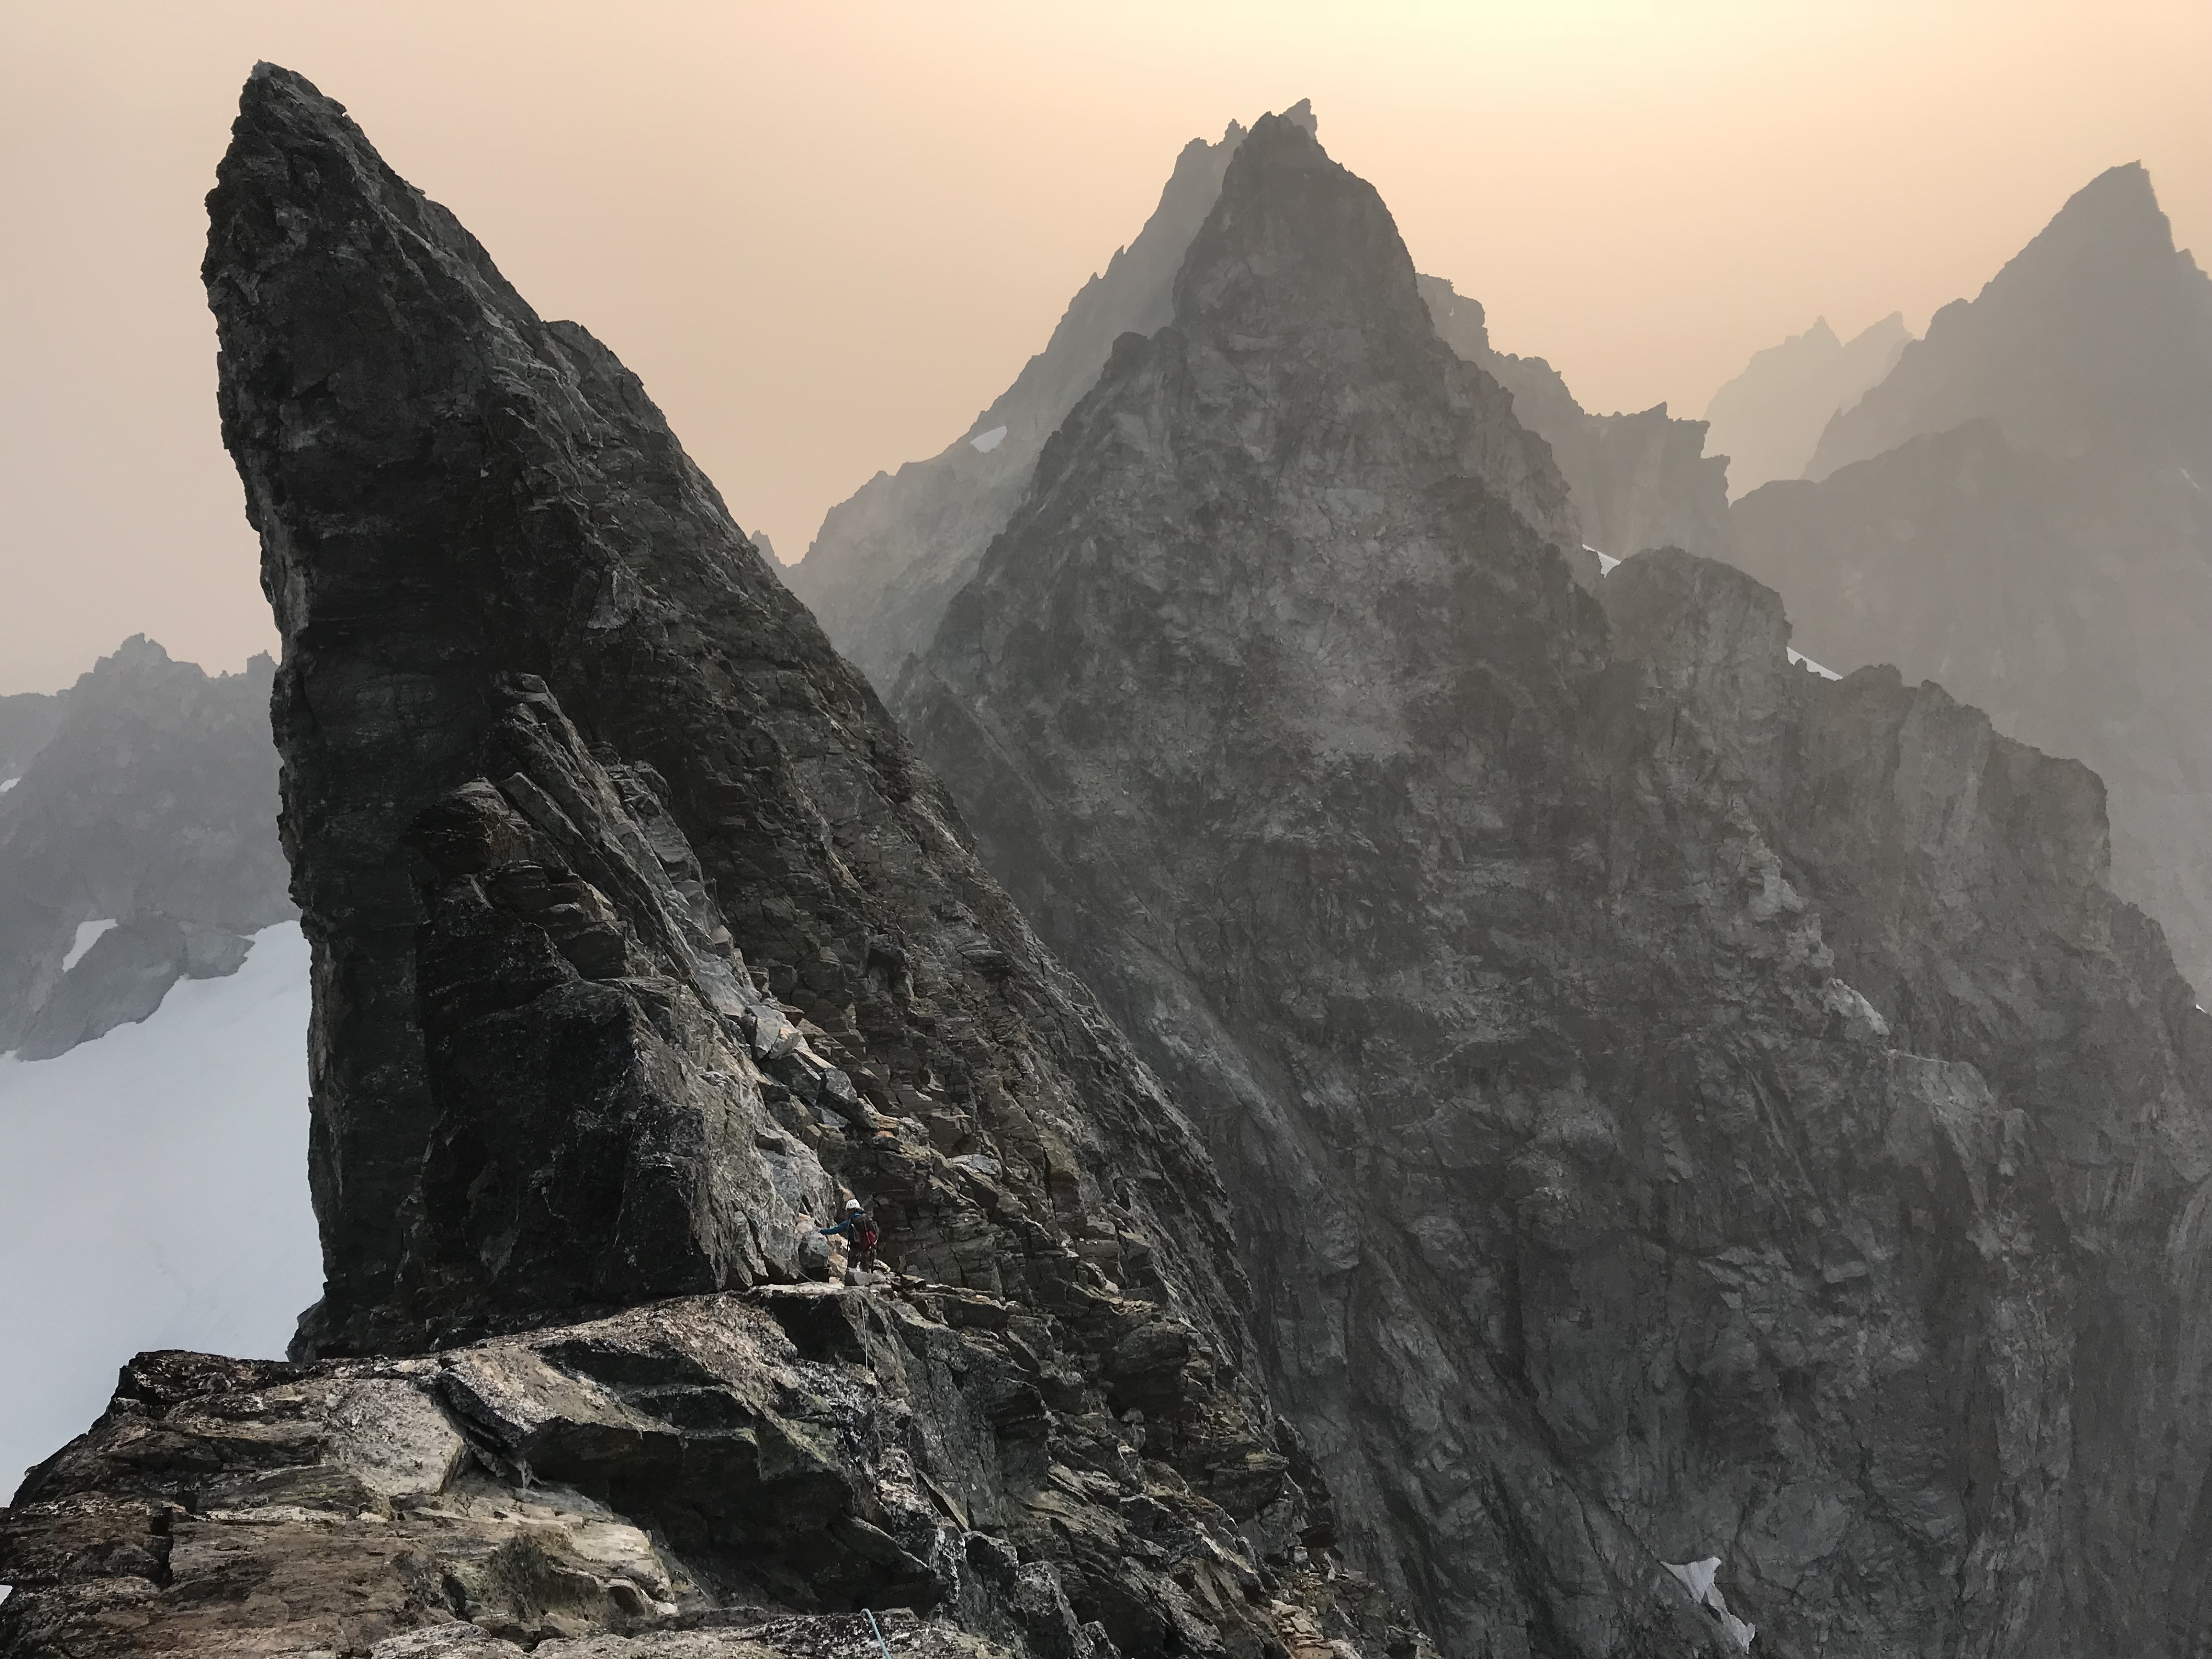
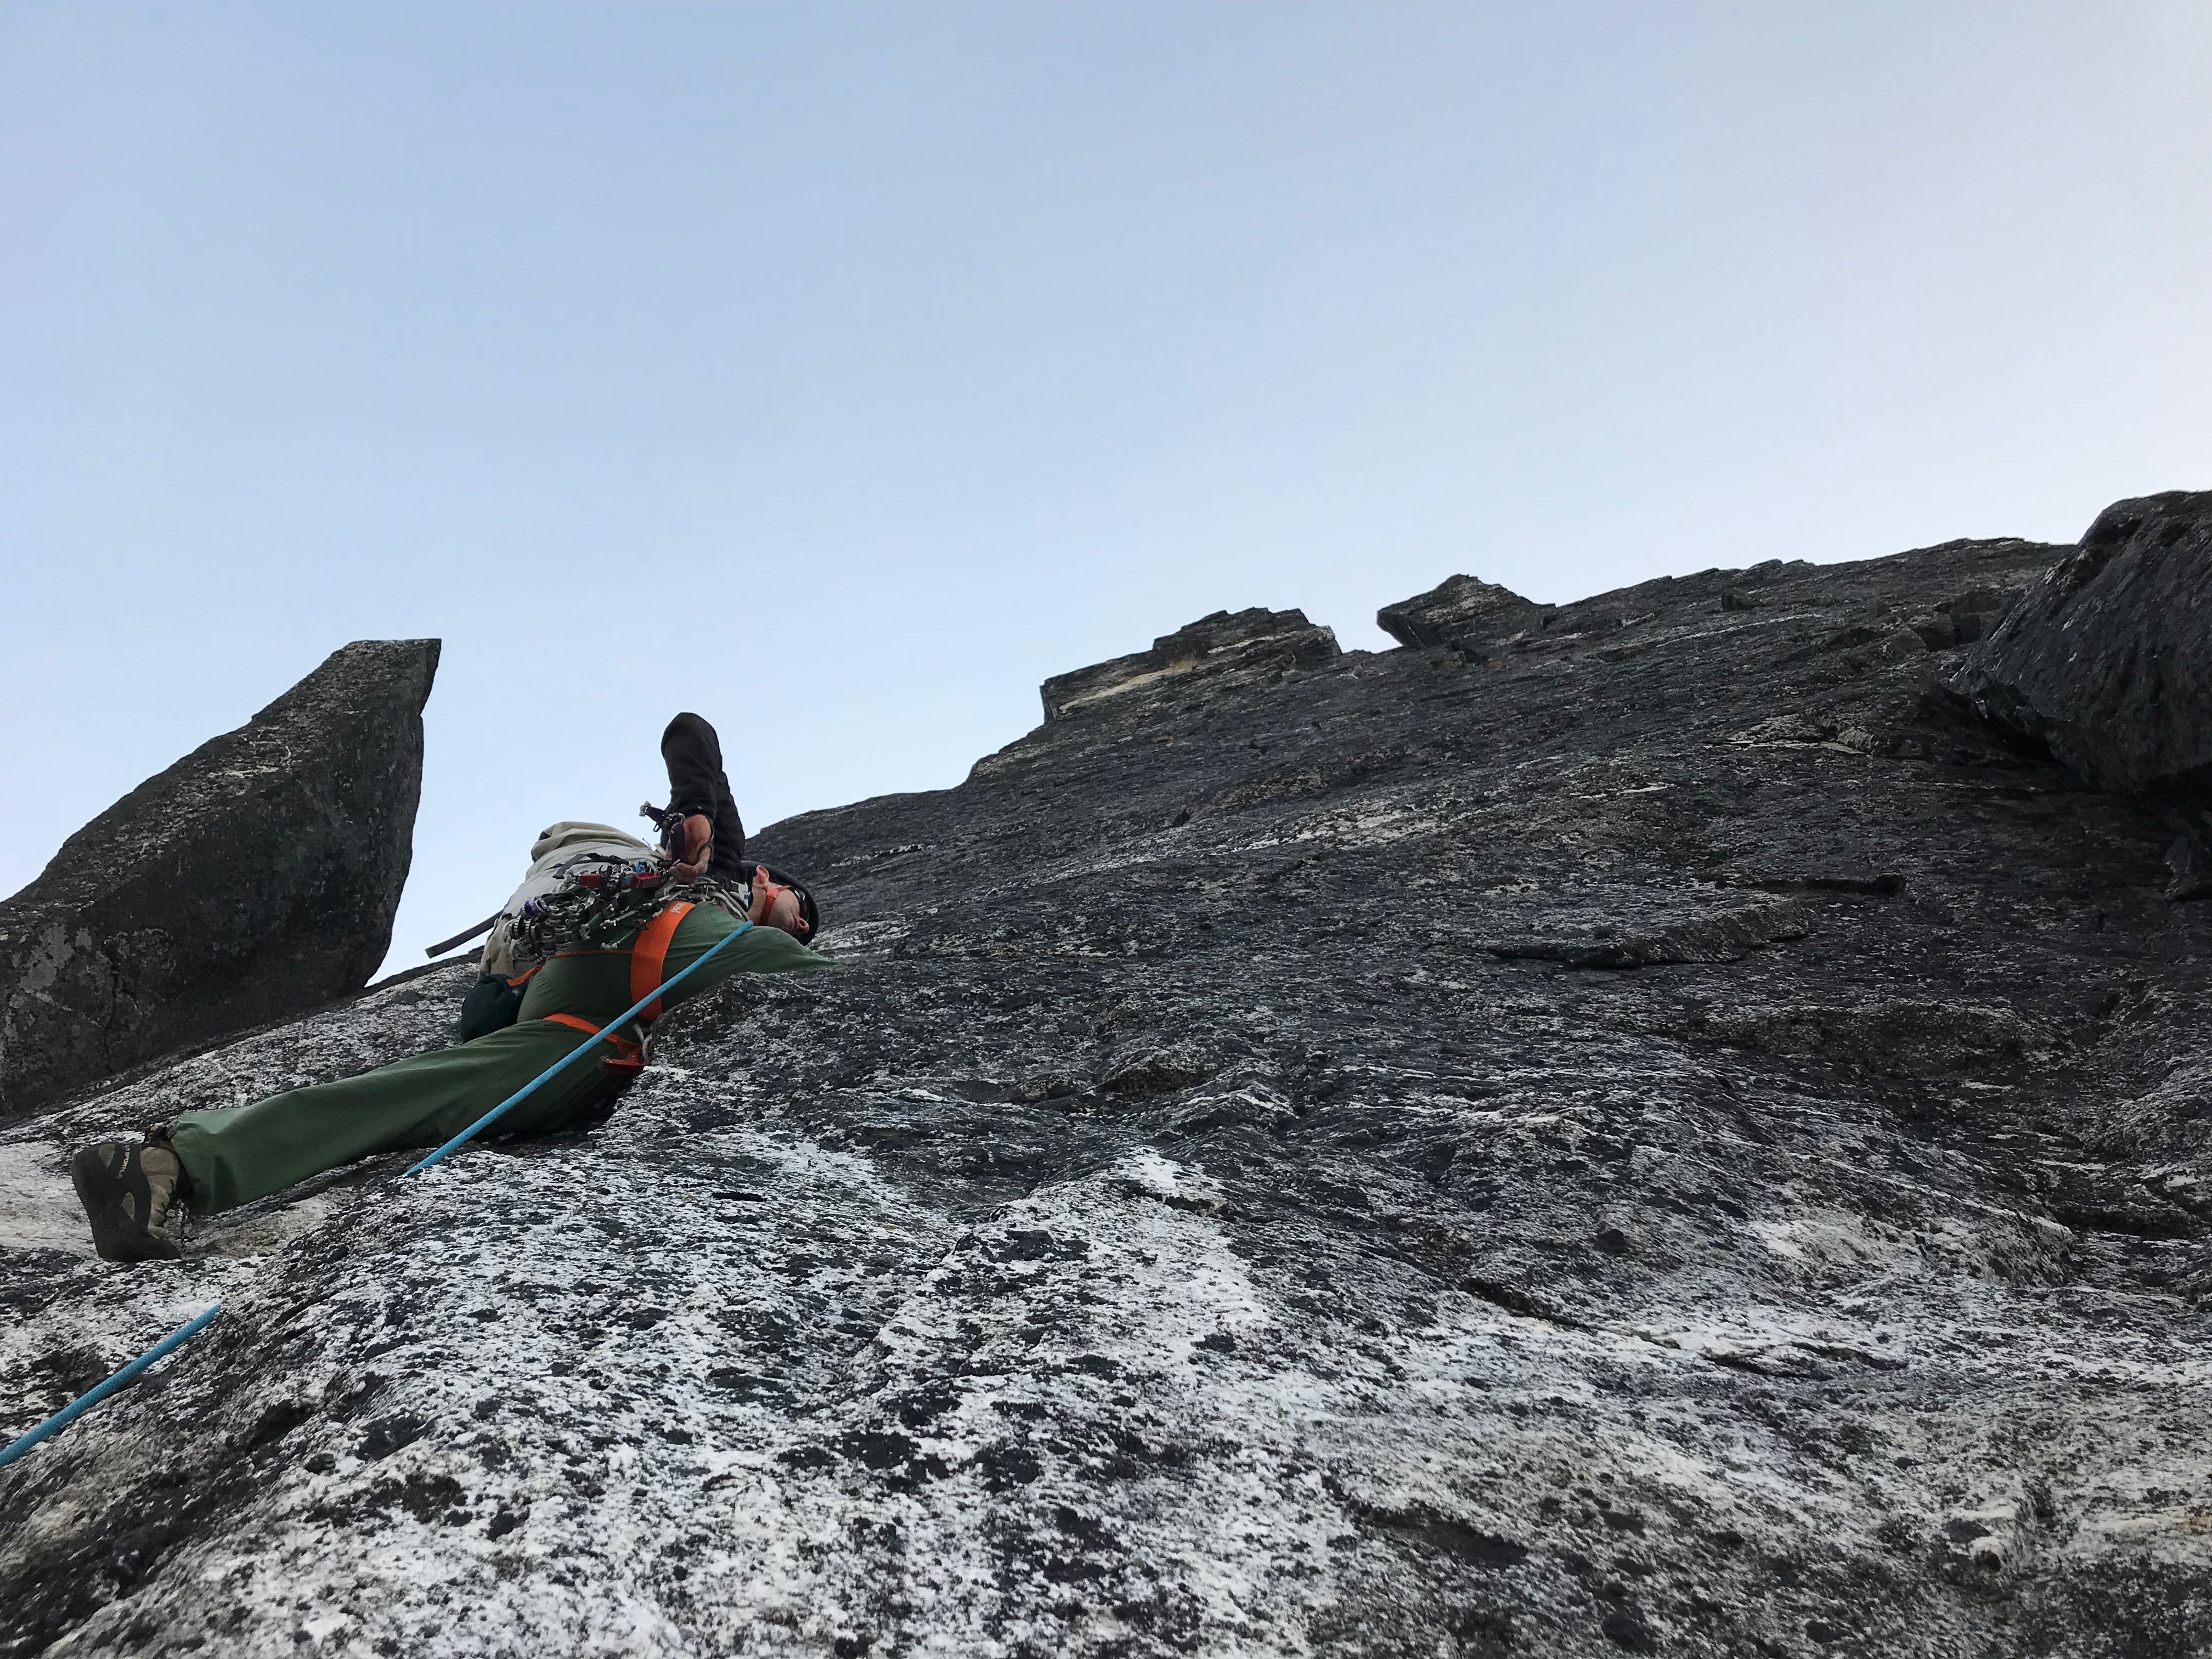
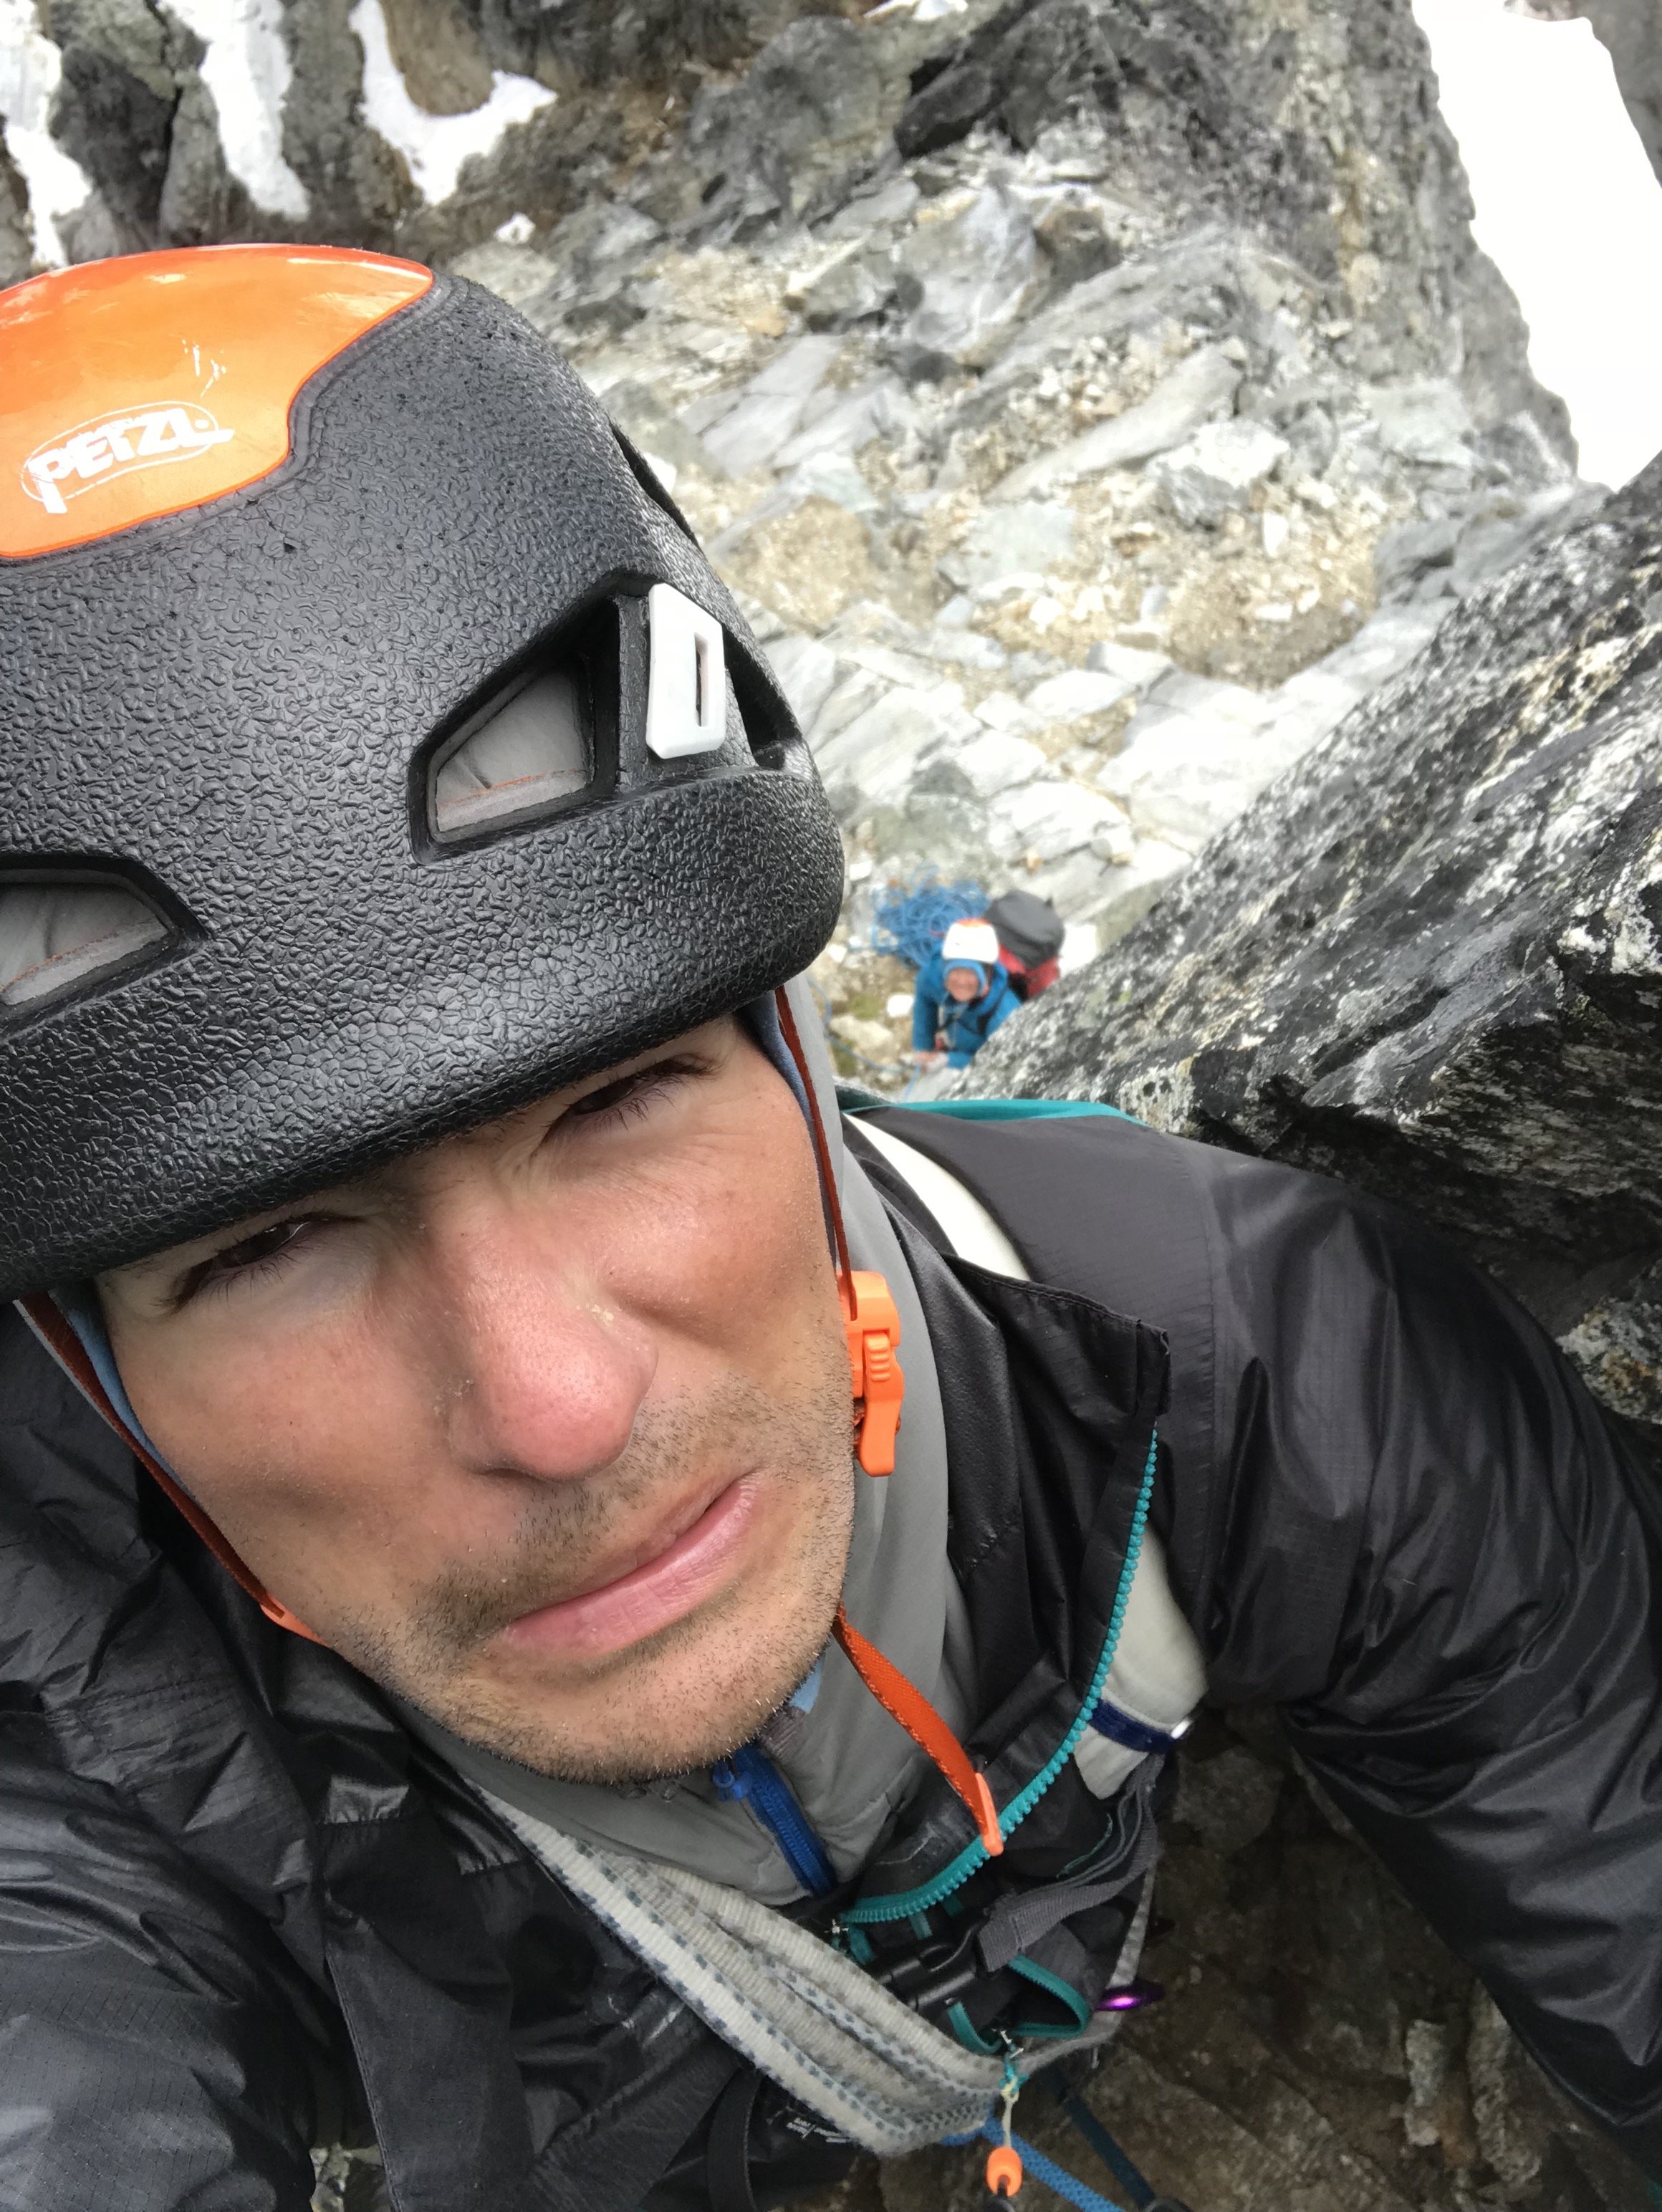
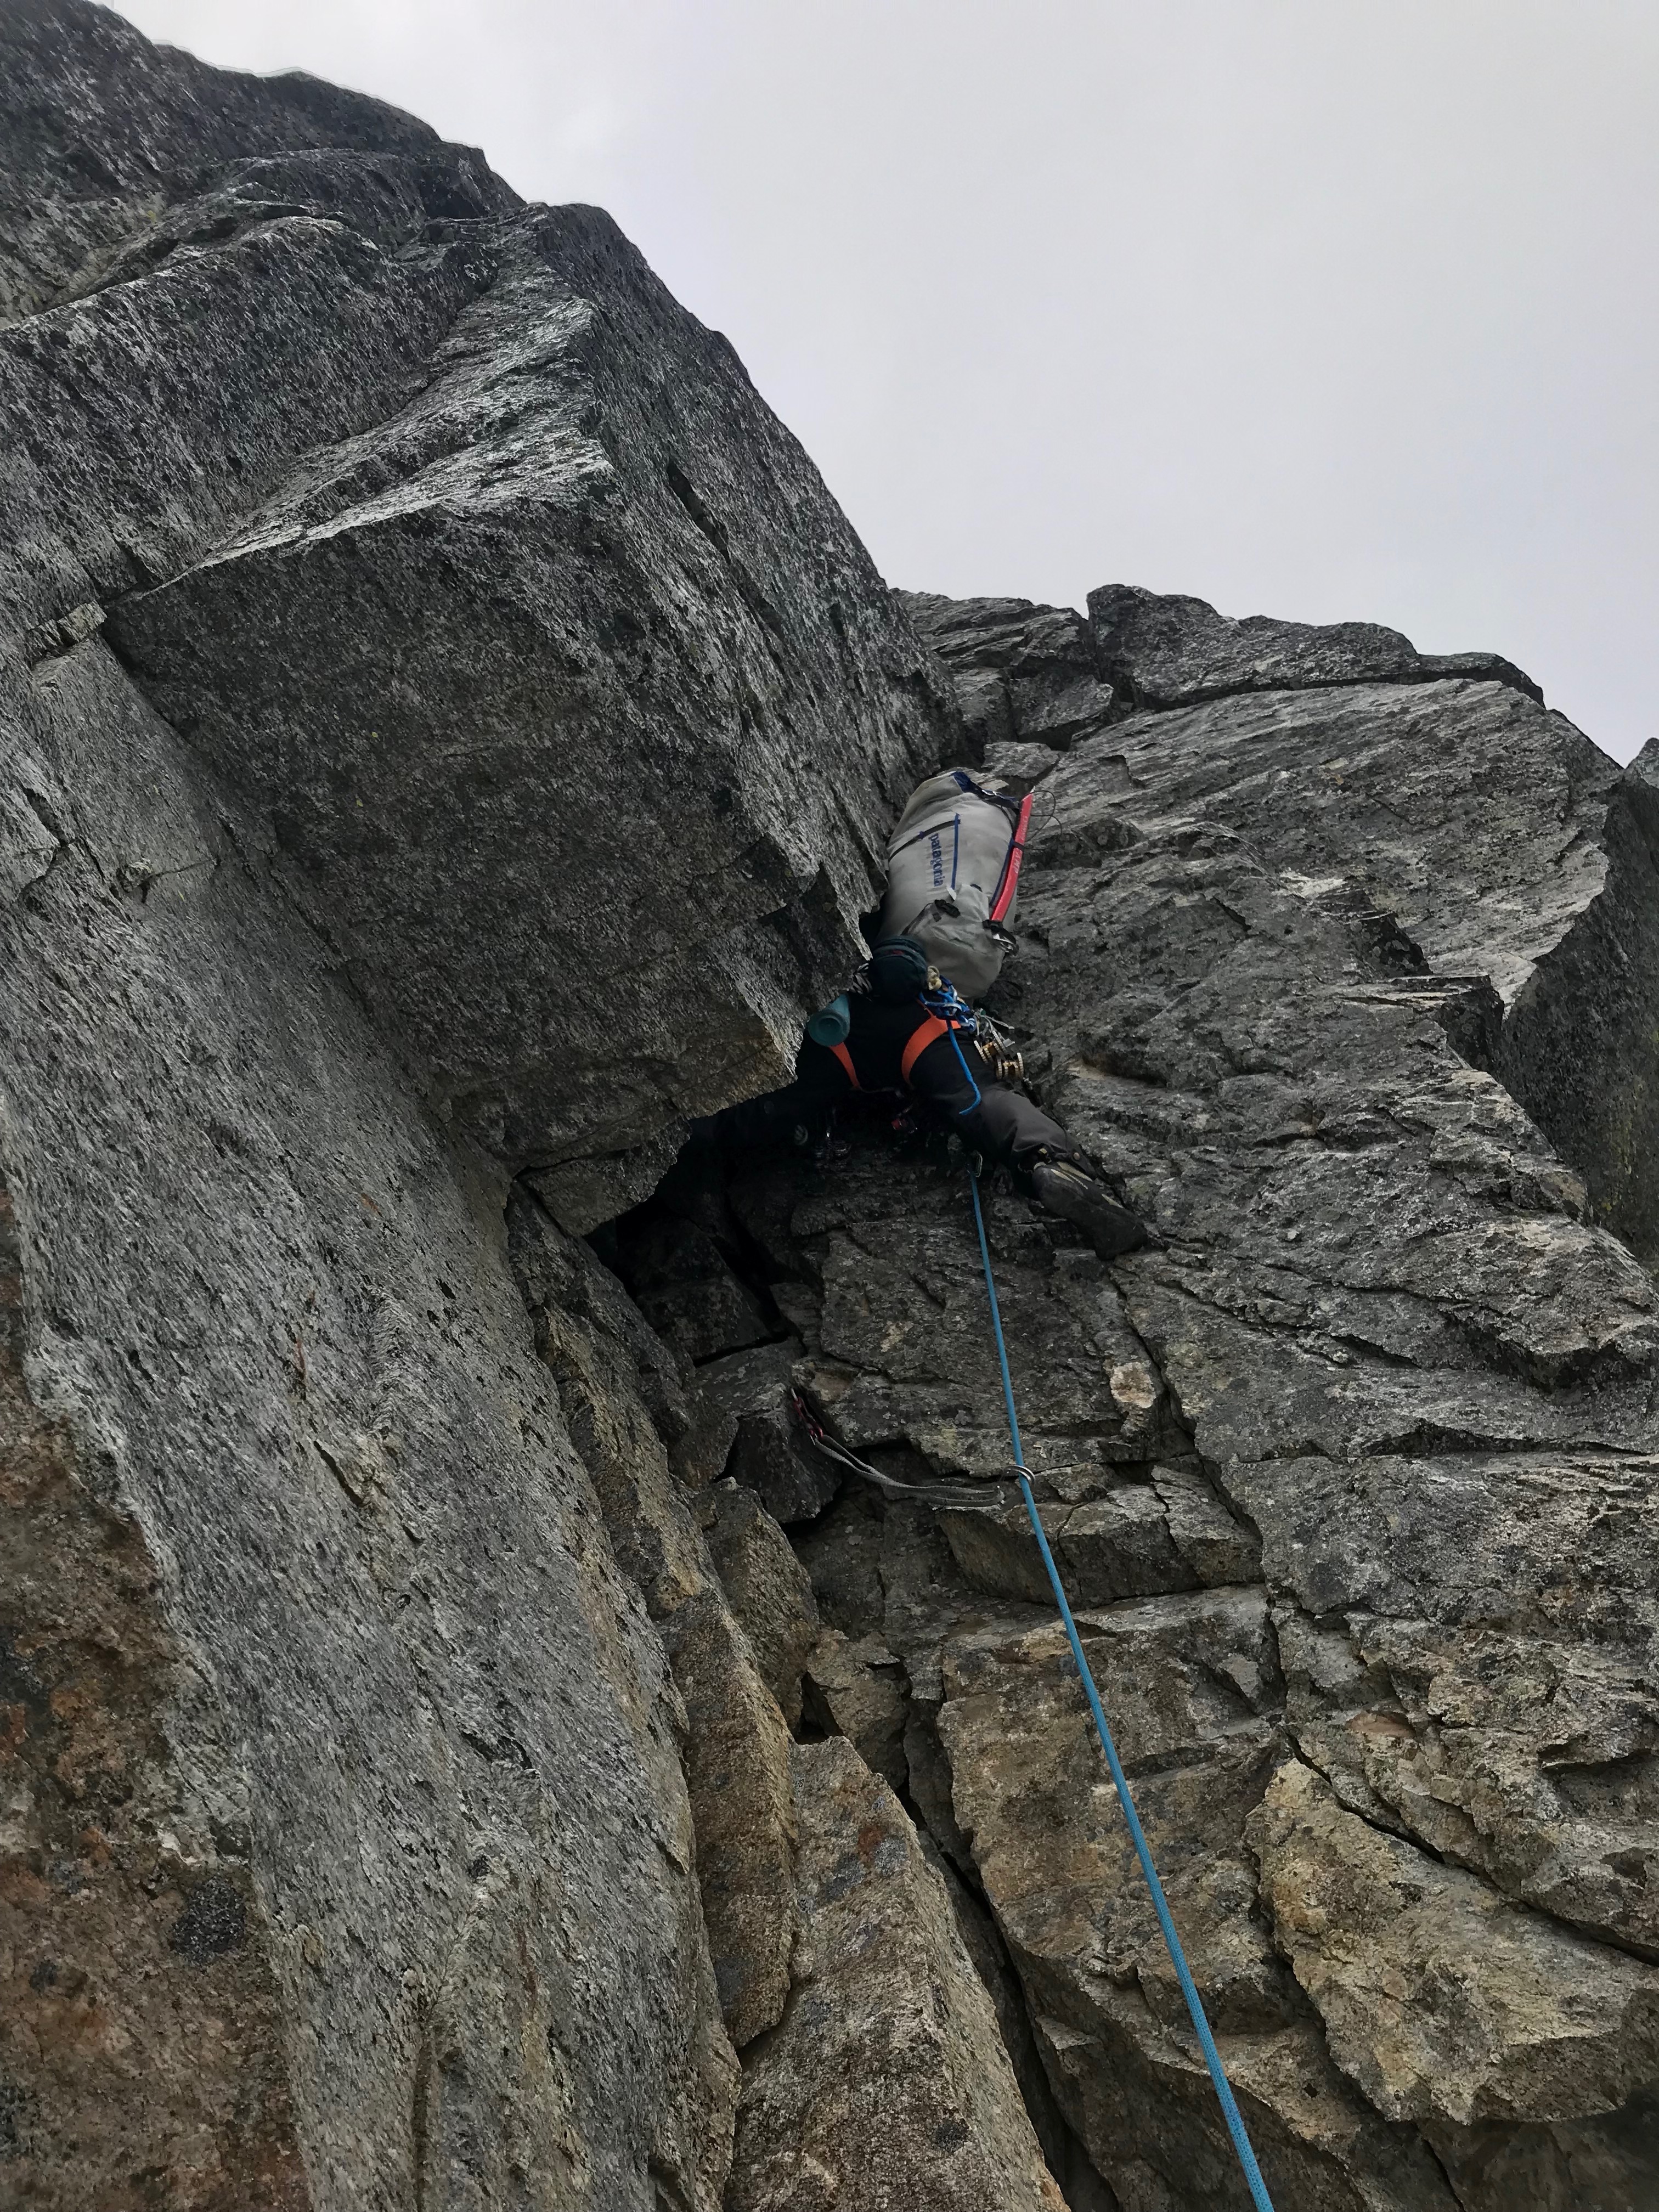
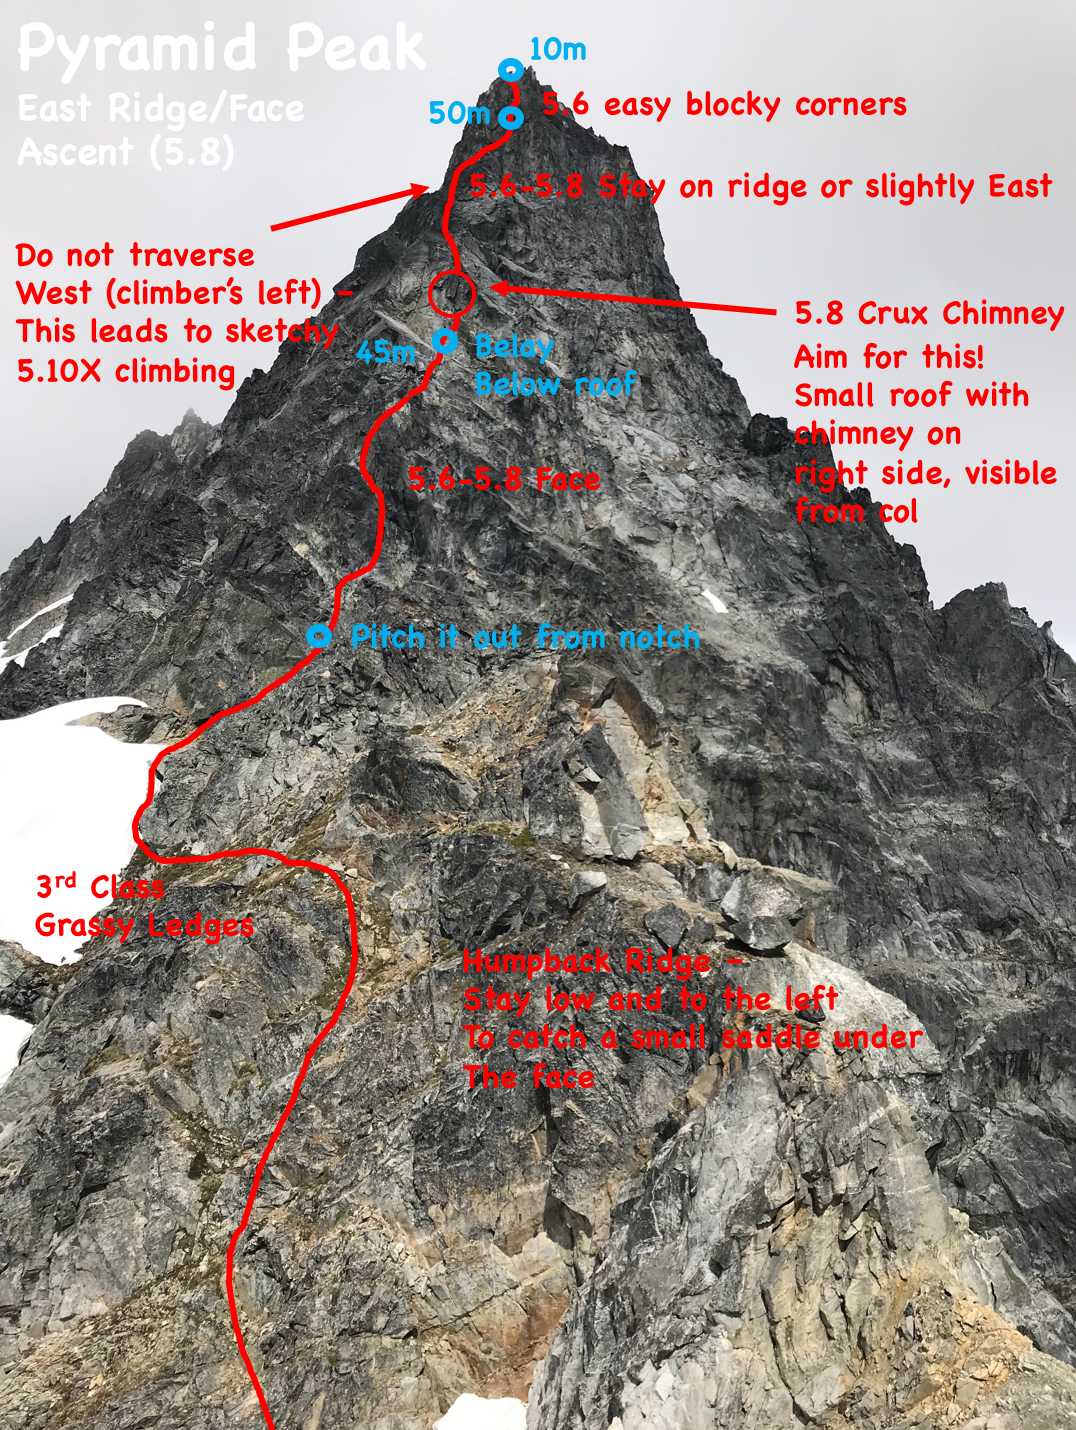
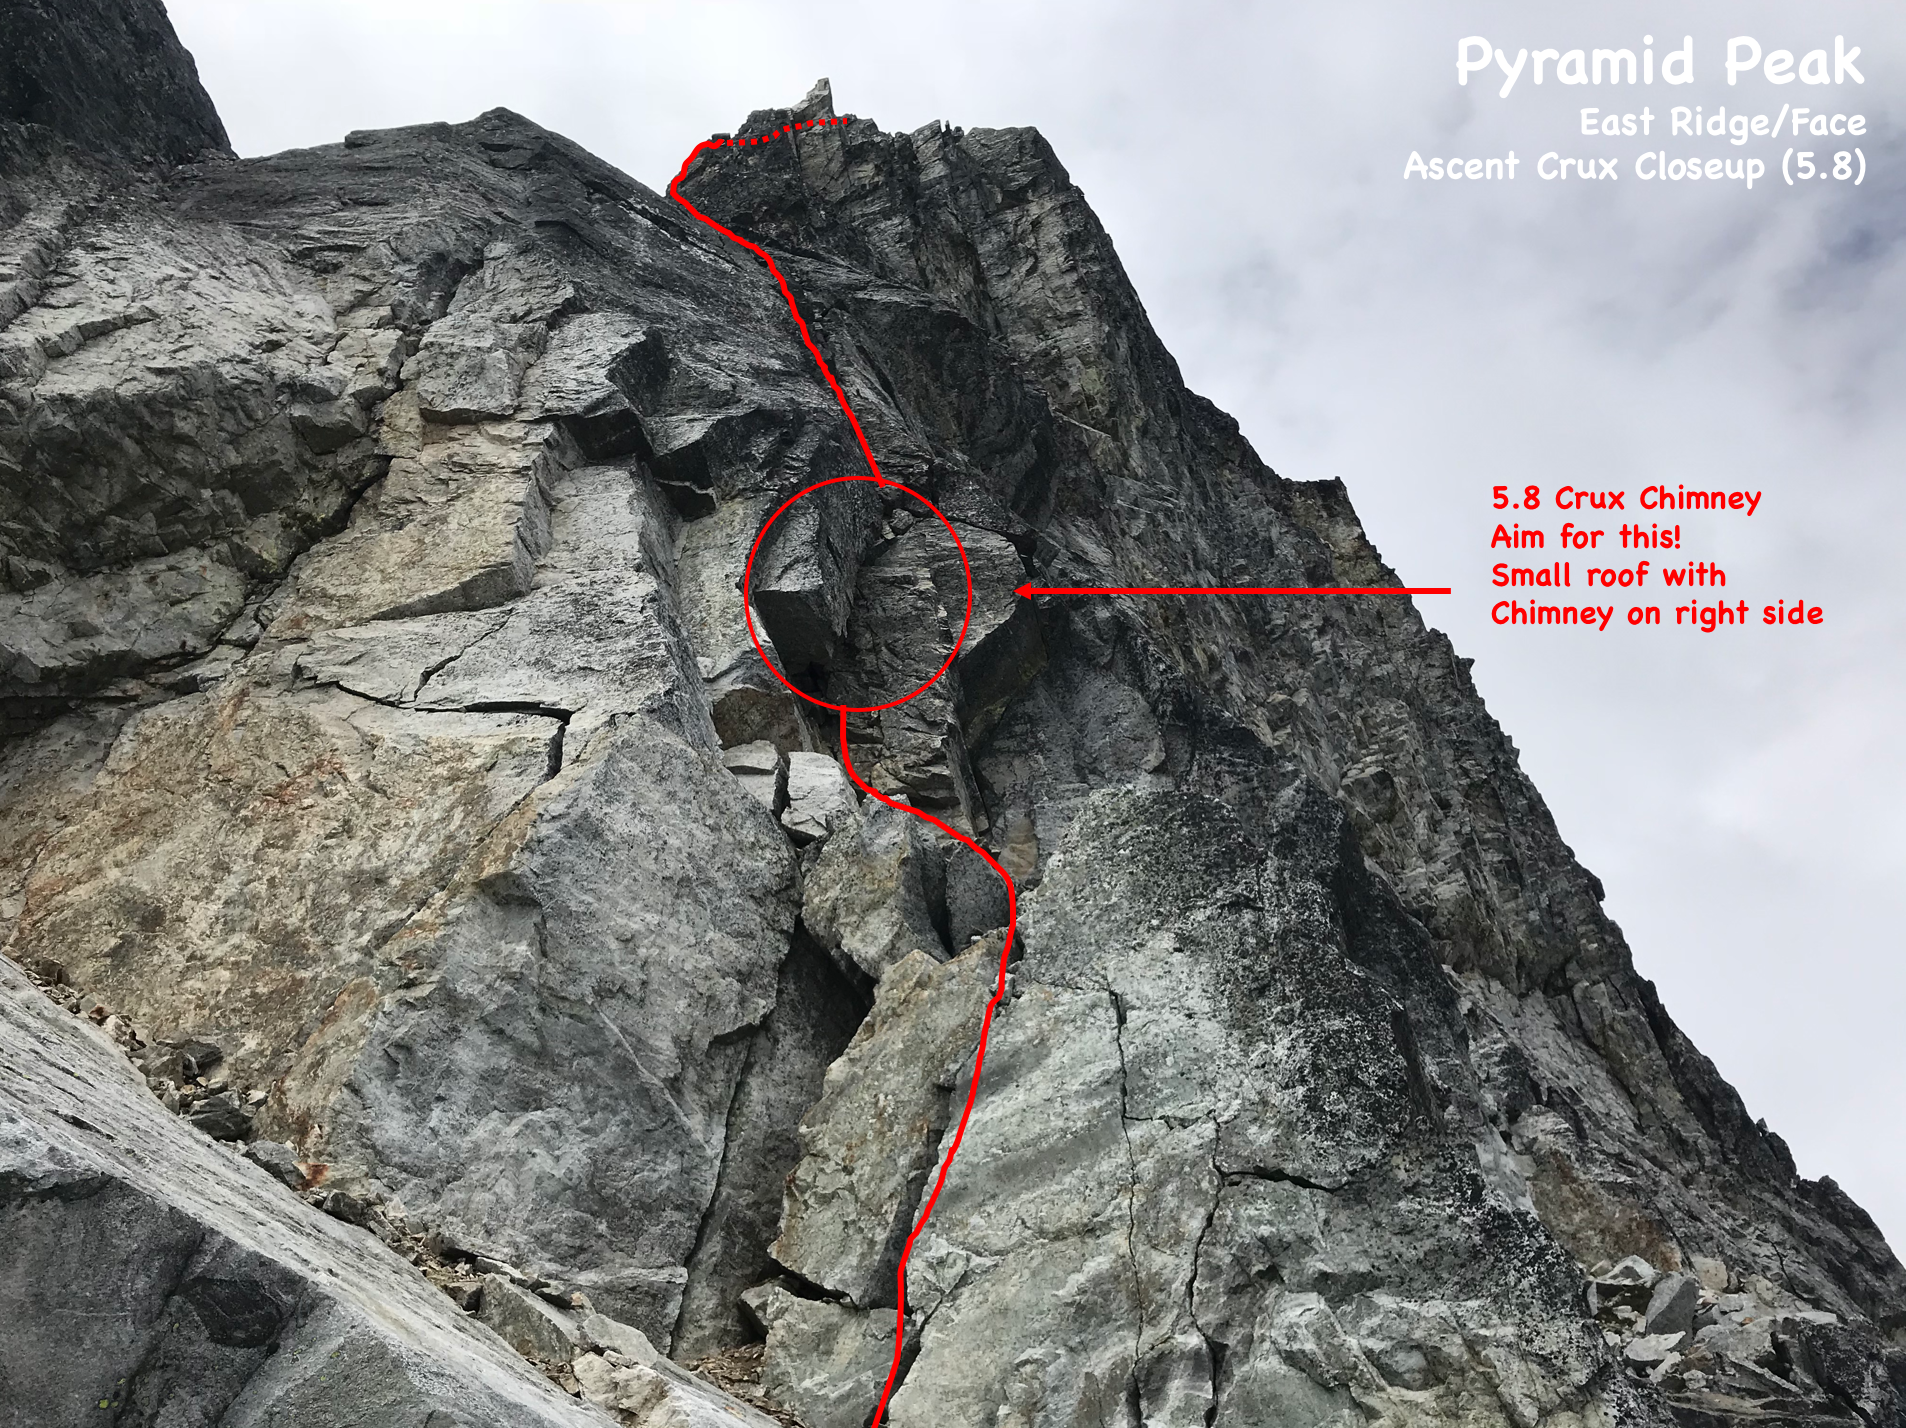
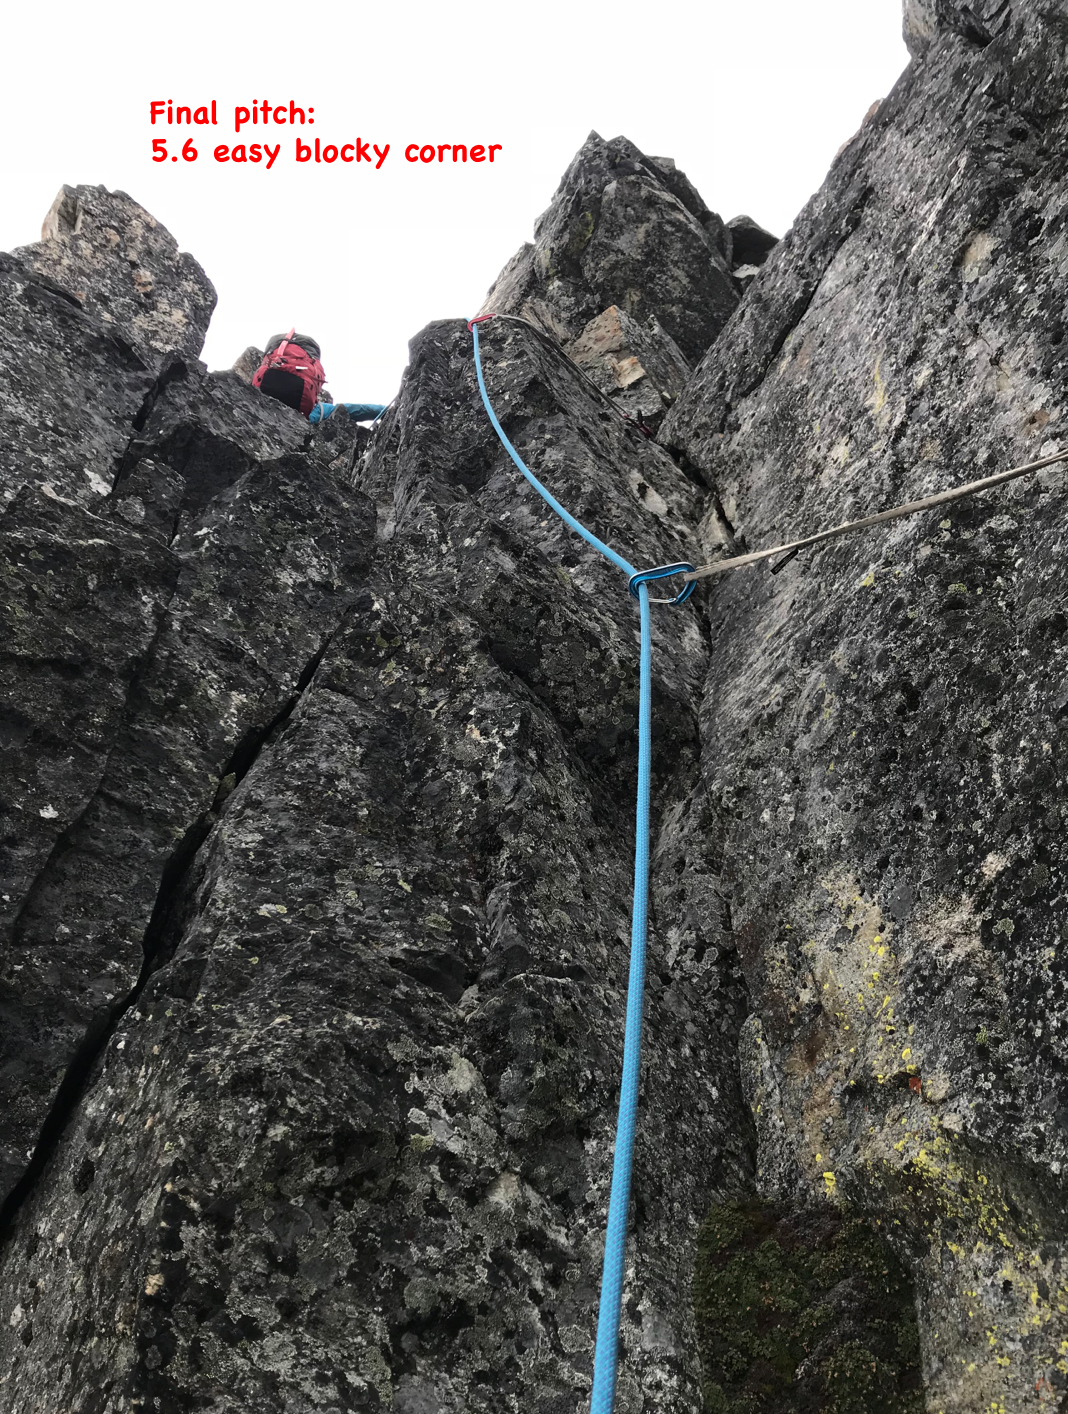
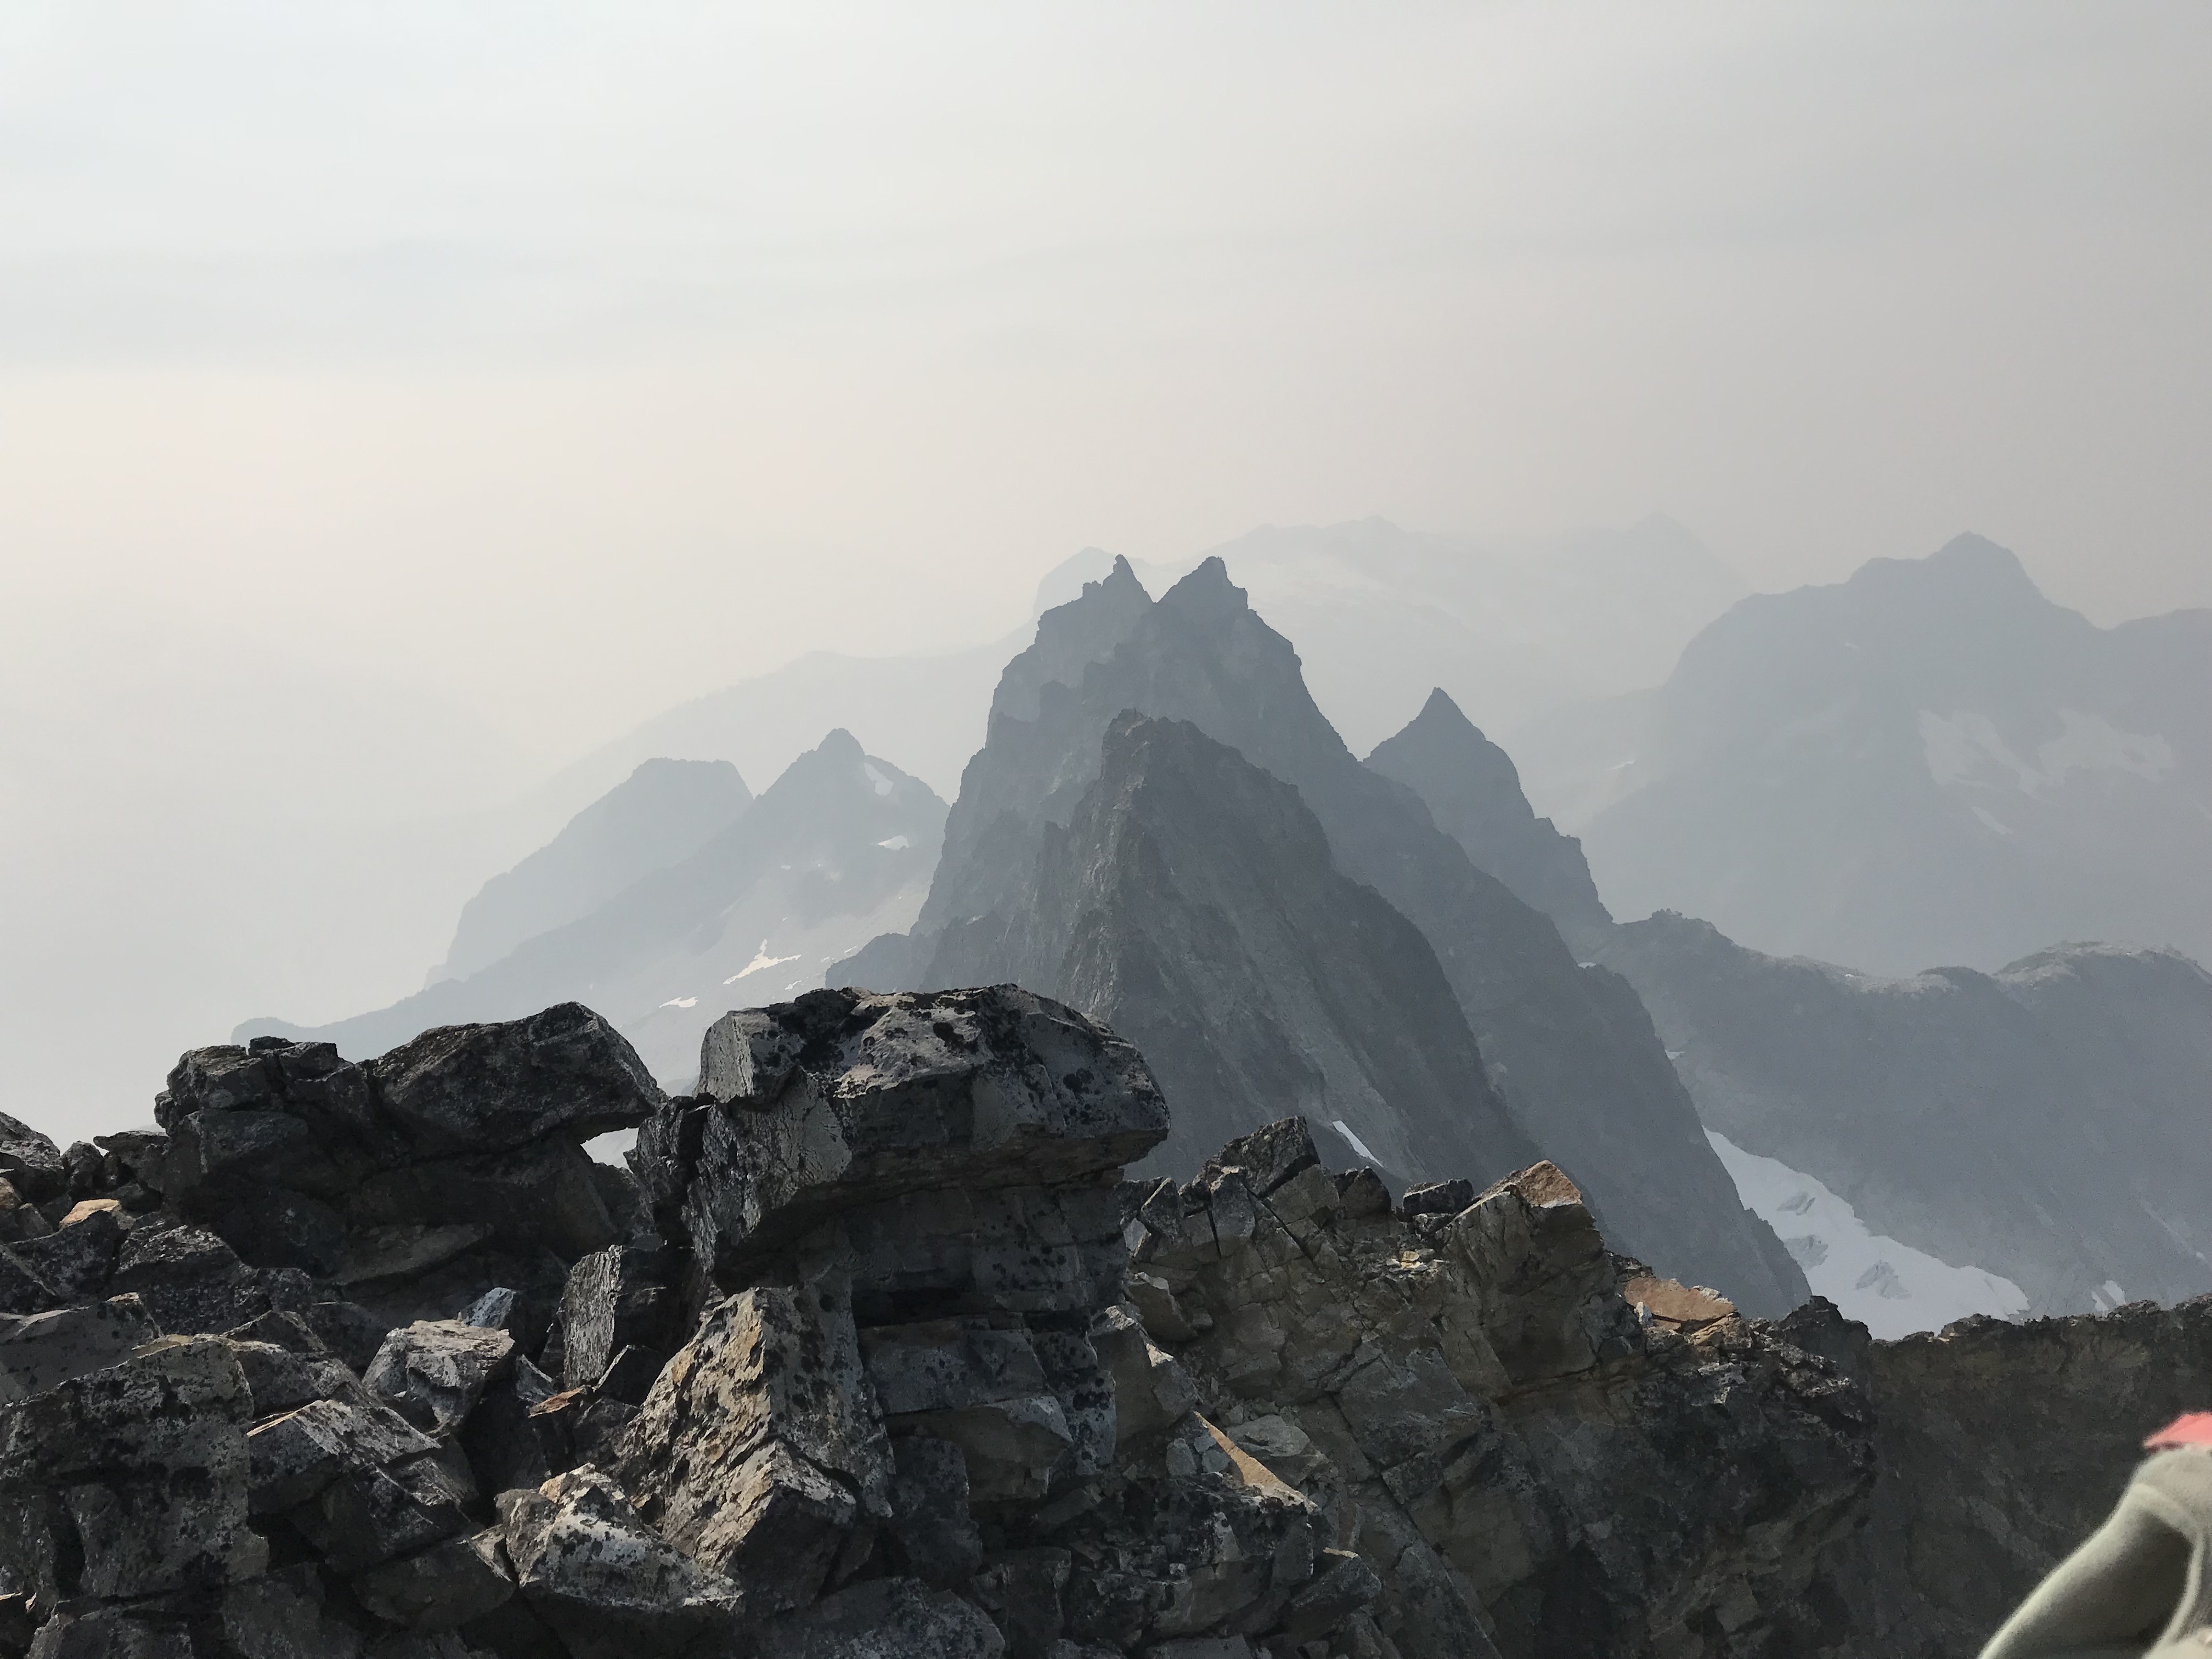
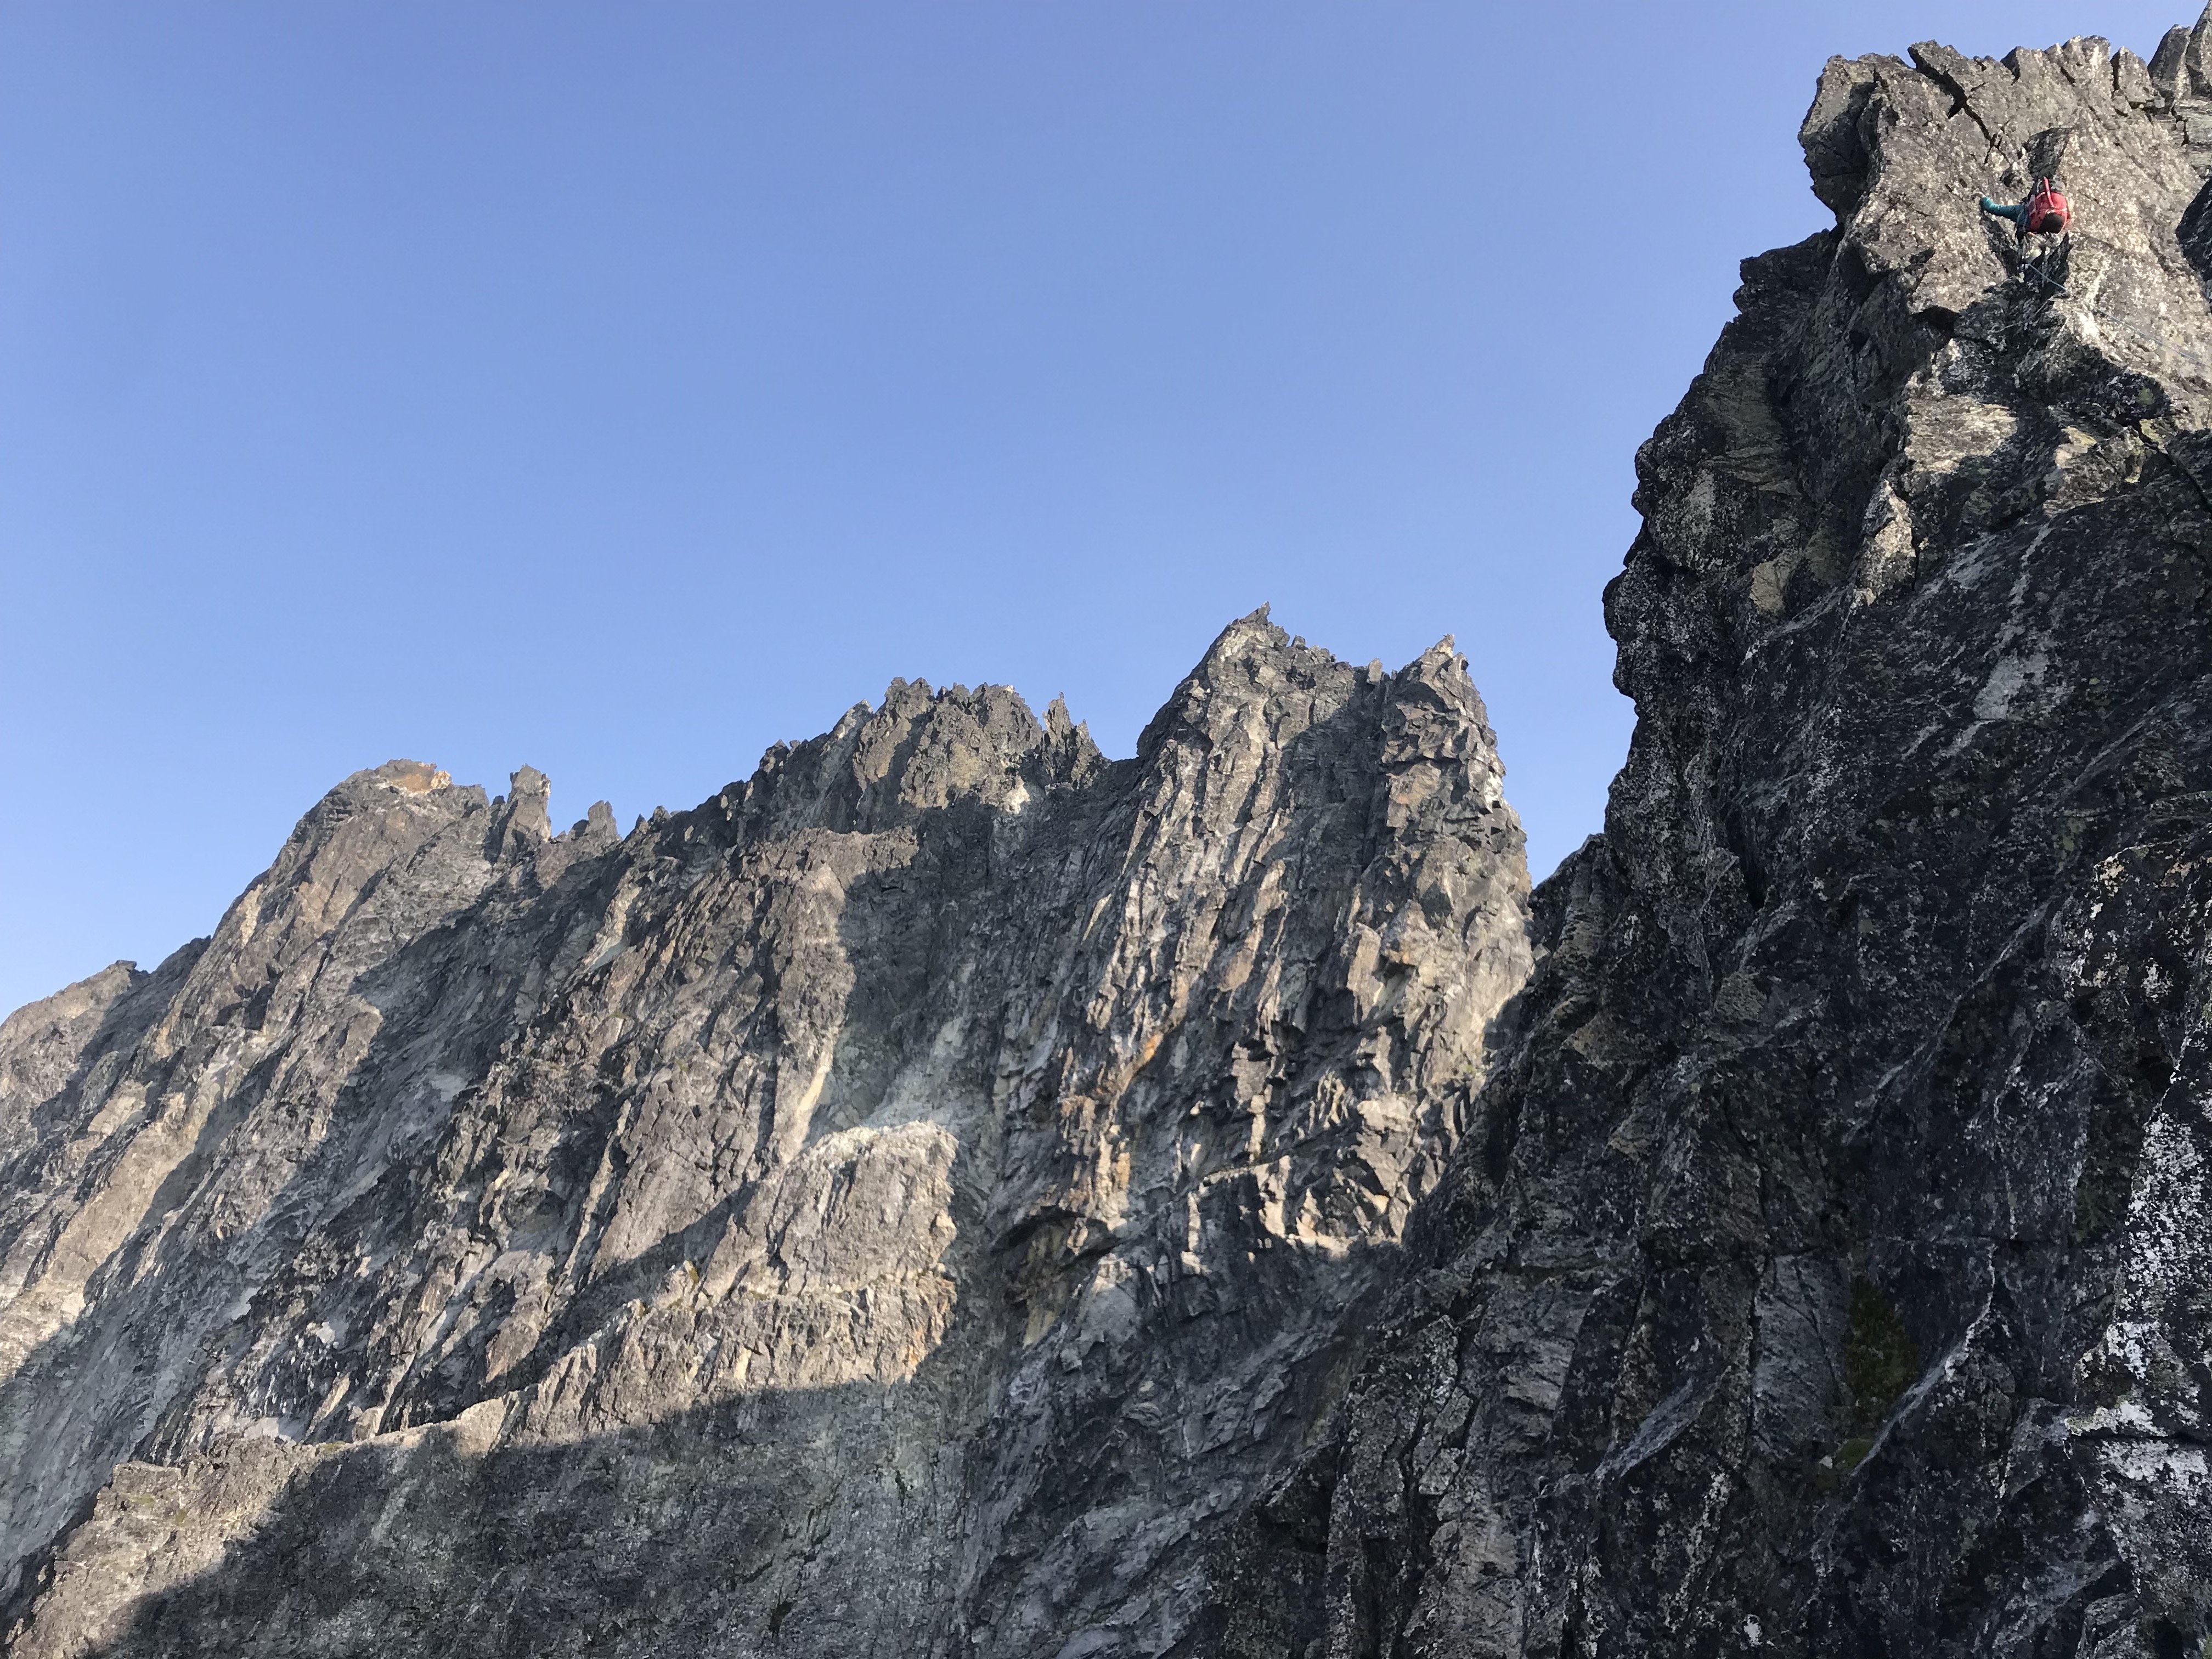
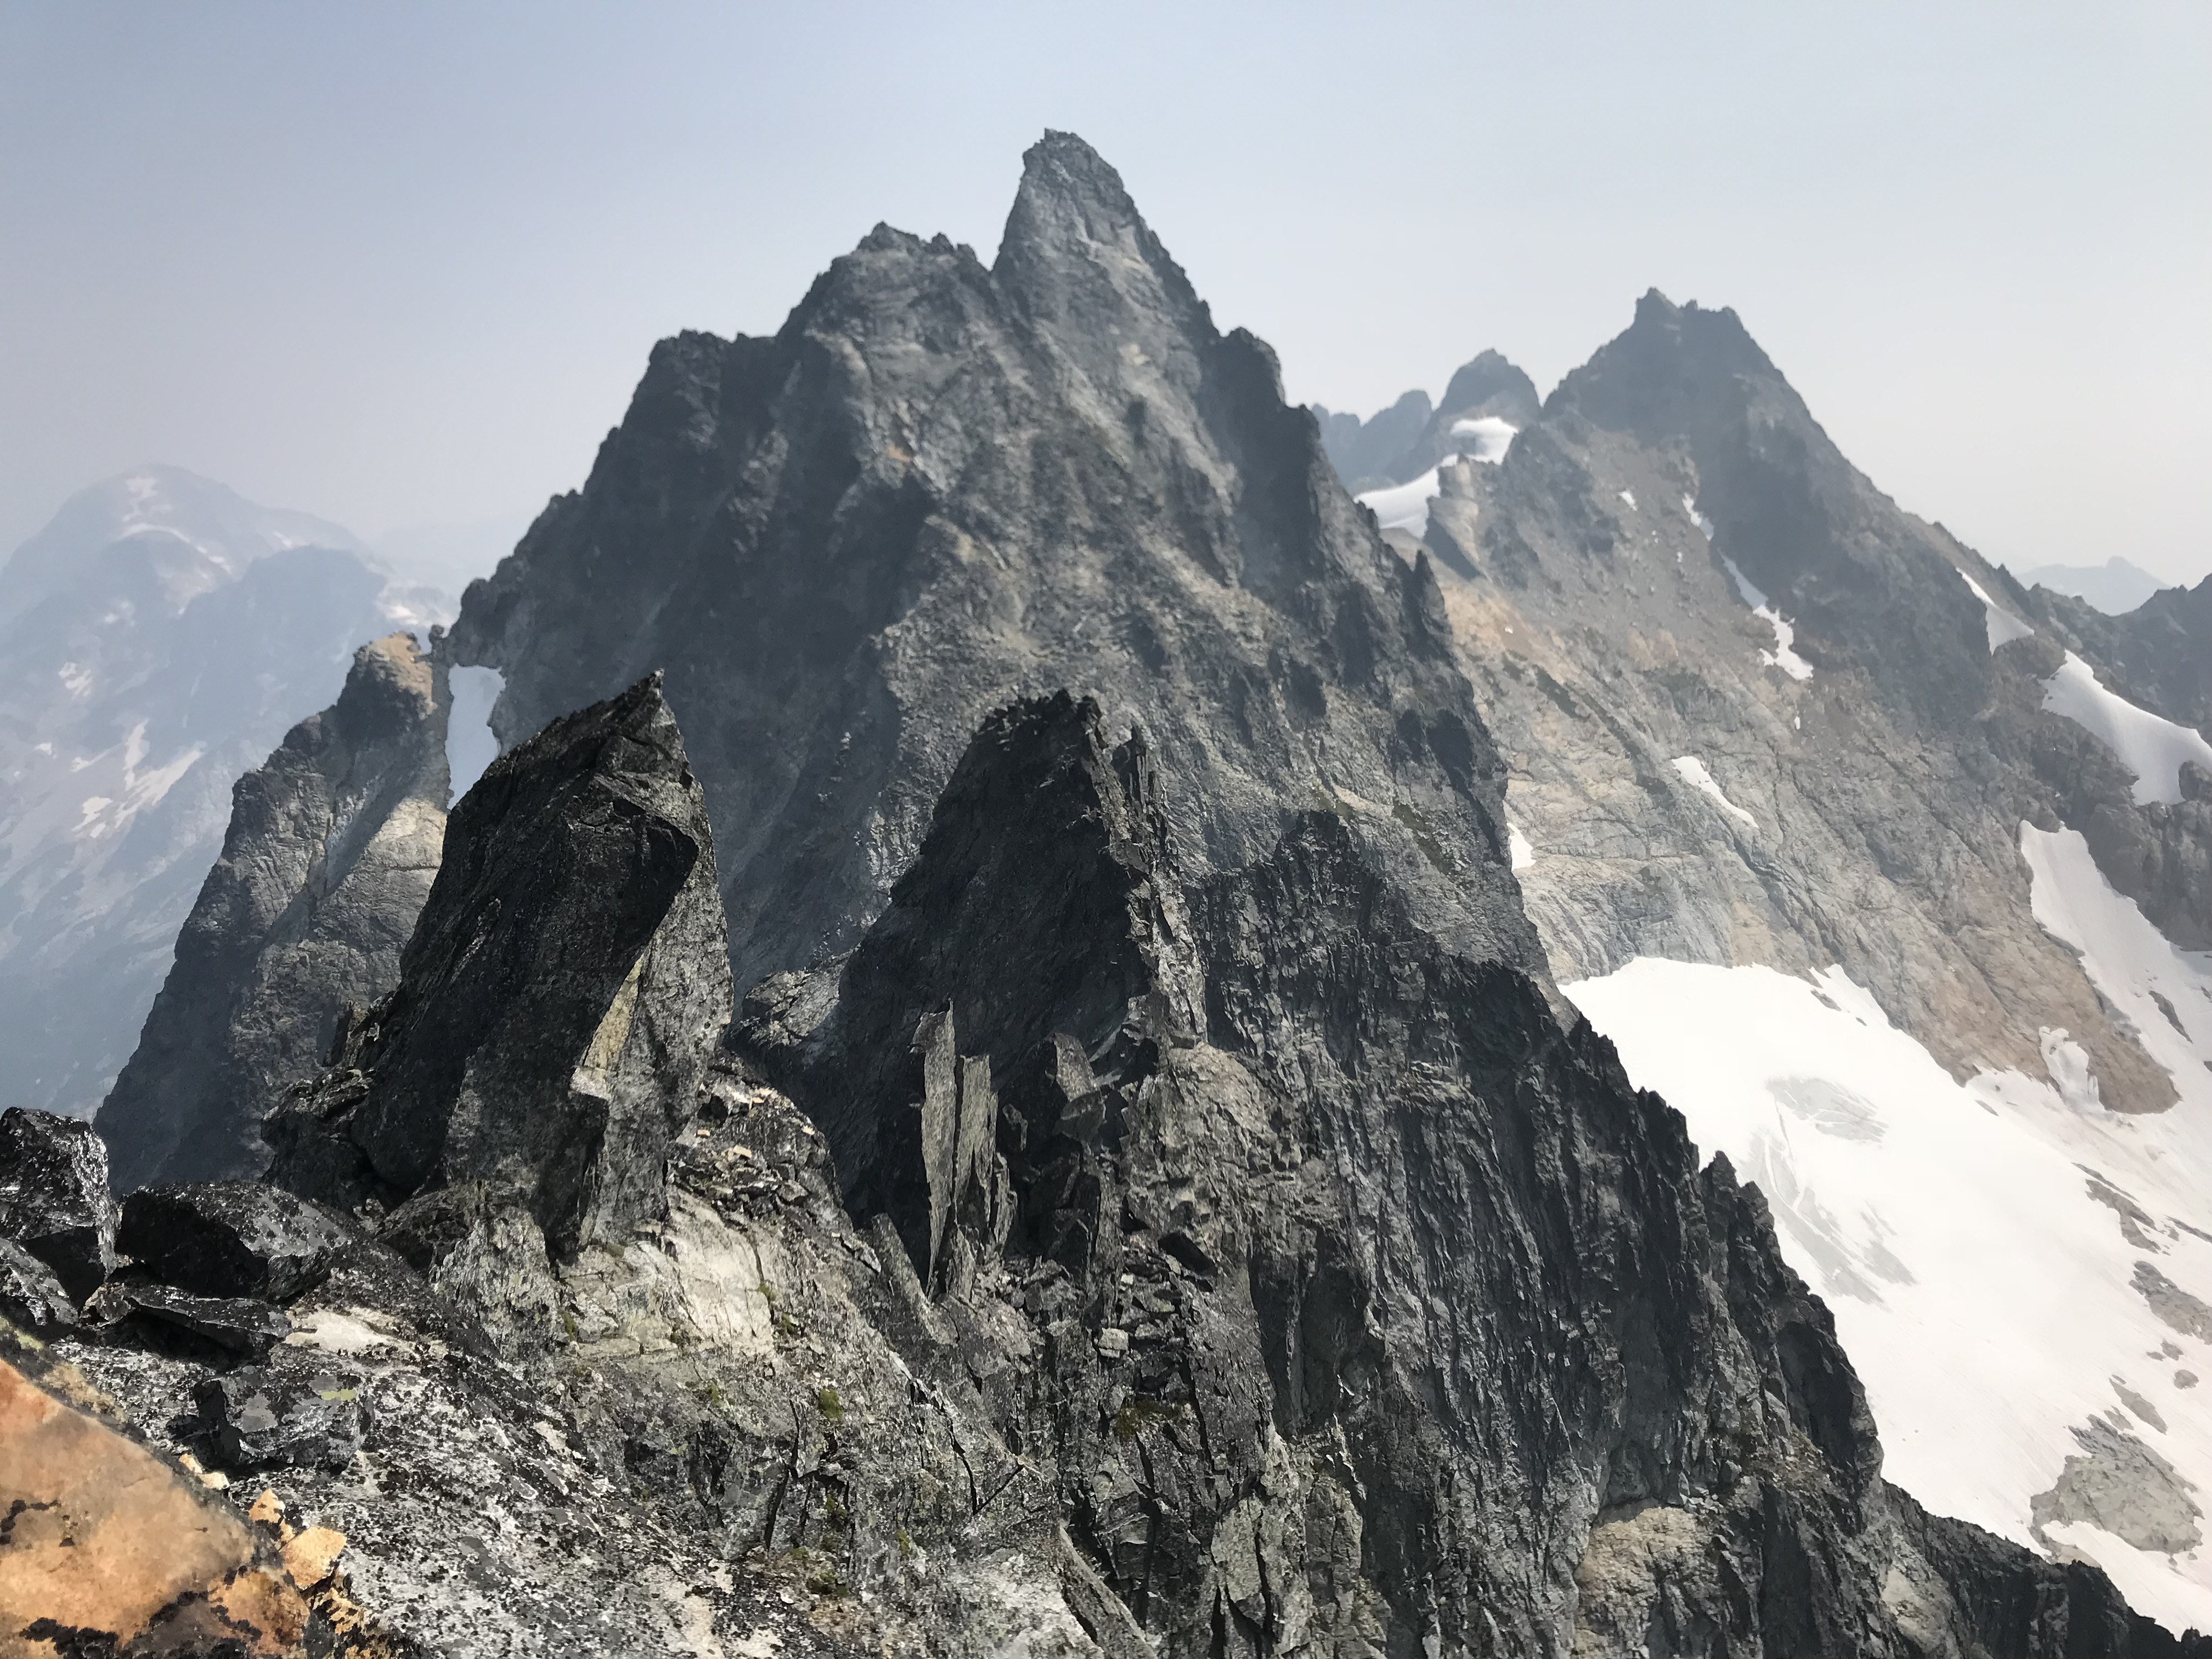
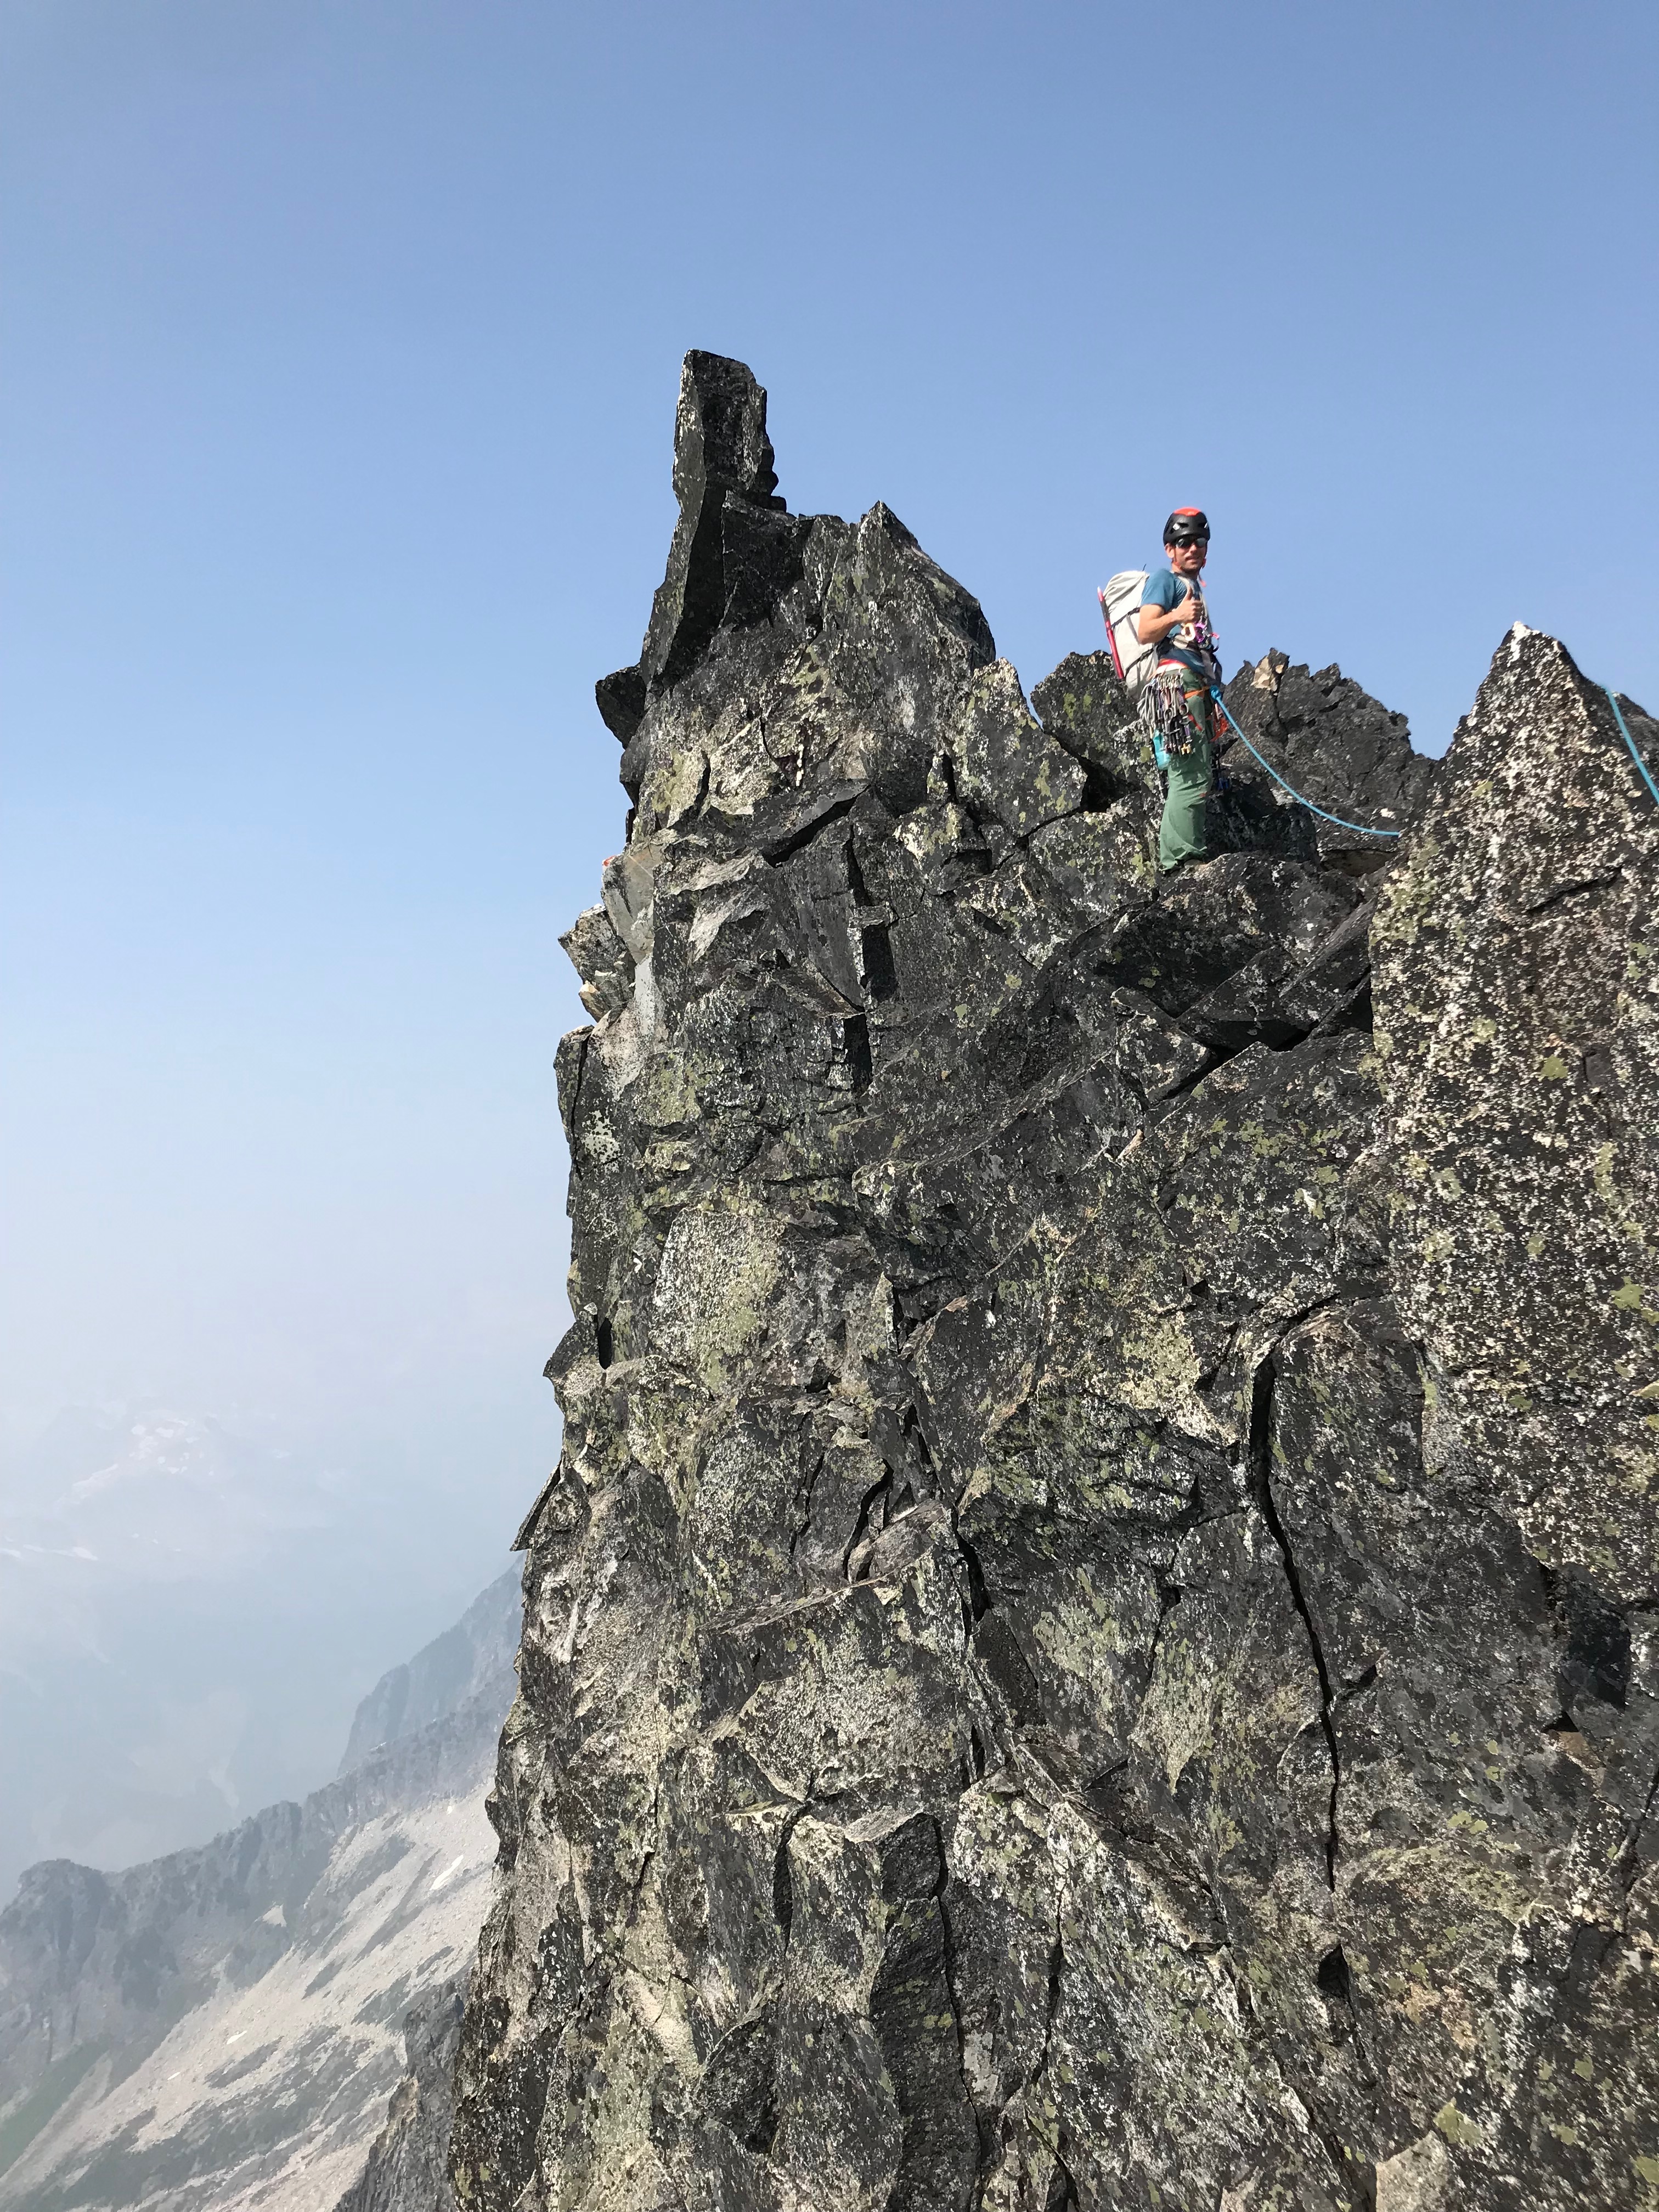
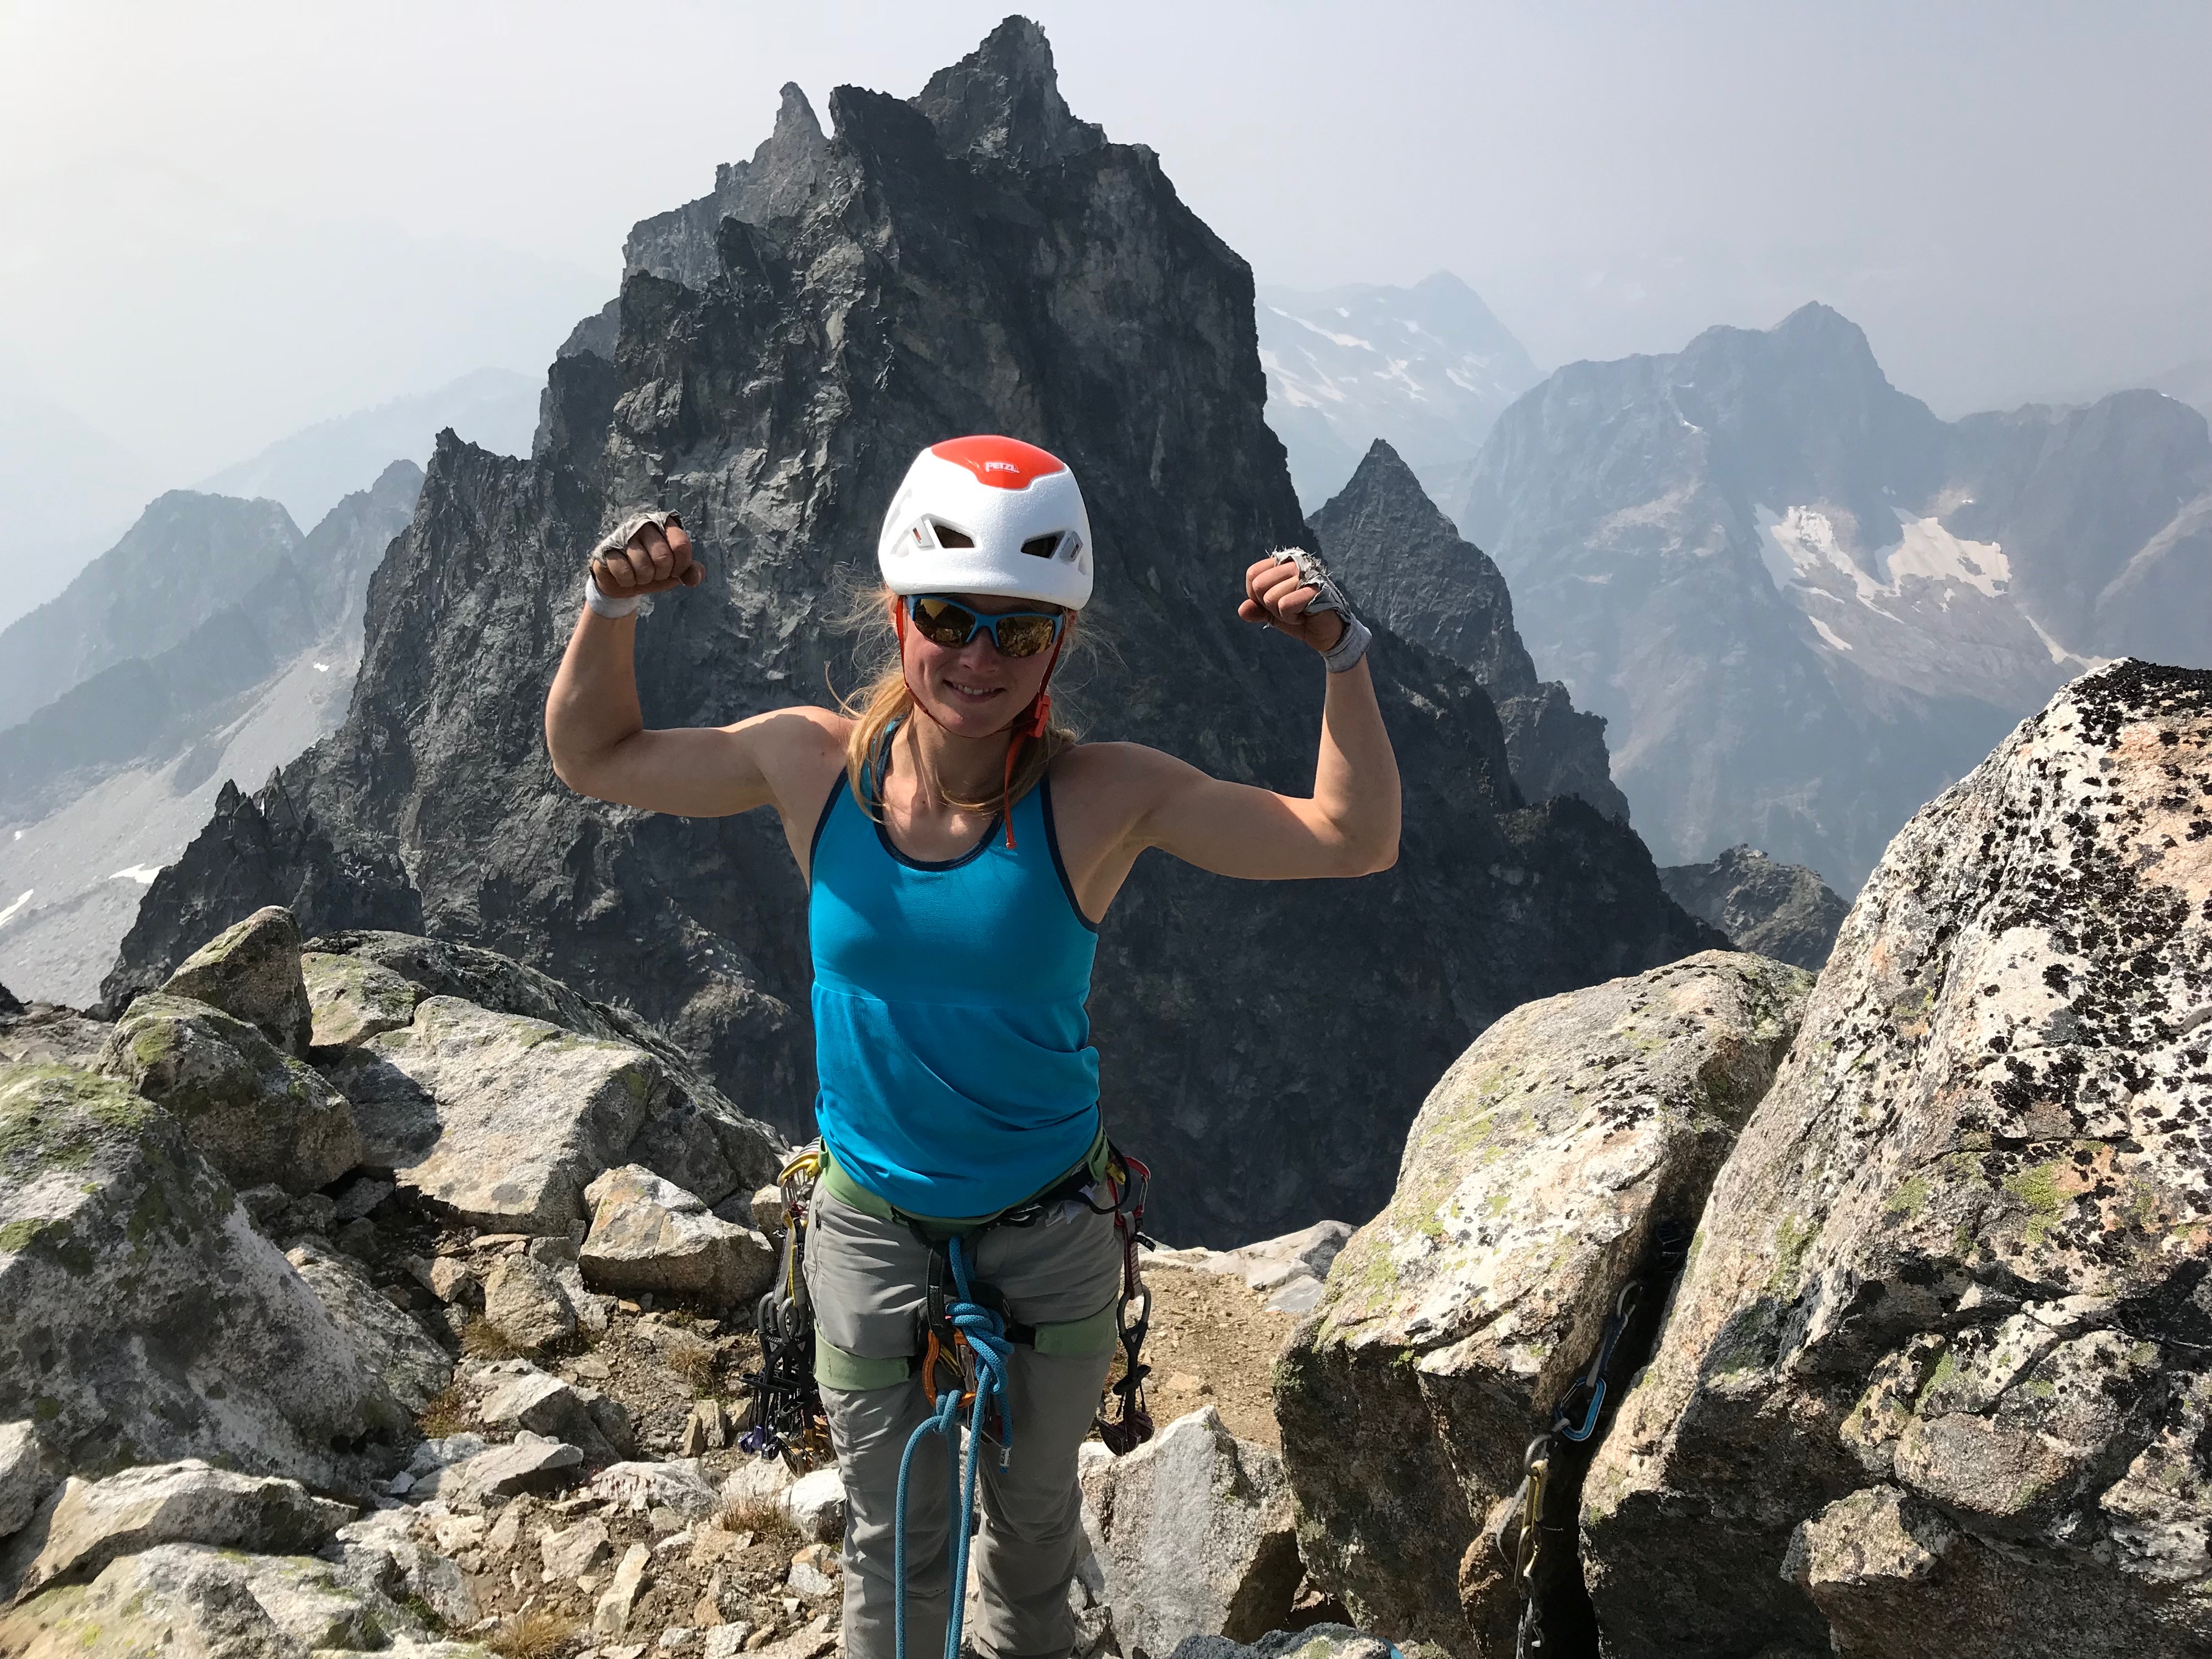
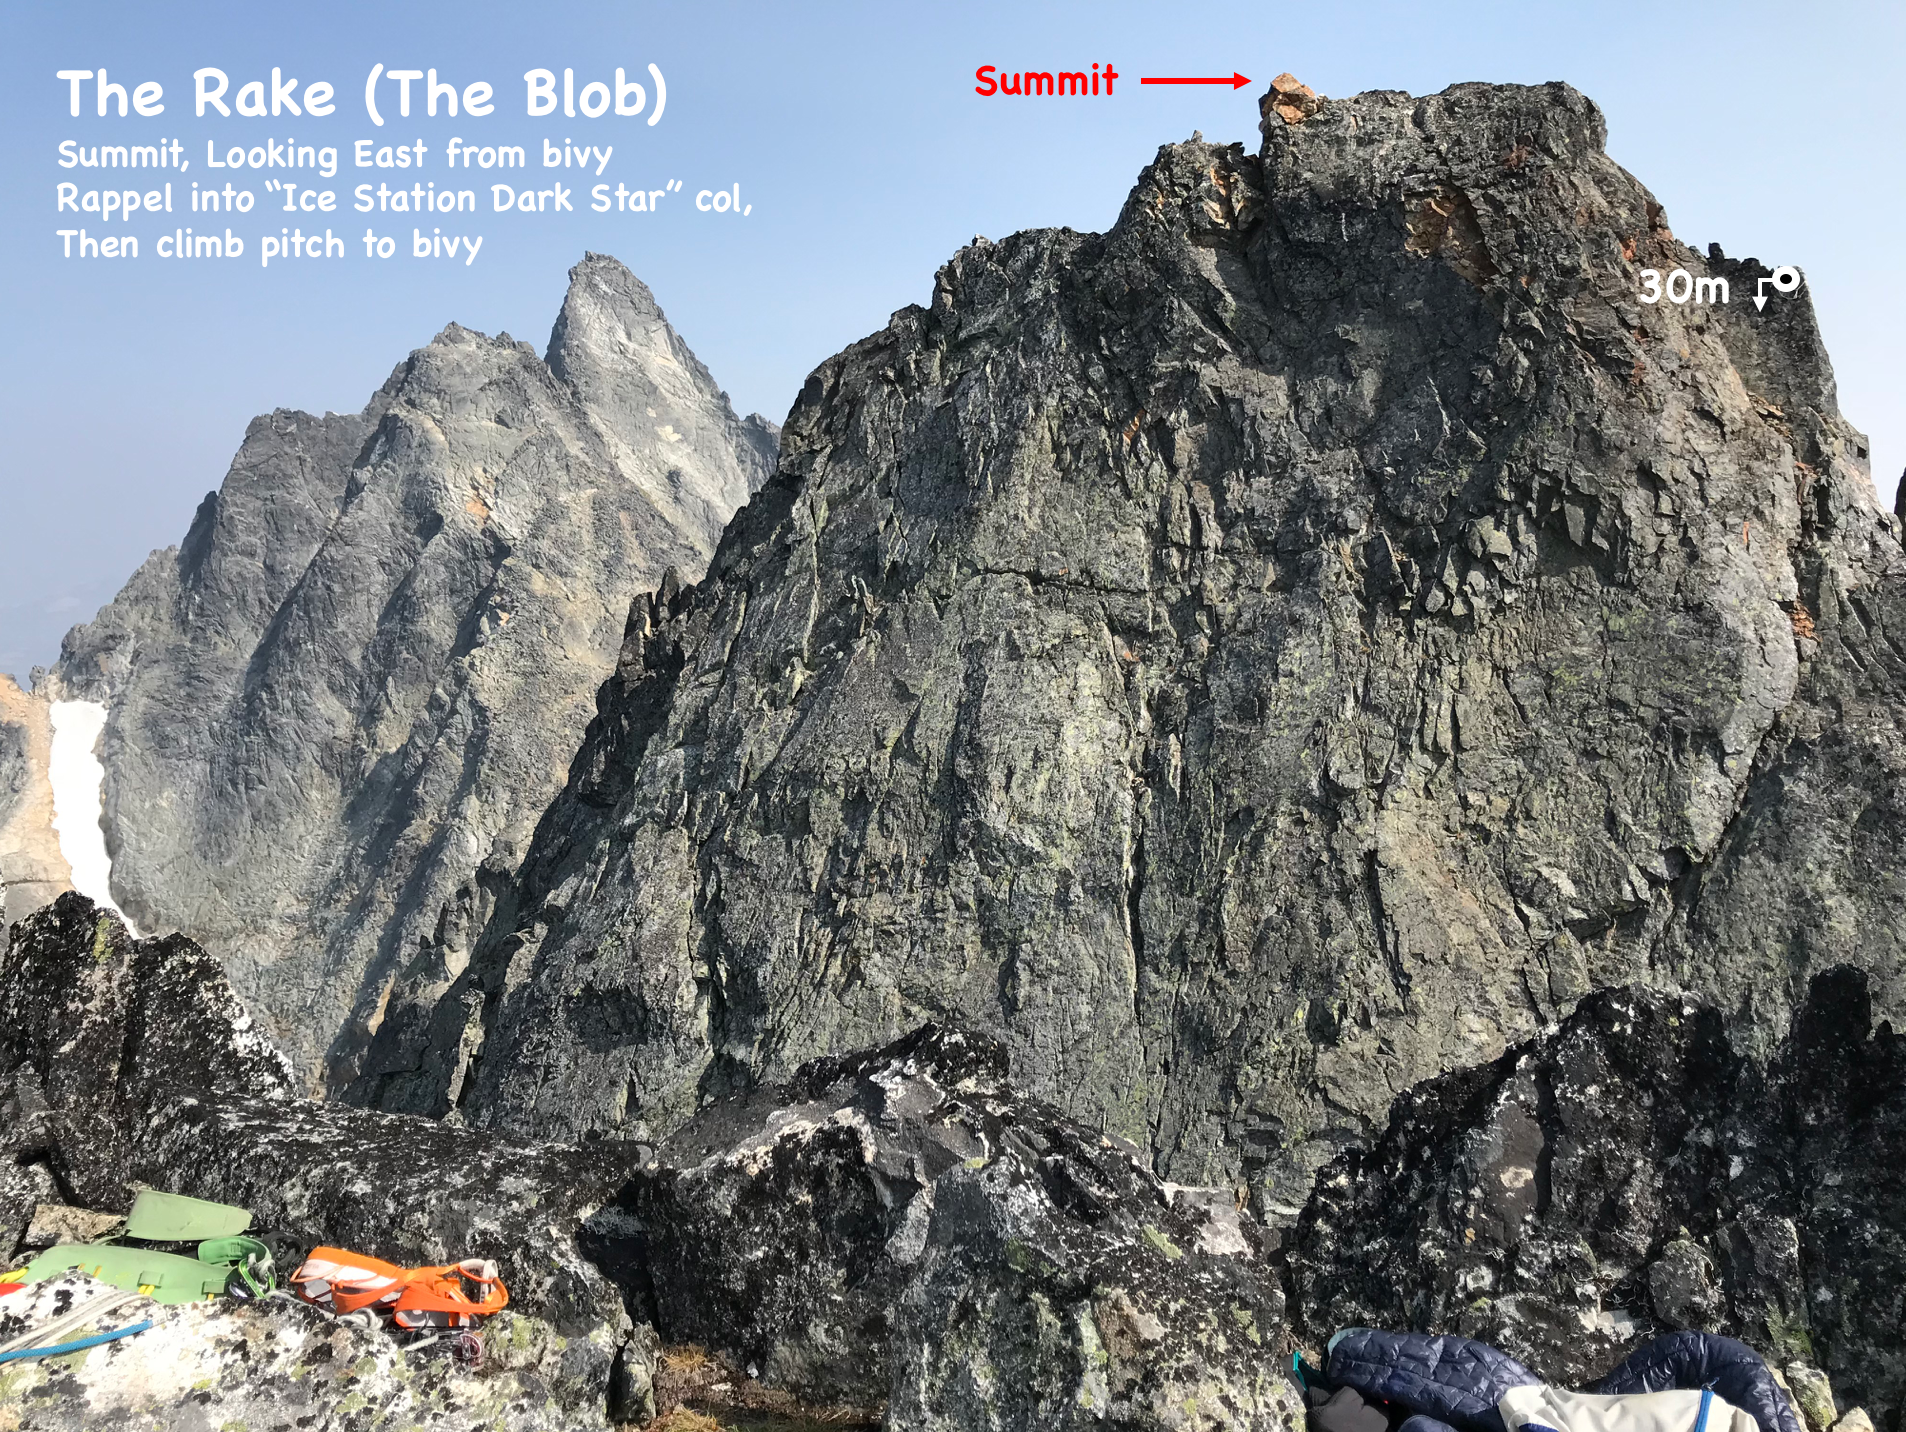
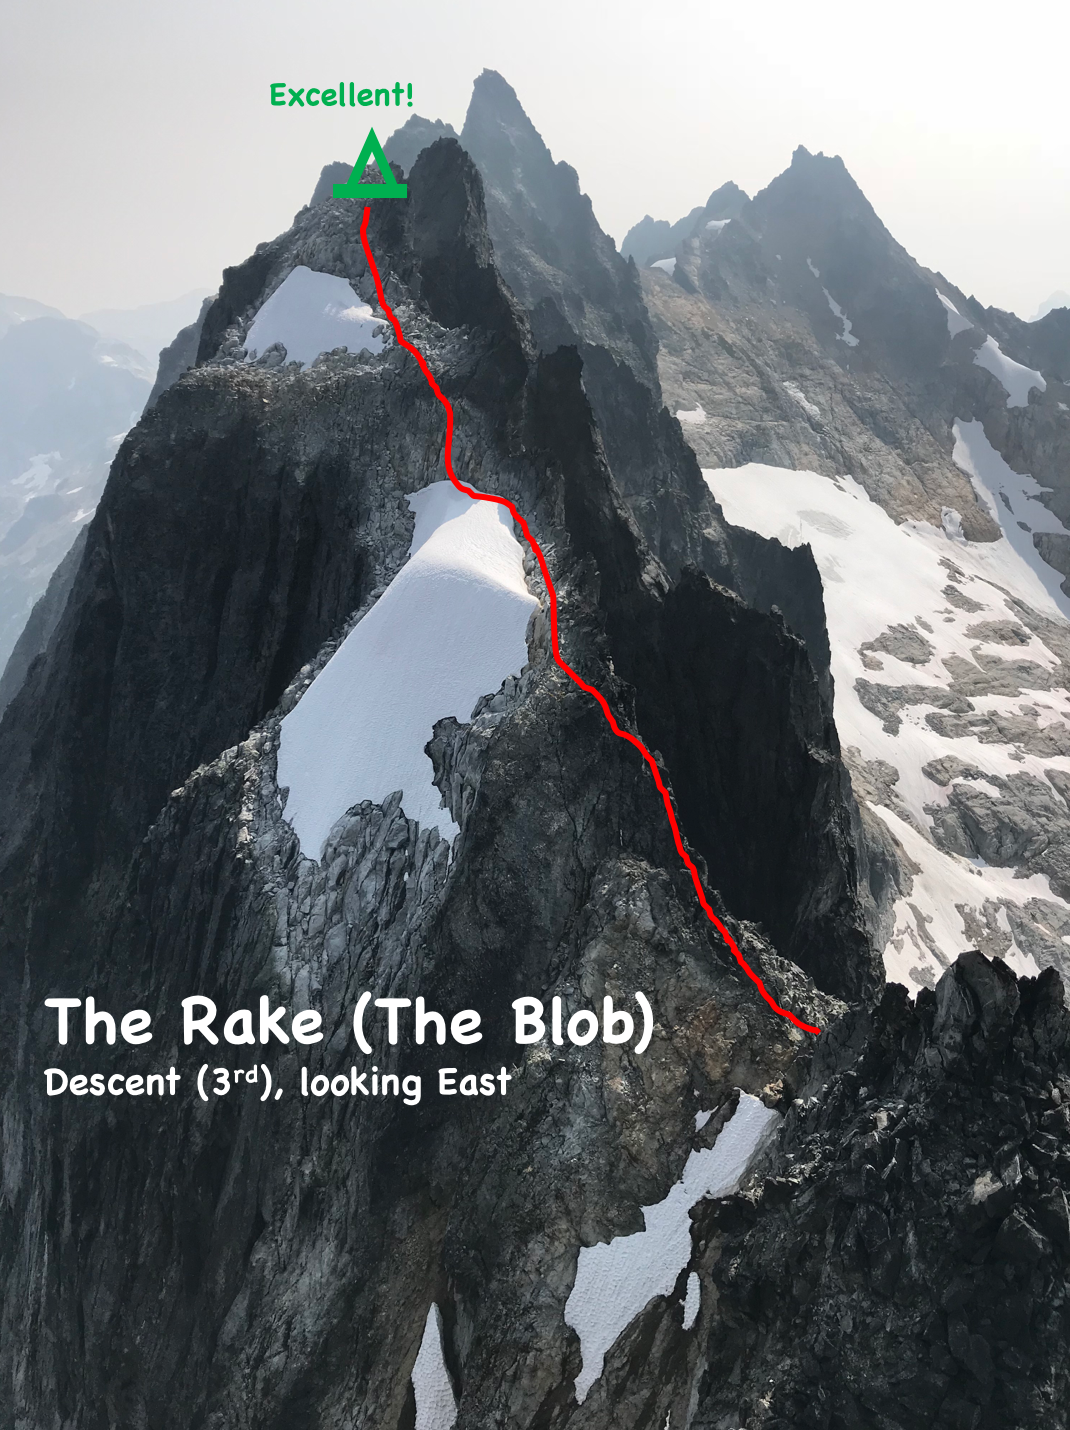
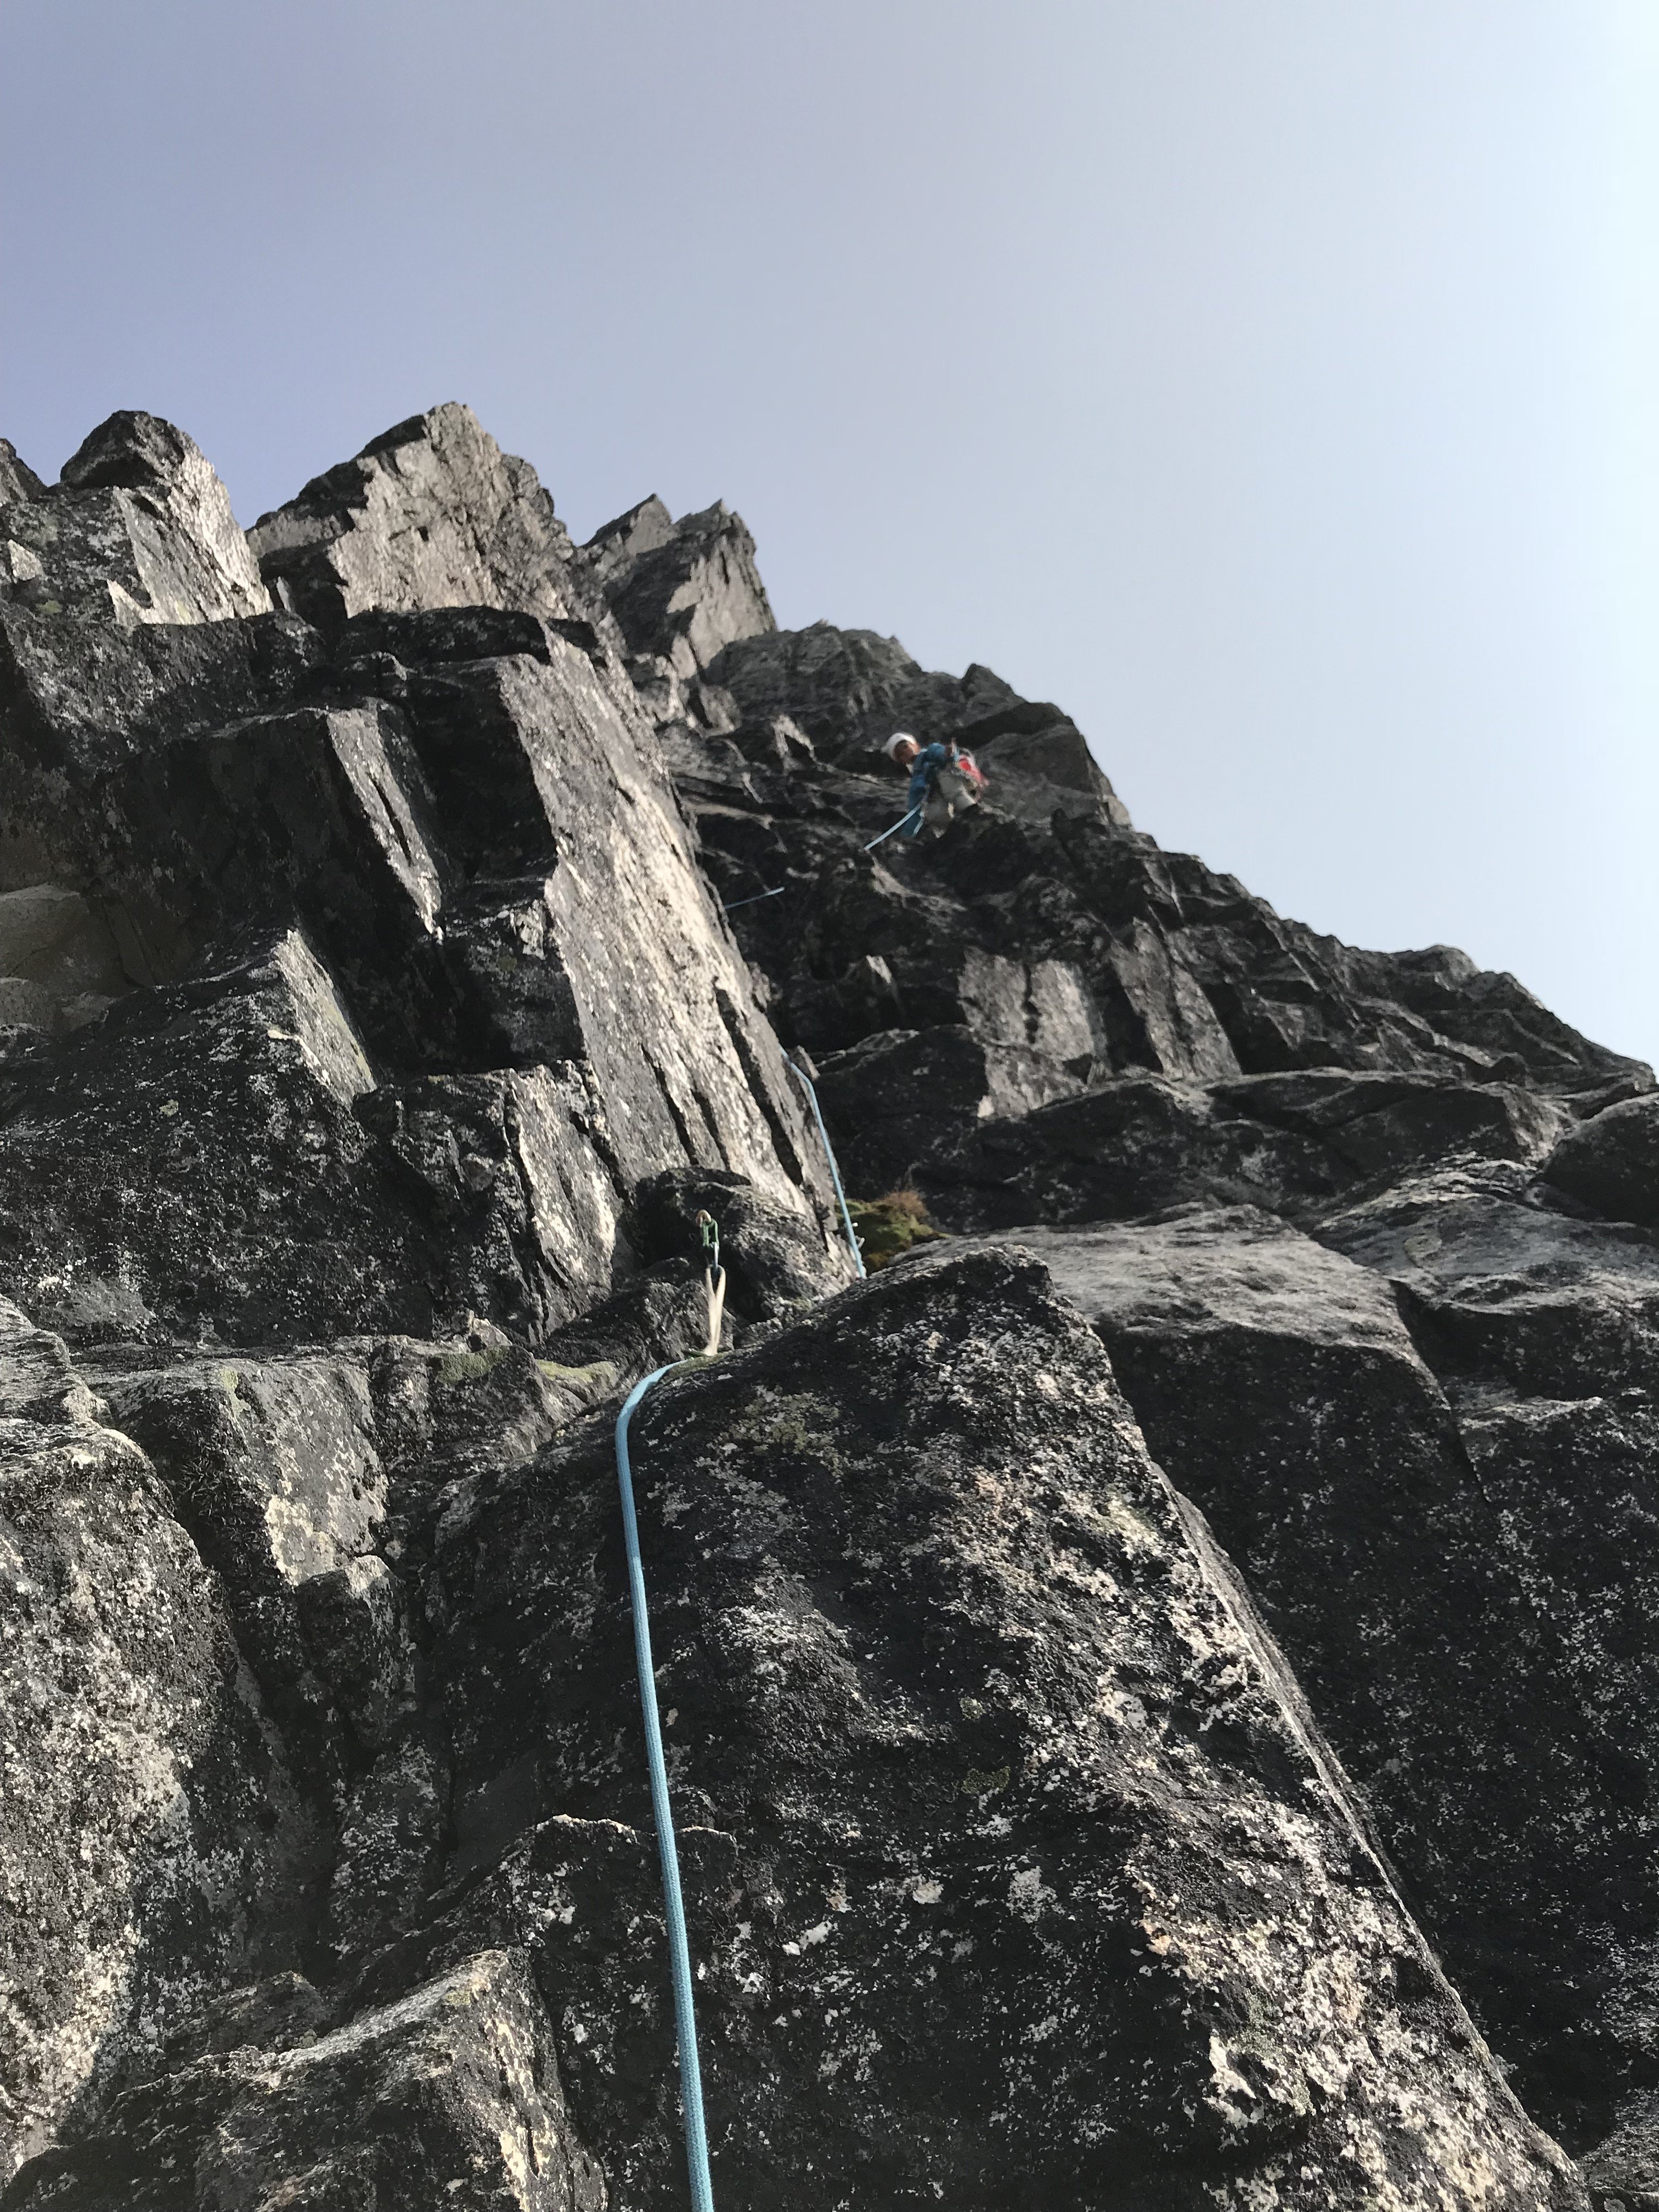
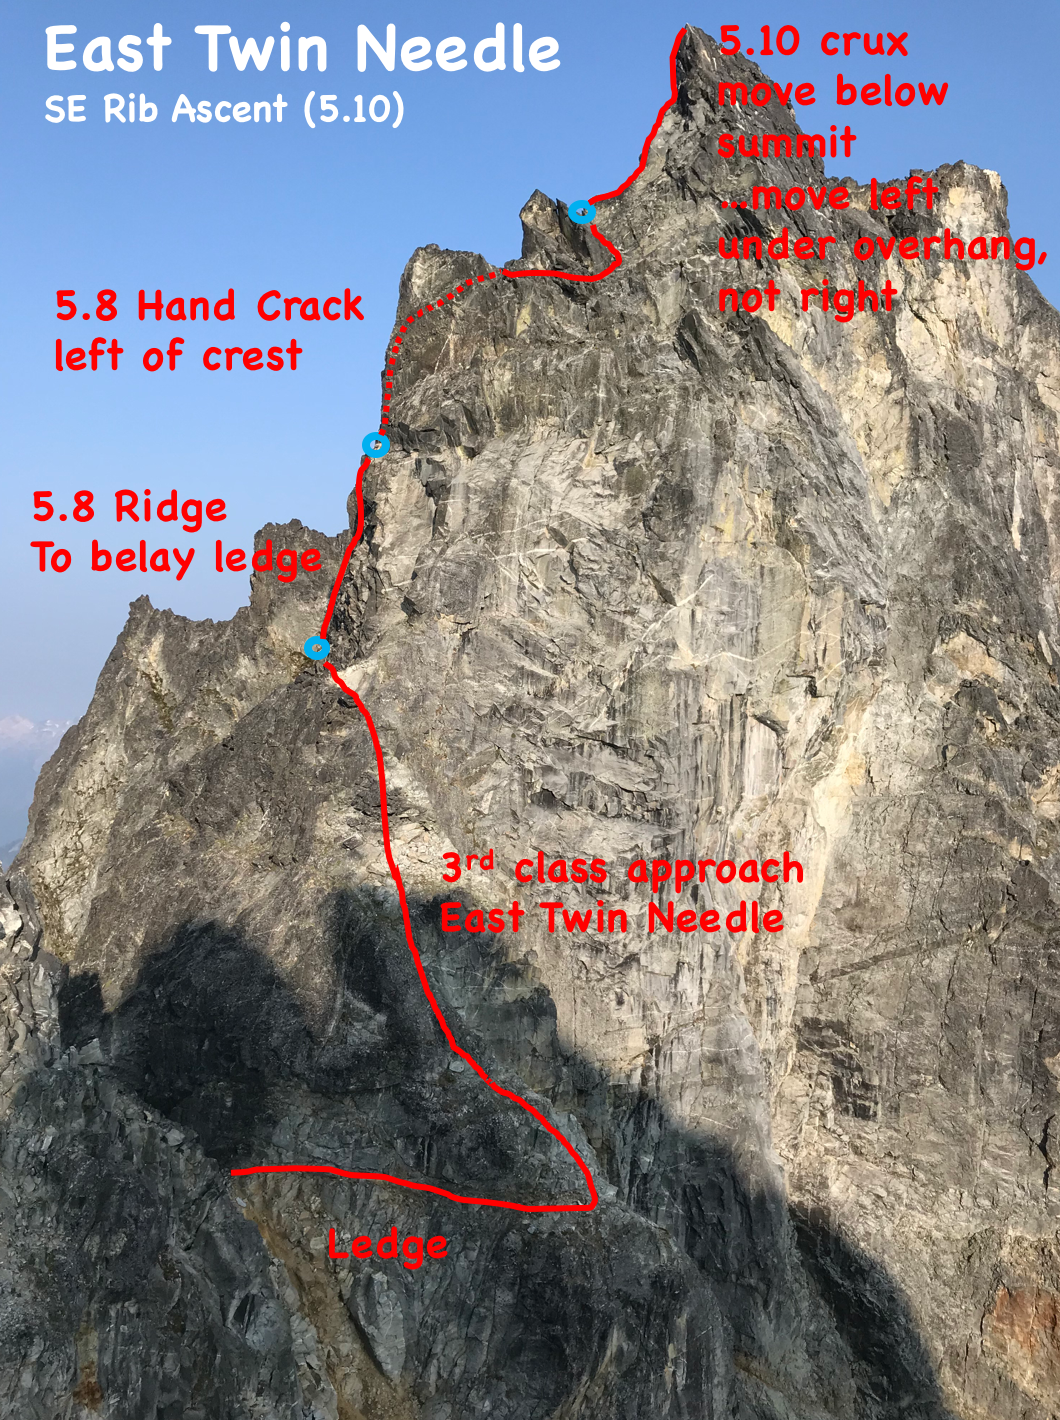
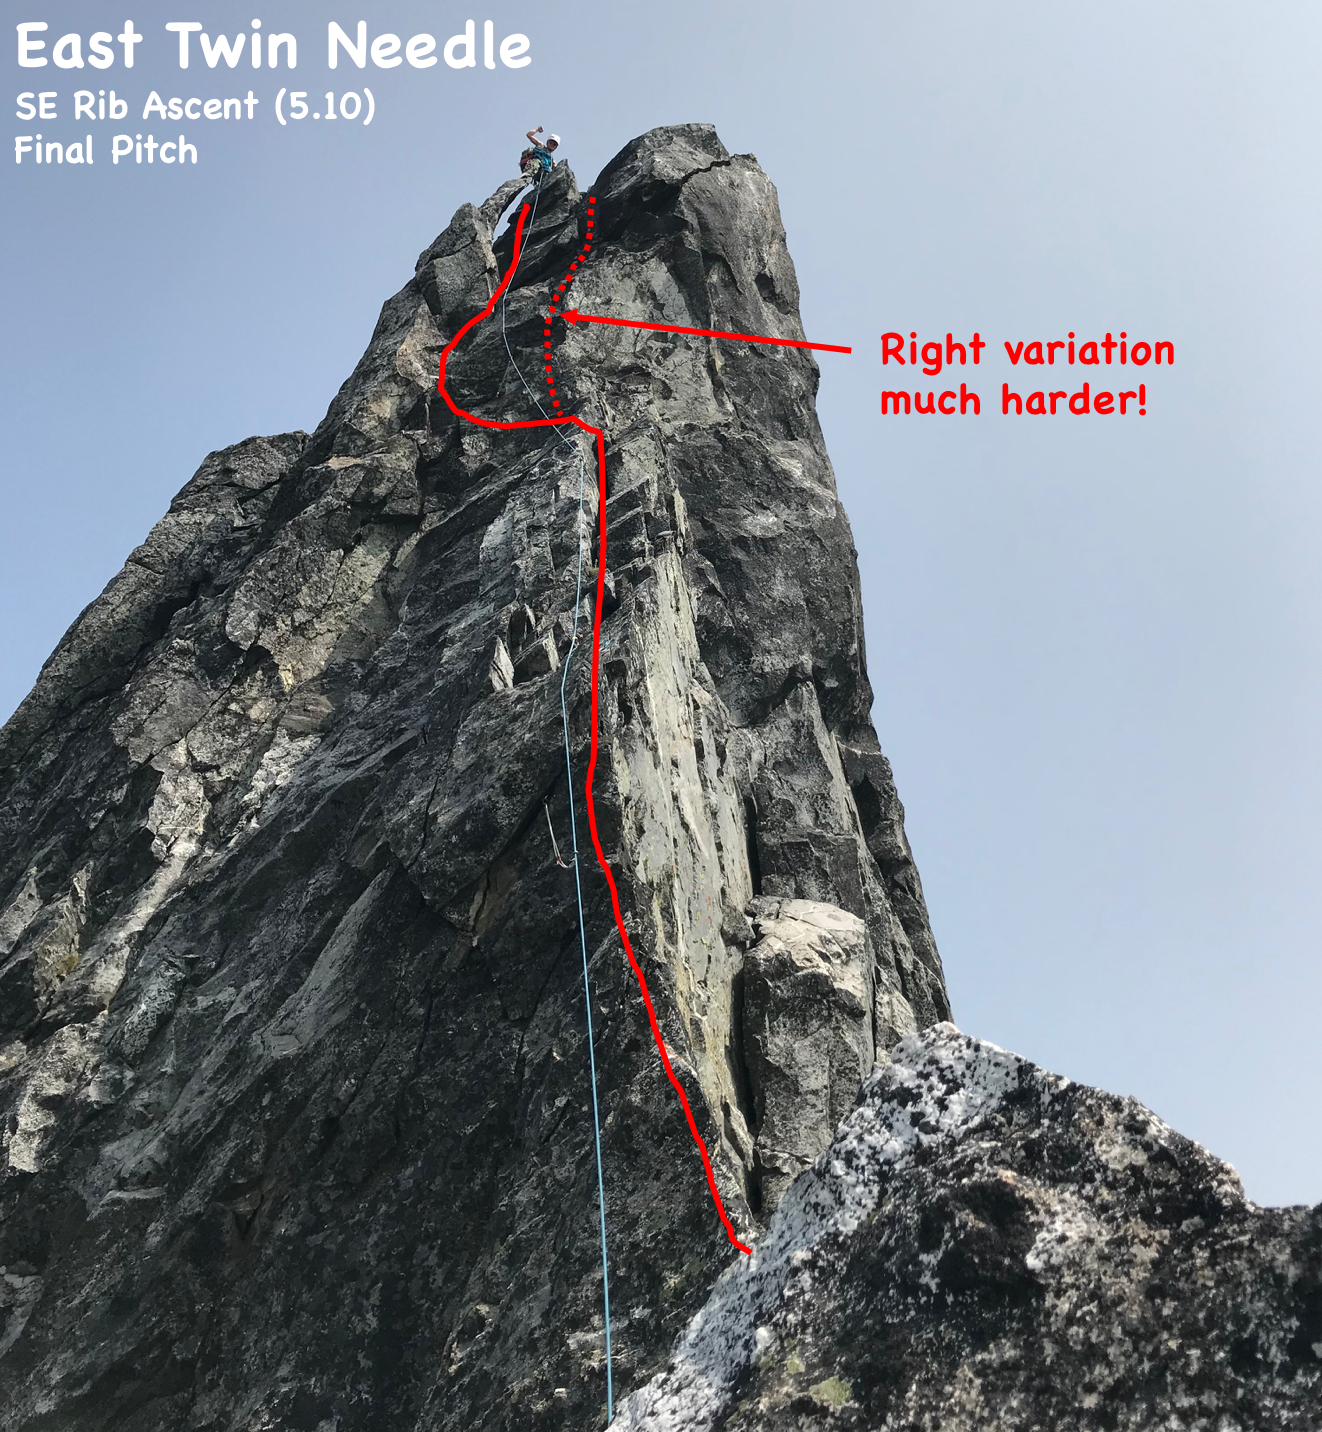
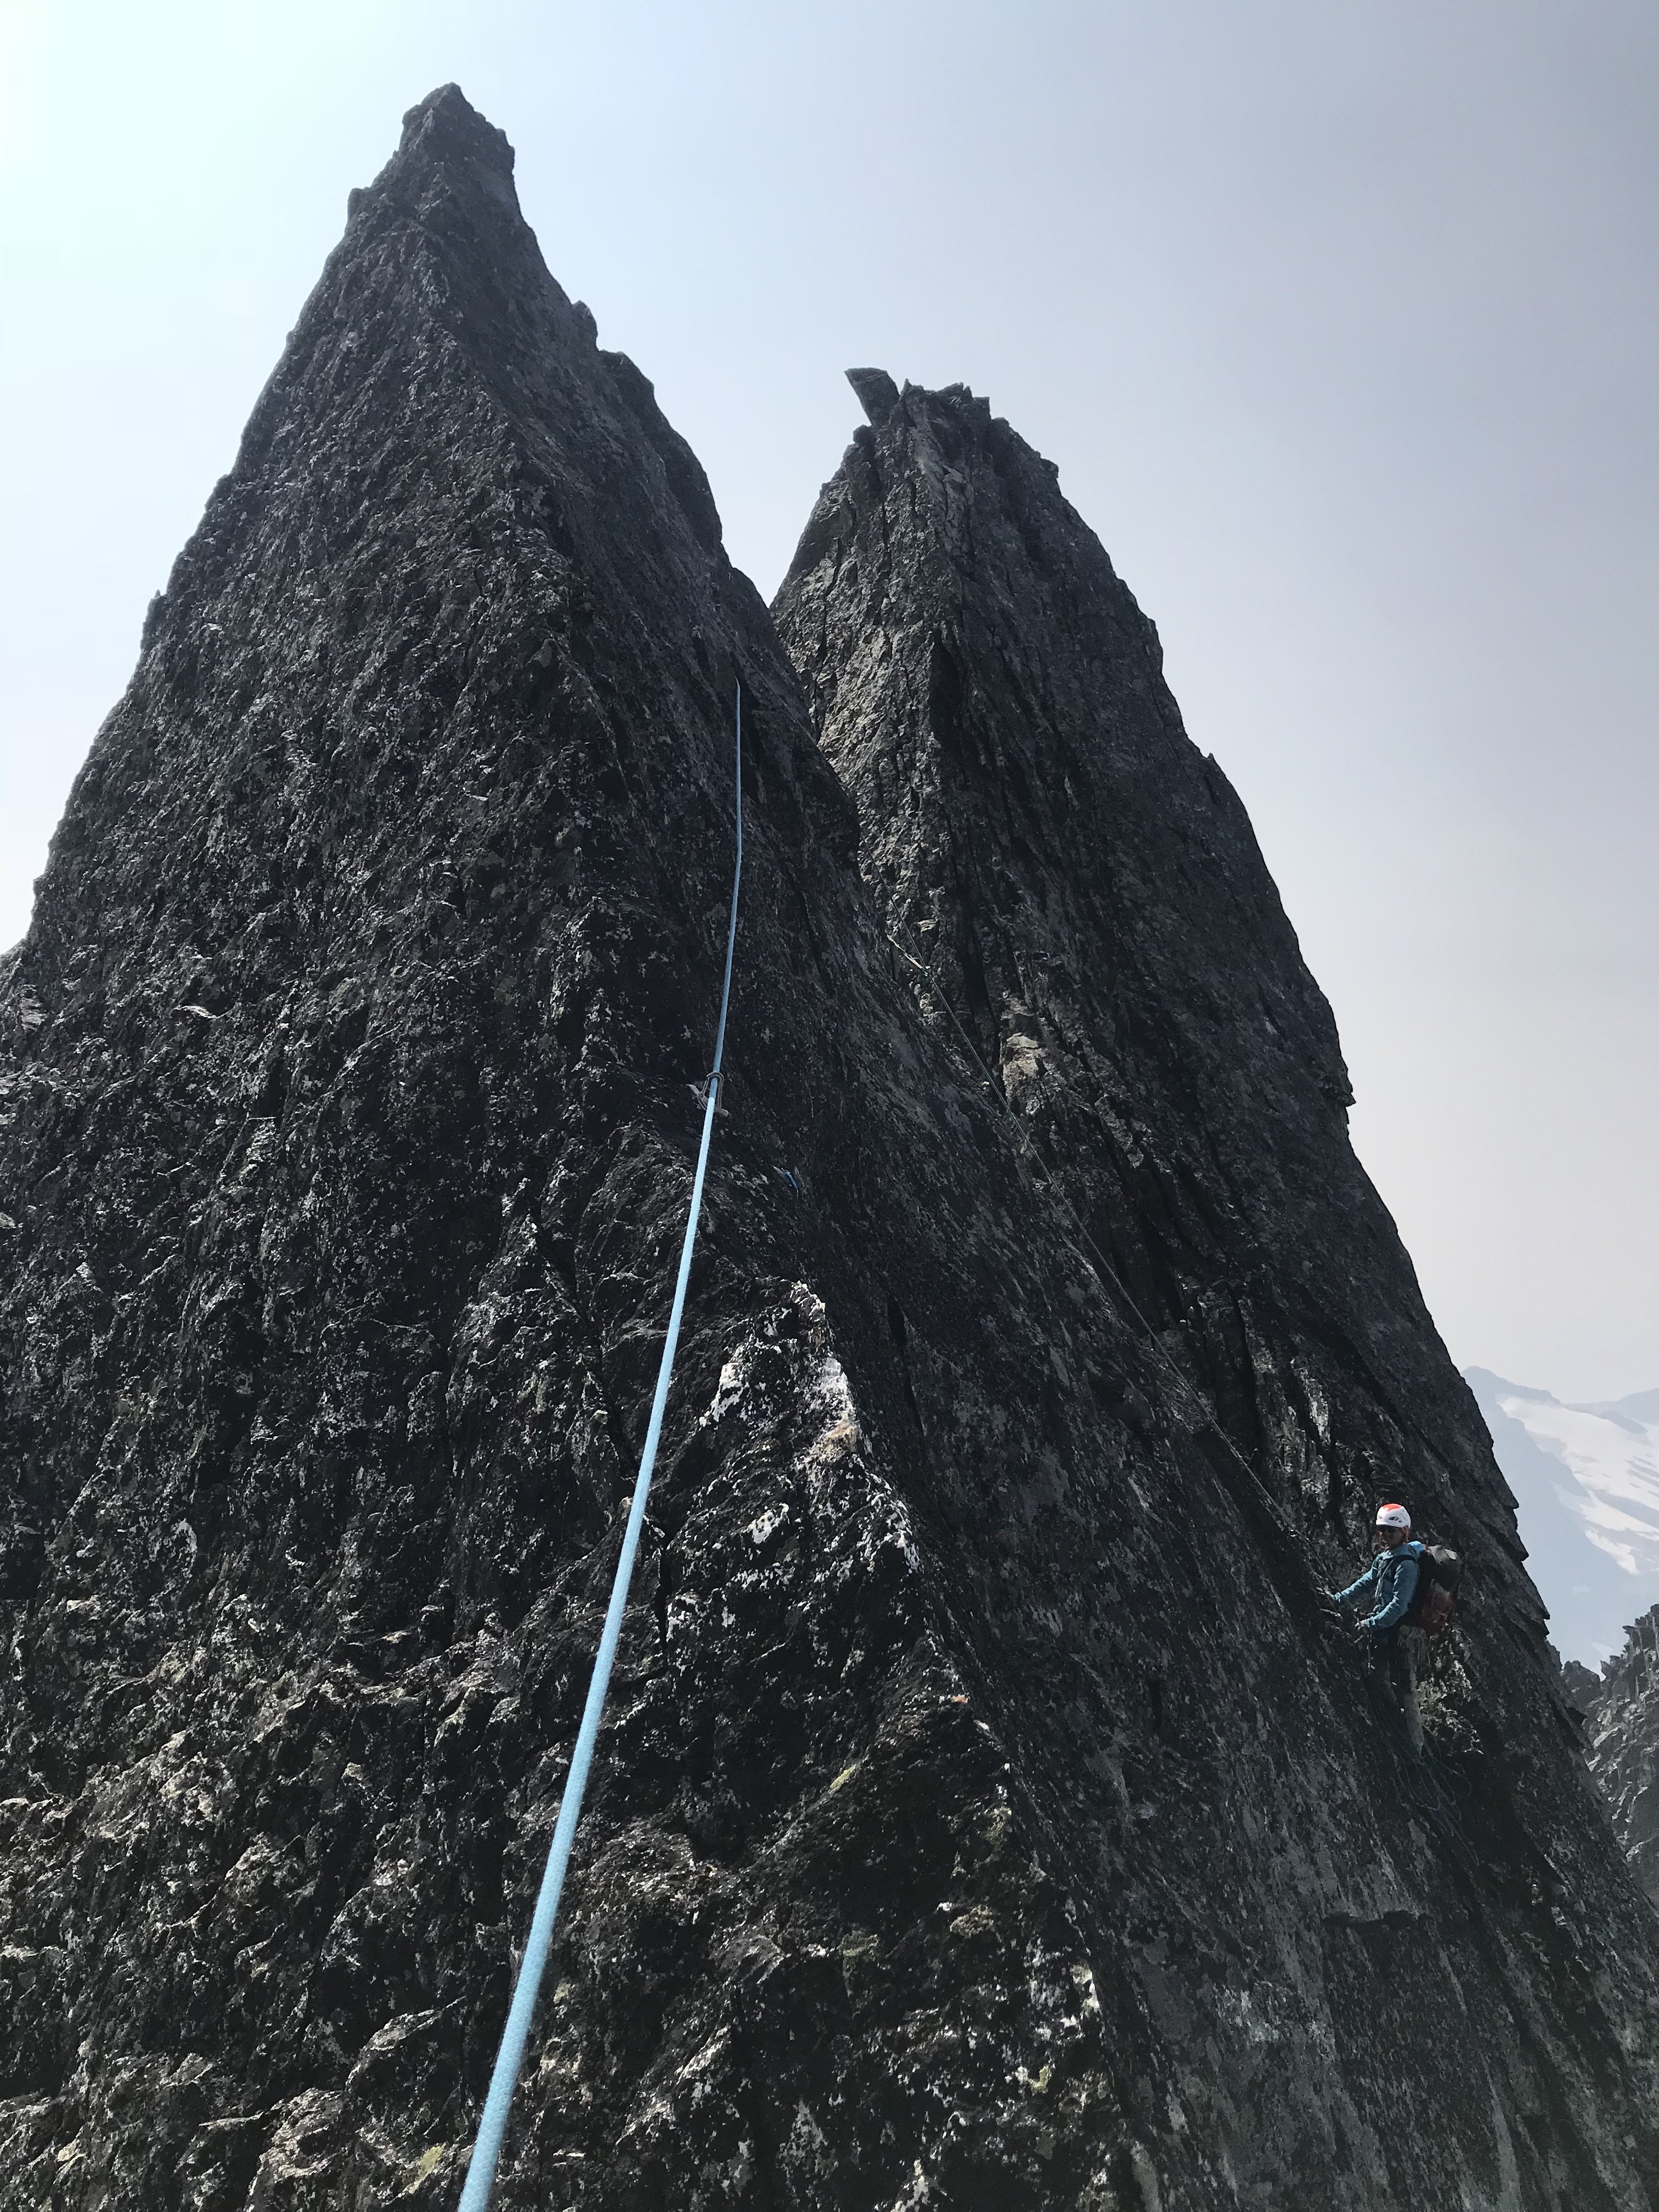
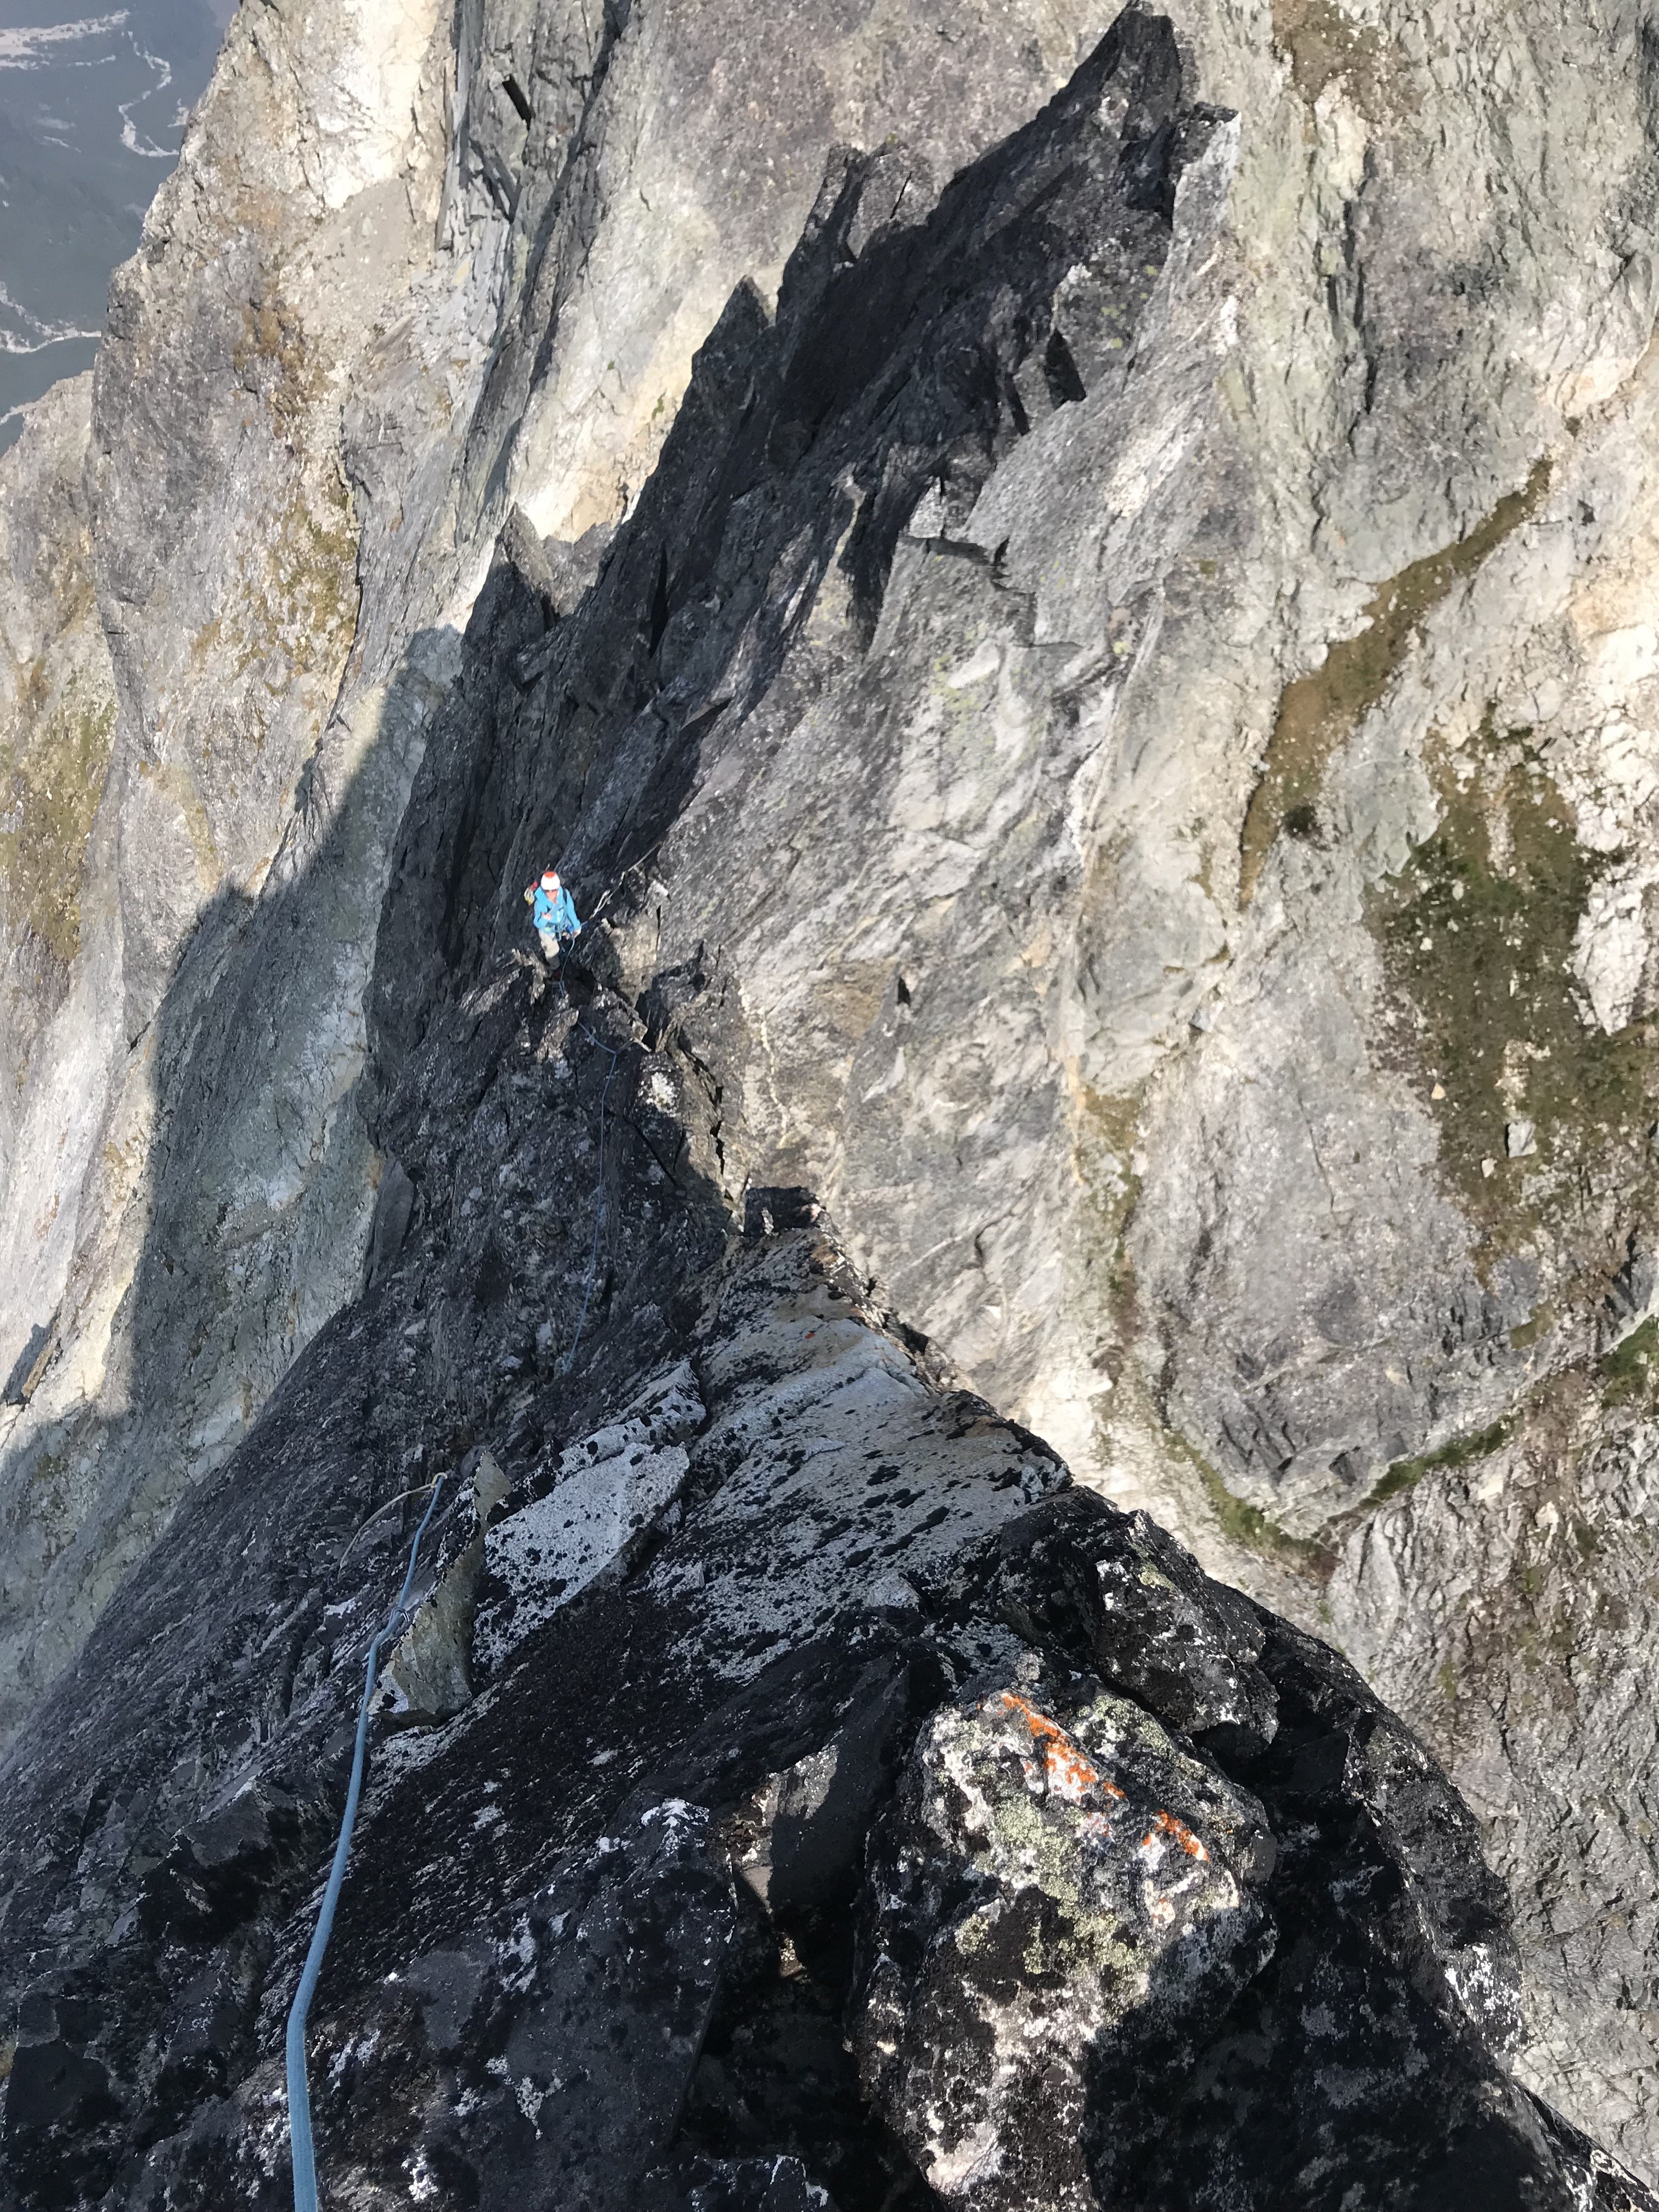
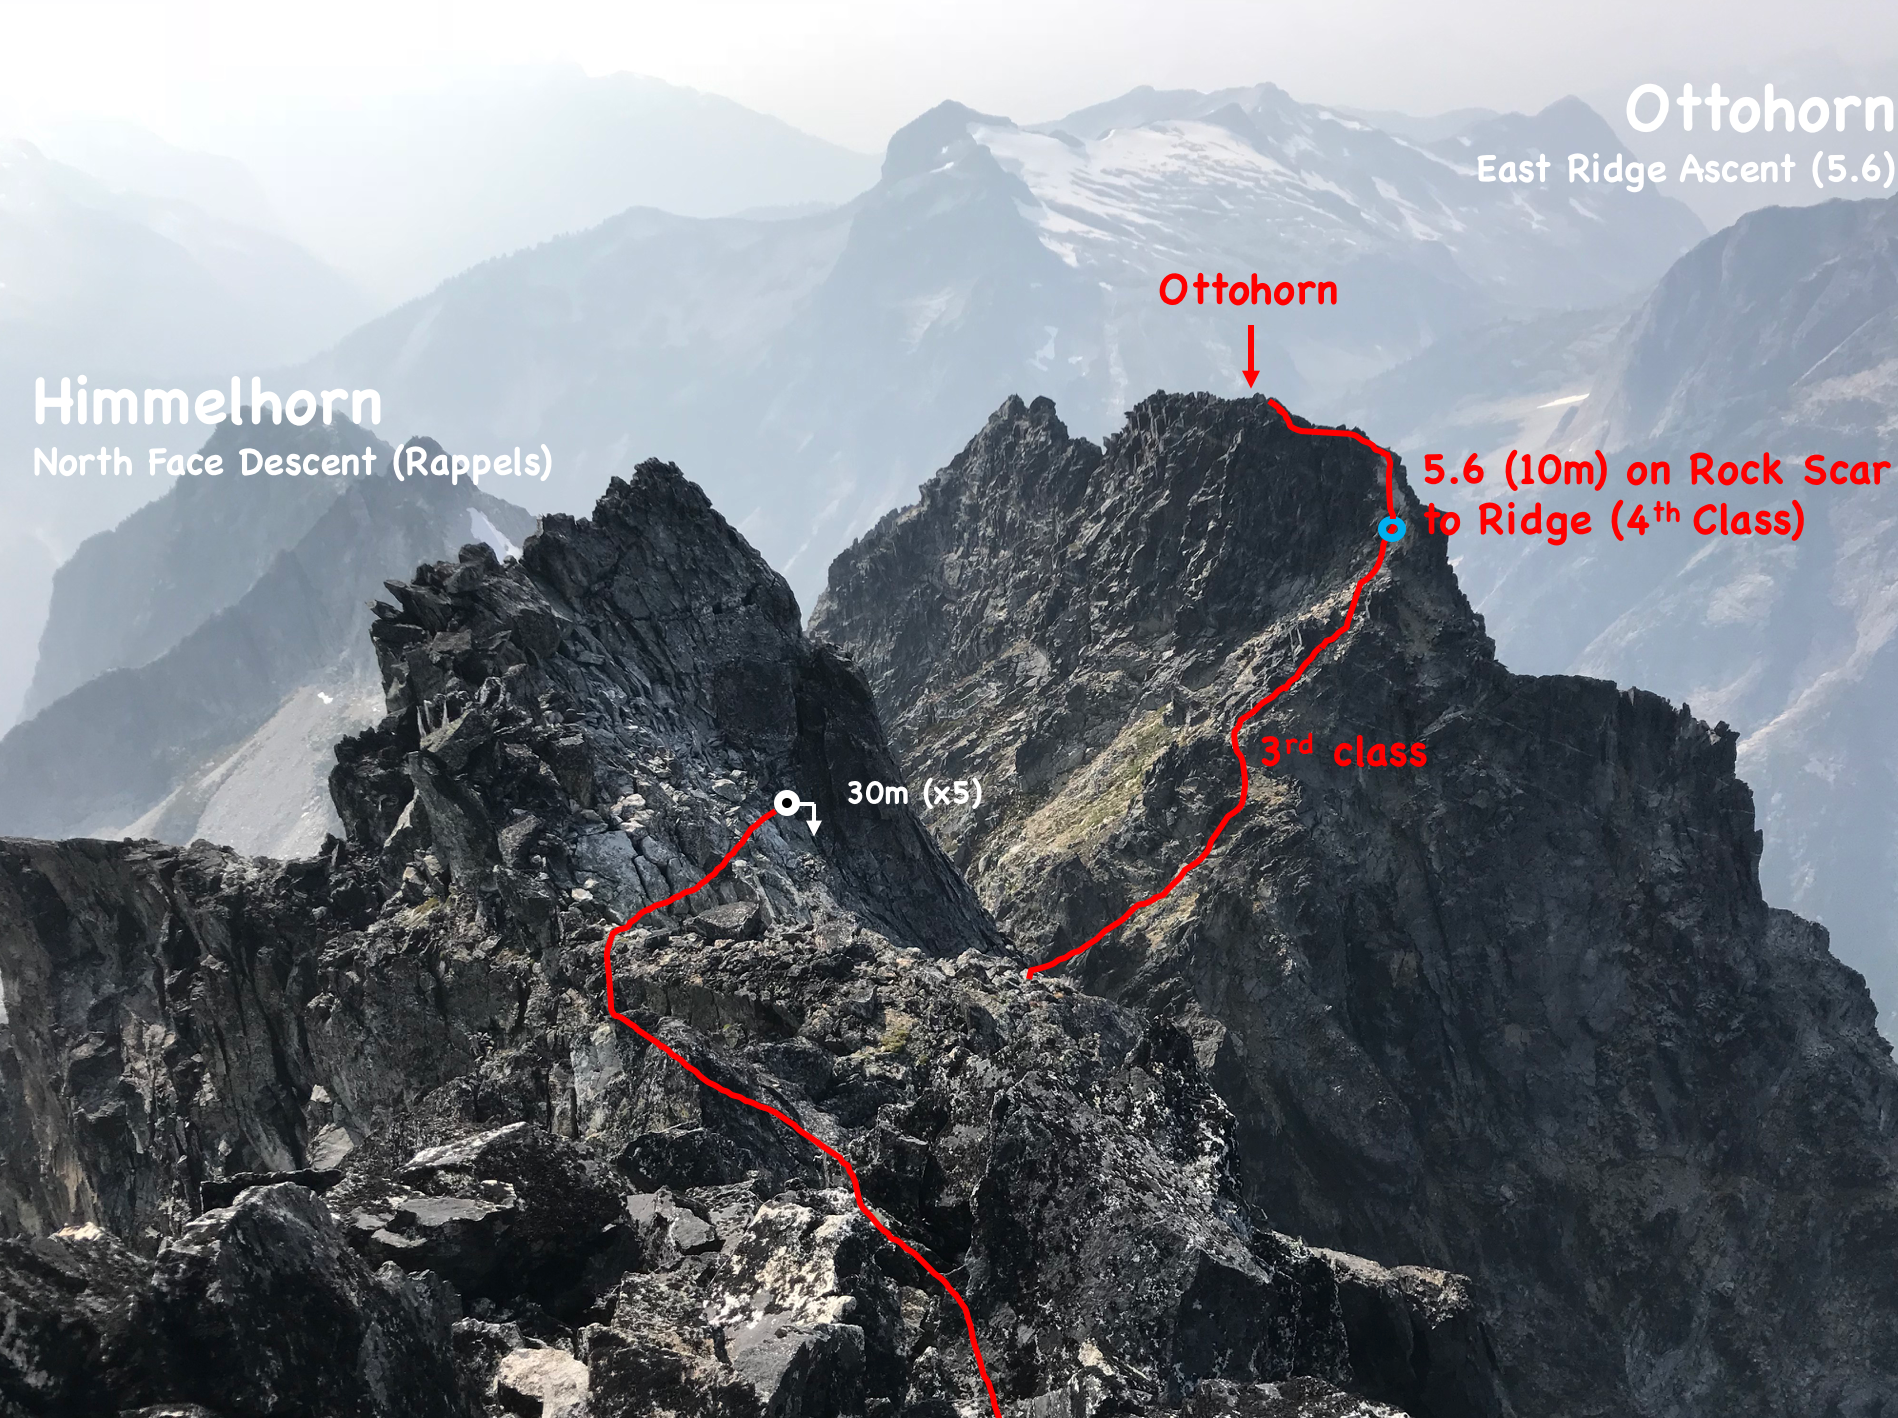
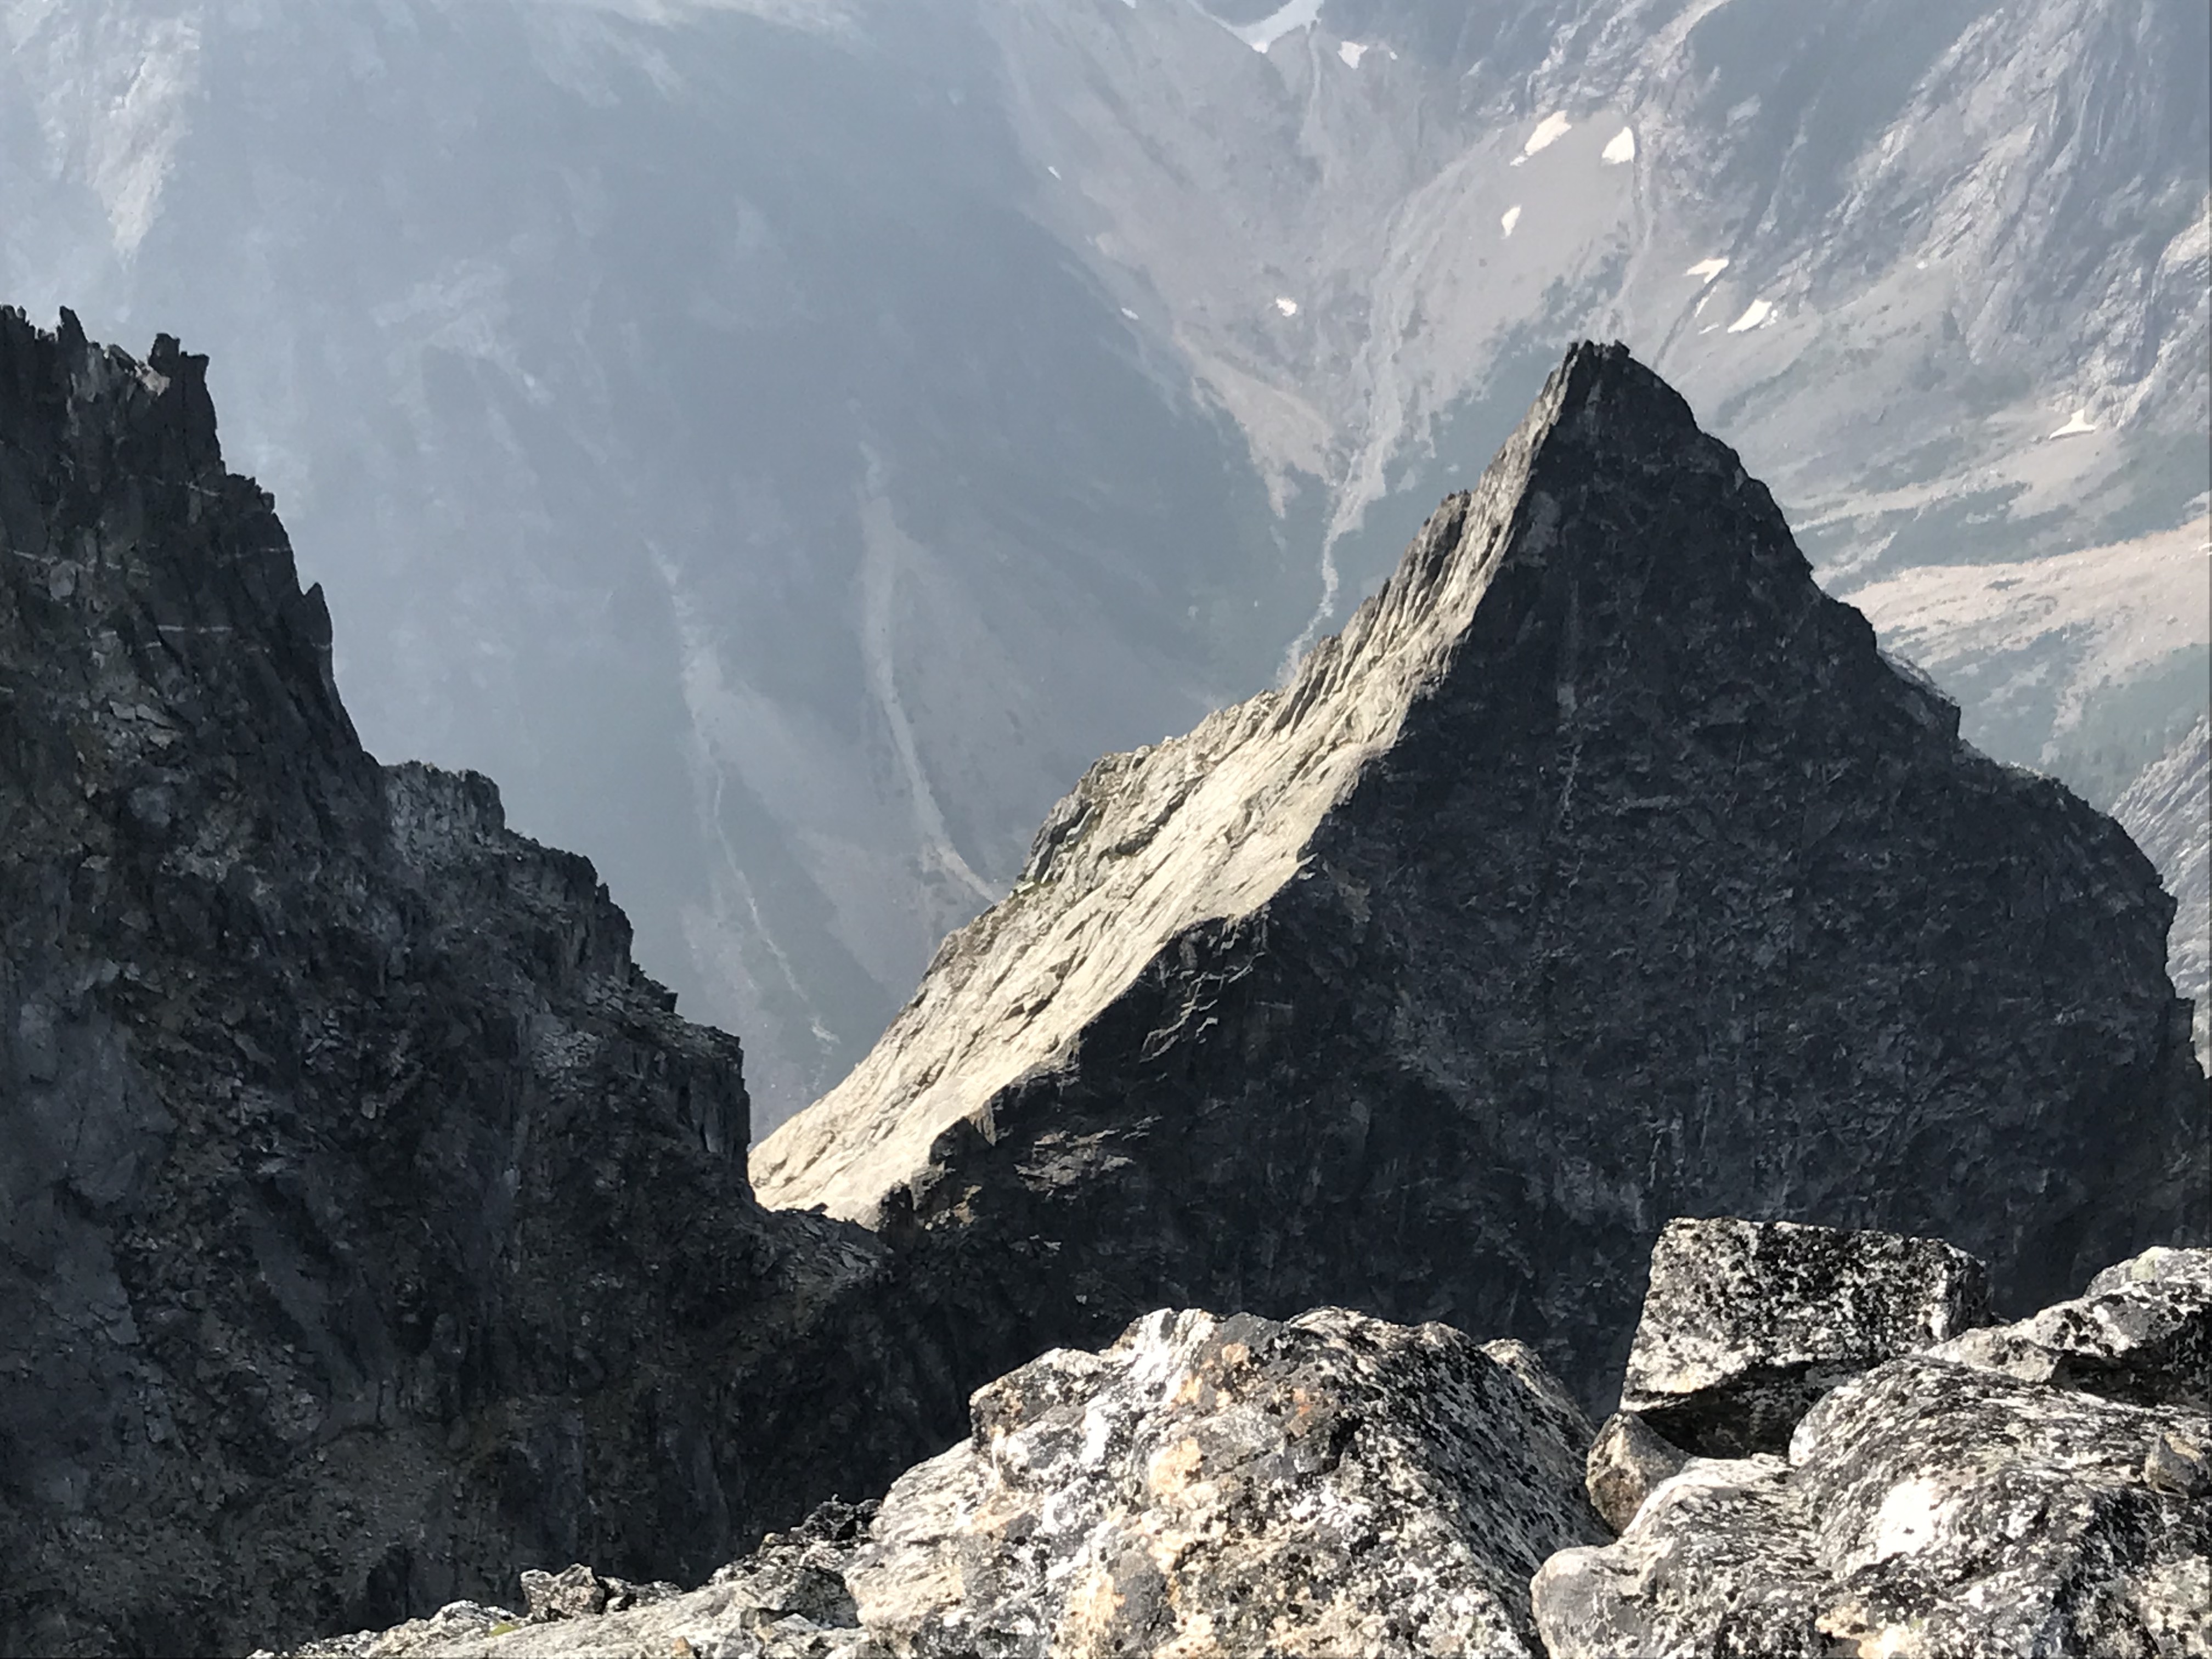
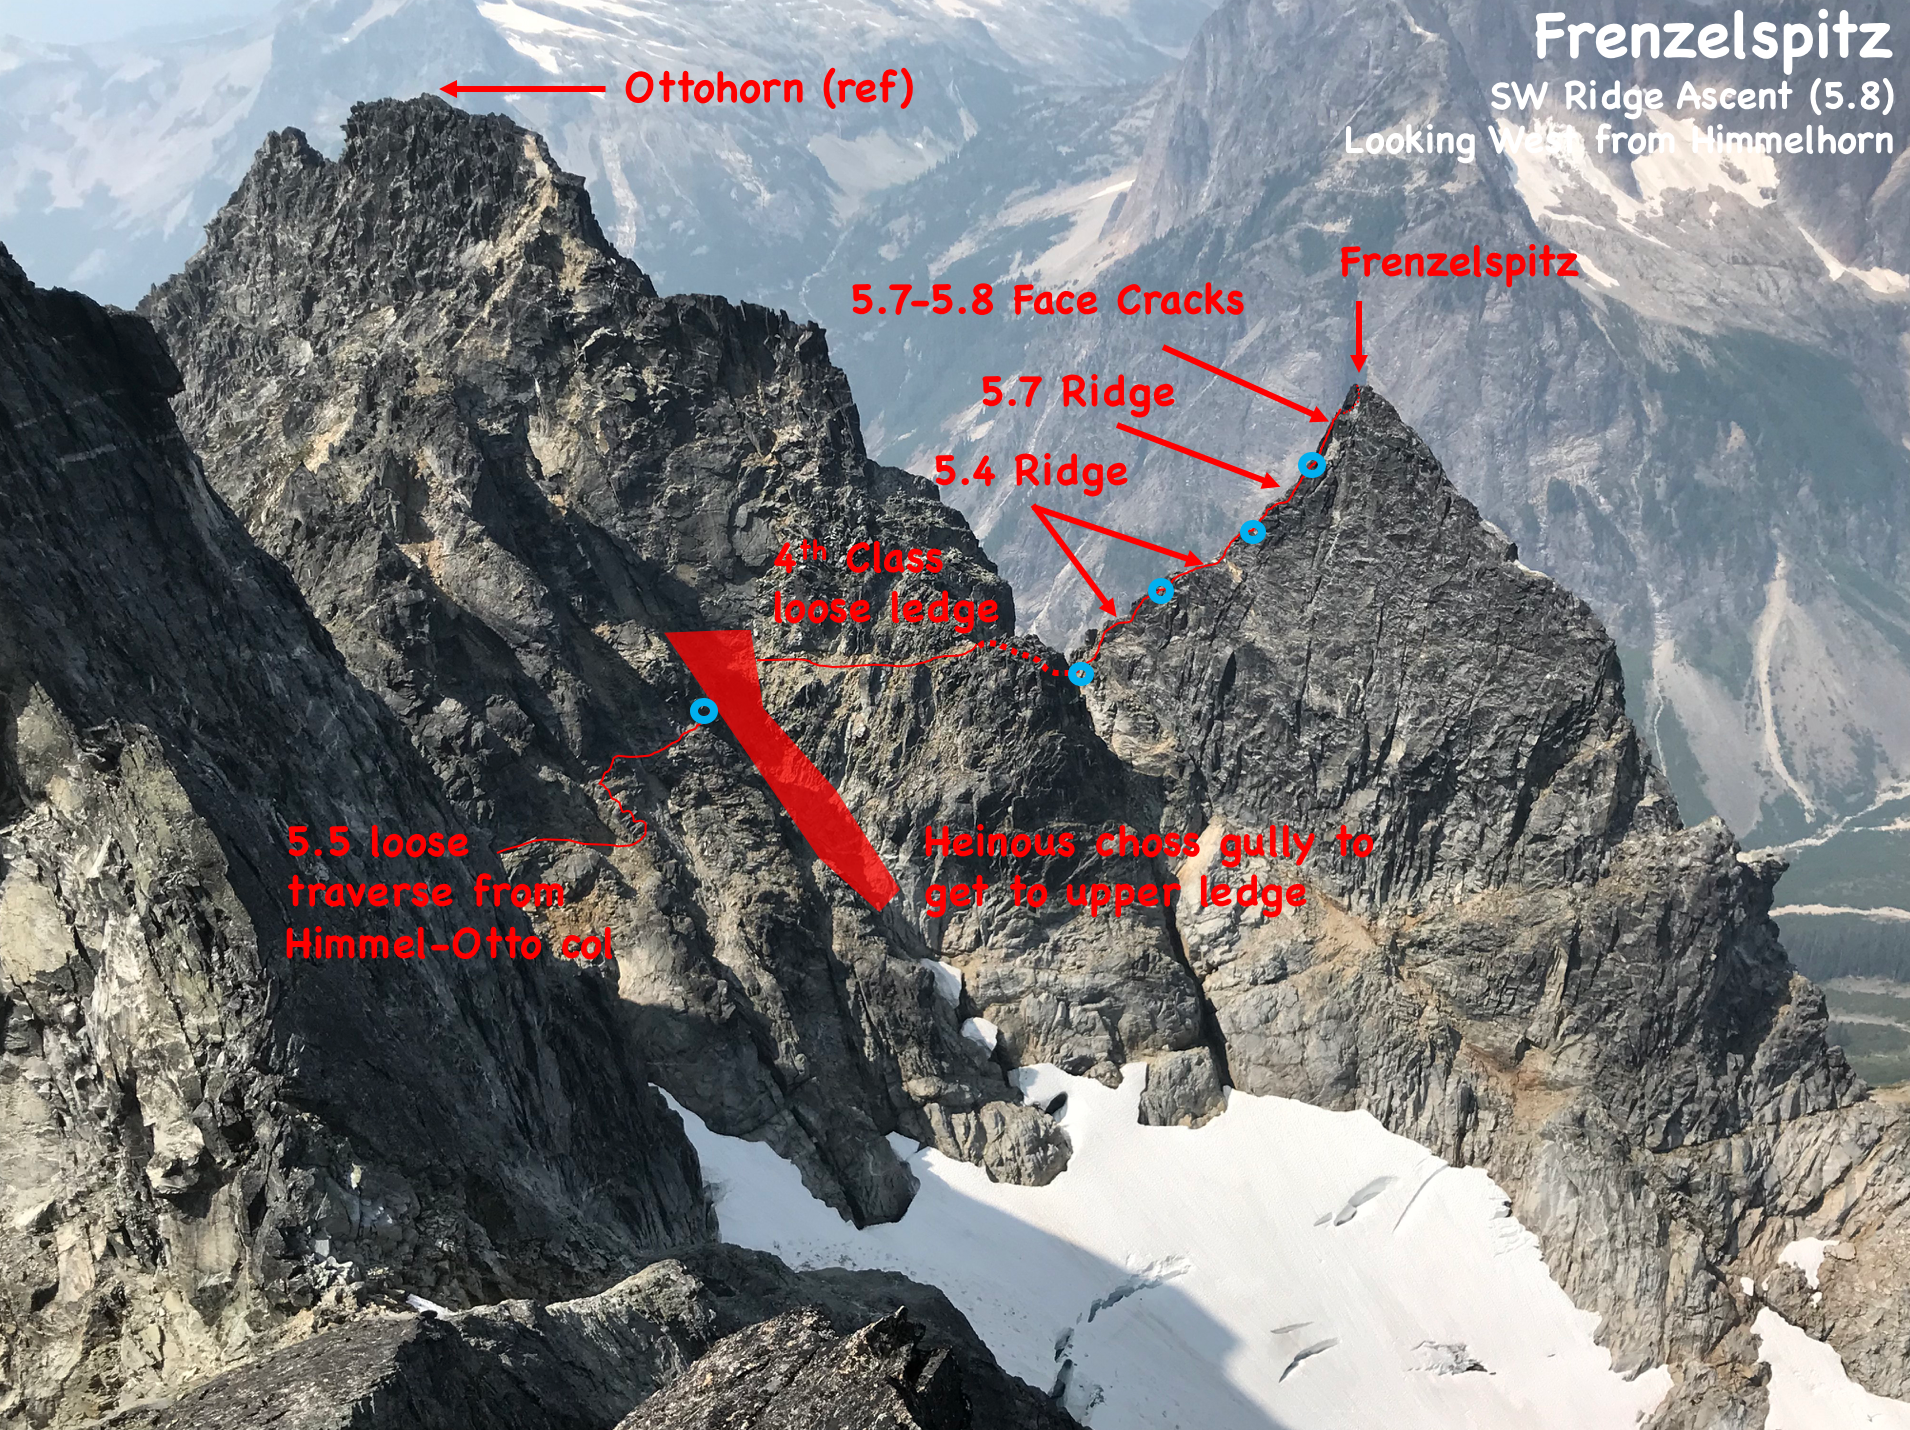
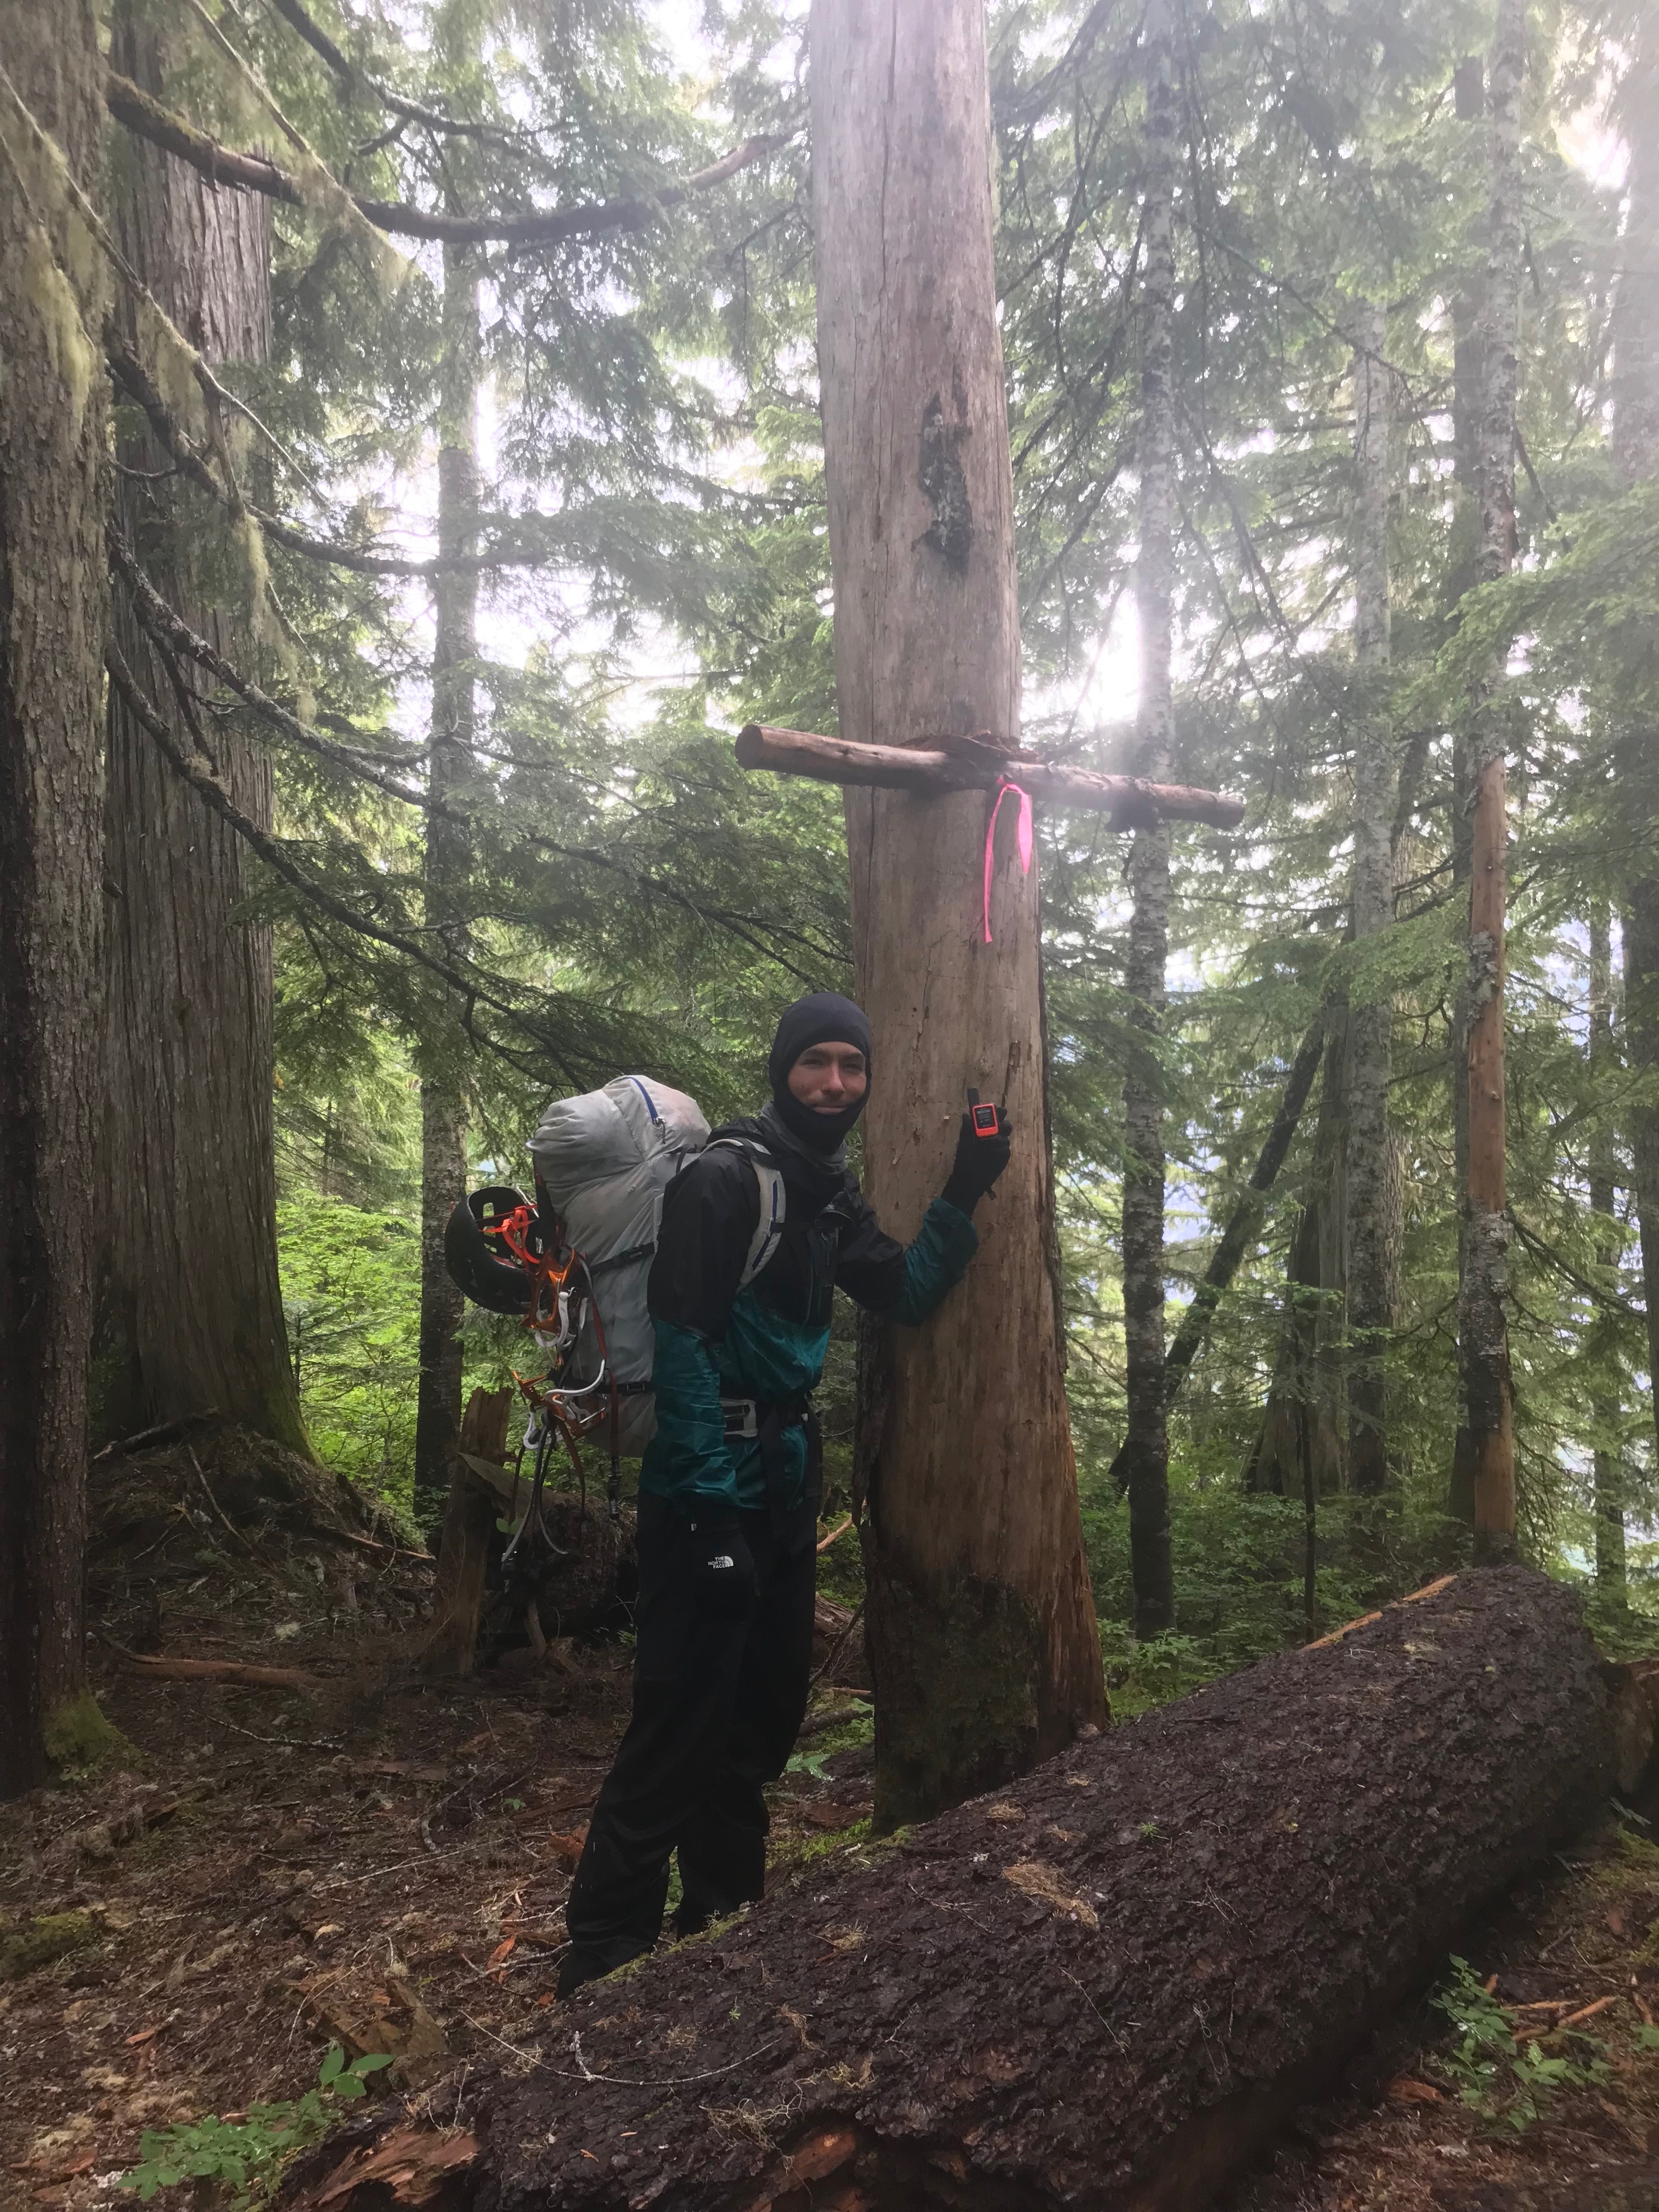
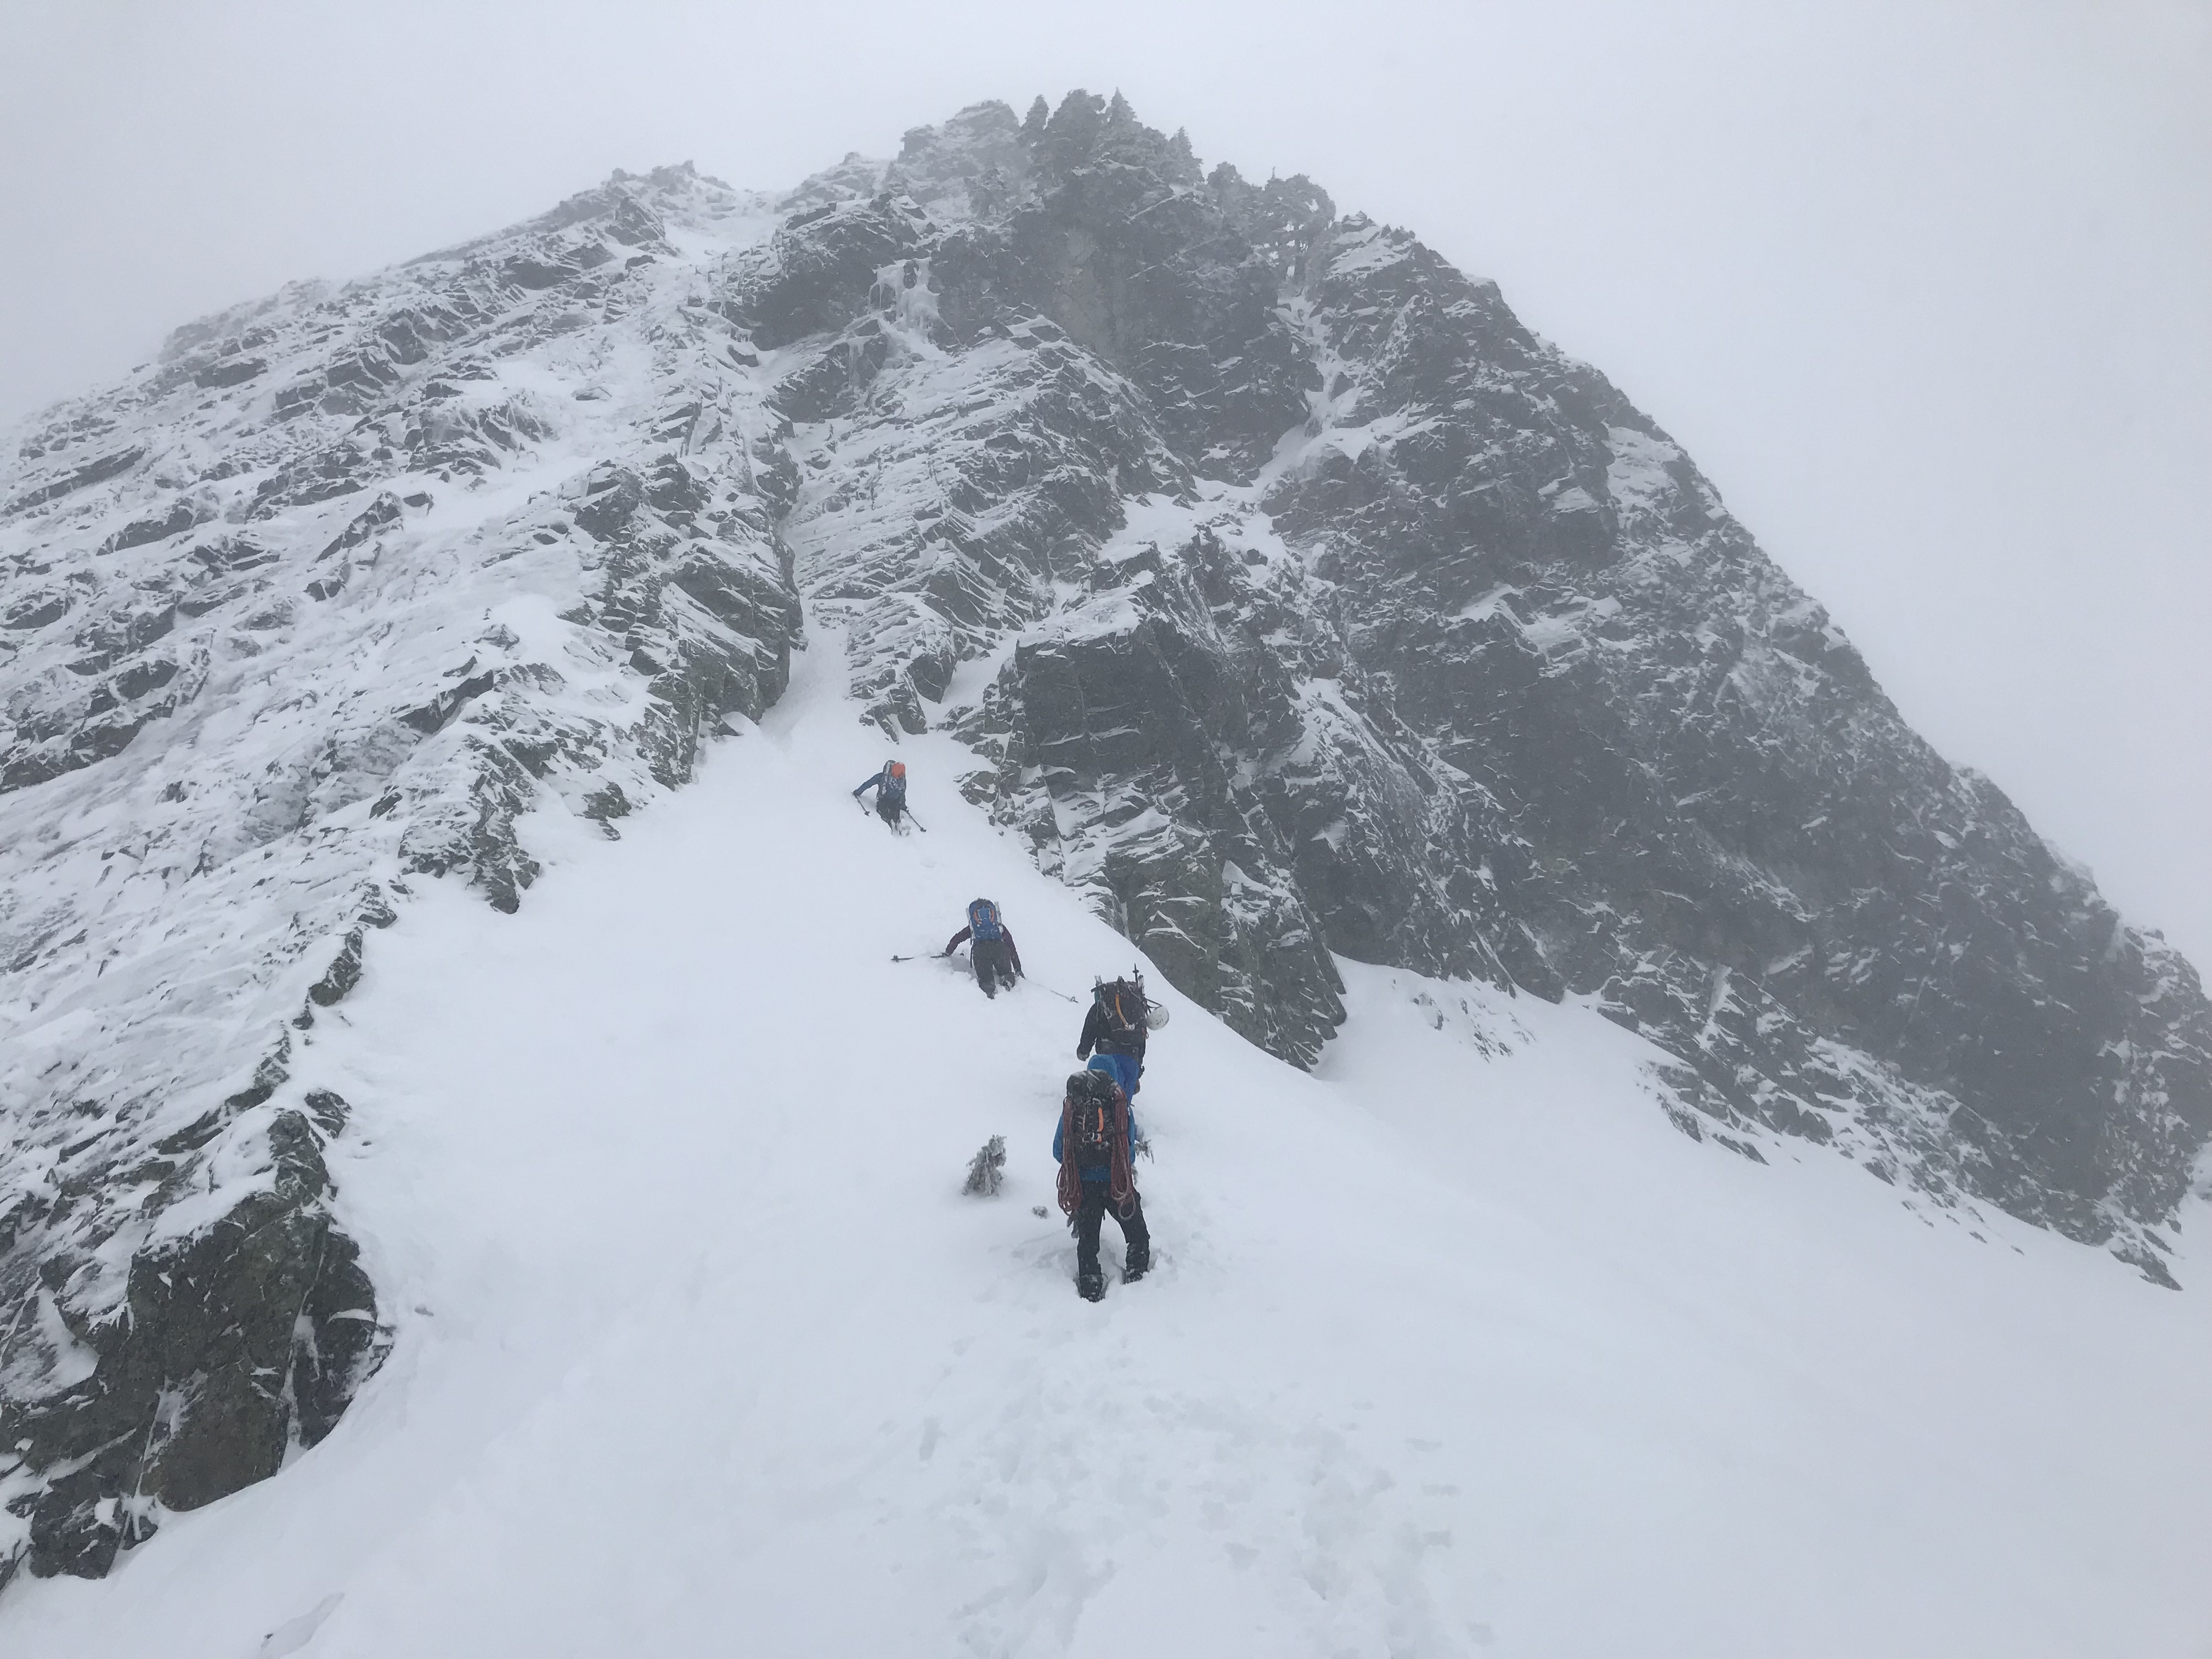
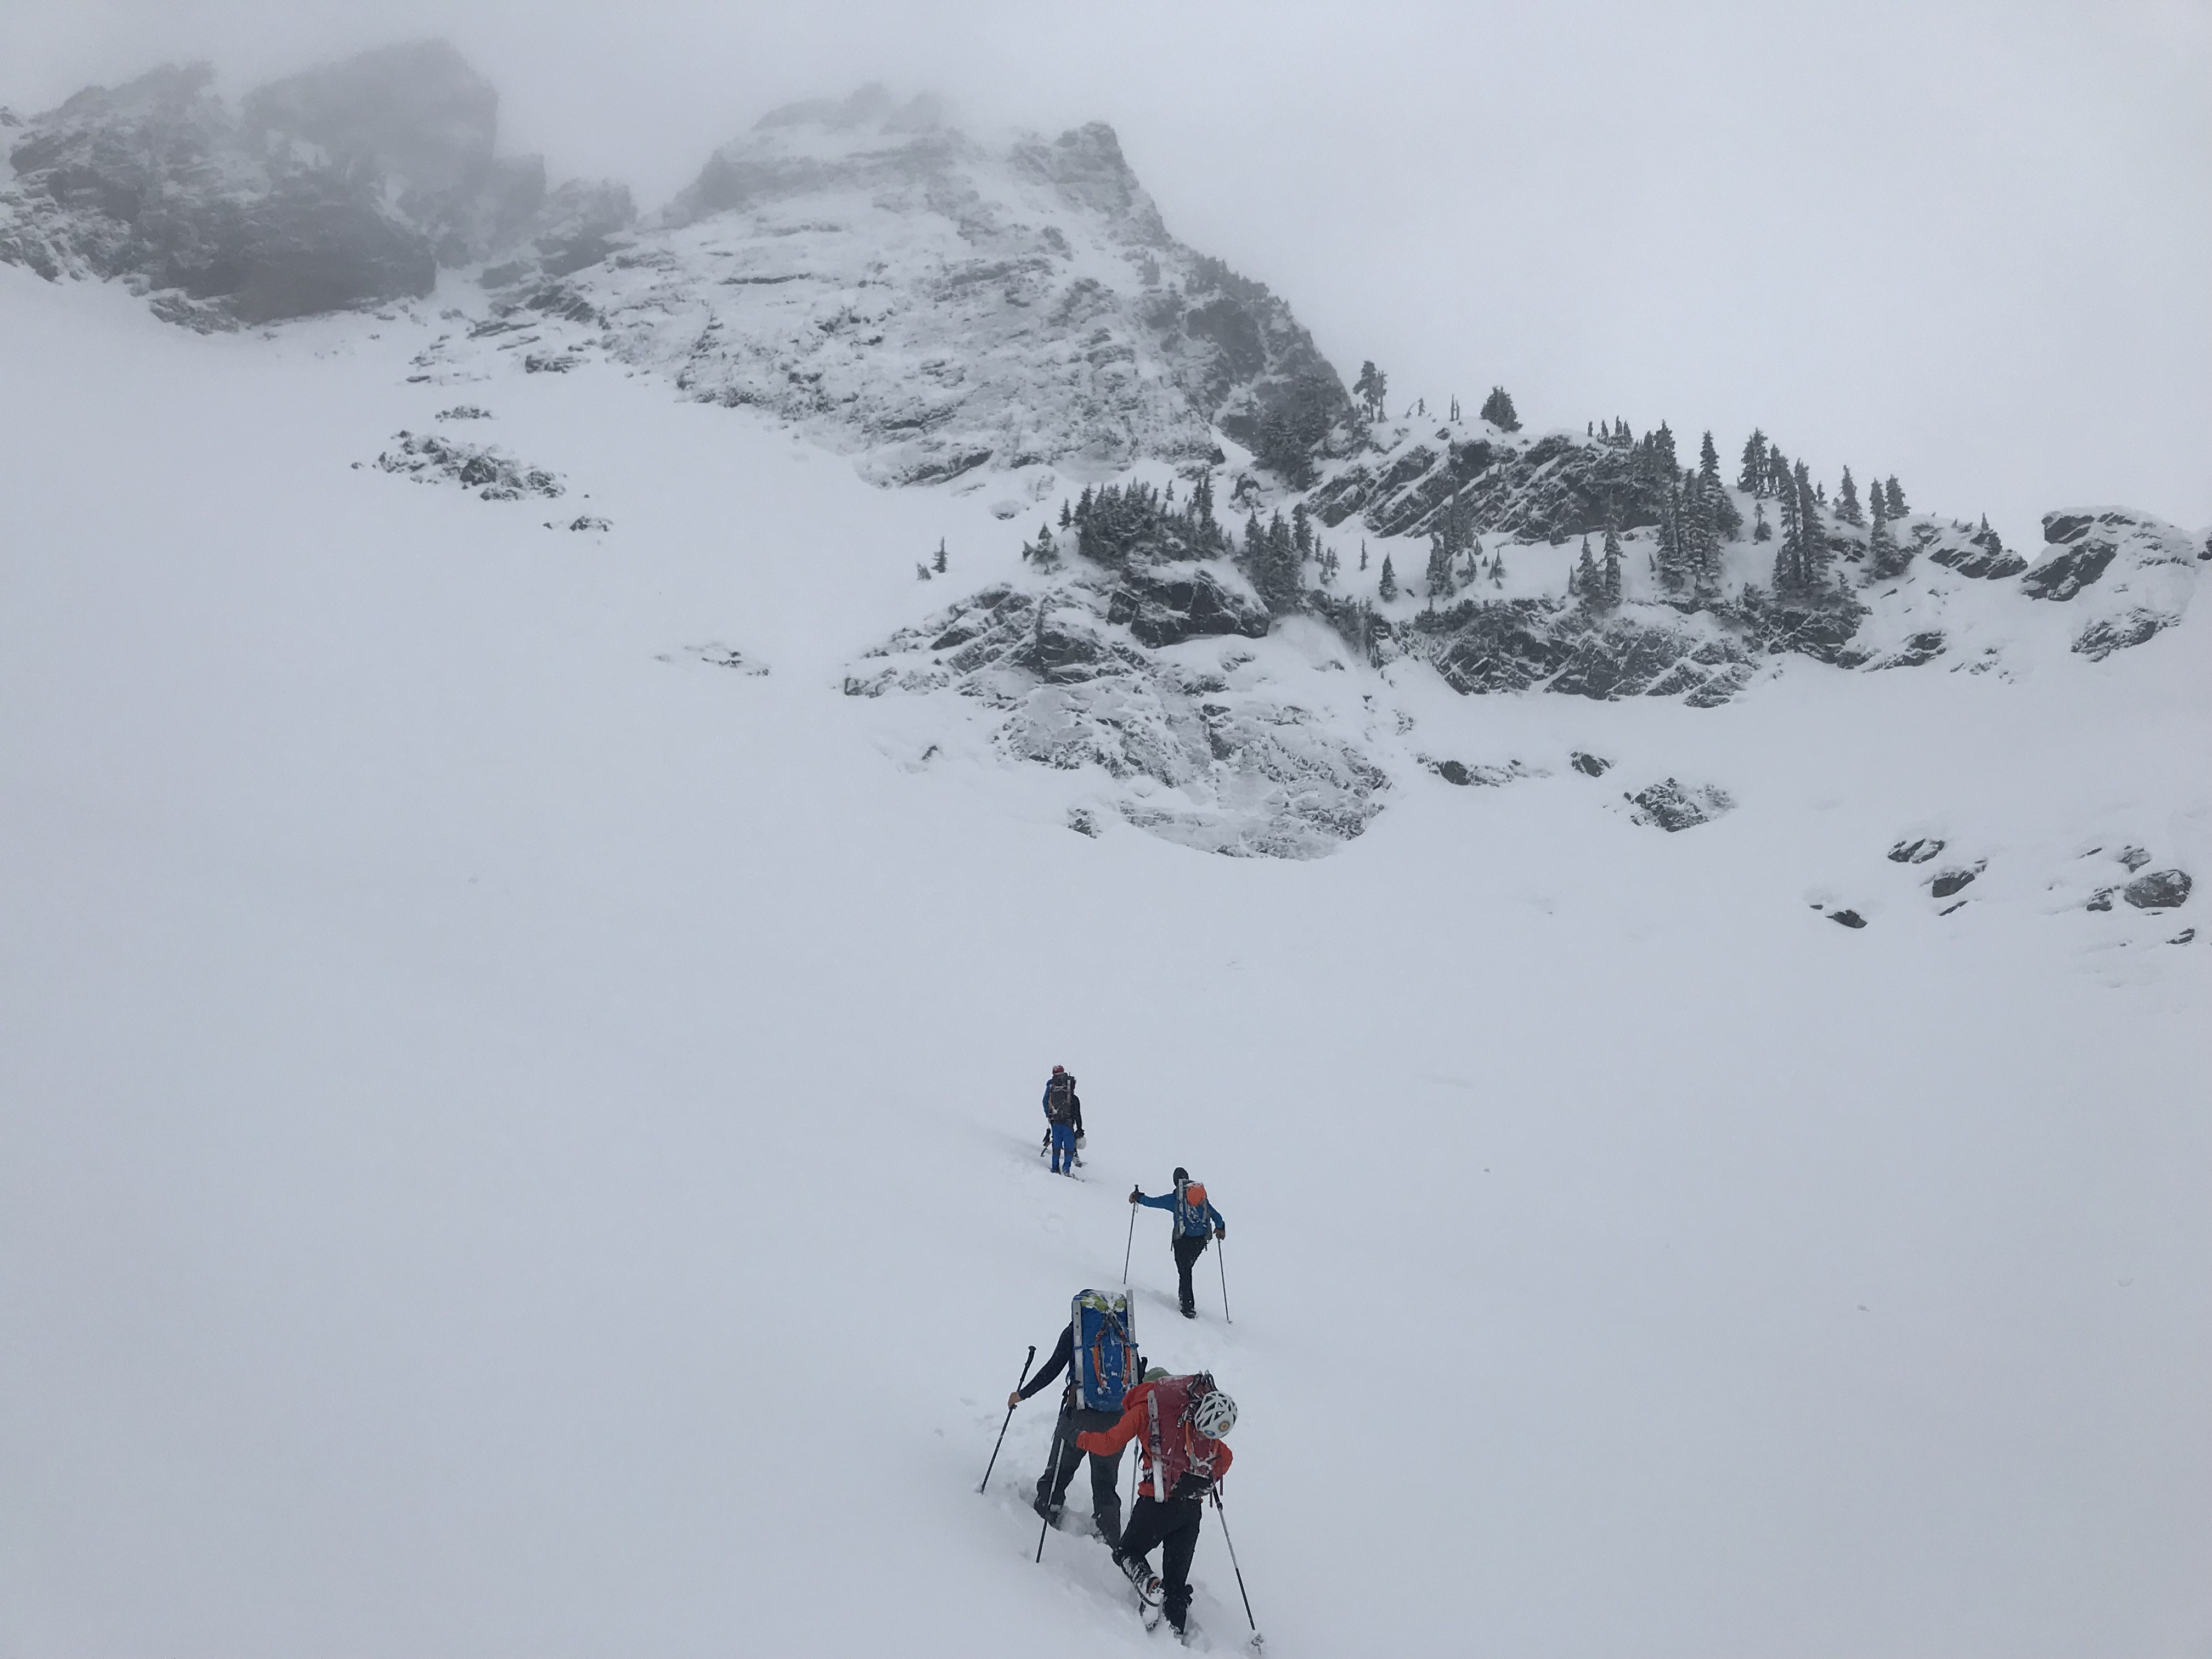
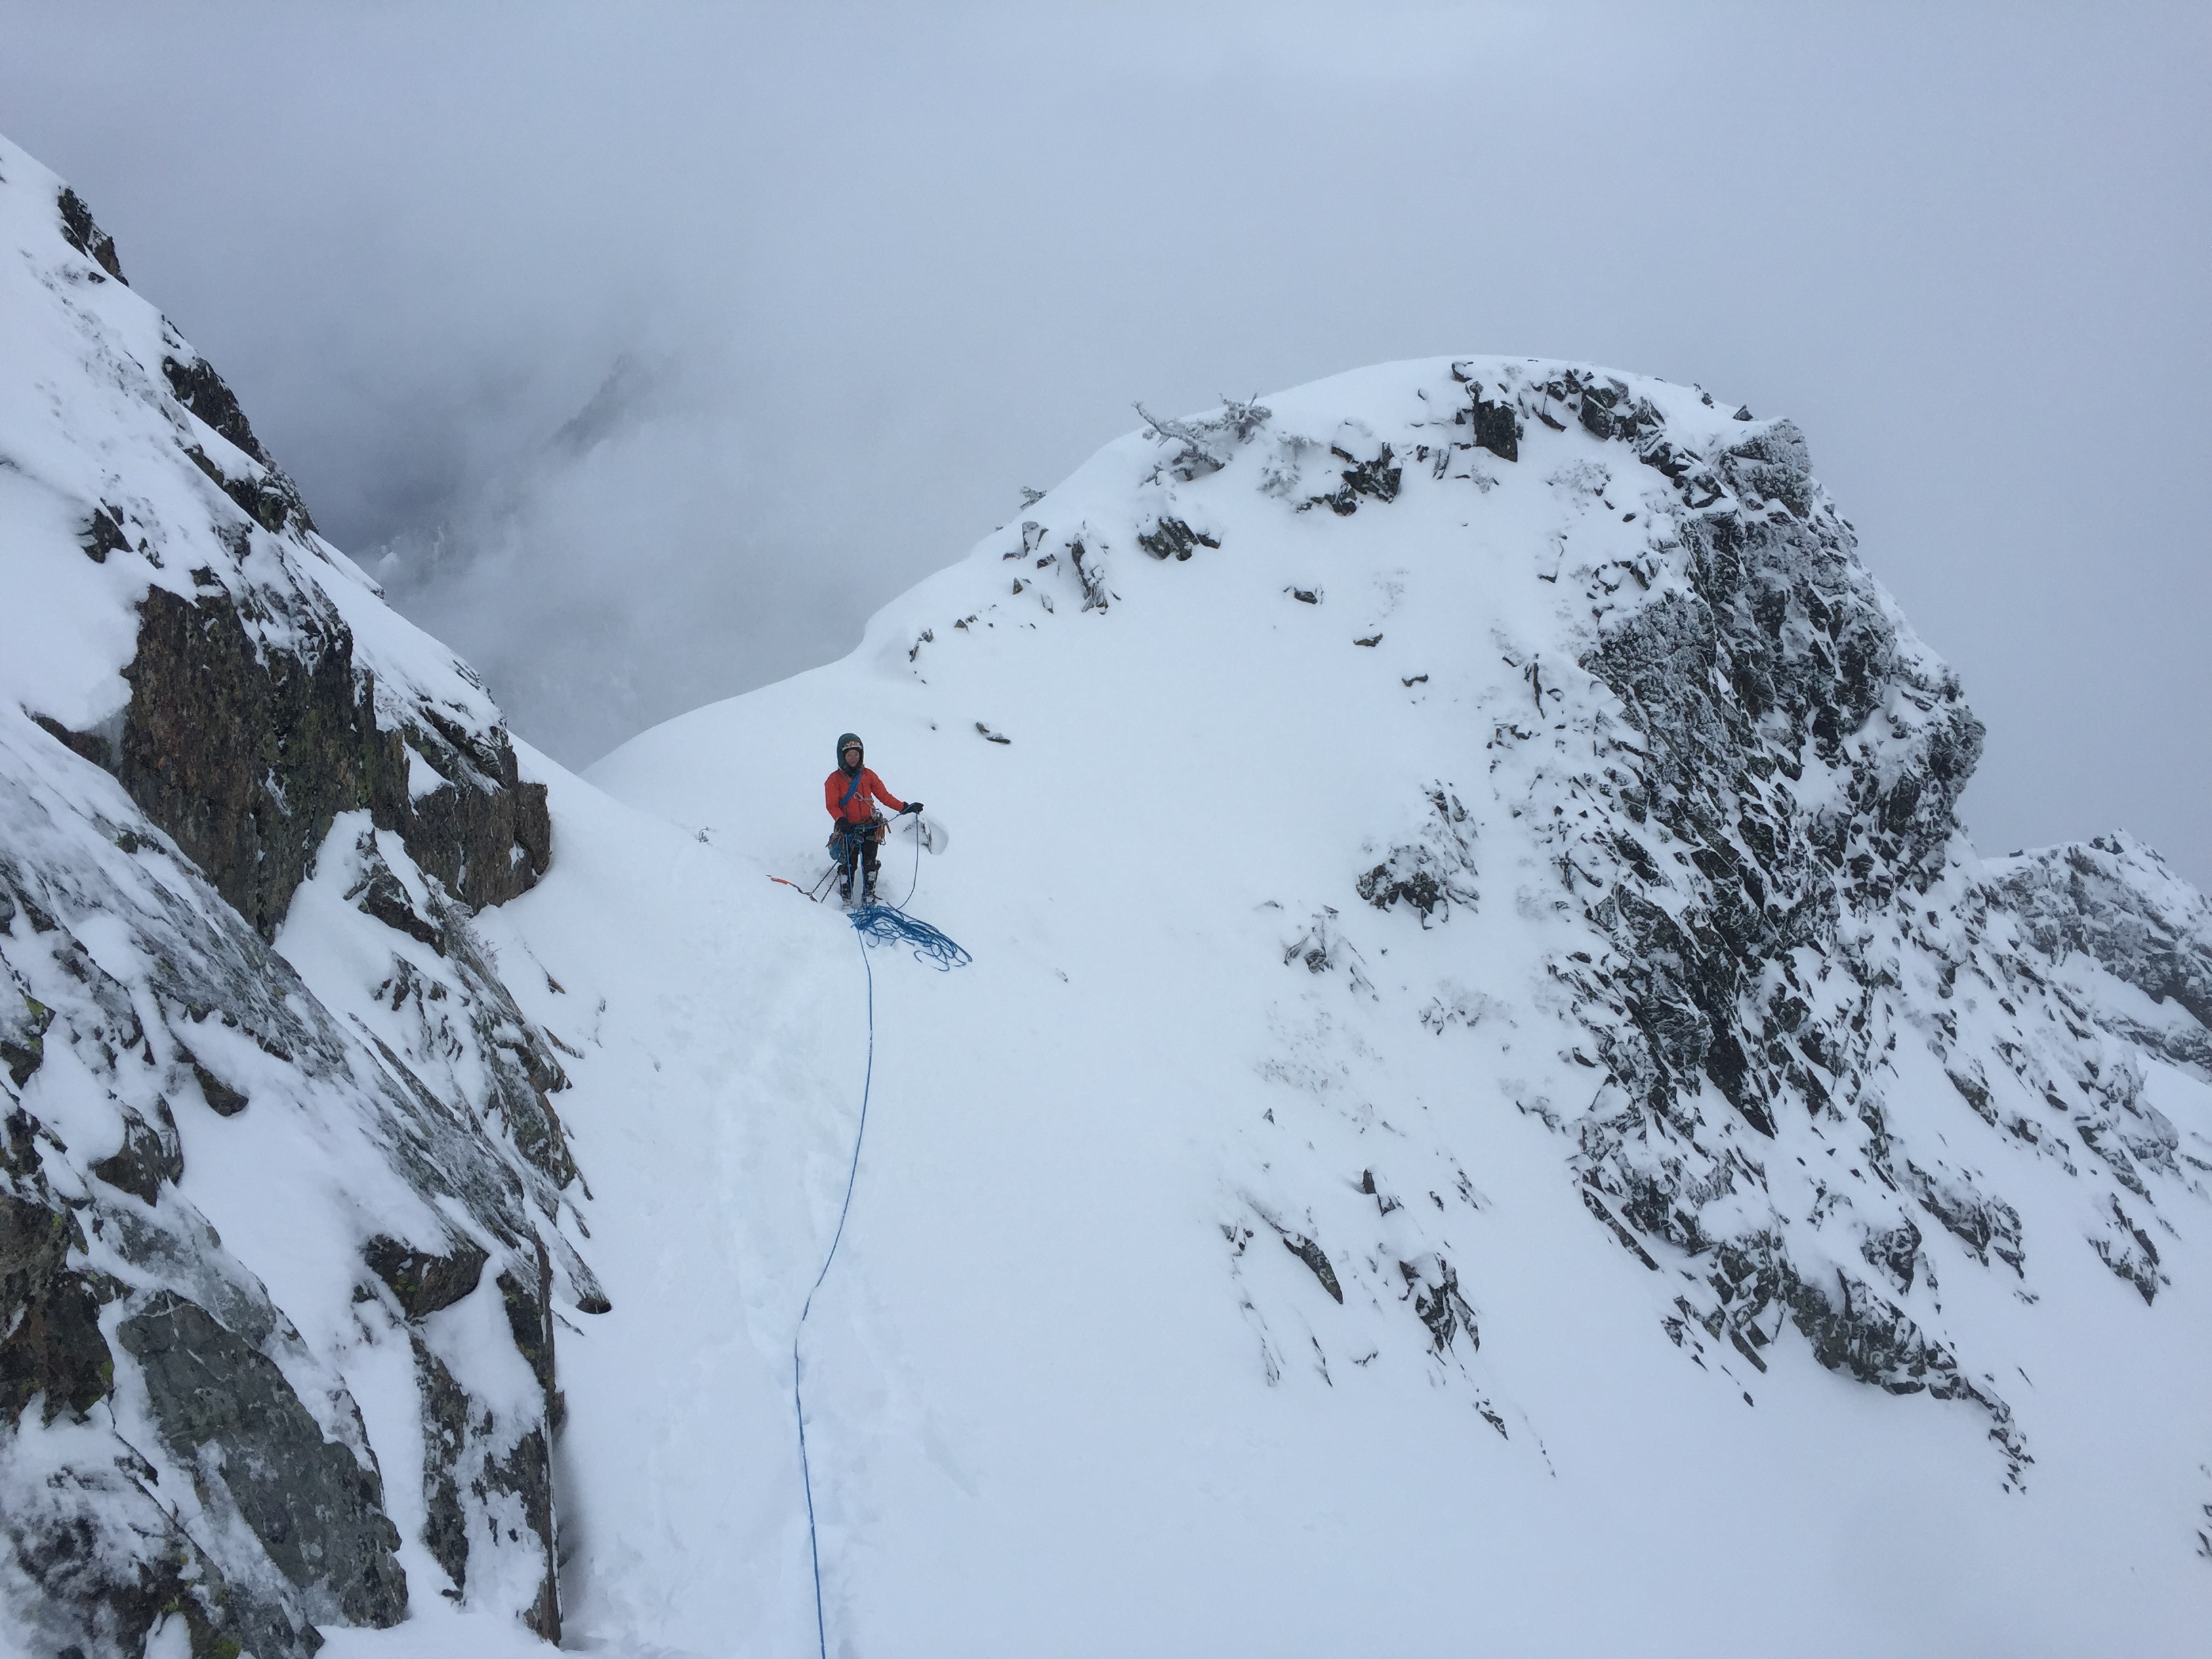
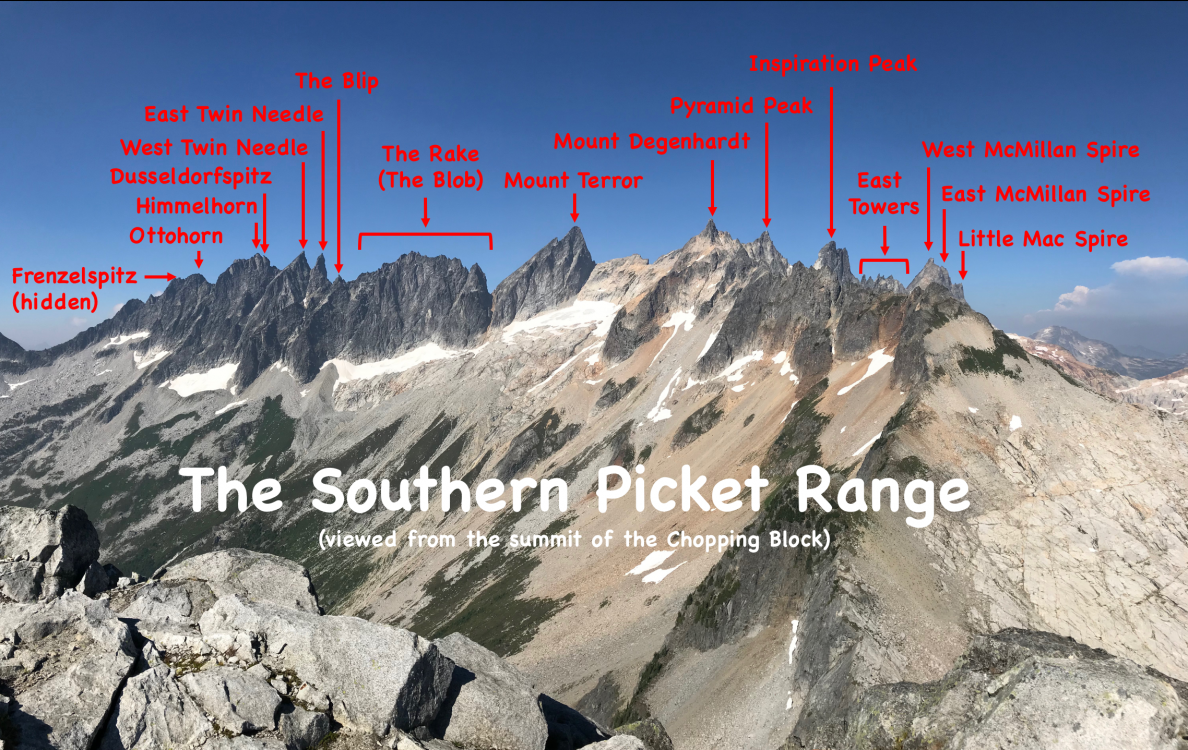
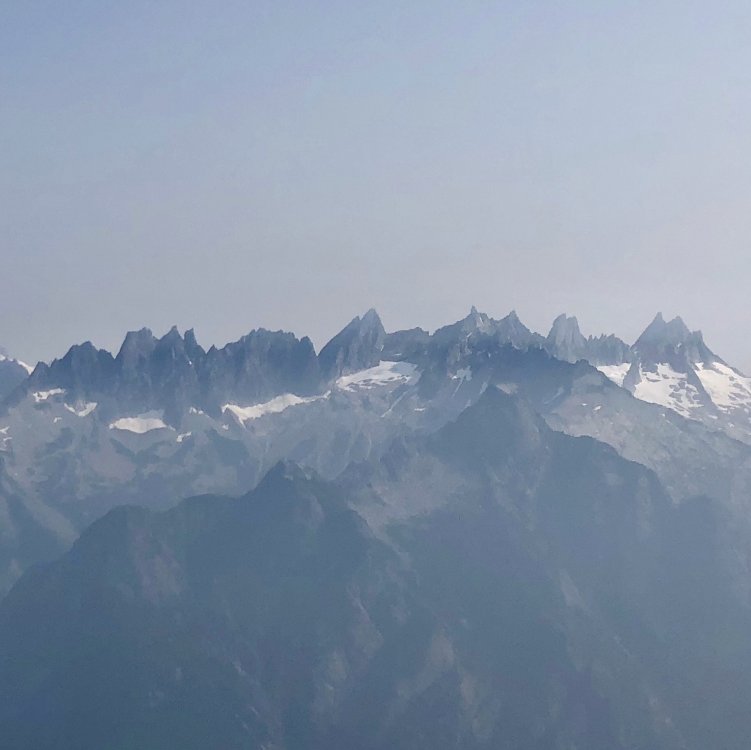
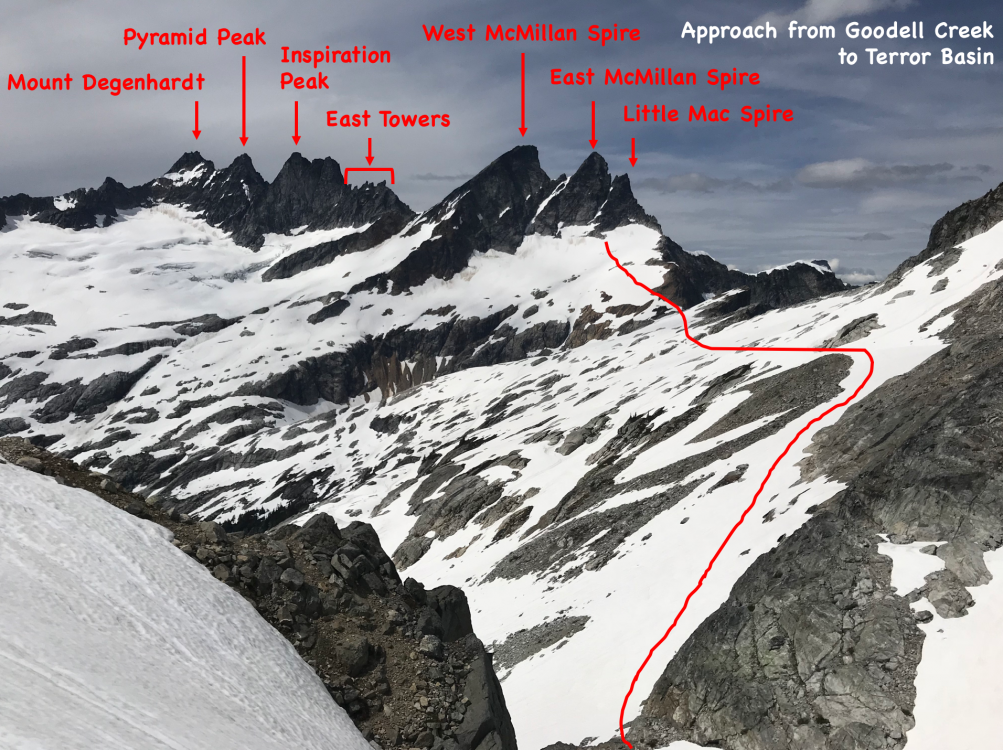
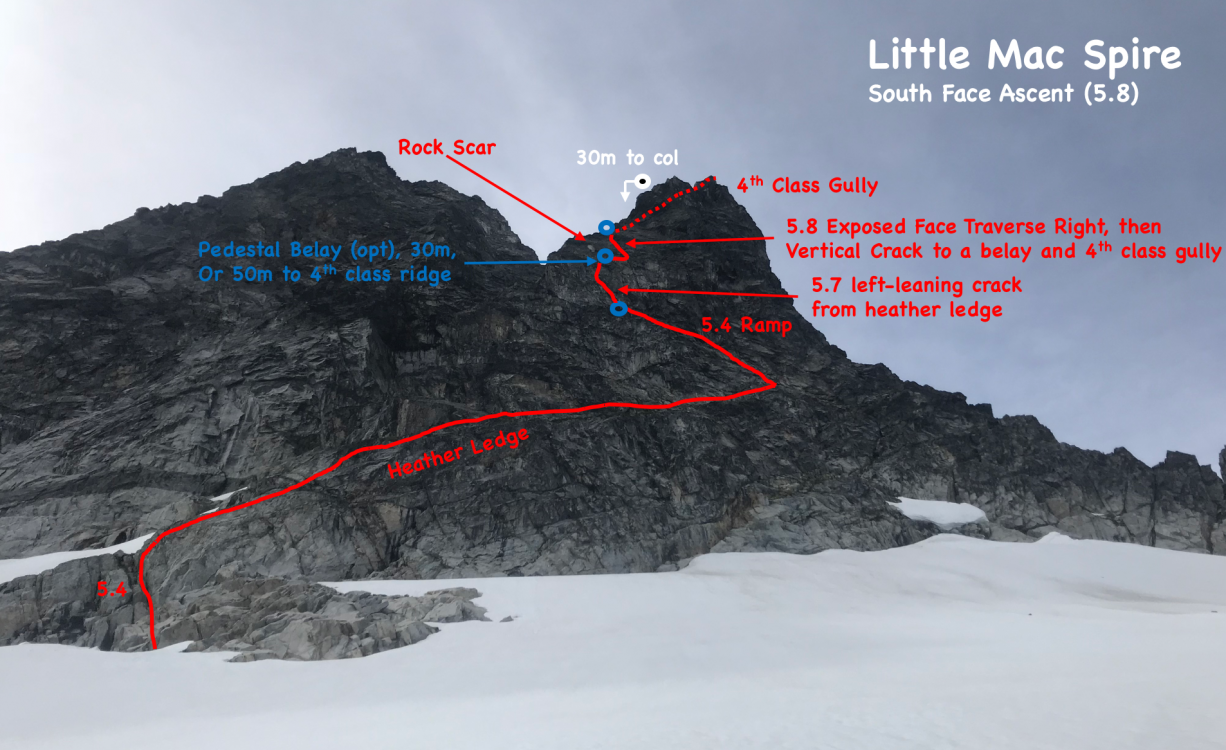
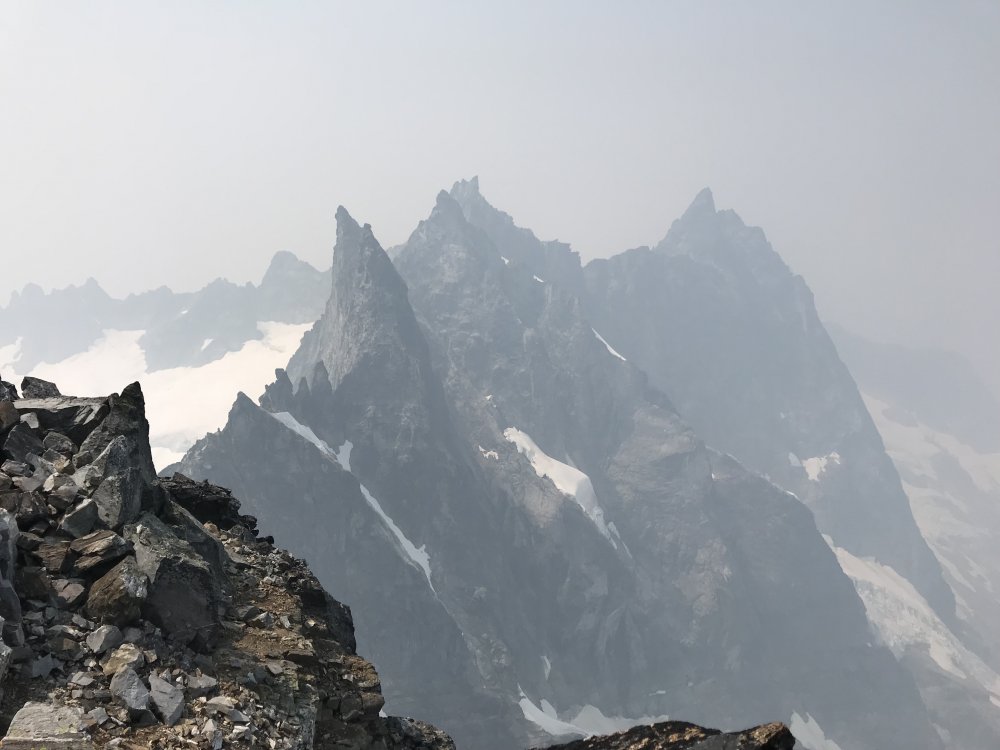
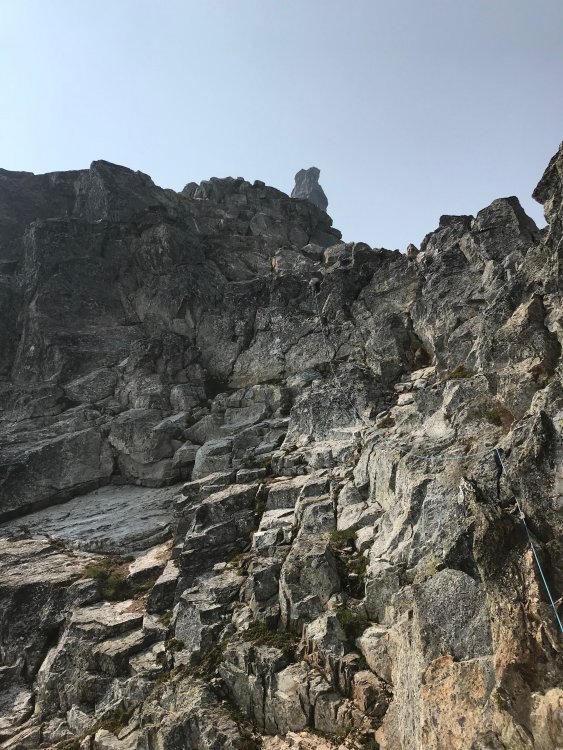
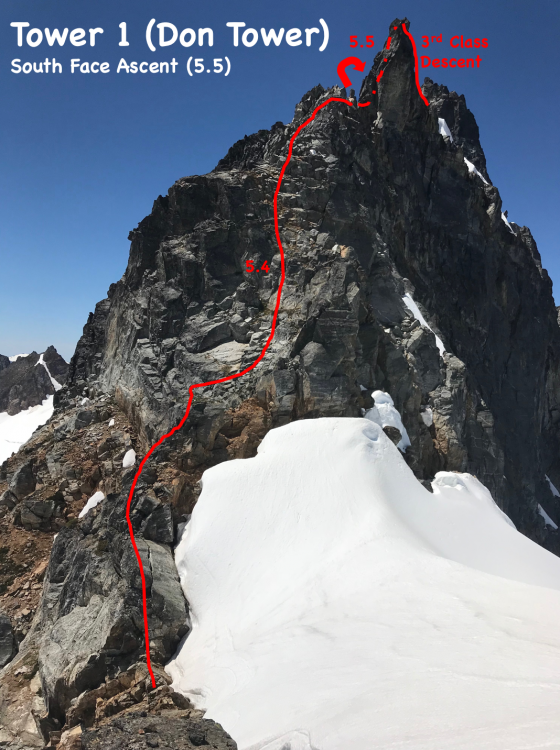
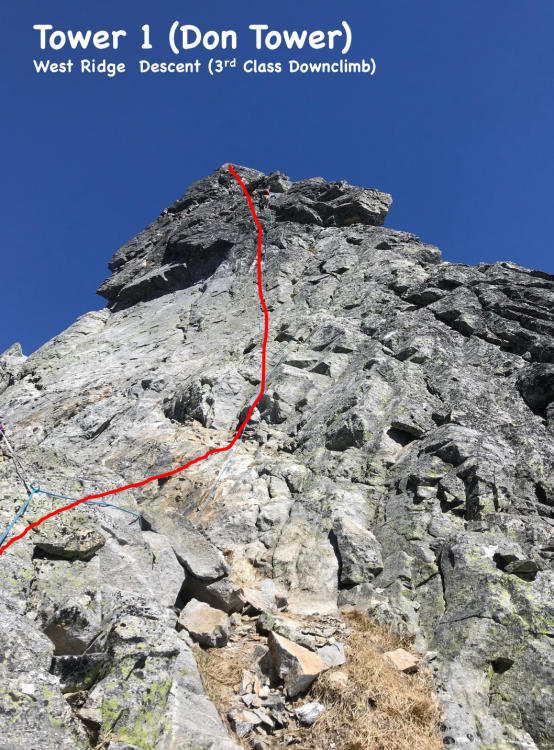
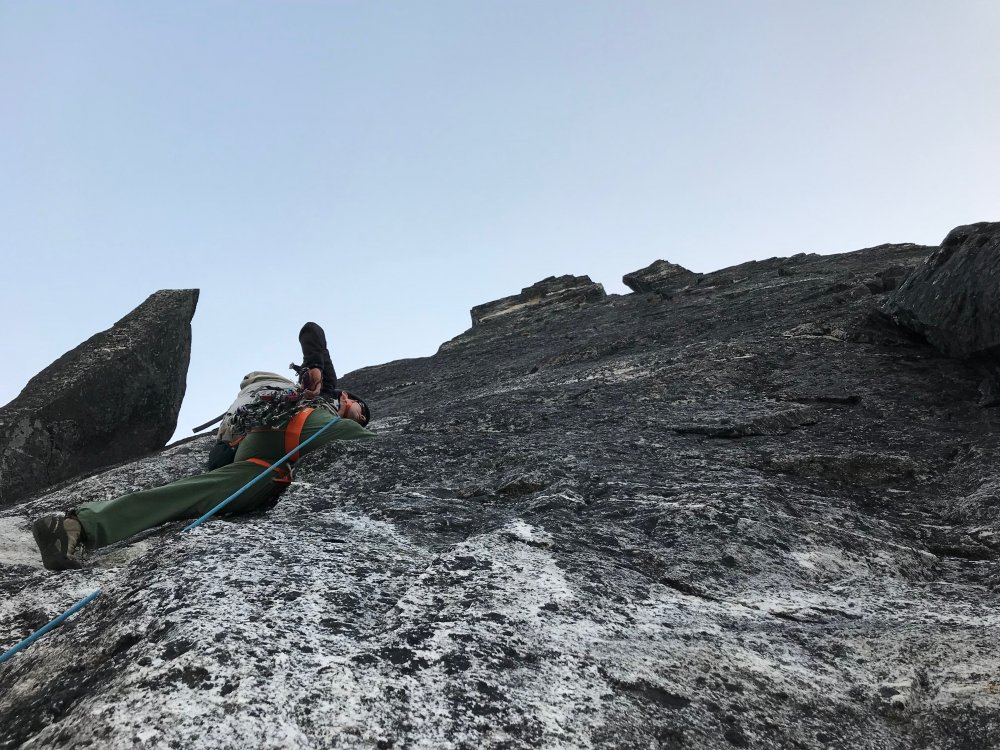
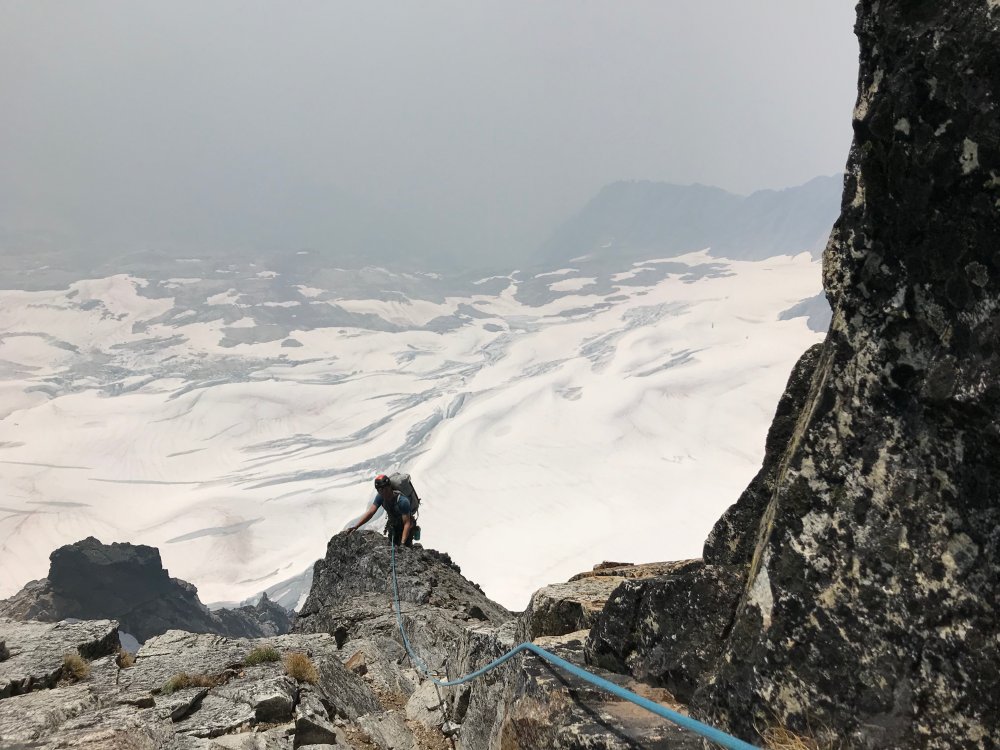
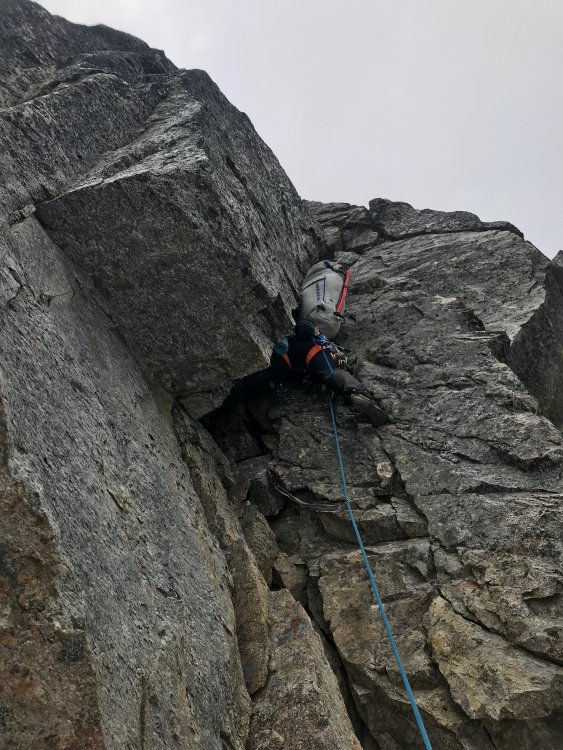
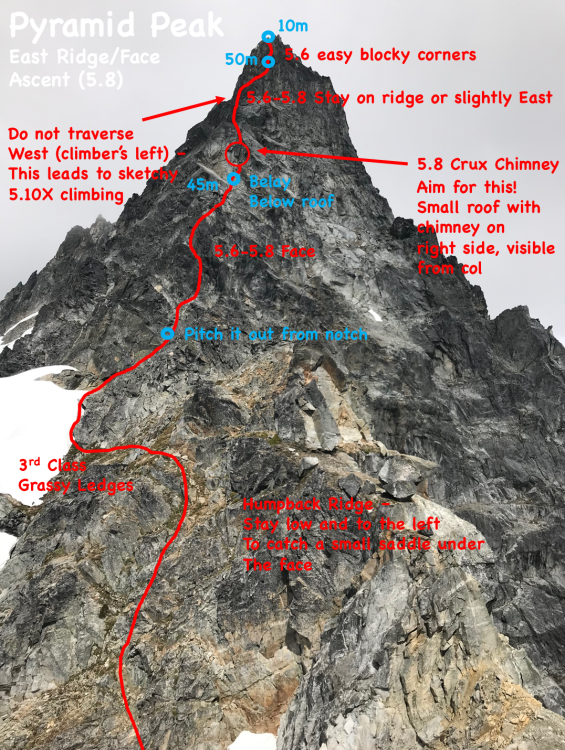
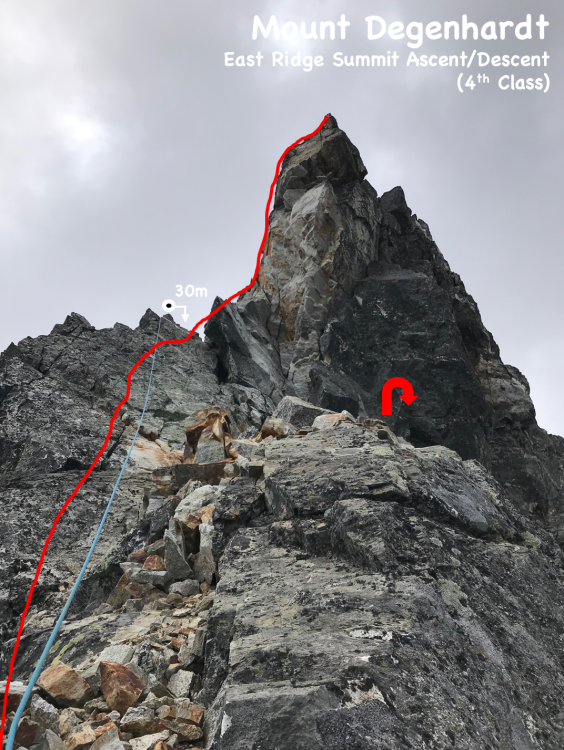
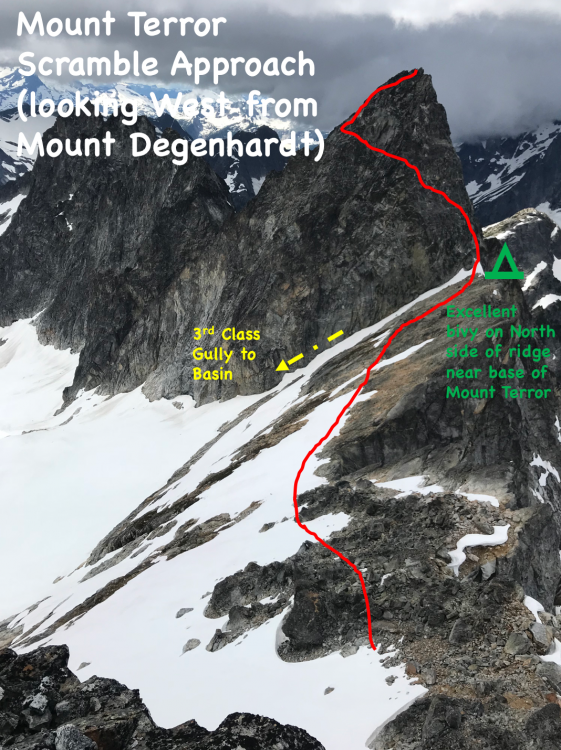
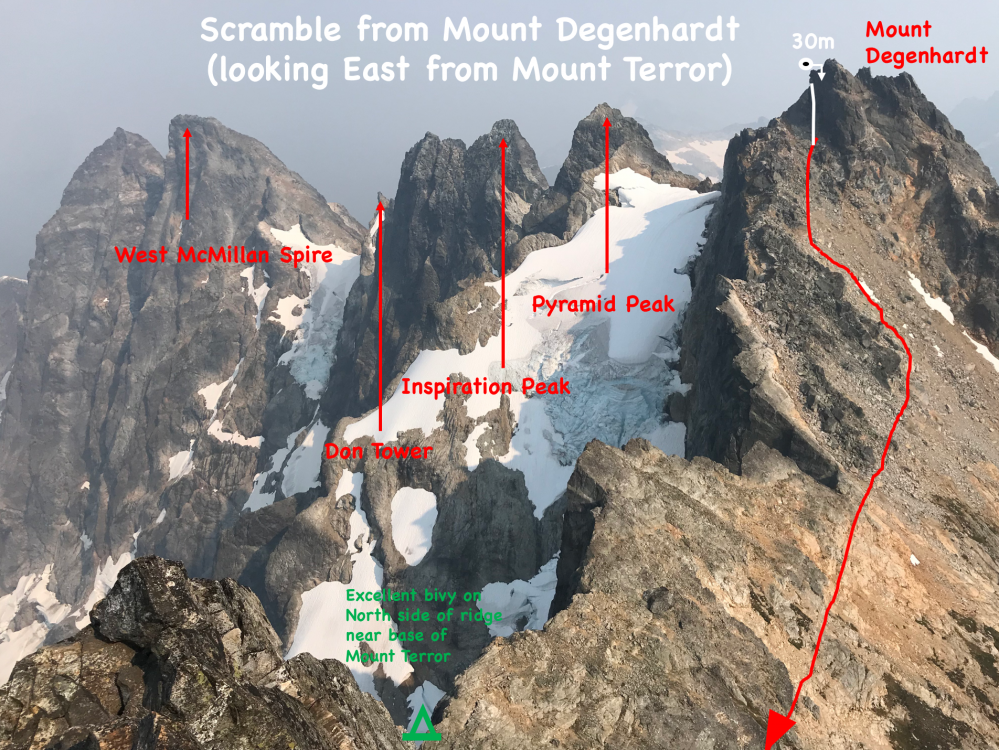
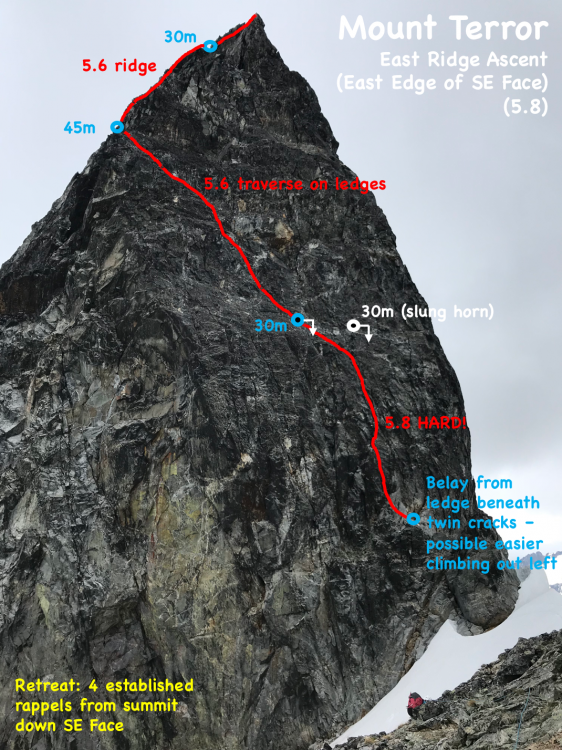
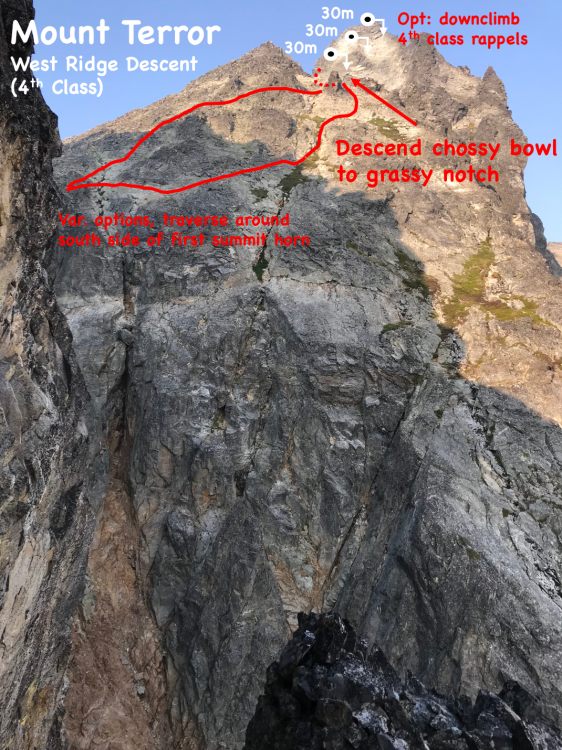
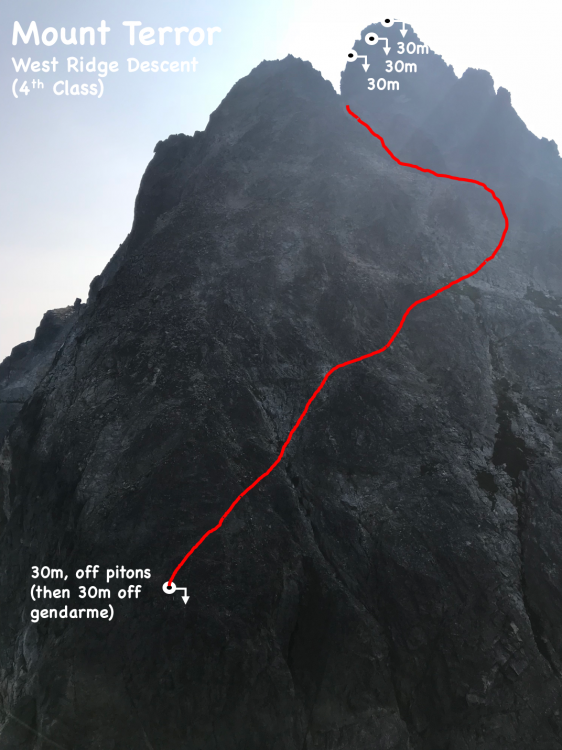
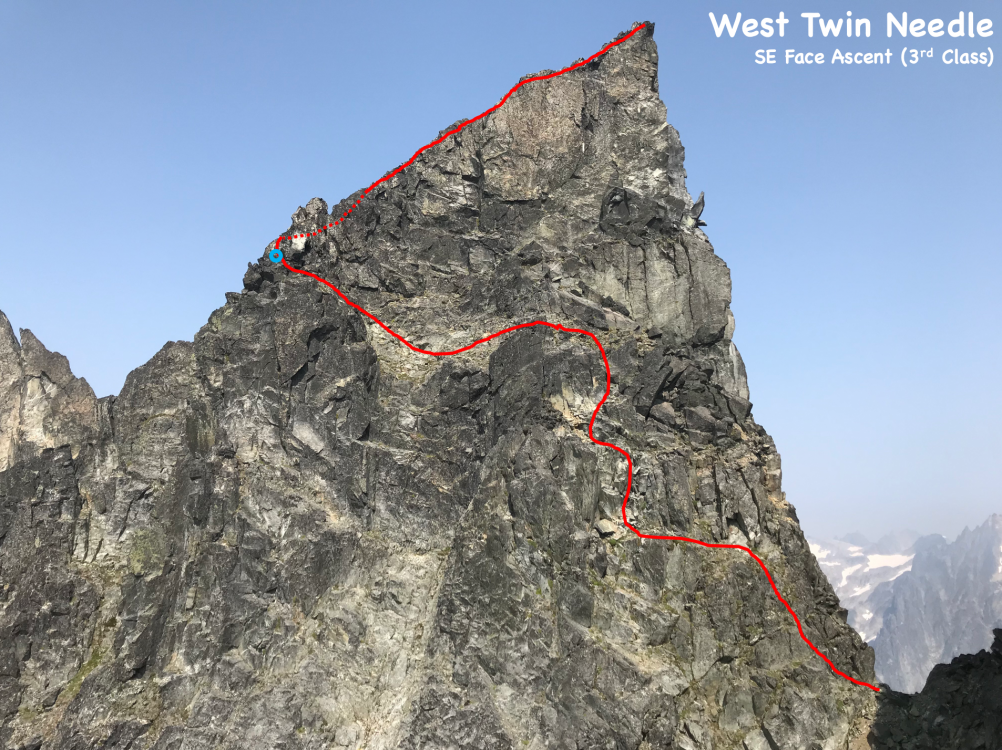
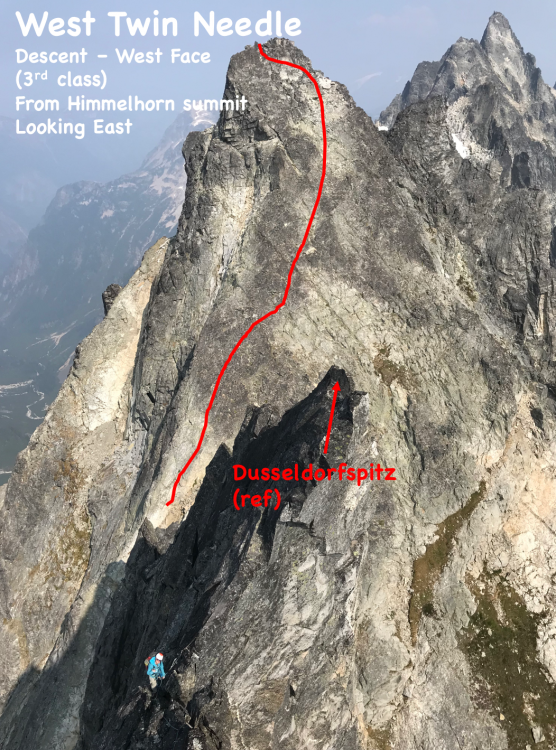
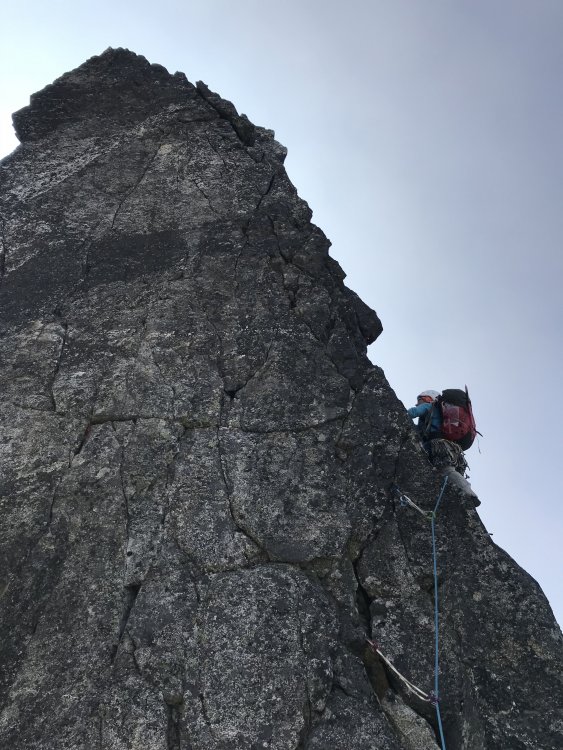
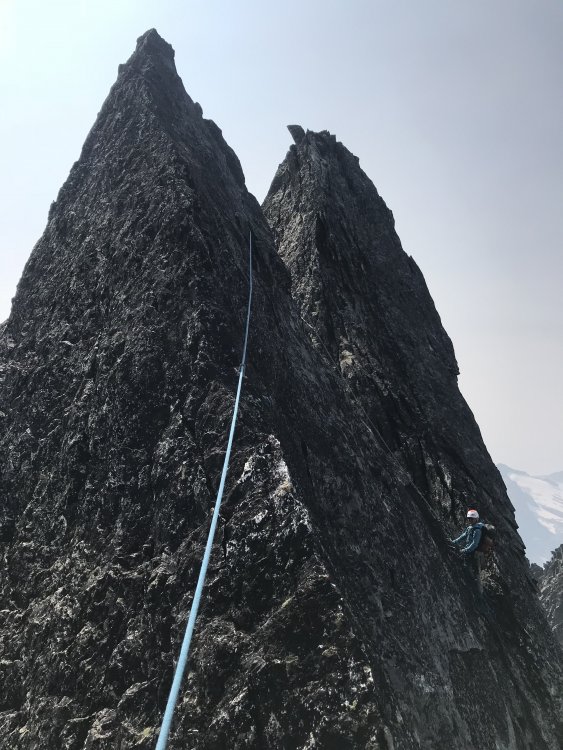
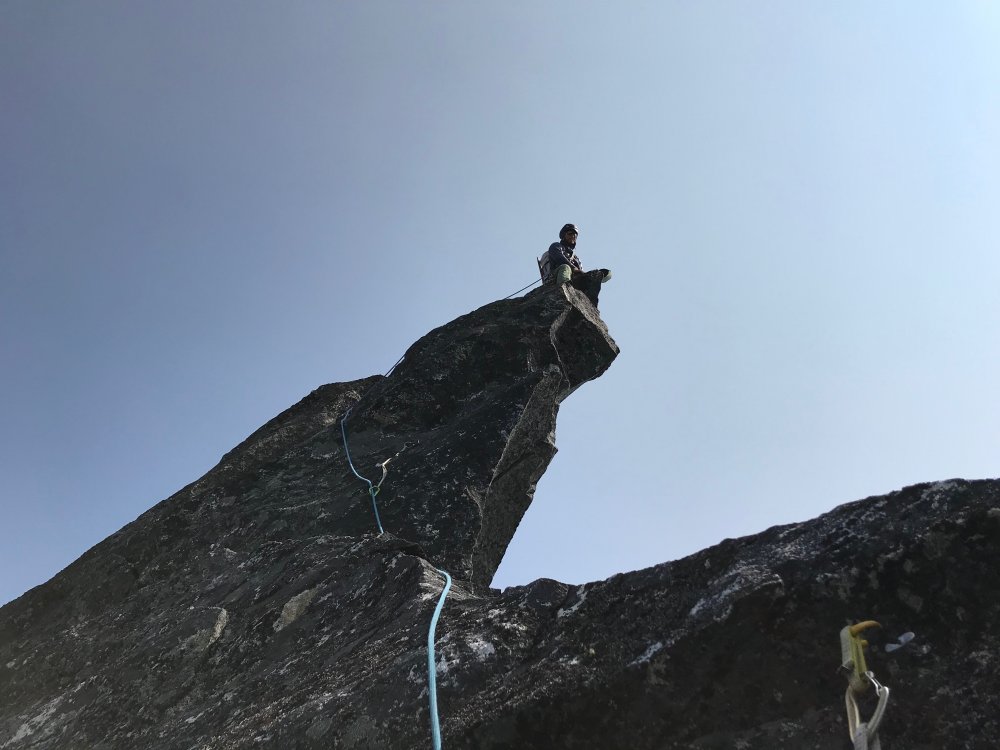
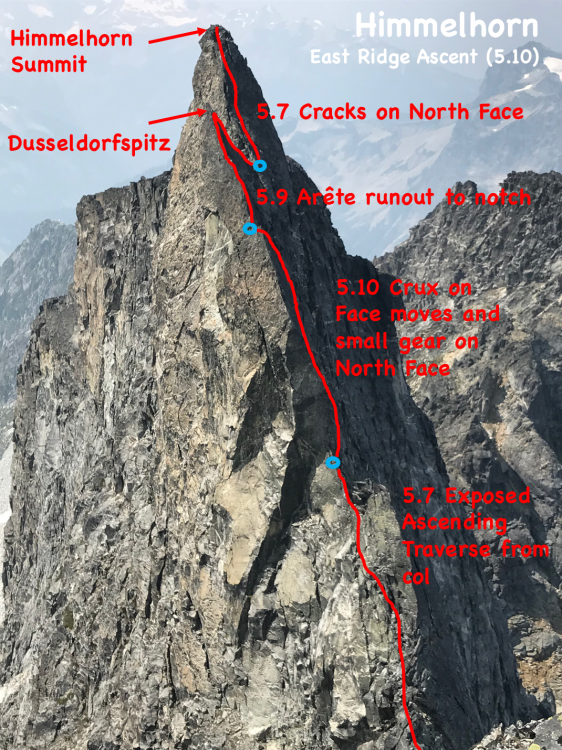
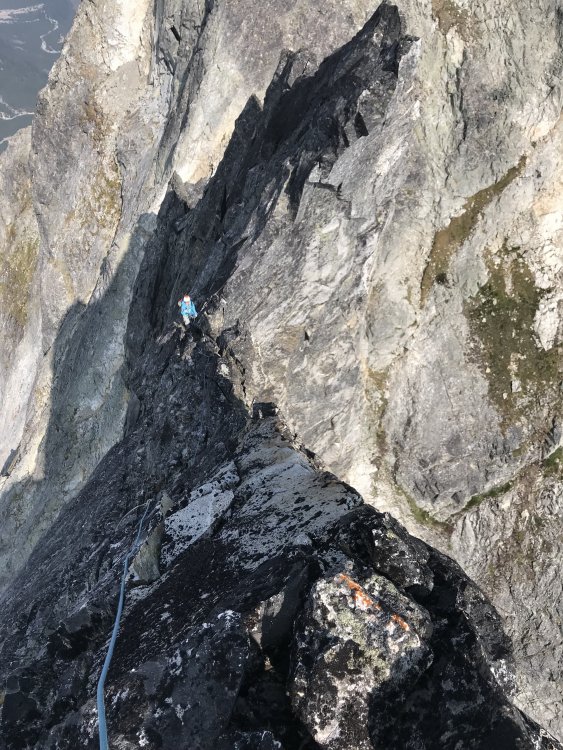
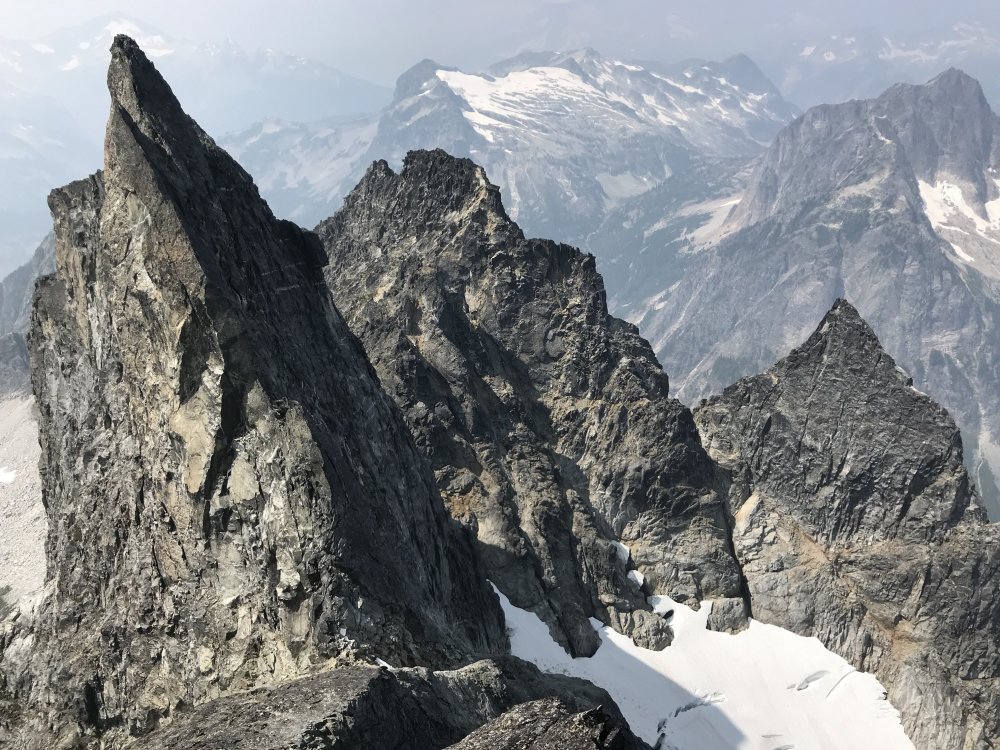
Trip: North Cascades - Southern Pickets - Southern Pickets Enchainment (Traverse) – Second Ascent Trip Date: 08/17/2018 Trip Report: Climbers/Scribe/Photos: Jeff and Priti Wright Priti and I completed the Second Ascent of the full Southern Pickets Enchainment (Traverse) between 8/12/2018 and 8/17/2018 via the first ascensionists’ agenda (VI 5.10+, ca. 3 miles). Thirteen peaks in four days staying on technical terrain enchaining every peak in the Southern Picket Range from East to West. The Chopping Block was our 14thpeak on the last day à la Bunker-Haley-Wallace. We were lucky to have splitter weather the whole time except for our approach day which was non-stop drizzling and kept us from jumping on the rock right away. We had previously attempted this climb during the July 4thweek earlier this summer but were stormed off at the base of Mount Terror. View of the entire Southern Pickets from Mount Triumph. Photo Credit: James Blackmon (1) Little Mac Spire, (2) East McMillan Spire, (3) West McMillan Spire, (4) Tower 1 summit of the East Towers aka "Don Tower", (5) Tower 5 summit of East Towers, (6) Inspiration Peak, (7) Pyramid Peak, (8) Mount Degenhardt, (9) Mount Terror, (10) The Rake aka "The Blob", (11) The Blip, (12) East Twin Needle, (13) West Twin Needle, (14) Dusseldorfspitz, (15) Himmelhorn, (16) Ottohorn, (17) Frenzelspitz, and (18) The Chopping Block The Chopping Block is on the left. History: FA: In 2003, this visionary line of 13 summits (Little Mac Spire to Frenzelspitz) was first completed by Mark Bunker, Colin Haley, and Wayne Wallace in an incredibly speedy 4 days car-to-car. http://c498469.r69.cf2.rackcdn.com/2004/34_wallace_pickets_aaj2004.pdf https://cascadeclimbers.com/forum/topic/15094-walking-the-fence/ 2011: Dan Hilden, Jens Holsten, and Sol Wertkin completed 12 of the Southern Pickets summits (Little Mac Spire to Ottohorn), but were halted by an impassable moat under the South Face of the final bookend peak, Frenzelspitz (a lesson we borrowed to not take the snow approach). https://www.outdoorresearch.com/blog/article/chad-kellogg-jens-holsten-tackle-complete-picket-range-enchainment http://www.alpinist.com/doc/web15s/wfeature-never-ending-holsten-kellogg https://cascadeclimbers.com/forum/topic/82900-tr-picket-range-complete-enchainment-attempt-922011/?tab=comments#comment-1029444 2013: Jens Holsten and Chad Kellogg traversed 11 of the Southern Pickets summits (Little Mac Spire to Himmelhorn), and carried on to the Northern Pickets to do a mind-blowing Southern and Northern Pickets traverse. Even though Jens humbly calls their climb an “attempt” since they left out three minor summits, their ascent was easily one of the greatest alpine achievements in the lower 48. https://cascadeclimbers.com/forum/topic/92032-they-made-it/?tab=comments#comment-1101276 http://jensholsten.blogspot.com/2013/07/desperate-country-seven-day-enchainment.html https://www.outdoorresearch.com/blog/article/chad-kellogg-jens-holsten-tackle-complete-picket-range-enchainment Legend In the topos below, note the following color codes -Blue circle: belays that we chose to take (all are optional, obviously) -Yellow arrows: Bail options, or ways to enter/exit shorter segments of the Enchainment -Green tent: bivy sites (note the comments) -Red lines: Ascent -White circles: Rappels -White lines: Descent Day 1 With our packs each weighing in at 28lbs, we hiked in to Terror Creek Basin via Goodell Creek through wet bushes and a light drizzle and bivied at the Terror Creek Basin High Camp. Day 2 As we roped up at the base of the start (Little Mac Spire) on Day 2, Priti glumly pulled two left-footed red Moccasym rock shoes out of her pack, but decided to keep going like the hardcore badass that she is! We climbed from Little Mac Spire (5.8) through East McMillan Spire (5.6), West McMillan Spire (5.8), the East Towers (5.8) summiting Don Tower and Tower 5, and finishing the day with Inspiration Peak (5.9). We had to climb up 1/3 of Pyramid to find a small snow patch for water and dinner. On our last trip in early July there was a lot of snow at the cols, so it was easy to find water. There was a lot less snow in the cols in August, making finding water along the traverse very tricky, to say the least. We filled our dromedary up every time we found snow. The smoke made the views hazy, but we could tell how far away the later peaks were, and how far we had to go. The base of Little Mac Spire The start of the technical climbing (5.7) on the face of Little Mac Spire The upper ridge of East McMillan Spire View looking West in July View looking West in August Upper face of West McMillan Spire Starting up Tower 1 Priti is belaying below Pitch 2 (5.8 with a hand/fist overhang) Inspiration Peak Summit is the impressive overhang on the left Day 3 On Tuesday (day 2 of climbing, day 3 of the trip), we started out on Pyramid (5.8), and traversed over Degenhardt (3rd class). We chose a steep face crack for the first pitch on Terror to start. This may be the 5.8 start Jens and Chad did. Starting further out left might go at 5.6. After finding the piton rappel off Terror, we downclimbed about half of the Rake-Terror col before starting up a loose gulley on The Rake (skier’s right). The climbing didn’t feel too hard, and we must have avoided the 5.9 R climbing described by previous parties. However we didn’t make it to the nice bivy at the summit, instead hunkering down on a slopey grassy ledge for the night. Snafflehounds poked me in the face and jumped on my feet to start the night out. The meteor shower sparkled above us. In the morning, Jeff found his helmet strap had been gnawed through, his crack gloves stolen and the nut butter munched. Nothing a little duct tape won’t fix! Starting up the technical climbing on Pyramid Peak Inside the crux chimney Day 4 On Wednesday (day 3 of climbing, day 4 of the trip), we only climbed for a few hours doing lots of fun ridge climbing on the Rake (5.8) which took us to the best bivy spot of the trip: on top of the West Rake Summit. It was so nice, we decided to relax the rest of the day and camel up for the next day. The choosy 4th class gully which exits the Terror-Rake col (about halfway down) on climber's right The entire Rake ridgeline is pictured here. Priti is on the initial ridgeline, heading to the Rake's deep, major notch (right of center). Stay high on this initial ridge to get to a 5.6 traverse about even with the notch to get over to the notch. Starting the traverse too soon may result in 5.9R climbing. The vertical ridgeline just left of the major notch is the technical crux. The technical crux of The Rake. This is the second pitch after getting to the major notch which takes you to the The Rake's ridge proper. 5.8+ ledges with small gear. Starting out on the Rake's ridge proper. Looking back at the Rake (Eastward) from the summit Guns out! Amazing bivy site! Don't stop at the col (aka "Ice Station Dark Star"), but continue to this bivy after a short pitch. Day 5 Thursday morning we woke up stoked for the Twin Needles and Himmelgeisterhorn. The Blip between the Rake and the Needles was a quick jaunt (5.6). In the descent gulley, Priti kicked a small rock down, which tipped a precarious car-door sized boulder over and core-shot our rope. She literally had two left feet! We just climbed the rest of the way with 40m of rope out. East Twin Needle (5.10a) had some of the best climbing on the trip, following an aesthetic line up the knife edge ridge, that looks like a gothic tower. There was a TCU that the previous party stuck behind a flake, and was reminded of the giant footsteps we were following. The last couple moves were extremely dirty though. The left variation of the crux is much easier than sticking right. West Twin Needle was chill 3rd Class. Then came Himmelgeisterhorn (5.10), the “Horn of the Sky Spirit”. The climbing was fantastic: engaging, with great position, and unique au chevaling! We climbed over Düsseldorfspitz, on the way to the summit of Himmelhorn. We rappelled down the North Face of Himmelhorn with our 60m rope which worked out perfectly. Ottohorn took about an hour to summit and get back down to the Himmel-Otto col. The 3rdclass route that Bunker-Haley-Wallace took is gone due to some fresh rock fall. Instead of taking the 2 pitch 5.7 variation that Hilden-Holsten-Wertkin took, we attacked the fresh rock scar directly which was splitter 5.6 hand cracks for maybe 15 m to the ridge and summit. In the fading light, we then headed over to Frenzelspitz (the final peak of the Enchainment) from the Himmel-Otto col, traversing along rock on the north side of Ottohorn. The ledge/gulley traverse had the most heinous, scary, exposed choss. Luckily the climbing on Frenzel was pretty great 5.7ish. We made four fresh rappel anchors, starting with a runner on the summit block, two double-nut anchors, and another slung horn. 5.8 ridge (vertical blocks) The fantastic climbing on the technical crux of East Twin Needle. Priti leading out onto the technical crux (and I mean technical!) - face climbing on crimps with small gear Looking up and over Dusseldorfspitz. Priti is belaying between Dusseldorfspitz (foreground) and Himmelhorn (background). The crazy outcropping (Dusseldorfspitz) just East of the summit of Himmelhorn Looking back down from the Himmelhorn summit at the belay. Left to right: Dusseldorfspitz (the small spire along the ridgeline, just below the summit), Himmelgeisterhorn ("Horn of the Sky Spirit", also a small suberb of the German city of Dusseldorf), Ottohorn, and Frenzelspitz...three names taken from the label of a mustard bottle brought along by Joan and Joe Firey (kindred spirits and personal heroes of ours) during their first ascent of these peaks in 1961. Ed Cooper, also on the trip, was "aghast" at the names chosen! The magnificent Northern Pickets Frenzelspitz, a perfect pyramid Day 6 The last day we climbed the Chopping Block via the NW Route (4thClass) and hiked out via “Stump Hollow” to Terror Creek. Mega thanks to Wayne, @solwertkin, and @jensholsten for their great beta, inspiration, and support. Priti and I have been dreaming of this climb for years now since reading Alpinist 47 magazine’s expansive article on the Picket Range and being inspired by Jens Holsten and Chad Kellogg’s 2013 Pickets Traverse (of both the Southern and Northern Pickets, 10 miles) after we had just taken the @boealps Basic Climbing Class. The next level of alpinism in the Southern Pickets may be to complete the entire enchainment in a day! This seems like an entirely reasonable feat (especially for a soloist) given enough familiarity and speed. Bivy Beta: Primo bivies (East to West) base of West McMillan Spire descent (snow through the summer, nice bivy walls) base of Mount Terror, cross over ridge to North side - late season snow available on top of the Rake sub-peak (1 pitch past the “Ice Station Dark Star”) – lots of snow just a short scramble distance away along the Rake descent. Himmel-Otto col (if no snow on the col, make one rappel toward Crescent basin to find snow) Terrible bivies (East to West) base of East McMillan Spire descent (sloping ledges, snow early season) slabby ledge about 1/4 the way up the Inspiration West Ridge (exposed) Pyramid-Inspiration col (no snow late season) grassy ledges down and climbers left when you first gain the ridge proper at the start of the Rake “Ice Station Dark Star” (as coined by Hilden-Holsten-Wertkin) which is the col after just rappelling from The Rake summit (snow early season, but rappel north late season to find snow down a heinous choss gully)…if no snow just at the col, then recommend continuing on to the Rake descent to find tons of easily accessible snow in late season Himmelhorn summit (no snow) Gear Notes: small set of nuts and some brassies doubles BD UL Camalots .4-2 single BD UL Camalot 3 (for Inspiration East Face) singles BD C3 000-1 (extra green 0) single BD Camalot X4 Offset 0.1/0.2 single BD Camalot X4 0.3 singles Metolius Mastercam 0-3 4 double-length runners with 2 Camp 22 biners each 3 double-length runners with 1 Camp 22 biner each 9 single-length runners with 1 Camp 22 biner each (can’t have too many runners) 30L Patagonia Ascensionist pack (for him) and 30L Black Diamond Speed pack (for her) Patagonia Micro Puff jacket (each) Patagonia Alpine Houdini jacket (each) Patgaonia Nano-Air Light Hybrid Jacket (for him) 2L MSR DromLite (essential!) Garmin inReach Mini (love this little guy!) Beal Escaper (for emergency bails) Petzl Leopard FL crampons (each) Petzl Sirocco helmets Petzl Sitta harness (for him) and Arc’teryx harness (for her) Metolius Feather Nut Tool (each) Camp Corsa Nanotech 50cm (each) chalk bag, each (didn’t use) tape gloves (for her) and OR Splitter gloves (for him) x2: Mammut Smart belay device (not the Alpine Smart) + Grivel Sigma Wire D carabiner 3 lockers for group: Grivel Tau K12L, Grivel Lambda HMS, Grivel Plume 60m 8.5mm Beal Opera rope 15m 5mm cord (did not use ever) 1 medium fuel canister 1 small fuel canister (did not use) Jetboil Sol stove Safety ‘biner (each) – Edelrid 19g caribeener, Petzl Micro Traxion, short Sterling Hollowblock, Trango Piranha knife Bivy setup (each) – Short Thermarest NeoAir XLite sleeping pad, Exped Air Pillow UL, Feathered Friends Vireo UL sleeping bag 8.5ft^2 tarp by Hyperlite Mountain Gear TC Pros (for him) and Moccassyms (for her) La Sportiva TX2 (for her) and TX4 (for him) approach shoes Petzl Reactik headlamps (each) + 3 extra AAA batteries + Petzl e+LITE headlamp Other things: 1 long spoon to share, chapstick to share, small Joshua Tree sun stick to share, Kenu iPhone tether, lighter, whistle, duct tape, Thermarest repair patches, Voke tabs, Nuun, pain killers, 1L Platypus soft water bottle (for her) and 750mL HydraPak Stash (for him), warm headband, glove liners, 1 pair thick long socks (each), sunglasses, ear plugs, WRFA emergency form, small pencil Dinner: 2 AlpineAire meals, 3 Near East Couscous boxes repackaged with small olive oil packets in ziplock bags, salt Day food was mostly bulky, yummy snacks: vegan jerky, dried mango, nuts, Cheese-Its, sesame sticks, Gu, nut butter, etc Approach Notes: Excellent Approach trail Goodell Creek to Terror Basin. The descent from Crescent Basin is tricky The luxurious tree marker where one descends from the ridge below "Stump Hollow" towards Terror Creek Log crossing Terror Creek on descent


- 23 replies
-
- 13
-

-

-

-

-
Actually, by any empirical measure, it was Angela! https://www.dailymotion.com/video/x2oht8a Also, I added a new video to the top of the trip report. It's a bit long, but hope it's entertaining and informative. Don't forget to turn the music up!
-
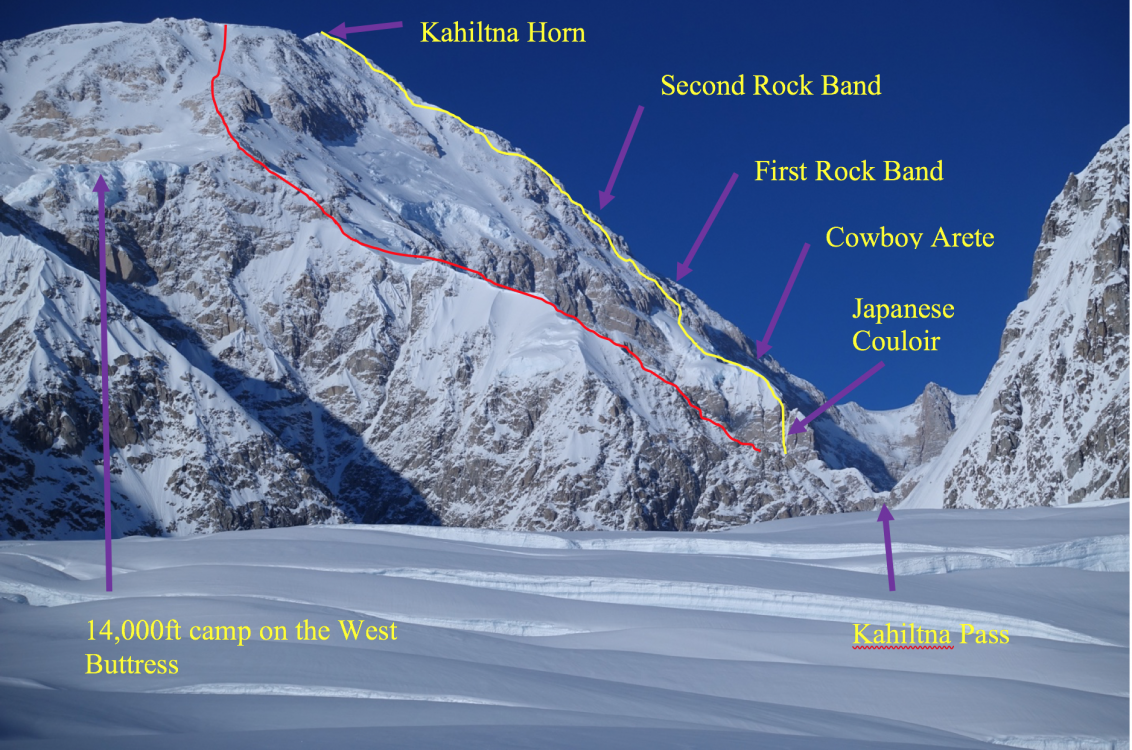
Route Overlays. West Rib in red for reference. Cassin Ridge in yellow.
-
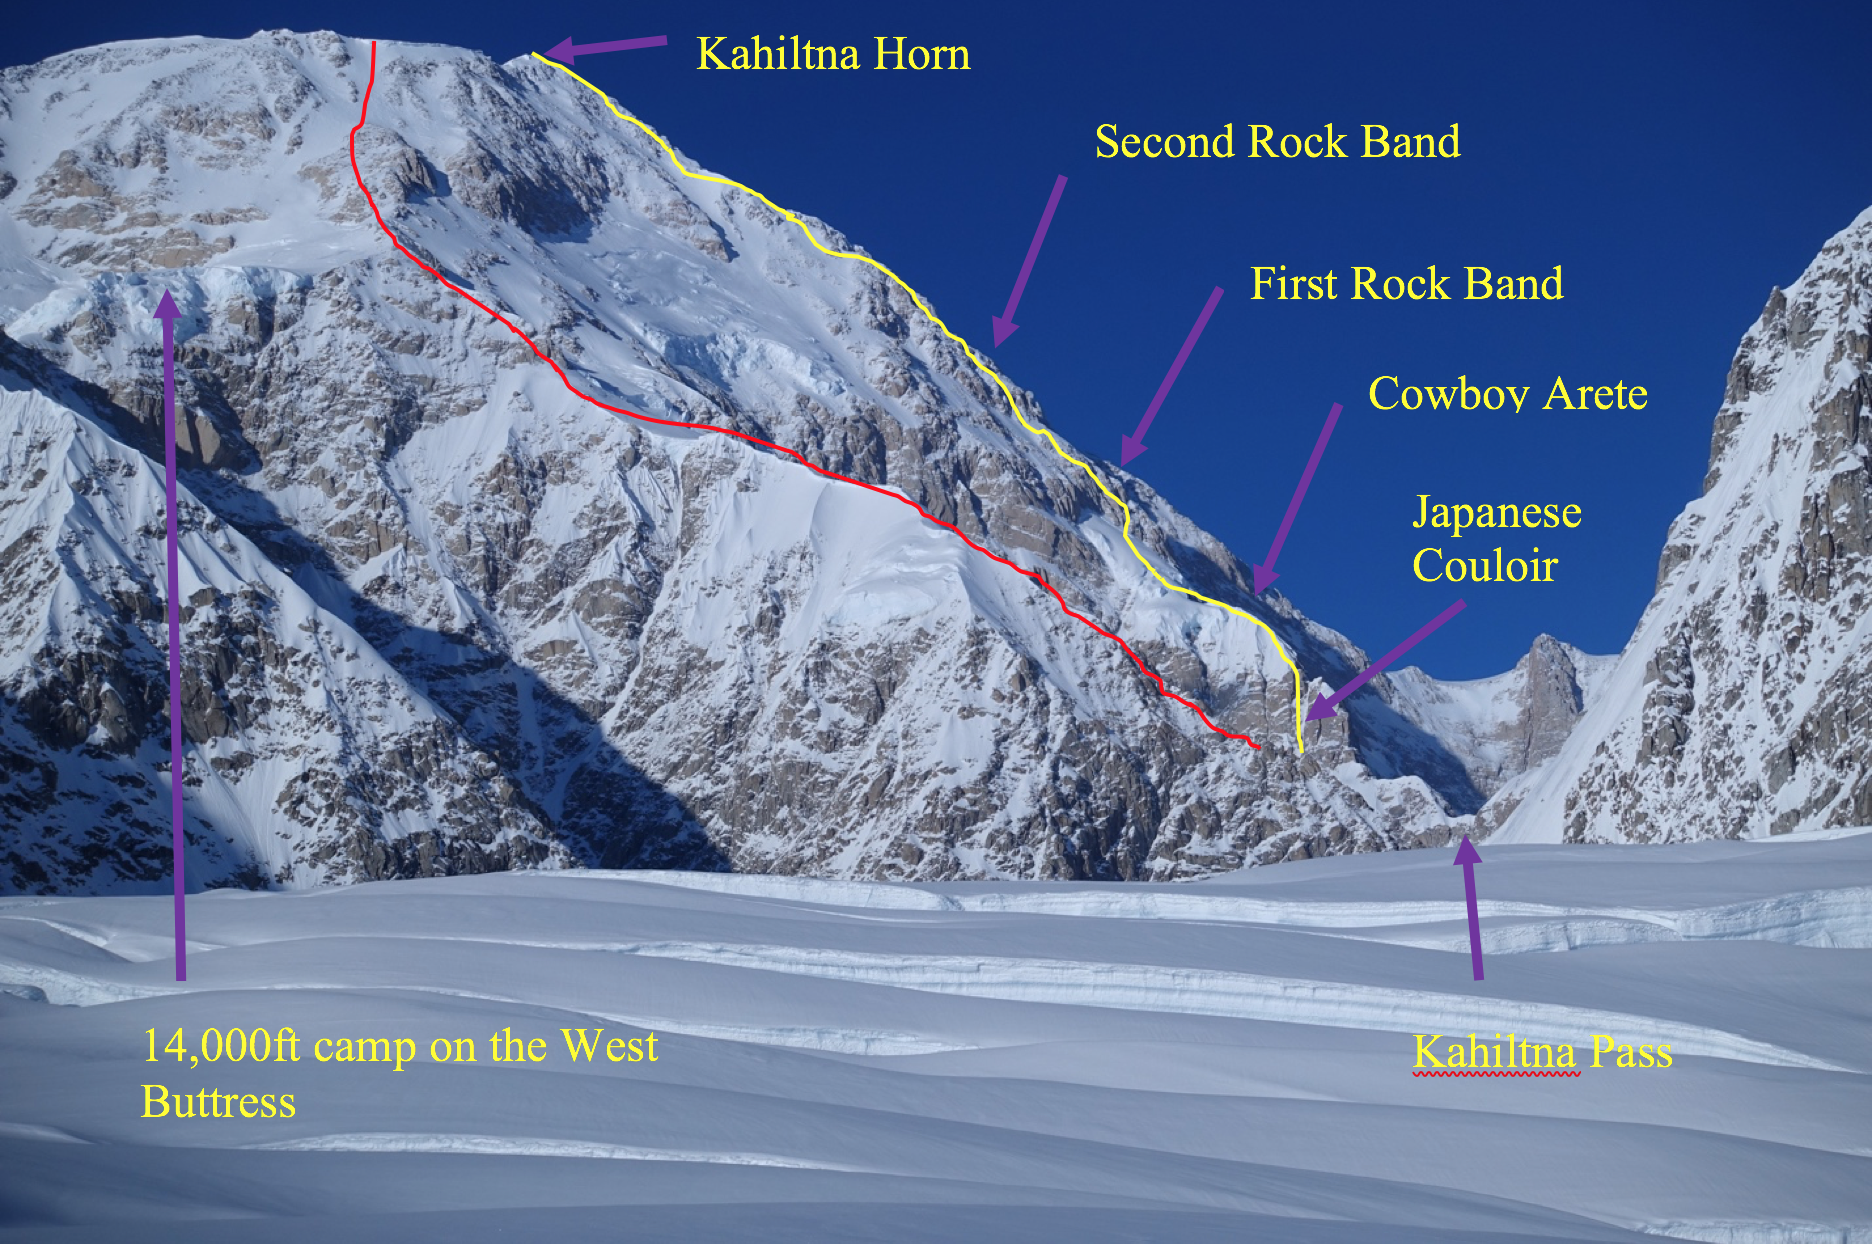
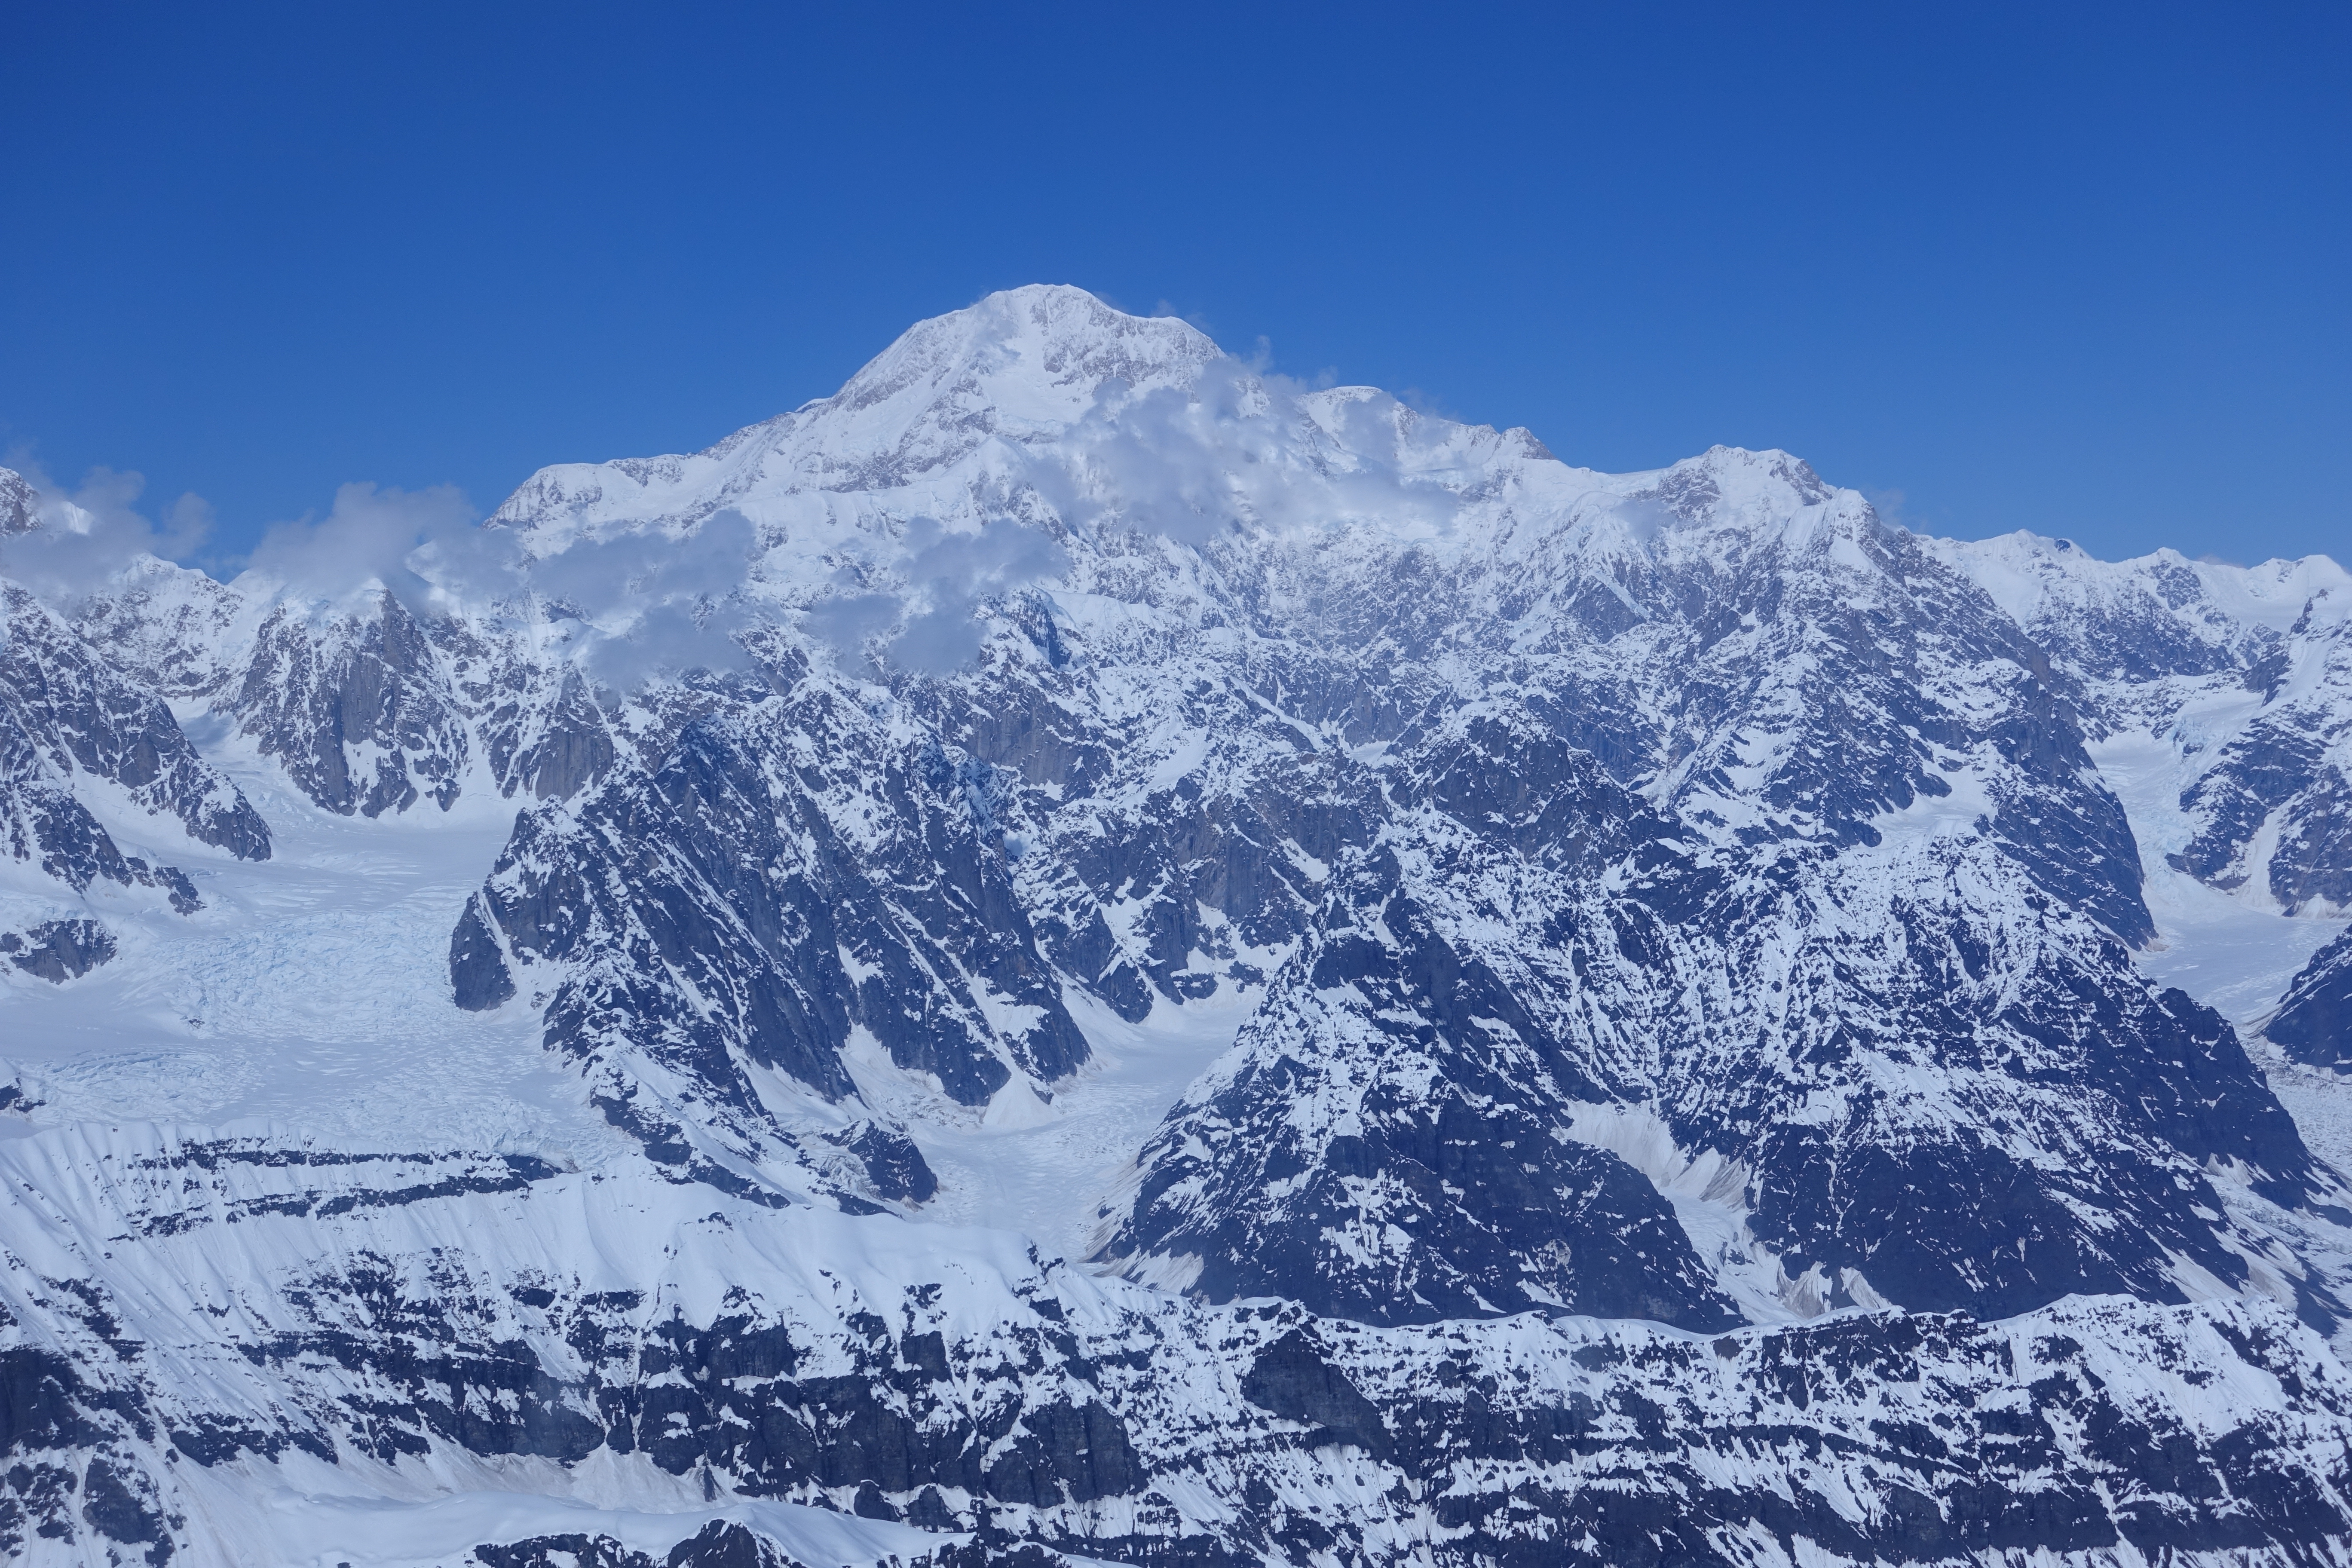
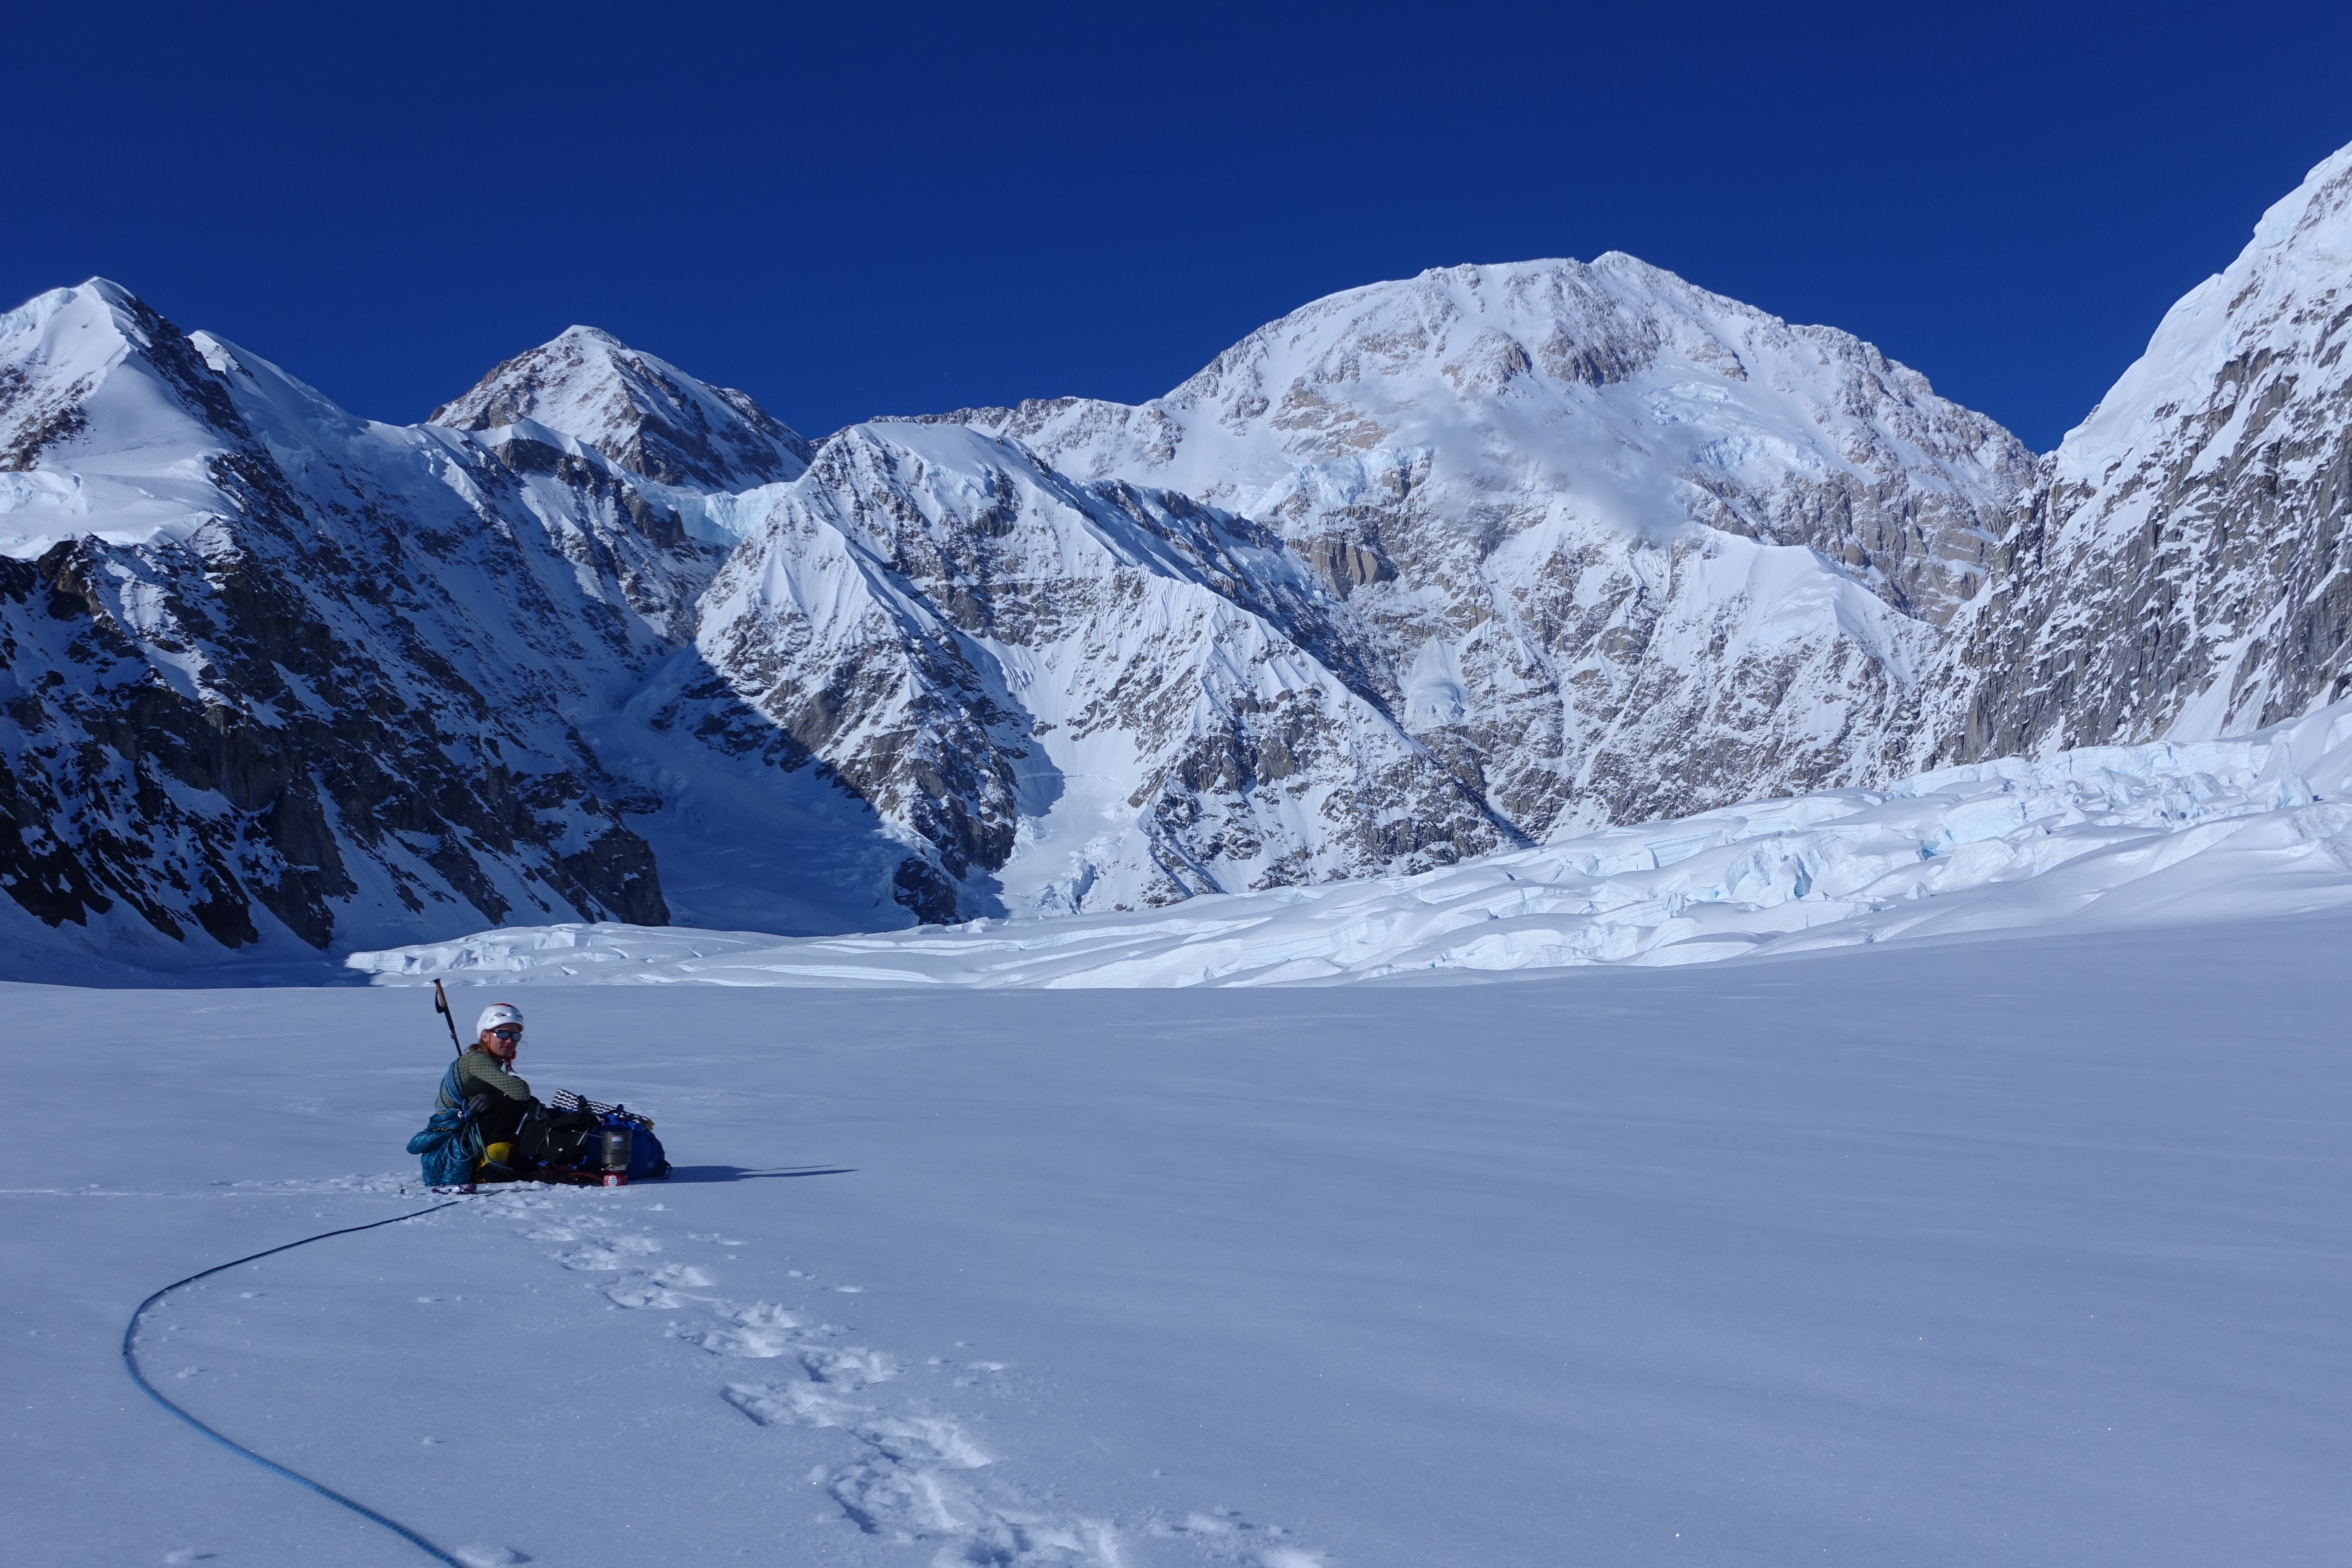
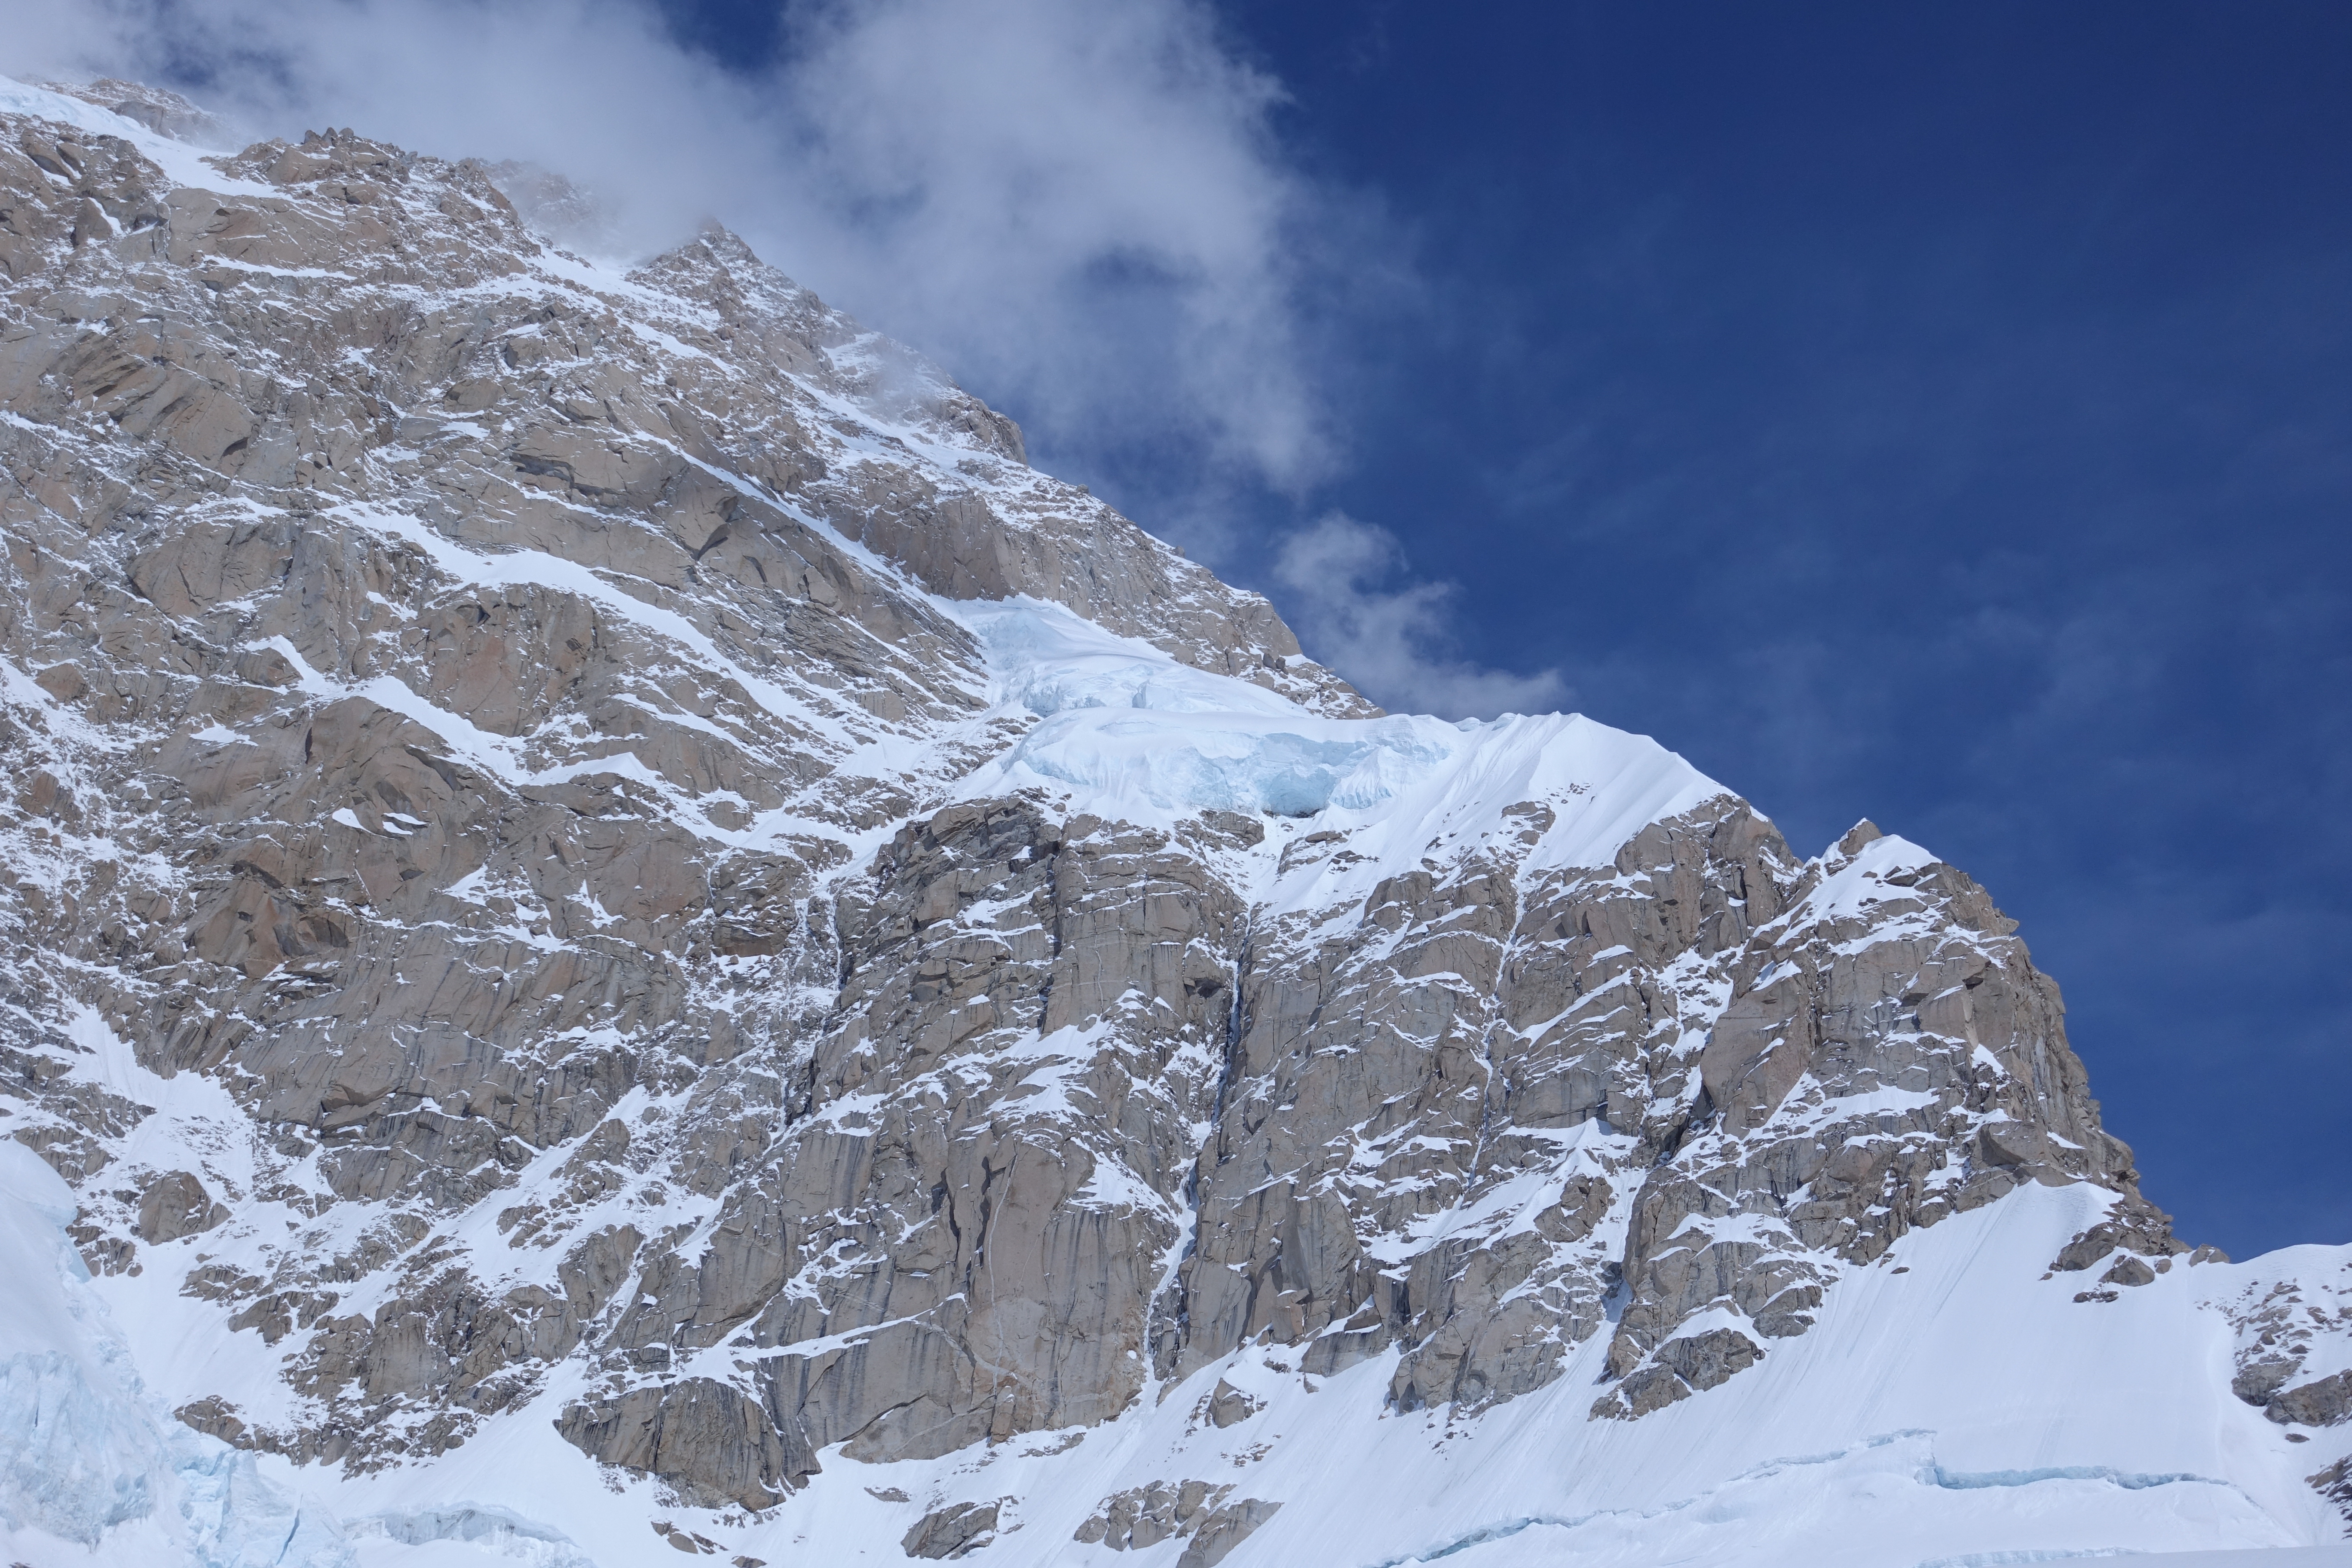
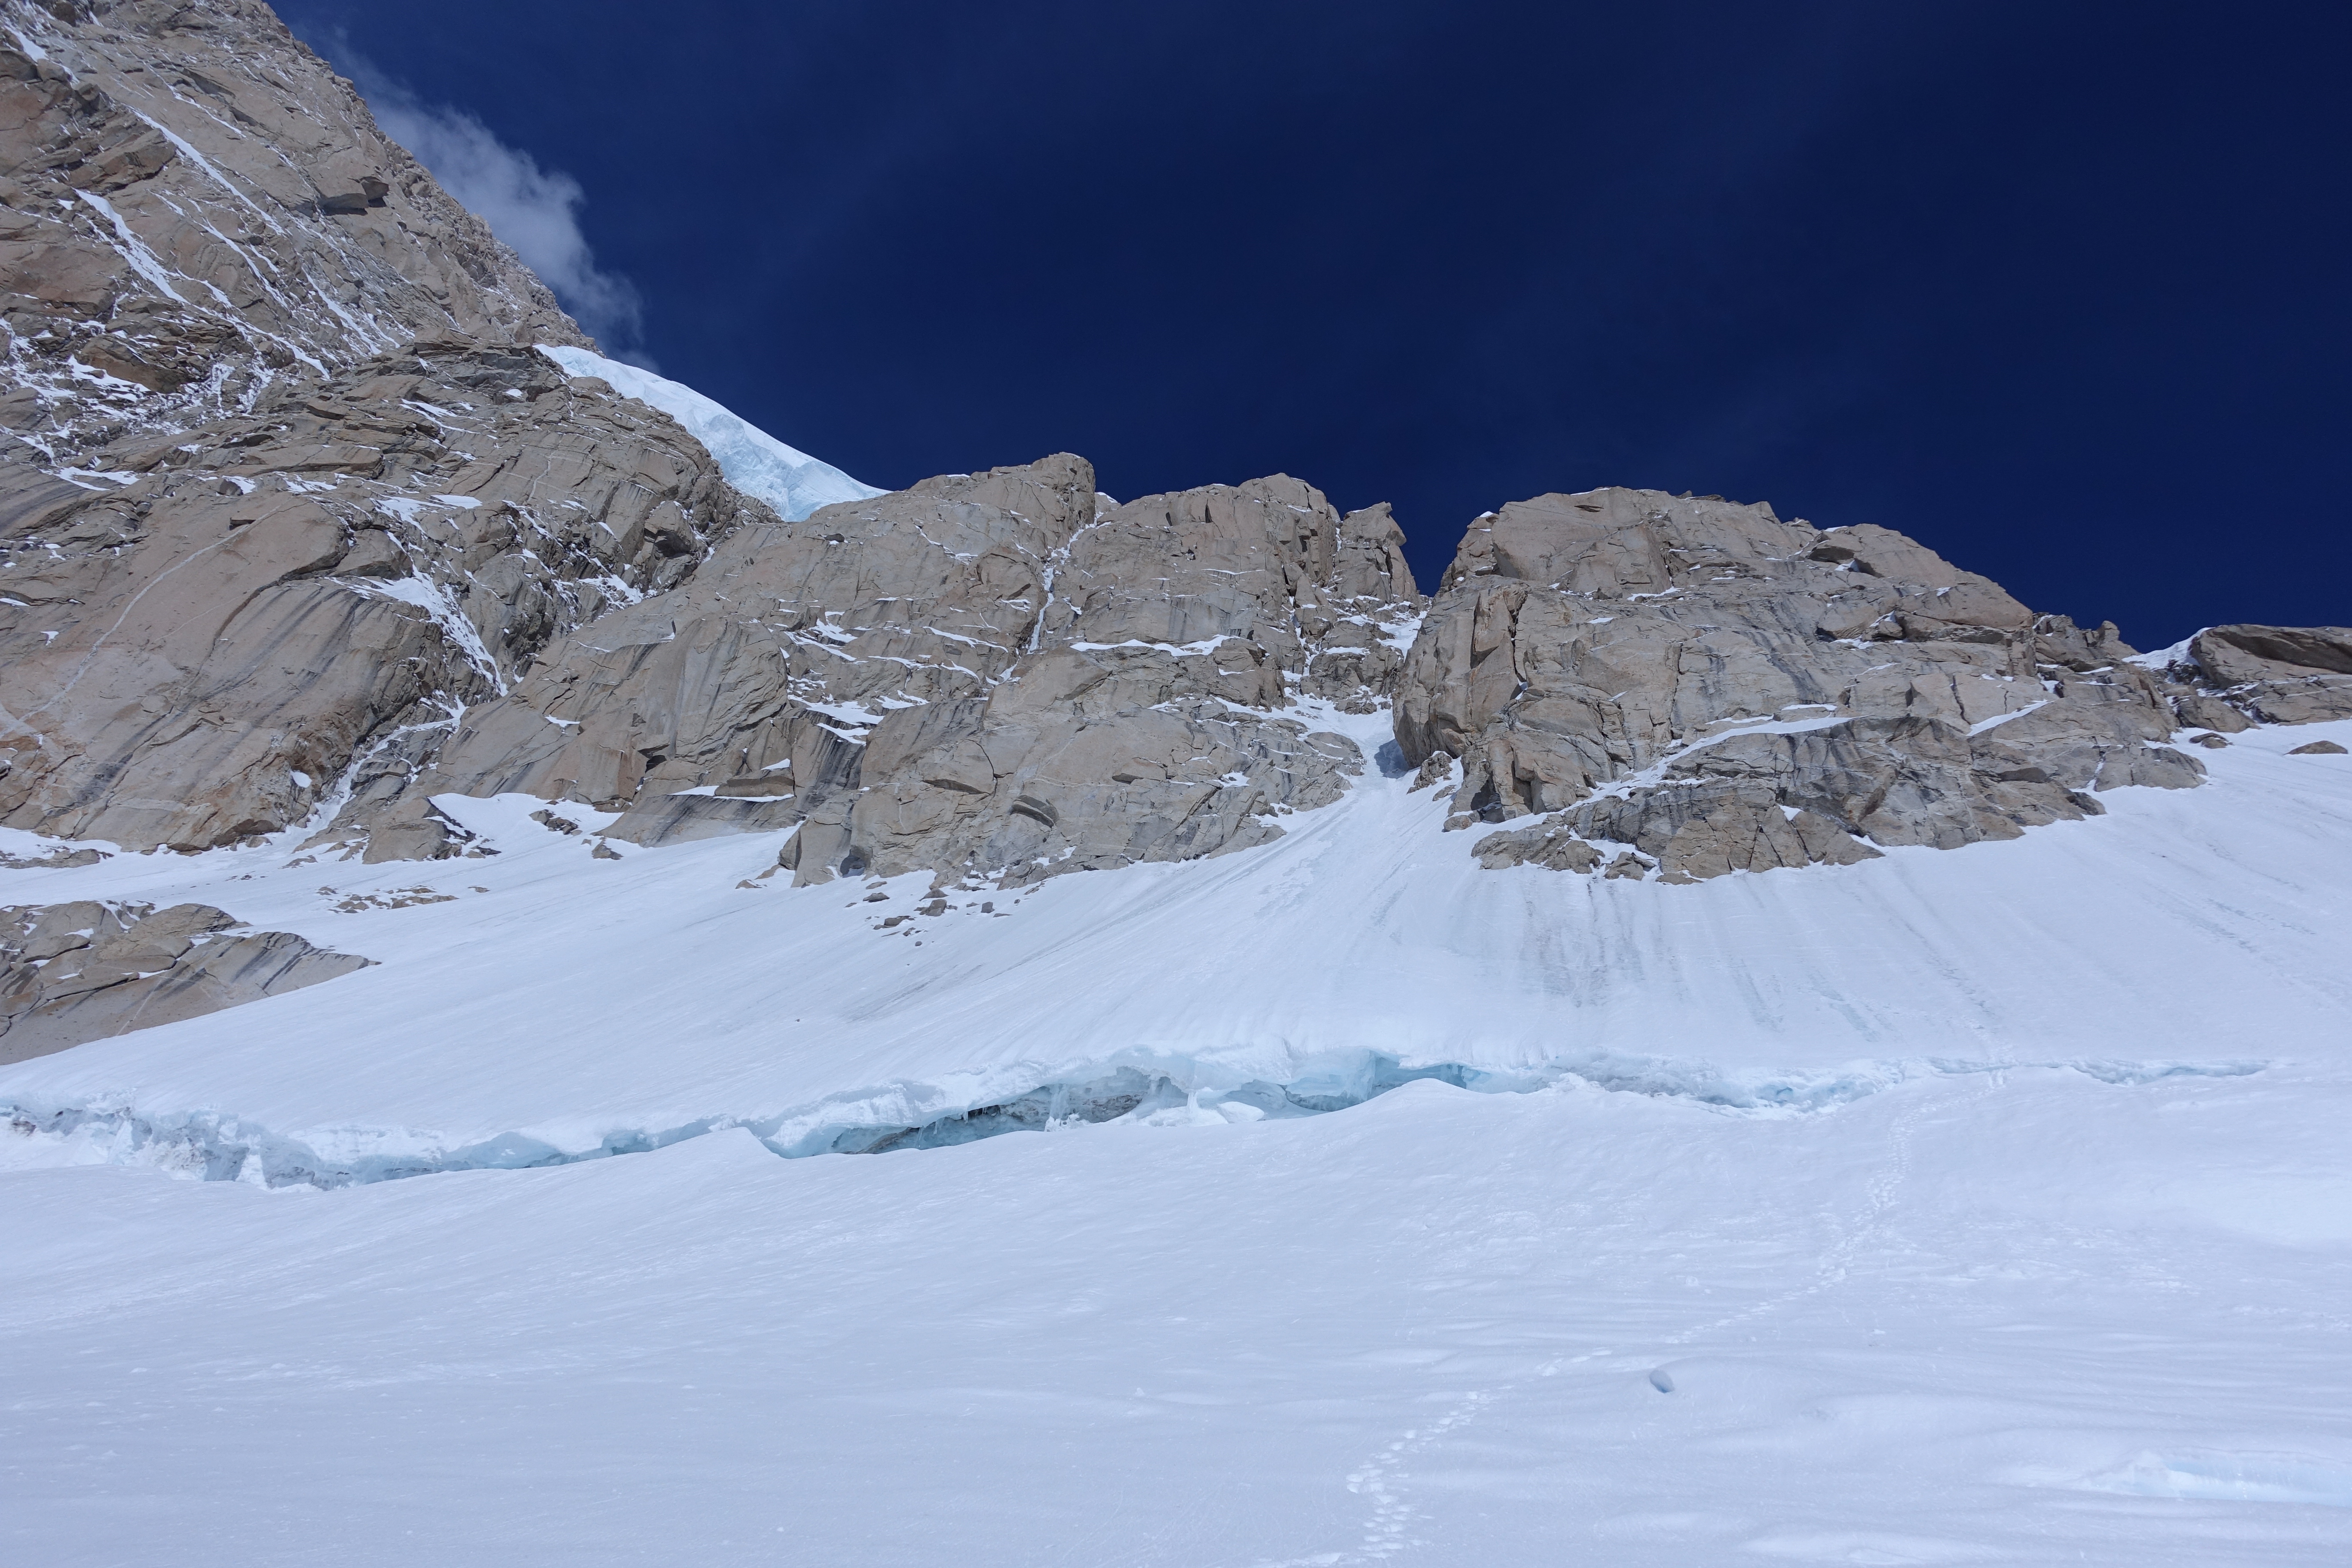
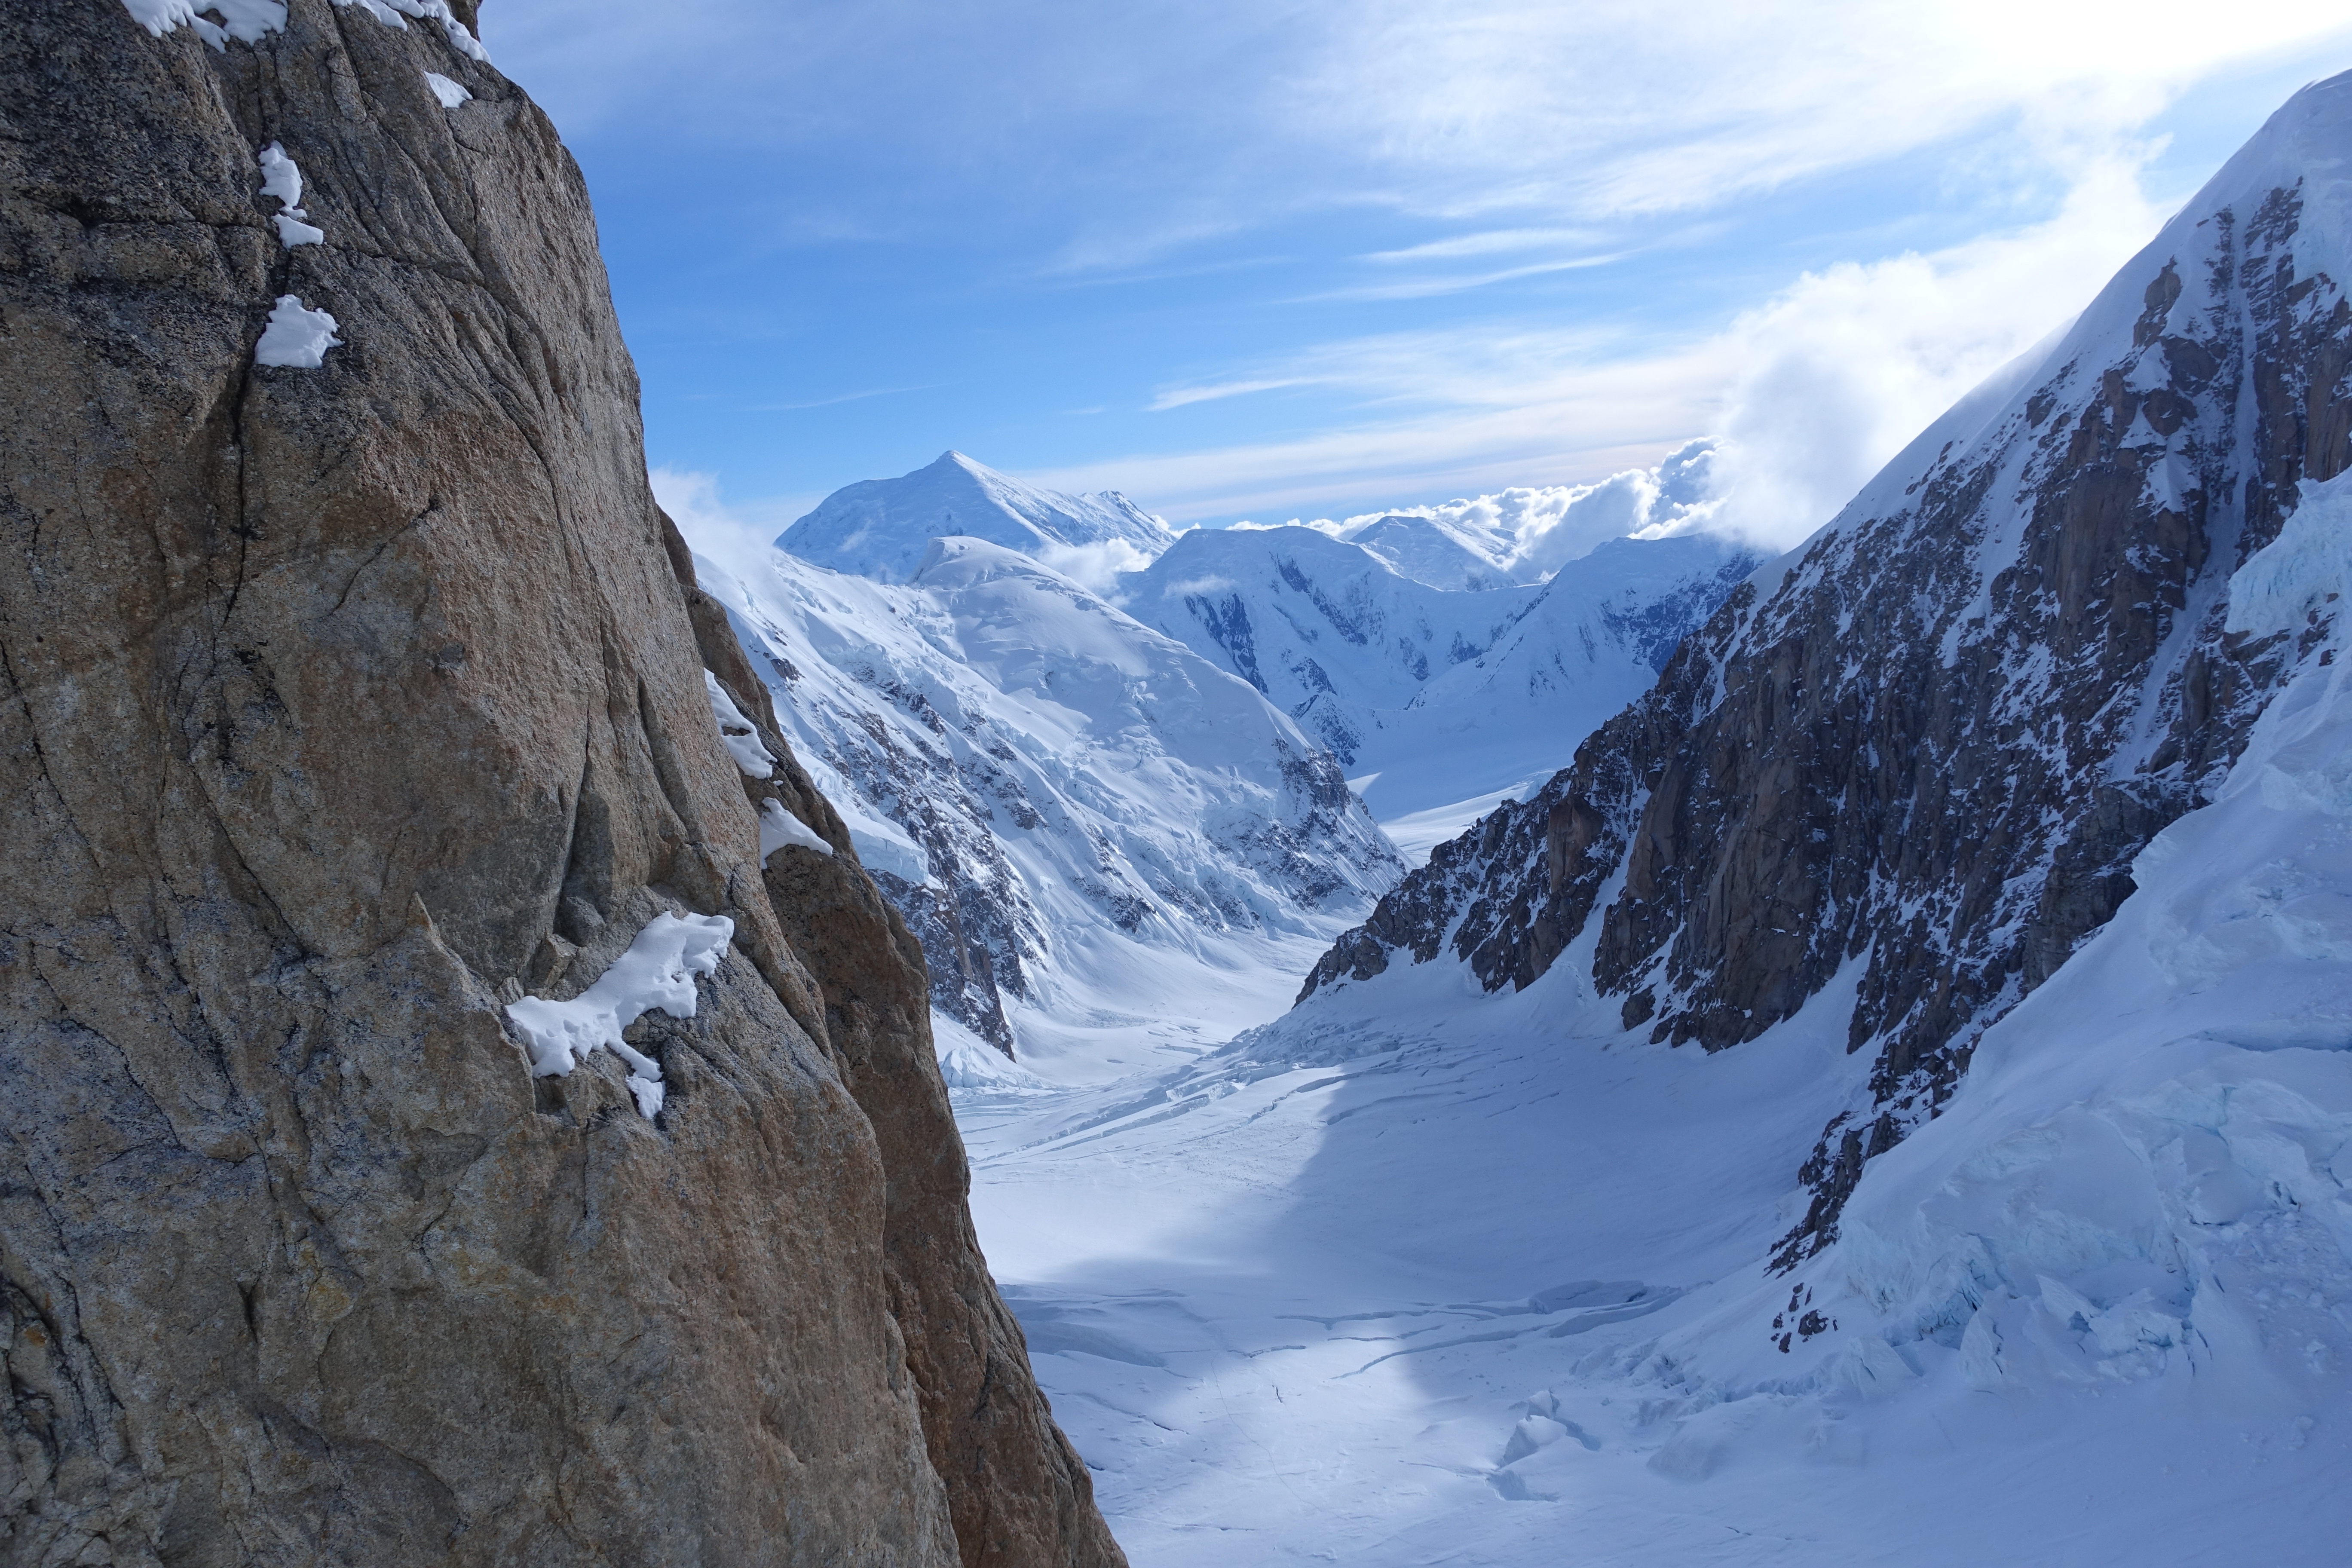
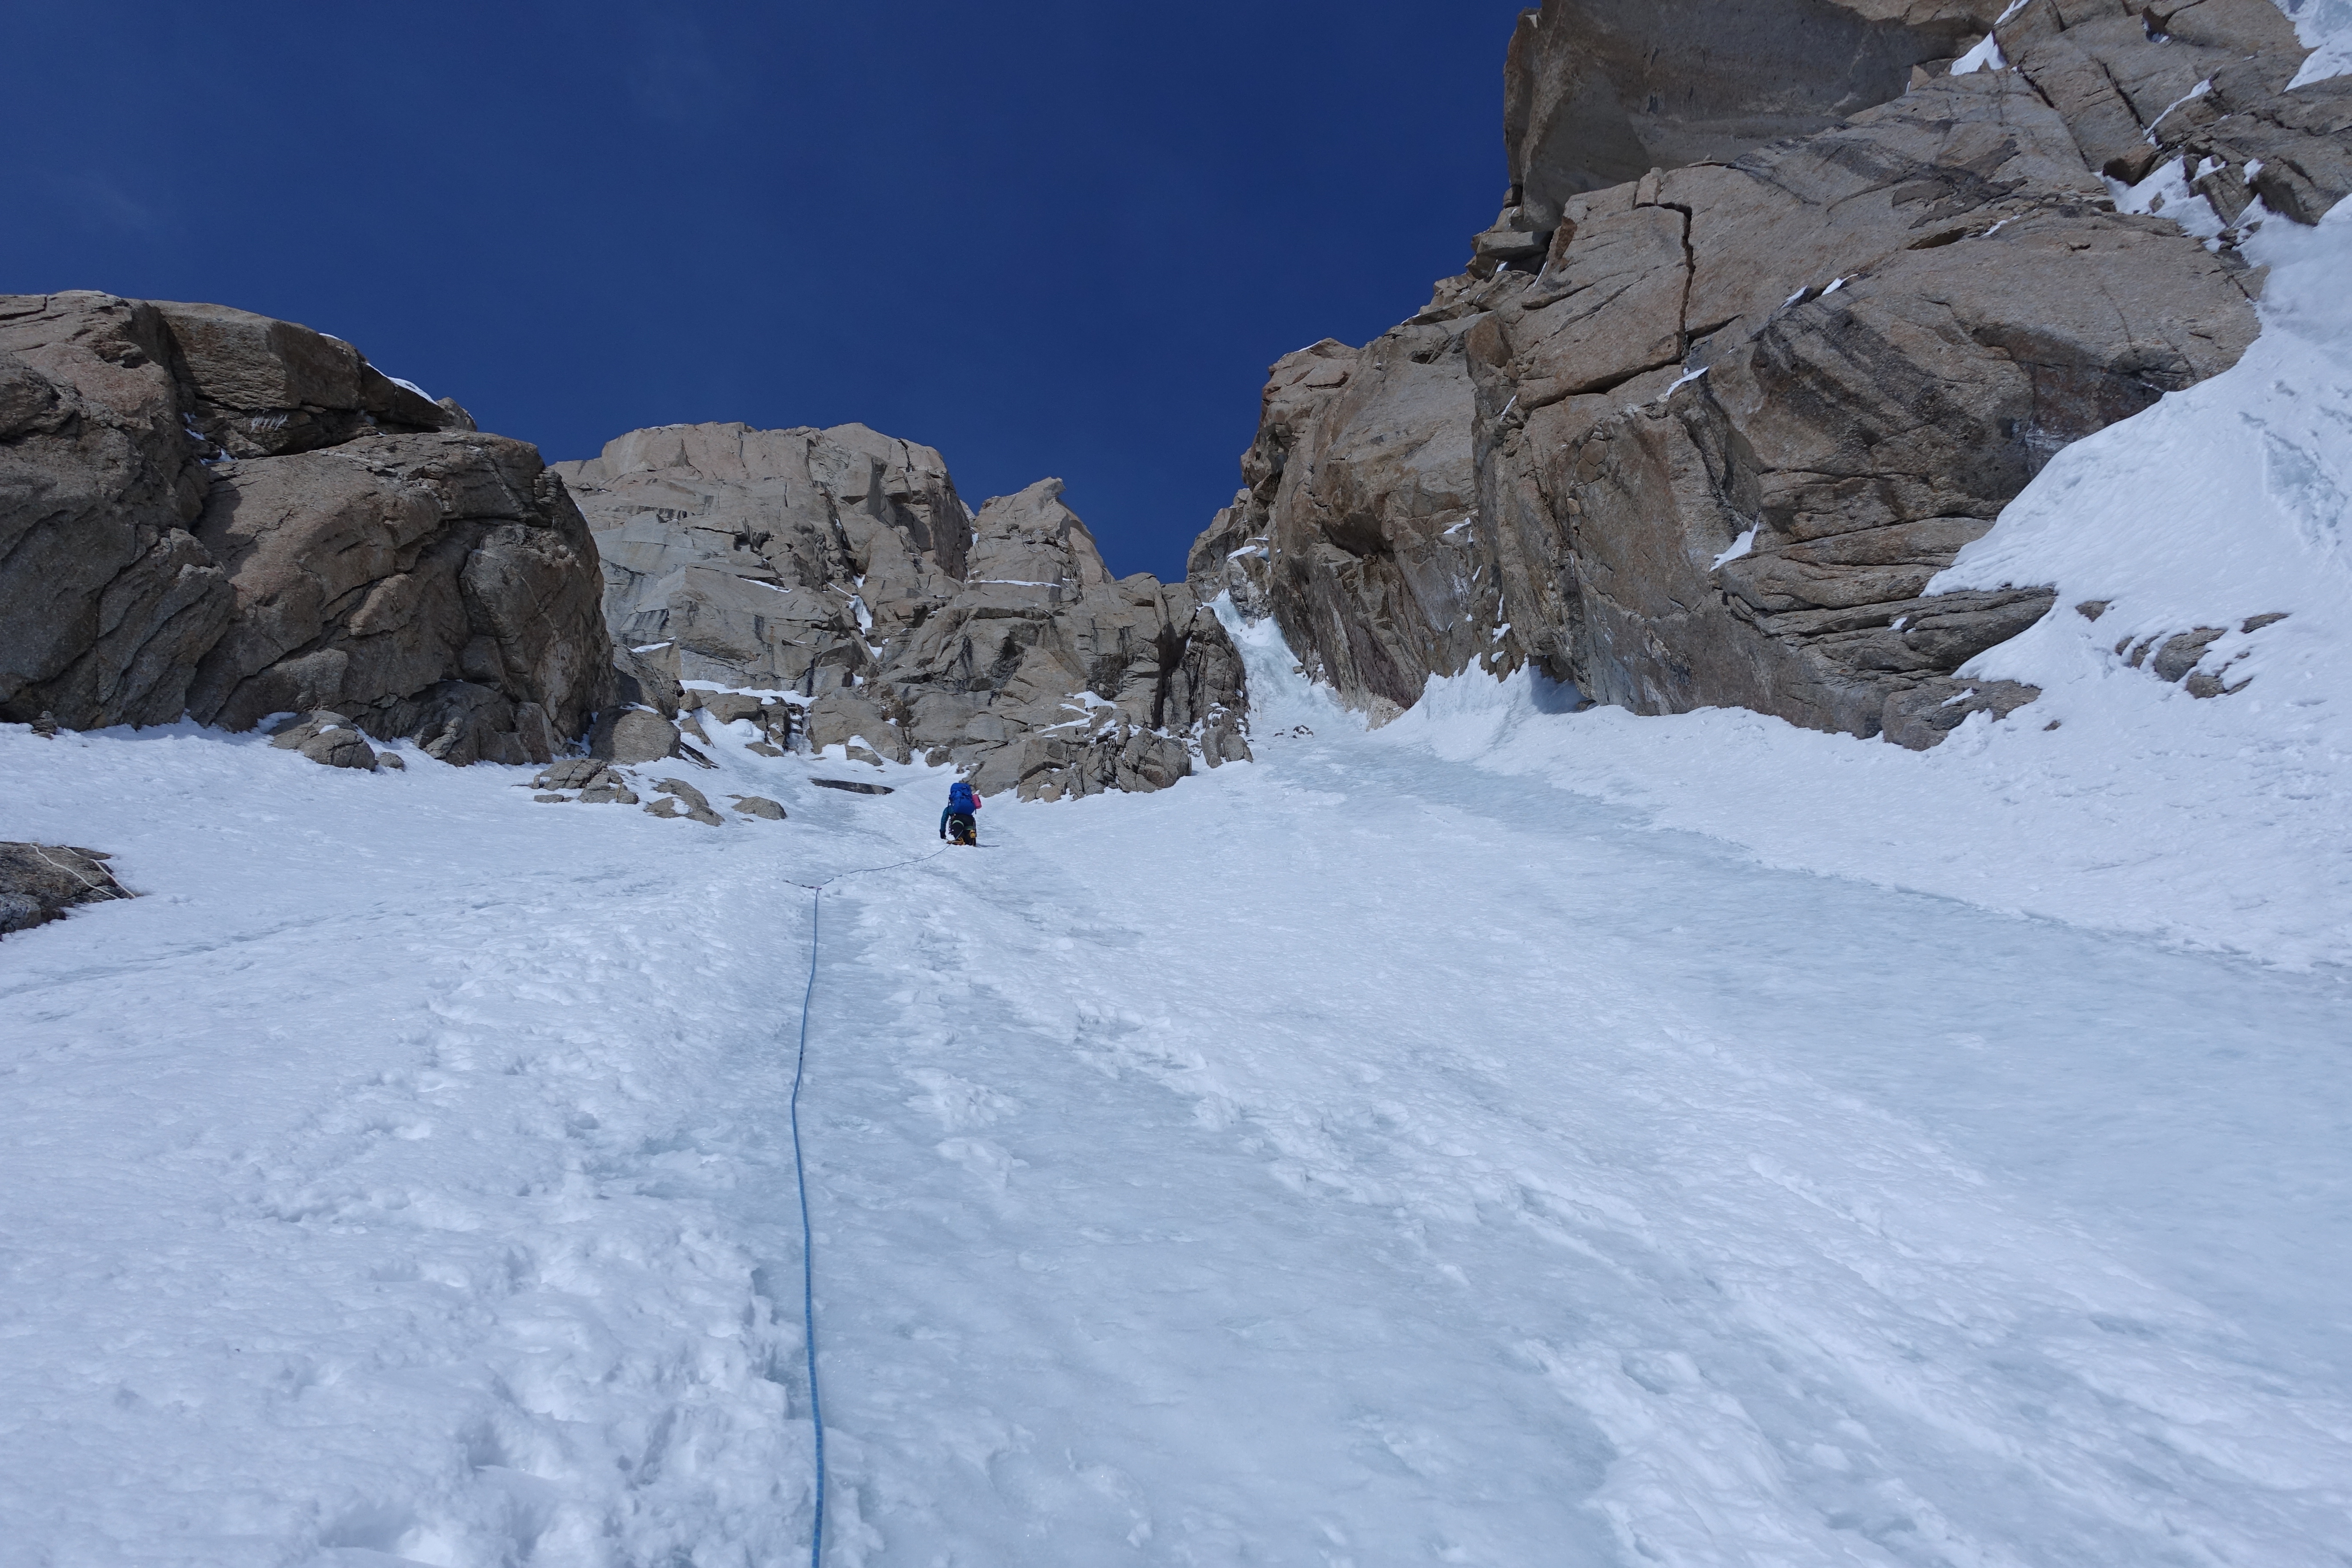
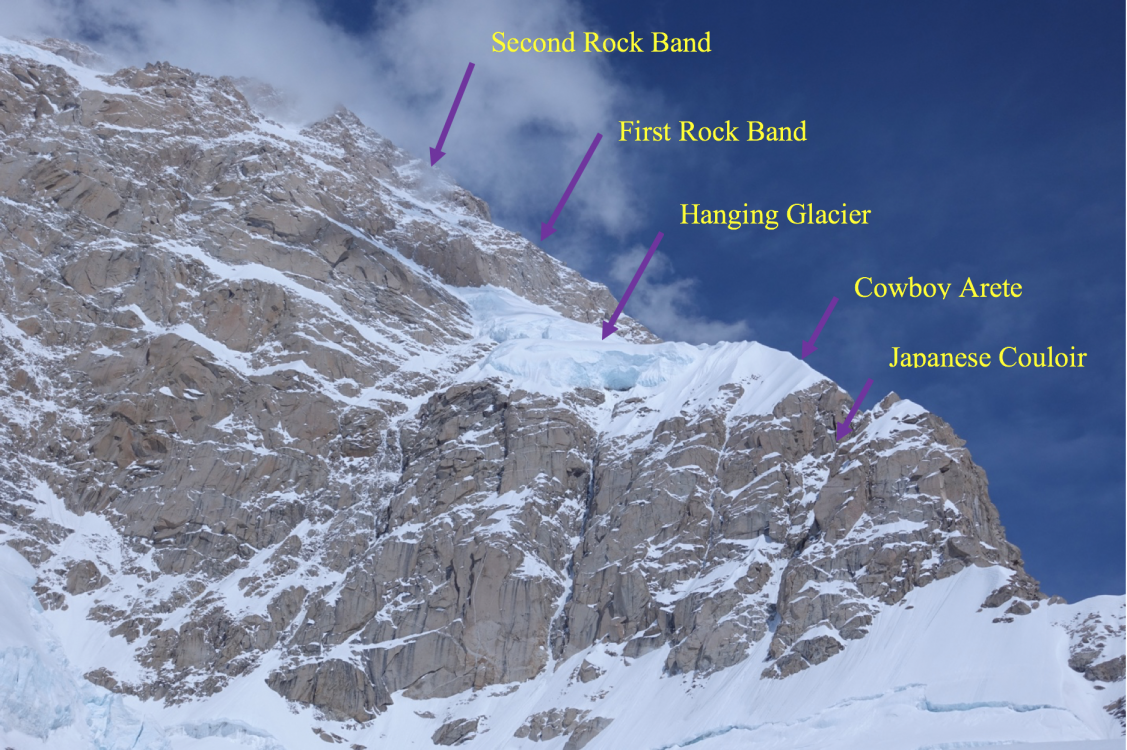
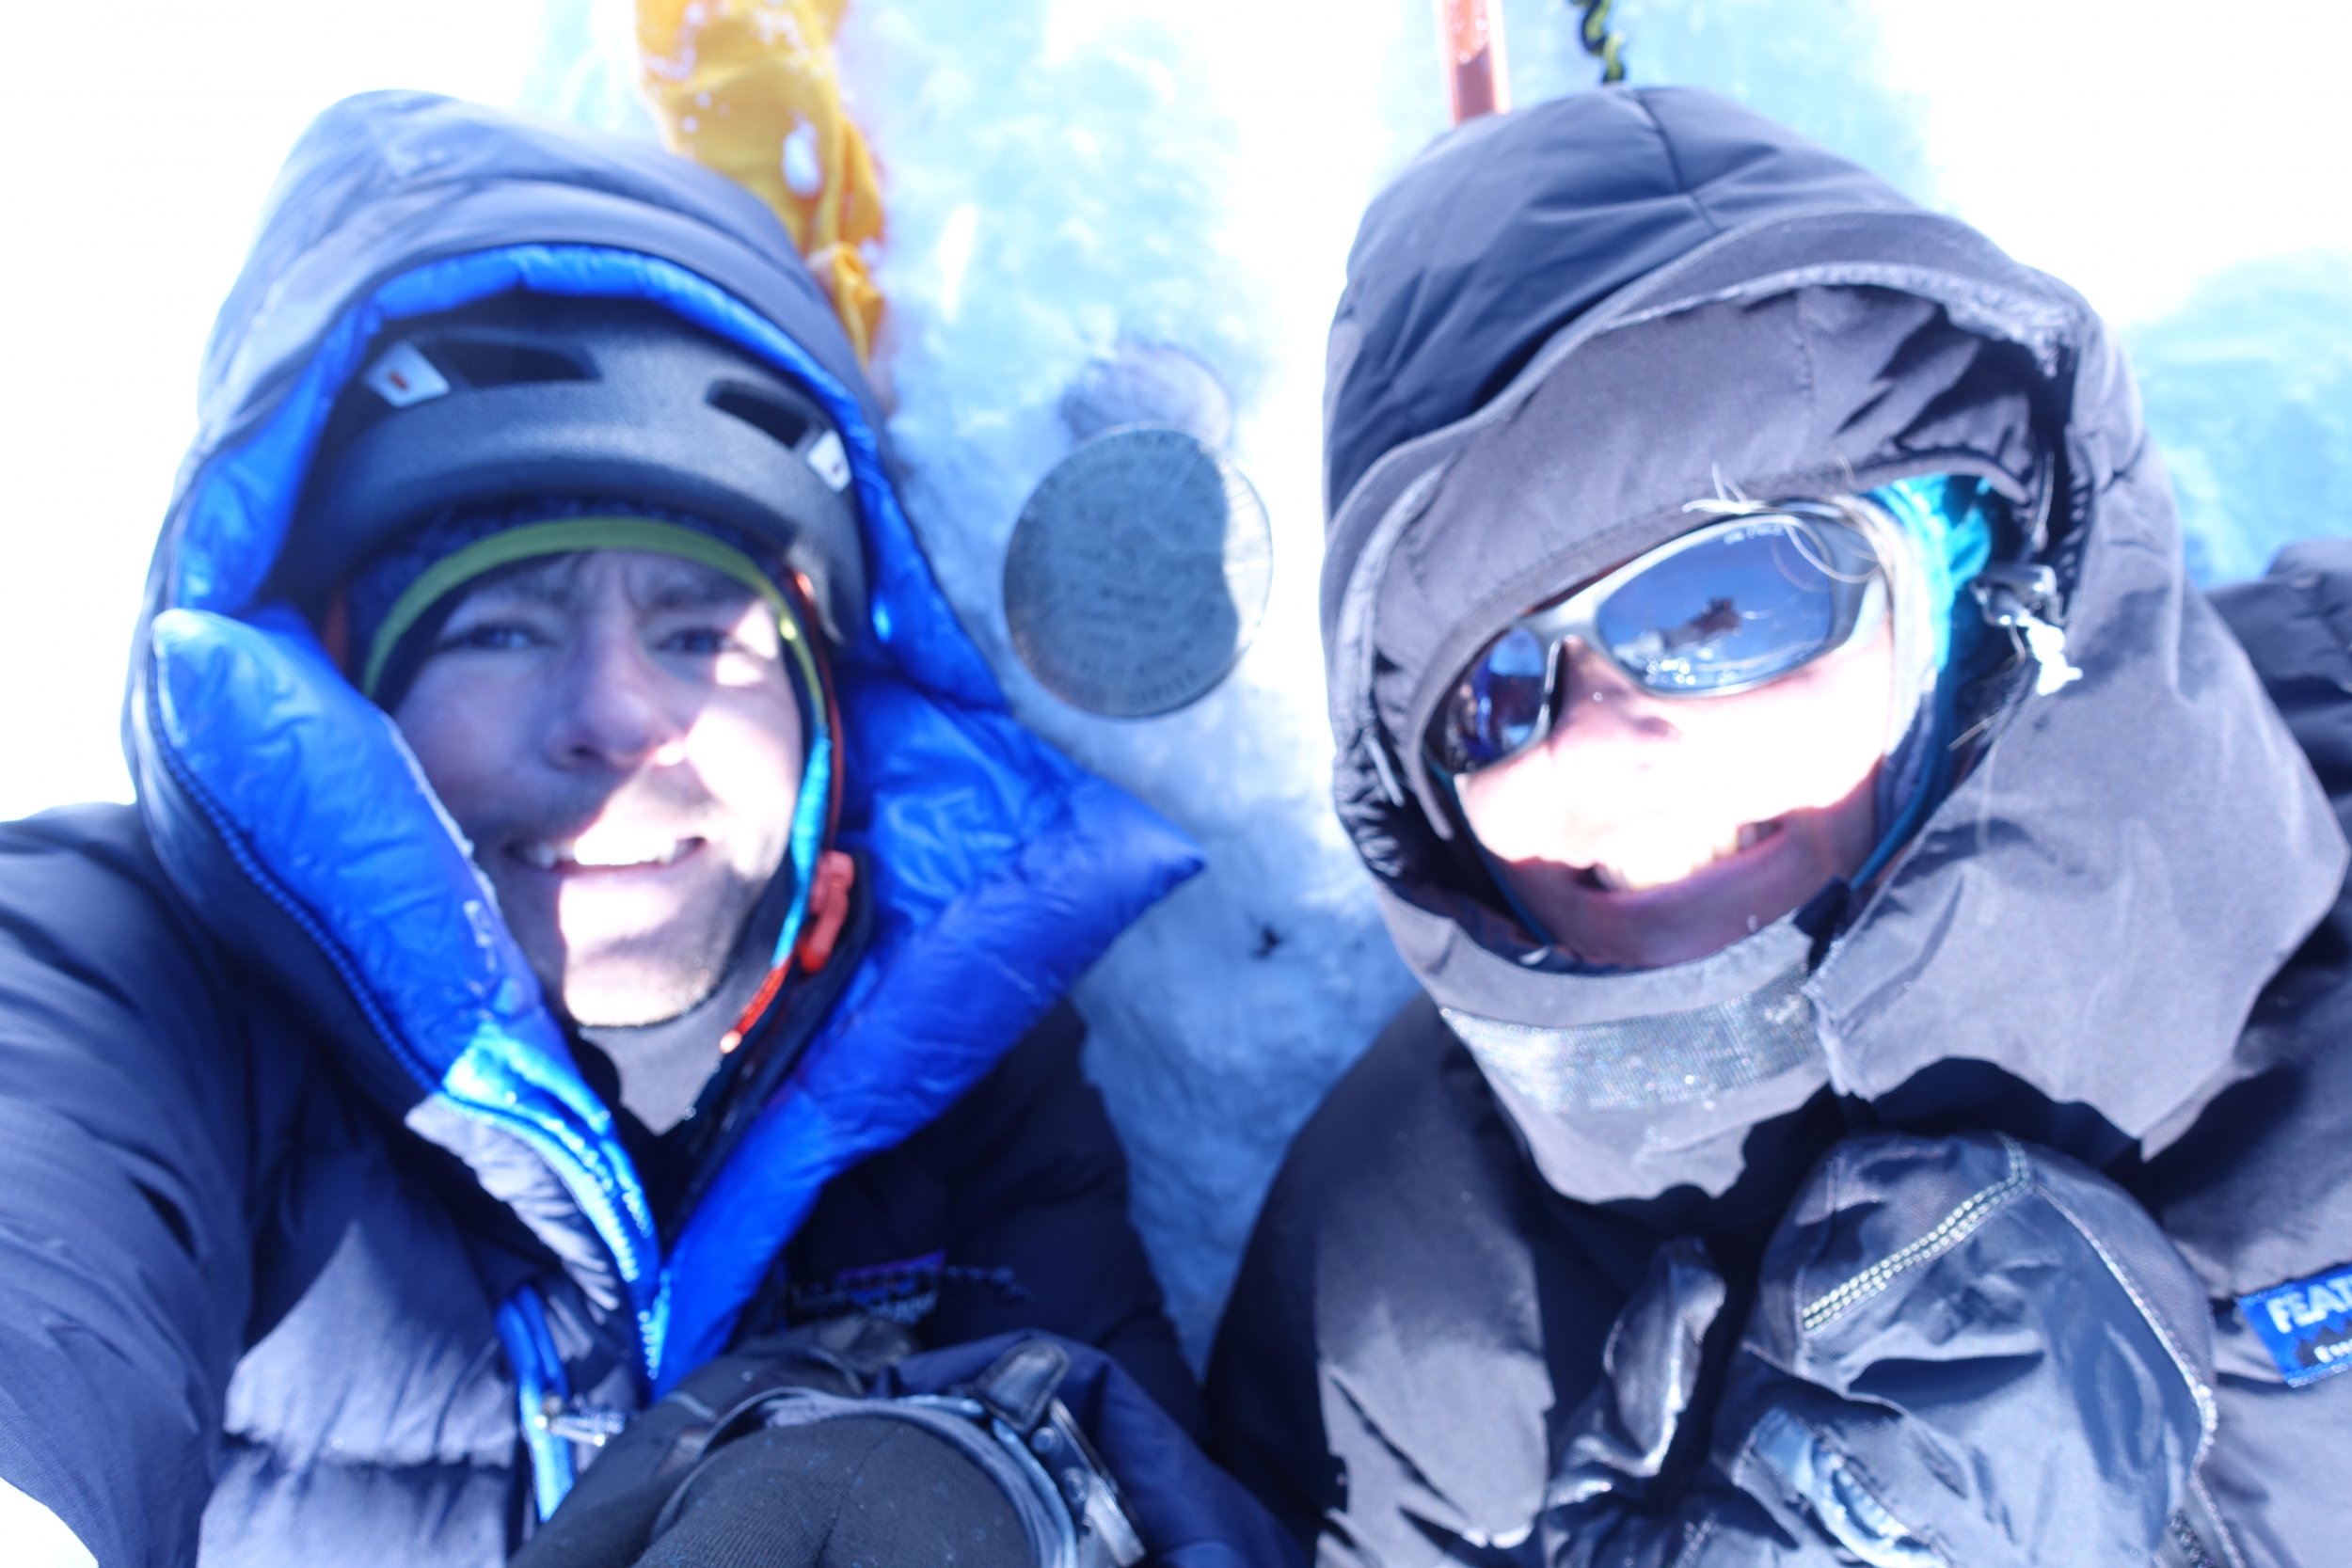
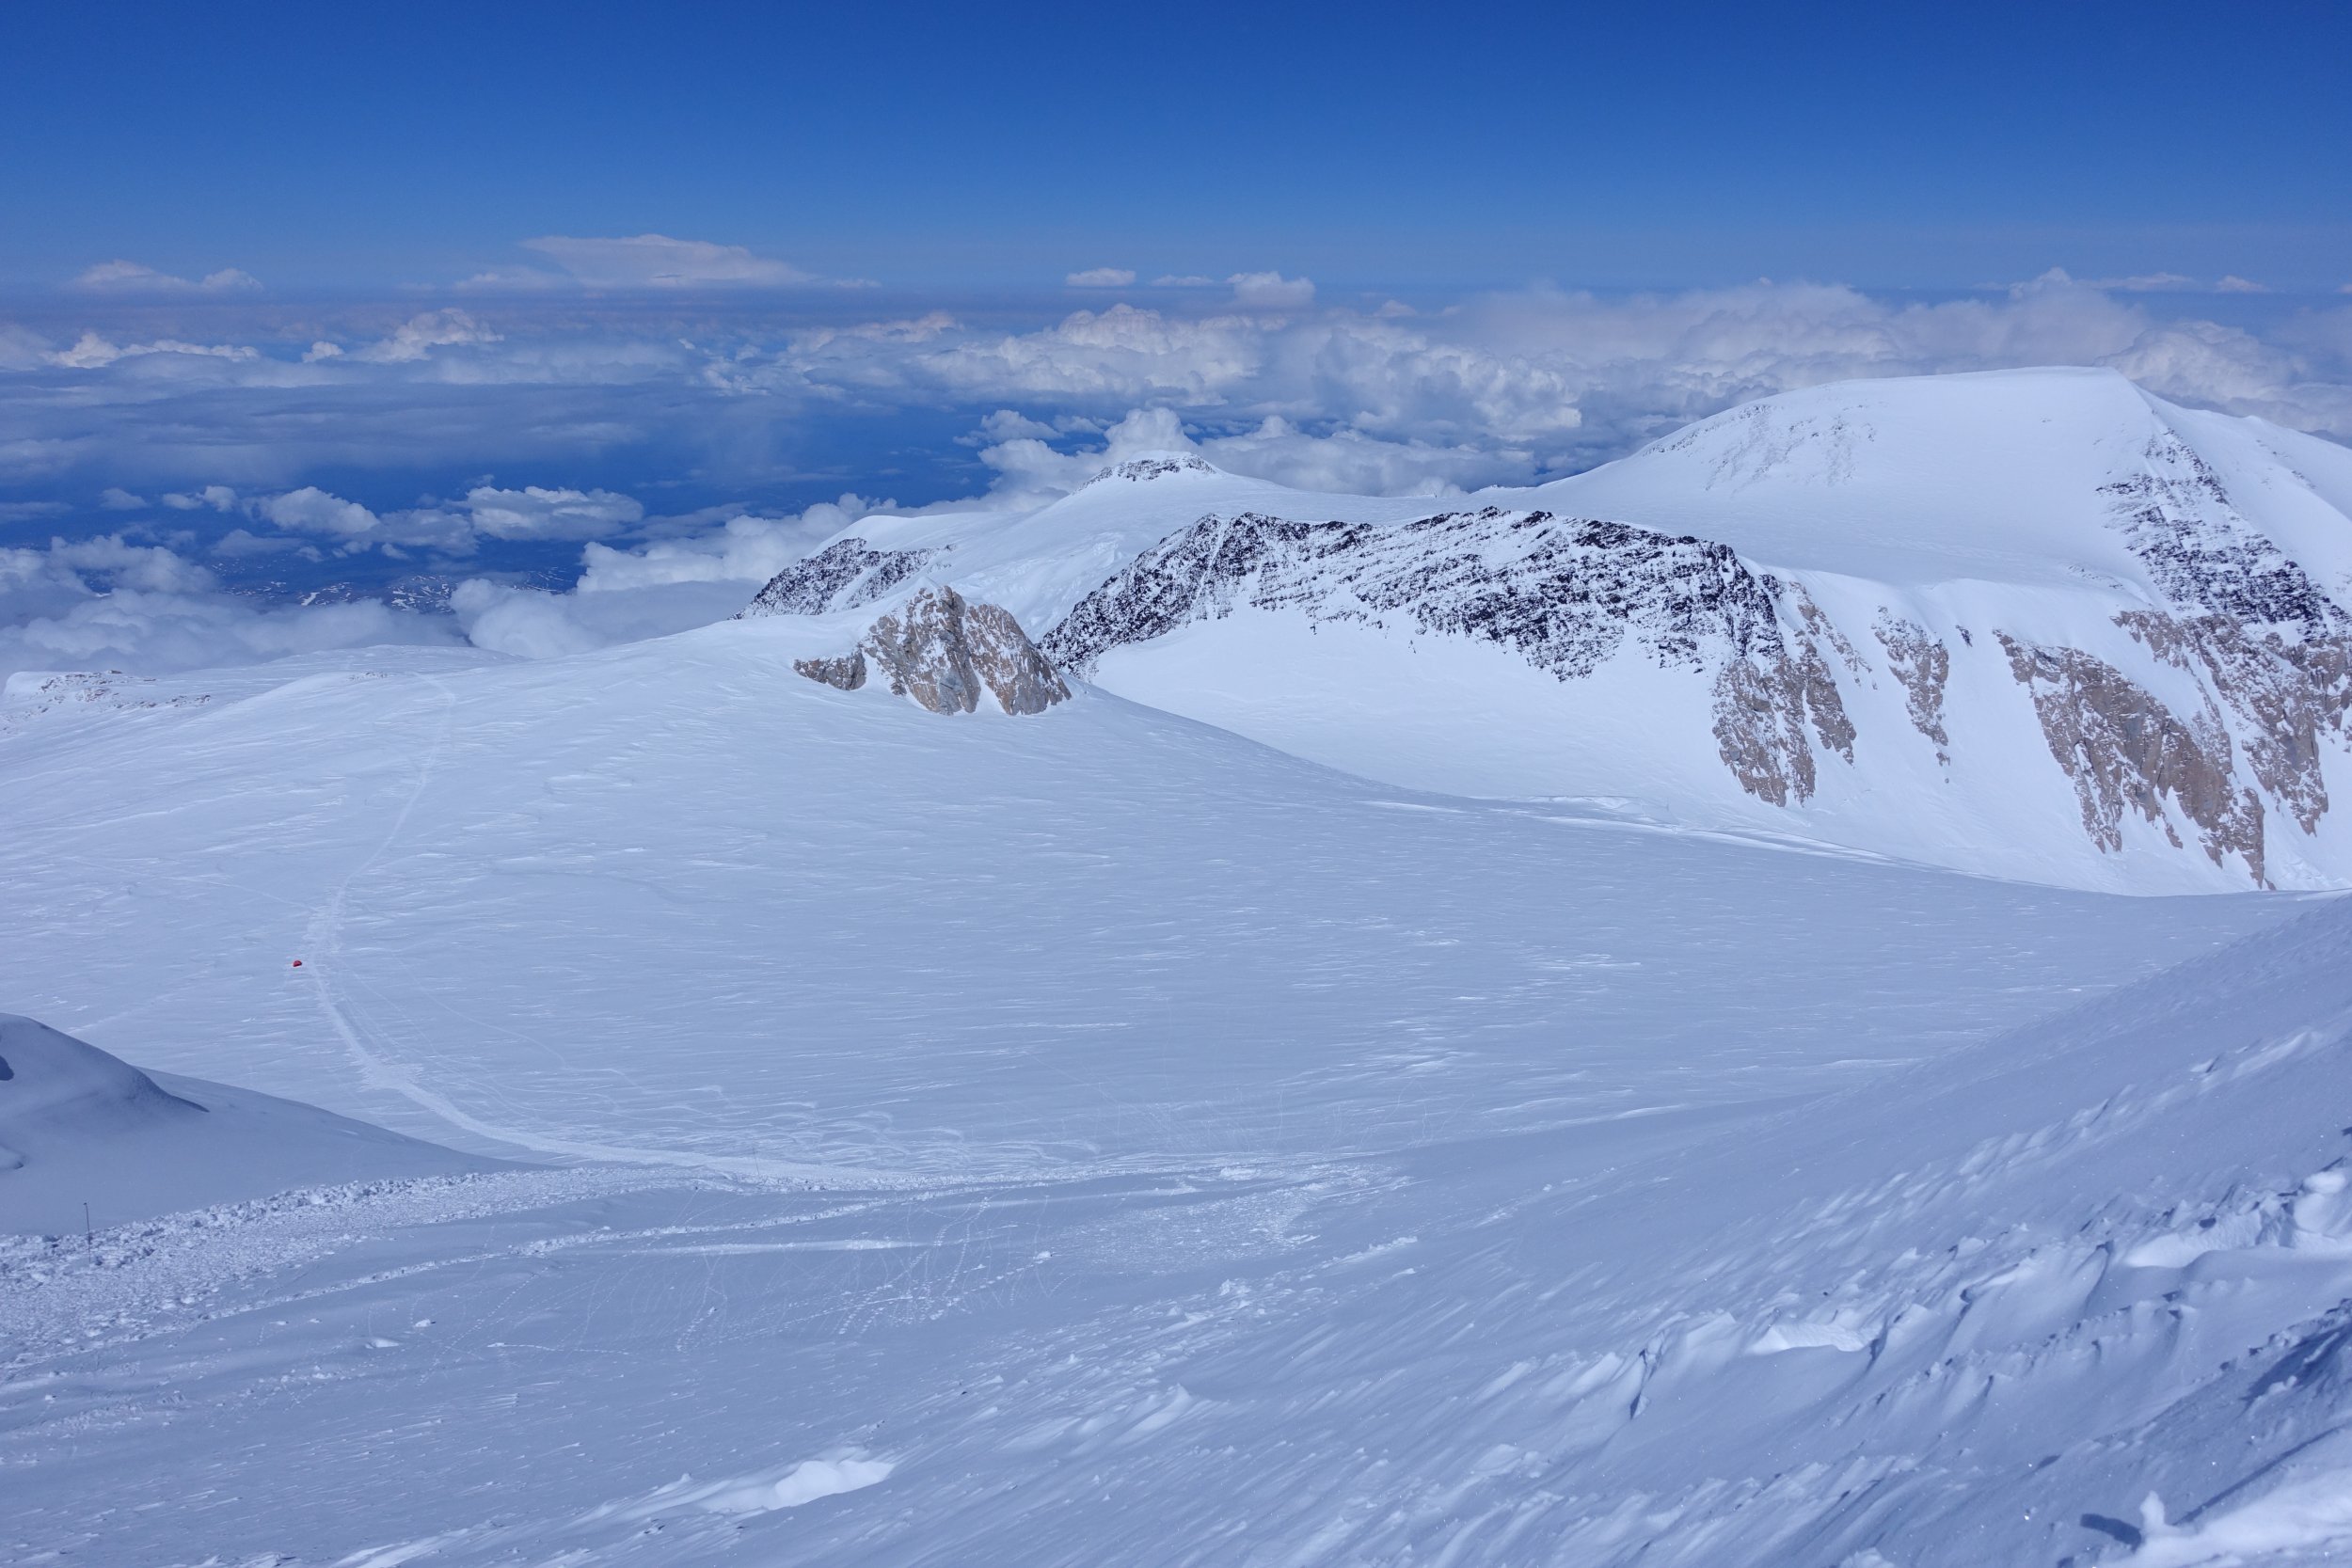
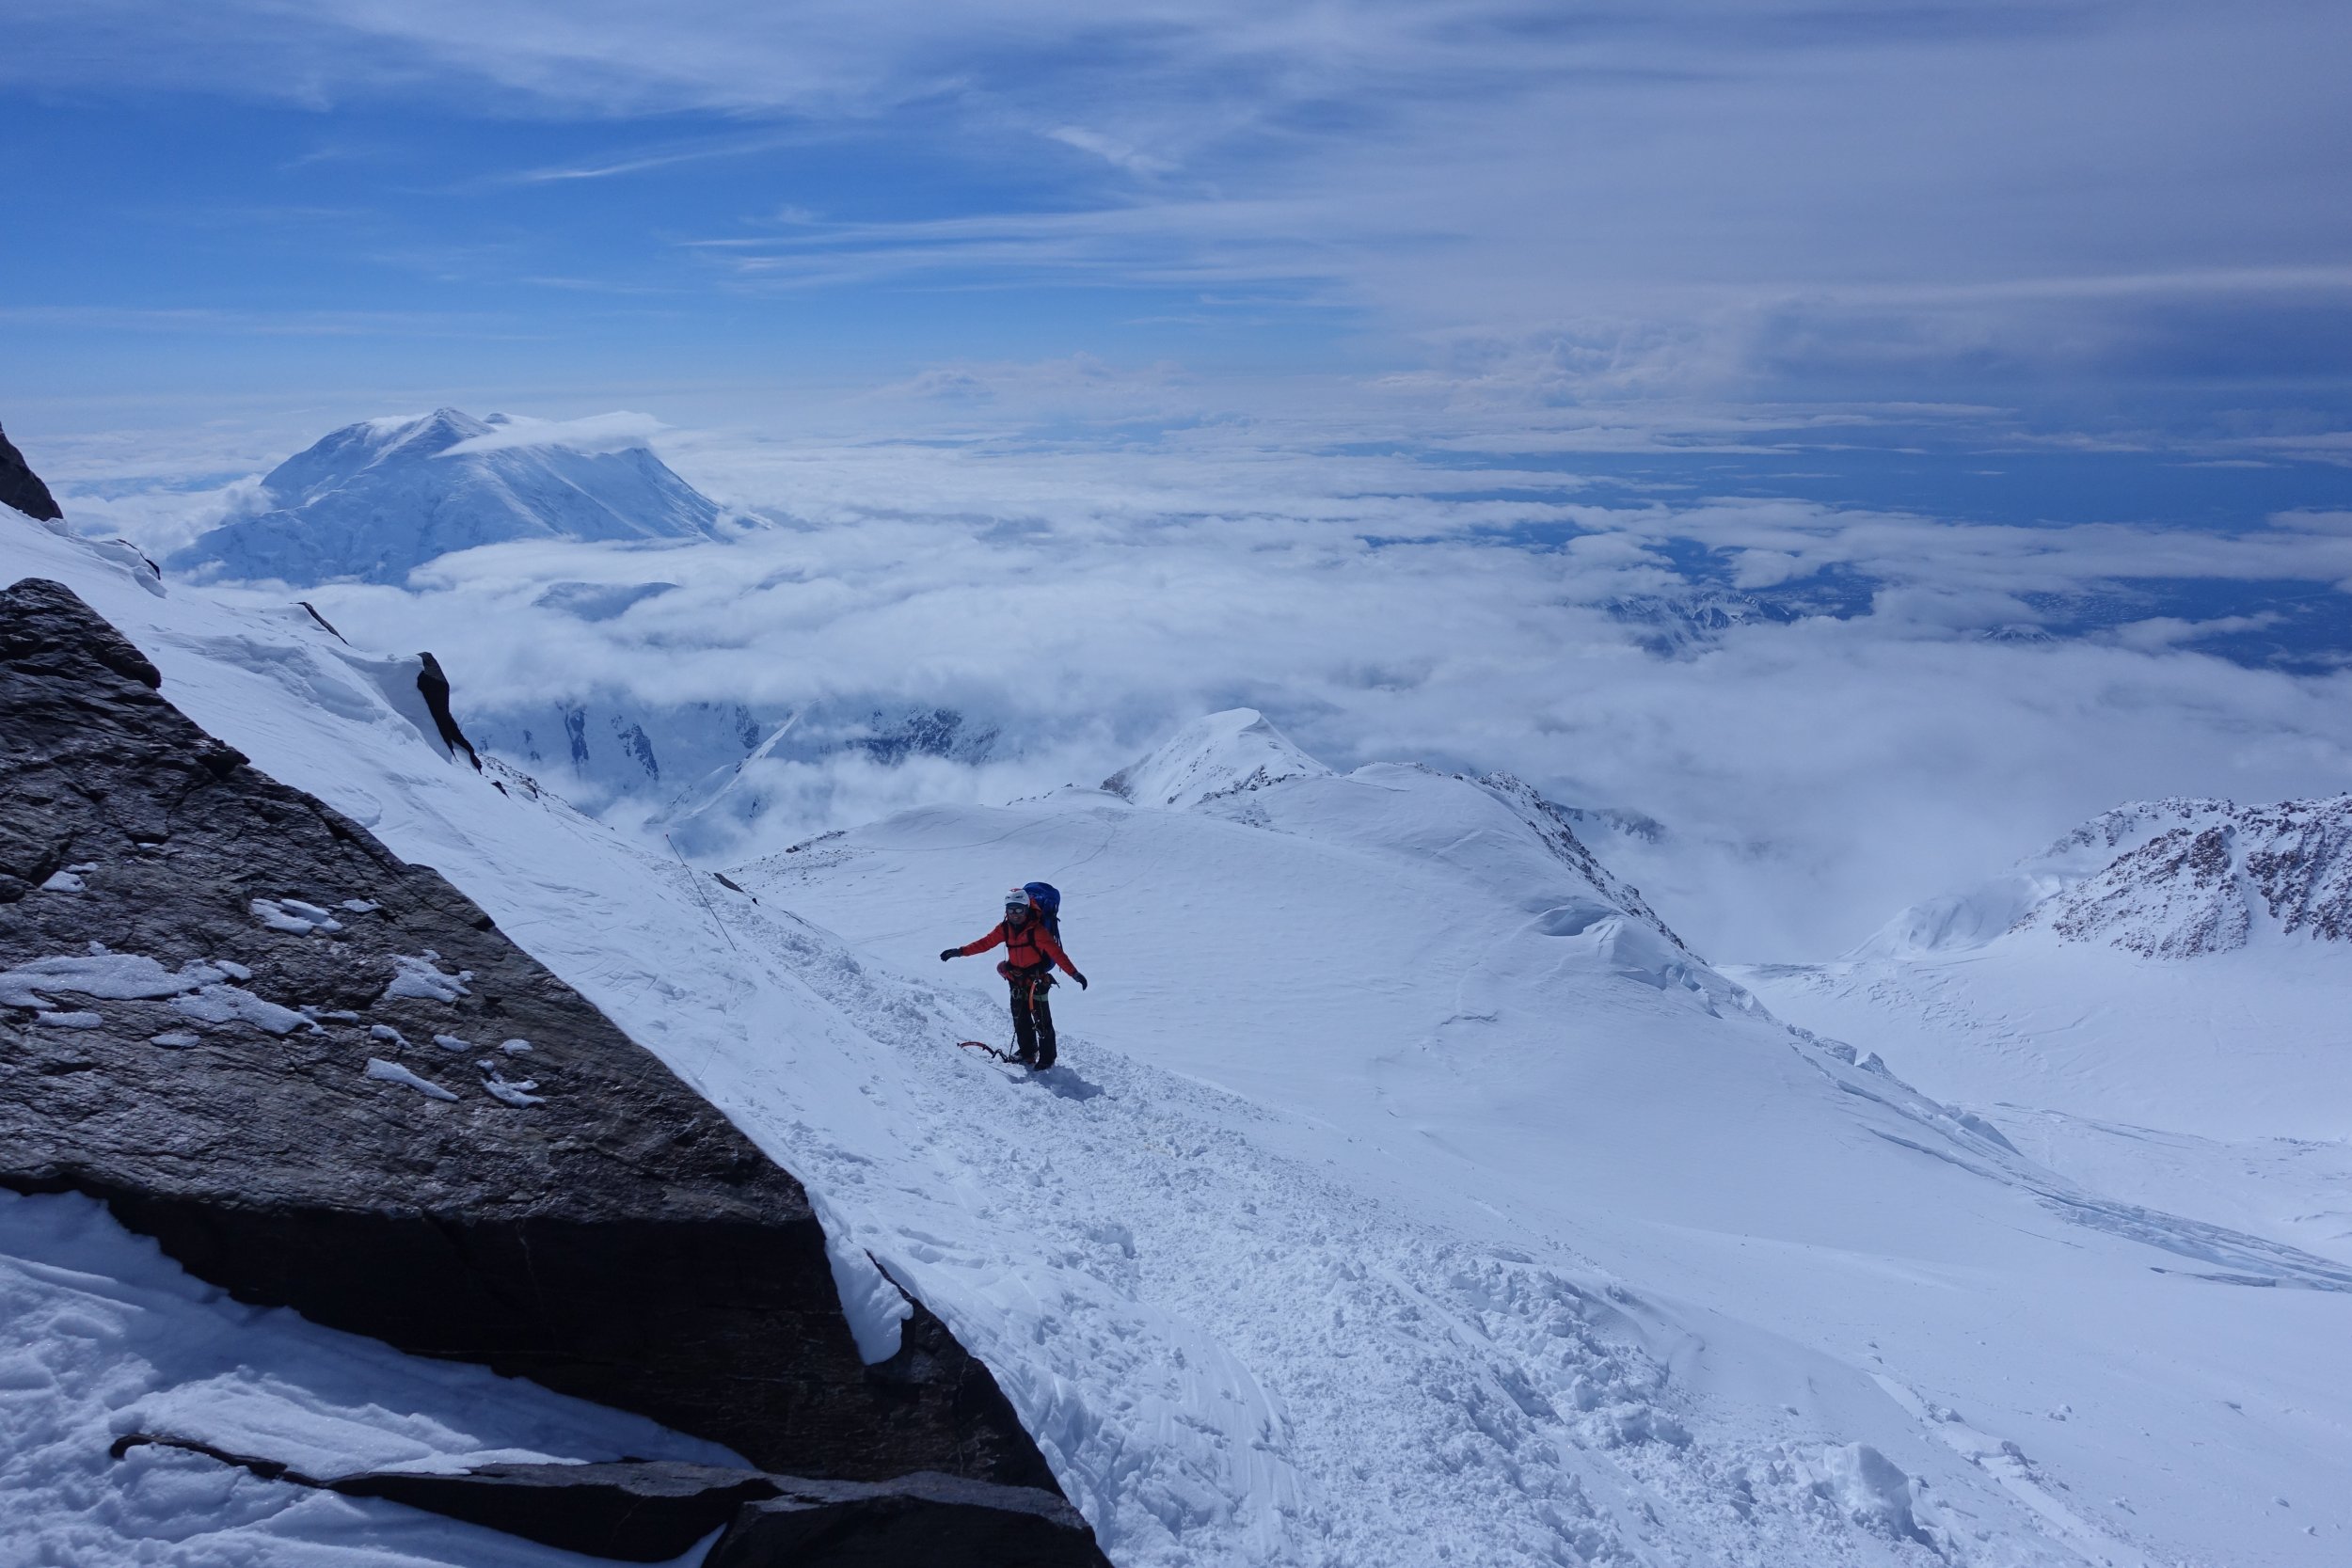
Trip: Denali - Cassin Ridge (Alaska Grade V, 5.8, AI4, 8,000ft), Alpine Style* Trip Date: 06/09/2018 Video: Between June 2 and June 11, Priti and I climbed the Cassin Ridge on the South Face of Denali approaching via the NE Fork of the Kahiltna Glacier (the “Valley of Death”), spending 6 days on route (including 1 rest/weather day at 17,700ft), summiting on June 9, and descending the West Buttress route. The whole trip was 10 days 7 hours door-to-door from Seattle. The Cassin Ridge is the second most popular route on Denali, with an average of 9 successful climbers each year, compared to an average of 584 successful climbers each year on the West Buttress route over the past decade. We carried everything up and over, climbing Ground-Up, with 38lbs packs each at the start, no sleds, and moving camp as we climbed, without caches. It was a Smash ’n’ Grab, meaning we decided to go at the last minute when we saw a good weather window. We watched Denali weather every day since early May until there was about a week of good weather. It took 24 hours from being at work on a Friday afternoon deciding to pull the trigger to being at Kahiltna Base Camp (including packing, Ranger orientation, flights, etc). We climbed Rainier 3 times the month and a half before our trip (Gib Ledges, Kautz, and Liberty Ridge), sleeping in the summit crater the weekend before. Still, we took Diamox while on Denali and had 2 weeks of food/fuel in case we felt altitude on route. Luckily, we had no altitude issues, and were only bounded by our own fitness, weather, and desire to move only when the sun was on us. Overall, weather was windless, clear, and sunny during the days with a few flurries at night. It was an “old-school” style of climbing, slow and heavy, while most folks nowadays opt to acclimatize on the West Buttress and climb the Cassin Ridge starting from 14,000ft camp on the West Buttress, then climb light-and-fast via the Seattle ’72 ramp or the West Rib (Chicken Gully) in a few days — this was our plan for our attempt last year with Ilia Slobodov, but didn’t get the weather window. Overall, a very successful trip, and we’re so excited to have pulled it off, after 3 years of dreaming of this route. *Alpine Style: The route was completed Alpine Style with the following exceptions: -Snowshoes were cached at Camp 1 in case the lower Kahiltna Glacier was sketchy on the way back. Didn’t really ever need snowshoes. The NE Fork was boot-able. There weren’t tracks going up the NE Fork, but it was wanded to the base of the West Rib. -We clipped into the existing fixed lines on the West Buttress descent above 14k, but this was unnecessary since it was basically a staircase. We didn’t clip into the existing pickets on the Autobahn above 17k. Google Street View: Apparently, nobody had done a 360 Photo Sphere Google Street View of the summit of Denali, so we obliged https://www.google.com/maps/@63.0690675,-151.0060278,3a,75y,78.91h,50.18t/data=!3m7!1e1!3m5!1sAF1QipOR4OLfMm5iBn15nn4OdiMbVTWa7lwk40pPUlnH!2e10!3e12!7i8704!8i4352 Itinerary: -June 2: Arrived at Kahiltna Base Camp at 3:00PM and moved to “Safe Camp” in the NE Fork of the Kahiltna Glacier (“Valley of Death”). We cached snowshoes at Camp 1 and took a right turn up the NE Fork. This “Safe Camp” is the widest part of the NE fork, where you are least threatened by avalanches and serac-fall sweeping the entire valley floor. -June 3: Hiked from "Safe Camp" halfway down the Valley of Death and climbed the Japanese Couloir and camped on Cassin Ledge with a sweeping view of Kahiltna Peaks and the entire NE Fork. -June 4: Climbed the 5.8 crux, Cowboy Arete, and Hanging Glacier, camping at the Hanging Glacier Bergschrund at the Base of the First Rock Band -June 5: Woke up to Colin Haley strolling by our bivy site on his 8hr7min speed ascent of the Cassin Ridge (he approached via the East Fork of the Kahiltna Glacier). This was a total surprise and very inspiring see him up there! We climbed the First Rock Band that day and bivied between the First and Second Rock Band just next to the rib. -June 6: Climbed the Second Rock Band and found the crux to be the sustained "Hidden Rock Couloir" at the entrance, which is sustained mixed 70-80deg for about 50m. At the end of the Second Rock Band, a Chilean Team of 2, plus Colin Haley, plus our team of 2 all took the wrong (harder) exit. From the overhanging triangle, we all traversed right about 40ft then went straight up, finding difficulties to M4-M5. We should have traversed right another 40ft or so to find the 5.6 slab pitches and the 5.6 dihedral as described in Super Topo. This ended the technical difficulties of the route. That night, we bivied at Mark Westman’s “excellent bivy site” at 17,700ft. This turned out to be very hard to find and we spent several hours looking around for it. It is way further up and right on the col than expected. -June 7: Lots of snow! So we decided to sleep all day, acclimatize and waiting out the weather. -June 8: So much snow accumulated on the upper mountain the previous day that it took us over 12 hours to ascend the final 2,500ft to Kahiltna Horn. We were knee to waist deep almost the entire day. Mark Westman told us later that he was watching us all day through the high-powered scope from Kahiltna Base Camp and he could see the long trench we left in our wake. Presumably, many day-tourists at Base Camp watched us in our embarrassing slog to the top. This was by far the hardest day of the trip! When we reached Kahiltna Horn at 10:30PM, we had no energy to go to the summit, so we slept on the “Football Field” at 20,000ft. The night was beautiful, calm, and cold! -June 9: Went back up to tag the summit, then descended 12,500ft to Camp 1. -June 10: Got to Kahiltna Base Camp from Camp 1 at 10:00AM but it was overcast all day so TAT could not come and pick us up. -June 11: TAT finally picked us up around noon, after we endured the most miserable and wettest night of the entire trip! Left to Right: Sultana (Mount Foraker), Begguyya (Mount Hunter), Denali Denali, the High One Heading into the NE Fork of the Kahiltna Glacier (the "Valley of Death"), the West Rib visible up the center of the peak The West Rib in the Center, The Cassin Ridge roughly up the right skyline Closer up view of the Cassin Ridge. The Japanese Couloir is the gash on the right. The Cowboy Arete (Knifedge Ridge) is above, followed by the First and Second Rock Bands Looking back at the West Rib and the Chicken Couloir Looking up the Japanese Couloir and the bergschrund at the base of the Cassin Ridge Looking back at the NE Fork Looking up at the crux of the Japanese Couloir (AI4) The Cassin Ledge. Razor thin, great views fo the whole NE Fork, Kahiltna Peaks, and Sultana! The 5.8 Crux just off the Cassin Ledge The Cowboy Arete The Base of the Hanging Glacier, the Cowboy Arete behind A short overhanging step to get over the bergshrund Colin Haley approaches! The crux of the First Rock Band, just above the M-rocks Somewhere near the top of the First Rock Band The South Face! Looking up at the "Hidden Rock Couloir", the beginning of the Second Rock Band, and the crux of the route, in my opinion Just below the V-shaped overhang in the Second Rock Band Slog to the top Denali Summit Ridge Summit Marker The Football Field on the West Buttress Route and our bivouac Heading down the Autobahn, 17k camp below on the West Buttress The Cowboy Arete Base Camp with Moonflower Buttress behind (North Buttress of Begguyya, Mount Hunter) Gear Notes: -6 screws (1x21cm, 2x17cm, 3x13cm) -40m rope -Small Rack of nuts -5 cams (.3-1) -2 pickets (didn’t use on route; just for glacier travel) -5 single alpine draws, 2 double alpine draws (no cordalette) -2 ice tools each (Nomics for him, X-Dream for her) -Monopoint crampons -Boots: Olympus Mons for him, G2SM+overboots for her -MSR AdvancePro2 Tent -Feathered Friends Spoonbill Sleeping Bag -2x Thermarest NeoAir Xtherm + 1x shorty closed cell foam pad (for emergency) -MSR Reactor + hanging kit + 3 medium cans of isopro Approach Notes: Approached via the NE Fork of the Kahiltna Glacier


-
[TR] The Brothers - Brothers Traverse 05/13/2018
JeffreyW replied to BootsandPants's topic in Olympic Peninsula
Strong work! Fun trip report -
[TR] Moose's Tooth - Shaken, Not Stirred 04/15/2018
JeffreyW replied to John Frieh's topic in Alaska
Solid work! Looks like a sweet trip!! -
[TR] Mt. Rainier - Sunset Ridge 05/25/2018
JeffreyW replied to ScaredSilly's topic in Mount Rainier NP
Wow, nice work, gentlemen! Very inspiring. I'm glad to see other routes getting tracks other than the usual suspects. When my wife and I met you on Liberty Cap, we definitely felt way less hardcore after climbing Liberty Ridge and heard you just came up Sunset! -
Trip: Chair Peak - North Face Trip Date: 12/16/2017 Trip Report: Priti and I climbed the North Face of Chair Peak on Saturday 12/16. Thanks, John Douglass for the pictures! Approach snow was deep. Recommend skis/snowshoes, but kick-stepping wasn't so bad. The first pitch had nice, consistent, solid, THIN ICE for 60m, maybe WI3. It was so stinking fun if you like thin, unprotectable ice. I got one good stubby in over the whole 60m pitch. We had rock pro and pitons but didn't find them helpful. Pitches 2-4 (to summit) were snow over rock with occasional thin ice for protection. Snow is too shallow and loose for pickets. Only used trees and stubby's for pro. Existing anchors every 60m. Red link cam backed up the anchor on pitch 1. NE Buttress of Chair Peak. Only one party of 2 attempted it and bailed due to loose snow. Pitch 1 on the North Face - 60m thin ice, some thicker ice near the top of the pitch. Upper pitches of North Face of Chair Peak. Snow over rock with thin ice. Deep snow to the False Summit and more snow-over-rock to the summit. Summit selfie Summit East Face of Chair Peak. There is avy debris in this bowl now. When we rappelled onto the slope from the standard descent, we triggered a slab avalanche which went 500 feet down, crown was .5-2ft deep and 15m wide. Be careful of avy danger here as always! I would wear beacon/shovel probe to the base of the climb, and also for the descent from the summit. Lots of rain in the Pass on Sunday, so no promises. Enjoy! Gear Notes: Brought: 10 screws all sizes, 1 picket, 1 red link cam, pitons, nuts. Used: 3 stubbies, runners to girth hitch trees. Approach Notes: Snowshoes/Skis recommended
-
Priti and I climbed the North Face of Chair Peak on Saturday 12/16. Thanks, John Douglass for the pictures! Approach snow was deep. Recommend skis/snowshoes, but kick-stepping wasn't so bad. The first pitch had nice, consistent, solid, THIN ICE for 60m, maybe WI3. It was so stinking fun if you like thin, unprotectable ice. I got one good stubby in over the whole 60m pitch. We had rock pro and pitons but didn't find them helpful. Pitches 2-4 (to summit) were snow over rock with occasional thin ice for protection. Snow is too shallow and loose for pickets. Only used trees and stubby's for pro. Existing anchors every 60m. Red link cam backed up the anchor on pitch 1. NE Buttress of Chair Peak. Only one party of 2 attempted it and bailed due to loose snow. Pitch 1 on the North Face - 60m thin ice, some thicker ice near the top of the pitch. Upper pitches of North Face of Chair Peak. Snow over rock with thin ice. Deep snow to the False Summit and more snow-over-rock to the summit. Summit selfie Summit East Face of Chair Peak. There is avy debris in this bowl now. When we rappelled onto the slope from the standard descent, we triggered a slab avalanche which went 500 feet down, crown was .5-2ft deep and 15m wide. Be careful of avy danger here as always! I would wear beacon/shovel probe to the base of the climb, and also for the descent from the summit. Lots of rain in the Pass on Sunday, so no promises. Enjoy!


-
Wow, Zack Attack looks amazing, way to go! And Matrix looks very different than it did in December...spookier!
-
Hey boys and girls! If you haven't heard, Slesse NE Buttress is open for business! And it's only getting colder and darker. The Pocket Glacier slid a few weeks ago and there is just a little bit of safely perched snow here and there on the slab. Climbers: Jeff and Priti Wright Route Up: NE Buttress via Bypass Route Route Down: Crossover Descent Total Time: 25hrs (13.5hrs up, 11.5hrs down) Download-able GPS tracks: http://www.peakbagger.com/climber/ascent.aspx?aid=701815 Here is a neat TR with pics of Slesse (for conditions) from Ensakwatch on the same day we were on Slesse: http://cascadeclimbers.com/forum/ubbthreads.php?ubb=showflat&Number=1151380 To continue our experiment of 50 Classics Car-to-Car/Single Push, this is our third in the past month (with Beckey-Chouinard on S Howser Tower and North Ridge of Mount Stuart). It was a slow, 25 hours. Again, we're not the fastest in the bunch, and it's not a Triple Linkup, but we're working on our pain and suffering tolerance! 3:15AM - Leave Trailhead 4:15AM - Memorial Plaque (don't get water here! It's a 10min bushwack...) 5:30AM - Propeller Cairn 6:45AM - Base of Bypass Route 4:45PM - Summit 4:15AM - Back at Trailhead The Crossover Descent was long and hard, with tricky routefinding in the dark. It started raining on the last pitch from the summit and lasted a few hours, so descending the Crossover on slick rock was slow and sketchy. We simul'd/short-roped most of the descent, not fully unroping until under the Wooded Stump. The climbing was fast and easy, but we found this descent route very difficult. The crux was finding the flagging boot path at the bottom of the orange scree through the subalpine meadows to get to the established Crossover Trail. We never found this path or any flagging, and wandered for hours in the subalpine before just bushwacking hard left to intercept the Crossover Trail. Otherwise, the Crossover Descent route was obvious. Next time, we'd want to know what elevation to expect the subalpine skier's left traverse..or better yet, next time, we're bringing two cars to do the normal descent! This Crossover Descent might have been must faster in dry condition, with daylight, backpacking boots, and general situational awareness. We had tennis shoes which were perfect for the approach, but terrible for the Crossover Descent. You have to do a lot of travel on sketchy, muddy scree! Blake Herrington has the best description of the Crossover Descent in his new book, Cascades Rock. Get as much beta as you can on the Crossover Descent! Because of the sopping wet rock, we took all available rappels (7 total) with a 60m rope off established tat anchors: 2 rappels at bottom of summit gully (could be done with 1 70m, or 5.6 downclimb), 1 after crossing the traverse notch from the gendarme (4th class downclimb), 2 to get down to the final scree/meadow slope (3th class downlimb), and 2 off the summit block of the final peak before Crossover Pass (raps recommended, looked like hard 5th class downclimbing). Usually I think people just do it in 3 (1 at the beginning, and 2 at the end). Water: There is running water at the Propeller Cairn, the Pocket Glacier slab, and the orange talus on the Crossover Descent. Crossing the Pocket Glacier slab, you don't have to get on snow, but it's a wet, muddy affair. No snow on route. The route: Routefinding on the Bypass and the NE Buttress was very straightforward. We pitched it out the exact same way as Steph Abegg did (13 Pitches), which was very natural and obvious. Only the first 2 pitches and the crest involved simul-climbing. Further simulclimbing would have been difficult with rope drag, unless you kept the rope very short. Did the whole Bypass Start unroped (3rd/4th class, never any 5th), roping up behind the gendarme on the NE Buttress. The only mistakes we made was on Steph Abegg's Pitch 4 and Pitch 8. On Pitch 4 where you cross right over the arete, there is "off-route" tat out left which gets you way left and adds a tons of rope drag...instead go straight up from the belay to cross the arete soon, angling right to cross the arete. On Pitch 8 (right after the long crest simul), there again is an aluring "off-route fixed nut" out left up a tempting hand crack (the only hand crack on the Buttress!)...instead, you want to avoid the beautiful hand crack and traverse right (away from the buttress) before going back left to the grassy ledge (just as Fred Beckey's topo shows). The hand crack out left near the buttress is a siren which leads to decaying, exposed, unprotectable 5.9 granodiorite. Beautiful route. In hindsight, after forgetting all of the descent suffering, the Crossover is rather adventurous and aesthetic, but I think 2 cars is still the best way to go. Gear Notes: -Not really any jamming on this route (mostly face climbing), so recommend leaving the Ocuns/Jammies at home -We both brought chalk bags, but the climbing was so easy, we never really used it. The route felt like a long scramble. -SR to 3; doubles of .5, 1, 2; orange, blue, yellow Mastercam (used a lot); red C3 (not used), light nuts, pink tricam (obligatory, lol) -Recommend light boots for Crossover Descent. Tennis Shoes for normal approach/descent.
-
[TR] Nesakwatch Spires - Ensakwatch Enchainment attempt 8/28/2016
JeffreyW replied to Daphne H's topic in North Cascades
Awesome report and beautiful pictures! Good effort on this long route. We were on Slesse NE Butt that day too. Didn't see the storm coming in until we were in it on the summit! It drizzled from 4:00-7:00PM, never really hard, but left the rock soggy. Good call to call it quits. Descending Slesse on soggy rock was super sketch. -
Incredible pictures/report. Nice work! I appreciate the work you did climbing this thing with a gigantic DSLR hanging from your neck
-
Awesome report, nice work! Gotta put that route on our list. Who knew you could be alpine climbing and not actually suffer sometimes. This winter, we'll have to take you back here and do the Improbably Traverse with tools and 'pons!
-
[TR] Bugaboos - Beckey-Chouinard - Car to car
JeffreyW replied to Priti's topic in British Columbia/Canada
Steph Abegg's Rappel overlay is spot on and saved our bacon from getting off-route. You definitely want to have her overlay with you as you do this rap for the first time. Some additional lessons on the descent: Ref: http://www.supertopo.com/tr/South-Howser-Tower-Beckey-Chouinard/t12222n.html -We did all rappels on a 60m rope (Mammut Serenity). No problem. Still, I think most ropes are within 5% of their advertised length, so our 60m rope might not equal your 60m rope. Plus we are light (100lb and 150lb) and rope stretch is another factor to consider. The ends or our ropes barely reached the bolts every time. On the 32m and 35m rappels, we did lower the first person to add pull cords if it didn't make it. Make sure to put knots on the end and be careful. If you're nervous, instead of bringing a 70m rope, you can just untie your 10m cordalette to add as a pull cord. We did use this method on the last rap over the shrund to get us to flat ground. When we do this again, we will simul rappels #4 to the shrund with just a 60m (with knots on the ends) and then add a 10m pull chord to the last rap over the shrund for a single-strand rap to flat ground. -The first anchor is tat (not bolts) on the N side of the summit block. -Thought her "1a" tat anchor was essential. Down climbing would be difficult. You pull your rope between 1 and 1a and walk to 1a on a big flat cube boulder. -"2" is a bolt anchor. We skipped this and walked on flat ground over to "3". -"3" was pretty easy and straightforward. Stay on the ridge until you see your bolt anchor. You kind of want to veer climber's right as you rap, but avoid the temptation. -"4" is straight down a corner. Lots of flakes and cracks. We got our rope stuck here in a crack and had to lead up it, so be careful pulling your rope here. -"6": There is a janky old handline to scramble down to some useless tat. Then some more "scrambling" between the useless, old tat and the anchor. First, I scrambled, unroped along the handline to the tat, but further scrambling seemed too dangerous below the tat to the bolts (which you can't see). So instead, Priti set up a rappel adjacent to the hand line so we could both rappel to the bolts. Recommend rappelling from the bolts (which hold the handline at position "6") and rappel parallel to the handline down the scrambley ledge, continue past the janky tat (in the same direction, along the wall) down the gully to the anchor. -"7": VERY IMPORTANT...as Steph notes, "DO NOT go down corner/gully". We missed this note, went down the corner/gully and had to jug back up. Instead, rappel down the slab climber's right. Bolts are easy to find. -"8": Anchor was easy to find here, instead of the advertised "hard to find" -If you try the last rap with just a 60m, it will still reach, but you'll want to have crampons on and your ice axe holstered. 60m barely gets you over the shrund but not to flat ground. FYI, The last rap station above the shrund is a tiny edge (not a ledge), so you'd be putting on crampons while hanging. -
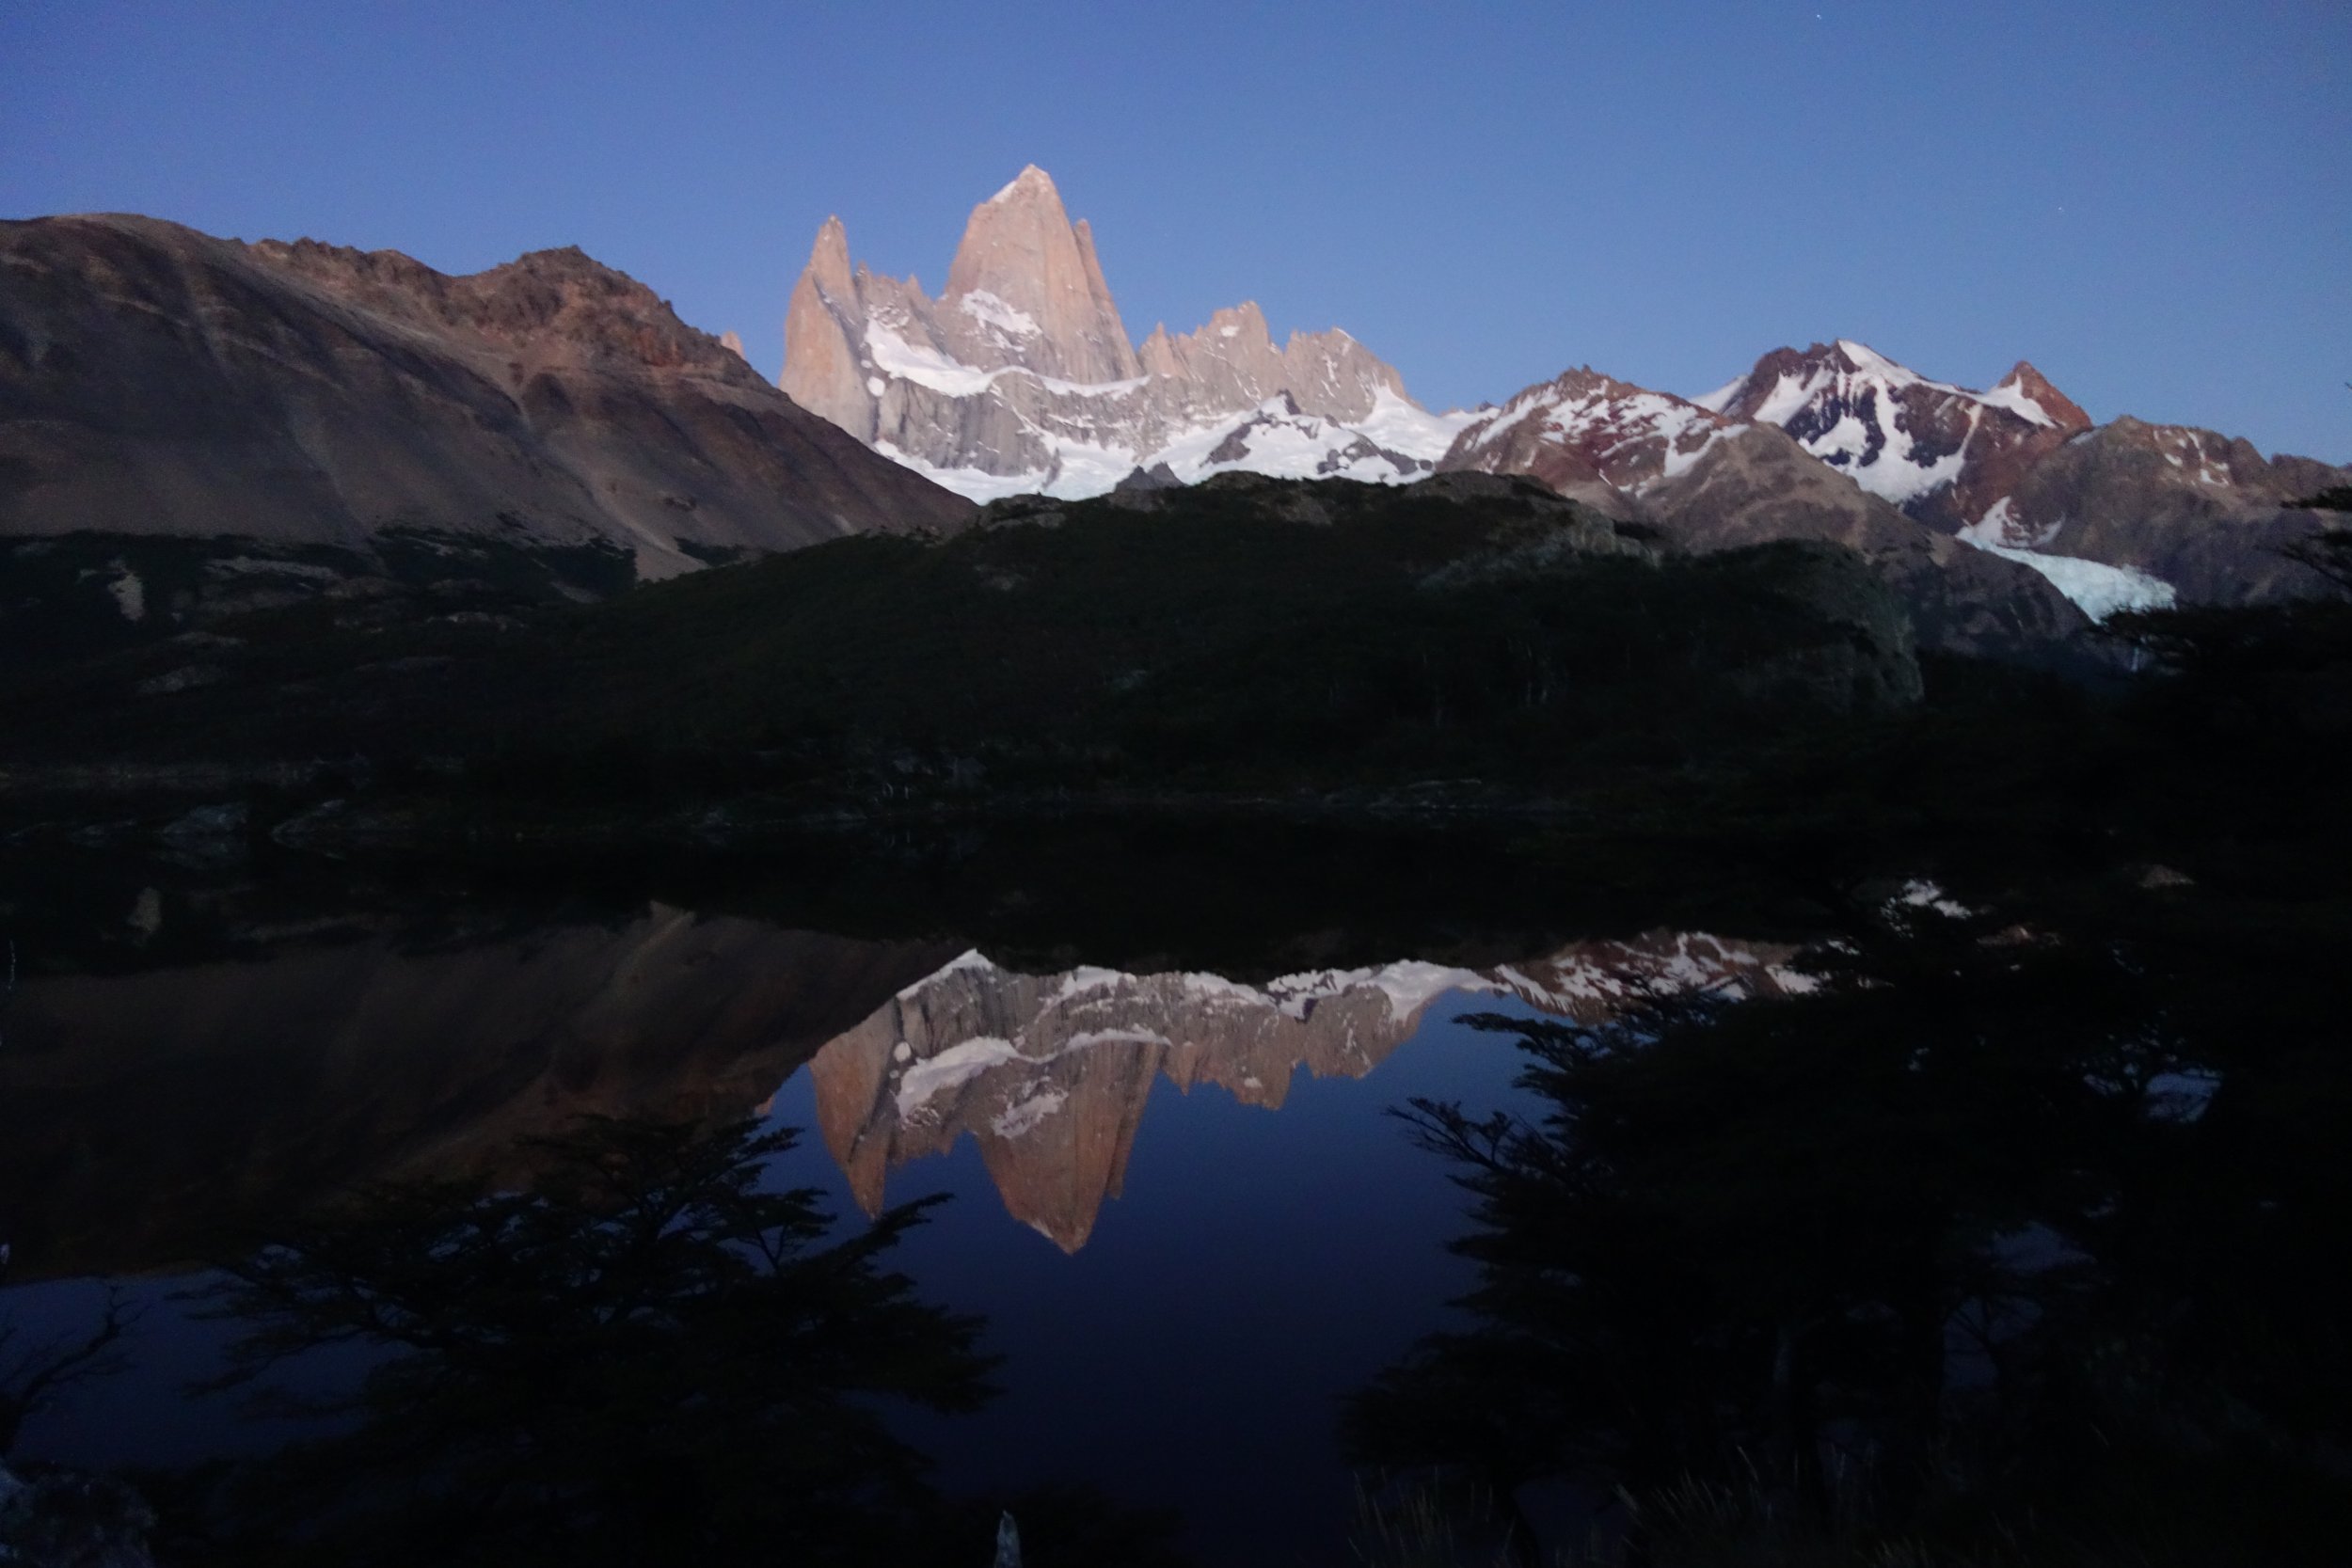
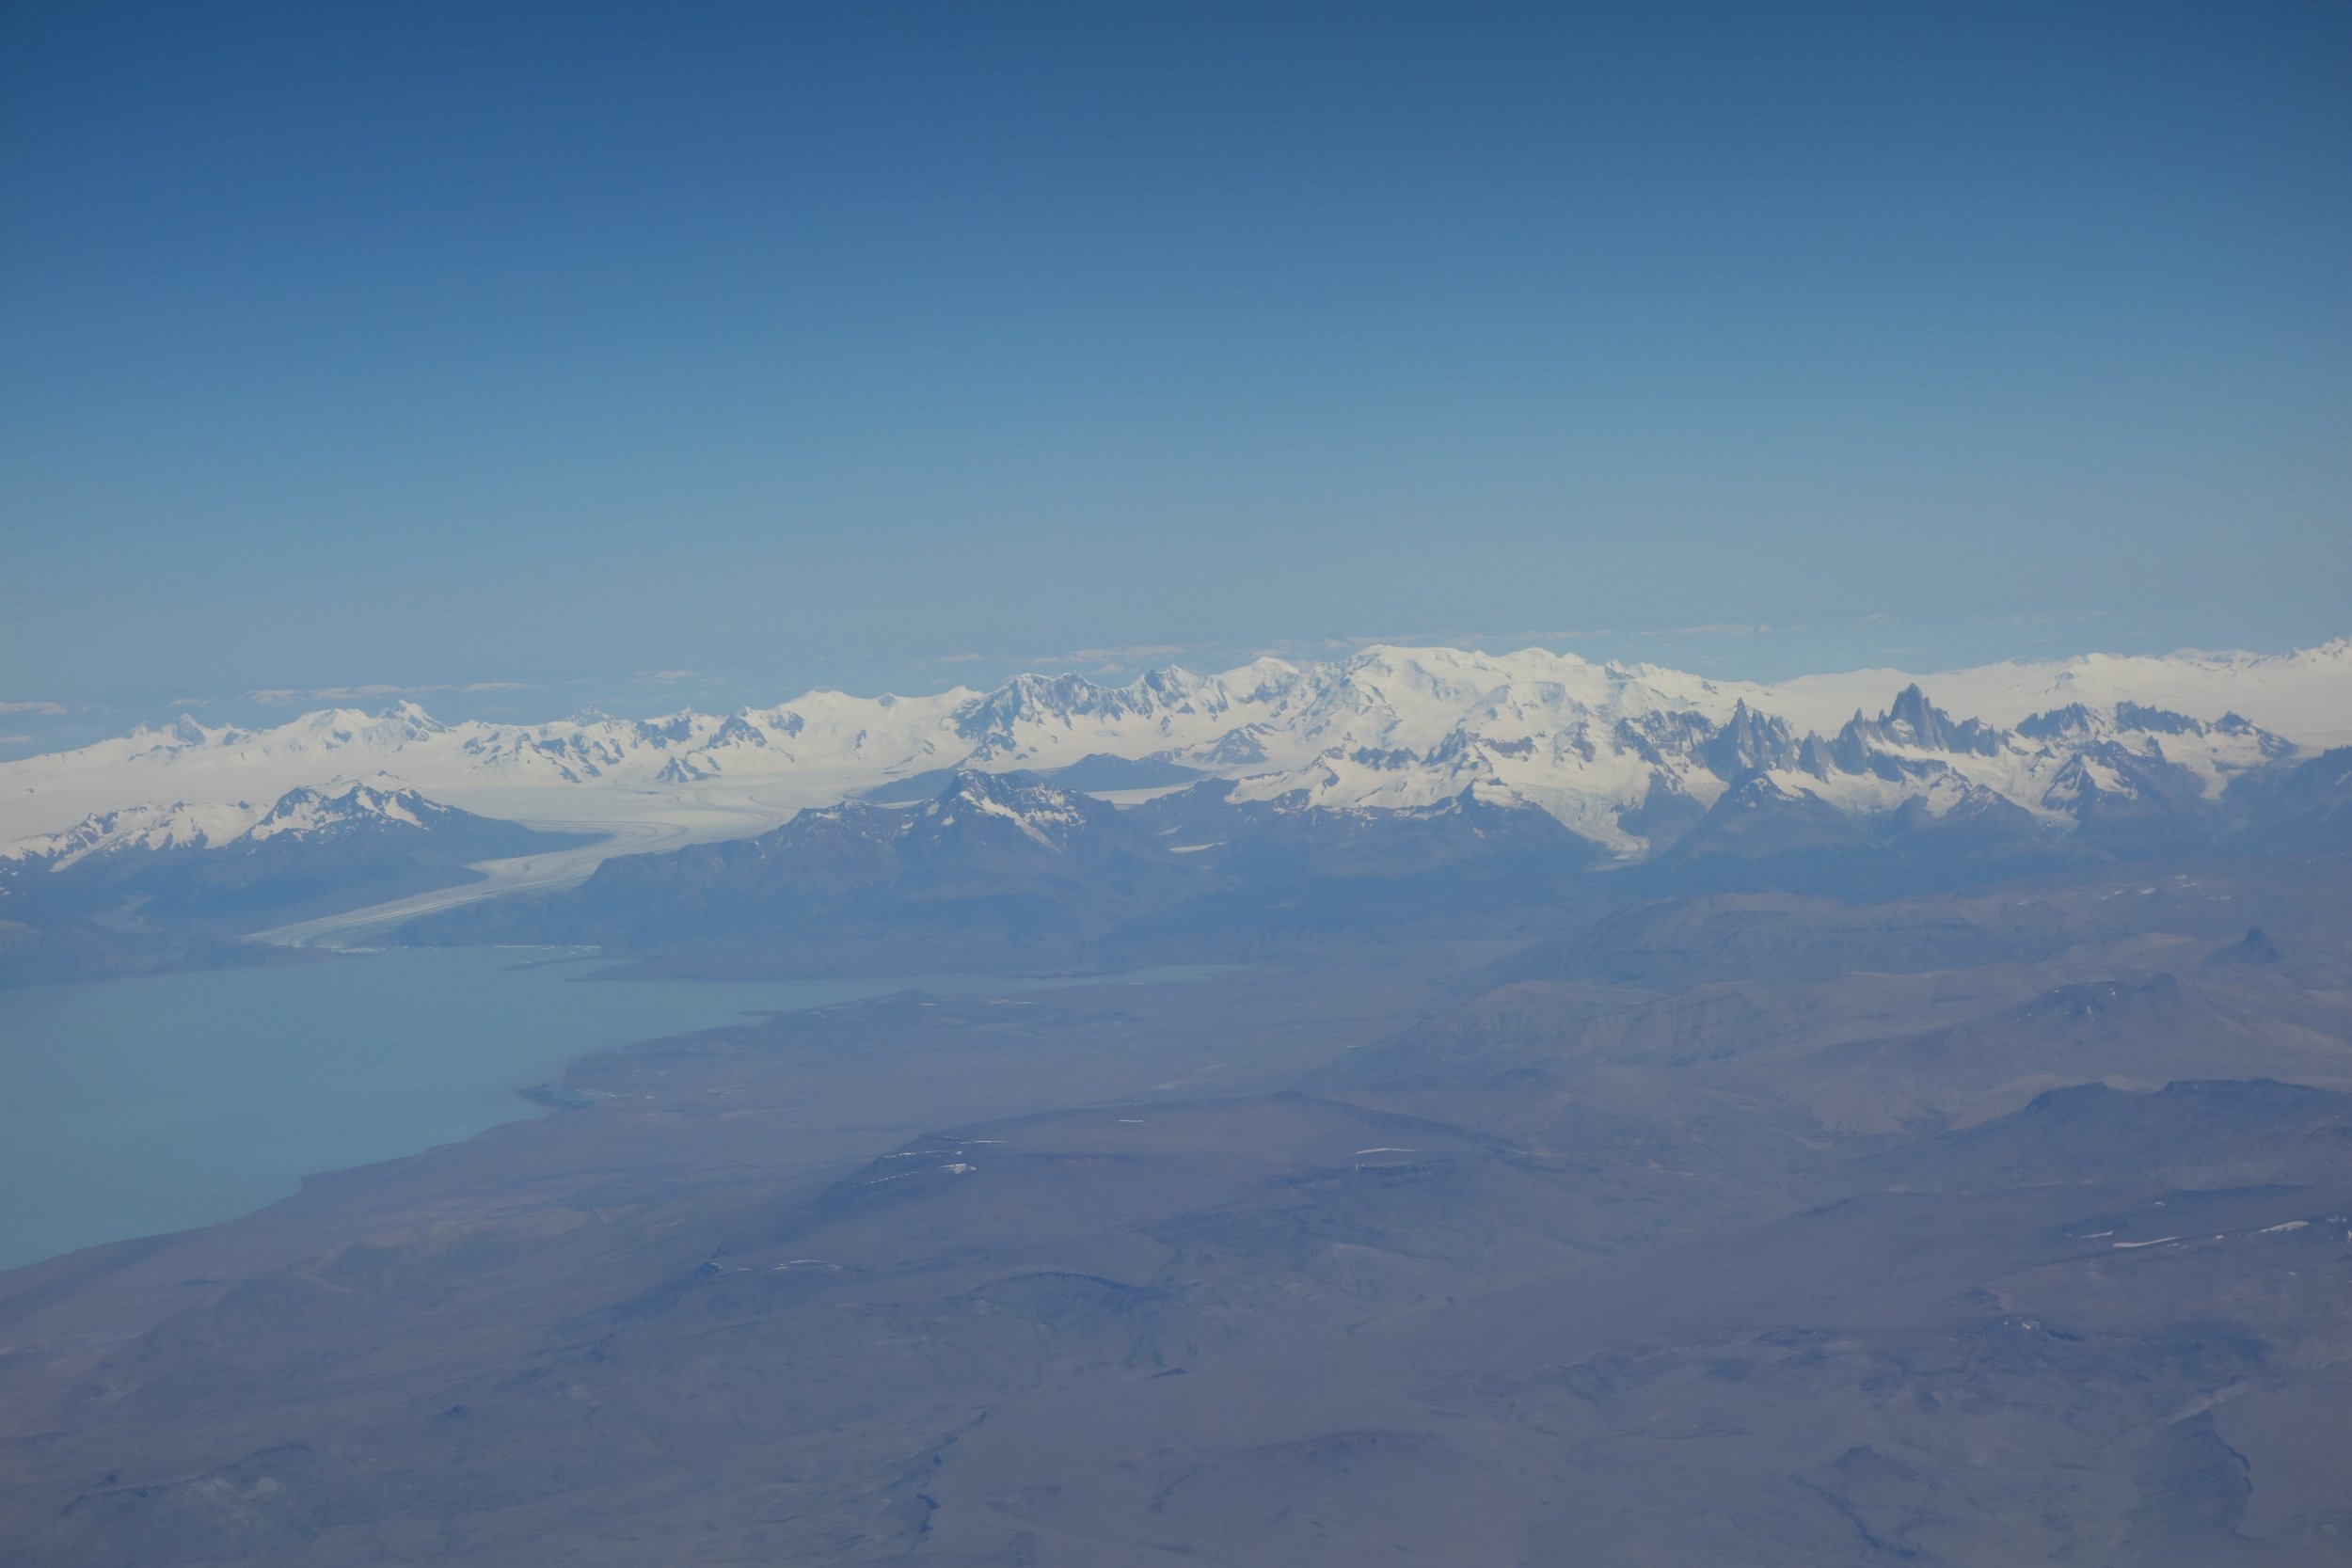
Climbers: Jeff and Priti Wright Routes: - Cerro Torre: Via dei Ragni (600m, 90deg, M4), unsuccessful - Aguja Guillaumet: Comesana-Fonrouge (400m, 30deg, 6b+), successful We've been meaning to post this TR for a while now, but hopefully it will inspire you for the next Patagonia season! Priti and I went back to el Chalten in February 2016 for our second season of climbing in Patagonia. In Dec 2014, we summited Aguja de l'S by the Austriaca route and had two unsuccessful attempts on Aguja Guillaumet due to poor weather. This time we went back and sumitted Aguja Guillaumet (the first peak on the Fitz Roy Traverse) by the Comesana-Fonrouge route and also made an unsuccessful attempt on Cerro Torre due to a bergshrund that we couldn't cross. Chalten Massif (with Cerro Torre and Cerro Chalten) Cerro Chalten (Fitz Roy) from Lago de los Tres Cerro Torre: Via dei Ragni (600m, 90deg, M4) The Torre Range looks like a row of dominos frozen in place mid-fall with Cerro Torre as the book-end, standing tall and narrow as a toothpick. We arrived in town very lucky to have a 3-day weather window in the first week. With such a long window, we decided to go for our biggest objective, Cerro Torre via the Ragni Route. This is the original line of ascent from 1974 and is an ice/mixed line on the opposite side of the massif, from the Hielo Continental (Southern Patagonian Ice Field). Colin Haley and Alex Honnold had just climbed the Torre Traverse in a historic, one-day sprint the week prior which really lit the stoke for us! View of our route and high point We were to approach via Paso Marconi, a 20mi approach over highly glaciated terrain, as opposed to the Col Standhardt which is much shorter but with exceptional difficulties at the moment. We met a European team the previous night who had just turned around from Cerro Torre last week due to difficulties getting over the Col Standhardt. According to Colin, the only reason to take the Col Standhardt approach is if you have gear cached at Niponino base camp, otherwise it's best to take the long, leisurely approach over Paso Marconi. Rio Electrico Valley over Paso Marconi onto the Hielo Continental View of Hielo Continental and Circo de los Altares (right) View of the Ragni Route up the glacial ramp between Cerro Torre and Filo Rosso (Red Spur) We started the approach up the Rio Electrico and continued up the valley onto the Glacier Marconi, crossing seracs to mount Paso Marconi, then marching 15km across flat ice on the Hielo Continental and finally entering the Circo de los Altares, a large cirque surrounded by majestic peaks: Cerro Rincon, Cerro Domo Blanco, and the Torres. Looking back at the Rio Electrico Glacier Marconi Paso Marconi: There are two routes, over the dangerous seracs on the left or up the chossy cliffs on the right The Hielo Continental When we got the base, we saw two other weary souls who had just come down from the difficulties of Col Standhardt intending to climb the Ragni as well. One had blood coming from his forehead. They looked like hardened, Eastern European climbers, but they were in no mood for talking...or climbing. They looked like they had seen ghosts; they just sat down and quietly looked up at the route with the disposition that they had already been defeated before they started. They just asked us in broken English how to get out, we pointed the way, and they left back for town. The Ragni is normally a very popular route, especially on huge weather windows like this one, but the entire time, Priti and I were the only climbers there, indicating that we had likely come too late in the season. Circo de los Altares The backside of the Torres Traverse (Left to Right): Cerro Standhardt, Punta Herron, Torre Egger, Cerro Torre Cerro Domo Blanco Everything was sweltering, making the glaciers very problematic. The first 400m of the climb is a simple 35deg; glacial slog, which for us is now a complex, time-consuming, serpentine maze of crevasses and a bonus 60m pitch of serac ice climbing (A2). The "mixed" pitches were actually super fun, with difficulties of M2/M3 with tools and crampons (the hardest bit being a 20m 5.8 hand crack). There was no actual ice on these pitches, but rather a few flowing waterfalls here and there. It turned out to be 4 wandering pitches, following the tat and the easiest way up (of which there were several possible lines). Looking up at the "mixed" pitches Priti following slab on crampons From the mixed pitches, another 300m of 40deg glacier climbing forms a narrow ramp between Cerro Torre and a rocky spur called Filo Rosso. After climbing about 250m, we were stopped by a 10m wide crevasse which stretched across the entire width of the glacial ramp. There were footprints left from last week's ascents which stopped at a terrible overhang; perhaps the warm weather had collapsed a previous bridge. We were hoping to make the Col de la Esperanza (Col of Hope) by the end of the day, but unfortunately we were forced to turn around about 200m short of that goal after having climbed about half of the vertical terrain of the mountain. The bergshrund we couldn't cross. Fresh steps indicated a recent bridge had collapsed. Heading back down Cerro Rincon at one end of the Circo We head home, weary and disappointed, but at least we had a beautiful sunset to watch from our high-perched bivy. Now, we make the long trek out, back through Paso Marconi. From what we've gathered, we were the last ones to attempt Cerro Torre that season. Rappeling steep, wet slabs near the foot of Filo Rosso The long march out Aguja Guillaumet: Comesana-Fonrouge (400m, 30deg, 6b+) Back in town, we had a few days to catch our breaths. Andrew Rothner (a bouldering badass) and Josh Wharton (an alpinist badass) were staying at our hostel. We went bouldering with Andrew and our friend Julieta one day and ran into Brette Harrington at the crag. Pretty cool to see celebrities all over town! One evening, Colin Haley and Alex Honnold stopped by the hostel and asked us to join them for dinner. At the table, we were joined by Mikey Schaefer, Ben Erdmann, and Josh Wharton. It was a really neat experience to swap stories with these legends. The next two weeks were filled with "sucker-windows" where there is an 8-10hr break with semi-climbable weather. Priti and I attempted Aguja Guillaumet, but the rain never let up and we also didn't reach the base. Finally, the trip was coming to a close, and we had one more sucker-window the day before we left, so we thought we should keep trying. This would be our 4th attempt of Aguja Guillaumet over 2 years. Since it's the Patagonian granite spire with the shortest approach, we always reserved it for these tiny micro-windows which always failed us. It's 13 pitches, with the crux being 6b+ (5.10d), then a steep snowfield at the top. Aguja Guillaumet, our route is the ridge on the right The other side of our ridge route (from a different trip); also visible is Aguja Mermoz and Cerro Chalten (Fitz Roy) All night long and all morning we were pounded with a snow storm in our bivy at Piedra Negra, near the base of the route. This did not bode well for conditions. We came expecting to find rime and snow on route, and we were not disappointed. We actually had decent weather for the first 10 hours as predicted, but climbing was a lot slower than we expected, having to use ice tools to climb, clearing the icy cracks. Then the wind started picking up and carried with it rime ice crystals that pelted your face and blew up in your nostrils. The temps were very cold and we climbed in big puffies. Priti leading up the crux A view of the crux after the ice has been chopped out! An airy traverse after the crux Finally at the notch above the Amy Couloir By dusk, the wind was howling and we still had a ways to the summit. We agreed ahead of time, we would only turn around if we could not go up anymore, so we kept going up... We finally reached the summit at the stroke of midnight. By then, the clouds had rolled in, and we could see some of the distant lights of the estancias far below. The winds ripped the ropes ferociously. We were proud to have pushed through this great struggle, but scared about the descent, as the winds kept picking up more and more. The ropes were plastered to the rocks by the wind and frozen in place. It took us 5 hours to make four 30m rappels in the blasting wind, which from the reports were expected to be about 40-50knots (although we had expected to be down before then). We finally made it to a small Amy notch and retreated to a snow/ice gully on the opposite side of the mountain which proved to be a little more sheltered from the wind. We were familiar with this gully, having climbed it the year prior, and knew that getting out from there was straight-forward. As we rappelled down the gully, the sun rose. It was a nightmare-ish experience, a true old-school Patagonian experience. We were the only ones on this exceedingly popular mountain. We were probably the only ones climbing in the massif. Later, we would have dinner with Jeannie Wall and Colin Haley and all the climbers there were impressed by our brazen stupidity in going out in such crappy weather. Definitely no regrets, but definitely would never climb in such conditions again. In total, we spent 30 hours moving from getting up from our bivy at Piedra Negra to hiking out back to town in one push. Photo Spheres from Cerro Torre and the Southern Patagonian Ice Field are on Google Maps. You can simply find them on there from the map (loaded by Jeffrey Wright), or copy/paste these addresses into your desktop: - https://www.google.com/maps/@-49.2911066,-73.1036873,3a,75y,52h,90t/data=!3m8!1e1!3m6!1s-ib_OTXqQ1IQ%2FVtpCHf3yBiI%2FAAAAAAAAGGQ%2FnZkwEQT-fHEWFVnFc51HCeCJv9R8x1azg!2e4!3e11!6s%2F%2Flh4.googleusercontent.com%2F-ib_OTXqQ1IQ%2FVtpCHf3yBiI%2FAAAAAAAAGGQ%2FnZkwEQT-fHEWFVnFc51HCeCJv9R8x1azg%2Fw203-h101-n-k-no%2F!7i8704!8i4352!5m1!1e4 - https://www.google.com/maps/@-49.2654099,-73.160241,3a,75y,46h,90t/data=!3m8!1e1!3m6!1s-xm-8K9-rhWk%2FVtpCD4jQZkI%2FAAAAAAAAGGI%2FQbmJKT0IIJAnXEYpv-myqJsmsjib0lgag!2e4!3e11!6s%2F%2Flh5.googleusercontent.com%2F-xm-8K9-rhWk%2FVtpCD4jQZkI%2FAAAAAAAAGGI%2FQbmJKT0IIJAnXEYpv-myqJsmsjib0lgag%2Fw203-h101-n-k-no%2F!7i8704!8i4352!5m1!1e4 - https://www.google.com/maps/@-49.2420604,-73.163543,3a,75y,21.88h,98.25t/data=!3m8!1e1!3m6!1s-Tx9sMx6lUUs%2FVtpCGqOjljI%2FAAAAAAAAGGo%2FlfNnv4_kHa86QIURq0nfrMkbdSYq1ppHA!2e4!3e11!6s%2F%2Flh4.googleusercontent.com%2F-Tx9sMx6lUUs%2FVtpCGqOjljI%2FAAAAAAAAGGo%2FlfNnv4_kHa86QIURq0nfrMkbdSYq1ppHA%2Fw203-h101-n-k-no%2F!7i8704!8i4352!5m1!1e4 - https://www.google.com/maps/@-49.2815767,-73.1182334,3a,75y,178.99h,74.08t/data=!3m8!1e1!3m6!1s-V-Wfgsg7rJM%2FVtpCG4QPnmI%2FAAAAAAAAGGk%2FheAEW-jRKRoKQwk6JHqxA1Xex-XtZea6Q!2e4!3e11!6s%2F%2Flh4.googleusercontent.com%2F-V-Wfgsg7rJM%2FVtpCG4QPnmI%2FAAAAAAAAGGk%2FheAEW-jRKRoKQwk6JHqxA1Xex-XtZea6Q%2Fw203-h101-n-k-no%2F!7i8704!8i4352!5m1!1e4 Gear Notes: -Cerro Torre: light rack, several screws, 1 picket, stuff sacks (for deadmen), ice tools with wings, double ropes 60m -Guillaumet: SR, single rope 60m with 60m pull cord
-
http://cascadeclimbers.com/forum/ubbthreads.php/topics/1150895/TR_Patagonia_El_Chalten_Cerro_#Post1150895