


peter_mcb
-
Posts
12 -
Joined
-
Last visited
-
Days Won
4
Content Type
Profiles
Forums
Events
Everything posted by peter_mcb
-
[TR] Mount Despair - southeast face/east ridge 08/14/2021
peter_mcb replied to peter_mcb's topic in North Cascades
Lunger -- thanks for providing that fine picture of Despair from the other (north) side--also nice to see it in clearer conditions. And yes, we were accompanied out there by the the thought of a teenage Beckey pioneering the route... or rather, a still-longer and less-familiar version of the route. CurtV, et al -- well, if it's a Cascades classic it would be for the appreciable approach more than the climbing. However, while it requires a bit of energy and time, at least in some seasons/conditions it needn't be imbued with expectations of a lot of technical or thrashing travel -- simply clarifying that was my main point with this posting. -
[TR] Mount Despair - southeast face/east ridge 08/14/2021
peter_mcb replied to peter_mcb's topic in North Cascades
Good question -- but unfortunately I don't have any more images or useful recall toward answering it. While traversing the small section of upper NE face of Despair I don't remember being able to see the nearer end of its ridge/connection NNW to North Despair--either due to the nearer part of the NE face being more convex than dished, or simply because it's what then required my attention. Since we were past our turnaround time following the unintended off-route sections, the final summit section had to be unfortunately pretty brief, resulting in less images/reconnoitering. -
[TR] Mount Despair - southeast face/east ridge 08/14/2021
peter_mcb replied to peter_mcb's topic in North Cascades
Hi Ian, thanks for the inquiry. I did get one image showing more of that south/west side of North Despair... looks pretty textured: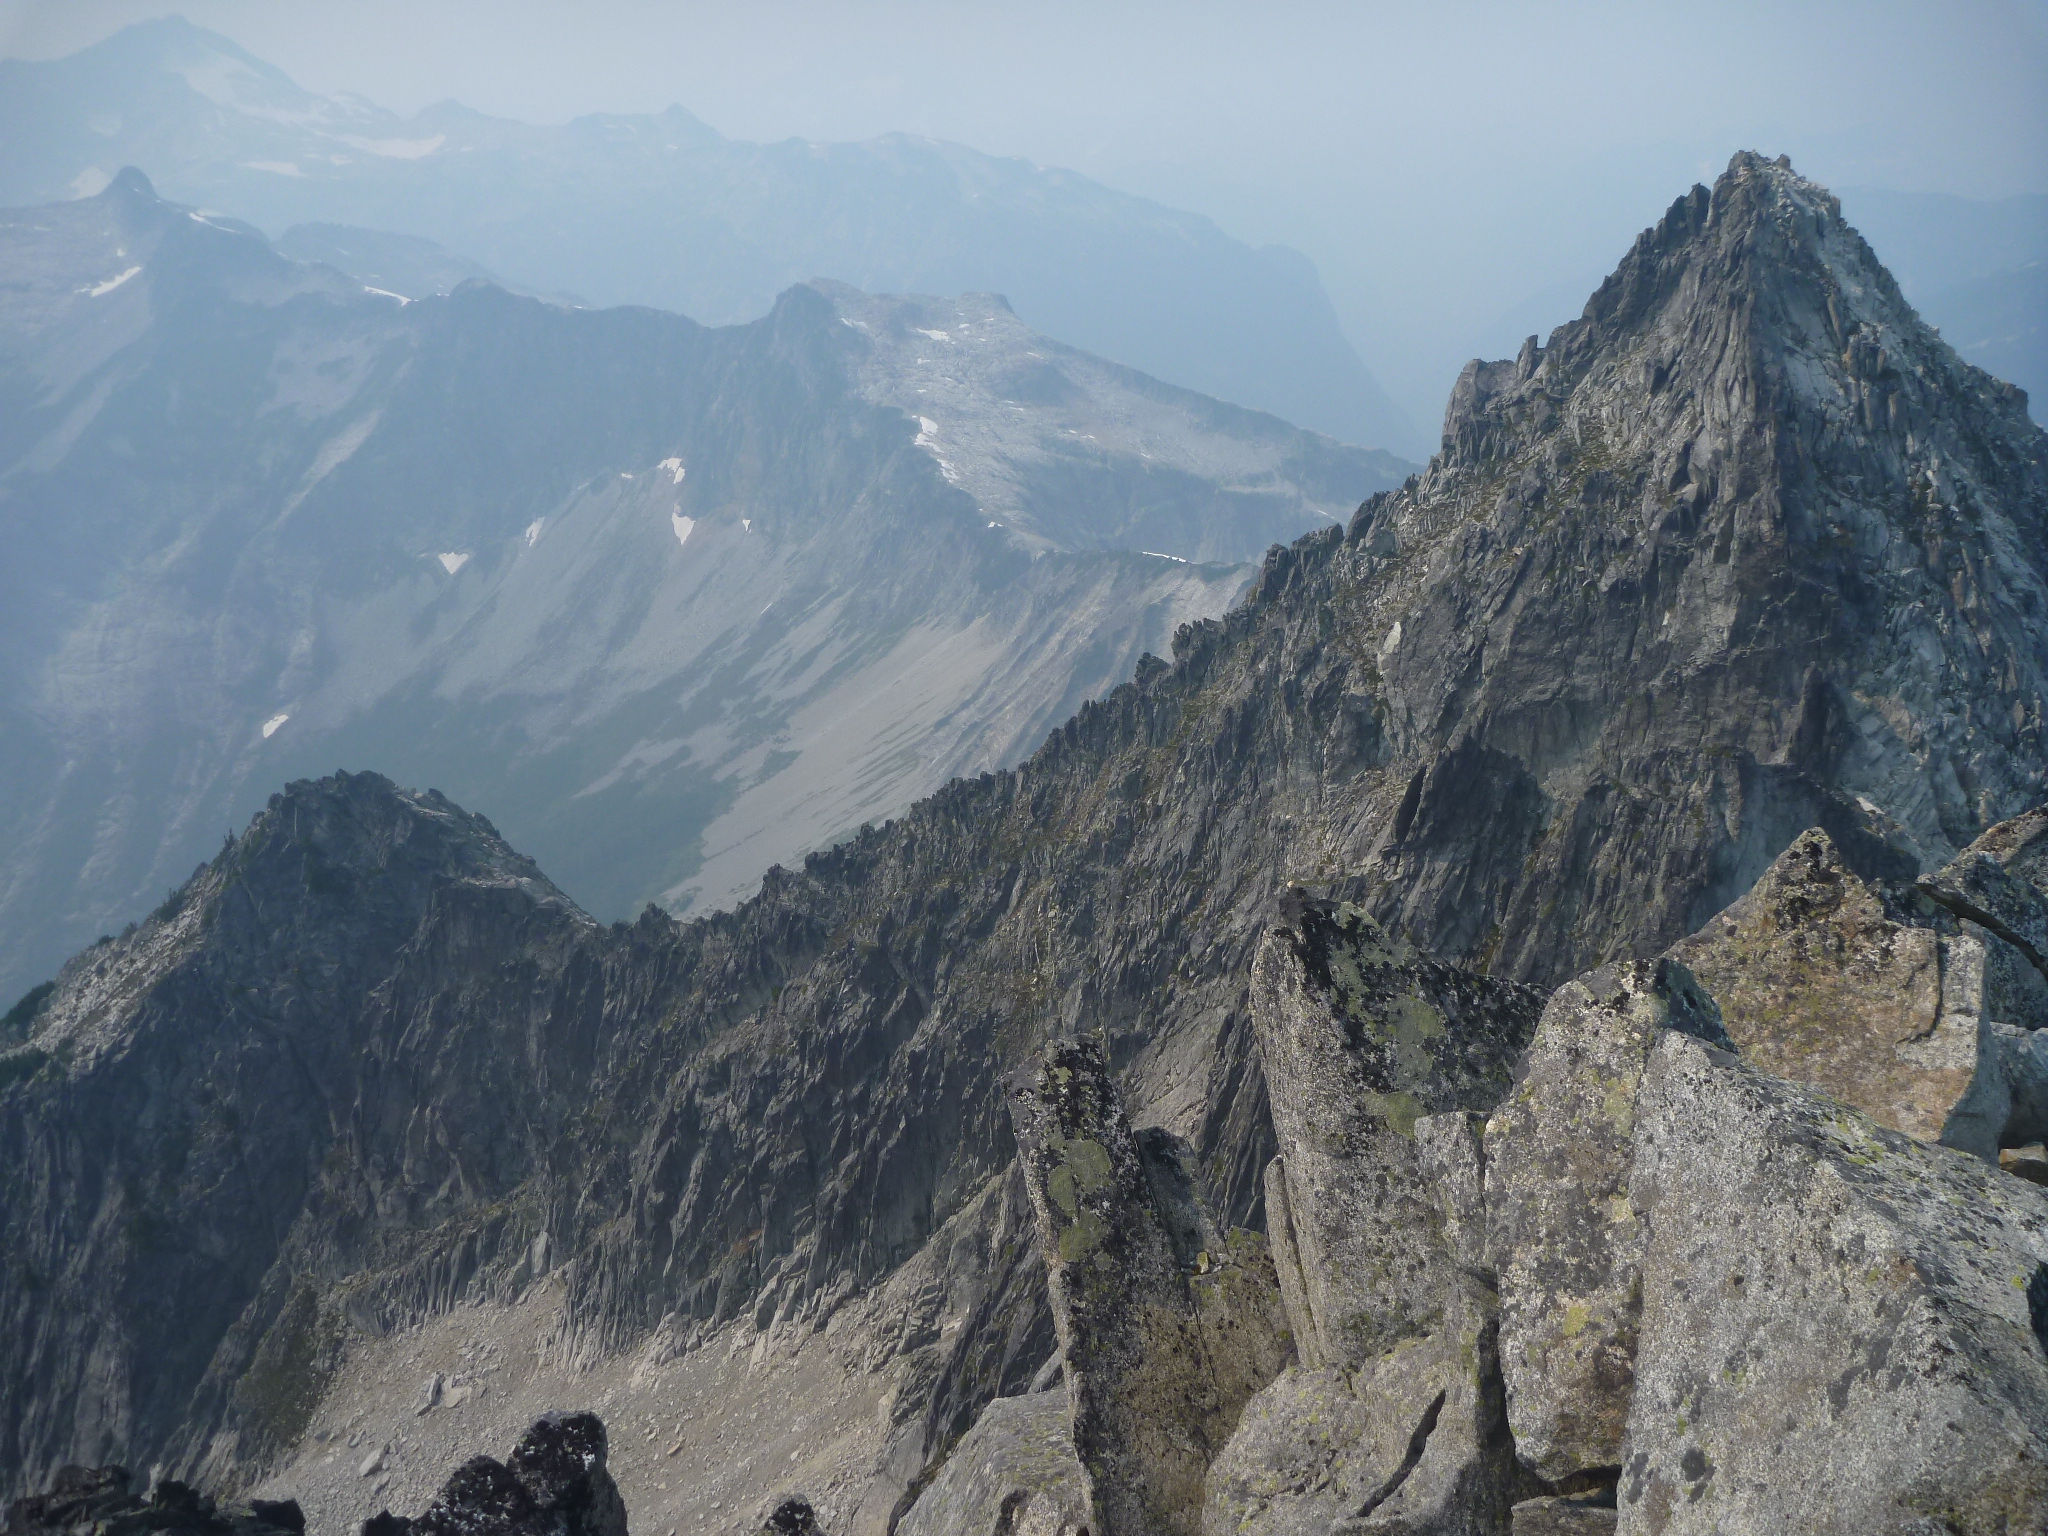
-
[TR] Mount Despair - southeast face/east ridge 08/14/2021
peter_mcb posted a topic in North Cascades
Trip: Mount Despair - southeast face/east ridge Trip Date: 08/14/2021 Trip Report: This is essentially the standard route for Mt Despair, approaching from the south via the Thornton and Triumph Creek basins, then traversing a third drainage (a west fork of Goodell Creek) before finally reaching the objective. Despite being such a well-known landmark, I was somewhat surprised by the scant route details I found in guidebooks or online, and wanted to post a few helpful or clarifying details for others headed this way, particularly in late-season conditions. Mount Despair was among my original list of North Cascades objectives, yet languished more than 20 years untried --- largely due to an approach sounding somewhere between grueling and grim. In particular, the travel from Triumph Creek's rim to valley bottom, somehow traversing along or across the steep lower buttress of Mount Triumph's southwestern "rampart", retained an evil mien -- and spiced the prospect with an atmosphere of morbid speculation. In the end Paul and I found a line that, while challenging, did not have the dire character we were fully expecting, and may warrant noting. [Imagery notes: we had the misfortune to venture here during a peak period of forest fire smoke, which shrouded the northern Cascades in a dry gray-brown pall and greatly diminished the scenic value of this outing; you have the misfortune to read a trip report illustrated with pictures in such conditions. Most of the route pictures that follow were taken on the last day on our way out, when the smoke-haze finally began to dissipate. I actually heightened the contrast in many of the other images, but still couldn't bring much detail out of the murk. Finally, note that in all the route images the yellow trace represents the more favorable line of travel we found in this season/conditions, whereas the pink trace are other route options that we either didn't attempt, or shouldn't have.] On prior trips I had tried both the south ridge (dividing Thornton and Damnation Creeks) and trail approaches to the 6120' col west of upper Thornton Lake, and found their times comparable. Since we were starting out amid another heat wave, we opted for the Thornton Lakes trail and its greater watering opportunities. (First view of Thornton Lakes basin on way in. Note spectral Triumph lurking faintly beyond the col leading to its celebrated NE Ridge route.) Between the lake outlet and the Thornton Lakes campsite, an obvious climbers trail departs to the right, contouring above the west shoreline of the lower lake and northerly toward the middle lake before bending hard west and ascending a forested ridge to and above timberline. (Note: On our return, we tried a more direct tread toward the Thornton Lakes camp, but after crossing some open granite barrens, the tread diverged and disappeared into a warren of trail-like runnels of sand fed by the decaying granitic hummocks above... so we didn't confirm whether/where that boot path goes through.) The climbers tread continues west well up the spur ridge, but before the final high point we departed the ridge rightward -- traversing northwest across a snowfield, then north through blocky terrain to the 6120' col on the divide between Thornton and Triumph Creeks. (this is section of traverse out of sight in view above) At 6120' saddle/col: view into next (Triumph Creek) drainage, and first glimpse of Mt Despair looming in the background. The descending traverse across talus and heather slopes of upper Triumph Creek drainage (with one hidden, raw ravine/water supply midway), toward the timbered rampart of Triumph's lower SW buttress. We aimed to take open talus as far as possible toward the stream course before the buttress, but ended up dipping unnecessarily into a few yards of dense slide alder/yellow-cedar thrash before reaching the stony streambed. In dry conditions, at least, one can stay higher and avoid that unpleasantness by contouring north through thinner alder before entering and downclimbing more of the broad, slabby stream bed. (view up stream along rampart, near top of timber at roughly 5100' elevation) (view down stream course to Triumph Creek valley bottom, ~1000' below) The uppermost timber was a bit thin on cliffy footings, so we crossed the stream and carefully downclimbed its dry slabs a couple hundred feet before entering more continuous timber. From here descending through the forest was steep but straightforward, initially straight downhill (W or SW) paralleling the stream, then angling more rightward lower in timber where the forest widens beneath a face of the buttress. The bottom (~W) edge of this rampart timber seems to end in steep drops and slabs, so we worked further to right to the far side (NW) of the timber band, where toward the downhill end we found a walk-off exit onto steep meadowy slopes leading to valley bottom. Nothing about this line was particularly difficult, but as several accounts of this traverse left us expecting something more harrowing, I wanted to add that at least in these late-season and dry conditions, that isn't necessarily one's experience here. (bottom of forest rampart, where we were finally able to exit to valley floor of Triumph Creek) (Given the reputation of the timbered rampart approach, the principal alternate I had identified was Kearney's early-season (June) route, which descends a timbered rib ~directly W/downhill of the 6120' col before traversing northward lower in Triumph Creek valley. This is my estimate of that line, which we did not attempt in the present snow-free condition, but I include here for general interest or those planning earlier-season trips.) It was evening by the time we exited the timbered rampart, and we decided to camp in the valley bottom rather than re-ascend 1000' to Triumph Pass as planned. We were able to quickly clear debris for a couple of sleeping spots next to the snout of this lingering snowfield, whose cool breath and running water made for a comfortable bivy. The next morning we continued up to Triumph Pass. This line is actually the way we descended that evening... ... but not knowing better [yet], in the morning we tried following the easy stream ravine west of the larger timber patch midway to the pass. around the corner the ravine steepened at a bedrock gorge, and it took some class 3+ scrambling--both dirty and airy--to exit the chasm and regain reasonable terrain above. From there up it was just steep heather with stringers of dry stream rocks (at this date flowing surface water vanished at least 500' below Triumph Pass). At the pass we noted several established bivy sites, though we didn't look in the timber patch camp Beckey noted just south of/below Triumph Pass (background). No water here, though it is available in the form of snow a few yards down on north side of pass. Speaking of, we found the snow on the remnant glacier (or perennial snowfield? - no sign of crevassing anywhere) to be in excellent condition--hard but not icy, and were able to quickly work down toward lake. (view north from Triumph Pass of traverse route and waiting objective) Exiting the lake basin, we immediately turned up-ridge and regained 500-600' to easily cross a gully high on good bedrock... not far below the same stream course quickly unravels into a messy, raw defile. This is also a good elevation for the continuing northward traverse above timberline. (view south from Despair over the ~2 mile approach from Triumph Pass) From the outlet of the pocket lake beneath Despair we initially ascended the timbered ridge northward out of the cirque-like basin. Where the continuous rock face on the rib to our left ended, we immediately crossed leftward over that rib to a parallel meadow-gully, which we ascended until it forked beneath an odd, oval headwall, where we again went left and followed a meadowy stream-course a short distance to coarse talus, which we ascended the remaining 800-1000' to base of the summit pyramid. We found the escarpment band below the upper face guarded by variable cliffy ramparts; we picked the most favorable looking section near center, where an area of slabby ledges promised a potential line through, but ultimately involved some exposed class 3-4 and pack-hauling before gaining the steep heather leading into the shallow boulder and bedrock basin of the upper SE face (finding our way up through the stony escarpment guarding access to Despair's upper SE face) In this season the snow-free upper face appears to offer lots of route latitude among the slabby rock outcrops, blocks, and heathered interstices. However, the right (E) side of face nearer the East Ridge looked likely to exceed scrambling terrain; we found a central line more promising, which eventually converged with and reached the East Ridge next to a conspicuous axehead step. Here we found a broad ledge wrapping around the backside of the ridge--roomy enough for a bivy site (at least for those who don't roll in their sleep). From here the route took an excursion on the shadier NE face for the better part of the remaining couple hundred feet and 15 minutes to the summit. (Initial part of route across slabby terrain of upper NE face, class 3-4 with some exposure. Note there is a hidden, narrow chimney-gully near center of image.) After down climbing a few yards from the ridgecrest ledge and crossing the hidden slot-chimney, the route bears upward and right across the blocky terrain of the NE face, till eventually regaining the crest. Here I opted to step back through to the sunnier south side, where the final crux was a 12-15' chimney-crack back up to the crest (and past a weathered rap station), then easier scrambling terrain to the summit just beyond. (view down final chimney-crack on S side of ridge) Happy to finally be on top! Since getting here already pushed beyond our turnaround time, it was a very brief summit stay, abetted by the near-absence of views. (A previously-reported summit register was not found in/around the large cairn there.) View NE past past Despair's North peak (and saddle joining the E & NE glaciers) toward shadowy hints of the snowfields in the Mt Crowder/Northern Pickets area. Descending the summit pyramid we tried the lower East Ridge and found a much more reasonable class 2-3 line that we should have taken on the way up. (This route is right on Despair's lower skyline, reaching/starting from the 6600' notch next to a distinct haystack pinnacle.) Once off the upper mountain we began the long traverse back down and around (west-) Goodell's headwater basin... in the late afternoon sun we noted that Triumph's classic features were beginning to emerge through the thinning haze. It would be twilight by the time we regained Triumph Pass, and full darkness overtook us partway down. Fortunately we'd the foresight to leave out an enormous white pointer, which guided us back to camp without incident (and once more provided cool breeze and colder water). As a final note, despite the appreciable cumulative elevation gains and losses of this approach across/through three drainages, the route described is essentially brush-free -- an uncommon pleasure for a remote objective in the North Cascades. The nearest to brush along this line is where the climbers tread around lower Thornton Lakes is somewhat overgrown, a bit (mostly avoidable) when reaching the slabby streamcourse below Triumph's rampart, and a trifle of brush amid timber on the rampart, and again on the rib leading from the pocket lake up toward Despair -- each and all notable only for their paucity. Gear Notes: ice axe, crampons, scramble rope (we only used for pack-hauling when essentially off-route) Approach Notes: south approach via Thornton Lakes and Triumph Pass -
Trip: Liberty Bell - North Face Date: 10/4/2015 Trip Report: After so many years of gazing up from Washington Pass at the impressive monolith of Liberty Bell, this summer I finally realized that there was a line on that side of the mountain that I might be up for leading (5.7-5.8). So when early October offered us a couple more clear, dry days, Phil and I decided it was time to find out. Here's an image of the North Face, taken much closer to solstice (early July) when evening sun still ventures onto the face and better reveals its features: But in October the North Face remains shaded all day. Once we entered its shadow in the morning, we would not feel the sun again until the summit. In the talus field below the face Phil found a golfball. I can only imagine how it got there.. time for helmets. Here's how the same route appears from the foot of the face -- with a lot of foreshortening. The red trace is our line, but we may have followed the red gully higher than necessary. I suspect [and hope other(s) might confirm] that a more direct, roped pitch may lead to the large belay ledge. Note too the large double-roof just right of face center--a key feature to confirm the line of the major traverse. Scrambling the class 3-4 blocky lower face provides immediate engagement. Here as well as higher on the face, we periodically passed faded rap slings, and I speculated ominously about their use. The traversing line of this route precludes easily rapping back down, and the conventional plan is for parties to carry over and descend the back side. Ascending the west-leaning "red gully" toward the west bench. A chockstone blocks the upper gully, but can be bypassed with a stout undercling and an awkward, footless [and prideless] squirm-across. Above the chockstone, an easy ramp provides a quick descent around to the first belay ledge, where roped climbing begins (for us). View up the lower part of pitch 1, aiming for conspicuous roofs. The upper part of pitch 1. Initially I attempted a higher line, close beneath the roof, until meeting the two seepy streaks on a blank slab--way past my last cam behind an iffy flake. So I backed off and tried a lower line, below this bulge and near the edge. Again finding some crumbly rock and a seepy wet area--and spotting more seepy streaks further out ahead--this proved to be the psychological crux of the climb for me. Knowing there would be no easy retreat off this route, I debated continuing. But at least I could get some gear in here, and resolved to at least push it a bit further. Pitch 2. Rock remains comfortably low-angle and drier, if crumbly in areas. Somewhat run-out as advertised--I just got in my second pro placement here. View back down P2, where Phil belays me from scrub-tree. Pitch 3. Great terrain, but less pro than it suggests. The huge corner system to right is mostly seepy and/or crumbly inside, while the textured surface to left mostly offers thin, decaying exfoliation. Plenty for hands and feet though. Just beyond where arch tops out, we traversed out and through Beckey's "friable trough", where it was possible to get in a couple of placements before crossing a short down-dipping face below a slimy ledge. Pitch 4. The great slopey-ledge feature we've been following now pinches off, with a crack system across a face continuing in same direction. The rock gets better, with reasonably-frequent pro now, and the climbing more fun and exposed. Pitch 5. The route steepens now (angling up to right), with some of the climb's hardest or more committing moves on this pitch. Rock is generally quite solid here, and pro sufficient. This must be the "distinct steep chimney" section, though the crease seems as much gully as chimney. Top of pitch 6. More fun climbing on solid rock. Under the skyline arch behind me, the next pitch starts with a 15' boulder problem: working a series of holds on face to right until climbing out from beneath the roof. That is the last section of harder moves on the climb. Continuation of pitch on easy terrain above the skyline arch. Phil prepares to lead us simul to the top. Easy blocky terrain nearing summit. Phil belaying me on the summit -- and again in sunshine! VERY happy to be on top, and out of shade. The Bell's distinct shadow over Washington Pass. Gear Notes: Standard alpine rack, cams to 3" and selection of smaller nuts is sufficient. Single 60m rope for 3 raps to notch. Approach Notes: Park just over Washington Pass, 1.3 miles east of Blue Lake TH. Pick up climber's tread at end of guardrail / by pond, and follow up through timber to talus field at base of Liberty Bell's huge east face. Angle right and skirt below the huge rock buttress toeing down between the Bell's east & north faces. Ascend blocky talus, then a looser dirt ridgecrest to the head of the second and further bay at the base of the north face; the scramble starts here. This time of year (October) face & route are in shade entire day, so puffy jacket/warm layers warranted. At this date, no snow anywhere on approach/descent, so light running shoes worked well for carryover. From summit descend per Beckey Route, rapping to notch, then scramble down to Blue Lake trail/TH, then hike highway back.
-
[TR] American Border Peak - Standard 9/27/2015
peter_mcb replied to JasonG's topic in North Cascades
Well, ABP was already working its way up my list, but your TR just gave it a firm nudge ahead. Thanks Jason for the beta and fine imagery - particularly that impressive N/NE facade of Tomyhoi, and the unexpectedly spectacular north face of Larrabee. -
[TR] Mount Sefrit - Bloody Head Couloir - SE Ridge 8/16/2015
peter_mcb replied to peter_mcb's topic in North Cascades
Jason -- as you can tell, I'm pleased to finally get after and up this long-awaited peak in my backyard... though the experience only reinforced my notion that it's an early-season route. I'd say you're wise to target it when stable snowpack may ease that ugly crux in the upper Couloir. Curt -- the "Northwest Glacier Route" in red Fred sounds like the one you have in mind. I've also heard it's a good route when the snow is right. (Obviously you want very stable conditions in that bowling alley.) We opted for the NE side and higher starting elevation/less gain to keep it a more reasonable day trip--and as it turned out, we just regained the trail in last twilight. -
Trip: Mount Sefrit - Bloody Head Couloir - SE Ridge Date: 8/16/2015 Trip Report: "Bloody-Minded Couloir" - the cautionary tale Mount Sefrit is one of those objectives, right in my backyard, that somehow I've neglected for nigh on 20 years--though not for lack of intent or interest on my part. Problem is, I've had it pigeonholed as an "early-season climb when snow conditions are just right"--and year after year that right combination of weather, snow, and my availability never seemed to co-align. A decade wandered by... I was beginning to feel a bit obstinate in my early-season fixation. So, when our big August trip fell through, and Keith suggested Sefrit as an alternate, I was out of objections. "Sure, why not?" What follows may serve to answer my rhetorical question--and to invite others to weigh in on the optimal season for Sefrit's NE flank. Keith, Paul, and I set out early on August 16 for the short drive to the Hannegen Pass trailhead. About half an hour up the trail, a large rocky streambed offers a brush-free route down to Ruth Creek -- and a great view of the route across the valley (red arrows=our line): If nothing else, it was the perfect year/season for an easy ford (or hop-across) of Ruth Creek. On the far side, there was a token bushwack before quickly emerging into the open rubblefield of the opposing gully, which provides a rapid avenue up to the notorious defile. In the shady Couloir travel is also quick save for a few spots where the stream-wettened rock is a bit treacherous. Before long we reached the crux waterfall (more on this at end), and after quickly reviewing its prospects, opted to try a different line a couple hundred feet back down the ravine, where the lower-angled south wall seemed to offer possibilities. We scrabbled up the ravine's flank, first over loose, saturated sediments then up mossy, wet rock, clinging to sedges and miner's lettuce, praying for a stunted alder or two. It was pretty ugly class 4 climbing; I could scarcely sling the occasional shrub or dubious horn, and the belays weren't much better. Finally we worked out around, then up a rocky rib, where it almost felt like climbing. View back down into Slimageddon From here it appeared that a short scramble further might top out and exit the Couloir altogether, but we opted for a descending contour back into the ravine above the waterfall. From here it was steady progress up standard, loose gully-rubble to the head of the Couloir, and a short distance further to the awaited snowfields. Given the strikingly glaciocidal summer we experienced this year, we were hardly surprised that the first "snowfield" we met was ablated down to solid ice, and even crampons may have been rather sporty. So we opted to angle up and right, across some grand and thankfully dry slabs. And were lucky to find the western snowfield still held a skim of softened and boot-worthy snow. Beyond that, one tedium of rotten rock rubble later we finally gained the ridgecrest... and enjoyed the views south across the NF Nooksack valley into Shuksan's magnificent northern facade: and northwest up the ridgecrest to Sefrit's summit. Enjoyable ridgecrest scrambling Near the summit, one can cross the face of this fin via a higher class-4 line with sharply-cleft holds, or lower by a class 3 route. After bypassing the first knob or two, the route stays very near the ridgecrest to the infrequented summit, where only about one party signs the register each year. Descent: On the summit we discussed several descent options, and decided to look for an established rap station next to the waterfall (the overall crux of the climb in present conditions). Once there, amid scrubby alders just above (east of) the waterfall, we found half-buried vintage webbing slung from the base of some prostrate alders. After backing up this exhumed anchor with a fresh sling, we did a single-strand 70' rappel to the base of the falls, leaving our short rope fixed in place where it may be of use to future parties. (FYI: lightly-used 1998 9mm glacier rope). With hindsight, the slot-chimney to Keith's left here must be Beckey's "narrow gully, class 4"; even rapping we found its smooth left face quite slippery. (Of course, everything here is slick with waterfall spray.) The more featured face over Keith's right shoulder appeared more promising, and must be that climbed ("maybe 5.0") by a party in June: http://www.summitpost.org/sefrit-via-bloody-head-couloir/900205 though I found the lower section [perhaps snow-covered in June?] disconcertingly mud-laden and crumbly, as well as out-sloping. Thus, our choice of the not-necessarily-any-better Slimageddon route on ascent. Thoughts? Gear Notes: Ice axe. Crampons carried but not needed on W snowfield; would have been essential on remnant glacier to E. Harness, and rope for 70' rappel. (9mm rope fixed in place for single-strand rap, Aug 2015). Carried light rack, but only found ltd natural pro to sling.
-
Very crooked indeed Rad, providing 4+ pitches of climbing on mostly-fine rock in under 400' of vertical gain. (If I recall, the yield on the Grimface Traverse was about the same.) I'm contemplating a corkscrew strategy for the next go....
-
Trip: Chablis Spire - East Face Date: 7/3/2015 Trip Report: Phil, Anna, and I did this climb last week, and thought it worth briefly commenting on the current conditions and route details, particularly where the latter differed from some prior reports. We were relieved to find that the "mosquito apocalypse" reported a few days earlier: http://cascadeclimbers.com/forum/ubbthreads.php?ubb=showflat&Number=1140661 had largely subsided (or been slaked), though headnets were still de rigueur in camp. The skeeters maintained a sporting presence all the way up through Burgundy Col, though beyond there they went completely off our radar. Here's our route as seen from "Chianti Col" to NE: though the lower traverses felt more horizontal and less convergent than they appear from this angle. Right off the deck I got to enjoy impeccable rock while traversing the handrail flake. Beyond the overhanging block (with FP), making sure follows are protected. This is where the apparent discrepancies began. Continuing north (right) along this ledge system, I ran out the full 60m rope before ascending the "gulley-chimney-thing" (shadowed in photo). I set up a belay on this ample ledge, deciding to add in a short vertical pitch--"1B"--to reduce rope drag on both pitches 1 & 2--and as insurance against coming up short on the heralded 5.6R bit. Thus: Pitch 1 (red), "1B" (blue), P2 (red), and P3 (blue). The upper half of 1B is lower-angled slab with no protection for 15-20'. Note that the lower rap station (yellow arrow) is about 20' above the belay ledge at top of P2. Anna finishing Pitch 1B: After traversing back south on P2, I extended a long sling off the base of a 2" spruce [not sure about the kN rating of that setup] rather than add even more rope drag seeking a gear placement further south. Then I doubled back up and rightward over the solid, featured, and truly gear-free 5.6 section. Here Phil tops out on same, with spruce-anchor waiting below: P3 runs back rightward/up (NW?) over easy ground, then P4 turns back left and up the licheny corner under the summit blocks. This is one climb where the last 15' really is the best; while I found nowhere to "leave gear in place" on that final monolith, I was happy to find a nice series of small positive holds bared amid the summit lichen. Last surprise was the small, slung horn at the top, allowing an easy rap off. But not before that vertigo-testing view down the west face! Phil gains the summit: Note: the upper double-rope rappel is somewhat low-angle and prone to rope hang-ups--way too many cracks and crevices to lure a down-slithering rope. Finally got ours down with only a short retrieval needed. Anna enjoying the cleaner and steeper lower rap: Gear Notes: Ice axe, two 60m ropes; single rack to C4 #3 fine. Replaced slings on upper two rap stations, so all three have fresh/solid material. Approach Notes: Water: the spring at Bench camp (follow tread to N a few minutes' walk) is still flowing; beyond that, one slow seep along tread about halfway up to Burgundy Col. For those camping at col, a snow finger extends up to col from east side.
-
Spot-on, Jason! I think it's because this one was so long in coming I was extra aware of the cost of coming up short.. hence my motivation to find/share good beta. Agreed, Wayne. We were two minutes from dropping the extra 1000'... simply for not having clear info about this option.
-
Trip: Mount Challenger - Challenger Gl, via Easy Ridge/Imperfect Impasse Date: 7/29/2014 Trip Report: Having long benefitted from viewing other climbers' TRs, I finally felt compelled to post one myself. While I believe this is a pretty standard line of approach for this summit, the combination of the length of the trip, together with this peak's penchant for turning back capable parties at any of several cruxes, left me desiring to describe and illustrate some of those crux points better than we found in our own pre-trip homework. (Kudos to my climbing partner, Keith, for supplying the photography, as I cleverly managed to leave my camera at home.) Following record-shattering rainfall two days earlier, Keith & I set out in perfect weather for Hannegan Pass on July 25th, trusting the upper Chilliwack would be flashy enough to be down to a reasonable ford again. My first route-finding question was finding the old lookout trail departing the maintained Hannegan trail, and leading to the ford. Turns out this was no issue; the advice to watch for the side trail "5 minutes after first seeing the Chilliwack through the trees" works well; with that heads-up the junction with the old trail was quite obvious. (If in doubt, watch for old sawn logs confirming that the tread was once a maintained trail.) This spur quickly leads down to the river, and what we found to be a refreshing, calf-deep ford. Camping feasible on forest bench just before river, or on gravel bar across. Chilliwack ford looking upriver, with tread onward just visible on left side of photo, next to small cairn: This ford is about 50 yards downstream of the confluence with Easy Creek, and the trail onward roughly parallels the latter initially. This is the most brush-encroached section of the old lookout trail, but there was only one spot--at a large treefall amid brush--where there was any ambiguity (cross rightward over treefall before continuing upward). Soon the trail begins climbing strongly through older forest; tread is narrow and deteriorating, with occasional down logs to cross--but remarkably obvious/functional for a trail unmaintained for decades(?). No water from river till the trail crests the ridge at ~5190', where forest opens to parkland and several shallow pools are soon found. Follow tread through delightful heather meadows and over granitic slabs. Occasional cairns mark the route over latter, but as the line basically follows the wide crest south through open country, precise routefinding is not essential. The only navigational challenge here is the worthy distraction of the ever-expanding panorama. After a short scrabbly section, the trail tops the high crest, soon reaching the old lookout site; currently residual cornices on the lee (north) side of ridge provide some snowmelt water on the otherwise dry crest. "Great Wall of China" cornicing on Easy Ridge crest: Enjoy this section, with sweeping views from Blum to Slesse to Redoubt, to--of course--the Northern Pickets ahead. For such an unapologetic pair of summit-chasers, Keith and I each had to admit that Easy Ridge is a grand backpacking destination in itself. Finally there is a view ahead framing the objective and its main milestones: Whatcom Peak, with its SW buttress descending to the Impasse; Perfect Pass; and beyond it, the Challenger Glacier leading to the summit pinnacle. Descend the 1000' from the ridgecrest to the toe of the buttress, and meet the long-awaited Impasse. After so much anticipation we were not disappointed (view S down Impasse): While the Impasse is a little less deep and steep above this point, it still looks pretty unappetizing from here. Apparently in some seasons/snowpacks a "useful snowbridge" eases this crossing - see Steph Abegg's excellent material here: http://www.stephabegg.com/home/tripreports/washington/northcascades/pickets#section3n That was in mid-August of 2012; about 3 weeks earlier this season the snowbridge was completely gone. This is my re-creation of her image for comparison: Unfortunately, between the red entry and exit arrows, that useful snowbridge is now replaced by a less-useful and ugly 30' chasm. We weren't keen on rapping with full packs down into a slot ravine we weren't sure we could climb back out of. Fortunately, before we resigned ourselves to the bonus 1000' descent/1000' bushwack re-ascent, we tried and found the rumored upper crossing (beyond yellow arrow in image above); here's a view of the same from above: Note the red arrows at lower left, showing the relative location of the snowbridge crossing (when present). Yes, this post-snow crossing involves some exposure, but nowhere near as wicked as it is a bit lower, and there are reasonable holds throughout. We took our time crossing unroped, traversing the rim, then working down where the going was easiest. The climb up/out on the east side of the ravine was slabbier, but sufficient holds could be found. On return we elected to set an anchor and rap down over these slabs rather than downclimb; if needed, watch for a single, red 9/16" sling threaded around a small/capped boulder set into slope. About halfway on toward Perfect Pass, there was one more section that warrants comment. From the top of a snowfield we saw options on slabs on either side of a scrubby conifer area; the slabs to climber's right were lower angle but braided with streams, so we opted for the higher-angle but drier slabs to the left (red trace): These progressively steepened until we were carrying our full packs up cracks and ribs at a rather jaunty angle for ascent, but not so sporty a prospect for the return. Fortunately, on descent we picked up the tread and found a standard route (yellow) snaking down, mostly along the east edge of the scrub-thicket and the somewhat wet slabs beneath: Perfect Pass has plenty of water and enough dry bivy spots if you look above the saddle to either side: We arrived at Perfect Pass almost simultaneously with another pair of climbers returning from their own summit bid on Challenger. This was very fortunate as Erin and Rachel enthusiastically provided us enough fresh route beta and ideas to all but climb the peak for us.(They had a rather more adventurous outing than our own, heading straight out into the tempest we'd ducked two days earlier: TR >?) The route up/out of PP was very straightforward, and other than crossing an initial rock rib was all snow until summit block: The glacier was in fine condition, and a surprisingly quick and direct crossing line required very little crevasse-skirting before reaching the bergschrund. Perhaps only a single snowbridge crossing was necessary: and although it spans an impressively deep ice chasm, the bridge appears pretty deep-seated, and should last a few more weeks--longer than other parts of our route? Near the east margin of the glacier we ascended and soon could see--as E & R had forewarned--that the bergschrund was gaping open all the way east to the rock rib. They found the climbing prospect there daunting, and above the rock section we could see that the transition back onto snow would be quite steep with immediate runout onto the rib. So we took their suggestion that traversing west under (and downclimbing some) the bergschrund might go, and it did. Fortunately the steepening snow here remained in great shape (other than a semi-icy section nearing the 'schrund); it was 45degr in the traverse, and 50degr ascending beyond the 'schrund: Despite the distant appearance that the bergschrund would be slightly open here, we crossed on uninterrupted snow--though this will not last long, as near below it reopens into a welter of crevasses: A more promising and direct line might (blue trace) be that described by Beckey (CAG3): ascending after passing below a small nunatak to go above the next/larger rock rib. We had close views of either end of this route, where there was minimal and easily negotiable crevassing; of the middle section we only had a distant view (per image above), but it also appeared uninterrupted. The steepest section (Beckey's "another steep slope") has the darker cast of icier snow, so it may be necessary to push higher for a less-direct if lower-angle line. The nunatak: Only on the uppermost snowfield did we meet any extent of icy snow; crampon points here provided some purchase where we could kick in no steps, and belay or arrest prospects were dubious. Once off the steeper NW face, the snow on the final crest was again soft, easing the transition onto rock. View of summit pinnacles from upper snowfield: The final rock pitch is more enjoyable than truly challenging; no need for rock shoes, nor probably additional pro; clipping into the 4 pitons present may suffice. The crux move (5.5-5.6?, just right of photo center), over/around a boulder midway, is at least protected by 2-3 FPs below: The panoramic views were outstanding, to say the least, but perhaps what will most mark this summit for me was the unguarded enthusiasm of the perennially-laconic Keith. Well won view over Northern Pickets and upper Luna Basin Perfect sunrise Easy Ridge wind cirque Gear Notes: Ice axe, crampons, glacier rope; pickets and light rack carried but not really needed. Approach Notes: On this date the Chilliwack ford was no issue, the Easy Ridge trail still easy to find/follow, the Impasse passable high, the Challenger Glacier in good condition, and the bergschrund still passable, at least to west.

