HHinkkala
-
Posts
64 -
Joined
-
Last visited
Content Type
Profiles
Forums
Events
Everything posted by HHinkkala
-
[TR] North Side of Yak Peak - Humbled Beginnings 02/14/2024
HHinkkala replied to AlexC192's topic in Ice Climbing Forum
This is quite the trip, and the epic! I thoroughly enjoyed reading the report. It is a very difficult balance trying to decide whether or not you have bitten off more then you can chew on a long winter route/new route. Looks like you made it out ok on this one, but boy did it sound like it tested you guys good. Glad you were both successful and made it down safely. If I could make one comment/feedback (assuming I read the TR correctly) is regarding making rapps on multiple single point/anchors (referring to gear, not v thread). Doing rapps off single pieces is required at times but as you know this does place you at a significant greater risk of a failure/release. I realize it is difficult to comment on this in hindsight, and for many reasons why it was still likely better to descend the route, but I would argue if a route requires a descent of this nature it might not be worth the risk (granted everyone has a different risk tolerance.) As an fyi I have found the DMM bulldog and/or even the large pecker pitons are indispensable on winter routes that need pro. When you can find nothing else for placements, you will find something for these. I have seen my share of pieces coming loose when you least suspect it....It is my hope that you guys can continue this pursuit for years to come. -
Nice work! Was curious about your rap line. So you just went direct down from summit, were there existing stations or did you just make your own/rapp horns, etc?
-
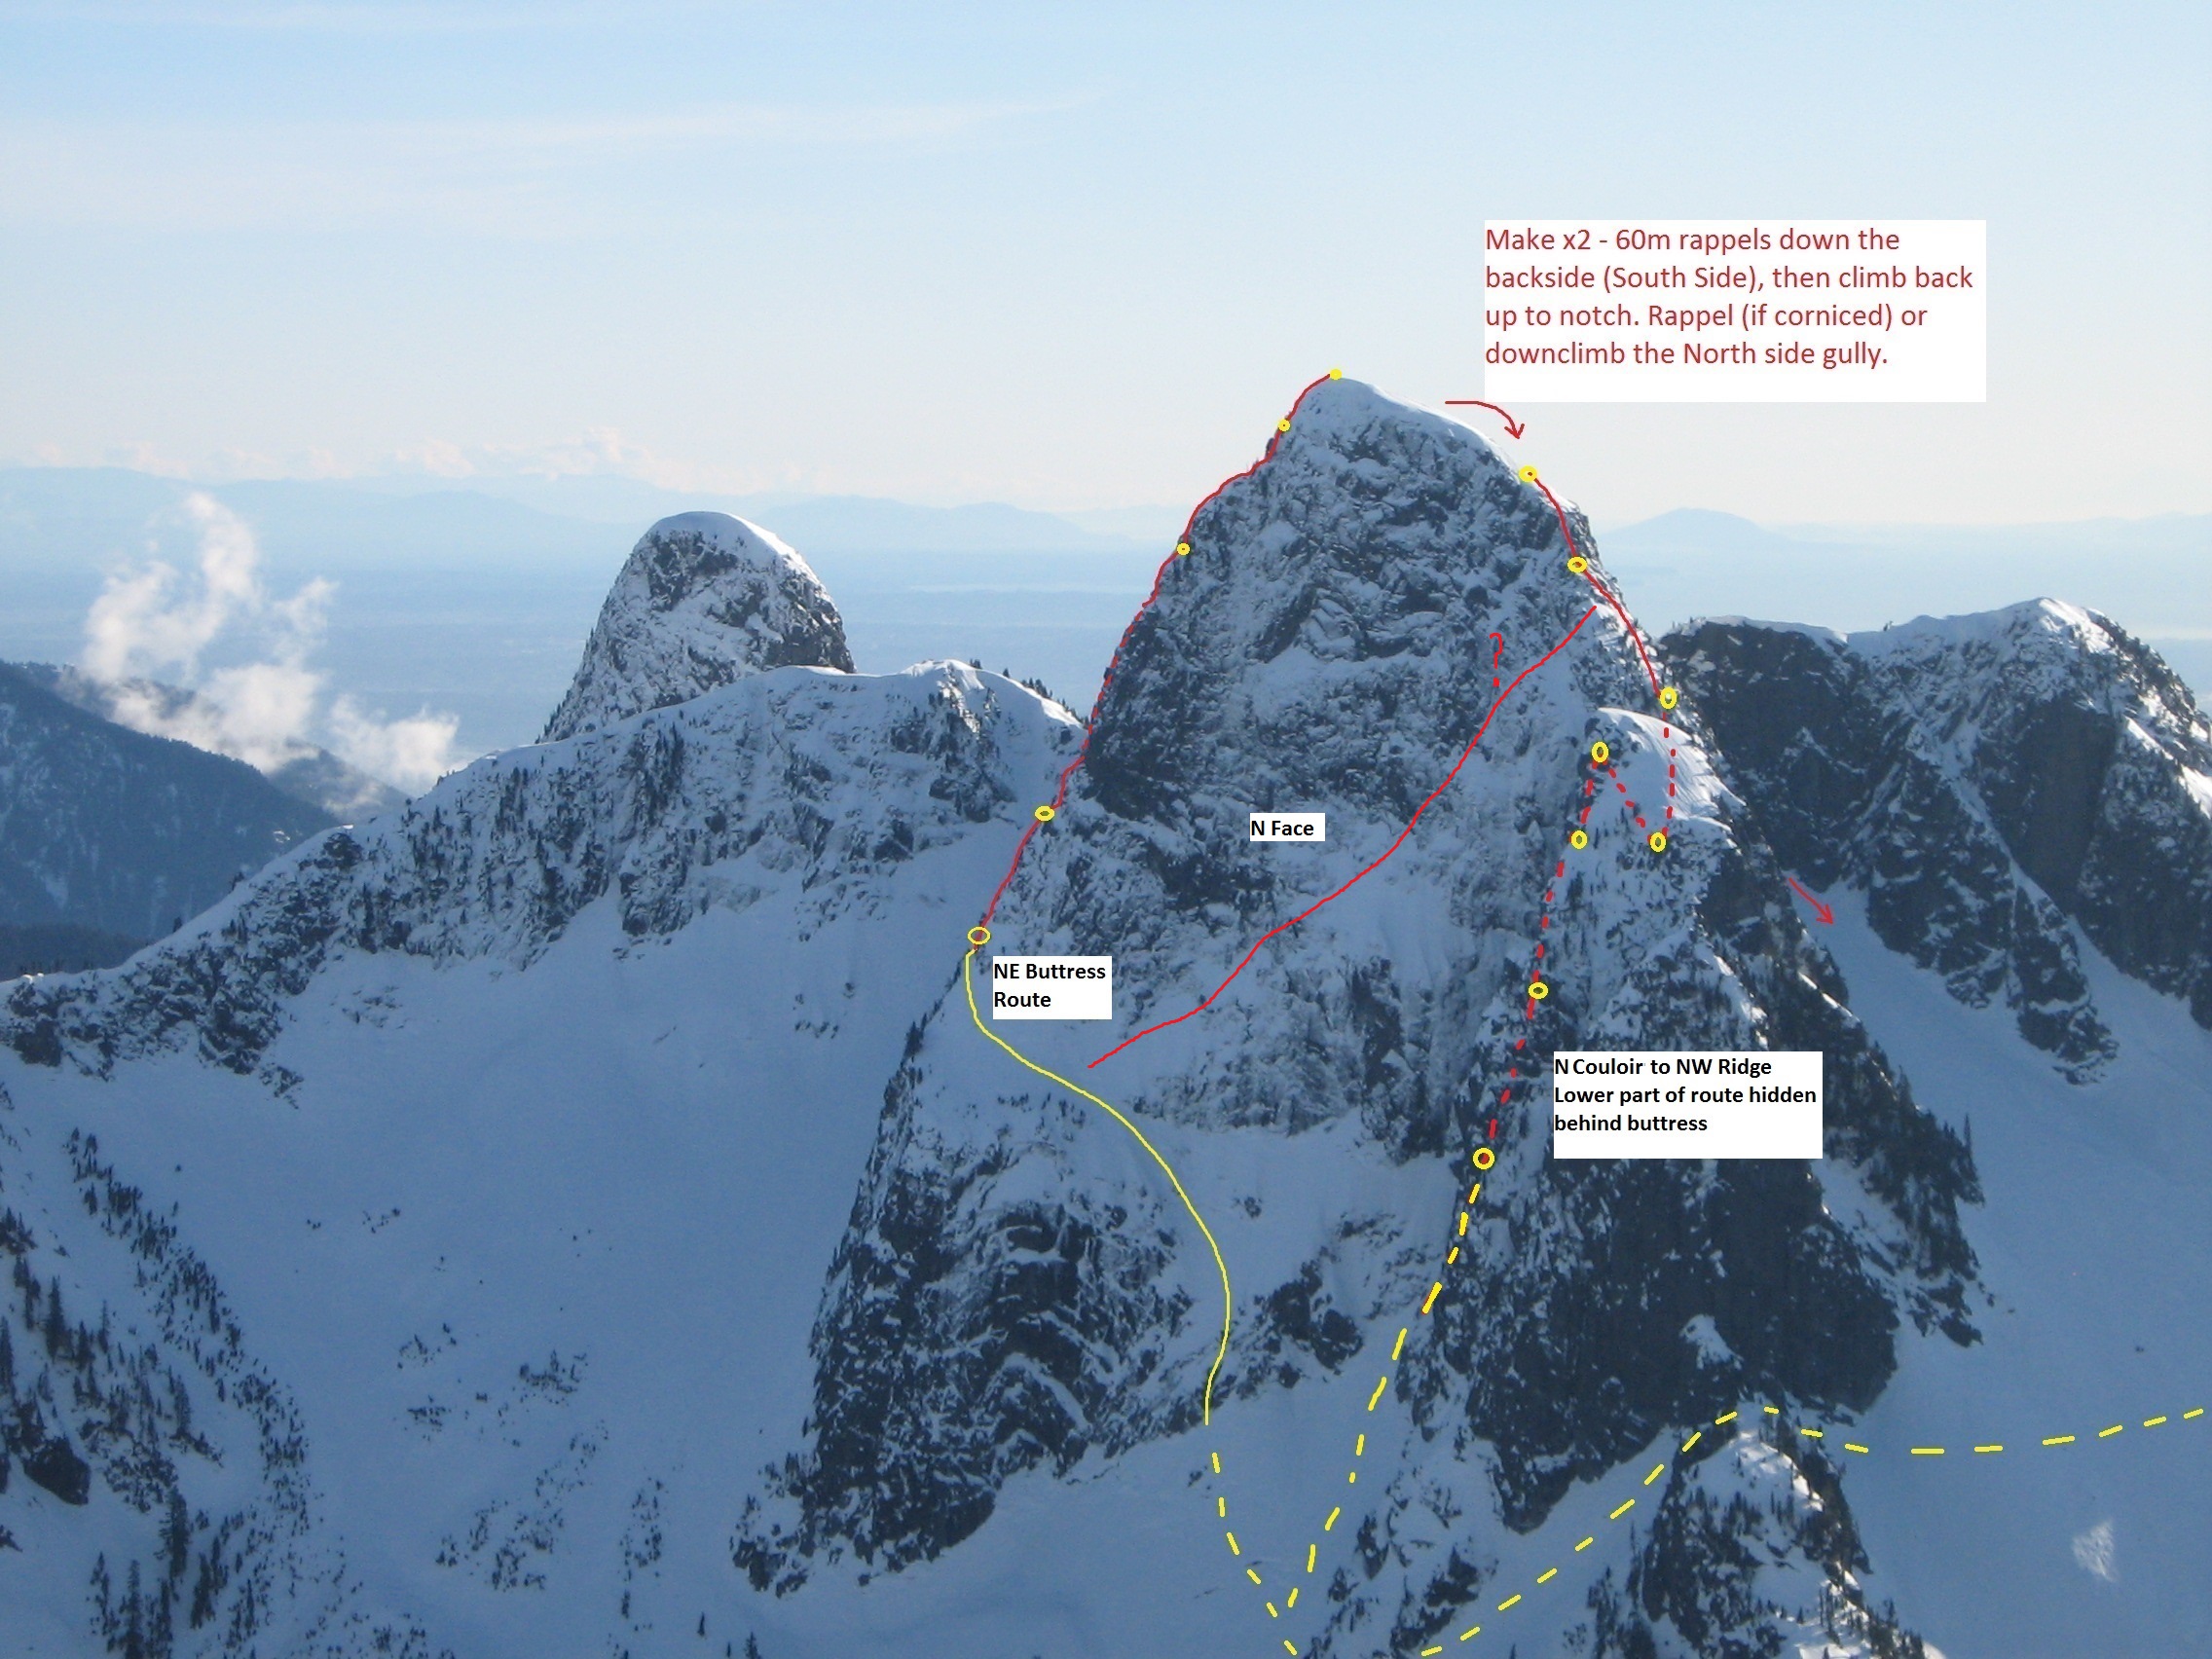
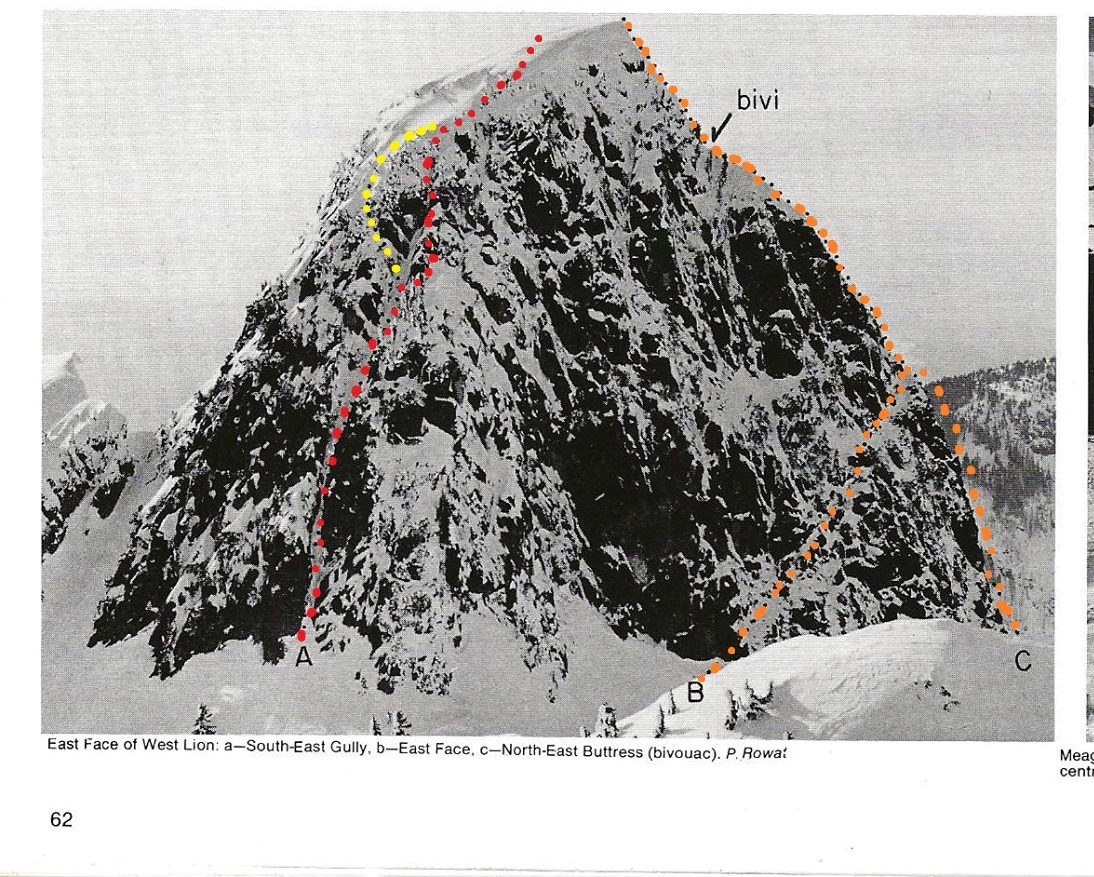
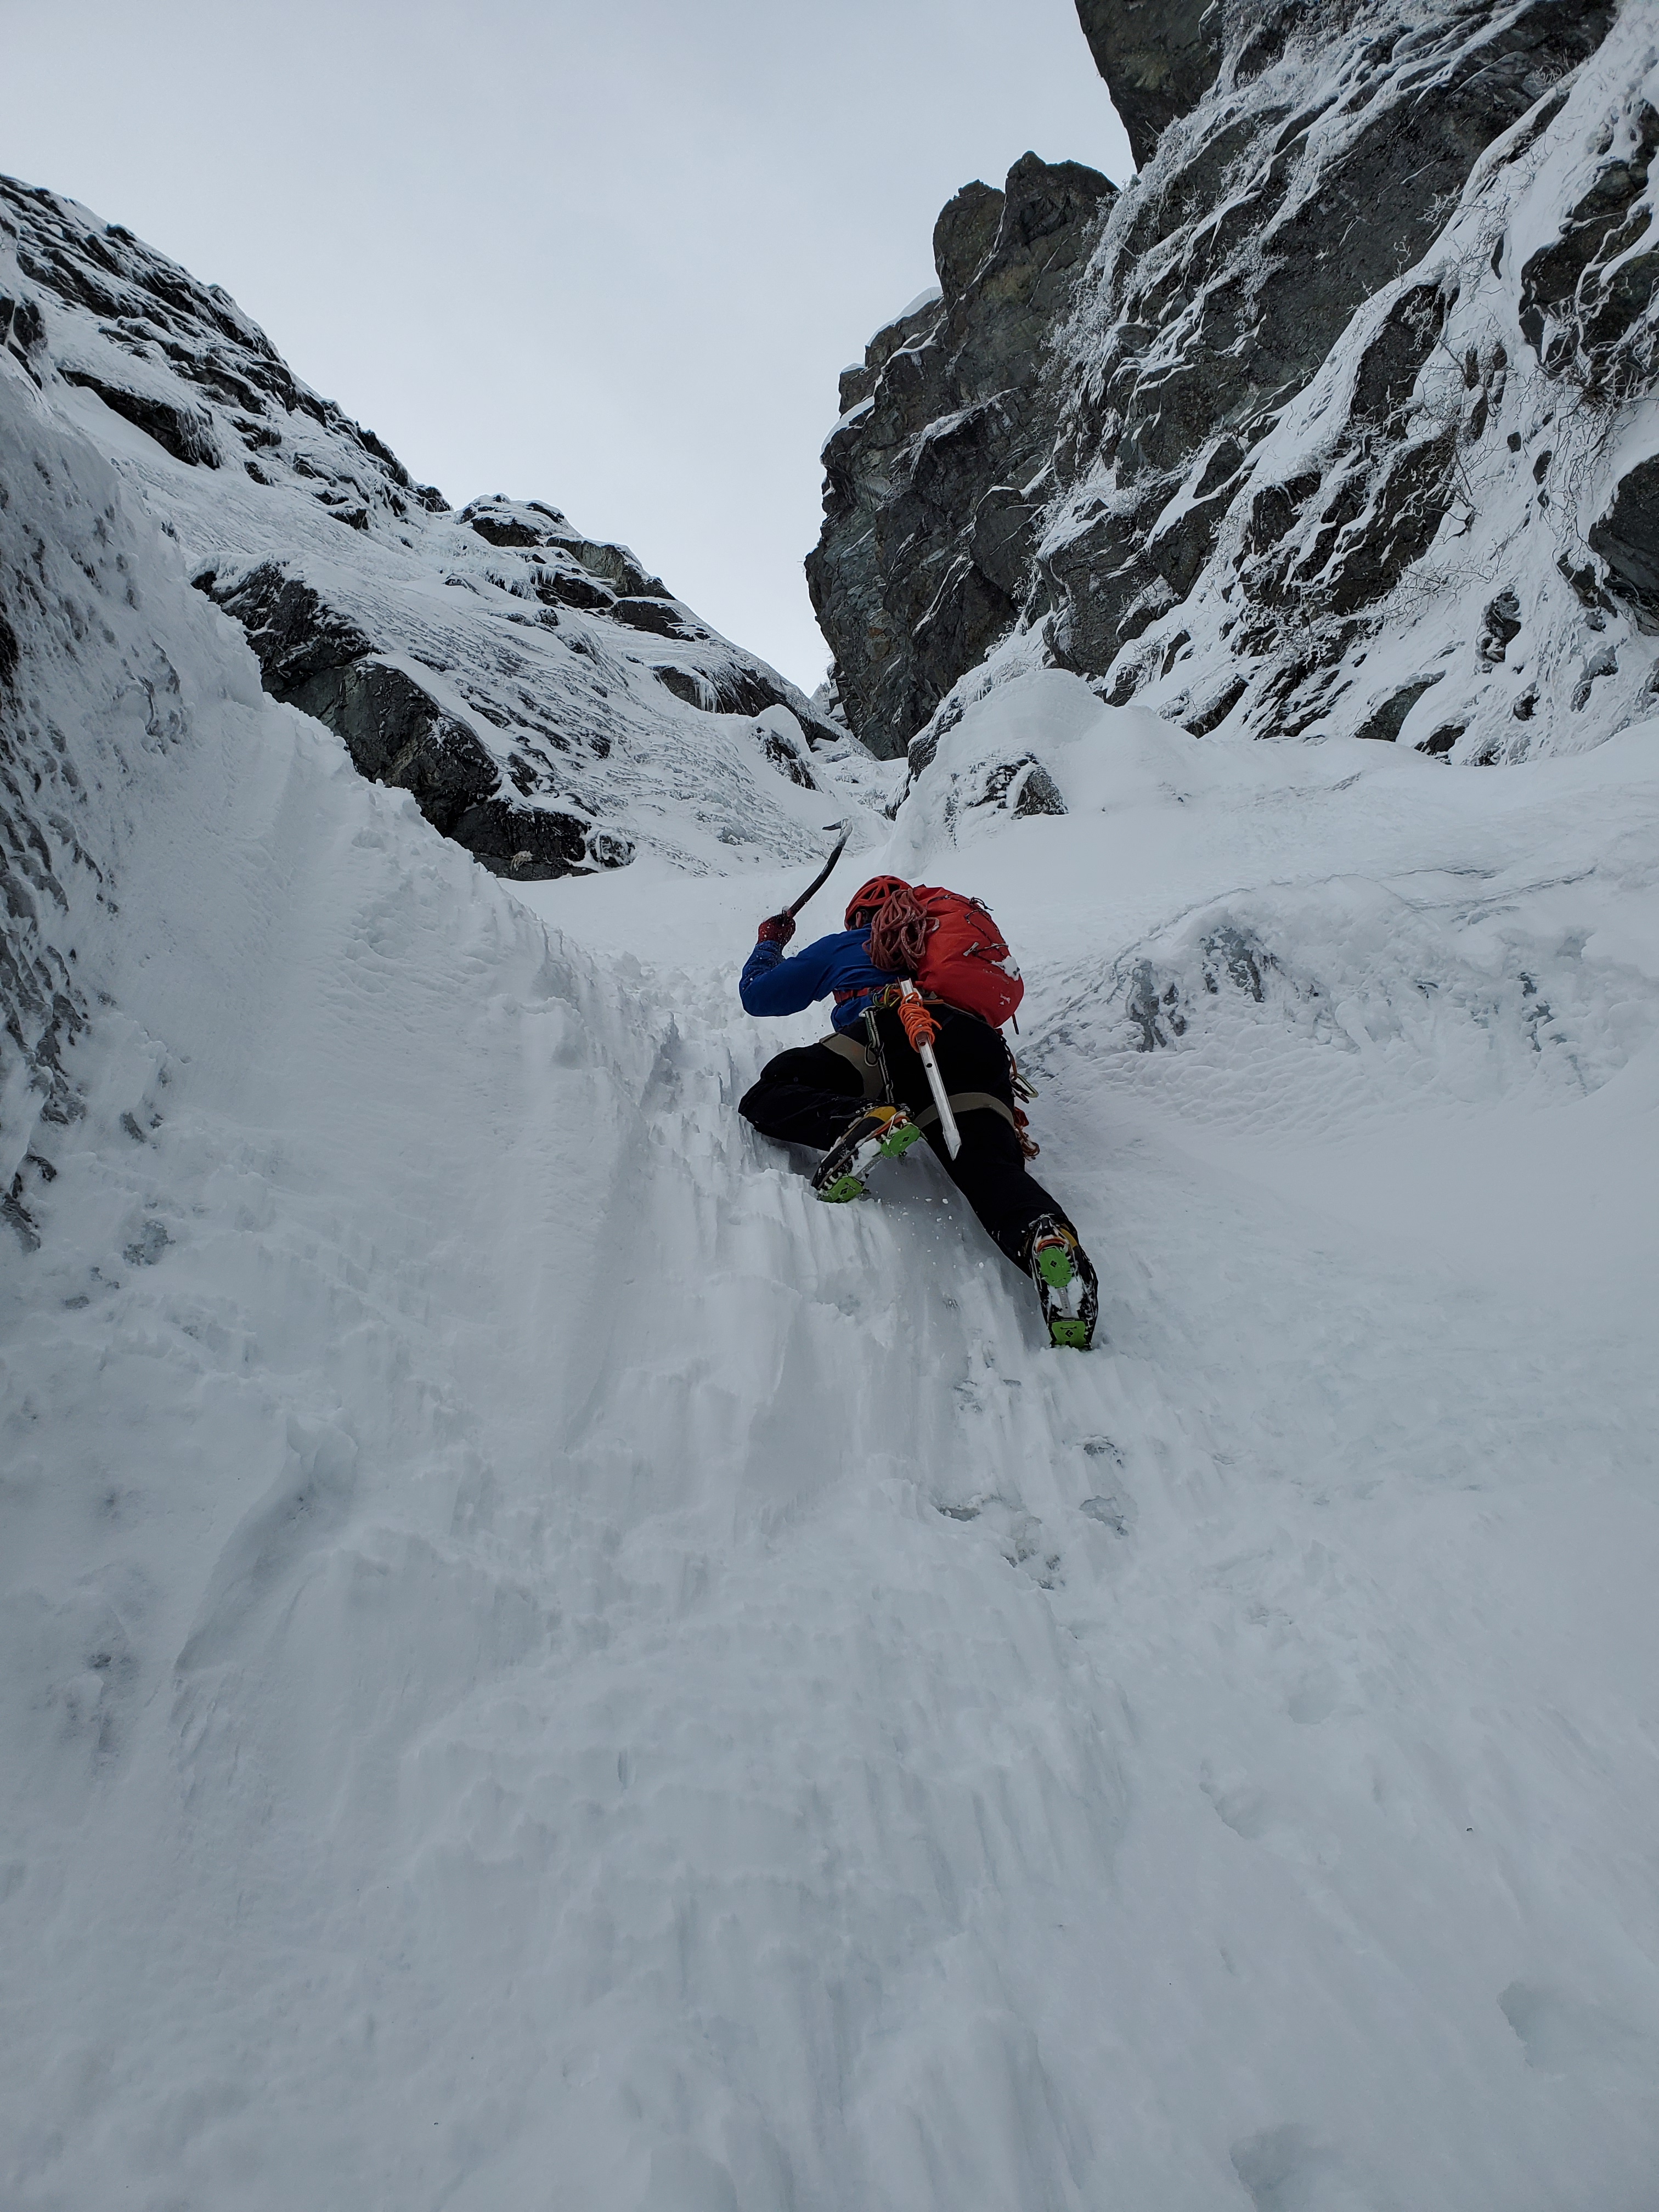
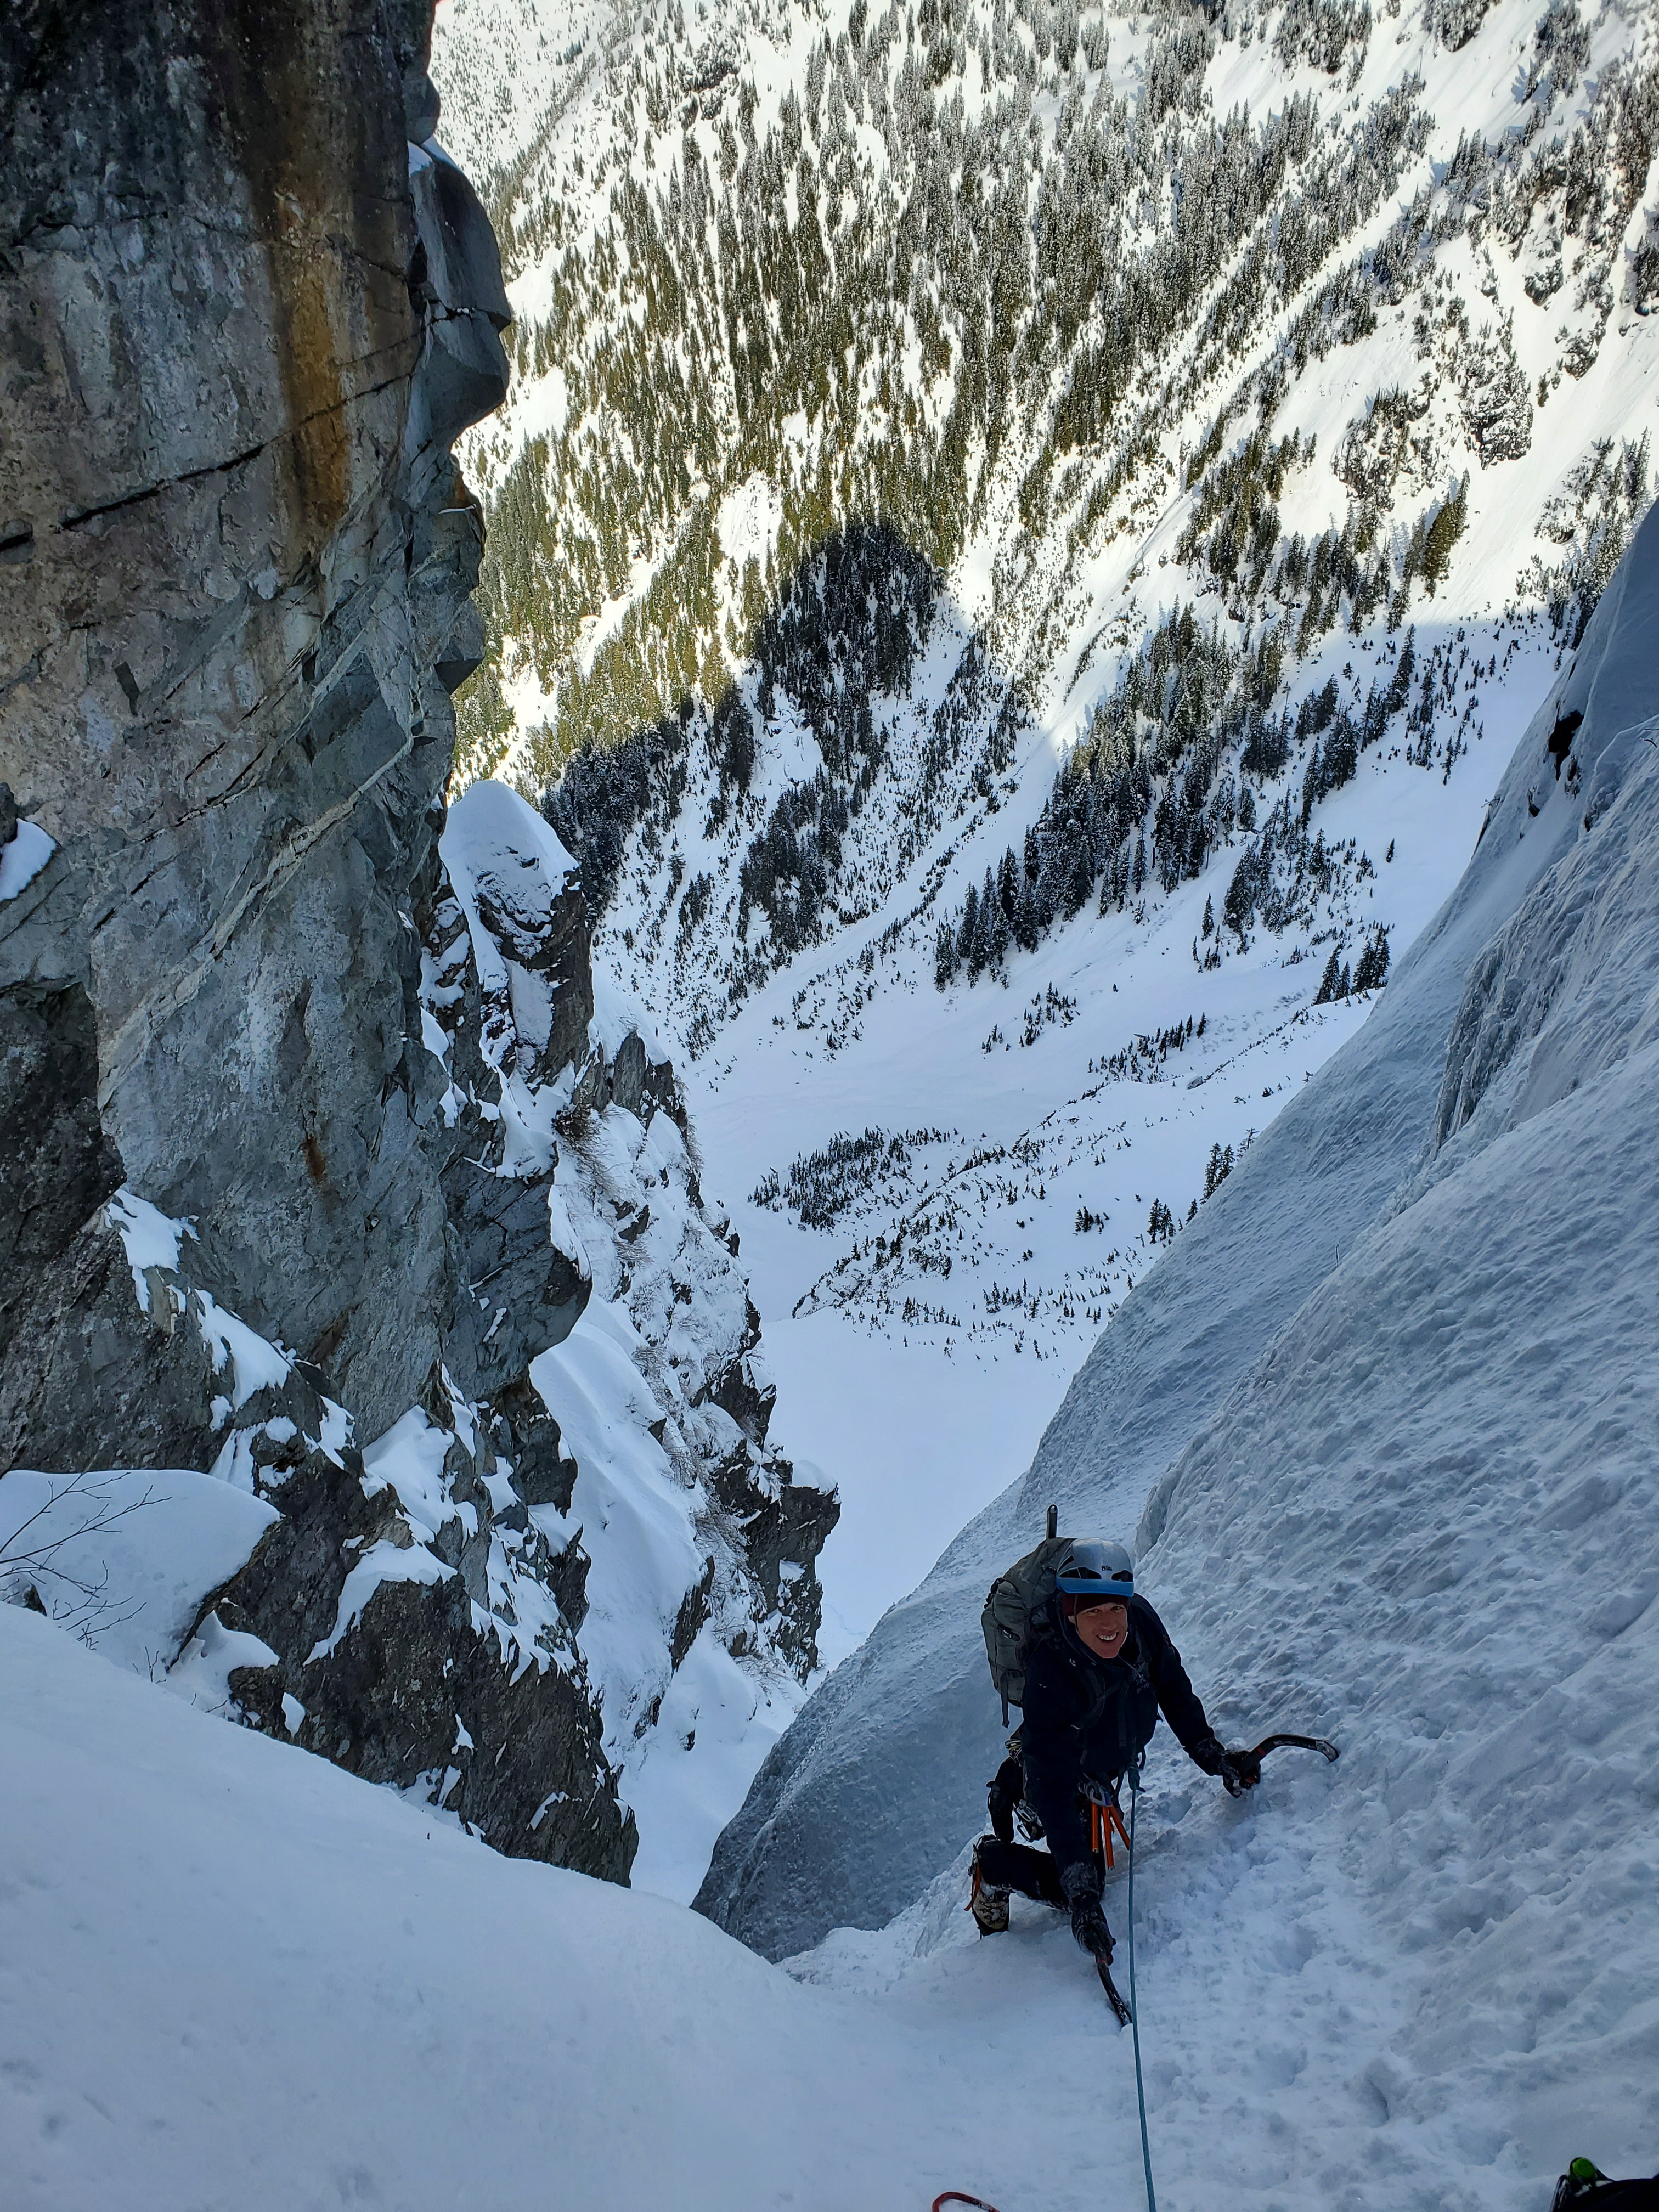
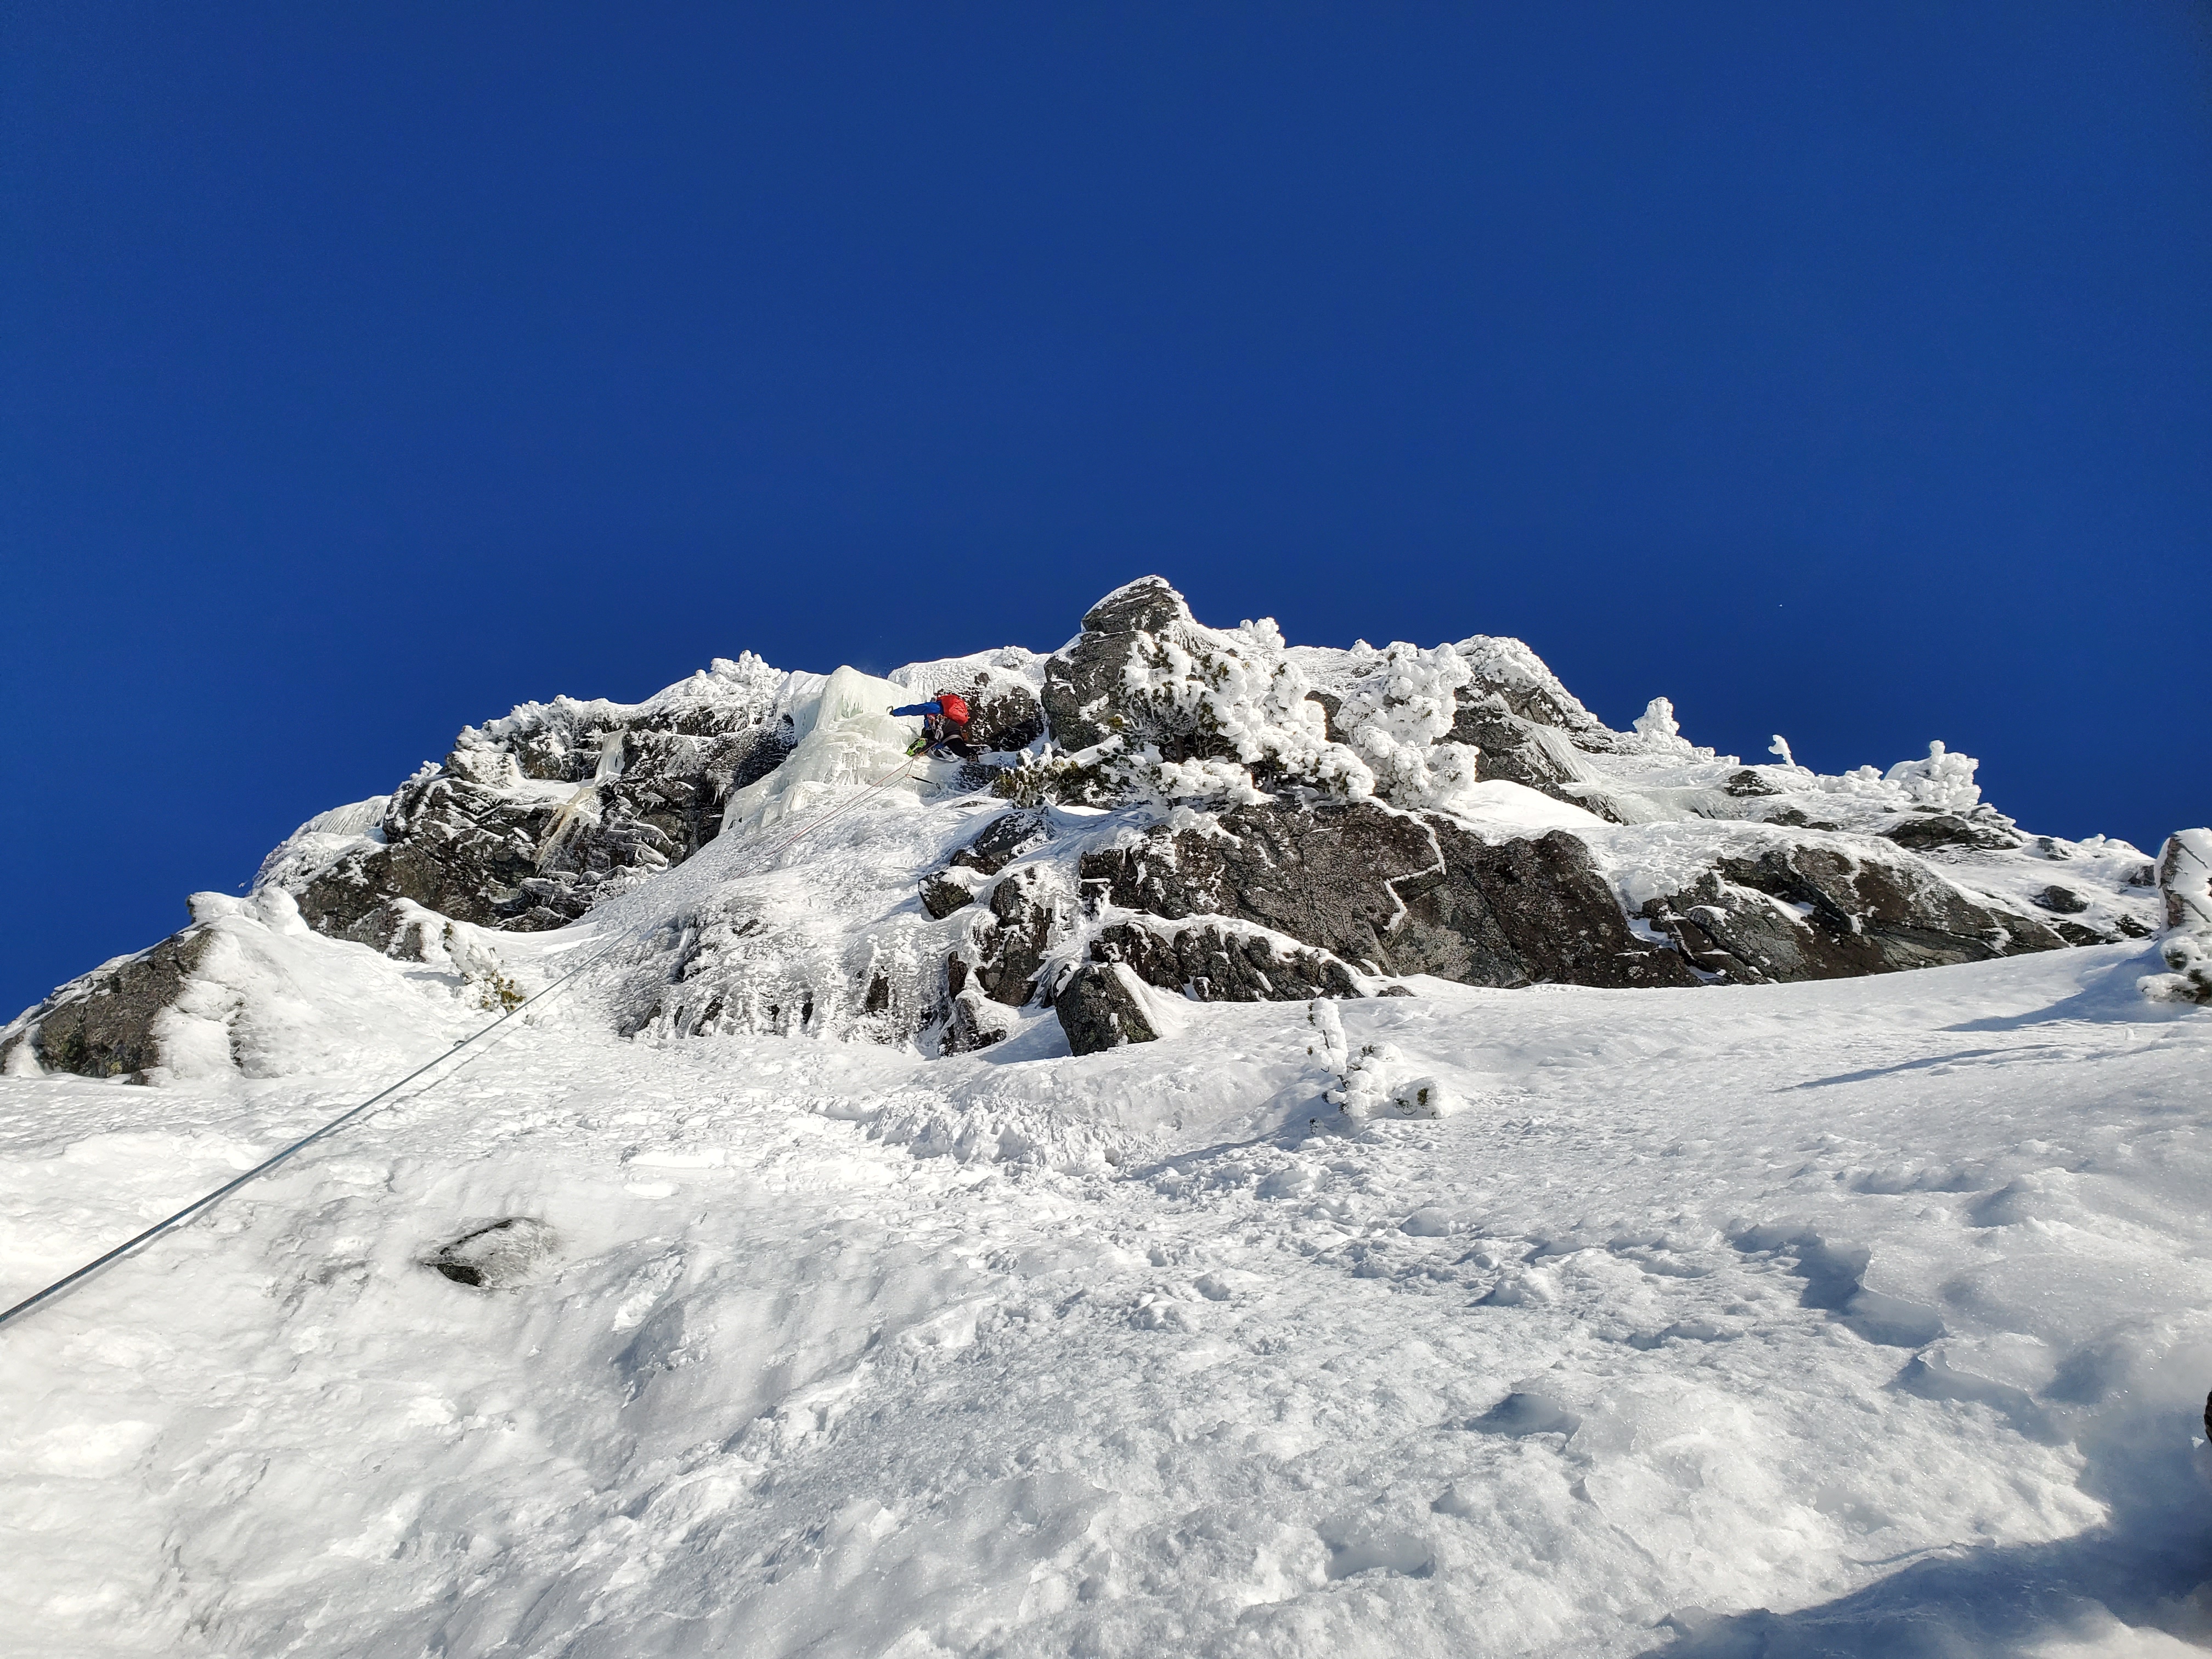
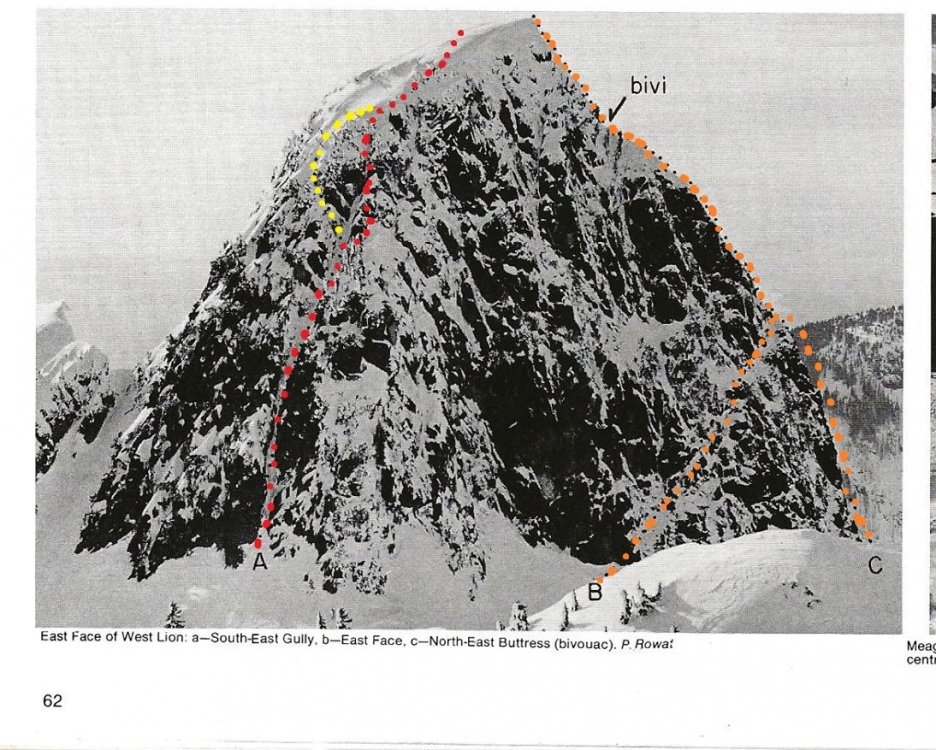
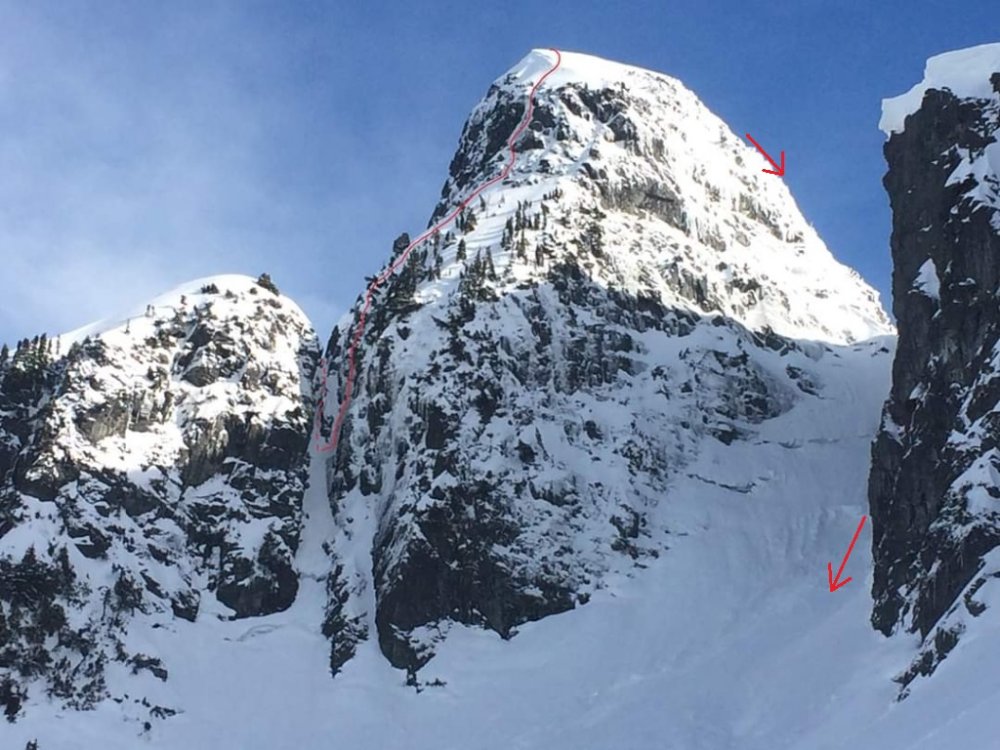
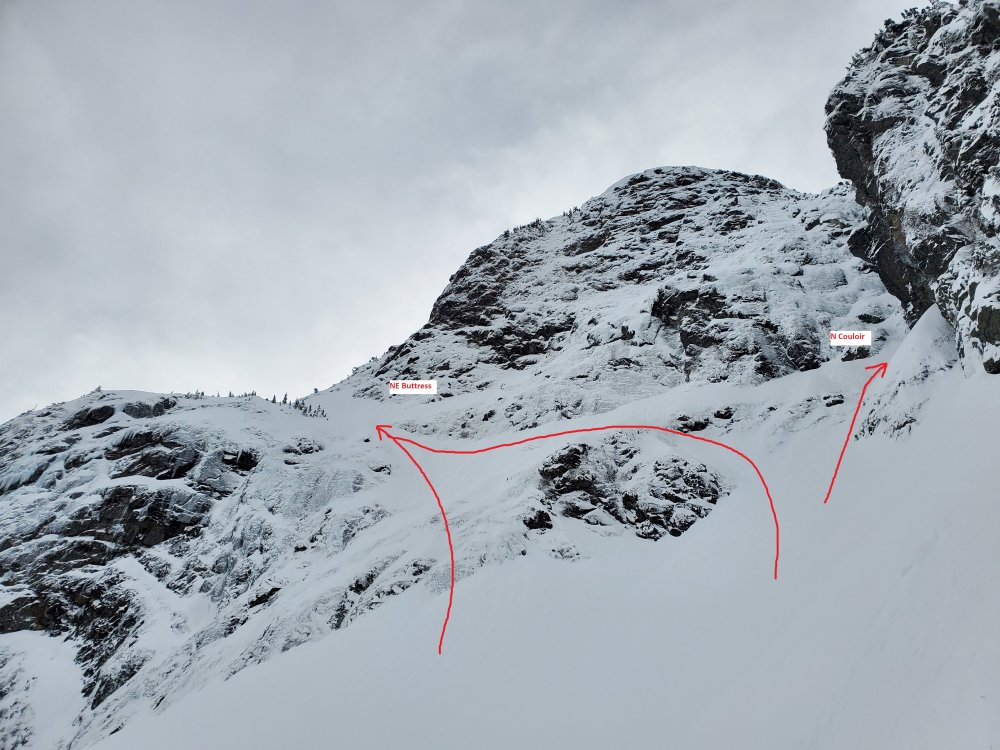
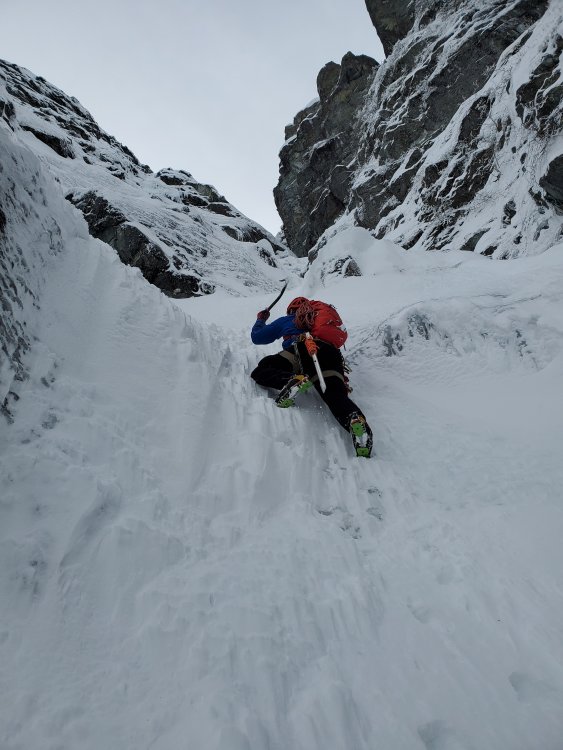
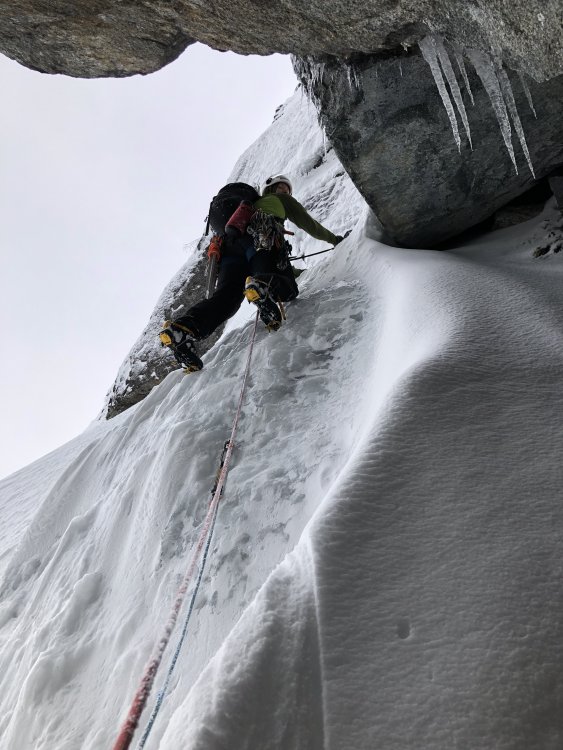
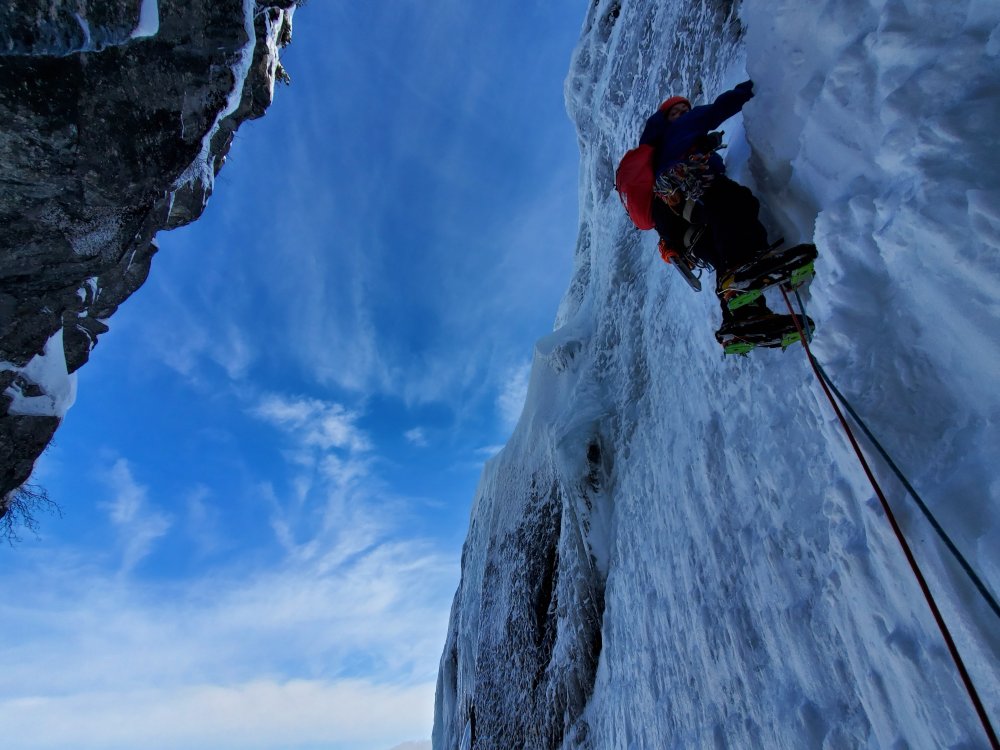
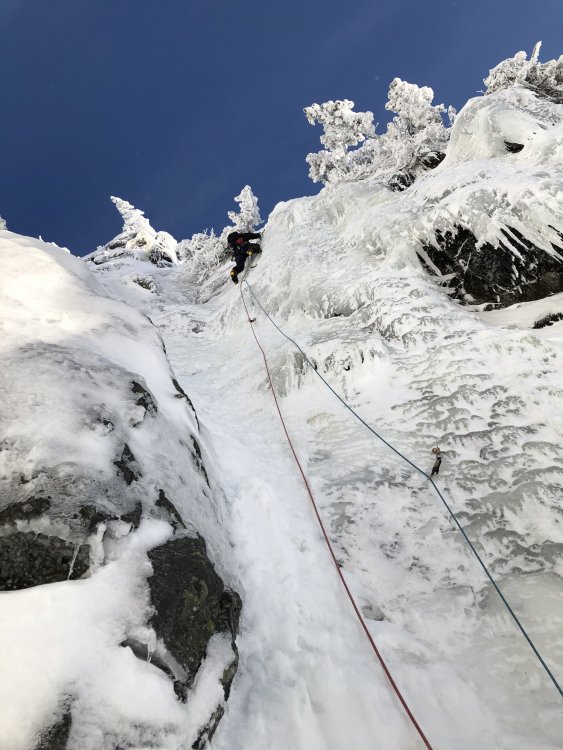
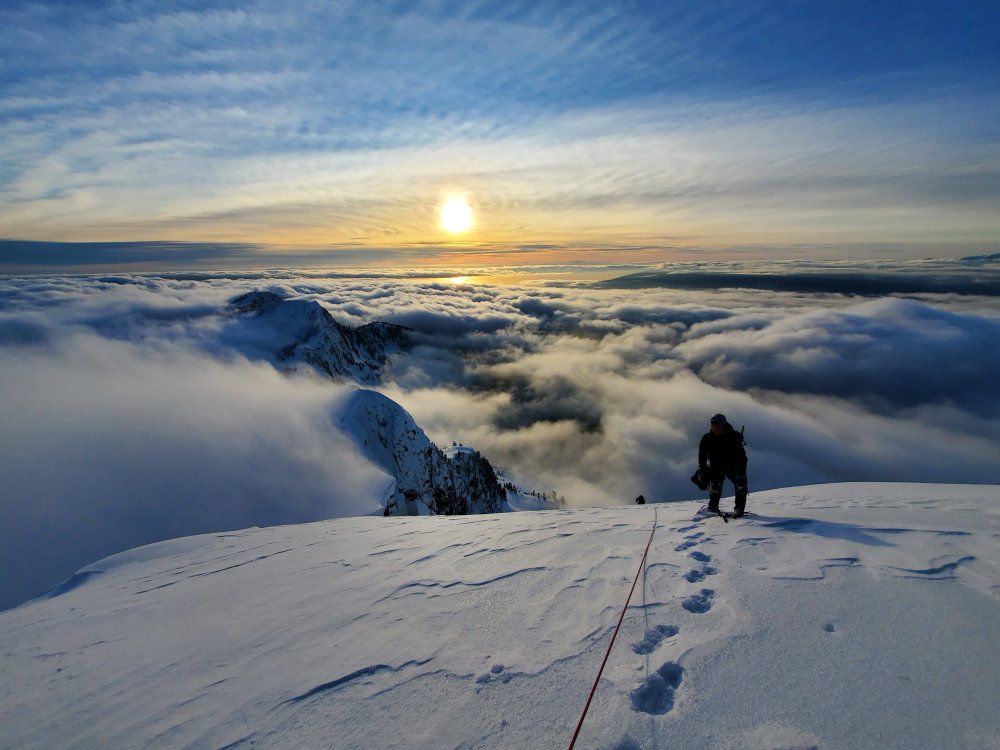
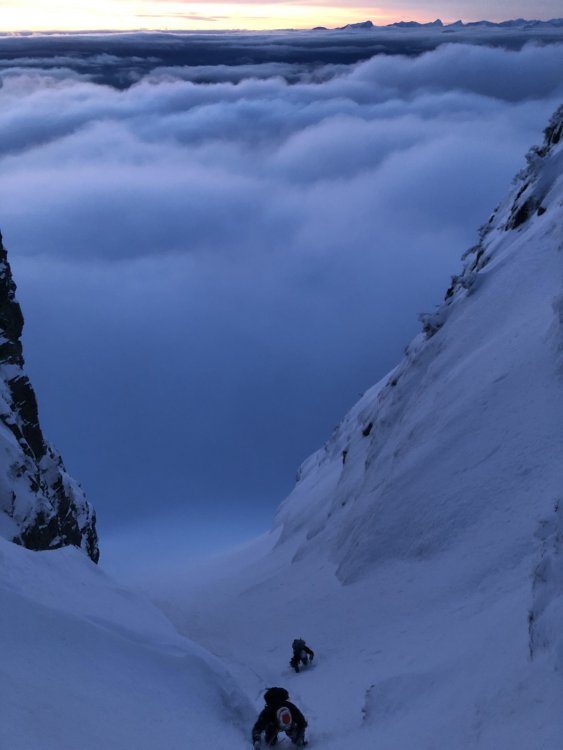
Trip: West Lion - Winter - North Couloir to NW Ridge Trip Date: 02/09/2020 Trip Report: This trip report is 2 months late but wanted to post this for folks in the future looking for info on this route/or the West Lion in general. On Feb 9 Richard, David and I Climbed the the West Lion via the N couloir and then the NW ridge. We were around 14hrs car to car which seems pretty average for winter routes up on the lions. Some faster groups do achieve 8-12hr range c to c. Nevertheless winter routes up here are always a longer day. For general info I'm aware of the following winter routes on the West Lion, there could be more... SE Gully - WI4- - 140m NE Buttress - AI3/M4 - 400m NE Buttress with East Face Approach - Difficulty Unknown North Face - Hard (Line below is approx) North Couloir to West Ridge - AI4- - 400m North Couloir to West Ridge Direct (no rappel) - M4/M5 addition? Photo topo of the North side routes and approach on West Lion Photo posted by Don Serl on Westcoastice Facebook group, outlining the East side routes on the West lion including a variation entrance onto the NE buttress in orange. I climbed the SE gully via the Red line, although I notice the original line in yellow goes out left. North Couloir to NW Ridge. Upper part of the route as viewed from the approach basin. Descent gully noted on the right. Looking up the North side of the West Lion while approach the North Couloir. Richard soloing up the lower portion of the North Couloir. Photo of me leaving the comfortable cave on Pitch 2 in the Couloir Dave coming up pitch 2 in the Couloir. Richard on pitch 3 in the Couloir. Photo of me on the 4rth pitch just after rapping from the notch Richard leading the last section of ice on pitch 6. Dave and Richard walking up the last portion to the summit with epic views that evening toward Howe sound/Strait of Georgia. Descending the gully back to the approach basin in fading light. On Feb 9 no flotation was needed on the approach, although the north side had much deeper penetration (crotch deep coming into gully). After being up to the lions area well over a dozen times in the winter I have concluded it is more likely then not, that flotation will be needed/helpful on the approach to the basin. FYI I have found that the approach trail up is too steep to skin up efficiently, and offers a very short (not worthwhile) ski descent. Conditions are very fickle for north shore alpine ice. When routes come in shape they seem to last only a couple weeks per season. I feel this line is similar in overall difficulty/ exertion as the winter NW buttress but this has more full length ice pitches then the NW buttress. I don't recall reading the route grade for the N Coulior/West Ridge but these are my thoughts on the difficulty (certainly conditions dependent): Pitch 1 - AI2+ - 70m P2 - AI3 out of cave - 60m P3 - AI3 step with vertical snow just below the notch - 30m (40m Rappel from notch on shrub to next continuous ice flow) P4 - AI4-/3+ - 50m P5 - Steep snow to base of last ice pitch - 70m P6 - AI3 - 60m Walk to summit 14hr car to car Cheers, Henrik Hinkkala Gear Notes: x2-60m half ropes, 10 extendable slings/runners (used all), 4 nuts (didn't use), 9 screws most 13-17cm (Used 7, many got rocked), 3 pitons + spectre (used all), 5 cams (blue/ yellow/ orange metolious, red ultralight, red link cam- used all but blue/ yellow), 1 picket (used twice) Approach Notes: Follow Lions Trail up to Lions Basin


-
[TR] Shuksan, Icy, Ruth - Nooksack Traverse 03/01/2019
HHinkkala replied to geosean's topic in North Cascades
Wow, epic TR and glad you were not injured. Regarding snow pro, totally agree it can be very difficult to place solid snow pro. I have rapped off T-slot pickets but nowadays I will opt to carry both a msr snow fluke and a picket on steep snow routes for this reason of snow variability. I have bounce tested snow flukes (run/slid full speed while roped in) and been pleasantly surprised how well they hold in different snow conditions since they dig deeper into the snow, particularly the newer ones....It took a fair amount of digging/effort to retrieve them after loading... -
Holy sh*t !!! lol.... 4 days + 2 days waiting on weather + helicopter resupply....That is certainly commitment to see it through....
-
Nice work on the route! Can you copy/past link to the other epic TR? Sounds like it would be a good read...
-
Nice work on climbing both those routes over the weekend! I'm curious how you approached capricorn, did you have to climbed any of the millar pillar routes (unsure if they are in?), or were you able to go around them? I tried to go left up another drainage and got totally lost last year so any info would be much appreciated! Cheers!
-
Ya wow, that would have been one a hell of an approach. I do think folks were generally hardier back in the day...
-
Got it! Had to delete the bullet point circles then convert to ubb/plain!
-
Struggling to get my copy paste from word to work, even with using the article formatter, and html to ubb convertor. Any tips?
-
Winter Ascent NE Buttress of the West Lion - AI3 / M3-4, 450m Graham Rowbotham and I climbed the NE Buttress of the West Lion on Feb 25, 2017. Another party had posted that they climbed it about a week prior and I knew we had to get on it asap before conditions changed. I have wanted to write a TR on this route for a quite a while now since I'm not aware that there is any information available for this route in winter. I have done the summer version of this route which is a bushy alpine 5.6 but in the winter it is not the same route and is significantly more technical. Jesse and I had tried this line a few years back, conditions were much different on that trip and a rocky headwall near the top of the 3rd pitch, which was easy to overcome this past Saturday, was on my previous attempt rimed up with unconsolidated sugar snow to the point that no pro or line of ascent was evident. We bailed. This weekend however was a different story and it became evident to me that the conditions on this route, and alpine routes on the north shore generally speaking, can be very temperamental. This can certainly effect the difficulty so please take my attempt at grading the route with a grain of salt. Overall this is a very unique and fun line that is not necessarily hard but it is also not trivial. It requires careful considering for climbing over thinly ice covered rock, it has some low grade dry tooling sections, lots of run-outs and requires contending with less than secure snow over very steep and exposed terrain. It does also have some wonderful frozen sections and some bushiness in places. Bailing off this route is also complex and in most places requires you to rapp the entire buttress to the bottom, (except if you bail East from the lowest tree between pitches 2-3, then you barely reach the NE gully with barely a meter to spare with 60m ropes, like me and Jesse found out by mere chance in fading light...), this is because there is no certainty you will find intermediate ice/trees/pro on the vertical cliffs that surround this ridge route. Nevertheless, I would still recommend this route to others in the Lower Mainland looking for worthy winter alpine objectives close to home. Our times for the route were as follows: -Left the car at 6:15am -Started soloing the North Face bypass at 10:15am -Summited at 3:45pm -Finished x3 raps back into North Bowl at 4:45pm -Back at car at 7:15pm Our approach for the route was up the standard 4.5km (600m gain) logging road uphill from Lions bay to the Lions trail turnoff. From there it's about another km or so uphill for another 500m vertical, then you reach the first main North snow bowl/basin. The descent gully from the notch between the summit and the ridge is obvious from this location. We stashed our poles and snowshoes here and traversed across the basin to another notch, from there we down climbed the gully on the backside and continued across to the start off the route. We opted to go up the North Face bypass, which is about 200m long of steep snow and a short section of grade 2ish ice at the bottom. We followed this up and leftward to where we set up our first belay at an obvious tree high on the ridge crest. The rest of the belayed pitches are broken down below: Pitch 1 - 40m, AI2 / easy mixed The first section takes you mostly straight up the ridge proper over steep snow and thinly ice cover rock steps. There were a few sections where I climbed with my hands over jugs. Gear is slim, mainly a slung bush or two. At one point near the top you travel a bit left prior to getting up to the next obvious stand of trees. Pass these trees and head to one higher up near/below a triangular shaped rock that gives a comfortable, sheltered, flat belay perch. Pitch 2 - 65m AI3 / M4 To me this felt like the most technical section on the route. From the belay you head right and around the triangular rock and then straight up and leftward. from up here it is possible to just traverse 10-15m left straight into the gully but we opted to go up over a steep rock step that lead you onto a higher leftward leaning ramp below the face (seen better in topo photo), small cams were used primarily up to here. Then follow the gully that typically provides great styrofoam ice up to a bushy area where the angle begins to ease. This will bring you to a junction where you can either go left or right around a small buttress. The last portion either provides protection for screws, or slung bushes, and the belay is from a slung tree/bush below the junction. Pitch 3 - 40m, AI2+ / M3-4 From the belay head right at the junction and up a gully that then puts you above the exposed North face. After about 20m you come to a 10m headwall. There is a large body size rock on the left side that you have to squirm up and stand on top of. From here there is a few decent cam placements above your left shoulder. The angle above begins to ease a bit and provides thinly ice covered rocky bulge that you mantle over. Thereafter you front point another 10-15m to a large tree for a belay. Pitch 4 - 40, AI2+ / M3-4 Climb immediately up to the left hand side of the ridge crest for about 15m. Here you arrive at a few cruxy moves, about a body length or two, that gains access back onto the ridge, which requires mantling onto the crest from a bouldery stance with insane exposure. Below this Graham slung a horn and he found cam slot after brushing away snow from a crack. The moves onto the ridge requiring some drytooling as well as gingerly climbing up a smear of ice less than an inch thick at the bottom. After this you follow up 30m along a knife shaped ridge that drops precipitously on both sides so travel with care. Continue along the ridge and into/through an obvious large stand of trees that provides a belay. Pitch 5 - 25m to 35m Steep Snow The last section of the route climbs up very steep snow to top out onto the summit. For the descent we did two rapps down the regular scramblers route. At the bottom we climbed back up to a notch. Previous times I have simply down climbed the gully on the other side of that notch but this time there was a huge cornice over it so we rapped from a tree a little ways back from the cornice. Gear we brought: - 70m twin/half ropes - Small set of cams #2C4, #.5C4, #1-3 TCU, #2 link cam (used them all except the #2C4) - x6 nuts (did not use) - x8 short screws (used a couple) - small set of pins (did not use) - Snow fluke (used on most sections) should have brought an extra fluke or picket. - 12 draws/extendables, probably only needed 8-10, definitely leaned more on extendables. Route top viewed from the North Route topo as seen from the ridge just East. View of the first North basin with descent gully visible View of the North face bypass Me soloing up the North face bypass Graham coming up the 1st pitch Graham heading up the 2nd pitch Me heading up and right on the 3rd pitch Graham heading up the 4rth pitch Looking back down just below the summit, the clouds came in and out that day Graham and I on the summit Rapping the cornice This route seemed to provide a little bit of everything, from great one stick styrofoam ice to manky snow that seemed to barely hold your body weight to fairly significant runouts and thinly covered rock. The conditions for this route can also be quite fickle, last time I tried it we were able to use mostly screws but this time the styrofoam ice, which placed tools beautifully,did not really take any screws they basically pulled straight out. I would definitely recommend others to check this route out if they are looking for a challenging nearby winter alpine adventure. The longish approach tends to make this, or other routes on the Lions, a fairly long day. Cheers, Henrik
-
Selling my baturas size 44.5, they are too narrow for my feet, otherwise i love these boots. They have been used on only a few outings, they are in excellent condition. I'm willing to meet in BC or Washington. Email hhinkkala@gmail.com for photos, contact info. Cheers, Henrik
-
[TR] Mount Sir Donald - NW Ridge 8/20/2016
HHinkkala replied to HHinkkala's topic in British Columbia/Canada
Shhhhhhhhhhh..... Exactly...lol Few climbers could or would adhere to that requirement anyways, I think many Rangers realize this (the ones that climb), not all though. Running into a grizzly is one your least hazards when climbing a peak...unless your that ice climber in the Rockies from last winter...son of a gun! -
[TR] Mount Sir Donald - NW Ridge 8/20/2016
HHinkkala replied to HHinkkala's topic in British Columbia/Canada
Since we showed up so late both times, bivyed in parking area behind car, and leave so early we have never confronted a ranger. If you come during the day when a ranger is at the post near the trail head you will probably be questioned... -
[TR] Mount Sir Donald - NW Ridge 8/20/2016
HHinkkala replied to HHinkkala's topic in British Columbia/Canada
Thanks and yes there are many stories of nasty descents! But I can certainly see how it could be easy to get yourself in scary terrain. The descent did feel a bit counter-intuitive in that you want to head over to the dike but you have to keep telling yourself not yet, and continue downward. We were very glad it was snow free. Hopefully other folks are able to find the easy path down similar to what we did... -
Trip: Mount Sir Donald - NW Ridge Date: 8/20/2016 Trip Report: Richard and I climbed the NW ridge of Sir Donald on August 20. After a week or so of high pressure and high temps it seemed primed for another attempt. We had tried the NW ridge last year in July but were thwarted by freezing temps and rime covered rock at the elevation of the bypass/West face ledges. Since there are plenty of TR's I'll simply share some thoughts and highlights of the route. Wait until late August to do the route after the snow has melted, so that no crampons/axe are needed and you can easily descend along the bypass ledges. You also need high temperatures in the valley to climb the route comfortably, even though it was 30 degrees Celsius in the valley it was only 7 degrees at the summit, add a strong wind and shade makes for cold hands and feet near the top. Our times on the route seemed average based on other trip reports, just over 11hrs car to car. We drove up from Vancouver Friday evening, arrived in camp at 11:00pm, left car at 4:15am, starting climbing from the col at 7:15am, got to summit at 10:30am, finished all rappels at 1:30pm, back at car 3:30pm. For our gear we brought a single 8.9mm rope, single rack of cams, 4 nuts, 4draws and 4 extendables. We broke out the climbing into three long simul blocks. On average we placed one or two pieces every 60meters. There are lots of terrain belays on the route. When in doubt stick to the ridge crest. It may be steep but jugs are everywhere. Remember to rappel to the North side at station #4 to avoid hanging in space, as the parks brochure and other reports mention. http://www.pc.gc.ca/eng/pn-np/bc/glacier/activ/~/media/pn-np/bc/glacier/visit/visit15/Sir%20Donald%20Brochure-EN-2012.ashx As we were coming up the last summit portion we passed several parties that were rappelling down in the cold windy shade of the upper ridge. With curiosity I asked why they didn't take the summit bypass since it looked dry and in the sun, they all said they had read horror stories so decided not to. Well our experience was very different from what we heard. We simply followed what looked like the common descent trail, well trodden in the scree, but we also did not turn too early toward the North. We actually went in the opposite direction (skiers left) for a good ways during the upper portion until we basically got cliffed/slabbed out, thereafter we slowly meandered skiers right and downward enjoying a leisurely walk back to the NW ridge. The close up photo of the bypass on the park brochure felt spot on. There were a few spots of slabby down climbing but honestly it was significantly easier and mellower than either of us had expected. I think the key is to not turn too early toward the NW ridge/quartz dike but instead travel down and skiers left until you're roughly at, or slightly above, the quartz dike that you eventually traverse under. I also saw photos of what other people had descended and we did not go down those same gullies or slopes. My guess is we followed the actual bypass fairly accurately, there were also carrions toward the lower half of the bypass which to our delight led us in the right direction. The rest of the descent went smoothly with us simul-rappelling interspersed with down climbing on the upper portions. There is a newer set of rap stations (two stations, #11 & #12 on park brochure) at the very bottom prior to the snow that prevents you from having to descend on the snow slope. Located on the slabs to skiers right. These are hard to see until you are very close to them. Google photo of the route viewed from the road Coming up the lower third of the ridge with another party from Virginia Heading up just above the bypass ledges Coming up the upper portion near the summit, it was blowing good up here Cresting the top, boy was it nice to get back into the sun Richard enjoying the views View toward the descent gully for the bypass ledges/West face descent Photo of the descent, with the quartz dike that we were headed toward, glad there was no snow on this section! Richard descending the morraine This is a fantastic route to say the least and an obvious classic. Cheers, Henrik
-
first ascent [TR] Hozomeen Mtn, South Pk - North Face, IV+ 5.9
HHinkkala replied to lunger's topic in North Cascades
I have discovered when there is no gear available there is always a spot to place a large bird beak...thats when you know things have become desperate. Congrats on what was obviously a challenging and complex climb. -
Right on, the foster always delivers a good time!
-
On Sat Aug 7 Dave and I climbed Liberty Crack. There was quite a bit of helpful information online that we used so I will just post a few photos and highlights. This was our first time on the route and on this side of the mountain. Some helpful TRs we found were as follows: http://cascadeclimbers.com/forum/ubbthreads.php?ubb=showflat&Number=1011563 http://www.summitpost.org/liberty-crack/309641 http://www.cs.cmu.edu/~mcmahan/trip_reports/liberty_crack/ Dave and I drove up from Vancouver Friday evening and bivyed along the service road just past the backside trail parking lot. We left the car at 4:30am and got back 7:30pm. Finding the trail just after the "pond" beside the highway was easy. We got up to the boulder fields and were a bit surprised to see that there was still snow at the base, we were hoping for no snow. Well it turned out there was about a 40-50ft section of 30-35 degree bullet proof snow at the base of the 1st low 5th pitch, but there was also a shorter a 30ft section lower to the right below the "5.7" alternate 1st pitch. I tried the first time but slipped about halfway up and slid down to the scree, no injury except some scrapes. I then went a bit further right where I saw a rope hanging from the cliffs and using one of Dave's poles I fished it out of the moat and was able to pull myself in. I then shimmied upward to a spot where I then brought up Dave with a rope and we proceeded to the normal start. Burned about an hour mucking about on this. This is one of the few times micro spikes would actually have been helpful. As far as the route goes it is fairly straight forward. The aid placements are pretty easy going with some interesting fixed pro higher up, but still relatively strenuous if you haven't aided in a while (my first time aiding in years)...Although I had my system fairly dialed your still doing a few hundred light chin ups as you clamor up your aiders. We had a good strategy to speed up the aid sequence by short fixing. I would aid up to the anchor, pull all the rope up tight to Dave, then fix the lead line (8.9 single/double rope) and the tag line (7.9 double rope) so that Dave could jug up and use the tag line as a back-up. I would then continue leading up past the anchor rope soling on the remaining rope and gear that I had, and using a gri-gri and a back-up knot on a locker. By the time Dave got up to the anchor I was already mid-way up the next pitch. I would then use the tag line to pull up the gear that he cleaned from the previous pitch. We did this for all the aid pitches and it worked well and saved a bunch of time. Took us 3.5 hours until both of us were at the top of the aid pitches. We continued upward using a double rope system. The fixed gear (pins/copperheads) appear to all be still in place and in my opinion are pivotal to getting up this route hammerless and in a quick time. I brought a hook and used it 3 times, first getting to the piton at the beginning of the 2nd aid pitch, 3rd time moving off a higher copperhead to a large cam under a roof midway up the 2nd aid pitch and then lastly at the obvious hook hole that everyone talks about. Looking back you could have free climbed the first hook move but I did not see another option on the 2nd placement. We brought a light leader pack and a 40liter follower pack to carry the approach shoes, aiders, extra jackets, etc., what a pig. The free pitches thereafter were surprisingly harder than what we were expecting in that they were consistently sustained at the grade. We both thought the first 5.9 pitch was the most difficult of the upper pitches, although we french freed past the 5.10 moves near the rotten block. Our rack: - x1 - 8.9mm rope rated as single/double - x1 - 7.9mm half rope - double cams from small purple tcu up to #2 C4 - One each, smallest grey TCU, #3 C4, #4 C4, red link cam - 1.5 set of nuts including some med size RP's, didn't need the smallest micro nuts or the very largest nuts - x7 quick draws, x7 extendable draws, x8 loose biners. Over half of the aid pieces were clipped with only a single biner. Often I had to pilfer loose biners off my rack/extendables until I got my re-supply from the tag line. I brought x3 liters of water for myself (not enough for me, 200pnds) and Dave brought x2 liters (enough for him, 160pnds). The route has good bolted anchors up to the top off the rotten block, thereafter there is one gear anchor and the last three anchors for us were from trees. We did the final 5.9 & 5.8 pitches in one 55m pitch, seemed like the best way to do it. Overall the route is a great line and can see why it is an obvious classic. Photos below and also a quick video I added to youtube: Me heading up the "Lithuanion Lip" Dave finishing up the sustained 5.8 - 6th Pitch Dave on the last 5.9/5.8 10th pitch. He finished the pitch at the tree you can barely see at the top of the main corner. Summit smiles! View of the peak from the road taken while walking back to vehicle.
-
[TR] Mount Habrich - Solar System 7/23/2016
HHinkkala replied to HHinkkala's topic in British Columbia/Canada
The road up to the parking area was pretty good, recently re-graveled in sections. There was also a Toyota matrix that drove all the way up, although they said they had to get some running starts on a few hills ... Thereafter it is gated so the rest of the road/trail has to be walked in. -
On Sat, July 23, Dave and I climbed Solar System on Habrich. Both of us have done Life on Earth so we wanted to try a different line. Since there is generally very little TR information on this route I wanted to provide as much information as I could. We used the other fellas TR on cascade for which his photos we also found helpful. http://cascadeclimbers.com/forum/ubbthreads.php/topics/1129687/TR_Mt_Habrich_Squamish_British Topo of the route: Green is Life on Earth Blue is Solar System Orignial hi-res photo can be downloaded from this link: Pitch 1 This pitch starts from a treed ramp, accessed prior to dropping down and around the wet/muddy corner as you head to Life on Earth. There are obvious cut branches, I believe some flagging and there is even an orange decal placed in a tree that you can only see if you are standing at the upper belay spot looking back down toward the approach trail. From here you travel up onto the rock and a bit right to where you see a vertical left facing dihedral above your position. This dihedral is very wide where it begins (looks kind of like a roof from below) and the crack eventually tapers down to a smaller crack. As you approach this crux roof (felt like 10a) there is a decent #1 C4 placement and then once at the roof/crack a #4 C4 fits well down deep. Continue up the crack, using some face holds on the right, until it diminishes and ends with a 15-20ft unprotected 5.7-5.8 slab, that you follow upward then at the end veer right to reach the bolted belay. This pitch is about 40m and seems to be 5.10a. Looking up the 1st pitch from the belay spot in the trees. Pitch 2 Begins with a three bolt aid ladder. To reach the third bolt from the second is the equivalent of high stepping in aiders. I'm 5'-11" and by standing in a 60cm sling with a knot in the middle I was just barely able to reach the hanger. This is where things begin to get exciting. The Alpine Select in its very brief descriptions says "3 bolts for aid lead to an obvious ramp". Well they forget to mention the +50ft between the aid bolt and the ramp, which is essentially run out 5.8-5.9 face climbing, since the gear is no good as will be described. From the 3 bolts you face climb up about 15ft and left to the next available piece of protection in a crack/flake. The problem is that the rock where the protection is available is straight garbage, friable granite. I placed two cams a few feet apart but did not put any trust in them. The other cascade TR mentions you can either get to the first piece of gear here and either go left or right. Right didn't look very appealing at the time but in hindsight it may have provided a more direct/shorter line to the "ramp" which is essentially a large leftward trending crack that is low 5th. After the two pieces of pro I moved about another 15ft up and left to where there is a very obvious three finger size pocket and a small crack right beside it. If I had had a #1 tri cam this may have fit into the flaring pocket, a cam would not fit. Instead I then placed a small nut, which when first set into place exploded the rock requiring a larger nut on the second attempt, and a yellow mastercam. Both marginal at best. From here you carry upward and rightward toward the ramp for 25+feet of 5.8-5.9 unprotectable face/flaring groove climbing. The last traversing move rightward toward the ramp revealed a thank God jug. Again not necessarily hard climbing just unnerving being above such terrible gear. The easy ramp then meanders up and left for another half a rope length until you get to a stance about 20feet back from a few trees, which you would walk into if you went to the very end of the ramp. Here I built a 4 piece belay in crumbly rock and belayed Dave off my harness. This pitch is closer to 50m, and I would grade it 5.8-5.9. Me clipping the rope into some gear above the 3rd bolt, about to head leftward Looking back down the ramp from the belay at base of the third pitch Pitch 3 Dave started up the next section and placed a cam in the friable hollow sounding flake 15ft above the belay. He then proceeded up and placed x2 more garbage cams above the dark looking hueco feature (a sign you are on route). From here he climbed up another 15-20ft of unprotectable 5.8-5.9 face climbing above x3 pieces that were certain to blow out. Above this there was a piece or two in actually good rock. Further above there is a vertical canoe shaped death block sitting on a ledge. Dave put a nut behind it but it was only psychological. I'm sure others have climbed over this piece many times but I bet a fall on say a cam placed behind that feature would break this rock apart. This pitches continues into the corner and ends at a semi awkward hanging style belay in the corner next to where the next pitch heads a bit right and then up the obvious groove/dihedral. Pitch 3, 40m 5.8-5.9. Dave running it out on the 3rd pitch. Note the dark hueco feature above the first piece of pro, as a feature to recognize that you are on route. Pitch 4 I didn't get great confidence from the belay here so I immediately placed two cams into the flaring crack just before surmounting the corner to get into the dihedral/groove. The next 30 meters for me seemed like the best quality climbing on the route with surprisingly good gear. You have to switch between jamming in the flaring crack, to sort of chimneying your way up, placing feet sometimes on the right wall with your back on the left. This part was enjoyable to be honest and somewhat physical as you slowly groveled upward. At the end I placed a half decent #1 C4 and veered right onto the face over some obvious chickenheads (fearful they would break off) and then ended on a narrow ledge/crack. Here I placed a okay nut higher up as a redirect and fired in three marginal cams in the crack above my feet. I then belayed directly off my harness and stood in a position to brace any potential fall. We had double ropes so one rope went up to the redirect while the other went straight to my harness. This pitch was about 30m and 10a. Looking up the base of the 4rth pitch, note the roof feature in the next two photos. Pitch 5 Dave came up and placed a few okay cams as he proceeded up to the overhang/dihedral. This is another crux of the route, not necessarily to climb, but to be able to view/reach your gear in and behind the deep overhung corner. Dave, with minimal visual ability placed the #4 in the flaring crack and did the short but challenging layback move to surmount the steep corner. From there you continue up the same crack and into easier terrain. Eventually you climb through a bush and to a large ledge. Dave could have belayed from here but instead continued up an obvious low 5th crack from the ledge that brought him to a tree belay. This made the pitch 60m with the 10a move down low at the overhang, becoming easier the higher you got. Dave making the final moves around the overhanging corner. Pitch 6 I scrambled quickly up to the last bolted anchor, albeit I went past it and then belayed from a tree. This pitch was 30m and was 4rth/low 5th. Thereafter we rapped down Life on Earth. Top of the route Stopping for a beer and burger at the Gondola is outstanding! Overall I cannot recommend this route to others in its current condition. The runouts on pitch 2 and 3 are in both our opinion R rated, and given that the rock at the gear belays at the top of pitch 2, 3 and 4 are marginal a leader fall could very possibly put these anchors in jeopardy if loaded, in my honest opinion. I certainly welcome comments from others who may disagree with my assessment and I also recognize that there are probably other climbers who have felt this route was well within their comfort zone. Life on Earth is remarkably better for both its rock quality and available protection. There also wasn't much info on what gear to bring. We brought a double rack of cams from blue mastercam to #3 C4, a #4 C4 that was used on half the pitches, and a small set of nuts. We also had 70m half ropes (don't need 70s). We basically used all of the gear we brought at some point on the climb. We drove up the backside and pushed our bikes up. Riding down is simply fantastic and saves so much time. Either way I'm still glad I did this route once but I wouldn't go back to climb it unless there are bolted anchors and some additional bolts on the run out sections. Cheers, Henrik
-
[TR] Mount Adams - South Spur 5/30/2016
HHinkkala replied to HHinkkala's topic in Southern WA Cascades
Hey Ian, thanks for the photo and it was nice to meet you at the top. Cheers! -
[TR] Mount Adams - South Spur 5/30/2016
HHinkkala replied to HHinkkala's topic in Southern WA Cascades
That is correct, it was a short hike in running shoes before putting on the skies. -
[TR] Mount Adams - South Spur 5/30/2016
HHinkkala replied to HHinkkala's topic in Southern WA Cascades
Yes you are able to drive all the way to the cold springs trailhead. The hike was about 20 minutes to reach the snowline from the parking area. -
Trip: Mount Adams - South Spur Date: 5/29/2016 Trip Report: My brother and I decided to do a late spring daytrip ski on Mount Adams since neither of us had been there before. We drove down in the rain from BC Saturday morning and camped at the cold springs campground. Forgot it was memorial weekend so tons of traffic on the roads and on the mountain, much more then I'm used to... We left camp at 3:30am, summit at 10:30am back at car at 12:30pm. Ferocious wind at the summit, was afraid my skies would blow away as I was trying to step in...Top half of pikers peak slope was bullet proof snow/ice, lower portion down to the trail head was glorious corn. Considering it was so windy and cold near the top I'm not certain a later start would have made a difference to soften the snow up high. We had to walk around 20minutes on trail before reaching the snowline. After getting back to the vehicle we tried to take a shortcut by driving through NF-23 Gifford Pinchot Road to Randle, then to Seattle...turns out the road is completely washed out about 23miles in so we had to drive all the way back...Other then that it was a good trip. Pikers Peak long slope Windy and cold summit