Hunter Lee
-
Posts
19 -
Joined
-
Last visited
-
Days Won
2
Content Type
Profiles
Forums
Events
Everything posted by Hunter Lee
-
[TR] Shuksan, Icy, Ruth - Nooksack Traverse 03/01/2019
Hunter Lee replied to geosean's topic in North Cascades
Epic trip! Thanks for sharing...snow pro is sooooo subjective, ice and rock and a lot easier to evaluate. -
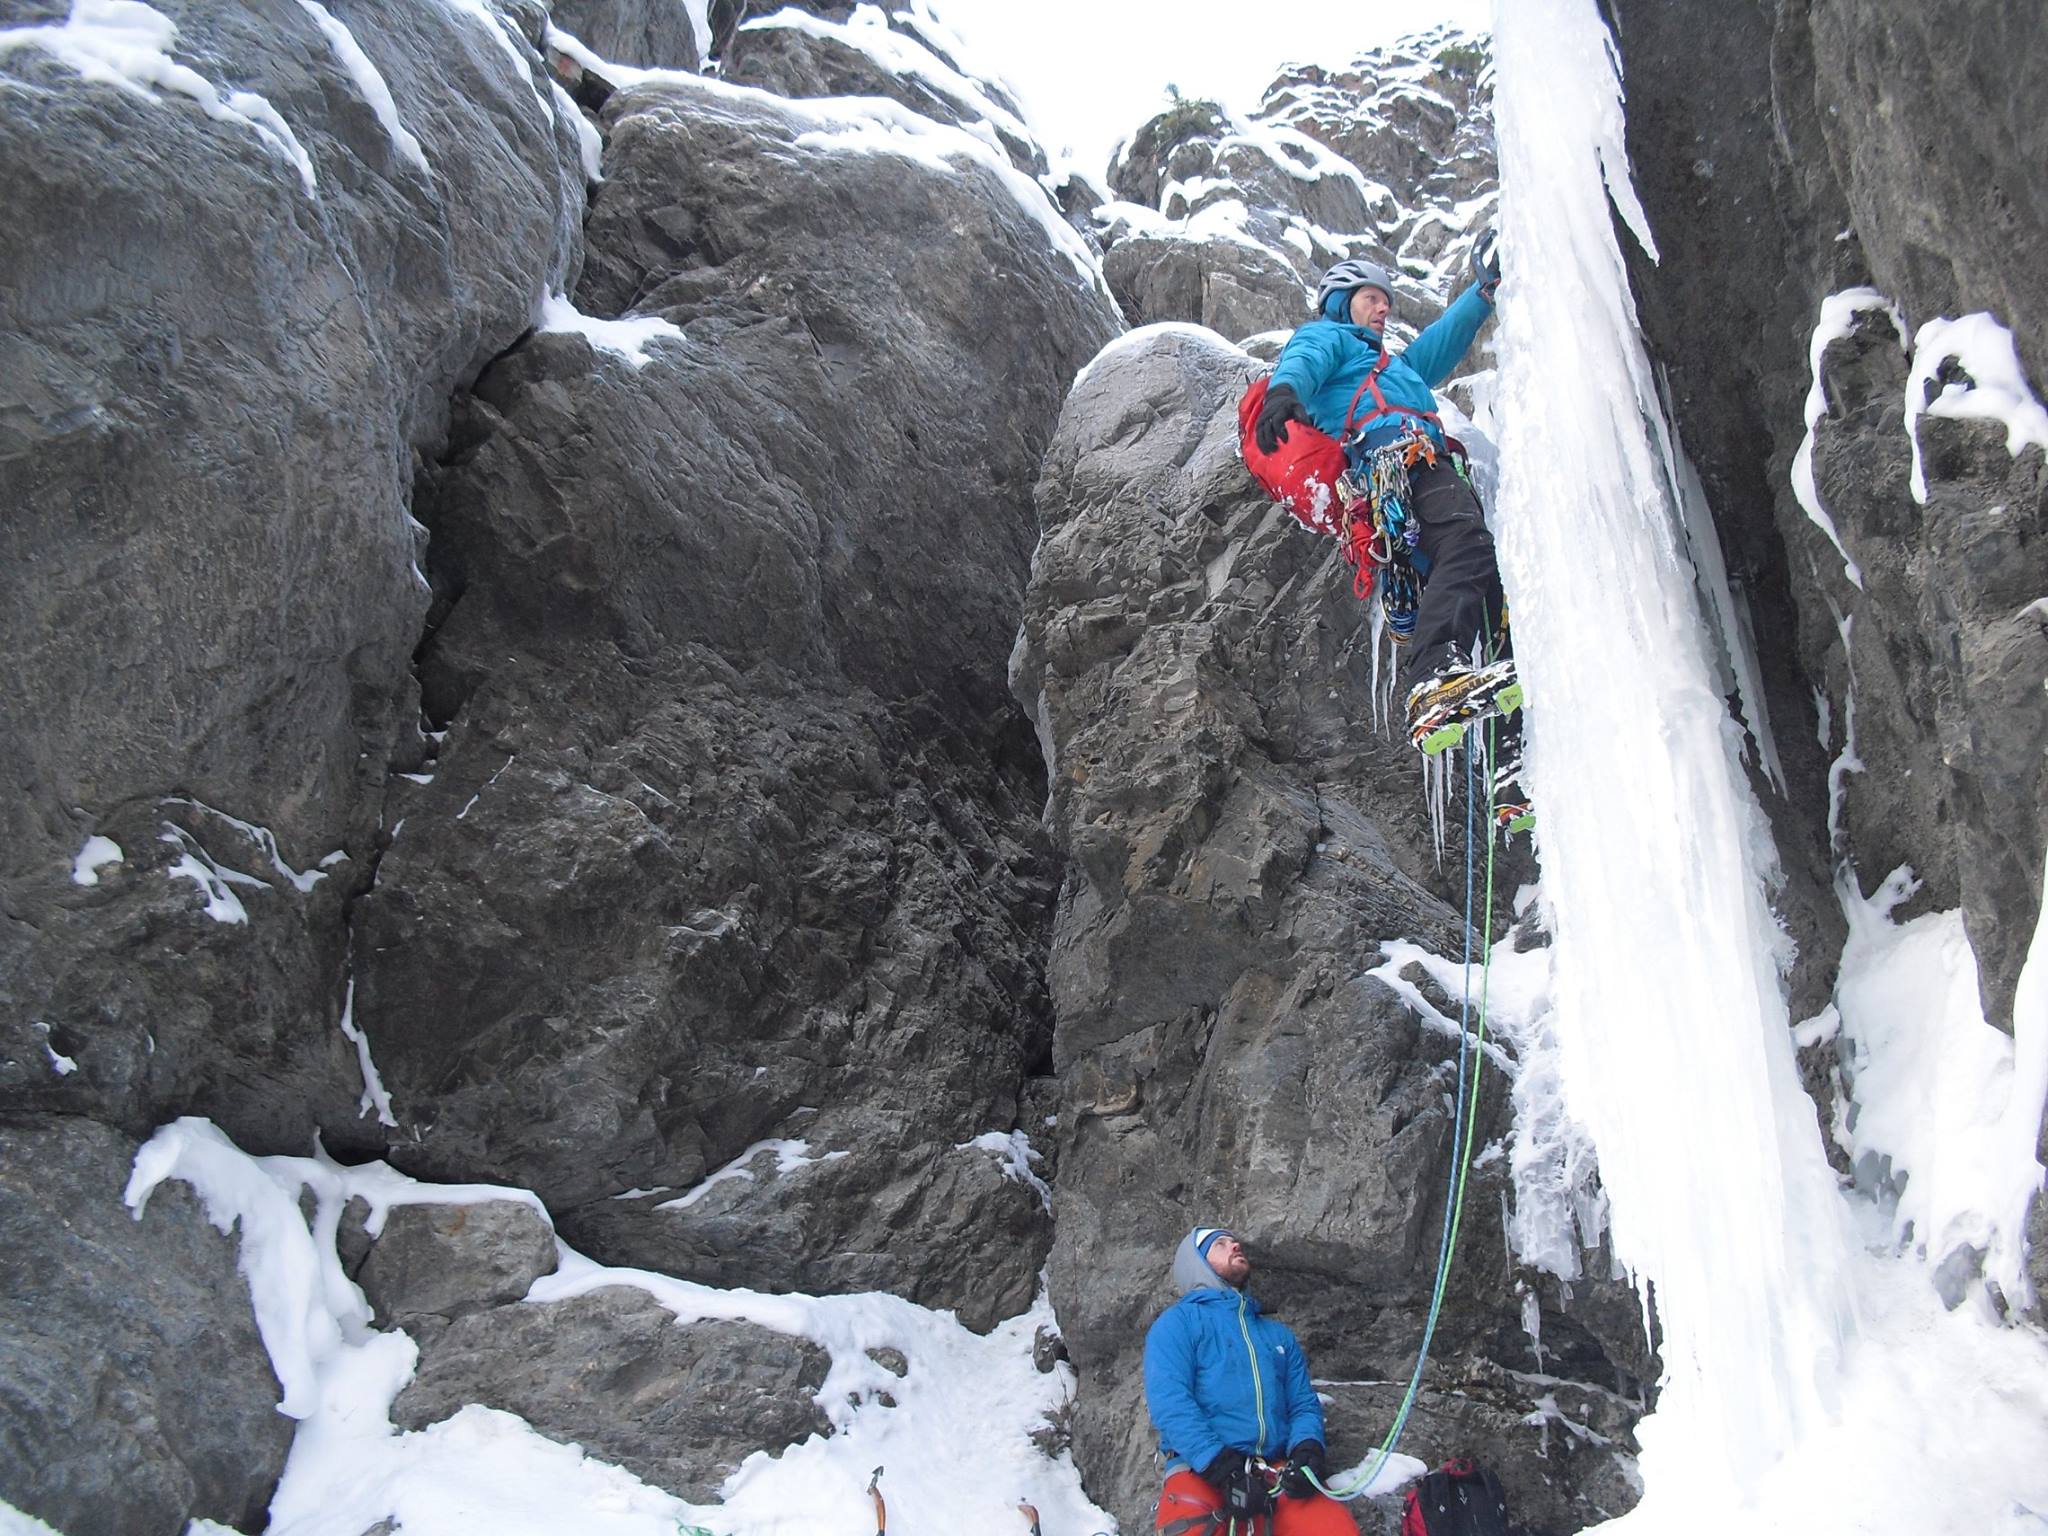
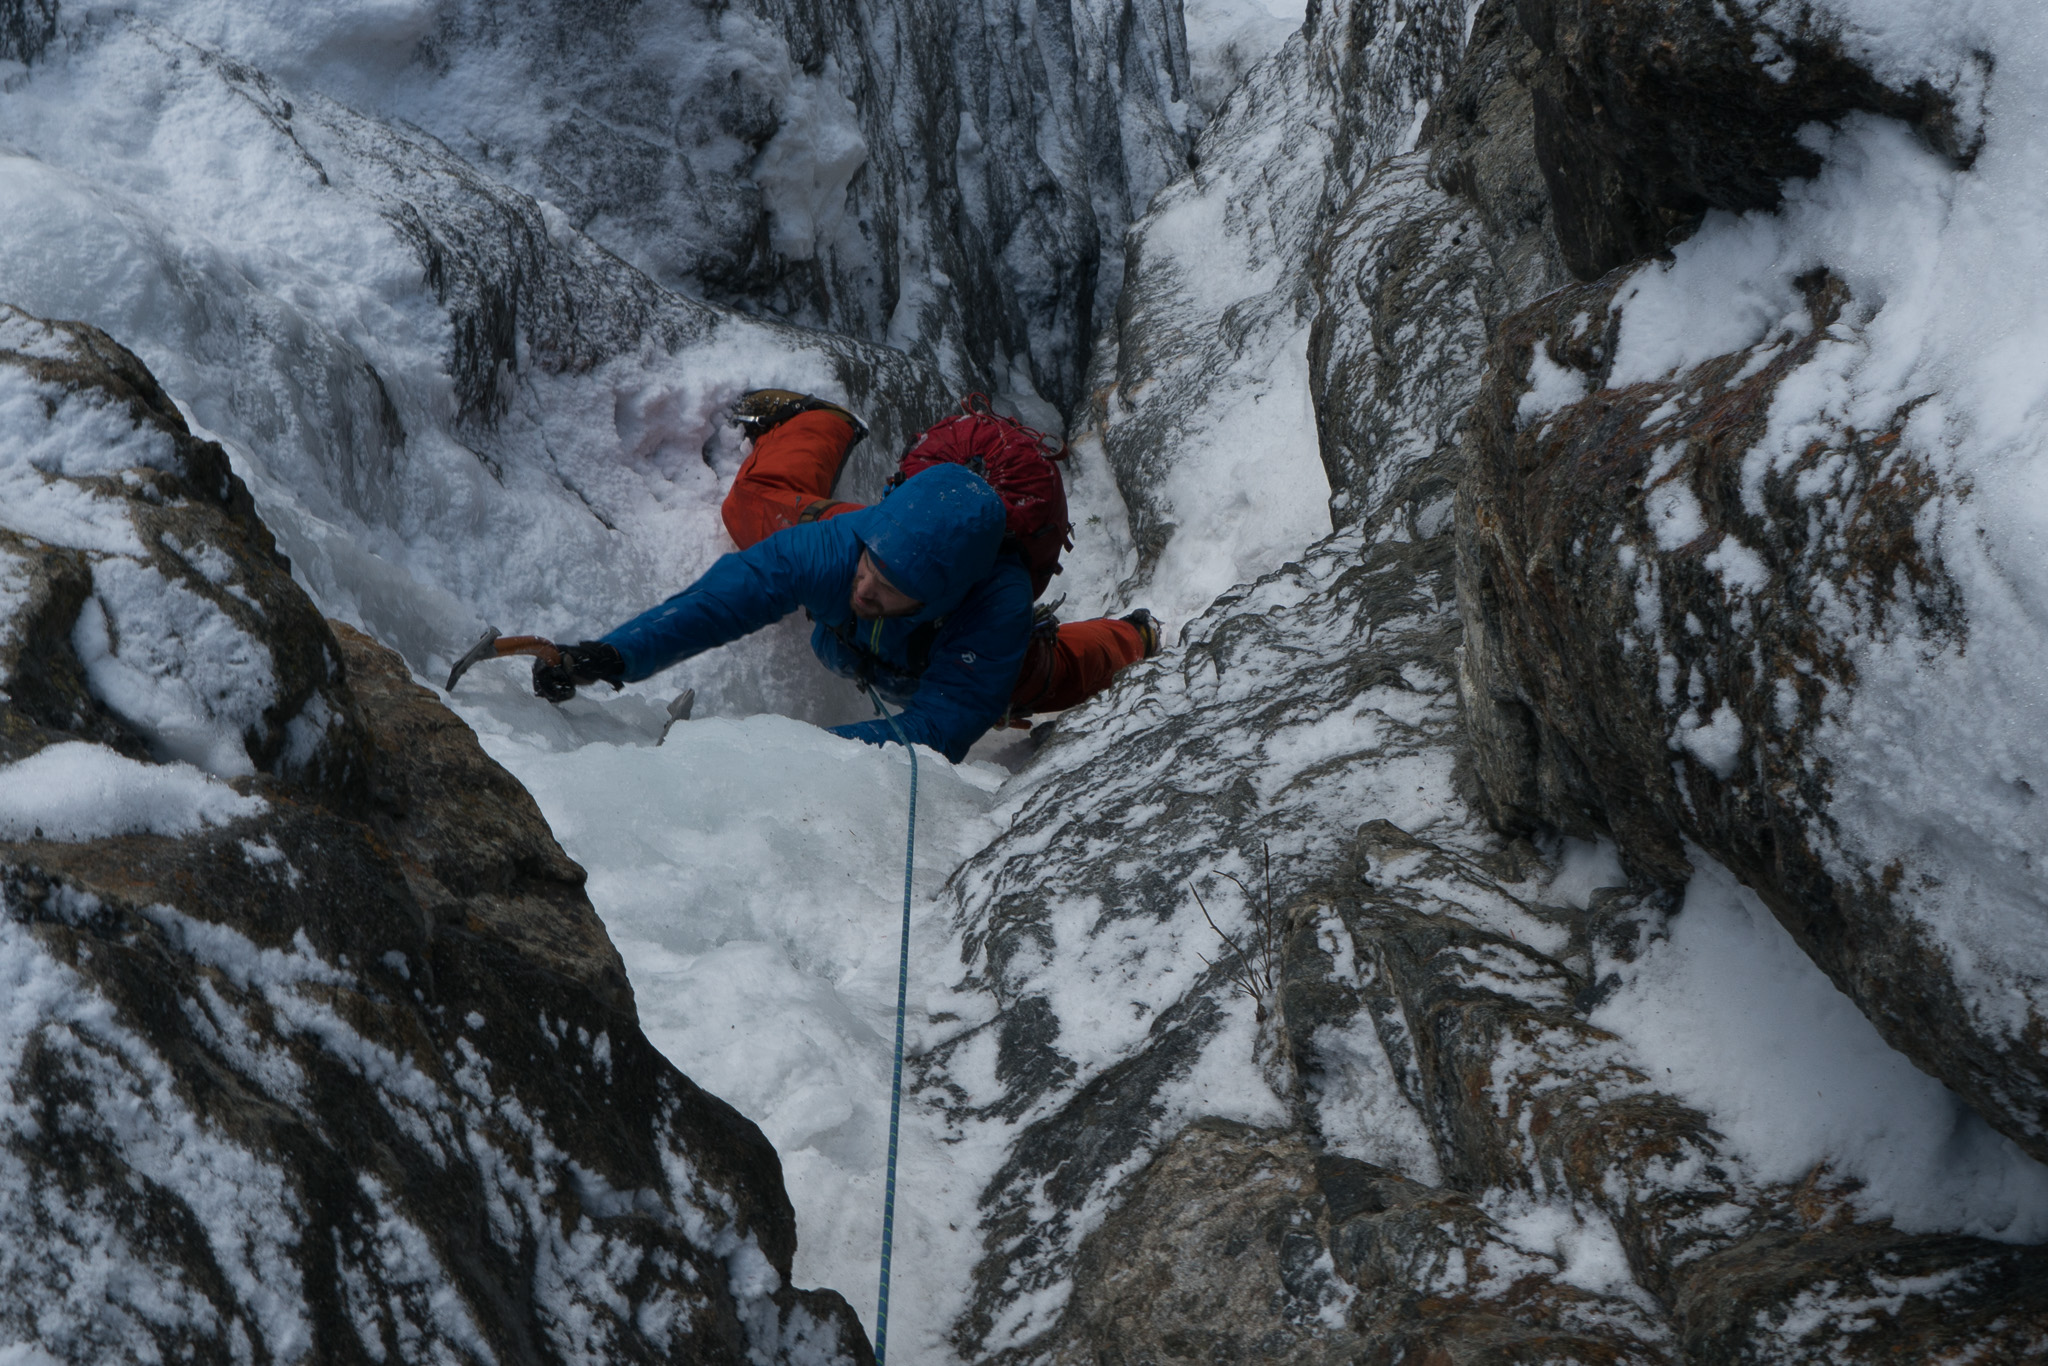
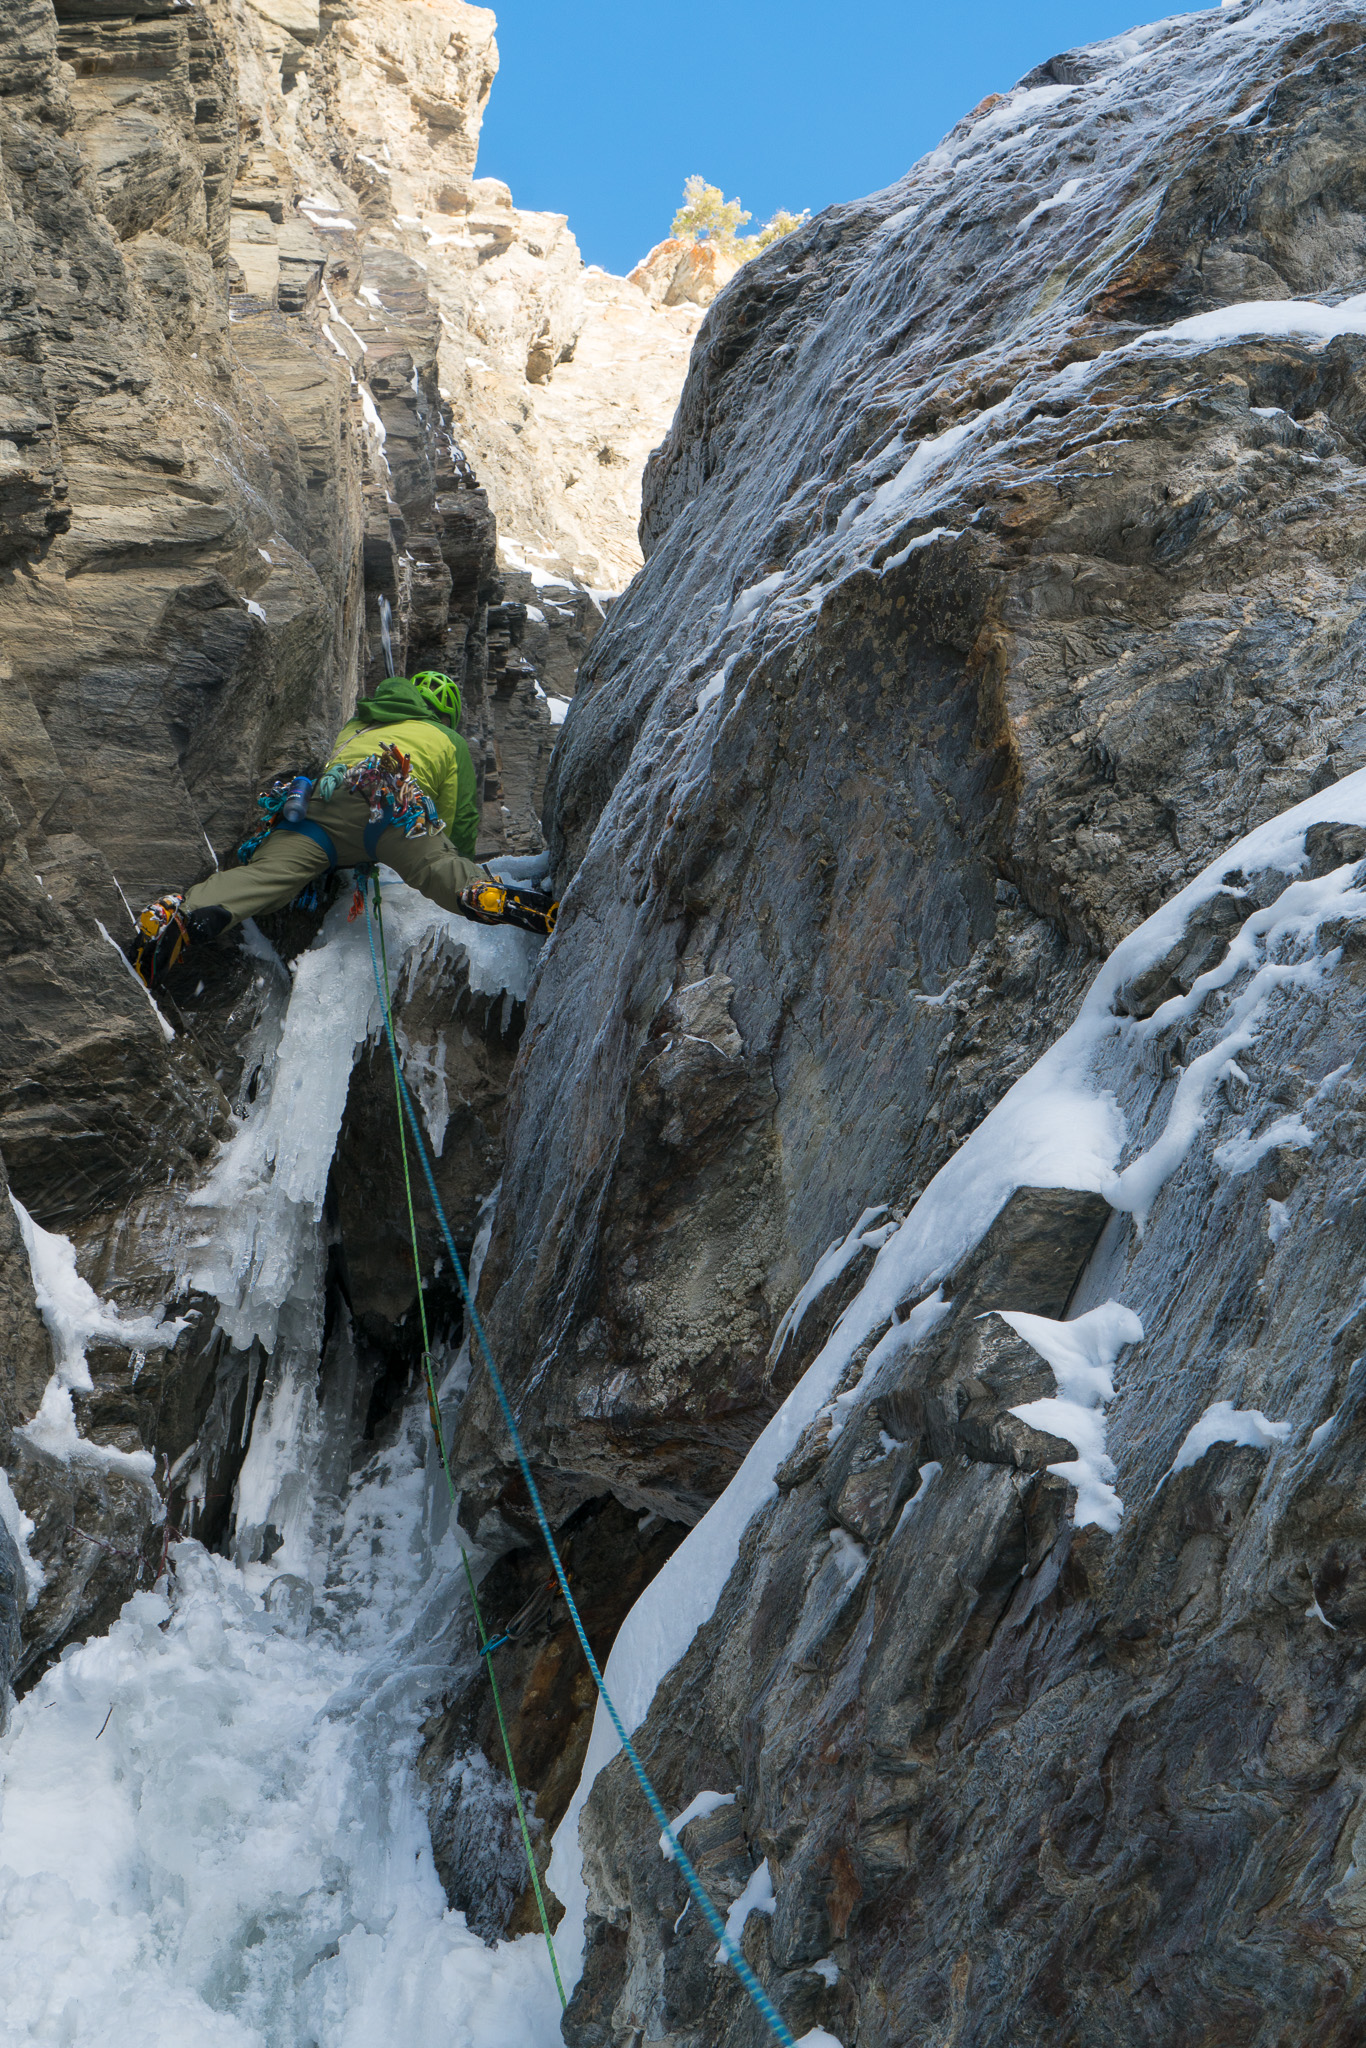
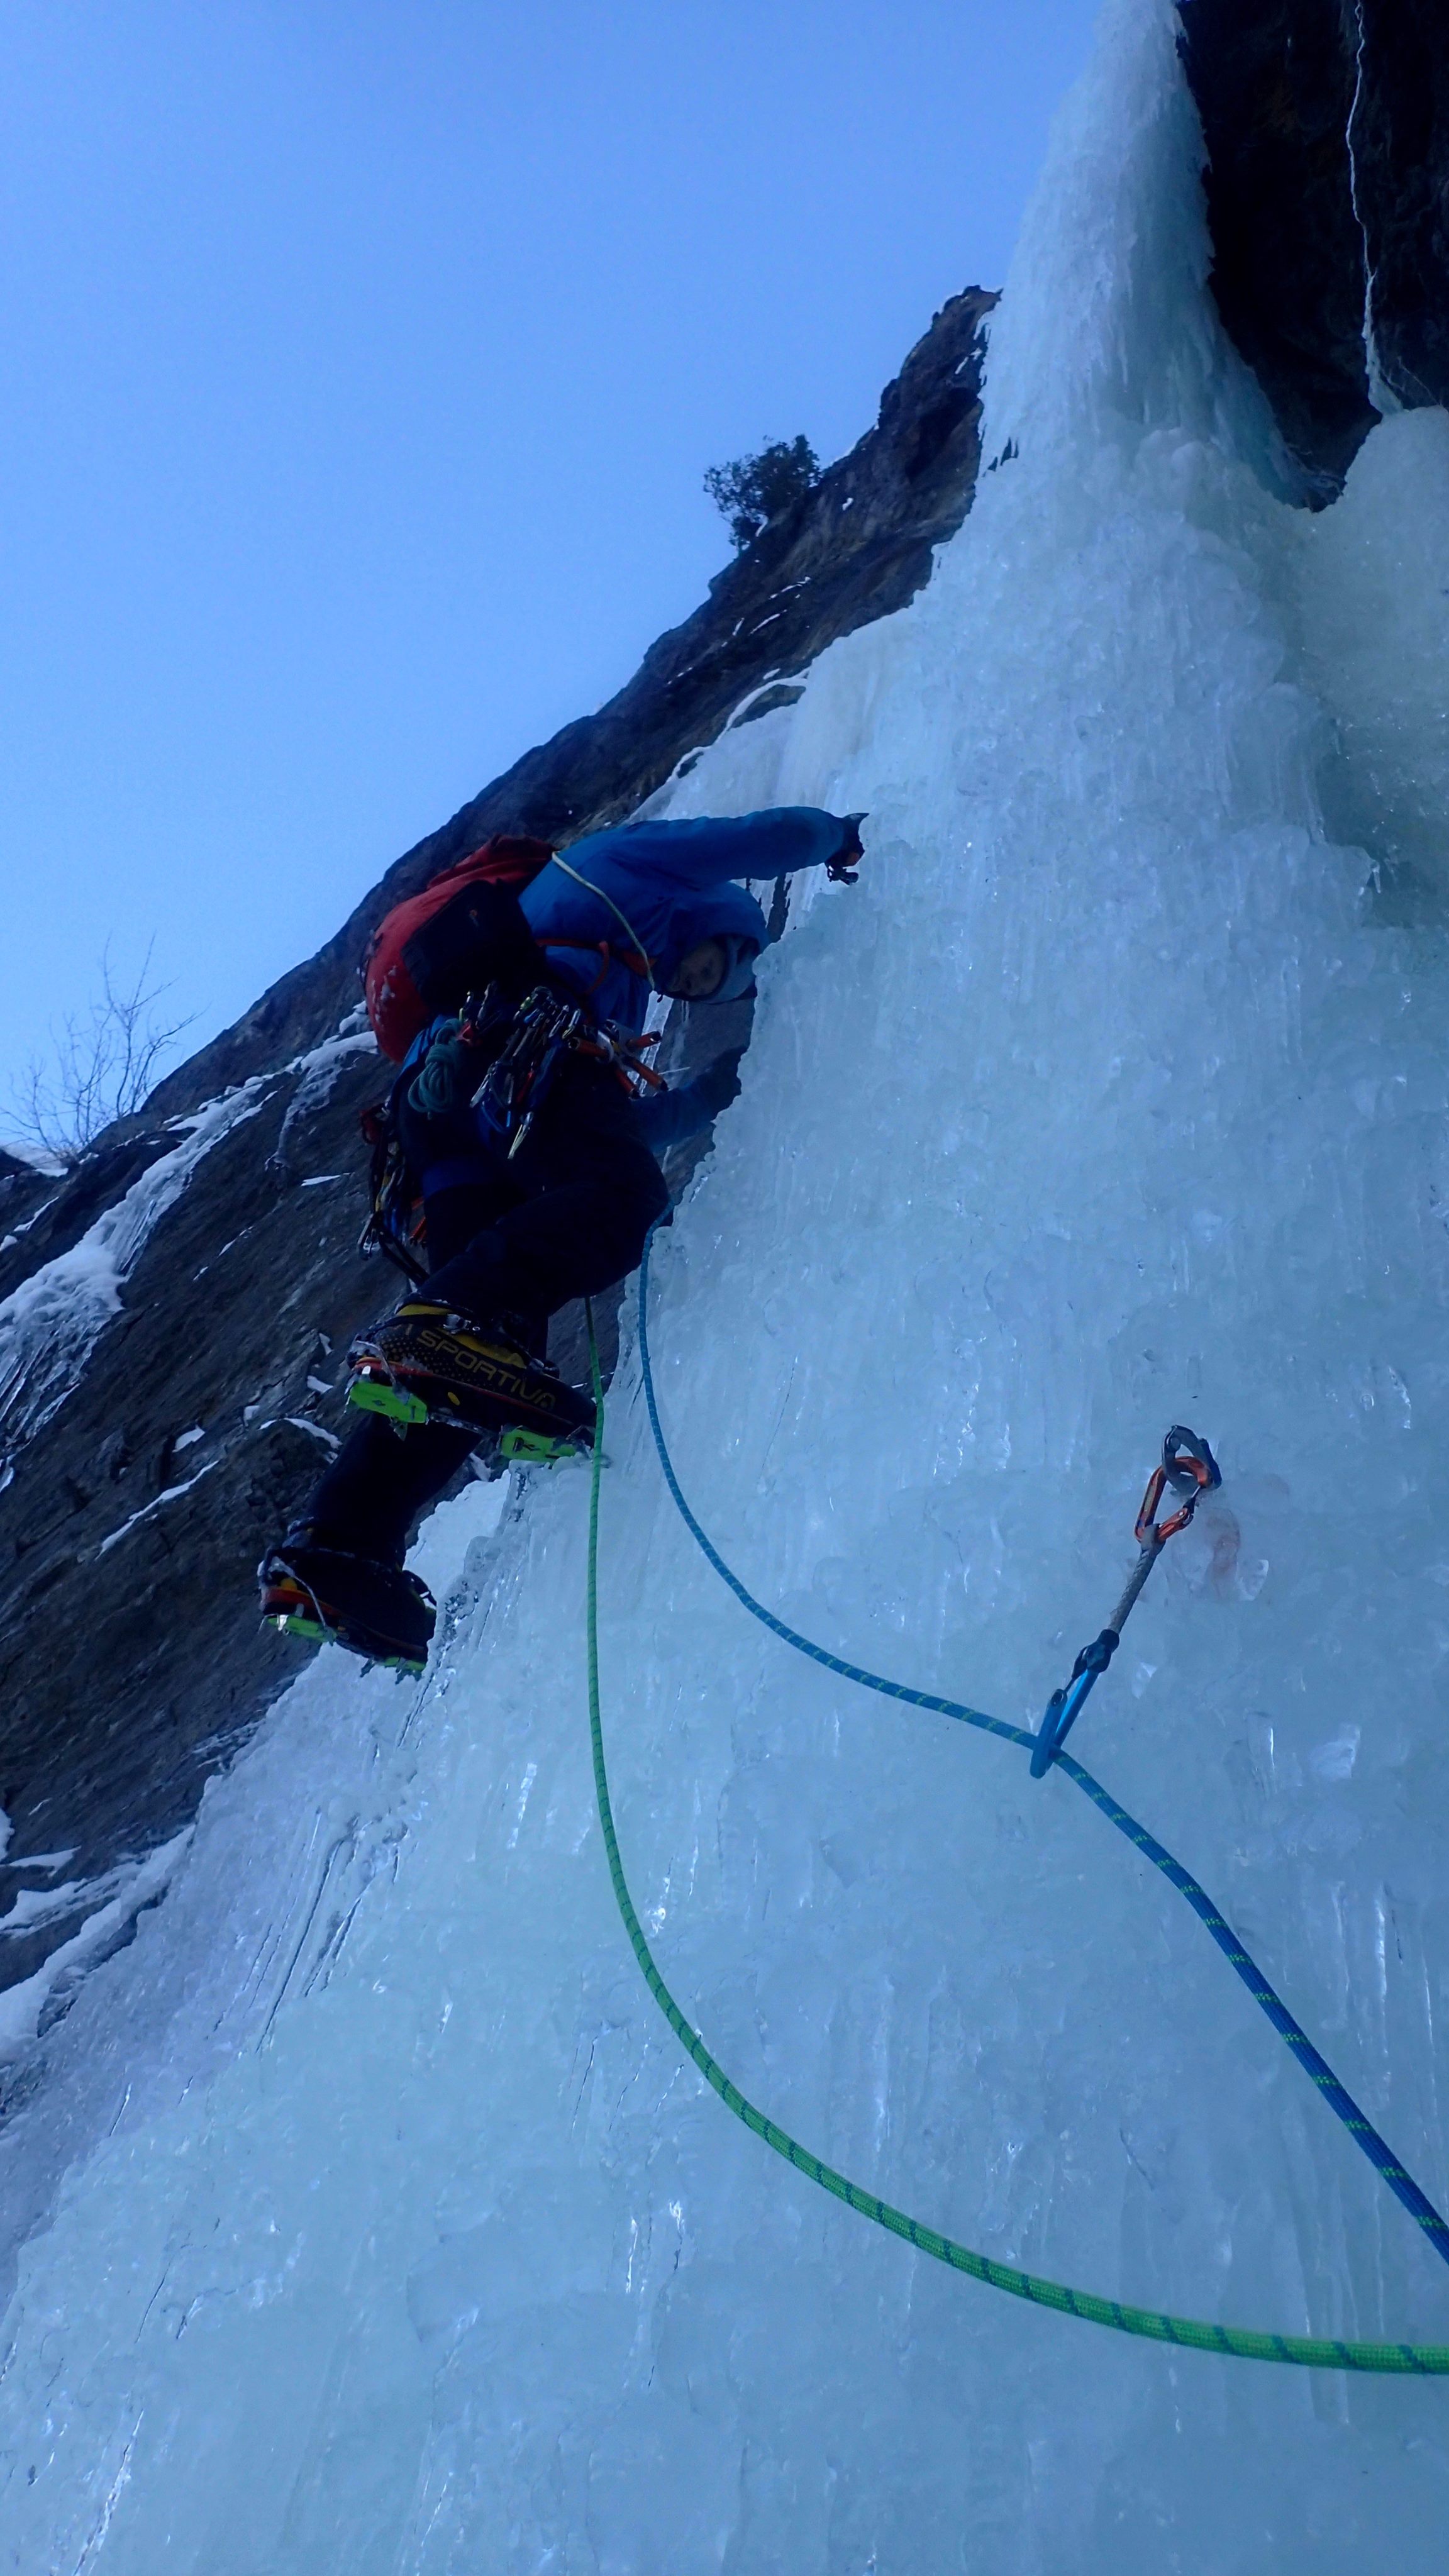
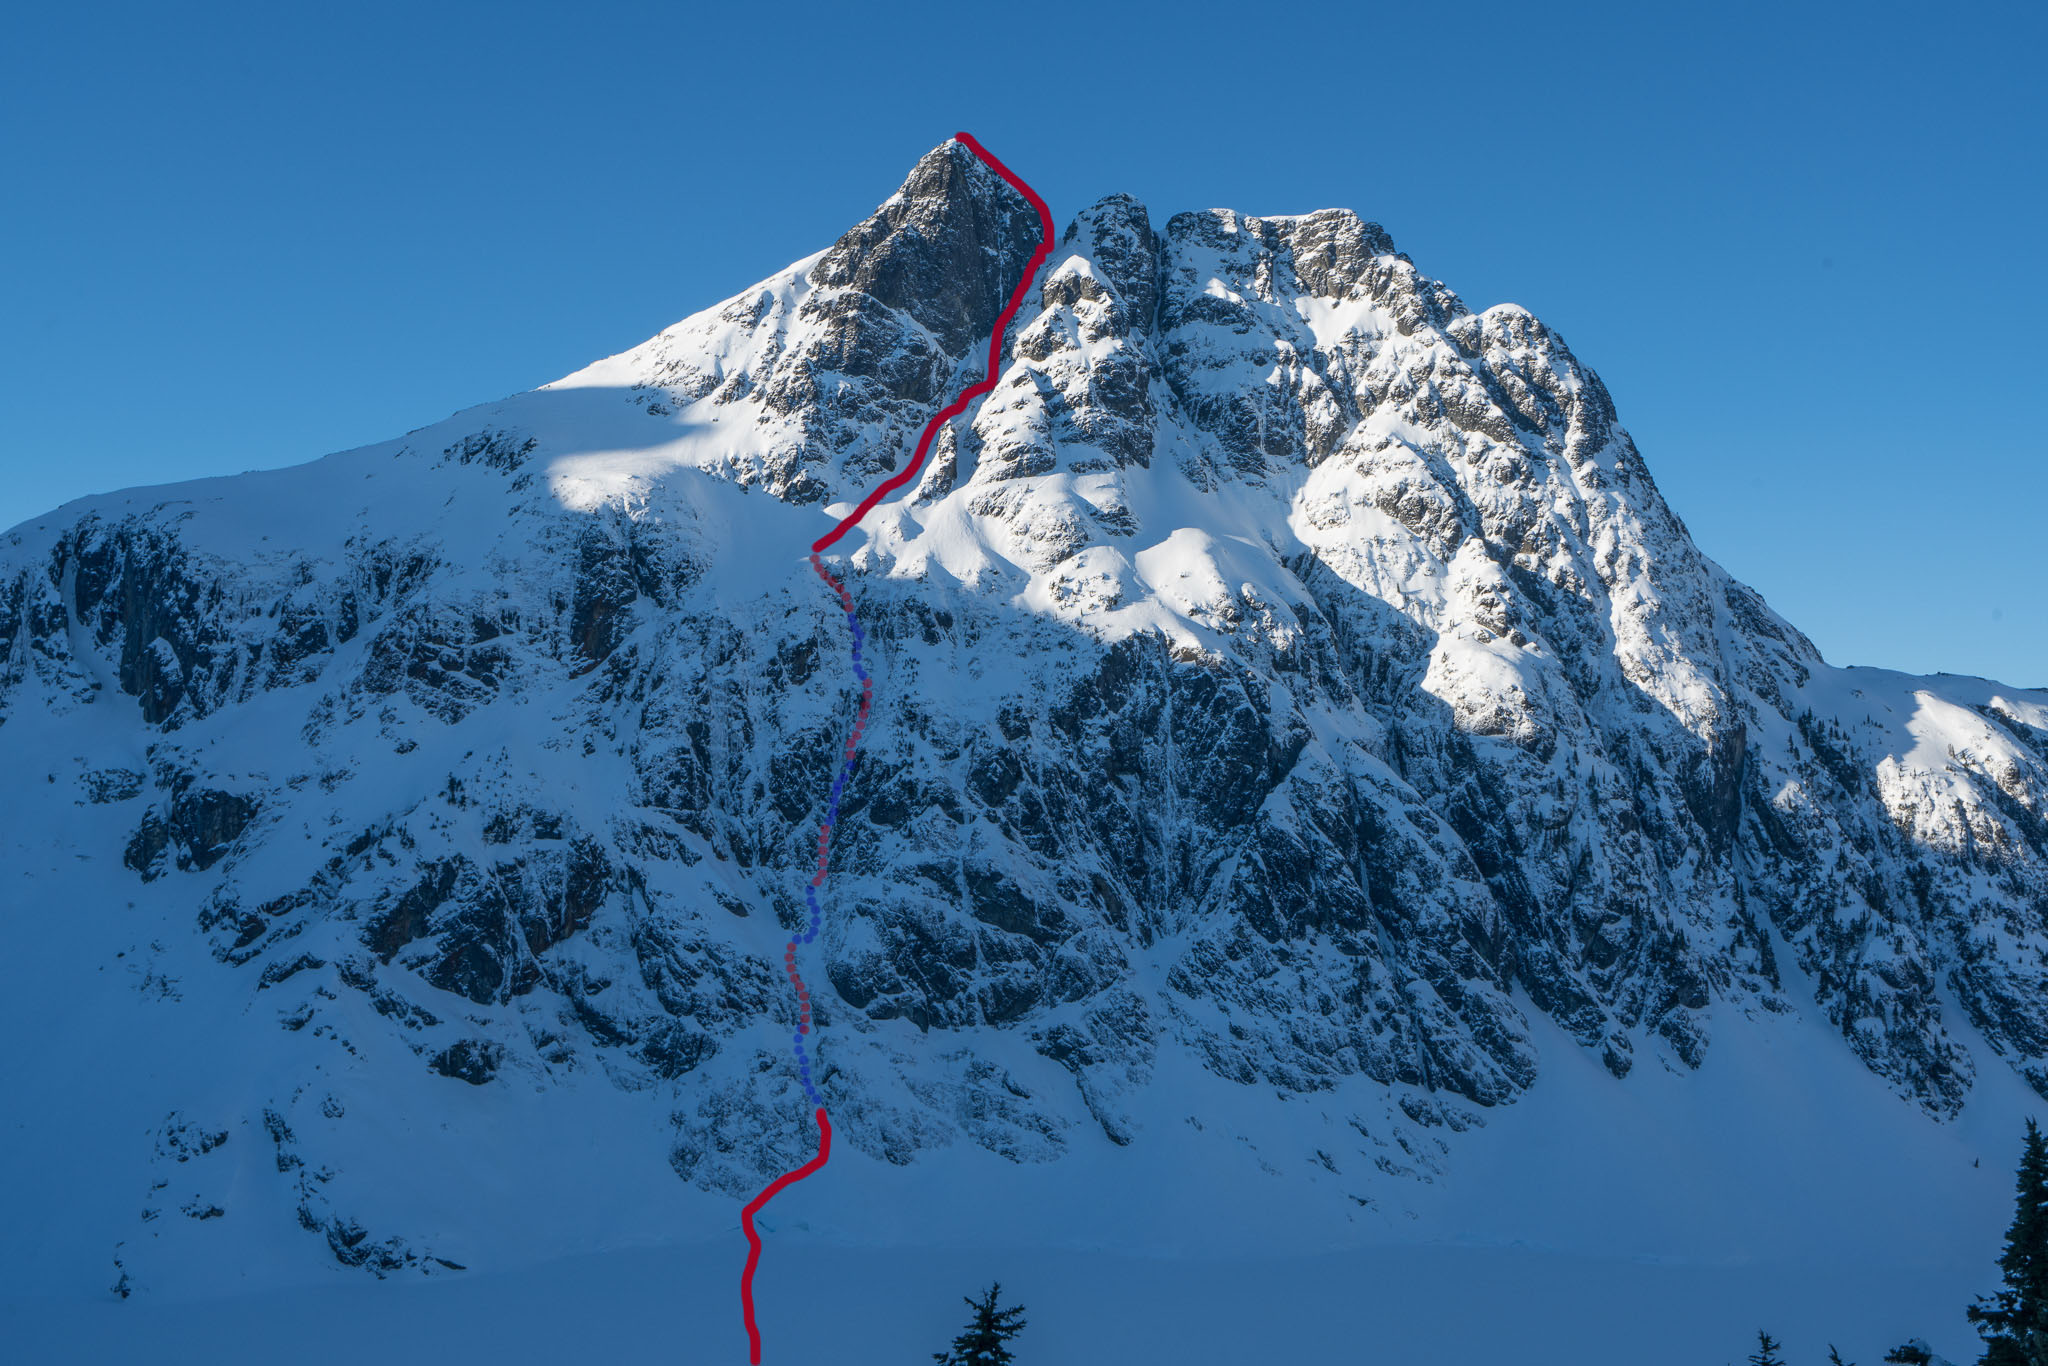
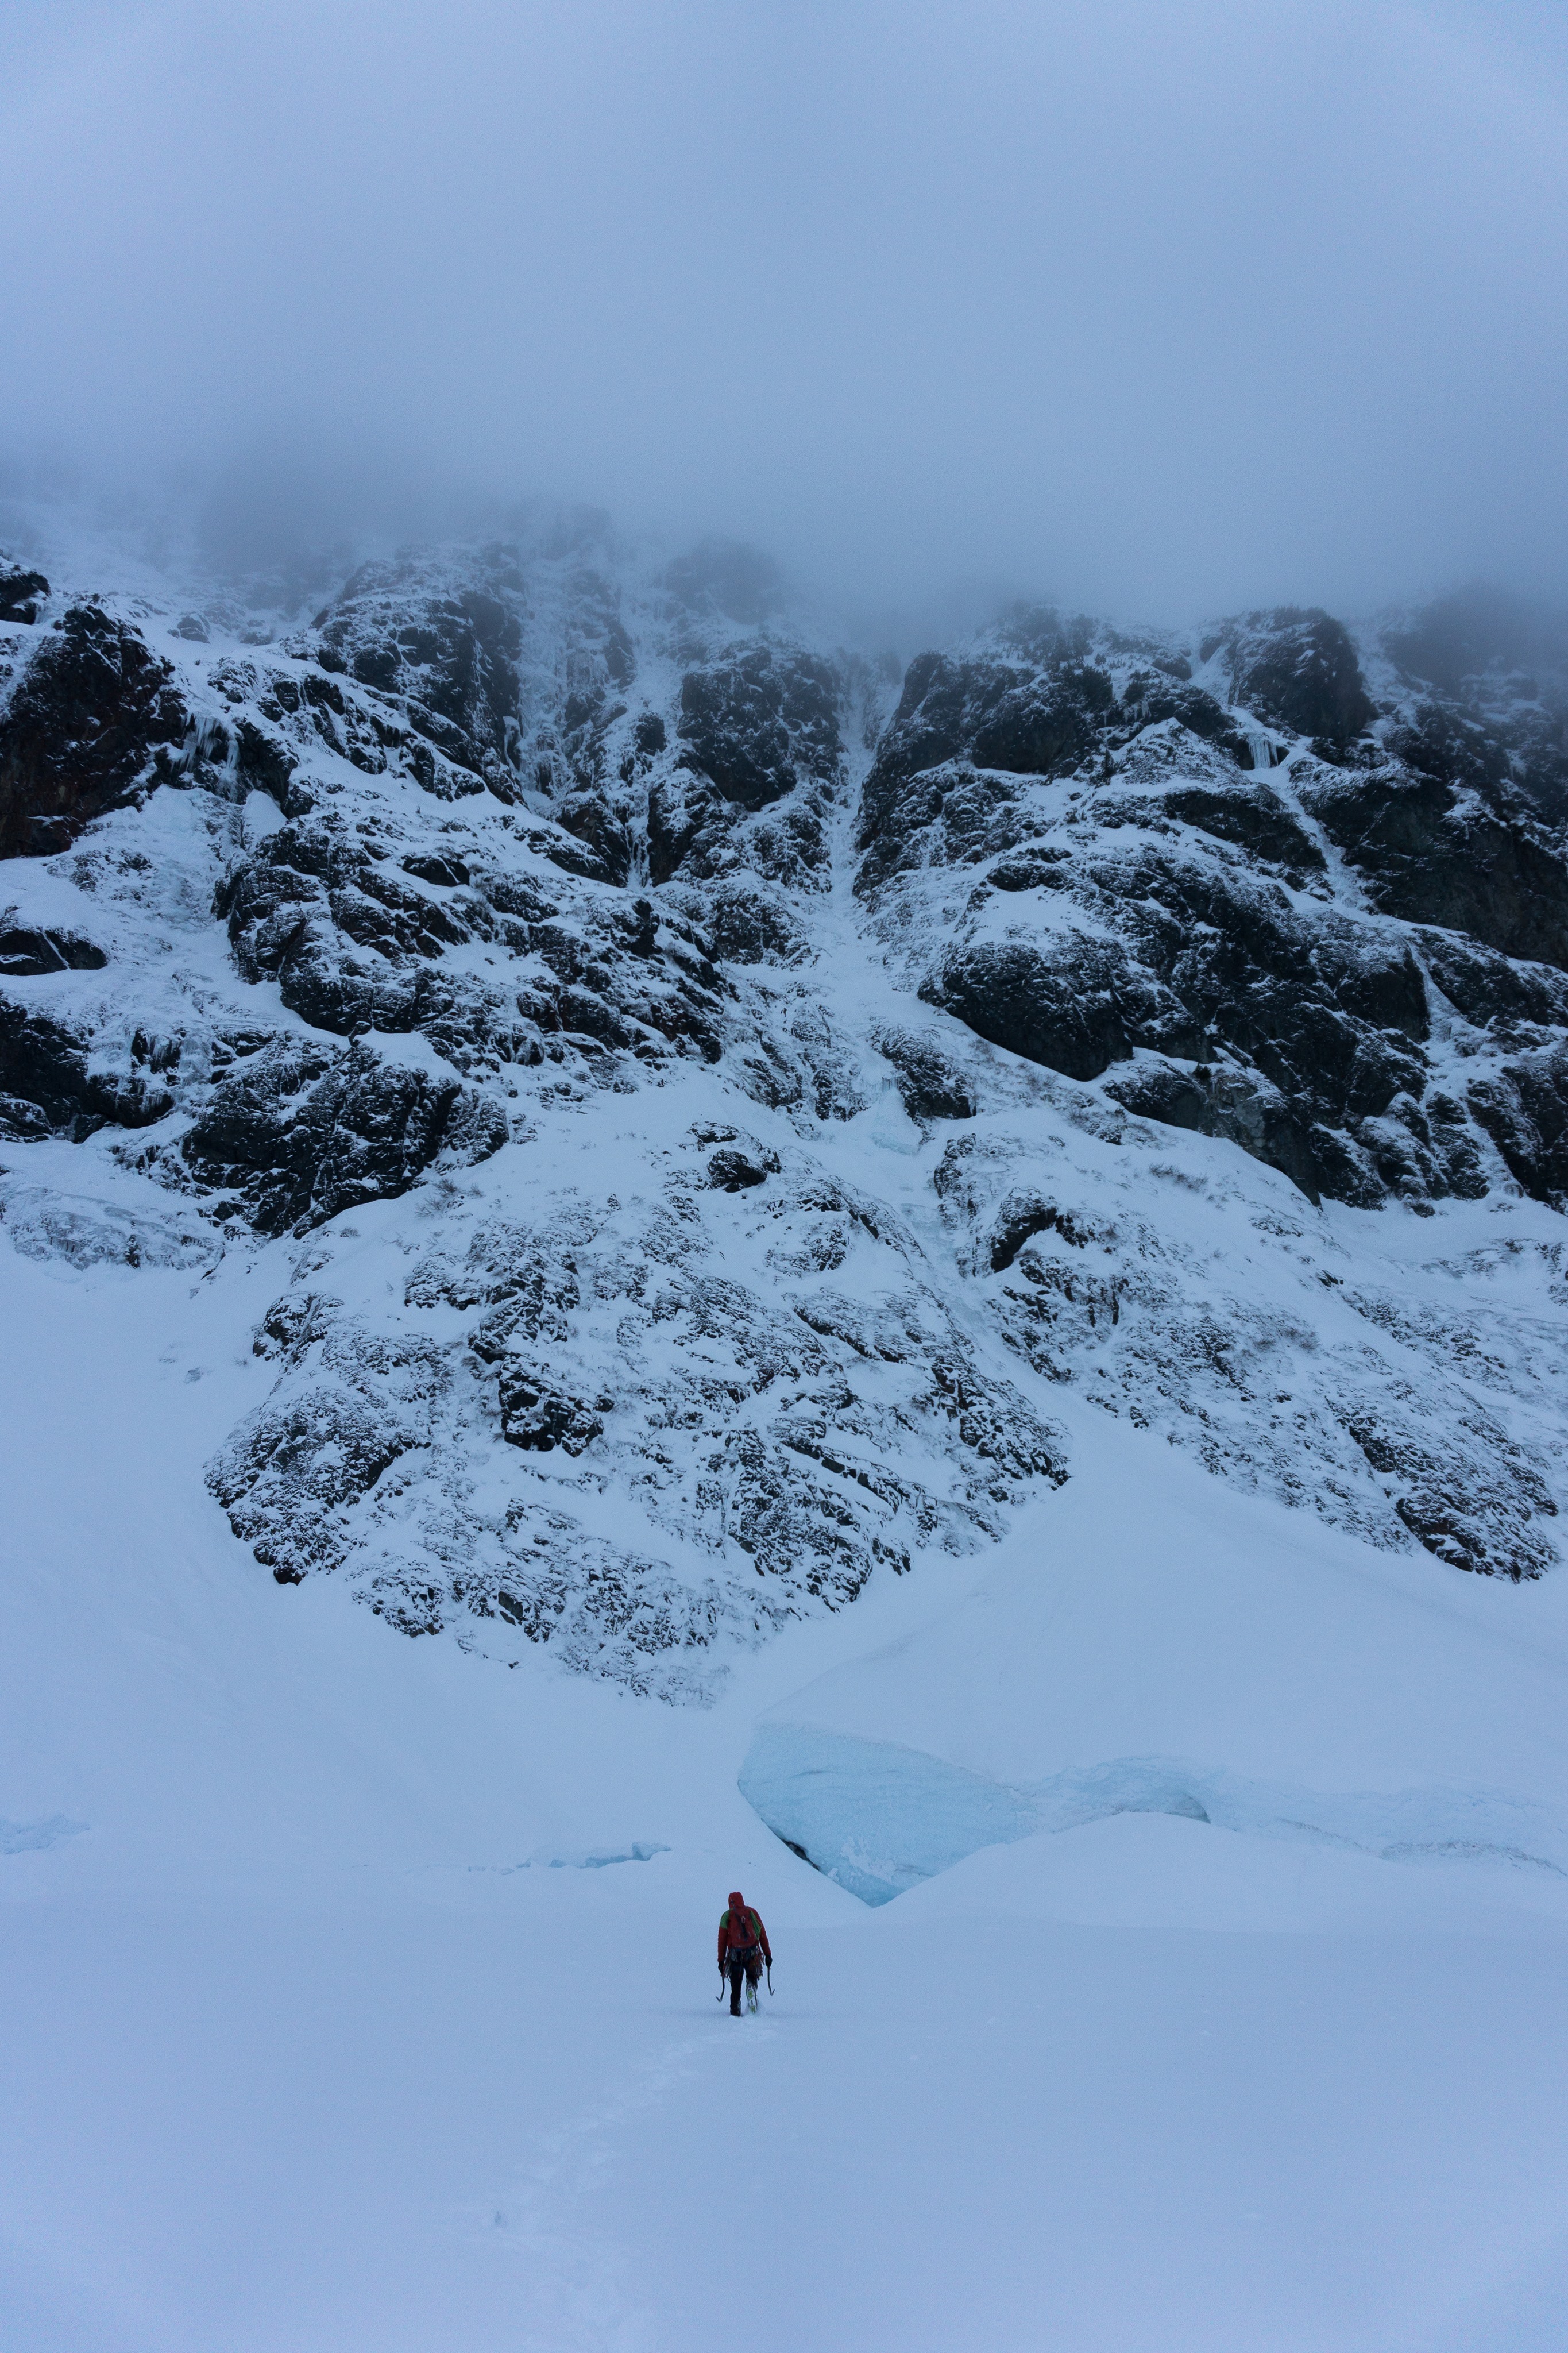
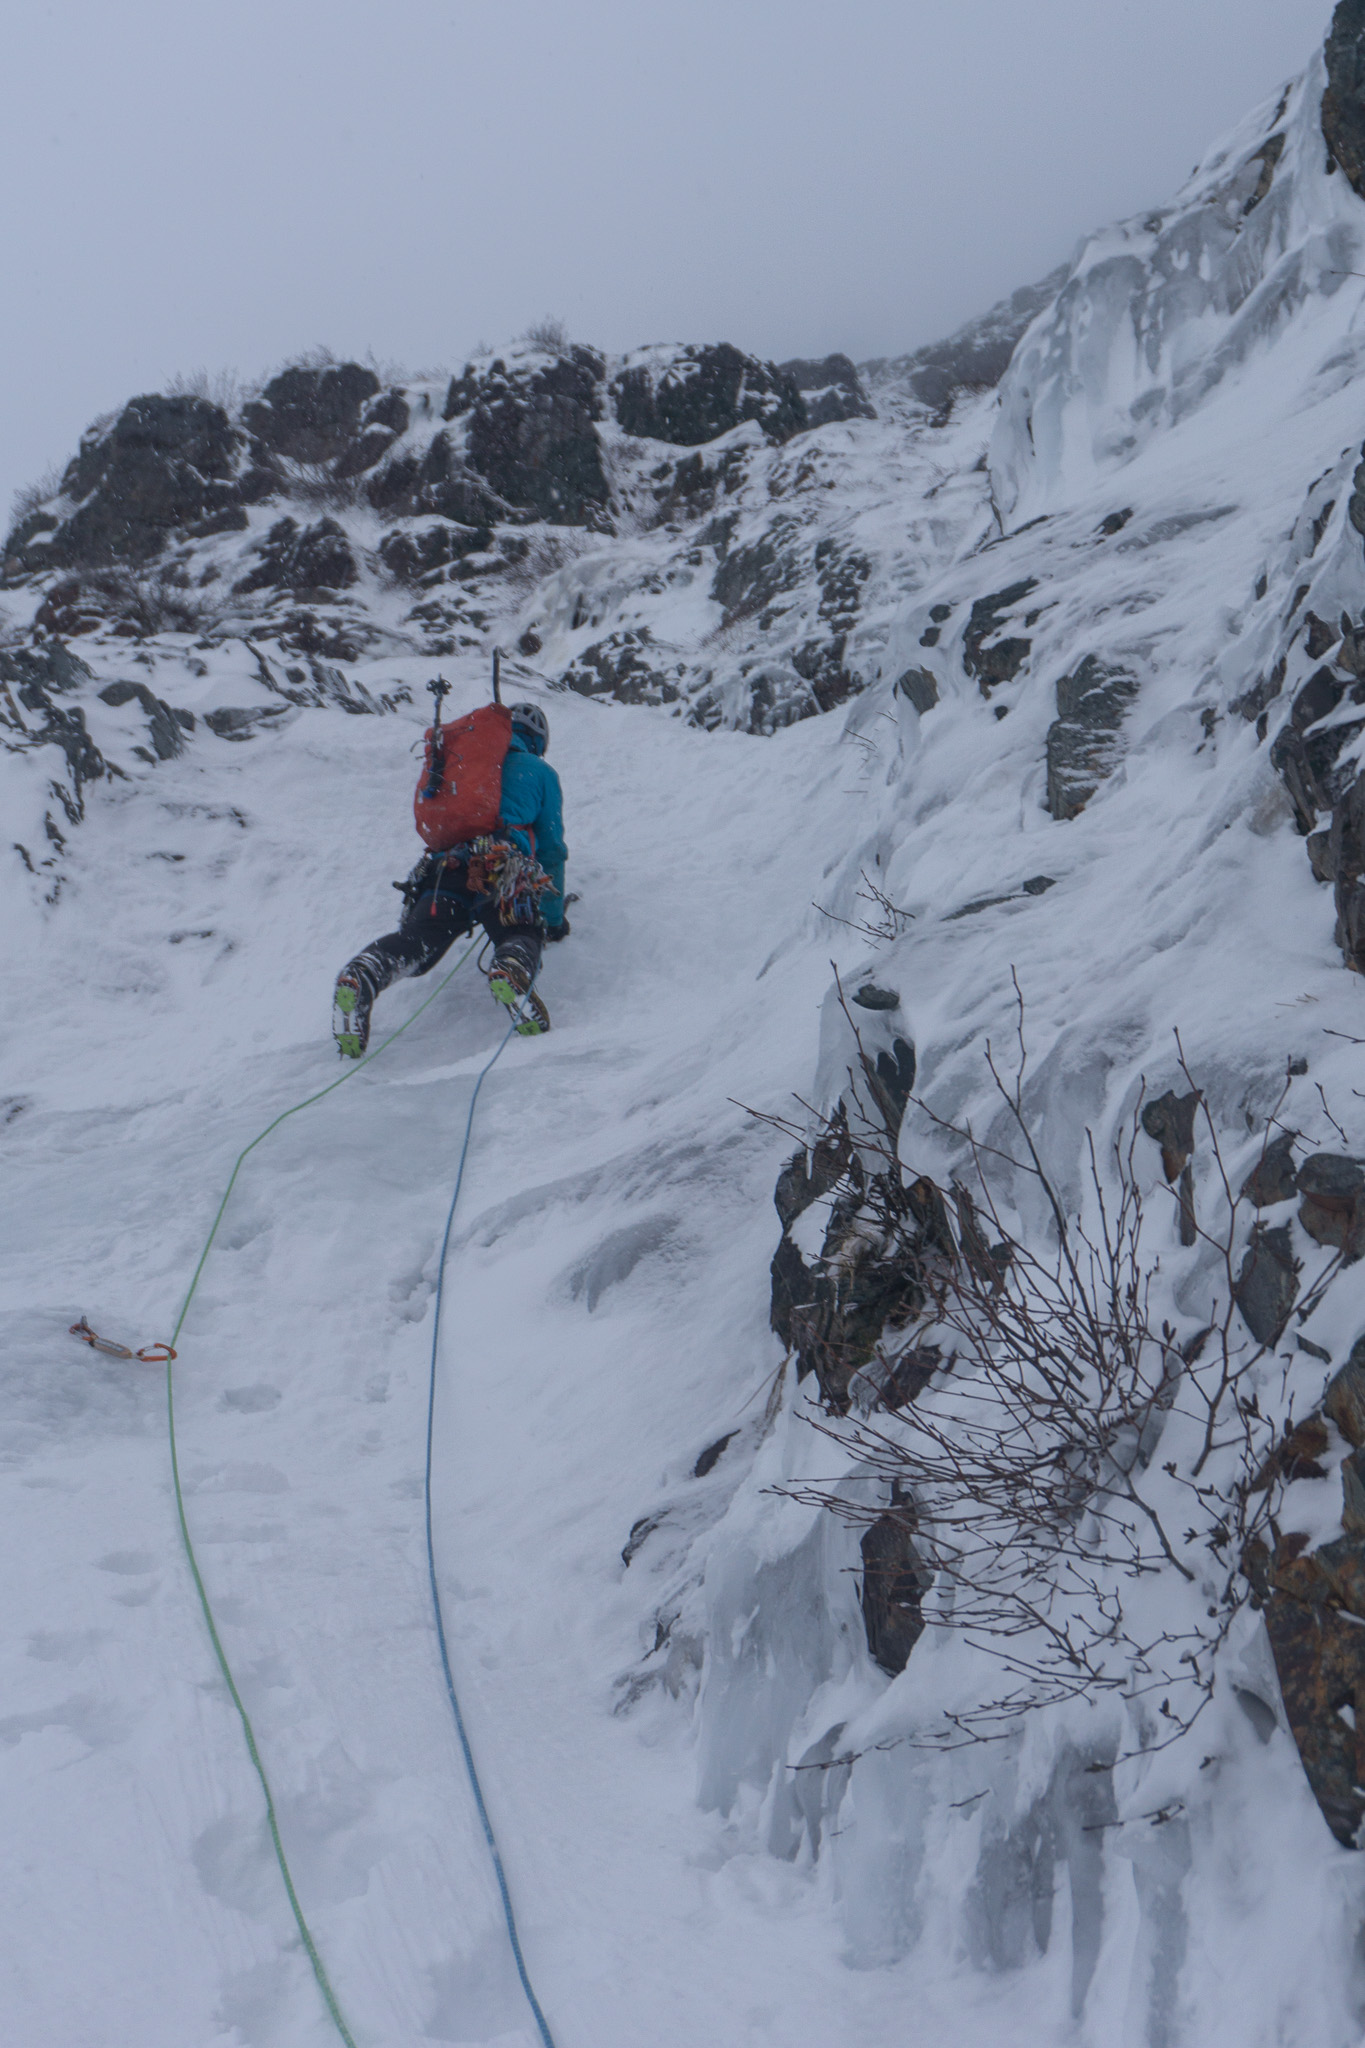
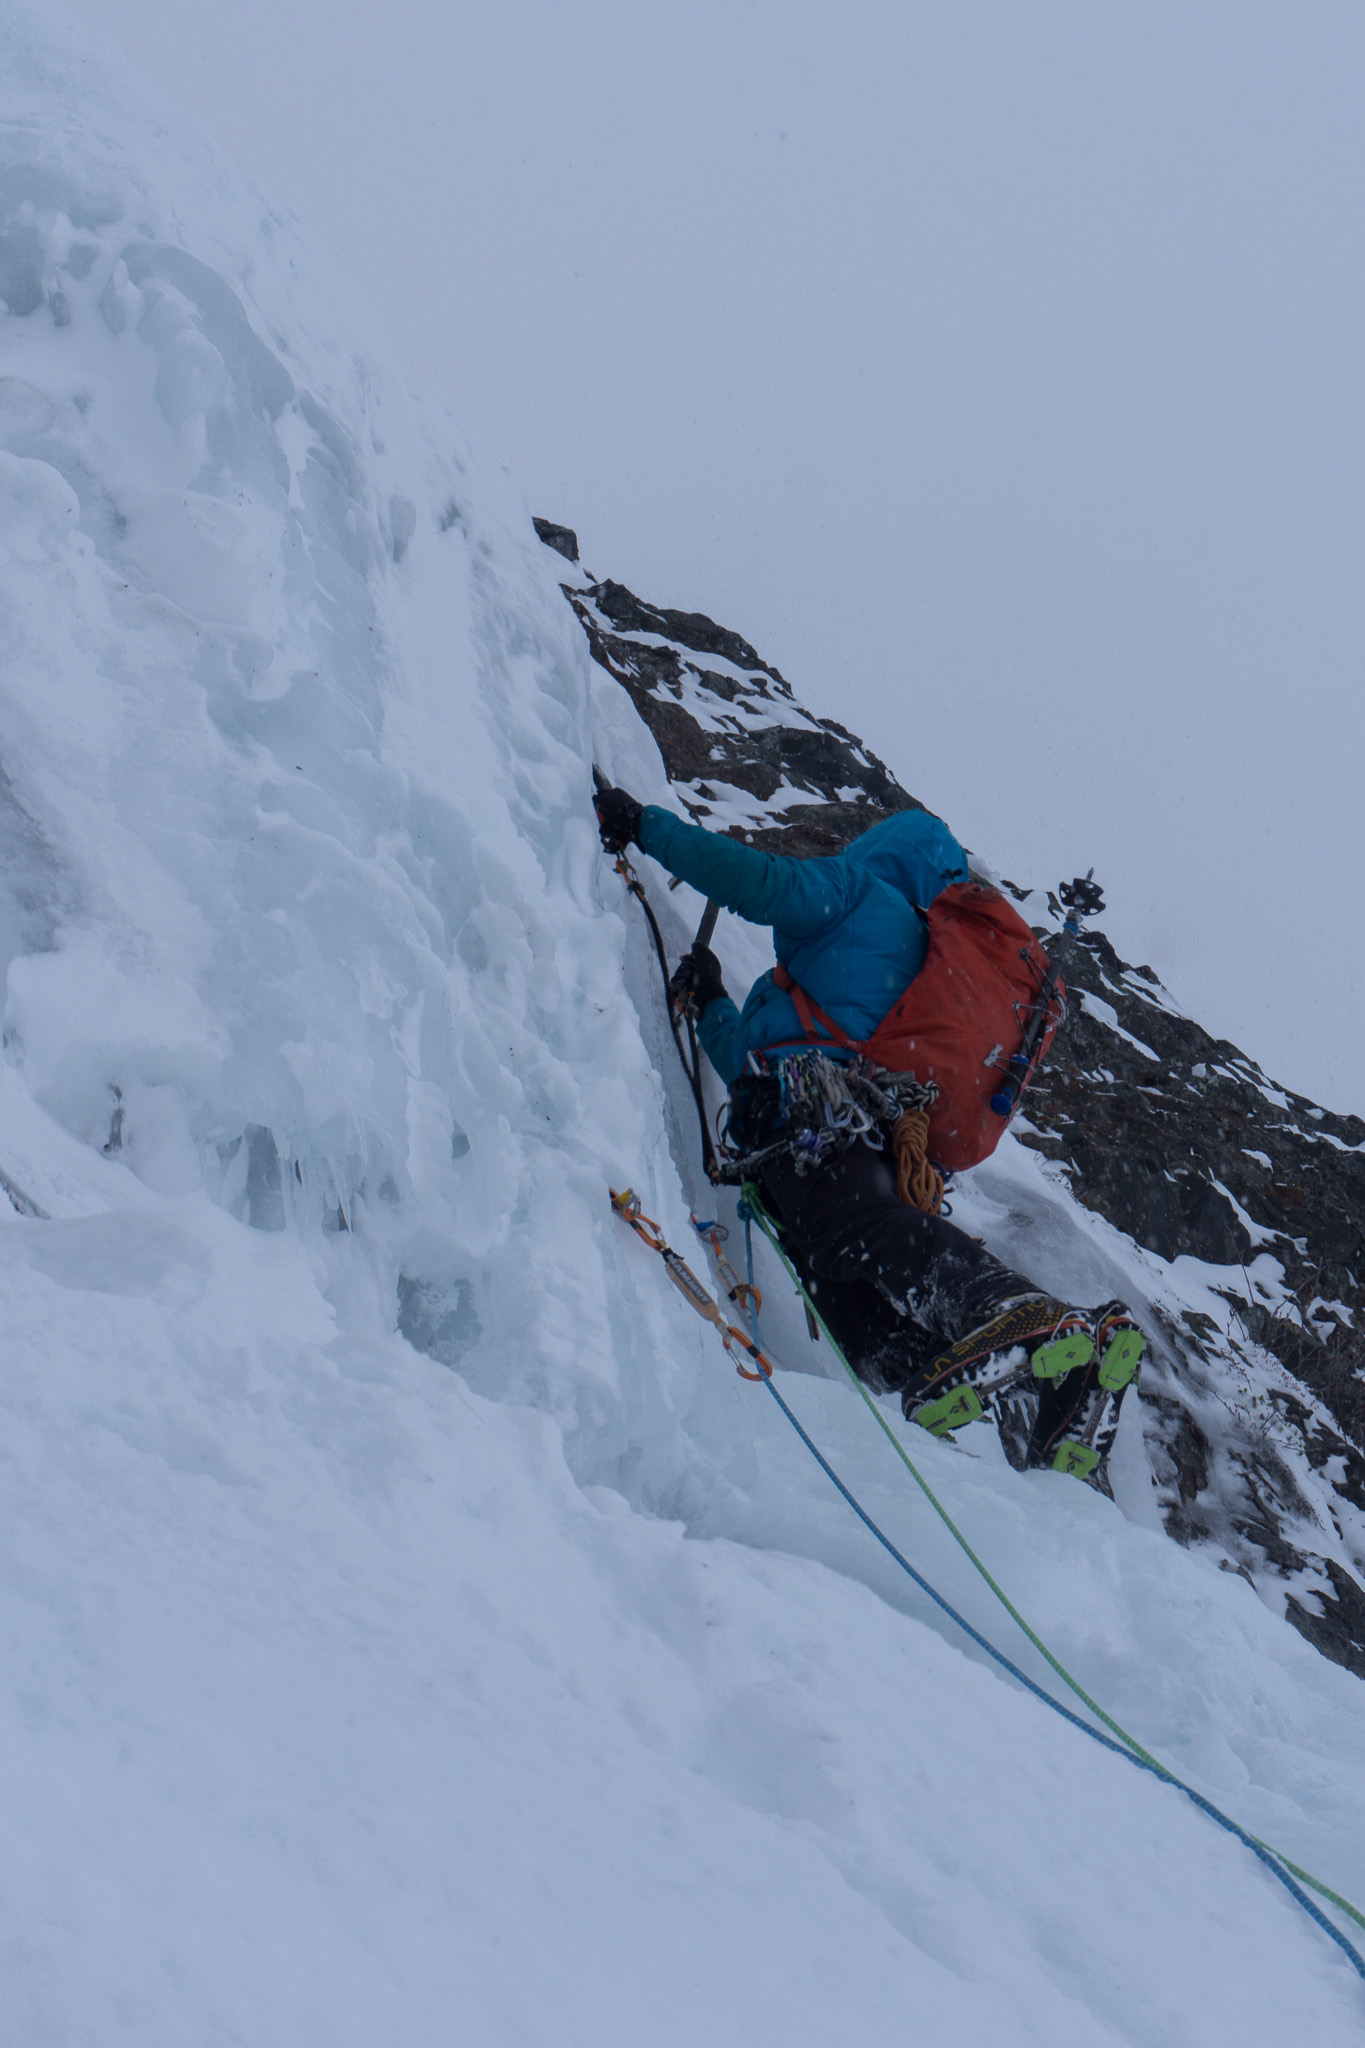
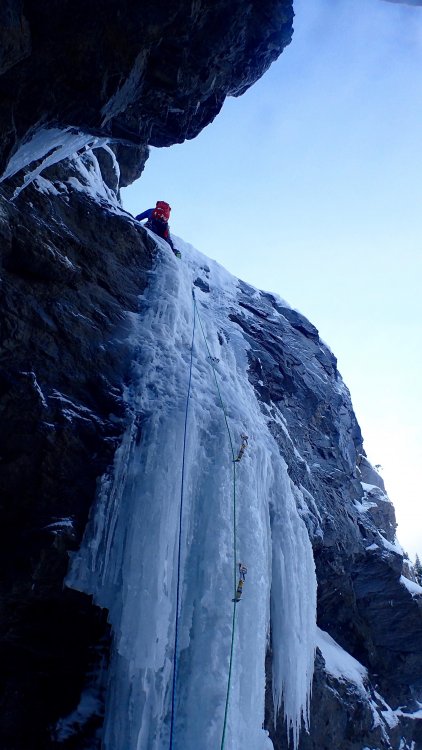
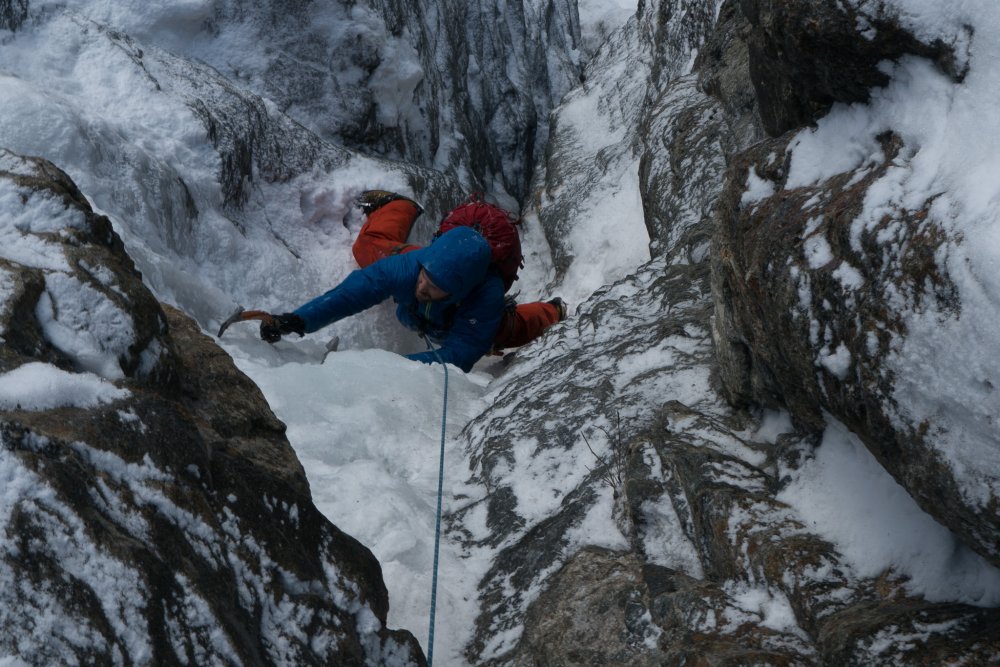
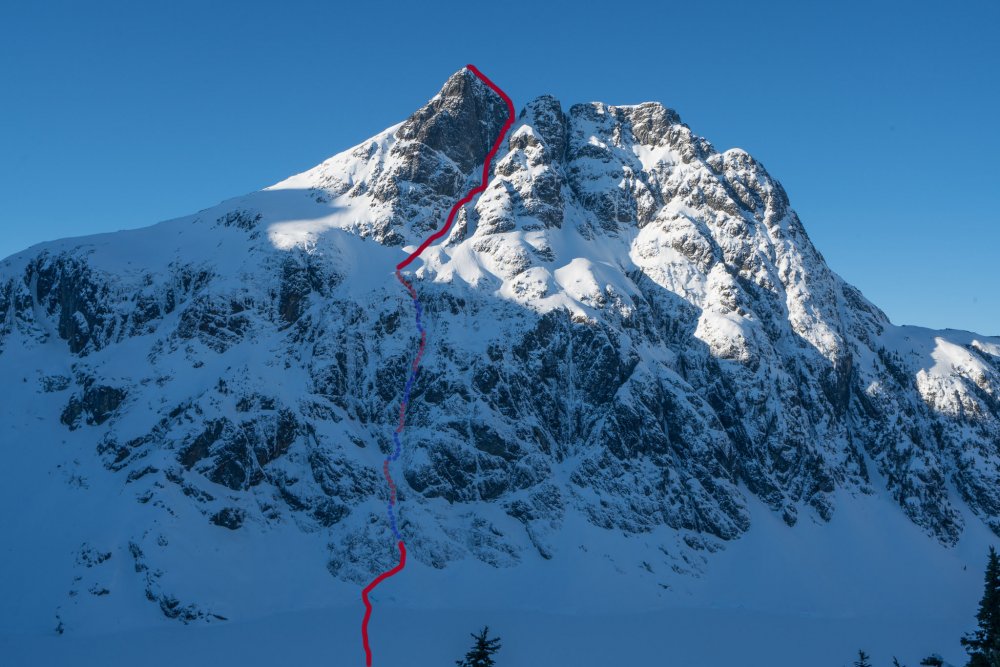
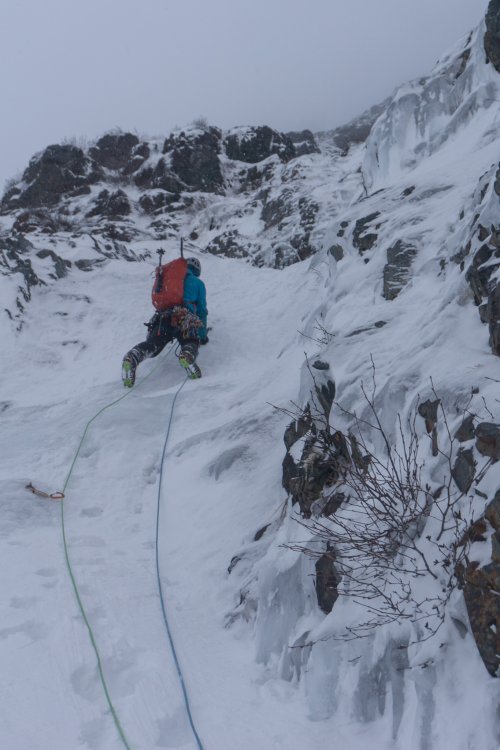
Trip: Vancouver Island- Elkhorn Mountain - Threading The Needle: WI-4, M-3, D+, 310 Meters Trip Date: 03/10/2018 Trip Report: With clears skies forecast Chris Jensen, Ryan Van Horne and I packed our bags and set our sites on Elkhorn Mountain. Initially our climb was to be on it's Northeast Face, but slightly warmer temperatures had the face shedding snow at an uncomfortable rate. Fortunately for us the North Face of the mountain, which we traversed on our way to scope the North-East Face, was solid and worthy of climbing. Here's the North-East Face looking as though it's in the Cordillera Blanca: We set up shop at the bottom of a deep chimney that had a promising start and appeared to continue upwards to the large snow pack above us. With a nice looking grade 4 pitch above us I racked up and set off. As per usual it was steeper than we thought, fortunately for our arms the lower section was close to a rock face and we were able to stem back and rest up for the upper half of the pitch. Here's Ryan enjoying a rest before he ran our of rock to rest on: With this fun pitch below us our stoke was high. Ryan racked up and lead the second pitch which had constant grade 2/3 steps for 50 meters. Here's Ryan dealing with the first step of the second pitch: Once anchored off above the second pitch we found ourselves at the base of the upper snow field. Chris took this pitch all the way to the start of the grade 4 pitch of an existing route: The Winter Needle. Here's Chris punching steps up the upper snow field en route to the upper mountain: With this long pitch below we set our sites on the existing route: The Winter Needle. Unfortunately the warm temperatures now exercising their influence on conditions we once again opted to back off and re-route our path due to spin drift coming down. A long pitch that had 20 meters of simultaneously-climbing lead us to a solid anchor just below a short mixed section that hopefully would allow us access to the Northwest aspect of the mountain. Here's Ryan making his way up the mixed section atop pitch 4: With our belay now in the sun, for the first time, we realized time was going to be an issue. Fortunately the top pitch of the Winter Needle has an easy chimney that leads to the summit. Here's Ryan and Chris enjoying the sun atop pitch 5: With day light at a premium Chris quickly set off and cruised up a snow slope to a comfy belay not too far from the summit. Here's a view looking down from the top of pitch 6: With the sun setting over the west coast of the island Chris, Ryan and I found ourselves standing atop the island's second highest mountain under blue bird conditions- definitely a summit experience to remember as the sky lit up and and smiles were wide. After a few quick photos on the summit we descended the upper section of the Northwest Ridge in the dark- 5 rappels and some down climbing later we found ourselves back on the Northwest ridge and at our camp some 15 hours after we set off. Threading The Needle: 6 pitch, 310 Meter, D+, WI4, M3 P1- WI4, 50 MeterP2- WI3, 50 MeterP3- WI2, 120 Meter, mostly snow slope (simul climbed after 60 Meters)P4- WI3, 80 Meter (20 Meter Simul Climb after WI3 step)P5- WI3/M3, 50 MeterP6- WI2, 60 Meter Gear Notes: Full rack of screws, handful of cams and nuts, 4 pins Approach Notes: Approach the the North-West Ridge trail, as described in Island Alpine Select by Phillip Stone.
-
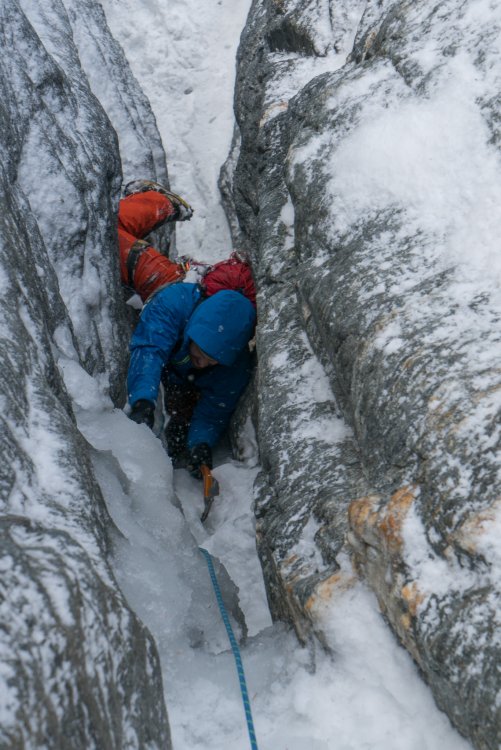
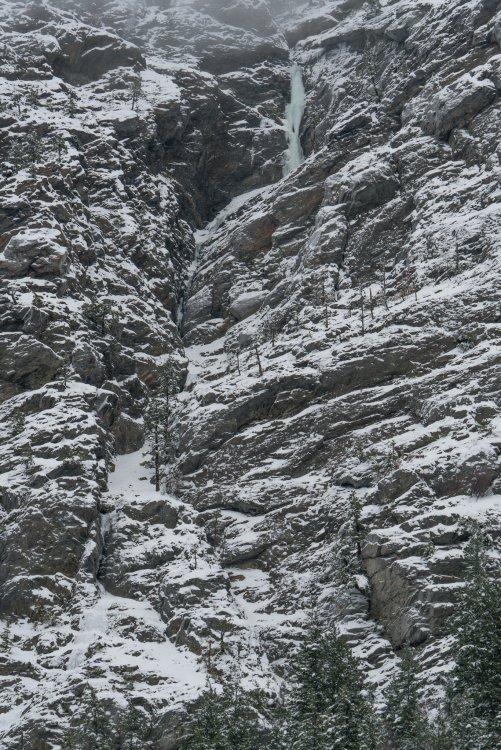
Trip: Bridge River near Lillooet - Bitcoin Billionaire Trip Date: 01/07/2018 Trip Report: Steve Janes, Danny O'Farrell and I climbed a new route off Bridge River on Jan 7/2017. After working in the area for a few years Danny noticed an attractive flow of ice high up the valley that had yet to be climbed. After driving by the previous day we knew that top pitch was in, and looking good. Photo Credit: Steve Janes After a 90 minute approach we were surprised to see another curtain of ice slightly off what we thought was going to be our start point- with the grade 4 ice looking good we started the climb there. Here's Danny belaying me on the first pitch. Another view of the first pitch which felt like a WI4- pitch. We were pleasantly surprised and excited to see this ice so low on the route. Going in we thought we'd be mixed climbing our way to the upper tier. Steve Janes dealing with the first difficulties on the memorable second pitch. Once we got going things only got better- after the first pitch we were drawn into a tight chimney and climbed thru some difficulties in the M6 range. Here's Danny making his way, or squeezing his way up the memorable 2'nd pitch. Here's Danny nearing the top of the second pitch. Once out of the chimney we climbed thru some easy grade 2 ice and one tricky M4 slab section before finding another M6 chimney. Here's Steve Janes dealing with the first tricky section of this pitch. Photo Credit: Danny O'Farrell Once above the second Chimney we pitched out a short 25 meter grade 2 ice pitch before climbing the WI 4- upper tier of ice. This was a really enjoyable day out with great company, this route has an alpine feel to it and is worthy of repeat climbs! Bitcoin Billionaire: WI4-, M6, 325 Meters P1- 55 meters WI 4- First Pitch P2- 55 meters WI3/M6 The Fun Chimney P3- WI2/M4 65 Meters The snow slope that had the low 45 degree slab (tricky) need to simul climb a short distance in order to reach a tree belay. P4- 30 Meters WI2 P5- 55 Meters WI3/M6 The roof pull then second Chimney P6- 25 Meters WI2 Quick Pitch to the upper curtain P7- 45 Meters WI 4- The wet upper pitch Here's a view of the route from the Bridge River road. Gear Notes: Rack of screws- heavy up on 13's, good idea to have a couple 10's as well, Rack of cams to #3, some pins knifeblades, half ropes Approach Notes: Approximately 43.5 km from the turnoff in Lillooet or 6.5 km before Terzaghi Dam. The route lies between the already established routes Salmon Stakes and A New Leash on Life” along the highway on the east side of the river.


-
Trip: Vancouver Island, Mt. Harmston- Northern Lights Trip Date: 12/22/2017 Trip Report: With a climbing friendly weather forecast Malcom Nicol, Ryan Van Horne and I plucked Mt. Harmston's unclimbed North East face out of the "to do bucket list" and made our way into snowy Strathcona Park on December 21/2017. Access to the eastern side of Strathcona park has been problematic the last few years, fortunately political pressure on forest companies to open up access for public recreation has resulted in a lot more open gates than we've been accustomed to. Once at the col between the Comox glacier and Iceberg peak we scoped out the options for the following days climb- two options presented themselves with one looking a grade or two harder than the other. Without seeing the harder route from a different perspective we couldn't determine for certainty if the line was in. With the uncertainty of the harder route hanging over us we opted for the sure thing. With with Winter solstice one day behind us, we knew we needed to maximize every minute of day light available, after hearing the alarms go off at 5:15 I felt like I needed a stick of dynamite to get out of my cozy mountain of down and face the frigid temps outside my bivy. The cool morning played havoc on the stove of choice for this trip, the trust worthy Jetboil melted the morning snow so slowly that Ryan and Malcom opted to skip a hot breakfast. Looking back we should have packed in one of our white gas stoves, canister stoves always seem to have issues once it's -15 celcius or lower. With a hasty breakfast finished we left camp in the dark @7:15 and unable to see our route as fog/cloud had enveloped the area over night. Photo Credit: Ryan Van Horne Once across Milla lake the lower section of the route opened up. After a quick gear sort on the frozen lake we were on our way. Photo Credit: Ryan Van Horne Here I am on the sharp end leading the first pitch. Photo Credit: Ryan Van Horne Here I am on the sharp end of the second pitch- one of the crux's of the route, a grade 3 step with little to swing into above it. If the route was filled in I think it would be a great grade 3 climb, but with the marginal conditions and dodgy protection options we had I'd give it a WI 3+ on this day. Here's Malcom dealing with the 4'th pitch. As with the other pitches this day, this one had a spicy early season feel to it. Here's Ryan on the sharp end of the 5'th pitch. The ramp to the right was initially our intended objective, once we were closer the gulley to the left presented itself and appeared to be in better climbing condition. Here's Ryan Van Horne coming up a tricky section on the 6'th pitch that definitely had a west coast feel to it- pull on whatever there is and yard your way up! Photo credit: Ryan Van Horne After 8 pitches of climbing we found ourselves on the upper snow field. With good snow conditions we were able to plod our way to the upper mountain without too much concern. At the top of this snow field we were greeted with a near vertical section of snow/ice and an overhanging cornice- fortunately we were able to body saw our way thru the cornice without too much swearing. After 12 hours of climbing we found ourselves on the summit of Mt. Harmston. With clear skies we were treated to views of the Comox Valley, the lights of Mt. Washington, a couple of the North shore ski resorts and the glow of Vancouver on the horizon. With descent off the hill looming I was struggling to recall the exact location of the summer descent line off the mountain- fortunately we had a couple phones with us and were able to look at the guide book. With a little uncertainty still clouding our exact bearing we tried calling a couple local climbers (as we had reception atop the mountain) who we knew would have the beta we needed, unfortunately both Philip Stone and Lindsay Elms weren't home, though we did leave messages wishing them the best of the season. To make the descent a little more interesting my headlamp died a minute after leaving the summit, fortunately I was worried that might happen and opted to carry a little 22 mA charge and the cable required to link the two devices. This lack of illumination made the first two rappels a little more memorable for me. To make things even more interesting Malcom's head lamp died after the 2'nd rappel leaving us with one working head lamp for 3 of us in the middle of bailing off one of the biggest mountains on the island! With events looking more and more epic for all the wrong reason I pulled my headlamp and the charger it was plugged into out of my coat and was relieved when it turned back on! Malcom, who is more resourceful than I turned into McGiver mode and duck taped his iPhone to his chest and finished the descent with it lighting the way off his chest- good times indeed... Northern Lights: 8 Pitches, 700 Meters, WI 3+, M3, TD- P1- WI2, 45 meters P2- WI3/3+, 50 meters P3- M1 (We simulclimbed this pitch) 45 meters P4- WI3+, 45 meters P5- WI 3, 45 meters P6- WI2/ M3, 60 meters P7- M1, Mostly a snow ramp, 50 meters P8- WI2, (Short section simulclimbed then belay off tree at top of pitch) 70 meters Gear Notes: Half/Twin Ropes, rack of screws (2-10's, 6-13's, 4-17's,1-22), cams to #3, 4 pins, bird beak, alpine runners and quick draws, 2 screamers. Approach Notes: Approach via Kweishun Creek as described in Philip Stone's "Island Alpine Select"


-
Trip: Victoria Peak- Vancouver Island - New Route: Summit or Plummet, 5.10a, Aid 1 Date: 8/10/2017 Trip Report: A quick discussion at the Victoria Valhalla store about an unclimbed face one Tuesday afternoon and the next thing you know Karsten Klawitter and I were driving up island late one Wednesday night with thoughts of what could be on the horizon the following day. I had attempted the climb a few weeks back with Andreas Hinkkala- On the initial attempt we climbed three pitches up the face before getting weathered off, so I knew the approach and the first 3 pitches would go quickly. Here's Karsten getting his stoke on while we rack up. There are a few options on how to get off the main ramp and up to a vegetated area above. We climbed the gulley behind Karsten here- a couple 5.4 moves and one more low fifth bulge will get you on your way to the large gulley system that makes up pitches 2-(5.6) and 3-(5.7/5.8 depending on line taken). Once atop pitch 3 you'll find yourself on a large ledge system that connects the West Ridge and Sceptre gulley. The natural line that holds you to the middle of the face is half a rope length to the right of where you top out of the 3'rd pitch. Another large open gulley is an option on the left as well as another crack system to it's right. If a party wanted to avoid the 10.a pitch they could possibly enter the Sceptre gulley and return to the face higher up, furthest right in this picture. Pitch 4 has a little scrambling with a few 5.7 moves- 35 meters out you'll find yourself on a nice hidden ledge looking up the first business pitch the route has to offer. Pitch 5 was a solid 5.9 pitch with a couple moves that felt 10.a. Here's Karsten lower down on pitch 5. Once up the 10.a corner we opted to sneak out right, avoiding the short upper gulley. Here we once again had options as to where we should climb. The natural line as seen from below took us up a dihedral crack into some steepness. Here's a picture as seen from the ledge below- we were both shocked as to how steep this corner was. A nice 30 meter pitch of 5.8 landed me on a small one person only ledge. We set up shop here for the difficulties above. Once past the anchor pitch 7 gets real, really fast. Thin face moves along side a finger crack in the corner had us aiding pretty much from the anchor onwards. Here's Karsten dealing with the roof on pitch 7. After aiding thru and my attempt at climbing the pitch on top rope we both felt this pitch would go free in the 5.11a or 5.11b range. Once past the difficult aid section we scooted out right. Pitch 8 went at 5.7 and led us to let another ledge system that connects the West Ridge and the Sceptre gulley. With the upper headwall in mind we plotted a route up and left looking to gain the West ridge below the upper head wall. Here's Karsten on lead climbing pitch 9 (5.8). Here's Karsten coming up to the anchor on pitch 10, which went at 5.7. Karsten pulled his camera out and snapped this view up pitch 11, which had some memorable moves in the 5.9 range. Here's Karsten topping out on pitch 11. Once on the upper head wall the North Glacier came into view making for a memorable alpine pitch. Pitch 12 was short and had us packing up our climbing shoes and looking to simul climb some easier terrain en route to the summit. Little did we know but there was one more short section that required a belay. Pitch 13 had an airy 5.8 traverse on a slopping ledge- once past this we scrambled our way to the summit. All in all it took 12 hours to climb the route. With night fall closing in on us we opted to down climb the south face and make a long traverse down the South ridge then bushwhack our way back to the high logging roads. If we had half ropes I think we would have rappelled down the Sceptre gulley, but we were tired and looking for the path of least resistance. Summit or Plummet- 13 Pitches, 5.10a, Aid 1, 600 Meters Gear Notes: -Single Rope -Half set of nuts -Cams to #3. (doubles 0.4 thru #3) Could have plugged a #4 numerous times though not critical Approach Notes: Detailed approach maps and beta for this side of the mountain are found in Island Alpine Select, by Phillip Stone. http://www.wildisle.ca
-
Thanks! Was a great trip with the family, the climb just added to the whole trip and made it that much more memorable...will probably do more like this in the future. We were told the same thing when we were in Zermatt in 2010. Not sure how many climb from the Italian side, won't be as many that's for sure. I'd say most of the teams on the Hornli Ridge were guided- my guess would be that the Italian side would not be as guided. It's a grade or two stiffer from Italy, think it's a 5.7 line. Not sure if there's much beta out there from the Italian side- definitely worth digging around for though!
-
Trip: Matterhorn (Solo) Via Hornli Ridge, Zermatt- Switzerland Date: 9/9/2016 Trip Report: Returning to Zermatt to climb the Matterhorn had been in the back of my mind since my first trip to Europe in 2010. On that occasion we had good luck in France and Italy, but unfortunately when we rolled into Zermatt the Matterhorn had just received a sizeable dumping of snow- thus a side trip up the Briethorn and a couple nights of drinking ensued in Zermatt before leaving town with thoughts of what could have been. After that first trip to Europe I'll admit my desires to go back and climb there were mixed- the terrain and views are great, as is the selection of classic climbs, but the crowded routes and sometimes overstepping guides on them didn't cast a friendly vibe in the alpine. Knowing full well that this route was busy I mentally prepared myself for what might be a gong show once the door opened up at 5:20AM at the Horlni hut. This trip was a family trip- a couple friends were getting married in Germany, and a climb in Switzerland was the second leg of our trip. With good weather forecasted for the week following the wedding, myself, my wife and our 2 1/2 year old son jumped on a few trains and rolled in Zermatt. Ironically, just as my previous trip in 2010, the Matterhorn had just received a dumping of snow and at the time of our arrival and the route was out. With solid stable weather we made good use of the first few days we were there. A trip up to the Gornergrat Bahn observatory and some sightseeing along the way. As well the following day we went up the Klien Matterhorn and spent some time acclimatizing at 12,740. With a couple days of acclimatizing above 10,000' I left Kim and Spencer behind in Zermatt and headed up to the famous Hornli Hut. I'm not a soloist, so this climb had me thinking a lot before hand- a nervous trepidation was rolling thru my mind. I knew exactly what the climbing difficulty was, and what altitude it was at, and felt comfortable about soloing it in principle. It wasn't until I got to the hut and scoped out the first hour or so of the route did a feeling of comfort and confidence come back to me. I was fortunate to enjoy a meal with an English guide and his client as well as a swiss climber- together we talked about the route, and our plans the following day. The guide filled me in on the chaos in the morning- the local guides will go first, but if you're on the ball and ready you might as well get yourself close to that door, as there isn't really a set pecking order when going out, just who's there and ready. The swiss guides are all over this and prep their clients to eat fast and be ready. I was dressed and ready to go @ 5:10, looking back I should have been more aggressive in the line when the hoard of people left the breakfast table. As it happened I left the hut in the middle of the pack (70 climbers or so). You'll find the fist bottle neck 10 minutes from he hut- a steep vertical section with ropes and a few steps here and there. I probably waited for 25 minutes before zipping up this section. Because I was soloing I was able to pass slower teams a lot easier than those that had ropes between them. There were a few guides who had stronger clients that simply waited in the hut till the bottle neck was clear and started climbing around 6AM. Most everyone else was out the door ASAP. After an hour or so there was a degree of separation between most teams. I was able to keep up to a few of the guided teams, and simply followed them up the ridge. Route finding is paramount on the Hornli ridge- there are NO carins up there, the guides must knock them down as carins would make it too easy for people to climb the route without them. There are numerous dead end side spurs one will be drawn onto. When the guides scooted ahead I didn't find the route finding too difficult, though my speed did decrease significantly in places. For the majority of the climb up and down I followed guides and their partners. Once leaving the hut a good indicator of how long it will take to climb the route is the time you arrive at the Slovay hut- it's about halfway. I was pleased to arrive there 2 hours after leaving the Hornli hut. The crux of the climb is below the hut, a short section of 5.4 climbing know as the lower Mosley Slabs. There's bolts scattered about the route, as are ropes. The route would definitely have a different feel to it if these aids were not in place. Just above the shoulder is another section that has ropes and is vertical in nature, by the time you're up there the altitude will be affecting you as well- this upper section felt the most physically challenging while lower down had the stiffest climbing moves. Once above the shoulder you'll experience some exposure and au chaval style moves across ridges- the views are spectacular. Higher up on the route my pace slowed, the limited acclimatization was showing its face; I found myself being passed more often as I rested and caught my breath- though I wasn't the only one slowing down up there...With clean skies and sun shining all around I found myself atop the Matterhorn a little before 10AM. The views down into Italy and the paranamic view of the Swiss alps are a sight to see. After resting and taking some pictures thoughts of the descent and hopes of making it back to Zermatt that night were front and centre. Shortly after 10 I started the descent down. All in all it took 4.5 hours to climb up and about 5 hours to descend down. I carried a 30 meter rope with me and had 6/7 rappels on the way down, while the rest was down climbed. There are a couple spots were a 40 meter rope would have speed up the process. If I was with another climber I probably would pack a 40, otherwise the 30 was just fine. Once back down at the Hornli hut I quickly grabbed my items in the storage room, bought a chocolate bar and a coke, slammed them back and bolted for the last cable car to Zermatt. With 25 minutes to spare I reached the Schwarsee Paradise station at 4:20 and was back in Zermatt pulling the boots off shortly after 5. Here's a view of the Matterhorn 5 days after we rolled into town- the snow had melted off the East face a lot in the week we were there. All in all the climb was great. The gong show that takes place while leaving the hut doesn't detract from the climb, it's just part of the experience. The guides on the hill were definitely focused on their clients, but also accommodating when they realized they were about to be passed. The price to stay at the Hornli hut is steep, as is everything in Switzerland. If given the option I'd climb the route again in a flash- though that North face line would be the first option, if there's ever a next time in Zermatt. Hope this TR helps anyone who's looking to climb the Matterhorn! Gear Notes: 30 meter rope A few draws Crampons/Ice Axe Climbed in Bartura 2.0's, would climb the route in Approach shoes next time. Approach Notes: From Zermatt take the cable car up to Schwarzsee Paradise and then hike to the Hornli hut.
-
[TR] Liberty Bell - Liberty Crack 8/7/2016
Hunter Lee replied to HHinkkala's topic in North Cascades
Looks like a fun outing! -
Trip: Colonel Foster- Vancouver Island - Cataract Arete Date: 7/30/2016 Trip Report: The stars finally aligned and a long awaited trip up Mt. Colonel Foster's Cataract Arete successfully took place under perfect conditions July 30/31 2016. I had just been up the West side of Colonel Foster the week before and my body hadn't recovered very much when Andreas and I cracked a plan to climb the classic Cataract Arete the following weekend. With family and professional obligations behind us we left Nanaimo later on Friday afternoon. By the time we hit the ground and started on the Elk River Trail it was 5:00 PM Friday evening. Such a late start had us pondering a stop at the gravel flats camp ground and a really early get up and go the following morning- fortunately we had wind at our backs and made it all the way to Foster Lake in a record 4 1/2 hours. A quick bite to eat and we were off to bed. Here's the view to the West from Foster lake with Elkhorn Mountain and the night sky. With our late arrival and my preference for a decent return to Victoria the following Monday we opted to get 6/7 hours sleep and bivouac on the mountain the following night. We had discussed resting the following day, Saturday, and climbing the route in a single push on Sunday- but after hearing about this "all world" bivy spot atop the route we opted to pack overnight gear up the East face. After a restful sleep we left the lake just after 7. The lower section of the route has you start further to the left of the face. There's a vegetated ramp that leads you to two gullies, the second, or gully on the right is the link to where the big rappel is. The lower section is mostly 3'rd and 4'th class scrambling. Once in the gulley the climbing gets steeper, especially near the top. The upper section of the gulley is somewhere in the 5.3 or 5.4 range. Once out of the gully your reach a knoll from which you look down and see the falls deep within the face. You'll need to back track and down climb roughly 7 meters and then skirt around to left. We searched for a long time for this rap station, longer than I like to admit. After scoping the scene and searching around for the rap station I had given up and was looking for a new anchor for us to use when Andreas found the hidden slings. I had been a mere 3' away and did not see it, it's up and inside a crack and on an uber exposed ledge. Here's Andreas just about to see what this 50+ free hanging rap is all about. It is a big rap, and there is a long free hanging section to it...the free hanger on the Monkey face is a little longer in the free hang department- it's memorable nonetheless! Once down to the creek, which is a tricky operation in it's own, (We opted to set another rap station and cross the creek safely) the crux of the climb presents itself. We crossed the creek near the lip of the falls (exposed!) and climb up there. You'll head up and be forced out right, the climbing isn't difficult, maybe 5.7, but the rock is suspect here, so tread carefully. After a pitch or two the terrain eases off and the ropes went into the packs for some fun scrambling. Higher up on the arete we opted to pull the rope out for a short section then scrambled across the classic au chaval section to the upper headwall. After: 1) burning time searching for the anchor at the falls, 2)initially choosing an exit from the falls that didn't go, and 3) having a late start to the day, we found ourselves watching the sun set and pulled out the head lamps for the last part of the route. Fortunately we were feeling good and in good spirits and up for a little night climb. Here's Andreas high up on the Arete shortly before the sun went down: I had called Phil Stone the night before and was well aware that we'd find one really nice bivy spot near the top of the route, but should pass on that and continue a little higher for an equally nice spot with water. We climbed two pitches guided by our headlamps and found ourselves atop the route with a beautiful ledge and water 10' away! Once again we were treated to a stellar display of the night sky with the island alpine as a backdrop: With the route below us we slept in and enjoyed the morning view from our exposed home: Here's a look down at the top of the arete and our home for the night: A quick climb up the glacier and we were looking down the Great West Couloir. Here's Andreas making his way up the upper glacier: I had descended the Great West Couloir twice before, both times in Winter. Even so, we had a degree of trepidation as to what it's summer condition would be. Looking down the first two raps I'd say it is rather loose and loaded with rocks- Andreas did his best to knock as many down as possible. The Winter rap Phil, Josh and I set was 10' in the air, so Andreas and I hammered in a bomber knife bade for the first rap. We had two 45 meter rappels and found ourselves looking at moderately steep snow. We opted to set one more rap station before transferring onto the snow. Once on the snow we down climbed a couple hundred meters and then as the snow tapered off down climbed 4'th class rock until the Couloir ends. Once able, we skirted around the West side of the mountain and shorty thereafter were looking down the Southern Approach from the South Col. I think it took us 6/7 hours to climb up the glacier, descent the Couloir, track around the mountain and make it back to Foster Lake. Gear Notes: Half set of nuts. 4/5 pins...small knifeblads, lost arrow, baby angle. Set of cams, up to #3 60 meter half ropes (must have for the big rap) Approach Notes: Detailed approach information, and other Colonel Foster routes are in "Island Select" and "Island Alpine" by Phillip Stone.
-
Trip: Mt. Gimli - South Ridge Date: 8/10/2014 Trip Report: Henrik and I were able to start a week long peak bagging trip off with a memorable climb up Mt. Gimli's imposing South ridge. We opted, due to our late arrival at the trail head, to sleep in the truck and simply day trip Gimli. With the alarms firing off @3:45 we found ourselves geared up and moving @4:30. The hike in is straight forward, and we soon found ourselves starring at the day's climbing objective: the imposing South Ridge of Mt. Gimli. For those who arrive a little earlier there's a fantastic bivy/camp site minutes away from the start of the climb. At 6:15 we found ourselves gearing up at the col. Gimli does see traffic on the weekends, fortunately there was just one other party climbing the route. After meeting several of the local goats, we found ourselves behind a party of two. At 7:30 we set sail on the route, Henrik lead the first pitch, which is definitely the hardest on the route. It's steep and deep right off the deck. Here I am making my way up the first pitch: The climbing eases off on the second pitch, here I am on lead: The are sections where the climbing gets airy and exposed- here's Henrik leaving the belay and starting the 3'rd pitch. Thanks to Gavi and co. as they allowed Henrik and I pass them! Atop the fourth pitch is an excellent/flat belay station...good spot to have lunch- Henrik captured the group of us after he set up an anchor atop the 5'th pitch: The climbing on Gimli is great, the rock is good old solid granite, which means crack climbing. Here I am leading the 6'th pitch. The route has been graded 5.8++, or simply 5.10A. The first pitch felt 5.9/5.10A, and high up there is a roof move on the 7'th pitch that is definitely 5.10. Here's Henrik dealing with the 10.A crux in style: A look down at me belaying Henrik on the 7'th pitch: Once past the roof, which is visible from the campsite, the route eases off to some degree...there's a few 5.7 moves here and there. After 8 pitches of climbing we put the rope away and scrambled our way to Gimli's summit. After 6.5 hours of climbing glorious granite we found ourselves atop Mt. Gimli. A nice bonus with this route is the decent down the 3'rd class East ridge. After relaxing at the summit we cruised down the East ridge and found ourselves back at the col @ 4:00. The decent back to the parking lot is straight forward, around 5:30 we were at the parking lot and planning where we were going to drink beer later that night! Round trip was 13 hours- with one hour waiting at the base as the other party climbed the first pitch. Gear Notes: Full range of cams to #3, doubles from yellow metalious thru #2 Full set of walnuts Alpine slings: shoulder length x8, double shoulder x2, 2 screamers We used half/twin ropes, though you could use a single, as the route doesn't wander too much. Half ropes if you feel you might be bailing off! You know what you're in for on the first pitch We climbed with a small lead pack and larger second pack, made the lead work a lot easier! I remember placing more small and mid sized cams, I'd probably not double the #2 again...we had a couple link cams which were handy on most of the pitches. Approach Notes: Drive to Slocan B.C, a small town on the South side of Slocan Lake...take the logging roads to Valhalla Provincial Park (aprox 1 hour). Depending on time of year and seasonal snow pack boots may or may not be required- we wore approach shoes (they take up a lot less space in your pack than mountaineering boots).
-
If the White River gate isn't open you'll have a long approach for Lib RIdge...Your best bet for access is from Paradise- I might be going up and down via The Fuhrer Finger in the next week- I'll let ya know what conditions are if this trip flies...If you're looking to swing the tools on that side of the mountain there are some shorter technical sections around the Kautz Glacier, Kautz Headwall. There are others who have been up Rainier a lot more than I, but from my experience the upper part of the mountain (10,000+) is usually wind blown or firm, so postholing isn't a concern on the way up, however if it warms up you might have a different story to tell in the afternoon.
-
first winter ascent [TR] Mt Huntington - French (NW) Ridge (FWA) 3/1/2014
Hunter Lee replied to John Frieh's topic in Alaska
Nice work! Looks like you guys had perfect timing- by the looks of what your wearing it wasn't too cold either. Congrats! -
Trip: Mt. Colonel Foster Winter Ascent- Direttissima Date: 2/17/2014 Trip Report: With clear skies forecasted for the Pacific North-West, an unusually low snow pack, and cold temps for 5 days straight, the conditions and timing for a Winter attempt on Colonel Foster couldn't have been better. Initially our thoughts were on a new route on the West side of the mountain, or a complete summit traverse. However, upon reaching Landslide and Foster lakes, and seeing the condition of the Colonel's classic east face direct line: Direttissima, our climbing plans were set. Here's Mike at Landslide lake, eyeing up the ice on Colonel Foster's (1000 meter) East face, Feb 6, 2014. A closer look at the East face, as seen from Foster lake- some mighty fine funk to be climbed here! With the reality of what we were about to tackle looming over us, we set up camp at Foster lake, brewed some warm fluids up and promptly turned in early. The first part of the route was a moderate snow field, we pulled one rope out and sailed on up it till we reached the first crux section- the book has this as "600' of 80 degree ice climbing leading to easier angled climbing." Here's Mike just before we stated to pitch out the first section: Here's Mike on the second pitch: I took the first lead, and after 3 full pitches we found ourselves staring down easier terrain once again. A look down the route from the top of the 3'rd pitch: Upon reaching milder terrain, mid-rotue, we opted to simul-climb. The climbing conditions were great when on snow, ice axes went in firmly and cramponing was a dream. The low-angled ice sections at times were decent, though most times were a little doggy, with good pro few and far between. Fortunately when things did steepen up the ice available was much more accepting of screws...we both had some healthy run outs and bottomed out a lot of placements along the way. Here's Mike on lead higher up on the route: Our plan was: to climb the route in one day, find a bivy spot on the summit ridge, summit the following day and return to camp. Unfortunately our alarm, my watch, decided it didn't like the cold and shut down. This delay leaving Foster lake cost us valuable day light. We left camp @7AM, instead of the planned 5:30 departure. Even with a timely departure we would have been climbing in the dark for an extended period of time that first day. As things go, we climbed well into the night. Both Mike and I were haggared, dehydrated to the point of dry-heaving, tired to the point of nearly sleeping when belaying and desperate for comforts of a bivy; our 18 hour climb came to an end a mere 15 meters from the summit ridge @ 1 in the morning. With relief we crammed our tired souls inside a tiny, and I mean tiny cave, for a brew and rest. We both agreed that we could have simul-climbed a lot more terrain high on the route, however, due to our haggared state and that fact that we were climbing at night the decision to pitch things out was the wise one. Here's a view of the upper part of the route, and the Elk valley, as seen from outside our bivy cave, morning of Feb 8, 2014. It was fortunate that we did stop when we did, as the crux of the climb was above us! I'm glad Mike lead this, (it's nice having a 5.12 rock climber on the other end of the rope) as it would have taken me a while to figure this part out! Once atop the summit ridge and in good spirits, we were our way to the main summit. Climbing Colonel Foster is a serious endeavour- even in the middle of Summer the main summit has no easy line to it. With the exception of Walsh's Forray, all routes to the summit come in at 5.8 or higher. Known attempts to climb the Colonel in Winter are few and far between. The last successful recorded Winter ascent was in 1989-since then two valiant attempts, one in March of 1998 the other in Dec 2013 have come up short due to suspect conditions- the Colonel's summit hadn't seen a Winter visitor in nearly 25 years. After simul-climbing some 4'th and low 5'th class terrain we were presented with a stunning view from atop Colonel Foster: There are legions of stories of un planned bivoauc's when climbing Colonel Foster- summiting Foster is optional, getting down is mandatory and tricky. After eyeing up Direttissima I knew Mike and I could climb it, I was more uneasy about the decent. Fortunately we only had a little head scratching when rappelling off the main summit and making our way to the upper glacier. Here's Mike walking to the Great Gendarme on the upper glacier. With my nerves at rest, we tidied up our rack and ropes, took one last look at the Elk Valley and made our way down the West Gully: Though off the upper part of the mountain, and in the clear, Colonel Foster's trickery had one more card to play- we, in the wee hours of the morning, confused ourselves into believing we had walked past the South Col, and opted to back track a bit and climb up high to get a good view of the scene. Upon reaching a vista high up some mountain side, we soon realized that we were on Colonel Foster's South-East peak! With a direct descent down one of the South Gully's we finally found ourselves at the South col and on our way to Foster lake. All in all, this was a great trip! I'm glad Mike's youth and confidence convinced me to tackle this stellar line with him! We will both remember this climb! Note: Good weather is a must if one aspires to climb the Colonel in Winter. The route down from the South Col is one big avy slope, and there's a classic terrain trap about mid descent. We had some point release slabs break off in parts, this was all wind loading as the snow pack to date on the island has consolidated really well. Both the other attempts in 2013 and 1998 had to turn back due to poor snow conditions. On our climb the snow was great- temps ranged from -5 thru -13 when we were on the mountain- the colder the better! As far as grading goes, it felt like most of the climb was either WI2/WI3 with short sections of WI3+/WI4...both the documented crux sections of the climb had some funk to deal with, but no extended vertical sections (thankfully). There were other options for us high up on the route- that tricky rock section can be avoided if a party so desired. If I climb this route again, I'll shoot out right and avoid it, it'll burn unnecessary time and energy climbing it. Gear Notes: Two 60 meter half ropes 12 screws: 1-10cm, 5-13cm, 5-16cm, 1-22cm Cams from .2 thru #2 Half set of walnuts One Picket...we should have had two 5 pins, assortment of blades, angles ect... 2 screamers, 8 alpine draws, 2 quickdraws Approach Notes: Approach via the Elk Valley Trail, as described in Phil Stones Island Alpine. We took roughly 5.5 hours to reach Foster lake- this may turn into a full day approach if there's more snow on the trail. One day on the approach (Feb 6), one day to climb the route (Feb 7), one day to summit and return to camp (Feb 8) and one day out (Feb 9).
-
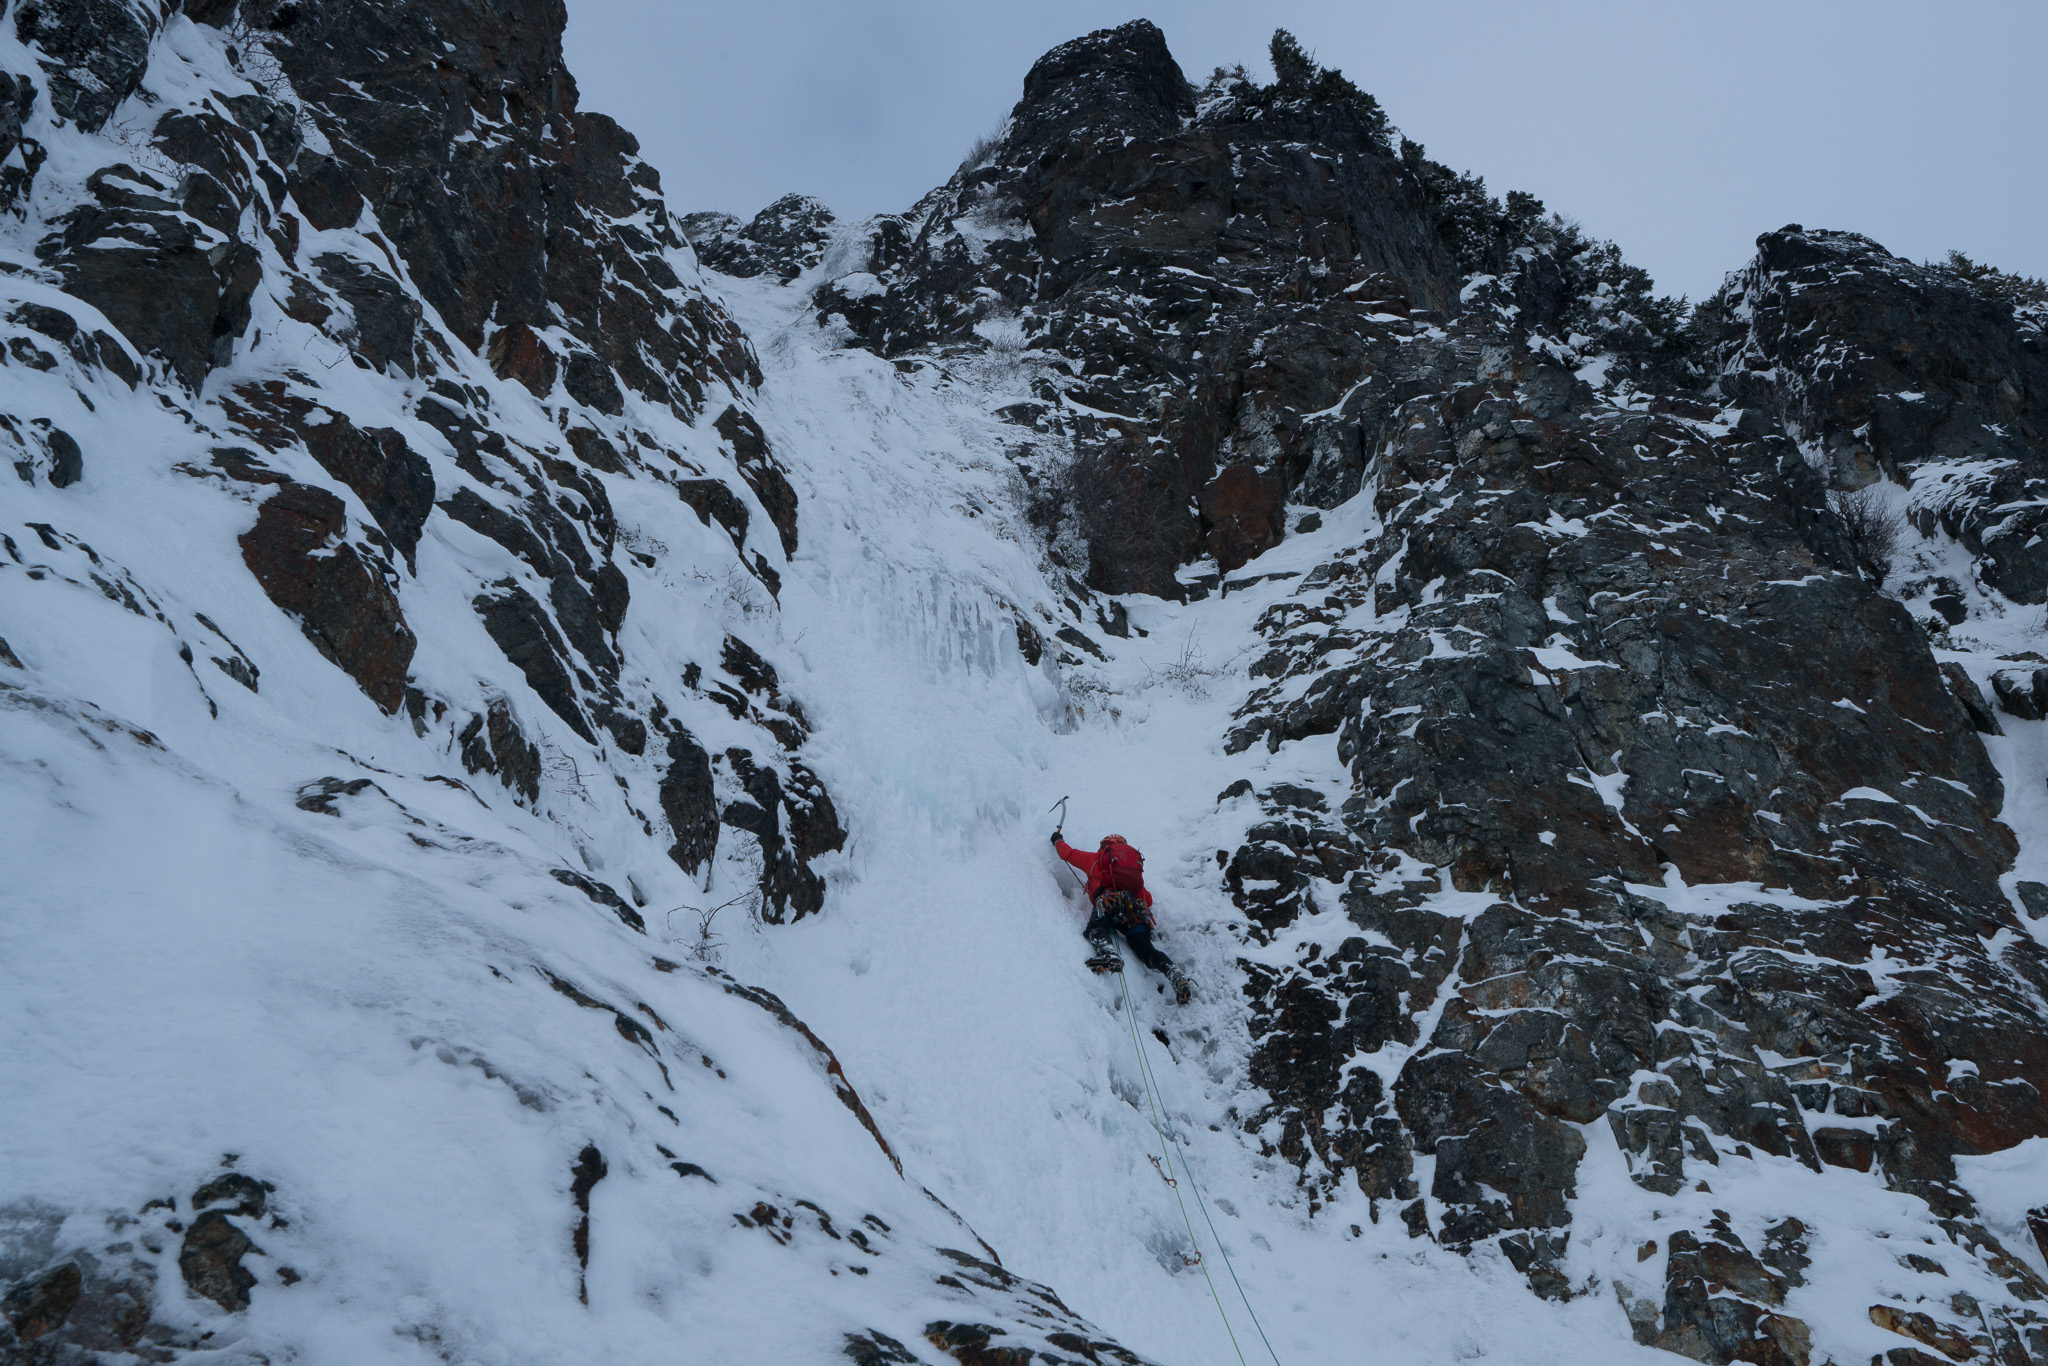
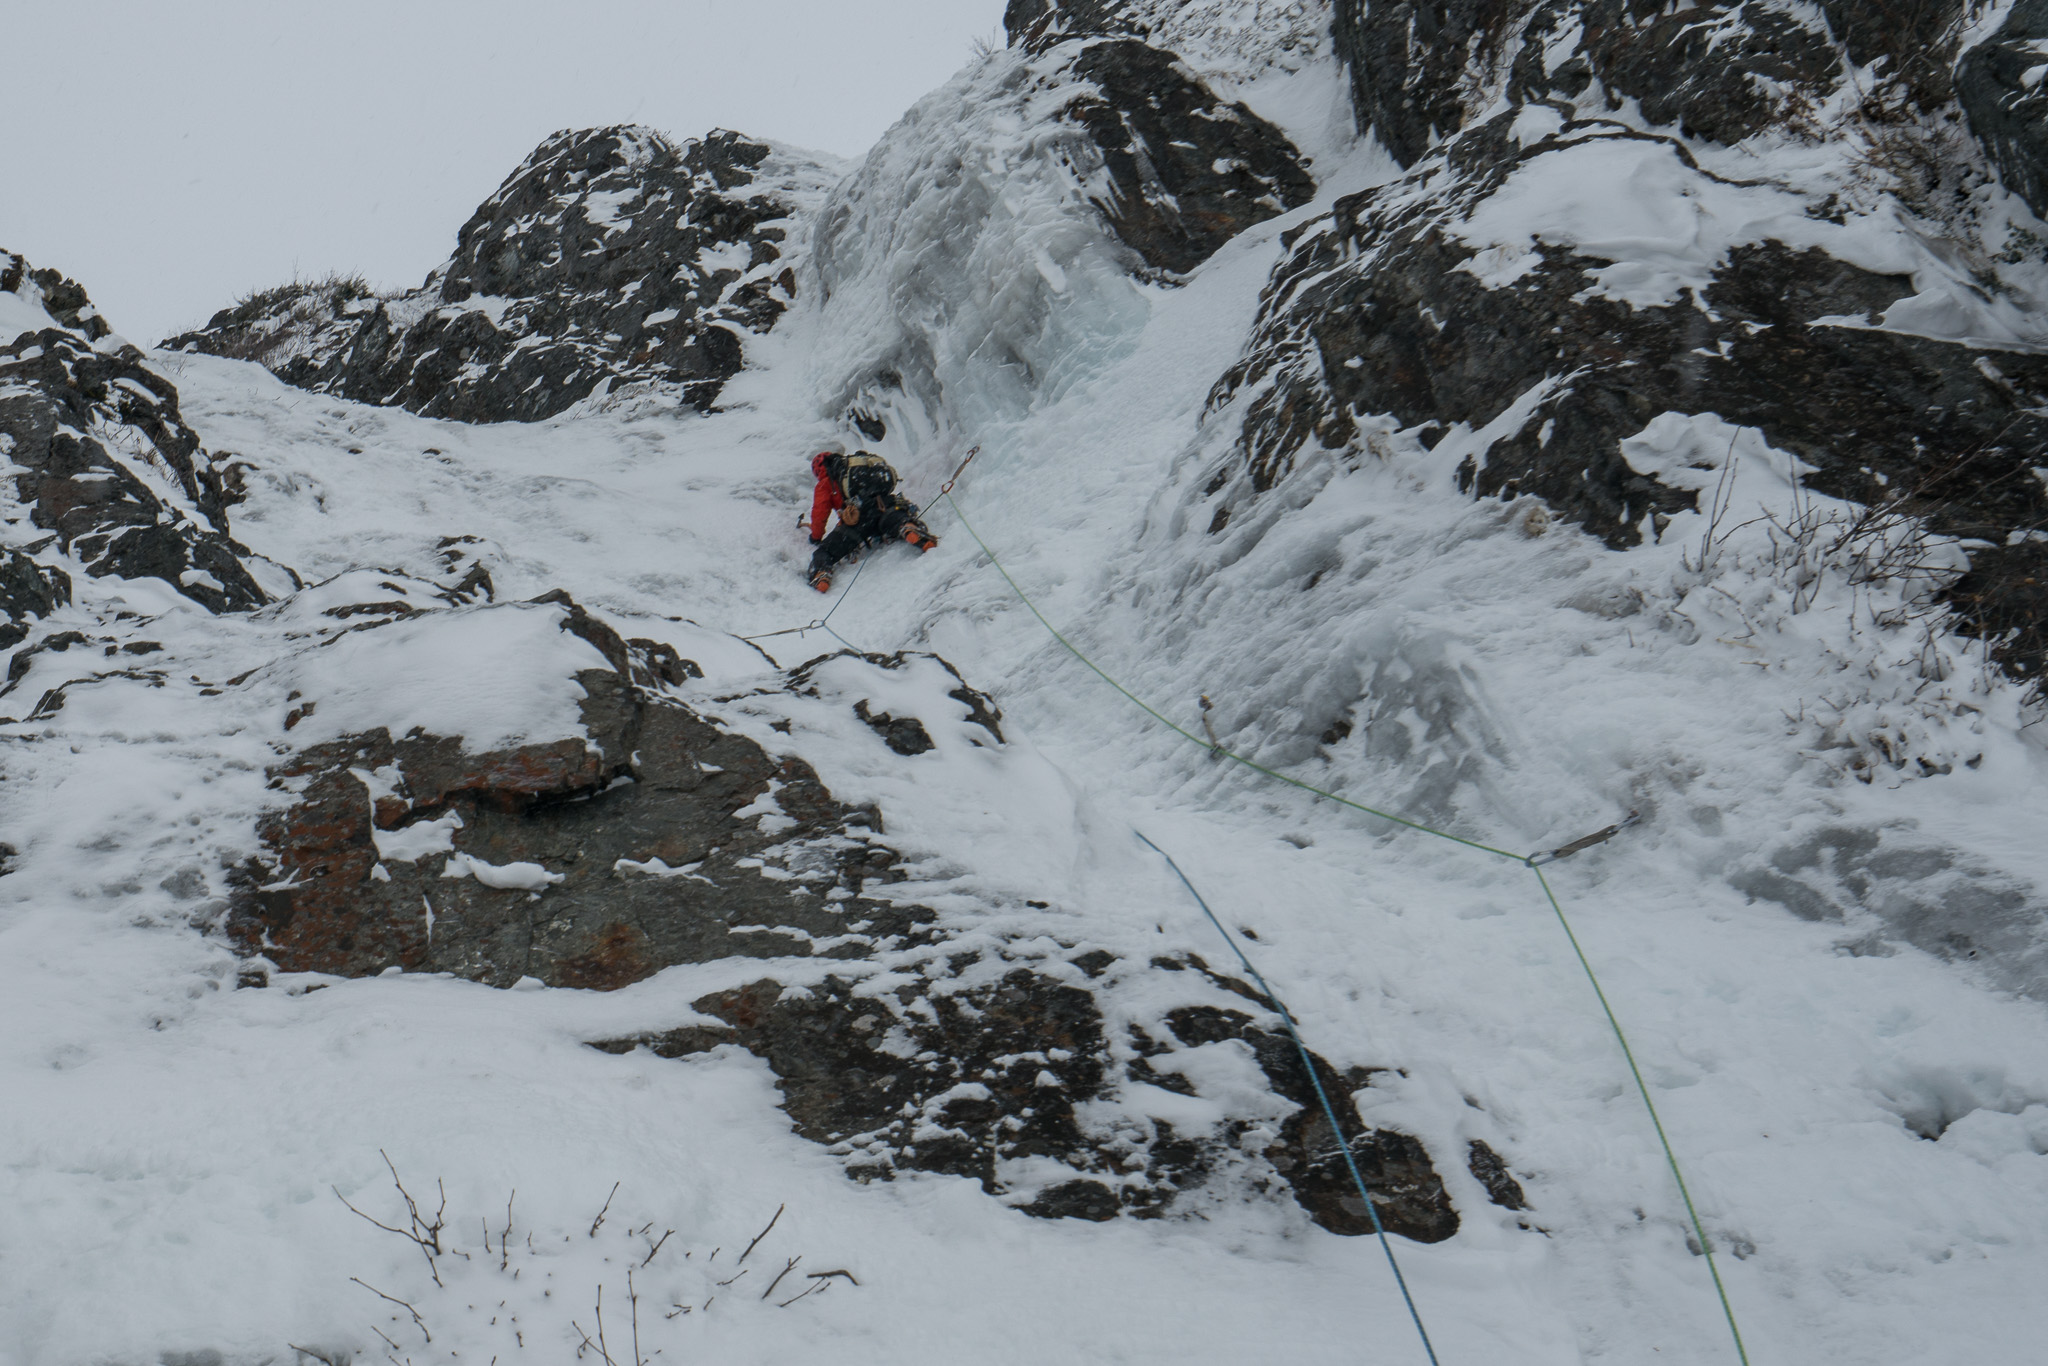
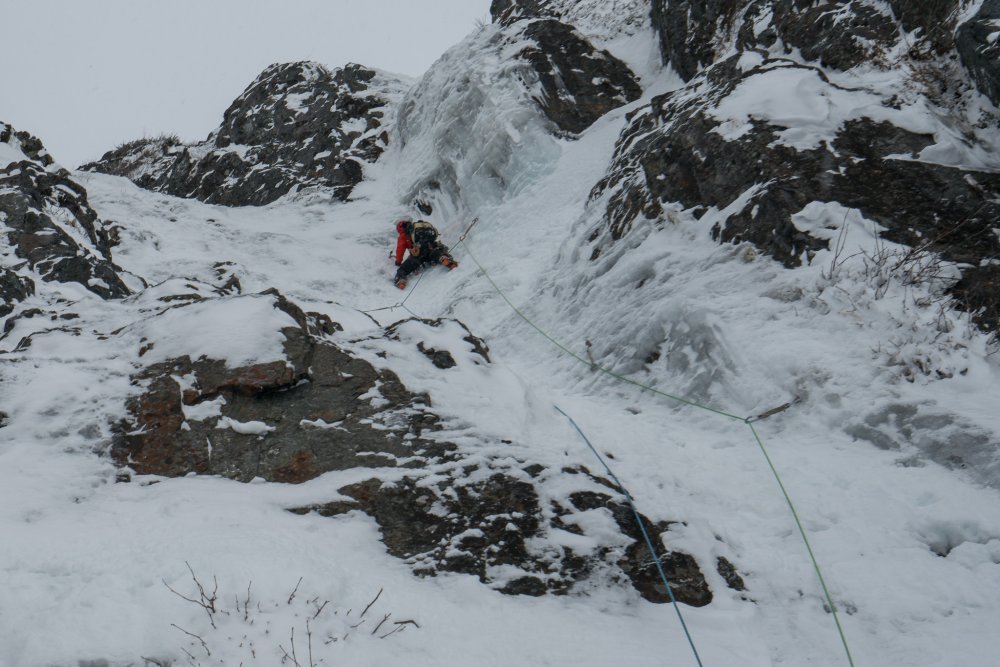
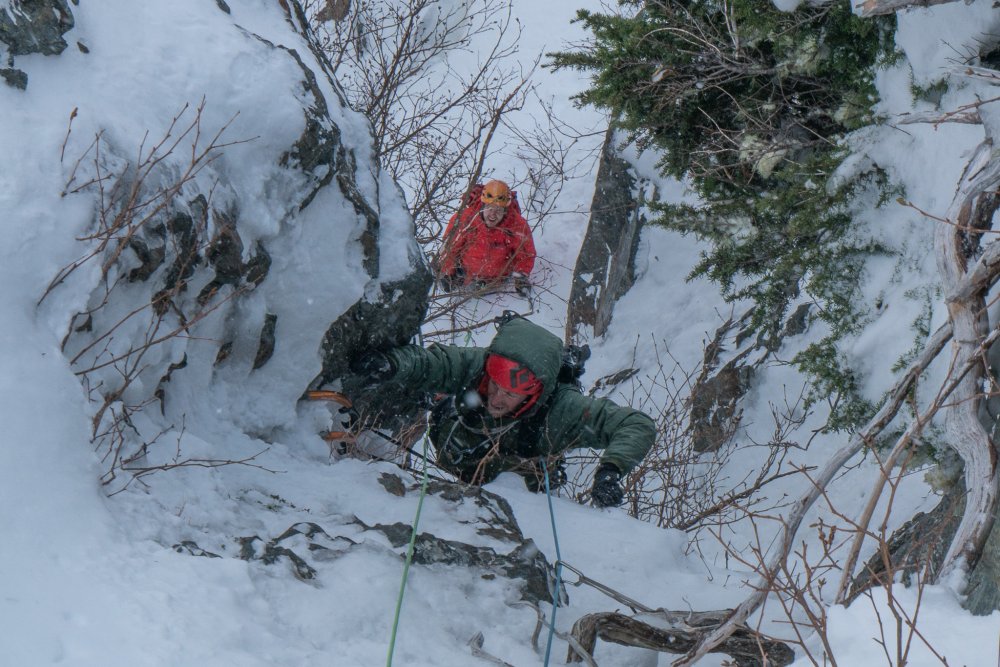
Trip: Rugged Mountain-Vancouver Island - New Route up North-West Face Date: 1/5/2014 Trip Report: Trip: Rugged Mt. Winter Ascent Date: Jan 3-Jan 5/2014 Rugged Mt. Vancouver Island Hunter Lee, Henrik Hinkkala Trip Report: After two years of waiting for the right weather window, the right temperatures and time available to climb, the stars aligned and Henrik and I found ourselves driving towards Zebellos in the wee hours of the morning hoping conditions would allow us to climb Rugged Mt. by its North-West Face. After failing in an attempt to climb Rugged in the Winter of 2010, we knew cold temperatures where the key to a successful climb. We had trepidation regarding the climbing conditions, as the Winter season has thus far been rather dry. Limited snow fall meant our ice line might end up being a mixed climb, or even a rock line in parts. Upon reaching high camp we were relieved to see that the route looked somewhat similar to the conditions of a 1992 picture we were using as beta. We simul climbed the yellow section and pitched out the green and red sections. The lower third of the route consisted of moderate angled terrain, most of which was hard pack neve like snow (front point crampon dream) and small blotches of ice with a few rock outcrops. When we scoped out the route the previous day we weren't sure if we were going to exit the lower snow field into a clearly visible chimney or continue moving up and to the right in order to avoid and go around it. Upon reaching the chimney, it was quickly decided (for good reason) that the ice within it needed to be climbed. This is where we started to pitch things out- the exit out of the chimney has a fun grade 3 section of ice. View looking up into the Chimney: Once out of the Chimney the terrain mellows once again, as you head straight up towards the left trending ramp that leads you to mid-mountain. After 3 or so pitches of climbing we reached this belay station. At this point the route turns to the right- when viewed from camp will go behind a rock buttress. As Henrik had on a previous trip descended off the mountain and looked down and seen this ramp, we knew we had a link to the upper part of the mountain. Upon finding the ramp in great condition we opted to quickly transition from belayed climbing to simul climbing mid-pitch and speed things up. We got our hearts going pretty good here as the length of the climb was becoming apparent. Here's Henrik leading the charge up the upper/mid mountain right trending snow ramp: Our simul climb ended when we ran into this pitch of ice. Once off the lower angled snow ramp we were forced to once again climb straight up an ice pitch. Henrik took this photo of me leading a fun pitch of ice: When we scoped out the route the previous day we had concerns for lower down near the chimney and for this section higher up on the mountain. We hoped that the rock beneath was sufficiently covered, otherwise the climbing would slow down significantly if we were forced in a mixed line. We definitely bottomed out a good percentage of screw placements, especially during these two pitches. The ice was good in places, but for the most part was pretty airy- I remember burying the 22cm mid-pitch in one occasion, the rest of the day the 13's and 16's were in use, and their teeth were getting abused. After climbing up I found a solid rock belay and opted to sit down and enjoy the view. We knew we were close to the left leaning ramp which leads to the summit...All smiles to be had today! After curling around and climbing above my comfy belay with a view, Henrik found a weakness and made an exposed traverse across a steep gully. Once across and above this gully we knew we were close to the upper snow ramp. And sure enough 100 feet out from his belay I was cruising up the upper snow ramp. Once at the top of the left trending upper Mt. snow ramp you're forced to go over the edge of its snow ridge top, down climb on the other side (5 feet or so) on an incredibly exposed snow/ice gully, then traverse 15' across (fortunately there is good pro on the traverse) and then tackle a short section of AI2+/AI3 ice with a monster drop off below. Once over that, there's a couple little benches and you're on the Summit! The views from atop Rugged Mt are stunning, and we were fortunate to find ourselves up there on a beautiful day! After taking some pictures and talking about the fun times on the North-West face, we descended down the East Ridge. We rapped 25 meters off a v-thread and found ourselves looking down towards the Rugged glacier, and to our delight there were a couple snow ramps leading off the upper slopes directly onto the glacier. Here's Henrik traversing the exposed East Ridge high up on Rugged Mt. We simul down climbed to the Rugged glacier- if a party so desired it's roughly 3 full 60 meter raps from the summit to the glacier. It's always comforting getting off the tricky terrain before sunset! I've been asked by many people over the years how they should go about meeting partners to climb with in the mountains, part of the usual answer I give them is "well get out and you'll probably meet some friends in the mountains!" Henrik and I meet on Rugged Mt. 3 1/2 years ago pretty much where I am in this picture...and yes the sunset that day was awesome and inspiring! One of the joys about being in the mountains is that every once in a while you're treated to a view that instantly makes you stop and just be in the moment- we had a few of them during this climb and on the descent from Nathan Creek Col we were treated to a few more moments like that: Going into the climb we knew that most probably this line had not been climbed, and that there were very few winter ascents of Rugged. After asking around and making sure, we have concluded that this is a new route for the mountain, and possibly the 2'nd or 3'rd Winter ascent. This Winter has seen minimal snow fall on Vancouver Island, and much of the Pacific North-West. The route is much more technically demanding than Liberty Ridge on Mt. Rainier, a D rated route, and felt a lot more like the technical climbing high up on Mt. Waddington rated TD-. If there's more snow on the route some of the funk we dealt with would probably be covered up. The ice pro on the route was so so, there were a few sections (the chimney) where the ice was solid, but a lot of screws went into less than ideal ice. We both had a few healthy run outs along the way. As it stands we opted to call and grade the route: Lee/Hinkkala, WI3, 4, 700 meters, D+/TD- When we woke up at 4:30 to climb it was -10 celcius, or 14 farenheit. This temperature was perfect, the snow was firm the entire route, and there was no sluffing or any kind. It had snowed in the few days previous to the climb, for the most part the snow pack was well consolidated- the only time we had foot penetration of any sort was on the descent down the East Ridge. I would climb this route again in a flash! Left Tent- 6AM Started climbing -7:30AM (fist 45 minutes in the dark) Summit-2:30PM Back at tent- 6PM Approach: As described in Phil Stone's Island Alpine the most often used approach for Rugged Mountain is via branch N20, a de-activated logging road off the Nomash main line. Unless you're looking to sign yourself up for an epic, use this approach. There was trail maintenance done in the Summer of 2013 making the approach much more bearable. The route is flagged once you're off the road. Here's Henrik eyeing up the less enjoyable part of the approach: We opted to camp at the same location I had camped the two previous trips in there. We could have travelled more on the first day, but seeing that the conditions were great (the snow was hard), we opted to shut er down early and rest in the afternoon. This also turned out to be a great spot to scope out our route: We were rewarded with a beautiful sunset that evening: Gear Notes: Our Rack Consisted of: -2 snow pickets -1 snow fluke/deadman -7 screws: 2-13's 4-16's 1-22 -Range of Cams from .3 to #2...we used a link cam as our #1 Red -Half set of nuts (6) -Half dozen Pins: 2 angles 2 knifeblades Bugaboo Stubai Softy -Bird Beak and Bull Dog -2 tri-cams 7 alpine draws 4 screamers We had two 60 half ropes, ended up just using one. Approach Notes:
-
[TR] Rainier - Ingraham Direct/Gib ledges 5/5/2013
Hunter Lee replied to roverguy10's topic in Mount Rainier NP
Good work making it thru the Ingy, it looked pretty broken up last Friday...haven't heard of many parties making it thru. I climbed the Gib Ledges last Friday, though the route was in decent condition. I totally agree later in the day things would be sketchier on the snow slopes; so if you do climb via the Ledges you'd have to leave Muir quite early, by midnight at the latest, earlier if your party is slower. The snow on the Ledges was soft and not very enjoyable on the return, though manageable last Friday- I was on skis so the descent to the Gib chute was quick.... Cooler temps at night will help firm up that section of the climb. Aside from the slushy snow on the Ledges the rest of the route was in good shape. Just get on and off it early, or ideally climb the DC when things it settle in. -
Seeking Conditions for Rainier, Gib Ledges
Hunter Lee replied to TeaBaron's topic in Mount Rainier NP
I climbed Rainier via the Gib Ledges Friday May the 3'rd. The route is in good shape, just be sure to get on it really early. You will not want to be on the Ledges later in the afternoon. Depending on your party's pace I'd suggest leaving Muir by midnight at the latest, the morning/afternoon sun will heat up the snow on the ledges making it progressively sketchier as the day goes on. I skied off the summit, so I got down quicker than a party on foot would, made the traverse OK, but the writing was on the snow that things could be a lot worse later in the day. -
[TR] Mt Waddington - Main Summit via Bravo Glacier
Hunter Lee replied to Hunter Lee's topic in British Columbia/Canada
I think three days is normal. If one was forced to they could pull it off in 2 days, you'd have a couple long days though. The view from the summit is second to none! -
Trip: Mt Waddington - Main Summit via Bravo Glacier Date: 7/14/2012 Trip Report: After 7 months of anticipation and planning, a dozen or so people coming then not coming, Shawn, Chris, Henrik and I landed on the Tiedemann glacier late Saturday night July the 14'th 2012. The drive from Vancouver, with stops took roughly 11 hours- if one was determined they could do it faster. We were lucky that a helicopter was available shortly after we arrived- Summer fires in BC lure the White Saddle helicopters away from climbers for hours at a time. Mike and Audrey King at the White Saddle ranch on Bluff lake are super helpful, they'll get ya in there, best to show up ready to go cause things happen fast around there. The route up the Bravo glacier starts off easy and progressively gets more and more challenging. Zipping up to Rainy Knob is pretty straight forward, after that you will slow down as more and more crevasses appear. You will most likely need to belay someone across a few of them, as terrain and snow bridge condition merit caution. Note: we climbed in Mid-July, the snow pack that year was slightly above average, though the weather up until July wasn't all that hot. What we dealt with is probably an average scenario for that time of year. Once past Rainy Knob the terrain became a little more challenging, there were two sections that we pitched out: one was a crevasse above Rainy Knob the other was the Headwall just below Bravo Col. Once past Bravo Col the terrain once again turns mild with a few cold holes here and there. We once again encountered some difficult terrain high up on the hill, a crevasse just below the Tooth and Mt. Waddington required us to climb down into and up the other side. Note: there were other options: a steep snow back with a HUGE drop off or a long walk around could have got us to our high camp as well. The climbing begins once you leave the upper glacier just below the Tooth. This is a mix between 4'th and low 5'th class terrain. We pitched out the last bit before the Notch. Once at the notch you'll get a good dose of exposure, and you'll enter the chimney on the South East side of Mount Waddington. The book rates this as 5.7. We opted to climb up and to the right out of the Chimney as the left exit looked caked with snow and rime. The Mazama exit is rated 5.8, as is the direct exit. The rock is loose in spots here, so be careful! The views from Waddington are second to none. This area has a South American/Himalayan feel to it. Definitely worth the time and effort! High up on the route, above the SE chimney you will enter easier terrain. Here you see Henrik and I with the Tooth behind us...If I ever go back I'll definitely climb the Tooth! Not sure what the terrain looks like when there is no snow and ice, it could be low 5'th, for us it was mixed terrain that required rock pro, ice pro and snow pro. We all summated Mt. Waddington, there wasn't much room up top. This was the most exposed summit I've ever stood on! The view from the top is breathtaking to say the least. All in all it took us three days to climb up there. Day 1 from the Tiedemann to just below the Headwall on the Bravo Glacier. Day 2 from just below the headwall to high camp. Day 3 summit climb. This is the view from the main summit looking at the North-West Summit. Not much room on the summit: The Route We ended up pitching out 6 pitches, if conditions were better we might have scrambled more. The route was mixed, MI 2, with some rock at 5.8- though most felt 5.6 or 5.7. Yellow is the descent line down from the notch onto the upper snow pack. From high camp to the summit and back took us 13 hours. In better conditions we would have been much faster....though the ice and mixed climbing made the trip that much more enjoyable! Pitched climbing up high. Rack Used We used a standard alpine rack: -set of nuts -5 pins- knife blades, bugs, and an angle -full range of cams up to #3 Camalot, we doubled up on .75 and #1 -5 screws, 10cm, 2-13's, 16cm and one 22cm (for v-threads) -2 pickets -alpine draws (12 in total), be sure to bring a handful of double length slings for horns. Approach Notes: javascript:void(0)
-
Wow! I saw the biggest avalanche that I've ever seen live rip down Thermogenesis last year when I was up on Lib Ridge...Hat's off to these dudes, that's something else...won't catch me doing that one though...wowzers