Riley81
-
Posts
240 -
Joined
-
Last visited
-
Days Won
1
Content Type
Profiles
Forums
Events
Everything posted by Riley81
-
 Sweet looking climb. Gonna put that at the top of the list of climbs to get on!
 -
[TR] Mt Index - North-Middle-Main Traverse 07/10/2021
Riley81 replied to Riley81's topic in Alpine Lakes
We didn't add to any of the existing rap stations and had to make 3 additional ones. Probably bought about 50' or so of webbing and we had 10 or so feet left. -
Trip: Mt Index - North-Middle-Main Traverse Trip Date: 07/10/2021 Trip Report: The weekend of the 10th and 11th of July Bobby, Chad, and I spent 2 days climbing the North, Middle, and Main peaks of Mount Index. Done as a traverse from north to south this route offers amazing exposure, complex route finding, and engaging climbing. Most interestingly is the proximity to civilization; the remote feeling you get high up on the peaks in juxtaposition of the ever present crowds of Lake Serene and the thrum of the weekend traffic is a dynamic I have not found elsewhere in the Cascades. I have stared at this mountain many times over the years, but always put off the traverse due to timing, lack of solid parters, or lack of physical ability. Fortunately all of the pieces fell together this summer and I had no reason not to do the climb, besides the well deserved reputation of the mountain and the route. It is a big route indeed with over 4k feet of technical scrambling and climbing. Long sections of steep sometimes loose rock on the way up and committing rappels on the way down keep you from gaining each peak. Also for any normal person, it takes an overnight bivy on the middle peak that may or may not have water. For us it was two 14+ hour days, but they were rewarded with one of the most amazing bivies I have slept at and stunning ridge climbing with views not only of Glacier Peak, but Seattle and Bellevue as well. Information on this route was a little hard to come by and it was one of the first times in a while I found the Becky book to have the most reliable route description. We also used trip reports from Tom Sjolseth and Jason Griffith found on this site. Both were helpful. I have added some beta to this trip report for those interested as there were some definite holes in the becky description. We left the parking lot about 6:30 am and enjoyed a talking pace up to the lake on the steep trail. The first views of the route come just before the lake when you can see the traverse in its entirety. As we got to the lake we got fresh water. We did not know when we would be able to get water next as the N face appeared basically dry. Bobby pondering what he had gotten himself into. We skirted the trail along the west side of the lake until the talus slope then headed up to the base of the North Face. The North face of the North Peak of Index is about 2500 feet of technical climbing and scrambling. None of it is extremely hard, but protection can be poor and belays hard to come by at times. While we climbed we passed many rappel station of various quality as well as old fixed pins so it was not too difficult to know we were on route. Route overlay of North Face of North Peak of Index. From the toe of the NNE rib we started up very brushy trees until you could gain the rib. We followed the rib straight up for about 100' then cut left at a bushy section to get into an open book. Climb up this before trending back right onto a long slabby section. Ascend the slab until reach a small roof feature. There is an anchor here made form a pin and nut just under the roof. From here we began simul climbing off left trending around overhanging roof features. The steep walls will kept pushing us left until we gained a treed ledge with an open book above. This is the crux of the route. I climbed an open book, that is more of a face, up about 50-60 feet until it forces you off right on a sharp traverse to gain a long gully system. There were 2 fixed pins at the point of the traverse right that I clipped for pro. The gulley system can't bee seen from the lake or trail as it is facing north. We went up the gully for 300-400 feet until we were able to traverse right into the open bowl of the north face. This put us in about the middle of the bowl at this point. Once there we went left into the obvious large gulley system. Most climbing was done on the right of the gulley until you can traverse right to the notch at the start of the North RIb. The North Rib is pretty obvious once you are there. It is great exposed climbing for 2-3 pitches. Looking down from above the North RIb. Once above the North rib the climbing is below 5th class with mostly exposed moved of 4th class. The false summit is gained via steep heather gullies on the east. We were able to find a patch of Snow just below the False summit and refreshed our water supply. From the false summit you scramble through a series of steep gendarmes. While the climbing is technically easy the exposure it insane. The final climb to the true summit is on the North face and is mostly heather and loose rock. Nothing too difficult, just very exposed. Exposed scrambling along the ridge from the North False Summit to the North Summit. More Insane exposure along the ridge to the North Peak. North peak at top of picture. View toward Main Peak from North Summit. We summited the North peak at about 3 pm. This is where the real choice is made. It is still possible to descend the North face, but once you head down to the North-Middle notch coming back becomes much more difficult. Of course we didn't do all that climbing with overnight packs to not at least try to find our way. At this point it seemed very unclear from the becky description as to where to go. He illiterates to descending to 4880' in a gulley to the west, which is not at all what we did. We descended the south side of the peak to the first gendarme and rappelled to the west about a rope length down a gulley from a block that is kinda hidden behind the gendarme. HFrom the end of the rappel we traversed back up the east side under the gendarme and descended down a gulley to the east about 150'. We did one rappel down the gulley to the east, but could have easily down-climbed. From here you climb back west and up to a notch between the second and third gendarme and rappel down to the west side of the ridge. Traverse down along the ridge on the west side until you get just above the North-Middle notch then do one rappel down to the notch. Not too complicated right? North Peak as viewed from the Middle peak. One can see pretty well how the descent from the North Peak to the North-Middle notch is done from here. This is the second rappel shown in the picture above. The block with all the slings is a pretty obvious point to get to and know you're on the right track. Chad and I getting ready to rap off the block down to the west side of the ridge. Once down to the North-Middle notch it is a simple matter of getting up onto the ridge then climbing this up and over the false summit of Middle to a bivy site we were hoping would have a patch of snow near it. Exactly where to ascend up to the ridge from the notch was unclear. We ended up traversing left about 50' and ascending a shallow east facing corner, which I think is what becky describes in his guide. We could not see that the corner was shallower until we got right underneath it. Once we gained the ridge we were treated with some of the best climbing of the trip. Gorgeous views all around on a knife edge ridge that went on for about 3-4 pitches. We continued this up and over the Middle false summit to one slightly overhanging rappel down to the notch between the Middle Peak false summit and Middle Peak. And just as luck had it there was still a small snow patch to get water from for the night. Amazing ridge climbing in route to Middle Peak. Almost to the Middle Peak false summit. Chad hoping for the long day to be over along the North Ridge of Middle Peak. We got the bivy about 8:30 PM. We melted snow, drank a little Jim Beam, and settled in for the night. The bivy is first class given what else is on the route. Plush and flat with plenty of room for 3, and perfectly located to split the climb into 2 relatively equal days of work. Celebrating getting to the bivy and a good night of sleep. Beautiful sunset over Mt. Persis. The next morning we got going around 7:30 AM and began the ascent to the Middle peak true summit. Most of the mornings travels were fairly easy given yesterdays work. The Middle peak is gained by the east face. Traverse to the east side and ascend broken slabs and heater until the summit is gained. Bobby excited to get up the Middle Peak of Index, one of the most difficult to reach in the state. Sunset falls can be seen in the middle of the photo in the background. From here Becky describes getting to the Middle-Main notch in one sentence. "Descend easily to the Middle-Main Peak notch". I am gonna have to disagree with Becky on this one and say it was a bit more involved then that. We did 2 rappels on the way there and switched from one side of the ridge to the other multiple times. We started mainly on the crest until steep rock forced us down to a gulley to the east. After passing this first gendarme we were forced back onto the west side with a short rappel down to a ledge system. We traversed the ledge system until we went back east onto a broad series of light colored slabby ledges. These ledges had snow for water. From here we went down the slab until we cliffed out and had to cross back to the east side down a steep series of steps leading directly toward the notch. From here one can see the notch. A steep red colored gulley trends back east and we set up a rap anchor on a tree above this gulley then rappelled down it under a chockstone. At the end of the rappel we traversed into the notch. In all parts there was basically only one way to go or it cliffed out. During this whole descent we were treated with the view of the impending north face of the Main Peak. It is very ominous looked at straight on. Foreshortening can be a real mind killer, but it is all there and the climbing is moderate, if not loose and sketchy in places. Technical crux of Main Peak north face coming out of the Middle-Main Notch. We climbed a short chimney out of the notch that lead to more low 5th class climbing. overall the idea was to climb the initial steep wall out of the notch, then trend left until the main ridge emanating from the South Norwegian buttress can be gained. This is climbed until the Wedge gendarme is reached. The climbing involves sections of trees and exposed ridge as well as a cool left facing corner to gain the upper ridge. Once at the Wedge gendarme we down climbed a short section then up the main face until we found a suitable place to traverse across the giant red gash through the middle of the face. View of the North Face of Main Peak from the descent down to the Middle-Main notch. High quality rock we had to traverse to get out of the north face and onto easier terrain. Once across the gulley we traversed ledges until you can pass through a notch and onto the west side of the Main peak. From here the technical climbing is over and it is a short trip to the summit. We continued traversing south from the notch past 3 gullies until we could ascend a heather and dirt gully up to gentle slopes near the summit. Walk SE toward the broad summit of the Main Peak of Index. We were excited to reach the summit. 3 peaks in 2 days of 1 mountain and still we were only half way there. Index does not give up the goods easily and we still had the arduous descent of the Hourglass gulley to get done. None of us had crampons and I only had approach shoes on, so the idea of descending steep snow was questionable at best. The trip to the top of the gulley was a quick easterly traverse from the summit. At the top of the gulley system we stayed skiers left and did one initial rappel off a tree to get onto a snow field. We made a gingerly descent of the snow field to a band of rocks and trees and did two more rappels from here to get down below the hourglass feature. At the time we passed it there was a 5-8 foot wide moat at the bottom of the hourglass that was very deep. Tedious down climbing of snow and a few good snow bollards got us down to the talus slope and most of the difficult descent behind us. We headed down until we got to the top of the ridge visible from Lake serene. We followed the ridge along its crest and did one rappel along the ridge where it got very steep. Talus down to the lake and traverse along the south side until we got to the main trail. It was a long day to get down and we didn't get back to the parking lot until 10:30 pm. It was well worth it though to be able to do such a big adventure so close to home. I am pretty sure I could see my house from the bivy. I would recommend this climb to anyone looking for a big adventure. If you have honed your alpine climbing skills and wish to test them all then Index provides as it always has. Gear Notes: single 60 or 70m rope will work double rack to 2" and set of nuts Long slings for trees and horns. Extra tat for rapel anchors as necessary Approach Notes: Lake serene trail is pretty nice given some of the approaches to climbs in this state.
-
Jeez, coming from you I don’t like the sound of sketch balls. Do you anything about rock quality along the east ridge climb of Fernow?
-
We’ll at least it isn’t covered with gendarmes. I’ve seen one trip report on here, but it seemed rather odd because the person described lots of difficulties on the way there, with rappels, but no difficulties on the way back. Do you know anyone who’s done it?
-
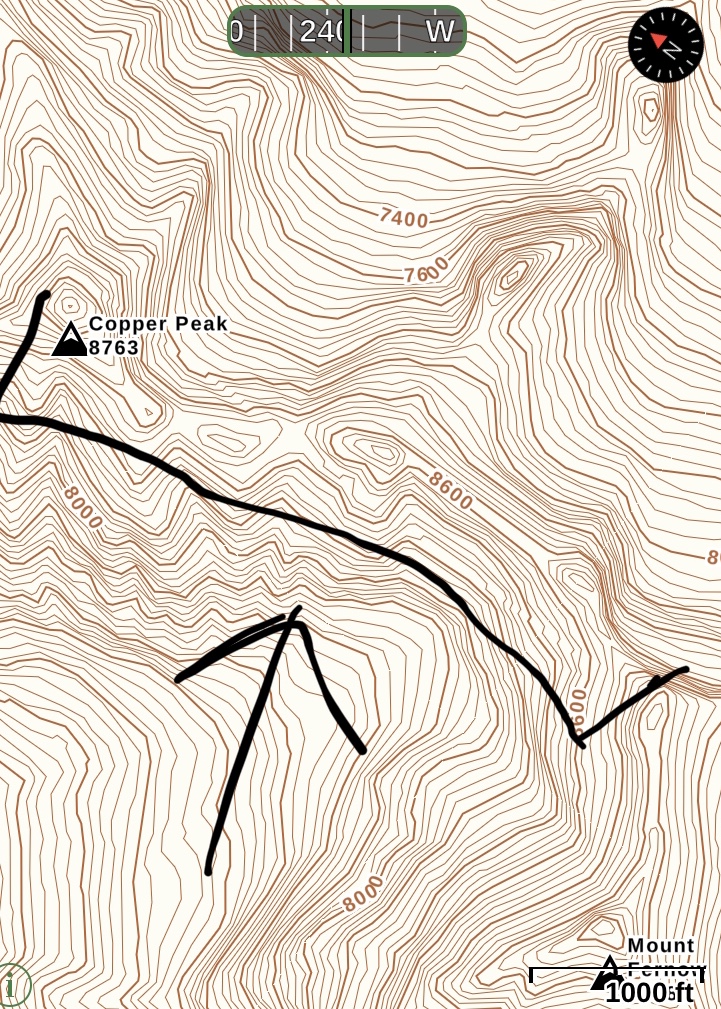
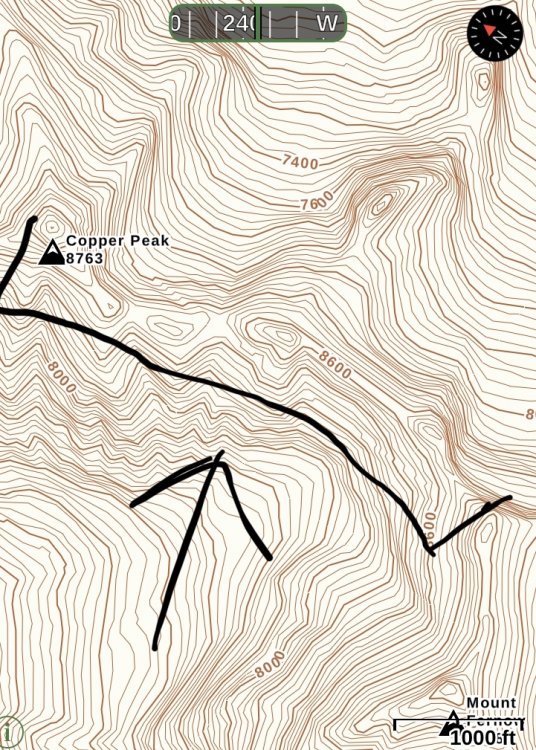
Anyone who’s traversed the ridge from Fernow to Copper care to share some route info. I have found a lot of questions about it, but not much solid info. I am wondering about the portion included in the attached photo.
-
Very good condition touring setup, all last years models, used only 5 times, mostly in bounds. 176 CM Black Diamond Link 90 skis DIAMIR VIPEC 12 TUV bindings La Sportiva Sidrel 2.0 Mens size 28 Black DIamond Glidelite Mix STD skins (Cut to fIt) $1200 OBO Sold as package only PM to make an offer
-
[TR] Dome Peak - Three Fingers, No Lube 6/29/2016
Riley81 replied to KaskadskyjKozak's topic in North Cascades
I would say doing Dome and Sinister together in a day is easier if you come in from the East and approach through the Gunsight notch. The Chickamin glacier is amazing! -
Check it out CC.comers! I am proud to announce that Everett Washington will continue to have a Climbing Gym in the heart of Downtown!!! My Company Summit Everett will be taking over the Cascade Crags facility and keeping it going for all of the residents of Snohomish county. Vertical World is on there way out and we plan on revitalizing the facility and opening it back up for the local climbing community in January 2016! Summit Everett is a small company owned by three local climbers who want to give an establishment that we have loved for many years a fresh new look and keep it open for the local climbing community. Check out our expanding website and leave your email so we can keep you informed with great deals and all the improvements we are planning for the Summit Everett Facility, or check us out on Facebook, give us a like, and share with your friends. We will be posting regular updates or our progress as we work hard to make Summit Everett an amazing place for the local climbing community! Climb Local!! Summit Everett
-
Cool! Gonna have to check that spot out soon.
-
Nice! is you ever want to part with that pan let me know. I'll give it a good home, and the rock looks sweet!
-
Thanks for the TR shappart. Love the tamale pie pan and that rock looks sweet! Is that all limestone?
-
Nice work finishing of the Stuart range.
-
Very cool!
-
[TR] Mt Slesse - NE Buttress 8/7/2015
Riley81 replied to Matt Foley's topic in British Columbia/Canada
Our own little piece of The Valley in the good old NW. Are all the ledges sticky too? -
[TR] Les Cornes - Sprung C#$k Erect 6/28/2015
Riley81 replied to Rad's topic in British Columbia/Canada
Strong Work Boys! -
Trip: Mount Rainier - Liberty Ridge Date: 6/9/2015 Trip Report: June 9 and 10 Mike Rynkiewicz and I (Daniel Coltrane) climbed Liberty Ridge. With a solid weather window and slightly decreasing temperatures we found good conditions on the ridge with slightly soft snow and small sections of exposed glacial ice in the upper portions of the route. A good boot pack was in place so we were able to follow previous parties for the majority of the route. The route currently stays close to the ridge the whole way skirting the upper ice face on climbers right. Short sections of low angle ice were encountered just above the black pyramid and just below Liberty Cap. Plenty of rock is exposed on the lower ridge and the carbon glacier is close to separating from the ridge at the current access point low on the ridge. Our initial plan was to climb to Thumb Rock the first day, but with the site currently in horrible condition, due to avalanche debris and continuous rockfall, and no visible bivy sites I am glad we elected to camp at Curtis Ridge and climb Liberty Ridge in one push. It made for a big day, but upon arriving at Thumb rock and having two rocks roll through in the 10 minutes we were there I was happy about the decision. Mike enjoying a little shade at the Curtis ridge Camp The ridge. Early morning crevasse crossing on the Carbon. Sunrise on Thumb rock. Thumb rock campsite remnants. If you want to bivy here expect to put in some work making a descent site. The ranger said previous parties had built walls around there sites. I saw no evidence of anybody doing any development so it must have been obliterated since. Mike sending the last bit of the ice face above the black pyramid. We took the shortest route through the exposed ice but still found thin snow over underlying glacial ice. Getting ready to send the last technical section to gain Liberty Cap. From here we slogged it out to the summit since Mike had never been. Not coming back here for a while, of course this will not be the first time I have said that. Sunset on Rainier from Paradise. Gear Notes: 5 screws and 2 pickets Approach Notes: Accessed the ridge from the west side. Glacier crossings were in good shape.
-
Looks like we got a name theme going. Strong work fellas! I will be checking that out for sure.
-
The third couloir is much better with snow in it. There isn't much gear, But it the lowest angle of the three couloirs, so it is pretty tame. I found a couple small cam placements along the climbers right side.
-
How to aid solo when there is no available anchor
Riley81 replied to Jacob Smith's topic in Climber's Board
Don't risk your life on a bad anchor just cause you can't find a partner. The anchor is your main point of connection to LIFE! A series of cams in pods does not equal a good anchor. And belaying aid pitches is fun. I hate the old adage that everyone should aid alone cause belaying is so boring. Get my number from Ryan and a six pack of good IPA and I'll throw you on a gri gri and you can climb till your hearts content. Just don't ask "watch me" cause I won't. It hurts my neck. -
Trip: Dragontail Peak - Gerber-Sink Date: 4/4/2015 Trip Report: Ryan Hoover and I climbed the Gerber-Sink route by the most obvious path; Straight up the white streak and left at the fin. It was a very direct and enjoyable route. We started from the trailhead at 2:45 AM and started climbing at 6:45 AM. Hit the summit at 10:30 AM after climbing the route in two long simul blocks. After a nice break on a windless summit we headed down Asgard back to our wonderful shoes at the lake and were back at the car at 3:45 PM for a nice 13 hour round trip. Conditions were amazing and the mixed pitches just below the fin were adequately protected. Just save a #2 or #3 camalot for the crux in the second section of mixed climbing. Getting ready for the sunrise start. Ryan heading up the start of the route on nice ice and snice. Cruising the huge simul block that took us up about 1600-1800 feet of the face. So many good sections of ice chimneys. More Ice Chimneys! Can you say more ice chimneys. Ice chimneys! Ice chimney close-up. This was the first belay after we ran out of gear. It was at the bottom of the snow field below the fin. Cruising the second block below the fin. From here you keep going up through the gully that funnels you up and left to the third couloir on the TC route. The first of the two more difficult mixed sections. Getting er' done! Looking down at Colchuck lake from between the two mixed sections. Working the crux mixed section. We guessed it was about M4ish. Good gear is to be had in a hand crack on the right face. Which also provided good hand jams to compensate for the super thin neve on the slab. Stoked to be at the end of the third couloir! Relaxing and hydrating on the summit. We took advantage of the windless conditions and hung out for a half hour or so. Summit Pano. Mt. Stuart with its North Ridge standing proud. Witches Tower Conditions are great right now! Go up and get on this thing! Gear Notes: Single rack to 3", set of nuts, few KB's, 6 ice screws. Approach Notes: Road is open to bridge before trailhead. Approach shoes worked to the lake.
-
Not much of a joke person eh? I guess humor is overrated.
-
Here are a few photos with lines on them that show approximately where we went. Photos are taken by and courtesy of John Scurlock. Photo by John Scurlock Photo by John Scurlock Photo by John Scurlock
-
It took us 18.5 hours round trip, which was very conditions dependent. I have asked John Scurlock if he would let me put a line on one of his photos, but until he responds I don't have a good photo of the whole face as it is quite complex and large and cannot be completely viewed on the approach.
-
Yes I was thinking this was the FWA and the only other route. Tom- All I know is that this is not the first time I've followed in your footsteps to some of the most amazing places in the cascades.