Leaderboard


Popular Content
Showing content with the highest reputation on 07/26/21 in Posts
-
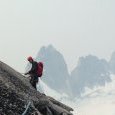
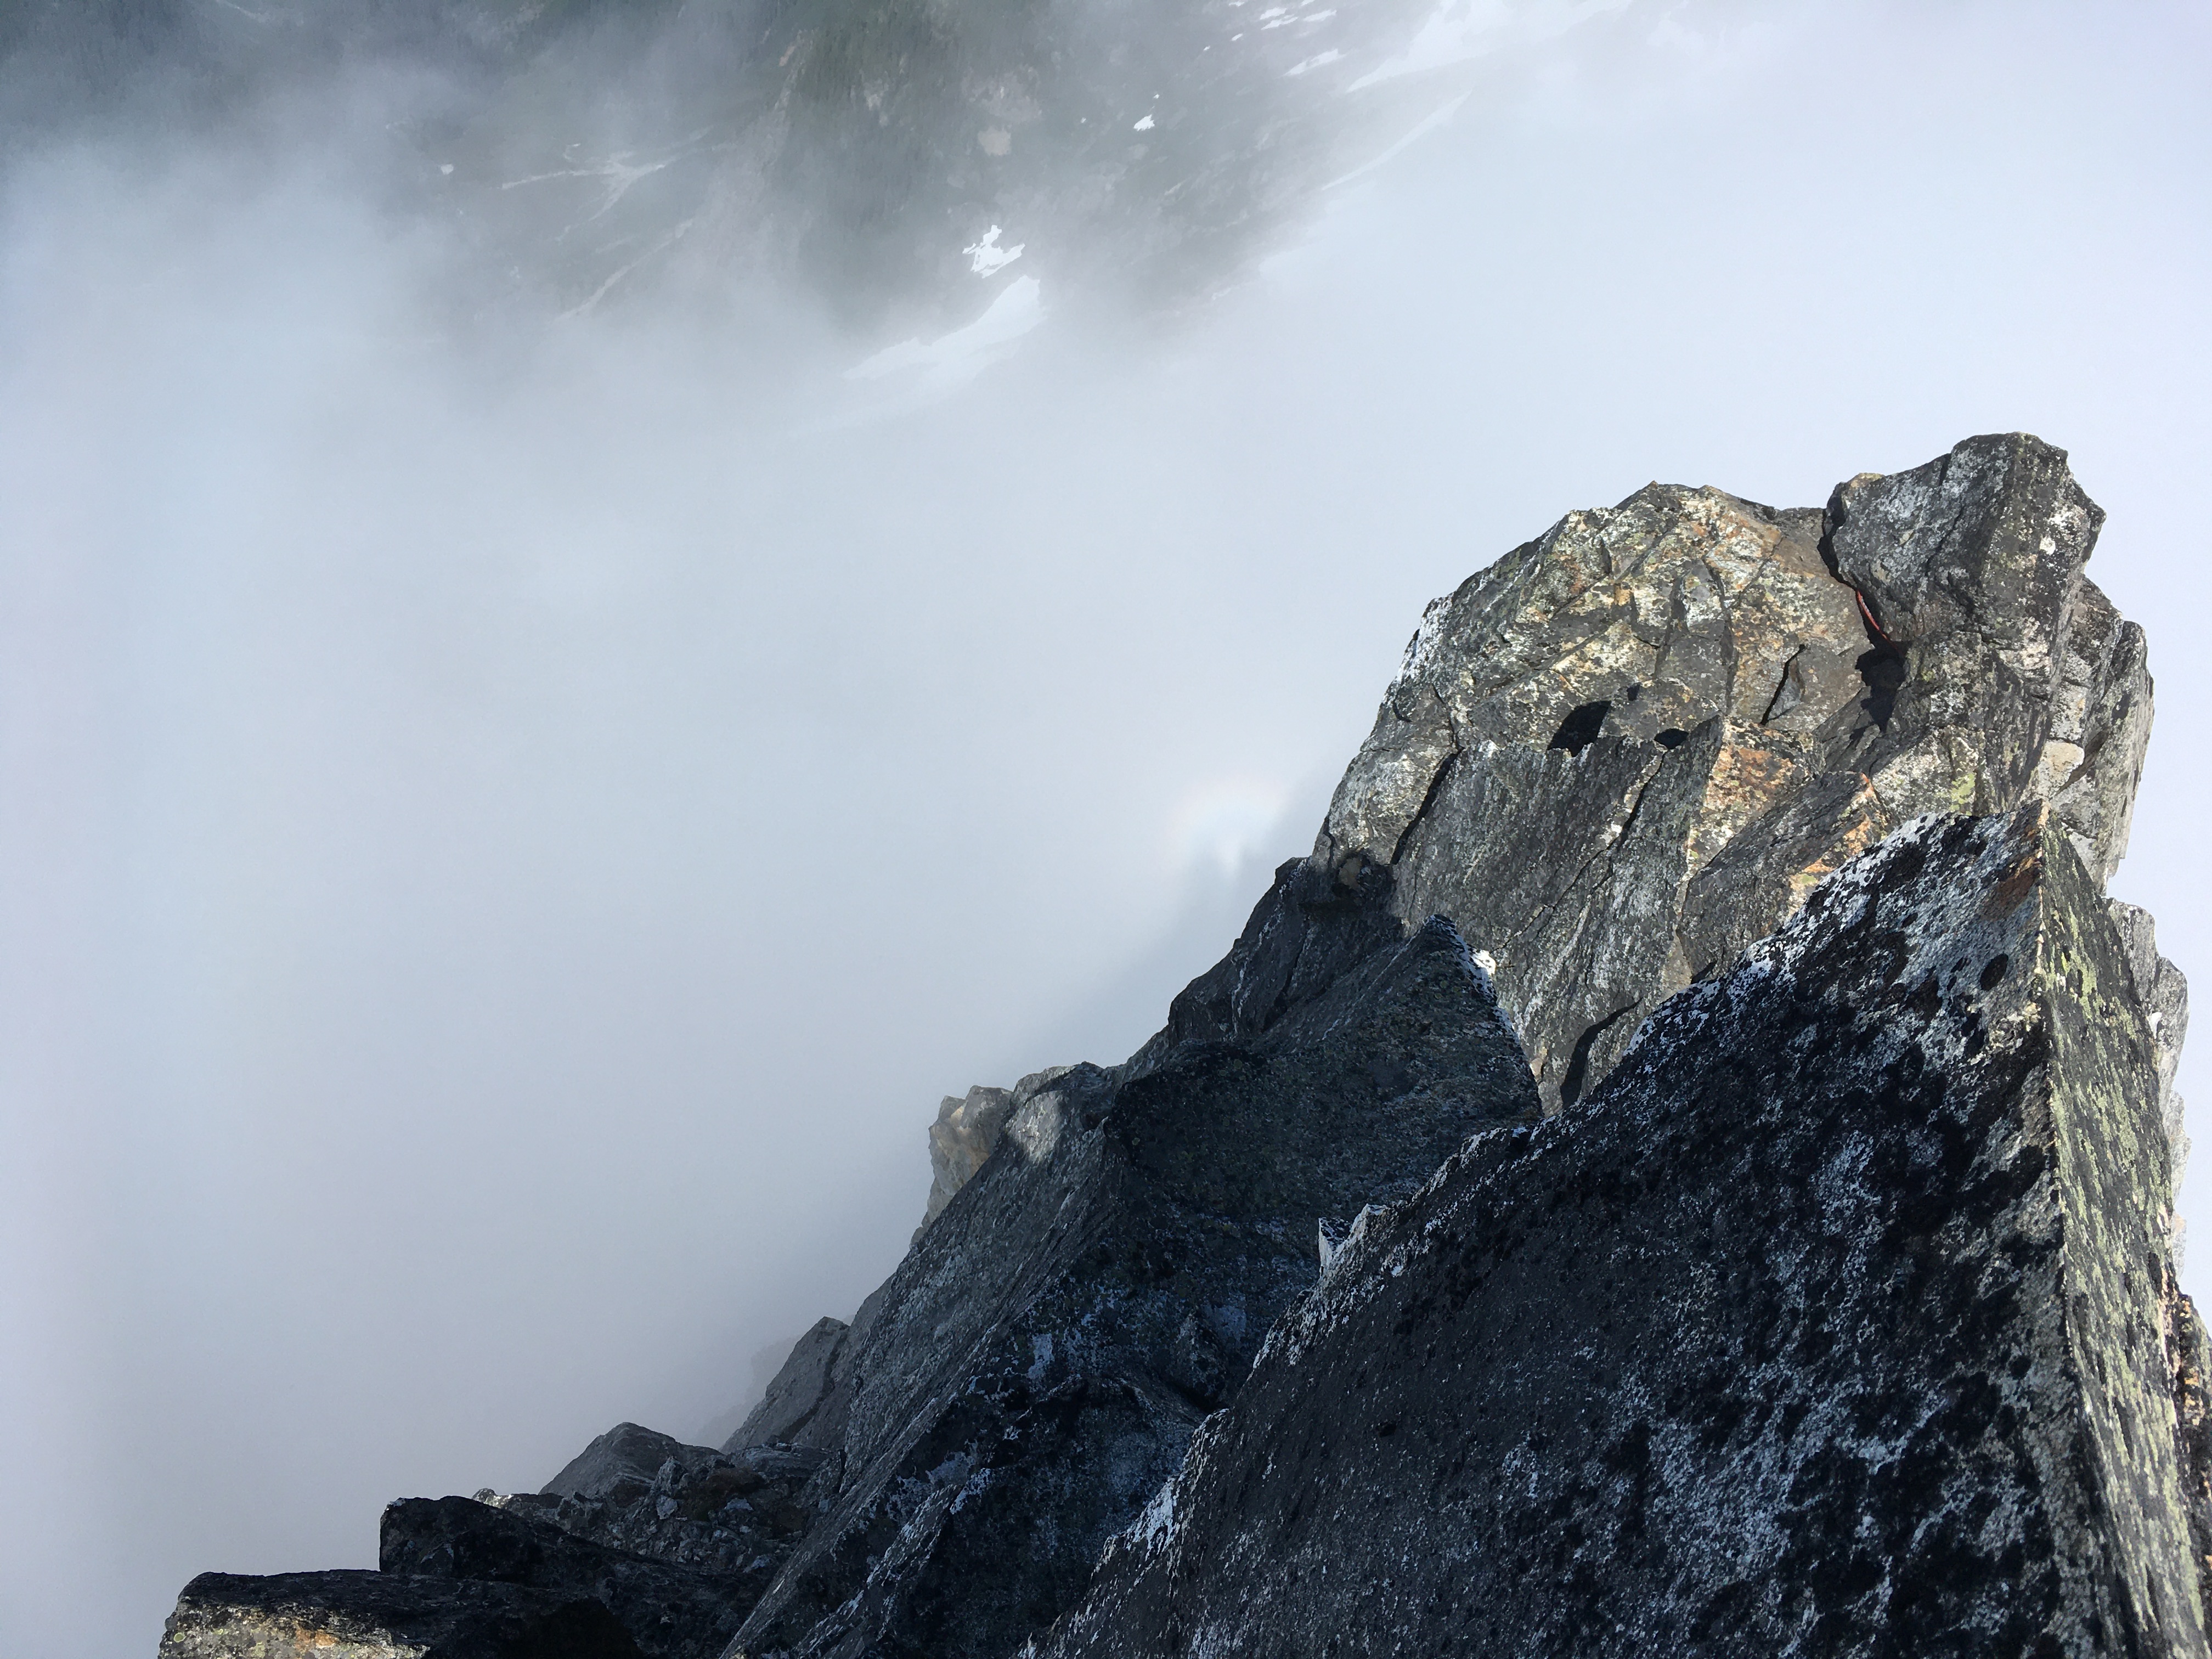
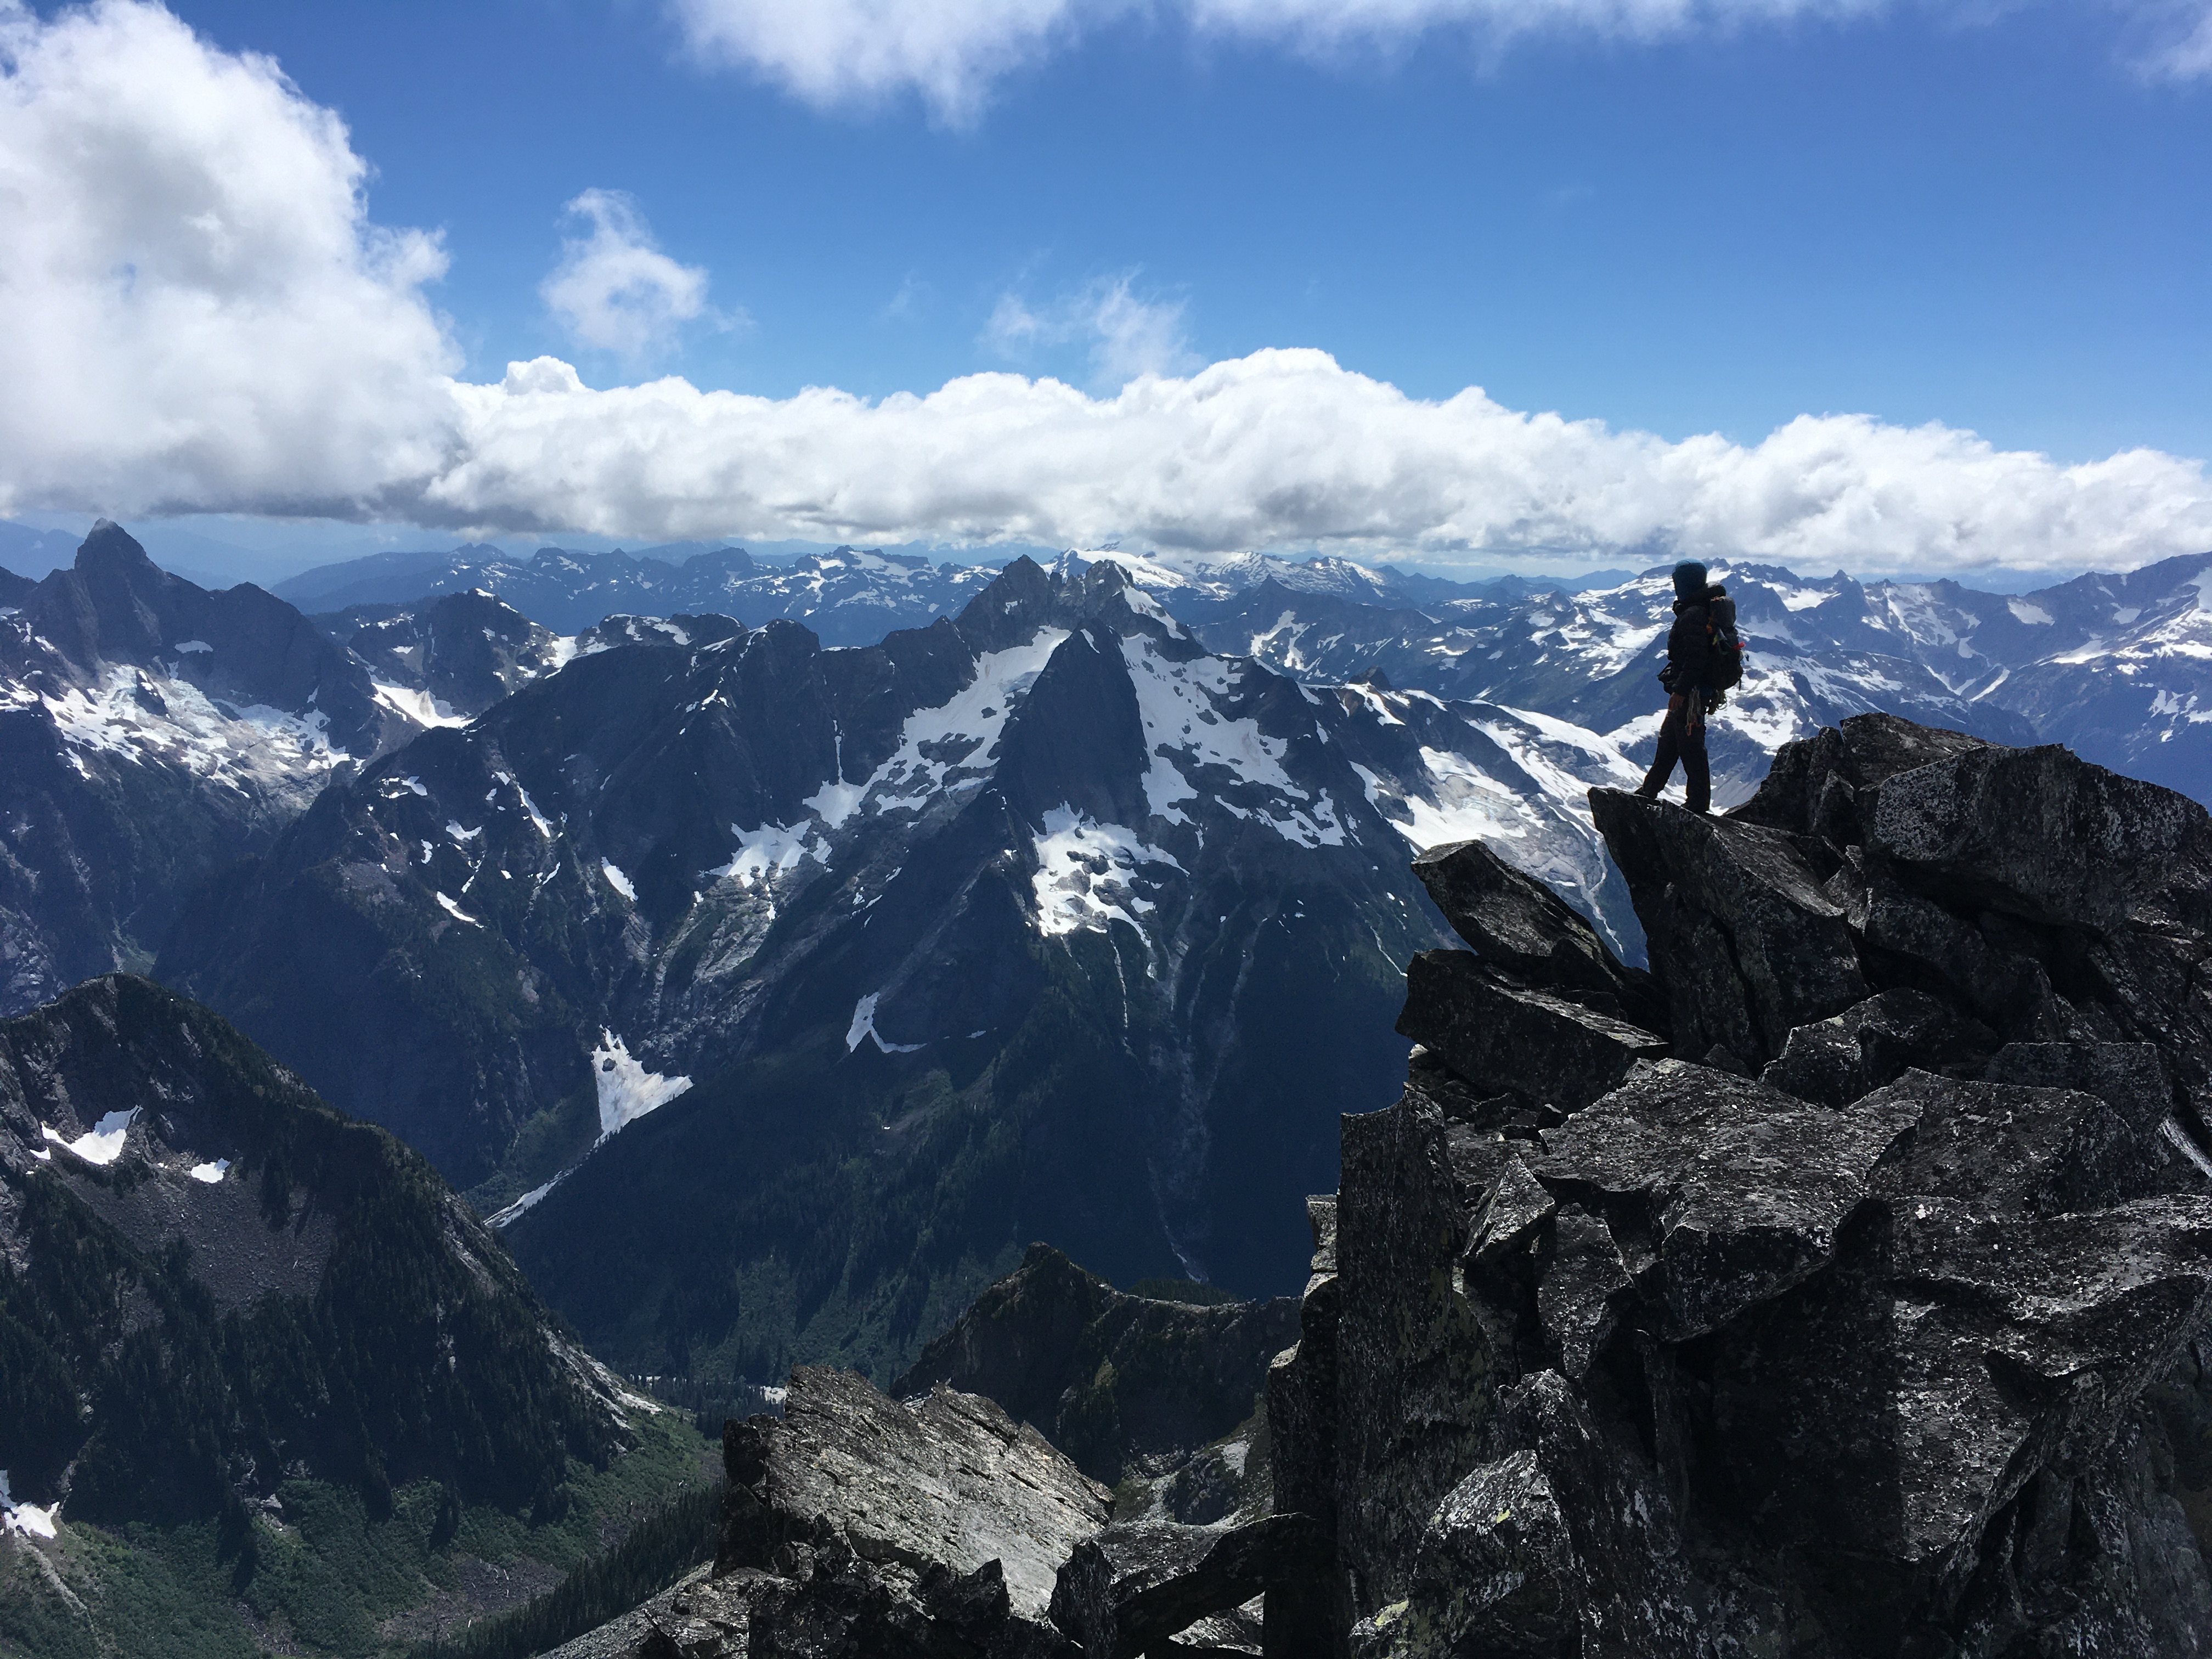
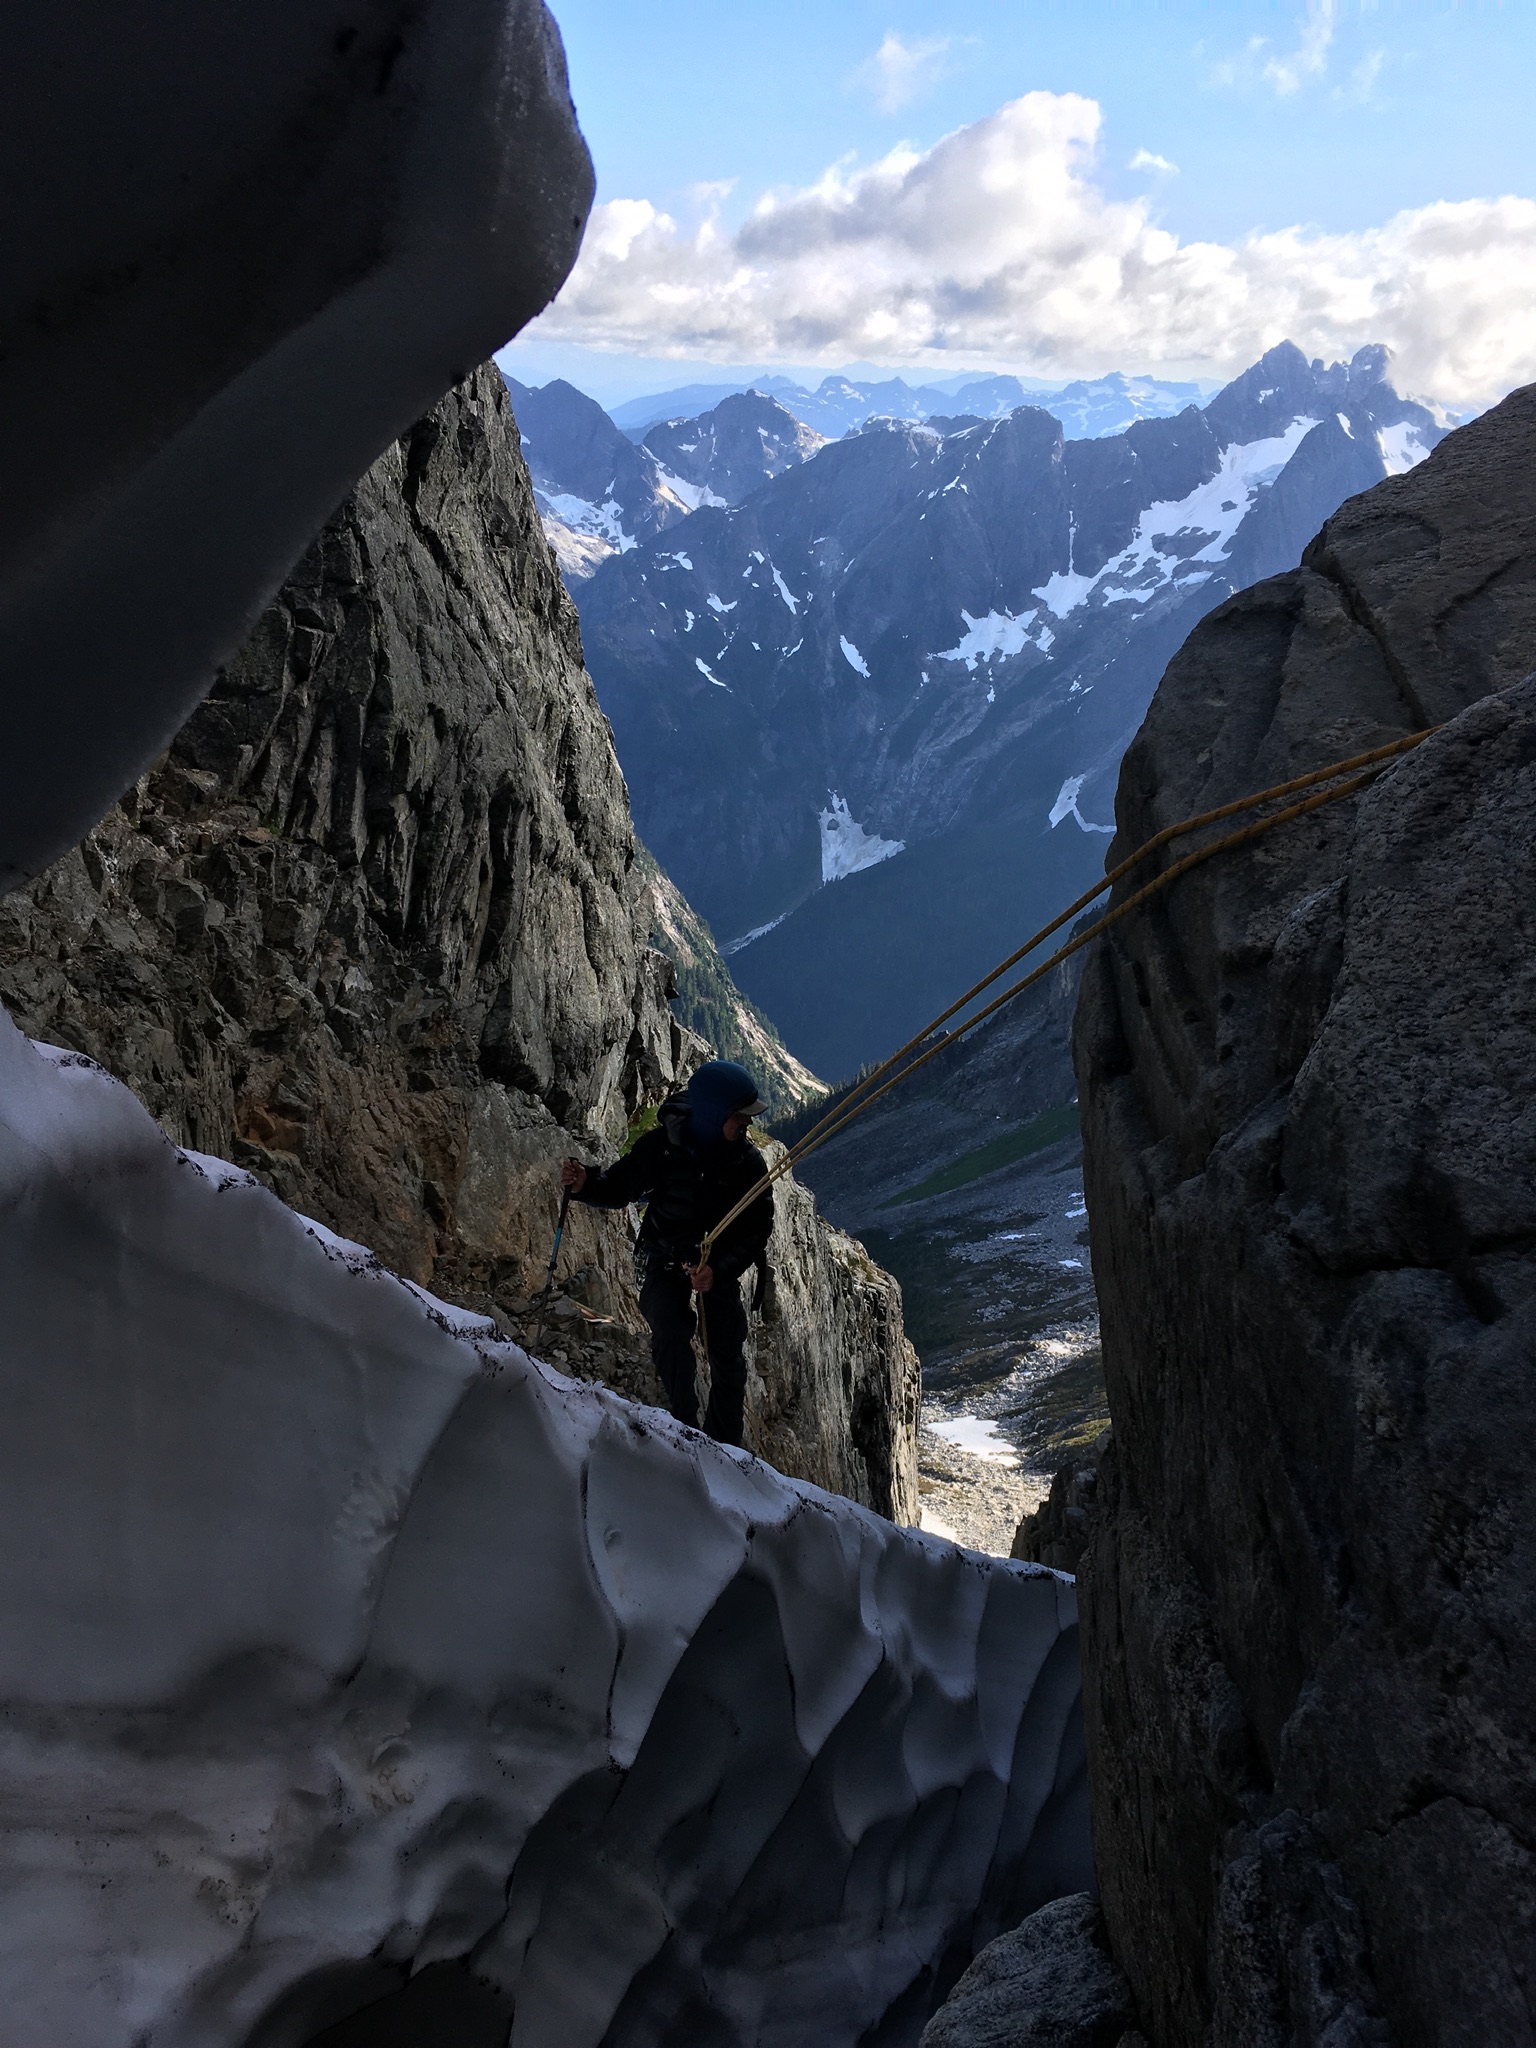
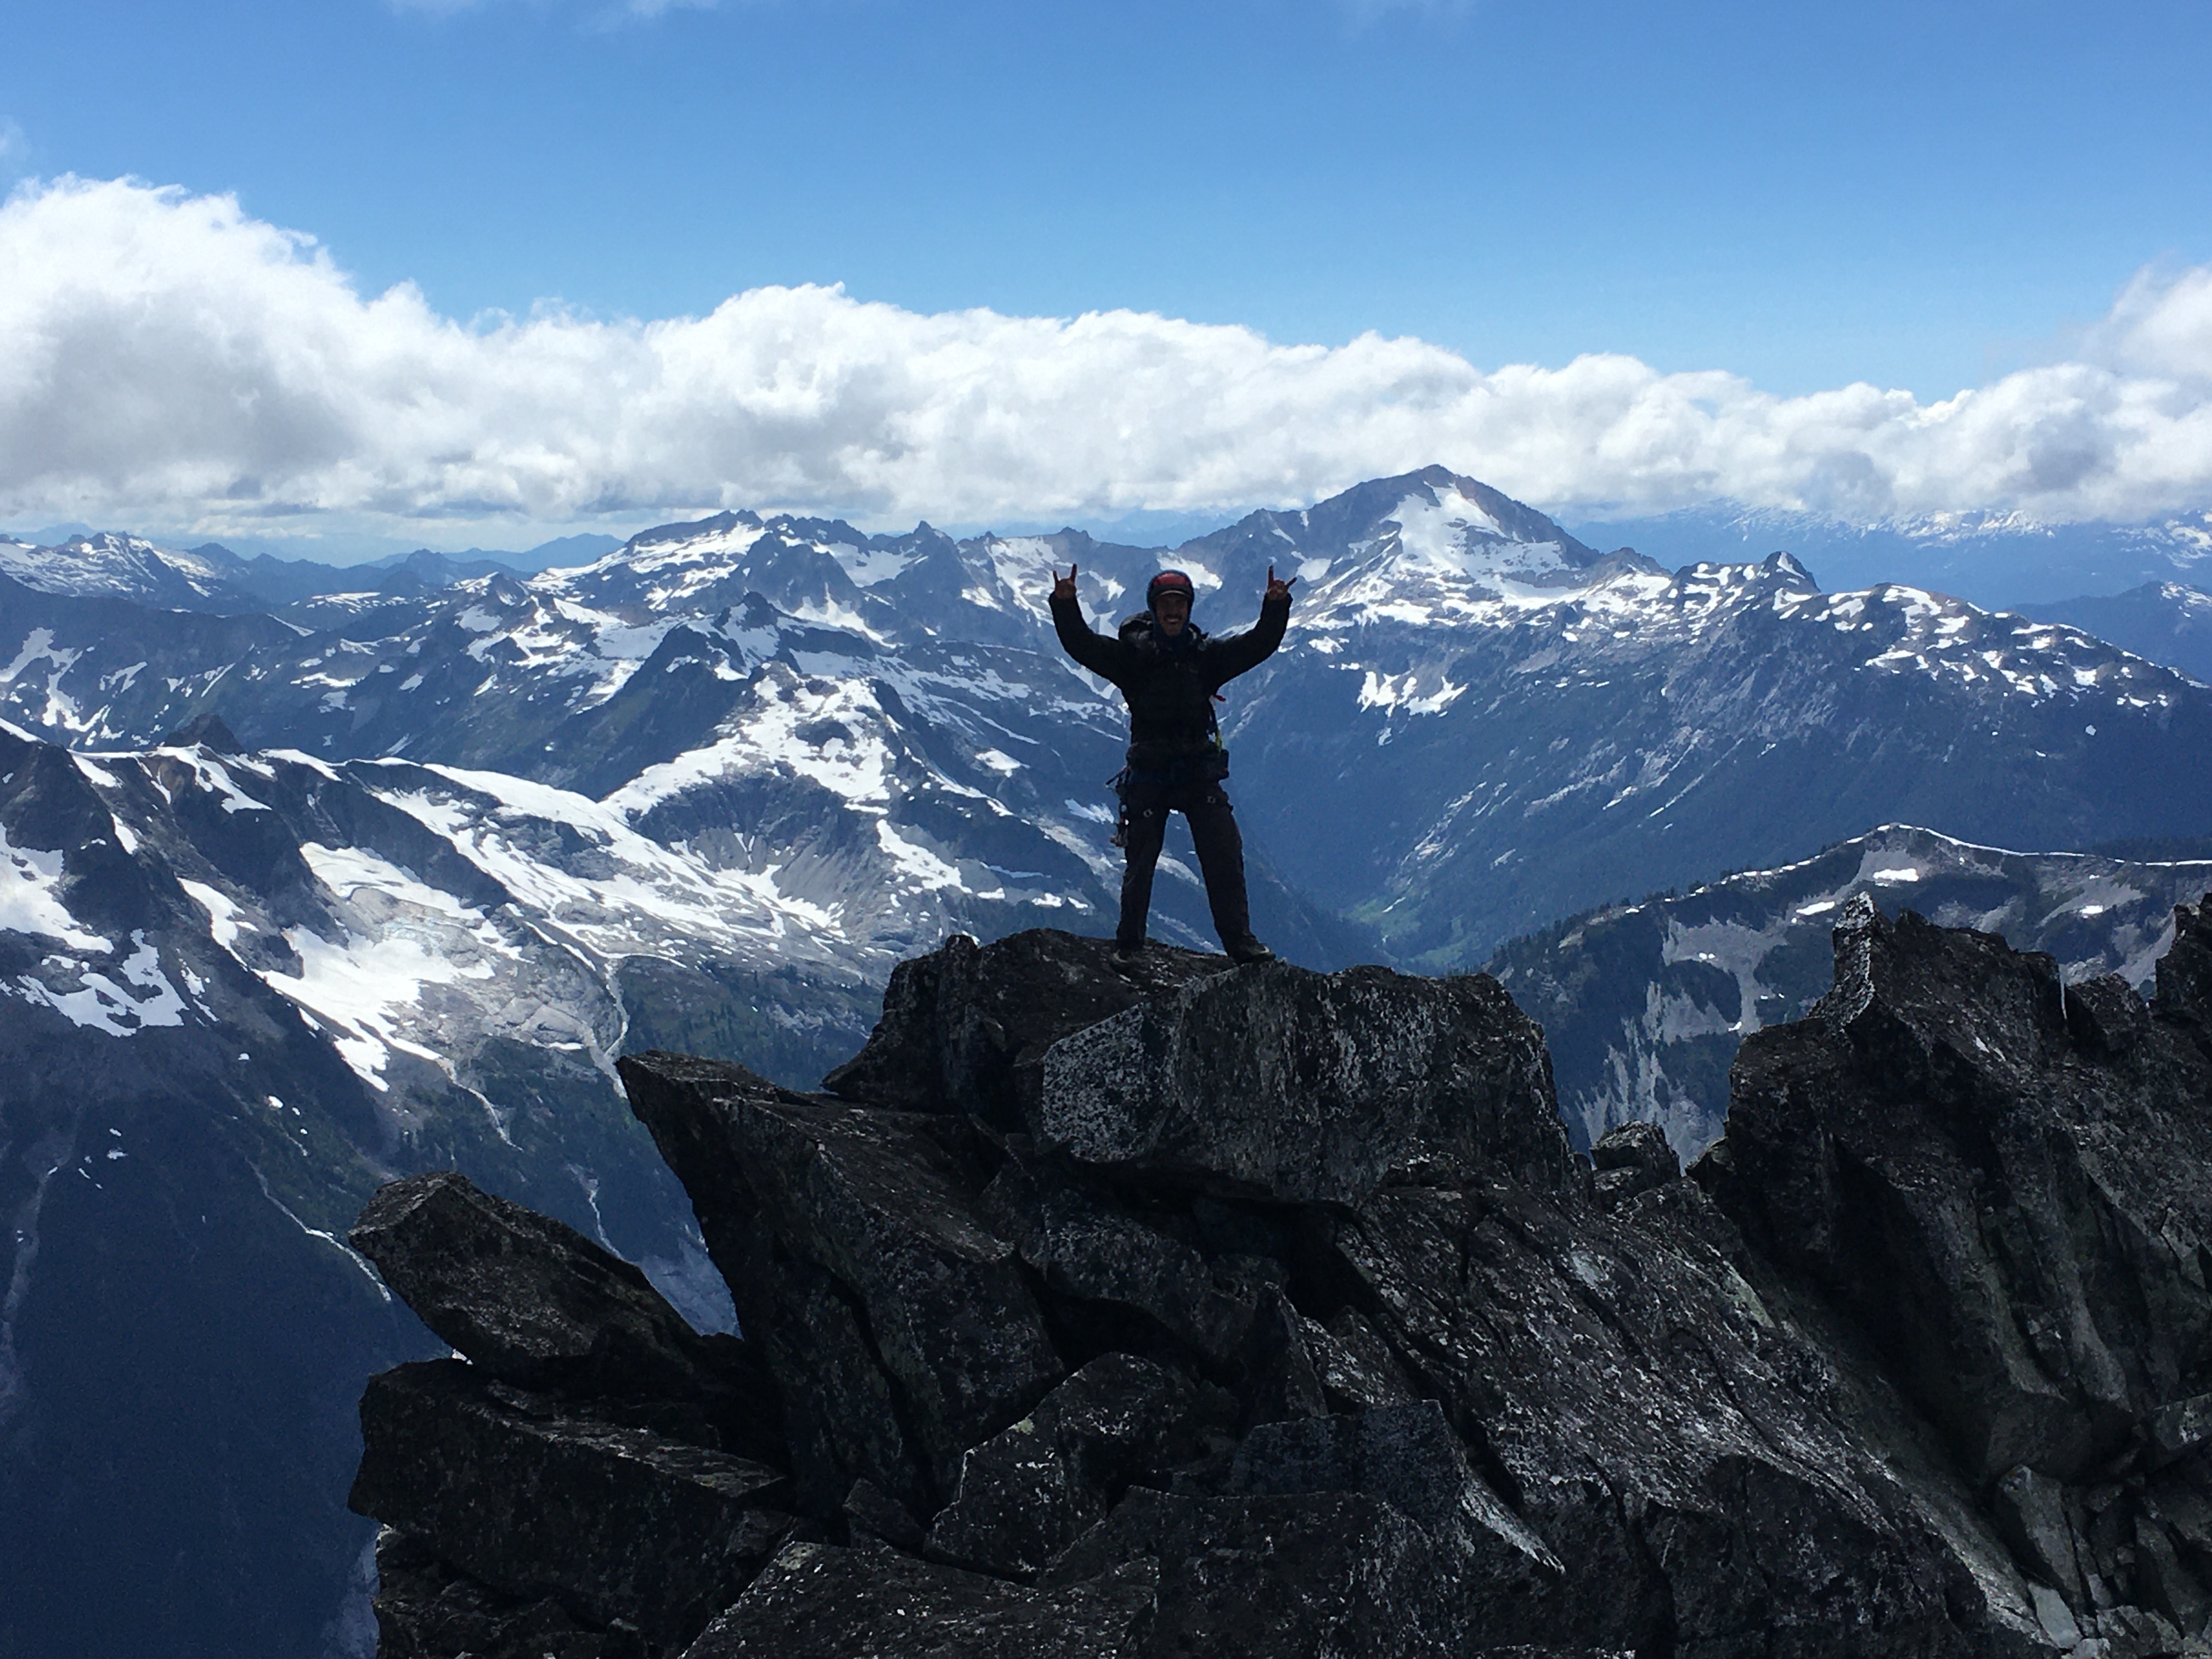
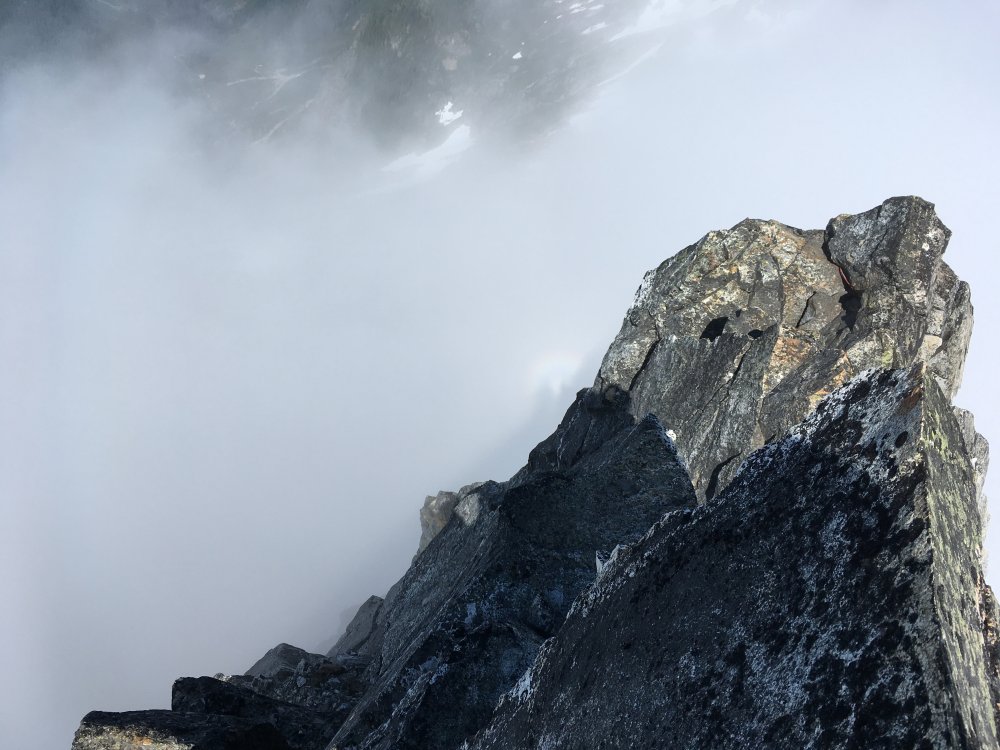
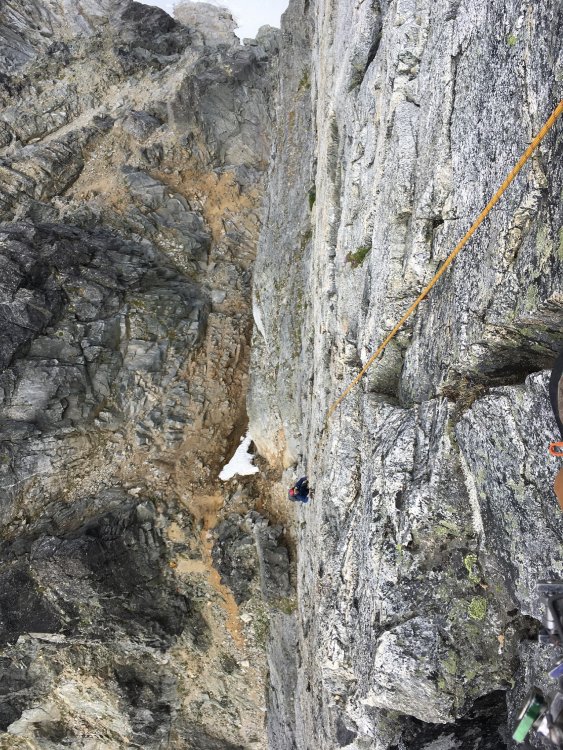
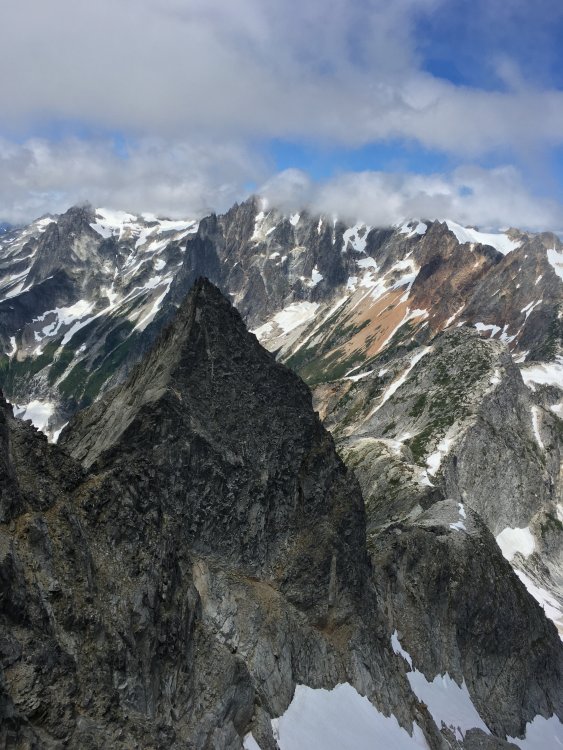
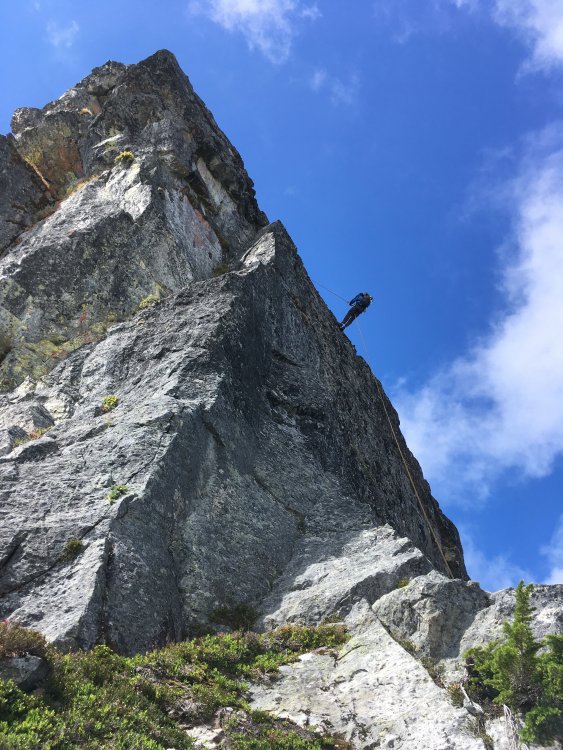
Trip: 9 Days in the Chiliwack Range - SE Mox, Lemolo. Redoubt, Spickard, NW Mox Trip Date: 06/24/2021 Trip Report: 9 Days in the Chilliwack Range - North Cascades National Park Climbers: Jake Johnson - Fort Collins, CO Adam Moline - Sacramento, CA Emilio Taiveaho - Chapel Hill, NC Summary: Days 1 & 2 - Boat ride and bushwack up Perry Creek Basin Day 3 - SE Mox and Lemolo Day 4 - Move to Camp 7200 at head of Redoubt Glacier Day 5 - Redoubt Day 6 - Spickard and NW Mox Day 7 - Rest / Weather Day Day 8 - Attempt at West Buttress of W Subpeak of NW Mox, return to Perry Creek Day 9 - Hike out and Boat back to civilization A pilgrimage to the North Cascades has become an annual tradition and with climbing partners like Adam and Emilio, the draw to more remote and chossier locations grows steadily with each visit. This trip to the Chilliwack Range marked our first climbs in the Cascades outside of the Pickets. With Covid restrictions complicating entry from Canada, we were stoked about likely having the peaks of this range to ourselves for the week, which it appeared we did. Video I threw together of clips I took: Day 1: The first day of our adventure started as many good adventures do: on 3 hours of anxious sleep. Adam and Emilio had driven up from California on I-5 the day before and picked me up in Seattle in the late evening, not allowing much time for slumber. An early boat ride across Ross Lake to Little Beaver gave us plenty of daylight to trudge up the trail-less Perry Creek valley, but with 10 days worth of food and gear and virtually no sleep, we recognized it wouldn’t be an easy day. Emilio stretching out: The boat ride: 4.5 miles of maintained trail walking provided some early views, and then a comfortable forested grind to the Perry Creek Shelter. Views of Ross on the first mile of the Little Beaver trail: After some initial route finding and stream crossings up the valley, the real schwacking began, and I would agree with all statements of parties that have come before us - some of the densest growth that I’ve forced my body through. A classic North Cascades stream crossing: The best picture I could find of the dense growth sections: A few hours later we were blessed with some talus and space to breathe and refill on water from the creek before plunging back into some older growth for several less abusive miles. A tattered and needle-covered Emilio: Talus relief from the dense brush bushwhacking: By mid afternoon the towering summit of Lemolo was in sight, but the lack of sleep and pounds of pine needles accumulating under our clothing started taking a toll and we found some large boulders in the talus to call home for the evening. Upper Perry Creek Basin: Day 2: The next morning we were faced with a decision: to push hard to the top of the valley and ascend the snowpack to the ridge (our original plan), or to take it a bit easier and settle for camp at the top of the valley. With over a week remaining in the backcountry we opted for the later, and in retrospect this was the right decision. Bushwhacking in the upper portion of the valley: The schwacking re-intensified a bit higher in the valley and we were happy to take the evening to wash our clothes and bodies at the head of Perry Creek. Dinner and a bath at the headwaters of Perry Creek: Some underwear bouldering: Day 3: With an early start, we had the opportunity to make back some time in our schedule. We trudged up the glacier slowly and steadily, gaining the elevation to the ridge with heavy packs over several hours. Steady progress climbing up out of Perry Creek Basin: By midday we were standing at the base of the gully that marks the start of the route up SE Mox (aka Hard Mox). Leaving the packs behind, we quickly scrambled the loose but easy pitches to the summit. The initial gully on SE Mox: More exposed climbing on the upper pitches: From here we eyed our primary objective of the trip: a deliciously exposed ridge connecting SE Mox to its sub peak - known as Hardest Mox until Eric Wehrly and Rolf Larsen summited it via the East Face in 2007; They dubbed it 'Lemolo'. The lack of visitors to such a wild and untamed peak was too intriguing for us to resist. Eric was kind enough to share some beta for the region and encourage us to attempt the climb to the summit of Lemolo via the ridge (their descent route after their first ascent of the summit). Looking from SE Mox across to Lemolo: Navigating the first portion of the ridge: After about 2.5 min of admiration and intimidation, we began moving along the ridge and found it to be exactly what we had hoped for; exposed choss with just enough relief to keep pressing forward. Some sections actually did have some solid stone, and made for some of the most fun 5.fun climbing I’ve done in my life. Adam and Emilio making moves on the traverse: On the ridge - This is probably the best photo to demonstrate scale and position of the route: Upon reaching the summit tower of Lemolo, we found Eric and Rolf’s tat from 2007, and we enjoyed the views in all directions, especially savoring the view looking back at SE Mox which few have had the privilege of soaking in. In the event that this traverse to the summit is a new route to the peak, we’d call it “Process and Reality” 5.4 X. Old rappel tat on the Summit of Lemolo: Group summit selfie: Rappel on SE Mox A bit of caving beneath the upper glacier provided the evening’s water, and we settled onto a steep scree slope for the night. The layers of sky at dusk after a full day of mountain moving brought a smile to my chapped lips as we drifted into dreamland. Bivy just below the route on SE Mox: Day 4: Emilio and I sipped some coffee and enjoyed the morning as Adam descended the upper part of the glacier to retrieve a Croc that had escaped in the night and slid many hundreds of meters down the mountain. The versatile footwear was far too valuable to leave behind until our descent back into the valley later in the week. Additionally, the risk of failing to recover it later and littering was unacceptable. When we finally got moving around midmorning, the going was slow, and our route finding was unimpressive. Most beta for the area assumes an approach from the West, so crossing the Ridge of Gendarmes from the East was a bit of a trick to do onsite. Convinced that the “canon hole” described by Becky was the intended route, Adam and I waited as Emilio loaded himself into the tight gully only to be shot back out along with some airborne scree. Some failed route finding in unstable gullies: Looking back at SE Mox: We eventually found the correct route and slid and rambled and postholed our way to Camp 7200 beneath the impressive SE crown of Redoubt. View of the long and sunny trudge from Ridge of Gendarmes to Camp 7200: Gnarly broken snow and ice: Camp 7200': Day 5: With the assumption that Mt. Redoubt would probably be an easy 3rd class venture, we prepared ourselves accordingly and set off around midmorning. The glacier walking was smooth and enjoyable without the weight of the packs, and we gleefully scampered up the steeper sections on the south side of the mountain, often stopping to look back and eye lines on Bear Mountain. Climbing towards Mt Redoubt: A wild Emilio and Bear Mountain: I found the towering buttresses of Redoubt to be super impressive, and our gully of choice took us deep within the heart of the mountain. We found ourselves beneath the summit block with a couple of options, all appearing to be 5th class - although, we didn't spend too much time searching for alternatives. After making some mental adjustments and reframing the level of focus that would be required, we made the few easy moves without issue. Exploring the low 5th class options to the true summit: Knowing our return to camp would only require an hour or so, we spent the better part of the morning on top of the mountain, hanging in the shade just off the summit and traversing across the buttresses and subpeaks on the summit ridge. A morning spent on the summit of Redoubt: Downclimbing off the summit block required some focus again, but then it was smooth sailing down the gully and joyful plunging on the glacier back to camp. Downclimbing Crux: Enjoying views on the slide down: Relaxing in camp: Milky Way: Day 6: After some discussion about how we wanted to spend the remaining days of the trip, it was determined that we would try to double up and hit Spickard and NW Mox on day 6. Again, leaving the packs behind made for smooth glacier walking, and Adam and I were soon following Emilio’s charge up the firm snow of Spickard’s SW couloir in the early morning. SW Couloir of Spickard; straight up the center of the mountain (photo taken later in the day): Following Emilio and Adam up Spickard: Views of Silver Lake, a quick stop on the summit, and a descent via the south slopes made for a nice tour of the mountain. Silver Lake as seen from Mt Spickard: It’s worth noting that the prize for “Chossiest Gully” of the trip might go our chosen route back over the ridge from the south slopes of Spickard into the Ouzel Basin. Descending snow beneath the angry gully: Back on the main glacier. NW Mox up next (top left of photo): Next up was NW Mox (aka Easy Mox). Our intent was to ascend via the North Ridge and descend via the West Ridge for variety, so the crampons and axes came along for the ride as we hopped off the snow and onto the long but easy scramble up the ridge. Easy Walking up NW Mox. Spickard in background: Lemolo and SW Mox from NW Mox: The summit block was steeper than I expected but by the time I caught up to Emilio and Adam, they had already scrambled up most of the route with ice axes in hand. Solid rock led to the summit, where we realized that a West Ridge descent might have been more than bargained for. The choices were steep and intimidating downclimbing or more rappels than we had tat for. Maybe we were just worked, and a bit scared. We reluctantly returned to the glacier via the North Ridge and stumbled back to camp, out of water and a bit delirious. Returning to the shade and water of camp was a dream. But the mountain continued to provide magic to the evening as a Wolverine appeared over the col just yards from camp and charged past us on the snow, clearly startled by our presence. Wolverine on Redoubt Glacier: By the time I grabbed the camera it was a ways off on the Redoubt glacier, but I feel fortunate to have witnessed it. Likely a once in a lifetime encounter for me. Day 7: We awoke to zero visibility. The truth is that we really didn’t have plans for the day, so the weather just confirmed that it would be a rest day in camp - washing of clothes and bodies, yoga, and naps. Watching the fog ride over the rock and ice of these mountains will always be awe inspiring to me, and the lazy day flew by quicker than most. Day 8: After a full week of aggressive calorie deficit, I was feeling lean, worked, and yet somehow very ready to climb something hard. We returned through some thick fog, towards the Ridge of Gendarmes, but stopped at an impressive buttress on the subpeak west of NW Mox. Trekking through the fog: A little break in the fog, revealing the buttress: I had seen several references to this buttress being unclimbed, and we gave the weather some time to stir in hopes of making an attempt. A short break in the fog and a glance up the tower was all it took, and we roped up and moved upwards. I led the first pitch, which was primarily 4th class starting at the right base of the buttress and trending left towards the giant flake. P1, 4th class up a chossy chimney: I brought up Adam and Emilio and then sent upwards again on some steeper climbing. Thankfully the guys had a slight overhang to shield themselves from all the rubble I sent down on them. For about an hour and a half, Adam and Emilio discussed life and risk at the belay as I shouted “rock!” and tried to calm shaking calves. The featured sections I had identified from the ground were typically too loose to be useful, but I was impressed with some fun sections of face climbing that I would call somewhere around 5.8. However, an overhanging section of loose blocks turned me back on my first line. My second choice involved a massive chimney leading far left to the giant flake, but I didn't think it would protect well enough to climb safely, despite Emilio’s vocal desire to take the lead on it. I worked up again but further to the right sticking more true to the buttress, and this route - despite initially looking the most intimidating - seemed to have the most potential once I was in the thick of it. Again I worked up, 50-100 ft or so, but when I set a nut behind a giant block and the whole thing moved, my remaining stoke for the day was drained. Looking up at the second pitch options: Emilio on rappel: We rappelled back down into the clouds below. Upon reviewing some photos, it appears the steepness of the climbing eases a bit just beyond my high point, and with that knowledge to haunt me, I’m sure we’ll be back to give it another go at some point. A shot of the buttress taken earlier in the week: The remainder of the day included ascending the quicksand up Col of the Wild, and scrambling out of the clouds over Ridge of Gendarmes. Then plunging down the now-much-smaller glacier back to the top of Perry Creek Basin. Day 9: Exiting the long and remote and savage valley was a bit easier than entering it, since we knew what we were up against. We geared up for a long day and plugged away at it. We were surprised to find a jetboil and nalgene perched on a boulder in a talus field, midway down the valley. We certainly didn’t expect to see any signs of recent human activity in the valley, and finding these two items with no other clues left us puzzled. We made note to include it in this trip report to see if we were perhaps not the only party in the Perry Creek valley on 7/3/21. An open section in the Perry Creek jungle: Mystery Jetboil and Nalgene The densest sections of growth towards the bottom of the valley ravaged us as expected, swimming through trees, with many meters of continuous travel without feet contacting ground. Finally - relief as the forest opened up, we crossed the creek, and met the Little Beaver trail. Walking the maintained trail felt like floating and we were at Ross lake in no time. A boat ride across Ross Lake with beautiful dogs on board, and then, with no time to waste, we hauled up to the car to race into Marblemount before the diner closed. Final Thoughts: I believe a successful trip involves a couple things: coming back in one piece, strengthening the bond between friends, completing some objectives, but also - leaving something to be desired. For every objective I complete in these mountains, I come home with at least a dozen more to add to my list. I cannot stop thinking of the dark and intense buttresses of Bear Mountain, and I cannot help but think that if I was just a little stronger - mentally and physically - that we might have seen success on our attempt of that buttress. These thoughts will consume me and drive me to be better until I inevitably return again to test myself. Gear Notes: Light rack and too much rope Approach Notes: Type 2 fun2 points
-
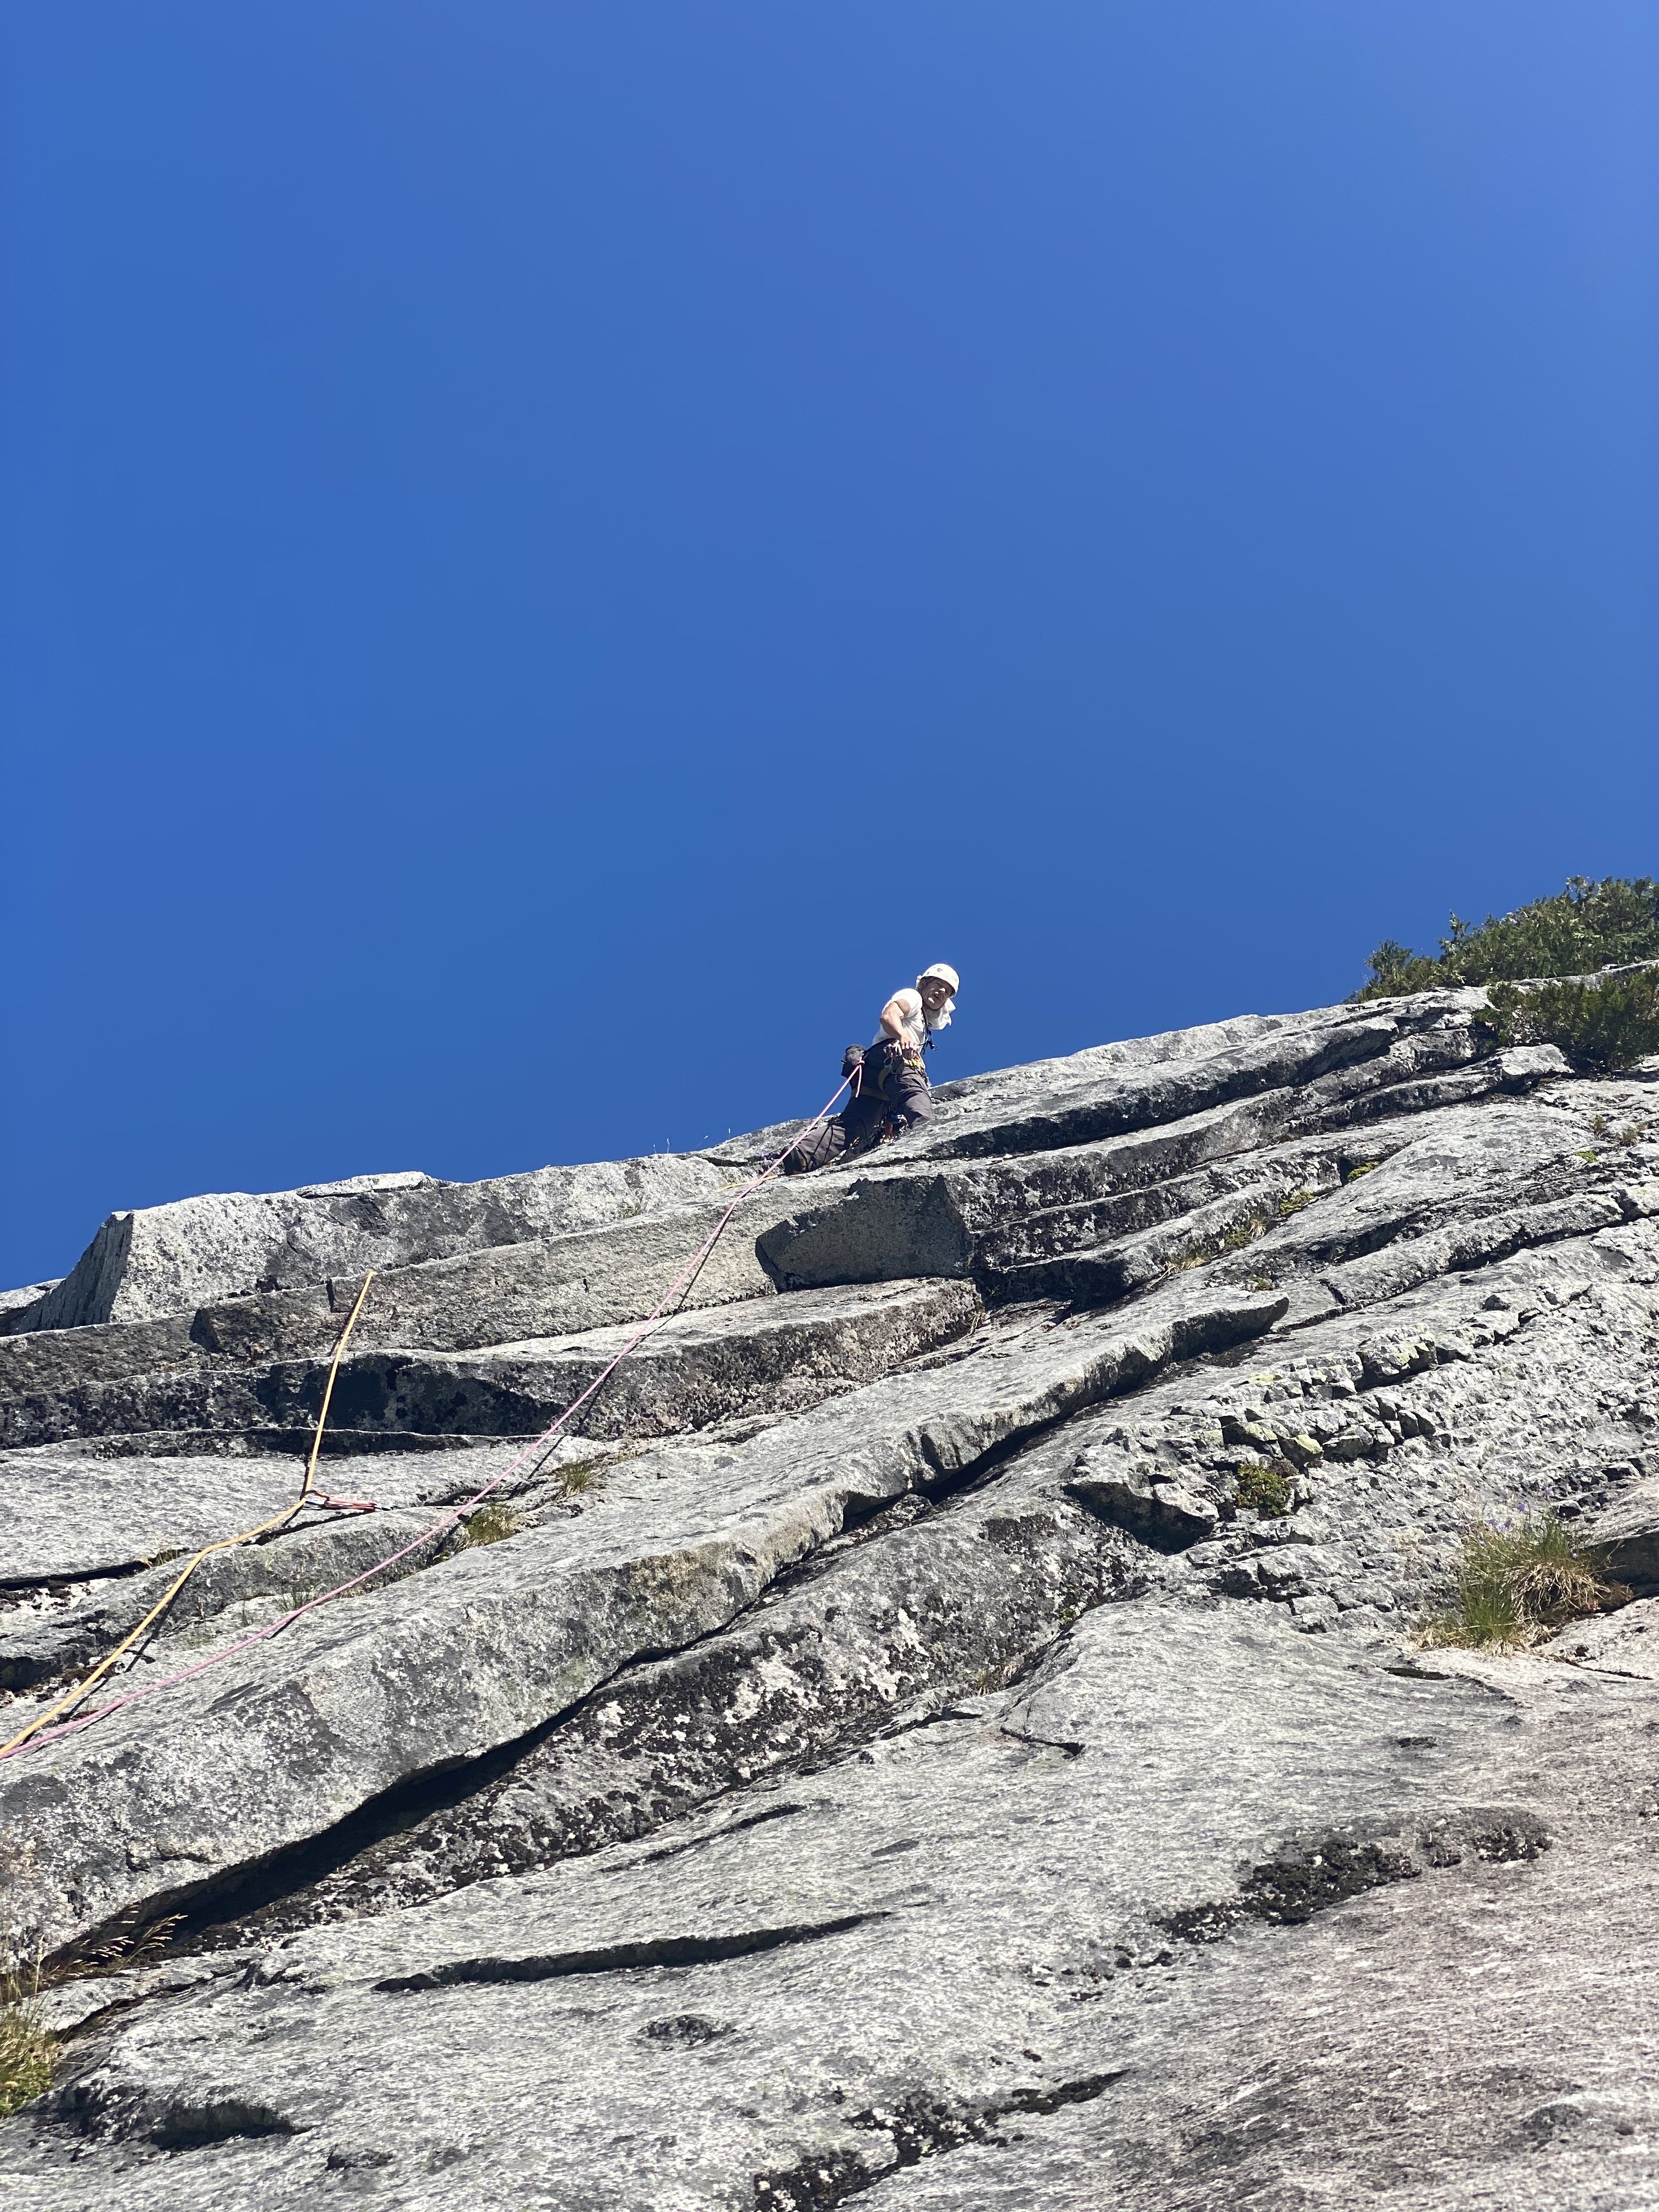
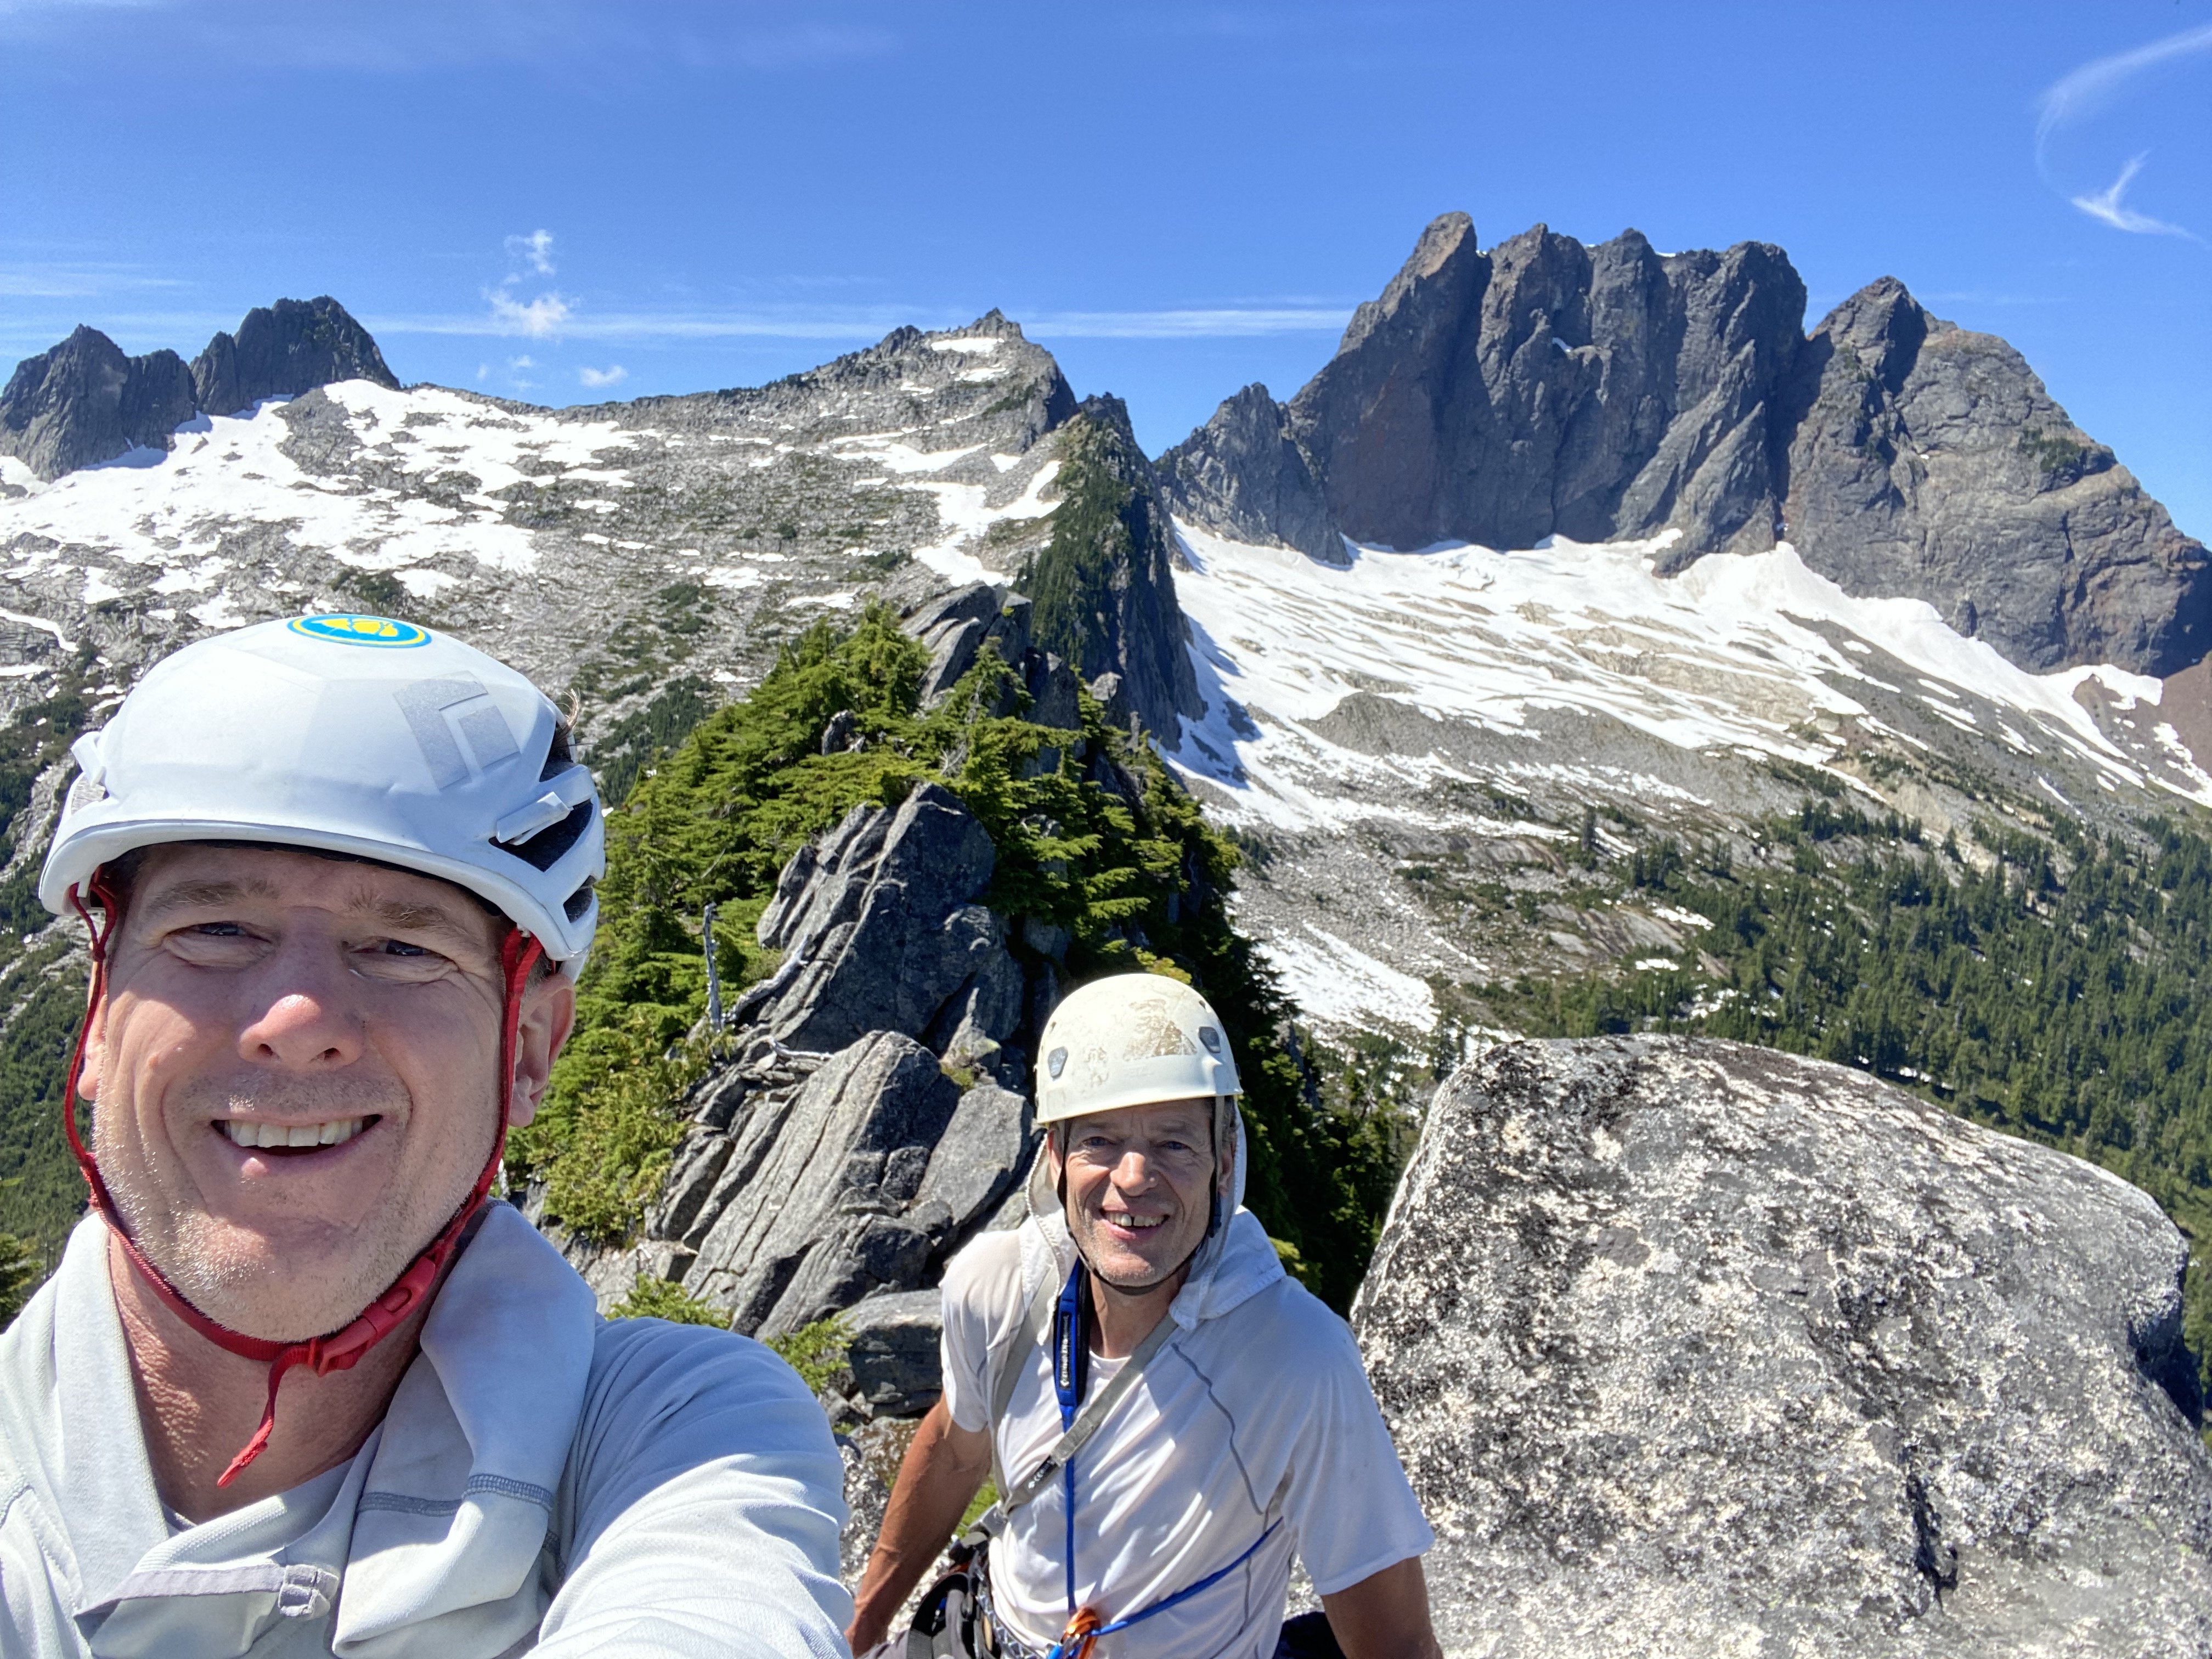
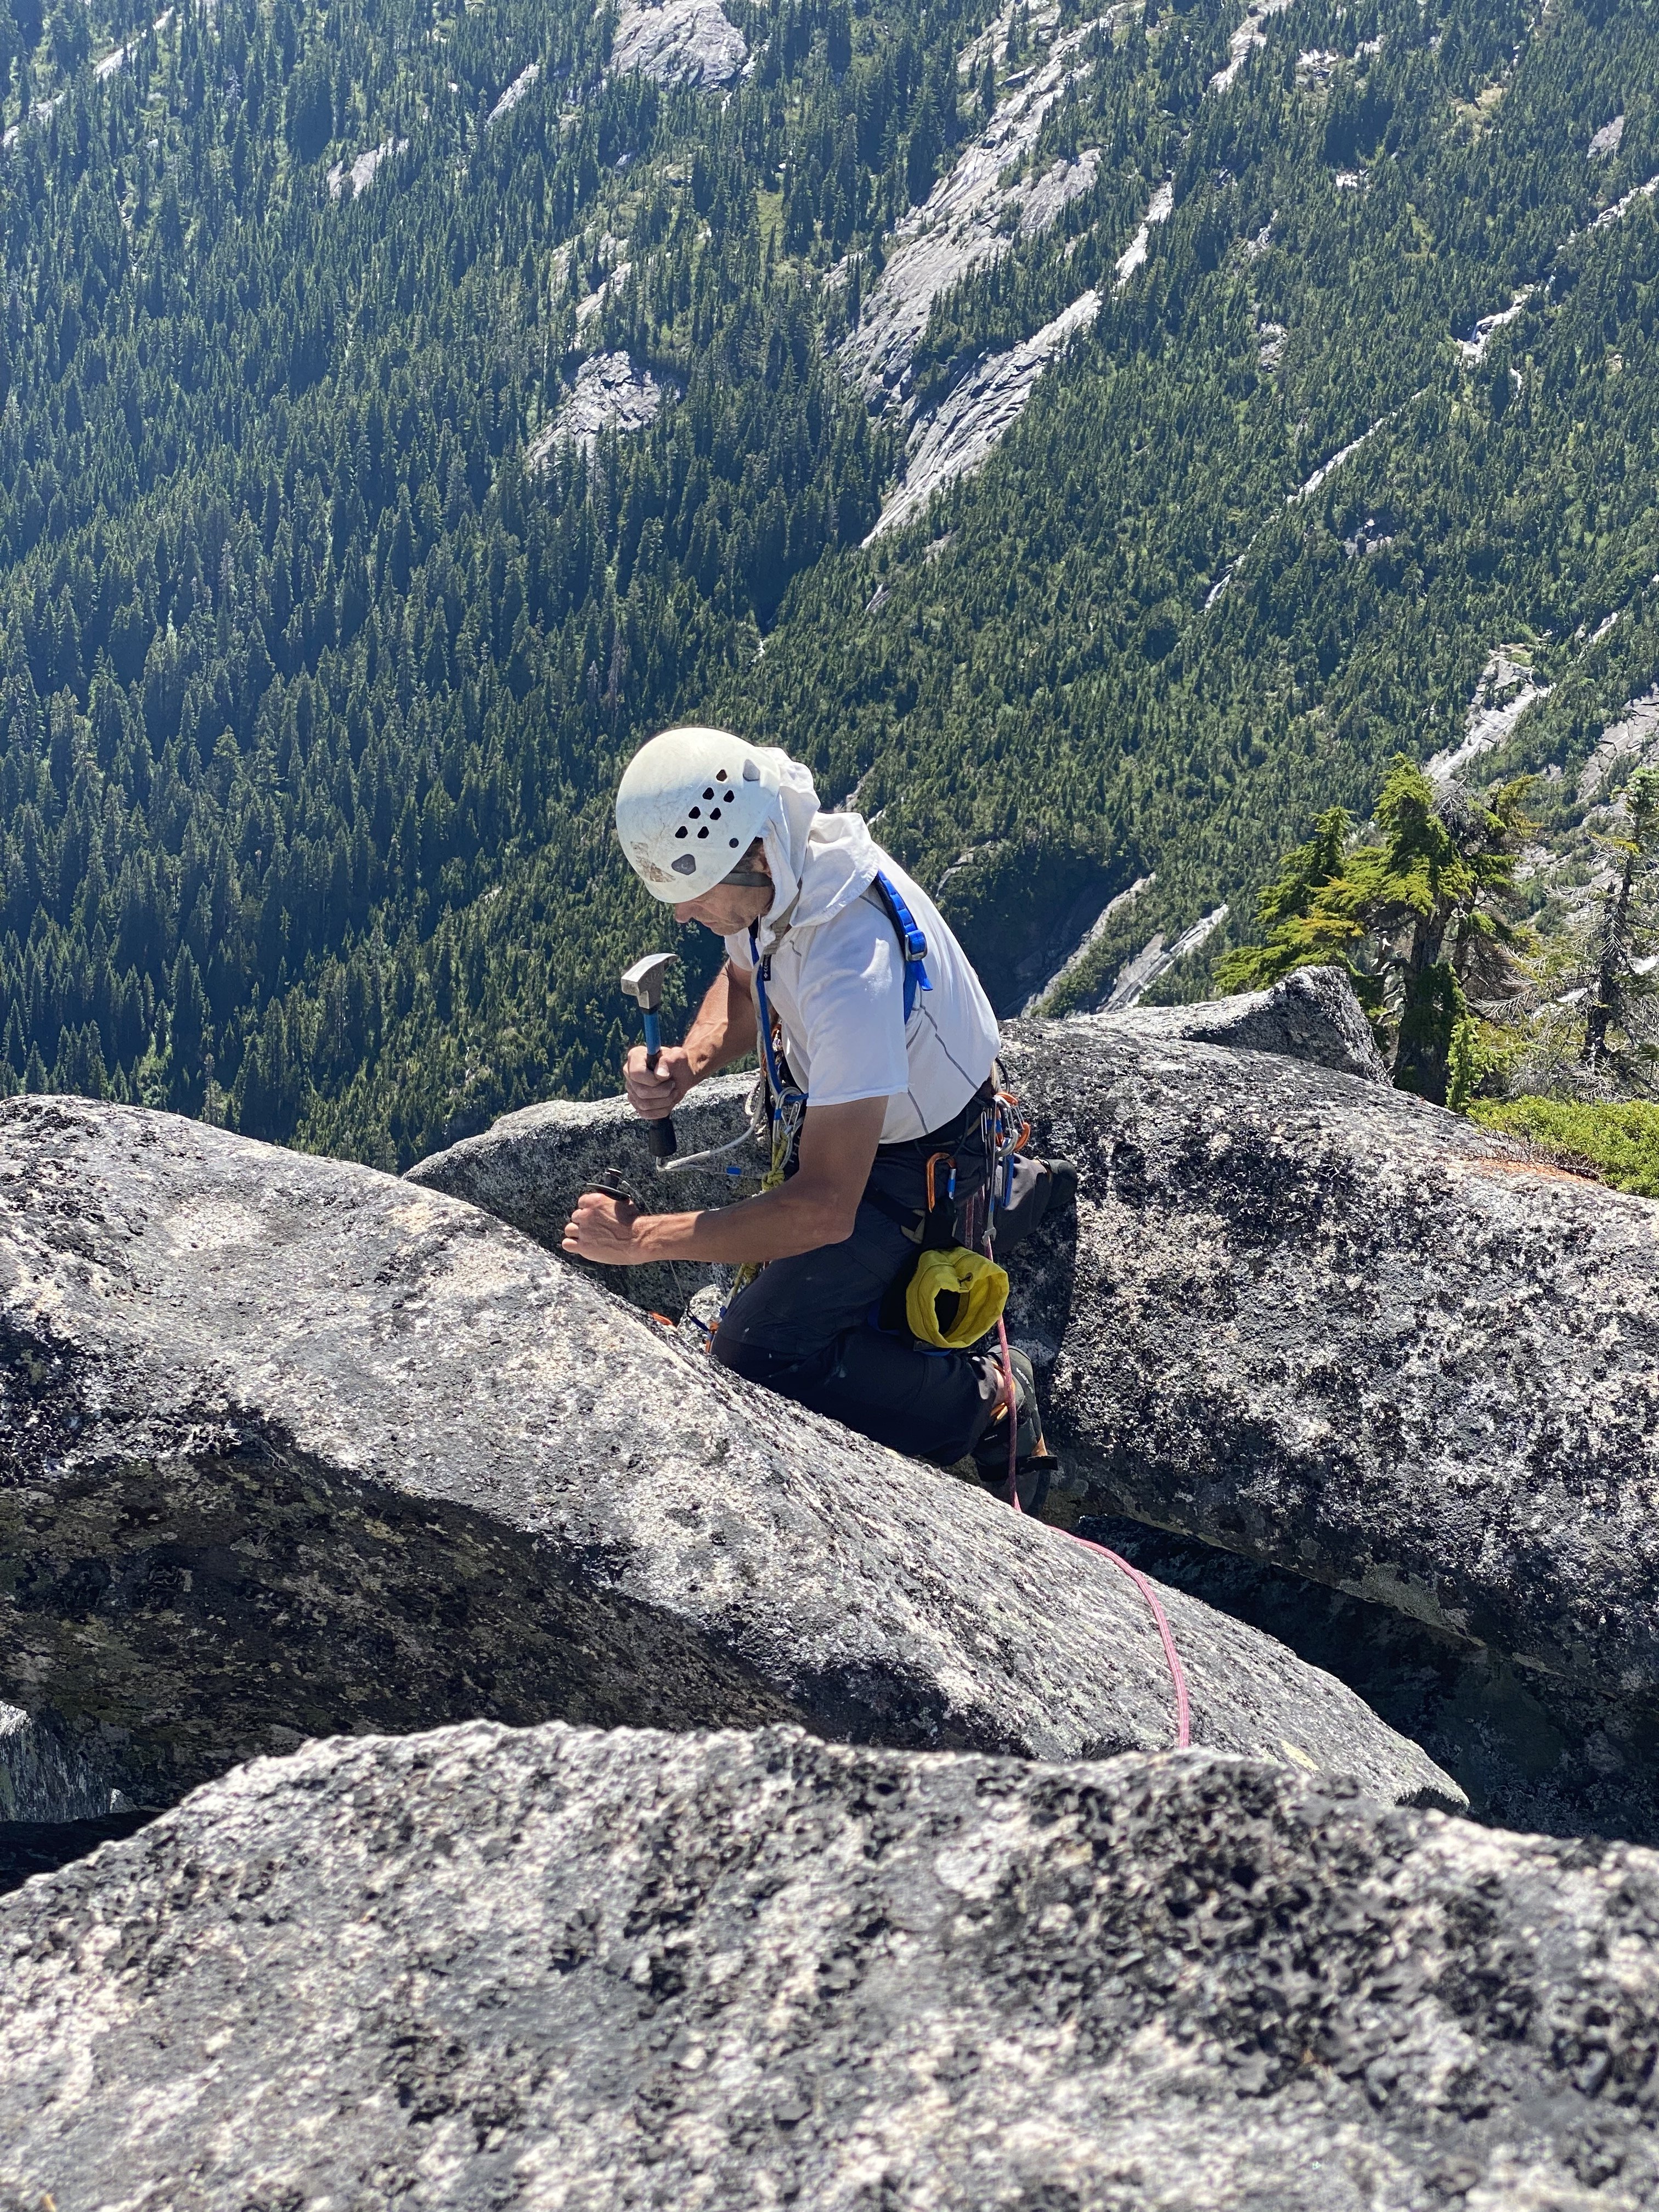
Trip: Squire Creek Wall - Concerto in C for Drill and Hammer Trip Date: 07/18/2021 Trip Report: On Saturday, July 17th I met Brian Young at the Shell station in Darrington for a trip up Concerto in C for Drill and Hammer on Squire Creek Wall. Glad that I'd borrowed Brian's brush cutter earlier this year, the bike ride up the old logging road was pleasant. In no hurry with only the approach to do this day, it took us 3 hours to get to camp. Then we carried our ropes and climbing gear up to the top of Pitch 1, having soloed the easy first pitch, and clipped it all to the anchor there. On Sunday the 18th we awoke at 4:30, first light, and departed after breakfast. At first we worried about the pack weight for the second, as it contained four full water bottles, all drilling gear, a chain anchor, and six bolts with hangers. We even discussed fixing each pitch and the second doing them on jumars. Instead, I tried climbing with it, and not one complaint was aired all day. We climbed rapidly and were at the Bubba Compactor at 7:30am! Brian took Pitch 2, which had me worried, but he cruised it and every even-numbered pitch thereafter. I followed Pitch 10 with no problem with the pack, it was even fun! I noted the piton was still there on Pitch 11; this point didn't seem as scary as on the FA. On Pitch 14 Brian yelled that this was the scariest pitch of the whole route! We noted that a bolt or two would be good on the sandy slabs there. We reached the summit at 2:00. I quickly made ready for drilling the list of fixups, which included: 1) Installing a chain anchor on the summit 2) Adding two bolts to Pitch 14 3) Replacing the piton on Pitch 11 with a bolt 4) Replacing the two quarter-inch buttonheads on Pitch 10 with fat bolts I drilled the summit anchor, and we descended. On the pitches with drilling tasks, we fixed the lead rope and I rapped down it, got on jumars, did the work, and rapped to the next anchor. Then Brian unfixed the rope and rapped both ropes normally. It all got done smoothly but took time and we knew we would be hiking out partly by headlamp. As it turned out, we crossed Squire Creek in the last of the dusky light. We dried off our feet, donned headlamps, hiked and biked down to the trailhead, and reached the cars at around 11:00. The C-shaped route On Pitch 11, with the "inverted prow" on the left Brian taking the summit shot Drilling the top anchor 20210719_002635000_iOS.MOV (an experiment to include a video file, may not work, or may show sideways) Replacing a quarter-inch buttonhead on Pitch 10. When drilling out a smaller hole, you have to make small hits, at first, to keep from binding the drill bit This is now a 14-pitch route, as I measured the remaining rope when Brian reached the "tree belay" atop Pitch 14, and know we could just as well have clambered up the summit blocks to the top. I will be editing the topo and posting it later. While descending high on the ridge we saw two climbers topping out on Skeena26. Good to see that route getting some use. The amazing linkup by Kyle and Jenny will have an effect! My thanks go to a smart, cautious, and patient partner; good on ya' Brian. And thanks, Kellie, for making the suggestion of a bolt on the 'white hump' on Pitch 14, corroborated by Brian; it is now a better pitch. All photos by Brian Young Gear Notes: Standard single rack to 3". Approach Notes: The boot track now has two detours around winter blowdowns. They are pretty well kicked in, watch for the piles of sticks blocking the original way, and turn right.


 2 points
 -
Trip: Darrington - Squire Creek Wall -> Buckeye -> Whitehorse Trip Date: 06/19/2021 Trip Report: @jenny.abegg and I did a linkup of Skeena26 on Squire Creek Wall, Buckeye Peak, and Whitehorse. It was a full value 16 hour day, even with nearly everything going "right". Super fun, if you don't mind some jungling and adventure climbing. The MP approach beta for Skeena26 is spot on. We did not find the bolts until the top of P3, and from there on it was still hard to follow the route as the bolts hide in the shade. The upper section of the buttress above the route is pretty blue collar, as is the top of Squire Creek Wall. We were happy to be on snow climbing up to Buckeye Peak. The ridge heading north from Buckeye was very aesthetic, featuring mid fifth class climbing over steep gendarmes with wild exposure. We did a few pitches and a few rappels and then ended up at the SE Ridge of Whitehorse. The SE Ridge definitely felt a bit fifth class to us for a few hundred feet, but we were definitely pretty tired. It is "Beckey 4th class" after all. The rock is ok. Rappel over the bergschrund, then long hike out. https://climberkyle.com/2021/06/19/the-darrington-rodeo/ D-Town is cool! Skeena26 is definitely worth checking out! Gear Notes: Single 60 m rope was enough. A few moderate sized cams, lots of long runners. Approach Notes: About 6-8 minutes after the official Squire Creek Trail sign, there is a white rock cairn. This marks the trail, which leads down to Squire Creek. Found a log crossing just downstream. Then hike up the trail on the other side.2 points
-
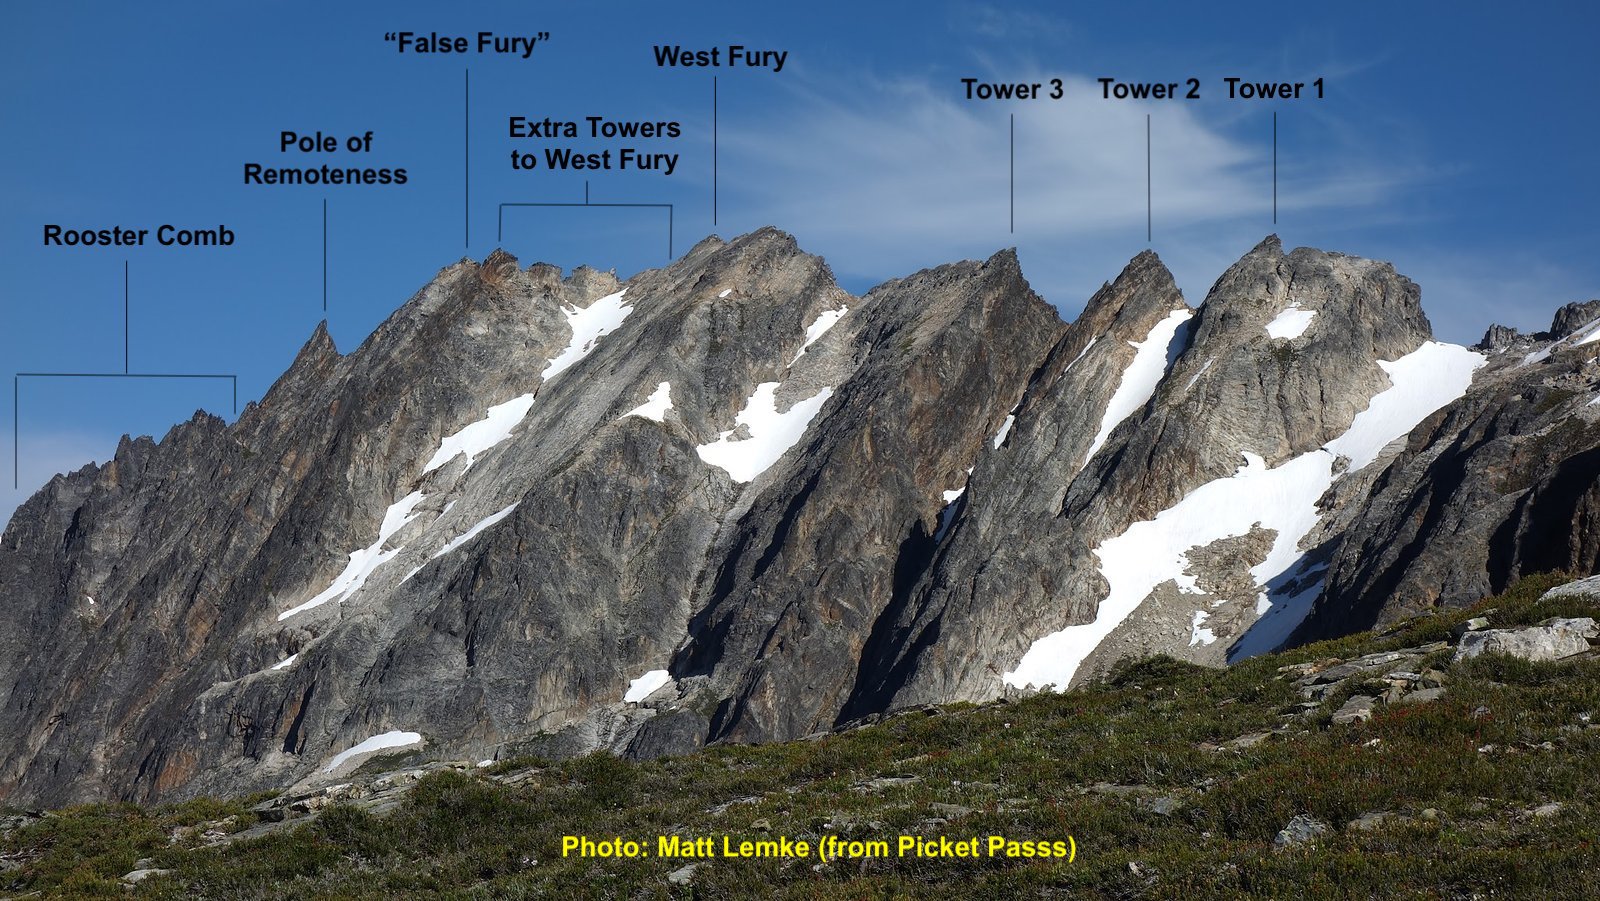
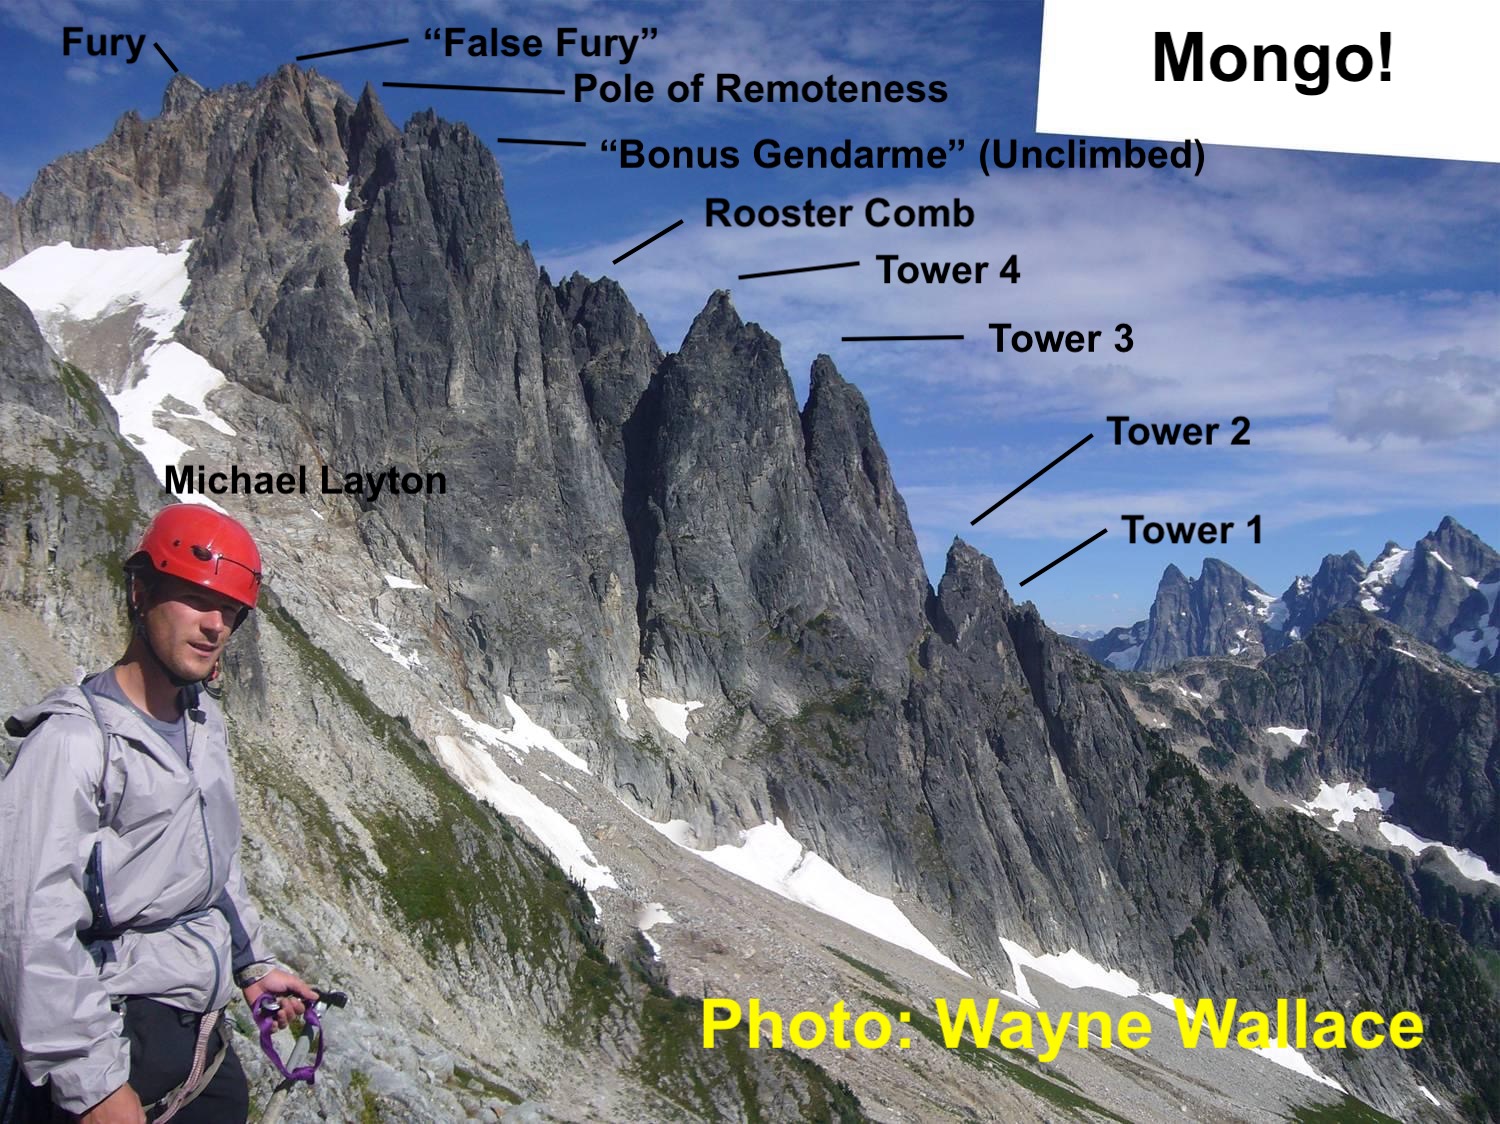
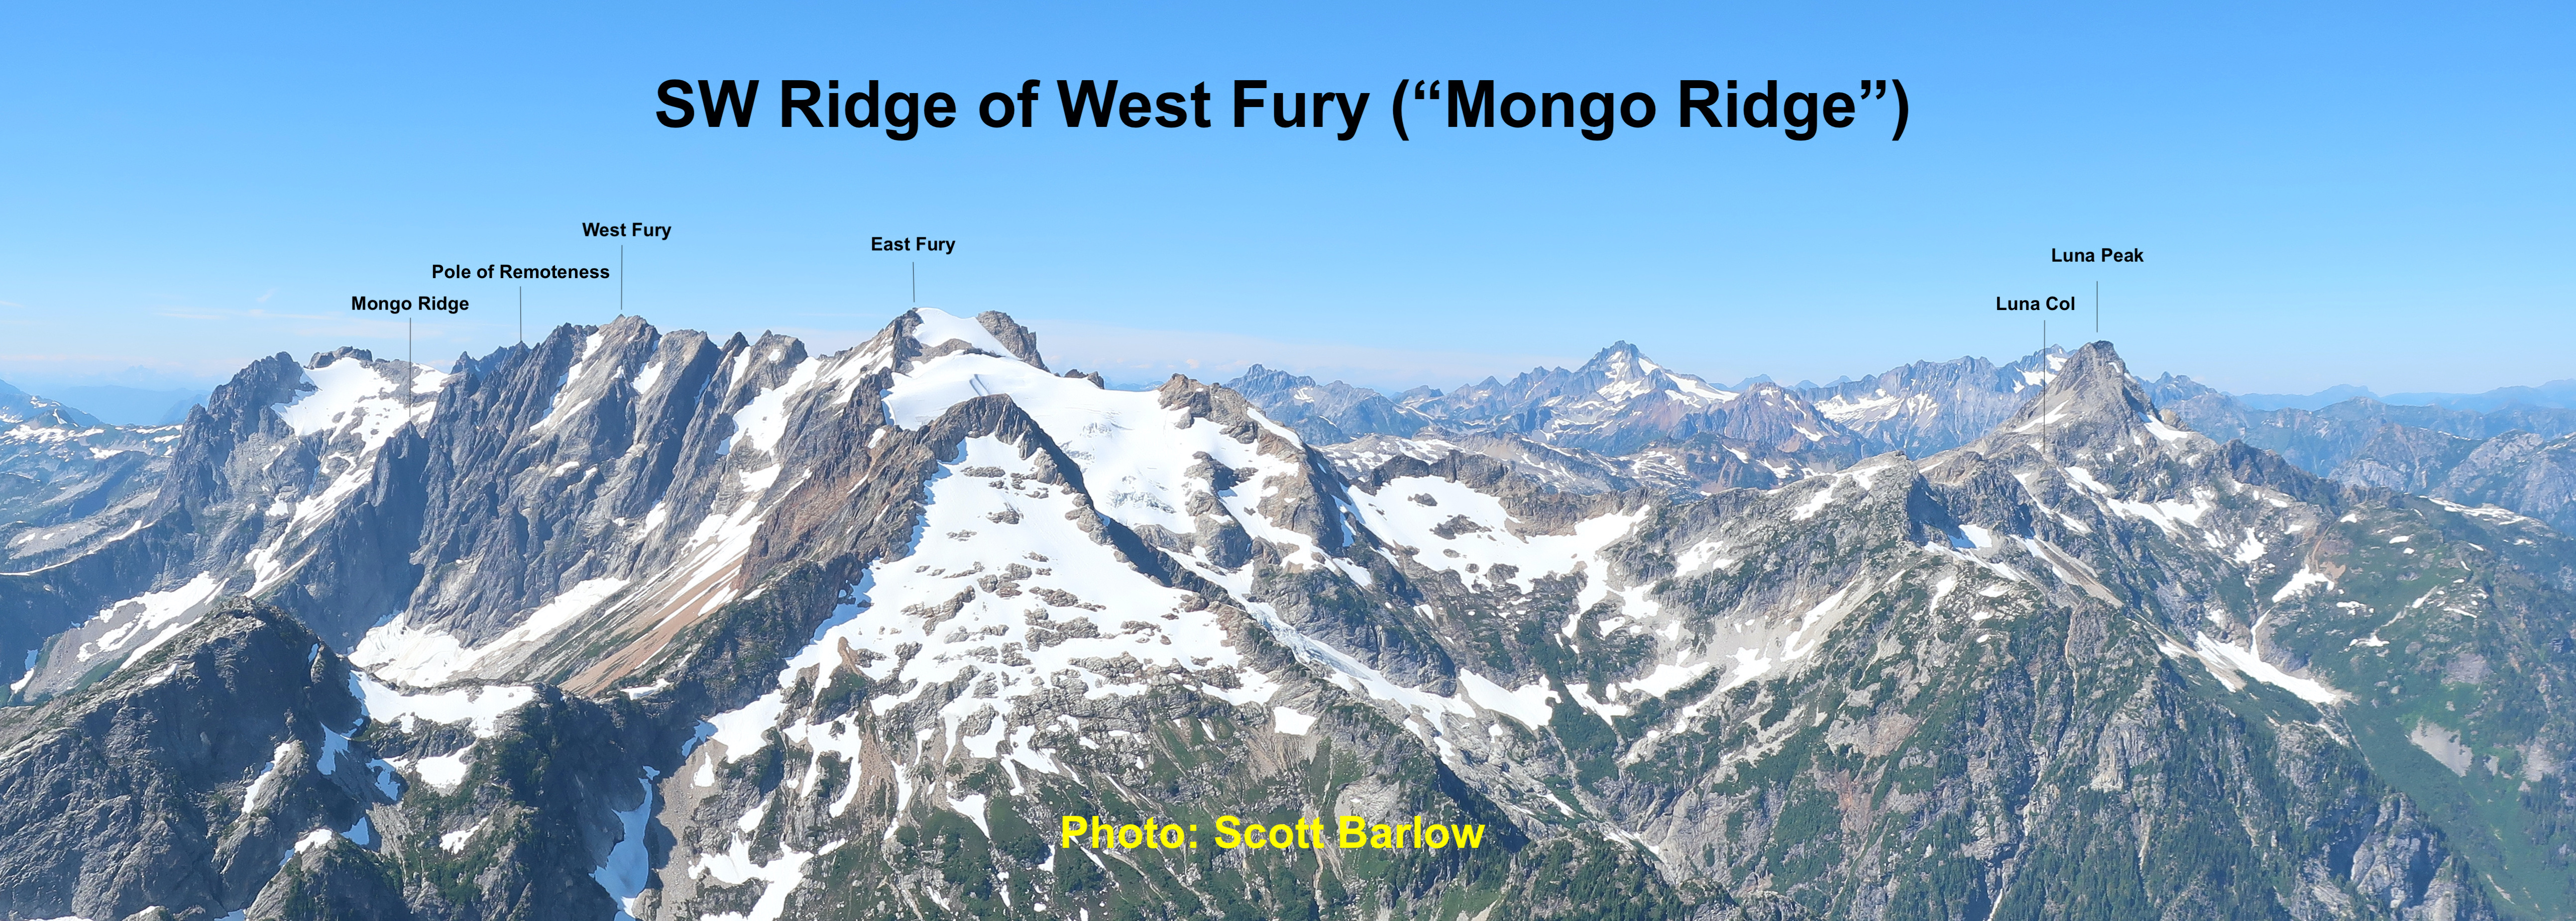
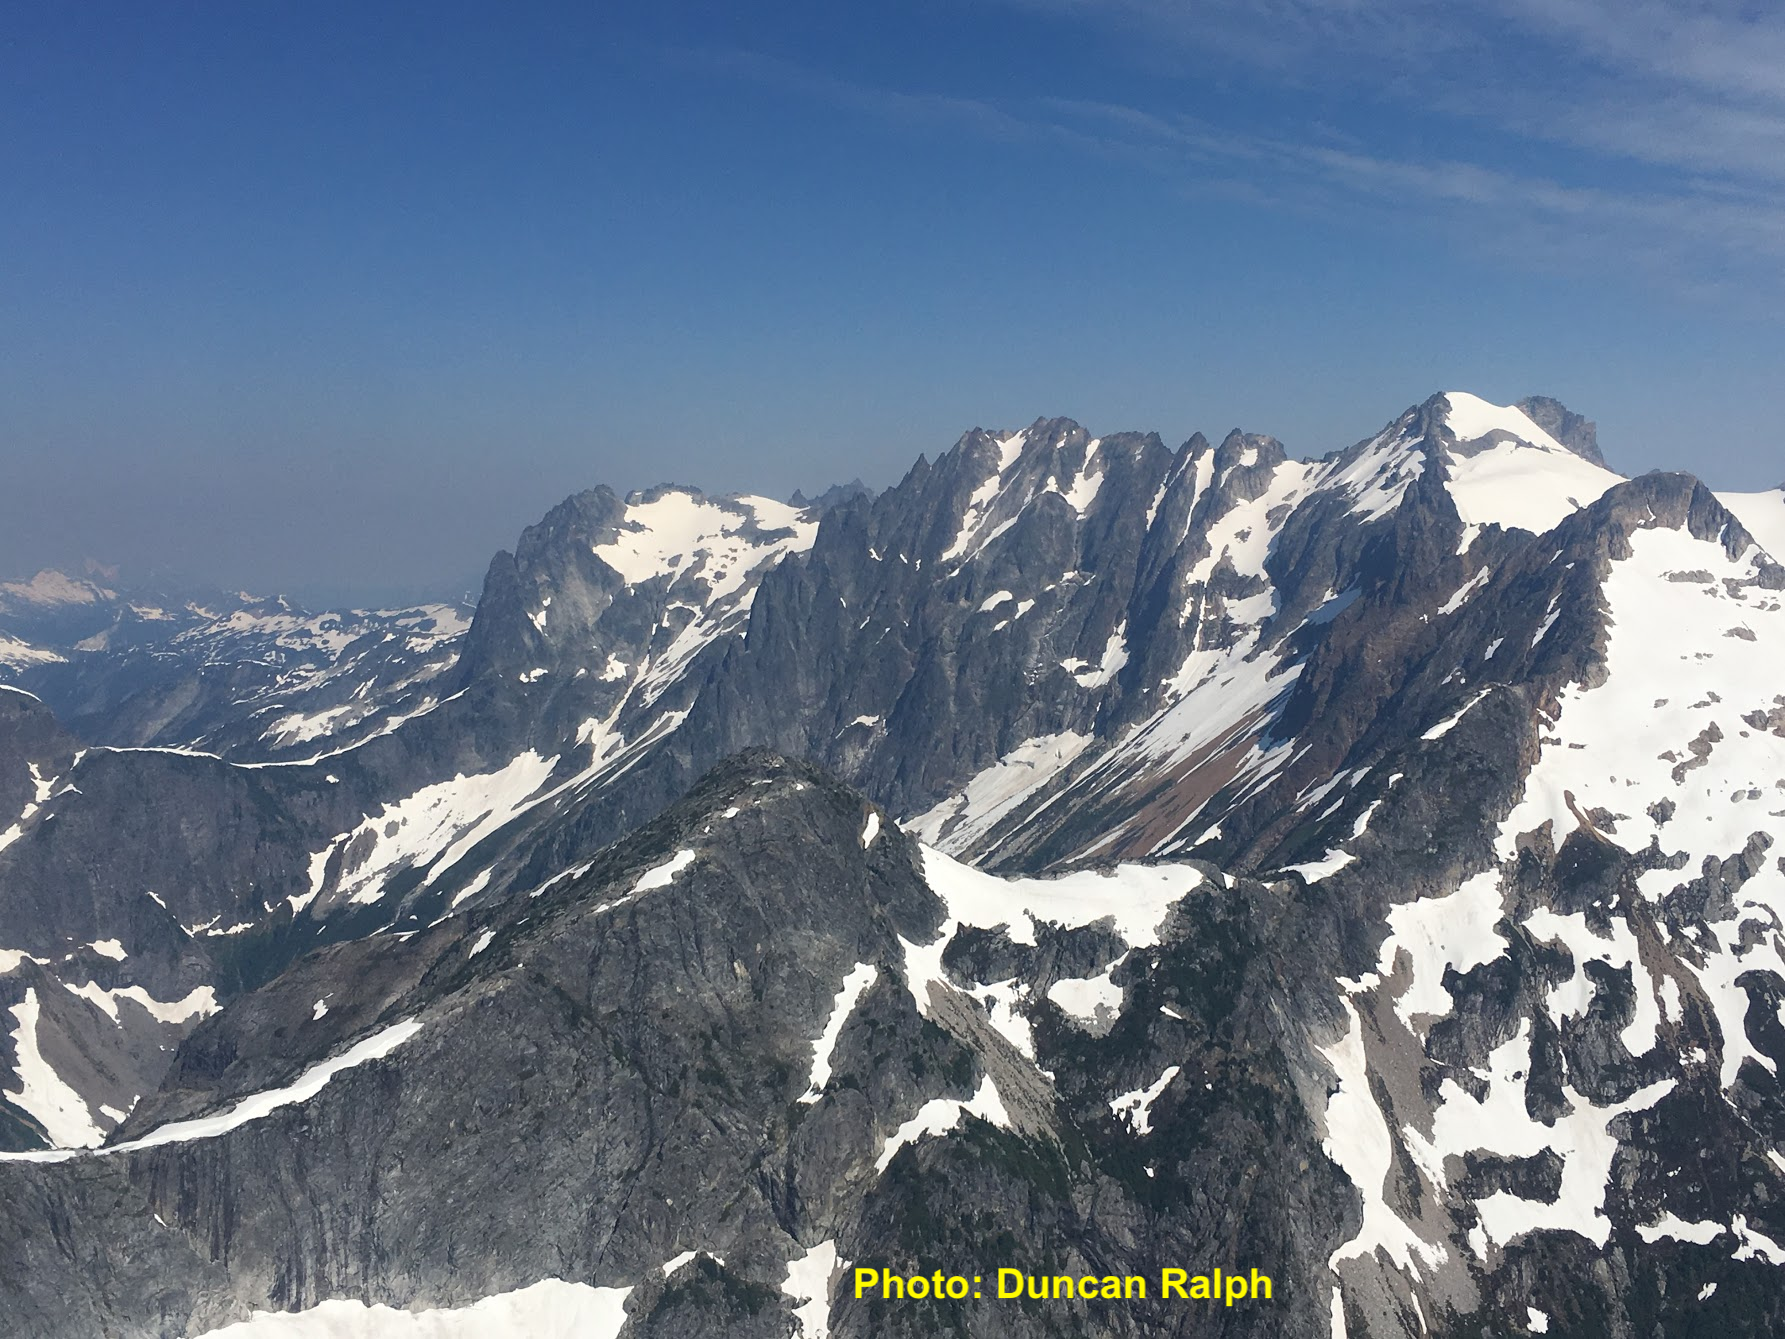
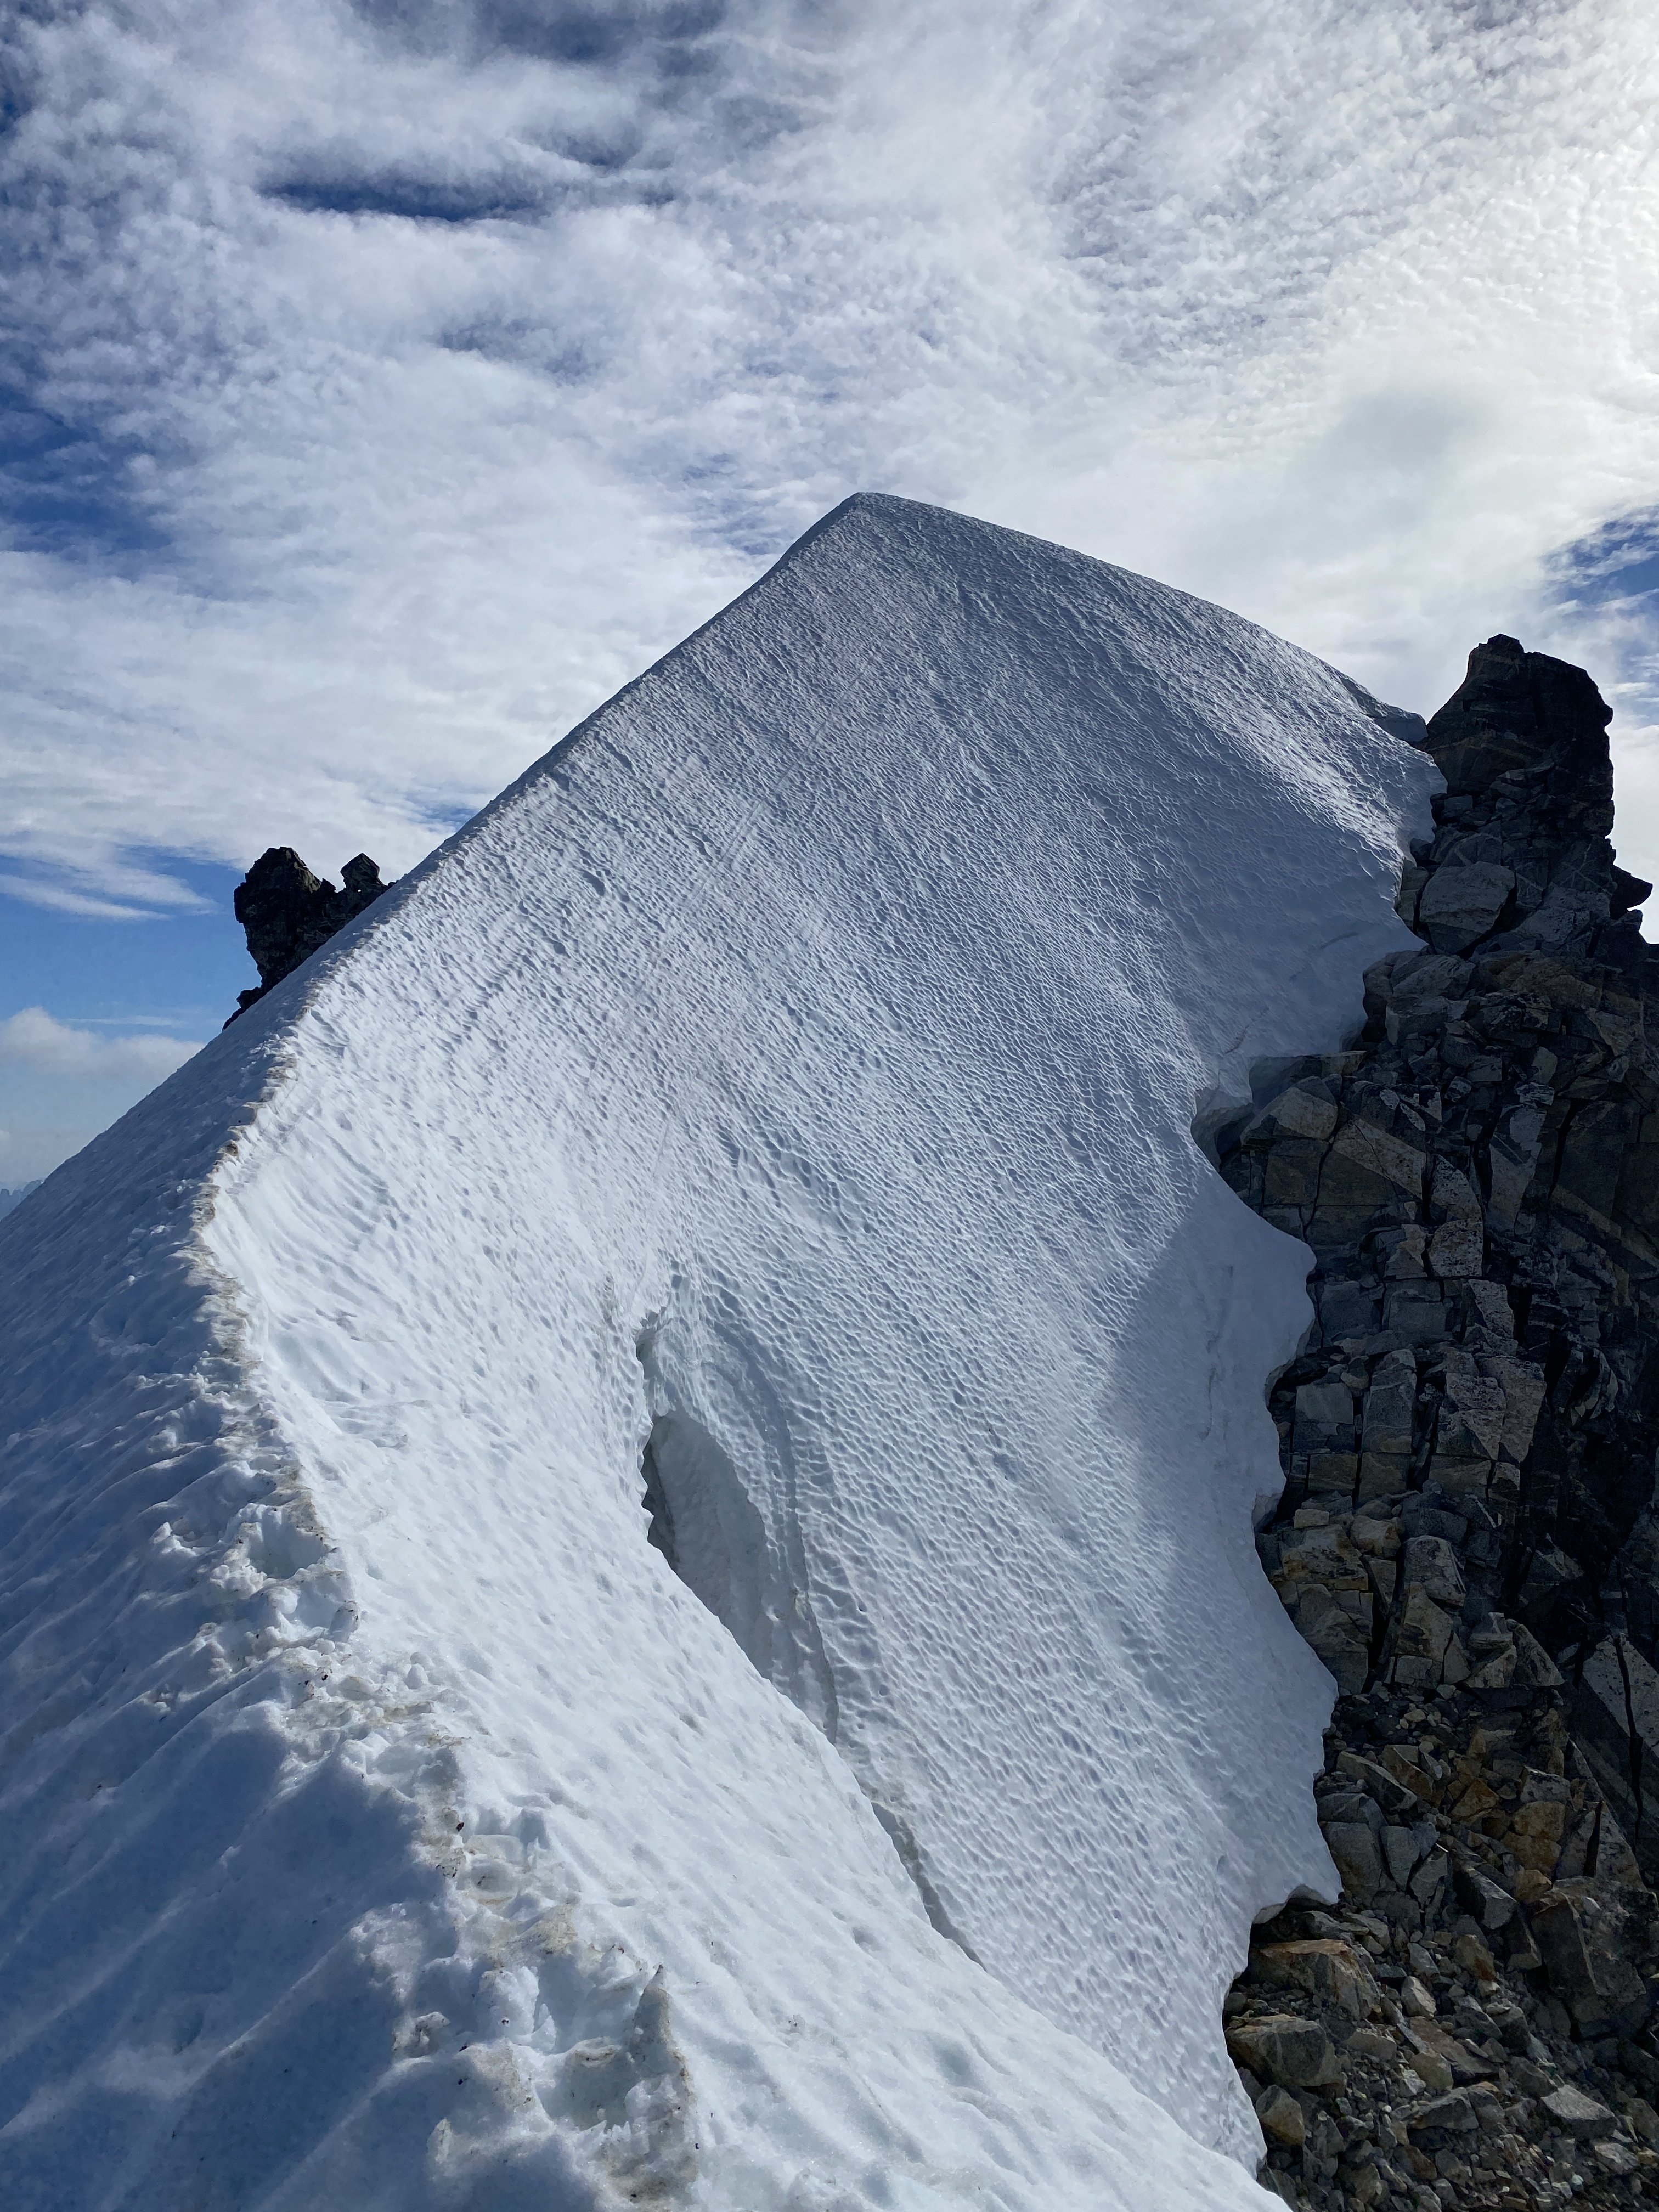
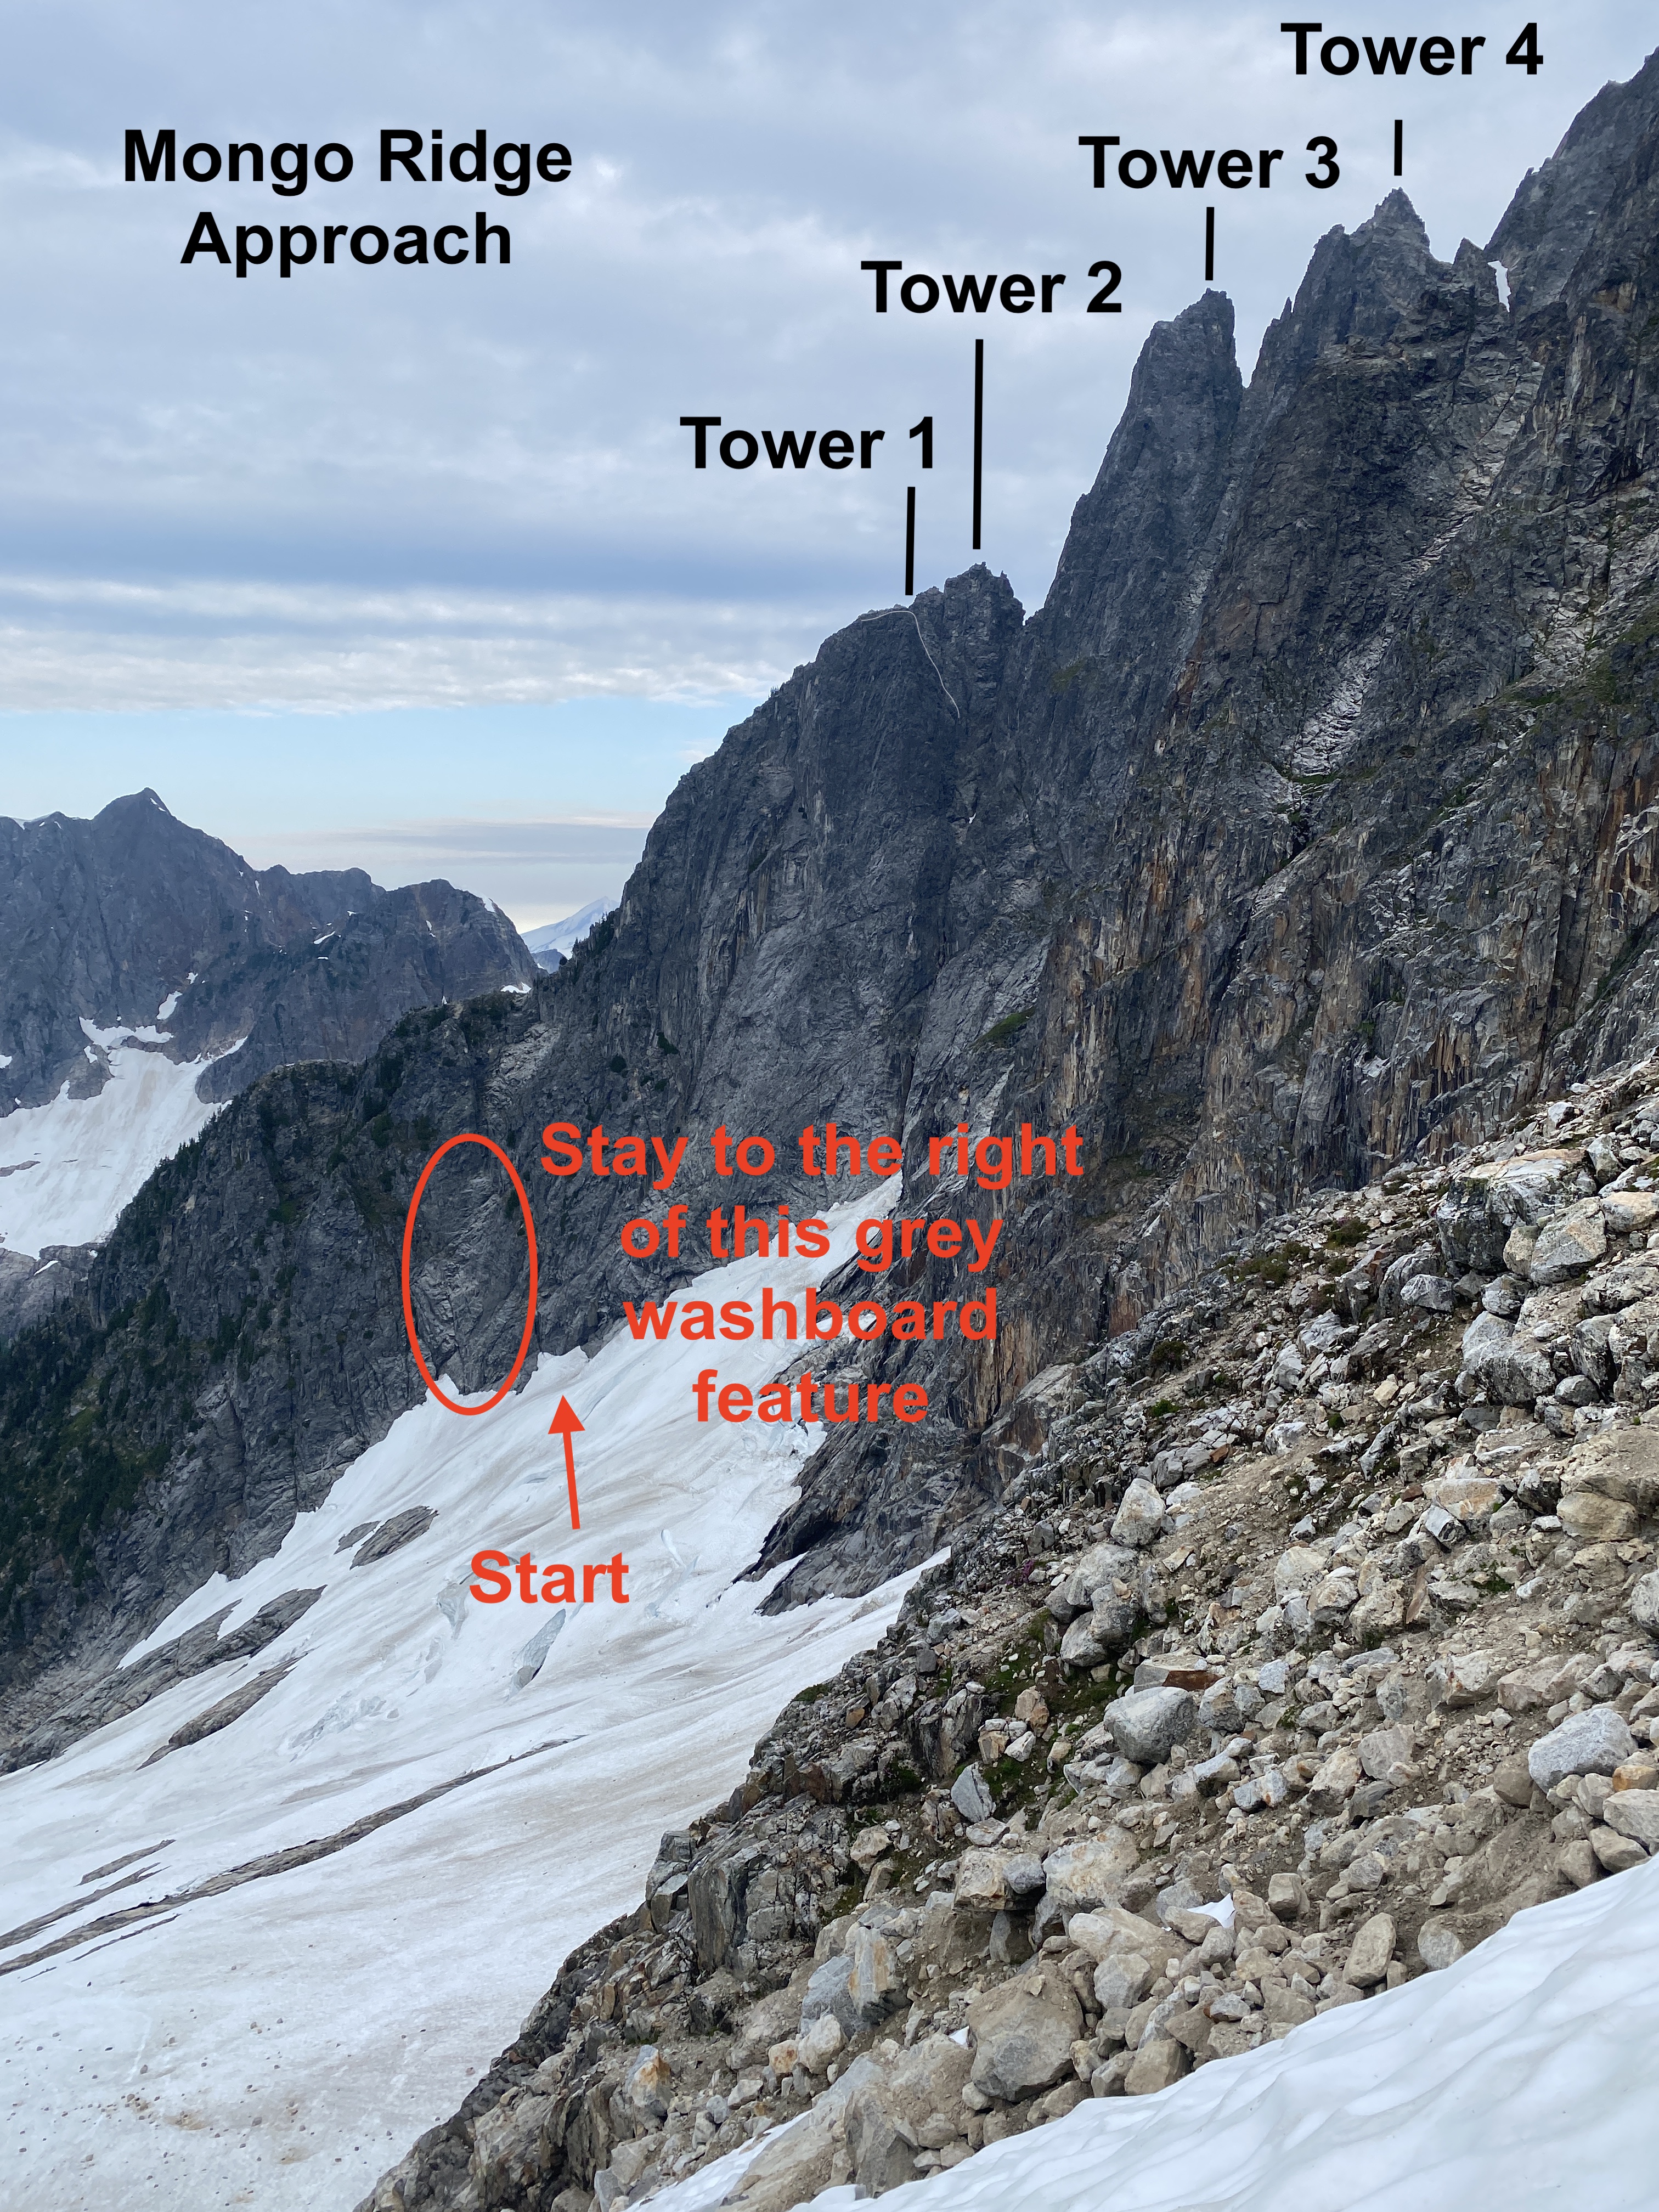
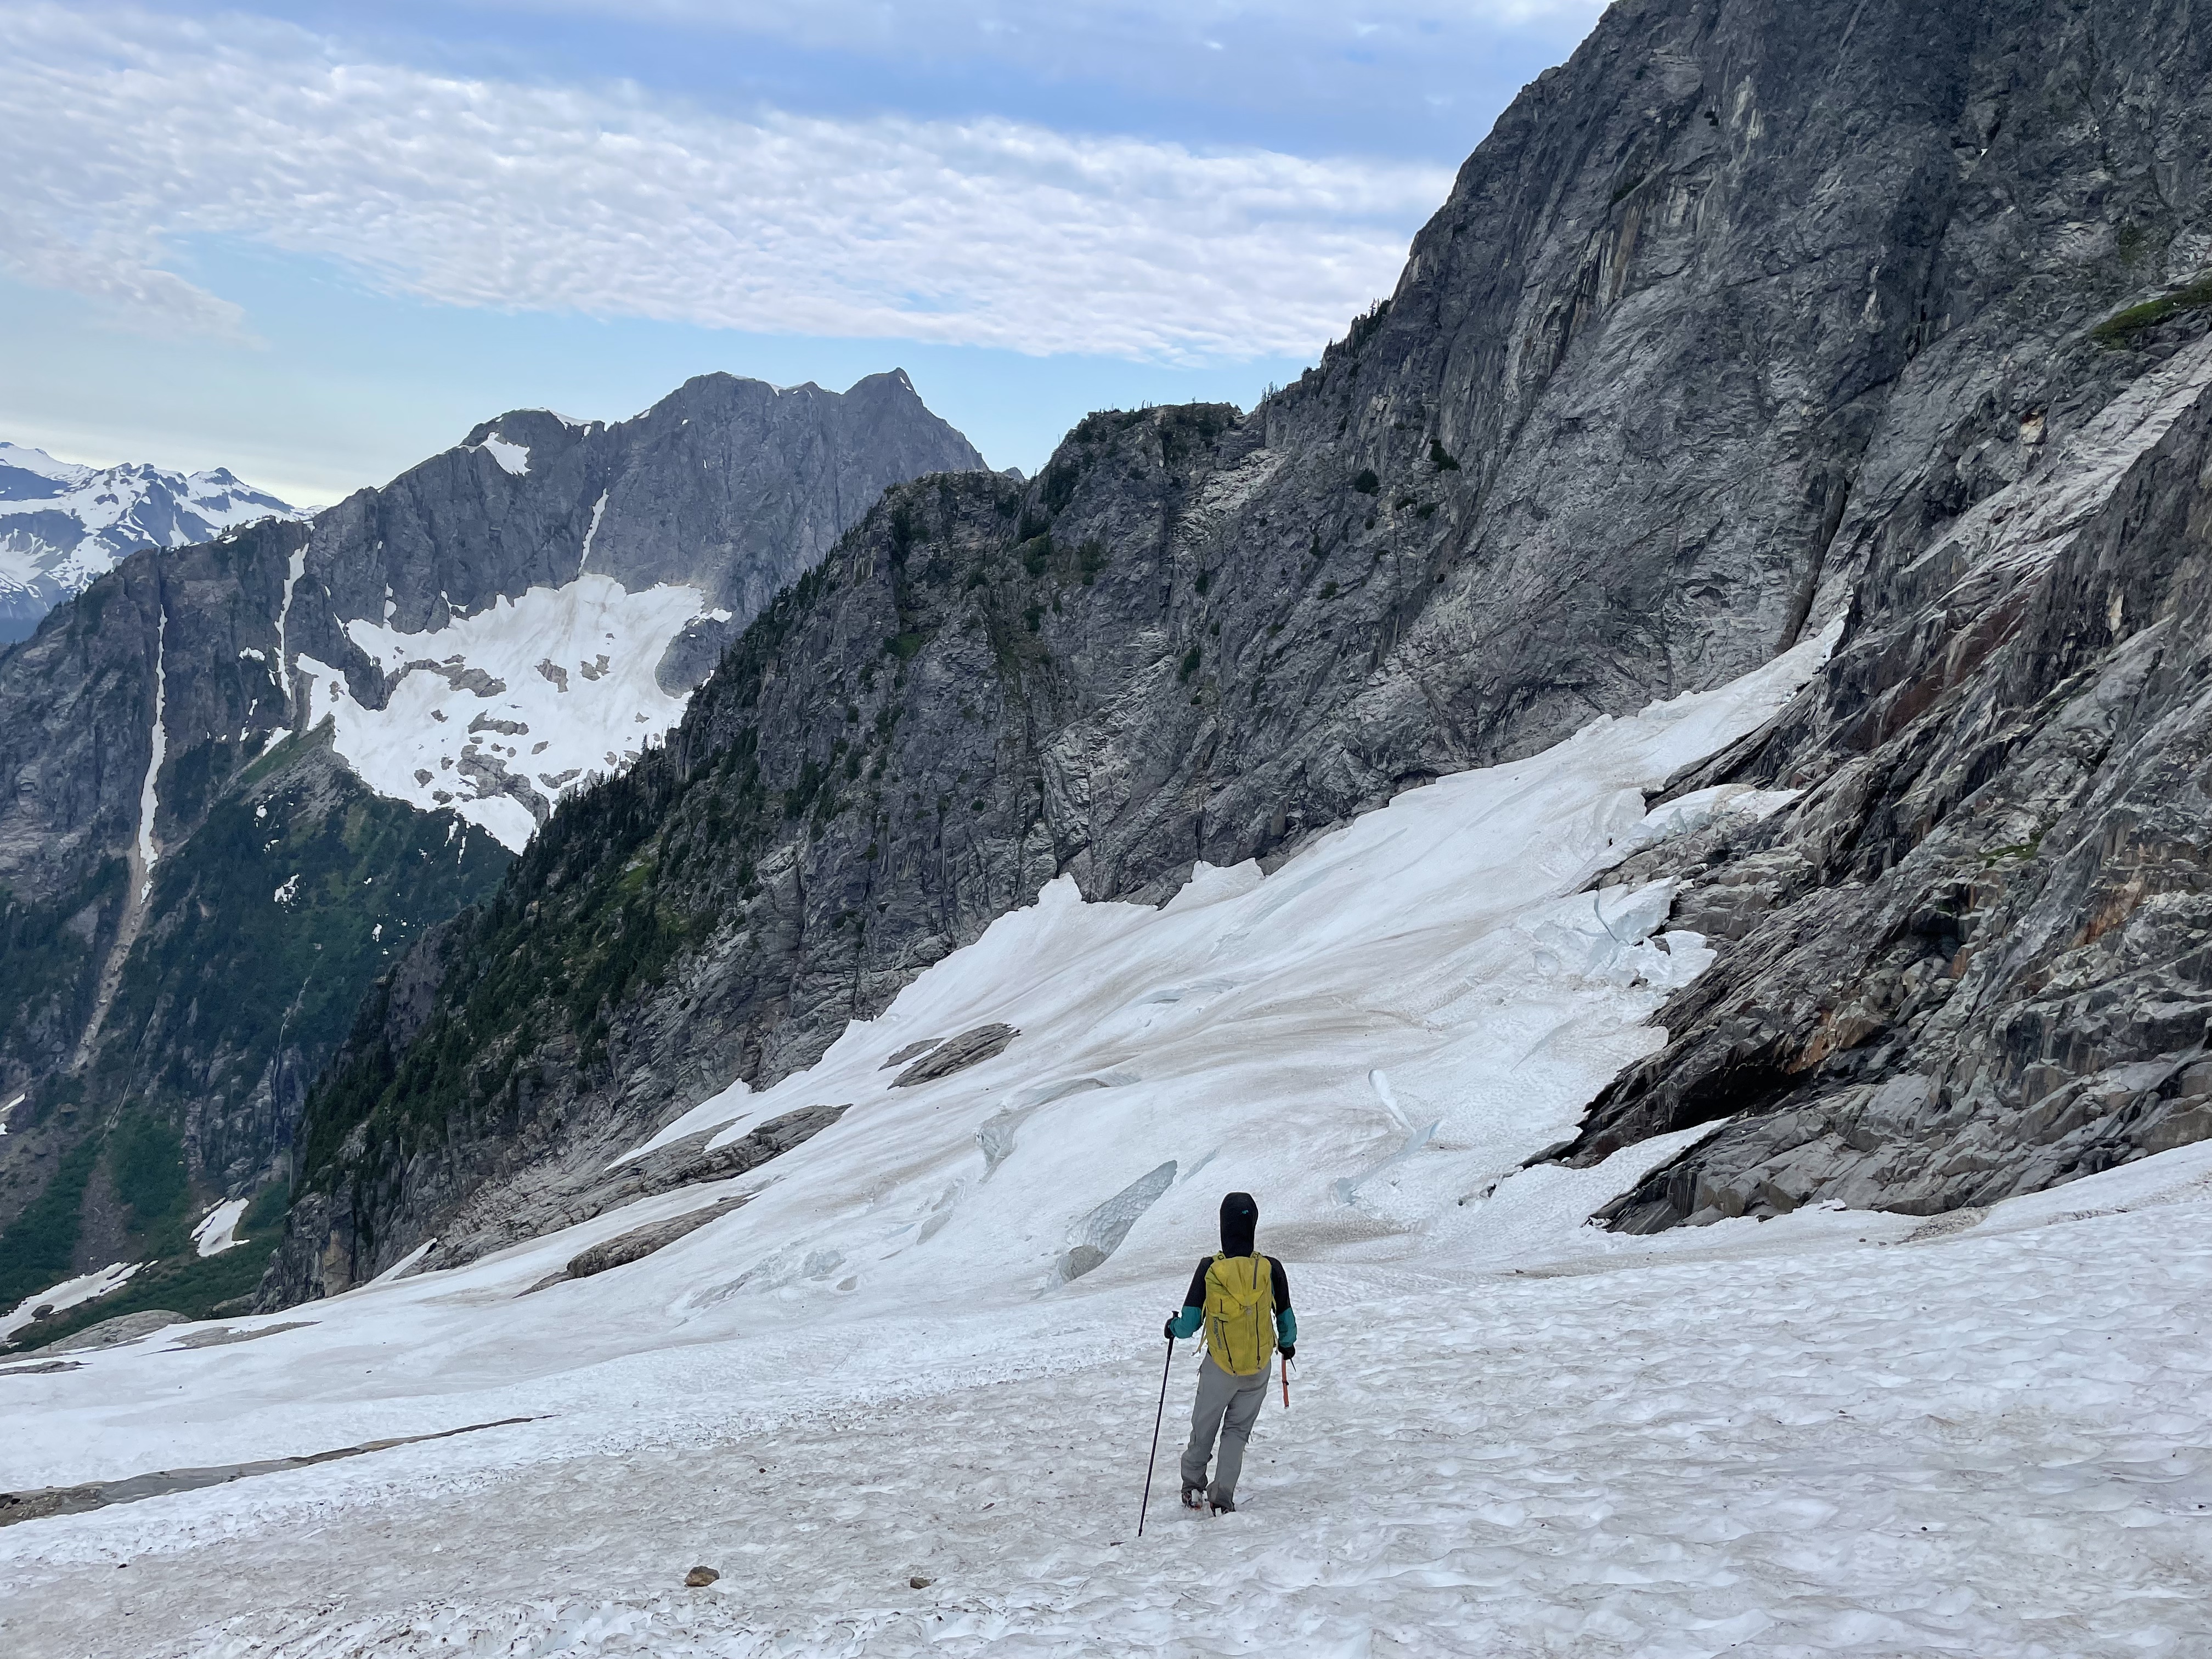
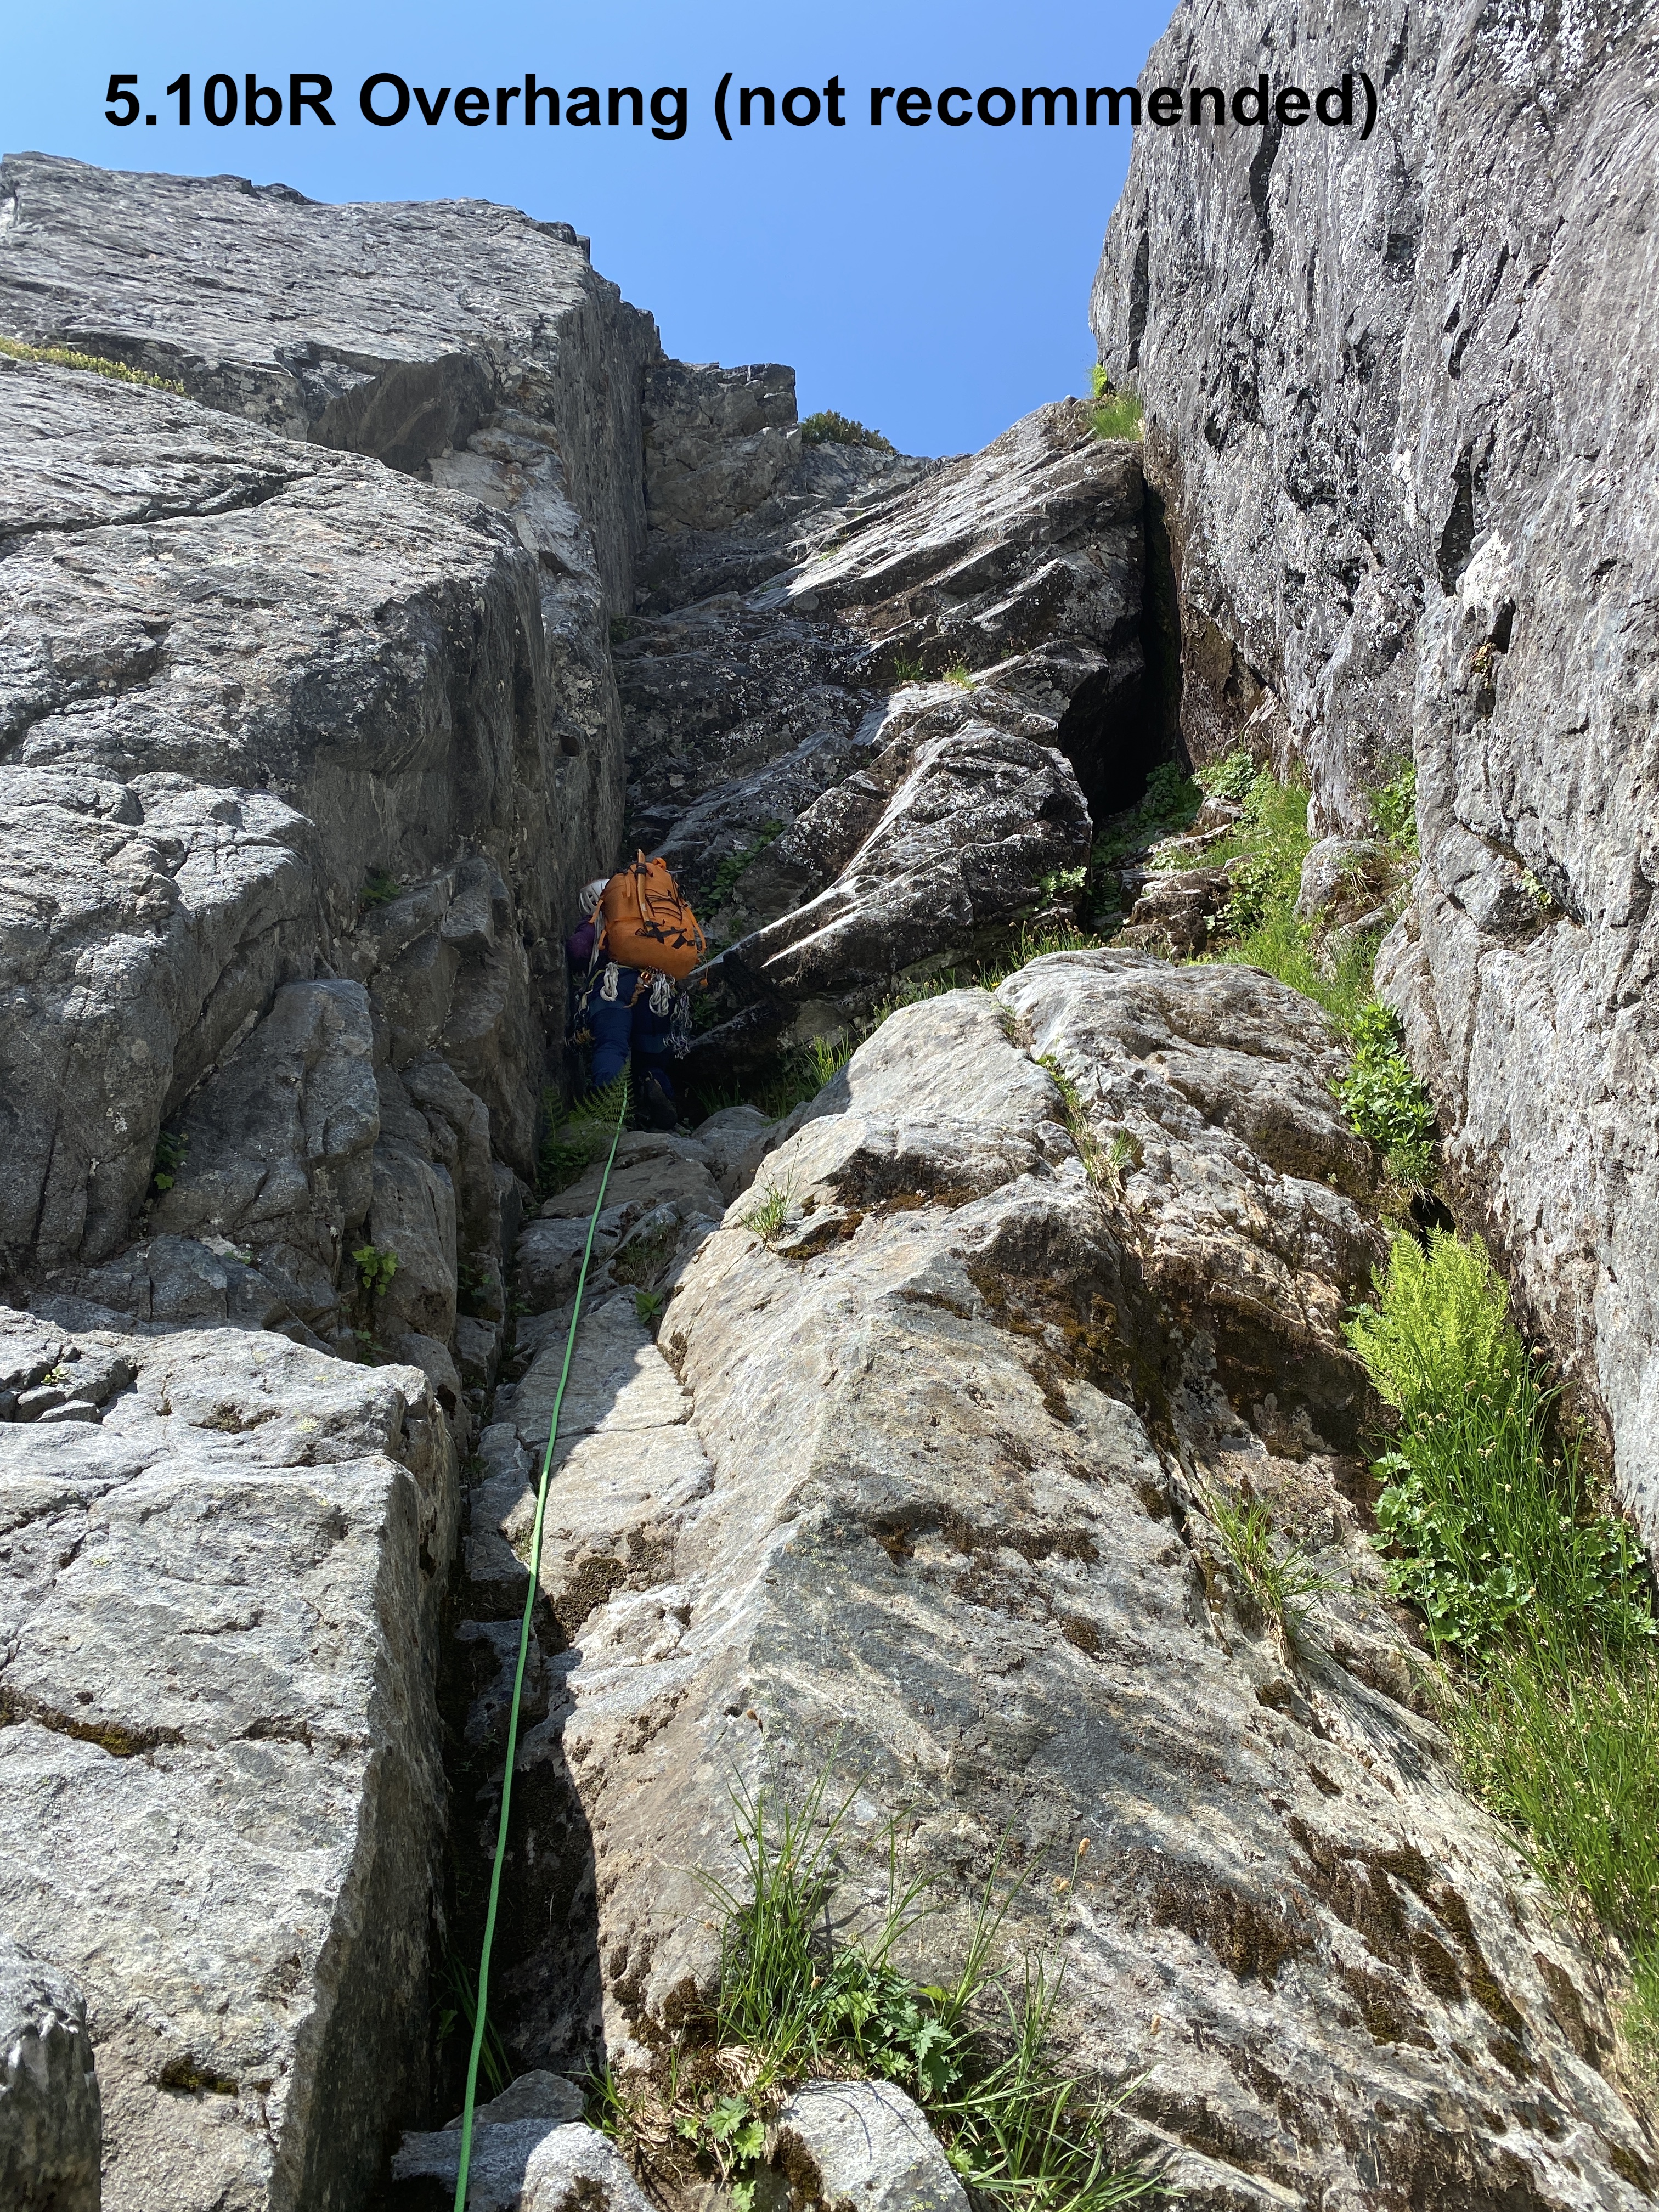
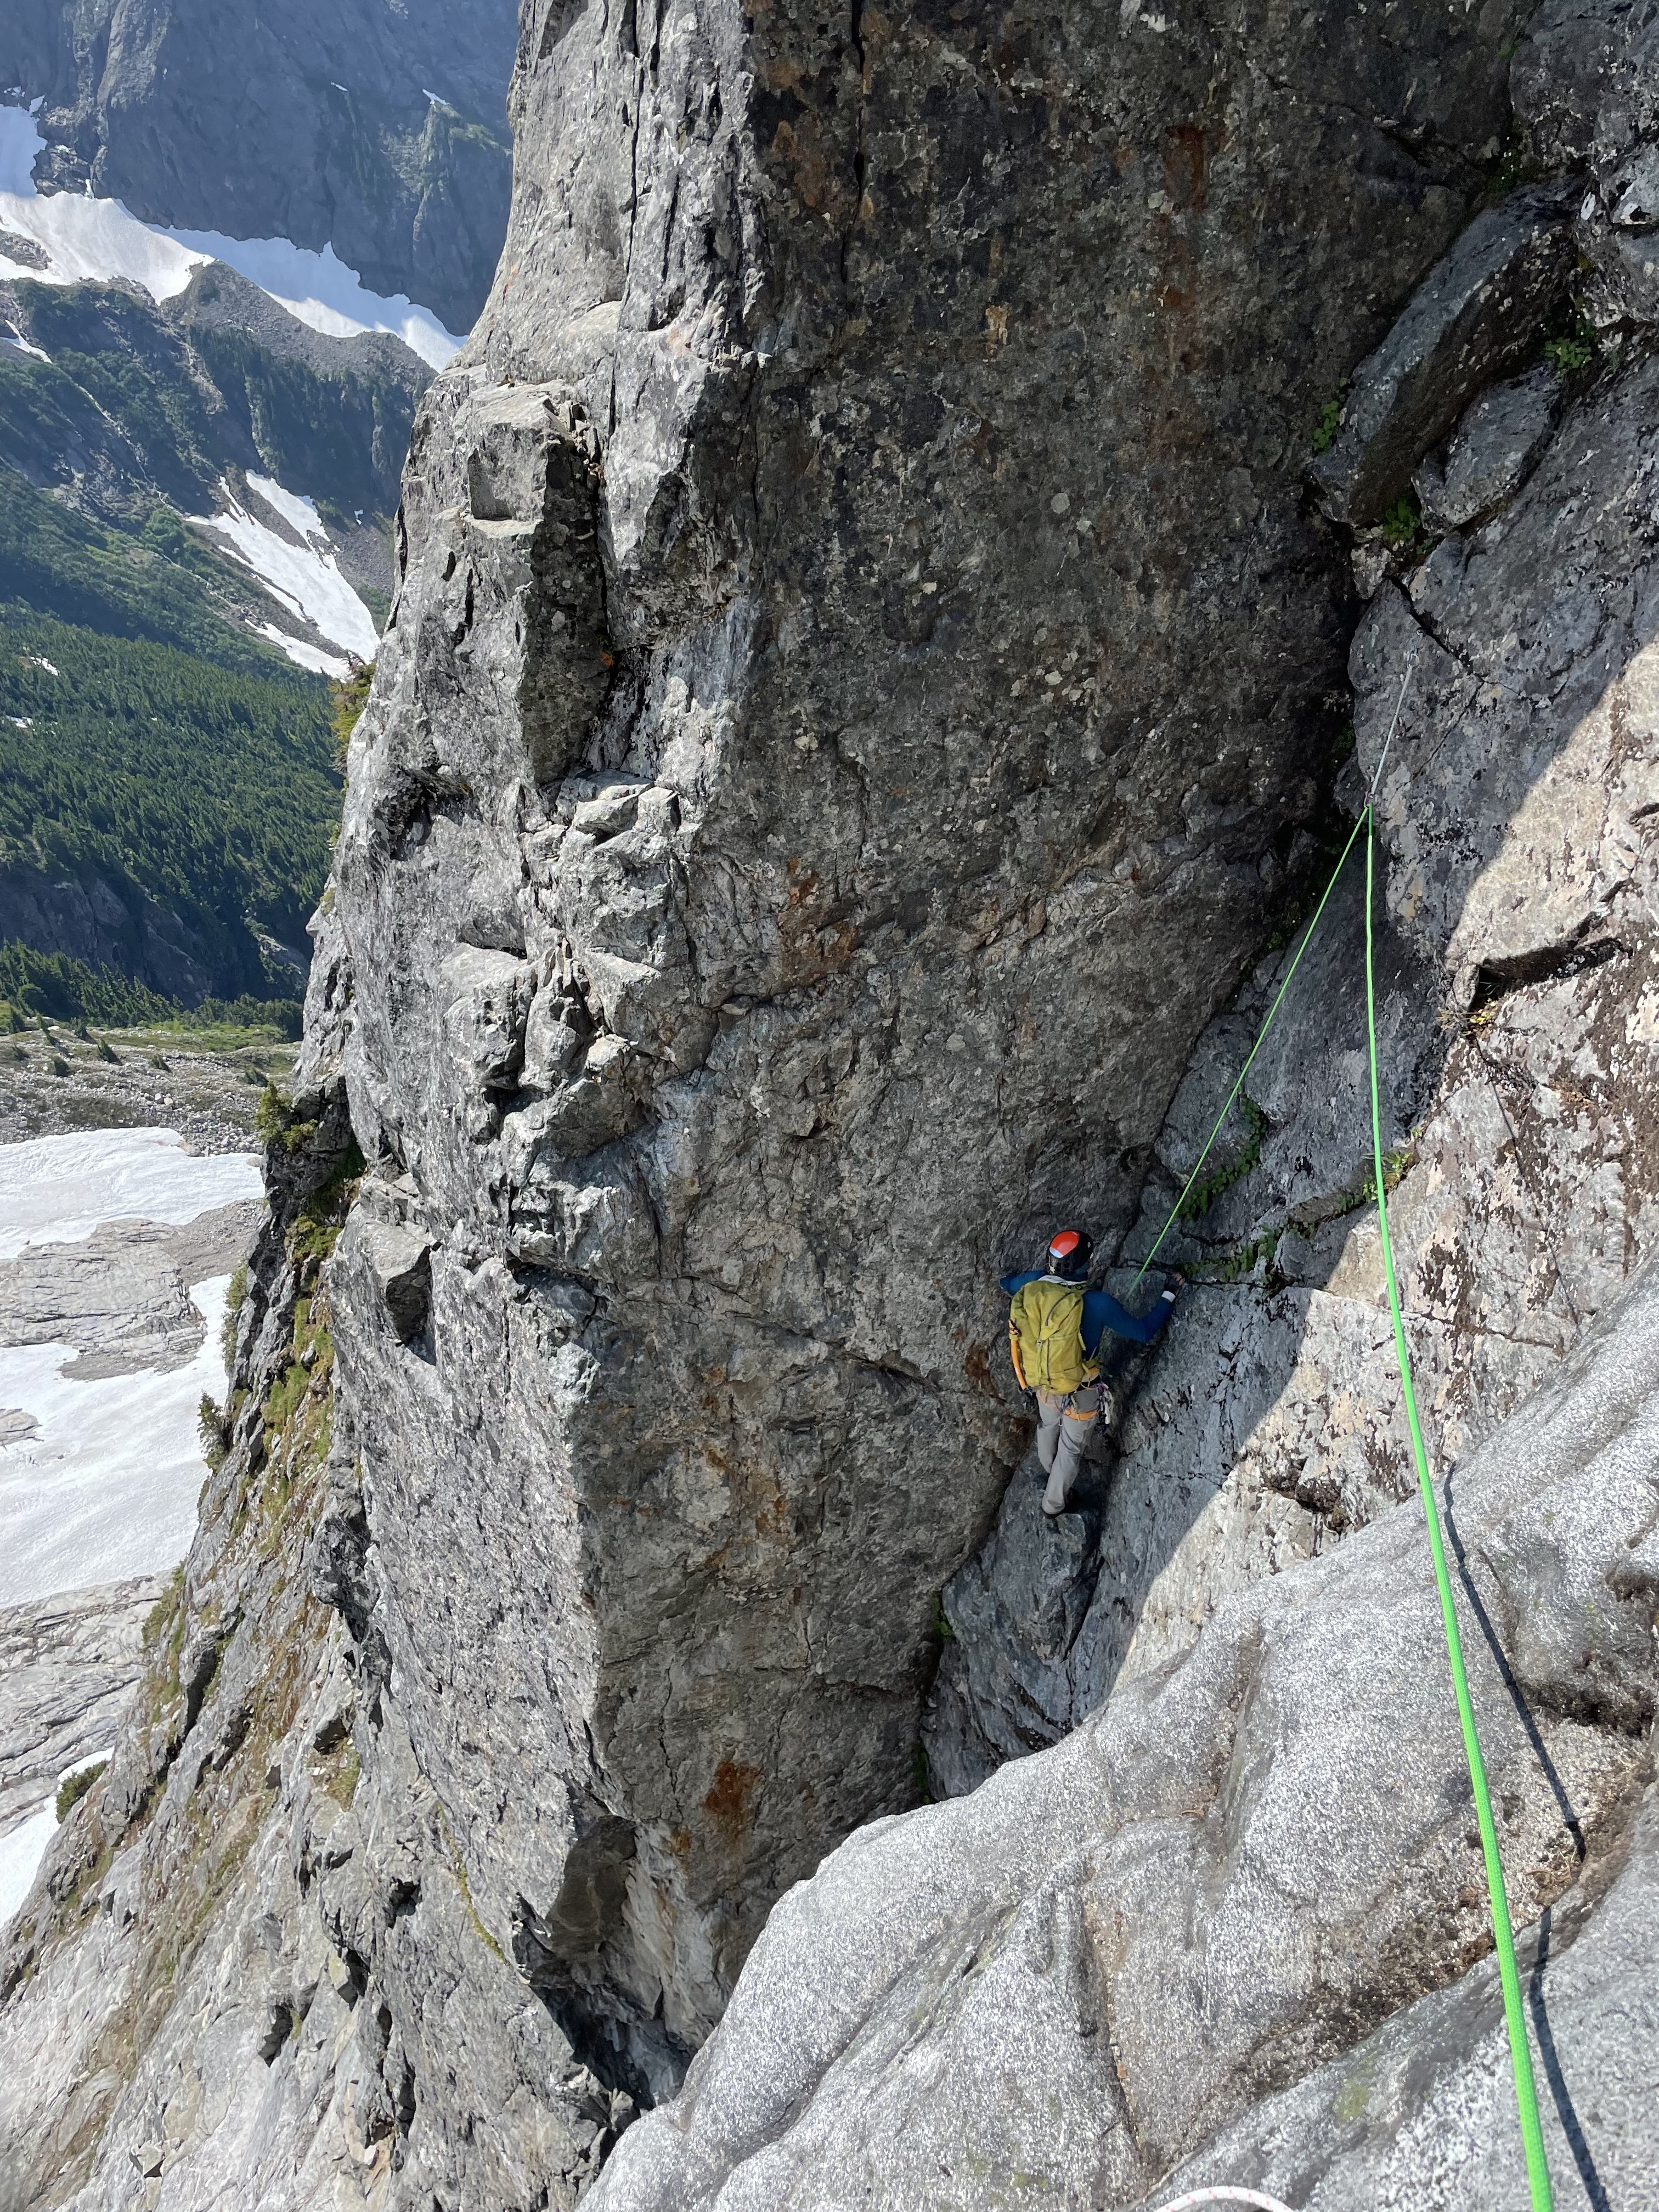
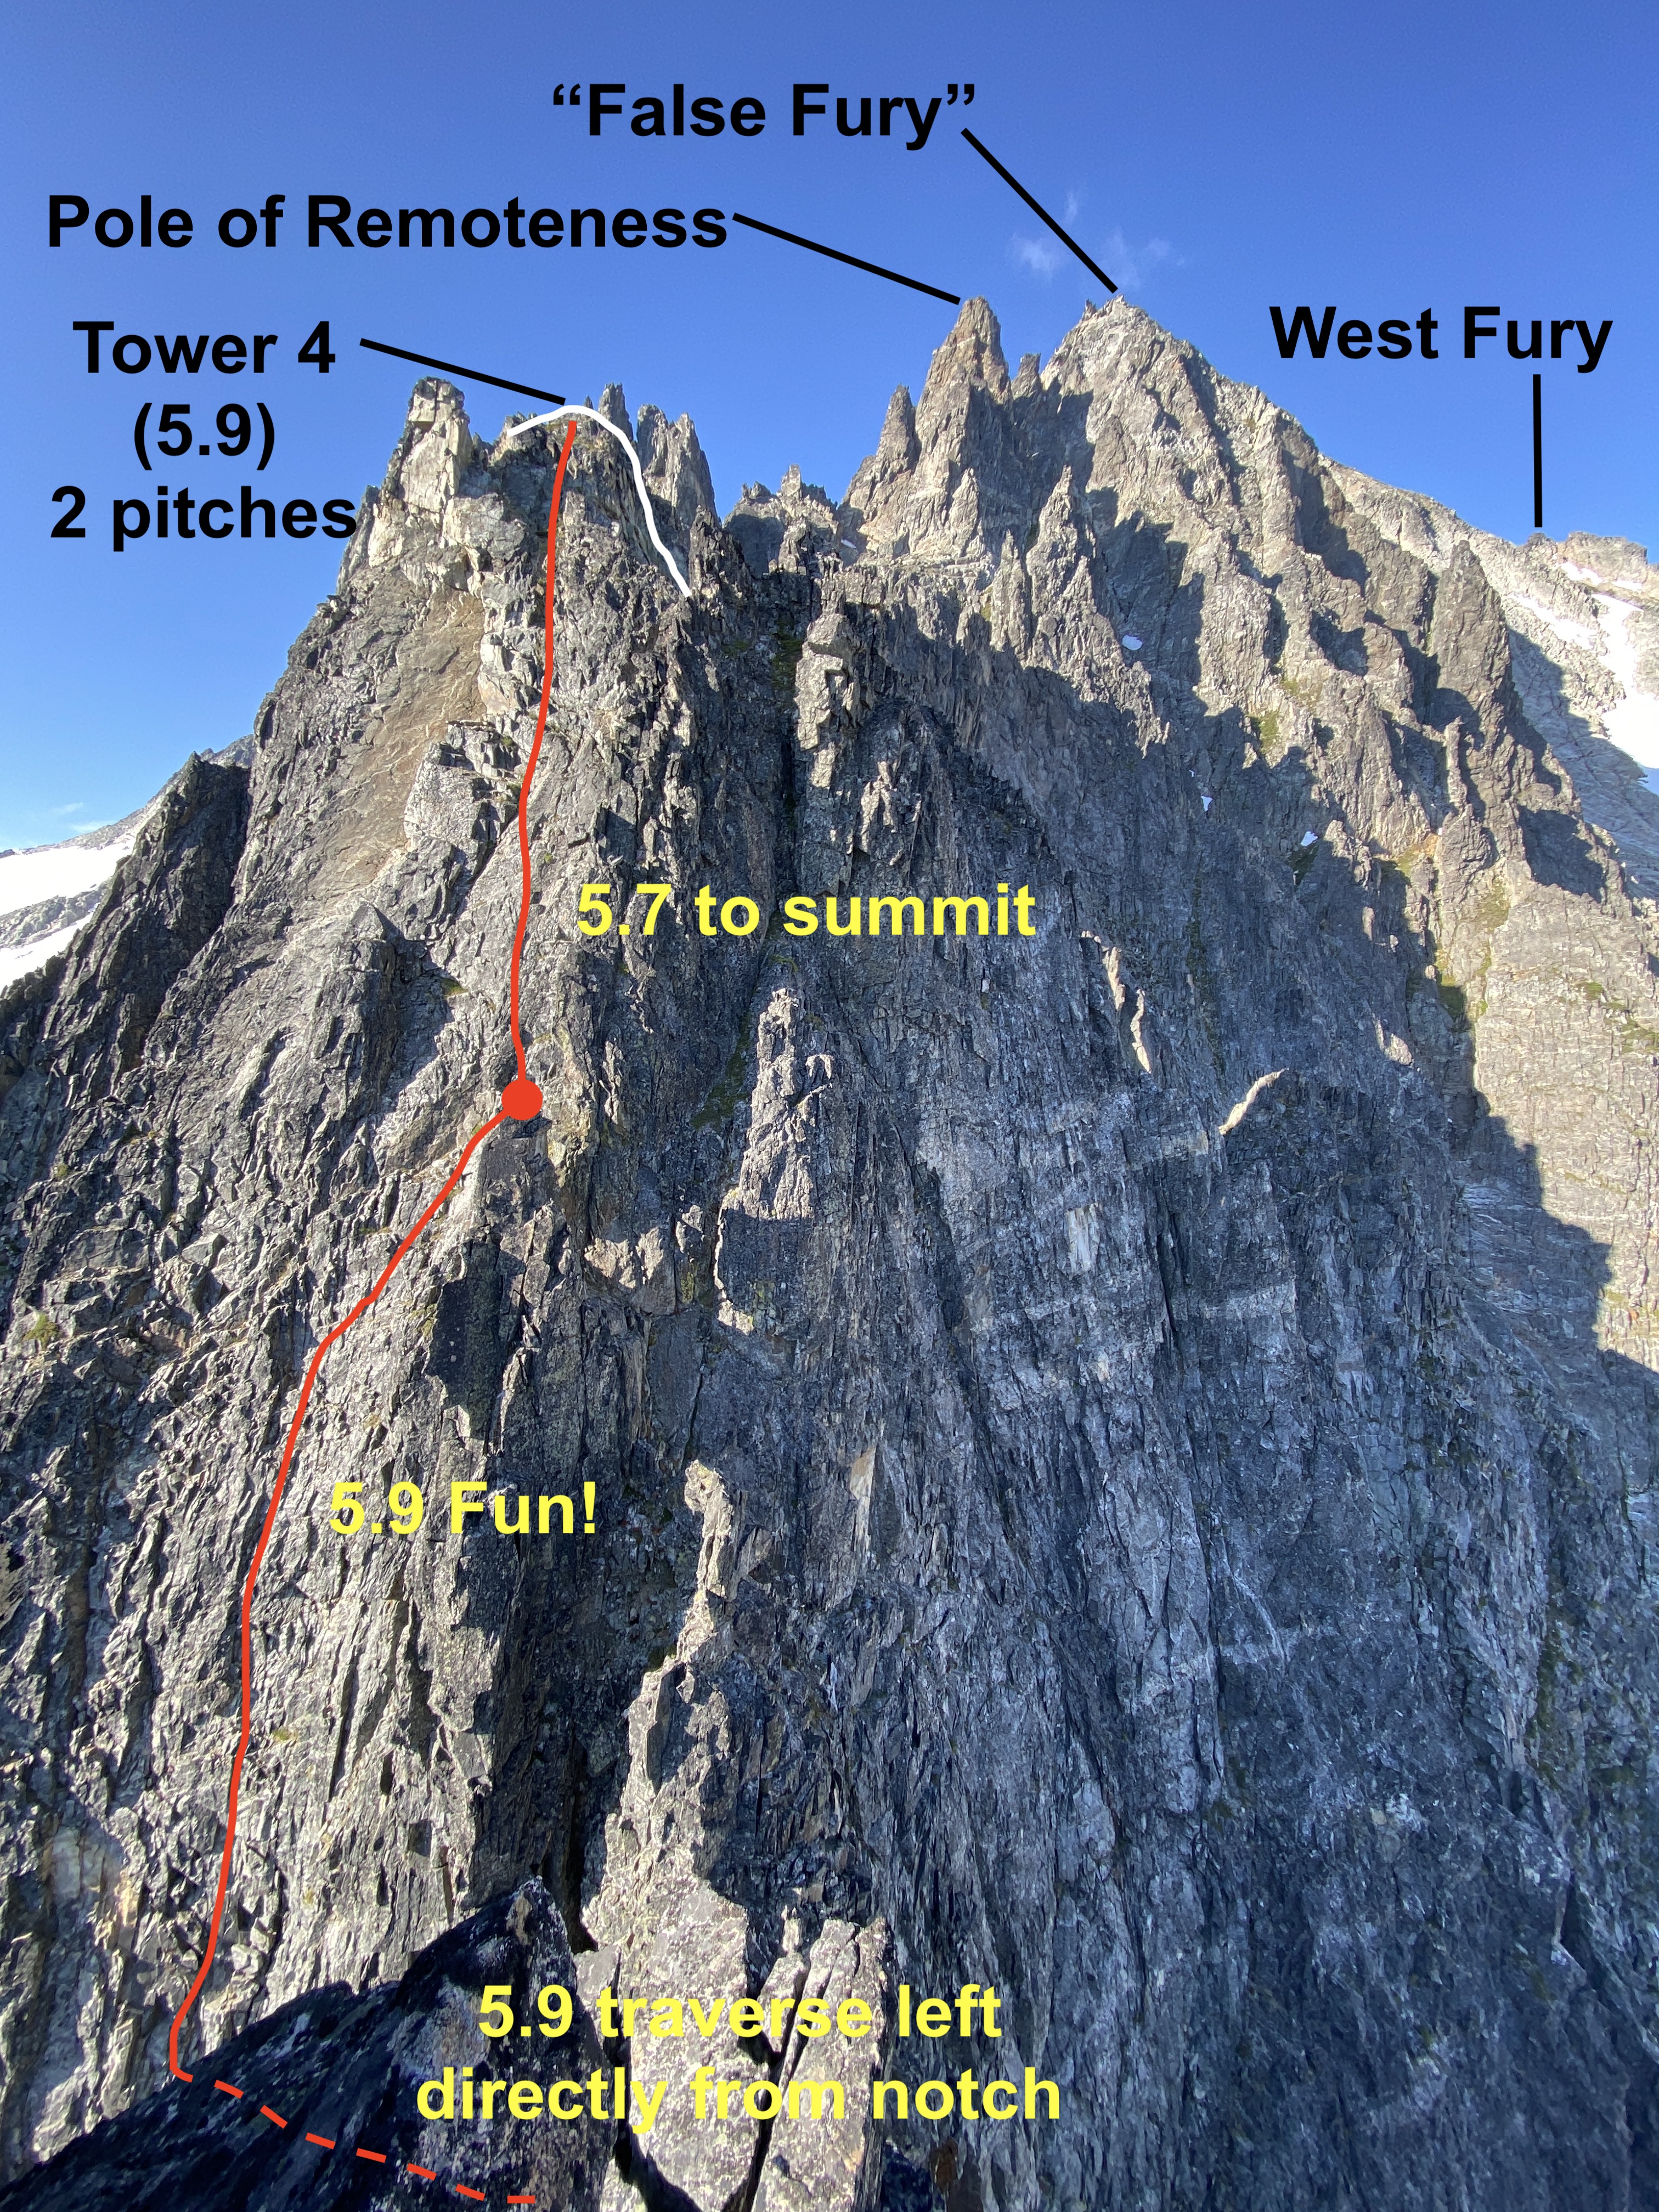
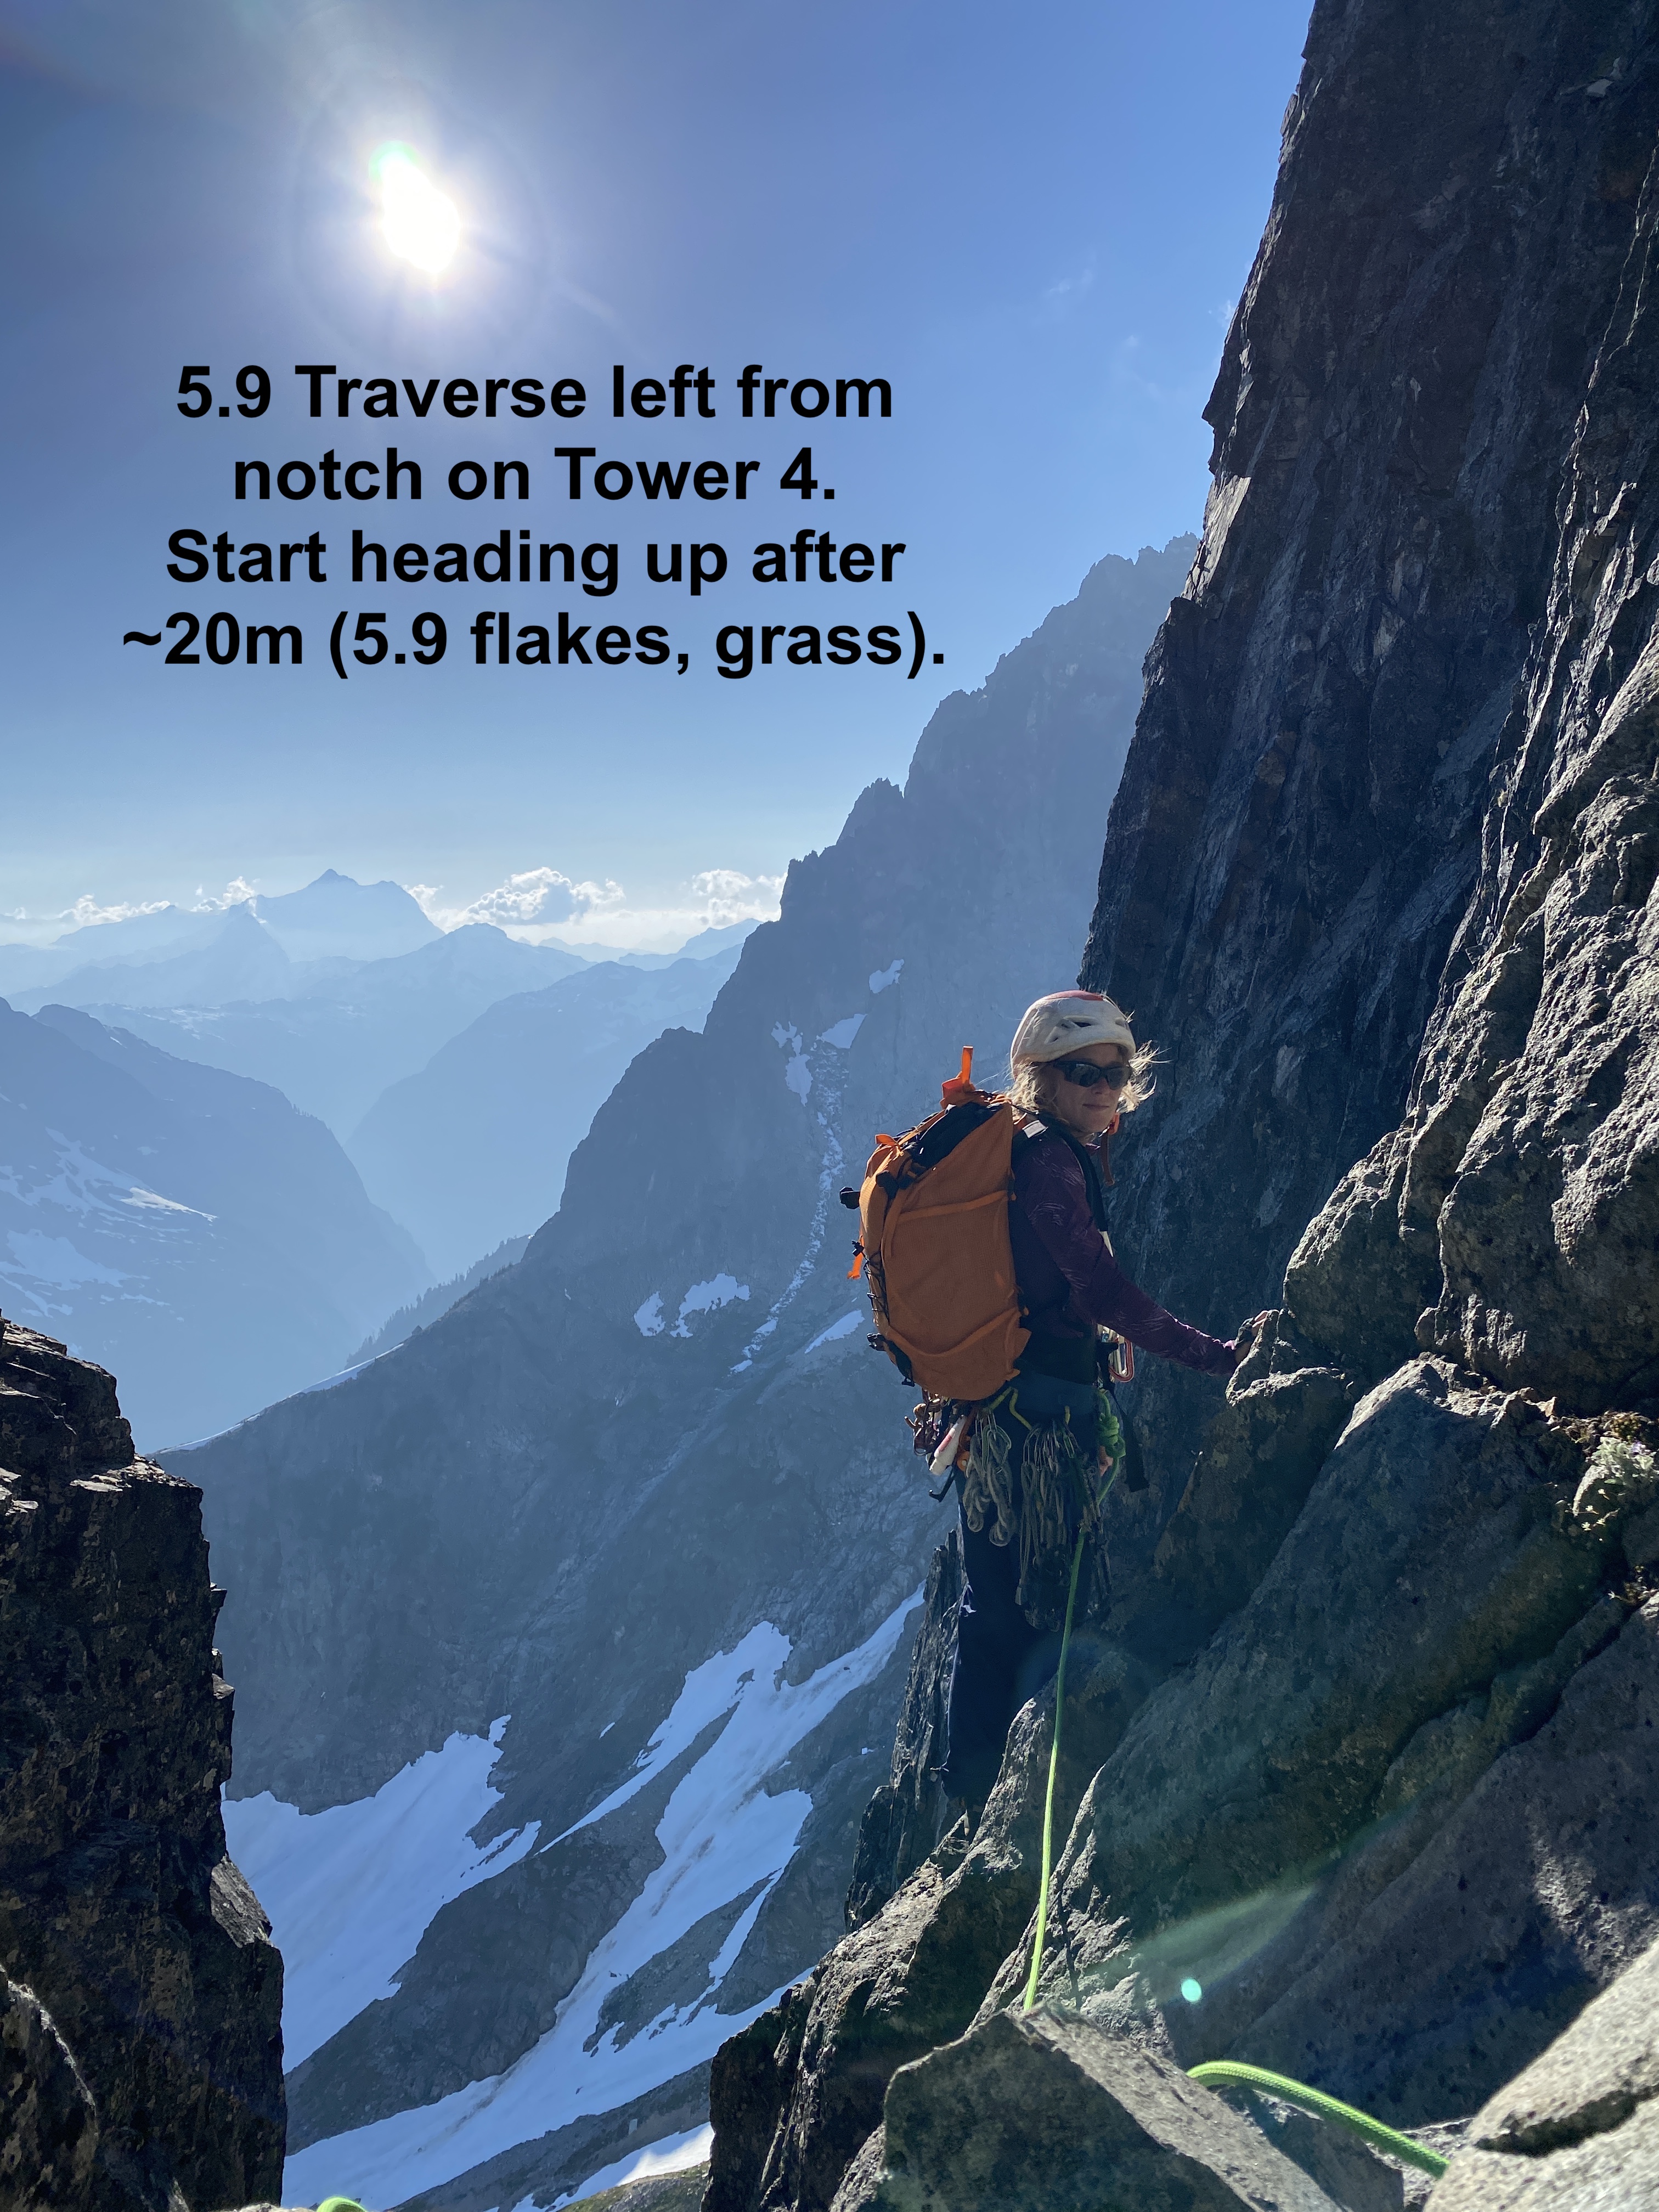
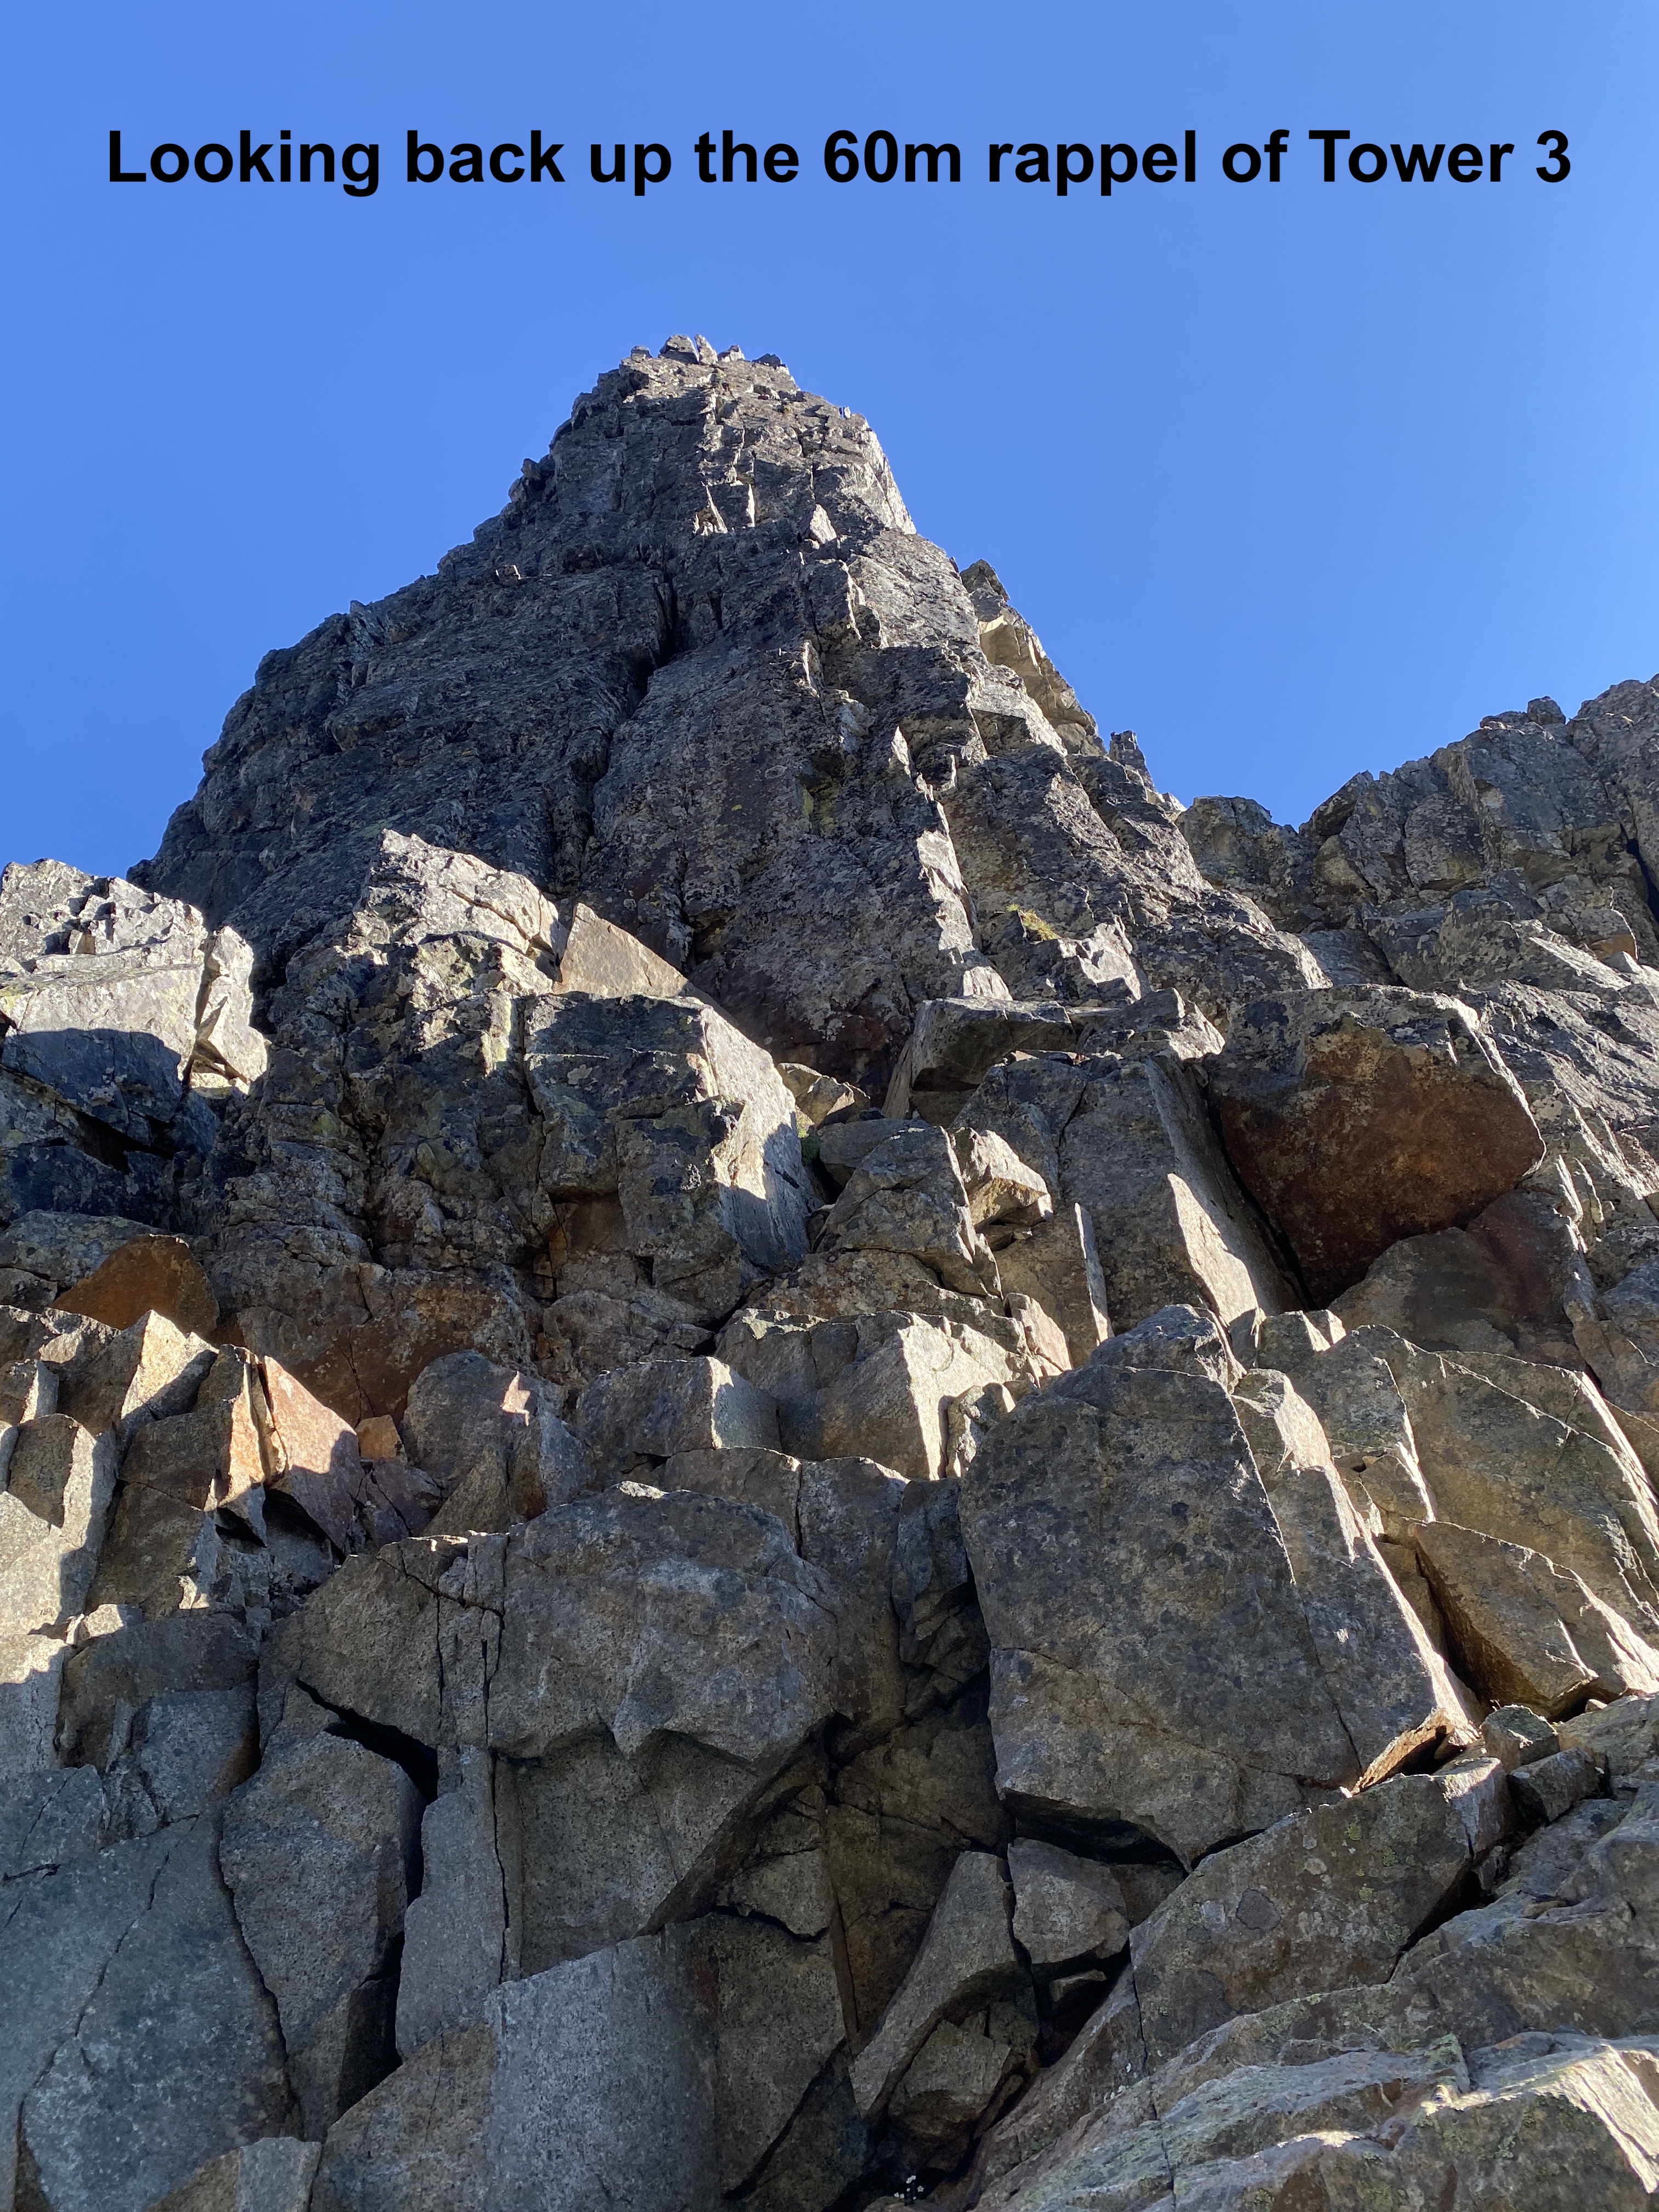
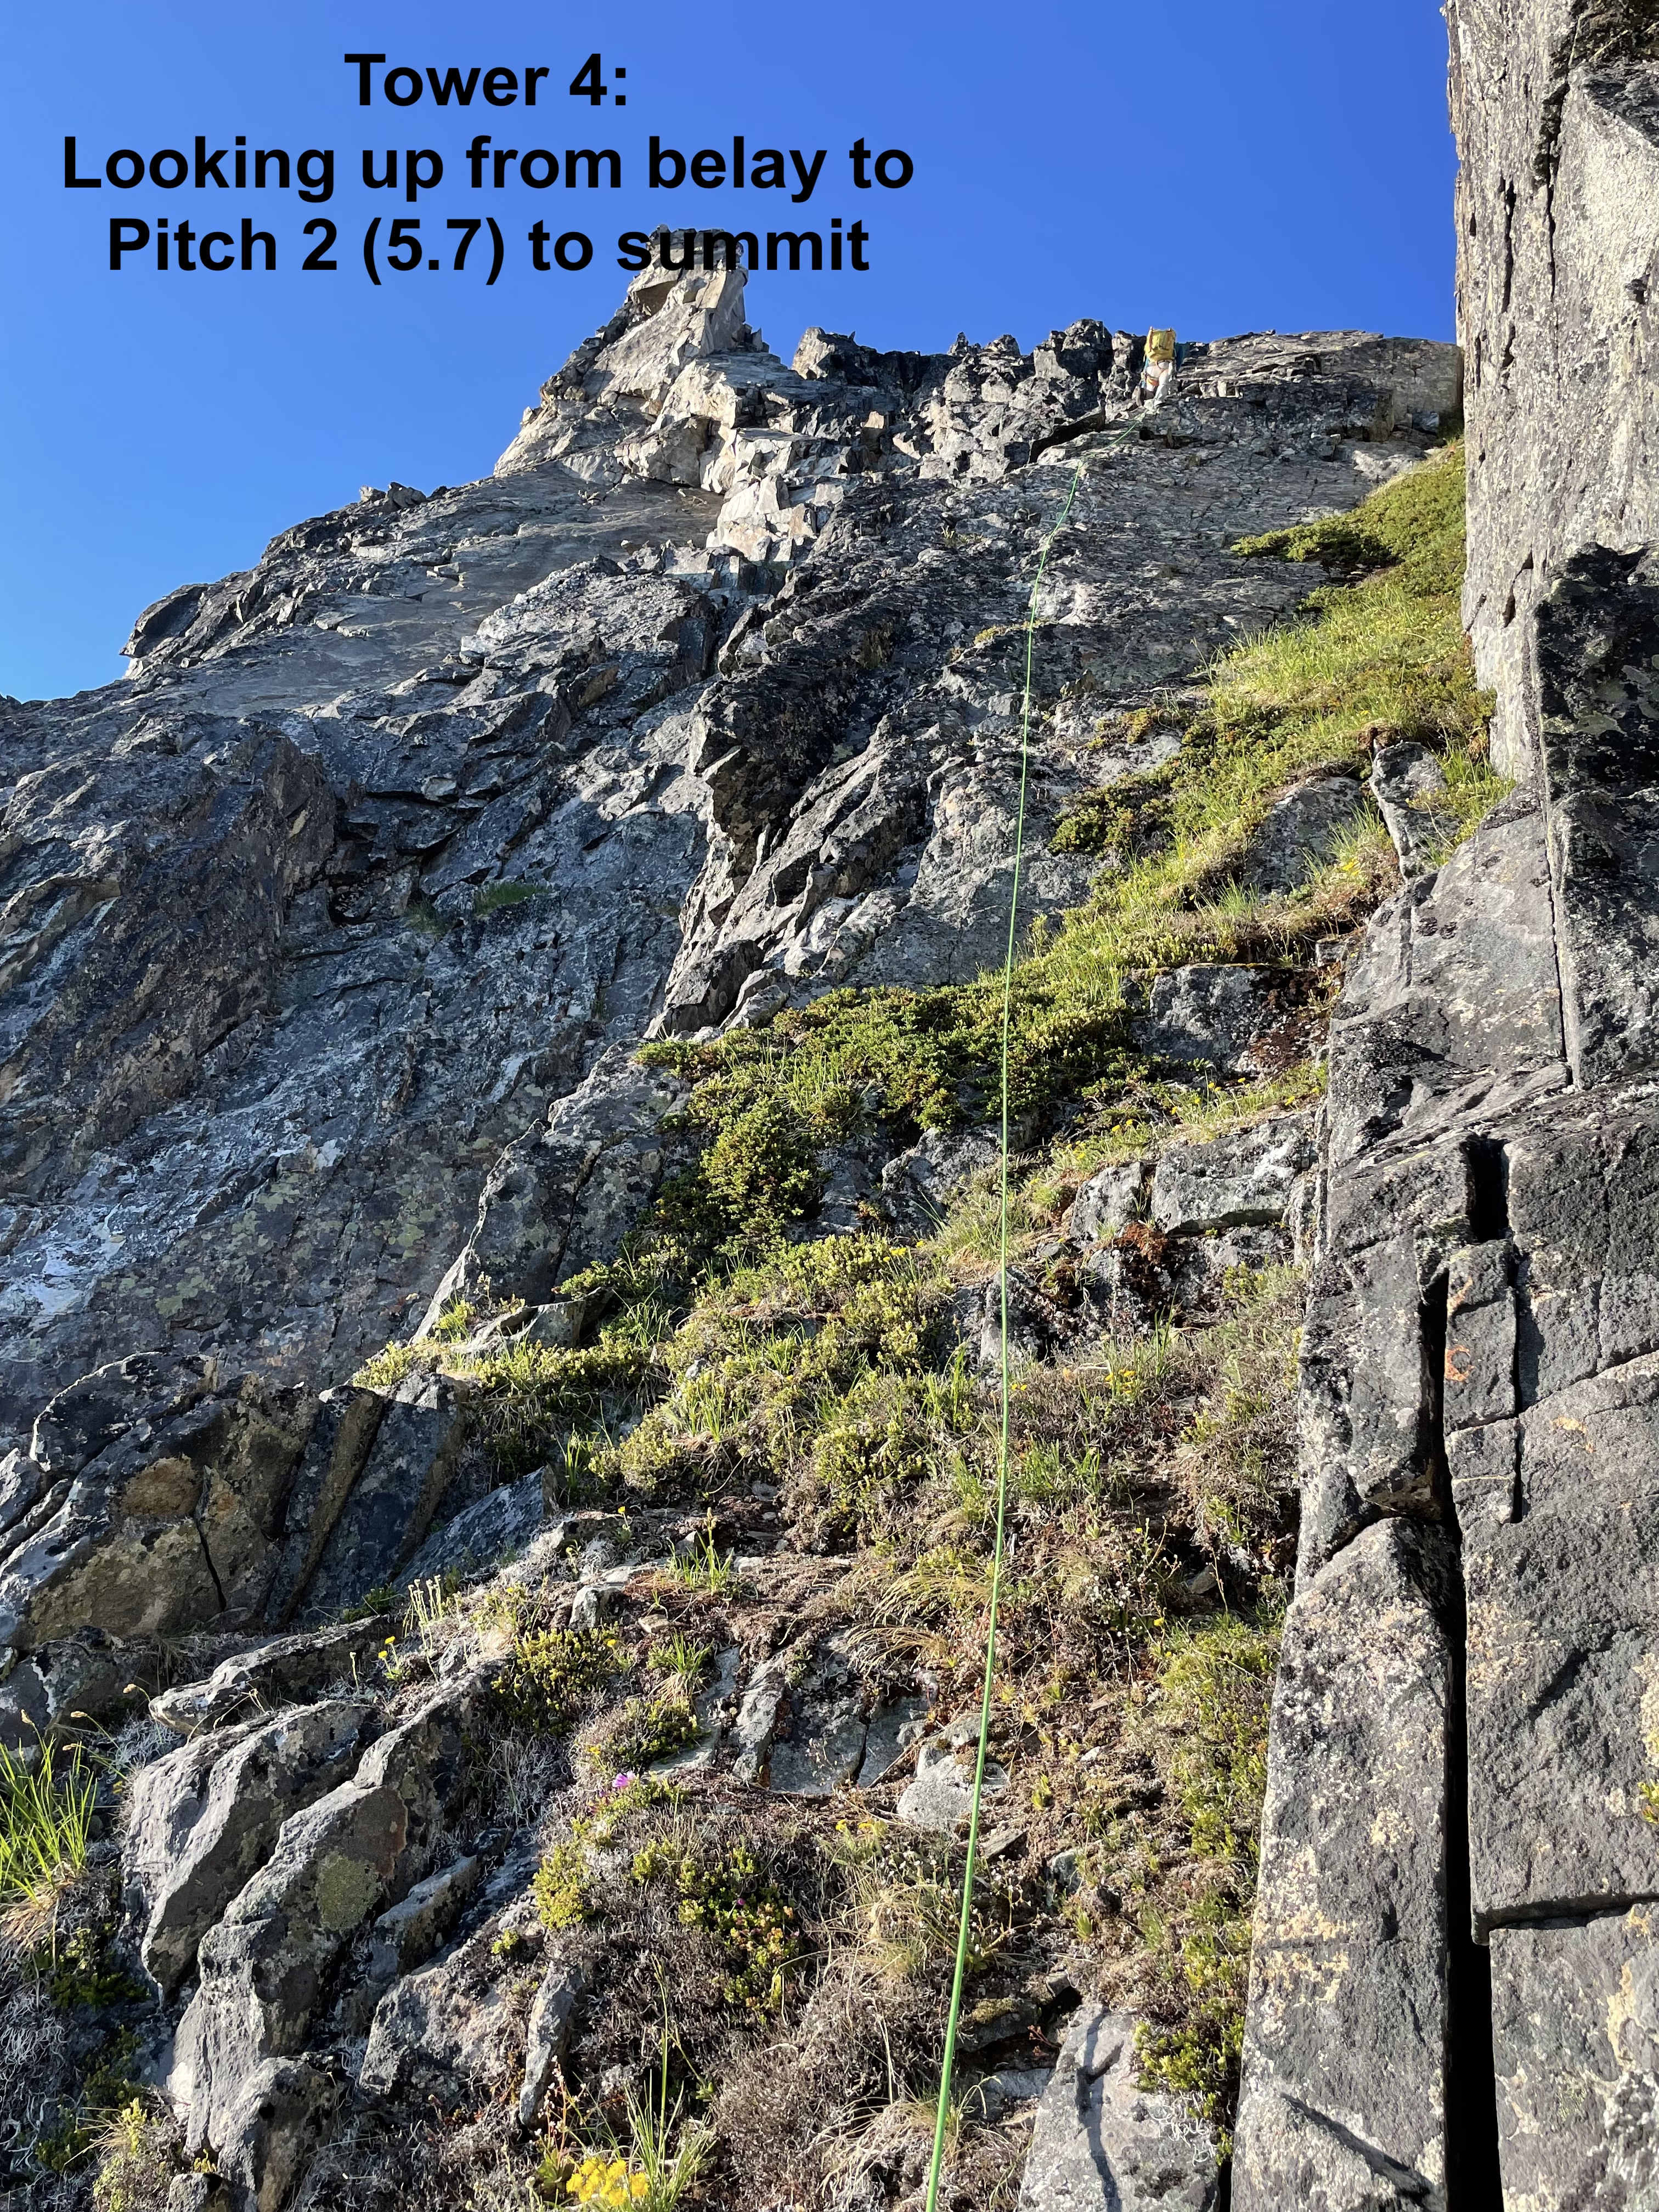
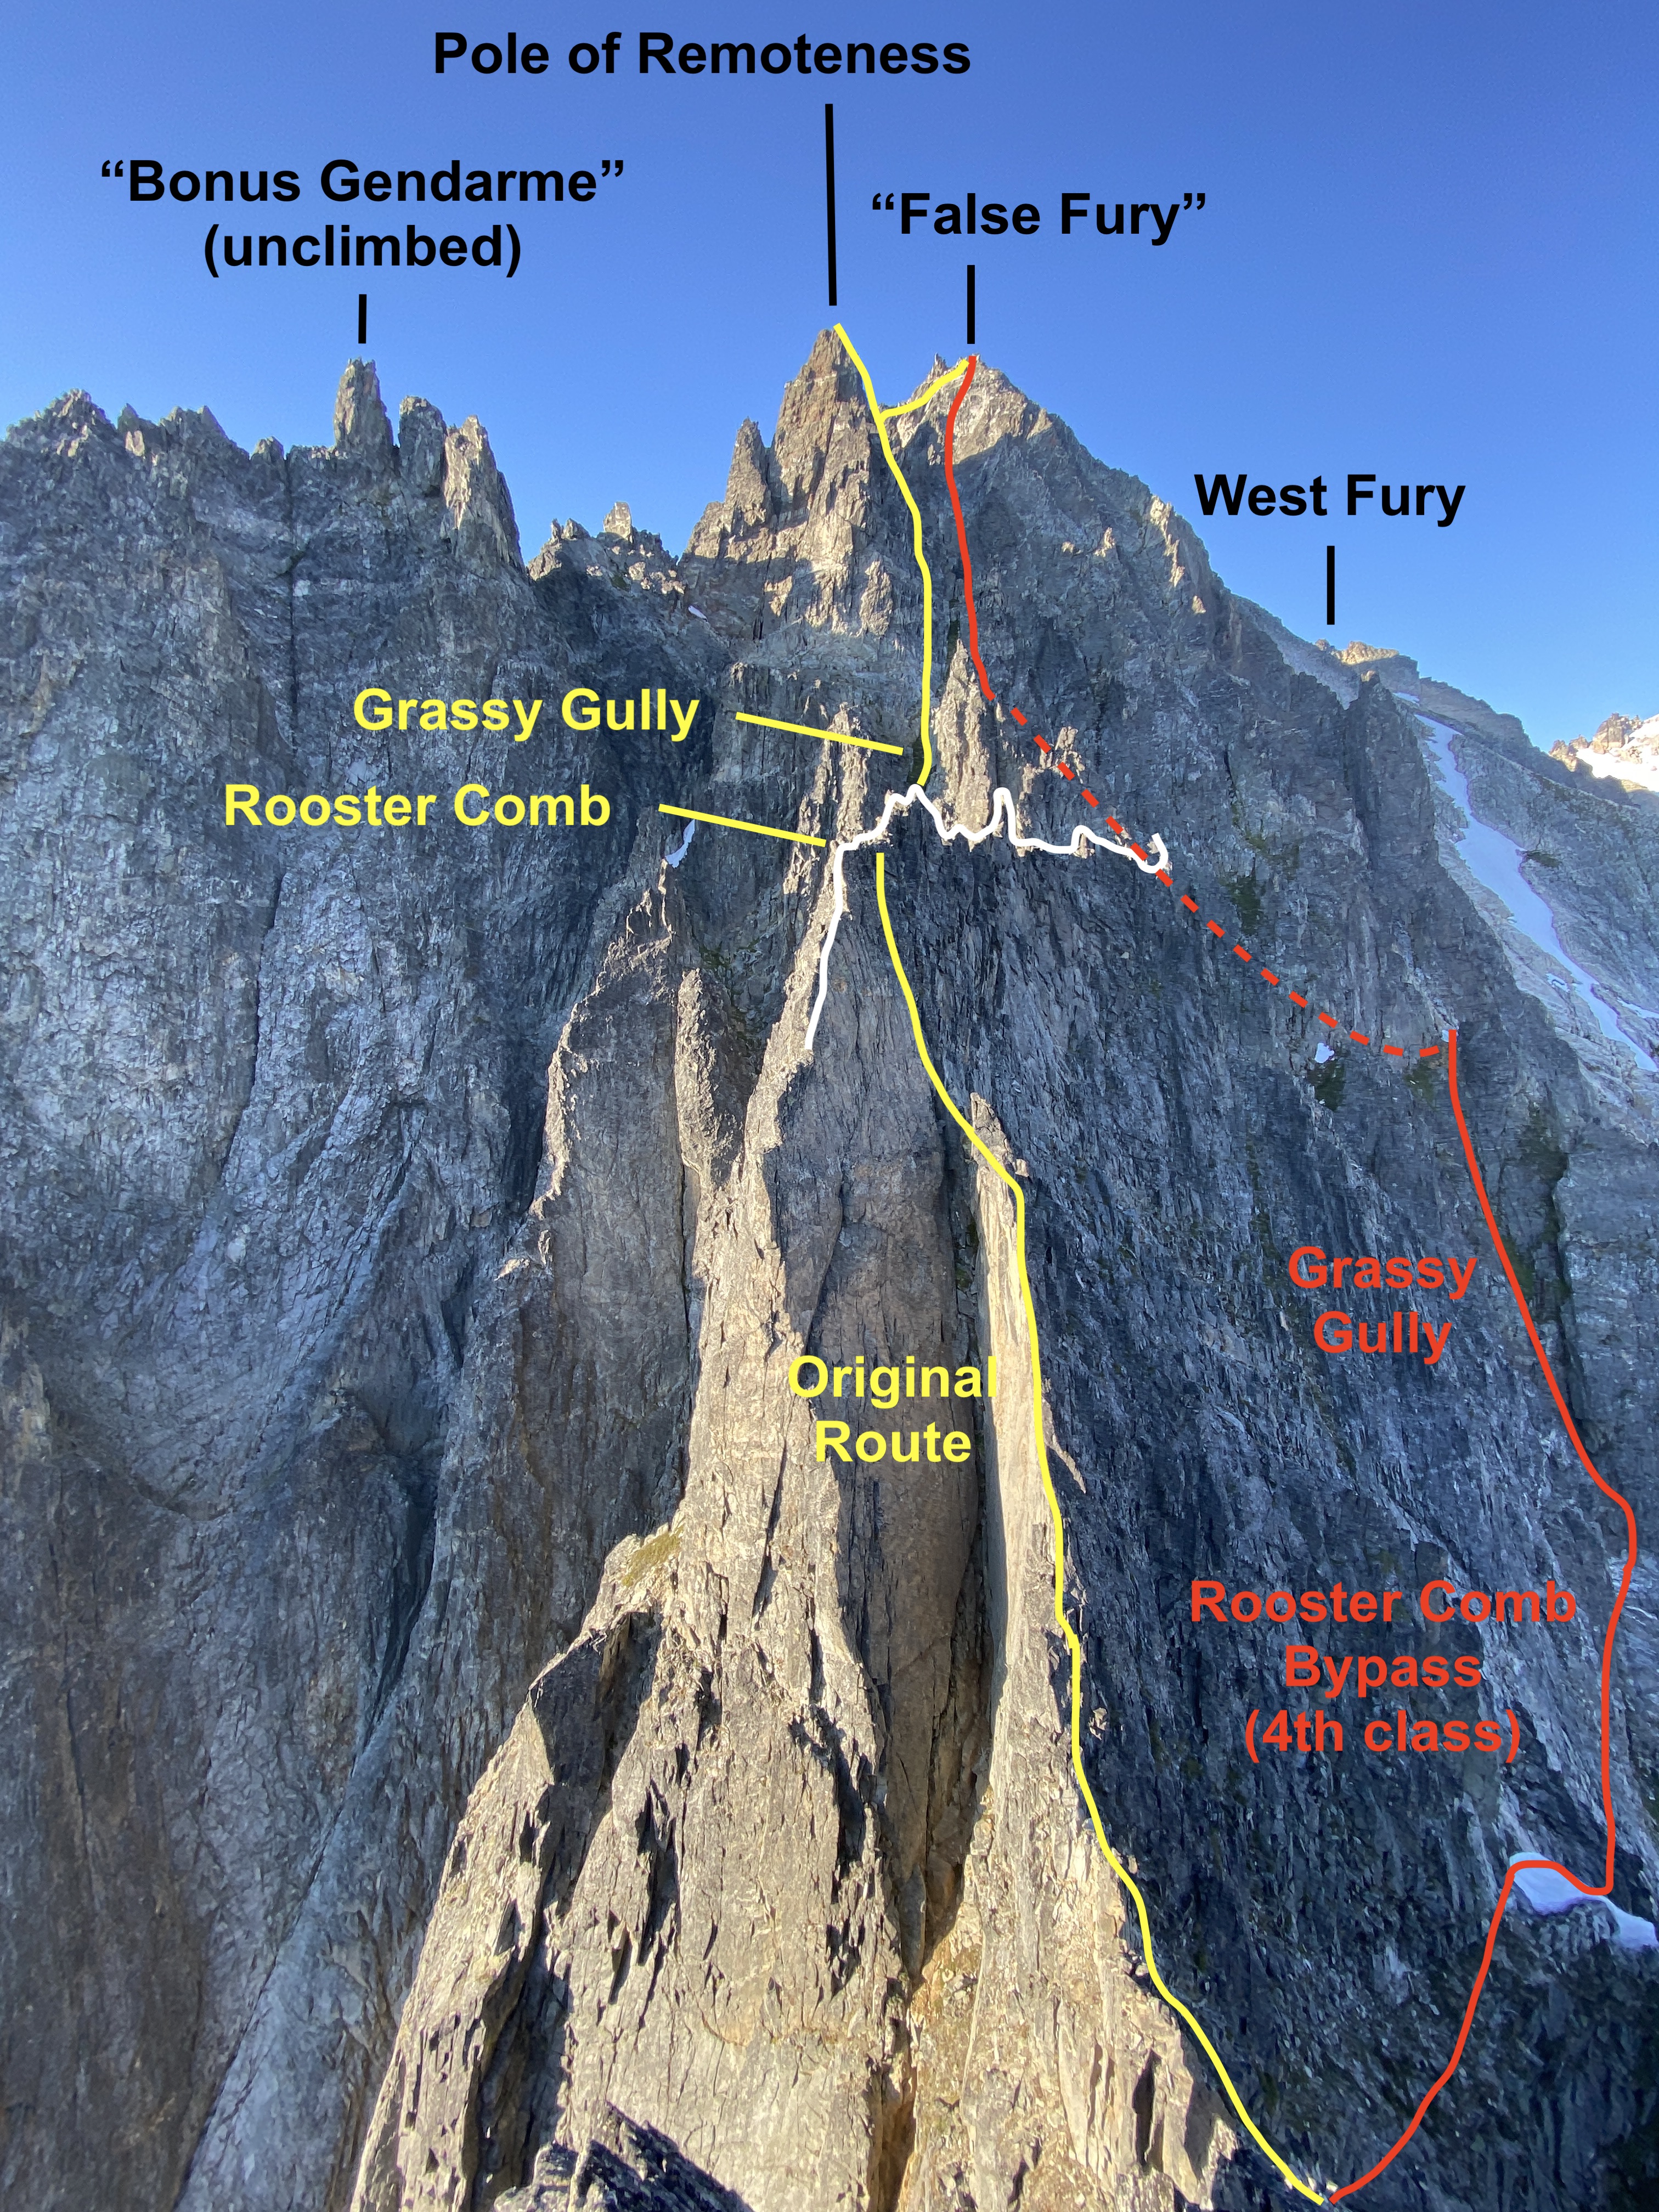
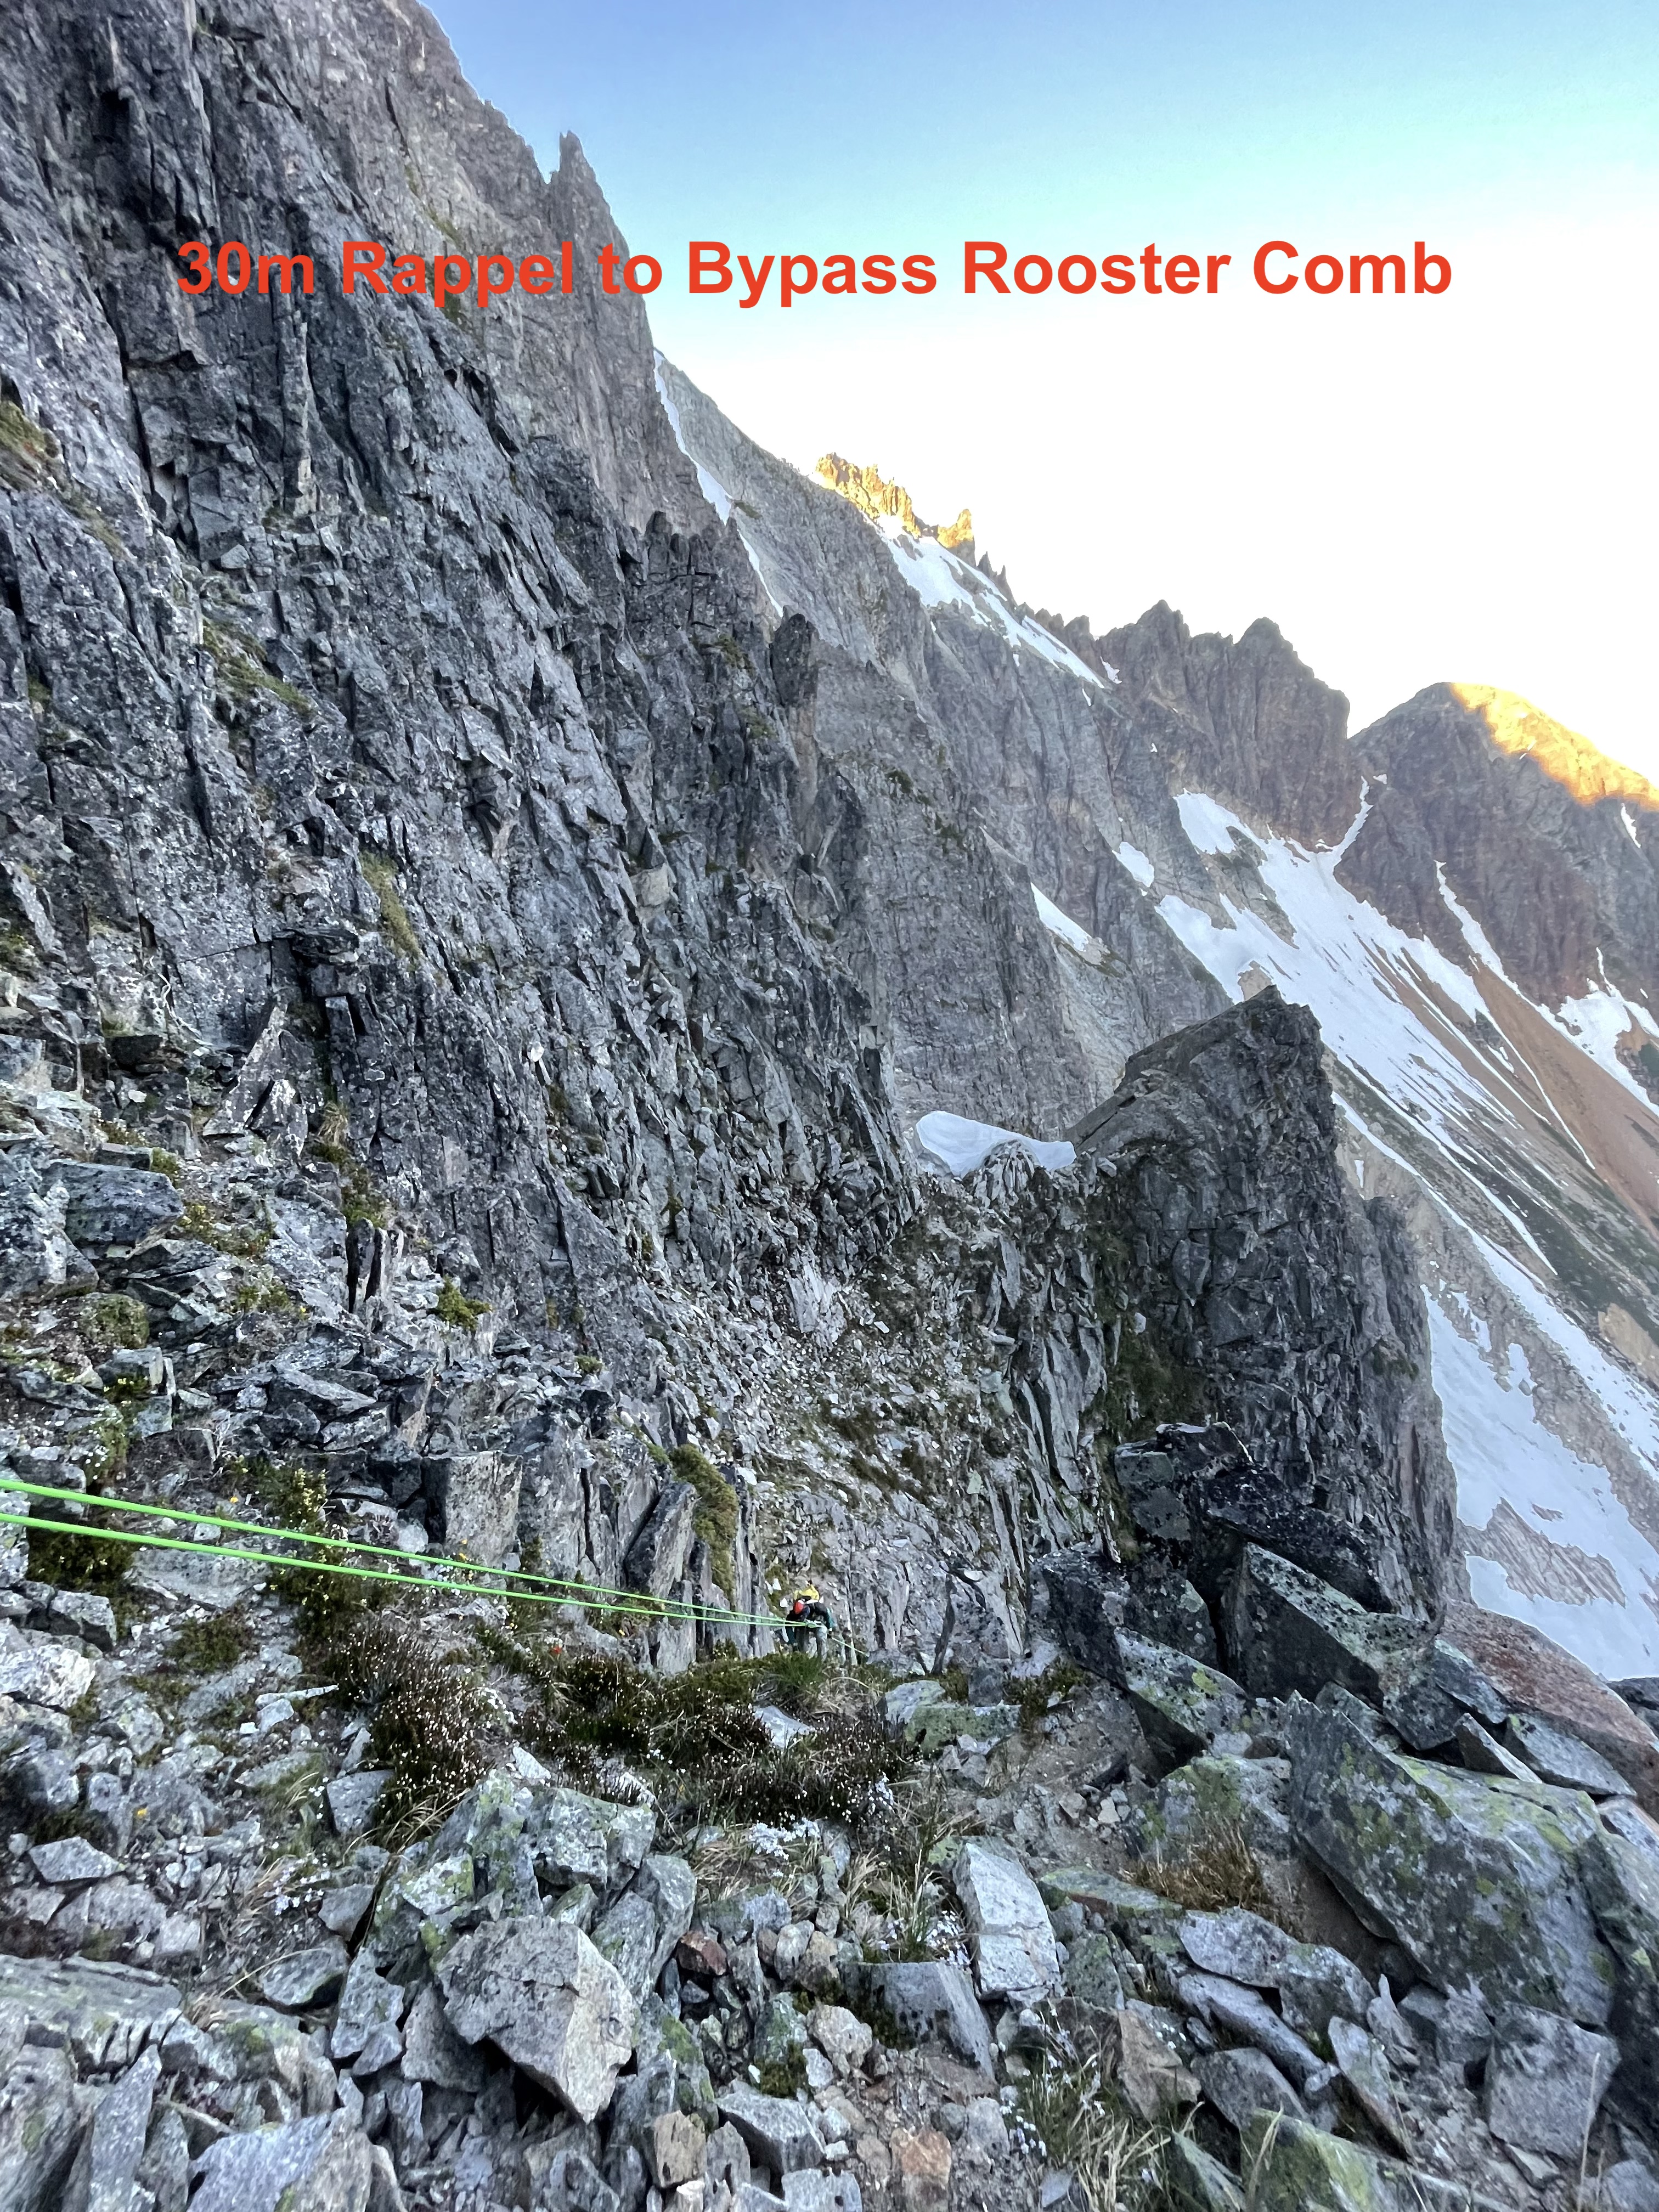
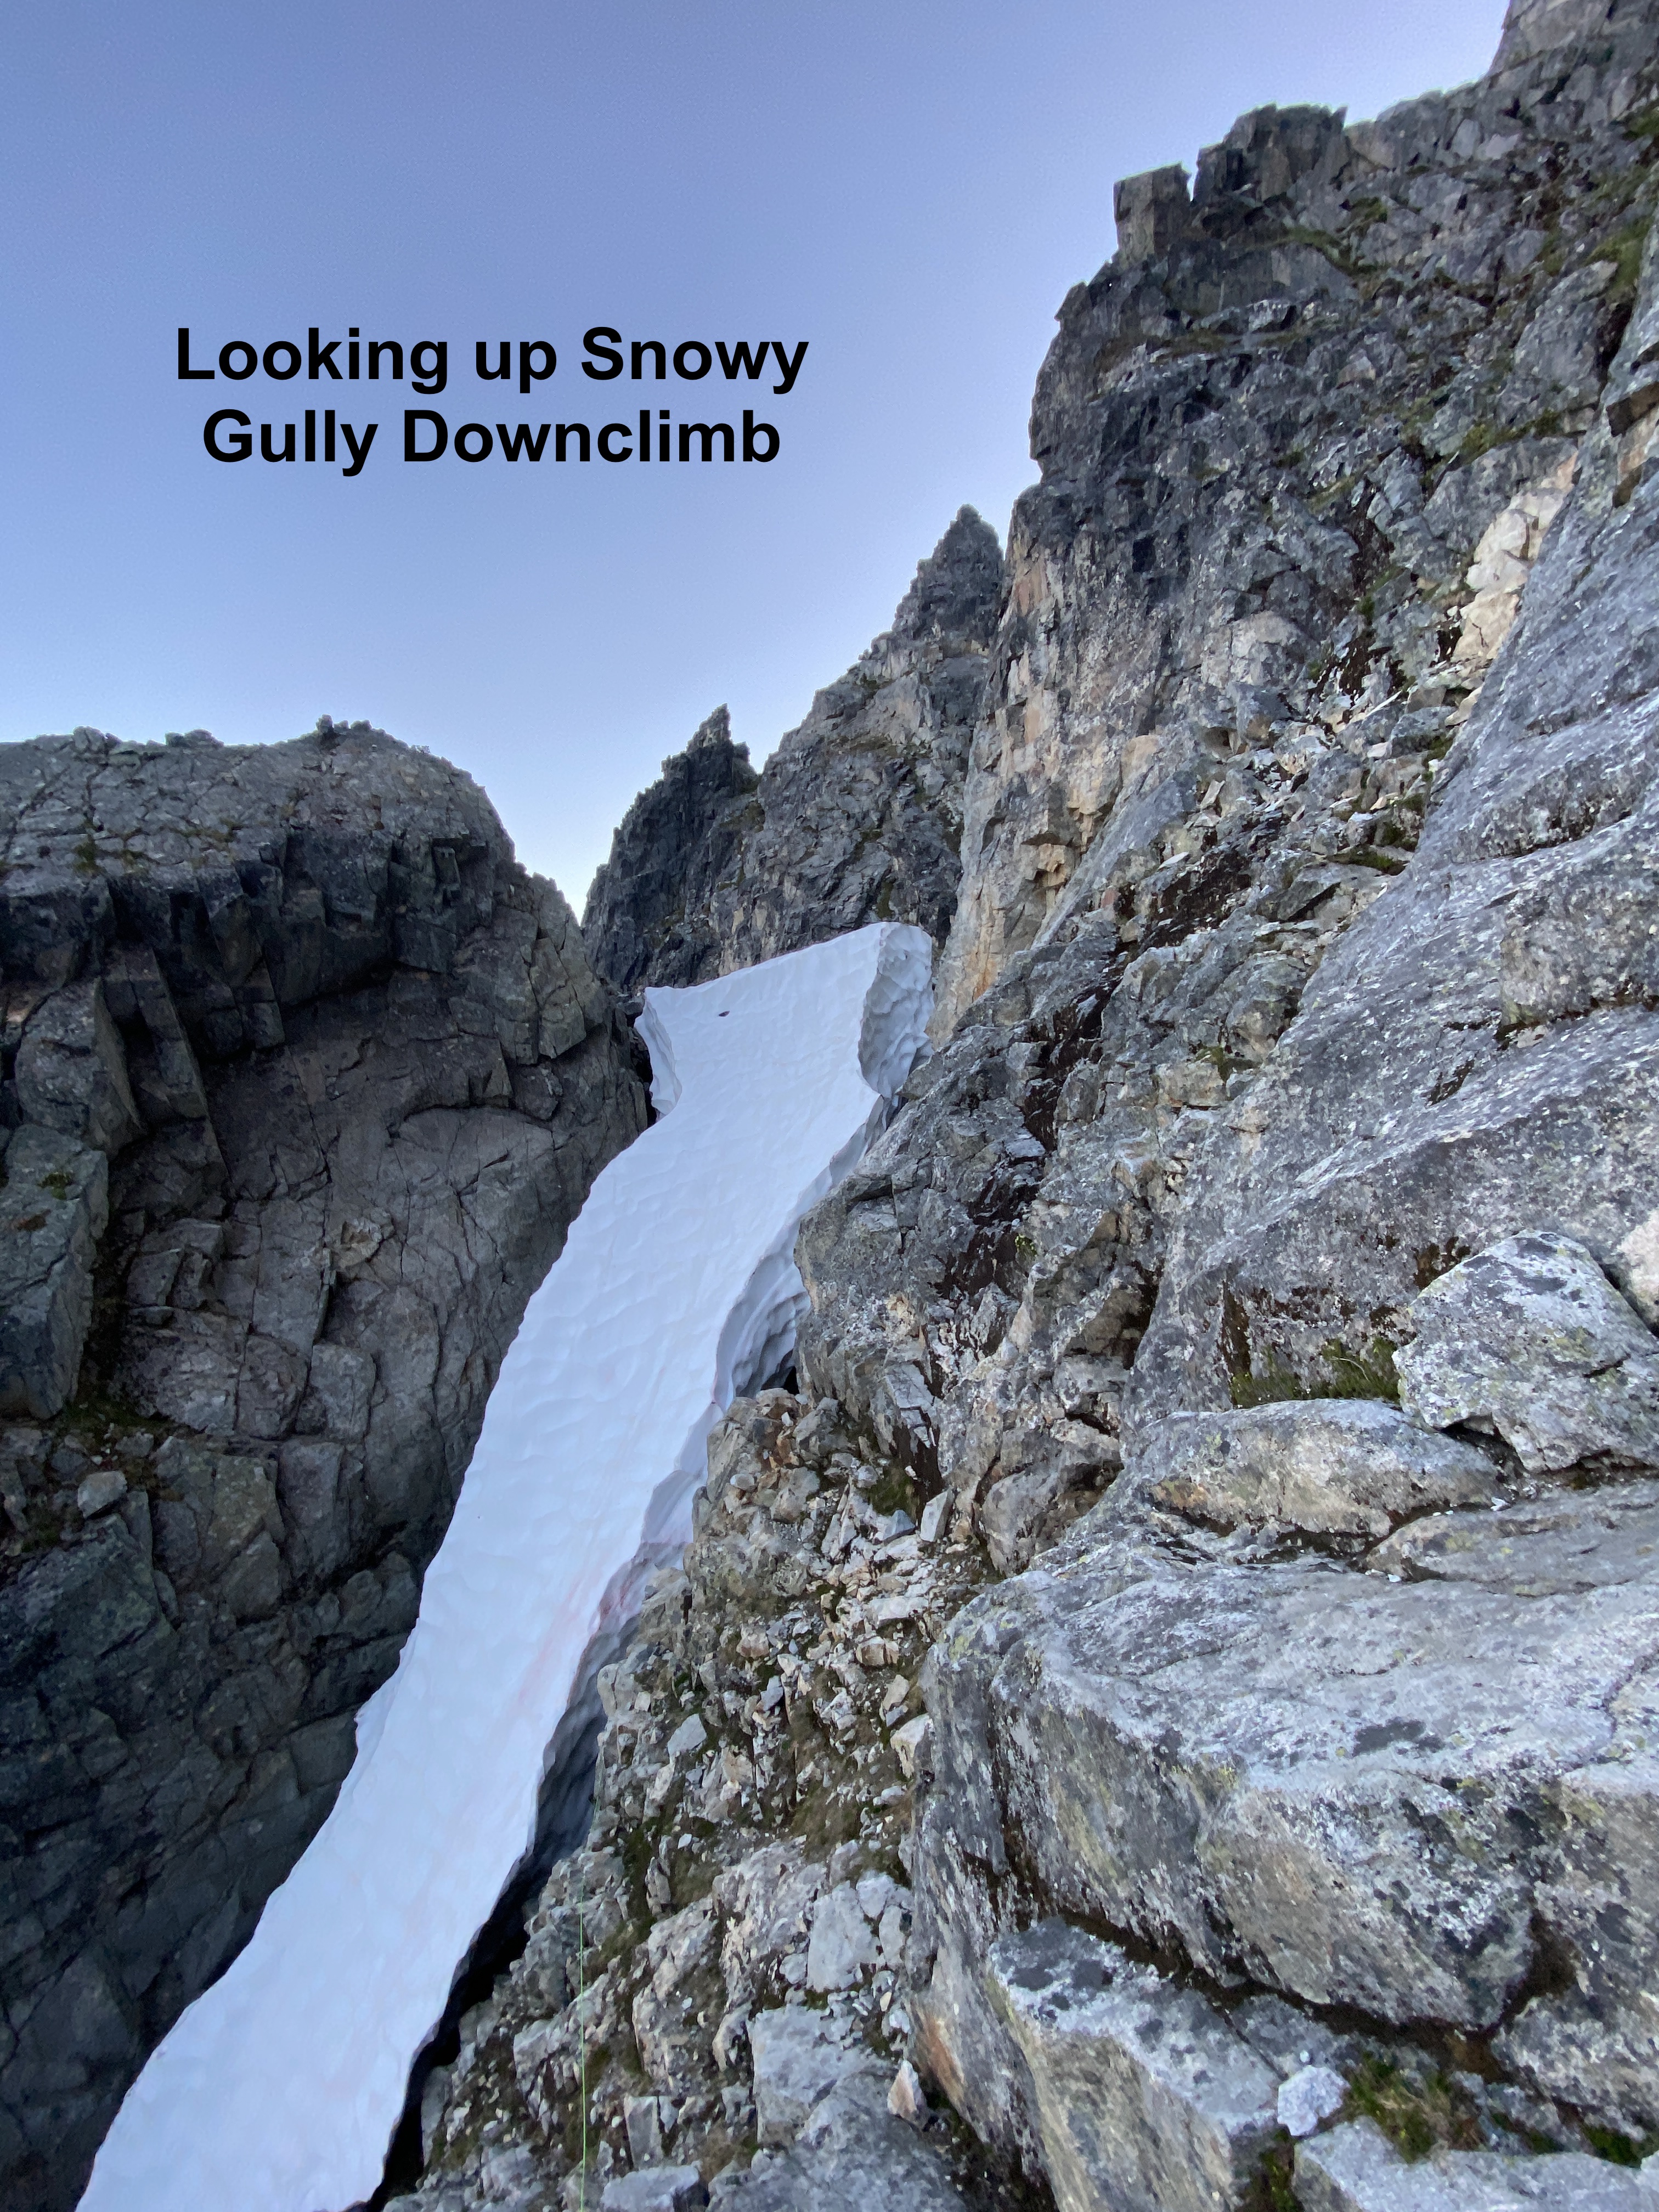
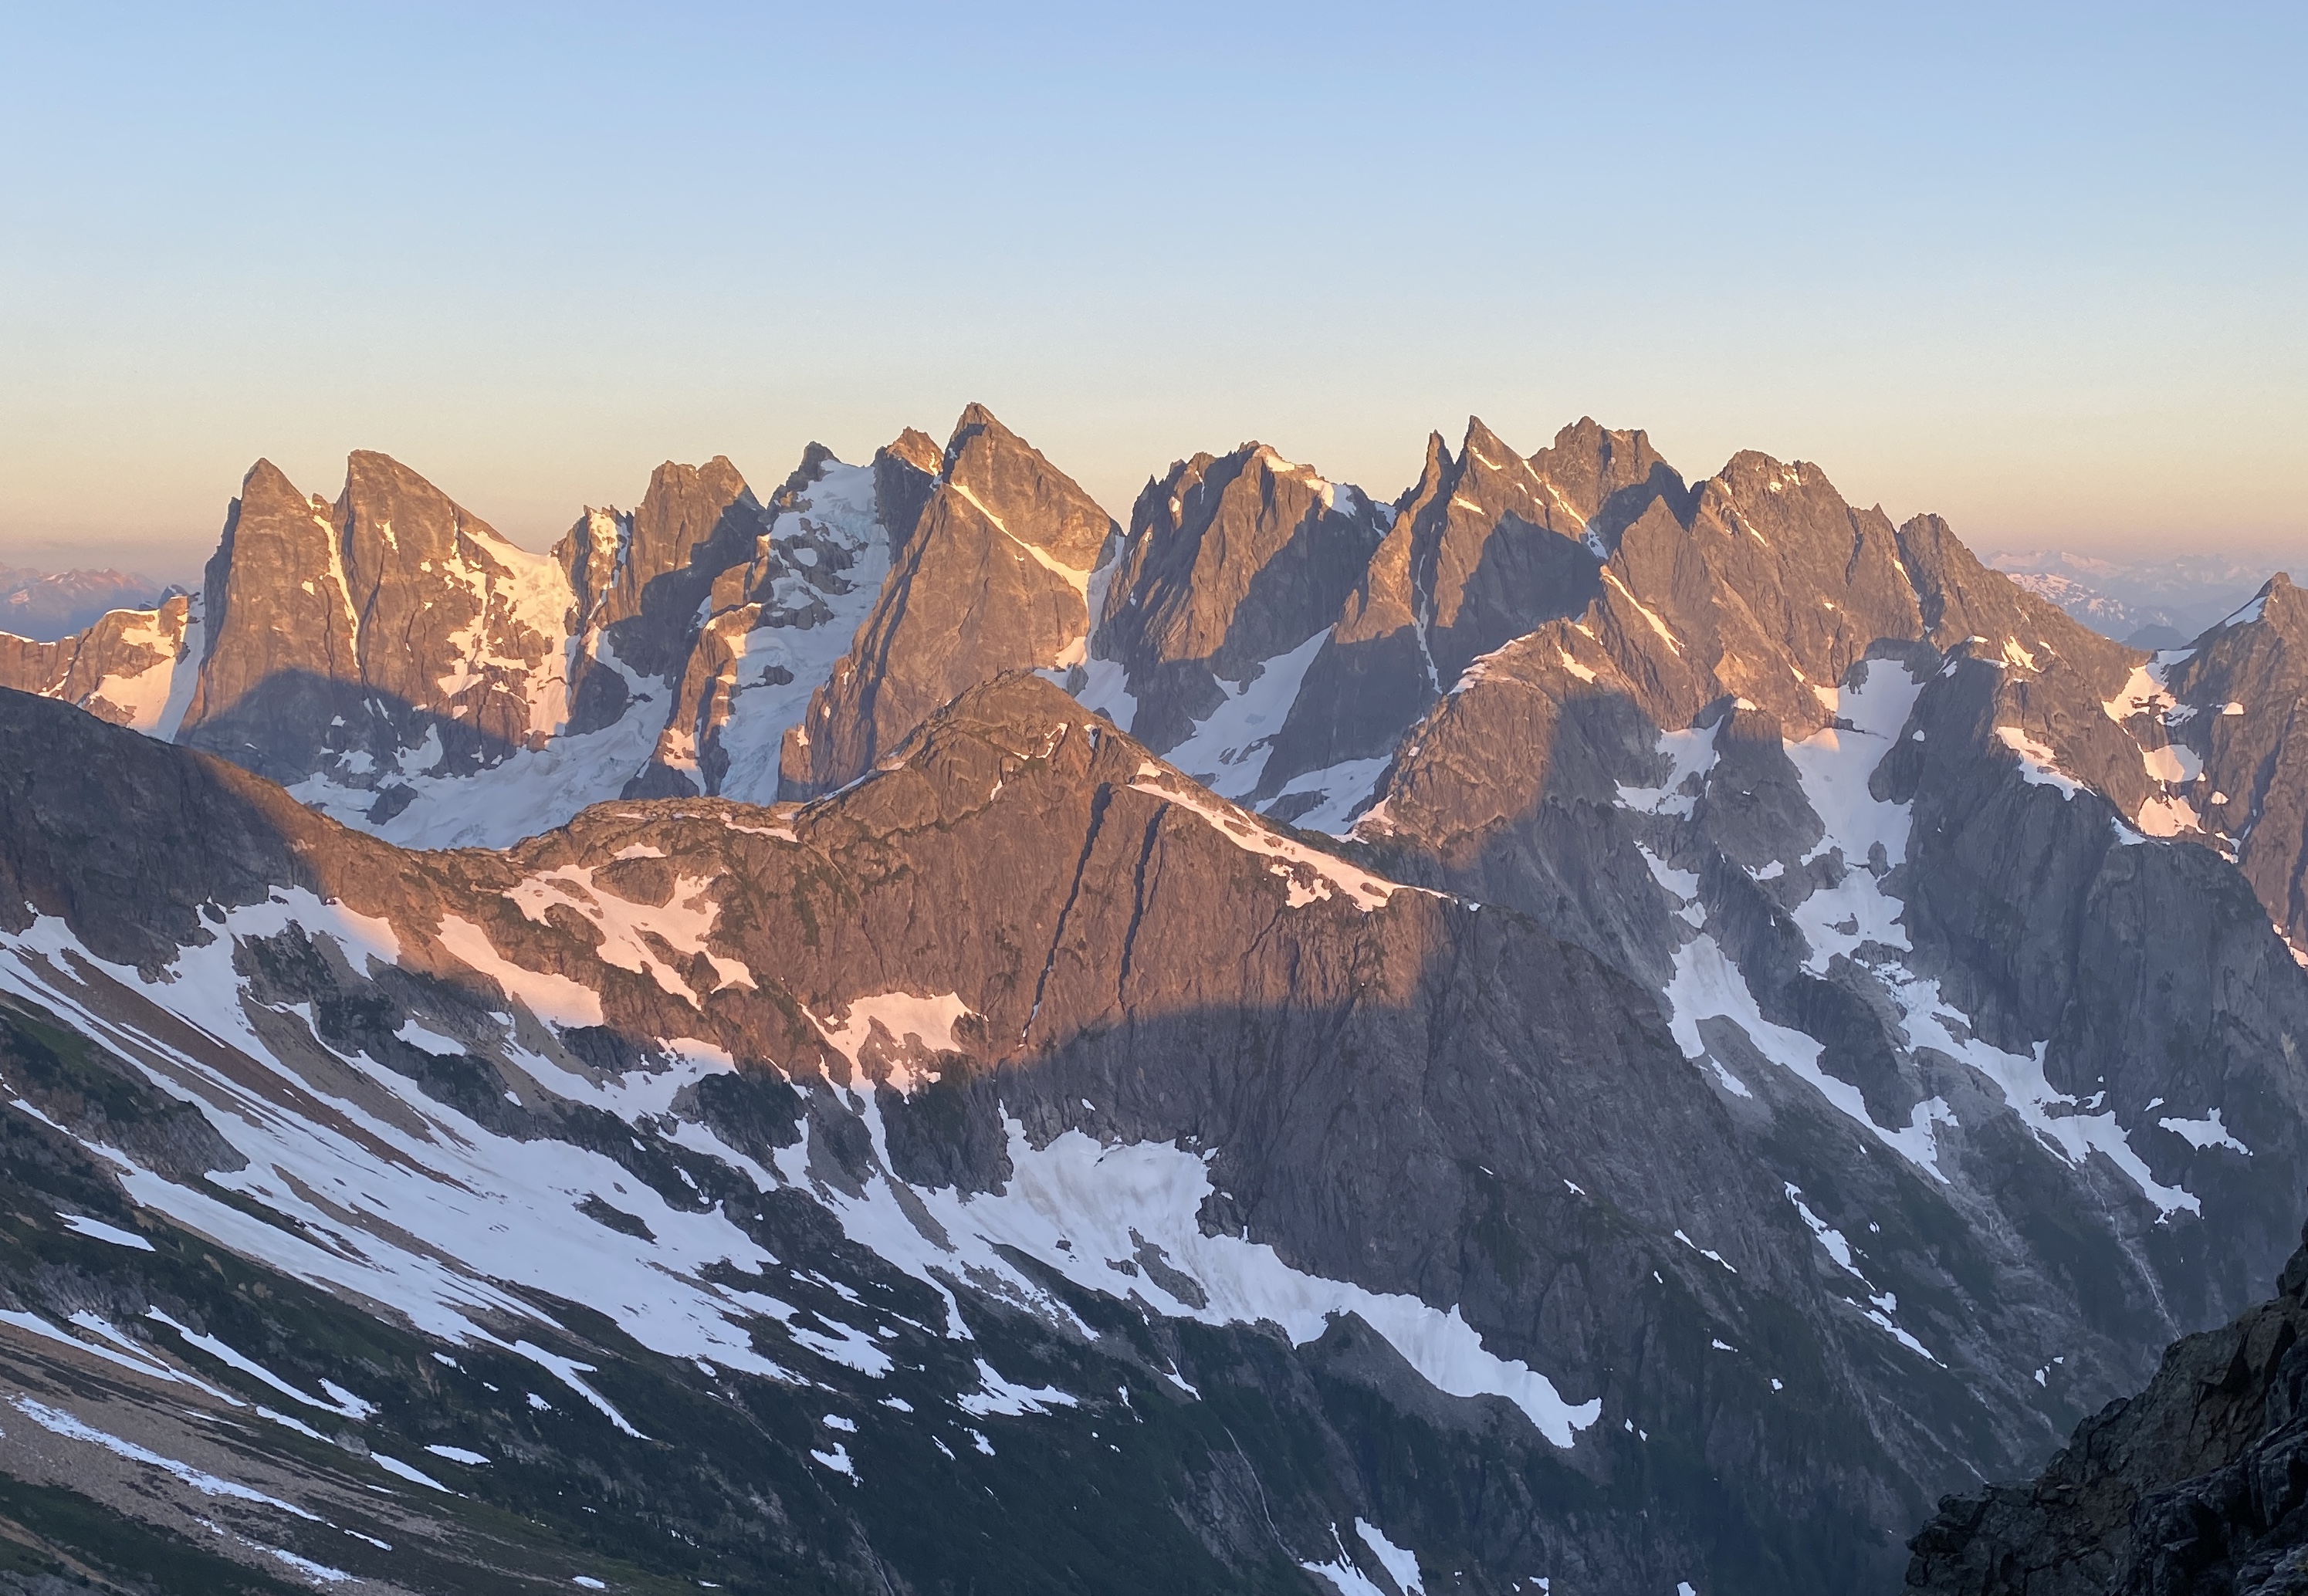
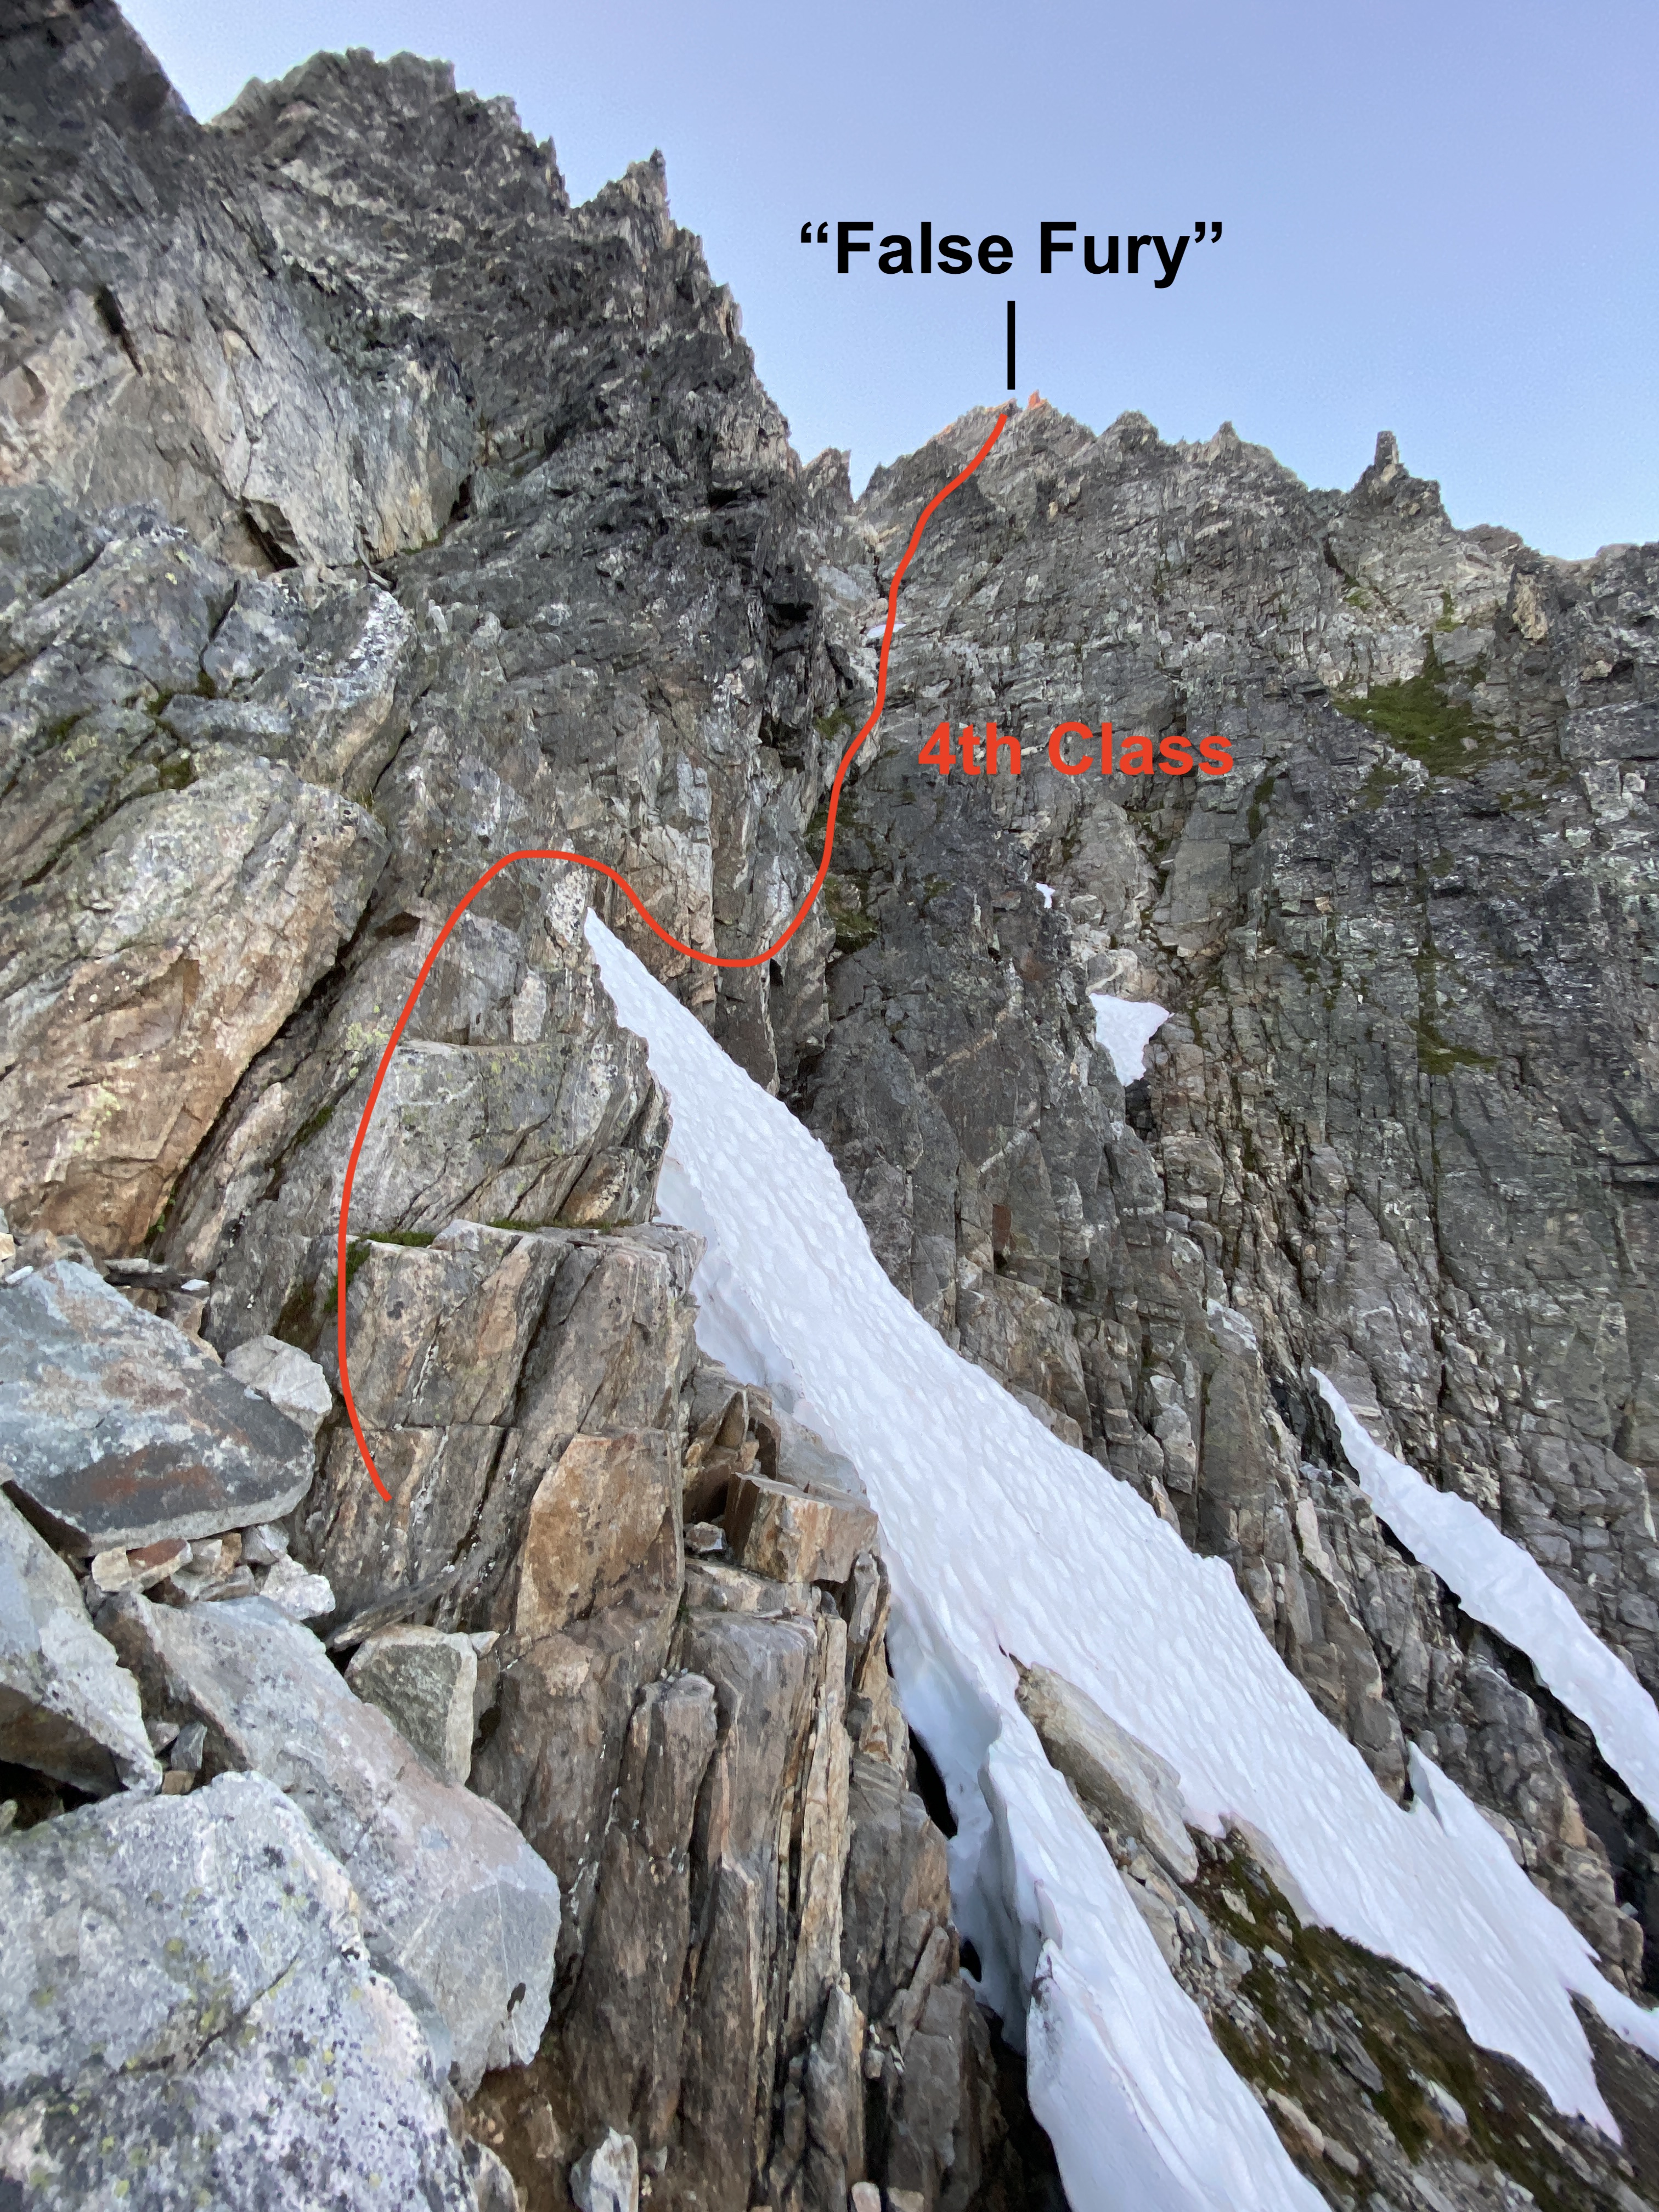
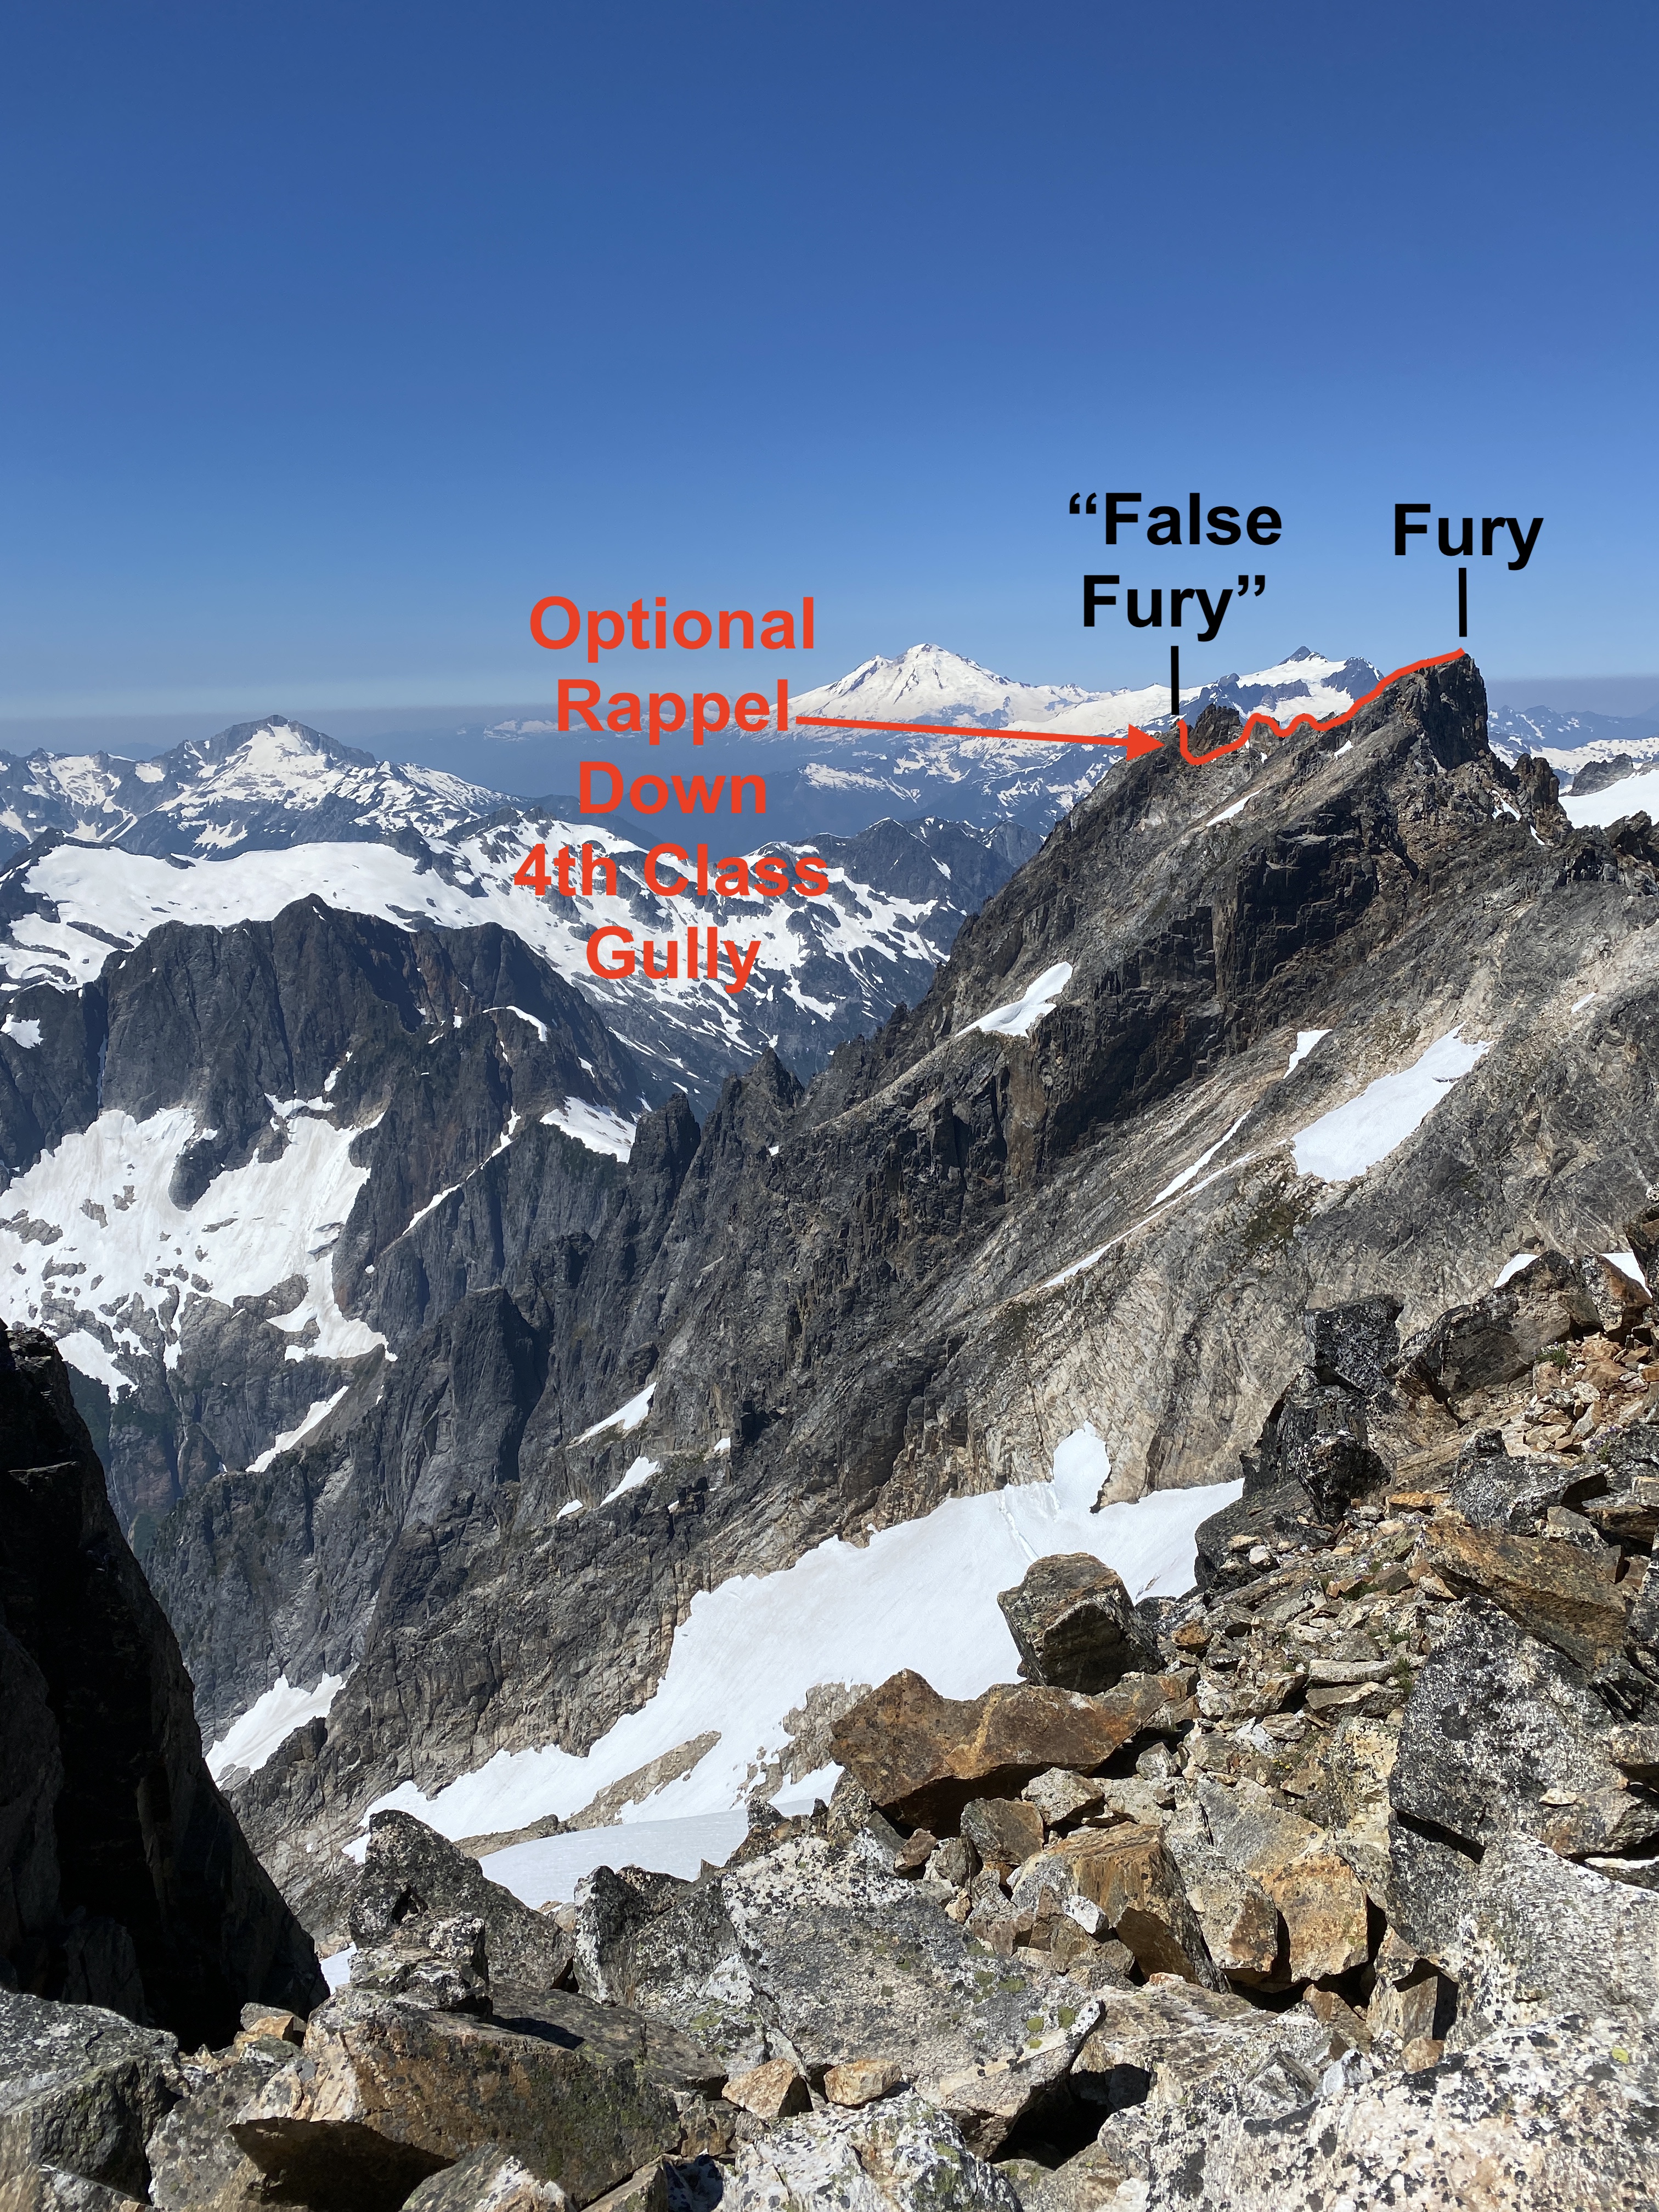
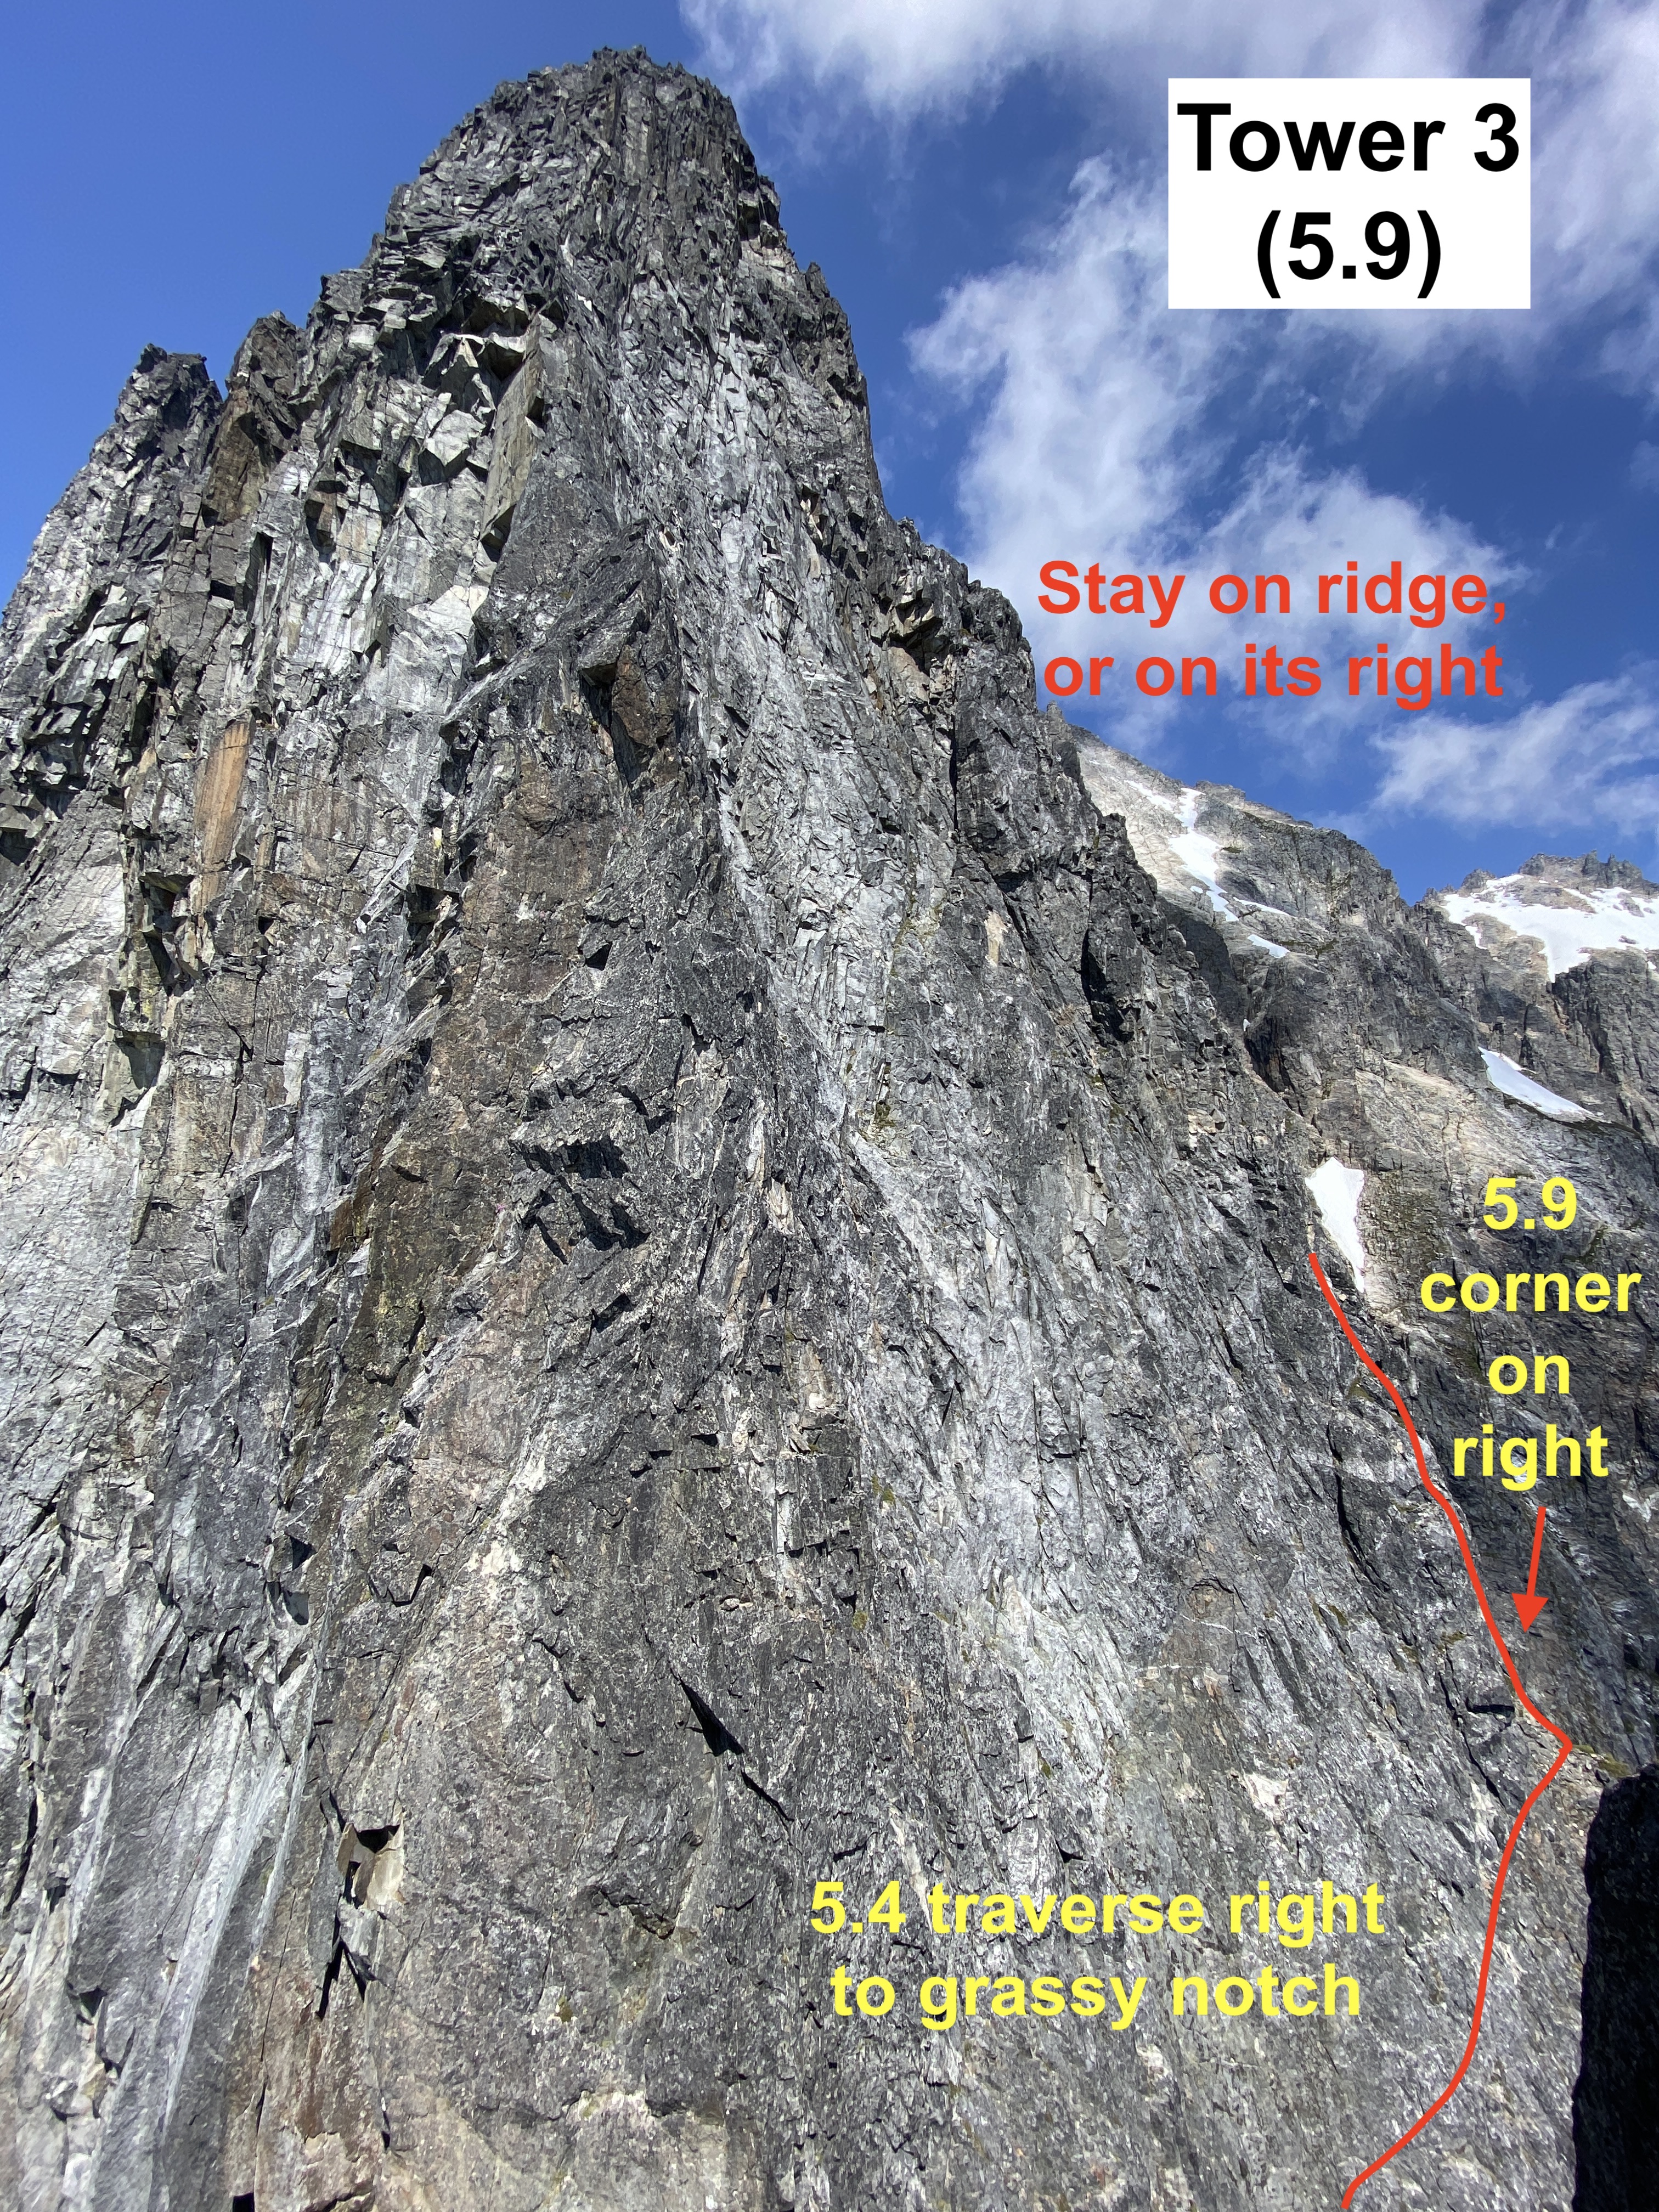
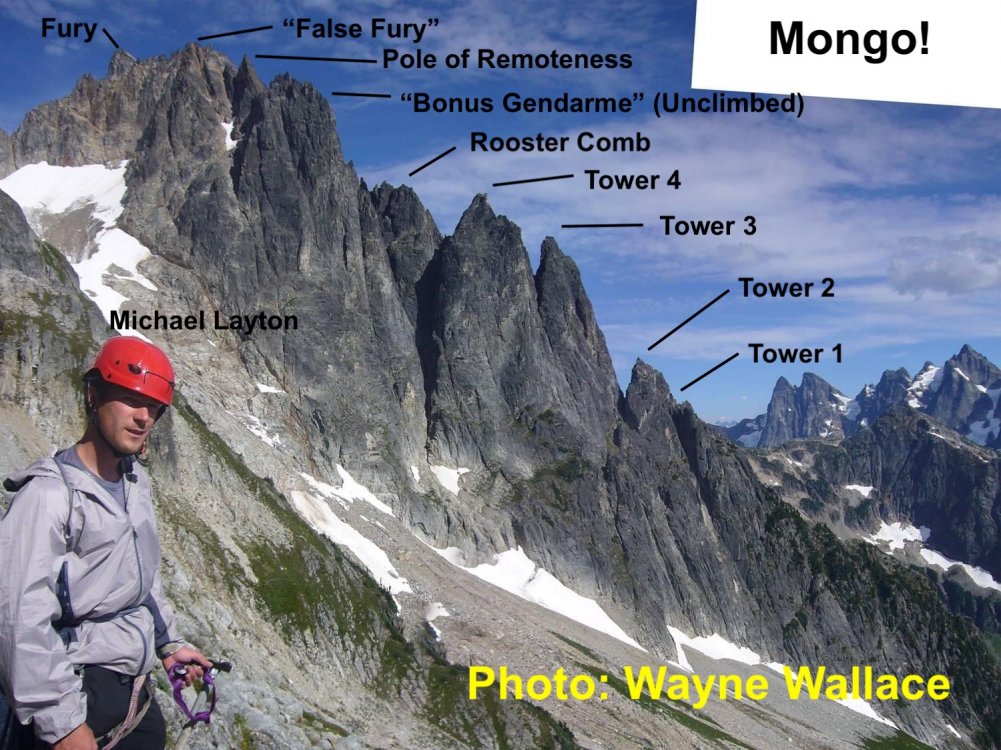
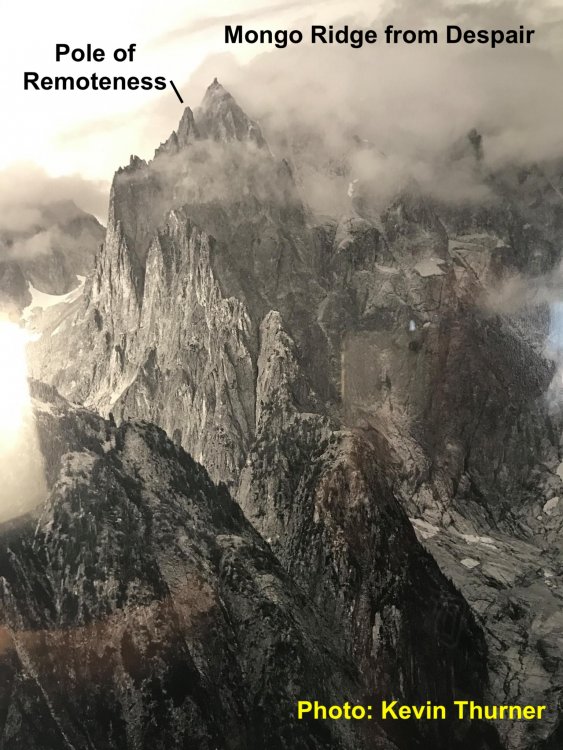
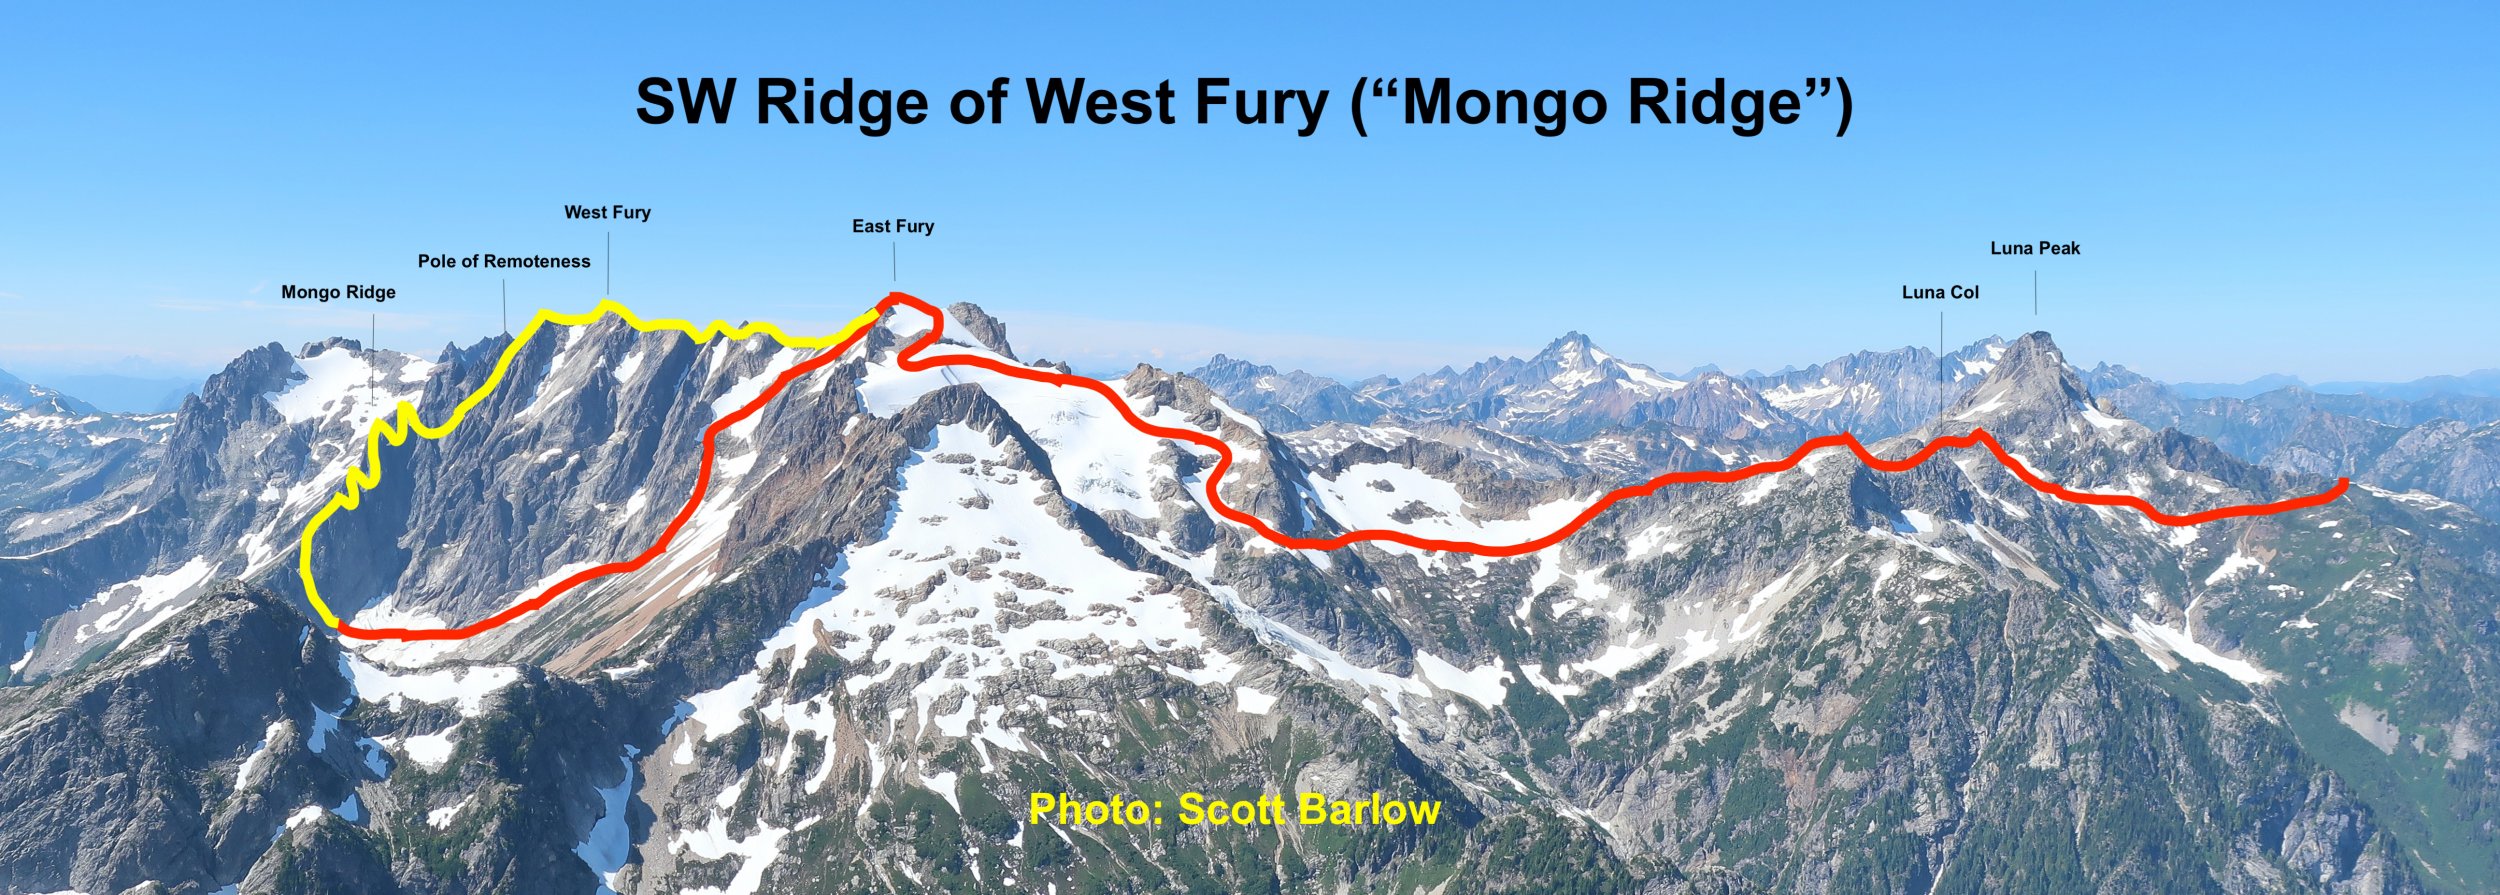
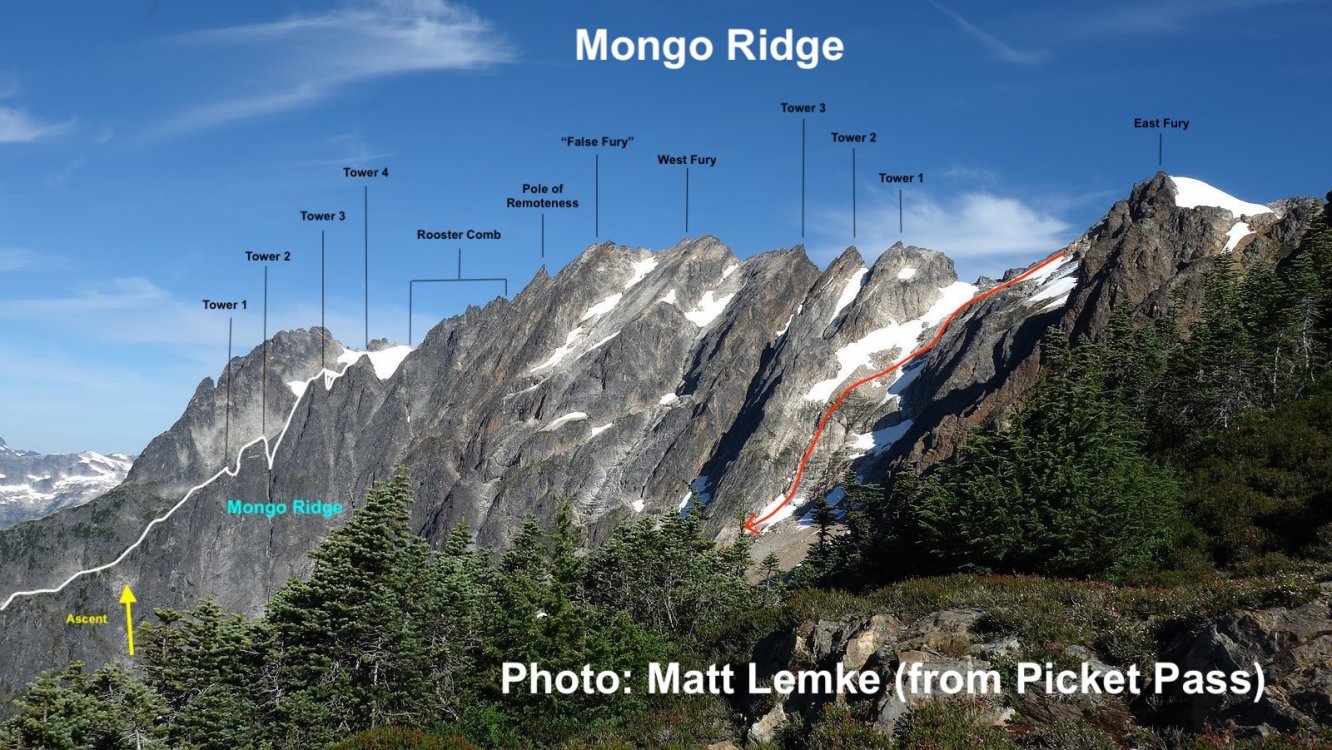
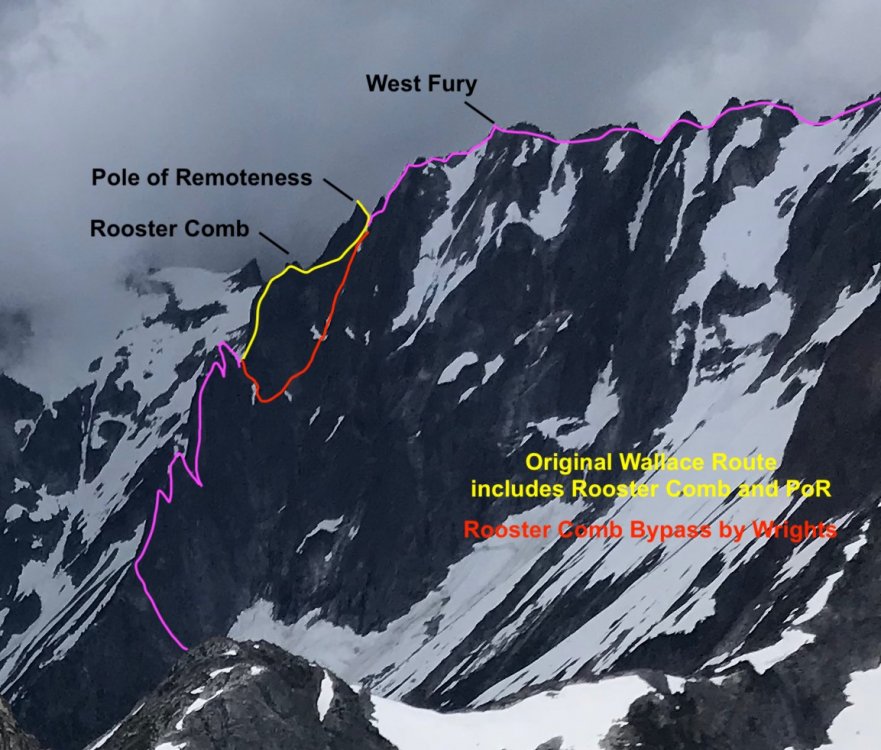
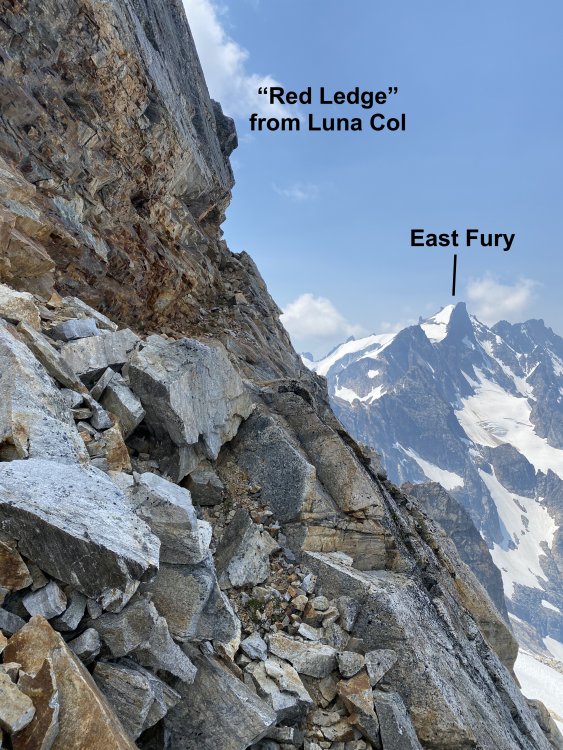
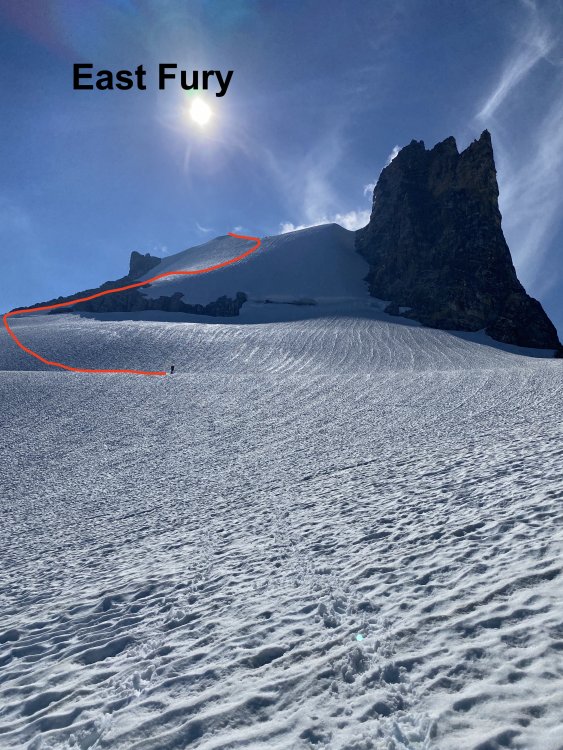
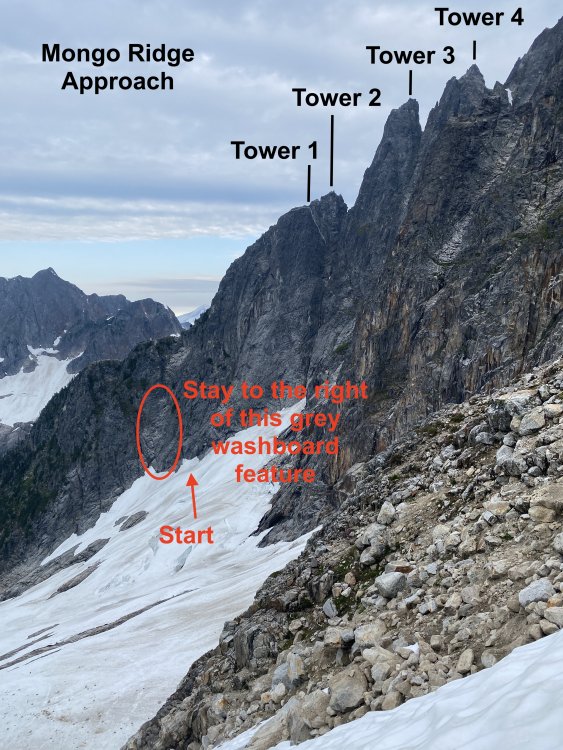
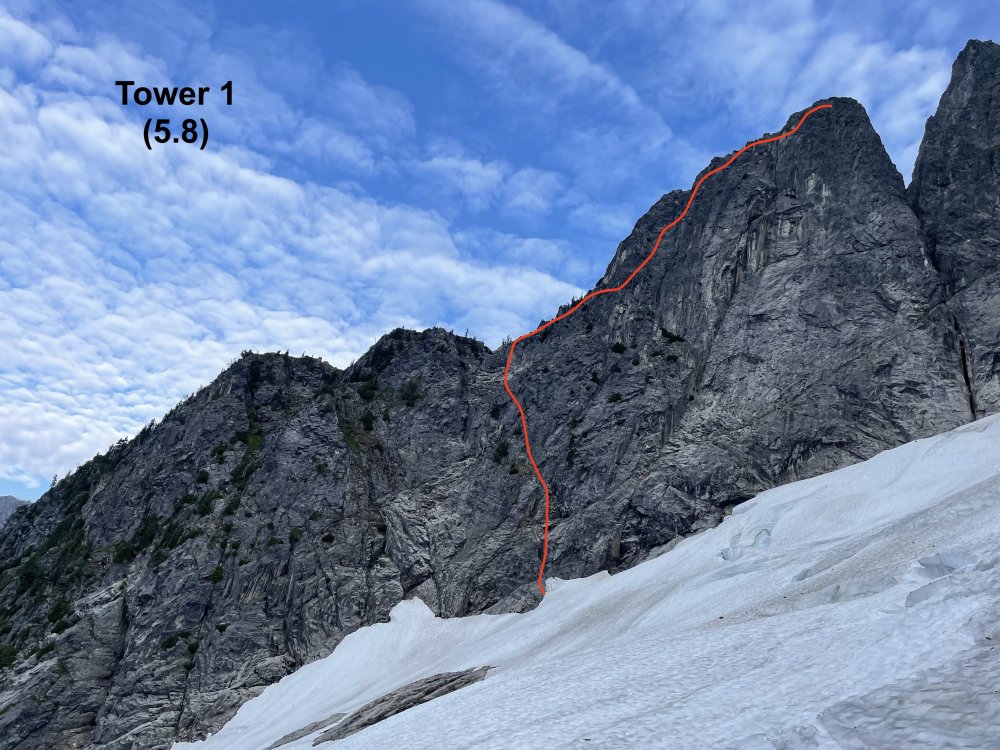
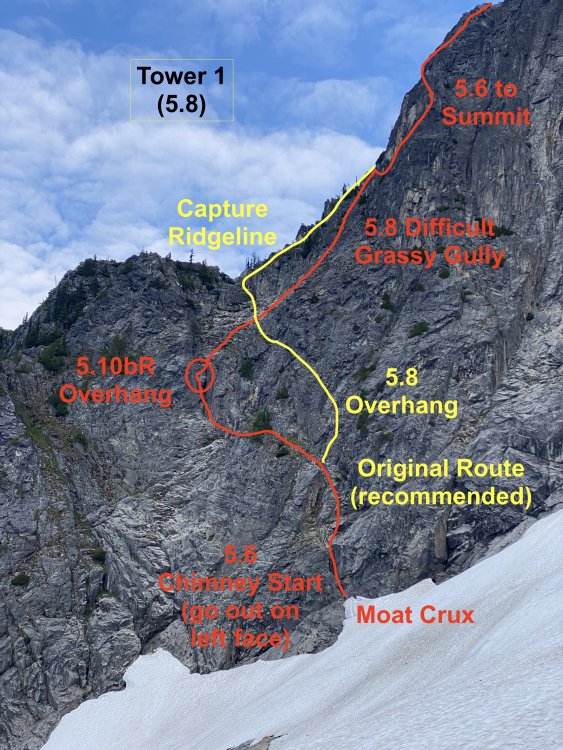
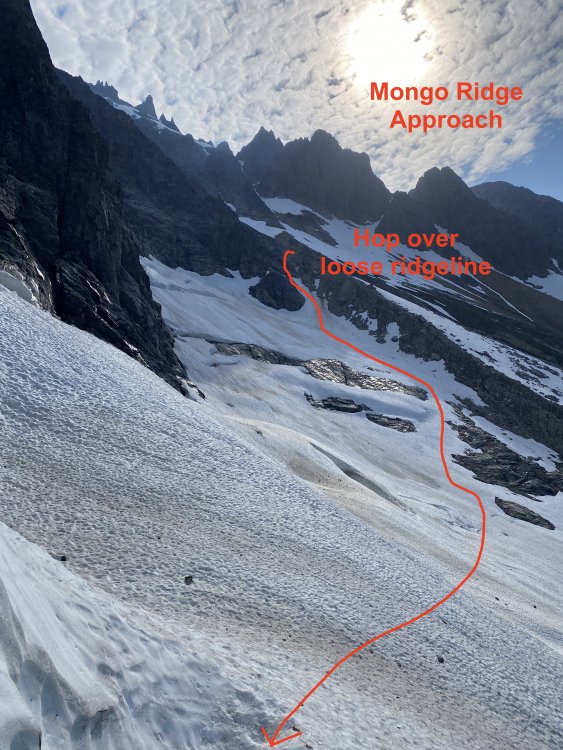
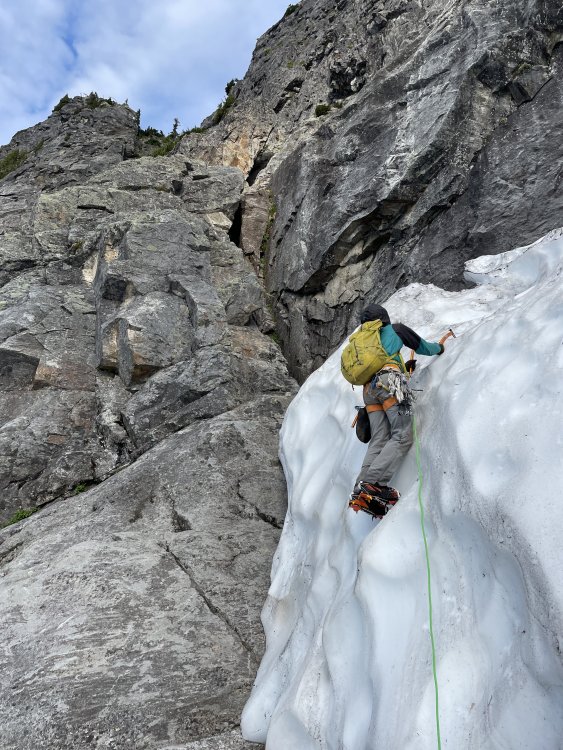
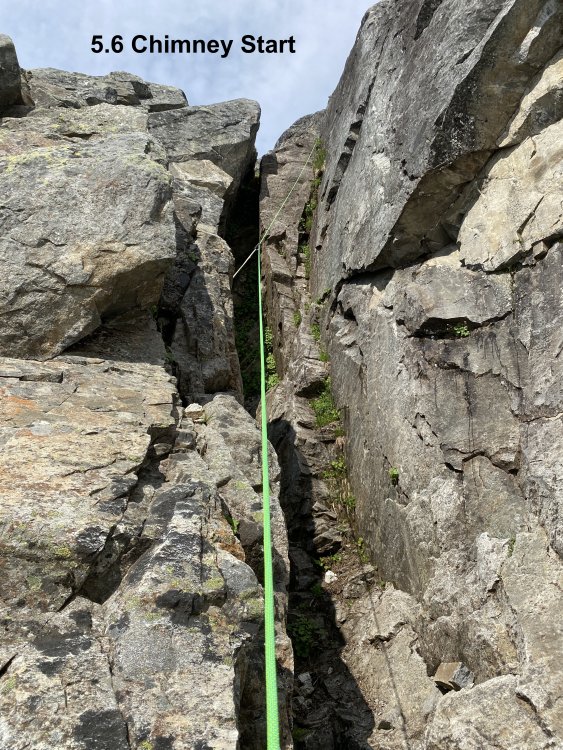
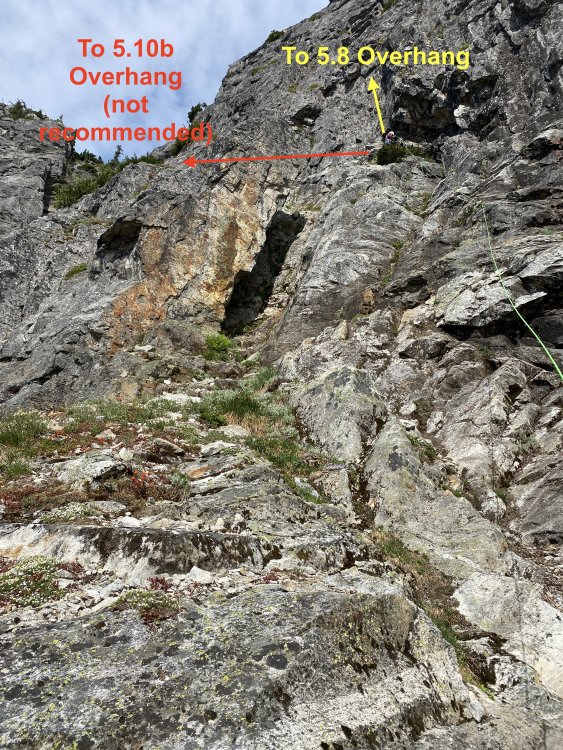
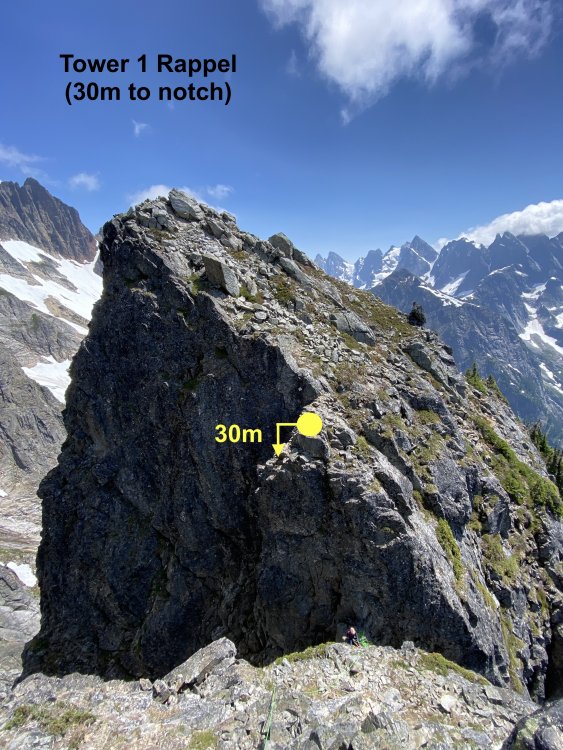
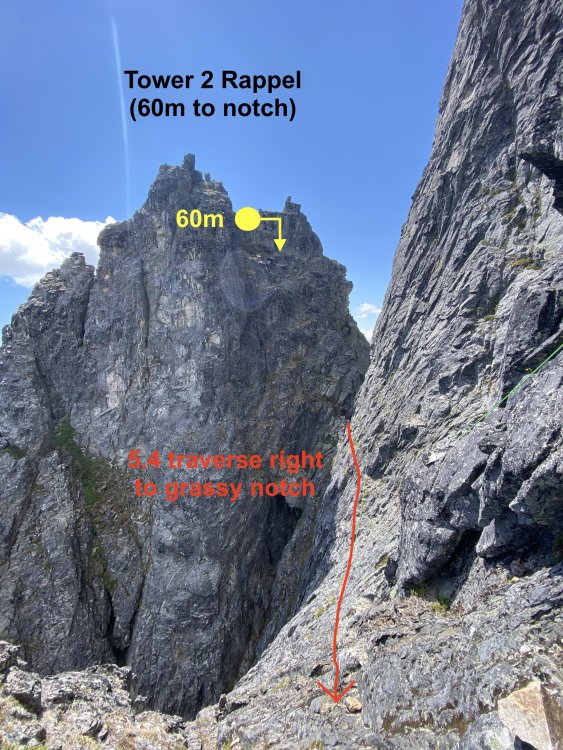
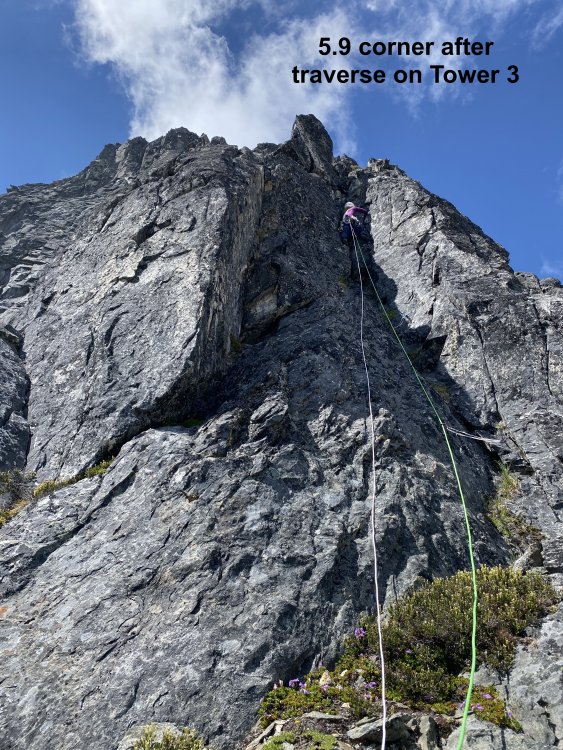
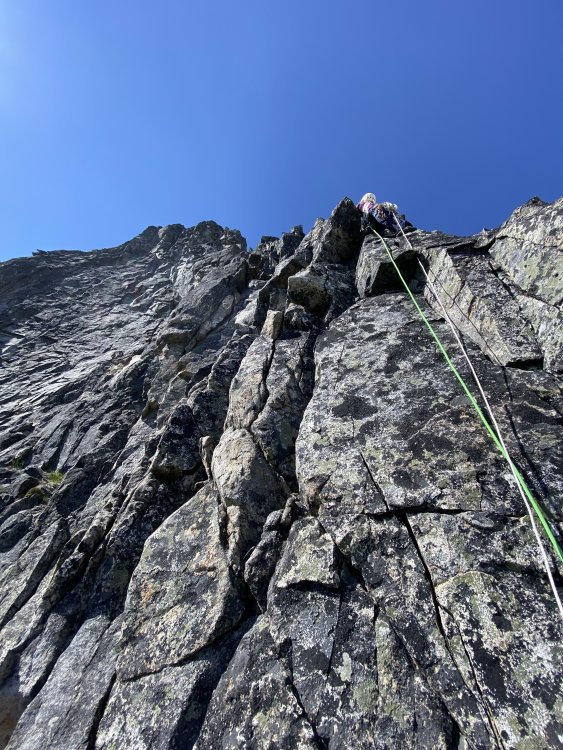
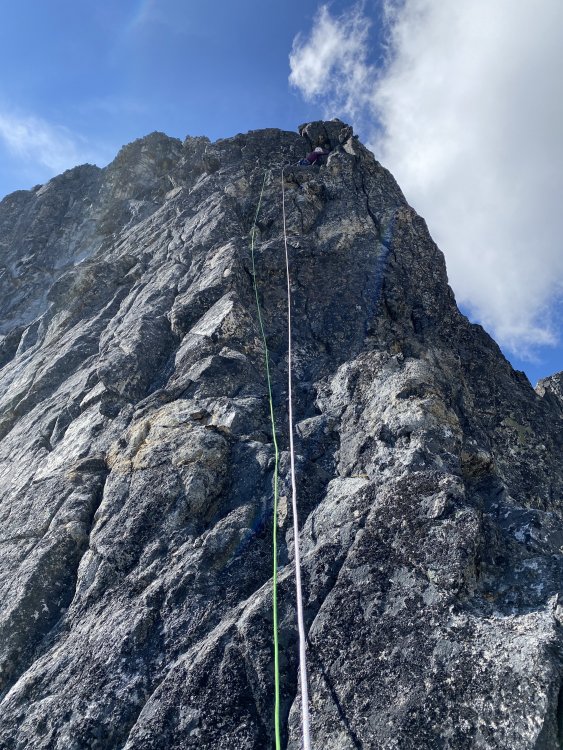
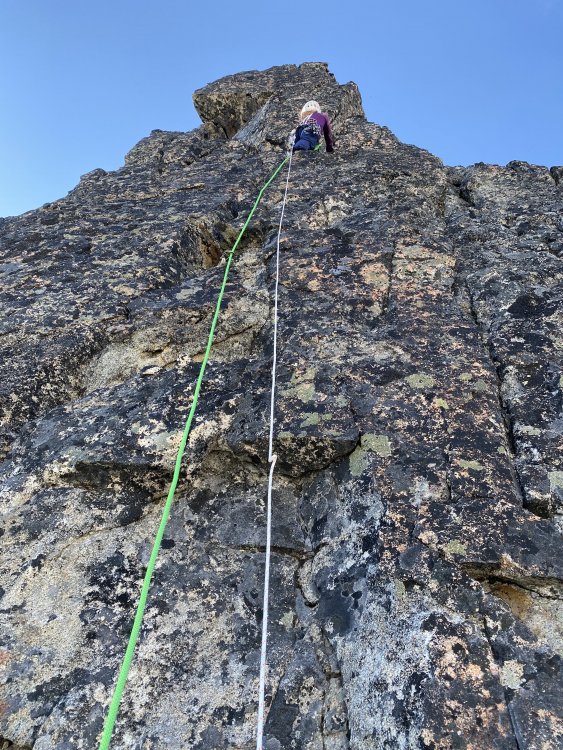
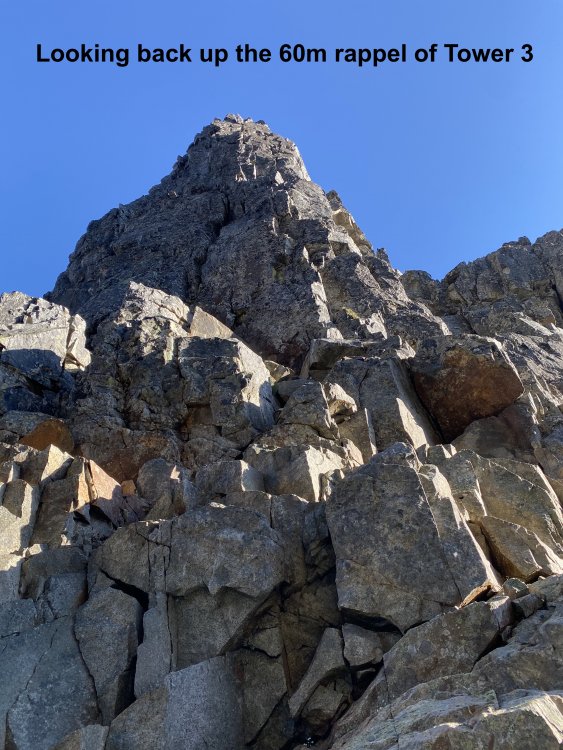
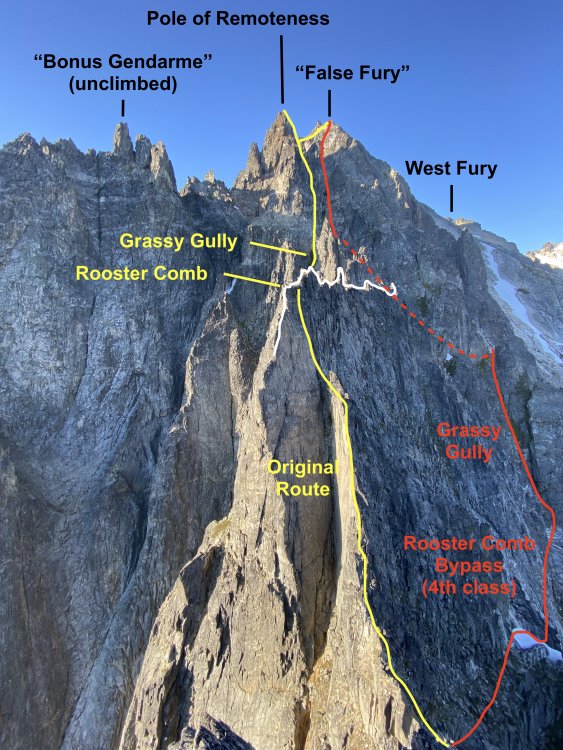
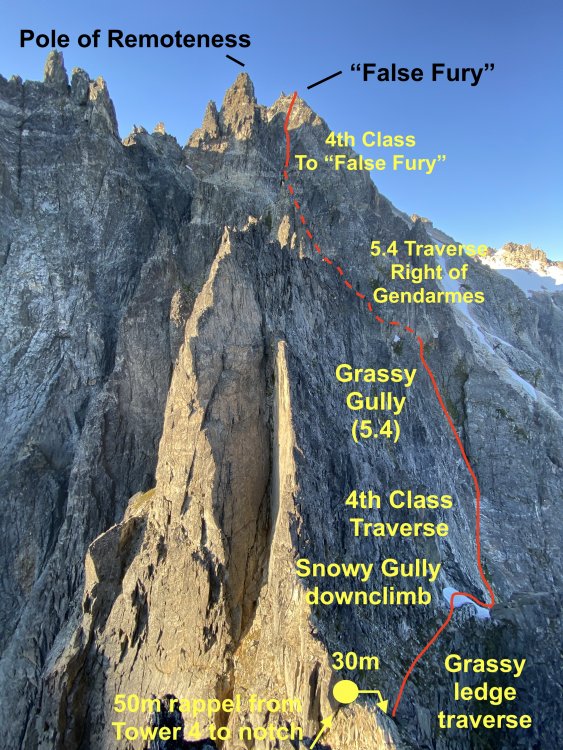
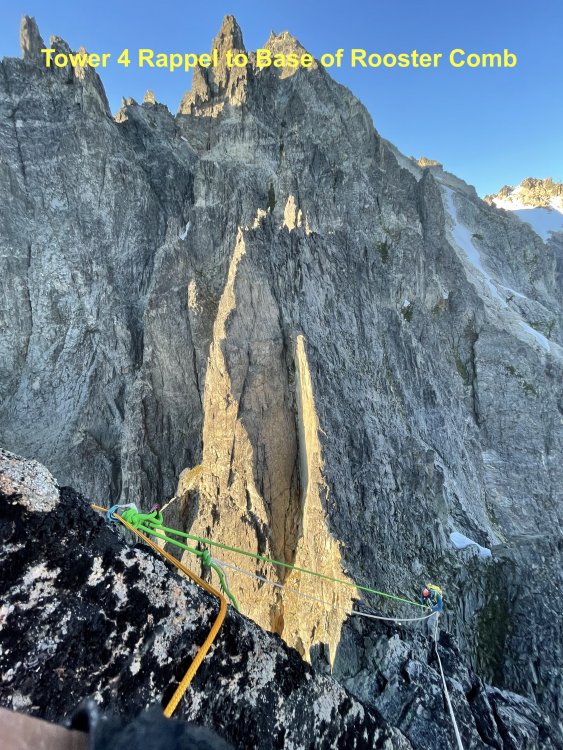
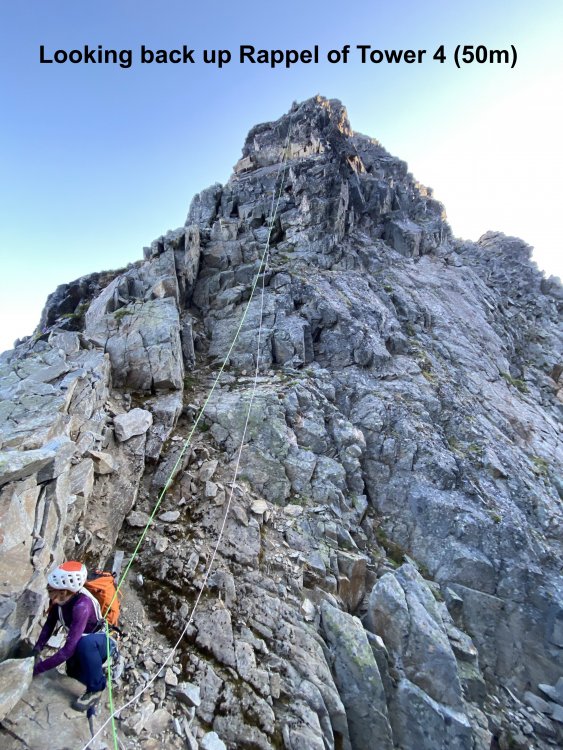
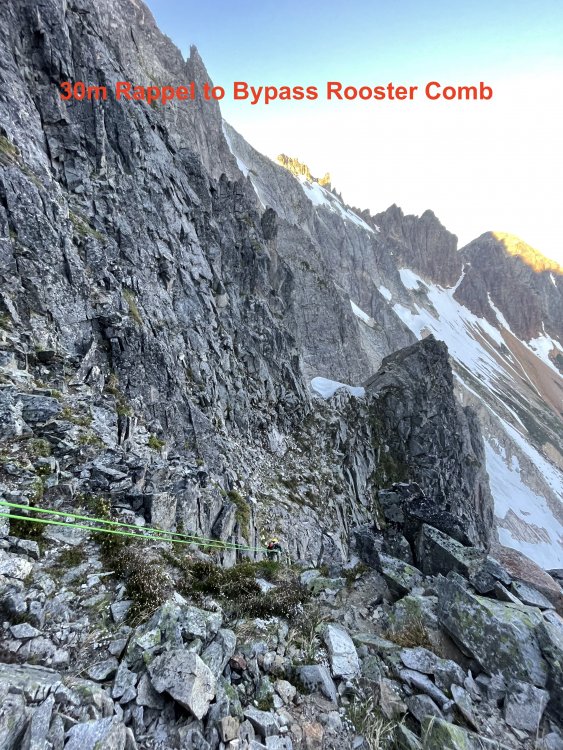
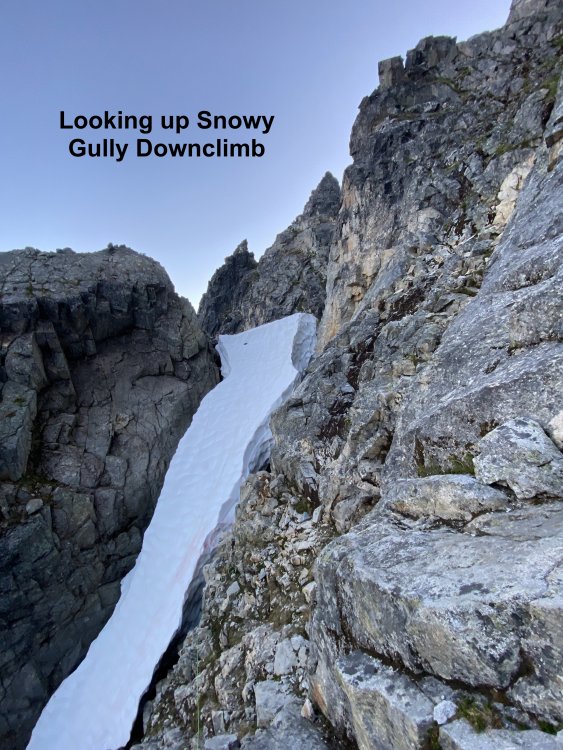
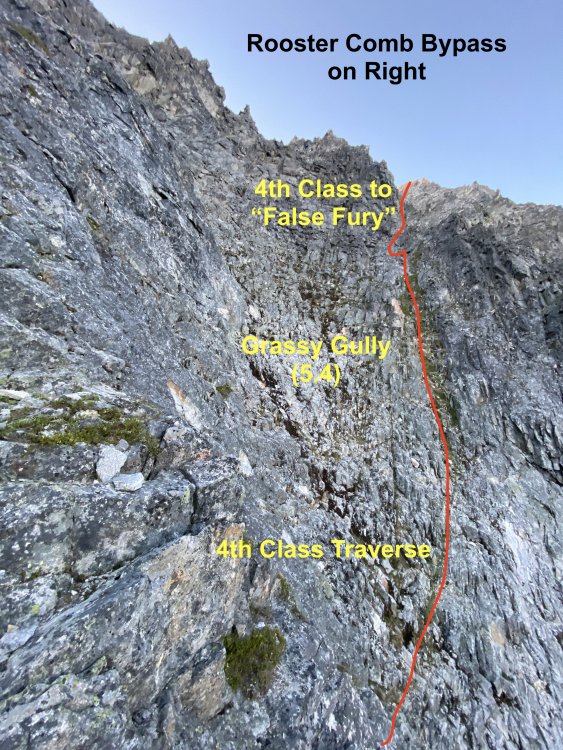
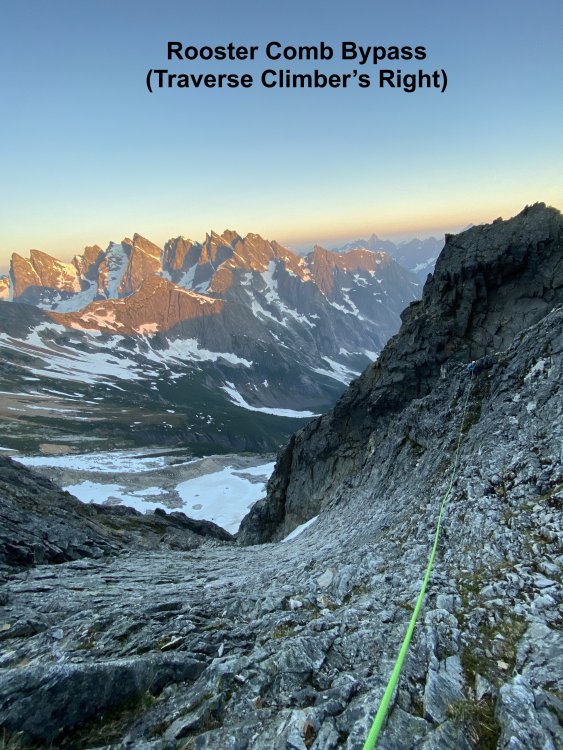
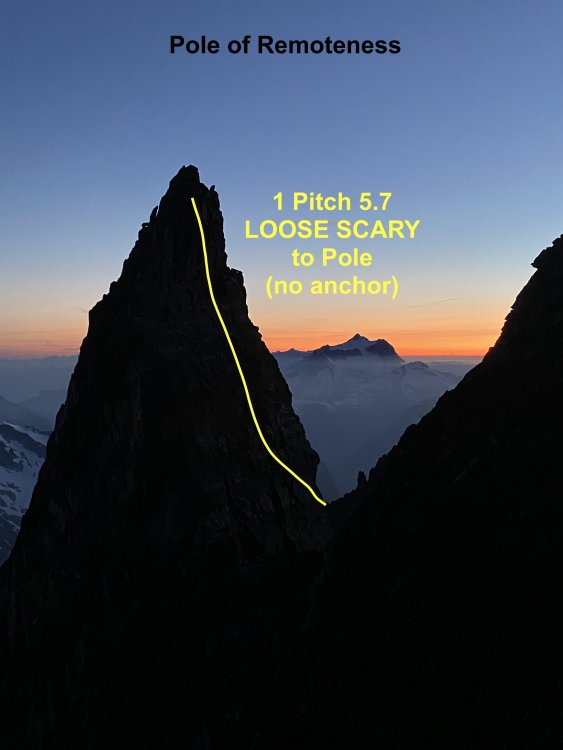
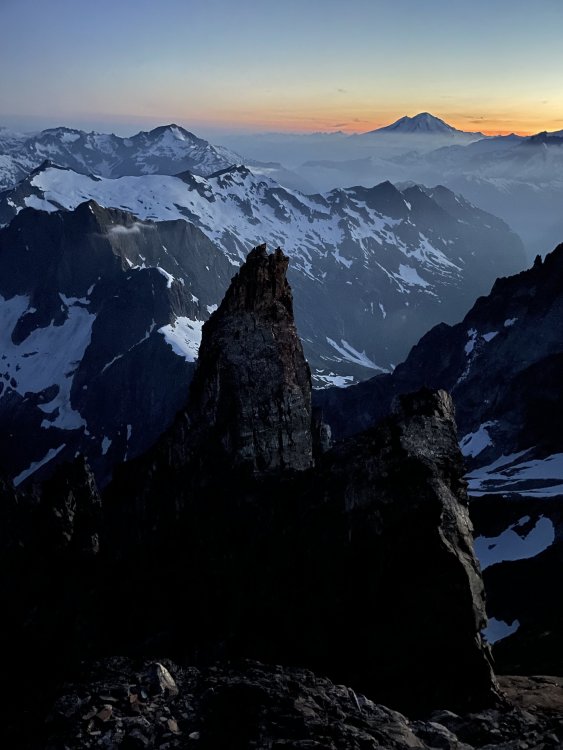
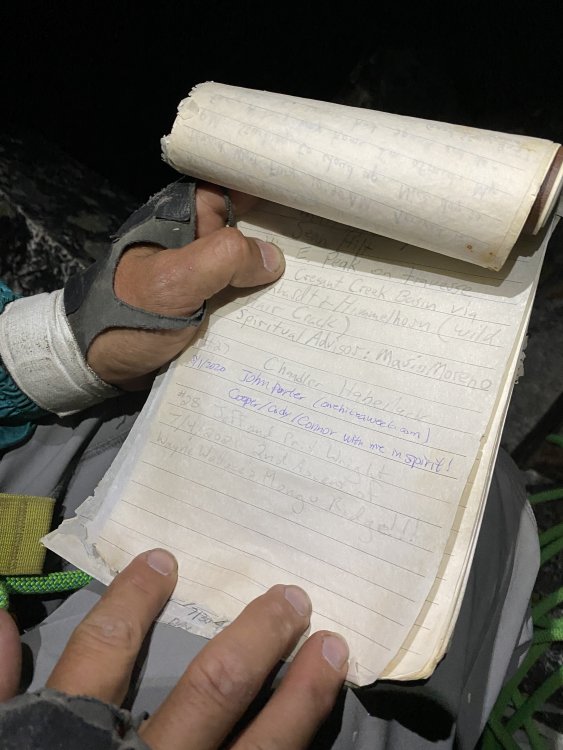
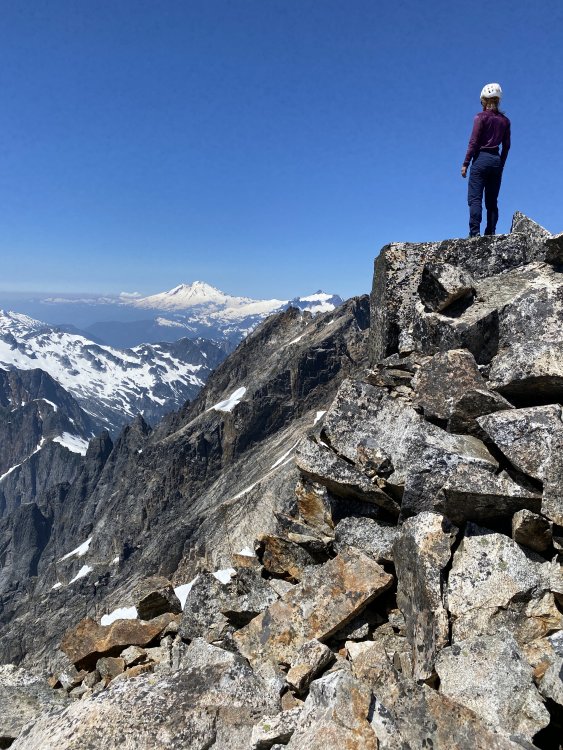
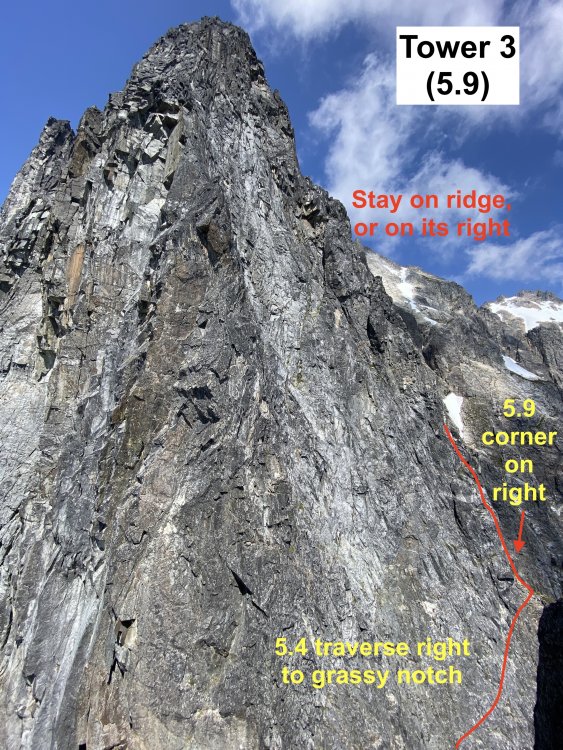
Trip: West Fury - Mongo Ridge Trip Date: 07/05/2021 Trip Report: In our relentless pursuit to ride the coattails of THE Wayne Wallace, Priti and I made the second ascent of Mongo Ridge (the SW Ridge of West Fury in the Northern Pickets of the North Cascades). It is a Stegasaurus ridge which rises 4,000ft over a mile from Goodell Creek punctuated by thick clusters of gendarmes that look like they’re straight out of the Karakoram. We first heard about Mongo when Wayne came to speak for a BOEALPS - Boeing Employees Alpine Society Banquet in 2015 and regaled a captive audience with his bold adventures. We warmed up Wayne's feature presentation with a talk on our trip to Patagonia climbing Aguja de l'S. Then Wayne came on stage talking about Mongo, making de l'S look like a mole-hill. Wayne climbed this route in 2006 SOLO, like a boss, questing into unknown terrain that easily could have landed him into mandatory hard free climbing. With vertiginous cliffs on both sides, he knew that bailing from the route was not an option and that he had to climb whatever the mountain presented. The difficulties on the route were up to 5.9, with an additional 5.10b pitch (a routefinding error), but the towers presented possibilities up to 5.11 if we weren’t lucky enough to have Wayne’s beta. The first ascent is one of the legendary, mythical ascents of the Cascades and even of the climbing world. After 15 years, only a handful of folks to my knowledge have even considered attempting it again. The bottom half of the ridge has four narrow towers which require you to summit and rappel in order to make vertical progress on the ridge. Long, double-rope rappels and hard technical climbing discouragingly makes it take hours just to ascent 100ft at times. Above these four towers are the “Rooster Comb” and the “Pole of Remoteness” (named by John Roper who figured it was the hardest place to get to in the lower 48). After Tower 4 and before the Rooster Comb, we scramble traversed low around each of these features and did not summit the Pole of Remoteness since it was getting dark and we did not bring bivy gear. At Wayne’s suggestion, we planned to climb camp-to-camp which was situated at the summit of East Fury. This means that while we did ascend the topographic feature of Mongo Ridge to the summit of West Fury, we did not truly climb “Wayne Wallace’s Mongo Ridge” in the manner that he climbed, including many more pitches of technical terrain. When we talked to Wayne in 2019, I told him that “Somebody needs to repeat this route, just so the world can understand what you accomplished.” It’s impossible to understand the scale of this route without being on it, competing as “one of the largest features on any mountain anywhere.” “You have to climb a major mountain [East Fury] just to start a most major climb.” Even with Wayne’s pictures and descriptions, we were still filled with dread as we attempted to route-find up each tower. While I am proud of what we did accomplish, I am still shaken at the boldness and audacity of the first ascent. Our tale should be considered a celebration of that event. Wayne called it Alpine Grade VI, but Beckey downgraded it to V deeming it (incorrectly imho) similar in commitment to Slesse NE Buttress (ref. Cascade Alpine Guide Book 3, pg. 118). We concur with Wayne's Grade VI rating, although I won't be even slightly offended if anyone wants to challenge the grade while ensconced in sofa cushions. Our itinerary: -7/3/21: 2PM boat ride from Ross Lake Resort to Big Beaver TH. Bivy in Access Creek basin. -7/4/21: Access Creek Basin to East Fury Summit. Left summit bivy in situ. -7/5/21: 23hr day camp-to-camp including Mongo Ridge and the traverse from West Fury to East Fury. -7/6/21: East Fury to Access Creek Basin -7/7/21: Access Creek Basin to Big Beaver TH. 2:30PM boat back to RLR. Here are collected links regarding Wayne's FA, for reference: https://waynewallace.wordpress.com/2014/05/ http://www.alpinist.com/doc/ALP19/climbing-note-fury https://www.nytimes.com/2006/10/21/sports/othersports/21outdoors.html http://www.alpenglow.org/nwmj/07/071_Mongo.html http://publications.americanalpineclub.org/articles/12200713002?fbclid=IwAR0iS9vNBvJ1XUQPOTPIXy8eymiTsuWFHI5TJtuAvLJUNb5LknfgeYgTriI Scurlock Picture: https://www.pbase.com/nolock/image/65948954 I won't go through too much detail on our approach to Luna Col and East Fury, since it is detailed well in many other places: https://onehikeaweek.com/2020/08/02/mount-fury/ http://www.nwhikers.net/forums/viewtopic.php?t=8021967 (specifically useful here is the traverse from East Fury to West Fury) Since we planned to do the route camp-to-camp (situated on the summit of East Fury), we studied the traverse from West Fury to East Fury in detail since we figured we'd be onsighting it in the dark to get back to camp. I will point out the "Red Ledge" (pictured above) just past Luna Col is reached by staying directly on the ridgeline from the col to begin the traverse over to East Fury. Past the Red Ledge, the next tower (called "Crux Tower" in some reports) is ascended directly via 4th class ledges and short 5.4 steps. A rope and gear would not be useful here. There is significant foreshortening here, as the route looks much more accessible as you get closer. Unless you're climbing in Winter or Spring, you will not be able to get across the bergshrund (as shown in the Beckey overlay), but instead will traverse left then right to reach the summit arête. Furthermore, the approach to the base of Mongo Ridge from East Fury's summit as discovered by Wayne is the easiest approach. While it is possible to reach Mongo's base via Picket Pass (either by navigating over Outrigger Peak "Southeast Peak" or Otto-Himmel Col), these approaches would be significantly more effort...or bushwhack for days up Goodell Creek. As you approach, notice the grey washboard streak with an overhanging gully. The route will start to the right of this feature. The 4,000ft descent from East Fury's summit may involve a lot of slab if the snow levels are low. We regret not bringing bivy gear on route. An alternative itinerary could be: -Day 1: Big Beaver TH to Luna Col -Day 2: Luna Col to Mongo Ridge Tower 1. Option to leave stove and tent on East Fury Summit as you pass by. There are no good bivouac sites on route. Just bring a sit pad and a sleeping bag and open bivy if splitter forecast. -Day 3: Tower 1 to either East Fury or Luna Col. A note on weather: The Pickets have notoriously unpredictable weather. Even with a splitter forecast, you can still have rain or even storms. Consider a tarp as backup shelter. Crossing the moat is the first crux. The moat is huge! Only found one place where it touched the rock slightly. On the approach, don't come down anything you can't go back up! Here I had to cross a giant moat (unprotectable compact snow), using both Gully tools (then passed the tools down to Priti). A picket here would have been very useful...but that's a big cost. Might have to bury a tool and rap/swing across the moat. Tower 1 was a TIME KILLER! Wayne reported a 5.8 overhang crux which we did not find. Instead we got suckered into a runout 5.10b overhang in the grey washboard gully. Recommend future parties to avoid this gully completely, and instead stay on the face to its right. Our second mistake was getting suckered into a difficult 5.8 grassy gully. Wayne later clarified that he immediately captured the ridge first, then went straight up the ridge (recommended). We started in an obvious chimney (5.6), gaining the face on the left then going right (many variations). After the chimney, we went left to the 5.10b overhanging grey gully instead of going up. It looked harder to gain the face above, but it is 5.8 if you can find Wayne's Way. The slopes to gain the ridge are all STEEP. We breathed a sigh of relief once we were on situated on the upper slopes of Tower 1, but route finding continued to be a challenge. A 30m rappel took us down to the notch between Tower 1 and 2. It seems possible to bail here back down the glacier and back up to East Fury. Perhaps the last legitimate bail option, so we considered the time and knew we would be climbing through the night. Tower 2 is only 2 pitches of 5.7 with no real route finding difficulty and went pretty quickly. The rock is REALLY loose however, so I was careful not to knock anything down on my belayer. Route lines are all approximate by the way! The first double rope rappel from Tower 2 led to the notch between Tower 2 and Tower 3. Tower 3 is the technical crux of the route and another TIME KILLER! It takes hours just to gain 100ft elevation. Once atop, it's demoralizing to look down and see the top of Tower 2 so close. Wayne reported a 5.10a bulge which I think we avoided by staying on and just right of the ridgeline. From the notch between Towers 2 and 3, a 5.4 traverse gains a grassy belay with 5 more pitches above ( 5.9 30m, 5.9 30m, 5.9 30m, 5.9 50m, 5.6 65m). Priti stopped whenever she found a good belay spot. We also hauled packs on 4 pitches expecting 5.10a climbing at any moment. It was real 5.9 climbing, consistently on decent rock for four pitches. Next time, instead of hauling just load everything into the follower pack and leave the leader with a mostly empty backpack instead. We took two backpacks on this climb to evenly distribute weight and bulk while simul-climbing. This was a good method. We consistently trended right above the belay. Higher Hiiiiiigher Hiiiiiiiiiigher Another 60m rappel deposited us to the notch between Towers 3 and 4. Finally, we got through the technical crux and we were losing sun fast! We knew we were in for an open bivy or a heartbreaking omission of the Pole of Remoteness. Tower 4 is another quick one. Two pitches, 5.9 then 5.7. It looks like really hard climbing going straight up! Instead we followed Wayne's advice and traversed out right for ~20m on 5.9 terrain with decent protection, then up following flakes and grass to a good belay. As you start climbing up, the climbing doesn't ease up, but instead is engaging, fun 5.9. Then 65m simul-climb to the summit. A final 50m rappel down to the base of the Rooster Comb. We were a bit confused here since the terrain opened up into a minefield of gendarmes. The Pole of Remoteness was indistinguishable among all of the towers. We knew we had to boogie so we took all the shortcuts that we could find. We noticed that the Rooster Comb could be bypassed on the right on low-5th terrain by taking another 30m rappel, then down climbing and traversing its Eastern flanks to a grassy gully. Wayne went up and over the Rooster Comb, not realizing there was a bypass. The Rooster Comb is very complex with several small flagpoles that required rappels. Wayne describes the final rappel off the rooster comb as a "diagonal rappel" that you can redirect off of horns, after which he flicked the rope to retrieve. There are at least two more intermediate gendarmes between the Rooster Comb and the Pole of Remoteness that we skirted around. Wayne found himself on their left side while we were on their right side. Wayne captured the upper 4th class slopes via a grassy gully (shown above). From here it's all 4th class to the "False Fury" summit. I coin the label "False Fury" because we stared at this point almost along the entire route thinking it was the West Fury Summit, but instead is fairly far from the true West Fury summit. Above is pictured our Rooster Comb bypass route which required an additional 30m rappel (or easy down climb). This was the first time we encountered snow on route, but don't count on it being there! Bring 4L water each. Southern Pickets in all their glory. Wayne traversed around the right side of the Pole of Remoteness to reach the col and summit it from the backside. To climb it directly would probably be 5 pitches of hard, loose climbing. From the notch between "False Fury" and the Pole of Remoteness, Wayne reported 1 pitch of 5.7 to reach the summit of the PoR. There is no anchor on top, so he threw a rope around a loose block and solo downclimbed, using the rope as a backup. If you are a team, consider downclimb-belaying. We sadly felt the need to skip the pole since it was total darkness by the time we got to the notch with a lot of traversing left to go. Once atop "False Fury", we couldn't find the summit register and realized that the real West Fury was maybe .25miles away separated by 4 more gendarmes, first downclimbing (or rappelling) down and right and traversing around the first gendarme, then weaving up, over, and around the others to finally reach the real West Fury summit. Glad to have put in the time to memorize the traverse beta between West and East Fury, it went off slowly but smoothly. One piece of key beta was at the end of Tower 1 (the last tower between the Fury's), you can find a secret 4th class ramp around to the North (climber's left) to find the rappel station that leads to the final push up the slopes back to East Fury. This is a 30m rope stretcher rappel, by the way! Thanks to Wayne for all of your support and encouragement! I think this route is more of a classic in the way that Hummingbird Ridge is a classic. We should really just sit back and marvel at the first ascent. It's a true Picketeering adventure, but loose rock, lack of bail options, and lack of bivy sites is pretty discouraging. The Pole of Remoteness still needs a second ascent, however! But it would a pretty doable day to get to PoR in-a-day from your East Fury bivouac by traversing high along the ridge and scrambling down from "False Fury", then reversing the route. Gear Notes: Single Rack .1 to 2, doubles .3-.75, small cams (TCU 00, TCU0). We like small cams in the Pickets! Small rack of nuts. 1 screw and 1 V-threader for glacier (didn't use). 60m single rope, 60m pull cord (three long rappels + optional pack hauling), 1 Petzl Gully (technical light ice axe) each, 10 single alpine draws, 3 double alpine draws, 1 quad, 50ft 5mm cord for rap anchors (used it all), left three caribeeners on rappel stations, steel horizontal front-point crampons. Approach Notes: Boat from Ross Lake Resort to Big Beaver Creek - Access Creek - Luna Col - East Fury - 4000ft descent on South side - Mongo Ridge - West Fury - Easy Fury


 1 point
 -
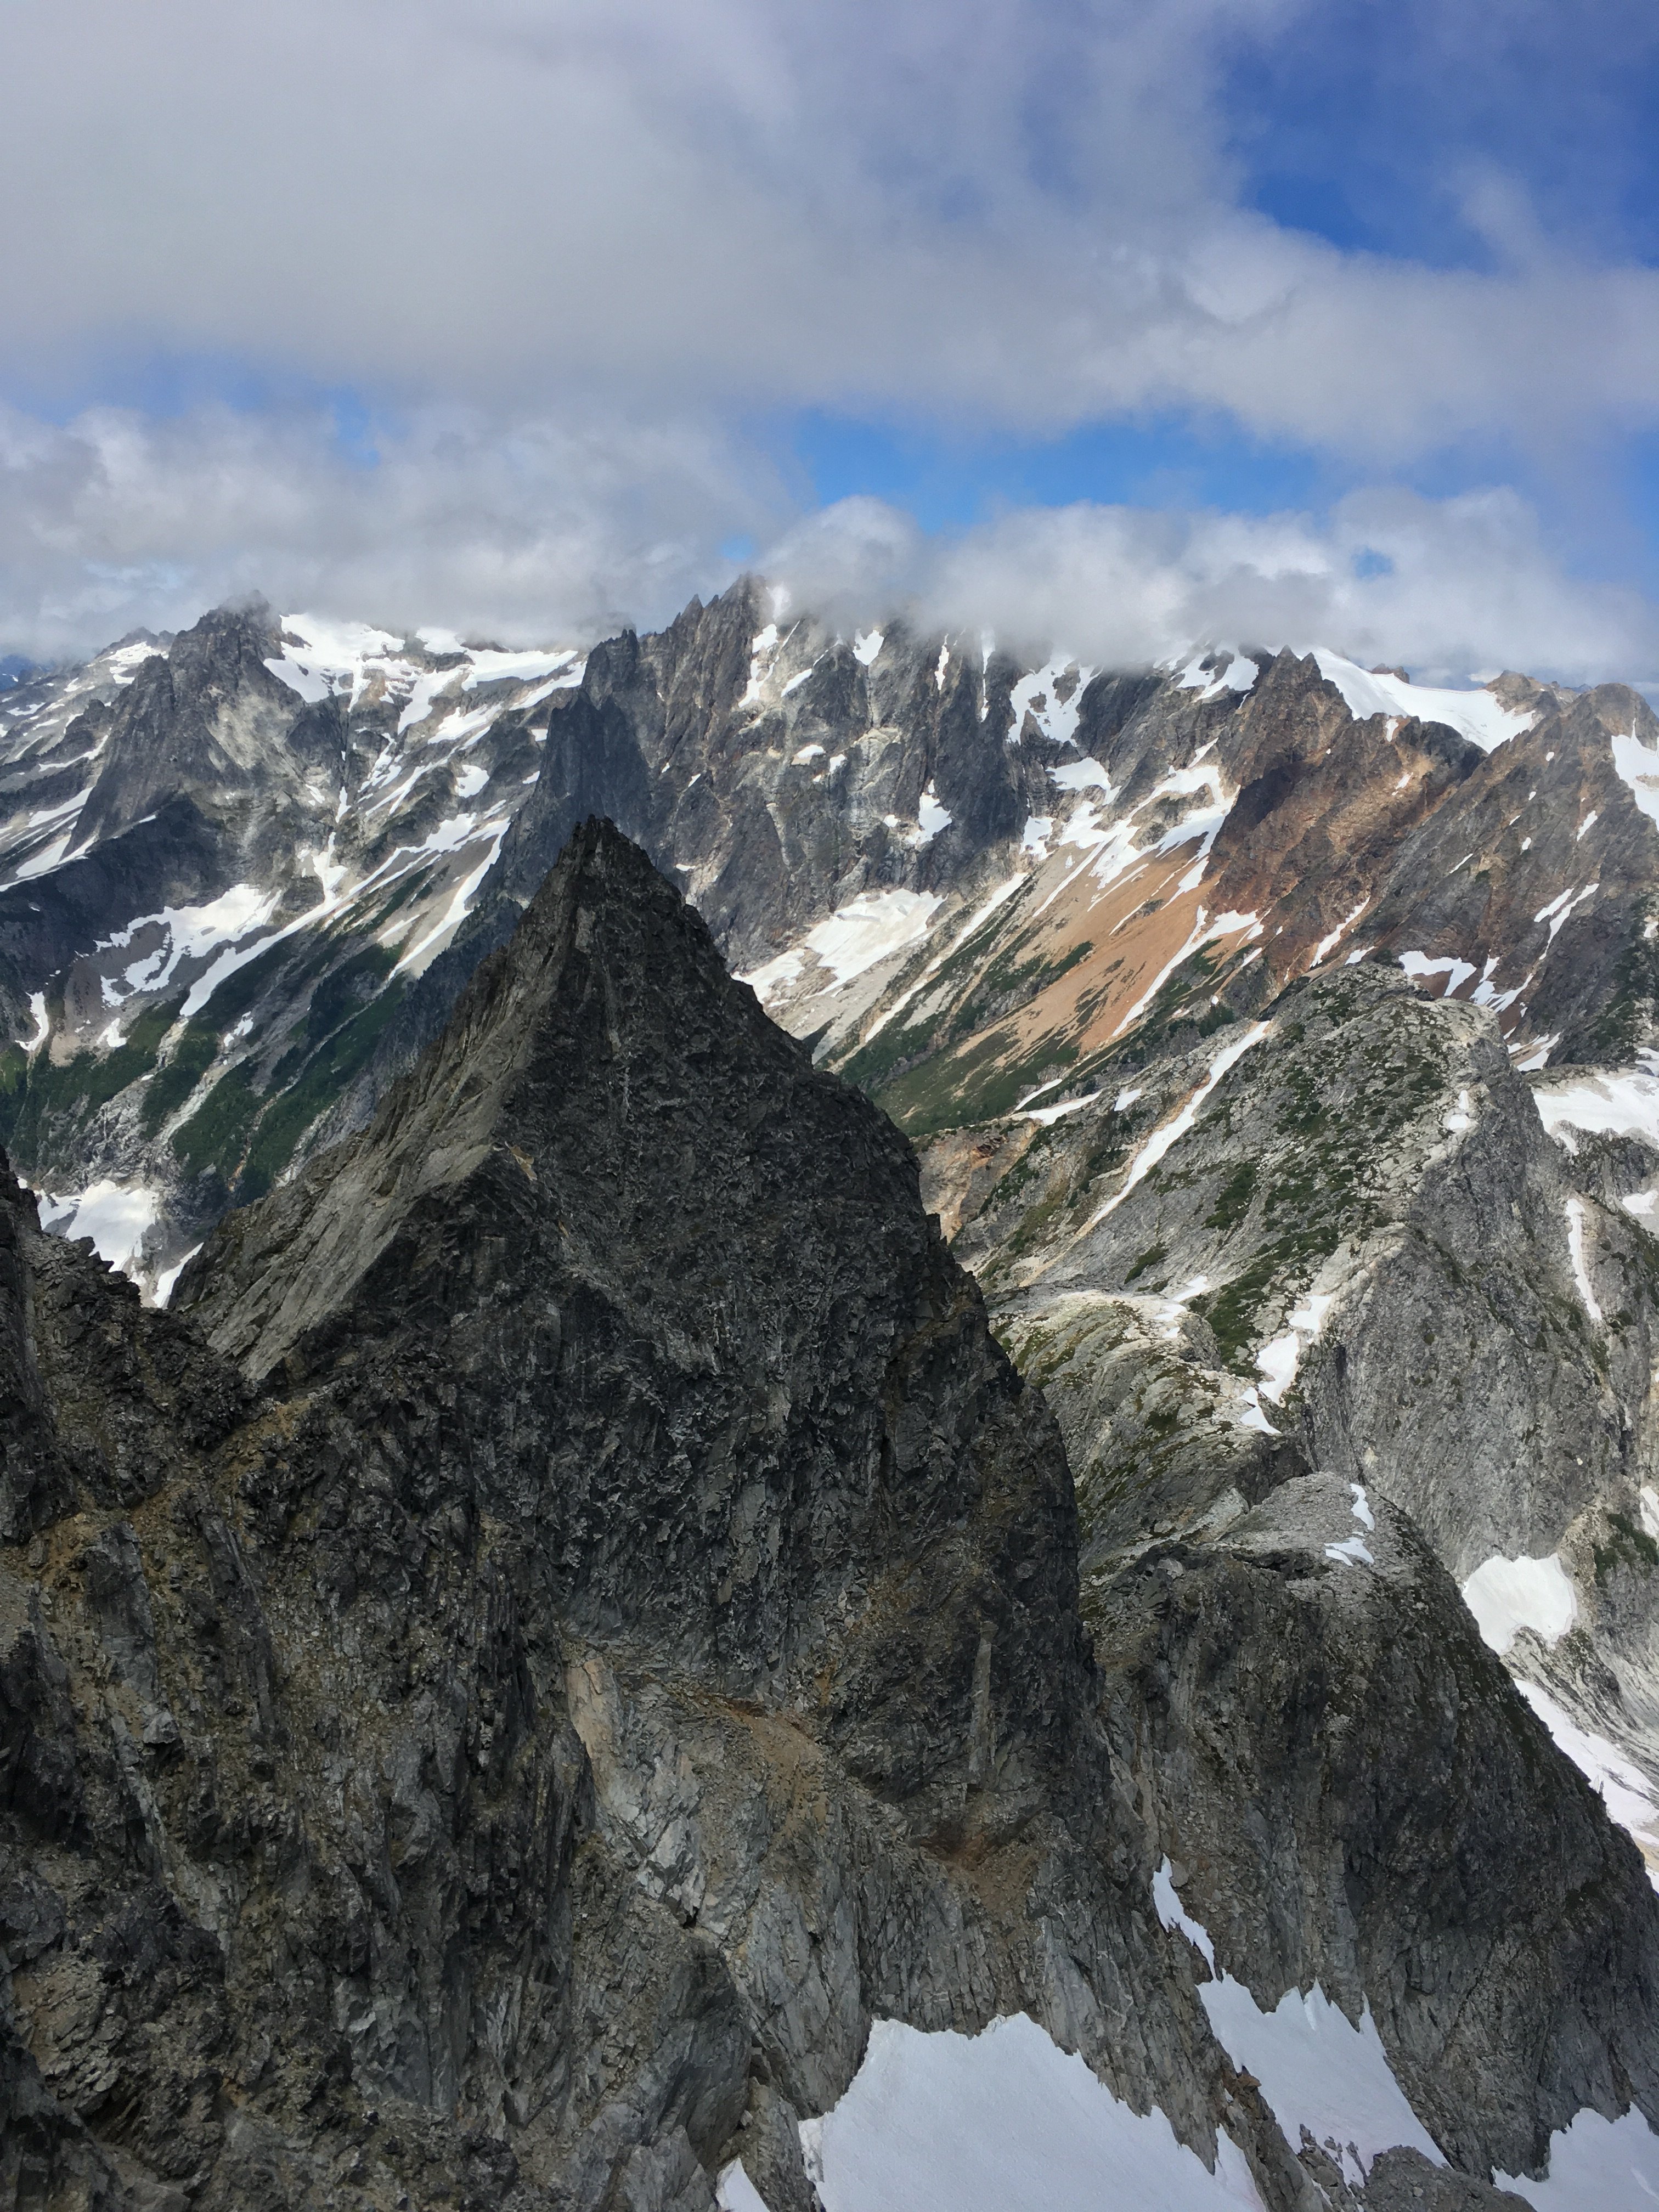
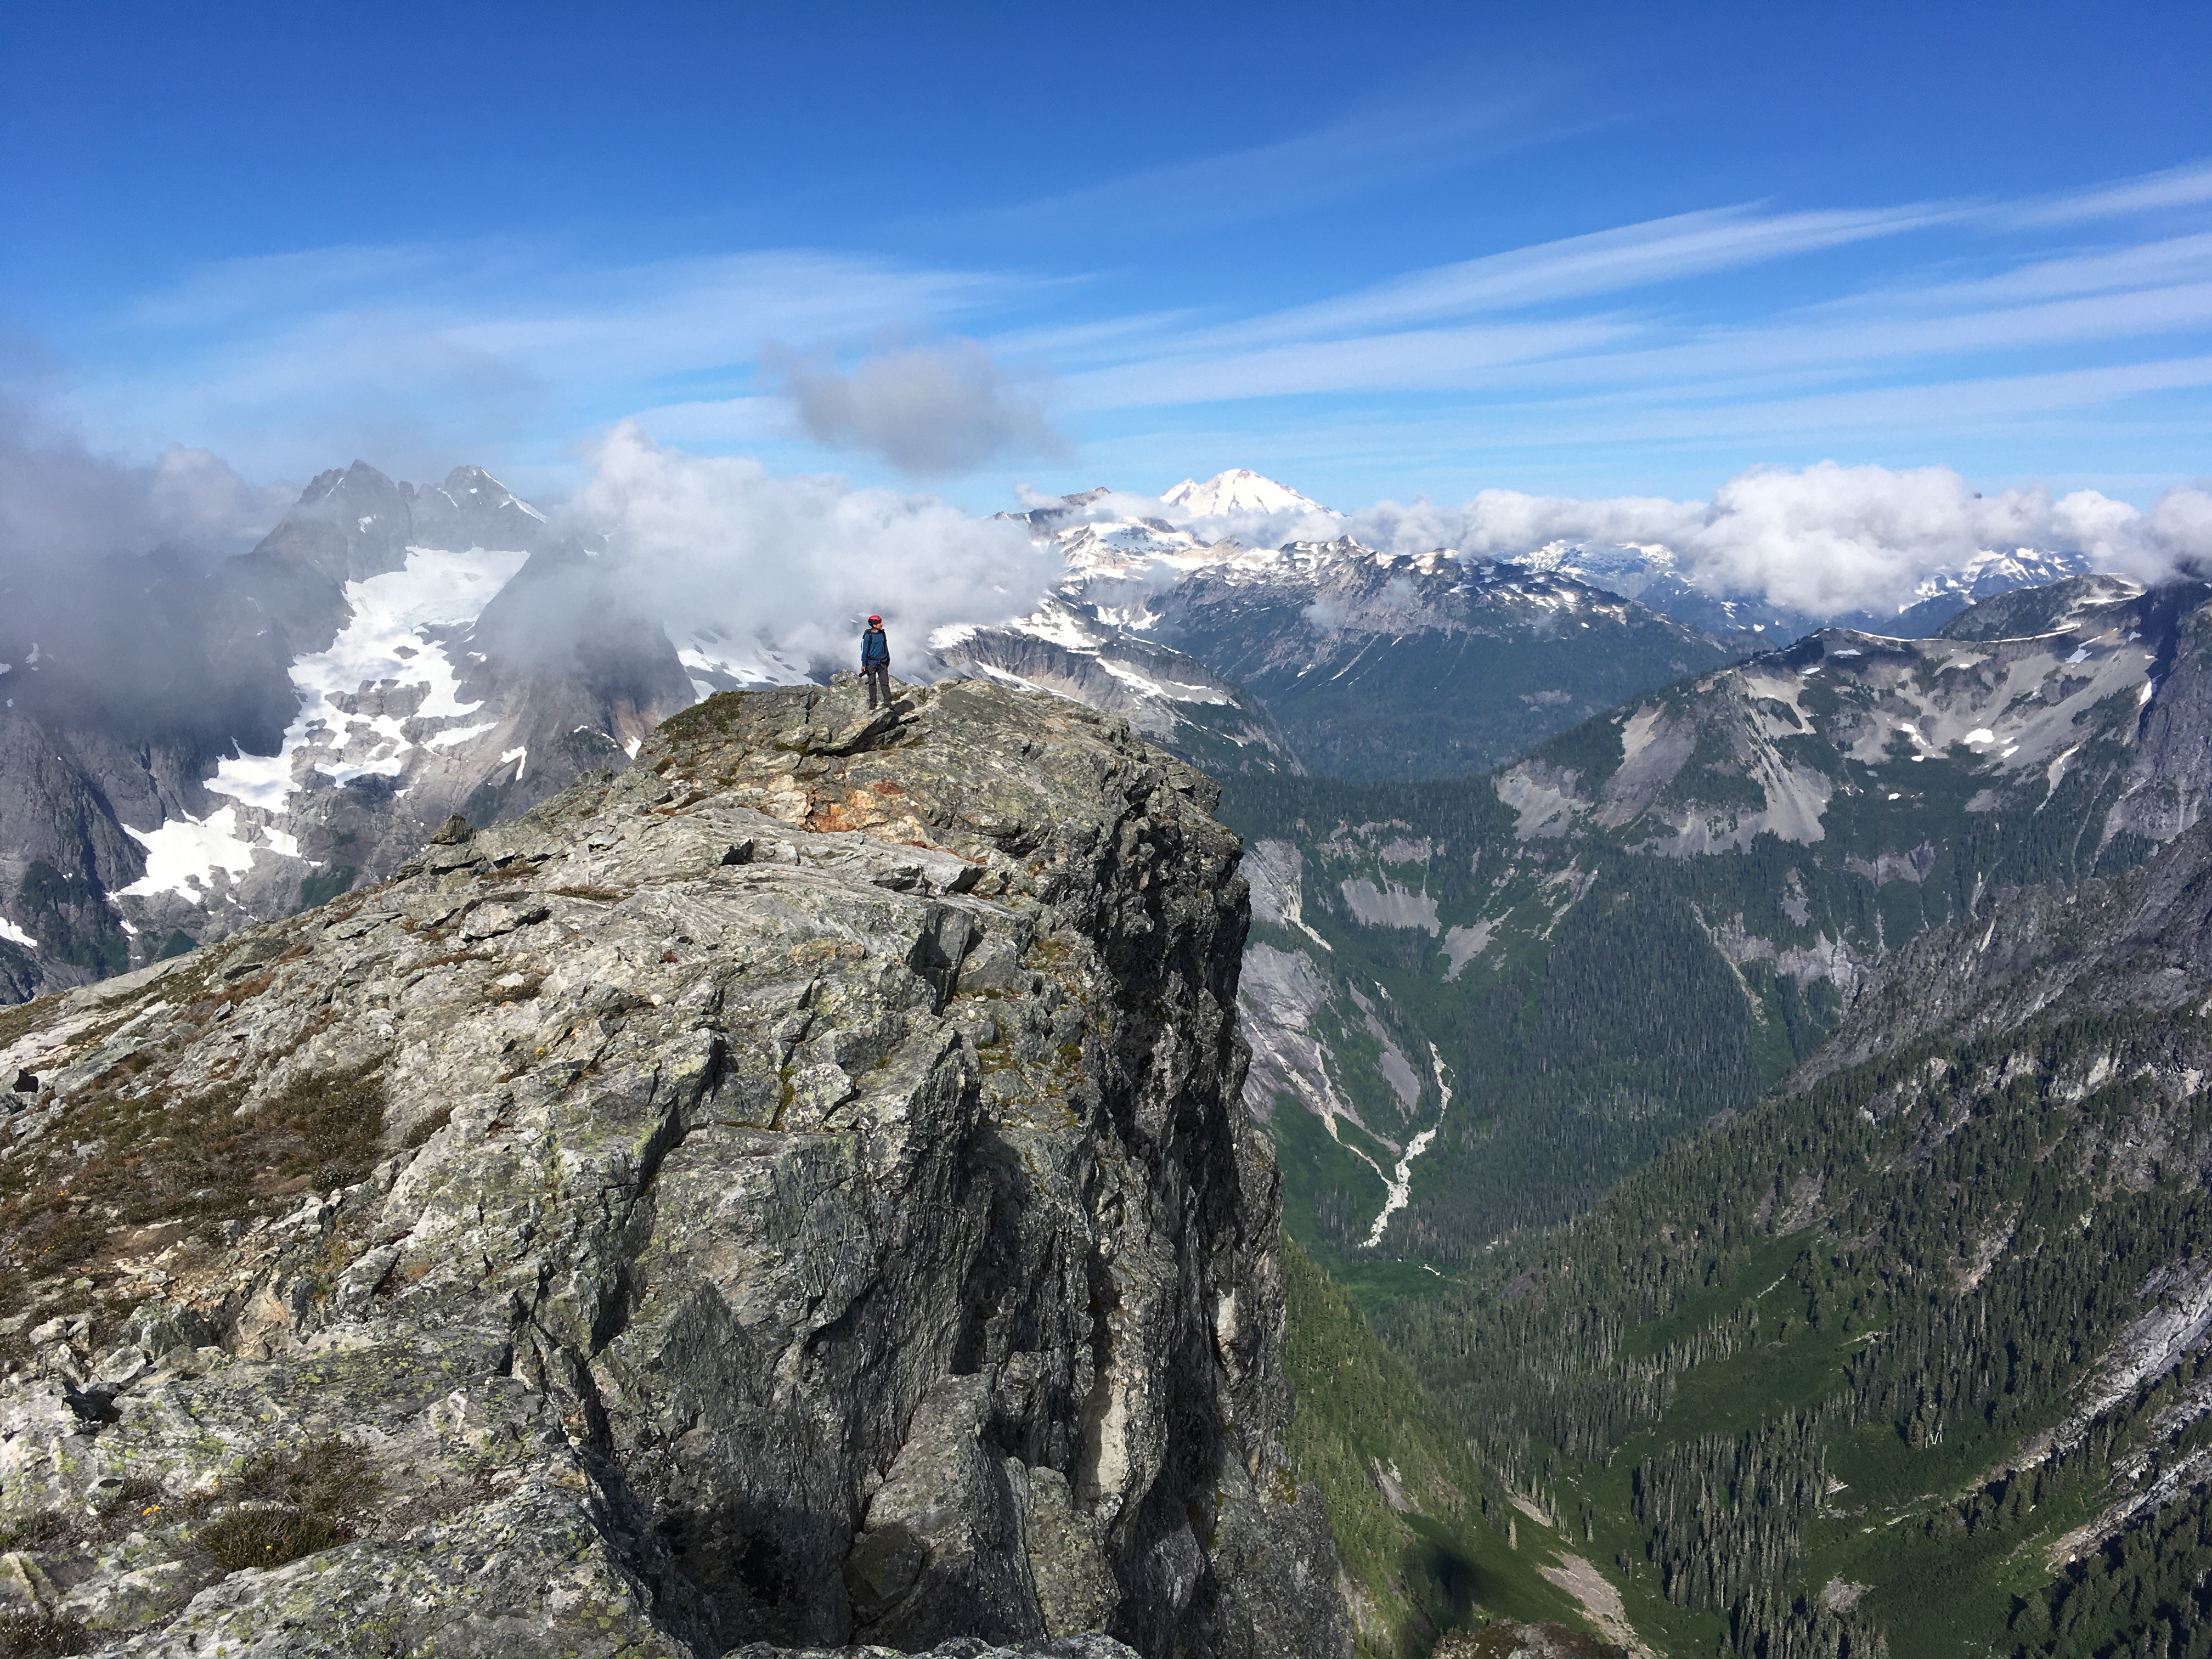
Trip: Mount Goode - Megalodon Ridge Trip Date: 07/19/2021 Trip Report: “Hey bear!” I shout, followed by a convincing monkey call from Sean. We are only a couple hundred yards away from the trail, but swallowed deep in the eight foot tall slide alder of the North Fork of Bridge Creek. Maybe we’re off route, maybe there is no route. A couple days prior Sean and I had been throwing around ideas for the weekend. Sean was interested in something hard on CBR, while I was craving some choss and adventure. Being the great friend and partner that he is, Sean agreed to my idea of Goode, and adjusted his schedule to fit mine. Meeting at the parking lot on Sunday, I ask Sean how comfortable he is soloing most of the ridge. He’s psyched on the idea, and I’m psyched to slim down the rack. I ditch the 4 and a few other pieces. With that I grab a couple bubbly waters to stash in a creek along the way and we’re off. In classic fashion, Sean takes off jogging almost immediately, it feels so good to be moving. The hiking flies by and we soon find ourselves stumbling down an alder infested hillside down to Bridge Creek. With no obvious entry point on the other side, we start hiking upstream along the river bank until the alder overtakes us, and we’re forced to wade up stream in the biting glacier melt water. Just in time for my feet to go fully numb, I find a narrow tunnel through the brush and out of the river. After a brief bout of screaming barfies we’re off and moving again. From this point, things got a little weird. All previous reports of this route seemed intentionally vague about how to gain the ridge. The alpine basin that looked like steep meadows on the map proved to be alder choked waterfalls. After re-reading Dan’s TR, I’m pretty sure we cut up the hill too early and endured some hellish bushwacking. Following the waterfall a little further seems like a better idea. Once re-birthed from the thicket, we followed a loose low 5th class gully up to the ridge crest. Freedom at last! The trudge up the treed ridge felt like it went on for eternity. Every roll, followed by another buttress and so on. It was at this point in the day that the true enormity of Jens and Dan’s single push effort set in. We were tired, and the idea of continuing up the ridge did not appeal. Maybe with tiny packs and perfect approach beta, but even then... As we tucked in for the night, a small plane flew circles around the summit. I assumed it could only be John Scurlock. After a nice night nestled into a bed of heather, we woke with the sun and enjoyed a warm pot of coffee to start the day. The initial part of the ridge proper was phenomenal. Highly textured white stone flowed up the mountain in a stunning spine feature. This section up to the first point would be a classic route on it’s own. I can not overstate how good the rock was through this section. Just perfect scrambling. Now atop point 8200, a cold wind ripped from the shady south side, adding to the intimidation of the ominous drop off ahead. Rather than onsight down-solo into the abyss, we opted to rope up here and simul down to the notch. This section did not boast the same quality rock, but made for comfortable down climbing with adequate protection. Once down, we again unroped and began back up to SE peak. Scrambling across this ridge was an incredible experience. I found myself falling into a flow state unlike much other. The climbing isn’t too hard, nor very sustained, so you are really able to enjoy the movement. Finally below the headwall, we roped up again. I lead a long somewhat loose and scary pitch of 5.9 slightly to the right of the FA party’s route. It went, but I can’t say I recommend it. Sean then took the lead, and after bailing on a N-side option, led an incredible 55m pitch up and left through splitter corners and up a striking arete feature. This pitch onward is definitely the same route that the FA party took. The last ~70m pitch took me up a very poorly protected arete composed of brick sized loose blocks up onto the ridge. As Blake says, “no lifeguard on duty here”. Sean questing the wrong way. Now with the biggest obstacle behind us, we basked in the sun before unroping and scrambling down to the snow patch, and top of the ski line. Things had gone very smoothly up to this point, so we took our time hanging out and brewing up. Sitting there looking at the steep grey ice, and rotten gendarmes was making me nervous. We only had one chintzy light axe between the two of us and no crampons. If there wasn’t a way around, we would be in a pretty bad spot. As we scampered further up the ridge, I theorized how we could dead-man some rocks to rap down the snow and swing over to the other side. Once over the ridge, I was relieved to find a casual (albeit shitty) scree slope taking us around the back side. More scrambling took us through looser and more convoluted gendarmes up towards the Black Tooth notch. Roping up one last time, I lead down and around the final gendarme into black tooth notch. I found this pitch to be easier than the proposed 5.10 grade, probably 5.8 or 5.9 and truly well protected. Maybe after 11 hours of FA questing with big packs this could feel like 10-. A short simul block took us to the summit and nap time! Having mentally prepared for an epic 12+ hour day, I was pleasantly surprised to arrive on the summit in the early afternoon with plenty of day to spare. We had full water bottles and a full seven hours to nap and enjoy the views. Life is Goode! The descent sucked, and the hike out only sucked for the last hour. Too many good photos to share in this TR. Our full photo album can be found HERE Gear Notes: If Simuling/pitching out most of the ridge Double rack .1-2 Single 3&4. If scrambling all but the cruxes, a single rack .1-3 should be fine. Small cams in the .1-.2 range are most useful. Fish themed snacks. Approach Notes: IDK, try and gain the ridge as soon as possible? Follow the waterfall? Maybe someone who has done it right will chime in.1 point
-
Trip: Forbidden - Northwest Face Trip Date: 07/18/2021 Trip Report: Last weekend, AC, AN, XT and I had a very humbling and unforgettable experience on the Northwest Face of Forbidden Peak. Some lessons learned -- always factor in ample time for routefinding; emergency bivvies, Nuun tablets and Justin’s nut butter are worth the weight; never take descents for granted; and a good attitude and level head are key in the mountains. Our epic journey began on Friday afternoon. After lunch at Mondo’s, we got a leisurely start from milepost 20 around 1:30pm. It was overcast and foggy when we reached low camp and we hoped for better weather as we swatted marmots away from our campsite and prepped our meals and packs for the next day. We left camp around 5:30am in a heavy fog. As we marched toward Sharkfin Col the fog broke and Johannesburg appeared behind us. By 7:30am we reached the base of Sharkfin Col bypass gully, which we recognized from the obvious snow finger. This we took until it petered out into loose rock that felt pretty miserable to navigate in crampons. (Left: The beginning of the Sharkfin Col bypass gully. Right: After the snow disappears, leaving loose rocks.) We missed the turnoff which would’ve led us to a rap station that supposedly would have brought us to Boston Glacier in one rappel. Instead, around 8:30am we reached the top of the gully at over 7800ft with a long and sketchy rappel path to the bottom. This mishap cost us several hours. Where we’d expected a single rap to take us down to the glacier, we instead required four unsavory rappels over hanging snowfields and loose rock. We found rappel tat in several places from parties that had found themselves in the same situation. Partway through, a falling rock struck AN’s rope leaving it coreshot about 15 feet from one end. We tied it off and used a biner block to rappel off the other rope. The final rappel took us over the lip of an enormous snowfield and a large bergschrund, from where we walked onto Boston Glacier. (Left: Rappelling off the snowfield. Right: A view of the hanging snowfield from below.) We touched down on Boston Glacier around noon. We were already 3 hours behind schedule but figured we could make up some of that time on what looked like a relatively flat glacier crossing. “The hard part is over!” we thought. In any case, now that we had made the sketchy raps over Sharkfin Col we had no real option to turn back. We had been worried that the hot summer had opened up the crevasses but AN navigated us across Boston Glacier skillfully and we reached the North Ridge around 2:30pm. Although prior trip reports had mentioned two possible crossings, the only one we recognized was a corner that others had described as a “dirt pitch” with the consistency of “potato chips.” It required some finagling to get to this pitch as the snow had melted out from the base of the notch leaving a moat. We prepared to arrest as AN carefully navigated around the edge and then lowered herself into the moat and brought the rest of us in. It’s hard to overstate how nasty the climbing is on this “pitch” — gravel and dirt held together by who knows what (gravity?) and unprotectable unless you count the picket in the snow. Other reports suggest that earlier season (or in a cooler summer) you can get directly onto the pitch higher up, but with the snow melt we had to climb up from the base on very loose terrain. AC led up in his aluminum crampons, kicking off loose dirt and gravel, and set up a fixed line for the rest of us. (Left: AC leading up the dirt pitch. Right: The moat from where we started.) The careful climbing took us more time, so it was 4pm by the time we were all on top. Thankfully from here we could walk directly onto Forbidden Glacier and for the first time could see our route. We were hopelessly behind schedule but decided to keep going to see how far we could get before dark. But at least now the hard part was definitely over, right?! (Left: View after crossing the North Ridge. You can see the severely broken up snow near the Northwest Buttress. Right: Crossing Forbidden Glacier with a view of Moraine Lake.) To avoid the many crevasses, we decided to stay high and hug the toe of the Northwest Buttress, which we reached by 5pm. However, once we reached the toe we found no obvious way to gain the rock. A curving snow bridge provided the only visible way to get around to the west side where the route began. AN put in a picket and walked carefully across the bowl. To our right was a wall of seracs, and we could hear ice/snow breaking after a full day in the sun. Once we were all on the other side, AC went up on belay with a picket to see if he could find the start of the climb, but as he continued higher all he found was hard 5th class climbing. (Left: The curving snowbridge to pass under the toe of the buttress. Right: Seracs to the right of the buttress.) We reconvened and decided we needed to reset. Because of crevasses, the only way to backtrack would have required us to loop back around the glacier. To save time and energy, we decided to set up a rappel. We slung a boulder with some cord, backed it up with a small cam, and lowered ourselves back onto the glacier. (Left: Rappelling back down to the glacier to try to gain the route from further right. Right: Heading up the steep snow ramp at sunset.) This time we stayed low and approached from the larger ramp on the far west side of the buttress. It was unexpectedly steep and lined with crevasses you couldn’t see until you were upon them. AN led us carefully over the snow ramp to what we could now see was the base of the climb at around 7600ft. (Left: The rocky ramp that marks the start of the route. Right: Simulclimbing after sundown.) At this point it was 8pm and the sun was dropping behind Eldorado. We snapped some photos of the sunset over Moraine Lake and prepared mentally for an unplanned bivy up on the ridge. We rested, packed our water bottles with snow, and finished gearing up. We started simulclimbing around 9pm in our headlamps and reached a ledge at around 7700ft right before the knife edge pitch. We anchored ourselves in and tried to find a way to Tetris/penguin-huddle our bodies onto the small platform. We had one emergency bivy for the four of us so we each picked our favorite leg and stuck it in for warmth. By now we were low on food and water, but still miraculously high in stoke (we credit the Nuun tablets). (Above: Packed into the bivy ledge watching the sunrise.) At 5am the sun started peeking over the North Ridge and the view was a nice consolation to a long and cold night. We divvied up a chocolate croissant while watching the clouds drift by. Once the sun hit the ledge our limbs began to thaw and we were ready to move. We assured one another, “now the hard part is most definitely over!” and that this would be a quick day. We racked up and AC and XT started up the knife edge around 7am. The knife edge was beautiful, exposed climbing on good rock and with unbeatable views. This side of Forbidden is rarely climbed and the isolation is both serene and intimidating. (Left: Sunrise from the bivy ledge. Right: Morning sun hitting the knife edge.) After the knife edge pitch, we continued up a crack with an old piton. This led to a very tight, featureless and poorly protected chimney. We opted to drop down and left to a decent ledge that led to easier climbing and likely bypassing the crux. From here we continued with a mix of pitched and simulclimbing on blocks, jugs and cracks. (Left: AC leading up the crux pitch. An old piton is stuck in the crack. Right: AC on the final pitches near the summit.) Routefinding became a challenge once the ridge blended into the face, and a “choose your own adventure” approach led us into harder terrain a few times. Towards the top, we stayed too far right and continued up a sketchy lichen-covered face where we should have veered left through a wide blocky corner. AC and XT moved swiftly and reached the summit around 2:30pm, and AN and I around 3:45pm as we had pitched out a couple of the trickier spots. (Above: XT at the summit.) We had a quick celebratory moment on the summit, but once the high was over, the lack of water, food and sleep caught up to us. “But the descent will be quick,” I thought to myself, as AC and AN had both done the West Ridge before. By now I should’ve known better! AC led the way with rappels down the West Ridge, putting in directionals to minimize risk of swings. After four rappels, we simulclimbed down to the “airy step” and then jumped over to the notch. Hardly a straightforward descent. We hiked down Catscratch Gully which was loose and trashy, as expected, to the first rappel station. The sun was nearly gone by the time we began our rappels around 8:30pm. We moved as quickly as we could, but with 7 rappels, 4 people and having to search for the rappel stations in the dark we did not touch back down onto snow until midnight. Exhaustion had fully set in. We had been carefully rationing food and water but by now it was all long gone except for a stale energy bar I couldn’t bring myself to eat because it just made me thirstier. We put our crampons back on and as we plunged down the snowfield, I made the mistake again of thinking to myself, “Thank god!! It’s almost over.” No such thing. Walking down, AC’s aluminum crampon had finally had enough and broke, causing him to fall and sprain his knee. We reached the edge of the snowfield and continued onto slick, wet slab. In the pitch black dark, it was hard to tell what was snow or rock, and we hit several dead ends. At one point we realized we had missed the trail for high camp, but figured we could cut low through the slab and grass and connect to the trail. Nope. Moss turned into high grass and brush and we bushwacked zombie-like across the meadow. However when we finally reached Boston Creek we were too low and could not find a passable route. Someone finally pointed out that it was already 3am and we froze -- we’d been wandering for 3 hours?! Deflated, we sat down in the grass and decided to wait until pre-dawn light could help us regain our bearings. In the distance we could see a couple of lights toward the direction of camp but could not make out a path to get there. I wondered whether someone had called search and rescue early, though we had our doubts since we were not yet overdue. AC suspected that it was just another party getting an alpine start. XT, at the end of her proverbial rope, began to flash her headlamp and shout for help. As soon as she saw them return the signal with their headlamp, she grabbed her pack and took off in their direction. Perplexed, the rest of us stayed put to wait for pre-dawn light. While AC and AN somehow continued conversing in complete sentences, I laid with my head in my arms and wondered dimly whether those porky marmots had trashed our camp while we were gone. At the first hint of light around 4:30am, we pulled ourselves up and were able to see where we could gain the high camp trail. We also noticed that a headlamp was still hovering around the other side of the creek, and it followed us as we hiked back up. Near the high camp trail, we connected with the owner of the headlamp, Ryan, who had been heading out with his partner for a one-day climb of Sahale before he heard XT shouting for help. In an admirable act of kindness, he and his partner had decided to forego their climb and instead wait for us to make sure we were all safe. (Ryan, if you’re out there, thank you!) We chatted a bit, confirmed that XT was safely back at camp, and then headed back ourselves, finally reaching low camp around 6am. Exhausted but relieved, we shared a couple of Mountain Houses, packed up our camp and headed back down around 8:30am, reaching the car at MP 20 around 11am on Monday. (Above: Digging deep for smiles on day 2 of our epic.) This route took us on a literal and figurative journey. We knew the route overall was committing (as once you pass over Sharkfin Col there is no easy way to bail), but underestimated the technical challenges that made each juncture committing also. Much of the terrain was steep, nonobvious, complicated by snowmelt, and backtracking was either dangerous or time-consuming or both. Even without routefinding mishaps I don’t think we could’ve done it in one push from and back to low camp. I am deeply grateful to this team who showed serious grit and heroic cheerfulness in unplanned situations, to good samaritans like Ryan for demonstrating that even among strangers there is a community that looks out for one another, and to this monster of a route for a humbling lesson. For the rest of the summer you’ll find me cragging at Index. Gear Notes: Doubles 0.3-2, lots of slings for simulclimbing. Axe, crampons (aluminum ones broke), emergency bivy! Approach Notes: See above1 point
-
Trip: Monument Peak (8592'), Lake Mountain (8371'), Bird Peak (8330') - East Ridge Up, SE Ridge Down Trip Date: 07/03/2021 Trip Report: I climbed three peaks over the holiday weekend. Monument Peak (8592'), Lake Mountain (8371'), Bird Peak (8330') outside Mazama, Pistol Pass Approach. Started the climb from the Monument Creek Trailhead (Trail 484). The weather was looking perfect again and a holiday weekend, time for another east side climb. Headed out Friday night, caught some Zs at the Trailhead and headed out early Saturday morning. Saturday: I planned for 3 days as the trip is long with lots of climbing. I headed up Monument Creek Trail to the Eureka Creek ford to the Pistol Pass Trail and up the ridge. There used to be a bridge across Eureka Creek years ago but it came down and has not been replaced. There is a nice bridge base and a solid rock platform on the other side of the creek that is begging for a new bridge. Sure would do wonders for connecting the trails in the area for a nice big loop around the mountains of the area. The ford across Eureka Creek is not too bad, knee to mid-thigh deep depending on the crossing location. I found it easiest to cross a little way down the trail toward a rocky river bank. The Pistol Pass ridge trail is bone dry the whole way up. There is no water from Eureka Creek to Lake of the Woods Lake. I filled up with 3 liters of water at the creek and still had to travel about 2.5 hours without water before I got to Lake of the Woods to set up camp. The ridge is hot as hell when the sun is out, no place to hide and no water to cool off in. The trail up the ridge is hard to follow between 3900’ and 6000’, when in doubt stick to the ridge crest. Sunday: I Left Lake of the Woods Camp at 6:00am and climbed straight up a gully to a ridge line at about 7500’. I was thinking that the prominent rocky peak seen from Pistol Pass and the Lake area was Lake Mountain, it isn’t. It is an unnamed peak that is 40’ lower than Lake Mountain (which is to the north and is much easier to climb). This unnamed peak I am going to call Bird Peak (8330’) from here on out. I’m calling it Bird Peak because it kind of looks like a bird beak from one side and from the other side it looks like the mountain is flipping you the bird. Maybe it should be called Homonym Peak. Anyway, Bird Peak is a decent climb. It is a mix of 3rd, 4th and 5th class rock with an airy summit and room for one, maybe two people, to sit directly on the summit. Sitting on the summit of Bird Peak I realized that I was on the wrong summit and needed to climb Lake Mountain like originally planned. Lake Mountain is a basic class 2-3 scramble. Bird Peak is a much nicer peak. I headed down the ridge from Lake Mountain toward the Lake in the basin between Lake Mtn. and Monument Peak. Lots of water and camping spots in the basin. The ridge down from Lake Mountain to the basin is fairly steep with loose rock combined with slick rock sections. Not too fun but doable. From the basin Lake I climbed up toward the start of the East Ridge of Monument Peak. The East Ridge of Monument Peak is a mix of class 3 & 4 steep, loose, down slopping rock. Off the north side of the ridge is a sheer drop for several hundred feet. The first 100’ is the hardest part of the ridge and then it eases up a bit. With the loose, steep rock and the sheer drop, the pucker factor was at the high setting. I made it to the summit of Monument Peak about 3:00pm. Great views in all directions. I headed down the SE Ridge of Monument to return to camp. The SE Ridge is composed of tedious loose talus most of the way. When I reached the 7000’ mark on the SE Ridge I headed down the diagonal gully to the basin below. It’s loose shit rock all the way down to 6600’. From here I climbed back up and over the gully above Lake of the Woods and back to camp at about 9:00pm. A long day with lots of climbing and distance, my feet were done. Monday: I left Lake of the Woods Camp at 7:00am. I went back up and over Pistol Pass, down the ridge trail, through the Creek and back to the car at 3:30pm. Some Tips and Notes: Bring comfortable shoes, this is a long trip. I brought Hokas for the easy trail and creek crossing and mountaineering boots for the cross country and peaks. There is no water at all on the ridge between Eureka Creek and Lake of the Wood Lake. Bring as much water as you can carry from Eureka Creek. The trail up the ridge is hard to follow between 3900’ and 6000’, when in doubt stick to the ridge crest. The trail will fade in and out in that stretch. There are actually two lakes in the Lake of the Woods area, only the bigger lake is on the map. There is a smaller lake about a ¼ mile north of the main lake. There is a lot of water in the basin between Lake Mtn. and Monument Peak. A lake and several streams with good camping options. The East Ridge of Monument Peak requires your full attention. Class 3-4 steep, loose, down slopping rock. The gully to get onto and off of the SE Ridge of Monument Peak is not fun but it is the best option. Bottom is at about 6600’ and top is at 7000’. Travel Time for reference: Saturday: Car to Lake of the Woods Camp - 10.5 hours. Sunday: Camp to Summits back to Camp - 15 hours Monday: Camp to Car - 8 hours Elevation Gain for the trip: about 10,000’ Gear used: Whippet & Helmet Eureka Creek Ford at the top of Trail 484 Pistol Pass View - Bird Peak & Lake of the Woods down in the trees Lake of the Woods - Nice Camping. Bird Peak from ridge above Lake of the Woods Lake Mountain from summit of Bird Peak. Monument Peak - SE Ridge & East Ridge and Face Monument Peak - East Ridge Blackcap Mountain in the distance from the East Ridge of Monument Peak. Monument Peak Summit. View from Monument Peak. Looking down SE Ridge of Monument Peak. 6600' Access point of SE Ridge of Monument Peak. It's a lot steeper than it looks. Wear and Tear. One days worth of grippy rock climbing. Gear Notes: Gear used: Whippet, Helmet, Work Gloves. Bring lots of water carrying capacity, you will need it! Approach Notes: Monument Creek Trailhead (Trail 484) Start Location. Climb ridge trail to Pistol Pass.1 point
-
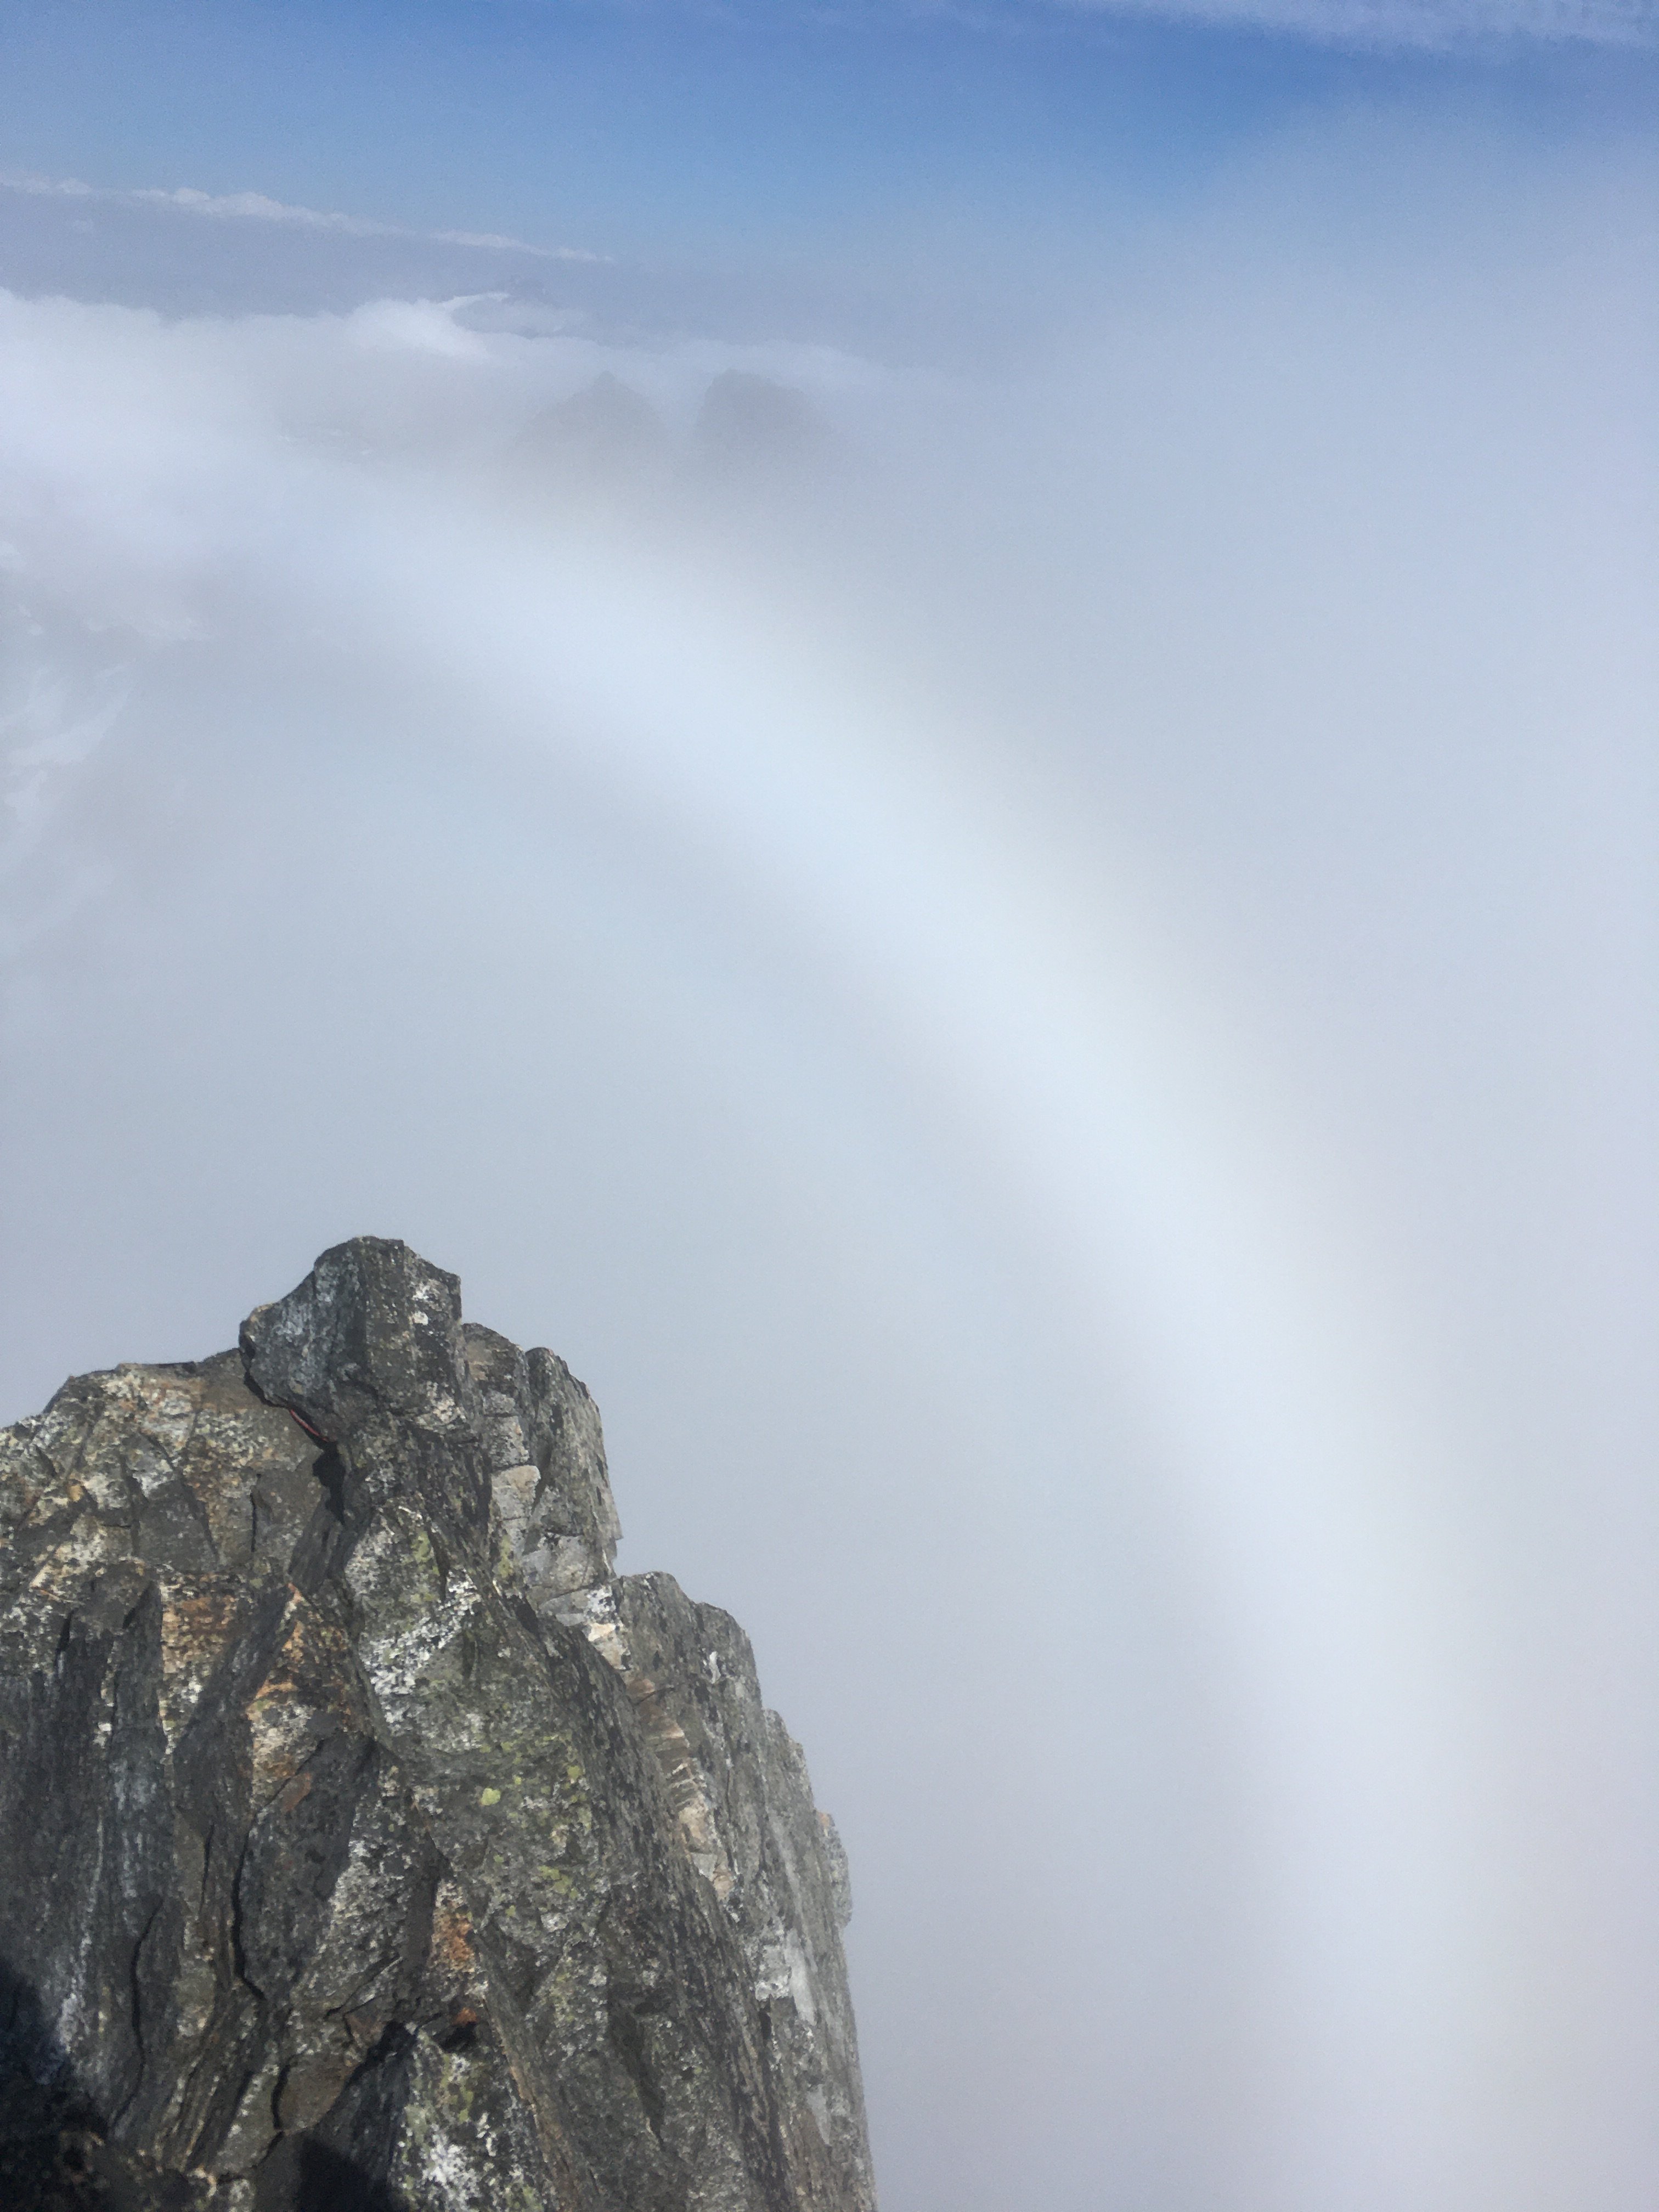
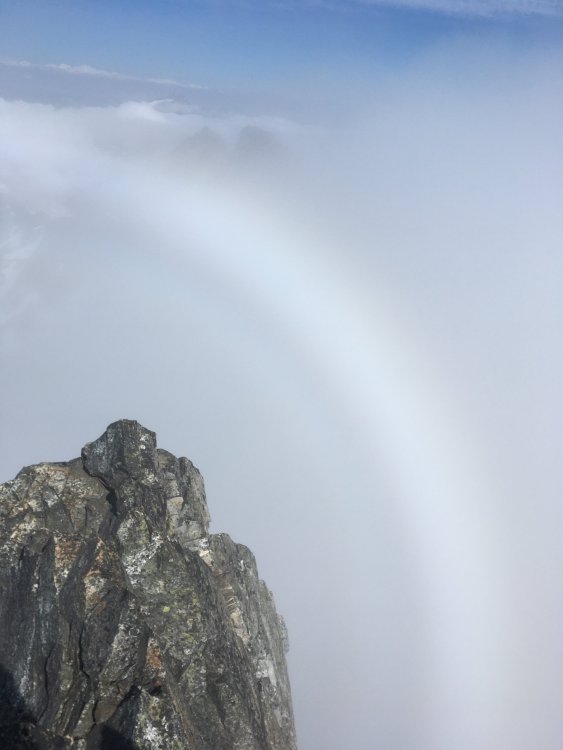
Trip: Crescent Creek - Terror W ridge, wild hair crack, chopping black NE Trip Date: 07/15/2021 Trip Report: Went to the crescent creek area 7/15-18 with Alex. Shwack before terror creek is confusing at times but not exactly heinous. The creek crossing (ford) was easy for us. Trail on the other side is superb, possibly the steepest I’ve hiked, and very beautiful too. Not as enjoyable going down though. Once at the crest the path becomes ambiguous again. Didn’t have any trouble on the way up but somehow kept losing it on the way back. It took a while to reach the 6400’ notch and weather was coming in so we opted to just rest in the evening. We could see only the lower portions of the basin, and the going looked tough from afar. The spires were still a mystery at this point. Top priority for the trip was Wild Hair Crack, and Stoddard was 2nd. We needed two full days of good weather on days 2-3 to pull them both off. Waking to very low visibility on the morning of the 2nd day we called off Stoddard (next time) and planned to push wild hair to day3. We caught up on sleep for a while, finally getting going after noon towards the west ridge of terror as consolation, because the weather didn’t seem to be getting any worse. Traversing the basin ended up not being as bad as it looked. Took an hour to reach the base of the gully leading to Terror. Crux of the day was in the middle of the gully where a break in the snow forced a tenuous step down onto slabby choss and a few moves up from there before returning to snow. On the way back we chopped back snow to excavate an anchor at that spot. If I’m not mistaken the chockstone flexed when I tested it, but we rapped anyway. Poor visibility made it hard to find the start of the route but eventually we did one diagonal pitch from a notch to a slung rock. We unroped and scrambled from here in the mist. Some of the rock on the route is quite nice, more like the granite in the basin than the crap in the gully. Just as we were reaching the summit the cloud layer thinned out. I was remarking that this was glory weather and sure enough, a large white ring formed behind Terror. We got flashes of clear views to Fury and MacMillan. Saw our own halos for a minute then headed back. The climb was done to pass the time during poor weather, but a glory sighting took it to another level, validated the whole day. The weather finally cleared mid morning day3 and we were soon at the Otto Himmel col. The chockstone had fun looking moves on its right side, but probably 5th class so we kept it simple with ledges on the left a little ways below the stone. WHC did not disappoint. I mostly took small cams and they were mostly useless. The first good spot I noticed above the runout chimney is a thin horizontal crack, so some small pro helps. Other than that it seemed like most pro opportunities were in #2-3 range. The climbing was easy and solid enough that I was fine with long run outs. We relished the views up top, calling to the tiny figure over on the summit of Terror, our neighbor for a couple days. Descending with 60m rope worked fine, there are probably more anchors around now than in the past. On our last day we went to the NE side of chopping block, doing some exposed scrambling before roping up at a rap anchor. To my surprise I reached the summit in one 60m from there. This is another great vantage a place to mull over various traverse schemes deep in the backcountry. As we were packing up for the hike back, someone arrived at our spot. It was not his face but his lack of a backpack that helped me correctly guess his identity. Not a lot of people do day trips in the pickets. At least one who does has posted some insane reports here. My suspicion was confirmed and it was nice to meet and chat with dr dirtbag himself A dip in Terror creek and another in Goodell at the end of the trail helped wash away the grind of the descent, literally and metaphorically. Gear Notes: Axe and crampons for gullies Try to keep it light but mostly large in the cams Approach Notes: Useful gpx are out there


 1 point
 -
Another @seano-sighting! @therunningdog and I saw him a couple weeks ago on Forbidden. He gets around! And good work on WHC- I bet Silas and @John_Roper are proud that that this route is getting more attention. It's an excellent one!1 point
-
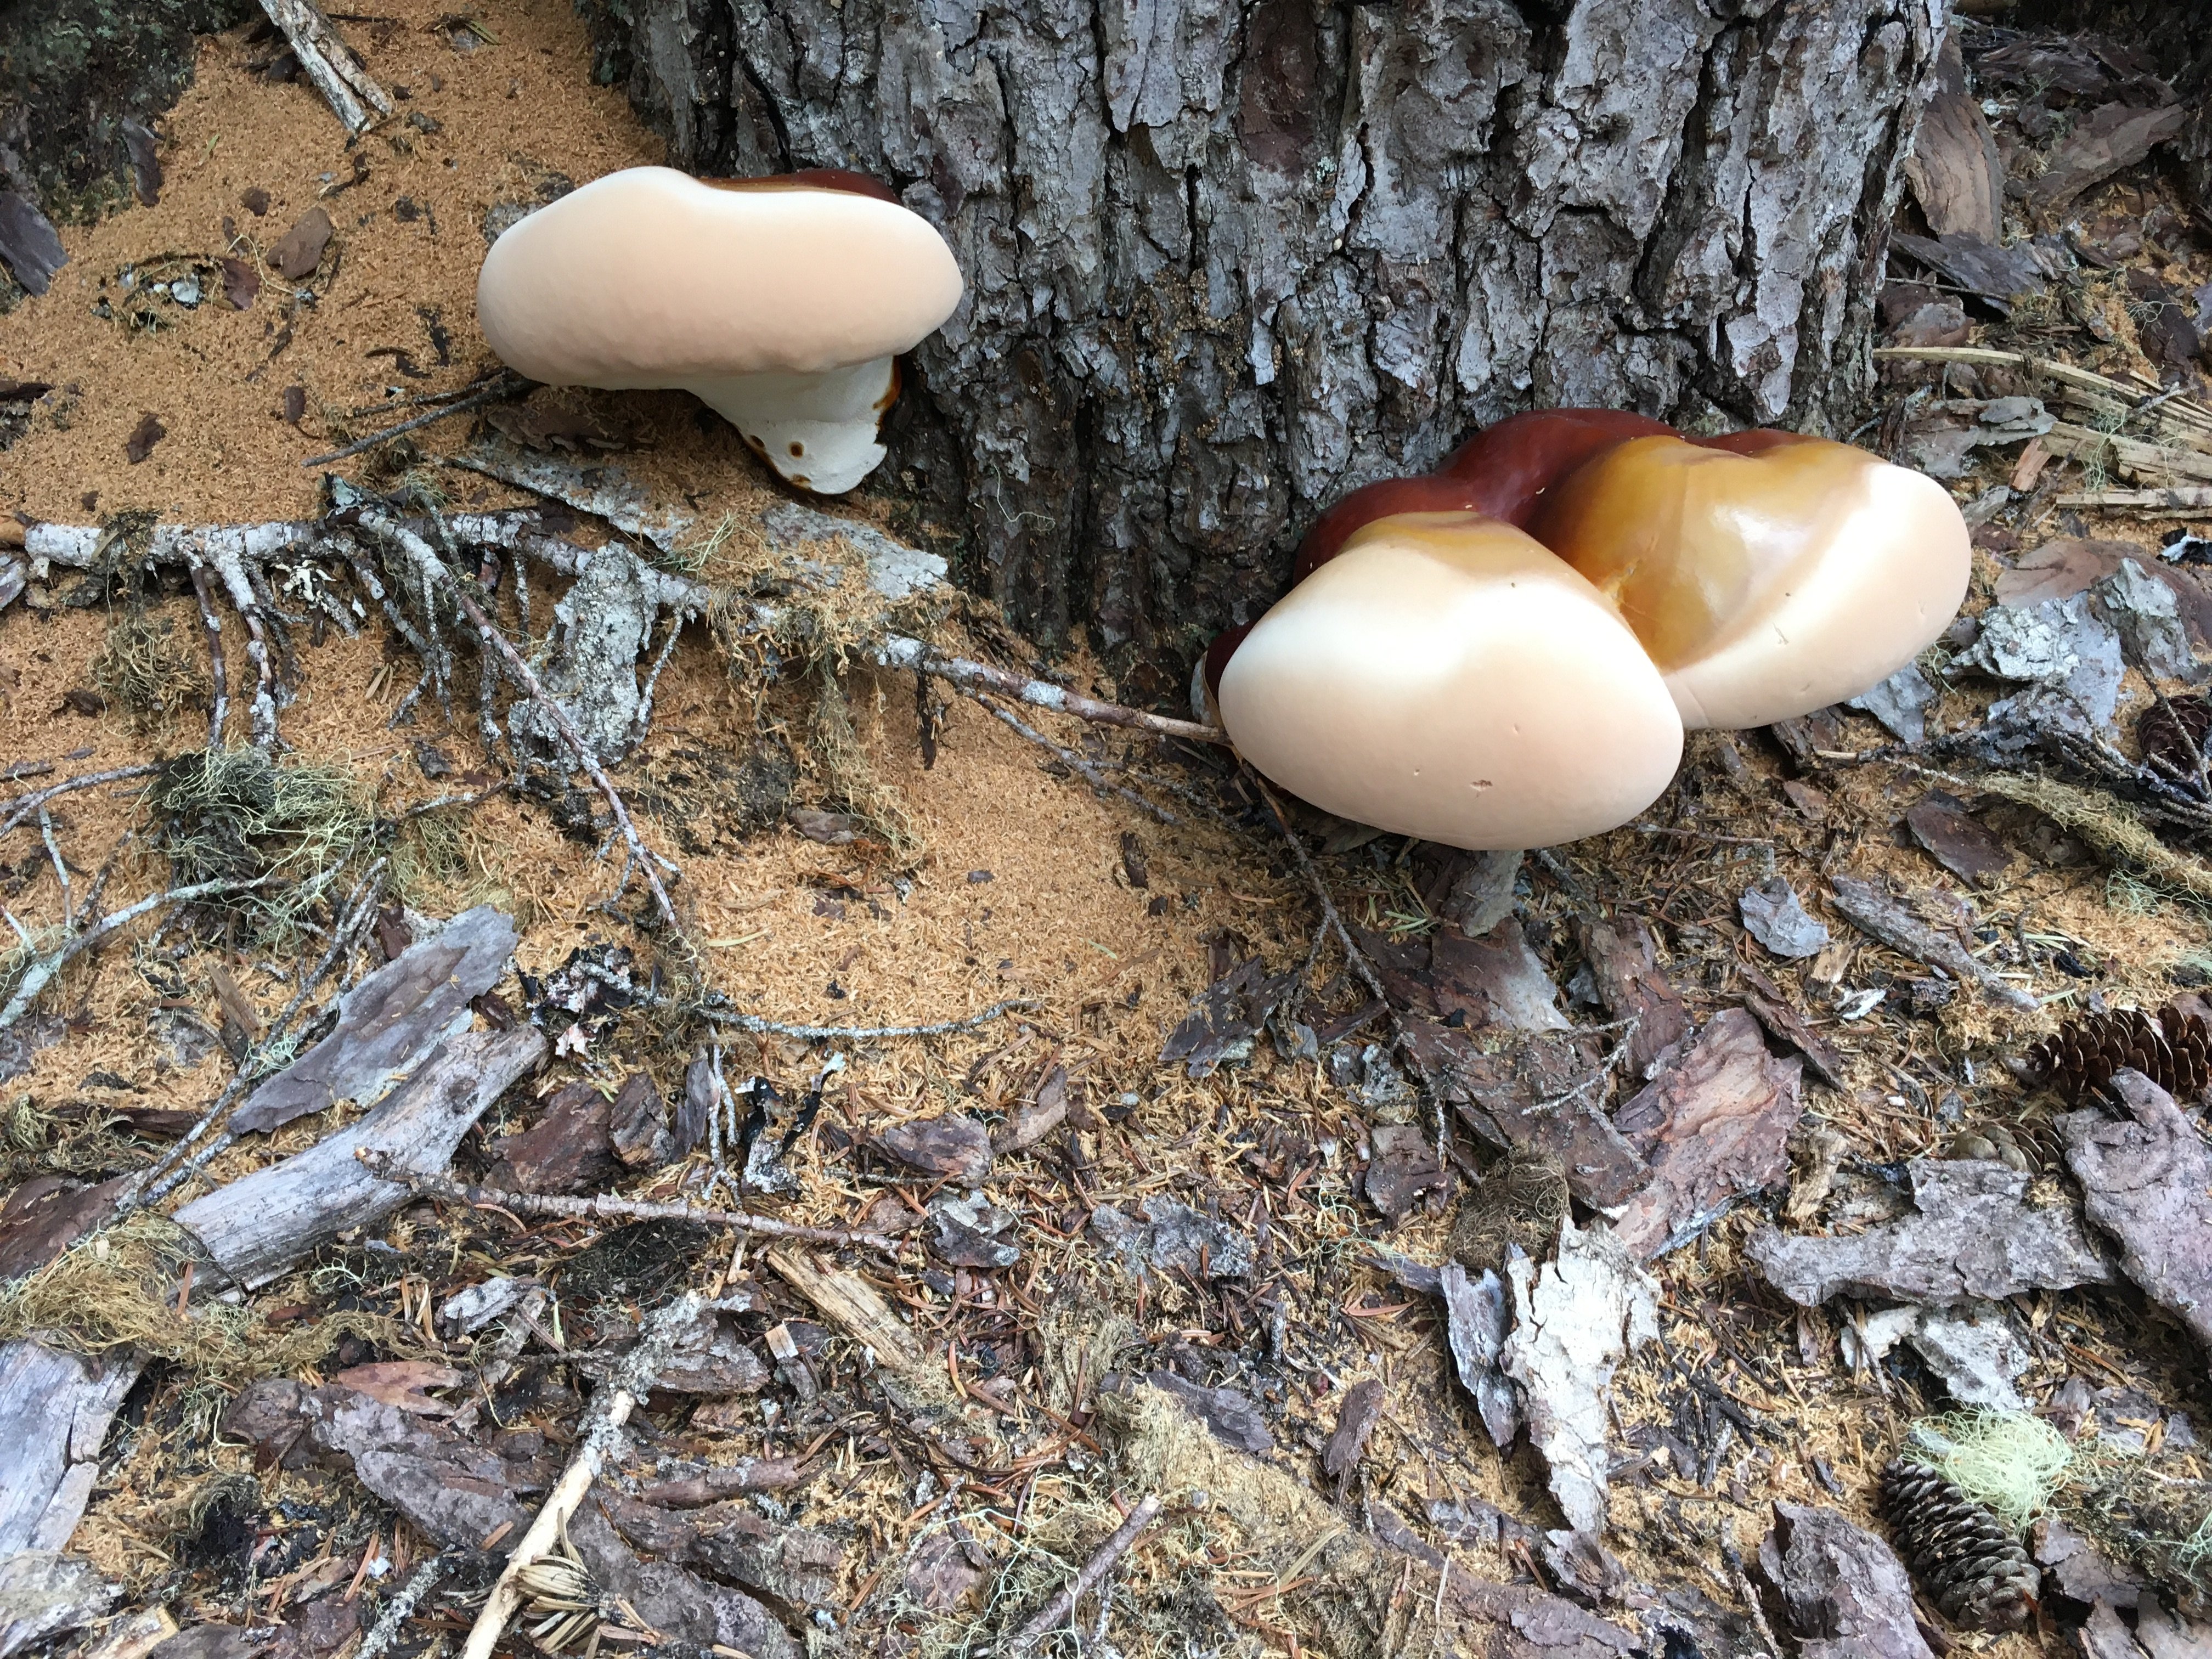
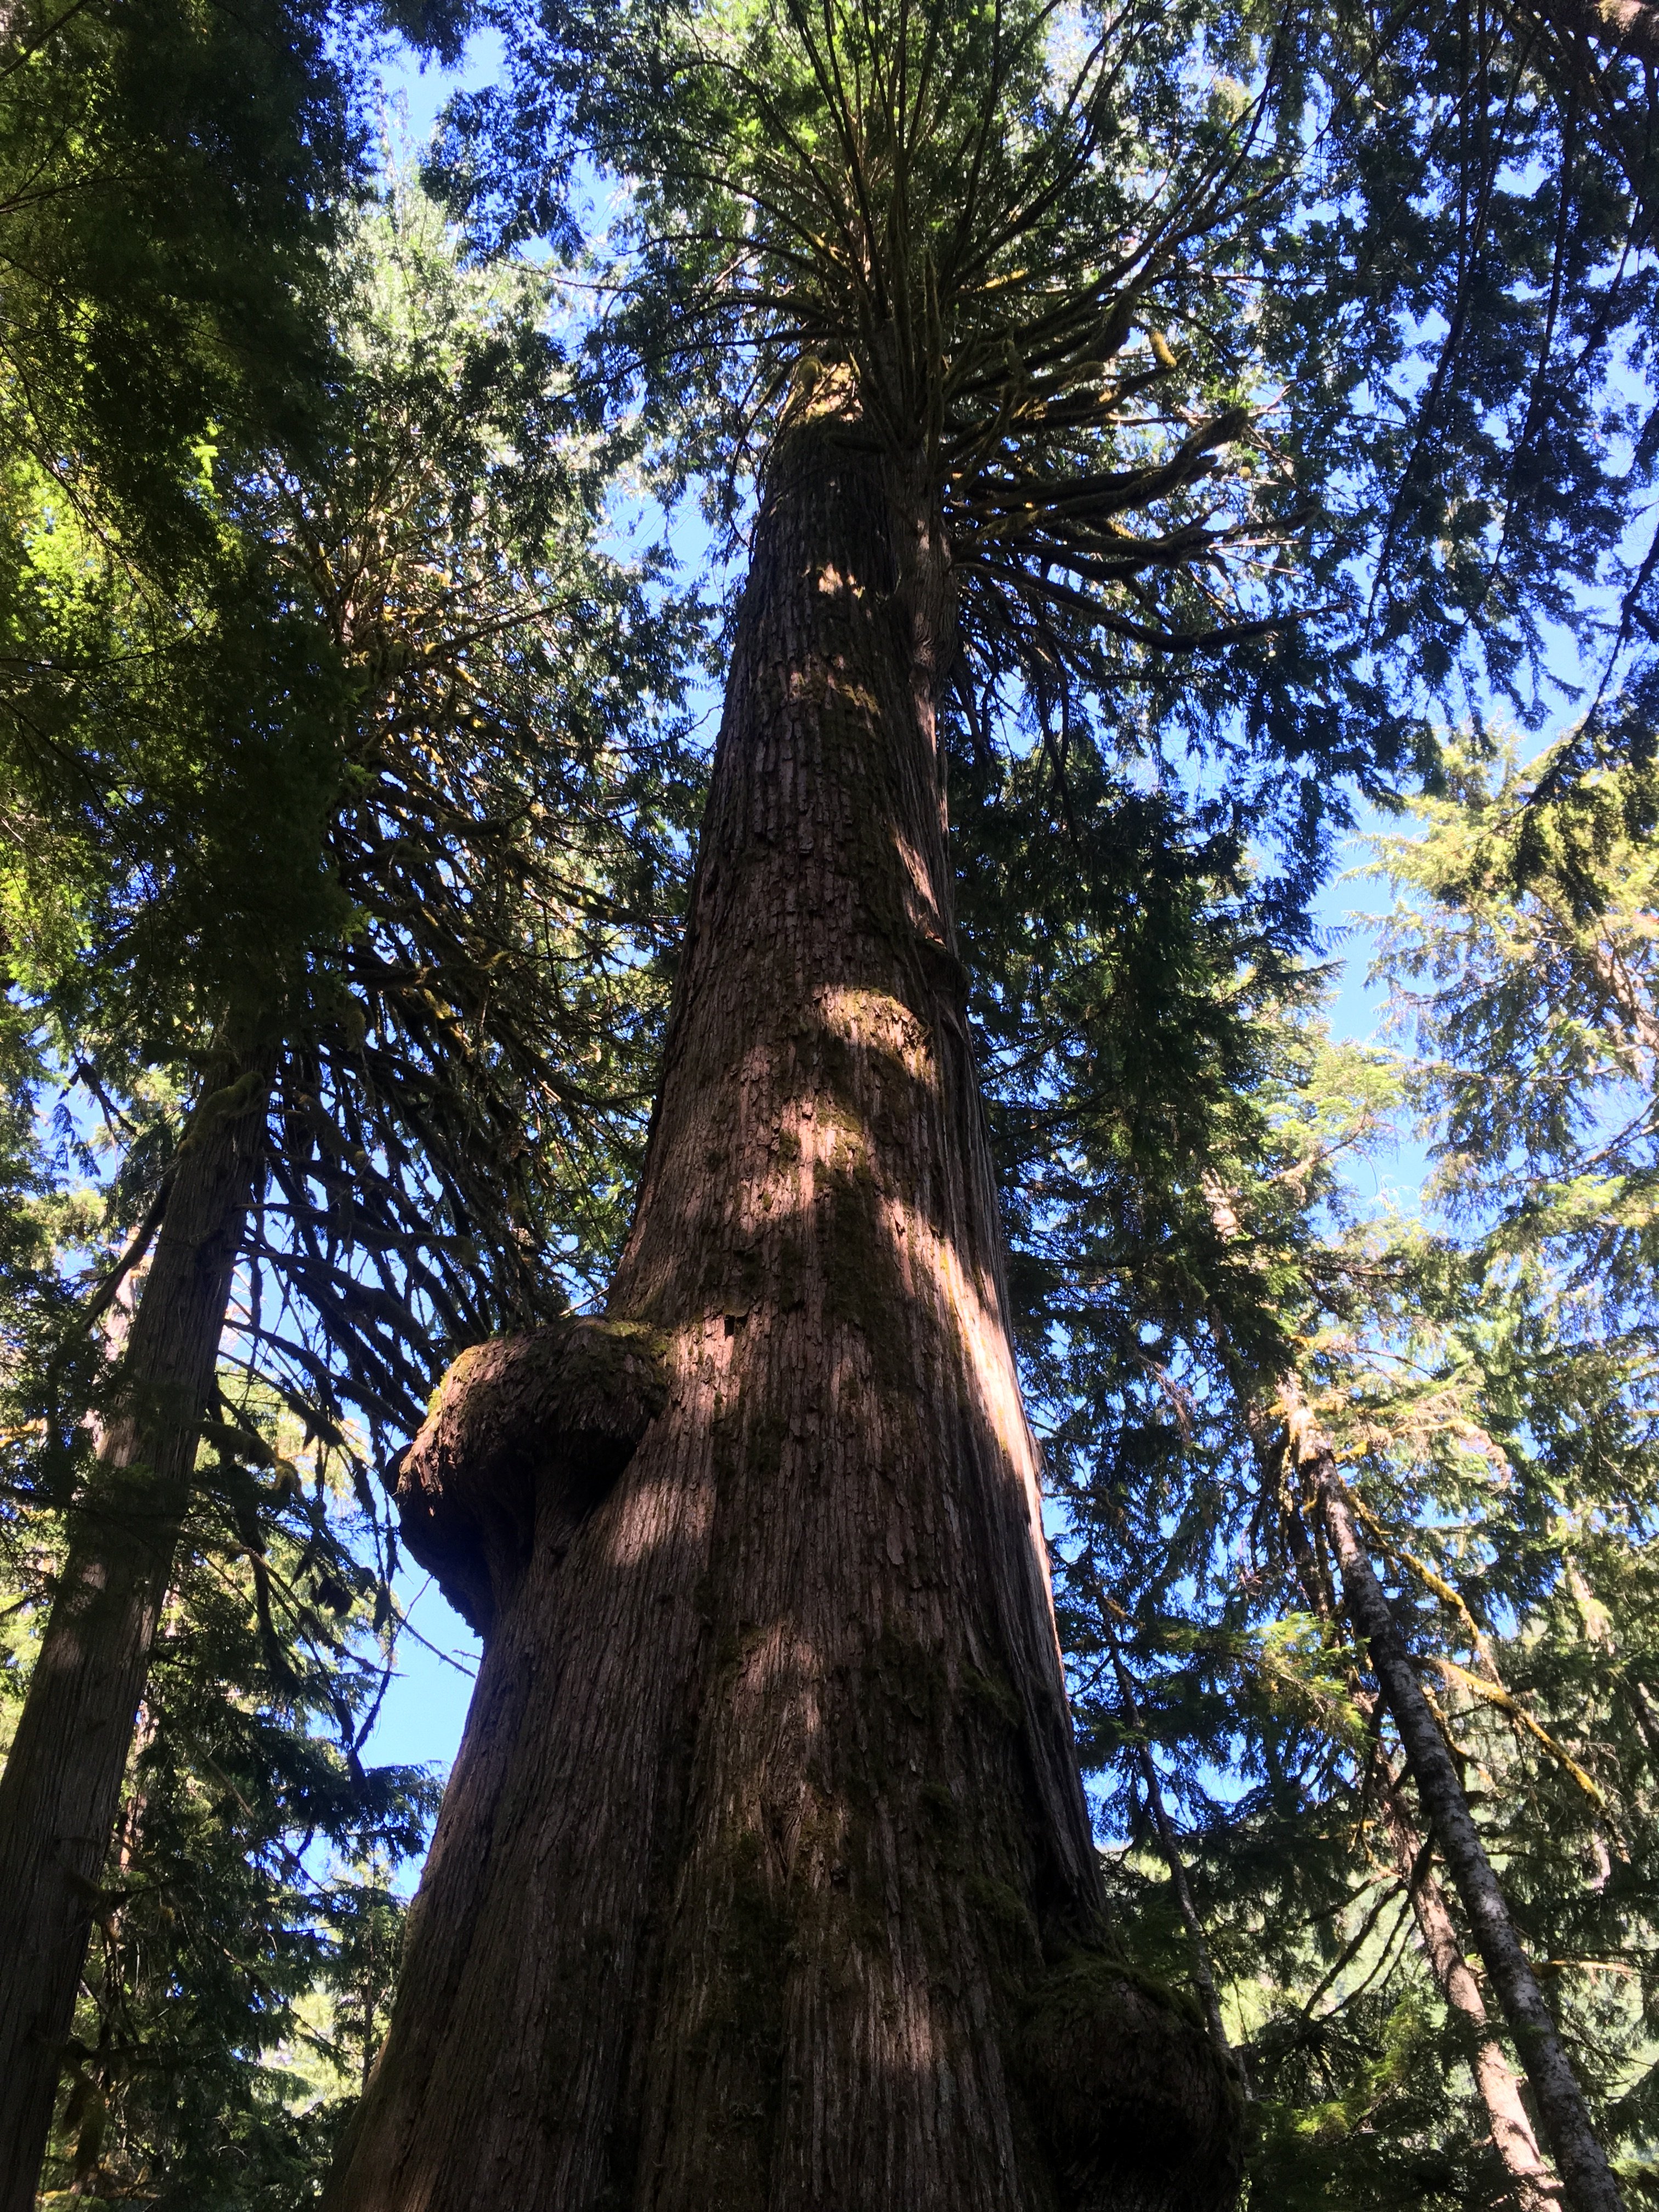
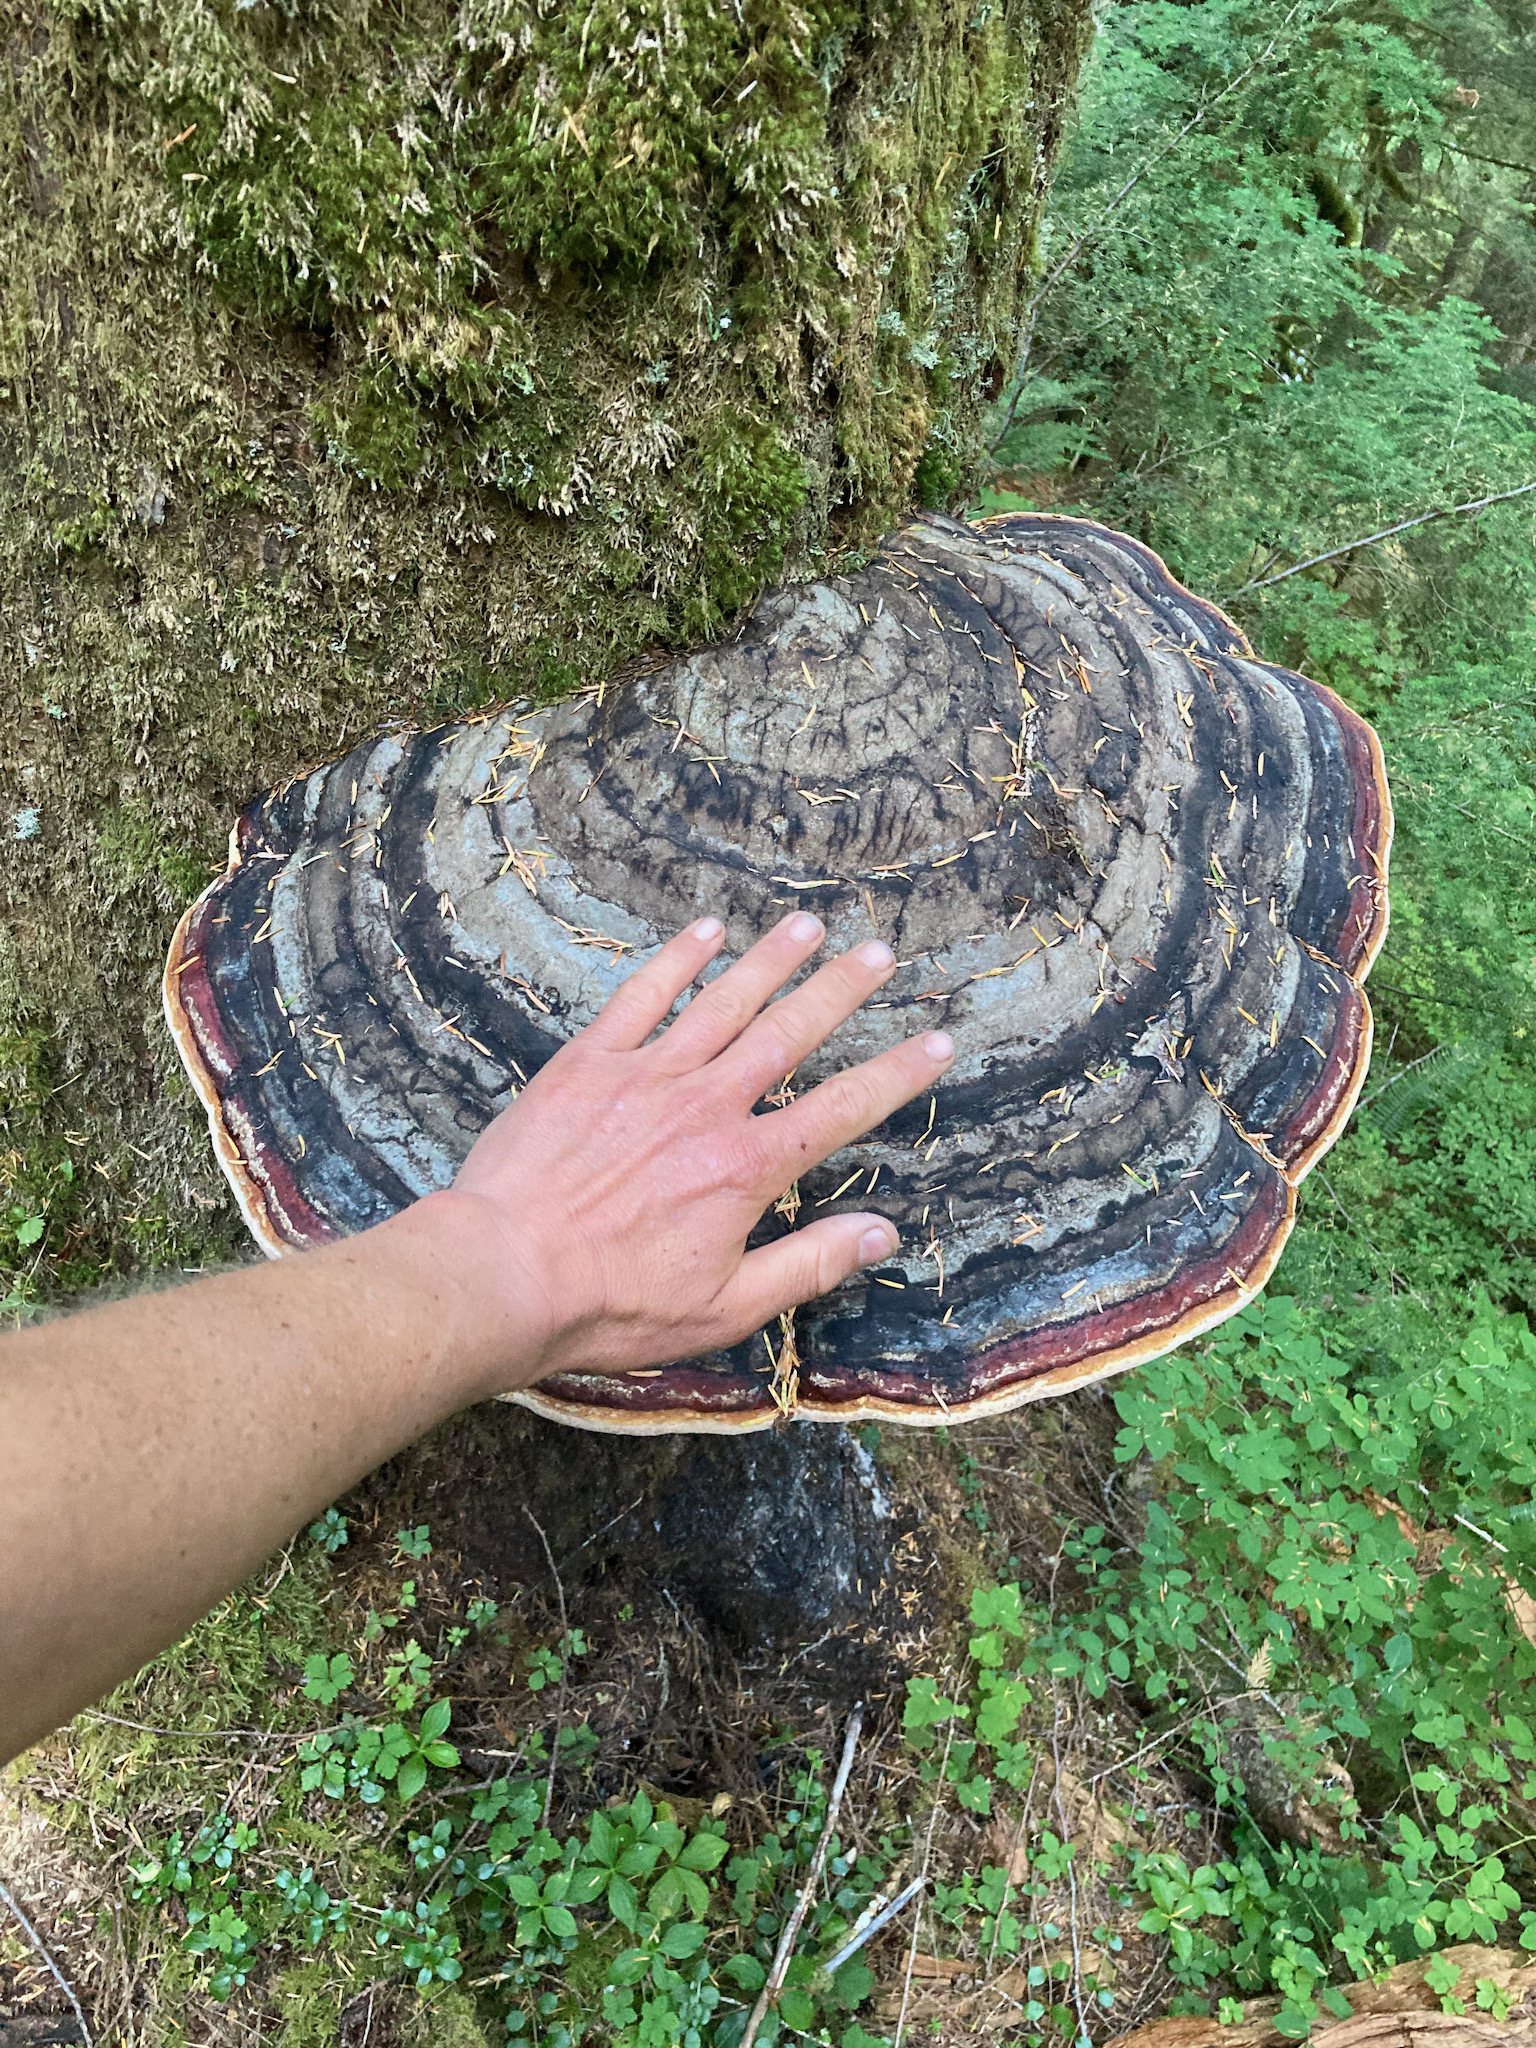
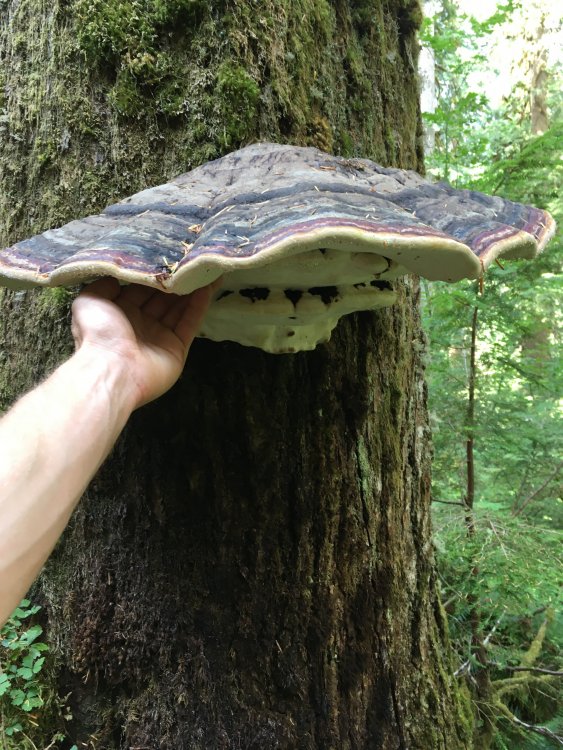
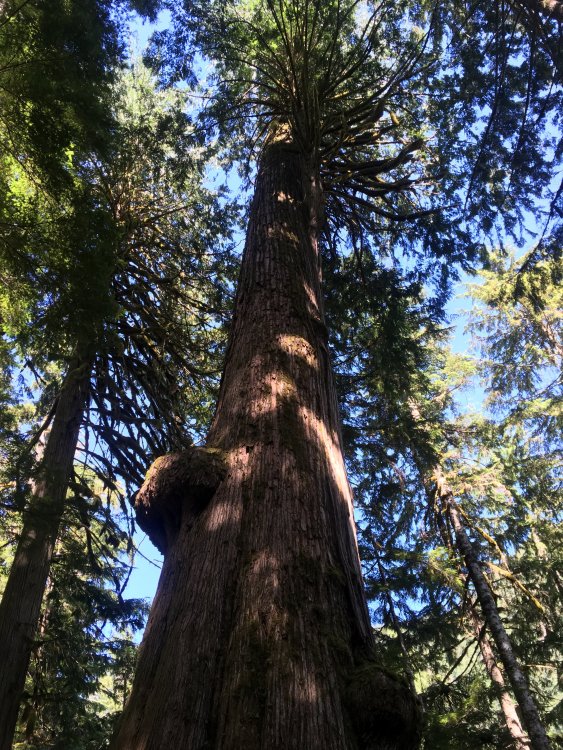
Nice TR, and great running into you guys! I think I took a photo of that very same giant "tree ear" mushroom on my much less successful Pickets trip:
 1 point
 -
Trip: Clark Mountain (8602') - Boulder Creek Route Trip Date: 06/19/2021 Trip Report: Clark Mountain (8602') Boulder Creek Approach Trip Report – June 19-21, 2021 (Sat-Mon) I climbed Clark Mountain (8602') outside Lake Wenatchee, Boulder Creek Approach. Started the climb from the White River Falls Campground Trailhead. The weather was looking perfect again, time for another east side climb. Texted DanO to see if he wanted to go, he was game. We headed out Friday night, caught some Zs at the Trailhead and headed out early Saturday morning. We planned for 3 days for extra time if needed or wanted. We headed down The White River Trail (1507) to Boulder Pass Trail (1562), then to Clark Mountain Trail (1556), then cross country to Clark Mountain and back the same way. White River Trail (1507) was a nice flat walk along the river through old growth forest, some blow downs to clear. Boulder Pass Trail (1562) was also nice with some blow downs and was where the climbing began. There was a ford across Boulder Creek that crosses the trail at 4000’. The ford had three sections of creek to cross. We crossed barefoot in the freezing ass water which actually felt quite nice on the feet after a few hours on the trail. The last section of the ford is the deepest and fastest moving, about mid-thigh deep for about 6 feet. I decided to slip and jam my toe into a rock on the last section just for giggles and shits. DanO didn’t have a problem. We started hitting snow just before the ford around 3900’. By the time we made it to camp at 5000’ at the base of Clark Mountain Trail (1556), the snow was thick. We only found one dry, halfway flat area to camp for Saturday night. Sunday. DanO decided to stay at camp and maybe try for the South East Peak Ridge later. I headed out for Clark at 5:30am. The snow was somewhat soft starting out which was a bit surprising. Once wrapping around the Clark Mountain Trail (1556) the snow firmed up for a while then went soft again above. I headed for the 7200’ level of the South East Peak Ridge of Clark Mtn. At that elevation there is a gully that is the easiest way down to the South side of Clark. Had to drop down about 300’. The gully is the easiest way down but it is not easy. The gully is composed of steep, loose rock and snow and is the hardest part of the climb going this route. I worked my way down by using ledges on the other side of the gully. If I had a rope, I would have rappelled the gully. The snow in the gully and on the South side of Clark was firm due to being in the shade, crampons and an ice axe were nice to have. I made my way across the snow to the Clark summit. The temp changed quite a bit once crossing the ridge. One side was like being microwaved alive and the other side had a nice stiff cold 30-40mph wind to deal with. I was happy that I brought a puffy coat to stay warm. The final summit area was basic 2nd class rock. I was thinking about bagging Luahna Peak next door, but after seeing that it would require several extra hours of side hilling on soft snow, I decided against it. There is water at the bottom of the cross over ridge and water all along the South side of Clark to about 7500’. There are several nice bivy locations on the cross over ridge, just no running water, only snow to melt. I came across a long line of Wolverine tracks that went over the ridge and kept going and going. They are amazing animals. Made it back to camp around 4:30pm. We packed up to move below the creek ford for the 2nd night camp. We found a nice camp ground around 3880’. Boulder Creek had gotten deeper the 2nd time across but the crossing went well. Monday. We left the 2nd camp about 7:30am and were back to the car at 10:30am. A nice stroll back. Overall it was a nice climb. All the snow remaining made the trip interesting. I’ll take the snow over the later season loose rock any day. Some Tips and Notes: 1. Bring sandals for the Boulder Cr. Ford at 4000’, I didn’t and now I have a toe that looks like a rotting banana. 2. Snow starts at 3900’ 3. The last running water was around 7500’ 4. A rope would be a good idea for the 7200’ gully descent and ascent. 5. There are decent bivy spots on the cross over ridge, bring up water with you or melt snow. Travel Time for reference: Saturday: Car to Camp (5000’) 8 hours. Sunday: Camp to Summit to 2nd Camp 12 hours Monday: 2nd Camp to Car 3 hours Gear used: Ice Axe, Trekking Poles, Crampons & Helmet On the way to camp at 5000' View from camp at 5000' Up & Over the South East Peak Ridge of Clark Mtn. A nice bivy spot on the cross over ridge around 7000' Looking down from top of 7200' Gully. Looking up from the bottom of the ledges I used to bypass the gully. Looking across the upper ledges used to bypass much of the gully on the way back up and over. Summit Rock. Great views from the top - Luahna Peak, Glacier Peak, Mount Baker & Shuksan. Gear Notes: Gear used: Ice Axe, Trekking Poles, Crampons & Helmet - A rope would be a good idea for the 7200’ gully descent and ascent. Approach Notes: White River Falls Campground Trailhead, White River Trail (1507) to Boulder Pass Trail (1562), then to Clark Mountain Trail (1556), then cross country to Clark Mountain.1 point