Leaderboard


Popular Content
Showing content with the highest reputation on 07/17/21 in Posts
-
Climbed this the other day and wanted to quickly pass on the following conditions update: 1 - N Fork river xing was trivial - knee deep. 2 - We melted and consumed the last snow at the 3/4 bivy ledge. No water there now. 3 - A previous report suggested snow access from the summit at a notch to the West. We found this was dry. Bottom line: no snow or water on the route from the glacier until camp 7400 on the S side. Plan appropriately.2 points
-
Trip: Kyes Peak (7227') & Monte Cristo Peak (7136') - South Ridge & Northwest Face Trip Date: 07/10/2021 Trip Report: I climbed Kyes Peak - South Ridge (7227') & Monte Cristo Peak - Northwest Face (7136') over the weekend. I started the climb from the Blanca Lake Trailhead Approach (Trail 1052) outside Skykomish, WA. The weather was looking perfect again and I had some more free time, so time for the mountains. I planned for a basic 2 day climb but it turned into a 3 day epic instead. Saturday: I drove to the Blanca Lake Trailhead and was starting the trip at 11:00am. I headed up the well traveled trail to Virgin Lake (4540’). I headed to the northeast side of the lake and looked for the climbers trail going north up the ridge toward Kyes Peak. I didn’t find a defined trail but I found something close and started up the ridge. The trail up the ridge comes and goes the whole way up. Sometimes the trail is beautiful and other times it disappears into oblivion. When the trail disappeared it was usually because it took a sharp turn straight up toward the crest of the ridge. The trail is vertical in several spots where you need to use tree branches to make it up. There are several sections of bushwacking in the middle of the trail & also a fair amount of loose rock. Once I dropped down below the west side of point 5845’, I was looking for a good route across the cliffy ridge to the open slopes above Columbia Glacier. I read a report that said you should go back up to the ridge once around point 5845’. I did not do that. I instead saw a nice looking traverse around the toe of the cliffy ridge. The traverse start elevation was about 5300’ and dropped down to about 5200’ while crossing. I hugged close to the toe of the cliffy ridge and found good game/climbers paths throughout the cross over. Some bushwacking through trees and brush on the way over but not bad. The traverse spit me out right in front of a stream and into much better terrain. I climbed up to about 5500’ and found a nice bluff to setup camp, right between two streams and flat. Called it a day at 6:00pm. Sunday: I left the bluff camp at 7:00am and climbed straight up toward the Roundabout Point gap. Took me an hour to get to the gap and then another hour to reach the summit of Kyes Peak. The climbing was relaxing and straight forward. The ridge to Kyes Peak looks pretty steep and exposed from a distance but once on the summit ridge it is basic Class 2-3. A great start to the day and I was making good time. I was thinking that I had plenty of time to hit Monte Cristo Peak next and get back to camp and then head out. Ignorance is bliss. From what I had read, Monte Cristo Peak has several class 3-4 routes up the mountain so I was just going to pick one and make it happen. I traversed below Roundabout Point and decided I wanted to do the Southwest Ridge route to Monte Cristo. I needed to make it down to the Columbia Glacier where I would head straight over to the ridge. Sounds easy. I spent the next 3 hours trying to find a route down to the Columbia Glacier finding nothing but cliffs and deep gullies that both required rapelling to make the glacier below. My only problem being that I did not bring a rope, thinking both peaks were going to be basic class 3-4. I needed to find a section I could down climb without too much risk. Finally at the end of the 3 hours I found the only rock ledge system that would get me to Monte Cristo Peak without a rope. I had to go high up to the base of the cliffs above, and traverse around at about 6650’. The ledge system led to the snow basin between Monte Cristo and the NW ridge of Kyes. I crossed the snow basin to the SE Ridge of Monte Cristo. The SE Ridge of Monte Cristo is supposed to be class 3-4 with a section of 5th. The route looked more like class 3 straight into vertical class 5 for several pitches. I decided to circle around the east side of Monte Cristo to see if there was another section that fit the Class 3-4 description. I made it to the North Col between Monte Cristo and Cadet Peak and still everything looked too vertical. I circle around to the NW Face of Monte Cristo and finally found a section that looked like Class 3-4 down low. I decided to climb this route thinking this must be another one of the Class 3-4 routes up. Wrong! The Class 3-4 turned into 5th Class about 50 feet up the route. I came across 3 different sling/piton setups for placing protection or rappelling along the route. Evidently I was right in the middle of the mid 5th Class route going to the summit, possibly climbing up the rappel route. All of the rock I was encountering was loose, downsloping, steep and nasty. Full suck mode was engaged. The rock quality was so poor that there was no way I wanted to attempt to down climb any of the route. My best option was to keep climbing to the summit and find an easy route down. Finding good holds going up was difficult at best. The rock on the entire side of the mountain was garbage. I would try going left or right to find better rock, but it did not matter, it all sucked. After a few more hours and several years off my life, I finally made the summit at 7:00pm. I found the summit registry in a PVC pipe. The registry was completely water logged and dissolving into pieces. Only the main portion of the summit log remains intact. The PVC pipe summit registries that I have been coming across do not keep out water and seems to absorb water into the pipe. Waterproof paper is a must for the summit registries. Now it was time to find the easy route down off of Monte Cristo. Yeah right! Monte Cristo Peak is basically a giant gravel pit with downsloping loose rock everywhere. The easiest route that I could find was going down the South Face. This was slow and tedious, like walking on marbles spread out all over a hardwood floor sloping off to a cliff. Did I mention that the rock on Monte Cristo Peak sucks? I finally made it down to the snow just as the sun was going down. Thank you Jesus! Out come the lights and I travel back to camp over much easier terrain arriving at 12:30am. I under estimated Monte Cristo Peak and paid a hefty toll. The best lessons are learned the hard way, that way you remember them forever. Monday: I left the bluff camp at 9:30am. I reversed my route all the way back to the car arriving at 4:30pm. I decided to make a stop at Blanca Lake to relax on the way back. Looking up the lake to the Columbia Glacier, there is a giant horseshoe of cliffs surrounding the glacier. The only easy way to the glacier is walking up the side of the lake to the base of the glacier. One thing I wished I knew before starting the climbs. Some Tips and Notes: 1. I’ve climbed a lot of peaks and I can say without a doubt that Monte Cristo Peak has some of the worst rock quality of any peak in the North Cascades. 2. If climbing Monte Cristo Peak, bring a rope for rappelling. Down climbing on the loose garbage rock is about as fun as slamming your hand in a car door. 3. The lower traverse from 5300’ to 5200’ across the toe of the cliffy ridge before the nice slope under Kyes Peak worked well both ways. 4. If you are not bringing a rope, the only route I could find to get to Monte Cristo’s SE Ridge from Kyes Peak is a ledge system at 6650’, on the NW side of the NW Ridge of Kyes Peak. 5. The ridge between Virgin Lake & the Camp below Kyes Peak is dry. Be sure to carry enough water. 6. There are several good camp options on the way up to Kyes Peak, look for the bluffs. Travel Time for reference: Saturday: Car to bluff Camp – 7 hours. Sunday: Camp to Summits, back to Camp - 17 hours Monday: Bluff camp to Car - 7 hours Gear used: Whippet, Crampons, Helmet - Could have used an ice axe & a rope Virgin Lake still mostly snow covered. Ridge Trail down low. Ridge Trail up higher. Looking straight across cliffy ridge traverse from 5300' View up toward Roundabout Gap and cross over bluff from camp. Summit ridge of Kyes Peak. On the way to Monte Cristo. Part of 3 hour tour getting to Monte Cristo. Cross over bluff, excellent camp spot. Looking back at the 6650' rock shelf to the SE Ridge of Monte Cristo. Monte Cristo South Face & SE Ridge. On Northwest Face route of Monte Cristo. Relaxing at Blanca Lake. Gear Notes: Gear used: Whippet, Crampons, Helmet - Could have used an ice axe & a rope Approach Notes: Blanca Lake Trailhead (Trail 1052) - Climbed ridge north of Virgin Lake to camp.2 points
-
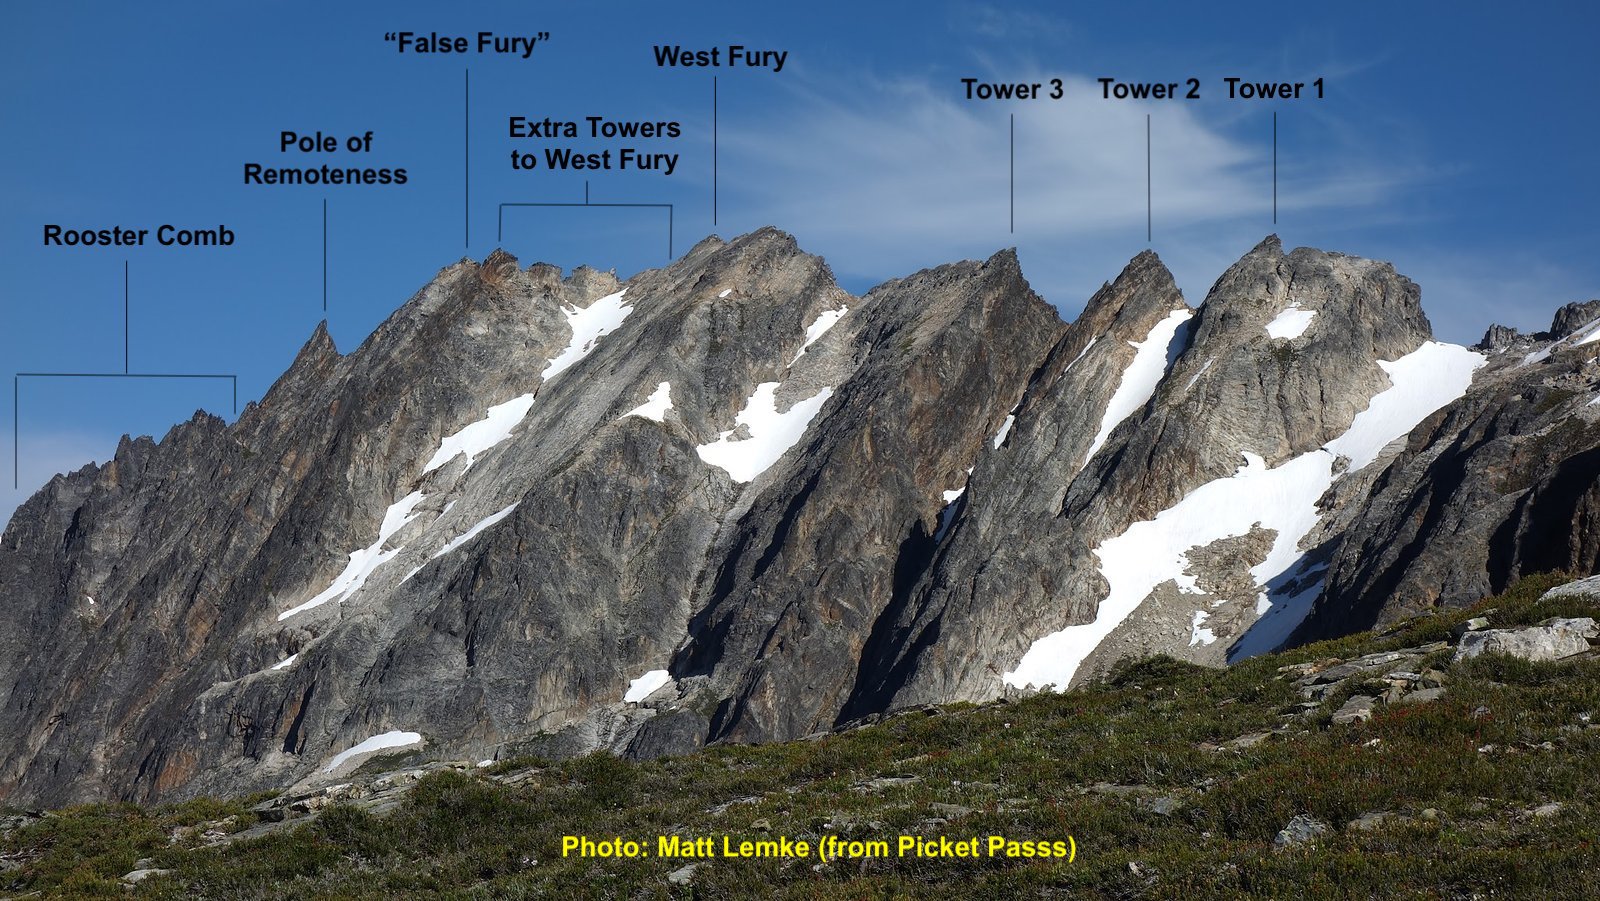
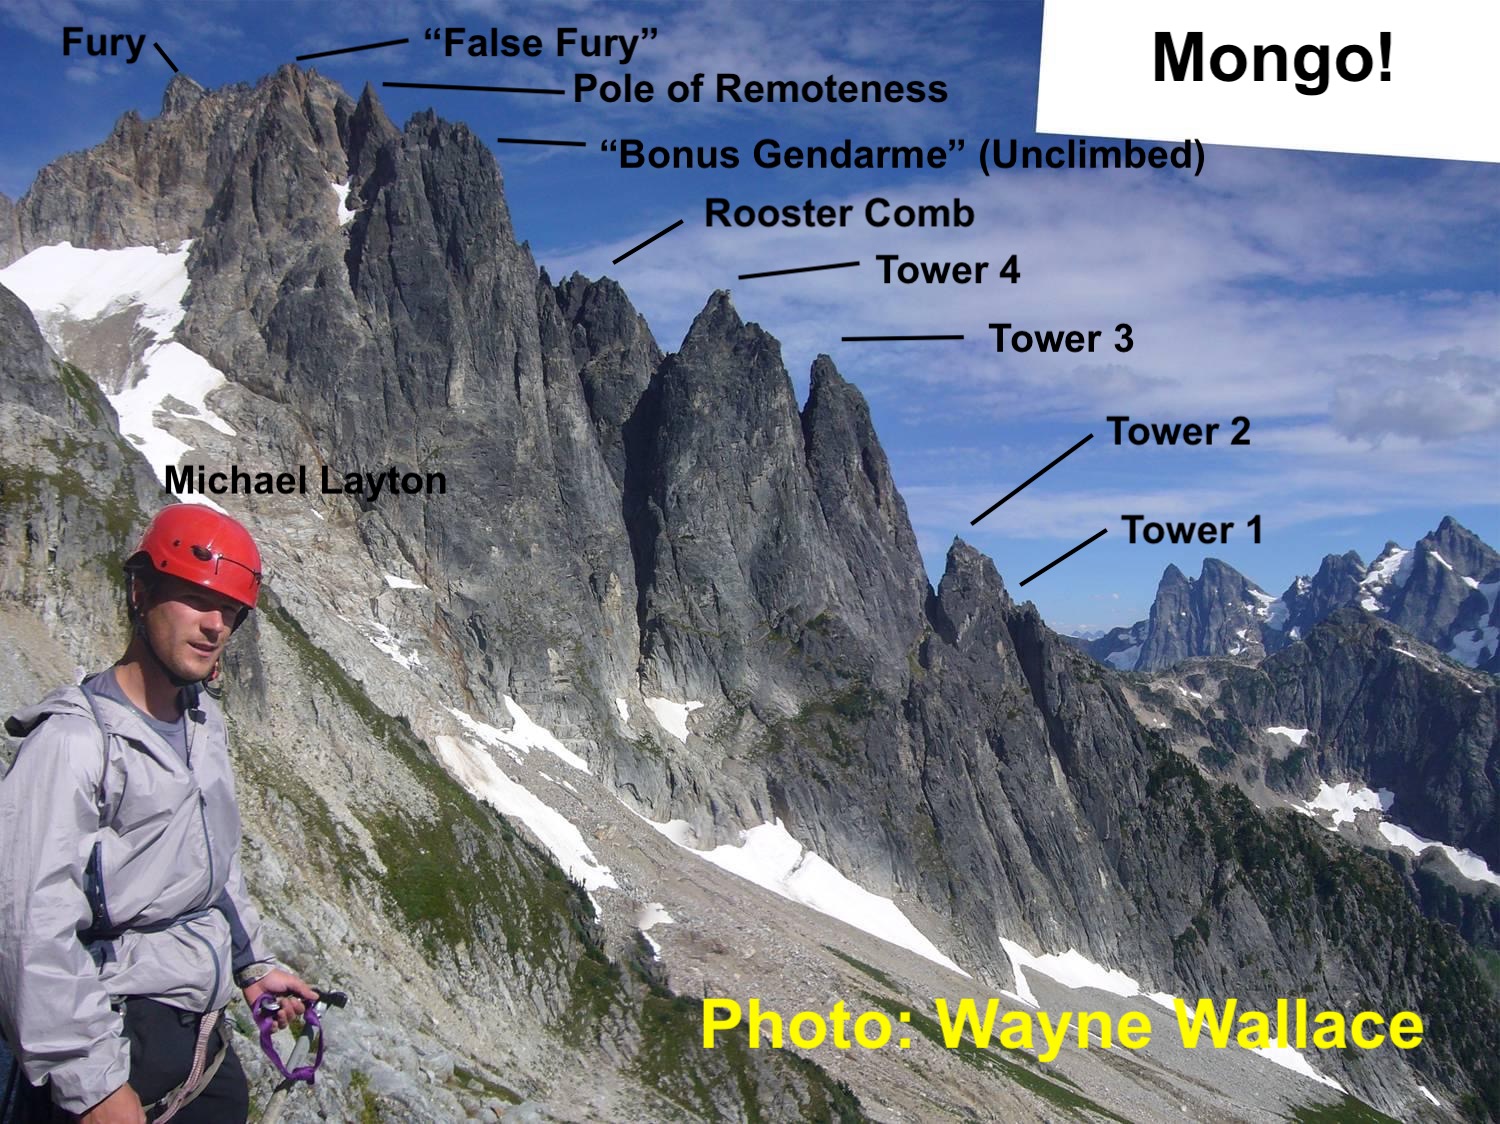
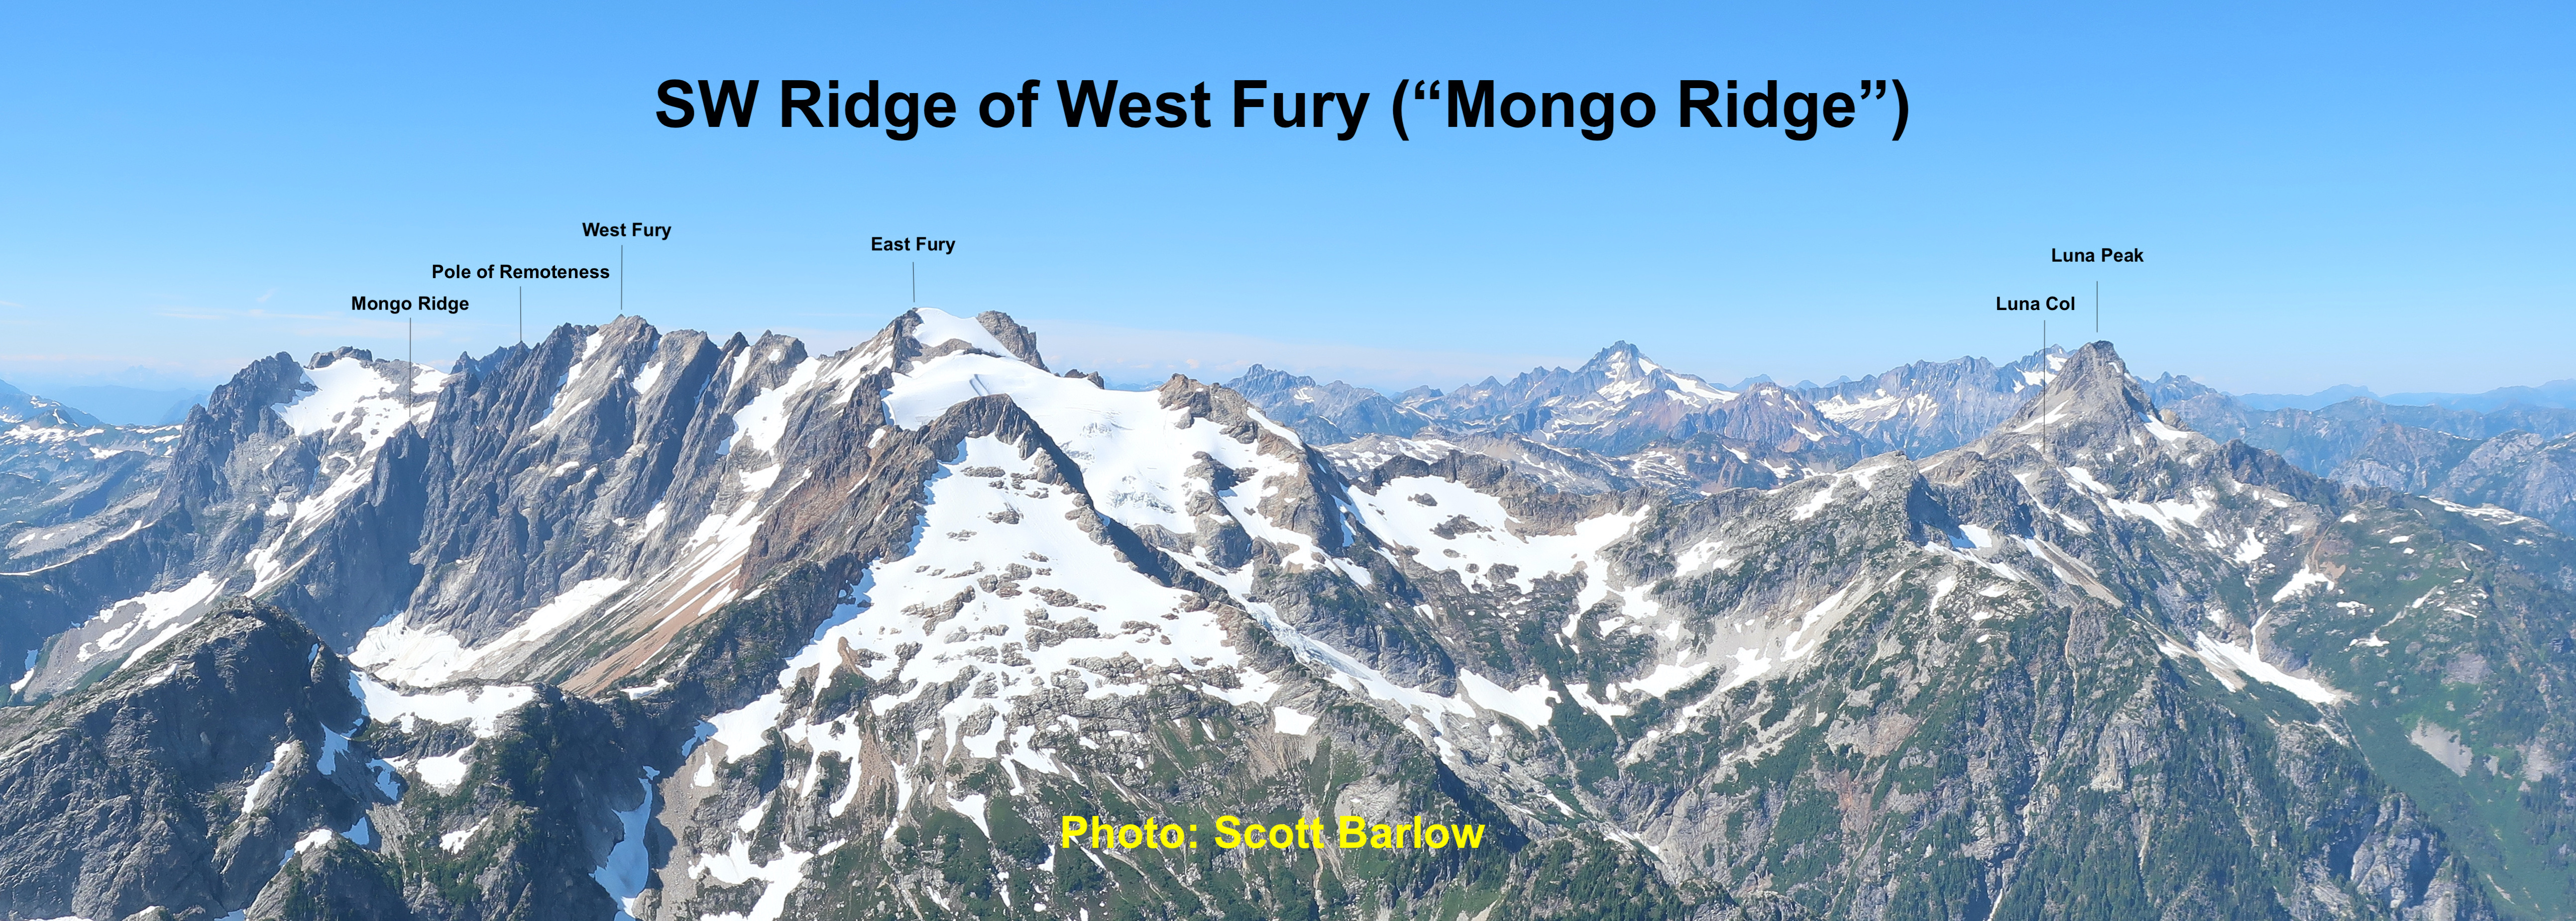
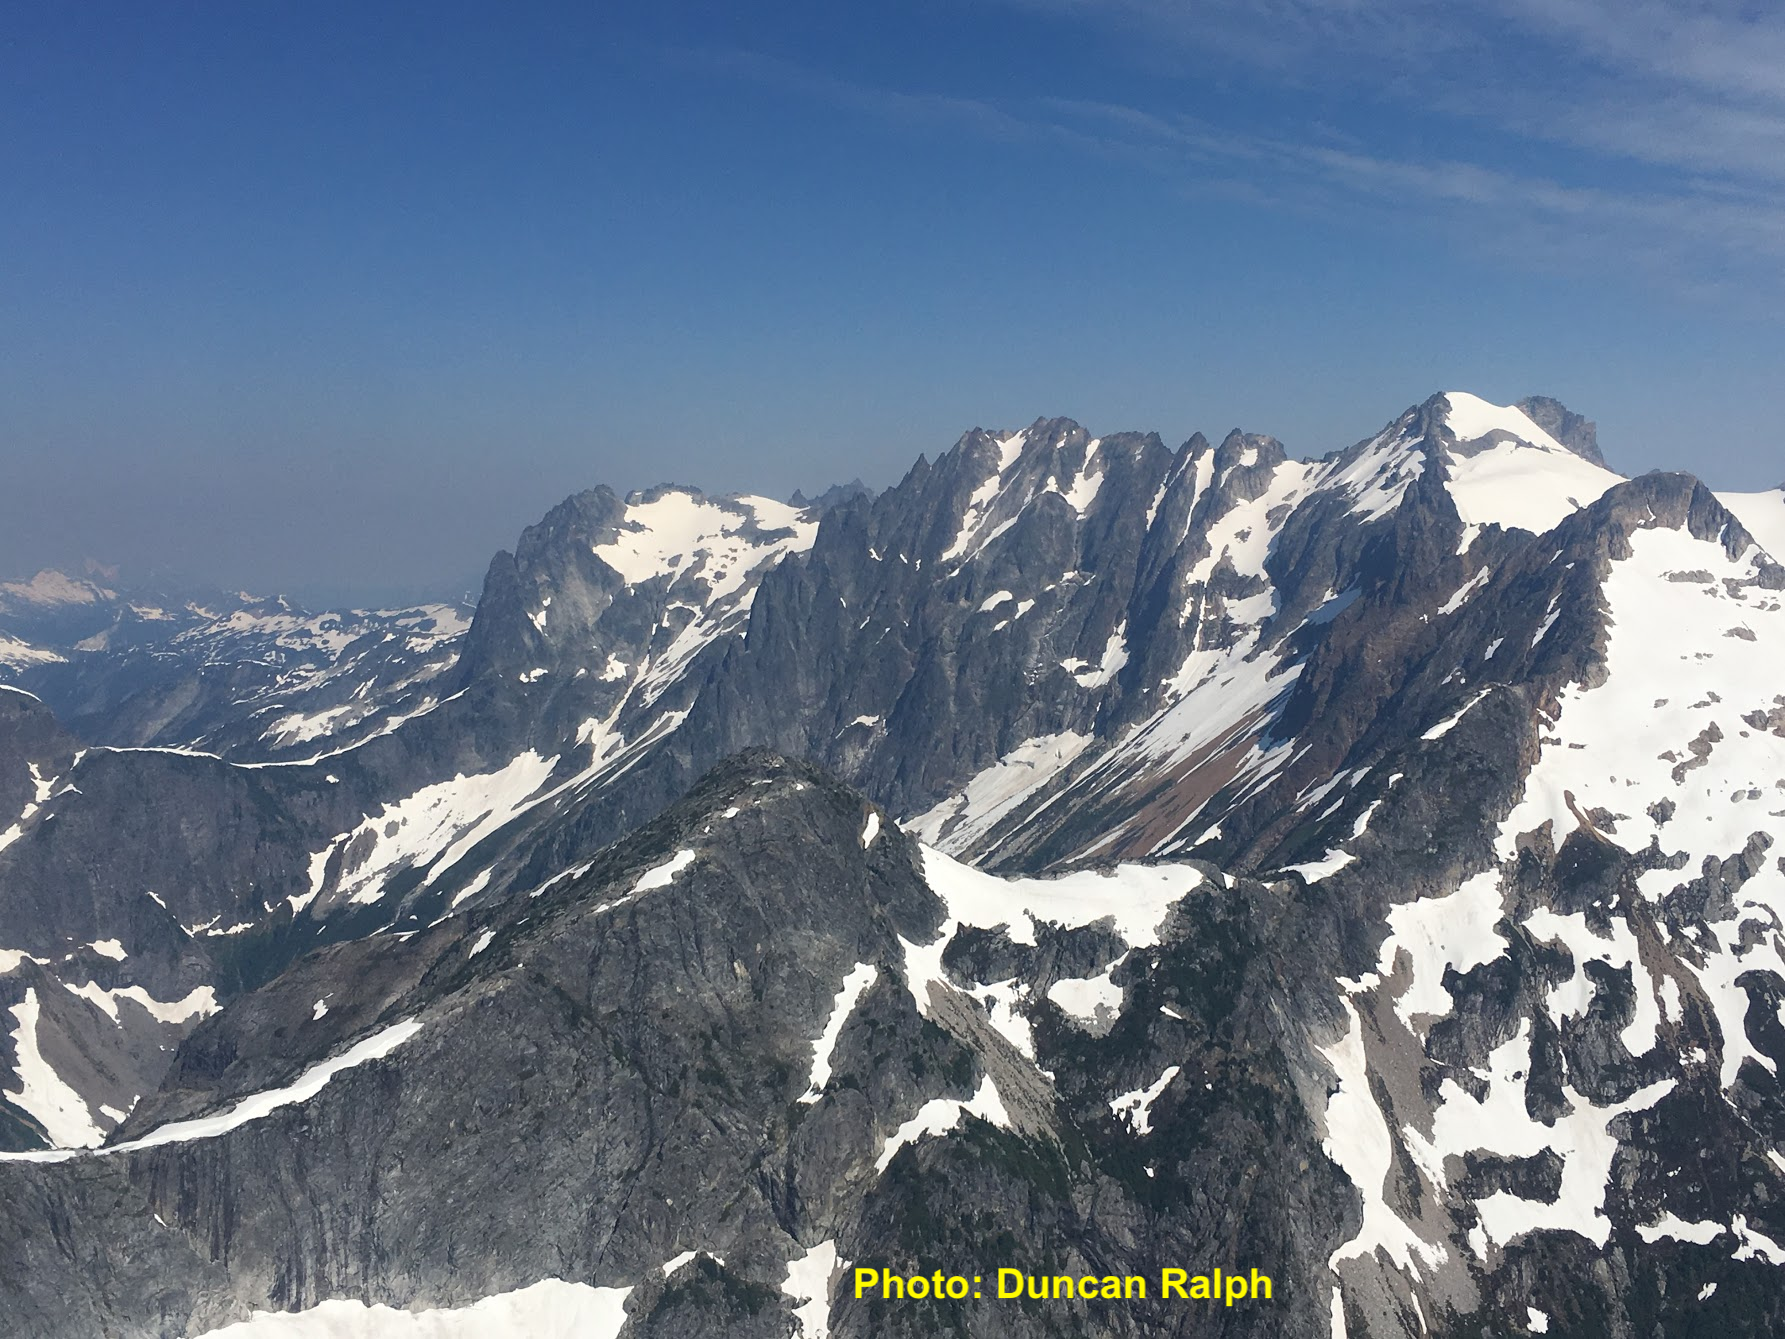
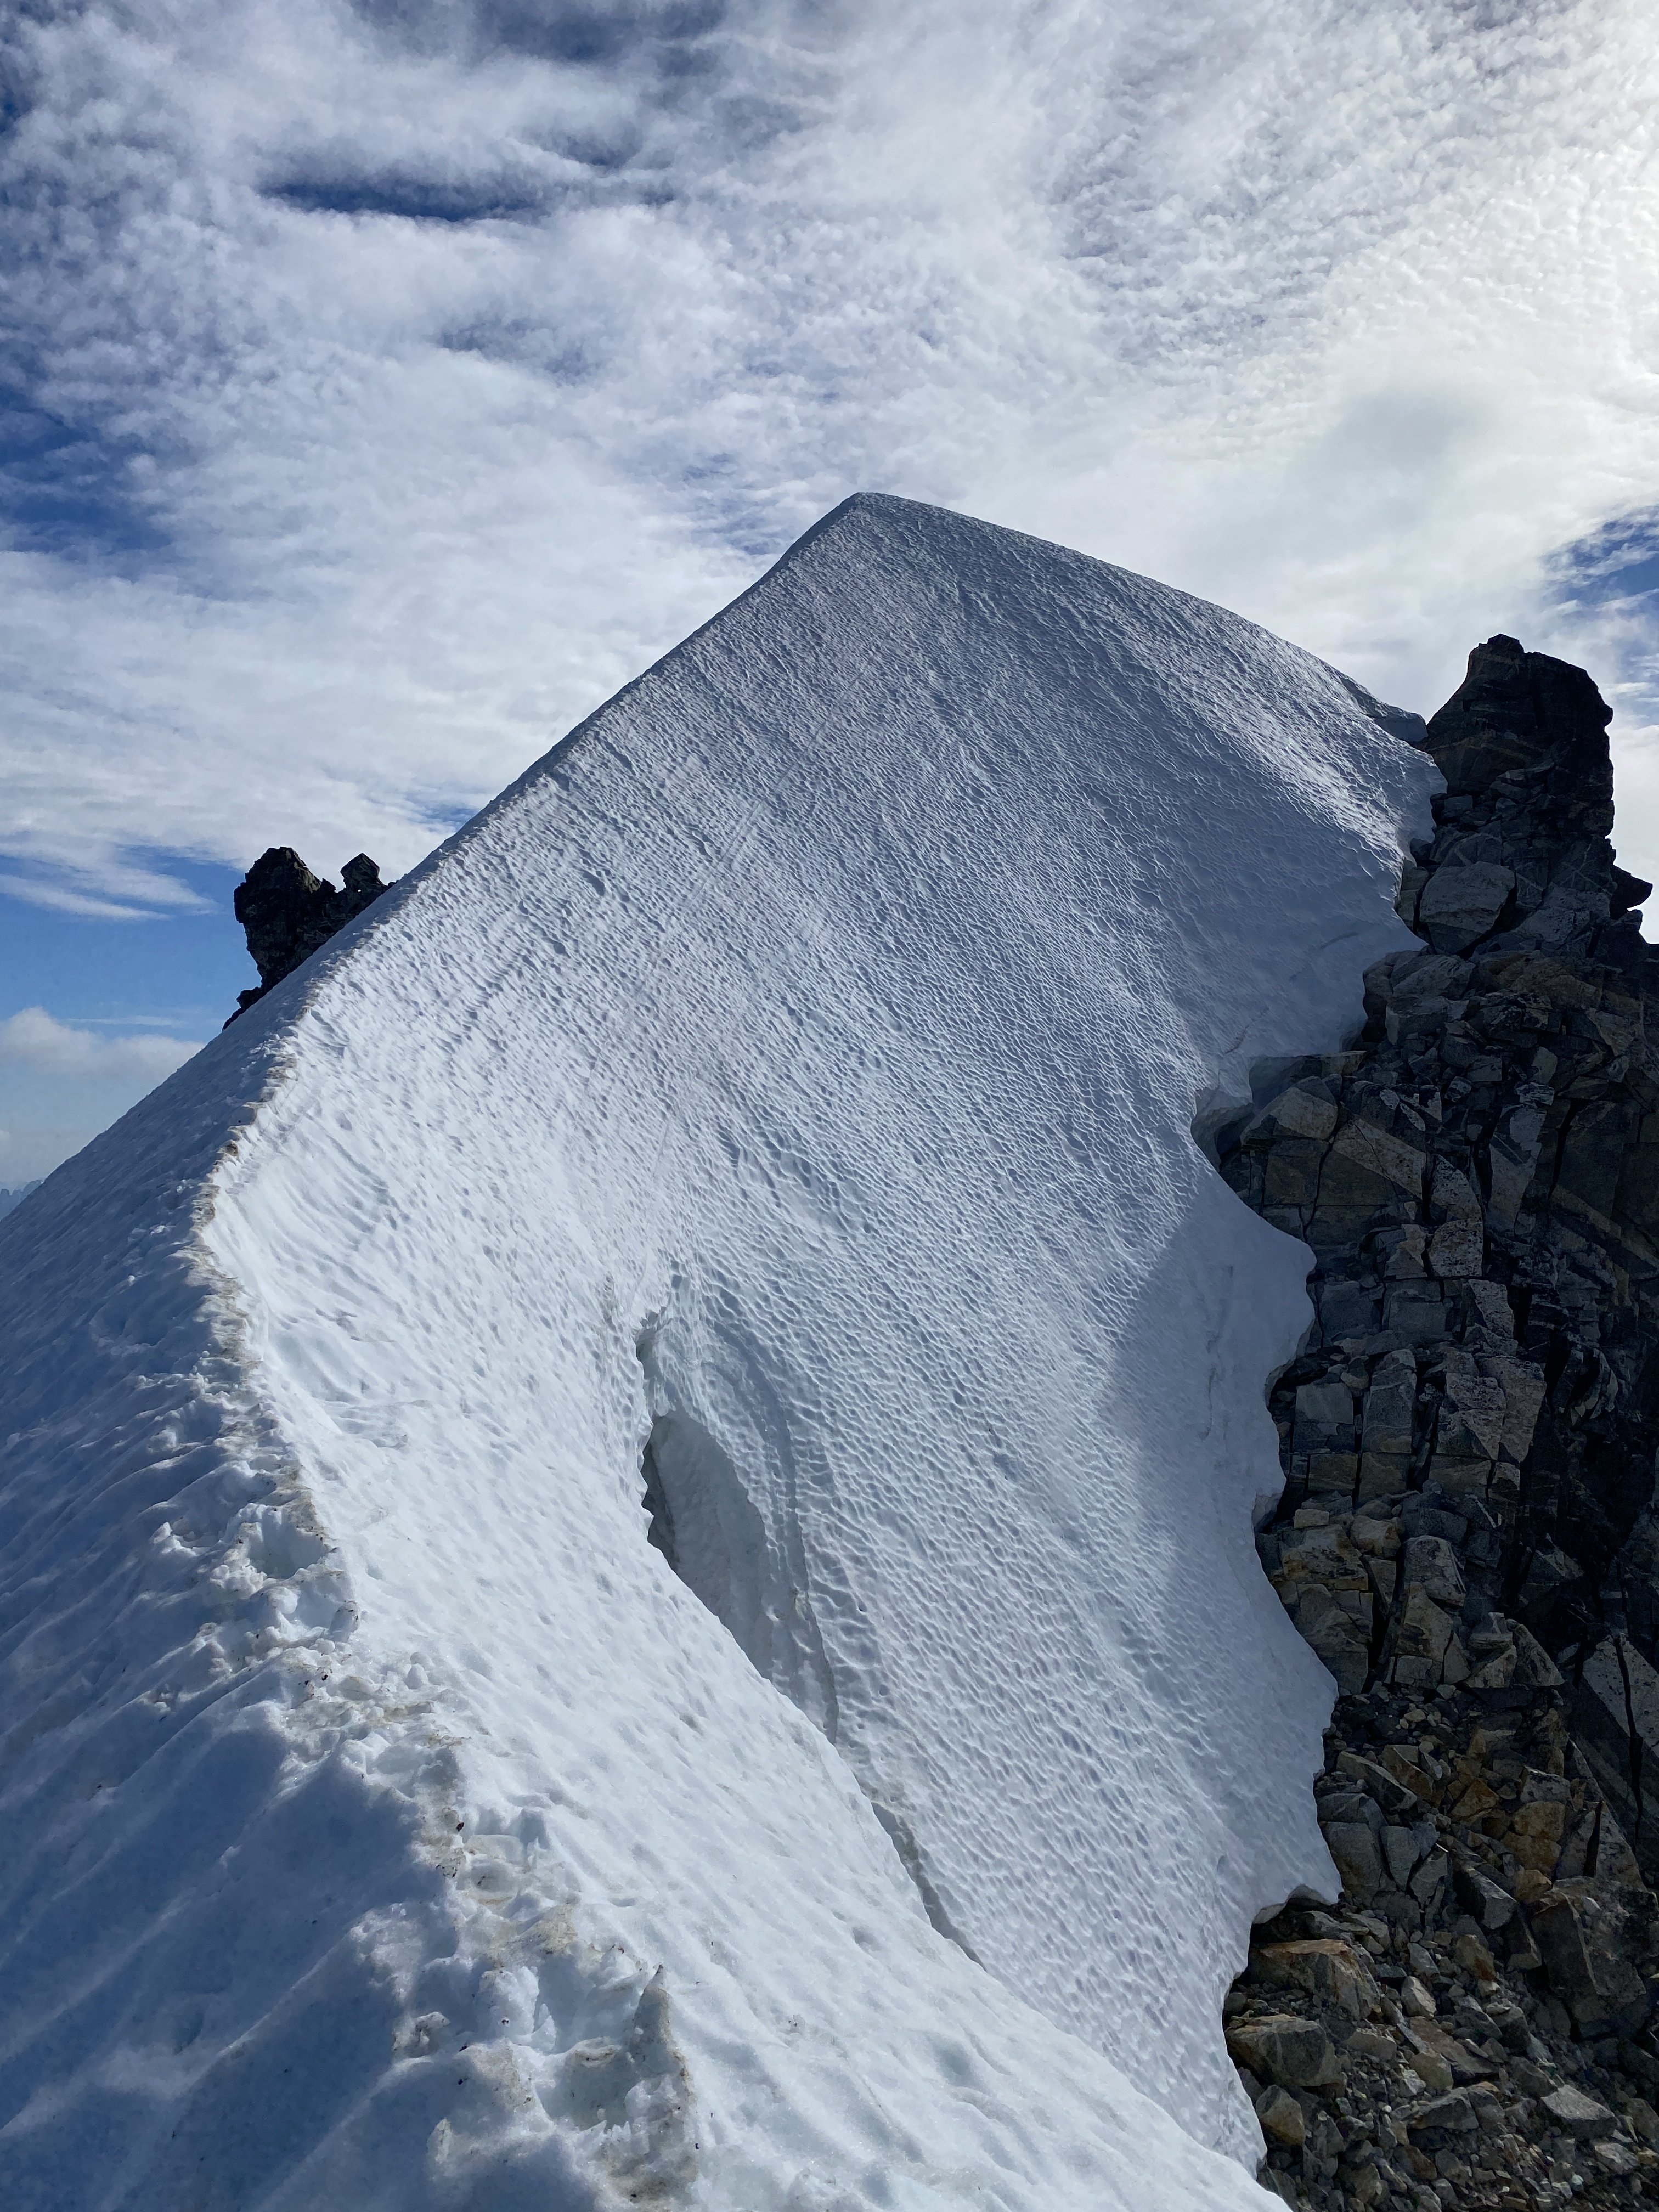
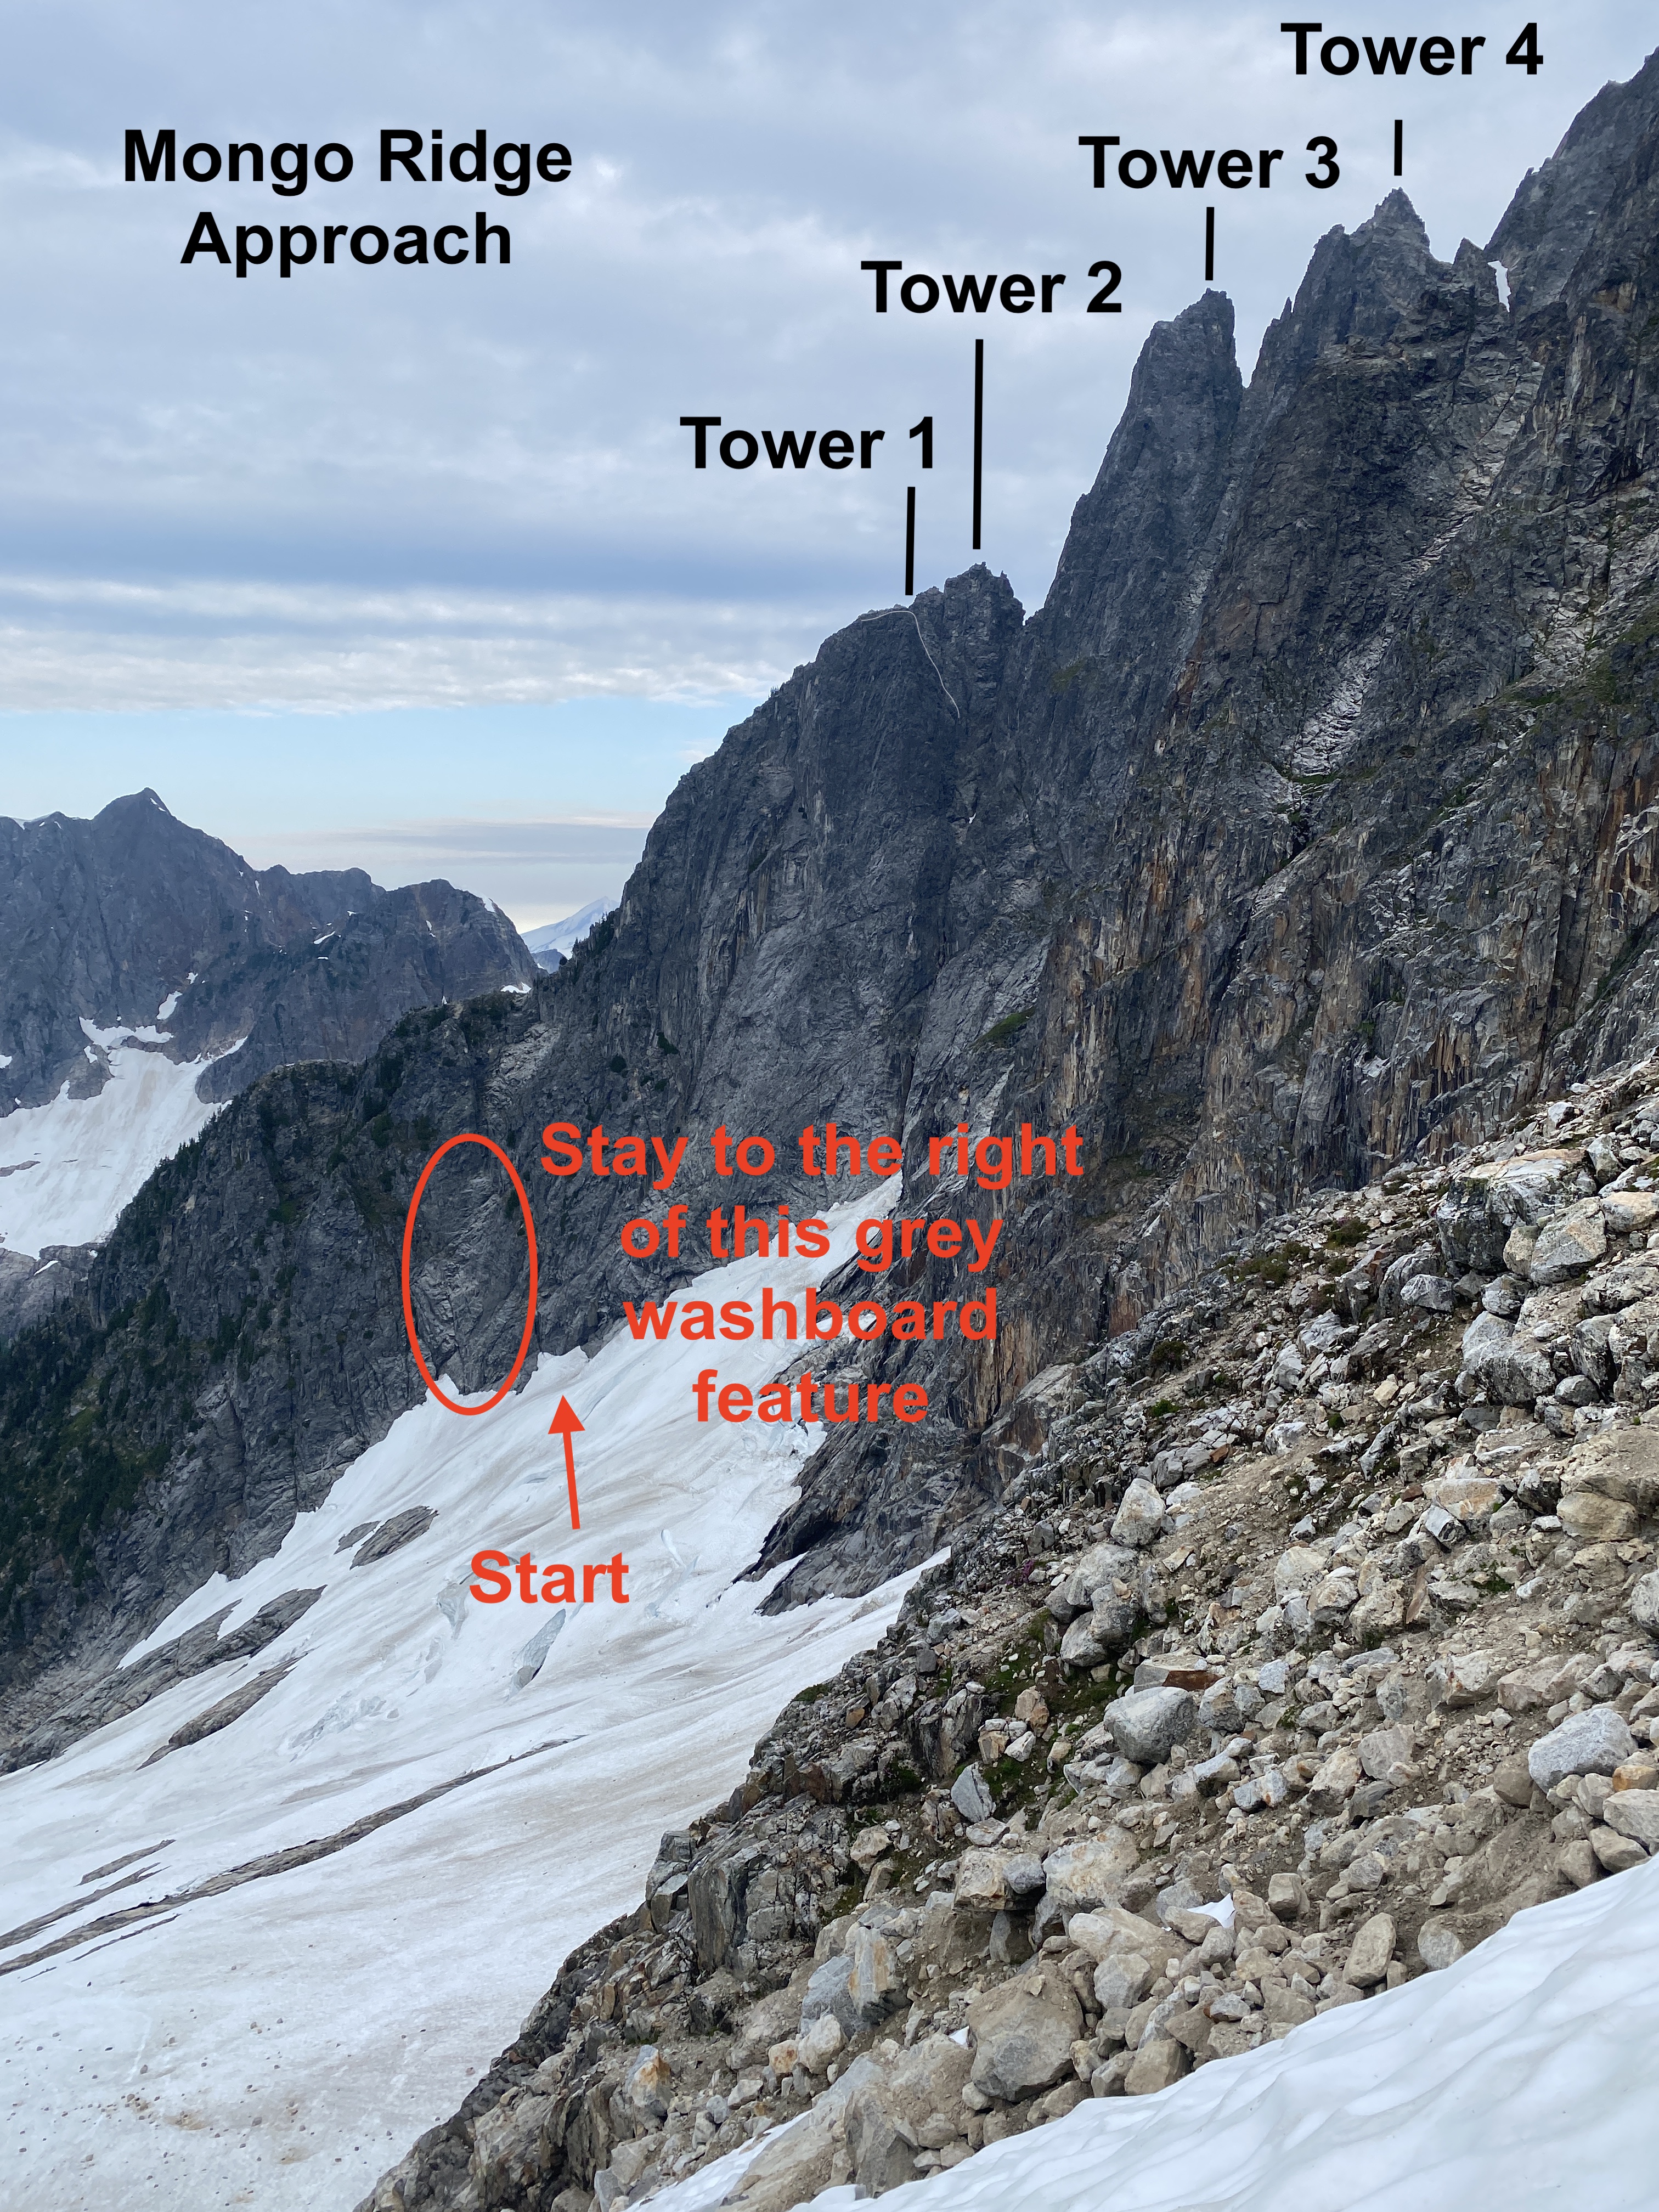
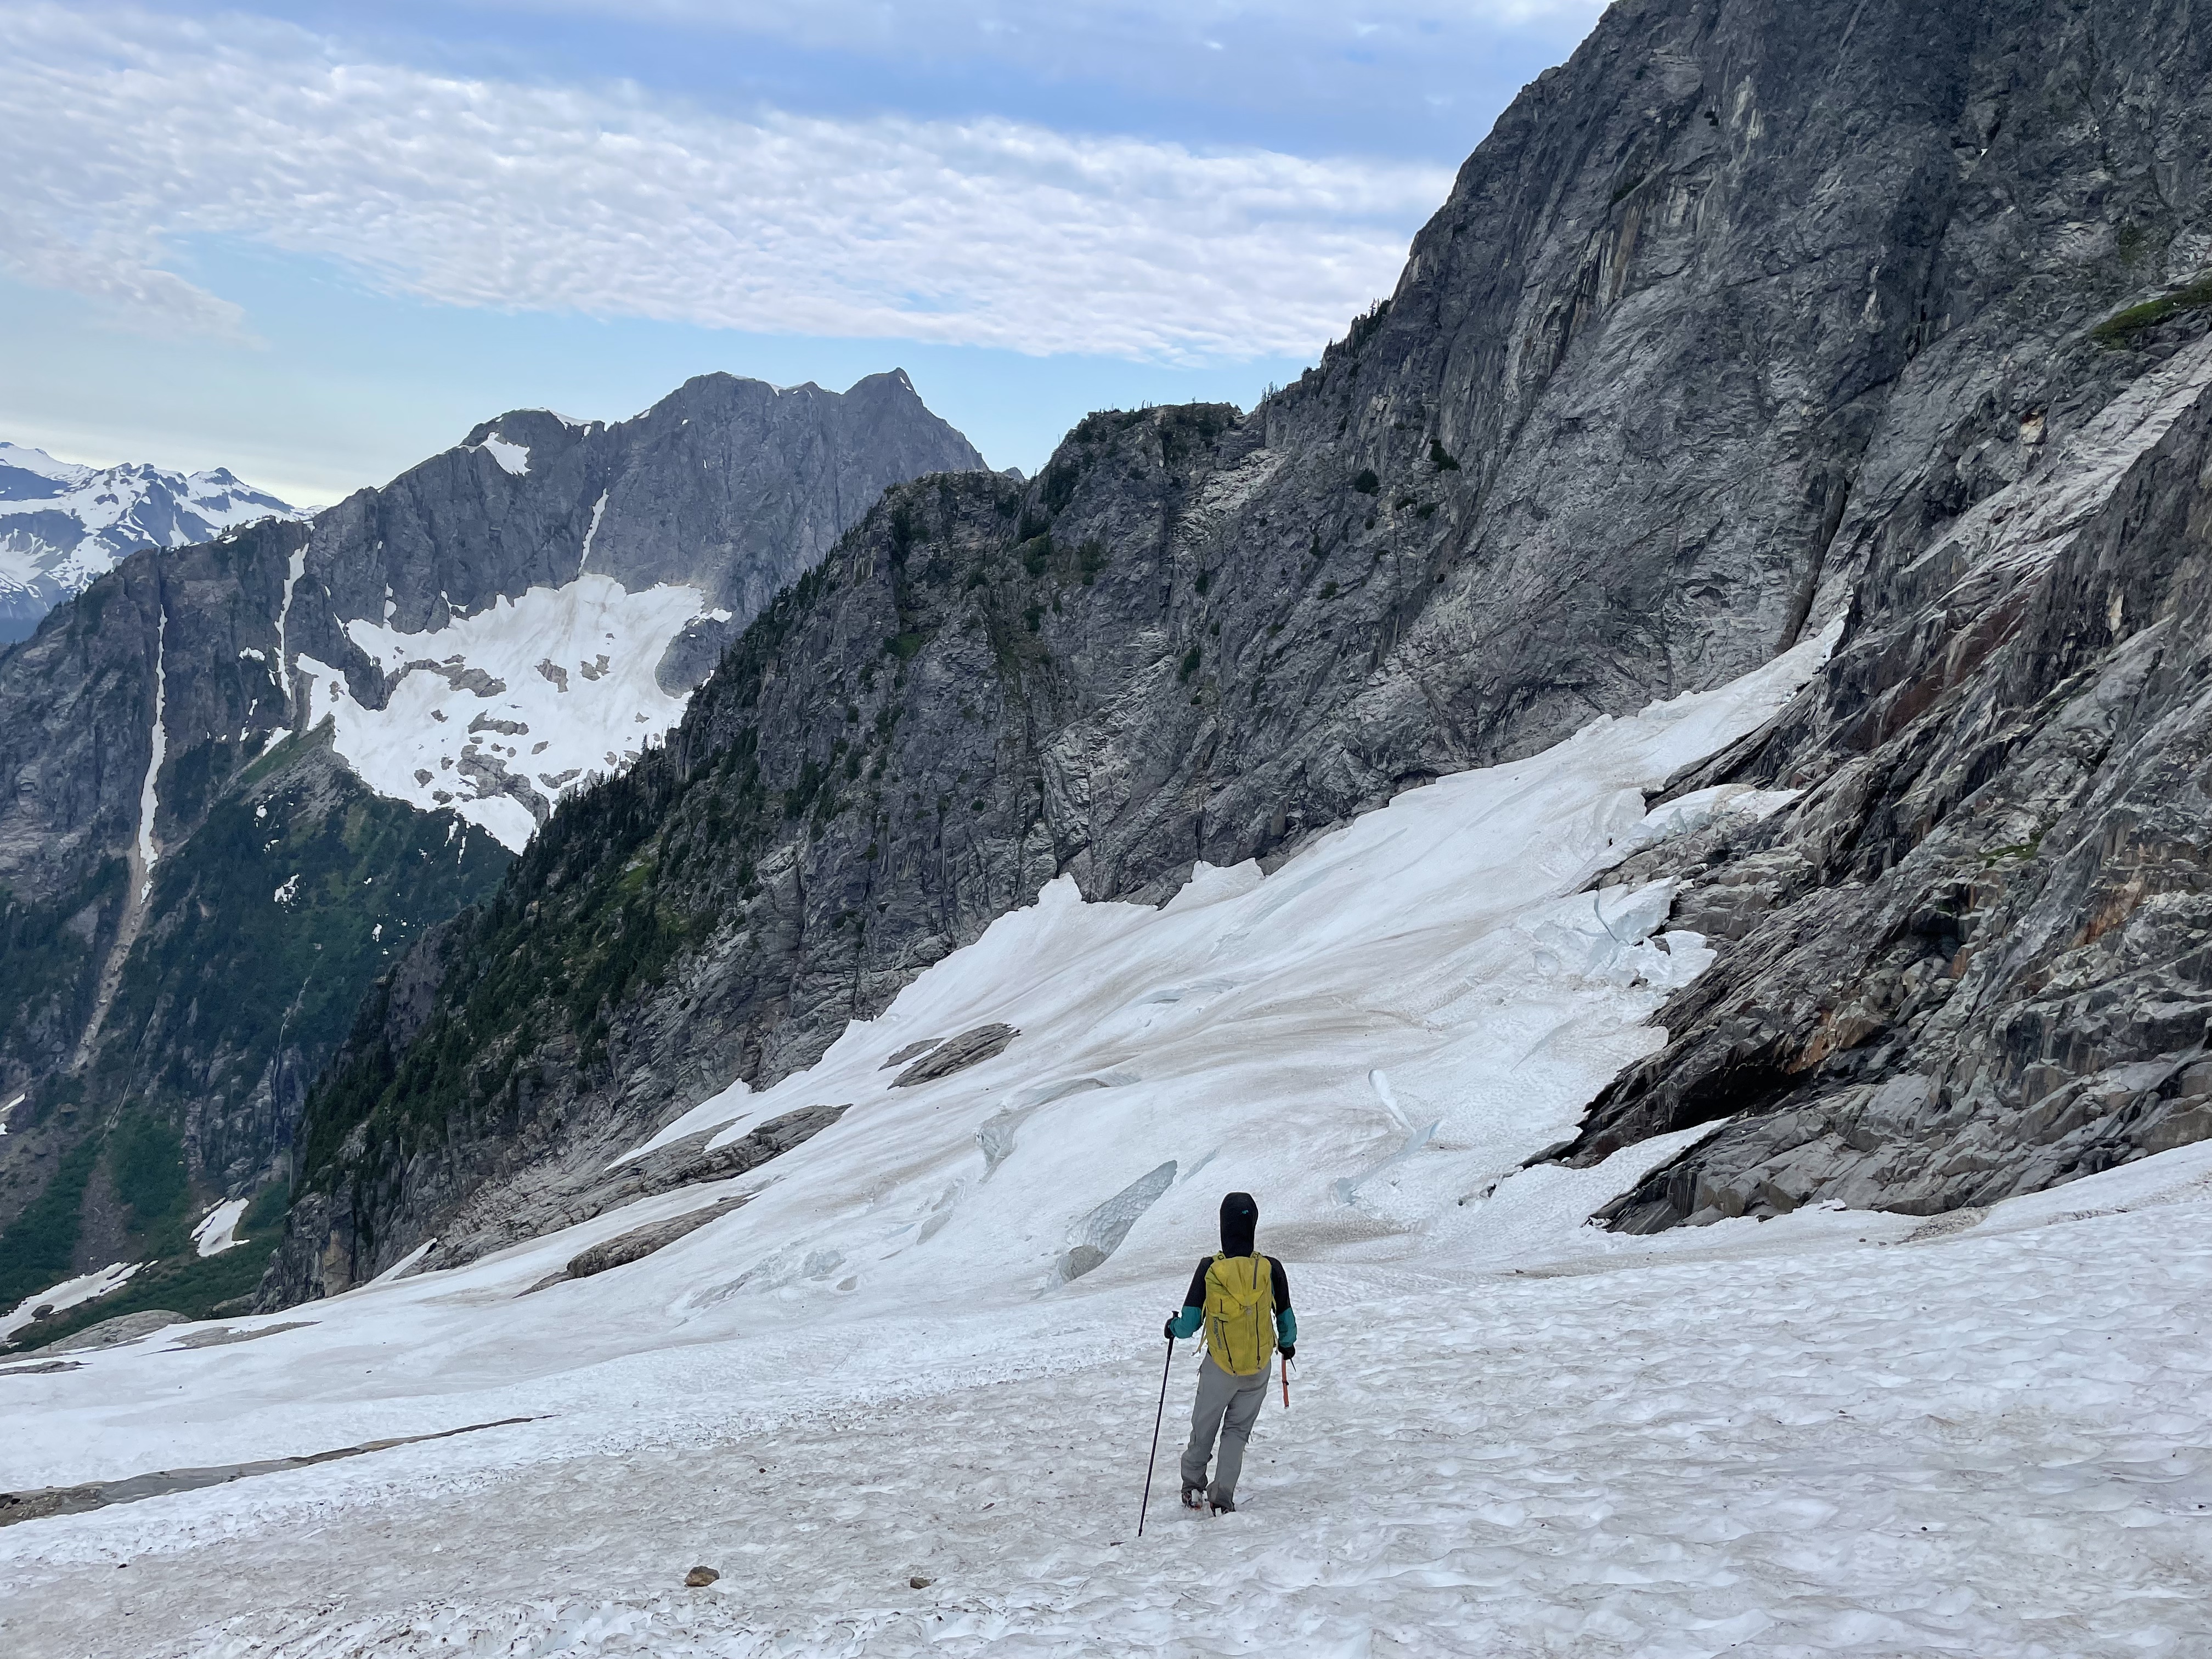
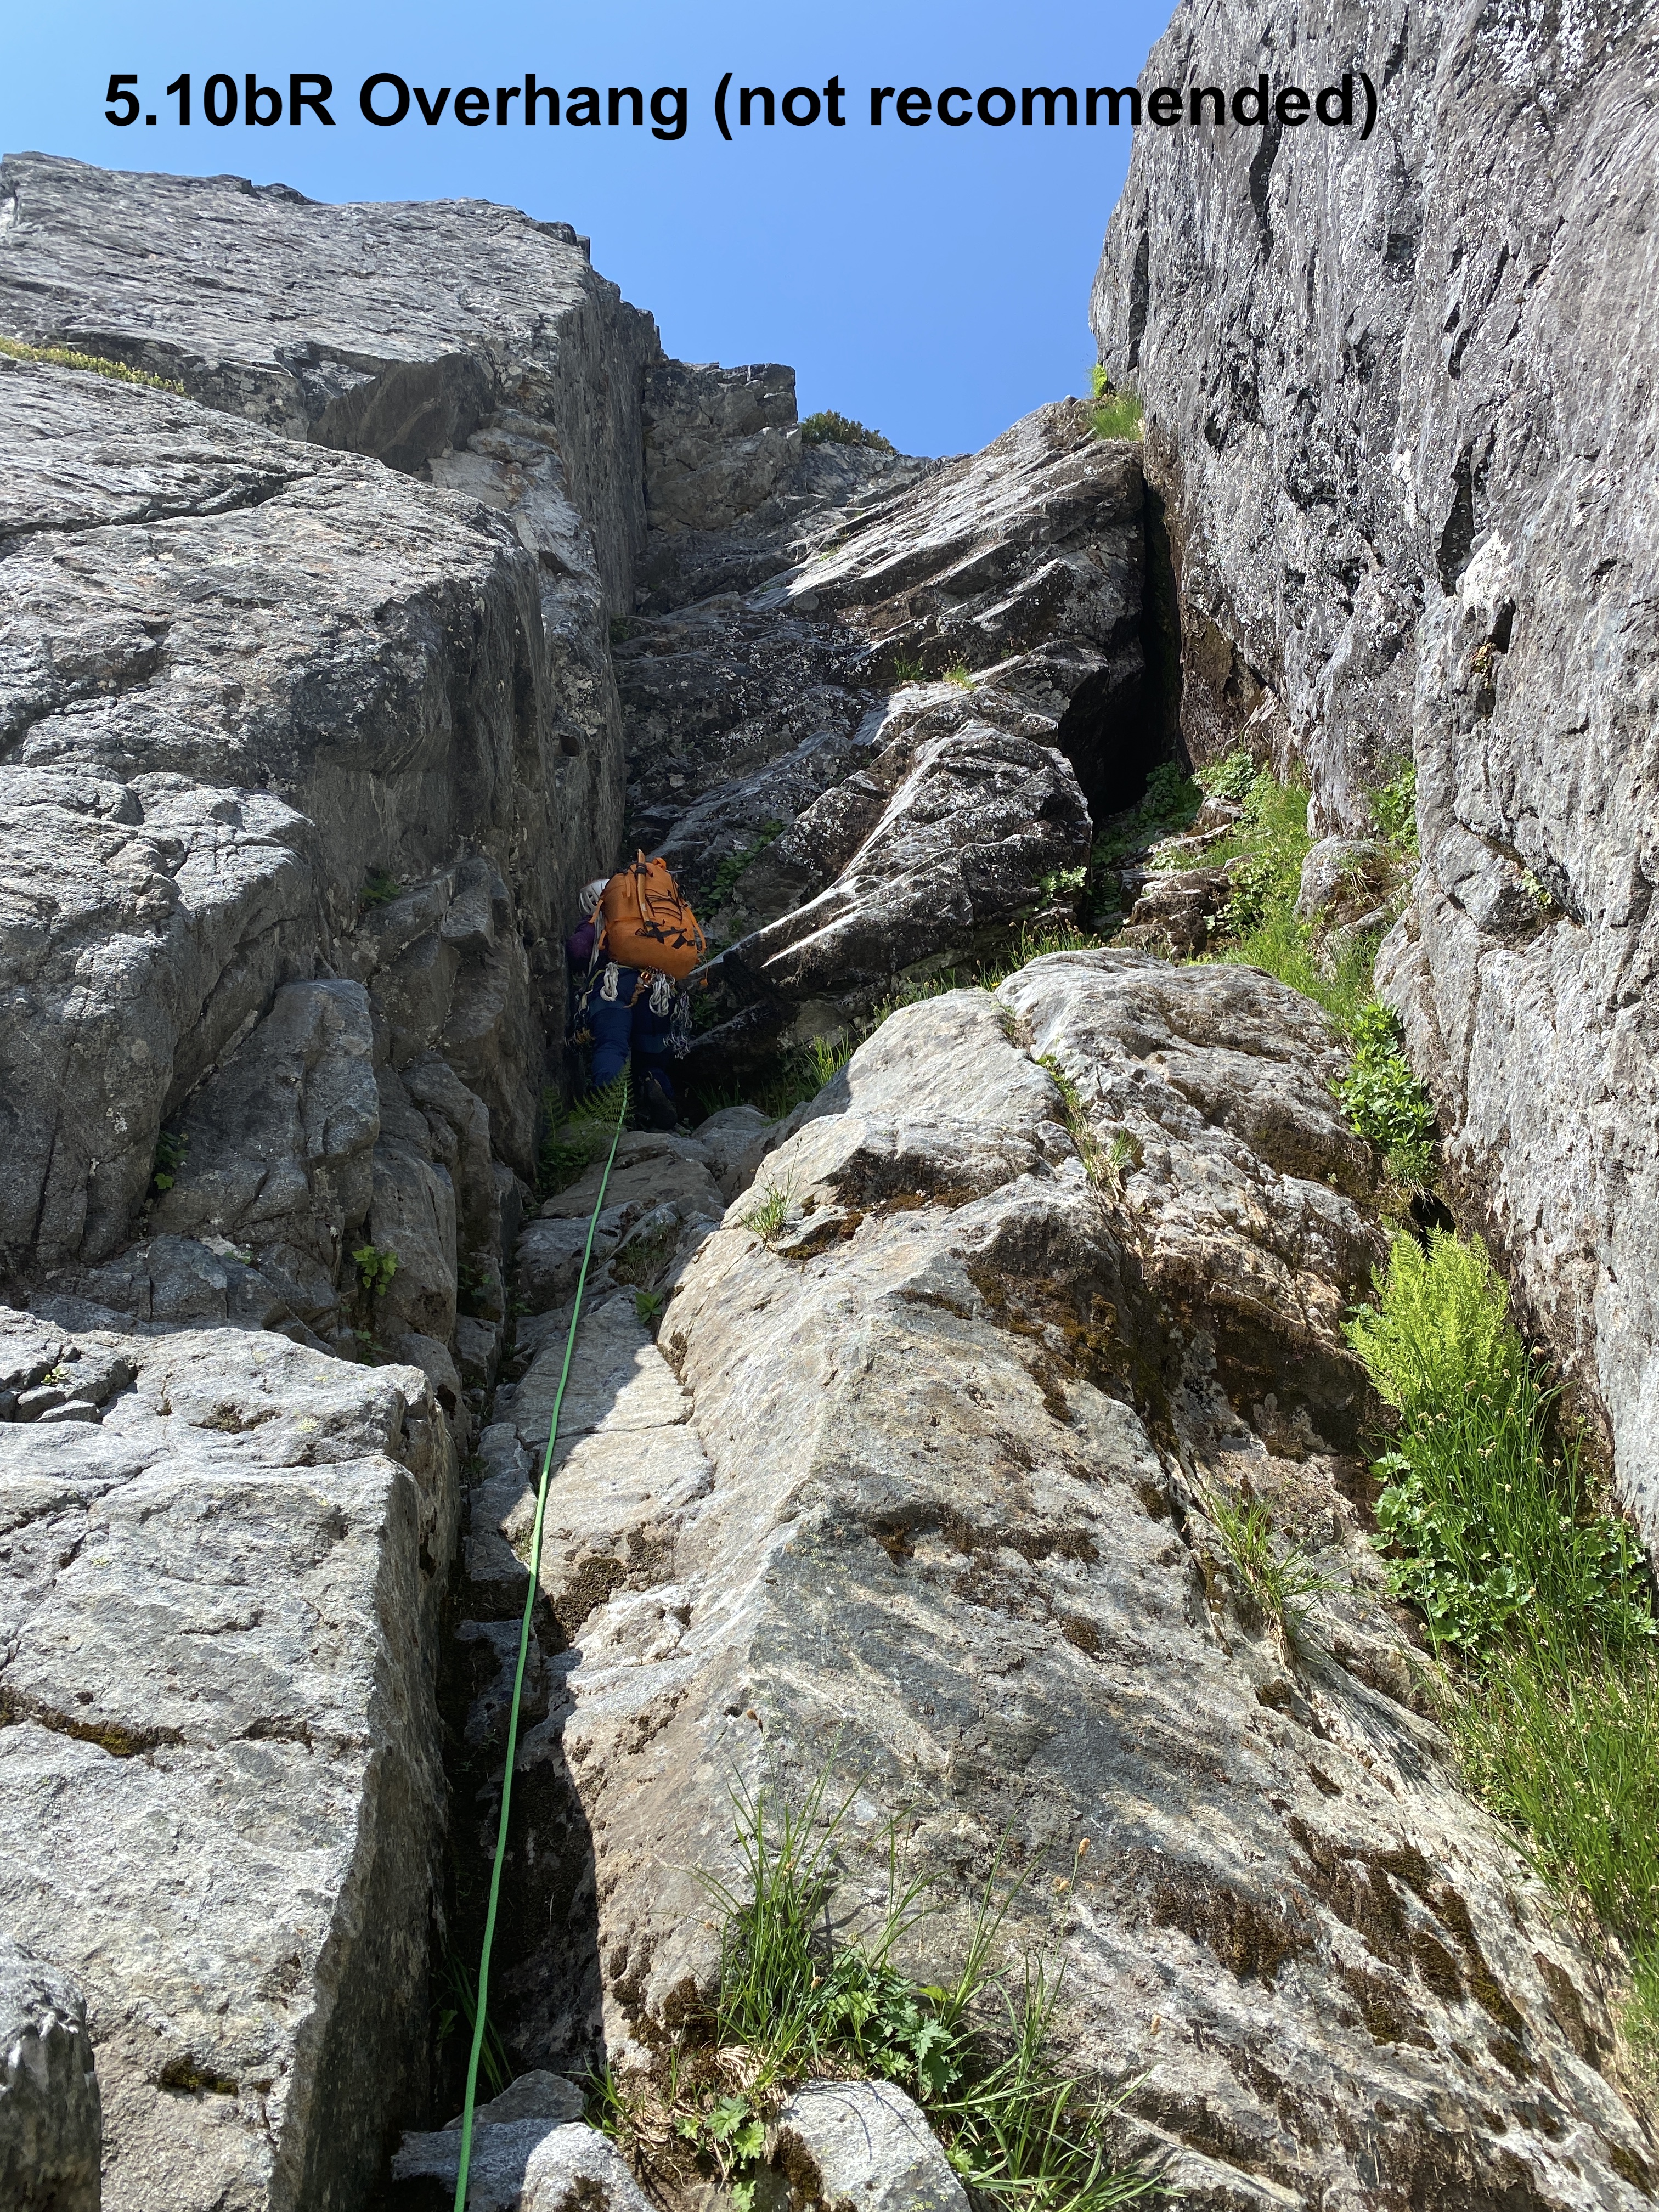
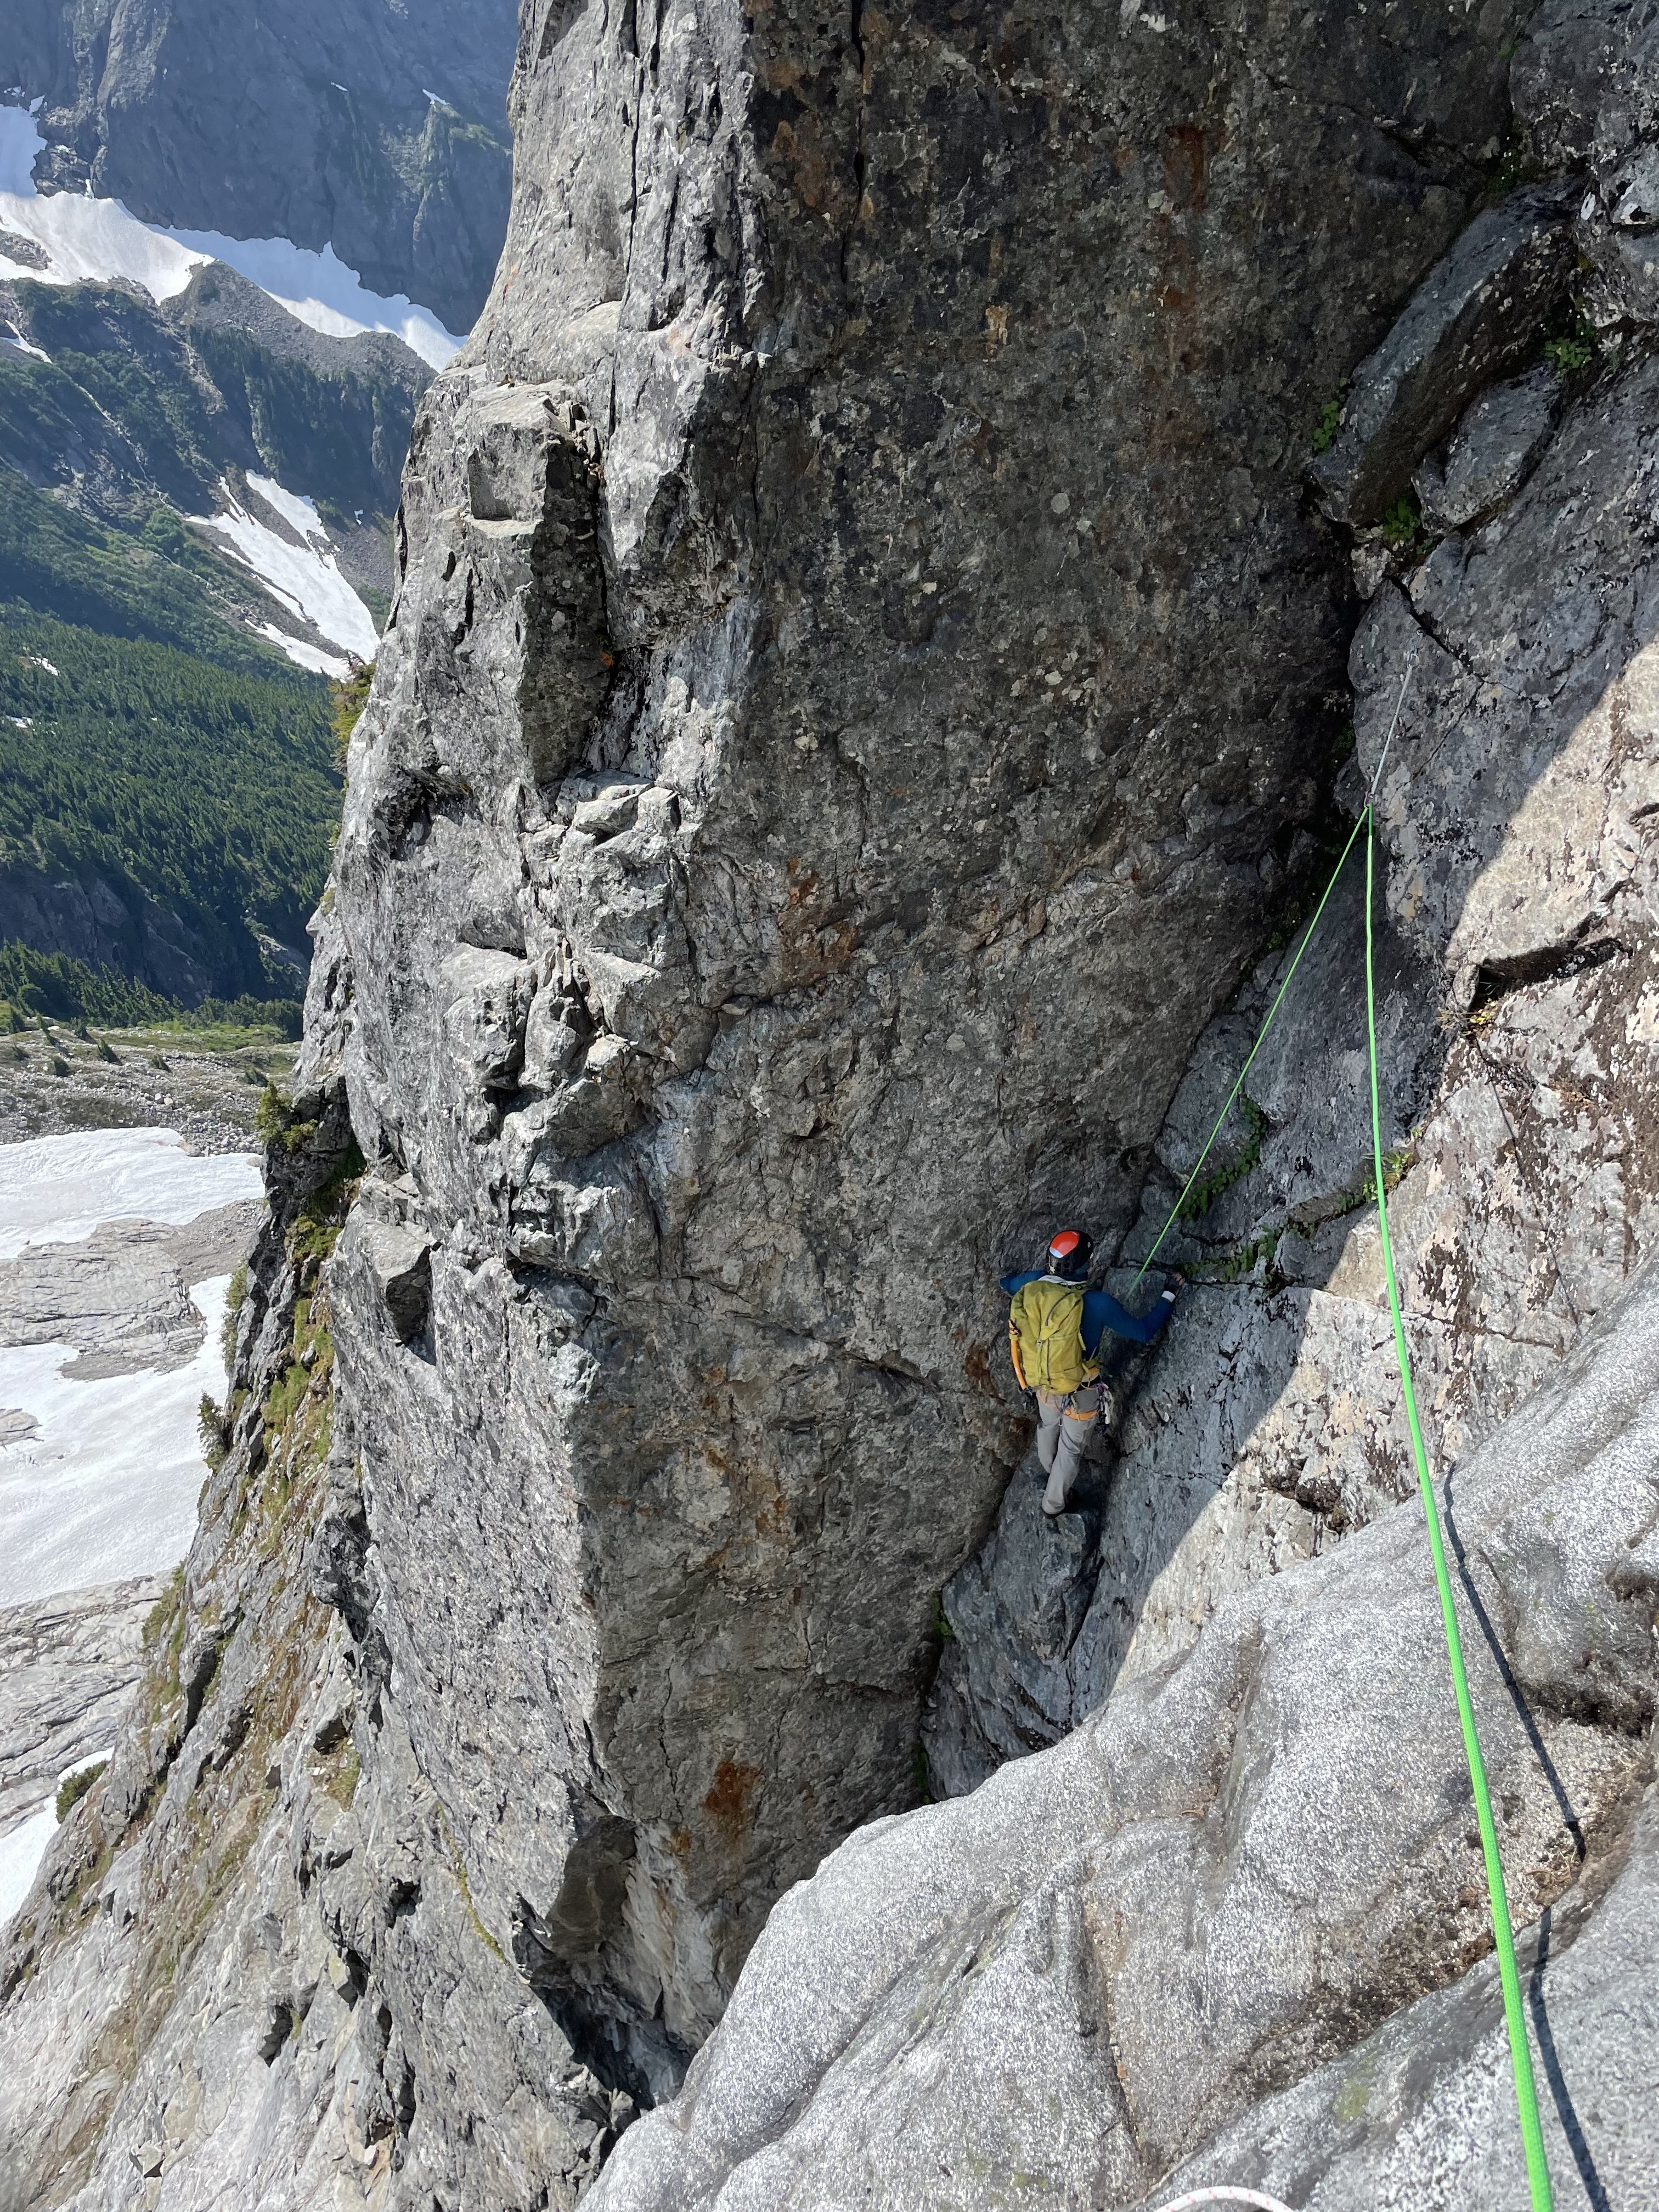
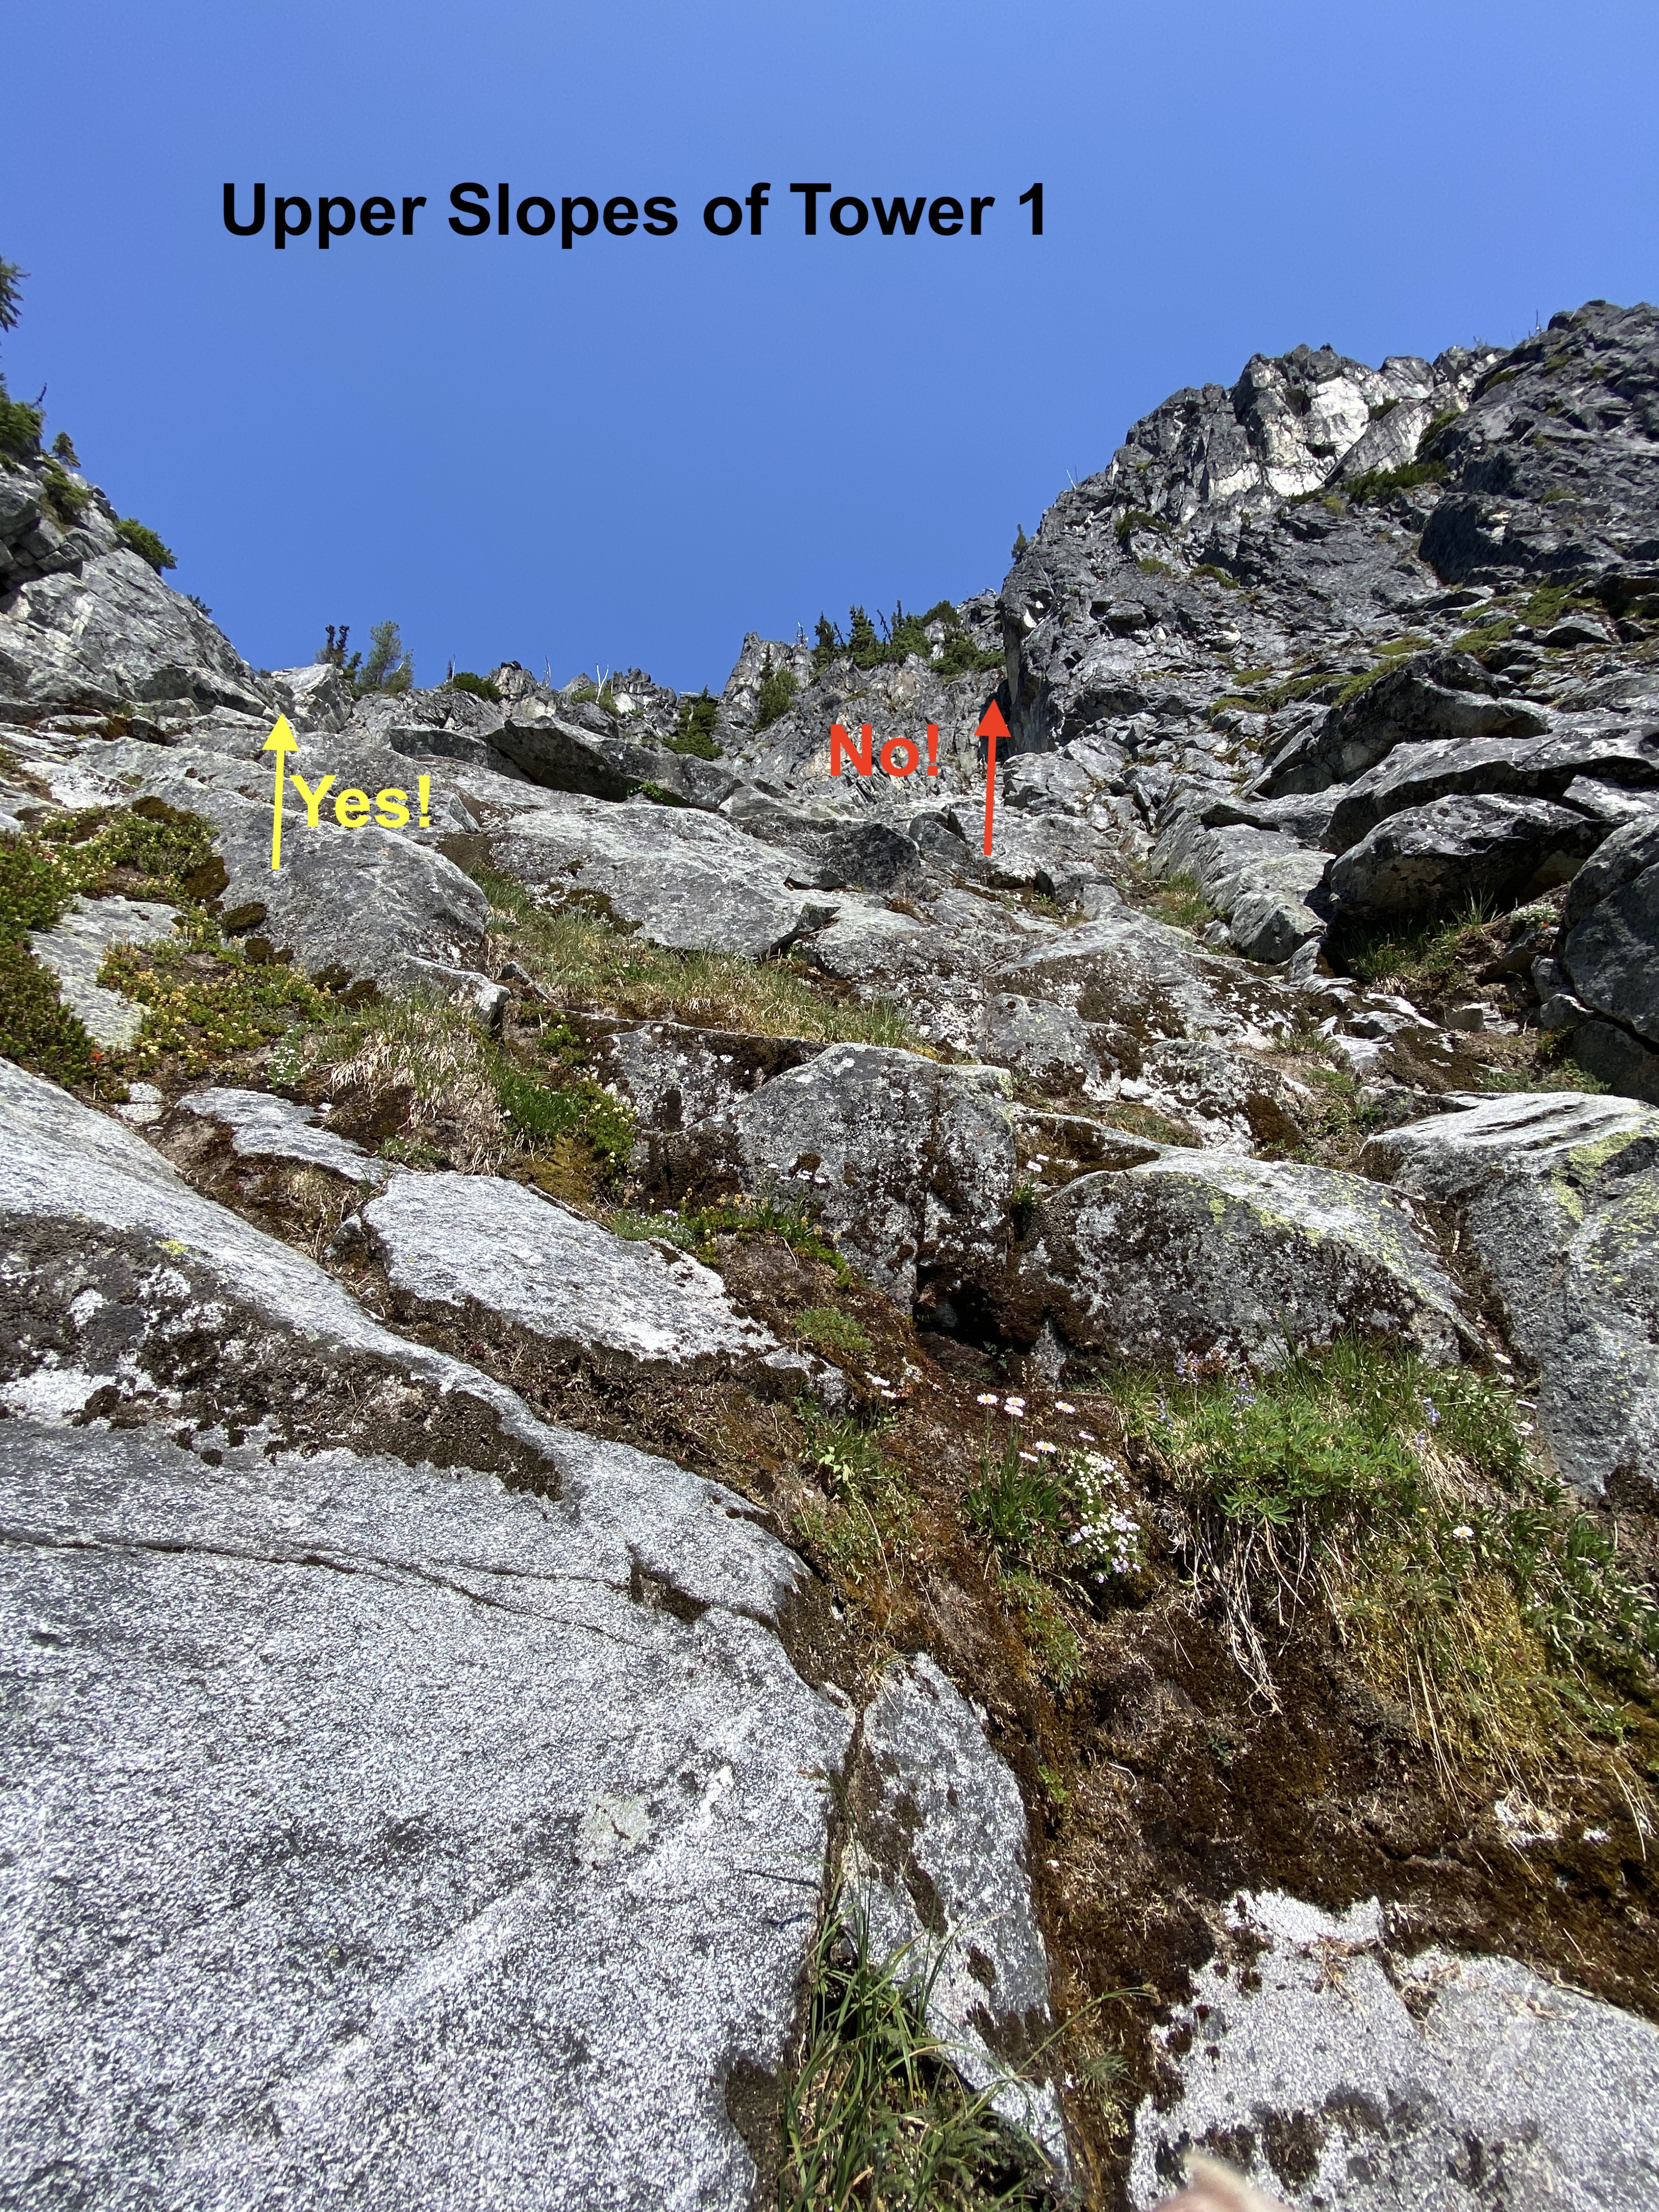
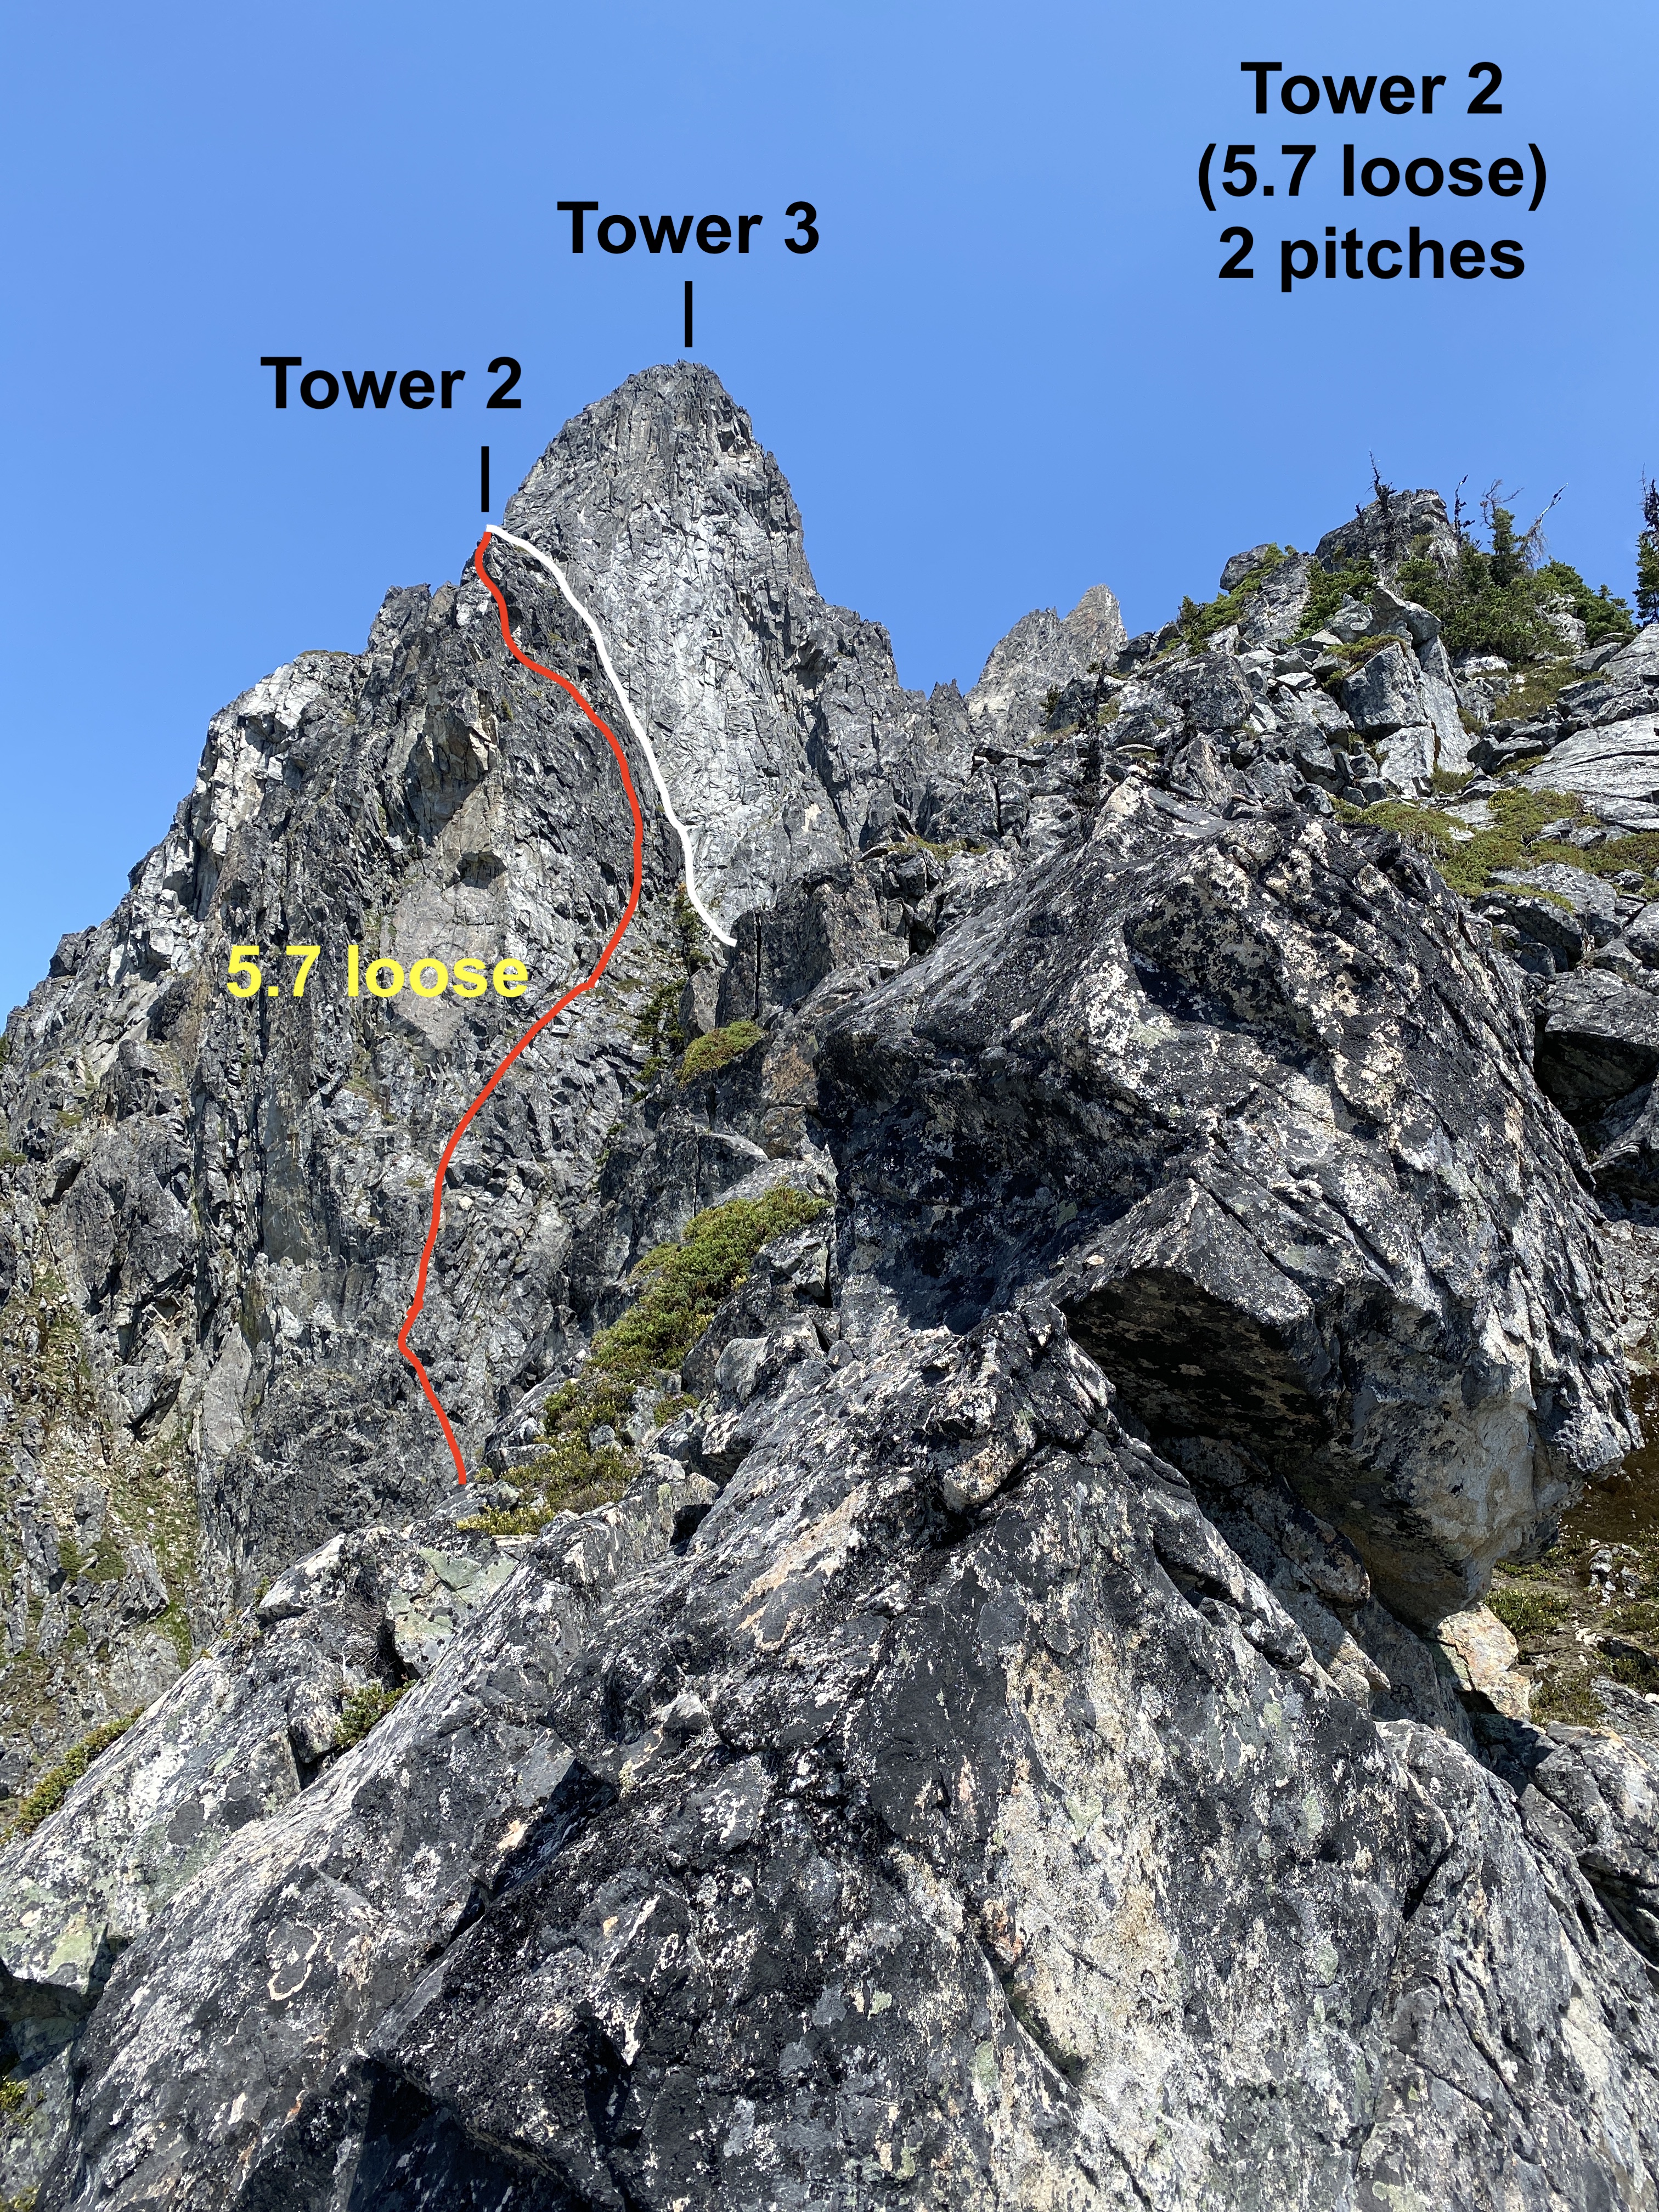
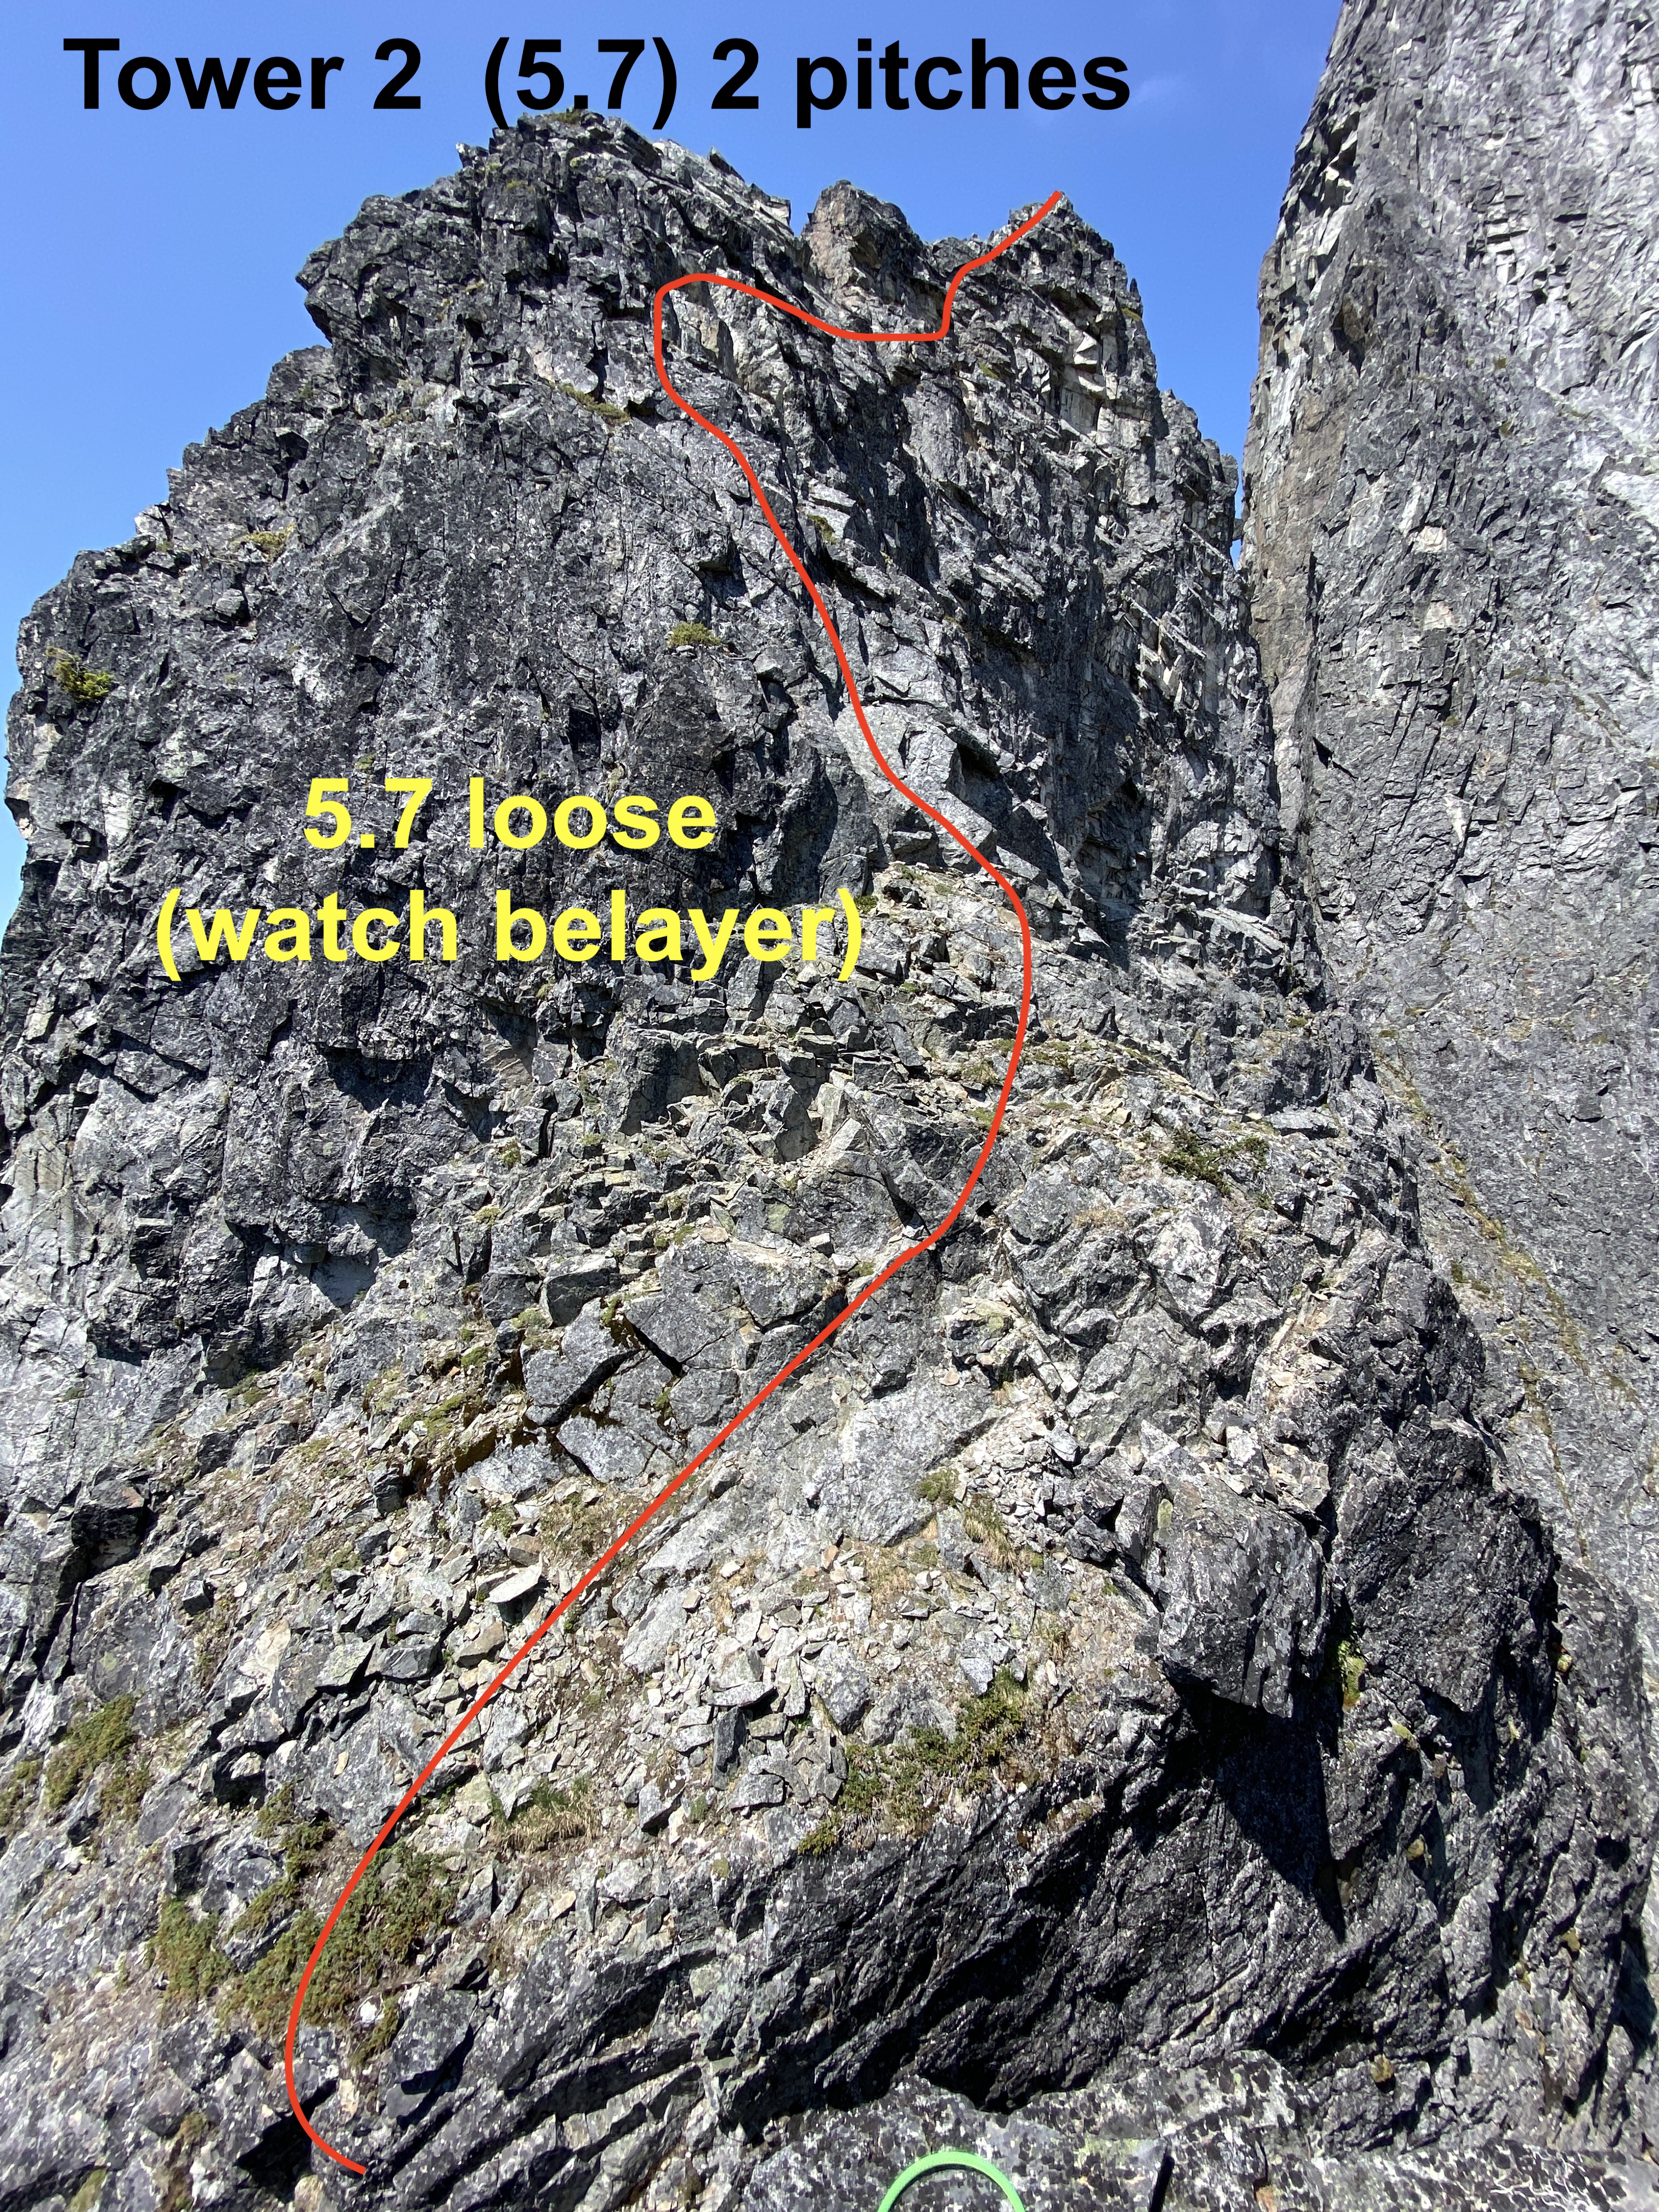
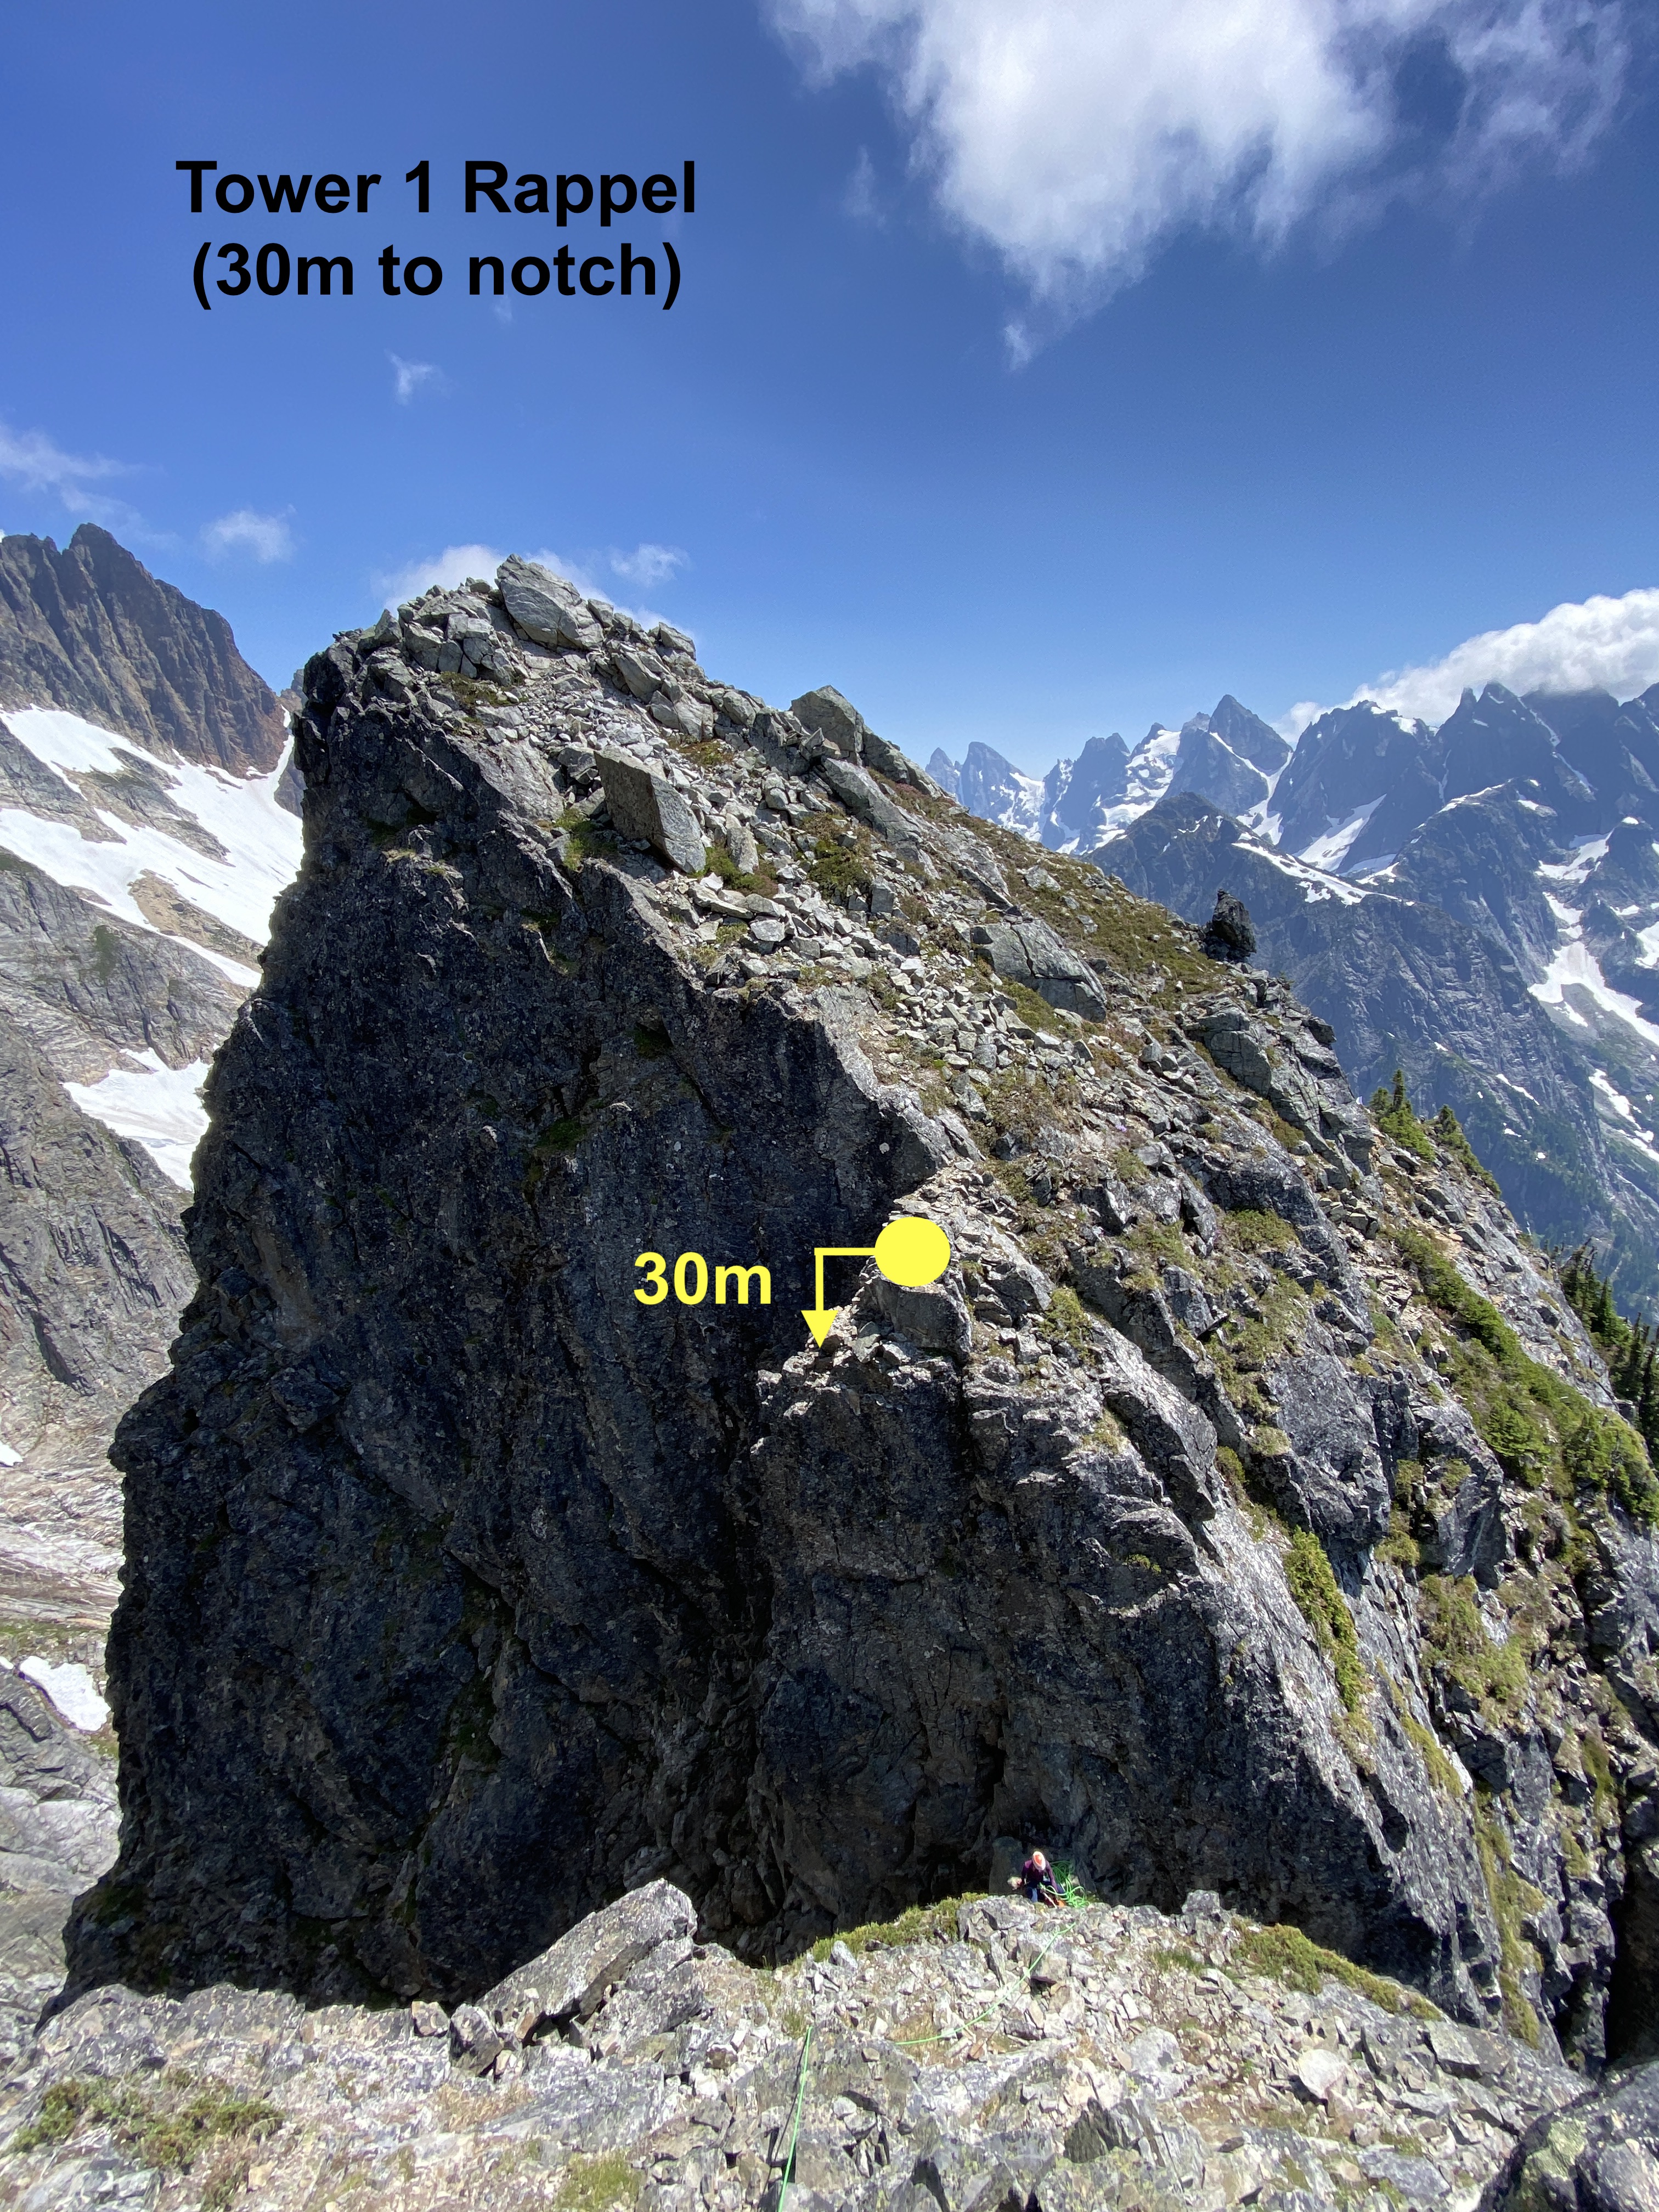
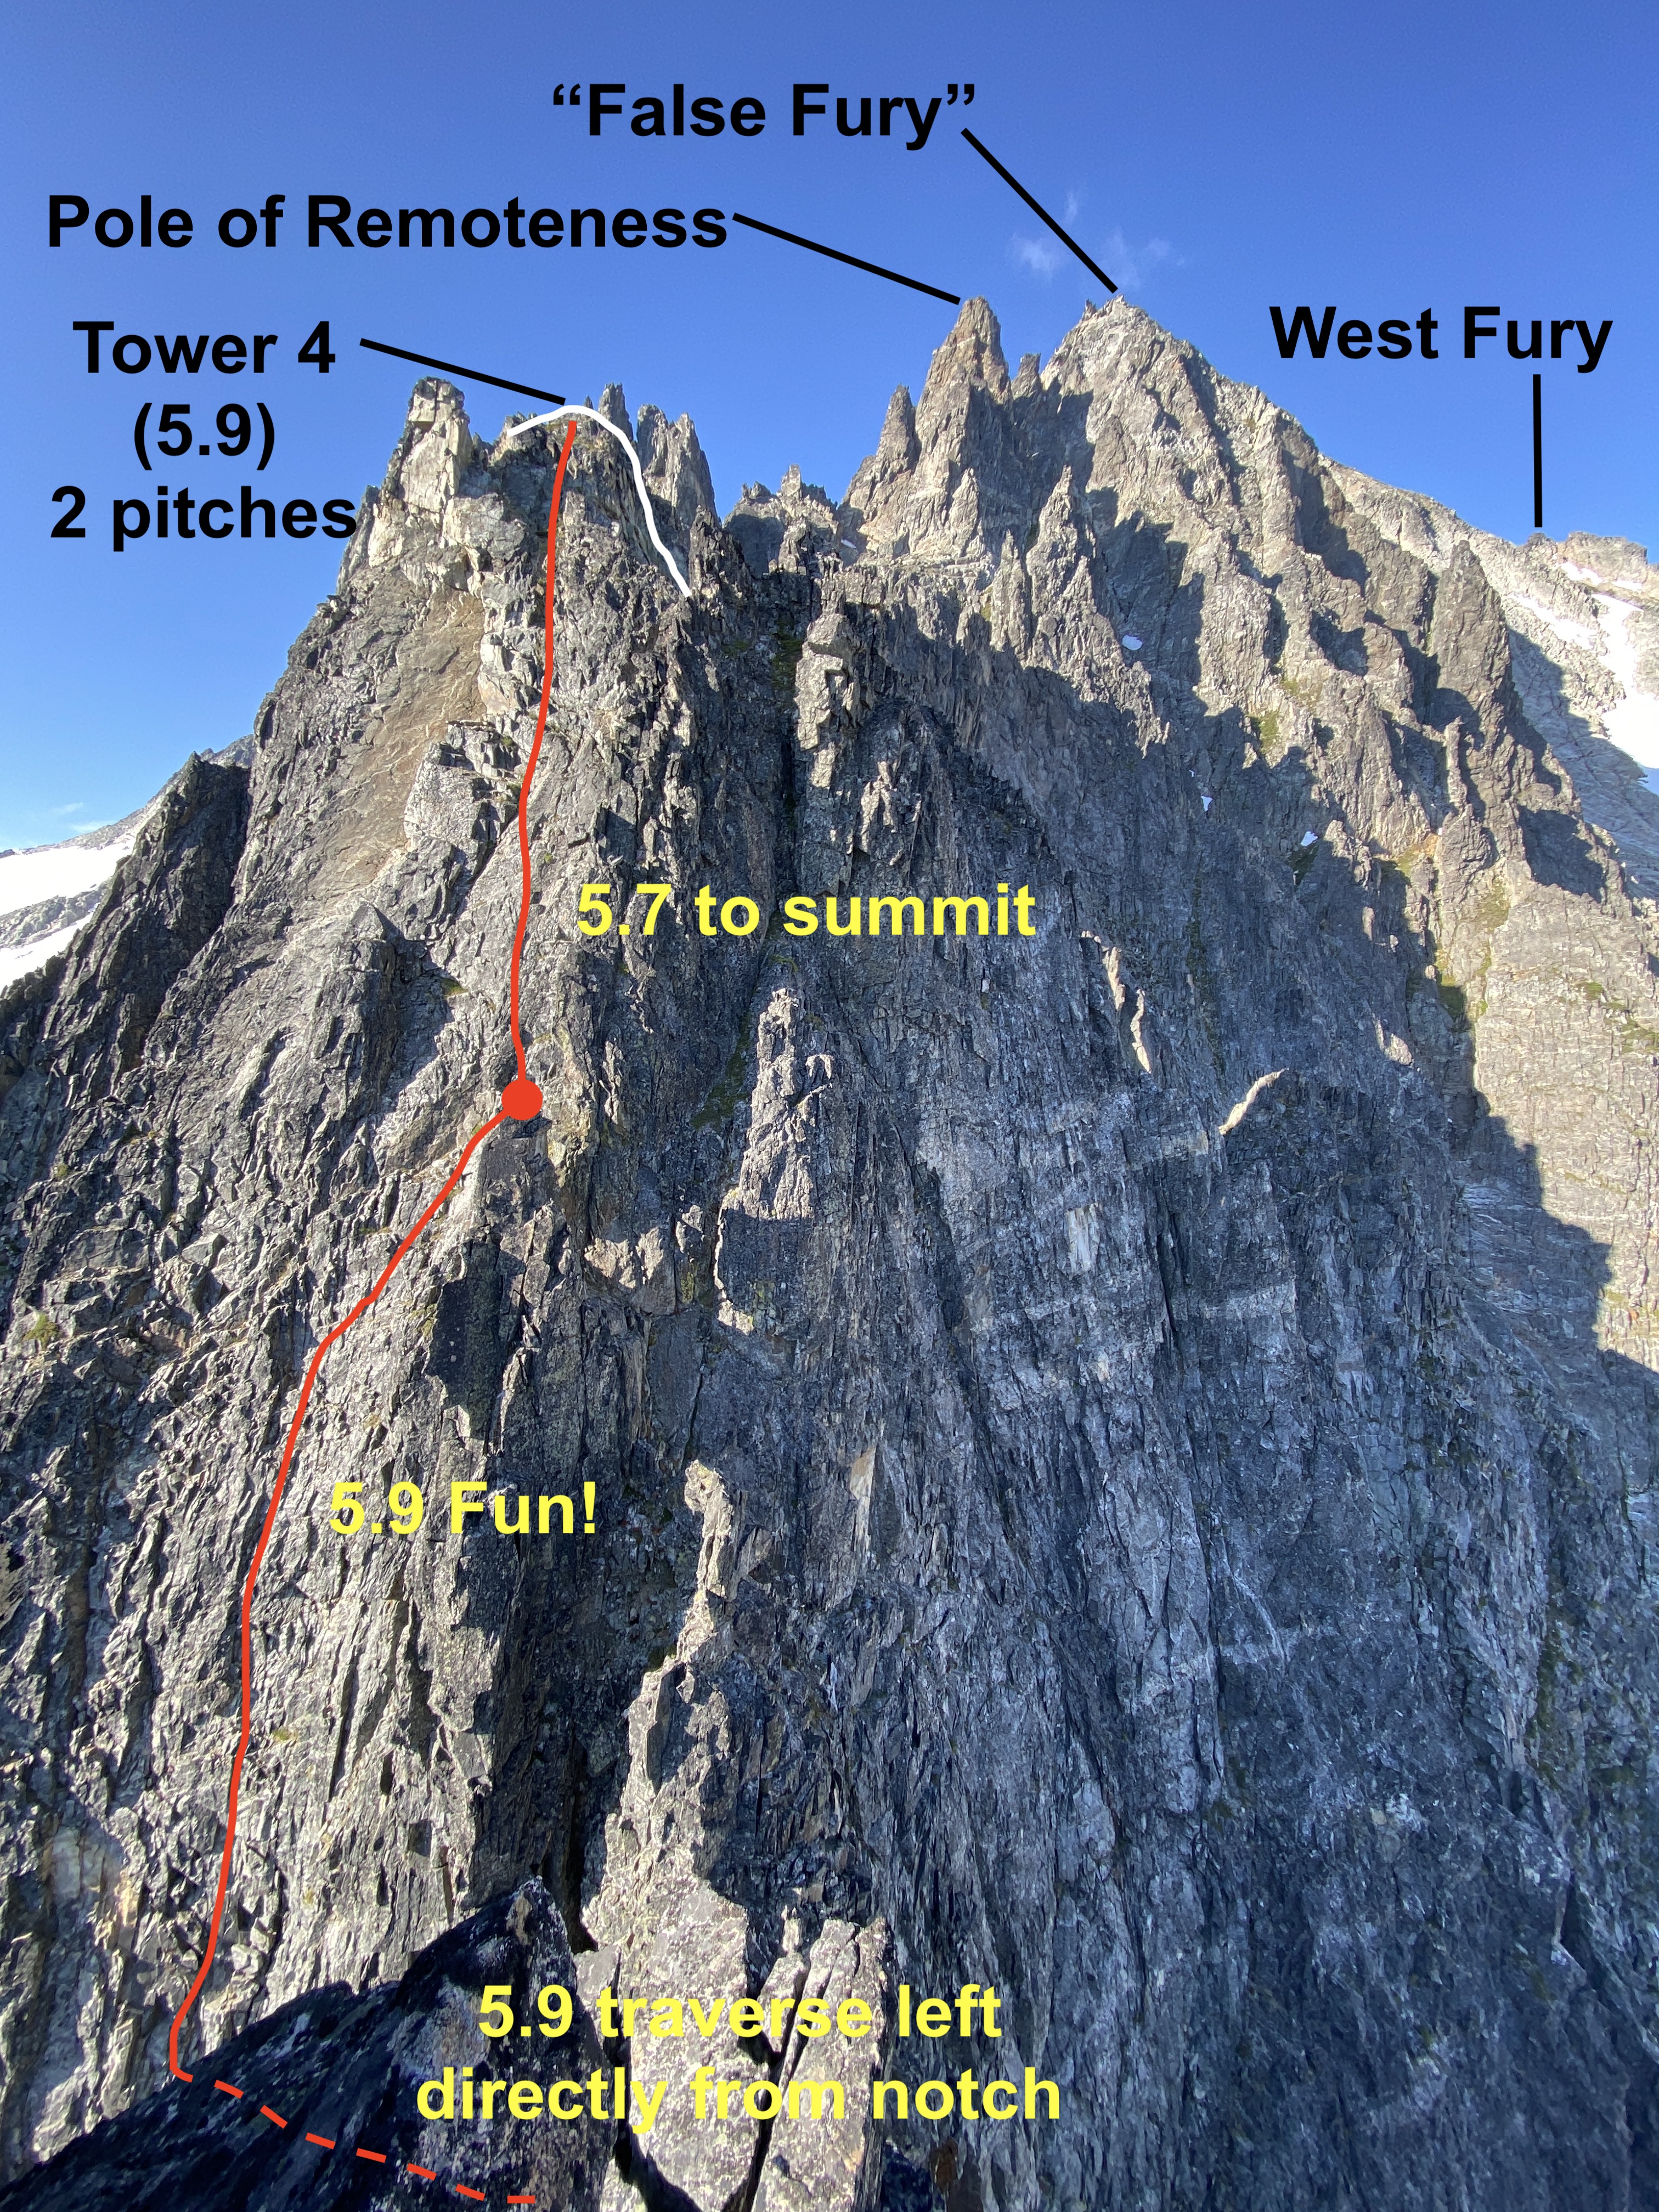
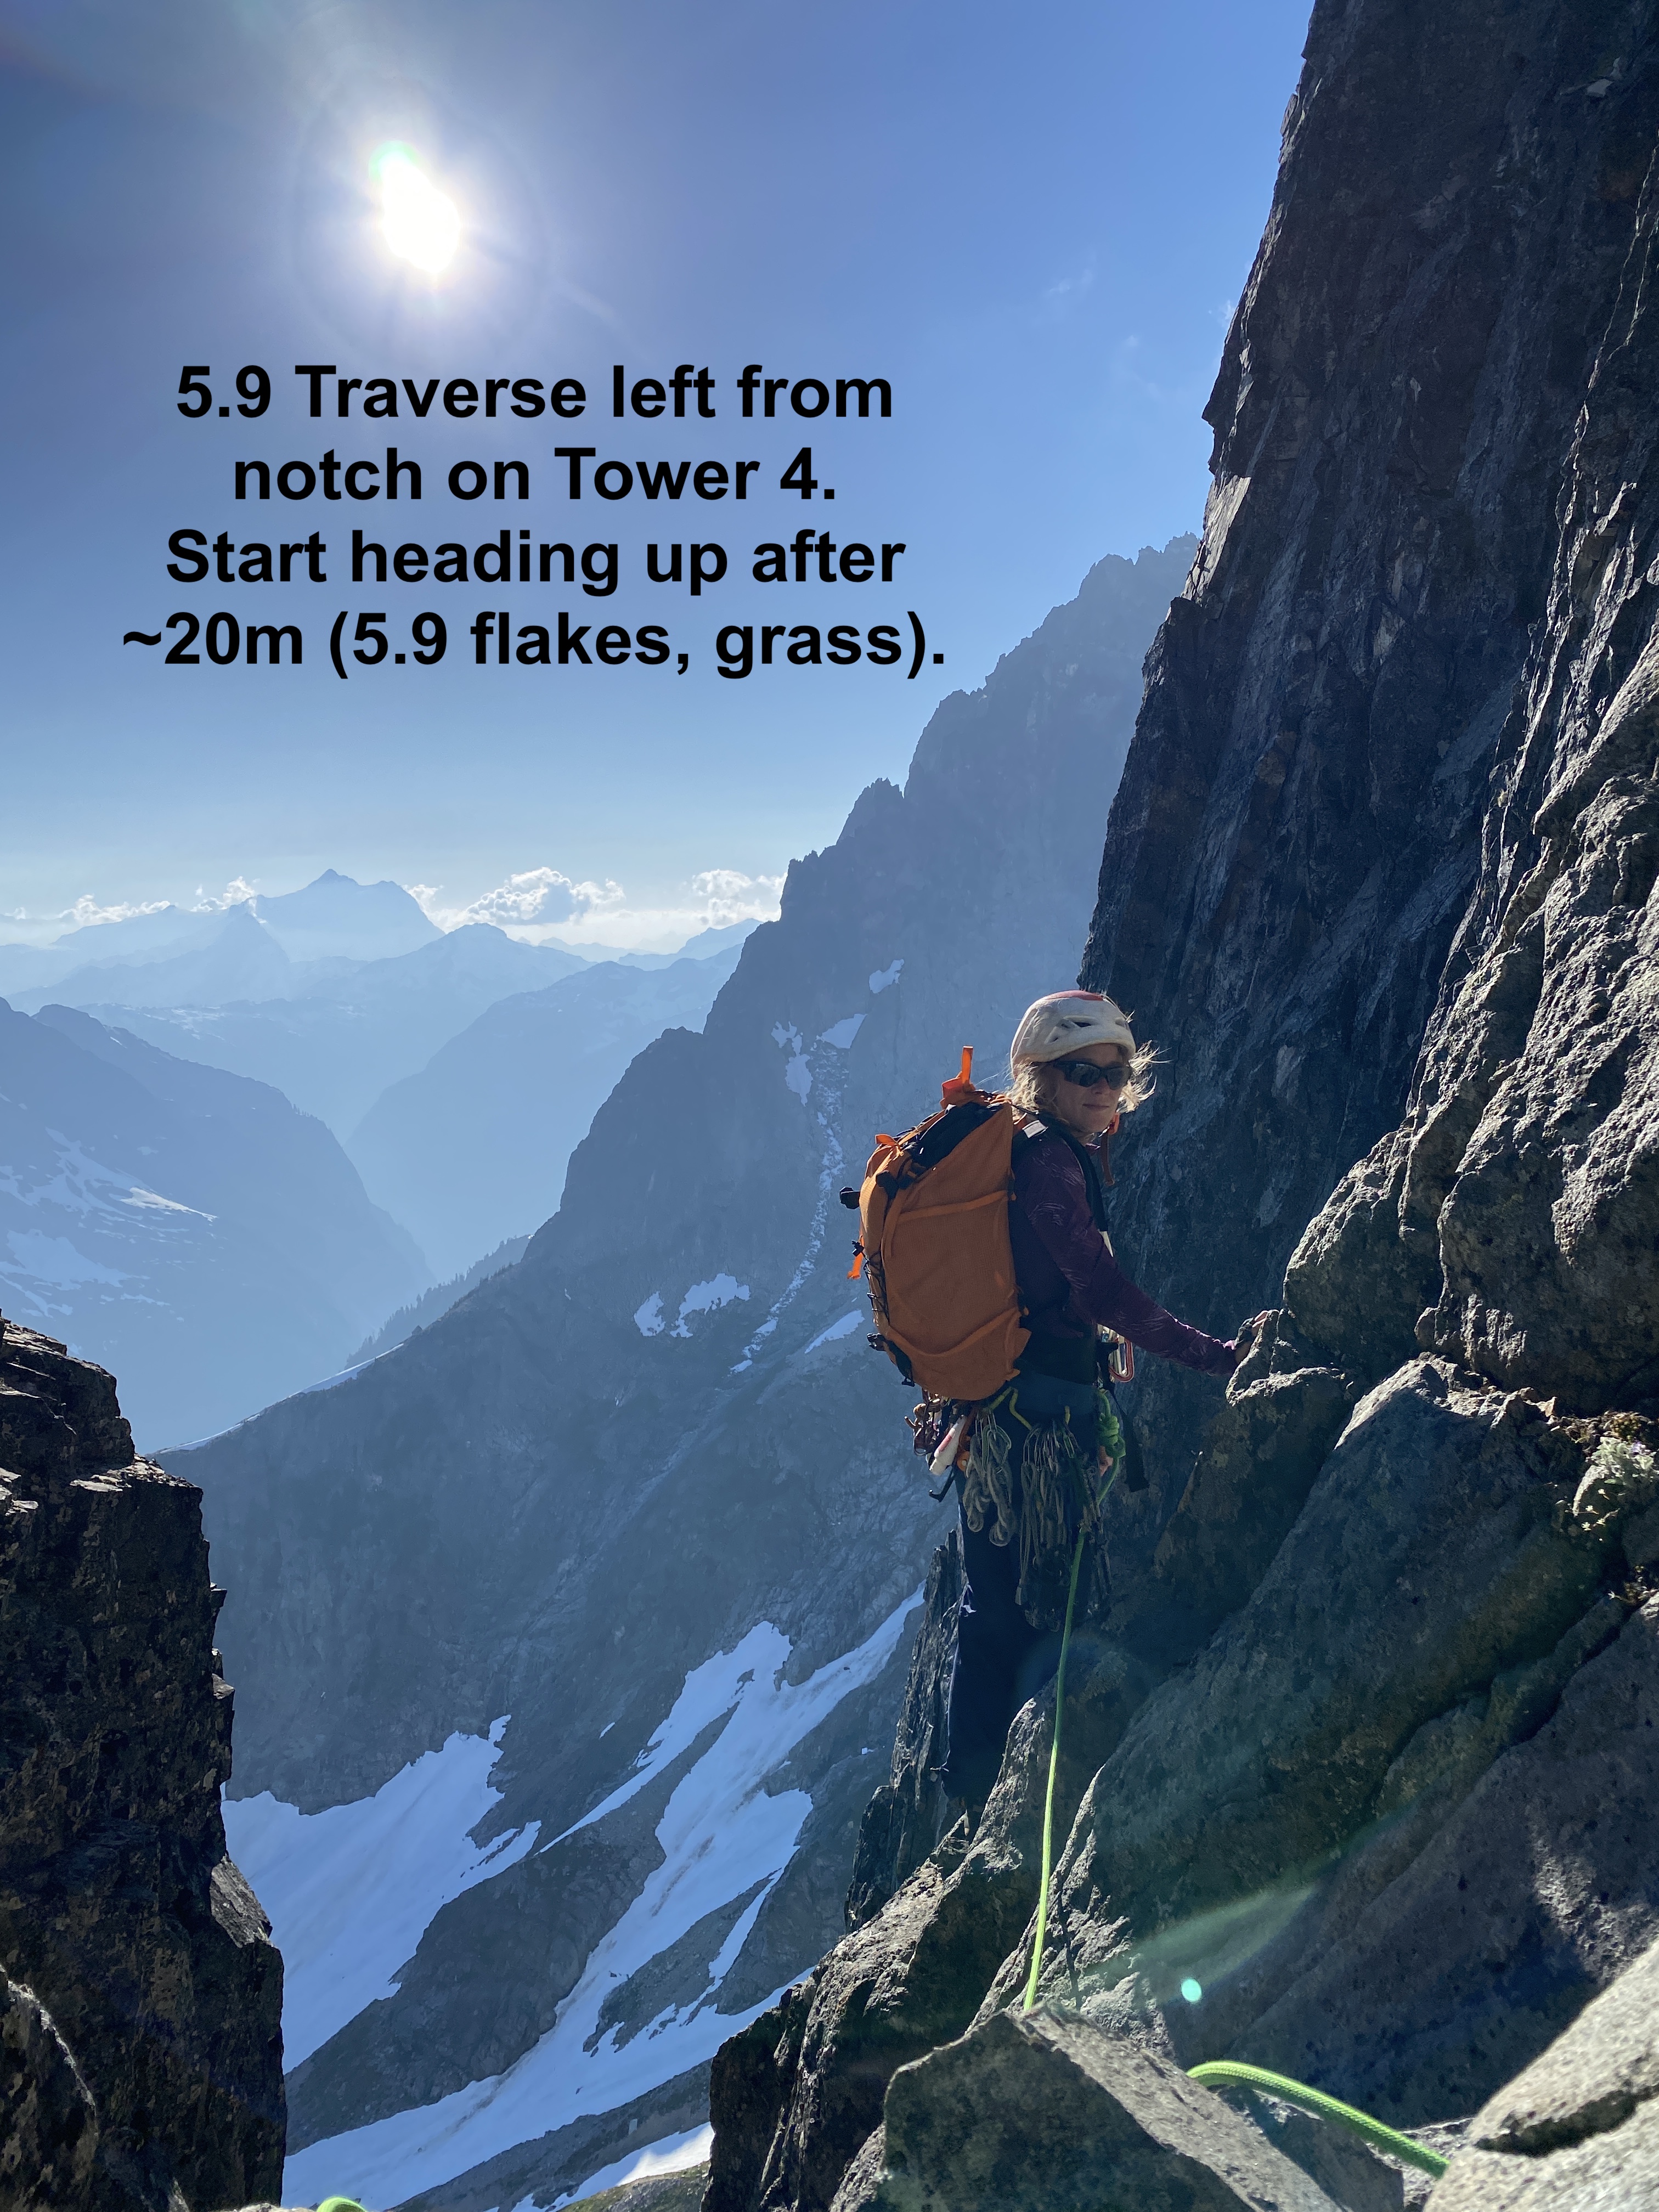
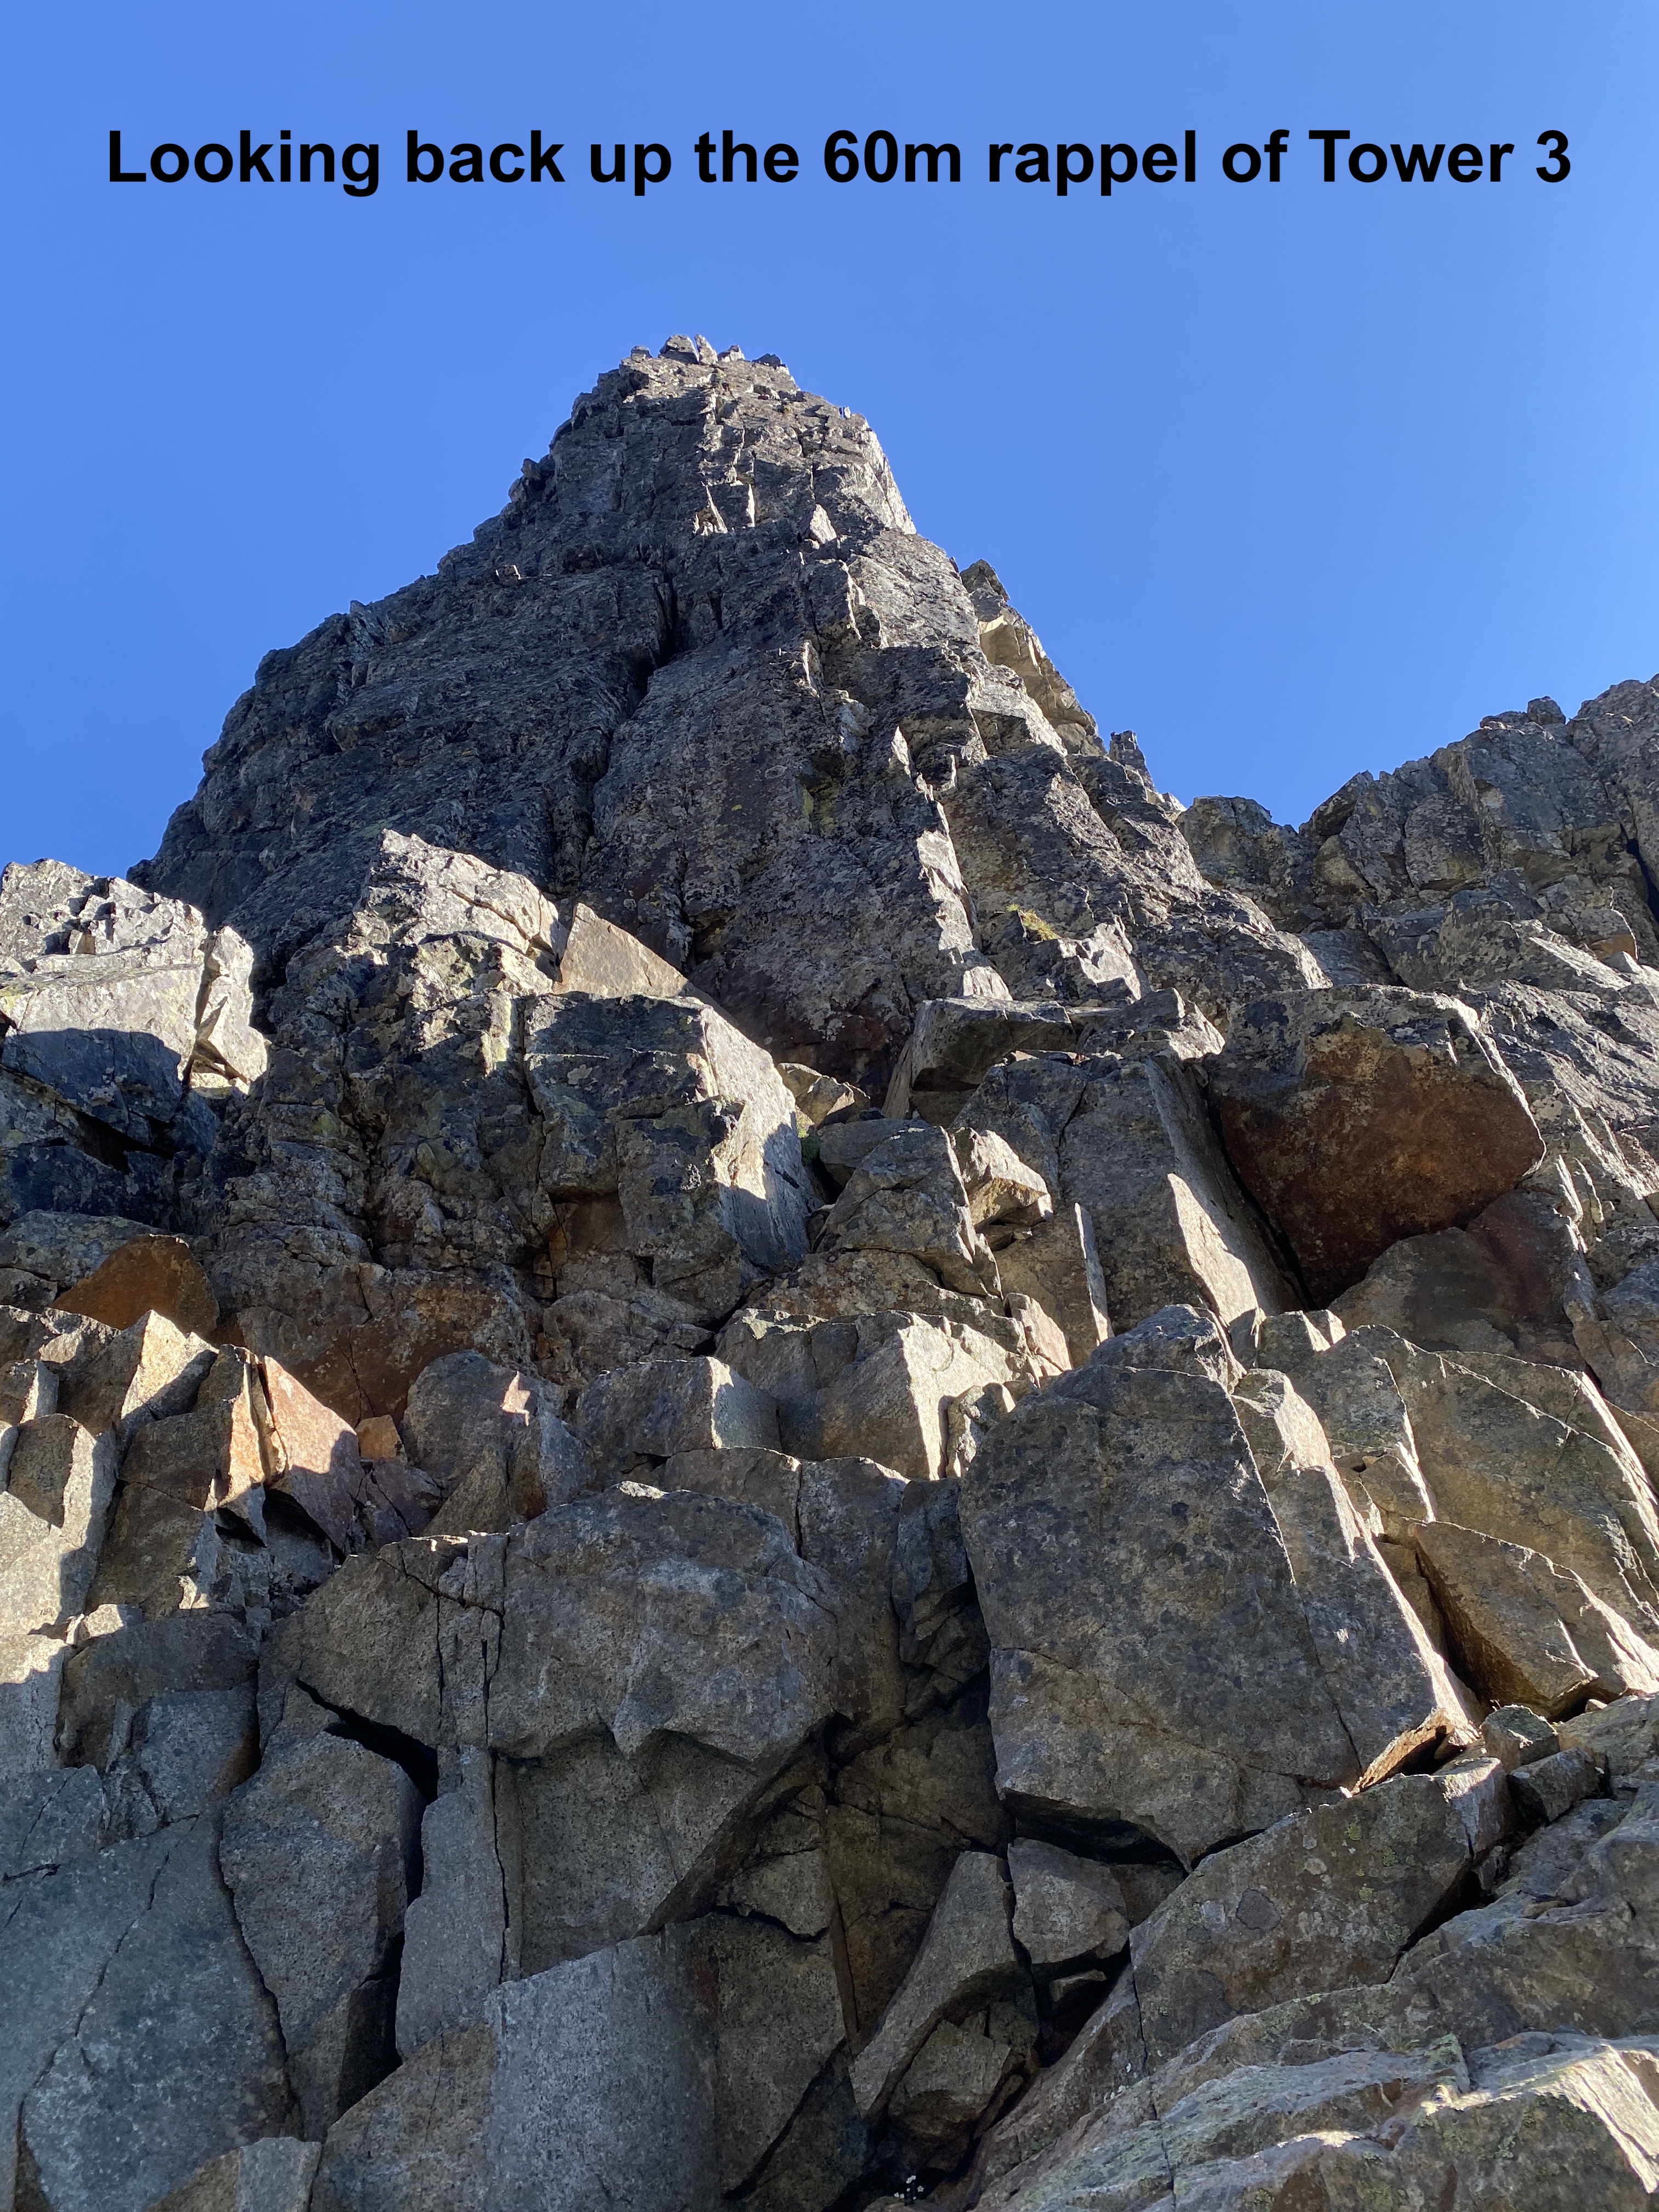
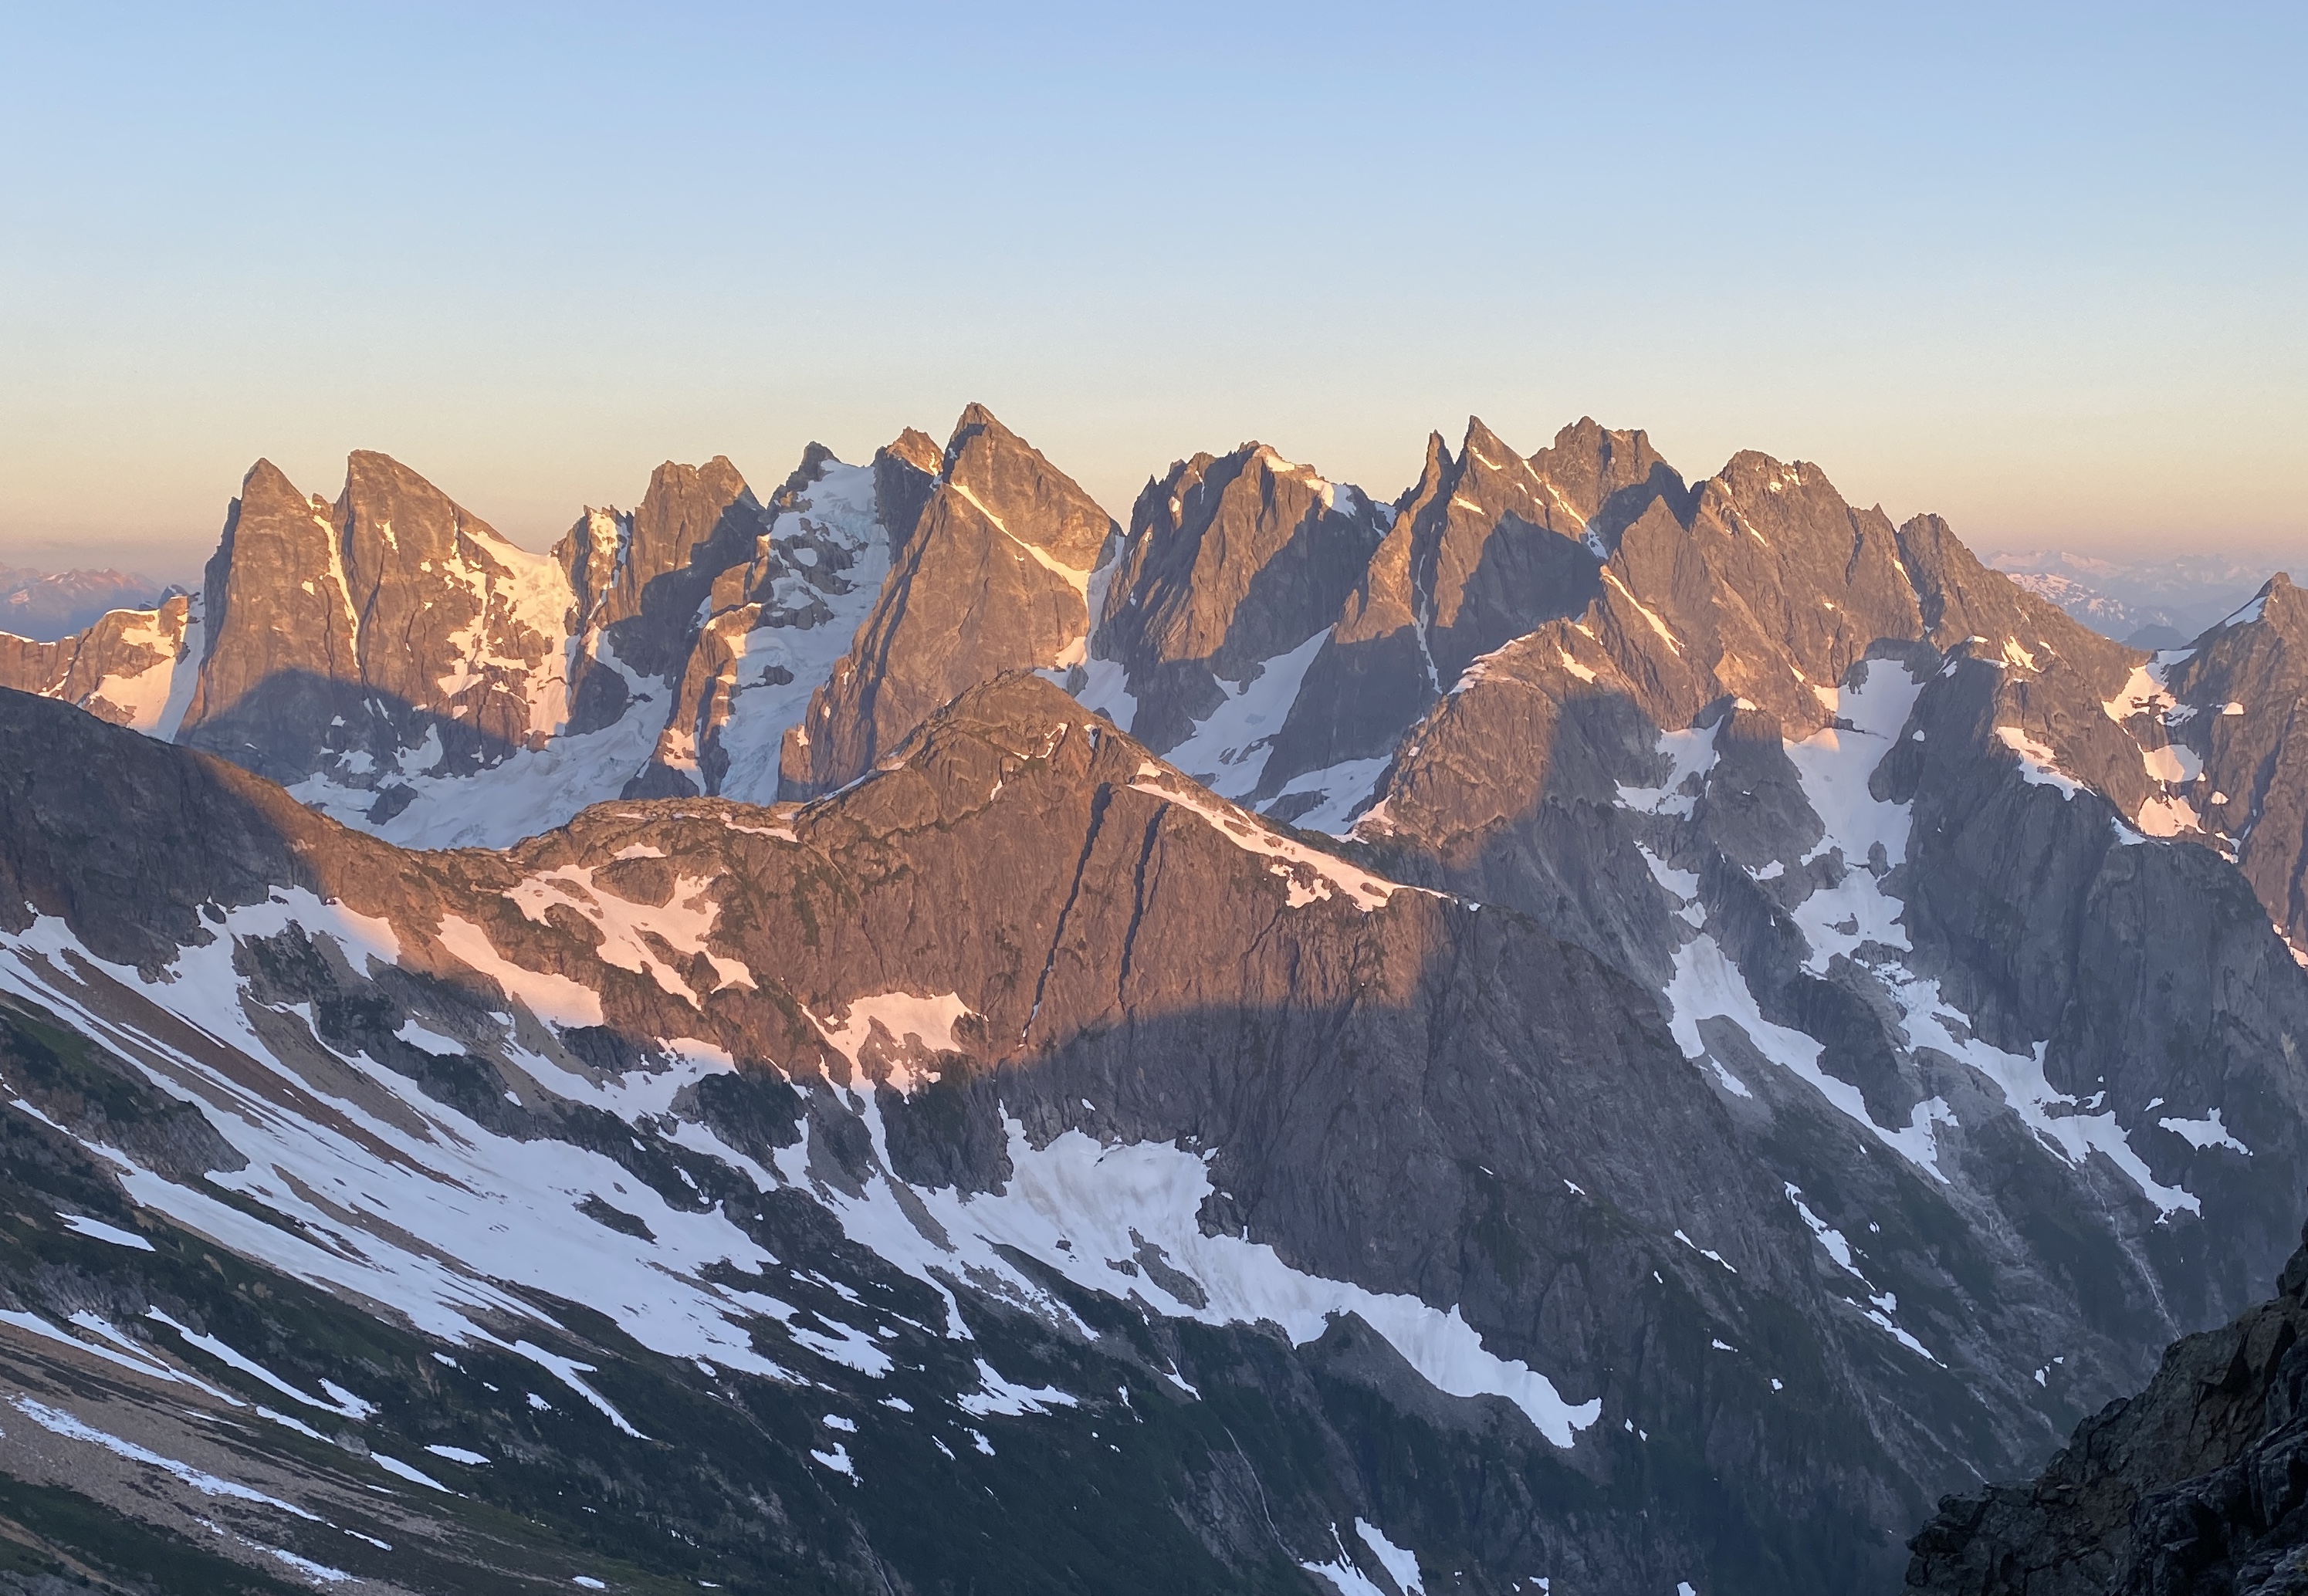
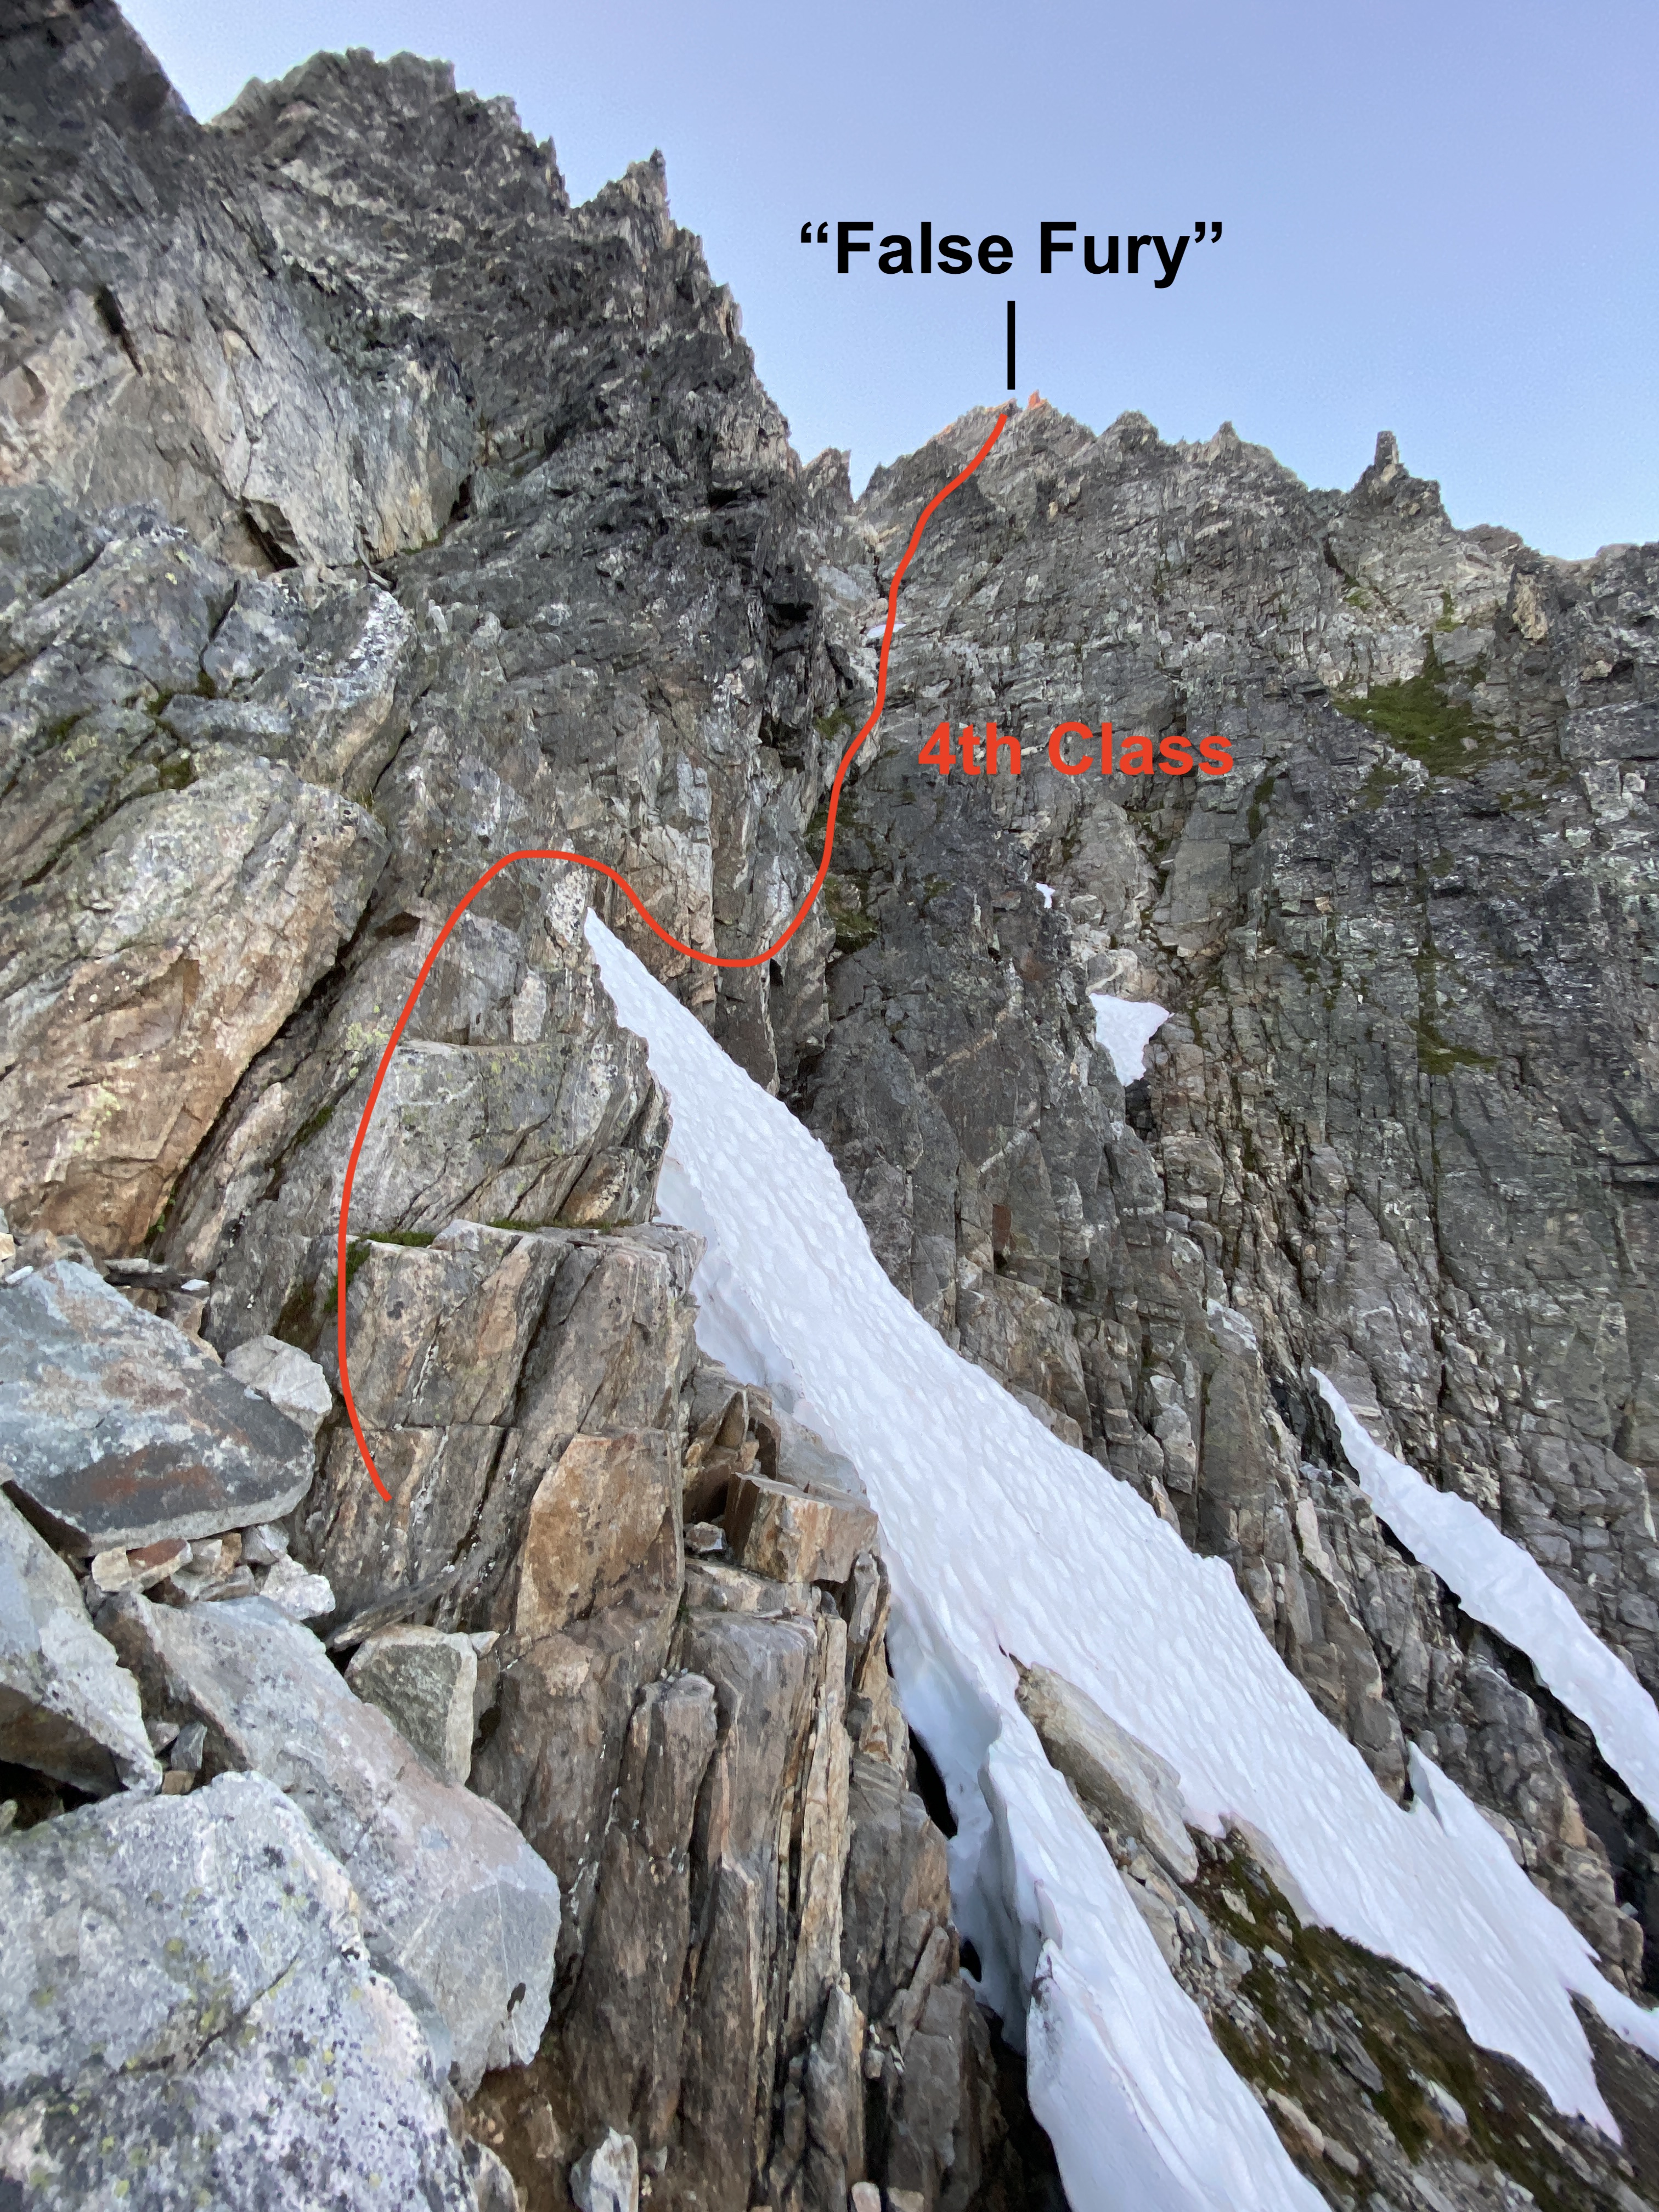
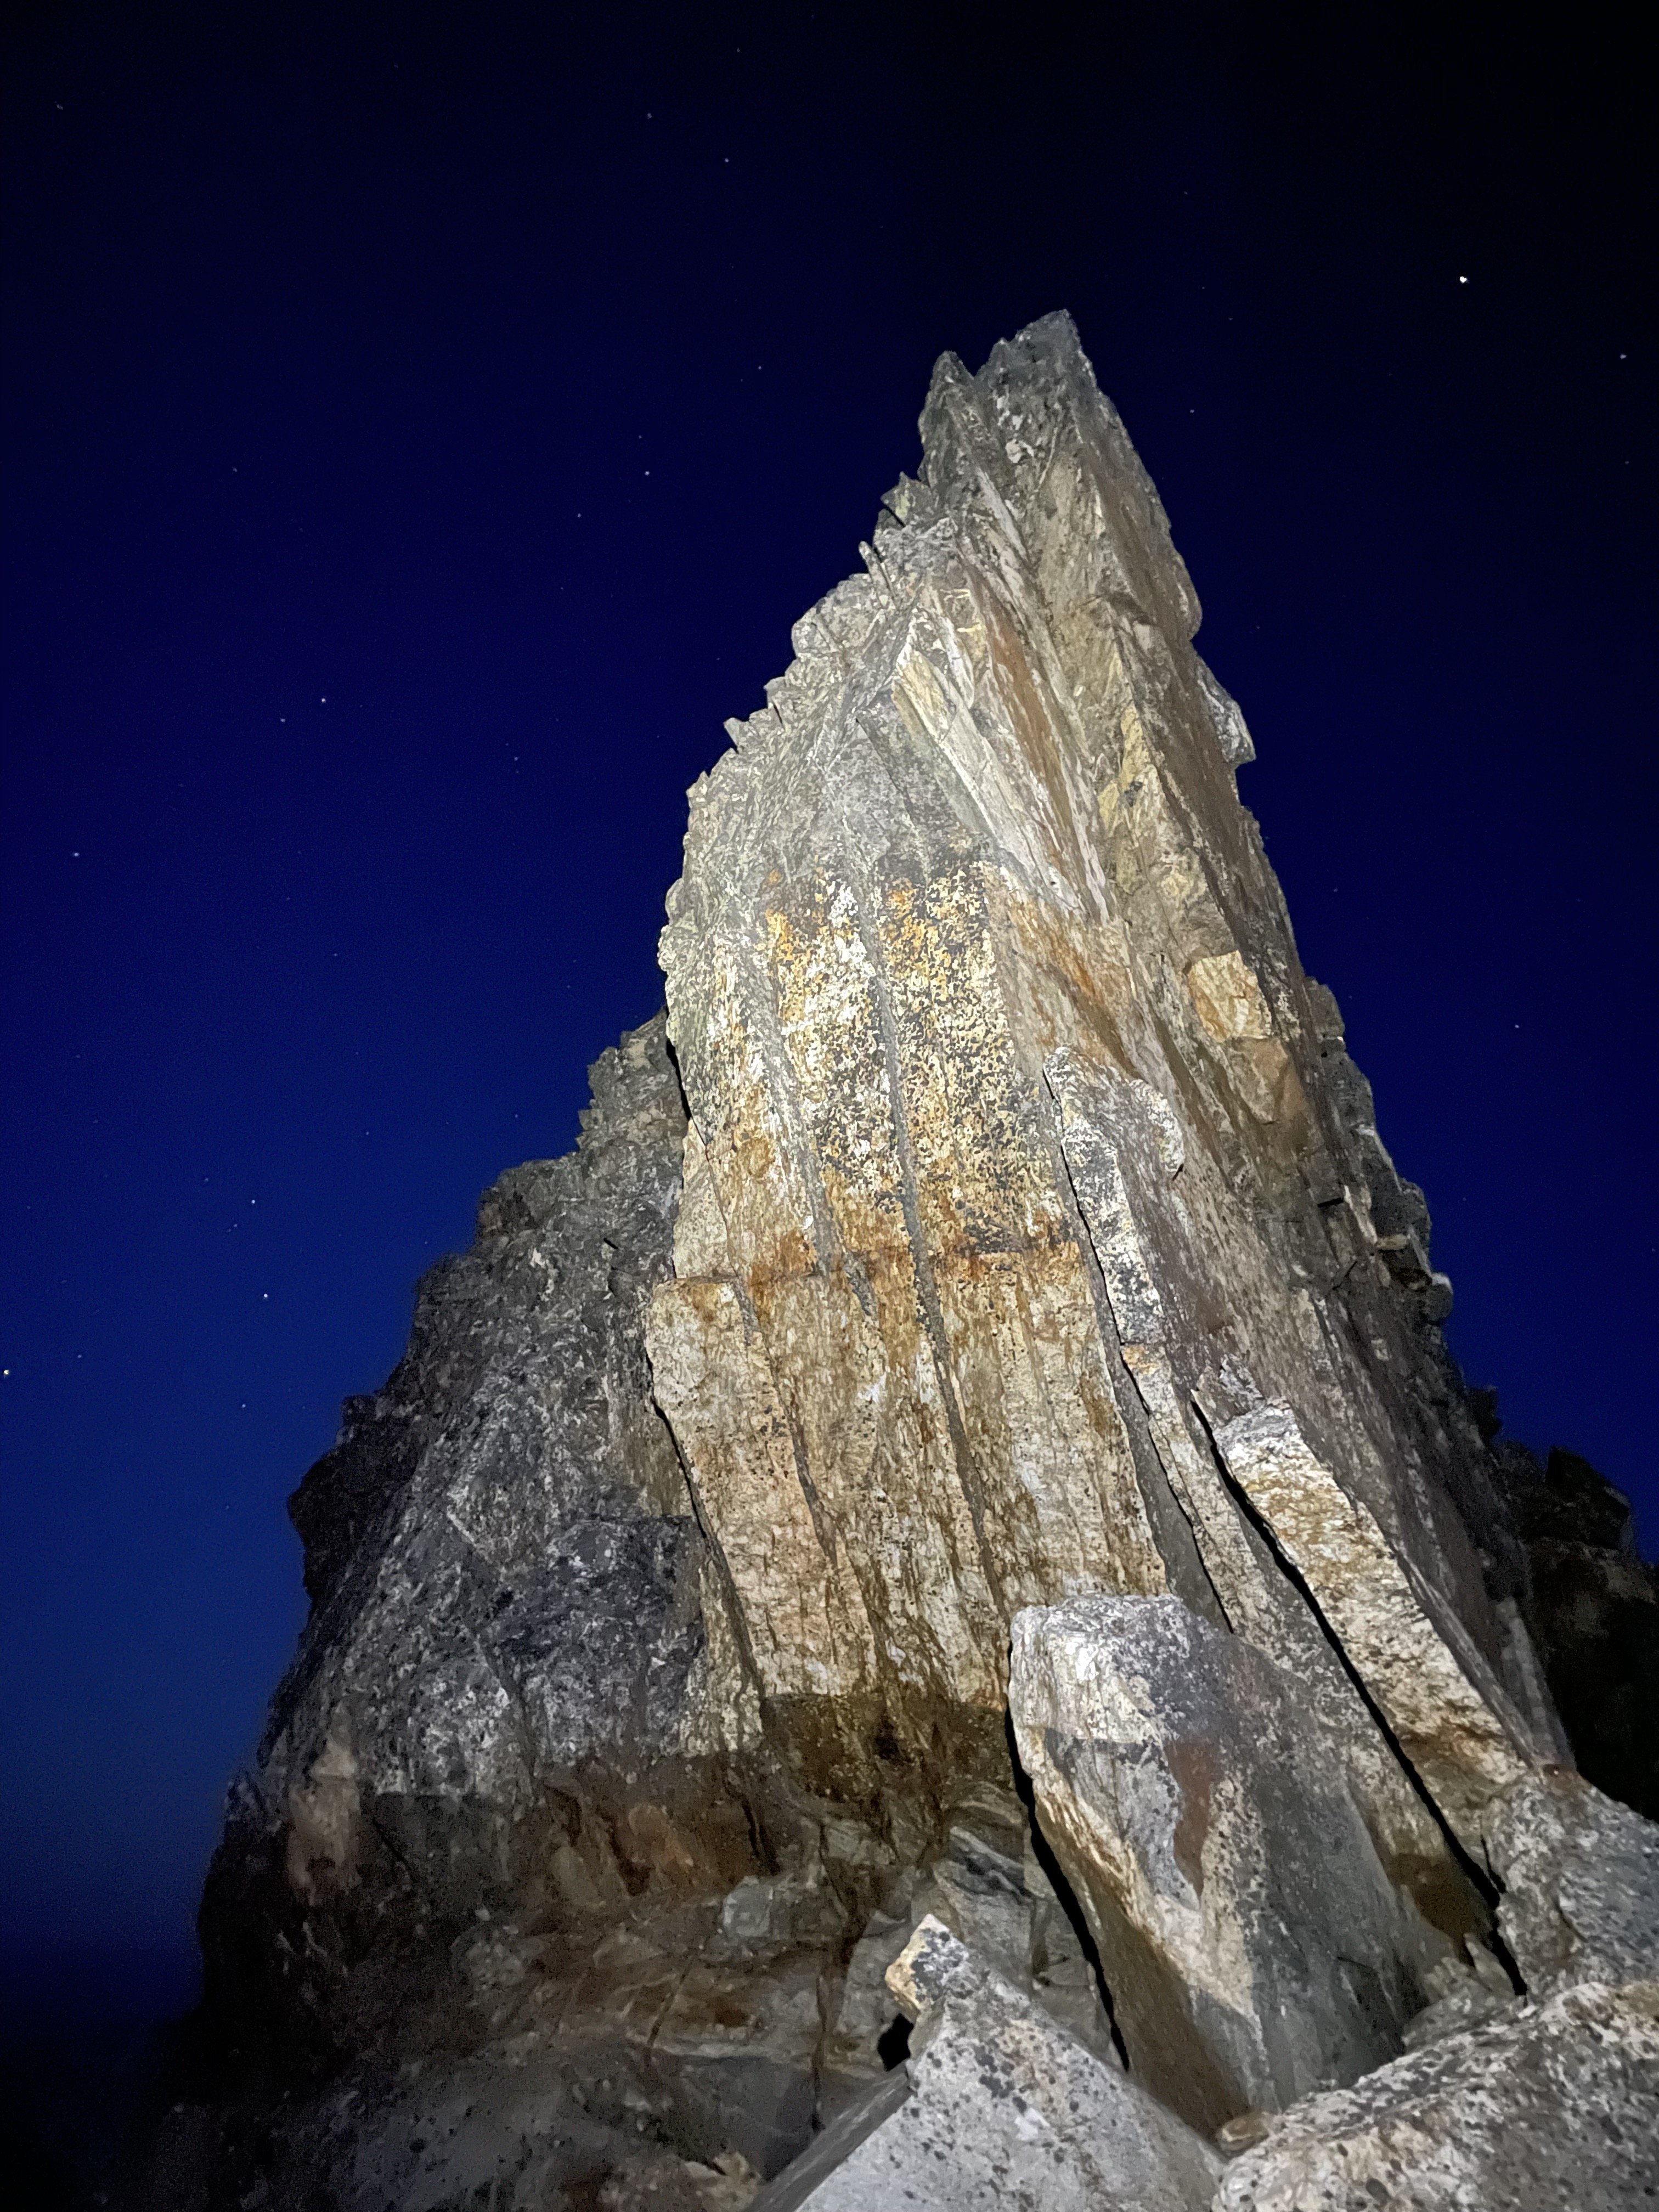
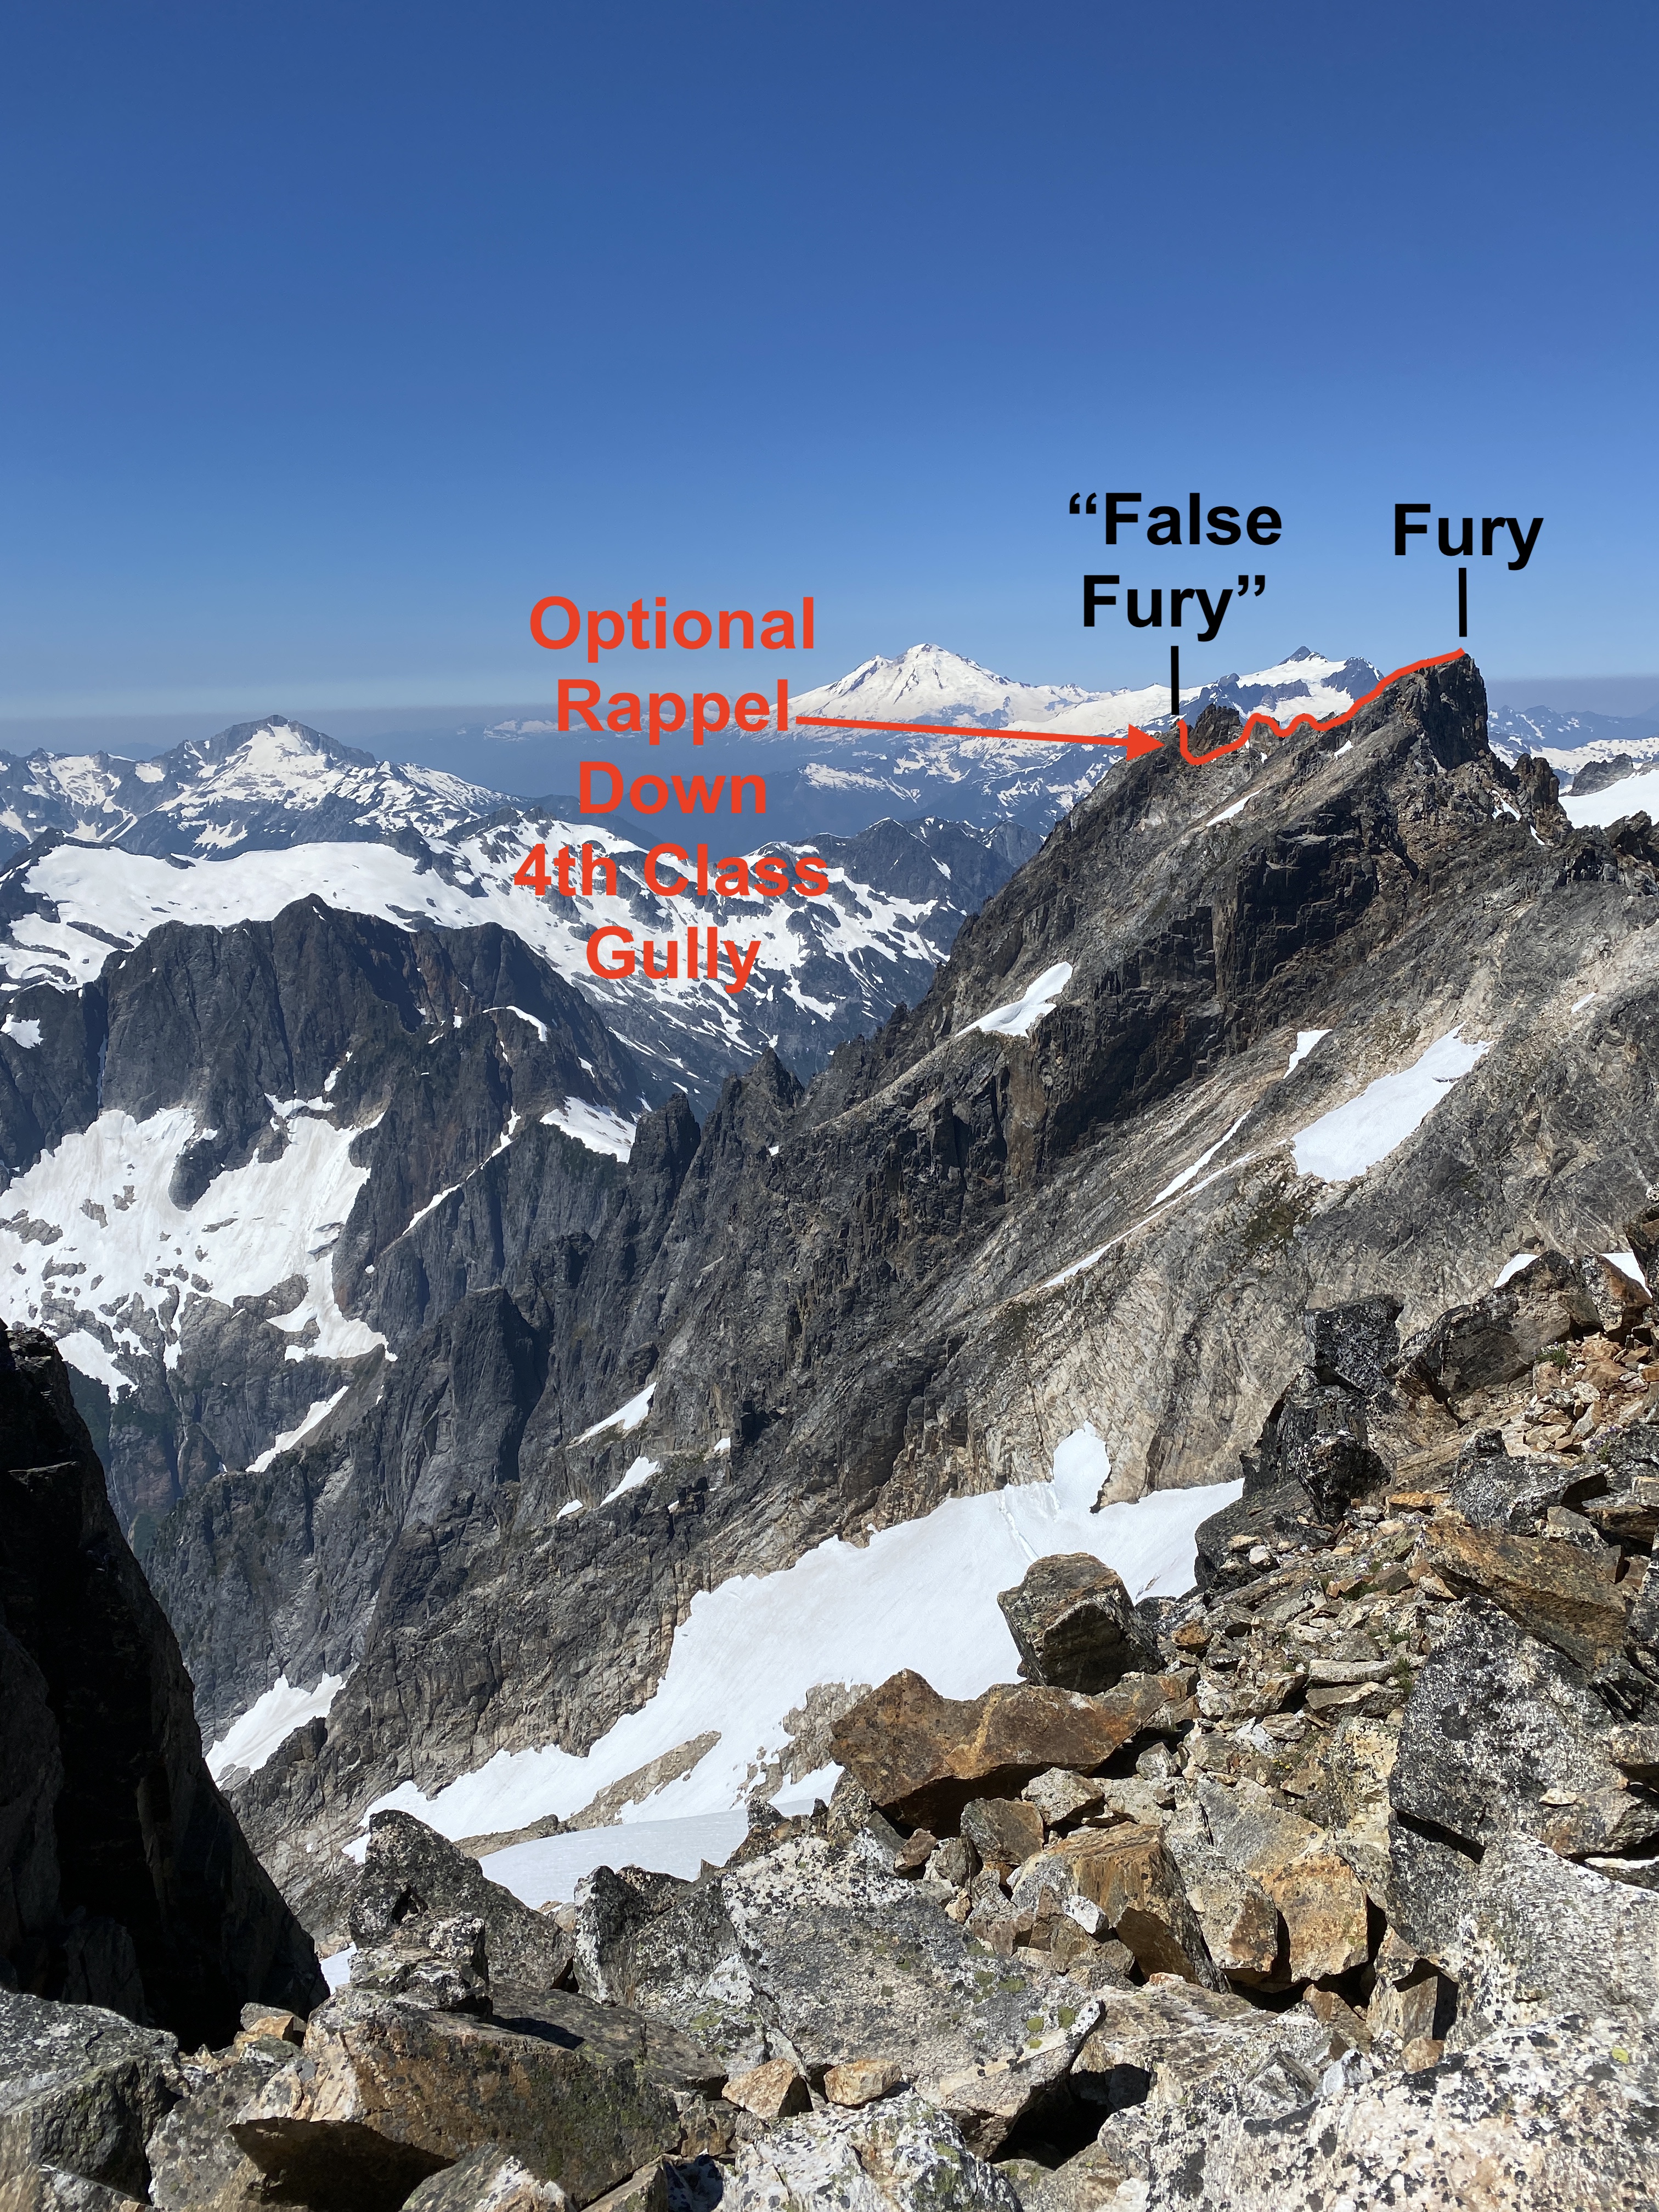
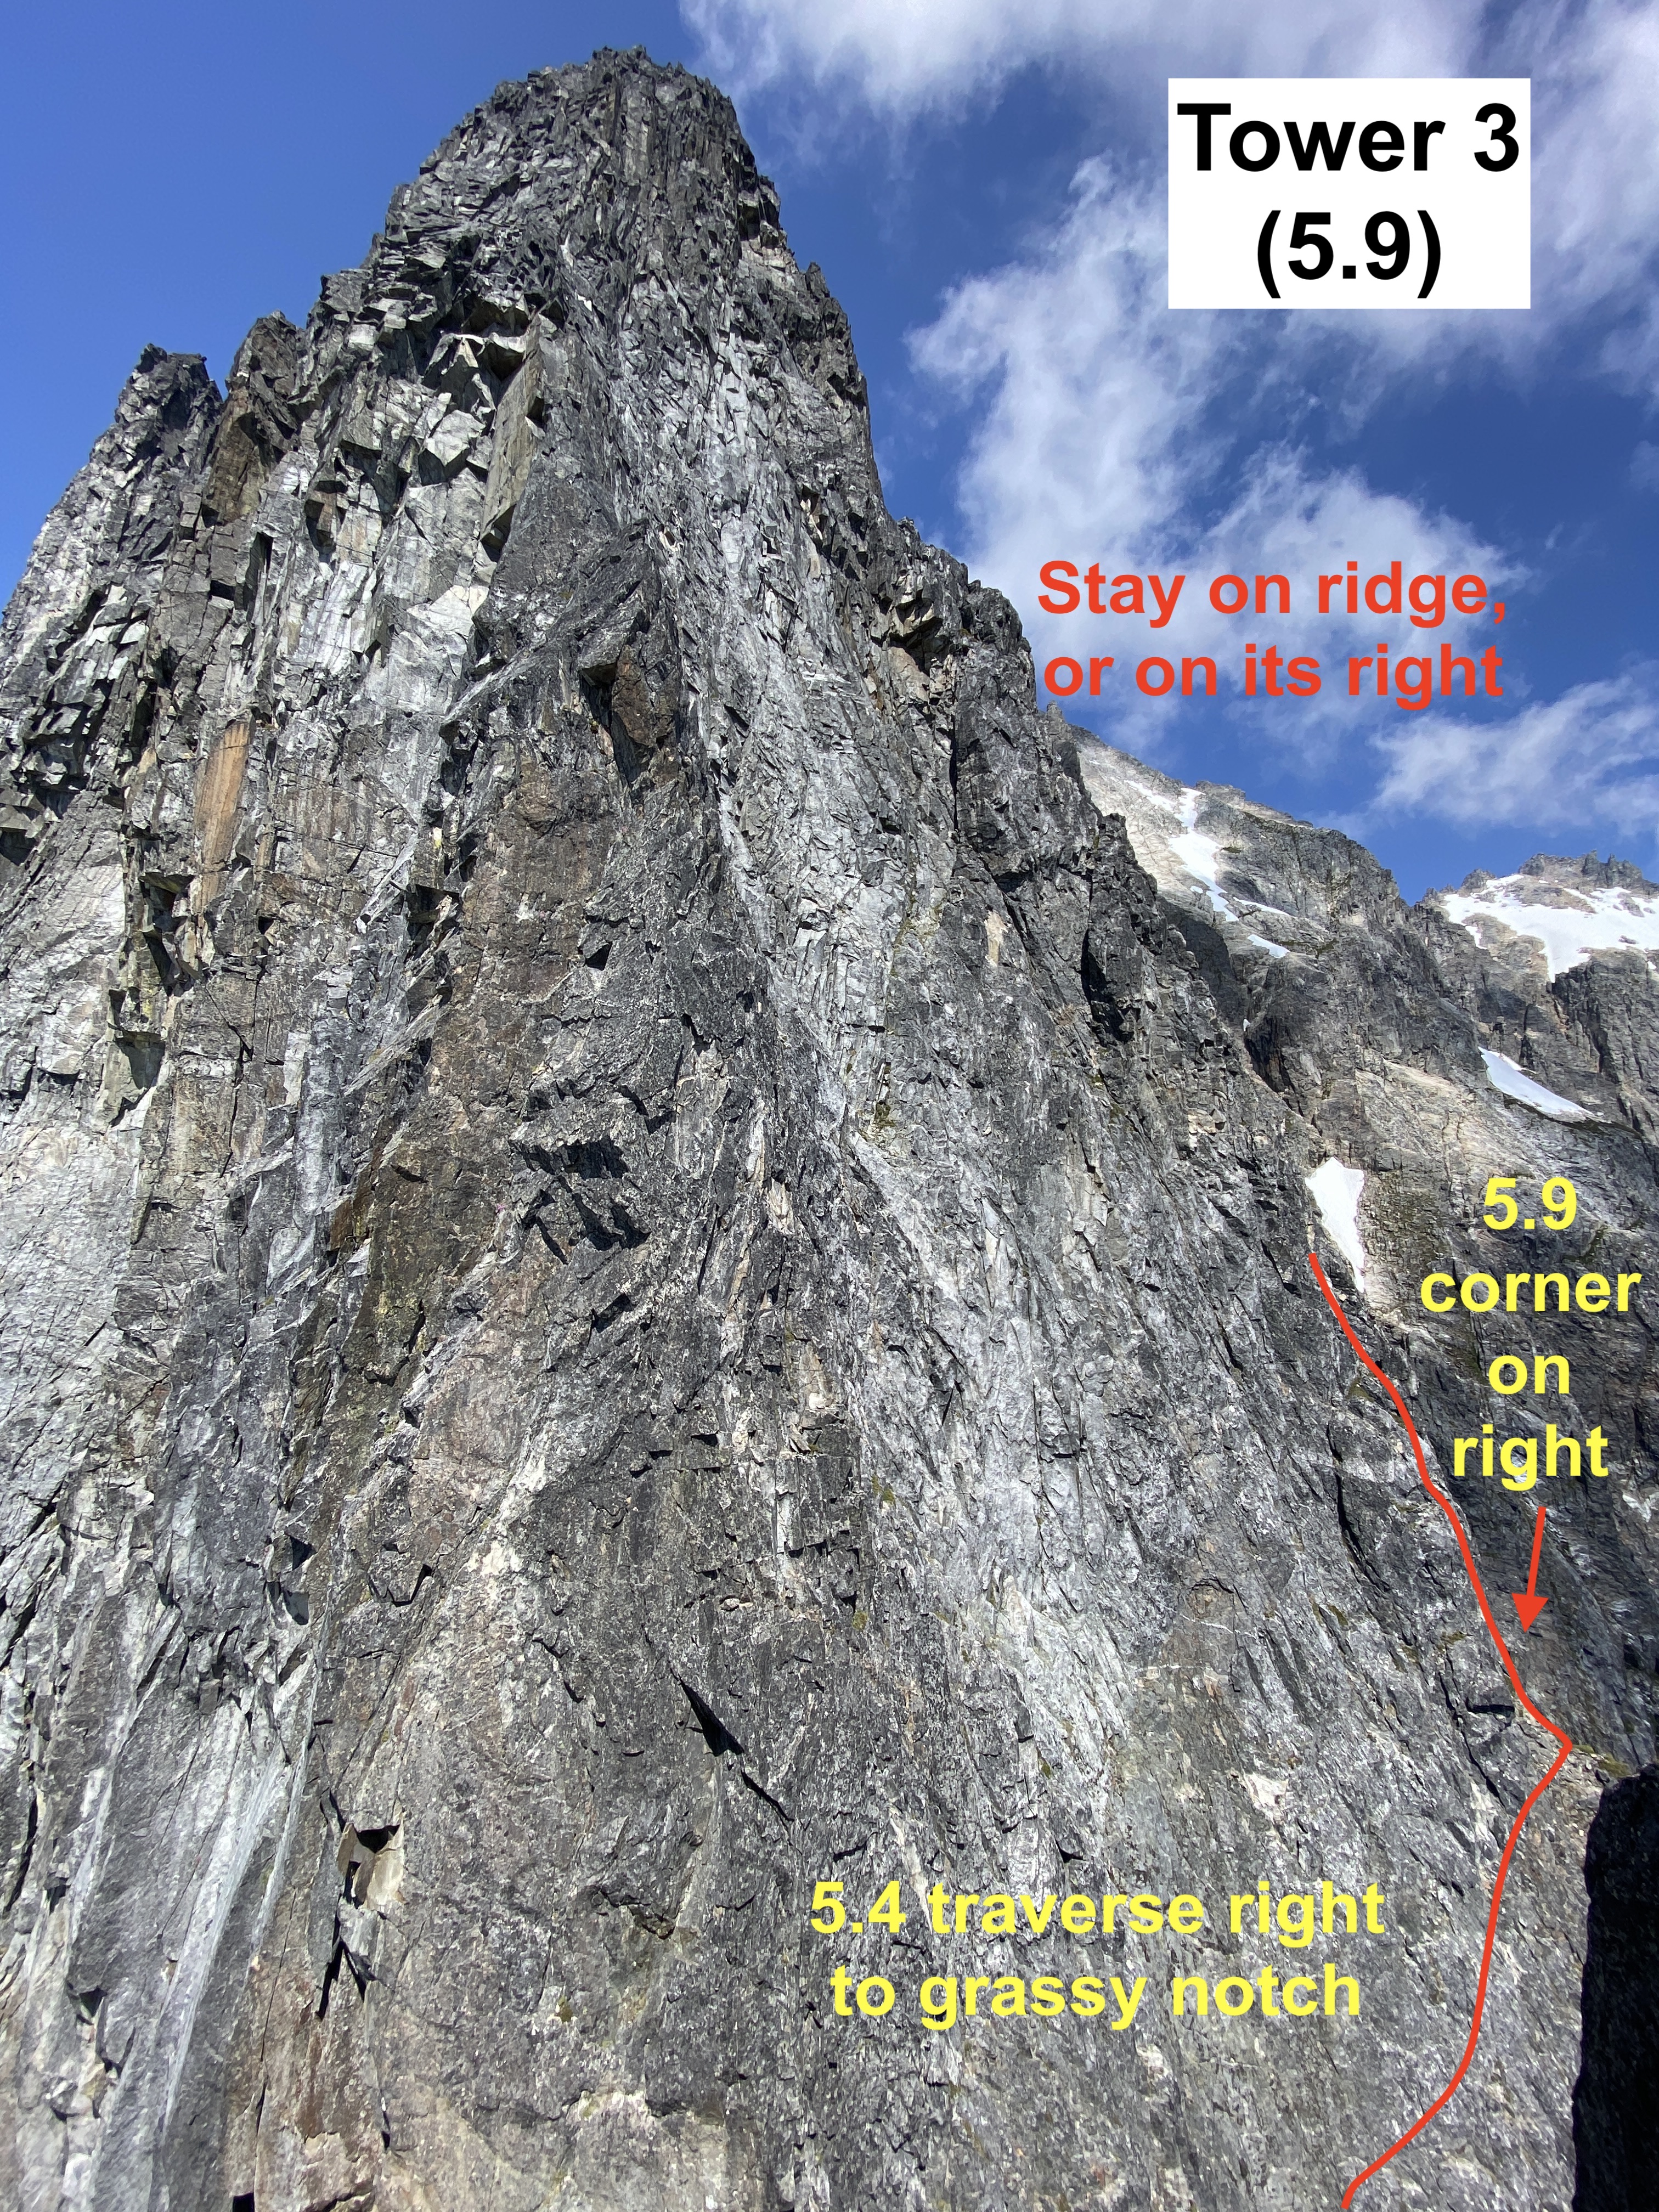
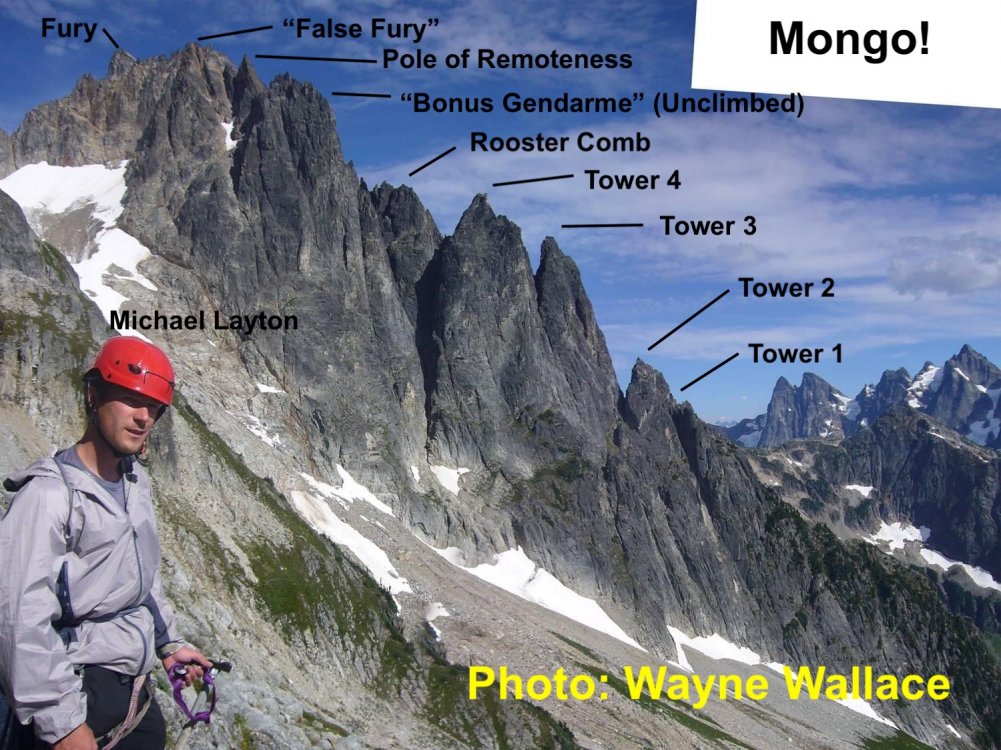
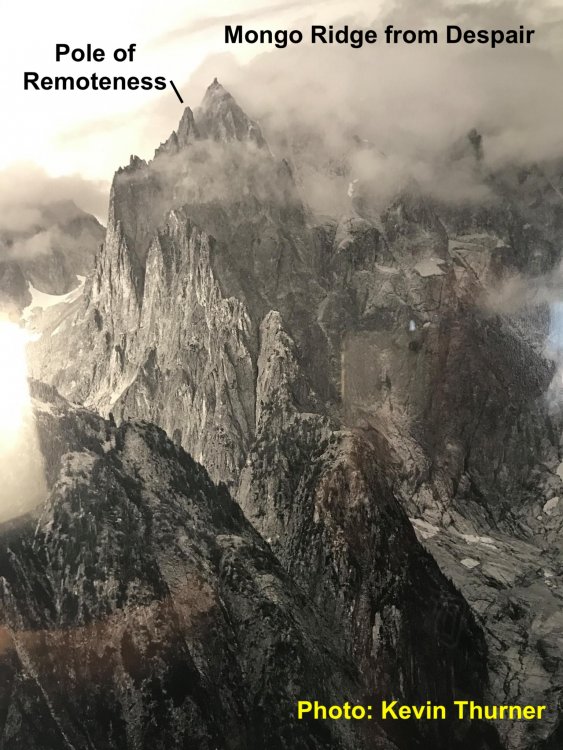
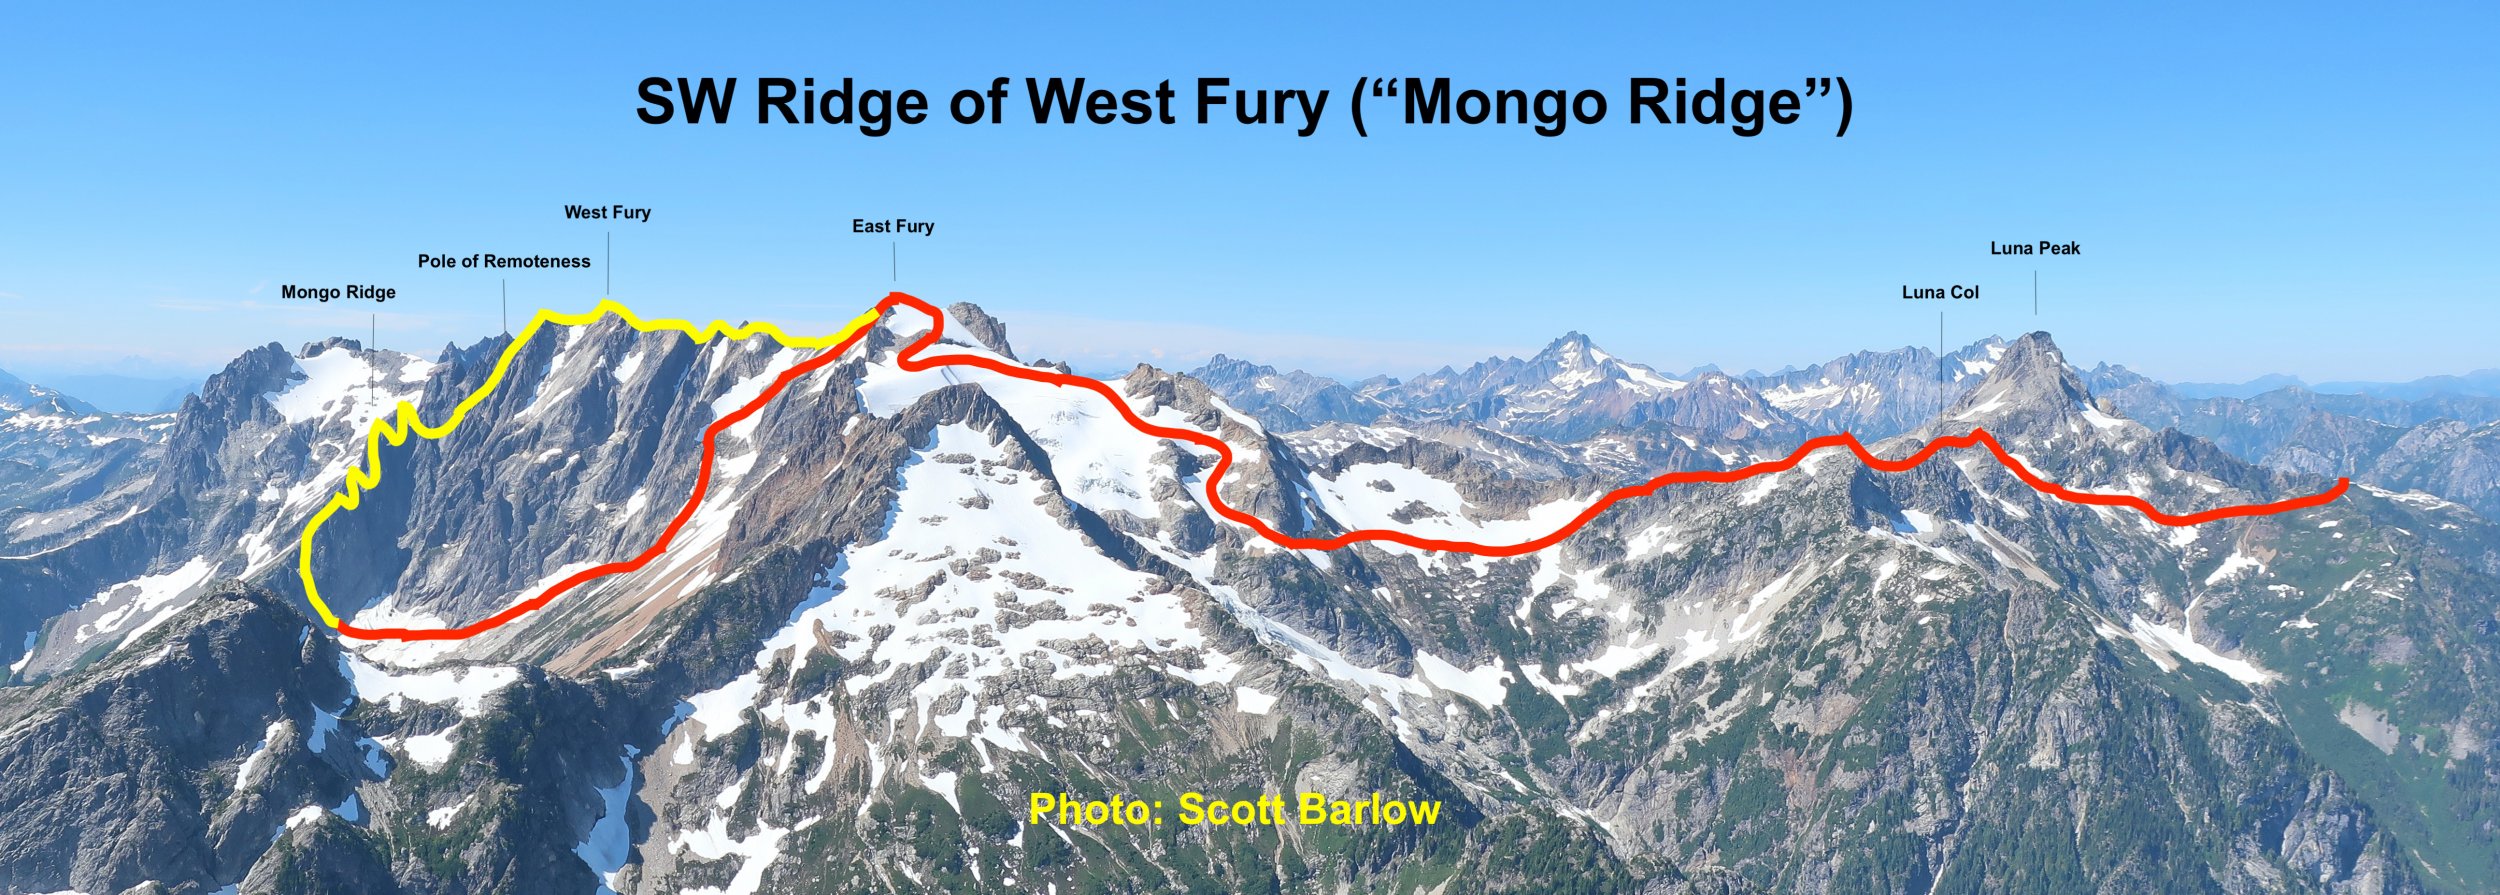
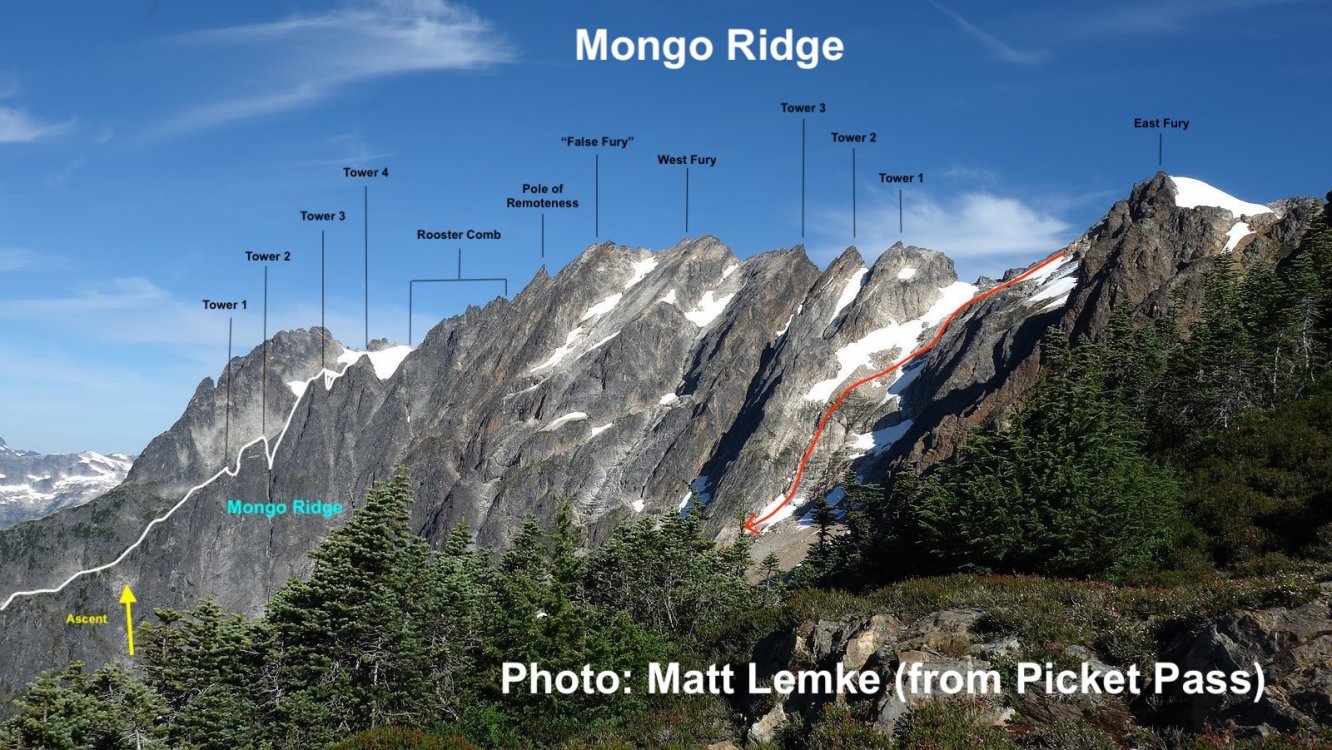
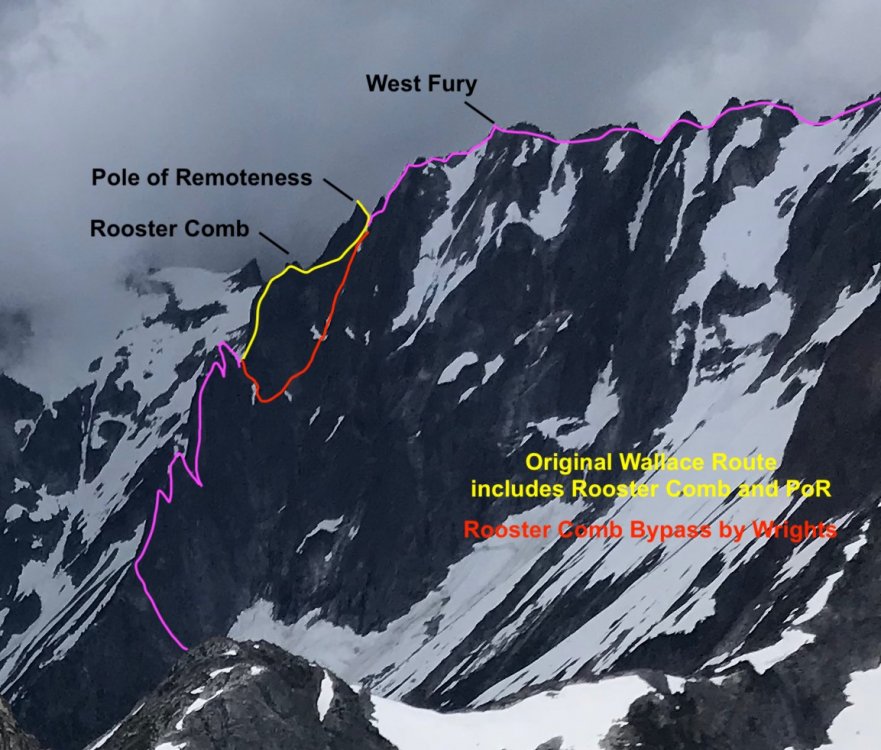
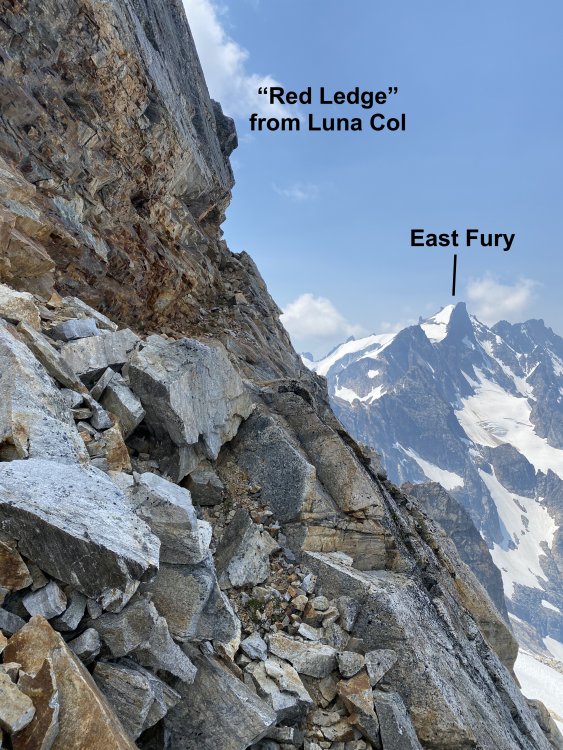
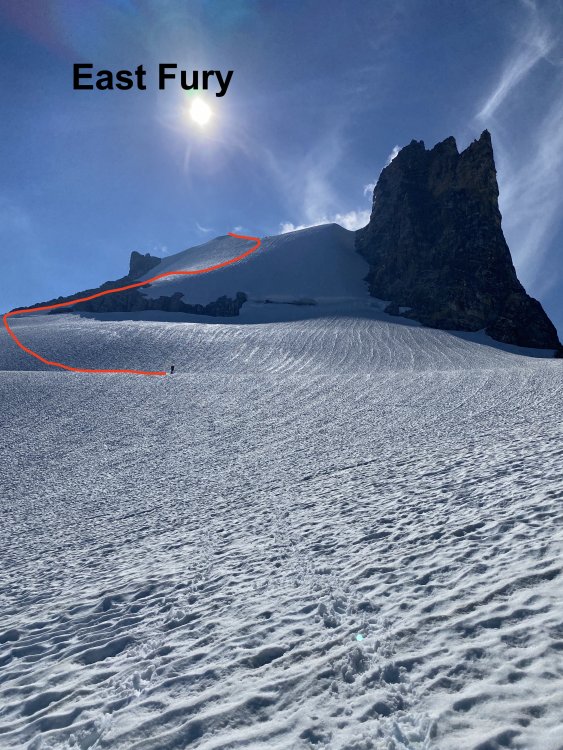
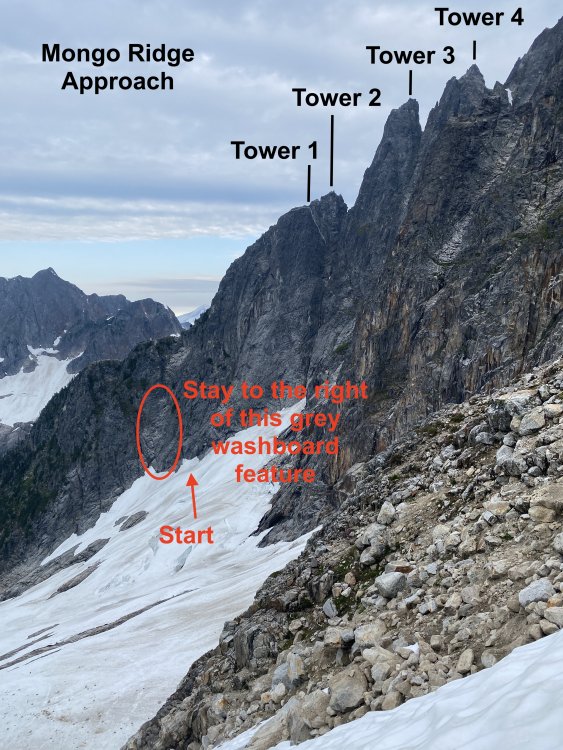
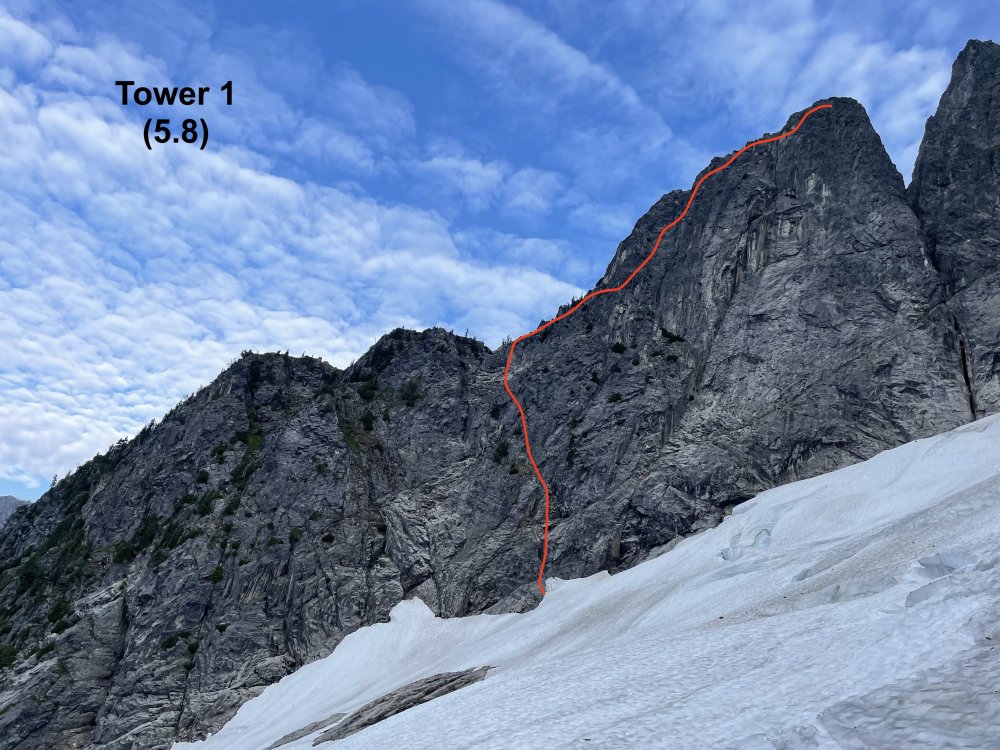
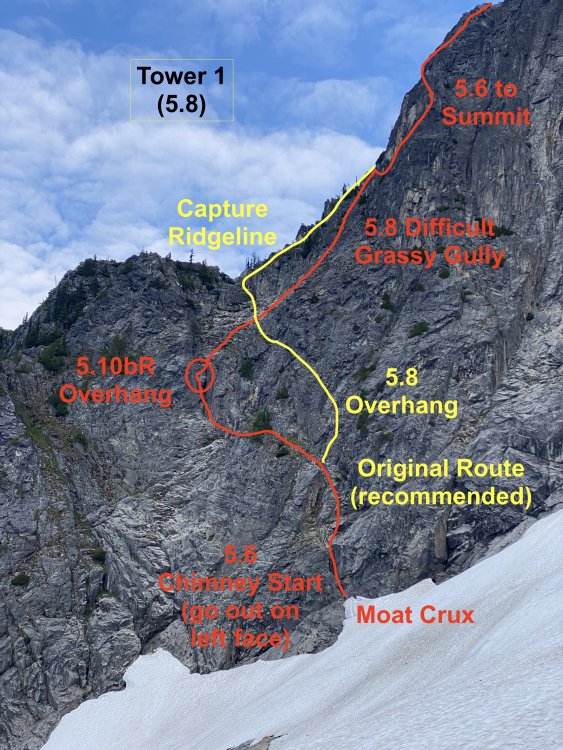
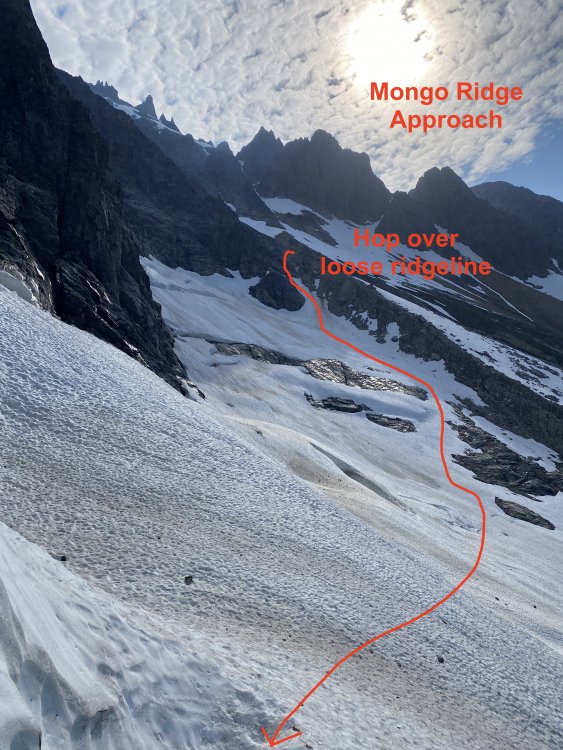
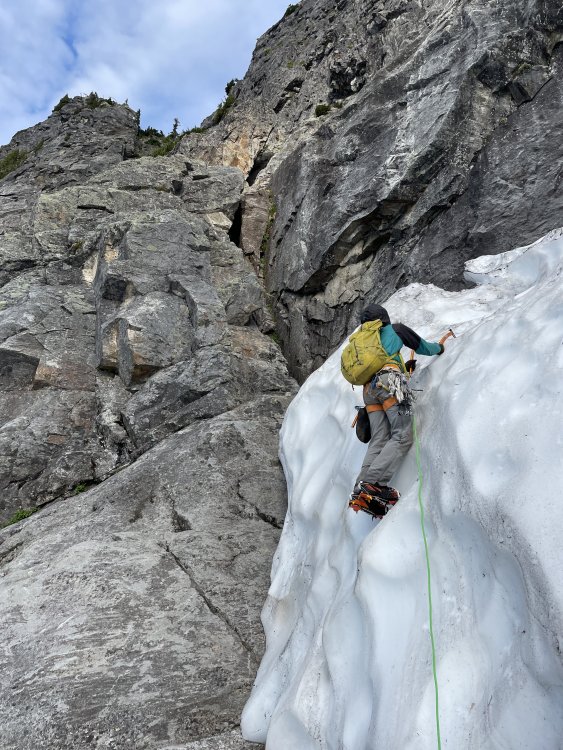
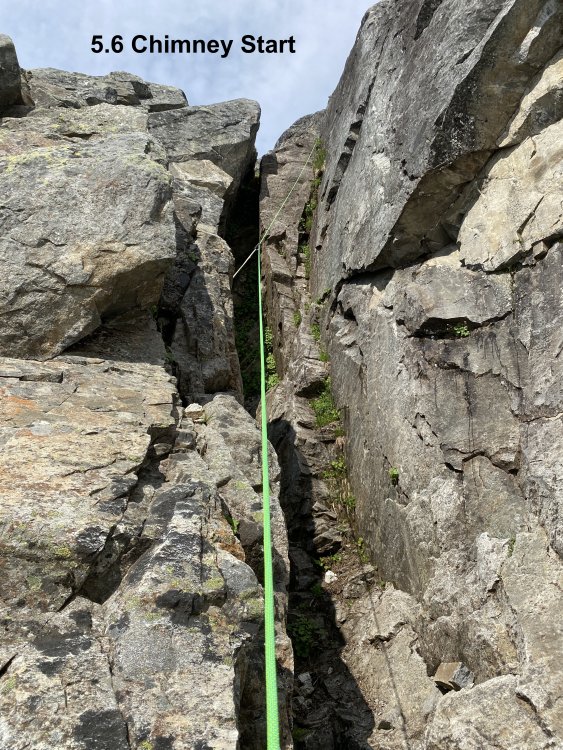
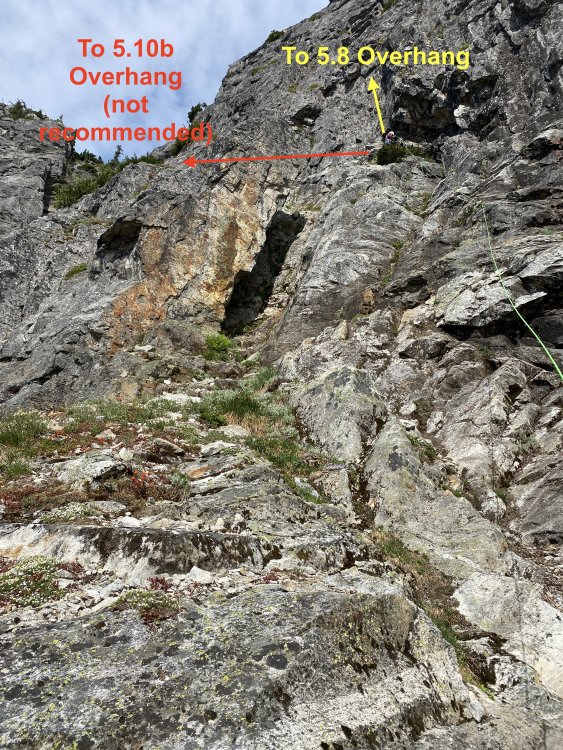
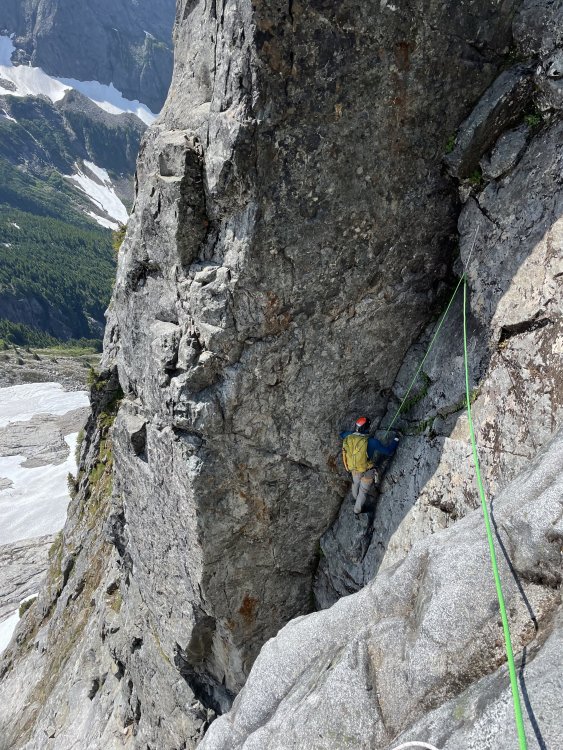
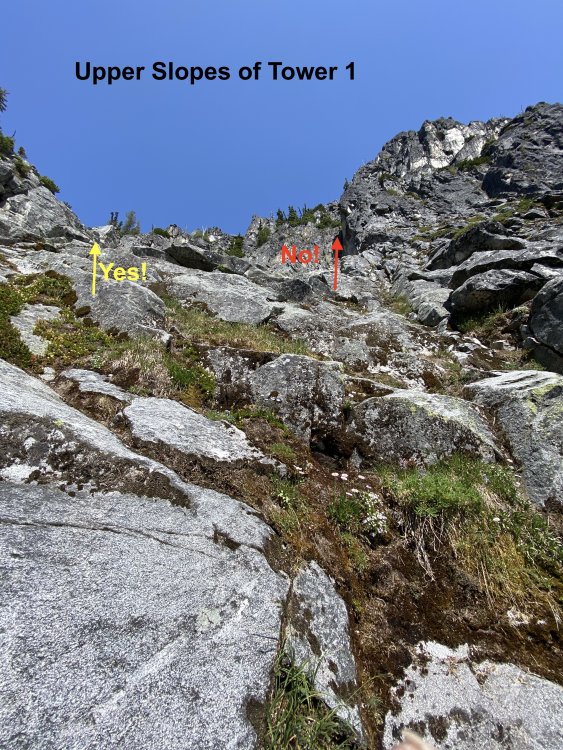
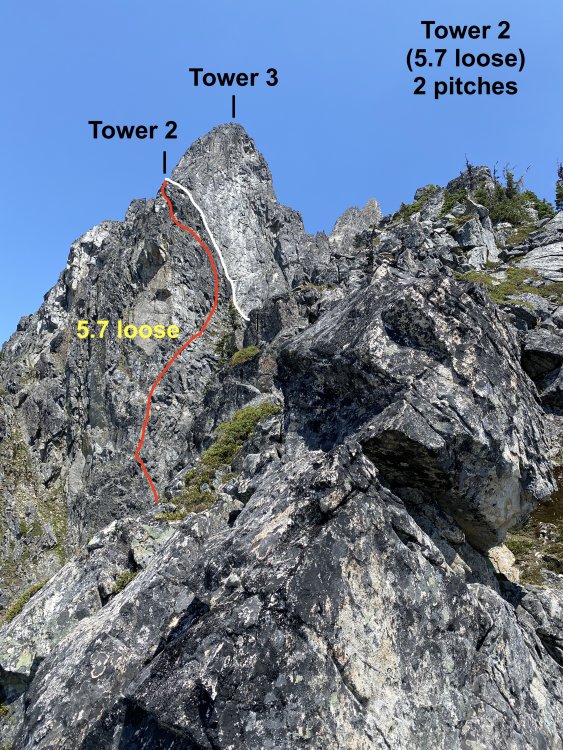
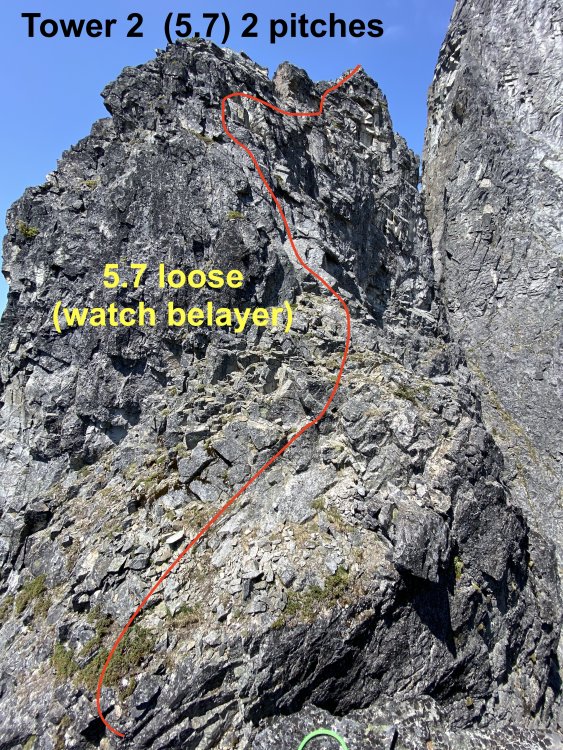
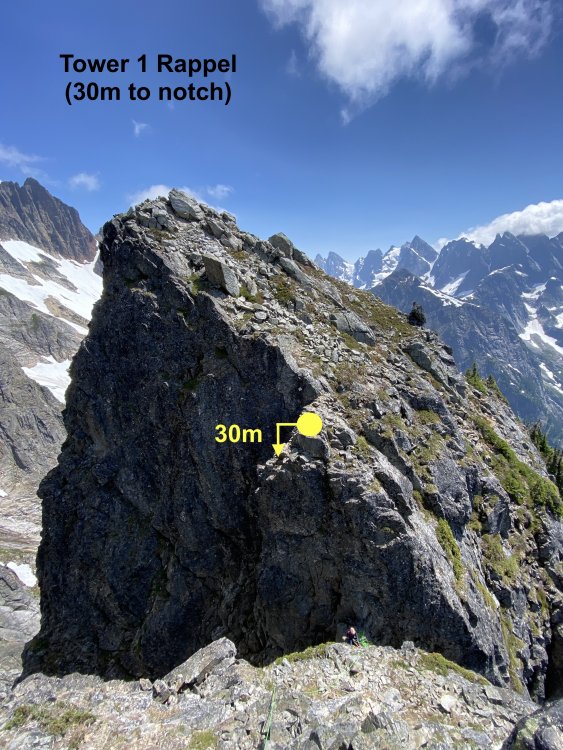
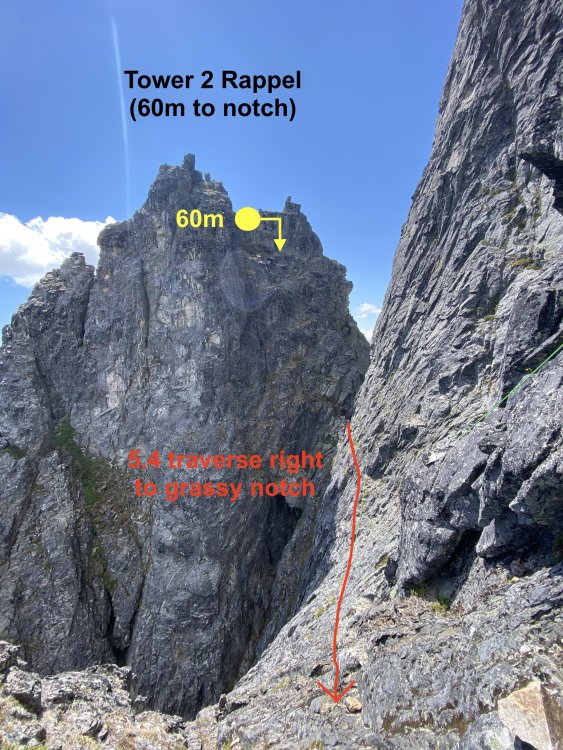
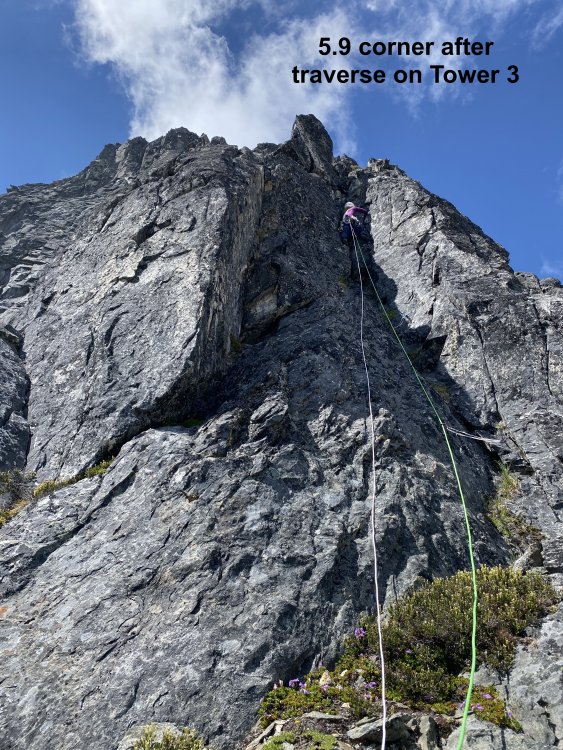
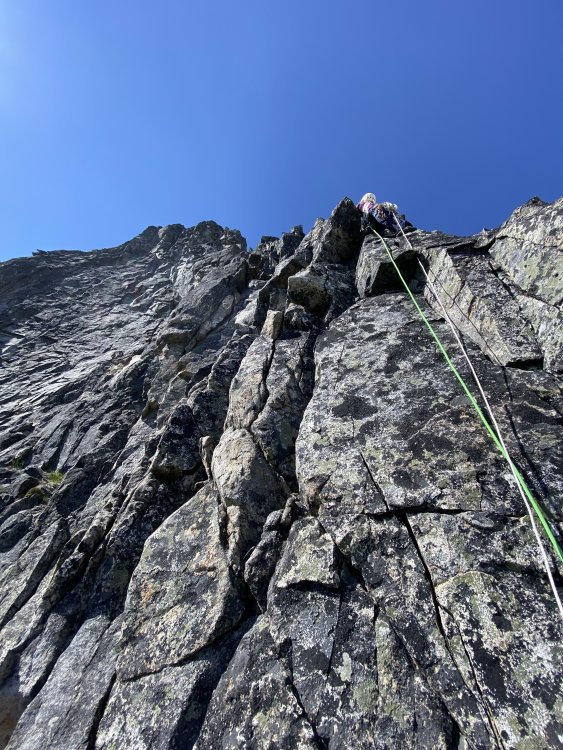
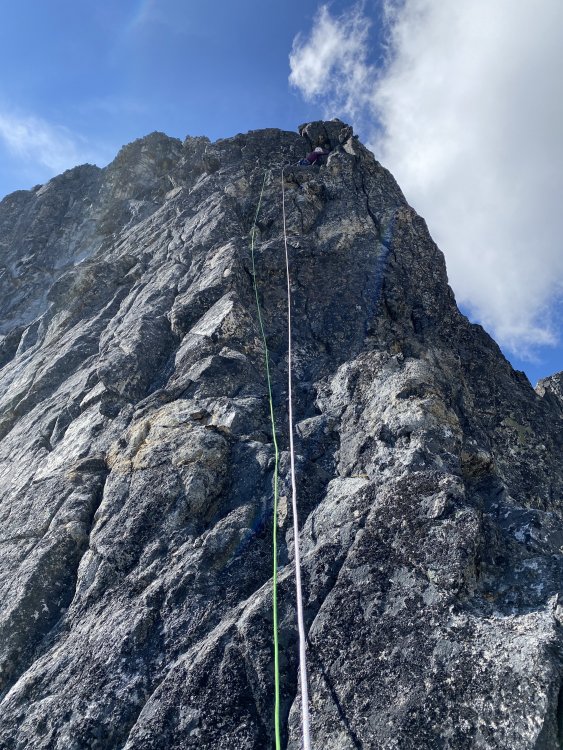
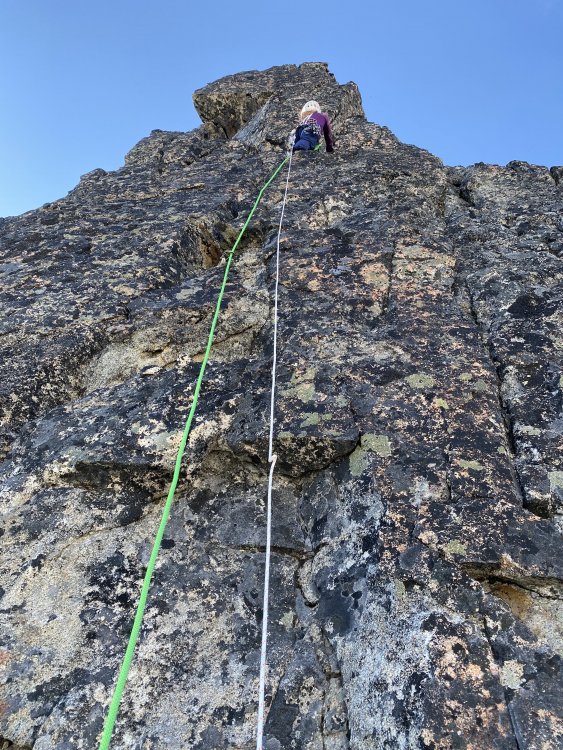
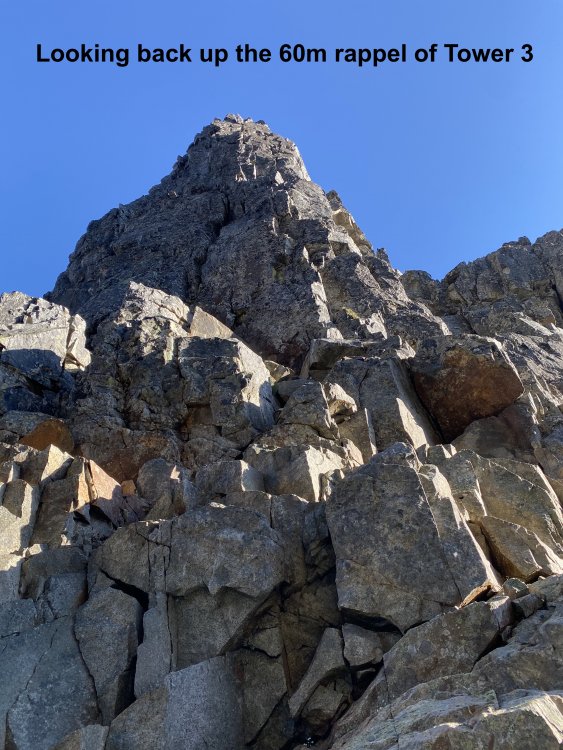
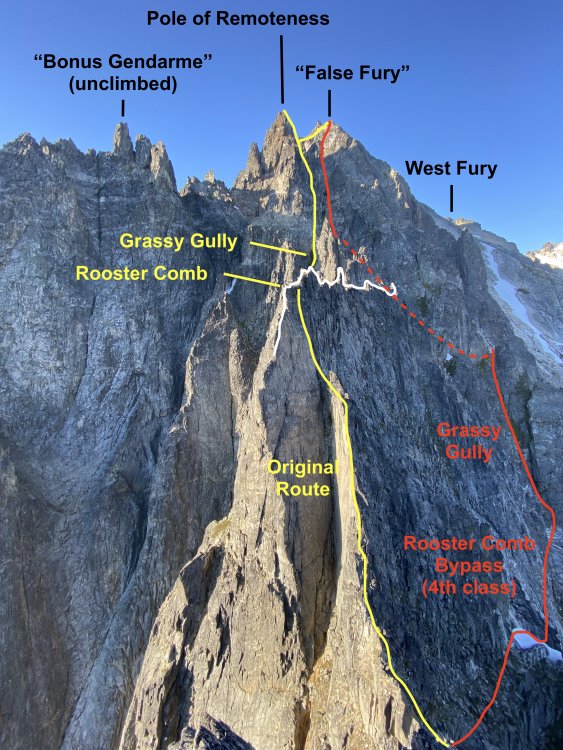
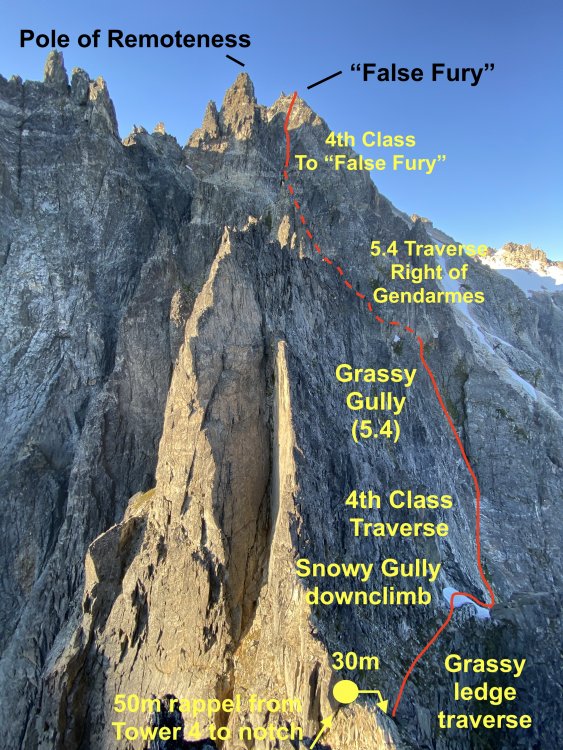
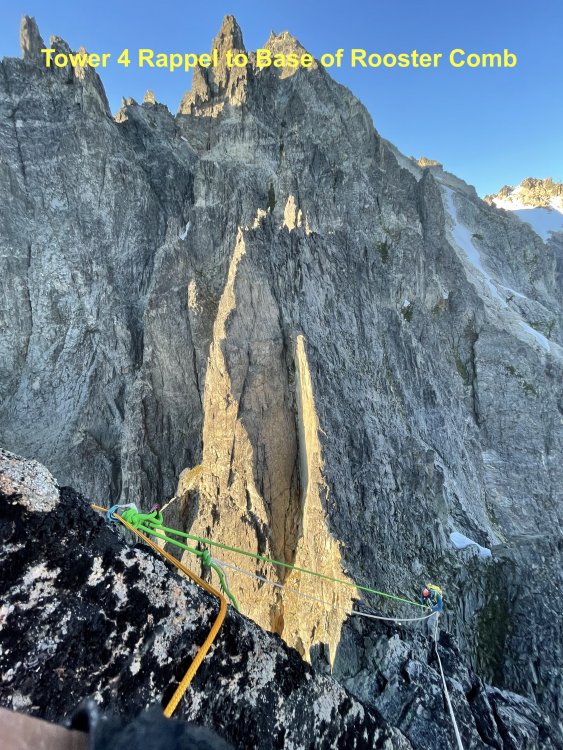
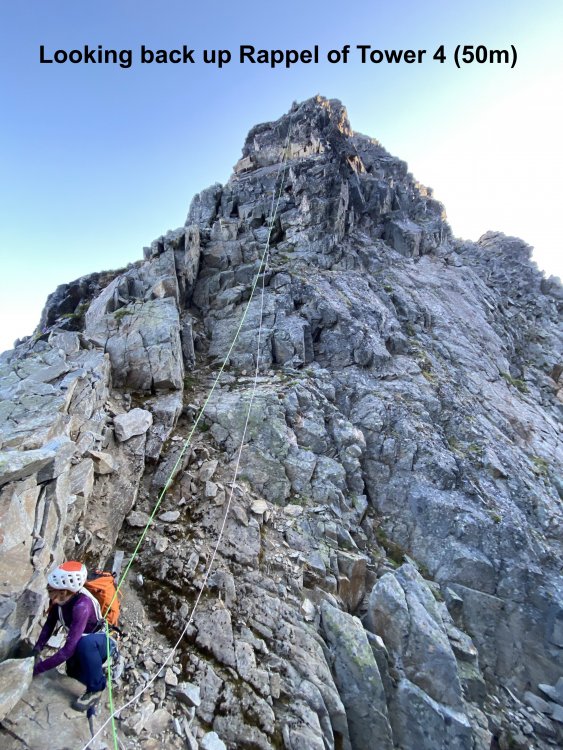
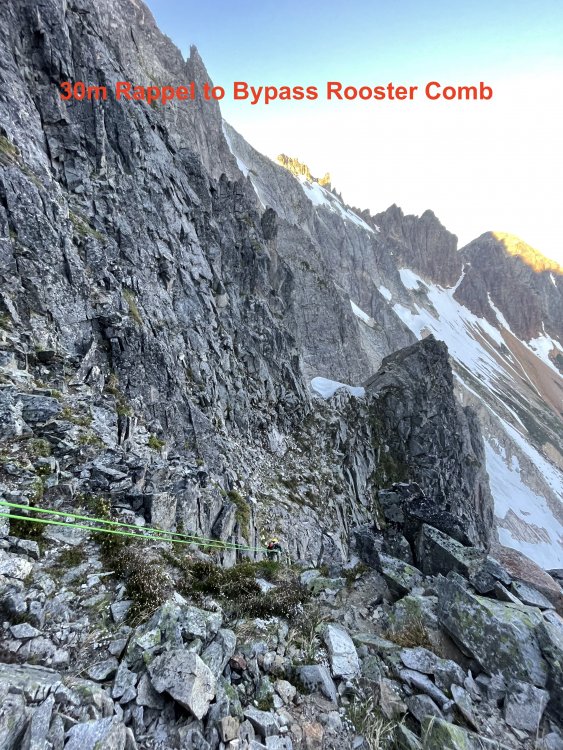
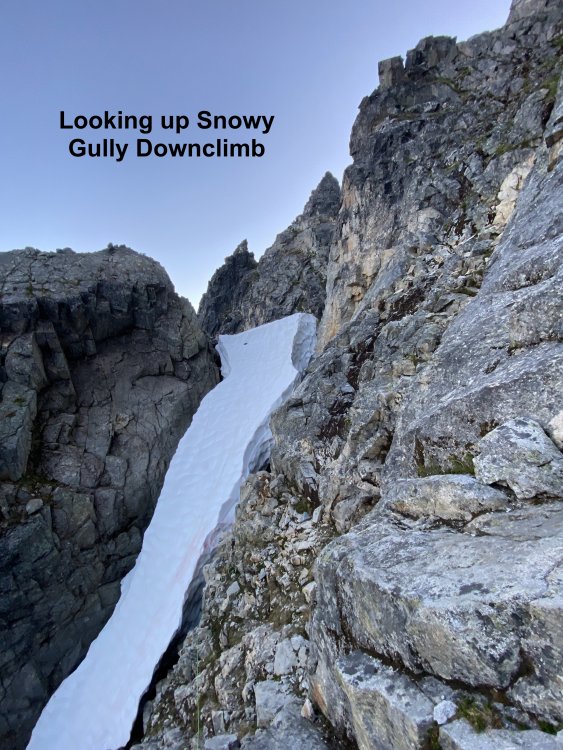
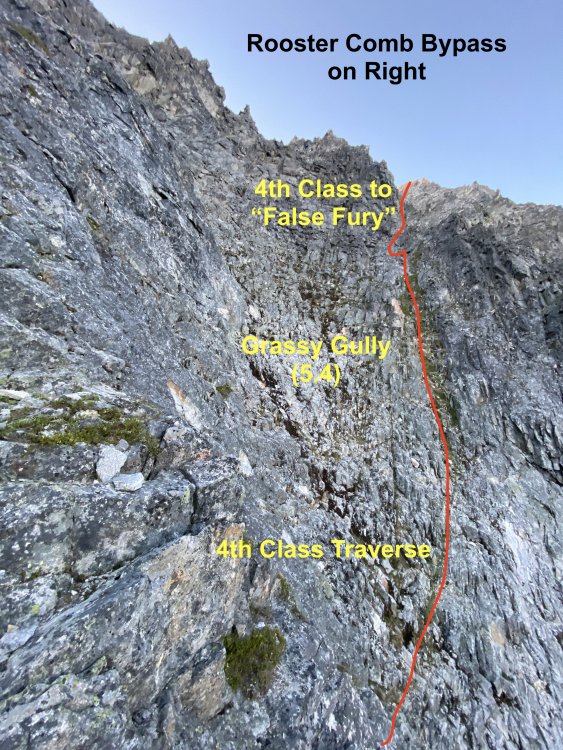
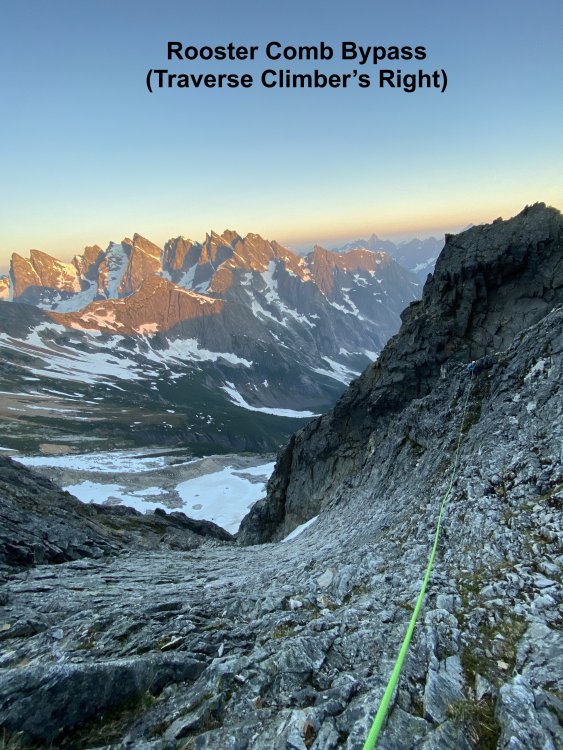
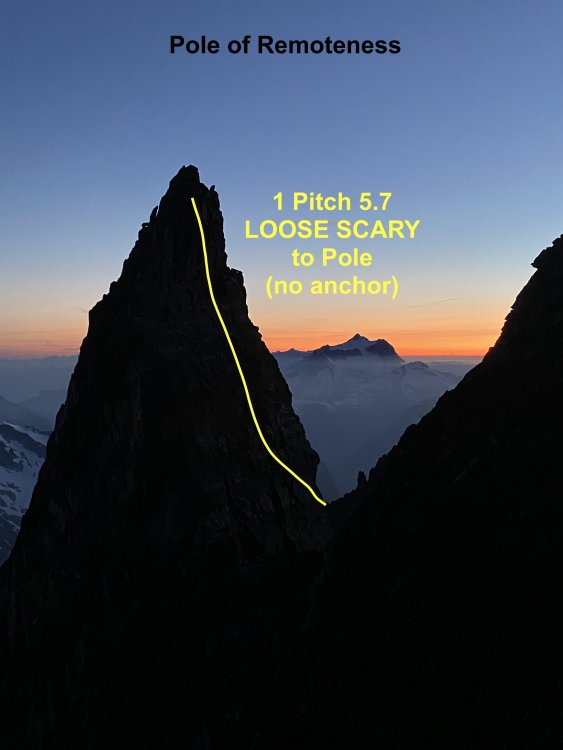
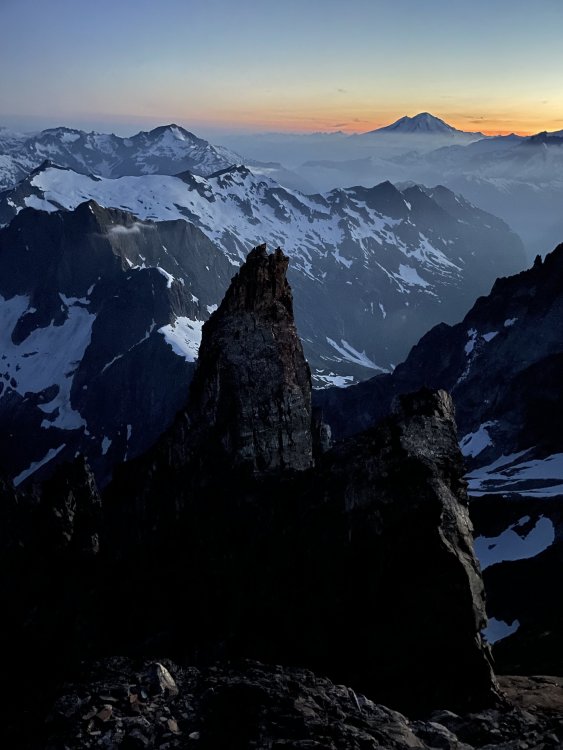
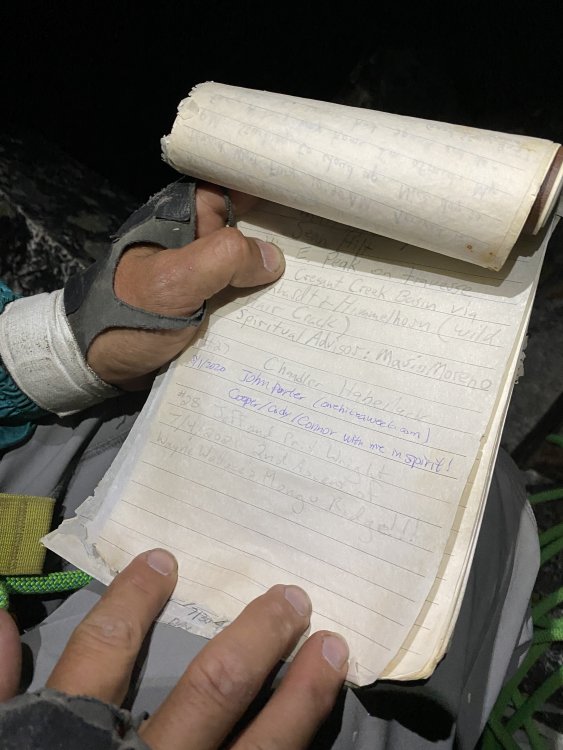
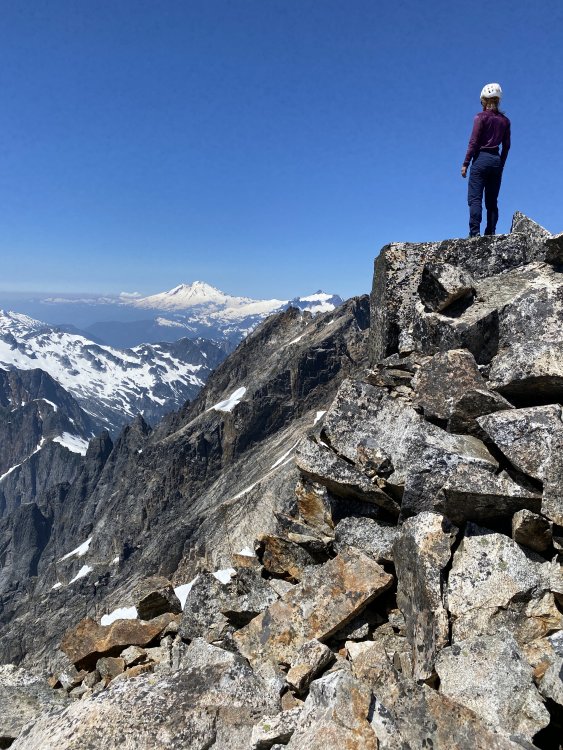
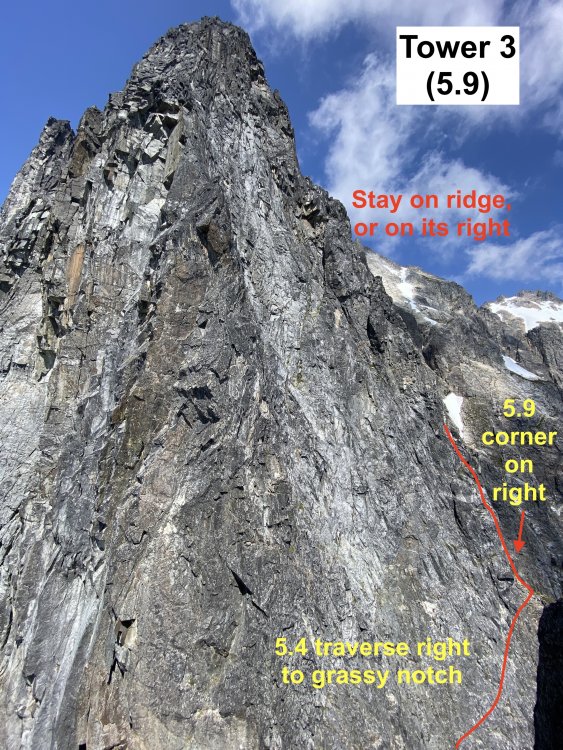
Trip: West Fury - Mongo Ridge Trip Date: 07/05/2021 Trip Report: In our relentless pursuit to ride the coattails of THE Wayne Wallace, Priti and I made the second ascent of Mongo Ridge (the SW Ridge of West Fury in the Northern Pickets of the North Cascades). It is a Stegasaurus ridge which rises 4,000ft over a mile from Goodell Creek punctuated by thick clusters of gendarmes that look like they’re straight out of the Karakoram. We first heard about Mongo when Wayne came to speak for a BOEALPS - Boeing Employees Alpine Society Banquet in 2015 and regaled a captive audience with his bold adventures. We warmed up Wayne's feature presentation with a talk on our trip to Patagonia climbing Aguja de l'S. Then Wayne came on stage talking about Mongo, making de l'S look like a mole-hill. Wayne climbed this route in 2006 SOLO, like a boss, questing into unknown terrain that easily could have landed him into mandatory hard free climbing. With vertiginous cliffs on both sides, he knew that bailing from the route was not an option and that he had to climb whatever the mountain presented. The difficulties on the route were up to 5.9, with an additional 5.10b pitch (a routefinding error), but the towers presented possibilities up to 5.11 if we weren’t lucky enough to have Wayne’s beta. The first ascent is one of the legendary, mythical ascents of the Cascades and even of the climbing world. After 15 years, only a handful of folks to my knowledge have even considered attempting it again. The bottom half of the ridge has four narrow towers which require you to summit and rappel in order to make vertical progress on the ridge. Long, double-rope rappels and hard technical climbing discouragingly makes it take hours just to ascent 100ft at times. Above these four towers are the “Rooster Comb” and the “Pole of Remoteness” (named by John Roper who figured it was the hardest place to get to in the lower 48). After Tower 4 and before the Rooster Comb, we scramble traversed low around each of these features and did not summit the Pole of Remoteness since it was getting dark and we did not bring bivy gear. At Wayne’s suggestion, we planned to climb camp-to-camp which was situated at the summit of East Fury. This means that while we did ascend the topographic feature of Mongo Ridge to the summit of West Fury, we did not truly climb “Wayne Wallace’s Mongo Ridge” in the manner that he climbed, including many more pitches of technical terrain. When we talked to Wayne in 2019, I told him that “Somebody needs to repeat this route, just so the world can understand what you accomplished.” It’s impossible to understand the scale of this route without being on it, competing as “one of the largest features on any mountain anywhere.” “You have to climb a major mountain [East Fury] just to start a most major climb.” Even with Wayne’s pictures and descriptions, we were still filled with dread as we attempted to route-find up each tower. While I am proud of what we did accomplish, I am still shaken at the boldness and audacity of the first ascent. Our tale should be considered a celebration of that event. Wayne called it Alpine Grade VI, but Beckey downgraded it to V deeming it (incorrectly imho) similar in commitment to Slesse NE Buttress (ref. Cascade Alpine Guide Book 3, pg. 118). We concur with Wayne's Grade VI rating, although I won't be even slightly offended if anyone wants to challenge the grade while ensconced in sofa cushions. Our itinerary: -7/3/21: 2PM boat ride from Ross Lake Resort to Big Beaver TH. Bivy in Access Creek basin. -7/4/21: Access Creek Basin to East Fury Summit. Left summit bivy in situ. -7/5/21: 23hr day camp-to-camp including Mongo Ridge and the traverse from West Fury to East Fury. -7/6/21: East Fury to Access Creek Basin -7/7/21: Access Creek Basin to Big Beaver TH. 2:30PM boat back to RLR. Here are collected links regarding Wayne's FA, for reference: https://waynewallace.wordpress.com/2014/05/ http://www.alpinist.com/doc/ALP19/climbing-note-fury https://www.nytimes.com/2006/10/21/sports/othersports/21outdoors.html http://www.alpenglow.org/nwmj/07/071_Mongo.html http://publications.americanalpineclub.org/articles/12200713002?fbclid=IwAR0iS9vNBvJ1XUQPOTPIXy8eymiTsuWFHI5TJtuAvLJUNb5LknfgeYgTriI Scurlock Picture: https://www.pbase.com/nolock/image/65948954 I won't go through too much detail on our approach to Luna Col and East Fury, since it is detailed well in many other places: https://onehikeaweek.com/2020/08/02/mount-fury/ http://www.nwhikers.net/forums/viewtopic.php?t=8021967 (specifically useful here is the traverse from East Fury to West Fury) Since we planned to do the route camp-to-camp (situated on the summit of East Fury), we studied the traverse from West Fury to East Fury in detail since we figured we'd be onsighting it in the dark to get back to camp. I will point out the "Red Ledge" (pictured above) just past Luna Col is reached by staying directly on the ridgeline from the col to begin the traverse over to East Fury. Past the Red Ledge, the next tower (called "Crux Tower" in some reports) is ascended directly via 4th class ledges and short 5.4 steps. A rope and gear would not be useful here. There is significant foreshortening here, as the route looks much more accessible as you get closer. Unless you're climbing in Winter or Spring, you will not be able to get across the bergshrund (as shown in the Beckey overlay), but instead will traverse left then right to reach the summit arête. Furthermore, the approach to the base of Mongo Ridge from East Fury's summit as discovered by Wayne is the easiest approach. While it is possible to reach Mongo's base via Picket Pass (either by navigating over Outrigger Peak "Southeast Peak" or Otto-Himmel Col), these approaches would be significantly more effort...or bushwhack for days up Goodell Creek. As you approach, notice the grey washboard streak with an overhanging gully. The route will start to the right of this feature. The 4,000ft descent from East Fury's summit may involve a lot of slab if the snow levels are low. We regret not bringing bivy gear on route. An alternative itinerary could be: -Day 1: Big Beaver TH to Luna Col -Day 2: Luna Col to Mongo Ridge Tower 1. Option to leave stove and tent on East Fury Summit as you pass by. There are no good bivouac sites on route. Just bring a sit pad and a sleeping bag and open bivy if splitter forecast. -Day 3: Tower 1 to either East Fury or Luna Col. A note on weather: The Pickets have notoriously unpredictable weather. Even with a splitter forecast, you can still have rain or even storms. Consider a tarp as backup shelter. Crossing the moat is the first crux. The moat is huge! Only found one place where it touched the rock slightly. On the approach, don't come down anything you can't go back up! Here I had to cross a giant moat (unprotectable compact snow), using both Gully tools (then passed the tools down to Priti). A picket here would have been very useful...but that's a big cost. Might have to bury a tool and rap/swing across the moat. Tower 1 was a TIME KILLER! Wayne reported a 5.8 overhang crux which we did not find. Instead we got suckered into a runout 5.10b overhang in the grey washboard gully. Recommend future parties to avoid this gully completely, and instead stay on the face to its right. Our second mistake was getting suckered into a difficult 5.8 grassy gully. Wayne later clarified that he immediately captured the ridge first, then went straight up the ridge (recommended). We started in an obvious chimney (5.6), gaining the face on the left then going right (many variations). After the chimney, we went left to the 5.10b overhanging grey gully instead of going up. It looked harder to gain the face above, but it is 5.8 if you can find Wayne's Way. The slopes to gain the ridge are all STEEP. We breathed a sigh of relief once we were on situated on the upper slopes of Tower 1, but route finding continued to be a challenge. A 30m rappel took us down to the notch between Tower 1 and 2. It seems possible to bail here back down the glacier and back up to East Fury. Perhaps the last legitimate bail option, so we considered the time and knew we would be climbing through the night. Tower 2 is only 2 pitches of 5.7 with no real route finding difficulty and went pretty quickly. The rock is REALLY loose however, so I was careful not to knock anything down on my belayer. Route lines are all approximate by the way! The first double rope rappel from Tower 2 led to the notch between Tower 2 and Tower 3. Tower 3 is the technical crux of the route and another TIME KILLER! It takes hours just to gain 100ft elevation. Once atop, it's demoralizing to look down and see the top of Tower 2 so close. Wayne reported a 5.10a bulge which I think we avoided by staying on and just right of the ridgeline. From the notch between Towers 2 and 3, a 5.4 traverse gains a grassy belay with 5 more pitches above ( 5.9 30m, 5.9 30m, 5.9 30m, 5.9 50m, 5.6 65m). Priti stopped whenever she found a good belay spot. We also hauled packs on 4 pitches expecting 5.10a climbing at any moment. It was real 5.9 climbing, consistently on decent rock for four pitches. Next time, instead of hauling just load everything into the follower pack and leave the leader with a mostly empty backpack instead. We took two backpacks on this climb to evenly distribute weight and bulk while simul-climbing. This was a good method. We consistently trended right above the belay. Higher Hiiiiiigher Hiiiiiiiiiigher Another 60m rappel deposited us to the notch between Towers 3 and 4. Finally, we got through the technical crux and we were losing sun fast! We knew we were in for an open bivy or a heartbreaking omission of the Pole of Remoteness. Tower 4 is another quick one. Two pitches, 5.9 then 5.7. It looks like really hard climbing going straight up! Instead we followed Wayne's advice and traversed out right for ~20m on 5.9 terrain with decent protection, then up following flakes and grass to a good belay. As you start climbing up, the climbing doesn't ease up, but instead is engaging, fun 5.9. Then 65m simul-climb to the summit. A final 50m rappel down to the base of the Rooster Comb. We were a bit confused here since the terrain opened up into a minefield of gendarmes. The Pole of Remoteness was indistinguishable among all of the towers. We knew we had to boogie so we took all the shortcuts that we could find. We noticed that the Rooster Comb could be bypassed on the right on low-5th terrain by taking another 30m rappel, then down climbing and traversing its Eastern flanks to a grassy gully. Wayne went up and over the Rooster Comb, not realizing there was a bypass. The Rooster Comb is very complex with several small flagpoles that required rappels. Wayne describes the final rappel off the rooster comb as a "diagonal rappel" that you can redirect off of horns, after which he flicked the rope to retrieve. There are at least two more intermediate gendarmes between the Rooster Comb and the Pole of Remoteness that we skirted around. Wayne found himself on their left side while we were on their right side. Wayne captured the upper 4th class slopes via a grassy gully (shown above). From here it's all 4th class to the "False Fury" summit. I coin the label "False Fury" because we stared at this point almost along the entire route thinking it was the West Fury Summit, but instead is fairly far from the true West Fury summit. Above is pictured our Rooster Comb bypass route which required an additional 30m rappel (or easy down climb). This was the first time we encountered snow on route, but don't count on it being there! Bring 4L water each. Southern Pickets in all their glory. Wayne traversed around the right side of the Pole of Remoteness to reach the col and summit it from the backside. To climb it directly would probably be 5 pitches of hard, loose climbing. From the notch between "False Fury" and the Pole of Remoteness, Wayne reported 1 pitch of 5.7 to reach the summit of the PoR. There is no anchor on top, so he threw a rope around a loose block and solo downclimbed, using the rope as a backup. If you are a team, consider downclimb-belaying. We sadly felt the need to skip the pole since it was total darkness by the time we got to the notch with a lot of traversing left to go. Once atop "False Fury", we couldn't find the summit register and realized that the real West Fury was maybe .25miles away separated by 4 more gendarmes, first downclimbing (or rappelling) down and right and traversing around the first gendarme, then weaving up, over, and around the others to finally reach the real West Fury summit. Glad to have put in the time to memorize the traverse beta between West and East Fury, it went off slowly but smoothly. One piece of key beta was at the end of Tower 1 (the last tower between the Fury's), you can find a secret 4th class ramp around to the North (climber's left) to find the rappel station that leads to the final push up the slopes back to East Fury. This is a 30m rope stretcher rappel, by the way! Thanks to Wayne for all of your support and encouragement! I think this route is more of a classic in the way that Hummingbird Ridge is a classic. We should really just sit back and marvel at the first ascent. It's a true Picketeering adventure, but loose rock, lack of bail options, and lack of bivy sites is pretty discouraging. The Pole of Remoteness still needs a second ascent, however! But it would a pretty doable day to get to PoR in-a-day from your East Fury bivouac by traversing high along the ridge and scrambling down from "False Fury", then reversing the route. Gear Notes: Single Rack .1 to 2, doubles .3-.75, small cams (TCU 00, TCU0). We like small cams in the Pickets! Small rack of nuts. 1 screw and 1 V-threader for glacier (didn't use). 60m single rope, 60m pull cord (three long rappels + optional pack hauling), 1 Petzl Gully (technical light ice axe) each, 10 single alpine draws, 3 double alpine draws, 1 quad, 50ft 5mm cord for rap anchors (used it all), left three caribeeners on rappel stations, steel horizontal front-point crampons. Approach Notes: Boat from Ross Lake Resort to Big Beaver Creek - Access Creek - Luna Col - East Fury - 4000ft descent on South side - Mongo Ridge - West Fury - Easy Fury


 1 point
 -
Trip: Chimney Rock - East Face (U-Gap) Trip Date: 08/24/2020 Trip Report: Are blue collar classic climbs becoming in vogue this year? I was the 18th person of 2020 to sign the Chimney Rock summit register this past Monday! I was inspired by solo trip reports from Jon Parker and Eric Eames (nwhikers) earlier this summer. I always thought I’d need a partner for Chimney Rock, but I enjoy traveling solo and their reports planted the seed that maybe I could do this one alone. Late Sunday afternoon I left the Pete Lake trailhead with a bit of anxiety about what lay ahead. It took just under 4 hours to get to the bivy boulder at 4800’. I was moving quick and racing daylight so I didn’t have to bushwhack in the dark, but I needn’t have worried, the climbers trail is pretty beaten in and was relatively easy to follow. Monday morning I was moving shortly after first light. I accessed the Chimney Glacier at the flat spot @ 6400’ immediately below the imposing North Peak. An easy traverse of the glacier and then up the U-Gap couloir and gully which was heavily moated and a took a lot of weaving back and forth to get through. At the top of the U-Gap came the section I was most anxious about. Super exposed class 3/4 ledges that look quite improbable from far and from near. The ledges had my complete attention. Early on there are a couple blind corners that seem to lead to nowhere but 1000+ feet of air. Once you commit the traverse is quite easy, but the exposure is quite heady. After the exposed traverse the white rocks and hidden ramps went quickly. The three rock pitches felt easy with rock shoes and the benefit of a self belay taking away the exposure anxiety. Views from the top were sublime. The hike out was long but it felt good to reflect on a climb well executed. Gear Notes: 60m rope, light rack Approach Notes: leave PCT at the second switchback to minimize brush1 point
-
Thanks Otto and Off_White. We climbed a day at Royal Columns, a day at Vantage, a day an Mazama. Royal Columns were really cool, the perfect spot for sub-5.10 crack climbing. We ended up flying to WA with a double rack since the weather forecast for Rainier was dismal and glad we carried the gear. Then two weeks later we got the Rainier forecast we needed and flew back for a successful Kautz trip.1 point
-
Yes, they should have a report up soon! The only caveat is they did not summit the pole of remoteness but they are the first people to do the whole ridge in one day! Cheers to the conquerors!1 point
-
@Priti and Jeff??!!1 point
-
Trip: Mount Terror - West Ridge Trip Date: 07/25/2020 Trip Report: Mount Terror 8151’ Trip Report I did a solo 3-day climb of the West Ridge of Mount Terror over the weekend. The weather was perfect all weekend and hot (80’s). Very few people do this climb in a given year. I was the first person on the summit registry this year. This is a climb you earn through suffering but the payoff is worth it. This climb tests your navigation skills, fitness, and your overall mountaineering skills. I was thinking about not bring a rope for the climb since I had heard there is a 4th class route up the steep start of the ridge climb. I was glad that I brought the rope. The supposed 4th class route looked like dog shit in my opinion, and I climb some loose, nasty rock on a regular basis. The low 5th class route up the middle looked pretty good, so I climbed that instead. I would not want to climb down that section, one slip and you are FUBAR. I brought a 30 meter glacier rope for rappelling and it worked perfectly for this trip. Some Tips and Notes: 1. Bring full gaiters for the extensive bushwhacking required for the approach. I brought half gaiters and wore shorts to start because it was hot and it saved some weight. My legs now look like hamburger. 2. The 30 meter glacier rope worked great for me but a longer rope would give you more options. There are plenty of anchors already established. I brought anchor material but didn’t need it. 3. DO NOT LOSE THE TRAIL. If you lose the trail go back and find it. The terrain in the Pickets does not suffer fools. You can wander for days out there and still not get anywhere. 4. Crossing Terror Creek sucked! The water is high right now and moving fast. The only place I found to cross was about 15 minutes downstream of the trail on the nice side. It was a log that goes about 2/3 of the way across the creek to some rocks that you can jump on to get across. It takes twice as long on the nasty side to get back to the trail that goes straight up the ridge. Falling in the creek at that spot would be bad. 5. Water on the ridge up to camp is non-existent. Get all the water you will need at Terror Creek before you start up the trail going up the ridge. There is no water from 2200’ to 5600’. 6. The trail heading up to the ridge is one of the steepest climber’s trails I have ever climbed up. I tapped out at 5600’ on day 1. 7. There is a sharp turn in the trail at around 3800’ that puts you on the ridge in a nice spot. It is marked well with a dead tree that has a stick across it and flagging tape. 8. There is still a lot of snow above 5600’. I was on snow until the very top of the Terror Col on summit day. The snow in the gully to Terror Col is steep, and when it is soft it is nerve-racking. Travel Time for reference: Day 1 (approach), 9 hours – Day 2 (summit), 11.5 hours – Day 3 (back to car), 6.5 hours. Gear used: Ice Axe, Trekking Poles, Crampons, Helmet, 30 meter Rope & Harness. Rocky tent platform at Terror Creek. If you don't come across this spot, you are off route. Trail start on the other side of the Terror Creek for the death march up the ridge to bliss. Remember this spot, it is very important. Terror Creek crossing location. It is not as nice as it looks. View of the route to Mount Terror gully from the 6400' camp at the Barrier Col Base of Terror gully (full of snow). Yes, it is that steep. Potential 4th Class section up to West Ridge? I call bullshit. Side view of lower part of 5th Class up ridge. Straight on view of wall you will be climbing. It doesn't look quite that steep in person. View looking down the 5th class sections. Heather goat trail that leads to the actual summit block. Airy summit. Summit Registry, Thanks Fay Pullen! Is the effort worth it? The pictures do no justice to the beauty of the area. Gear Notes: Ice Axe, Trekking Poles, Crampons, Helmet, 30 meter Rope & Harness, Bring Full Gaiters for the bushwhacking. Approach Notes: Terror Creek crossing sucked, See Tip #4. Limited water on approach, See Tip #51 point
-
Kk pics. Skin track on the way up Chair Bryant Slopes Pineapple Basin The notch Zach on the final pitch Chair from the summit More views Scramble to first rap The route Second rap into the gully1 point