
Leaderboard

Popular Content
Showing content with the highest reputation on 06/29/20 in all areas
-
I recently found my hard copy of this guide and seeing it has not been posted up (at least I could not find it) I thought for fun I would post it. It was written probably 25 plus years ago by Make Dale. The Cascade Brush and Bushwhack Rating System by Mark Dale For years there has been something sadly lacking in the climbing world. Something necessary to help describe the total mountaineering experience in those areas blessed with challenging peaks surrounded by primeval forest. That something is a brush and bushwhack rating system. After years of the hand-to-limb combat encountered in below-timberline approaches, one comes to realize that this part of an ascent can be half or more of the battle. (Notice the use of fighting terms.) And yet, just how does one accurately relate this important facet of a climb in words? "It was ugly, real ugly," "Brutal," "A freaking flail," "Oh, not too bad, but I did lose a pint of blood." Well, these are pretty good subjective descriptions, but what's missing here is something more definitive. What we need is a way to portray in a more precise manner those endearing struggles with the brush. Therefore I propose the Cascade Brush and Bushwhack Rating System. This system is so named because most of my experience in the past ten years of climbing has been in the Washington Cascades. It's perfectly applicable, though, to other ranges of a similar nature, e.g. the Olympics, Northern Selkirks, British Columbia Coast Range, Alaska Range or any mountain group where below-timberline approaches necessitate brush-beating and bushwhacking. This system rates both difficulty and grade much like the technical climbing ratings in use today. Before defining system nomenclature here are a few guidelines for describing your favorite flail: 1. Conditions described must be when the approach is snow-free, since snowpack greatly affects most bushwhacks, reducing their difficulty considerably. 2. More demanding terrain, e.g. cliffy or steep, will increase a bushwhack's difficulty and grade as compared to one with the same vegetation on level ground. 3. Both the density and the type of brush are important factors. I'll take an open area of mature devil's club over a dense stand of slide alder any day. 4. Grade is determined by both time and distance involved in completing the approach, as well as the duration of the difficulties. 5. Since creek and river crossings play an important part of many approaches, a special sub-rating has been devised for these. 6. When a mechanical device such as a machete is used the bushwhack is no longer "free," and an aid sub-rating must be used. Difficulty Ratings These apply to the "free" difficulties (no aid used) and range from BW1 to BW5, where BW stands for "bushwhack." Difficulty ratings apply to those areas of worst brush that can't be avoided. BW1 Light brush. Travel mostly unimpeded, only occasional use of hands required (e.g. mature open forest). BW2 Moderate brush. Occasional heavy patches. Pace slowed, frequent use of hands required. BW3 Heavy brush. Hands needed constantly. Some loss of blood may occur due to scratches and cuts. Travel noticably hindered. Use of four-letter words at times. BW4 Severe brush. Pace less than one mile per hour. Leather gloves and heavy clothing required to avoid loss of blood. Much profanity and mental anguish. Thick stands of brush requiring circumnavigation are encountered. BW5 Extreme brush. Multiple hours needed to travel one mile. Full body armor desirable. Wounds to extremities likely, eye protection needed. Footing difficult due to lack of visibility. Loss of temper inevitable. Aid Ratings When artificial means are used to penetrate brush, then an aid rating should be used to describe the device required. These ratings range from BA1 to BA5, where BA stands for "brush aid": BA1 Machete or sickle BA2 Gas-powered weed-eater BA3 Chainsaw BA4 Agent orange BA5 Bulldozer Creek and River Ratings These ratings are used to describe the difficulty in crossing watercourses. The range is WA1 to WA5, where WA stands for "water": WA1 A dry crossing is possible by using rocks or logs. WA2 Possible wet crossing, but a dry crossing can be accomplished with some finesse. WA3 Wet crossing, ankle- to calf-deep. WA4 Wet crossing, calf- to knee-deep. WA5 Wet crossing, greater than knee-deep, possibility of getting swept downstream. WA6 Water deep enough to require swimming. WA7 Water temperature, current velocity, to factors make an attempt to cross potentially lethal. (Frequently a factor in Alaska and New Zealand, for instance). Grades Grades range from I to VI and follow the same general guidelines as climbing grades: I Brush beating can be done in a few hours or less. II Generally will take less than half a day. III Could take most of a day, but hardened parties will be able to complete in a short day. IV Will take a long day and involve continuous battle. V A 1+ to 2-day bushwhack, difficulty rarely less than BW4, large quantities of bandaids and wound dressings will be needed unless properly attired. VI The most extreme of bushwhacks, requiring over 2 days to complete with probably a BW5 encountered along the way. Epic Ratings E1 Unplanned delays require explanations to significant other. E2 Same as E1, but with companion of opposite sex (not significant other). E3 Overnight bivy required. E4 Same as E3, but with companion of opposite sex. ... E10 Whole party vanishes. Following are some examples of rated bushwhacks: Picket Range, Goodell Creek approach -- Grade III - IV, BW4 Mt. Shuksan, White Salmon approach -- Grade I - II, BW4- Mt. Spickard, Silver Creek approach -- Grade V, BW4+ Mt. Blum, Blum Lakes approach -- Grade III, BW3+, WA5 Devils Peak, Coal Creek approach -- Grade I, BW2 Monashees, Thor Creek approach -- Grade VI, BW4, BA1 Chimney Rock, standard approach -- Grade II, BW2 And there you have it. No longer must one try to decipher the deranged mutterings of a victim of jungle warfare. A person needs only to apply the appropriate brush ratings to relate his brutal experience to others. And who knows? With advances in bush technology and the competitive nature of climbers, we'll probably see difficulties pushed to BW6 and beyond. And there just HAVE to be some Grade VII's out there! So come on, folks! The next time you report a mountaineering trip that involves green hell, use the Cascade Brush and Bushwhack Rating System to tell others about it. They'll be glad you did!3 points
-
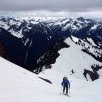
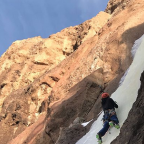
Trip: Mt Stuart - Direct North Ridge Trip Date: 06/22/2020 Trip Report: I finally ticked off this crown jewel of the Cascades! We did deal with some tough early season conditions, including snow and ice on the "Slab with Crack" as well as the section between the gendarme and the summit. I've included the text of my report below. Full report with photos can be found at https://spokalpine.com/2020/06/29/mt-stuart-direct-north-ridge/ John and I climbed the Direct North Ridge of Mount Stuart on a “leisure” schedule from June 21-23, 2020. It was the culmination of years of honing my mountain craft in the Cascades and abroad; this one meant a lot! The journey started in 2016, when I saw Stuart in person for the first time from Colchuck Peak. I was spellbound by the rugged beauty of the mountain with its springtime coating of snow and ice, making the North Ridge even more dramatic as it soared directly to the summit. It is possible to climb the North Ridge using an “abbreviated” start, gaining the ridge crest at half-height via a rocky gully rising from Stuart Glacier – this version of the route is included as one of the “50 Classic Climbs of North America” and some say it is the most commonly climbed version. To me, a direct start climbing directly from the toe of the ridge creates a much more pure, aesthetic and logical line to the summit. The Direct North Ridge instantly became my goal. Three months later after I first laid eyes on it, John and I made the Southern approach via Ingalls Creek for an attempt on the route. Cresting Goat Pass, we stopped to stare at the route in profile. The scale of the climb was jaw-dropping; we quickly turned around and went home. We were not ready and we knew it, but we made other excuses. Four years and many climbs went by before John and I decided that it was time to put this project to bed. This time, we trudged up Mountaineer’s Creek to Mount Stuart. Swarming insects, brutal heat, boulder hopping and a off-trail bushwhacking brought us to our plush back country campsite below Stuart’s Northern aspect. A few other climbers passed by our camp on their way out; they were the last people we would see for two days. We had the entire valley, and mountain, to ourselves. Cheers to weekday alpinism! With the Summer Solstice only two days prior, we had a long day of daylight on our side. Planning to blast the route and descent in a single push from camp, the route was already in full sun as we started hiking up the moraine at 5:30am. John volunteered to lead the first pitch, which was a great warmup for the day. The “slot” on this pitch is as awkward as people say… hang the leader’s pack off of a cam below the slot and belay just above. The leader can lower a loop of rope to the follower and haul the packs past the slot. I took point on the uneventful second pitch and John fired the 5.9+ third pitch, the hardest pitch on the climb. After a fourth belayed pitch (perhaps 5.7), we changed gears to simulclimbing mode. This part of the climb was truly a gift, featuring moderate climbing and unbeatable alpine ambiance. Rock and ice thundered down Ice Cliff Glacier every few minutes, reminding us that the mountain is always in charge. Our staircase of clean granite carried us 1600 feet higher into the cobalt sky. After a few hours, I lead over a high point in the ridgeline and felt my stomach drop. I was looking at the well-known and typically easy “slab with crack” pitch, but it was partially covered in snow and ice. There were no signs of prior passage and I questioned whether or not I would be able to climb it in these conditions. I quickly realized that I had to give the pitch my absolute best effort – bailing from this high on the ridge would be an absolute nightmare. The mountain was testing us even more than I expected. I cautiously led up the pitch, placing a solid cam a few feet below the snow patch before strapping my pathetic, worn-down aluminum crampons on my approach shoes. Evaluating the snow patch, I realized that it consisted of about 1 inch of ice against the rock with a couple of inches of snow on top. My ultralight ice axe would not be able to excavate the crack to place protection. The first few feet were the thinnest, and I willed the snow patch to stay attached to the mountain. With full commitment, I stepped onto the ice and quickly power-stepped my way up, trying to maintain my upward momentum. Racing to the top, I slapped my hands on the lip and mantled to a perfect belay stance. The final section of mid-fifth class climbing was still very snowy. Several miserable pitches with snow blocking the easiest route cost us a lot of time. Since it was dark already, we chose not to hurry, shifting our focus to finding the safest route among the snow and loose rock. Several times, I found myself at a dead-end, requiring me to reverse the last few moves and find another way. This was crushing in my exhausted state! We pulled onto the summit just at 11:30pm as the temperatures dropped. Regardless, I was incredibly happy and felt no stress about our situation, just focus and joyful resolve. We could handle this. The night sky was ablaze with stars and I was living my ideal atop this massive, complex peak. We began toiling our way down the East Ridge on snow, then 4th class rock, and then a lot more snowy rock. It was extremely slow going in the dark and we settled in for a short bivouac once we found a good platform. Bouts of violent shivering and continual harassment from the local snafflehounds provided entertainment until the sun rose again. In the morning, we continued traversing the East Ridge and descended the Sherpa Glacier, which was a tedious but straightforward descent option. The hike out to the car was quite the death march, but it always seems that way! Gear Notes: Doubles from fingers to #3. Approach Notes: Approach via Mountaineer's Creek and descent via the Sherpa Glacier.3 points
-
Trip: 3 Sisters Wilderness - 4 Sisters Traverse RT from Tumalo Falls w/ bike approach Trip Date: 06/26/2020 Trip Report: Normally I wouldn't bother to share a linkup like this, but I think this loop is very aesthetic (both in the areas you move through, and the logical line it draws on a map) and thought others out there might find use in the description... Ever since my first summer in Oregon when I went up several volcanoes I swore that I would never deal with the choss again unless it was coated in snow or ice (this trip fully confirmed that and now that I've done it I have no desire to repeat it, but some of you might be crazy/stupid enough to follow my footsteps). Because of this I had absolutely zero interest in the Sisters Traverse as a summer outing (skiing it in spring I was fine with and found enjoyable). Then, this past winter my friend Miles suggested I could do it as a human powered outing from my house in Bend. I believe he was envisioning something efficient like biking to Green Lakes or Pole Creek trailheads to shorten the distance on foot. However, I immediately thought of biking to Tumalo Falls and doing the traverse as a loop from there. This was for several reasons... 1. the road to Tumalo Falls draws a direct line toward the mountains from town (instead of going way out and around to other trailheads) 2. this road is less busy and more enjoyable to bike 3. the areas you would get to pass through on the approach/depproach are some of my favorite in the area (Farewell Bend trail, Tam Rim, Broken Top trail, Happy Valley and North Fork trail) which favorably skews the scenic hiking to scree slogging ratio 4. the bike and loop made for a logical line when drawn on a map and made it easy to do as a self-supported outing with no bike shuttling. While I thought it was a cool idea, I had other plans this summer. Unfortunately the solstice came and went without a favorable weather window in the less-chossy ranges that I prefer. So, with no other big objectives on the horizon and clear skies locally I ended a 3 day streak of sitting on the couch watching weather models and Netflix to take advantage of the long daylight hours. The nice thing about short trips from your home is the packing is minimal. I woke up, ate a big breakfast, packed and was out the door. Itinerary: bike to Tumalo Falls, hike Farewell Bend trail to FS road 370 N, W on Tam Rim Horse Trail to Tam Rim Trail and the far W end of Tam Rim, drop down cross-country and traverse high eventually picking up the Green Lakes Trail N, take a L on Camp Lake Trail and follow the climbers trail up to the Hayden Glacier and the saddle between North and Middle Sisters (I shiver bivied part way up the ridge above the saddle for a few hours), climb/descend North via the standard S Ridge to Bowling Alley, climb Middle via the N Ridge and descend the S Ridge to Chambers lakes, climb South via the NW Ridge (less steep than the N Ridge but lots of loose scree), and descend the standard climbers trail on the S side to just below the glacier, cut down to Green Lakes (careful not to get cliffed out here) and follow the trail around the S side of the main lake to the climbers trail for Broken Top, climb BT by the standard NW Ridge, scree ski down the W face and traverse L on flatter ground to pop over the SW ridge and connect to the Broken Top Trail, follow this E (lots of snow fields) over the ridge just S of Ball Butte (I cut cross country quite a bit here as everything was under snow), eventually connect with FS road 370 (S of where you had it the first time) headed N and then connect to the Metolius-Windigo Trail, this takes you to Happy Valley where it is only 4 miles of easy and slightly downhill trail to the bike at Tumalo Falls, from here I had a mere 14.5 mile net downhill ride back to my house, arriving home just before I needed to break out the headlamp. I could tell you all the little stories but they are a little hazy and seem rather irrelevant now. I'd love to see someone else do this loop fast. I bet there is someone out there who could destroy it, as supposed to be destroyed like I was. There is a fair amount of off-trail travel and the early summer timing after a wet spring meant there was still lots of snow and some fairly large river crossings, however I would rather have that than endless scree. Gear Notes: road bike, small pack, sun protection, blister kit, trail running shoes with gaiters, spare socks to switch out when your shoes get soaked, light pons/axe, emergency reflective bivy bag and micropuff for the shivering, lots of water to be found early season, GPS w/ topo map were helpful in optimizing the cross-country travel Approach Notes: ride yo bi-cycle!1 point
-
This was just brought to my attention. Why has the climbing community kept this secret from me!?1 point
-
I should have noted the full movie is on YouTube!1 point