Leaderboard


Popular Content
Showing content with the highest reputation on 03/18/19 in all areas
-
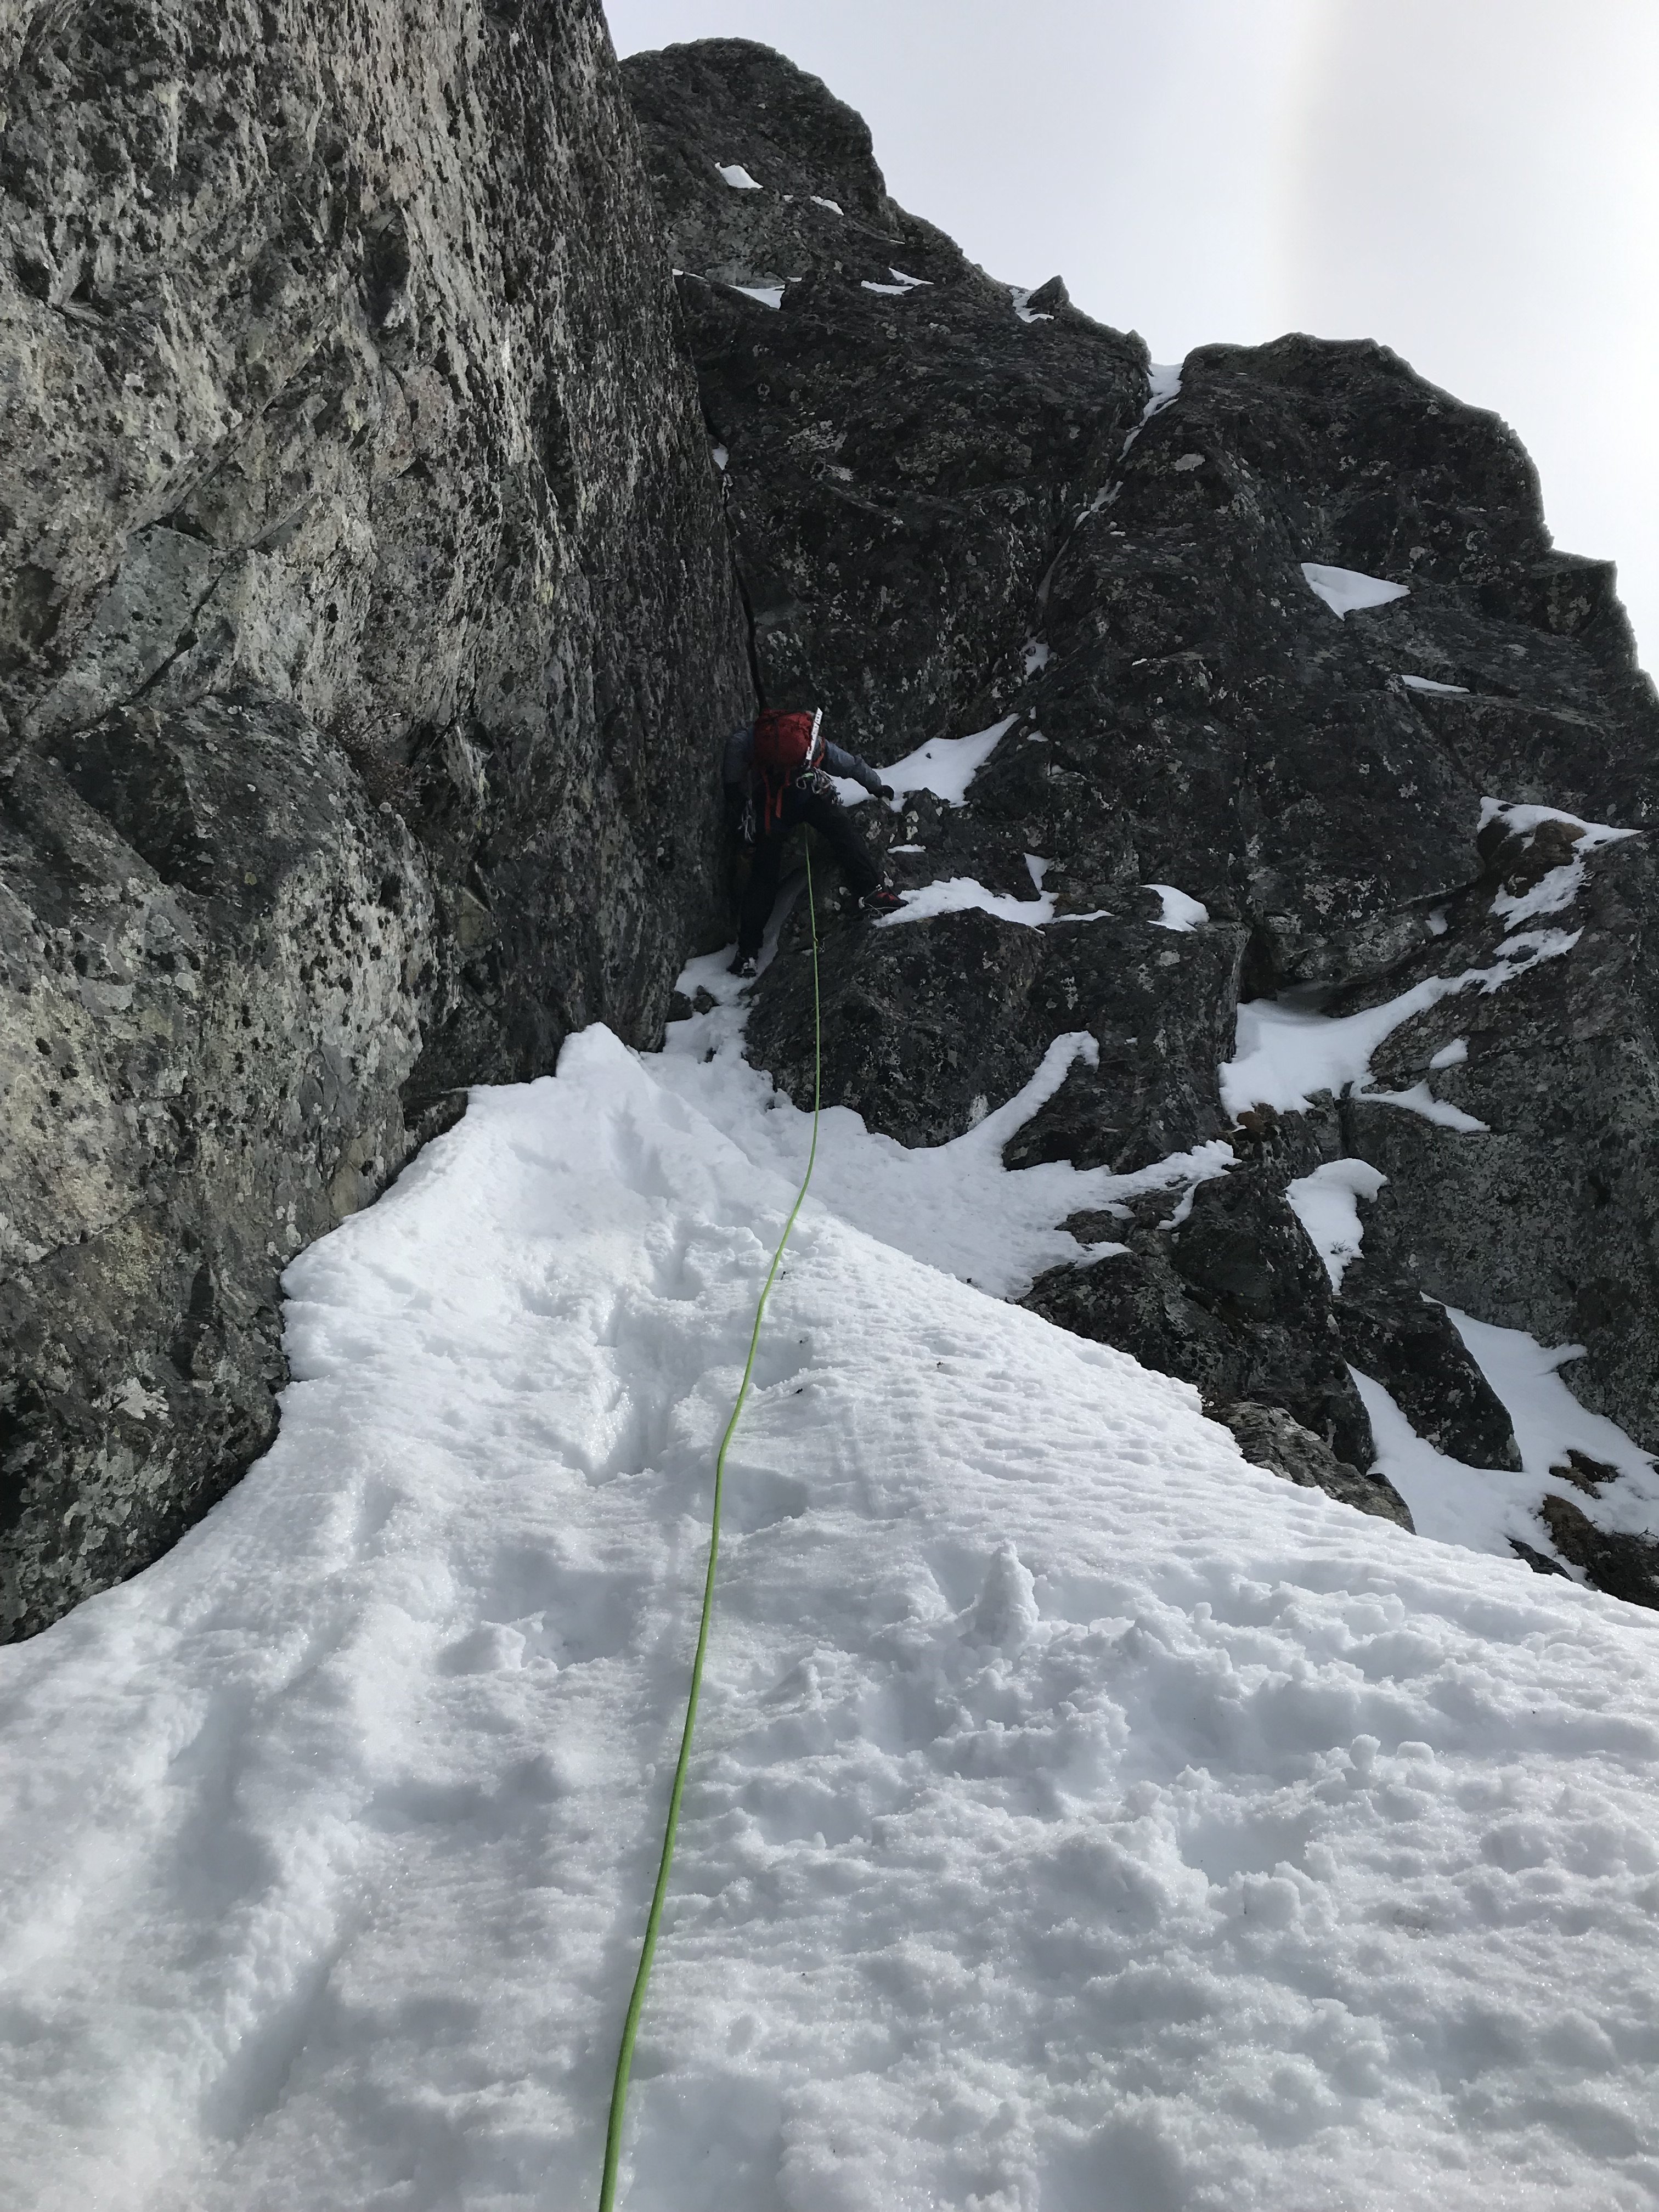
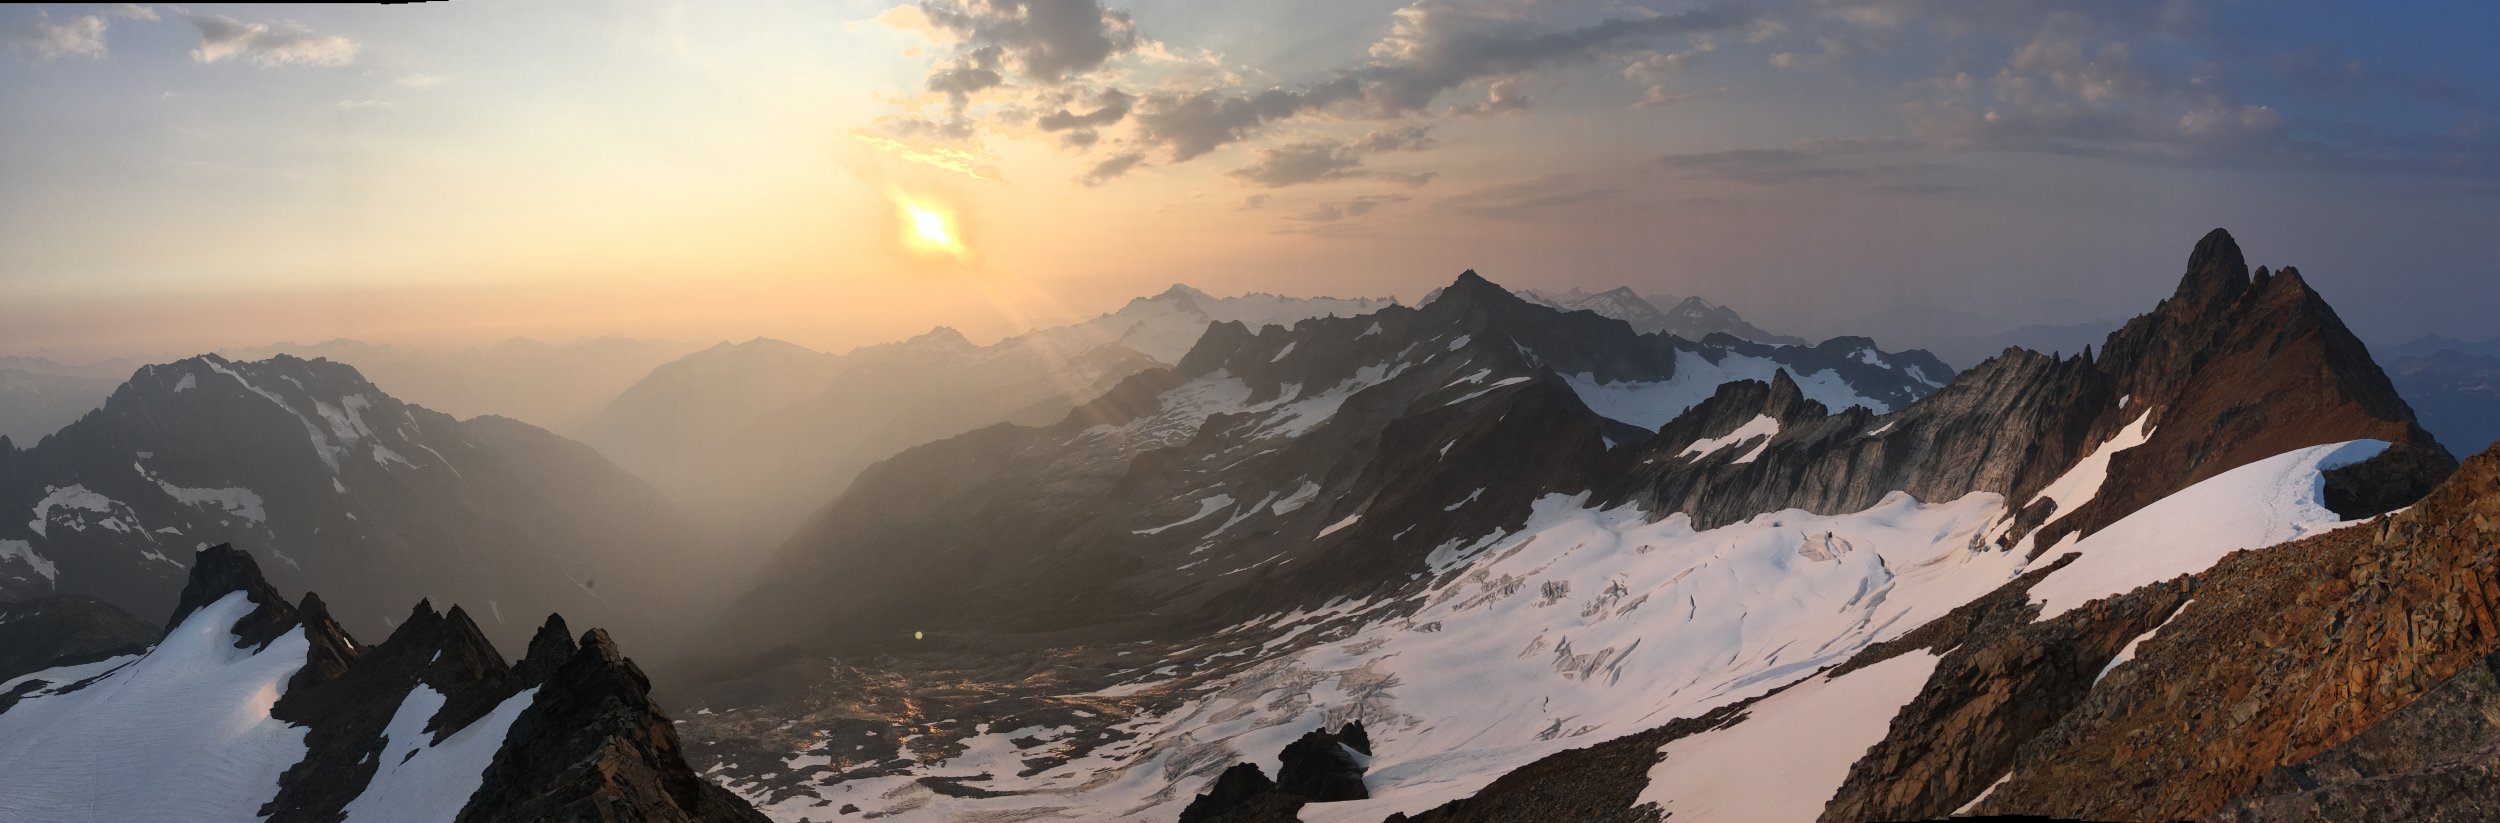
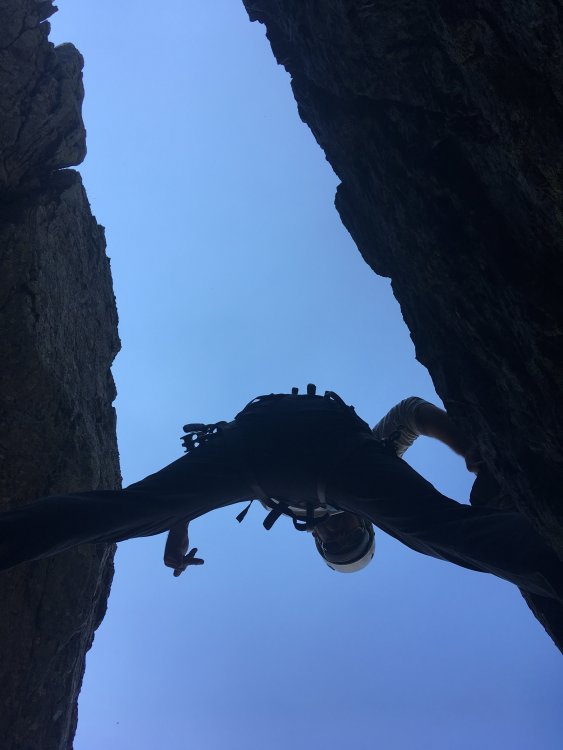
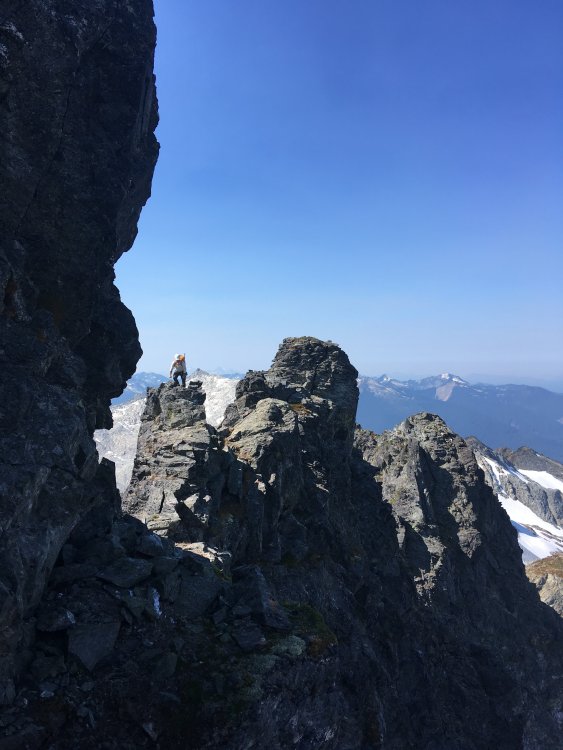
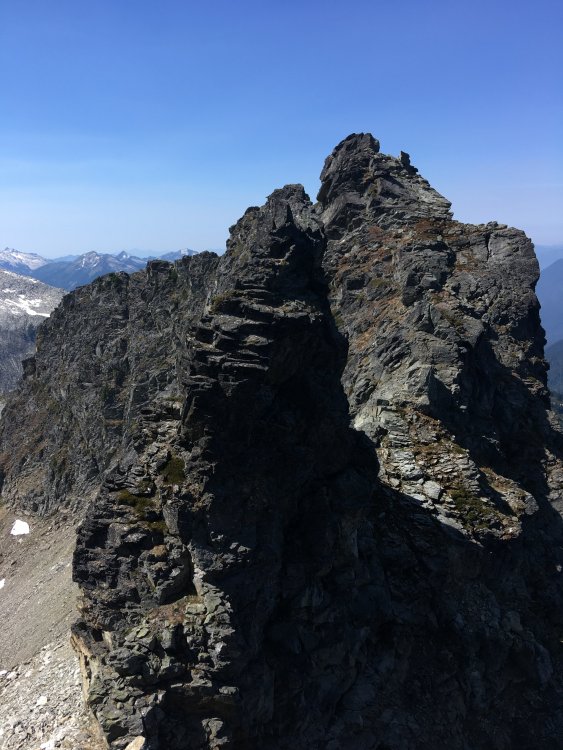
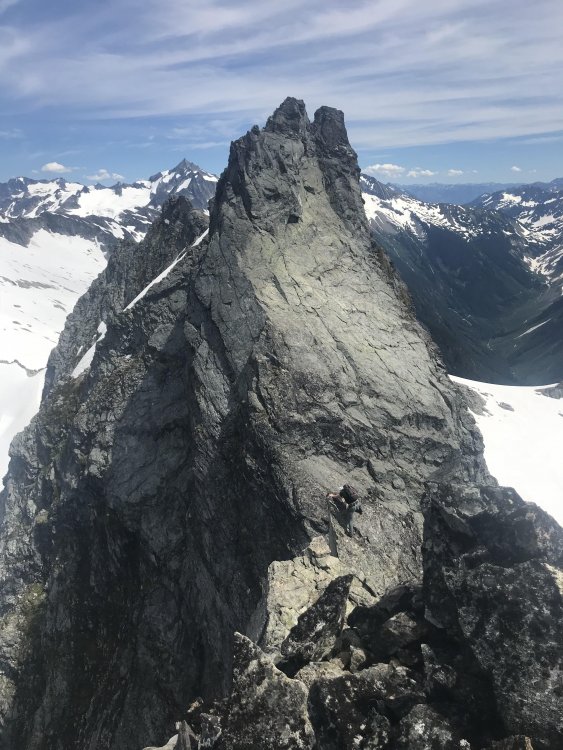
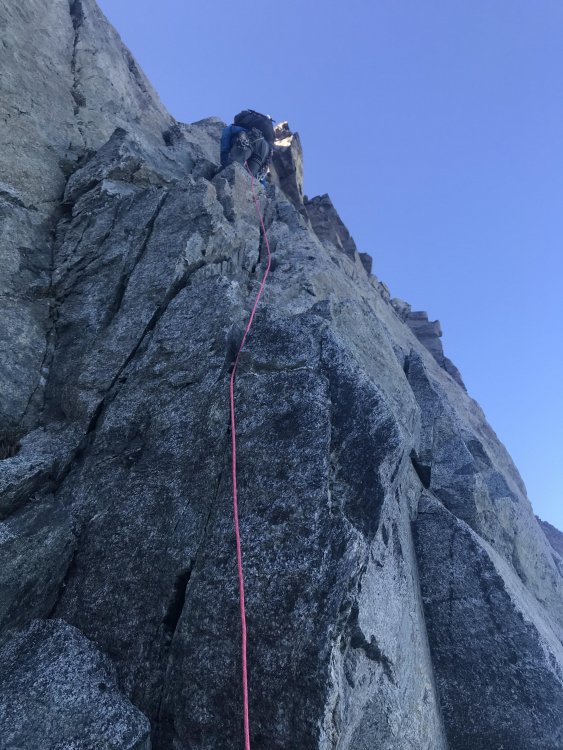
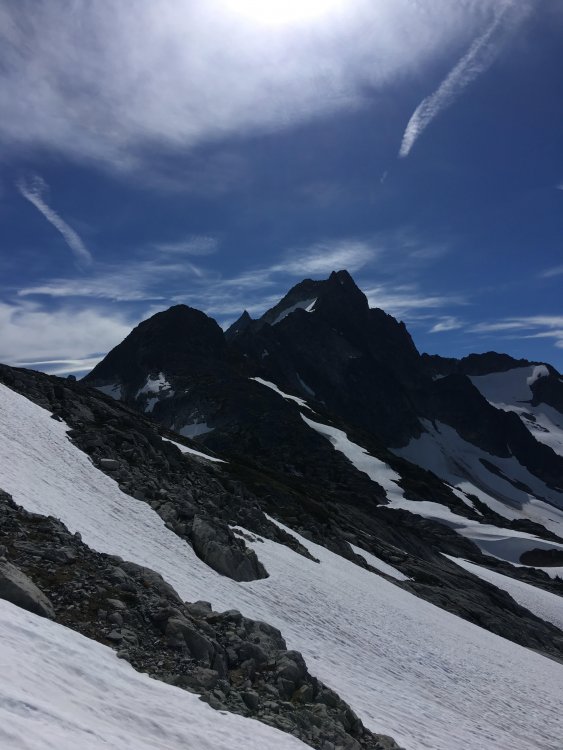
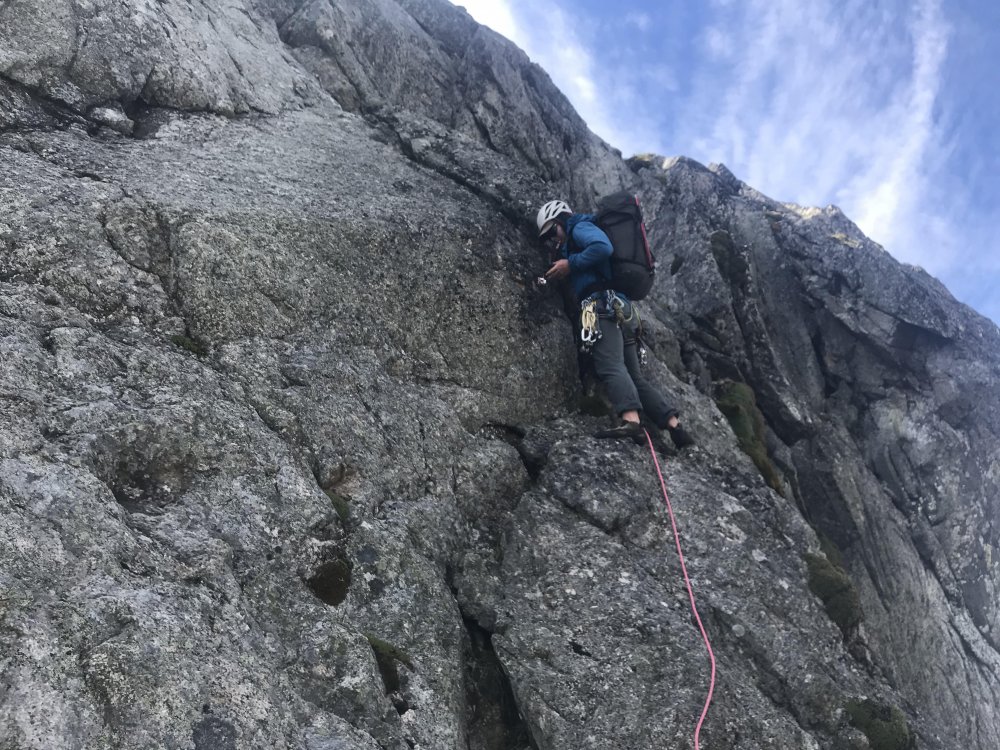
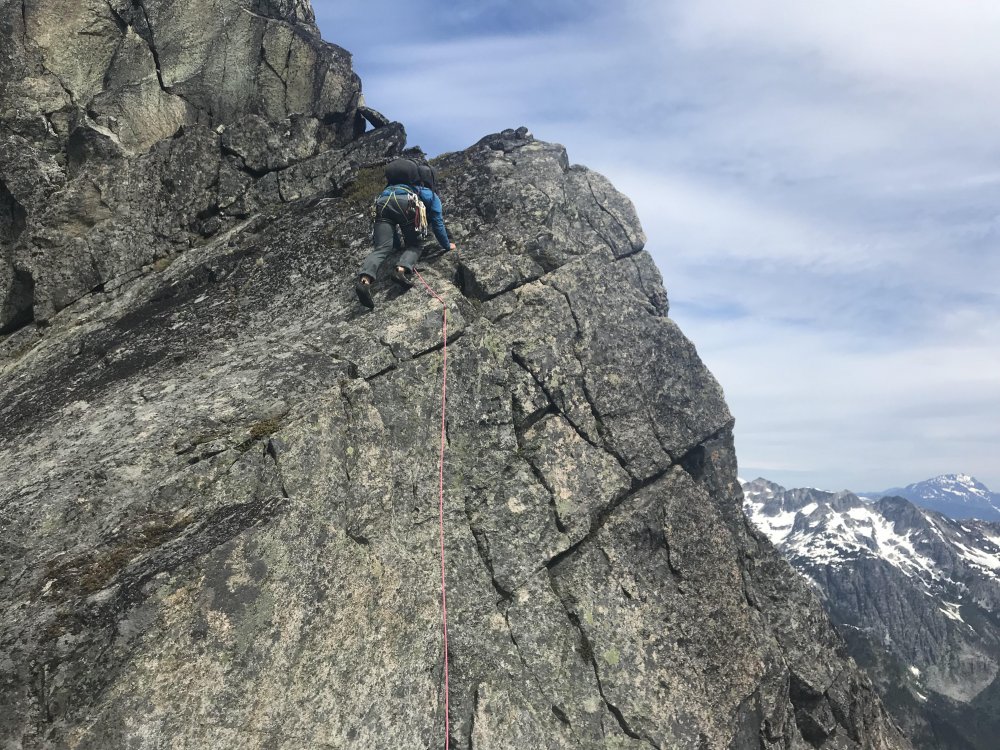
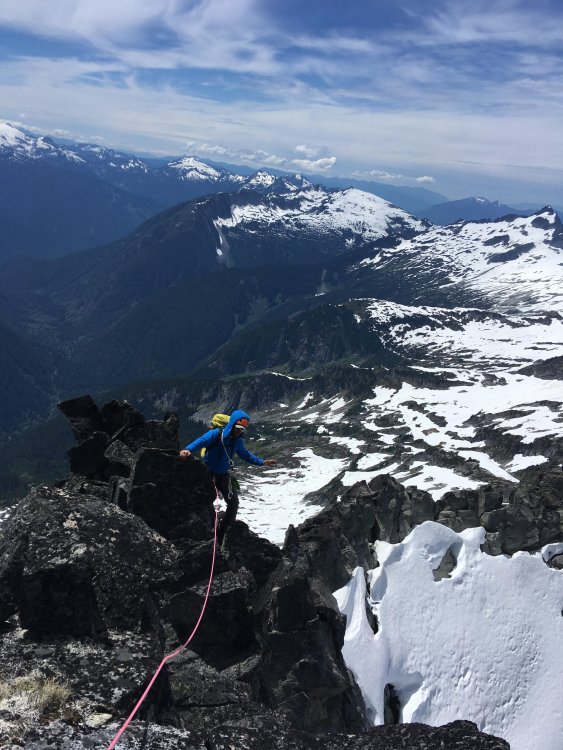
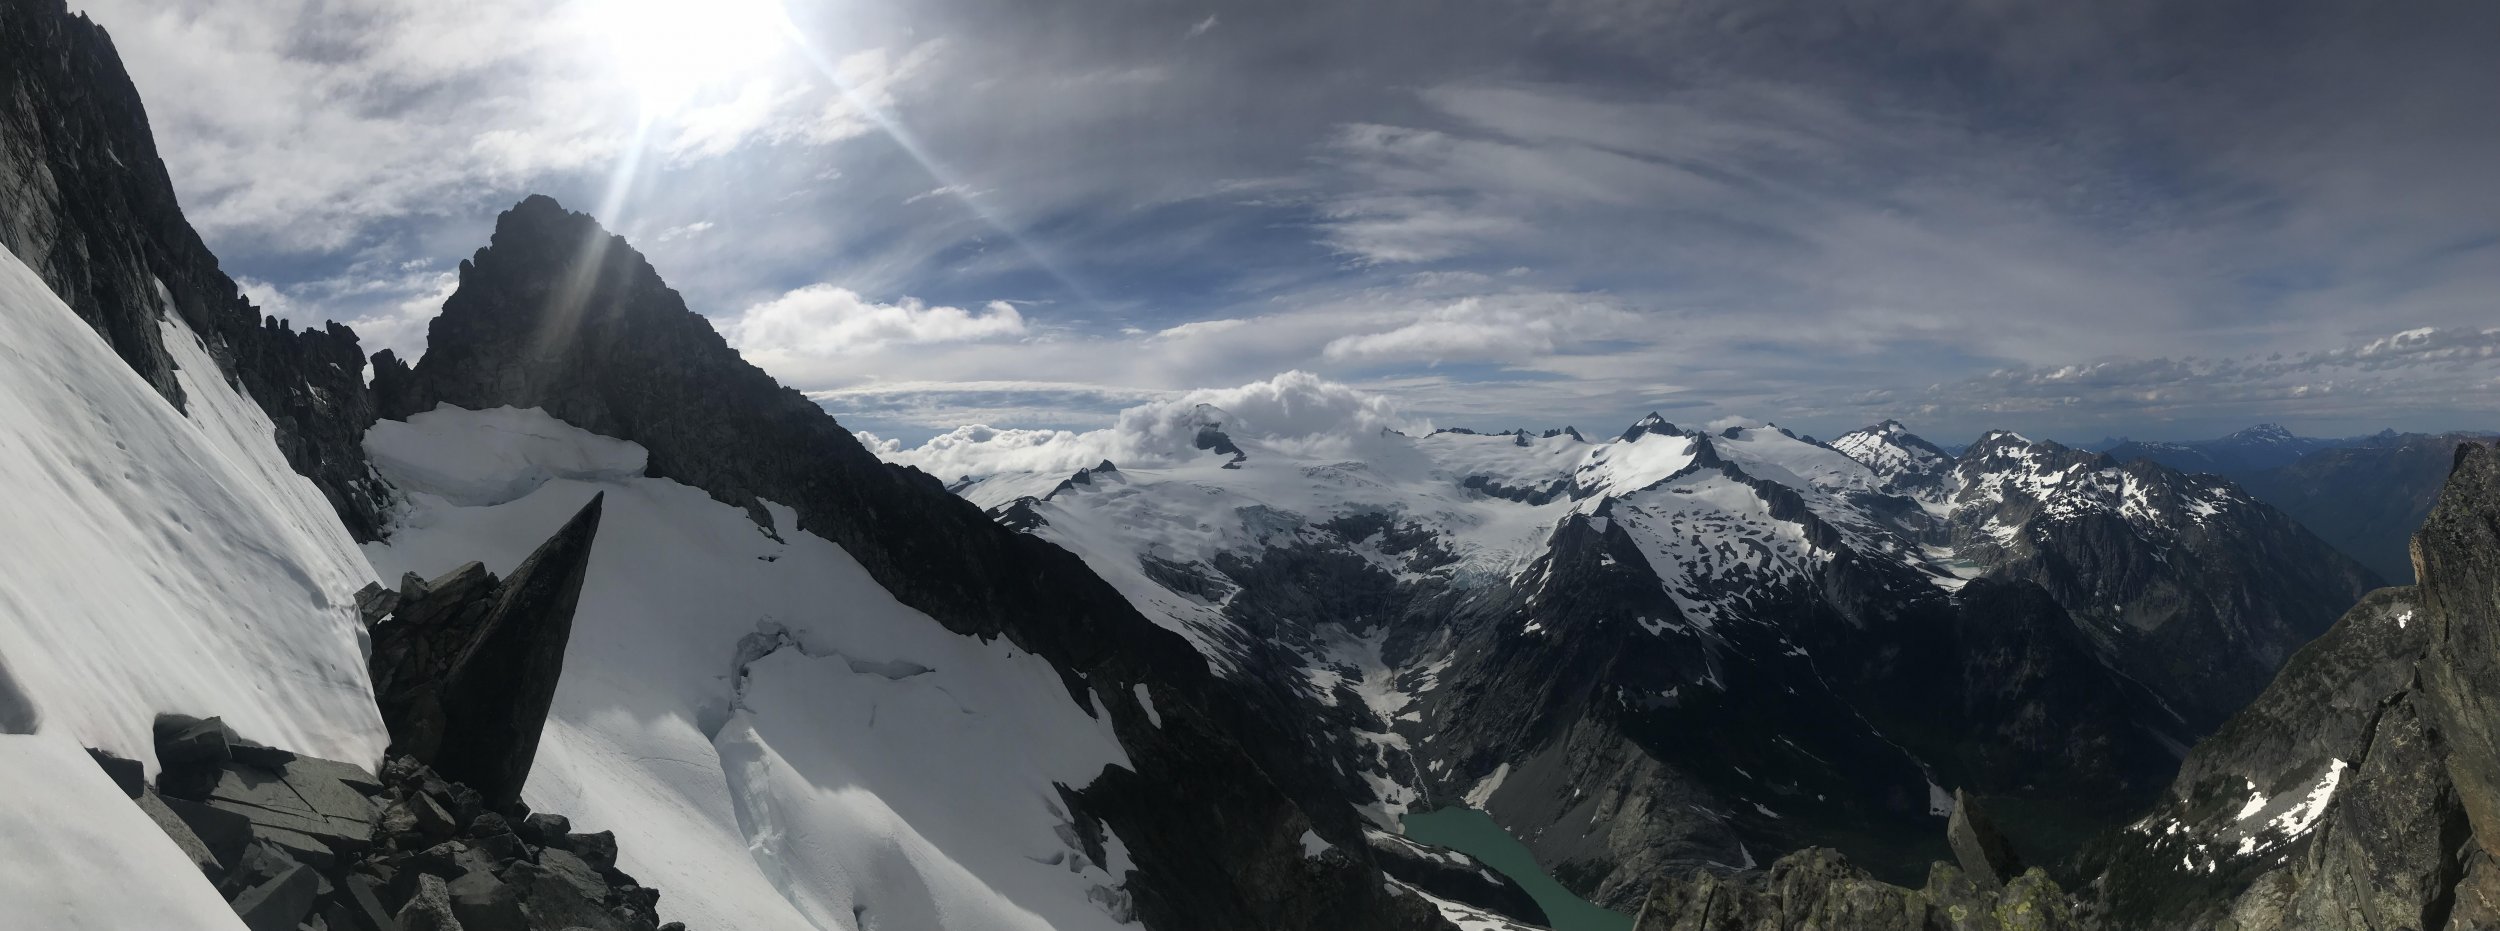
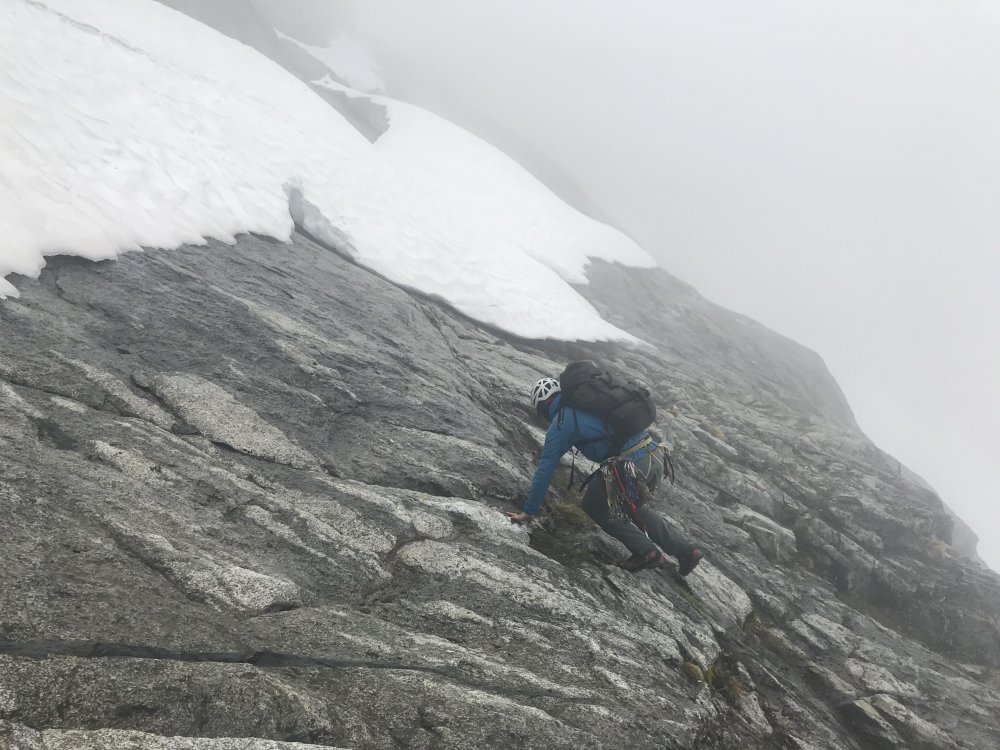
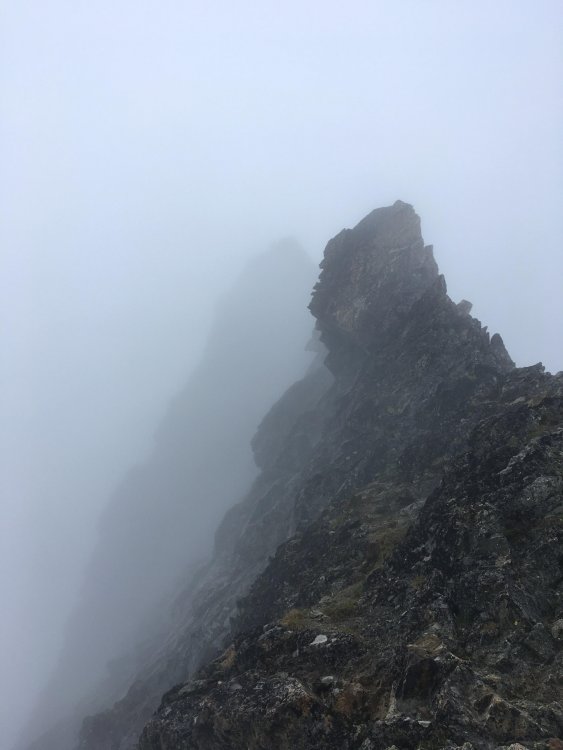
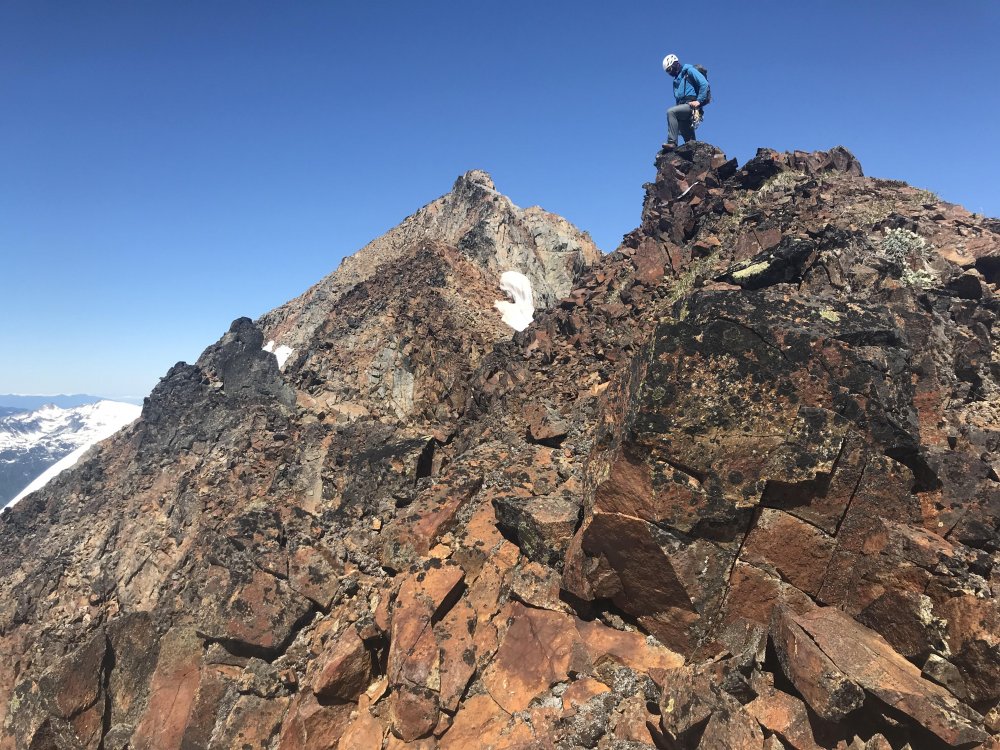
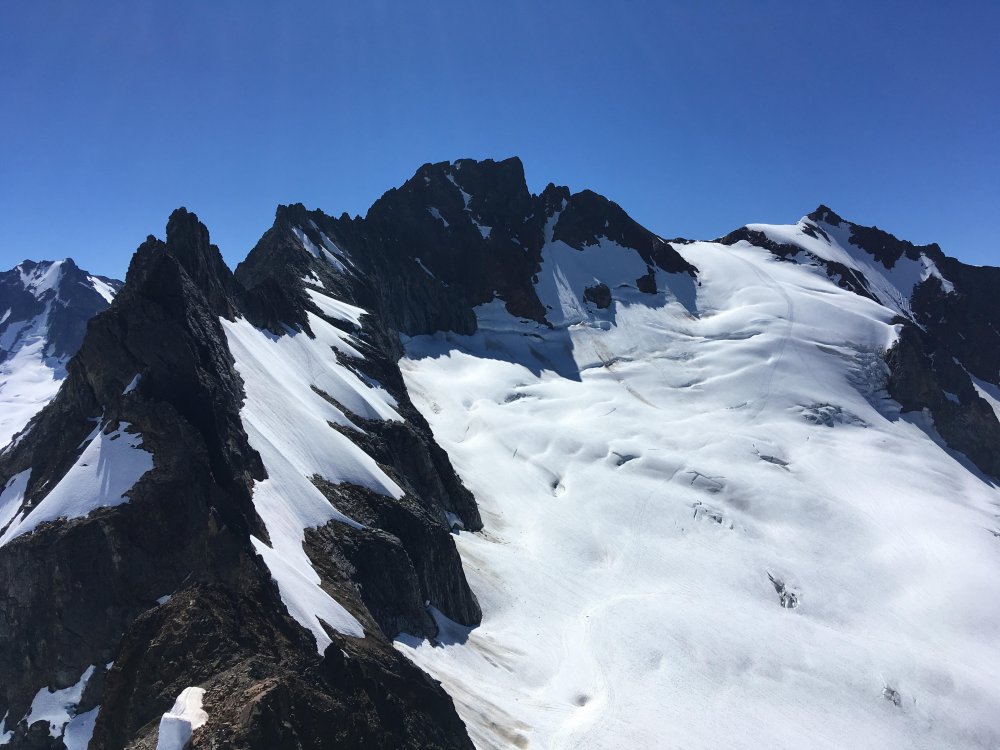
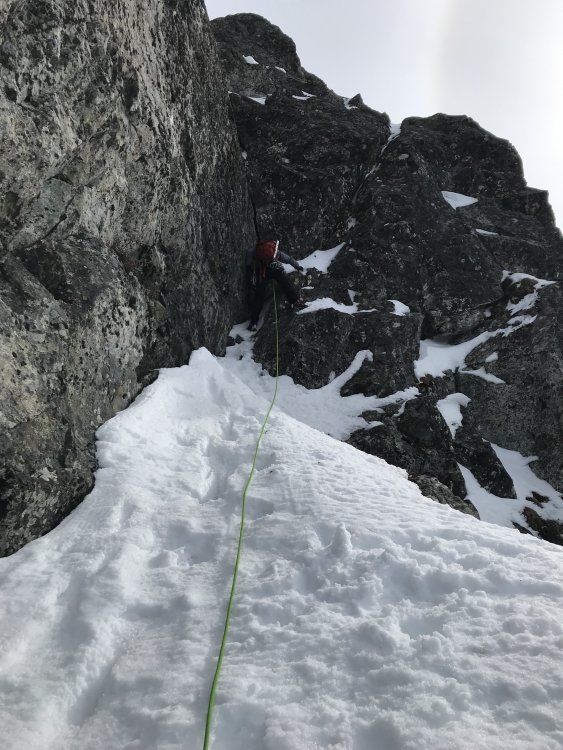
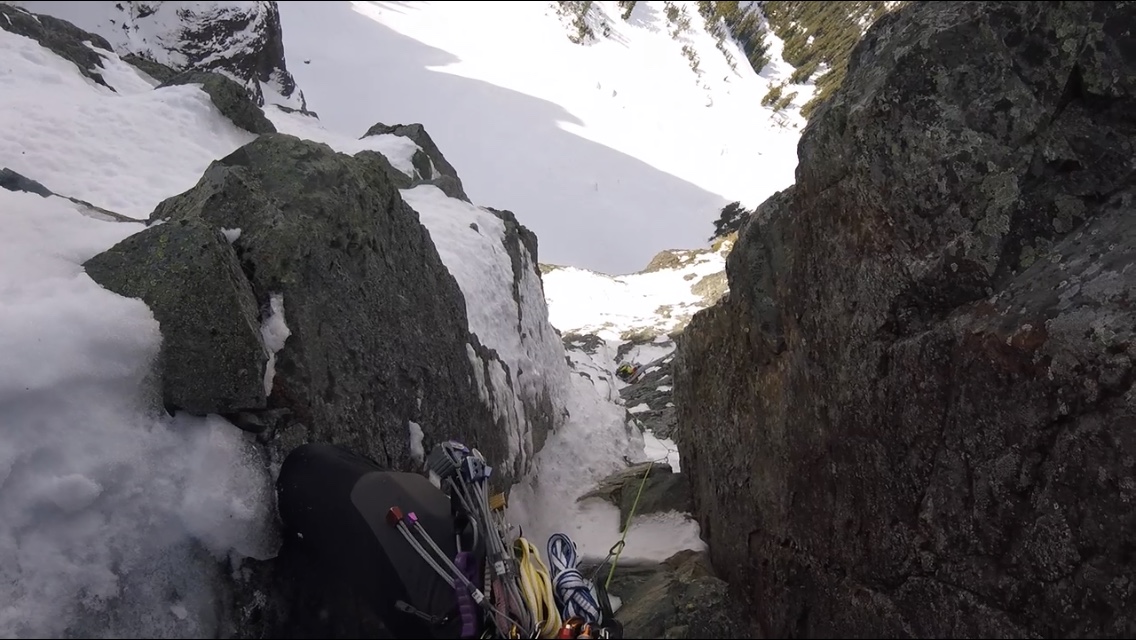
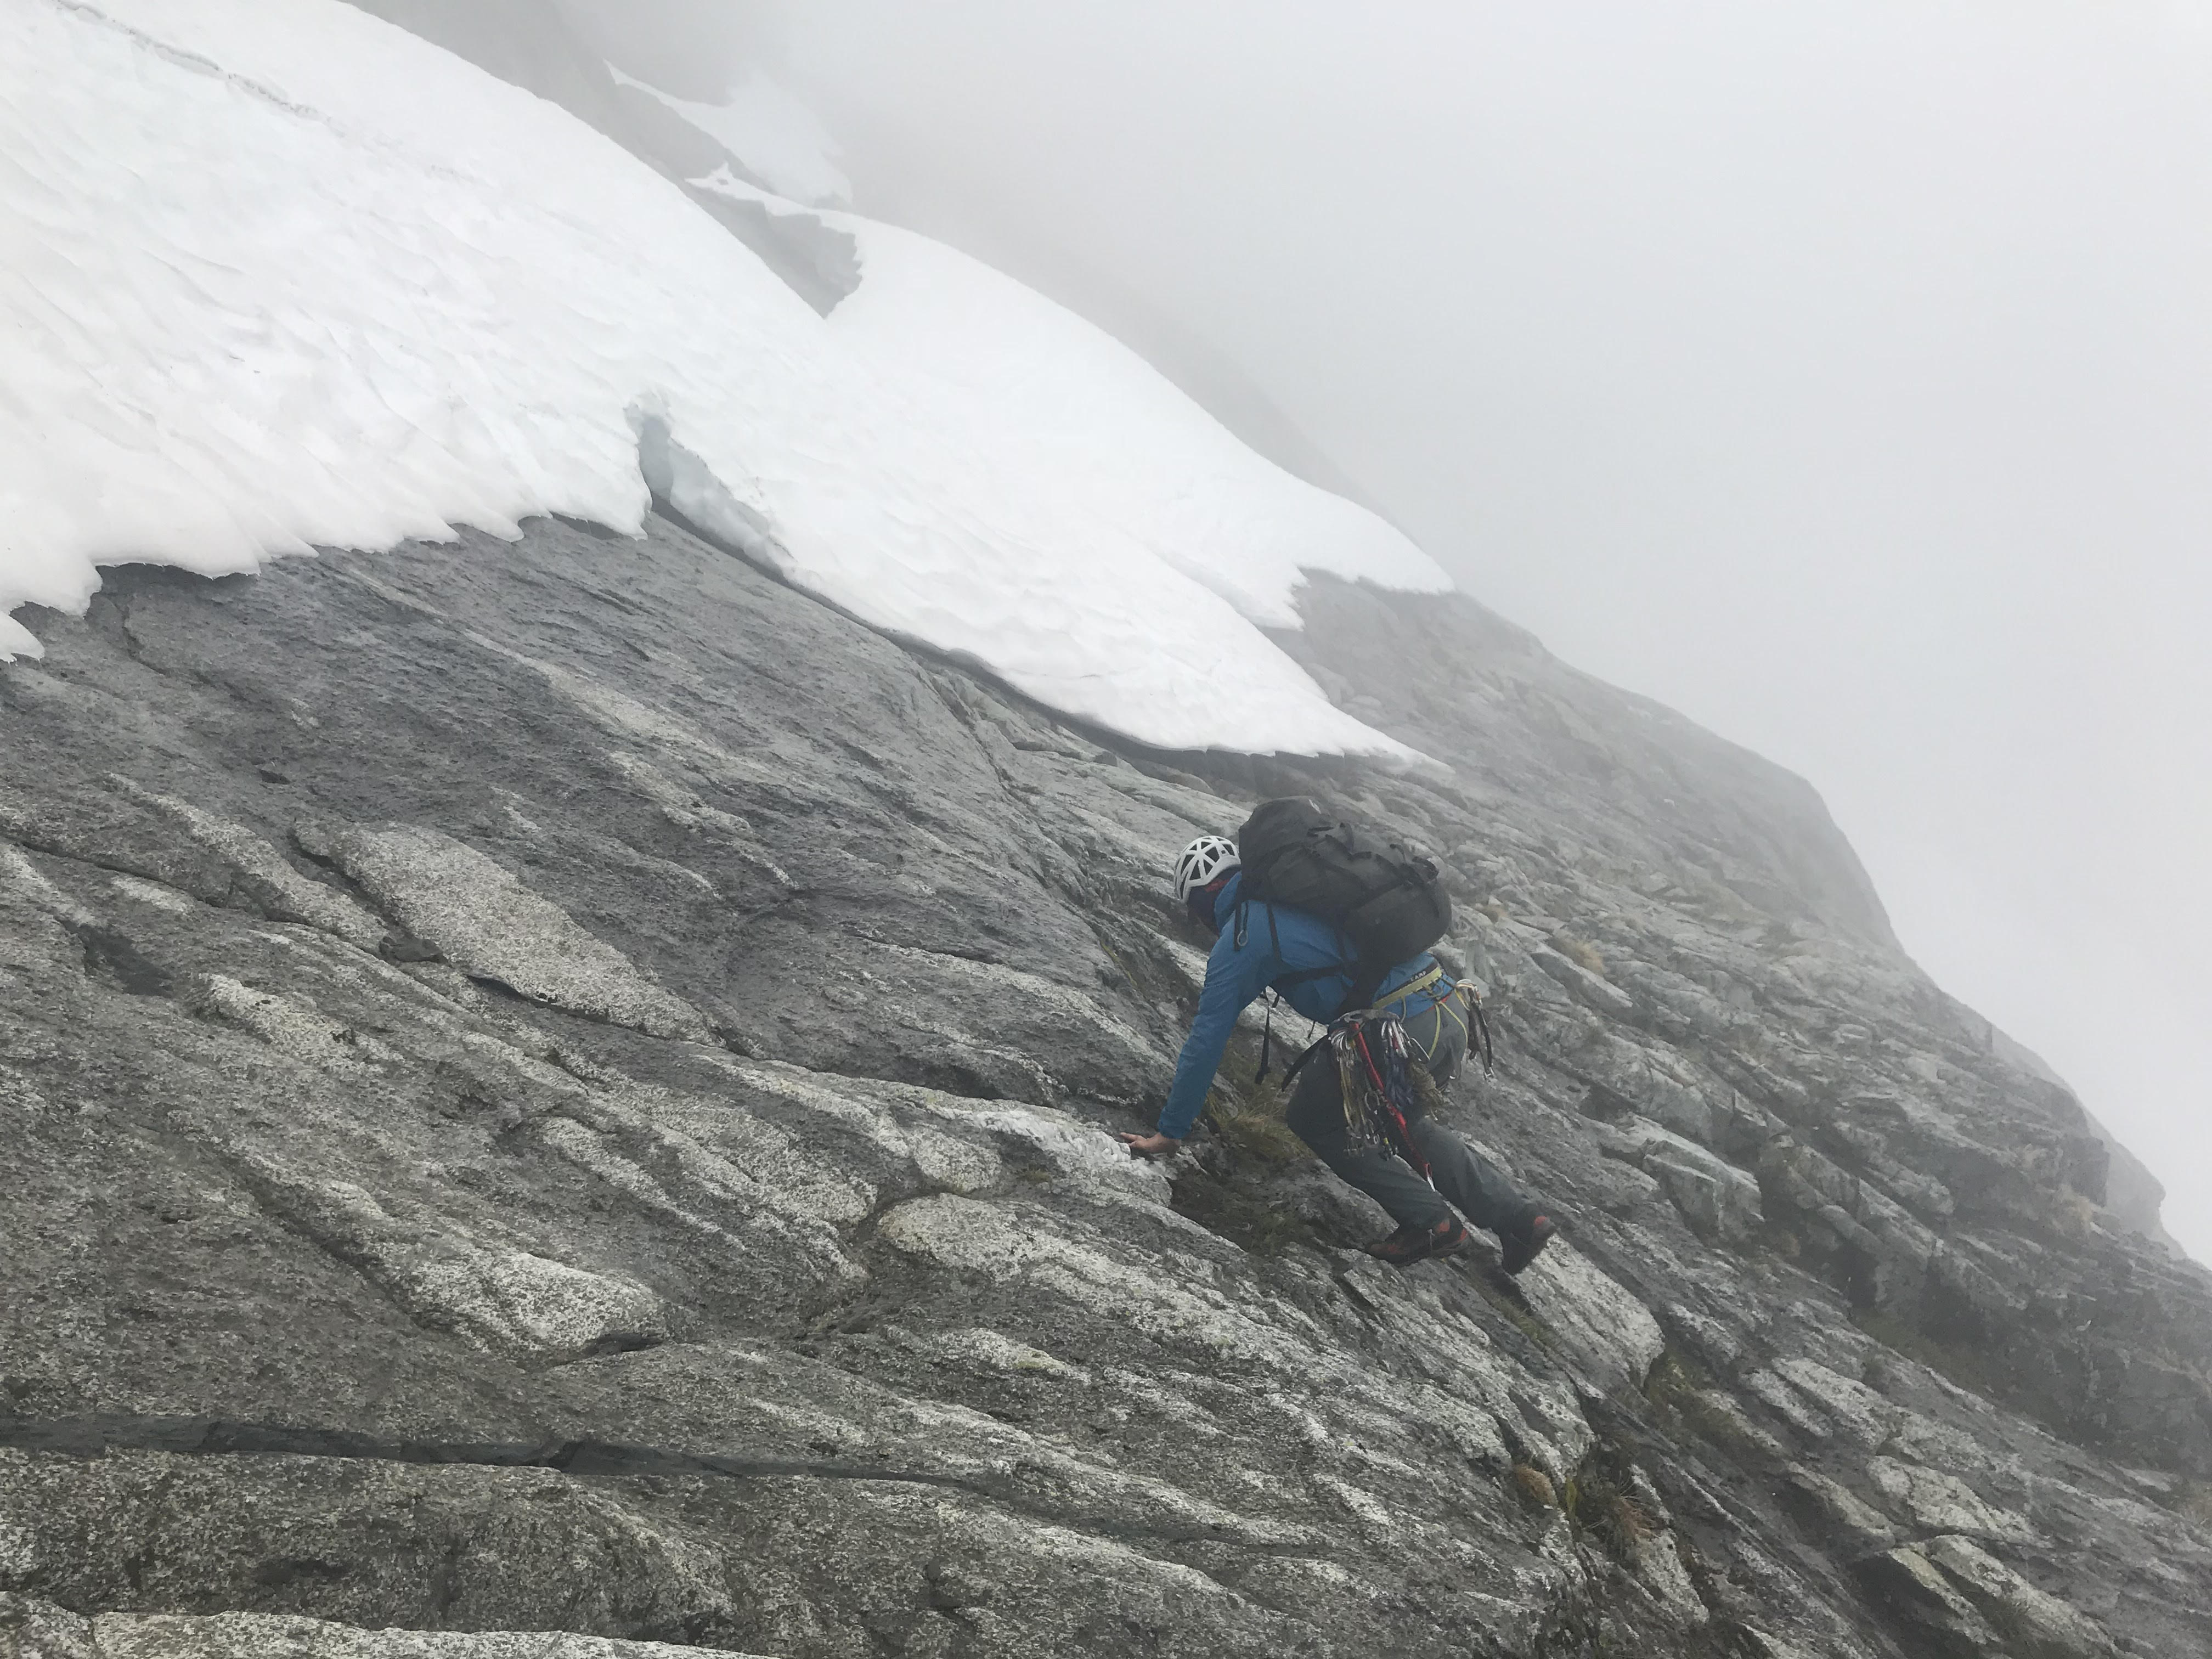
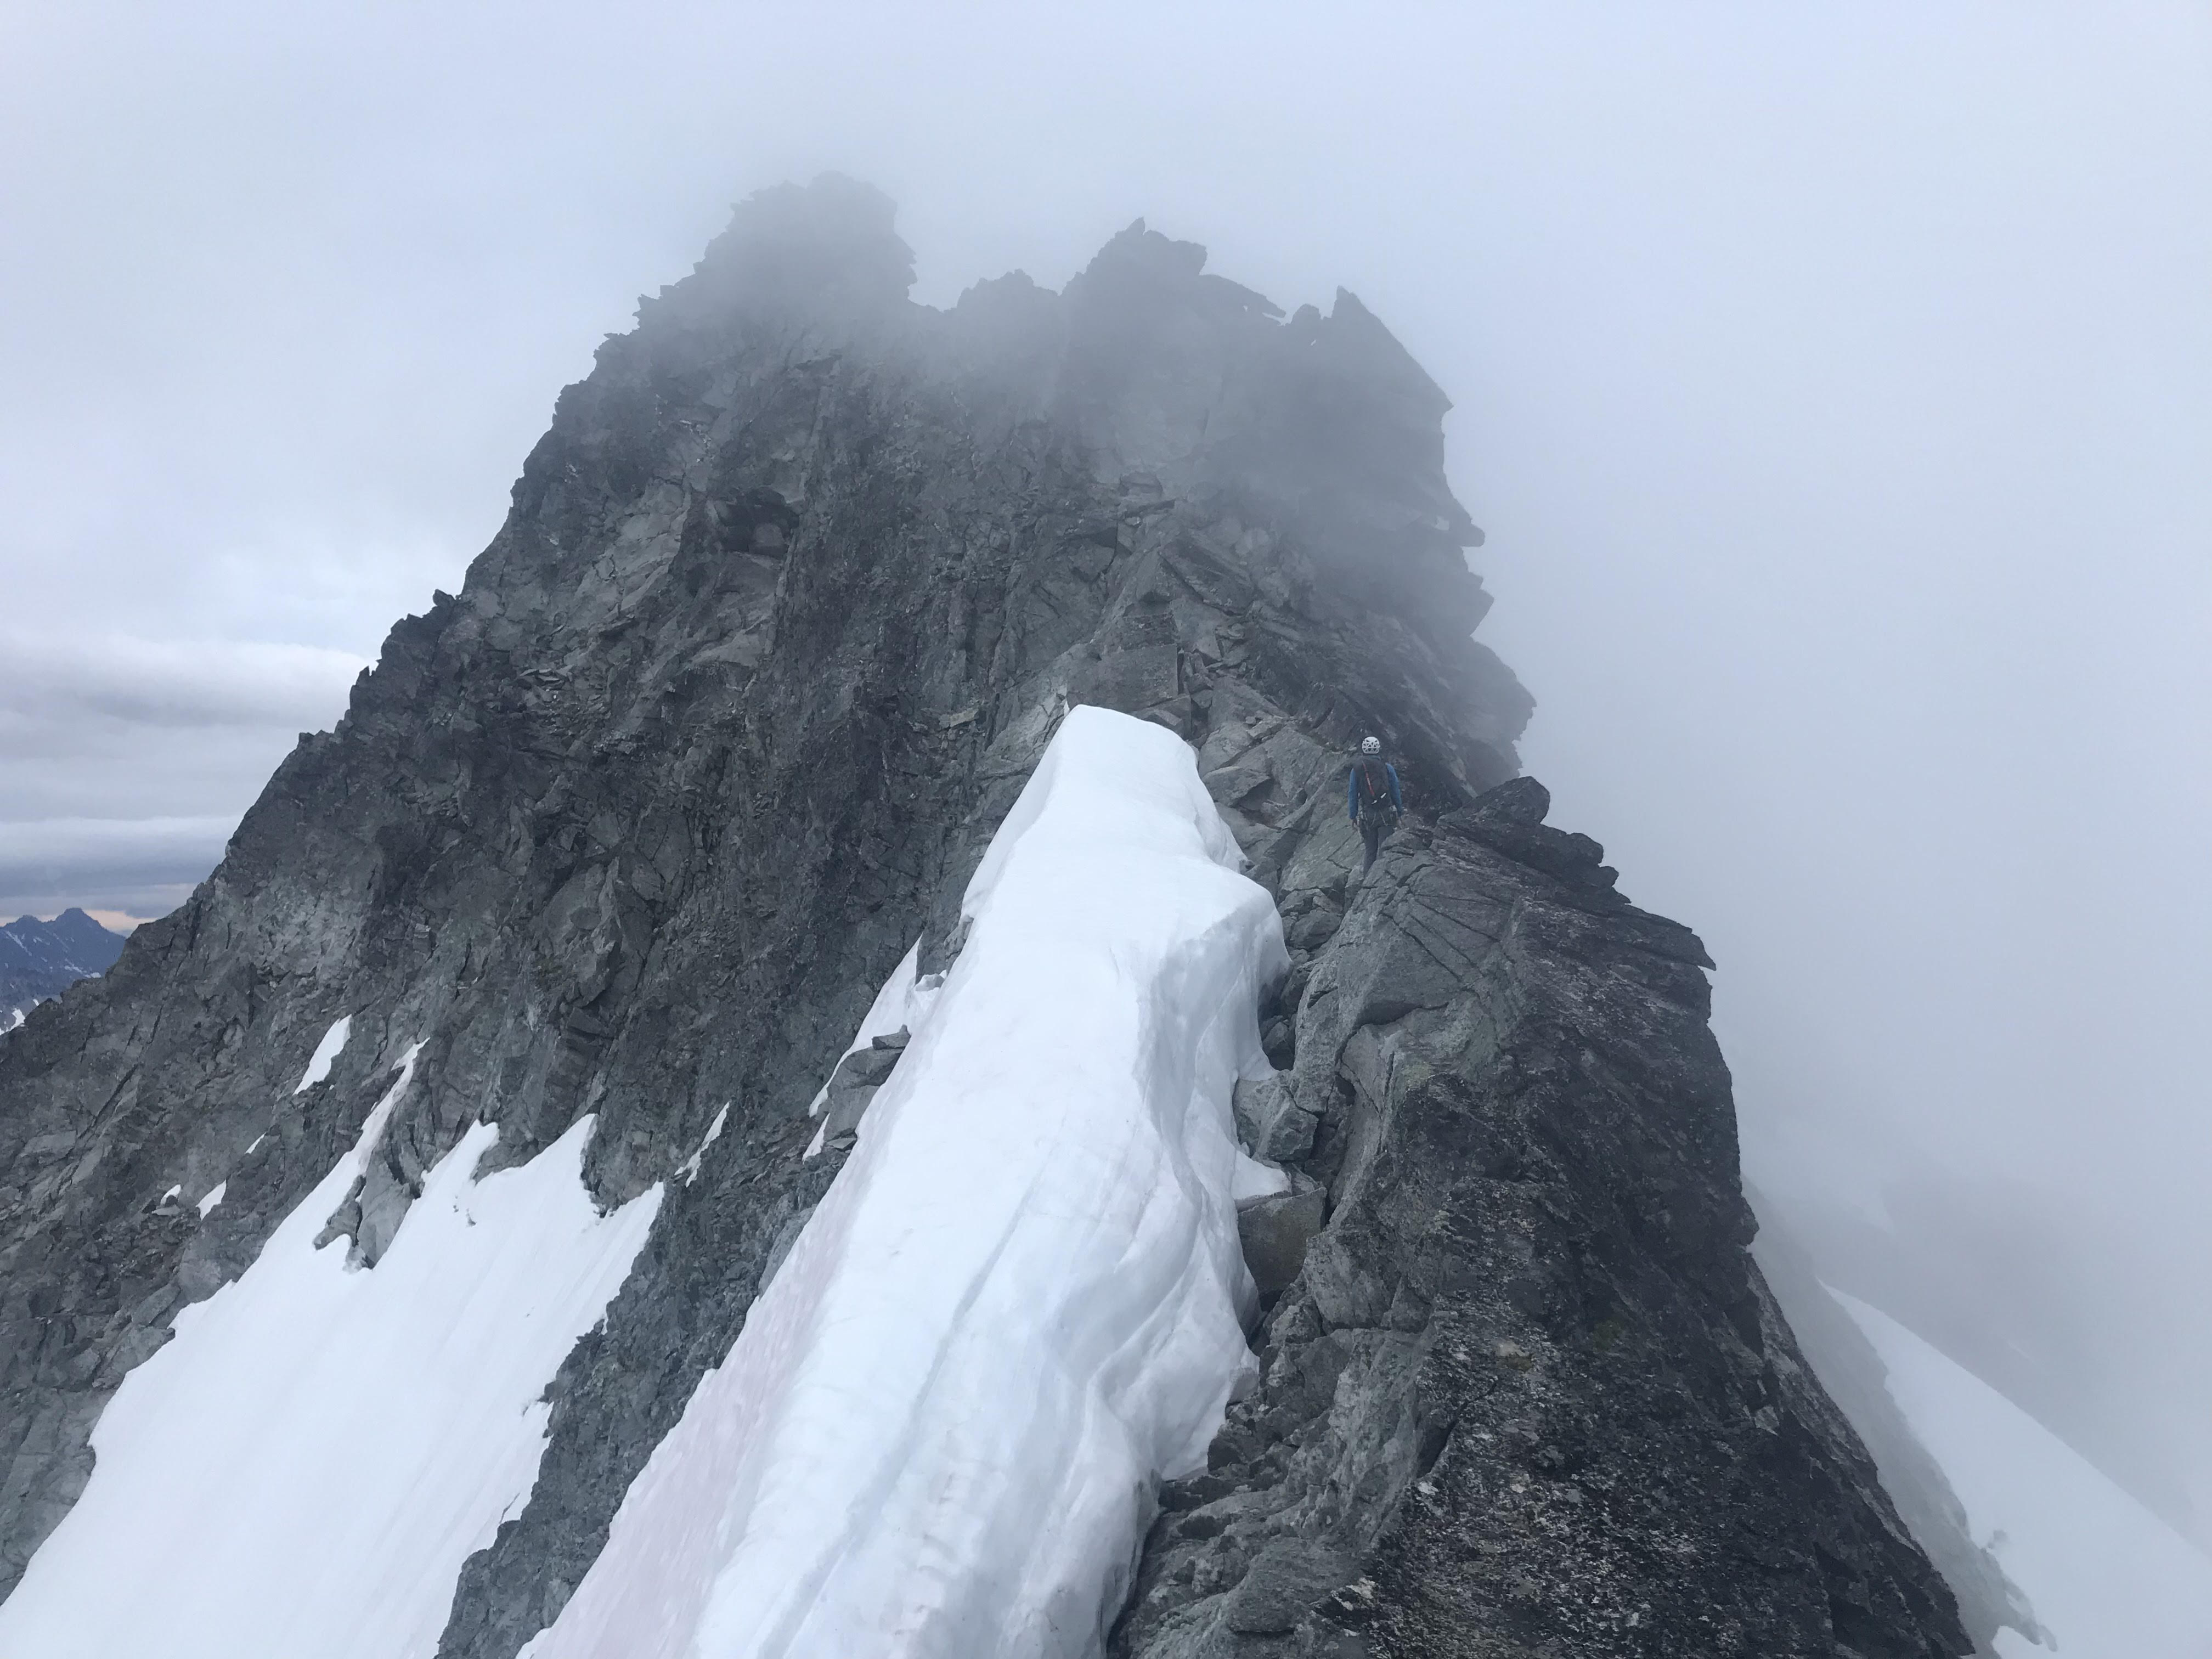
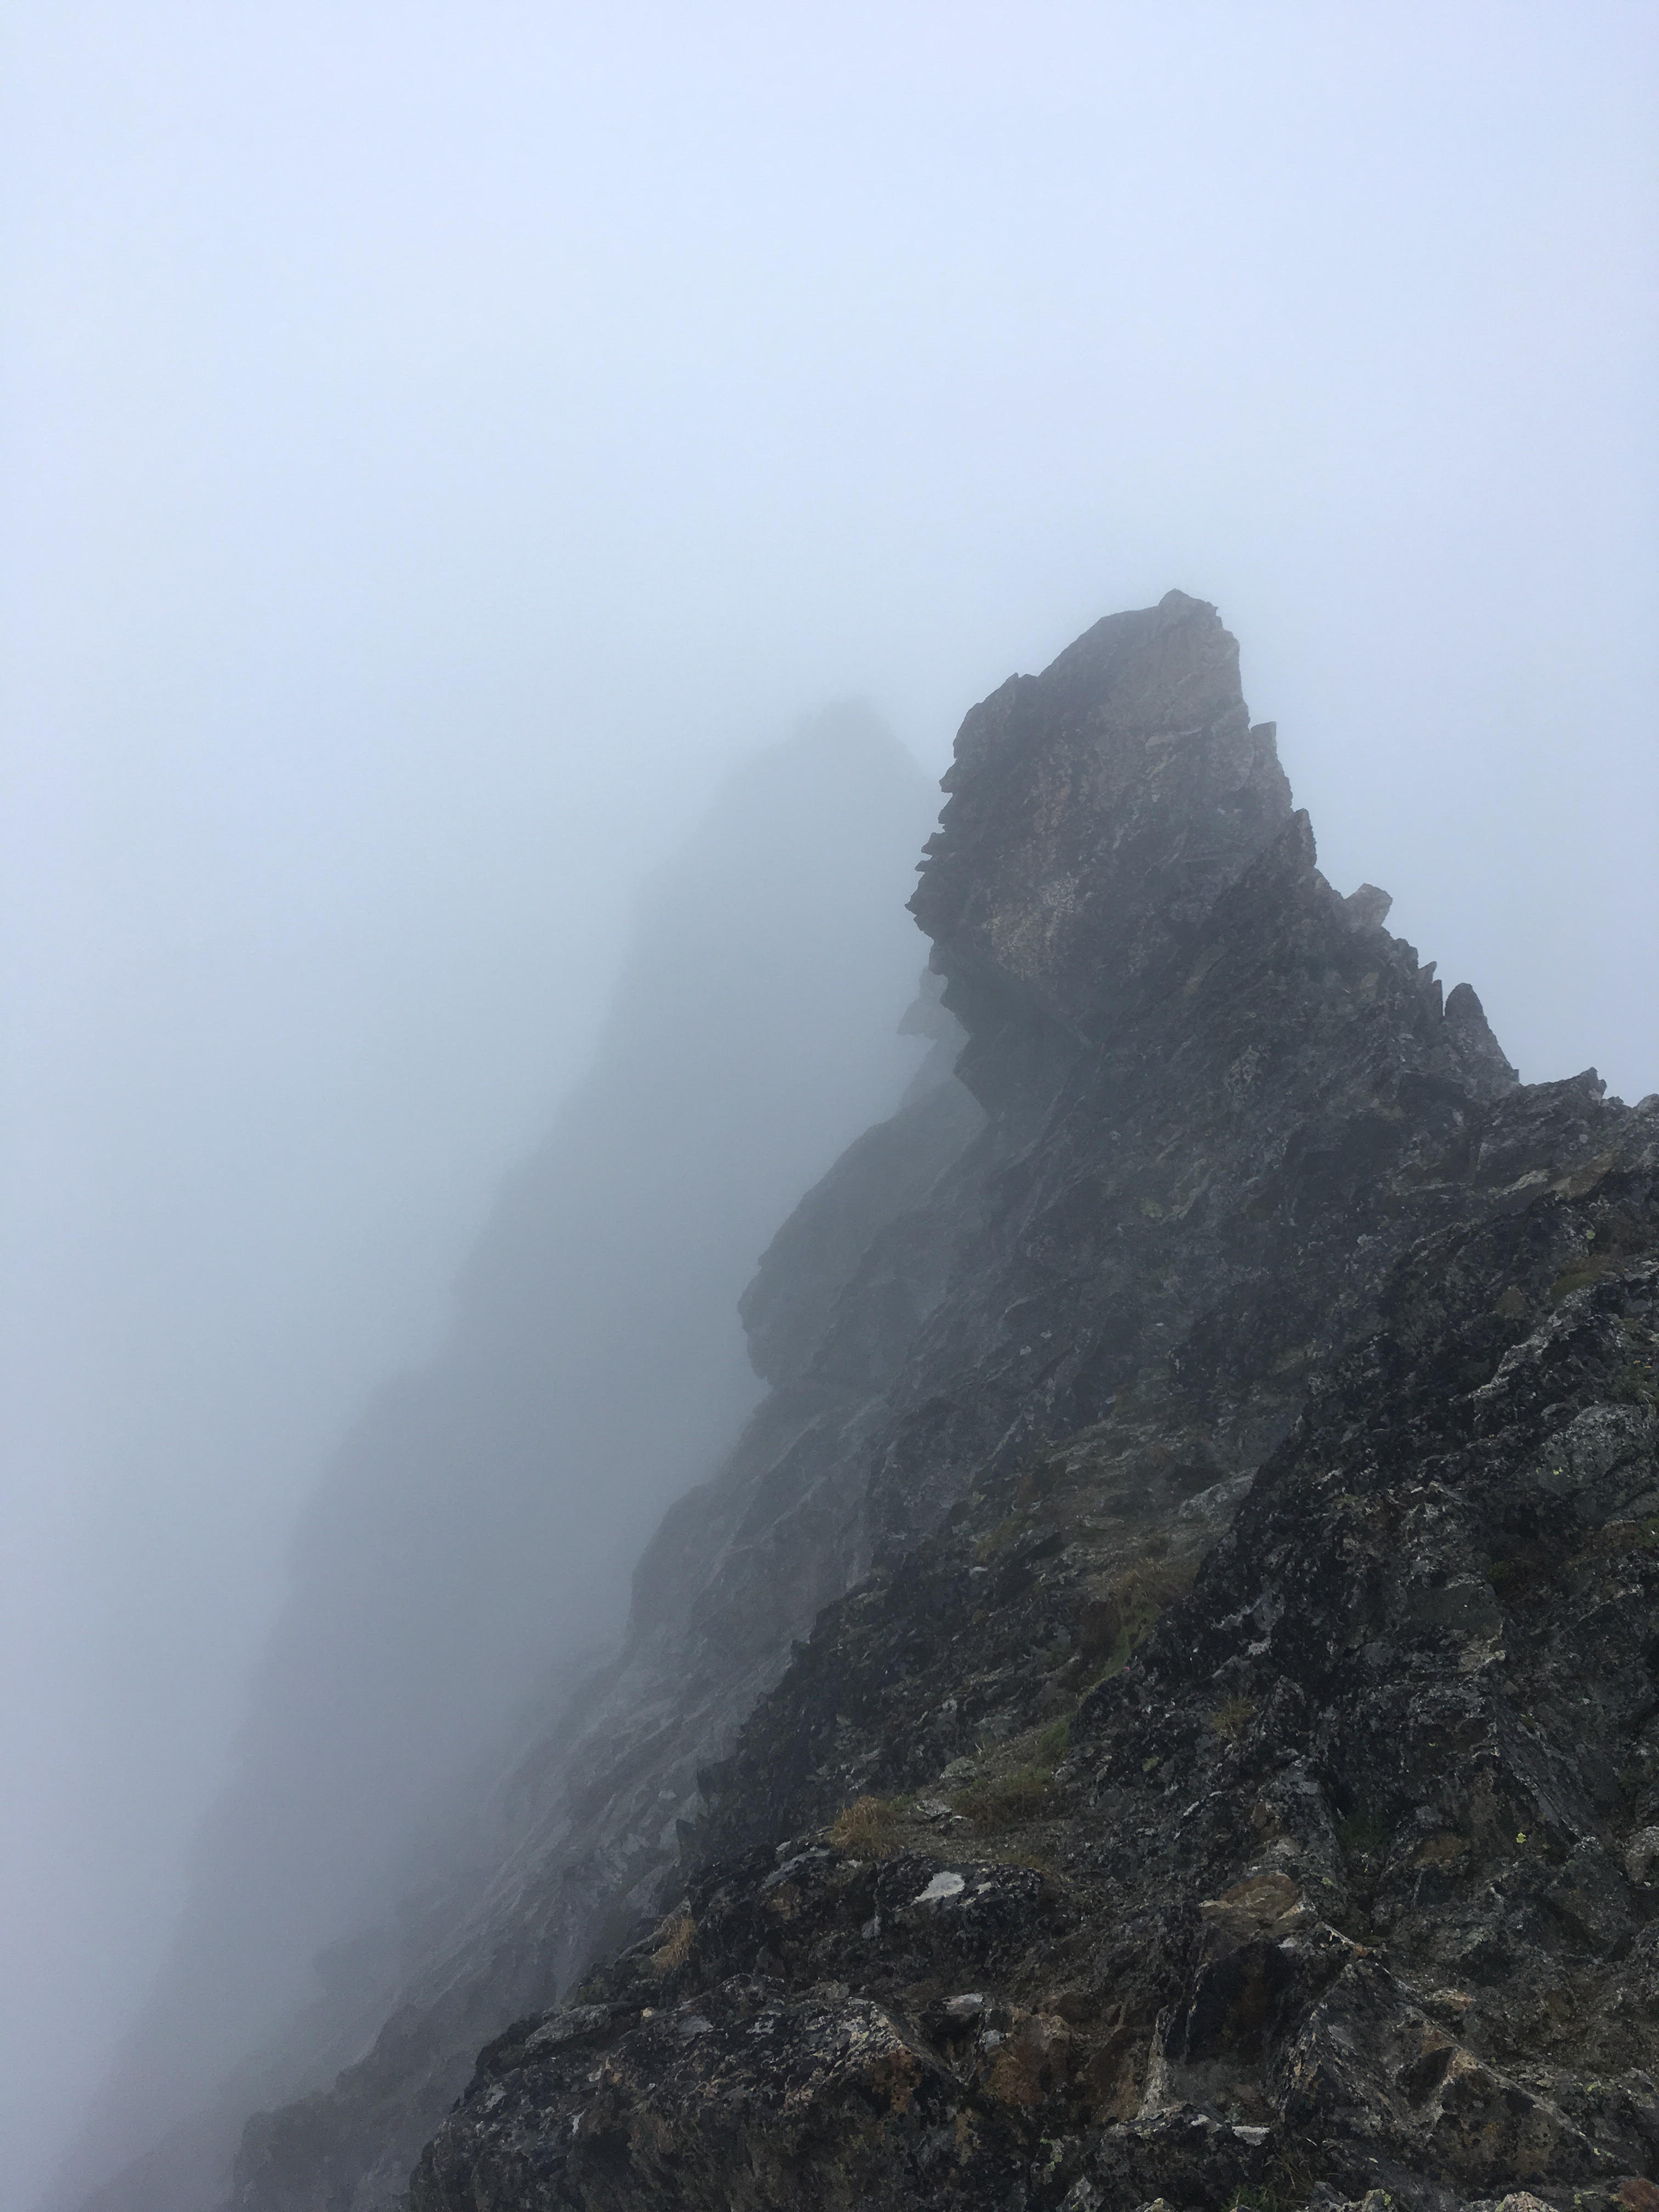
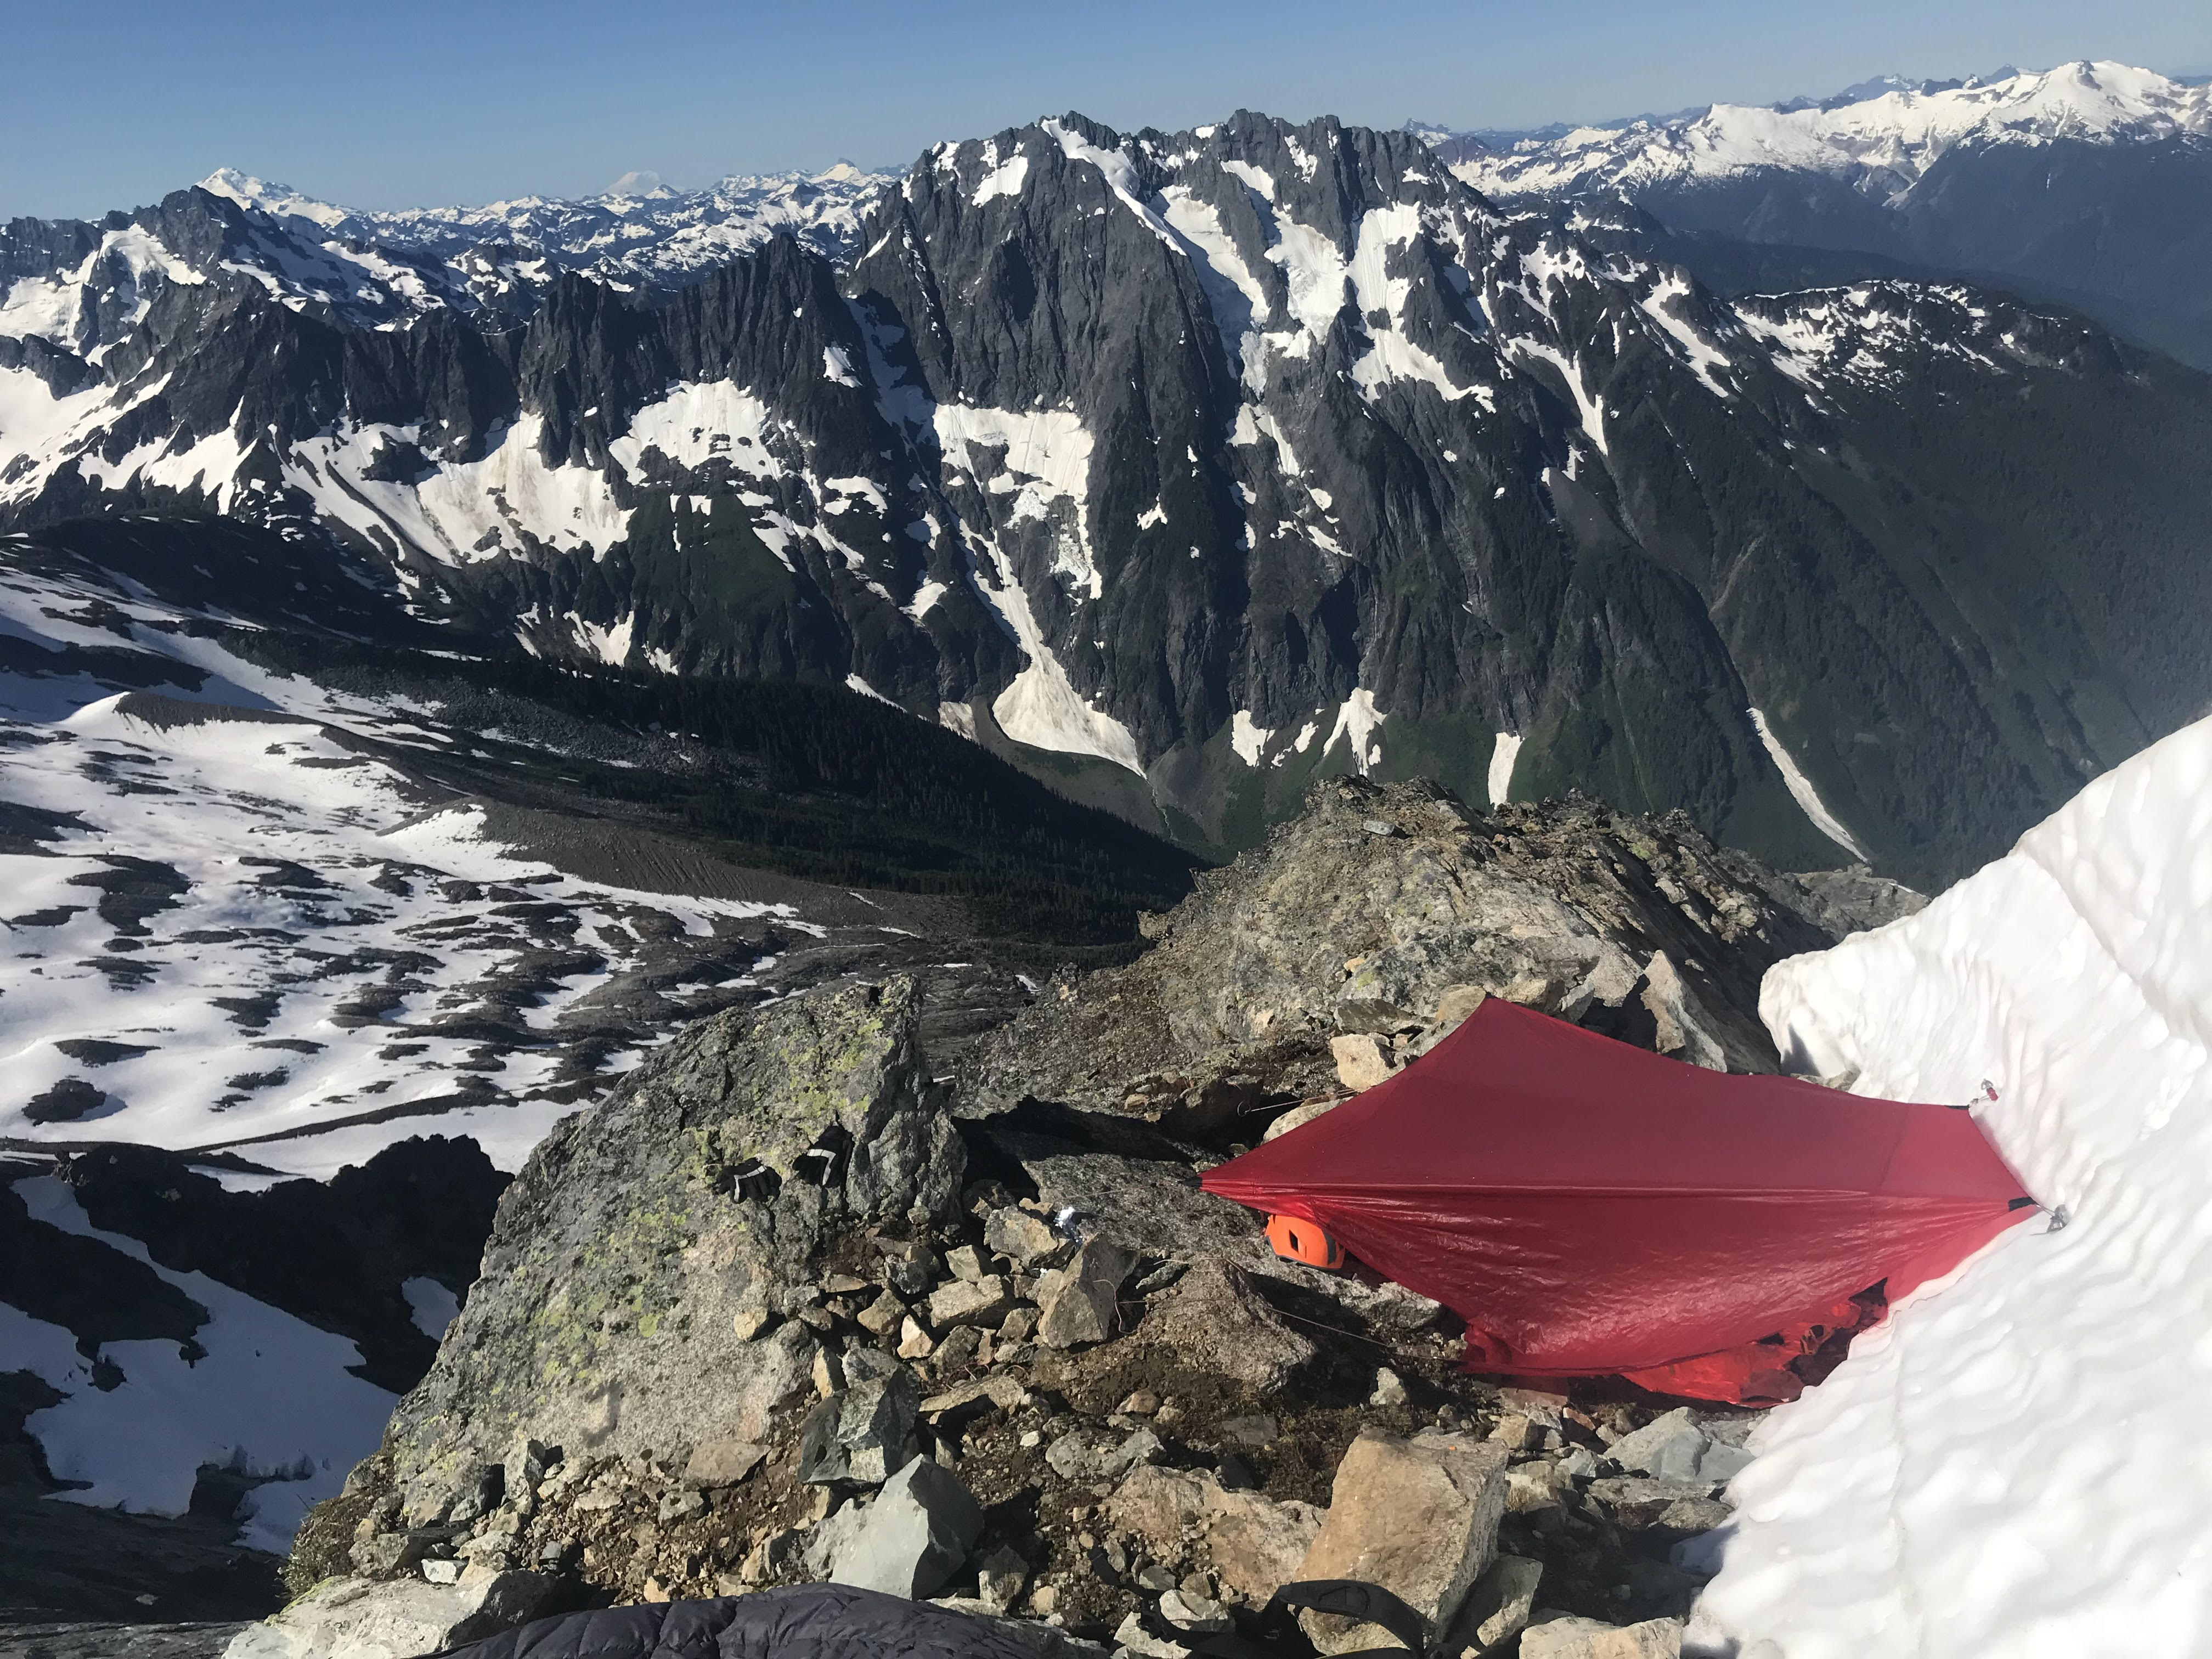
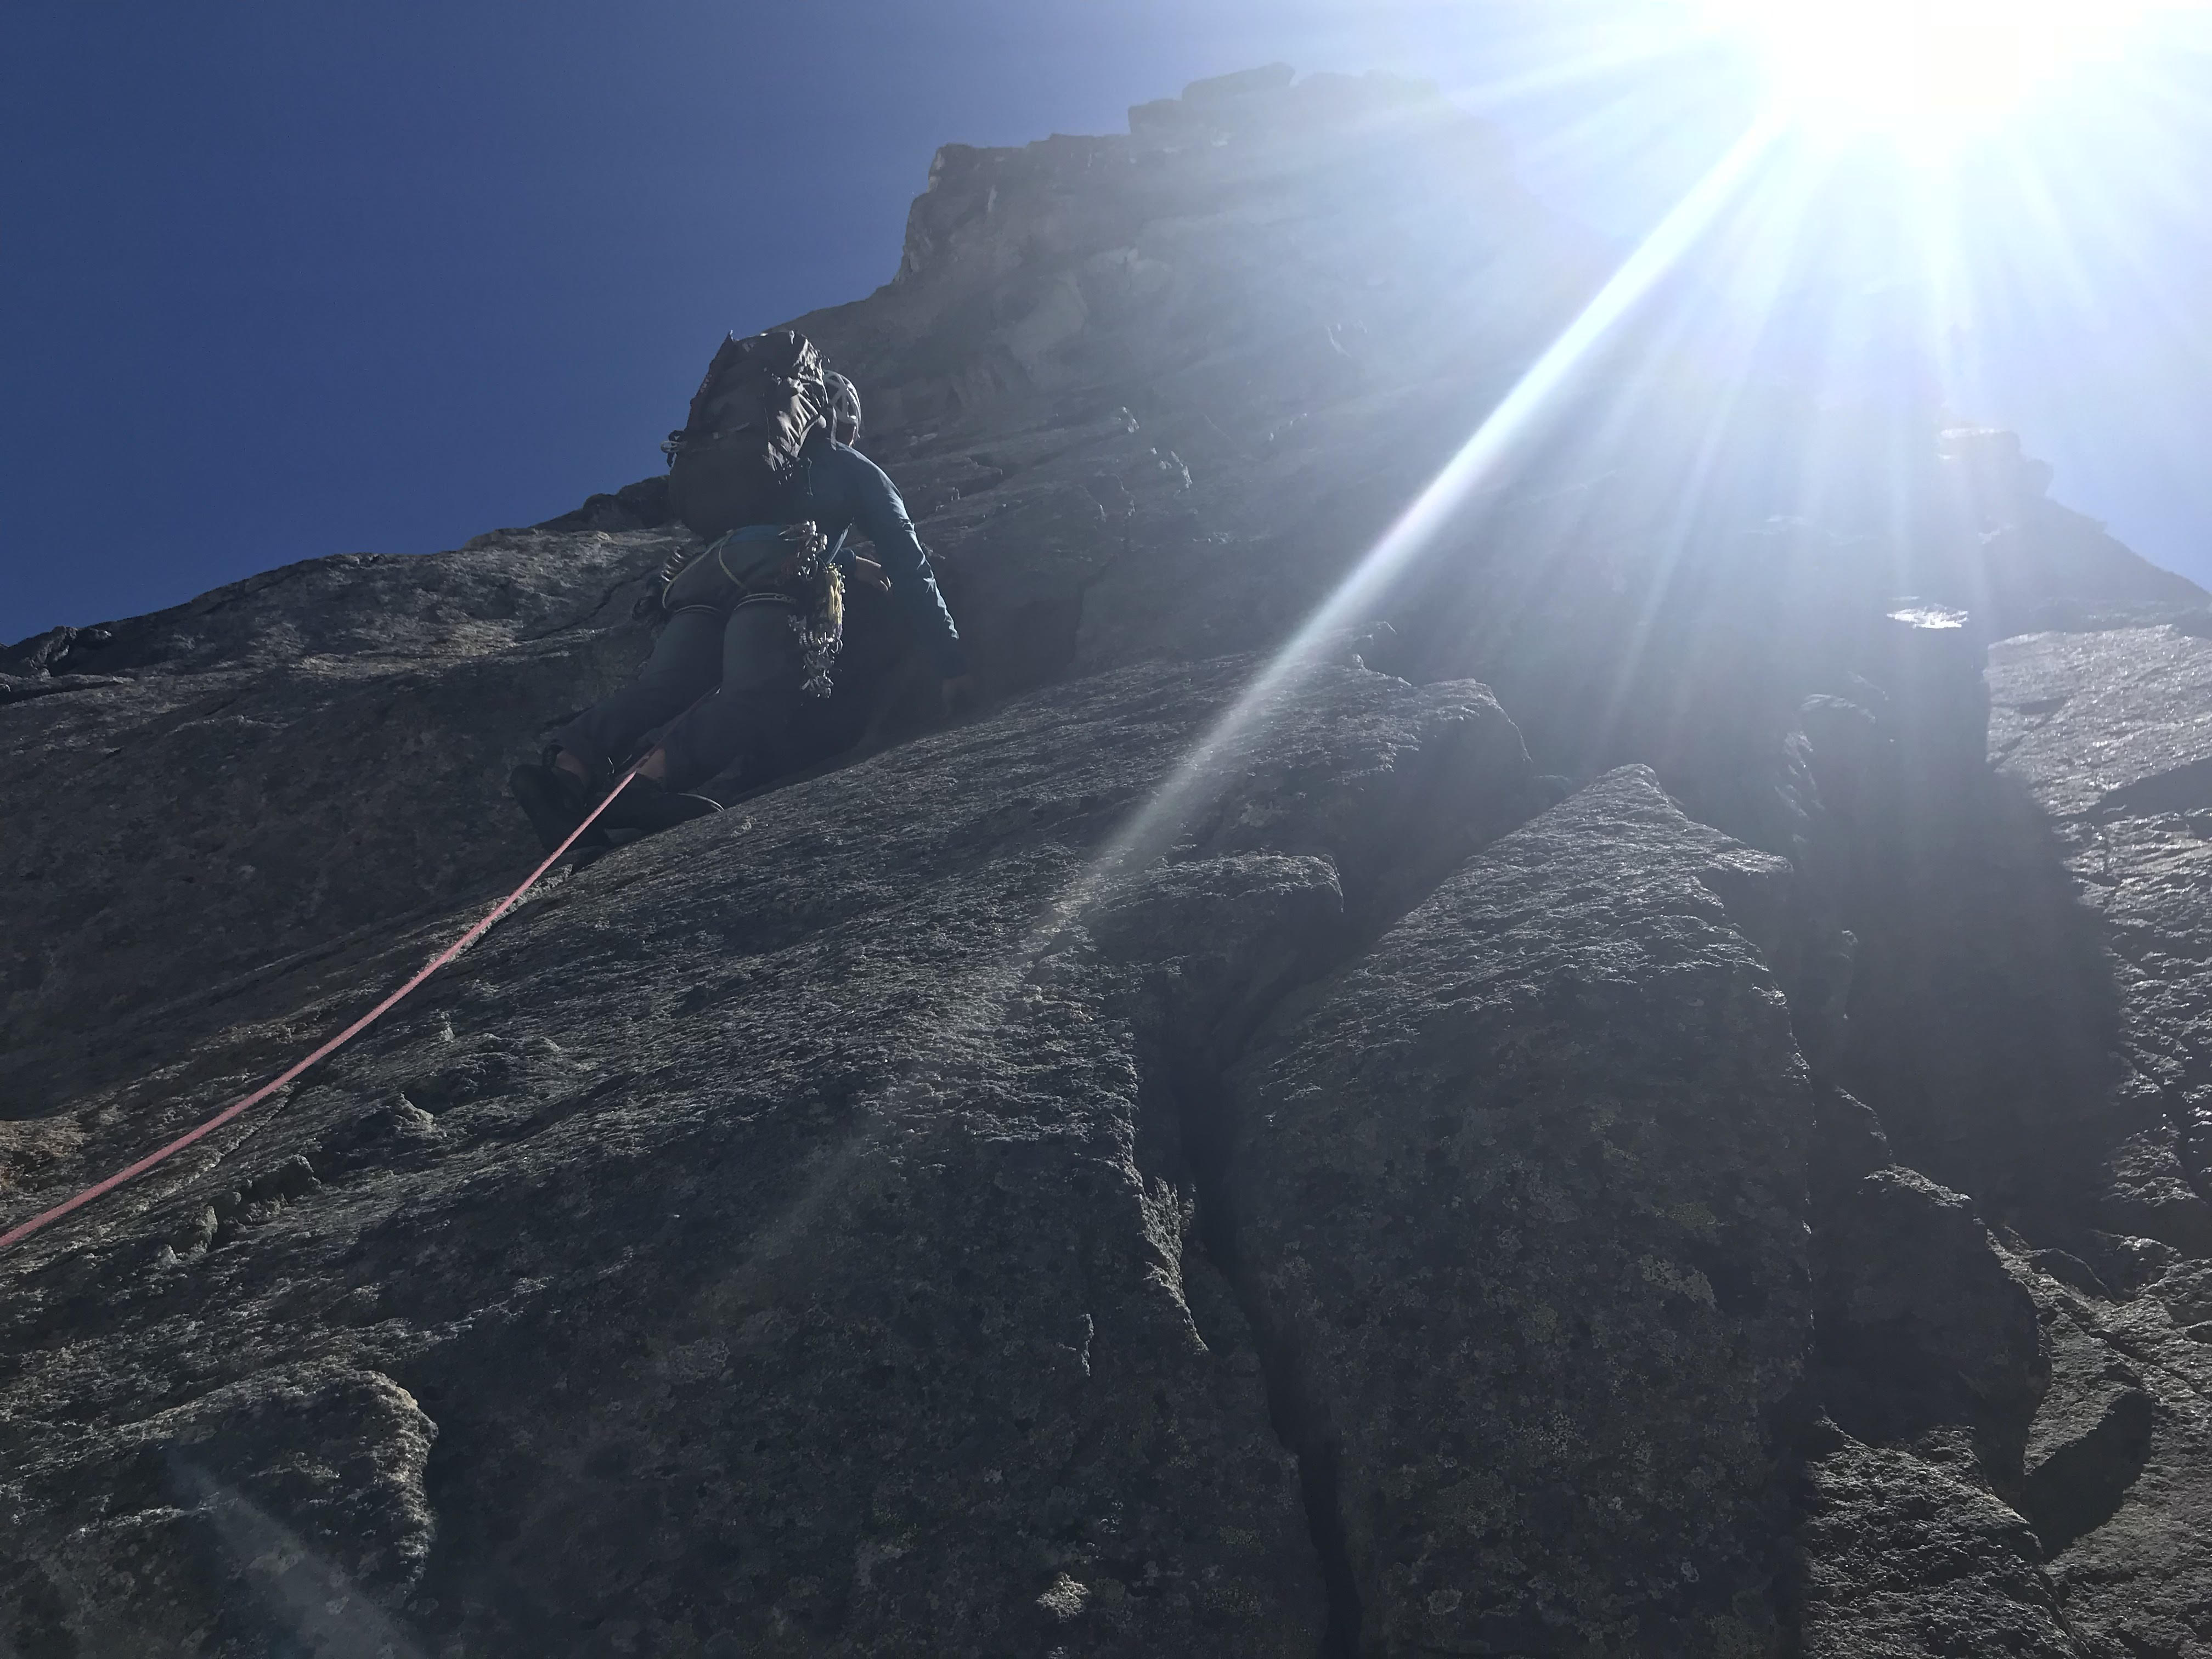
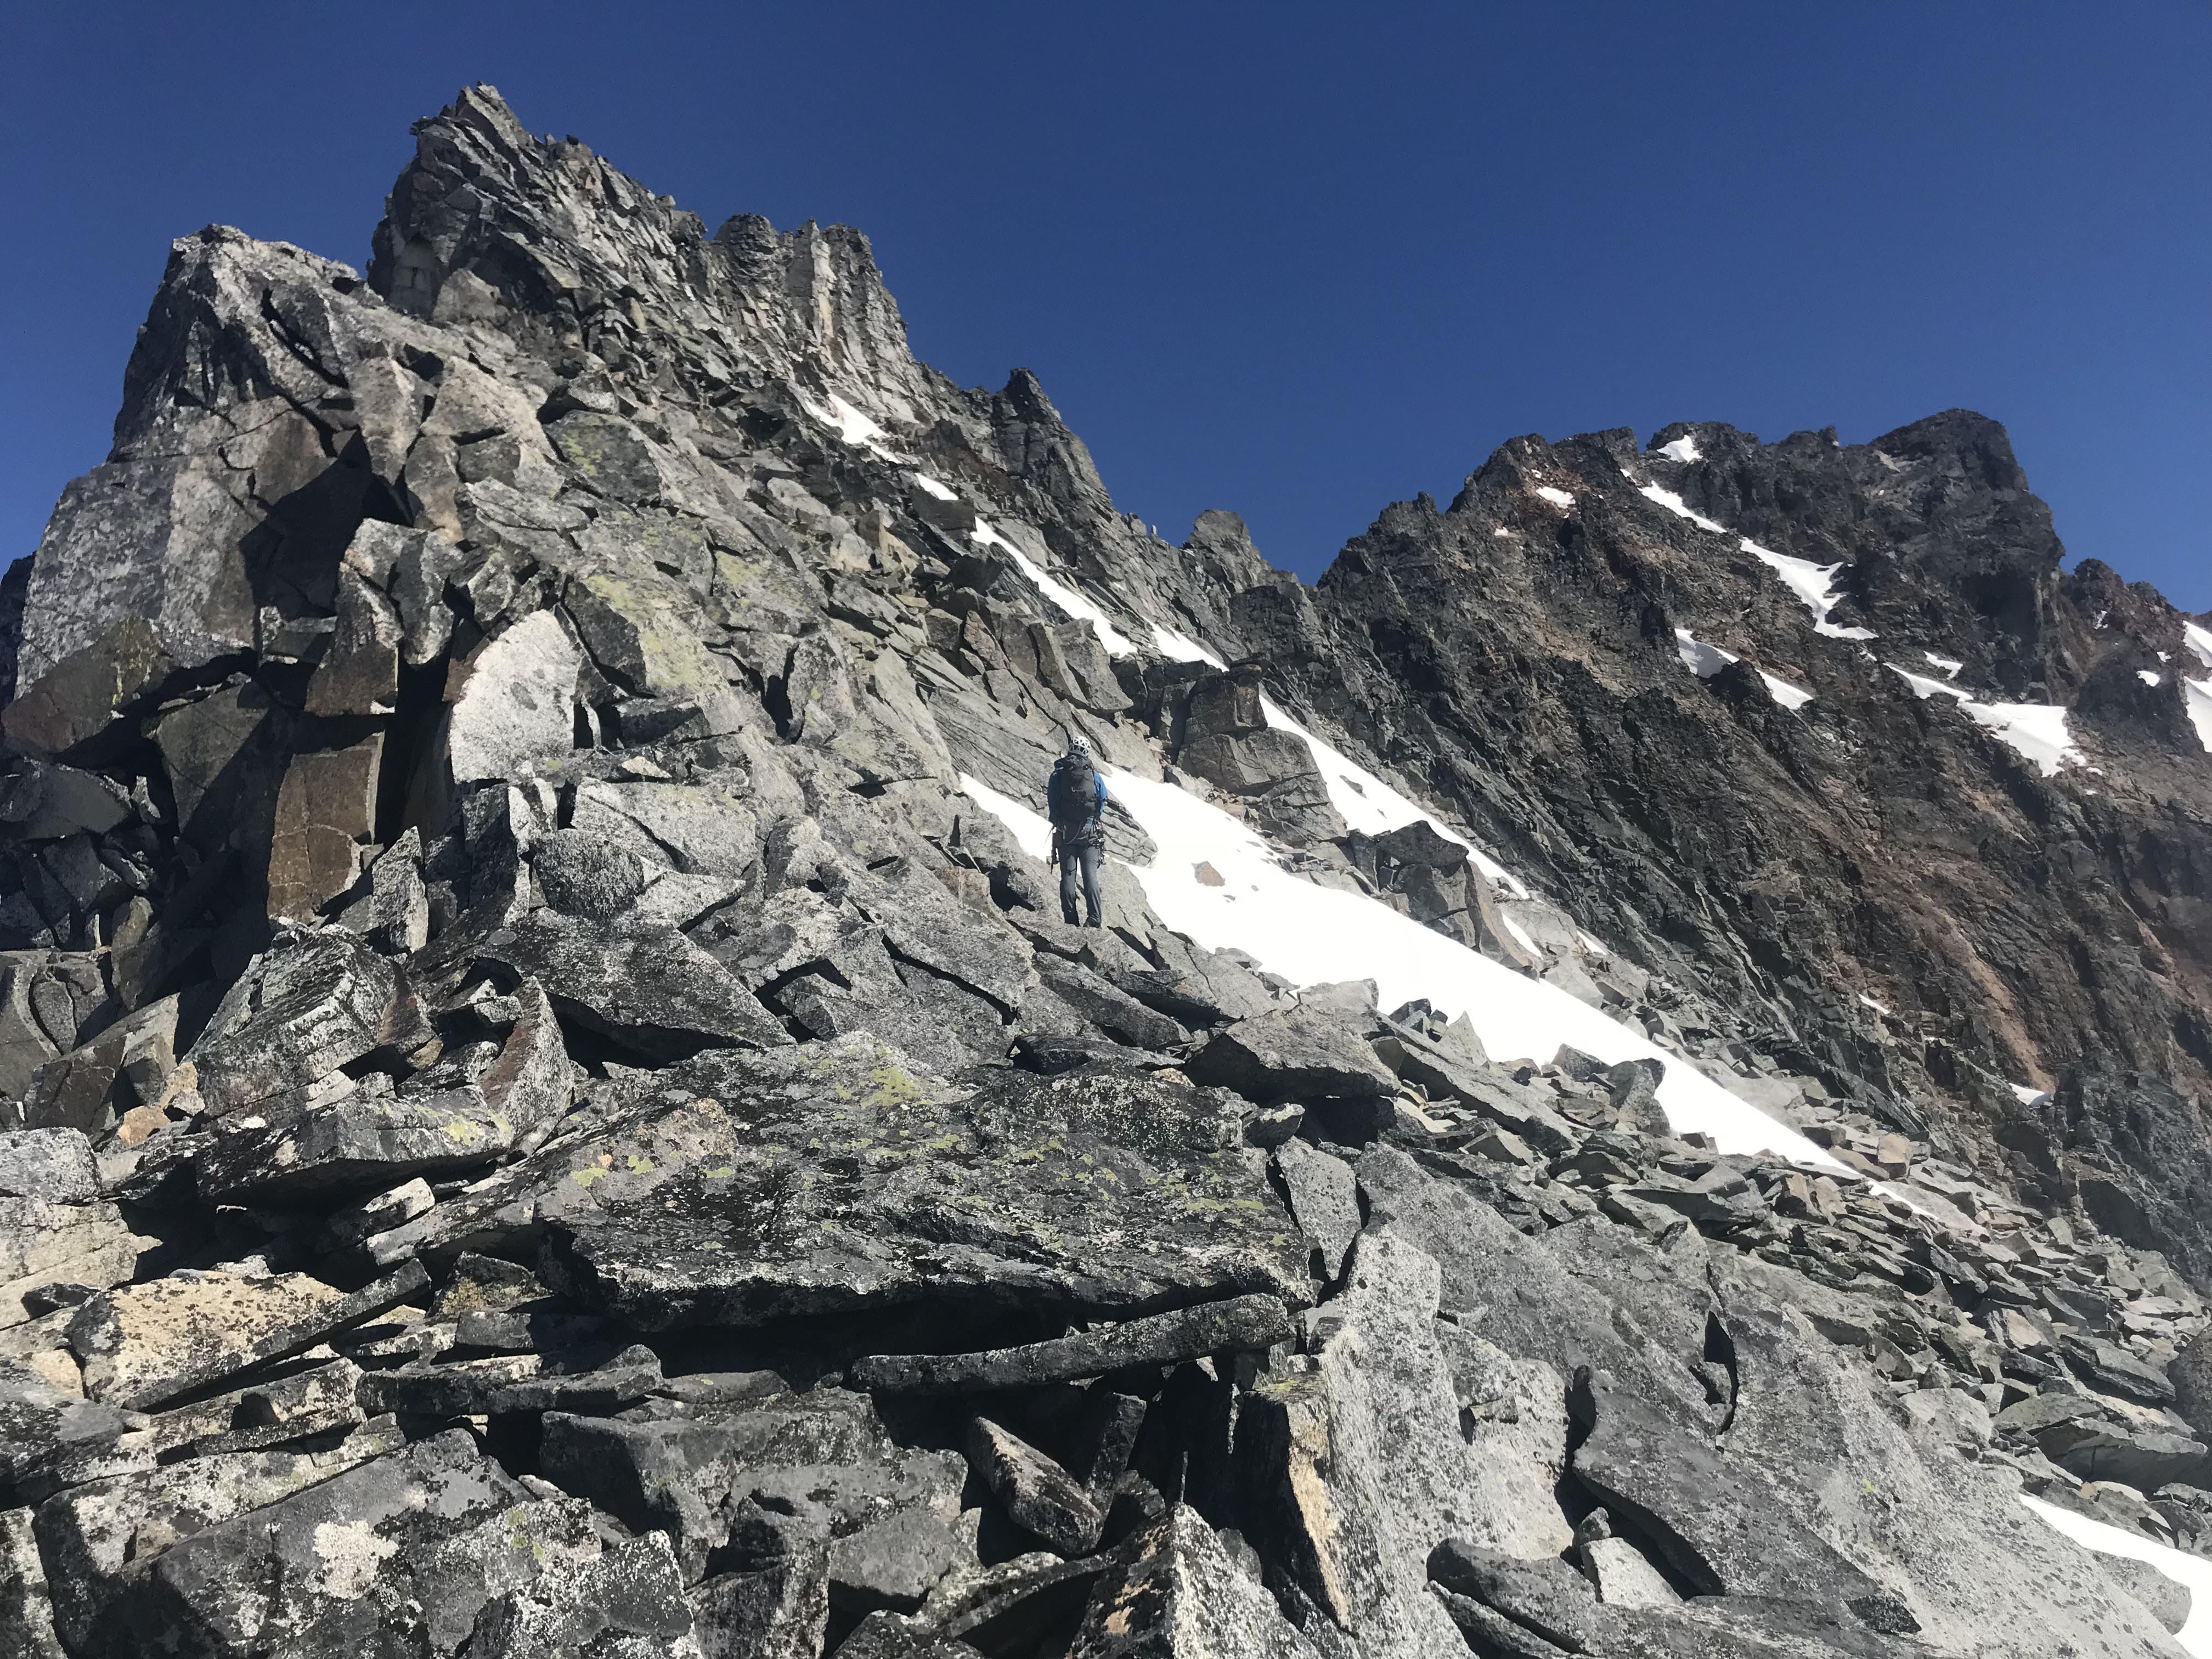
Trip: North Cascades- Boston Basin - The Boston Marathon Trip Date: 07/10/2018 Trip Report: This is super delayed, but i was looking though old pics and thought this trip was worth sharing with y'all. Kyle was most certainly the brain-child behind this absurdity. I think it was sometime in the summer of 2017 he mentioned this idea of solo circumnaving boston basin. I was a bit suspicious that things might be a little more involved than was anticipated so told him i'd join in for a recon mission. We trail ran the sahale glacier route one day and gawked at the rest of the ridge, reading the unknown v known terrain and looking at the way the ridges tended to run. It was clear we were going in the wrong direction. For one, we would have to do the tft backwards, which would have honestly been the most chill weirdness. Downclimbing the ridge to sharkfin looked damn near suicidal. So we regrouped and planned a 2 day mission from the other end. We decided to start at the hidden lakes th and start on the triad via the sibley pass approach. When we hit the triad it was clear the "triad traverse" approach as described for marble creek basin didn't really let on to how gnarly the scrambling would be if one were to stay true to the ridge. We estimated summiting the triad sometime before 10 am, somewhere around mid afternoon we finally were running up the eldorado glacier. After tagging eldo via the east ridge, we ran over to the torment col while the sun was setting. After soloing the s ridge of torment in the morning, we realized we again had underestimated our objective, so we bailed down b basin and gorged on berries. One last attempt that summer would be thwarted by an overuse injury. And the september rains came, and boston basin stood like that itch you just cant reach all friggin winter long. Summer came around again and we were racking up at our first opportunity. Sometime in early July. looking back towards eldo and the triad on an early recon We Again set up the car shuttle, but this time the road was closed at the eldo th, and we had 4 days off, so we figured we'd tentatively plan on just tossing the triplets, cascade and j-berg in on the final day (our plan was to scramble the j berg summit ridge and bushwack down the gnar forrest straight back to the eldo th.). Weather ultimately meant this final link would not go, but its certainly something to aspire to. We set off from the trailhead for the triad. This time, we were prepared for the choss. early scrambling Kyle down-soloing some 5.6 choss on the triad Some 4th class funk on the triad 100ft tower we climbed along the way, 5.7 nothing on top suggested we were the first to visit such a bizzare place some more down climbin w face of w triad 5.6 R super aesthetic The first time we visited the triad we stayed true to the ridge crest east of the eastern summit and down-climbed somewhere about a third or half way down the east ridge. This proved to be an extremely dangerous experiment in natural jenga. We pushed off multiple oven to mini cooper sized blocks that impeded safe passage. We ended up bailing down some 500 ft 5.4-5.7 wall to the glacier. This was the boldest down-soloing i've ever committed to and would never be recommended. Remembering this experience, we opted to drop off the ridge after the eastern summit of the triad. A quick jaunt accross the glacier brought us over to eldo. We decided the truest line would be to climb the south ridge of eldorado. We found info on the south face, but none on the south ridge. We thought this odd, but the ridge looked quite reasonable. It ended up providing 4-6 epic and high quality pitches of easy rock climbing. A worthy stand alone mission and my second favorite (second to the west arete) way to summit the mountain. the first pitch gaining the s ridge of eldo second pitch some good ol' fashioned knife ridin good conditions meant a casual walk down the e ridge From the summit of eldo we decided to stop and rest at eldo camp rather than push through the dark to the torment col. I mean, there is a toilet there, thats pretty darn good motivation. We woke up early the next day and scurried across the feint climbers path leading over to torment. The torment col is always a neat place to hang out and fill up water. The true line here is the NW ridge of torment. We quickly glanced at the beckey bible the first time, and saw that it had gone. But when we got to the base of the ridge the gnar choss was quite strong, and we weren't entirely sure if we had the beta memorized, so we bailed back around the mountain to the south ridge. This time around we had taken some photos of the guidebook and decided to turn reason off. Getting on the ridge was the crux, purely mental, it turned out to be fairly easy going. There was one exposed and runout 5.8ish knife-edge pitch somewhere in there, but it all kinda blurred together. Soon enough we found ourselves on the summit of torment and in familiar terrain. The TFT awaited, finally some classic easy ridge travel! A classic b basin white out slowly creeped up as we reached the w ridge notch. It became apparent a storm was comming in so we scrambled to get the tarp up. We knew we were in for a wet night. looking over at the nw ridge of torment the entrance to the ridge, what looked like 5.10 from afar turned out to be 5.6 some more ridge scrambles on torment topping out the crux pitch of the nw ridge looking back at the entrance to the tft. getting on the glacier required a 20ft pendulum, then we had to rap down that high bergshrund. our first overhanging rap off a snow bollard. things were wet and snowy on the "3rd class rock" bypass variation We woke up on day 3 soaked (i say woke up, but there wasn't that much sleep). Rain stopped around 1 pm. The whiteout however persisted. We eventually got restless and started up the w ridge of forbidden. Neither of us had been down the east side of the mountain before, so we knew we were in for a good challenge when the whiteout lingered, but we knew we had to keep going if the traverse was going to go down. Finding the raps down the east ledges was tricky, but not unreasonable, we eventually got onto the e shoulder of the mountain below the start of the east ridge route. and knew that we had no clue what layed ahead, so we tucked tails and pitched the tarp. west ridge with a fog break another little break in the whiteout while descending the east ledges our bivy the next morning, j-berg looking classy as ever We awoke on day 4 with the sun and our first view of the nw ridge of boston. And we were decidedly a little concerned. Nonetheless we packed up and found our way down to the end of the e shoulder of forbidden. if ya think boston peak is choss, try scrambling around out here, it will change your understanding of the word. We reached the end, and the large cliff that would feed us to the the notch below the sharkfin ridge. this was truly un-rappellable terrain. So we backtracked to a low 5th class gully. A very stressful hour of downclimbing and rappelling spat us on the edge of the Qiuen Sabe. Another gully by the notch led us up to the steep hanging snowfield below the sharkfin ridge. We were short on time because of weather and opted to leave the subsummit west of sharkfin for another time. We quickly found ourselves at sharkfin. We climbed something on the sw ridge of the tooth, hard to remember exactly what we did. It was solid, exposed and 5.8. Had a hanging belay and no other signs of climbers. Not sure what we climbed, but it was fun. After some victory food on the summit we rapped off and set sail into a sea of virgin choss. I think there was maybe 1 more rappel to access boston, then we started up the ridge. We soloed about 1500 ft of low 5th class before hitting a vertical section and roping up. A circuitous combination of rappeling and ridge climbing brought us to the famous "ore" describing boston. A knife edge ridge guarded the easier looking summit headwall. The prospect of bailing at that point seemed worse than climbing the ridge, so i pushed up. The rock was best described as feta cheese. And i had to mow about a foot of the surface rock off as i au chevaled to ensure the entire ridge wouldn't collapse with me on it. I fabricated a belay half way across this called "off-belay". Kyle didn't look convinced i had found gear. Climbing delicately through the remaining pitches we found ourselves in unprotectable low 5th. So we soloed to the summit. The register up there is pretty rad, its a neat summit and the regular route doesn't look that bad. A few rappels and we knew we had done it, sahale was like the icing on the cake. And a 2000 ft boot ski down to the sahale arm was the reward. We blasted obscene music and trudged down to the cascade pass th. Overall we pitched out 26 pitches, rappelled 26 times and the gps read 26.2 miles back at the eldo th. A proper cascades test-piece. Some day we might go back and add j-berg. Maybe when memory fails us. "The Boston Marathon" VI 5.8R scouting the downclimb to the qiuen sabe looking over at the nw ridge of boston starting up sharkfin the final approach to boston. We ended up climbing just under the ridge crest for good 4th and low 5th class traversing until the gendarme right before the ridge starts gaining elevation, thats were we roped up the first roped climbing on boston finishing up on the first pitch of the au cheval Heres the track i took of the traverse loaded into caltopo, my phone died for about half of boston peak, so there is a straight line through that section. Gear Notes: Single Rack to 2, 50m half rope Approach Notes: We approached via the hidden lakes th with a car shuttle to the eldo th


.thumb.jpg.e1bfe41408e1b7f12c77d6a1201c222a.jpg) 2 points
2 points -
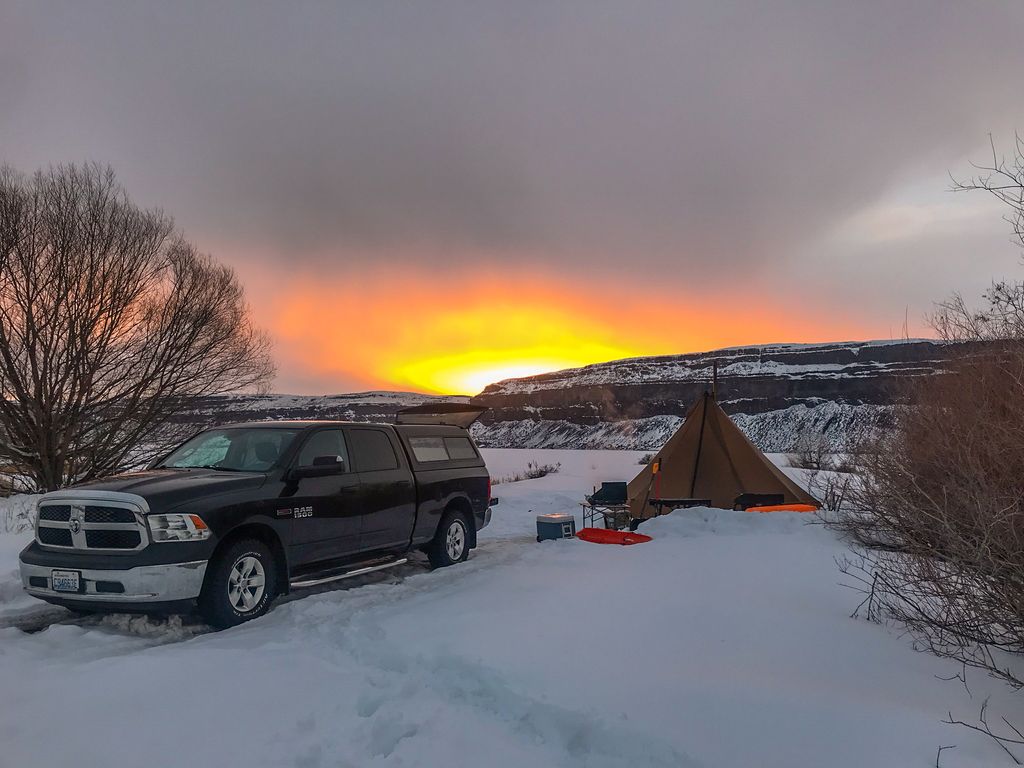
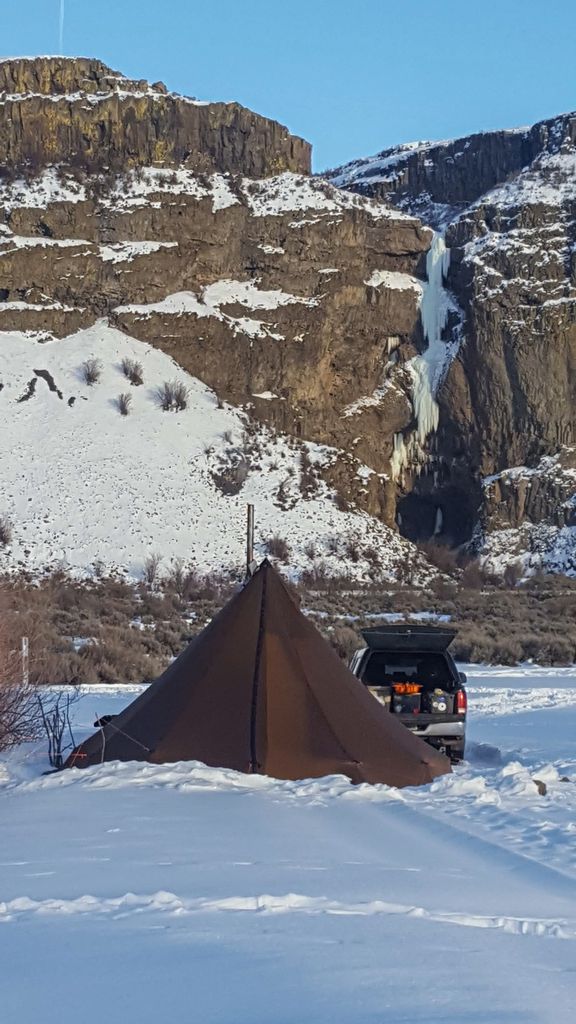
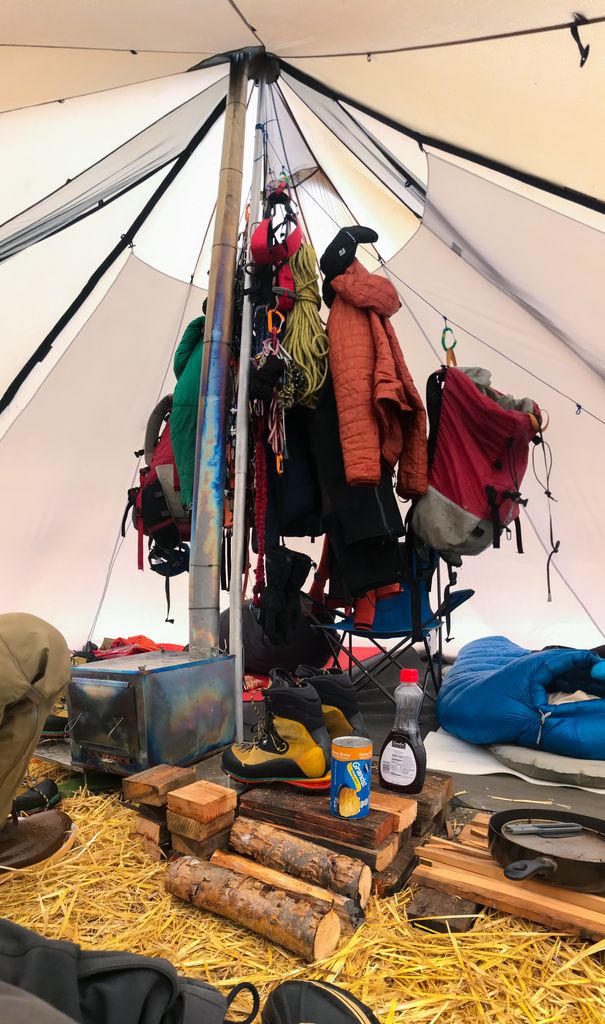
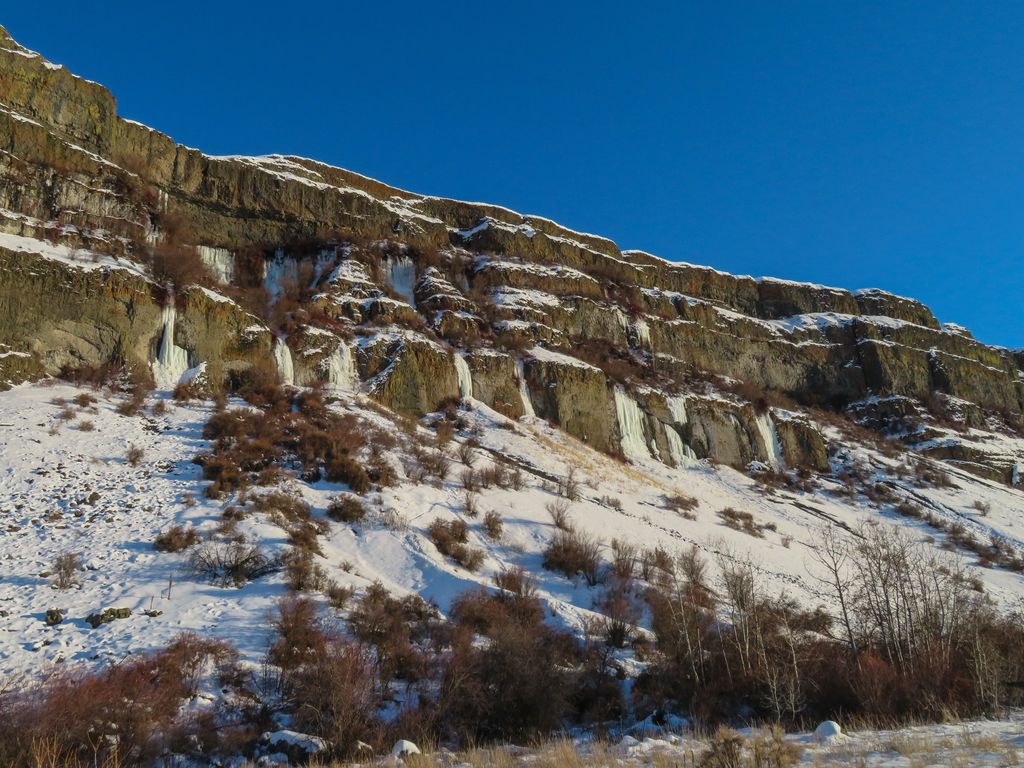
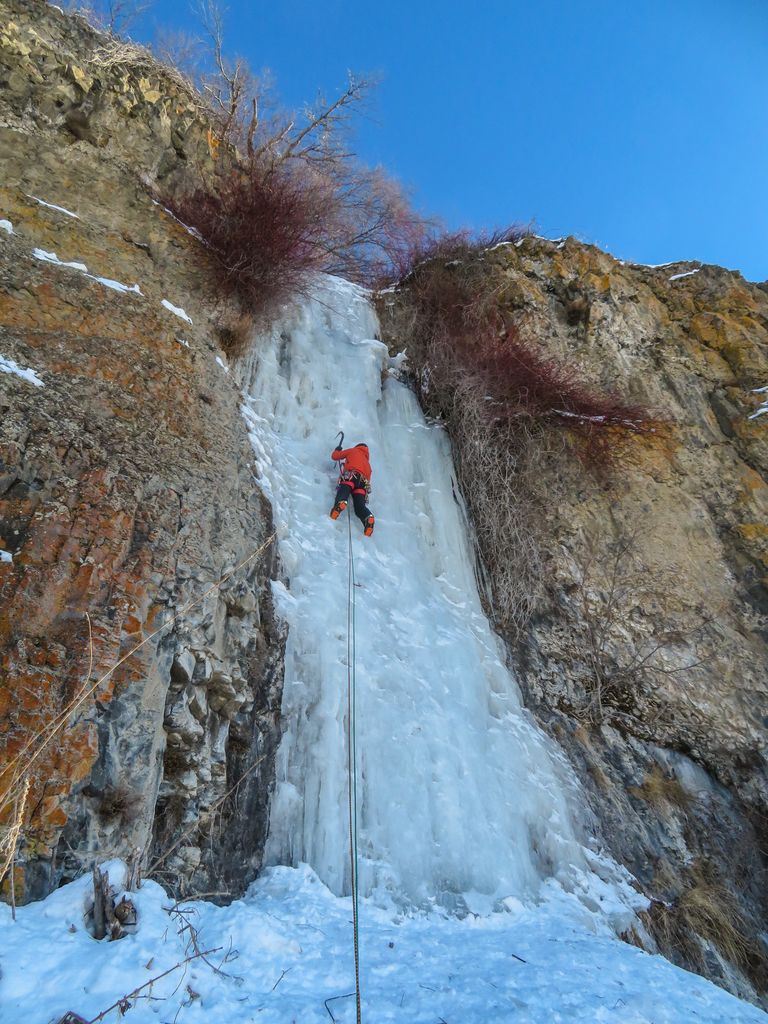
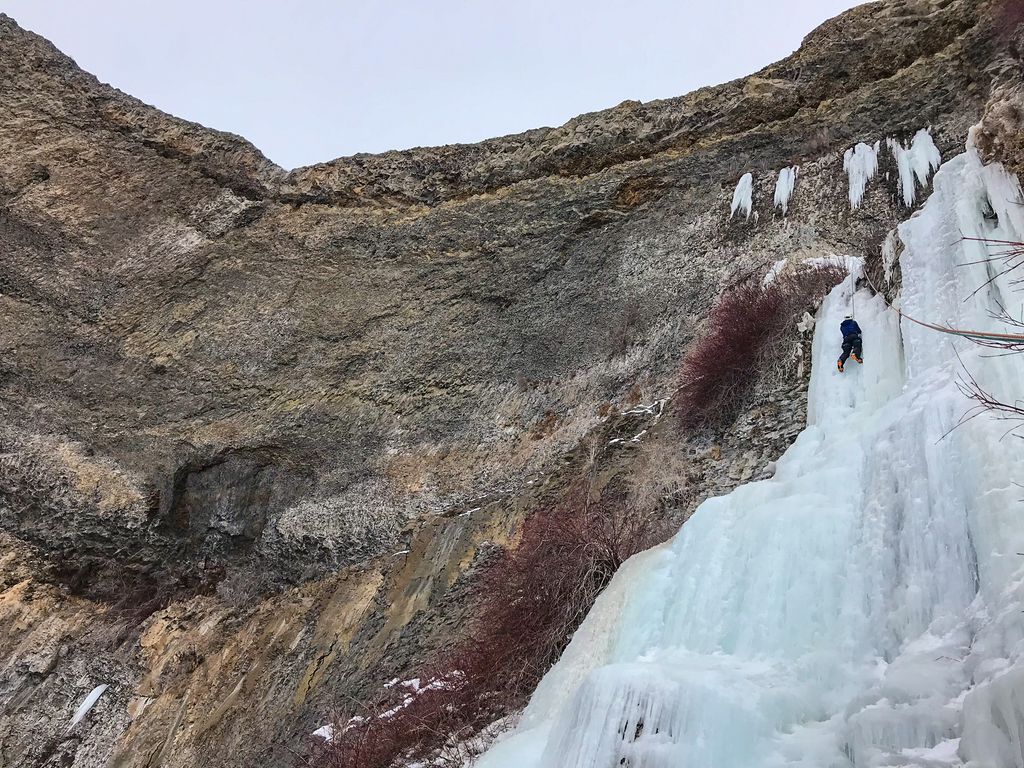
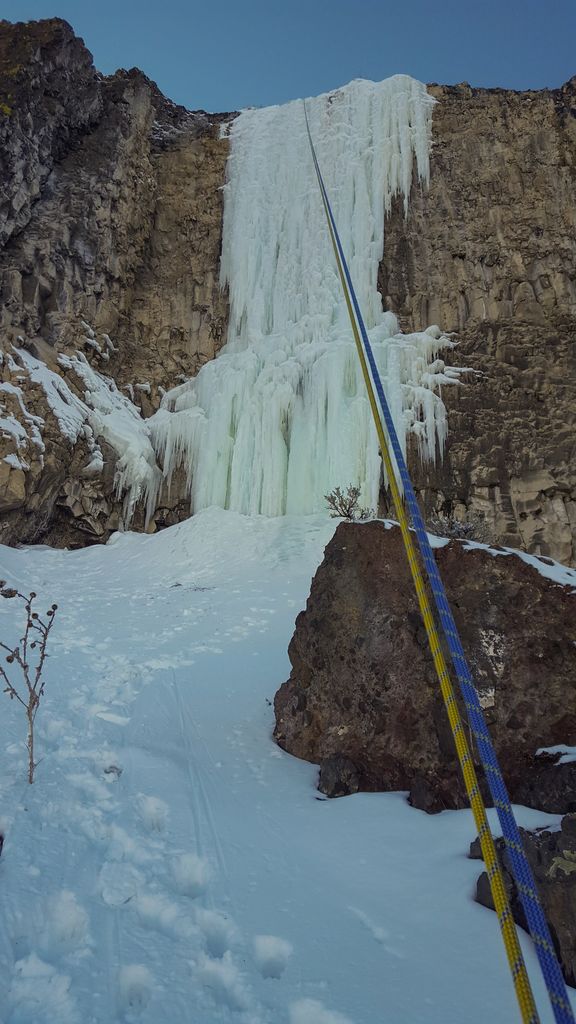
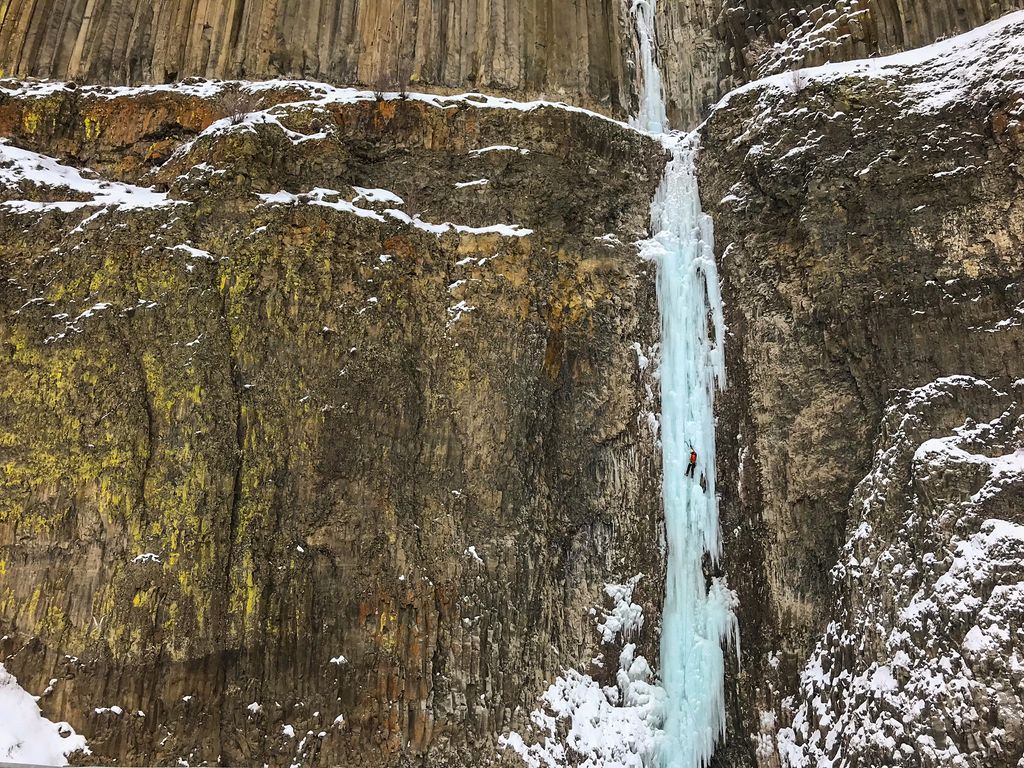
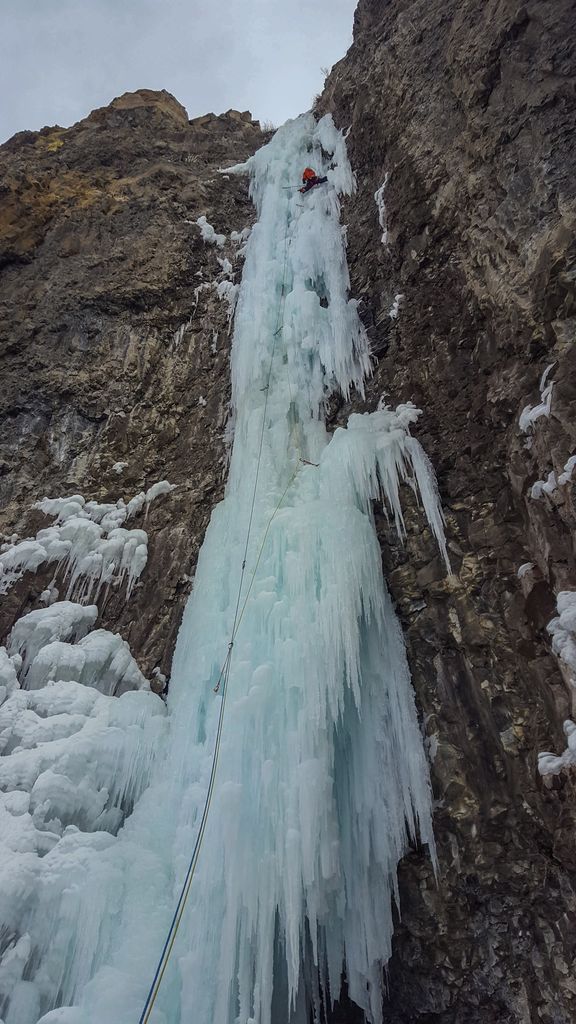
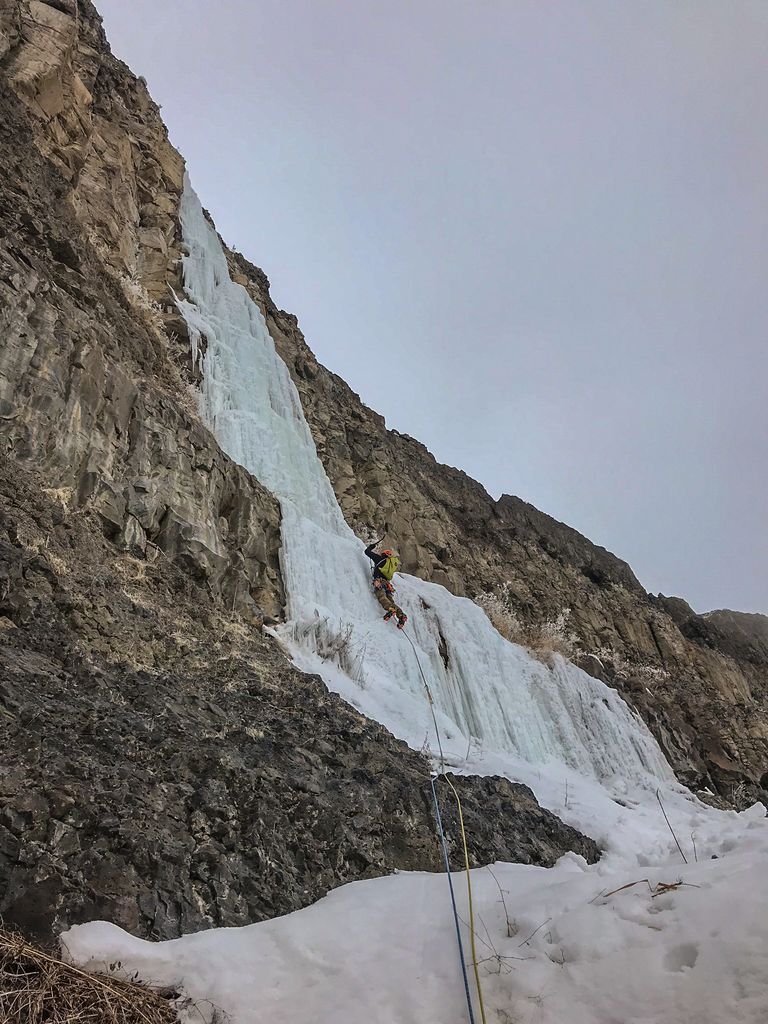
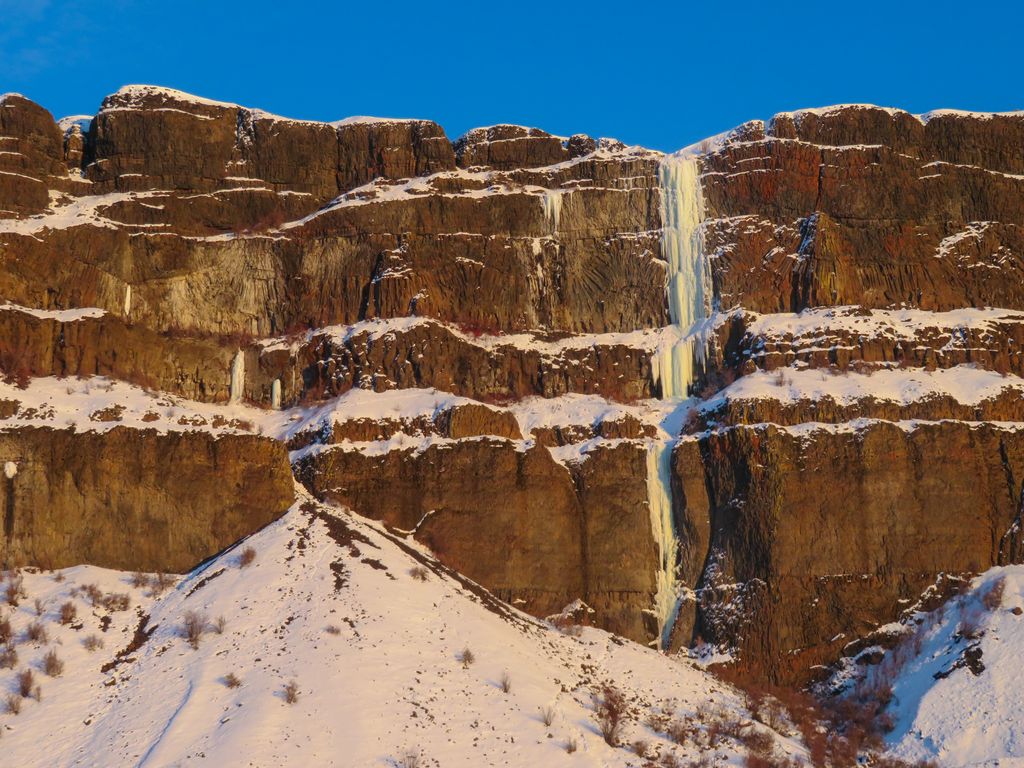
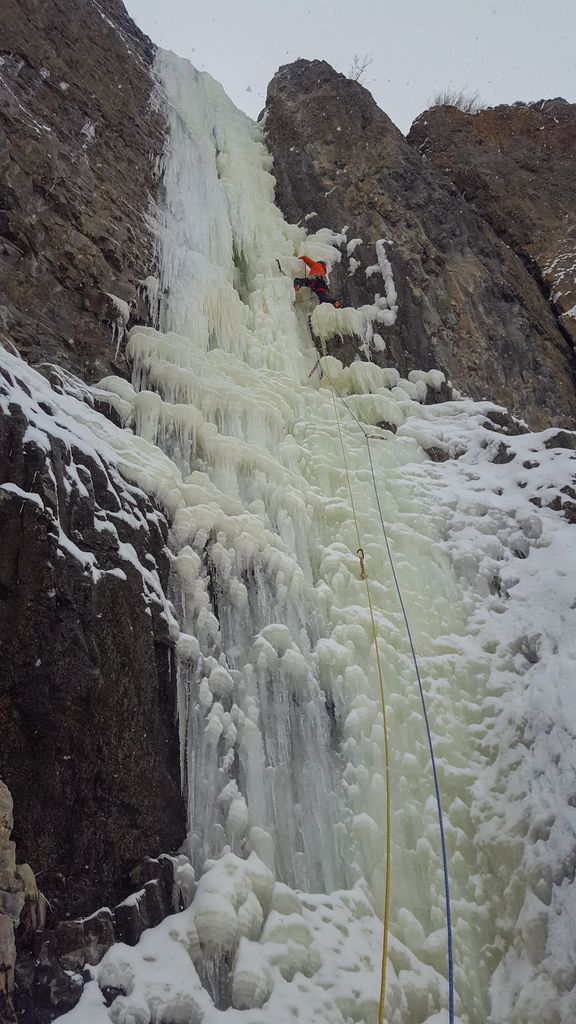
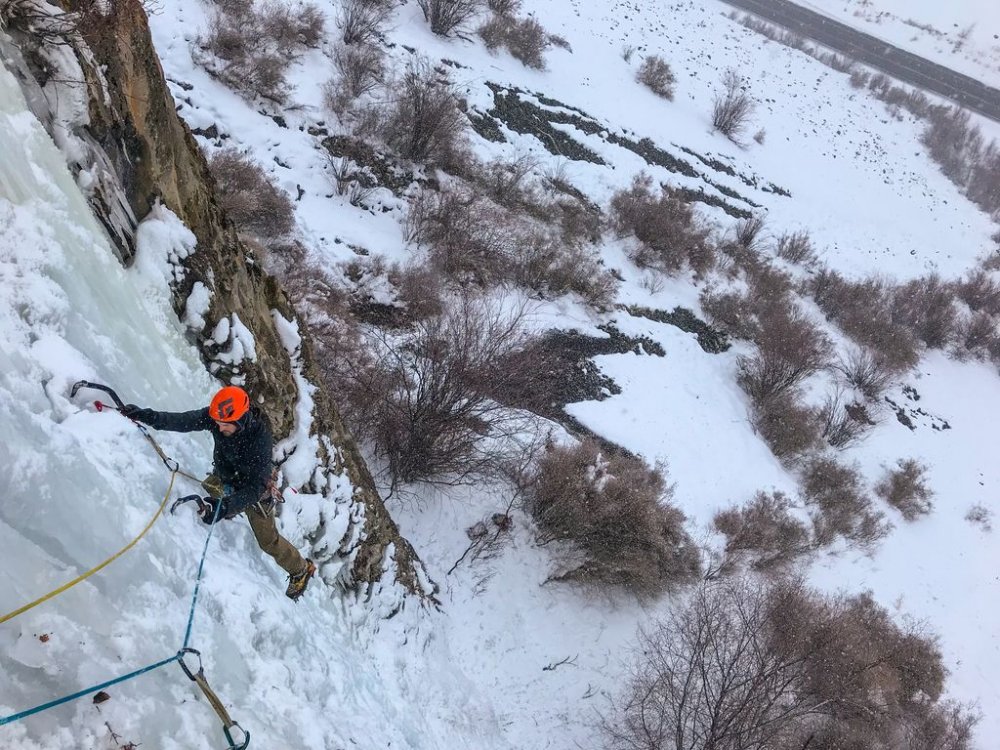
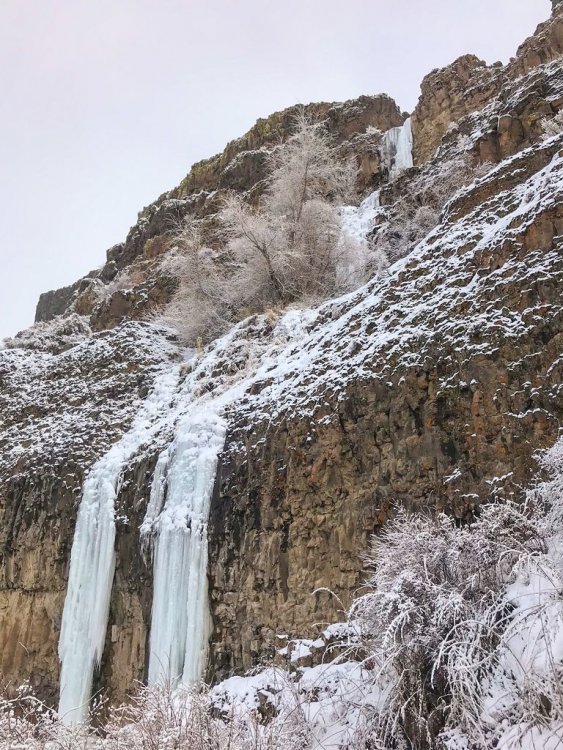
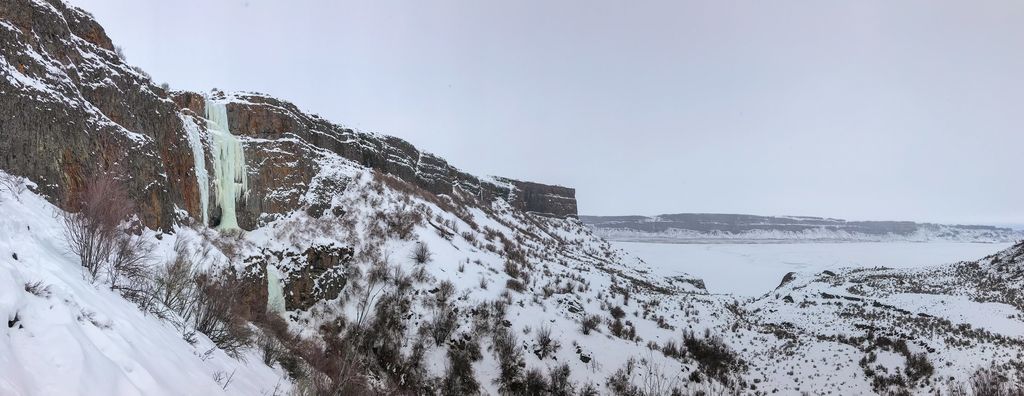
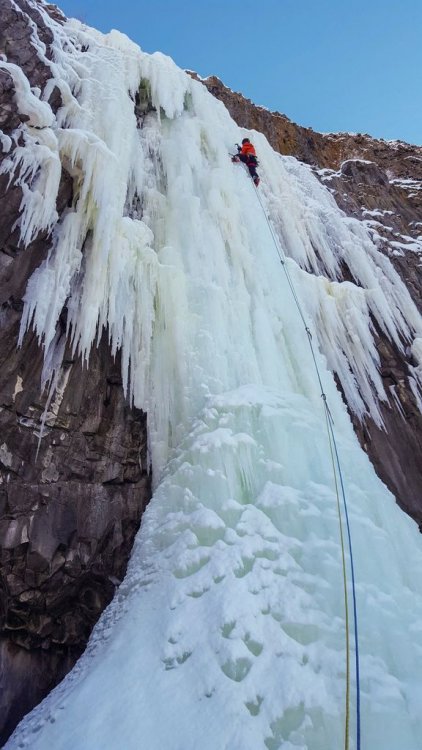
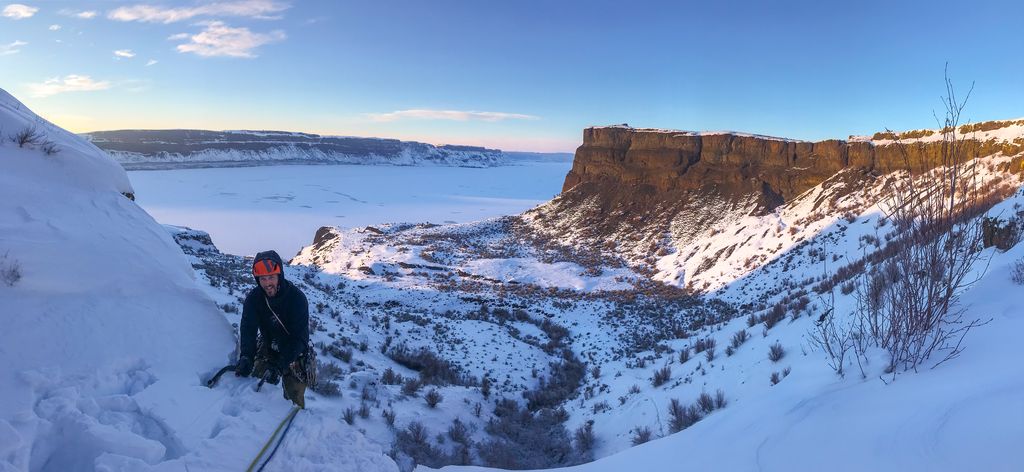
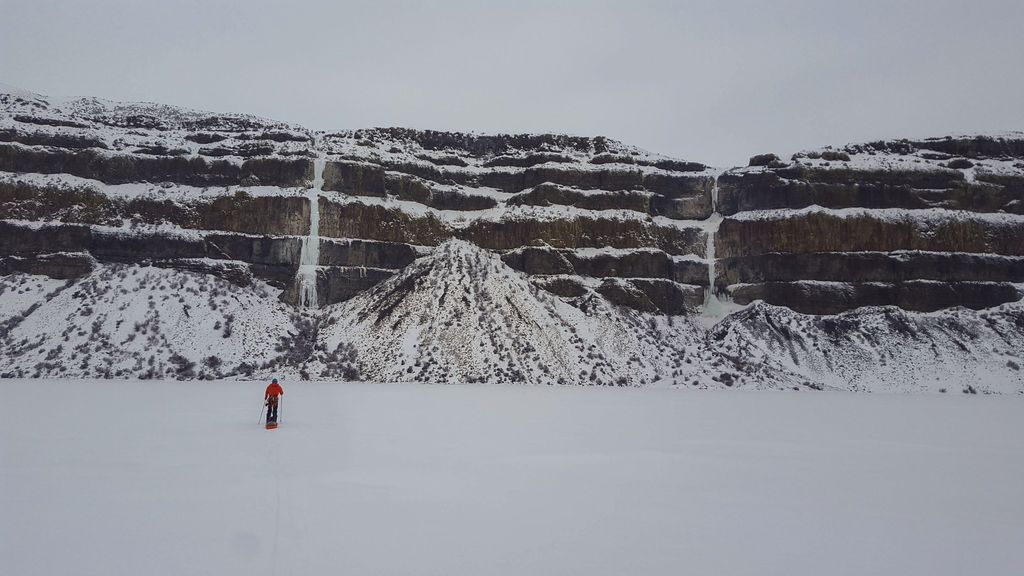
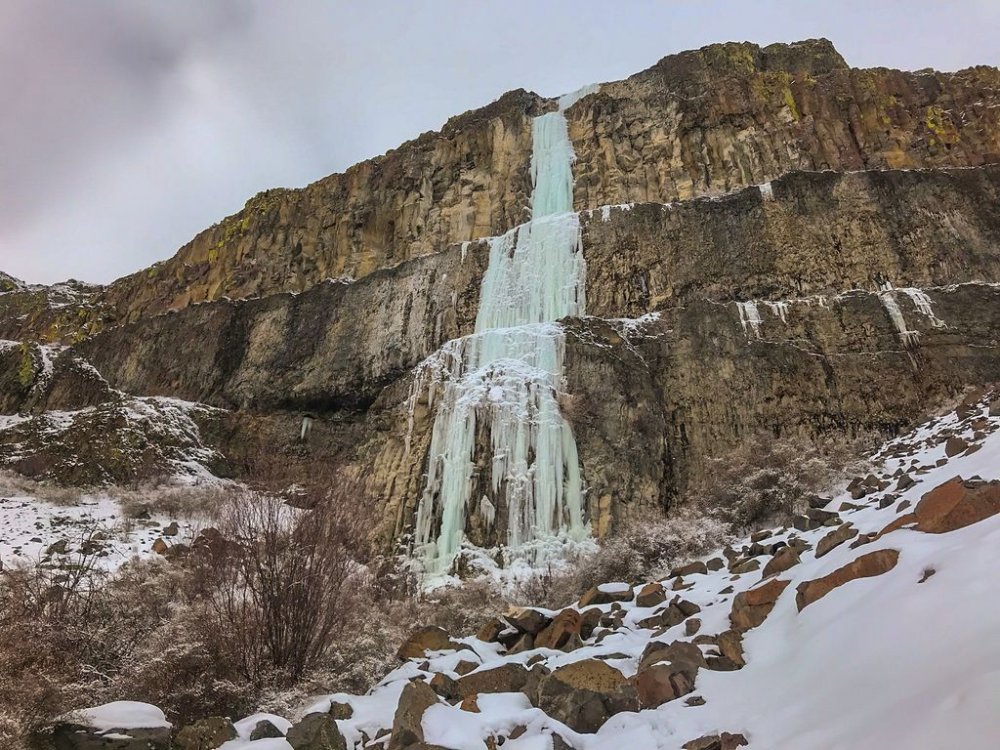
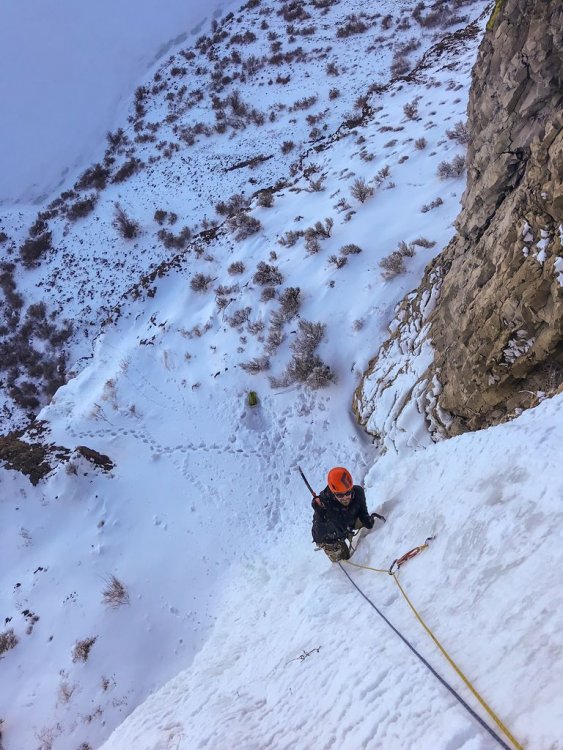
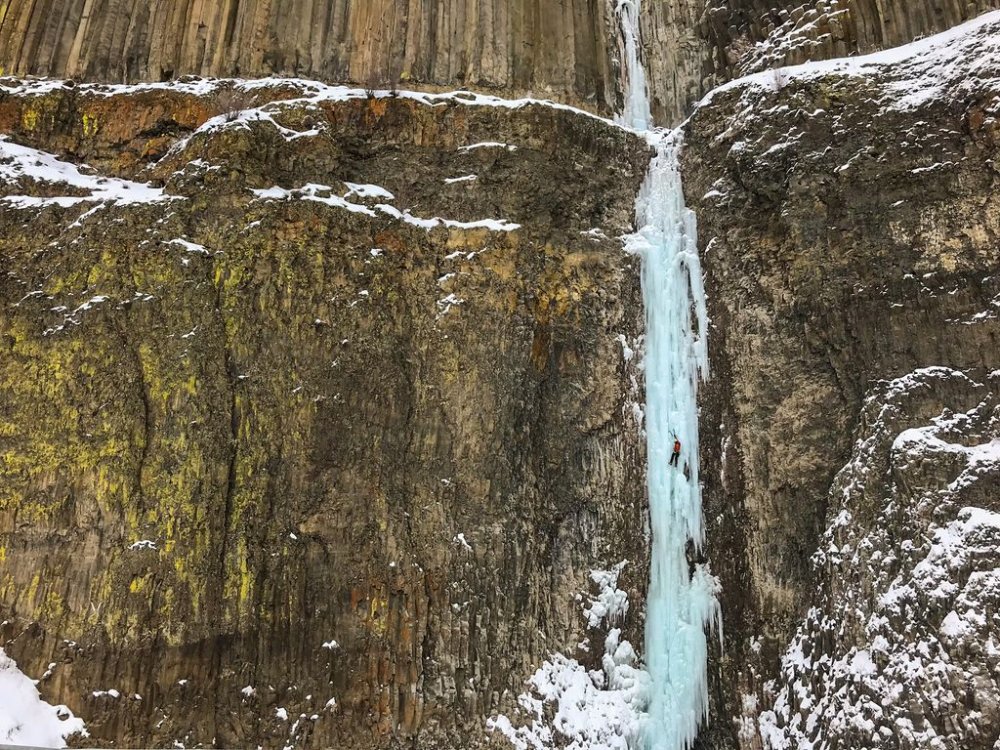
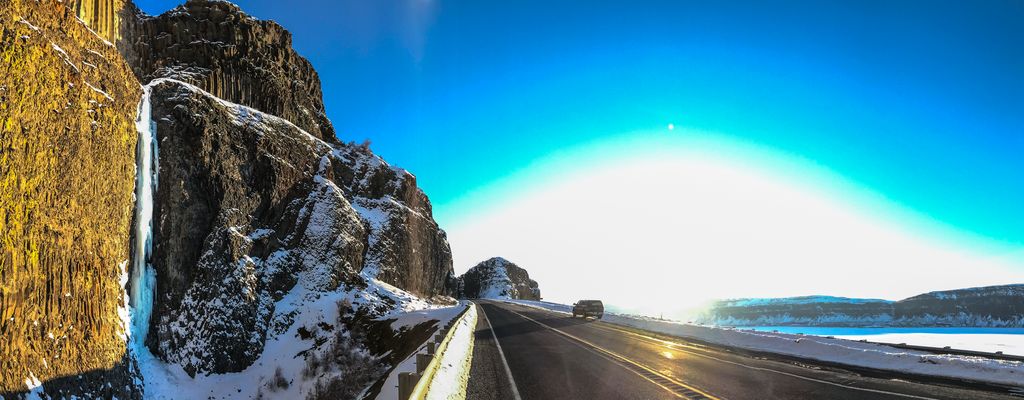
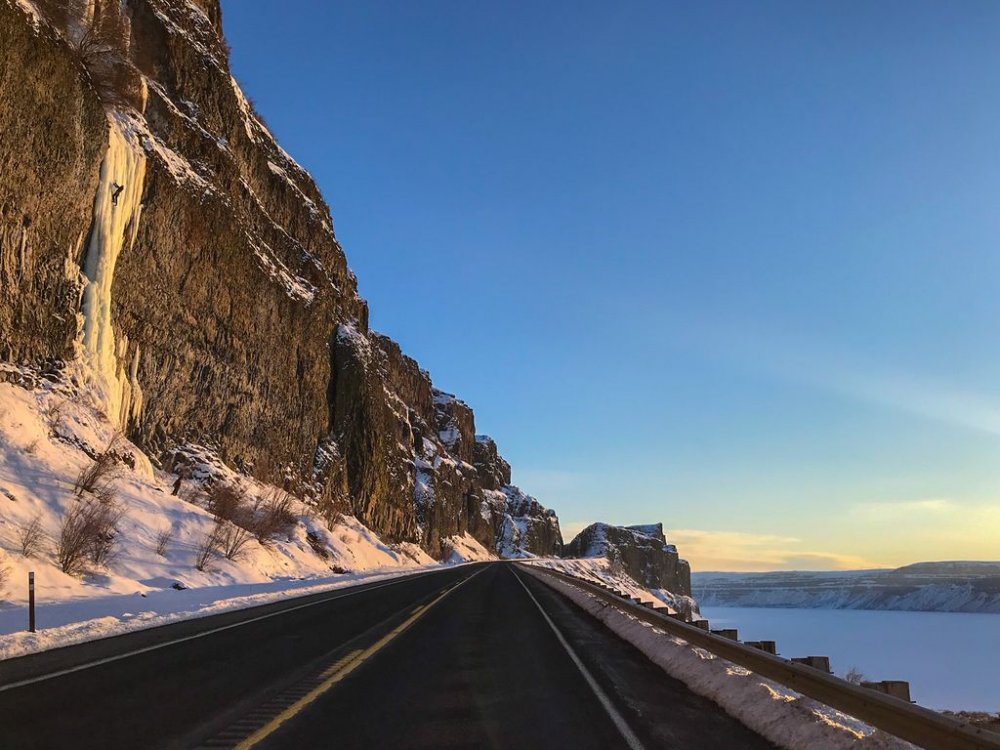
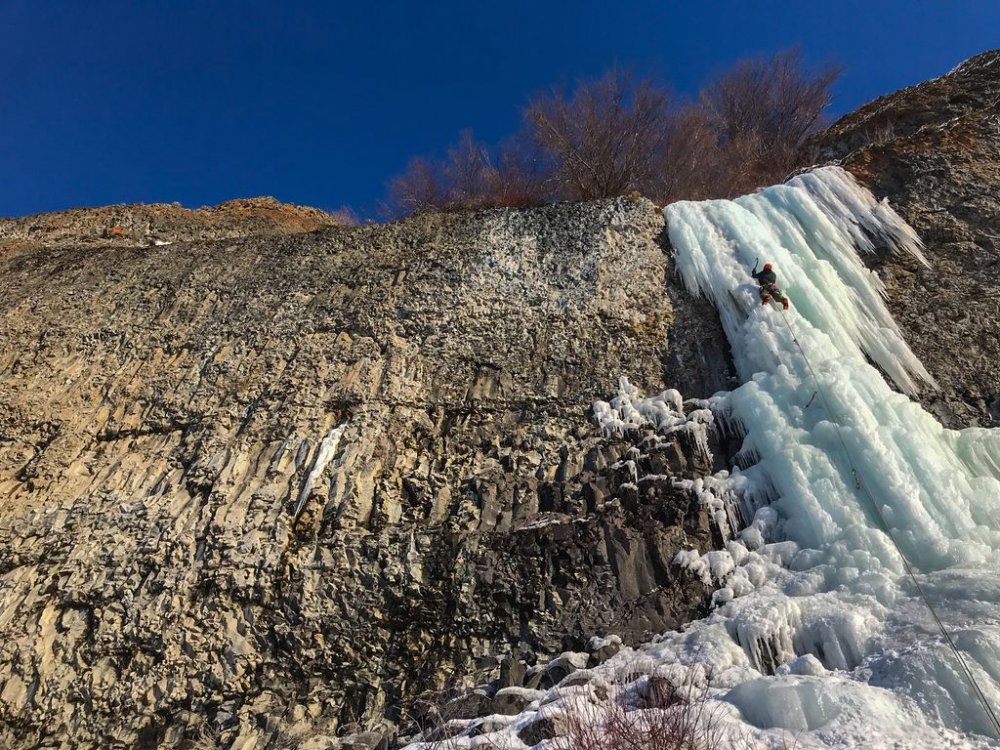
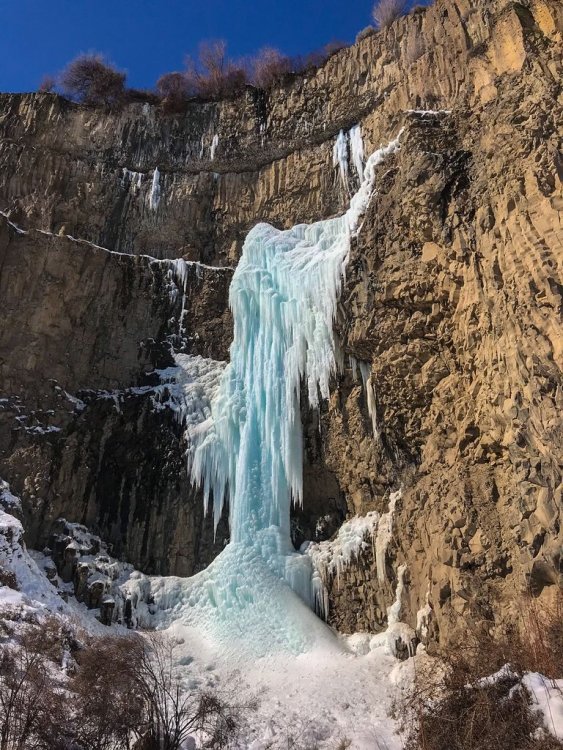
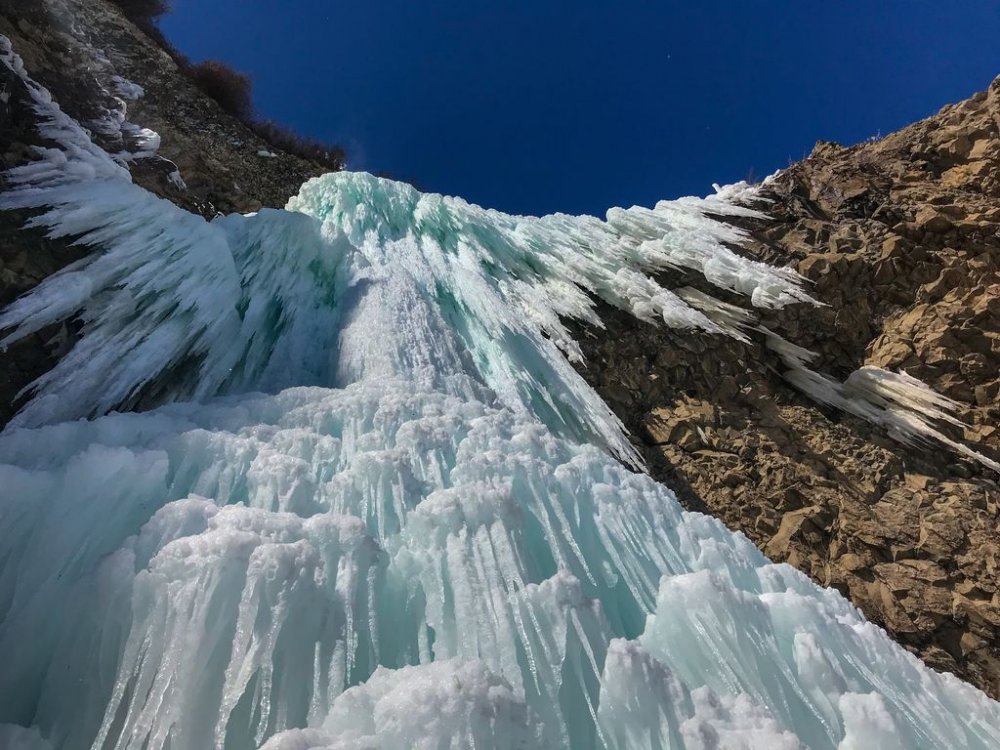
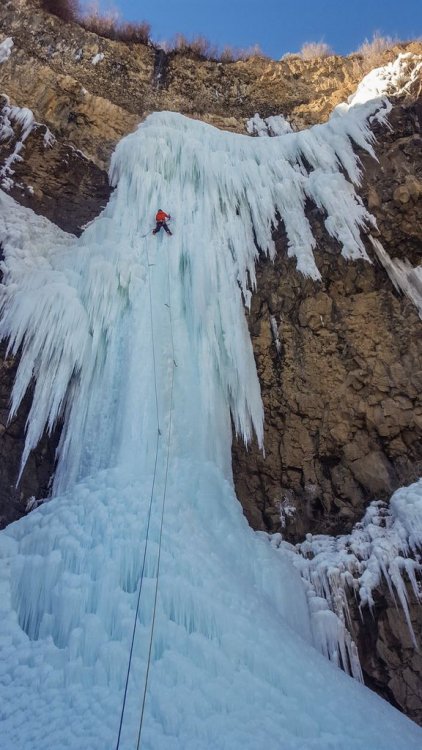
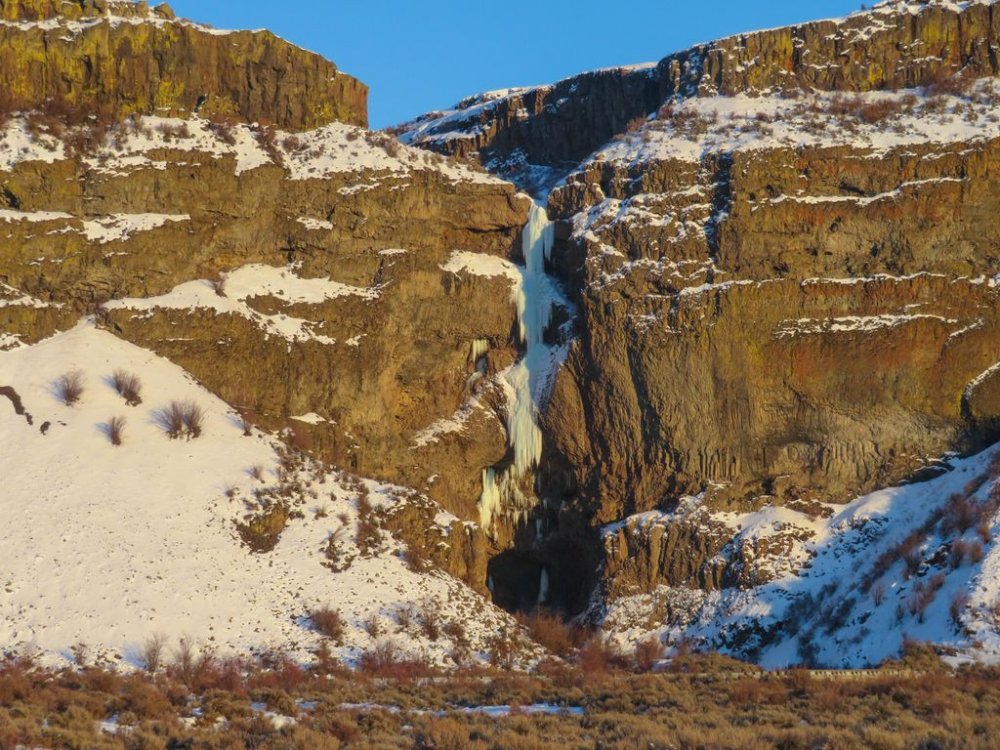
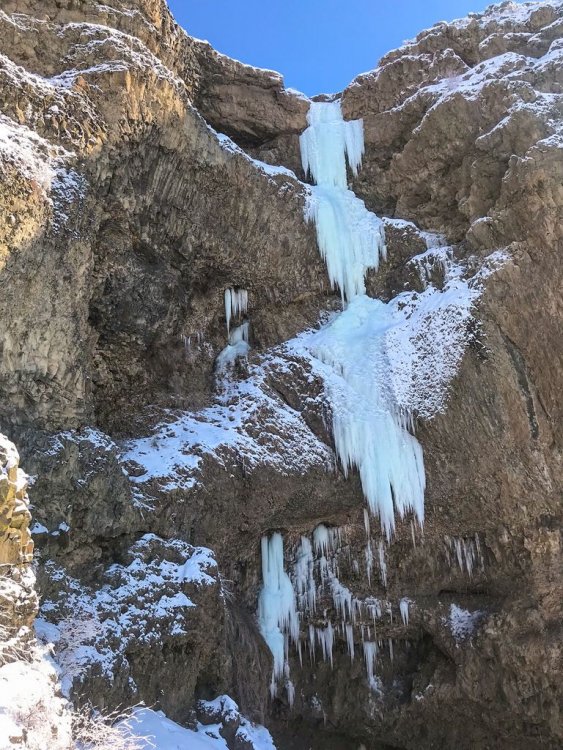
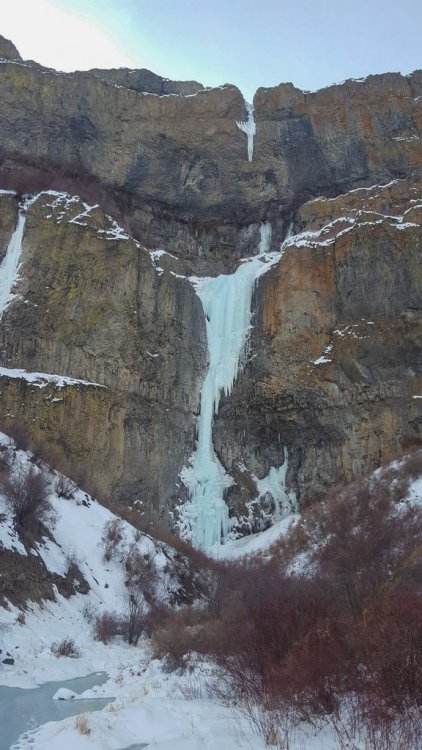
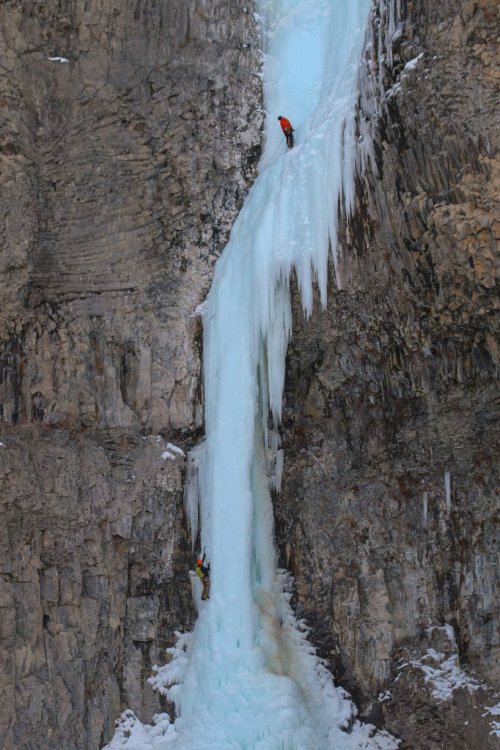
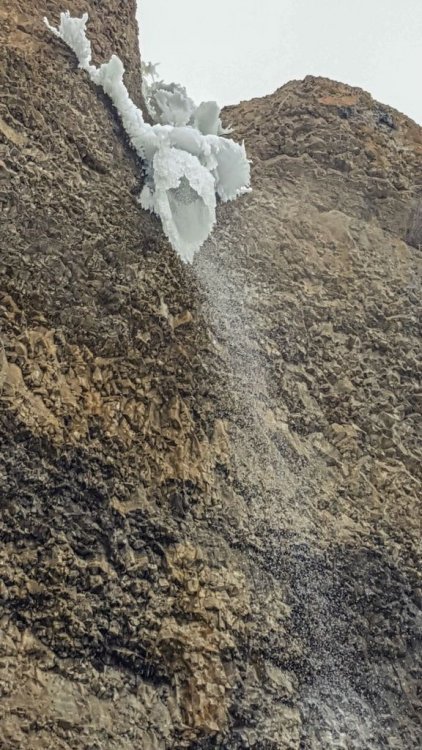
Trip: Banks Lake, WA - Zenith, Emerald, Cable, Razorblades plus others Trip Date: 03/03/2019 to 03/14/2019 Trip Report: With reports of an incredible season at Banks Lake, my partner (Joe Peters) and I decided we needed to get over there. We drove over on March 3 to find a good place to set up a camp. Joe had to finish a couple things at work, but my wife Trisha came out to climb for the 1st two days until Joe got back. Then Joe and I were able to spend another 9 days climbing some of the wildest ice I have ever been on. Banks lake is that good!! I didn't list any grades in this trip report. Banks is a funny place and I found that grades were tricky to judge. In the end I decided that Wayne Wallace was right when he said..."Grades don't matter, everything here is hard." We camped in Joe's tipi tent which is pretty luxurious complete with stove for heat and drying gear. The best spot we found to camp was right across from Salt and Pepper. Camping limit is 15 days, it was free, and there was a toilet. We were able to sit in camp and stare up at Salt and Pepper every evening. Evening light in our camp. The view of Salt and Pepper from camp. (photo credit Joe Peters) Living it up inside the tipi. With that stove we could be sitting around in a t-shirt. It was absolutely essential for drying out boots and other wet gear after climbing every day. Here is a brief overview of our trip. 3/4 - Peewees #2, 3, 4, 6, and 7 3/5 - Climb below Emerald, Trotsky's Folly and Trotsky's Revenge (also called Phase Transition) 3/6 - Peewees #1 and 5 3/7 - The Emerald and Satan's Panties (also called Absent Minded Professor) 3/8 - Tea 'n' the Sahara 3/9 - The Cable and H2O2 3/10 - Unnamed climb Butch Cassidy in Moses Coulee 3/11 - Bombs over Old Baghdad (the climb across Banks lake at MP3) 3/12 - Shitting Razorblades 3/13 - Salt and Pepper 3/14 - Zenith I will just let the pictures tell the rest of story with a few captions. Peewee's Playground. I referenced these from right to left starting with 1 and ending with 8. Me leading Peewee #4 on the 1st day. A great place to start getting used to Banks ice! (photo credit Trisha Thorman) Craig Pope had just put up this line which he thought was probably an FA. It transitioned from the ice through the rock and out to the hanging dagger. It is Peewee #2 and he named it Turn the Page. This is a couple guys from MT climbing it on TR in the beautiful afternoon sun. The next day Trisha and I climbed this little flow. It was fantastic steep climbing that eased off about half way up. It is right off the road at the Emerald Pullout. It is amazing to me that there are so many of these lines that don't have names. Anywhere else and these good pitches of ice would all be named! Trisha doing a TR lap on Trotsky's Revenge. Day 3 Trisha headed back home and Joe arrived. Here Joe is arriving at the top of the fantastic Peewee #1. This is Satan's Panties (also called Absent Minded Professor). Rumor is that it hasn't come in for multiple years. It was a really fun multi-tiered climb that was a great warmup for the bigger climbs at Banks. The Emerald sits tucked up in a small valley above the main Banks Lake proper. It was a fantastic steep pitch of excellent climbing. It even faced north so it didn't get any sun to ruin the ice! Me leading the Emerald. (photo credit Joe Peters) Joe topping out on the Emerald at the end of a great day! With a cloudy day we decided to brave the lake and head across for some of the bigger lines. Thankfully the lake ice was thick and solid with no noises. The climb directly above me is Tea 'n' the Sahara. The one to my right is unknown.....it never came in this year unfortunately (or at least the dagger never touched down). (Photo credit Joe Peters). A closer view of Tea 'n' the Sahara. This was definitely my favorite climb of the trip. It consisted of 4 steep pitches each about 90-120 feet in length. The ice was typical Banks with plenty of excavating but the position and length of the climbing make it a classic for sure. Joe climbing the final steep 4th pitch. Looking back up at pitch 4 of Tea 'n' the Sahara from rappel. We were able to rappel the entire route with 2 rope stretching 70m rappels......take 70m ropes! (photo credit Joe Peters) The Cable....it is such an amazing, steep, crazy, gymnastic, different route. An absolute must do at Banks. Here Brian Williams is a little past halfway up the long pitch. Me leading the Cable. It is so good......just go do it! (photo credit Joe Peters) The Cable in the setting sun. Next we went to climb H2O2. Here are a couple of unknown climbers on it the night before. Yet another great pitch of climbing right next to the road. Here Joe is putting up H2O2 in the evening sun. The following day we drove over to Moses Coulee. Unfortunately Butch Cassidy and the Sundance Kid were pretty wrecked by the sun. This is an unnamed climb on the same road about 1/2 mile before Butch Cassidy. After reviewing the guidebook and talking with several other people this is actually Butch Cassidy. The climb between Butch and Sundance Kid is unnamed (although climbed). The WA ice guidebook has the wrong mileage to these climbs. Looking up at Unnamed route Butch Cassidy was awe inspiring. There were so many hanging daggers through the steep upper roofs. I gave it a go on lead but ended up sitting on a screw in the roof. I found out I wasn't fit enough to lock off on a tool and clean hanging daggers for that long. Still an awesome experience! Me approaching the large ice roof of hanging icicles. (Photo credit Joe Peters) The next day was cloudy so we headed back across the lake. This climb is right across from MP3. It isn't in the WA ice book and nobody seems to know what it is called. After staring at it disappearing into the fog above we decided to call it Stairway to Heaven. (Edit: sounds like it is called Bombs over old Baghdad) Here is Joe leading up pitch 2. The next day was time to get on Razorblades. This is a climb that had been on my list to do for a while and it didn't disappoint. Some years the first pitch isn't in or so thin that you can't protect it well. This year it was fat! Me leading up the crux first pitch of Razorblades. I don't think I have ever climbed ice by pulling on ice mushrooms with my hands instead of swinging my tools into the ice....fun but funky! (Photo credit Joe Peters) Finally after staring at Salt and Pepper every night for a week, we decided we needed to go and do it. The guidebook made the 1st pitch sound hard and scary. It climbs the loose rock on the left and traverses up the snow ramp to the ice. It was loose, but I found a decent pin and a couple cam placements. You definitely don't need a #3 C4. I would take a couple of KB pins and a set of cams from BD .3 to #1. The crux step of rock is easy 5th but it is loose and a fall would be very bad. Joe climbing up the steep ice of Salt and Pepper. It was a fantastic climb with big exposure. This is looking straight down for about 300 feet. We wrapped up our trip with Zenith. A fitting end to a fantastic trip. It was very fat this year but still steep and long! (Photo credit Joe Peters) Joe and I on Zenith. Being a roadside crag, many times a few people stop and watch. Sue Tebow was one such person but she was kind enough to leave us her contact information so we could get a couple pictures she took. It is always a treat to get both the leader and the follower in the same picture. Thanks Sue! (Photo credit Sue Tebow) A final parting shot of the huge deathcicle above Zenith. It was so fascinating to look up at but we wasted no time in getting out of there. It consisted of a thin hollow tube of ice that extended 30 feet or so below the cliff. Out of the center poured a huge amount of water. (Photo credit Joe Peters) Gear Notes: Ice screws and 70m ropes Approach Notes: Short and easy unless you are crossing the lake!


 1 point
 -
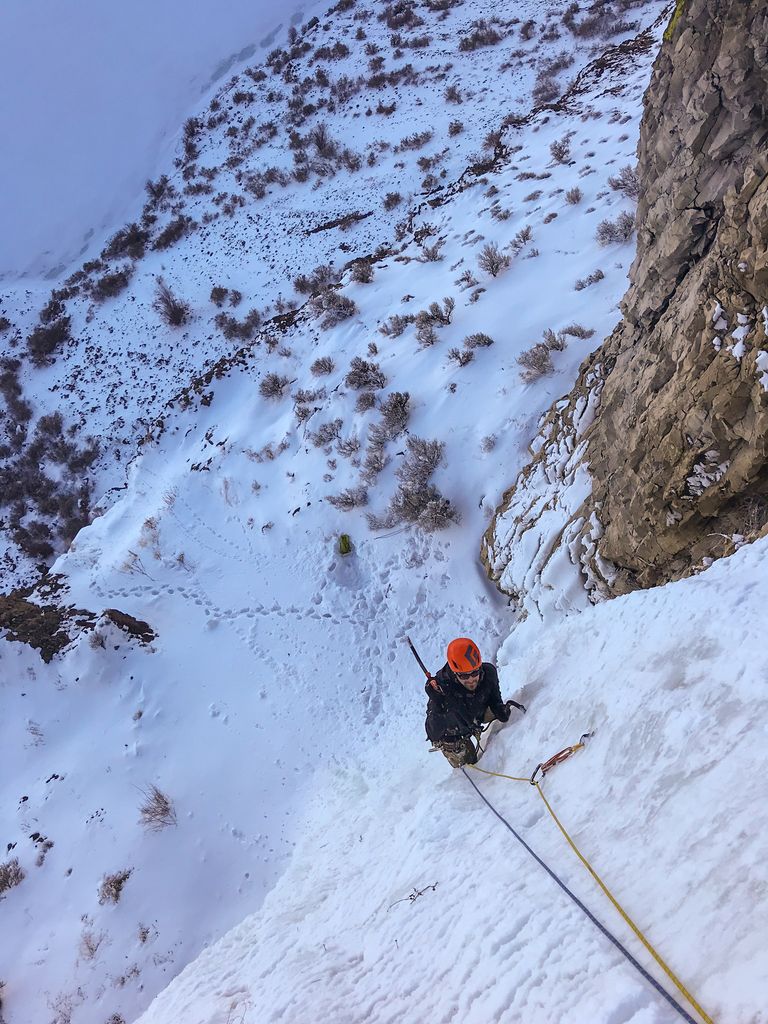
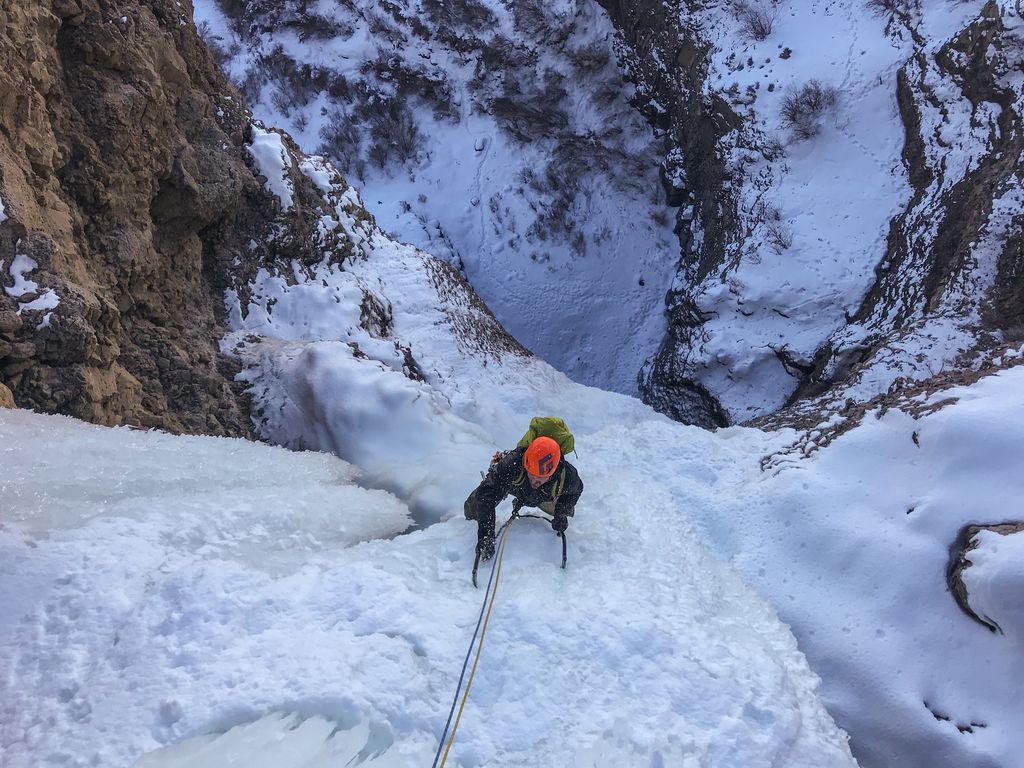
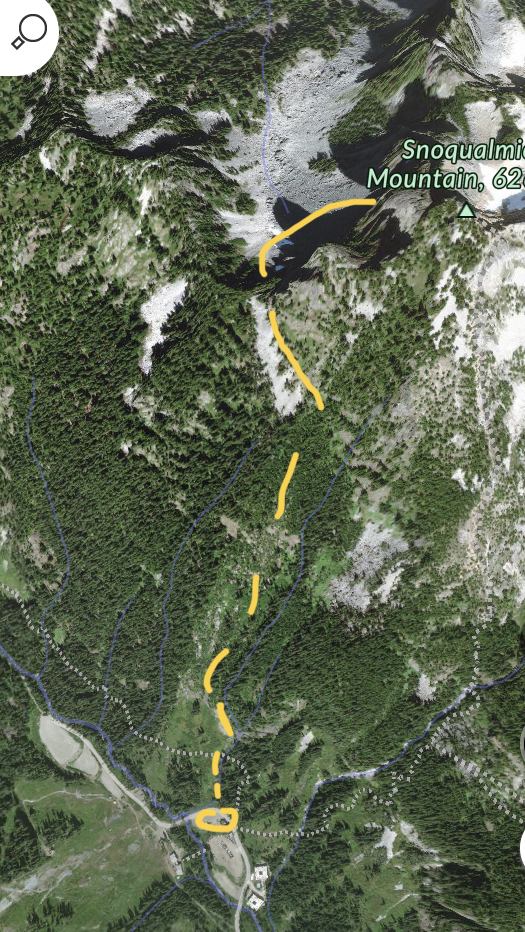
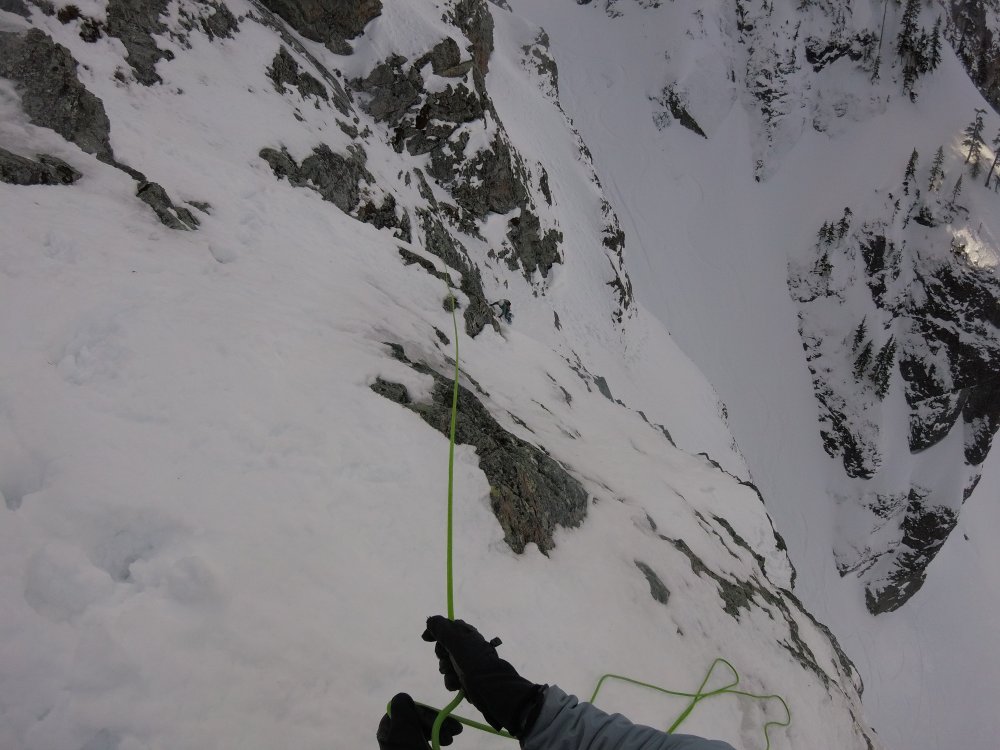
Trip: Snoqualmie Mountain - New York Gully Trip Date: 03/16/2019 Trip Report: Lael and I climbed New York Gully yesterday on Snoqualmie Mtn. We had great conditions and were treated to warm temps and high quality ice. We left Bellingham around 5, left the car around 7 or so on skis. The approach was fairly straight forward once we found the right parking lot/skin track (which took a bit, below is a pic with the approach laid out and where to park.) We left our skis on the ridge before dropping down to the north side of the mountain. The boot pack to the base of the route was slow and tiring as I post-holed about hip deep. We started up the route around 11, opting for the Direct NY Gully variation (mostly because we were so done with post-holing but also because there was another group right behind us and I was hoping this would space us out). Forecasts called for freezing levels around 6-7k so we expected any ice to be pretty rotten. It actually turned out to be pretty good! First pitch of the Direct variation was very high quality and quite fun. Only got one piece of gear but the climbing wasn't very hard. We then met up with the normal route and belayed there because the other team was a bit ahead of us. The next pitch was shorter, a left-hand traverse to another belay as we were moving a bit quicker than the team ahead of us. They were very nice and then allowed us to pass at the base of the box gully. We had a 60m rope so I knew there would be some simuling and communicated such to Lael. I had 9 draws and led about 90m through the box gully to near the 5.8 crack. I had to run it out more than I'd like given that the climbing wasn't super easy. It was a blast of a pitch though, the ice was good, the movement was fun and it was practically bolted with the pins in there. In fact, I don't think I placed more than a piece or two on the whole pitch, just clipped fixed pins. Lael followed every pitch much faster than I lead them. I topped out at a nice crack for a 3 piece belay from which we climbed about 40ft to the base of the 5.8 crack. It wasn't as hard as it looked but conditions were in our favor. I traversed to the base and put in a #2 then racked my axes and took off my gloves since it was sunny and warm. I jammed up the crack, pulled on the old webbing around a chock block in the top, clipped a biner on that webbing, and just like that, the crack was done. The difficulty didn't immediately ease though. I got out my axes and climbed some pretty steep turf and ice to a tree which I passed in favor of a rocky spine to belay off of. From here we traversed across a solar face with some pretty bad roller balls, so we simuled across to the trees where we unroped and headed for the skis, got there around 4:30 so we spent perhaps 4hrs or 4.5hrs on the route, in 6 pitches. The snow was atrocious from a whole day of sun and warmth but it still beat walking down! Had a great day of fun and hard climbing. Gear Notes: single rack from .4 to 3, 2 knife blades, 1 13cm screw (would have liked more), some nuts. 60m single. Approach Notes: Short, but a bit slow..


 1 point
 -
ummmmmmm....wow. For a near miss of total team death, you seem remarkably sanguine. And yes, curious as to how the pickets and axe were placed.... Well done at finishing it, and thanks for posting all the gory details. This has been on my list, but your TR gives me pause.1 point
-
I'm really surprised to read this bit and it's a pretty unfair version of history, although I'll be the first to admit that a lot of the trolls and general bad behavior likely caused a lot of lasting damage that will take time to fix. Yes, there was some really terrible behavior early on and those people were permanently banned. Should it happened quicker? I don't know, probably. Nobody handed us an owners manual when we started this; I was barely 24 when we went live. There are definitely people who I wish I had 86'ed earlier. But you of all people should have known how much we struggled with how to deal with these situtations, which is why I kind of find the "Ad impressions and the trolls won out" astonishing to read. We have never made a decision here for money. Did the trolls win? This site has been online for 18 years and has 8800+ TRs, so I'd argue no. Did they leave a lasting bruise, sure. I have however come to accept this world has changed, there was no iPhone, FB, IG, millions of apps vying for your attention when we first started. This was one of a handful of a small handful of climbing sites.1 point
-
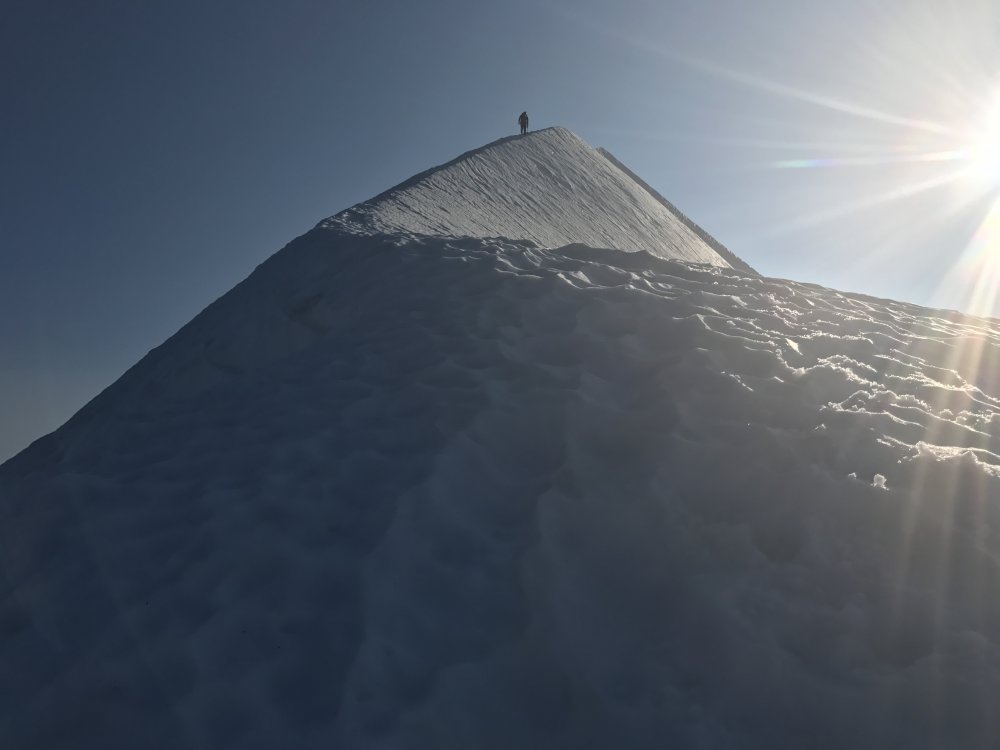
Trip: Mt Shasta - Casaval Ridge Trip Date: 03/03/2018 Trip Report: Mt. Shasta Via Casaval Ridge Mt Shasta Facts: Its the second highest peak in the Cascades next to Rainier(No.1) Over 15,000 summit attempts are made every year with only a third being successful. Most of the climbing is done via the popular Avalanche Gulch Casaval ridge has an elevation gain of approx 7,300' Lessons Learned Shorty after arriving from my Rainier trip I was eager to redeem myself on another mountain. Although I had summited, the ass kicking I received really humbled me and opened my eyes to all the areas I needed to improve on for my next going. After much searching I came across Mt Shasta and instantly knew this one would be next. I booked a winter trip via Casaval ridge, I prefer going on the less popular routes to avoid the crowds. This time around I convinced my good friend Yen to join me which made me that much more excited knowing one of my good buddies was joining me for the adventure. The lead up to this climb was especially difficult and there where times when I considered cancelling the trip, I had lost my grandfather to cancer a month after booking the trip and two months before the climb my younger cousin died of an opioid overdose (Please see passion & purpose for more on this and how I’m using my climbs to raise awareness on opioid addiction). These where very difficult times for me personally and made my summit all the more emotional. Training Things where much different this time around. I gave my self considerable amounts of time to train (7 months) and I took my training much more seriously. I trained hard and frequent. I ran 4-5 times a week 5 miles/day on average and did lots of leg work outs, especially exercises that would target my hamstrings and tibialis (down hill muscles). I got on a strict stretching regimen to make sure I had no tightness on my muscles and the best possible range of motion. A good diet got me much leaner and faster for this trip. I had learned my lesson and I wasn't about to commit the same mistakes that nearly prevented me from getting to the summit on Rainier. Mt Shasta California After 7 long months, February finally came around and I was all packed up and ready to go. I flew to San Francisco, spent a few days getting to know the the beautiful city before renting a car and heading up north. On route to Shasta we where able to enjoy the amazing ride, taking in all the scenery that surrounded us completely topped in fresh snow. We got to Shasta in the midst of some crappy weather, it was all cloudy and the visibility sucked. So we opted to head to a local restaurant to have one last solid meal before heading up for the climb the next day! We had pasta, steak and potatoes, it was a feast! We where making sure our bellies where completely satisfied before the big day. We where so stuffed we can hardly walk but when we stepped outside, the weather had cleared and Mt. Shasta's massive presence was towering over us in the most incredible of ways. It really was a sight to be seen. At that very moment I knew we where in for a treat! The Climb The next morning we all met at the SWS office and introduced ourselves. This time around I was one of the few that had some past mountaineering experience. Despite all my training I was still a bit weary and intimidated by the mountain. To my surprise the guides let us know that due to the bad weather conditions, no group from SWS had reached the summit this winter. But luckly we had a very narrow window where we might be the first to make it up(fingers crossed). After a quick pow wow, gear check and poop bag course (poop bags vary from mountain to mountain, not all poop bags are created equal!), we loaded up our packs and headed for the bunny flats. Upon arrival we quickly realized the snow was soft and deep thanks to a heavy fall the days before. We straped on our snow shoes and began breaking trail. The weather was nice and cool and the mountain was as if you where looking at a Virtual reality post card, it was perfect. We slowly started making our way up to what would be our camp for the next two days. It was a very pleasant day on the mountain and I was feeling great, absolutely no exhaustion or leg pumps. Every hour or so we would stop for a break and a chance to take in the breath taking view's. The last 90 minutes consisted of ascending a fairly steep snow field and before we knew it we had arrived at this ledge that would be our camp for the next 2 days. Everyone dropped their pack, pulled out the shovels and automatically started digging out the tent platform. We dug about 3’ in the deepest section and where able to get some nice cozy spots for the tents where they would be protected from the wind. As the sun came down, the temperature started dropping quickly and in a blink of an eye it got very very cold. Even with my mitts on, my fingers were so cold they hurt. I figured it was a good idea to get warm so I quickly tucked my self into my sleeping bag and "tried"( hardly a truth when mountaineering) to get a good night’s sleep. This proved very difficult due to the winds pounding on the tent all night long. It was also Yen's first time on a mountain so he was so excited he wasn’t having any sleep either. What seemed like 15 min after I was finally able close my eyes, the guides where shinning their head lamps on our tents to wake us up. Summit Day It was 2 am, extremely cold and it took some serious will power to get moving. We drank hot coco, got our gear on and set out to conquer the summit. It was dark out and windy while we roped up and started on the ridge. The wind was picking up the snow and spraying it on my face making for some nice frozen snot. We kept moving along waiting for the sun to rise and warm us up a bit. Eventually It did and we got the most incredible views with Mt Shasta’s shadow casted upon the surrounding landscape. We where also able to get a good view of the ridge we where climbing. It was amazing, full of these huge red rocks protruding from the snow forming whats really the most aesthtic line on the mountain. We where roped up in two groups of four. By sunrise our group was moving at a considerably slower pace than the other, so we started to worry we wouldn’t make it to the top on time. We had been at it for nearly 6 hours and had yet to make it to Shastina (Shasta’s little sister at 12,335’) and we still had 2000’ of elevation gain to go before making the summit. I was feeling great, my training had proven to work and I was ready to pick up the pace at any moment to race for the top. The problem was my group members where having a hard time keeping pace and where giving in to exhaustion. By just focusing on putting one foot in front of the other for few hours, we eventually made it to the famous misery hill. By now I could see the first group already making it to the top of the hill. Matt, our group guide sat us down for a second to let us know that our summiting window was closing. We had a choice, either call it a day and start making our way down or haul ass to the top, each one at his best pace and one of us summits on time. At this point we un-roped and he let us know that we had 45 minutes to drop onto misery hill and make it to the top (this is where my training really kicked in). After all the events that happened leading up to this trip and how emotional it was for me, I had to summit on way or another. So I kicked it into high gear and started working my way down onto misery hill on my own and then raced up to the top at a frantic pace. I was able to catch up with the first group just at the beginning of the summit plateau. I felt some guilt leaving my partner to climb up at a slower pace knowing he probably wont make it but knowing he was safe and accompanied by the guide, I decided to push on since this climb meant too much to me. Once I met with the other group, I got a quick drink of water before setting out for the summit pyramid. It was gorgeous once at the plateau, you really get to see how massive of a mountain Shasta really is. Then it’s a short hike before getting to the true summit. We had made it!. We took some pictures, signed the summit log and hung out for a bit before heading back down to camp. Just as I started making my way off the summit I saw Yen, my climbing partner approaching the top. I raced down to where he was and took the final steps with him. I was ecstatic he had made it and that we where able to get a summit picture together. The descent At this time we really had to start heading down in order to make it to camp before sun down. We descended down the side of Avalanche Gulch in a long and boring slog in knee deep snow. It took about 4 hours to get back down. Once at camp I took off my boots, organized my gear inside the tent and went straight to sleep. After a long day, when I finally laid down on my sleeping bag I was so tired I it felt like I was laying on a temperpedic and In a matter os minutes i was out cold. The next morning, we where up around 7 and quickly began packing up since a storm was working its way onto the mountain. We wanted to be out as soon as possible. After a quite uneventful descent we had finally made it back to Bunny Flats. Spirits where high and we where all eager to have a decent meal and get some rest. After thoughts All in all even though my physical conditioning was a lot better on Shasta, I still consider Rainier to be much harder both physically and technically. That being said, this is a beautiful mountain with amazing features. I really enjoyed climbing it in the winter since there wasn't any one else on the mountain at the time. Despite the sun beating down on us the whole summit day, it was still cool enough to where we didn't feel fatigued by the sun. I definitely wouldn't mind coming back and climbing it again, maybe try ski mountaineering it instead! HERES A LIST OF THE GEAR I USED, THE PLACES I STAYED AND THE COST BREAK DOWN OF THE TRIP: Logistics: Shasta is pretty much far from everything, you don't have many options other than renting a car. Plus the drive is well worth it (amazing scenery). Your nearest air port is Sacramento which is about a 3 hour drive. Once at shasta, your best bet is to stay at the SWS bunk house. There are plenty of restaurant in the area to satisfy your pre climb cravings. From the SWS bunk house, its about a 30 min drive to Bunny Flats, where you will begin your climb. Cost break down: SWS mountain guides - $825.00 (+ guide tip) Car rental - $235.00 Hotel - $166.00 (2 nights) Pre climb food - $74.00 Snow Shoe Rentals - $40.00 Total: Approx $1340.00 Gear List: Lower Body- La Sportiva Baruntse Point 6 Medium weight Socks Point 6 Heavy weight socks Smart Wool base layer Mountain Hardware ChockStone pants Arc'teryx Alpha SL Pant Upper Body- Bight Gear Solstice Hoody Men's (base layer) North face Soft shell hooded Jacket (**Highly Recomended) Mountain Hardware ghost lite jacket Mountain Hardwear Micro Dome (insulating warm hat) Marmot Men's Windstopper Glove (light weight) Marmot Men's Randonnee Glove (medium weight) Marmot Mens Mit Climbing Gear- Julbo Monte Bianco Glacier Glasses Black Diamond Climbing Helmet Black Diamond Couloir Harness Black Diamond Raven Pro Ice Axe Black Diamond Sabertooth Clip Crampons Osprey 85 Pack Mountain Hardware 3 degrees sleeping bag MSR Snow Shoes Find out more on my website: www.brandonclimbs.com All climbs are used to raise awareness for the opioid epidemic that is weeping our nation. Gear Notes: On report Approach Notes: On report1 point
-
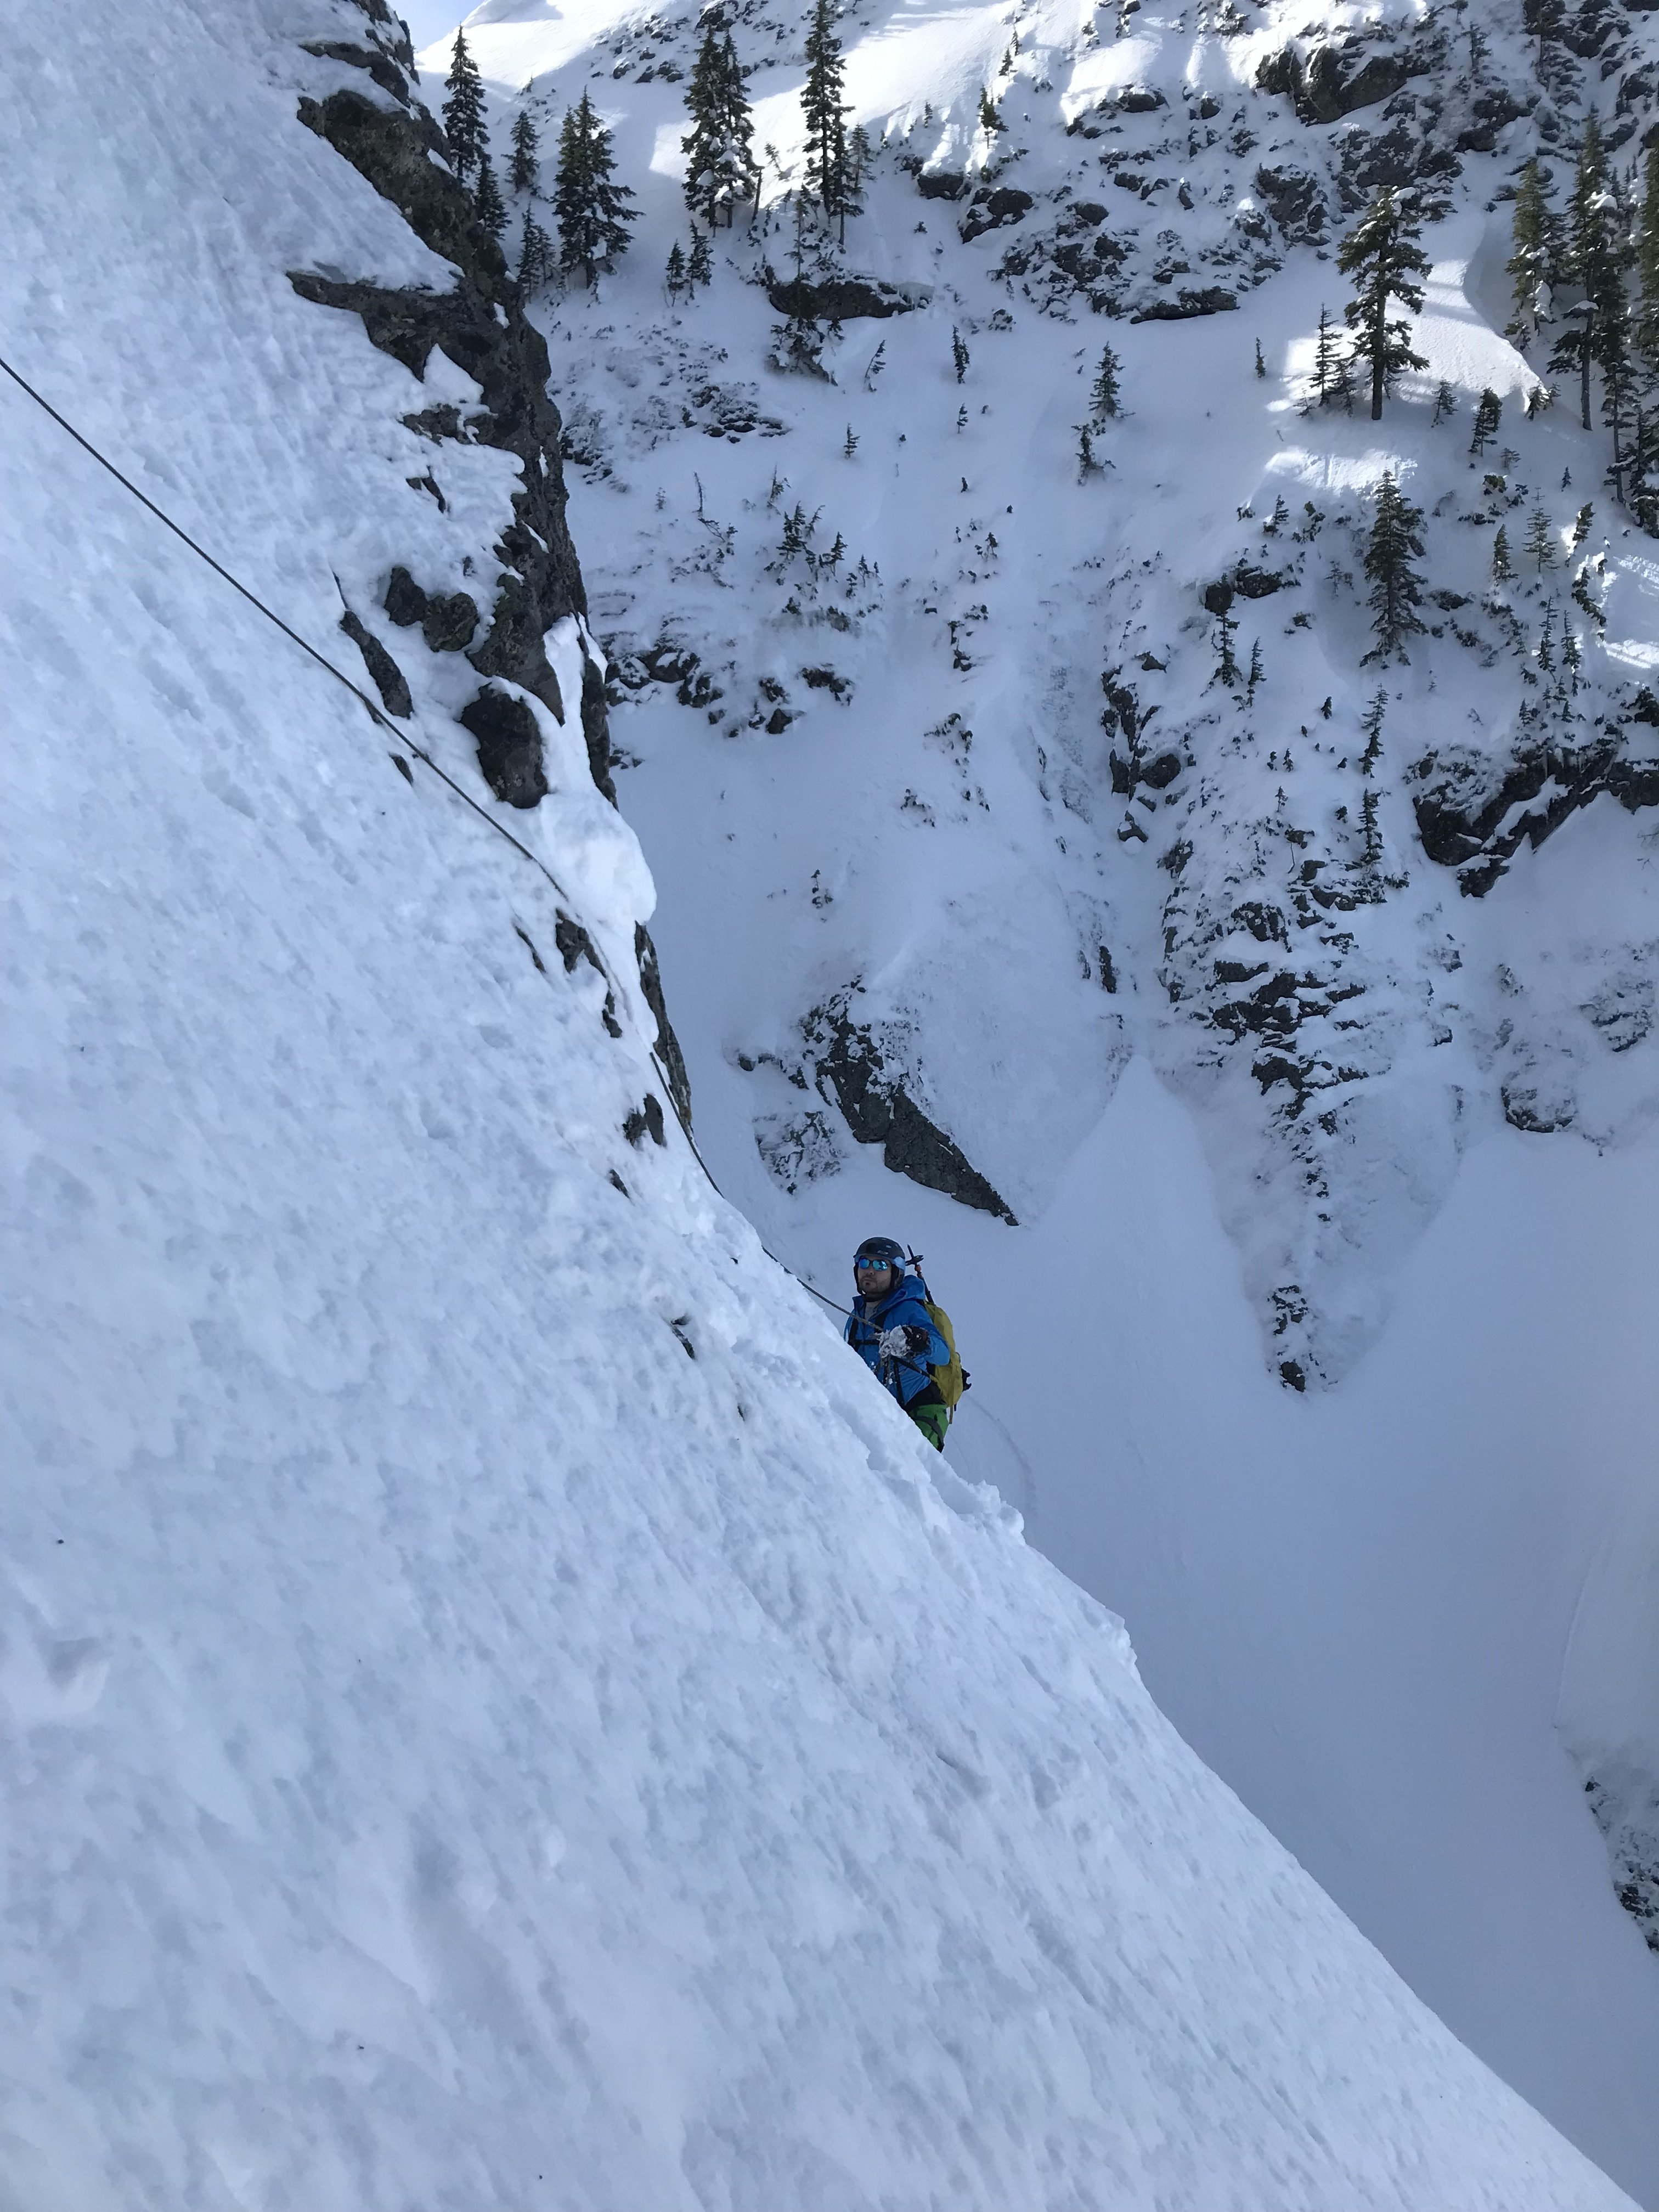
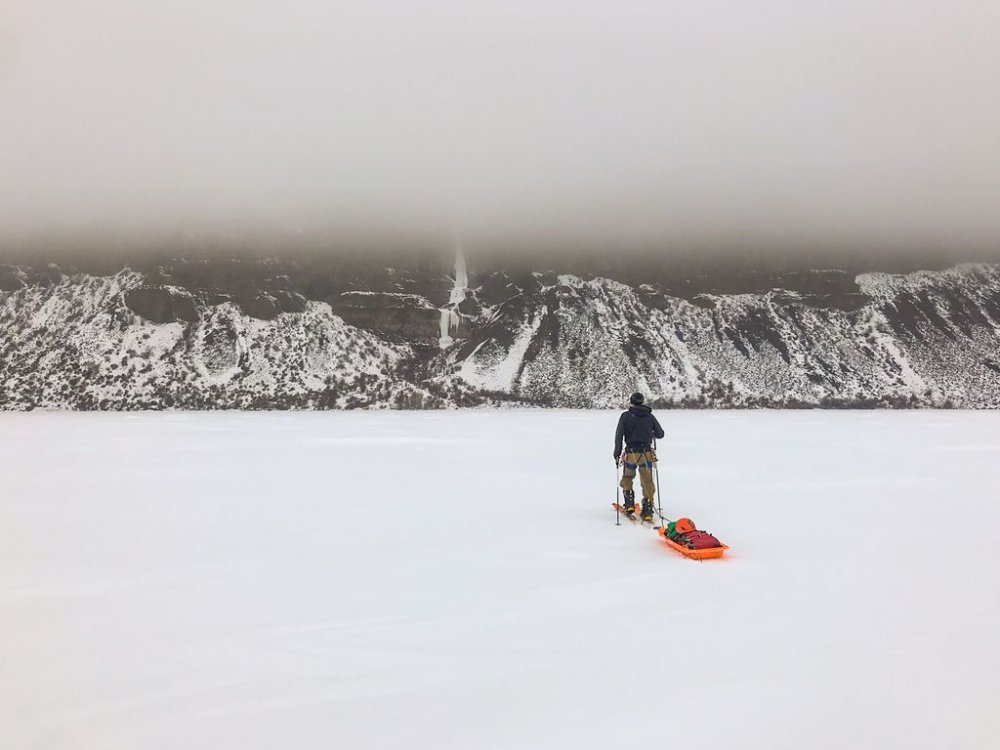
So this isn't a climb and not really a true trip report, but in the chance that this might be interesting or helpful, I decided to post my notes from our recent scramble of Luna Peak in a day. See below for splits, route beta (log crossing, bushwack) and a few pics. The crux of the trip was the navigation. Nailing the creek crossing location, following the path of least resistance during the bushwack and finding the correct gully to the alpine were all critical. Otherwise it was a class 2 hike (minus the true summit traverse). The bushwack ended up being much better than what I had heard (no wallowing in swamps full of devils club!), but the gully was a bit harder than expected, very long, loose and steep, but overall not too bad. Plenty of water available in the basin south of the peak and near Luna Col. Luna Peak - 8/30/17 Abram Elwell, Jenni S, Luke P 48.2 miles, 12,200' gain, 23:18 elapsed Ross Dam TH, 2:33 am, 0:00 elapsed Ross Dam, 0:12 Big Beaver Trail, 1:40 Leave Trail (After second clearing past Luna Camp, three large boulders on left, near "B" in Beaver on USGS map), 4:18 Easy cross-country travel to log jam with minimal brush until river Big Beaver Crossing (On log jam south of Access Creek, near "v" in Beaver on USGS map), 4:28 Climb up slope while traversing right with moderate brush Access Creek Crossing (3000'), 5:18 Bushwack upstream not far from creek with moderate brush, slide paths had waytrails through slide alder Cross creek to southern boulder fields (3840', before slide alder!), 6:43 Access Creek Basin Camp, 7:16 Halfway up gully (5400') cross over to the gully on left, stay right at the fork. Gully is loose and steep. Top of Gully (6240'), 8:30 Luna Col, 9:51 Summit, 10:35 (we opted out of the exposed scramble to the true summit, it looked much harder than 3rd class) Leave Summit, 11:02 Luna Col, 11:37 Top of Gully, 12:43 Access Creek Basin Camp, 13:55 Cross creek to north, 14:20 Split from ascent route (to try Big Beaver ford), 15:29 Big Beaver ford (knee height, north of confluence), 15:50 Back to Trail (follow flagging through swamp, difficult brush, cairn by trail), 16:13 LOG JAM CROSSING BETTER!! Big Beaver bridge crossing, 19:42 Ross Dam, 22:42 (includes two short sit down, eye-closed breaks) Ross Dam TH, 1:51 am, 23:18 elapsed Gear: Light axe (CAMP Corsa Nanotech), micro-spikes (Hillsound Freesteps6), helmet, 3000 Cals (bars, gels, chews, salt pills, rice crispy treats), three half-liter soft water bottles, emergency shelter (puffy, light jacket, baselayer pants, arm sleeves, warm hat, space blanket, garbage bag), gloves for bushwacking, headlamp w/ extra batteries, phone with gps mapping app and extra battery, gps watch with route loaded, gopro, PLB, sun hat, sunglasses, sunscreen, buff, chapstick, TP, knife, lighter, etc: all fit in/on my Ultimate Direction AK Mountain running vest. Wore La Sportiva Mutants, thin wool socks, calf sleeves for brush, running shorts and top. Didn't bring poles but should have. GPS Route .gpx file GPS Route and elevation profile Nice beach at the Big Beaver Creek crossing Big Beaver Creek crossing location Big Beaver Creek log jam crossing Typical Access Creek brush Approaching the head of Access Creek with the first view of Luna Loose gully The view of the Southern Pickets from the top of the gully Luna Pass views of the Northern Pickets Fury, Baker, Shuksan and Luna Lake Opted out of the "3rd class" traverse to the slightly higher true summit. Chilliwack range in background. Access Creek approach valley to the right. Best view in the Cascades? Definitely a contender!1 point
-
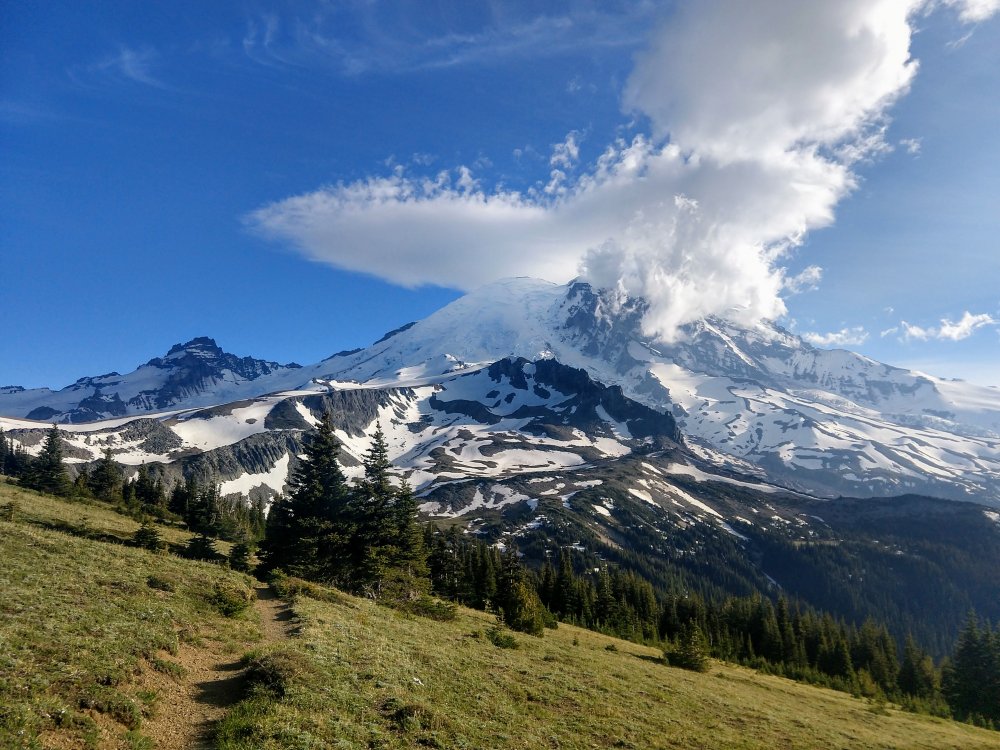
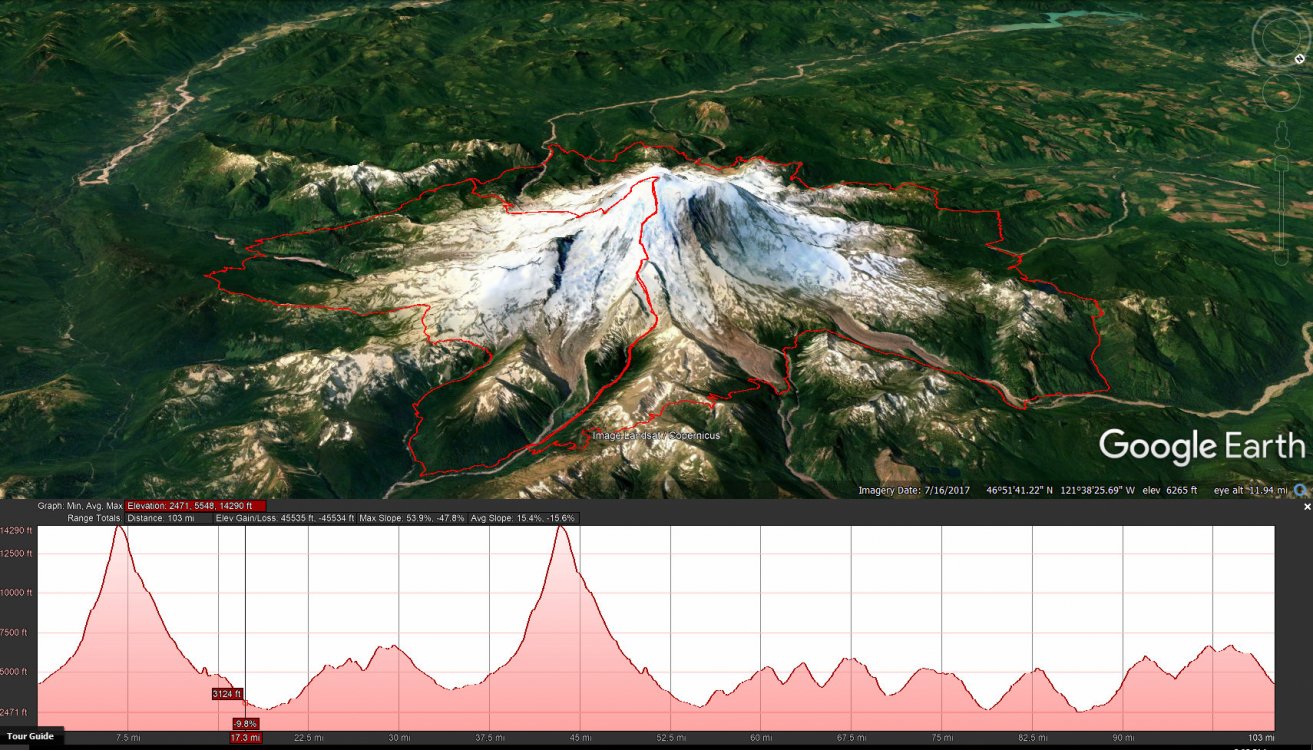
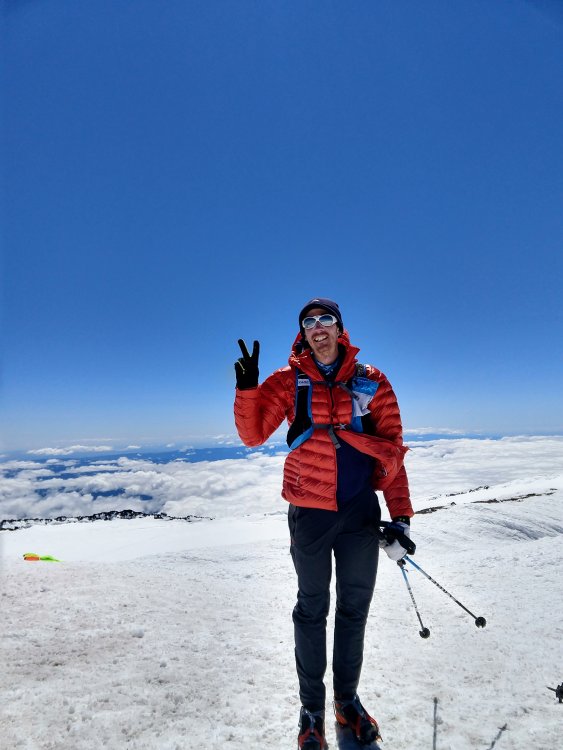
Hey all! Before this week I'd never climbed Tahoma, but after traversing the summit three times in five days and running all the way around the base, I can say I understand the special place this big mountain has in the hearts of all Cascade climbers. The combo of insane vertical relief, great access, well-established routes and stunning scenery make this one of the unique mountains of the world. A great way to experience this place, I thought, would be the "infinity loop". It's been done a couple times so far, and deserves more attention from the many dedicated mountain runners of the world. Though its certainly not a race, I think it's interesting to post times, to give others a sense of what might be possible and encourage motivated folks to train harder. Start (White River): June 22 3:23am End (White River): June 24 9:45pm Total: 66 hours and 22 minutes Mileage: 130ish Vertical gain: ~45 thousand feet Routes: up Emmons, down DC. Twice. One full lap of the Wonderland trail. Here's my trip report of the adventure: https://ropeandsummit.wordpress.com/2018/06/27/rainier-infinity-loop/ And my Instagram if you wanna follow along on future shenanigans: @ropeandsummit Thanks! Scott
 1 point


.jpg.22eb2979f0d666bcc955d7e97c379357.jpg)