Leaderboard


Popular Content
Showing content with the highest reputation on 08/29/18 in all areas
-
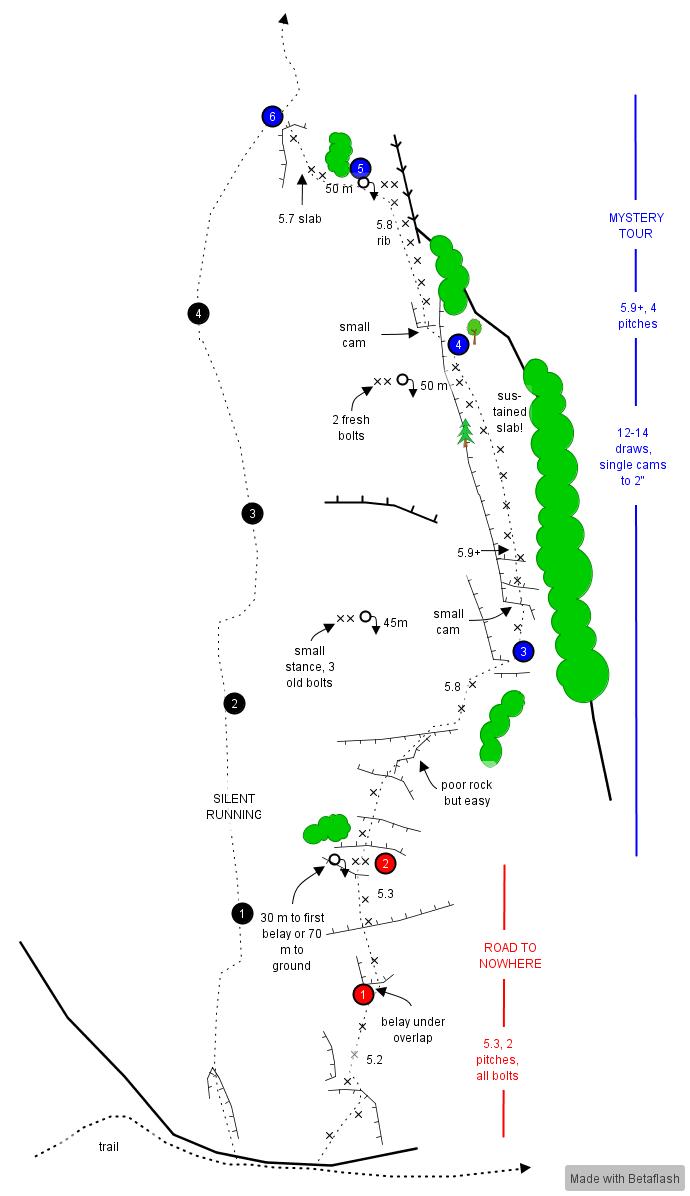
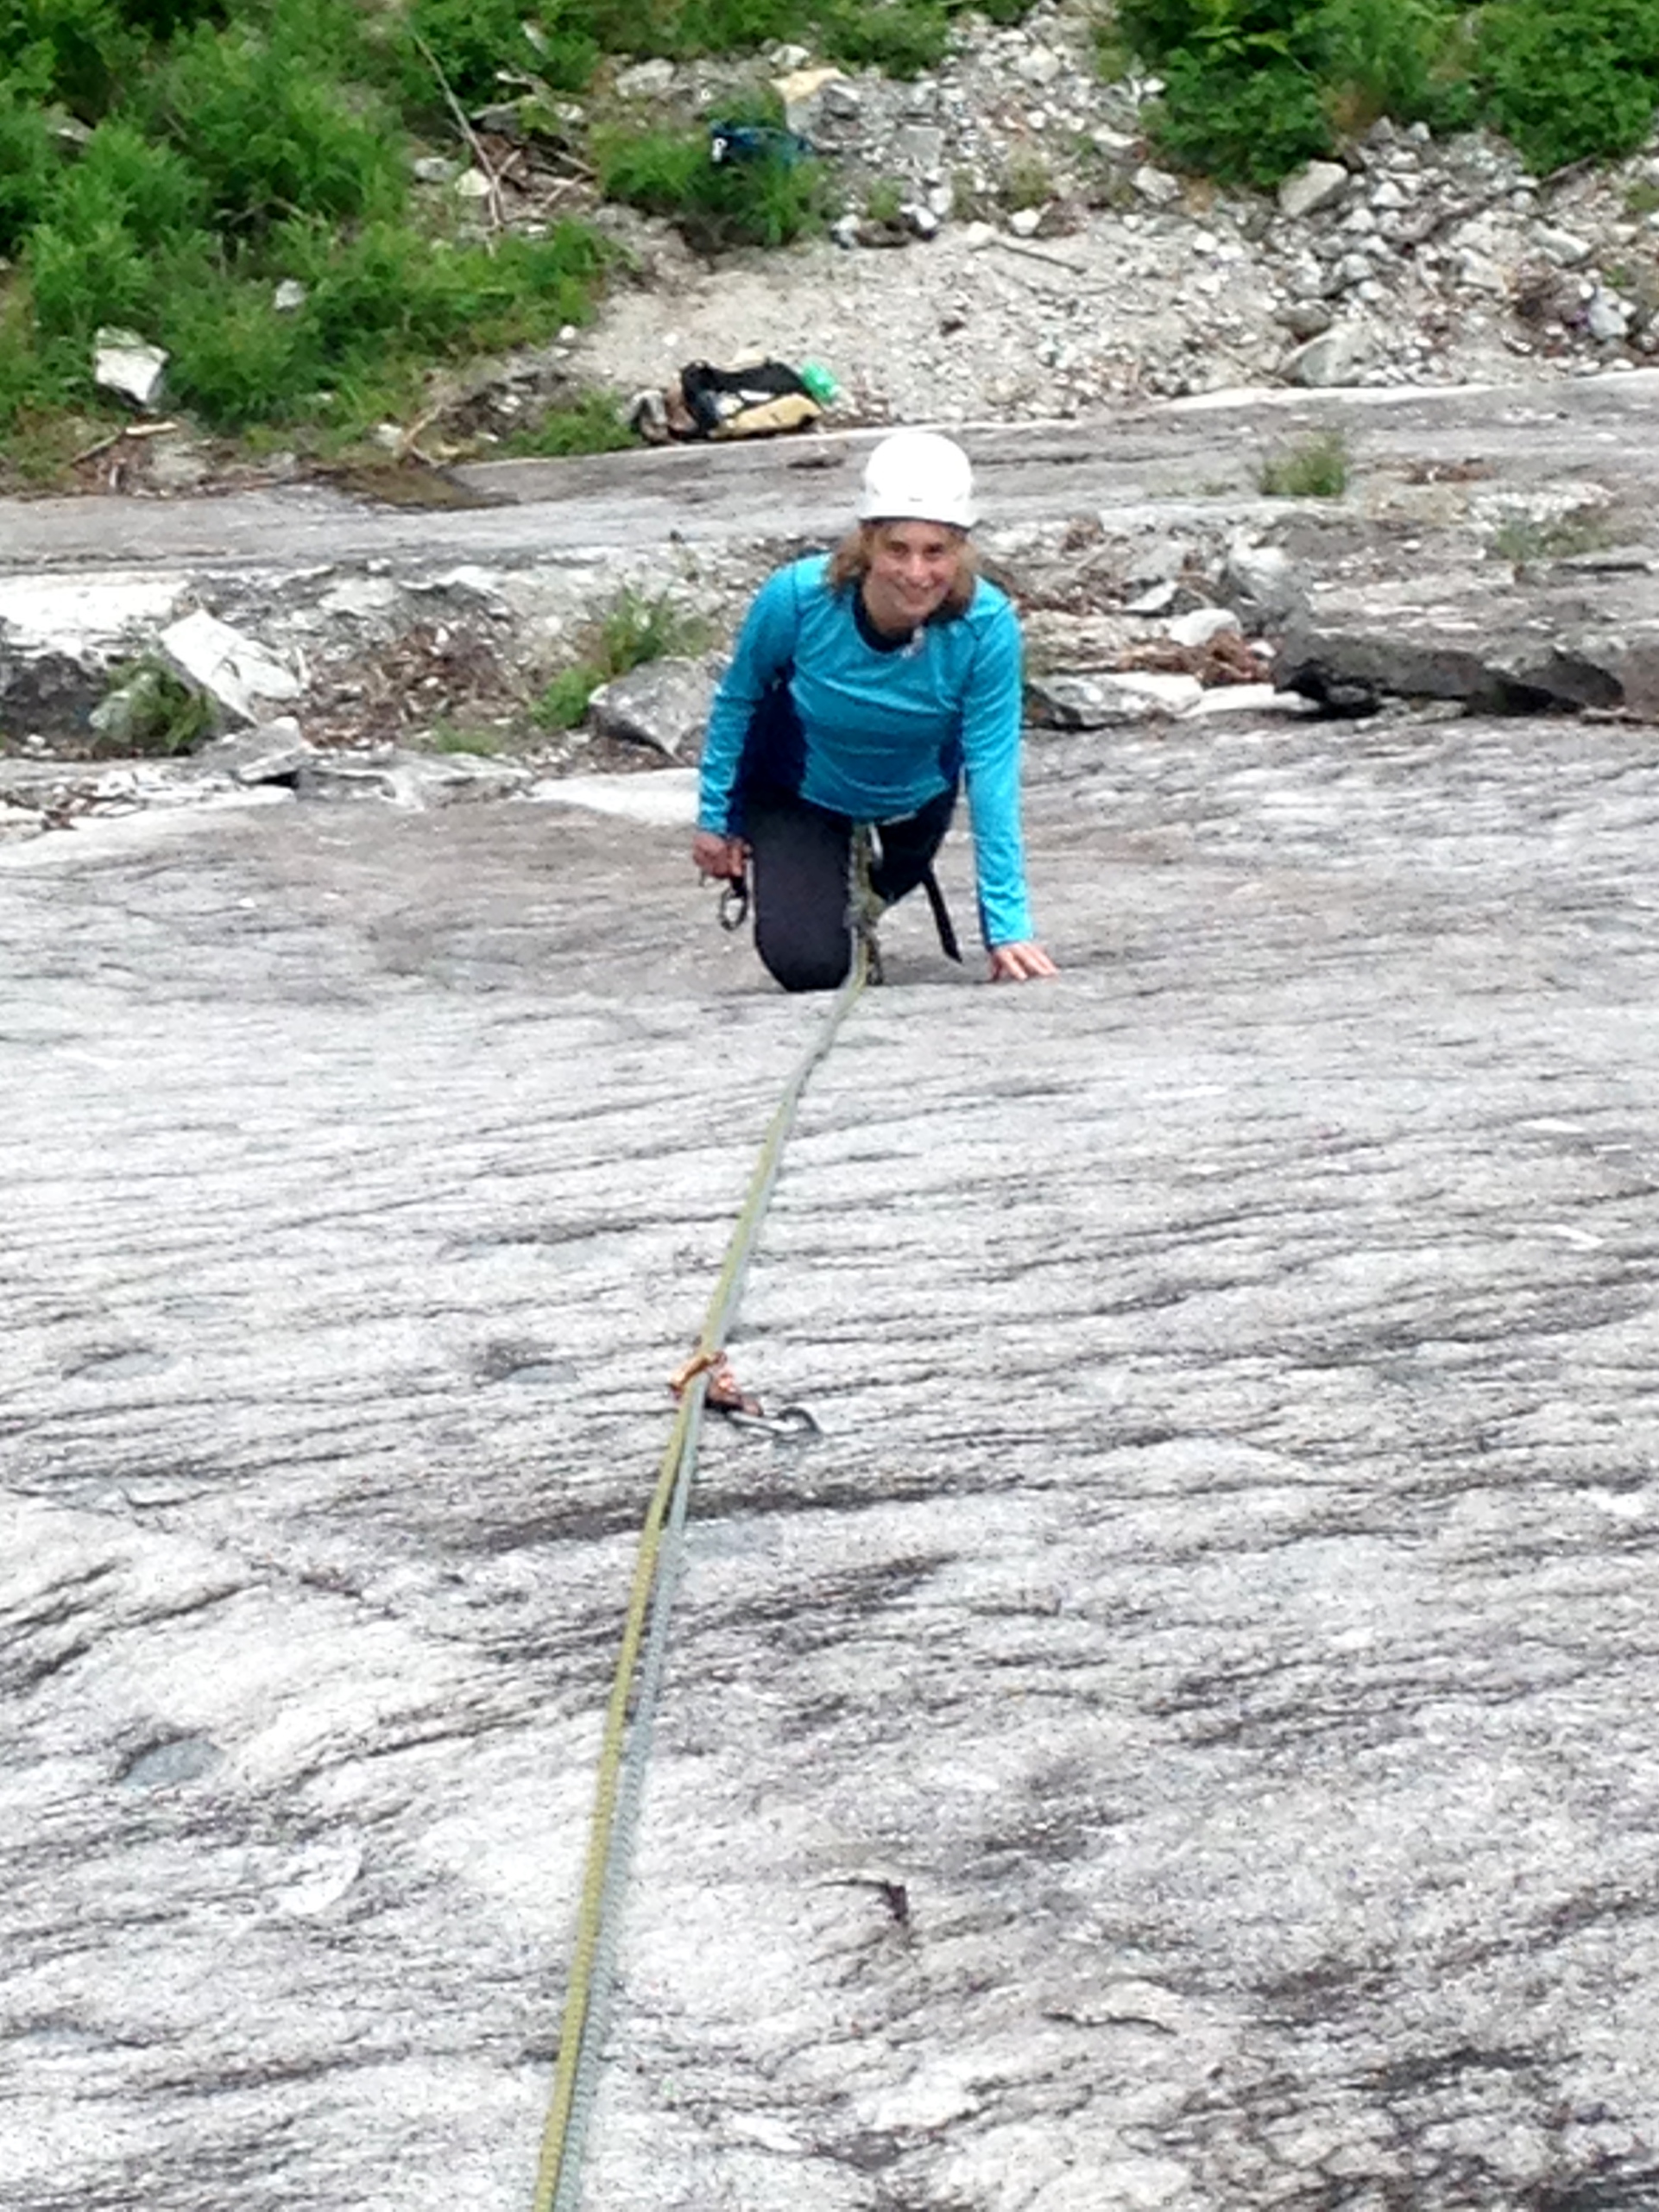
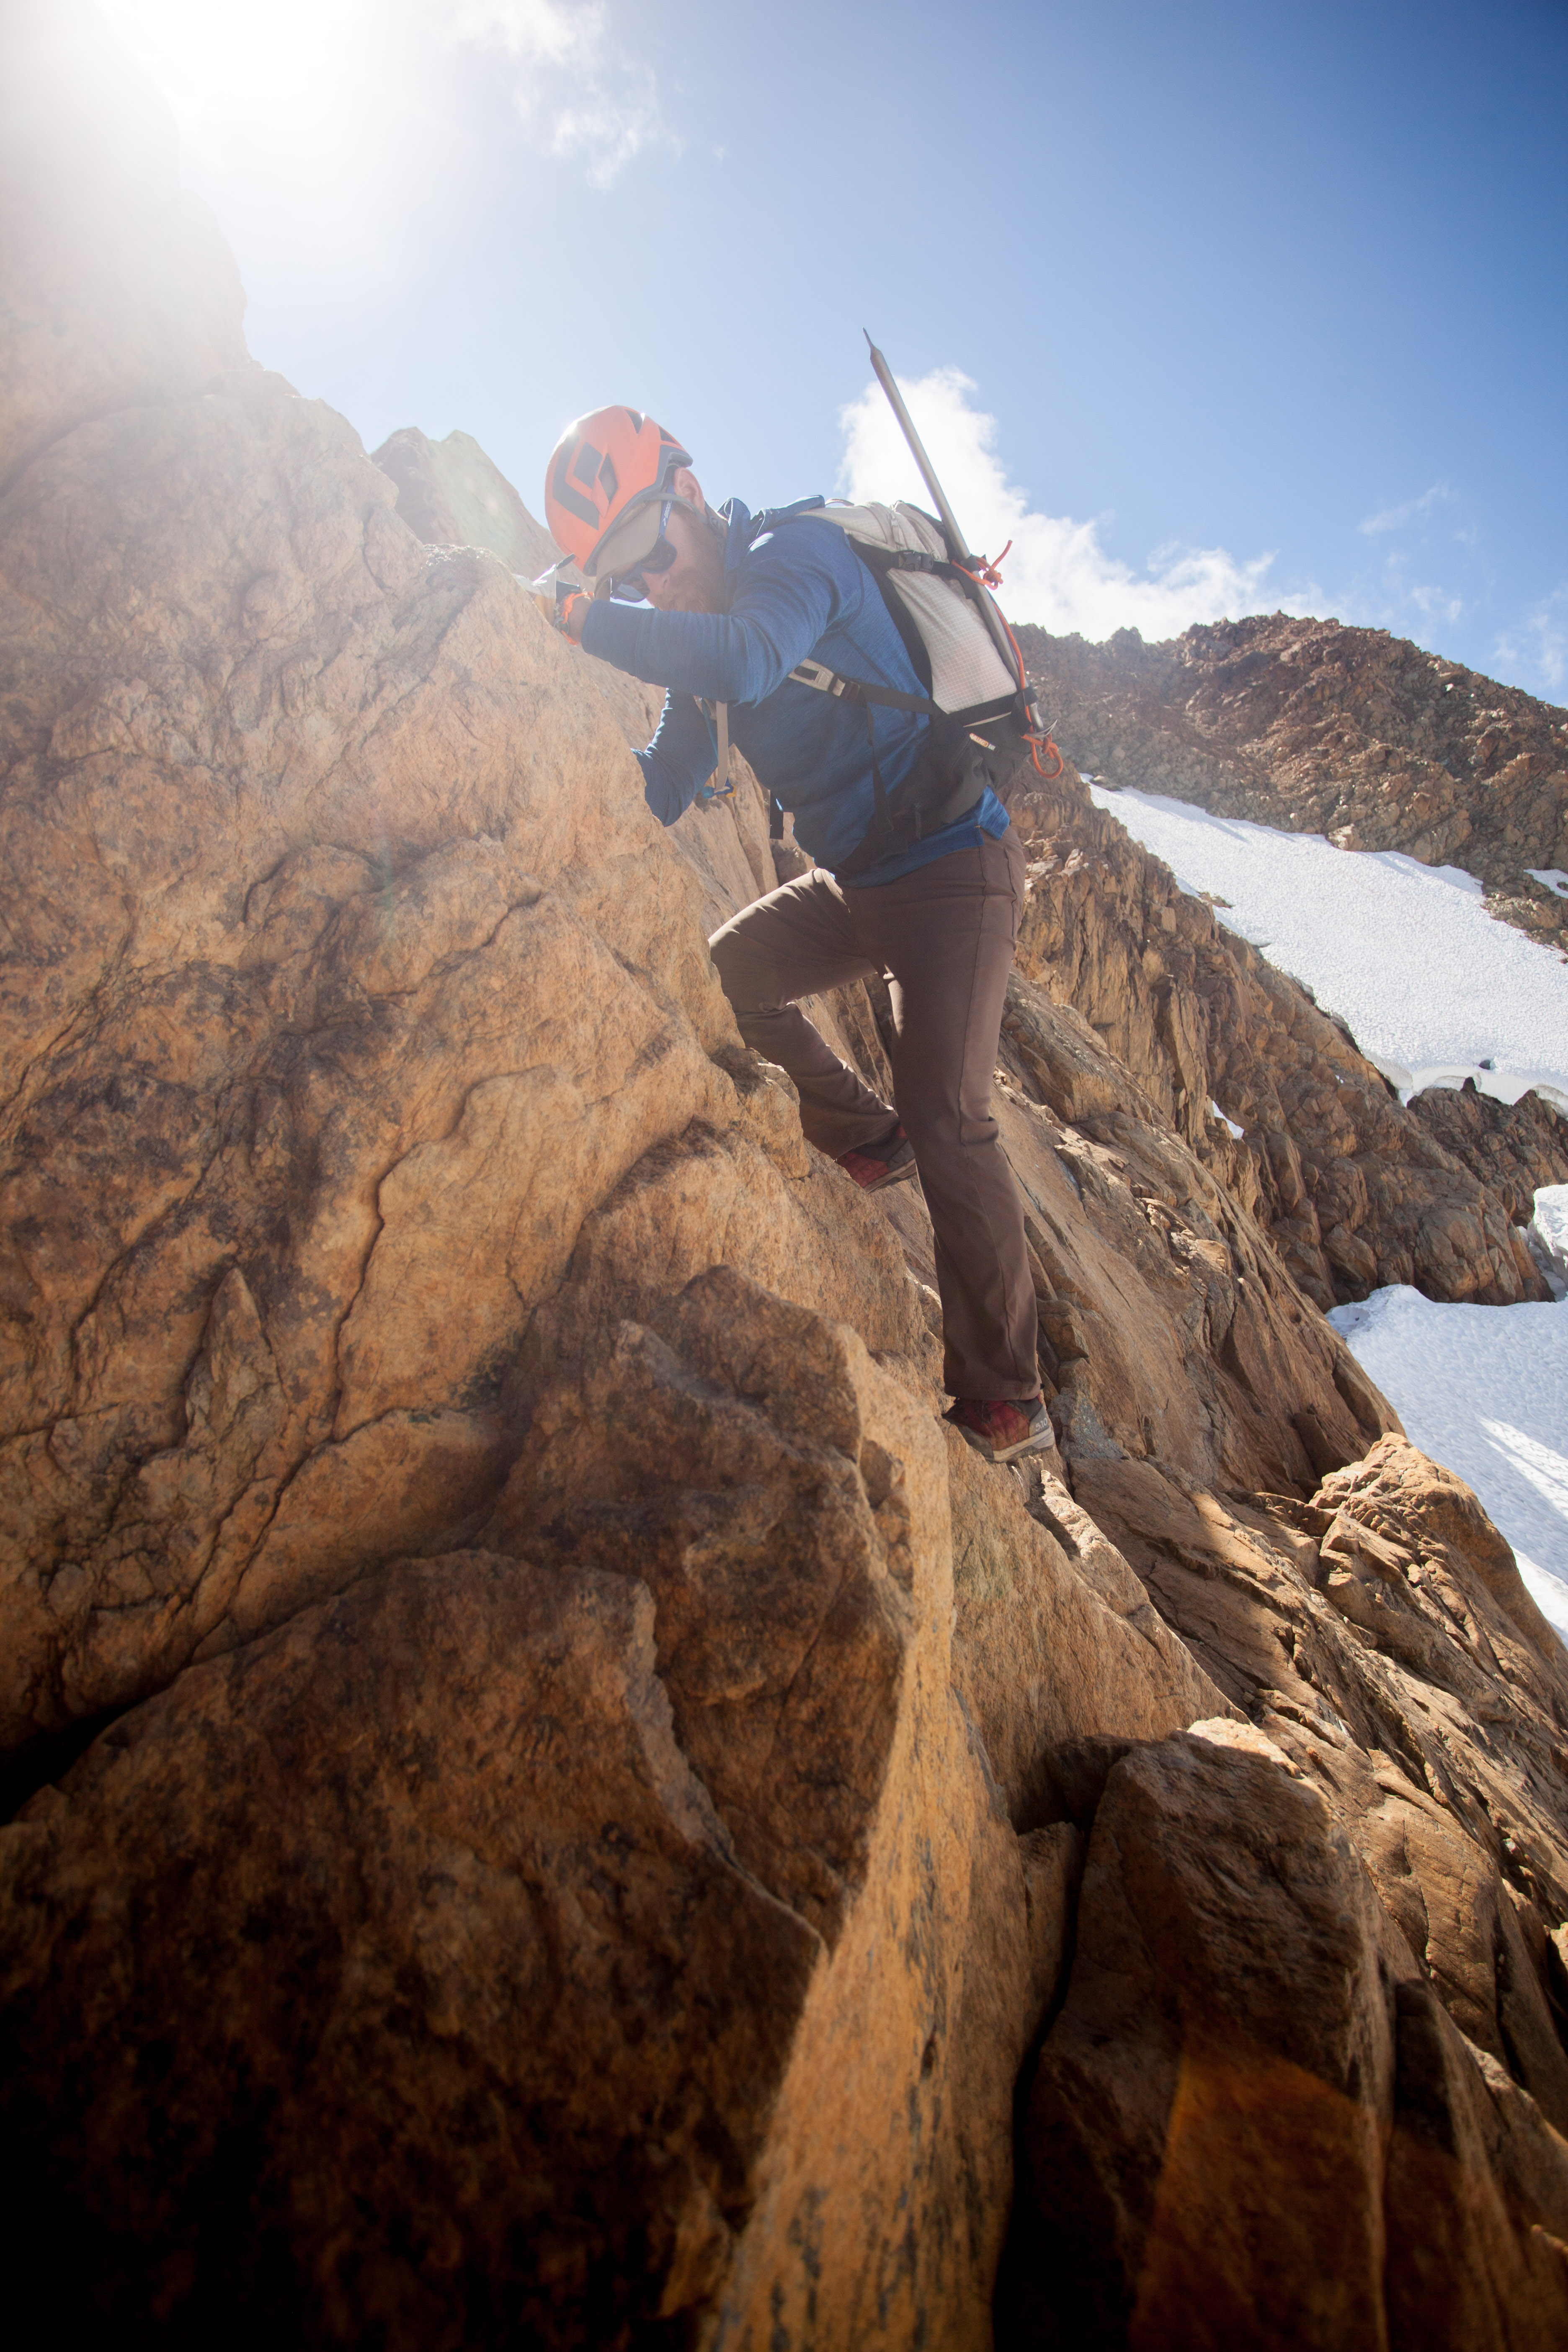
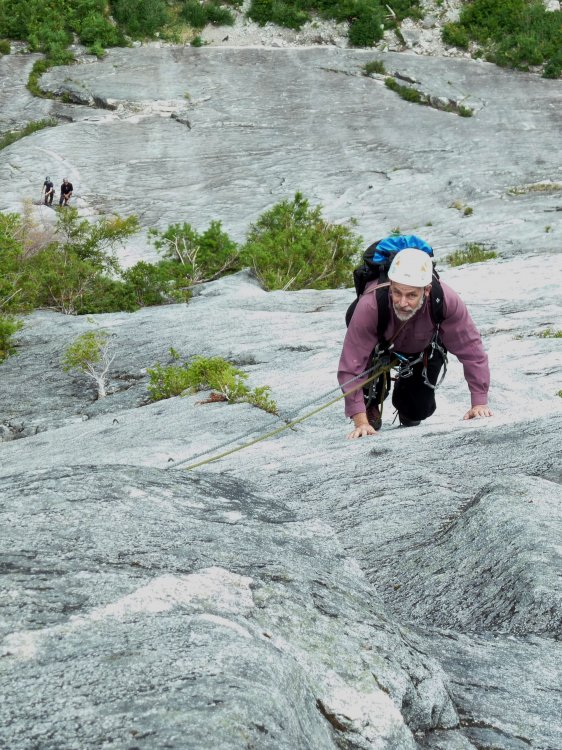
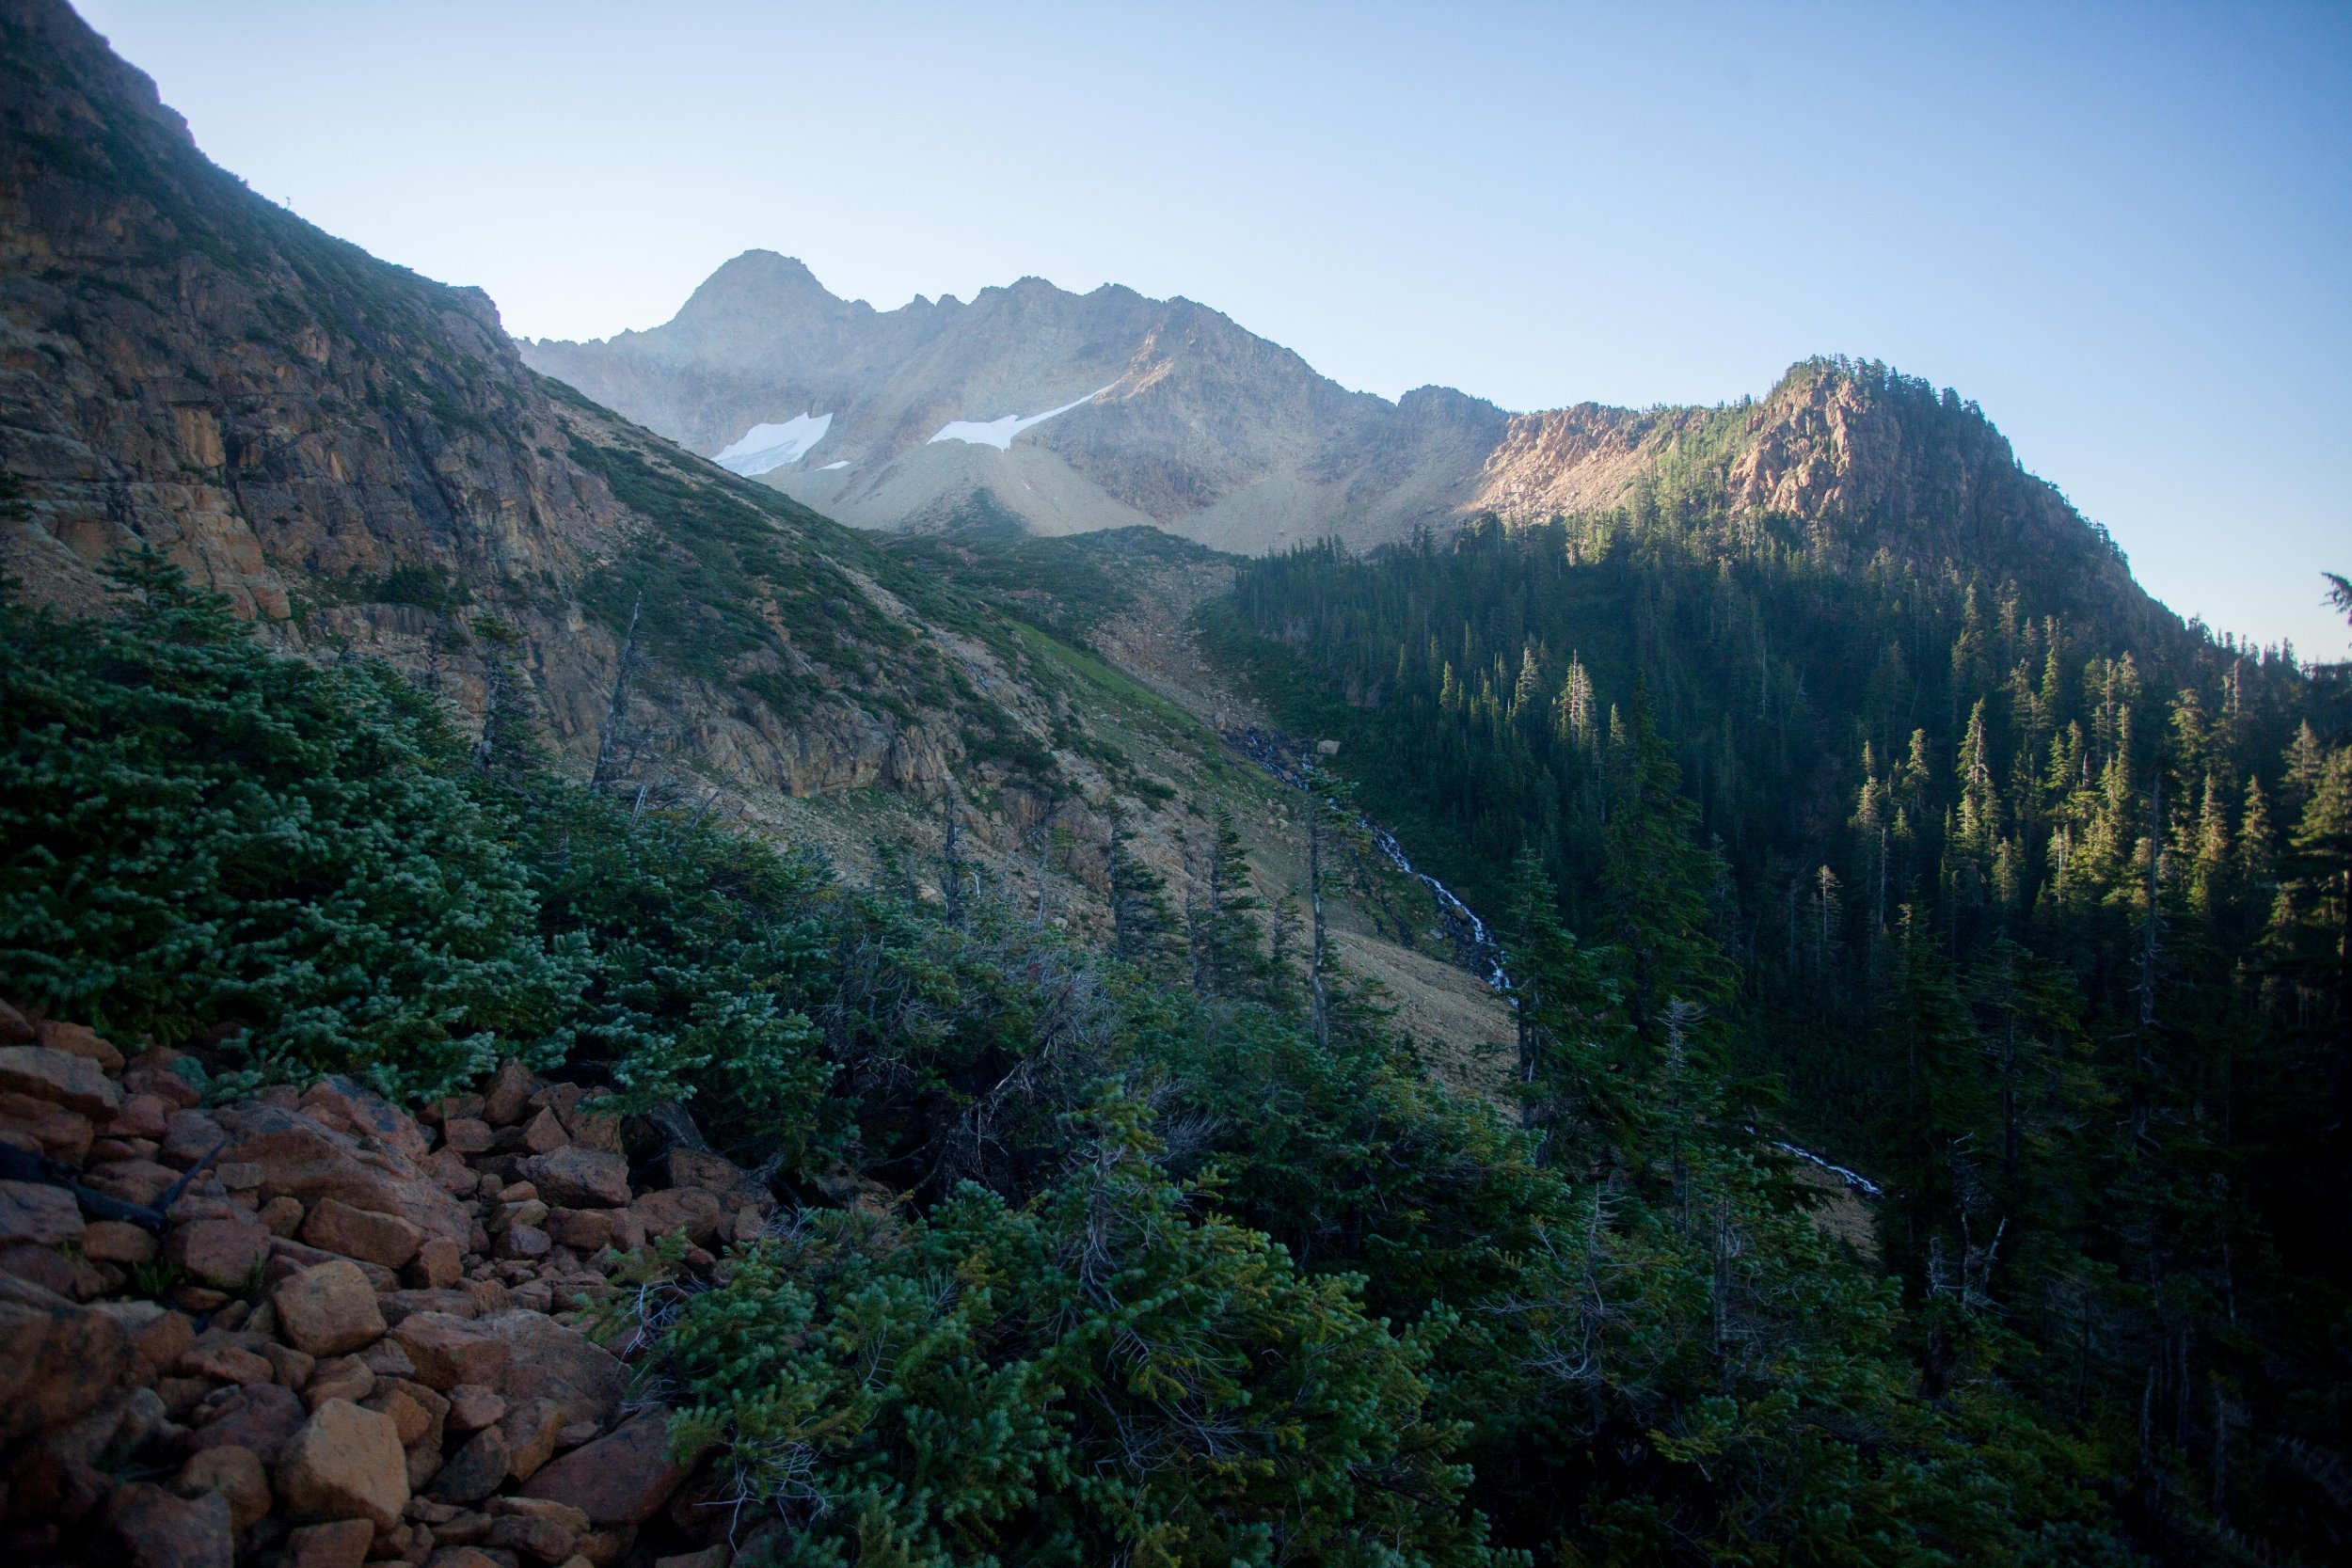
Trip: Three O Clock Rock - Road to Nowhere, Mystery Tour Trip Date: 07/20/2018 Trip Report: Hey, a quick update about some new options up at 3 O’Clock Rock...for those that care. Year after year, it seems that over 95% of Washington climbers find zero appeal in hiking to easy slab climbs. But that just keeps the quiet experience for the dedicated regulars and newcomers. Andy and I added an easy (~5.3) slab climb a bit right of Silent Running that features two short pitches. Road to Nowhere has proven a fun outing for novice slab climbers. If you want more challenge, try it hands free (though the FHFA has already been done). You will need 5 draws and one 70 m rope to get up and down. If you’re up for a more difficult experience and/or other parties are lined up for Silent Running, continue another 4 pitches up Mystery Tour, which wanders to the right-hand edge of the North Buttress (topo below). The second pitch of Mystery Tour (5.9+) is the standout, featuring 58 m of very sustained slab climbing. From there, continue up the rounded buttress at 5.8 and then a shorter pitch that ties into Silent Running. More beta and gear details are below. Currently, the easiest descent is down Silent Running, though we hope to have a separate rappel route tuned up in the near future. Leah on Road to Nowhere, pitch 1 Matt approaching the rounded buttress on pitch 3 of Mystery Tour. Climbers below and left are one pitch up Road to Nowhere Route topo Gear Notes: For Mystery Tour, you'll want double 60s, a single set of cams to 2" and ~14 draws. About 80% of pro is bolts. Approach Notes: FS road #2060 to Eight-mile trailhead, then 45 minutes of easy uphill (standard 3 O Clock Rock approach)

 1 point
 -
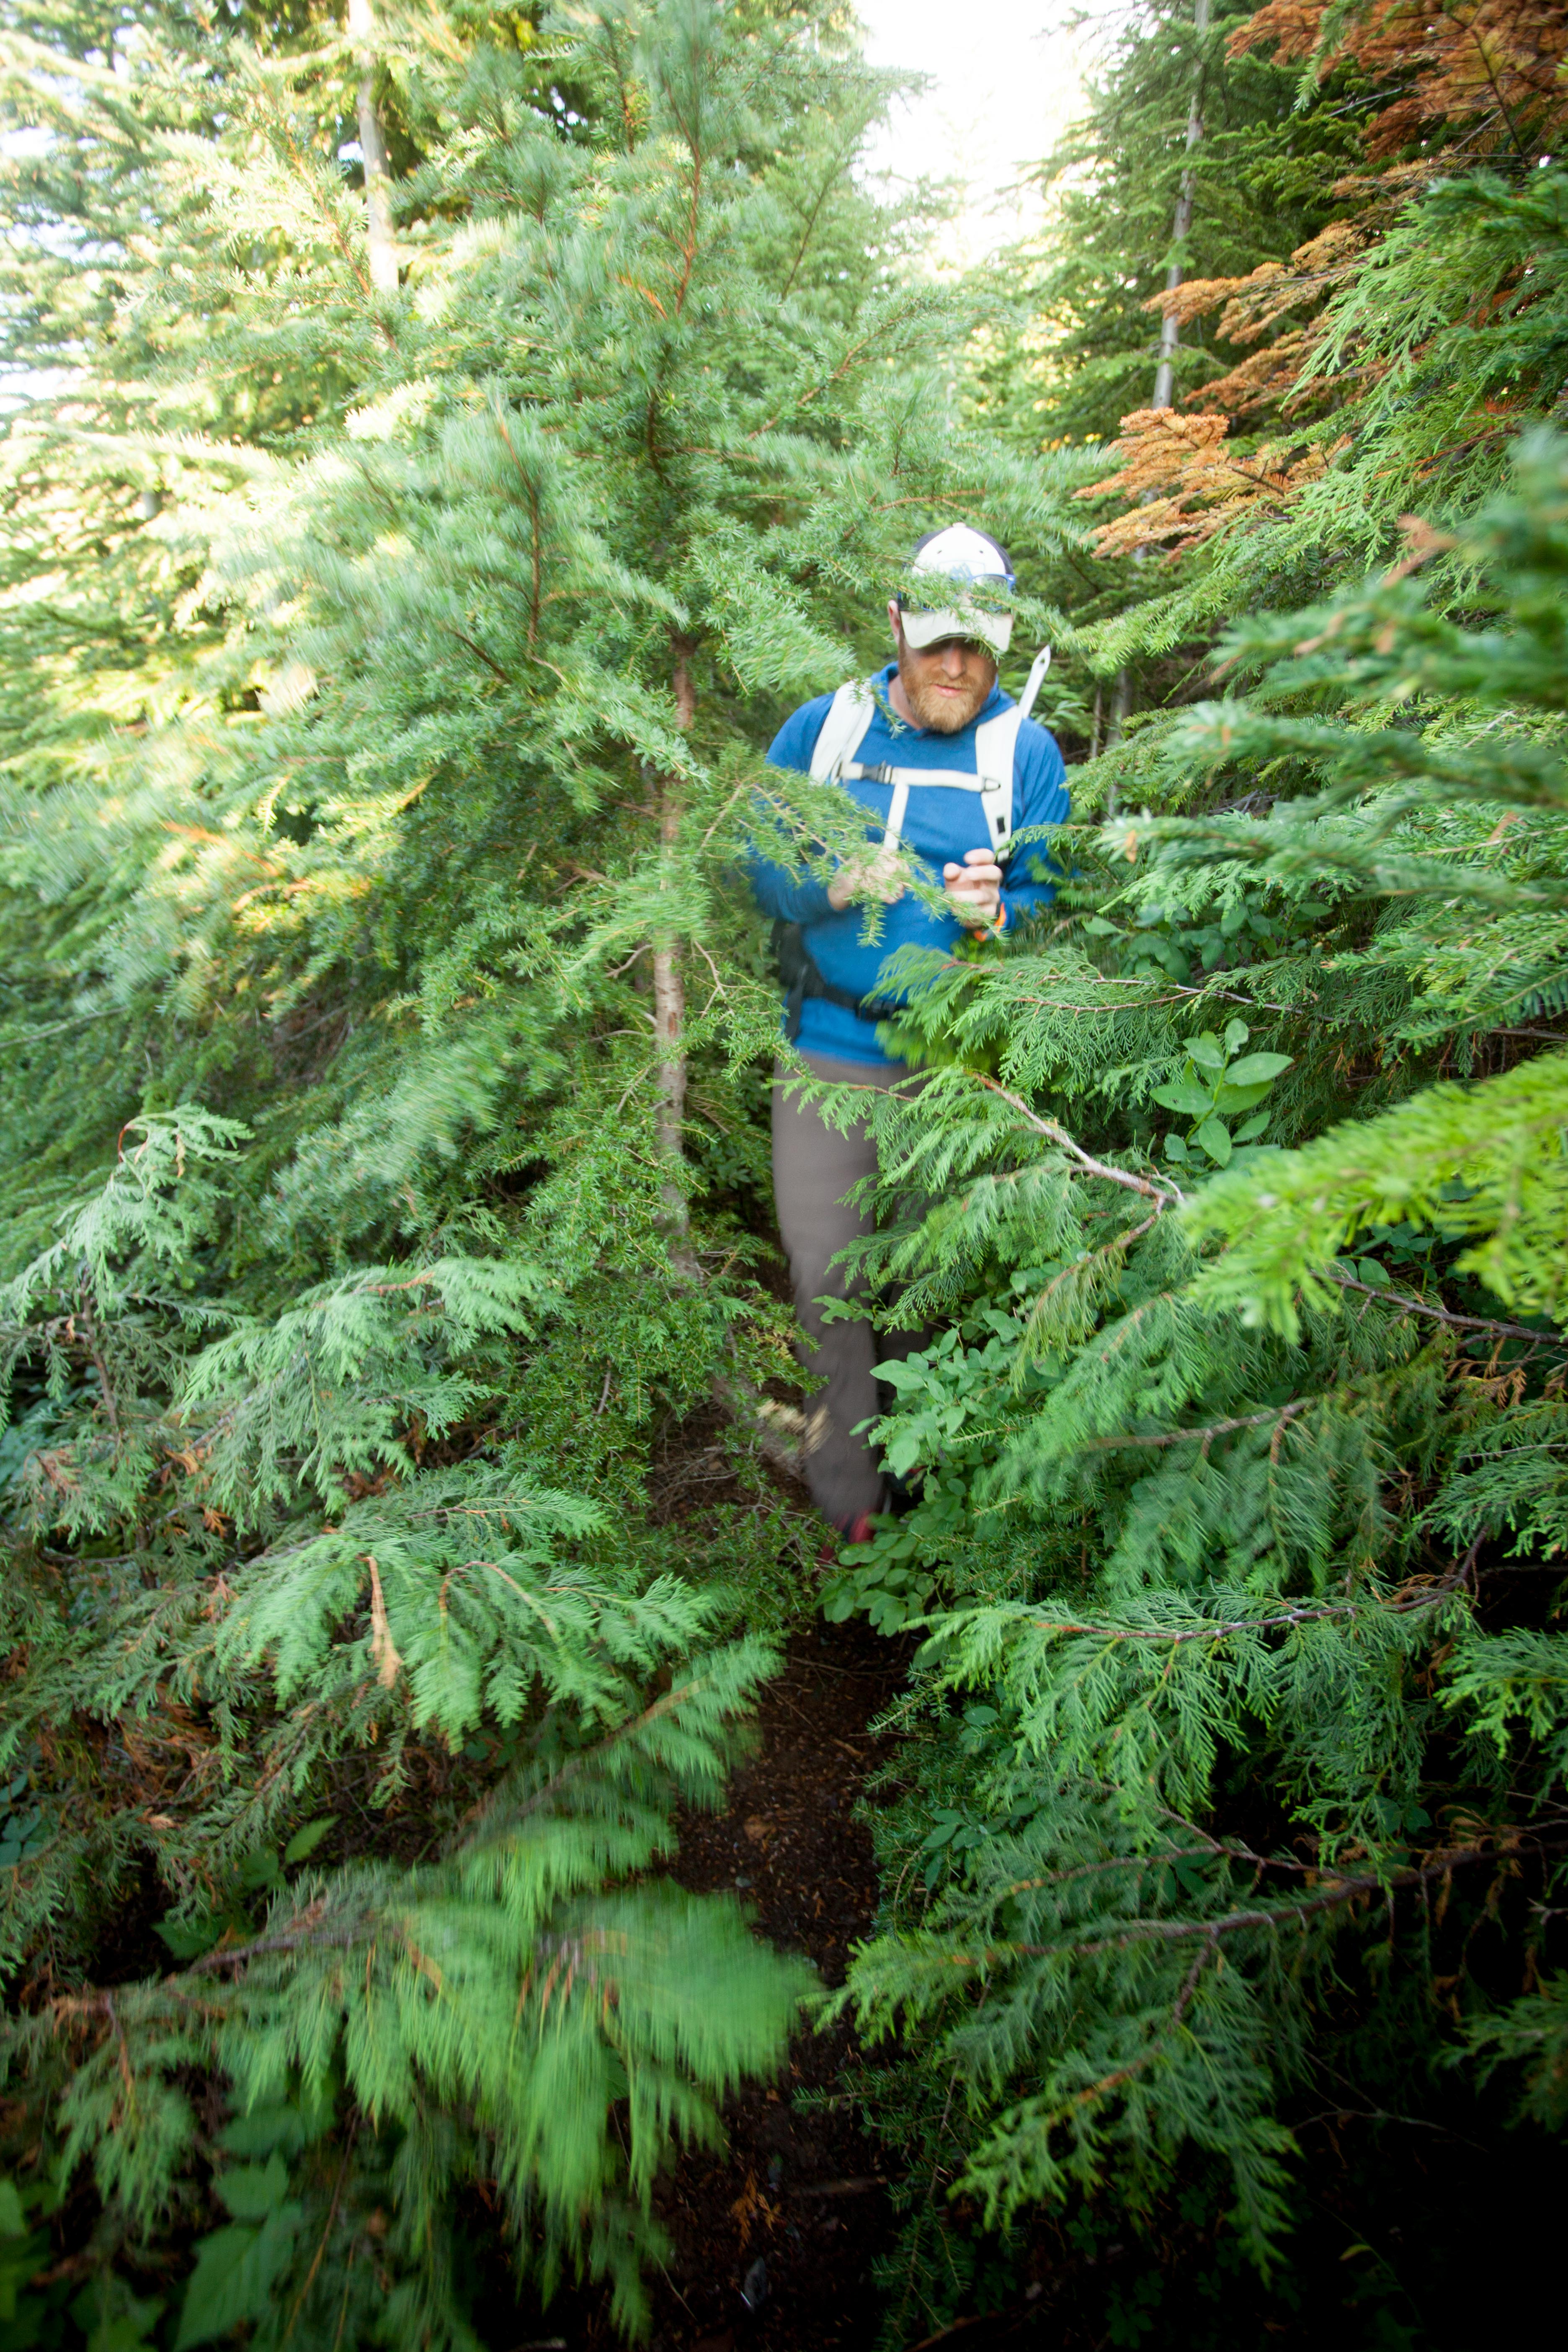
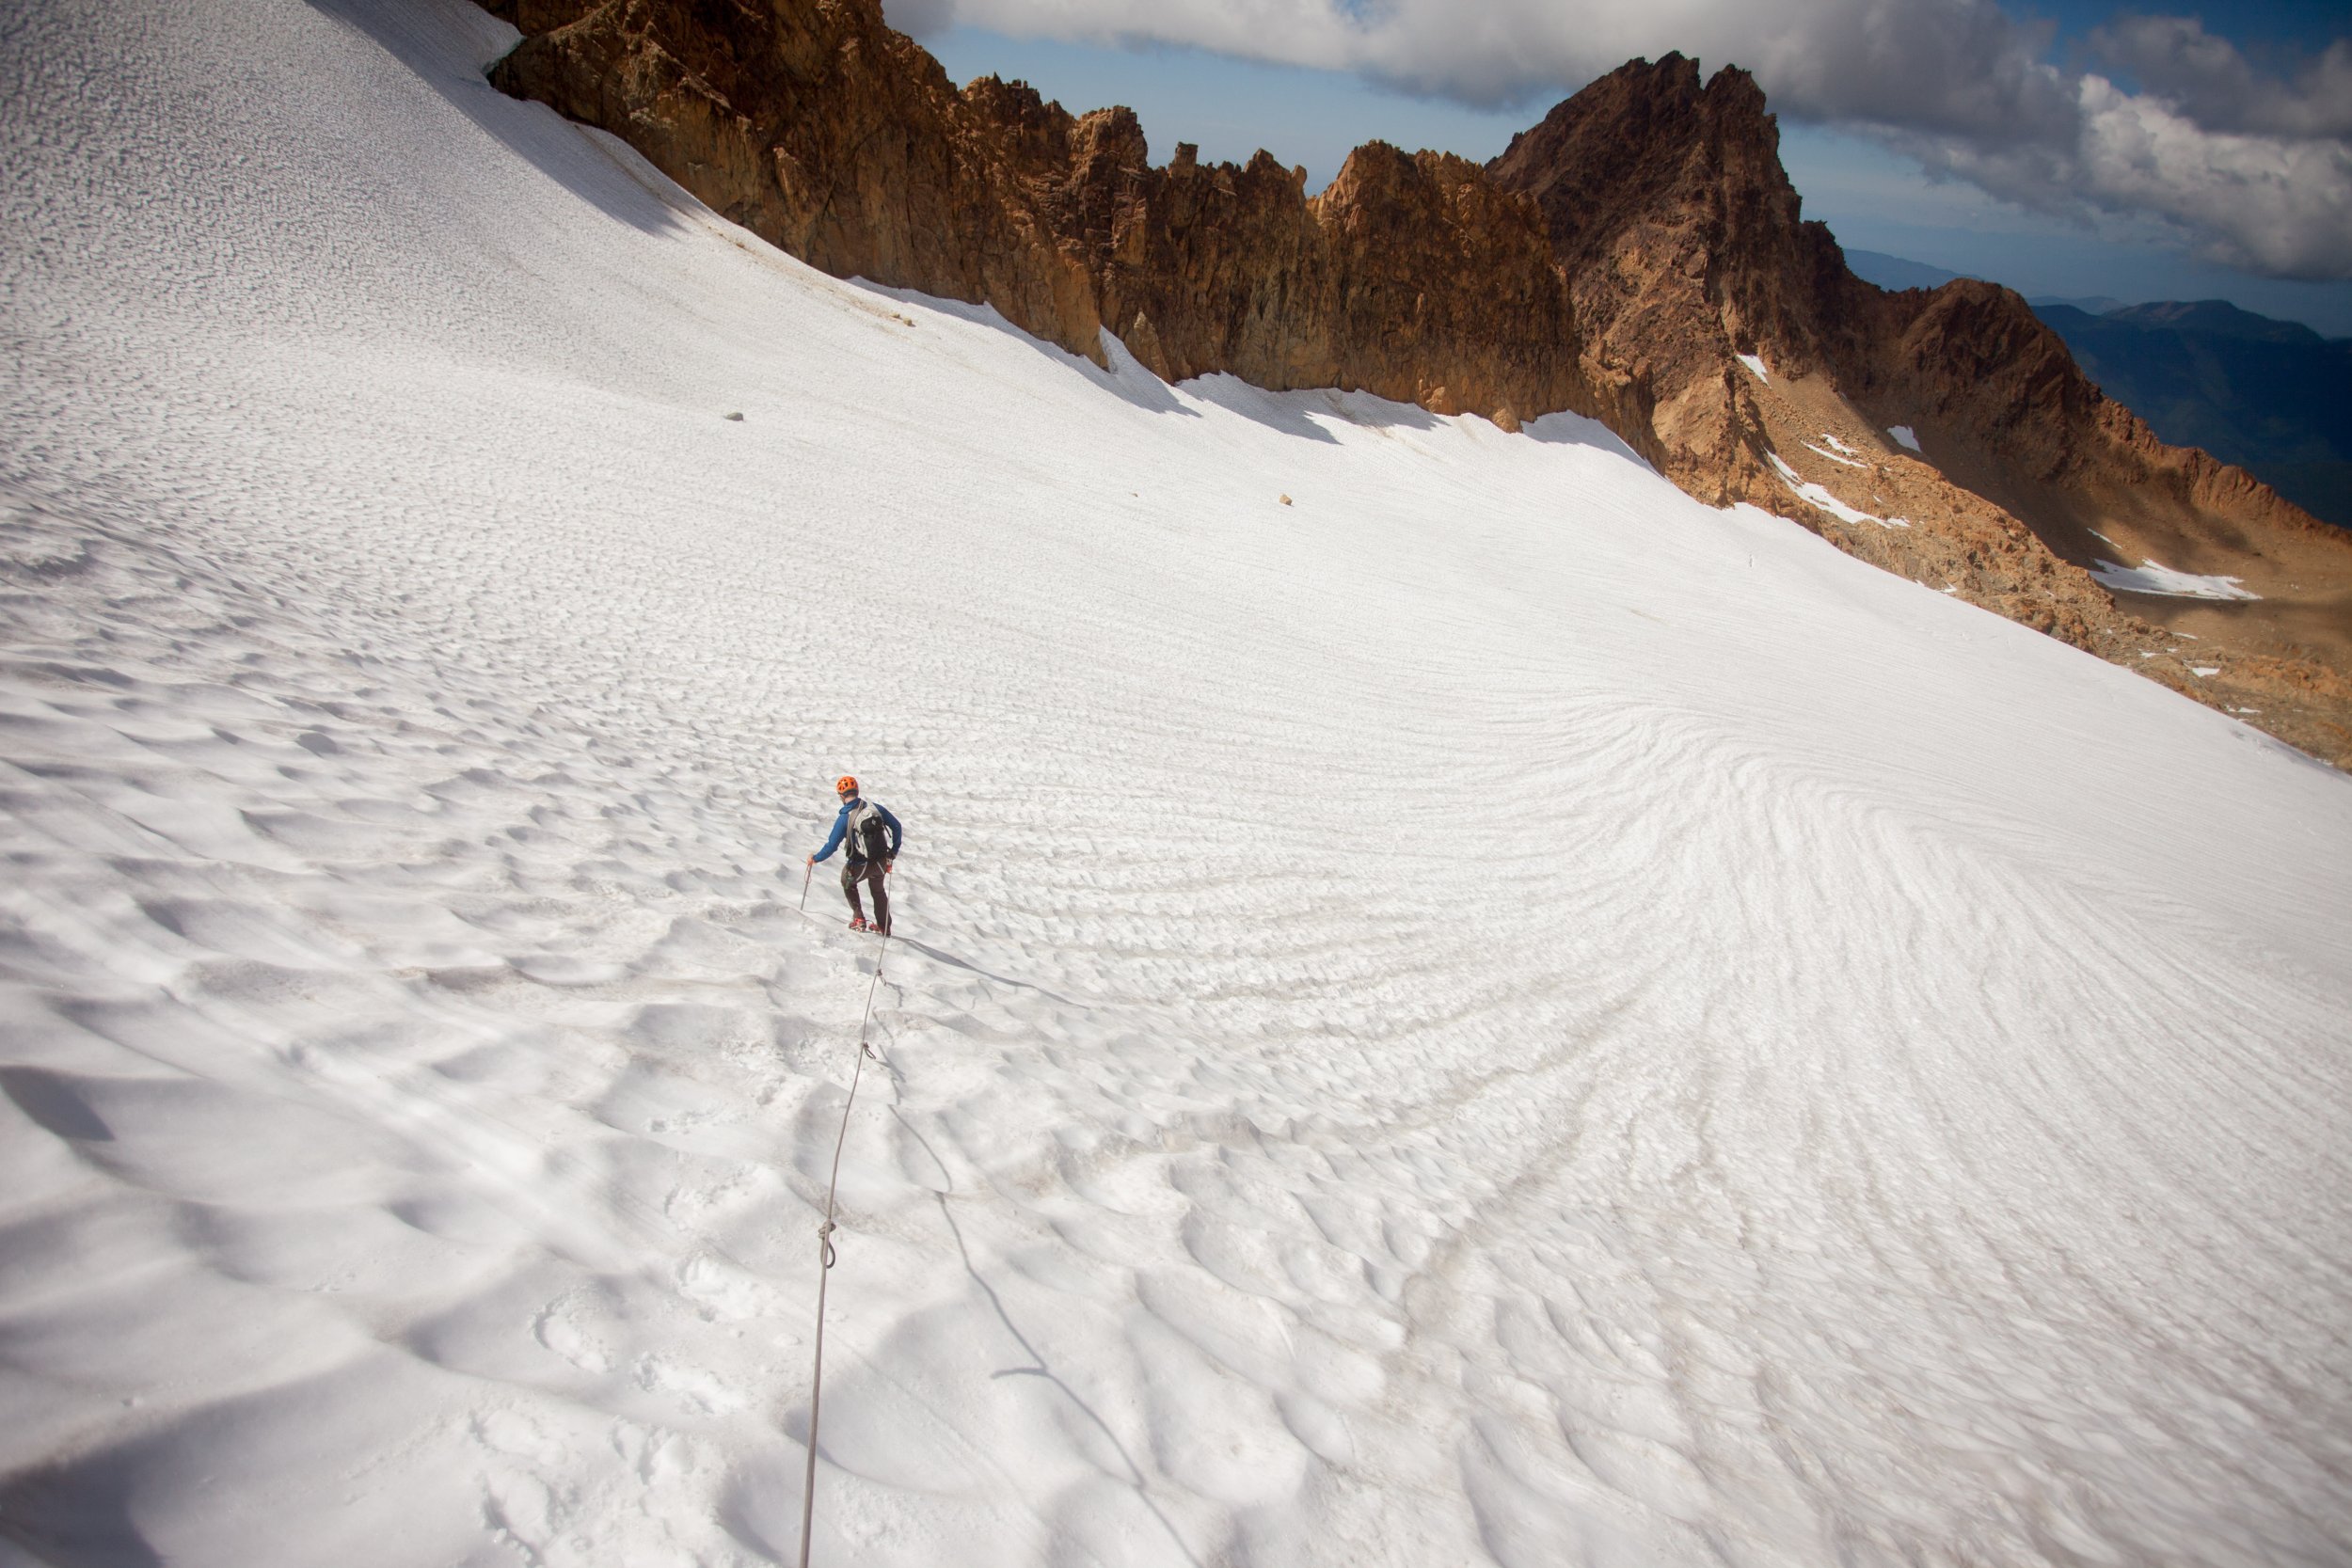
Trip: Twin Sisters Range - Green Creek (Lite) Circuit Trip Date: 08/28/2018 Trip Report: I've really only dabbled in the Twin Sisters area since moving to Bham for school a couple years ago, but what a surprisingly complex, interesting and under-appreciated resource it is, so close to town. The recently cleared air got me giddy, and after being unable to find a partner for any adventures further afield I set my sights closer to home. The Green Creek Circuit looked like a great way to familiarize myself with lesser-traveled corners of the range, and it was. Definitely gained a new appreciation for this area. I crossed the Middle Fork and began hiking the Elbow Lake trail in the deep blue, pre-dawn glow graciously accompanied by the feeling that some apex predator was eyeing me from the bushes which tends to happen while hiking solo in unfamiliar places. The "bushwack" into the cirque has apparently really cleaned up since previous TRs I've read; I've had harder times following trails to popular crags in Squamish. There's solid tread the whole way and the route is generously marked with blue reflective diamonds, perhaps excessively so, but it eased any worries I had about potentially having to hike this section in the dark. Some of the ancient cedars and firs in this area are really impressive. The Green Creek cirque is gorgeous. It wouldn't even be unreasonable for the highly motivated boulderer to haul some pads out here - there's some great looking boulders and lines. I couldn't have felt any further way from Bham or other familiar places up the Nooksack. Truly wild zone, that is until I had to pick up someone's pile of plastic food wrappers that were clearly too heavy to pack out. Seriously? I started up Green Creek Arete as the sun poked over Mt. Baker and began to fill the valley. Solid, clean rock, nice exposure, great scrambling. I haven't felt that relaxed and in tune with the mountains in a while. As I topped out, smoke began to fill the air and Kulshan was temporarily obscured - bleh. It slowly cleared, though, and crossing slabs and tarns en route to the Sisters Glacier was another unexpected scenic highlight of the trip. Easy travel, great views and lots of peaks ahead. The moat crossing to S Twin NE Ridge was easy, and the ridge was a lot shorter than I expected. On top around 10, I started to relax and slow my pace down with all the daylight still in front of me. As I scooted down the south face gullies, I was eyeing Skookum with a little apprehension. I didn't bring a rope, and the Jaws Tooth downclimb didn't sound very up my alley, so I was looking at climbing directly up to the Jaws Tooth notch and finishing up Skookum. It looked like a large moat to steep choss - which, in hindsight after climbing other things on this traverse, I'm sure it wasn't, but I also became more worried about sketchy looking conditions crossing the Hayden Col, Little Sister Col and dropping back on the glacier, and ended up passing Skookum by. I know I probably missed out on the best climbing of the whole outing, but that was my call in the moment. I'll be back. A common theme of the Sisters area appears to be things looking much steeper/chossier/more difficult than they really are from a distance. Despite being totally melted out, the Hayden Col was casual, so I scrambled over to a summit I thought to be Ribbon Point, but was actually the one just to the north of it. Either way, cool spot. The talus crossings weren't nearly as bad as I'd heard they might be without snow, though my bruised tailbone might think differently. Slower going, but reasonable. Not wanting to miss out on any more good climbing, I eyed up my line on Little Sister's NW face and settled on the rightmost of the two ribs on the left side of the face. Surprisingly good 5.4ish up and sometimes left of a little corner system, stepping left onto a beautiful, highly featured and varnished slab to bypass a small bulge, leading to class 3 up the rib to the summit. Stellar! selfies are hard with an slr! stoked on top of little sister route up little sister with the easy-ish access to green ck glacier marked I dropped my pack at the notch just above the Green Creek Glacier, sussed it out and found passage via a collapsed snow bridge. All around, the schrund was huge, and I decided to go with the devil I knew and hop across here, as opposed to traversing Little Sister and Cinderella and potentially not being able to get back down to the glacier. This I think was a good call, the normal col where people drop onto the glacier was severely melted out with a large looking moat. The hike down the glacier, into the valley and out was calm and tranquil. The smoke had fully cleared, I don't think I've ever had as good of a view of Lincoln and Colfax as this. Grassy benches without a trace of human travel, bright orange rock contrasting with Baker's white, and the jagged cirque and glacier at my back. 15 hours car to car, for what little peakbagging I actually accomplished I'd say this is a modest time that could be significantly improved with less lollygagging, summit naps, routefinding snafus and blueberry pit stops. But I like all those things. Gear Notes: axe and pons, sense of adventure Approach Notes: now equipped for the masses


 1 point
 -
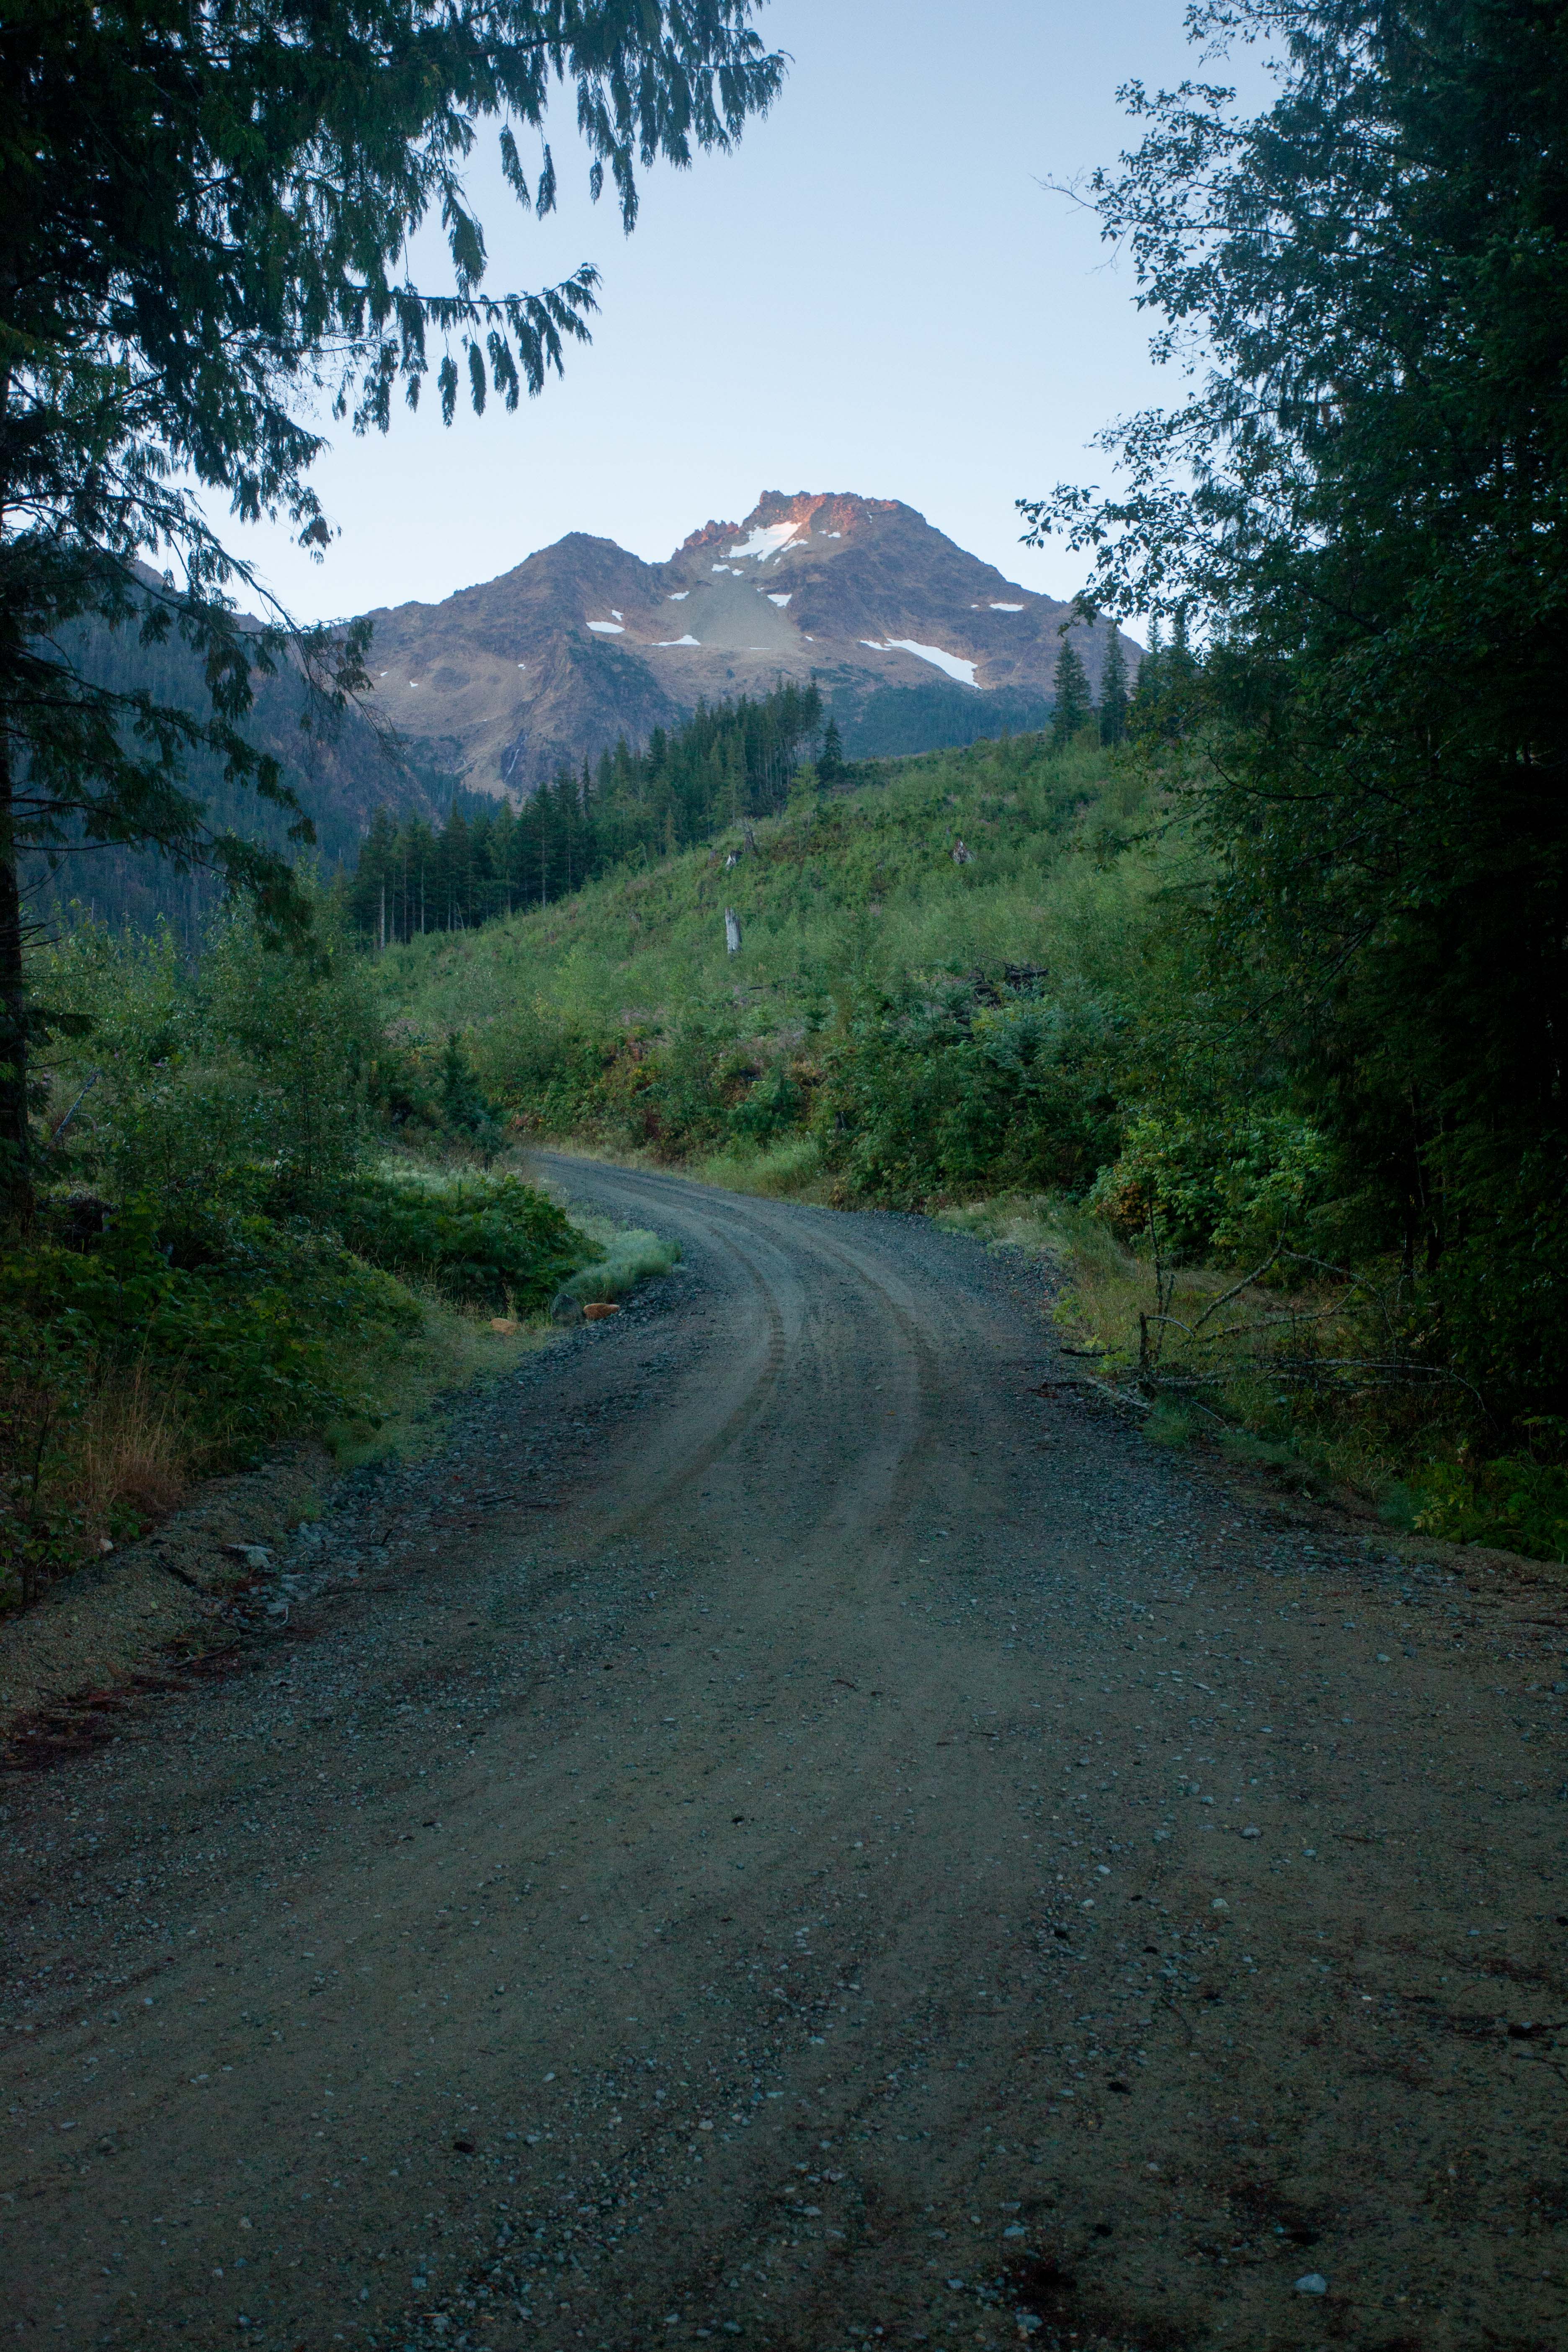
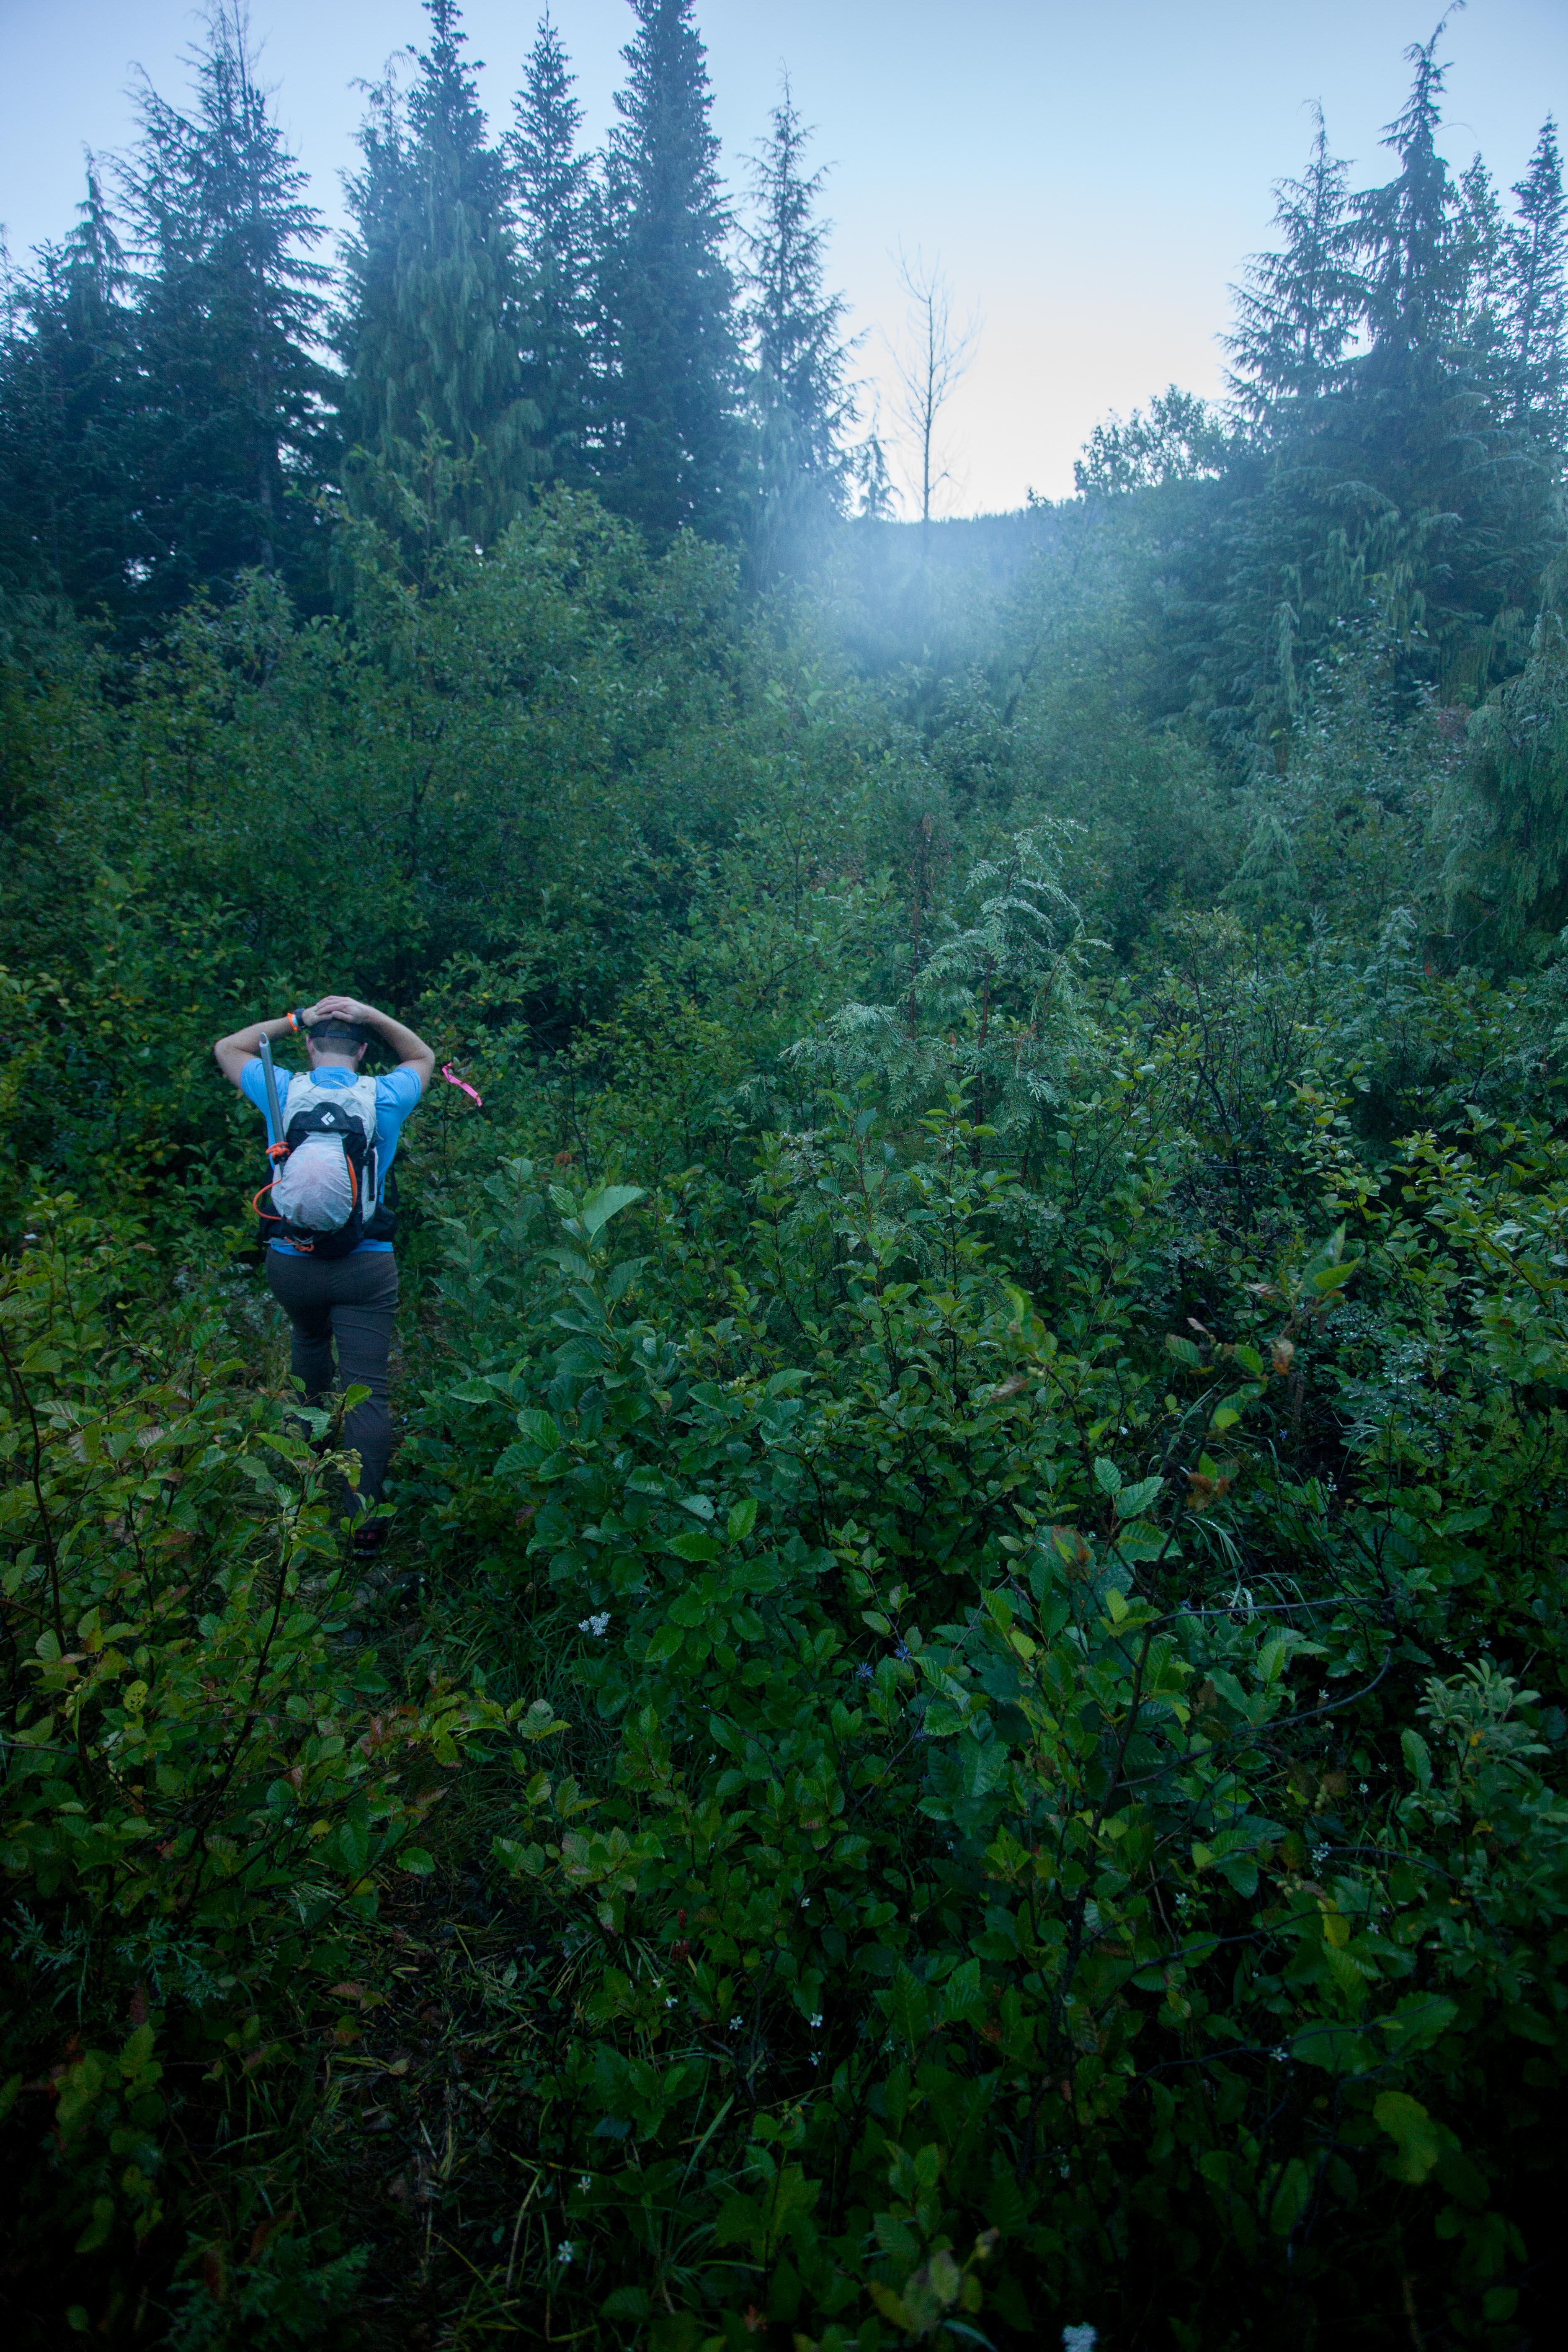
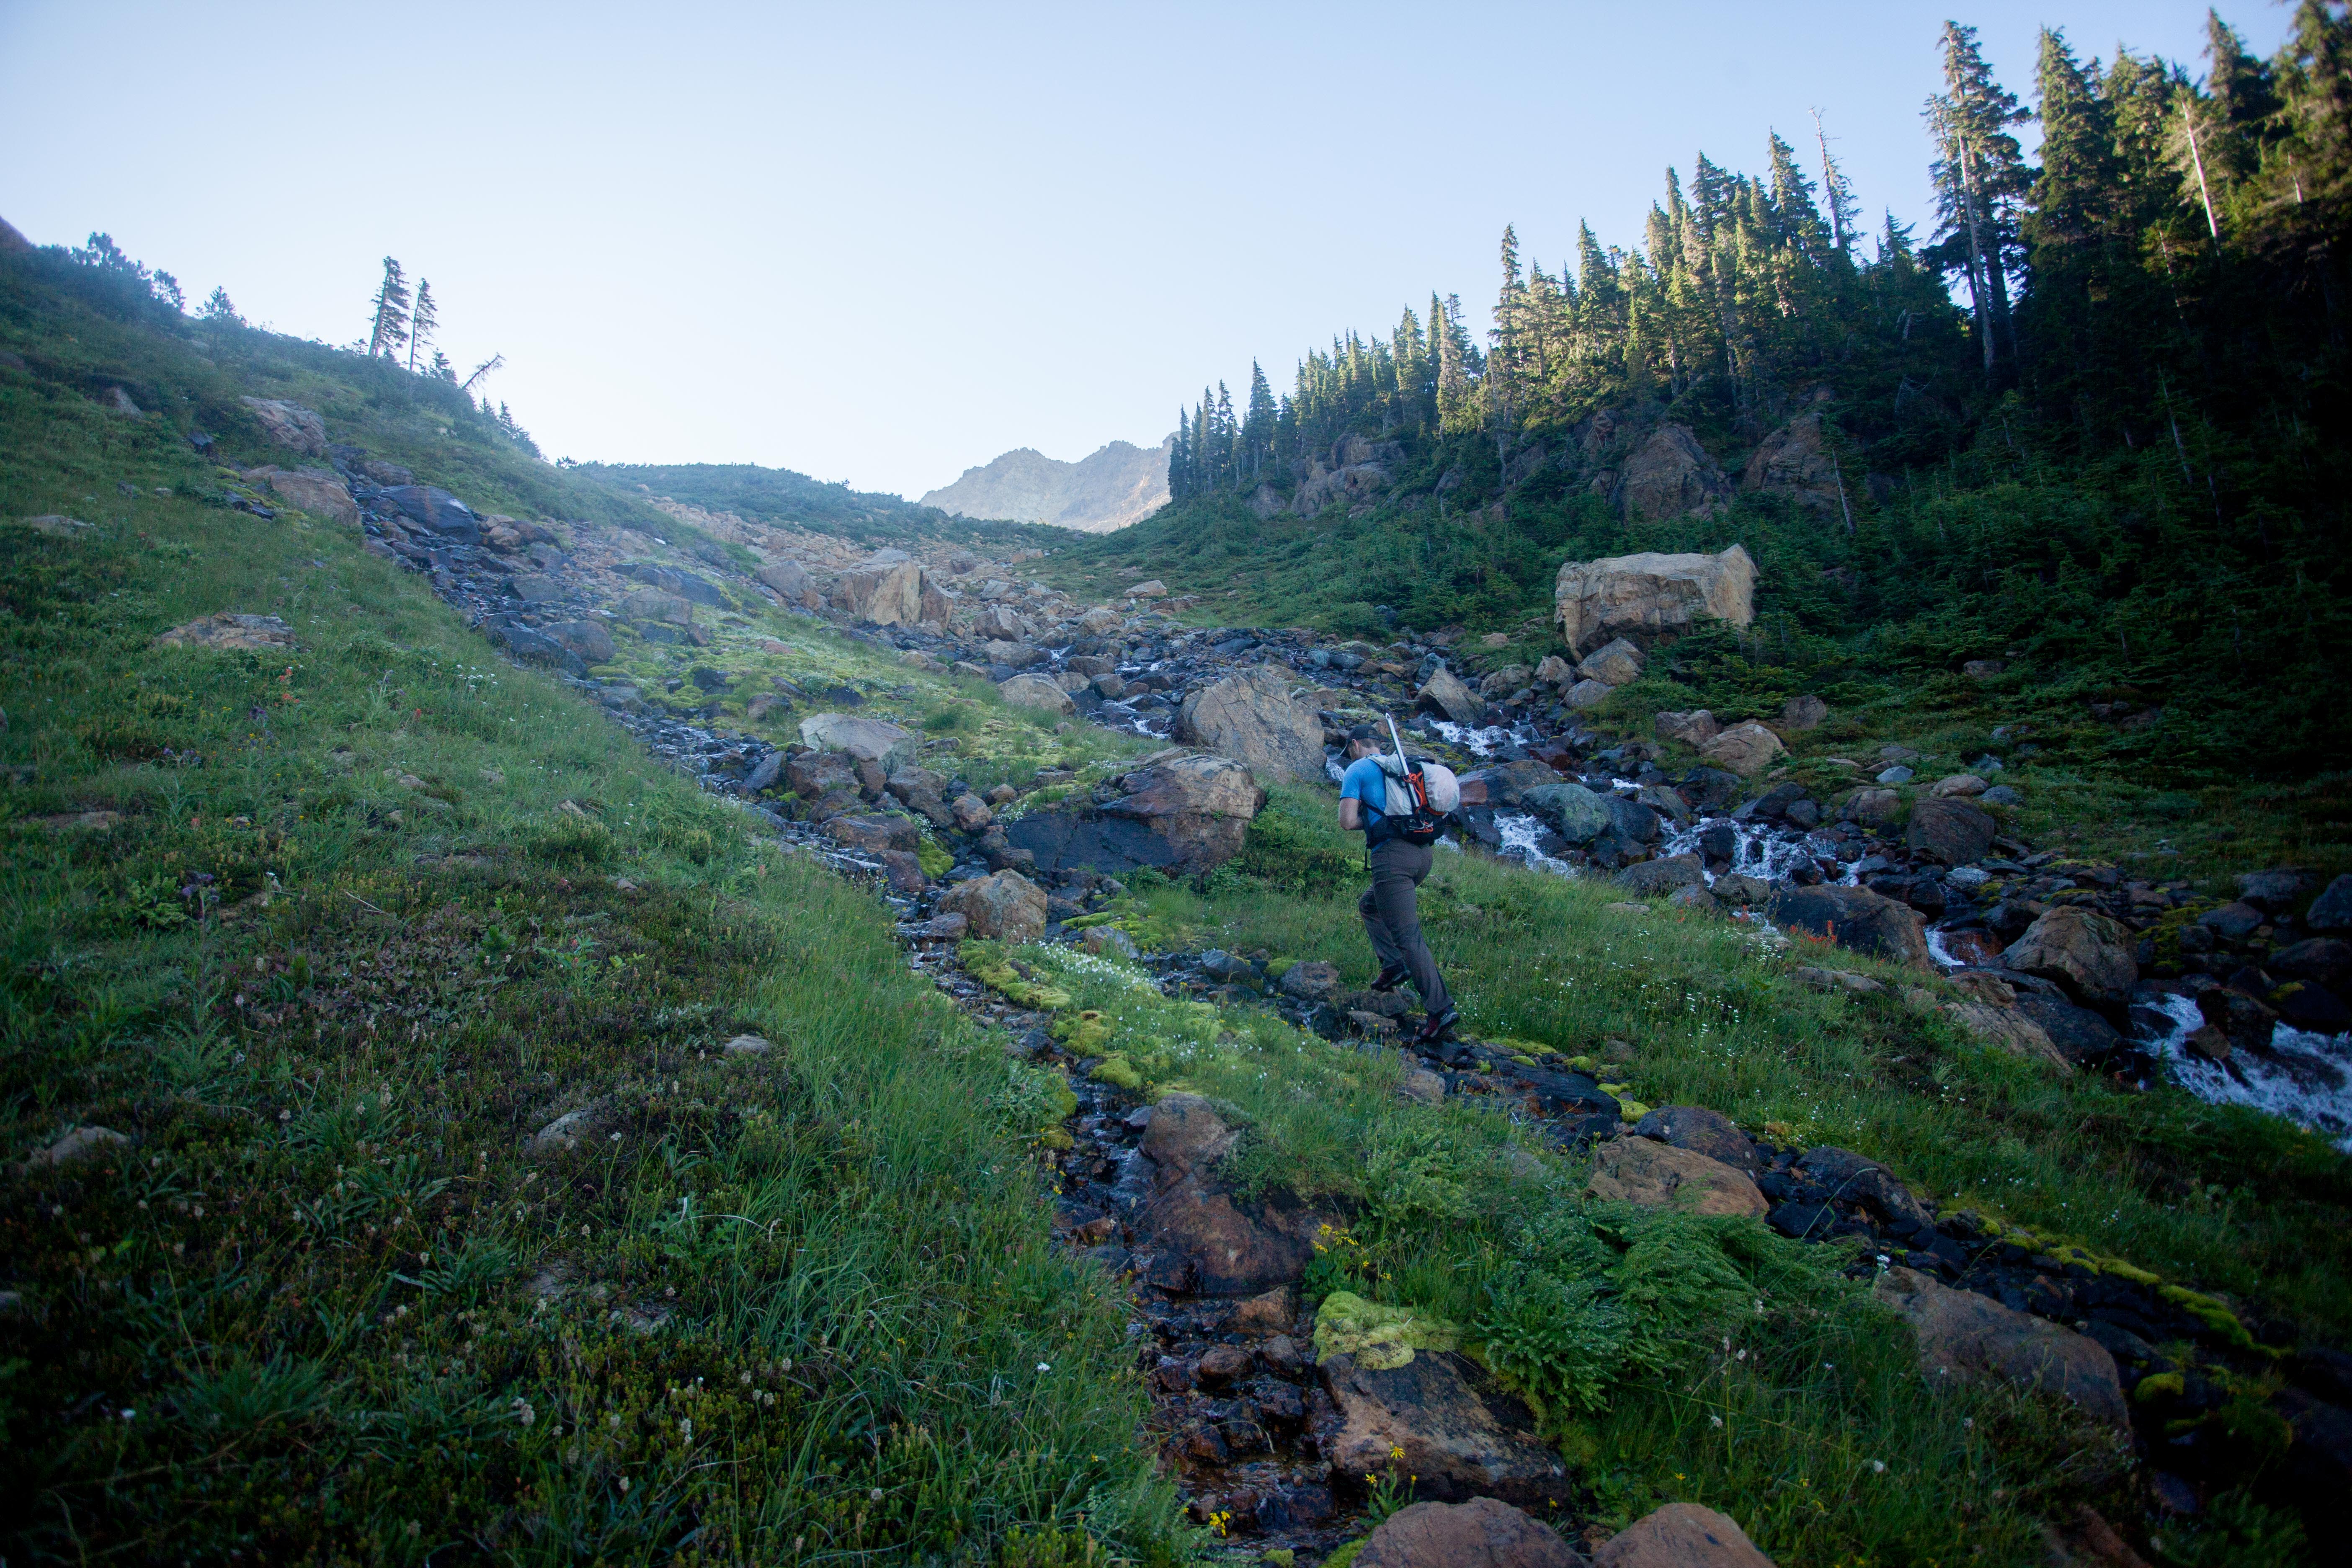
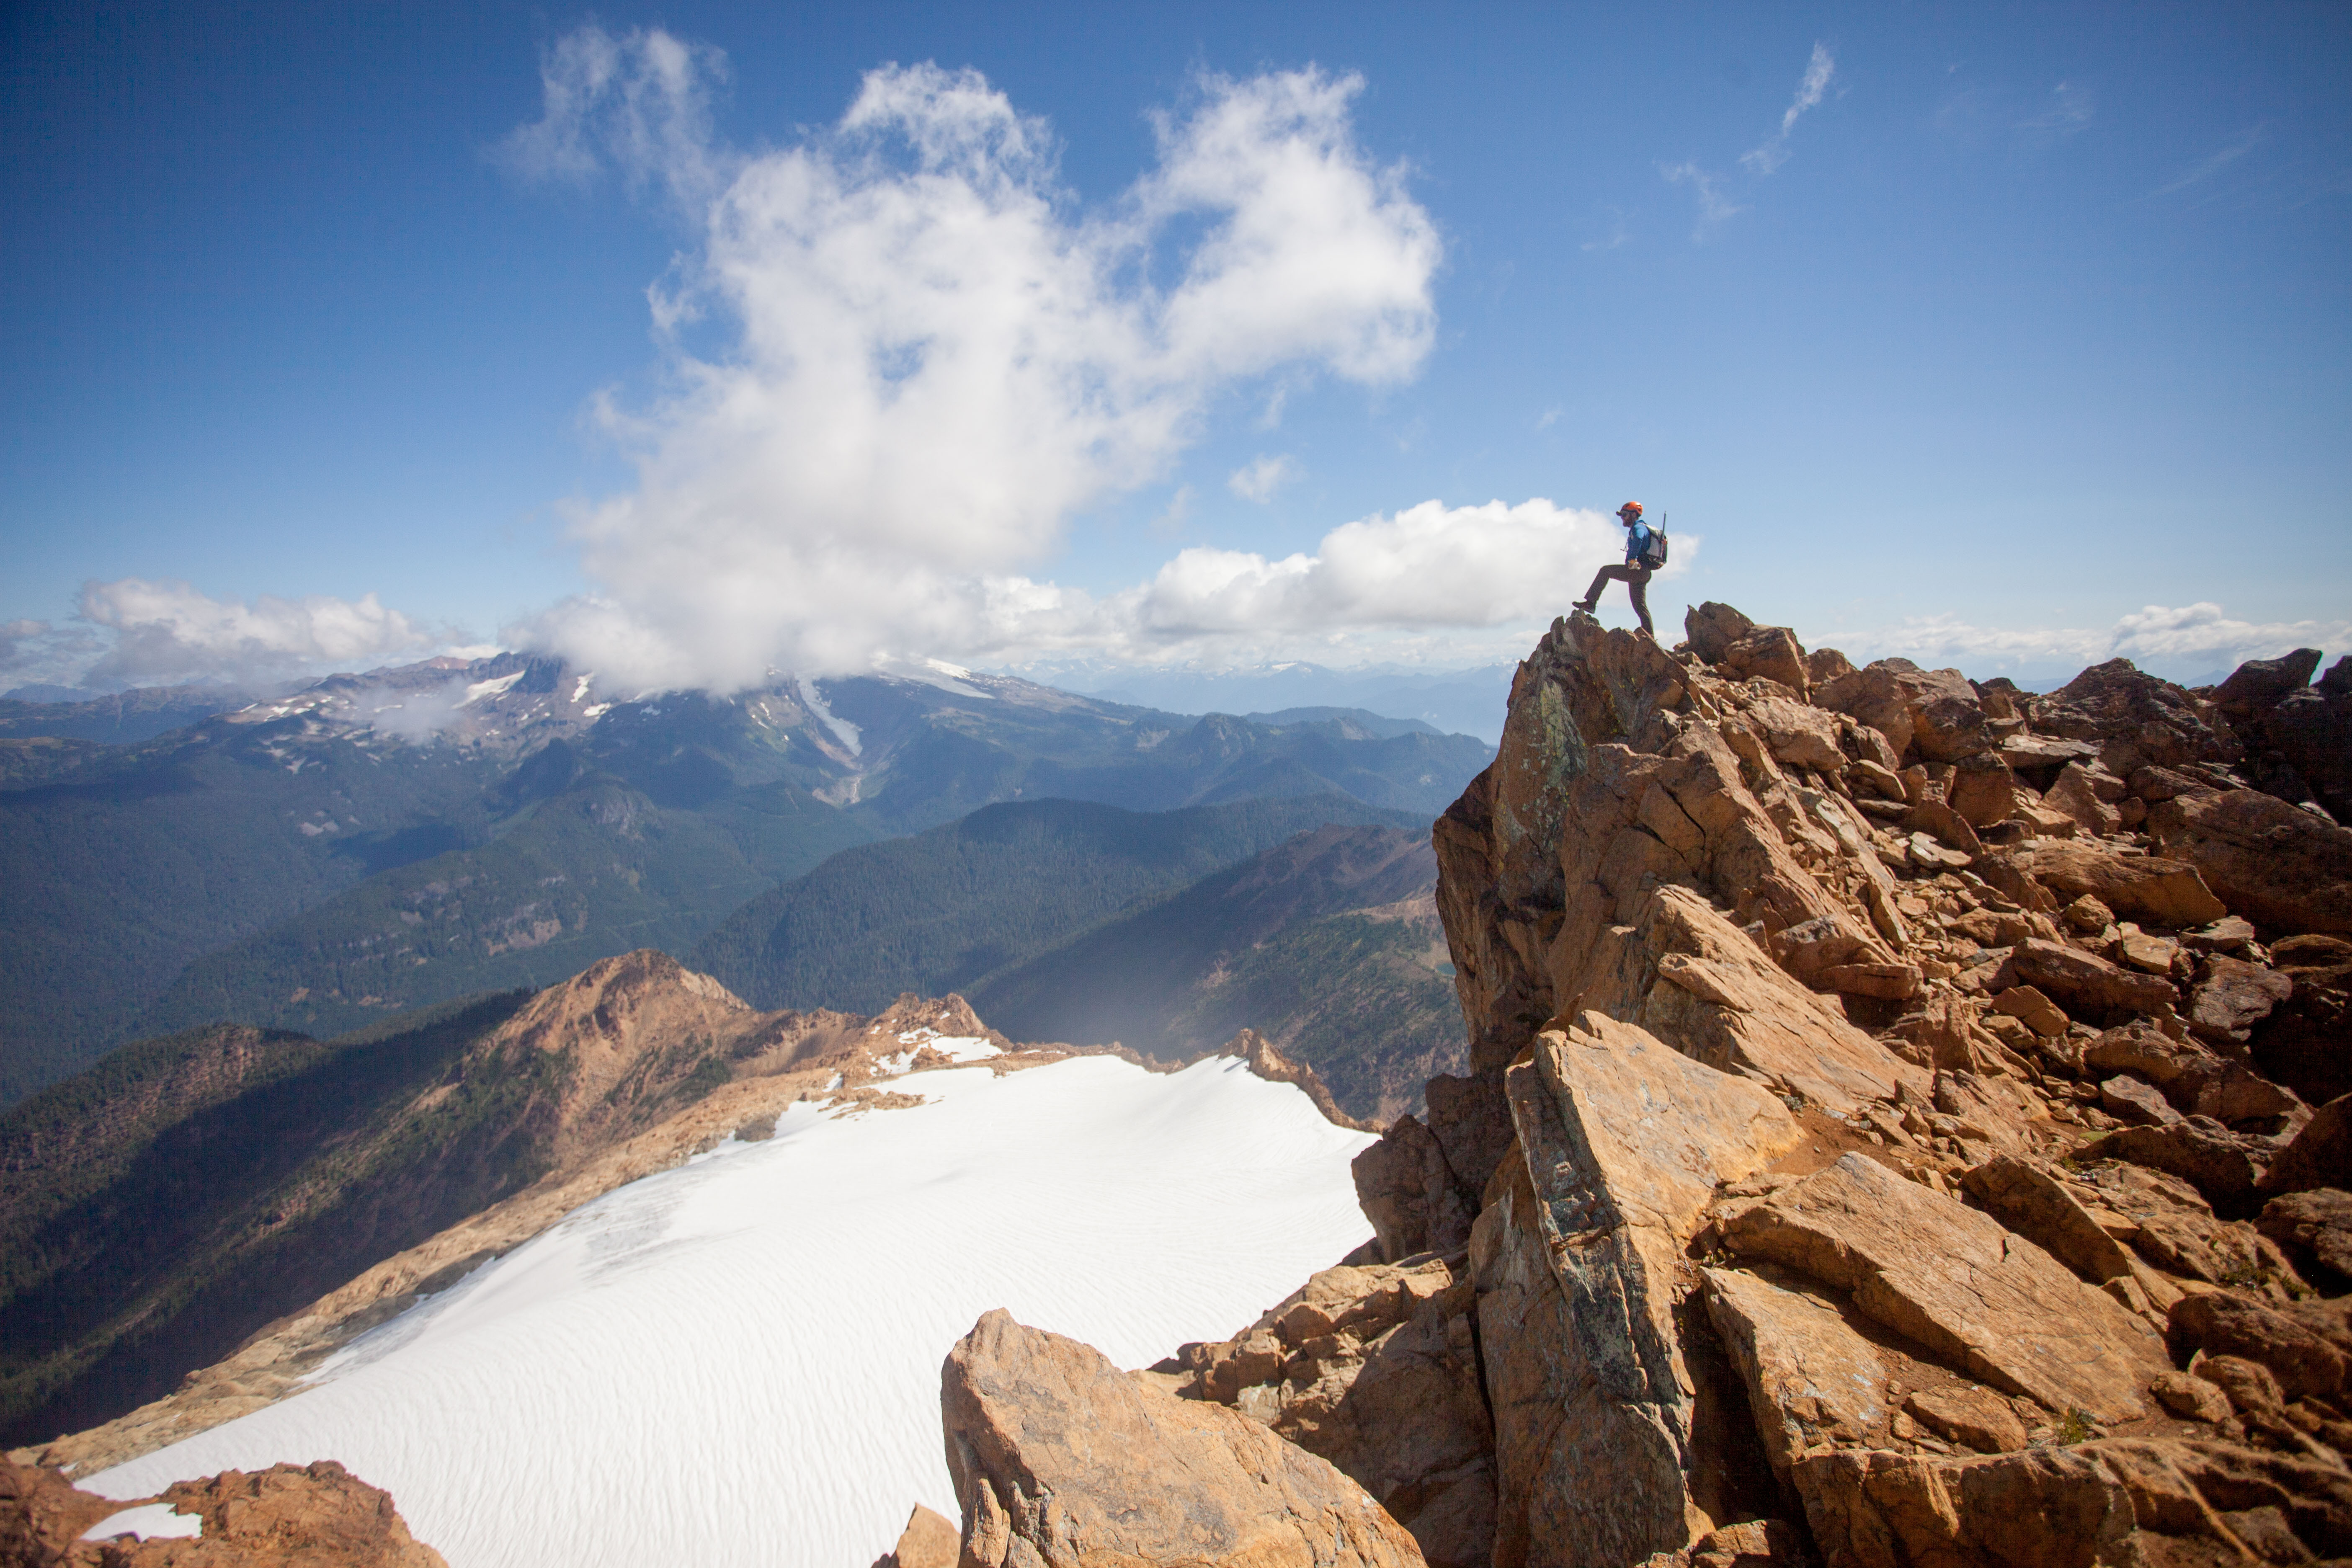
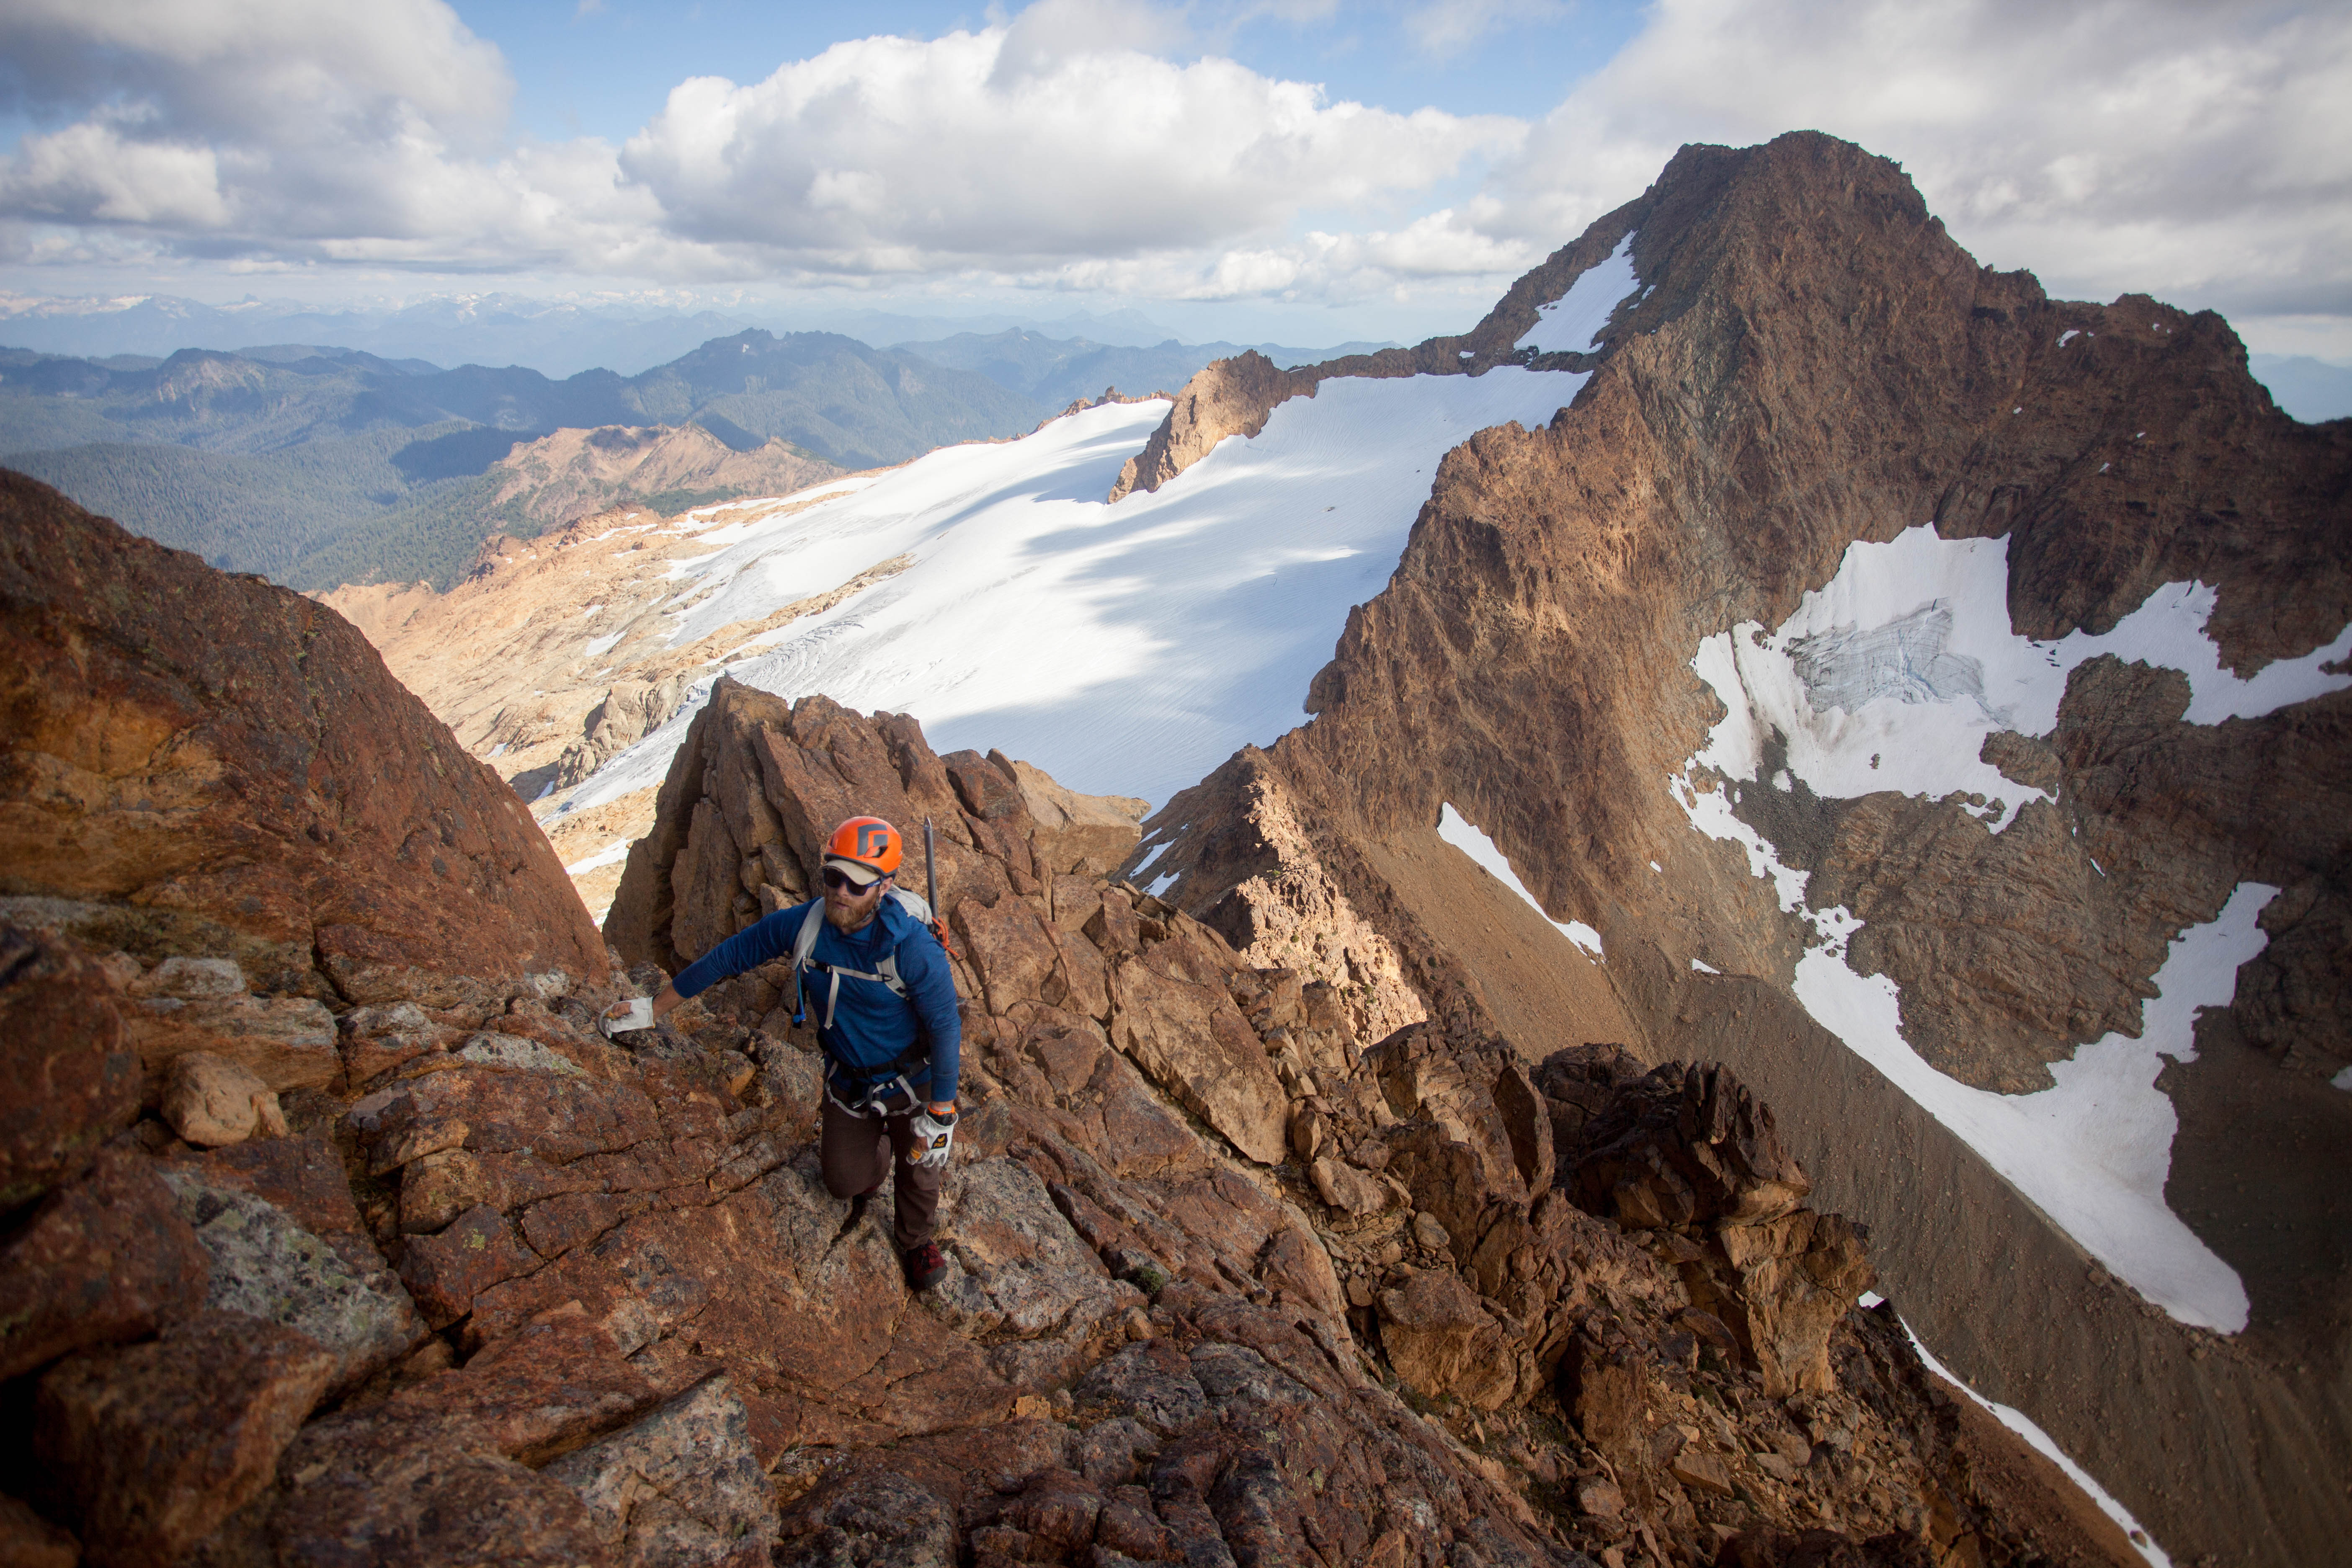
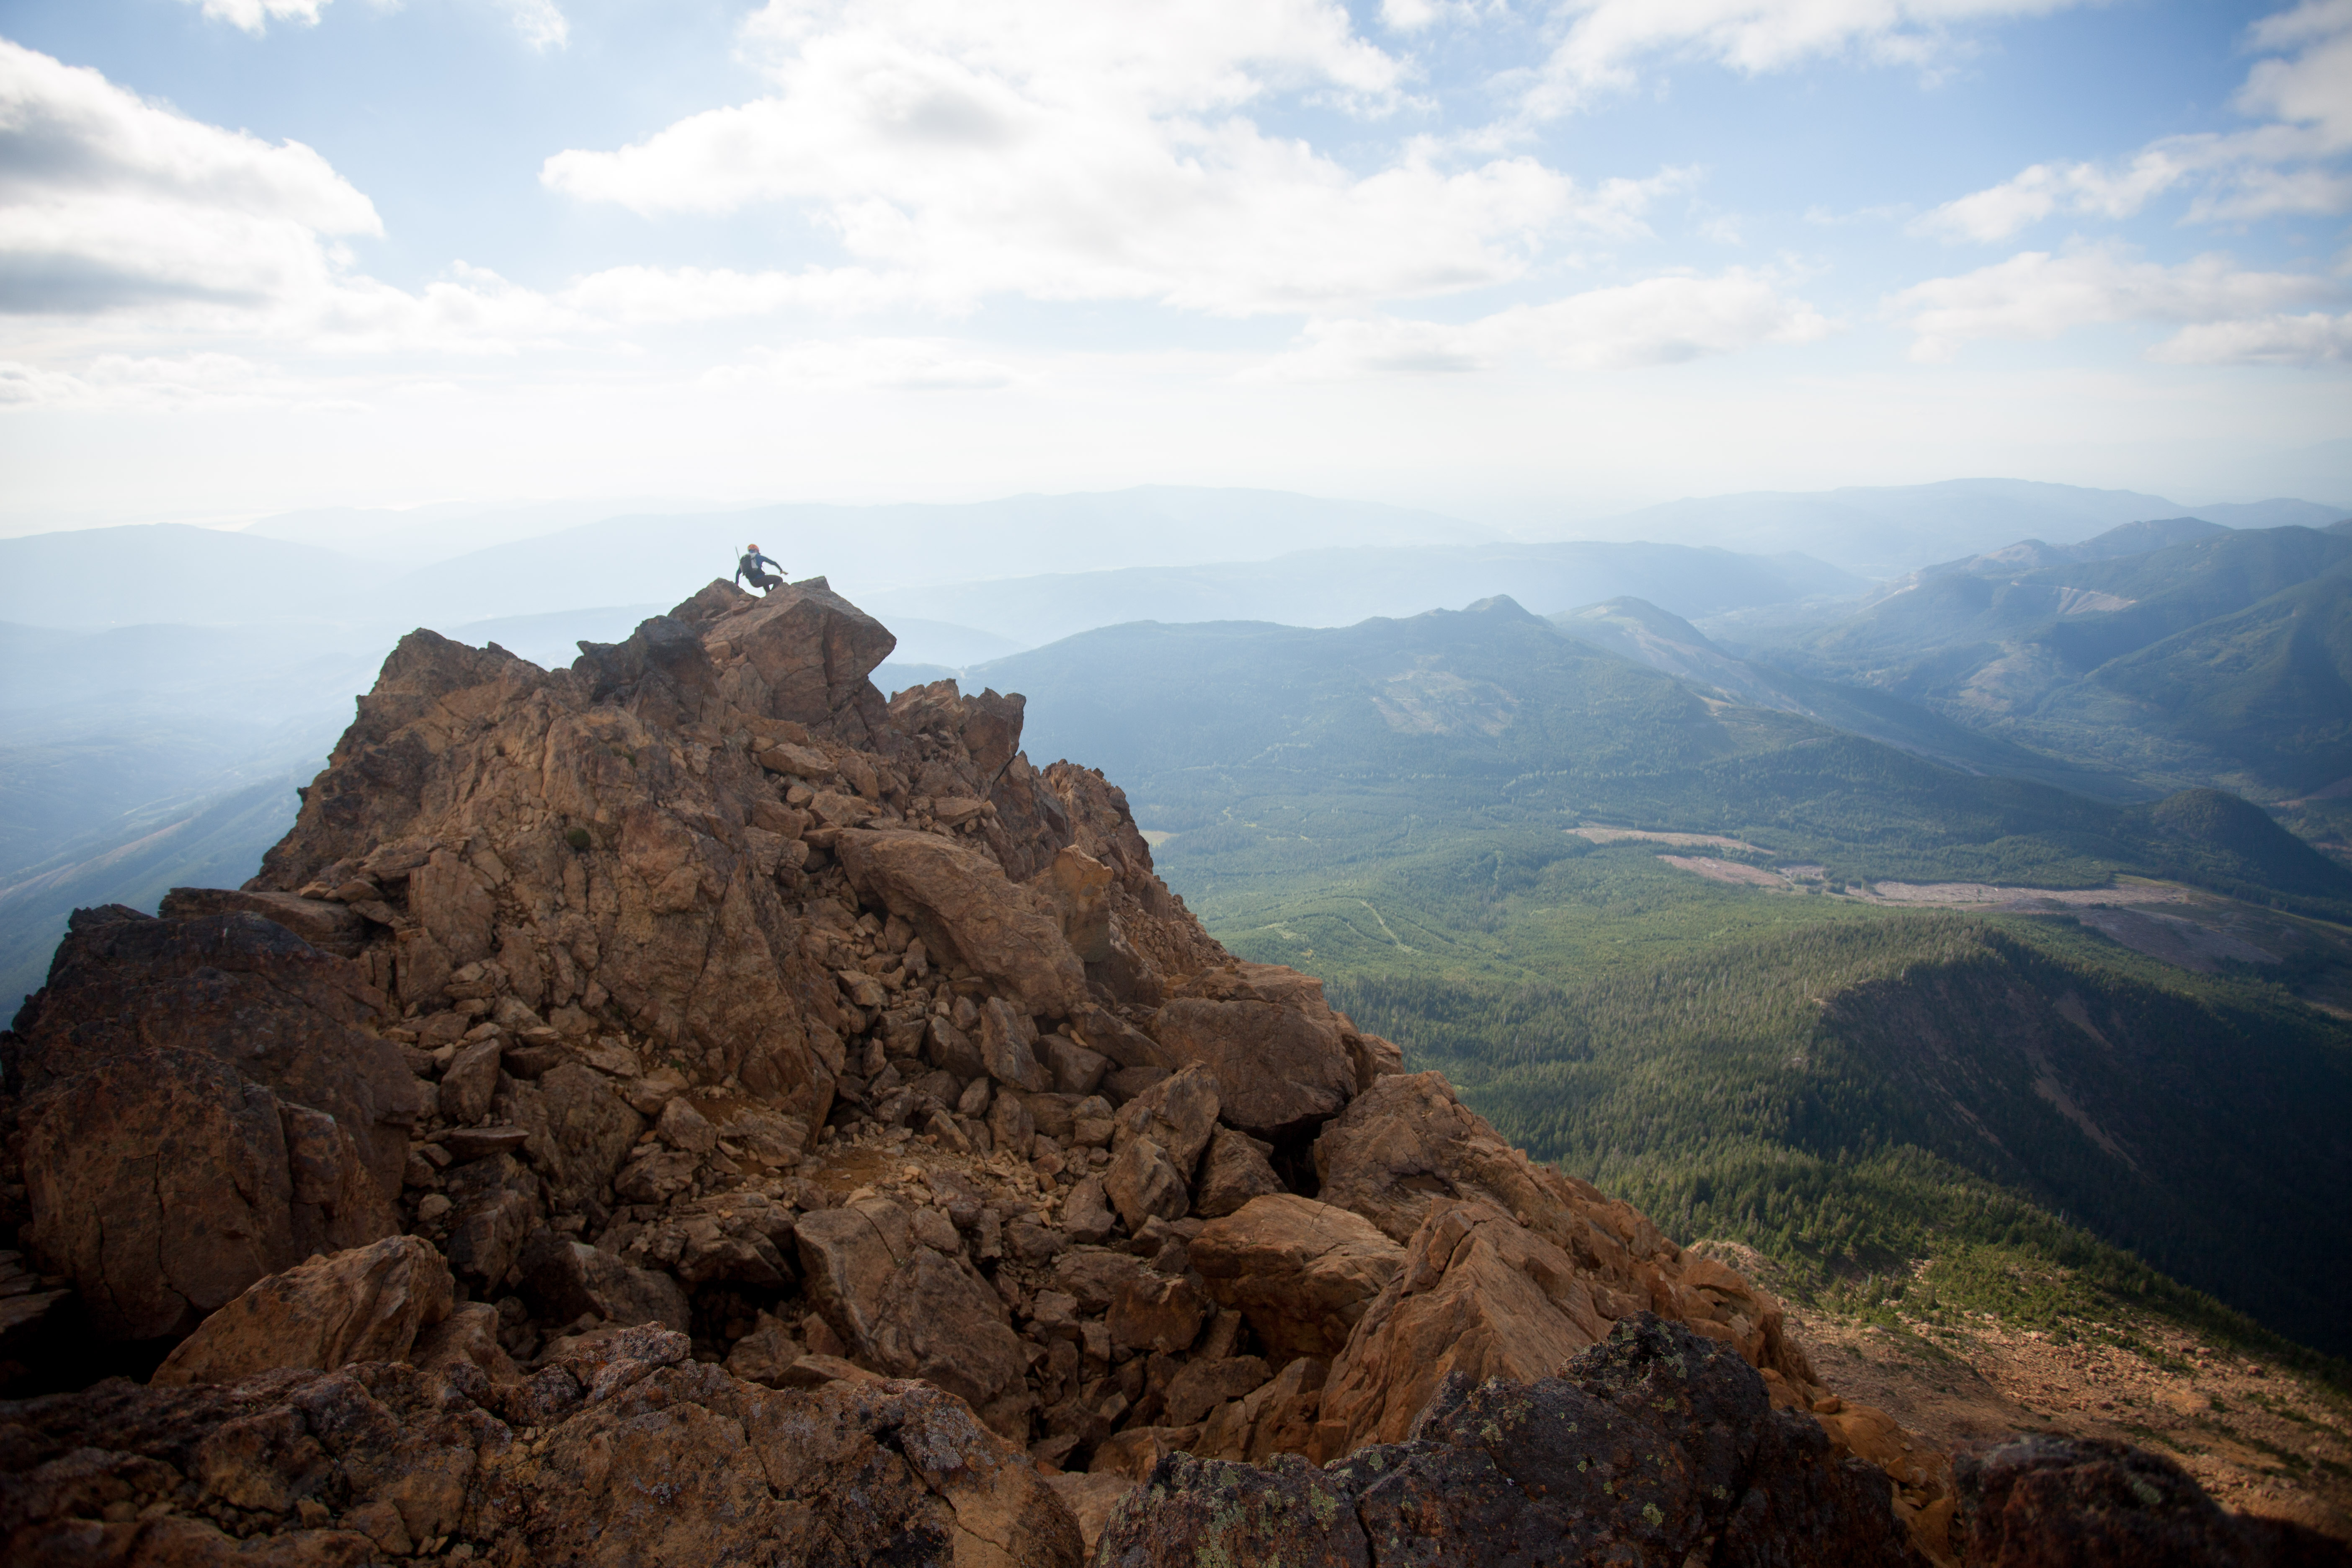
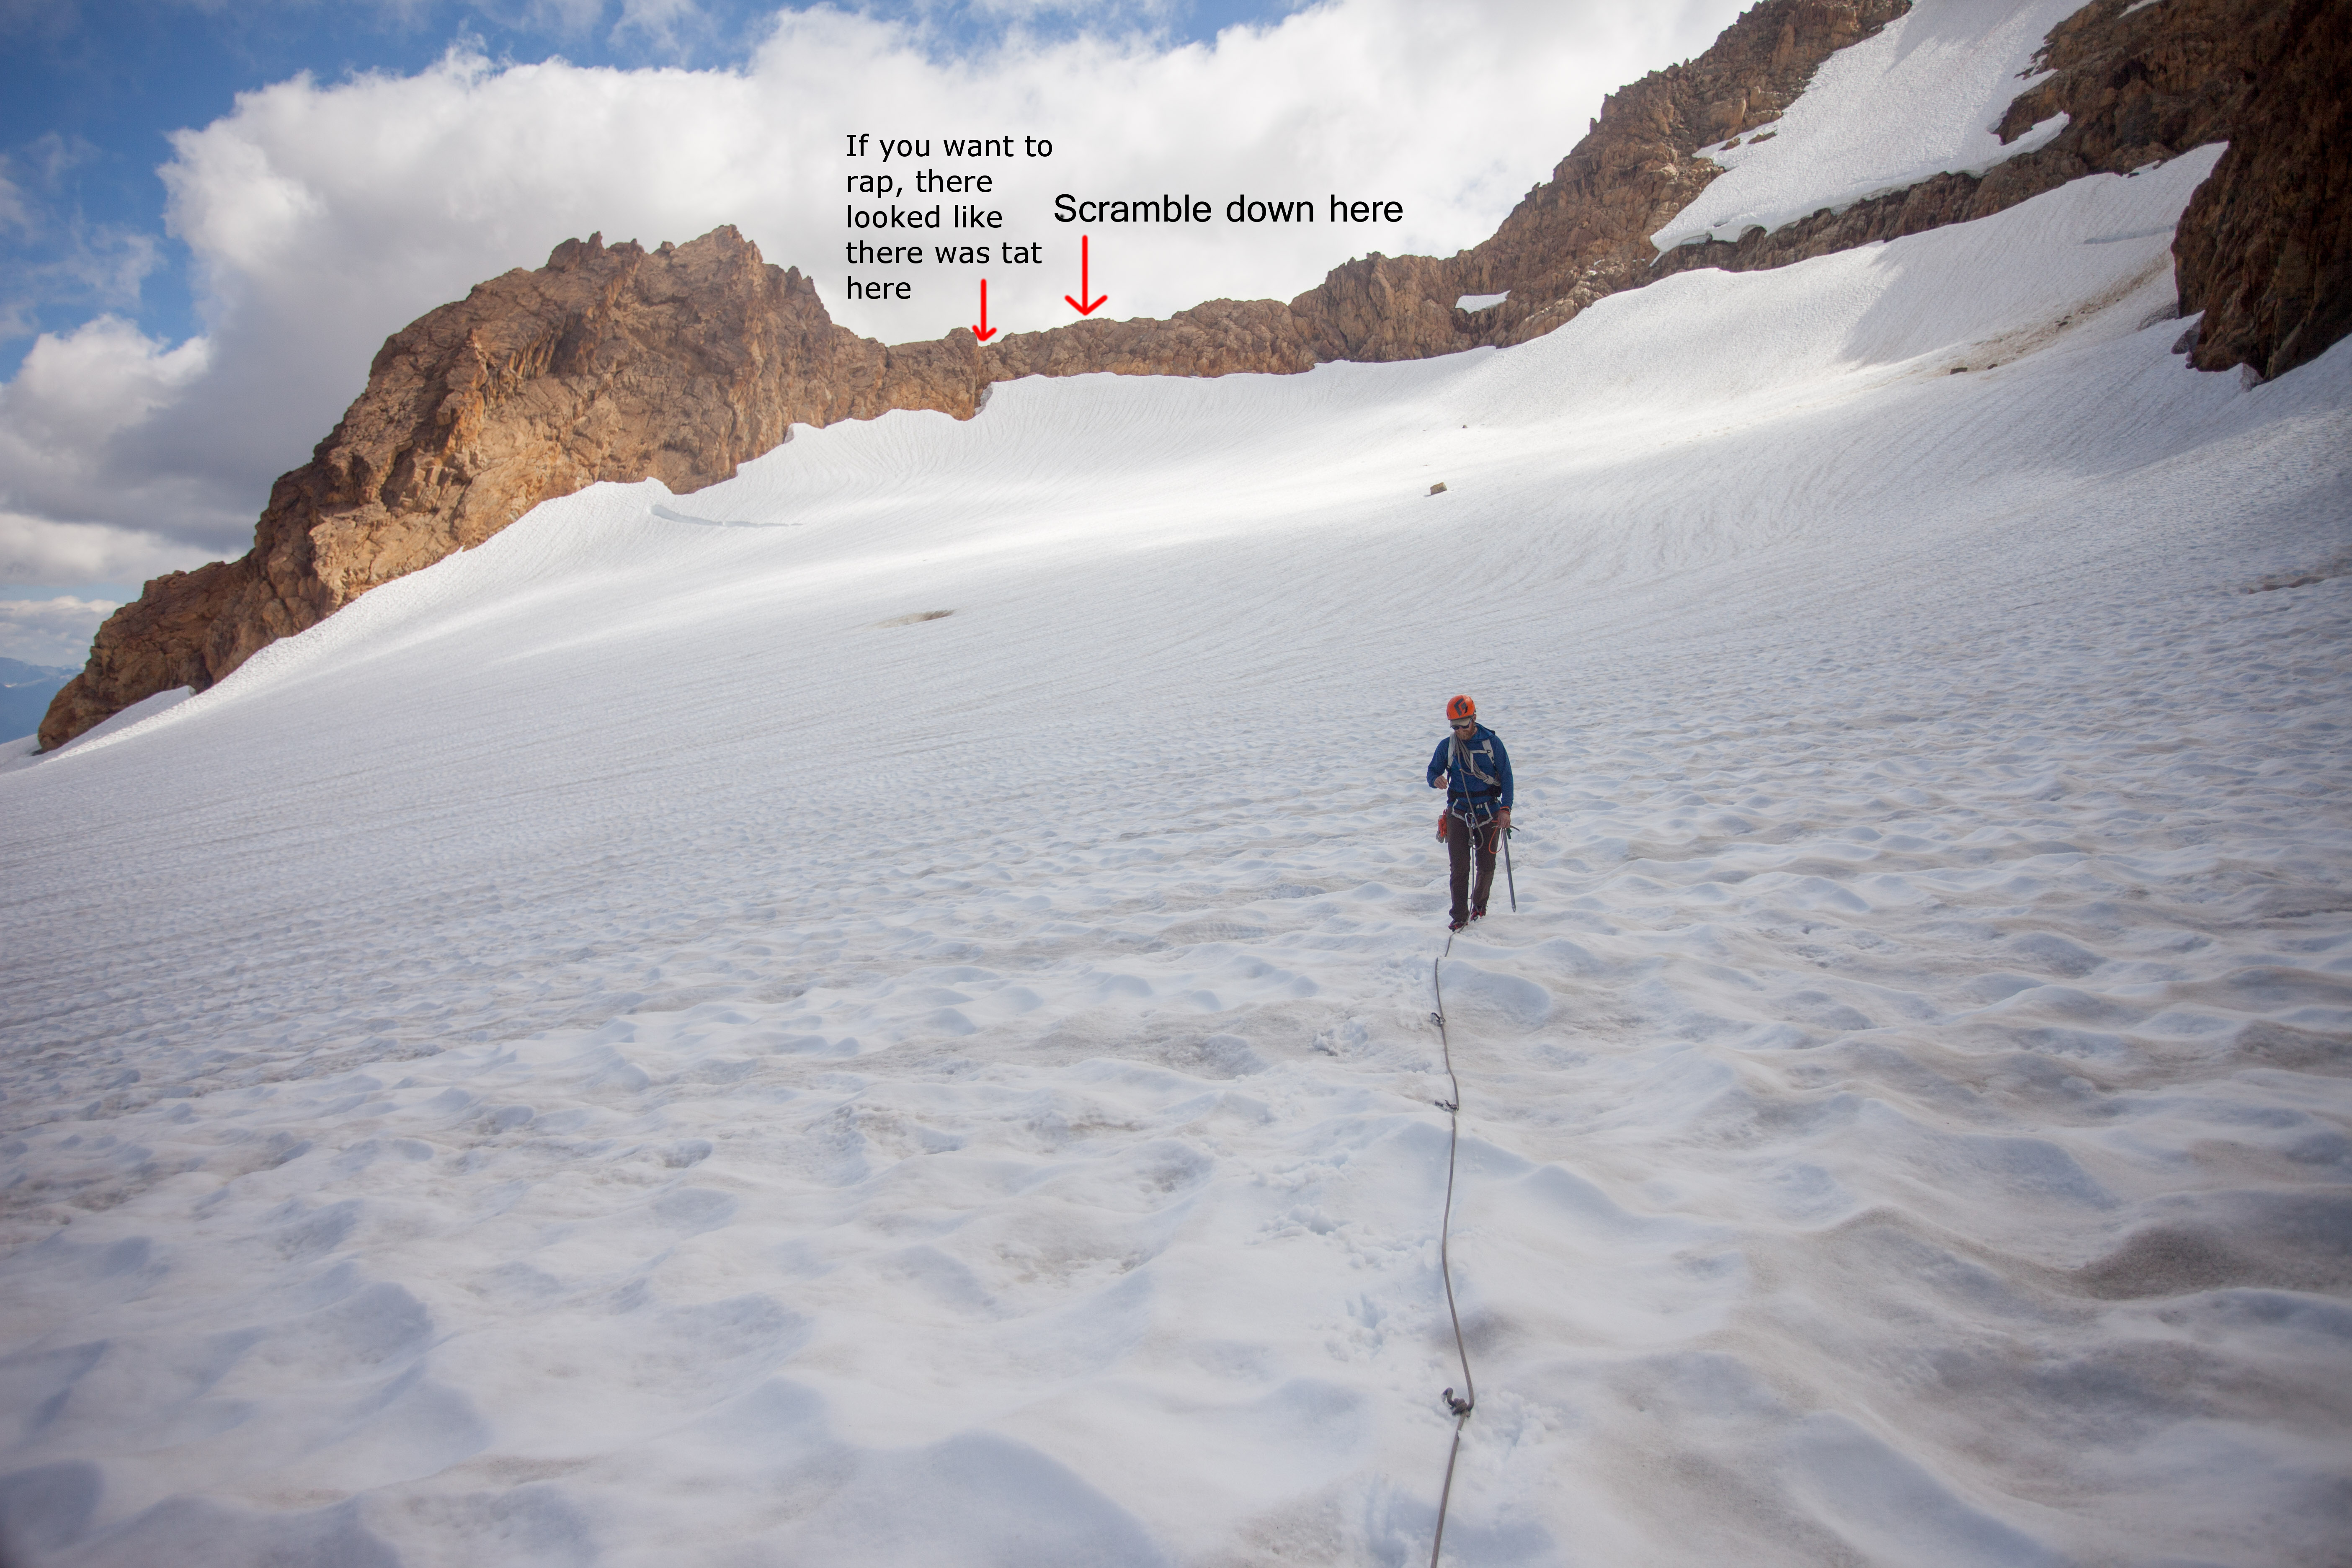
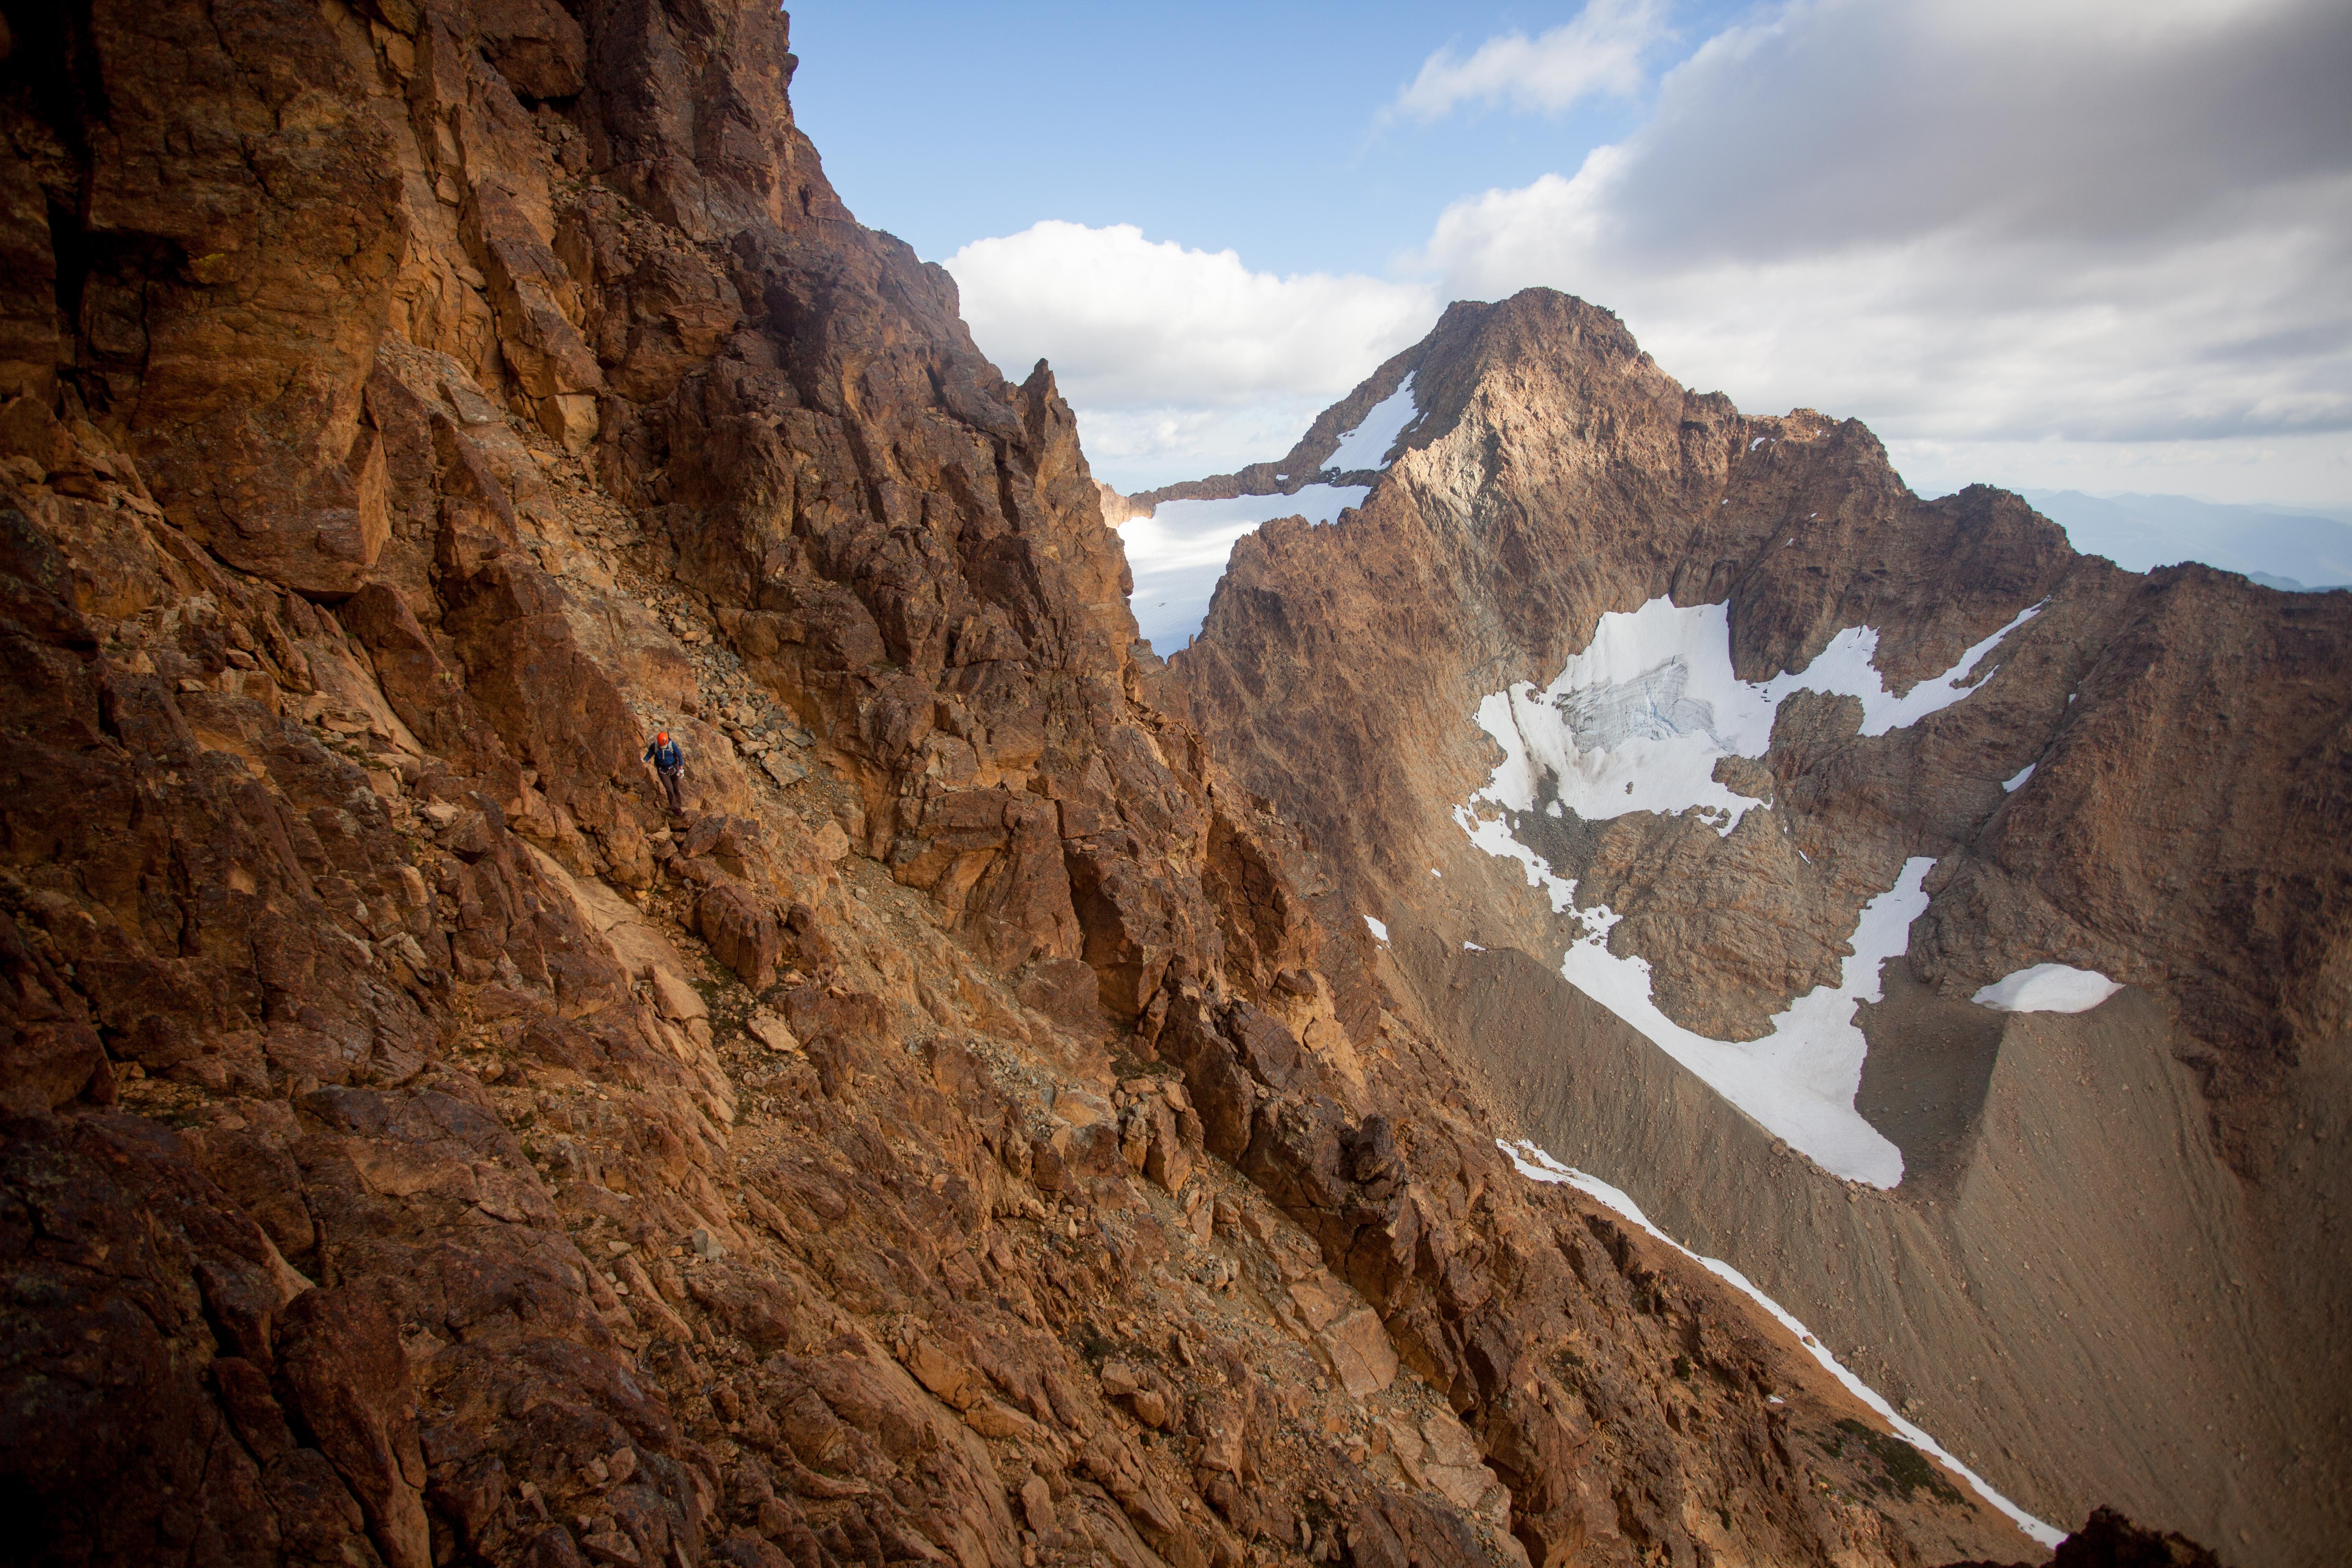
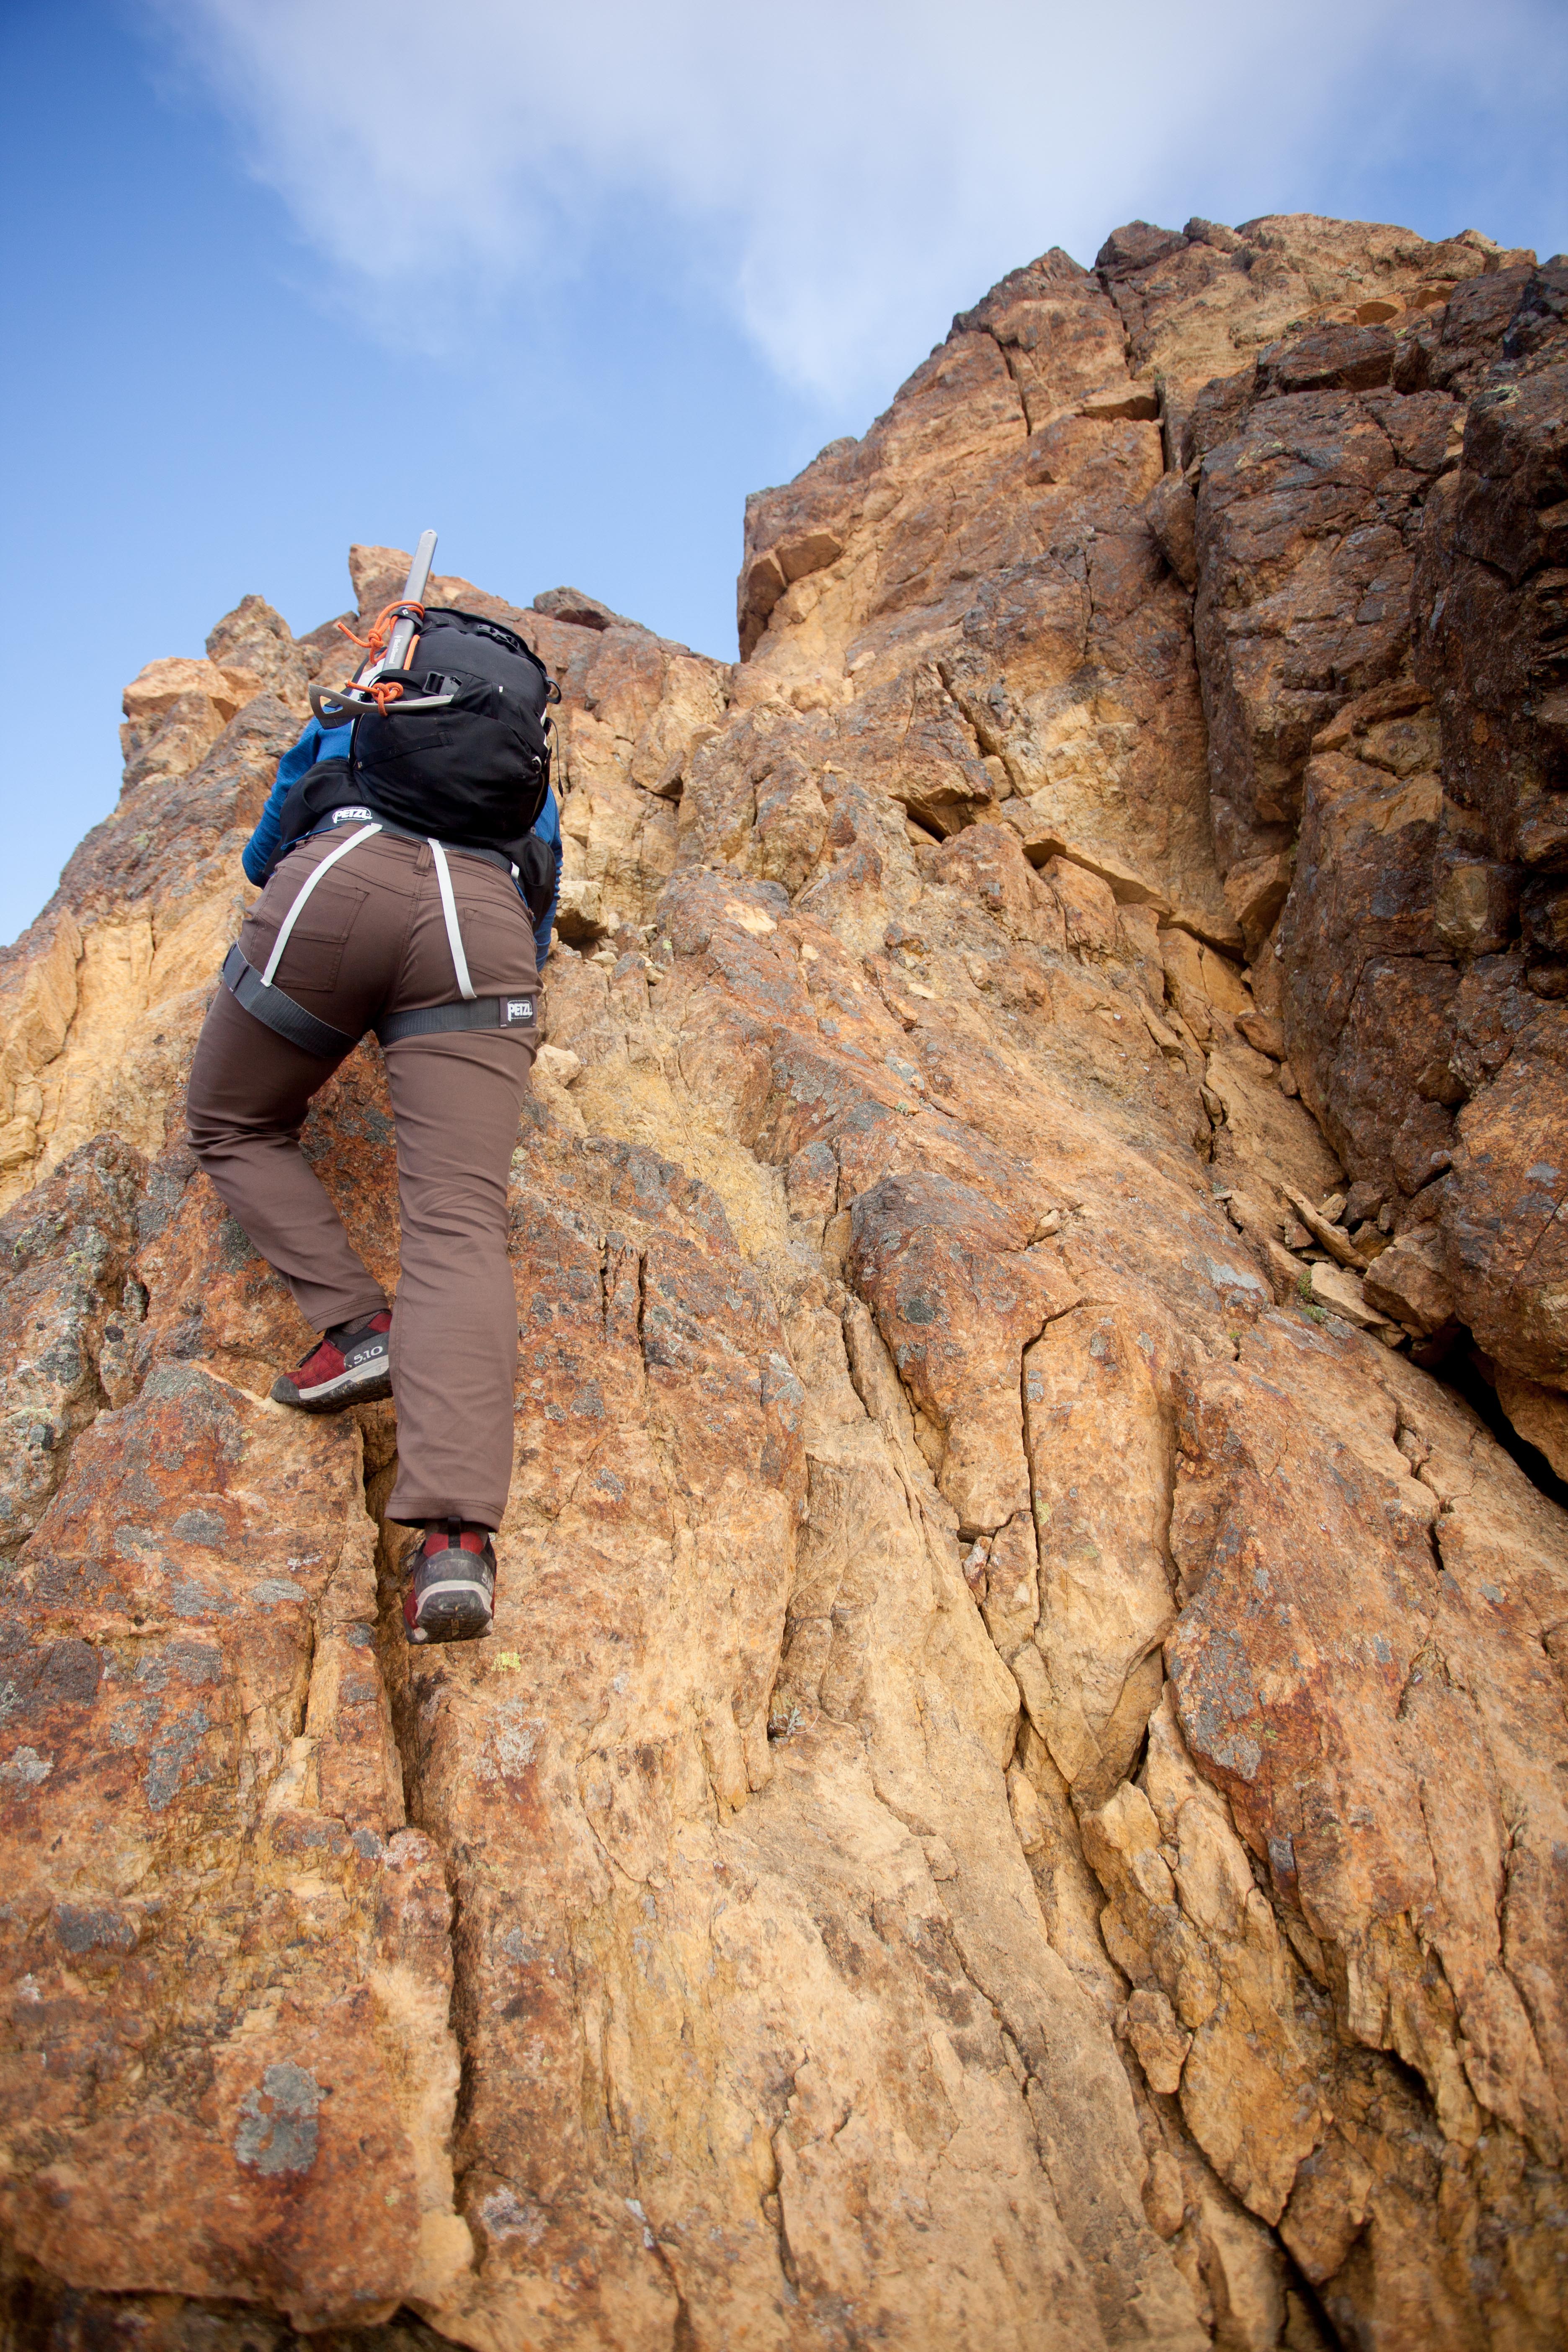
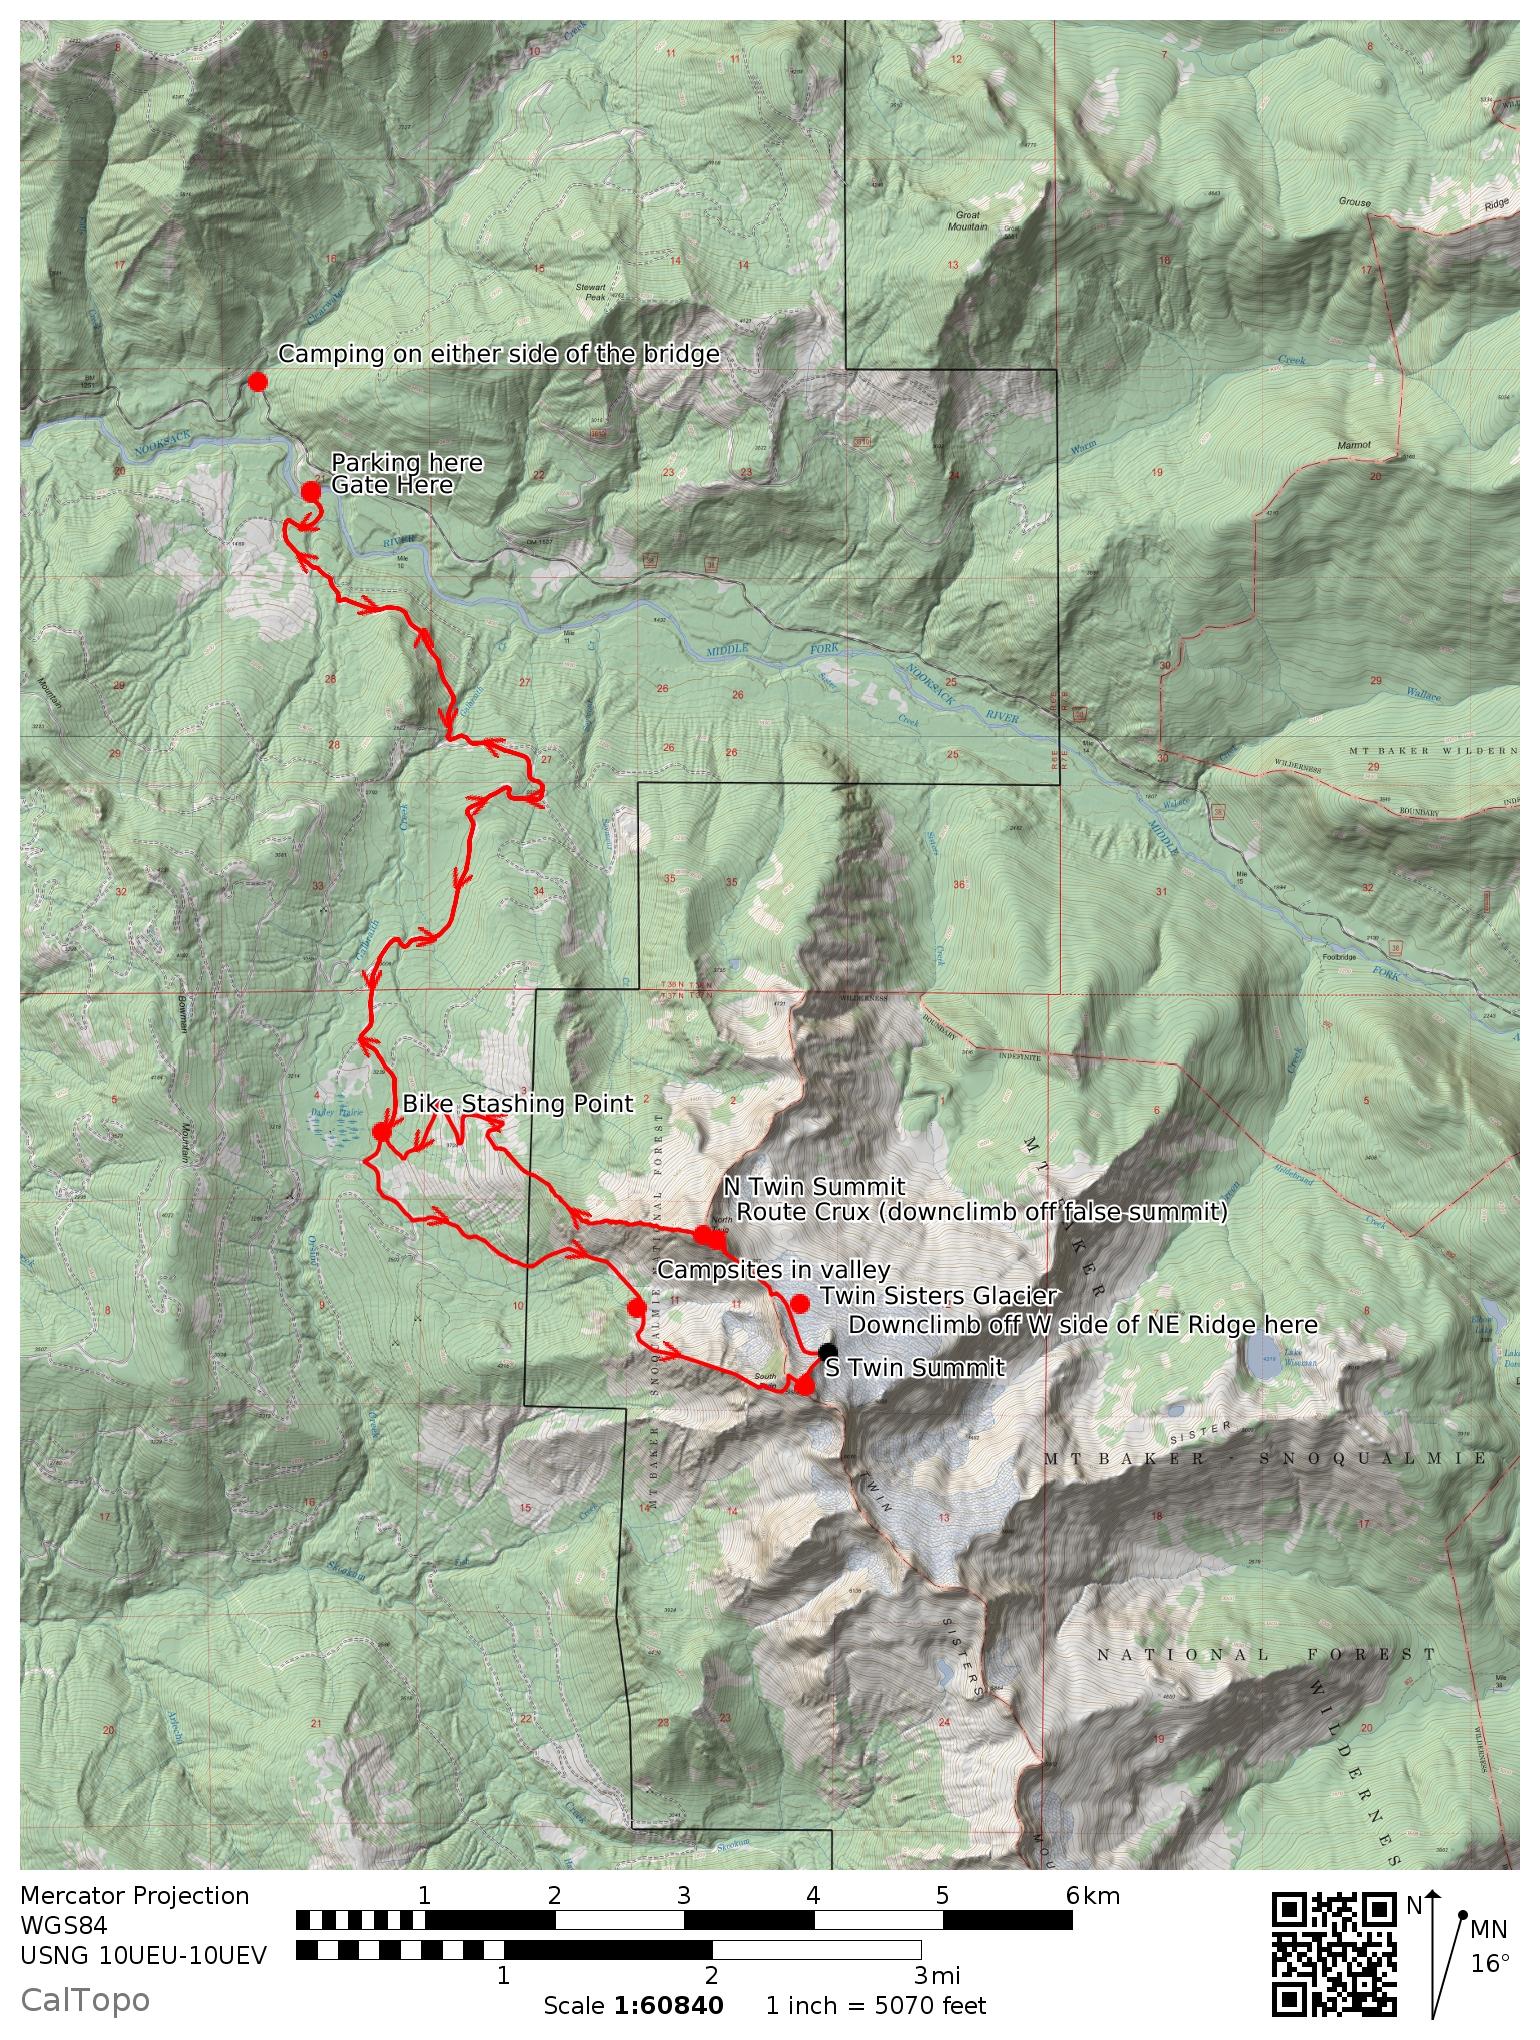
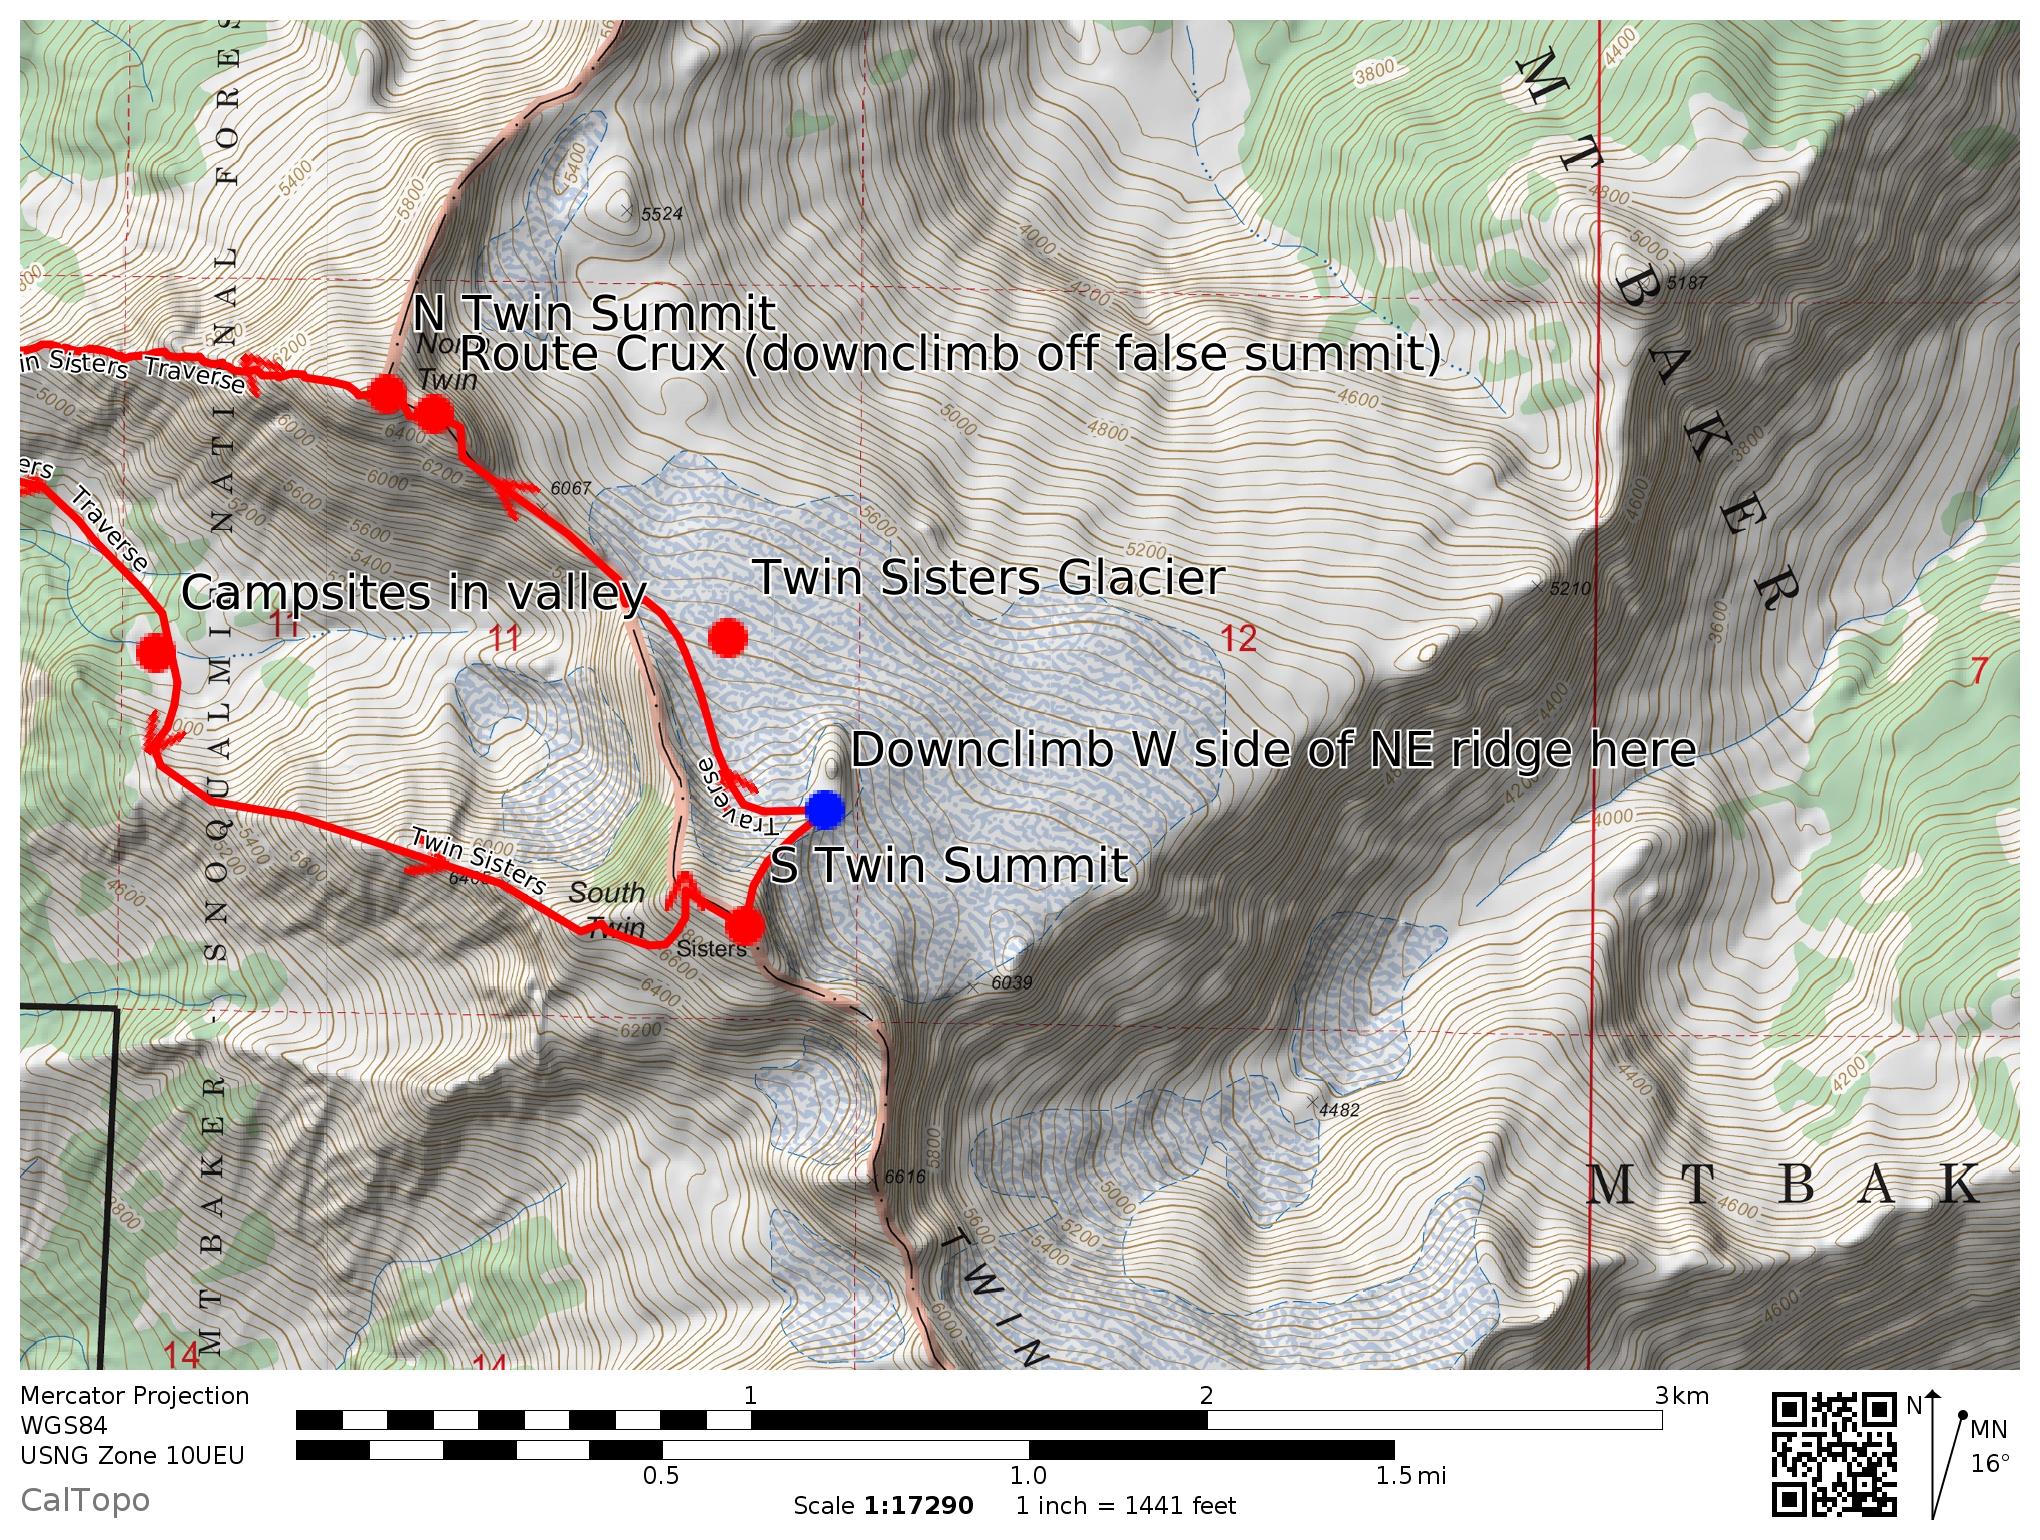
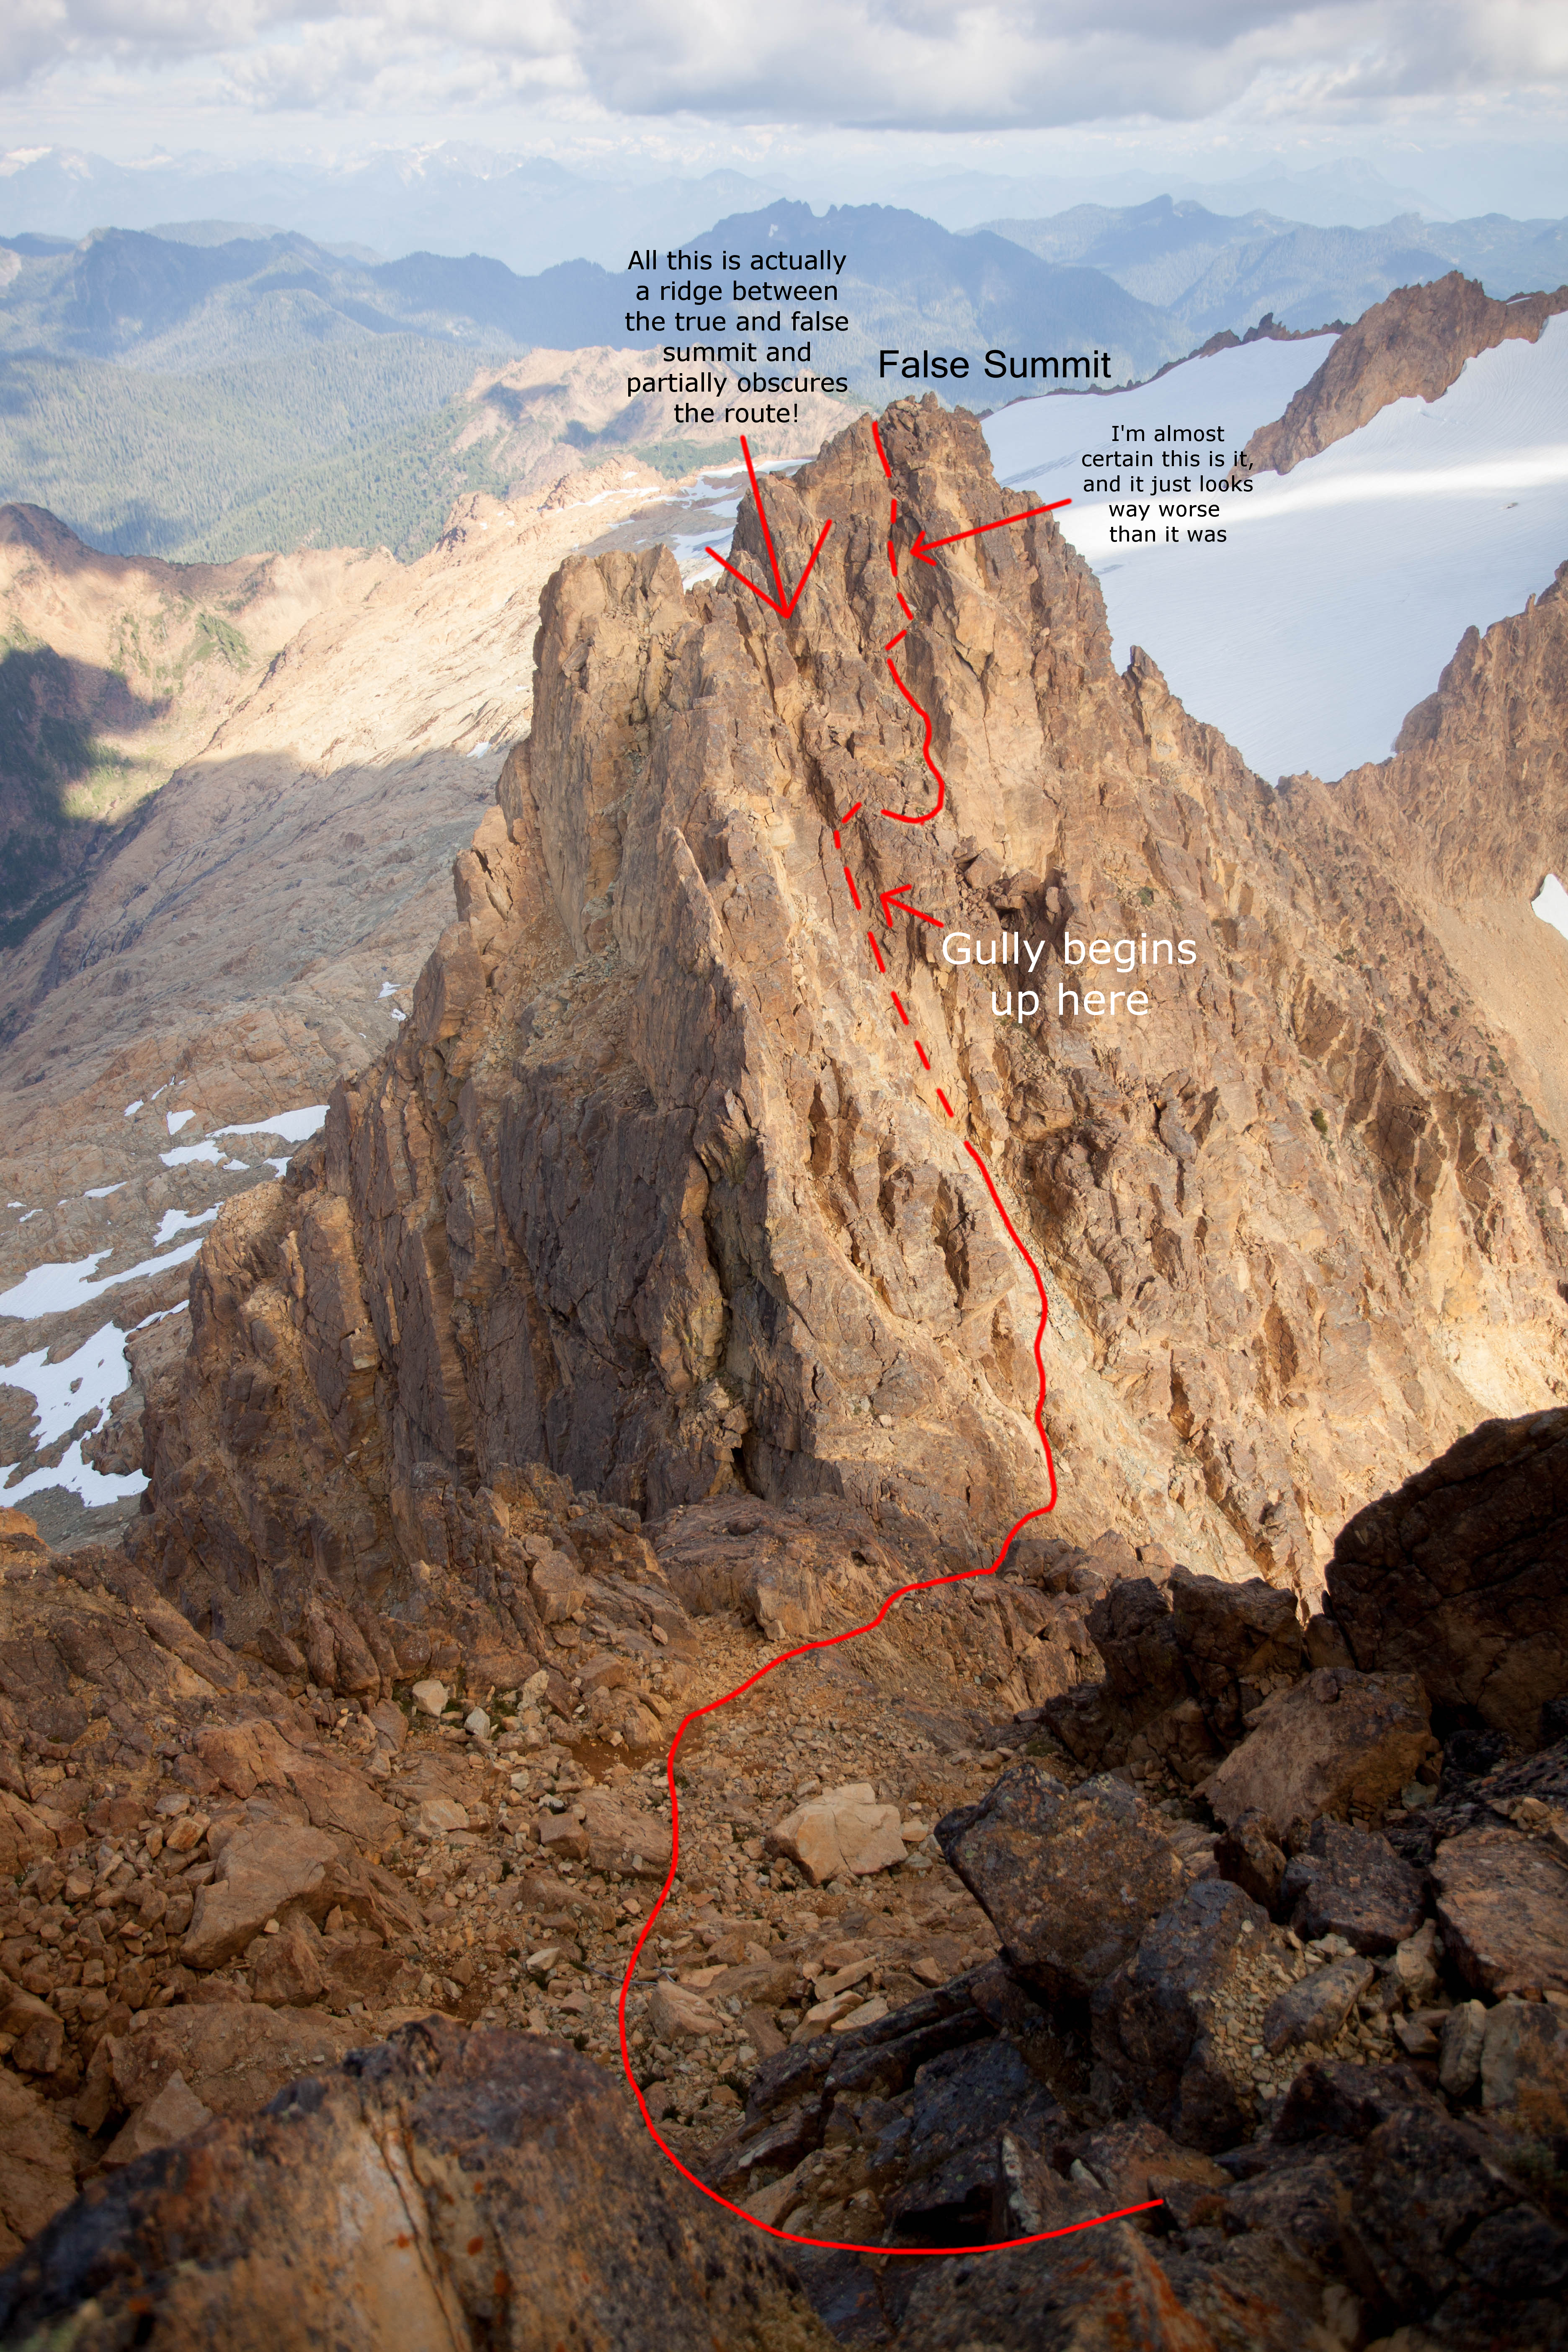
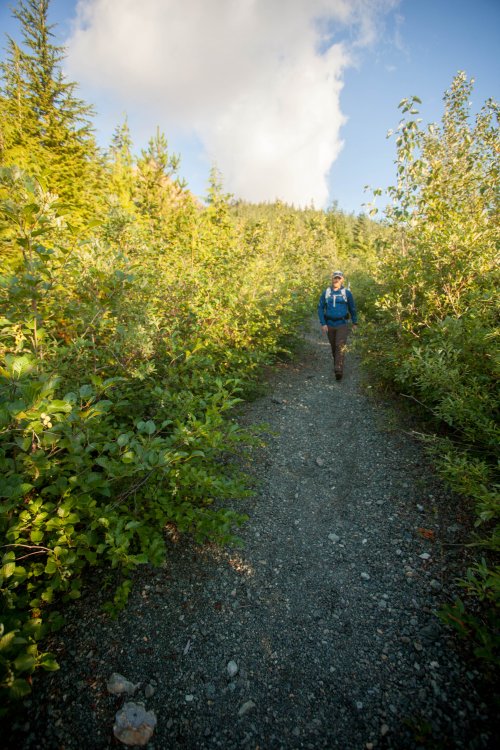
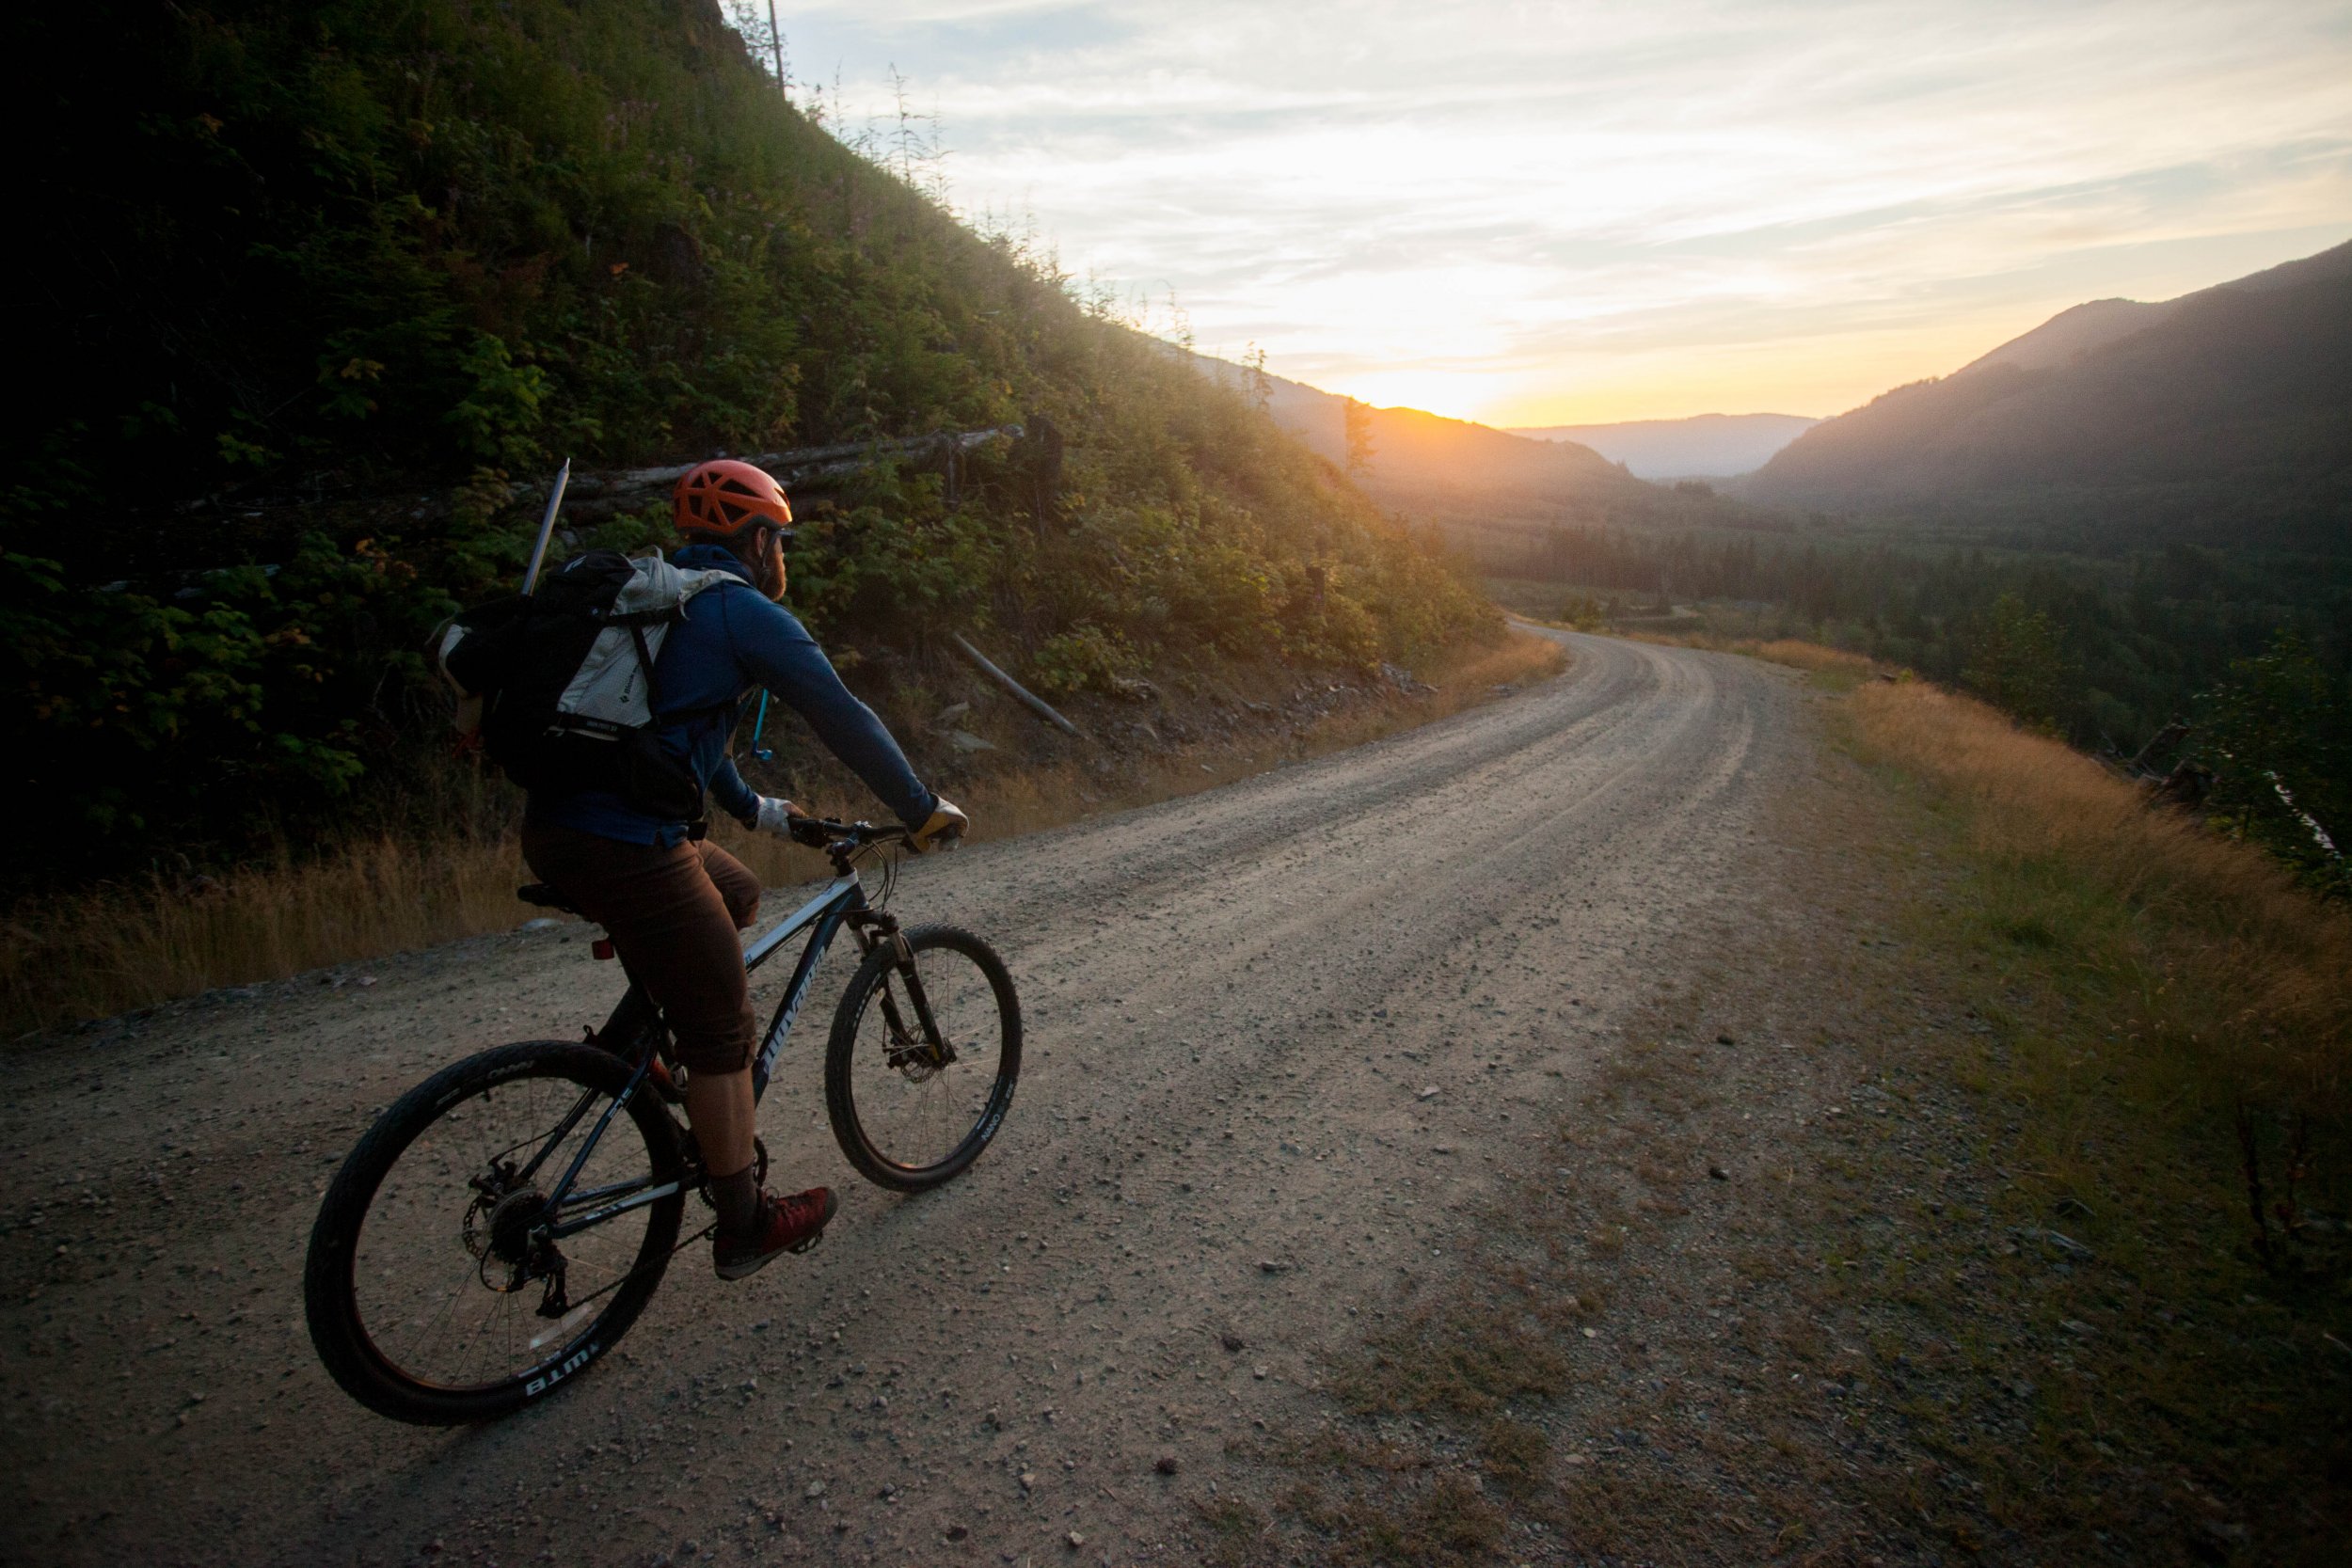
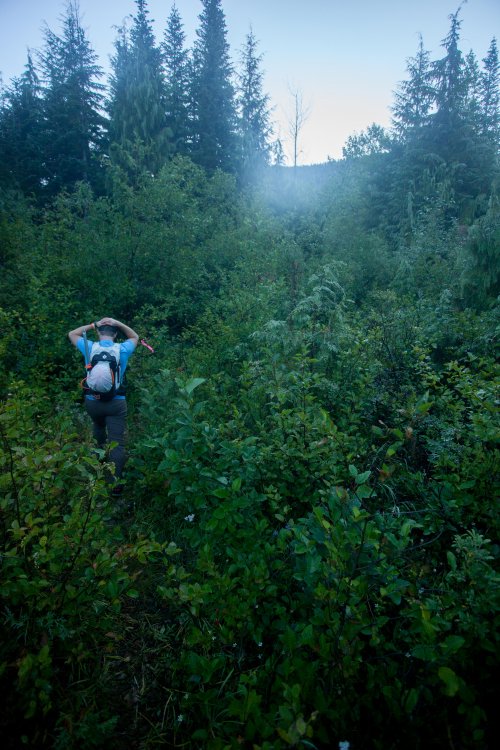
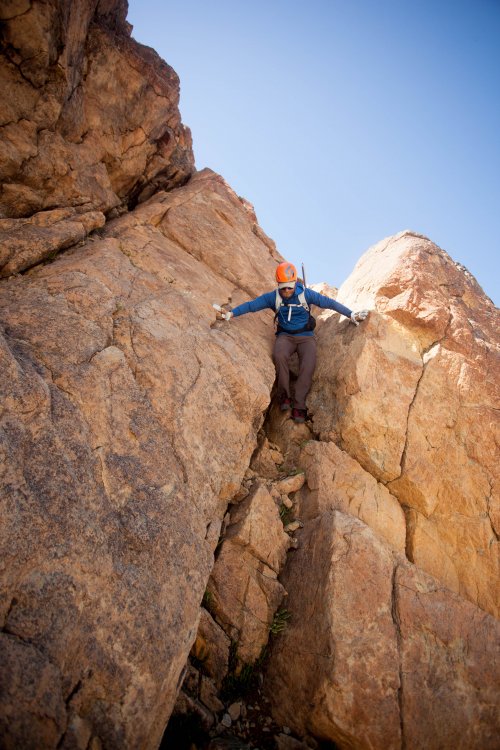
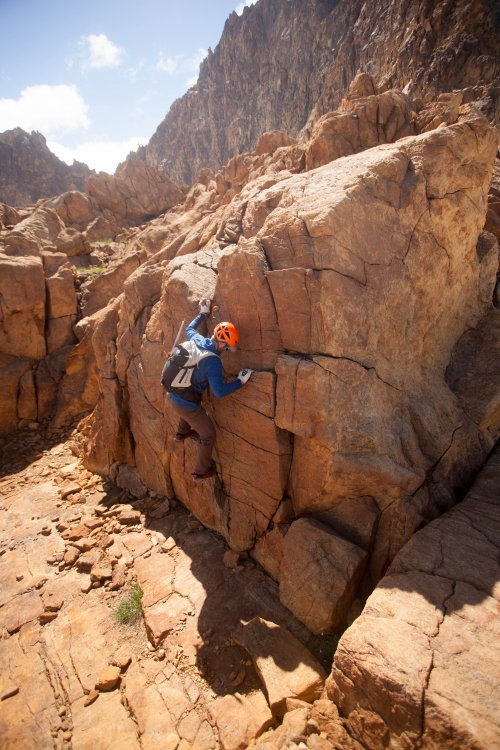
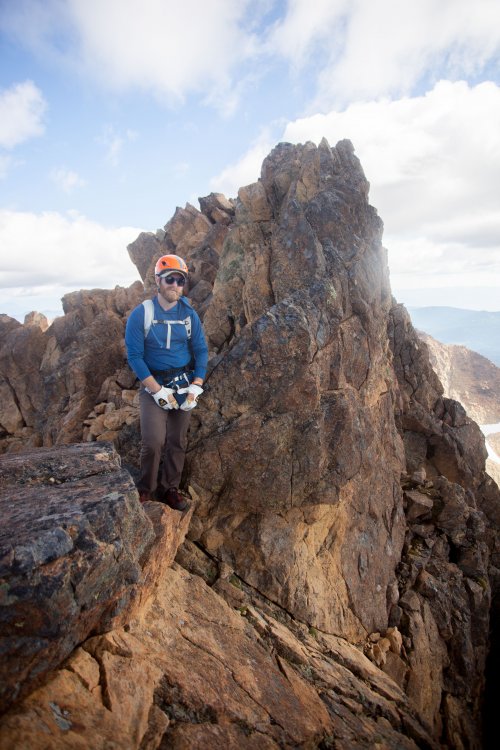
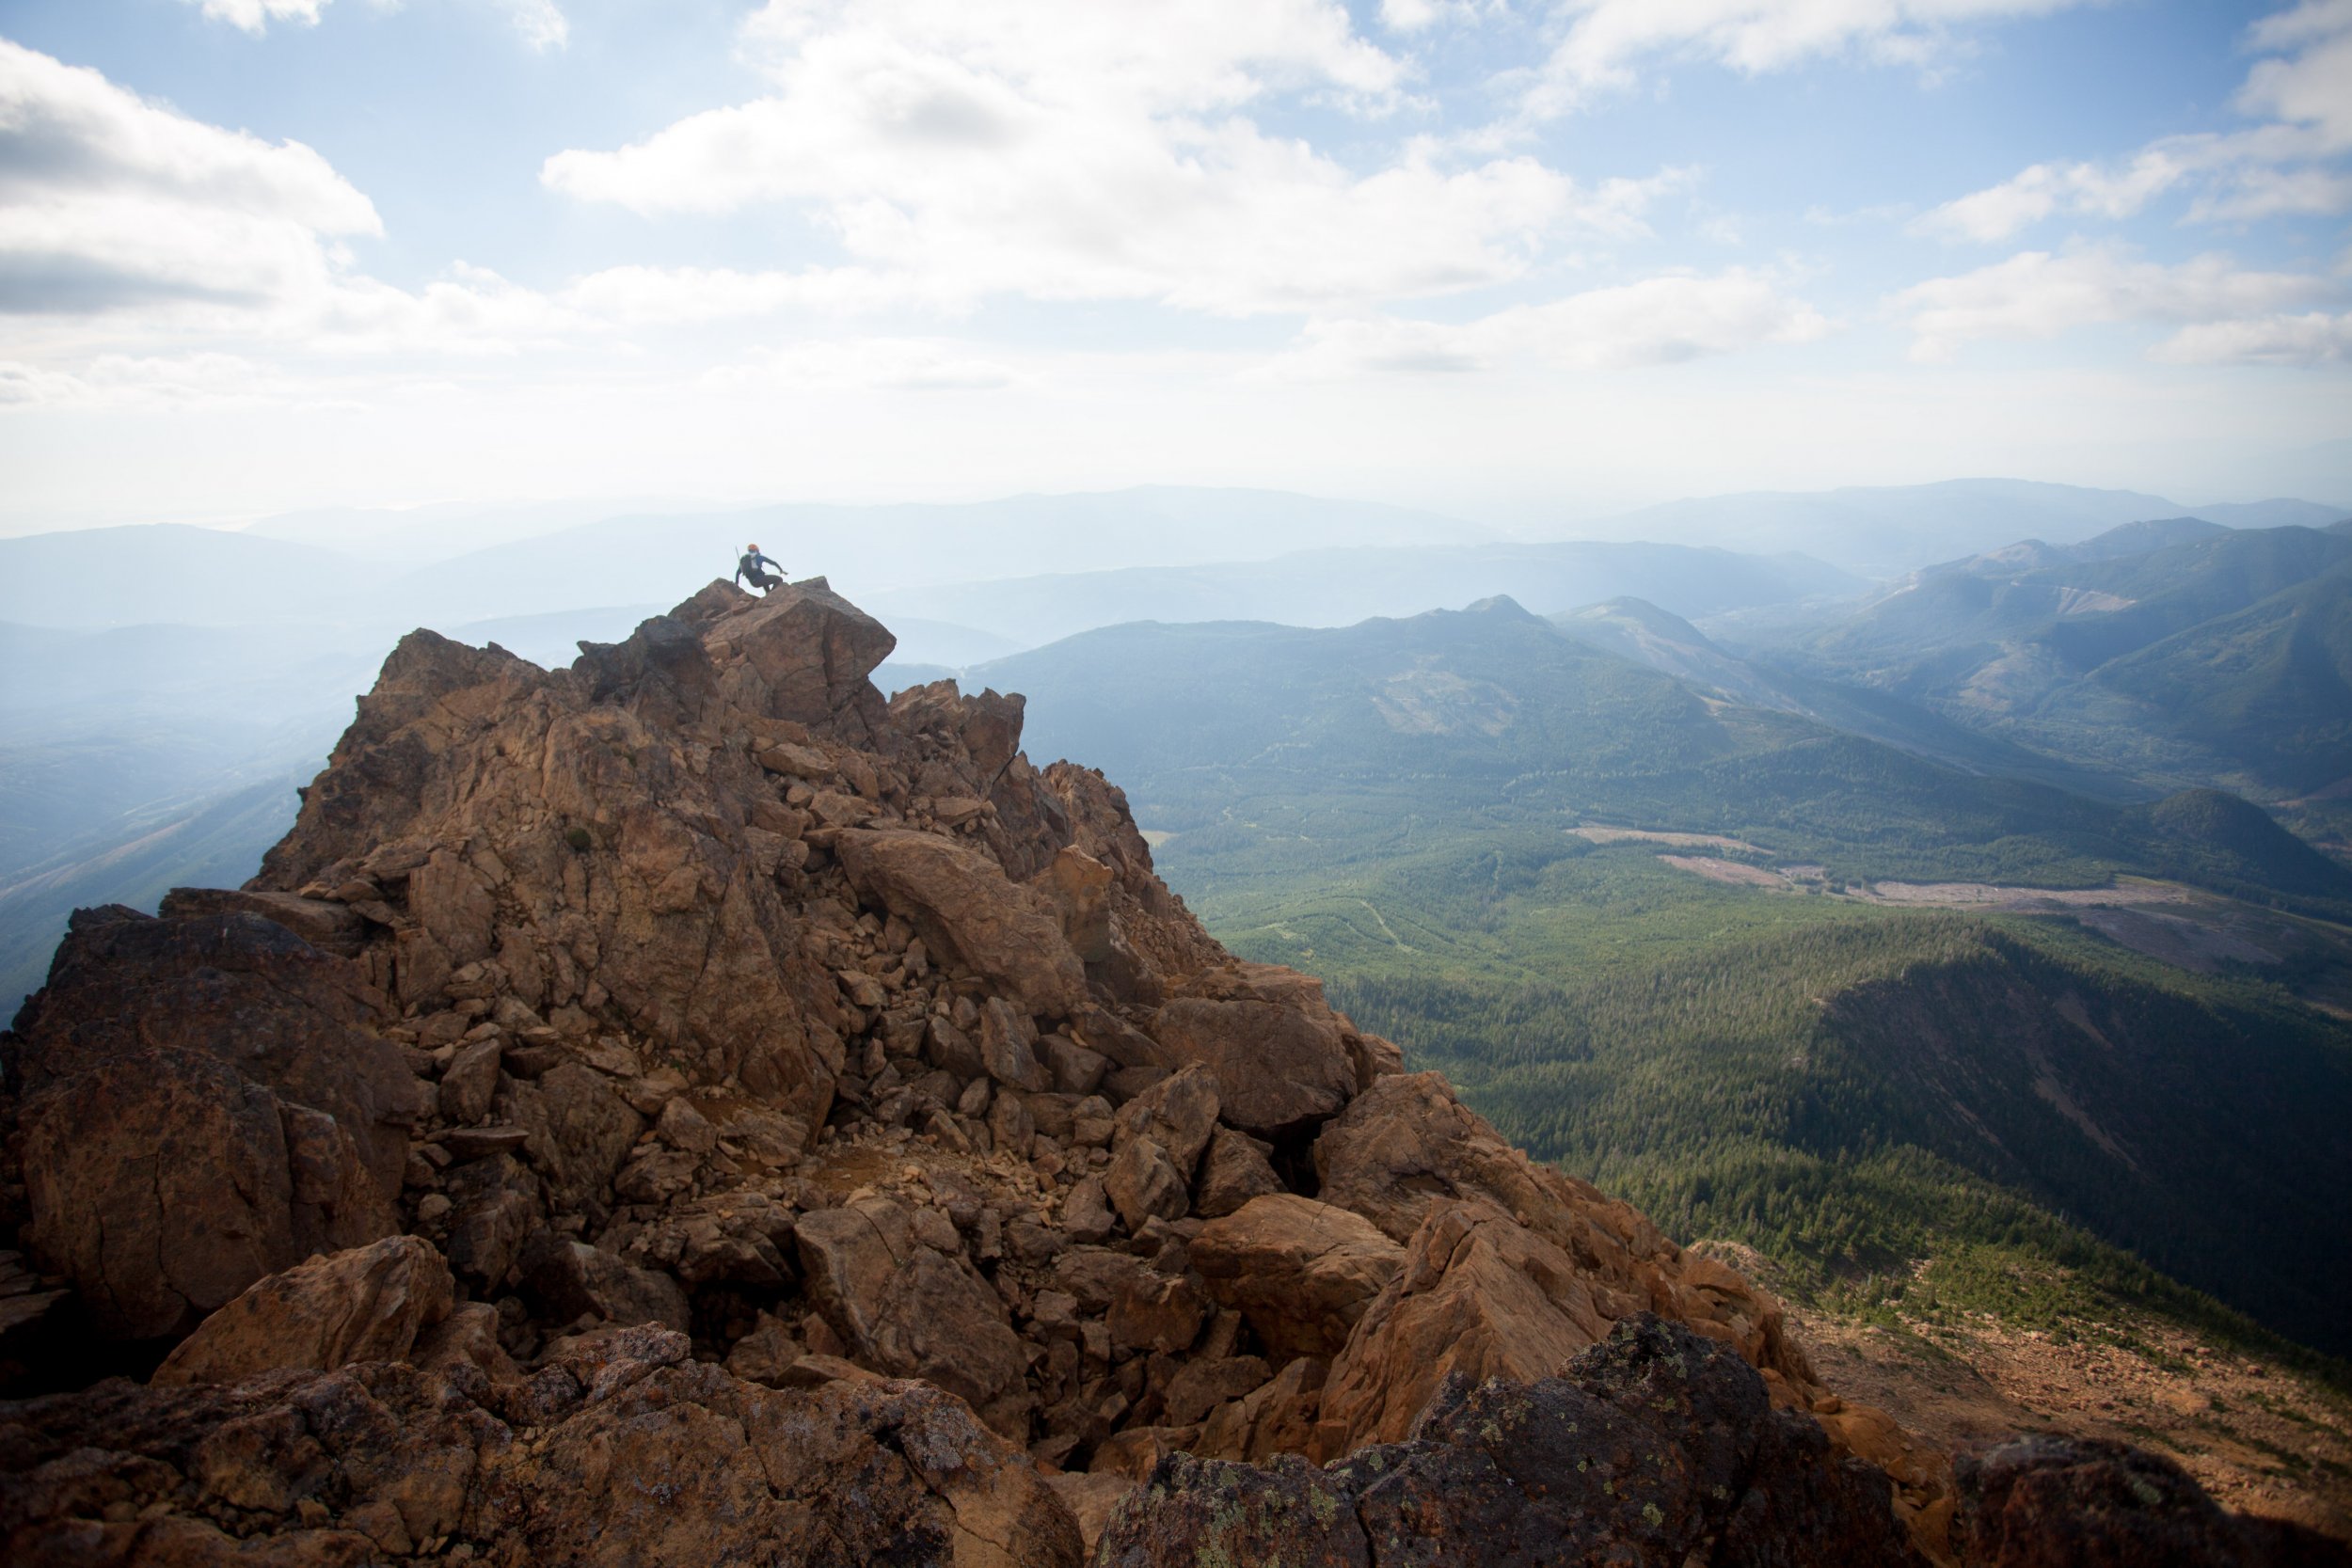
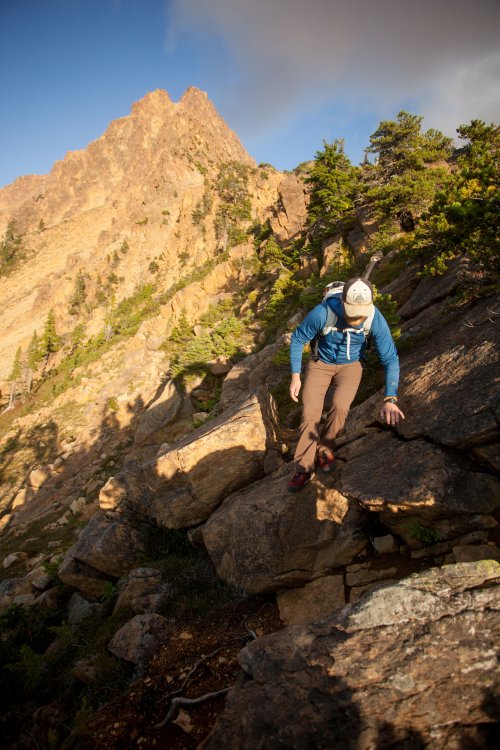
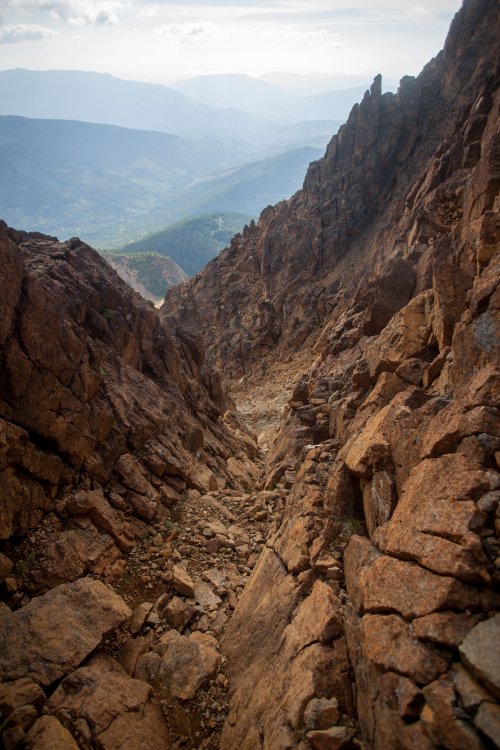
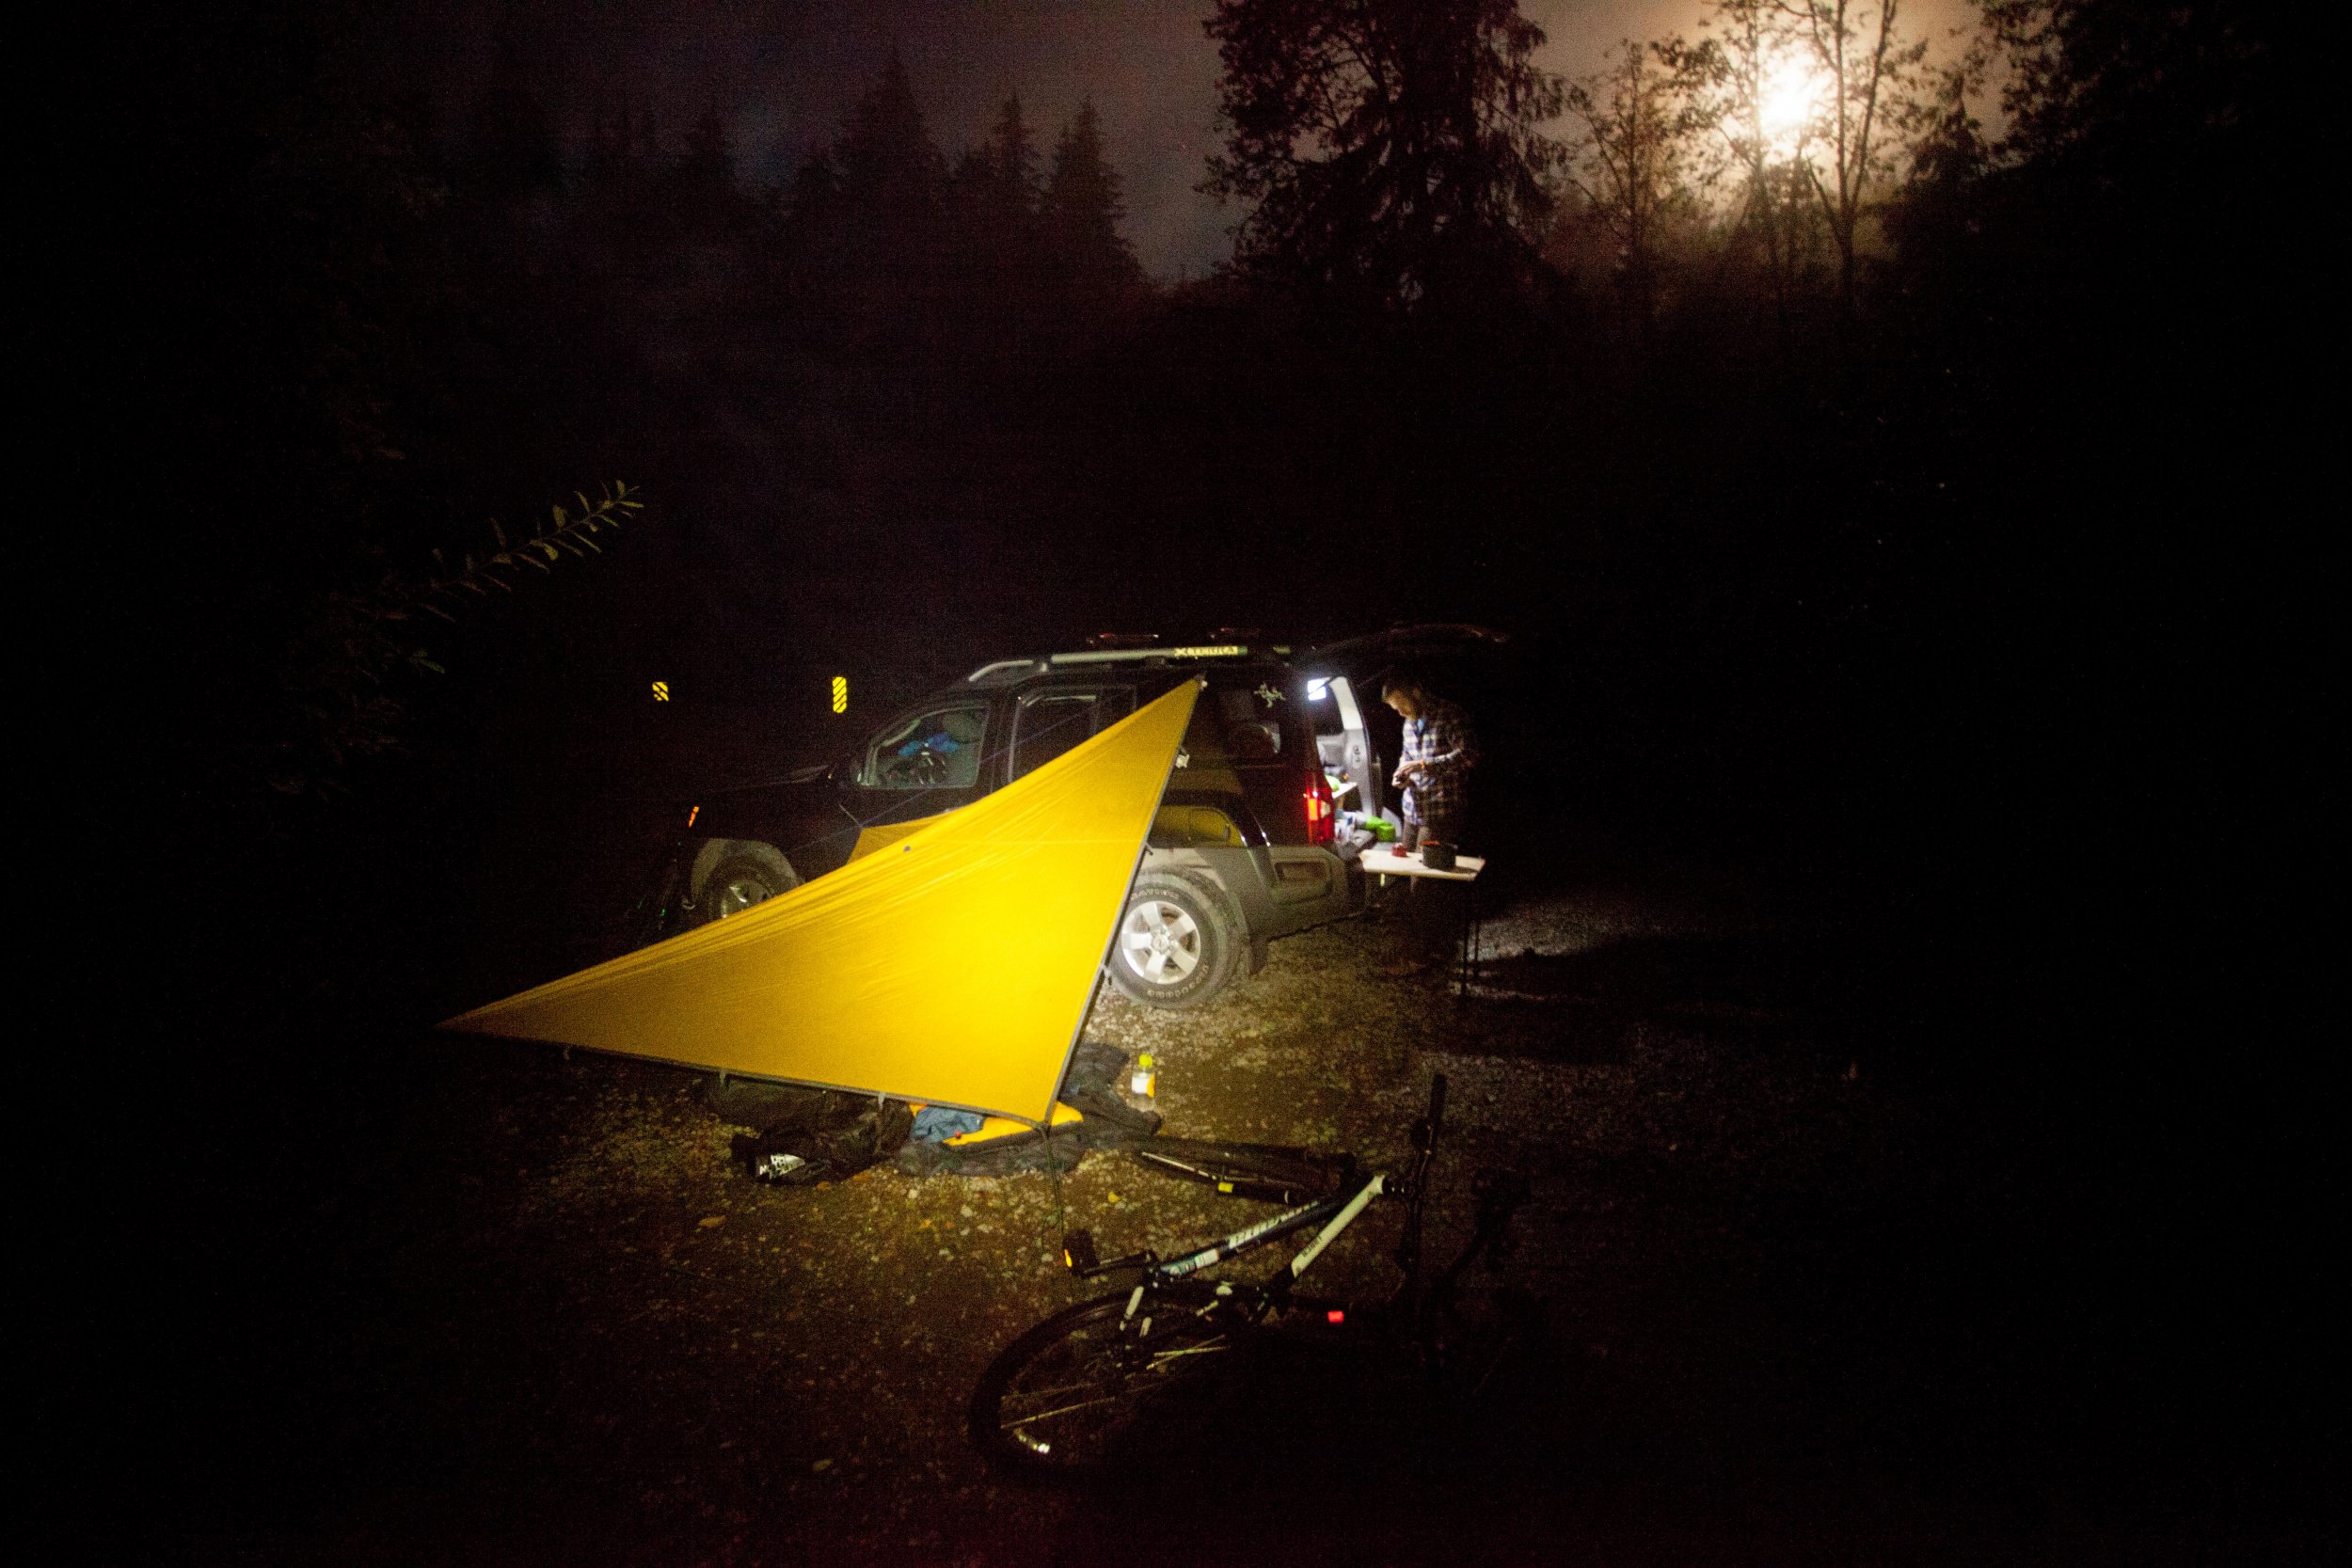
Trip: Twin Sisters - Twin Sisters Traverse Trip Date: 08/27/2018 Trip Report: Hey all, I've been reading trip reports on CC forever and wanted to submit my first! My climbing partner and I traversed the Twin Sisters on 8/27/18 after being inspired by kuhar's incredible trip report a few weeks ago. If you're gearing up for this traverse and haven't read it, it's definitely worth the time. Since his report is so comprehensive, I'll only go into detail to describe where we used a different route or where I think his could use a little more detail. But I took a bunch of photos, so it'll mostly be a photo story. Overview Here's our route from the summit of N Twin. This is drawn as accurately as I can! and here are some maps: And with more detail: GPX here - Twin_Sisters_Traverse.gpx. To be clear, I used kuhar's gpx as a base, then drew our route in on Caltopo. Gear - gravel bike (for me) and mountain bike (for my partner) - essential - 35 meter rope - if we hadn't roped up for the glacier, we wouldn't have needed this at all - good approach shoes - essential! - harnesses + basic belay/crevasse rescue gear + rap tat - ice axes - essential - crampons - essential - helmets - essential - capacity to carry at least 3 liters - there's no liquid water on the route after you leave the stream below the camping area in the valley, though there is plenty of snow on the glacier - gloves - the rock is incredibly rough and I spent the whole day in fingerless gloves with leather palms Ratings? These are hard because they're so dependent on your experience and head game, but here goes: W Ridge of S Twin - 3rd class with short sections of 4th NE Ridge of S Twin - 3rd and unexposed 4th class SE Ridge of N Twin - 3rd to 5.5ish, depending on your route W Ridge of N Twin - 3rd class, though you could make it harder if you wanted to Rough Distances based on the Caltopo: 6 miles biking to the stash point 1.6 miles hiking to the W Ridge of S Twin 1 mile on the W Ridge of S Twin .2 miles on the NE Ridge of S Twin .4 miles on the glacier .4 miles on the SE Ridge of N Twin .6 miles on the W Ridge of N Twin 1.7 miles hiking back to the stash point 6 fast miles biking down Total Time: 5:30 am to 7:52 pm - 14:22 hrs Trip Report The stars are out and the moon is up, time to go! We headed up Sunday night, and crashed by the gate for a few hours in the misting rain. Overnight, the skies cleared and by 5:30 am we were headed out under clear skies. The gate was open in the morning, and we thought about driving in, but it was closed when we got back to the car, so we're ultimately glad we didn't try it. First views of N Twin from the road - The approach took us 1:30. The road was in great condition but just steep enough to be consistently exhausting. And with the pre-dawn start came lots of wet underbrush. We got soaked, and I spent the rest of the day in slowly drying shoes. The trail can be somewhat hard to follow but just keep an eye out for the flagging and cairns and you'll stay on track. Here's the view from the approach to S Twin. Once you get up here, there are less cairns, but just head across the valley to the campsites and then up to the ridge. This is the last liquid water you'll find all day. There are some small tarns below the glacier (E of N Twin) but they're not easily accessible. We did pack our droms with snow from the glacier, which got us through the rest of the day. From the sites, we pushed straight up to the ridge ,then began scrambling. The olivine rock is just as grippy as everyone says! The W ridge of S Twin reminds me of the W ridge of Stuart (which I did just a few weeks ago). The route somewhat generally follows the ridge but constantly swings around to the south, where you traverse for a bit, then climb back to the ridge. The W ridge is generally 3rd class with a few heady moves that some might call 4th or 5th. It all depends on your scrambling comfort level though - it wasn't as heady as the W Ridge of Stuart. Obligatory summit shot looking over Baker, except Baker won't cooperate... Is this why it's called olivine? We descended the NE Ridge of S Twin because it didn't look too bad (bottom left of this picture), and let us cut some distance off our glacier crossing. This descent was pretty good - while it constantly looked like it would cliff out, we always found a good route down. Maybe a few moves of 5th class? but it all felt reasonable. This was more or less what it looked like, with some exposure but not as much as the next ridge. Extra-credit downclimbing! We didn't need to rap off the NE Ridge - we found an easy 3rd class scramble on the W side of the ridge down to the glacier, where there wasn't even much of a moat. I can't say for certain, but I don't think you'd need a rope for this descent unless it was a significantly lower snow year? I was expecting a lot more crevasses, but we only saw four or five, and only passed one. If you're more confident on glaciers than I am, you might not even need a rope on here. Here's a view back towards the NE Ridge. The downclimb is pretty obvious - if you've managed to get here, you'll find it, but I also marked it on the map. Once you're on the glacier, just aim for the notch on the left side and head straight there (avoiding the one obvious crevasse). The snow was harder than I was expecting, despite the warm sunny weather. The SE ridge was (as reported by kuhar) the hardest of the whole trip, with a lot of notches and spires. When in doubt, swing climber's left when you get stuck. The rock quality wasn't horrendous, but was noticeably looser than the other ridges. And there's definitely some 5th class on this ridge, though I soloed all of it. I did throw my partner a handline once. Once you get up to the false summit, it gets trickier. Here's my partner in the small notch on the false summit. He's not stoked about the next few moves, but it looks worse than it is... Downclimbing off the false summit. This view is from the summit of N Twin, but there's a ridge between the false and true summit, so this obscures parts of the route... The crux of the entire day was the descent off the false summit of N Twin. Basically you top out the false summit, find the small notch a few feet to the north of the top, and then scramble down a heady section before swinging skier's right into a loose gully. Send people down this one at a time - no matter how careful we were, we sent a lot of choss down below us. Then swing right under a finned (if you look back at it) buttress. Take a breather, then push up to the summit. Looking down the loose gully - it's really not too bad. Skirting around to the base of the true summit block. Once you're down the gully, everything gets better! Scramble up over broken rock to an easy dihedral, then up into a low-angle loose gully to the summit of N Twin! From here, head down the W Ridge! There are infinite options here and you can make it as easy or hard as you want. I generally stuck to the top of the ridge, which almost always worked out well. There are lot of cairns scattered all over, most of which weren't too helpful. If you've gotten here, you'll figure it all out - just keep going down along the ridge. Looking back up the ridge from near the finish After a long time, the ridge will peter out into a trail. It gets pretty tight at points, but just keep following the obvious boot path. The final mile or so is what I assume to be an overgrown forest service road. We ended up running down this section, trying to get out before sunset. Once we got back to our bikes, it took us 20 minutes to get down, and we could have gone faster, but Baker finally revealed herself and I had to take photos A fast downhill bike ride is the best way to finish up a long day! Thanks! Richard Gear Notes: See TR Approach Notes: See TR


 1 point
 -
Hey nice work, dude! I'm psyched you tried that descent off the NE ridge of S twin and that it went so easily. If we get more people to try that route on the N twin I'm sure it'll firm up more, right?1 point
-
Trip: Mt Shasta - Casaval Ridge Trip Date: 03/03/2018 Trip Report: Mt. Shasta Via Casaval Ridge Mt Shasta Facts: Its the second highest peak in the Cascades next to Rainier(No.1) Over 15,000 summit attempts are made every year with only a third being successful. Most of the climbing is done via the popular Avalanche Gulch Casaval ridge has an elevation gain of approx 7,300' Lessons Learned Shorty after arriving from my Rainier trip I was eager to redeem myself on another mountain. Although I had summited, the ass kicking I received really humbled me and opened my eyes to all the areas I needed to improve on for my next going. After much searching I came across Mt Shasta and instantly knew this one would be next. I booked a winter trip via Casaval ridge, I prefer going on the less popular routes to avoid the crowds. This time around I convinced my good friend Yen to join me which made me that much more excited knowing one of my good buddies was joining me for the adventure. The lead up to this climb was especially difficult and there where times when I considered cancelling the trip, I had lost my grandfather to cancer a month after booking the trip and two months before the climb my younger cousin died of an opioid overdose (Please see passion & purpose for more on this and how I’m using my climbs to raise awareness on opioid addiction). These where very difficult times for me personally and made my summit all the more emotional. Training Things where much different this time around. I gave my self considerable amounts of time to train (7 months) and I took my training much more seriously. I trained hard and frequent. I ran 4-5 times a week 5 miles/day on average and did lots of leg work outs, especially exercises that would target my hamstrings and tibialis (down hill muscles). I got on a strict stretching regimen to make sure I had no tightness on my muscles and the best possible range of motion. A good diet got me much leaner and faster for this trip. I had learned my lesson and I wasn't about to commit the same mistakes that nearly prevented me from getting to the summit on Rainier. Mt Shasta California After 7 long months, February finally came around and I was all packed up and ready to go. I flew to San Francisco, spent a few days getting to know the the beautiful city before renting a car and heading up north. On route to Shasta we where able to enjoy the amazing ride, taking in all the scenery that surrounded us completely topped in fresh snow. We got to Shasta in the midst of some crappy weather, it was all cloudy and the visibility sucked. So we opted to head to a local restaurant to have one last solid meal before heading up for the climb the next day! We had pasta, steak and potatoes, it was a feast! We where making sure our bellies where completely satisfied before the big day. We where so stuffed we can hardly walk but when we stepped outside, the weather had cleared and Mt. Shasta's massive presence was towering over us in the most incredible of ways. It really was a sight to be seen. At that very moment I knew we where in for a treat! The Climb The next morning we all met at the SWS office and introduced ourselves. This time around I was one of the few that had some past mountaineering experience. Despite all my training I was still a bit weary and intimidated by the mountain. To my surprise the guides let us know that due to the bad weather conditions, no group from SWS had reached the summit this winter. But luckly we had a very narrow window where we might be the first to make it up(fingers crossed). After a quick pow wow, gear check and poop bag course (poop bags vary from mountain to mountain, not all poop bags are created equal!), we loaded up our packs and headed for the bunny flats. Upon arrival we quickly realized the snow was soft and deep thanks to a heavy fall the days before. We straped on our snow shoes and began breaking trail. The weather was nice and cool and the mountain was as if you where looking at a Virtual reality post card, it was perfect. We slowly started making our way up to what would be our camp for the next two days. It was a very pleasant day on the mountain and I was feeling great, absolutely no exhaustion or leg pumps. Every hour or so we would stop for a break and a chance to take in the breath taking view's. The last 90 minutes consisted of ascending a fairly steep snow field and before we knew it we had arrived at this ledge that would be our camp for the next 2 days. Everyone dropped their pack, pulled out the shovels and automatically started digging out the tent platform. We dug about 3’ in the deepest section and where able to get some nice cozy spots for the tents where they would be protected from the wind. As the sun came down, the temperature started dropping quickly and in a blink of an eye it got very very cold. Even with my mitts on, my fingers were so cold they hurt. I figured it was a good idea to get warm so I quickly tucked my self into my sleeping bag and "tried"( hardly a truth when mountaineering) to get a good night’s sleep. This proved very difficult due to the winds pounding on the tent all night long. It was also Yen's first time on a mountain so he was so excited he wasn’t having any sleep either. What seemed like 15 min after I was finally able close my eyes, the guides where shinning their head lamps on our tents to wake us up. Summit Day It was 2 am, extremely cold and it took some serious will power to get moving. We drank hot coco, got our gear on and set out to conquer the summit. It was dark out and windy while we roped up and started on the ridge. The wind was picking up the snow and spraying it on my face making for some nice frozen snot. We kept moving along waiting for the sun to rise and warm us up a bit. Eventually It did and we got the most incredible views with Mt Shasta’s shadow casted upon the surrounding landscape. We where also able to get a good view of the ridge we where climbing. It was amazing, full of these huge red rocks protruding from the snow forming whats really the most aesthtic line on the mountain. We where roped up in two groups of four. By sunrise our group was moving at a considerably slower pace than the other, so we started to worry we wouldn’t make it to the top on time. We had been at it for nearly 6 hours and had yet to make it to Shastina (Shasta’s little sister at 12,335’) and we still had 2000’ of elevation gain to go before making the summit. I was feeling great, my training had proven to work and I was ready to pick up the pace at any moment to race for the top. The problem was my group members where having a hard time keeping pace and where giving in to exhaustion. By just focusing on putting one foot in front of the other for few hours, we eventually made it to the famous misery hill. By now I could see the first group already making it to the top of the hill. Matt, our group guide sat us down for a second to let us know that our summiting window was closing. We had a choice, either call it a day and start making our way down or haul ass to the top, each one at his best pace and one of us summits on time. At this point we un-roped and he let us know that we had 45 minutes to drop onto misery hill and make it to the top (this is where my training really kicked in). After all the events that happened leading up to this trip and how emotional it was for me, I had to summit on way or another. So I kicked it into high gear and started working my way down onto misery hill on my own and then raced up to the top at a frantic pace. I was able to catch up with the first group just at the beginning of the summit plateau. I felt some guilt leaving my partner to climb up at a slower pace knowing he probably wont make it but knowing he was safe and accompanied by the guide, I decided to push on since this climb meant too much to me. Once I met with the other group, I got a quick drink of water before setting out for the summit pyramid. It was gorgeous once at the plateau, you really get to see how massive of a mountain Shasta really is. Then it’s a short hike before getting to the true summit. We had made it!. We took some pictures, signed the summit log and hung out for a bit before heading back down to camp. Just as I started making my way off the summit I saw Yen, my climbing partner approaching the top. I raced down to where he was and took the final steps with him. I was ecstatic he had made it and that we where able to get a summit picture together. The descent At this time we really had to start heading down in order to make it to camp before sun down. We descended down the side of Avalanche Gulch in a long and boring slog in knee deep snow. It took about 4 hours to get back down. Once at camp I took off my boots, organized my gear inside the tent and went straight to sleep. After a long day, when I finally laid down on my sleeping bag I was so tired I it felt like I was laying on a temperpedic and In a matter os minutes i was out cold. The next morning, we where up around 7 and quickly began packing up since a storm was working its way onto the mountain. We wanted to be out as soon as possible. After a quite uneventful descent we had finally made it back to Bunny Flats. Spirits where high and we where all eager to have a decent meal and get some rest. After thoughts All in all even though my physical conditioning was a lot better on Shasta, I still consider Rainier to be much harder both physically and technically. That being said, this is a beautiful mountain with amazing features. I really enjoyed climbing it in the winter since there wasn't any one else on the mountain at the time. Despite the sun beating down on us the whole summit day, it was still cool enough to where we didn't feel fatigued by the sun. I definitely wouldn't mind coming back and climbing it again, maybe try ski mountaineering it instead! HERES A LIST OF THE GEAR I USED, THE PLACES I STAYED AND THE COST BREAK DOWN OF THE TRIP: Logistics: Shasta is pretty much far from everything, you don't have many options other than renting a car. Plus the drive is well worth it (amazing scenery). Your nearest air port is Sacramento which is about a 3 hour drive. Once at shasta, your best bet is to stay at the SWS bunk house. There are plenty of restaurant in the area to satisfy your pre climb cravings. From the SWS bunk house, its about a 30 min drive to Bunny Flats, where you will begin your climb. Cost break down: SWS mountain guides - $825.00 (+ guide tip) Car rental - $235.00 Hotel - $166.00 (2 nights) Pre climb food - $74.00 Snow Shoe Rentals - $40.00 Total: Approx $1340.00 Gear List: Lower Body- La Sportiva Baruntse Point 6 Medium weight Socks Point 6 Heavy weight socks Smart Wool base layer Mountain Hardware ChockStone pants Arc'teryx Alpha SL Pant Upper Body- Bight Gear Solstice Hoody Men's (base layer) North face Soft shell hooded Jacket (**Highly Recomended) Mountain Hardware ghost lite jacket Mountain Hardwear Micro Dome (insulating warm hat) Marmot Men's Windstopper Glove (light weight) Marmot Men's Randonnee Glove (medium weight) Marmot Mens Mit Climbing Gear- Julbo Monte Bianco Glacier Glasses Black Diamond Climbing Helmet Black Diamond Couloir Harness Black Diamond Raven Pro Ice Axe Black Diamond Sabertooth Clip Crampons Osprey 85 Pack Mountain Hardware 3 degrees sleeping bag MSR Snow Shoes Find out more on my website: www.brandonclimbs.com All climbs are used to raise awareness for the opioid epidemic that is weeping our nation. Gear Notes: On report Approach Notes: On report1 point
-
Luckily, the dude stole the car was a heroin junkie. Cams don't trade well in the seedy underbelly of Seattle. Passed out stealing another car about 48 hours later and fessed up to the location of mine, cops got it back quick. Only thing he managed to pawn off in that time was the sleeping bag and a couple day packs and my super light thermarest. Got to keep the iron skirt and nearly all my gear! Thanks for looking out! Seth1 point
-
I guess the moral of the story is not to leave fixed ropes anymore.....1 point