Leaderboard


Popular Content
Showing content with the highest reputation on 07/08/18 in all areas
-
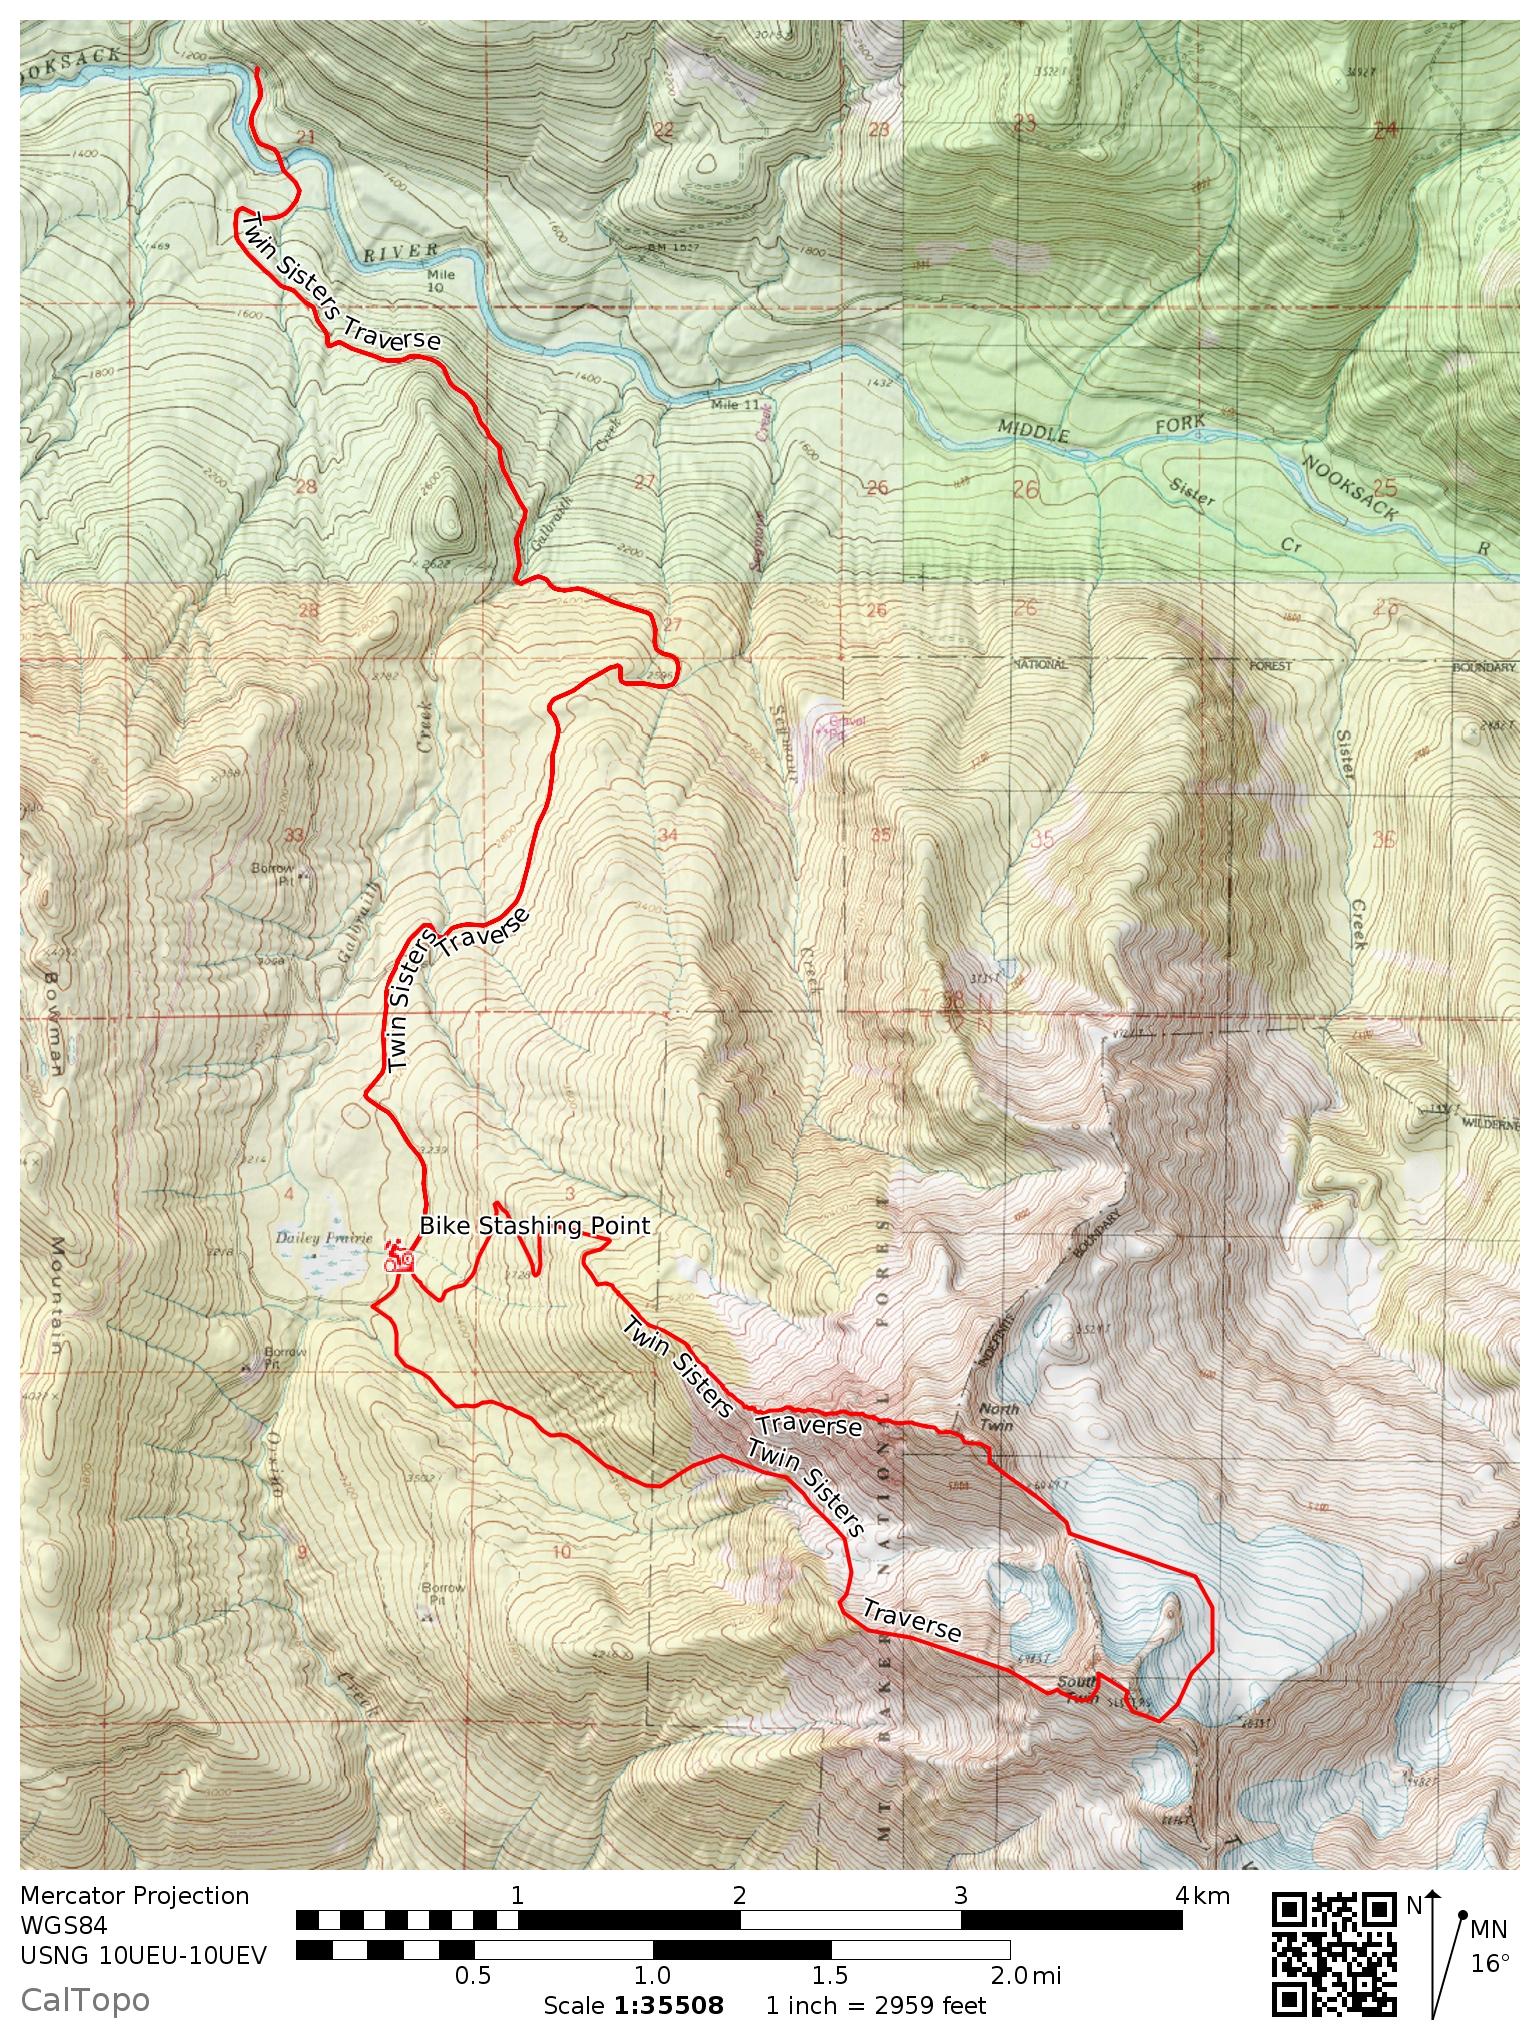
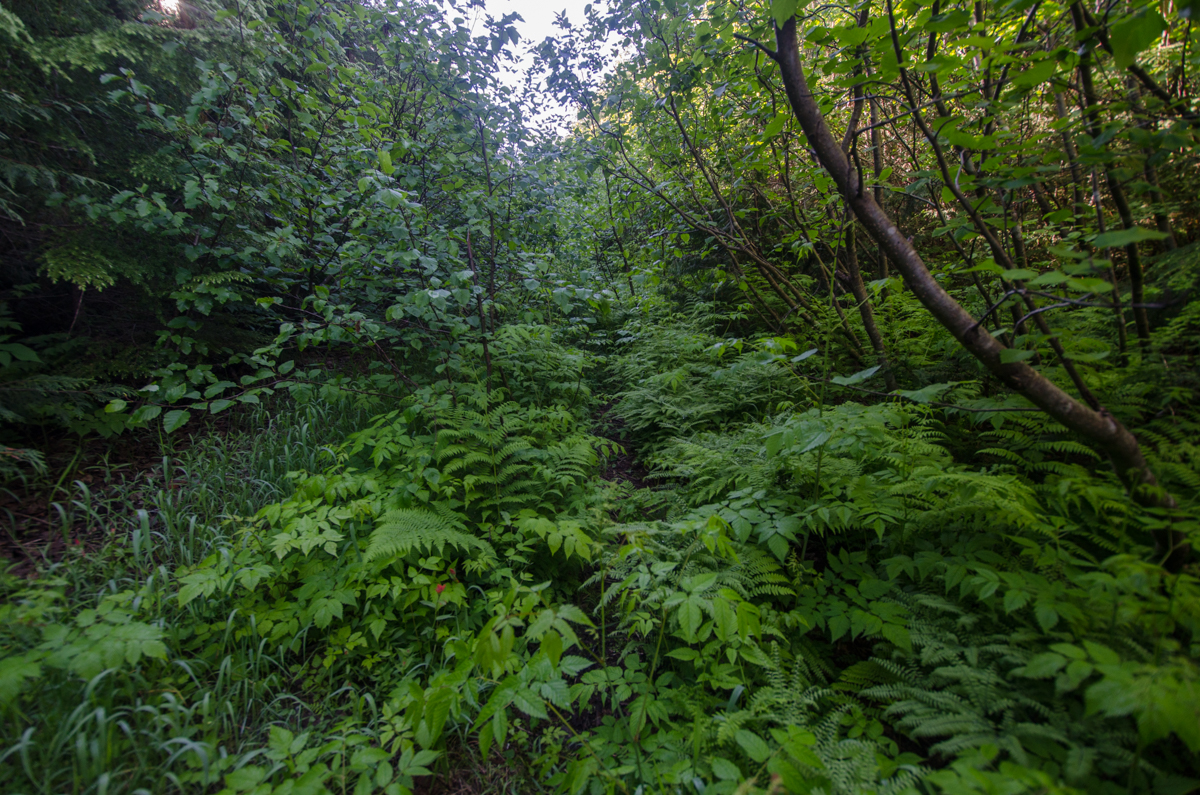
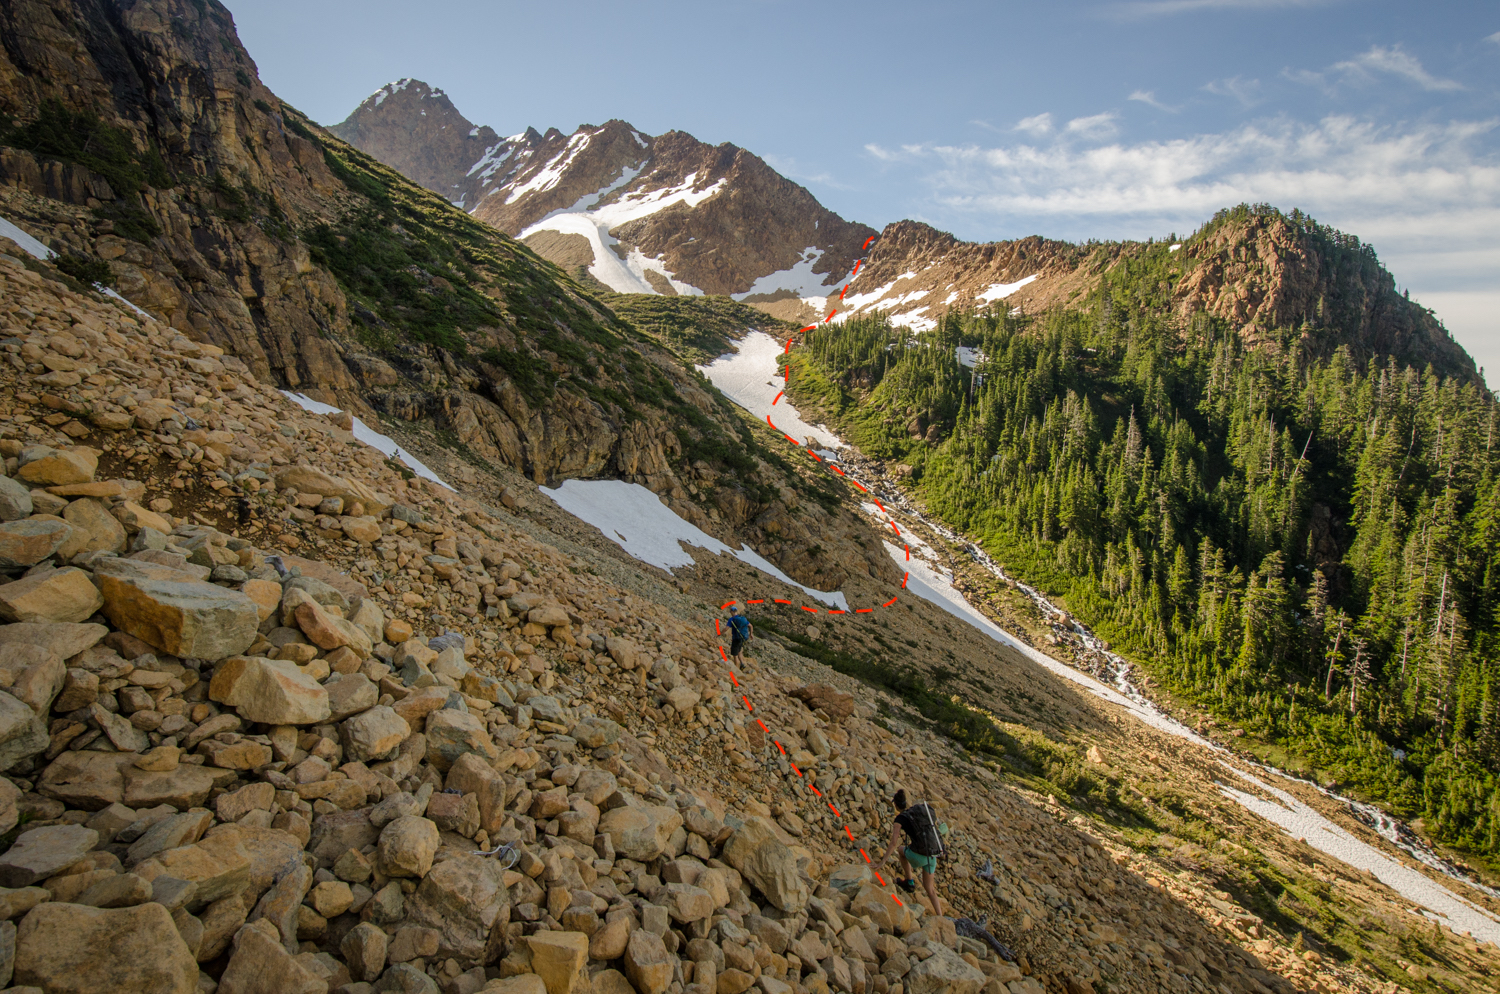
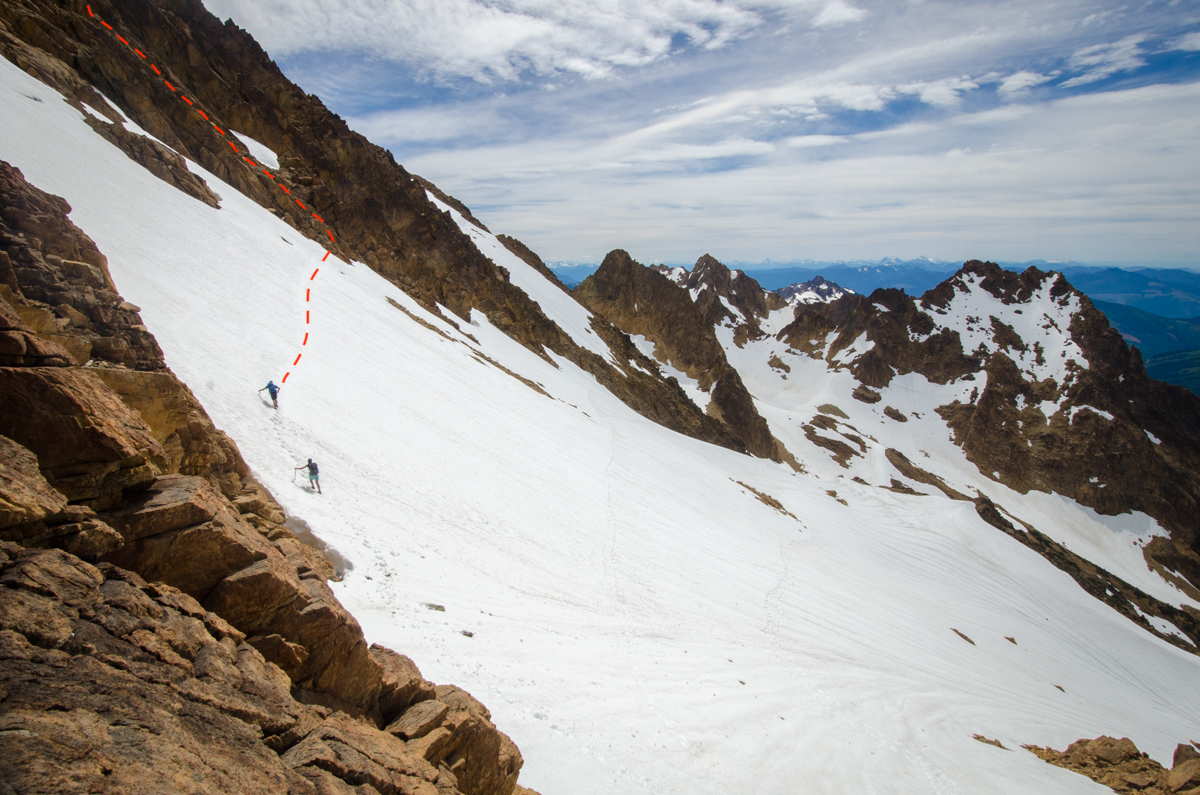
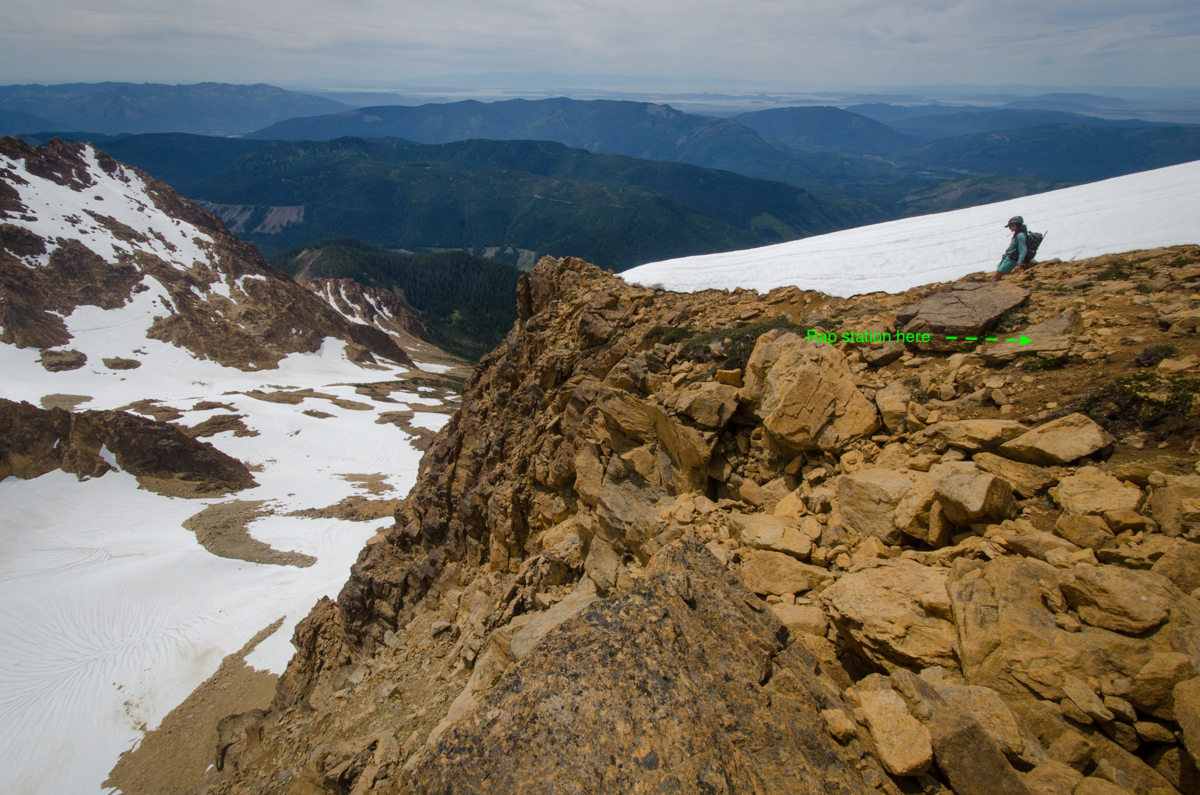
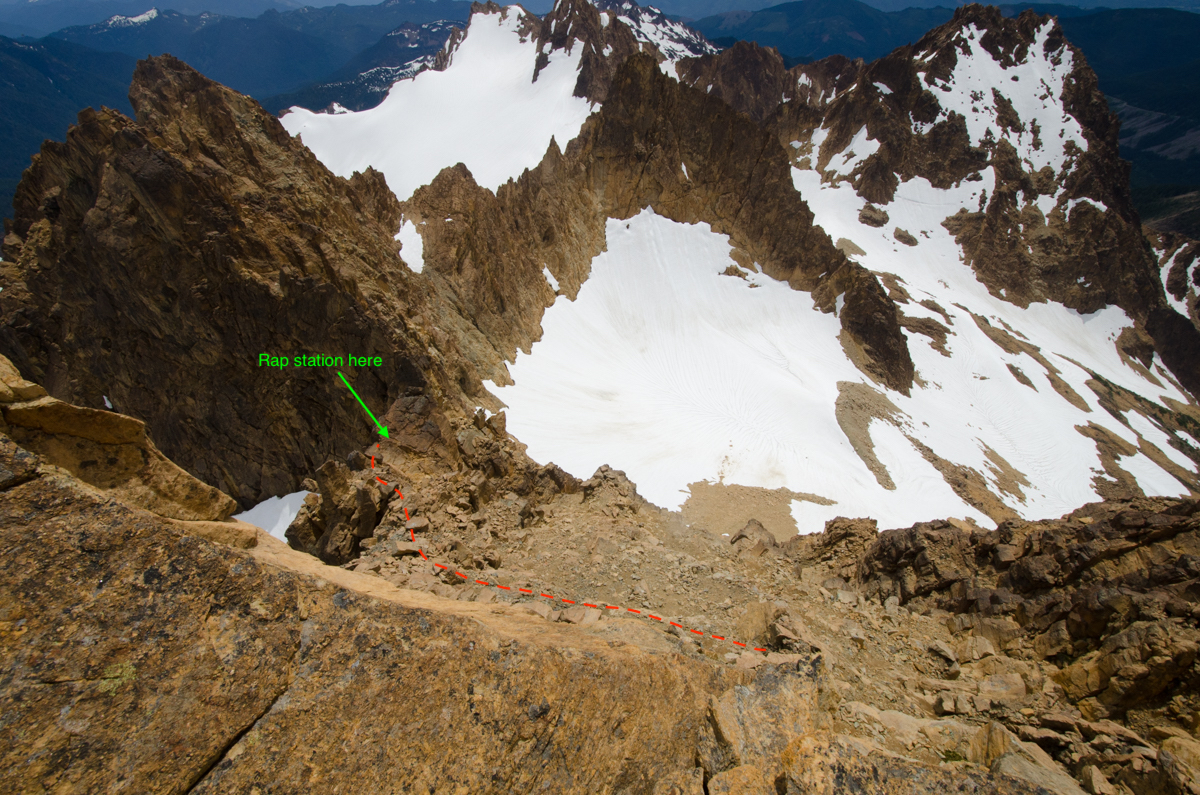
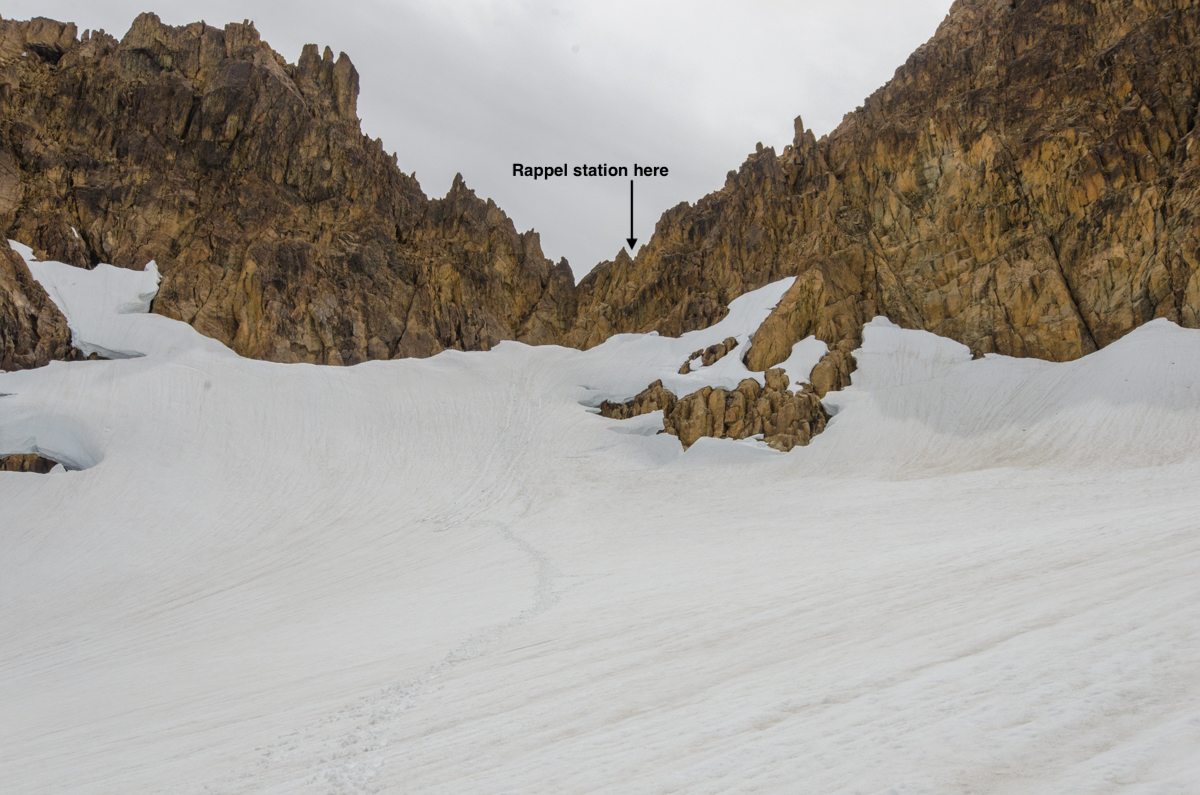
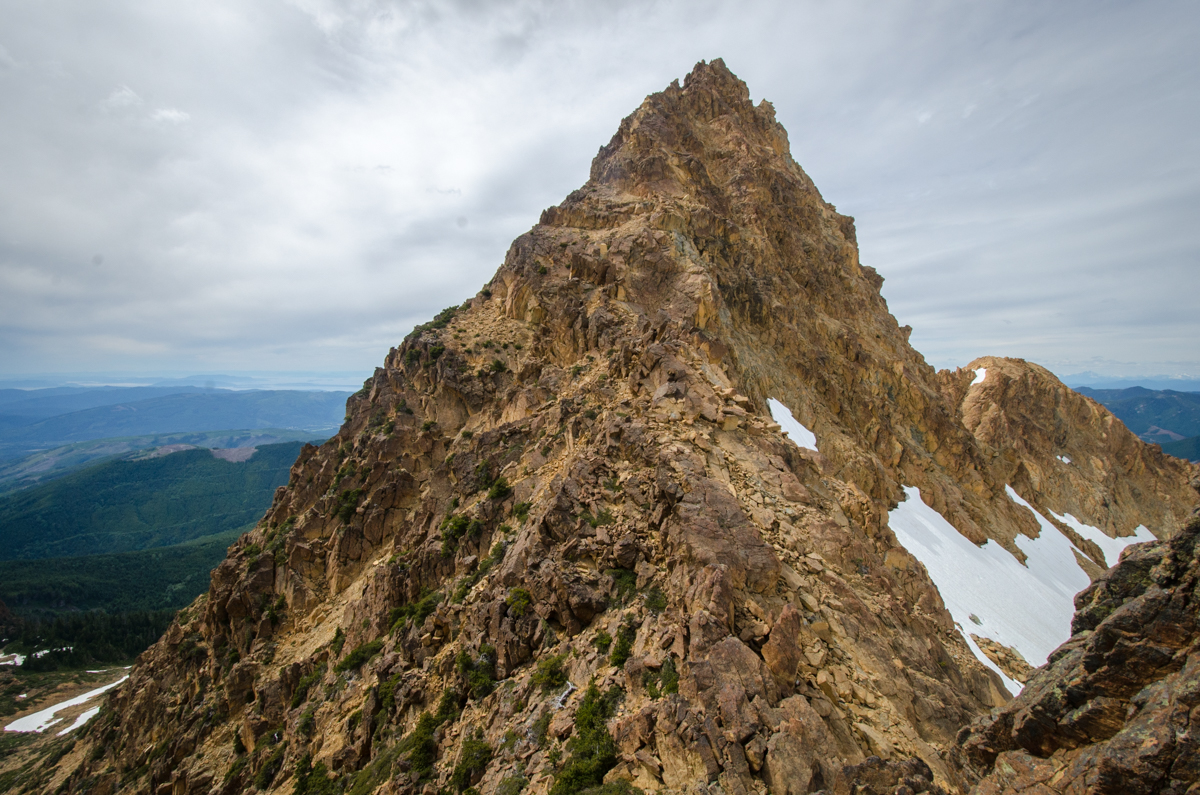
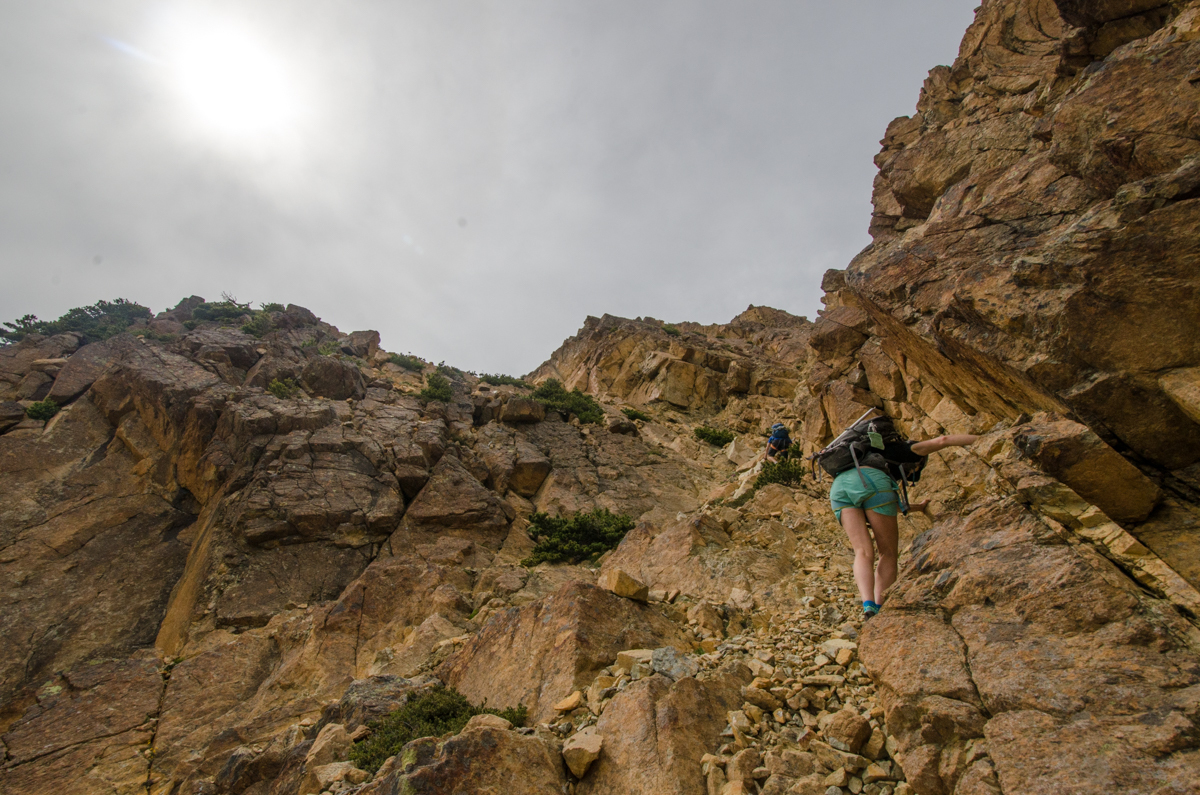
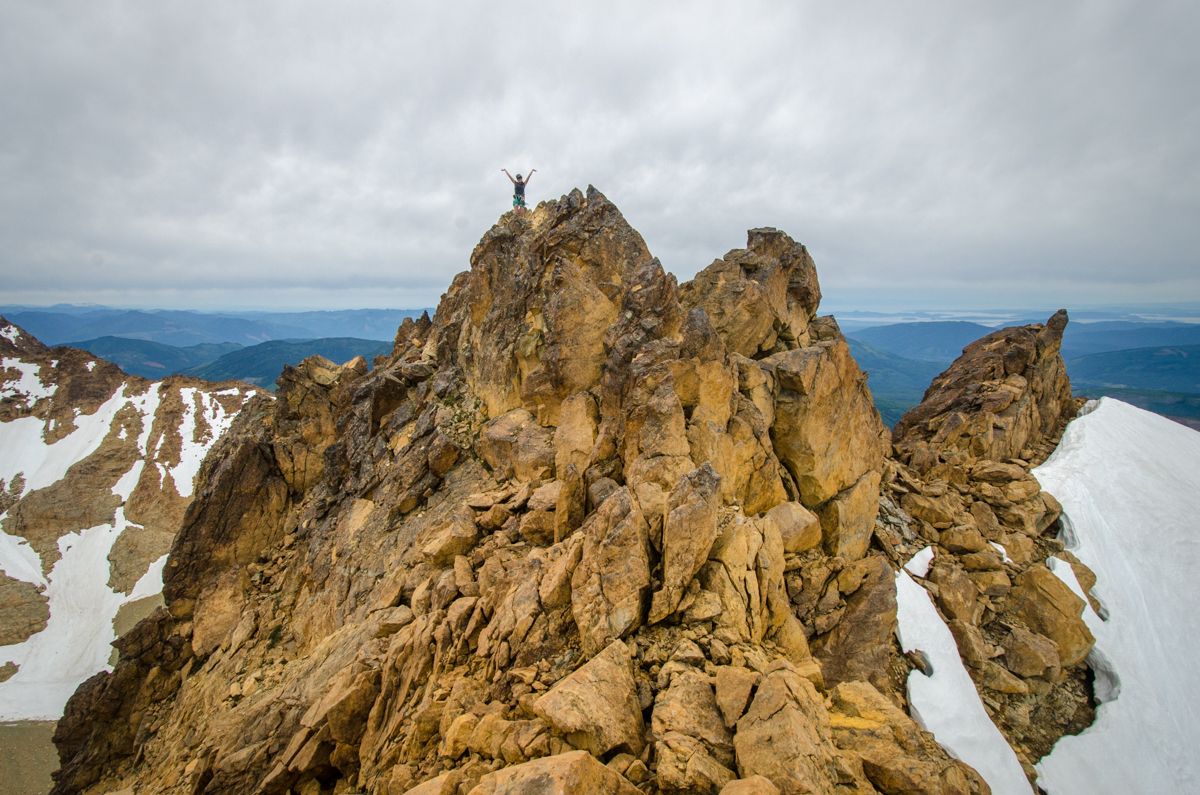
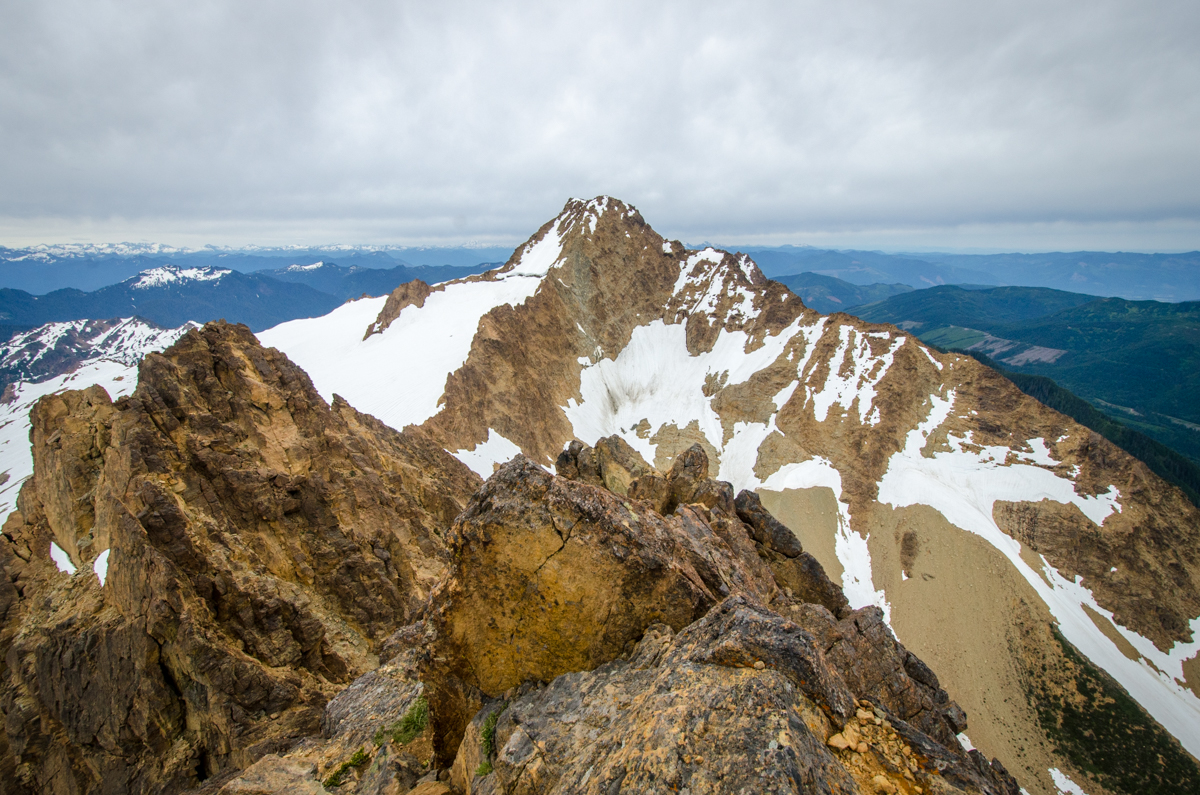
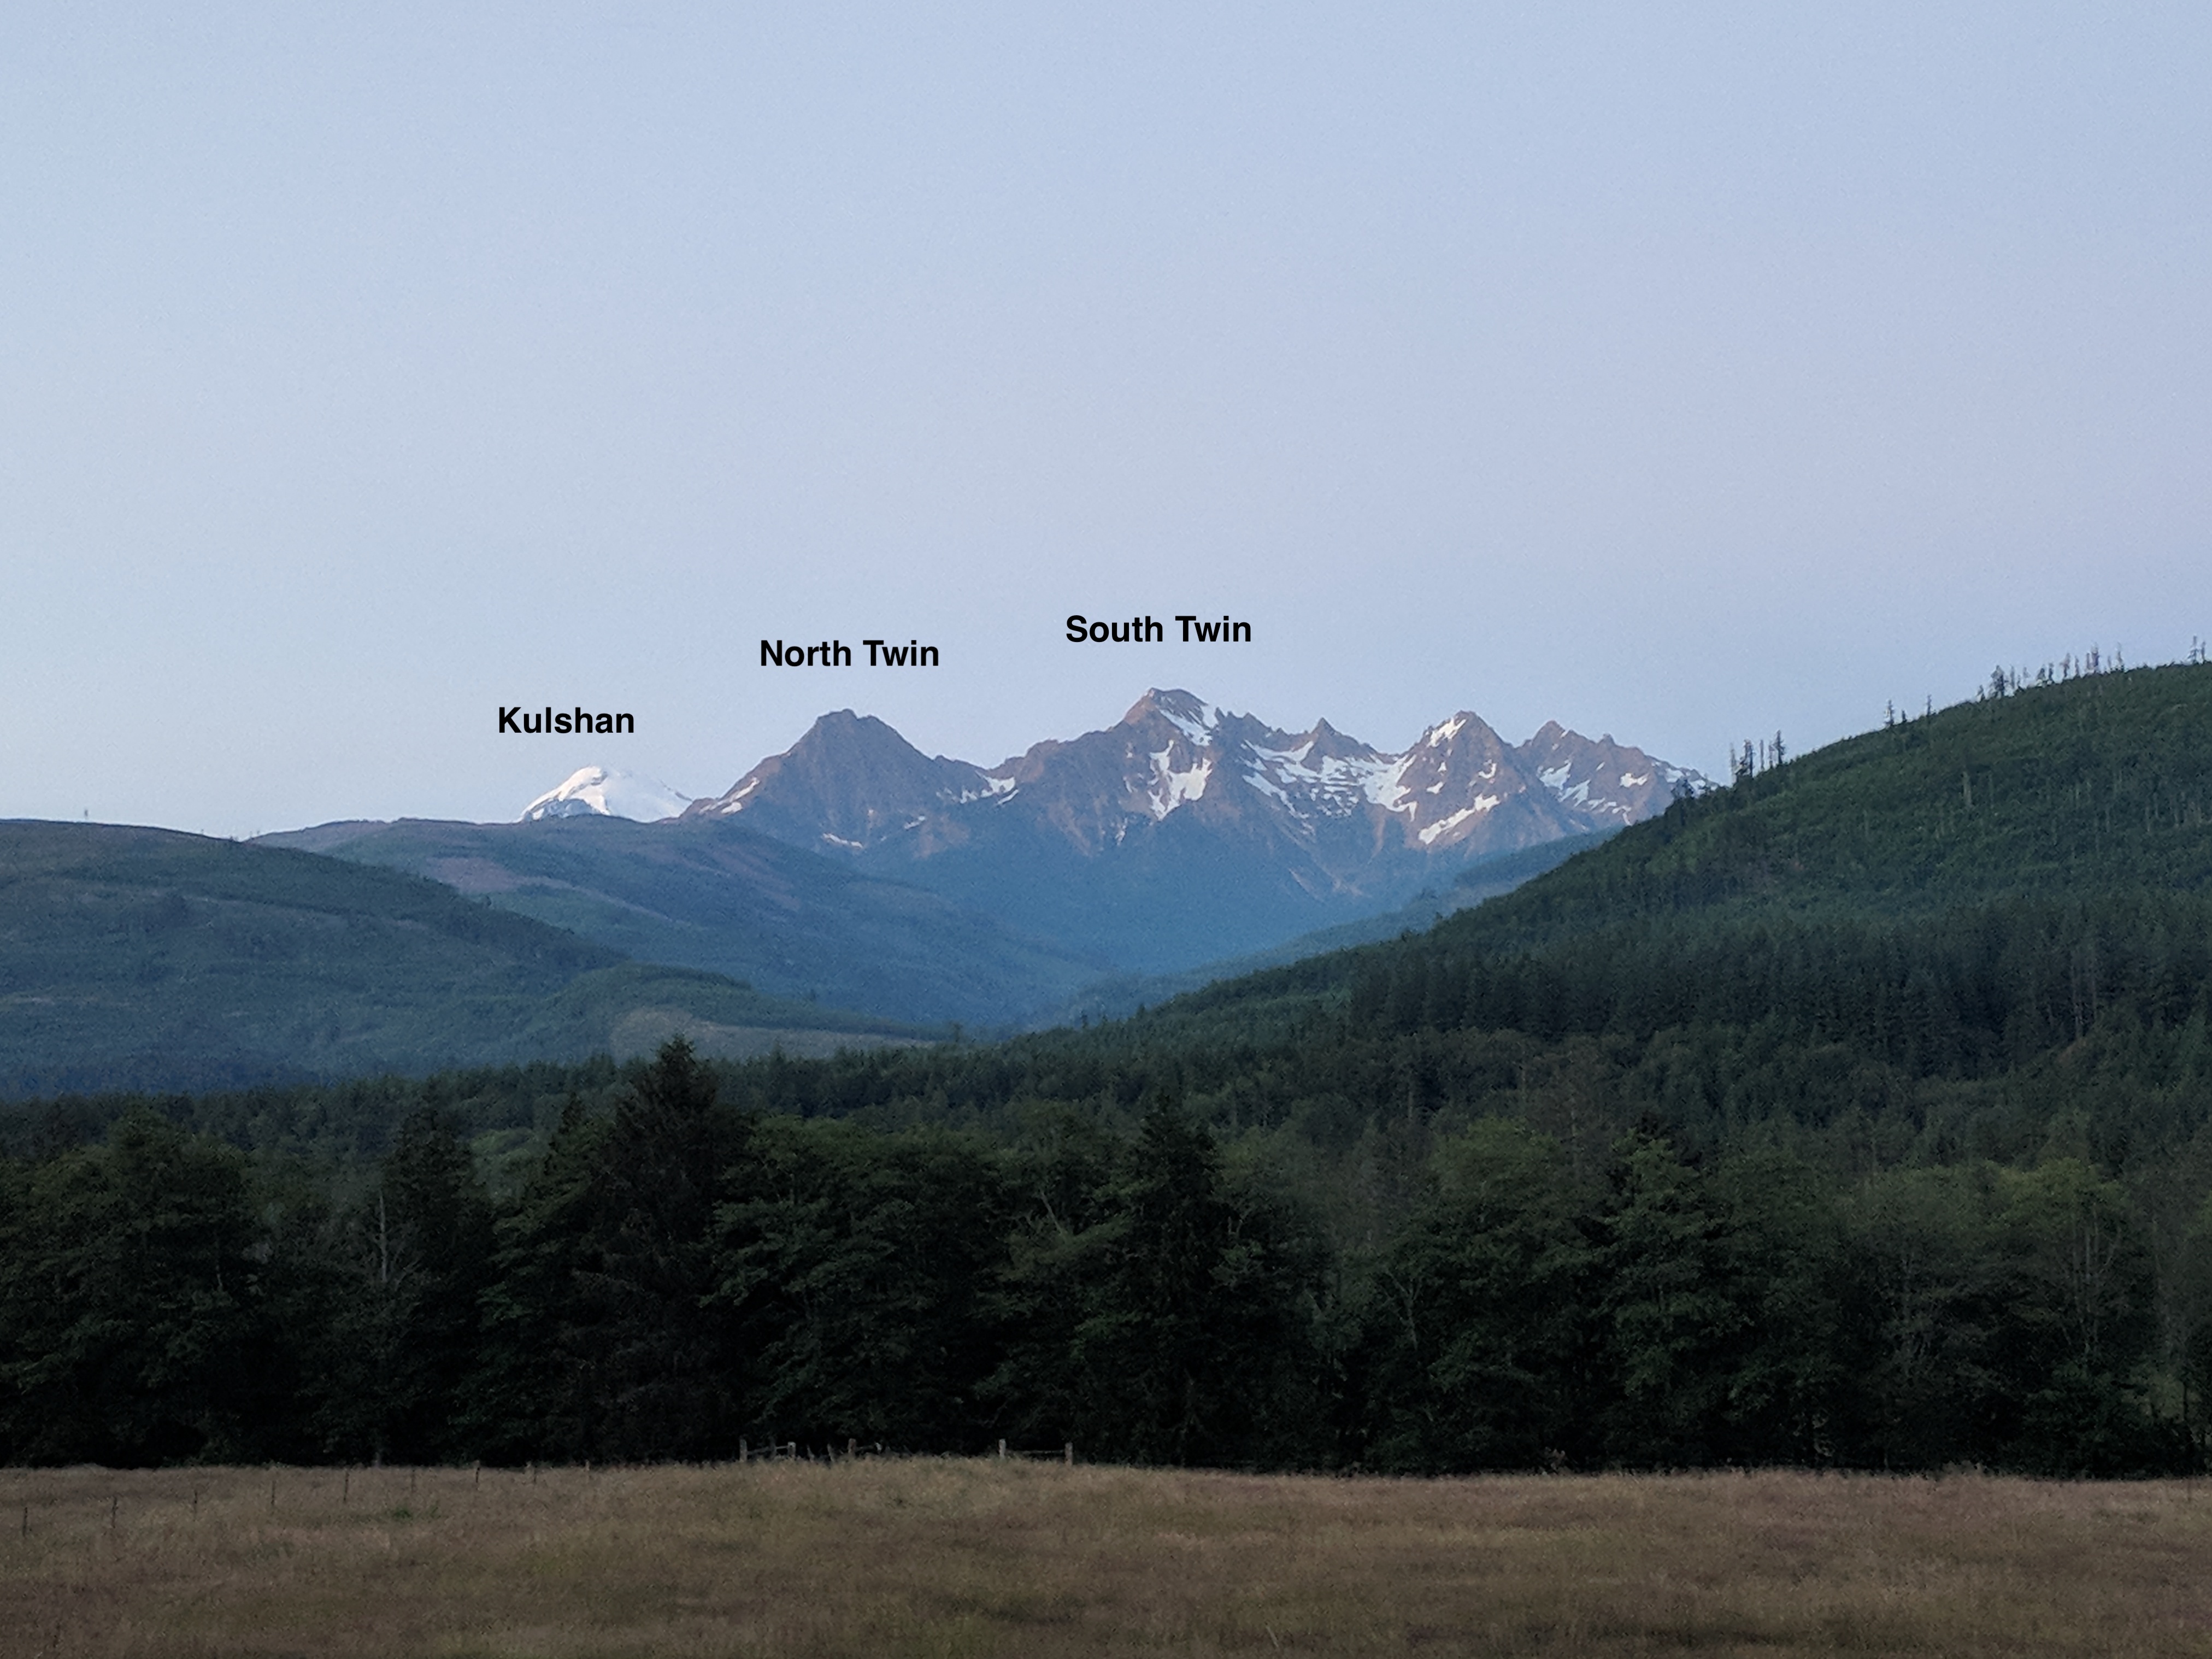
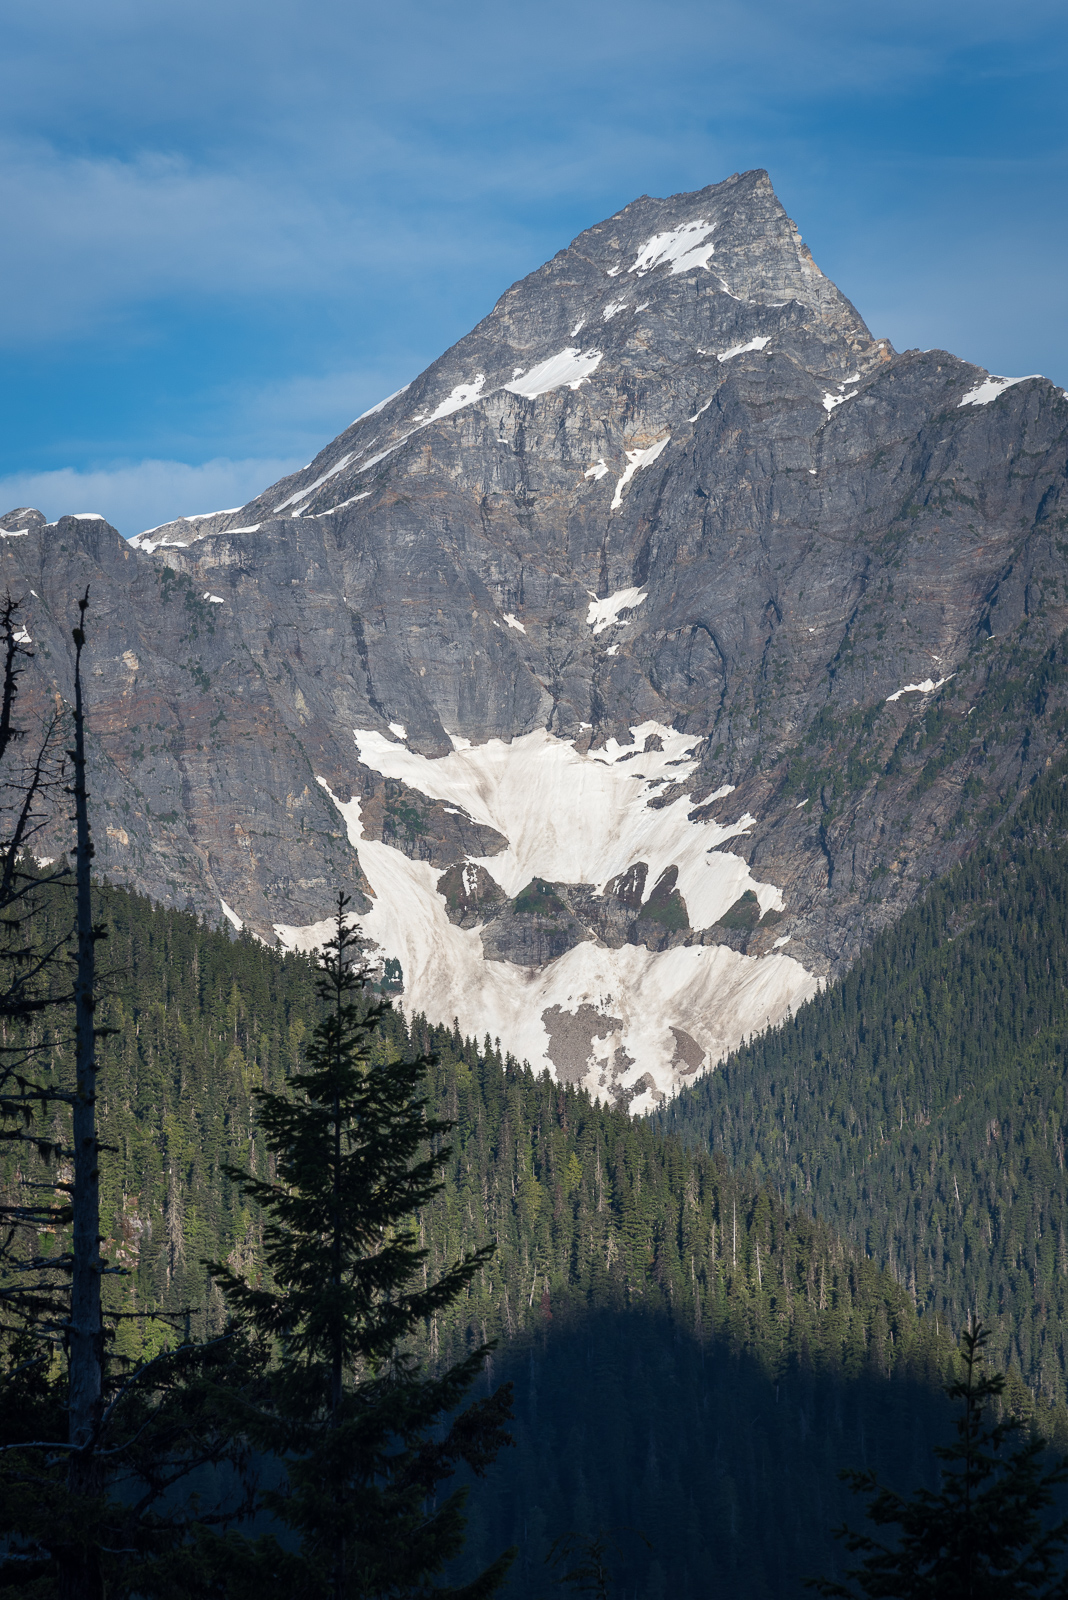
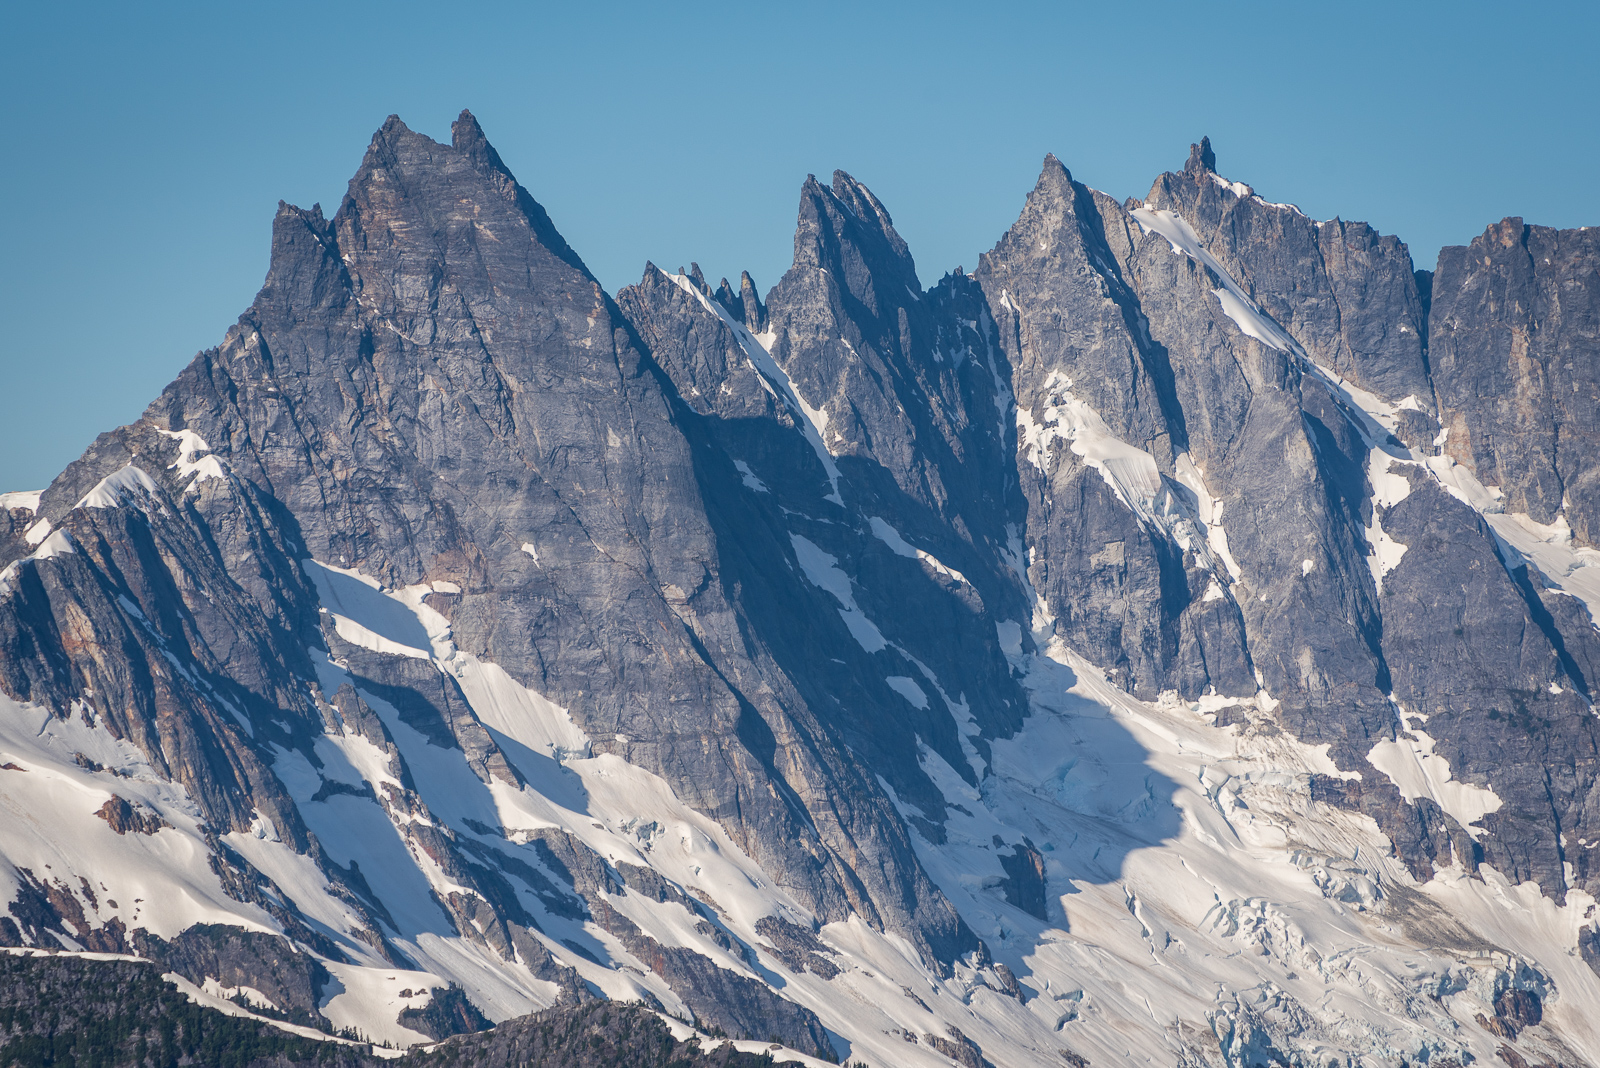
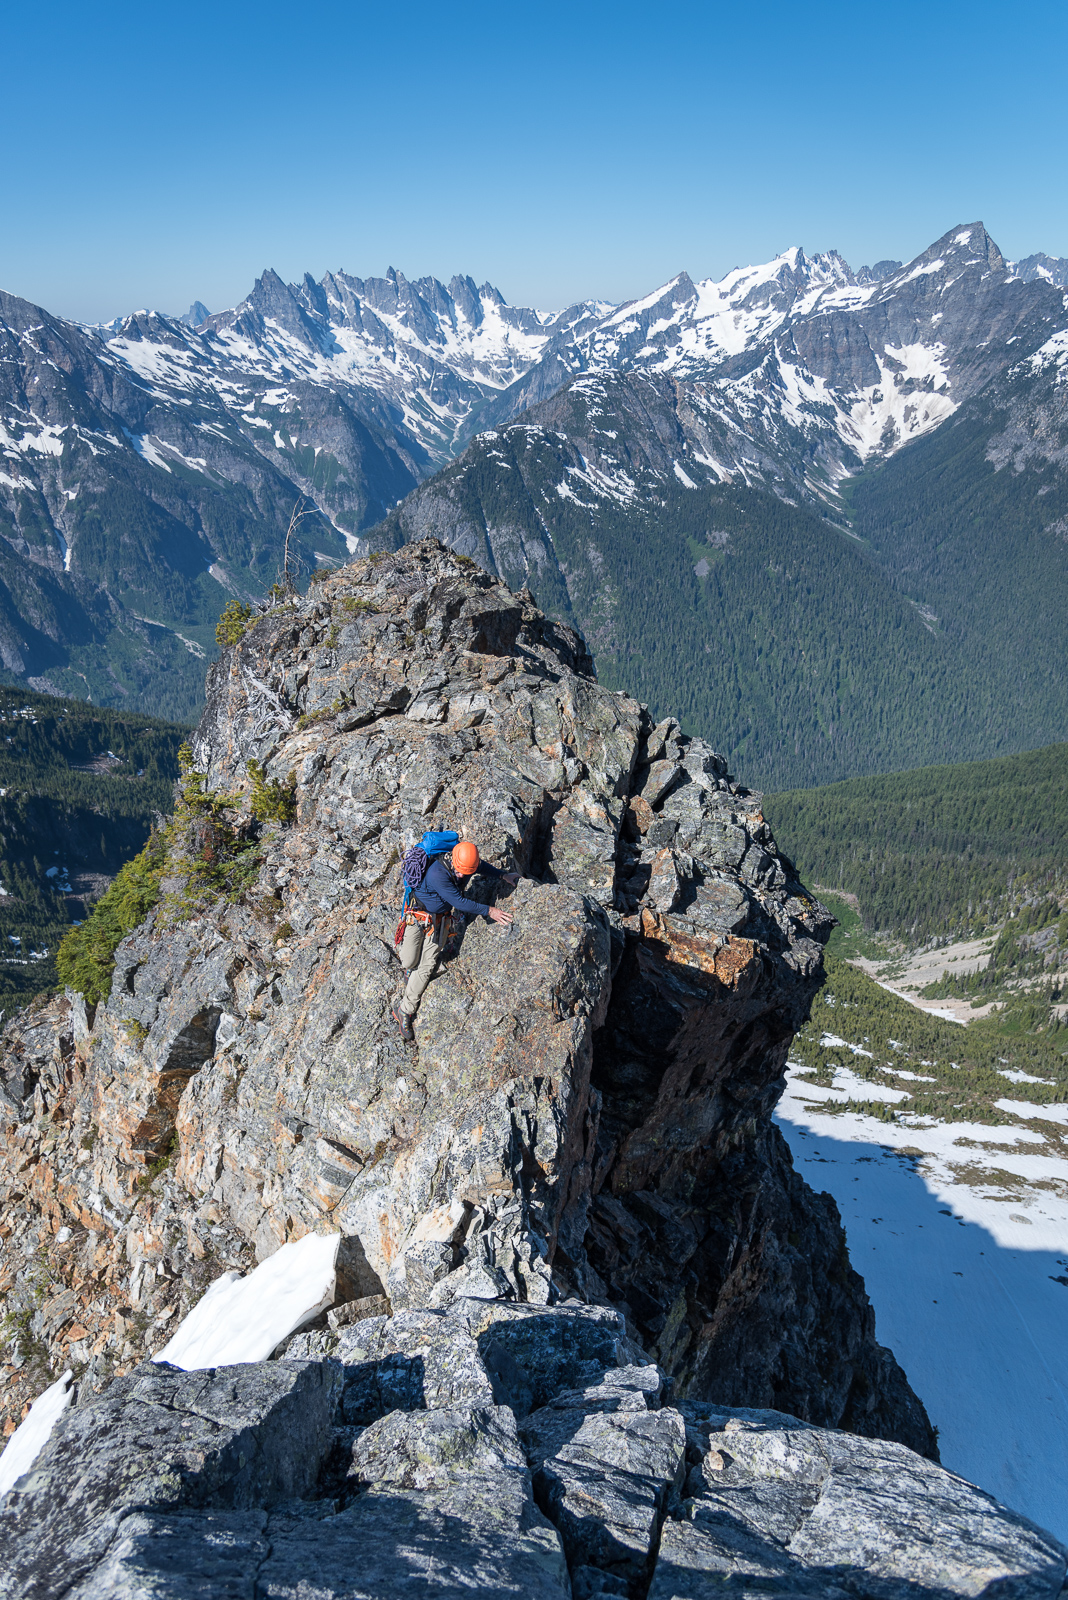
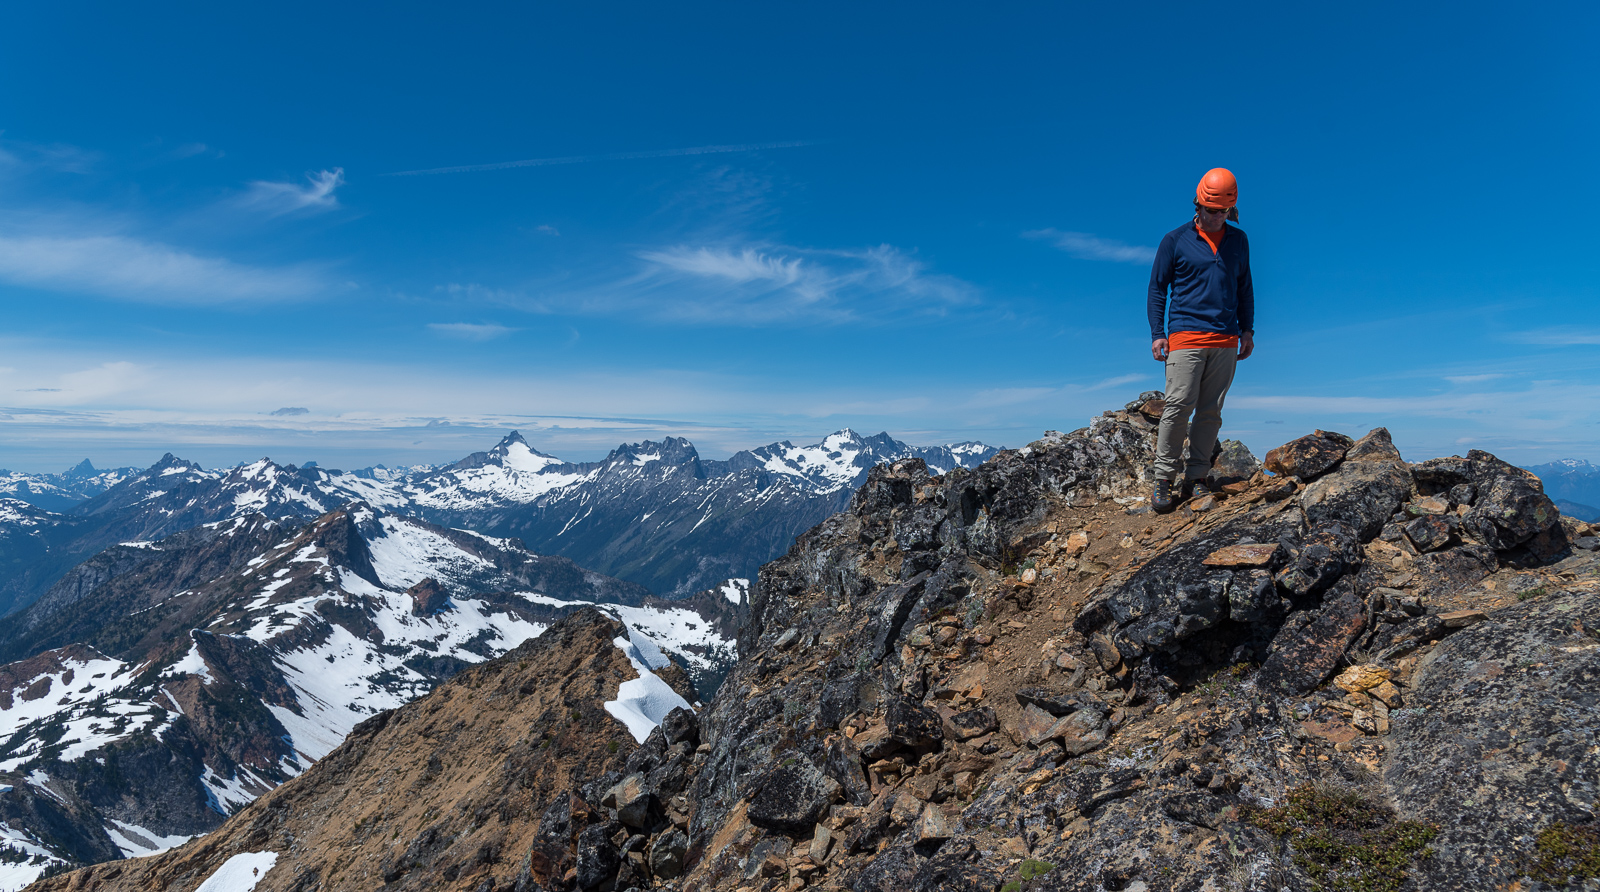
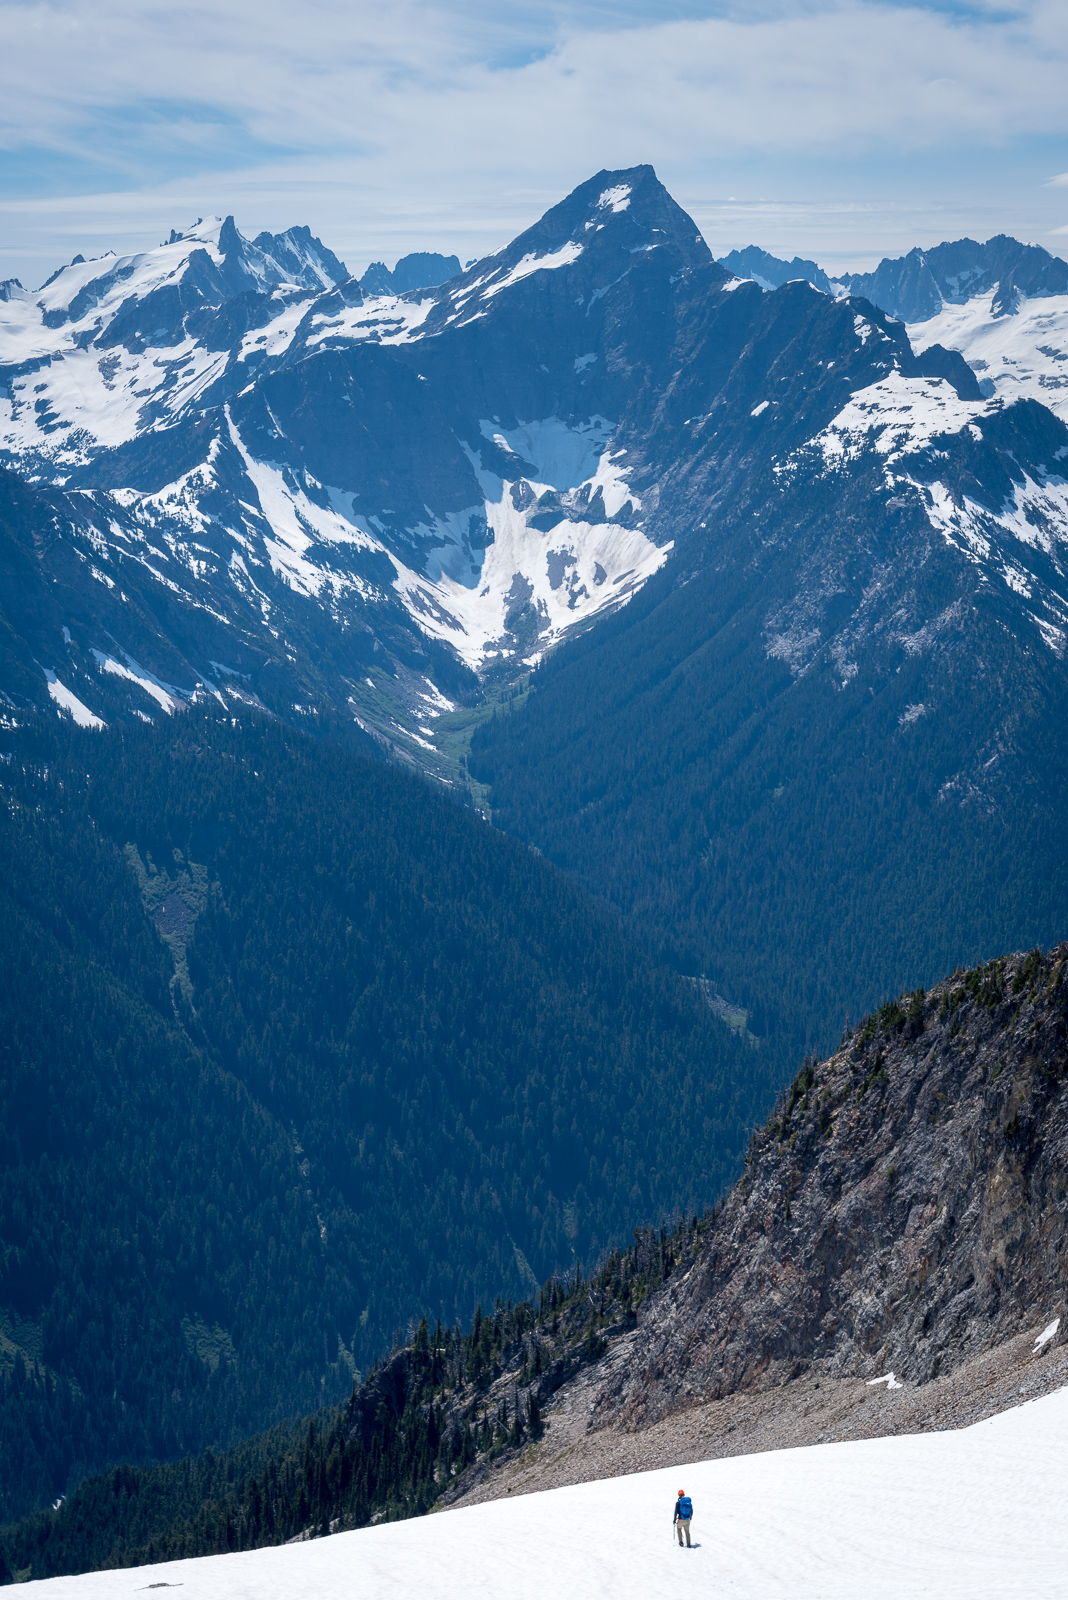
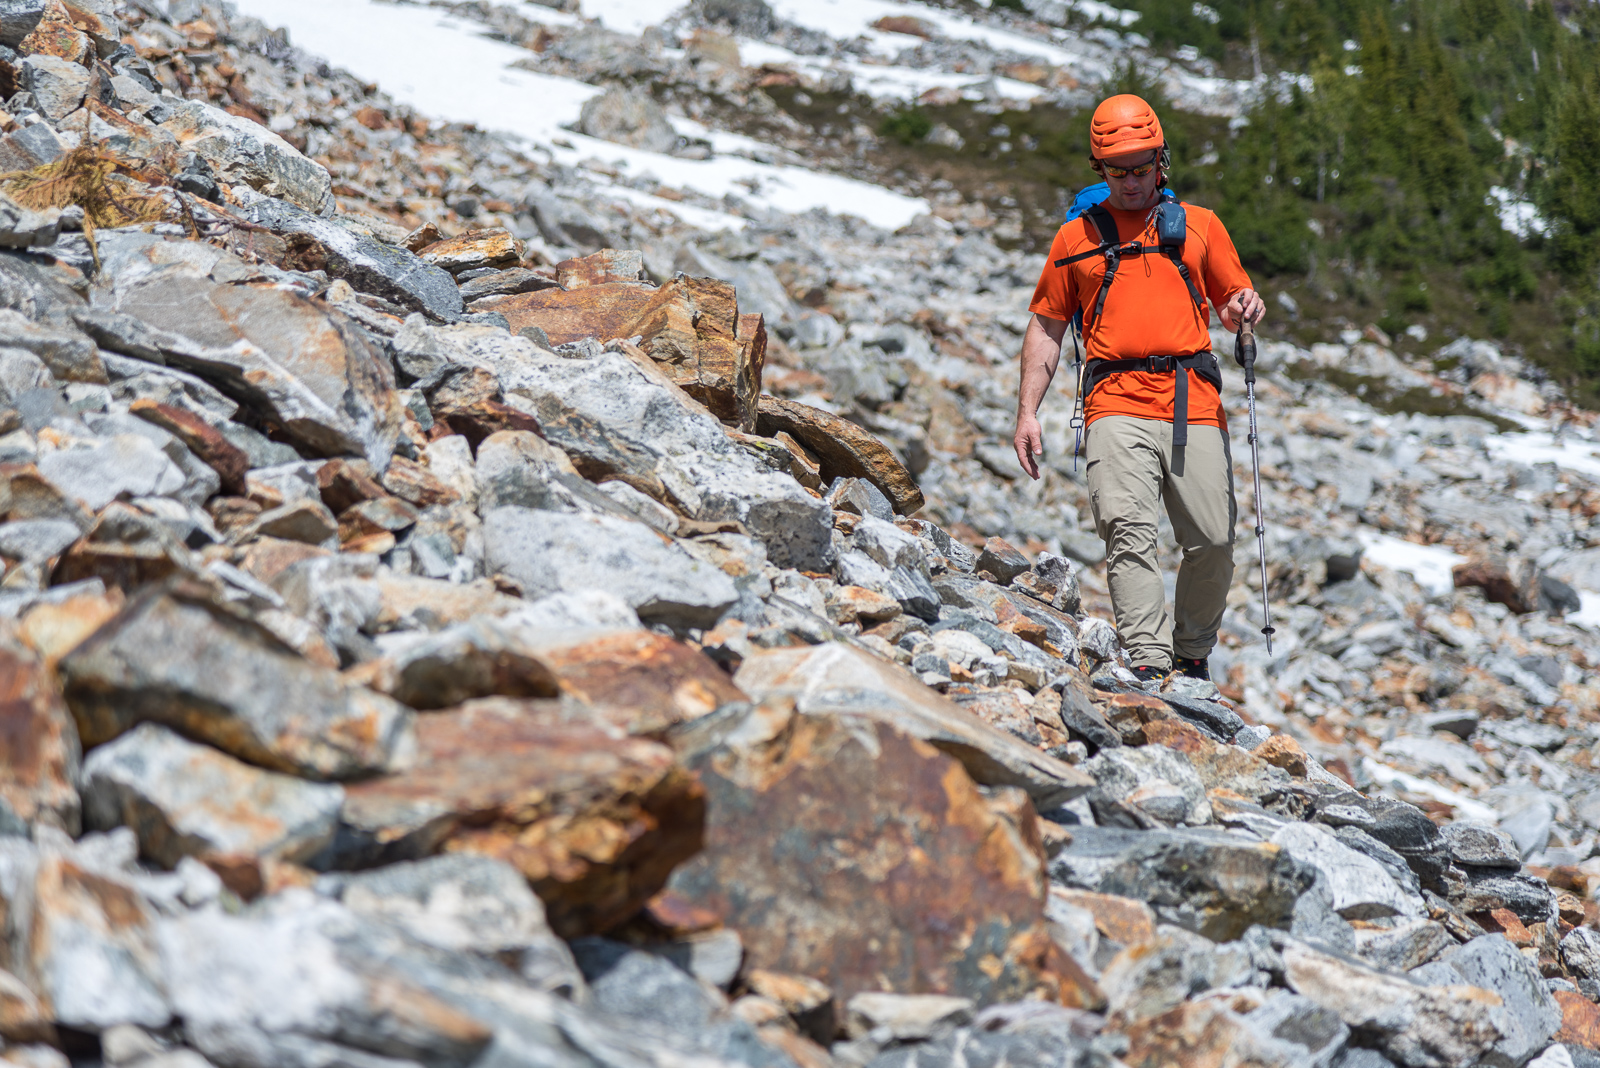
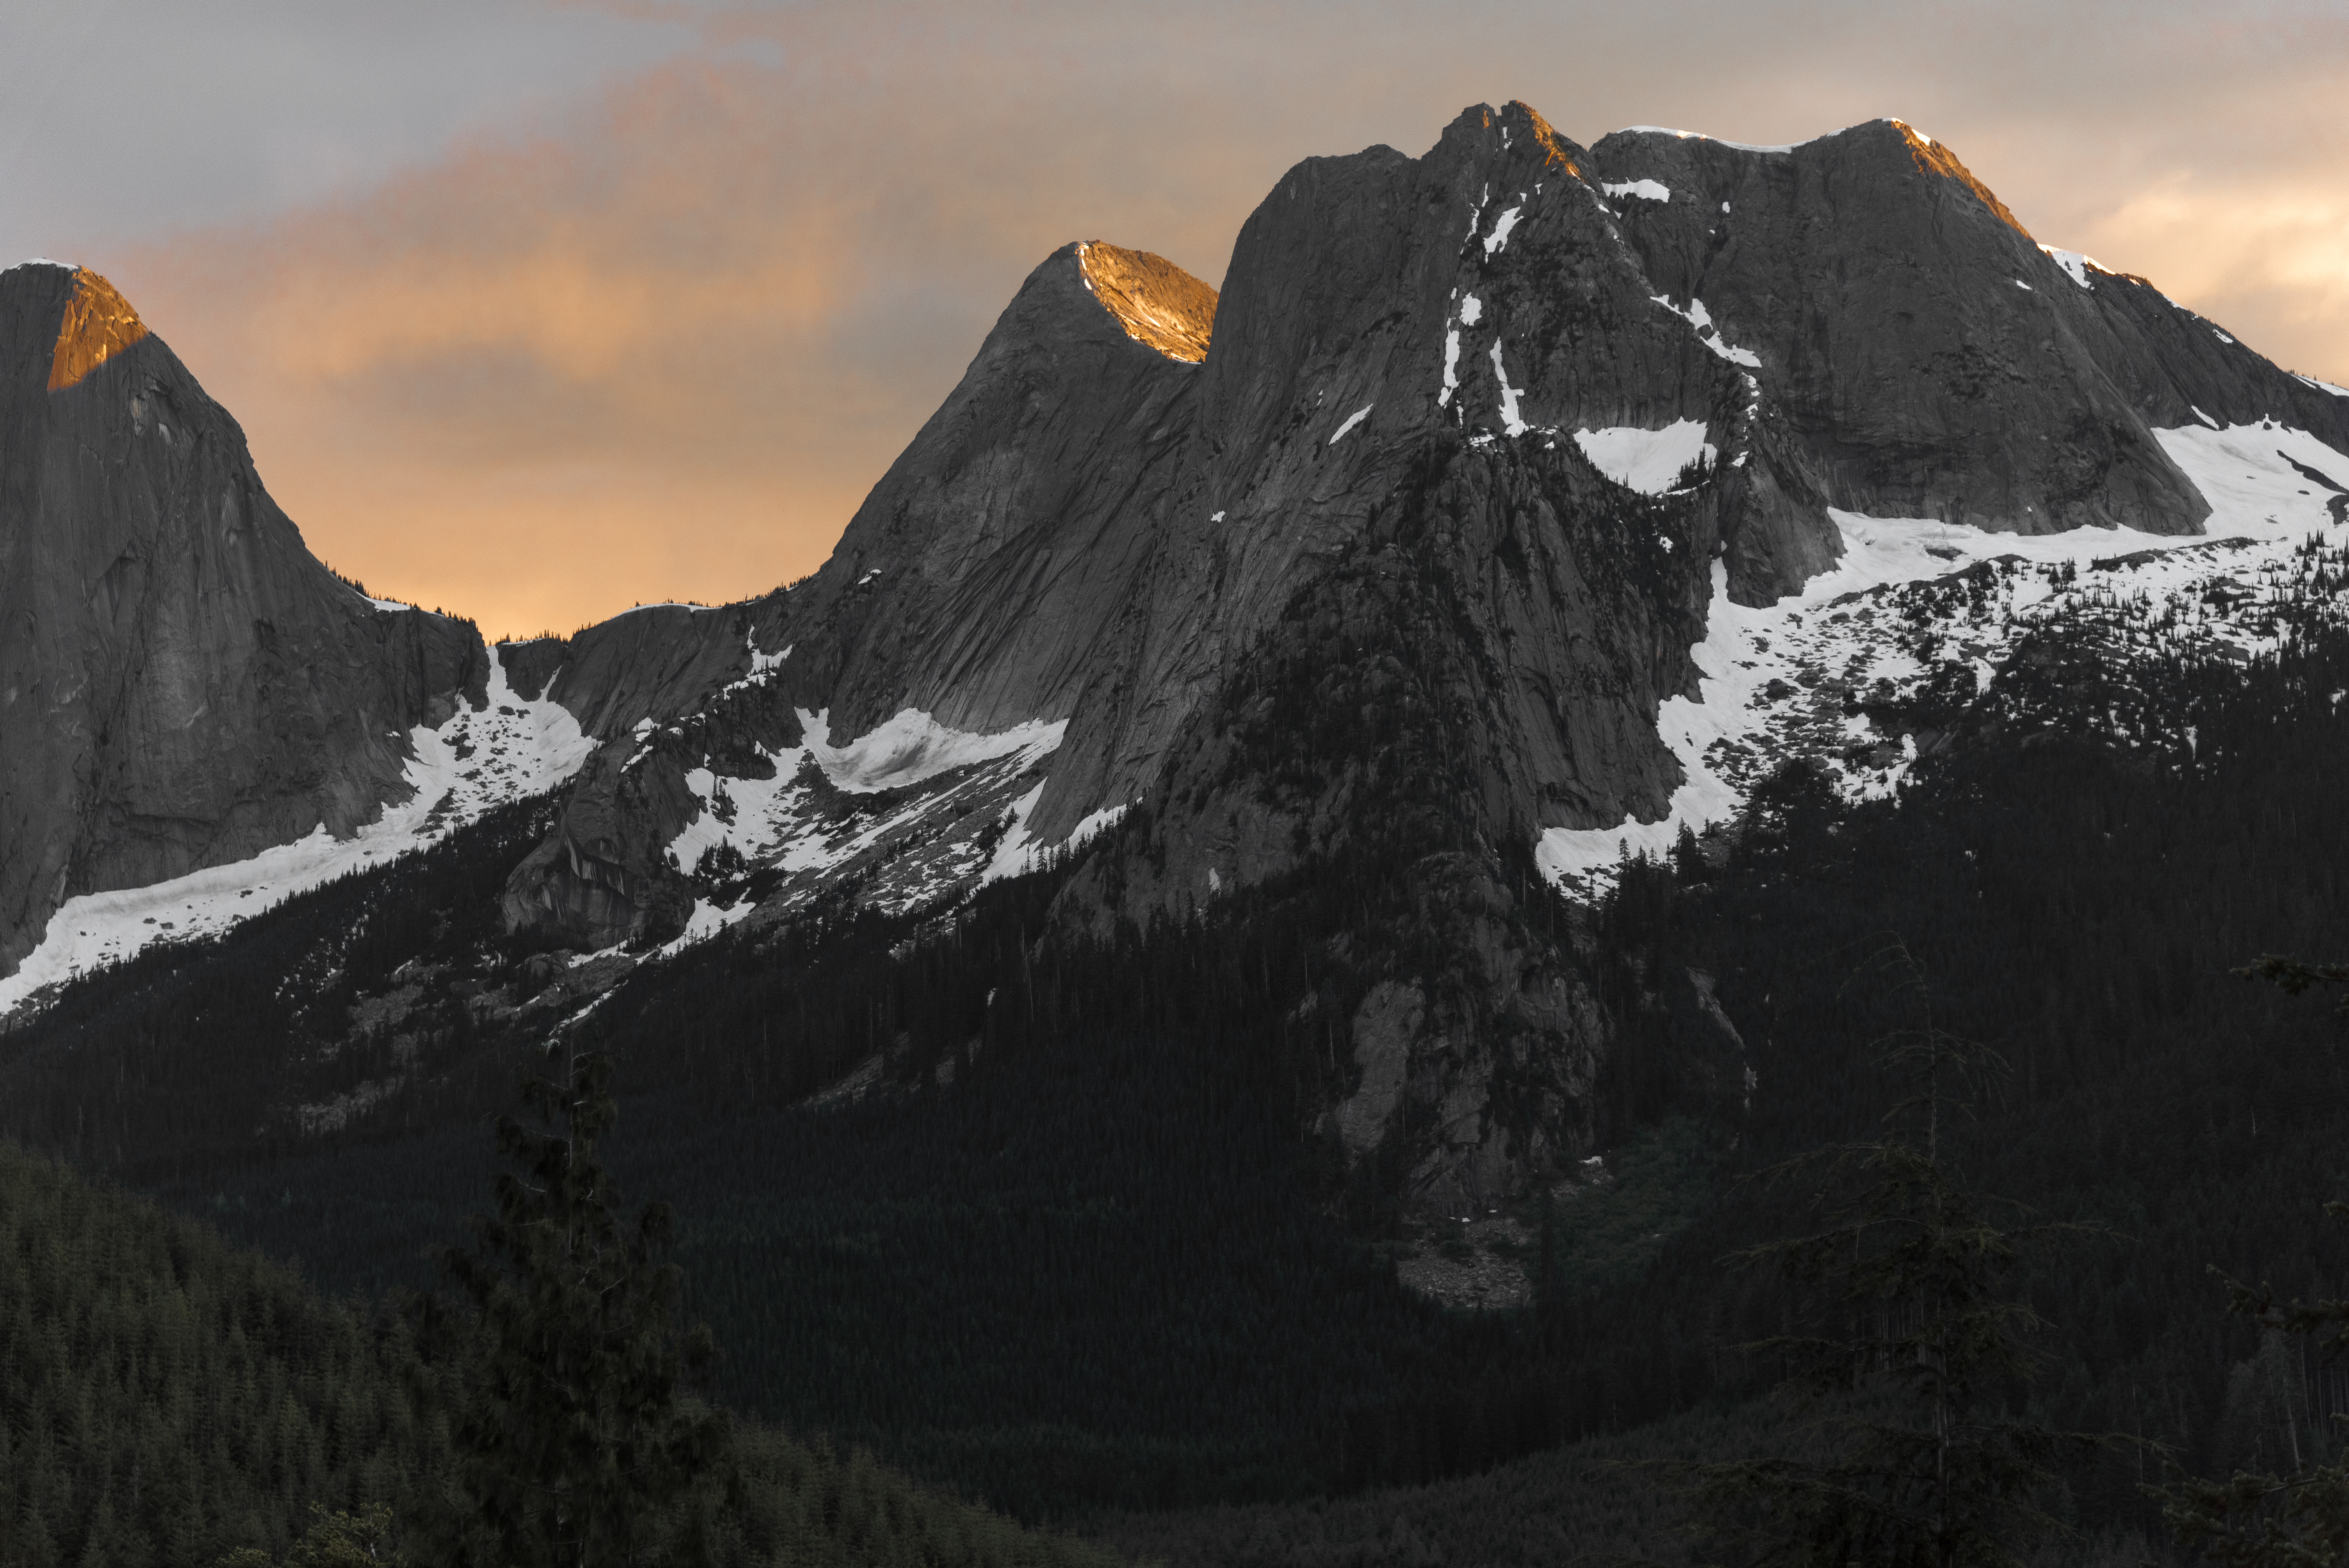
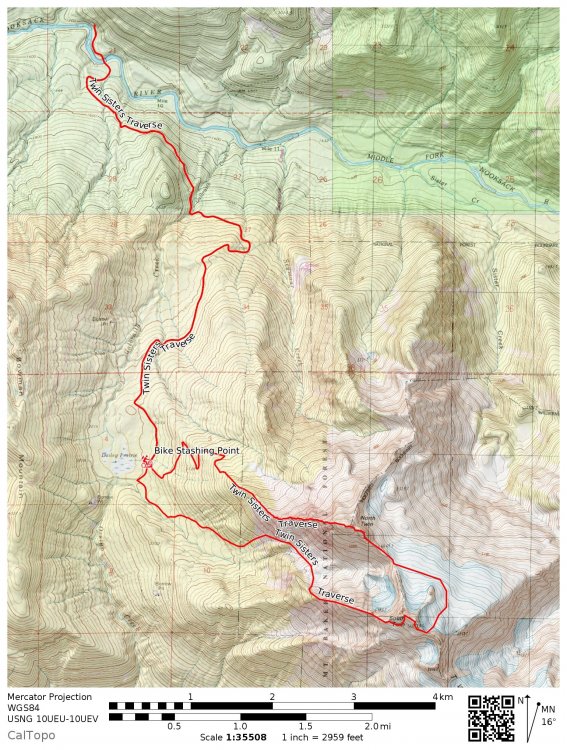
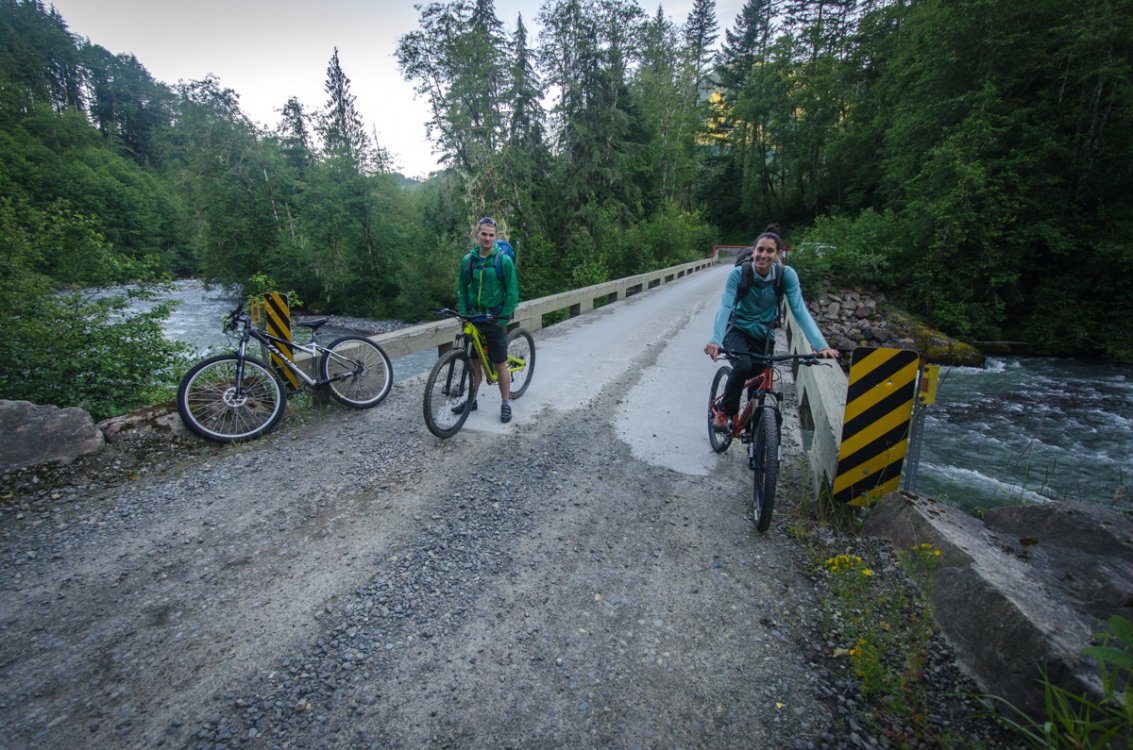
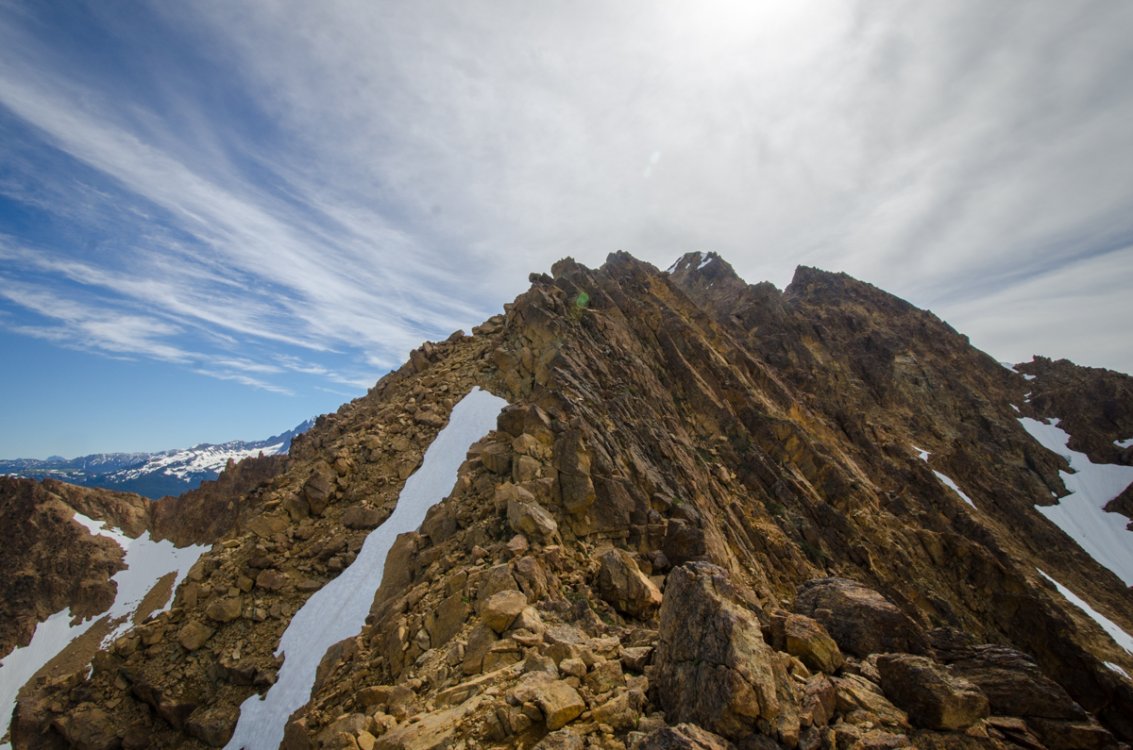
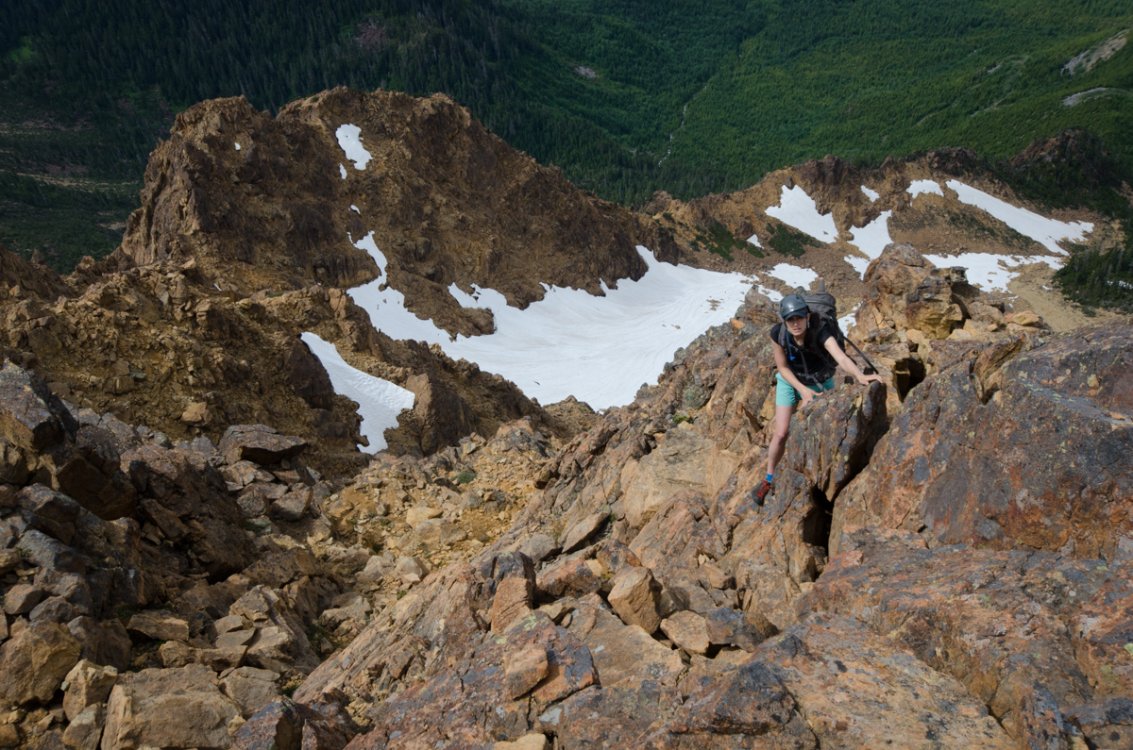
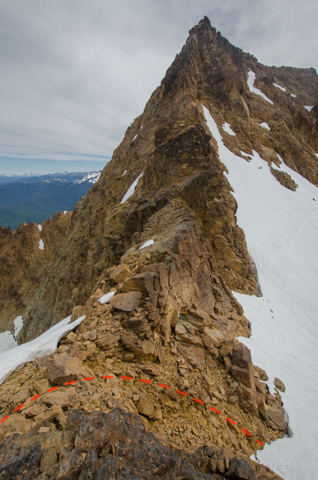
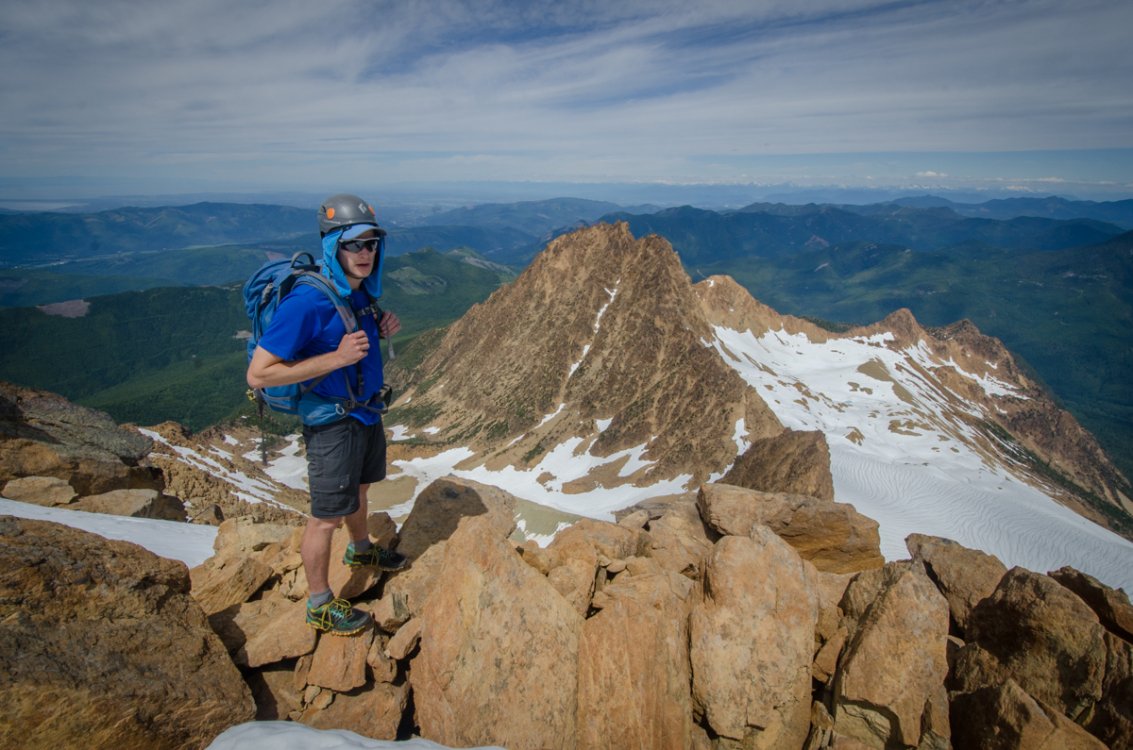
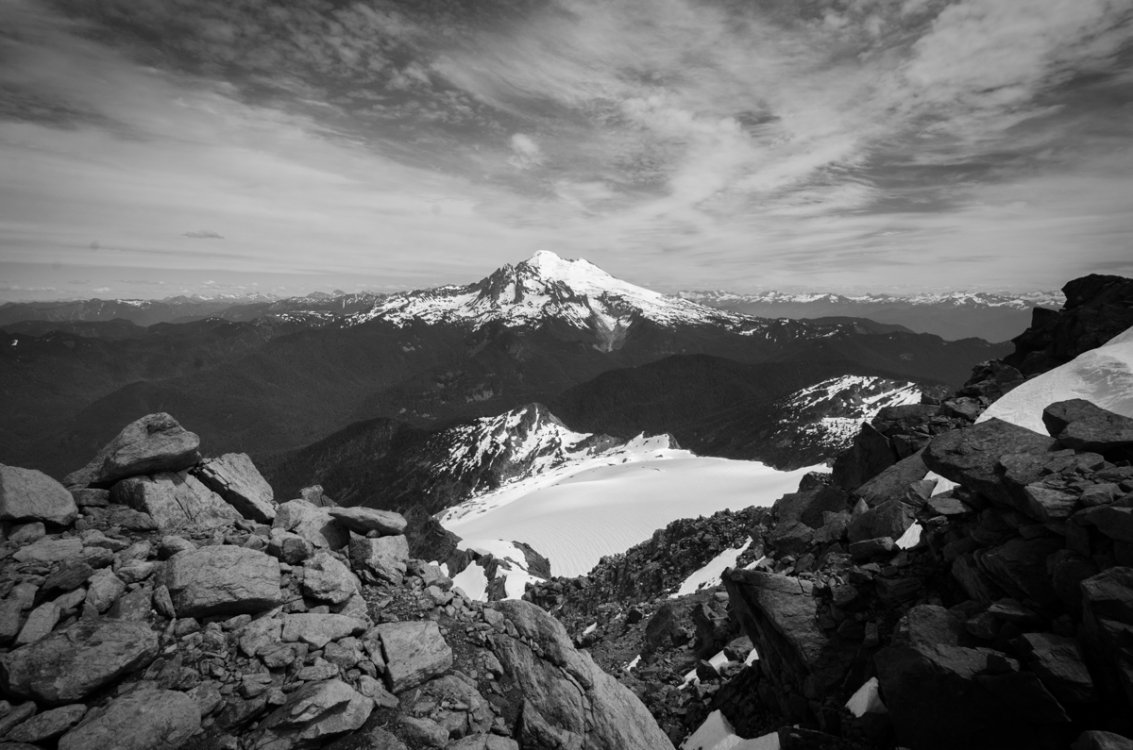
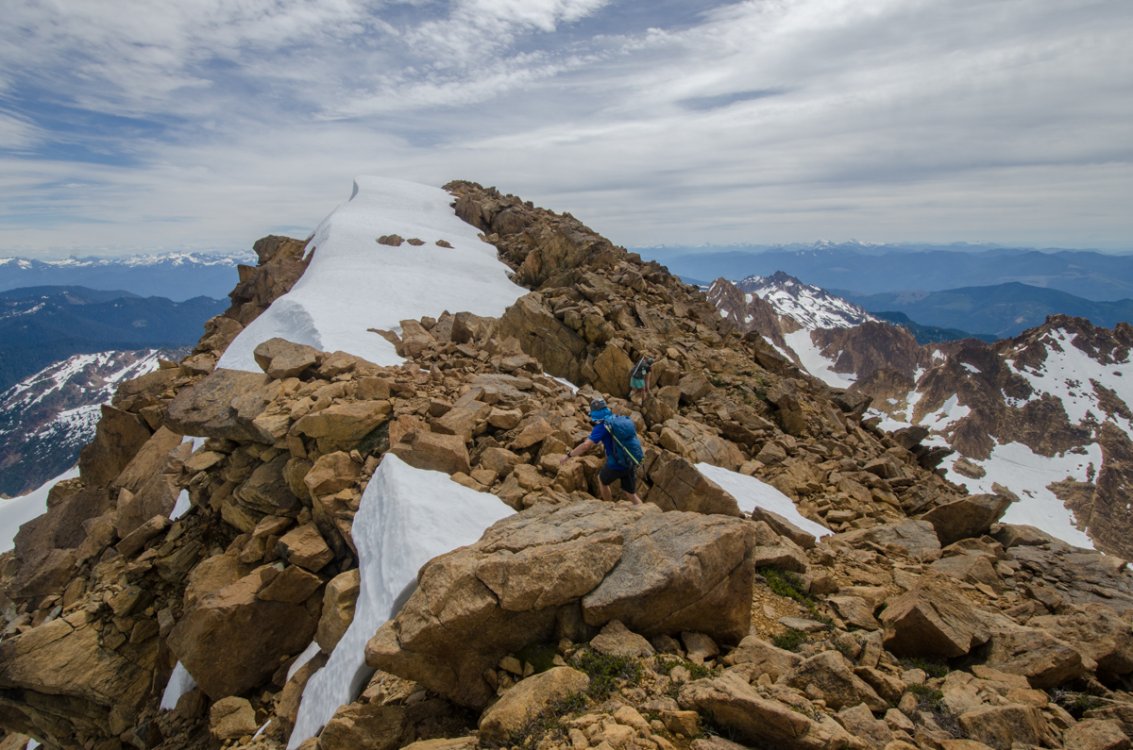
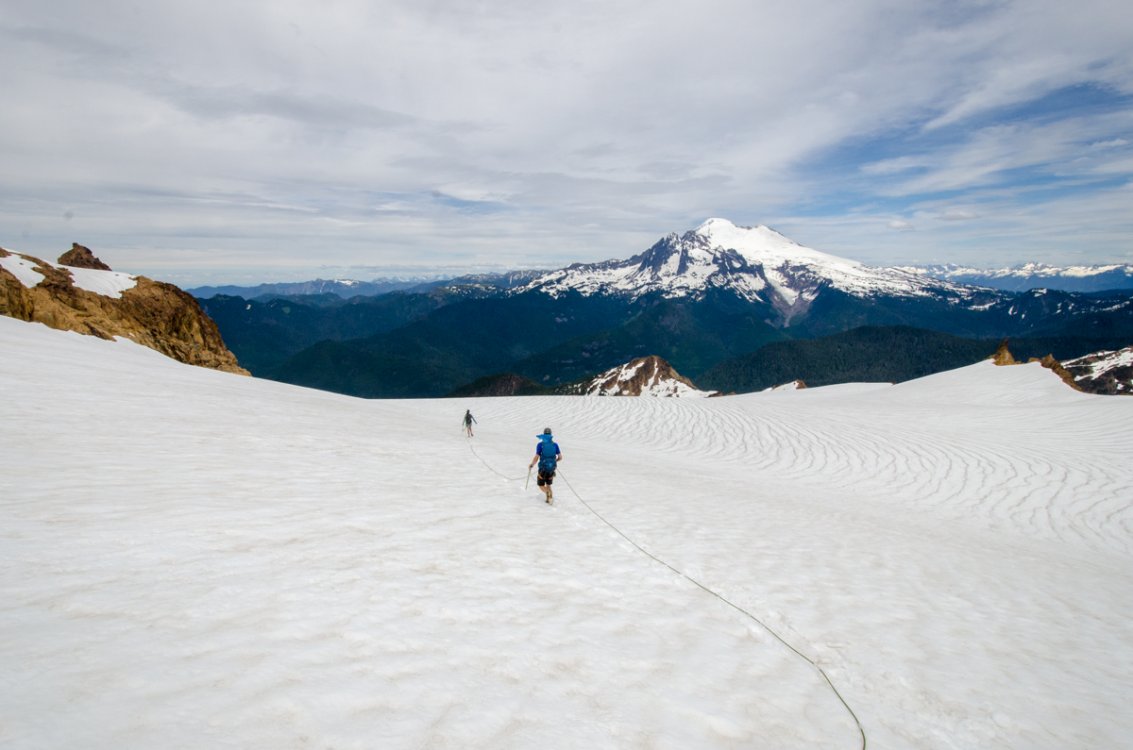
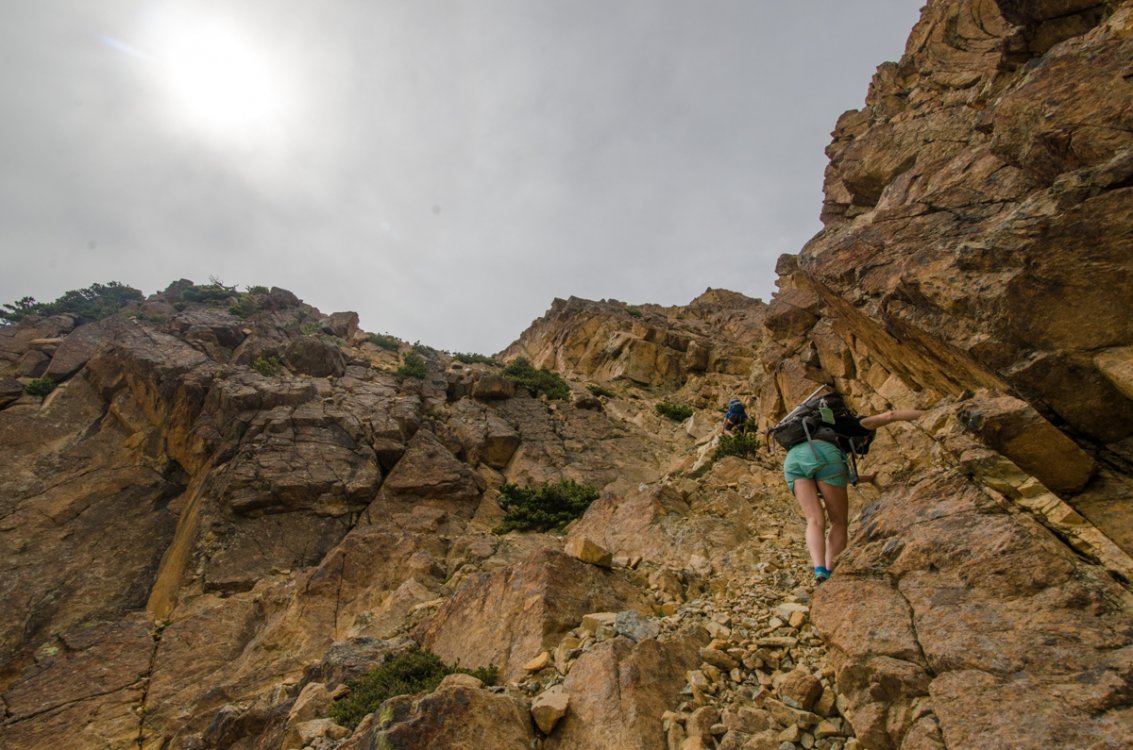
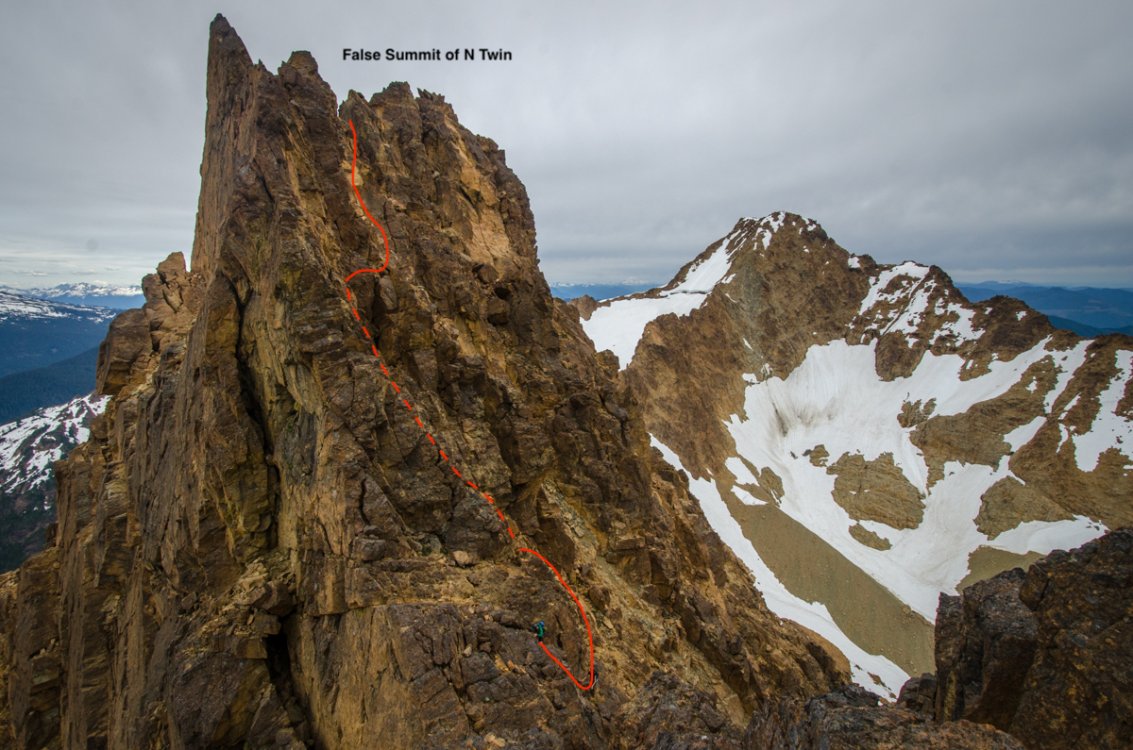
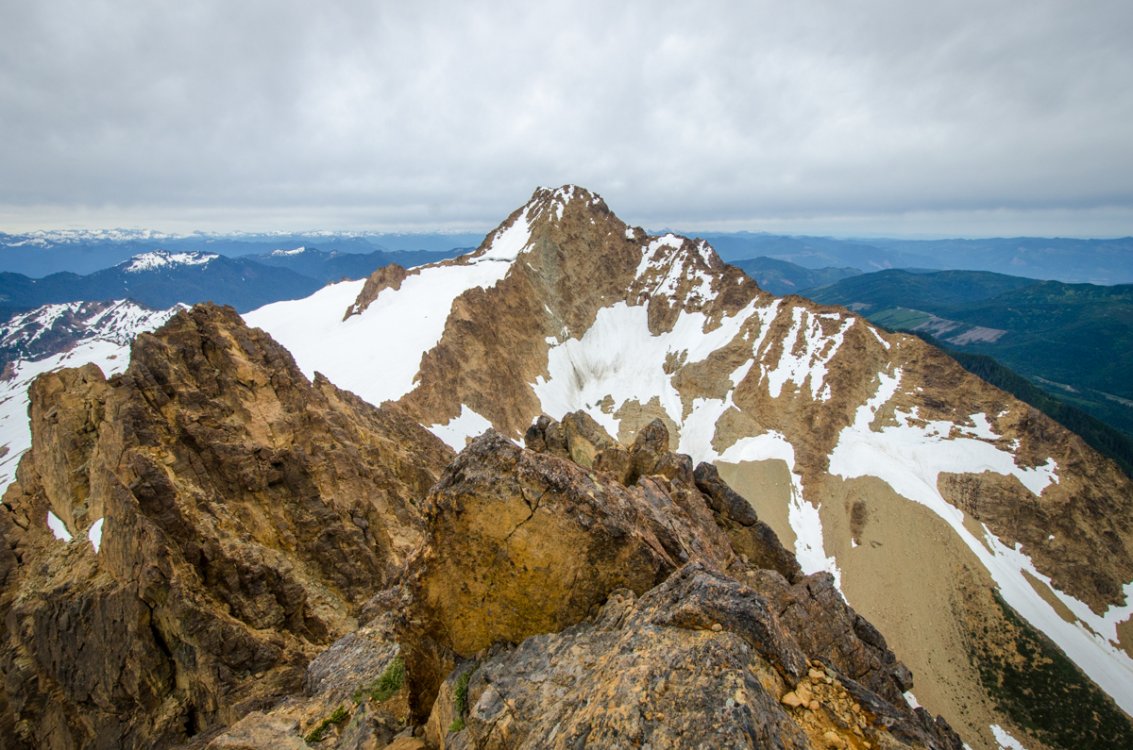
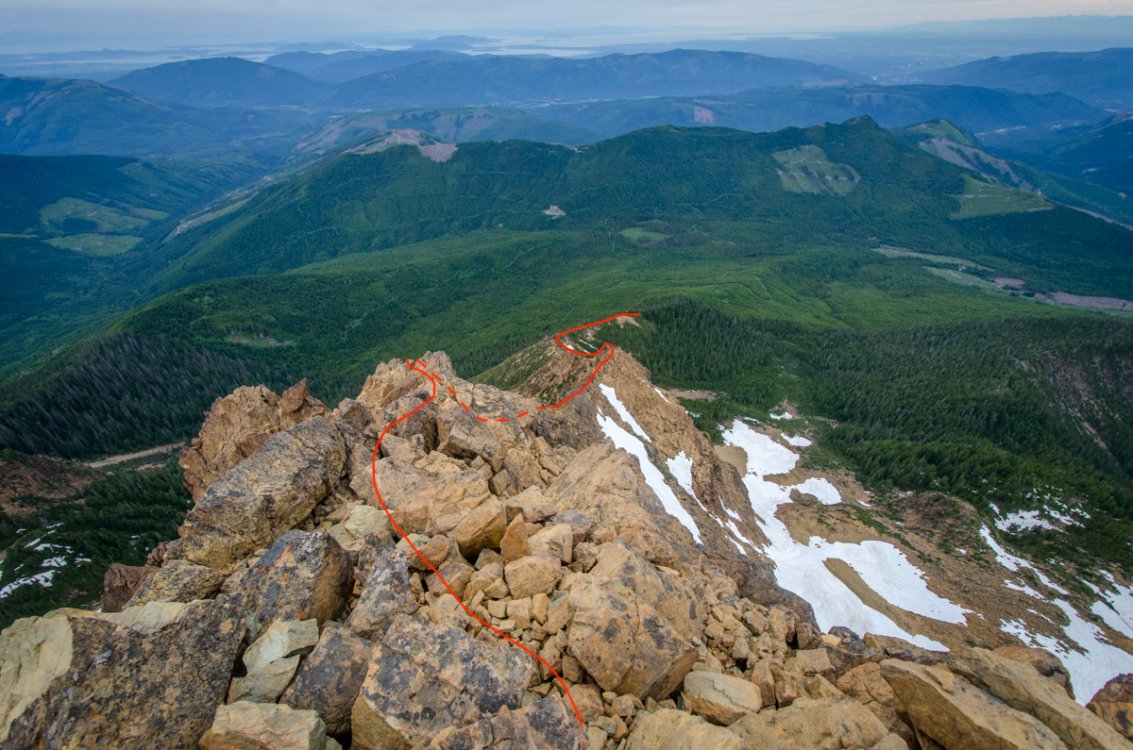
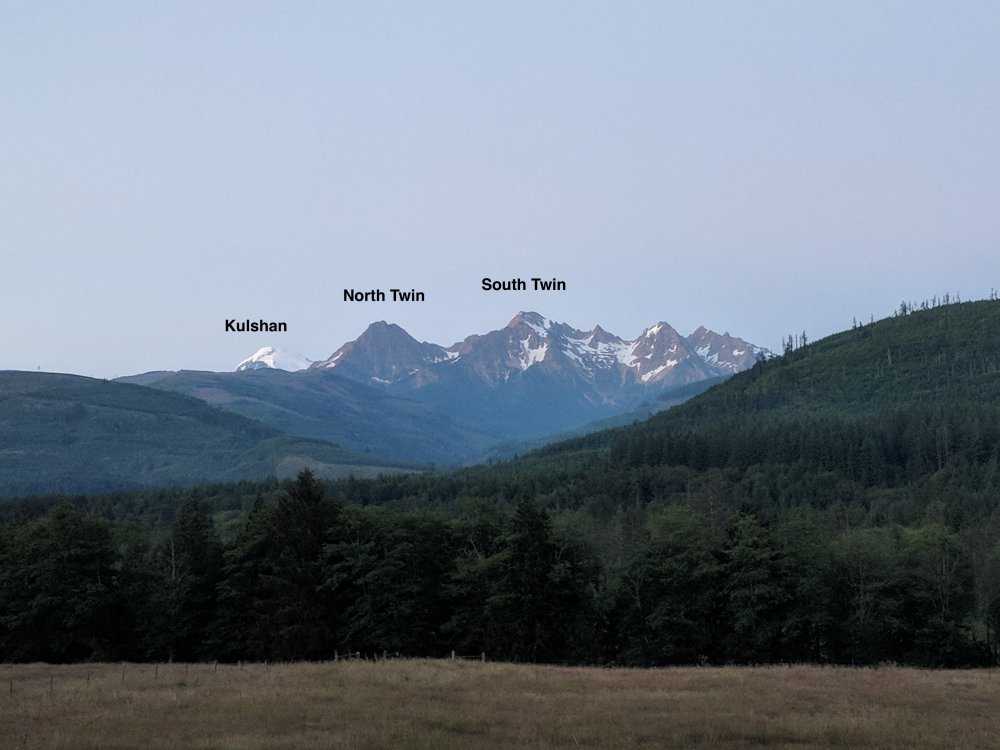
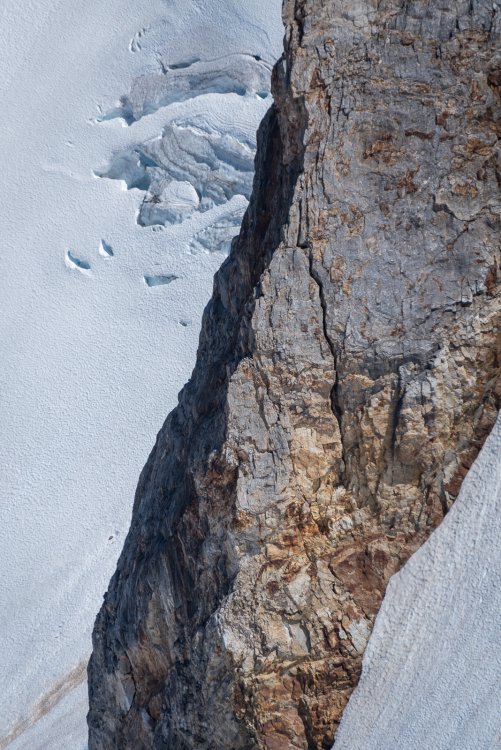
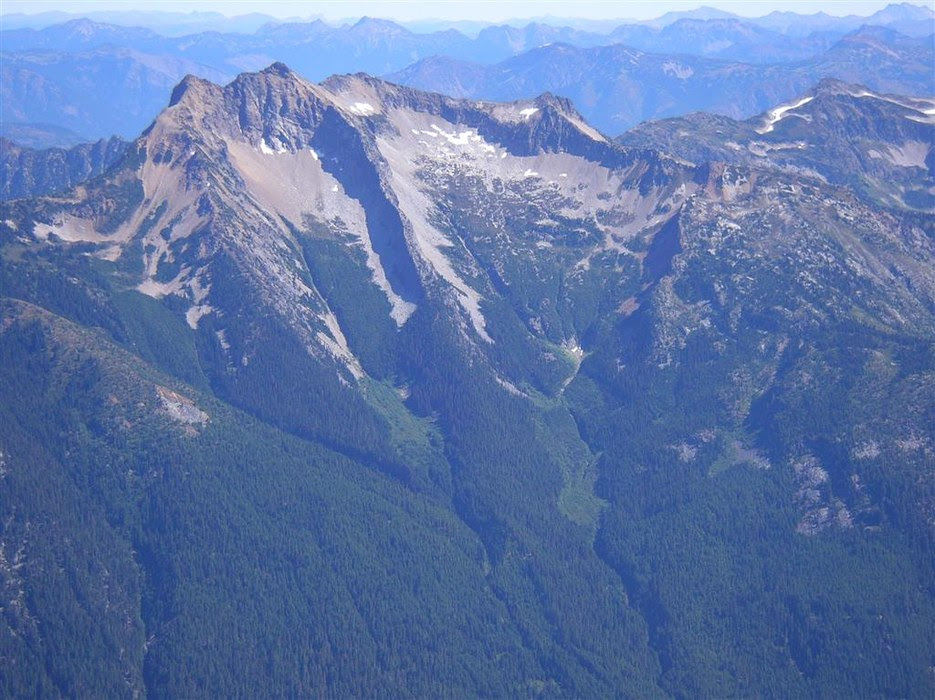
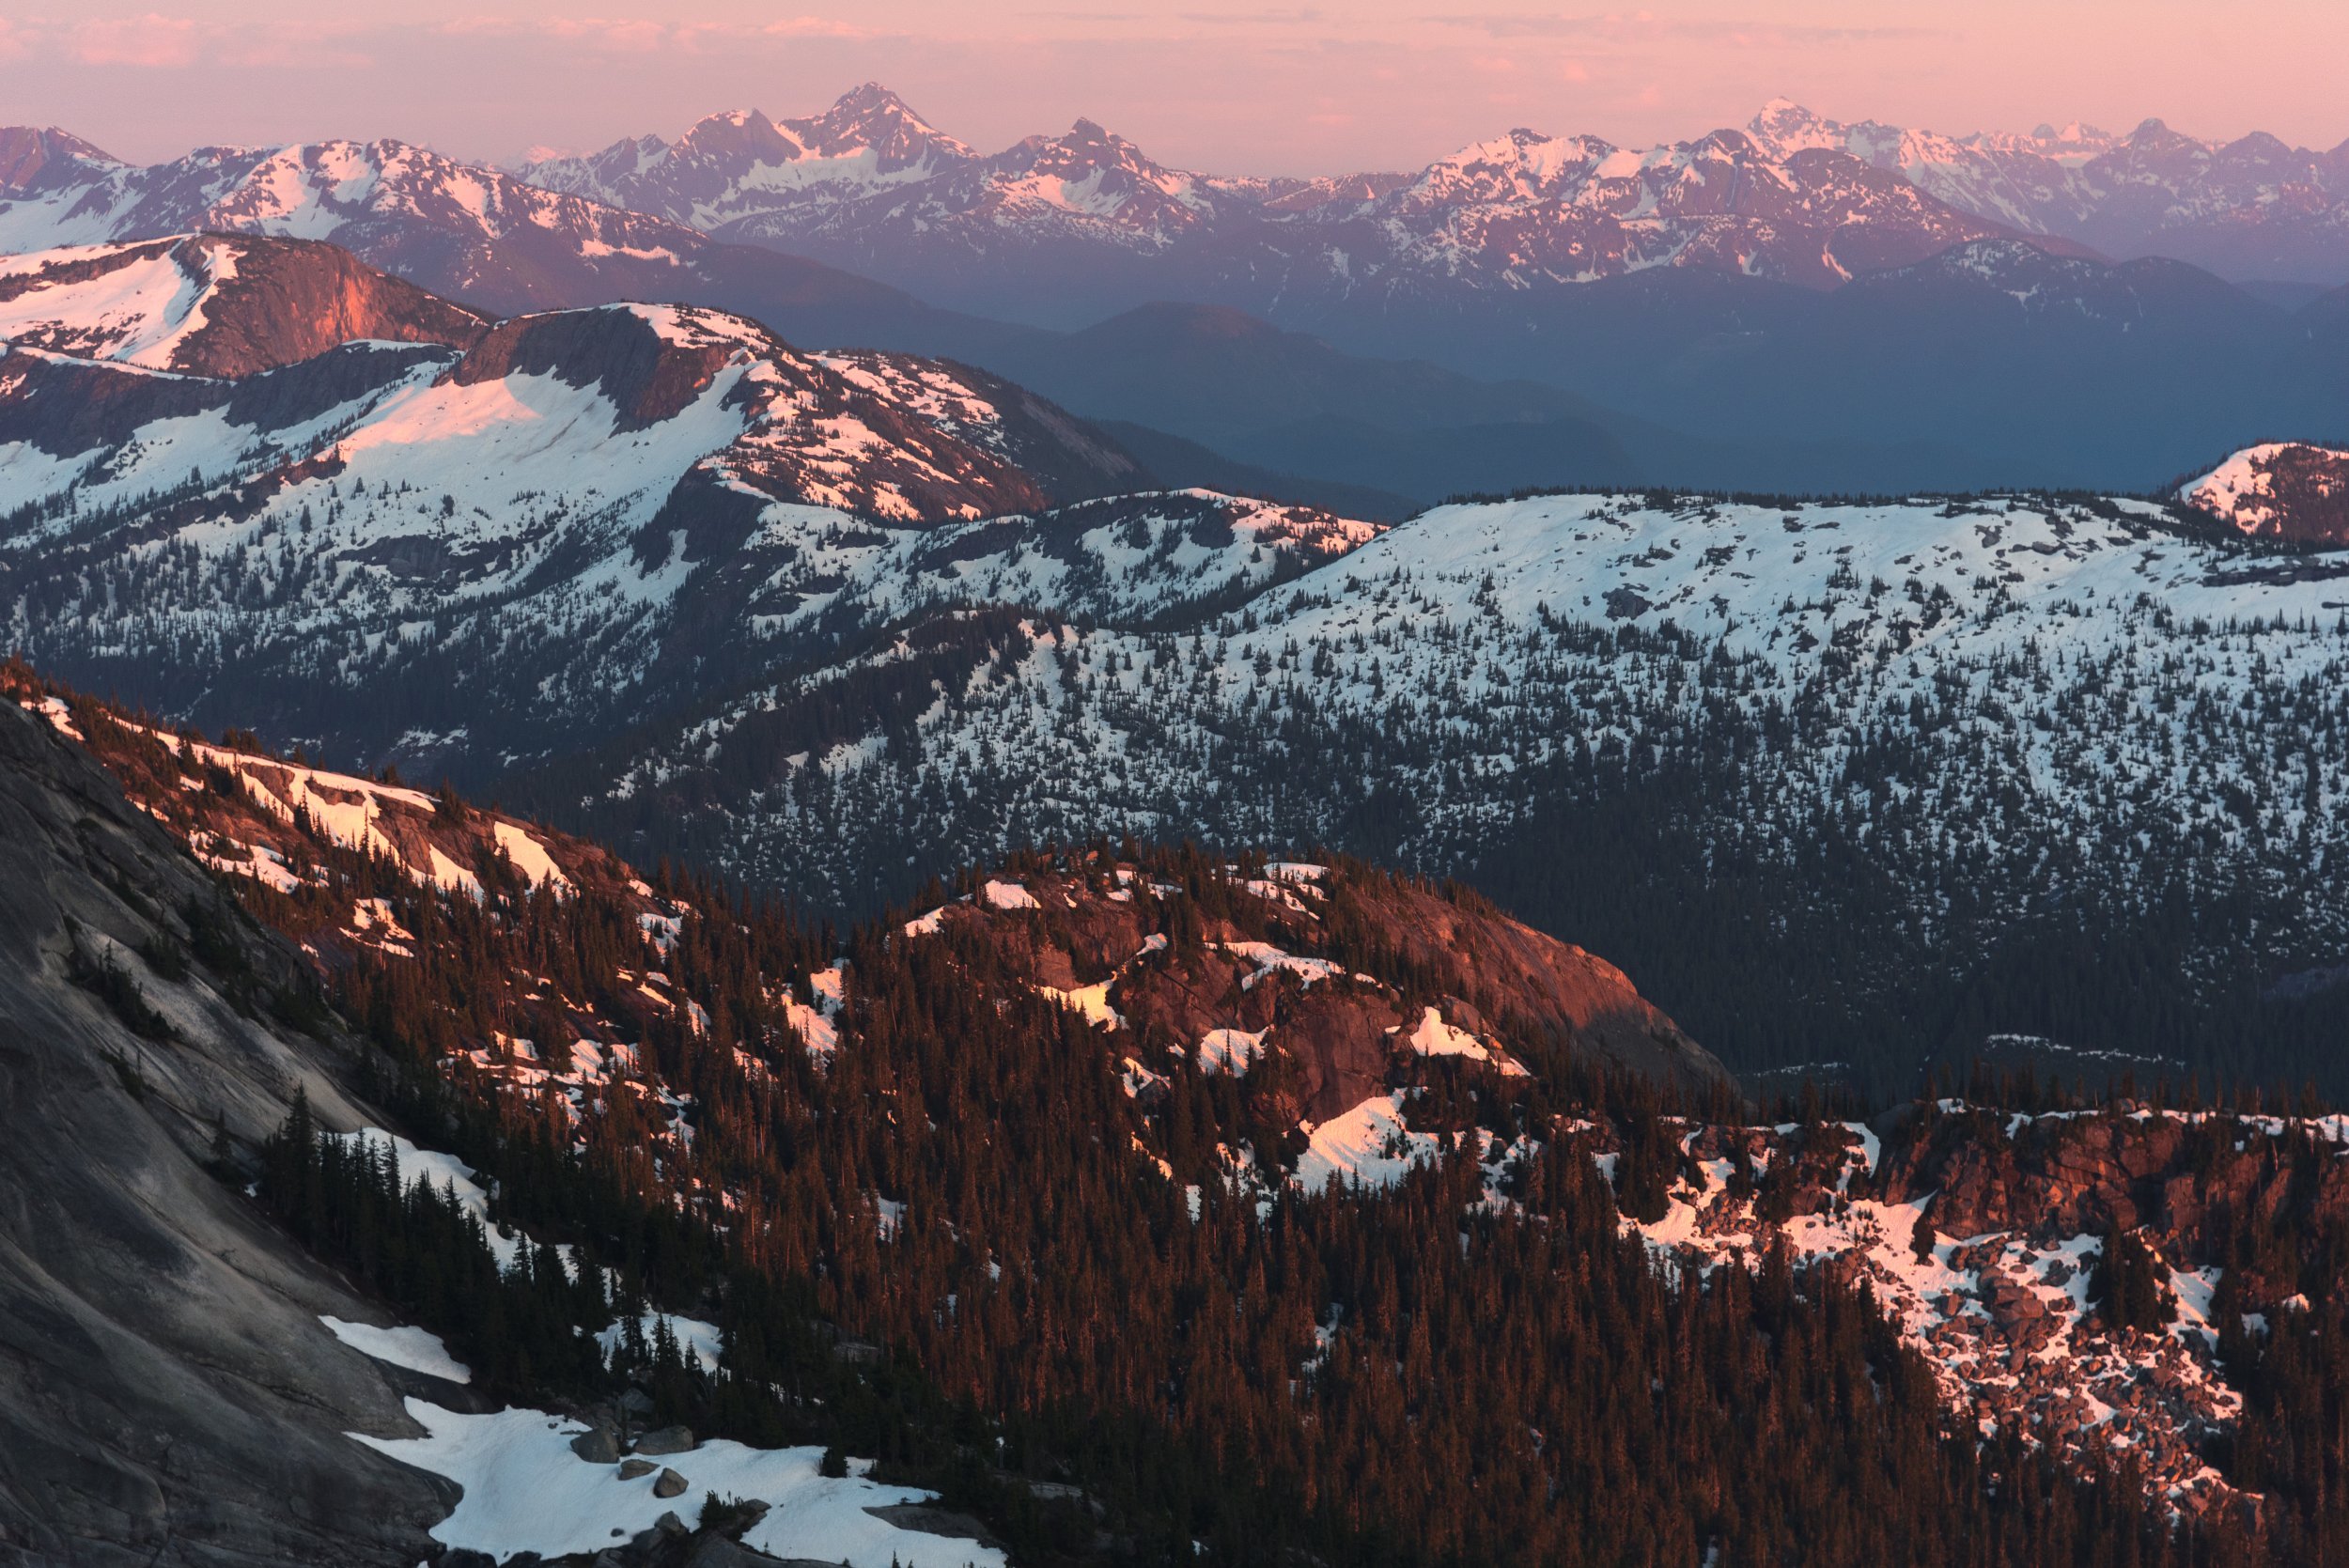
Trip: Twin Sisters Range - Twin Sisters Traverse Trip Date: 07/04/2018 Trip Report: Hi friends, We traversed the Twin Sisters on the Fourth of July in 14.5 hrs. I have always been curious what this range offers as I've stared at it from Mt. Baker or other places in Skagit Valley. As a team of three we gave the route a go and had a great time out in the mountains exploring this new range. I'll write a few more details than the average TR as it seems like this route is not completed very often (judging by the poor quality of rap tat [now replaced] we found) and maybe could use some specifics and pictures (since I lugged a DSLR along the route). By the numbers: Linear distance: 17.2 mi Vertical gain: 6,536 ft Our route combined the following (for reference, see Beckey Guide 3: Rainy Pass to Frasier River pp. 40-45): TH on Middle Fork Nooksack River Rd. 38 (Beckey Guide 3 p. 395) South Twin ascent via the W. Ridge (II-III; mostly class 3-4, upper segment is low 5th) North Twin ascent via the SE Ridge (II; low class 5) North Twin descent via the W. Ridge (II; class 3-4) Click here for topo Our gear: Mountain or cyclocross bike 70 m half rope (60 m would be the minimum) Approach shoes (Eg. guide tennies) Glacier harness Ice axe Micro-spikes Helmet Climbing gear for rappel, rap tat (you shouldn't need any now ;-)) and maybe a very limited set of pro (we didn't use any, but that was our comfort level) Getting to the TH is pretty straightforward. We camped at the bridge the night before so we could get an early start. In the morning we set off on our bikes for a 6 mile uphill ride (took us 1.5h) on the nice gravel/dirt road before stashing them at the start of the trail for the North Twin (our out for the day). Quick note here about our choice of going S to N: descending the W Ridge of the N Twin at the end of the day was very nice. It has the best quality rock and the trail out is way more established. It's a lot of ground to cover and knowing the end of the day was going to be straightforward was something we were thankful for after a day of feeling pretty out there. It's a quick walk further down the road to the start for the S. Twin. The trail is in pretty good shape, but the brush is thick for most of the first half. After about an hour we exited the forest and into a beautiful alpine valley in-between the twins. We gained the W ridge of S twin pretty far down through some climbing on snow and then easy rock. From here it's a mostly class 3-4 affair for about 2-3hrs to the summit. The route-finding was sometimes unclear although there are occasional well-placed cairns. We found ourselves on something like a trail just south of the crest for the lower half of the route and then stuck mostly to the crest itself for the upper half. Like all of the climbing of the day, we did not rope up. Getting started: Trail to S. Twin is easy to follow, but overgrown: Into the alpine to ascend the ridge of S Twin: The W Ridge of S Twin is long and like this most of the time: The summit of S. Twin was accessed by a short traverse of a snowfield south of the crest and then ascending the final SW flank. This was low class 5 in places, but always secure. From here we traversed over to the true (?) summit to the SE for a quick lunch before debating how best to make our way over to the N. Twin. Descending the N ridge of . Twin looked to be full of towers that would probably slow our progress. We also probably didn't have enough rap tat for all of that. Descending the NE aspect and out on the arm looked dicey, but probably could go for a team that is braver than we are. We finally decided on descending the SE ridge to a notch that is well-visible. There is lots of exposure and loose rock here. We put in a rappel station up high and then reinforced/replaced the one in the notch that drops down onto the glacier. A quick rappel, downclimb, and small glissade put us down onto the sisters glacier. This area is probably also possible to downclimb if you really wanted to go ropeless, but please be safe, you know? This is where you exit the ridge and then ascend the snowfield to the final climbing for the summit of S Twin: On the summit of S Twin: Rapping onto the glacier from further down the SE ridge toward a notch: Backside of the rappel onto the glacier: Traversing the glacier was probably the high point of the day: Fast moving over flat ground, minimal crevasse hazard, gorgeous views in a remote-feeling alpine setting that just reinforced that the N. Cascades are the proverbial shit. Getting back onto the rock for us could not have been easier. We aimed for a clear low point in the ridge connecting the twins. From here we unroped and weighed our options, choosing ultimately to go for the not-often-traveled SE ridge (FA in 2008 according to Beckey). Of note, we did observe a new-looking rappel station here that would be convenient for those choosing to descend back into the valley. The SE ridge was by far the most dirty and chossy section of the day with challenging route finding in places. I tried to assemble a few cairns along the way. If you have trouble dealing with uncertainty, this is going to be a great way for you to work through those issues... Closer to the top we were able to reach the false summit by transitioning onto the W aspect and ascending a small, loose gulley back to solid rock. From the false summit, we downclimbed an airy section below several towers into the head of a massive gulley before quickly making our way on rapidly improving rock quality to the true summit. Aiming for the notch to access the SE Ridge of N Twin: Eyeing the SE Ridge of N Twin (I can't even begin to draw a line): It mostly looks like this: Traversing between the false and true summit: From the other side: True Summit of N Twin: Looking back on the day from N Twin summit: From the true summit we downclimbed the entire W ridge of N Twin giggling at how good the rock quality was. It was a superb experience to be so exposed with such high quality rock and clear route finding. You literally just stick to the crest for most of the route. From the base of the route we blitzed down the excellent trail to the bikes and then onward to lightspeed for the 6 mi downhill bike ride. Descending W Ridge of N Twin: Thanks for reading! -Ryan Gear Notes: See TR Approach Notes: See TR


 2 points
 -
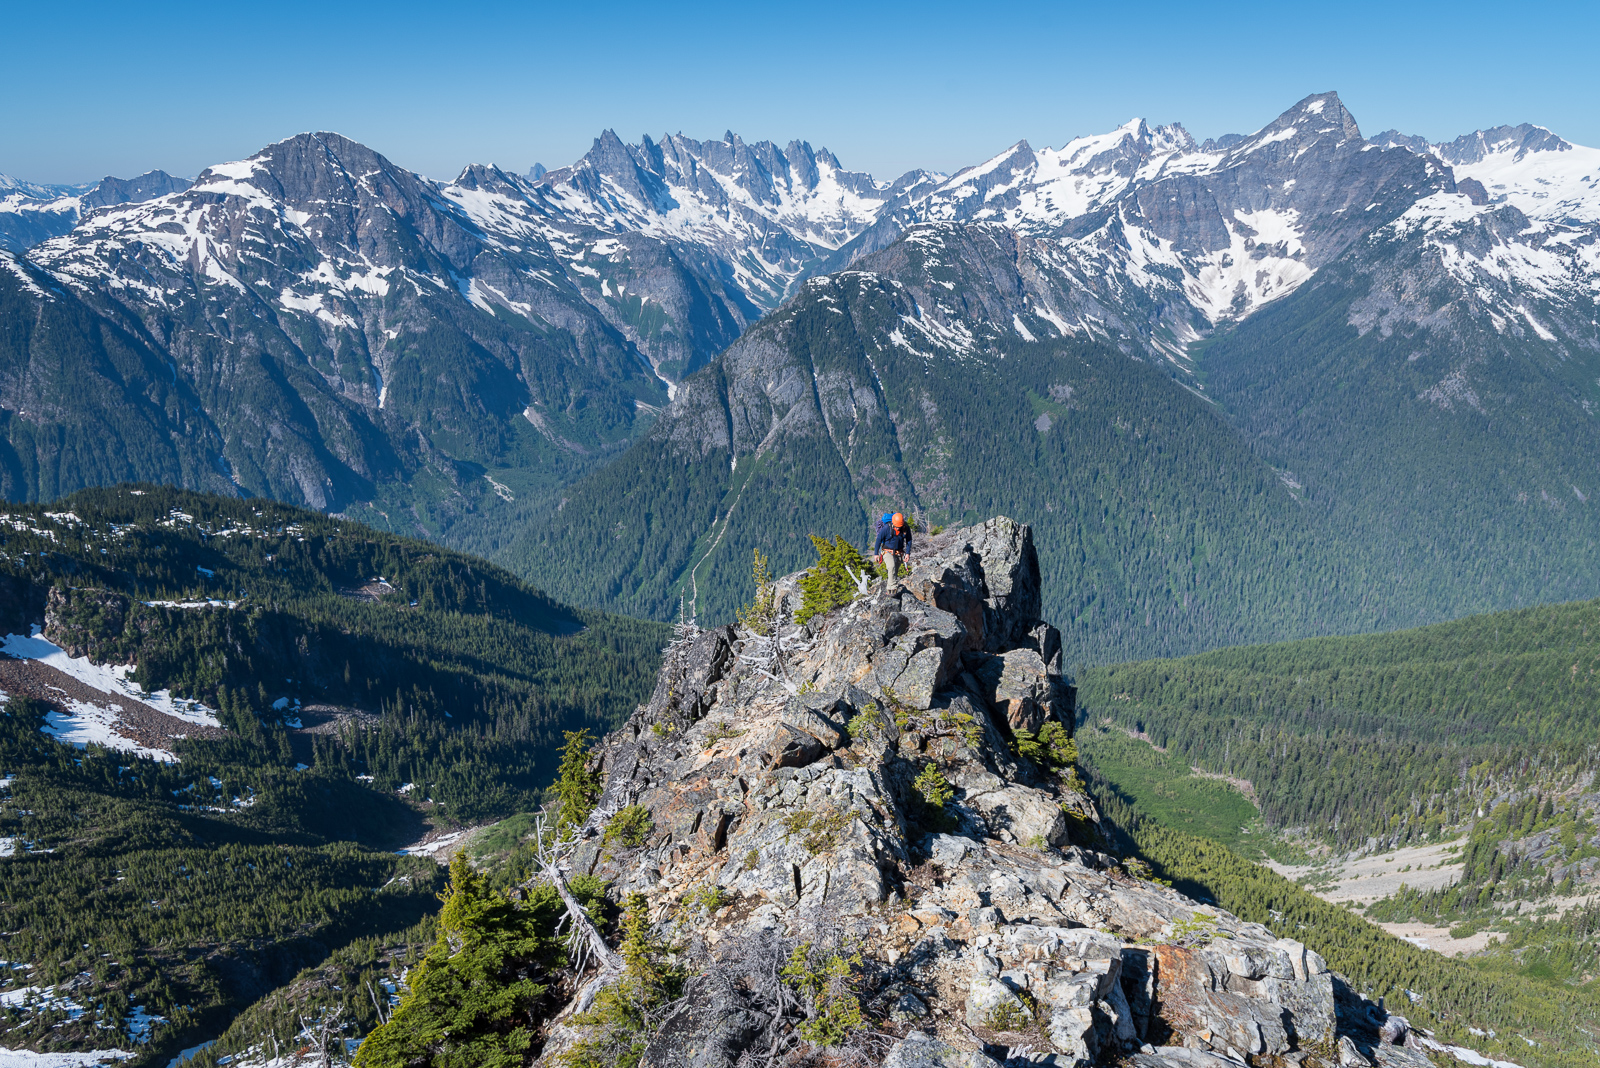
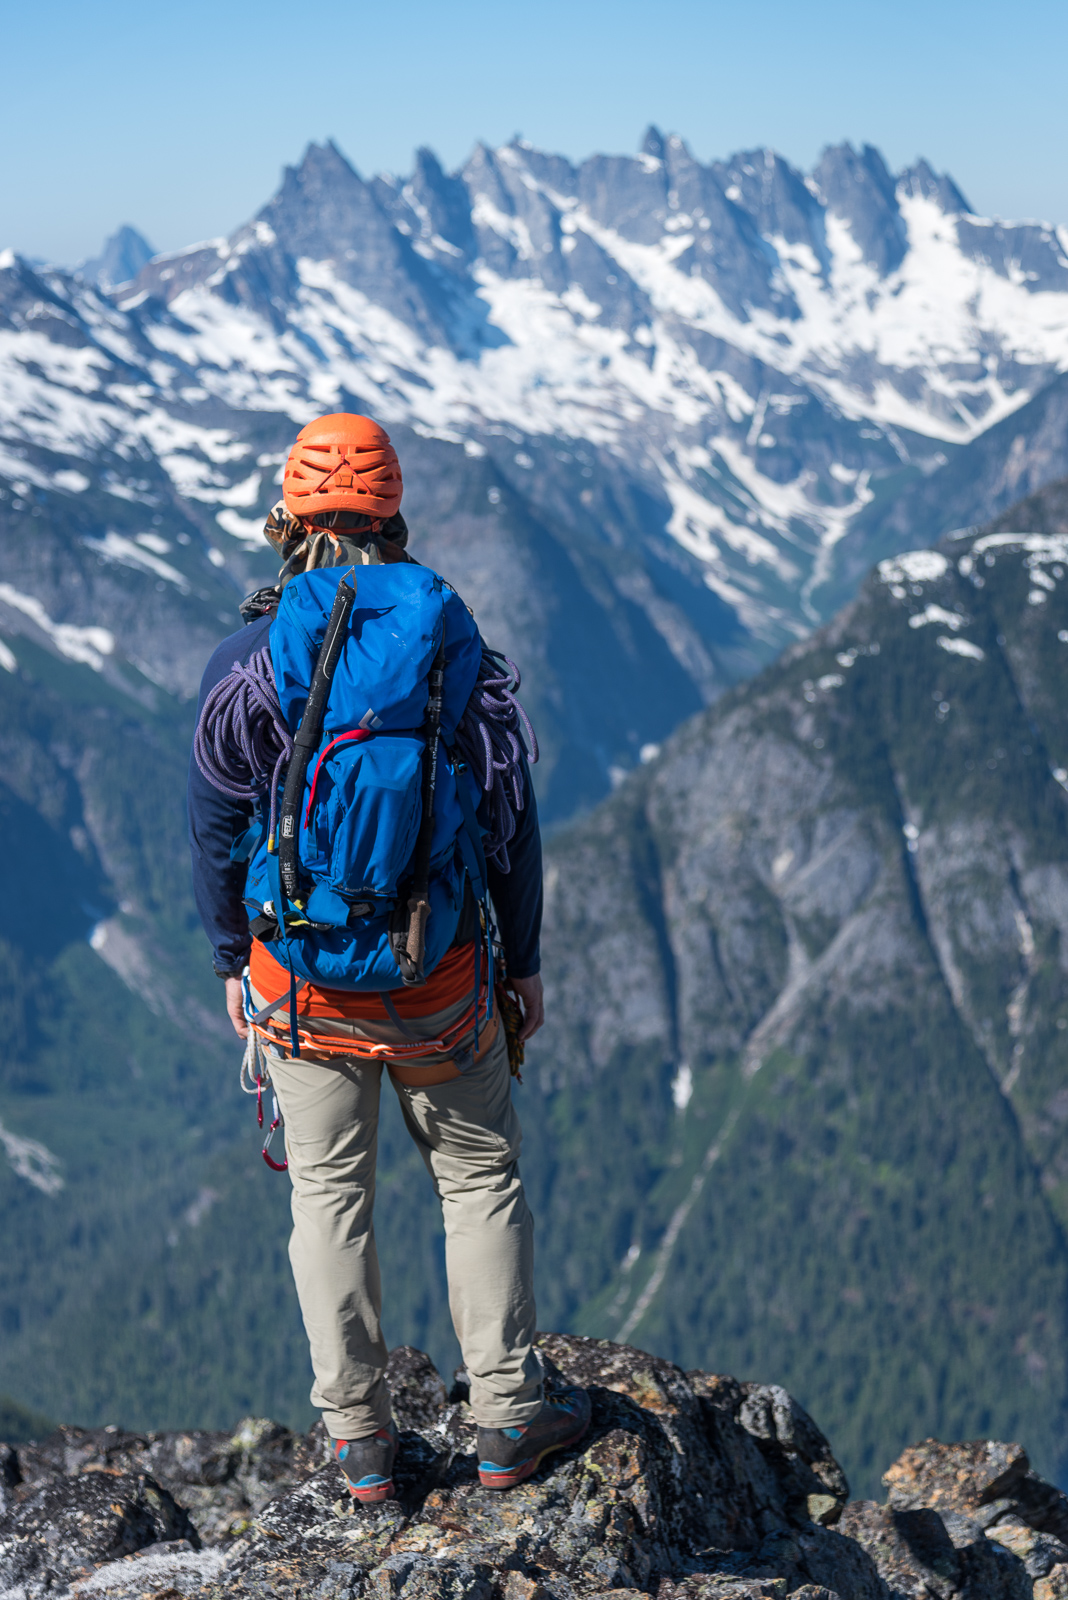
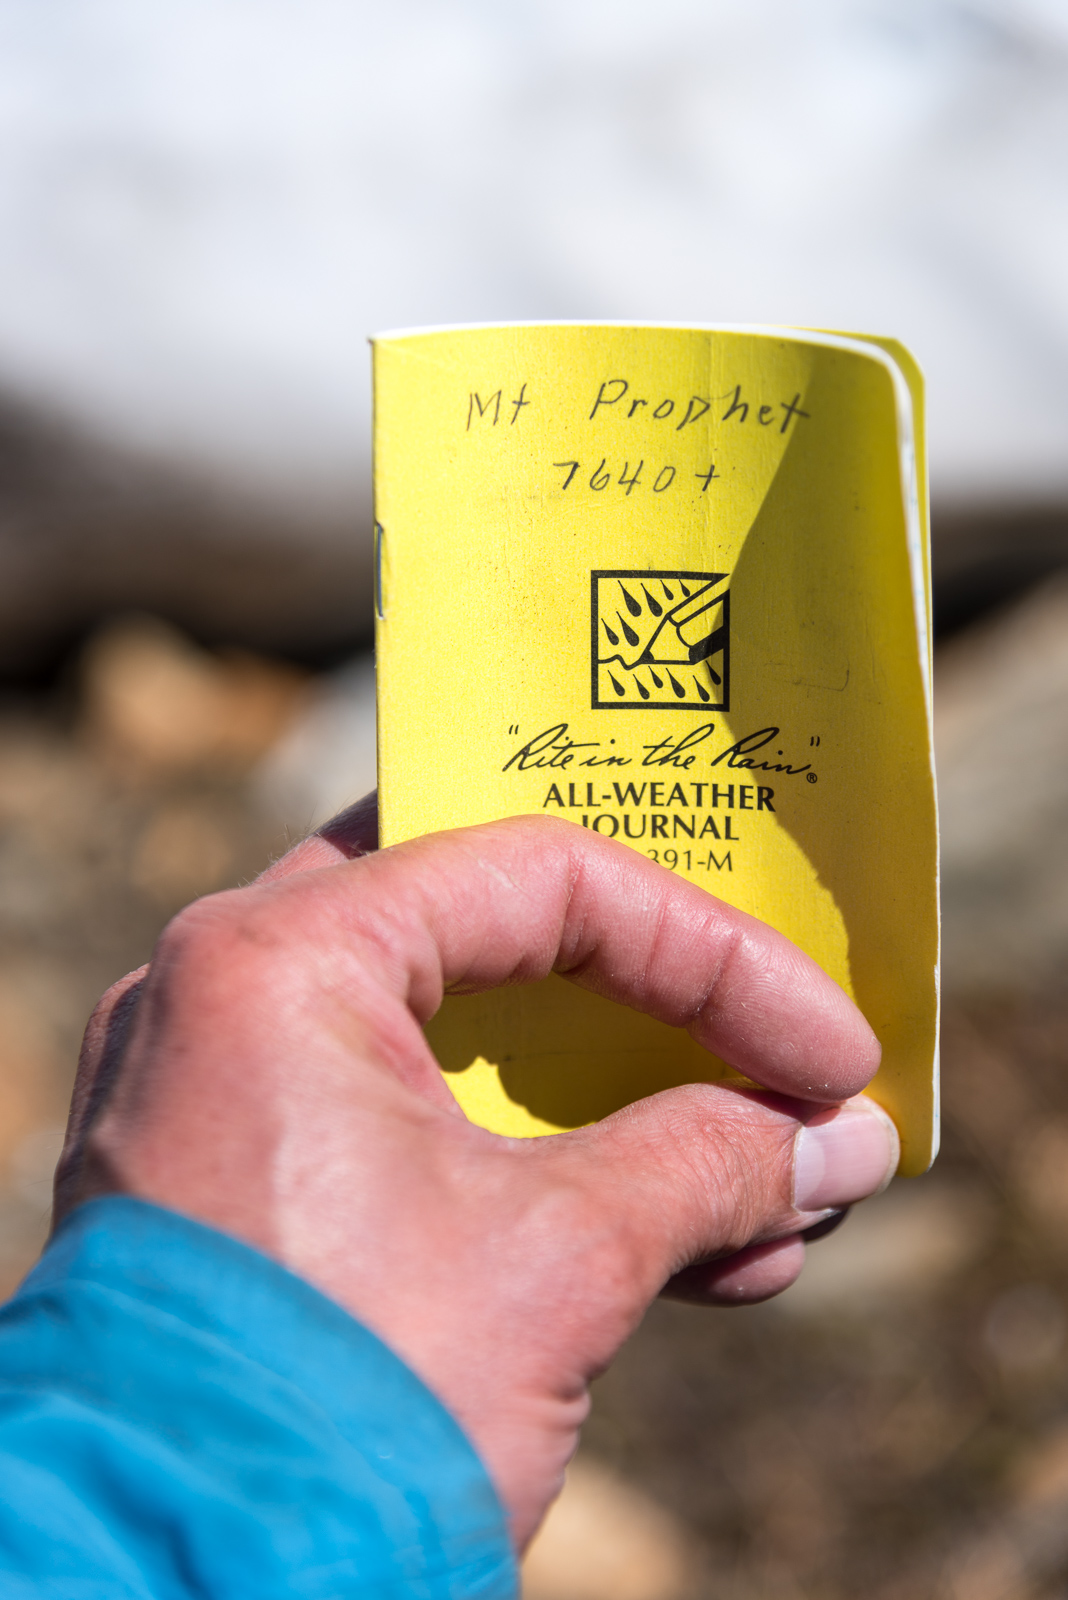
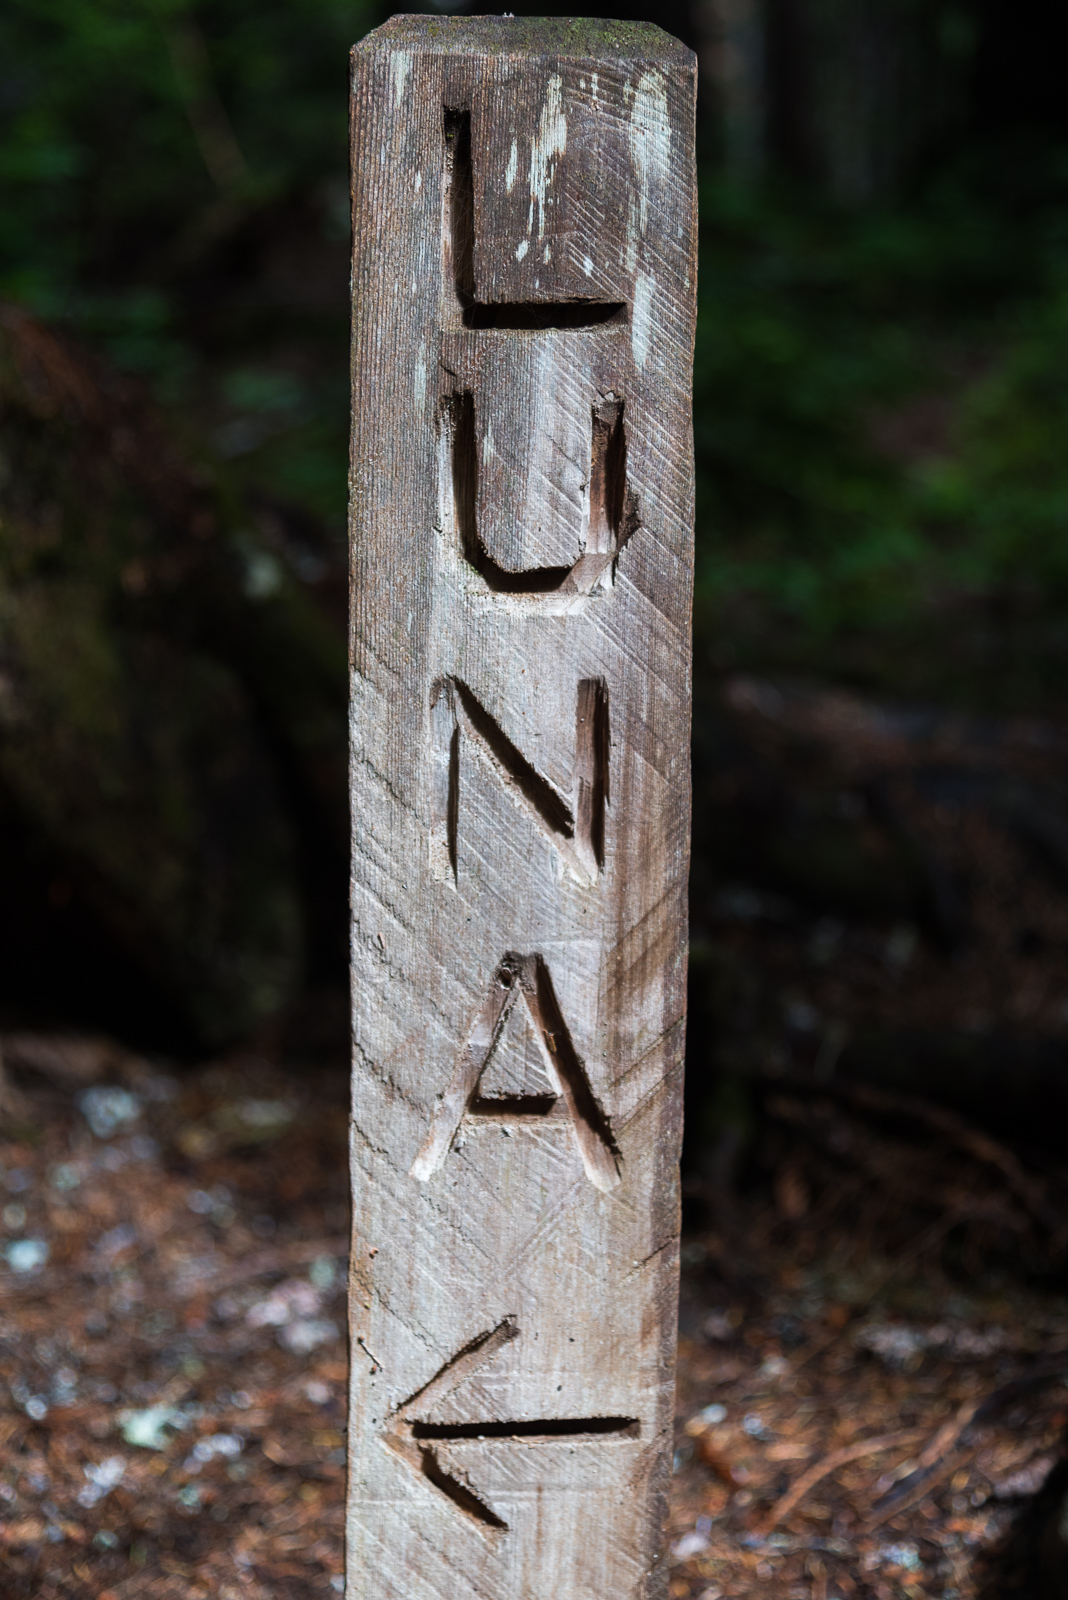
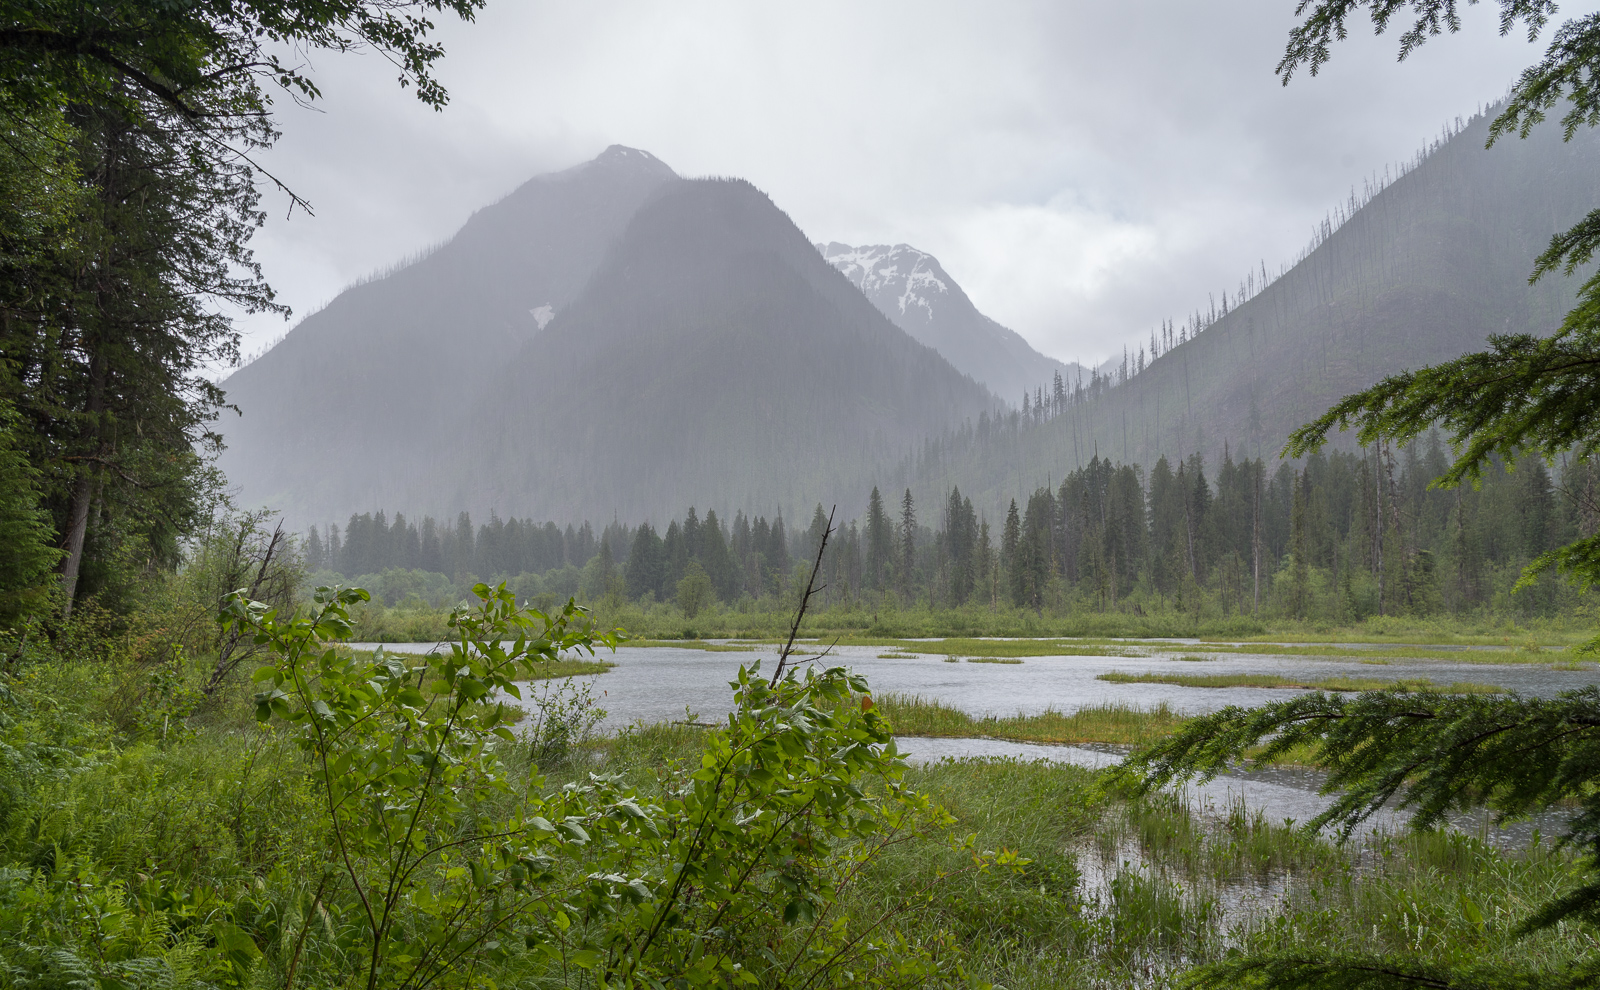
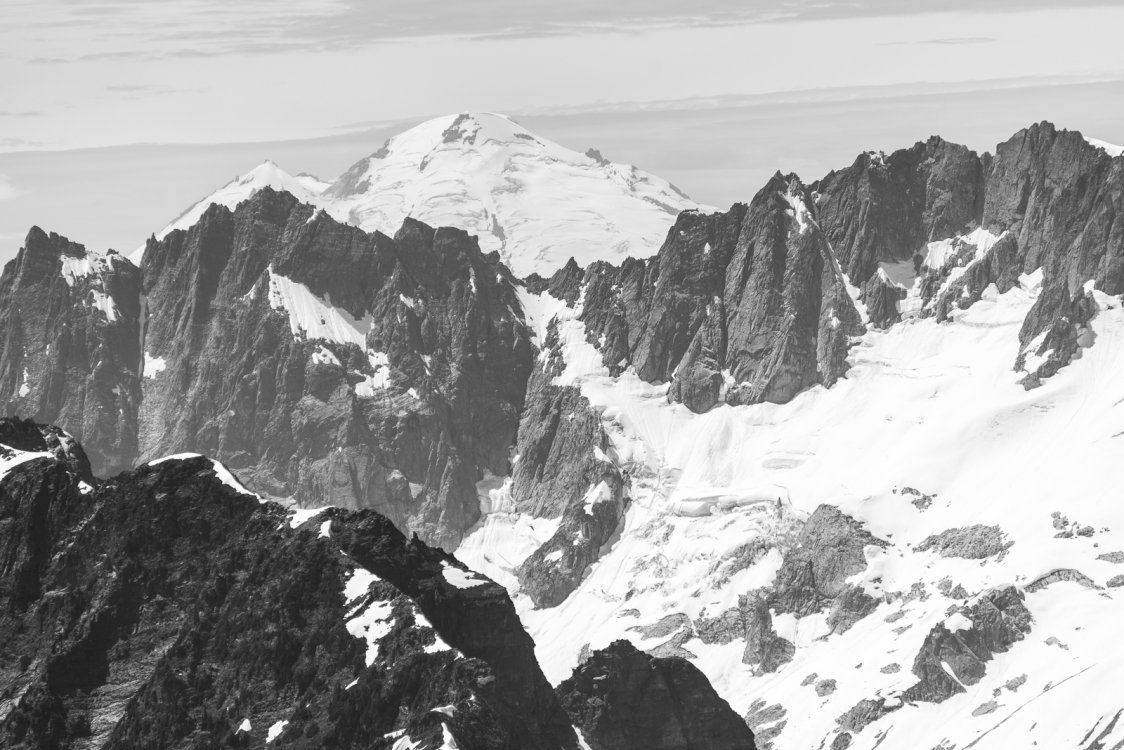
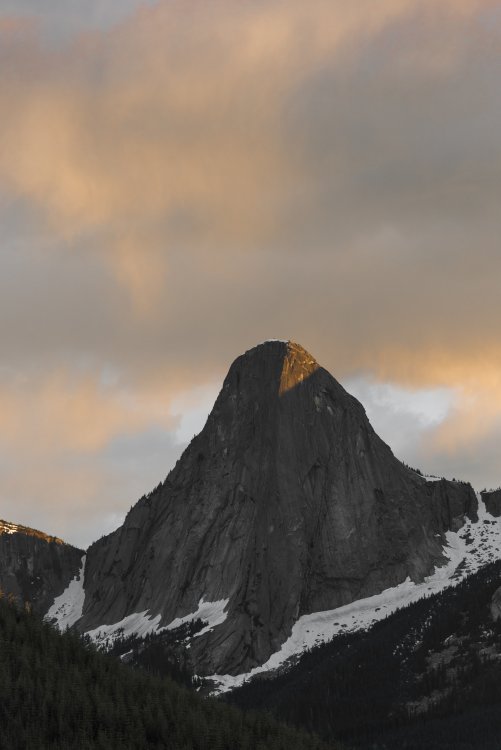
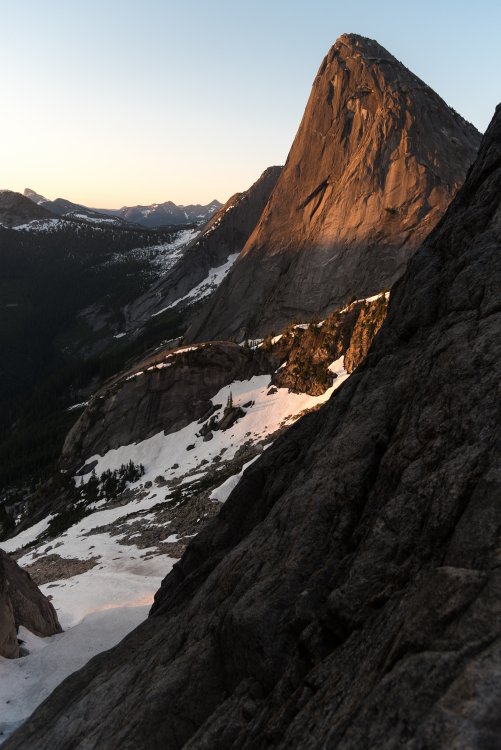
Trip: Mount Prophet - "Jacob's Ladder" (AKA full SW rib...FA?) Trip Date: 06/24/2018 Trip Report: "And Jacob went out from Beersheba, and went toward Haran. And he lighted upon a certain place, and tarried there all night, because the sun was set; and he took of the stones of that place, and put them for his pillows, and lay down in that place to sleep. And he dreamed, and behold a ladder set up on the earth, and the top of it reached to heaven: and behold the angels of God ascending and descending on it." - Genesis 28:10-12 KJV Grunting our way up the prominent rib on the SW side of Mount Prophet (above, in photo taken from Luna Peak by Martin Shetter), nobody would have mistaken Kit Moffitt and I for angels. Although the summit of Prophet this past Sunday was certainly much closer to heaven than the bug infested forests back at Luna Camp, our home for two nights as we investigated the directissima up the SW rib. Our aim was to explore above 5450' on the feature, where everyone seems to traverse off the rib into a typically crappy talus basin (via 4th class down climb). Given the ominous warning on SummitPost, Kit and I went in with a rope, rack, and even a pair of rock shoes: "The rib has cliffs on either side and no one has yet explored the possibility of climbing it directly to the summit. That could prove to be a bad idea."- SP We were a little disappointed that the gear stayed in the pack the entire time, however (long way to carry it!), but pleasantly surprised to find fairly clean and exposed class 3 climbing for ~1500 vertical feet to the summit. There really is no reason to leave the SW rib for future parties, until it is time to descend. We did go down the "SW rib" route (south of actual SW rib, described well on SP and found it to be your typical mix of scree, talus,and pain). We also found a way back on to the rib at about 5600' that only involved a bit of exposed class 3 (seems easier than how the lower access is described on SP?). Given the obvious difference in quality between the two scramble routes, I suspect that future parties will follow the loop that Kit and I did this past Sunday. However, I wouldn't be surprised if someone has ascended the full SW rib before we did this past weekend. Does anyone have info of previous parties, before Kit and I go claiming this massive, 3rd class, FA?? It is quite prominent as you descend out Access (Axes? Pickaxes?) Creek, and I noticed it back in 2007 on the exit from my first Pickets trip. It was fun to come back and explore something that has not been documented before- our very own backyard adventure! Just goes to show that there are still plenty of blanks on the (climbing) map, even for the blue collar set.... Calling the resort for the boat pickup, saving 12 miles RT: Luna Peak: Mac Spires, Inspiration, The Pyramid, Degenhardt: Blue collar! Nearing the summit as the rib fades: Jack: "Jacob's Ladder" from the summit Old habits die hard. Hanging out with the ghosts at Good Food, post trip: Gear Notes: Helmet, axe, crampons (early season). We brought gear in case it was technical, but found nothing over exposed class 3. Approach Notes: Big Beaver trail to just before Luna camp, then head uphill a steep vertical mile to the summit. It goes from hiking to scrambling at about 5800' The slope turns into the SW rib which is followed religiously to the summit. Descend on the south side of the rib until you can regain it about 5600'


 1 point
 -
Trip: Les Cornes - Springbok Arete Trip Date: 06/17/2018 Trip Report: I'm not the trip report type, as evidenced by the fact we went out there weeks ago, but the approach to Les Cornes and that whole group of peaks has changed a bit since Cascades Rock so wanted to give a heads up to anyone heading that way. Cattermole Timber and Chilliwack Natural Resources don't really go out that way so don't count on calling them as a way of getting current road beta. The road getting there is pretty much impassable at 12.1 miles - so plan on an extra ~3.7 miles of human powered travel each way. I don't see this changing anytime soon, as there's a couple back to back washouts, with the remaining roadbed being off-camber and partially blocked by small boulders. Mountain bikes or dirt bikes would be great. The final road (the turnoff at 15.1 miles in Blake's guide) is overgrown to the point that we second guessed ourselves when we turned onto it. Didn't really look like it was driveable any time in the last decade. But, it's marked by flagging at the entrance. It's also washed out beyond repair not long after the turnoff but the stream that did the deed is crossable on a good log. The route was stellar. We did the direct start and half the first pitch was under snow. Not sure the slung block belay at the end of the awkward 5.9 OW horizontal pitch was still there, but there is a fair bit of choss in that sector, I belayed at the start of the 10+ wide hands cracks above. The rappels are feasible with a 70m just by following Blake's double 60 rap beta in Cascades Rock and finding intermediate anchors on the longer raps. Some rope stretchers. Doing this in the dark may lead to shenanigans - the sunset was nice though. Ibex/Les Cornes/Chamois S T E I N B O K - would love to talk with someone who's climbed this name those peaks? Gear Notes: hefty - doubles tips to #4 (both 4's were placed on at least two pitches). 70m rope. Approach Notes: long.

 1 point
 -
New FKT for Complete North Ridge of Stuart, 5:57 car to car. https://ropeandsummit.wordpress.com/2018/07/05/mt-stuart-complete-north-ridge/1 point
-
Trip: East Wilmans Spire - Standard Trip Date: 06/24/2018 Trip Report: My friend Jean was looking for a partner to climb East Wilmans Spire. I had never heard of it so of course I was in. We left Seattle at 6am and arrived at the TH around 7:30 and we were off. The trail to Monte Cristo is pretty flat and the four miles flew by in a little over an hour. A little less than two hours after leaving Monte Cristo we could finally see our objective. The snow field is split by a rocky ridge. The left of the ridge looked like it might have continuous snow all the way to the notch, the right would definitely involve some talus. We opted to go right since we weren't sure if we could actually get over that ridge and didn't want to get cliffed out. Jean headed up first and decided to ascend straight to the talus/scree and hike up. However the scree proved to be extremely loose so we traversed left and ascended a thin sliver of snow as far as we could. Once we were back on the snow the slope angle gradually increased and it was at this point I started to regret my gear choices. I had brought soft hiking boots and Petzl Irvis hybrid crampons (the kind with the dyneema cord). This combo proved to be too flexy for the snow conditions. Fortunately Jean had some real mountaineering boots and graciously led up the snow kicking pretty solid steps that I could follow. The snow just barely continued up to the notch. The notch itself was completely snow free and comprised of the same extremely loose talus we had encountered earlier. Once at the base of the climb we geared up and Jean took the first lead. This involved first climbing up some low fifth-class terrain, traversing, and then down climbing about 15 feet of loose 5.5, finally followed by another traverse over loose rock at which point rope drag dictated a belay. While following I was very thankful that Jean somehow managed to get 4 pieces of pro in that short section of down climbing (more gear than the rest of the climb combined!) which made the crumbly down climb feel really safe. I took the next lead which zig-zagged left then right. The topo said "follow the obvious route" which of course was not obvious at all. I stopped at a decent stance which looked like it could have been the start of the third pitch and contemplated setting up an anchor. However further right looked much more promising so I committed to a thin traverse (probably only around 5.3, but felt significantly harder with all the rope drag) and found a comfortable belay spot beneath a splitter (relatively speaking) hand crack. We swapped leads again and Jean got the privilege of leading the only real section of rock climbing on the entire route. Three hand jams, one cam and a 50 foot run out later and she was on the summit. On the way down I cut away at least six slings from one of the rappel anchor (and added one) and it was still a complete rats nest. PSA: if you are going to add a new sling to a rap anchor, cut at least one old sling away. The descent was mostly uneventful other than slicing my leg open with my ice ax. Total gumby move. In total it took us about 11:30 hours car-to-car. Was it worth it? Yeah I guess so. It's an extremely cool feature that just begs to be climbed. Gear Notes: Cams to #2, nuts Approach Notes: The snow field is split by a rocky ridge/cliff. From the base you can't see if the left side is continuous or not, however from above you can see that it is possible to get through the cliff band (at least when there is enough snow).1 point
-
Trip: Mt. Baker - North Ridge Trip Date: 06/27/2018 Trip Report: Hey everyone, relatively new to cc. So far I have just been lurking and using the TR database for planning but I feel like it's time to add some content and write my first TR; so here it goes, hopefully it's not too bad. Michael and I drove up Tuesday afternoon to the TH and hike up to the hogsback and set up our camp for the night. We realized that we were going to have the North Ridge to ourselves as the only other party on the mountain was heading up the Coleman-Deming. The Coleman is in good condition and route finding was pretty straight forward and soon enough we were at the base of the ridge. We took the upper variation to get to the ice pitch. Here I racked up and off I went, it had been a couple months since I had last swung my tools so I was a little nervous. After the first 20 ft I got into my groove, the nerves went away and I started to have a lot of fun! I set up a belay a little bit before we got off of the ice and brought Michael up. From there I ran it out a full seventy meters before setting up one last belay on a couple of pickets. Once Michael got up to me we decided to simul-climb the rest of the way. We kept pretty close to the ridge crest, and after some fun climbing we crossed the schrund and were on the summit plateau. The group that had climbed the Coleman-Deming had already summited so we had the summit to ourselves for the ten or so minutes that we were up there. We sped down to our camp, drank our celebratory summit beer and took a quick nap. We packed up and started the hike out to the car, and then drove back to Bellingham to go to Kulshan Brewing. This route is awesome and truly deserves it's status as a classic. I am super stoked to have been able to knock it off my tick list! Gear Notes: 6 ice screws and 3 pickets Approach Notes: Coleman glacier still in pretty good conditions.1 point