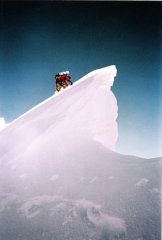
HHinkkala Posted July 7, 2014 Share Posted July 7, 2014 Trip: Chehalis Range - BC - South Face - Viennese Peak Date: 7/2/2014 Trip Report: After some back and forth on prospective routes for the long weekend, coupled with the poor weather forecasted for Sat-Sun, the South Face of Viennese in the Chehalis became the objective for Mon-Wed. Early Monday morning Hunter and I began the drive up the Harrison Forest Service road on route to the Statlu lake trail that would give access to the area. I was not successful in finding an available trip report for this route so hopefully what I have put together might offer future parties some assistance. I get the impression that this area has been seldom visited in recent few years, which seems surprising given quality of the routes found in here. For the approach hike we utilized the following club tread link as a resource on how to get to upper Statlu Lake, as well as the drive in, and found it to be very useful for someone completely new to the area http://www.clubtread.com/routes/Route.aspx?Route=68. Log Bridge on approach to Statlu Lake Statlu Lake We started hiking around 9am and made our way to the upper Statlu lake, this is where I would say the official “trail” disappears and climbers are left to find their own way into the alpine, although a few lonely carrions can be seen along the way. McLane’s SW BC Alpine Select has info on which drainage to hike toward, I have marked this on one of the photos taken when you gain decent views of the upper basin. Views of the upper basin of Viennese Peak, gully to ascend follows red arrow. Once we got to the end of the trail at the upper lake we turned right and followed a 1-2m wide rocky outcrop upstream for about 100m, then at a nondescript location turned left through 30m of heavy brush to cross over an initial creek. This put us into the main rocky drainage which was clear of bush, I placed a carrion on a log here to mark where to turn back into the bush. As mentioned in McLane’s Alpine Select we followed this rocky drainage upward for about 150m until we took the first left fork that turned us into the direction we needed to go. This fork followed a rocky creek that brought us to a good size waterfall, approximately 30-40m tall. This rocky creek was also free of bush up to the waterfall. We walked/scrambled along the creek boulders/rock on the left hand side below the falls until we got cliffed out, then we turned left into the bush. In here there is a very faint trail where after around 30m there is a short section that has a few body lengths of vertical tree/bush climbing to gain the top of the cliff. There is also another smaller waterfall about 20m to your left to help gauge that you are in the right location. After this short treed climb we were above the cliff where the waterfalls run over. Once you pop out of the vertical bush a faint trail takes you right for about 15m and you will see a carrion at the bottom of a small creek, with a small clearing, this carrion is important to remember on the return. From this carrion you head straight up the small creek uphill which takes you onto the slabs that ultimately provide access to the main basin below the South Face. Carrions are located periodically as you ascend. Hunter and I reached the snow above the slabs and looked for a flat and dry bivy spot but in the end we had to back track and head down descenders right into a treed area where we found x2 downward sloping bivy swales in the slabs, as could be best described... actually turned out to be quite comfortable. It took us around 6-7hrs to reach the bivy from the vehicle. View of our bivy site on the slabs The following morning, after a quick breakfast and gear sort, we left camp at 5:30am. Upon gaining the snow above the slabs we immediately realized that with the warm temperatures crampons were not going to be required, we ditched them here. We then walked up the rest of the soft snow to the berg at the base of the route. It took us around 1/2 hr to get to base of the climb from our bivy. There are certainly a lot of options on this face for route finding. We tried our best to start near the plumb line below the main dihedral with the intention on the first 2 pitches to weave left and back right into it like it was shown in the topo from McLane’s Alpine Select, but we didn’t follow this exactly but it worked out in the end. Red is the approx line we took, blue is my interpretation of the topo... Hunter starting the first pitch off the berg Hunter took the first pitch which took him left of the dihedral (55m). The next pitch I opted not to climb upward but went horizontally right for about 10m to get back into the groove below the dihedral. Then I went straight up for a bit until I found no more pro in the main corner. I then went right, over a roof, then back left into the main groove and built a reasonable belay with 2 cams and a nut (40m and serious rope drag). This put us at the beginning of the large main dihedral seen in the middle of the South face. Hunter coming up the 2nd pitch From here the topo describes the route heading rightward onto a rib. Hunter continued up the dihedral for a short ways then headed right and up onto the center of the rib (55m). Hunter heading toward the dihedral on the 3rd pitch before traversing right onto the rib After this I came up to his belay, transferred gear, and started looking up at where the next pitch went. From where our belay was positioned it seemed the only good route upward was directly above our belay station over a series of vertically piled boulders that gave me the sense they could slide down onto us, and the belay, at any moment. After some serious hesitation, and tapping on these blocks to confirm they resonated (giving me the sense they were in fact loose) I simply couldn’t bring myself to climb up this vertical section since the results from dislodging these blocks would have been catastrophic. Instead I decided to traverse hard right for about 20m to bring me into the dihedral that was to the right of this rib, shown as the right side 5.9 variation in McLane’s topo. I entered this variation a little higher on the face compared to how it seems to be shown on the topo, but this worked out well. Me on the 4rth pitch getting ready to traverse out right After I had traversed on a slabby section I headed up the corner system on steep and stemming terrain (55m), with reasonable gear along the way. Unfortunately near the end of the rope I found myself in location where the belay anchor was challenging to assemble and took some time to put together. This spot required some excavation of moss/dirt for a decent nut placement as well as a dubious piton & bird beak nailed into large wedged blocks that moved slightly as I banged them in, less then inspiring but it worked, there was simply nothing else available here next to pasting some copperheads. I belayed Hunter off my harness and stood in a braced position in the corner. Hunter came up and headed up the next pitch which got a little steeper but provided for better protection, good holds also presented themselves at just the right times. Hunter finished this 5th pitch and headed leftward back toward the original line over the rib and made a belay in what I would describe as the main upper rocky basin below the summit towers (60m). Hunter heading up the steep corner Here the route has two options, either left or right. We ended up going right and took a meandering line upward for two pitches, exiting onto the East ridge. My impression is that we followed the topo fairly accurately here keeping the steep vertical headwall slightly above our left shoulder the whole time. After two easy (55m) pitches we reached the East Ridge. Photo of me finding my way toward the East Ridge Once on the ridge we scrambled un-roped for a short distance to high location where you can finally view the summit. There was a short flat spot up here to rope up again before setting off on the exposed scramble, and final summit pinnacle. Hunter put me on belay and I scrambled over toward the summit to investigate the final section. The route guide mentions traversing left around the summit on 4rth class terrain for a rope length then climbing a short 5.8 section to the summit. Well I went as far over on a sloping ledge below the summit until the ledge disappeared, as did any obvious route to traverse around, so I decided that I would try out the 5.9 direct line to the top. I wasn’t sure exactly where this went but from where I stood on the small downward sloping ledge, between the summit and a small preliminary tower on the right, I climbed a crack system below the right tower up to a location where I could reach over toward the summit. After some searching I found a small hidden hand crack on the left hand side that took a perfect .75 C4 cam and after few layback moves, followed with some mantling, I reached the summit rap station (50m including the exposed scramble). I then belayed Hunter up this last pitch. Contemplating the last section of the East ridge Photo of me finishing up the last pitch of the day to the top Its hard to beat traveling in the mountains. There was some great exposure up here Summit shot After a quick scramble to the main summit we took some photos and then did 1 rappel down from the summit pinnacle. We then backtracked to our boots and descended/downclimbed the East ridge, which was an easy scramble down. Thereafter we glissaded down the main snow couloir located just below peak 6500. It took us 11.5hrs camp to camp. Hunter just after descending the East Ridge View of the line we took and where we descended We stayed that night at our bivy and had a great snooze. The following day it took around 5hrs to hike back to the truck. A few notes on the climb: We had no idea what gear to bring so we brought a bit of everything and I can say we used almost everything we brought. • Double set of cams from small #1 blue TCU up to #2 C4, plus x1-#3 C4 cam and x1-#00 TCU. (The doubles in red and yellow C4 were link cams of similar size) • Full set of nuts plus pinky and blue tricam (blue didn’t get used) • Pitons needed for almost every belay. Brought x3 knifeblades (only need x1-2), x1 lost arrow, x1 baby angle x1 large bird beak • 12-13 draws, mixture of quick draws, screamers and extendables • We carried between 2-3 liters each of water and this lasted until we were descending the snow. It was very warm in the sun on the South facing route and we were glad we brought extra water. • We used a leader follower pack such that the follower carried all the boots. This made for a heavy follower pack but on top rope it was manageable. This route is graded 5.9 and we both agreed a lot of the climbing was in the 5.8-5.9 range. Run outs and loose rock are to be expected in sections but I would say it was never uncomfortable and when the route got steep the gear and holds revealed themselves adequately. The quality of the rock was overall really good for the mountains and I would recommend the area to others, but be prepared to bushwhack in some places, which I understand is typical for the Chehalis. Cheers, Henrik Quote Link to comment Share on other sites More sharing options...
Don_Serl Posted July 8, 2014 Share Posted July 8, 2014 Nicely done. It's good to see that there are still people around who are willing to bash in the bush a bit in order to get to great alpine routes. And who are smart enough to NOT climb loose blocks above a belay... Quote Link to comment Share on other sites More sharing options...
layton Posted July 8, 2014 Share Posted July 8, 2014 One of the best kept secrets and one of the most pain in the ass areas to get to. Nice Quote Link to comment Share on other sites More sharing options...
marc_leclerc Posted July 8, 2014 Share Posted July 8, 2014 Nice work! We chanced it with the weather Thurs and Fri and ended up hiking a rack and bivy gear to the top of Recourse in the fog and hiking out the same day. Classic. Quote Link to comment Share on other sites More sharing options...
skeletalmachine Posted July 9, 2014 Share Posted July 9, 2014 (edited) I was up there earlier this year and found the trail to the upper lake was pretty well marked and easy to follow. It is probably not as direct as your route however! Edited July 9, 2014 by skeletalmachine Quote Link to comment Share on other sites More sharing options...
Pete_H Posted July 9, 2014 Share Posted July 9, 2014 Climbed bardeen a number of years back. I think the most adventurous part of the route was getting to it! Quote Link to comment Share on other sites More sharing options...
Don_Serl Posted July 16, 2014 Share Posted July 16, 2014 (edited) We chanced it with the weather Thurs and Fri and ended up hiking a rack and bivy gear to the top of Recourse in the fog and hiking out the same day. Classic. Oh man, Marc, the number of times I took the gear for a walk in the Chehalis 'back in the day' is staggering (maybe a poor double entendre there?). My favourite "I'm an ass" episode involved packing off for the (then unclimbed) north face of Clarke with John Wittmayer in iffy weather, and getting in about 4 hours (nearly to Nursery Pass) before it started to rain. On the way back out we came across a slabby little gully which was slimey and sorta dangerous in the wet, and I suggested to John that he get the rope out... and he replied, "The rope? You've got the rope!" ...or not, as the case may be! Damn, mountaineering is a great activity! Edited July 16, 2014 by Don_Serl Quote Link to comment Share on other sites More sharing options...
mthorman Posted July 16, 2014 Share Posted July 16, 2014 Wow great job! Looks like a really fun line in a less than popular location. Great scenery too! Quote Link to comment Share on other sites More sharing options...


Recommended Posts
Join the conversation
You can post now and register later. If you have an account, sign in now to post with your account.